Proposal Development User Guide 1 Version: 13.0 InfoEd Global, Inc. US Edition Version 13 Proposal Development User Guide

Welcome message from author
This document is posted to help you gain knowledge. Please leave a comment to let me know what you think about it! Share it to your friends and learn new things together.
Transcript

Proposal Development User Guide 1
Version: 13.0
InfoEd Global, Inc. US Edition
Version 13
Proposal Development User Guide
Proposal Development User Guide 2
Table of Contents
Table of Contents ...................................................................................... 2
Welcome ................................................................................................... 5
Legal Disclaimer .............................................................................................................. 6
Manual Conventions........................................................................................................ 6
Introduction to My Proposals .................................................................... 7
Accessing Proposals in the Show/List ........................................................ 9
Opening a Proposal....................................................................................................... 10
Forwarding a Proposal .................................................................................................. 11
Deleting a Proposal ....................................................................................................... 13
Logging a User Out of a Proposal ................................................................................. 14
Search for Proposals ............................................................................... 16
Working on a Proposal in PD ................................................................... 19
Stationary Toolbar ......................................................................................................... 19
Proposal Header ........................................................................................................... 20
Navigating the Sidebar .................................................................................................. 20
Use of Icons, Links, and Buttons ................................................................................... 21
User Defined Fields (UDFs) .......................................................................................... 22
Free-Text Boxes ............................................................................................................ 23
Attachments .................................................................................................................. 23
Alpha Split Lists and Pick Lists ...................................................................................... 23
Date Fields .................................................................................................................... 24
Proposal Browse Popup ................................................................................................ 25
PD Features ............................................................................................. 27
PD Create Setup ........................................................................................................... 27
PD Lite .......................................................................................................................... 28
Proposal Submissions: NIH S2S or Dynamic S2S or Non-S2S ..................................... 30
NIH Modular Applications .............................................................................................. 30
Budgeting Models: Total Project or Period by Period or 424 .......................................... 33
Release of Salary and Effort Information ....................................................................... 35
Personnel Wizard .......................................................................................................... 40
Subcontractors .............................................................................................................. 47
Subprojects ................................................................................................................... 66
How to Create a New Proposal (Questionnaire) ...................................... 71
Step 0: Confirm PI ......................................................................................................... 71
Step 1: New or Copy ..................................................................................................... 72
Step 2: Proposal Type ................................................................................................... 77
Step 3: Selecting a Sponsor .......................................................................................... 78
Step 4: Proposal Numbering ......................................................................................... 79
Step 5: Project Title ....................................................................................................... 80
Step 6: Project Start and End Dates .............................................................................. 81

Step 7: Number of Years ............................................................................................... 82
Step 8: Setup Questions ............................................................................................... 83
Submission Mechanism/Form Information (Selecting a Template) ............................ 85
Deadline Information ................................................................................................. 88
General Proposal Properties ..................................................................................... 89
424 R&R NIH Template ............................................................................................. 90
Associated and PI Departments ................................................................................ 91
Associated Centers/Programs ................................................................................... 93
Because You Indicated that This Proposal Is to PHS/NIH ......................................... 94
Budget Setup Information .......................................................................................... 95
Cost Sharing Information ........................................................................................... 98
PD Lite Tab Questions ............................................................................................ 100
Completing the Setup Questions (Step 8) ................................................................ 101
Making Changes on the Setup Questions Screen ................................................... 102
Templates ............................................................................................. 103
424 R&R NIH Template ............................................................................................... 103
SF 424 R&R ............................................................................................................ 104
Performance Sites ................................................................................................... 112
Other Project Info .................................................................................................... 113
Project Summary ..................................................................................................... 115
Project Narrative ...................................................................................................... 116
References Cited ..................................................................................................... 117
Resources ............................................................................................................... 118
Other Attachments .................................................................................................. 119
Personnel ................................................................................................................ 121
PHS 398 Cover Page .............................................................................................. 127
PHS 398 Research Plan .......................................................................................... 130
PHS 398 Checklist .................................................................................................. 133
PHS 398 Cover Letter ............................................................................................. 135
Approvals ................................................................................................................ 135
424 R&R NIH Dynamic Template ................................................................................ 141
S2S Forms .............................................................................................................. 142
424 R&R Template ...................................................................................................... 144
S2S Forms .............................................................................................................. 144
424 Template .............................................................................................................. 145
SF 424 Form ........................................................................................................... 145
S2S Forms .............................................................................................................. 146
424 Mandatory Template ............................................................................................ 146
SF 424 Mandatory Form .......................................................................................... 147
S2S Forms .............................................................................................................. 147
424 Short Template ..................................................................................................... 147
SF 424 Short Organizational Form .......................................................................... 148
S2S Forms .............................................................................................................. 149
Default Screens Template ........................................................................................... 149
Generic Face Page ................................................................................................. 149
Summary Budget Personnel .................................................................................... 154
Summary Budget (Justifications; Budget Periods & Setups) .................................... 155
Custom Templates ...................................................................................................... 157
Budgets ................................................................................................. 158

Proposal Development User Guide 4
Setup Questions Affecting Budgets ............................................................................. 160
Budget Periods and Setups ......................................................................................... 163
Budgeting Type ....................................................................................................... 164
Inflation Dates ......................................................................................................... 166
Object Code Budgeting ........................................................................................... 167
Allow Inflation to Make Salary Exceed Cap ............................................................. 168
Advanced Budgeting ............................................................................................... 168
Track Un-Allowable Charges ................................................................................... 169
Show Budget Summary ........................................................................................... 172
Build Subproject Documents with Parent Proposal .................................................. 174
Change PI ............................................................................................................... 175
Project Period .......................................................................................................... 176
Budget Period ......................................................................................................... 177
Budget Sources ....................................................................................................... 178
Alternate Currency .................................................................................................. 180
Budget Items ............................................................................................................... 183
Personnel Costs ...................................................................................................... 185
Non-Personnel Costs .............................................................................................. 207
Subcontractors ........................................................................................................ 215
Subprojects ............................................................................................................. 216
Facilities & Administration Costs (F&A) ....................................................................... 217
Sponsor Calculation Method.................................................................................... 220
Cost Sharing ............................................................................................................... 225
Justifications ............................................................................................................... 228
Versions ...................................................................................................................... 229
Internal Documents .............................................................................. 231
Finalizing the Submission ...................................................................... 234
Appendices ........................................................................................... 248
Icon Key ...................................................................................................................... 249
Glossary ...................................................................................................................... 252

Proposal Development User Guide 5
Proposal Development— User Guide v13
Welcome
InfoEd Global is the leading provider of software solutions for managing sponsored programs. Worldwide, over six hundred academic, medical and scientific institutions rely
on us to support their grant and contract activity. InfoEd Global's proven web-based modules streamline processes, enable proactive
monitoring of compliance, and enhance internal and external collaboration.
InfoEd Global’s Proposal Development module (PD) significantly reduces the effort related to the preparation, review, and submission
of applications for grants and contracts. The efficiencies made possible by PD improve productivity, allowing investigators and
administrators to focus on research instead of paperwork.
With PD, researchers can collaborate online with departmental and research office staff to complete proposals. The Web-based software puts everyone on the same page, focusing their efforts on a shared set of records. By connecting all the parties at the outset of the application process, InfoEd Global eliminates the traditional proposal paper chase.

Proposal Development User Guide 6
Proposal Development— User Guide v13
Legal Disclaimer
InfoEd International, Inc. has prepared this Document for use by InfoEd International, Inc. personnel, licensees, customers, and prospective clients. The information contained in this Document is solely owned, and proprietary to, InfoEd International, Inc. All materials and information contained in this Document are copyrighted and all rights and privileges contained therein are afforded to, and enforceable, by InfoEd International, Inc. The material and information contained in this Document may not be modified, altered, or integrated into any other electronic or printed material without first obtaining written permission from InfoEd International, Inc.
Licensees and customers may copy the information contained in this Document for distribution to authorized users for the purposes of developing internal training materials, provided that all titles, trademarks, and copyright, proprietary, and restricted rights notices shall be reproduced in all such copies or materials. Licensee shall not copy, make available, nor distribute all or part of the information contained in this Document to any third party by assignment, sublicense, subscription, or by any other means.
InfoEd International, Inc. shall not be liable for technical or editorial errors or omissions in this Document or in any reproduced, translated, or transmitted copies or for incidental or consequential damages resulting from the furnishing, performance, or use of this material.
InfoEd International, Inc. reserves the right to revise the information contained in this Document without advance notice. InfoEd International, Inc. will provide a revised electronic copy of this Document with each version release.
Manual Conventions
Navigating to a particular setup often involves several separate clicks. Navigation instructions are abbreviated: Profile > Employment > Add New . The latter would be read as: “Select Profile, then Select Employment, and then Select Add New.”
Bolded words or terms direct users to click on a particular item or link. For example, “Click on Profile to open your profile for editing.”

Introduction to My Proposals InfoEd Global’s new portal offers significant improvements that increase the user’s ability to create, submit, and track proposals. The Proposal Development experience begins by clicking on My Proposals in the Web server’s sidebar.
There are several options within My Proposals . The underlined items below are specifically applicable to this user guide:
• Show/List allows the user to locate previously created proposals. For more information, see the next section in this user guide, Accessing Proposals in the Show/List.
• Search For allows the user to set search criteria to locate previously created proposals.
For more information, see Search for Proposals in this user guide.
• Create New Proposal allows the user to create a new proposal in Proposal Development. For more information, How to Create a New Proposal (Questionnaire) in this user guide.
• Create New PT Record allows the user to create a new proposal in Proposal Tracking.
This is covered in the Proposal Tracking User Guide.
• Report On offers the ability to gather data associated with proposals in the form of reports. This is fully covered in the Proposal Tracking User Guide, and partly covered in the Reporting Tool User Guide.
• WorkFlow Admin offers the Proposal WorkFlow for Administration. If you have security
access to this, you may read the Workflow Administration section of the Admin Tools Manual for more information.
• Help – PD opens the online version of the Proposal Development User Guide, which is
this document.

Proposal Development User Guide 8
Proposal Development— User Guide v13
• Help – PT opens the online version of the Proposal Tracking User Guide. Note: When a proposal is created within Proposal Development, a record is automatically created within Proposal Tracking. However, if a proposal is created in PT, a record will NOT automatically be created within PD. The ability to view and/or edit items for either system will depend on the security granted by your administrator .

Accessing Proposals in the Show/List Proposals that have already been created are available by clicking My Proposals > Show/List in the sidebar. The Show/List displays records for which the user is the Principal Investigator, as well as records with PIs to which the user is a delegate. For each proposal, the following will display: Institution Number, Title, Principal Investigator (PI), Proposal Type, Account Number, Award Number, Requested Period start and end dates, Awarded Period start and end dates, Sponsor, and Department. Scroll down the screen to find the desired proposals.
The following options are available in the Results:
• Sort by Column : A single header at a time can be sorted by clicking the header’s hyperlink , and then clicking the up or down arrows ( ). To choose a different header by which to sort the results, click the new header’s hyperlink . When the screen refreshes, the up/down arrows will appear next to the newly chosen header.
• Next or Previous Results : If a lot of records are available in the results, click to
view additional pages. Then, click if you would like to go back to an earlier page of the results.
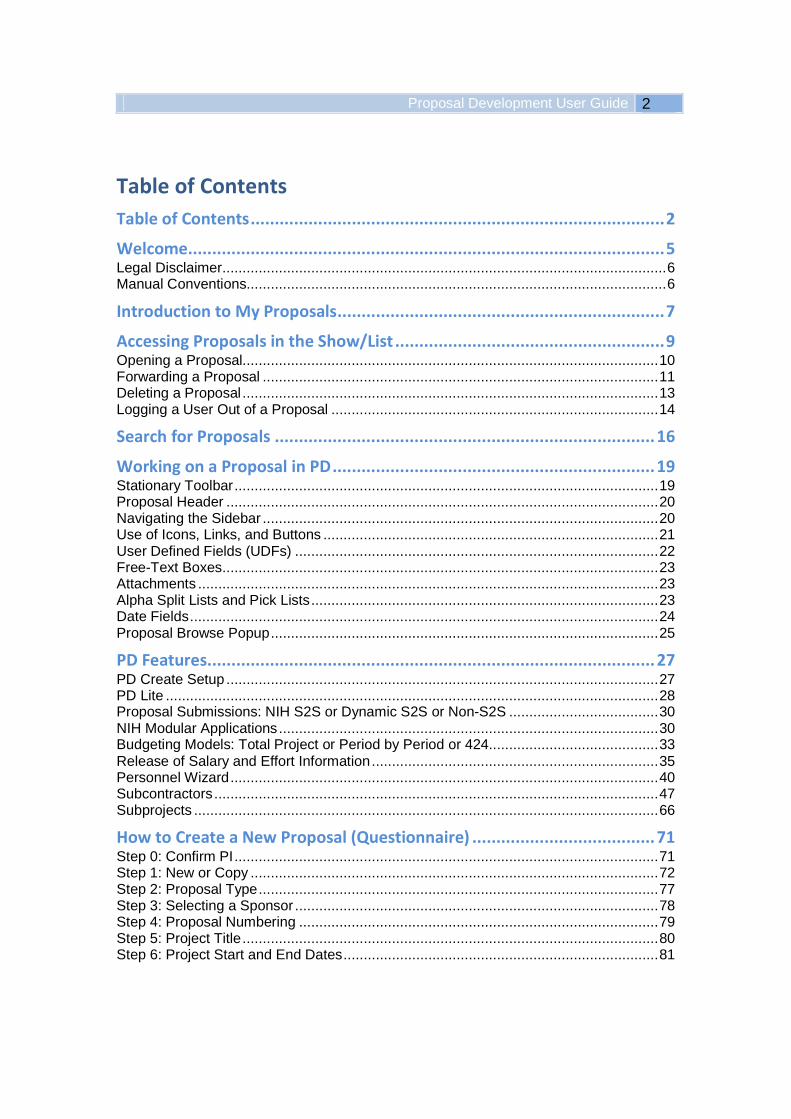
• Action : Moving the cursor over a record’s will open a window with various options.
Depending on security, you may open, forward, or delete records, as well as log out other users. Hovering over an icon will display what it does.
o PD: If a record was created in Proposal Tracking, instead of Proposal Development, then “N/A” will appear, meaning there is no PD record available to
open. If a record was created in PD, then click to open the record in edit mode, or click to open the record in view mode.
Note: When a proposal is created in PD, a record is automatically created within PT. However, if a proposal is created in PT, a record will NOT automatically be created within PD.
Proposal Development User Guide 10
Proposal Development— User Guide v13
o PT: Regardless of whether the record was created in Proposal Tracking or Proposal Development, the PT record will be available in edit or view mode, depending on your security access.
o In Use : If the proposal is in use or not exited properly, click to open a popup with details about how to log out other users, if permitted by the administrator.
o Fwd : To forward the record electronically as an attachment in an email, click .
o Del: If permitted by the administrator, click to delete the record.
• Source, Account Number : In some cases, the may appear for a record in the Account Number column. Moving the cursor over the icon will cause a small popup to appear with the record’s Source and Account Number.
• Info : Moving the cursor over the icon will show the corresponding record’s Proposal Status and Status Date and time.
The next few sections in this user guide will further explain how to open in PD/PT, forward, delete, and log out users.
Opening a Proposal In the Show/List or Search For tabs of My Proposals, you may open existing proposals in Proposal Development and Proposal Tracking. In the Results, click to open the below window:
In PD or PT, records may be available in two modes, depending on security:
• N/A: If a record was created in Proposal Tracking, instead of Proposal Development, then “N/A” will appear, meaning there is no PD record available to open. Note: When a proposal is created in PD, a record is automatically created within PT. However, if a proposal is created in PT, a record will NOT automatically be created within PD.
• Edit : Clicking will open a PD or PT record in edit mode, depending on your security access.
• View : Clicking will open a PD or PT record in view mode, depending on your
security access. The proposal displays differently depending on whether you are using a proposal in PD or PT. Below is an example of what a proposal looks like in PD:

Forwarding a Proposal In the Show/List or Search For tabs of My Proposals, you may forward proposals to other users.
In the Results, click to open a window, and then click Fwd to forward the proposal as an attachment in an email. In the forward popup, you may select recipients of the email, attach more proposals and files, and send the email or save as a draft.
The following is available in the forward popup:

Proposal Development User Guide 12
Proposal Development— User Guide v13
• To, CC, and BCC : Click , , or to select a recipient of the emailed proposal. In the Personnel popup, click the first letter of the person’s last name. Highlight the name in the pick list or enter the last name first in the Search for a Particular Entry
field. You may also Filter by Position. When the name is located, click .
When the forward popup refreshes, the selection will appear in the following columns:
o Name: The recipients of the email display next to the , , and buttons. If the person is a primary recipient of the email (To), the name will be bold.
o Department : The department of each name displays. If the person is a primary
recipient (To) of the email, the department will be in italics.
o Email : Check this box to send the person an email.
o Remove : Click to remove the name as a possible recipient of the email.
• Subject : “New Message” defaults to this field, but may be changed to the subject that will appear in the email.
• Message : Enter a message for the email in this free-text box.
• Attachments : The proposal will already be included as an attachment to the email (on
the left below). More attachments may be added, such as files and proposals. Access to the attachments may be changed. Attachments may also be removed.

o Edit or View Access to an Attachment : The presence of the edit icon means recipients will have edit access to the attachment. The presence of the view icon means recipients will only be able to view the attachment. Click or to change the access to the attachment. In the below popup, click the desired radio button, and
then click .
o Removing Attachments : Click to remove an attachment from the email.
o Adding Attachments : To add more attachments to the email, select Proposal or File, and then click .
� Proposal : If you chose to add a proposal, the Proposal Browse popup will
appear. See Proposal Browse Popup for information on how to select a proposal that will be viewable or editable to the emailed recipients. After a selection has been made, the forward popup will refresh with the proposal as an attachment.
� File : If you chose to add a file, the Upload File popup will appear. Click
to locate a file on your computer’s hard drive. When the File
Path is entered, click . When the forward popup refreshes, the new file will be attached.
• Send : When done in the forward popup, click to send the email as created. A record will be saved in My Messages > Sent . For more information on InfoEd Global’s Message Center, read the Baseline General User Guide.
• Save to Drafts : If the email is not done, click to save the email in your drafts folder, which is located in My Messages > Drafts . For more information on InfoEd Global’s Message Center, read the Baseline General User Guide.
• Close : Click to close the forward popup without saving.
Deleting a Proposal In the Show/List or Search For tabs of My Proposals, you can delete proposals if permitted by
your administrator. In the Results, click to open a window, and then click Del to delete the proposal. In the Delete Proposal popup, click if the proposal number is correct. Click OK in the warning window. Click when done.

Proposal Development User Guide 14
Proposal Development— User Guide v13
Logging a User Out of a Proposal If a proposal is already in use by someone else or if someone neglected to properly exit a proposal, you will be able to log out the other users, if permitted by the administrator. In the Show/List or Search For tabs of My Proposals, click to open a window in the Results, and
then click In Use to log out the other users.
After clicking , a popup will open with the proposal’s user details. Depending on whether a single user or multiple users are in the proposal, the resulting popup will appear differently. If a single user in the proposal should be logged out, check the Log Out box, and then click
. Returning to the Show/List or Search For screen, the proposal should now appear without the end user session icon next to it.
If multiple users are in a proposal, the up and down arrows ( , ) may be used to order the columns for each header. Locate the user or users who should be logged out and check the corresponding boxes on the right. If all the users in the proposal need to be logged out, check the “all” box at the top right. Then, click . Returning to the Show/List or Search For screen, the proposal will appear with or without the end user session icon next to it depending on whether some or all of the users were logged out.

Multiple users can work in a proposal in Edit mode at the same time, but not on the same section. The first user to visit a section will have Edit privileges, while all others will have View privileges for that section. All other sections will be editable as long as another user is not currently in that section.
To close the popup without logging someone out, click without checking any boxes or clicking . When a user is logged out of a proposal, the below message will appear in the proposal window:
Note: There are various reasons why a user may be logged out of a record. Check with your administrator for more information.
Proposal Development User Guide 16
Proposal Development— User Guide v13
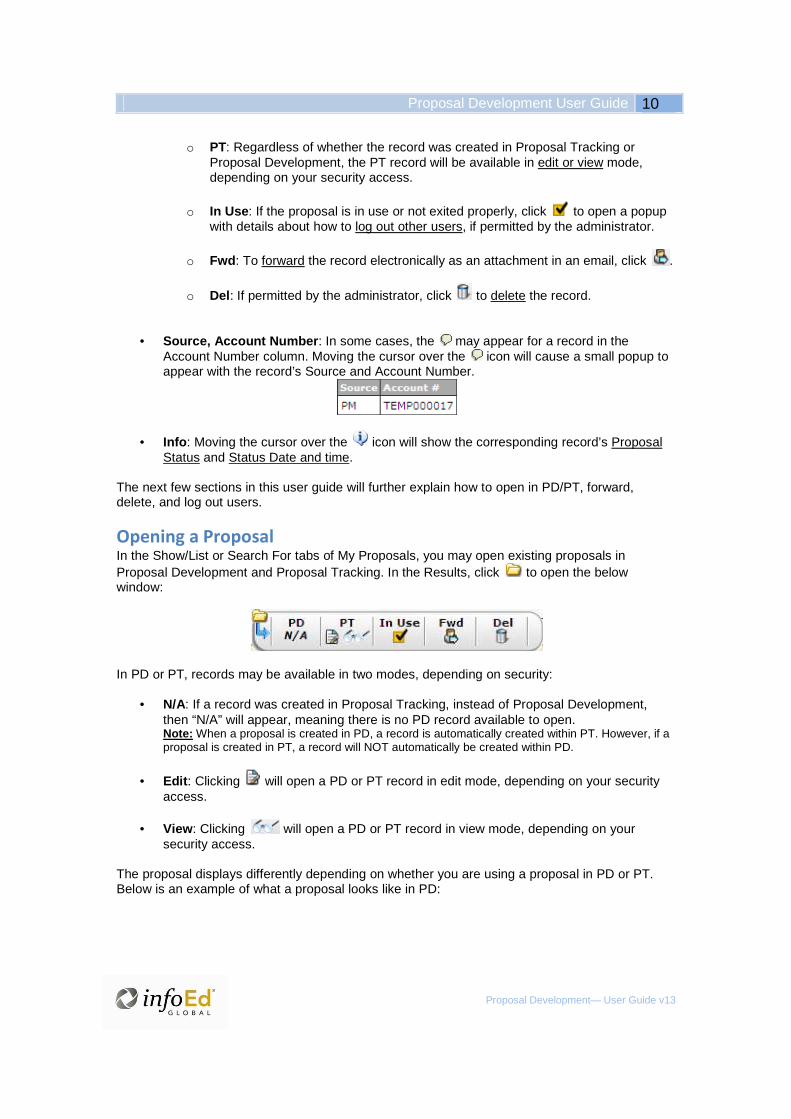
Search for Proposals To search for previously created proposals, click My Proposals > Search For in the sidebar:
The Search for Proposals screen has three general views:
• Abbreviated Search : This view appears towards the top when the screen first opens. This features six of the most commonly used searches: Proposal Number, Sponsor, Principal Investigator (PI), Custom Account Number, Proposal Status, and Primary Associated Department.
• Additional Search Fields : To display more search options, click at the bottom of the screen. To hide these again,
click . The following search options are available in this section of the screen: Title, Sponsor Type, Sponsor Program Number, Principal Investigator’s Department, Investigator, Investigator’s Department, Award Number, Protocol Number, Proposal Type, Approval Date, Project Status, Deadline dates, Requested Start and End Dates, Awarded Start and End Dates, Award Date, Grants.Gov ID Number, Subcontractor Number, and Originating Sponsor.

• Results : Click after the search options have been set (instructions below). The screen will refresh with the Results section at the bottom of the screen displaying all the proposals that correspond to the search criteria. Scroll down the screen to find the desired proposals.
A single header at a time will have the ability to be sorted top to bottom by clicking the up or down arrows ( ). To choose a different header by which to sort the proposals, click the header’s hyperlink . When the screen refreshes, the arrows will appear next to the newly chosen header.
Click and to move forward and backward among the results of the search.
Click to clear all of the search criteria and the results.
For more information on how to use the Results, see Accessing Proposals in the Show/List and its subsections in this user guide.
Setting Search Options The search fields offer different ways to enter criteria for the proposal search.
• Pull-Down Selection : Click on the down arrow and highlight the desired option.
• Set: While appearing as textboxes, these fields can only be set by clicking the Set link to the right of the field. When a popup opens, click the first number or letter of the item, or the person’s last name, in the alpha split list. Click the down arrow and highlight the selection, or enter the desired text in the Search for a Particular Entry field. Also, you may select to Filter by Position for the search. When the desired selection is highlighted, click
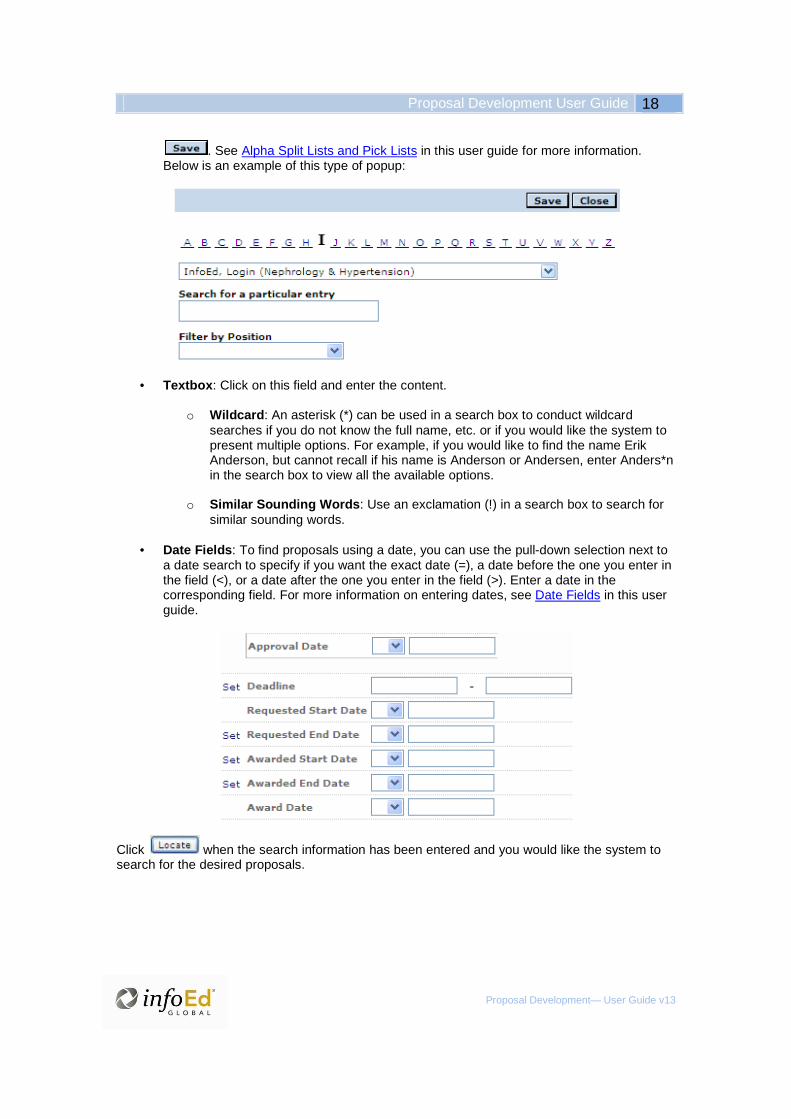
Proposal Development User Guide 18
Proposal Development— User Guide v13
. See Alpha Split Lists and Pick Lists in this user guide for more information. Below is an example of this type of popup:
• Textbox : Click on this field and enter the content.
o Wildcard : An asterisk (*) can be used in a search box to conduct wildcard searches if you do not know the full name, etc. or if you would like the system to present multiple options. For example, if you would like to find the name Erik Anderson, but cannot recall if his name is Anderson or Andersen, enter Anders*n in the search box to view all the available options.
o Similar Sounding Words : Use an exclamation (!) in a search box to search for
similar sounding words.
• Date Fields : To find proposals using a date, you can use the pull-down selection next to a date search to specify if you want the exact date (=), a date before the one you enter in the field (<), or a date after the one you enter in the field (>). Enter a date in the corresponding field. For more information on entering dates, see Date Fields in this user guide.
Click when the search information has been entered and you would like the system to search for the desired proposals.

Working on a Proposal in PD After opening a proposal in PD or creating a new PD record, you will be able to view the proposal window to add or change content associated with that proposal. Note: The proposal window displays differently depending on whether you are using a proposal for Proposal Development or Proposal Tracking. Below is an example of a proposal in PD:
Stationary Toolbar A stationary toolbar appears at the top of the proposal window and contains several icons users may click to perform functions and access help information. The appearance of the stationary toolbar may vary based on administrative setups.
The two most important icons to remember while working on a proposal in the InfoEd Global
Suite are Save and Done. Click after entering information in the various screens of the
proposal window. Only click when you really are finished with the proposal and would like to exit that proposal window.
opens an electronic user guide. opens information about the access history of the proposal.

Proposal Development User Guide 20
Proposal Development— User Guide v13
opens a popup with the proposal title and number in barcode form. Using a barcode scanner, the program can be scanned into the search engine in the Proposal Number field to locate a proposal.
opens an internal support URL that is institutionally configured.
shows security information.
Clicking will display help information for various fields. Move your cursor over any of the available help icons to open a textbox with tips. When you are done with the field level help
and no long want it to display, click to hide the help icons from view.
Warning: While working in the proposal window, be sure to save your work by clicking in the
stationary toolbar. If you accidentally click before you are ready, the system will exit from that proposal window and you will have to find and open the proposal again. Stated more simply, do not click
, unless you really are done.
Proposal Header The top of the proposal window remains stationary regardless of which proposal in PD is opened or where you click in the proposal window. The stationary header contains the Proposal Number, Principal Investigator, Sponsor, and Title. The Primary Associated Department will also appear in the header if the display option has been chosen in Organizational Admin.
Navigating the Sidebar The sidebar for a proposal in Proposal Development varies based on the Sponsor and Template chosen on the Setup Questions screen. All the templates have the Setup Questions, Personnel, Budget, Internal Documents, and Finalize tabs. However, the other tabs in the sidebar vary based on the template being used. Some tabs have additional subtabs. The Budget tab also contains Budget Items, F&A, Cost Sharing, Justifications, Versions, and Budget Periods and Setups, as well as additional subtabs that display in different instances. A red check ( ) appears to the left of a tab when that screen’s Completed checkbox has been checked and the screen saved. A red flag ( ) to the right of a tab indicates there is a problem with that tab requiring attention before the proposal can be completed. Below is an example of a sidebar in Proposal Development:

Use of Icons, Links, and Buttons While working in the InfoEd Global Suite, there will be many instances when the user will encounter icons, hyperlinks, and buttons. Clicking these items will perform functions, open popups, or display additional screens. Some of the most common icons used in Proposal Development are in the below table. See the List of Icons in the Appendix of this user guide for a description of icons commonly used in the InfoEd Global Suite.
Icon Use
To Open
To View
or To Edit
To Remove
To Delete
For a Calendar
To Upload a Document
To Open a PDF
To Replace
To Download
To Get a Document
To Remove a Document

Proposal Development User Guide 22
Proposal Development— User Guide v13
For a History
To Inflate
For Committed
For a Budget Detail
To Build To Insert
For a History Occasionally a screen within the proposal window will have an underlined and highlighted word that links to another screen or popup, and so if clicked, will open this other section of the proposal. Examples include Change and Resource URL .
Clicking buttons like will implement changes or provide a popup or screen.
User Defined Fields (UDFs) Individual institutions can create custom fields to collect data of unique institutional importance and significance. Such fields, if any have been created by your administrator, are displayed throughout the InfoEd Global module. Because these fields are institution-specific and will vary greatly in the type of data collected, they cannot be generically described within this guide. Please contact your administrator for advice as to how best to complete the information requested in these fields. As a general rule, user defined fields will appear at the bottom of the screens within the module, under their own unique section header(s).
• Table – allows for creation of a table structure that can contain an unlimited number of User Defined Fields within it. This will create a more structured appearance to the UDF setups as shown on the item pages. Most database fields and UDF types are available for use in Table UDFs; however, table, dynamic URL, and URL/hyperlink UDF types are not available for use within a Table UDF.
Note: Table UDFs are designed primarily for layout purposes; within the system they are treated essentially like a page of their own and can be reported on just like any other UDF. There are two ways in which a Table UDF can be reported on:
1. List – adding the name of the Table UDF to your report will produce a single
entry in your report; each value input into the Table UDF will be displayed in a comma delineated list. For example, assuming your Table UDF contained account numbers and departments, your report would display:
Account Number Department 3494076-2, 21430-5, 123954-0
English, Mathematics, History
This arrangement would hold true even if/when exported to Excel.
2. Separate Entries – if you wanted the data from the Table UDF to be
displayed in separate entries, you would need to add the names of each field

in the Table UDF separately. For example, assuming your Table UDF contained account numbers and departments, your report would display:
Account Number Department 3494076-2 English 21430-5 Mathematics 123954-0 History
This arrangement would hold true even if/when exported to Excel.
• Upload – the created UDF will allow for the uploading of files.
For information on the Reporting Tool, see the Reporting Tool section of the Admin Tools Manual.
Free-Text Boxes Free-text boxes are used throughout My Proposals for the capture of potentially lengthy amounts of information. Free-text boxes will capture up to 20,000 characters. Items exceeding this limit should be uploaded to the system in the form of an attachment.
Attachments A number of areas within the InfoEd Global Suite permit the uploading of attachments. When uploading any type of file, the application is designed to recognize the mime type.
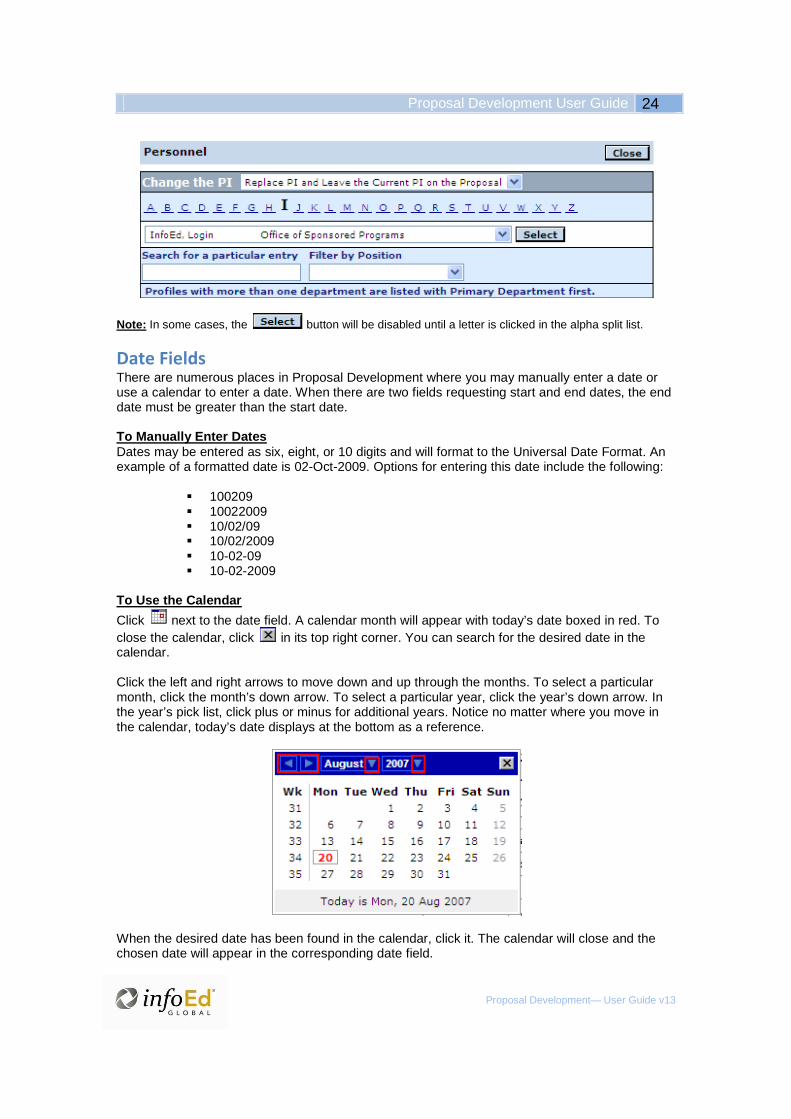
Alpha Split Lists and Pick Lists There are many instances in My Proposals when an alpha split list and pick list will offer the ability to locate something, such as a name, sponsor, or department. To use the alpha split list, select the first letter of the item or first letter of the person’s last name. You may enter the name in the Search for a Particular Entry field and view the results as you type. For a person, enter the last name, a comma, and the first name. After the letter has been chosen, you may also use the pick list by clicking the down arrow. Scroll down to highlight the item you want in the list. Before choosing a letter, you may also use the Filter by Position option. This list corresponds with the position category set within investigator administration.
In the example below, after the name is highlighted and displays, you would click :
Proposal Development User Guide 24
Proposal Development— User Guide v13
Note: In some cases, the button will be disabled until a letter is clicked in the alpha split list.
Date Fields There are numerous places in Proposal Development where you may manually enter a date or use a calendar to enter a date. When there are two fields requesting start and end dates, the end date must be greater than the start date. To Manually Enter Dates Dates may be entered as six, eight, or 10 digits and will format to the Universal Date Format. An example of a formatted date is 02-Oct-2009. Options for entering this date include the following:
� 100209 � 10022009 � 10/02/09 � 10/02/2009 � 10-02-09 � 10-02-2009
To Use the Calendar
Click next to the date field. A calendar month will appear with today’s date boxed in red. To close the calendar, click in its top right corner. You can search for the desired date in the calendar. Click the left and right arrows to move down and up through the months. To select a particular month, click the month’s down arrow. To select a particular year, click the year’s down arrow. In the year’s pick list, click plus or minus for additional years. Notice no matter where you move in the calendar, today’s date displays at the bottom as a reference.
When the desired date has been found in the calendar, click it. The calendar will close and the chosen date will appear in the corresponding date field.

The below images depict some of the ways you may use the calendar:
Proposal Browse Popup The Proposal Browse popup appears any time you need to locate an existing proposal in the InfoEd Global system. There are numerous ways to search for a proposal in the Browse popup. If you know the Proposal Number, then enter it into the Select by Number field and click the corresponding . You can Apply Filters to select from all the proposals that match the specifications you set. Click
the corresponding button to apply a filter for the Sponsor/Scheme, Sponsor Type, Primary Center/Program, Center/Program, Principal Investigator, Investigator, Primary Associated Department, or Principal Investigator’s Department. Under the Proposal Status heading, make sure the appropriate checkboxes are included for the search. When you have set the appropriate criteria for the search, click to the right of Apply Filters.
You may clear the criteria to begin again by clicking .

Proposal Development User Guide 26
Proposal Development— User Guide v13
When the Browse popup refreshes, the search results will display at the bottom. Scroll through the Records Found to locate the proposal you want. Click the proposal’s corresponding radio
button on the right, and then click .

PD Features Proposal Development is very flexible and has many features and settings that can be configured by the administrator. The following is a summary of the major features that have optional configurations:
• PD Create Setup • PD Lite • Proposal Submissions: NIH S2S, Dynamic S2S, Non-S2S • NIH Modular applications • Budgeting models: Budget by Total Project, Budget Period by Period, 424 Budgeting • Release of Salary and Effort information • Personnel Wizard • Subcontractors • Subprojects • Review: Draft, Final
Depending how these features are configured by the institution, the view for the user may differ from screenshots shown in this guide. This guide will show how each feature can be used.
PD Create Setup The Setup Questionnaire (also referred to as the New Proposal Questionnaire), which will be covered in detail later in the manual, is used to capture key data elements when setting up a new proposal, such as PI, new or copy from existing, proposal type, sponsor, opportunity, proposal number, proposal title, project start and end dates and the number of budget periods. The generic Setup Questionnaire is built into the program and can be used without modification. There is also the ability for the administrator to set up a custom Setup Questionnaire for the institution which would replace the first seven questions of the generic Setup Questionnaire and would include the data elements listed above. Html is used to create the custom form, and if applicable, there is the ability to set default answers to some of the questions. This setup is in Pre/Post Award Admin > PD Setups > PD Create Setup. The following is an example of a custom Setup Questionnaire:

Proposal Development User Guide 28
Proposal Development— User Guide v13
PD Lite Setup by the administrator in PD Setups, the activation of PD Lite may cause certain areas of the proposal to default to preset values, not be changeable, and/or be hidden. While the user may not be able to determine easily if PD Lite has been activated, the effect of simplifying areas of the proposal will likely have a positive impact on the use of Proposal Development. This section of the user guide will provide an overview of how PD Lite may impact a proposal. Note: When using this guide, your screen may look different from screenshots shown because of administrative settings, including PD Lite. The first instance you may notice the activation of PD Lite will be in Step 8 of the Setup Questions. The entire Setup Questions tab can be influenced by your administrator’s setup of PD Lite. Since the administrative setup for PD Lite is based on the template, the application of PD Lite in the proposal may vary based on which template is set at the top of the Setup Questions (Step 8) screen. Also, based on PD Lite, this template question may be unavailable and/or hidden to the user. Of course, the templates available in the proposal are determined by the sponsor chosen during proposal creation and perhaps modifiable on the Setup Questions (Step 8) screen. If the sponsor and/or template questions are visible and/or modifiable in Step 8 of the Setup Questions, these selections may influence whether and how PD Lite is active in the proposal.
If Permitted to Show the Hidden Areas of the Screen If the administrator has permitted the user to view hidden areas of the screen for a particular
template, then the (or ) button will be available at the top of the screen in the proposal. This will apply to any screen in the proposal that may be impacted by PD Lite. Also,
Module Administrators will be able to see the button on the Setup Questions (Step 8) screen.
• Clicking will cause the items that were hidden by PD Lite to be visible in the
proposal. Also, the button will be replaced by a button. The user in a PD proposal with the ability to show hidden items can switch back and forth between
showing and hiding the items by clicking or .
Note: If the administrator has set an item as NOT being able to be changed, then clicking will only make the item visible, not changeable.
• When available to Module Administrators, clicking the button on the Setup Questions (Step 8) screen will reset the default values for the screens and uncomplete any completed tabs in PD. This means that the screens will be returned to

the template’s default state prior to any information being entered. Previous content will be lost.
How PD Lite May Impact Tabs in the Proposal Various areas of the proposal may or may not default, be able to be changed, and/or be hidden based on the application of PD Lite. These areas include the following tabs, some of which may only apply when using certain templates:
• Setup Questions (Step 8) : All, some, or none of the questions may be influenced. The PD Lite Tab Questions section may appear at the bottom of the screen.
• Approvals : This tab may or may not be visible.
• Budget Periods and Setups : This tab may or may not be visible. If not shown, this tab
will autocomplete. Also, when the screen is available, some sections may be hidden.
• Budget Items : The Open Budget column in the Subcontractors section of this screen may be hidden.
• F&A: This tab may or may not be visible. If not shown, this tab may autocomplete.
Also, the institutional base/target scheme, F&A drift and details sections at the top of this screen may be hidden.
• Cost Sharing : This tab may or may not be visible. If not shown, this tab may
autocomplete. Also, the details section in the middle of the screen may be hidden.
• Modular Budget : The F&A detail section of the screen may be hidden.
• Justifications (and Subcontract’s Justifications) : The upload method may default to Upload Form or Use Database. The method may not be modifiable. The radio button options may not appear at the top of the screen. The subcontractor’s Justifications tab may be similarly influenced independent of how the main proposal’s Justifications tab is set for PD Lite.
• Versions : This tab may or may not be visible.
The following template tabs may also be changed in PD Lite: • Resources : The upload method may default to Upload Form or Use Database. The
method may not be modifiable. The radio button options may not appear at the top of the screen.
• Appendix : The administrator may have created customized text to default to this
screen. This text may replace the usual information/instructions that would appear.
• Project Summary/Project Description : The administrator may have created customized text to default to this screen. This text may replace the usual information/instructions that would appear. Also, the upload method may default to Upload Document or Manual Entry. The method may not be modifiable. The radio button options may not appear at the top of the screen.
• Project Narrative : The administrator may have created customized text to default to
this screen. This text may replace the usual information/instructions that would appear. Additionally, the administrator may have added the ability to indicate the Project Narrative is Draft or Final.

Proposal Development User Guide 30
Proposal Development— User Guide v13
• References Cited : The administrator may have created customized text to default to
this screen. This text may replace the usual information/instructions that would appear.
• Other Attachments : The administrator may have created customized text to default to this screen. This text may replace the usual information/instructions that would appear.
• Supplementary Docs : The administrator may have created customized text to default
to this screen. This text may replace the usual information/instructions that would appear.
Proposal Submissions: NIH S2S or Dynamic S2S or Non-S2S Proposal Development allows for electronic system to system (S2S) proposal submissions to all federal agencies that accept applications through Grants.gov. By also using the internal routing feature available in PD, proposals can be prepared on-line, submitted for internal review on-line and submitted electronically to Grants.gov (i.e., no paper necessary!). There are several templates in PD that are available for S2S submissions, two for NIH and four for other federal agencies (depending on what 424 form is used). See Templates for more information. When creating a proposal, opportunities listed at both Grants.gov and SPIN will indicate whether the proposal can be submitted S2S. Depending on the opportunity, PD will setup the proposal using the correct template and forms. NIH S2S uses standard PD tabs to create the application. Dynamic S2S uses both standard PD tabs and a tab called S2S Forms which will contain any other mandatory or optional forms that are part of the application. For Non-S2S proposals, i.e., those that will not be submitted electronically through Grants.gov, the administrator can use the Default template or can create Custom templates to allow the preparation of Non-S2S proposals in PD. All the budget and internal routing features are also available for Non-S2S proposals. See Templates for more information.
NIH Modular Applications If the proposal is to be submitted to PHS or NIH, and you indicated that the proposal will be using a Modular Budget on the Setup Questions screen, then a Modular Budget tab will appear within the Budget tab in the sidebar. Below is the question that appears on the Setup Questions screen:
If you decided to use a Modular Budget on the Setup Questions screen, then two additional checkboxes will display on the Budget Periods and Setups screen about how to calculate the F&A amount for modular budgets using the F&A base. You may either choose to use the F&A
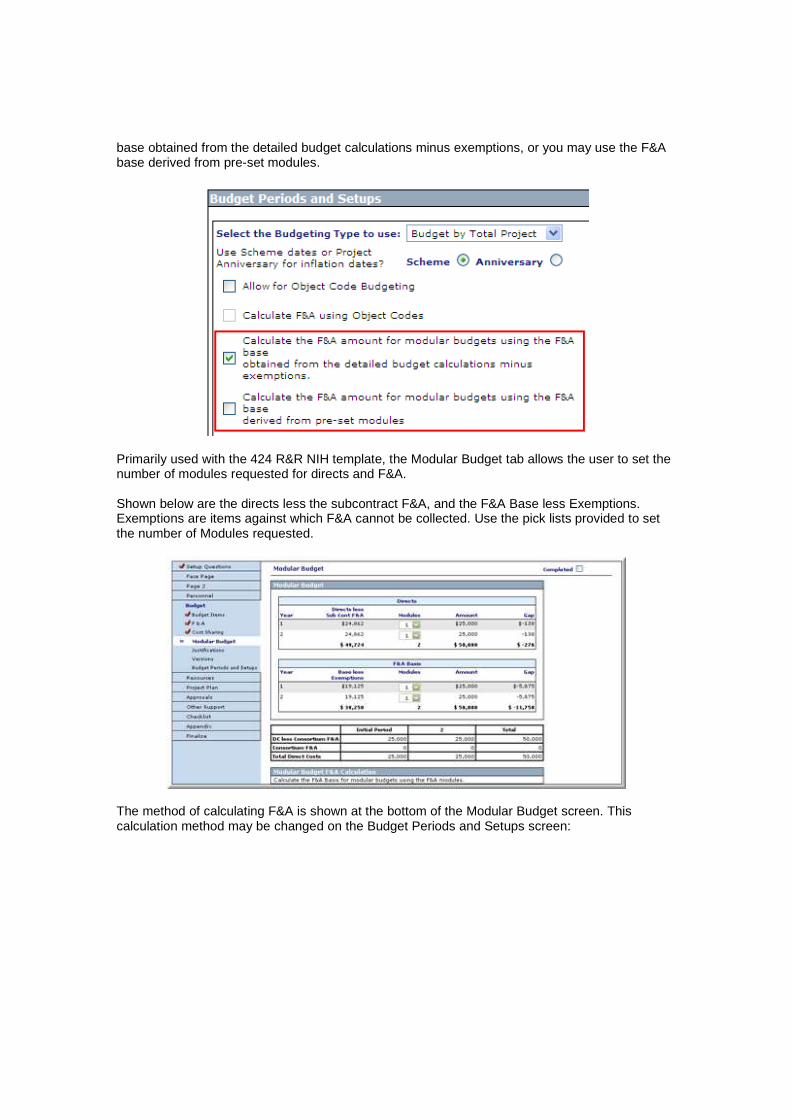
base obtained from the detailed budget calculations minus exemptions, or you may use the F&A base derived from pre-set modules.
Primarily used with the 424 R&R NIH template, the Modular Budget tab allows the user to set the number of modules requested for directs and F&A. Shown below are the directs less the subcontract F&A, and the F&A Base less Exemptions. Exemptions are items against which F&A cannot be collected. Use the pick lists provided to set the number of Modules requested.
The method of calculating F&A is shown at the bottom of the Modular Budget screen. This calculation method may be changed on the Budget Periods and Setups screen:

Proposal Development User Guide 32
Proposal Development— User Guide v13
Sample calculations are as follows:
• Calculate the F&A amount for modular budgets using the F&A base obtained from the detailed budget calculations minus exemptions:
Direct Costs: $50,000 Exemptions: $20,000 F&A Base: $30,000 F&A Rate: 50% F&A Amount: $15,000 Total Costs: $65,000 (Direct Costs + F&A Amount)
• Calculate the F&A amount for modular budgets using the F&A base derived from pre-set modules:
Direct Costs: 2 Modules = $50,000 F&A Base: 1 Module = $25,000 F&A Rate: 50% F&A Amount: $12,500 Total Costs: $62,500 (Direct Costs + F&A Amount)
Click in the stationary toolbar to save your work. Be sure to check the Completed checkbox when the Modular Budget screen is completed. The screen will refresh and show in completed (view) mode.

When viewed in Proposal Tracking, there will be a balancing entry in the direct costs so that the Detailed Budget equals the Modular Budget.
Budgeting Models: Total Project or Period by Period or 424 The Budget Model is selected in the Setup Questions (Step 8) when creating a proposal. There are three different budget models that can be used: • Budget by Total Project
This preferred budgeting method allows the user to complete the budget at the Project Level. Period calculations for the entire project are automatically completed, allowing for more accurate effort timeframes to be used when determining timeframes and effort on the project.
• Budget Period by Period
This traditional budgeting method allows the user to complete the budget Period by Period. This method of budgeting closely mirrors the functionality currently available within Proposal Tracking.
• 424 Budgeting
The 424 Budgeting Model is inspired by the SF 424 format, but at times may be available for other proposals in PD as well. It allows for less detail budgeting than the other models.
• Summary Budget The Summary Budget Model is used in the Default Template and Custom templates. It is described in detail in the Default Template section.
Note: After the Setup Questions (Step 8) is completed, the Budgeting Model may be modified on the Budget Periods and Setups screen in the Budget tab. Below are examples of the Budget Detail for Personnel screen when the three different budgeting models are selected:

Proposal Development User Guide 34
Proposal Development— User Guide v13

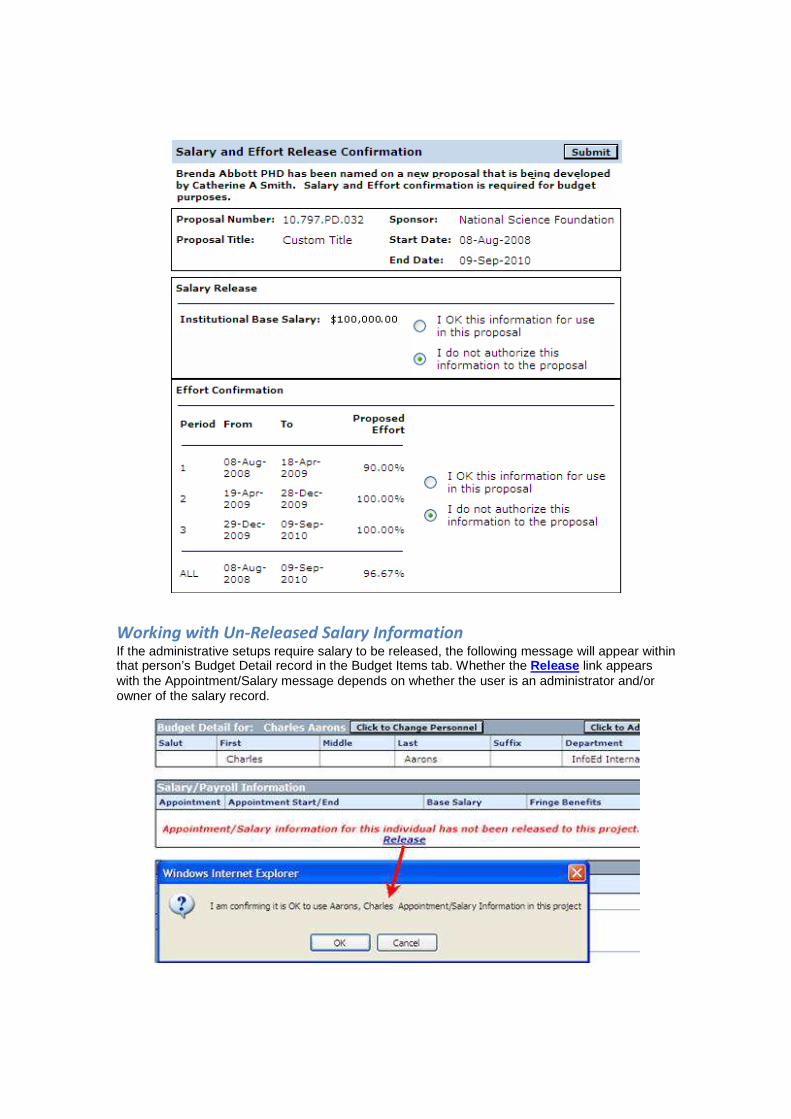
Release of Salary and Effort Information Within Proposal Development, the administrative setups may require salary or proposed effort to be approved or “released” by the individual and/or Key Personnel prior to proposal submittal. Salary release is only required if the individual’s profile (Salary tab) contains salary information. However, if the Effort release is set in administration, all individuals (regardless of Salary information) will need to approve the use of their name and the proposed effort prior to proposal submittal. Below is an example of the Budget Detail for Personnel screen in the Budget Items tab when both salary and effort must be released:
My Messages If a release of salary and/or effort information is required, then a message will appear in My Messages > InBox . For more information on working in the new portal, including the Messages
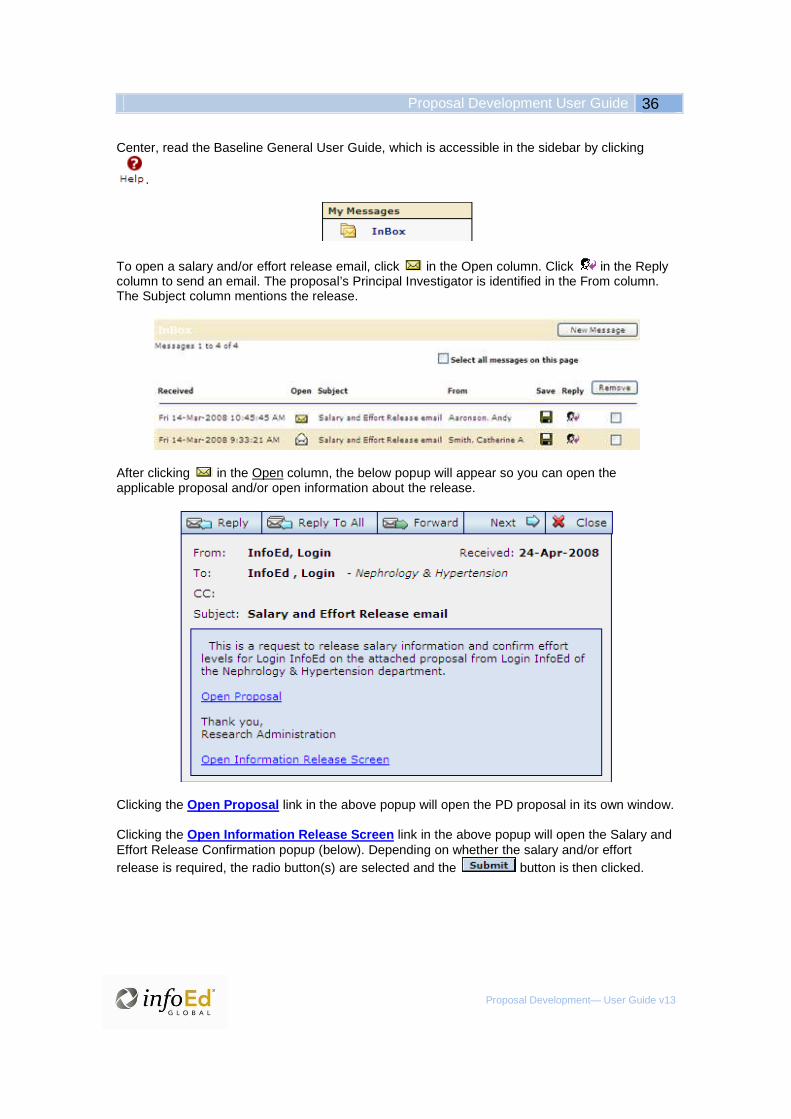
Proposal Development User Guide 36
Proposal Development— User Guide v13
Center, read the Baseline General User Guide, which is accessible in the sidebar by clicking
.
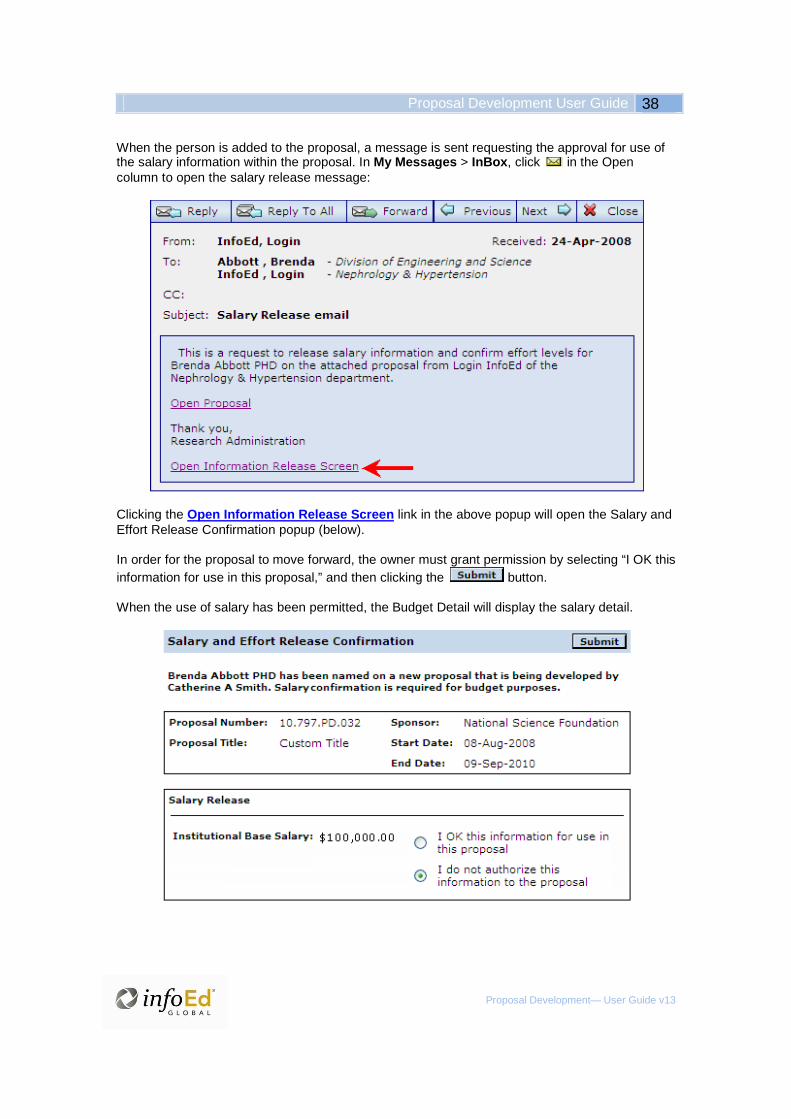
To open a salary and/or effort release email, click in the Open column. Click in the Reply column to send an email. The proposal’s Principal Investigator is identified in the From column. The Subject column mentions the release.
After clicking in the Open column, the below popup will appear so you can open the applicable proposal and/or open information about the release.
Clicking the Open Proposal link in the above popup will open the PD proposal in its own window. Clicking the Open Information Release Screen link in the above popup will open the Salary and Effort Release Confirmation popup (below). Depending on whether the salary and/or effort release is required, the radio button(s) are selected and the button is then clicked.
Working with Un-Released Salary Information If the administrative setups require salary to be released, the following message will appear within that person’s Budget Detail record in the Budget Items tab. Whether the Release link appears with the Appointment/Salary message depends on whether the user is an administrator and/or owner of the salary record.
Proposal Development User Guide 38
Proposal Development— User Guide v13
When the person is added to the proposal, a message is sent requesting the approval for use of the salary information within the proposal. In My Messages > InBox , click in the Open column to open the salary release message:
Clicking the Open Information Release Screen link in the above popup will open the Salary and Effort Release Confirmation popup (below). In order for the proposal to move forward, the owner must grant permission by selecting “I OK this information for use in this proposal,” and then clicking the button. When the use of salary has been permitted, the Budget Detail will display the salary detail.

Working with Un-Released Effort Information If the administrative setups require effort to be released, the following message will appear within that person’s Budget Detail record in the Budget Items tab. Whether the Release link appears depends on whether the user is an administrator and/or owner of the salary record.
When the person is added to the proposal or when the person’s effort changes, a message is sent requesting the approval for use of the effort information within the proposal. In My Messages > InBox , click in the Open column to open the effort release message:
Clicking the Open Information Release Screen link in the above popup will open the Salary and Effort Release Confirmation popup (below). In order for the proposal to move forward, the owner must grant permission by selecting “I OK this information for use in this proposal,” and then clicking the button.

Proposal Development User Guide 40
Proposal Development— User Guide v13
Personnel Wizard
The button will display on the Personnel screen instead of the button if your administrator has enabled the Personnel Wizard within PD Setups.
If using the Default Screens Template, the button will appear on the Summary Budget Personnel screen regardless of whether the Personnel Wizard has been enabled by the administrator. Also, regardless of how the last question in the Add Personnel popup (below) is answered, all the personnel entered will appear on the Summary Budget Personnel screen under the corresponding headings of Key Personnel, Significant Contributor, Non-Key, Consultant Key, or Consultant Non-Key.
Click to add personnel. In the Add Personnel popup, you will be asked several questions. How you answer will determine what question displays next. The last question is the same regardless of how you answer the prior questions. Below is an example of the Add Personnel popup:

Note: A flowchart depicting the Personnel Wizard is available at the end of this section of the user guide. Below is a description of the questions available in the Add Personnel popup for the Personnel Wizard: QUESTION 1: Is this person appointed to your instit ution or will they be if they are not hired or identified yet?
Select Yes or No. Click .
• YES TO QUESTION 1: If you answered YES, this person will be appointed to your institution, then the below question will appear: Does this person currently work at your institution? (“No” implies they eithe r do not work here yet, or are otherwise not assigned or identified yet.)
Select Yes or No. Click . Click to begin the add personnel again.
o If you answered YES, this person does currently work at your institution, then the
below question will appear: Locate the individual by clicking on the first lett er of their last name. Click the first letter of the person’s last name. Select the name from the list. Or, use the Search for a Particular Entry field to enter the last name first, followed by a comma and space, and then the first name. When a name is chosen, click
. Click to begin the add personnel again.
o If you answered NO, this person does not currently work at your institution, then the below question will appear: Is this person “named” or will they be determined l ater (TBD)?
Select Named or TBD. Click . Click to begin the add personnel again.

Proposal Development User Guide 42
Proposal Development— User Guide v13
� If you indicated that this person will be NAMED, then the below questions will
appear: Please enter the name of the person you wish to add and the Department. Enter the Salutation, First, Middle, and Last Names, and the Suffix. Click Set to open the Departments popup (example below). Click the desired radio button for the department at the bottom. Or, click the first letter in the alpha split list at the top, highlight the department in the pick list, and then click
. When the department’s radio button is set, click . When the Add Personnel popup refreshes, the department will display.
Click . Click to begin the add personnel again.
� If you indicated that this person will be TBD (to be determined), then the below questions will appear: Please enter the designation for the “TBD” person and the Department. Click Set to open the Departments popup. (Look above for instructions and an image example.)
Click . Click to begin the add personnel again.
• NO TO QUESTION 1: If you answered NO, this person will not be appointed to your institution, then the below question will appear: Will this person be a part of a subcontract on this proposal?
Select Yes or No. Click . Click to begin the add personnel again.
o If you answered YES, this person will be part of a subcontract on this proposal, then
the below question will appear: Please select the institution from this list. Subco ntractors already used on this proposal will be listed at the top of the list and noted as such. Leave “Not Found” if the institution you are looking for is no t in this list. Select an institution in the list or leave as it is with “Not Found” displaying. Click
. Click to begin the add personnel again.
� If you leave the selection as NOT FOUND, then please enter the name of the
institution in the available textbox. Click . Click to begin the add personnel again.

Then, please enter the name of the person you wish to add and the Department. Enter the Salutation, First, Middle, and Last Names, and the Suffix. Either click on the drop down list to choose a department, or type in the department name.
Click for the question below. Click to begin the add personnel again.
� If you selected an institution, then:
Please select the name of the person from the insti tution you wish to add to this proposal. The first person selected for thi s subcontractor on this proposal will be assumed to be the subcontractor PI . If you cannot find the correct person, please select “Person Not in List” and then “Continue.” Select a person in the list or leave as it is with “Person Not in List” displaying.
Click . Click to begin the add personnel again.
If you leave the selection as Person Not in List, then please enter the name of the person you wish to add and the Department. Enter the Salutation, First, Middle, and Last Names, and the Suffix. Either click on the drop down list to choose a department, or type in the department name.
Click . Click to begin the add personnel again.
o If you answered NO, this person will not be part of a subcontract on this proposal, then
the below question will appear: Please select the institution from this list. Leave “Not Found” if the institution you are looking for is not in this list. Select an institution in the list or leave as it is with “Not Found” displaying. Click
. Click to begin the add personnel again.
� If you leave the selection as NOT FOUND, then please enter the name of the institution in the available textbox.
Click . Click to begin the add personnel again. Then, please enter the name of the person you wish to add and the Department. Enter the Salutation, First, Middle, and Last Names, and the Suffix. Either click on the drop down list to choose a department, or type in the department name.
Click for the question below. Click to begin the add personnel again.
� If you selected an institution, then:
Please select the name of the person from the insti tution you wish to add to this proposal. If you cannot find the correct pe rson, please select "Person Not in List" and then "Continue." Select a person in the list or leave as it is with “Person Not in List” displaying.
Click . Click to begin the add personnel again.

Proposal Development User Guide 44
Proposal Development— User Guide v13
If you leave the selection as Person Not in List, then please enter the name of the person you wish to add and the Department. Enter the Salutation, First, Middle, and Last Names, and the Suffix. Either click on the drop down list to choose a department, or type in the department name.
Click . Click to begin the add personnel again.
LAST QUESTION: Please select the “Personnel Type” f or this person on this proposal. Select among the radio buttons below. Depending on how you answered the prior questions, these may not all appear.
• Key • Other Significant Contributor • Non-Key • Consultant – Key • Consultant – Non-Key
Other Significant Contributors and Consultants (Key and Non-Key) will NOT be added to the Budget in the Personnel section. This will be particularly apparent on the Budget Items screen, which has a Personnel Costs section. This does not apply to the Summary Budget Personnel screen where all the personnel will appear.
When the Personnel Type is chosen, click . Click to begin the add personnel again. When the Add Personnel popup refreshes, the popup will either reactivate to add another person if desired, or the Contact Information For Personnel popup may display to request additional information about the person. See Personnel in this user guide for more information on the “Other Options” available on the Personnel screen and the Summary Budget Personnel screen. The Contact Information For Personnel popup is described at the end of that section.
Below are two pages depicting the Personnel Wizard in a flowchart:


Proposal Development User Guide 46
Proposal Development— User Guide v13

Subcontractors The ability to add Subcontractors to the proposal may depend on the type of template and/or sponsor selected within the Setup Questions screen. It is possible that some sponsors or their associated templates will not accept subcontractor information. If subcontractors are permitted, the option to add subcontractors must be selected on the Setup Questions screen:
If selected, the Subcontractors will show as a separate section on the Budget Items screen:

Proposal Development User Guide 48
Proposal Development— User Guide v13
Personnel Wizard
When the Personnel Wizard is enabled by the administrator in PD Setups, the button does not display in the Subcontractors section on the Budget Items screen. In this case,
subcontractors will need to be added by clicking the button on the Personnel screen. In the Add Personnel popup, answer No to the first question (“This person will not be appointed to your institution.”). Answer Yes to the second question (“This person will be part of a subcontract.”). See Personnel Wizard in this user guide for more information on the Personnel Wizard. Creating a Subcontract (when the Personnel Wizard i s NOT active)
To create a subcontractor on the Budget Items screen, click in the Subcontractors section. The Select Subcontractor/Consortium popup offers a list of all the subcontractors within the Master Subcontractor Database. If the administrator has enabled the “on-the-fly subcontractor” functionality, the Create Subcontractor/Consortium section will be at the bottom of the popup.
Select the desired subcontractor and click , or enter the name of the subcontractor
within the textbox and click . Depending on the administrative setups, a subcontract number may need to be entered.

When the popup refreshes, you will need to select the Principal Investigator for the subcontract. If the subcontractor is newly created, a PI will also need to be added. For existing subcontractors, new PI information may be added as well.
Select the PI from the pick list and click . Or, enter the new PI information, including the
mandatory department, and click . The popup will close and the Budget Items screen will refresh with the new subcontractor.
Importing a Subcontract Note: Functionality temporarily unavailable.
If the administrator has enabled the subcontractor import in PD Setups, then the button will appear in the Subcontractors section on the Budget Items screen in the Budget tab. The Personnel Wizard is NOT a factor in whether the button appears. If available, click to import a subcontractor. The initial popups will be the same as when you are adding a subcontractor on the Budget Items screen. However, a new popup will appear later in the process. Select or add a subcontract in the first popup. Then select or add a PI in the next popup. Note that the selection or addition of the subcontract is crucial for importing, but the PI can be changed later during the import process. (Read above in the “Creating a Subcontract ...” instructions for more information on these popups.) After the subcontractor and PI are chosen in the popups, the Subcontractor Import popup will
appear. Click to select a file on your computer’s hard drive that has a .xfdl or .xfd
extension. After the location has been entered, click .

Proposal Development User Guide 50
Proposal Development— User Guide v13
After browsing and uploading the subcontractor file (above), a second Subcontractor Import popup will appear with the following options:
• Copying Requested Budget Periods : For each requested period of the subcontract, select a budget period to copy. If the period is NOT needed for the subcontract, check the Inactive box.
• Personnel Mapping : The first person in this section will replace the PI chosen during
the prior step in the subcontract import process. If the bold name on the left is acceptable to add, then leave the selection as “Add New” and the person will be added to the subcontract. If the bold name on the left is NOT the desired name, then select a new name on the right. For each name, there is the option to select a Department. If the desired department does NOT appear in the selection, then add a new department by leaving the person’s Department selection as “Add New” and entering the new department in the textbox on the right.
• Sponsor Budget Categories for Direct Costs : For each direct cost, select a sponsor
budget category. When ready in the popup (example below), click . The Budget Items screen will refresh with the imported subcontractor listed in the Subcontractors section.
Subcontractors Section on the Budget Items Screen The following columns will appear in the Subcontractors section of the Budget Items screen in the Budget tab:
• Open Budget : Click to open the Subcontractor Budget Detail screen.
• Short Form : Click to open the Subcontractors screen and access the Short Form and Agreement.
• Institution/Contractor Name : The subcontractor’s name will display.
• Detail Budgeting : Click to open the Subcontractor Budget in its own window.

• Periods and Totals : The period and total amounts display for each subcontractor. At the bottom of the Subcontractors section, the period totals and overall totals for all the subcontractors display.
• Remove : Click to remove a subcontractor.
Subcontract Header While working with subcontracts, there are times when a subcontract window will open with a header that is different from the proposal. The following information may display at the top of the subcontract window in the stationary header: the Subcontract Title, Subcontract PI Name, Subcontractor Name, Subcontract Sponsor Name, and Subcontract Institution Number.
Subcontractors Screen, Short Form, and Agreement As each subcontract is created within Proposal Development, an associated agreement is created for that subcontract. This agreement may be edited within the Subcontractors screen or within Proposal Tracking’s Agreements tab. Read the Proposal Tracking User Guide for more information. The proposal’s budgeting type, chosen on the Setup Questions screen or the Budget Periods and Setups screen, will impact the budgeting type for the subcontract. This will determine whether the subcontract has Total Project Budgeting, Period by Period Budgeting, or 424 Budgeting. However, subcontracts can take this a step further by allowing the use of Detailed or Non-Detailed Budgets.
In the Subcontractors section on the Budget Items screen, click in the Short Form column.
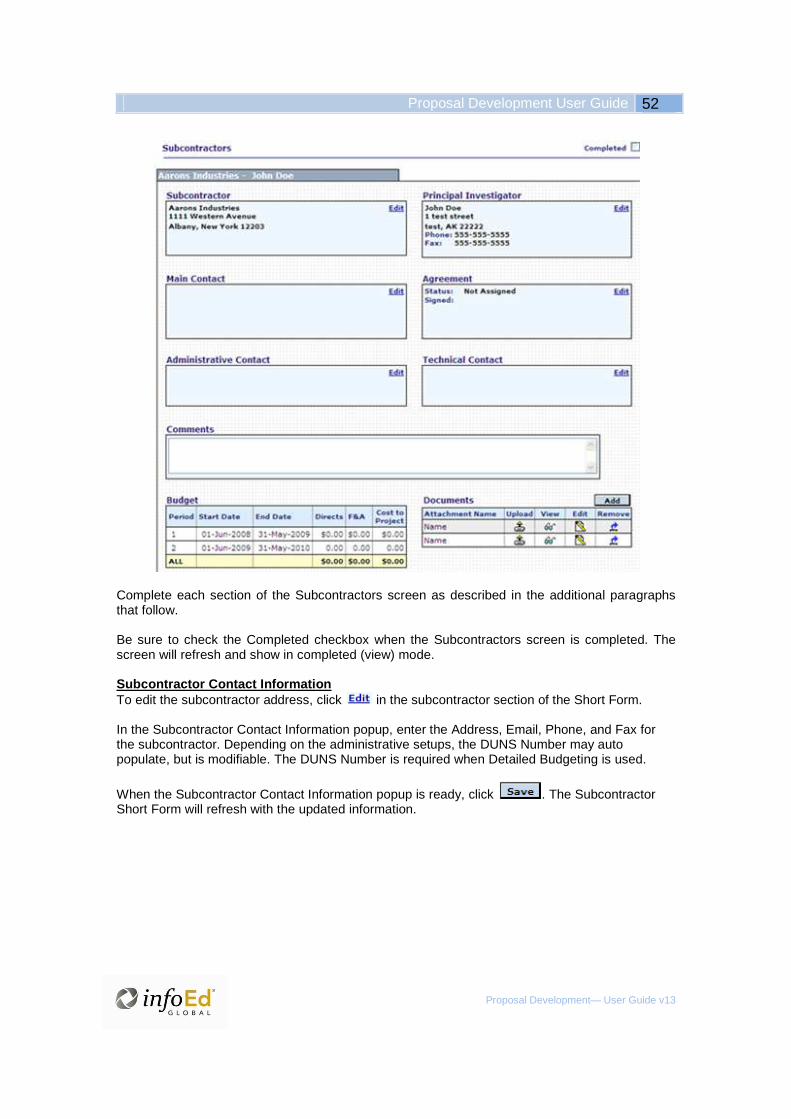
On the Subcontractors screen, information about the subcontractor displays in sections that may be edited. This information includes the Subcontractor address, Principal Investigator, Agreement, Comments, Budget summary, and uploaded Documents, as well as the Main, Administrative, and Technical Contact:
Proposal Development User Guide 52
Proposal Development— User Guide v13
Complete each section of the Subcontractors screen as described in the additional paragraphs that follow. Be sure to check the Completed checkbox when the Subcontractors screen is completed. The screen will refresh and show in completed (view) mode. Subcontractor Contact Information To edit the subcontractor address, click in the subcontractor section of the Short Form. In the Subcontractor Contact Information popup, enter the Address, Email, Phone, and Fax for the subcontractor. Depending on the administrative setups, the DUNS Number may auto populate, but is modifiable. The DUNS Number is required when Detailed Budgeting is used.
When the Subcontractor Contact Information popup is ready, click . The Subcontractor Short Form will refresh with the updated information.

Principal Investigator To modify the PI, who was entered during the subcontract’s creation, click in the PI section on the Subcontractors screen. Enter changes in the Select Personnel to Edit popup and click
.
Administrative, Technical, and Main Contact, as wel l as Comments Click in the Administrative, Technical, or Main Contact section. The Short Form popup contains important information pertaining to the subcontract.

Proposal Development User Guide 54
Proposal Development— User Guide v13
The following information may be entered or maintained in the Short Form:
• From: The Start Date for the subcontract.
• To: The End Date for the subcontract.
• Contract Number: The contract number for the subcontract.
• Type: Select the type of subcontract from the pre-defined list.
• Subcontractor Institution Number: The subcontractor institution number is view-only.
• Main Contact: Enter the Name, Address, Email, Phone, and Fax for the main contact.
• Performance Period: Enter the Received, Sent, and Paid dates. Enter the Account Number and PO Number. Select Yes or No for Final Invoice and Audit.
• Technical Contact : Enter the Name, Email, Phone, and Fax for the technical contact.
• Administrative Contact : Enter the Name, Email, Phone, and Fax for the administrative
contact.
• Comments: Comments entered in this textbox will display in the Subcontractor detail screen.
When you are done entering information in the Short Form popup, click . When the popup refreshes, click . Returning to the Subcontracts screen, the modifications will display in the Administrative, Technical, and Main Contact sections, as well as the Comments section. Documents Multiple supporting documents may be uploaded within the Subcontractors screen. To add a new
document, click in the Documents section. In the Upload popup, enter the Attachment Name for the document.

If this upload should be made available in the Assemble section of the Finalize screen, check the Paginate into Proposal option. This will allow the item to be included in the final application package.
Enter the pathname to the location of the document, or click and select the document
from your hard drive. Click or to attach the document.
Returning to the Subcontractors screen, the Attachment Name for the new document will display. Click to view the document.
An uploaded document may be modified. Click to edit the name and/or replace a document in the Upload popup.
To upload a new document, which will replace the existing one, click and enter changes in the Upload popup.
To remove an uploaded document, click .
Budget Summary and Page Creation Options The budget summary for the subcontract displays at the bottom of the Subcontractors screen:

Proposal Development User Guide 56
Proposal Development— User Guide v13
This summary will show all period dates, direct cost totals, F&A totals and subtotals, as well as the project total for the subcontractor. Budget Form Pages allows the user to determine if the budget form pages should be generated from the system or if they will be uploaded. This option does not pertain to the SF 424 R&R templates, and therefore, will not appear when these templates are used.
If the forms will be uploaded, make sure that the “Paginate in Proposal” option is selected when adding the attachment to the subcontract. Agreement for the Subcontract

The system automatically creates a Subcontract Agreement for each subcontract within the proposal. Click in the Agreement section of the Subcontractors screen to open the Edit Agreements/Contracts window:
To retain additions or changes, click in the top left toolbar of the Agreements window. When
done with the Agreements window, click in the top left toolbar, NOT in the toolbar of the proposal window. The following fields are available in the Agreements window when creating a new agreement or editing an existing agreement:
• Current Status : The current status of the agreement displays in this field. Modify this in the Status pull-down selection described below.
• Agreement Type : Select the type that best describes the agreement in the drop-down
selection. The agreement types are defined by the administrator.
• From : Enter the start date for the agreement.
• To: Enter the end date for the agreement.
• Date Signed : Enter the date the agreement was established.
• Institution : Enter the name of the institution with which the agreement was established.
• Agreement ID Number : Enter the agreement’s ID number.
• Conditions : Type the conditions of the agreement in this free-text field.
• Comments : Type any relevant comments in this free-text field.

Proposal Development User Guide 58
Proposal Development— User Guide v13
Agreement Status History To save a status in the Agreement Status History, enter the Status, Date, and Comments, then click to the right. You may add multiple statuses to the Status History to reflect changes in the agreement.
• Status : Choose the status that best describes the current agreement in the pull-down selection. The agreement statuses are defined by the administrator.
• Date: The effective date and time of the status. The date and time the Agreements
window was opened auto populates in this field, but it may be modified.
• Comments : Enter comments about the status of the agreement in this free-text field, which holds up to 1,000 characters. “No Comments” will automatically be recorded if none are entered.
• You Have ____ Characters Left : The number of characters still available for use in the
above Comments field will display as you type. This numeric field is not modifiable. The following fields will display at the bottom of the Agreement Status History on the Agreements window after a status has been added:
• Date: Displays the date and time of the status that was added.
• Status : Displays the status of the agreement.
• Recorded By : Displays the user who recorded the status.
• Comments : Displays comments written about the status. “No Comments” will display if none were entered.
Document Summary The Document Summary appears at the bottom of the Agreements window when you are adding an agreement or editing an existing agreement. Click to the right of the Document Summary to upload attachments, such as an electronic copy of the agreement. In the Upload popup, click a radio button to indicate if you want to upload a new Document or a new Version of an Existing Document.
You can enter the Location of the document or click to find the location from which you will be uploading. Type the Name of the document. Select the Category from the pull-down selection, which may default to Agreement.

Select the Folder you want the attachment added to or leave it set for the default Parent Folder called [ROOT].
When ready, click in the popup. After the popup refreshes, you may upload more attachments or click .
Returning to the Agreements window, the uploaded attachment will display in the Document Summary. The Name and Category you chose in the Upload popup will display, as well as the number of Versions and the Last Updated date. Click the corresponding to view the latest version of the attachment.
Click the corresponding to delete an attachment. If there are multiple versions of an attachment, deleting in the Document Summary will delete all the versions.
In the Document Summary, click a corresponding history icon to refresh the Agreements window as the Document window, The Document window displays the Document Detail and Upload History. You can choose to view the other attachments listed in the sidebar on the left of the Document window. The Document Detail displays the Document Name and Document Category, which are both modifiable here for the attachment. The Document Upload History lists all the versions of an attachment. The File Name, Date Uploaded, and Owner are displayed for each version. Owner refers to the user who did the
upload. Click to view a single version. Click to remove a single version. Click in the Document window to add another attachment in the Upload popup.

Proposal Development User Guide 60
Proposal Development— User Guide v13
To retain additions or changes, click in the top left toolbar of the Document window. Click
in the stationary toolbar to return to the Edit Agreements/Contracts window. Be sure to check the Completed checkbox when the Subcontractors screen is completed. The screen will refresh and show in completed (view) mode.
Subcontractor Budgeting On the Budget Items screen, the Subcontractors section displays a summation of all the subcontractors associated with the proposal. Whether the budgeting type is Detailed or Non-Detailed can be determined in this section.
Detailed Budgeting Electing to use Detailed Budgeting within subcontracts allows the user to develop budget detail in the same manner as the main budget detail, incorporating independent sections to record detail for Personnel and Non-Personnel Costs. When an SF 424 R&R template is used, Detailed Budgeting is required for subcontractors.

This applies to both budgeting methods selected on the proposal’s Setup Questions screen or Budget Periods and Setups screen that are referred to as Total Project Budgeting or Period by Period Budgeting.
Non-Detailed Budgeting Electing to use Non-Detailed Budgeting within subcontracts allows the user to develop simple budgets by using lump-sum direct costs and F&A. This applies to both budgeting methods selected on the proposal’s Setup Questions screen or Budget Periods and Setups screen that are referred to as Total Project Budgeting or Period by Period Budgeting.

Proposal Development User Guide 62
Proposal Development— User Guide v13
Detailed Budgeting for the Subcontract After a subcontract has been created, you may access the subcontract’s budget from the Budget
Items screen by clicking in the Detail Budgeting column.
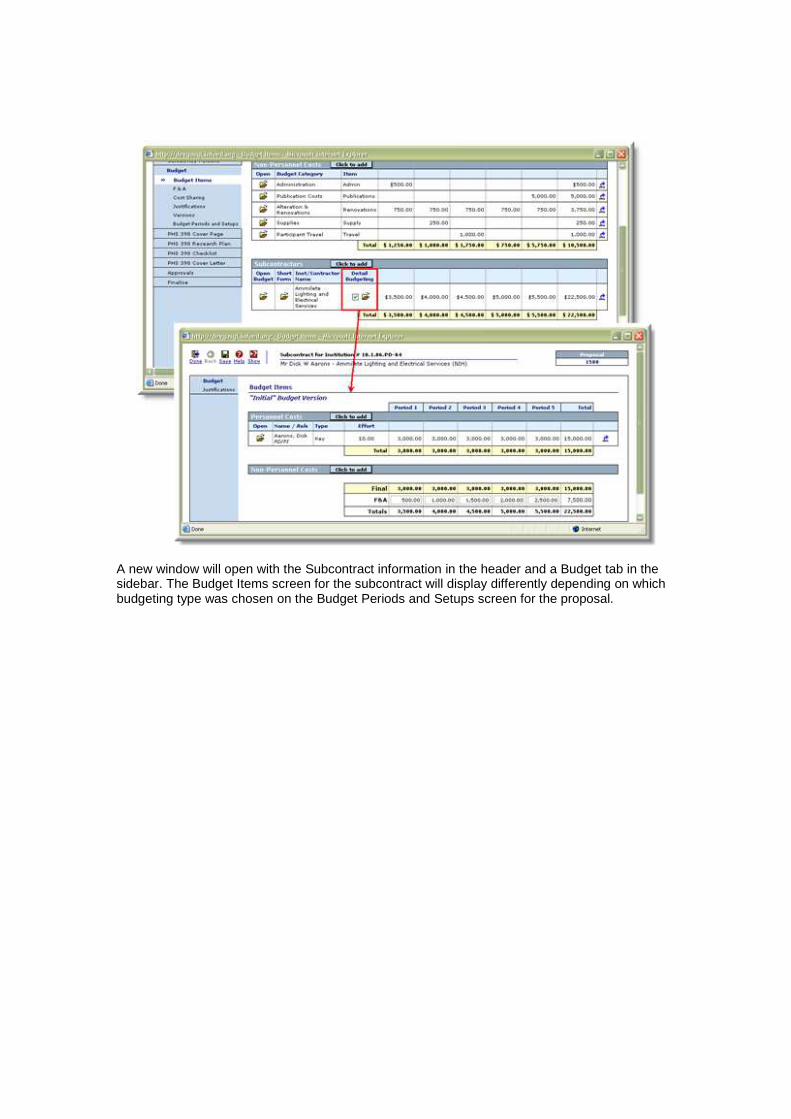
A new window will open with the Subcontract information in the header and a Budget tab in the sidebar. The Budget Items screen for the subcontract will display differently depending on which budgeting type was chosen on the Budget Periods and Setups screen for the proposal.
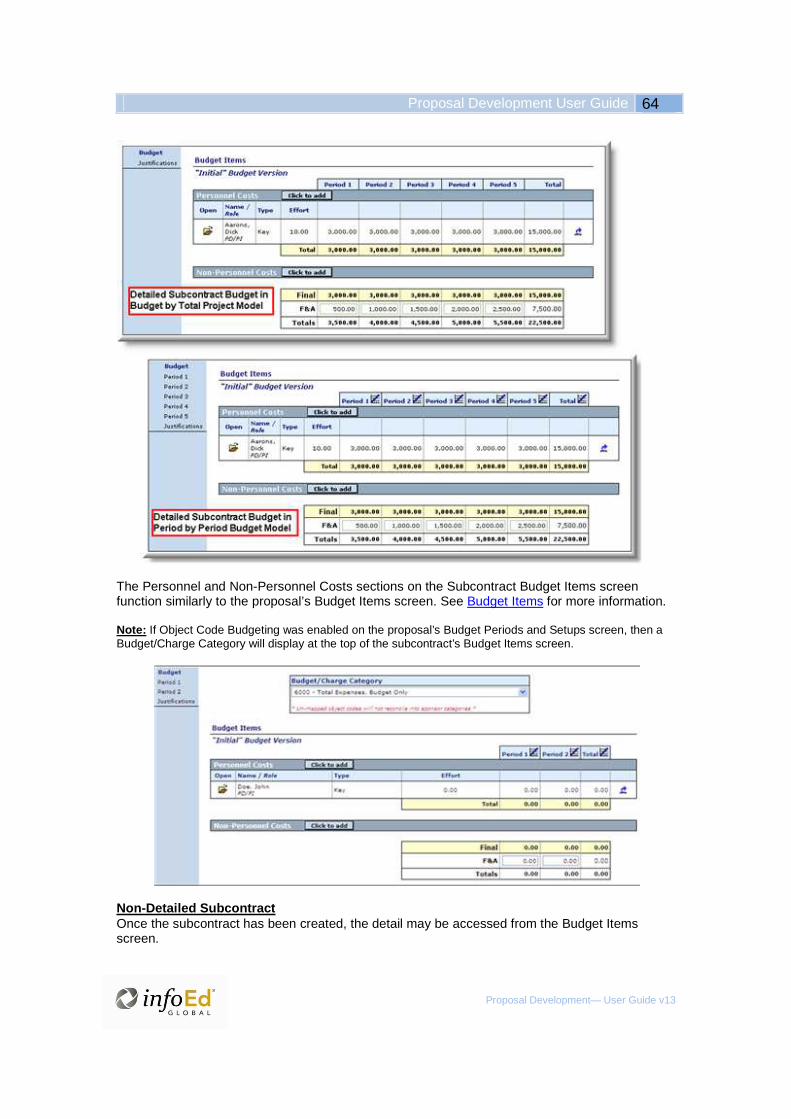
Proposal Development User Guide 64
Proposal Development— User Guide v13
The Personnel and Non-Personnel Costs sections on the Subcontract Budget Items screen function similarly to the proposal’s Budget Items screen. See Budget Items for more information. Note: If Object Code Budgeting was enabled on the proposal’s Budget Periods and Setups screen, then a Budget/Charge Category will display at the top of the subcontract’s Budget Items screen.
Non-Detailed Subcontract Once the subcontract has been created, the detail may be accessed from the Budget Items screen.

When working with Non-Detailed Budgets, Personnel and Non-Personnel Costs are not broken into separate buckets. The user is given the ability to enter bulk monies for Direct Costs and F&A only.
On the Budget Items screen in the Subcontractors section, click in the Open Budget column. The Budget Detail for the subcontract that opens will vary based on which Budgeting Type was selected on the Budget Periods and Setups screen or the Setup Questions screen.
Budgeting by Total Project When first opened, this screen will contain one row within the Budget by Period section. The user may enter Direct Costs and F&A and the Start and End Periods to which the monies apply. The user may enter date ranges that cross budget periods. If this is the case, the system will determine the period costs at the bottom of the screen, in the Costs By “Budget Periods” section. Budgeting Period by Period When first opened, this screen will show one record for each Budget Period created within the proposal. The user may enter Direct Costs and F&A for each period where the costs should be applied.
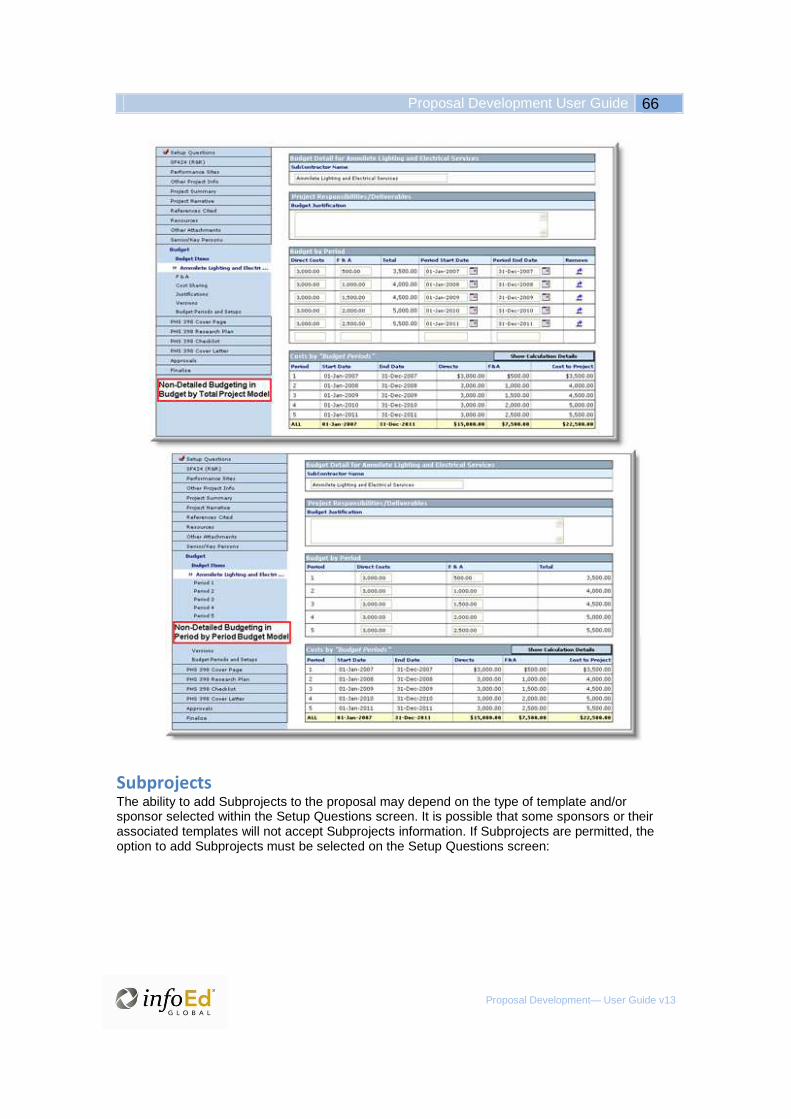
Proposal Development User Guide 66
Proposal Development— User Guide v13
Subprojects The ability to add Subprojects to the proposal may depend on the type of template and/or sponsor selected within the Setup Questions screen. It is possible that some sponsors or their associated templates will not accept Subprojects information. If Subprojects are permitted, the option to add Subprojects must be selected on the Setup Questions screen:
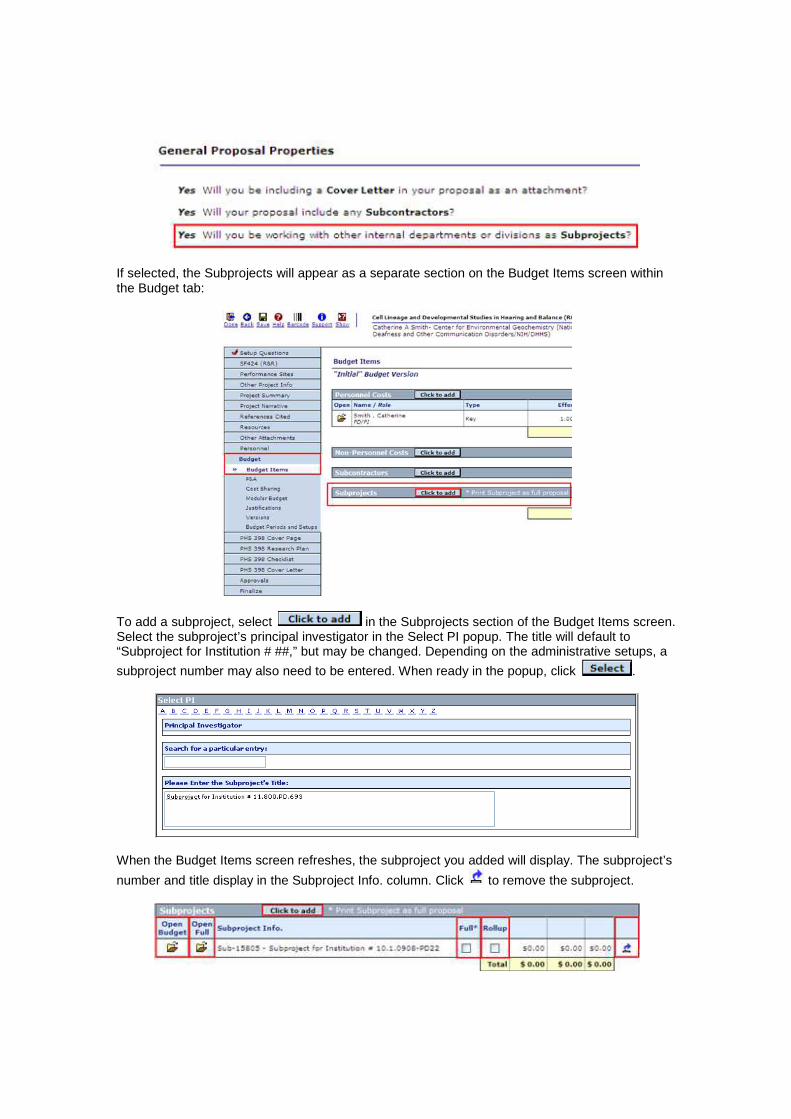
If selected, the Subprojects will appear as a separate section on the Budget Items screen within the Budget tab:
To add a subproject, select in the Subprojects section of the Budget Items screen. Select the subproject’s principal investigator in the Select PI popup. The title will default to “Subproject for Institution # ##,” but may be changed. Depending on the administrative setups, a
subproject number may also need to be entered. When ready in the popup, click .
When the Budget Items screen refreshes, the subproject you added will display. The subproject’s
number and title display in the Subproject Info. column. Click to remove the subproject.
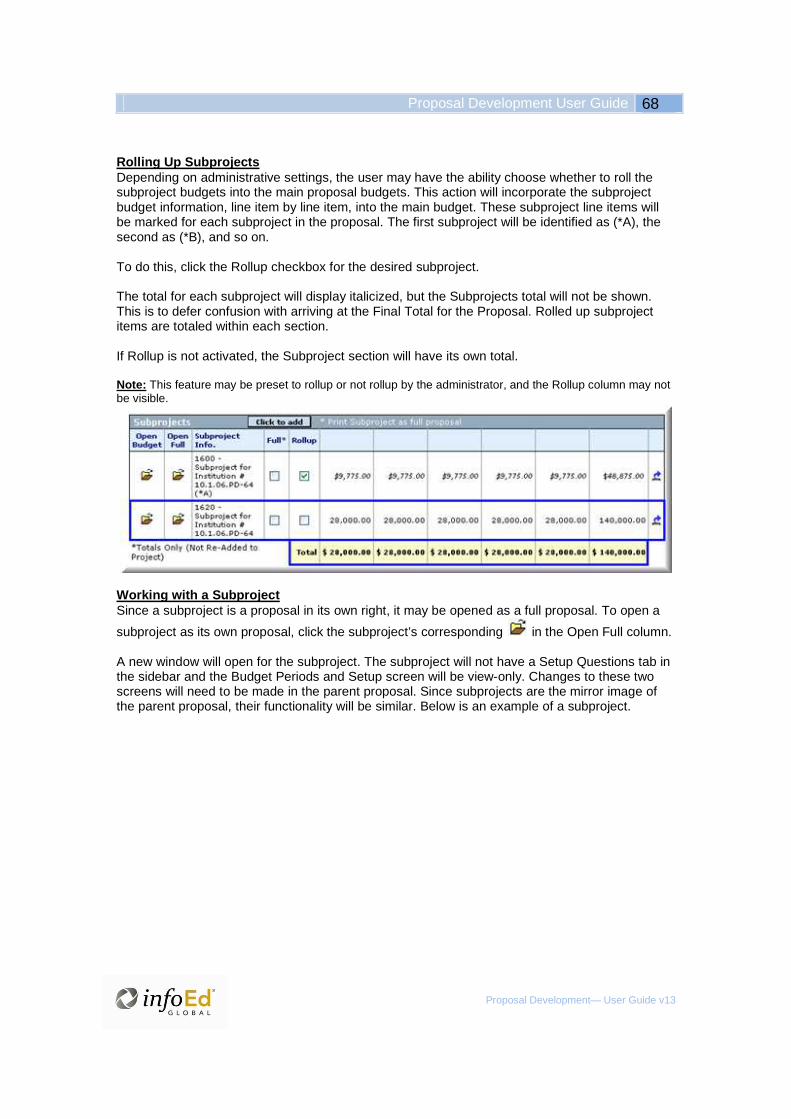
Proposal Development User Guide 68
Proposal Development— User Guide v13
Rolling Up Subprojects Depending on administrative settings, the user may have the ability choose whether to roll the subproject budgets into the main proposal budgets. This action will incorporate the subproject budget information, line item by line item, into the main budget. These subproject line items will be marked for each subproject in the proposal. The first subproject will be identified as (*A), the second as (*B), and so on. To do this, click the Rollup checkbox for the desired subproject. The total for each subproject will display italicized, but the Subprojects total will not be shown. This is to defer confusion with arriving at the Final Total for the Proposal. Rolled up subproject items are totaled within each section. If Rollup is not activated, the Subproject section will have its own total. Note: This feature may be preset to rollup or not rollup by the administrator, and the Rollup column may not be visible.
Working with a Subproject Since a subproject is a proposal in its own right, it may be opened as a full proposal. To open a
subproject as its own proposal, click the subproject’s corresponding in the Open Full column. A new window will open for the subproject. The subproject will not have a Setup Questions tab in the sidebar and the Budget Periods and Setup screen will be view-only. Changes to these two screens will need to be made in the parent proposal. Since subprojects are the mirror image of the parent proposal, their functionality will be similar. Below is an example of a subproject.

If you just want to open the subproject’s budget, instead of the full subproject, click the
subproject’s in the Open Budget column. Below is an example of a subproject’s budget.
Printing a Subproject as a Full Proposal To print a subproject as a full proposal, as opposed to only the budget information, check the corresponding Full box.

Proposal Development User Guide 70
Proposal Development— User Guide v13
Build Subproject Documents with Parent Proposal
This feature can be controlled within each proposal by checking or unchecking the default in PT > Budget > Budget Periods and Setups.
If checked, subproject documents can be built during Finalize > Build PDF/Form Pages at the same time the parent proposal documents are built. In order for the Build button to appear for a subproject, all the required tabs for the subproject must be completed. If all the required tabs are not completed, a message will display “Interim building of documents for subprojects must be done from the subproject itself. When all tabs in the subproject are complete, it can be built from this parent window.”
Subproject documents built in the parent proposal will appear as documents in the Assembled Application.

How to Create a New Proposal (Questionnaire) When a proposal is created within Proposal Development, a record is automatically created within Proposal Tracking. The ability to view and/or edit items for either system will depend on the security granted by your administrator. Proposals may be generated from existing records or new proposals may be created. A principal investigator (PI) and sponsor are required to create a proposal in the InfoEd Global Suite. Note: Never close the browser when working on or creating proposals. Always properly back out of the
system to ensure proper record creation. In other words, click if you want to cancel the
proposal creation. Click if you want to move back to the prior screen in the creation. But, do not
click . To create a new proposal in Proposal Development, click My Proposals in the sidebar, and then
click .
New Proposal Questionnaire The proposal creation process in PD involves electronically filling out a questionnaire, which defines the basic information for the proposal. Some of the information entered during the creation process includes Type, Sponsor, Numbering, Title, Start and End Dates, and Number of Periods.
Step 0: Confirm PI By default, the PI is set to the user who is logged into the InfoEd Global system. To modify the Principal Investigator, click . The screen will refresh with the Personnel selection options.

Proposal Development User Guide 72
Proposal Development— User Guide v13
Select the first letter of the last name you would like to find in the Personnel search. Click the down arrow and scroll through the pick list to highlight the desired name, or type the name into the textbox to Search for a Particular Entry. To use the Filter by Position instead, click the down arrow and highlight the desired position. The screen will refresh with a Personnel search for that position.
When the desired name is located, click . The screen will refresh with the new Principal Investigator at the top of the screen and in the header. Click to close the Personnel selection, but leave the New Proposal Questionnaire open to Step 1.
Click to close the New Proposal Questionnaire without saving. As you proceed into the questionnaire, use this Cancel button with caution since you could lose information already
entered or create an incomplete record. Avoid clicking in the top right corner of the screen.
Step 1: New or Copy When the correct Principal Investigator displays at the top of the New Proposal Questionnaire, you are ready for Step 1. Step 1 offers the option to create a new proposal or copy from a proposal that already exists. A new proposal is a blank or empty proposal. If you choose to copy from an existing proposal, a previously created proposal is used as a template, if security permits. Some information from the existing proposal will be copied into the new proposal. All the information in the new proposal is modifiable without affecting the original proposal. On the right, click Create New Proposal or Copy from Existing Proposal in the Do You Want To section of the screen. When the desired option is highlighted, click
.
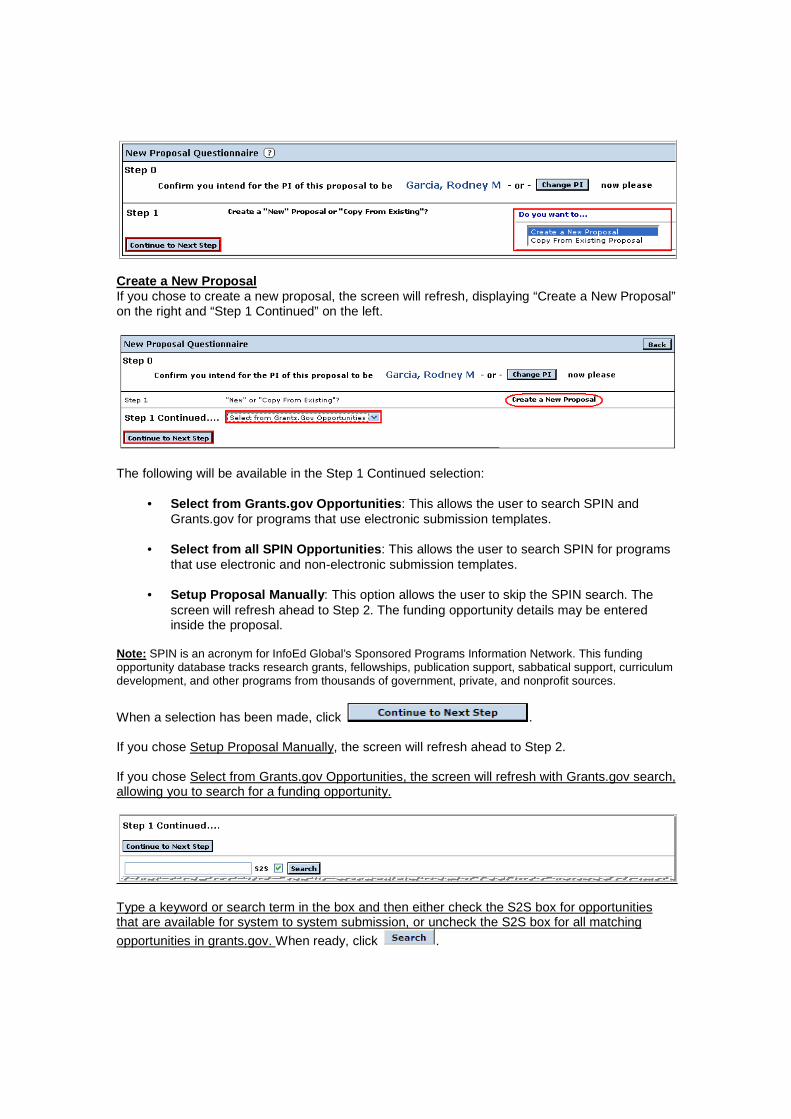
Create a New Proposal If you chose to create a new proposal, the screen will refresh, displaying “Create a New Proposal” on the right and “Step 1 Continued” on the left.
The following will be available in the Step 1 Continued selection:
• Select from Grants.gov Opportunities : This allows the user to search SPIN and Grants.gov for programs that use electronic submission templates.
• Select from all SPIN Opportunities : This allows the user to search SPIN for programs
that use electronic and non-electronic submission templates.
• Setup Proposal Manually : This option allows the user to skip the SPIN search. The screen will refresh ahead to Step 2. The funding opportunity details may be entered inside the proposal.
Note: SPIN is an acronym for InfoEd Global’s Sponsored Programs Information Network. This funding opportunity database tracks research grants, fellowships, publication support, sabbatical support, curriculum development, and other programs from thousands of government, private, and nonprofit sources.
When a selection has been made, click . If you chose Setup Proposal Manually, the screen will refresh ahead to Step 2. If you chose Select from Grants.gov Opportunities, the screen will refresh with Grants.gov search, allowing you to search for a funding opportunity.
Type a keyword or search term in the box and then either check the S2S box for opportunities that are available for system to system submission, or uncheck the S2S box for all matching
opportunities in grants.gov. When ready, click .

Proposal Development User Guide 74
Proposal Development— User Guide v13
The results show the number of records found matching the search criteria, and the opportunities are displayed with the Opportunity Number, CFDA Number, Competition ID, S2S, Open Date, Agency, Title, and SPIN View. The results can be sorted by any of the headings by clicking on the up or down arrow in the column you wish to sort the list. By clicking on Program or SPIN in the SPIN View column, you can view detail information about an opportunity. When the funding option has been located, click Select after the Opportunity Number. The screen will refresh, displaying the program you selected. Step 2 will also display.
If you chose Select from all SPIN Opportunities, the screen will refresh with the SPIN search, allowing you to search for a funding opportunity.

For a simple search, type in a keyword or phrase to search for, and click . For more search options, click on Advanced. The screen will refresh. In addition to searching by a keyword or phrase, you can filter the results by checking Open Deadlines, S2S, putting all or part of the Sponsor’s name and/or selecting the Sponsor Type from the drop down list. When you are
ready, click .
The screen will refresh with the results of the search. Scroll through the results. Click on Next or page numbers at the bottom to display additional results.
Click on to view its full program description in a popup. Click when done with the popup. To a new search, enter a search criteria in the textbox, or click on Advanced to display advanced
search options. Click to activate the search again. When the funding option has been located, click Use.

Proposal Development User Guide 76
Proposal Development— User Guide v13
The screen will refresh, displaying the program you selected in SPIN. Step 2 will also display.
If you do not find a funding option in SPIN, but want to continue to create the proposal, click to go to Step 2 (you will be given the option to select the sponsor in Step 3).
Copy From Existing Proposal If you chose to copy from an existing proposal, the screen will refresh with Step 1A. This step allows you to locate the proposal you want to copy.
Enter the Proposal Number in the available textbox, or click on . The available proposals are based on the security access set by your administrator. Only proposals created within Proposal Development are permitted to be copied. When the proposal to be copied
is found, click the radio button on the right and then click .
If there are no proposals to copy, click to create a new proposal in Step 1. If you have selected a proposal to copy, the number will appear in the text box. To “Include all
Proposal Attachments,” check the box. Click . If the Principal Investigator from Step 0. is not the Principal Investigator on the copied proposal, the PI will be changed to the same PI as on the copied proposal, and you will receive the following message. Take note of this if you will need to change the PI on this proposal, and click
to continue.
The screen will refresh, displaying Step 2.

Step 2: Proposal Type Step 2 in the New Proposal Questionnaire allows the selection of the proposal type from the drop down list.
If this proposal is to be linked to a PT master record, click on Look Up to open a popup that displays all PT master records. The available PT master records are based on the security access set by your administrator.
To select a PT master record to link to, check the box for the proposal, and click . If
you do not want link to a PT master record, click on to return to Step 2.

Proposal Development User Guide 78
Proposal Development— User Guide v13
If you selected a PT master record to link to, the PT master record number will show as linked in Step 2, and this proposal will be assigned a proposal number as a child proposal.
If you did not link to an existing proposal, the proposal number will be assigned after Step 7.
When ready, click . The screen will refresh, displaying the results of your selection in Step 2. The Sponsor in Step 3 may auto-select based on the selection during Step 1.
Step 3: Selecting a Sponsor The sponsor in Step 3 may be automatically selected if you selected a SPIN or Grants.gov opportunity that only has one sponsor, or the sponsor may be copied from an existing proposal in Step 1. For some federal opportunities there may be multiple sponsors associated with the opportunity. If that is the case, the primary sponsor from SPIN will show in Step 3, and by clicking on the drop down arrow you will be able to select an alternate sponsor listed in SPIN for this opportunity.

If you want to select a sponsor from the full sponsor list, click on .If you need a sponsor which does not appear, contact your administrator. A preferred sponsor list may also be created by your administrator especially for your institution. Administrators may rename or use a nickname to refer to a sponsor. For example, an administrator may rename National Institutes of Health as NIH. Depending on how many sponsors are available, the screen will appear as a simple list or an alpha split list. Select the name of the sponsor by clicking the first letter in the alpha split list or the down arrow in the list. You can also type in the box titled Search for a particular entry to quickly find a sponsor name.
When ready, click .
Step 4: Proposal Numbering Based on administrative setups, the proposal “Tracking” Number or “Proposal” Number may be automatically assigned. If the number is automatically assigned, Step 4 is skipped. The step will display onscreen with the notation “This proposal will be automatically numbered.” If the numbering is set to manual, Step 4 will be available. You may enter up to 30 characters in length, including alphanumeric characters, commas, periods, forward slashes, or dashes. When
the numbering is ready, click .
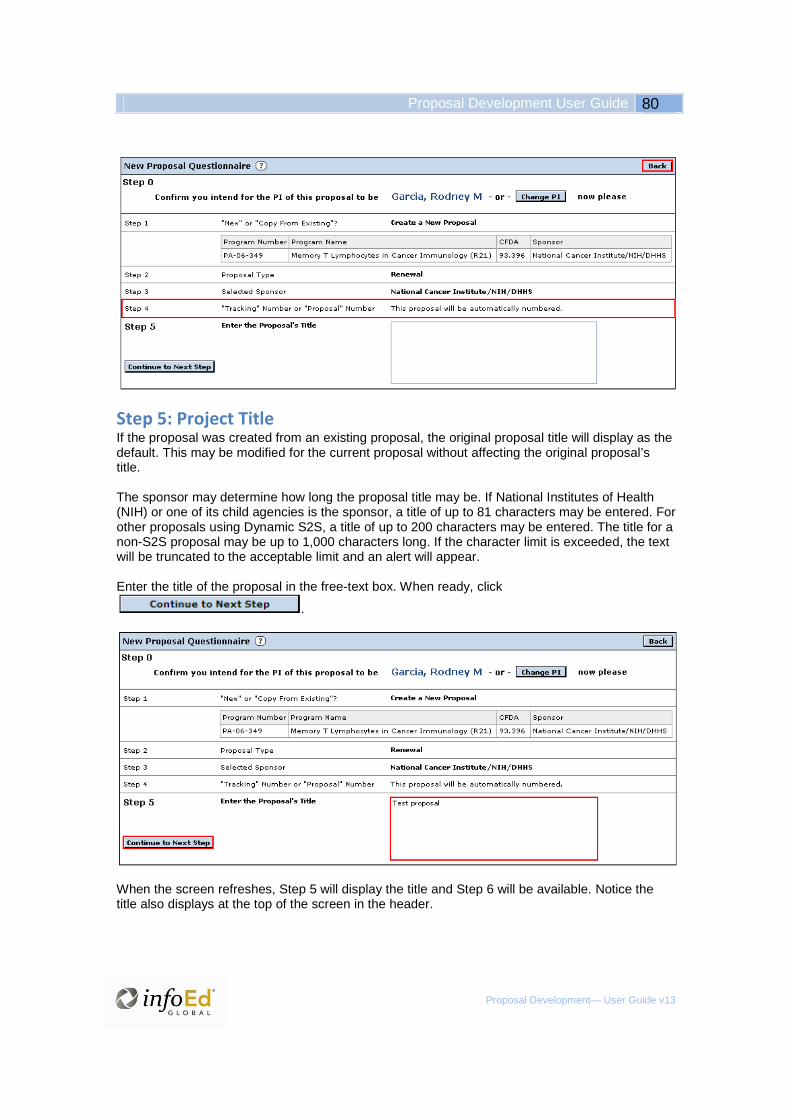
Proposal Development User Guide 80
Proposal Development— User Guide v13
Step 5: Project Title If the proposal was created from an existing proposal, the original proposal title will display as the default. This may be modified for the current proposal without affecting the original proposal’s title. The sponsor may determine how long the proposal title may be. If National Institutes of Health (NIH) or one of its child agencies is the sponsor, a title of up to 81 characters may be entered. For other proposals using Dynamic S2S, a title of up to 200 characters may be entered. The title for a non-S2S proposal may be up to 1,000 characters long. If the character limit is exceeded, the text will be truncated to the acceptable limit and an alert will appear. Enter the title of the proposal in the free-text box. When ready, click
.
When the screen refreshes, Step 5 will display the title and Step 6 will be available. Notice the title also displays at the top of the screen in the header.

Step 6: Project Start and End Dates The start and end dates may be entered manually or selected in the Calendar. The start and end dates may be adjusted later if necessary.
When you have entered the start and end dates, click . When the screen refreshes, Step 6 will display the dates and Step 7 will be available.

Proposal Development User Guide 82
Proposal Development— User Guide v13
Step 7: Number of Years Based on the start and end dates entered in Step 6, the application will estimate the number of budget periods to be created for the proposal. Estimates are based on a full calendar year. For example, if you enter 01/01/2009 to 06/01/2010, two budget periods will be the estimate. If the date range is greater than seven years, the estimate will default to one, but can be manually adjusted. Up to seven budget periods/years may be selected. If the proposal requires more than seven budget periods/years, additional periods/years may be added in the Budget after the proposal is created. Adjust the number of years and/or budget periods in the pick list as needed, selecting a number between one and seven.
When ready, click . When the screen refreshes, Step 7 will display the number of budget periods.
The new screen will also inquire if “all of the above information is correct?” If all the information
has been entered correctly, click . You will still be able to modify the proposal’s information after creation. If you would like to make modifications immediately, click
. The screen will refresh to Step 7 and you can click
the button to modify other steps as well. Notice the button is still available at the top of the screen.
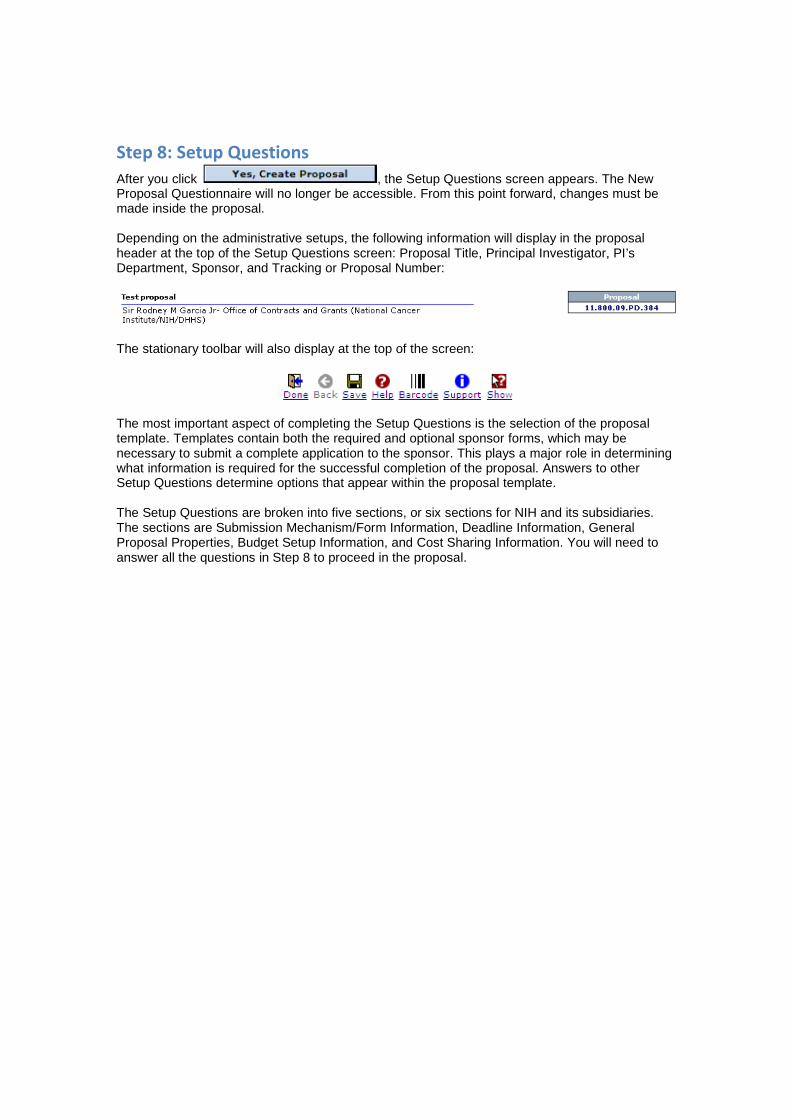
Step 8: Setup Questions
After you click , the Setup Questions screen appears. The New Proposal Questionnaire will no longer be accessible. From this point forward, changes must be made inside the proposal. Depending on the administrative setups, the following information will display in the proposal header at the top of the Setup Questions screen: Proposal Title, Principal Investigator, PI’s Department, Sponsor, and Tracking or Proposal Number:
The stationary toolbar will also display at the top of the screen:
The most important aspect of completing the Setup Questions is the selection of the proposal template. Templates contain both the required and optional sponsor forms, which may be necessary to submit a complete application to the sponsor. This plays a major role in determining what information is required for the successful completion of the proposal. Answers to other Setup Questions determine options that appear within the proposal template. The Setup Questions are broken into five sections, or six sections for NIH and its subsidiaries. The sections are Submission Mechanism/Form Information, Deadline Information, General Proposal Properties, Budget Setup Information, and Cost Sharing Information. You will need to answer all the questions in Step 8 to proceed in the proposal.

Proposal Development User Guide 84
Proposal Development— User Guide v13

Submission Mechanism/Form Information (Selecting a Template) At the top of the Setup Questions (Step 8) screen is the Submission Mechanism/Form Information section. To change the Proposal Sponsor, click the link to open the Sponsor/Template Selection. An alert will pop up stating that changing the proposal sponsor will cause all the previous responses on the setup questions page to be resent to their default state.
Click to continue, or to leave the sponsor unchanged.
After clicking OK, a new window will open with Sponsor/Template Selection. Options in this section may vary based on the Sponsor and/or Template chosen, but in general you can change the Proposal Sponsor, Originating Sponsor, search for a different Opportunity Number, search for funding either from SPIN or Grants.gov, and select a different Opportunity.
Is this a flow through Project? If this project is a flow through project, click the Yes radio button. In the Sponsor/Template Selection popup you can change or add the Originating Sponsor. Submission Mechanism/Screen Template

Proposal Development User Guide 86
Proposal Development— User Guide v13
The template(s) available depend on the Opportunity selected. For more information, see the Templates section in this guide. Has your sponsor given a specific reference for thi s proposal? Click the Yes or No radio button to indicate whether the sponsor has given a specific reference for this proposal.
• If you answer Yes, meaning the sponsor has provided a specific reference, you will be asked to enter the Program/Opportunity Number .
• If you answer No, no additional questions will appear.
Is this an unsolicited application? Click the Yes or No radio button to indicate whether this proposal is an unsolicited application.
• If you answer Yes, meaning you are NOT responding to a specific solicitation, the Choose Program Mechanism link will appear. You may set a mechanism on the Select Mechanism pick list and then click Choose Program Mechanism to see the available unsolicited opportunities for the sponsor.
• If you answer No, meaning you are responding to a specific solicitation, you will be asked
to enter the Program/Opportunity Number . You may set a mechanism in the Select Mechanism pick list. Enter the Program/Opportunity Number in the available box.
Click Get Opportunity Number to see the sponsor’s available program announcements and requests for applications. In the Select Program from This Sponsor popup below, you may sort the results based on the information in each column. Click a column’s hyperlinked header to sort by ascending or descending order (example: Competition ID ). When the program has been located in the popup, check the corresponding box in the
Select column, and then click .
When a Program/Opportunity Number is selected, the Setup Questions screen will update to reflect the information. In the following example, an opportunity has been selected using the Get Opportunity Number link. This is also an electronic submission via Grants.gov; therefore, the right-hand side of the Setup Questions screen updates to reflect the Grants.gov submission information, if available from the sponsor. This includes the Opportunity Title, Offering Agency, CFDA Number, CFDA Description, Opportunity Number, Competition ID, Opportunity Open Date, Opportunity Close Date, and Agency Contact. Deadline Information, if provided by the sponsor, will appear in the Deadline Information section. Also, the Form Version will appear – Grants.gov opportunities currently use version 2 and version 2A form sets; a valid opportunity must be selected that uses one of these sets in order to be able to complete the Setup Questions screen.
In addition, if a specific mechanism has been selected, the list of validations pertaining to that mechanism will be displayed. This may cause other Setup Questions to set to a specific response in accordance with that mechanism (i.e. the subcontract, subproject,

modular budget, and other questions may be auto-answered in order to adhere to the mechanism rules).
Note: If you have selected an opportunity under Step 1 – Continued of the New Proposal Questionnaire, this information will automatically populate.
Mechanism Opt In/Out In addition to selecting a Mechanism/Program, the user must also determine whether to opt in or opt out of the standard validations for that mechanism, which may include such things as the size of the Research Plan, number of budget/project periods, etc. The opt out would be used for cases where the user wanted to override these restrictions because the program guidelines will allow them to do so. Click Mechanism Opt In/Out to open the Currently Active Program Validations popup. Mark the boxes for the validation rules that should NOT be enforced and click . At any time, the validations may be restored by clicking . If you have completed tabs in a proposal while opting out, and then choose to opt back into validations, those tabs will need to be re-completed in order to confirm the re-validation of the rules.
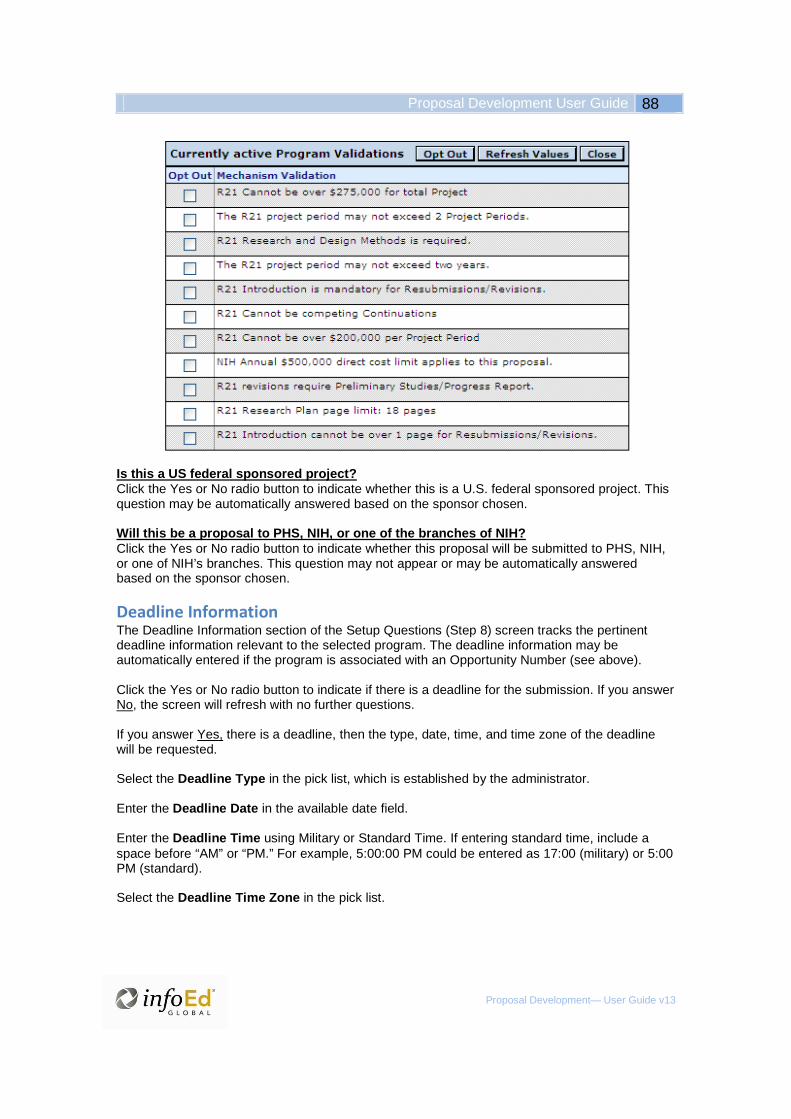
Proposal Development User Guide 88
Proposal Development— User Guide v13
Is this a US federal sponsored project? Click the Yes or No radio button to indicate whether this is a U.S. federal sponsored project. This question may be automatically answered based on the sponsor chosen. Will this be a proposal to PHS, NIH, or one of the branches of NIH? Click the Yes or No radio button to indicate whether this proposal will be submitted to PHS, NIH, or one of NIH’s branches. This question may not appear or may be automatically answered based on the sponsor chosen.
Deadline Information The Deadline Information section of the Setup Questions (Step 8) screen tracks the pertinent deadline information relevant to the selected program. The deadline information may be automatically entered if the program is associated with an Opportunity Number (see above). Click the Yes or No radio button to indicate if there is a deadline for the submission. If you answer No, the screen will refresh with no further questions. If you answer Yes, there is a deadline, then the type, date, time, and time zone of the deadline will be requested. Select the Deadline Type in the pick list, which is established by the administrator. Enter the Deadline Date in the available date field. Enter the Deadline Time using Military or Standard Time. If entering standard time, include a space before “AM” or “PM.” For example, 5:00:00 PM could be entered as 17:00 (military) or 5:00 PM (standard). Select the Deadline Time Zone in the pick list.

General Proposal Properties The General Proposal Properties section of the Setup Questions (Step 8) screen offers several general questions on the left. The ability to add departments and centers/programs on the right will be explained in the next two sections of this user guide.
The answers to some of these questions will directly affect which tabs will be made available within the proposal package, such as the Cover Letter, Subcontractors, and Subprojects.
The following is available on the left side of the General Proposal Properties section:
1. Will you be including a Cover Letter in your propos al as an attachment? A Cover Letter usually introduces the proposal to the sponsor. It is typically written on institutional letterhead and signed by the applicant. This is not the same as a sponsor Face Page or Cover Page that would have been supplied by the sponsor and required in the submission.
2. Will your proposal include any Subcontractors?
Subcontractors are people/organizations who will be contributing to the project but are not part of your institution. If you answer "Yes" to this question, you will be able to track consortium personnel and budgets.

Proposal Development User Guide 90
Proposal Development— User Guide v13
3. Will you be working with other internal departme nts or divisions as
Subprojects? Subprojects can be created for many different reasons. Most commonly these are used for large center or program project grants. You can also create subprojects for dealing with complicated budgeting issues (multiple F&A rates, multi-department budget distribution, etc.).
4. Will your proposal involve the use of Human Subj ects?
Proposals involving Human Subjects require special handling by the institution as well as the sponsor. Indicate whether your proposal will involve the use of humans as part of the experiment or projects.
5. Will your Proposal involve the use of Laboratory Animals?
The use of vertebrate animals in a proposal will require some additional protocols to be followed before the proposal can be submitted and potentially funded. Indicate whether your proposal will be using any such animals.
424 R&R NIH Template When the 424 R&R NIH Template has been selected, an additional question will appear:
This question will allow the preparation of proposals that use multiple principal investigators. The following requirements are enforced for multiple-PI proposals:
• A Cover Letter is required. When the Multiple PI question is marked Yes, the Cover Letter question will automatically be marked Yes too:
• Multiple-PI proposals require designation of a Contact PI. This functionality is visible on the Personnel tab after all the Setup Questions are saved. Individuals who have been assigned the role of Principal Investigator for the institution will show the Contact PI radio button. Subcontract PIs and other non-PIs will not show this option.

• In the Project Plan tab of a multiple-PI proposal, section I of the Project Plan becomes required:
Associated and PI Departments The associated department defaults to the PI department association selected during the proposal creation process. Additional Departments may be associated with the proposal. However, it is the Primary Associated Department that dictates the administrative information located within the proposal. This is described below as the Organizational Information Determined by the Primary Associated Department. To add an associated department, click Add on the right.

Proposal Development User Guide 92
Proposal Development— User Guide v13
In the Departments popup, click the first letter or number of the department, select the desired
department in the pick list, and then click . The location of the department will display and the radio button will be set. You may also skip the search at the top of the screen and instead search through the tree view to find the department. When the desired department has its
corresponding radio button set, click . When the Setup Questions screen refreshes, the selection will display.
To change the Primary status of an associated department, select the radio button for the desired department within the Prime column. Then, save the screen. The Primary Associated Department cannot be removed. To remove other associated departments, click the corresponding in the Remove column.
Organizational Information Determined by the Primar y Associated Department The Primary Associated Department of the proposal plays a significant role in the determination of Institutional Information displayed within the proposal. Organizational Information includes:
Organizational Unit Name Address, City, State, Zip, Country Organization Type Organizational Unit Profile File Number Entity Identification Number Tax ID Number DUNS NO. Congressional District DHHS F&A Agreement Information Assurance Numbers Administrative/Business Official Authorizing/Signing Official

PI Departments The PI Departments option allows the use of multiple departments for the Principal Investigator, in addition to the associated department. To add departments for the PI, click Add to the right of PI Departments. In the Departments popup (described above), select a department. When the Setup Questions screen refreshes, the additional department will be listed for the PI. To change the Primary status of the PI department, select the radio button for the desired department within the Prime column. Then, save the screen. The Primary PI Department cannot be removed. To remove other PI departments, click the corresponding in the Remove column.
Associated Centers/Programs The associated centers/programs do not have a set default. Multiple centers and/or programs may be associated with the proposal.
To add a center/program on the Setup Questions screen, click Add to the right of Associated Centers/Programs. In the Centers/Programs popup, click the first letter or number of the name, select the desired
center/program in the pick list, and then click . The location of the center/program will display and the radio button will be set. You may also skip the search at the top of the screen and instead search through the tree view to find the center/program. When the desired
center/program has its corresponding radio button set, click . When the Setup Questions screen refreshes, the selection will display. Note: The centers/programs pick list is shown in hierarchical format, duplicating the structure set within administrative setups.

Proposal Development User Guide 94
Proposal Development— User Guide v13
Unlike the Associated and PI Departments, the Associated Centers/Programs do not have a Prime setting. To remove a center/program, click the corresponding in the Remove column.
Because You Indicated that This Proposal Is to PHS/NIH If you indicated the proposal is to PHS/NIH, there will be four additional questions listed in this section pertaining to Stem Cells, Clinical Trials, and Modular Budgets. Answers to these questions have a direct impact on tabs shown within the module, as well as the 398 Face Page.

Click the Yes or No radio button for the following questions on the Setup Questions (Step 8) screen: • Will this proposal involve human embryonic stem cel ls?
If the proposed project involves human embryonic stem cells, please indicate so. • Is this proposal funding a Clinical Trial?
Select Yes or No to indicate whether the project is a clinical trial. • Is this proposal an NIH-defined Phase III Clinical Trial?
Select Yes or No to indicate whether the project is an NIH-Defined Phase III clinical trial. • Will this proposal be using a Modular budget?
Modular budgets should be used for certain research grant applications requesting $250,000 or less per year for direct costs.
Budget Setup Information In the Budget Setup Information section of the Setup Questions (Step 8) screen, the most important question is the budgeting model. Depending on administrative setups, the budgeting model may offer three options: Budget by Total Project, Budget Period by Period, and/or 424 Budgeting.

Proposal Development User Guide 96
Proposal Development— User Guide v13
What Kind of Budgeting Model Would You Like to Use? • Budget by Total Project This preferred budgeting method allows the user to complete the budget at the Project Level. Period calculations for the entire project are automatically completed, allowing for more accurate effort timeframes to be used when determining timeframes and effort on the project. • Budget Period by Period This traditional budgeting method allows the user to complete the budget Period by Period. This method of budgeting closely mirrors the functionality currently available within Proposal Tracking. � 424 Budgeting The availability of this newer budgeting model depends on administrative setups. The 424 Budgeting Model is inspired by the SF 424 format, but at times may be available for other proposals in PD as well. Check with your administrator if you would like to use this budgeting model, but it does not appear in the selection. Note: After the Setup Questions (Step 8) is completed, the Budgeting Model may be modified on the Budget Periods and Setups screen in the Budget tab. Below are examples of the Budget Detail for Personnel screen when the three different budgeting models are selected:

Select the Program Type Program Types are institutionally definable within administration. If setups are completed within administration, this selection may play a part in the Targeted F&A shown at the top of the F&A Budget screen. The majority of the research will be conducted… Select the proper response for On or Off Campus research. If setups are completed within administration, this selection may play a part in the Targeted F&A shown at the top of the F&A Budget screen.

Proposal Development User Guide 98
Proposal Development— User Guide v13
Cost Sharing Information In the Cost Sharing Information section of the Setup Questions (Step 8) screen, you can assign the responsible party for cost sharing and non-reimbursable/unallowable expenses, as well as record funding guidelines and restrictions.
Which department or organization will be responsibl e for any cost sharing on the proposal? Defaulting to the department of the selected PI, this option may be changed by clicking the corresponding Set link. In the Responsible Account popup, click the number or first letter of the name. Then, locate the name in the pick list. You may also Filter by People, Department, Sponsors, or Firms. When the desired name is highlighted, click .
Who will be responsible for project costs that migh t not be reimbursable/allowable by the sponsor? Defaulting to the department of the selected PI, this option may be changed by selecting the corresponding Set link. In the Responsible Account popup, select who will be responsible for project costs that are not reimbursable/allowable. (The Responsible Account popup is described above.) Does this program or application have any funding c aps or ceilings? If caps or ceilings exist, this option allows the determination of how F&A will be calculated. Selecting No for this question implies that there are no caps or ceilings on any categories within the budget on this proposal. All monies will be applied to the sponsor. If Yes is selected for this question, enter the Amount and select one of the following options:
• Total Directs, Sponsor will pay F&A beyond directs The amount entered will represent the Sponsor’s portion of directs. This amount will be used in the F&A cost calculations for the sponsor.
• Total Directs, Sponsor will not pay F&A

The amount entered will represent the Sponsor’s portion of directs. The sponsor will not pay any F&A costs.
• Total Project, Directs and F&A not to exceed this a mount
The amount entered will represent the limit that may be applied to the sponsor. This includes any F&A that might be accrued.
Does the sponsor expect any financial contribution from your Institution? Selecting No for this question implies that cost sharing will not be in effect on this proposal. All monies will be applied to the sponsor. If Yes is selected for this question, select one of the below options. Then, enter the Amount and decide whether the institution will waive F&A.
• Amount of Project The amount entered is the total amount the institution is responsible for on the entire project. All other monies will be applied to the sponsor.
• Percent of Project
The percent entered is the total percent the institution is responsible for on the entire project. All other monies will be applied to the sponsor.
• Amount of Labor
The amount entered is the total amount the institution is responsible for on labor over the entire project. All other monies will be applied to the sponsor.
• Percent of Labor
The percent entered is the total percent the institution is responsible for on labor over the entire project. All other monies will be applied to the sponsor.
Institution will waive F&A on project?
• If this option is set to Yes, the institution will not charge the sponsor any F&A. The institution is waiving the ability to charge the sponsor F&A.
• If this option is set to No, F&A will be applied to the sponsor.
Other Funding Information, Guidelines, or Restricti ons In the free-text box, enter any other information about funding, guidelines, or restrictions.

Proposal Development User Guide 100
Proposal Development— User Guide v13
PD Lite Tab Questions If the administrator has enabled PD Lite, then the PD Lite Tab Questions section may appear at the bottom of the Setup Questions (Step 8) screen. For more information on how PD Lite impacts the proposal, see PD Lite section in this user guide.
The following is available in the PD Lite Tab Questions section of the Setup Questions screen:
• Show Approvals Tab : Checking this box will cause the Approvals tab to be visible and available in the proposal.
• Show Versions Tab : Checking this box will cause the Budget’s Versions tab to be
visible and available in the proposal.
• Show F&A Tab (tab will autocomplete when not shown) : Checking this box will cause the F&A tab to be visible and available in the proposal. If this box is NOT checked, then the F&A tab will autocomplete.
• Show Cost Sharing Tab (tab will autocomplete when n ot shown) : Checking this
box will cause the Cost Sharing tab to be visible and available in the proposal. If this box is NOT checked, then the Cost Sharing tab will autocomplete.
• Show the Budget Periods and Setups Tab : Checking this box will cause the Budget
Periods and Setups tab within the Budget tab to be visible and available in the proposal.
Below is an example of a proposal’s sidebar with these tabs highlighted:

Completing the Setup Questions (Step 8) In order to trigger the generation of the desired tabs within the proposal, all the questions on the Setup Questions screen need to be completed.
After the questions are answered, there are two ways to save:
• Click the button located at the bottom left of the screen. This will save the screen, validate that all the questions have been answered, and mark the screen completed.
• Click in the stationary toolbar at the top left of the screen.
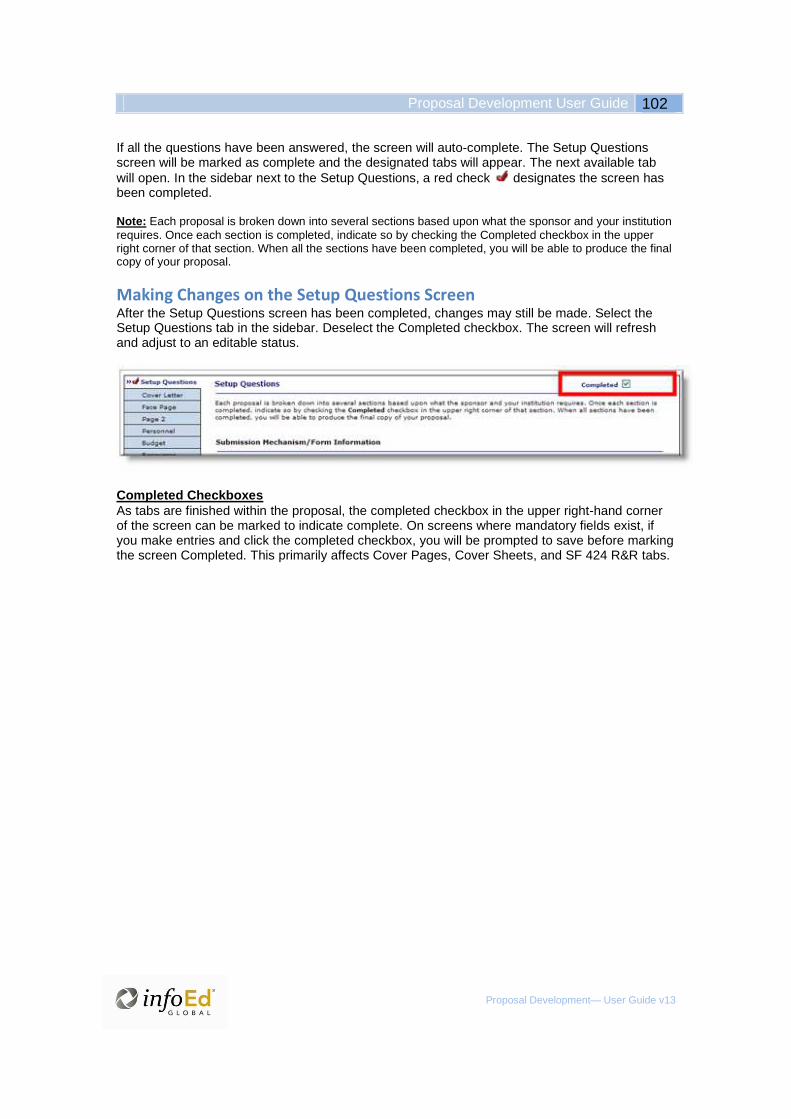
Proposal Development User Guide 102
Proposal Development— User Guide v13
If all the questions have been answered, the screen will auto-complete. The Setup Questions screen will be marked as complete and the designated tabs will appear. The next available tab will open. In the sidebar next to the Setup Questions, a red check designates the screen has been completed. Note: Each proposal is broken down into several sections based upon what the sponsor and your institution requires. Once each section is completed, indicate so by checking the Completed checkbox in the upper right corner of that section. When all the sections have been completed, you will be able to produce the final copy of your proposal.
Making Changes on the Setup Questions Screen After the Setup Questions screen has been completed, changes may still be made. Select the Setup Questions tab in the sidebar. Deselect the Completed checkbox. The screen will refresh and adjust to an editable status.
Completed Checkboxes As tabs are finished within the proposal, the completed checkbox in the upper right-hand corner of the screen can be marked to indicate complete. On screens where mandatory fields exist, if you make entries and click the completed checkbox, you will be prompted to save before marking the screen Completed. This primarily affects Cover Pages, Cover Sheets, and SF 424 R&R tabs.

Templates Templates define the interface tabs that are necessary to collect information for required and optional forms needed to submit a complete application to the sponsor. The following system templates are available for System to System (S2S) electronic submission proposals:
• 424 R&R NIH • 424 R&R NIH Dynamic • 424 R&R • 424 • 424 Mandatory • 424 Short
The 424 R&R NIH template is used for all NIH electronic submissions, with the exception of NIH Fellowships and Training Grants which use the 424 R&R NIH Dynamic template. The other templates are used for other federal agencies via Dynamic S2S. The correct template will default in the Setup Questions based on which face page is called for in the opportunity schema provided by Grants.gov (e.g., if the agency package calls for the “424 Mandatory” face page, then the template in the Setup Questions will default to the “424 Mandatory” template). Additionally, there may be other templates created by the administrator for non-S2S submissions. The Default Screens Template is available to use as the default, or as a model to create Custom templates for non-S2S submissions. The 424 R&R NIH template will be used as an example to show how the templates are used to complete a proposal application.
424 R&R NIH Template The 424 R&R NIH Template allows the user to assemble both modular and non-modular grant applications for NIH. Depending on the answers entered in the Setup Questions screen, the following tabs will be visible in the sidebar: SF424 (R&R), Performance Sites, Other Project Info, Project Summary, Project Narrative, References Cited, Resources, Other Attachments, Personnel, Budget, PHS 398 Cover Page, PHS 398 Research Plan, PHS 398 Checklist, PHS 398 Cover Letter, Approvals, and Finalize. Depending on how each template is set up, there may also be an Internal Documents tab. Most of the tabs will be covered in this section, with the exception of the Budget, Internal Documents and Finalize tabs which are described towards the end of this user guide. In the following example, the template has been entered as the Proposal’s Title for display purposes:

Proposal Development User Guide 104
Proposal Development— User Guide v13
SF 424 R&R The form will display with the majority of the fields filled in with both institutional information and proposal specific information from the Setup Questions. If information is incomplete within mandatory fields, the field itself will show a yellow highlight.
If changing information will take the user off the screen, the field will show a blue highlight.


Proposal Development User Guide 106
Proposal Development— User Guide v13
Information on the SF 424 R&R screen may be requested in the following fields:
Box 1: Type of Submission - This field will be initially marked as an Application, but can be changed by clicking the radio button next to the correct type. If after submitting to Grants.gov, it is necessary to make changes to proposal and resubmit, this box should be changed to Changed/Corrected Application.
Box 2: Date Submitted - To enter the date the application is being submitted to the
sponsor, click . When the screen refreshes, enter the date. Click in the
stationary toolbar. Click to return to the SF 424 R&R screen.
Application Identifier - The Application Identifier is the Institution Number. The entry made on the New Proposal Questionnaire will populate this field. Depending on the administrative setups, the institution number may or may not be editable. An entry of up to 30 characters long is permitted. Only the following characters are allowed: alphanumeric characters, commas, periods, forward slashes, or dashes. If modifiable, click . When the
screen refreshes, enter the date. Click in the stationary toolbar. Click to return to the SF 424 R&R screen.
Box 3: Date Received By State - The Date Received is sponsor defined. Click .
When the screen refreshes, enter the date. Click in the stationary toolbar. Click
to return to the SF 424 R&R screen.
State Application Identifier - The State Application Identifier is sponsor defined. Click
. When the screen refreshes, enter the State Application Identifier. Click in
the stationary toolbar. Click to return to the SF 424 R&R screen.
Box 4.a.: Federal Identifier - The Federal Identifier is sponsor defined. If you have selected a Re-Submission, the Federal Identifier is required in order to complete the screen.
Click . When the screen refreshes, enter the Federal Identifier. Click in the
stationary toolbar. Click to return to the SF 424 R&R screen. Box 4.b.: Agency Routing Identifier – The Agency Routing Identifier is sponsor defined. If the opportunity requires information in this field, click in the field and type in the information.
Click in the stationary toolbar. Click to return to the SF 424 R&R screen. Box 5: Applicant Information
Organizational DUNS: This field is used to define the Data Universal Numbering System (DUNS) Number of the organization submitting the proposal. This field is institutionally defined. Contact your administrator if you feel the information is incorrect or incomplete.
Legal Name: The institution’s name will auto populate in this field.
Department and Division: This defaults to the Principal Investigator/Program Director’s unit, but may be changed if desired. Changes made here will carry back to
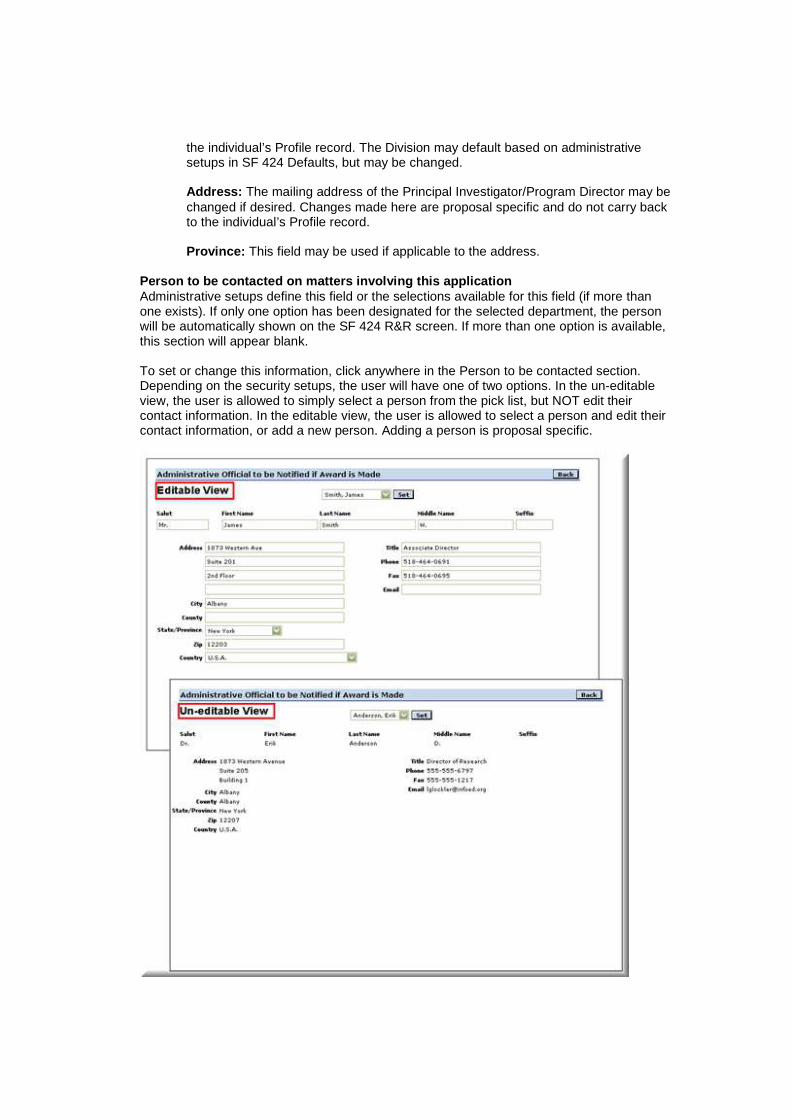
the individual’s Profile record. The Division may default based on administrative setups in SF 424 Defaults, but may be changed.
Address: The mailing address of the Principal Investigator/Program Director may be changed if desired. Changes made here are proposal specific and do not carry back to the individual’s Profile record.
Province: This field may be used if applicable to the address.
Person to be contacted on matters involving this ap plication Administrative setups define this field or the selections available for this field (if more than one exists). If only one option has been designated for the selected department, the person will be automatically shown on the SF 424 R&R screen. If more than one option is available, this section will appear blank.
To set or change this information, click anywhere in the Person to be contacted section. Depending on the security setups, the user will have one of two options. In the un-editable view, the user is allowed to simply select a person from the pick list, but NOT edit their contact information. In the editable view, the user is allowed to select a person and edit their contact information, or add a new person. Adding a person is proposal specific.

Proposal Development User Guide 108
Proposal Development— User Guide v13
Highlight the desired option within the pick list. Click to populate the individual fields on this screen. Once selected, this individual’s personal details may be modified as necessary.
Alternately, a new entry can be made if the desired option does not exist. Click in
stationary toolbar. Click to return to the SF 424 R&R screen.
Box 6: Employer Identification Number (EIN) - This field is used to define the Entity Identification Number of the organization submitting the proposal. This field is institutionally defined. Contact your administrator if you feel the information is incorrect or incomplete.
Box 7: Type of Applicant - This field describes the type of institution and is institutionally defined. Contact your administrator if you feel the information is incorrect or incomplete.
Other (Specify) - This field is institutionally defined. Contact your administrator if you feel the information is incorrect or incomplete.
Box 8: Type of Application
The selection made on the Setup Questions screen will populate here. This may be changed if desired. Changing this field may make the Federal Identifier field mandatory.
If Revision, Mark Appropriate Box(es) - If you selected Revision for the Type of Application, click an appropriate checkbox. If Other is chosen in this field, specify in the available textbox.
Is this application being submitted to other agenci es? - Select a Yes or No radio button to indicate a response to this question. If Yes, specify What Other Agencies in the available textbox.
Box 9: Name of Federal Agency - The entry made on the New Proposal Questionnaire will populate here. This can only be changed by changing the Opportunity in the Setup Questions screen if desired.
Box 10: Catalog of Federal Domestic Assistance Num ber – The CFDA number is sponsor defined. The sponsor will define whether you should leave the field blank or how to determine what values to use (e.g., NIH states that both the CFDA number and associated description should be left blank).
Box 11: Descriptive Title of Applicant’s Project - Entries may be up to 81 characters long for NIH and other PHS agencies. The Proposal’s Title entered in Step 5 of the New Proposal Questionnaire auto populates this field, but may be changed. Use only standard characters: A through Z, 0 through 9, and underscore (_).
Box 12: Proposed Project Start Date and End Date - The entries made on the New Proposal Questionnaire will populate here, but may be changed if desired. Changes must be made within the Budget tab.
Box 13a.: Congressional Districts of Applicant- This field is populated from institutional setups.

Box 14: Project Director/Principal Investigator Co ntact Information - The selection made on the New Proposal Questionnaire will populate here, but may be changed if desired. Click Change to select a different Principal Investigator/Project Director.
There are two options when changing the PI on a proposal:
Replace and Remove the Current PI will completely remove the current PI from the proposal.
Replace PI and Leave the Current PI on the Proposal will add the newly selected PI to the proposal and keep the prior (current) PI on the proposal as an investigator.
Locate the individual from the pick list by selecting the first letter of the last name. If more than one person appears on the proposal, the option to Switch the PI to other KEY personnel, currently listed on the proposal, will be shown as well.
Select the radio button in the New PI column and click .
Edit Personnel The last, first, and middle name of the Principal Investigator/Program Director appear here, along with other profile information. Click in a field to make changes.

Proposal Development User Guide 110
Proposal Development— User Guide v13
Note: Changes made here are only proposal specific, and are not saved to the individual’s Profile record,
Edit the desired information and click in the stationary toolbar. Click to return to the SF 424 R&R screen.
Box 15.: Estimated Funding – When there is a Budget tab in the proposal, these numbers are established under the Budget tab in the proposal, and the Federal, Applicant, State, and Local funding are view only on this screen. If there is no Budget tab in the proposal, these amounts will be editable.
Box 16: Is Application Subject to Review by State Executive Order 12372 Process? - This indicates whether the application is subject to review by State Executive Order 12372 Process. If Yes, indicate the Date it was made available. If No, indicate whether the Program Is Not Covered by E.O. 12372 Or Program Has Not Been Selected by State for Review. The answer may default based on administrative setups in SF 424 Defaults, but may be changed.
Box 17: By signing this application ...- This certification statement has to do with the proposal contents. This checkbox will become marked once the individual submits the proposal to Grants.gov under the Finalize tab.
Box 18: SFLLL or other Explanatory Documentation – If applicable, attach the SFLLL (Standard Form LLL, Disclosure of Lobbying Activities) or other documents per agency instructions. Click to upload a document. Only one file may be uploaded. Click
to locate the file on your hard drive. When the desired file has been entered, click again to upload the item.

The uploaded document will be available by clicking the PDF icon . To remove the document, click . Box 19: Authorized Representative - Administrative setups define this field or the selections available for this field if more than one exists. If only one option has been designated for the selected department, the person will be automatically shown on the SF 424 R&R screen. If more than one option is available, this section will appear blank.
To set or change this information, click anywhere in the Official Signing for Applicant Organization section. Dependent upon security setups, the user will have one of two options. In the un-editable view, the user is allowed to simply select a person from the pick list, but NOT edit their contact information. In the editable view, the user is allowed to select a person and edit their contact information, or add a new person. Adding a person or editing their information is proposal-specific.
Highlight the desired option within the pick list. Click to populate the individual fields on this screen. Once selected, this individual’s personal details may be modified as necessary. Alternately, a new entry can be made if the desired option does not exist.

Proposal Development User Guide 112
Proposal Development— User Guide v13
Click in the stationary toolbar. Click to return to the SF 424 R&R screen.
Box 20: Pre-application - If applicable, attach the Pre-application per agency instructions. Click to upload a document. Only one file may be uploaded. Click to locate the file on your hard drive. When the desired file has been entered, click again to upload the item.
The uploaded document will be available by clicking the PDF icon . To remove the document, click .
User Defined Fields: There may be institutionally defined fields at the bottom of the SF 424 R&R screen. These are for internal use and are not part of the assembled application.
Be sure to check the Completed checkbox when the SF 424 R&R screen is completed. The screen will refresh and show in completed (view) mode.
Performance Sites List all locations where work related to the project will be performed. By default, the institution’s Name, City, and State will be populated here. In addition, if any Subcontracts have been added, their details will be populated here. At least one Performance Site must be listed. Use the Sequence column to set the order in which Performance Sites will be listed on the PDF. Note: Prior to completing the Performance Sites screen, be sure to complete the Subcontracts since data flows to the Performance Sites from Subcontracts.
On the Performance Sites screen, each site may have a Sequence number, Site Name, and Address. Sites are listed in the order set in the Sequence column.

Click in the stationary toolbar to retain your work.
To remove a site, click the corresponding in the Delete column on the right. The Delete column will display N/A if only one site is entered. Be sure to check the Completed checkbox when the Performance Sites screen is completed. The form will not complete until data is entered into all mandatory fields. The screen will refresh and show in completed (view) mode. Below is an example of the completed view.
Other Project Info Working from the answers given on the Setup Questions screen, the Other Project Info screen allows the user to set additional information if Human Subjects or Animals will be included within the proposal.

Proposal Development User Guide 114
Proposal Development— User Guide v13
Questions 1 and 2 will be set from answers on the Setup Questions screen. Answer all the other available questions on the screen. 1. Are Human Subjects Involved? Click the Yes or No radio button to indicate whether the Project is Exempt from Federal regulations? If Yes, click the appropriate checkboxes for the Exemption Number. If No, click the Yes or No radio button to indicate whether the IRB review is Pending. Enter the IRB Approval Date. The Human Subject Assurance Number auto populates according to administrative setups. 2. Are Vertebrate Animals Used? Click the Yes or No radio button to indicate whether the IACUC review is Pending. Enter the IACUC Approval Date. The Animal Welfare Assurance Number auto populates according to administrative setups. 3. Is proprietary/privileged information included i n the application? Click the Yes or No radio button. 4. Does this project have an actual or potential im pact on the environment? Click the Yes or No radio button. If you click Yes, there will be a new box to explain the actual or potential impact to the environment. There will also be an additional question: 4.a. Has an exemption been authorized or an environ mental assessment (EA) or
environmental impact statement (EIS) been performed ? Click the Yes or No radio button. If you click Yes, there will be a new box to explain what has been done.
5. Is this research performance site designated, or eligible to be designated, as a historic place? Click the Yes or No radio button. If you click Yes, there will be a new box to explain. 6. Does this project involve activities outside the U.S. or partnership with International Collaborators?

Click the Yes or No radio button. If you click Yes, there will be two new boxes, one to identify the countries involved and another to provide an optional explanation.
When done with the Other Project Info screen, click in the stationary toolbar. Be sure to check the Completed checkbox when the Other Project Info screen is completed. The screen will refresh and show in completed (view) mode. Note: If you have marked the Other Project Info screen as completed, and then subsequently un-complete the Setup Questions screen, the Other Project Info screen will automatically un-complete. This is to ensure that if answers to Human Subjects and Lab Animals questions are changed on the Setup Questions, the Other Project Info screen will be properly updated.
Project Summary The Project Summary may be uploaded or typed into the database. At the top of the screen, click a radio button to upload the document or enter manually.
Upload Document To upload the project summary, select the Upload Document option. Only one file may be uploaded. Click to locate the file on your hard drive. When the desired file has been entered, click to upload the item. When the screen refreshes, the number of pages for the document will display under Pages.
Click to view the document. Click to remove. If you browse and upload another document, it will replace the prior one.

Proposal Development User Guide 116
Proposal Development— User Guide v13
Manual Entry Select the Manual Entry option. Enter the project summary into the free-text field to describe the goals of the project. Text may be typed or copy/pasted into the field.
When done, click in the stationary toolbar.
Be sure to check the Completed checkbox when the Project Summary screen is completed. The screen will refresh and show in completed (view) mode.
Project Narrative Use the Project Narrative tab to upload documents that describe the research goals of the project and other information that is relevant to the project.
A default document name will display in the Name field, but may be changed. Click to locate the file on your hard drive. When the desired file has been entered, click to upload the item.
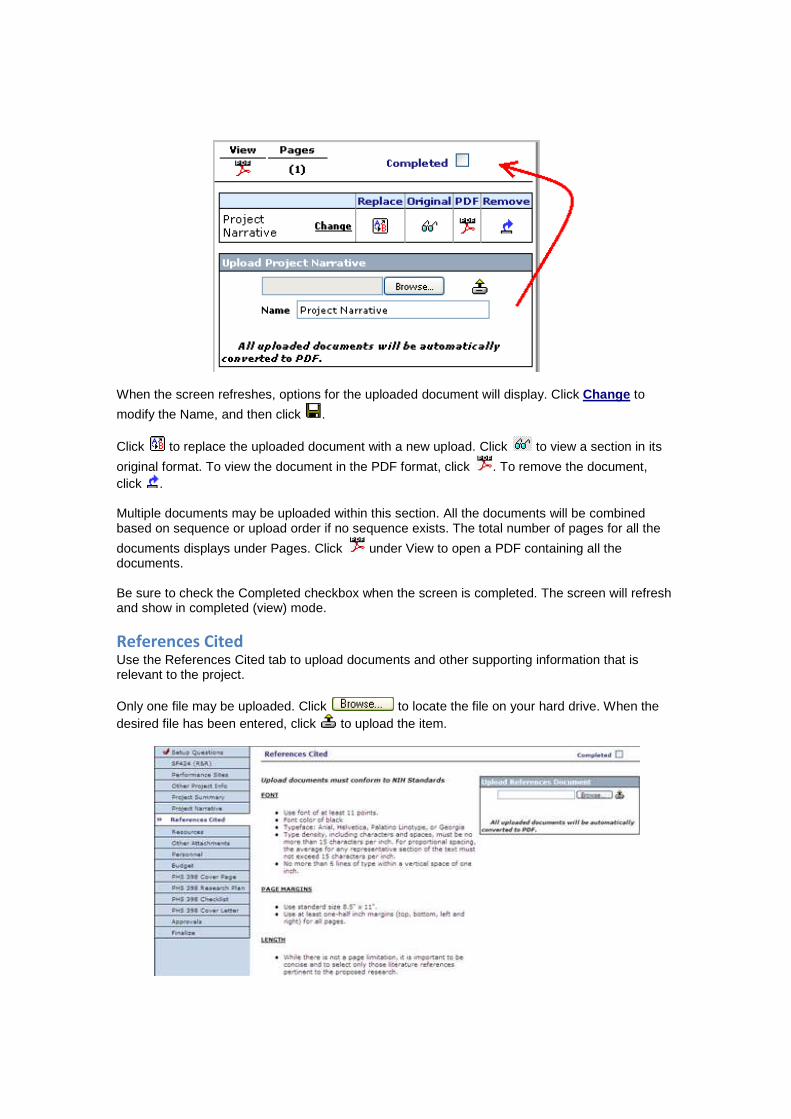
When the screen refreshes, options for the uploaded document will display. Click Change to
modify the Name, and then click . Click to replace the uploaded document with a new upload. Click to view a section in its
original format. To view the document in the PDF format, click . To remove the document, click . Multiple documents may be uploaded within this section. All the documents will be combined based on sequence or upload order if no sequence exists. The total number of pages for all the
documents displays under Pages. Click under View to open a PDF containing all the documents. Be sure to check the Completed checkbox when the screen is completed. The screen will refresh and show in completed (view) mode.
References Cited Use the References Cited tab to upload documents and other supporting information that is relevant to the project. Only one file may be uploaded. Click to locate the file on your hard drive. When the desired file has been entered, click to upload the item.

Proposal Development User Guide 118
Proposal Development— User Guide v13
After the document has been uploaded, the browse and upload options will no longer appear. Click to view the document in PDF format. Click to remove the document. The number of pages for the document displays under Pages.
Be sure to check the Completed checkbox when the screen is completed. The screen will refresh and show in completed (view) mode.
Resources Information related to the laboratory, clinic, animal, computer, office, and other resources that will support the proposed project is collected through the Resources tab. Also collected here is information pertaining to major equipment that will support the proposed project. The Resources component may be provided by the institution or by one or more third parties supporting the proposed project. Resources to be provided by the sponsor are requested through the Budget tab. If this information has been entered in your Profile under the Resources tab, it will automatically populate on this screen (for the PI designated), but may be changed if necessary.
Use Database Click the Use Database radio button at the top of the screen. To view “boilerplate” Resource information for the institution, click the Resource URL link. To reload the resources from the PI
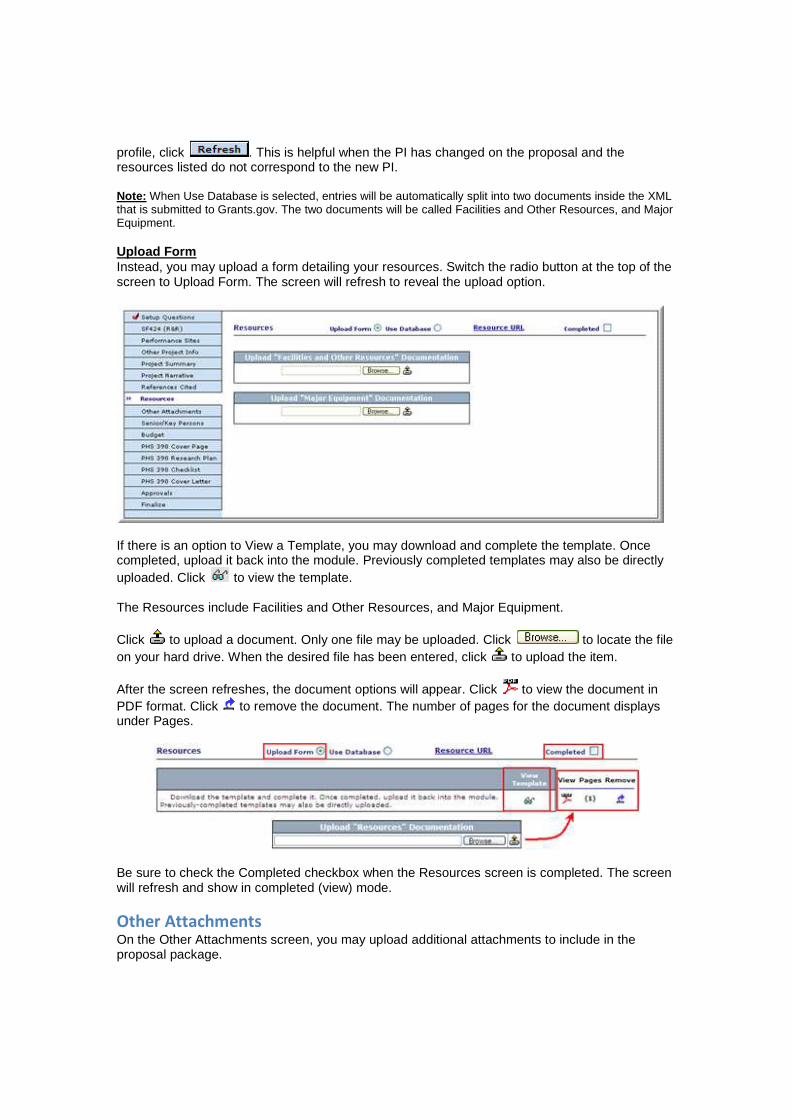
profile, click . This is helpful when the PI has changed on the proposal and the resources listed do not correspond to the new PI. Note: When Use Database is selected, entries will be automatically split into two documents inside the XML that is submitted to Grants.gov. The two documents will be called Facilities and Other Resources, and Major Equipment. Upload Form Instead, you may upload a form detailing your resources. Switch the radio button at the top of the screen to Upload Form. The screen will refresh to reveal the upload option.
If there is an option to View a Template, you may download and complete the template. Once completed, upload it back into the module. Previously completed templates may also be directly uploaded. Click to view the template. The Resources include Facilities and Other Resources, and Major Equipment. Click to upload a document. Only one file may be uploaded. Click to locate the file on your hard drive. When the desired file has been entered, click to upload the item. After the screen refreshes, the document options will appear. Click to view the document in PDF format. Click to remove the document. The number of pages for the document displays under Pages.
Be sure to check the Completed checkbox when the Resources screen is completed. The screen will refresh and show in completed (view) mode.
Other Attachments On the Other Attachments screen, you may upload additional attachments to include in the proposal package.

Proposal Development User Guide 120
Proposal Development— User Guide v13
If you are in the Attachments tab for the Default Screens Template, click to display the Upload section. A default document name will display in the Name field, but may be changed. Click to locate the file on your hard drive. When the desired file has been entered, click to upload the item.
When the screen refreshes, options for the uploaded document will display. Click to
modify the Name, and then click . Click to replace the uploaded document with a new upload. Click to view a section in its
original format. Click to view the section in the PDF format. Click to remove a section. Multiple documents may be uploaded within this section. To order how the documents will appear in the combined PDF, enter the order number in the Sequence column for each individual document.
The total number of pages for the combined document displays under Pages. Click under View to open a PDF containing all the documents. If you have uploaded documents, be sure to mark the Completed checkbox when the Other Attachments screen is completed. The screen will refresh and show in completed (view) mode.
The linked image cannot be displayed. The file may have been moved, re

Personnel Use the Personnel tab to list all Key and Non-Key Personnel, as well as Significant Contributors. The Principal Investigator/Program Director will automatically populate to the Personnel screen. In addition, Subcontractor or Subproject personnel that have been added to the project will also appear. Subproject personnel are identified with * next to their names, and Subcontractors are identified with ** next to their names.
Note: Some types of Applications submitted to NIH may allow for multiple Principal Investigators. If there are multiple PIs, you must indicate one of the PIs to be the Contact PI. Be sure to check the Completed checkbox when the Personnel screen is completed. The screen will refresh and show in completed (view) mode.
Note: The Principal Investigator (PI) can be changed on the Budget Periods and Setups screen in the Budget tab. For more information, see Change PI in this user guide. Note: If the Budget tab has been completed, adding or removing Personnel will cause the Budget tab to un-complete.
Adding Personnel To add an individual to the proposal, click on the Personnel screen. If on the Budget Items screen, use the button in the Personnel Costs section. If on the Budget Detail for Personnel screen, you may add the next person in the proposal by clicking
.
Note: The button will display on the Personnel screen instead of the button if your administrator has enabled the Personnel Wizard within PD Setups. See Personnel Wizard in this user guide for information on adding personnel using the Personnel Wizard. The Select Existing or Add New Staff popup will vary slightly based on which Budgeting Method was selected on the Setup Questions screen or on the Budget Periods and Setups screen within the Budget tab. If Budget Period by Period was chosen as the Budgeting Type, then there will be checkboxes allowing the individual to be added to specific periods in the budget. At least one period must be checked in order to select or add an individual. If Budget by Total Project or 424 Budgeting was chosen, then the period checkboxes will not appear in the popup.
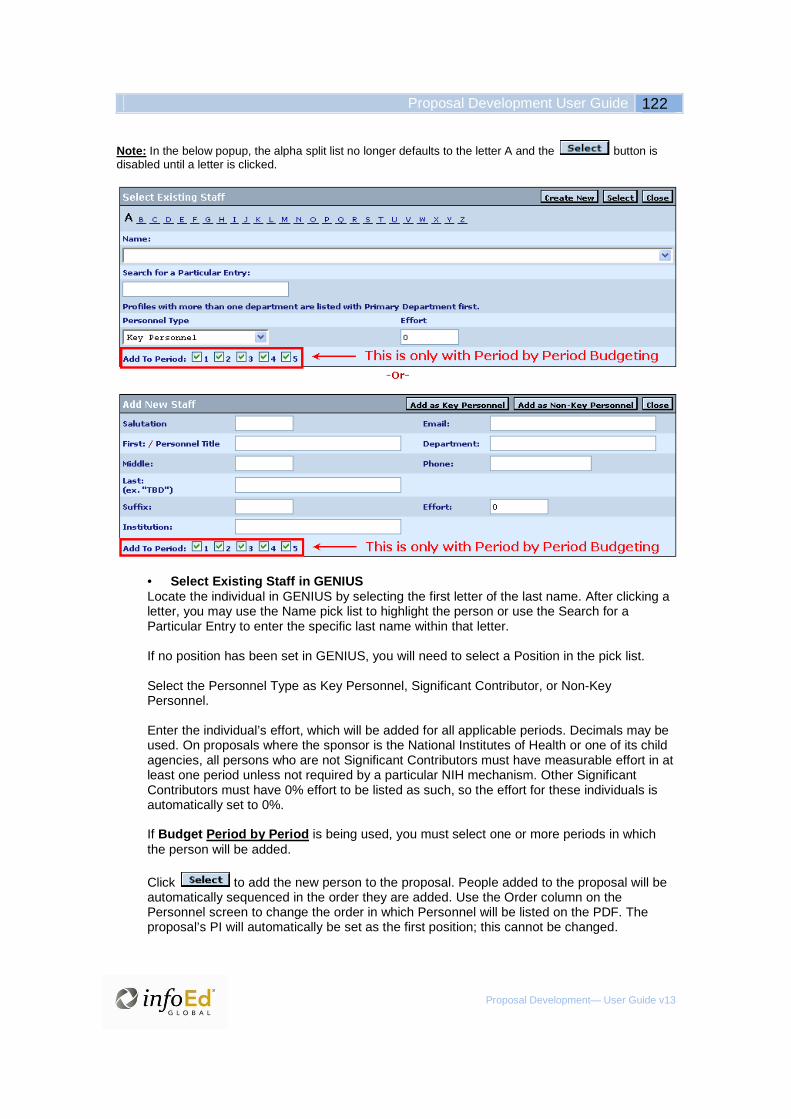
Proposal Development User Guide 122
Proposal Development— User Guide v13
Note: In the below popup, the alpha split list no longer defaults to the letter A and the button is disabled until a letter is clicked.
• Select Existing Staff in GENIUS Locate the individual in GENIUS by selecting the first letter of the last name. After clicking a letter, you may use the Name pick list to highlight the person or use the Search for a Particular Entry to enter the specific last name within that letter. If no position has been set in GENIUS, you will need to select a Position in the pick list. Select the Personnel Type as Key Personnel, Significant Contributor, or Non-Key Personnel. Enter the individual’s effort, which will be added for all applicable periods. Decimals may be used. On proposals where the sponsor is the National Institutes of Health or one of its child agencies, all persons who are not Significant Contributors must have measurable effort in at least one period unless not required by a particular NIH mechanism. Other Significant Contributors must have 0% effort to be listed as such, so the effort for these individuals is automatically set to 0%. If Budget Period by Period is being used, you must select one or more periods in which the person will be added. Click to add the new person to the proposal. People added to the proposal will be automatically sequenced in the order they are added. Use the Order column on the Personnel screen to change the order in which Personnel will be listed on the PDF. The proposal’s PI will automatically be set as the first position; this cannot be changed.

After adding a person in the popup, the screen will refresh, displaying the Budget Detail for that person. • Add New Staff or Unnamed Personnel New staff or staff yet to be named, otherwise known as unnamed, may be added to the proposal by using the Add New Staff section of the popup. If the person’s name is known, enter the Salutation, First, Middle, and Last Names, and Suffix. If you are entering an unnamed individual or the person is yet To Be Determined, enter TBD in the Last name textbox. Enter the person’s Institution and Department. Enter Email and Phone if desired. You must select a Position in the pick list to add a person to the proposal. Enter the individual’s effort, which will be added for all applicable periods. Decimals may be used. On proposals where the sponsor is the National Institutes of Health or one of its child agencies, all persons who are not Significant Contributors must have measurable effort in at least one period unless not required by a particular NIH mechanism. Other Significant Contributors must have 0% effort to be listed as such, so the effort for these individuals is automatically set to 0%. If Period by Period Budgeting is being used, you must select one or more periods in which the person will be added.
Click to add the new person to the proposal. People added to the proposal will be automatically sequenced in the order they are added. Use the Order column on the Personnel screen to change the order in which Personnel will be listed on the PDF. The proposal’s PI will automatically be set as the first position; this cannot be changed. Note: Unnamed persons will only appear within Budgets, not in the Personnel tab. After adding a person in the popup, the screen will refresh, displaying the Budget Detail for that person. • Create a New Person If enabled through security setups, the option to create on-the-fly profiles may be present. If
so, a button will appear at the top of the popup. This option allows the
addition of people to the GENIUS pick list. Click to begin. In the Create New Profile popup, select whether the individual is an Institution Associate or an External Non-Affiliated individual. Then, click .
In the second Create New Profile popup, enter the Salutation and the First, Middle, and Last Names. Enter an Email address.

Proposal Development User Guide 124
Proposal Development— User Guide v13
Click Set to select the individual’s Primary Department in the Departments popup. Depending on the administrative setups, the username and password will be automatically assigned or will need to be entered.
When ready in the second Create New Profile popup, click .
Returning to the Select Existing or Add New Staff popup, the newly added individual will now appear in the GENIUS pick list at the top of the popup. Select a Position in the pick list. Select the Personnel Type as Key Personnel, Significant Contributor, or Non-Key Personnel. Enter the individual’s effort, which will be added for all applicable periods. Decimals may be used. On proposals where the sponsor is the National Institutes of Health or one of its child agencies, all persons who are not Significant Contributors must have measurable effort in at least one period unless not required by a particular NIH mechanism. Other Significant Contributors must have 0% effort to be listed as such, so the effort for these individuals is automatically set to 0%. If Period by Period Budgeting is being used, you must select one or more periods in which the person will be added. Click to add the new person to the proposal. People added to the proposal will be automatically sequenced in the order they are added. Use the Order column on the Personnel screen to change the order in which Personnel will be listed on the PDF. The proposal’s PI will automatically be set as the first position; this cannot be changed. After adding a person in the popup, the screen will refresh, displaying the Budget Detail for that person. See Personnel Costs in this user guide for more information. Note: The screen will not refresh to the Budget Detail for that person if there is no Budget tab included in the template or opportunity schema.
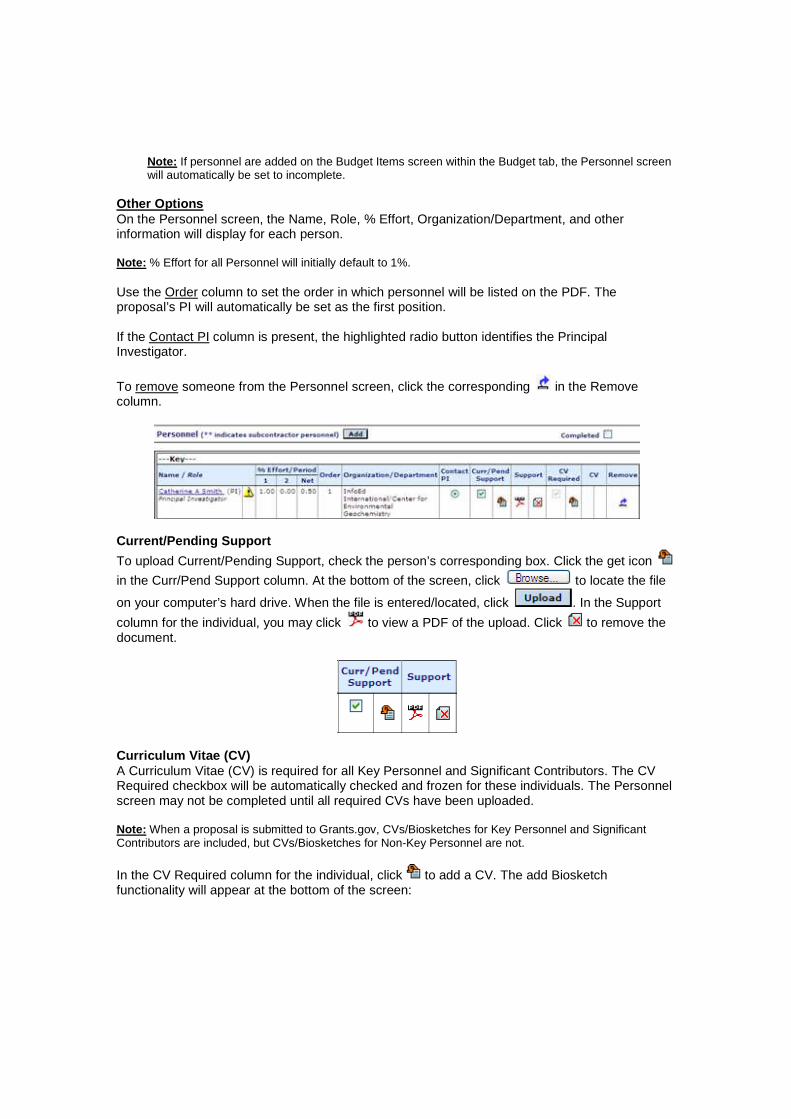
Note: If personnel are added on the Budget Items screen within the Budget tab, the Personnel screen will automatically be set to incomplete.
Other Options On the Personnel screen, the Name, Role, % Effort, Organization/Department, and other information will display for each person. Note: % Effort for all Personnel will initially default to 1%. Use the Order column to set the order in which personnel will be listed on the PDF. The proposal’s PI will automatically be set as the first position. If the Contact PI column is present, the highlighted radio button identifies the Principal Investigator.
To remove someone from the Personnel screen, click the corresponding in the Remove column.
Current/Pending Support
To upload Current/Pending Support, check the person’s corresponding box. Click the get icon
in the Curr/Pend Support column. At the bottom of the screen, click to locate the file
on your computer’s hard drive. When the file is entered/located, click . In the Support
column for the individual, you may click to view a PDF of the upload. Click to remove the document.
Curriculum Vitae (CV) A Curriculum Vitae (CV) is required for all Key Personnel and Significant Contributors. The CV Required checkbox will be automatically checked and frozen for these individuals. The Personnel screen may not be completed until all required CVs have been uploaded. Note: When a proposal is submitted to Grants.gov, CVs/Biosketches for Key Personnel and Significant Contributors are included, but CVs/Biosketches for Non-Key Personnel are not. In the CV Required column for the individual, click to add a CV. The add Biosketch functionality will appear at the bottom of the screen:

Proposal Development User Guide 126
Proposal Development— User Guide v13
A number of CV/Biosketches may be created within an individual’s profile. Working within proposals, these previously created CVs may be copied from profile, as well as uploaded. All uploaded CVs will appear in the profile for that individual and only one file may be uploaded. Upload New CV/Biosketch
Click to locate the file on your computer’s hard drive. When the file is
entered/located, click . Incorporate Existing CV/Biosketch Alternately, if the individual has created/uploaded a CV via the Biosketch tab within Profile, the existing CV may be used. To use an existing CV, select the desired CV from the pull-down selection at the bottom of the screen and click .
When the screen refreshes, icons will display in the individual’s CV column. Click to view a PDF of the CV. Click to remove the document.
Contact Information For Personnel Personnel names are hyperlinked to allow their contact information to be edited. The user must have privileges as a GENIUS administrator to edit contact information. If a person’s profile is incomplete, a warning will appear next to the name on the Personnel
screen. Click to learn what is missing. Click the hyperlinked name to open the Contact Information For Personnel popup and enter the missing content. At the top of the Contact Information For Personnel popup, you may modify the Personnel Type as Key Personnel, Significant Contributor, or Non-Key Personnel. If the person is a consultant, then check the Consultant box. Midway down the popup, select the Role. If “Other” is chosen as the Role, then an additional textbox will appear to the right allowing you to specify the role up to 100 characters long. If the person is a Principal Investigator, the Personnel Type may default to “Key Personnel (PI)” and the Role may display as “PD/PI.” Enter or modify the following: Salutation, First, Middle, and Last Names, Suffix, Title, Degree Type, Degree Year, Address, City, State, Zip, County, Country, Phone, Fax, Email, and Sponsor Credential Type, and Sponsor Credential. The Department may be modified by clicking Set.
When done with the Contact Information For Personnel popup, click . Click to close the popup. Note: Fields marked with yellow background must be completed before the Personnel screen can be marked completed.

Be sure to check the Completed checkbox when the Personnel screen is completed. The screen will refresh and show in completed (view) mode. Note: You will not be able to complete the Personnel tab if there are any non-GENIUS personnel listed as Key Personnel, Significant Contributor or Key Consultant.
PHS 398 Cover Page The PHS 398 Cover Page contains four primary sections titled Project Director/Principal Investigator (PD/PI), Human Subjects, Applicant Organization Contact, and Human Embryonic Stem Cells.

Proposal Development User Guide 128
Proposal Development— User Guide v13
• Project Director/Principal Investigator (PD/PI) The selection made on the New Proposal Questionnaire will display on the Cover Page, but may be changed if desired. Click Change to select a different Project Director/Principal Investigator. When the screen refreshes with the Personnel selection, locate the individual by clicking the first letter of the last name. Select the name in the list or enter the last name first in the Search for a Particular Entry field. You may also Filter by Position. When the name is
found, click . The screen will refresh with the changes on the Cover Page. This change will also be reflected on the Personnel screen.

• Human Subjects
o Clinical Trial - This populates from the Setup Questions screen. It indicates
whether the project is a clinical trial. The NIH defines a clinical trial as a prospective biomedical or behavioral research study of human subjects that is designed to answer specific questions about biomedical or behavioral interventions (drugs, treatments, devices, or new ways of using known drugs, treatments, or devices).
o Agency-Defined Phase III Clinical Trial - This populates from the Setup
Questions screen. It indicates whether the project is an NIH-defined Phase III clinical trial. An NIH-defined Phase III clinical trial is a broadly based prospective Phase III clinical investigation, usually involving several hundred or more human subjects, for the purpose of either evaluating an experimental intervention in comparison with a standard or control intervention or of comparing two or more existing treatments.
• Applicant Organization Contact (Administrative Offi cial to be Notified if Award is
Made) Administrative setups define this field or the selections available for this field if more than one exists. If only one option has been designated for the selected department, the person will be automatically shown on the Face Page. If more than one option is available, this section will appear blank. To set or change this information, click anywhere in the Administrative Official section. Depending on the security setups, the user will have one of two options when the screen refreshes. In the un-editable view, the user is allowed to select a person from the pick list, but NOT
edit the contact information. Select a name and click . In the editable view ( shown below), the user is allowed to select a person and edit the contact information, or add a new person. Adding a person is proposal specific. If
selecting a name, click after the name is found in the list.
When you are done, click in the stationary toolbar. Click to return to the Cover Page and view the changes.
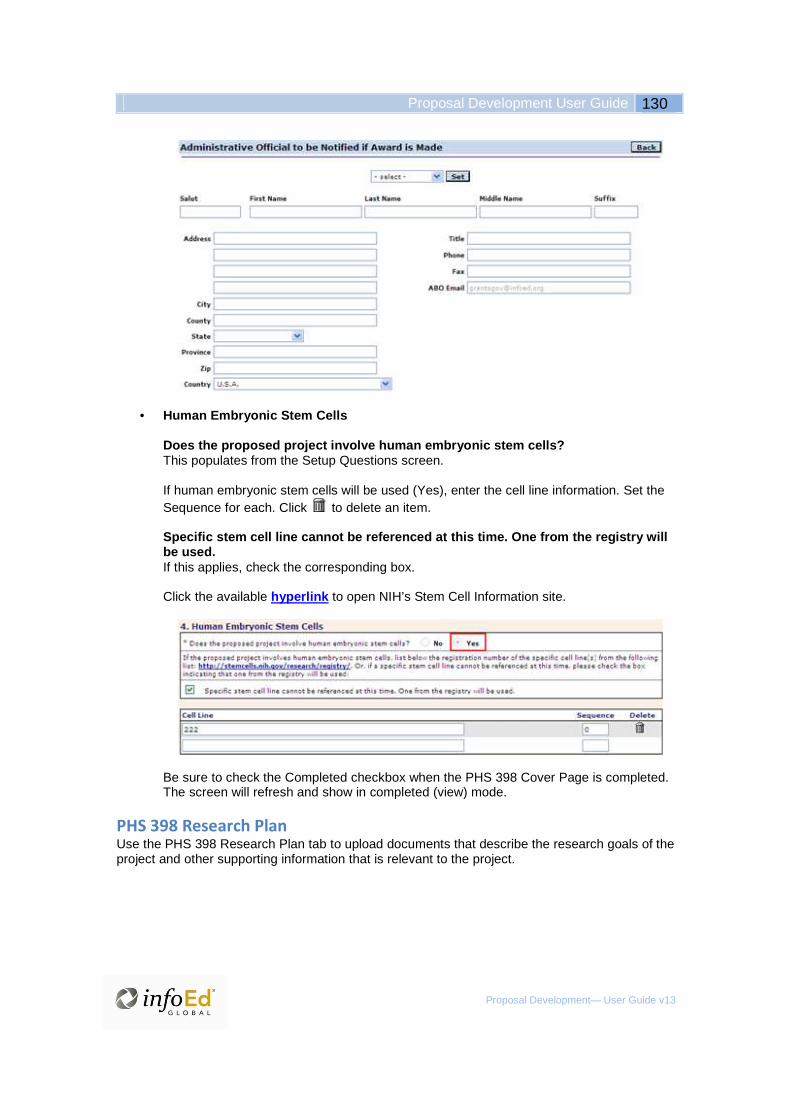
Proposal Development User Guide 130
Proposal Development— User Guide v13
• Human Embryonic Stem Cells
Does the proposed project involve human embryonic s tem cells? This populates from the Setup Questions screen. If human embryonic stem cells will be used (Yes), enter the cell line information. Set the Sequence for each. Click to delete an item. Specific stem cell line cannot be referenced at thi s time. One from the registry will be used. If this applies, check the corresponding box. Click the available hyperlink to open NIH’s Stem Cell Information site.
Be sure to check the Completed checkbox when the PHS 398 Cover Page is completed. The screen will refresh and show in completed (view) mode.
PHS 398 Research Plan Use the PHS 398 Research Plan tab to upload documents that describe the research goals of the project and other supporting information that is relevant to the project.
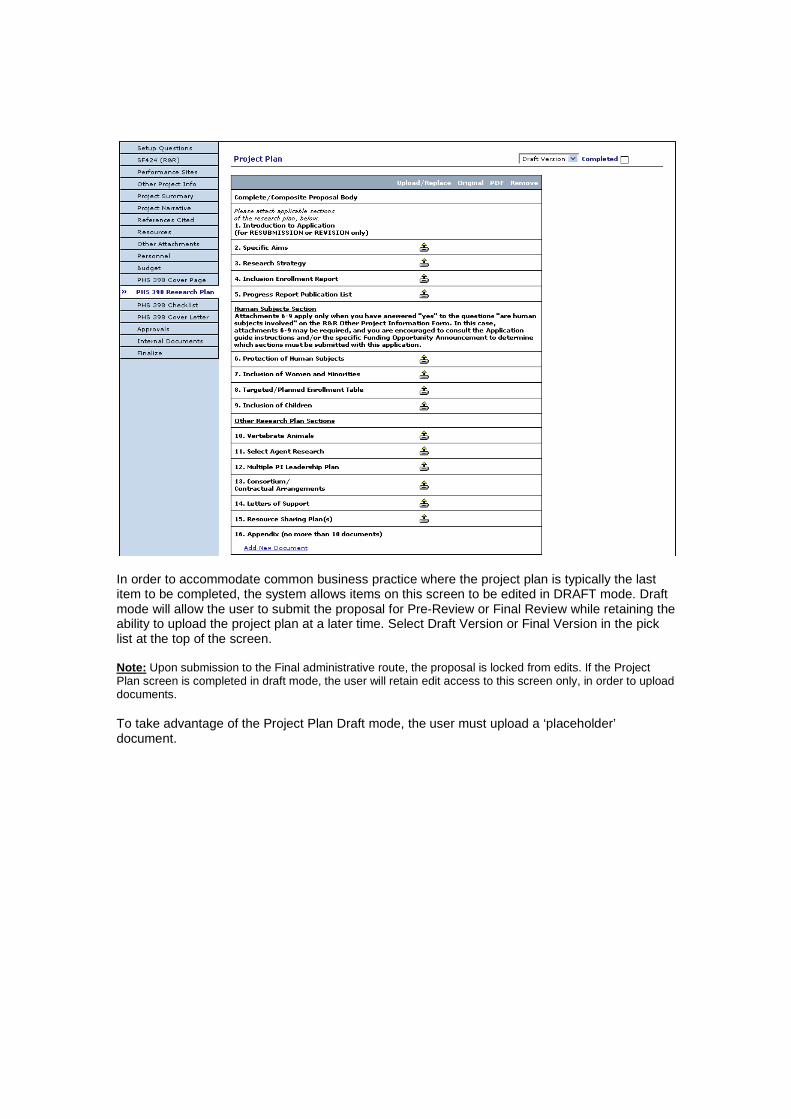
In order to accommodate common business practice where the project plan is typically the last item to be completed, the system allows items on this screen to be edited in DRAFT mode. Draft mode will allow the user to submit the proposal for Pre-Review or Final Review while retaining the ability to upload the project plan at a later time. Select Draft Version or Final Version in the pick list at the top of the screen. Note: Upon submission to the Final administrative route, the proposal is locked from edits. If the Project Plan screen is completed in draft mode, the user will retain edit access to this screen only, in order to upload documents. To take advantage of the Project Plan Draft mode, the user must upload a ‘placeholder’ document.

Proposal Development User Guide 132
Proposal Development— User Guide v13
To upload the Project Plan, click to upload a document for any of the listed sections. Only one file may be uploaded for each section. Click to locate the file on your hard drive. When the desired file has been entered, click next to the Browse button to upload the item. After a section has been uploaded, the upload icon will be replaced by the replace icon. Click to replace a section. Click to view a section in its original format. Click to view the section
in the PDF format. Click to remove a section. The number of pages also displays for each uploaded section. The complete document appears at the top of the screen. Documents are compiled in the order shown on the screen, regardless of the order uploaded. To view the complete document as a PDF, click at the top of the screen. The number of pages for the complete document also displays at the top of the screen. Note: There is a limit of 10 documents that may be uploaded for the Appendix section of the PHS 398 Research Plan screen for NIH.
The linked image cannot be displayed. The file may have been moved, re
The linked image cannot be displayed. The file may have been moved, re

Be sure to set the version type to Draft or Final. Check the Completed checkbox when the PHS 398 Research Plan screen is completed. The screen will refresh and show in completed (view) mode.
PHS 398 Checklist The Checklist form is an official NIH form that captures detail on the Type of Application, Program Income, Assurances/Certifications, and Facilities and Administrative Costs (F&A)/Indirect Costs.
• Application Type - The Type of Application will default based on the answer given on the New Proposal Questionnaire in Step 2 (New, Resubmission, Renewal, Continuation or Revision). If the Application Type is anything other than New, enter the grant number of the current grant you are seeking to extend. The Inventions and Patents field will appear if Renewal has been selected or if a Phase II application has been selected. Otherwise, it will be hidden from view. Using the radio buttons, indicate
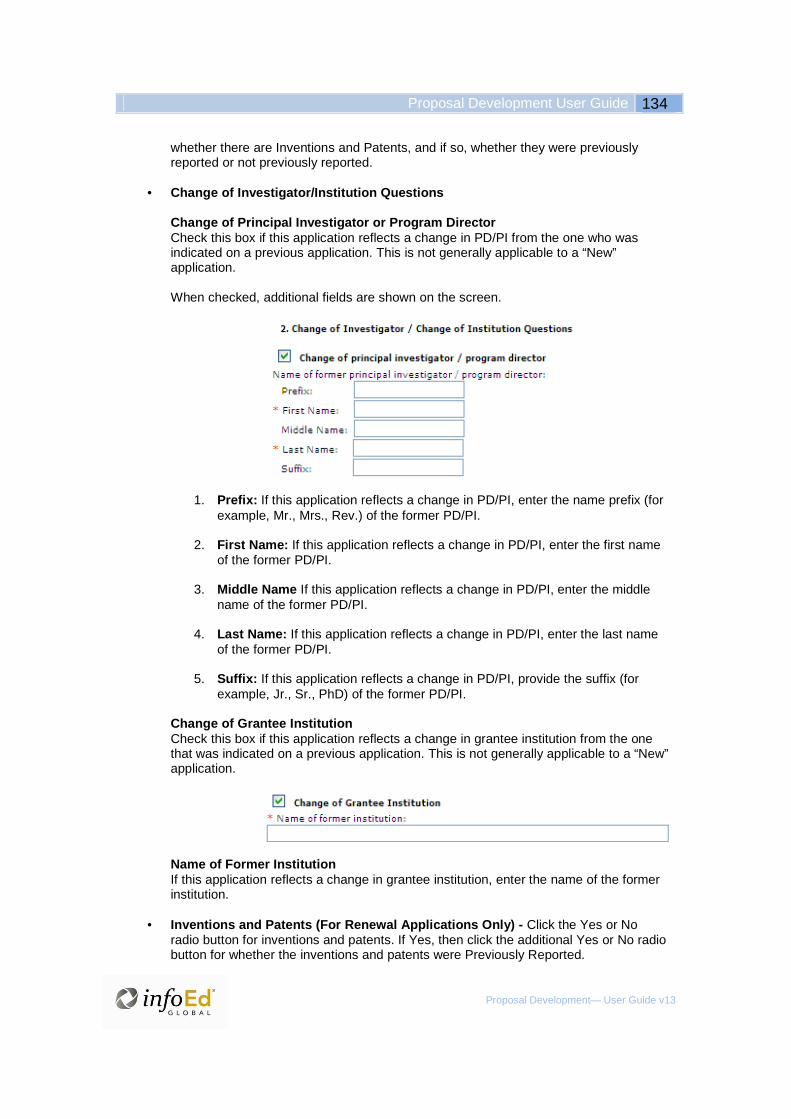
Proposal Development User Guide 134
Proposal Development— User Guide v13
whether there are Inventions and Patents, and if so, whether they were previously reported or not previously reported.
• Change of Investigator/Institution Questions
Change of Principal Investigator or Program Directo r Check this box if this application reflects a change in PD/PI from the one who was indicated on a previous application. This is not generally applicable to a “New” application. When checked, additional fields are shown on the screen.
1. Prefix: If this application reflects a change in PD/PI, enter the name prefix (for example, Mr., Mrs., Rev.) of the former PD/PI.
2. First Name: If this application reflects a change in PD/PI, enter the first name
of the former PD/PI.
3. Middle Name If this application reflects a change in PD/PI, enter the middle name of the former PD/PI.
4. Last Name: If this application reflects a change in PD/PI, enter the last name
of the former PD/PI.
5. Suffix: If this application reflects a change in PD/PI, provide the suffix (for example, Jr., Sr., PhD) of the former PD/PI.
Change of Grantee Institution Check this box if this application reflects a change in grantee institution from the one that was indicated on a previous application. This is not generally applicable to a “New” application.
Name of Former Institution If this application reflects a change in grantee institution, enter the name of the former institution.
• Inventions and Patents (For Renewal Applications On ly) - Click the Yes or No
radio button for inventions and patents. If Yes, then click the additional Yes or No radio button for whether the inventions and patents were Previously Reported.
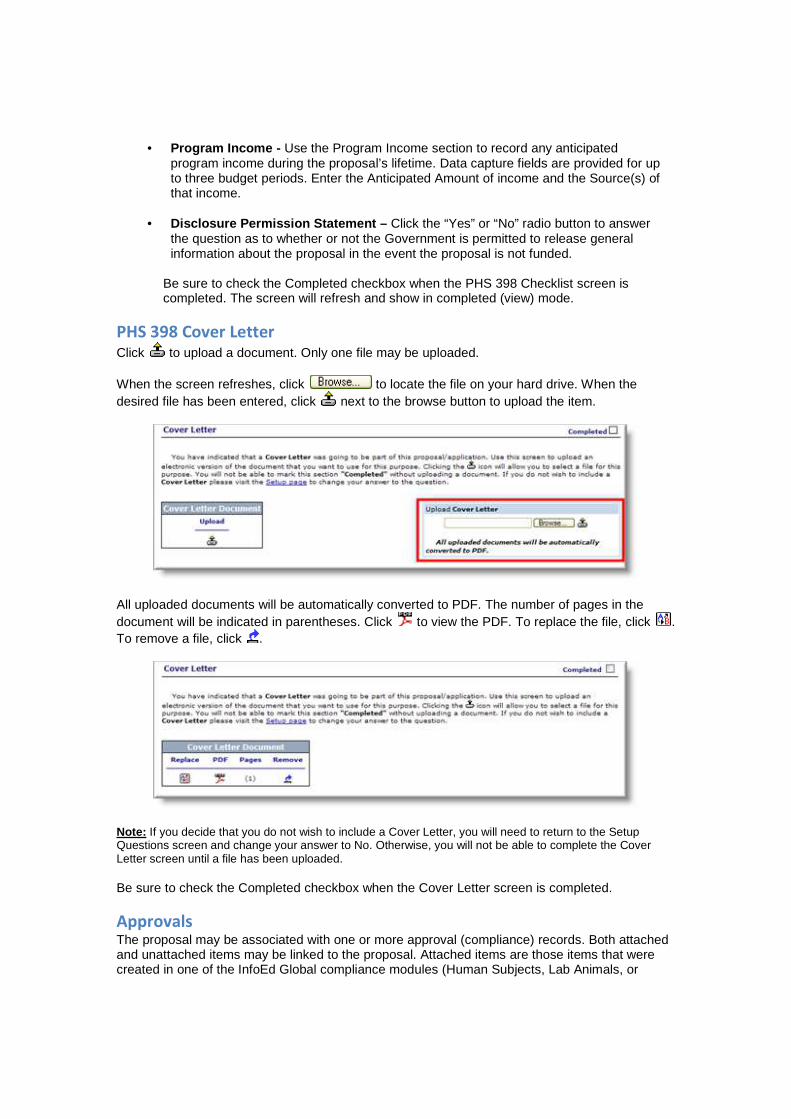
• Program Income - Use the Program Income section to record any anticipated program income during the proposal’s lifetime. Data capture fields are provided for up to three budget periods. Enter the Anticipated Amount of income and the Source(s) of that income.
• Disclosure Permission Statement – Click the “Yes” or “No” radio button to answer
the question as to whether or not the Government is permitted to release general information about the proposal in the event the proposal is not funded.
Be sure to check the Completed checkbox when the PHS 398 Checklist screen is completed. The screen will refresh and show in completed (view) mode.
PHS 398 Cover Letter Click to upload a document. Only one file may be uploaded. When the screen refreshes, click to locate the file on your hard drive. When the desired file has been entered, click next to the browse button to upload the item.
All uploaded documents will be automatically converted to PDF. The number of pages in the document will be indicated in parentheses. Click to view the PDF. To replace the file, click . To remove a file, click .
Note: If you decide that you do not wish to include a Cover Letter, you will need to return to the Setup Questions screen and change your answer to No. Otherwise, you will not be able to complete the Cover Letter screen until a file has been uploaded. Be sure to check the Completed checkbox when the Cover Letter screen is completed.
Approvals The proposal may be associated with one or more approval (compliance) records. Both attached and unattached items may be linked to the proposal. Attached items are those items that were created in one of the InfoEd Global compliance modules (Human Subjects, Lab Animals, or

Proposal Development User Guide 136
Proposal Development— User Guide v13
Environmental Health and Safety). Unattached items are those that were created outside the InfoEd Global system.
Click to begin. From the Type pick list, choose the compliance type. Values in the pick list are defined by your administrator. You may add an unattached record for any of the types listed. Attached items may be added only if these systems are active and you have access: Human Subjects, Lab Animals, or Hazardous Materials (Environmental Health and Safety). The next four sub-sections in this user guide describe the Approvals tab in further detail.
Attached Approvals After selecting the Type on the Approvals screen, select the Attached radio button and click
. The protocol browse screen will appear.

Using the browse options provided (above #5), locate and select one or more protocols. Clicking
will cause the associated records to appear at the bottom. Check the box(es) of the desired records, and click (below).
The Approvals screen will refresh with the item(s) at the top of the screen.

Proposal Development User Guide 138
Proposal Development— User Guide v13
The following columns are available:
• Type : This displays the protocol’s Approval Review Type, which is institutionally defined in Codes and Tables.
• Approved : This displays the date the protocol was approved. “Pending” may display
before a date is entered. Read the Edit entry below for more information.
• Status : This displays the protocol’s current status, which is institutionally defined in Codes and Tables.
• Review : This displays the Protocol Review Category, which is institutionally defined in
Codes and Tables.
• Reference : This displays the protocol’s Reference Number.
• Sequence : This displays the Sequence Number of the protocol.
• Edit : Click to view/edit the protocol. The protocol’s details will appear at the bottom of the screen. If able, enter changes as needed. For more information, see the next section of this user guide, Unattached Approvals.
• Remove : Click to remove the protocol. Be sure to check the Completed checkbox when the Approvals screen is completed.
Unattached Approvals After selecting the Type on the Approvals screen, select the Not Attached radio button and click
.

After clicking , the Add/Edit Approvals section will appear.
The following information is requested:
• Status: From the pick list provided, select the value best describing the current status of the protocol. This list is institutionally defined in Codes and Tables.
• Approval Review Type: From the pick list provided, select the value best describing
the Review Type for the protocol. This list is institutionally defined in Codes and Tables.
• Approval Review Category: From the pick list provided, select the value best
describing the Review Category for the protocol. This list is institutionally defined in Codes and Tables.

Proposal Development User Guide 140
Proposal Development— User Guide v13
• Exemption No. : Enter the Exemption Number. Entries may be up to 20 characters
long.
• Reference No.: Enter the Reference Number associated with the protocol. Entries may be up to 30 characters long.
• Sequence No. : Enter the Sequence Number. Entries may be up to 20 characters long.
• Approved: Enter the date that the protocol was approved. Date values may be
entered in any of the following formats: 03/09/74, 03/09/1974, 030974, 03091974, or 09-Mar-1974.
• Approved From: Enter the approval’s beginning date. Date values may be entered in
any of the following formats: 03/09/74, 03/09/1974, 030974, 03091974, or 09-Mar-1974.
• Approved To: Enter the approval’s end date. Date values may be entered in any of
the following formats: 03/09/74, 03/09/1974, 030974, 03091974, or 09-Mar-1974.
To finalize the entry, click in the stationary toolbar. The screen will refresh with the protocol details.
Repeat as necessary. Click to edit an approval. Click to remove an approval. Be sure to check the Completed checkbox when the Approvals screen is completed. The screen will refresh and show in completed (view) mode. Notice the Edit column changes to the View column, and the Remove column no longer appears.
Approvals Functionality in the SF 424 R&R Templates When using the SF 424 R&R templates, the Approval Date for Human Subjects and/or Laboratory Animals records will populate to the Other Project Info tab. If more than one Human Subjects or Laboratory Animals Approval is added, the Approval Date from the first added item of each type will populate to the Other Project Info tab.

424 R&R NIH Dynamic Template The 424 R&R NIH Dynamic Template is used to assemble grant applications for NIH Fellowships and Training Grants. Depending on the answers entered in the Setup Questions screen, the following tabs will be visible in the sidebar: SF424 (R&R), Performance Sites, Other Project Info, Project Summary,

Proposal Development User Guide 142
Proposal Development— User Guide v13
S2S Forms, Project Narrative, References Cited, Resources, Other Attachments, Personnel, PHS 398 Checklist, PHS 398 Cover Letter, Approvals, and Finalize. Depending on how the template is set up, there may also be an Internal Documents tab.
All of the tabs were covered in the previous section for the 424 R&R NIH Template or are described towards the end of this user guide, with the exception of the S2S Forms tab.
S2S Forms For electronic applications to other federal sponsors’ opportunities (and, as in this case to NIH for training and fellowship grants), information for required forms are entered in a mix of tabs on the left and forms in the S2S tab. In the Setup Questions tab for the 424 R&R NIH Dynamic (electronic submission) there is a section that shows all the forms (required and optional) for the application. Several of the forms are the same forms used by the 424 R&R NIH Template, so for those forms, the tabs will appear on the left sidebar menu.
For the remaining forms listed for the mechanism, the first two are checked in Included column and will appear under the S2S tab. The last form on the list was not checked, because in the Setup Questions the answer “No” was selected for question as to whether there are subcontractors. That form will not be included in the application. If it should be included, check the Included box for the form and Save. The S2S Forms tab screen shows the opportunity number at the top, a Completed box for checking when the forms have been done, and a table with columns for Form, Version, Completed and Edit.

To open a form, click on the Edit icon. The form will open in a new window.
Mandatory items are marked with an asterisk (*). To save information on the form, click Save in the upper left of the form screen. To mark the form completed, check the Completed box in the
upper right corner. When you are done with the form, click Done in the upper left corner and the window will close.
The S2S Forms screen will refresh, and if you have marked the form as completed, it will have a checkmark in the Completed column of the table. After all the forms are completed, you can mark the screen completed.

Proposal Development User Guide 144
Proposal Development— User Guide v13
Note: If the opportunity/mechanism requests an upload of a file, only certain files types can be converted to PDF. If you try to upload a file that cannot be converted (example: Excel), you will get an error message: “Invalid File Type. Please Upload Different File Type.”
424 R&R Template The 424 R&R Template will be the dynamic template selected in the Setup Questions for federal sponsors who indicate use of the 424 R&R face page for grant applications for electronic submission. This includes NIH, but the 424 R&R NIH Template is specifically designed for (and should be used for) NIH proposals. Depending on the opportunity and the answers entered in the Setup Questions screen, the following tabs will be visible in the sidebar: SF424 (R&R), Personnel, S2S Forms, Cover Letter, Research Plan, Approvals, Checklist, Performance Sites, Cover Page Supplement and Finalize. Depending on how the template is set up, there may also be an Internal Documents tab. Any other information or forms needed will under the S2S Forms tab. The SF424 (R&R), Personnel, Research Plan, Approvals, Checklist, Performance Sites, and Cover Page detail information is described above under the 424 R&R NIH Template. Budget, Internal Documents and Finalize are described later in this guide.
S2S Forms For electronic applications to other federal sponsors’ opportunities, information for required forms are entered in a mix of tabs on the left and forms in the S2S tab. See instructions for completing forms in the S2S tab above under the 424 R&R NIH Dynamic Template.

424 Template The 424 template will be the template selected in the Setup Questions for federal sponsors who indicate use of the standard 424 face page for grant applications for electronic submission. Depending on the answers entered in the Setup Questions screen, the following tabs will be visible in the sidebar: SF424, S2S Forms, Approvals, and Finalize. Depending on how the template is set up, there may also be an Internal Documents tab.
The Internal Documents and Finalize tabs are described towards the end of this user guide.
SF 424 Form This form is a variation of the SF 424 R&R NIH described above. Any changes to information in the form is handled the same way. See 424 R&R NIH Template for details.
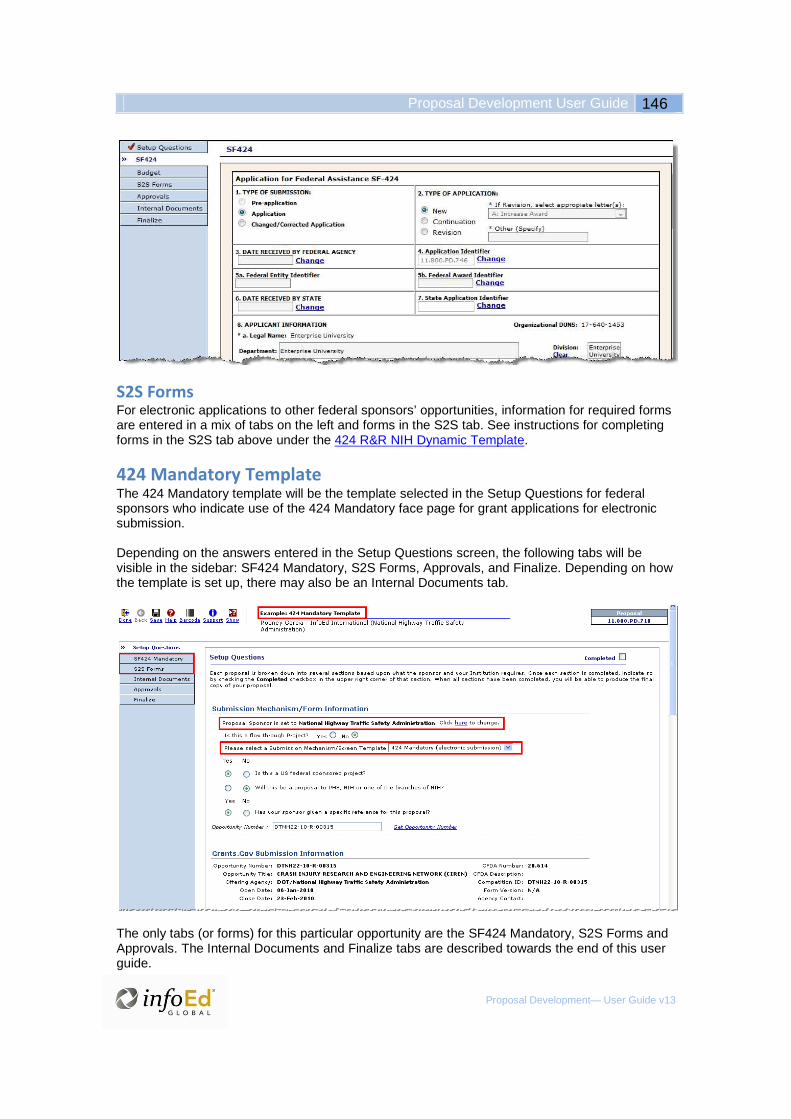
Proposal Development User Guide 146
Proposal Development— User Guide v13
S2S Forms For electronic applications to other federal sponsors’ opportunities, information for required forms are entered in a mix of tabs on the left and forms in the S2S tab. See instructions for completing forms in the S2S tab above under the 424 R&R NIH Dynamic Template.
424 Mandatory Template The 424 Mandatory template will be the template selected in the Setup Questions for federal sponsors who indicate use of the 424 Mandatory face page for grant applications for electronic submission. Depending on the answers entered in the Setup Questions screen, the following tabs will be visible in the sidebar: SF424 Mandatory, S2S Forms, Approvals, and Finalize. Depending on how the template is set up, there may also be an Internal Documents tab.
The only tabs (or forms) for this particular opportunity are the SF424 Mandatory, S2S Forms and Approvals. The Internal Documents and Finalize tabs are described towards the end of this user guide.

SF 424 Mandatory Form This form is a variation of the SF 424 R&R NIH described above. Any changes to information in the form is handled the same way. See 424 R&R NIH Template for details.
S2S Forms For electronic applications to other federal sponsors’ opportunities, information for required forms are entered in a mix of tabs on the left and forms in the S2S tab. See instructions for completing forms in the S2S tab under the 424 R&R NIH Dynamic Template.
424 Short Template The 424 Short template will be the template selected in the Setup Questions for federal sponsors who indicate use of the 424 Short Organizational face page for grant applications for electronic submission. Depending on the answers entered in the Setup Questions screen, the following tabs will be visible in the sidebar: SF424 Short, S2S Forms, Approvals, and Finalize. Depending on how the template is set up, there may also be an Internal Documents tab.

Proposal Development User Guide 148
Proposal Development— User Guide v13
The only tabs (or forms) for this particular opportunity are the SF424 Short and Approvals. Approvals is described under the 424 R&R NIH Template. The Internal Documents and Finalize tabs are described towards the end of this user guide.
SF 424 Short Organizational Form This form is very similar to the SF 424 R&R NIH described above, but has less information. Any changes to information in the form is handled the same way. See 424 R&R NIH Template for details.

S2S Forms For electronic applications to other federal sponsors’ opportunities, information for required forms are entered in a mix of tabs on the left and forms in the S2S tab. See instructions for completing forms in the S2S tab above under the 424 R&R NIH Dynamic Template.
Default Screens Template The Default Screens Template allows the preparation of non-S2S proposals for sponsors that do not require a specific format. The Default Screens Template uses several tabs that have similar functionality to the other templates. See 424 R&R NIH Template for more information on these tabs. The Internal Documents and Finalize tabs are described towards the end of this user guide. The Cover Letter option on the Setup Questions screen (below) must be enabled for the Cover Letter tab to appear in the sidebar:
A few tabs specific to the Default Screens Template are described in subsections of this section:
• Generic Face Page • Summary Budget Personnel • Summary Budget (Justifications; Budget Periods and Setups)
Below is an example of a sidebar and Setup Questions screen for a Default Screens Template:
Generic Face Page The Generic Face Page for the Default Screens Template has some similarities to the 424 R&R used in other templates. Many of the fields are modifiable if you click on them. When done in the new screen that appears,
click to return to the Generic Face Page. Mandatory fields are marked with a red asterisk (*).
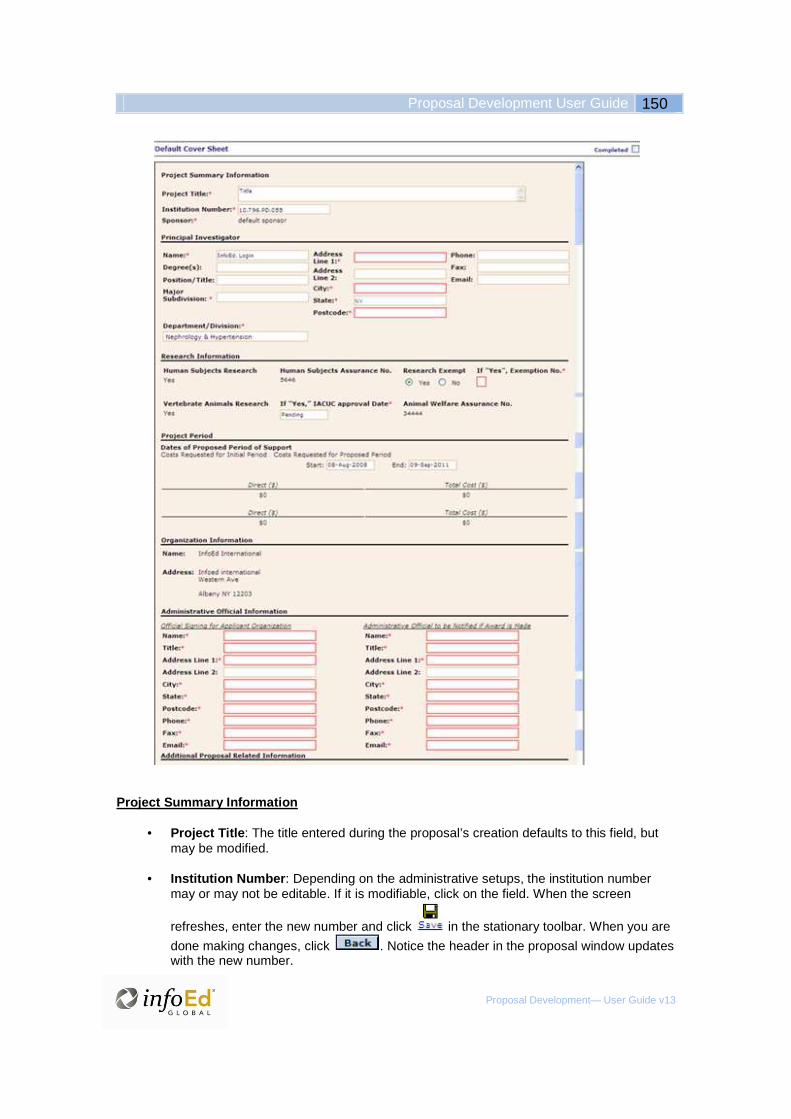
Proposal Development User Guide 150
Proposal Development— User Guide v13
Project Summary Information
• Project Title : The title entered during the proposal’s creation defaults to this field, but may be modified.
• Institution Number : Depending on the administrative setups, the institution number
may or may not be editable. If it is modifiable, click on the field. When the screen
refreshes, enter the new number and click in the stationary toolbar. When you are
done making changes, click . Notice the header in the proposal window updates with the new number.

• Sponsor : The sponsor displays in this field, but is modifiable on the Setup Questions screen.
Principal Investigator
To modify the Principal Investigator information, click on any of the PI fields on the Generic Face Page. The screen will refresh with the Edit Personnel screen. Enter or modify the following: Salutation, First, Middle, and Last Names, Suffix, Degrees, Address, City, County, State/Province, Zip, Country, Title, Telephone, Fax, Email, and Credential.
When you are done making changes, click in the stationary toolbar. Click to return to the Generic Face Page and view the changes you entered. Notice the header in the proposal window updates with the new PI information.
• Department/Division : This field automatically populates with the PI’s department, but may be changed by clicking on the field. When the screen refreshes, the Departments selection will be available. Click the first letter of the department, select the desired
department in the pick list, and then click . The location of the department will display and the radio button will be set. You may also skip the search at the top of the screen and instead search through the tree view to find the department. When the
desired department has its corresponding radio button set, click . When the Generic Face Page refreshes, the selection will display.

Proposal Development User Guide 152
Proposal Development— User Guide v13
Research Information
• Human Subjects Research : This displays differently depending on how you answered the following question on the Setup Questions screen: “Will your proposal involve the use of Human Subjects?”
If the answer on the Setup Questions screen is No, then the only option for Human Subjects on the Generic Face Page will be a radio button to indicate Yes or No whether the research is Exempt . If the research is exempt (Yes), then enter the Exemption Number . A one-digit entry is required (numbers 1 through 6 may be used).
If the answer on the Setup Questions screen is Yes, then the Human Subjects will display as below on the Generic Face Page.
To modify the Human Subjects Assurance Number that defaults based on administrative setups, click on the number. When the screen refreshes, select an Existing number. To enter a new number, select “Other” in the list, and then Enter the Assurance
Number. When done, click in the stationary toolbar. Click to return to the Face Page.
• Vertebrate Animals Research : This displays differently depending on how you answered the following question on the Setup Questions screen: “Will your proposal involve the use of Laboratory Animals?”
If the answer on the Setup Questions screen is No, then there will be no questions for Vertebrate Animals on the Generic Face Page.

If the answer on the Setup Questions screen is Yes, then Vertebrate Animals will display as below on the Generic Face Page.
The IACUC (Institutional Animal Care and Use Committee) Approval Date defaults based on administrative setups. If permitted, click on it to modify.
To modify the Animal Welfare Assurance Number that defaults based on administrative setups, click on the number. When the screen refreshes, select an Existing number. To enter a new number, select “Other” in the list, and then Enter the Assurance Number.
When done, click in the stationary toolbar. Click to return to the Face Page.
Project Period – Dates of Proposed Period of Suppor t
• Start and End Dates : The Project Start and End Dates from the New Proposal Questionnaire default to these fields. They are modifiable on the Budget Periods and Setups screen within the Summary Budget tab.
• Costs Requested for Initial Period and Costs Reques ted for Proposed Period : The
Direct and Total Cost amounts display on the Generic Face Page. You may enter and/or modify these numbers on the Summary Budget screen.
Organization Information
• The Name and Address of the organization, which was setup in Organizational Administration, display and are not modifiable on the Generic Face Page.
Administrative Official Information
• Official Signing for Applicant Organization : To modify this information, click on any of the fields. The screen will refresh with the below. To select an existing person, use
the pull-down selection to find the individual. When the name is highlighted, click and the screen will refresh with that person’s information.
Enter or modify the following: Salutation, First, Middle, and Last Names, Suffix, Address, City, County, State, Province, Zip, Country, Title, Phone, Fax, and SAO Email.
When you are done making changes, click in the stationary toolbar. Click to return to the Generic Face Page and view the changes you entered.

Proposal Development User Guide 154
Proposal Development— User Guide v13
• Administrative Official to Be Notified If Award Is Made: To modify this information, click on any of the fields. The screen will refresh with the below. To select an existing person, use the pull-down selection to find the individual. When the name is highlighted,
click and the screen will refresh with that person’s information.
Enter or modify the following: Salutation, First, Middle, and Last Names, Suffix, Address, City, County, State, Province, Zip, Country, Title, Phone, Fax, and ABO Email.
When you are done making changes, click in the stationary toolbar. Click to return to the Generic Face Page and view the changes you entered.
Be sure to check the Completed checkbox when the Generic Face Page is completed. The screen will refresh and show in completed (view) mode.
Summary Budget Personnel The Summary Budget Personnel screen is similar to the Personnel screen, which is used with
other templates. The button will appear on the Summary Budget Personnel screen regardless of whether the Personnel Wizard has been enabled by the administrator. Also,

regardless of how the Last Question in the Add Personnel popup is answered, all the personnel entered will appear on the Summary Budget Personnel screen under the corresponding headings of Key Personnel, Significant Contributor, Non-Key, Consultant Key, or Consultant Non-Key. For information on adding personnel with the Personnel Wizard, see the Personnel Wizard section.
Summary Budget (Justifications; Budget Periods & Setups) The Summary Budget tab in the Default Screens Template has some similarities to the Budget tab in the other templates. The Summary Budget tab includes Justifications and Budget Periods and Setups tabs. However, the Budget Items, F&A, Cost Sharing, and Versions tabs are not included. See Budgets in this user guide for more information. See Justifications in this user guide for information on using the Justifications tab.
The Summary Budget main screen has four sections like the Budget main screen. In the Project
Budget Summary section at the top, there are icons to open a Budget Detail for each period. However, the second section is titled Sponsor Budget Summary, instead of just Budget Summary. Also, you may enter amounts into the three lower sections, which is not possible on the Budget main screen in the other templates. Be sure to check the Completed checkbox when the Summary Budget tab is completed. The screen will refresh and show in completed (view) mode.

Proposal Development User Guide 156
Proposal Development— User Guide v13
See Budget – General in this user guide for more information on the Budget main screen.
The Budget Periods and Setups screen in the Default Screens Template has many of the same options, except those that appear in the top left of the screen, such as Budgeting Type, Object Code Budgeting, Advanced Budgeting, etc.

The below options do not display on the Budget Periods and Setups screen when the Default Screens Template is used:
Custom Templates The Default Screens Template can be used as an example by the administrator to create custom templates for non-S2S proposals. Templates are created in Pre/Post Award Admin>PD Setups>PD Screen Setups .

Proposal Development User Guide 158
Proposal Development— User Guide v13
Budgets There are six main sections within the Budget tab: Budget Items, F&A, Cost Sharing, Justifications, Versions, and Budget Periods and Setups. Additional user options, located on the Setup Questions screen, are available to allow Modular Budgeting for National Institutes of Health (NIH) applications. See NIH Modular Applications section for more information. The Proposal Development Budget section depends on several different setups. These setups control availability of budget sub-tabs, method of budgeting, movement between tabs, inflation calculation methods, targeted F&A, versioning of budgets, and cost sharing sources. Depending on the administrative setups, the 424 Budgeting Model, or one of the detailed budgeting models (either Budget by Total Project or Period by Period Budgeting) may be available. Note: The Default Screens template and custom templates uses the Summary Budget model. For more information, see Default Screens Template section.
The Budget main screen will display the same regardless of which budgeting type or model was chosen in the Setup Questions or Budget Periods and Setups tab. The top portion of the screen shows the Project Budget Summary, which summarizes the Direct Costs, Indirect Costs, Period Totals, and overall Project Totals. Beneath the Project Budget Summary, the sponsor’s proposal costs are detailed. Following this, the costs for the party responsible for cost sharing are shown. Finally, the costs for the party responsible for the proposal’s non-allowable costs/charges are shown. For each, a period-by-period total of each budget category is shown, along with overall period totals and an overall project total. If your administrator has activated Object Code Budgeting and you have selected this option on the Budget Periods and Setups screen, then you will have the option to switch between two
displays on the Budget main screen. Click or to modify the information on the Budget main screen.
Be sure to check the Completed checkbox when the Budget is completed. The screen will refresh and show in completed (view) mode.
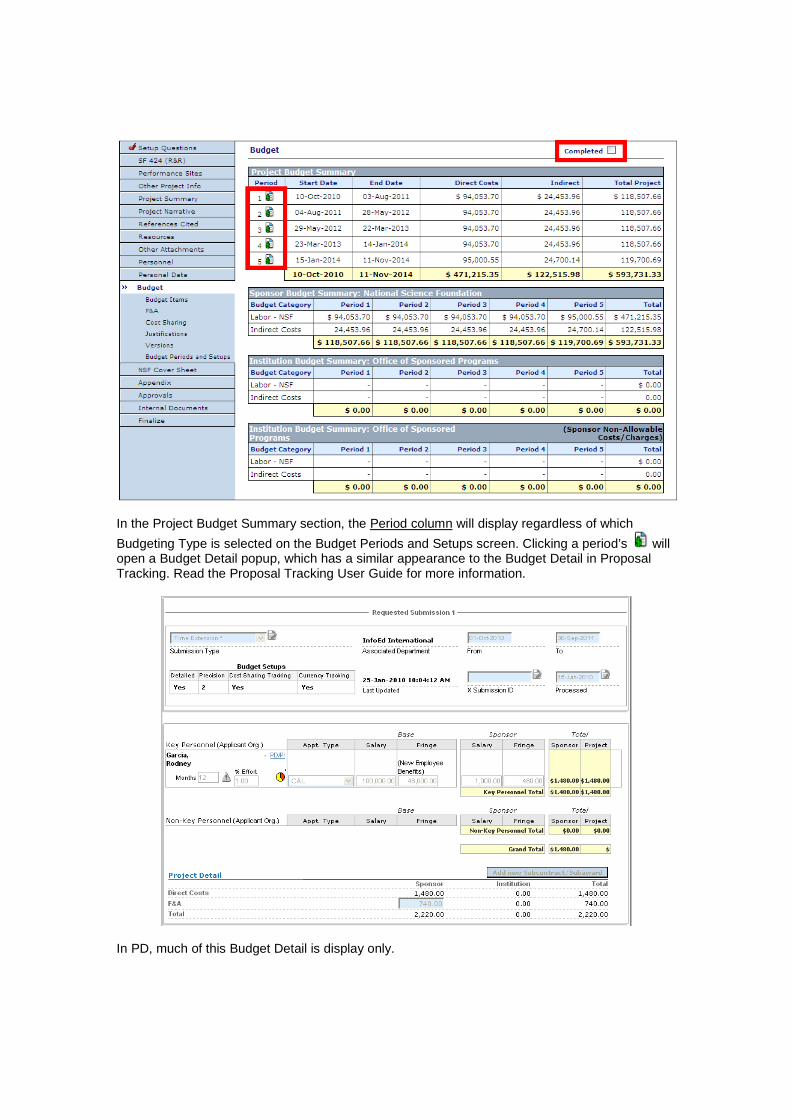
In the Project Budget Summary section, the Period column will display regardless of which
Budgeting Type is selected on the Budget Periods and Setups screen. Clicking a period’s will open a Budget Detail popup, which has a similar appearance to the Budget Detail in Proposal Tracking. Read the Proposal Tracking User Guide for more information.
In PD, much of this Budget Detail is display only.

Proposal Development User Guide 160
Proposal Development— User Guide v13
In the Personnel section, click the role hyperlink to view the Roles and Justifications popup for an individual. When done, click .
Click an individual’s corresponding to view that person’s effort in a popup. When done, click .
Click the Subcontract/SubAward’s corresponding to view the Budget Detail for that subcontractor. Clicking Jst will open the Justification popup.
Setup Questions Affecting Budgets The Setup Questions screen of the proposal plays an important role in the appearance of the Budget tab. Answers to questions on this screen will provide the initial framework for the proposal’s budget. The following Setup Questions directly relate to the Budget tab:
• Will your proposal include any Subcontractors? - Answering yes to this question allows the inclusion of one or more subcontractors by activating the subcontractors section of the Budget Items screen.
• Will you be working with other internal departments or divisions as
Subprojects? - Answering yes to this question allows the inclusion of one or more subprojects within the budget.
• Will this proposal be using a Modular budget? - This question appears when the
National Institutes of Health (NIH) or one of its child agencies is the selected sponsor. If you answer yes to this question, Modular Budget will appear as an additional tab within Budget in the proposal’s sidebar. This option allows the preparation of the budget using modules of $25,000.

• What kind of budgeting model would you like to use? - To answer this question, select one of the three available budgeting models, Budget by Total Project, Budget Period by Period, or 424 Budgeting.
o Budget by Total Project: This preferred budgeting method allows the user to
complete the budget at the Project Level. Period calculations for the entire project are automatically completed, allowing for more accurate effort time frames to be used when determining timeframes and effort on the project.
o Budget Period by Period: This traditional budgeting method allows the user to
complete the budget Period by Period. This method of budgeting closely mirrors the functionality currently available within Proposal Tracking.
o 424 Budgeting: The availability of this budgeting model depends on administrative
setups. The 424 Budgeting Model is inspired by the SF 424 format, but at times may be available for other proposals in PD as well. Check with your administrator if you would like to use this budgeting model, but it does not appear in the selection.
• Is this a flow through Project? - If this project is a flow through project, the
Originating Sponsor, which is chosen, will display.
• Select the Program Type, and • The majority of the research will be conducted On o r Off campus
The answers to these two questions will determine the Institution Base/Target Scheme on the Budget F&A screen. This base is used to determine the cost or drift from the established “norm” within F&A costs.
• Which department or organization will be responsibl e for any cost sharing on
the proposal? - This sets the department or organization that will cost share on the proposal. This defaults to the department of the selected PI.
• Who will be responsible for project costs that migh t not be
reimbursable/allowable by the sponsor? - This sets the individual, department, or organization that will cover project costs not allowed by the sponsor. This defaults to the department of the selected PI.

Proposal Development User Guide 162
Proposal Development— User Guide v13
PD Lite Tab Questions section PD Lite settings can affect the following items in the Budget tab in the proposal (for more information see the PD Lite section):
• Show Versions Tab : Checking this box will cause the Budget’s Versions tab to be visible and available in the proposal.
• Show F&A Tab (tab will autocomplete when not shown) : Checking this box will
cause the F&A tab to be visible and available in the proposal. If this box is NOT checked, then the F&A tab will autocomplete.
• Show Cost Sharing Tab (tab will autocomplete when n ot shown) : Checking this
box will cause the Cost Sharing tab to be visible and available in the proposal. If this box is NOT checked, then the Cost Sharing tab will autocomplete.
• Show the Budget Periods and Setups Tab : Checking this box will cause the Budget
Periods and Setups tab within the Budget tab to be visible and available in the proposal.

Budget Periods and Setups The Budget Periods and Setups tab should be reviewed prior to working with the budget. In fact, you may modify this screen at any time while working on the proposal.
The Budget Periods and Setups screen allows flexibility in how the proposal’s budget is handled. You may select the type of budgeting method, determine when inflation will be applied, incorporate object code budgeting, decide if unallowable costs will be tracked, change the PI, modify the start and end dates, add/remove periods, modify budget sources, and perform many other functions related to the budget. If you are permitted to and choose to use a Modular Budget on the Setup Questions screen, then two additional checkboxes will display on the Budget Periods and Setups screen about how to calculate the F&A amount for modular budgets using the F&A base. See NIH Modular Applications for more information.
Note: Alternate Currency and Exchange Rates are only available in PD and PT if the administrator has set them up in multiple administrative locations: Activate Currency Conversion Support, Codes and Tables, Exchange Rate Setups, and Default Currency. When the budgeting type is set to Period by Period there is an additional option to clear all costs from specific periods. To display this option, select Budget Period by Period at the top of the
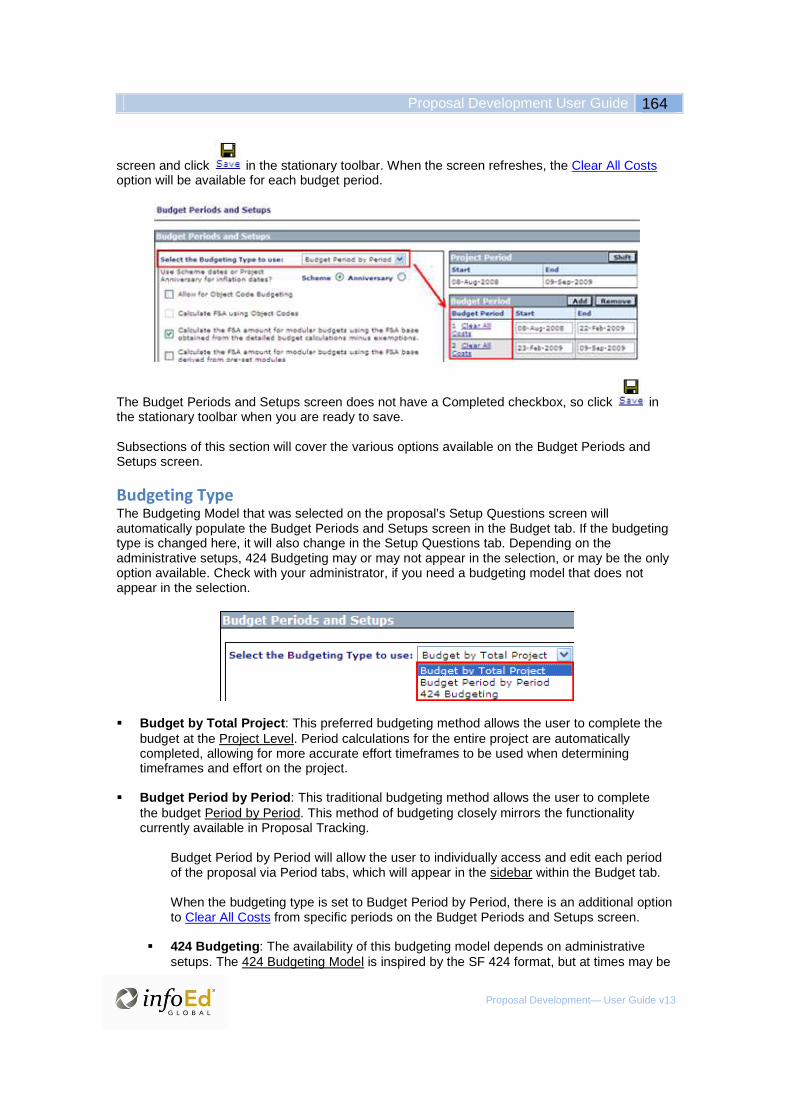
Proposal Development User Guide 164
Proposal Development— User Guide v13
screen and click in the stationary toolbar. When the screen refreshes, the Clear All Costs option will be available for each budget period.
The Budget Periods and Setups screen does not have a Completed checkbox, so click in the stationary toolbar when you are ready to save. Subsections of this section will cover the various options available on the Budget Periods and Setups screen.
Budgeting Type The Budgeting Model that was selected on the proposal’s Setup Questions screen will automatically populate the Budget Periods and Setups screen in the Budget tab. If the budgeting type is changed here, it will also change in the Setup Questions tab. Depending on the administrative setups, 424 Budgeting may or may not appear in the selection, or may be the only option available. Check with your administrator, if you need a budgeting model that does not appear in the selection.
� Budget by Total Project : This preferred budgeting method allows the user to complete the
budget at the Project Level. Period calculations for the entire project are automatically completed, allowing for more accurate effort timeframes to be used when determining timeframes and effort on the project.
� Budget Period by Period : This traditional budgeting method allows the user to complete
the budget Period by Period. This method of budgeting closely mirrors the functionality currently available in Proposal Tracking.
Budget Period by Period will allow the user to individually access and edit each period of the proposal via Period tabs, which will appear in the sidebar within the Budget tab.
When the budgeting type is set to Budget Period by Period, there is an additional option to Clear All Costs from specific periods on the Budget Periods and Setups screen.
� 424 Budgeting : The availability of this budgeting model depends on administrative
setups. The 424 Budgeting Model is inspired by the SF 424 format, but at times may be

available for other proposals in PD as well. Check with your administrator if you would like to use this budgeting model, but it does not appear in the selection.
Below are examples of the Budget Detail for Personnel screen when the three different budgeting models are selected:

Proposal Development User Guide 166
Proposal Development— User Guide v13
Inflation Dates On the Budget Periods and Setups screen, select one of the below radio buttons:

If inflation is applied to the costs for personnel/items, this option will determine whether the inflation is applied on the proposal’s anniversary date or the inflation scheme’s anniversary date . The Pre/Post Award administrator sets the default value, but this value may be changed. Project anniversary dates occur yearly from the start date of the project. Current effective inflation rates are applied at that point. This refers to one year from the beginning date of the project and each subsequent year on that date. Scheme Dates, when selected, will apply inflation rates when that rate becomes effective, regardless of project dates. This refers to the effective date of the inflation chart.
Object Code Budgeting Budgeting for personnel/items may be done either by using the sponsor’s budget categories, or the institution’s object code categories. The use of object codes allows an institution to very precisely track where a proposal’s funds are applied. Because an institution can have hundreds or even thousands of these categories, it can be problematic to conform to sponsor budgeting categories, which are often fewer in number and different in their naming conventions. With object code mapping, these codes are linked directly to a sponsor budget category. Object code mapping is done by your Pre/Post Award administrator. Inside the proposal, simply select the proper object code and it will automatically map to the proper sponsor category.
Object code budgeting can be particularly useful with InfoEd Global’s Post Award Management (PAM) module, as it allows for a seamless transition to managing the account for the awarded proposal. Object code budgeting is an administrative setup and will only be available if determined by the Pre/Post Award administrator. Options on the Budget Periods and Setups Screen
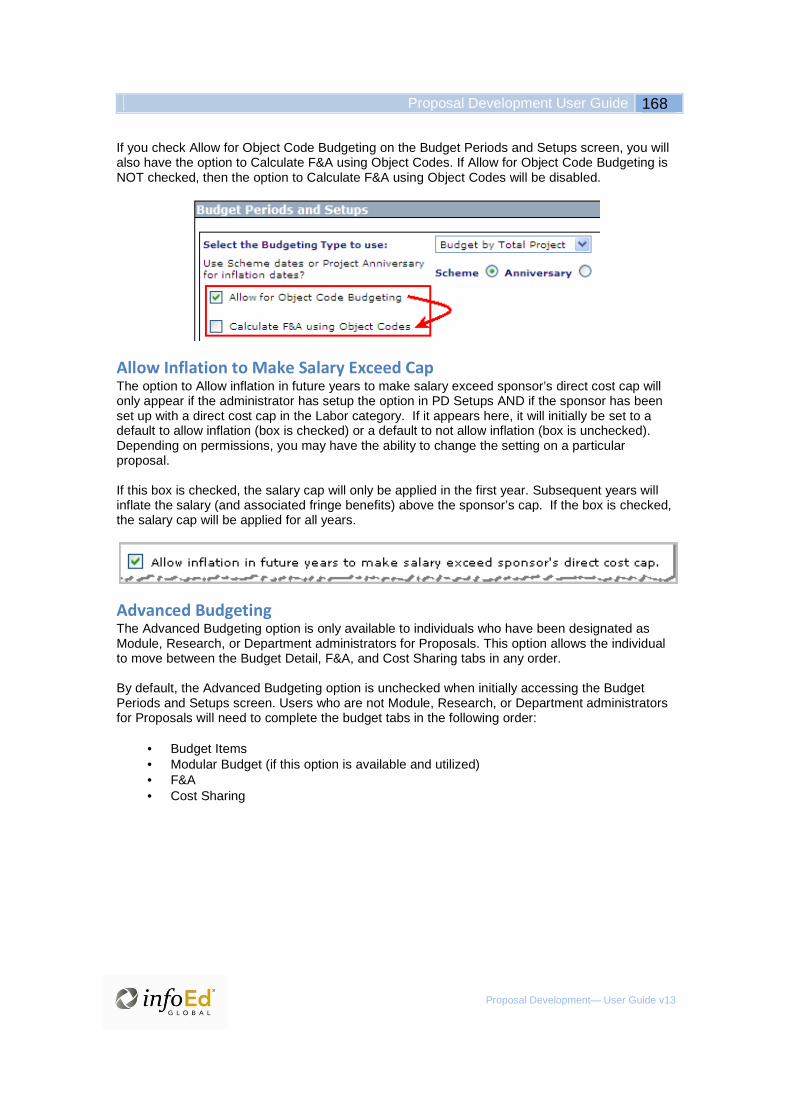
Proposal Development User Guide 168
Proposal Development— User Guide v13
If you check Allow for Object Code Budgeting on the Budget Periods and Setups screen, you will also have the option to Calculate F&A using Object Codes. If Allow for Object Code Budgeting is NOT checked, then the option to Calculate F&A using Object Codes will be disabled.
Allow Inflation to Make Salary Exceed Cap The option to Allow inflation in future years to make salary exceed sponsor’s direct cost cap will only appear if the administrator has setup the option in PD Setups AND if the sponsor has been set up with a direct cost cap in the Labor category. If it appears here, it will initially be set to a default to allow inflation (box is checked) or a default to not allow inflation (box is unchecked). Depending on permissions, you may have the ability to change the setting on a particular proposal. If this box is checked, the salary cap will only be applied in the first year. Subsequent years will inflate the salary (and associated fringe benefits) above the sponsor’s cap. If the box is checked, the salary cap will be applied for all years.
Advanced Budgeting The Advanced Budgeting option is only available to individuals who have been designated as Module, Research, or Department administrators for Proposals. This option allows the individual to move between the Budget Detail, F&A, and Cost Sharing tabs in any order. By default, the Advanced Budgeting option is unchecked when initially accessing the Budget Periods and Setups screen. Users who are not Module, Research, or Department administrators for Proposals will need to complete the budget tabs in the following order:
• Budget Items • Modular Budget (if this option is available and utilized) • F&A • Cost Sharing
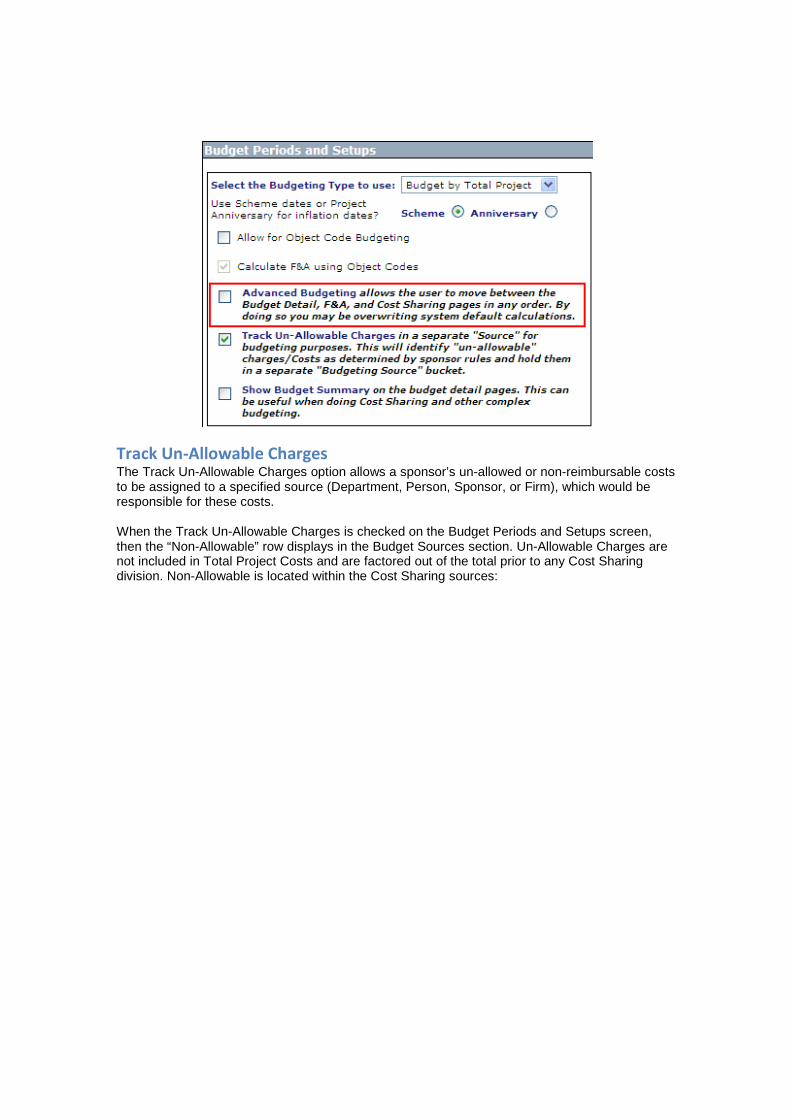
Track Un-Allowable Charges The Track Un-Allowable Charges option allows a sponsor’s un-allowed or non-reimbursable costs to be assigned to a specified source (Department, Person, Sponsor, or Firm), which would be responsible for these costs. When the Track Un-Allowable Charges is checked on the Budget Periods and Setups screen, then the “Non-Allowable” row displays in the Budget Sources section. Un-Allowable Charges are not included in Total Project Costs and are factored out of the total prior to any Cost Sharing division. Non-Allowable is located within the Cost Sharing sources:

Proposal Development User Guide 170
Proposal Development— User Guide v13
Totals for the Non-Allowable costs can be seen, in full, at the bottom of the Budget main screen :

Resetting Who the Non-Allowable Is Charged To When the Track Un-Allowable Charges is checked, the Non-Allowable charges in the Budget Sources is automatically set to the Principal Investigator’s department. To change who will be charged for Non-Allowable, click .

Proposal Development User Guide 172
Proposal Development— User Guide v13
After clicking , find who to charge the non-allowable to in the Responsible Account popup. Select the first letter of the name in the alpha split list, and then choose the name in the pick list. Or, Filter By people (located within GENIUS), department, sponsors, or firms. When you have
located the responsible party, click in the popup. The Budget Periods and Setups screen will refresh with your selection.
The Short Name of the Non-Allowable defaults to “UnAllow,” but may be modified.
When you are done, click in the stationary toolbar. Un-checking the Track Un-Allowable Charges option, along with re-saving any Budget Detail screen, will remove the source (identified as Non-Allowable) in the Budget Sources section on the Budget Periods and Setups screen.
Show Budget Summary On the Budget Periods and Setups screen, you may choose to Show the Budget Summary on the Budget Detail screens, which may be useful when working with complex budgeting:
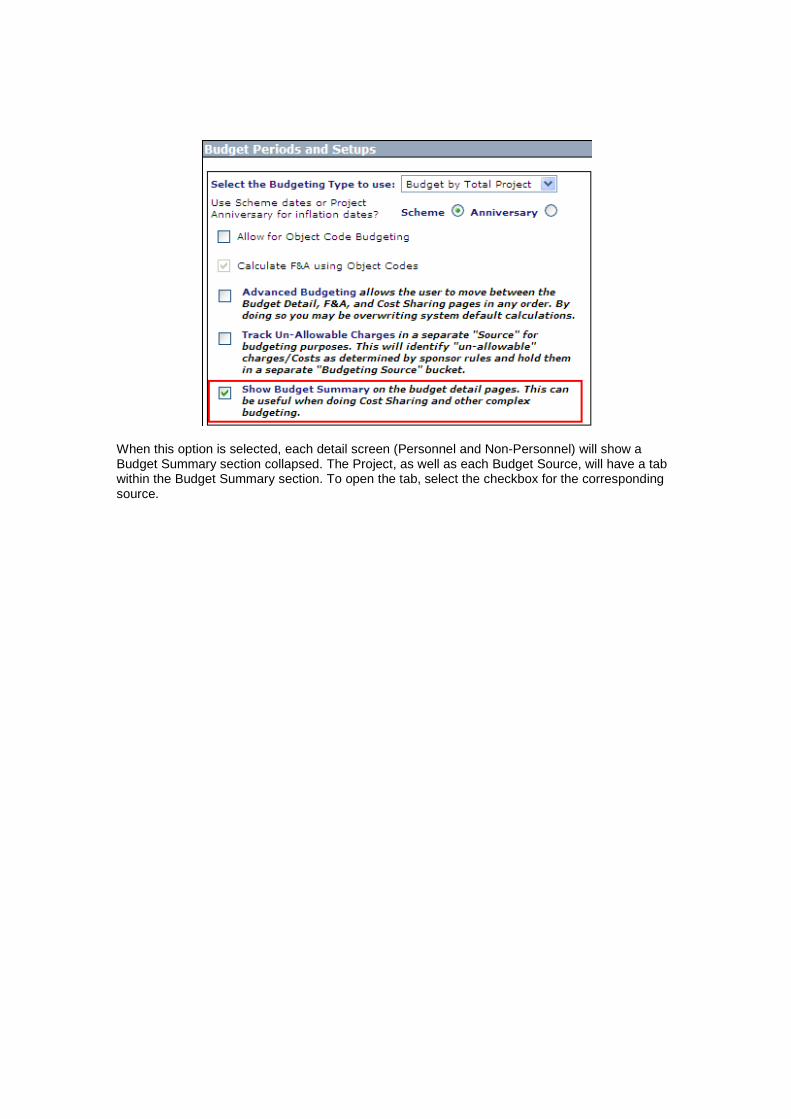
When this option is selected, each detail screen (Personnel and Non-Personnel) will show a Budget Summary section collapsed. The Project, as well as each Budget Source, will have a tab within the Budget Summary section. To open the tab, select the checkbox for the corresponding source.

Proposal Development User Guide 174
Proposal Development— User Guide v13
Build Subproject Documents with Parent Proposal This feature can be controlled within each proposal by checking or unchecking the default in PT > Budget > Budget Periods and Setups.
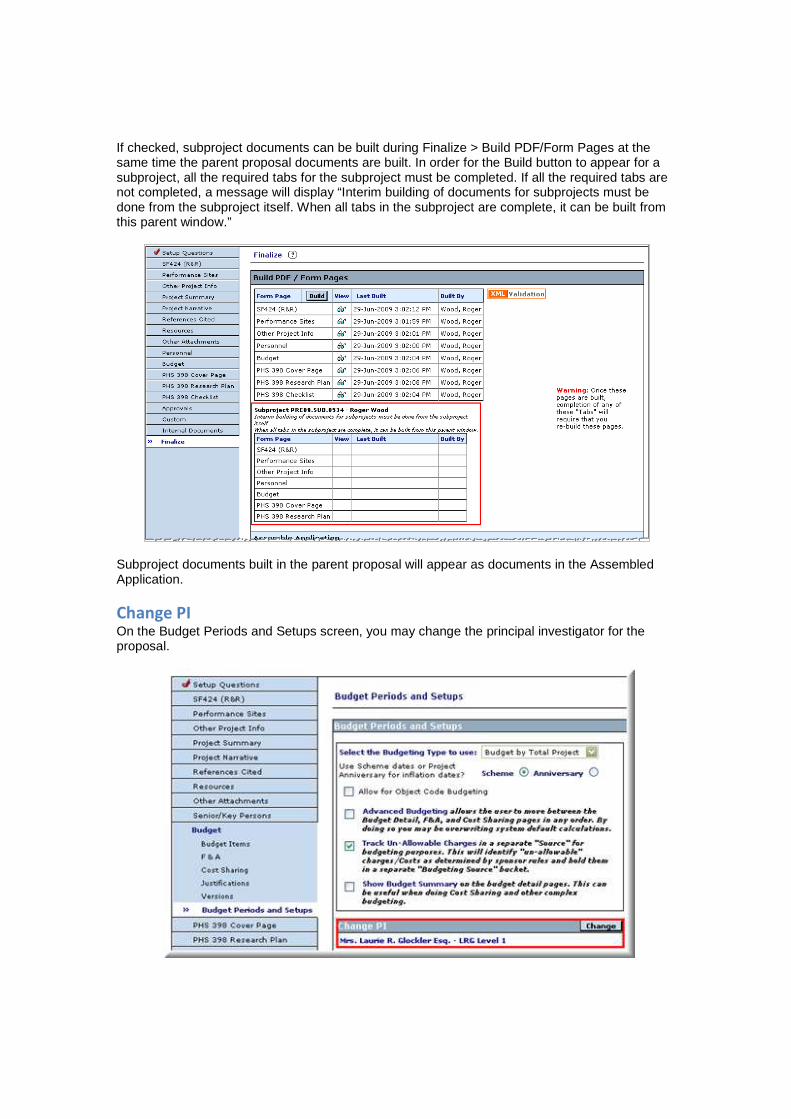
If checked, subproject documents can be built during Finalize > Build PDF/Form Pages at the same time the parent proposal documents are built. In order for the Build button to appear for a subproject, all the required tabs for the subproject must be completed. If all the required tabs are not completed, a message will display “Interim building of documents for subprojects must be done from the subproject itself. When all tabs in the subproject are complete, it can be built from this parent window.”
Subproject documents built in the parent proposal will appear as documents in the Assembled Application.
Change PI On the Budget Periods and Setups screen, you may change the principal investigator for the proposal.

Proposal Development User Guide 176
Proposal Development— User Guide v13
Click to select a different Principal Investigator/Program Director. In the Personnel popup, there are two options when changing the PI on a proposal.
• Replace and Remove the Current PI will completely remove the current PI from the proposal.
• Replace PI and Leave the Current PI on the Proposal will add the newly selected PI
to the proposal and keep the current PI on the proposal as an investigator. Find the individual in the popup by selecting the first letter of the last name. Select the name in the pick list or enter the name in the Search for a Particular Entry. You may also Filter by Position. If more than one person appears on the proposal, the option to Switch the PI to other KEY personnel, currently listed on the proposal, will be shown as well.
Click the radio button in the New PI column and click . When the Budget Periods and Setups screen refreshes, the new PI will display. This change will impact the entire proposal so the new name will also display in the header at the top of the screen.
Note: Changing the PI will uncomplete the Budget tab, if it has previously been checked complete.
Project Period The Project Start and End Dates were entered in Step 6 of the proposal creation. These dates display in the Project Period section of the Budget Periods and Setups screen within the Budget tab. Calculations within the budgets are based on the range or duration of the budget period and the project as a whole. Thus, project dates cannot simply be changed. Instead, the dates must be moved in direct correlation to each other.
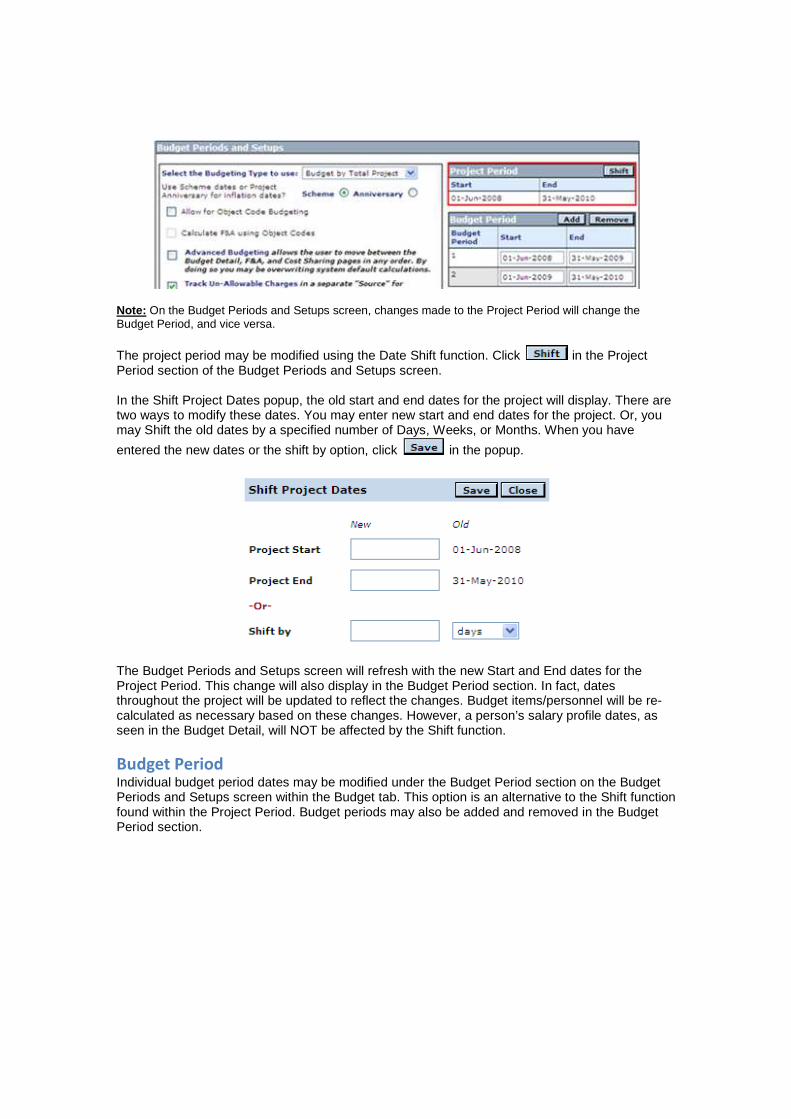
Note: On the Budget Periods and Setups screen, changes made to the Project Period will change the Budget Period, and vice versa. The project period may be modified using the Date Shift function. Click in the Project Period section of the Budget Periods and Setups screen. In the Shift Project Dates popup, the old start and end dates for the project will display. There are two ways to modify these dates. You may enter new start and end dates for the project. Or, you may Shift the old dates by a specified number of Days, Weeks, or Months. When you have
entered the new dates or the shift by option, click in the popup.
The Budget Periods and Setups screen will refresh with the new Start and End dates for the Project Period. This change will also display in the Budget Period section. In fact, dates throughout the project will be updated to reflect the changes. Budget items/personnel will be re-calculated as necessary based on these changes. However, a person’s salary profile dates, as seen in the Budget Detail, will NOT be affected by the Shift function.
Budget Period Individual budget period dates may be modified under the Budget Period section on the Budget Periods and Setups screen within the Budget tab. This option is an alternative to the Shift function found within the Project Period. Budget periods may also be added and removed in the Budget Period section.
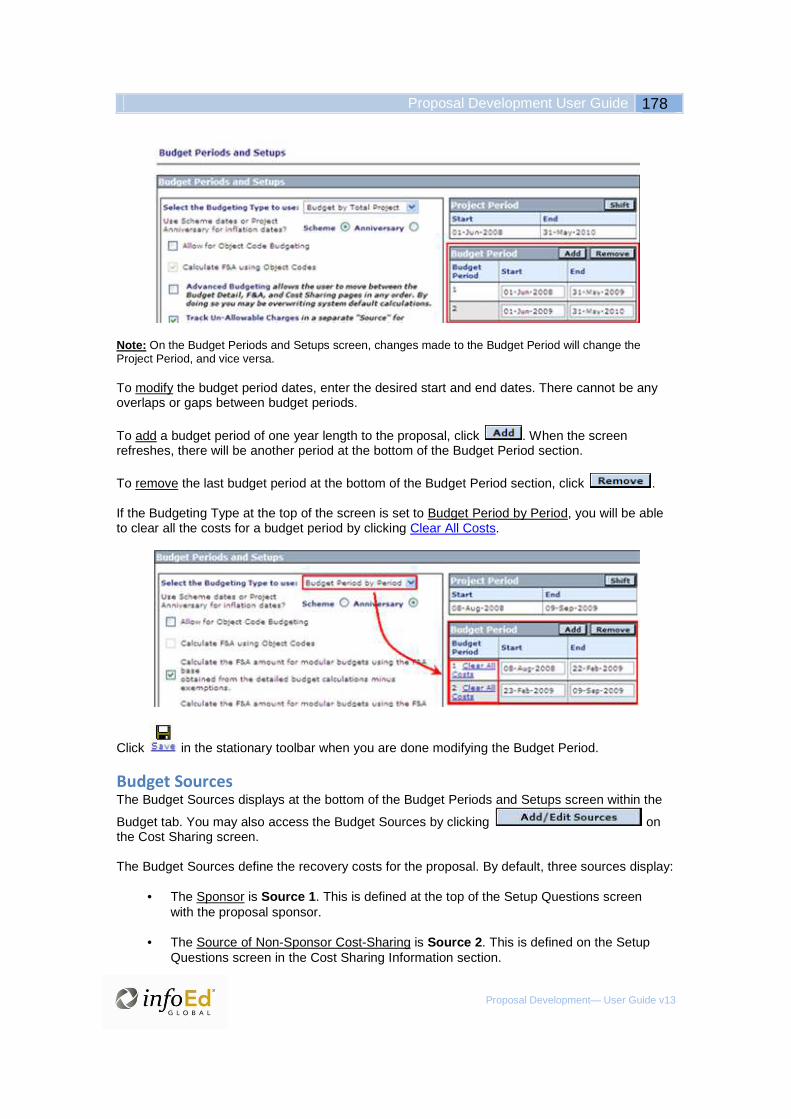
Proposal Development User Guide 178
Proposal Development— User Guide v13
Note: On the Budget Periods and Setups screen, changes made to the Budget Period will change the Project Period, and vice versa. To modify the budget period dates, enter the desired start and end dates. There cannot be any overlaps or gaps between budget periods. To add a budget period of one year length to the proposal, click . When the screen refreshes, there will be another period at the bottom of the Budget Period section. To remove the last budget period at the bottom of the Budget Period section, click . If the Budgeting Type at the top of the screen is set to Budget Period by Period, you will be able to clear all the costs for a budget period by clicking Clear All Costs.
Click in the stationary toolbar when you are done modifying the Budget Period.
Budget Sources The Budget Sources displays at the bottom of the Budget Periods and Setups screen within the
Budget tab. You may also access the Budget Sources by clicking on the Cost Sharing screen. The Budget Sources define the recovery costs for the proposal. By default, three sources display:
• The Sponsor is Source 1 . This is defined at the top of the Setup Questions screen with the proposal sponsor.
• The Source of Non-Sponsor Cost-Sharing is Source 2 . This is defined on the Setup
Questions screen in the Cost Sharing Information section.
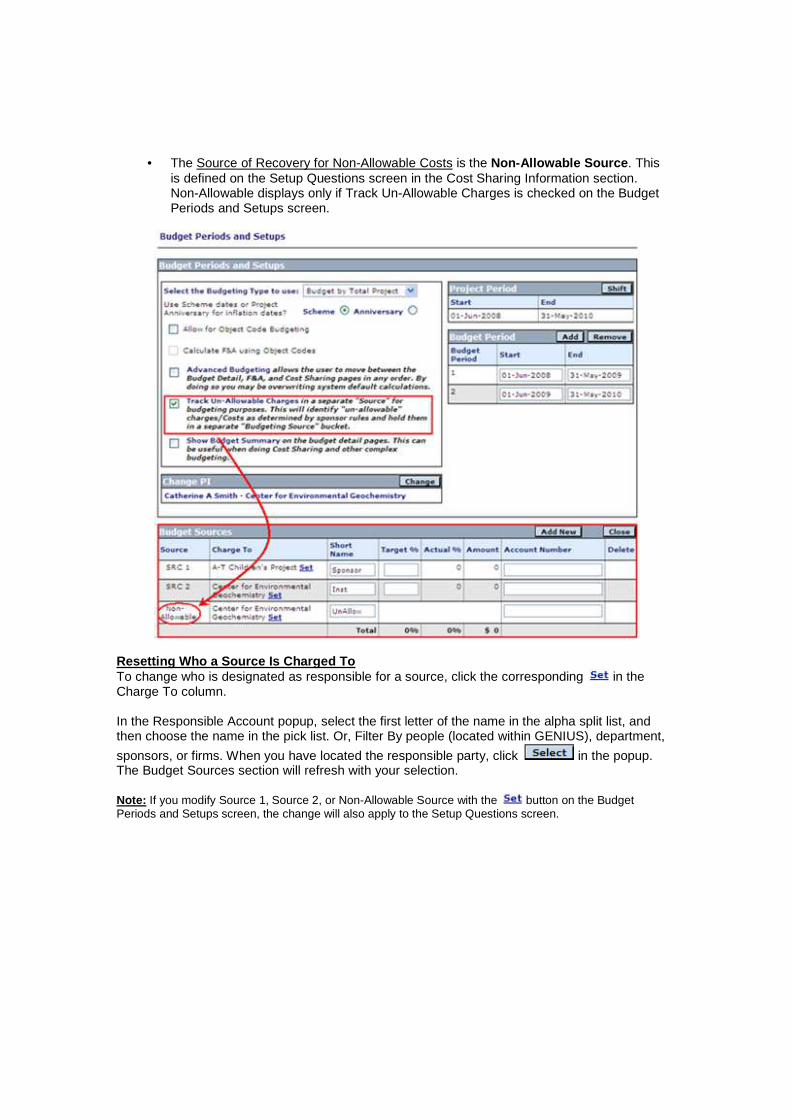
• The Source of Recovery for Non-Allowable Costs is the Non-Allowable Source . This
is defined on the Setup Questions screen in the Cost Sharing Information section. Non-Allowable displays only if Track Un-Allowable Charges is checked on the Budget Periods and Setups screen.
Resetting Who a Source Is Charged To To change who is designated as responsible for a source, click the corresponding in the Charge To column. In the Responsible Account popup, select the first letter of the name in the alpha split list, and then choose the name in the pick list. Or, Filter By people (located within GENIUS), department,
sponsors, or firms. When you have located the responsible party, click in the popup. The Budget Sources section will refresh with your selection. Note: If you modify Source 1, Source 2, or Non-Allowable Source with the button on the Budget Periods and Setups screen, the change will also apply to the Setup Questions screen.

Proposal Development User Guide 180
Proposal Development— User Guide v13
Adding/Deleting New Sources
To add a new Budget Source, click . The screen will refresh with a blank line item above the Non-Allowable Source. Click the new source’s corresponding and select the name of the new source in the Responsible Account popup.
To delete a source that has been added, click the corresponding . Source 1, Source 2, and Non-Allowable Source cannot be deleted. Other Columns in the Budget Sources By default, a Short Name is provided for the Sponsor, Institution, and Non-Allowable. These Short Names are modifiable. If an Account Number is to be associated with any source, enter the number in the available field. For each source, enter the Target Percentage of proposal costs. The total Target Percentage should equal 100%, but the interface does allow for +/- 100% as a total for this column. These percentages will act as a base/measure for the Actual % which is calculated from the budget totals.
Click in the stationary toolbar if you are on the Budget Periods and Setups screen. If you
are in the Budget Sources popup from the Cost Sharing screen, then click . Check the Budget Sources often to compare the Actual % to the originally set Target %.
Alternate Currency Depending on administrative setups, the Alternate Currency section will appear on the right side of the Budget Periods and Setups screen within the Budget tab. Note: Alternate Currency and Exchange Rates are only available in PD and PT if the administrator has set them up in multiple administrative locations: Activate Currency Conversion Support, Codes and Tables, Exchange Rate Setups, and Default Currency.
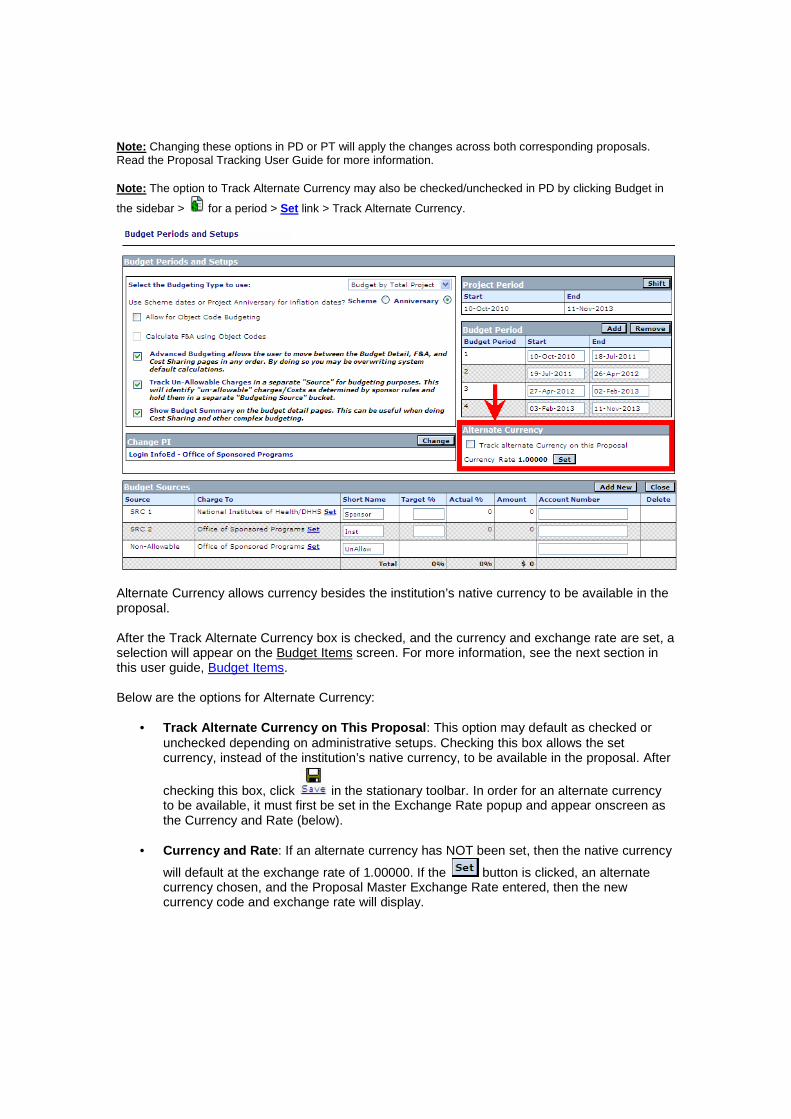
Note: Changing these options in PD or PT will apply the changes across both corresponding proposals. Read the Proposal Tracking User Guide for more information. Note: The option to Track Alternate Currency may also be checked/unchecked in PD by clicking Budget in
the sidebar > for a period > Set link > Track Alternate Currency.
Alternate Currency allows currency besides the institution’s native currency to be available in the proposal. After the Track Alternate Currency box is checked, and the currency and exchange rate are set, a selection will appear on the Budget Items screen. For more information, see the next section in this user guide, Budget Items. Below are the options for Alternate Currency:
• Track Alternate Currency on This Proposal : This option may default as checked or unchecked depending on administrative setups. Checking this box allows the set currency, instead of the institution’s native currency, to be available in the proposal. After
checking this box, click in the stationary toolbar. In order for an alternate currency to be available, it must first be set in the Exchange Rate popup and appear onscreen as the Currency and Rate (below).
• Currency and Rate : If an alternate currency has NOT been set, then the native currency
will default at the exchange rate of 1.00000. If the button is clicked, an alternate currency chosen, and the Proposal Master Exchange Rate entered, then the new currency code and exchange rate will display.

Proposal Development User Guide 182
Proposal Development— User Guide v13
Clicking will open the below Exchange Rate popup with the following options:
• Currency : Select among the currency codes setup by the administrator in Codes and Tables. When the popup refreshes, the Latest Exchange Rate setup by the administrator will display. Below are some examples of currency codes that may be included by the administrator. The native currency will NOT appear in this selection since it is already the default. The currency may default to an option based on the sponsor if the administrator has chosen a Default Currency in Sponsors Administration.
Code Country, Currency AUD Australia, Dollars EUR Euro Member Countries, Euro GBP United Kingdom, Pounds USD United States of America,
Dollars ZAR South Africa, Rand
• Proposal Master Exchange Rate : After choosing a Currency (above entry), the popup
refreshes with the Latest Exchange Rate setup by the administrator (below entry). There are three choices for the Proposal Master Exchange Rate field:
o Clicking the Get link will refresh this field with the Latest Exchange Rate.
o Enter the desired rate for the Currency. Clicking Lookup Current Exchange Rates will open a window where rates may be found.
o If the Currency is reset to the default native currency (no selection), then this field
can be reset to 1.00000.
After a rate is entered in the numeric field, click . The user, date, and time the rate was set will display.
• Latest Exchange Rate : After a Currency is chosen (above), the latest exchange rate for
that currency will automatically display. The administrator, date, and time the rate was set will display. The exchange rates for each currency are setup by the administrator in the Exchange Rate Setups.
• Lookup Current Exchange Rates : Clicking this hyperlink opens a window to the
Exchange Rate URL setup in administration.
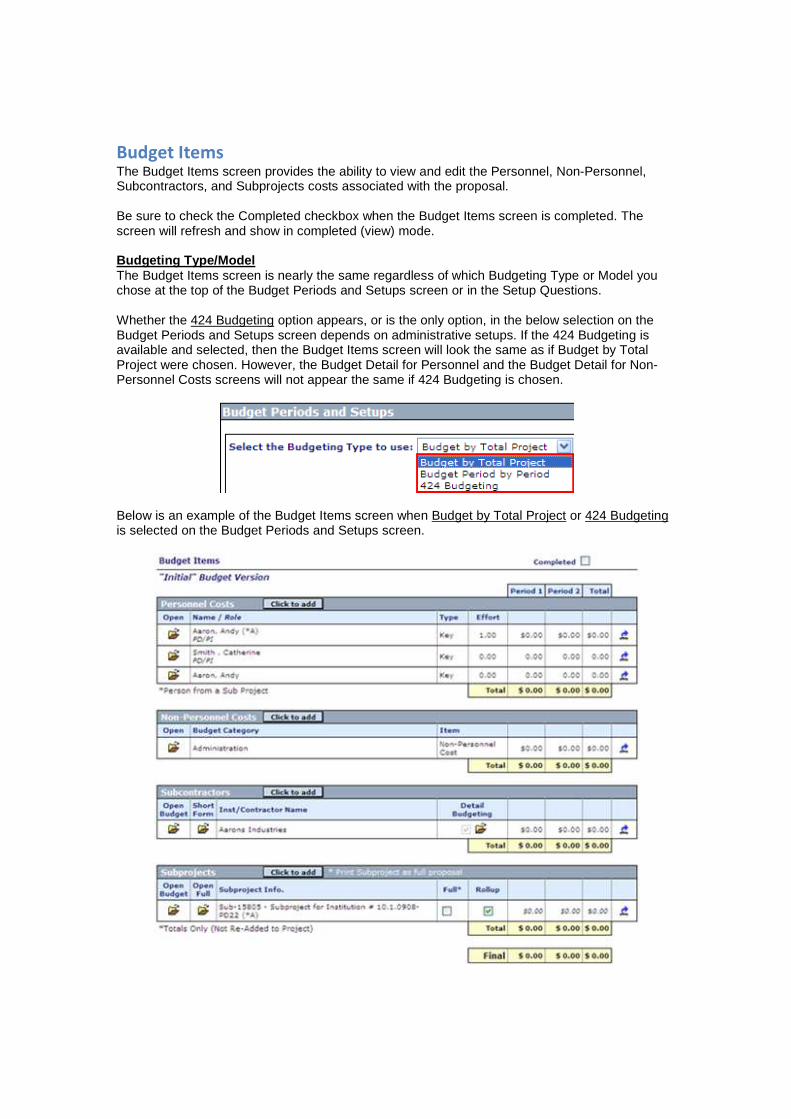
Budget Items The Budget Items screen provides the ability to view and edit the Personnel, Non-Personnel, Subcontractors, and Subprojects costs associated with the proposal. Be sure to check the Completed checkbox when the Budget Items screen is completed. The screen will refresh and show in completed (view) mode. Budgeting Type/Model The Budget Items screen is nearly the same regardless of which Budgeting Type or Model you chose at the top of the Budget Periods and Setups screen or in the Setup Questions. Whether the 424 Budgeting option appears, or is the only option, in the below selection on the Budget Periods and Setups screen depends on administrative setups. If the 424 Budgeting is available and selected, then the Budget Items screen will look the same as if Budget by Total Project were chosen. However, the Budget Detail for Personnel and the Budget Detail for Non-Personnel Costs screens will not appear the same if 424 Budgeting is chosen.
Below is an example of the Budget Items screen when Budget by Total Project or 424 Budgeting is selected on the Budget Periods and Setups screen.

Proposal Development User Guide 184
Proposal Development— User Guide v13
Inflation The only difference between the Budget by Total Project model and the Budget Period by Period model is the Budget Period by Period model allows inflation from period to period on the Budget Items screen. Below is an example of the Budget Items screen when Budget Period by Period is
selected on the Budget Periods and Setups screen. Notice the inflate icon is available for each period and the total at the top of the screen:
After information is entered in the Personnel Costs, Non-Personnel Costs, Subcontractors, and/or Subprojects sections, you may inflate each period and/or the total if you are using Period by Period Budgeting. Note: Inflating budget period data will erase and replace all the budget data that may currently exist in that period.
Click for any period. In the Inflate Period popup, enter the inflation percentage at the top. If you left-click in the popup, it will refresh with the same inflation entered for the Administration, Facilities, and Labor categories. You may modify the individual category inflations. When done entering the inflations, click . Below is an example of the Inflate popup for Period 1:
Click for the total. In the Inflate Total popup, enter the inflation percentage at the top. When done, click . Below is an example of the Inflate Total popup:
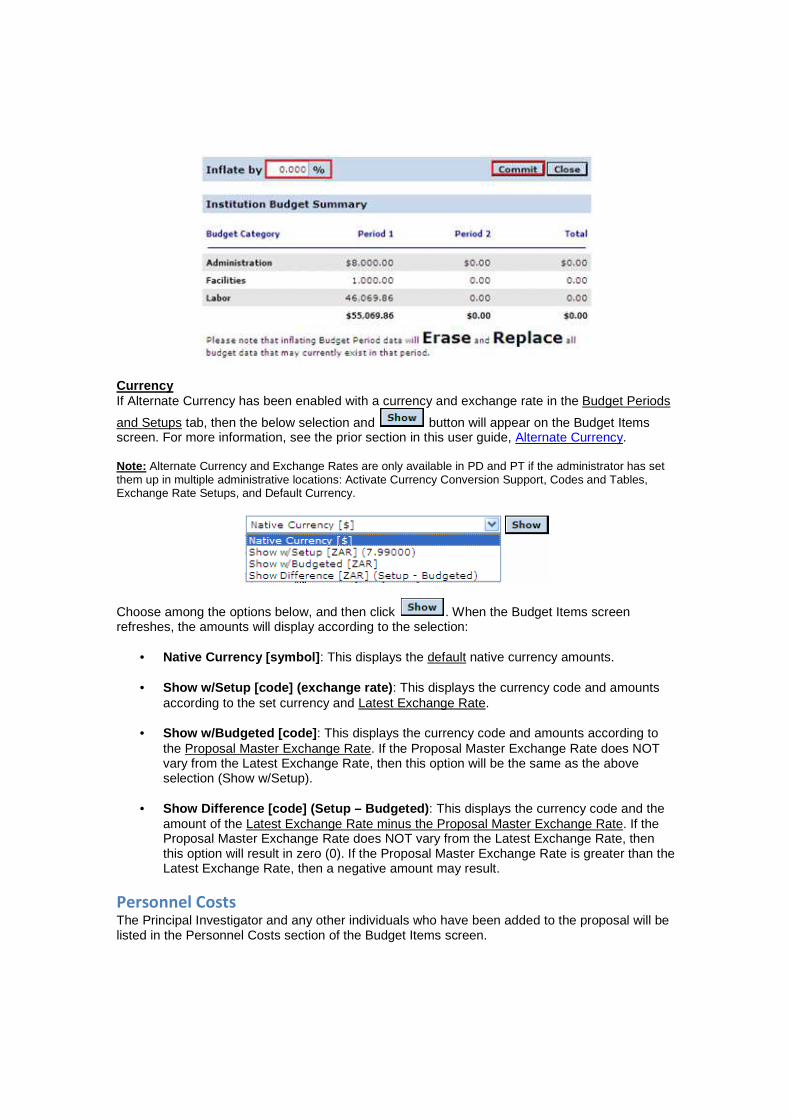
Currency If Alternate Currency has been enabled with a currency and exchange rate in the Budget Periods
and Setups tab, then the below selection and button will appear on the Budget Items screen. For more information, see the prior section in this user guide, Alternate Currency. Note: Alternate Currency and Exchange Rates are only available in PD and PT if the administrator has set them up in multiple administrative locations: Activate Currency Conversion Support, Codes and Tables, Exchange Rate Setups, and Default Currency.
Choose among the options below, and then click . When the Budget Items screen refreshes, the amounts will display according to the selection:
• Native Currency [symbol] : This displays the default native currency amounts.
• Show w/Setup [code] (exchange rate) : This displays the currency code and amounts according to the set currency and Latest Exchange Rate.
• Show w/Budgeted [code] : This displays the currency code and amounts according to
the Proposal Master Exchange Rate. If the Proposal Master Exchange Rate does NOT vary from the Latest Exchange Rate, then this option will be the same as the above selection (Show w/Setup).
• Show Difference [code] (Setup – Budgeted) : This displays the currency code and the
amount of the Latest Exchange Rate minus the Proposal Master Exchange Rate. If the Proposal Master Exchange Rate does NOT vary from the Latest Exchange Rate, then this option will result in zero (0). If the Proposal Master Exchange Rate is greater than the Latest Exchange Rate, then a negative amount may result.
Personnel Costs The Principal Investigator and any other individuals who have been added to the proposal will be listed in the Personnel Costs section of the Budget Items screen.
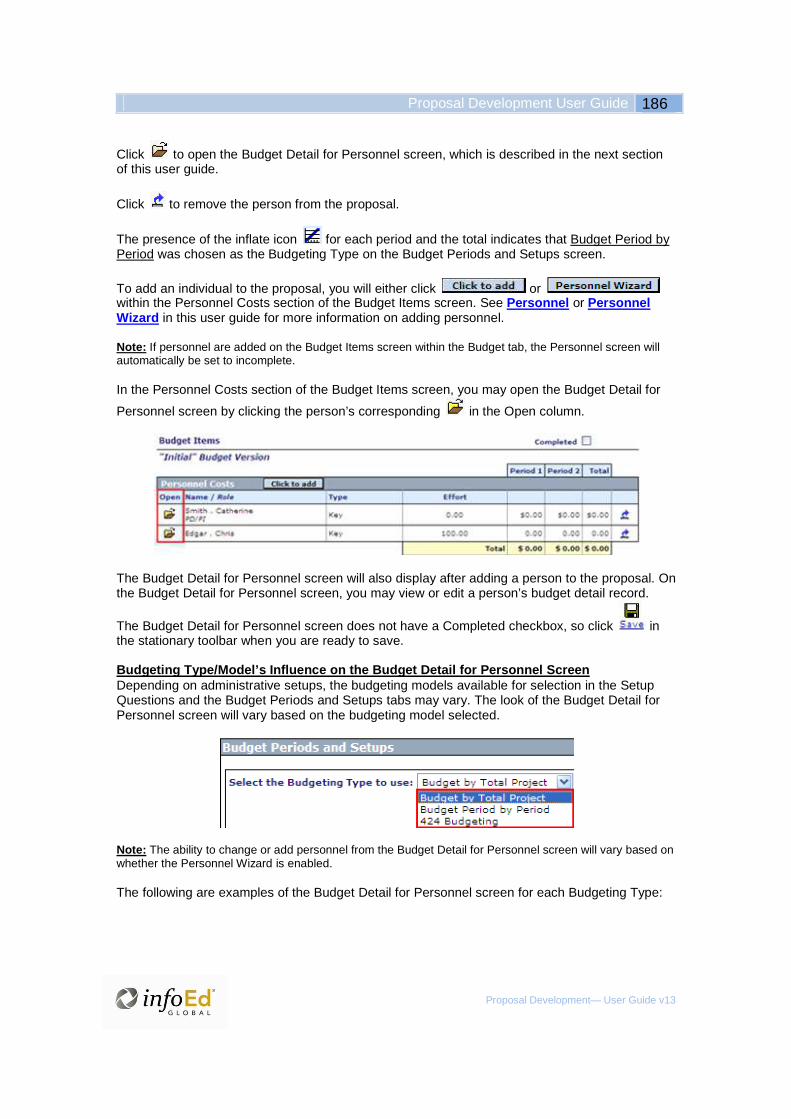
Proposal Development User Guide 186
Proposal Development— User Guide v13
Click to open the Budget Detail for Personnel screen, which is described in the next section of this user guide.
Click to remove the person from the proposal.
The presence of the inflate icon for each period and the total indicates that Budget Period by Period was chosen as the Budgeting Type on the Budget Periods and Setups screen.
To add an individual to the proposal, you will either click or within the Personnel Costs section of the Budget Items screen. See Personnel or Personnel Wizard in this user guide for more information on adding personnel. Note: If personnel are added on the Budget Items screen within the Budget tab, the Personnel screen will automatically be set to incomplete. In the Personnel Costs section of the Budget Items screen, you may open the Budget Detail for
Personnel screen by clicking the person’s corresponding in the Open column.
The Budget Detail for Personnel screen will also display after adding a person to the proposal. On the Budget Detail for Personnel screen, you may view or edit a person’s budget detail record.
The Budget Detail for Personnel screen does not have a Completed checkbox, so click in the stationary toolbar when you are ready to save. Budgeting Type/Model’s Influence on the Budget Deta il for Personnel Screen Depending on administrative setups, the budgeting models available for selection in the Setup Questions and the Budget Periods and Setups tabs may vary. The look of the Budget Detail for Personnel screen will vary based on the budgeting model selected.
Note: The ability to change or add personnel from the Budget Detail for Personnel screen will vary based on whether the Personnel Wizard is enabled. The following are examples of the Budget Detail for Personnel screen for each Budgeting Type:
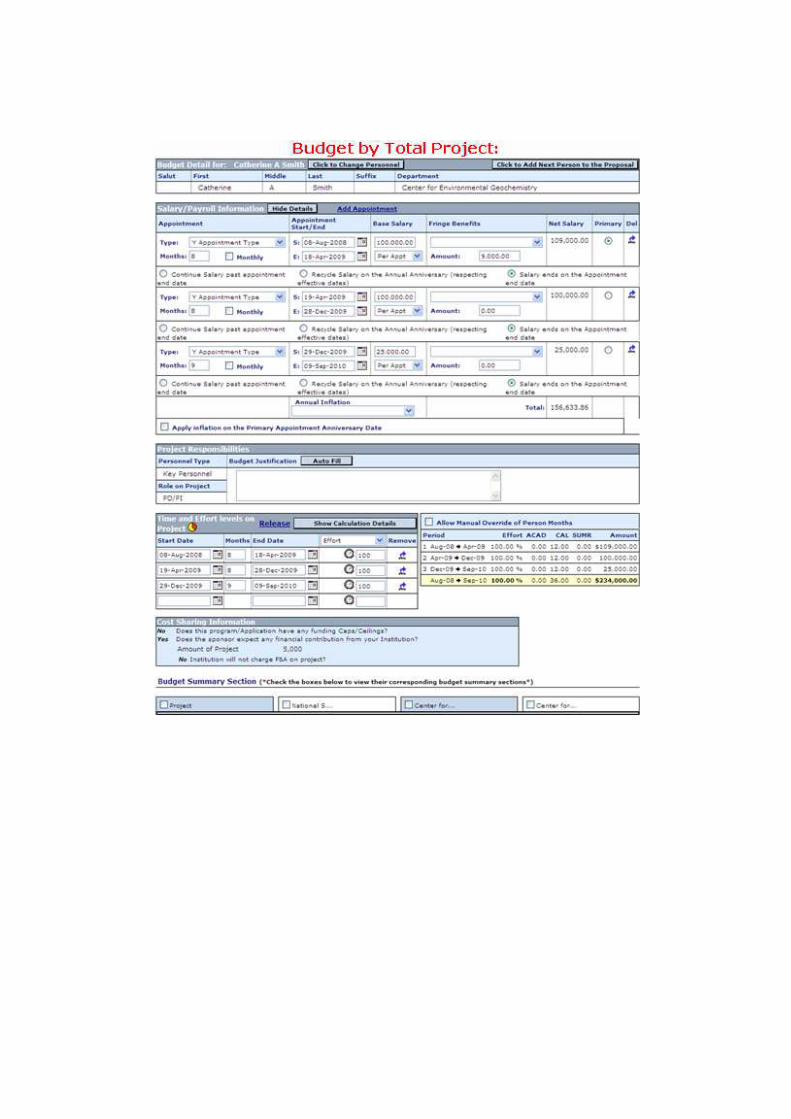

Proposal Development User Guide 188
Proposal Development— User Guide v13

Note: When the 424 Budgeting Model is chosen, the bottom of the Budget Detail for Personnel screen will vary based on whether the Personnel Type is Key or Non-Key Personnel. The following table shows which of the following subsections in this user guide will apply to the Budget Detail for Personnel screen depending on the Budgeting Type:
Budget by Total
Project
Budget Period by
Period
424 Budgeting
Salary Release X X
Effort Release X X
Changing Personnel, Including PI X X X
Add the Next Person to the Proposal X X X
Salary/Payroll Information X X
Project Responsibilities X X X
Time and Effort Levels on the Project X X
Total Project Budgeting X
Period by Period Budgeting X
Review Committed and Pending Effort X X
Cost Sharing Information X X X
Budget Summary Section X X X
Budget Period Information (424) X

Proposal Development User Guide 190
Proposal Development— User Guide v13
Salary Release In the Salary/Payroll Information section of the Budget Detail for Personnel screen, click the
Release link to permit the salary to be used in the proposal, and then click to confirm the release is permitted.
The Budget Detail for Personnel screen will refresh, revealing the salary information and a date/time stamp along with the name of the person releasing the information.
For more information on Salary Release, see Release of Salary and Effort Information.
Effort Release In the Time and Effort Levels on the Project section of the Budget Detail for Personnel screen,
click the Release link to permit the salary to be used in the proposal, and then click to confirm the release is permitted.

The Budget Detail for Personnel screen will refresh, removing the Release link within the Time and Effort Levels on the Project section.
For more information on Effort Release, see Release of Salary and Effort Information.
Change Personnel, Including PI On the Budget Detail for Personnel screen, you may replace the current person by clicking
at the top of the screen. The popup that appears will vary based on whether the Budget Detail is for the Principal Investigator or not.
Personnel Wizard If your administrator has enabled the Personnel Wizard within PD Setups, then the
and buttons will NOT display on the Budget Detail for Personnel screen.
If the Budget Detail is NOT for the Principal Inves tigator If the person in the Budget Detail was not the PI, then the Select Existing Staff popup will appear after using the button. You may select a new staff member for the proposal to replace the current one in the Budget Detail. Select the new person’s Position. If Budget Period by Period is being used as the Budget Type, check the applicable periods. If enabled through security setups, you may also create a new
person by clicking .

Proposal Development User Guide 192
Proposal Development— User Guide v13
When ready, click . When the screen refreshes, the Budget Detail will be for the newly selected person. Note: In the below popup, the alpha split list no longer defaults to the letter A and the button is disabled until a letter is clicked.
If the Budget Detail is for the Principal Investiga tor If the person in the Budget Detail is the PI, then the Personnel popup will appear after using the
button. There are two options when changing the PI on a proposal:
• Replace and Remove the Current PI will completely remove the current PI from the proposal.
• Replace PI and Leave the Current PI on the Proposal will add the newly selected PI
to the proposal and keep the current PI on the proposal as an investigator. Locate the individual in the pick list by selecting the first letter of the last name. If more than one person appears on the proposal, the option to Switch the PI to other KEY personnel, currently listed on the proposal, will be shown as well. Select the radio button in the New PI column.
When ready, click . When the screen refreshes, the Budget Detail will be for the newly selected PI.

Add the Next Person to the Proposal On the Budget Detail for Personnel screen, you may add the next person in the proposal by clicking .
In the Select Existing or Add New Staff popup, you may select from existing staff in GENIUS, add new staff or unnamed personnel, or create a new person. See Personnel for more information on how to use this popup. Use the Order column on the Personnel screen to change the order in which Personnel will be listed on the PDF. The proposal’s PI will automatically be set as the first position; this cannot be changed. Note: In the below popup, the alpha split list no longer defaults to the letter A and the button is disabled until a letter is clicked.
Personnel Wizard If your administrator has enabled the Personnel Wizard within PD Setups, then the
and buttons will NOT display on the Budget Detail for Personnel screen.
Salary/Payroll Information On the Budget Detail for Personnel screen, the Salary/Payroll Information section can be shown in three formats: basic, detail (view), and detail (edit). From the Basic view, click .

Proposal Development User Guide 194
Proposal Development— User Guide v13
The section will expand to reveal the Detail section in view mode. To collapse the detail, click
.
To edit the Detail information, click .
Note: Information originating from Salary setups within the Profile will not be editable. The Salary/Payroll Information section consists of the following information:
• Sponsor Cap : When the sponsor cap has been applied, a red flag ( ) will appear at the top of the Salary/Payroll Information section. If you want to restore appointment information from the profile, click the Refresh link to open a popup, and click OK. When the Budget Detail for Personnel screen refreshes, the red flag ( ) will no longer appear.
• Appointment Type : Select the appointment type, which is setup by administration.
Information within this section will help define this appointment. Multiple records may be recorded for each person on the proposal using the Add Appointment option.
• Appointment Months : The number of months for the appointment defaults to 12, but
may be changed. This helps define the duration for the base salary.
• Appointment Start and End Dates : These dates define the length of time in which the entered salary is applied. The appointment cannot be saved without these dates being entered. If the dates are NOT entered, a warning will appear upon attempting to save (below). These dates may be entered or changed in the date fields or by clicking
. For more information, see Date Fields in this user guide.

• Base Salary Amount : Enter the amount of money the person makes per the appointment period in the Base Salary.
• Base Salary Per: Choose Per Appt, Per Hour or Per Week.
• Fringe Benefits Scheme : Defined within administration, the fringe benefit scheme selected in this pick list will calculate the Fringe Benefit Amount (shown below) based on determinants defined within setups.
• Fringe Benefits Amount : If the Fringe Benefit Scheme has been selected, this field
will auto-populate. However, this field may be changed or set manually.
• Net Salary : This amount represents the total Base Salary + Fringe Benefit Amount for each appointment record.
• Primary : If additional appointments have been added with the Add Appointment
option, you may select this radio button to modify the primary appointment.
• Delete : If additional appointments have been added with the Add Appointment
option, you may remove appointments by clicking .
• Salary radio button : Select a radio button to Continue Salary past appointment end date, Recycle Salary on the annual anniversary (respecting effective dates), or Salary ends on the Appointment end date.
If you choose to Continue the Salary Past the Appointment End Date, then an appointment(s) can be entered for a given timeframe. The salary associated with this appointment will continue to be extrapolated beyond the actual appointment start and end dates. If a person shows a single calendar appointment and the salary is expected to increase with a standard inflation, then this is the option you should consider.
If you choose to Recycle the Salary on the Annual Anniversary (respecting effective dates), then the appointments are recycled or reused for future periods. This option would be a likely choice for institutions that show an academic and summer appointment, and the salary is expected to increase with a standard inflation.
Note: If a person only shows a single 12-month appointment, the first two radio buttons will produce the same result.
If you choose to End the Salary on the Appointment End Date, then the InfoEd Global system will not extrapolate the salary appointments and the salary will not be recycled. This option is helpful in prime and subcontract budgets when the anticipated salary in outyear(s) cannot be determined by a standard inflation rate. An institution’s effort to setup appointments for future years is respected by the InfoEd Global system. This means that if the system does not know what base salary to use during a timeframe, it will display $0.

Proposal Development User Guide 196
Proposal Development— User Guide v13
• Annual Inflation : The inflation scheme may be selected independently for each item
within the budget.
• Salary Total : The total salary for the person may include totals of multiple appointments.
• Inflation Calculation Method : Inflation will be applied on the Primary Appointment
Anniversary Date for this person, if this checkbox is checked. Otherwise inflation will be calculated according to what is setup on the Budget Periods and Setup screen to either apply inflation based on the scheme dates or on the project anniversary dates.
Salary Calculations For Total Project Budgeting and Period by Period Budgeting (but not applicable to 424 Budgeting) salary amounts for the proposal will calculate using monthly amounts (annual salary total (salary plus fringes) divided by 12, rather than by 365 days), if the dates of the scenario are either the first or last day of a month for all the following:
• Start and end dates of all appointments • Effort period start and end dates • Inflation schemes • Fringe benefits schemes
Note: F&A scheme dates are not required to meet this constraint. Alternatively, if any of the dates involved are NOT the first or last day of a month, then all the calculations will be on a daily basis (i.e., annual salary divided by 365 to get a daily rate rather than a monthly rate).
Project Responsibilities On the Budget Detail for Personnel screen, the Project Responsibilities section defines the Personnel Type and Role, and offers the ability to enter the Budget Justification.
Personnel Type This option is initially set during the Add Personnel process, but may be changed. Select from Key Personnel, Significant Contributor, or Non-Key Personnel. For the Principal Investigator, this defaults to Key Personnel.
• Key Personnel: Individuals identified as Key Personnel must devote measurable effort (unless not required by a particular program) to the proposed project whether or not salaries are requested.
• Significant Contributors: Individuals who have committed to contribute to the
scientific development and execution of the project, but are not committing any

specified measurable effort to the proposed project, should be identified as Other Significant Contributors. Consultants should be included if they meet this definition.
• Non-Key Personnel: Individuals identified as Non-Key Personnel may have
originated from GENIUS or been added to the proposal as unnamed. Role on Project For the PI, this is set by the system. For other personnel, the role is selected from the pre-defined pick list. If Other (Specify) is selected, you must specify in the textbox below the pick list. Budget Justification Justifications may be entered within each individual person’s budget detail record. Justifications may include percent of effort and roles on the project. No individual salary information should be provided. Click to enter an introduction that includes: Full Name (effort %) will be responsible for…
Time and Effort Levels on the Project The Time and Effort Levels on the Project is an important section of the Budget Detail for Personnel screen. Establishing the time and effort for each individual can be done without regard to period start and end dates. There could be occasions when a person’s effort on a proposal may change as the work on the project progresses. Working alongside the administrative setups, the effort designated within this proposal may need to be approved or released by either the person for whom the effort will apply or the administrator. In such a case, this section will appear with an “Unreleased” link. This link will be removed when the effort has been approved/released.

Proposal Development User Guide 198
Proposal Development— User Guide v13
Total Project Budgeting If Budget by Total Project was chosen as the budgeting type/model, then this section in the user guide applies. On the Budget Detail for Personnel screen, the default entry within this section spans the project from start date to end date. This may be changed. If the effort on the project fluctuates, or is proposed to fluctuate, it can be recorded in this section. The start and end dates entered must fall within the project timeframe, but do not need to include them.

Enter the proposed start date. The user may enter either the number of months, in which case the end date will auto-populate. Or, the user may enter the end date, in which case the months will auto-calculate. Effort on the project may be recorded in standard Effort, Hrs/Week, Hrs/Year, Hrs/Interval, or in Person Months.
Select the option that will represent the amount entered and enter the corresponding effort. Click
in the stationary toolbar.
The total effort and salary will calculate for each period. In addition, the number of Academic/Calendar/Summer months devoted during each period is displayed. These amounts are based upon the Salary/Payroll Information appointment entries. The last row will show the project totals. Project Effort will be represented as an average across the period and as an average for the total project as well. Allow Manual Override of Person Months

Proposal Development User Guide 200
Proposal Development— User Guide v13
If the administrator has allowed this option to be visible, you may use the checkbox to Allow the
Manual Override of Person Months. After checking the box, click in the stationary toolbar. When the Budget Detail for Personnel screen refreshes, you may make manual entries in the area depicted below:
Period by Period Budgeting On the Budget Detail for Personnel screen, the Time and Effort Levels on the Project section appears differently if the budgeting method is Period by Period.
For this method, the start and end dates for each period are listed in this section (without the ability to change). Enter the amount of effort. Effort on the project may be recorded in standard Effort, Hrs/Week, Hrs/Year, Hrs/Interval, or in Person Months.
Select the option that will represent the amount entered and enter the corresponding effort. Click
in the stationary toolbar.
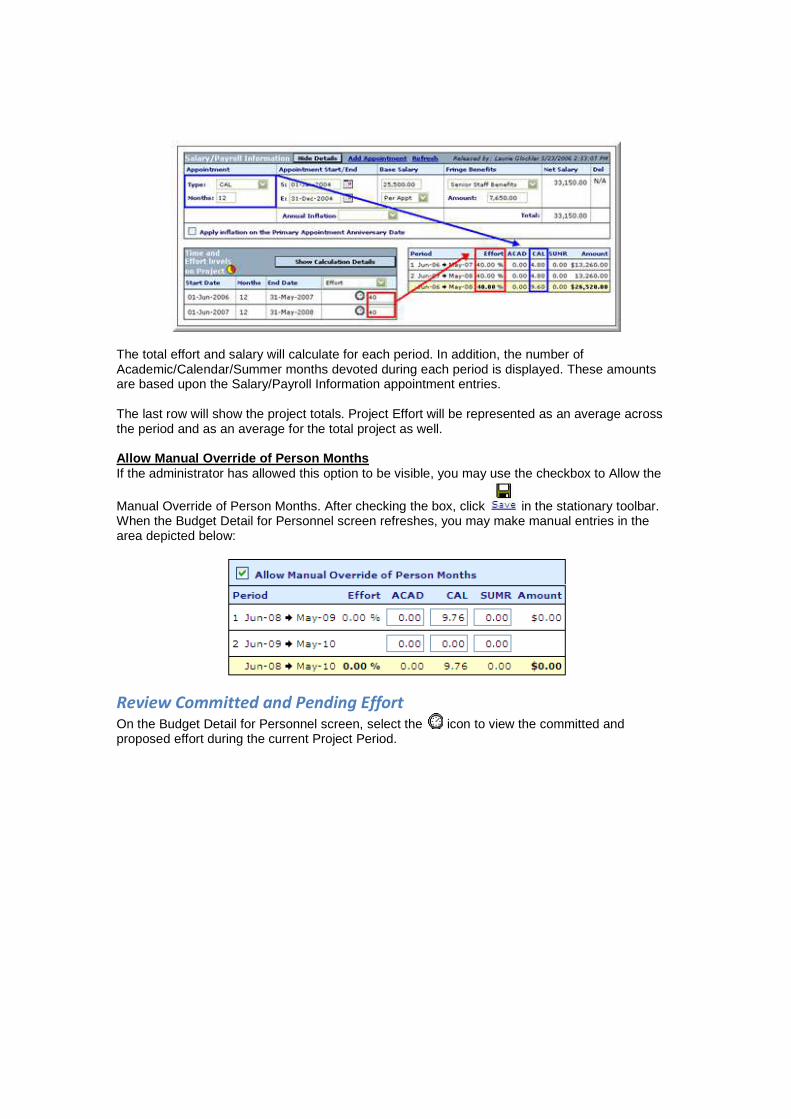
The total effort and salary will calculate for each period. In addition, the number of Academic/Calendar/Summer months devoted during each period is displayed. These amounts are based upon the Salary/Payroll Information appointment entries. The last row will show the project totals. Project Effort will be represented as an average across the period and as an average for the total project as well. Allow Manual Override of Person Months If the administrator has allowed this option to be visible, you may use the checkbox to Allow the
Manual Override of Person Months. After checking the box, click in the stationary toolbar. When the Budget Detail for Personnel screen refreshes, you may make manual entries in the area depicted below:
Review Committed and Pending Effort On the Budget Detail for Personnel screen, select the icon to view the committed and proposed effort during the current Project Period.

Proposal Development User Guide 202
Proposal Development— User Guide v13
• Committed Effort from existing projects over this p eriod : The effort from all existing awards within this proposal’s Project Period.
• Minimum effort (committed and proposed) over this p eriod : The lowest effort for
both awarded and non-awarded proposals within this proposal’s Project Period.
• Maximum effort (committed and proposed) over this p eriod : The highest effort for both awarded and non-awarded proposals within this proposal’s Project Period.
• Maximum Remaining effort based upon current committ ed effort : The highest
effort available based on existing awards within this proposal’s Project Period. To see a graphical view of pending and committed effort for the Project Period, click the committed icon . Pending effort will show with stripes, while awarded will show as solid.

Cost Sharing Information On the Budget Detail for Personnel screen, the Cost Sharing Information section displays some of the questions and answers from the Cost Sharing Information section on the Setup Questions screen.
If you want to modify the answers to these questions, you must do so in the Setup Questions.
Budget Summary Section On the Budget Periods and Setups screen, you have the option to the Show the Budget Summary on the Budget Detail screens.

Proposal Development User Guide 204
Proposal Development— User Guide v13
If this option is enabled, then each Budget Detail screen for Personnel and Non-Personnel will show a Budget Summary section at the bottom of the screen. There will be a tab for the Project and each Budget Source.
To expand a tab from the collapsed view, click the corresponding checkbox. To hide that tab’s view again, uncheck the tab.
You may click one or more of the tabs, resulting in the Budget Summaries displaying in the order of the tabs.

Budget Period Information (with the 424 Budgeting Model) If 424 Budgeting was chosen for the budgeting model in the Setup Questions and Budget Periods and Setups tabs, then the Budget Detail for Personnel screen may appear as below. The top of the screen, Project Responsibilities, Cost Sharing Information, and the Budget Summary Section are covered in other subsections of this user guide (above). The budget period information at the bottom of the screen is described here. Note: When the 424 Budgeting Model is chosen, the bottom of the Budget Detail for Personnel screen will vary based on whether the Personnel Type is Key or Non-Key Personnel. If Key Personnel is chosen, then the Base Salary column will appear. If a named Non-Key Personnel is chosen, then enter one (“1”) in the Number of Personnel column for each applicable period. If TBD Non-Key Personnel are added, then enter the number of people in the Number of Personnel column for each applicable period.

Proposal Development User Guide 206
Proposal Development— User Guide v13
When the 424 Budgeting is used, you may enter the following at the bottom of the Budget Detail for Personnel screen. If the Base Salary column displays, then the Number of Personnel column will not, and vice versa:
• Period : The number of periods in the proposal display in this column. After proposal creation, this is modifiable on the Budget Periods and Setups screen in the Budget tab.
• Base Salary : If Key Personnel is chosen as the Personnel Type, this column will
display. Enter the base salary for each period that the key person will be involved. To
inflate, enter a percentage to the right of . Starting with the second period, there is a percentage in light grey that shows the “back-calculated” percent of inflation based on the difference between the previous row base salary and the current row base salary. This allows the user to know the percentage of inflation each year.
• Number of Personnel : If Non-Key Personnel is chosen as the Personnel Type, this
column will display. If the person is known, as in named, enter one (“1”) in this column for each applicable period. If one or more people are unnamed or TBD (to be determined), enter the number of personnel in this column for each applicable period.
To inflate, enter a percentage to the right of .
• Months – Calendar : Enter the number of calendar months for the period. If Calendar is used, then Academic and Summer should not be used for the same period. If entering TBD Non-Key Personnel, enter the total months for all the personnel listed in the Number of Personnel column. For example, if three (“3”) TBD Non-Key Personnel are entered in the Number of Personnel column for a period, then 36 calendar months may be entered in this column for the same period.
If Key Personnel is chosen as the Personnel Type, the icon will display in the
Months header. Clicking will open the Effort for Personnel popup (example below):
• Months – Academic : Enter the number of academic months for the period. The
Academic and Summer columns may both be used for the same period, but not with the Calendar column. If entering TBD Non-Key Personnel, enter the total months for all the personnel listed in the Number of Personnel column. For example, if two (“2”) TBD Non-Key Personnel are entered in the Number of Personnel column for a period, then 18 academic months may be entered in this column for the same period.
• Months – Summer : Enter the number of summer months for the period. The Academic
and Summer columns may both be used for the same period, but not with the Calendar column. If entering TBD Non-Key Personnel, enter the total months for all the personnel listed in the Number of Personnel column. For example, if four (“4”) TBD Non-Key Personnel are entered in the Number of Personnel column for a period, then 12 summer months may be entered in this column for the same period.
• Requested – Salary : Enter the requested salary amount. A Grand Total automatically
calculates at the bottom of the screen. If entering TBD Non-Key Personnel, enter the total amount for all the personnel listed in the Number of Personnel column for the period.
• Requested – Fringe Benefits : Enter the requested fringe benefit amount. A Grand
Total automatically calculates at the bottom of the screen. If entering TBD Non-Key Personnel, enter the total amount for all the personnel listed in the Number of Personnel column for the period.
• Total : The total for each period automatically calculates. A Grand Total automatically
calculates at the bottom of the screen. If entering TBD Non-Key Personnel, the total will be for all the personnel listed in the Number of Personnel column.
When done, click in the stationary toolbar to retain your work.
Non-Personnel Costs Non-Personnel Costs that have been added to the proposal will be listed in the second section of the Budget Items screen. Each Non-Personnel Cost is listed as a Budget Category. The Item column corresponds to the Description field on the Budget Detail for Non-Personnel Costs screen.
To remove a Non-Personnel Cost from the Budget Items screen, click the corresponding on the right.
The presence of the inflate icon for each period and the total indicates that Budget Period by Period was chosen as the Budgeting Model/Type in the Setup Questions and the Budget Periods and Setups tabs. Be sure to check the Completed checkbox when the Budget Items screen is completed. The screen will refresh and show in completed (view) mode.

Proposal Development User Guide 208
Proposal Development— User Guide v13
Opening or Adding
To open the Budget Detail for Non-Personnel Costs screen, click in the Open column of the Non-Personnel Costs section of the Budget Items screen. To add a Non-Personnel Cost, click in that section of the Budget Items screen. When the screen refreshes, the Budget Detail for Non-Personnel Costs screen will display. The Budget Detail for Non-Personnel Costs screen does not have a Completed checkbox, so
click in the stationary toolbar when you are ready to save. The look of the Budget Detail for Non-Personnel Costs screen will vary based on the budgeting method used. Budgeting Type/Model’s Influence on the Budget Deta il for Non-Personnel Costs Screen Depending on administrative setups, the budgeting models available for selection in the Setup Questions and Budget Periods and Setups tabs may vary. The look of the Budget Detail for Non-Personnel Costs screen will vary based on the budgeting model selected.
Budget Detail for Non-Personnel Costs After opening or adding a Non-Personnel Cost on the Budget Items screen, the Budget Detail for Non-Personnel Costs screen will appear.

The Budget Detail for Non-Personnel Costs screen does not have a Completed checkbox, so
click in the stationary toolbar when you are ready to save. All Screen Versions The look of the Budget Detail for Non-Personnel Costs screen will vary based on the budgeting type/model selected in the Setup Questions and the Budget Periods and Setups tabs. The following will be available on all the versions of the Budget Detail for Non-Personnel Costs screen:
• Line Item URL : Click the Line Item URL link at the top of the screen to open a popup that lists common institutional prices for non-personnel items. This URL is chosen by the administrator.
• Adding the Next Non-Personnel Cost Item : If you are done with the current non-
personnel cost and you would like to add another, click at the top right of the screen.
• Description : The Description will default to the Sponsor Budget Category, but can be
edited. This field corresponds to the sidebar tab and the top of the Budget Detail for Non-Personnel Costs screen, as well as the Item column on the Budget Items screen in the Budget tab.
• Budget Justification : Enter the justification for the non-personnel cost in the textbox.

Proposal Development User Guide 210
Proposal Development— User Guide v13
• Object Code Budgeting : Depending on whether the Object Code Budgeting checkbox is available and enabled on the Budget Periods and Setups screen (below), the budget category selections will vary on the Budget Detail for Non-Personnel Costs screen.
Depending on the budgeting model/type chosen in the Setup Questions and Budget Periods and Setups tabs, the Budget Detail for Non-Personnel Costs screen may vary in appearance. The variations of the screen are described below. 424 Budgeting If the 424 Budgeting Model was chosen for the budgeting model in the Setup Questions and Budget Periods and Setups tabs, then the Budget Detail for Non-Personnel Costs screen may offer the following:
• Sponsor Budget Category : Select a sponsor budget category for the non-personnel cost item.
• Budget/Charge Category : If Object Code Budgeting is checked on the Budget
Periods and Setups screen (read more above), then this selection may appear. Unmapped object codes will not reconcile into sponsor categories. Click Note about “*”... to read a note about Budget/Charge Categories that have an asterisk (*) next to them in this selection. The proposal may contain only three of these special budget categories, but may have as many items as needed under each of these categories.
Costs by “Budget Period”
• Period : The periods in the budget display. The Total row is for all the periods.
• Start Date : The start date of each period displays. The start date for the entire budget displays in the Total row. This may be changed in the Budget Periods and Setups tab within the Budget tab.
• End Date : The end date of each period displays. The end date for the entire budget
displays in the Total row. This may be changed in the Budget Periods and Setups tab within the Budget tab.
• Cost to Project : Enter the amount for the non-personnel cost according to the
corresponding period. The Total at the bottom of the screen will automatically calculate.
To inflate, enter a percentage to the right of .

Budget by Total Project If the Budget by Total Project was chosen for the budgeting model in the Setup Questions and Budget Periods and Setups tabs, then the Budget Detail for Non-Personnel Costs screen may offer the following:
• Annual Inflation : Select the annual inflation scheme, which may vary for each item in the budget.
• Sponsor Budget Category : If Object Code Budgeting is checked on the Budget
Periods and Setups screen (read more above), then this selection may appear. Select a sponsor budget category for the non-personnel cost item.
• Budget/Charge Category : Select a budget/charge category. Unmapped object codes
will not reconcile into sponsor categories. Click Note about “*”... to read a note about Budget/Charge Categories that have an asterisk (*) next to them in this selection. The proposal may contain only three of these special budget categories, but may have as many items as needed under each of these categories. Click Clear Categories to clear the selection so you may choose again.
Purchase/Usage Schedule
• Units/Quantity : Enter the number of units or quantity of the line item for the non-personnel cost. This is multiplied by the Price/Charge Each column to produce the Total.
• Price/Charge Each : Enter the price or charge amount for each line item. This is
multiplied by the Units/Quantity column to produce the Total.

Proposal Development User Guide 212
Proposal Development— User Guide v13
• Total : After saving the prior two entries, the Total for the line item will automatically calculate. The total is the Units/Quantity column multiplied by the Price/Charge Each column.
• Charge Start and End Dates : The Charge Start Date and Charge End Date auto
populate based on the Project Period on the Budget Periods and Setups screen.
These dates may be modified in the date field or by clicking . These dates may be the same for a line item, indicating a one-point purchase. The dates may also differ to represent a span of time. If a date range is entered for the Charge Start and End Dates, then the system will calculate the cost of the item across the specified date range.
• Remove : Click to remove a line entry from the Purchase/Usage Schedule. Costs by “Budget Period”
• Period : The periods in the budget display. The ALL row is for all the periods.
• Start Date : The start date of each period displays. The start date for the entire budget displays in the ALL row. This may be changed in the Budget Periods and Setups tab within the Budget tab.
• End Date : The end date of each period displays. The end date for the entire budget
displays in the ALL row. This may be changed in the Budget Periods and Setups tab within the Budget tab.
• Cost to Project : The cost to the project for each period and ALL the periods
automatically calculate based on the entries in the Purchase/Usage Schedule.
• Calculation Details : To open a popup with the Calculation Details, click
towards the bottom of the screen in the Costs by Budget Period section. Below is an example of the rather lengthy calculation details:
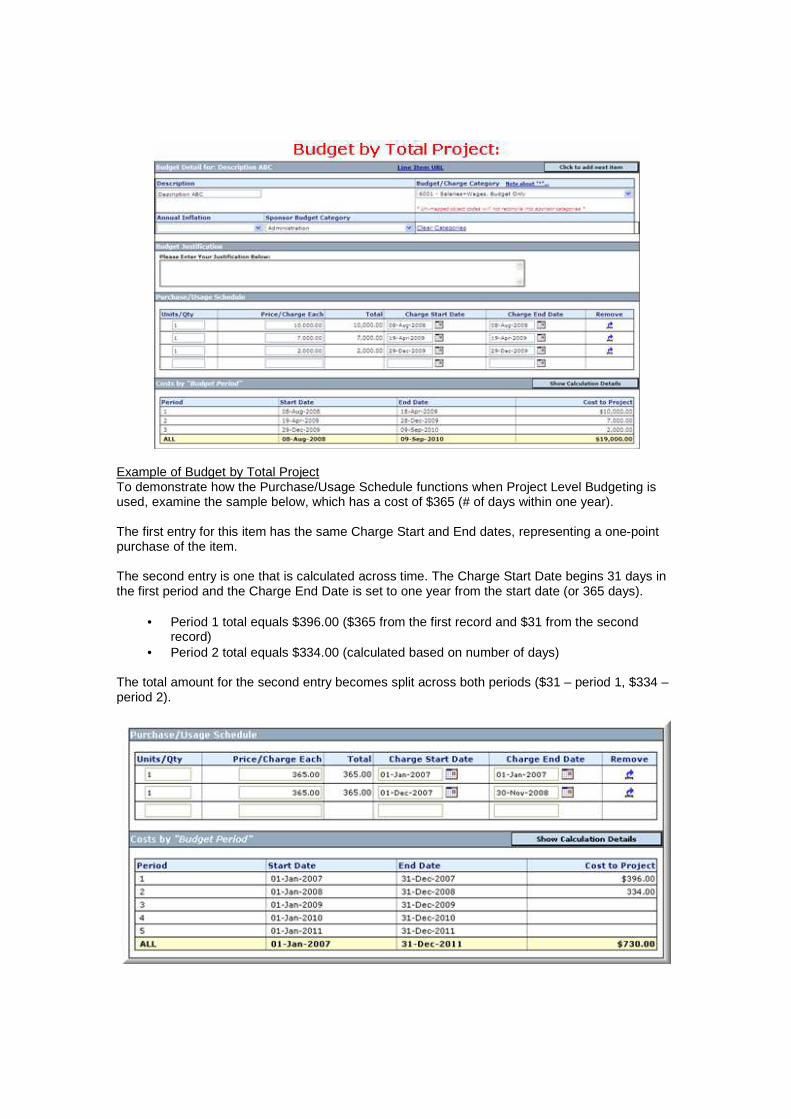
Example of Budget by Total Project To demonstrate how the Purchase/Usage Schedule functions when Project Level Budgeting is used, examine the sample below, which has a cost of $365 (# of days within one year). The first entry for this item has the same Charge Start and End dates, representing a one-point purchase of the item. The second entry is one that is calculated across time. The Charge Start Date begins 31 days in the first period and the Charge End Date is set to one year from the start date (or 365 days).
• Period 1 total equals $396.00 ($365 from the first record and $31 from the second record)
• Period 2 total equals $334.00 (calculated based on number of days) The total amount for the second entry becomes split across both periods ($31 – period 1, $334 – period 2).
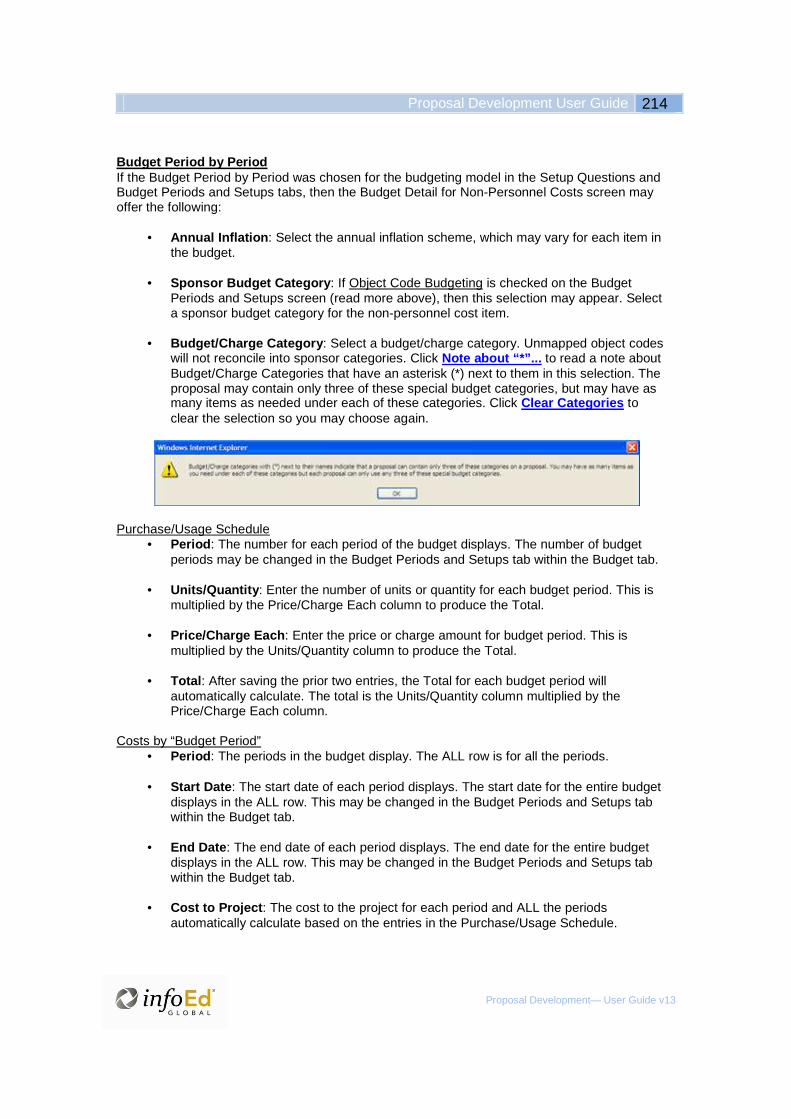
Proposal Development User Guide 214
Proposal Development— User Guide v13
Budget Period by Period If the Budget Period by Period was chosen for the budgeting model in the Setup Questions and Budget Periods and Setups tabs, then the Budget Detail for Non-Personnel Costs screen may offer the following:
• Annual Inflation : Select the annual inflation scheme, which may vary for each item in the budget.
• Sponsor Budget Category : If Object Code Budgeting is checked on the Budget
Periods and Setups screen (read more above), then this selection may appear. Select a sponsor budget category for the non-personnel cost item.
• Budget/Charge Category : Select a budget/charge category. Unmapped object codes
will not reconcile into sponsor categories. Click Note about “*”... to read a note about Budget/Charge Categories that have an asterisk (*) next to them in this selection. The proposal may contain only three of these special budget categories, but may have as many items as needed under each of these categories. Click Clear Categories to clear the selection so you may choose again.
Purchase/Usage Schedule
• Period : The number for each period of the budget displays. The number of budget periods may be changed in the Budget Periods and Setups tab within the Budget tab.
• Units/Quantity : Enter the number of units or quantity for each budget period. This is
multiplied by the Price/Charge Each column to produce the Total.
• Price/Charge Each : Enter the price or charge amount for budget period. This is multiplied by the Units/Quantity column to produce the Total.
• Total : After saving the prior two entries, the Total for each budget period will
automatically calculate. The total is the Units/Quantity column multiplied by the Price/Charge Each column.
Costs by “Budget Period”
• Period : The periods in the budget display. The ALL row is for all the periods.
• Start Date : The start date of each period displays. The start date for the entire budget displays in the ALL row. This may be changed in the Budget Periods and Setups tab within the Budget tab.
• End Date : The end date of each period displays. The end date for the entire budget
displays in the ALL row. This may be changed in the Budget Periods and Setups tab within the Budget tab.
• Cost to Project : The cost to the project for each period and ALL the periods
automatically calculate based on the entries in the Purchase/Usage Schedule.

• Calculation Details : To open a popup with the Calculation Details, click
towards the bottom of the screen in the Costs by Budget Period section. Below is an example of the rather lengthy calculation details:
When done on the Budget Detail for Non-Personnel Costs screen, click in the stationary toolbar.
Subcontractors The ability to add Subcontractors to the proposal may depend on the type of template and/or sponsor selected within the Setup Questions screen. It is possible that some sponsors or their associated templates will not accept subcontractor information. If subcontractors are permitted, the option to add subcontractors must be selected on the Setup Questions screen:
If selected, the Subcontractors will show as a separate section on the Budget Items screen:

Proposal Development User Guide 216
Proposal Development— User Guide v13
See detail information in the Subcontractors section.
Subprojects The ability to add Subprojects to the proposal may depend on the type of template and/or sponsor selected within the Setup Questions screen. It is possible that some sponsors or their associated templates will not accept Subprojects information. If Subprojects are permitted, the option to add Subprojects must be selected on the Setup Questions screen:
If selected, the Subprojects will appear as a separate section on the Budget Items screen within the Budget tab:

See detail information in the Subprojects section.
Facilities & Administration Costs (F&A) To locate the Facilities and Administration Costs, click the F&A tab within the Budget tab in the sidebar:
If Object Code Budgeting is checked on the Budget Periods and Setups screen, then you may Calculate the F&A Using Object Codes too. Checking the Advanced Budgeting option may also impact the F&A. If Modular Budgeting is an option you choose to use on the Setup Questions screen, then you may opt to also use the F&A base on the Budget Periods and Setups screen. See NIH Modular Applications for more information. Recording the F&A Costs for the entire proposal is done within the single F&A screen, unlike Proposal Tracking, which has one F&A screen for each period.
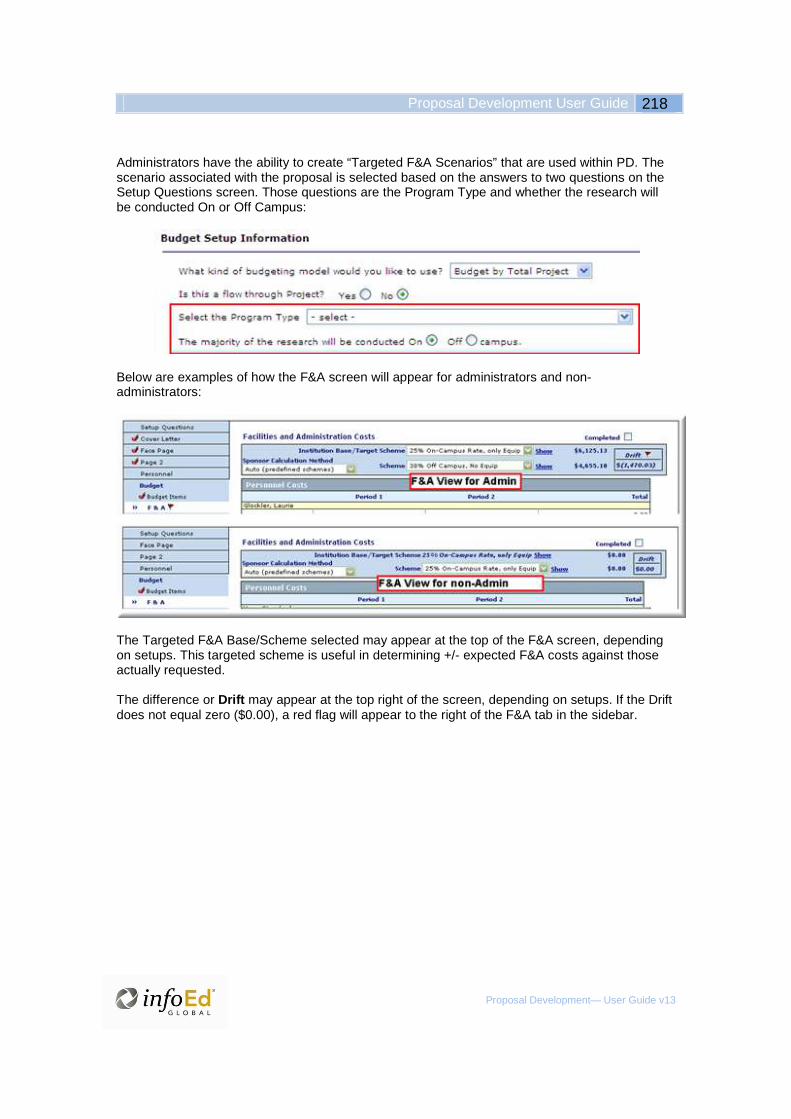
Proposal Development User Guide 218
Proposal Development— User Guide v13
Administrators have the ability to create “Targeted F&A Scenarios” that are used within PD. The scenario associated with the proposal is selected based on the answers to two questions on the Setup Questions screen. Those questions are the Program Type and whether the research will be conducted On or Off Campus:
Below are examples of how the F&A screen will appear for administrators and non-administrators:
The Targeted F&A Base/Scheme selected may appear at the top of the F&A screen, depending on setups. This targeted scheme is useful in determining +/- expected F&A costs against those actually requested. The difference or Drift may appear at the top right of the screen, depending on setups. If the Drift does not equal zero ($0.00), a red flag will appear to the right of the F&A tab in the sidebar.

To view the components of the Scheme, click the Show link. A window will open showing detailed information about the Scheme, including the Base and Rate used to create the scheme, Rates and their Effective Dates, and Budget Categories that have been Included, along with the Direct Cost Caps and Indirect Cost Caps. Below is a shortened example of this window:
The next section of this user guide describes how to use the Sponsor Calculation Methods pick list.
If you have made any changes, click in the stationary toolbar. Check the Completed checkbox when the F&A screen is completed. The screen will refresh and show in completed (view) mode.
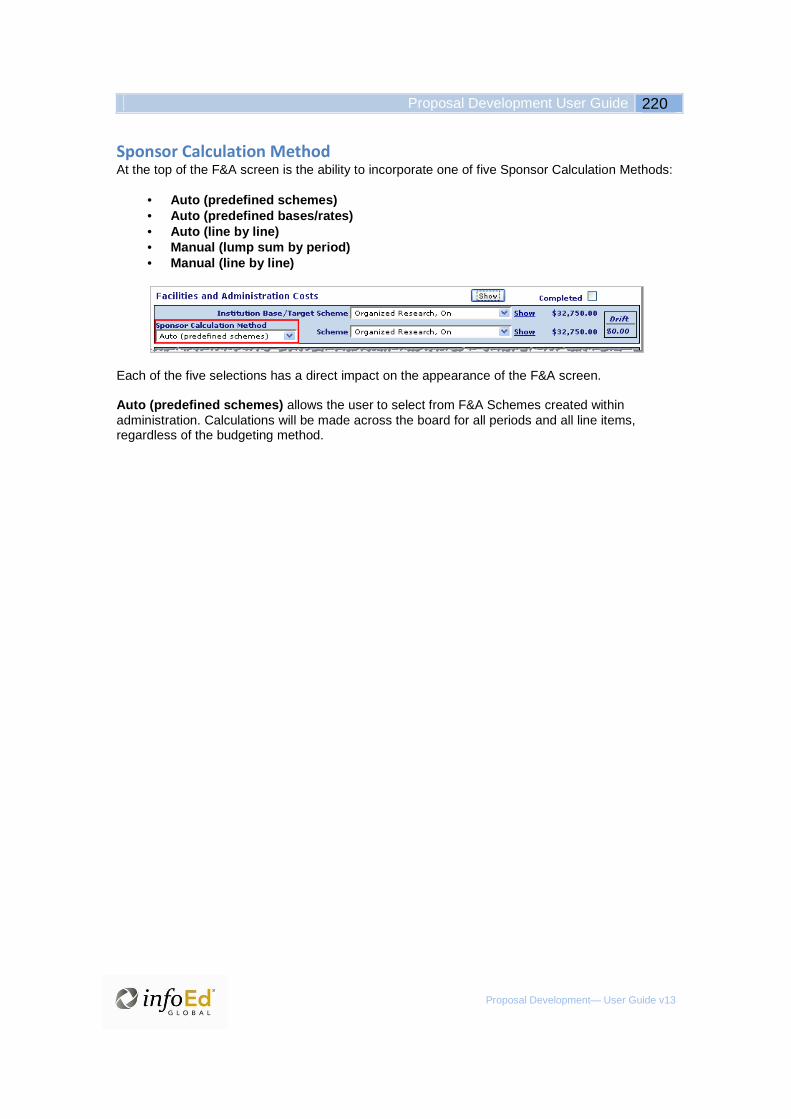
Proposal Development User Guide 220
Proposal Development— User Guide v13
Sponsor Calculation Method At the top of the F&A screen is the ability to incorporate one of five Sponsor Calculation Methods:
• Auto (predefined schemes) • Auto (predefined bases/rates) • Auto (line by line) • Manual (lump sum by period) • Manual (line by line)
Each of the five selections has a direct impact on the appearance of the F&A screen. Auto (predefined schemes) allows the user to select from F&A Schemes created within administration. Calculations will be made across the board for all periods and all line items, regardless of the budgeting method.

Auto (predefined bases/rates) allows the user to select the Base and Rate for the calculation, independent of any predefined schemes.

Proposal Development User Guide 222
Proposal Development— User Guide v13
Auto (line by line) allows the user to select from F&A Schemes created within administration. Calculations will be made on each budget item based on the effective dates of the F&A rates. If the F&A rate changes during the project period of the proposal, each budget item will reflect the amount of base and F&A calculated at the rate in effect at the time.

For complex proposals with more than one F&A scheme, there is also the ability to change the F&A scheme for any budget item. Click on View F&A Breakdown to see the breakdown of the entire budget with period, scheme, base, rate and amount for each change in the F&A. For budget items with a change of rate during a budget period, click on Requested F&A for that line item to see the F&A breakdown
during the period for that budget item. Click on to close the F&A breakdown popup.
The SF424 and NIH Modular budget forms allow for four distinct rate-base combinations. If there are more than four, the final budget PDFs will appear with a single blended rate-base combination. Manual (lump sum by period) allows the user to enter F&A Totals for each period.
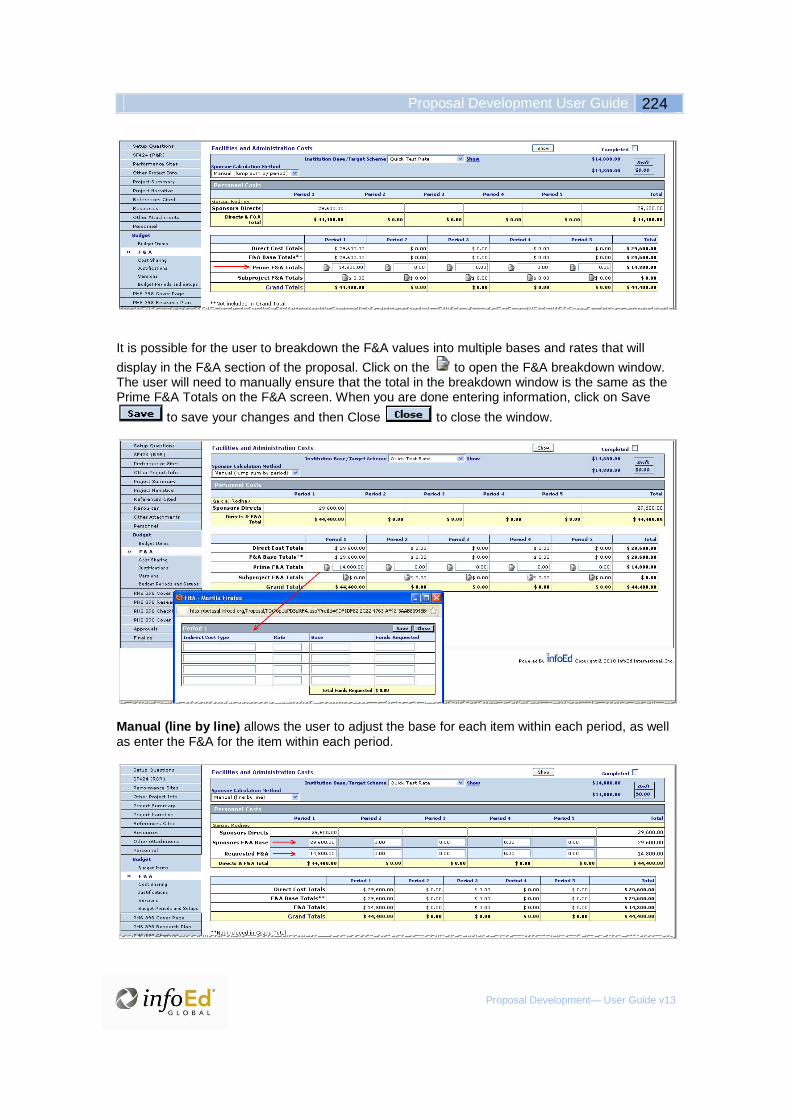
Proposal Development User Guide 224
Proposal Development— User Guide v13
It is possible for the user to breakdown the F&A values into multiple bases and rates that will
display in the F&A section of the proposal. Click on the to open the F&A breakdown window. The user will need to manually ensure that the total in the breakdown window is the same as the Prime F&A Totals on the F&A screen. When you are done entering information, click on Save
to save your changes and then Close to close the window.
Manual (line by line) allows the user to adjust the base for each item within each period, as well as enter the F&A for the item within each period.

Be sure to check the Completed checkbox when the F&A screen is completed. The screen will refresh and show in completed (view) mode.
Cost Sharing The Cost Sharing tab is located within the Budget tab in the sidebar:
The Advanced Budgeting option on the Budget Periods and Setups screen may impact how the Cost Sharing tab and screen function. If Track Un-Allowable Charges is checked on the Budget Periods and Setups screen, then the Non-Allowable Source will display in the Budget Sources:
Also on the Budget Periods and Setups screen, the Budget Sources section allows you to enter the Target % for the sources, as well as add additional budget sources.

Proposal Development User Guide 226
Proposal Development— User Guide v13
By default, calculations completed within the Cost Sharing screen will be based on the Cost Sharing percentages entered in the Budget Sources, as well as the answers given on the Setup Questions screen. The answers entered in the Cost Sharing Information section on the Setup Questions screen are carried over to the Cost Sharing screen where they may be modified. See Cost Sharing Information for more on how these questions may be answered.
To add or edit the Budget Sources, click on the Cost Sharing screen. The Budget Sources popup appears and functions similarly to the Budget Sources section on the Budget Periods and Setups screen. See Budget Sources for more information on how to use the Budget Sources popup. Note: There is no limit to the number of sources that may be set within a proposal. On the 424 form, the Total Non-Federal Funds will be the sum of all Institutional sources of cost sharing (i.e., will not include Sponsor or Unallowable sources).

Each item within the budget for each period in which it appears will be available for edits/adjustments. In addition, each item within each period can be associated with Cost Share Categories and Cost Share Types, if desired.
For Personnel costs, if the salary and fringe benefits for have different cost share type, cost share
category or amount, you can click on the split button for an individual. This will open a
popup with the breakout between salary and fringe benefits by period. Click to save
changes on the screen and click to close the popup.
Changes to the cost sharing rules can be saved separately using the button or
the button. To apply modified rules to the data, save the rules by clicking
. Apply these changes to the data by clicking . Be sure to check the Completed checkbox when the Cost Sharing screen is completed. The screen will refresh and show in completed (view) mode.

Proposal Development User Guide 228
Proposal Development— User Guide v13
Justifications The Justifications tab is located within the Budget tab in the sidebar:
The Budget Justifications screen allows the user to enter all the justifications at one time for each item on the budget or as a single entry. At the top of the screen, you may choose to Upload a Form or Use the Database. You may NOT do both. Content already entered in one mode will be lost if you switch between the two options. Note: If you enter content in the Upload Form or Use Database mode, and switch to the other mode, then all content related to the prior mode will be lost. For example, if data is entered into the Database fields, such data will be erased if you switch to the Upload Form option. Upload a Form To upload the budget justification documentation, click the Upload Form radio button. Click
to locate the file on your hard drive. Click to upload the file. When the screen
refreshes, the document’s number of pages will display. Click to open the document as a
PDF. Click to remove the document. If you upload again, the new document will replace the prior document.
Use the Database Click the Use Database radio button to use a different view of the Justifications screen. Justifications entered within each individual budget item will display and are editable. Individual justifications can be merged in order of appearance into the General section. Check the
Move to General checkbox for each item, and then click in the stationary toolbar.

Within the General and Equipment sections, click to open a window. Enter content. Click to close this popup, which will automatically save.
Click in the stationary toolbar to save. Be sure to check the Completed checkbox when the Justifications screen is completed. The screen will refresh and show in completed (view) mode.
Versions The Versions tab is located within the Budget tab in the sidebar. The Versions screen does not contain a Completed checkbox.
The Versions screen contains the Initial Budget Version and allows the user to add new versions of the budget. For each budget version, the Name of the version, who it was Versioned By, the Date and time it was versioned, and the Total for that budget version will display.
Click in the Download column to open a Microsoft Excel file of the budget version.
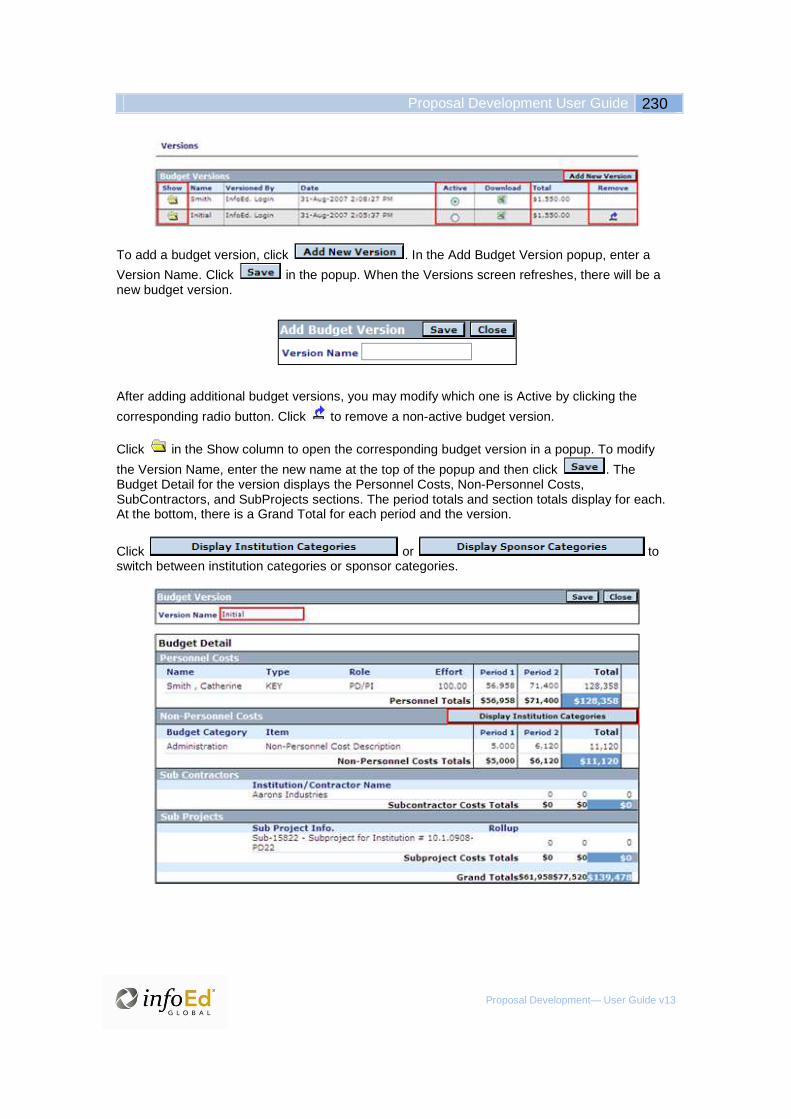
Proposal Development User Guide 230
Proposal Development— User Guide v13
To add a budget version, click . In the Add Budget Version popup, enter a
Version Name. Click in the popup. When the Versions screen refreshes, there will be a new budget version.
After adding additional budget versions, you may modify which one is Active by clicking the
corresponding radio button. Click to remove a non-active budget version. Click in the Show column to open the corresponding budget version in a popup. To modify
the Version Name, enter the new name at the top of the popup and then click . The Budget Detail for the version displays the Personnel Costs, Non-Personnel Costs, SubContractors, and SubProjects sections. The period totals and section totals display for each. At the bottom, there is a Grand Total for each period and the version.
Click or to switch between institution categories or sponsor categories.

Internal Documents The Internal Documents tab is an optional tab that allows institutional forms and/or supporting documents to be added to the proposal before being ready to finalize the submission. This tab will only appear when there are published eforms. The Internal Documents tab works in conjunction with the Finalize tab so that any additions made in the Internal Documents tab will also appear in the Submit for Internal Review section of the Finalize tab, and vice versa. Optional and mandatory items may appear on the Internal Documents screen. If Pre-Review routes are defined, Internal Documents can be submitted for Pre-Review from this tab. The Internal Documents tab has a Completed checkbox that needs to be checked as part of finalizing the proposal. For more information, see the next section in this user guide, Finalizing the Submission.
Below is an example of the Internal Documents screen:
The following columns appear on the Internal Documents screen:
• Routing History icon – This icon will appear when there is a history item. Click to view detailed routing history information. This same information is also available under the Finalize tab under Submit for Internal Review.
• Pre-Review Route: If any Pre-Review Routes have been set up by the administrator that meet the criteria for the proposal, there will be an option for Pre-Review Route. If there is more than one route, you can choose the route from the drop down list. Next to the route is the Submit Pre-Review button . After the proposal is submitted, the Routing Progress will appear at the bottom of the screen.
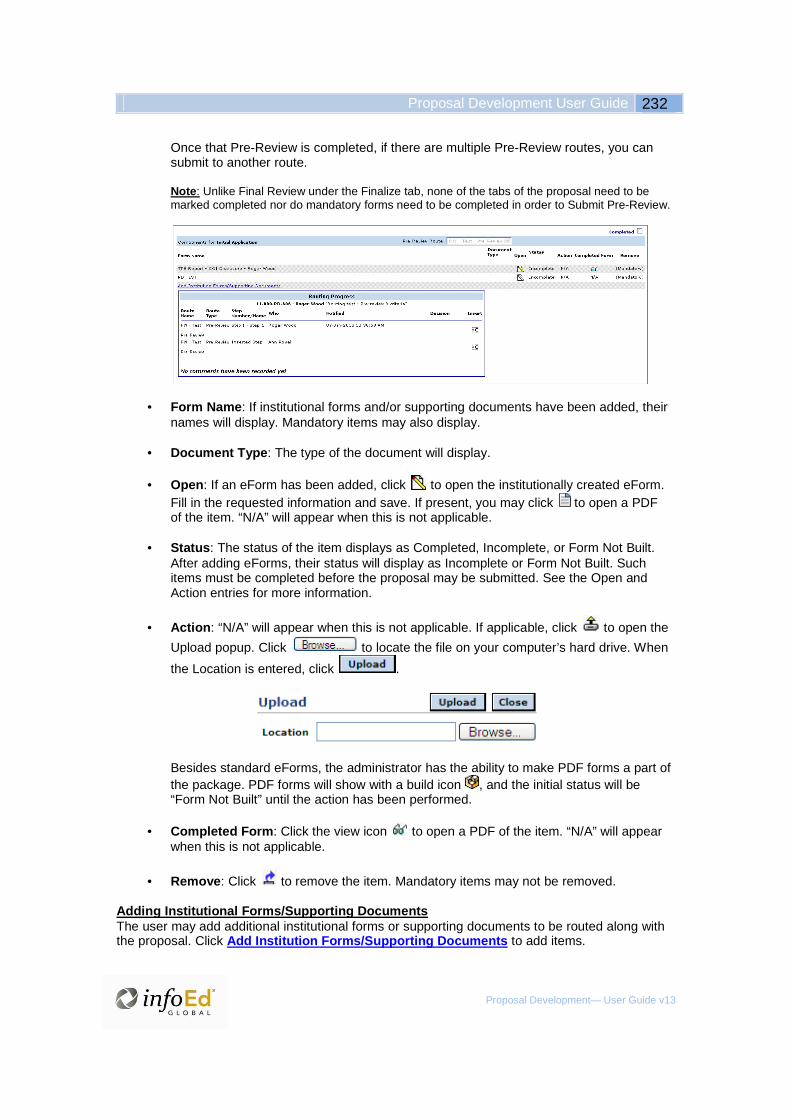
Proposal Development User Guide 232
Proposal Development— User Guide v13
Once that Pre-Review is completed, if there are multiple Pre-Review routes, you can submit to another route. Note : Unlike Final Review under the Finalize tab, none of the tabs of the proposal need to be marked completed nor do mandatory forms need to be completed in order to Submit Pre-Review.
• Form Name : If institutional forms and/or supporting documents have been added, their
names will display. Mandatory items may also display.
• Document Type : The type of the document will display.
• Open : If an eForm has been added, click to open the institutionally created eForm. Fill in the requested information and save. If present, you may click to open a PDF of the item. “N/A” will appear when this is not applicable.
• Status : The status of the item displays as Completed, Incomplete, or Form Not Built.
After adding eForms, their status will display as Incomplete or Form Not Built. Such items must be completed before the proposal may be submitted. See the Open and Action entries for more information.
• Action : “N/A” will appear when this is not applicable. If applicable, click to open the
Upload popup. Click to locate the file on your computer’s hard drive. When
the Location is entered, click .
Besides standard eForms, the administrator has the ability to make PDF forms a part of the package. PDF forms will show with a build icon , and the initial status will be “Form Not Built” until the action has been performed.
• Completed Form : Click the view icon to open a PDF of the item. “N/A” will appear
when this is not applicable.
• Remove : Click to remove the item. Mandatory items may not be removed. Adding Institutional Forms/Supporting Documents The user may add additional institutional forms or supporting documents to be routed along with the proposal. Click Add Institution Forms/Supporting Documents to add items.
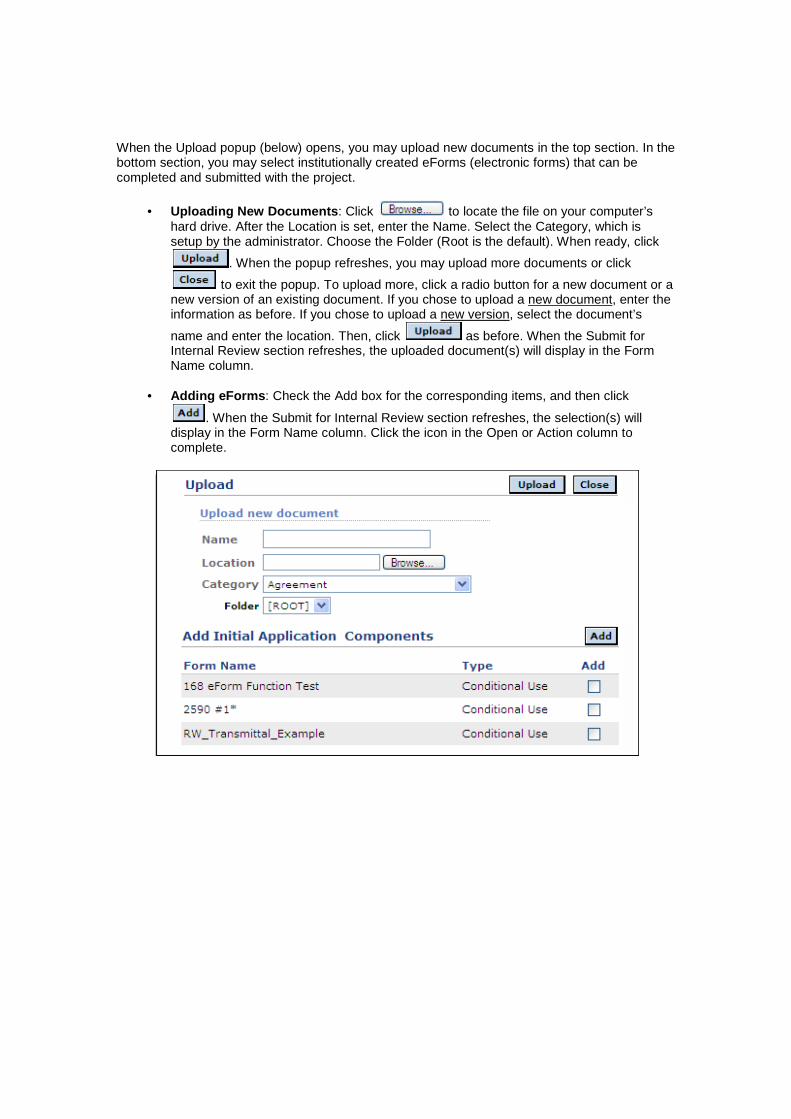
When the Upload popup (below) opens, you may upload new documents in the top section. In the bottom section, you may select institutionally created eForms (electronic forms) that can be completed and submitted with the project.
• Uploading New Documents : Click to locate the file on your computer’s hard drive. After the Location is set, enter the Name. Select the Category, which is setup by the administrator. Choose the Folder (Root is the default). When ready, click
. When the popup refreshes, you may upload more documents or click
to exit the popup. To upload more, click a radio button for a new document or a new version of an existing document. If you chose to upload a new document, enter the information as before. If you chose to upload a new version, select the document’s
name and enter the location. Then, click as before. When the Submit for Internal Review section refreshes, the uploaded document(s) will display in the Form Name column.
• Adding eForms : Check the Add box for the corresponding items, and then click
. When the Submit for Internal Review section refreshes, the selection(s) will display in the Form Name column. Click the icon in the Open or Action column to complete.

Proposal Development User Guide 234
Proposal Development— User Guide v13
Finalizing the Submission The Finalize tab of Proposal Development encompasses several different functions. On the Finalize screen, the user may build PDFs, add attachments, sequence the application pieces, and submit the application to a route. The form pages that appear will depend upon the template in use. If an InfoEd Global-provided template is used, a specific set of forms pertaining to that template will be used. If a custom template is used, the administrator is able to associate a form set to the template when it is created, and those forms will be available for building. In addition, for a custom template whose sponsor has PDF forms associated with it in Sponsor Admin, those PDFs will also become a part of the build package. The Finalize screen consists of three or four sections, depending on whether an electronic or non-electronic template is used. The sections must be completed in the order they appear:
• Build PDF/Form Pages : The form pages are built in this section. If a tab in the proposal’s sidebar is recompleted, the build will need to be redone.
• Assemble Application : The final proposal is assembled in this section, which will vary
based on whether an electronic or non-electronic submission template is used.
• Submit for Internal Review : The proposal can be electronically routed for internal review and the necessary approvals, either as Pre-Review or Final Review. Additional institutional forms and/or supporting documents may be added in this section and routed along with the proposal.
• Submit to Grants.gov (electronic submission templat es only) : This is the final step
in the proposal submission process if using an electronic template. In this section, the proposal can be submitted to the sponsor through Grants.gov.
Note: The Submit to Grants.gov section will only appear when using an electronic submission template, not when using a non-electronic submission template. The submission template is set in the Setup Questions tab. Also, when using an electronic submission template, the appearance of the XML Validation button depends on administrative setups.
Build PDF/Form Pages

Click to build each form page. While the pages are building, a status bar will show in the Last Built column. As each form page completes, the words “Build Complete” will display:
Once all of the form pages are built, the following columns will appear in the Build PDF/Form Pages section:
• Form Pages : The name of the form page displays. You may build the pages again by
clicking .
• View : Click the corresponding to view each form page independently in a PDF.
• Last Built : The date and time each form page was built automatically displays.
• Built By : The user who built the form pages displays. Note: The form pages will need to be built again if any of the tabs are recompleted. In other words, if the
Completed checkbox is undone and then checked again in a tab, the button will need to be clicked again in the Build PDF/Form Pages section on the Finalize screen.

Proposal Development User Guide 236
Proposal Development— User Guide v13
XML Validation (only appears when using an Electronic Submission Template and enabled by the administrator in PD Setups)
Click to check the final build that will be submitted to the agency. The Validating XML popup will open, but may take a few minutes to process. If everything has Passed, then it means that the application has met the agency submission requirements. If something Fails, then base your correction on the error message. Click to open another popup with detailed information, such as the Opportunity ID and Competition ID.
Assemble Application After building the PDF/form pages, the screen will refresh to the Assemble Application section, or
you may click .

The Assemble Application section allows you to assemble the final proposal. All of the necessary components should have been generated from the system into PDF documents, or uploaded and converted (if necessary) into PDF documents. The Assemble Application section will vary depending on whether the submission template is electronic or not:
• Non-Electronic Submission Template : If you are working with a non-electronic submission template, you will need to check the Sequence and Page Numbers for the document before building the application.
Below is an example of the Assemble Application section when a non-electronic submission template is used:
The first step is to indicate in which “sequence” you would like the components assembled. A default order has been set, but you may be able to choose a different sequence.
You may also indicate which pages you would like numbers to appear on the bottom of, and what the starting point is for those numbers. If you do not want sections to be numbered, leave the box for that section blank. Page numbers are sequential within a given section.
Clicking the button will construct one composite document based upon the preferences you indicated. Please review this document carefully. This is your final proposal. If there are problems with the proposal, please correct them at this point. Sequencing or page numbering problems may be corrected from this screen. Other problems may require you to visit that section of the proposal and make changes. It will be necessary to “un-check” the completed sections in order to make changes. You may build the proposal as many times as you need to. Only the final version will be saved.

Proposal Development User Guide 238
Proposal Development— User Guide v13
When completed, the submission package will be available for view in PDF. At the
bottom of the Assemble Application section, click to open the PDF. The Submit for Internal Review section on the Finalize screen will be available as the next step.
• Electronic Submission Template (S2S) : If you are working with an electronic S2S submission template, there is no need to sequence/paginate the items, since they will be assembled in the correct order when the XML is generated for transmission to
Grants.gov. Click in the Assemble Application section. When the screen refreshes, the Submit for Internal Review section will display.
Below is an example of when an electronic submission template is used:
Note: No Table of Contents is created in this assembled document. While a Cover Letter may be included at the beginning to aid in review, it will not appear in the final Commons proposal. While Appendices are included at the end of the Research Plan to aid in review, it will not appear in the final Commons proposal. The Cover Letter and Appendices are stored separately by NIH. A few

pages may appear in the assembled document as “lists of attachments” (such as Modular Budget Justifications and Assurances/Certification Explanation), but will not show up in the Commons proposal document. The 398 Cover Page will appear before the Research Plan in both the modular and detailed budget applications. References Cited will appear after the Research Plan in both the modular and detailed budget applications. In detailed budget applications, the cumulative budget will appear immediately following the detailed budget, and the budget justification will follow the cumulative budget.
Submit for Internal Review The Submit for Internal Review section of the Finalize tab works in conjunction with the Internal Documents tab so that any institutional forms and/or supporting documents added to the Internal Documents tab will also appear in the Submit for Internal Review section of the Finalize tab, and vice versa. For more information, see the prior section in this user guide, Internal Documents. When the proposal is completed, it can be electronically routed for internal review and the necessary approvals. The Submit for Internal Review section will display in two modes:
• Un-submitted : The submit icon will appear if the proposal has NOT been submitted and routed.
• Submitted : If the proposal is submitted, the approval path will be visible. Since your
administrators have configured the approval path that they believe is appropriate for your proposal, check with them if you have questions regarding this process.
The assembled proposal document will appear as “Assembled Doc” in the Form Name column. Note: While amounts within the InfoEd Global Budget are displayed with cents, they will be rounded to the nearest whole dollar within the PDF of the assembled document.
At this point, the user may add additional institutional forms or supporting documents to be routed along with the proposal. Click Add Institution Forms/Supporting Documents to add items.

Proposal Development User Guide 240
Proposal Development— User Guide v13
When the Upload popup (below) opens, you may upload new documents in the top section. In the bottom section, you may select institutionally created eForms (electronic forms) that can be completed and submitted with the project.
• Uploading New Documents : Click to locate the file on your computer’s hard drive. After the Location is set, enter the Name. Select the Category, which is setup by the administrator. Choose the Folder (Root is the default). When ready, click
. When the popup refreshes, you may upload more documents or click
to exit the popup. To upload more, click a radio button for a new document or a new version of an existing document. If you chose to upload a new document, enter the information as before. If you chose to upload a new version, select the document’s
name and enter the location. Then, click as before. When the Submit for Internal Review section refreshes, the uploaded document(s) will display in the Form Name column.
• Adding eForms : Check the Add box for the corresponding items, and then click
. When the Submit for Internal Review section refreshes, the selection(s) will display in the Form Name column. Click the icon in the Open or Action column to complete.
The following columns will appear in the Submit for Internal Review section on the Finalize screen:
• Form Name : The assembled document displays as “Assembled Doc.” If institutional forms and/or supporting documents have been added, their names will also display.
• Open : If an eForm has been added, click to open the institutionally created eForm.
Fill in the requested information and save. If present, you may click to open a PDF of the item.
• Status : The status of the item displays as Completed, Incomplete, or Form Not Built.
After adding eForms, their status will display as Incomplete or Form Not Built. Such

items must be completed before the proposal may be submitted. See the Open and Action entries for more information.
• Action : Click to open the Upload popup. Click to locate the file on your
computer’s hard drive. When the Location is entered, click .
Besides standard eForms, the administrator has the ability to make PDF forms a part of the package. PDF forms will show with a build icon , and the initial status will be “Form Not Built” until the action has been performed.
• Completed Form : Click the view icon to open a PDF of the item.
• Remove : Click to remove the item.
Submitting for Internal Review
If the proposal is ready to submit, will be present. If submissions are currently locked down (not allowed) for the proposal status being used, or if the proposal is currently en-route, the submit icon will NOT be present. You will need to contact your administrator to determine the reason why submission is not currently permitted. If a form’s status is not completed (Form Not Built or Incomplete), then the item will need to be completed before the submit icon may be successfully used.
Click the submit icon to open the below popup. Enter your username and password, and then click .

Proposal Development User Guide 242
Proposal Development— User Guide v13
The Routing Detail popup will appear:
In the Routing Detail popup (above), the below options are available:
• Refresh Route : Prior to submitting, click Refresh Route to ensure that any changes in the Steps are properly updated.
• Add New Person to Review Path : Click Add New Person to Review Path to insert
additional individuals into the route. Individuals may be inserted as “Approval Required” or “Informational Only.”
In the Personnel popup (below), click the first letter of the person’s last name. Highlight the name in the pick list or enter the last name first in the Search for a Particular Entry field. You may also Filter by Position. After the name is highlighted in the Personnel popup, select a radio button for the Routing Step Insert:
o Approval Required : The selected person must act on the route (i.e. record a
decision) in order for the route to progress forward.
o Informational Only : The selected person will only be notified that the proposal is en route, and does not need to act on it.
When the name is located and a radio button chosen, click in the Personnel popup.

When the below popup refreshes, the added person will appear as a step. Unlike the default route steps, individuals who are inserted into the route may be removed by
clicking the corresponding .
• Adding a New Step : In addition to adding a person to the review path, the option to insert new steps for the route is provided. Click for the same options as when adding a person to the review path. Choose to add the individual as Approval Required or Informational Only in the Personnel popup (look above for information). However, unlike adding a person to the review path, new steps cannot be removed.

Proposal Development User Guide 244
Proposal Development— User Guide v13
Click the Submit button in the above popup once the route has been configured as desired. Remember to click Refresh Route first to ensure that any changes in the Steps are properly updated before submitting. Routing Progress After clicking the Submit button (in the above popup), the Submit for Internal Review section of the Finalize screen will refresh with the Routing Progress. For any steps that are not yet completed, the ability to insert steps will remain. Any comments recorded will be visible here as well. To insert another step, click in the Insert column (below). In the Personnel popup, locate the name and select a radio button to insert the routing step as Informational Only or Approval
Required. When ready, click . Look above for information on using this version of the Personnel popup. When the Finalize screen refreshes, the person will appear in the Who column as an inserted step.
Click to view detailed routing history information. When a step is complete, the Comments column will either display ‘None’ if there are no comments, or the info icon . The Comments can be viewed by hovering the mouse over the .

If the route is for Final review, once the initial route has been completed, the user may re-route the proposal as necessary. Until that time, however, the individual pieces of the proposal may NOT be modified. The only exception is the Project Plan, which can be modified while the proposal is en route if it is in draft mode. However, once the proposal is finalized, no further changes are allowed until the route is complete. If the route is for Pre-Review, once the initial route has been completed, the user may re-route the proposal as necessary. Changes can be made to any part of the proposal. When the proposal is en route, the individual tabs of the proposal will show with a yellow checkbox/black checkmark:
Submit to Grants.gov The Submit to Grants.gov section will only appear on the Finalize screen if you are using an electronic submission template. This section of the screen cannot be accessed until the Project Plan has been switched from Draft mode to Finalized mode. Proposals do NOT need to be routed prior to submitting to Grants.gov.

Proposal Development User Guide 246
Proposal Development— User Guide v13
Click when the proposal is ready. Note: This is the final step in the proposal submission process – the submission to the sponsor through Grants.gov. Depending on the sponsor, it may take administrative action from your institution to retract the submission. Once the proposal is submitted to Grants.gov, an official from your institution may need to log into the sponsor’s online system to formally release the proposal to the sponsor. There would be no further action required by you at that point.
Click to check the final build that will be submitted to the agency. For more information, look above in this section of the user guide (under the “Build PDF/Form Pages” description).
Click to finally submit the proposal to Grants.gov. The screen will refresh with a message that the proposal was successfully submitted. A date/time stamp will appear under the Submitted Date, “TBD” under the Grants.Gov ID, and “Pending” under Receipt Date and Receipt Status. Once Grants.gov has processed the application, these fields will update as shown below. The timeframe in which these fields will be filled depends on how quickly the grant image is processed at Grants.gov. Notice the most recent user who submitted the proposal will display in italics. Read below for information on using to open the submission history in a popup.
Submitting to Grants.gov will trigger emails from Grants.gov to be delivered to the Authorized Organization Representative (AOR) and/or Principal Investigator (PI) to detail the application status.

Failure If the submission fails, the Receipt Status will say FAILURE and there will be an error log showing the response from Grants.gov.
Submission History To open a popup with a history of all of the submissions to Grants.gov and who submitted each time, click . The following will display: Submitted Date and time, Grants.gov ID, Receipt Date and time, Receipt Status, and who the proposal was Submitted By.
Re-Submitting Should it become necessary to re-submit to Grants.gov, the “Type of Submission” field (box 1) on the SF 424 R&R tab of the proposal can be changed to “Changed/Corrected Application.” (For more information, see SF 424 R&R.) When done, return to the Finalize tab and re-submit the application.
Note: After a proposal has been submitted, the button will change to .

Proposal Development User Guide 248
Proposal Development— User Guide v13
Appendices
The following are included in the appendices of this manual:
� Icon Key
� Glossary

Icon Key
Add Item: This icon allows users to add an item or object to a list or collection.
Add New: Used to initiate the creation of new items within the system (contacts, protocols, protocols, etc.).
Administrative: This icon appears next to components that the user has administrative rights to. Clicking on the link adjacent to it provides users with access to project management-related data.
Attachment: Indicates that a message contains an attached document or image. Allows a user to access the attachment by clicking on the icon.
Back: Returns users to the screen most recently accessed, previous to the current screen.
Barcode: Allows users to generate individual, unique ,and scannable barcodes for generated protocols.
Change: Assuming access has been granted by an administrator, this icon provides users with the ability to change their profile information.
Check-In: When changes are in progress, clicking on this button will “check-in” the profile, and implement the changes within the record.
Close Message: Closes the window that contains the message.
Collapse Arrow: Collapses menus to simplify screen views.
Completed Action Items: Indicates Action Items that have been completed.
/ Delete: Allows users to delete items from the system.
Draft Messages: This icon provides user access to the Message Center Draft Messages Folder, where messages that have been written, but not sent, are stored.
Edit: Provides users with access to an item in order to perform editing tasks.
Expand Arrow: Expands menus to allow users to access all details within a menu.
Expand View: Expands the frame within the screen to allow users to have a fuller view of a Workflow Map.
Financials: Allows users to access financial tracking features within the system.
Forward: Opens a new message window in order to send a previously received message to a new recipient.
Group: Clicking on this icon allows users to view the other users affiliated with an item or object.

Proposal Development User Guide 250
Proposal Development— User Guide v13
Help: Allows users to immediately access online help documentation.
History: Allows users to view the “check-ins” and “check-outs” of their profile records.
Institution Support: Provides users with access to their institutions’ support systems.
Load: Allows users to view other users’ calendars for scheduling purposes.
Logout: Allows users to sign out of the system.
Message Center Inbox: This icon provides user access to the Message Center Inbox, which shows all incoming messages.
Module Help: If help is available within the currently-opened module, this icon will be present, allowing users to access help on demand.
New Portal/Portal: Allows users to toggle between the old and new portals.
Next Message: Advances a user to the next message in his or her inbox.
Open: Allows users to open and view items within the system.
Open Action Items: Indicates Action Items that are still in process.
Previous Message: Re-directs a user to the previous message within his or her inbox.
Print: Allows users to send the currently-opened item to their local printer.
Read Message: Indicates that a message has previously been opened by a user. Allows user to re-open the message.
Read Task: Indicates that there is task that has been previously accessed by a user. Allows a user to re-access the task by clicking on the icon.
Recycle Bin: This icon provides user access to messages which have been recently moved to be deleted in the near future.
Remove: Clicking on this icon will remove an item from a list or modular component.
Reply: Opens a new message window to allow a user to reply to the sender of a received message.
Reply to All: Opens a new message window to allow a user to reply to the sender of a received message, as well as to all other recipients of the message.
Report On: Initiates the process for generating reports.
Run Report: Clicking this will run the report that is shown next to the icon.
Save: Allows users to retain changes made to the current project, setup, or communication.

Saved Messages: This icon provides user access to the Message Center Saved Messages Folder, which contains messages that a user has decided to save for future reference.
Sent Messages: This icon provides user access to the Message Center Sent Messages Folder, which retains copies of all messages that have been sent by the user.
Settings and Preferences: Provides users with access to the user preferences menu, which allows for the customization of various features within the system.
Show/Hide Help: Clicking this button will reveal rollover help buttons for each field, which provide explanations of information requested by the system.
Unlock/Lock: These icons allow users to lock or unlock protocol fields in order to edit them.
Unread Message: Indicates that a message or alert has not yet been opened by a user, and allows user to open the message.
Unread Task: Indicates that there is task that has not yet been opened by a user. Allows a user to access the task by clicking on the icon.
Upload: Provides users with access to an interface for uploading files to the system.
View: Allows users to view (but not edit) a selected item.
View/Search: Allows users to search for particular items within the system.
Workflow Map: Provides users with access to their Workflow Maps.

Proposal Development User Guide 252
Proposal Development— User Guide v13
Glossary
Access History: Administrators may track users’ access throughout the modules, including current use and delete history.
Administrative Setups: Administrators set numerous features in the modules based on the specific needs of institutions.
administrato r: This person(s) is responsible for organizing institution-specific modules in the eRA Portal and has the ability to control the view, options, and use of such modules.
agreements: Agreement or contract information associated with the proposal may be recorded in the Agreements tab of the submission in Proposal Tracking and in the subcontractor’s Short Form in Proposal Development. Electronic copies of the agreements may also be uploaded in these sections.
alpha split list: Entries are broken up by the system and filed under their first letter; great for use when there are a large number of different entries. (See pick list in this glossary for the other way the system presents lists.)
attachments: Any document created outside the eRA portal and uploaded as an element of a proposal, award, or account. Microsoft Word and Excel documents that are uploaded will be transformed into PDFs for inclusion in the final assembled document.
Award Tracking (AT): This InfoEd Global module streamlines the negotiation process between the researcher and the sponsor. As part of the Post Award process, researchers can manage and track their awards.
Barcode: Located in the stationary toolbar, the Barcode icon will open the record’s unique scannable barcode. For example, in Proposal Tracking, a barcode of the proposal title and number can be used to locate a proposal.
Batch: An administrator can perform numerous functions in a collective manner, including communications, invoices, Dunning Letters, LOC statements, and tracking Grants.Gov Submissions.
Batch Communications: An administrator may create document templates, custom form letters, agendas, and minutes for use throughout the InfoEd Global system. Alerts can be created to automatically run Batch Communications.
checking: Checking refers to the process of clicking on a checkbox field to fill it with a checkmark. Checking an already checked checkbox is called un-checking and removes the checkmark, which deselects the item.
completed (view) mode: After a user has checked the Completed box on a screen in Proposal Development and clicked Save, the screen will refresh as completed with a red check next to the corresponding tab in the sidebar.

consortium: When a substantial portion of the research activity of a project will be carried out by collaborators at another institution (or separate legal entity), that portion of the work and its related budget is managed via a subcontract or consortium agreement. (See subcontractor in this glossary for more information.)
contacts: People who are internally or externally associated with the PT proposal, award, or account may be entered into the record’s Contacts tab. Their contact information may be stored for future reference, including sending related emails.
Curriculum Vitae (CV): While similar to resumes, CVs are usually lengthier descriptions of professional qualifications, including prior employment, education, publication, and other achievements and credentials. In Proposal Development, Curriculum Vitae or biosketches are required for Key Personnel and Other Significant Contributors. Biosketch is the term used for a short (typically 3-4 pages) summary of a key person’s CV; biosketches are used in lieu of CVs for U.S. federal proposals.
deliverables: Project deliverables (e.g. technical, financial, property, etc.) may be monitored in the Deliverables tab of the PT proposal, award, or account. Due dates are instantly computed based on the start date, frequency, and number of reports. Deliverables can be tracked globally across all active grants and contracts.
Direct Cost (DC): The expenses for a research project that directly relate to the research being conducted, as opposed to the indirect expenses or overhead.
disabled: When an administrator turns off a section, sub-section, or field for all users in the administrative setups; this is referred to in the manual as disabled.
eForm: Administrators custom design these electronic forms for data entry. eForms can vary in content and as to whether they are mandatory or not.
eRA Portal: InfoEd Global, Inc.’s Web portal provides integrated management of proposals, protocols, patents, publications, and profiles. eRA stands for Electronic Research Administration.
F&A: Facilities and Administration Costs, often abbreviated as F&A, are the Indirect Costs of a research project, otherwise known as the overhead expenses.
Financial Desktop: In Financial Tracking, functions inside the accounts may be performed en masse for multiple accounts at once using the Financial Desktop, which is located in My Financials > Financials.
Financial Staging Area (FSA):
InfoEd Global supports the export of award details to institutional systems and the import of related financial transactions and payroll distributions via InfoEd Global’s Financial Staging Area.
Proposal Development User Guide 254
Proposal Development— User Guide v13
Financial Tracking (FT): This InfoEd Global module provides a single reference point for tracking all the countless details related to accounts. The account is a very specialized record, focusing exclusively on the Post Award process and grant accounting.
Folder Maintenan ce: In the Attachments tabs of a PT proposal or the Documents tab of an award or account, folders may be setup so that when a document is uploaded, it may be stored in a particular folder within the tab(s). [ROOT] is the automatic parent folder under which other folders may be added.
free-text box or field: Text, numerals, and comments may be entered into these boxes or fields up to varying character limits. Larger documents should be uploaded as an attachment.
GENIUS (Global Expertise Network for
Industry, University, and Scholars):
This online database provides researchers and administrators with the ability to profile information associated with the Curriculum Vitae, such as appointments, awards, degrees, memberships, publications, photos of physical works, and audio files of conference presentations.
Grants.Gov Submissions:
Located within Administration > Pre/Post Award Admin > Batch Processes, users may track the status of proposals, sort proposals, and electronically submit proposals for U.S. government grants from the InfoEd Global eRA Portal.
Grants.gov: The U.S. federal government’s Web portal to “Find and Apply” for any federal research support. The site is managed by The U.S. Department of Health and Human Services.
hidden: When an administrator alters a user’s or group of users’ security to not display a section to that set of users; this is referred to in the manual as hidden.
hyperlink: Depicted in the InfoEd Global system with blue underlined text, clicking a hyperlink will open a new screen or popup.
Indirect Cost: Also referred to as the Facilities and Administration Costs (F&A), Indirect Costs are the overhead expenses for a research project.
InfoEd Global Suite : Refers to the InfoEd Global software package as a whole.
Institution Number: Administrators set whether Institution Numbers are automatically generated or manually entered, but are required to be unique. Institution numbers are often referred to as a “proposal number” or “protocol number,” for example, when discussing specific modules.
Institutio nal Review Board (IRB):
The U.S. government mandated institutional committee responsible for reviewing and approving any proposed research involving human subjects prior to carrying out that work. These committees may be known by other names at specific institutions.

Key Personnel: The U.S. government identifies three broad types of personnel that may be involved in a proposal: key personnel, other significant contributors, and non-key personnel. During the Add Personnel process in PD and PT, one of these three personnel types is chosen. Key personnel are substantially involved in the design, execution, or reporting of a research project. Key personnel must have effort in at least one budget period that exceeds zero percent. The Principal Investigator is always key personnel. Consultants may be identified as key personnel or other significant contributors. In PD, Curriculum Vitae (CV) are required for all key personnel.
Keyword Thesaurus: InfoEd Global’s Keyword Thesaurus originated from the National Institutes of Health/National Science Foundation/Department of Energy model. Administrators may add or exclude Keywords based on the institution’s needs.
Layout: The information that administrators designate to retrieve when running and saving reports with the Reporting Tool. (See Reporting Tool and Query in this glossary for more information.)
milestone payment: In Financial Tracking, a user may configure the InfoEd Global system to automatically create transactions on a particular milestone date in the Schd Pay/Milestones tab within the Setups tab of the account.
module: The InfoEd Global Suite is divided into parts referred to as modules.
Monospace Font: A font (set of characters in a particular style and size) similar to that used on a typewriter, in which each character occupies the same amount of horizontal space regardless of its width – an i, for example, taking as much room as an m. This is a sentence in a monospace font. Also called fixed-width font. (See Proportional Font in this glossary for more information.)
New Proposal Questionnaire:
The creation process in Proposal Development involves electronically filling out a questionnaire with eight steps. The Principal Investigator (PI) and sponsor are required to create any proposal in the InfoEd Global system. Some of the other basic information included during the creation in PD are the proposal’s type, number, title, start and end dates, and number of years or budget periods. The eighth and final step in the creation process is the Setup Questions.
Non-Key Personnel: The U.S. government identifies three broad types of personnel that may be involved in a proposal: key personnel, other significant contributors, and non-key personnel. During the Add Personnel process in PD and PT, one of these three personnel types is chosen. Non-key personnel are individuals whose work on a project is necessary, but could also be done equally by other individuals. Research assistants, technicians, and students are typical examples of non-key personnel.

Proposal Development User Guide 256
Proposal Development— User Guide v13
Object -Level Security: Available on the Security screen in the Personnel tab of a PT proposal, award, or account, this option allows administrators to grant specific users varying levels of access to certain tabs of the record. Specific users may have the ability to add, edit, or view a tab, or may not see a tab at all.
on the fly profiles: This is an administrative security setup that allows the user to be able to create permanent personnel profiles from within a record, rather than the temporary ones created by users, who are not setup as GENIUS administrators. The term also applies to the setup that allows subcontract institutions and/or personnel at subcontract institutions to be able to be entered in real-time by individuals who are not designated as Module Administrator for PD/PT.
Other Significant Contributor:
The U.S. government identifies three broad types of personnel that may be involved in a proposal: key personnel, other significant contributors, and non-key personnel. During the Add Personnel process in PD and PT, one of these three personnel types is chosen. Other significant contributors are individuals who are important to the project in a manner similar to that of key personnel, but who will devote de minimus effort to the project. Other significant contributors may not have effort in any budget period of a proposal. Consultants are typically defined as other significant contributors.
parent: Refers to an item from which other items are created or linked; i.e. parent proposal or parent folder.
PD Lite: This administrative setup is based on the templates defined in the PD Screen Setups. The administrator can simplify Proposal Development by defaulting preset values, hiding sections/tabs, and/or not allowing users to change items in the proposal. Among the sections of the proposal that can be influenced by PD Lite are the Setup Questions (Step 8) screen and tabs within the Budget.
PDF: This abbreviation for portable document format is commonly associated with the Adobe Acrobat’s creation and reader software program. Electronic forms (eForms) on the eRA Portal may be available in PDF.
personnel: Individuals associated with a proposal, award, or account may be entered in the Personnel tab of the record. The Principal Investigator (PI) chosen during the record’s creation is modifiable in Personnel.
Personn el Wizard: When enabled by the administrator and/or using the Default Screens Template, personnel may be added in Proposal Development by answering various questions. When activated, all personnel must be added to a proposal from the Personnel tab in PD.

pick list: The second type of list in the InfoEd Global Suite; all entries are shown in one big list. This list is best used when there are relatively few entries to display. (See alpha split list in this glossary for the other way the system presents lists.)
Post Award: InfoEd Global’s pre-award modules connect researcher proposal activity with institutional administrative processes for a seamless electronic workflow from concept-to-closeout. The Proposal Development and Proposal Tracking modules are part of the pre-award process.
Pre Award: InfoEd Global’s post-award solutions support the detailed financial management of grants and contracts, as well as the integration of third party institutional ERP systems for fully synchronized operations. The Proposal Tracking, Financial Tracking, and Award Tracking modules are part of the post-award process.
Principal Investigator (PI):
The lead investigator on a research project is also referred to as the Program Director. A research proposal may have multiple Principal Investigators. In Australia, this individual is referred to as the Chief Investigator.
Proportional Font: A set of characters in a particular style and size in which a variable amount of horizontal space is allotted to each letter or number. In a proportional font, the letter i, for example, is allowed less space than the letter m. (See Monospace Font in this glossary for more information.)
Proposal Development (PD):
The InfoEd Global module that is used by investigators and their support staff to build a proposal record that will be submitted for internal review and to a sponsor.
Proposal Tracking (PT): The InfoEd Global module that serves as a ‘system of record’ primarily for management reporting on proposals submitted and awards received by an institution. Information entered into a proposal in Proposal Development is automatically available in Proposal Tracking.
Query: A set of criteria designed to retrieve information within InfoEd Global’s Reporting Tool. Depending on the module, the Simple and/or Advanced Query may be available. The Simple Query searches selected fields for data, while the Advanced Query allows the user to set operations to be performed on the selected fields. (See Reporting Tool and Layout in this glossary for more information.)
record: Refers generically to all items created in the module’s components; an account is a record, as is a proposal, etc.

Proposal Development User Guide 258
Proposal Development— User Guide v13
Reporting Tool: When administrators and researchers, want to pull information from the eRA Portal, they may utilize system tools for reporting such data. These Reports may be created by InfoEd Global or administrators. The Reporting Tool is divided into two sides, the Query and Layout. Depending on the module, the Simple and/or Advanced Query sets the criteria to retrieve information. The Layout defines the look of the report. The Reporting Tool may also be used to create alerts in the form of emails. (See Query and Layout in this glossary for more information.)
review path: Synonymous with routing; this term refers to the administrator-customizable list of people who will examine and/or approve a particular record.
routing: Synonymous with review path; this term refers to the administrator-customizable list of people and associated rules for the internal/institutional review and approval process.
scheduled payment: In Financial Tracking, a user may configure the InfoEd Global system to automatically create transactions on a scheduled basis in the Schd Pay/Milestones tab within the Setups tab of the account.
Setup Questions: In Proposal Development, the eighth and final step of the New Proposal Questionnaire becomes the first tab in the sidebar after the proposal is created. Modifications may be made to the Setup Questions tab before the proposal is finalized. Among the options included in the Setup Questions are the sponsor, template, deadline, subcontractor, and subproject.
Short Form: Each time a subcontractor is added in Proposal Development or Proposal Tracking, a Short Form is created. The Short Form records basic information about the subcontract, including the start and end dates, contract number, institution number, performance period, and contact information.
sidebar: The sidebar is the list of navigational links located on the left side of the screen.
SMARTS (SPIN Matching And Research
Transmittal Service):
As part of the SPIN service, SMARTS is an automated alert system, which notifies investigators of relevant new programs, matching their research interests.
SPIN (Sponsored Programs Information
Network):
This funding opportunity database tracks research grants, fellowships, publication support, sabbatical support, curriculum development, and other programs from thousands of government, private, and nonprofit sources.
sponsor: The agency, foundation, corporation, or other entity from which financial assistance is sought in support of a research project.
stationary toolbar: The stationary toolbar is located in the top left corner of the screen and may include icons for Exit, Help, Portal, Support, Done, Back, Save, History, Support, Access, and Show. See the List of Icons section for more information on what icons are in the stationary toolbar and what they do.

status history: This enables users to record status changes in the InfoEd Global Suite for such records as proposals, awards, accounts, deliverables, budget periods, agreements, award increments, receipts, etc.
subcontractor: An individual or organization that contributes to the research project, but is not a member of the institution. A subcontract among these parties is referred to as a consortium. Administrators enable the on-the-fly subcontractor functionality. The Master Subcontractor Database lists available subcontractors. If enabled in the Setup Questions of Proposal Development, subcontractors may be added in the Budget Items tab. In Proposal Tracking, subcontractors are added in the Budget and Award Detail tabs, but will also appear in the SubContracts tabs. The Short Form contains basic information about the subcontract. Electronic copies of the agreement may be uploaded. In both PD and PT, subcontracts may be opened in their own windows.
subproject: When a proposal involves other internal departments or divisions, these may be added as subprojects. If enabled in the Setup Questions of Proposal Development, subprojects may be added in the Budget Items tab. In Proposal Tracking, subprojects are added in the SubProjects or Budget tab of the submission, as well as the Awards tab. In both PD and PT, subprojects may be opened in their own windows.
TBD: If an entry is not typed into a textbox, it may default to TBD, which is an abbreviation for to be determined. This feature is sometimes used when a position has not been filled yet, so the name is not available. Users may also sometimes enter TBD into a textbox themselves.
templates: In Proposal Development, InfoEd Global provides default templates (electronic submission, PDF forms), which are automatically associated with sponsors. When a sponsor is entered in the Setup Questions, specific templates will be available for use. The chosen template will determine which tabs appear in the sidebar of the proposal. Also, administrators may modify the existing templates or add new templates, as well as set the associating sponsors for those templates.
transaction: In Financial Tracking, a transaction is a financial exchange that may be applied to an account. Such transactions as accounts payable and accounts receivable may be carried out within an account’s Transactions tab, or within the Financial Desktop for many accounts at once.
Transaction Spawning Rules:
Instead of having to manually create all the transactions in Financial Tracking, these rules instruct the InfoEd Global system to perform certain transactions automatically when specific conditions are met. The administrator may influence whether a user sees these rules during the account creation or on the Attributes screen in the Setups tab of the account.

Proposal Development User Guide 260
Proposal Development— User Guide v13
un-allowable: Research expenses that are not covered by a sponsor are referred to as un-allowable or non-reimbursable. Their financial responsibility must be assigned to a specific source, such as a department, person, sponsor, or firm. These expenses are factored out of the sponsor costs on a proposal.
unnamed: When personnel are not yet named or hired, they are referred to as unnamed. This term may be used for budgeting purposes. (See TBD in this glossary for more on entering unnamed personnel in the system.)
user defined fields (UDFs):
An administrator may create an unlimited number of additional tracking fields for screens in a module. These extra fields can be tailored to serve the specific needs of institutions. User defined fields usually appear at the bottom of the screen under their own unique section header(s) within the module.
Related Documents