© 2018 ev iCore healthcare. All Rights Reserv ed. This presentation contains CONFIDENTIAL and PROPRIETARY inf ormation. Prominence Health Plan Prior Authorization of Musculoskeletal Therapies and Chiropractic Services Therapy corePath SM Migration Beginning: August 1 st , 2018

Welcome message from author
This document is posted to help you gain knowledge. Please leave a comment to let me know what you think about it! Share it to your friends and learn new things together.
Transcript
© 2018 ev iCore healthcare. All Rights Reserv ed. This presentation contains CONFIDENTIAL and PROPRIETARY inf ormation.
Prominence Health Plan Prior Authorization of Musculoskeletal Therapies and Chiropractic Services
Therapy corePathSM Migration
Beginning: August 1st, 2018

2
What is Therapy corePathSM?
Appropriate
Decision
Focused on the member
Authorization strategy
emphasizes the unique attributes
of a specific member’s condition
and any associated complexities.
Streamlined for providers
Providers will experience a
simplified and consistent prior
authorization process that
requires only key clinical
information.
Condition-specific approvals
Visits allocated in accordance
with condition
severity/complexity, functional
loss and confirmation that care is
progressing as planned.
We’ve received your feedback and modified our approach

3
Therapy corePathSM: How it Works…
Getting to the Right Yes vs the Wrong No
1 2
Initial visit allocation
Based on each patient’s needs
Additional visits authorized
Based on each patient’s response to previous treatment
Collects only key clinical information
Uses validated measurement tools
Considers complexities
Focuses on patient response to care
Captures lack of response reasons
Confirms effectiveness of treatment
Ongoing care requires more detailed review to identify the individual patient’s special need
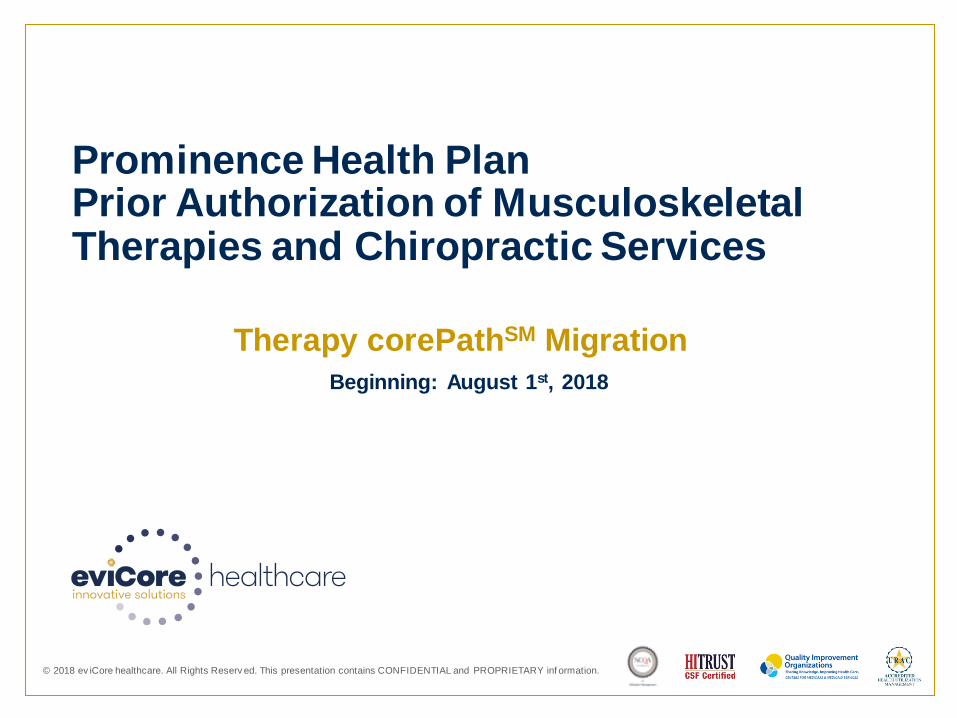
corePath will apply to requests submitted on or after August 1st, 2018.
4
Program Overview
Prior authorization applies to
services:
• Outpatient
• PT/OT/Speech
• Chiropractic
Prior authorization
does not apply to services
that are performed in:
• Emergency room
• Inpatient
• Home Health
It is the responsibility of the performing provider to request prior
authorization approval for services.

5
Pathway Comparisons: Standard Processing
Login Credentials for the eviCore Portal
Authorizations will still reflect the following:
Visits/Units
Specific authorization timeframes
Date Extension / Backdate Request Process
7 Day Timeframe to request authorization
Process for Speech Therapy Authorization
The following processes will remain the same

Sample Therapy corePathSM Pathway
Initial Requests
6
Case Related Questions:
• Identify new care vs.
continuing care based on
treatment area, not time
• Identify primary area of
treatment
• First indicator of complexity
– second unrelated
treatment area
1
2
3
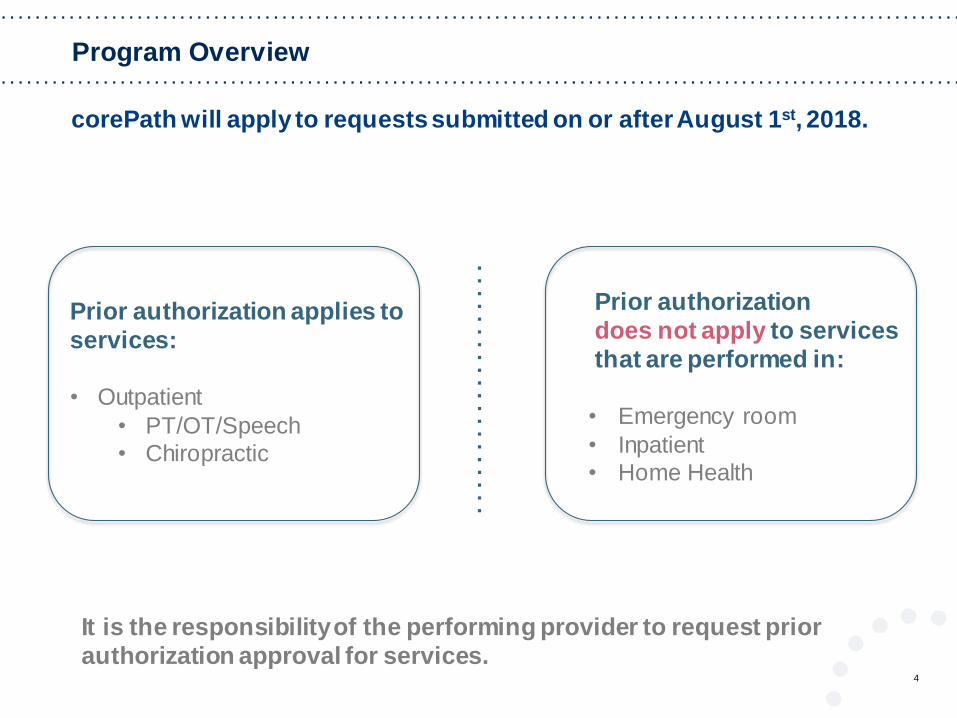
Sample Therapy corePathSM Pathway
Initial Requests, continued….
7
Initial Clinical Questions:
• Enter functional score, if available
• Oswestry Index
• Neck Disability Index
• LEFS
• HOOS Jr./ KOOS Jr
• Dash / QuickDASH
• Incorporates ROM, Strength, Pain, etc.
• Complexity:
• Neural signs
• Chronicity
4
5
6
High Potential for Immediate Approval When Pathway is
Completed!
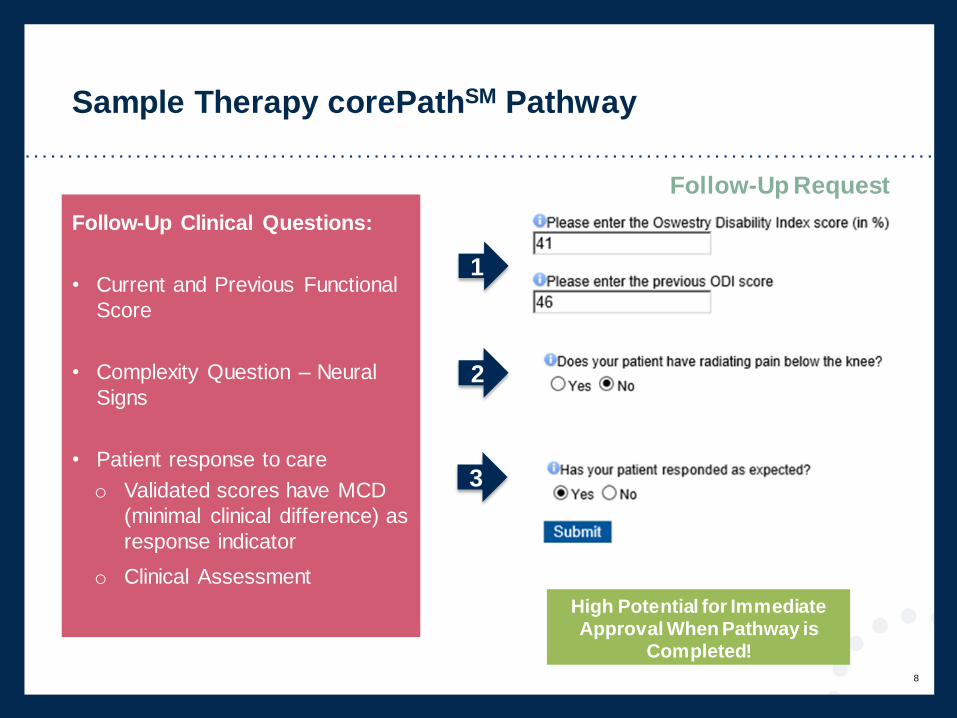
Sample Therapy corePathSM Pathway
Follow-Up Request
8
Follow-Up Clinical Questions:
• Current and Previous Functional
Score
• Complexity Question – Neural
Signs
• Patient response to care
o Validated scores have MCD
(minimal clinical difference) as
response indicator
o Clinical Assessment
1
2
3
High Potential for Immediate Approval When Pathway is
Completed!
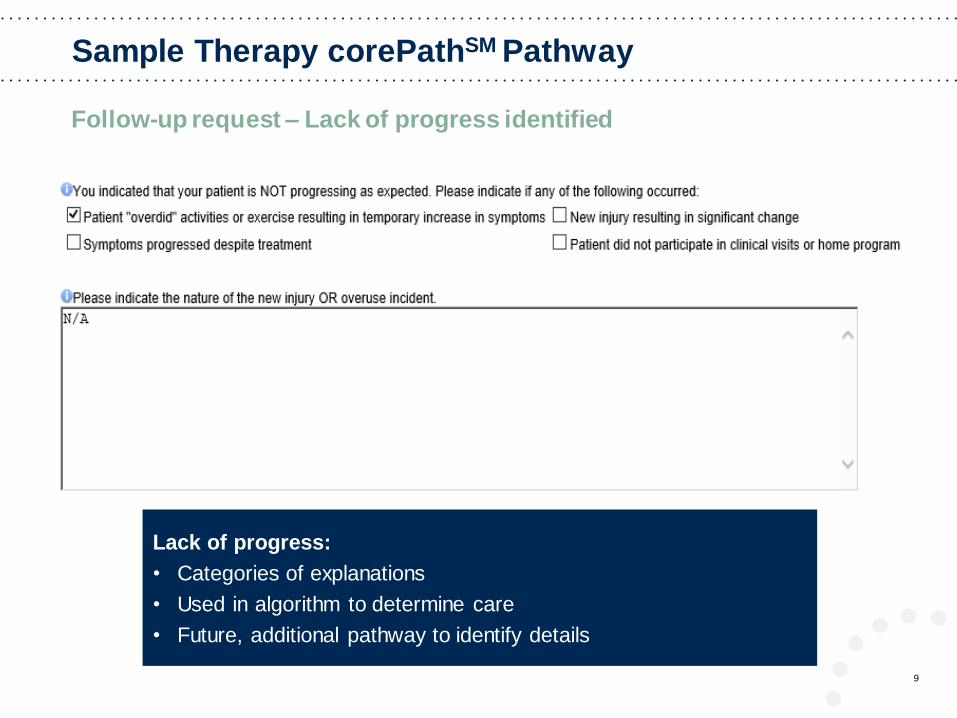
Sample Therapy corePathSM Pathway
Lack of progress:
• Categories of explanations
• Used in algorithm to determine care
• Future, additional pathway to identify details
Follow-up request – Lack of progress identified
9

How to request prior authorization:
10
Prior authorization requests
Or by phone: 800-
792-8751
7 a.m. to 7 p.m. (local
time) Monday through
Friday
WEB
www.eviCore.com
Available 24/7 and the most
efficient way to create prior
authorizations and check existing
case status. Web submissions
also have a high potential for
immediate approval!
Fax: 855.774.1319
11
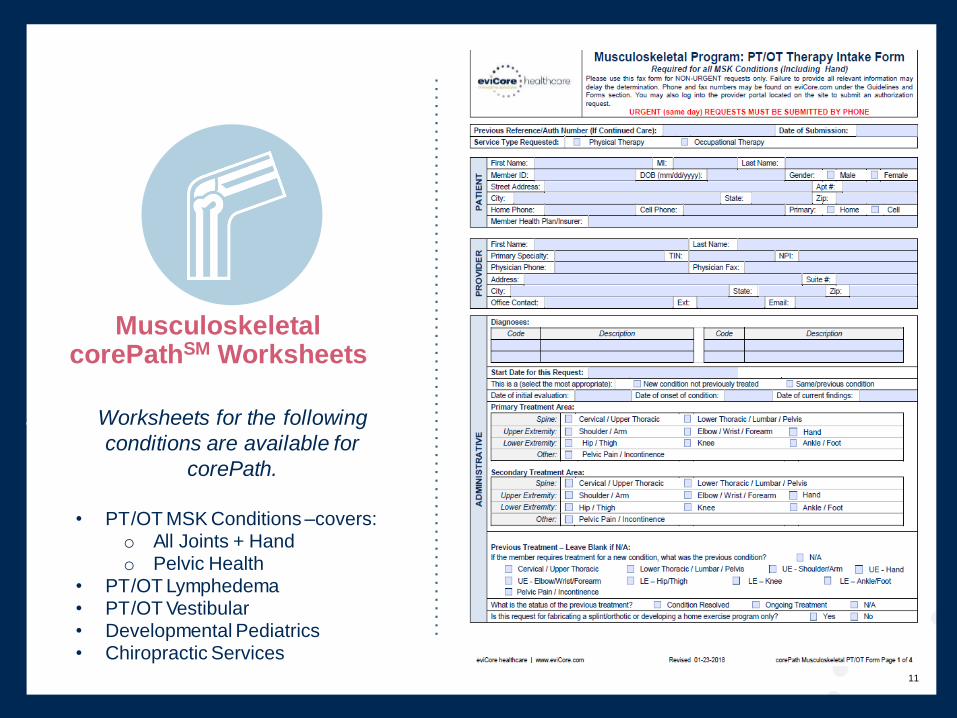
MusculoskeletalcorePathSM Worksheets
Worksheets for the following
conditions are available for
corePath.
• PT/OT MSK Conditions –covers:o All Joints + Hando Pelvic Health
• PT/OT Lymphedema• PT/OT Vestibular• Developmental Pediatrics• Chiropractic Services

12
Clinical Worksheet Example – cont…
13
Pediatric Neurodevelopmental Cases
• Collect recommended Plan of Care
- Visits
- Units
- Duration
• General Clinical Conditions/Problems
• Standardize Test Results
• Clinical Observations
• Short Term Goals
- Progress Towards Goals
• Additional Clinical Information

14
Speech Therapy (Adult + Pediatric) Cases
• corePathwill run for the 1st authorization only
• Report standard scores and/or the impairment rating as a percent
• For subsequent requests, submit medical records including most recent
examination findings, test results, and Measurable goals

15
Therapy corePathSM Summary
Elimination of pre-set waivers
Increased provider satisfaction
Reduced administrative burden for providers
Increased opportunity for real-time decisions
Expanded, member-focused decisions
Decreased case review turn-around-times
Patients able to receive the right amount of care in a timely manner
16
Web Portal Services
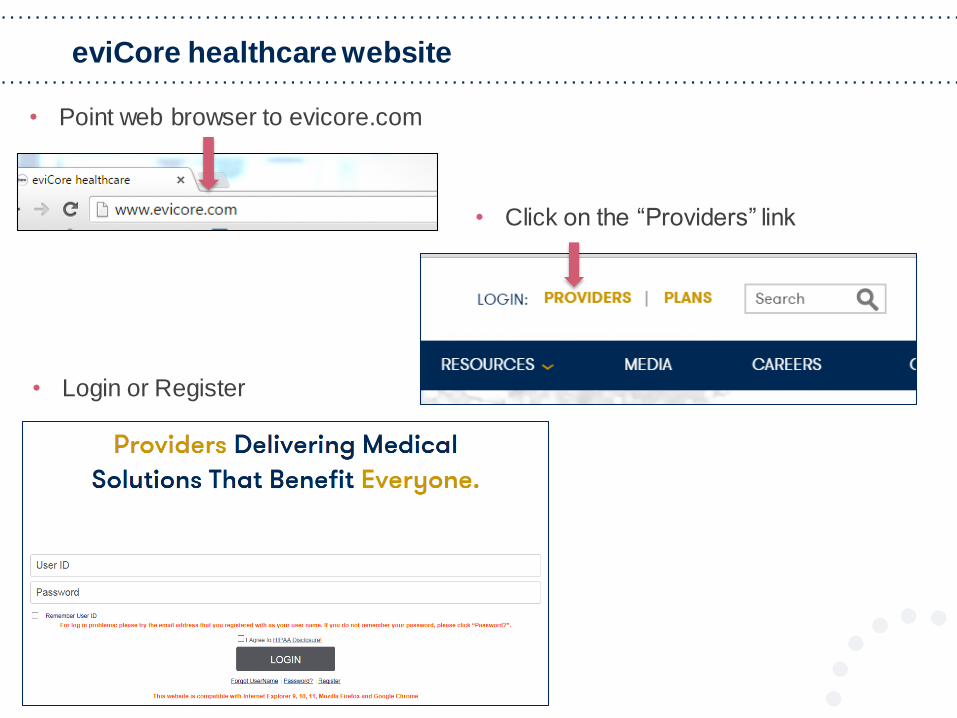
eviCore healthcare website
• Login or Register
• Point web browser to evicore.com
• Click on the “Providers” link

Creating An Account
18
To create a new account, click Register.
Creating An Account
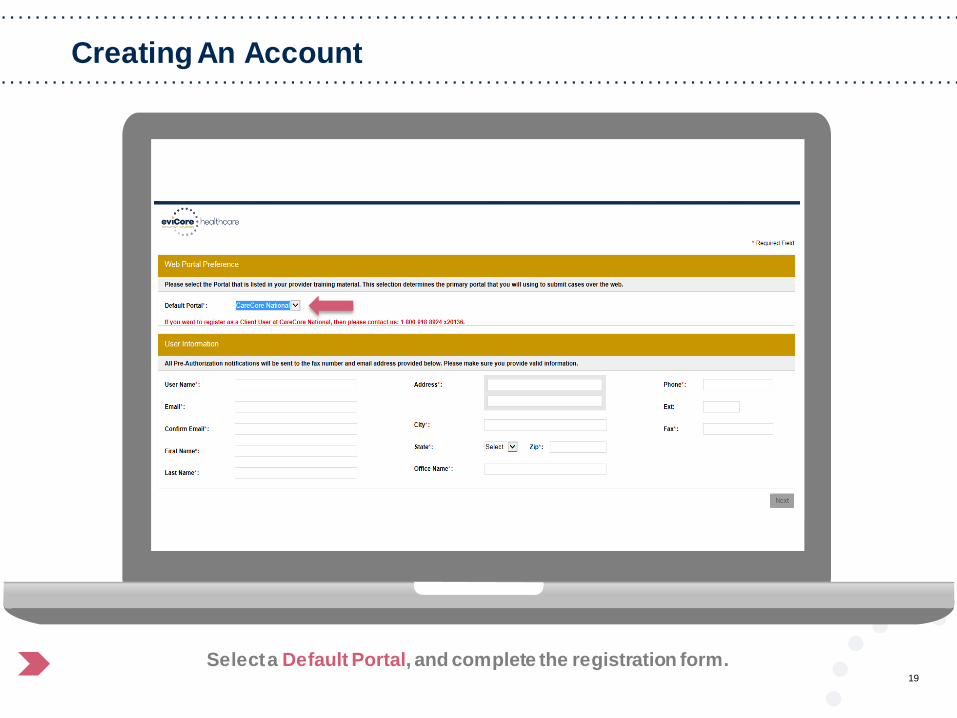
19
Select a Default Portal, and complete the registration form.

Creating An Account
20
Review information provided, and click “Submit Registration.”
User Registration-Continued
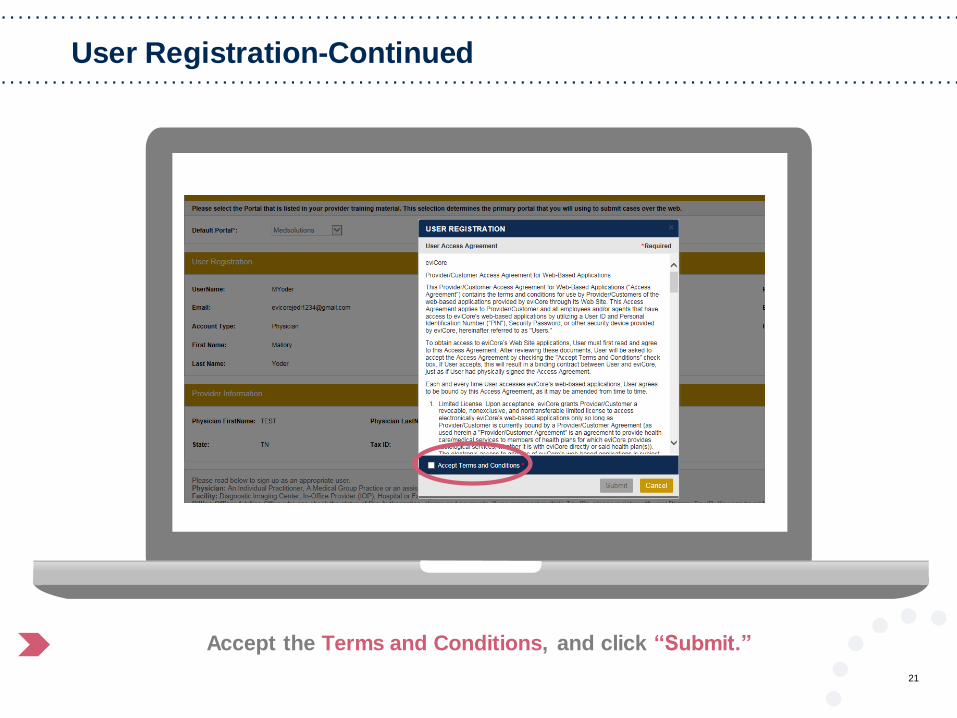
21
Accept the Terms and Conditions, and click “Submit.”

User Registration-Continued
22
You will receive a message on the screen confirming your registration is
successful. You will be sent an email to create your password.
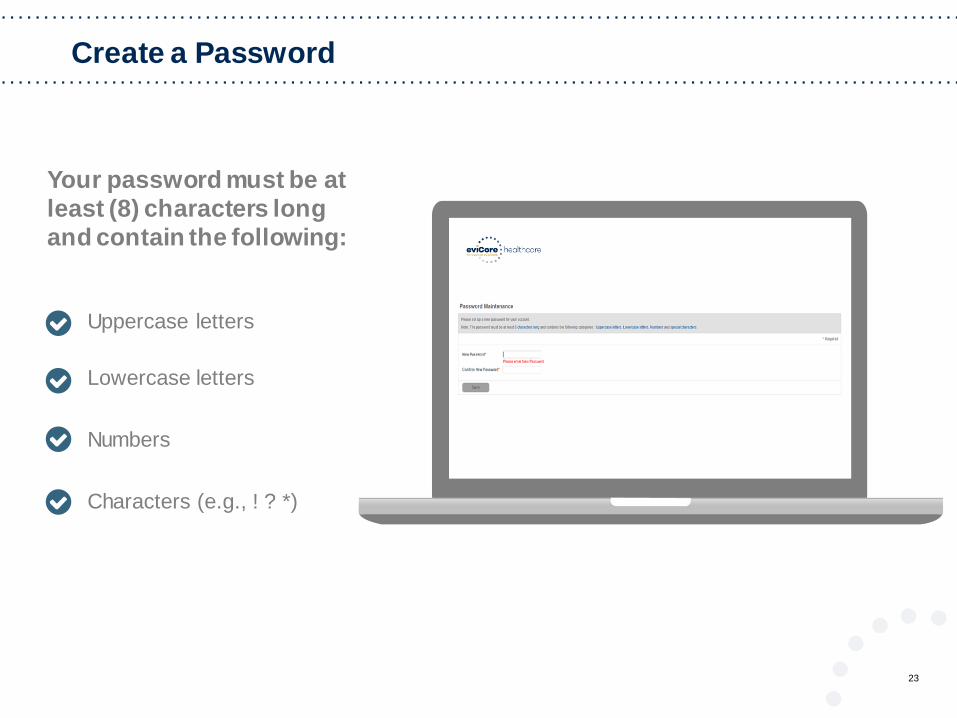
Create a Password
23
Uppercase letters
Lowercase letters
Numbers
Characters (e.g., ! ? *)
Your password must be at
least (8) characters long
and contain the following:

Account Log-In
24
To log-in to your account, enter your User ID and Password. Agree to
the HIPAA Disclosure, and click “Login.”

25
Account Overview

Welcome Screen
26
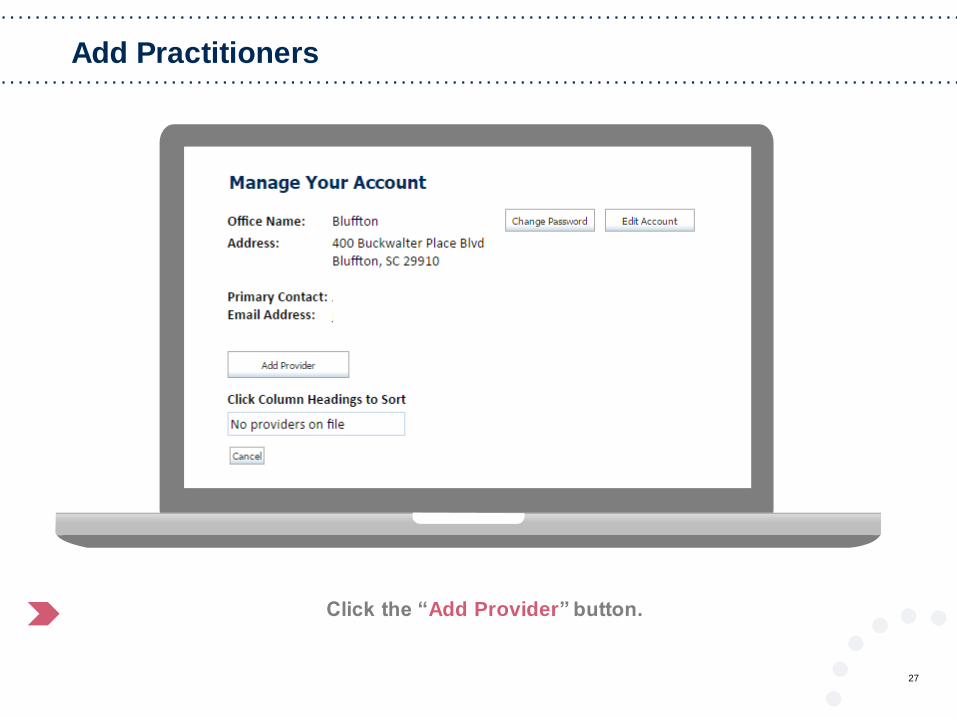
Providers will need to be added to your account prior to case submission. Click the “Manage
Account” tab to add provider information.
Note: You can access the MedSolutions Portal at any time if you are registered. Click the MedSolutions Portal button on the top right corner to seamlessly toggle back and forth
between the two portals without having to log-in multiple accounts.
Add Practitioners
27
Click the “Add Provider” button.
Add Practitioners
28
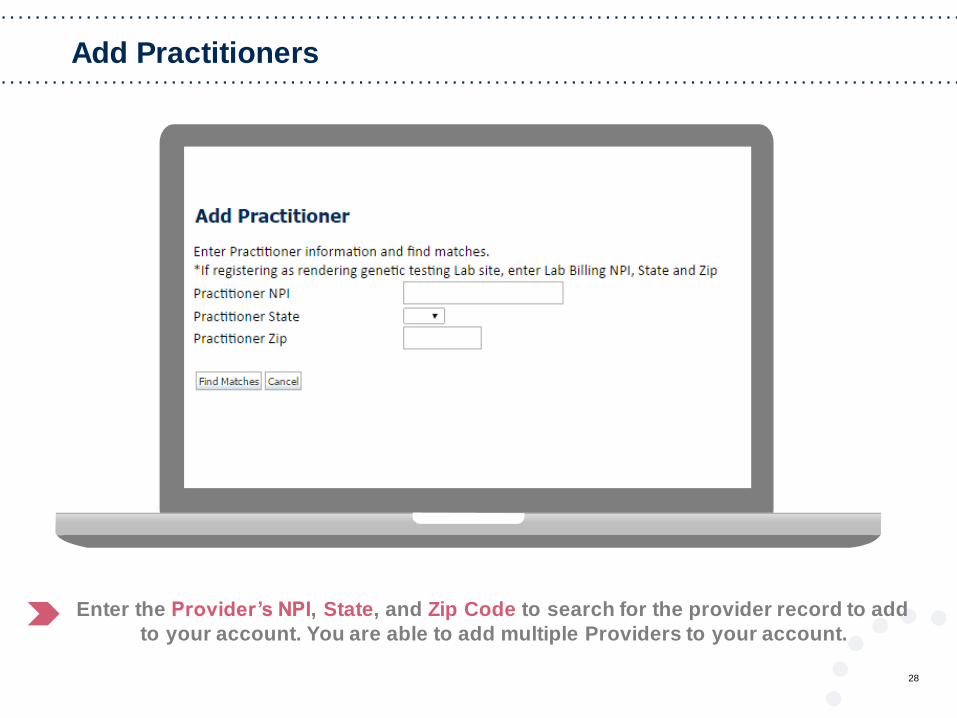
Enter the Provider’s NPI, State, and Zip Code to search for the provider record to add
to your account. You are able to add multiple Providers to your account.

Adding Practitioners
29
Select the matching record based upon your search criteria

Manage Your Account
30
• Once you have selected a practitioner, your registration will be completed.
You can then access the “Manage Your Account” tab to make any necessary
updates or changes.
• You can also click “Add Another Practitioner” to add another provider to your
account.

31
Case Initiation
Initiating A Case
32
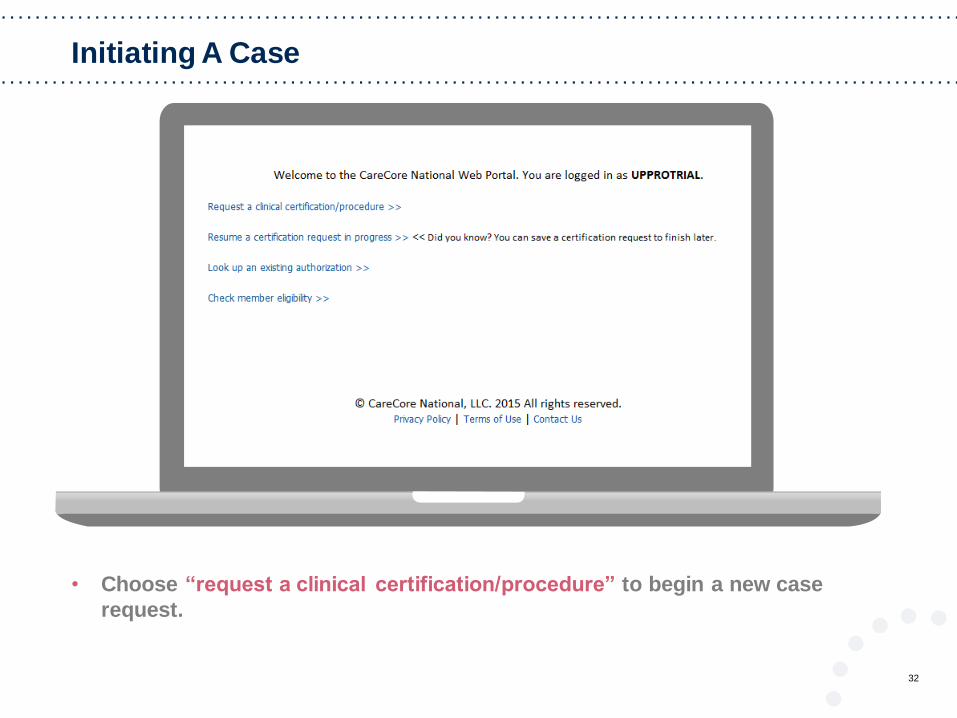
• Choose “request a clinical certification/procedure” to begin a new case
request.
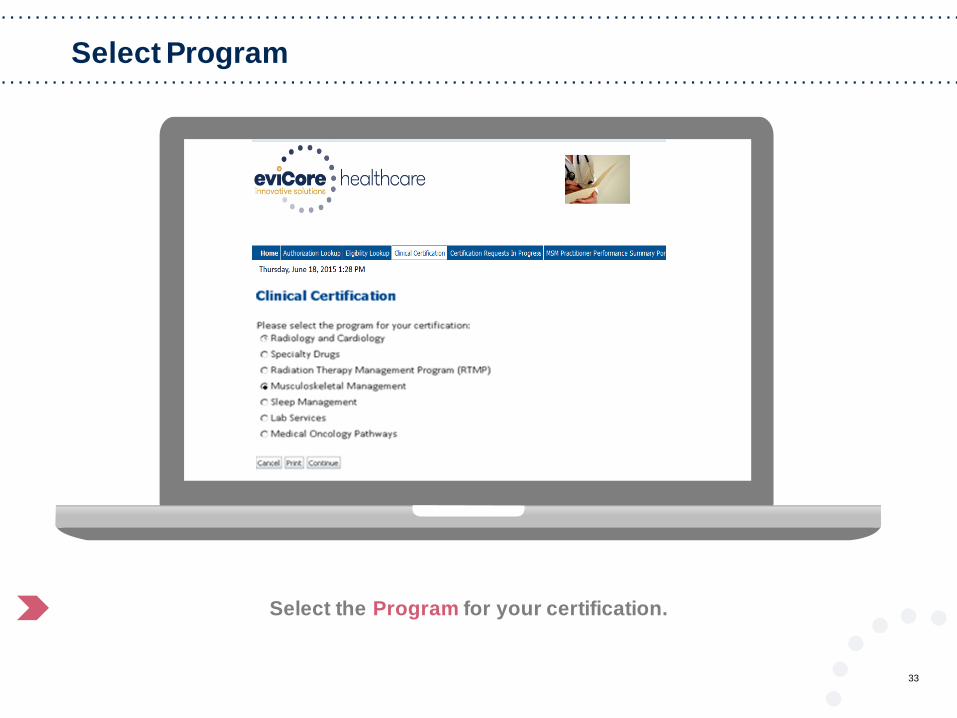
Select Program
33
Select the Program for your certification.

Service Options
34
Select Date Extension, Continuing Care, or Build a New Case.

Select Provider
35
Select the Practitioner/Group for whom you want to build a case.
Select Health Plan
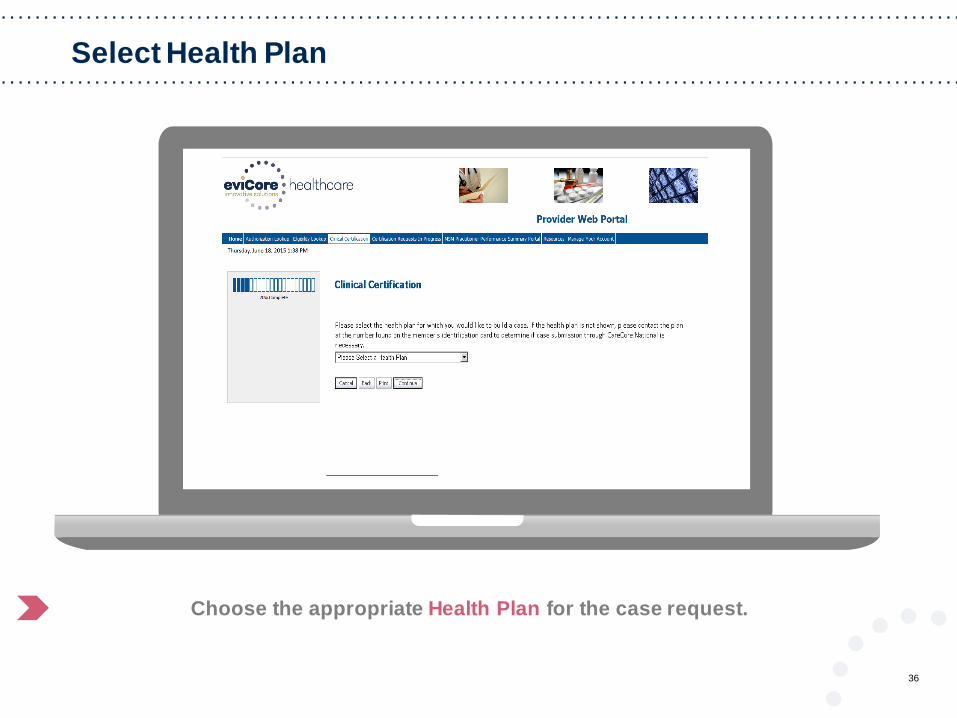
36
Choose the appropriate Health Plan for the case request.

Select Address
37

Contact Information
38
Enter the Provider's name and
appropriate information for the
point of contact individual.

Member Information
39
Enter the member information including the Patient ID number, date of birth, and
patient’s last name. Click “Eligibility Lookup.”

Member History
40

Clinical Details
41

Verify Service Selection
42
ICD-10 Code
ICD-10 Code

Site Selection
43
Verify all information entered and make any needed changes prior to moving
into the clinical collection phase of the prior authorization process.
You will not have the opportunity to make changes after that point.

Medical Review
44
If additional information is required, you will have the option to either upload
documentation, enter information into the text field, or contact us via phone.

Approval
45
Once the clinical pathway
questions are completed
and the answers have met
the clinical criteria, an
approval will be issued.
Print the screen and store
in the patient’s file.

Building Additional Cases
46
Once a case has been submitted for clinical certification, you can return to the Main
Menu, resume an in-progress request, or start a new request. You’re even able to
indicate if any of the previous case information will be needed for the new request.

47
Date Extensions
• The authorization can be extended if all the approved visits have not been used.
• eviCore healthcare will approve one date extension per Approved Time Period up to 30 days as long as the authorization has not expired.
• Date extension can be requested via the online portal.

Service Options
48
Select Date Extension
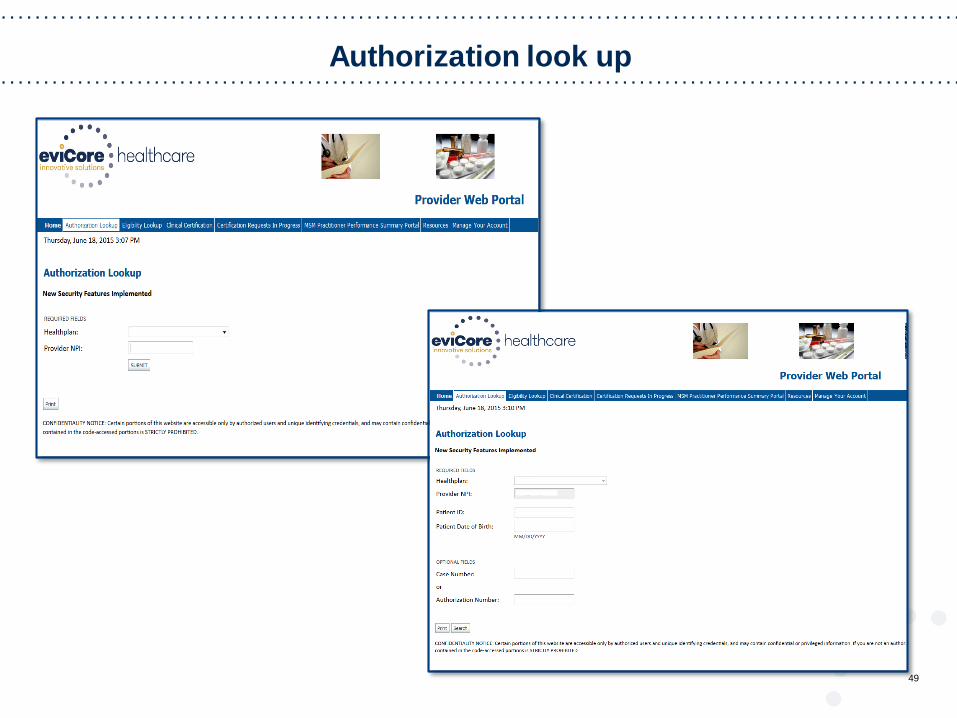
Authorization look up
49

Authorization Status
50
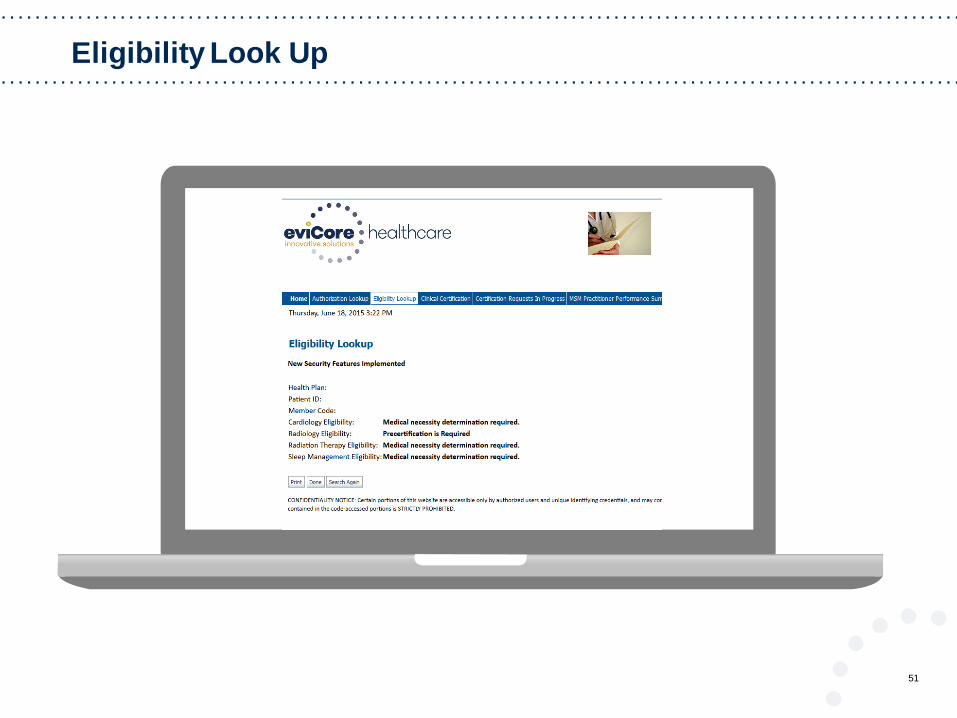
Eligibility Look Up
51
52
Provider Resources
Provider Relations
Department
Pre-Certification
Call Center
Web-Based
Services
Documents
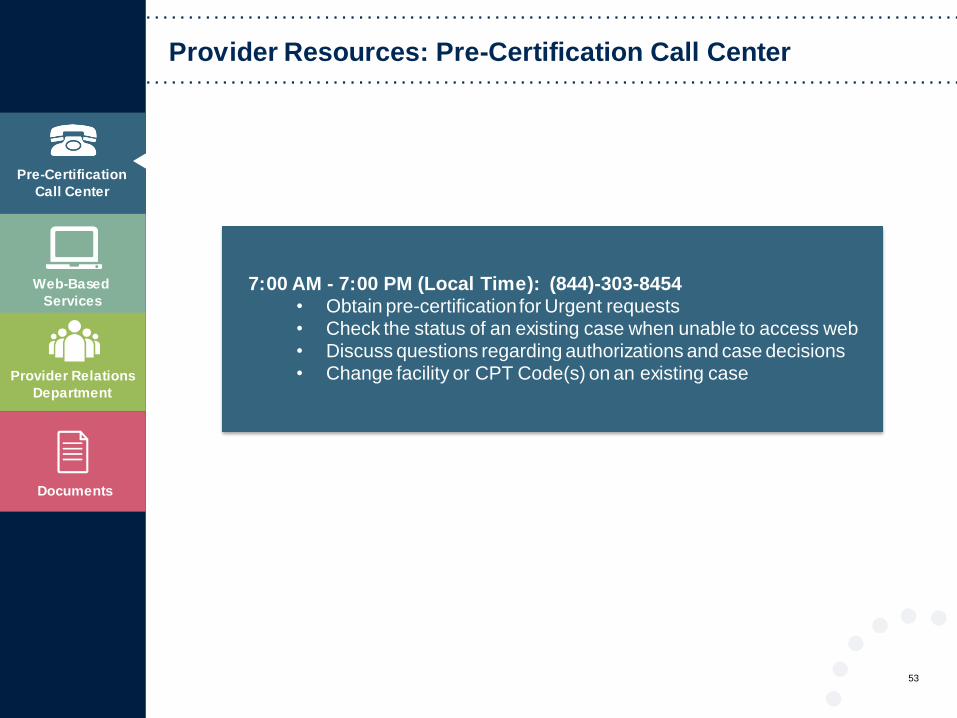
Provider Resources: Pre-Certification Call Center
53
7:00 AM - 7:00 PM (Local Time): (844)-303-8454• Obtain pre-certification for Urgent requests• Check the status of an existing case when unable to access web• Discuss questions regarding authorizations and case decisions• Change facility or CPT Code(s) on an existing case

Client Provider
Operations
Pre-Certification
Call Center
Web-Based
Services
Documents
Provider Resources: Web-Based Services
54
www.evicore.com
To speak with a Web Specialist, call (800) 646-0418 (Option #2) or
email [email protected].
• Request authorizations and check case status online – 24/7• Pause/Start feature to complete initiated cases• Upload electronic PDF/word clinical documents
Client Provider
Operations
Pre-Certification
Call Center
Web-Based
Services
Documents
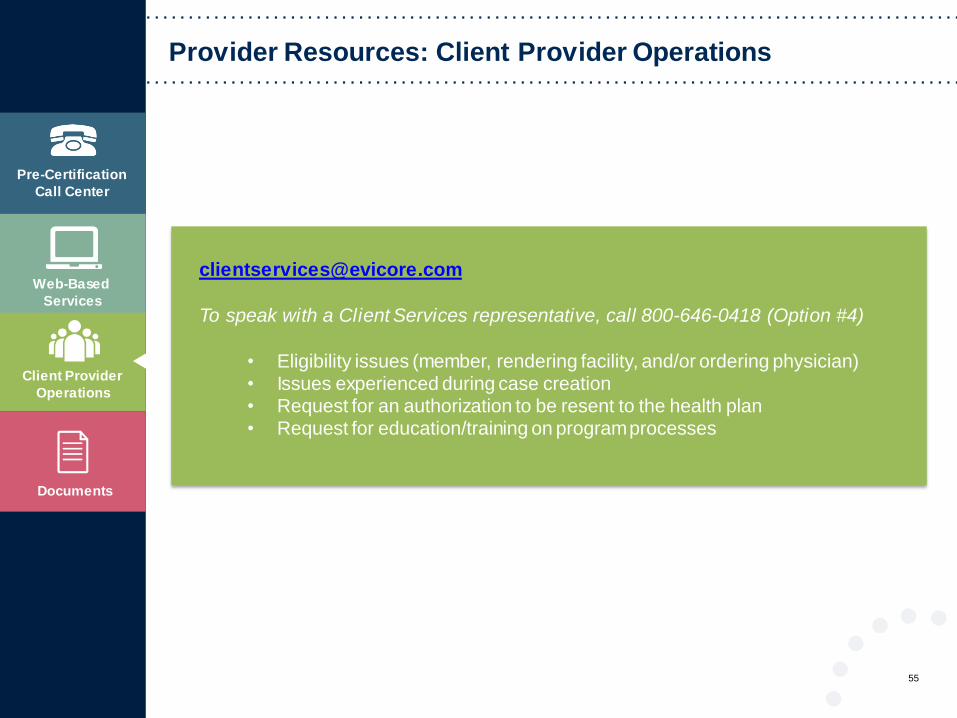
Provider Resources: Client Provider Operations
55
To speak with a Client Services representative, call 800-646-0418 (Option #4)
• Eligibility issues (member, rendering facility, and/or ordering physician)• Issues experienced during case creation• Request for an authorization to be resent to the health plan• Request for education/training on program processes

Provider Relations
Department
Pre-Certification
Call Center
Web-Based
Services
Documents
Provider Resources: Implementation Document
56
Prominence Implementation Site:
• Worksheets• Program Specific Presentations• eviCore clinical guidelines• CPT Code Lists
Provider Enrollment Questions Contact WellCare
Coding Guidelines & Program Criteria:
https://www.evicore.com/
https://www.evicore.com/healthplan/prominence

57
Thank You!
Related Documents