EECT 112 & Projects from MultiSim Jeff Noggle & Stephen Smith EECT 112 Summer 2013

Welcome message from author
This document is posted to help you gain knowledge. Please leave a comment to let me know what you think about it! Share it to your friends and learn new things together.
Transcript

EECT 112 & Projects from MultiSim Jeff Noggle & Stephen Smith
EECT 112
Summer 2013

Contents
Conversion Table
Multisim Circuits
Boolean Diagrams using Multisim
LABS
Final Project
Additional Data
Logic Gates, Boolean Diagrams, Chip Diagrams,

BCD, HEX, Base 10, Octal, Gray Conversions

Using Multisim. . . It’s a BLAST!!!!!

U1A
74LS00D
U2B
74LS00D
1
1
1
Probe1
V: 5.00 V
U1A
74LS00D
U2B
74LS00D
1
1
1
XMM1
U1A
74LS00D
U2B
74LS00D
1
1
1
5G A
+
-
Dual NAND Gates and Methods to set them up: Slides 2 thru 5

U1A
74LS00D
U2B
74LS00D
XSC1
A B C D
G
T
250 Hz
U9
1kHz
500 Hz
NAND GATES – Setup one

U1A
74LS00D
U2B
74LS00D
250 Hz
U9
1kHz
500 Hz
XLA1
C Q T
1
F
NAND GATES – Setup Two

U1A
74LS00D
U2B
74LS00D
XLA1
C Q T
1
F
OUT
XWG1
RT
X
O
X
X
O
O
016
1531
CB A
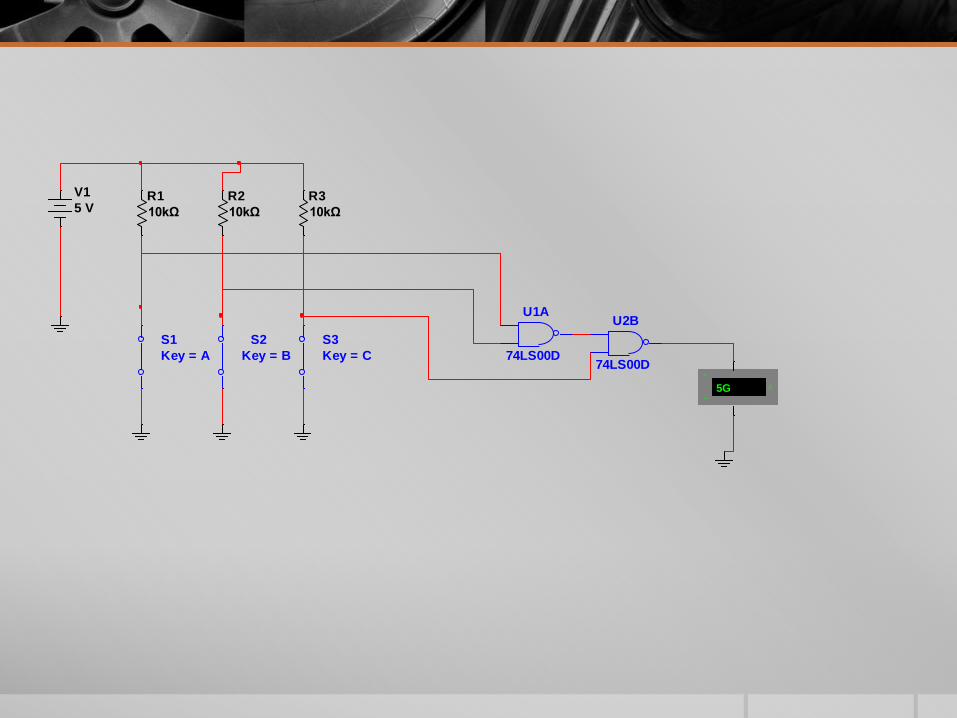
U1A
74LS00D
U2B
74LS00D
5G A
+
-
R1
10kΩ
R2
10kΩ
R3
10kΩ
V1
5 V
S1
Key = A
S2
Key = B
S3
Key = C

Boolean Theorems for AND Gates

Boolean Theorems for OR Gates

Multivariable Distributive Laws 13a

Multivariable Distributive Law 13b
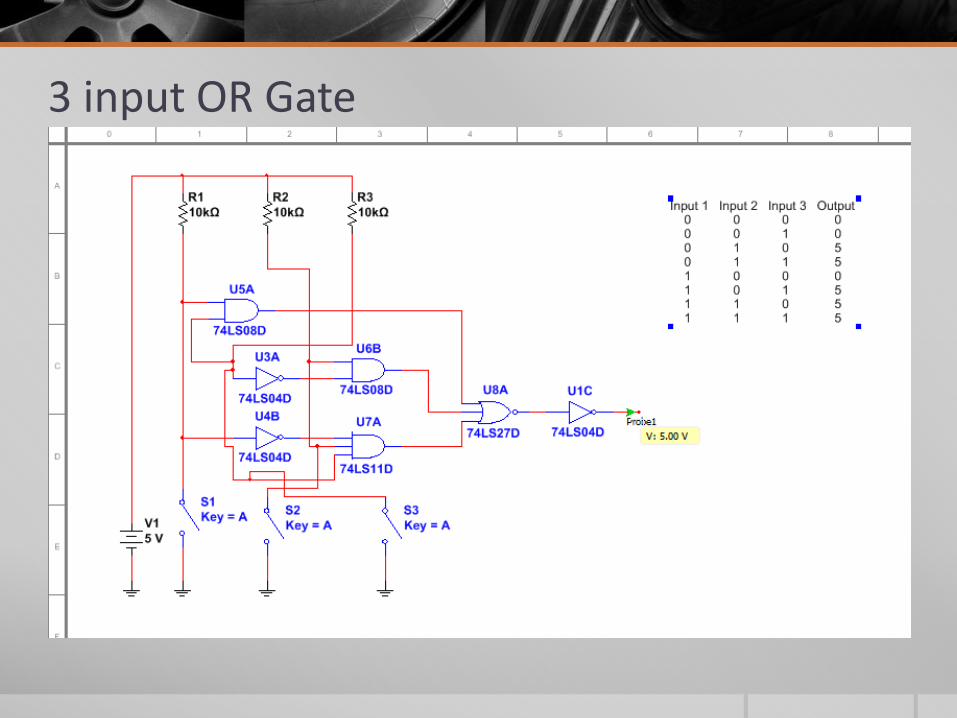
3 input OR Gate

R1
10Ω
Lecture 3, Slide 20, Simulated on MultiSim
3 Input AND with Inverter Circuit

Universality of NAND and NOR Gates

Simplify Circuit Example #1

Simplify Circuit Example #2

Exclusive NOR
Karnaugh Maping
A B C X C' C
0 0 0 1 A'B' 1 0
0 0 1 0 A'B 0 0
0 1 0 0 AB 0 1
0 1 1 0 AB' 0 0
1 0 0 0
1 0 1 0
1 1 0 0
1 1 1 1
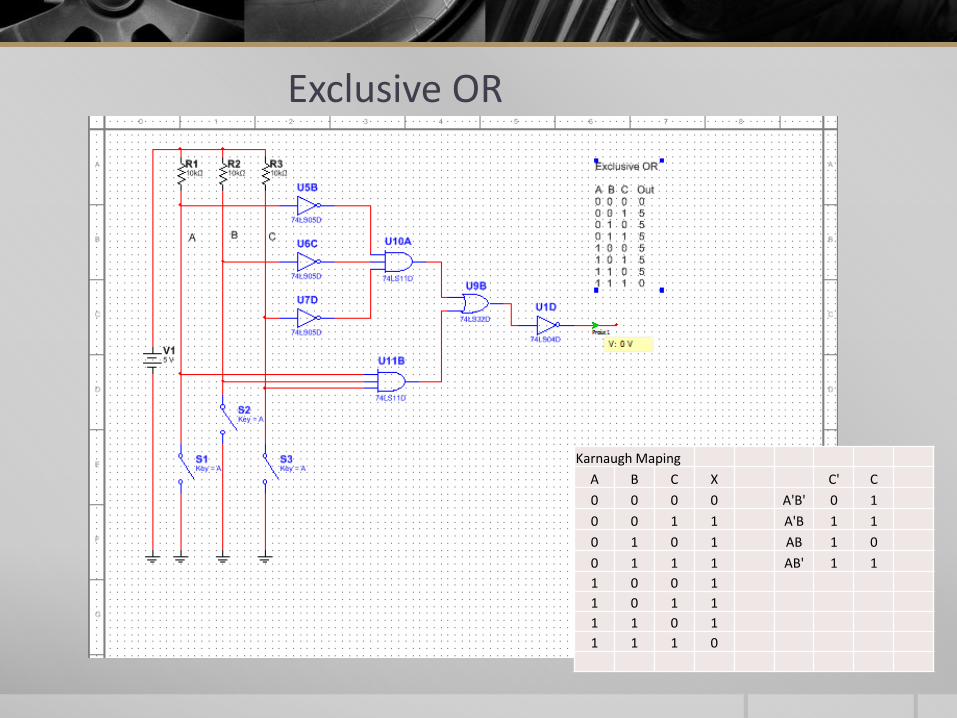
Exclusive OR
Karnaugh Maping
A B C X C' C
0 0 0 0 A'B' 0 1
0 0 1 1 A'B 1 1
0 1 0 1 AB 1 0
0 1 1 1 AB' 1 1
1 0 0 1
1 0 1 1
1 1 0 1
1 1 1 0

Gates with XOR & XNOR

LABS
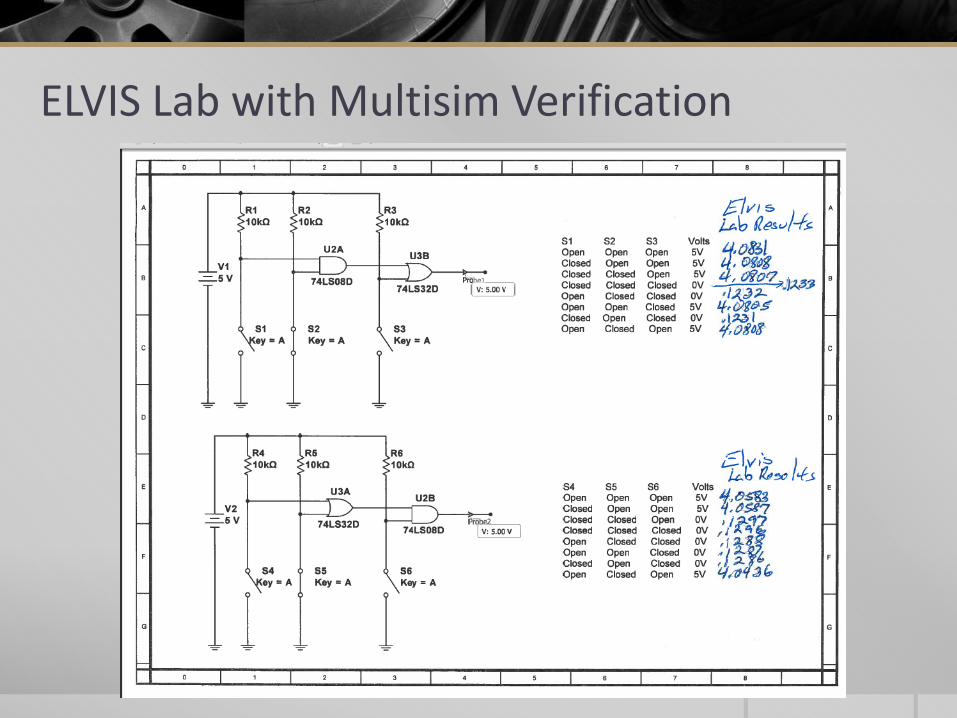
ELVIS Lab with Multisim Verification

Lecture 3, Simulated on MultiSim and in LAB
LAB Lecture 3
5 Gate Input Results
S1 S2 S3 S4 S5 Probe
0 0 0 0 0 5.156
0 0 0 0 1 0.1342
0 0 0 1 0 0.1362
0 0 0 1 1 0.1343
0 0 1 0 0 5.161
0 0 1 0 1 0.1336
0 0 1 1 0 5.111
0 0 1 1 1 0.1337
0 1 0 0 0 5.174
0 1 0 0 1 0.1337
0 1 0 1 0 0.1339
0 1 0 1 1 0.1339
0 1 1 0 0 5.177
0 1 1 0 1 0.1335
0 1 1 1 0 5.178
0 1 1 1 1 0.1334
1 0 0 0 0 5.176
1 0 0 0 1 0.1336
1 0 0 1 0 0.1336
1 0 0 1 1 0.1338
1 0 1 0 0 5.178
1 0 1 0 1 0.1334
1 0 1 1 0 5.178
1 0 1 1 1 0.1334
1 1 0 0 0 5.174
1 1 0 0 1 0.1334
1 1 0 1 0 5.174
1 1 0 1 1 0.1335
1 1 1 0 0 5.188
1 1 1 0 1 0.1333
1 1 1 1 0 5.182
1 1 1 1 1 0.1334

DeMorgan’s Theorem, Simulated on MultiSim & Lab Results
Demorgan's Theorem #16
Lab Results
S1 S2 Probe 1 Probe 2
0 0 4.098 4.04
0 1 0.0861 0.1262
1 0 0.0861 0.1262
1 1 0.0861 0.1262
Demorgan's Theorem #17
Lab Results
S1 S2 Probe 1 Probe 2
0 0 4.096 4.085
0 1 4.096 4.083
1 0 4.094 4.083
1 1 0.086 0.1262

Wrong way to do a Flip Flop

Correct Way to do a Flip Flop & Lab Results Flip Flop Circuit
Lab Results
S1 S2 Q Q/Bar
0 0 4.04 4.039
0 1 0.011 4.04
1 0 4.042 0.117
1 1 .1262/4.042 0.129

Presentation 5: Slide 47 Lab Results

Test Results for DeMorgan from Elvis Simulation:
Input 1 Input 2 Volts Input 1 Input 2 Volts
0 0 4.018 0 0 4.04
0 1 0.0861 0 1 0.1262
1 0 0.0861 1 0 0.1262
1 1 0.0861 1 1 0.1263
Input 1 Input 2 Volts Input 1 Input 2 Volts
0 0 4.096 0 0 4.085
0 1 4.096 0 1 4.083
1 0 4.094 1 0 4.083
1 1 0.086 1 1 0.1262
DeMorgan's Theorem #16
Probe After AND Gate Probe After NOR Gate
DeMorgan's Theorem #17
Probe After NAND Gate Probe After OR Gate

LAB: Blinking LED on Basic Stamp 2; Programming
'{$STAMP BS2}
'PBASIC 2.0}
'{$PORT {$COM1}
'Program 1.1/; Blinking LED Example
Cnt VAR Byte 'Variable for counting
PB1 VAR IN1 'Variable for PB1 input
LED1 CON 4 'Variable for LED1 output
INPUT 1 'Set PB1 as input
OUTPUT 4 'Set LED1 as output
LOW LED1 'Turn off LED
Start:
IF PB1 = 0 THEN Start 'Not Pressed? Go back to loop
GOSUB Blink_LED1 'If it was pressed then perform subroutine
GOTO Start 'Afer return, go back to start
Blink_LED1: 'Subroutine to blink LED 5 repetitions
FOR Cnt = 1 TO 5 'Setup loop for 5 counts
HIGH LED1 'Turn on LED
PAUSE 1000 'Wait 1 second
LOW LED1 'Turn off LED
PAUSE 1000 'wait 1 second
NEXT 'Repeat loop until done
RETURN 'return back to after gosub call
See Next Slide . . .

Blinking LED LAB using Basic Stamp 2 & BoE
Components: 1. LED Yellow 2. 220 ohm resistor 3. Push button 4. 10 k-ohm resistor 5. Board of Education
http://www.youtube.com/watch?v=zJ55SocmE8Y
To watch a video of our blinking LED go to:

Basic Stamp 2, Temperature Control check using a potentiometer. Program -> See Next Slide

Heater Control Adding a potentiometer (10K) and a capacitor (1 Uf) to the original Blinking light circuit, we were able to turn the LED on and off using the potentiometer. Of course a new program was written to control this as well. See Below:
http://youtu.be/hX5S-4GpeyI
See the video of how this works at:
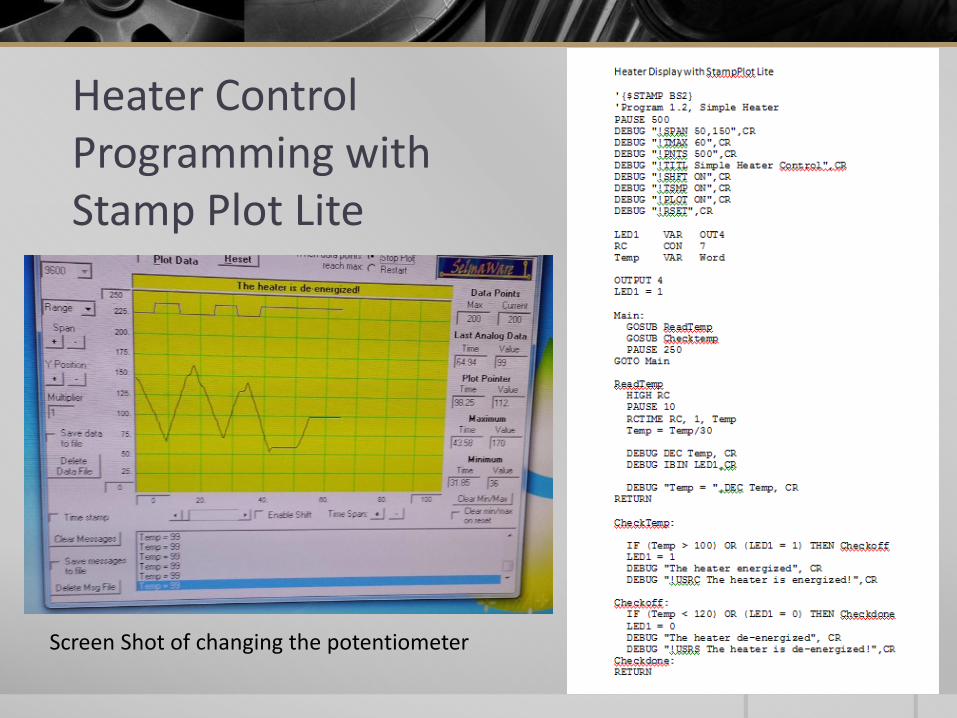
Heater Control Programming with Stamp Plot Lite
Screen Shot of changing the potentiometer

Blinking Binary Code: Programming PROGRAM FOR BINARY COUNTER FOR BASIC STAMP 2 JULY 25, 2013 JEFF NOGGLE & STEVE SMITH
'{$STAMP BS2} HIGH LED3 HIGH LED1 Cnt VAR Byte HIGH LED3 HIGH LED3
Cnt VAR Byte HIGH LED1 HIGH LED2 LED1 CON 1 HIGH LED2 HIGH LED1
LED1 CON 1 PAUSE 1500 HIGH LED4 LED2 CON 2 PAUSE 1500 HIGH LED4
LED2 CON 2 LOW LED3 PAUSE 1500 LED3 CON 3 LOW LED3 PAUSE 1500
LED3 CON 3 LOW LED1 LOW LED1 LED4 CON 4 LOW LED2 LOW LED3
LED4 CON 4 PAUSE 1500 LOW LED2 PAUSE 1500 LOW LED1
LOW LED4 OUTPUT 1 LOW LED4
OUTPUT 1 HIGH LED3 PAUSE 1500 OUTPUT 2 HIGH LED3 PAUSE 1500
OUTPUT 2 HIGH LED2 OUTPUT 3 HIGH LED2
OUTPUT 3 PAUSE 1500 HIGH LED3 OUTPUT 4 HIGH LED1 HIGH LED3
OUTPUT 4 LOW LED3 HIGH LED4 PAUSE 1500 HIGH LED2
LOW LED2 PAUSE 1500 LOW LED1 LOW LED3 HIGH LED4
LOW LED1 PAUSE 1500 LOW LED3 LOW LED2 LOW LED2 PAUSE 1500
LOW LED2 LOW LED4 LOW LED3 LOW LED1 LOW LED3
LOW LED3 HIGH LED3 PAUSE 1500 LOW LED4 PAUSE 1500 LOW LED2
LOW LED4 HIGH LED2 LOW LED4
HIGH LED1 HIGH LED3 START: HIGH LED1 PAUSE 1500
START: PAUSE 1500 HIGH LED1 HIGH LED1 HIGH LED4
LOW LED1 LOW LED3 HIGH LED4 PAUSE 1500 PAUSE 1500 HIGH LED3
PAUSE 1500 LOW LED2 PAUSE 1500 LOW LED1 LOW LED1 HIGH LED2
LOW LED1 LOW LED3 PAUSE 1500 LOW LED4 HIGH LED1
HIGH LED1 PAUSE 1500 LOW LED1 PAUSE 1500 HIGH LED4
PAUSE 1500 LOW LED4 HIGH LED2 PAUSE 1500
LOW LED1 HIGH LED4 PAUSE 1500 PAUSE 1500 HIGH LED2 LOW LED3
PAUSE 1500 PAUSE 1500 LOW LED2 HIGH LED4 LOW LED2
LOW LED4 HIGH LED3 PAUSE 1500 PAUSE 1500 LOW LED1
HIGH LED2 PAUSE 1500 HIGH LED2 LOW LED2 LOW LED4
PAUSE 1500 HIGH LED4 HIGH LED1 LOW LED4 PAUSE 1500
LOW LED2 HIGH LED1 PAUSE 1500 HIGH LED2 PAUSE 1500
PAUSE 1500 HIGH LED4 LOW LED3 PAUSE 1500 RETURN
PAUSE 1500 LOW LED2 LOW LED1 HIGH LED1
HIGH LED1 LOW LED1 LOW LED4 LOW LED2 HIGH LED2
HIGH LED2 LOW LED4 PAUSE 1500 PAUSE 1500 HIGH LED4
PAUSE 1500 PAUSE 1500 PAUSE 1500
LOW LED1 HIGH LED3 HIGH LED3 LOW LED1
LOW LED2 HIGH LED2 HIGH LED2 PAUSE 1500 LOW LED2
PAUSE 1500 HIGH LED4 HIGH LED1 LOW LED3 LOW LED4
PAUSE 1500 HIGH LED4 PAUSE 1500 PAUSE 1500
HIGH LED3 LOW LED2 PAUSE 1500
PAUSE 1500 LOW LED4 LOW LED3 HIGH LED3 HIGH LED3
LOW LED3 PAUSE 1500 LOW LED2 HIGH LED1 HIGH LED4
PAUSE 1500 LOW LED1 PAUSE 1500 PAUSE 1500
LOW LED4 LOW LED3 LOW LED3
PAUSE 1500 LOW LED1 LOW LED4
PAUSE 1500 PAUSE 1500
This is a little hard to read but to follow the columns. See the link below to the Youtube video.
http://youtu.be/Cm8NYPWkp_s
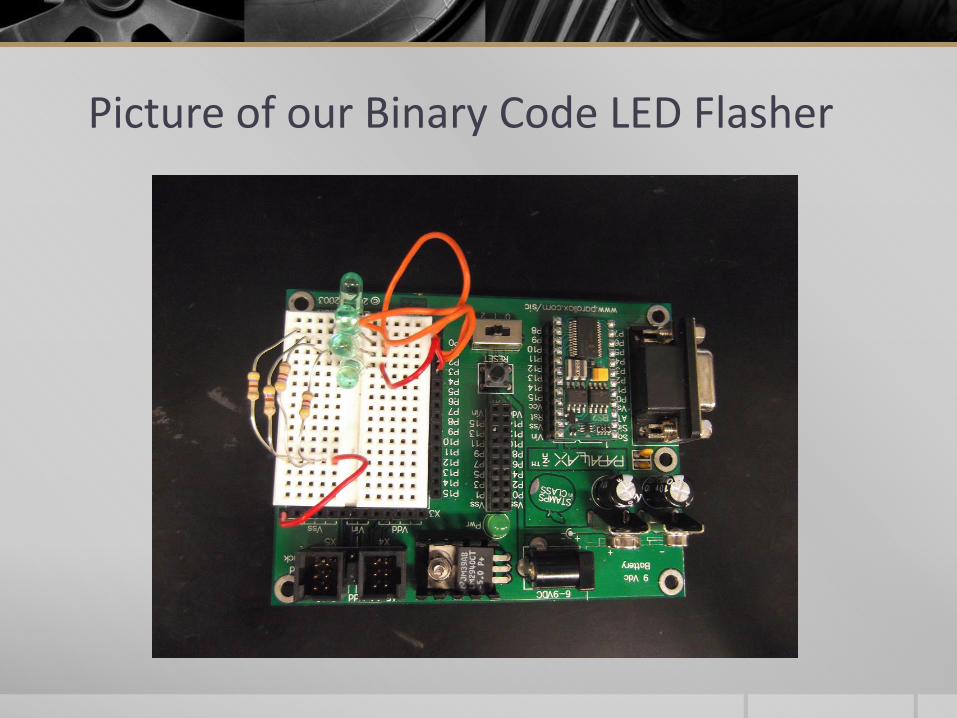
Picture of our Binary Code LED Flasher

FINAL PROJECT
7 Segment LED displaying a sequential count of the hexadecimal numbers 1 thru 9 then A thru F. This is followed by tones from a speaker playing . . . Frere Jacques!
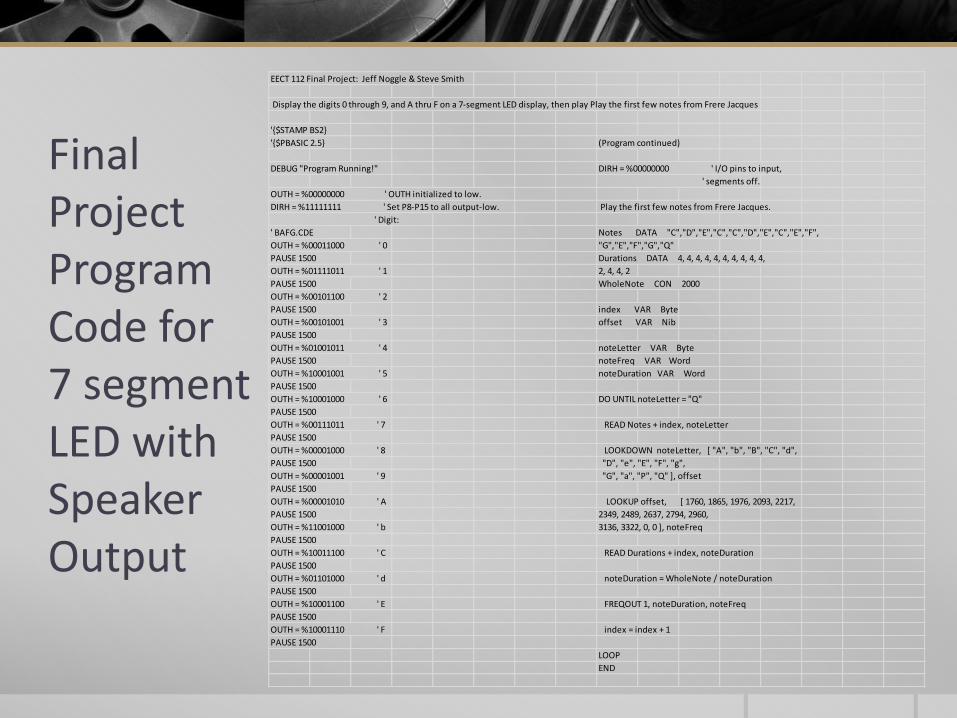
Final Project Program Code for 7 segment LED with Speaker Output
EECT 112 Final Project: Jeff Noggle & Steve Smith
Display the digits 0 through 9, and A thru F on a 7-segment LED display, then play Play the first few notes from Frere Jacques
'{$STAMP BS2}
'{$PBASIC 2.5} (Program continued)
DEBUG "Program Running!" DIRH = %00000000 ' I/O pins to input,
' segments off.
OUTH = %00000000 ' OUTH initialized to low.
DIRH = %11111111 ' Set P8-P15 to all output-low. Play the first few notes from Frere Jacques.
' Digit:
' BAFG.CDE Notes DATA "C","D","E","C","C","D","E","C","E","F",
OUTH = %00011000 ' 0 "G","E","F","G","Q"
PAUSE 1500 Durations DATA 4, 4, 4, 4, 4, 4, 4, 4, 4, 4,
OUTH = %01111011 ' 1 2, 4, 4, 2
PAUSE 1500 WholeNote CON 2000
OUTH = %00101100 ' 2
PAUSE 1500 index VAR Byte
OUTH = %00101001 ' 3 offset VAR Nib
PAUSE 1500
OUTH = %01001011 ' 4 noteLetter VAR Byte
PAUSE 1500 noteFreq VAR Word
OUTH = %10001001 ' 5 noteDuration VAR Word
PAUSE 1500
OUTH = %10001000 ' 6 DO UNTIL noteLetter = "Q"
PAUSE 1500
OUTH = %00111011 ' 7 READ Notes + index, noteLetter
PAUSE 1500
OUTH = %00001000 ' 8 LOOKDOWN noteLetter, [ "A", "b", "B", "C", "d",
PAUSE 1500 "D", "e", "E", "F", "g",
OUTH = %00001001 ' 9 "G", "a", "P", "Q" ], offset
PAUSE 1500
OUTH = %00001010 ' A LOOKUP offset, [ 1760, 1865, 1976, 2093, 2217,
PAUSE 1500 2349, 2489, 2637, 2794, 2960,
OUTH = %11001000 ' b 3136, 3322, 0, 0 ], noteFreq
PAUSE 1500
OUTH = %10011100 ' C READ Durations + index, noteDuration
PAUSE 1500
OUTH = %01101000 ' d noteDuration = WholeNote / noteDuration
PAUSE 1500
OUTH = %10001100 ' E FREQOUT 1, noteDuration, noteFreq
PAUSE 1500
OUTH = %10001110 ' F index = index + 1
PAUSE 1500
LOOP
END

Picture: Board of Education Final Project
Materials: 7 – 1K resitors 1 – 7 segment LED LN513RA 1 – 8 Ohm Speaker Many Wires We removed the one resistor and changed to a direct wire to get a brighter display.
Please enjoy Frere Jacques !!!!

Trials and Tribulations of the Final Project
We found that we were still having an issue with the display and it would not show the 0 thru F as we wanted to see it. Finally we wrote down what we were seeing and noticed a pattern: , , , , , , , which was giving us the missing parts of the numbers. Therefore we established we needed to reverse what our code was being sent to the controller. Once we switched the program for our data strings we got the correct numbers and letters showing on the 7 segment LED. We added the finale of Frere Jacques! At one point, we also had a wire that was not fully inserted into the board for the ‘c’ segment of the LED but that was quickly rectified. Go to next Slide for the link to the Video of our final project!

WOO HOO!!!
http://youtu.be/-DDEgVoWwuI

ADDITIONAL DATA

Alternate Logic-Gate Representations (From Class) To convert a standard symbol to an alternate:
Invert each input and output in standard symbols.
Add an inversion bubble where there are none.
Remove bubbles where they exist.

Boolean Theorems Continued…

Boolean Theorems

FLIP-FLOP using NAND Gates

The following pages contain Chip Diagrams 2 input NOR Gate

Inverter Diagram
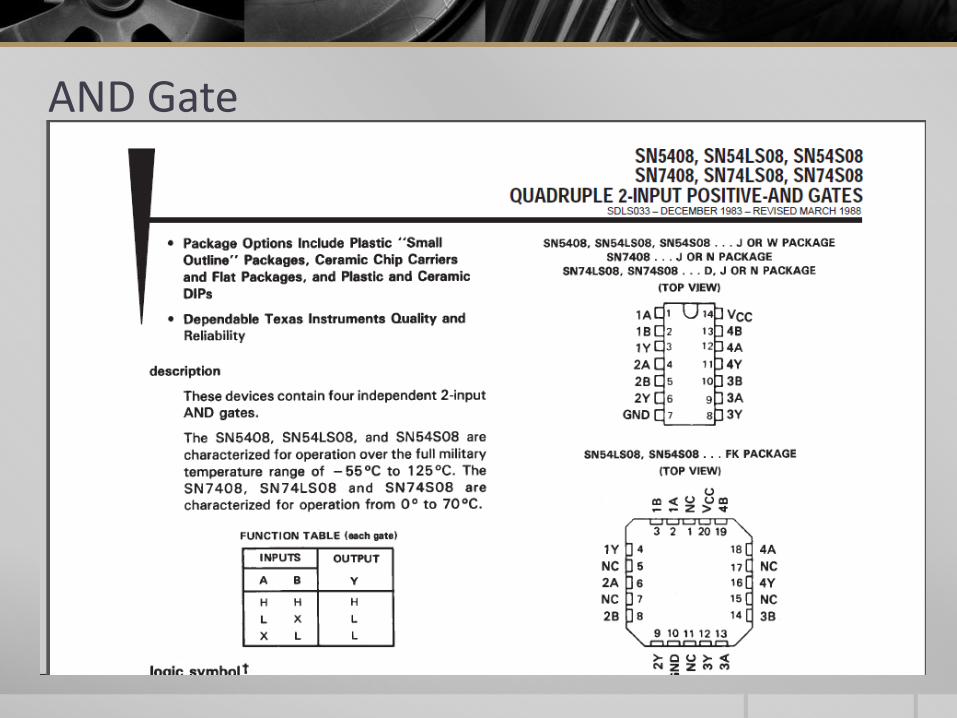
AND Gate

OR Gate

Triple 3-Input AND Gate

Dual J-K Flip-Flops w/Clear
Related Documents