Progressive web app with Angular 2 and ASP.NET Juraj Kubala Bachelor’s thesis December 2017 School of Technology, Communication and Transport Degree Programme in Information and Communications Technology

Welcome message from author
This document is posted to help you gain knowledge. Please leave a comment to let me know what you think about it! Share it to your friends and learn new things together.
Transcript
Progressive web app
with Angular 2 and ASP.NET
Juraj Kubala
Bachelor’s thesis December 2017 School of Technology, Communication and Transport Degree Programme in Information and Communications Technology
Description
Author(s)
Juraj Kubala Type of publication
Bachelor’s thesis Date
December 2017
Language of publication: English
Number of pages
61 Permission for web publi-
cation: yes
Title of publication
Progressive web app with Angular 2 and ASP.NET
Degree programme
Information and Communications Technology
Supervisor(s)
Salmikangas, Esa Assigned by
Inmics Oy
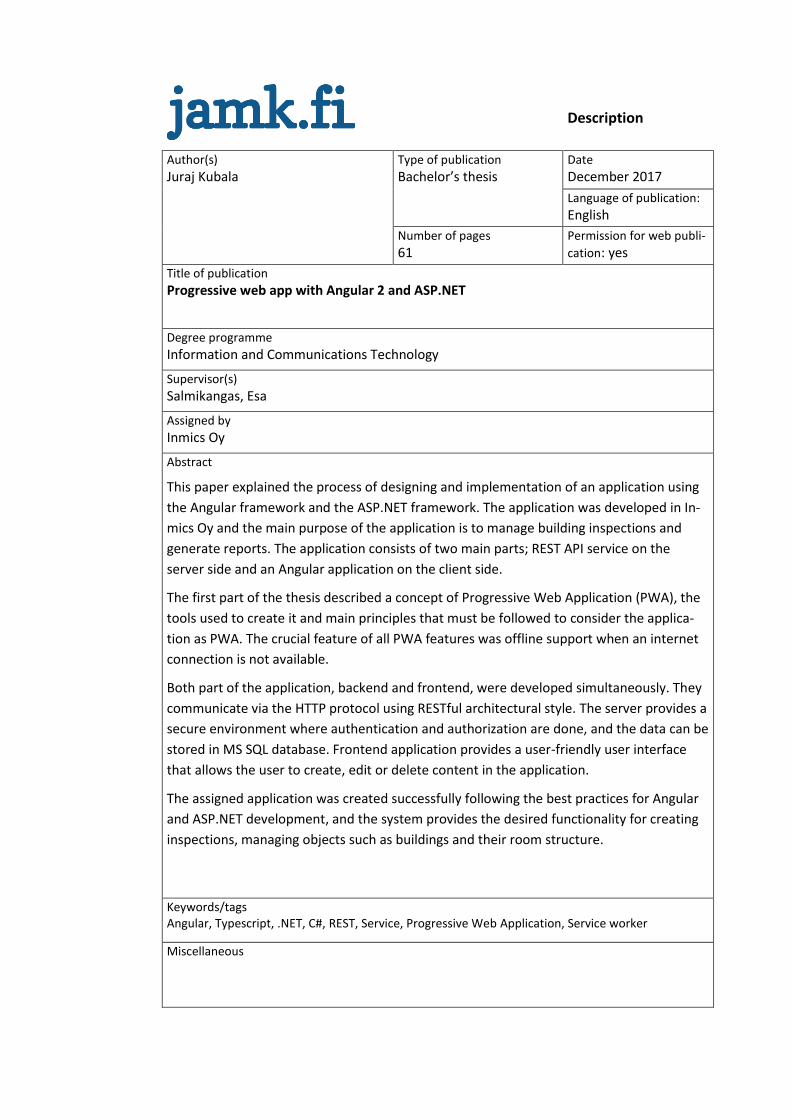
Abstract
This paper explained the process of designing and implementation of an application using
the Angular framework and the ASP.NET framework. The application was developed in In-
mics Oy and the main purpose of the application is to manage building inspections and
generate reports. The application consists of two main parts; REST API service on the
server side and an Angular application on the client side.
The first part of the thesis described a concept of Progressive Web Application (PWA), the
tools used to create it and main principles that must be followed to consider the applica-
tion as PWA. The crucial feature of all PWA features was offline support when an internet
connection is not available.
Both part of the application, backend and frontend, were developed simultaneously. They
communicate via the HTTP protocol using RESTful architectural style. The server provides a
secure environment where authentication and authorization are done, and the data can be
stored in MS SQL database. Frontend application provides a user-friendly user interface
that allows the user to create, edit or delete content in the application.
The assigned application was created successfully following the best practices for Angular
and ASP.NET development, and the system provides the desired functionality for creating
inspections, managing objects such as buildings and their room structure.
Keywords/tags Angular, Typescript, .NET, C#, REST, Service, Progressive Web Application, Service worker
Miscellaneous

1
Contents
1 Introduction ................................................................................................... 7
2 Progressive web application ........................................................................... 8
2.1 Introduction to progressive web application ................................................. 8
2.2 Caching possibilities of PWA .......................................................................... 9
2.3 Web Application Manifest............................................................................ 12
2.4 Service Worker ............................................................................................. 13
2.5 Service Worker Precache ............................................................................. 14
2.6 Benefits and disadvantages of PWA ............................................................ 15
2.7 Lighthouse .................................................................................................... 15
3 Angular ........................................................................................................ 16
3.1 Introduction to Angular ................................................................................ 16
3.2 Architecture .................................................................................................. 17
3.2.1 Dependency injection............................................................................... 17
3.2.2 Module ..................................................................................................... 19
3.2.3 Directive and component ......................................................................... 20
3.2.4 Service ...................................................................................................... 22
3.2.5 Lifecycle hooks ......................................................................................... 23
3.3 Typescript ..................................................................................................... 24
4 Web API Service ........................................................................................... 26
4.1 Overview ...................................................................................................... 26
4.2 Representational State Transfer API ............................................................ 27
4.3 ASP.NET introduction ................................................................................... 29
4.4 ASP.NET Web API ......................................................................................... 30
4.4.1 Introduction to ASP.NET Web API ............................................................ 30
4.4.2 Routing ..................................................................................................... 31
4.4.3 Controller ................................................................................................. 33
4.4.4 Data access layer ...................................................................................... 34
2
5 Implementation ............................................................................................ 36
5.1 Introduction .................................................................................................. 36
5.2 Backend application ..................................................................................... 37
5.2.1 Solution structure ..................................................................................... 37
5.2.2 Installing and configuring Entity Framework ........................................... 38
5.2.3 Model ....................................................................................................... 40
5.2.4 Presentation layer .................................................................................... 42
5.2.5 Data Access Layer ..................................................................................... 44
5.3 Angular application ...................................................................................... 45
5.3.1 Setting up the development environment............................................... 45
5.3.2 Create a new Angular project .................................................................. 46
5.3.3 Service for authenticated REST API calls .................................................. 50
5.3.4 Inspection module .................................................................................... 51
5.3.5 SW Precache ............................................................................................. 54
6 Conclusion .................................................................................................... 56
References ................................................................................................... 58
3
Figures
Figure 1 - Implementation of the 'Cache than network' caching strategy .................. 11
Figure 2 - Configuration file to set an additional info about a web page .................... 12
Figure 3 - Importing a web application manifest in the head of the web page .......... 12
Figure 4 - Support table for a service worker (Can I use: Service Workers 2017) ....... 13
Figure 5 - Using a service worker as a network middleware (Semenov 2017) ............ 14
Figure 6 - Architecture of Angular framework (Architecture Overview 2017) ............ 17
Figure 7 - Injecting of a service to the component ...................................................... 18
Figure 8 - Configuration of root module ...................................................................... 19
Figure 9 - Component class and connected template ................................................. 21
Figure 10 - Data binding syntax and direction of a data flow (Data binding 2017) ..... 21
Figure 11 - Implementation of a ConnectivityService .................................................. 23
Figure 12 - Component/directive life cycle (data adapted from Lifecycle Hooks 2017)
...................................................................................................................................... 24
Figure 13 - Relationship between Typescript and ECMAScript.................................... 25
Figure 14 - Client-server model .................................................................................... 27
Figure 15 - RESTful communication between service provider and consumer ........... 29
Figure 16 - ASP.NET framework architecture (adapted from Hanselman 2012) ......... 30
Figure 17 - Web API application architecture .............................................................. 31
Figure 18 - Usage of attribute to define routes ........................................................... 32
Figure 19 – Building controller ..................................................................................... 33
Figure 20 - Application overview .................................................................................. 36
Figure 21 - Creating a REST API project ........................................................................ 38
Figure 22 - Adding ADO.NET Entity Data Model to the application............................. 39
Figure 23 - Selecting database objects which will be in included in the model .......... 39
Figure 24 - Business and EF model conversion ............................................................ 40
Figure 25 - Extending EF model class ........................................................................... 41
Figure 26 - Enabling attribute-based routing ............................................................... 42
Figure 27 - Adding new controller ................................................................................ 43
Figure 28 - User API controller ..................................................................................... 43

4
Figure 29 - Encapsulating DB related code with using statement ............................... 44
Figure 30 - User data access class ................................................................................ 45
Figure 31 - Project structure generated by Angular CLI ............................................... 47
Figure 32 - Definition of an AppModule ...................................................................... 48
Figure 33 - Definition of CoreModule .......................................................................... 49
Figure 34 - Implementation of AuthHttp service ......................................................... 50
Figure 35 - Mockups for an inspection views ............................................................... 52
Figure 36 - Structure of inspection module ................................................................. 53
Figure 37 - Inspection detail and space inspection view ............................................. 54
Figure 38 - Configuration for an sw-precache module ................................................ 55

5
Tables
Table 1 - HTTP method names and related operations ............................................... 28
Table 2 - Project files and its explanations ................................................................... 47

6
Acronyms
API Application Programming Interface
CLI Command-line Interface
CSS Cascading Style Sheets
DAL Data Access Layer
DI Dependency Injection
DOM Document Object Model
HTML Hypertext Markup Language
HTTP Hypertext Transfer Protocol
IDE Integrated Development Environment
JSON JavaScript Object Notation
MVC Model – View - Controller
NPM Node.js Package Manager
PWA Progressive Web Application
REST Representational State Transfer
SEO Search Engine Optimization
SPA Single Page Application
UI User Interface
URL Uniform Resource Locator
XML Extensible Markup Language
7
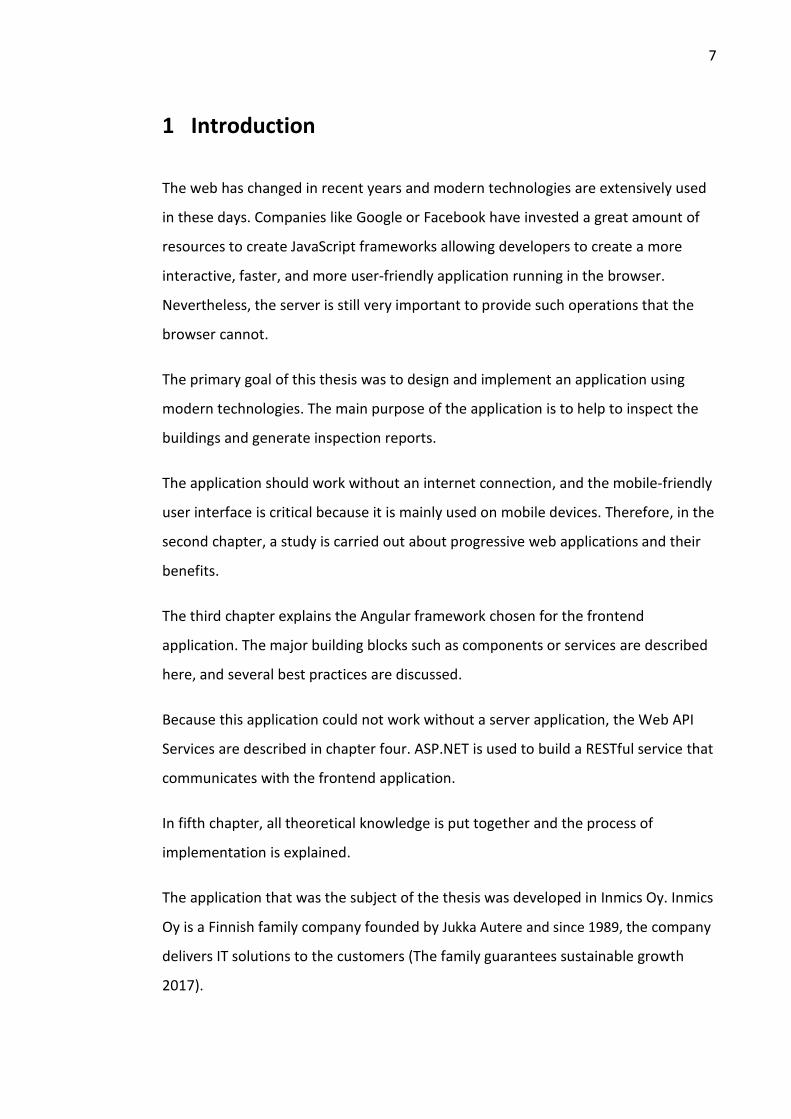
1 Introduction
The web has changed in recent years and modern technologies are extensively used
in these days. Companies like Google or Facebook have invested a great amount of
resources to create JavaScript frameworks allowing developers to create a more
interactive, faster, and more user-friendly application running in the browser.
Nevertheless, the server is still very important to provide such operations that the
browser cannot.
The primary goal of this thesis was to design and implement an application using
modern technologies. The main purpose of the application is to help to inspect the
buildings and generate inspection reports.
The application should work without an internet connection, and the mobile-friendly
user interface is critical because it is mainly used on mobile devices. Therefore, in the
second chapter, a study is carried out about progressive web applications and their
benefits.
The third chapter explains the Angular framework chosen for the frontend
application. The major building blocks such as components or services are described
here, and several best practices are discussed.
Because this application could not work without a server application, the Web API
Services are described in chapter four. ASP.NET is used to build a RESTful service that
communicates with the frontend application.
In fifth chapter, all theoretical knowledge is put together and the process of
implementation is explained.
The application that was the subject of the thesis was developed in Inmics Oy. Inmics
Oy is a Finnish family company founded by Jukka Autere and since 1989, the company
delivers IT solutions to the customers (The family guarantees sustainable growth
2017).
8
2 Progressive web application
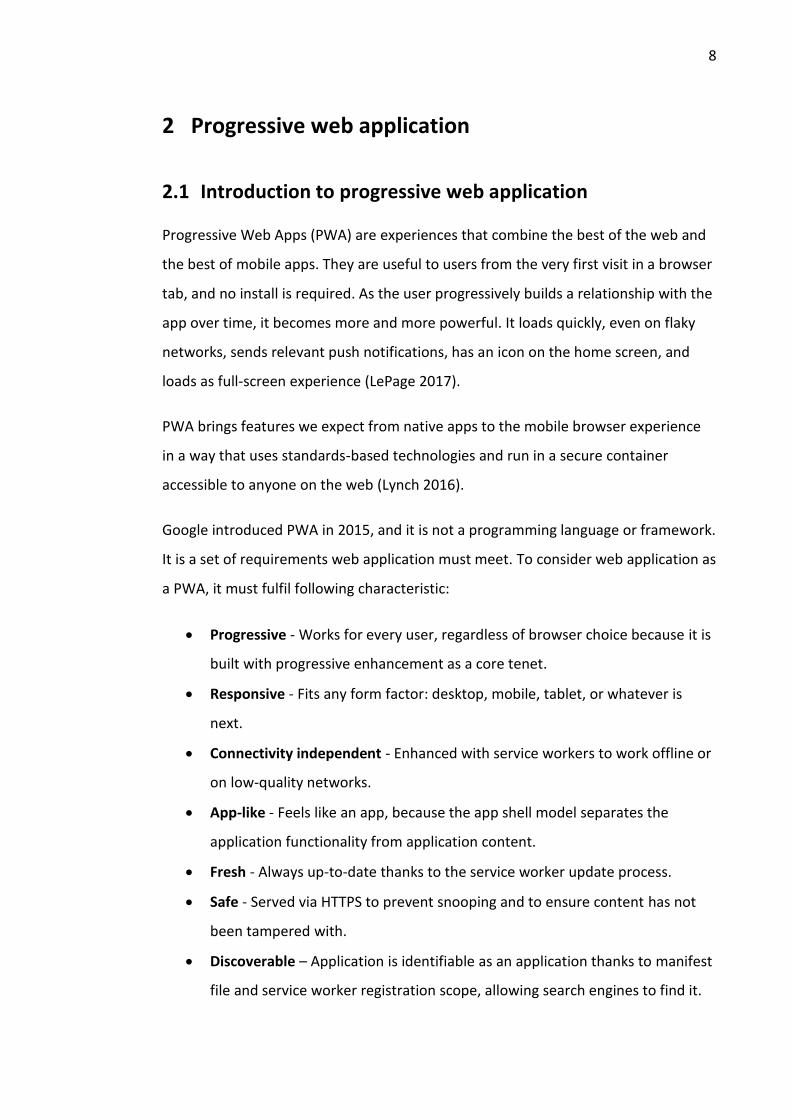
2.1 Introduction to progressive web application
Progressive Web Apps (PWA) are experiences that combine the best of the web and
the best of mobile apps. They are useful to users from the very first visit in a browser
tab, and no install is required. As the user progressively builds a relationship with the
app over time, it becomes more and more powerful. It loads quickly, even on flaky
networks, sends relevant push notifications, has an icon on the home screen, and
loads as full-screen experience (LePage 2017).
PWA brings features we expect from native apps to the mobile browser experience
in a way that uses standards-based technologies and run in a secure container
accessible to anyone on the web (Lynch 2016).
Google introduced PWA in 2015, and it is not a programming language or framework.
It is a set of requirements web application must meet. To consider web application as
a PWA, it must fulfil following characteristic:
• Progressive - Works for every user, regardless of browser choice because it is
built with progressive enhancement as a core tenet.
• Responsive - Fits any form factor: desktop, mobile, tablet, or whatever is
next.
• Connectivity independent - Enhanced with service workers to work offline or
on low-quality networks.
• App-like - Feels like an app, because the app shell model separates the
application functionality from application content.
• Fresh - Always up-to-date thanks to the service worker update process.
• Safe - Served via HTTPS to prevent snooping and to ensure content has not
been tampered with.
• Discoverable – Application is identifiable as an application thanks to manifest
file and service worker registration scope, allowing search engines to find it.
9
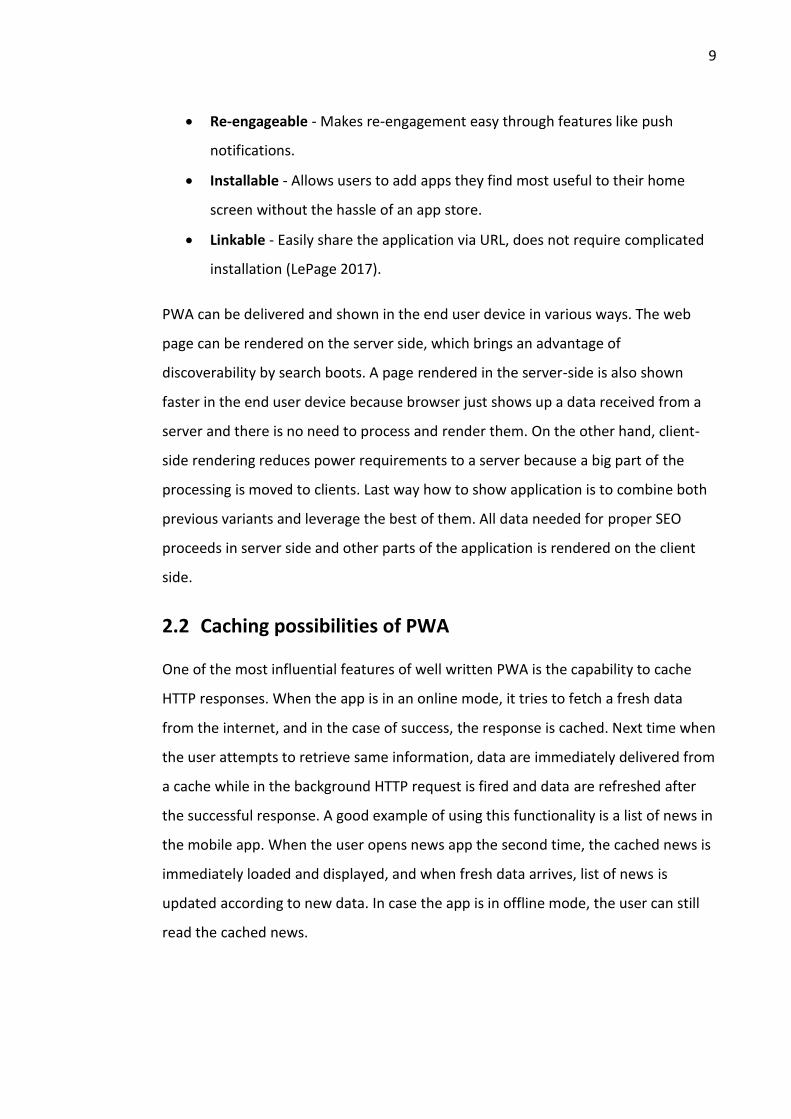
• Re-engageable - Makes re-engagement easy through features like push
notifications.
• Installable - Allows users to add apps they find most useful to their home
screen without the hassle of an app store.
• Linkable - Easily share the application via URL, does not require complicated
installation (LePage 2017).
PWA can be delivered and shown in the end user device in various ways. The web
page can be rendered on the server side, which brings an advantage of
discoverability by search boots. A page rendered in the server-side is also shown
faster in the end user device because browser just shows up a data received from a
server and there is no need to process and render them. On the other hand, client-
side rendering reduces power requirements to a server because a big part of the
processing is moved to clients. Last way how to show application is to combine both
previous variants and leverage the best of them. All data needed for proper SEO
proceeds in server side and other parts of the application is rendered on the client
side.
2.2 Caching possibilities of PWA
One of the most influential features of well written PWA is the capability to cache
HTTP responses. When the app is in an online mode, it tries to fetch a fresh data
from the internet, and in the case of success, the response is cached. Next time when
the user attempts to retrieve same information, data are immediately delivered from
a cache while in the background HTTP request is fired and data are refreshed after
the successful response. A good example of using this functionality is a list of news in
the mobile app. When the user opens news app the second time, the cached news is
immediately loaded and displayed, and when fresh data arrives, list of news is
updated according to new data. In case the app is in offline mode, the user can still
read the cached news.

10
There are many different ways and strategies how to handle and implement caching.
It is up to a developer to choose right strategy, which is best for given problem.
These are the main and most common ones:
• Cache and network race – The primary goal of this approach is to look for
response simultaneously in the cache while firing HTTP request and the first
response is used. With some combinations of older hard drives, virus
scanners, and faster internet connections, getting resources from the
network can be quicker than going to disk. However, going to the network
when the user has the content on their device can be a waste of data, so bear
that in mind (Archibald 2014).
• Network falling back to cache – User always get fresh online content in a
case user is online while the offline user can still get an older cached data. If
HTTP request is successful, in most cases cache is updated with a new set of
content. The most significant weakness of this approach will occur in the case
of a slow connection when a user must wait for the network fail before
cached version is served.
• Cache then network – This is a right approach for resources that update
frequently. It will get content on screen as fast as possible, but still display up-
to-date content once it arrives. This requires the page to make two requests:
one to the cache, and one to the network. The idea is to show the cached
data first, then update the page when/if the network data arrives (Archibald
2014).
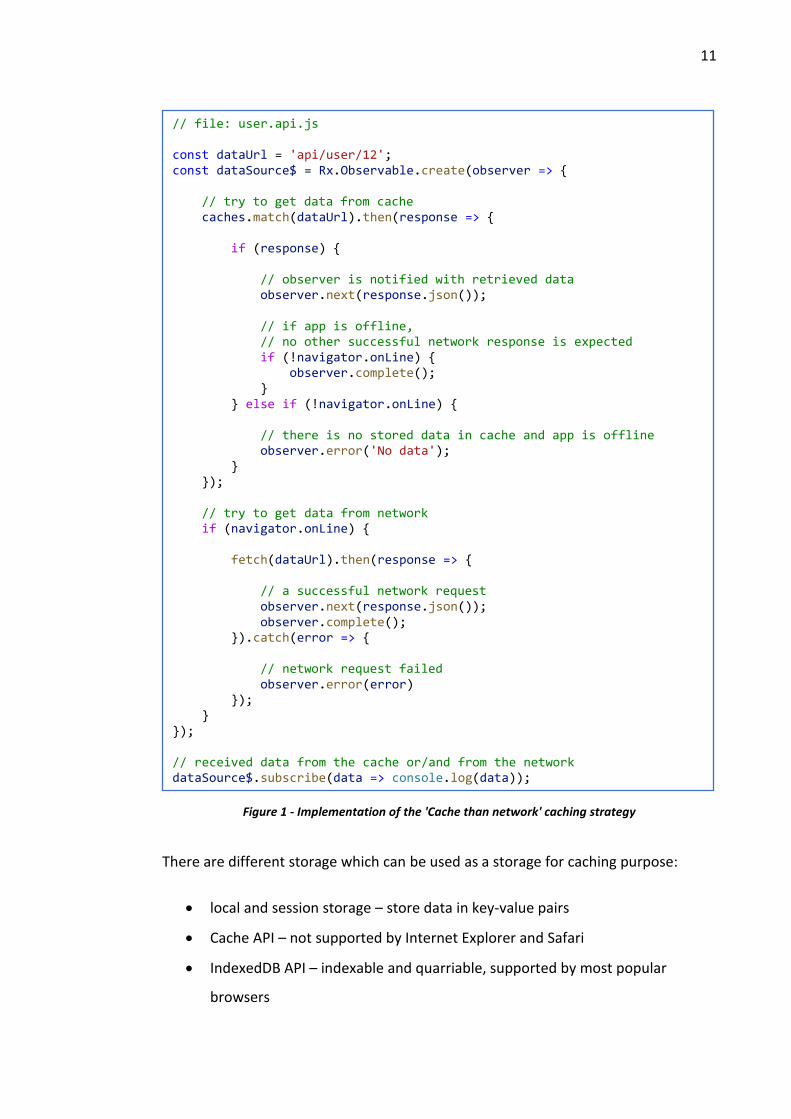
In Figure 1 can be seen the implementation of the Cache then network caching
strategy using streams. When the stream is subscribed, both cache and network
request is fired. The cache request is in the most cases fulfilled before the network
request and provides cached data to the user, even if the data is not up to date. After
successful network request, the cache is updated, and the fresh data is served to the
user. The data is delivered to the user fast and up to date.
11
Figure 1 - Implementation of the 'Cache than network' caching strategy
There are different storage which can be used as a storage for caching purpose:
• local and session storage – store data in key-value pairs
• Cache API – not supported by Internet Explorer and Safari
• IndexedDB API – indexable and quarriable, supported by most popular
browsers
// file: user.api.js const dataUrl = 'api/user/12'; const dataSource$ = Rx.Observable.create(observer => { // try to get data from cache caches.match(dataUrl).then(response => { if (response) { // observer is notified with retrieved data observer.next(response.json()); // if app is offline, // no other successful network response is expected if (!navigator.onLine) { observer.complete(); } } else if (!navigator.onLine) { // there is no stored data in cache and app is offline observer.error('No data'); } }); // try to get data from network if (navigator.onLine) { fetch(dataUrl).then(response => { // a successful network request observer.next(response.json()); observer.complete(); }).catch(error => { // network request failed observer.error(error) }); } }); // received data from the cache or/and from the network dataSource$.subscribe(data => console.log(data));
12
A general guideline for data storage is that URL addressable resources should be
stored with the Cache interface, and other data should be stored with IndexedDB.
For example, HTML, CSS, and JS files should be stored in the cache, while JSON data
should be stored in IndexedDB (Live Data in the Service Worker 2017).
2.3 Web Application Manifest
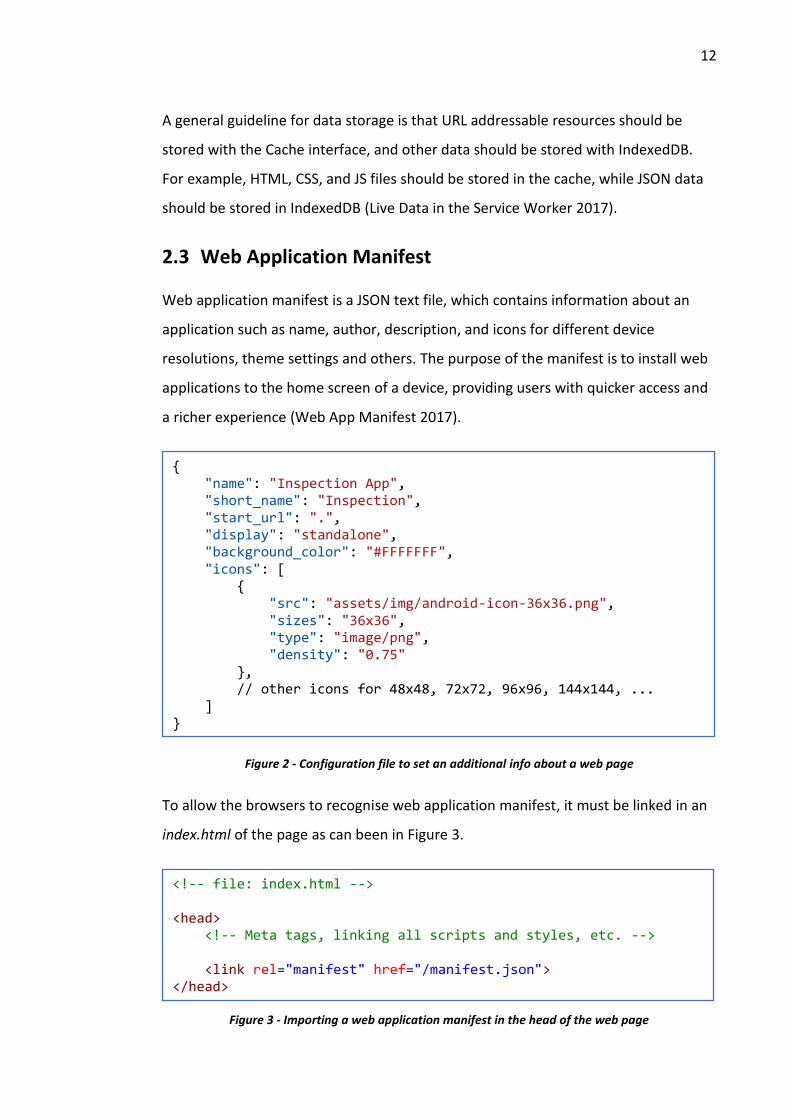
Web application manifest is a JSON text file, which contains information about an
application such as name, author, description, and icons for different device
resolutions, theme settings and others. The purpose of the manifest is to install web
applications to the home screen of a device, providing users with quicker access and
a richer experience (Web App Manifest 2017).
Figure 2 - Configuration file to set an additional info about a web page
To allow the browsers to recognise web application manifest, it must be linked in an
index.html of the page as can been in Figure 3.
Figure 3 - Importing a web application manifest in the head of the web page
{ "name": "Inspection App", "short_name": "Inspection", "start_url": ".", "display": "standalone", "background_color": "#FFFFFFF", "icons": [ { "src": "assets/img/android-icon-36x36.png", "sizes": "36x36", "type": "image/png", "density": "0.75" }, // other icons for 48x48, 72x72, 96x96, 144x144, ... ] }
<!-- file: index.html --> <head> <!-- Meta tags, linking all scripts and styles, etc. --> <link rel="manifest" href="/manifest.json"> </head>
13
If the user uses an app regularly, he will be asked to install a web application on the
device. The application will be installed, and an icon will be shown on the home
screen right between the native apps. The user can quickly open the application
similarly just like he would open a native mobile app.
2.4 Service Worker
At a high level, a Service Worker is a worker script that works behind the scenes,
independent of the main app, and runs in response to events like network requests,
push notifications, connectivity changes, and more (Lynch 2016).
Service worker runs in a separate process, which means it is independent of the
application it is associated with, and it will not be terminated when a browser tab is
closed. This feature is crucial to keep the app up to date and to receive push
notifications. Running in a separate thread has several consequences:
• Service worker cannot directly access the DOM. To communicate with the
page, the service worker uses the postMessage() method and event listener
attached to “message” event.
• Synchronous XHR and localStorage is unavailable in a service worker because
service worker is designed to be asynchronous.
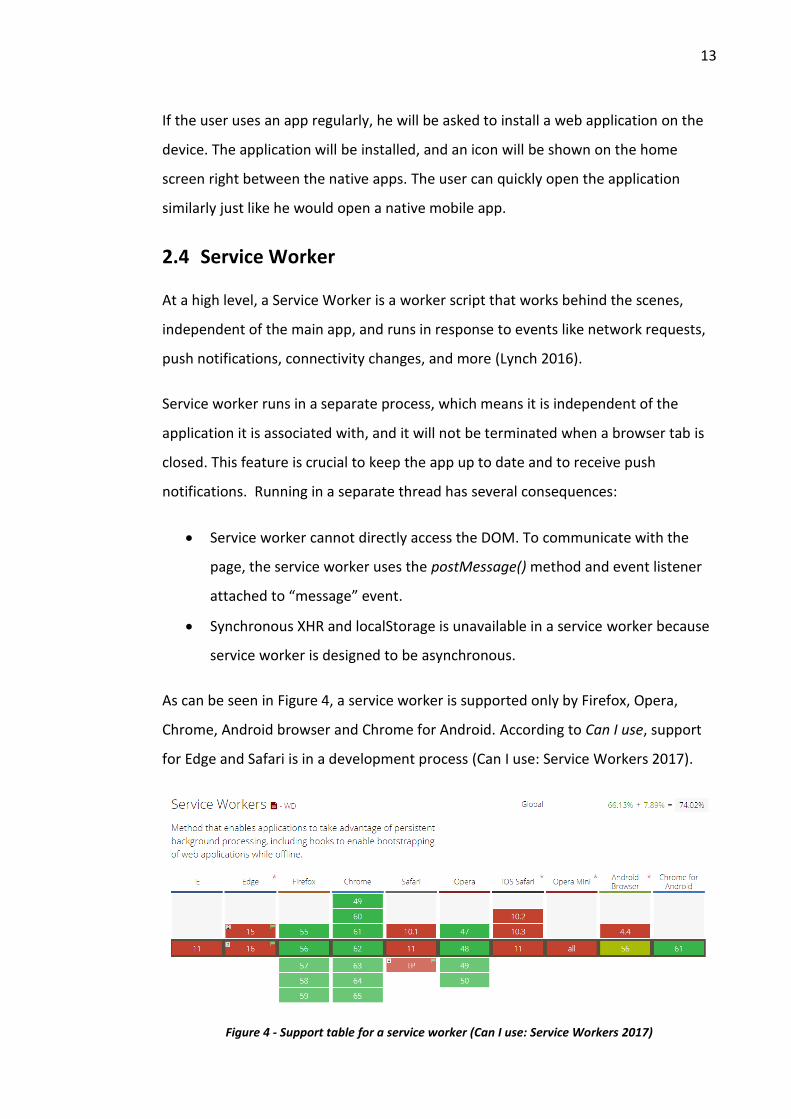
As can be seen in Figure 4, a service worker is supported only by Firefox, Opera,
Chrome, Android browser and Chrome for Android. According to Can I use, support
for Edge and Safari is in a development process (Can I use: Service Workers 2017).
Figure 4 - Support table for a service worker (Can I use: Service Workers 2017)
14
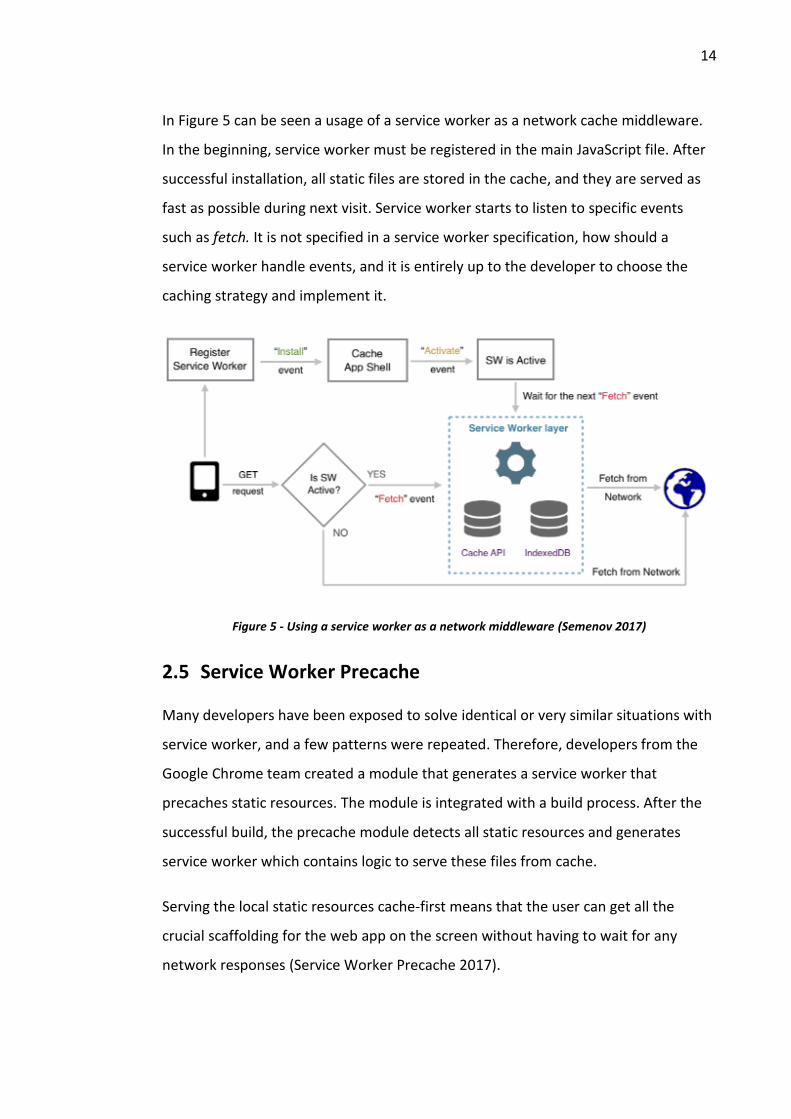
In Figure 5 can be seen a usage of a service worker as a network cache middleware.
In the beginning, service worker must be registered in the main JavaScript file. After
successful installation, all static files are stored in the cache, and they are served as
fast as possible during next visit. Service worker starts to listen to specific events
such as fetch. It is not specified in a service worker specification, how should a
service worker handle events, and it is entirely up to the developer to choose the
caching strategy and implement it.
Figure 5 - Using a service worker as a network middleware (Semenov 2017)
2.5 Service Worker Precache
Many developers have been exposed to solve identical or very similar situations with
service worker, and a few patterns were repeated. Therefore, developers from the
Google Chrome team created a module that generates a service worker that
precaches static resources. The module is integrated with a build process. After the
successful build, the precache module detects all static resources and generates
service worker which contains logic to serve these files from cache.
Serving the local static resources cache-first means that the user can get all the
crucial scaffolding for the web app on the screen without having to wait for any
network responses (Service Worker Precache 2017).
15
2.6 Benefits and disadvantages of PWA
PWAs are web pages which differ in many ways from old-school pages. Unlike the old
school pages, the PWAs are fast and load instantly, regardless of network state,
which makes them network independent. They also bring new features such as push
notification, an icon on a home screen, background synchronisation, caching
possibilities and other.
PWA is web page what predestines it to work and perform the same across latest
browsers, platforms and operating systems. One of the most significant advantages is
that developers do not have to adapt the app to the specific operating system such
as iOS or Android. At the same time, this is the biggest disadvantage too, because
developers lose access to low-level API specific for a particular platform and the
benefits of programming languages such as Java for Android or Objective-C for iOS.
For some businesses, for which is an aspect of performance crucial, PWAs are not
suitable. PWAs can use many device features except a few features such as access to
a Bluetooth or NFC.
On the other hand, developing a native mobile application for many platforms makes
development longer, more expensive and there is a need for different specialists for
each platform. It is difficult to maintain separate codebases for each platform, and
the process of updating the app in the store is more laborious because of the strict
store publication policy.
2.7 Lighthouse
Lighthouse is an open-source, automated tool for improving the quality of web
pages. It can be run against any web page, public or requiring authentication. It has
audits for performance, accessibility, progressive web apps, and more. It runs a
series of audits against the page, and then it generates a report on how well the page
did. From there, the failing audits can be used as indicators on how to improve the
page. Each audit has a reference doc explaining why the audit is important, as well as
how to fix it (Lighthouse 2017).
16
3 Angular
3.1 Introduction to Angular
Angular is a JavaScript open-source client-side framework created and maintained by
Google and a community of developers on GitHub. It is written entirely in Typescript,
but there is a chance to use vanilla JavaScript version.
The release of Angular 2 as the successor of Angular 1 (AngularJS) was announced in
2014 by Google and was released in the fall of 2016. Angular 2 differs from the
previous version in many ways. The entire codebase is written in the Typescript,
which gives the developer a richer experience by providing a code completion and a
static type control. The entire development process is more focused on object-
oriented programing and uses the benefits of ES2016, such as classes or decorators1.
The angular team announced a time-based release cycle. In general, a patch release
can be expected every week, about three minor updates and one major release
should be released every six months. Contributors around Angular decided to name
it just Angular because many major versions (Angular 2, Angular 3, and Angular 4)
could cause a mess in naming (Golden 2017).
The primary goal of Angular is to simplify the building of client applications in HTML
and either JavaScript or in a language such as TypeScript that compiles to JavaScript.
The framework consists of several libraries, some of them are core and some
optional. The developer writes an Angular application by composing
HTML templates with an Angularized mark-up, writing component classes to manage
these templates, adding application logic to services, and boxing components and
services in modules (Architecture Overview 2017).
1 Decorators are functions that modify JavaScript classes. Angular has many decorators that attach metadata to classes so that it knows what those classes mean and how they should work (Modules 2017).
17
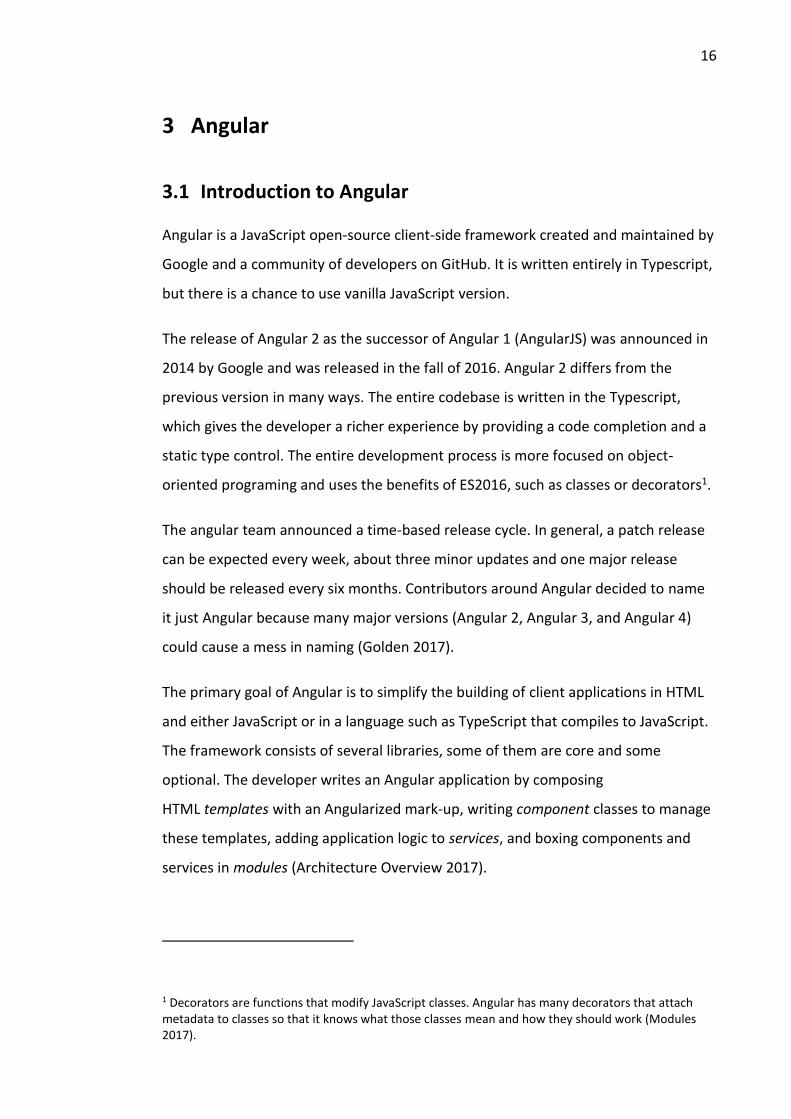
In Figure 6 can be seen all the major building blocks of the Angular framework. This
method of separating HTML templates, component classes that manage the
templates, services that contain business logic and other components, leads to
logical architectural design, higher component reusability and better testability of
separate blocks. This design principle of separation program into distinct parts is well
known in computer science as a separation of concerns.
Figure 6 - Architecture of Angular framework (Architecture Overview 2017)
3.2 Architecture
3.2.1 Dependency injection
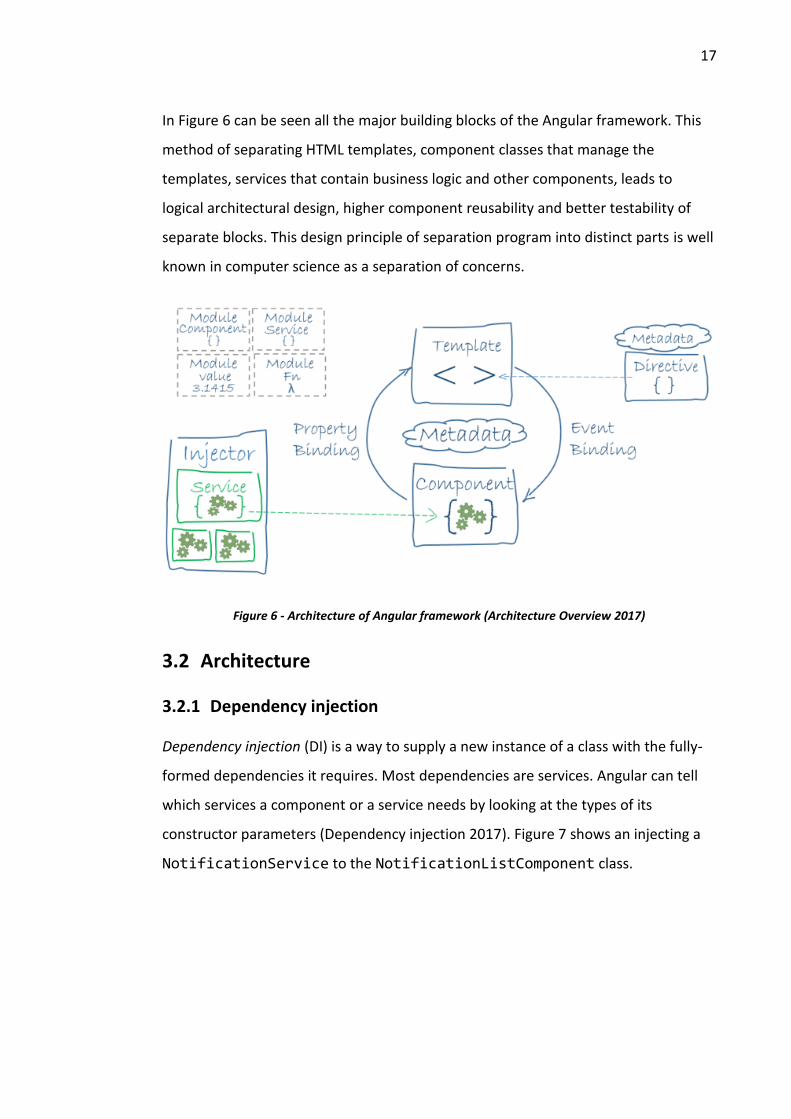
Dependency injection (DI) is a way to supply a new instance of a class with the fully-
formed dependencies it requires. Most dependencies are services. Angular can tell
which services a component or a service needs by looking at the types of its
constructor parameters (Dependency injection 2017). Figure 7 shows an injecting a
NotificationService to the NotificationListComponent class.
18
Figure 7 - Injecting of a service to the component
The DI in Angular framework consists of two key parts:
• Injector – is a dependency management service that takes care of the
registration of dependencies and figures out how to create them
• Dependencies – services managed by injector, they are created and provided
to other services or components
When Angular creates a component, it first asks an injector for the services that the
component requires. An injector maintains a container of service instances that it has
previously created. If a requested service instance is not in the container, the injector
makes one and adds it to the container before returning the service to Angular.
When all requested services have been resolved and returned, Angular can call the
component's constructor with those services as arguments (Dependency injection
2017).
Before the service is used, it must previously register a provider of a service with the
injector. Provides can be registered in modules or components. An important fact
about injected dependencies is that all services are singletons, which means that
there is only one instance of the service for given injector. Difference between
registering providers in module and component is when the provider is registered in
a module, provided service is a singleton in the entire application. On the other hand,
provider registered in a component is available for that component scope and its
children.
@Component({
selector: 'notification-list',
templateUrl: './notification.component.html',
styleUrls: ['./notification.component.css']
})
export class NotificationListComponent {
constructor(private service: NotificationService) { }
// other methods
}
19
3.2.2 Module
Angular apps are modular and Angular has its own modularity system
called NgModules. A NgModule, whether a root or feature, is a class with
an @NgModule decorator and is a fundamental feature of Angular (Modules 2017).
A NgModule class describes how the application parts fit together. Every application
has at least one NgModule, the root module that is bootstrapped to launch the
application. The conventional name is AppModule (Bootstrapping 2017).
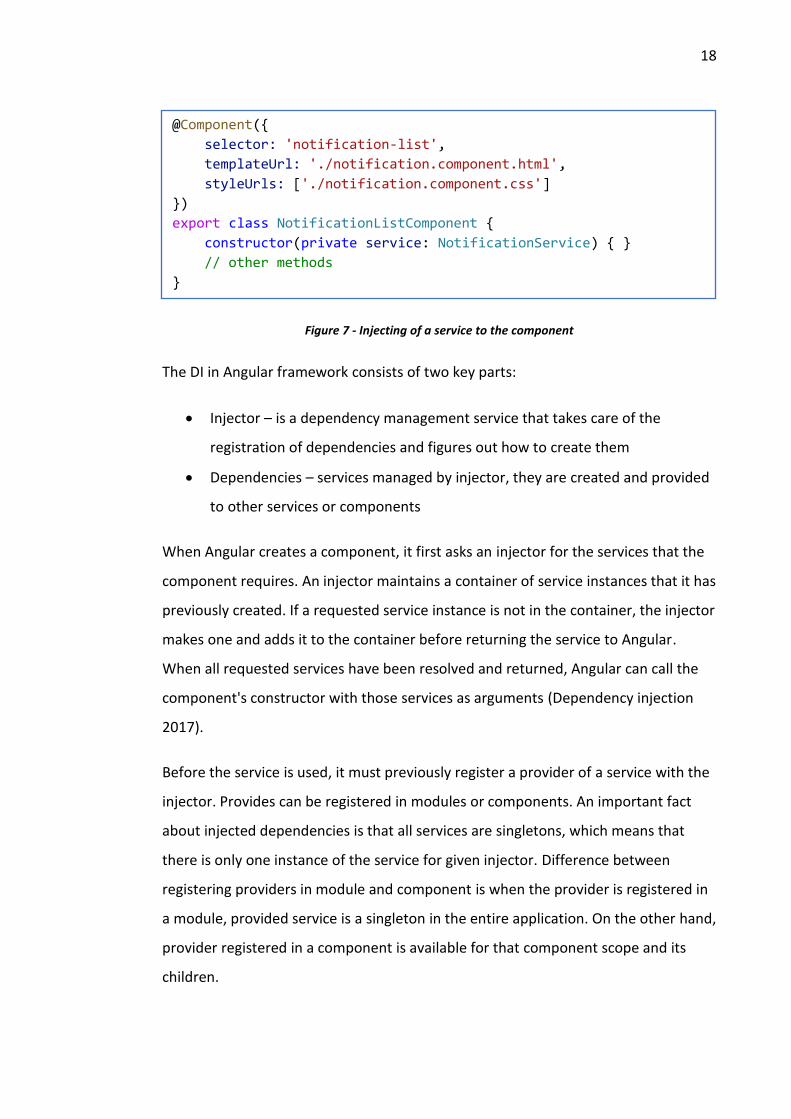
Figure 8 shows the use of NgModule decorator and the way the module is
configured. NgModule decorator takes a single metadata object whose properties
describe the module.
Figure 8 - Configuration of root module
The most important properties in the module configuration are:
• Declarations - the view classes that belong to this module. Angular has three
kinds of view classes: components, directives, and pipes.
• Imports - other modules whose exported classes are needed by component
templates declared in this module.
• Providers - creators of services that this module contributes to the global
collection of services (they become accessible in all parts of the app).
• Bootstrap - the main application view, called the root component, that hosts
all other app views. Only the root module should set this bootstrap property
(Modules 2017).
@NgModule({
declarations: [AppComponent],
imports: [BrowserModule, FeatureModule],
providers: [],
bootstrap: [AppComponent]
})
export class AppModule { }
20
3.2.3 Directive and component
The Angular team has created its template system to simplify creating views. It
includes features such as directives, custom elements, interpolation and more.
Angular templates have HTML syntax enriched with a few new elements. Templates
are dynamic, and when Angular renders them, it transforms the DOM according to
the instructions given by directives (Directives 2017).
It is very common that a developer needs to display or hide an element conditionally
on a property value, or to display a list of elements of an unknown length. For this
purpose and many others, the Angular team added an essential feature called
directives to the template system.
The directive is a class with a @Directive decorator. They look like ordinary HTML
attributes, hence the name. There are two types of directives: the structural and the
attribute directives. Structural directives alter layout by adding, removing, and
replacing elements in the DOM, while attribute directives alter the appearance or
behaviour of an existing element (Directives 2017).
A specific type of directive is a component. The component is a directive with a
@Component decorator where a component template is defined. Components are
the main blocks used to create a user interface and are arranged to the component
tree. Within the component class, there is defined application logic that determines
what it does to support the view (Components 2017).
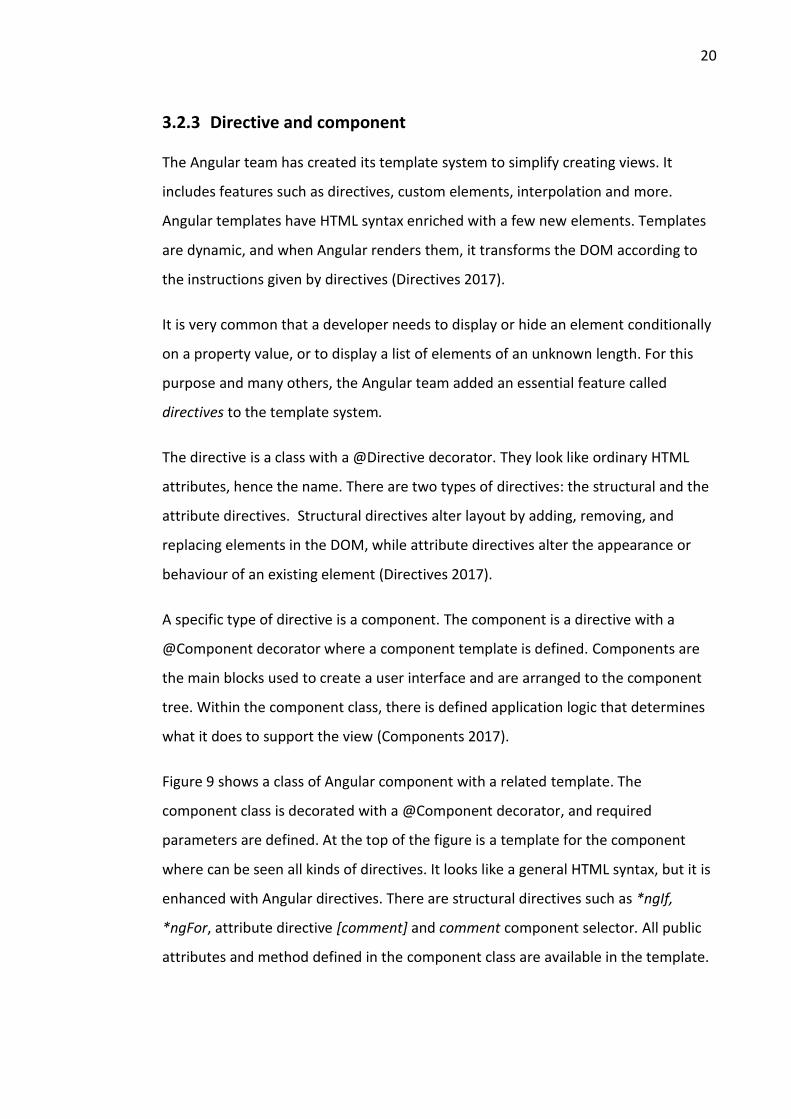
Figure 9 shows a class of Angular component with a related template. The
component class is decorated with a @Component decorator, and required
parameters are defined. At the top of the figure is a template for the component
where can be seen all kinds of directives. It looks like a general HTML syntax, but it is
enhanced with Angular directives. There are structural directives such as *ngIf,
*ngFor, attribute directive [comment] and comment component selector. All public
attributes and method defined in the component class are available in the template.
21
Figure 9 - Component class and connected template
While writing the component template, there is need to push data values into the
HTML and define methods to handle various user actions. To make it simple, Angular
offers for this purpose a feature called data binding. Data binding is a process of
synchronisation between a template and its component and is also used for
communication between parent and child component and vice versa. Data binding is
defined by a mark-up in the template HTML.
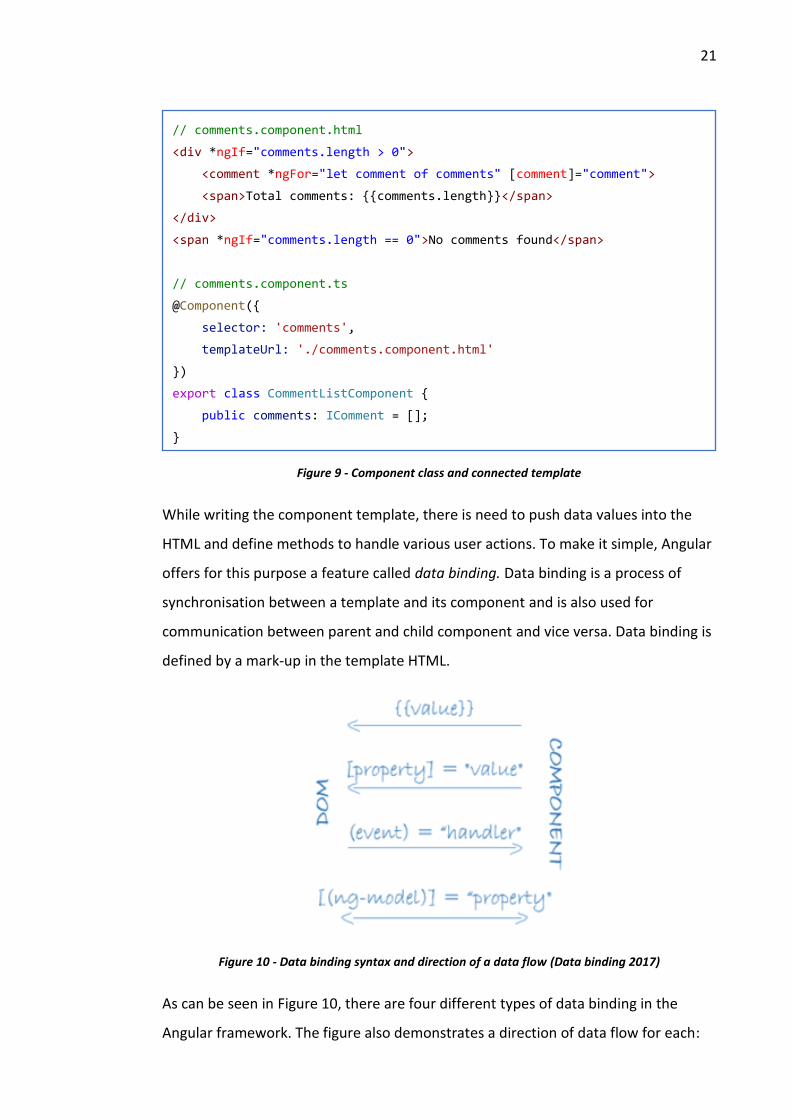
Figure 10 - Data binding syntax and direction of a data flow (Data binding 2017)
As can be seen in Figure 10, there are four different types of data binding in the
Angular framework. The figure also demonstrates a direction of data flow for each:
// comments.component.html
<div *ngIf="comments.length > 0">
<comment *ngFor="let comment of comments" [comment]="comment">
<span>Total comments: {{comments.length}}</span>
</div>
<span *ngIf="comments.length == 0">No comments found</span>
// comments.component.ts
@Component({
selector: 'comments',
templateUrl: './comments.component.html'
})
export class CommentListComponent {
public comments: IComment = [];
}
22
• Interpolation – Interpolation is the way how to display property value. It is
identified by double curly brackets, e.g. <b>{{propertyValue}}</b>
• Property binding – Property binding syntax consists of an element property
name within square braces and a quoted value, e.g. <img [src]="imgUrl">
• Two-way binding – The fourth type is a combination of property binding and
event binding. As the name suggests, data flows in both direction from
component to template and vice versa,
e.g. <input [(ngModel)]="inputValue"/> (Template Syntax 2017).
3.2.4 Service
Components are responsible for preparing data for a view and for defining methods
as the handlers for user actions. A component should not contain a complex business
logic, and it is recommended to keep components as lean as possible. A service is a
place, where all nontrivial business logic is located. It is a class annotated with the
@Injectable() decorator and with a well-defined purpose of doing one specific thing.
The @Injectable() decorator tells Angular the service itself might have dependencies
defined in a constructor of service and is not necessary if a service does not have any
dependencies, but Angular team recommend always to use it to make code unified.
A good example of services is:
• Logging service
• Data service
• Configuration service
• Local storage service
23
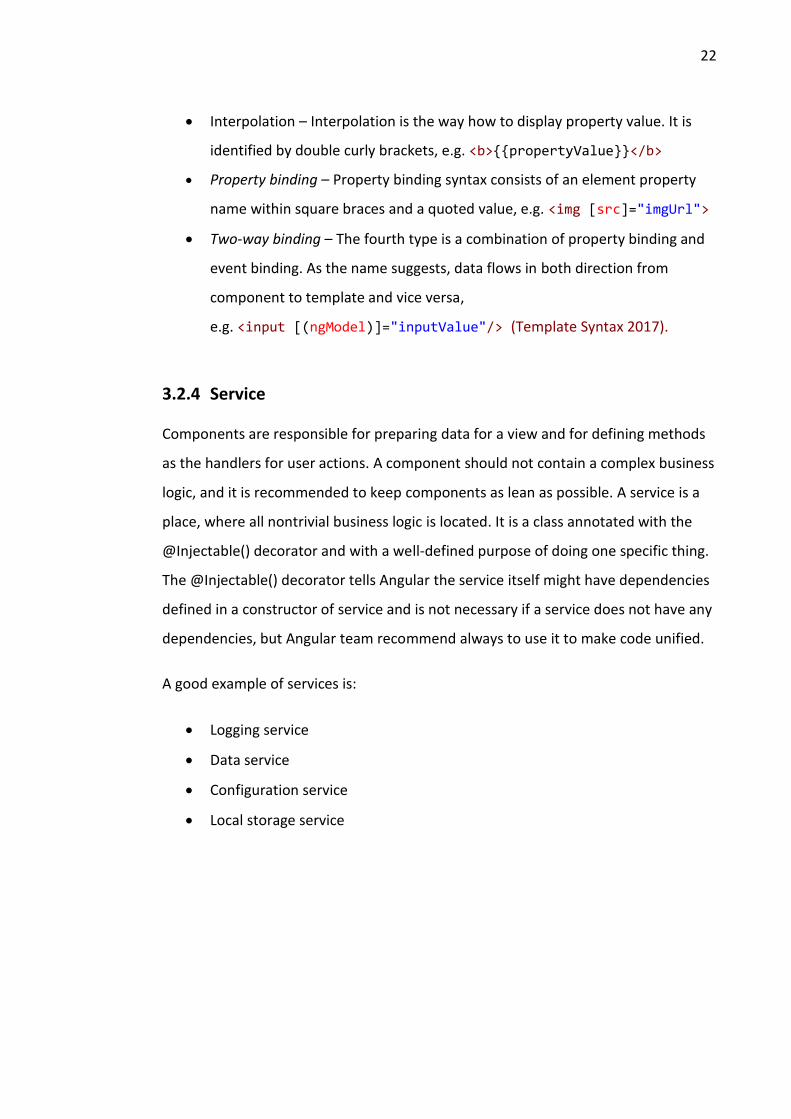
Figure 11 - Implementation of a ConnectivityService
The figure above shows an example of a service whose main purpose is to find out
whether the browser is online or offline and listen to the connectivity changes. The
attentive reader will not miss the fact that using the method directly on the navigator
object is simpler than injecting the service. The benefits of wrapping this simple
functionality are appreciated, for example, when testing other services that depend
on the browser connection. It is easier to create a fake service that simulates the
original service behaviour, compared to the bending of the navigator object.
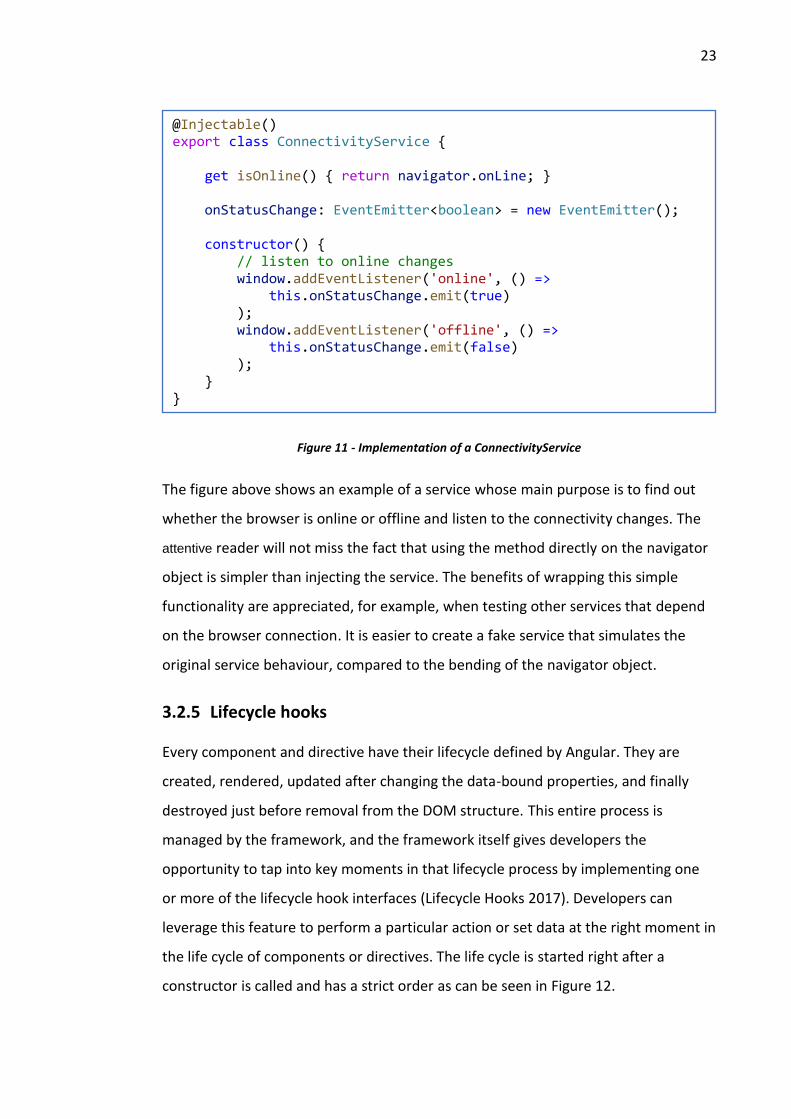
3.2.5 Lifecycle hooks
Every component and directive have their lifecycle defined by Angular. They are
created, rendered, updated after changing the data-bound properties, and finally
destroyed just before removal from the DOM structure. This entire process is
managed by the framework, and the framework itself gives developers the
opportunity to tap into key moments in that lifecycle process by implementing one
or more of the lifecycle hook interfaces (Lifecycle Hooks 2017). Developers can
leverage this feature to perform a particular action or set data at the right moment in
the life cycle of components or directives. The life cycle is started right after a
constructor is called and has a strict order as can be seen in Figure 12.
@Injectable() export class ConnectivityService { get isOnline() { return navigator.onLine; } onStatusChange: EventEmitter<boolean> = new EventEmitter(); constructor() { // listen to online changes window.addEventListener('online', () => this.onStatusChange.emit(true) ); window.addEventListener('offline', () => this.onStatusChange.emit(false) ); } }

24
Figure 12 - Component/directive life cycle (data adapted from Lifecycle Hooks 2017)
3.3 Typescript
TypeScript is described as a strict superset of JavaScript, which adds optional static
typing and class-based object-oriented programming aligned with ECMAScript 6
standard proposal. It is compiled down to an idiomatic JavaScript and does not
require any runtime library to support it (What is TypeScript? Pros and Cons 2014).
The Angular team strongly recommend using of Typescript in the project of any scale.
Typescript brings to the world of JavaScript the benefits of statically typed languages
such as:
• Object-oriented paradigm – Typescript brings the classes and interfaces to
JavaScript what gives developers ability to write more object-oriented
applications.

25
• Type system – Type checking can enhance workflow and enables tons of IDE
features, such as a listing of members, parameter info or viewing quick
documentation. Type checking is very useful while refactoring and it can
catch mismatches in types or structure problems before an application runs in
the browser.
Typescript is a superset of JavaScript what is illustrated in Figure 13. This fact means
that every valid JavaScript program is also valid in a Typescript world. It is important
because developers can still use the third-party libraries which are often written in
JavaScript and applications very often depend on them. The fact that Typescript is a
superset of JavaScript also has downsides. It does not eliminate weaknesses of
JavaScript. It just offers the better way how to solve the same problem. The
developer still can decide to write old-fashion code with all vulnerabilities and do not
use all features of TypeScript.
Figure 13 - Relationship between Typescript and ECMAScript
26
4 Web API Service
4.1 Overview
One reason traditional websites are slow is that popular MVC server frameworks are
focused on serving page after page of static content to an essentially dumb client.
When we click a link in a traditional website slideshow, for example, the screen
flashes white, and everything reloads over several seconds (Mikowski, & Powell
2017).
In the beginning, there was a decision to build a single page application (SPA) in the
Angular framework to create a faster and more user-friendly application. The SPA
moves much of the presentation and business logic to the browser, but the server is
still very important. It becomes lean, but there are still areas where the server must
be involved to achieve desired security level or data consistency.
Each application works with the data it creates, modifies or transforms, and it is
often needed to persist these data for later use. In addition, not all operations are
meant to be executed in a browser, and therefore there is a need for a server that
can handle those operations that the frontend application cannot accomplish. These
are the following areas:
• Data persistence
• Authentication and authorisation
• Sharing data between devices
• Operations requiring high computing power
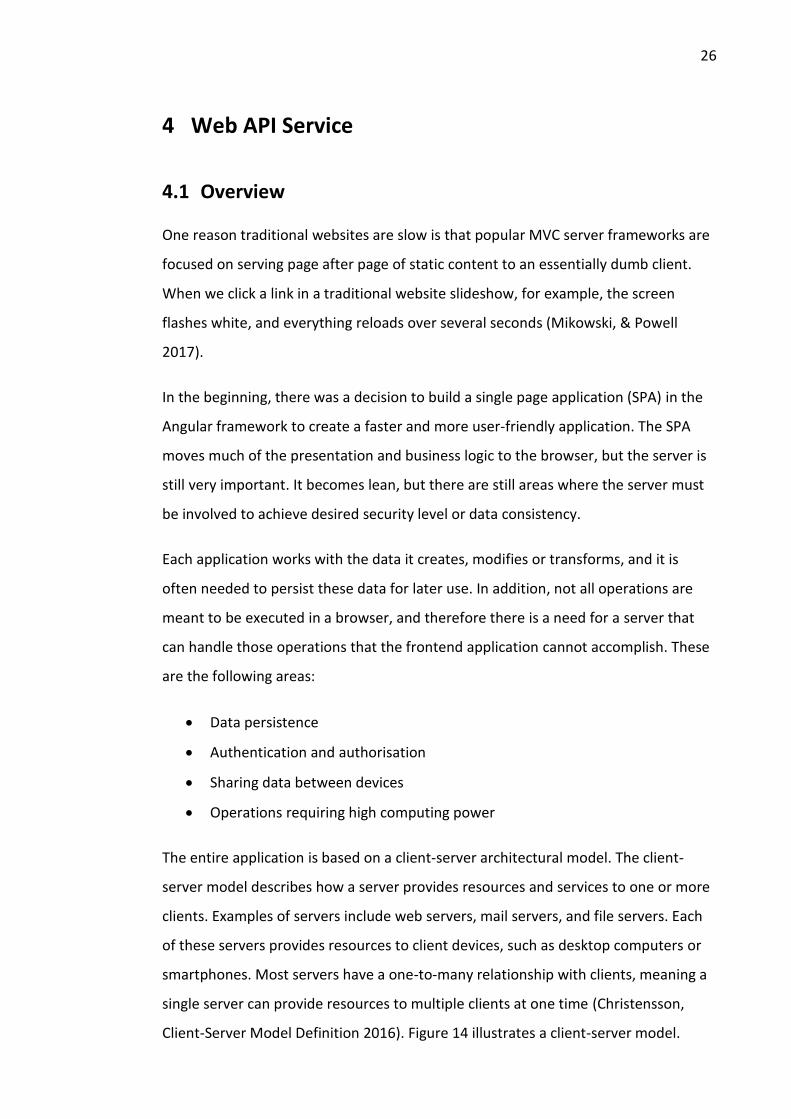
The entire application is based on a client-server architectural model. The client-
server model describes how a server provides resources and services to one or more
clients. Examples of servers include web servers, mail servers, and file servers. Each
of these servers provides resources to client devices, such as desktop computers or
smartphones. Most servers have a one-to-many relationship with clients, meaning a
single server can provide resources to multiple clients at one time (Christensson,
Client-Server Model Definition 2016). Figure 14 illustrates a client-server model.
27
Figure 14 - Client-server model
SPA runs on client devices to provide a user interface, and the ASP.NET application
runs on the server to serve resources and services. The communication between
client and server is performed using Hypertext Transfer Protocol (HTTP), and the
Representational State Transfer (REST) architecture is implemented to follow best
practices. The ASP.NET framework and REST architecture will be described in the
following chapters.
4.2 Representational State Transfer API
Representational State Transfer (REST) is a style of architecture based on a set of
principles that describe how networked resources are defined and addressed. These
principles were described in 2000 by Roy Fielding as part of his doctoral dissertation.
REST is an alternative to Simple Object Access Protocol (SOAP) (Barry 2017).
While we are talking about REST APIs, words such as resource, collection or URL are
often used:
• The resource is a set of attributes that represents a particular object. The
resource is uniquely addressable by a URL and the operations such as
retrieve, create, update, or delete can be performed on that resource. E.g.
user or building.
• Uniform Resource Locator (URL) is a unique resource location identifier. All
resources can be located by URL, and it should be clear from the URL which
resource is addressed. E.g. http://api.site.com/v1/users
• The collection is a set of resources. E.g. users, buildings, projects
28
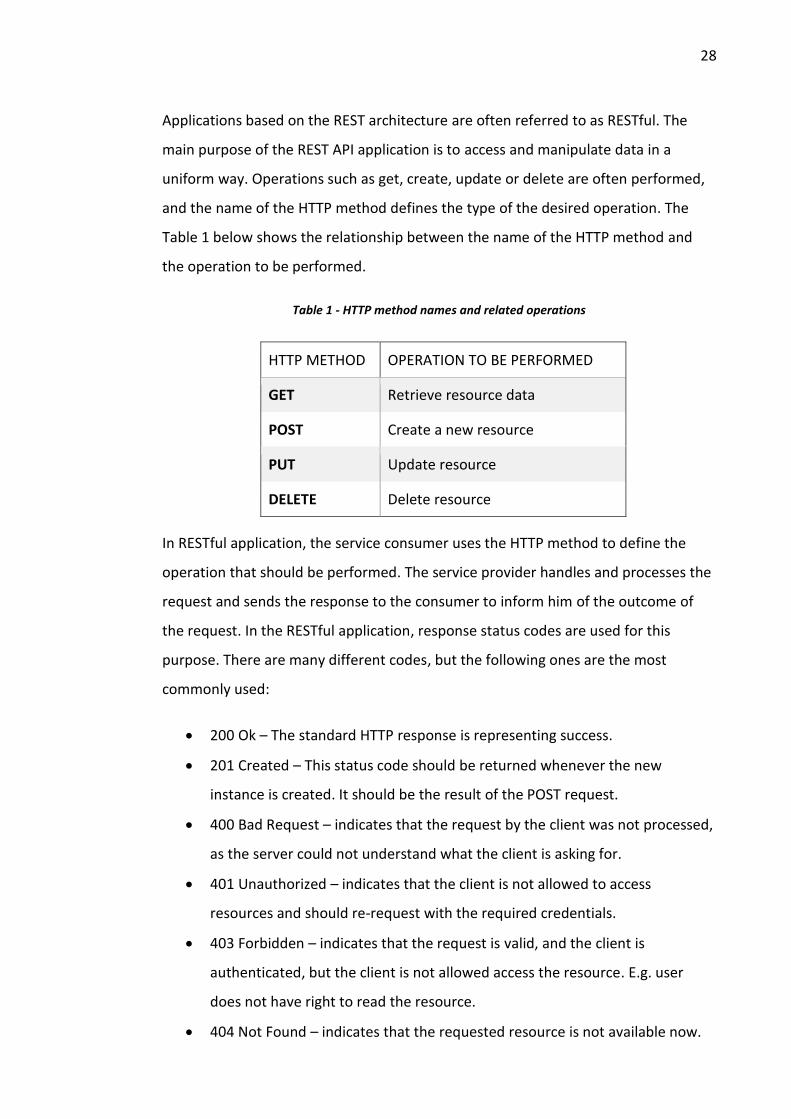
Applications based on the REST architecture are often referred to as RESTful. The
main purpose of the REST API application is to access and manipulate data in a
uniform way. Operations such as get, create, update or delete are often performed,
and the name of the HTTP method defines the type of the desired operation. The
Table 1 below shows the relationship between the name of the HTTP method and
the operation to be performed.
Table 1 - HTTP method names and related operations
HTTP METHOD OPERATION TO BE PERFORMED
GET Retrieve resource data
POST Create a new resource
PUT Update resource
DELETE Delete resource
In RESTful application, the service consumer uses the HTTP method to define the
operation that should be performed. The service provider handles and processes the
request and sends the response to the consumer to inform him of the outcome of
the request. In the RESTful application, response status codes are used for this
purpose. There are many different codes, but the following ones are the most
commonly used:
• 200 Ok – The standard HTTP response is representing success.
• 201 Created – This status code should be returned whenever the new
instance is created. It should be the result of the POST request.
• 400 Bad Request – indicates that the request by the client was not processed,
as the server could not understand what the client is asking for.
• 401 Unauthorized – indicates that the client is not allowed to access
resources and should re-request with the required credentials.
• 403 Forbidden – indicates that the request is valid, and the client is
authenticated, but the client is not allowed access the resource. E.g. user
does not have right to read the resource.
• 404 Not Found – indicates that the requested resource is not available now.
29
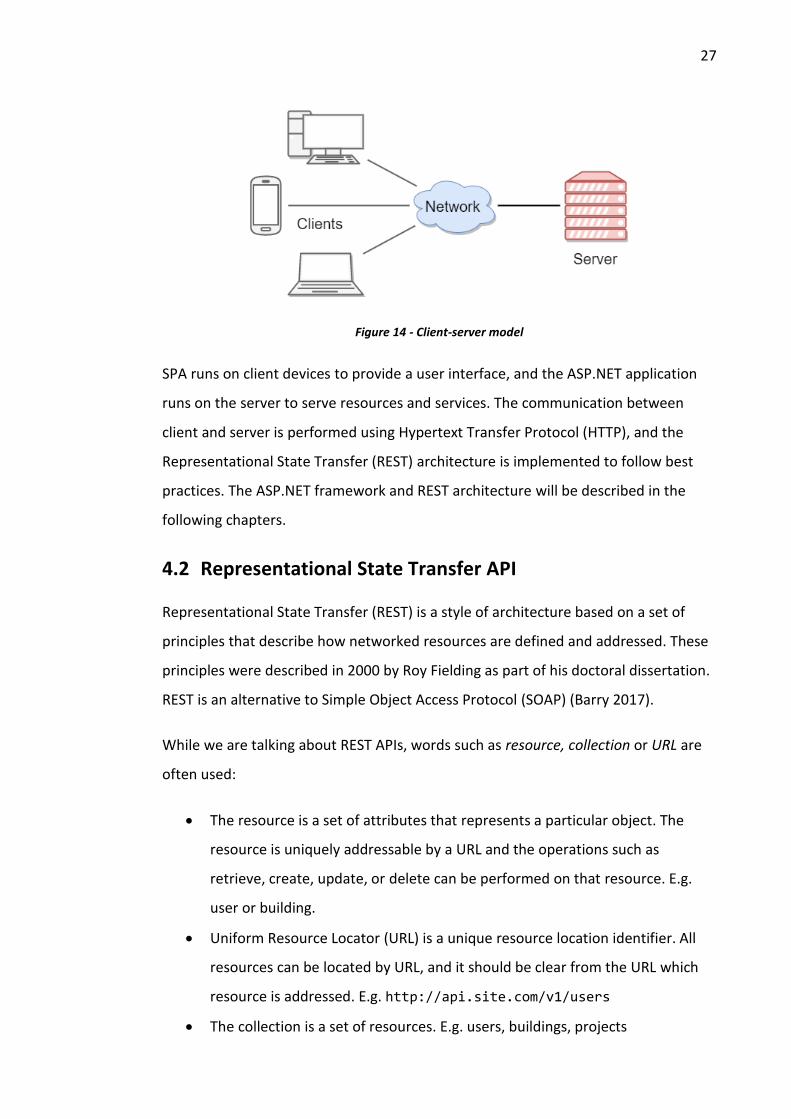
• 500 Internal Server Error – indicates that the request is valid, but there was
an unexpected error while processing the request (Haldar 2017).
Figure 15 - RESTful communication between service provider and consumer
Figure 15 shows the communication between a service consumer (client) and a
service provider (server). The client requests a user with id 2 by firing an HTTP
request with a resource URL and specified HTTP method. The server handles the
request and returns the response with status code 200 and user data.
4.3 ASP.NET introduction
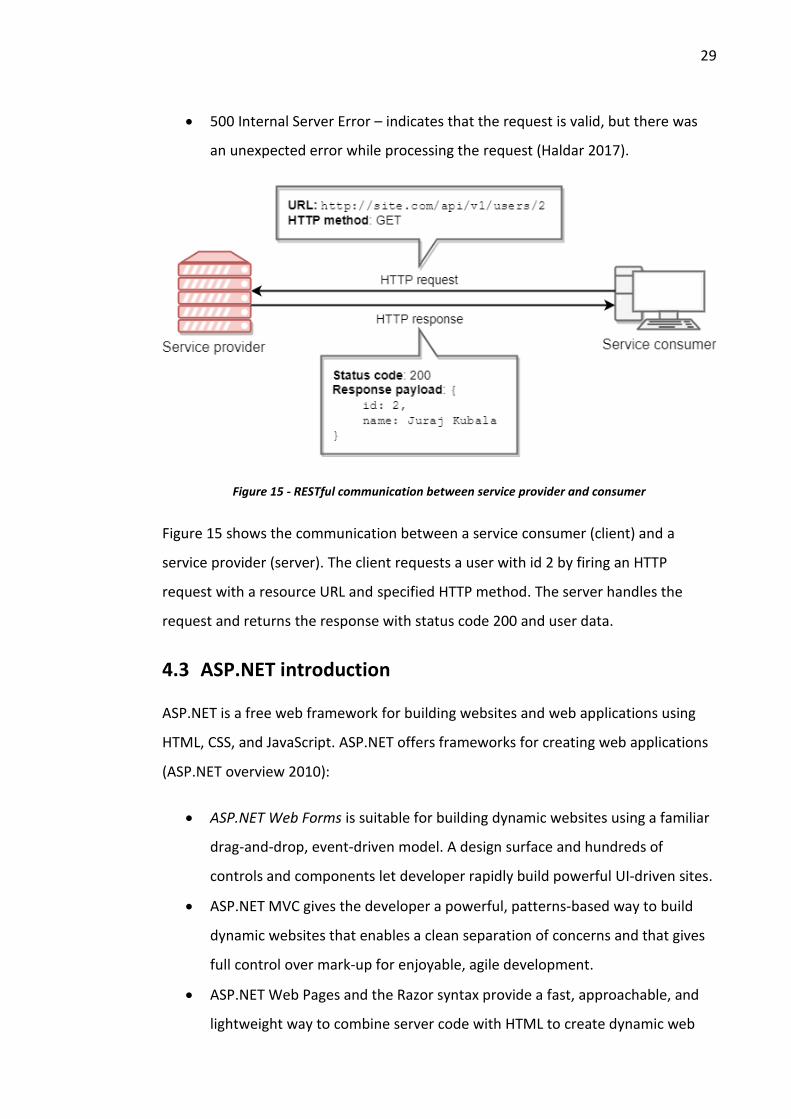
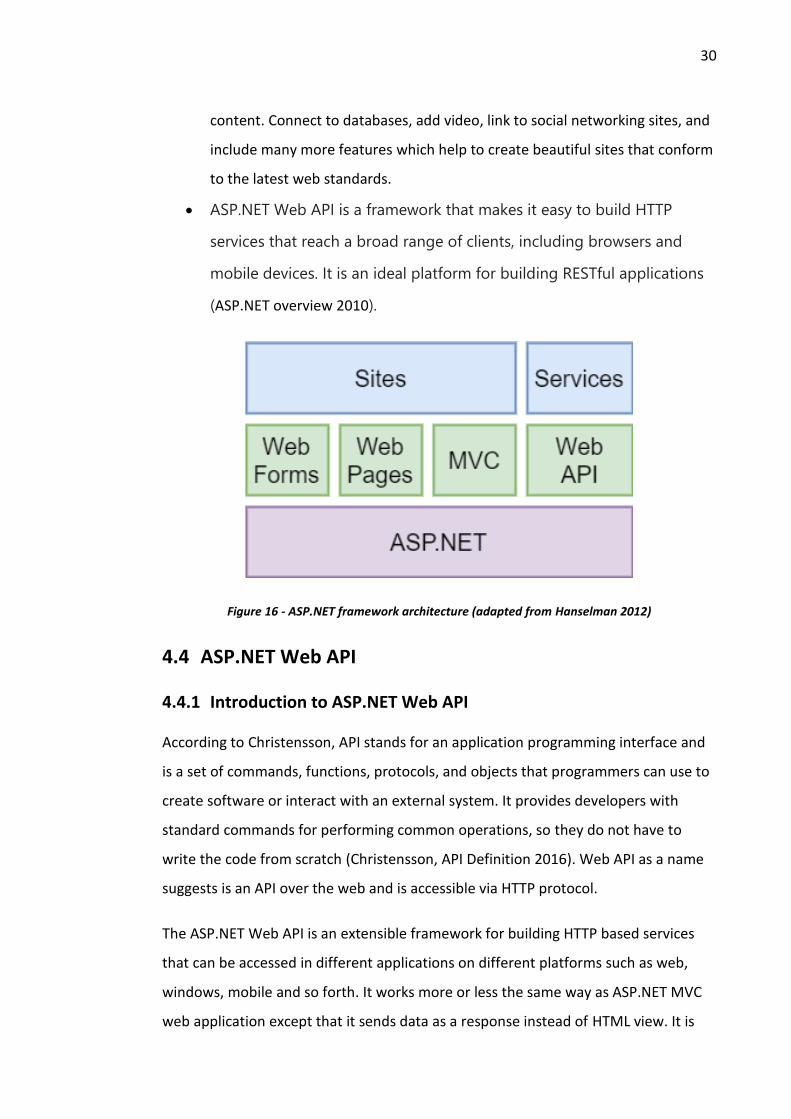
ASP.NET is a free web framework for building websites and web applications using
HTML, CSS, and JavaScript. ASP.NET offers frameworks for creating web applications
(ASP.NET overview 2010):
• ASP.NET Web Forms is suitable for building dynamic websites using a familiar
drag-and-drop, event-driven model. A design surface and hundreds of
controls and components let developer rapidly build powerful UI-driven sites.
• ASP.NET MVC gives the developer a powerful, patterns-based way to build
dynamic websites that enables a clean separation of concerns and that gives
full control over mark-up for enjoyable, agile development.
• ASP.NET Web Pages and the Razor syntax provide a fast, approachable, and
lightweight way to combine server code with HTML to create dynamic web
30
content. Connect to databases, add video, link to social networking sites, and
include many more features which help to create beautiful sites that conform
to the latest web standards.
• ASP.NET Web API is a framework that makes it easy to build HTTP
services that reach a broad range of clients, including browsers and
mobile devices. It is an ideal platform for building RESTful applications
(ASP.NET overview 2010).
Figure 16 - ASP.NET framework architecture (adapted from Hanselman 2012)
4.4 ASP.NET Web API
4.4.1 Introduction to ASP.NET Web API
According to Christensson, API stands for an application programming interface and
is a set of commands, functions, protocols, and objects that programmers can use to
create software or interact with an external system. It provides developers with
standard commands for performing common operations, so they do not have to
write the code from scratch (Christensson, API Definition 2016). Web API as a name
suggests is an API over the web and is accessible via HTTP protocol.
The ASP.NET Web API is an extensible framework for building HTTP based services
that can be accessed in different applications on different platforms such as web,
windows, mobile and so forth. It works more or less the same way as ASP.NET MVC
web application except that it sends data as a response instead of HTML view. It is
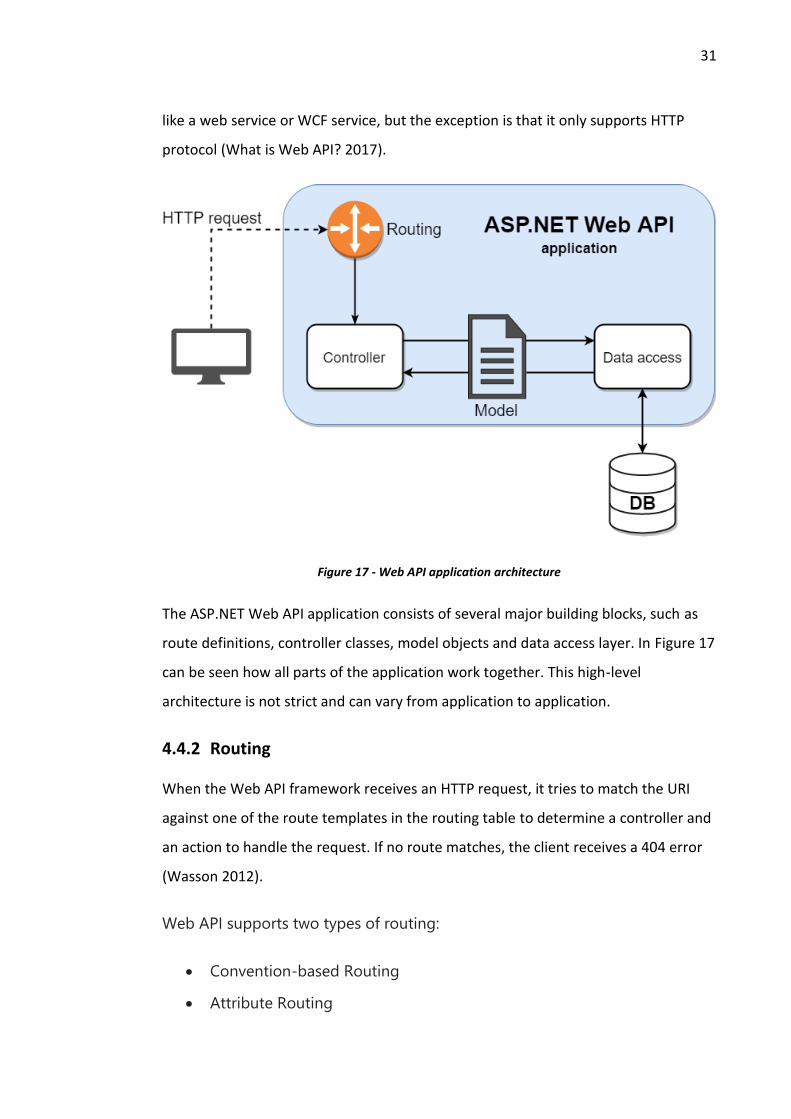
31
like a web service or WCF service, but the exception is that it only supports HTTP
protocol (What is Web API? 2017).
Figure 17 - Web API application architecture
The ASP.NET Web API application consists of several major building blocks, such as
route definitions, controller classes, model objects and data access layer. In Figure 17
can be seen how all parts of the application work together. This high-level
architecture is not strict and can vary from application to application.
4.4.2 Routing
When the Web API framework receives an HTTP request, it tries to match the URI
against one of the route templates in the routing table to determine a controller and
an action to handle the request. If no route matches, the client receives a 404 error
(Wasson 2012).
Web API supports two types of routing:
• Convention-based Routing
• Attribute Routing

32
The first release of Web API used convention-based routing. In that type of routing, a
developer defines one or more route templates, which are basically parameterized
strings. When the framework receives a request, it matches the URI against the route
template. Route templates are defined in a single place, and the routing rules are
applied consistently across all controllers (Wasson 2012).
As the name implies, attribute routing uses attributes to define routes. Attribute
routing gives developer more control over the URIs in Web API application.
Convention-based routing makes it hard to support specific URI patterns that are
common in RESTful APIs. For example, resources that contain child resources:
Customers have projects (Wasson 2012).
Both, convention-based and attribute based routing can be combined in the same
project. The attribute routing is not enabled by default. To enable this feature, the
WebApiConfig.cs file must contain the calling of the MapHttpAttributeRoutes
method.
Figure 18 - Usage of attribute to define routes
Attribute routing uses attributes such as [Route()], [RoutePrefix] and
[HttpGet/Post/Delete/Put] to define routes. Figure 18 shows the usage of all these
attributes.
// file: CustomersController.cs
[RoutePrefix("api/v1/customers")]
public class CustomersController : ApiController
{
// GET api/v1/customers
[HttpGet, Route("")]
public IEnumerable<Customer> GetAllCustomers() { ... }
// GET api/v1/customers/3
[HttpGet, Route("{id:int}")]
public Customer GetOne(int id) { ... }
// POST api/v1/customers
[HttpPost, Route("")]
public HttpResponseMessage Create(Customer customer) { ... }
}
33
4.4.3 Controller
When the Web API framework receives a request, it routes the request to the
particular controller and action. A controller is an object that handles incoming HTTP
requests and sends a response back to the caller. Web API controller can be created
under the Controllers folder or any other folder under the project's root folder. The
name of a controller class must end with "Controller", and it must be derived from
System.Web.Http.ApiController class. All the public methods of the controller are
called action methods (Wasson 2012).
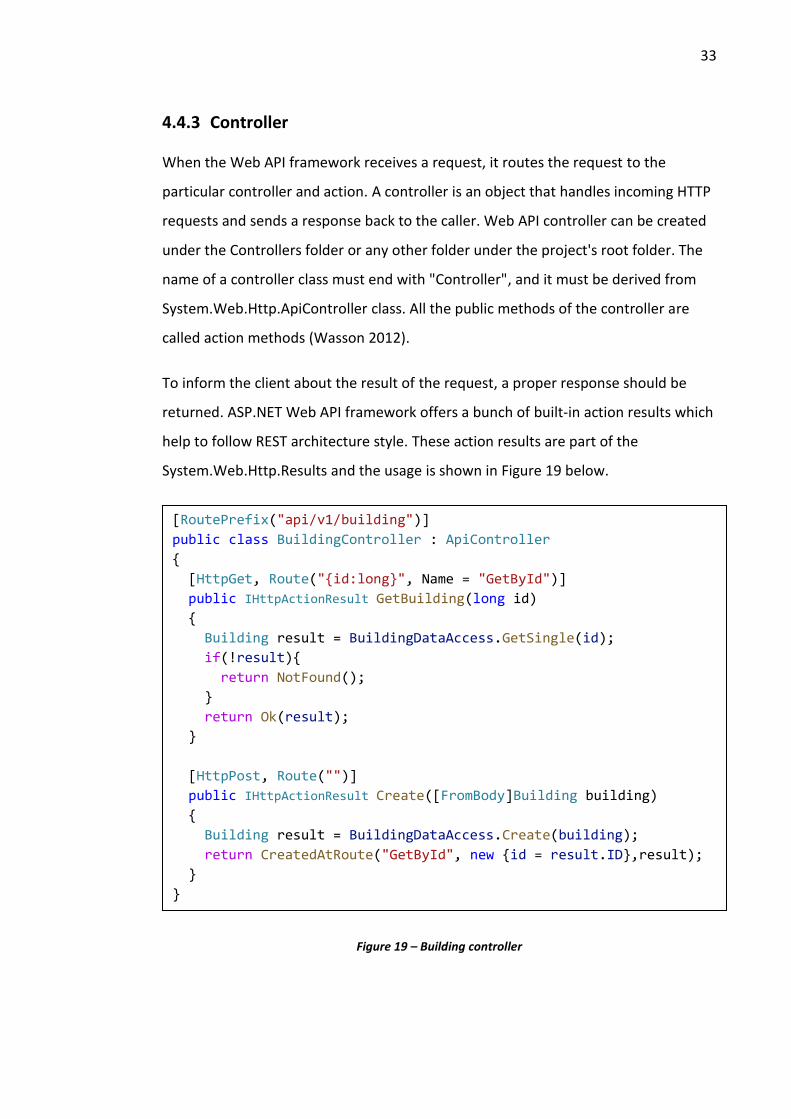
To inform the client about the result of the request, a proper response should be
returned. ASP.NET Web API framework offers a bunch of built-in action results which
help to follow REST architecture style. These action results are part of the
System.Web.Http.Results and the usage is shown in Figure 19 below.
Figure 19 – Building controller
[RoutePrefix("api/v1/building")]
public class BuildingController : ApiController
{
[HttpGet, Route("{id:long}", Name = "GetById")]
public IHttpActionResult GetBuilding(long id)
{
Building result = BuildingDataAccess.GetSingle(id);
if(!result){
return NotFound();
}
return Ok(result);
}
[HttpPost, Route("")]
public IHttpActionResult Create([FromBody]Building building)
{
Building result = BuildingDataAccess.Create(building);
return CreatedAtRoute("GetById", new {id = result.ID},result);
}
}
34
4.4.4 Data access layer
Controllers serve data to the client and represent a presentation layer of an
application. These controllers need to obtain data from a database or other kind of
storage. It is recommended to separate storage specific operations to the separate
classes, which form the collection of classes with the same motivation on storage
access, also known as data access layer (DAL). The purpose of DAL is to abstract the
rest of the application from the storage-specific API. DAL should never expose or
require information that is tied to a specific storage system. (The Data Access Layer
Explained 2012). If DAL is used correctly, it is easy to change storage type in the
future, e.g. from SQL database to cloud-based object-oriented database.
A business layer is another layer of the application that is situated between the
presentation and the data access layer. Layers need to communicate and send data
in a shape that understand both of layer. This shape of data is defined by model
classes.
A model is an object that represents the data in the application. ASP.NET Web API
can automatically serialise the model to JSON, XML, or some other format, and then
write the serialised data into the body of the HTTP response message. A client can
indicate which format it wants by setting the Accept header in the HTTP request
message (Wasson 2015).
ADO.NET is a set of classes exposing data access services for .NET Framework
programmers. ADO.NET provides a rich set of components for creating distributed,
data-sharing applications. It is an integral part of the .NET Framework (ADO.NET
2017).
The Entity Framework is a set of technologies in ADO.NET that support the
development of data-oriented software applications. The Entity Framework allows
developers to query entities and relationships in the domain model while relying on
the Entity Framework to translate those operations into data source–specific
commands. This frees applications from hard-coded dependencies on a particular
data source (Entity Framework Overview 2017).
35
Entity Framework supports three approaches how to use it in an application:
• Code-first approach – In this approach developer defines entity classes
with properties and Entity Framework will create entire database and
tables based on entity classes’ definition.
• Model-first approach – A database model is designed and edited in the
Entity Framework Designer and is stored in an EDMX file. After the model
is created, Entity Framework creates both database tables and related
classes.
• Database-first approach – This approach is used when database already
exists or wants to be designed and managed separately or by another
team. The framework creates Plain Old CLR Objects (POCOs) for each
table in a database. After the database is modified, Entity Framework
updates POCOs according to changes.
36
5 Implementation
5.1 Introduction
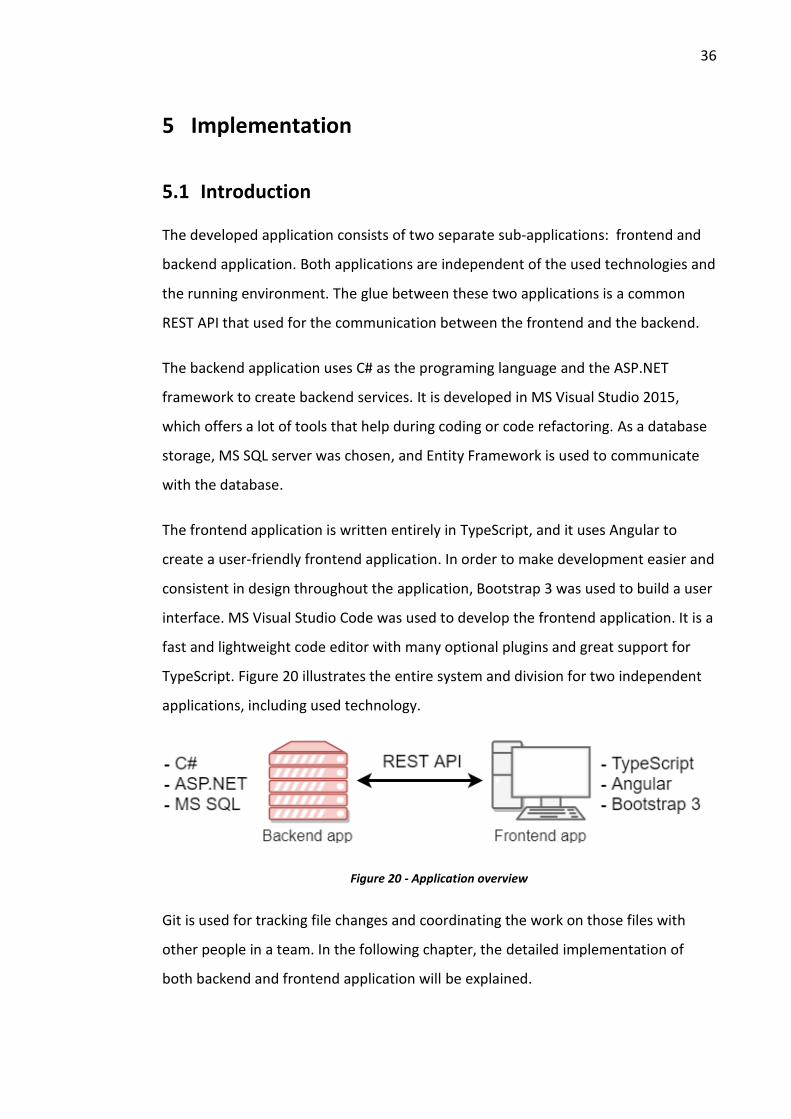
The developed application consists of two separate sub-applications: frontend and
backend application. Both applications are independent of the used technologies and
the running environment. The glue between these two applications is a common
REST API that used for the communication between the frontend and the backend.
The backend application uses C# as the programing language and the ASP.NET
framework to create backend services. It is developed in MS Visual Studio 2015,
which offers a lot of tools that help during coding or code refactoring. As a database
storage, MS SQL server was chosen, and Entity Framework is used to communicate
with the database.
The frontend application is written entirely in TypeScript, and it uses Angular to
create a user-friendly frontend application. In order to make development easier and
consistent in design throughout the application, Bootstrap 3 was used to build a user
interface. MS Visual Studio Code was used to develop the frontend application. It is a
fast and lightweight code editor with many optional plugins and great support for
TypeScript. Figure 20 illustrates the entire system and division for two independent
applications, including used technology.
Figure 20 - Application overview
Git is used for tracking file changes and coordinating the work on those files with
other people in a team. In the following chapter, the detailed implementation of
both backend and frontend application will be explained.

37
5.2 Backend application
5.2.1 Solution structure
Visual Studio enables to write code accurately and efficiently without losing the
current file context. The developer can easily zoom into details such as call structure,
related functions, check-ins, and test status. The developer can also leverage the
functionality to refactor, identify, and fix the code issues (Visual Studio IDE 2017).
A project is contained, in a logical sense and in the file system, within a solution,
which may contain one or more projects, along with build information, Visual Studio
window settings, and any miscellaneous files that are not associated with any
project. A solution has an associated *.suo file that stores settings, preferences and
configuration information for each user that has worked on the project (Solutions
and Projects in Visual Studio 2015).
The solution is created when the first project is created. The solution name is set to
Inmics.TPASuite in order to follow naming conventions. Each other project has the
name Inmics.TPASuite.ProjectName. The solution includes three main projects:
• Inmics.TPASuite.Business
• Inmics.TPASuite.Data
• Inmics.TPASuite.REST
The solution with several projects was chosen in order to follow the principle of
separation of concerns. The Inmics.TPASuite.Business project contains, for example,
model classes, authentication logic, and authorisation. The data layer is represented
by the Inmics.TPASuite.Data project with the main purpose to provide
communication with the database. The Inmics.TPASuite.REST project contains
controllers that handle REST communication and define public API endpoints.
Projects are added to the solution by right-clicking the solution name in the solution
explorer and selecting Add -> New project. Inmics.TPASuite.Business and
Inmics.TPASuite.Data are created as empty projects. Inmics.TPASuite.REST is created
as an empty ASP.NET Web Application that is a template situated in the Web

38
category. The folders and core references for Web API are added by marking Web
API checkbox as can be seen in Figure 21 as follows.
Figure 21 - Creating a REST API project
5.2.2 Installing and configuring Entity Framework
Before the implementation can start, the Entity Framework needs to be installed.
This can easily be done through the NuGet package manager. The NuGet package
manager can be opened by right-clicking on the project in solution explorer and
selecting Manage NuGet packages. The Entity Framework can be found in the
opened dialog under online packages and can be installed by clicking Install and
accepting the license.
The next step is to add the Entity Data Model to the application. This is done by right-
clicking on the Inmics.TPASuite.Data project where the Entity Data Model will be
situated and selecting Add -> Add new item from the context menu. The ADO.NET
Entity Data Model item is under the Visual C# -> Data category as can be seen in
Figure 22.
39
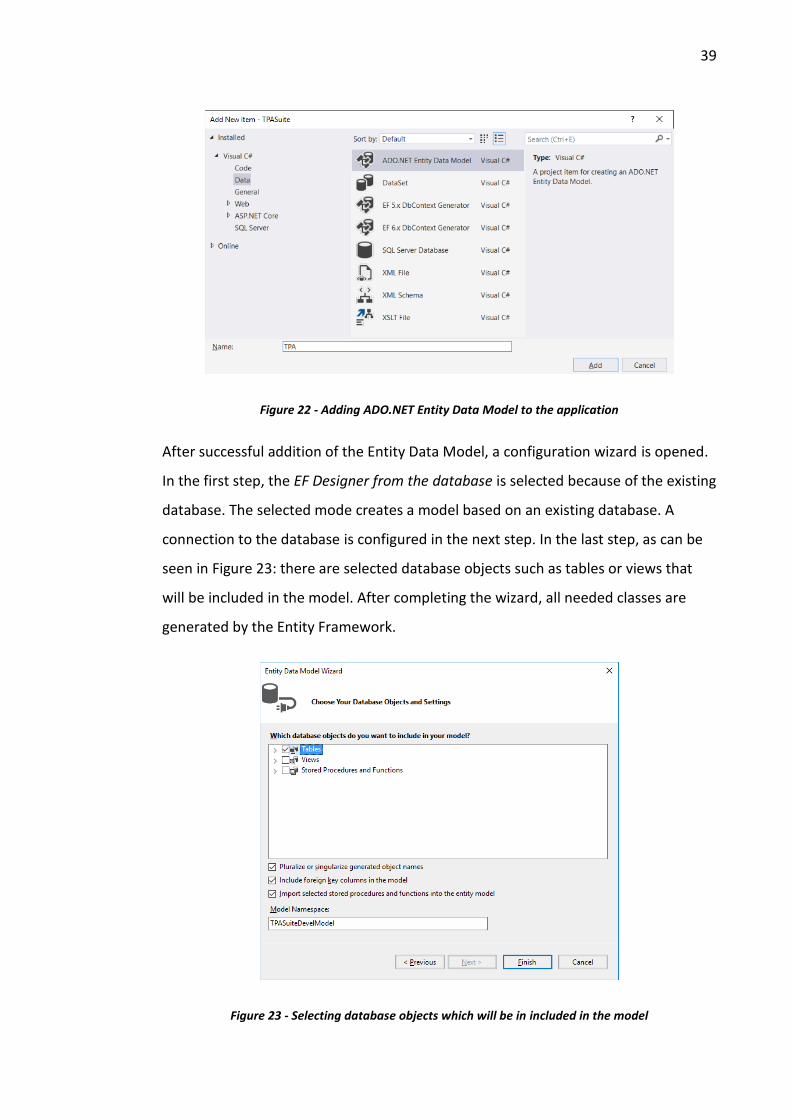
Figure 22 - Adding ADO.NET Entity Data Model to the application
After successful addition of the Entity Data Model, a configuration wizard is opened.
In the first step, the EF Designer from the database is selected because of the existing
database. The selected mode creates a model based on an existing database. A
connection to the database is configured in the next step. In the last step, as can be
seen in Figure 23: there are selected database objects such as tables or views that
will be included in the model. After completing the wizard, all needed classes are
generated by the Entity Framework.
Figure 23 - Selecting database objects which will be in included in the model
40
5.2.3 Model
Entity Framework generated a whole set of POCO objects that are created for each
table in the database, and their attributes correspond the table columns. A
developer should not modify these objects because they are automatically
generated, and the changes are overwritten when the model is regenerated.
A common model is needed, however, the model generated by the Entity Framework
(EF model) should not be used because a tight connection will arise between the
database and the application. Instead, there is another model defined in the
Inmics.TPASuite.Business project under the Entities folder.
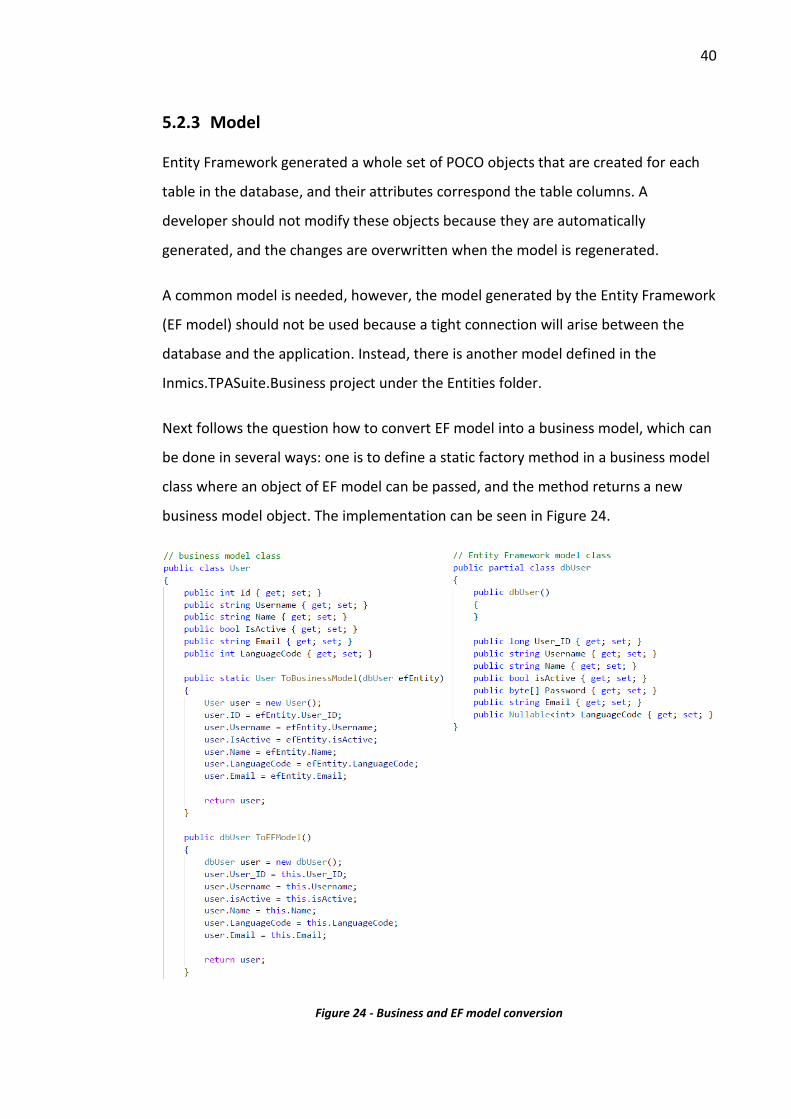
Next follows the question how to convert EF model into a business model, which can
be done in several ways: one is to define a static factory method in a business model
class where an object of EF model can be passed, and the method returns a new
business model object. The implementation can be seen in Figure 24.
Figure 24 - Business and EF model conversion

41
This implementation has several downsides; the main one being that the business
model depends on the EF model situated in another project. The Entity Framework
generates model classes with a partial modifier keyword. Partial classes give the
developer an ability to define a single class in multiple files, which provides a hint to
use the partial classes to extend the EF model without modifying actual classes.
Implementation with extension classes can be seen in Figure 25 below.
Figure 25 - Extending EF model class
42
5.2.4 Presentation layer
The presentation layer is responsible for providing data to the user, in the case of
developing application it is done by exposing the REST API endpoints. When the
server receives an HTTP request, it routes it to a particular controller and action. In
order to achieve the desired routing functionality, conventional-based or attribute-
based routing can be used. The attribute-based routing gives us more freedom in
how the URL looks. That is why the attribute-based routing is used over the
conventional-based routing. If all features of attribute-based routing need to be
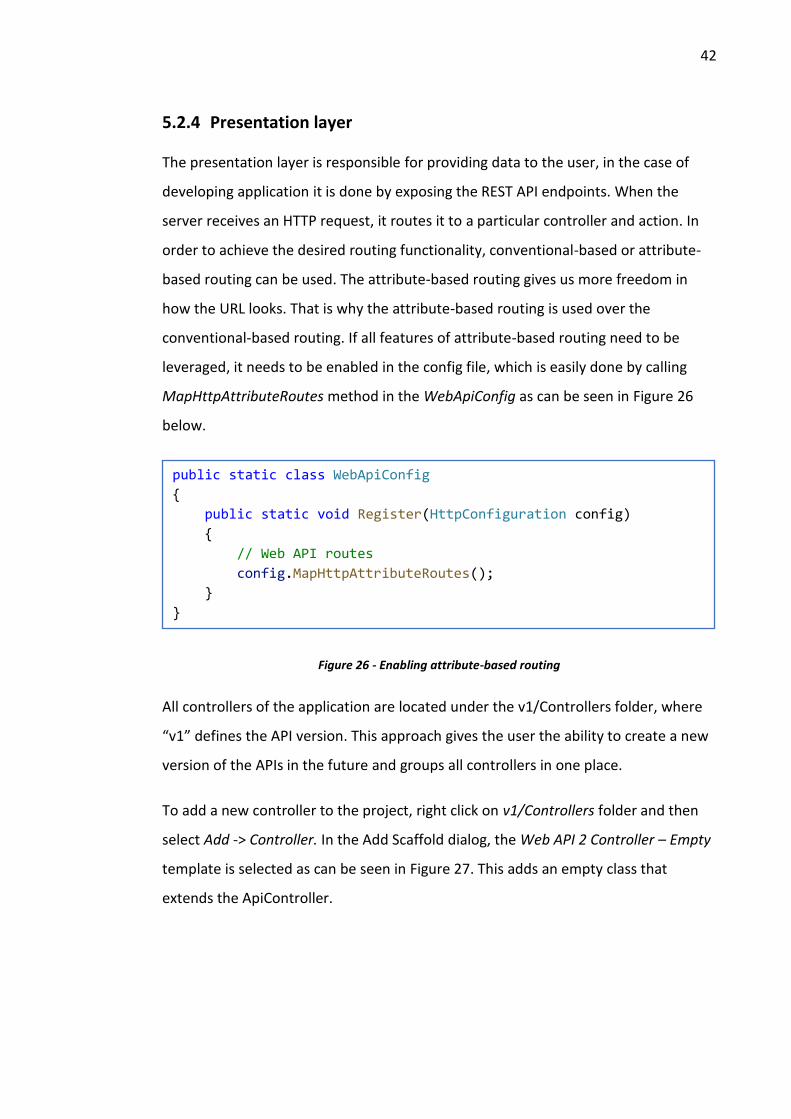
leveraged, it needs to be enabled in the config file, which is easily done by calling
MapHttpAttributeRoutes method in the WebApiConfig as can be seen in Figure 26
below.
Figure 26 - Enabling attribute-based routing
All controllers of the application are located under the v1/Controllers folder, where
“v1” defines the API version. This approach gives the user the ability to create a new
version of the APIs in the future and groups all controllers in one place.
To add a new controller to the project, right click on v1/Controllers folder and then
select Add -> Controller. In the Add Scaffold dialog, the Web API 2 Controller – Empty
template is selected as can be seen in Figure 27. This adds an empty class that
extends the ApiController.
public static class WebApiConfig
{
public static void Register(HttpConfiguration config)
{
// Web API routes
config.MapHttpAttributeRoutes();
}
}

43
Figure 27 - Adding new controller
In the developed application, most controllers call static methods directly on the
data access classes because there is no complicated business logic as can be seen in
Figure 28 below. Other controllers are created in a similar way for each resource
such as building, customer, project, inspection.
Figure 28 - User API controller
[RoutePrefix ("api/v1/users")]
public class UsersController : ApiController {
[HttpGet, Route("{id:long}", Name = "GetById")]
public IHttpActionResult GetUser(long id) {
User result = UserDataAccess.GetSingle(id);
return result ? Ok(result) : NotFound();
}
[HttpPost, Route("")]
public IHttpActionResult Create([FromBody] User user) {
User result = UserDataAccess.Create(user);
return CreatedAtRoute("GetById", new{id = result.ID}, result);
}
[HttpPut, Route ("{id:long}")]
public IHttpActionResult Save([FromBody] User user, long id) {
User result = UserDataAccess.Update(id, user);
return Ok(result);
}
// other methods
}
44
5.2.5 Data Access Layer
The primary goal of the controller is to process the request, obtain the data and
provide it to the client. It is not very reasonable to place data access logic to the
controller because it becomes a very complicated class with many interests.
Therefore, it is better to leave the controller leaner, and move the complex data
access logic to a separate layer, so-called data access layer that is described in this
chapter.
All data access classes are situated in the Inmics.TPASuite.Data project in the
DataAccess folder. This project hosts the model classes generated by the Entity
Framework and all the extension classes extending the functionality of the generated
model without modifying the generated classes.
A data access class is a simple class that exposes methods in order to provide data. It
encapsulates the entire database related code. The Entity Framework is used to
simplify the communication with the database.
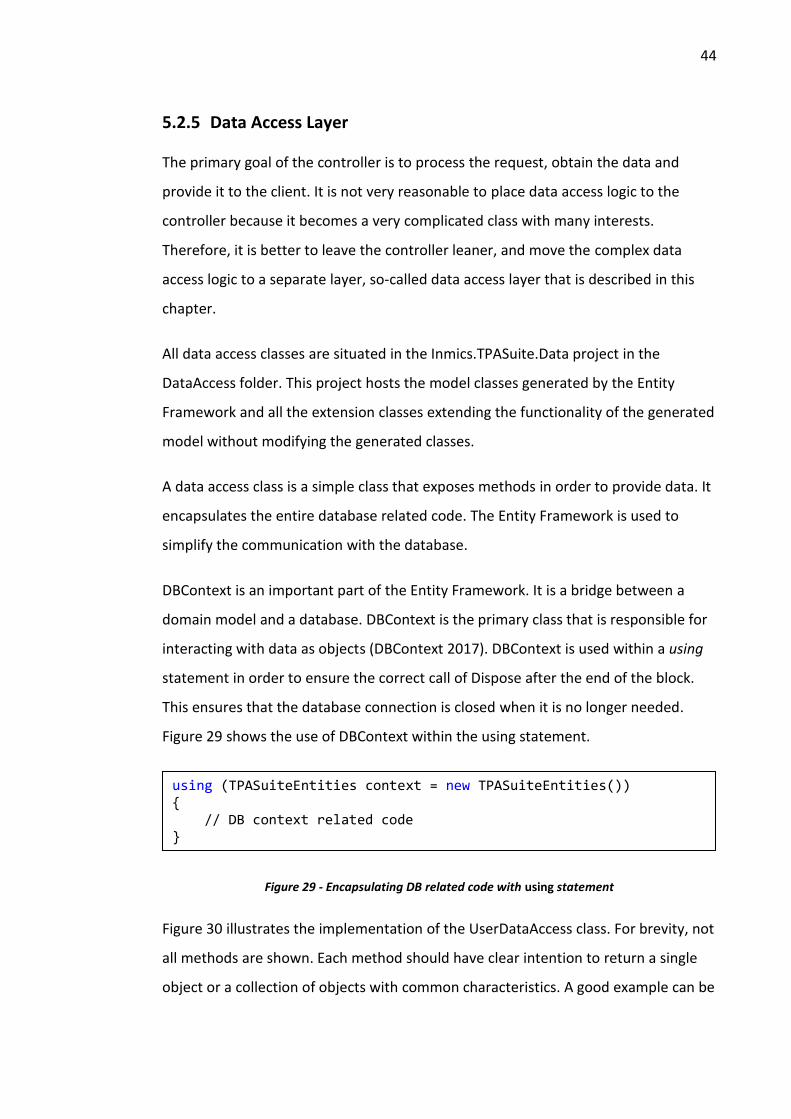
DBContext is an important part of the Entity Framework. It is a bridge between a
domain model and a database. DBContext is the primary class that is responsible for
interacting with data as objects (DBContext 2017). DBContext is used within a using
statement in order to ensure the correct call of Dispose after the end of the block.
This ensures that the database connection is closed when it is no longer needed.
Figure 29 shows the use of DBContext within the using statement.
Figure 29 - Encapsulating DB related code with using statement
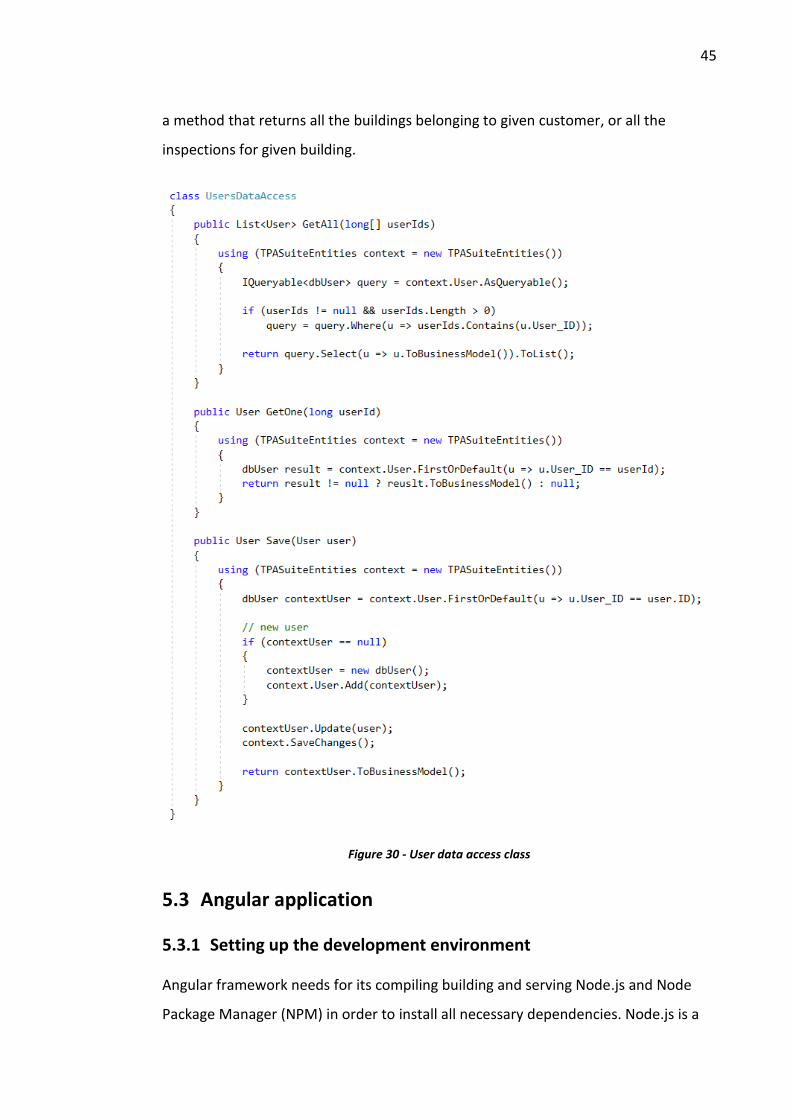
Figure 30 illustrates the implementation of the UserDataAccess class. For brevity, not
all methods are shown. Each method should have clear intention to return a single
object or a collection of objects with common characteristics. A good example can be
using (TPASuiteEntities context = new TPASuiteEntities()) { // DB context related code }
45
a method that returns all the buildings belonging to given customer, or all the
inspections for given building.
Figure 30 - User data access class
5.3 Angular application
5.3.1 Setting up the development environment
Angular framework needs for its compiling building and serving Node.js and Node
Package Manager (NPM) in order to install all necessary dependencies. Node.js is a
46
JavaScript runtime built on Chrome's V8 JavaScript engine using an event-driven,
non-blocking I/O model that makes it lightweight and efficient (Node.js 2017). The
Node.js installer can be simply downloaded from the page
https://nodejs.org/en/download/ and installed. The NPM is included in the NodeJS
installer, so no explicit installation is required.
Visual Studio Code, a lightweight and powerful code editor, is used to write the
Angular application. Plugins such as Angular Language Service and Angular2-inline
are installed for better Angular support and developing experience.
To start with, an Angular project must be created. There are two ways how to create
and initialise Angular project: firstly, by using a command line tool called Angular CLI
and secondly, by creating the entire project structure, build configuration files and
manually installing necessary dependencies. The first method was chosen to set up
the application. The Angular CLI makes application development quicker and easier
to maintain than if you did everything by hand (QuickStart 2017).
First, the Angular CLI package must be installed via NPM:
$ npm install -g @angular/cli
5.3.2 Create a new Angular project
When the Angular CLI is installed, a new project is created by running the following
command:
$ ng new tpa-suite
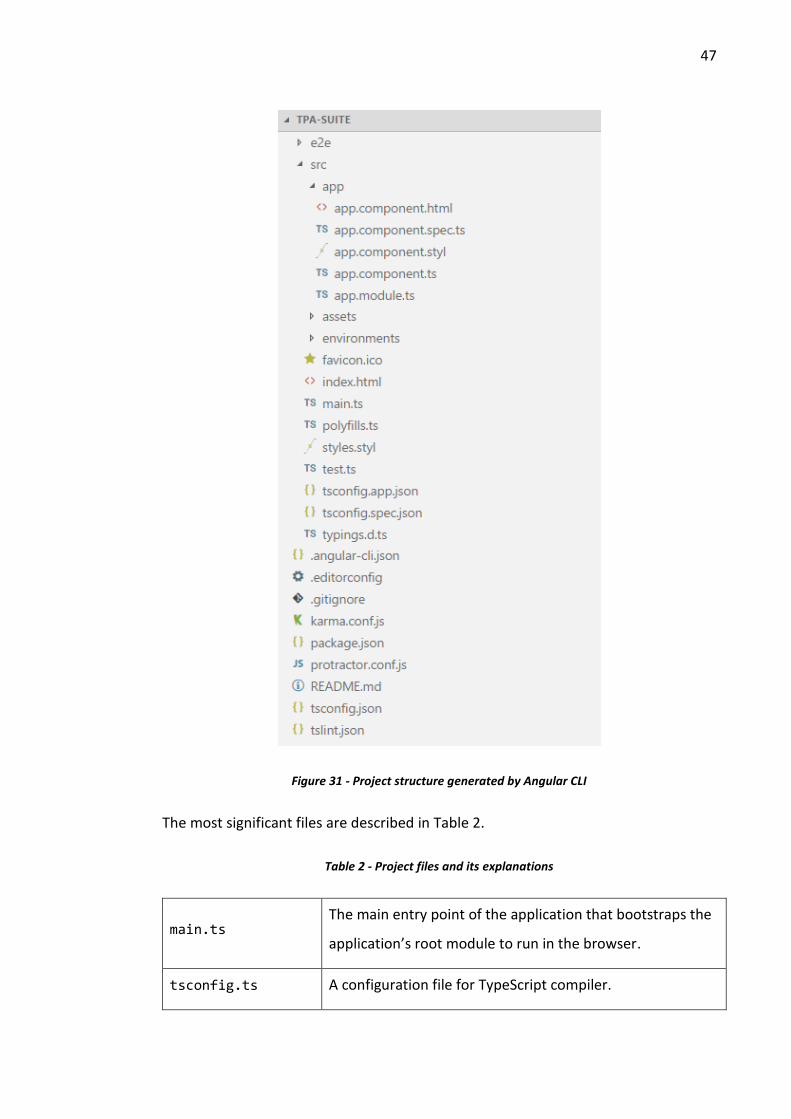
The previous command generates the Angular application with the folder structure
shown in Figure 31 below. The src folder contains the Angular application and all files
such as components, styles, HTML templates and configuration files. Files outside of
the src folder are meant to support building of the application (QuickStart 2017).
47
Figure 31 - Project structure generated by Angular CLI
The most significant files are described in Table 2.
Table 2 - Project files and its explanations
main.ts The main entry point of the application that bootstraps the
application’s root module to run in the browser.
tsconfig.ts A configuration file for TypeScript compiler.
48
index.html
Index.html is a file that is loaded at first when someone
visits the site. The CLI adds all assets files when building the
app.
package.json NPM configuration listing the third party packages project
uses.
.angular-cli.json
A configuration file for Angular CLI. In this file, there can be
set several defaults and also configure what files are
included when your project is built.
All components, services, modules and everything that the developer creates is
located in the /src/app folder. It is important to choose the right structure strategy
for this folder to make it organised and easy to refactor. According to Angular Docs, a
more complex application should contain four kinds of modules: AppModule,
SharedModule, CoreModule and FeatureModules (NgModules: What kinds of
NgModules should I have and how should I use them? 2017).
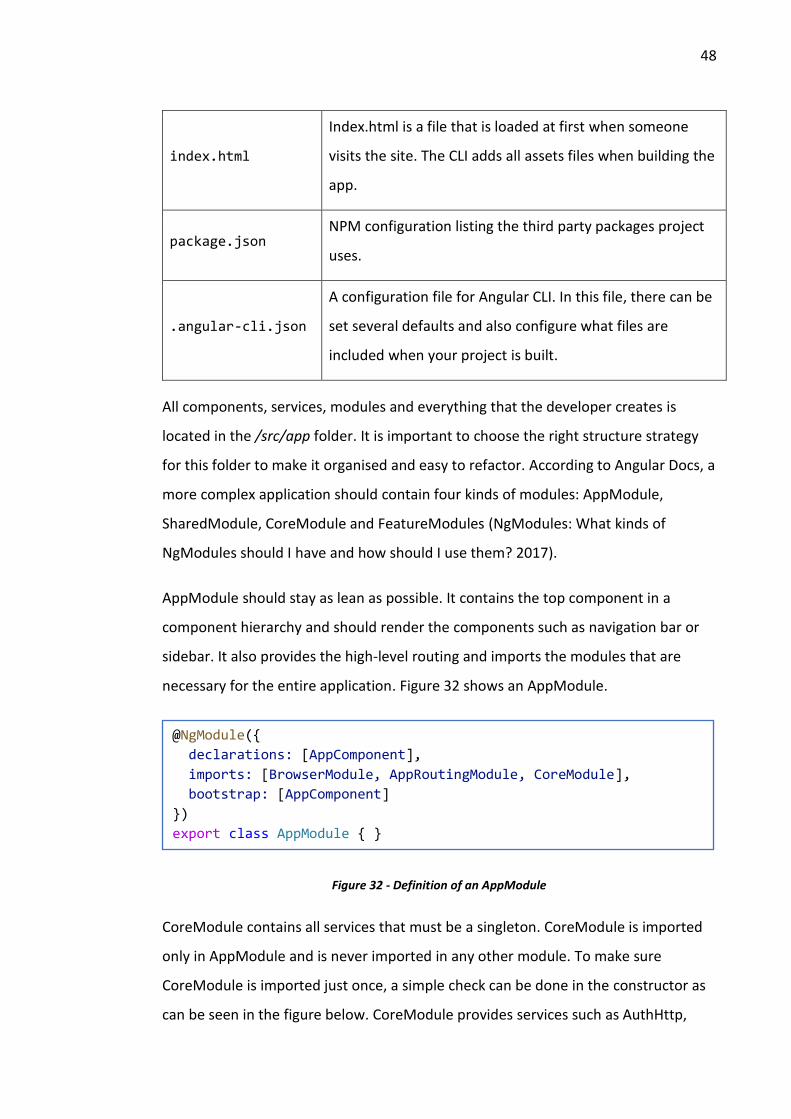
AppModule should stay as lean as possible. It contains the top component in a
component hierarchy and should render the components such as navigation bar or
sidebar. It also provides the high-level routing and imports the modules that are
necessary for the entire application. Figure 32 shows an AppModule.
Figure 32 - Definition of an AppModule
CoreModule contains all services that must be a singleton. CoreModule is imported
only in AppModule and is never imported in any other module. To make sure
CoreModule is imported just once, a simple check can be done in the constructor as
can be seen in the figure below. CoreModule provides services such as AuthHttp,
@NgModule({
declarations: [AppComponent],
imports: [BrowserModule, AppRoutingModule, CoreModule],
bootstrap: [AppComponent]
})
export class AppModule { }

49
UserService, NotificationService and all services responsible for making REST API
requests.
Figure 33 - Definition of CoreModule
SharedModule, similarly to CoreModule, contains code that is used across the entire
application. The biggest difference is that SharedModule is imported by feature-
modules and not in AppModule or CoreModule. All dumb components, directives
and pipes belong to SharedModule. It may include and re-export other modules,
mainly modules from UI libraries and should not have specified providers
(NgModules: What kinds of NgModules should I have and how should I use them?
2017).
Architecturally, a feature module is an NgModule class dedicated to an application
feature or workflow. Technically, it is another class adorned by the @NgModule
decorator. A feature module delivers a cohesive set of functionalities focused on an
application business domain, user workflow, facility (forms, HTTP, routing), or
collection of related utilities. Feature modules help you partition the app into areas
of specific interest and purpose (NgModules 2017).
A good example of feature module is a building module whose main purpose is to
show and edit building information or an inspection module that provides an
interface for doing an inspection.
@NgModule({
providers: [
AuthHttp, AuthenticationService, UserService,
/* ...REST API services */
]
})
export class CoreModule {
/* make sure CoreModule is imported only by AppModule */
constructor(@Optional() @SkipSelf() coreModule: CoreModule) {
if (coreModule)
throw new Error('Import CoreModule only in AppModule');
}
}
50
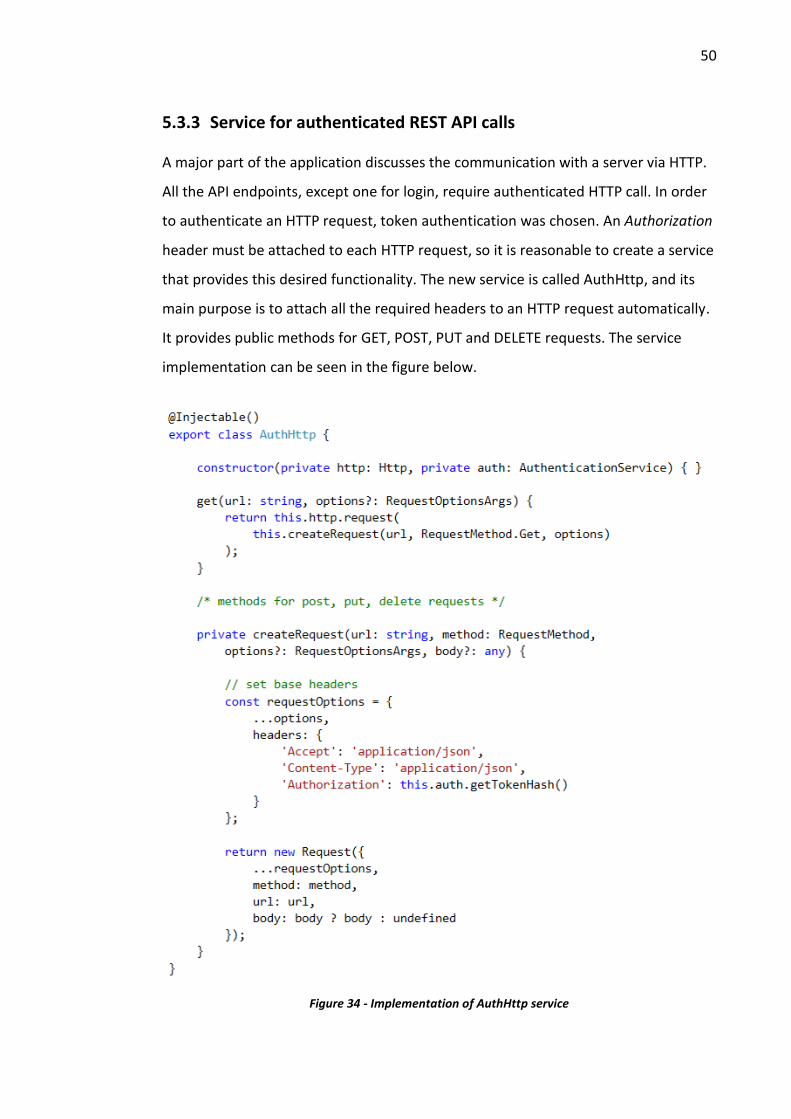
5.3.3 Service for authenticated REST API calls
A major part of the application discusses the communication with a server via HTTP.
All the API endpoints, except one for login, require authenticated HTTP call. In order
to authenticate an HTTP request, token authentication was chosen. An Authorization
header must be attached to each HTTP request, so it is reasonable to create a service
that provides this desired functionality. The new service is called AuthHttp, and its
main purpose is to attach all the required headers to an HTTP request automatically.
It provides public methods for GET, POST, PUT and DELETE requests. The service
implementation can be seen in the figure below.
Figure 34 - Implementation of AuthHttp service

51
In order to authenticate HTTP call, an authentication token is needed. This token is
retrieved after successful login and is saved in the browser local storage. Token
handling is packaged in AuthenticationService.
5.3.4 Inspection module
One of the main features of the application is an inspection module that helps
inspectors to inspect buildings easily. The user interface must be mobile-friendly
because inspectors use mobile devices during the inspection. The mobile-friendly
user interface is crucial in order to make a collecting an inspection values easier and
spotlessly.
The workflow of the inspection is following:
- Inspector creates an inspection and must define in which building the
inspection is doing. He or she can select set of spaces2 that should be
inspected or the entire building.
- Inspector enters the first space and should be able to find the space in the
application.
- If the space does not exist in the application yet (could be a new space), the
inspector can add a new one.
- If there is any fault in the space, the inspector marks the fault in the
application and can write a comment or take a photo of the fault.
- When the space is inspected, the inspector inspects another one until the
required amount of inspected spaces is fulfilled.
In the beginning, a component scheme was created for the mobile version. The user
interface consists of two main views: inspection detail and space inspection detail.
The scheme can be shown below in Figure 35.
2 Inspector generally do inspection against a room, but there could be exceptions, so the word space is used instead of room.

52
Figure 35 - Mockups for an inspection views
An inspection detail view contains information about the inspection, a list of all
already inspected spaces and notes that can be added to the inspection. A space
inspection detail view helps to easily mark a fault in the inspected space and add a
comment or a photo of the fault.
When the mock-ups were created and the basic functionality was defined, the
implementation process could start. At first, the inspection module and two view
components were generated via Angular CLI:
$ ng generate module inspection –routing
$ mkdir inspection/views && cd inspection/views
$ ng generate component inspection-detail
$ ng generate component space-inspection-detail
To each view component its own service was dedicated, in order to keep the
component lean and move the complex functionality to the service where it belongs.
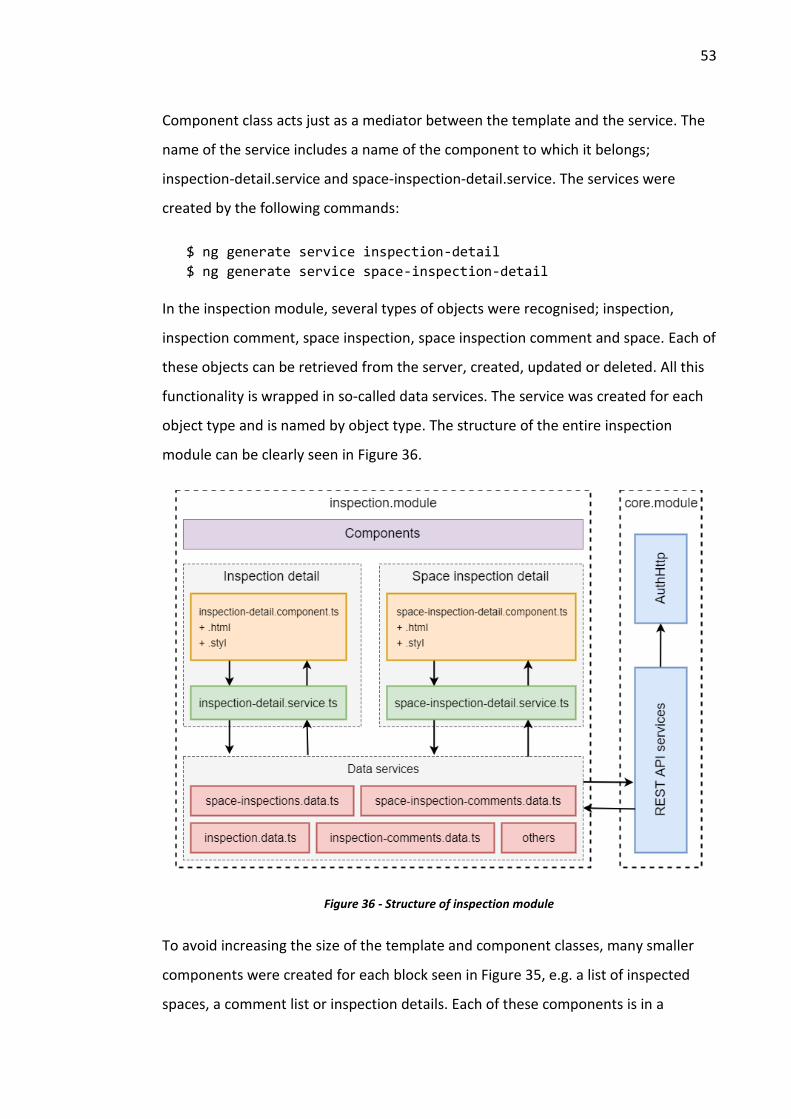
53
Component class acts just as a mediator between the template and the service. The
name of the service includes a name of the component to which it belongs;
inspection-detail.service and space-inspection-detail.service. The services were
created by the following commands:
$ ng generate service inspection-detail
$ ng generate service space-inspection-detail
In the inspection module, several types of objects were recognised; inspection,
inspection comment, space inspection, space inspection comment and space. Each of
these objects can be retrieved from the server, created, updated or deleted. All this
functionality is wrapped in so-called data services. The service was created for each
object type and is named by object type. The structure of the entire inspection
module can be clearly seen in Figure 36.
Figure 36 - Structure of inspection module
To avoid increasing the size of the template and component classes, many smaller
components were created for each block seen in Figure 35, e.g. a list of inspected
spaces, a comment list or inspection details. Each of these components is in a
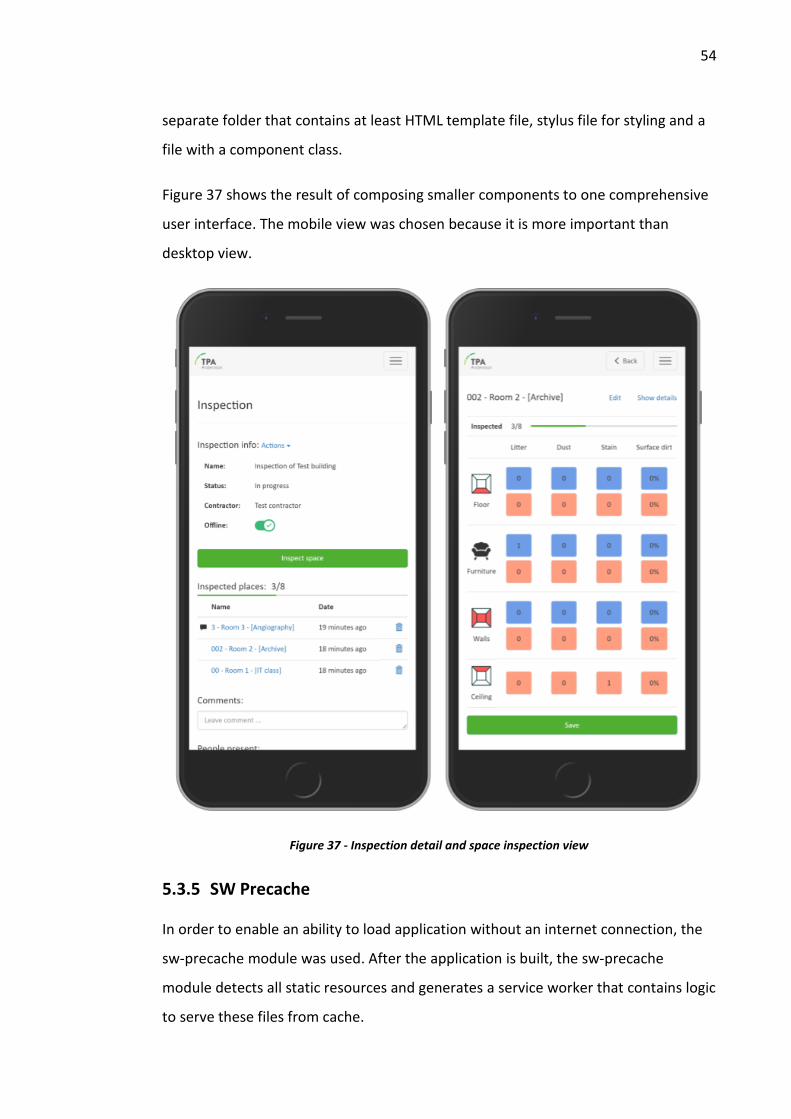
54
separate folder that contains at least HTML template file, stylus file for styling and a
file with a component class.
Figure 37 shows the result of composing smaller components to one comprehensive
user interface. The mobile view was chosen because it is more important than
desktop view.
Figure 37 - Inspection detail and space inspection view
5.3.5 SW Precache
In order to enable an ability to load application without an internet connection, the
sw-precache module was used. After the application is built, the sw-precache
module detects all static resources and generates a service worker that contains logic
to serve these files from cache.

55
The module is installed by running the following script
$ npm install --save-dev sw-precache
and a service worker is generated by running the following script
$ sw-precache --verbose --config=sw-precache-config.js
The basic configuration can be done using CLI parameters, however, when a more
complicated configuration is needed, the best way is to create a separate config file
and link it with the --config parameter. The config file for the developed
application can be seen in Figure 38. It tells where the files from the build process are
located, which static files should be precached, and it is specified that the external
dependence on the jQuery library should be cached too.
Figure 38 - Configuration for an sw-precache module
In the end, calling a precache script was added to build script in package.json:
"scripts": {
"build": "ng build -aot -prod && sw-precache --config=sw-precache.js",
...
}
// file: sw-precache-config.js
module.exports = {
navigateFallback: '/index.html',
root: './dist',
staticFileGlobs: [
'/index.html',
'/**.js',
'/**.css',
'/**.png',
'/assets/**/*',
'/glyphicons-halflings*'
],
runtimeCaching: [{
urlPattern: /^https:\/\/code\.jquery\.com\//,
handler: 'cacheFirst'
}]
};
56
6 Conclusion
The main goal of this thesis was to develop an application consisting of two separate
projects and two different technologies. The purpose of the application was to help
with the building inspections by providing functionality to log the faults in the
building and documenting them. Several sub-modules for managing users and their
rights, buildings or building structures were needed in addition. Last but not least,
the users had to be able to use the core functionality for doing inspections without
internet connection or in the areas with weak connection.
At the beginning, I was challenged by the new technologies such as Angular
framework and ASP.NET framework. While exploring and gathering new knowledge
about these technologies, very well written official documentations was the pillar for
me that I could repose on. Both teams, Google and Microsoft have done great work
with detailed API documentation and plenty of tutorials. In addition to official
documentation, many articles can be found about these popular frameworks.
After the first weeks of delving into new technologies, I started to design and
implement the application. At the beginning, I was the only developer working on
this project, so I made some architectural decisions that turned out to be not very
successful. Over time, I have come up with new architectural solutions and ideas, and
I discovered the importance of the code refactoring.
I gained the knowledge about RESTful design and client-server architecture. The
client-server architecture allows to use server-hosted services with various
applications running on different devices or platforms. While developing the backed
service, Visual Studio 2015 gave me a great support with a lot of templates to
generate various classes, objects or models what speeded up the development
process.
The ability to work offline was secured by implementing PWA requirements that
includes the Service Worker that serves static content when there is no connection,
or precaching all static files in the build process. The cached static files are served

57
immediately, so the end user can see the application much faster. The Service
Worker can be easily generated without complicated configuration by sw-precache
module. The main limitation for PWA and especially for the Service Worker is weak
support for iOS devices.
The result of several months of work is an application meeting all the set objectives.
However, the development of the application has not yet been finished, and new
modules will be added in the future in order to meet the new requirements that
have arisen during the development process.
The reader can use this thesis as a demonstration of how to combine technologies
such as ASP.NET and Angular together and use this technology stack to build fast and
reliable application with dynamic content. The Angular framework is as a robust
platform and a good choice for both smaller and larger frontend applications or for
mobile application with PWA characteristics. From my point of view, I found a new
passion in the technologies like ASP.NET and Angular, which were completely
unknown platforms for me.

58
References
ADO.NET. Microsoft Docs. Accessed on 18 November 2017. Retrieved from
https://docs.microsoft.com/en-us/dotnet/framework/data/adonet/
Archibald, J. 2014. The offline cookbook. Accessed on 9 October 2017. Retrieved from
https://jakearchibald.com/2014/offline-cookbook/
Architecture Overview. Angular Docs. Accessed on 1 November 2017. Retrieved from
https://angular.io/guide/architecture
ASP.NET overview. Microsoft Docs. Accessed on 15 November 2017. Retrieved from
https://docs.microsoft.com/en-us/aspnet/overview
Barry, D. K. n.d. Representational State Transfer (REST). Accessed on 13 November
2017. Retrieved from https://techterms.com/definition/client-server_model
Bootstrapping. Angular Docs. Accessed on 3 November 2017. Retrieved from
https://angular.io/guide/bootstrapping#bootstrapping
Can I use: Service Workers. Can I use. Accessed on 18 October 2017. Retrieved from
https://caniuse.com/#feat=serviceworkers
Components. Angular Docs. Accessed on 5 November 2017. Retrieved from
https://angular.io/guide/architecture#components
Entity Framework Overview. Microsoft Docs. Accessed on 19 November 2017.
Retrieved from https://docs.microsoft.com/en-
us/dotnet/framework/data/adonet/ef/overview
Data binding. Angular Docs. Accessed on 6 November 2017. Retrieved from
https://angular.io/guide/architecture#data-binding
DBContext. EntityFrameworkTutorial.net. Accessed on 22 November 2017. Retrieved
from http://www.entityframeworktutorial.net/EntityFramework4.3/dbcontext-vs-
objectcontext.aspx
Dependency injection. Angular Docs. Accessed on 3 November 2017. Retrieved from
https://angular.io/guide/architecture#dependency-injection
Directives. Angular Docs. Accessed on 5 November 2017. Retrieved from
https://angular.io/guide/architecture#directives
59
Golden, M. 2017. Why it is going to be called just Angular instead of Angular v4.0 and
so on. Accessed on 25 October 2017. Retrieved from https://cali-style.com/blog/just-
call-it-angular-already
Haldar, M. 2017. RESTful API Designing guidelines — The best practices. Accessed on
13 November 2017. Retrieved from https://hackernoon.com/restful-api-designing-
guidelines-the-best-practices-60e1d954e7c9
Hanselman, S. 2012. ASP.NET Web API. ASP.NET Site Videos. Accessed on 12
November 2017. Retrieved from https://channel9.msdn.com/Blogs/ASP-NET-Site-
Videos/aspnet-web-api
Christensson, P. 2016. API Definition. Accessed on 12 November 2017. Retrieved
from https://techterms.com/definition/api
Christensson, P. 2016. Client-Server Model Definition. Accessed on 12 November
2017. Retrieved from https://techterms.com/definition/client-server_model
LePage, P. 2017. Your First Progressive Web App. Accessed on 9 October 2017.
Retrieved from https://developers.google.com/web/fundamentals/codelabs/your-
first-pwapp/
Lifecycle Hooks. Angular Docs. Accessed on 8 November 2017. Retrieved from
https://angular.io/guide/lifecycle-hooks
Lighthouse. Google Developers. Accessed on 18 October 2017. Retrieved from
https://developers.google.com/web/tools/lighthouse/
Live Data in the Service Worker. Progressive Web Apps Training. Accessed on 12
October 2017. Retrieved from https://developers.google.com/web/ilt/pwa/live-data-
in-the-service-worker
Lynch, M. 2016. What are Progressive Web Apps? Accessed on 9 October 2017.
Retrieved from http://blog.ionic.io/what-is-a-progressive-web-app/
Mikowski, M. S., & Powell, J. C. 2014. Single Page Web Applications. Manning
Publications Co.
Modules. Angular Docs. Accessed on 5 November 2017. Retrieved from
https://angular.io/guide/architecture#modules
NgModules. Angular Docs. Accessed on 29 November 2017. Retrieved from
https://angular.io/guide/ngmodule
60
NgModules: What kinds of NgModules should I have and how should I use them?
Angular Docs. Accessed on 29 November 2017. Retrieved from
https://angular.io/guide/ngmodule-faq#what-kinds-of-ngmodules-should-i-have-
and-how-should-i-use-them
Node.js. Node.js. Accessed on 30 November 2017. Retrieved from
https://nodejs.org/en/
QuickStart. Angular Docs. Accessed on 30 November 2017. Retrieved from
https://angular.io/guide/quickstart
Semenov, A. 2017. How Progressive Web Apps make the Web great again. Accessed
on 18 October 2017. Retrieved from https://webagility.com/posts/how-progressive-
web-apps-make-the-web-great-again
Service Worker Precache. GitHub. Accessed on 18 October 2017. Retrieved from
https://github.com/GoogleChromeLabs/sw-precache
Solutions and Projects in Visual Studio. Microsoft Docs. Accessed on 21 November
2017. Retrieved from https://msdn.microsoft.com/en-us/library/b142f8e7.aspx
Template Syntax. Angular Docs. Accessed on 29 November 2017. Retrieved from
https://angular.io/guide/template-syntax
The Data Access Layer Explained. Sapiens Works. Accessed on 18 November 2017.
Retrieved from http://blog.sapiensworks.com/post/2012/11/18/The-Data-Access-
Layer-(DAL)-Explained.aspx
The family guarantees sustainable growth. Inmics Oy. Accessed on 6 December 2017.
Retrieved from https://www.inmics.fi/yritys/perhe-takaa-kestavan-kasvun/
Visual Studio IDE. Microsoft. Accessed on 21 November 2017. Retrieved from
https://www.visualstudio.com/vs/
Wasson, M. 2012. Routing in ASP.NET Web API. Microsoft Docs. Accessed on 15
November 2017. Retrieved from https://docs.microsoft.com/en-us/aspnet/web-
api/overview/web-api-routing-and-actions/routing-in-aspnet-web-api
Wasson, M. 2015. Getting Started with ASP.NET Web API 2. Microsoft Docs. Accessed
on 15 November 2017. Retrieved from https://docs.microsoft.com/sk-
sk/aspnet/web-api/overview/getting-started-with-aspnet-web-api/tutorial-your-
first-web-api
Web App Manifest. Web technology for developers. Accessed on 15 October 2017.
Retrieved from https://developer.mozilla.org/en-US/docs/Web/Manifest

61
What is TypeScript? Pros and Cons. Designmodo. Accessed on 10 November 2017.
Retrieved from https://designmodo.com/typescript/
What is Web API? TutorialsTeacher.com. Accessed on 15 November 2017. Retrieved
from http://www.tutorialsteacher.com/webapi/what-is-web-api
Related Documents