Top Banner
Progress Monitoring Schedules Step by Step
19

Progress Monitoring Schedules Step by Step. LOGIN: Customer ID = 3894 Username= First initial of first name And Last name Ex. mlemire.

Dec 14, 2015

Download

Documents

Caitlin Eaton
Welcome message from author
This document is posted to help you gain knowledge. Please leave a comment to let me know what you think about it! Share it to your friends and learn new things together.
Transcript
Page 1: Progress Monitoring Schedules Step by Step. LOGIN: Customer ID = 3894 Username= First initial of first name And Last name Ex. mlemire.

Progress Monitoring Schedules Step by Step

Page 2: Progress Monitoring Schedules Step by Step. LOGIN: Customer ID = 3894 Username= First initial of first name And Last name Ex. mlemire.

LOGIN:

Customer ID = 3894

Username=First initial of first name And Last name Ex. mlemire

Page 3: Progress Monitoring Schedules Step by Step. LOGIN: Customer ID = 3894 Username= First initial of first name And Last name Ex. mlemire.

1. Click the Progress Monitor Tab located on the top of the page2. Click the Schedules Tab on the left of the page

Page 4: Progress Monitoring Schedules Step by Step. LOGIN: Customer ID = 3894 Username= First initial of first name And Last name Ex. mlemire.

Progress Monitoring: Adding a New Student

3. Click Manage Students Button

Page 5: Progress Monitoring Schedules Step by Step. LOGIN: Customer ID = 3894 Username= First initial of first name And Last name Ex. mlemire.

4. Type in student’s First and Last Name (only) 5. Click Search (DO NOT CLICK ADD)

6. Student name will be listed under “Student List” If no results- Type Last Name Only into search fieldIf still no results contact external coach so the student can be searched/added to the system

Page 6: Progress Monitoring Schedules Step by Step. LOGIN: Customer ID = 3894 Username= First initial of first name And Last name Ex. mlemire.

7. Check box next to student name

8. Click Add PM button

9. A message will pop on the screen asking if you want to use the “schedule wizard” CLICK OK

Page 7: Progress Monitoring Schedules Step by Step. LOGIN: Customer ID = 3894 Username= First initial of first name And Last name Ex. mlemire.

A List of Measures will appear on the screen

9. Mark the RCBM (or other GOM) box

10. Click Next

Page 8: Progress Monitoring Schedules Step by Step. LOGIN: Customer ID = 3894 Username= First initial of first name And Last name Ex. mlemire.

A Schedule Page will appear

The Goal start date is entered as the day the schedule is being made.

Choose an end date

11. Choose Weekly or every two weeks

25<10%ile=weekly >10%ile= biweekly  12. Choose day of

week  13. Click save

Page 9: Progress Monitoring Schedules Step by Step. LOGIN: Customer ID = 3894 Username= First initial of first name And Last name Ex. mlemire.

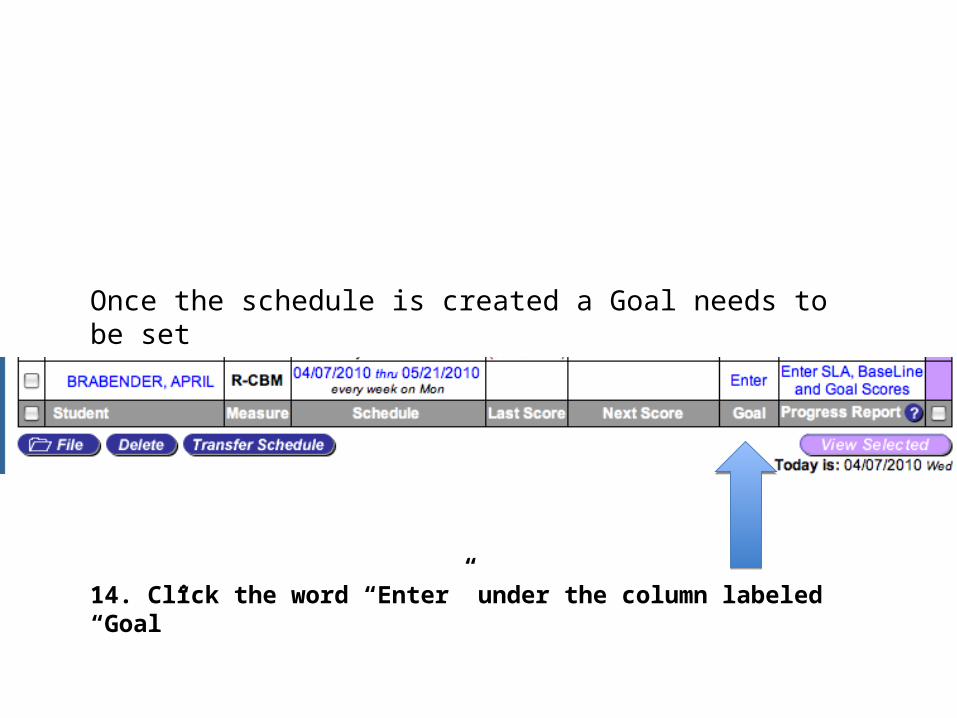
Once the schedule is created a Goal needs to be set

14. Click the word “Enter” under the column labeled “Goal”

Page 10: Progress Monitoring Schedules Step by Step. LOGIN: Customer ID = 3894 Username= First initial of first name And Last name Ex. mlemire.

15. Enter benchmark score under “initial corrects”

16. Enter Goal for end of school year. Goal is to be set to the Spring 25%ile cut score.

**If you are progress monitoring at the 8th grade level set the goal as 150WRC

If conducted enter SLA scores

Page 11: Progress Monitoring Schedules Step by Step. LOGIN: Customer ID = 3894 Username= First initial of first name And Last name Ex. mlemire.

How to Add a Program Change/Intervention Line

Page 12: Progress Monitoring Schedules Step by Step. LOGIN: Customer ID = 3894 Username= First initial of first name And Last name Ex. mlemire.

Sign Into AIMSwebClick on the blue “Progress Monitoring” Tab

Page 13: Progress Monitoring Schedules Step by Step. LOGIN: Customer ID = 3894 Username= First initial of first name And Last name Ex. mlemire.

Click on the date under the Next Score column for the desired student

Page 14: Progress Monitoring Schedules Step by Step. LOGIN: Customer ID = 3894 Username= First initial of first name And Last name Ex. mlemire.

Click the link labeled “Show All Weeks of This Schedule.”

Page 15: Progress Monitoring Schedules Step by Step. LOGIN: Customer ID = 3894 Username= First initial of first name And Last name Ex. mlemire.

On the date you are changing the intervention, click the “I” icon

Page 16: Progress Monitoring Schedules Step by Step. LOGIN: Customer ID = 3894 Username= First initial of first name And Last name Ex. mlemire.

Enter the Intervention details as needed. Click “Add”

Page 17: Progress Monitoring Schedules Step by Step. LOGIN: Customer ID = 3894 Username= First initial of first name And Last name Ex. mlemire.

Click “Save”

Page 18: Progress Monitoring Schedules Step by Step. LOGIN: Customer ID = 3894 Username= First initial of first name And Last name Ex. mlemire.

To view Progress Monitoring Graph with new intervention line click “insufficient scores” in the Progress Report column

Page 19: Progress Monitoring Schedules Step by Step. LOGIN: Customer ID = 3894 Username= First initial of first name And Last name Ex. mlemire.

Your graph will now display an intervention line