Programming & Utilities Guide

Welcome message from author
This document is posted to help you gain knowledge. Please leave a comment to let me know what you think about it! Share it to your friends and learn new things together.
Transcript

Programming & Utilities Guide

COPYRIGHT 1989 - 2000 by ZUCCHETTI TOOLS S.r.l. All rights reserved. This publication contains information protected by copyright. This publication may not be reproduced, stored, or transmitted, in any form or by any means without the prior permission of the publisher. TRADEMARKS All produced trademarks are ownership of the holder and are acknowledged by this publication. ZUCCHETTI TOOLS S.r.l. SOFTWARE TECHNOLOGY PADOVA - BELLARIA - RIMINI E-mail: [email protected] Web Address: http:\\www.zucchettitools.com http:\\www.codepainter.com http:\\www.codelab.it
P R O G R A M M I N G & U T I L I T I E S G U I D E
S U M M A R Y - I
Summary
User Interface............................................................................1
1.1 Introduction.....................................................................................1
1.2 Client/Server User Interface For MS Visual FoxPro ........................1 1.2.1 The Main Menu...................................................................................2 1.2.2 The Toolbar .........................................................................................2
Function Keys ..............................................................................................2 1.2.3 The Utility Menu.................................................................................3
Database Administration..............................................................................4 Query Painter ...............................................................................................5 Dialog Window Painter................................................................................6 Zoom Painter................................................................................................6 Visual Zoom Configuration .........................................................................7 Display Area ................................................................................................8 Configuration Area ....................................................................................10 User Area ...................................................................................................14 Menu Painter ..............................................................................................16 User And Group Administration................................................................18 Security Administration .............................................................................18 Table Administration For Autonumbered Variables..................................20
1.2.4 The Application Bar And Post-INs ...................................................20 1.2.5 Application Name, Version, Dimension and Date ............................26 1.2.6 Change The Application Background Bitmap ..................................27

P R O G R A M M I N G & U T I L I T I E S G U I D E
S U M M A R Y - I I
1.2.7 Dialog Window Background ............................................................ 27 Same Background For All Dialog Windows............................................. 28 Different Backgrounds for Different Dialog Windows ............................. 29
File Management .................................................................... 31
2.1 Introduction ...................................................................................31
2.2 File Management ...........................................................................32 2.2.1 Tables And Links Management ........................................................ 32
Database Administration ........................................................................... 33 Managing Installation Procedures For Applications (CP_INST).............. 33 Connection to more Server ........................................................................ 33 Creating Multi Company Files .................................................................. 36 Company, User And Group Tables ........................................................... 44 Updating An Existing Database ................................................................ 46
Menu Management................................................................. 49
3.1 Introduction ...................................................................................49
3.2 The Menu File (.DBF). ..................................................................50
Printer Management .............................................................. 53
4.1 Introduction ...................................................................................53
4.2 Printer Management.......................................................................53 4.2.1 Printer Selection................................................................................ 54
Print Preview ............................................................................................. 55 Send To Printer.......................................................................................... 55 Send To Printer With Options ................................................................... 55 Print Or Export On File ............................................................................. 56 Microsoft Word Document........................................................................ 57 Microsoft Excel Document........................................................................ 57 MS Graph Graph ....................................................................................... 57 Connect Report To Printer......................................................................... 57 One Printer Across The Application ......................................................... 59

P R O G R A M M I N G & U T I L I T I E S G U I D E
S U M M A R Y - I I I
One Printer Connected To One Procedure And One Workstation.............60 One Printer Connected To One Procedure And One Company.................60 One Printer Connected To One Company, One Workstation And One User...................................................................................................................61
User Management................................................................... 63
5.1 User Management in MS Visual FoxPro........................................63
5.2 Selecting The User ........................................................................63
5.3 The Login Dialog Window CP_LOGIN.........................................64
5.4 User Administration ......................................................................68
5.5 Access Definition ..........................................................................71 5.5.1 Security Administration ....................................................................73
5.6 Managing Post-IN Messages .........................................................74
5.7 Users And Groups Files.................................................................75 5.7.1 Users Table........................................................................................75 5.7.2 Group Table.......................................................................................76 5.7.3 User/ Groups Table ...........................................................................77
System Routines...................................................................... 79
6.1 Introduction...................................................................................79
6.2 System Routines For MS Visual FoxPro........................................79 6.2.1 cp_AskProg .......................................................................................80 6.2.2 cp_AskTableProg ..............................................................................81 6.2.3 cp_BuildWhere..................................................................................82 6.2.4 cp_ChangeAzi ...................................................................................83 6.2.5 cp_ChangeUser .................................................................................83 6.2.6 cp_Class ............................................................................................84 6.2.7 cp_CreateAzi .....................................................................................85

P R O G R A M M I N G & U T I L I T I E S G U I D E
S U M M A R Y - I V
6.2.8 cp_Dbinst .......................................................................................... 86 6.2.9 cp_DeleteAzi .................................................................................... 87 6.2.10 cp_ErrorMsg ..................................................................................... 87 6.2.11 cp_ExistAzi....................................................................................... 88 6.2.12 cp_Exprt............................................................................................ 89 6.2.13 cp_GetProg ....................................................................................... 90 6.2.14 cp_info .............................................................................................. 91 6.2.15 cp_Msg ............................................................................................. 93 6.2.16 cp_NextProg ..................................................................................... 93 6.2.17 cp_NextTableProg ............................................................................ 94 6.2.18 cp_NullValue.................................................................................... 95 6.2.19 cp_szoom .......................................................................................... 96 6.2.20 cp_ToStr ........................................................................................... 97 6.2.21 cp_YesNo ......................................................................................... 98 6.2.22 GetCtrl .............................................................................................. 98 6.2.23 LookTab............................................................................................ 99
System Variables .................................................................. 101
7.1 System Variables for MS Visual FoxPro......................................101 7.1.1 Global Variables ............................................................................. 101
i_datsys .................................................................................................... 101 i_codute ................................................................................................... 102 i_codazi ................................................................................................... 102
7.1.2 cTrsName Variable ......................................................................... 102 7.1.3 The i_cSuperPwd Variable ............................................................. 102 7.1.4 The i_cBmpPath Variable............................................................... 103 7.1.5 The i_cStdIcon Variable ................................................................. 103 7.1.6 The i_demolimits Variable ............................................................. 103 7.1.7 The i_TableProp Variable............................................................... 104 7.1.8 The i_ServerConn Variable ............................................................ 104

P R O G R A M M I N G & U T I L I T I E S G U I D E
S U M M A R Y - V
7.1.9 The i_CpDic Variable .....................................................................105 7.1.10 The CP_PATH Variable..................................................................105 7.1.11 The CP_DBTYPE Variable.............................................................105 7.1.12 The CP_ODBCCONN Variable......................................................106
Managing AutoNumber Values ........................................... 107
8.1 Managing AutoNumber Values in MS Visual FoxPro..................107 8.1.1 Introduction .....................................................................................107 8.1.2 AutoNumber Values........................................................................108
Advanced Options................................................................. 111
9.1 Module Management...................................................................111
9.2 Multilanguage Management ........................................................116 9.2.1 Implementation................................................................................119 9.2.2 Technical Notes...............................................................................121
Changing The Database ....................................................... 123
10.1 MS Visual FoxPro Databases .....................................................123 10.1.1 From Visual Fox Pro to Jet .............................................................124 10.1.2 From Visual Fox Pro to SQL Server ...............................................131


P R O G R A M M I N G & U T I L I T I E S G U I D E
U S E R I N T E R F A C E 1
Chapter 1
User Interface
1.1 Introduction
This chapter describes the functionalities of CODEPAINTER REVOLUTION User Interface.
1.2 Client/Server User Interface For MS Visual FoxPro
Let us now examine the user interface for Client/Server applications developed in MS Visual FoxPro.

P R O G R A M M I N G & U T I L I T I E S G U I D E
2 U S E R I N T E R F A C E
1.2.1 The Main Menu
The main menu of your running application shows the items you defined during the Desing Phase. If the items are more than those fitting on one line the items are displayed on as many lines as required. Opening these items the designed procedures are executed. To open an item on the toolbar you can either click the desidered item or press <Alt> and the underlined letter. Each application also has the 'Utility' menu containing basic functionalities that will be explained in this reference guide.
Opening the desidered item on the menu the corresonding procedure is executed. Procedures are always opened in the 'Query' mode. You can change into the 'Load' mode pressing <F4> and into the 'Change' mode pressing <F3>, or clicking on the corresponding icon on the second toolbar.
1.2.2 The Toolbar
The application's default toolbar is under the main menu. You can move it anywhere on the screen. Positioning the mouse on any icon and waiting a few seconds, the corresponding tooltip is displayed. The toolbar functionalities can be also accessed using Function Keys.
Function Keys
The following table shows the toolbar button functionalities and the corresponding functional keys.

P R O G R A M M I N G & U T I L I T I E S G U I D E
U S E R I N T E R F A C E 3
Button Functional Key Action
Load <F4> To input a new record
Query Starting mode To read a file
Change <F3> To change the selected record
Filter <F12> To search a record in the table
Delete <F5> To delete the selected record
Zoom <F9> To zoom on the table
Previous record <F7> To go to the previous record
Next record <F8> To go to the next reord
Page Up <Page up> To scroll up a page
Page down <Page Down> To scroll down a page
Exit <Esc> To exit the open procedure
Save <F10> To save the curent record
1.2.3 The Utility Menu
The 'Utility' menu has a set of functionalities that allow interacting with the application.
The menu items are:

P R O G R A M M I N G & U T I L I T I E S G U I D E
4 U S E R I N T E R F A C E
Database Administration
The 'Database Administration' functionality allows checking and re-alligning the database and the application design. When the application is run this funtionality is automatically started and discrepancies identified.
Clicking the 'Update Database' button the re-allignement procedure is launched, a small window displaying the executed SQL instructions is shown, and all selected tables are up-dated.
The 'Check Links' button verifies the user defined 'ODBC' connections.
The 'Change' button allows to manually configure table options. The 'Sel.all' button selects all tables in the dialog window.

P R O G R A M M I N G & U T I L I T I E S G U I D E
U S E R I N T E R F A C E 5
For more information please refer to chapter 2 'Client/Server File Management'.
Query Painter
The Query Painter is a powerful query and multifile reporting tool that deeply exploits the SQL language and works in a Client/Server environment. It replaces all tools that have been used so far guaranteeing independence and versatility. Using the Query Painter you can define multifile queries that can be called from within the application. Data can be extracted (routine procedures), displayed (Visual Zoom), or processed through advanced reporting functionalities. The end result is not code to be compiled, but complex SQL sentences that are components of the host application. These sentences can be changed or implemented as required, delivering a high level of flexibility.
The Query Painter is highly integrated with the application's Data Dictionary to guide the experienced user through complex queries without the need of deeply knowing the application's structure. This renders this powerful tool ease to use.
For more information please refer to the 'Visual Tool Guide' chapter 2 'Query Painter'.

P R O G R A M M I N G & U T I L I T I E S G U I D E
6 U S E R I N T E R F A C E
Dialog Window Painter
The Dialog Window Painter deeply exploits Object-Oriented Programming, integrating the Query Painter and allowing to create interpreted dialog windows, i.e selection windows that are not hard coded.
For more information please refer to the 'Visual Tools Guide' chapter 3 'Dialog Window Painter'.
Zoom Painter
The 'Zoom Painter' deeply exploits object oriented technology. It integrates the 'Query Painter' allowing to create interpreted zooms on multifile queries.
Visual Zooms can be integrated in applications and can be launched from a button object or directly from the menu.

P R O G R A M M I N G & U T I L I T I E S G U I D E
U S E R I N T E R F A C E 7
Visual Zoom Configuration
Visual Zooms are used as autozoom as well as link to zoom on other tables. Visual Zooms allow configuring any kind of query on a given table easily and within a short time.

P R O G R A M M I N G & U T I L I T I E S G U I D E
8 U S E R I N T E R F A C E
Let us now analyze the various Zoom Painter sections.
Display Area
The 'Display' area is highly customizable and can be configured easily. Defaulted records are organized in titled columns. You can change the size of this area so that you can display variable fields and add fixed fields ('Opt.' button).

P R O G R A M M I N G & U T I L I T I E S G U I D E
U S E R I N T E R F A C E 9
Right click the column title to open the 'Column Title' window.
'Field Name' contains the name of the reference field and cannot be changed. In the 'Title' field you can define the description string for the column title or the field name if the field is in a fixed position.
The 'Format' field contains the picture of the field. Please refer to Visual FoxPro manuals for the list of pictures available.

P R O G R A M M I N G & U T I L I T I E S G U I D E
1 0 U S E R I N T E R F A C E
The 'Height' and 'Width' fields define the field dimension in pixel. The fields 'Text Color' and 'Background Color' define the column colors using the MS Visual FoxPro functionality RGB(). You can also add logical conditions or expressions accepted by the Visual FoxPro language.
Configuration Area
The 'Configuration' area is activated clicking the 'Options' button. In this area you can define zoom parameters.
The 'Configuration' area is divided in five tab-strips, namely 'Selection', 'Order By', 'Fields', 'SQL', and 'File'. In the first three you can define charcteristics of the SQL sentence. In the 'SQL' tab-strip you can check the SQL sentence you are building. Clicking the 'Query File' button you can select an existing query to be associated to the zoom. In the 'File' tab-strip you can save the defined paramenters in the zoom or create/ modify a report.
Changes to the zoom can be checked immediately. Clicking the 'Query' button (next to the 'Options' button) the query is executed basing on current parameters.

P R O G R A M M I N G & U T I L I T I E S G U I D E
U S E R I N T E R F A C E 1 1
Select
In the 'Select' tab-strip you can define query expressions and/or further record selection parameters. Complex multiparameter query expressions can be defined using the operators in the second column, or the boolean operator 'OR'.
Fields are dragged&dropped from selection columns in the 'Display' area. The comparison operator is selected double clicking the desidered one in the second column, or dragging it on the selected field. To select the boolean operator click the 'OR' button.
Order By
In the 'Order By' tab-strip you can define the field order simply dragging&dropping fields from the selection columns in the 'Display' area. By default fields are ordered in ascending order. Double clicking the field the order changes to descending.
The 'Delete' button allows deleting fields from the 'Order By' list.
Fields
The 'Fields' tab-strip displays the list of fields that are displayed in the 'Display' area. The right column displays excluded fields. Fields can be moved clicking the '<<' or '>>' buttons.

P R O G R A M M I N G & U T I L I T I E S G U I D E
1 2 U S E R I N T E R F A C E
SQL
The 'SQL' tab-strip contains the SQL sentence defined for displaying extracted data. Associating a Visual Query to the zoom 'WHERE' clause is replaced by the query name.
Clicking the 'Query File' button you can select an existing Visual Query (*.VQR). You can also edit the SQL sentence activating the 'Edit SQL Sentence' flag and make manual changes.
File
In the 'File' tab-strip you can either save the parameters defined in the zoom or create/ modify a report.
P R O G R A M M I N G & U T I L I T I E S G U I D E
U S E R I N T E R F A C E 1 3
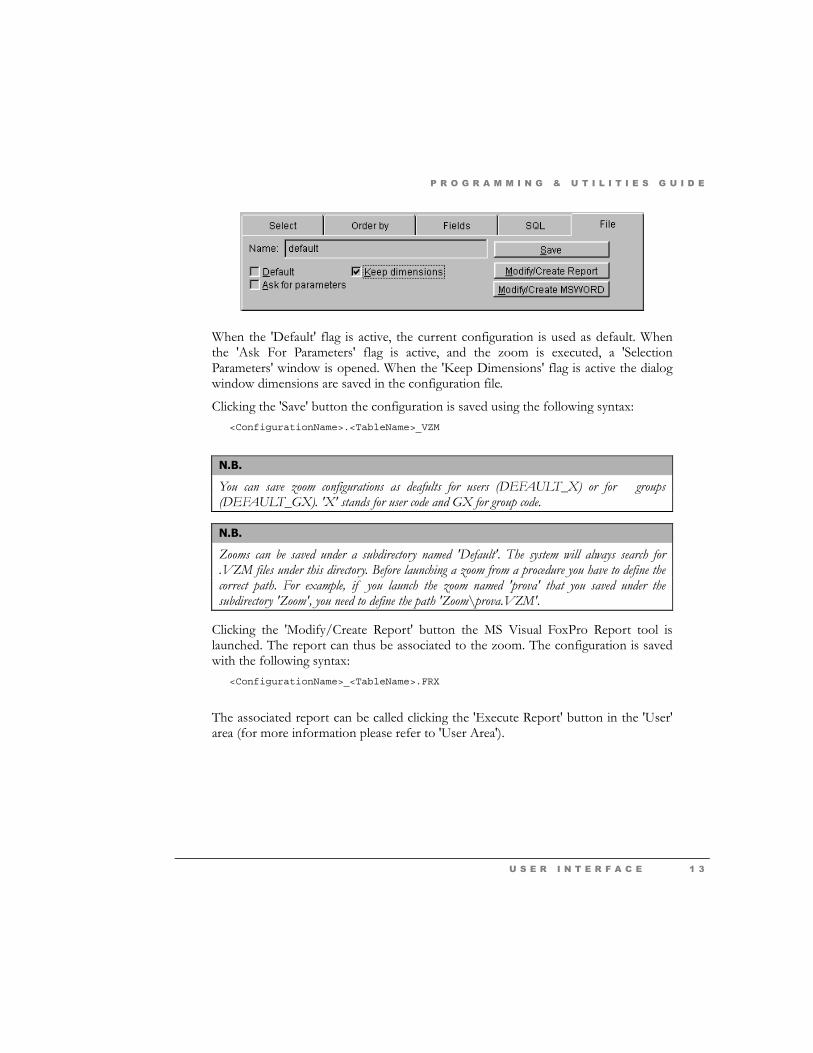
When the 'Default' flag is active, the current configuration is used as default. When the 'Ask For Parameters' flag is active, and the zoom is executed, a 'Selection Parameters' window is opened. When the 'Keep Dimensions' flag is active the dialog window dimensions are saved in the configuration file.
Clicking the 'Save' button the configuration is saved using the following syntax: <ConfigurationName>.<TableName>_VZM
N.B.
You can save zoom configurations as deafults for users (DEFAULT_X) or for groups (DEFAULT_GX). 'X' stands for user code and GX for group code.
N.B.
Zooms can be saved under a subdirectory named 'Default'. The system will always search for .VZM files under this directory. Before launching a zoom from a procedure you have to define the correct path. For example, if you launch the zoom named 'prova' that you saved under the subdirectory 'Zoom', you need to define the path 'Zoom\prova.VZM'.
Clicking the 'Modify/Create Report' button the MS Visual FoxPro Report tool is launched. The report can thus be associated to the zoom. The configuration is saved with the following syntax:
<ConfigurationName>_<TableName>.FRX
The associated report can be called clicking the 'Execute Report' button in the 'User' area (for more information please refer to 'User Area').

P R O G R A M M I N G & U T I L I T I E S G U I D E
1 4 U S E R I N T E R F A C E
Clicking the 'Create/Modify MS Word' button MS Word is opened and a model is created (<ConfigurationName>_<TableName>.DOC) on which extracted data is merged. The model can be changed basing on customer requirements, i.e. letters, envelops, labels, etc.
The database supporting the mailmerge (__WORD__.DBF e FPT) is saved in the temporary Windows directory (TEMP=C:\WINDOWS\TEMP).
Clicking the 'MSWord' button in the application opens the model <ConfigurationName><TableName>.DOC ed that will execute the data mailmerge creating the file CATHALOG1.DOC. You can also change the mailmerge model selecting one from the mailmerge pick-list (e.g. e-mail).
User Area
The 'User Area' on top of the tab-strips has a set of buttons that help you interacting with the zoom. Each button has a tooltip that helps you understanding its use.

P R O G R A M M I N G & U T I L I T I E S G U I D E
U S E R I N T E R F A C E 1 5
Ask For Parameters
The 'Ask For Parameters' button launches a selection dialog window. This window is created basing on parameters defined in the 'Selection' tab-strip. If no parameters have been defined a warning message appears.
Settings
Clicking the 'Settings' button you can select an existing configuration file.
Execute Report
Clicking the 'Execute Report' button a dialog window is opened in order to select the device on which the report must be run.
For further information please refer to Chapter 5 'Printer Management'.
Recalculate Report
Left clicking the 'Recalculate Report' button the last query is re-executed. Right clicking the button, configuration paramenters are cleared.
For more information please refer to the 'Visual Tools Guide' chapter 4 'Zoom Painter'.

P R O G R A M M I N G & U T I L I T I E S G U I D E
1 6 U S E R I N T E R F A C E
Menu Painter
Using the 'Menu Painter' you can customize menus at user level by simply designing the menu structure. Basing on the default menu you can change the menu order, limit or deny access to certain functionalities, or create custom configurations.
Menu Treeview
The application main menu can be treeviewed pressing <CTRL> and <T>:

P R O G R A M M I N G & U T I L I T I E S G U I D E
U S E R I N T E R F A C E 1 7
The menu structure reflects the project Design. The 'Default' menu can be changed using the 'Menu Painter'.
If a background image has been defined for the application, the image will be moved to the right so to display it next to the Treeview. The Treeview window can be resized. In this latter case the image will be moved back to the original position.
You can access the application procedures directly from the treeview. This makes generated application user friendly.
The treeview root is defined as 'Main Menu'. Under the root there are as many folders (branches) as application procedures. To open the folders you need to click them. You can close the detail clicking them again.
To start procedures you need to select the corresponding icon and double click the description. Browsing the application becomes thus easy.
N. B.
If you exit the application leaving the Menu treeview open, the next time you run the application the Treeview window is automatically displayed.
For more information please refer to the 'Visual Tool Guide' chapter 5 'Menu Painter'.

P R O G R A M M I N G & U T I L I T I E S G U I D E
1 8 U S E R I N T E R F A C E
User And Group Administration
The 'User And Group Administration' functionality allows defining users and groups, which are at the basis of access and security control. The User/ Groups table is also used to send 'Post-IN' messages between users.
For more information please refer to Chapter 6 'User Management'.
Security Administration
Using the 'Security Administration' functionality the System Administrator can define which user groups can access specific procedures and also the access level: Query, Load, Change or Delete.

P R O G R A M M I N G & U T I L I T I E S G U I D E
U S E R I N T E R F A C E 1 9
The 'Security Administration' functionality can be also accessed pressing <ALT> and <F12> and is protected by password. The default password is 'CodePainter'. Opening the 'Security Administration' option on an active dialog window you can define advanced security levels on the opened zoom.
For more information please refer to Chapter 6 - 'User Management'.

P R O G R A M M I N G & U T I L I T I E S G U I D E
2 0 U S E R I N T E R F A C E
Table Administration For Autonumbered Variables
The 'Table Administration For Autonumbered Variables' option allows managing accrued autonumbered values. On the left side of the dialog window corresponding the list of autonumbered values you defined during the Design phase is displayed. On the right there is the accrued value.
For more information please refer to Chapter 9 'Autonumbering Management'.
1.2.4 The Application Bar And Post-INs
The 'Application' bar allows to add messages ('Post-INs) to records or to send messages between users. The following table details the 'Application Bar functionalities.

P R O G R A M M I N G & U T I L I T I E S G U I D E
U S E R I N T E R F A C E 2 1
Button Name Meaning
Post-IN To create new Post-INs
Post-IN Folder To open the user's Post-IN folder.
Check Mail To check incoming mail (Post-IN)
Users To send messages between users (Post-IN)
Post-IN Contents
Post-IN can contain:
• Text
• Procedures
• File Attachments
Single Post-INs can have one or more of these elements. To attach records or files into Post-INs you need to drag and drop then into the Post-IN. Records cannot be attached if you are in 'Query' mode.
The record name is displayed in the Post-IN body. In the Post-IN footer a button is displayed from which the procedure can be directly launched.
Post-IN Attachments

P R O G R A M M I N G & U T I L I T I E S G U I D E
2 2 U S E R I N T E R F A C E
A wide range of file types can be attached to Post-INs, namely images (.EMF, .BMP e .JPG), documents (.TXT, .DOC, .HTM, .HTML, .XLS, .XLT), queries (.VQR), films (.AVI) and 'URL' (Uniform Resource Locator) address.
N.B.
Post-IN as attachements can be used only with MS Visual FoxPro version 6.x. Previous versions do not support this functionality.
To attach files to Post-INs you simply need to open the 'Resources Management' window, select the file icon, drag and drop it in the Post-IN.
To attach 'URL' addresses you need to drag and drop the address from the Browser address bar into the Post-IN.
Attachments are displayed in the Post-IN header and the footer details the file name.
The attachment can be opened double cliking on the icon. Basing on the file extention the system will open the file using the associated application. You can also rename the file right clicking the file name. You can delete the file selecting it and clicking the 'Delete' button on the toolbar.
To add plain text to the Post-IN select the desidered text, drag and drop it in the Post-IN body.
Using Post-INs
Post-INs can be implemented within the application in different ways, namely:

P R O G R A M M I N G & U T I L I T I E S G U I D E
U S E R I N T E R F A C E 2 3
• Notes
• Integrated Warnings
• Non Integrated Warnings
• Messagges
Post-INs can be used to 'glue' notes on the screen. These notes can be left on the desktop or filed (please refer to the 'Post-IN File' paragraph).
Post-INs can be used to add warning messages to records. Messages will be displayed every time the record is selected. Warnings can be integrated or not integrated.
To attach non-integrated Warnings you need to drag and drop the Post-IN in the selected record. The 'Warning Added' message appears confirming the attachment. The Post-IN is strictly linked to the records and to display it you need to open the record either from the procedure or through a link. Post-INs as warnings can be used to advise users that specific warehouse items are becoming obsolete and no new stock will thus be produced/ordered.
Post-IN Warnings can be integrated in the procedure setting the 'Integrated In Form' flag in the Post-IN Properties' window. The dialog window is opened clicking the 'Change' button. The Post-IN will be integrated in the procedure as a new folder. You can also define the nane of the new folder defining the 'Page Name' field.

P R O G R A M M I N G & U T I L I T I E S G U I D E
2 4 U S E R I N T E R F A C E
Post-INs can be used to send messages between users. To send a message to another user, open the 'Utility Menu' and select the 'User Administration' option. Write the message in the Post-IN, drag and drop the message on the desidered user. A message appears asking you to confirm the sending of the message. The message is cancelled from your desktop. The adresee receives the message straight away, but it is not displayed. Indeed incoming mail is checked every ten minutes and the 'Check Mail' button changes, displaying a flag. The user can force the checking clicking the 'Check Mail' button. The Post-In is displayed on the receiver desktop.
Post-IN Properties
Open a Post-IN and click the 'Change' button or press <F3> to open the Post-IN Properties window.

P R O G R A M M I N G & U T I L I T I E S G U I D E
U S E R I N T E R F A C E 2 5
It Appears From
In this field define the start date from which the Post-IN must be displayed.
Till In this field define the end date until the Post-IN must be displayed.
Created By
This field displayes the code of the user that has defined the Post-IN. The field is display only.
Addressee
This field dispalyes the code of the user to whom the Post-IN is addressed. The field is display only.
It Appears In Links (Warning Only) This flag allows displaying the Post-IN when the record is selected from a link. This means for example that the warning has been defined in 'Items'. When users input order forms and select the given item, the associated warning is displayed.
Integrated In Form (Warning Only)

P R O G R A M M I N G & U T I L I T I E S G U I D E
2 6 U S E R I N T E R F A C E
This flag allows displaying the Post-IN is the procedure as additional folder of the associated record.
Page Name
This field is displayed only when the 'Integrated In Form' flag is selected. In this field you can define the name of the additional page. If no name is defined the default name 'Enclosures' is used.
Background Color This field allows changing the Post-IN background color. The default color is yellow.
Post-IN Folder
The 'Post-IN Folder' contains all Post-INs saved by the user. To save Post-INs simply close the Post-IN window. To edit saved Post-INs, open the 'Post-IN Folder' and double click the desired Post-IN. You can also delete Post-INs selecting one or more and clicking the 'Delete' button on the toolbar.
Check Mail
The Check Mail button allows accessing incoming mail. When a new message has arrived the icon displays a flag and the message 'Incoming Mail' appears on the receiver's desktop. To read new messages simply click the icon.
1.2.5 Application Name, Version, Dimension and Date
General Information on the generated SW application can be accessed pressing <Alt> and <F11>.

P R O G R A M M I N G & U T I L I T I E S G U I D E
U S E R I N T E R F A C E 2 7
The opened dialog window displays default information on the application Name, Version, Dimension and Date. You can customize the window creating a dedicated dialog window. For more information please refer to the 'Client/Server System Routines - CP_INFO.
1.2.6 Change The Application Background Bitmap
You can change the background bitmap image saving the desidered file as PROG.BMP under the main application directory or under the subdirectory EXE for large applications.
1.2.7 Dialog Window Background
You can change the background of dialog windows saving the desidered files under ther previously created directory BMP or EXE for large applications.
Images are added to dialog windows starting from the window's coordinates 0,0, i.e. from top left.

P R O G R A M M I N G & U T I L I T I E S G U I D E
2 8 U S E R I N T E R F A C E
You can associate one picture to all dialog windows or more pictures to different dialog windows.
Same Background For All Dialog Windows
Save the desired file as DEFAULT.BMP under the BMP directory (or EXE for large applications). All dialog windows will have the same background.

P R O G R A M M I N G & U T I L I T I E S G U I D E
U S E R I N T E R F A C E 2 9
Different Backgrounds for Different Dialog Windows
Save the desired images under the BMP directory (or EXE for large applications). The name of the file should have the following syntax: <ProcedureName>.BMP.


P R O G R A M M I N G & U T I L I T I E S G U I D E
F I L E M A N A G E M E N T 3 1
Chapter 2
File Management
2.1 Introduction
CODEPAINTER REVOLUTION Client Server environment makes tables management transparent to the SW developer (including triggers and stored procedures). This chapter analyzes File Management in MS Visual FoxPro Client/Server.

P R O G R A M M I N G & U T I L I T I E S G U I D E
3 2 F I L E M A N A G E M E N T
2.2 File Management
2.2.1 Tables And Links Management
When the generated application is run for the first time physical tables, their triggers and stored procedures are created during the connection to the database. The 'Update Database' functionality must be executed so that the system can check the existence of all tables and can perform the realignment procedure between tables and the application Design, if required.
N.B.
If you are using either the database Oracle or SQL Server the access to administration procedures are allowed only to users that have the appropriate security level.

P R O G R A M M I N G & U T I L I T I E S G U I D E
F I L E M A N A G E M E N T 3 3
Database Administration
To access the 'Database Administration' functionality run your application, open the 'Utility' menu and select the 'Database Administration' option. The option's main task is to realign the databases with the Design. The functionality is automatically executed when the application is run and discrepancies found.
Clicking the 'Update Database' button the re-alignment is executed on the selected tables. You can select all tables pushing the 'Sel.All' button. The database structure as well as indexes, triggers and stored procedures are updated.
The 'Check Links' button checks connections to all servers declared in the application.
N.B.
If you are using either the database Oracle or SQL Server the access to administration procedures are allowed only to users that have the appropriate security level.
Managing Installation Procedures For Applications (CP_INST)
For managing installation you need a procedure for end-users on how to modify or create new configurations. The procedure must be named CP_INST.PRG and must be added in the project. The procedure must return a boolean value. If the value is TRUE the database creation can continue, if not the database is not created.
Connection to more Server
SW Applications generated with CODEPAINTER REVOLUTION can use tables stored on more servers.
N.B.
If you are using either the database Oracle or SQL Server the access to administration procedures are allowed only to users that have the appropriate security level.
The 'Database Administration' routine allows defining on which servers the tables are stored.

P R O G R A M M I N G & U T I L I T I E S G U I D E
3 4 F I L E M A N A G E M E N T
To define the servers you need to click the 'Server button'. The current dialog window is expanded.
Click the 'New' button. The 'Server Set Up' window is opened.

P R O G R A M M I N G & U T I L I T I E S G U I D E
F I L E M A N A G E M E N T 3 5
In the 'Name' field type the name of the Server. In the 'Descr.' field define the Server description.
The 'ODBC' combobox lists all available connection for that machine. For more information please refer to the 'ODBC Administrator' manual.
The 'Type' combobox lists all certified database types. Once you select the connection, the 'type' is automatically defined.
The two flags at the bottom of the dialog window define when the connection must be started (at program start up or when the data is asked from the server) and if Post-IN management must be executed from the database to which you are connecting.
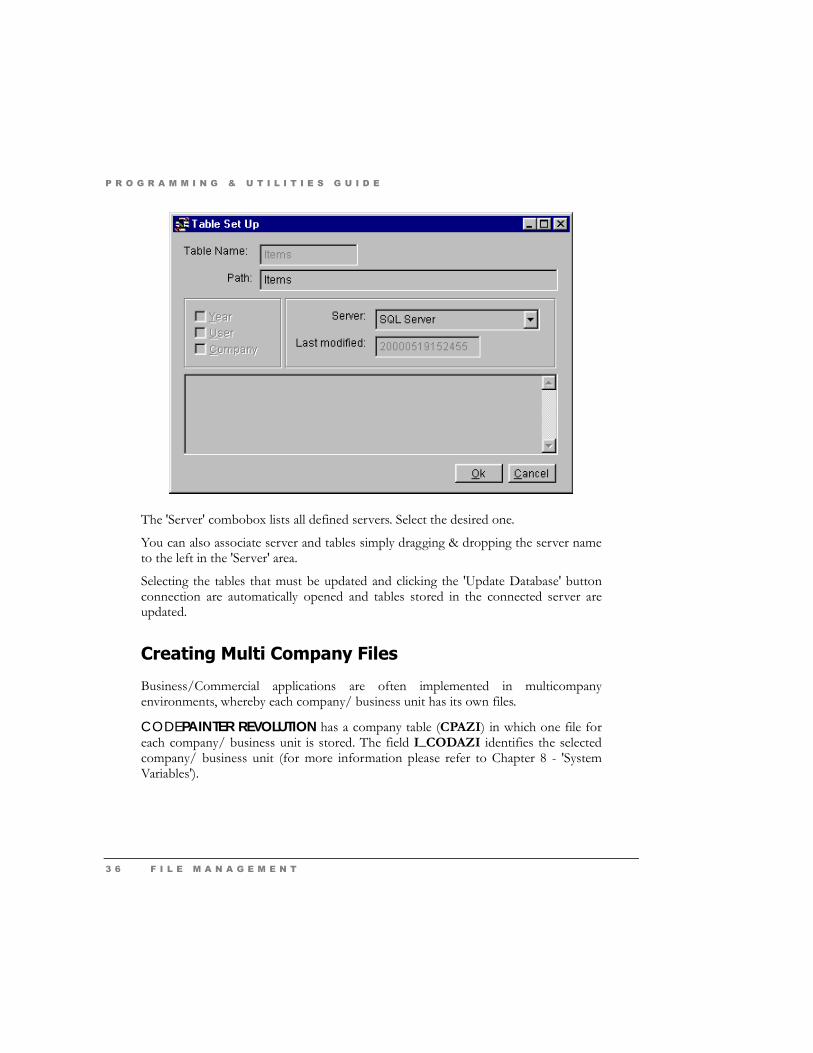
Once the server has been set up you need to define the tables that are stored on the server. Double click the desired table or select the table and click the 'Change' button. The 'Table Set Up' window is opened.
P R O G R A M M I N G & U T I L I T I E S G U I D E
3 6 F I L E M A N A G E M E N T
The 'Server' combobox lists all defined servers. Select the desired one.
You can also associate server and tables simply dragging & dropping the server name to the left in the 'Server' area.
Selecting the tables that must be updated and clicking the 'Update Database' button connection are automatically opened and tables stored in the connected server are updated.
Creating Multi Company Files
Business/Commercial applications are often implemented in multicompany environments, whereby each company/ business unit has its own files.
CODEPAINTER REVOLUTION has a company table (CPAZI) in which one file for each company/ business unit is stored. The field I_CODAZI identifies the selected company/ business unit (for more information please refer to Chapter 8 - 'System Variables').

P R O G R A M M I N G & U T I L I T I E S G U I D E
F I L E M A N A G E M E N T 3 7
The company code is read from the company table and is used as part of the physical name of generated files. In the 'Design' phase you therefore need to define which tables have multicompany features activating the 'Company Name' flag and including three dedicated characters 'XXX' after the application name. When the application is run you need to select the desired company.
N.B:
The company code must be defined after the physical name, because during the execution of the Database Administration option these characters are automatically replaced by the company code.
Example
De f ine two compan ies ' Company1 ' and ' Company2 ' i n the company f i l e . Name the I tem f i l e as ' I temsXXX ' . Dur i ng the 'Database Admin is t r a t ion ' phase the tab l es ' I temsCompany1 ' and ' I temsCompany2 ' w i l l be managed .

P R O G R A M M I N G & U T I L I T I E S G U I D E
3 8 F I L E M A N A G E M E N T
Company Tables can be managed, i.e. created, selected, deleted using system routines:
Routine Description
CP_CREATEAZI Create Company
CP_CHANGEAZI Select Company
CP_DELETEAZI Delete Company
CP_EXISTAZI Company Existence
For more information please refer to chapter 7 - 'System Routines'.
These routine procedures are the basis for developing dialog window for managing the defined companies. Indeed you need to develop dialog windows that allow creating, deleting or changing companies using these routine procedures.
Define a dialog window having the following variables:
P R O G R A M M I N G & U T I L I T I E S G U I D E
F I L E M A N A G E M E N T 3 9
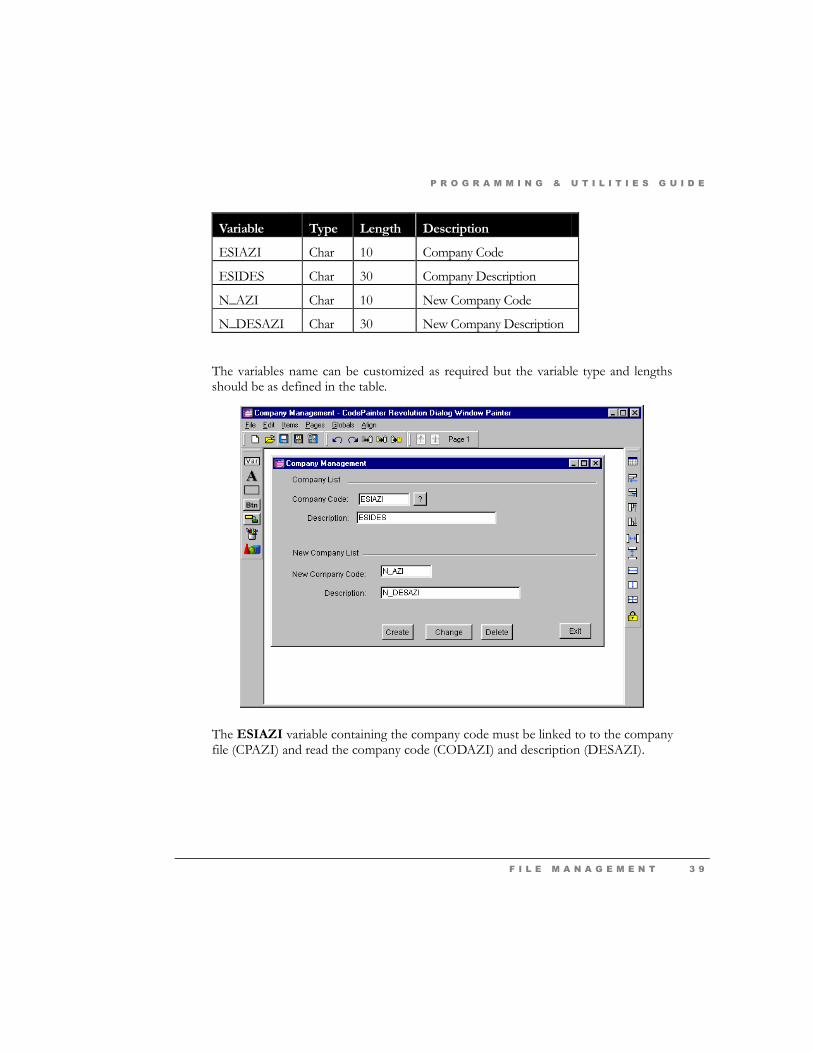
Variable Type Length Description
ESIAZI Char 10 Company Code
ESIDES Char 30 Company Description
N_AZI Char 10 New Company Code
N_DESAZI Char 30 New Company Description
The variables name can be customized as required but the variable type and lengths should be as defined in the table.
The ESIAZI variable containing the company code must be linked to to the company file (CPAZI) and read the company code (CODAZI) and description (DESAZI).

P R O G R A M M I N G & U T I L I T I E S G U I D E
4 0 F I L E M A N A G E M E N T
N.B.
The 'CPAZI' table and its fields 'CODAZI' and 'DESAZI' cannot be selected from the pick-list, because they are system tables and fields. Defining the link table you need to manually type these values.
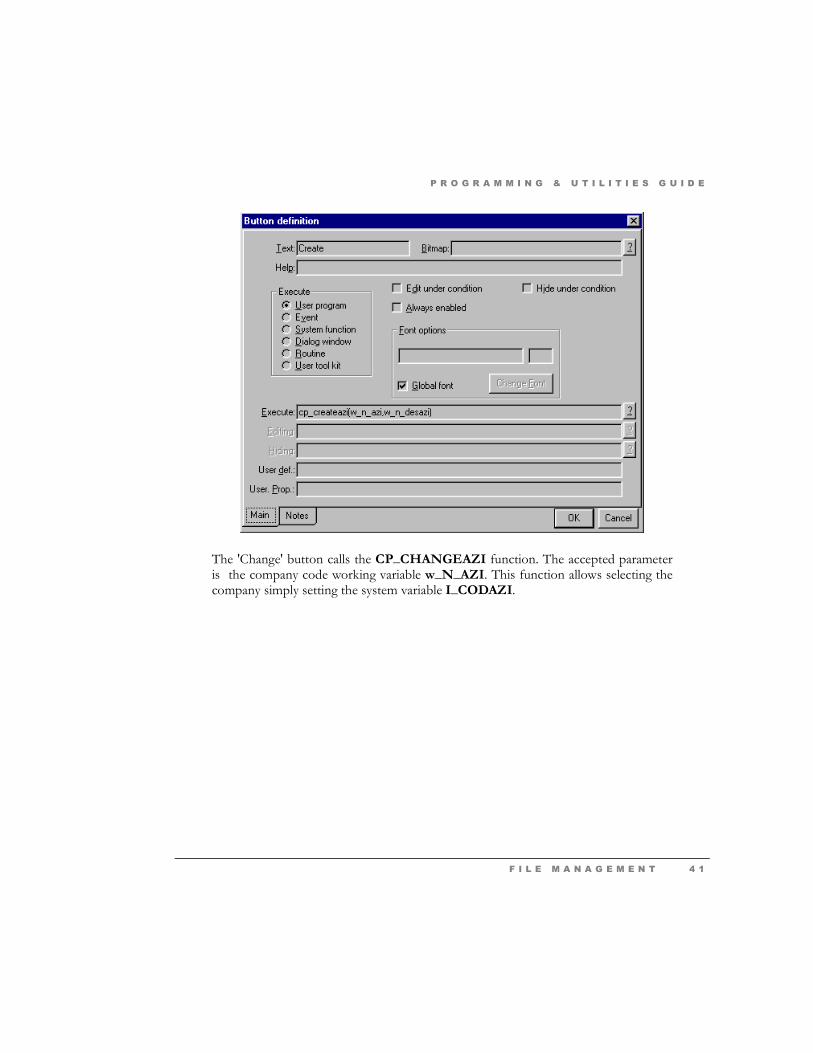
The '?' button defined next to the variable w_ESIAZI allows zooming on existing companies using the 'ZoomPrev' function. The variables w_N_AZI and w_N_DESAZI contain the code and description of the new company that can be created. These new values are passed on to CP_CREATEAZI, which is called from the 'Create' button to create all required multicompany tables for the selected company.
P R O G R A M M I N G & U T I L I T I E S G U I D E
F I L E M A N A G E M E N T 4 1
The 'Change' button calls the CP_CHANGEAZI function. The accepted parameter is the company code working variable w_N_AZI. This function allows selecting the company simply setting the system variable I_CODAZI.

P R O G R A M M I N G & U T I L I T I E S G U I D E
4 2 F I L E M A N A G E M E N T
The 'Delete' button calls the CP_DELETEAZI function. Its parameter is the company code (w_N_AZI). This function allows deleting all multicompany files related to the selected company.

P R O G R A M M I N G & U T I L I T I E S G U I D E
F I L E M A N A G E M E N T 4 3
The 'Exit' button calls the system function 'Quit' that allows closing the dialog window.

P R O G R A M M I N G & U T I L I T I E S G U I D E
4 4 F I L E M A N A G E M E N T
Company, User And Group Tables
Let us now analyze system tables for companies, users and groups. These tables cannot be directly accessed from pick-lists in the various Painters. Nevertheless you can read them defining the values in the Link Table of the codify phase.

P R O G R A M M I N G & U T I L I T I E S G U I D E
F I L E M A N A G E M E N T 4 5
Defining the link you need to type these values correctly and set the same type and lengths for the variables that receive the value (e.g. the variable w_DESAZI has the same type and lengths as DESAZI).
The company table CPAZI containing companies created in the application has the following format:
Field Type Lengths Description
CODAZI Char 10 Company Code (Primary Key)
DESAZI Char 30 Company Description
The user table CPUSERS containing the users defined in the application has the following format:

P R O G R A M M I N G & U T I L I T I E S G U I D E
4 6 F I L E M A N A G E M E N T
Field Type Lengths Description
CODE Num 4 User Code (Primary Key)
NAME Char 20 User Description
PASSWD Char 20 Crypted Password
The CPGROUPS table containing the groups defined in the application has the following format:
Field Type Lengths Description
CODE Num 4 Group Code (Primary Key)
NAME Char 20 Group Description
Updating An Existing Database
Note on databases installed at your customers' site in Client/Server environments:
This kind of database is active and therefore purposes must entail all calls to 'Triggers' and 'Stored Procedures' for proper management. Each time the database is updated 'Triggers' and 'Stored Procedures' are verified and re-generated within the active database basing on the extended application data dictionary (.XDC).
This means that in order to update an existing database in which the files have changed or new tables must be added you simply need to bring along to your customer the file <DesignName>.XDC. Once the file has been copied you need to execute the 'Database Administration' from the application's 'Utility' menu. The database is automatically updated and data is realigned.
In MS Visual Foxpro 5.x 'Stored Procedures' can be saved either in the database or in an external procedure. If you use CODEPAINTER REVOLUTION on MS Visual Foxpro 5.x 'Stored Procedures' are saved in an external procedure (CP_DBPRC.PRG). This procedure is automatically re-generated and re-compiled when the 'Database Administration' option is executed.

P R O G R A M M I N G & U T I L I T I E S G U I D E
F I L E M A N A G E M E N T 4 7
In this latter case you need to bring along to your customer the new extended dictionary (.XDC) as well as the new file CP_DBPRC.FXP, which must be copied in the installation directory. The database and the rules can thus be realigned to the changes made.


P R O G R A M M I N G & U T I L I T I E S G U I D E
M E N U M A N A G E M E N T 4 9
Chapter 3
Menu Management
3.1 Introduction
Menus of applications generated with CODEPAINTER REVOLUTION can be maintained using MS FoxPro for Windows 2.x or Microsoft Visual FoxPro 5.x.
The routine managing menus makes the environment ready basing on a .DBF database that contains required specifications (CP__MENU.DBF).
Using the Menu Painter you can change the menu layout and disactivate specific functionalieties at user level. For more information please refer to the 'Visual Tool Guide' chapter 5 'Menu Painter'.

P R O G R A M M I N G & U T I L I T I E S G U I D E
5 0 M E N U M A N A G E M E N T
3.2 The Menu File (.DBF). Field Type Length Description
OPT_NAME Character 40 Name of the Menu or Option
ACTION Numeric 1 Option Action
0 &= Menu
1 &= Procedure
2 &= Submenu
3 &= Submenu with show
9 &= Not Active
OPT_PROC Character 40 Name of Procedure or Menu that must be executed
TOT_OPT Numeric 2 Number of Options in the Procedure
ROW_NUM * Numeric 2 Number of Rows in the Menu
COL_NUM * Numeric 2 Number of Columns in the Menu
OPT_LEN * Numeric 2 Length of the Display Option
TITL_ACT * Character 1 Title Activation
0 &= Not Active
1 &= Active
XCOORD * Numeric 2 Column Coordinate of the Combobox
YCOORD * Numeric 2 Row Coordinate of the Combobox
ROW_SPC * Numeric 1 Line Spacing of the Box
COL_SPC * Numeric 1 Spacing between Columns
BACK_COL * Character 1 Box and Background Color
FORE_COL * Character 1 Color for Options
TITL_COL * Character 1 Color for Title
SHADOW * Character 1 Shading Activation

P R O G R A M M I N G & U T I L I T I E S G U I D E
M E N U M A N A G E M E N T 5 1
0 &= Not Active
1 &= Active
BOXED * Character 1 Box Type
0 &= No Box
1 &= Single
2 &= Double
3 &= Narrow
SEL_TYPE Character 2 Option Selection Type
SECLEVEL Numeric 2 Security Level


P R O G R A M M I N G & U T I L I T I E S G U I D E
P R I N T E R M A N A G E M E N T 5 3
Chapter 4
Printer Management
4.1 Introduction
This chapter describes the functionalities of CODEPAINTER REVOLUTION Printer System.
4.2 Printer Management
CODEPAINTER REVOLUTION has a dedicated subsystem for managing printers. This means that device configuration and printer characteristics can be checked. This subsystem further allows exporting data stored in the application to MS Word or MS Excel. This can be achieved using the 'Query Painter'.

P R O G R A M M I N G & U T I L I T I E S G U I D E
5 4 P R I N T E R M A N A G E M E N T
With CodePainter Printer Management System you can also associate different printers to different procedures. The printer is identified basing on company, user and workstation. For more information please refer to chapter 1 'User Interface', 'Connect Report To Printer'.
These functionalities mainly base on two system routines, namely CP_CHPRN.PRG and CPUSRREP.PRG and on the table CPUSRREP.DBF.
4.2.1 Printer Selection
The 'Printer Selection' window is managed by the system routine CP_CHPRN.PRG. The dialog window has a set of options to select the device, the print format and export to various formats. The two buttons in the window allow passing on extracted data to MS Word or MS Excel documents.
Visual Queries can be associated to reports created with MS Visual FoxPro report tool, or to MS Word mailmerge models. In both cases when the query is executed the window shown above is opened. Pressing <ALT> and <F12> the report associated to the query is re executed. If some buttons in the window are disactivated it means that either no report or no model have been defined. This option can be used only by system administrators. Let us now analyze the functionalities in more detail.

P R O G R A M M I N G & U T I L I T I E S G U I D E
P R I N T E R M A N A G E M E N T 5 5
Print Preview
The Print Preview functionality prints the report on the screen. The button is active only if the report has been associated to a query created with the Query Painter. The selected report is opened in the print preview window. You can scroll up or down using the Preview toolbar.
Send To Printer
The 'Send To Printer' button outputs the report to the printer. The button is active only if the report has been associated to a query created with the Query Painter. The output printer is defined in the 'Printer' area. The default printer is the one you use as predefined printer in other Microsoft applications. 'Clicking' the '...' button next to 'Printer' you can select the printer from the pick-list.
Send To Printer With Options
The 'Send To Printer With Option' button outputs the report to the selected printer. The button is active only if the report has been associated to a query created with the Query Painter. Clicking this button the 'Print' window is opened and you can define print options such as the print range, the number of copies, etc.

P R O G R A M M I N G & U T I L I T I E S G U I D E
5 6 P R I N T E R M A N A G E M E N T
Print Or Export On File
The 'Print Or Export On File' button outputs the report to a file or exports extracted data. The button is active only if the report has been associated to a query created with the Query Painter. In the 'Print On File' combobox you can select whether the report must be printed on a file (.TXT) or if extracted data must be exported to one of the following supported formats: DBF, SDF, DELIMITED.
Selecting the TXT option the report is send to a text file. The default file name is DEFA0<UserCode>.TXT.
Selecting the DBF option data is exported to the file specified in the 'File' area. The default file name is 'DEFAO<UserCode>.DBF'
Selecting the SDF option data is exported to the file specified in the 'File' area (the default file name is 'DEFAO<UserCode>.TXT'). The file format is text without separators.

P R O G R A M M I N G & U T I L I T I E S G U I D E
P R I N T E R M A N A G E M E N T 5 7
Selecting the DELIMITED option data is exported to the file specified in the 'File' area (the default file name is 'DEFAO<UserCode>.TXT'). The file format is text whereby single fields are divided by commas.
Microsoft Word Document
The 'Microsoft Word Document' button opens the mailmerge model for extracted data. The button is active only if the report model has been created using the Query Painter. For more information refer to the 'Visual Tool Guide' chapter 2 'Query Painter' 'Create/ Modify Mailmerge'.
Microsoft Excel Document
The 'Microsoft Excel Document' button opens a MS Excel worksheet containing all extracted data. The worksheet name is defined in the 'File' area. The default file name is DEFA0<UserCode>.XLS. The button is active only if the report model has been created using the Query Painter.
MS Graph Graph
The 'MS Graph Graph' button uses extracted data to create a graph. The graph name is specified in the query <QueryName>.VGR. The button is active only if the report model has been created using the Query Painter.
Connect Report To Printer
The 'Connect Report To Printer' button associates a printer to each print procedure basing on the company, the user and the workstation. The system routine managing this procedure is CPUSRREP.PRG. Data is written into the system table CPUSRREP.DBF.

P R O G R A M M I N G & U T I L I T I E S G U I D E
5 8 P R I N T E R M A N A G E M E N T
Once the connection between the procedure and the report is defined the system routine CP_CHPRN.PRG identifies the printer that must be associated during the procedure execution. The identified printer is defaulted in the dialog window.
The routine managing the connection is a Master File in which records can be loaded, changed and deleted. You can therefore customize the file simply defining the fields. The table structure is:

P R O G R A M M I N G & U T I L I T I E S G U I D E
P R I N T E R M A N A G E M E N T 5 9
Field Name Type Length Meaning
NROASSO Character 6 Connection No.
DESASSO Character 40 Description
USRASSO Numeric 4 User
AZIASSO Character 10 Company
WSTASSO Character 10 Workstation
REPASSO Character 20 Report Name
DEVASSO Character 50 Device Name
COPASSO Numeric 3 Number Of Copies
Let us now see some examples.
One Printer Across The Application
To use the same Printer for all application procedures, companies, users, and workstations you need to define the following expression:
(Workstation &= space or Workstation &= '00' and Company &= space)
P R O G R A M M I N G & U T I L I T I E S G U I D E
6 0 P R I N T E R M A N A G E M E N T
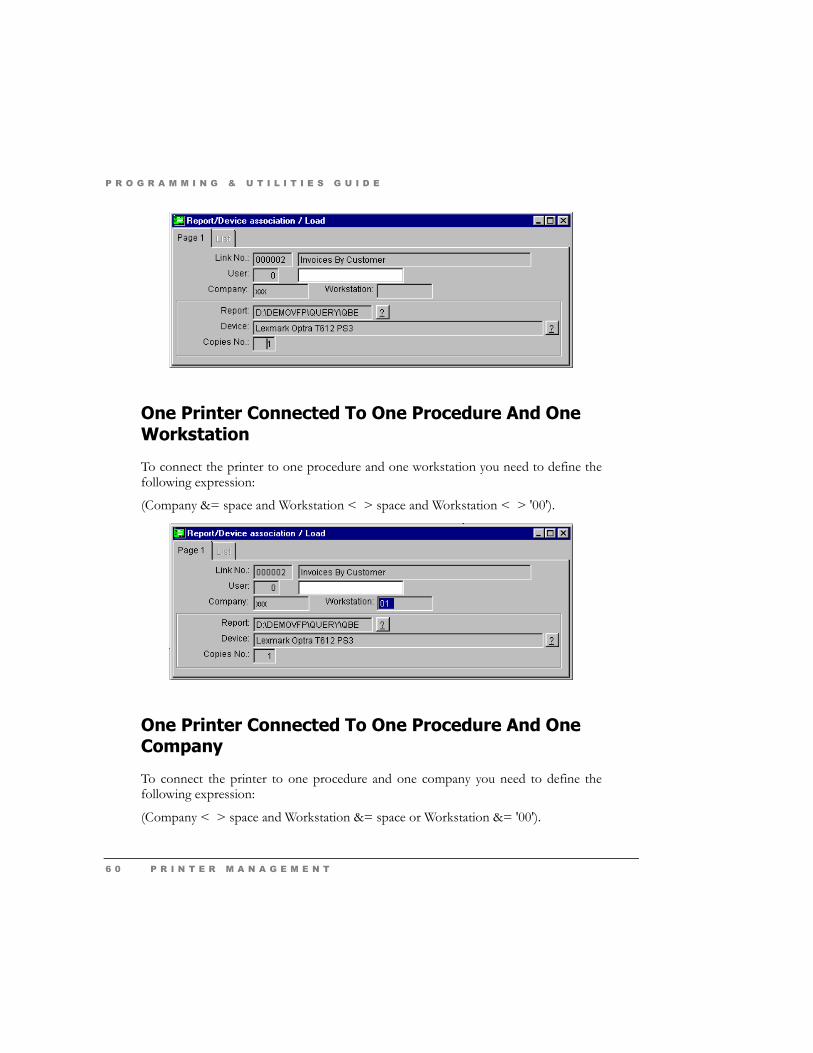
One Printer Connected To One Procedure And One Workstation
To connect the printer to one procedure and one workstation you need to define the following expression:
(Company &= space and Workstation < > space and Workstation < > '00').
One Printer Connected To One Procedure And One Company
To connect the printer to one procedure and one company you need to define the following expression:
(Company < > space and Workstation &= space or Workstation &= '00').

P R O G R A M M I N G & U T I L I T I E S G U I D E
P R I N T E R M A N A G E M E N T 6 1
One Printer Connected To One Company, One Workstation And One User
To connect the printer to one company, one workstation and one user you need to define the following expression:
(Company < > space and Workstation < > space and Workstation < > '00').


P R O G R A M M I N G & U T I L I T I E S G U I D E
U S E R M A N A G E M E N T 6 3
Chapter 5
User Management
5.1 User Management in MS Visual FoxPro
The Security Level functionality in CODEPAINTER REVOLUTION is managed by routine procedures stored in the Interface Manager. Users, groups and security levels are defined in a dedicated table.
5.2 Selecting The User
When the application is run you are required to select the user and type the corresponding password.

P R O G R A M M I N G & U T I L I T I E S G U I D E
6 4 U S E R M A N A G E M E N T
In some cases, e.g. in multicompany environments, you may have to define a more complex dialog window to login the application. This can be made saving the customized window as CP_LOGIN. When the application is executed the password routine (CP_ASKUSER) searches for the window CP_LOGIN. If the file is found the default login window is replaced.
You can create the CP_LOGIN dialog window using the 'Dialog Window Painter'. The following paragraph will show you how.
5.3 The Login Dialog Window CP_LOGIN
Depending on the customer/application requirements you can either create or customize the login dialog window CP_LOGIN . The login window generally included thefollowing five variables:

P R O G R A M M I N G & U T I L I T I E S G U I D E
U S E R M A N A G E M E N T 6 5
Variable Type Length Description
UTE Num 4 User Code
DESUTE Char 20 User Description
PWD Char 20 Password
AZI Char 10 Company Code
DESAZI Char 20 Company Description
You can name the variables as desired, but type and length should be kept the same as those defined in the table.
The UTE variable containing the user code must be linked to the User Administration table (CPUSERS). The user code (CODE) and description (NAME) are read from this table and carried over to the variable DESUTE as display only.
N. B.

P R O G R A M M I N G & U T I L I T I E S G U I D E
6 6 U S E R M A N A G E M E N T
The table CPUSERS and the fields CODE and NAME are system values. Therefore they cannot be chosen from the pick-list, but need to be manually typed.
This password is typed in the PWD variable the user types the password. The function CP_CHANGEUSER checks the input basing on the variables w_UTE (user code) and w_PWD(password). The function returns either TRUE or FALSE.
When the password is typed the 'CriptPwd' object checks the visual properties of the variable and displays an asterisk for each typed letter. The password is checked calling the standard textbox property 'passwordchar'.
N.B.
The CriptPwd object belongs to the object class 'Controlla Proprietà Visuali' (Check Visual Properties)
The AZI variable contains the company code and must be linked to the company system table CPAZI so that the company code (CODAZI) and description (DESAZI) are read.

P R O G R A M M I N G & U T I L I T I E S G U I D E
U S E R M A N A G E M E N T 6 7
N.B.
The table CPAZI and the fields CODAZI and DESAZI are system values. Therefore they cannot be chosen from the pick-list, but need to be manually typed.
The company code is typed in the AZI variable. The function CP_CHANGEAZI checks the input basing on the working variable w_AZI. The function selects the company basing on the system variable I_CODAZI.

P R O G R A M M I N G & U T I L I T I E S G U I D E
6 8 U S E R M A N A G E M E N T
5.4 User Administration
The 'Users and Groups Administration' option can be accessed either from the 'Utility' menu or clicking the 'Users' button on the Application bar. The first time this functionality is accessed the System Administrator password is requested. The default password is 'CodePainter'.
User code 1 should always be kept for the System Administrator. Accordingly Group 1 should be used for System Administrators.

P R O G R A M M I N G & U T I L I T I E S G U I D E
U S E R M A N A G E M E N T 6 9
To add a new user click the 'New User' button and define the parameters for your System Administrator.

P R O G R A M M I N G & U T I L I T I E S G U I D E
7 0 U S E R M A N A G E M E N T
Now define other three users following the same guidelines. These four users must now be assigned to groups. Groups are needed to define security levels for accessing procedures.
Click the 'New Group' button and define the System Administrators group. Drag and drop User 1 (the System Administrator) from the 'Does not belong' area to the 'Belongs to' area. User 1 belongs to the System Administrators group.

P R O G R A M M I N G & U T I L I T I E S G U I D E
U S E R M A N A G E M E N T 7 1
Define other two groups, e.g. 'IT' and 'Accountants'. Add users 3 and 4 to the 'IT' group, and users 2 and 4 to the 'Accountants' group. As you can notice one user can belong to more groups.
5.5 Access Definition
Access to application procedures are managed at group level. You can define security levels for each single procedure pressing <Alt> and <F12> on the opened procedure. Security levels can be defined by the System Administrator only.
You are now required to make the 'Items' procedure accessible to all groups with different security levels. The 'System Administrators' group must have full functionality on the procedure. The 'IT' group has access only and the 'Accountants' group must be able to access and enter new records.
Open the 'Items' procedure and press <Alt> and <F12> to open the 'Procedure Security' window. Now open the 'User Administration' option to select the groups. Drag and drop the three groups in the 'Procedure Security' window. For the 'System Administrators' group set all flags. For the 'IT' group set the 'Enter' flag and for the 'Accountants' group set the 'Enter' and the 'Insert' flag.

P R O G R A M M I N G & U T I L I T I E S G U I D E
7 2 U S E R M A N A G E M E N T
The next time the application is executed the security levels will be working. Now access the application pretending to be the various users in turn. You will notice that the security levels have been implemented. You can also notice that user 4 (belonging to two groups) can access the procedure and insert records, indeed the security level for one user is given by the sum of security levels defined for the groups to which the user belongs.
The 'Procedure Security' functionality can be also used to limit access to the zoom advanced options. Open the zoom for which you want to limit access and press <Alt> and <F12>

P R O G R A M M I N G & U T I L I T I E S G U I D E
U S E R M A N A G E M E N T 7 3
You can notice that the name of the opened 'Procedure Security' window has the prefix 'Z*'. The prefix identifies zoom options bound to the procedure.
5.5.1 Security Administration
The 'Security Administration' option gives you an overview of security levels defined for single procedures.

P R O G R A M M I N G & U T I L I T I E S G U I D E
7 4 U S E R M A N A G E M E N T
The 'Security Administration' option is accessed from the 'Utility menu'. If you access this option before having defined users you need to input the 'System Administrator' password. The default password is 'CodePainter'.
The 'Procedure Security' overview widow allows changing security levels for single procedures. To add a new procedure in the list click the 'New' button and type the procedure name (e.g. gsan_lis). Open the 'User Administration' option, drag at least one group in the 'Procedure Security' window and define the security levels for the group. You can also define security levels for zooms simply typing the prefix 'Z*' before the procedure name.
To delete security level definitions select the desired procedure in the list and click the 'Delete' button. You can do the same opening the single procedure.
5.6 Managing Post-IN Messages
The 'User Management' option is also used to manage Post-IN messages between application users. To send messages to other users, open a Post-IN, write the message and add attachments if required. Open the 'User Administration' option select the desired user and drag and drop the Post-IN on the selected user.

P R O G R A M M I N G & U T I L I T I E S G U I D E
U S E R M A N A G E M E N T 7 5
The addressee will receive the message and save it in the Post-IN file.
5.7 Users And Groups Files
Information on users and groups are stored in the system tables CPUSERS and CPGROUPS. Information on the links between users and groups are stored in the system table CPUSRGRP.
5.7.1 Users Table
The User table stores information on user code, user name, and password for each user. It has the following structure:

P R O G R A M M I N G & U T I L I T I E S G U I D E
7 6 U S E R M A N A G E M E N T
Name Type Length Description
Code Numeric 4 User Code
Name Character 20 User Name
Passwd Character 20 Password
The table's primary key is the User Code.
During the 'Codify' phase you can link to this table defining a link from a numeric field with length 4. Because the file is not included in the data dictionary, in the Link Table you need to define the file name as CPUSERS. To link to other data please refer to the table structure.
5.7.2 Group Table
The Group table stores information on each group code and group name. The table has the following structure:
Name Type Length Description
Code Numeric 4 Group Code
Name Character 20 Group Name
The table's primary key is the 'Group Code'.
During the 'Codify' phase you can link to this table defining a link from a numeric field with length 4. Because the file is not included in the data dictionary, in the Link Table you need to define the file name as CPGROUPS. To link to other data please refer to the table structure.

P R O G R A M M I N G & U T I L I T I E S G U I D E
U S E R M A N A G E M E N T 7 7
5.7.3 User/ Groups Table
The table that stores information on group codes and on user codes belonging to the group has the following structure:
Name Type Length Description
Groupcode Numeric 4 Group Code
Usercode Numeric 4 User Code
The table's primary key is the Group Code.
During the 'Codify' phase you can link to this table defining a link from a numeric field with length 4. Because the file is not included in the data dictionary, in the Link Table you need to define the file name as CPUSRGRP. To link to other data please refer to the table structure.


P R O G R A M M I N G & U T I L I T I E S G U I D E
S Y S T E M R O U T I N E S 7 9
Chapter 6
System Routines
6.1 Introduction
This chapter describes system routines that build the environment of CODEPAINTER REVOLUTION. A brief description of the routines and their syntax is included.
These routines are used by generated applications and can be also used in manual areas. The SW developer can exploit the rules of CodePainter architecture to customize or add new funtionalities to the opertating environment.
6.2 System Routines For MS Visual FoxPro
This pharagraph defines the syntax and the use of Interface Manager routines. Most routines are saved under CodePainter's subdirectory VFCSIM in the routines 'CP_LIB.PRG', 'CP_DBADM.PRG', 'CP_SEC.PRG' .

P R O G R A M M I N G & U T I L I T I E S G U I D E
8 0 S Y S T E M R O U T I N E S
6.2.1 cp_AskProg
Assignes the next progressive number to an autonumbered field with no associated table. cp_AskProg(<i_oObj>,<i_nConn>,<i_cTable>,<i_cProg>)
<i_oObj>
Object name containing the variable in which the proposed AutoNumber is input
<i_nConn>
Connection number
<i_cTable>
File name in which we wont the AutoNumber is search
<i_cProg>
Variable in which we will input the AutoNumber
The routine is stored in 'CP_LIB.PRG' and searches for the current autonumbered value in the table to which the autonumbered field is associated. The routine then assignes the next value to the defined variable.
N.B.
Before the procedure execution the variable to which the next number is assigned must be defined as 0.
...
Code &= 0
i_nConn &= i_TableProp[this.customers_IDX,3]
cp_AskProg(this,i_nConn,i_"customers","w_CODCLI")
...
P R O G R A M M I N G & U T I L I T I E S G U I D E
S Y S T E M R O U T I N E S 8 1
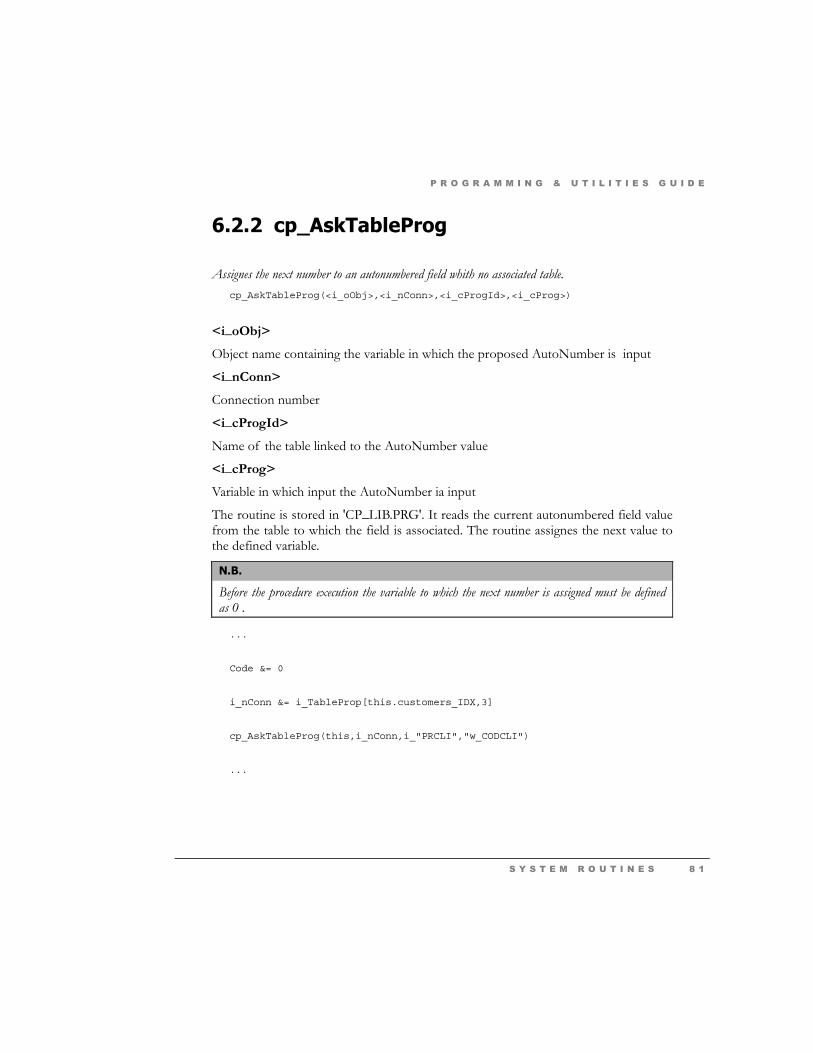
6.2.2 cp_AskTableProg
Assignes the next number to an autonumbered field whith no associated table. cp_AskTableProg(<i_oObj>,<i_nConn>,<i_cProgId>,<i_cProg>)
<i_oObj>
Object name containing the variable in which the proposed AutoNumber is input
<i_nConn>
Connection number
<i_cProgId>
Name of the table linked to the AutoNumber value
<i_cProg>
Variable in which input the AutoNumber ia input
The routine is stored in 'CP_LIB.PRG'. It reads the current autonumbered field value from the table to which the field is associated. The routine assignes the next value to the defined variable.
N.B.
Before the procedure execution the variable to which the next number is assigned must be defined as 0 .
...
Code &= 0
i_nConn &= i_TableProp[this.customers_IDX,3]
cp_AskTableProg(this,i_nConn,i_"PRCLI","w_CODCLI")
...

P R O G R A M M I N G & U T I L I T I E S G U I D E
8 2 S Y S T E M R O U T I N E S
6.2.3 cp_BuildWhere
Builds a section of the Where clause. cp_BuildWhere(<i_cCmd>,<i_xValue>,<i_cNome>,<i_nConn>)
<i_cCmd>
Name of the variable containing a part of the Where condition
<i_xValue>
Value of the field added to the Where clause
<i_cNome>
name of the field added to the Where clause
<i_cConn>
Connection number of the file to which the Where is referring
Returns the new Where sentence.
The routine is stored in 'CP_LIB.PRG'. It adds a new condition to a Where sentence. ...
i_nConn &= i_TableProp[this.clienti_IDX,3]
i_cFlt &= ""
i_cFlt &= cp_BuildWhere(i_cFlt,this.w_CODCLI,"CODCLI",i_nConn)
i_cFlt &= cp_BuildWhere(i_cFlt,this.w_SURNAME,"SURNAME",i_nConn)
i_cFlt &= cp_BuildWhere(i_cFlt,this.w_ADDRESS,"ADDRESS",i_nConn)
* --- Manual Area &= Build Filter
i_cFlt &= cp_BuildWhere(i_cFlt,'A',"ADDRESS",i_nConn)

P R O G R A M M I N G & U T I L I T I E S G U I D E
S Y S T E M R O U T I N E S 8 3
--- End Manual Area
...
6.2.4 cp_ChangeAzi
Allows changing the Company. Cp_ChangeAzi(<icName>)
<icName>
Company name
Returns a boolean value that identifies whether the Company has changed or not.
The function is stored in 'CP_DBADM'. The icName variable input in the function contains the code of the company in which the user wants to work. If the entered value is found the value TRUE is returned and the company code changed. If the value is not found the value FALSE is returned.
...
cp_ChangeAzi ("ZucchettiTools")
...
6.2.5 cp_ChangeUser
Allows changing the user during the application execution. Cp_ChangeUser (<i_Ncodute>,<i_cPwd>)
<i_Ncodute>
User code

P R O G R A M M I N G & U T I L I T I E S G U I D E
8 4 S Y S T E M R O U T I N E S
<i_cPwd>
User password
Returns a boolean value that identifies whether the user has changed or not.
This function is stored in 'CP_SEC.PRG'. The variables i_NCodute and i_cPwd input in the function contain the user code and password and manage the number of connection trials. In case the number of trials is higher than the defined limit the returned value is FALSE and the function is terminated. The routines also determine whether users have been defined or not. Only if they have been defined they search for the value defined in i_Ncodute. If the value is not found the returned value is FALSE. If the value is found the password in the table is compared with the one input in i_cPwd. If both values (user code and password) are matched, the returned value is TRUE. Otherwise the total number of connection trials is increased.
.cp_ChangeUser ("1","password")
...
6.2.6 cp_Class
Defines the code of standard CodePainter classes.
The cp_Class.prg file stores all classes defined in CodePainter for managing Visual Objects. You can add custom classes simply defining them in this file and adding the class name in the file classes.cpl under the CodePaiters 'Classes' directory.
Add the following instructions in the file cp_Class.prg define class cp_myclass as custom
var&=''
enabled&=.t.
proc Calculate(xValue)
local p,n

P R O G R A M M I N G & U T I L I T I E S G U I D E
S Y S T E M R O U T I N E S 8 5
n&=stuff(n,p,1,'(this.parent.oContained,')
n&=strtran(n,'w_','.w_')
...
endde
...
Add the new class name in the Class.cpl file. ...
My Class
cp_myclass
classes\my.bmp
var&='w_???'
100,100
...
6.2.7 cp_CreateAzi
Allows creating a new company and all declared tables related to the companies. Cp_CreateAzi(<icName>, <icDescr>)
<icName>
New company name (max 10 characters)
<icDescr>

P R O G R A M M I N G & U T I L I T I E S G U I D E
8 6 S Y S T E M R O U T I N E S
New company description (max 30 characters)
Returns a boolean value which identifies whether the new company has been created or not.
The function is stored in 'CP_DBADM.PRG'. The variables icName and icDescr contain the name and description of the company that must be created. First of all the routine checks the name uniqueness. It then analyzes which and how many tables must be created and then creates the company starting from generic tables. The value TRUE is returned if the creation run with no errors. The value FALSE is returned if errors occured, i.e. the company name already exists, the name is blank, the server connection is not active or if the data dictionary does not exist.
...
cp_CreateAzi ("ZucchettiTools","ITSolutions")
...
6.2.8 cp_Dbinst
Monitors the creation of databases. Cp_Dbinst()
Returns a boolean value to identify whether the database has been created or not. If the value FALSE is returned the creation is terminated
The function is stored in 'CP_DBADM.PRG' and monitors the first creation of databases in order to launch the configuration procedure CP_INST if required.
CP_INST is typically a programm or a routine function displaying a configuration dialog window in which configuration variables can be defined. CP_INST must always return a logical value that allows to go on with (if TRUE) or inhibit (if FALSE) the database creation.
...
if !cp_Dbinst()

P R O G R A M M I N G & U T I L I T I E S G U I D E
S Y S T E M R O U T I N E S 8 7
return(.f.)
endif
...
6.2.9 cp_DeleteAzi
Allows deleting a company. Cp_DeleteAzi (<icAzi>)
<icAzi>
Company code to be deleted
Returns a boolean value to identify whether the company has been deleted or not.
The function is stored in 'CP_DBADM.PRG'. The variable icAzi contains the name of the company. The function checks if the company and the data dictionary exist, and if the server connection is active. If the checking is not successful the value FALSE is returned. Otherwise the value TRUE is returned and all references and related tables deleted.
...
cp_DeleteAzi ("Codelab")
...
6.2.10 cp_ErrorMsg
Displays an error message Cp_ErrorMsg(<i_msg>,<i_xIcon>,<i_cTitle>)
P R O G R A M M I N G & U T I L I T I E S G U I D E
8 8 S Y S T E M R O U T I N E S
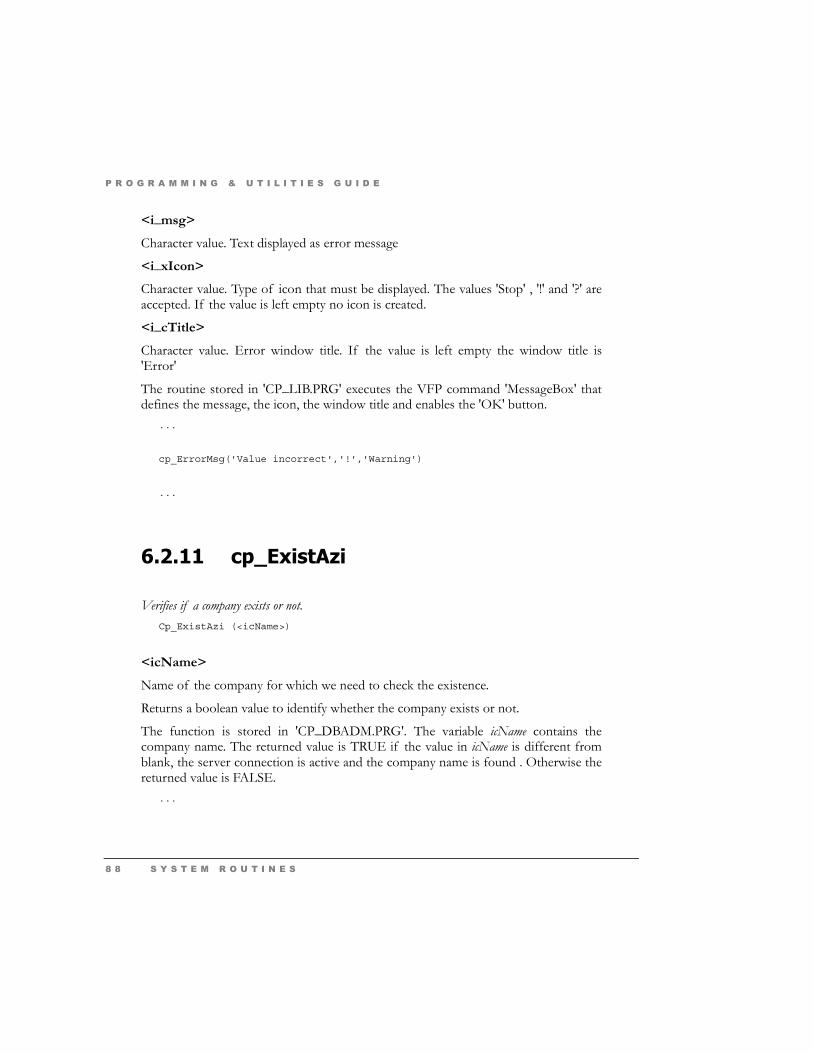
<i_msg>
Character value. Text displayed as error message
<i_xIcon>
Character value. Type of icon that must be displayed. The values 'Stop' , '!' and '?' are accepted. If the value is left empty no icon is created.
<i_cTitle>
Character value. Error window title. If the value is left empty the window title is 'Error'
The routine stored in 'CP_LIB.PRG' executes the VFP command 'MessageBox' that defines the message, the icon, the window title and enables the 'OK' button.
...
cp_ErrorMsg('Value incorrect','!','Warning')
...
6.2.11 cp_ExistAzi
Verifies if a company exists or not. Cp_ExistAzi (<icName>)
<icName>
Name of the company for which we need to check the existence.
Returns a boolean value to identify whether the company exists or not.
The function is stored in 'CP_DBADM.PRG'. The variable icName contains the company name. The returned value is TRUE if the value in icName is different from blank, the server connection is active and the company name is found . Otherwise the returned value is FALSE.
...
P R O G R A M M I N G & U T I L I T I E S G U I D E
S Y S T E M R O U T I N E S 8 9
if !cp_ExistAzi ("Codelab")
wait window"Company not found!"
endif
...
6.2.12 cp_Exprt
Allows exporting data from a cursor to an external table. Cp_Exprt(<i_cTableName>,<i_cCursor>)
< i_cTableName >
External table of destination
< i_cCursor >
Memory cursor in which are contained the data to export
Returns a boolean value: ".t." if the data transfer was successful, ".f." if it was not successful.
This function is stored under the VFCSIM directory and opens the external table 'i_cTableName' (if the table cannot be opened an error message is displayed) and exports data stored in the cursor 'i_cCursor'.
...
if cp_Exprt('Clienti', 'Curs_Cli')
wait windows "Export was successful"
else
wait windows "Export was not successful"

P R O G R A M M I N G & U T I L I T I E S G U I D E
9 0 S Y S T E M R O U T I N E S
endif
...
6.2.13 cp_GetProg
Assignes the next progressive number to a autonumbered field. This procedure has been defined to work within a routine.
cp_GetProg(<i_cFile>, <i_cTable>,<i_var>,< i_x1>,[<ix5>])
<i_cFile> Table name
<i_cTable> AutoNumber table name
<i_var> AutoNumber variable
<i_x1>..<i_x5> Fixed parts of the key
This routine is stored in 'CP_LIB.PRG'. It assignes the next progressive number to the variable i_var in the i_cFile basing on the i_cTable. The variable can be numeric or alphanumeric.
a)
this.w_newprg&=cp_GetProg('items','prart',this.w_newprg)
b)
this.w_newprg&=cp_GetProg('items','prart',this.w_newprg,this.magart)

P R O G R A M M I N G & U T I L I T I E S G U I D E
S Y S T E M R O U T I N E S 9 1
N.B.
The w_newprog variable must be created within the routine procedure. The variable length and type must be identical to the autonumbered field.
6.2.14 cp_info
Shows information on the selected entity pressing < ALT < and > F11 > cp_info(this)
The routine ecpInfo is contained in cp_forms. It calls the cp_info.prg program and passes on the current entity as parameter (cp_Info(this)). If the cp_info.prg does not exist (what happens as default) the routine displayed a standard Messagebox showing procedure name, version, and FXP date (last update).
You can use information windows for customized entities creating the new file named cp_info.prg under the application directory or under EXE for large applications.
The Information window can be created using the Dialog Window Painter; in order to decode the variable values use the instructions shown in the next picture:
You further need to add under 'Blank Record End in the manual area the code listed below'.
i_n&=substr(this.oParentObject.class,2)
P R O G R A M M I N G & U T I L I T I E S G U I D E
9 2 S Y S T E M R O U T I N E S
i_fxpsize&=0
i_fxpdate&={//}
do case
case adir(i_a,i_n+'.fxp')&=1
i_fxpsize&=i_a[2]
i_fxpdate&=i_a[3]
case adir(i_a,'..\vfcssrc\'+i_n+'.fxp')&=1
i_fxpsize&=i_a[2]
i_fxpdate&=i_a[3]
case adir(i_a,i_cBmpPath+i_n+'.fxp')&=1
i_fxpsize&=i_a[2]
i_fxpdate&=i_a[3]
endcase
with this
.w_UltRev &= Alltrim(.oParentObject.infodaterev)
.w_NomeOgg &= upper(i_n)+'.FXP'
.w_DataOgg &= dtoc(i_fxpdate)
.w_SizeOgg &= Alltrim(str(i_fxpsize) + ' byte')
P R O G R A M M I N G & U T I L I T I E S G U I D E
S Y S T E M R O U T I N E S 9 3
.w_FileName &= upper( .oParentObject.cFile) + '.DBF'
endwith
this.SetControlsValue()
6.2.15 cp_Msg
Displays messages. cp_Msg(<i_cMsg>)
<i_cMsg>
Character type value. Message displayed
The routine stored in 'CP_LIB.PRG' executes the 'wait window' with the defined text. ...
cp_Msg('Processing Start')
6.2.16 cp_NextProg
Assignes the next progressive number of autonumbered fields with no table. cp_NextProg(<i_oObj>,<i_nConn>,<i_cTable>,<i_cProg>)
<i_oObj>
Name of the object containing the proposed AutoNumber
<i_nConn>
Connection number
<i_cTable>

P R O G R A M M I N G & U T I L I T I E S G U I D E
9 4 S Y S T E M R O U T I N E S
Name of the file in which the AutoNumber is searched
<i_cProg>
Variable in which the autonumber is input.
The routine is stored in 'CP_LIB.PRG'. It reads the current value from the <I_cTable> table and assignes the next progressive value to the defined variable.
N.B.
Before the procedure execution the variable to which the next number is assigned must be defined as 0 .
...
Code &= 0
i_nConn &= i_NextProp[this.customers_IDX,3]
cp_NextProg(this,i_nConn,i_"customers","w_CODCLI")
...
6.2.17 cp_NextTableProg
Assignes the next progressive value of an autonumbered field associated to a table. cp_NextTableProg(<i_oObj>,<i_nConn>,<i_cProgId>,<i_cProg>)
<i_oObj>
Name of the object containing the suggested AutoNumber.
<i_nConn>
Connection number
<i_cProgId>
Name of the file in which the AutoNumber is searched.
<i_cProg>

P R O G R A M M I N G & U T I L I T I E S G U I D E
S Y S T E M R O U T I N E S 9 5
Variable in which the AutoNumber is input.
The routine is stored in 'CP_LIB.PRG'. It reads the current value in the <I_cProgID> table and assignes the next value to the defined variable
N.B.
Before the procedure execution the variable to which the next number is assigned must be defined as 0 .
...
Code &= 0
i_nConn &= i_TableProp[this.customers_IDX,3]
cp_NextTableProg(this,i_nConn,i_"PRCLI","w_CODCLI")
...
6.2.18 cp_NullValue
Returns the null value basing on the variable type. cp_NullValue(<cs>)
<cs>
Variable for which the null value is required
Returns the null value basing on the variable type that has been passed as paramenter.
The routine is stored in 'CP_LIB.PRG'. Depending on the variable type different values are returned:
For Character or Memo values the returned value is a string of blanks
For Numeric values the returned value is 0.00
For Date or Time values the returned value is ( \ \ \ )
For Logical values the returned value is False

P R O G R A M M I N G & U T I L I T I E S G U I D E
9 6 S Y S T E M R O U T I N E S
...
* Set variables to zero
Code &= cp_NullValue(Code)
Balance &= cp_NullValue(Balance)
...
6.2.19 cp_szoom
Executes Visual Zooms with selection Cp_szoom (<i_cCursor>,<i_cFilename>,<i_cZoomTitle>,<i_cZoomFile>)
Or
do Cp_szoom with<i_cCursor>,<i_cFilename>,<i_cZoomTitle>,<i_cZoomFile>
<i_cCursor>
Name of the cursor created by the selected records
<i_CFileName>
Name of the Table on which the zoom is working.
<i_CZoomTitle>
Title of the zoom window.
<i_CZoomFile>
Name of the configuration file;
<i_cZoomFile> <i_cFileName>_vzm is opened:
<i_cZoomFile>.<i_cFileName>_vzm
If the argument was not specified the routine searches: 'default.<i_cFileName>_vzm'.

P R O G R A M M I N G & U T I L I T I E S G U I D E
S Y S T E M R O U T I N E S 9 7
default.<i_cFileName>_vzm
If also this configuration was not found than all table fields are displayed
The procedure allows executing Visual Zooms in which the record can be selected setting the flag next to each row.
This procedure can be used only with the Routine Painter in order to create cursors in which data can be processed.
...
cp_szoom with "test_sel","antxtpre","LIST OF DIAGNOSIS",""
...
6.2.20 cp_ToStr
Returns the value converted into a string cp_ToStr(<cs>,[<ty>])
<cs>
Variable to convert
<ty> optional If the type of the variable is Character or Memo we can specify if we wont the text contained between apexes
1 - the text will be between apexes
0 - the text will be without apexes.
The routine stored in 'CP_LIB.PRG' converts the variable <cs> to character format. ...
Total &= Quantity, * Price
cp_Msg('The balance is: ' + cp_ToStr(Totale))

P R O G R A M M I N G & U T I L I T I E S G U I D E
9 8 S Y S T E M R O U T I N E S
...
6.2.21 cp_YesNo
Confirmation request cp_YesNo(<i_cMsg>)
<i_msg>
String displayed as confirmation request message
Returns a numeric value
6 - Yes
7 - No
The routine cp_YesNo is stored in 'CP_LIB.PRG'. It executes the VFP MessageBox command without defining any window title, displaying the question mark icon and enabling the 'Yes' and 'No' button.
You can change the question text. ...
IF cp_YesNo('Print Report?') &= 6
vq_exec with 'Stam_art.vqr'
endif
...
6.2.22 GetCtrl
Allows positioninig the pointer on the defined field or variable.
P R O G R A M M I N G & U T I L I T I E S G U I D E
S Y S T E M R O U T I N E S 9 9
object&=[parent.]GetCtrl('<FieldName/Variable>')
<FieldName/Variable>
Field or variable name from which the pointer must be obtained.
This function is stored in the cp_forms file and returns the pointer to the defined field or variable. It is typically used in routine procedures where methods must be executed or properties set for fields or variables of calling forms. In these cases the object must referenced with the clause 'parent'. During the 'Codify' phase the 'parent' clause will be translated with the calling object reference (oParentObject).
...
*in object oMyVar position the pointer to Desart
oMyVar&=parent.GetCtrl('w_Desart')
*hide the variables
o.MyVar.hide&=.t.
...
6.2.23 LookTab
Allows searching and finding field values on linked tables LookTab('<TableName>','<ReturnedField>','<ComparisonField1>',<ComparisonValue1>'[,'<ComparisonField_i>',<ComparisonValue_i>'])
<TableName>
Table name in which the value must be searched
<ReturnedField>
Field name to be returned
<ComparisonField[n]>

P R O G R A M M I N G & U T I L I T I E S G U I D E
1 0 0 S Y S T E M R O U T I N E S
Search field name
<ComparisonValue[n]>
Search value name
You can define up to 5 comparison fields and values. To optimize efficiency use always primary key fields of the linked table.
This routine is stored under the VFCSIM directory and returns the <ReturnedField> value after having created the SQL sentence that will be used for data extraction. The SQL sentence uses the received values as follows:
SELECT <ReturnedField>;
FROM <TableName>
WHERE <ComparisonField1>&=<ComparisonValue1> [ and
<ComparisonField_i>&=<ComparisonValue_i>]
INTO CURSOR __TMP__ ...
LookTab('Items','DESART','CODART',artmov)
...
Reads the Items table and returns the item description value for whichthe expression CODART&=artmov is true.
P R O G R A M M I N G & U T I L I T I E S G U I D E
S Y S T E M V A R I A B L E S 1 0 1
Chapter 7
System Variables
7.1 System Variables for MS Visual FoxPro
This chapter analyzes functionalities of system variables used by CODEPAINTER REVOLUTION, in particular those variables used to make library routines and generated procedure work properly.
7.1.1 Global Variables
In this section you will find some configuration global variables that e.g. allow to define the company and the fiscal year on which the user wants to work.
i_datsys
Date, 8 or 10 bytes depending on whether the SET CENTURY ON clause is defined or not. Contains the system date. The default value is: i_datsys&=date()

P R O G R A M M I N G & U T I L I T I E S G U I D E
1 0 2 S Y S T E M V A R I A B L E S
i_codute
Numeric, 4 bytes. Contains the user code. The default value is: i_codute &= 1
i_codazi
Character, 10 bytes. Contains the company code. The default value is 'XXX' defined in CP3START.
7.1.2 cTrsName Variable
The variable 'cTrsname' contains the temporary file name for Detail and Master/Detail entities. This variable can be used within routines in order to reference the temporary name of the entity that is in use.
Example
I n a rout ine p rocedure you a re requ i red to c l ear the tempo rary f i l e o f a Deta i l o r Mas te r /Deta i l en t i t y . You need to add two s ta tements :
Select (this.cTrsName)
Zap
The f i r s t s ta tement a l l ows se l ec t i ng the tempora ry f i l e . The second executes the ' z ap ' c ommand tha t a l l ows de le t ing a l l r ecords conta ined i n the temporary f i l e .
7.1.3 The i_cSuperPwd Variable
This variable is initializated in CP3START with the value 'CodePainter' and is used to manage default passwords.

P R O G R A M M I N G & U T I L I T I E S G U I D E
S Y S T E M V A R I A B L E S 1 0 3
The default password is required to access the 'User Administration' option. For more information please refer to Chapter 6 'User Management'.
7.1.4 The i_cBmpPath Variable
This variable is initializated in CP3START with the value " " and is used to manage the search path for bitmap and icon files.
When added to SET PATH it allows defining the search path for images used within the generated application.
7.1.5 The i_cStdIcon Variable
This variable is initializated in CP3START.PRG with the value "painter.ico" and is used to associate the icon to the main window.
7.1.6 The i_demolimits Variable
This variable is stored in CP3START and defines the limits for the application demo version.
The first value is generic and is valid for all tables. The other values define exceptions. E. g. i_demolimits&='250, items&=50, orders&=30, warehouse&=0' defines that all tables have a limit of 250 records except the Items table that has a limit of 50 records, Orders having a limit of 30 and warehouse without any limit. When tables have been filled up to two thirds of their capacity and are opened once again the message warning that the demo limit is about to be reached is displayed. When the capacity is reached no more records can be added.

P R O G R A M M I N G & U T I L I T I E S G U I D E
1 0 4 S Y S T E M V A R I A B L E S
7.1.7 The i_TableProp Variable
This variable is a public array for table management. For more information please refer to Chapter 2 'File Management'.
Value Meaning
1 Logical Name
2 Physical Name
3 Connection No.(0 &= Local Visual FoxPro Database)
4 Counter for number of openings
5 Server Number (if exists the connection must be opened)
7.1.8 The i_ServerConn Variable
This variable is a public array for managing Servers. For more information please refer to Chapter 2 'File Management'. The table returns the value and the value taken on from each array element.

P R O G R A M M I N G & U T I L I T I E S G U I D E
S Y S T E M V A R I A B L E S 1 0 5
Value Meaning
1 Server Name
2 ODBC Connection Number
3 ODBC Data Source
4 When the database must be opened (1&=Start,2&=Program, 3&=F10)
5 Counter for the number of openings
6 Database Type (Oracle, SQLServer, Access, VFP, ...)
7 Use/ Does not use Post-INs and Warnings
7.1.9 The i_CpDic Variable
Name of the Data Dictionary
This variable is used by the CP3START function GetConfigFile() to read procedure configuration files and routines required to open the database.
The configuration file must be defined with one of the following names: <DesignName>.CNF or CP3START.CNF. It contains all application configuration paramenters: parametrical pictures, environment setting variables, and global variables.
7.1.10 The CP_PATH Variable
This variable defines the path of application programs.
Added to the SET PATH allows to define the path to search for application programs.
7.1.11 The CP_DBTYPE Variable
Defines the database type.

P R O G R A M M I N G & U T I L I T I E S G U I D E
1 0 6 S Y S T E M V A R I A B L E S
This variable takes on one of the following values: VFP, Access, SQLServer, Oracle, DB2, Abadas.
7.1.12 The CP_ODBCCONN Variable
Defines the name of the ODBC connection.
This variable contains the name of the ODBC connection to the selected database.
To defined a connection please refer to the ODBC Administrator manuals or to the driver vendor.
N.B.
You can also define the entire connection string and the connection name (DSN), thus avoiding to create it in the ODBC. The syntax you need to use is:
"DRIVER"=<drivername>;DATABASE&=<databasename>;SERVER&=<servername>;UID&=<username>;PWD&=<password>"
P R O G R A M M I N G & U T I L I T I E S G U I D E
M A N A G I N G A U T O N U M B E R V A L U E S 1 0 7
Chapter 8
Managing AutoNumber Values
8.1 Managing AutoNumber Values in MS Visual FoxPro
8.1.1 Introduction
Business/Commercial Applications typically have a high level of data input. In these cases managing the primary key efficiently becomes crucial.
To avoid errors in inputting the primary key, CodePainter manages the autoNumbering of values.

P R O G R A M M I N G & U T I L I T I E S G U I D E
1 0 8 M A N A G I N G A U T O N U M B E R V A L U E S
8.1.2 AutoNumber Values
You can manage progressive numbering of values automatically simply setting the 'AutoNumber' flag in the desidered fields during the Codify phase. This option generates the required code and manages a record in which the last progressive value is stored. When you define the AutoNumber working variable in the Codify phase (Globals menu, AutoNumber option) you can define whether to link a table managing progressive values or not.
If you do not define any 'Table Name' the system will automatically assign the next progressive value to the record going to the end of the file, reading the last value and adding one unit to that value. These values cannot be maintained. It is therefore advisable to define a support table to manage progressive numbers.
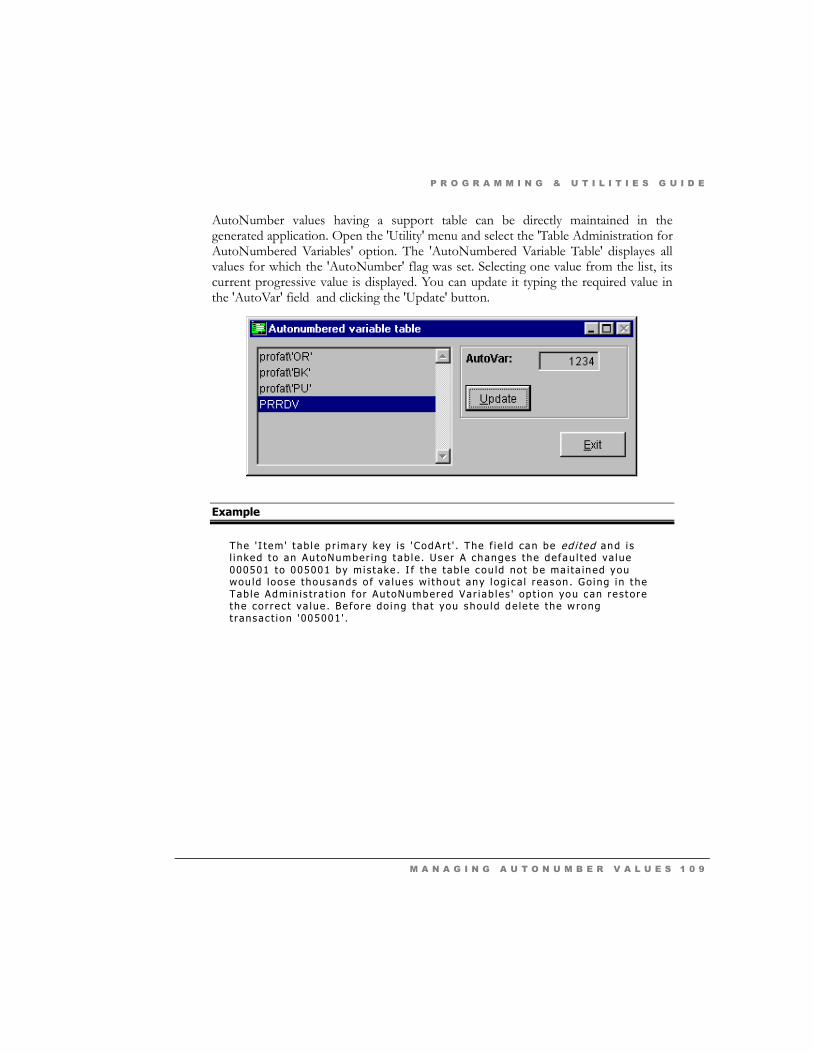
P R O G R A M M I N G & U T I L I T I E S G U I D E
M A N A G I N G A U T O N U M B E R V A L U E S 1 0 9
AutoNumber values having a support table can be directly maintained in the generated application. Open the 'Utility' menu and select the 'Table Administration for AutoNumbered Variables' option. The 'AutoNumbered Variable Table' displayes all values for which the 'AutoNumber' flag was set. Selecting one value from the list, its current progressive value is displayed. You can update it typing the required value in the 'AutoVar' field and clicking the 'Update' button.
Example
The ' I tem' t ab l e p r ima ry key i s ' CodA r t ' . The f i e ld can be ed i ted and i s l i nked to an AutoNumber i ng t ab l e . User A changes the de fau l ted va lue 000501 to 005001 by m i s t ake . I f the tab l e cou ld not be ma i ta ined you wou ld loo se thousands o f va lues w i thou t any l og i c a l r eason . Go ing i n t he Tab le Admin is t ra t ion fo r AutoNumbered Var i ab les ' op t i on you can re s t ore the cor re c t va lue . Be fore do ing tha t you shou ld de le te the w rong t ransac t i on ' 005001 ' .


P R O G R A M M I N G & U T I L I T I E S G U I D E
A D V A N C E D O P T I O N S 1 1 1
Chapter 9
Advanced Options
9.1 Module Management
Large projects generally include a core functionality and a series of linked modules. The core must contain all functionalities and all tables required for a thorough management of the basic module. The linked modules typically include functionalities and tables that not each customer may require and therefore may not be prepared to buy.
To meet these market requirements the SW developer must be able to subdivide SW applications in more modules and develop a program that during run-time links the submodules to the basic module.
To deliver these types of solution using CODEPAINTER REVOLUTION you simply need to create more Design Plans and include them in the same project. When you need to customize the SW application you simply need to copy the Design Plans required for your project.
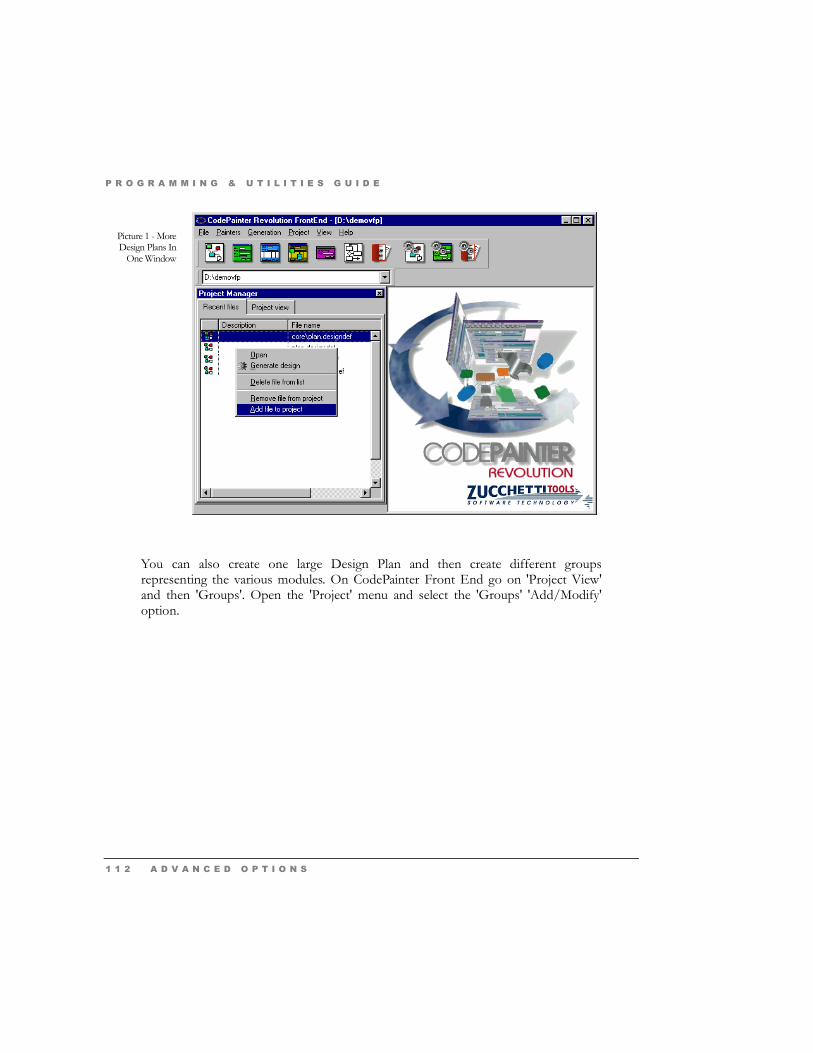
P R O G R A M M I N G & U T I L I T I E S G U I D E
1 1 2 A D V A N C E D O P T I O N S
You can also create one large Design Plan and then create different groups representing the various modules. On CodePainter Front End go on 'Project View' and then 'Groups'. Open the 'Project' menu and select the 'Groups' 'Add/Modify' option.
Picture 1 - More Design Plans In
One Window

P R O G R A M M I N G & U T I L I T I E S G U I D E
A D V A N C E D O P T I O N S 1 1 3
The 'Group' setup window is divided in two tab-strips. in the 'Name' tab-strip you can define the group name, the path where the new group must be stored, and bitmaps.
Picture 2 - How To Access Groups

P R O G R A M M I N G & U T I L I T I E S G U I D E
1 1 4 A D V A N C E D O P T I O N S
In the 'Files' tabstrip you can define which plan, entities, etc. must be included to that particular group.
Picture 3 - Group Setup Window

P R O G R A M M I N G & U T I L I T I E S G U I D E
A D V A N C E D O P T I O N S 1 1 5
Another useful feature is given by 'External Entities'. This entity simply links to the entity of another design that thus becomes part of the current design. To add an 'External Entity' go to your design plan and click the 'External Entity' button on the 'Painter Tools' bar. The 'Opens' window is opened and you can select the Design Plan from which you want to retrieve your entity.
Picture 4 - Defining Group Components

P R O G R A M M I N G & U T I L I T I E S G U I D E
1 1 6 A D V A N C E D O P T I O N S
The 'External Entities' window is opened and you can select the entity. If you need to go into another plan click the 'File' button.
9.2 Multilanguage Management
Often the same Business/Commercial application is used in different countries. It becomes therefore important for SW developers to be able to develop application releases in different languages quickly and efficiently.
Sometimes the same Business/Commercial application is used within the same company by people speaking different languages, e.g in companies based on the borders between two countries. In this case SW developers are required to create the same dialog windows, menus, warning messages, etc. in different languages to be used within the same application.
Picture 5 - Defining Group
Components

P R O G R A M M I N G & U T I L I T I E S G U I D E
A D V A N C E D O P T I O N S 1 1 7
CODEPAINTER REVOLUTION passes each string that must be displayed in the application through a routine that reads a translation database. Further a global variable has been defined in which values can be entered to recognize in which language procedures must be displayed. If this global variable is left empty the string is returned in the original language, otherwise the string and the defined language build the search key for finding the corresponding translation in the database. If no match is found the string is returned in the original language.
Here to follow you will see the same dialog window opened by two users for which different languages have been defined.
Picture 6 - A: Customer Dialog Window in English
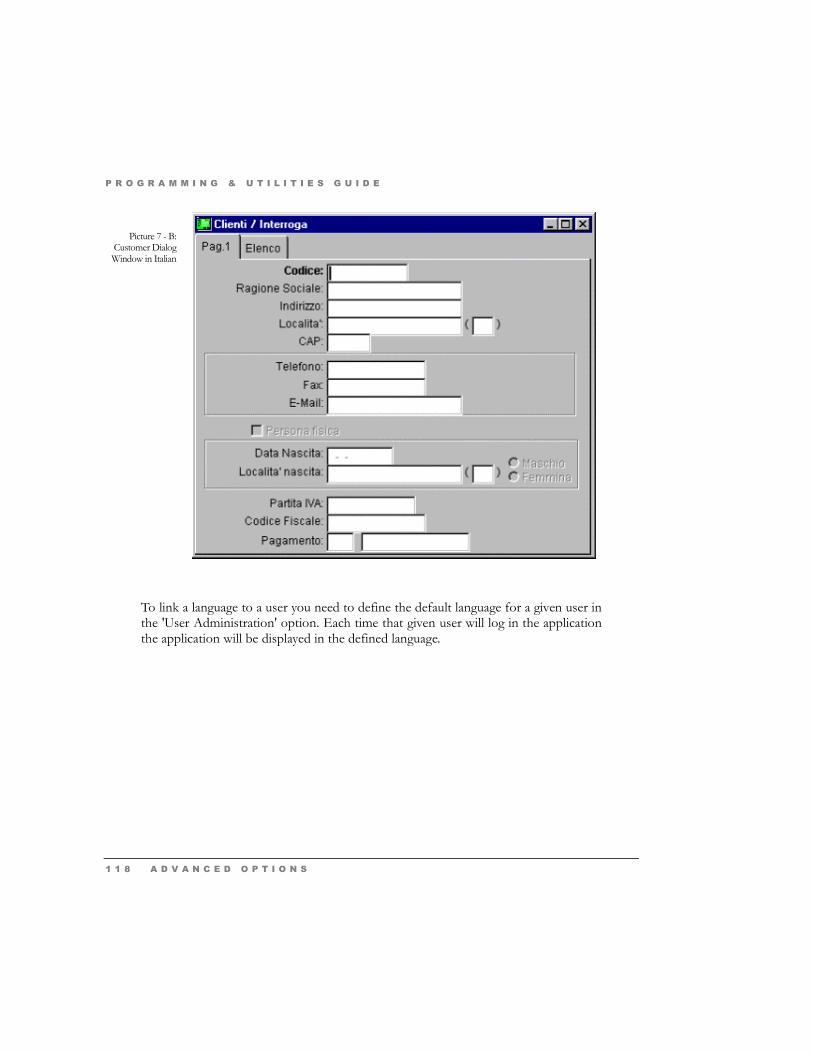
P R O G R A M M I N G & U T I L I T I E S G U I D E
1 1 8 A D V A N C E D O P T I O N S
To link a language to a user you need to define the default language for a given user in the 'User Administration' option. Each time that given user will log in the application the application will be displayed in the defined language.
Picture 7 - B: Customer Dialog Window in Italian

P R O G R A M M I N G & U T I L I T I E S G U I D E
A D V A N C E D O P T I O N S 1 1 9
9.2.1 Implementation
During the Design phase you should pay attention to the size of fields, variables, etc. Indeed depending on the languages you will translate the application into, fields, variables, etc. may have different sizes. During the translation you may therefore incur in two kind of problems : either strings are cut off, or the layout adjustment for comment strings goes lost. As general rule you should always define strings longer than the original text and adjust strings to the right. In case the string becomes larger it increases on the left leaving the fields on the right unchanged. CodePainter prototypes are generated according to these standards.
Messages you define in routine procedures or in manual areas must be translated using the routine CP_TRANSLATE. Let us consider for example that you define in a routine procedure a statement that executes the following message:
wait wind "Warning!"
You have to change it to:
wait wind cp_translate("Warning!")
If you then define the translation in the database the routine will return the translated string.
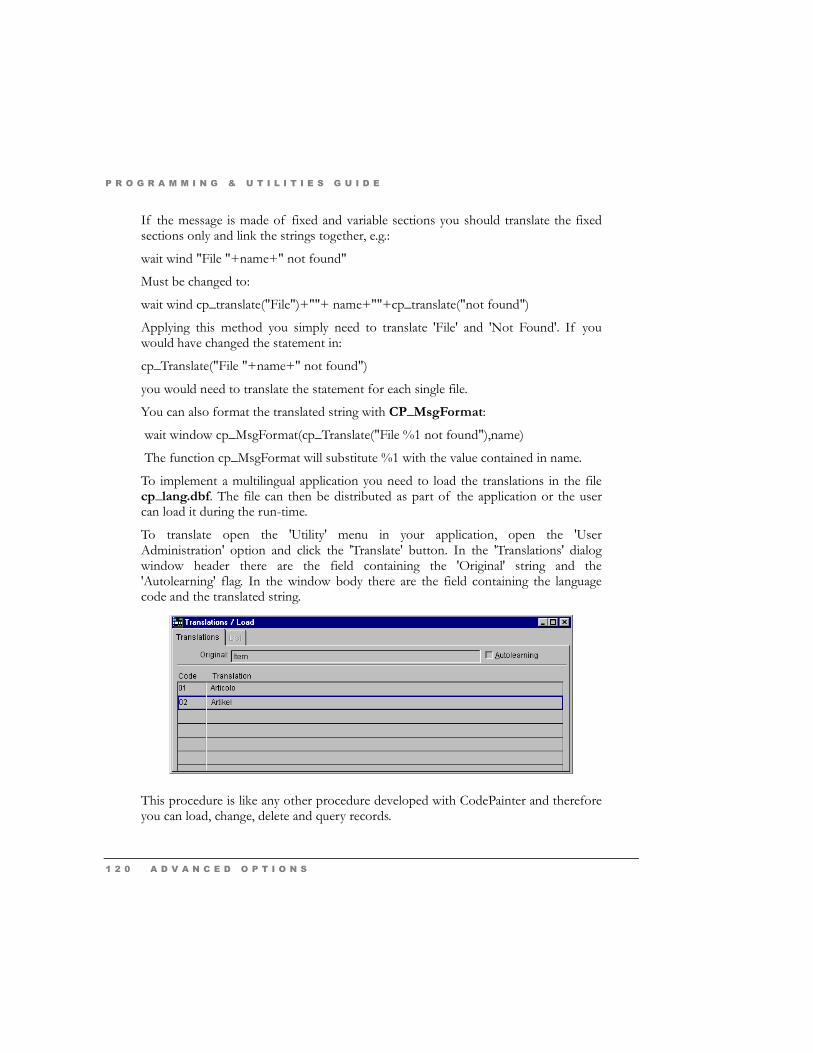
P R O G R A M M I N G & U T I L I T I E S G U I D E
1 2 0 A D V A N C E D O P T I O N S
If the message is made of fixed and variable sections you should translate the fixed sections only and link the strings together, e.g.:
wait wind "File "+name+" not found"
Must be changed to:
wait wind cp_translate("File")+""+ name+""+cp_translate("not found")
Applying this method you simply need to translate 'File' and 'Not Found'. If you would have changed the statement in:
cp_Translate("File "+name+" not found")
you would need to translate the statement for each single file.
You can also format the translated string with CP_MsgFormat: wait window cp_MsgFormat(cp_Translate("File %1 not found"),name)
The function cp_MsgFormat will substitute %1 with the value contained in name.
To implement a multilingual application you need to load the translations in the file cp_lang.dbf. The file can then be distributed as part of the application or the user can load it during the run-time.
To translate open the 'Utility' menu in your application, open the 'User Administration' option and click the 'Translate' button. In the 'Translations' dialog window header there are the field containing the 'Original' string and the 'Autolearning' flag. In the window body there are the field containing the language code and the translated string.
This procedure is like any other procedure developed with CodePainter and therefore you can load, change, delete and query records.

P R O G R A M M I N G & U T I L I T I E S G U I D E
A D V A N C E D O P T I O N S 1 2 1
The 'Autolearning' functionality helps you (or the user) loading all original strings in the table rapidly and correctly. Set the flag and browse through the application opening all dialog windows available. The original strings are automatically loaded into the table and you can start translating the application. Please notice that you can translate one original string in different languages simultaneously simply defining language codes.
9.2.2 Technical Notes
The database containing original strings and translations is local to the application and independent from the database created by the application itself. The multilanguage database is a Visual FoxPro database whereas the application database can be of any kind (ORACLE, DB2, etc.).
The multilanguage database is made of one transaction only. The structure is: one field in the header (orig_str) and two in the body (language and tran_str).
The field ORIG_STR in the header is the primary key, string type, character, length 60 and contains the original string.
The field LANGUAGE in the body is a key field, string type, character, length 3 and contains the language code.
The field TRAN_STR in the body string type, character, length 200 and contains the translated string.
The global variable i_cLanguage identifying the language is initializated as blank in the starting program CP3START. The language variable is defined in the log-in dialog window (user specific).
Routines for translations CP_TRANSLATE, CP_MSGFORMAT are stored in CP_LIB.
Many strings are followed by the character ':'. In these cases the routine deletes the character, searches for the translation and restores the character ':'. You are therefore not required to translate these kind of strings.


P R O G R A M M I N G & U T I L I T I E S G U I D E
C H A N G I N G T H E D A T A B A S E 1 2 3
Chapter 10
Changing The Database
10.1 MS Visual FoxPro Databases
One of the fundamental features of developing Client/Server applications with CODEPAINTER REVOLUTION is that they are fully independent from the database used. This means that in whichever development stage you are, or even once the application has been installed, you can always change the database. This makes CodePainter very flexible and makes you save money and time.

P R O G R A M M I N G & U T I L I T I E S G U I D E
1 2 4 C H A N G I N G T H E D A T A B A S E
This chapter will show you how you can change your application's databases (Visual FoxPro 5.x) into Jet (Acces/.mdb) or into SQL Server 6.5.
10.1.1 From Visual Fox Pro to Jet
To convert from Visual FoxPro to Jet (the engine used by MS Access) you need to create a Windows 95/98 ODBC connection. Open the 'Start' menu, select 'Set-up' and open the 'Control Panel' containing the system icons.

P R O G R A M M I N G & U T I L I T I E S G U I D E
C H A N G I N G T H E D A T A B A S E 1 2 5
Double click 'ODBC' or '32bit ODBC' to open the 'ODBC Modules' window. In the first sheet click the 'Add' button to add a new module.
Picture 8 - The Control Panel

P R O G R A M M I N G & U T I L I T I E S G U I D E
1 2 6 C H A N G I N G T H E D A T A B A S E
You now need to define the driver for the new connection. Select 'Microsoft Access Driver' and click 'End'.
Picture 9 - 'ODBC Modules' Dialog
Window

P R O G R A M M I N G & U T I L I T I E S G U I D E
C H A N G I N G T H E D A T A B A S E 1 2 7
You are now required to define the connection name and to give a brief description. Name the connection 'Trial' and input the description 'Trying to change the database'.
Picture 10 - Selecting the Driver

P R O G R A M M I N G & U T I L I T I E S G U I D E
1 2 8 C H A N G I N G T H E D A T A B A S E
Click 'Create' to create a new database. You are required to name the file and to select the path in which to save it. Browse to find the directory in which you saved your project plan (C:\Newapp) and save the file naming it 'Plan'. You have just configured a new ODBC connection, which allows interfacing the Jet database (MS Access).
The new connection must be communicated to the application, by creating a new file named 'PLAN.CNF' containing the information on the database and the 'ODBC' connection address. Open the MS Windows 'Notepad' and type the following instructions:
CP_DBTYPE='Access'
CP_ODBCCONN='trial'
Picture 11 - Defining The New
Module

P R O G R A M M I N G & U T I L I T I E S G U I D E
C H A N G I N G T H E D A T A B A S E 1 2 9
Save the file in the application's directory ('Newapp') naming it 'PLAN.CNF'.
Open MS Visual FoxPro and run the application as usual. You can notice that the database update window is opened. This happens because tables do not exist in the new database. Click the 'Update Database' button and confirm the windows that follow.
All databases used by the application are created again. This happens because the system has noticed the existence of a new 'PLAN.CNF', i.e. the name of your project. The file has been read and the new databases created linking via ODBC to the Jet database. Your application manages the Jet database via ODBC and not using Visual FoxPro. Enter some data in the files to verify it.
Picture 12 - The Database Maintenance' Window

P R O G R A M M I N G & U T I L I T I E S G U I D E
1 3 0 C H A N G I N G T H E D A T A B A S E
The application's functionalities have not changed. The only thing that has changed is the database management. Indeed the system deals with this aspect using Jet and the ODBC connection.
Using MS Access you can now verify whether the created tables are managed correctly. Open the 'File' menu, select 'Open', go to the application directory (C:\Newapp) and open the only file available (PLAN.MDB), i.e. the file you created via ODBC. A new window opens up showing how the database is build. You can notice that in the 'Tables' sheet there are all application's tables.
Click 'Items' and then 'Open'. The list of records input in the application is displayed.
Check the other database tables to verify that the change of database has fully succeeded and that the two programs are now compatible.
Picture 13 - Application Tables
viewed with MS Access
Picture 14 - Corresponding List
of Records
P R O G R A M M I N G & U T I L I T I E S G U I D E
C H A N G I N G T H E D A T A B A S E 1 3 1
10.1.2 From Visual Fox Pro to SQL Server
To change the database from Visual FoxPro to SQL Server you need a Server NT, an installed SQL Server and an existing database.
Again, you need to create an ODBC connection. Open the 'Start' menu, select 'Set-up' and open the 'Control Panel' containing the system icons.
Double click 'ODBC' or '32bit ODBC' to open the 'ODBC Modules' window. In the first window click the 'Add' button to add a new module.
You now need to define the driver for the new connection. Select 'SQL Server' and click 'End'.
You are now required to define the connection name and to give a brief description. Name the connection 'Trial' and input the description 'Trying to change the database'. On the 'Server' row digit the name of the server you are going to use. Click 'Options' and on the 'Database Name' row digit the name of the database on the Server NT (e.g. 'Trial').

P R O G R A M M I N G & U T I L I T I E S G U I D E
1 3 2 C H A N G I N G T H E D A T A B A S E
You have configured a new ODBC connection that allows you to interface the SQL Server Database.
You now need to communicate the new connection to your application, creating a new file and name it 'PLAN.CNF' containing information on the database and the 'ODBC' connection address. Open the MS Windows 'Notepad' and type the following instructions:
CP_DBTYPE='SQLserver'
CP_ODBCCONN='trial'
Save the file in the application directory ('Newapp') and name it 'PLAN.CNF'.
Open MS Visual FoxPro and run the application as usual. You are asked to input a login and a password. Input 'SA' (System Administrator) as login and click 'OK'.
Picture 15 - Defining the
ODBC Module for SQL Server

P R O G R A M M I N G & U T I L I T I E S G U I D E
C H A N G I N G T H E D A T A B A S E 1 3 3
You can notice that the database update window is opened. This happens because tables do not exist in the new database. Click the 'Update Database' button and confirm the windows that follow.
All databases used by the application are created again. This happens because the system has noticed the existence of a new 'PLAN.CNF', i.e. the name of your project. The file has been read and the new databases created linking via ODBC to the SQL Server. Your application manages the SQL Server database via ODBC and not using Visual FoxPro. Enter some data in the files to verify it.
Picture 16 - SQL Server Log-On Requirements
Picture 17 - Database Maintenance Window

P R O G R A M M I N G & U T I L I T I E S G U I D E
1 3 4 C H A N G I N G T H E D A T A B A S E
The application's functionalities have not changed. The only thing that has changed is the database management. Indeed the system deals with this aspect using the SQL Server and the ODBC connection.
Using MS Query (MSQUERY32.exe) you can now verify whether the created tables are managed correctly. You can open a database and execute a query on the files. For example you can execute a query on the 'Items' file and verify the success of the database change.
Picture 18 - Example Of A
SQL Server Query
Related Documents