Computer and Information Technology McGraw-Hill Primis ISBN-10: 0-39-017402-5 ISBN-13: 978-0-39-017402-4 Text: Programming in Visual C# 2008 Bradley-Millspaugh Programming in Visual C# 2008 Bradley-Millspaugh McGraw-Hill =>?

Welcome message from author
This document is posted to help you gain knowledge. Please leave a comment to let me know what you think about it! Share it to your friends and learn new things together.
Transcript
Computer and Information Technology
McGraw−Hill Primis
ISBN−10: 0−39−017402−5ISBN−13: 978−0−39−017402−4
Text: Programming in Visual C# 2008Bradley−Millspaugh
Programming in Visual C#2008
Bradley−Millspaugh
McGraw-Hill���

Computer and Information Technology
http://www.primisonline.comCopyright ©2009 by The McGraw−Hill Companies, Inc. All rights reserved. Printed in the United States of America. Except as permitted under the United States Copyright Act of 1976, no part of this publication may be reproduced or distributed in any form or by any means, or stored in a database or retrieval system, without prior written permission of the publisher. This McGraw−Hill Primis text may include materials submitted to McGraw−Hill for publication by the instructor of this course. The instructor is solely responsible for the editorial content of such materials.
111 COMPGEN ISBN−10: 0−39−017402−5 ISBN−13: 978−0−39−017402−4
This book was printed on recycled paper.
Computer and Information Technology
Contents
Bradley−Millspaugh • Programming in Visual C# 2008
Front Matter 1
Preface 1To the Student 7
1. Introduction to Programming and Visual C# 2008 9
Text 9
2. User Interface Design 75
Text 75
3. Variables, Constants, and Calculations 115
Text 115
4. Decisions and Conditions 165
Text 165
5. Menus, Common Dialog Boxes, and Methods 225
Text 225
6. Multiform Projects 267
Text 267
7. Lists, Loops, and Printing 301
Text 301
8. Arrays 339
Text 339
iii
9. Web Applications 377
Text 377
10. Database Applications 419
Text 419
11. Data Files 459
Text 459
12. OOP: Creating Object−Oriented Programs 489
Text 489
13. Graphics, Animation, Sound, and Drag−and−Drop 543
Text 543
14. Additional Topics in C# 579
Text 579
Back Matter 621
Appendix A: Answers to Feedback Questions 621Appendix B: Methods for Working with Dates, Mathematics, and
String Operations 635Appendix C: Tips and Shortcuts for Mastering the Environment 643Appendix D: Security 661Glossary 665Index 676
iv
Bradley−Millspaugh: Programming in Visual C# 2008
Front Matter Preface 1© The McGraw−Hill Companies, 2010
v
PREFACE
Visual C# (C Sharp) is a relatively new language introduced by Microsoft along with Visual Studio. Its goal was to provide the ease of working with Visual Basic with the flexibility and power of the Java and C++ languages. The syntax of C# is similar to Java and C++ but the ease of creating a graphical user inter-face and an event-driven application rivals Visual Basic. C# is fully object-oriented, compatible with many other languages using the .NET Framework. This book incorporates the object-oriented concepts throughout, as well as the syntax and terminology of the language. C# is designed to allow the programmer to develop applications that run under Windows and/or in a Web browser without the complexity generally as-sociated with programming. With very little effort, the programmer can design a screen that holds standard elements such as buttons, check boxes, radio but-tons, text boxes, and list boxes. Each of these objects operates as expected, producing a “standard” Windows or Web user interface.
About This Text
This textbook is intended for use in an introductory programming course, which assumes no prior knowledge of computer programming. The later chapters are also appropriate for professional programmers who are learning a new language to upgrade their skills. This text assumes that the student is familiar with the Windows operating environment and can use an Internet browser application.
Approach
This text incorporates the basic concepts of programming, problem solving, and programming logic, as well as the design techniques of an object-oriented event-driven language. Chapter topics are presented in a sequence that allows the programmer to learn how to deal with a visual interface while acquiring important program-ming skills such as creating projects with objects, decisions, loops, and data management. A high priority is given to writing applications that are easy for the user to understand and use. Students are presented with interface design guidelines throughout the text. This text follows essentially the same sequence as the Bradley/Millspaugh Visual Basic text. Object-oriented programming (OOP) is introduced in Chap-ter 1 and is used consistently in every chapter of the book. The code for all in-chapter projects is available to instructors.
Bradley−Millspaugh: Programming in Visual C# 2008
Front Matter Preface2 © The McGraw−Hill Companies, 2010
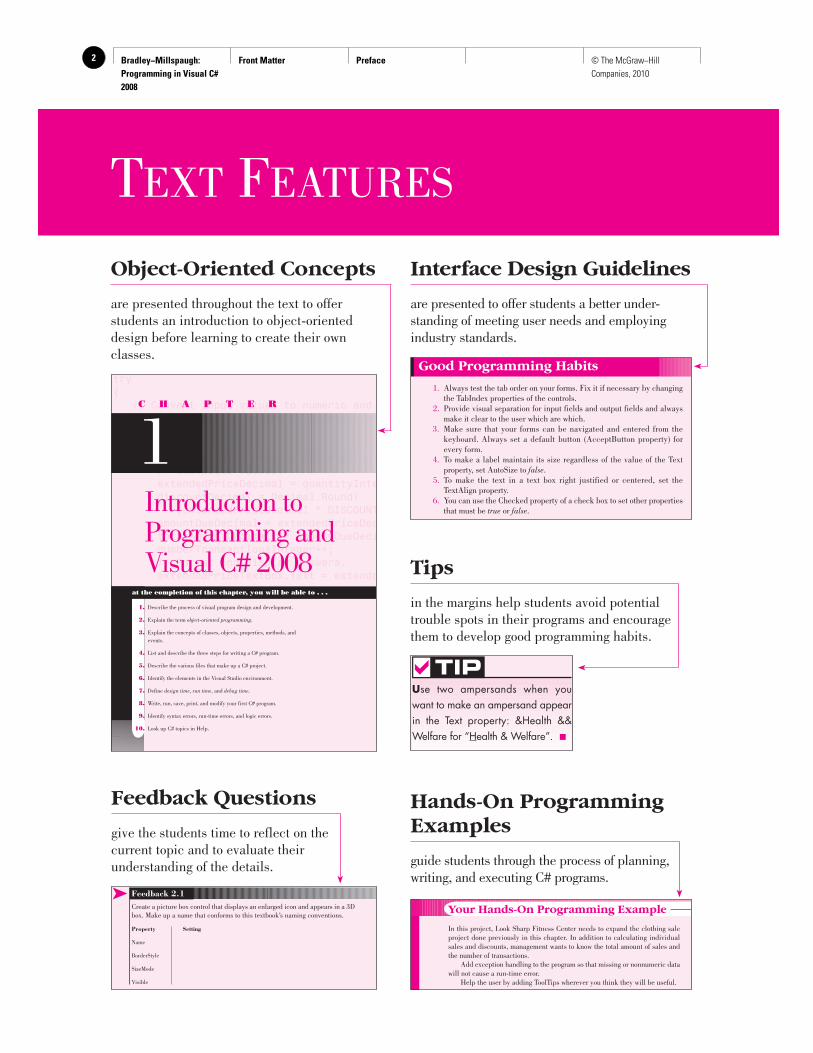
TEXT FEATURES
try{ // Convert input values to numeric and quantityInteger = int.Parse(quantityTex try { priceDecimal = decimal.Parse(priceT // Calculate values. extendedPriceDecimal = quantityInte discountDecimal = Decimal.Round( (extendedPriceDecimal * DISCOUNT amountDueDecimal = extendedPriceDec totalAmountDecimal += amountDueDeci numberTransactionsInteger++; // Format and display answers. extendedPriceTextBox.Text = extende
C H A P T E R
1 Introduction to Programming and Visual C# 2008
at the completion of this chapter, you will be able to . . .
1. Describe the process of visual program design and development.
2. Explain the term object-oriented programming.
3. Explain the concepts of classes, objects, properties, methods, and events.
4. List and describe the three steps for writing a C# program.
5. Describe the various files that make up a C# project.
6. Identify the elements in the Visual Studio environment.
7. Define design time , run time , and debug time.
8. Write, run, save, print, and modify your first C# program.
9. Identify syntax errors, run-time errors, and logic errors.
10. Look up C# topics in Help.
Good Programming Habits
1. Always test the tab order on your forms. Fix it if necessary by changing the TabIndex properties of the controls.
2. Provide visual separation for input fields and output fields and always make it clear to the user which are which.
3. Make sure that your forms can be navigated and entered from the keyboard. Always set a default button (AcceptButton property) for every form.
4. To make a label maintain its size regardless of the value of the Text property, set AutoSize to false .
5. To make the text in a text box right justified or centered, set the TextAlign property.
6. You can use the Checked property of a check box to set other properties that must be true or false .
U se two ampersands when you want to make an ampersand appear in the Text property: &Health && Welfare for “Health & Welfare”. ■
TIP
Tips
in the margins help students avoid potential trouble spots in their programs and encourage them to develop good programming habits.
Hands-On Programming Examples
guide students through the process of planning, writing, and executing C# programs.
Your Hands-On Programming Example
In this project, Look Sharp Fitness Center needs to expand the clothing sale project done previously in this chapter. In addition to calculating individual sales and discounts, management wants to know the total amount of sales and the number of transactions. Add exception handling to the program so that missing or nonnumeric data will not cause a run-time error. Help the user by adding ToolTips wherever you think they will be useful.
Feedback Questions
give the students time to reflect on the current topic and to evaluate their understanding of the details.
➤ Feedback 2.1 Create a picture box control that displays an enlarged icon and appears in a 3D box. Make up a name that conforms to this textbook’s naming conventions.
Property Setting
Name
BorderStyle
SizeMode
Visible
Object-Oriented Concepts
are presented throughout the text to offer students an introduction to object-oriented design before learning to create their own classes.
Interface Design Guidelines
are presented to offer students a better under-stan ding of meeting user needs and employing industry standards.
Bradley−Millspaugh: Programming in Visual C# 2008
Front Matter Preface 3© The McGraw−Hill Companies, 2010
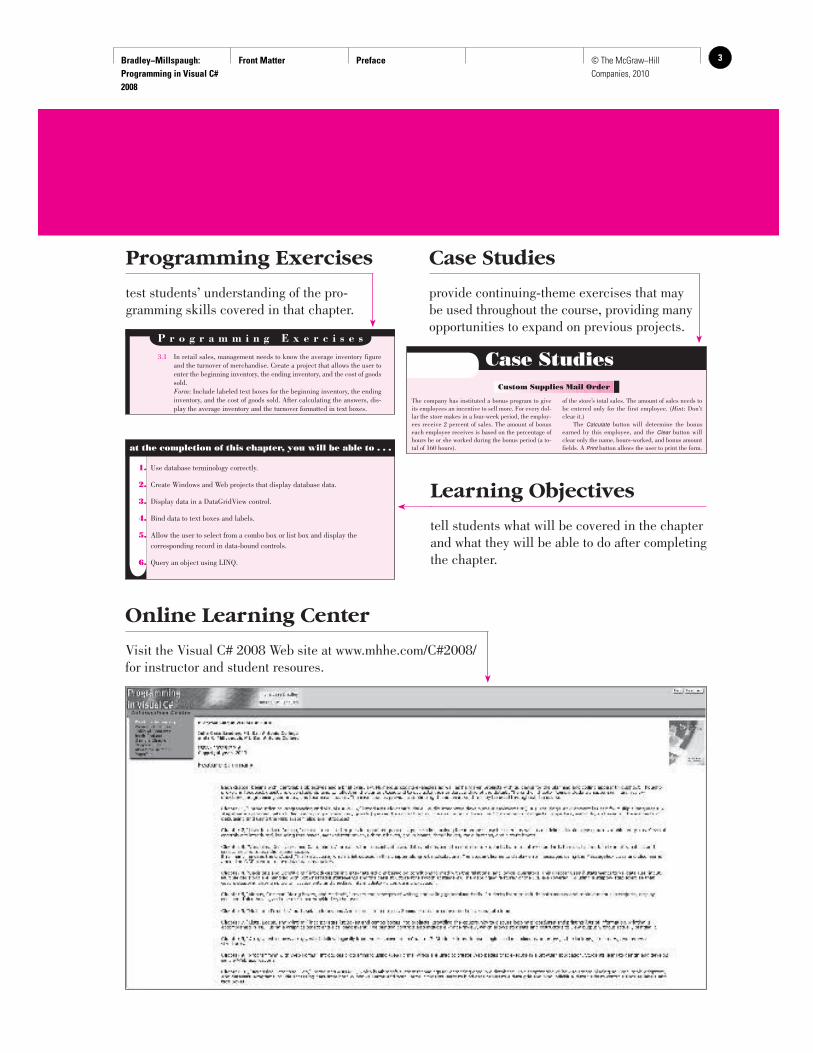
Case Studies
provide continuing-theme exercises that may be used throughout the course, providing many opportunities to expand on previous projects.
Case Studies Custom Supplies Mail Order
The company has instituted a bonus program to give its employees an incentive to sell more. For every dol-lar the store makes in a four-week period, the employ-ees receive 2 percent of sales. The amount of bonus each employee receives is based on the percentage of hours he or she worked during the bonus period (a to-tal of 160 hours).
h ll ll h h
of the store’s total sales. The amount of sales needs to be entered only for the first employee. ( Hint : Don’t clear it.) The Calculate button will determine the bonus earned by this employee, and the Clear button will clear only the name, hours-worked, and bonus amount fields. A Print button allows the user to print the form.
ll b d d l h
Learning Objectives
tell students what will be covered in the chapter and what they will be able to do after completing the chapter.
at the completion of this chapter, you will be able to . . .
1. Use database terminology correctly.
2. Create Windows and Web projects that display database data.
3. Display data in a DataGridView control.
4. Bind data to text boxes and labels.
5. Allow the user to select from a combo box or list box and display the corresponding record in data-bound controls.
6. Query an object using LINQ.
Online Learning Center
Visit the Visual C# 2008 Web site at www.mhhe.com/C#2008/ for instructor and student resoures.
P r o g r a m m i n g E x e r c i s e s
3.1 In retail sales, management needs to know the average inventory figure and the turnover of merchandise. Create a project that allows the user to enter the beginning inventory, the ending inventory, and the cost of goods sold.Form : Include labeled text boxes for the beginning inventory, the ending inventory, and the cost of goods sold. After calculating the answers, dis-play the average inventory and the turnover formatted in text boxes.
Programming Exercises
test students’ understanding of the pro-gramming skills covered in that chapter.

Bradley−Millspaugh: Programming in Visual C# 2008
Front Matter Preface4 © The McGraw−Hill Companies, 2010
viii P R E F A C E
Changes in This Edition
This revision of the text is based on the Professional Edition of Visual Studio (VS) 2008. The 2008 version of VS includes Language-Integrated Queries (LINQ) for a more consistent means of querying a variety of data sources. The Windows Presentation Foundation (WPF) brings new dimensions to interface design. AJAX also has been added to provide faster postbacks for Web pages. Microsoft has made many enhancements to the integrated development environment (IDE). The Editor now has a much richer IntelliSense. New tool windows for creating, managing, and applying styles in Web applications are now included in Chapter 9. A new PrintForm component makes printing a form extremely easy and conve-nient for a classroom environment. The PrintForm component is part of a Microsoft download called the Visual Basic Power Packs , which can be added to the IDE for use with a C# program. PrintForm is covered in Chapter 2 for output to either the printer or a Print Preview window. Standard printing is still covered in Chapter 7. LINQ is covered in Chapter 10 (“Database Applications”) and again in the XML section of Chapter 14. Chapter 11 (“Data Files”) includes a simplified method for writing small amounts of data without performing an open operation. Drag-and-drop for images is now covered in the graphics chapter (Chapter 13). Students learn the development techniques for this familiar operation. Chapter 14 includes XML data files and an introduction to programming with WPF. The text narrative, step-by-step exercises, screen captures, and appen-dixes have all been updated to Visual Studio 2008. The screen captures are all based on Windows Vista.
Features of This Text
Each chapter begins with identifiable objectives and a brief overview. Numerous coding examples as well as hands-on projects with guidance for the planning and coding appear throughout. Thought-provoking feedback questions give students time to reflect on the current topic and to evaluate their understanding of the details. The end-of-chapter items include a chapter summary, review questions, programming exercises, and four case studies. The case studies provide a continuing-theme exercise that may be used throughout the course.
Chapter 1, “Introduction to Programming and Visual C# 2008,” introduces Microsoft’s Visual Studio integrated development environment (IDE). The single environment is used for multiple languages. A step-by-step program gets students into programming very quickly (quicker than most books). The chapter introduces the OOP concepts of objects, properties, methods, and events. The elements of debugging and using the Help system also are introduced.
Chapter 2, “User Interface Design,” demonstrates techniques for good program design, including making the interface easy for users as well as guide-lines for designing maintainable programs. Several controls are introduced, including text boxes, masked text boxes, rich text boxes, group boxes, check boxes, radio buttons, and picture boxes. A new section covers the controls in the Power Pack including PrintForm and the Shape and Line controls.
Bradley−Millspaugh: Programming in Visual C# 2008
Front Matter Preface 5© The McGraw−Hill Companies, 2010
P R E F A C E ix
Chapter 3, “Variables, Constants, and Calculations,” presents the concepts of using data and declaring the data type. Students learn to follow standards to indicate the data type of variables and constants and to use the proper scope. Error handling uses the try/catch/finally structure, which is introduced in this chapter along with calculations. The student learns to display error messages using the MessageBox class and also learns about the OOP concept of overloaded constructors.
Chapter 4, “Decisions and Conditions,” introduces taking alternate actions based on expressions formed with the relational and logical operators. This chapter uses if statements to validate user input. Multiple decisions are handled with both nested if statements and the case structure (the switch statement). The debugging features of the IDE are covered, including a step-by-step exercise that covers stepping through program statements and checking intermediate values during execution.
Chapter 5, “Menus, Common Dialog Boxes, and Methods,” covers the concepts of writing and calling general methods. Students learn to include both menus and context menus in projects, display common dialog boxes, and use the input provided by the user.
Chapter 6, “Multiform Projects,” adds splash forms and About forms to a project. Summary data are presented on a separate form.
Chapter 7, “Lists, Loops, and Printing,” incorporates list boxes and combo boxes into projects, providing the opportunity to discuss looping procedures and printing lists of information. Printing is accomplished in .NET using a graphics object and a callback event. The printing controls also include a Print Preview, which allows students and instructors to view output without actually printing it.
Chapter 8, “Arrays,” introduces arrays, which follow logically from the lists covered in Chapter 7. Students learn to use single- and multidimension arrays, table lookups, structures, and arrays of structures.
Chapter 9, “Web Applications,” introduces programming using Web Forms, which are used to create Web pages that execute in a browser application. Students learn to design and develop simple Web applications. CSS styles and AJAX provide the ability to create improved, more efficient Web sites.
Chapter 10, “Database Applications,” introduces ADO.NET, which is Microsoft’s technology for accessing data in a database. This chapter shows how to create binding sources, table adapters, and datasets. Programs include accessing data from both Windows Forms and Web Forms. Students learn to bind data tables to a data grid and bind individual data fields to controls such as labels and text boxes. LINQ is used to query an array and a database.
Chapter 11, “Data Files,” presents the techniques for data file handling. Students learn to save and read small amounts of data using streams. The StreamWriter and StreamReader objects are used to store and reload the contents of a combo box.
Chapter 12, “OOP: Creating Object-Oriented Programs,” explains more of the theory of object-oriented programming. Although we have been using OOP concepts since Chapter 1, in this chapter students
Bradley−Millspaugh: Programming in Visual C# 2008
Front Matter Preface6 © The McGraw−Hill Companies, 2010
x P R E F A C E
learn the terminology and application of OOP. Inheritance is covered for visual objects (forms) and for extending existing classes. The samples are kept simple enough for an introductory class.
Chapter 13, “Graphics, Animation, Sound, and Drag-and-Drop,” covers the classes and methods of GDI+. The chapter covers graphics objects, pens, and brushes for drawing shapes and lines. Animation is accomplished using the Timer control and the SetBounds method for moving controls. Students learn to play sounds using the SoundPlayer class. Video files are played using Windows Media Player. Drag-and-drop events are used to transfer images and the contents of a text box to a list box.
Chapter 14, “Additional Topics in C#,” introduces some advanced programming topics. This final chapter covers validating user input using Error Providers and the Validating event of controls. Students learn to create applications using multiple document interfaces (MDI), create toolbars and status bars using ToolStrip and StatusStrip controls, and add Web content to a Windows Form using the WebBrowser control. The code-snippet feature is introduced. Reading and writing XML text files are covered. The chapter also covers LINQ to XML. An introduction to Windows Presentation Framework (WPF) includes using WPF Interoperability with a standard Windows Form and creating a WPF Form project.
The appendixes offer important additional material. Appendix A holds the answers to all Feedback questions. Appendix B covers methods for dates, math, and string handling. In the OOP programming style, actions are accomplished with methods of the Math class and String class. Appendix C gives tips and shortcuts for mastering the Visual Studio environment, and Appendix D discusses security issues for both Windows and Web programming.
Thank You
Many people have worked very hard to design and produce this text. We would like to thank our editors, Scott Davidson and Alaina Grayson. Our thanks also to the many people who produced this text, including Marlena Pechan and Betsy Blumenthal. We greatly appreciate Robert Price and Peter van der Goes for their thor-ough technical reviews, constructive criticism, and many valuable suggestions. Thank you to Theresa Berry for her work on the exercise solutions. And, most importantly, we are grateful to Dennis and Richard for their support and understanding through the long days and busy phone lines.
The Authors
We have had fun writing about C#. We hope that this feeling is evident as you read this book and that you will enjoy learning or teaching this outstanding programming language.
Julia Case Bradley Anita C. Millspaugh
Bradley−Millspaugh: Programming in Visual C# 2008
Front Matter To the Student 7© The McGraw−Hill Companies, 2010
xi
TO THE STUDENT
The best way to learn to program in Visual C# is to do it. If you enter and run the sample projects, you will be on your way to writing applications. Reading the examples without trying to run them is like trying to learn a foreign lan-guage or mathematics by just reading about it. Enter the projects, look up your questions in the extensive MSDN Help files, and make those projects run .
Installing Visual C#
For the programs in this text, you need to install the .NET Framework v 3.5, Visual C# 2008, and the MSDN (Microsoft Developers Network) library, which contains all of Help and many instructive articles. You can download the Express Edition of Visual C# and Visual Web De-veloper from msdn.microsoft.com/express. Using these two products, you can complete most of the exercises in this text.
Format Used for Visual C# Statements
Visual C# statements, methods, and functions are shown in this font. Any values that you must supply are in italics . As you work your way through this textbook, note that you may see a subset of the available options for a C# statement or method. Generally, the options that are included reflect those covered in the chapter. If you want to see the complete format for any statement or all versions of a method, refer to Help.
J.C.B. A.C.M.

8 Notes
Bradley−Millspaugh: Programming in Visual C# 2008
1. Introduction to Programming and Visual C# 2008
Text 9© The McGraw−Hill Companies, 2010
try{ // Convert input values to numeric and assign quantityInteger = int.Parse(quantityTextBox.T try { priceDecimal = decimal.Parse(priceTextBox // Calculate values. extendedPriceDecimal = quantityInteger * discountDecimal = Decimal.Round( (extendedPriceDecimal * DISCOUNT_RATE_ amountDueDecimal = extendedPriceDecimal - totalAmountDecimal += amountDueDecimal; numberTransactionsInteger++; // Format and display answers. extendedPriceTextBox.Text = extendedPrice
C H A P T E R
1 Introduction to Programming and Visual C# 2008
at the completion of this chapter, you will be able to . . .
1. Describe the process of visual program design and development.
2. Explain the term object-oriented programming.
3. Explain the concepts of classes, objects, properties, methods, and events.
4. List and describe the three steps for writing a C# program.
5. Describe the various files that make up a C# project.
6. Identify the elements in the Visual Studio environment.
7. Define design time , run time , and debug time.
8. Write, run, save, print, and modify your first C# program.
9. Identify syntax errors, run-time errors, and logic errors.
10. Look up C# topics in Help.
Bradley−Millspaugh: Programming in Visual C# 2008
1. Introduction to Programming and Visual C# 2008
Text10 © The McGraw−Hill Companies, 2010
2 V I S U A L C# Introduction to Programming and Visual C# 2008
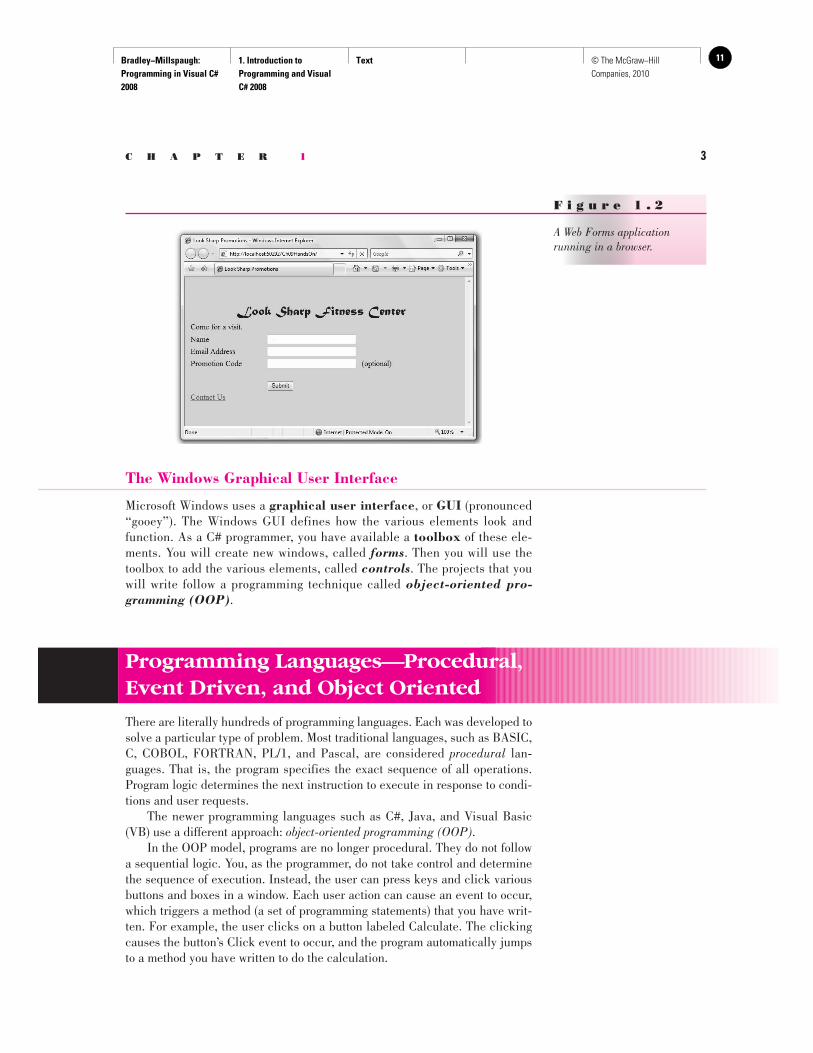
Beginning in Chapter 9 you will create programs using Web Forms and Visual Web Developer. You can run Web applications in a browser such as Internet Explorer or Mozilla FireFox, on the Internet, or on a company intranet. Figure 1.2 shows a Web Forms application. You also will become acquainted with Microsoft’s new screen design tech-nology, Windows Presentation Foundation (WPF), which is covered in Chapter 14. WPF uses its own designer and design elements, which are different from those used for Windows forms.
Writing Windows Applications with Visual C#
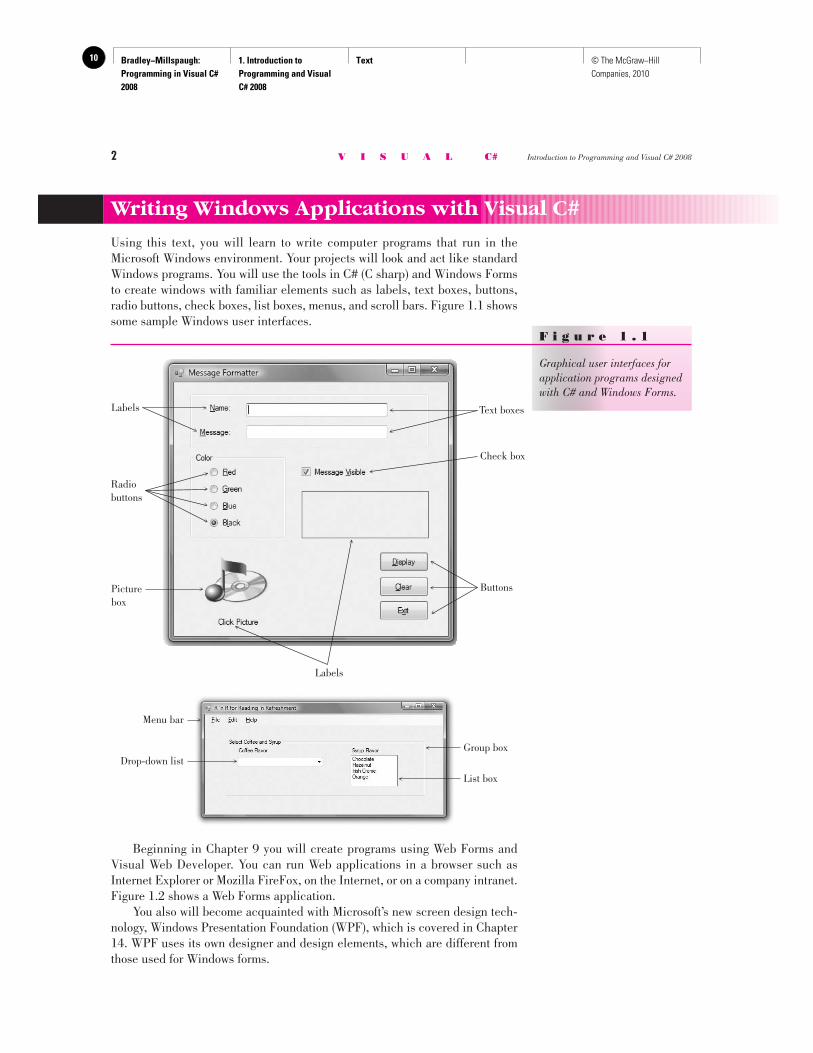
Using this text, you will learn to write computer programs that run in the Microsoft Windows environment. Your projects will look and act like standard Windows programs. You will use the tools in C# (C sharp) and Windows Forms to create windows with familiar elements such as labels, text boxes, buttons, radio buttons, check boxes, list boxes, menus, and scroll bars. Figure 1.1 shows some sample Windows user interfaces.
F i g u r e 1 . 1
Graphical user interfaces for application programs designed with C# and Windows Forms.
Text boxes
ButtonsPicturebox
Labels
Radiobuttons
Labels
Check box
Group box
List box
Drop-down list
Menu bar
Bradley−Millspaugh: Programming in Visual C# 2008
1. Introduction to Programming and Visual C# 2008
Text 11© The McGraw−Hill Companies, 2010
C H A P T E R 1 3
The Windows Graphical User Interface
Microsoft Windows uses a graphical user interface , or GUI (pronounced “gooey”). The Windows GUI defines how the various elements look and function. As a C# programmer, you have available a toolbox of these ele-ments. You will create new windows, called forms . Then you will use the toolbox to add the various elements, called controls . The projects that you will write follow a programming technique called object-oriented pro-gramming (OOP) .
F i g u r e 1 . 2
A Web Forms application running in a browser.
Programming Languages—Procedural, Event Driven, and Object Oriented
There are literally hundreds of programming languages. Each was developed to solve a particular type of problem. Most traditional languages, such as BASIC, C, COBOL, FORTRAN, PL/1, and Pascal, are considered procedural lan-guages. That is, the program specifies the exact sequence of all operations. Program logic determines the next instruction to execute in response to condi-tions and user requests. The newer programming languages such as C#, Java, and Visual Basic (VB) use a different approach: object-oriented programming (OOP) . In the OOP model, programs are no longer procedural. They do not follow a sequential logic. You, as the programmer, do not take control and determine the sequence of execution. Instead, the user can press keys and click various buttons and boxes in a window. Each user action can cause an event to occur, which triggers a method (a set of programming statements) that you have writ-ten. For example, the user clicks on a button labeled Calculate. The clicking causes the button’s Click event to occur, and the program automatically jumps to a method you have written to do the calculation.
Bradley−Millspaugh: Programming in Visual C# 2008
1. Introduction to Programming and Visual C# 2008
Text12 © The McGraw−Hill Companies, 2010
4 V I S U A L C# Introduction to Programming and Visual C# 2008
The Object Model
In C# you will work with objects, which have properties, methods, and events. Each object is based on a class.
Objects Think of an object as a thing, or a noun. Examples of objects are forms and controls. Forms are the windows and dialog boxes you place on the screen; controls are the components you place inside a form, such as text boxes, but-tons, and list boxes.
Properties Properties tell something about or control the behavior of an object such as its name, color, size, or location. You can think of properties as adjectives that describe objects. When you refer to a property, you first name the object, add a period, and then name the property. For example, refer to the Text property of a form called SalesForm as SalesForm.Text (pronounced “sales form dot text”).
Methods Actions associated with objects are called methods . Methods are the verbs of object-oriented programming. Some typical methods are Close , Show , and Clear . Each of the predefined objects has a set of methods that you can use. You will learn to write additional methods to perform actions in your programs. You refer to methods as Object.Method (“object dot method”). For exam-ple, a Show method can apply to different objects: BillingForm.Show shows the form object called BillingForm; exitButton.Show shows the button object called exitButton.
Events You can write methods that execute when a particular event occurs. An event occurs when the user takes an action such as clicking a button, pressing a key, scrolling, or closing a window. Events also can be triggered by actions of other objects, such as repainting a form or a timer reaching a preset point.
Classes A class is a template or blueprint used to create a new object. Classes contain the definition of all available properties, methods, and events. Each time that you create a new object, it must be based on a class. For example, you may decide to place three buttons on your form. Each button is based on the Button class and is considered one object, called an instance of the class. Each button (or instance) has its own set of properties, methods, and events. One button may be labeled “OK”, one “Cancel”, and one “Exit”. When the user clicks the OK button, that button’s Click event occurs; if the user clicks on the Exit button, that button’s Click event occurs. And, of course, you have written different program instructions for each of the button’s Click events.
An Analogy If the concepts of classes, objects, properties, methods, and events are still a little unclear, maybe an analogy will help. Consider an Automobile class. When
T he term members is used to refer to both properties and methods. ■
TIP

Bradley−Millspaugh: Programming in Visual C# 2008
1. Introduction to Programming and Visual C# 2008
Text 13© The McGraw−Hill Companies, 2010
C H A P T E R 1 5
we say automobile, we are not referring to a particular auto, but we know that an automobile has a make and model, a color, an engine, and a number of doors. These elements are the properties of the Automobile class. Each individual auto is an object, or an instance of the Automobile class. Each Automobile object has its own settings for the available properties. For example, each Automobile object has a Color property, such as myAuto.Color = Blue and yourAuto.Color = Red. The methods, or actions, of the Automobile class might be Start , SpeedUp , SlowDown , and Stop . To refer to the methods of a specific object of the class, use myAuto.Start and yourAuto.Stop . The events of an Automobile class could be Arrive or Crash. In a C# pro-gram, you write event-handling methods that specify the actions you want to take when a particular event occurs for an object. For example, you might write a method to handle the yourAuto.Crash event. Note : Chapter 12 presents object-oriented programming in greater depth.
Microsoft’s Visual Studio
The latest version of Microsoft’s Visual Studio, called Visual Studio 2008, in-cludes C#, Visual C++, Visual Basic, and the .NET 3.5 Framework.
The .NET Framework The programming languages in Visual Studio run in the .NET Framework. The Framework provides for easier development of Web-based and Windows-based applications, allows objects from different languages to operate together, and standardizes how the languages refer to data and objects. Several third-party vendors have produced versions of other programming languages to run in the .NET Framework, including .NET versions of APL by Dyalog, FORTRAN by Lahey Computer Systems, COBOL by Fujitsu Software Corporation, Pascal by the Queensland University of Technology (free), PERL by ActiveState, RPG by ASNA, and Java, known as IKVM.NET. The .NET languages all compile to (are translated to) a common machine language, called Microsoft Intermediate Language (MSIL). The MSIL code, called managed code, runs in the Common Language Runtime (CLR), which is part of the .NET Framework.
C# Microsoft C# is a part of Visual Studio. You also can purchase C# by itself (without the other languages but with the .NET Framework). C# is available in an Express Edition , a Standard Edition, a Professional Edition , and four specialized versions of Team System Editions for large enterprise application development. You can find a matrix showing the features of each edition in Help. Anyone planning to do professional application development that in-cludes the advanced features of database management should use the Profes-sional Edition or the Team System Database version. The full Professional Edition is available to educational institutions through the Microsoft Academic Alliance program and is the best possible deal. When a campus department purchases the Academic Alliance, the school can install Visual Studio on all classroom and lab computers and provide the software to all students and fac-ulty at no additional charge. For more information, have your instructor visit: http://msdn.microsoft.com/en-us/academic/default.aspx
Bradley−Millspaugh: Programming in Visual C# 2008
1. Introduction to Programming and Visual C# 2008
Text14 © The McGraw−Hill Companies, 2010
6 V I S U A L C# Introduction to Programming and Visual C# 2008
Microsoft provides an Express Edition of each of the programming lan-guages, which you can download for free ( www.microsoft.com/express/down-load/ ). You can use Visual C# Express for Windows development and Visual Web Developer Express for the Web applications in Chapters 9 and 10. This text is based on the Professional Edition of Visual Studio 2008, the current version. You cannot run the projects in this text in any earlier version of C#.
Writing C# Programs
When you write a C# application, you follow a three-step process for planning the project and then repeat the three-step process for creating the project. The three steps involve setting up the user interface, defining the properties, and then creating the code.
The Three-Step Process
Planning 1. Design the user interface . When you plan the user interface , you draw
a sketch of the screens the user will see when running your project. On your sketch, show the forms and all the controls that you plan to use. Indicate the names that you plan to give the form and each of the objects on the form. Refer to Figure 1.1 for examples of user interfaces.
Before you proceed with any more steps, consult with your user and make sure that you both agree on the look and feel of the project.
2. Plan the properties . For each object, write down the properties that you plan to set or change during the design of the form.
3. Plan the C# code . In this step you plan the classes and methods that will execute when your project runs. You will determine which events require action to be taken and then make a step-by-step plan for those actions.
Later, when you actually write the C# code , you must follow the language syntax rules. But during the planning stage, you will write out the actions using pseudocode , which is an English expression or comment that describes the action. For example, you must plan for the event that occurs when the user clicks on the Exit button. The pseudocode for the event could be End the project or Quit .
Programming After you have completed the planning steps and have approval from your user, you are ready to begin the actual construction of the project. Use the same three-step process that you used for planning.
1. Define the user interface . When you define the user interface, you create the forms and controls that you designed in the planning stage.
Think of this step as defining the objects you will use in your application.
Bradley−Millspaugh: Programming in Visual C# 2008
1. Introduction to Programming and Visual C# 2008
Text 15© The McGraw−Hill Companies, 2010
C H A P T E R 1 7
2. Set the properties . When you set the properties of the objects, you give each object a name and define such attributes as the contents of a label, the size of the text, and the words that appear on top of a button and in the form’s title bar.
You might think of this step as describing each object. 3. Write the code . You will use C# programming statements (called C#
code ) to carry out the actions needed by your program. You will be sur-prised and pleased by how few statements you need to create a powerful Windows program.
You can think of this third step as defining the actions of your program.
C# Application Files
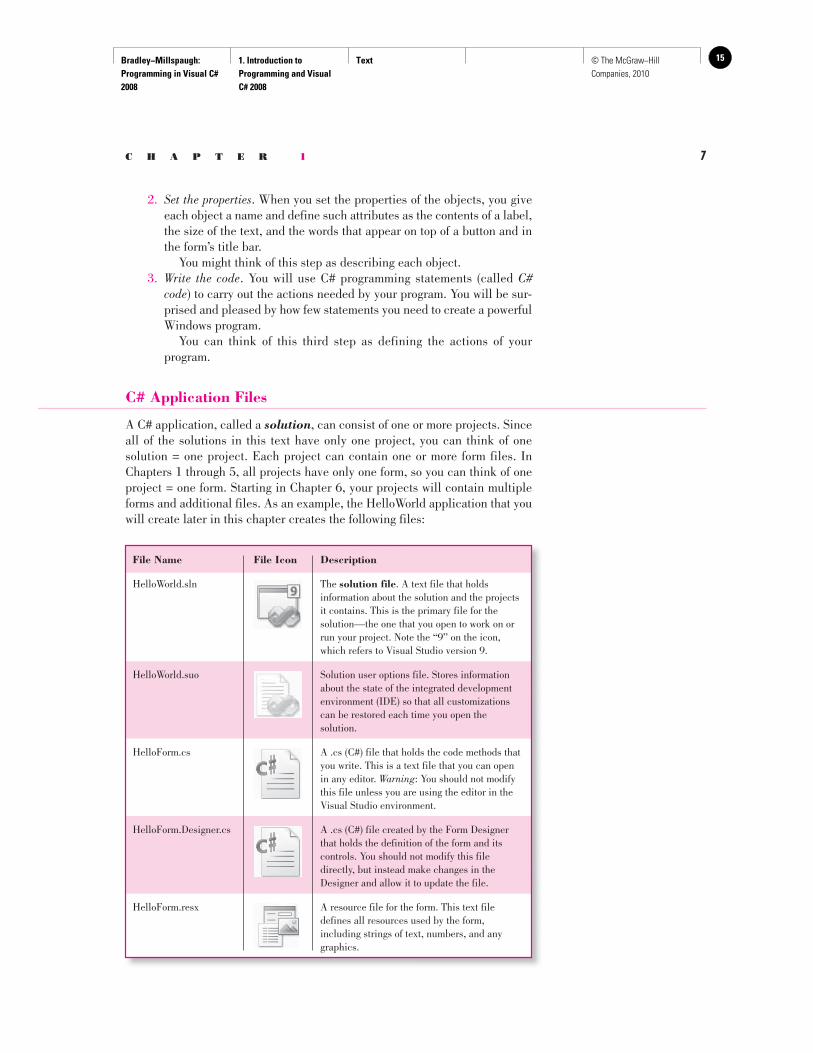
A C# application, called a solution , can consist of one or more projects. Since all of the solutions in this text have only one project, you can think of one solution = one project. Each project can contain one or more form files. In Chapters 1 through 5, all projects have only one form, so you can think of one project = one form. Starting in Chapter 6, your projects will contain multiple forms and additional files. As an example, the HelloWorld application that you will create later in this chapter creates the following files:
File Name File Icon Description
HelloWorld.sln The solution file . A text file that holds information about the solution and the projects it contains. This is the primary file for the solution—the one that you open to work on or run your project. Note the “9” on the icon, which refers to Visual Studio version 9.
HelloWorld.suo Solution user options file. Stores information about the state of the integrated development environment (IDE) so that all customizations can be restored each time you open the solution.
HelloForm.cs A .cs (C#) file that holds the code methods that you write. This is a text file that you can open in any editor. Warning : You should not modify this file unless you are using the editor in the Visual Studio environment.
HelloForm.Designer.cs A .cs (C#) file created by the Form Designer that holds the definition of the form and its controls. You should not modify this file directly, but instead make changes in the Designer and allow it to update the file.
HelloForm.resx A resource file for the form. This text file defines all resources used by the form, including strings of text, numbers, and any graphics.
Bradley−Millspaugh: Programming in Visual C# 2008
1. Introduction to Programming and Visual C# 2008
Text16 © The McGraw−Hill Companies, 2010
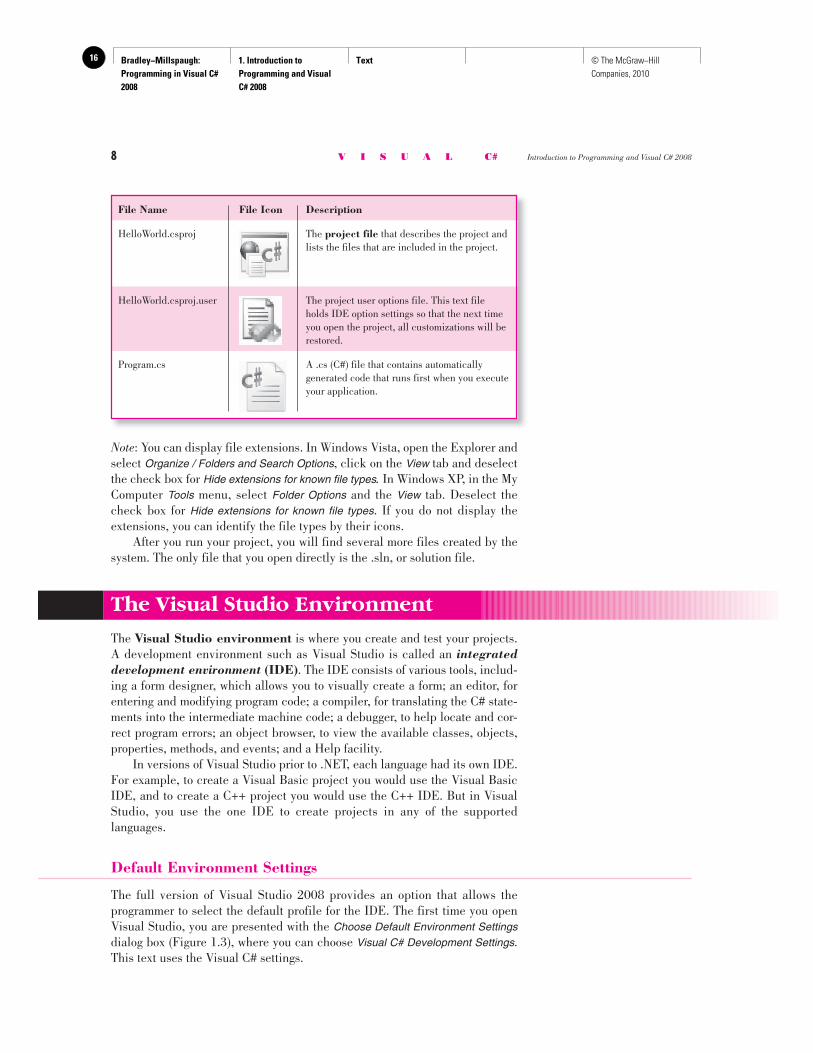
8 V I S U A L C# Introduction to Programming and Visual C# 2008
Note : You can display file extensions. In Windows Vista, open the Explorer and select Organize / Folders and Search Options , click on the View tab and deselect the check box for Hide extensions for known file types. In Windows XP, in the My Computer Tools menu, select Folder Options and the View tab. Deselect the check box for Hide extensions for known file types . If you do not display the extensions, you can identify the file types by their icons. After you run your project, you will find several more files created by the system. The only file that you open directly is the .sln, or solution file.
The Visual Studio Environment
The Visual Studio environment is where you create and test your projects. A development environment such as Visual Studio is called an integrated development environment ( IDE ) . The IDE consists of various tools, includ-ing a form designer, which allows you to visually create a form; an editor, for entering and modifying program code; a compiler, for translating the C# state-ments into the intermediate machine code; a debugger, to help locate and cor-rect program errors; an object browser, to view the available classes, objects, properties, methods, and events; and a Help facility. In versions of Visual Studio prior to .NET, each language had its own IDE. For example, to create a Visual Basic project you would use the Visual Basic IDE, and to create a C++ project you would use the C++ IDE. But in Visual Studio, you use the one IDE to create projects in any of the supported languages.
Default Environment Settings
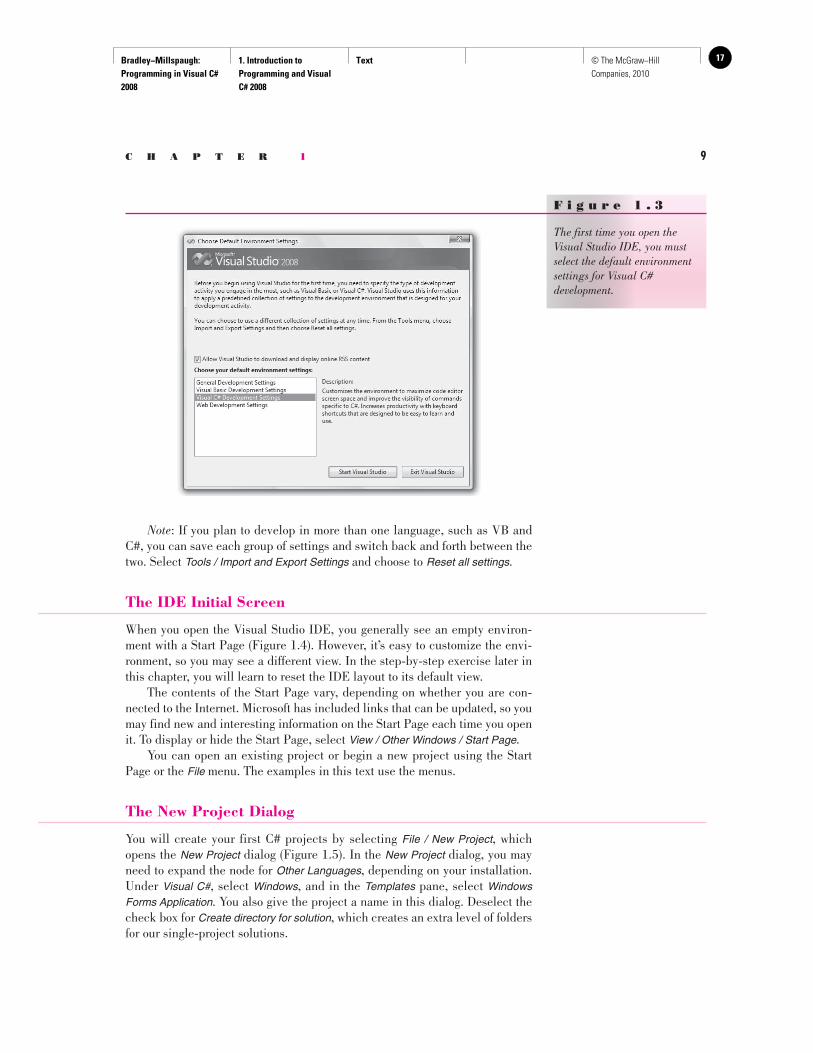
The full version of Visual Studio 2008 provides an option that allows the programmer to select the default profile for the IDE. The first time you open Visual Studio, you are presented with the Choose Default Environment Settingsdialog box ( Figure 1.3 ), where you can choose Visual C# Development Settings . This text uses the Visual C# settings.
File Name File Icon Description
HelloWorld.csproj The project file that describes the project and lists the files that are included in the project.
HelloWorld.csproj.user The project user options file. This text file holds IDE option settings so that the next time you open the project, all customizations will be restored.
Program.cs A .cs (C#) file that contains automatically generated code that runs first when you execute your application.
Bradley−Millspaugh: Programming in Visual C# 2008
1. Introduction to Programming and Visual C# 2008
Text 17© The McGraw−Hill Companies, 2010
C H A P T E R 1 9
Note : If you plan to develop in more than one language, such as VB and C#, you can save each group of settings and switch back and forth between the two. Select Tools / Import and Export Settings and choose to Reset all settings .
The IDE Initial Screen
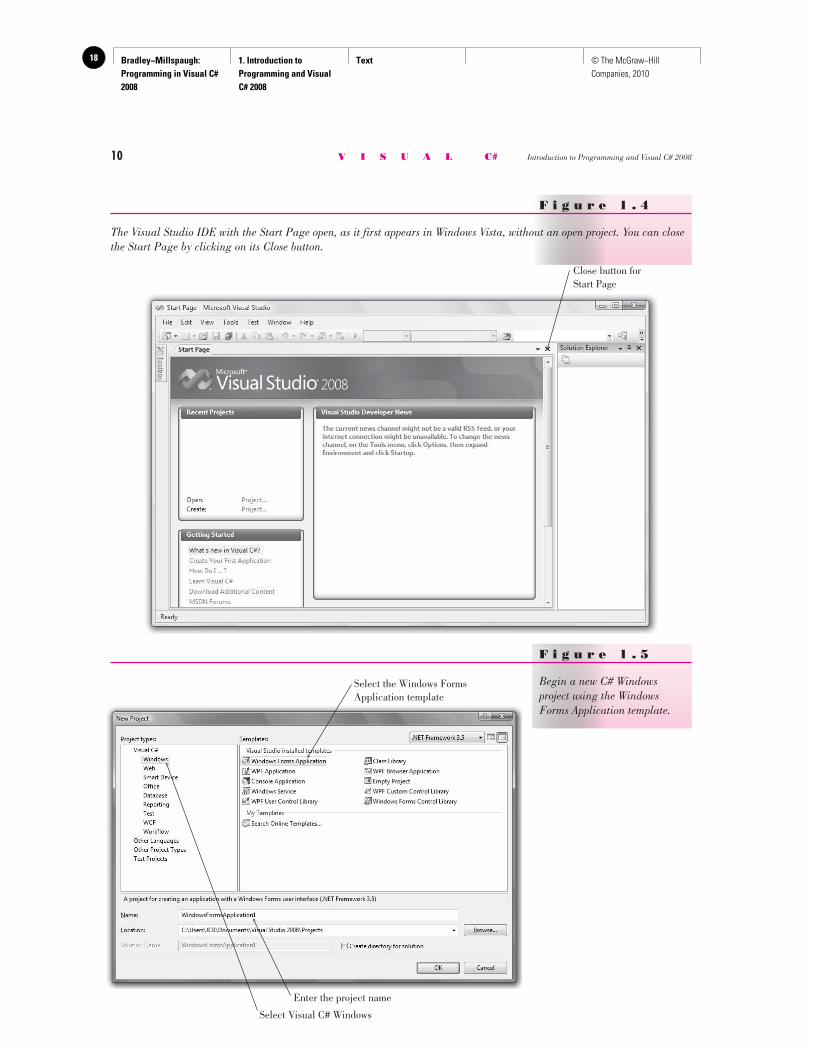
When you open the Visual Studio IDE, you generally see an empty environ-ment with a Start Page ( Figure 1.4 ). However, it’s easy to customize the envi-ronment, so you may see a different view. In the step-by-step exercise later in this chapter, you will learn to reset the IDE layout to its default view. The contents of the Start Page vary, depending on whether you are con-nected to the Internet. Microsoft has included links that can be updated, so you may find new and interesting information on the Start Page each time you open it. To display or hide the Start Page, select View / Other Windows / Start Page . You can open an existing project or begin a new project using the Start Page or the File menu. The examples in this text use the menus.
The New Project Dialog
You will create your first C# projects by selecting File / New Project , which opens the New Project dialog ( Figure 1.5 ). In the New Project dialog, you may need to expand the node for Other Languages , depending on your installation. Under Visual C# , select Windows , and in the Templates pane, select Windows Forms Application . You also give the project a name in this dialog. Deselect the check box for Create directory for solution , which creates an extra level of folders for our single-project solutions.
F i g u r e 1 . 3
The first time you open the Visual Studio IDE, you must select the default environment settings for Visual C# development.
Bradley−Millspaugh: Programming in Visual C# 2008
1. Introduction to Programming and Visual C# 2008
Text18 © The McGraw−Hill Companies, 2010
10 V I S U A L C# Introduction to Programming and Visual C# 2008
F i g u r e 1 . 4
The Visual Studio IDE with the Start Page open, as it first appears in Windows Vista, without an open project. You can close the Start Page by clicking on its Close button.
Close button forStart Page
F i g u r e 1 . 5
Begin a new C# Windows project using the Windows Forms Application template.
Select the Windows Forms Application template
Select Visual C# Windows
Enter the project name
Bradley−Millspaugh: Programming in Visual C# 2008
1. Introduction to Programming and Visual C# 2008
Text 19© The McGraw−Hill Companies, 2010
C H A P T E R 1 11
The IDE Main Window
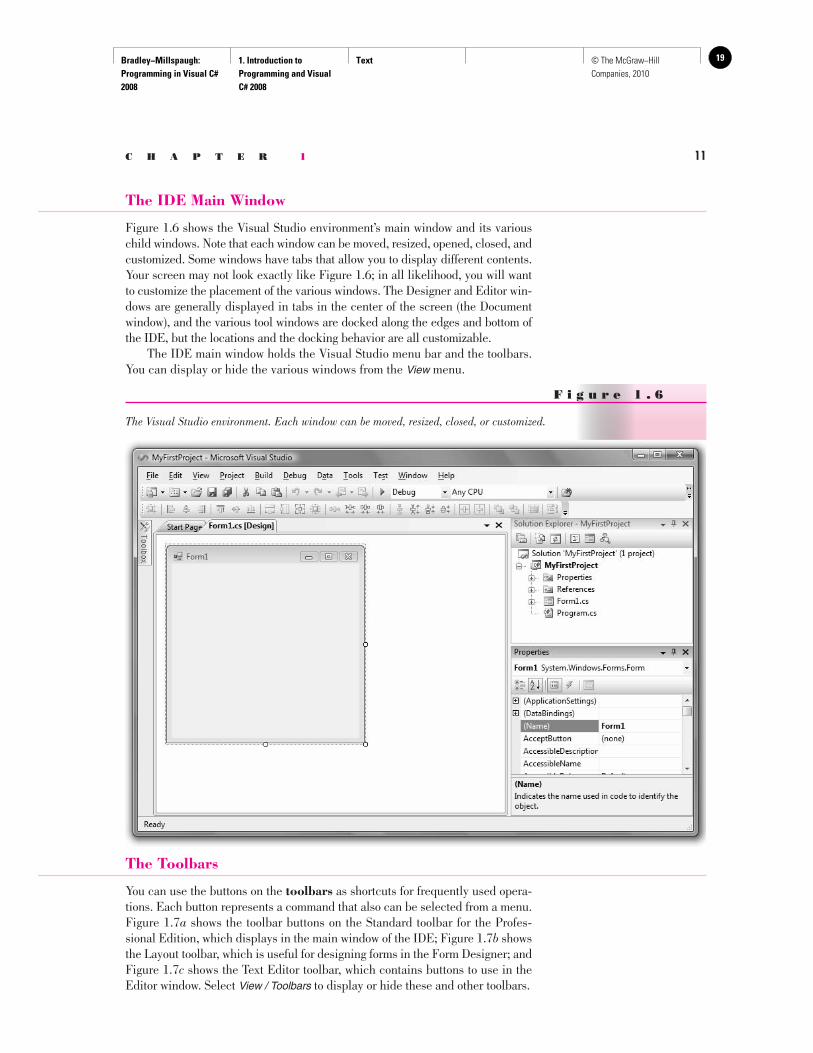
Figure 1.6 shows the Visual Studio environment’s main window and its various child windows. Note that each window can be moved, resized, opened, closed, and customized. Some windows have tabs that allow you to display different contents. Your screen may not look exactly like Figure 1.6 ; in all likelihood, you will want to customize the placement of the various windows. The Designer and Editor win-dows are generally displayed in tabs in the center of the screen (the Document window), and the various tool windows are docked along the edges and bottom of the IDE, but the locations and the docking behavior are all customizable. The IDE main window holds the Visual Studio menu bar and the toolbars. You can display or hide the various windows from the View menu.
F i g u r e 1 . 6
The Visual Studio environment. Each window can be moved, resized, closed, or customized.
The Toolbars
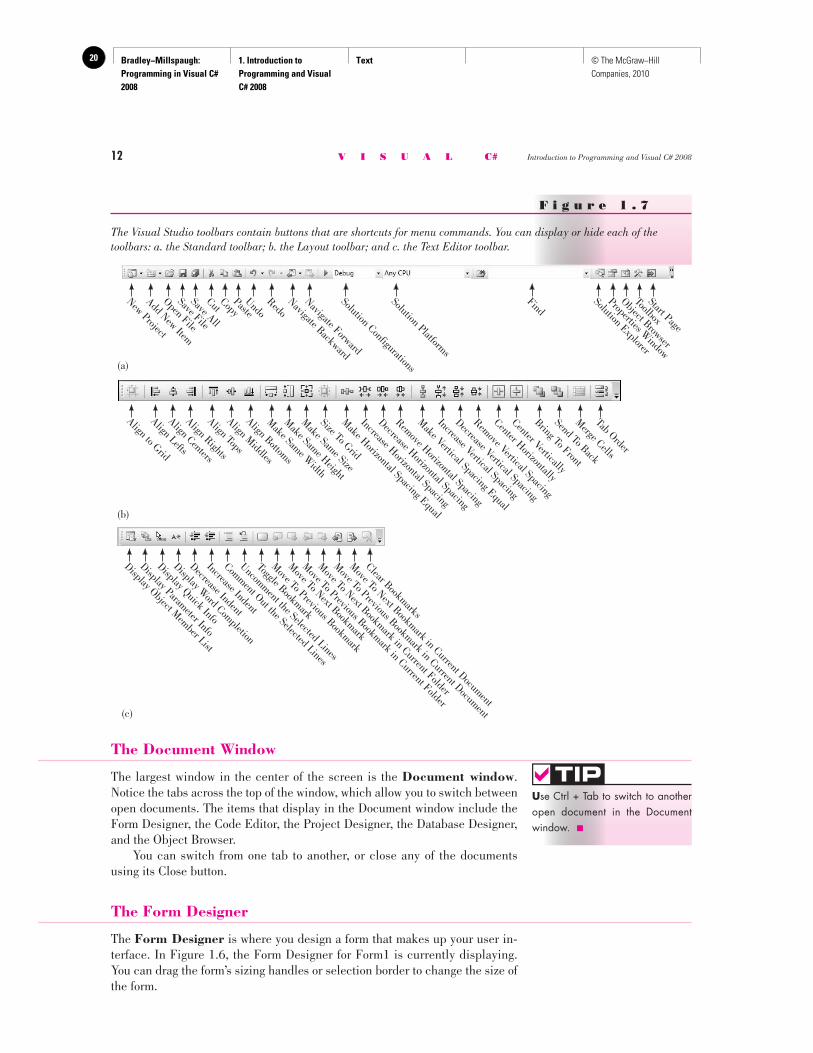
You can use the buttons on the toolbars as shortcuts for frequently used opera-tions. Each button represents a command that also can be selected from a menu. Figure 1.7 a shows the toolbar buttons on the Standard toolbar for the Profes-sional Edition, which displays in the main window of the IDE; Figure 1.7 b shows the Layout toolbar, which is useful for designing forms in the Form Designer; and Figure 1.7 c shows the Text Editor toolbar, which contains buttons to use in the Editor window. Select View / Toolbars to display or hide these and other toolbars.
Bradley−Millspaugh: Programming in Visual C# 2008
1. Introduction to Programming and Visual C# 2008
Text20 © The McGraw−Hill Companies, 2010
12 V I S U A L C# Introduction to Programming and Visual C# 2008
The Document Window
The largest window in the center of the screen is the Document window . Notice the tabs across the top of the window, which allow you to switch between open documents. The items that display in the Document window include the Form Designer, the Code Editor, the Project Designer, the Database Designer, and the Object Browser. You can switch from one tab to another, or close any of the documents using its Close button.
The Form Designer
The Form Designer is where you design a form that makes up your user in-terface. In Figure 1.6 , the Form Designer for Form1 is currently displaying. You can drag the form’s sizing handles or selection border to change the size of the form.
F i g u r e 1 . 7
The Visual Studio toolbars contain buttons that are shortcuts for menu commands. You can display or hide each of the toolbars: a. the Standard toolbar; b. the Layout toolbar; and c. the Text Editor toolbar.
U se Ctrl + Tab to switch to another open document in the Document window. ■
TIP
Toolbox
Start Page
Solution Explorer
Object Browser
Properties Window
FindSolution Platforms
RedoUndo
Navigate Backward
Navigate Forward
Solution Configurations
PasteCopy
CutSave All
Save File
Open File
Add New Item
New Project
(a)
Tab Order
Merge Cells
Send To Back
Bring To Front
Center Vertically
Center Horizontally
Remove Vertical Spacing
Decrease Vertical Spacing
Increase Vertical Spacing
Make Vertical Spacing Equal
Remove Horizontal Spacing
Decrease Horizontal Spacing
Increase Horizontal Spacing
Make Horizontal Spacing Equal
Size To Grid
Make Same Size
Make Same Height
Make Same Width
Align Bottoms
Align Middles
Align Tops
Align Rights
Align Centers
Align Lefts
Align to Grid
(b)
Uncomment the Selected Lines
Comment Out the Selected Lines
Clear Bookmarks
Move To Next Bookmark
Move To Previous Bookmark in Current Folder
Move To Next Bookmark in Current Folder
Move To Previous Bookmark in Current Document
Move To Next Bookmark in Current Document
Move To Previous Bookmark
Toggle Bookmark
Display Word Completion
Display Quick Info
Display Parameter Info
Display Object Member List
(c)
Increase Indent
Decrease Indent
Bradley−Millspaugh: Programming in Visual C# 2008
1. Introduction to Programming and Visual C# 2008
Text 21© The McGraw−Hill Companies, 2010
C H A P T E R 1 13
Y ou can sort the properties in the window either alphabetically or by categories. Use the buttons on the Properties window. ■
TIP
When you begin a new C# Windows application, a new form is added to the project with the default name Form1. In the step-by-step exercise later in the chapter, you will learn to change the form’s name.
The Solution Explorer Window
The Solution Explorer window holds the filenames for the files included in your project and a list of the classes it references. The Solution Explorer window and the environment’s title bar hold the name of your solution (.sln) file, which is WindowsFormsApplication1 by default unless you give it a new value in the New Project dialog box. In Figure 1.6 , the name of the solution is MyFirstProject.
The Properties Window
You use the Properties window to set the properties for the objects in your project. See “Set Properties” later in this chapter for instructions on changing properties.
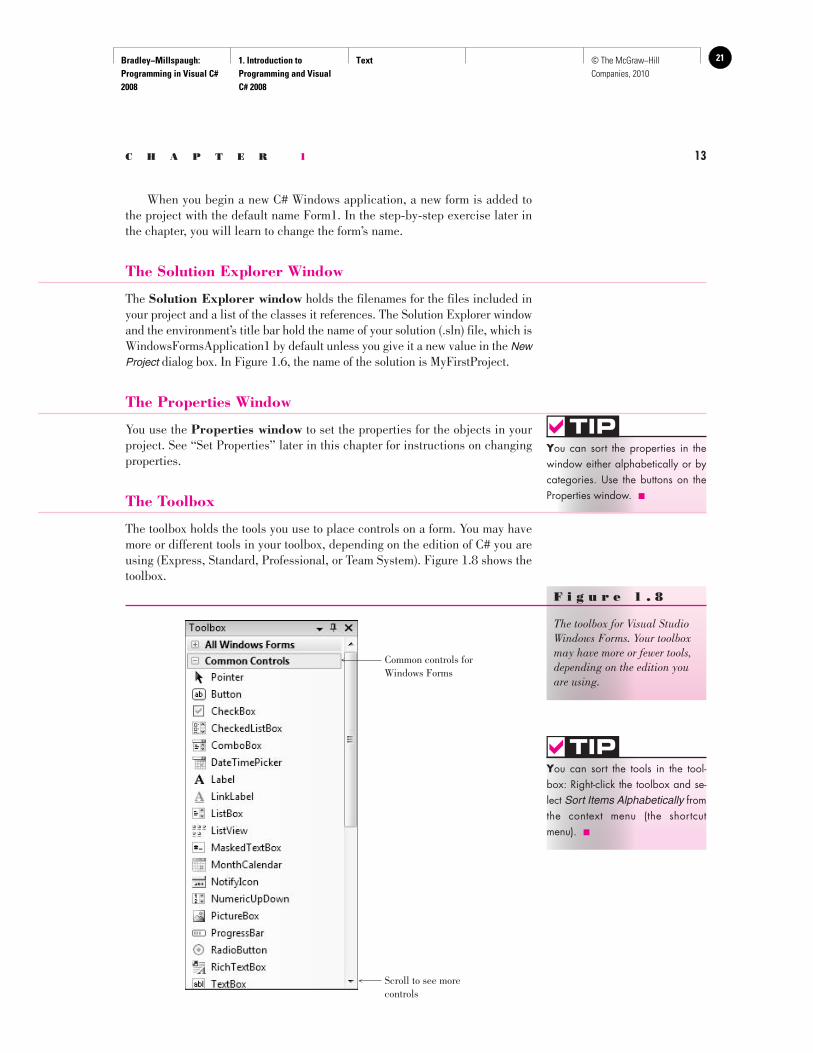
The Toolbox
The toolbox holds the tools you use to place controls on a form. You may have more or different tools in your toolbox, depending on the edition of C# you are using (Express, Standard, Professional, or Team System). Figure 1.8 shows the toolbox.
Y ou can sort the tools in the tool-box: Right-click the toolbox and se-lect Sort Items Alphabetically from the context menu (the shortcut menu). ■
TIP
F i g u r e 1 . 8
The toolbox for Visual Studio Windows Forms. Your toolbox may have more or fewer tools, depending on the edition you are using.
Common controls forWindows Forms
Scroll to see morecontrols
Bradley−Millspaugh: Programming in Visual C# 2008
1. Introduction to Programming and Visual C# 2008
Text22 © The McGraw−Hill Companies, 2010
14 V I S U A L C# Introduction to Programming and Visual C# 2008
Help with Specific TasksSelected Topic
Help Search
Index ResultsHelp FavoritesHelp Contents
Help Index
Filter
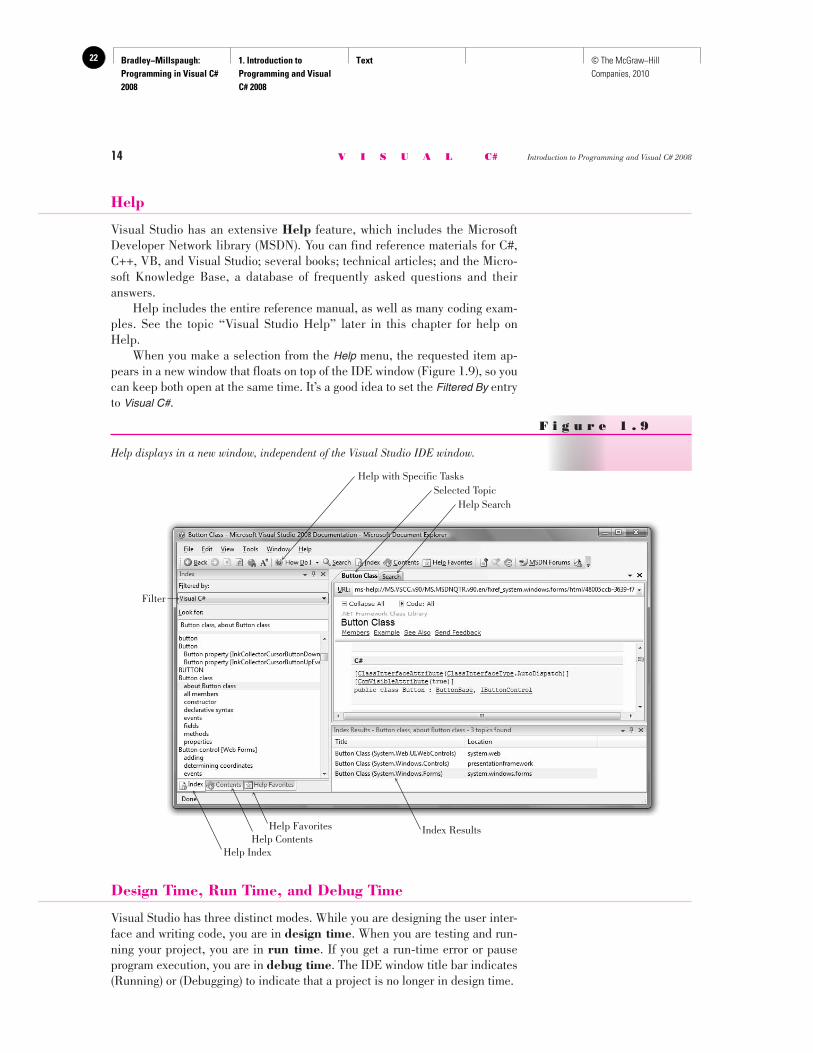
F i g u r e 1 . 9
Help displays in a new window, independent of the Visual Studio IDE window.
Help
Visual Studio has an extensive Help feature, which includes the Microsoft Developer Network library (MSDN). You can find reference materials for C#, C++, VB, and Visual Studio; several books; technical articles; and the Micro-soft Knowledge Base, a database of frequently asked questions and their answers. Help includes the entire reference manual, as well as many coding exam-ples. See the topic “Visual Studio Help” later in this chapter for help on Help. When you make a selection from the Help menu, the requested item ap-pears in a new window that floats on top of the IDE window ( Figure 1.9 ), so you can keep both open at the same time. It’s a good idea to set the Filtered By entry to Visual C# .
Design Time, Run Time, and Debug Time
Visual Studio has three distinct modes. While you are designing the user inter-face and writing code, you are in design time . When you are testing and run-ning your project, you are in run time . If you get a run-time error or pause program execution, you are in debug time . The IDE window title bar indicates (Running) or (Debugging) to indicate that a project is no longer in design time.
Bradley−Millspaugh: Programming in Visual C# 2008
1. Introduction to Programming and Visual C# 2008
Text 23© The McGraw−Hill Companies, 2010
C H A P T E R 1 15
Set Up Your Workspace
Before you can begin a project, you must open the Visual Studio IDE. You also may need to customize your workspace.
Run Visual Studio These instructions assume that Visual Studio 2008 is installed in the default location. If you are running in a classroom or lab, the program may be installed in an alternate location, such as directly on the desktop.
STEP 1: Click the Windows Start button and move the mouse pointer to All Programs .
STEP 2: Locate Microsoft Visual Studio 2008 . STEP 3: If a submenu appears, select Microsoft Visual Studio 2008 or Microsoft
Visual C# 2008 Express . Visual Studio will start and display the Start Page (refer to Figure
1.4 ). If you are using Visual Studio Professional and this is the first time that VS has been opened for this user, you will need to select Visual C# Development Settings from the Choose Default Environment Settings dialog box (refer to Figure 1.3 ).
Note : The VS IDE can be customized to not show the Start Page when it opens.
Start a New Project STEP 1: Select File / New / Project ; the New Project dialog box opens (refer to
Figure 1.5 ). Make sure that Visual C# and Windows are selected for
Writing Your First C# Project
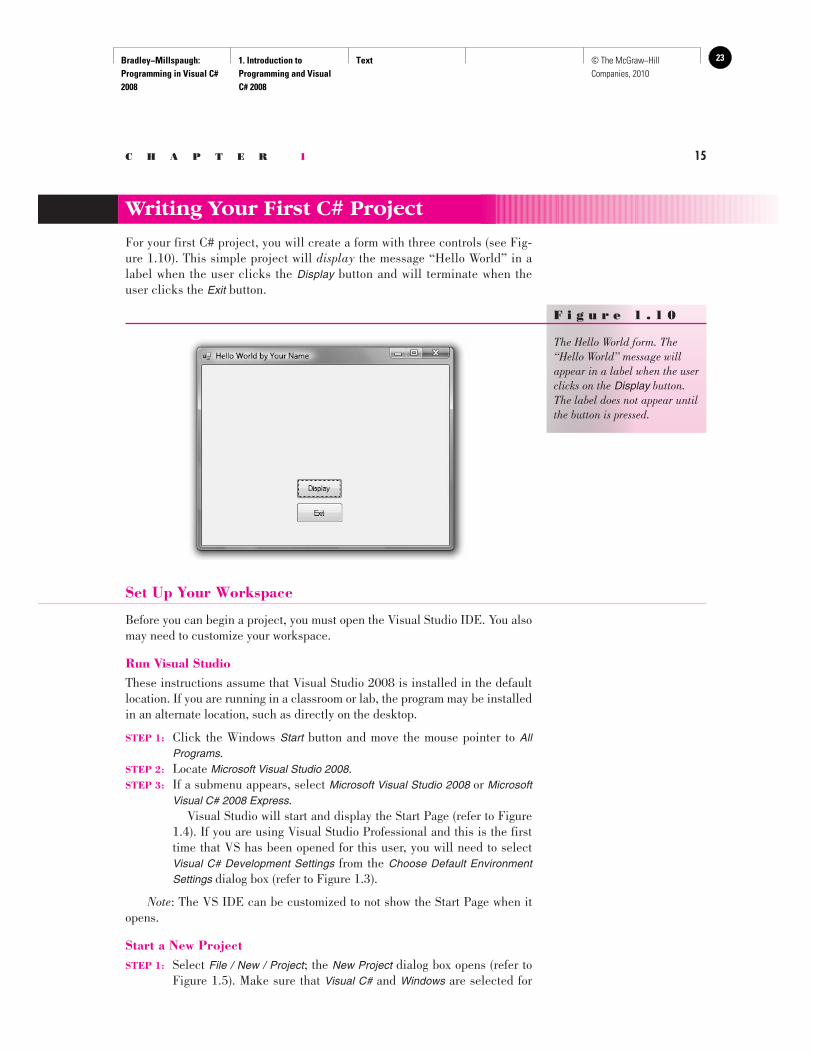
For your first C# project, you will create a form with three controls (see Fig-ure 1.10 ). This simple project will display the message “Hello World” in a label when the user clicks the Display button and will terminate when the user clicks the Exit button.
F i g u r e 1 . 1 0
The Hello World form. The “Hello World” message will appear in a label when the user clicks on the Display button. The label does not appear until the button is pressed.

Bradley−Millspaugh: Programming in Visual C# 2008
1. Introduction to Programming and Visual C# 2008
Text24 © The McGraw−Hill Companies, 2010
16 V I S U A L C# Introduction to Programming and Visual C# 2008
Project types and Windows Forms Application is selected for the template. If you are using Visual C# Express, the dialog box differs slightly and you don’t have to choose the language, but you can still choose a Win-dows Forms Application.
STEP 2: Enter “HelloWorld” (without the quotes) for the name of the new proj-ect ( Figure 1.11 ) and click the OK button. The new project opens ( Figure 1.12 ). At this point, your project is stored in a temporary di-rectory. You can specify a new location for the project later when you save it.
F i g u r e 1 . 1 1
Enter the name for the new project.
Set Up Your Environment In this section, you will customize the environment. For more information on customizing windows, floating and docking windows, and altering the location and contents of the various windows, see Appendix C.
STEP 1: Reset the IDE’s default layout by choosing Window / Reset Window Layout and responding Yes . The IDE should now match Figure 1.12 .
STEP 2: Point to the icon for the toolbox at the left of the IDE window. The Toolbox window pops open. Notice the pushpin icon at the top of the window ( Figure 1.13 ); clicking this icon pins the window open rather than allowing it to Auto Hide.
STEP 3: Click the Auto Hide pushpin icon for the Toolbox window; the toolbox will remain open.
Bradley−Millspaugh: Programming in Visual C# 2008
1. Introduction to Programming and Visual C# 2008
Text 25© The McGraw−Hill Companies, 2010
C H A P T E R 1 17
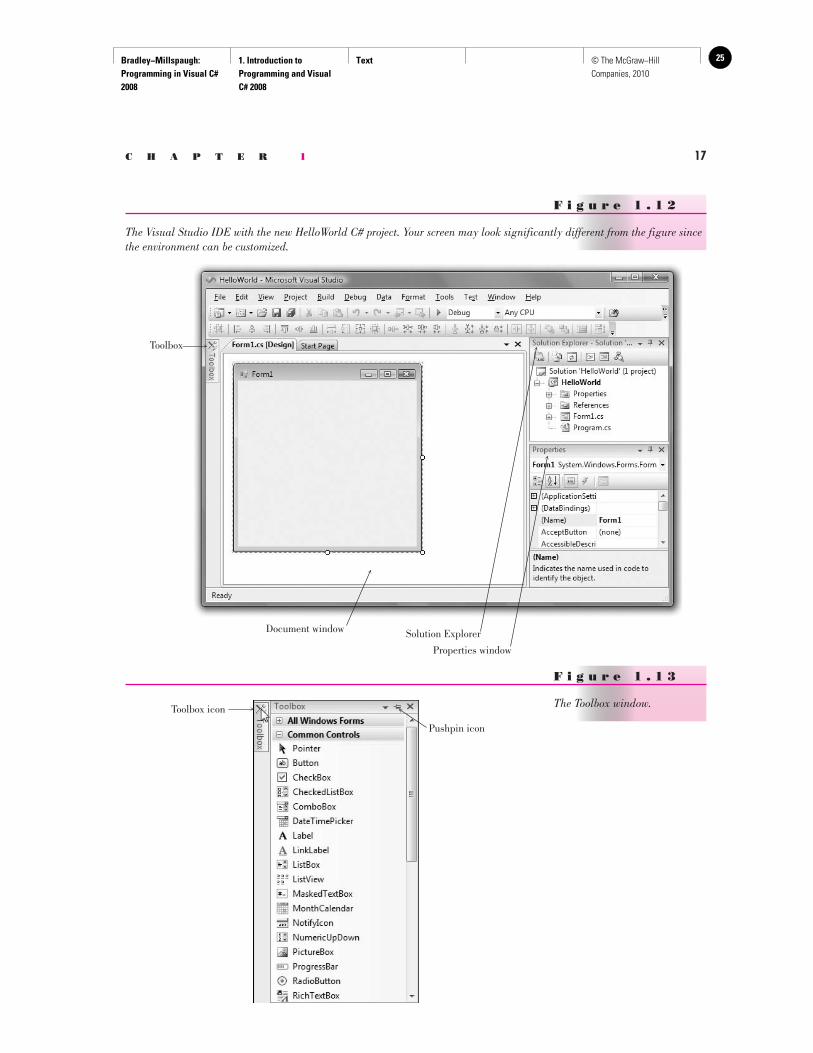
F i g u r e 1 . 1 2
The Visual Studio IDE with the new HelloWorld C# project. Your screen may look significantly different from the figure since the environment can be customized.
Solution ExplorerDocument window
Toolbox
Properties window
F i g u r e 1 . 1 3
The Toolbox window. Toolbox icon
Pushpin icon
Bradley−Millspaugh: Programming in Visual C# 2008
1. Introduction to Programming and Visual C# 2008
Text26 © The McGraw−Hill Companies, 2010
18 V I S U A L C# Introduction to Programming and Visual C# 2008
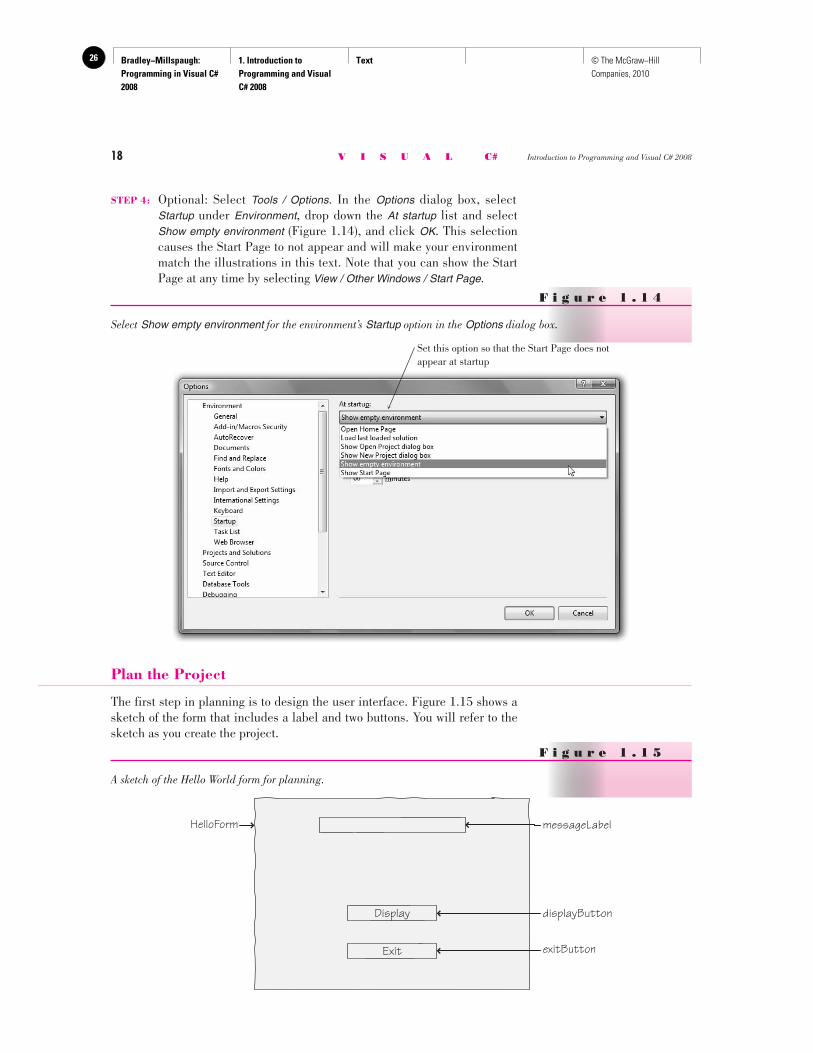
STEP 4: Optional: Select Tools / Options . In the Options dialog box, select Startup under Environment , drop down the At startup list and select Show empty environment ( Figure 1.14 ), and click OK . This selection causes the Start Page to not appear and will make your environment match the illustrations in this text. Note that you can show the Start Page at any time by selecting View / Other Windows / Start Page .
Plan the Project
The first step in planning is to design the user interface. Figure 1.15 shows a sketch of the form that includes a label and two buttons. You will refer to the sketch as you create the project.
F i g u r e 1 . 1 4
Select Show empty environment for the environment’s Startup option in the Options dialog box .
Set this option so that the Start Page does not appear at startup
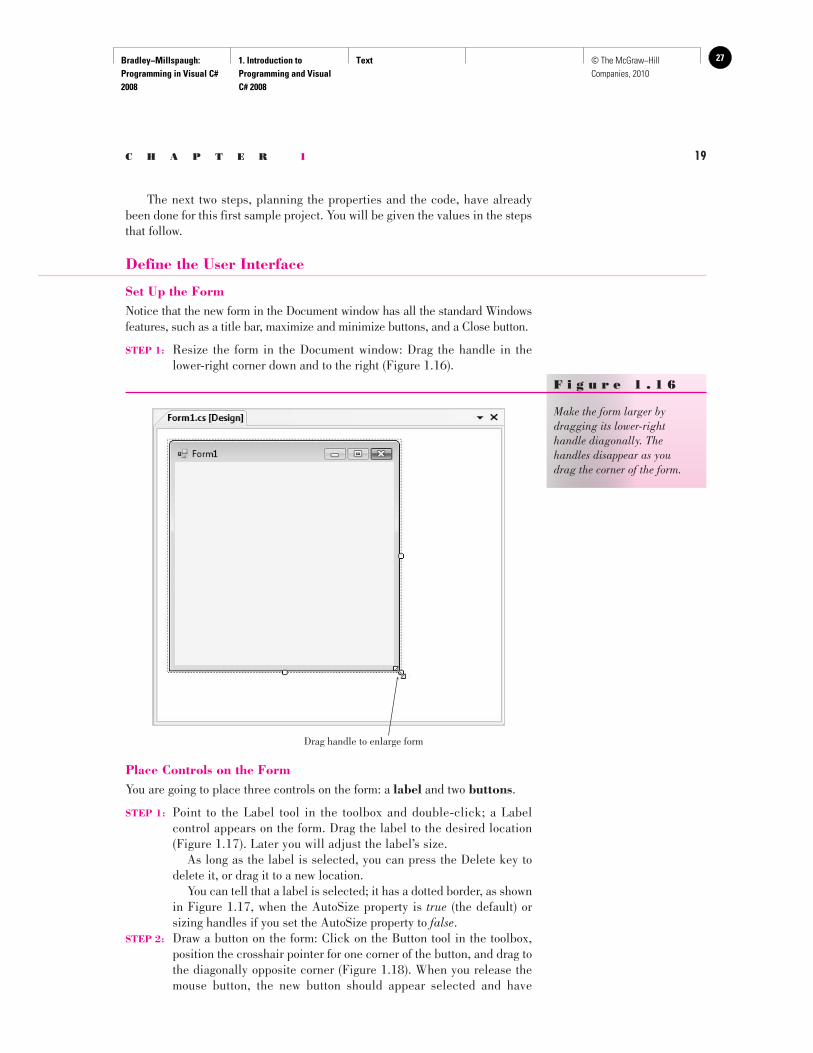
F i g u r e 1 . 1 5
A sketch of the Hello World form for planning.
Display
Exit
messageLabelHelloForm
displayButton
exitButton
Bradley−Millspaugh: Programming in Visual C# 2008
1. Introduction to Programming and Visual C# 2008
Text 27© The McGraw−Hill Companies, 2010
C H A P T E R 1 19
The next two steps, planning the properties and the code, have already been done for this first sample project. You will be given the values in the steps that follow.
Define the User Interface
Set Up the Form Notice that the new form in the Document window has all the standard Windows features, such as a title bar, maximize and minimize buttons, and a Close button.
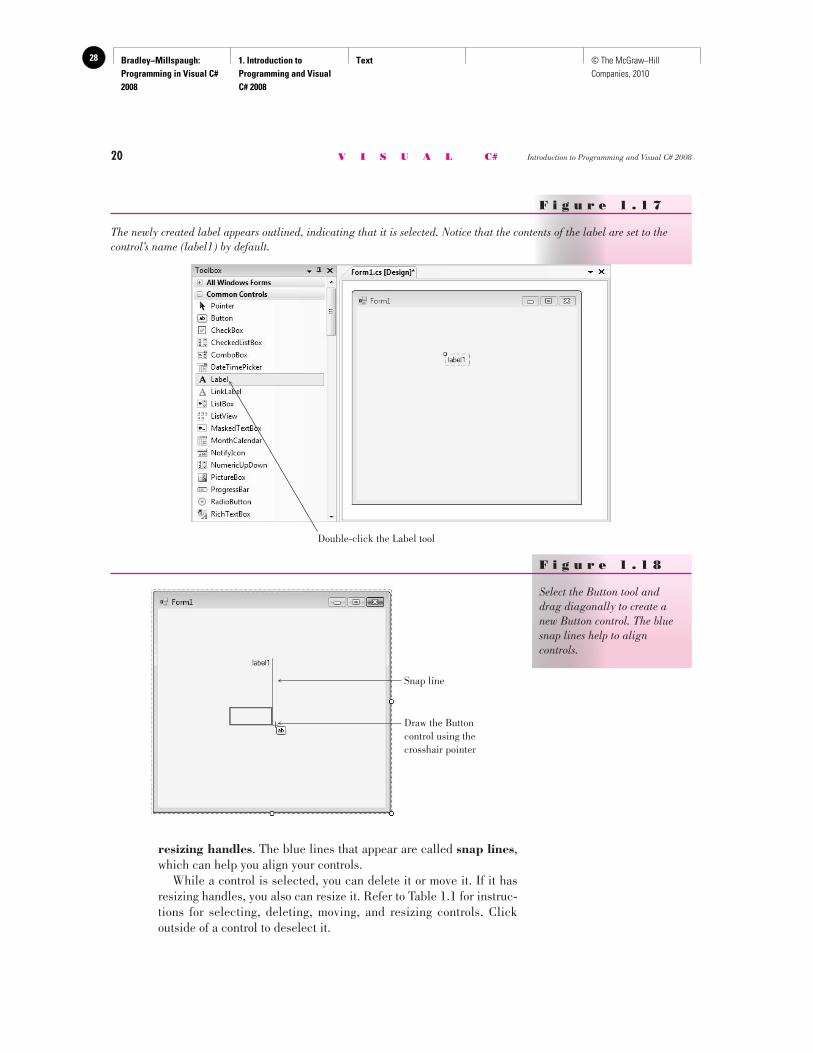
STEP 1: Resize the form in the Document window: Drag the handle in the lower-right corner down and to the right ( Figure 1.16 ).
F i g u r e 1 . 1 6
Make the form larger by dragging its lower-right handle diagonally. The handles disappear as you drag the corner of the form.
Drag handle to enlarge form
Place Controls on the Form You are going to place three controls on the form: a label and two buttons .
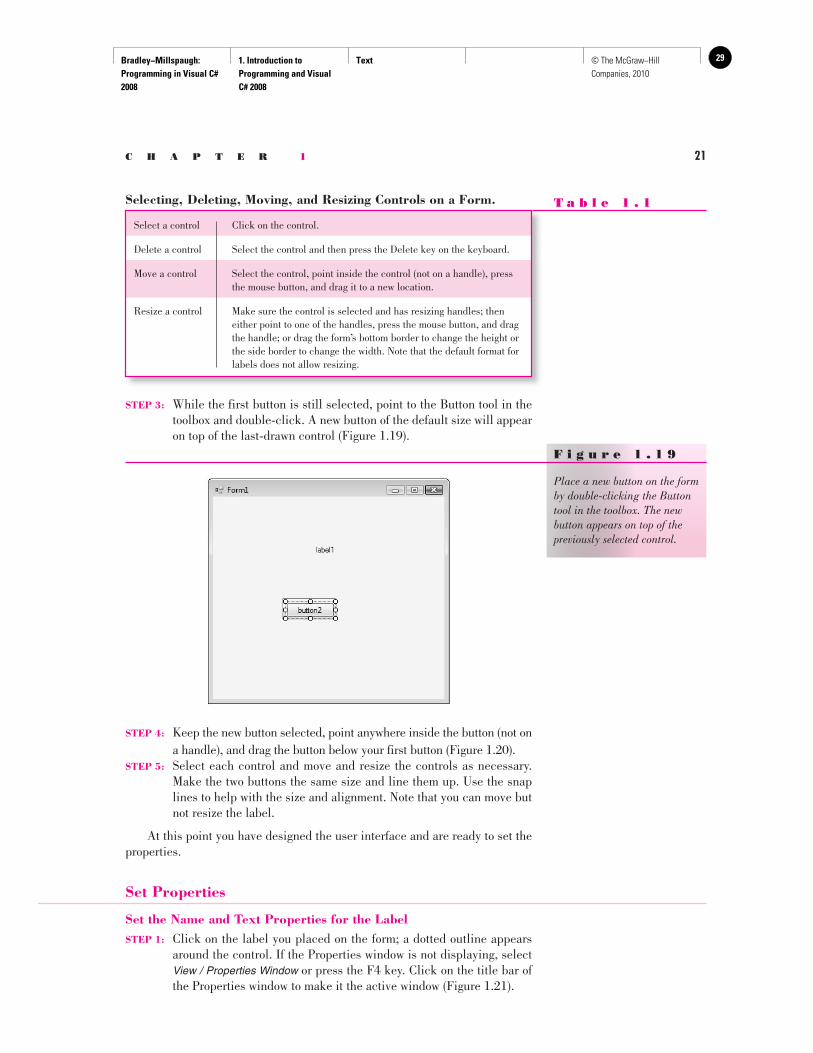
STEP 1: Point to the Label tool in the toolbox and double-click; a Label control appears on the form. Drag the label to the desired location ( Figure 1.17 ). Later you will adjust the label’s size.
As long as the label is selected, you can press the Delete key to delete it, or drag it to a new location.
You can tell that a label is selected; it has a dotted border, as shown in Figure 1.17 , when the AutoSize property is true (the default) or sizing handles if you set the AutoSize property to false .
STEP 2: Draw a button on the form: Click on the Button tool in the toolbox, position the crosshair pointer for one corner of the button, and drag to the diagonally opposite corner ( Figure 1.18 ). When you release the mouse button, the new button should appear selected and have
Bradley−Millspaugh: Programming in Visual C# 2008
1. Introduction to Programming and Visual C# 2008
Text28 © The McGraw−Hill Companies, 2010
20 V I S U A L C# Introduction to Programming and Visual C# 2008
resizing handles . The blue lines that appear are called snap lines , which can help you align your controls.
While a control is selected, you can delete it or move it. If it has resizing handles, you also can resize it. Refer to Table 1.1 for instruc-tions for selecting, deleting, moving, and resizing controls. Click outside of a control to deselect it.
F i g u r e 1 . 1 7
The newly created label appears outlined, indicating that it is selected. Notice that the contents of the label are set to the control’s name (label1) by default.
Double-click the Label tool
F i g u r e 1 . 1 8
Select the Button tool and drag diagonally to create a new Button control. The blue snap lines help to align controls.
Snap line
Draw the Buttoncontrol using thecrosshair pointer
Bradley−Millspaugh: Programming in Visual C# 2008
1. Introduction to Programming and Visual C# 2008
Text 29© The McGraw−Hill Companies, 2010
C H A P T E R 1 21
STEP 3: While the first button is still selected, point to the Button tool in the toolbox and double-click. A new button of the default size will appear on top of the last-drawn control ( Figure 1.19 ).
Selecting, Deleting, Moving, and Resizing Controls on a Form. T a b l e 1 . 1
Select a control Click on the control.
Delete a control Select the control and then press the Delete key on the keyboard.
Move a control Select the control, point inside the control (not on a handle), press the mouse button, and drag it to a new location.
Resize a control Make sure the control is selected and has resizing handles; then either point to one of the handles, press the mouse button, and drag the handle; or drag the form’s bottom border to change the height or the side border to change the width. Note that the default format for labels does not allow resizing.
F i g u r e 1 . 1 9
Place a new button on the form by double-clicking the Button tool in the toolbox. The new button appears on top of the previously selected control.
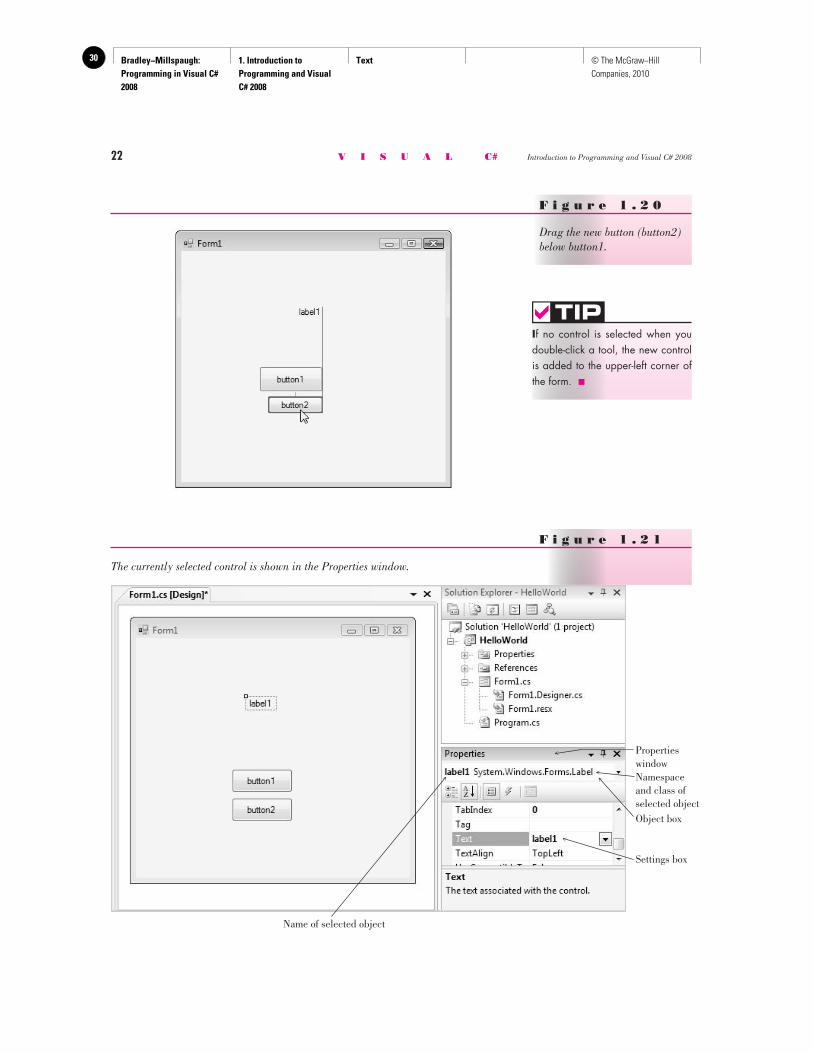
STEP 4: Keep the new button selected, point anywhere inside the button (not on a handle), and drag the button below your first button ( Figure 1.20 ).
STEP 5: Select each control and move and resize the controls as necessary. Make the two buttons the same size and line them up. Use the snap lines to help with the size and alignment. Note that you can move but not resize the label.
At this point you have designed the user interface and are ready to set the properties.
Set Properties
Set the Name and Text Properties for the Label STEP 1: Click on the label you placed on the form; a dotted outline appears
around the control. If the Properties window is not displaying, select View / Properties Window or press the F4 key. Click on the title bar of the Properties window to make it the active window ( Figure 1.21 ).
Bradley−Millspaugh: Programming in Visual C# 2008
1. Introduction to Programming and Visual C# 2008
Text30 © The McGraw−Hill Companies, 2010
22 V I S U A L C# Introduction to Programming and Visual C# 2008
F i g u r e 1 . 2 0
Drag the new button (button2) below button1.
I f no control is selected when you double-click a tool, the new control is added to the upper-left corner of the form. ■
TIP
F i g u r e 1 . 2 1
The currently selected control is shown in the Properties window.
PropertieswindowNamespaceand class ofselected object
Settings box
Object box
Name of selected object
Bradley−Millspaugh: Programming in Visual C# 2008
1. Introduction to Programming and Visual C# 2008
Text 31© The McGraw−Hill Companies, 2010
C H A P T E R 1 23
Notice that the Object box at the top of the Properties window is showing label1 (the name of the object) and System.Windows.Forms. Label as the class of the object. The actual class is Label; System. Windows.Forms is called the namespace , or the hierarchy used to locate the class.
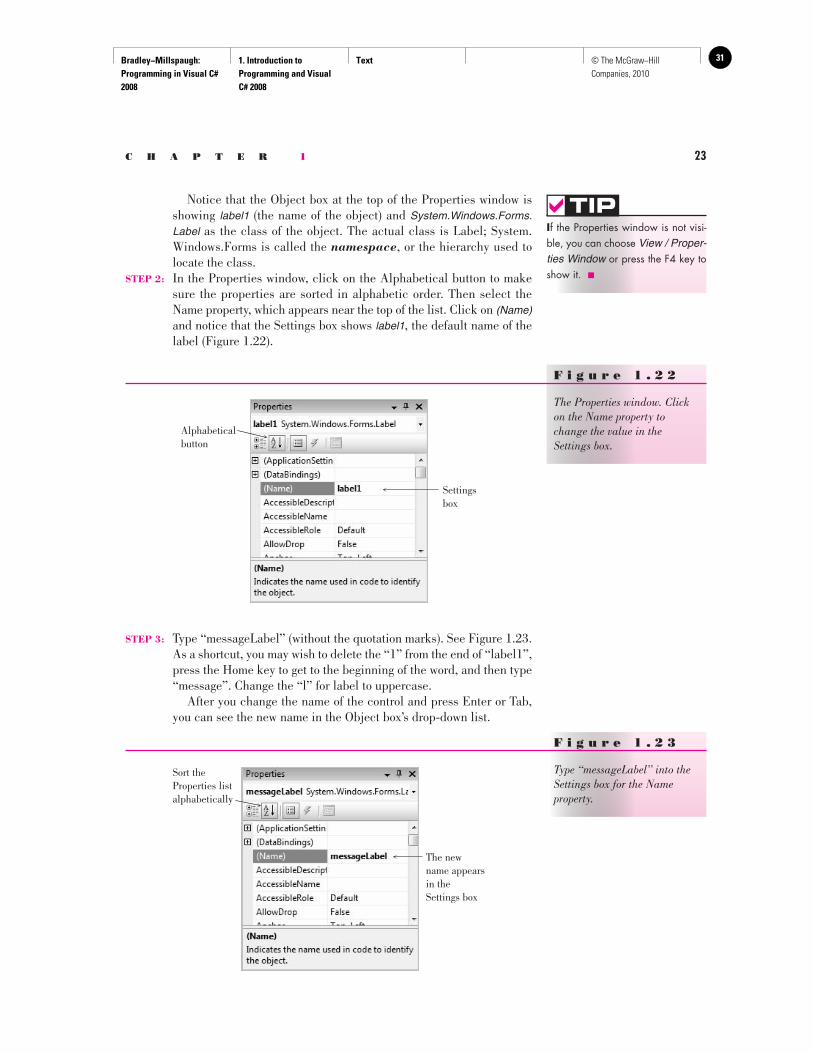
STEP 2: In the Properties window, click on the Alphabetical button to make sure the properties are sorted in alphabetic order. Then select the Name property, which appears near the top of the list. Click on (Name) and notice that the Settings box shows label1 , the default name of the label ( Figure 1.22 ).
I f the Properties window is not visi-ble, you can choose View / Proper-ties Window or press the F4 key to show it. ■
TIP
F i g u r e 1 . 2 2
The Properties window. Click on the Name property to change the value in the Settings box.
Alphabeticalbutton
Settingsbox
STEP 3: Type “messageLabel” (without the quotation marks). See Figure 1.23 . As a shortcut, you may wish to delete the “1” from the end of “label1”, press the Home key to get to the beginning of the word, and then type “message”. Change the “l” for label to uppercase.
After you change the name of the control and press Enter or Tab, you can see the new name in the Object box’s drop-down list.
F i g u r e 1 . 2 3
Type “messageLabel” into the Settings box for the Name property.
Sort theProperties listalphabetically
The newname appearsin theSettings box
Bradley−Millspaugh: Programming in Visual C# 2008
1. Introduction to Programming and Visual C# 2008
Text32 © The McGraw−Hill Companies, 2010
24 V I S U A L C# Introduction to Programming and Visual C# 2008
STEP 4: Select the AutoSize property and change the value to False. You can easily change a property from True to False in several ways: (1) Click in the word “True” and type only the letter “f”, and the value changes automatically; (2) Double-click on either the property name (Auto-Size) or the property value (True), and the value toggles each time you double-click; or (3) Click on either the property name or the property value, and a drop-down arrow appears at the right end of the Settings box. Drop down the list and make your selection from the possible values (True or False, in this case).
STEP 5: Click on the Text property to select it. (Scroll the Properties list if necessary.)
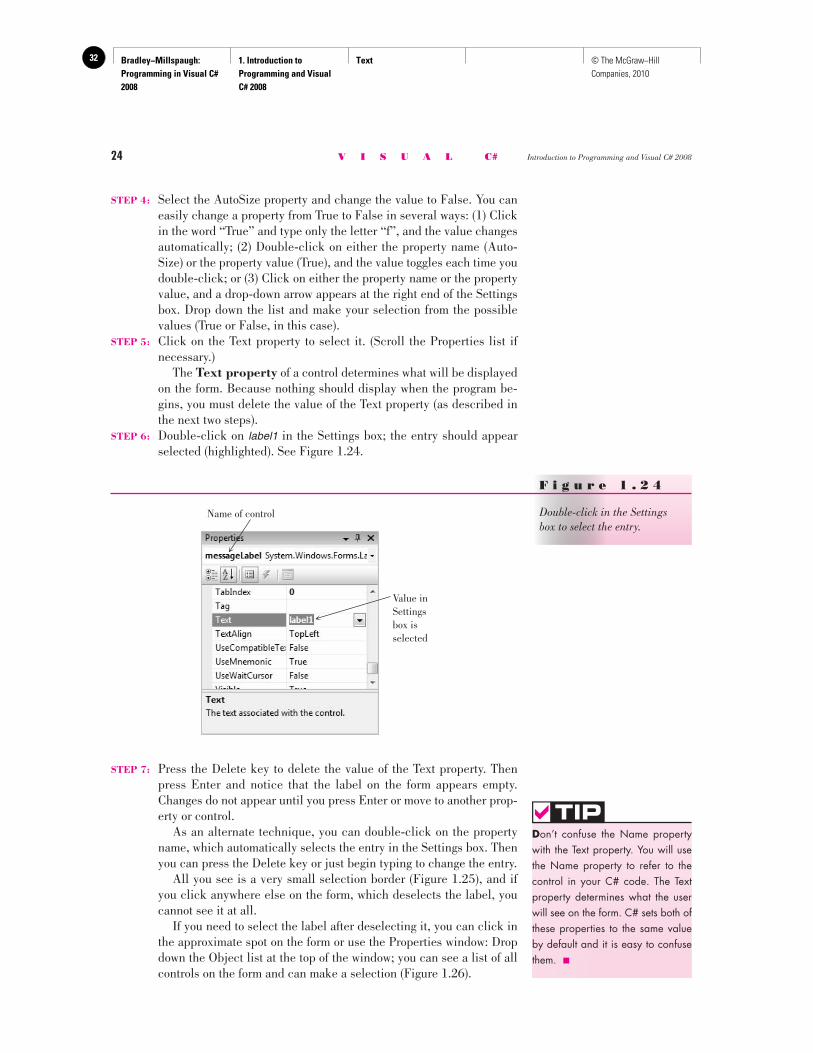
The Text property of a control determines what will be displayed on the form. Because nothing should display when the program be-gins, you must delete the value of the Text property (as described in the next two steps).
STEP 6: Double-click on label1 in the Settings box; the entry should appear selected (highlighted). See Figure 1.24 .
F i g u r e 1 . 2 4
Double-click in the Settings box to select the entry.
Name of control
Value inSettingsbox isselected
STEP 7: Press the Delete key to delete the value of the Text property. Then press Enter and notice that the label on the form appears empty. Changes do not appear until you press Enter or move to another prop-erty or control.
As an alternate technique, you can double-click on the property name, which automatically selects the entry in the Settings box. Then you can press the Delete key or just begin typing to change the entry.
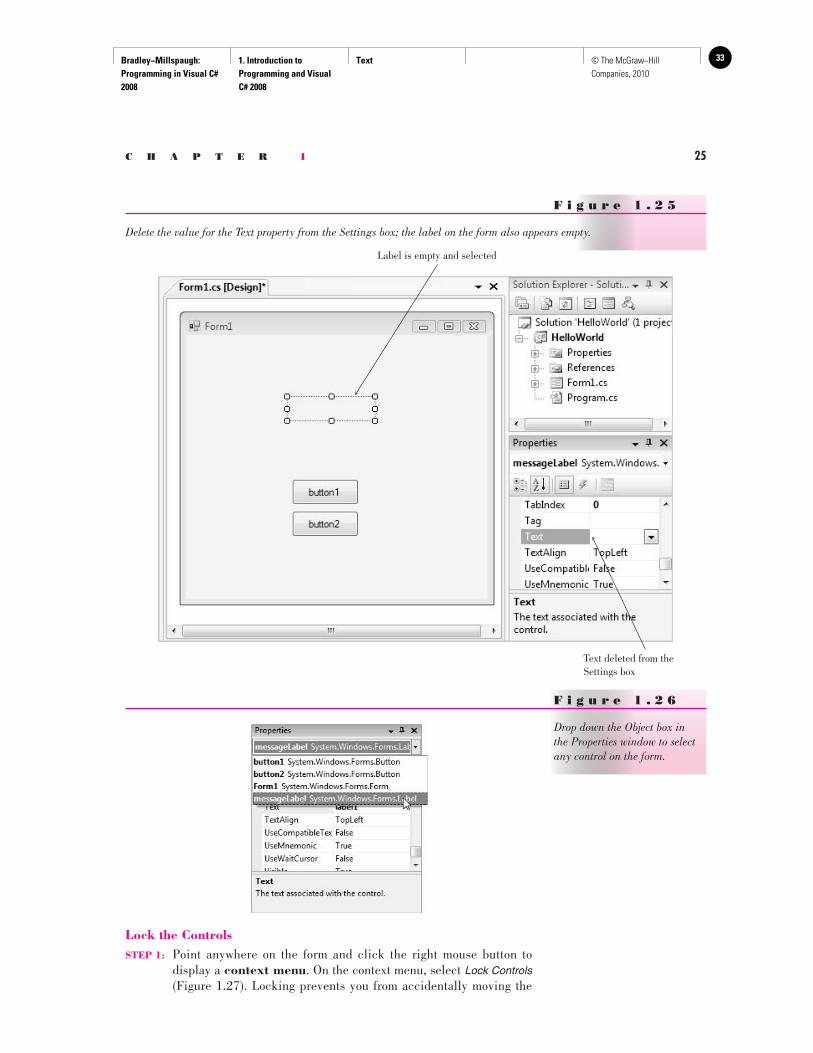
All you see is a very small selection border ( Figure 1.25 ), and if you click anywhere else on the form, which deselects the label, you cannot see it at all.
If you need to select the label after deselecting it, you can click in the approximate spot on the form or use the Properties window: Drop down the Object list at the top of the window; you can see a list of all controls on the form and can make a selection ( Figure 1.26 ).
D on’t confuse the Name property with the Text property. You will use the Name property to refer to the control in your C# code. The Text property determines what the user will see on the form. C# sets both of these properties to the same value by default and it is easy to confuse them. ■
TIP
Bradley−Millspaugh: Programming in Visual C# 2008
1. Introduction to Programming and Visual C# 2008
Text 33© The McGraw−Hill Companies, 2010
C H A P T E R 1 25
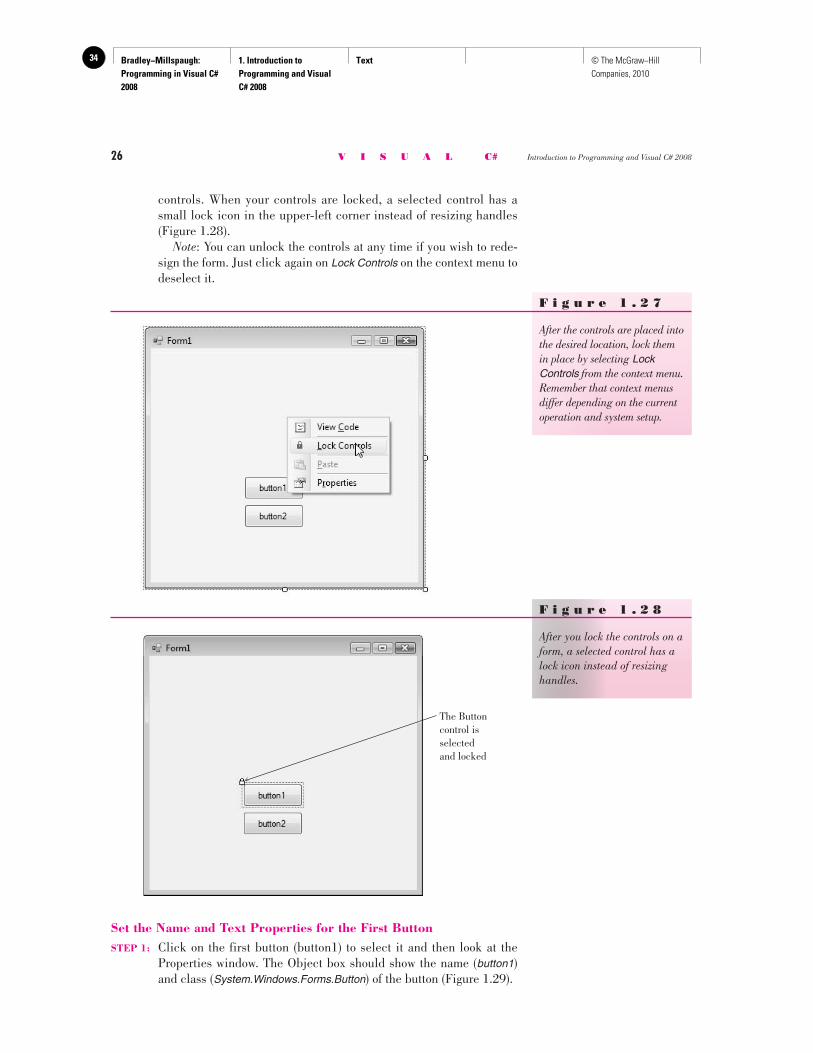
Lock the Controls STEP 1: Point anywhere on the form and click the right mouse button to
display a context menu . On the context menu, select Lock Controls ( Figure 1.27 ). Locking prevents you from accidentally moving the
F i g u r e 1 . 2 5
Delete the value for the Text property from the Settings box; the label on the form also appears empty.
Label is empty and selected
Text deleted from theSettings box
F i g u r e 1 . 2 6
Drop down the Object box in the Properties window to select any control on the form.
Bradley−Millspaugh: Programming in Visual C# 2008
1. Introduction to Programming and Visual C# 2008
Text34 © The McGraw−Hill Companies, 2010
26 V I S U A L C# Introduction to Programming and Visual C# 2008
controls. When your controls are locked, a selected control has a small lock icon in the upper-left corner instead of resizing handles ( Figure 1.28 ).
Note : You can unlock the controls at any time if you wish to rede-sign the form. Just click again on Lock Controls on the context menu to deselect it.
F i g u r e 1 . 2 7
After the controls are placed into the desired location, lock them in place by selecting Lock Controls from the context menu. Remember that context menus differ depending on the current operation and system setup.
F i g u r e 1 . 2 8
After you lock the controls on a form, a selected control has a lock icon instead of resizing handles.
The Buttoncontrol isselectedand locked
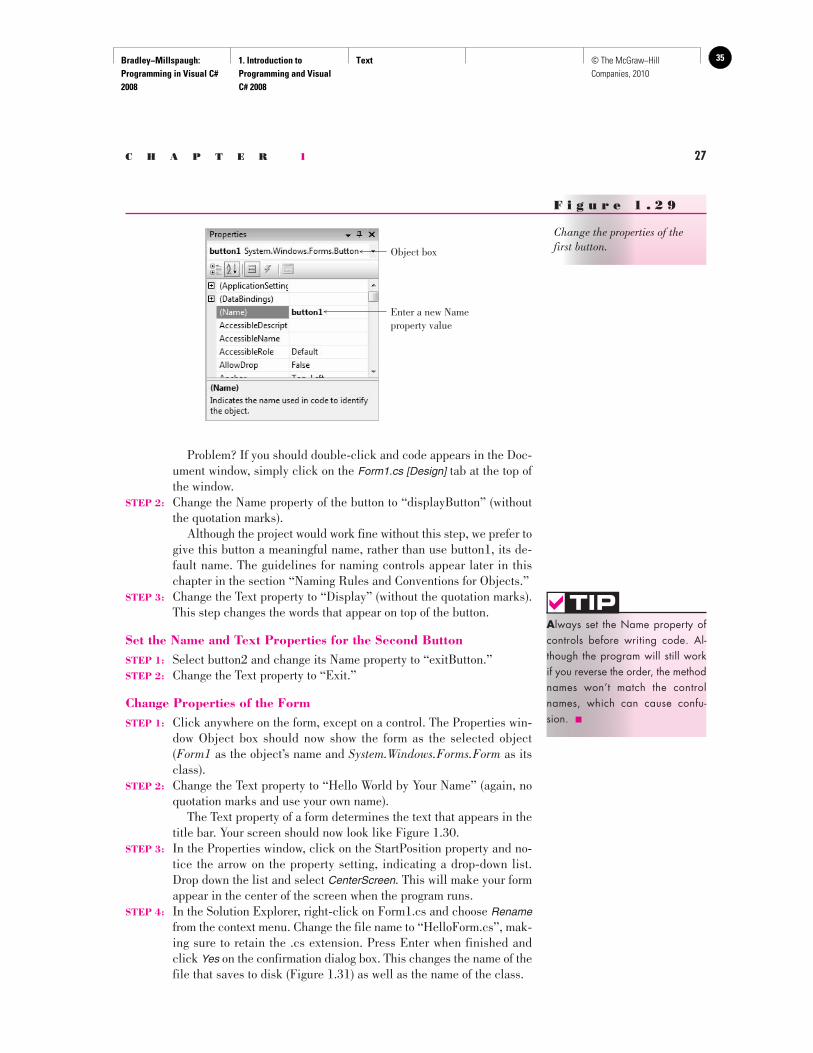
Set the Name and Text Properties for the First Button STEP 1: Click on the first button (button1) to select it and then look at the
Properties window. The Object box should show the name ( button1 ) and class ( System . Windows . Forms . Button ) of the button ( Figure 1.29 ).
Bradley−Millspaugh: Programming in Visual C# 2008
1. Introduction to Programming and Visual C# 2008
Text 35© The McGraw−Hill Companies, 2010
C H A P T E R 1 27
Problem? If you should double-click and code appears in the Doc-ument window, simply click on the Form1.cs [Design] tab at the top of the window.
STEP 2: Change the Name property of the button to “displayButton” (without the quotation marks).
Although the project would work fine without this step, we prefer to give this button a meaningful name, rather than use button1, its de-fault name. The guidelines for naming controls appear later in this chapter in the section “Naming Rules and Conventions for Objects.”
STEP 3: Change the Text property to “Display” (without the quotation marks). This step changes the words that appear on top of the button.
Set the Name and Text Properties for the Second Button STEP 1: Select button2 and change its Name property to “exitButton.” STEP 2: Change the Text property to “Exit.”
Change Properties of the Form STEP 1: Click anywhere on the form, except on a control. The Properties win-
dow Object box should now show the form as the selected object ( Form1 as the object’s name and System.Windows.Forms.Form as its class).
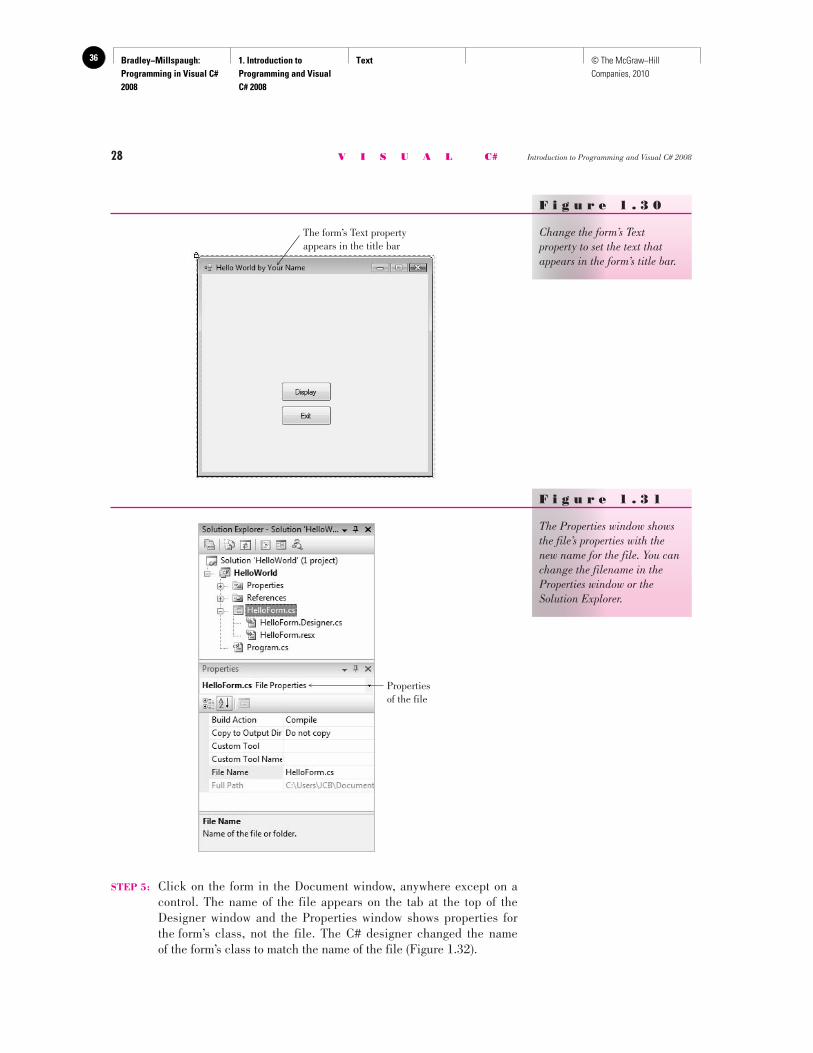
STEP 2: Change the Text property to “Hello World by Your Name” (again, no quotation marks and use your own name).
The Text property of a form determines the text that appears in the title bar. Your screen should now look like Figure 1.30 .
STEP 3: In the Properties window, click on the StartPosition property and no-tice the arrow on the property setting, indicating a drop-down list. Drop down the list and select CenterScreen . This will make your form appear in the center of the screen when the program runs.
STEP 4: In the Solution Explorer, right-click on Form1.cs and choose Rename from the context menu. Change the file name to “HelloForm.cs”, mak-ing sure to retain the .cs extension. Press Enter when finished and click Yes on the confirmation dialog box. This changes the name of the file that saves to disk ( Figure 1.31 ) as well as the name of the class.
A lways set the Name property of controls before writing code. Al-though the program will still work if you reverse the order, the method names won’t match the control names, which can cause confu-sion. ■
TIP
Object box
Enter a new Name property value
F i g u r e 1 . 2 9
Change the properties of the first button.
Bradley−Millspaugh: Programming in Visual C# 2008
1. Introduction to Programming and Visual C# 2008
Text36 © The McGraw−Hill Companies, 2010
28 V I S U A L C# Introduction to Programming and Visual C# 2008
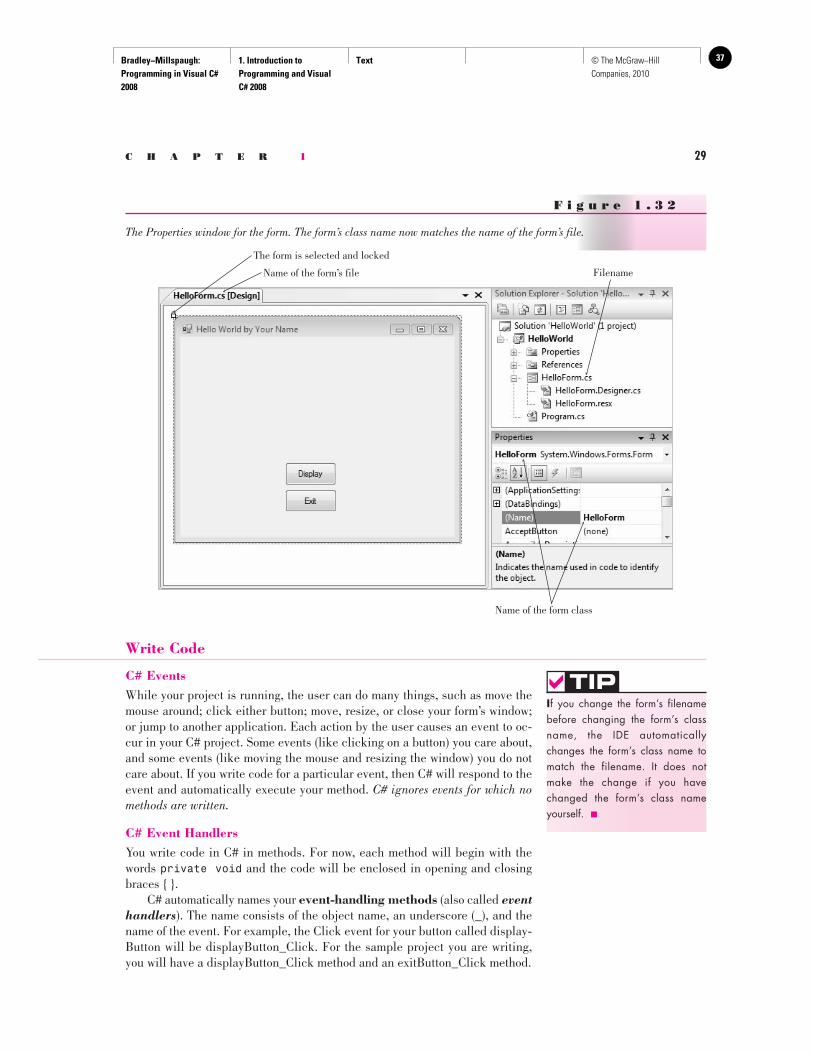
STEP 5: Click on the form in the Document window, anywhere except on a control. The name of the file appears on the tab at the top of the Designer window and the Properties window shows properties for the form’s class, not the file. The C# designer changed the name of the form’s class to match the name of the file ( Figure 1.32 ).
F i g u r e 1 . 3 0
Change the form’s Text property to set the text that appears in the form’s title bar.
The form’s Text propertyappears in the title bar
F i g u r e 1 . 3 1
The Properties window shows the file’s properties with the new name for the file. You can change the filename in the Properties window or the Solution Explorer.
Propertiesof the file
Bradley−Millspaugh: Programming in Visual C# 2008
1. Introduction to Programming and Visual C# 2008
Text 37© The McGraw−Hill Companies, 2010
C H A P T E R 1 29
Write Code
C# Events While your project is running, the user can do many things, such as move the mouse around; click either button; move, resize, or close your form’s window; or jump to another application. Each action by the user causes an event to oc-cur in your C# project. Some events (like clicking on a button) you care about, and some events (like moving the mouse and resizing the window) you do not care about. If you write code for a particular event, then C# will respond to the event and automatically execute your method. C# ignores events for which no methods are written.
C# Event Handlers You write code in C# in methods. For now, each method will begin with the words private void and the code will be enclosed in opening and closing braces { }. C# automatically names your event-handling methods (also called event handlers ). The name consists of the object name, an underscore (_), and the name of the event. For example, the Click event for your button called display-Button will be displayButton_Click. For the sample project you are writing, you will have a displayButton_Click method and an exitButton_Click method.
F i g u r e 1 . 3 2
The Properties window for the form. The form’s class name now matches the name of the form’s file.
The form is selected and locked
Filename
Name of the form class
Name of the form’s file
I f you change the form’s filename before changing the form’s class name, the IDE automatically changes the form’s class name to match the filename. It does not make the change if you have changed the form’s class name yourself. ■
TIP
Bradley−Millspaugh: Programming in Visual C# 2008
1. Introduction to Programming and Visual C# 2008
Text38 © The McGraw−Hill Companies, 2010
30 V I S U A L C# Introduction to Programming and Visual C# 2008
C# Code Statements
This first project requires two C# statements: the comment and the assign-ment statement . You also will execute a method of an object.
The Comment Statement Comment statements, sometimes called remarks , are used for project documen-tation only. They are not considered “executable” and have no effect when the program runs. The purpose of comments is to make the project more readable and understandable by the people who read it. Good programming practices dictate that programmers include comments to clarify their projects. Every method should begin with a comment that de-scribes its purpose. Every project should have comments that explain the pur-pose of the program and provide identifying information such as the name of the programmer and the date the program was written and/or modified. In ad-dition, it is a good idea to place comments within the logic of a project, espe-cially if the purpose of any statements might be unclear. When you try to read someone else’s code or your own after a period of time, you will appreciate the generous use of comments. C# comments begin with slashes. Most of the time, your comments will be on a separate line. You also can add slashes and a comment to the right end of a line of code.
The Comment Statement—Examples
Exam
ples
// This project was written by Jonathon Edwards. // Exit the project. messageLabel.Text = "Hello World"; // Assign the message to the Text property.
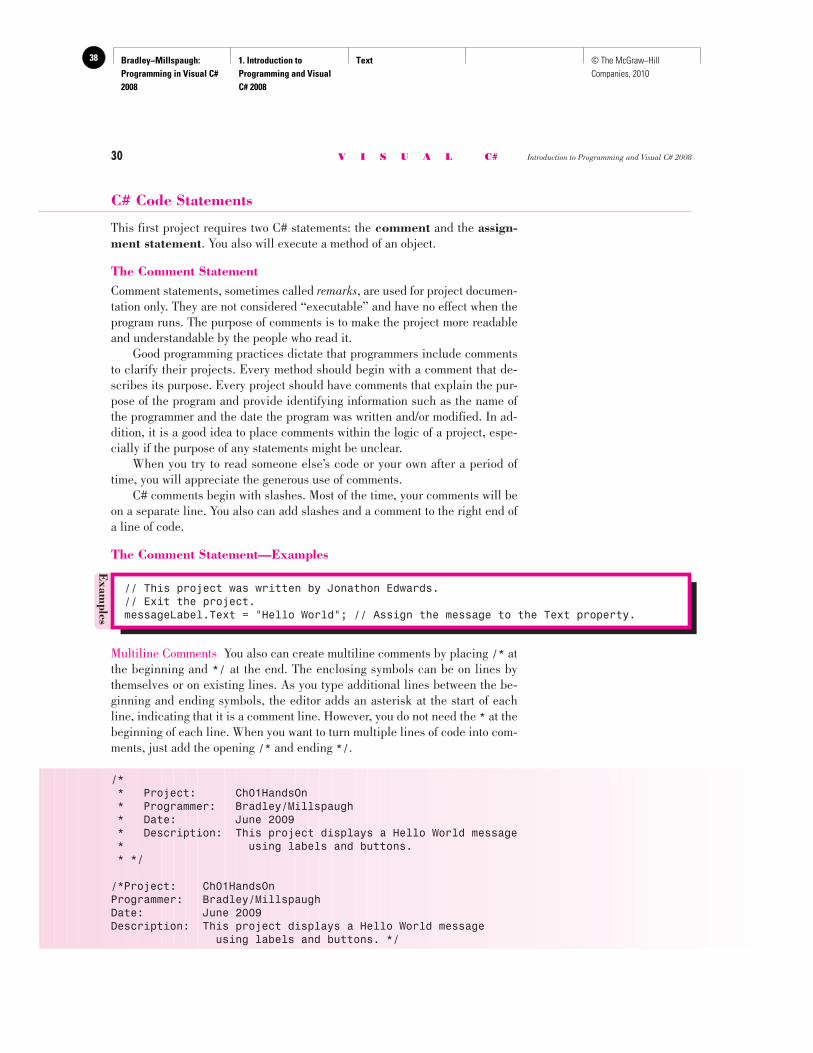
Multiline Comments You also can create multiline comments by placing /* at the beginning and */ at the end. The enclosing symbols can be on lines by themselves or on existing lines. As you type additional lines between the be-ginning and ending symbols, the editor adds an asterisk at the start of each line, indicating that it is a comment line. However, you do not need the * at the beginning of each line. When you want to turn multiple lines of code into com-ments, just add the opening /* and ending */ .
/* * Project: Ch01HandsOn * Programmer: Bradley/Millspaugh * Date: June 2009 * Description: This project displays a Hello World message * using labels and buttons. * */
/*Project: Ch01HandsOnProgrammer: Bradley/MillspaughDate: June 2009Description: This project displays a Hello World message using labels and buttons. */
Bradley−Millspaugh: Programming in Visual C# 2008
1. Introduction to Programming and Visual C# 2008
Text 39© The McGraw−Hill Companies, 2010
C H A P T E R 1 31
Ending a Statement Most C# statements must be terminated by a semicolon (;). Comments and a few other statements (which you will learn about later) do not end with a semi-colon. A C# statement may extend over multiple lines; the semicolon indicates that the statement is complete.
The Assignment Statement The assignment statement assigns a value to a property or variable (you learn about variables in Chapter 3). Assignment statements operate from right to left; that is, the value that appears on the right side of the equal sign is assigned to the property named on the left of the equal sign. It is often helpful to read the equal sign as “is replaced by.” For example, the following assignment state-ment would read “messageLabel.Text is replaced by Hello World.”
messageLabel.Text = "Hello World";
The Assignment Statement—General Form
Object.Property = value ;
General
Form
The value named on the right side of the equal sign is assigned to (or placed into) the property named on the left.
The Assignment Statement—Examples
Exam
ples
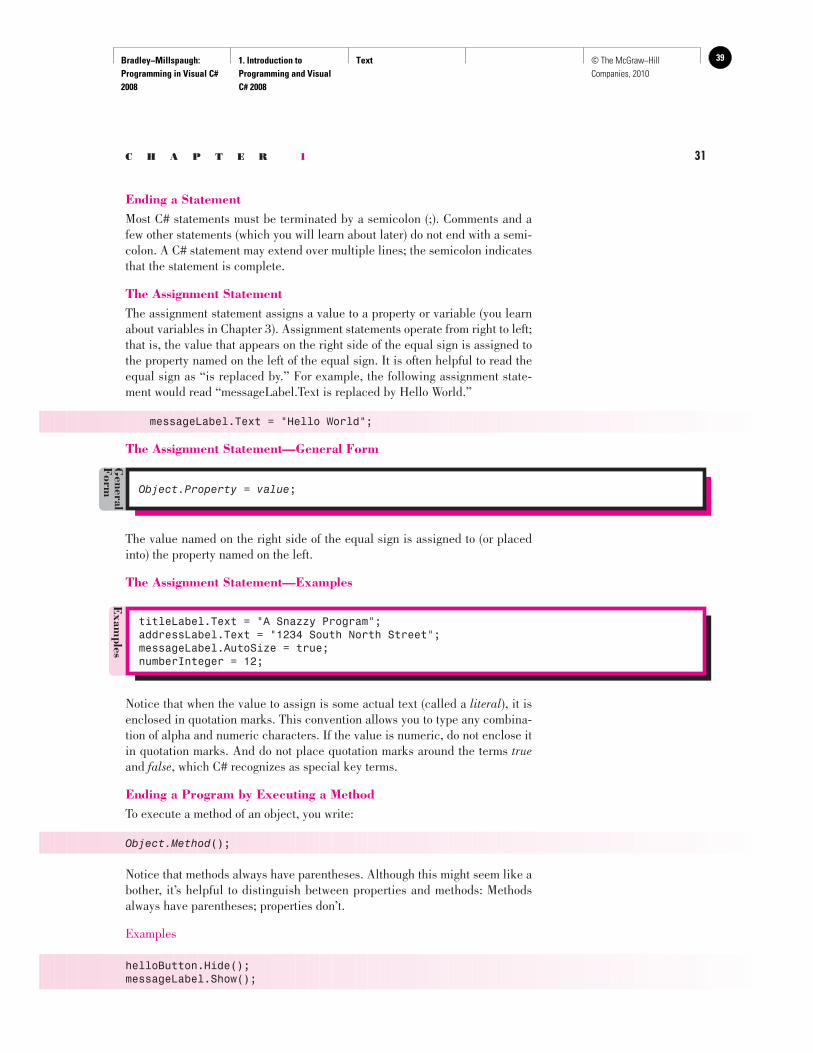
titleLabel.Text = "A Snazzy Program"; addressLabel.Text = "1234 South North Street"; messageLabel.AutoSize = true; numberInteger = 12;
Notice that when the value to assign is some actual text (called a literal ), it is enclosed in quotation marks. This convention allows you to type any combina-tion of alpha and numeric characters. If the value is numeric, do not enclose it in quotation marks. And do not place quotation marks around the terms true and false , which C# recognizes as special key terms.
Ending a Program by Executing a Method To execute a method of an object, you write:
Object.Method ();
Notice that methods always have parentheses. Although this might seem like a bother, it’s helpful to distinguish between properties and methods: Methods always have parentheses; properties don’t.
Examples
helloButton.Hide(); messageLabel.Show();
Bradley−Millspaugh: Programming in Visual C# 2008
1. Introduction to Programming and Visual C# 2008
Text40 © The McGraw−Hill Companies, 2010
32 V I S U A L C# Introduction to Programming and Visual C# 2008
To execute a method of the current form, you use the this keyword for the object. And the method that closes the form and terminates the project execu-tion is Close .
this.Close();
In most cases, you will include this.Close() in the event-handling method for an Exit button or an Exit menu choice. Note : Remember, the keyword this refers to the current object. You can omit this since a method without an object reference defaults to the current object.
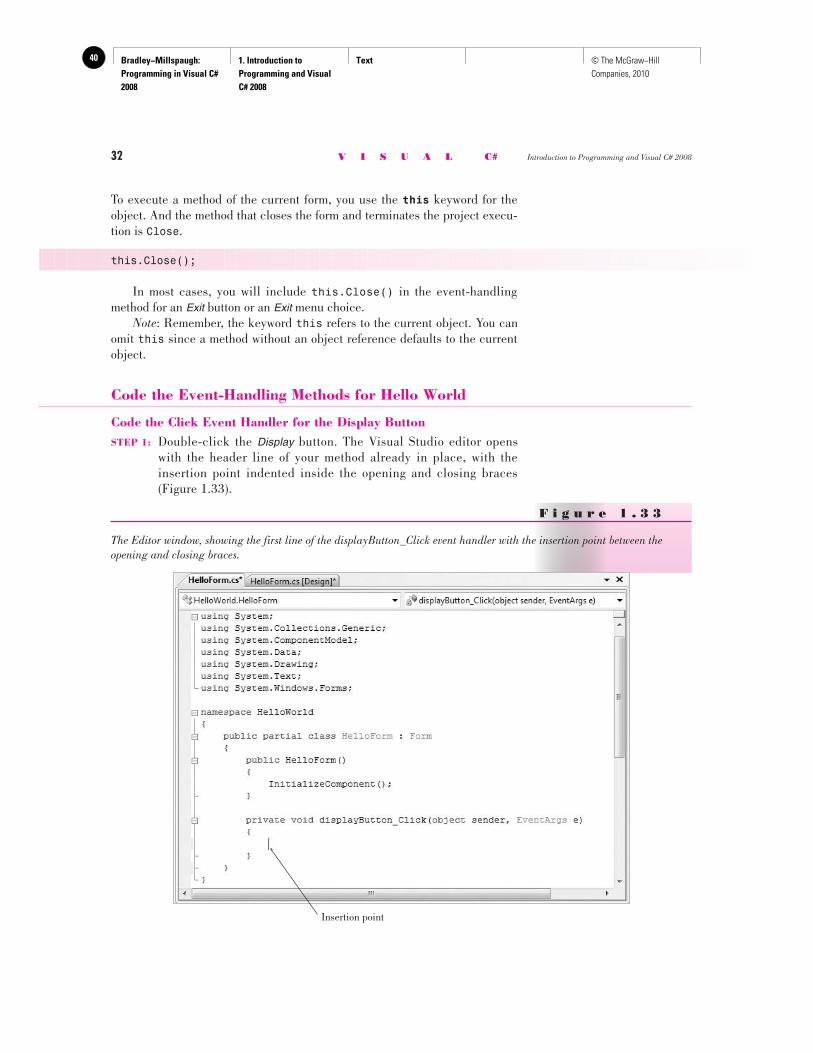
Code the Event-Handling Methods for Hello World
Code the Click Event Handler for the Display Button STEP 1: Double-click the Display button. The Visual Studio editor opens
with the header line of your method already in place, with the insertion point indented inside the opening and closing braces ( Figure 1.33 ).
F i g u r e 1 . 3 3
The Editor window, showing the first line of the displayButton_Click event handler with the insertion point between the opening and closing braces.
Insertion point
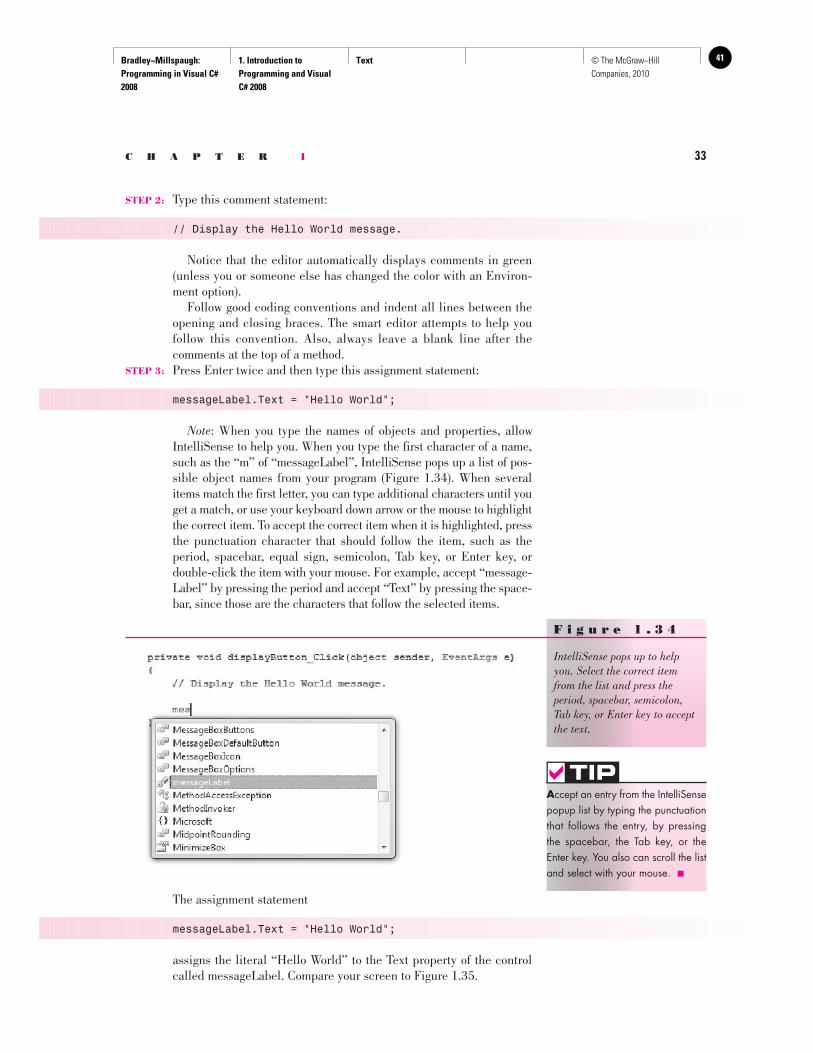
Bradley−Millspaugh: Programming in Visual C# 2008
1. Introduction to Programming and Visual C# 2008
Text 41© The McGraw−Hill Companies, 2010
C H A P T E R 1 33
STEP 2: Type this comment statement:
// Display the Hello World message.
Notice that the editor automatically displays comments in green (unless you or someone else has changed the color with an Environ-ment option).
Follow good coding conventions and indent all lines between the opening and closing braces. The smart editor attempts to help you follow this convention. Also, always leave a blank line after the comments at the top of a method.
STEP 3: Press Enter twice and then type this assignment statement:
messageLabel.Text = "Hello World";
Note : When you type the names of objects and properties, allow IntelliSense to help you. When you type the first character of a name, such as the “m” of “messageLabel”, IntelliSense pops up a list of pos-sible object names from your program ( Figure 1.34 ). When several items match the first letter, you can type additional characters until you get a match, or use your keyboard down arrow or the mouse to highlight the correct item. To accept the correct item when it is highlighted, press the punctuation character that should follow the item, such as the period, spacebar, equal sign, semicolon, Tab key, or Enter key, or double-click the item with your mouse. For example, accept “message-Label” by pressing the period and accept “Text” by pressing the space-bar, since those are the characters that follow the selected items.
F i g u r e 1 . 3 4
IntelliSense pops up to help you. Select the correct item from the list and press the period, spacebar, semicolon, Tab key, or Enter key to accept the text.
The assignment statement
messageLabel.Text = "Hello World";
assigns the literal “Hello World” to the Text property of the control called messageLabel. Compare your screen to Figure 1.35 .
A ccept an entry from the IntelliSense popup list by typing the punctuation that follows the entry, by pressing the spacebar, the Tab key, or the Enter key. You also can scroll the list and select with your mouse. ■
TIP

Bradley−Millspaugh: Programming in Visual C# 2008
1. Introduction to Programming and Visual C# 2008
Text42 © The McGraw−Hill Companies, 2010
34 V I S U A L C# Introduction to Programming and Visual C# 2008
Code the Click Event Handler for the Exit Button STEP 1: Double-click the Exit button to open the editor for the exitButton_
Click event handler. STEP 2: Type this comment:
// Exit the project.
STEP 3: Press Enter twice and type this C# statement:
this.Close();
STEP 4: Make sure your code looks like the code shown in Figure 1.36 .
Editor tab Form Designer tab
Comment statement
Assignment statement
F i g u r e 1 . 3 5
Type the comment and assignment statement for the displayButton_Click event handler.
A llow the Editor and IntelliSense to help you. If the IntelliSense list does not pop up, likely you misspelled the name of the control. ■
TIP
STEP 4: Return to the Form Designer (refer to Figure 1.32 ) by clicking on the HelloForm.cs [Design] tab on the Document window (refer to Figure 1.35 ).
F i g u r e 1 . 3 6
Type the code for the exitButton_Click event handler. Notice that an asterisk appears on the tab at the top of the window, indicating that there are unsaved changes in the file.
Asterisk indicates unsaved changes
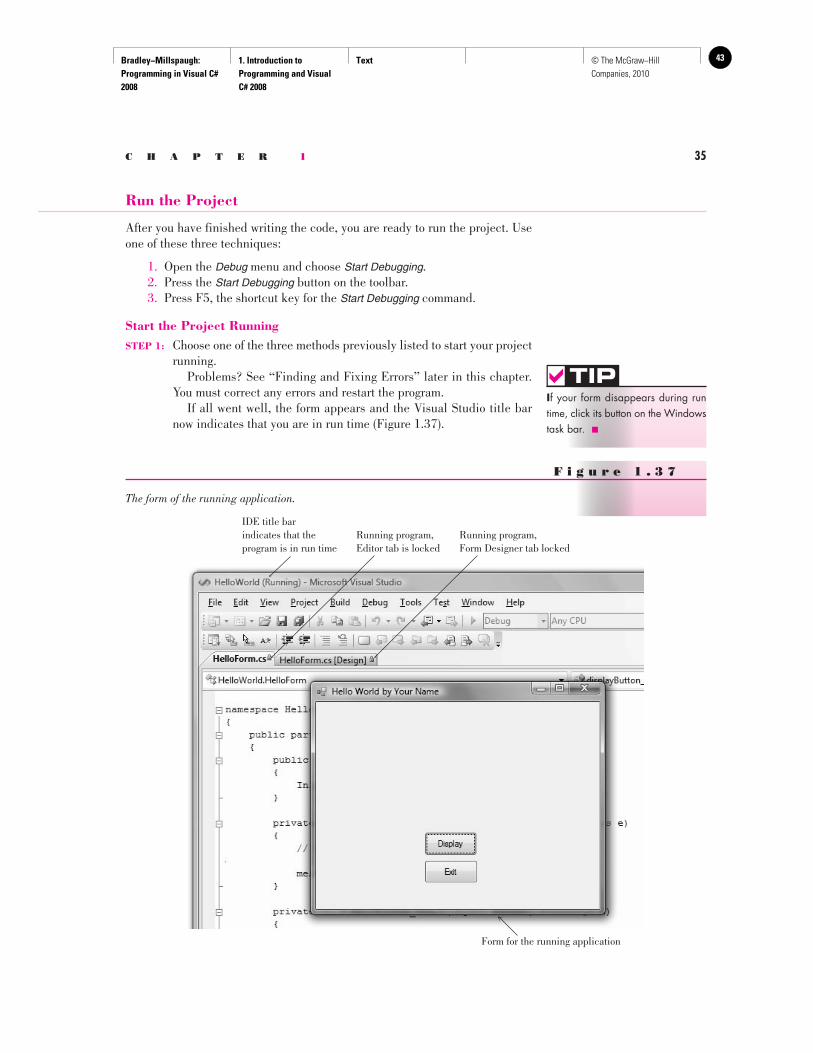
Bradley−Millspaugh: Programming in Visual C# 2008
1. Introduction to Programming and Visual C# 2008
Text 43© The McGraw−Hill Companies, 2010
C H A P T E R 1 35
Run the Project
After you have finished writing the code, you are ready to run the project. Use one of these three techniques:
1. Open the Debug menu and choose Start Debugging . 2. Press the Start Debugging button on the toolbar. 3. Press F5, the shortcut key for the Start Debugging command.
Start the Project Running STEP 1: Choose one of the three methods previously listed to start your project
running. Problems? See “Finding and Fixing Errors” later in this chapter.
You must correct any errors and restart the program. If all went well, the form appears and the Visual Studio title bar
now indicates that you are in run time ( Figure 1.37 ).
I f your form disappears during run time, click its button on the Windows task bar. ■
TIP
F i g u r e 1 . 3 7
The form of the running application.
IDE title barindicates that theprogram is in run time
Running program,Editor tab is locked
Running program, Form Designer tab locked
Form for the running application
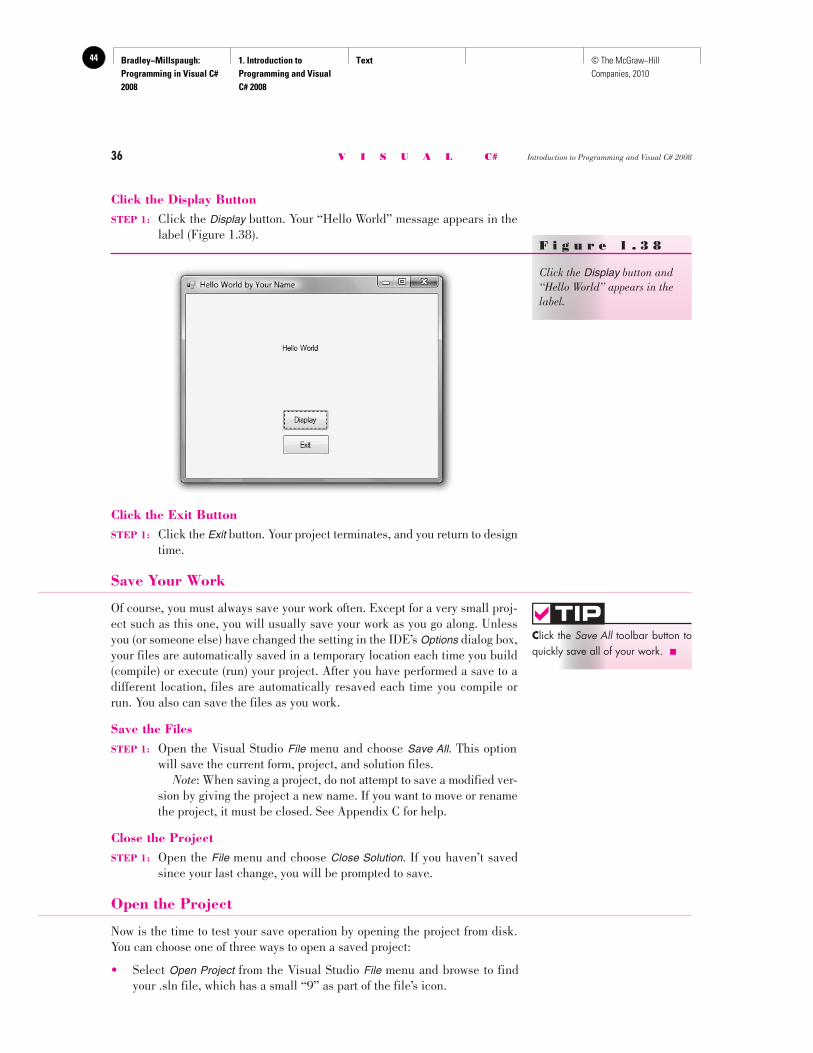
Bradley−Millspaugh: Programming in Visual C# 2008
1. Introduction to Programming and Visual C# 2008
Text44 © The McGraw−Hill Companies, 2010
36 V I S U A L C# Introduction to Programming and Visual C# 2008
Click the Display Button STEP 1: Click the Display button. Your “Hello World” message appears in the
label ( Figure 1.38 ). F i g u r e 1 . 3 8
Click the Display button and “Hello World” appears in the label.
Click the Exit Button STEP 1: Click the Exit button. Your project terminates, and you return to design
time.
Save Your Work
Of course, you must always save your work often. Except for a very small proj-ect such as this one, you will usually save your work as you go along. Unless you (or someone else) have changed the setting in the IDE’s Options dialog box, your files are automatically saved in a temporary location each time you build (compile) or execute (run) your project. After you have performed a save to a different location, files are automatically resaved each time you compile or run. You also can save the files as you work.
Save the Files STEP 1: Open the Visual Studio File menu and choose Save All . This option
will save the current form, project, and solution files. Note : When saving a project, do not attempt to save a modified ver-
sion by giving the project a new name. If you want to move or rename the project, it must be closed. See Appendix C for help.
Close the Project STEP 1: Open the File menu and choose Close Solution . If you haven’t saved
since your last change, you will be prompted to save.
Open the Project
Now is the time to test your save operation by opening the project from disk. You can choose one of three ways to open a saved project:
• Select Open Project from the Visual Studio File menu and browse to find your .sln file, which has a small “9” as part of the file’s icon.
C lick the Save All toolbar button to quickly save all of your work. ■
TIP
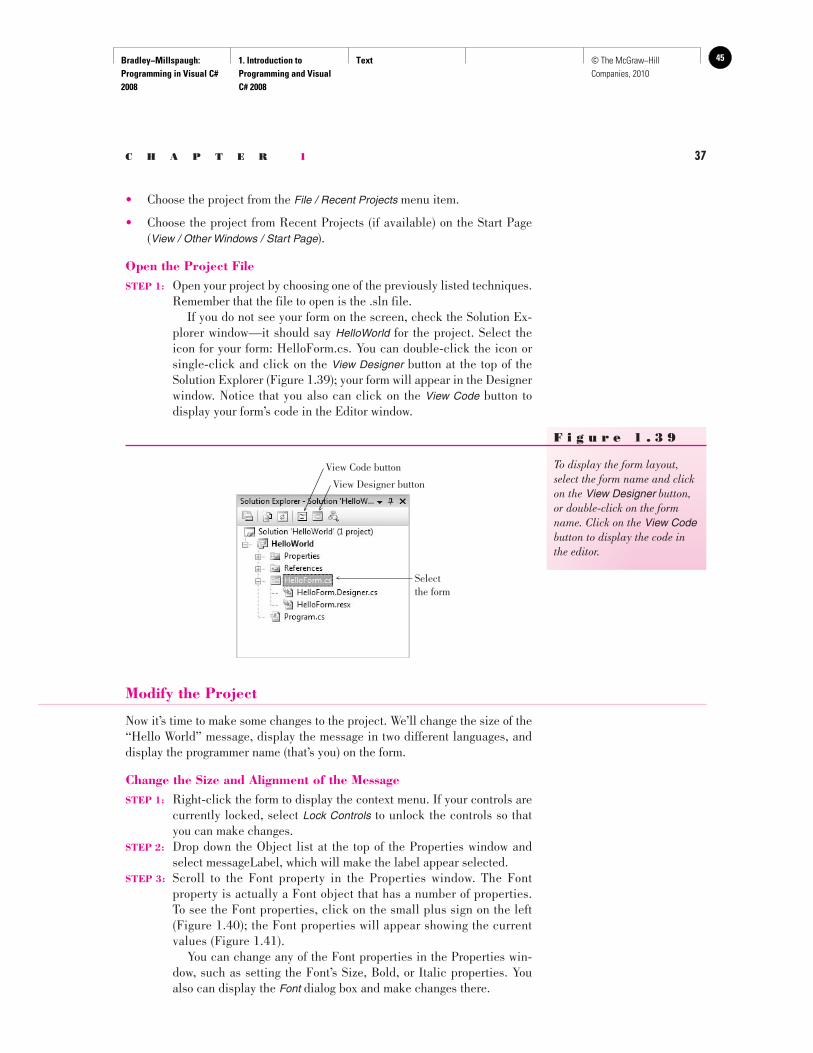
Bradley−Millspaugh: Programming in Visual C# 2008
1. Introduction to Programming and Visual C# 2008
Text 45© The McGraw−Hill Companies, 2010
C H A P T E R 1 37
• Choose the project from the File / Recent Projects menu item.
• Choose the project from Recent Projects (if available) on the Start Page ( View / Other Windows / Start Page ).
Open the Project File STEP 1: Open your project by choosing one of the previously listed techniques.
Remember that the file to open is the .sln file. If you do not see your form on the screen, check the Solution Ex-
plorer window—it should say HelloWorld for the project. Select the icon for your form: HelloForm.cs. You can double-click the icon or single-click and click on the View Designer button at the top of the Solution Explorer ( Figure 1.39 ); your form will appear in the Designer window. Notice that you also can click on the View Code button to display your form’s code in the Editor window.
View Code button
View Designer button
Selectthe form
F i g u r e 1 . 3 9
To display the form layout, select the form name and click on the View Designer button, or double-click on the form name. Click on the View Code button to display the code in the editor.
Modify the Project
Now it’s time to make some changes to the project. We’ll change the size of the “Hello World” message, display the message in two different languages, and display the programmer name (that’s you) on the form.
Change the Size and Alignment of the Message STEP 1: Right-click the form to display the context menu. If your controls are
currently locked, select Lock Controls to unlock the controls so that you can make changes.
STEP 2: Drop down the Object list at the top of the Properties window and select messageLabel, which will make the label appear selected.
STEP 3: Scroll to the Font property in the Properties window. The Font property is actually a Font object that has a number of properties. To see the Font properties, click on the small plus sign on the left ( Figure 1.40 ); the Font properties will appear showing the current values ( Figure 1.41 ).
You can change any of the Font properties in the Properties win-dow, such as setting the Font’s Size, Bold, or Italic properties. You also can display the Font dialog box and make changes there.
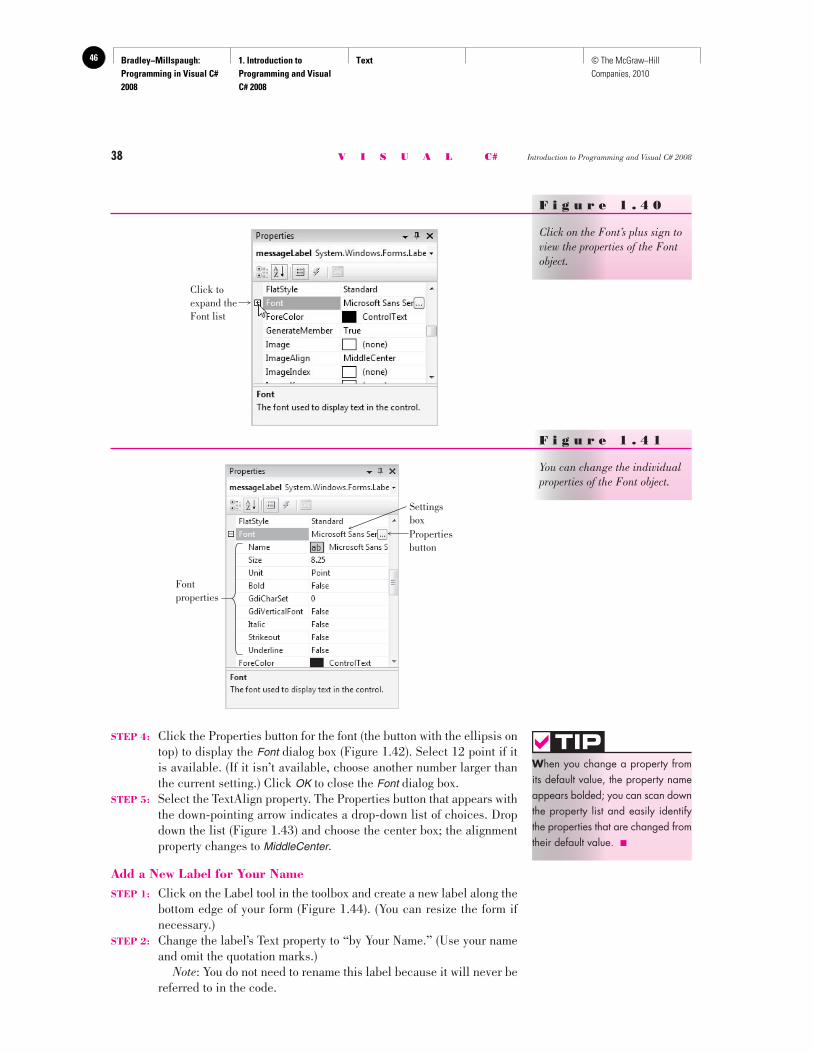
Bradley−Millspaugh: Programming in Visual C# 2008
1. Introduction to Programming and Visual C# 2008
Text46 © The McGraw−Hill Companies, 2010
38 V I S U A L C# Introduction to Programming and Visual C# 2008
STEP 4: Click the Properties button for the font (the button with the ellipsis on top) to display the Font dialog box ( Figure 1.42 ). Select 12 point if it is available. (If it isn’t available, choose another number larger than the current setting.) Click OK to close the Font dialog box.
STEP 5: Select the TextAlign property. The Properties button that appears with the down-pointing arrow indicates a drop-down list of choices. Drop down the list ( Figure 1.43 ) and choose the center box; the alignment property changes to MiddleCenter .
Add a New Label for Your Name STEP 1: Click on the Label tool in the toolbox and create a new label along the
bottom edge of your form ( Figure 1.44 ). (You can resize the form if necessary.)
STEP 2: Change the label’s Text property to “by Your Name.” (Use your name and omit the quotation marks.)
Note : You do not need to rename this label because it will never be referred to in the code.
F i g u r e 1 . 4 0
Click on the Font’s plus sign to view the properties of the Font object.
Click toexpand theFont list
F i g u r e 1 . 4 1
You can change the individual properties of the Font object.
Settingsbox
Fontproperties
Propertiesbutton
W hen you change a property from its default value, the property name appears bolded; you can scan down the property list and easily identify the properties that are changed from their default value. ■
TIP
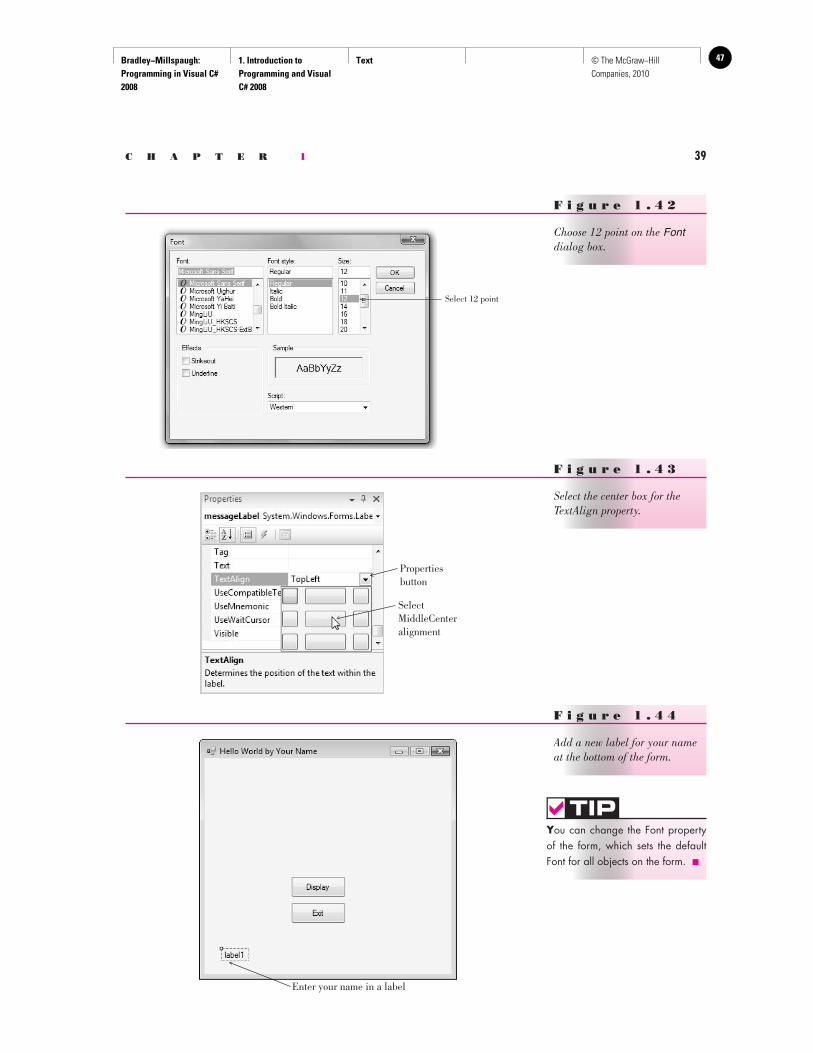
Bradley−Millspaugh: Programming in Visual C# 2008
1. Introduction to Programming and Visual C# 2008
Text 47© The McGraw−Hill Companies, 2010
C H A P T E R 1 39
Y ou can change the Font property of the form, which sets the default Font for all objects on the form. ■
TIP
F i g u r e 1 . 4 2
Choose 12 point on the Font dialog box.
Select 12 point
F i g u r e 1 . 4 3
Select the center box for the TextAlign property.
Propertiesbutton
SelectMiddleCenteralignment
F i g u r e 1 . 4 4
Add a new label for your name at the bottom of the form.
Enter your name in a label
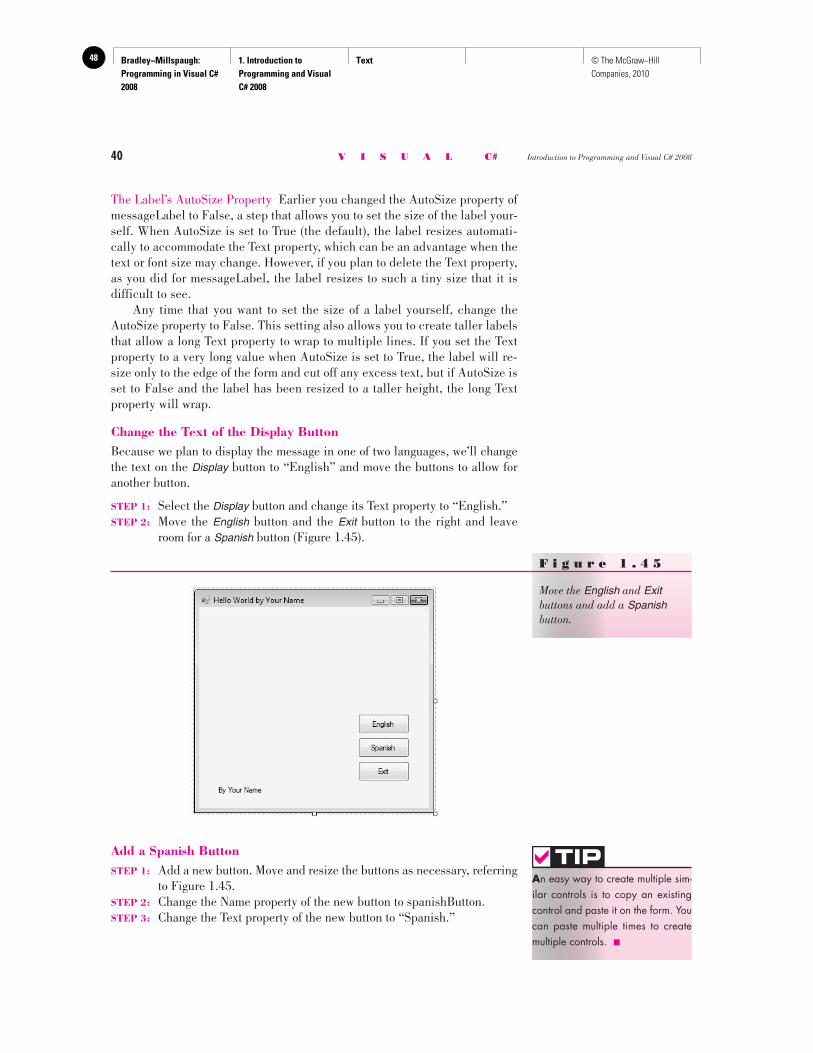
Bradley−Millspaugh: Programming in Visual C# 2008
1. Introduction to Programming and Visual C# 2008
Text48 © The McGraw−Hill Companies, 2010
40 V I S U A L C# Introduction to Programming and Visual C# 2008
Add a Spanish Button STEP 1: Add a new button. Move and resize the buttons as necessary, referring
to Figure 1.45 . STEP 2: Change the Name property of the new button to spanishButton. STEP 3: Change the Text property of the new button to “Spanish.”
The Label’s AutoSize Property Earlier you changed the AutoSize property of messageLabel to False, a step that allows you to set the size of the label your-self. When AutoSize is set to True (the default), the label resizes automati-cally to accommodate the Text property, which can be an advantage when the text or font size may change. However, if you plan to delete the Text property, as you did for messageLabel, the label resizes to such a tiny size that it is difficult to see. Any time that you want to set the size of a label yourself, change the AutoSize property to False. This setting also allows you to create taller labels that allow a long Text property to wrap to multiple lines. If you set the Text property to a very long value when AutoSize is set to True, the label will re-size only to the edge of the form and cut off any excess text, but if AutoSize is set to False and the label has been resized to a taller height, the long Text property will wrap.
Change the Text of the Display Button Because we plan to display the message in one of two languages, we’ll change the text on the Display button to “English” and move the buttons to allow for another button.
STEP 1: Select the Display button and change its Text property to “English.” STEP 2: Move the English button and the Exit button to the right and leave
room for a Spanish button ( Figure 1.45 ).
A n easy way to create multiple sim-ilar controls is to copy an existing control and paste it on the form. You can paste multiple times to create multiple controls. ■
TIP
F i g u r e 1 . 4 5
Move the English and Exit buttons and add a Spanish button.
Bradley−Millspaugh: Programming in Visual C# 2008
1. Introduction to Programming and Visual C# 2008
Text 49© The McGraw−Hill Companies, 2010
C H A P T E R 1 41
Add an Event Handler for the Spanish Button STEP 1: Double-click on the Spanish button to open the editor for spanishBut-
ton_Click. STEP 2: Add a comment:
// Display the Hello World message in Spanish.
STEP 3: Press Enter twice and type the following line of C# code.
messageLabel.Text = "Hola Mundo";
STEP 4: Return to design view.
Lock the Controls STEP 1: When you are satisfied with the placement of the controls on the form,
display the context menu and select Lock Controls again.
Save and Run the Project STEP 1: Save your project again. You can use the File / Save All menu command
or the Save All toolbar button. STEP 2: Run your project again. Try clicking on the English button and the
Spanish button. Problems? See “Finding and Fixing Errors” later in this chapter. STEP 3: Click the Exit button to end program execution.
Add Comments Good documentation guidelines require some more comments in the project. Always begin each method with comments that tell the purpose of the method. In addition, each project file needs identifying comments at the top.
STEP 1: Display the code in the editor and click in front of the first line ( using System; ). Make sure that you have an insertion point; if the entire first line is selected, press the left arrow to set the inser-tion point.
STEP 2: Press Enter to create a blank line. Warning : If you accidentally deleted the first line, click Undo (or
press Ctrl + Z) and try again. STEP 3: Move the insertion point up to the blank line and type the following
comments, one per line ( Figure 1.46 ):
/* * Project: Hello World * Programmer: Your Name (Use your own name here.) * Date: (Fill in today ’s date.) * Description: This project will display a "Hello World" * message in two different languages. */
P ress Ctrl + Home to quickly move the insertion point to the top of the file. ■
TIP
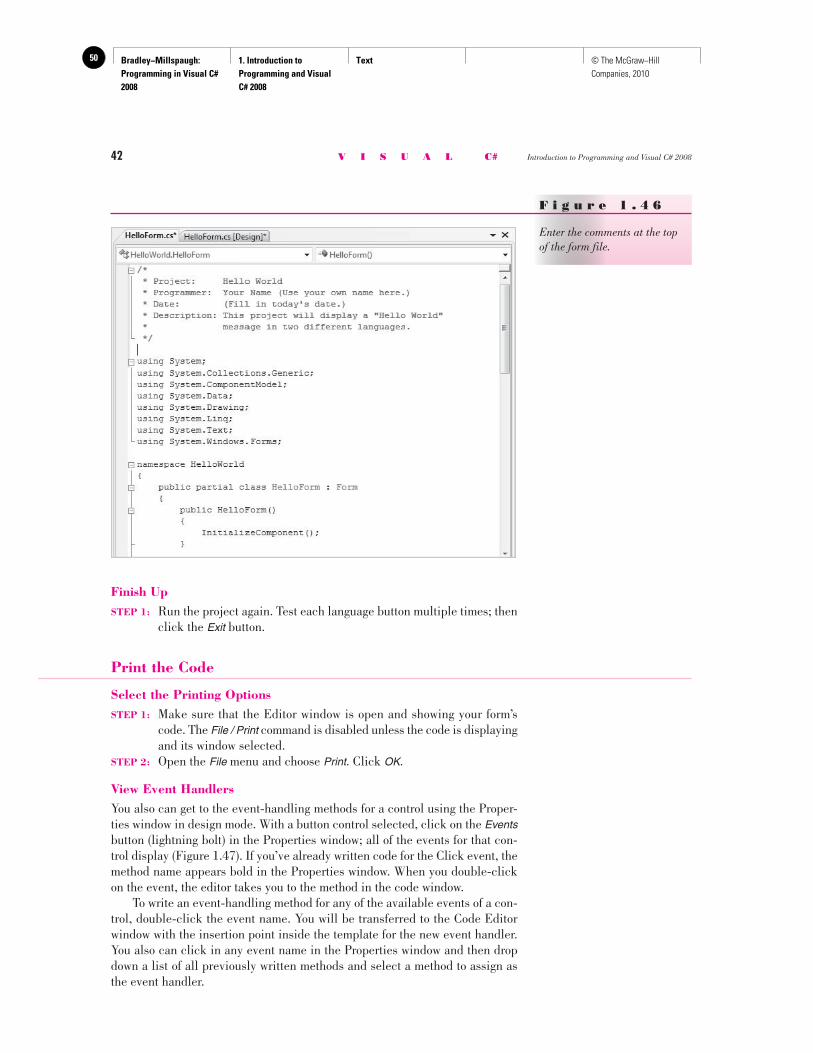
Bradley−Millspaugh: Programming in Visual C# 2008
1. Introduction to Programming and Visual C# 2008
Text50 © The McGraw−Hill Companies, 2010
42 V I S U A L C# Introduction to Programming and Visual C# 2008
Finish Up STEP 1: Run the project again. Test each language button multiple times; then
click the Exit button.
Print the Code
Select the Printing Options STEP 1: Make sure that the Editor window is open and showing your form’s
code. The File / Print command is disabled unless the code is displaying and its window selected.
STEP 2: Open the File menu and choose Print . Click OK .
View Event Handlers You also can get to the event-handling methods for a control using the Proper-ties window in design mode. With a button control selected, click on the Events button (lightning bolt) in the Properties window; all of the events for that con-trol display ( Figure 1.47 ). If you’ve already written code for the Click event, the method name appears bold in the Properties window. When you double-click on the event, the editor takes you to the method in the code window. To write an event-handling method for any of the available events of a con-trol, double-click the event name. You will be transferred to the Code Editor window with the insertion point inside the template for the new event handler. You also can click in any event name in the Properties window and then drop down a list of all previously written methods and select a method to assign as the event handler.
F i g u r e 1 . 4 6
Enter the comments at the top of the form file.
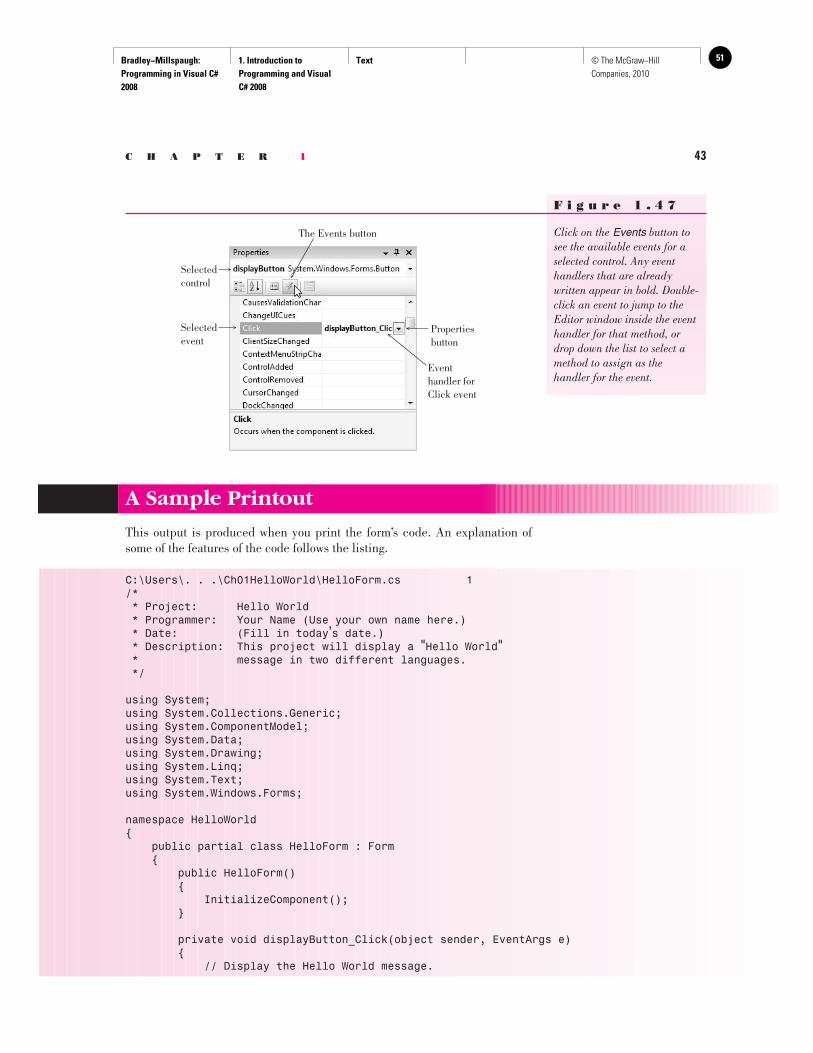
Bradley−Millspaugh: Programming in Visual C# 2008
1. Introduction to Programming and Visual C# 2008
Text 51© The McGraw−Hill Companies, 2010
C H A P T E R 1 43
F i g u r e 1 . 4 7
Click on the Events button to see the available events for a selected control. Any event handlers that are already written appear in bold. Double-click an event to jump to the Editor window inside the event handler for that method, or drop down the list to select a method to assign as the handler for the event.
The Events button
Propertiesbutton
Eventhandler forClick event
Selectedcontrol
Selectedevent
A Sample Printout
This output is produced when you print the form’s code. An explanation of some of the features of the code follows the listing.
C:\Users\. . .\Ch01HelloWorld\HelloForm.cs 1/* * Project: Hello World * Programmer: Your Name (Use your own name here.) * Date: (Fill in today ’s date.) * Description: This project will display a "Hello World" * message in two different languages. */
using System;using System.Collections.Generic;using System.ComponentModel;using System.Data;using System.Drawing;using System.Linq;using System.Text;using System.Windows.Forms;
namespace HelloWorld{ public partial class HelloForm : Form { public HelloForm() { InitializeComponent(); }
private void displayButton_Click(object sender, EventArgs e) { // Display the Hello World message.
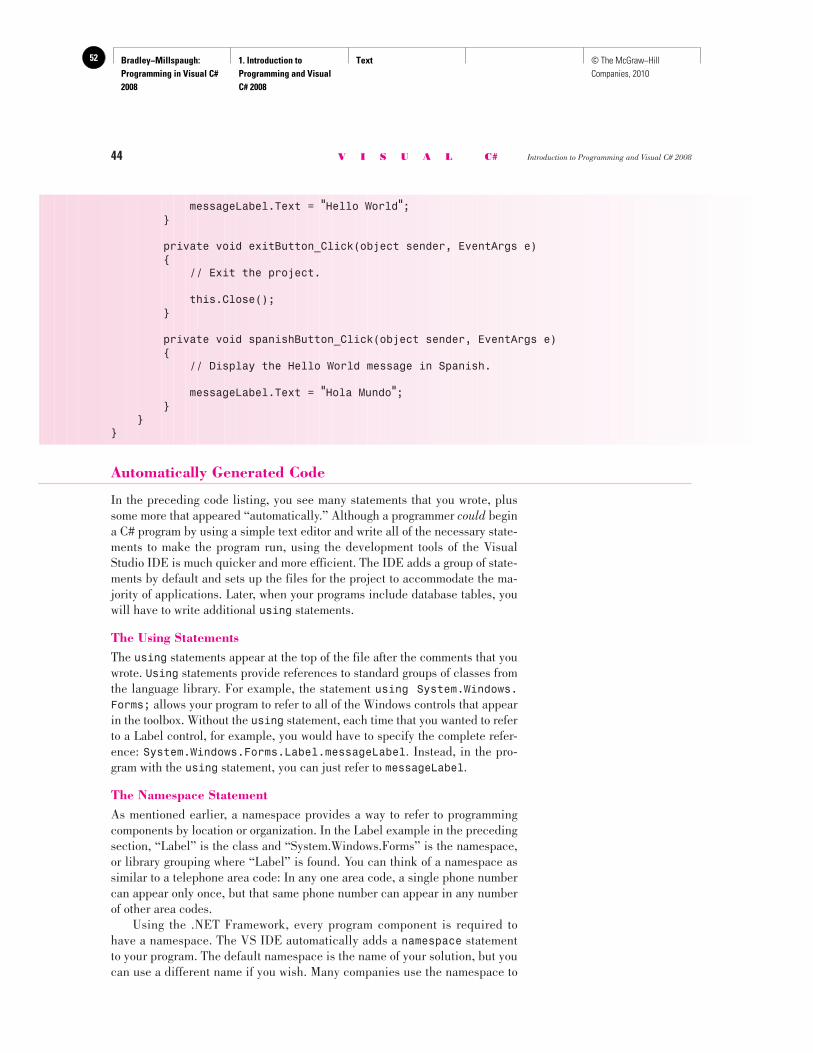
Bradley−Millspaugh: Programming in Visual C# 2008
1. Introduction to Programming and Visual C# 2008
Text52 © The McGraw−Hill Companies, 2010
44 V I S U A L C# Introduction to Programming and Visual C# 2008
messageLabel.Text = "Hello World"; }
private void exitButton_Click(object sender, EventArgs e) { // Exit the project.
this.Close(); }
private void spanishButton_Click(object sender, EventArgs e) { // Display the Hello World message in Spanish.
messageLabel.Text = "Hola Mundo"; } }}
Automatically Generated Code
In the preceding code listing, you see many statements that you wrote, plus some more that appeared “automatically.” Although a programmer could begin a C# program by using a simple text editor and write all of the necessary state-ments to make the program run, using the development tools of the Visual Studio IDE is much quicker and more efficient. The IDE adds a group of state-ments by default and sets up the files for the project to accommodate the ma-jority of applications. Later, when your programs include database tables, you will have to write additional using statements.
The Using Statements The using statements appear at the top of the file after the comments that you wrote. Using statements provide references to standard groups of classes from the language library. For example, the statement using System.Windows.Forms; allows your program to refer to all of the Windows controls that appear in the toolbox. Without the using statement, each time that you wanted to refer to a Label control, for example, you would have to specify the complete refer-ence: System.Windows.Forms.Label.messageLabel . Instead, in the pro-gram with the using statement, you can just refer to messageLabel .
The Namespace Statement As mentioned earlier, a namespace provides a way to refer to programming components by location or organization. In the Label example in the preceding section, “Label” is the class and “System.Windows.Forms” is the namespace, or library grouping where “Label” is found. You can think of a namespace as similar to a telephone area code: In any one area code, a single phone number can appear only once, but that same phone number can appear in any number of other area codes. Using the .NET Framework, every program component is required to have a namespace. The VS IDE automatically adds a namespace statement to your program. The default namespace is the name of your solution, but you can use a different name if you wish. Many companies use the namespace to
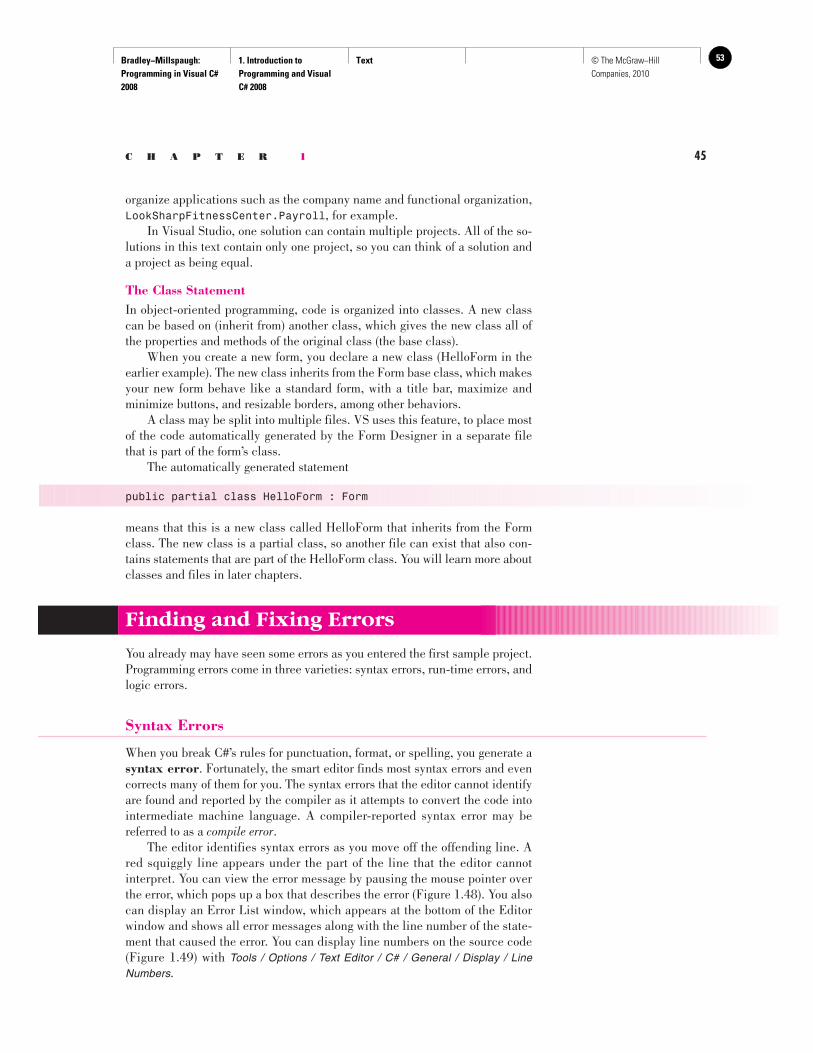
Bradley−Millspaugh: Programming in Visual C# 2008
1. Introduction to Programming and Visual C# 2008
Text 53© The McGraw−Hill Companies, 2010
C H A P T E R 1 45
organize applications such as the company name and functional organization, LookSharpFitnessCenter.Payroll , for example. In Visual Studio, one solution can contain multiple projects. All of the so-lutions in this text contain only one project, so you can think of a solution and a project as being equal.
The Class Statement In object-oriented programming, code is organized into classes. A new class can be based on (inherit from) another class, which gives the new class all of the properties and methods of the original class (the base class). When you create a new form, you declare a new class (HelloForm in the earlier example). The new class inherits from the Form base class, which makes your new form behave like a standard form, with a title bar, maximize and minimize buttons, and resizable borders, among other behaviors. A class may be split into multiple files. VS uses this feature, to place most of the code automatically generated by the Form Designer in a separate file that is part of the form’s class. The automatically generated statement
public partial class HelloForm : Form
means that this is a new class called HelloForm that inherits from the Form class. The new class is a partial class, so another file can exist that also con-tains statements that are part of the HelloForm class. You will learn more about classes and files in later chapters.
Finding and Fixing Errors
You already may have seen some errors as you entered the first sample project. Programming errors come in three varieties: syntax errors, run-time errors, and logic errors.
Syntax Errors
When you break C#’s rules for punctuation, format, or spelling, you generate a syntax error . Fortunately, the smart editor finds most syntax errors and even corrects many of them for you. The syntax errors that the editor cannot identify are found and reported by the compiler as it attempts to convert the code into intermediate machine language. A compiler-reported syntax error may be referred to as a compile error . The editor identifies syntax errors as you move off the offending line. A red squiggly line appears under the part of the line that the editor cannot interpret. You can view the error message by pausing the mouse pointer over the error, which pops up a box that describes the error ( Figure 1.48 ). You also can display an Error List window, which appears at the bottom of the Editor window and shows all error messages along with the line number of the state-ment that caused the error. You can display line numbers on the source code ( Figure 1.49 ) with Tools / Options / Text Editor / C# / General / Display / Line Numbers .
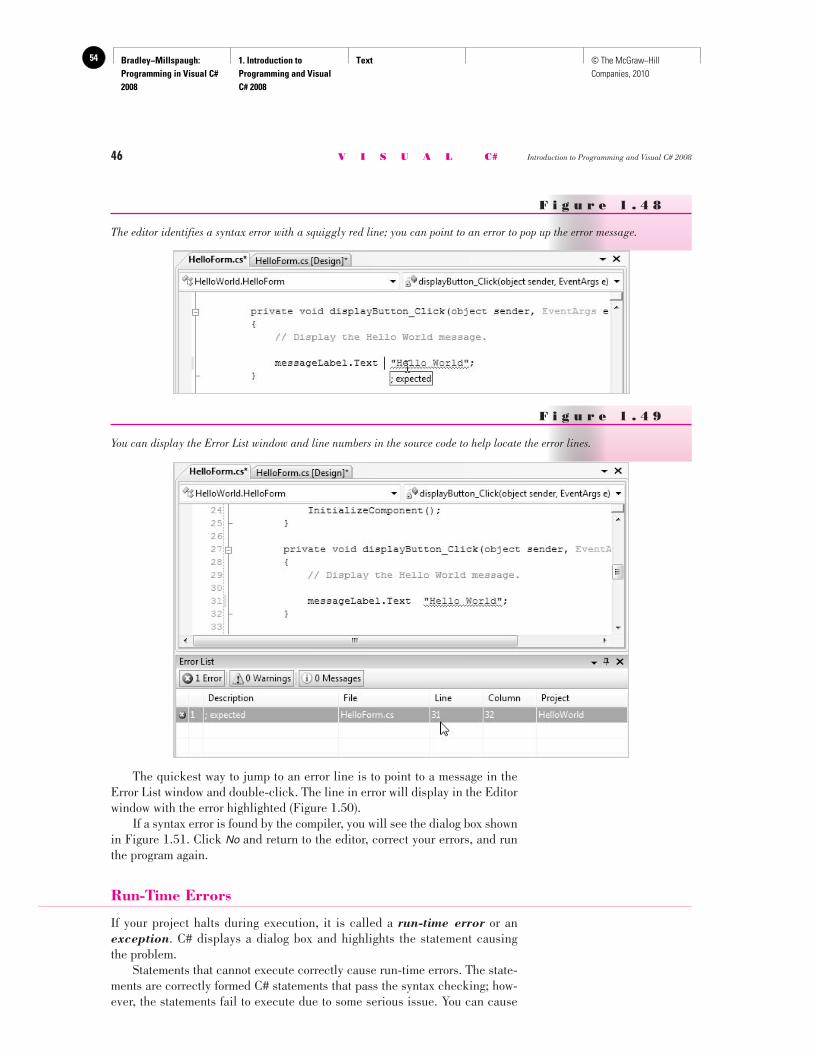
Bradley−Millspaugh: Programming in Visual C# 2008
1. Introduction to Programming and Visual C# 2008
Text54 © The McGraw−Hill Companies, 2010
46 V I S U A L C# Introduction to Programming and Visual C# 2008
The quickest way to jump to an error line is to point to a message in the Error List window and double-click. The line in error will display in the Editor window with the error highlighted ( Figure 1.50 ). If a syntax error is found by the compiler, you will see the dialog box shown in Figure 1.51 . Click No and return to the editor, correct your errors, and run the program again.
Run-Time Errors
If your project halts during execution, it is called a run-time error or an exception . C# displays a dialog box and highlights the statement causing the problem. Statements that cannot execute correctly cause run-time errors. The state-ments are correctly formed C# statements that pass the syntax checking; how-ever, the statements fail to execute due to some serious issue. You can cause
F i g u r e 1 . 4 8
The editor identifies a syntax error with a squiggly red line; you can point to an error to pop up the error message.
F i g u r e 1 . 4 9
You can display the Error List window and line numbers in the source code to help locate the error lines.
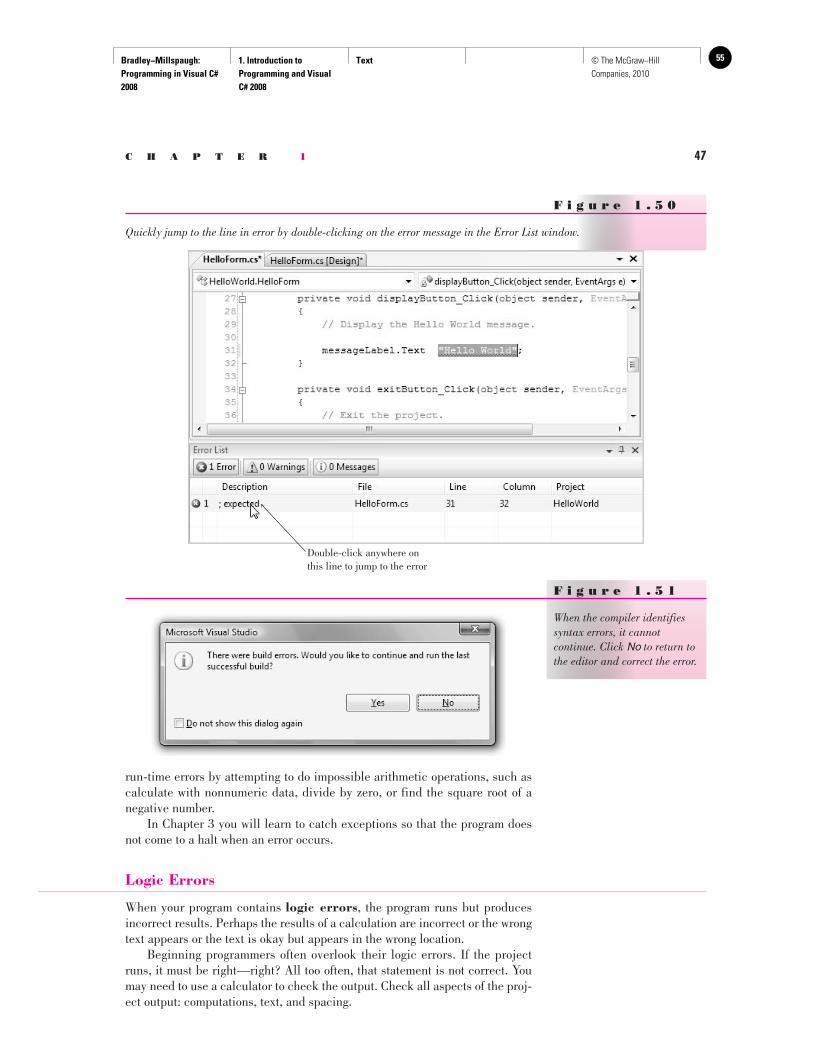
Bradley−Millspaugh: Programming in Visual C# 2008
1. Introduction to Programming and Visual C# 2008
Text 55© The McGraw−Hill Companies, 2010
C H A P T E R 1 47
run-time errors by attempting to do impossible arithmetic operations, such as calculate with nonnumeric data, divide by zero, or find the square root of a negative number. In Chapter 3 you will learn to catch exceptions so that the program does not come to a halt when an error occurs.
Logic Errors
When your program contains logic errors , the program runs but produces incorrect results. Perhaps the results of a calculation are incorrect or the wrong text appears or the text is okay but appears in the wrong location. Beginning programmers often overlook their logic errors. If the project runs, it must be right—right? All too often, that statement is not correct. You may need to use a calculator to check the output. Check all aspects of the proj-ect output: computations, text, and spacing.
F i g u r e 1 . 5 0
Quickly jump to the line in error by double-clicking on the error message in the Error List window.
Double-click anywhere onthis line to jump to the error
F i g u r e 1 . 5 1
When the compiler identifies syntax errors, it cannot continue. Click No to return to the editor and correct the error.
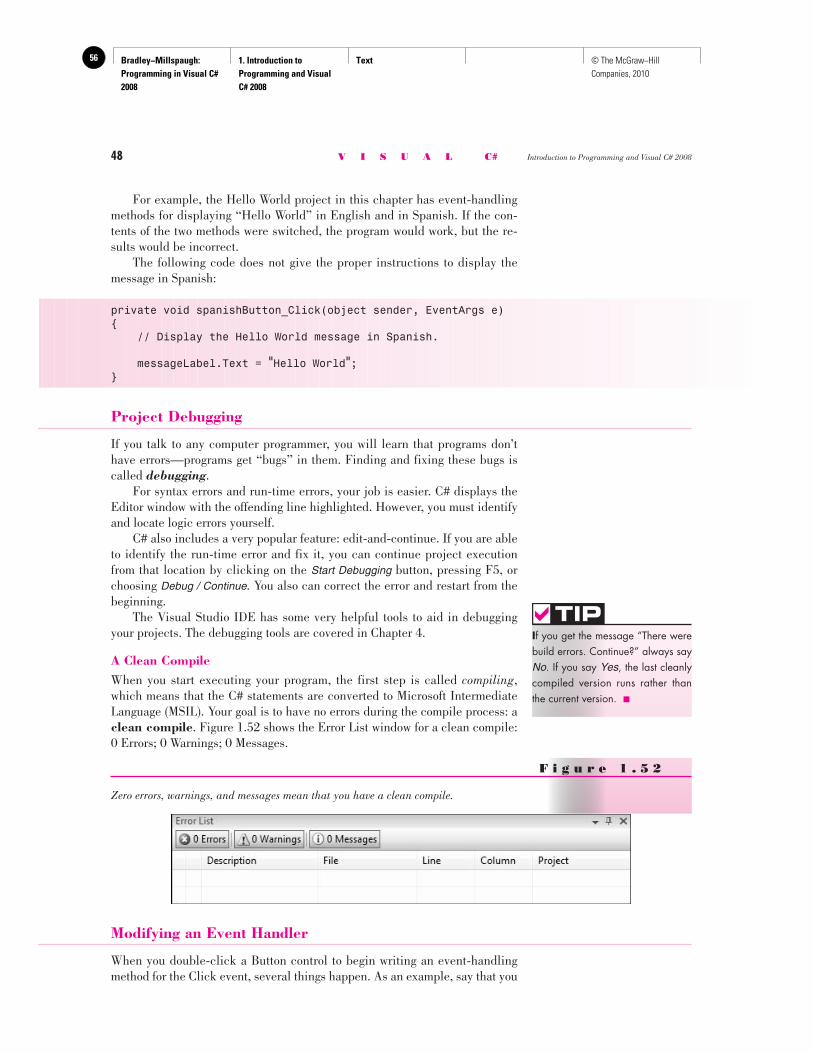
Bradley−Millspaugh: Programming in Visual C# 2008
1. Introduction to Programming and Visual C# 2008
Text56 © The McGraw−Hill Companies, 2010
48 V I S U A L C# Introduction to Programming and Visual C# 2008
For example, the Hello World project in this chapter has event-handling methods for displaying “Hello World” in English and in Spanish. If the con-tents of the two methods were switched, the program would work, but the re-sults would be incorrect. The following code does not give the proper instructions to display the message in Spanish:
private void spanishButton_Click(object sender, EventArgs e){ // Display the Hello World message in Spanish.
messageLabel.Text = "Hello World ";}
Project Debugging
If you talk to any computer programmer, you will learn that programs don’t have errors—programs get “bugs” in them. Finding and fixing these bugs is called debugging . For syntax errors and run-time errors, your job is easier. C# displays the Editor window with the offending line highlighted. However, you must identify and locate logic errors yourself. C# also includes a very popular feature: edit-and-continue. If you are able to identify the run-time error and fix it, you can continue project execution from that location by clicking on the Start Debugging button, pressing F5, or choosing Debug / Continue . You also can correct the error and restart from the beginning. The Visual Studio IDE has some very helpful tools to aid in debugging your projects. The debugging tools are covered in Chapter 4.
A Clean Compile When you start executing your program, the first step is called compiling , which means that the C# statements are converted to Microsoft Intermediate Language (MSIL). Your goal is to have no errors during the compile process: a clean compile . Figure 1.52 shows the Error List window for a clean compile: 0 Errors; 0 Warnings; 0 Messages.
I f you get the message “There were build errors. Continue?” always say No . If you say Yes , the last cleanly compiled version runs rather than the current version. ■
TIP
F i g u r e 1 . 5 2
Zero errors, warnings, and messages mean that you have a clean compile.
Modifying an Event Handler
When you double-click a Button control to begin writing an event-handling method for the Click event, several things happen. As an example, say that you
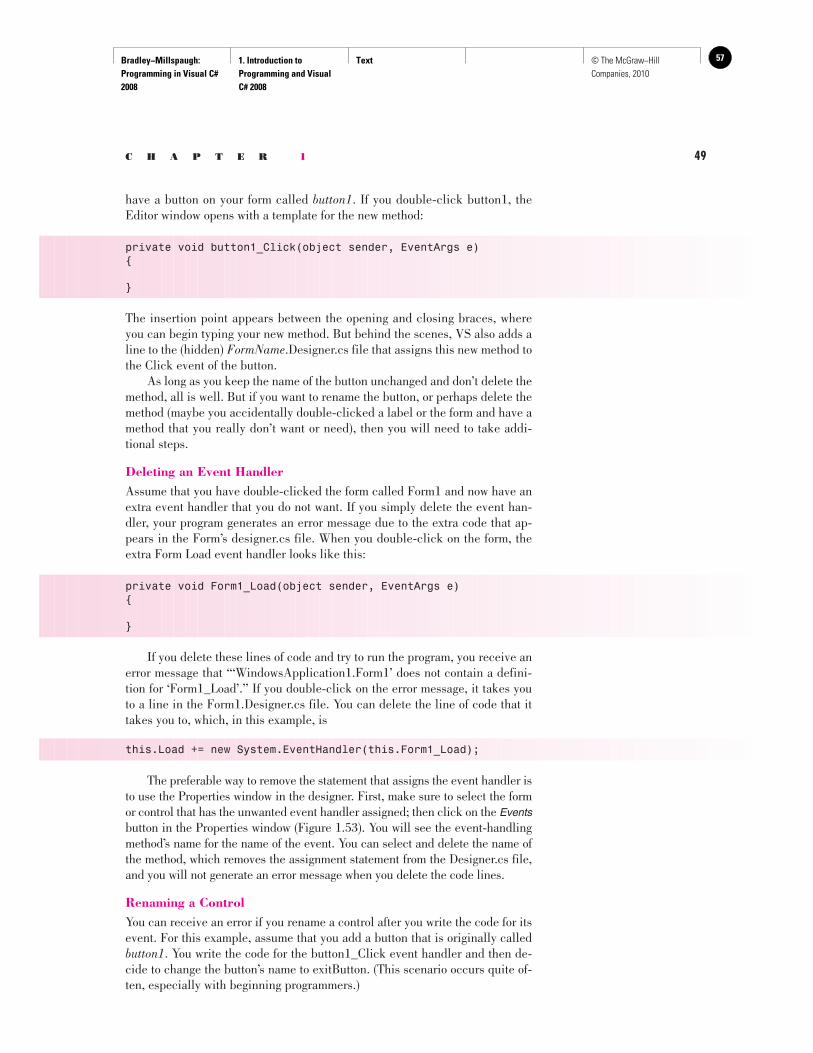
Bradley−Millspaugh: Programming in Visual C# 2008
1. Introduction to Programming and Visual C# 2008
Text 57© The McGraw−Hill Companies, 2010
C H A P T E R 1 49
have a button on your form called button1 . If you double-click button1, the Editor window opens with a template for the new method:
private void button1_Click(object sender, EventArgs e) {
}
The insertion point appears between the opening and closing braces, where you can begin typing your new method. But behind the scenes, VS also adds a line to the (hidden) FormName .Designer.cs file that assigns this new method to the Click event of the button. As long as you keep the name of the button unchanged and don’t delete the method, all is well. But if you want to rename the button, or perhaps delete the method (maybe you accidentally double-clicked a label or the form and have a method that you really don’t want or need), then you will need to take addi-tional steps.
Deleting an Event Handler Assume that you have double-clicked the form called Form1 and now have an extra event handler that you do not want. If you simply delete the event han-dler, your program generates an error message due to the extra code that ap-pears in the Form’s designer.cs file. When you double-click on the form, the extra Form Load event handler looks like this:
private void Form1_Load(object sender, EventArgs e) {
}
If you delete these lines of code and try to run the program, you receive an error message that “‘WindowsApplication1.Form1’ does not contain a defini-tion for ‘Form1_Load’.” If you double-click on the error message, it takes you to a line in the Form1.Designer.cs file. You can delete the line of code that it takes you to, which, in this example, is
this.Load += new System.EventHandler(this.Form1_Load);
The preferable way to remove the statement that assigns the event handler is to use the Properties window in the designer. First, make sure to select the form or control that has the unwanted event handler assigned; then click on the Events button in the Properties window ( Figure 1.53 ). You will see the event-handling method’s name for the name of the event. You can select and delete the name of the method, which removes the assignment statement from the Designer.cs file, and you will not generate an error message when you delete the code lines.
Renaming a Control You can receive an error if you rename a control after you write the code for its event. For this example, assume that you add a button that is originally called button1 . You write the code for the button1_Click event handler and then de-cide to change the button’s name to exitButton. (This scenario occurs quite of-ten, especially with beginning programmers.)
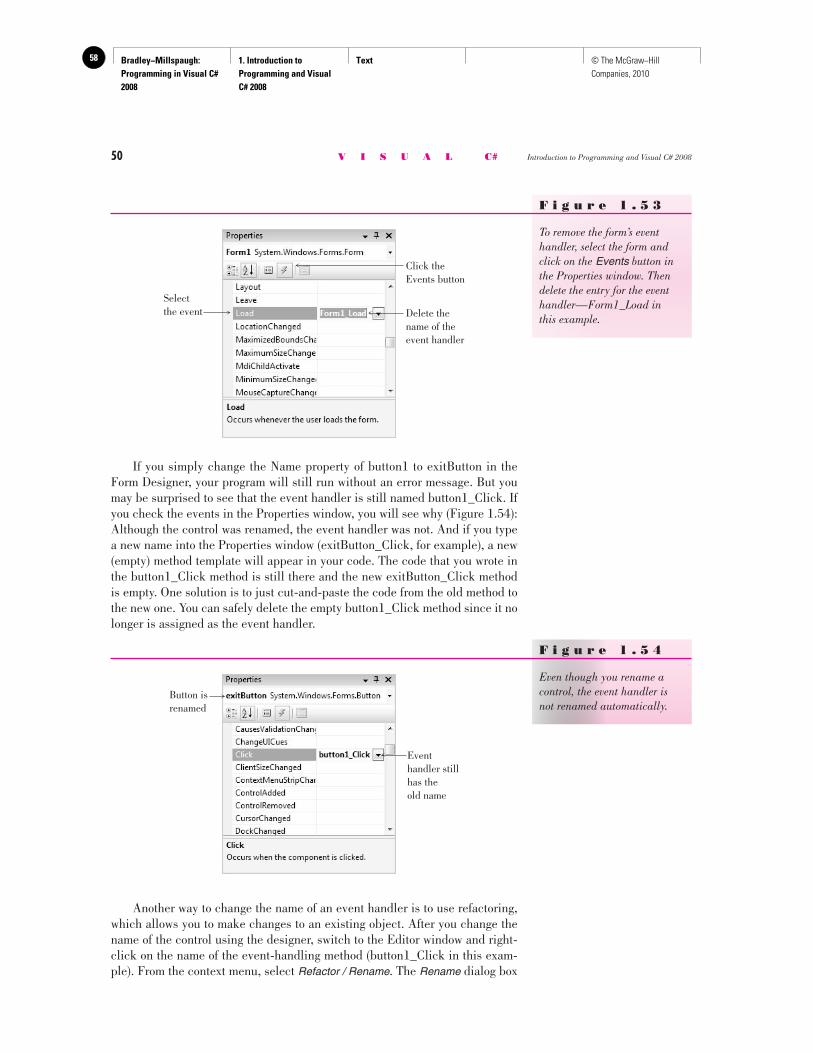
Bradley−Millspaugh: Programming in Visual C# 2008
1. Introduction to Programming and Visual C# 2008
Text58 © The McGraw−Hill Companies, 2010
50 V I S U A L C# Introduction to Programming and Visual C# 2008
If you simply change the Name property of button1 to exitButton in the Form Designer, your program will still run without an error message. But you may be surprised to see that the event handler is still named button1_Click. If you check the events in the Properties window, you will see why ( Figure 1.54 ): Although the control was renamed, the event handler was not. And if you type a new name into the Properties window (exitButton_Click, for example), a new (empty) method template will appear in your code. The code that you wrote in the button1_Click method is still there and the new exitButton_Click method is empty. One solution is to just cut-and-paste the code from the old method to the new one. You can safely delete the empty button1_Click method since it no longer is assigned as the event handler.
F i g u r e 1 . 5 4
Even though you rename a control, the event handler is not renamed automatically.
Button isrenamed
Eventhandler stillhas the old name
Click theEvents button
Delete thename of theevent handler
Selectthe event
F i g u r e 1 . 5 3
To remove the form’s event handler, select the form and click on the Events button in the Properties window. Then delete the entry for the event handler—Form1_Load in this example.
Another way to change the name of an event handler is to use refactoring, which allows you to make changes to an existing object. After you change the name of the control using the designer, switch to the Editor window and right-click on the name of the event-handling method (button1_Click in this exam-ple). From the context menu, select Refactor / Rename . The Rename dialog box
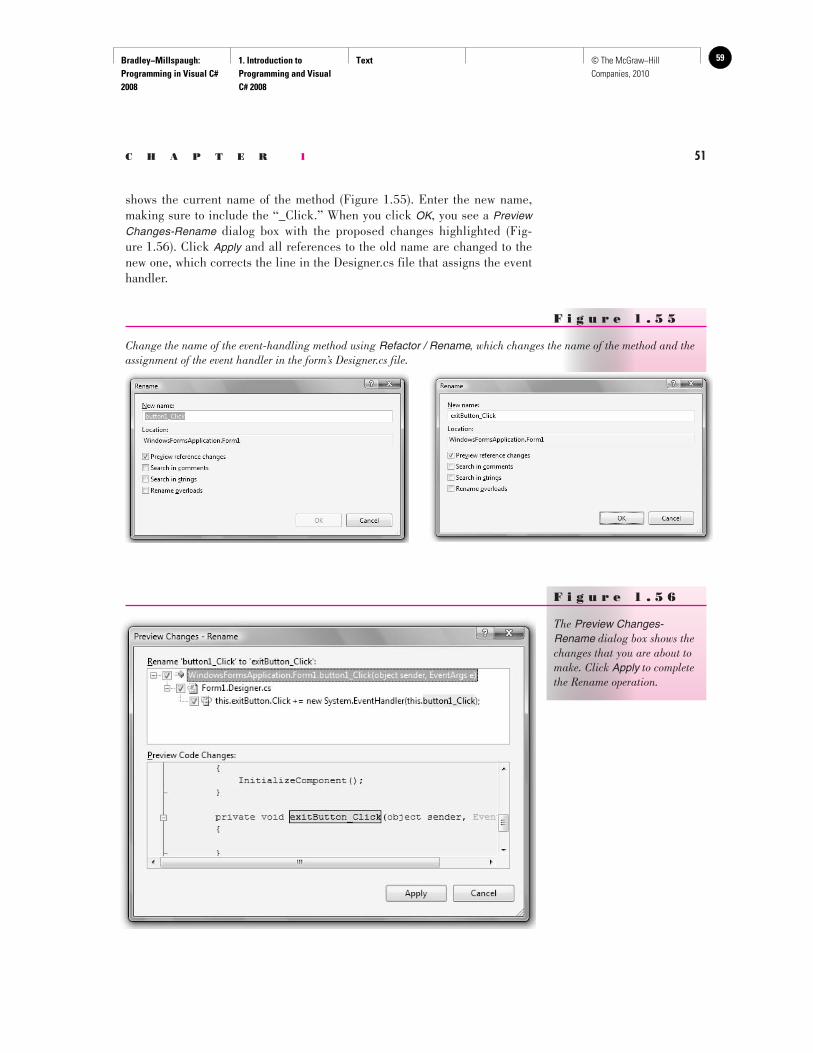
Bradley−Millspaugh: Programming in Visual C# 2008
1. Introduction to Programming and Visual C# 2008
Text 59© The McGraw−Hill Companies, 2010
C H A P T E R 1 51
shows the current name of the method ( Figure 1.55 ). Enter the new name, making sure to include the “_Click.” When you click OK , you see a Preview Changes-Rename dialog box with the proposed changes highlighted ( Fig-ure 1.56 ). Click Apply and all references to the old name are changed to the new one, which corrects the line in the Designer.cs file that assigns the event handler.
F i g u r e 1 . 5 5
Change the name of the event-handling method using Refactor / Rename , which changes the name of the method and the assignment of the event handler in the form’s Designer.cs file.
F i g u r e 1 . 5 6
The Preview Changes-Rename dialog box shows the changes that you are about to make. Click Apply to complete the Rename operation.
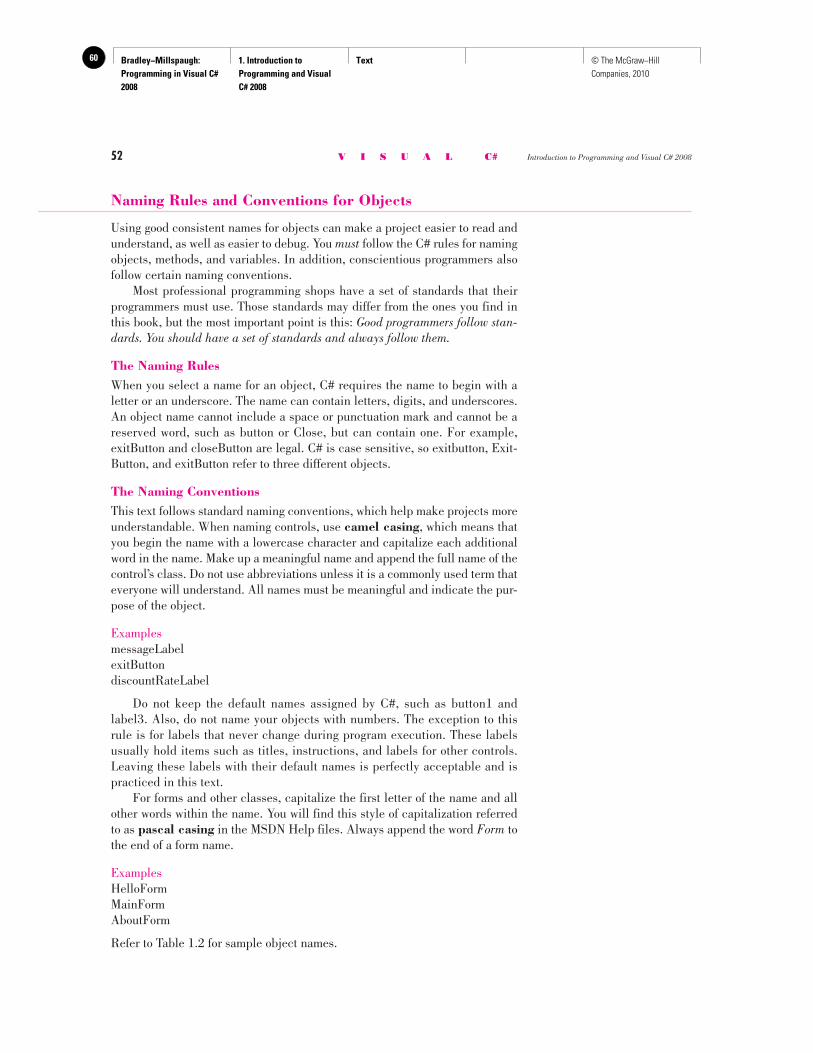
Bradley−Millspaugh: Programming in Visual C# 2008
1. Introduction to Programming and Visual C# 2008
Text60 © The McGraw−Hill Companies, 2010
52 V I S U A L C# Introduction to Programming and Visual C# 2008
Naming Rules and Conventions for Objects
Using good consistent names for objects can make a project easier to read and understand, as well as easier to debug. You must follow the C# rules for naming objects, methods, and variables. In addition, conscientious programmers also follow certain naming conventions. Most professional programming shops have a set of standards that their programmers must use. Those standards may differ from the ones you find in this book, but the most important point is this: Good programmers follow stan-dards. You should have a set of standards and always follow them.
The Naming Rules When you select a name for an object, C# requires the name to begin with a letter or an underscore. The name can contain letters, digits, and underscores. An object name cannot include a space or punctuation mark and cannot be a reserved word, such as button or Close, but can contain one. For example, exitButton and closeButton are legal. C# is case sensitive, so exitbutton, Exit-Button, and exitButton refer to three different objects.
The Naming Conventions This text follows standard naming conventions, which help make projects more understandable. When naming controls, use camel casing , which means that you begin the name with a lowercase character and capitalize each additional word in the name. Make up a meaningful name and append the full name of the control’s class. Do not use abbreviations unless it is a commonly used term that everyone will understand. All names must be meaningful and indicate the pur-pose of the object.
Examples messageLabel exitButton discountRateLabel
Do not keep the default names assigned by C#, such as button1 and label3. Also, do not name your objects with numbers. The exception to this rule is for labels that never change during program execution. These labels usually hold items such as titles, instructions, and labels for other controls. Leaving these labels with their default names is perfectly acceptable and is practiced in this text. For forms and other classes, capitalize the first letter of the name and all other words within the name. You will find this style of capitalization referred to as pascal casing in the MSDN Help files. Always append the word Form to the end of a form name.
Examples HelloForm MainForm AboutForm
Refer to Table 1.2 for sample object names.
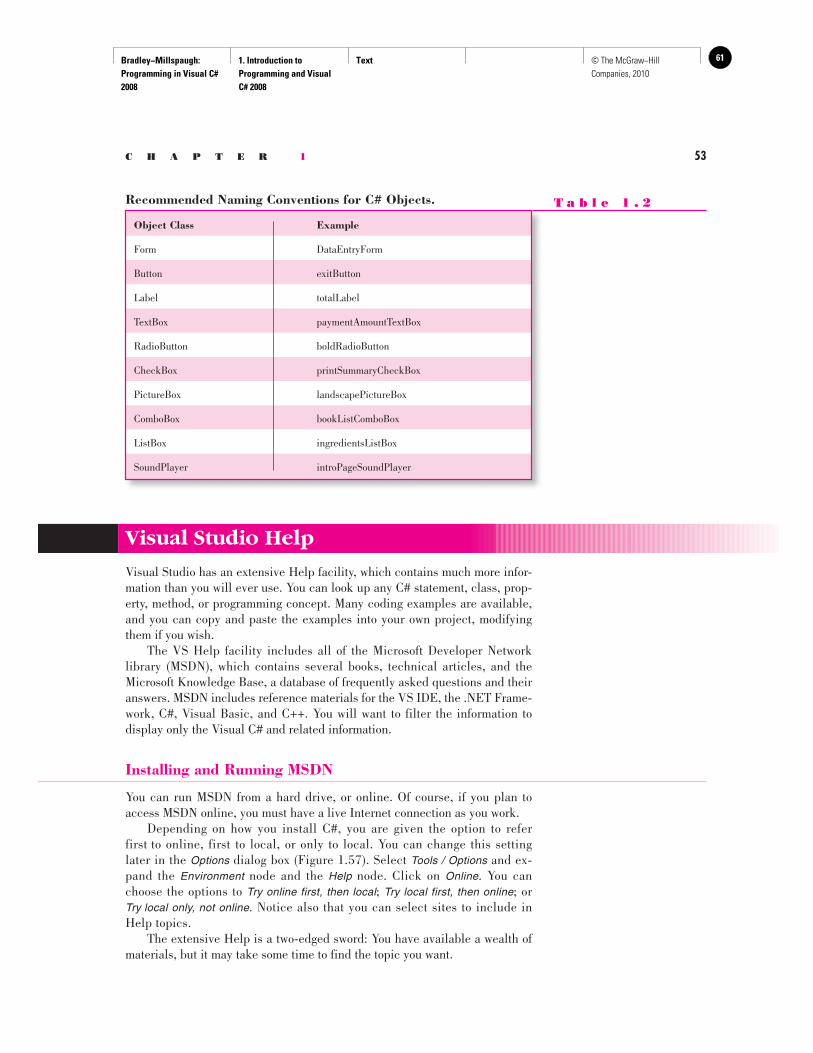
Bradley−Millspaugh: Programming in Visual C# 2008
1. Introduction to Programming and Visual C# 2008
Text 61© The McGraw−Hill Companies, 2010
C H A P T E R 1 53
Recommended Naming Conventions for C# Objects. T a b l e 1 . 2
Object Class Example Form DataEntryForm
Button exitButton
Label totalLabel
TextBox paymentAmountTextBox
RadioButton boldRadioButton
CheckBox printSummaryCheckBox
PictureBox landscapePictureBox
ComboBox bookListComboBox
ListBox ingredientsListBox
SoundPlayer introPageSoundPlayer
Visual Studio Help
Visual Studio has an extensive Help facility, which contains much more infor-mation than you will ever use. You can look up any C# statement, class, prop-erty, method, or programming concept. Many coding examples are available, and you can copy and paste the examples into your own project, modifying them if you wish. The VS Help facility includes all of the Microsoft Developer Network library (MSDN), which contains several books, technical articles, and the Microsoft Knowledge Base, a database of frequently asked questions and their answers. MSDN includes reference materials for the VS IDE, the .NET Frame-work, C#, Visual Basic, and C++. You will want to filter the information to display only the Visual C# and related information.
Installing and Running MSDN
You can run MSDN from a hard drive, or online. Of course, if you plan to access MSDN online, you must have a live Internet connection as you work. Depending on how you install C#, you are given the option to refer first to online, first to local, or only to local. You can change this setting later in the Options dialog box ( Figure 1.57 ). Select Tools / Options and ex-pand the Environment node and the Help node. Click on Online . You can choose the options to Try online first, then local ; Try local first, then online ; or Try local only, not online . Notice also that you can select sites to include in Help topics. The extensive Help is a two-edged sword: You have available a wealth of materials, but it may take some time to find the topic you want.
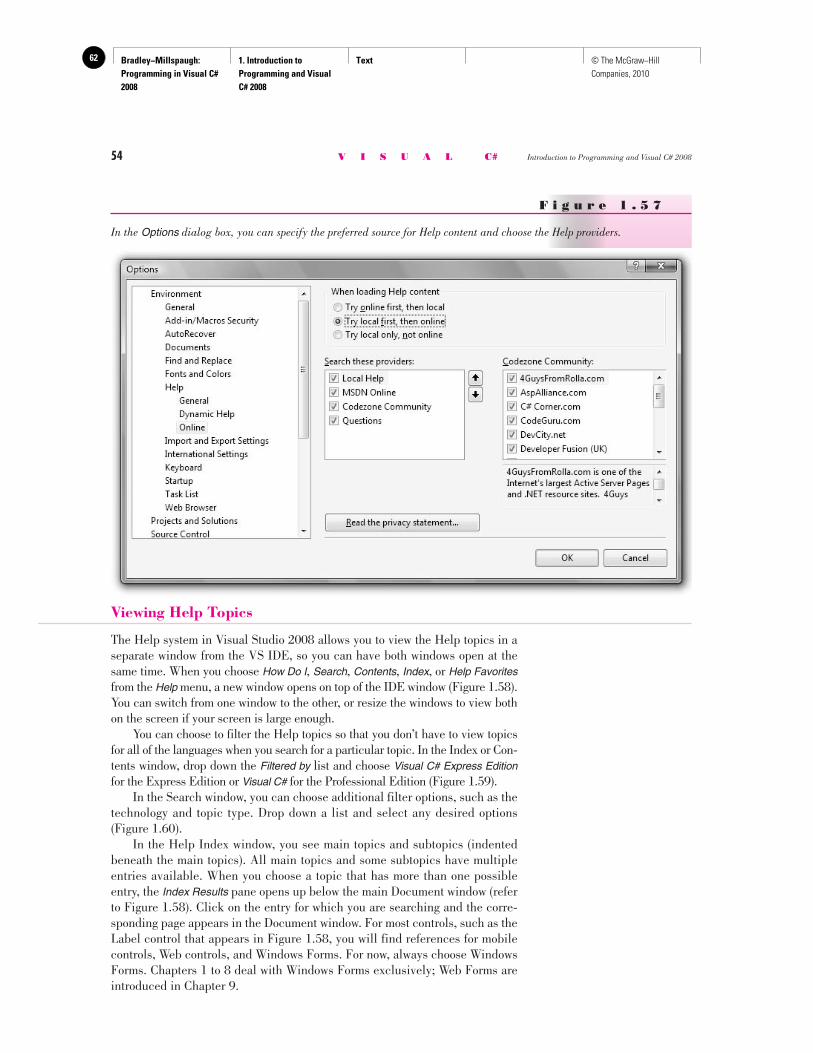
Bradley−Millspaugh: Programming in Visual C# 2008
1. Introduction to Programming and Visual C# 2008
Text62 © The McGraw−Hill Companies, 2010
54 V I S U A L C# Introduction to Programming and Visual C# 2008
F i g u r e 1 . 5 7
In the Options dialog box, you can specify the preferred source for Help content and choose the Help providers.
Viewing Help Topics
The Help system in Visual Studio 2008 allows you to view the Help topics in a separate window from the VS IDE, so you can have both windows open at the same time. When you choose How Do I , Search , Contents , Index , or Help Favorites from the Help menu, a new window opens on top of the IDE window ( Figure 1.58 ). You can switch from one window to the other, or resize the windows to view both on the screen if your screen is large enough. You can choose to filter the Help topics so that you don’t have to view topics for all of the languages when you search for a particular topic. In the Index or Con-tents window, drop down the Filtered by list and choose Visual C# Express Edition for the Express Edition or Visual C# for the Professional Edition ( Figure 1.59 ). In the Search window, you can choose additional filter options, such as the technology and topic type. Drop down a list and select any desired options ( Figure 1.60 ). In the Help Index window, you see main topics and subtopics (indented beneath the main topics). All main topics and some subtopics have multiple entries available. When you choose a topic that has more than one possible entry, the Index Results pane opens up below the main Document window (refer to Figure 1.58 ). Click on the entry for which you are searching and the corre-sponding page appears in the Document window. For most controls, such as the Label control that appears in Figure 1.58 , you will find references for mobile controls, Web controls, and Windows Forms. For now, always choose Windows Forms. Chapters 1 to 8 deal with Windows Forms exclusively; Web Forms are introduced in Chapter 9.
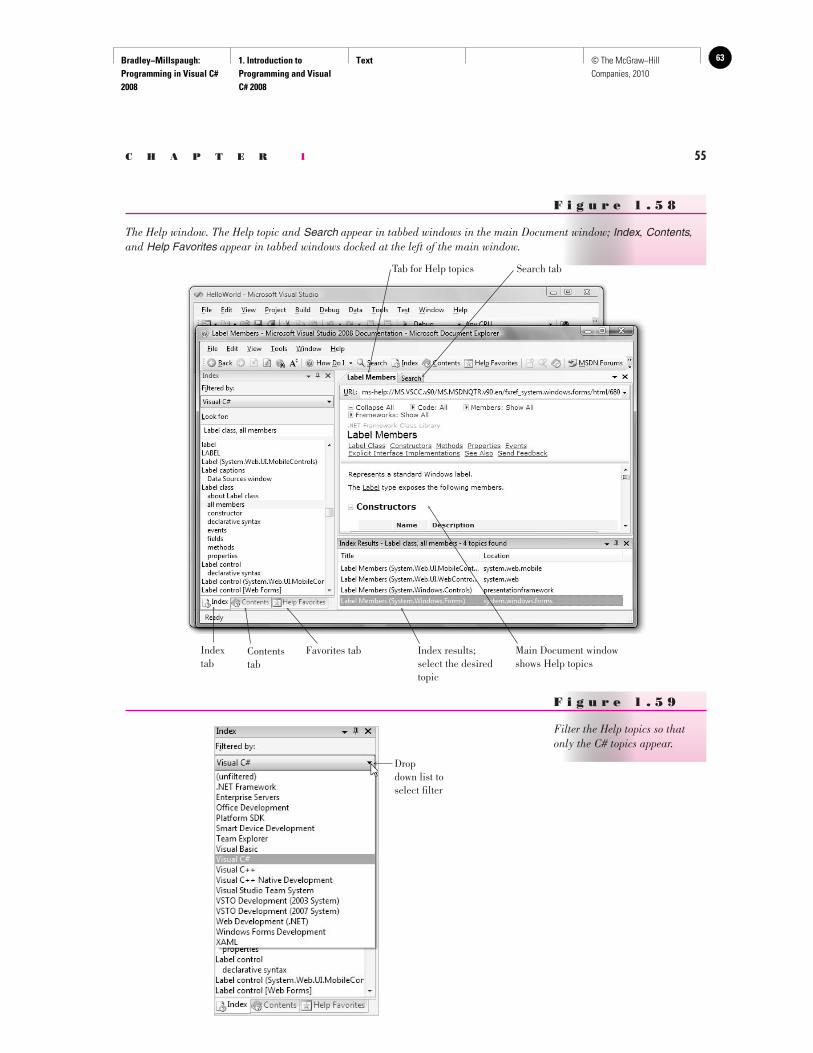
Bradley−Millspaugh: Programming in Visual C# 2008
1. Introduction to Programming and Visual C# 2008
Text 63© The McGraw−Hill Companies, 2010
C H A P T E R 1 55
Dropdown list toselect filter
F i g u r e 1 . 5 9
Filter the Help topics so that only the C# topics appear.
F i g u r e 1 . 5 8
The Help window. The Help topic and Search appear in tabbed windows in the main Document window; Index , Contents , and Help Favorites appear in tabbed windows docked at the left of the main window.
Tab for Help topics Search tab
Indextab
Contentstab
Favorites tab Index results;select the desiredtopic
Main Document windowshows Help topics
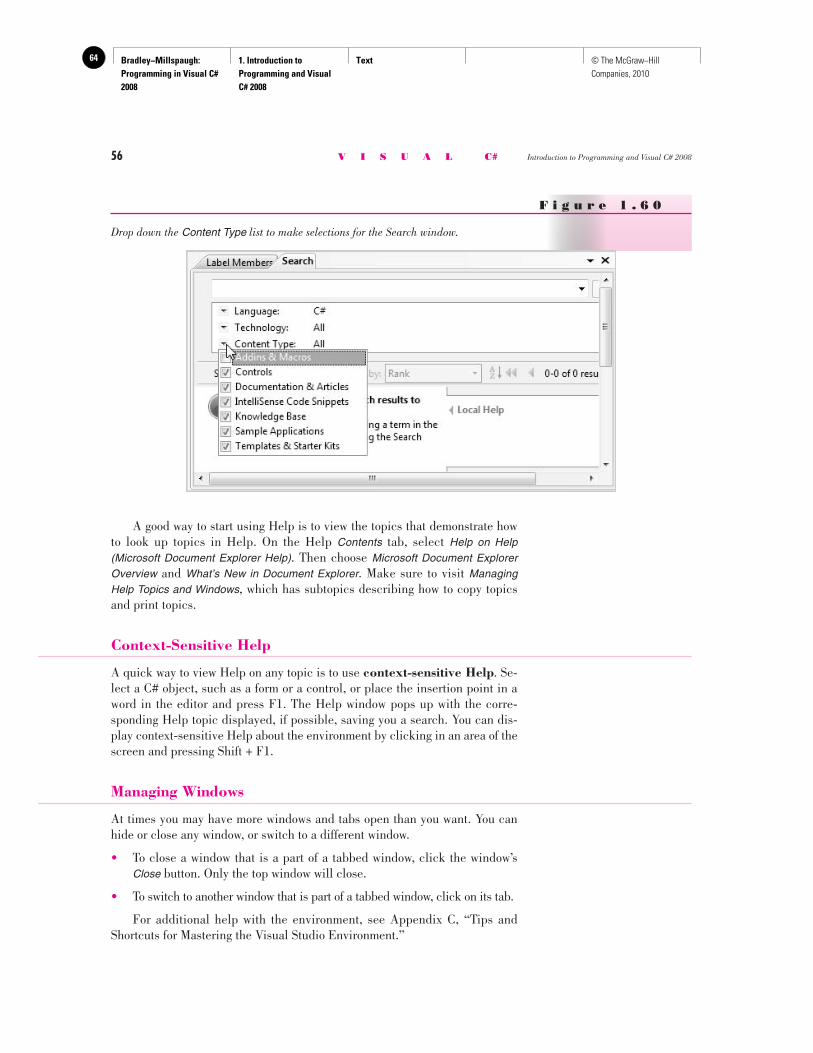
Bradley−Millspaugh: Programming in Visual C# 2008
1. Introduction to Programming and Visual C# 2008
Text64 © The McGraw−Hill Companies, 2010
56 V I S U A L C# Introduction to Programming and Visual C# 2008
A good way to start using Help is to view the topics that demonstrate how to look up topics in Help. On the Help Contents tab, select Help on Help (Microsoft Document Explorer Help) . Then choose Microsoft Document Explorer Overview and What’s New in Document Explorer . Make sure to visit Managing Help Topics and Windows , which has subtopics describing how to copy topics and print topics.
Context-Sensitive Help
A quick way to view Help on any topic is to use context-sensitive Help . Se-lect a C# object, such as a form or a control, or place the insertion point in a word in the editor and press F1. The Help window pops up with the corre-sponding Help topic displayed, if possible, saving you a search. You can dis-play context-sensitive Help about the environment by clicking in an area of the screen and pressing Shift + F1.
Managing Windows
At times you may have more windows and tabs open than you want. You can hide or close any window, or switch to a different window.
• To close a window that is a part of a tabbed window, click the window’s Close button. Only the top window will close.
• To switch to another window that is part of a tabbed window, click on its tab.
For additional help with the environment, see Appendix C, “Tips and Shortcuts for Mastering the Visual Studio Environment.”
F i g u r e 1 . 6 0
Drop down the Content Type list to make selections for the Search window.
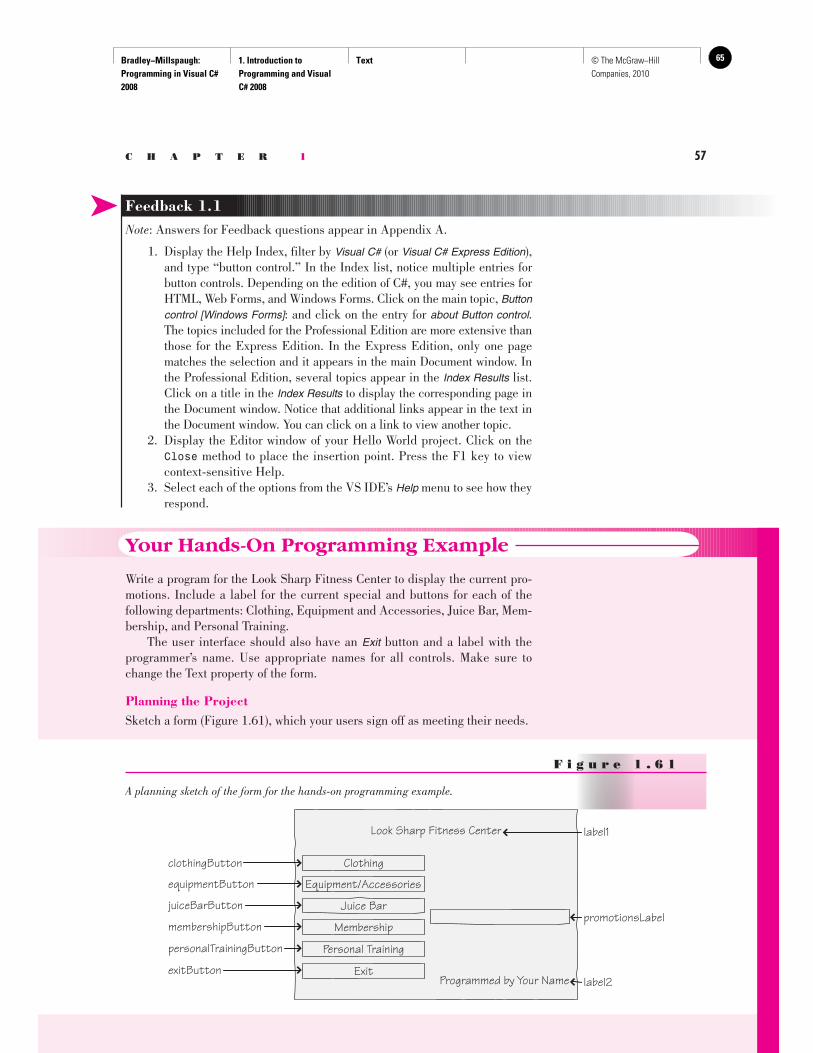
Bradley−Millspaugh: Programming in Visual C# 2008
1. Introduction to Programming and Visual C# 2008
Text 65© The McGraw−Hill Companies, 2010
C H A P T E R 1 57
Your Hands-On Programming Example
Write a program for the Look Sharp Fitness Center to display the current pro-motions. Include a label for the current special and buttons for each of the following departments: Clothing, Equipment and Accessories, Juice Bar, Mem-bership, and Personal Training. The user interface should also have an Exit button and a label with the programmer’s name. Use appropriate names for all controls. Make sure to change the Text property of the form.
Planning the Project Sketch a form ( Figure 1.61 ), which your users sign off as meeting their needs.
➤ Feedback 1.1 Note : Answers for Feedback questions appear in Appendix A.
1. Display the Help Index, filter by Visual C# (or Visual C# Express Edition ), and type “button control.” In the Index list, notice multiple entries for button controls. Depending on the edition of C#, you may see entries for HTML, Web Forms, and Windows Forms. Click on the main topic, Button control [Windows Forms] : and click on the entry for about Button control . The topics included for the Professional Edition are more extensive than those for the Express Edition. In the Express Edition, only one page matches the selection and it appears in the main Document window. In the Professional Edition, several topics appear in the Index Results list. Click on a title in the Index Results to display the corresponding page in the Document window. Notice that additional links appear in the text in the Document window. You can click on a link to view another topic.
2. Display the Editor window of your Hello World project. Click on the Close method to place the insertion point. Press the F1 key to view context-sensitive Help.
3. Select each of the options from the VS IDE’s Help menu to see how they respond.
F i g u r e 1 . 6 1
A planning sketch of the form for the hands-on programming example.
label2
label1Look Sharp Fitness Center
Programmed by Your Name
promotionsLabel
ClothingclothingButton
Equipment/AccessoriesequipmentButton
Juice BarjuiceBarButton
MembershipmembershipButton
Personal TrainingpersonalTrainingButton
ExitexitButton
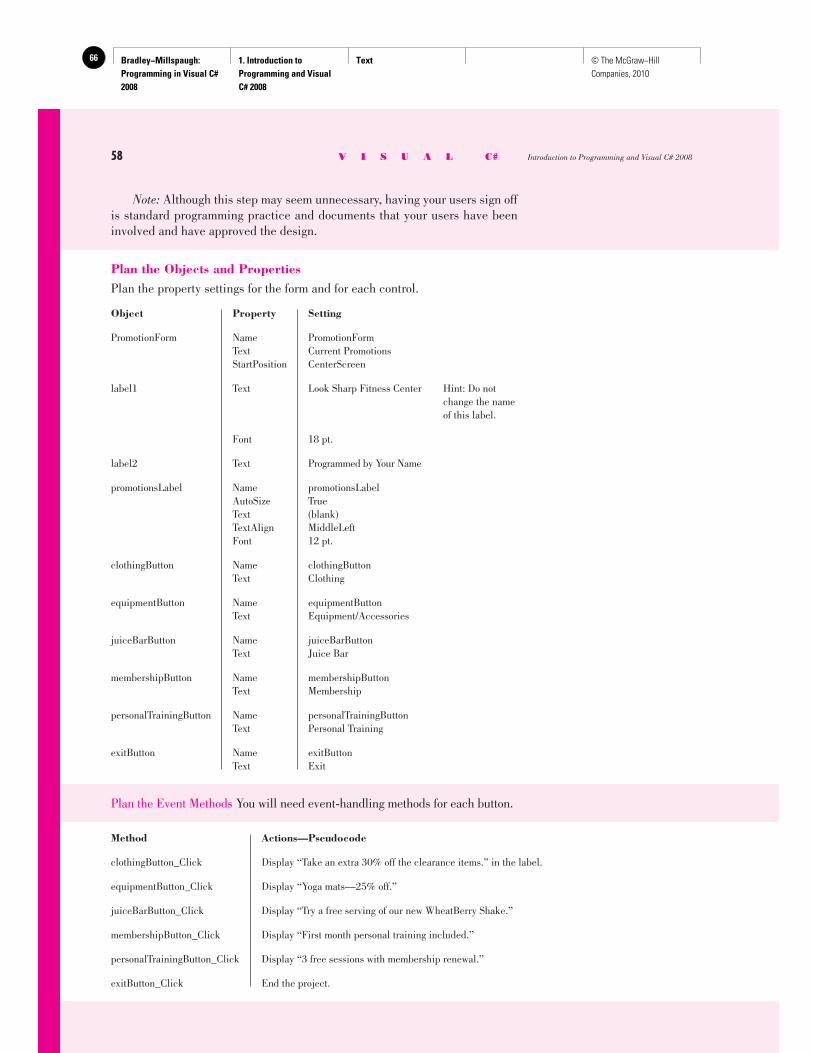
Bradley−Millspaugh: Programming in Visual C# 2008
1. Introduction to Programming and Visual C# 2008
Text66 © The McGraw−Hill Companies, 2010
58 V I S U A L C# Introduction to Programming and Visual C# 2008
Note: Although this step may seem unnecessary, having your users sign off is standard programming practice and documents that your users have been involved and have approved the design.
Plan the Objects and Properties Plan the property settings for the form and for each control.
Object Property Setting
PromotionForm Name PromotionForm Text Current Promotions StartPosition CenterScreen
label1 Text Look Sharp Fitness Center Hint: Do not change the name of this label.
Font 18 pt.
label2 Text Programmed by Your Name
promotionsLabel Name promotionsLabel AutoSize True Text (blank) TextAlign MiddleLeft Font 12 pt.
clothingButton Name clothingButton Text Clothing
equipmentButton Name equipmentButton Text Equipment/Accessories
juiceBarButton Name juiceBarButton Text Juice Bar
membershipButton Name membershipButton Text Membership
personalTrainingButton Name personalTrainingButton Text Personal Training
exitButton Name exitButton Text Exit
Plan the Event Methods You will need event-handling methods for each button.
Method Actions—Pseudocode
clothingButton_Click Display “Take an extra 30% off the clearance items.” in the label.
equipmentButton_Click Display “Yoga mats––25% off.”
juiceBarButton_Click Display “Try a free serving of our new WheatBerry Shake.”
membershipButton_Click Display “First month personal training included.”
personalTrainingButton_Click Display “3 free sessions with membership renewal.”
exitButton_Click End the project.
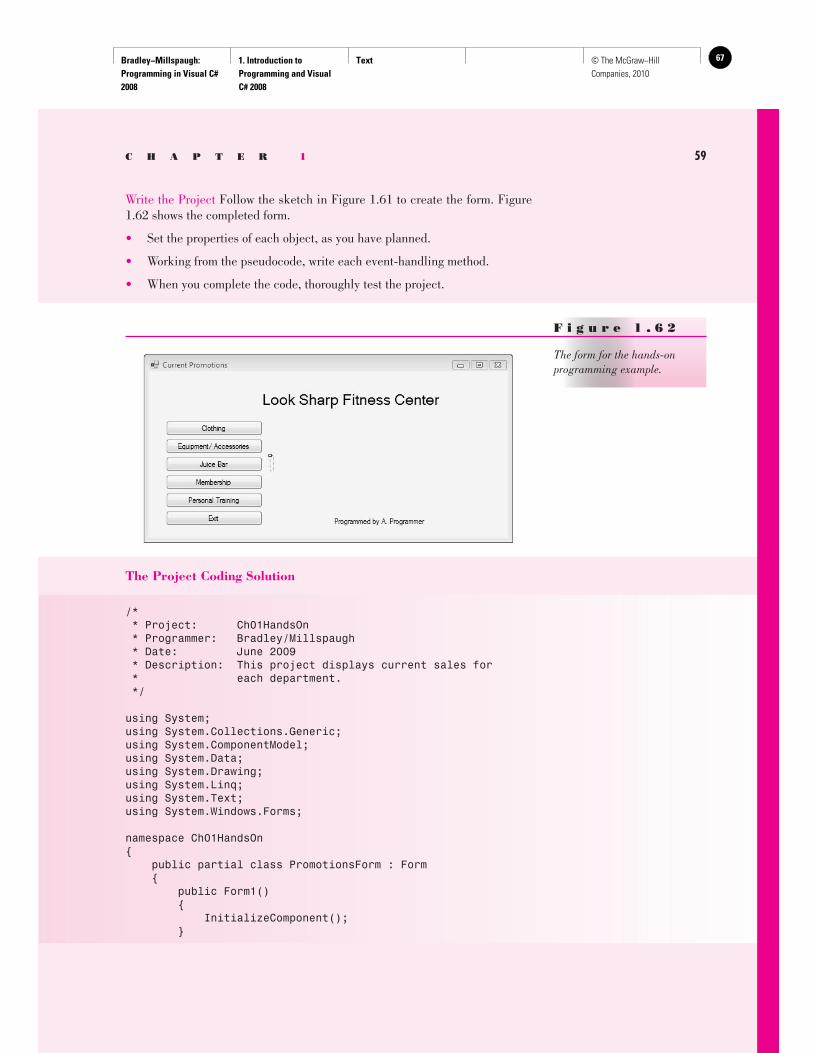
Bradley−Millspaugh: Programming in Visual C# 2008
1. Introduction to Programming and Visual C# 2008
Text 67© The McGraw−Hill Companies, 2010
C H A P T E R 1 59
Write the Project Follow the sketch in Figure 1.61 to create the form. Figure 1.62 shows the completed form.
• Set the properties of each object, as you have planned.
• Working from the pseudocode, write each event-handling method.
• When you complete the code, thoroughly test the project.
F i g u r e 1 . 6 2
The form for the hands-on programming example.
The Project Coding Solution
/* * Project: Ch01HandsOn * Programmer: Bradley/Millspaugh * Date: June 2009 * Description: This project displays current sales for * each department. */
using System;using System.Collections.Generic;using System.ComponentModel;using System.Data;using System.Drawing;using System.Linq;using System.Text;using System.Windows.Forms;
namespace Ch01HandsOn{ public partial class PromotionsForm : Form { public Form1() { InitializeComponent(); }
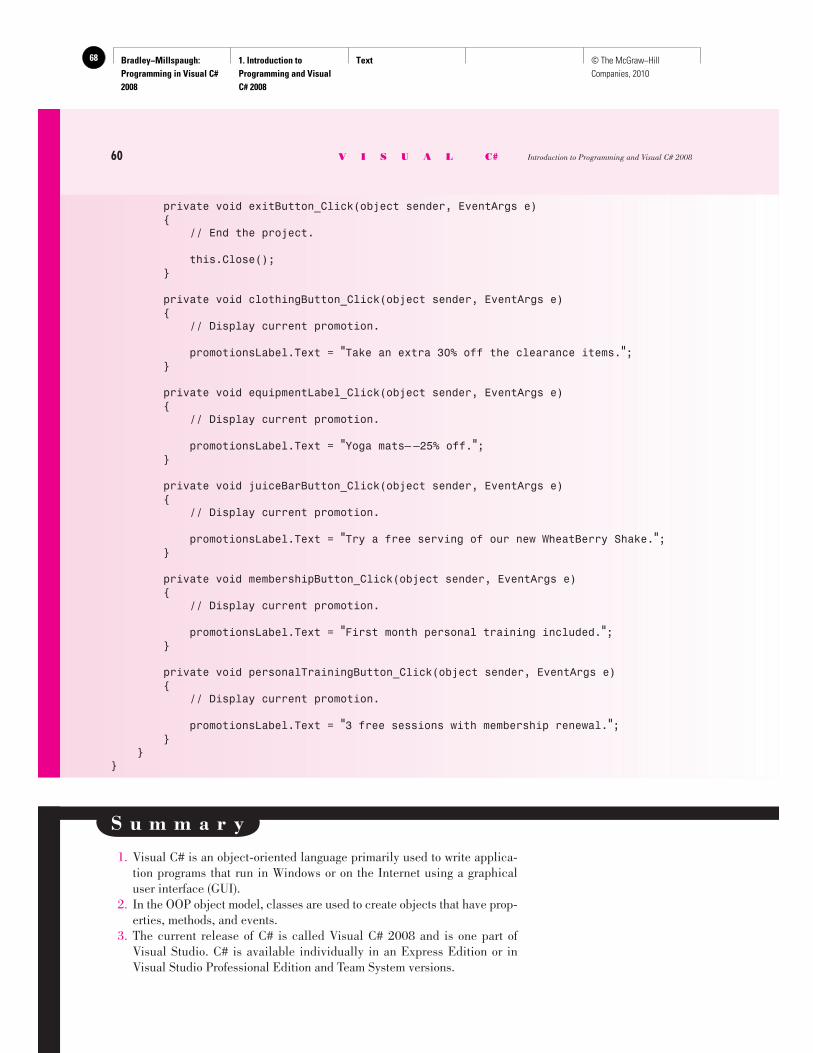
Bradley−Millspaugh: Programming in Visual C# 2008
1. Introduction to Programming and Visual C# 2008
Text68 © The McGraw−Hill Companies, 2010
private void exitButton_Click(object sender, EventArgs e) { // End the project.
this.Close(); }
private void clothingButton_Click(object sender, EventArgs e) { // Display current promotion.
promotionsLabel.Text = "Take an extra 30% off the clearance items."; }
private void equipmentLabel_Click(object sender, EventArgs e) { // Display current promotion.
promotionsLabel.Text = "Yoga mats— —25% off."; }
private void juiceBarButton_Click(object sender, EventArgs e) { // Display current promotion.
promotionsLabel.Text = "Try a free serving of our new WheatBerry Shake."; }
private void membershipButton_Click(object sender, EventArgs e) { // Display current promotion.
promotionsLabel.Text = "First month personal training included."; }
private void personalTrainingButton_Click(object sender, EventArgs e) { // Display current promotion.
promotionsLabel.Text = "3 free sessions with membership renewal."; } }}
S u m m a r y
1. Visual C# is an object-oriented language primarily used to write applica-tion programs that run in Windows or on the Internet using a graphical user interface (GUI).
2. In the OOP object model, classes are used to create objects that have prop-erties, methods, and events.
3. The current release of C# is called Visual C# 2008 and is one part of Visual Studio. C# is available individually in an Express Edition or in Visual Studio Professional Edition and Team System versions.
60 V I S U A L C# Introduction to Programming and Visual C# 2008
Bradley−Millspaugh: Programming in Visual C# 2008
1. Introduction to Programming and Visual C# 2008
Text 69© The McGraw−Hill Companies, 2010
C H A P T E R 1 61
4. The .NET Framework provides an environment for the objects from many languages to interoperate. Each language compiles to Microsoft Intermedi-ate Language (MSIL) and runs in the Common Language Runtime (CLR).
5. To plan a project, first sketch the user interface and then list the objects and properties needed. Then plan the necessary event-handling methods.
6. The three steps to creating a C# project are (1) define the user interface, (2) set the properties, and (3) write the code.
7. A C# application is called a solution . Each solution may contain multiple projects, and each project may contain multiple forms and additional files. The solution file has an extension of .sln, a project file has an extension of .csproj, and form files and additional C# files have an extension of .cs. In addition, the Visual Studio environment and the C# compiler both create several more files.
8. The Visual Studio integrated development environment (IDE) consists of several tools, including a form designer, an editor, a compiler, a debugger, an object browser, and a Help facility.
9. Visual Studio has three modes: design time, run time, and debug time. 10. You can customize the Visual Studio IDE and reset all customizations back
to their default state. 11. You create the user interface for an application by adding controls from the
toolbox to a form. You can move, resize, and delete the controls. 12. The Name property of a control is used to refer to the control in code. The
Text property holds the words that the user sees on the screen. 13. C# code is written in methods. Method bodies begin and end with braces { }. 14. Project comments are used for documentation. Good programming practice
requires comments in every method and at the top of a file. 15. Most C# statements must be terminated by a semicolon. A statement may
appear on multiple lines; the semicolon determines the end of the state-ment. Comments and some other statements do not end with semicolons.
16. Assignment statements assign a value to a property or a variable. Assign-ment statements work from right to left, assigning the value on the right side of the equal sign to the property or variable named on the left side of the equal sign.
17. The this.Close() method terminates program execution. 18. Each event to which you want to respond requires an event-handling
method, also called an event handler . 19. You can print out the C# code for documentation. 20. Three types of errors can occur in a C# project: syntax errors, which violate
the syntax rules of the C# language; run-time errors, which contain a state-ment that cannot execute properly; and logic errors, which produce errone-ous results.
21. Finding and fixing program errors is called debugging . 22. You must have a clean compile before you run the program. 23. Following good naming conventions can help make a project easier to debug. 24. C# Help has very complete descriptions of all project elements and their
uses. You can use the How Do I , Contents , Index , Search , Help Favorites , or context-sensitive Help.
Bradley−Millspaugh: Programming in Visual C# 2008
1. Introduction to Programming and Visual C# 2008
Text70 © The McGraw−Hill Companies, 2010
62 V I S U A L C# Introduction to Programming and Visual C# 2008
R e v i e w Q u e s t i o n s
1. What are objects and properties? How are they related to each other? 2. What are the three steps for planning and creating C# projects? Describe
what happens in each step. 3. What is the purpose of these C# file types: .sln, .suo, and .cs? 4. When is C# in design time? run time? debug time? 5. What is the purpose of the Name property of a control? 6. Which property determines what appears on the form for a Label control? 7. What is the purpose of the Text property of a button? the Text property of a
form? 8. What does displayButton_Click mean? To what does displayButton refer?
To what does Click refer? 9. What is a C# event? Give some examples of events. 10. What property must be set to center text in a label? What should be the
value of the property? 11. Describe the two types of comments in a C# program and tell where each
is generally used.
K e y T e r m s assignment statement 30 button 19 camel casing 52 class 4 clean compile 48 code 6 comment 30 context menu 25 context-sensitive Help 56 control 3 debug time 14 debugging 48 design time 14 Document window 12 event 4 event handler 29 event-handling method 29 exception 46 Express Edition 5 form 3 Form Designer 12 graphical user interface (GUI) 3 Help 14 integrated development
environment (IDE) 8 label 19 logic error 47
method 4 namespace 23 object 4 object-oriented
programming (OOP) 3 pascal casing 52 Professional Edition 5 project file 8 Properties window 13 property 4 pseudocode 6 resizing handle 20 run time 14 run-time error 46 snap lines 20 solution 6 Solution Explorer window 13 solution file 7 Standard Edition 5 syntax error 45 Team System 5 Text property 24 this 32 toolbar 11 toolbox 3 user interface 6 Visual Studio environment 8

Bradley−Millspaugh: Programming in Visual C# 2008
1. Introduction to Programming and Visual C# 2008
Text 71© The McGraw−Hill Companies, 2010
C H A P T E R 1 63
12. What is meant by the term debugging ? 13. What is a syntax error, when does it occur, and what might cause it? 14. What is a run-time error, when does it occur, and what might cause it? 15. What is a logic error, when does it occur, and what might cause it? 16. Tell the class of control and the likely purpose of each of these object
names: addressLabel exitButton nameTextBox
17. What does context-sensitive Help mean? How can you use it to see the Help page for a button?
P r o g r a m m i n g E x e r c i s e s
1.1 For your first C# exercise, you must first complete the Hello World proj-ect. Then add buttons and event-handling methods to display the “Hello World” message in two more languages. You may substitute any other languages for those shown. Feel free to modify the user interface to suit yourself (or your instructor).
Make sure to use meaningful names for your new buttons, following the naming conventions in Table 1.2 . Include comments at the top of every method and at the top of the file.
“Hello World” in French: Bonjour tout le monde “Hello World” in Italian: Ciao Mondo
1.2 Create a project that displays the hours for each department on campus. Include buttons for Student Learning, Financial Aid, Counseling, and the Bookstore. Each button should display the hours for that department in a label. The interface should have one label for the hours, one label for the programmer name, buttons for each department, and an Exit button.
Make sure to use meaningful names for your new buttons, following the naming conventions in Table 1.2 . Include comments at the top of every method and at the top of the file.
1.3 Write a project that displays four sayings, such as “The early bird gets the worm” or “A penny saved is a penny earned.” (You will want to keep the sayings short, as each must be entered on one line. However, when the saying displays on your form, you can set the label’s properties to allow long lines to wrap within the label.)
Make a button for each saying with a descriptive Text property for each, as well as a button to exit the project.
Include a label that holds your name at the bottom of the form. Also, make sure to change the form’s title bar to something meaningful.
If your sayings are too long to display on one line, set the label’s Auto-Size property to False and resize the height of the label to hold multiple lines. You may change the Font properties of the label to the font and size of your choice.
Make sure the buttons are large enough to hold their entire Text properties.
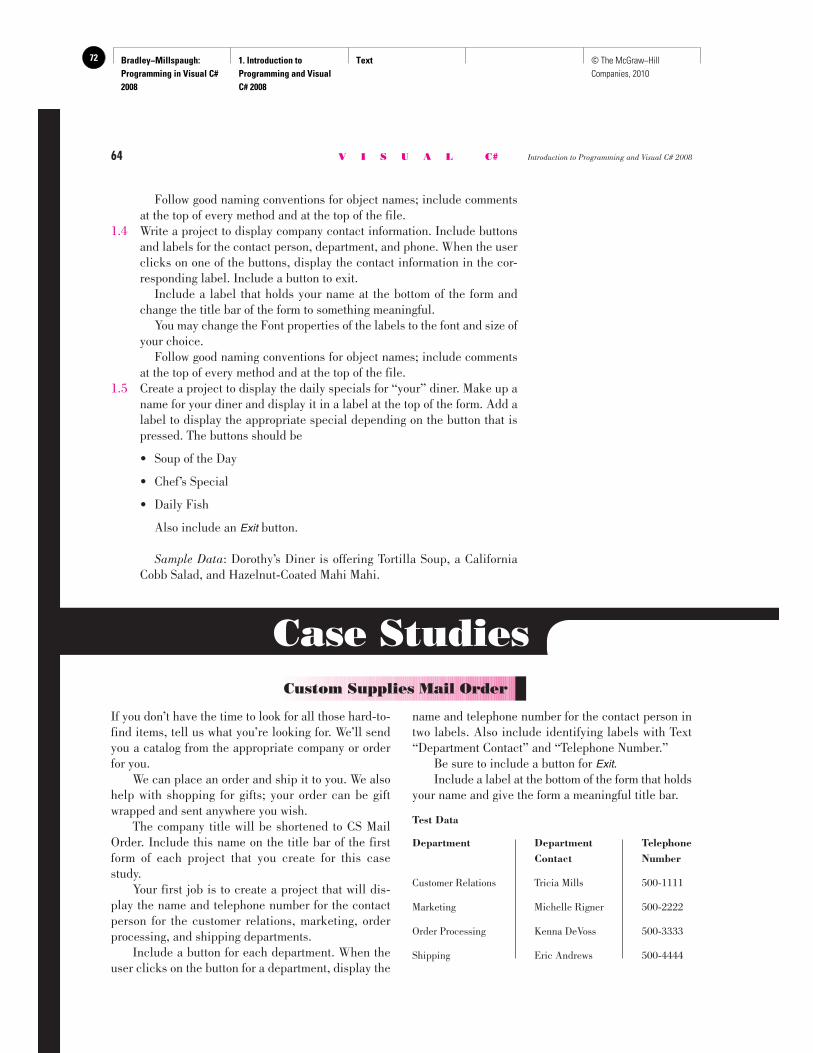
Bradley−Millspaugh: Programming in Visual C# 2008
1. Introduction to Programming and Visual C# 2008
Text72 © The McGraw−Hill Companies, 2010
64 V I S U A L C# Introduction to Programming and Visual C# 2008
Follow good naming conventions for object names; include comments at the top of every method and at the top of the file.
1.4 Write a project to display company contact information. Include buttons and labels for the contact person, department, and phone. When the user clicks on one of the buttons, display the contact information in the cor-responding label. Include a button to exit.
Include a label that holds your name at the bottom of the form and change the title bar of the form to something meaningful.
You may change the Font properties of the labels to the font and size of your choice.
Follow good naming conventions for object names; include comments at the top of every method and at the top of the file.
1.5 Create a project to display the daily specials for “your” diner. Make up a name for your diner and display it in a label at the top of the form. Add a label to display the appropriate special depending on the button that is pressed. The buttons should be
• Soup of the Day
• Chef’s Special
• Daily Fish
Also include an Exit button.
Sample Data: Dorothy’s Diner is offering Tortilla Soup, a California Cobb Salad, and Hazelnut-Coated Mahi Mahi.
Case Studies Custom Supplies Mail Order
If you don’t have the time to look for all those hard-to-find items, tell us what you’re looking for. We’ll send you a catalog from the appropriate company or order for you. We can place an order and ship it to you. We also help with shopping for gifts; your order can be gift wrapped and sent anywhere you wish. The company title will be shortened to CS Mail Order. Include this name on the title bar of the first form of each project that you create for this case study. Your first job is to create a project that will dis-play the name and telephone number for the contact person for the customer relations, marketing, order processing, and shipping departments. Include a button for each department. When the user clicks on the button for a department, display the
name and telephone number for the contact person in two labels. Also include identifying labels with Text “Department Contact” and “Telephone Number.” Be sure to include a button for Exit . Include a label at the bottom of the form that holds your name and give the form a meaningful title bar.
Test Data
Department Department Telephone Contact Number
Customer Relations Tricia Mills 500-1111
Marketing Michelle Rigner 500-2222
Order Processing Kenna DeVoss 500-3333
Shipping Eric Andrews 500-4444
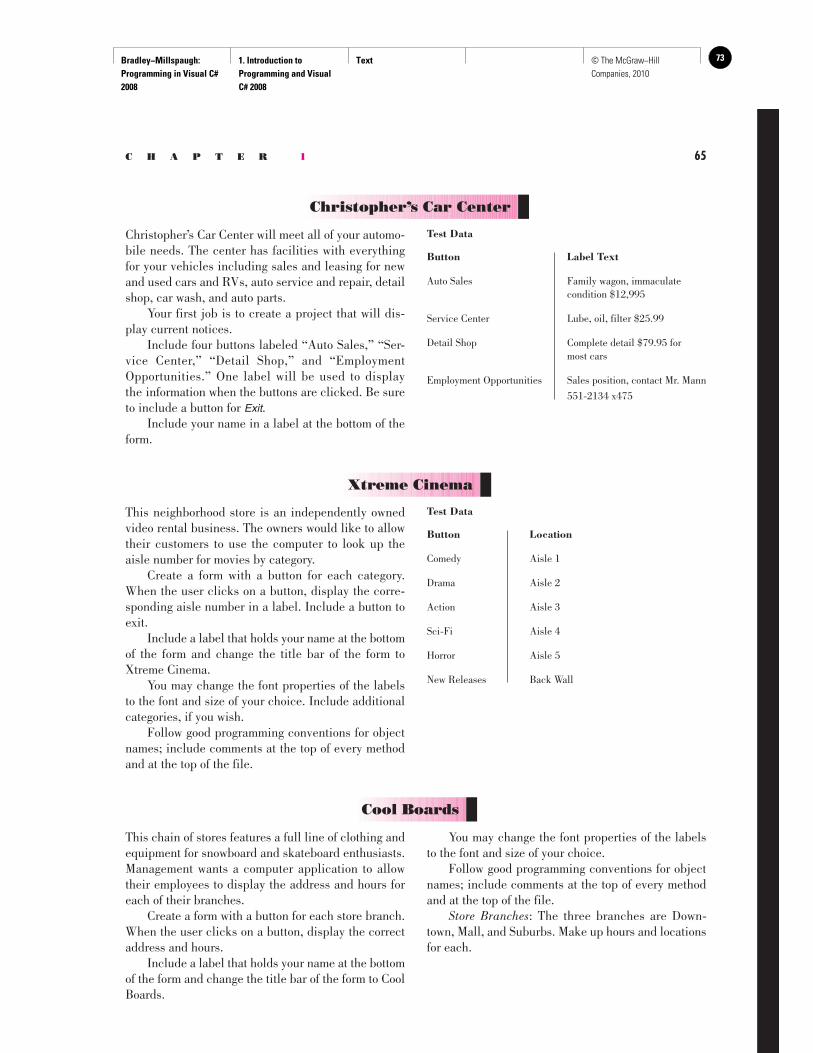
Bradley−Millspaugh: Programming in Visual C# 2008
1. Introduction to Programming and Visual C# 2008
Text 73© The McGraw−Hill Companies, 2010
C H A P T E R 1 65
Christopher’s Car Center will meet all of your automo-bile needs. The center has facilities with everything for your vehicles including sales and leasing for new and used cars and RVs, auto service and repair, detail shop, car wash, and auto parts. Your first job is to create a project that will dis-play current notices. Include four buttons labeled “Auto Sales,” “Ser-vice Center,” “Detail Shop,” and “Employment Opportunities.” One label will be used to display the information when the buttons are clicked. Be sure to include a button for Exit . Include your name in a label at the bottom of the form.
Christopher’s Car Center
Cool Boards
Test Data
Button Label Text
Auto Sales Family wagon, immaculate condition $12,995
Service Center Lube, oil, filter $25.99
Detail Shop Complete detail $79.95 for most cars
Employment Opportunities Sales position, contact Mr. Mann
551-2134 x475
Xtreme Cinema
This neighborhood store is an independently owned video rental business. The owners would like to allow their customers to use the computer to look up the aisle number for movies by category. Create a form with a button for each category. When the user clicks on a button, display the corre-sponding aisle number in a label. Include a button to exit. Include a label that holds your name at the bottom of the form and change the title bar of the form to Xtreme Cinema. You may change the font properties of the labels to the font and size of your choice. Include additional categories, if you wish. Follow good programming conventions for object names; include comments at the top of every method and at the top of the file.
Test Data
Button Location
Comedy Aisle 1
Drama Aisle 2
Action Aisle 3
Sci-Fi Aisle 4
Horror Aisle 5
New Releases Back Wall
This chain of stores features a full line of clothing and equipment for snowboard and skateboard enthusiasts. Management wants a computer application to allow their employees to display the address and hours for each of their branches. Create a form with a button for each store branch. When the user clicks on a button, display the correct address and hours. Include a label that holds your name at the bottom of the form and change the title bar of the form to Cool Boards.
You may change the font properties of the labels to the font and size of your choice. Follow good programming conventions for object names; include comments at the top of every method and at the top of the file. Store Branches: The three branches are Down-town, Mall, and Suburbs. Make up hours and locations for each.

74 Notes
Bradley−Millspaugh: Programming in Visual C# 2008
2. User Interface Design Text 75© The McGraw−Hill Companies, 2010
try{ // Convert input values to numeric and assign quantityInteger = int.Parse(quantityTextBox.T try { priceDecimal = decimal.Parse(priceTextBox // Calculate values. extendedPriceDecimal = quantityInteger * discountDecimal = Decimal.Round( (extendedPriceDecimal * DISCOUNT_RATE_ amountDueDecimal = extendedPriceDecimal - totalAmountDecimal += amountDueDecimal; numberTransactionsInteger++; // Format and display answers. extendedPriceTextBox.Text = extendedPrice
C H A P T E R
2 User Interface Design
at the completion of this chapter, you will be able to . . .
1. Use text boxes, masked text boxes, rich text boxes, group boxes, check boxes, radio buttons, and picture boxes effectively.
2. Set the BorderStyle property to make controls appear flat or three-dimensional.
3. Select multiple controls and move them, align them, and set common properties.
4. Make your projects easy for the user to understand and operate by defining access keys, setting an Accept and a Cancel button, controlling the tab sequence, resetting the focus during program execution, and causing ToolTips to appear.
5. Clear the contents of text boxes and labels.
6. Make a control visible or invisible at run time by setting its Visible property.
7. Disable and enable controls at design time and run time.
8. Change text color during program execution.
9. Concatenate ( join) strings of text.
10. Download the Line and Shape controls, add them to the toolbox, and use the controls on your forms.
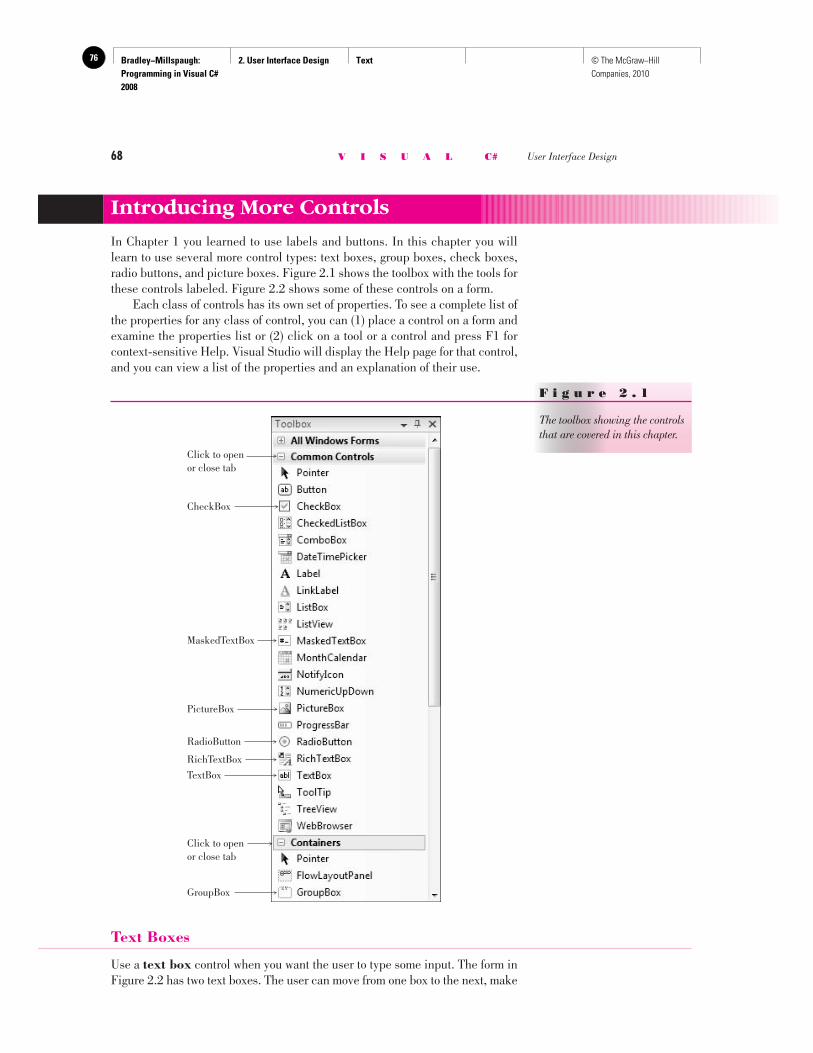
Bradley−Millspaugh: Programming in Visual C# 2008
2. User Interface Design Text76 © The McGraw−Hill Companies, 2010
68 V I S U A L C# User Interface Design
Introducing More Controls
In Chapter 1 you learned to use labels and buttons. In this chapter you will learn to use several more control types: text boxes, group boxes, check boxes, radio buttons, and picture boxes. Figure 2.1 shows the toolbox with the tools for these controls labeled. Figure 2.2 shows some of these controls on a form. Each class of controls has its own set of properties. To see a complete list of the properties for any class of control, you can (1) place a control on a form and examine the properties list or (2) click on a tool or a control and press F1 for context-sensitive Help. Visual Studio will display the Help page for that control, and you can view a list of the properties and an explanation of their use.
F i g u r e 2 . 1
The toolbox showing the controls that are covered in this chapter.
RichTextBox
TextBox
MaskedTextBox
CheckBox
RadioButton
GroupBox
Click to openor close tab
Click to openor close tab
PictureBox
Text Boxes
Use a text box control when you want the user to type some input. The form in Figure 2.2 has two text boxes. The user can move from one box to the next, make
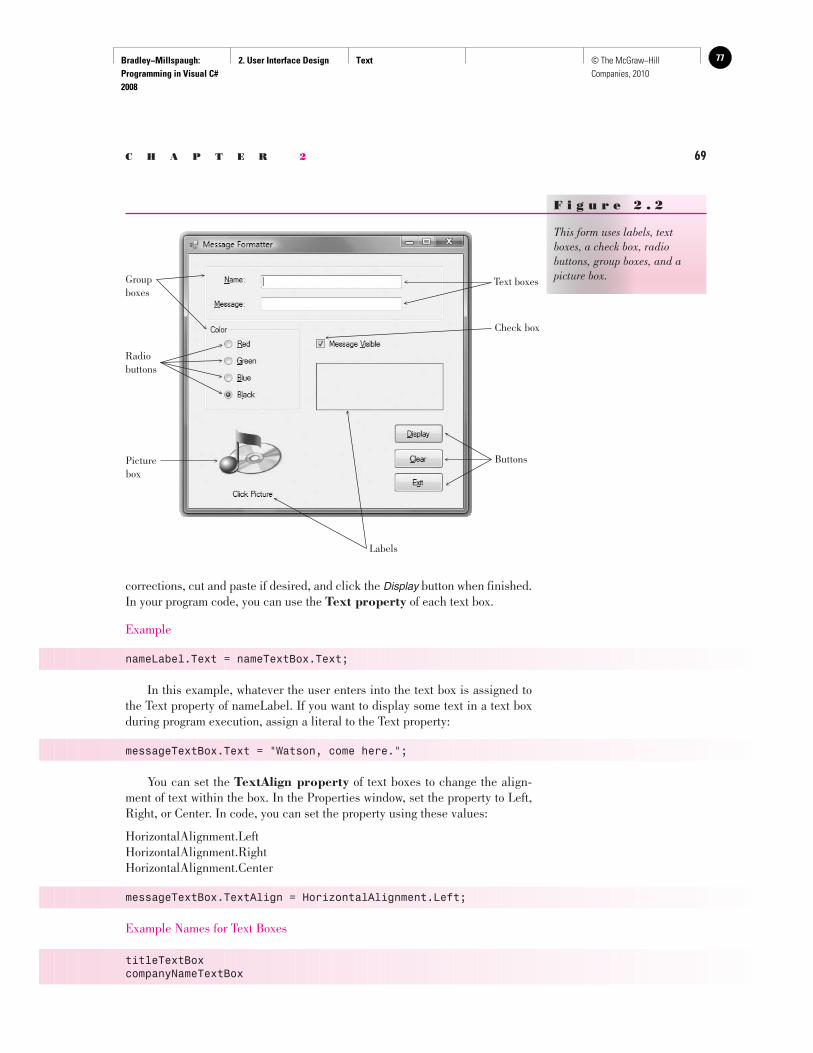
Bradley−Millspaugh: Programming in Visual C# 2008
2. User Interface Design Text 77© The McGraw−Hill Companies, 2010
C H A P T E R 2 69
corrections, cut and paste if desired, and click the Display button when finished. In your program code, you can use the Text property of each text box.
Example
nameLabel.Text = nameTextBox.Text;
In this example, whatever the user enters into the text box is assigned to the Text property of nameLabel. If you want to display some text in a text box during program execution, assign a literal to the Text property:
messageTextBox.Text = "Watson, come here.";
You can set the TextAlign property of text boxes to change the align-ment of text within the box. In the Properties window, set the property to Left, Right, or Center. In code, you can set the property using these values:
HorizontalAlignment.Left HorizontalAlignment.Right HorizontalAlignment.Center
messageTextBox.TextAlign = HorizontalAlignment.Left;
Example Names for Text Boxes
titleTextBox companyNameTextBox
F i g u r e 2 . 2
This form uses labels, text boxes, a check box, radio buttons, group boxes, and a picture box. Text boxes
ButtonsPicturebox
Groupboxes
Radiobuttons
Labels
Check box
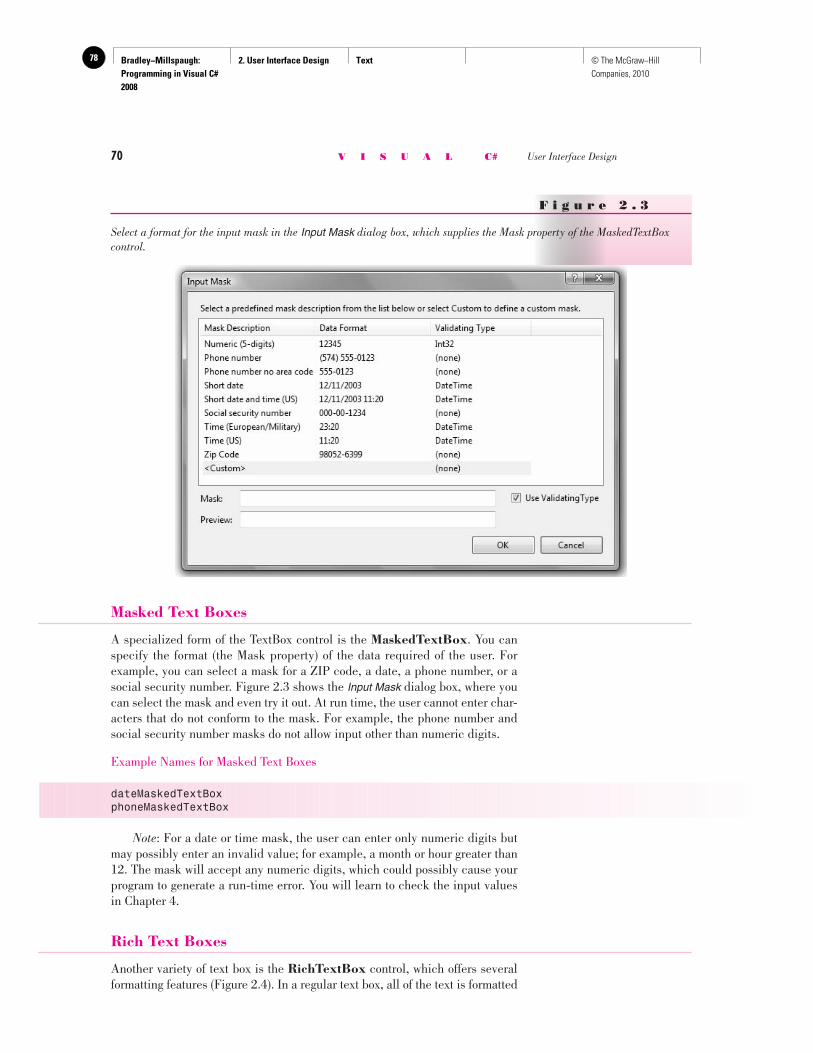
Bradley−Millspaugh: Programming in Visual C# 2008
2. User Interface Design Text78 © The McGraw−Hill Companies, 2010
70 V I S U A L C# User Interface Design
Masked Text Boxes
A specialized form of the TextBox control is the MaskedTextBox . You can specify the format (the Mask property) of the data required of the user. For example, you can select a mask for a ZIP code, a date, a phone number, or a social security number. Figure 2.3 shows the Input Mask dialog box, where you can select the mask and even try it out. At run time, the user cannot enter char-acters that do not conform to the mask. For example, the phone number and social security number masks do not allow input other than numeric digits.
Example Names for Masked Text Boxes
dateMaskedTextBox phoneMaskedTextBox
Note: For a date or time mask, the user can enter only numeric digits but may possibly enter an invalid value; for example, a month or hour greater than 12. The mask will accept any numeric digits, which could possibly cause your program to generate a run-time error. You will learn to check the input values in Chapter 4.
Rich Text Boxes
Another variety of text box is the RichTextBox control, which offers several formatting features ( Figure 2.4 ). In a regular text box, all of the text is formatted
F i g u r e 2 . 3
Select a format for the input mask in the Input Mask dialog box, which supplies the Mask property of the MaskedTextBox control.
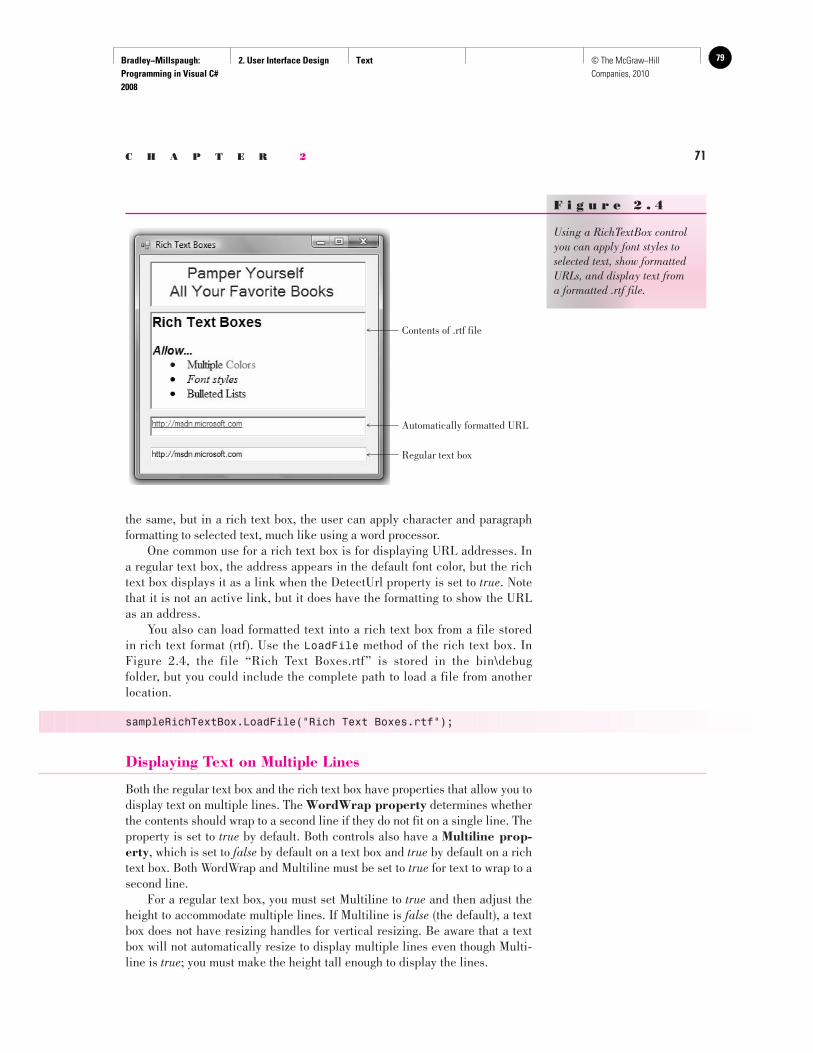
Bradley−Millspaugh: Programming in Visual C# 2008
2. User Interface Design Text 79© The McGraw−Hill Companies, 2010
C H A P T E R 2 71
the same, but in a rich text box, the user can apply character and paragraph formatting to selected text, much like using a word processor. One common use for a rich text box is for displaying URL addresses. In a regular text box, the address appears in the default font color, but the rich text box displays it as a link when the DetectUrl property is set to true . Note that it is not an active link, but it does have the formatting to show the URL as an address. You also can load formatted text into a rich text box from a file stored in rich text format (rtf). Use the LoadFile method of the rich text box. In Figure 2.4 , the file “Rich Text Boxes.rtf” is stored in the bin\debug folder, but you could include the complete path to load a file from another location.
sampleRichTextBox.LoadFile("Rich Text Boxes.rtf");
Displaying Text on Multiple Lines
Both the regular text box and the rich text box have properties that allow you to display text on multiple lines. The WordWrap property determines whether the contents should wrap to a second line if they do not fit on a single line. The property is set to true by default. Both controls also have a Multiline prop-erty , which is set to false by default on a text box and true by default on a rich text box. Both WordWrap and Multiline must be set to true for text to wrap to a second line. For a regular text box, you must set Multiline to true and then adjust the height to accommodate multiple lines. If Multiline is false (the default), a text box does not have resizing handles for vertical resizing. Be aware that a text box will not automatically resize to display multiple lines even though Multi-line is true ; you must make the height tall enough to display the lines.
Contents of .rtf file
Automatically formatted URL
Regular text box
F i g u r e 2 . 4
Using a RichTextBox control you can apply font styles to selected text, show formatted URLs, and display text from a formatted .rtf file.
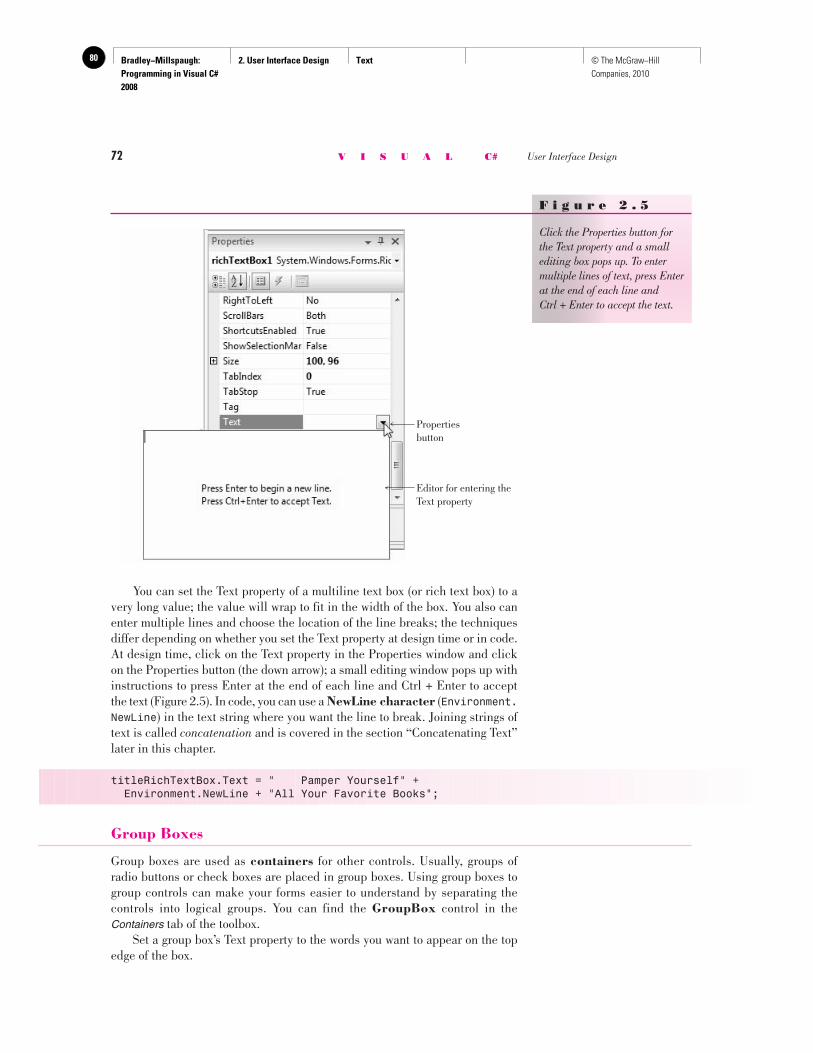
Bradley−Millspaugh: Programming in Visual C# 2008
2. User Interface Design Text80 © The McGraw−Hill Companies, 2010
72 V I S U A L C# User Interface Design
You can set the Text property of a multiline text box (or rich text box) to a very long value; the value will wrap to fit in the width of the box. You also can enter multiple lines and choose the location of the line breaks; the techniques differ depending on whether you set the Text property at design time or in code. At design time, click on the Text property in the Properties window and click on the Properties button (the down arrow); a small editing window pops up with instructions to press Enter at the end of each line and Ctrl + Enter to accept the text ( Figure 2.5 ). In code, you can use a NewLine character ( Environment.NewLine ) in the text string where you want the line to break. Joining strings of text is called concatenation and is covered in the section “Concatenating Text” later in this chapter.
titleRichTextBox.Text = " Pamper Yourself" + Environment.NewLine + "All Your Favorite Books";
Group Boxes
Group boxes are used as containers for other controls. Usually, groups of radio buttons or check boxes are placed in group boxes. Using group boxes to group controls can make your forms easier to understand by separating the controls into logical groups. You can find the GroupBox control in the Containers tab of the toolbox. Set a group box’s Text property to the words you want to appear on the top edge of the box.
Propertiesbutton
Editor for entering the Text property
F i g u r e 2 . 5
Click the Properties button for the Text property and a small editing box pops up. To enter multiple lines of text, press Enter at the end of each line and Ctrl + Enter to accept the text.
Bradley−Millspaugh: Programming in Visual C# 2008
2. User Interface Design Text 81© The McGraw−Hill Companies, 2010
C H A P T E R 2 73
Example Names for Group Boxes
colorGroupBox styleGroupBox
You only need to change the name of a group box if you plan to refer to it in code. One reason to use it in code is to set the Enabled property of the group box to false, which disables all of the controls inside the box.
Check Boxes
Check boxes allow the user to select (or deselect) an option. In any group of check boxes, any number can be selected. The Checked property of a check box is set to false if unchecked or true if checked. You can write an event handler for the CheckedChanged event, which ex-ecutes when the user clicks in the box. In Chapter 4, when you learn about if statements, you can take one action when the box is checked and another action when it is unchecked. Use the Text property of a check box for the text you want to appear next to the box.
Example Names for Check Boxes
boldCheckBox italicCheckBox
Radio Buttons
Use radio buttons when only one button of a group may be selected. Any radio buttons that you place directly on the form (not in a group box) function as a group. A group of radio buttons inside a group box function together. The best method is to first create a group box and then create each radio button inside the group box. When you need separate lists of radio buttons for different purposes, you must include each list in a separate group box. You can find an example pro-gram later in this chapter that demonstrates using two groups of radio but-tons, one for setting the background color of the form and a second set for selecting the color of the text on the form. See “Using Radio Buttons for Selecting Colors.” The Checked property of a radio button is set to true if selected or to false if unselected. You can write an event handler to execute when the user selects a radio button using the control’s CheckedChanged event. In Chapter 4 you will learn to determine in your code whether or not a button is selected. Set a radio button’s Text property to the text you want to appear next to the button.
Example Names for Radio Buttons
yellowRadioButton blueRadioButton
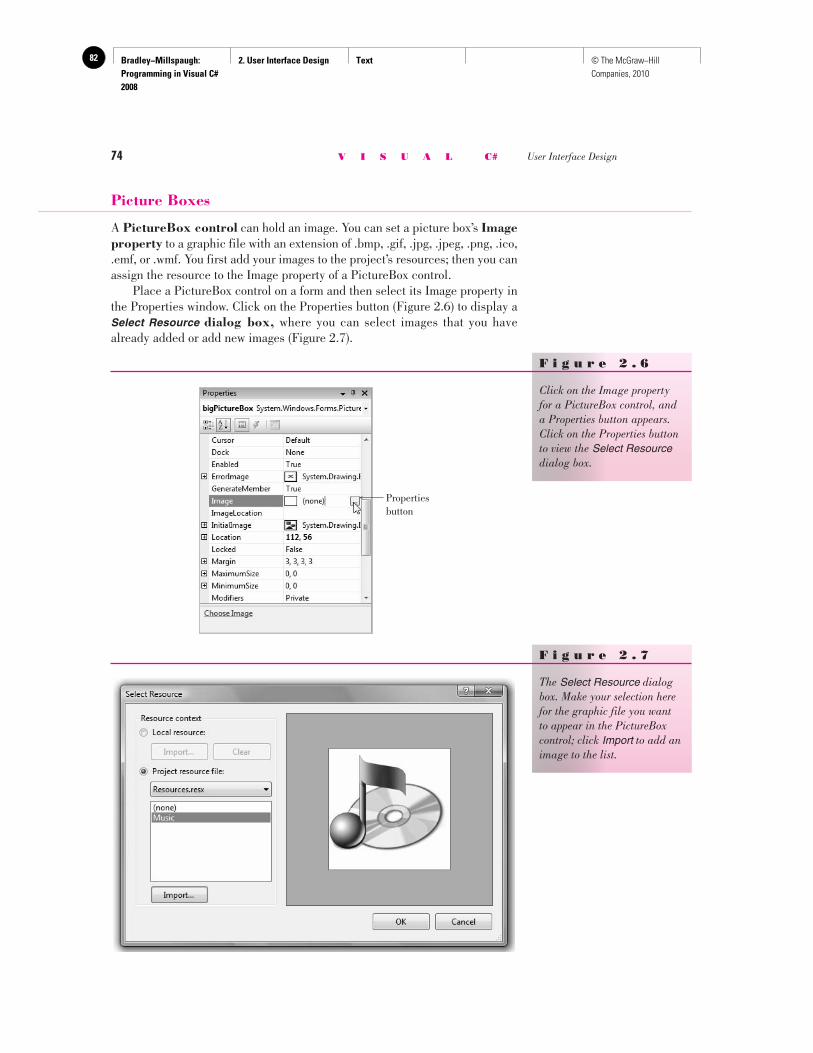
Bradley−Millspaugh: Programming in Visual C# 2008
2. User Interface Design Text82 © The McGraw−Hill Companies, 2010
74 V I S U A L C# User Interface Design
Picture Boxes
A PictureBox control can hold an image. You can set a picture box’s Image property to a graphic file with an extension of .bmp, .gif, .jpg, .jpeg, .png, .ico, .emf, or .wmf. You first add your images to the project’s resources; then you can assign the resource to the Image property of a PictureBox control. Place a PictureBox control on a form and then select its Image property in the Properties window. Click on the Properties button ( Figure 2.6 ) to display a Select Resource dialog box, where you can select images that you have already added or add new images ( Figure 2.7 ).
F i g u r e 2 . 6
Click on the Image property for a PictureBox control, and a Properties button appears. Click on the Properties button to view the Select Resource dialog box.
Propertiesbutton
F i g u r e 2 . 7
The Select Resource dialog box. Make your selection here for the graphic file you want to appear in the PictureBox control; click Import to add an image to the list.
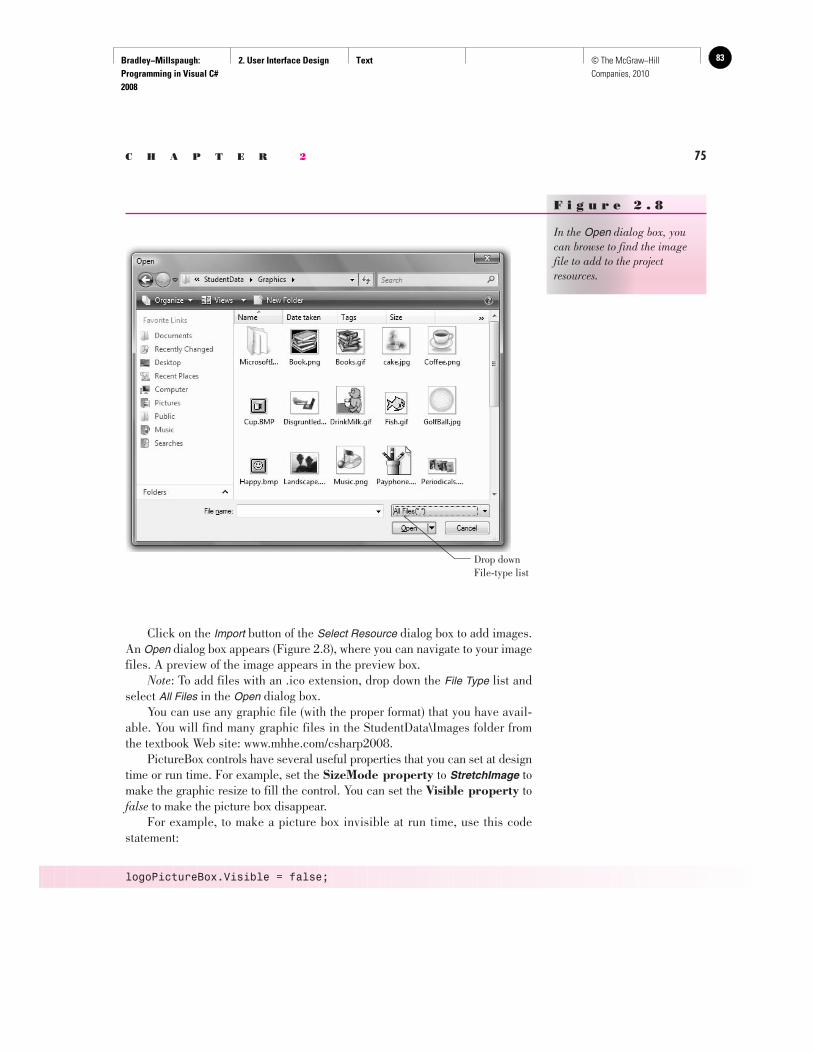
Bradley−Millspaugh: Programming in Visual C# 2008
2. User Interface Design Text 83© The McGraw−Hill Companies, 2010
C H A P T E R 2 75
Click on the Import button of the Select Resource dialog box to add images. An Open dialog box appears ( Figure 2.8 ), where you can navigate to your image files. A preview of the image appears in the preview box. Note : To add files with an .ico extension, drop down the File Type list and select All Files in the Open dialog box. You can use any graphic file (with the proper format) that you have avail-able. You will find many graphic files in the StudentData\Images folder from the textbook Web site: www.mhhe.com/csharp2008 . PictureBox controls have several useful properties that you can set at design time or run time. For example, set the SizeMode property to StretchImage to make the graphic resize to fill the control. You can set the Visible property to false to make the picture box disappear. For example, to make a picture box invisible at run time, use this code statement:
logoPictureBox.Visible = false;
F i g u r e 2 . 8
In the Open dialog box, you can browse to find the image file to add to the project resources.
Drop down File-type list
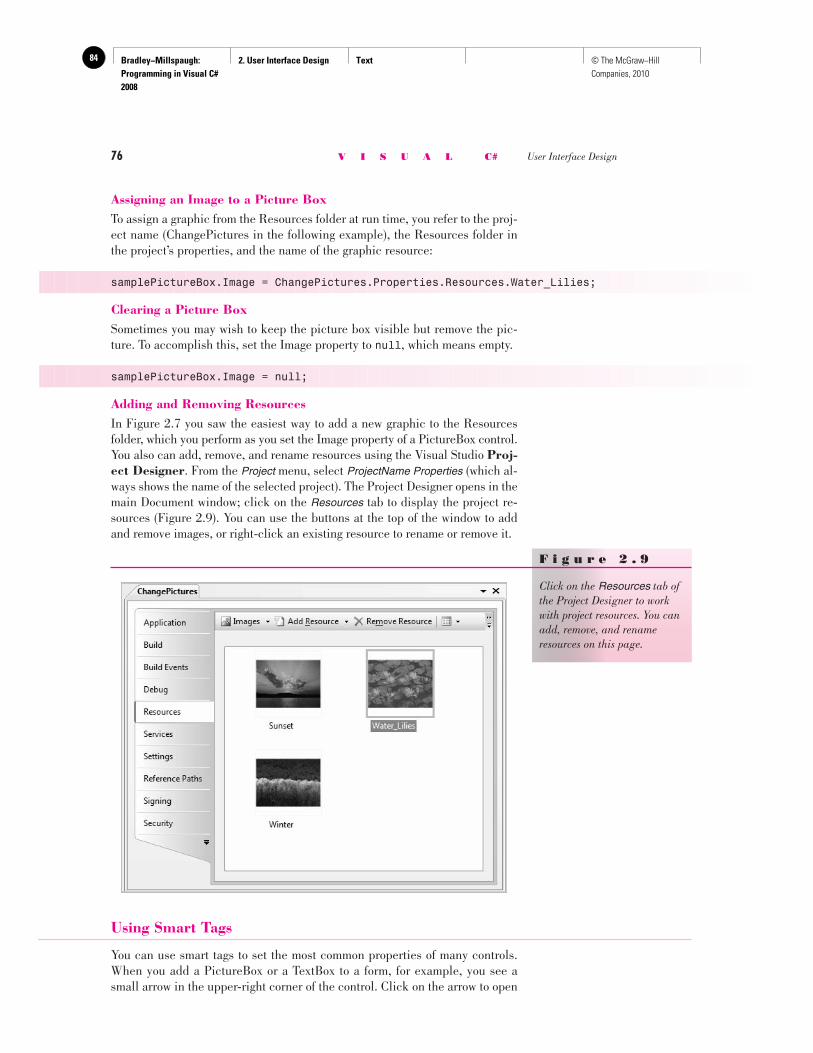
Bradley−Millspaugh: Programming in Visual C# 2008
2. User Interface Design Text84 © The McGraw−Hill Companies, 2010
76 V I S U A L C# User Interface Design
Assigning an Image to a Picture Box To assign a graphic from the Resources folder at run time, you refer to the proj-ect name (ChangePictures in the following example), the Resources folder in the project’s properties, and the name of the graphic resource:
samplePictureBox.Image = ChangePictures.Properties.Resources.Water_Lilies;
Clearing a Picture Box Sometimes you may wish to keep the picture box visible but remove the pic-ture. To accomplish this, set the Image property to null, which means empty.
samplePictureBox.Image = null;
Adding and Removing Resources In Figure 2.7 you saw the easiest way to add a new graphic to the Resources folder, which you perform as you set the Image property of a PictureBox control. You also can add, remove, and rename resources using the Visual Studio Proj-ect Designer . From the Project menu, select ProjectName Properties (which al-ways shows the name of the selected project). The Project Designer opens in the main Document window; click on the Resources tab to display the project re-sources ( Figure 2.9 ). You can use the buttons at the top of the window to add and remove images, or right-click an existing resource to rename or remove it.
F i g u r e 2 . 9
Click on the Resources tab of the Project Designer to work with project resources. You can add, remove, and rename resources on this page.
Using Smart Tags
You can use smart tags to set the most common properties of many controls. When you add a PictureBox or a TextBox to a form, for example, you see a small arrow in the upper-right corner of the control. Click on the arrow to open
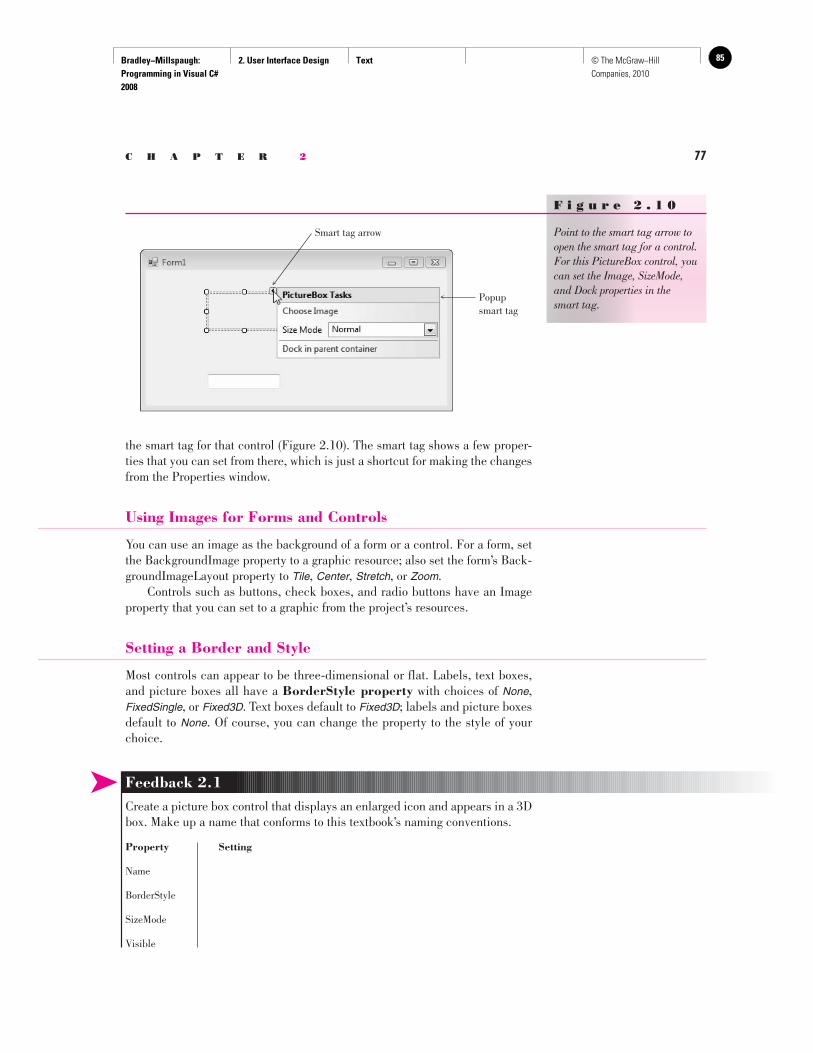
Bradley−Millspaugh: Programming in Visual C# 2008
2. User Interface Design Text 85© The McGraw−Hill Companies, 2010
C H A P T E R 2 77
the smart tag for that control ( Figure 2.10 ). The smart tag shows a few proper-ties that you can set from there, which is just a shortcut for making the changes from the Properties window.
Using Images for Forms and Controls
You can use an image as the background of a form or a control. For a form, set the BackgroundImage property to a graphic resource; also set the form’s Back-groundImageLayout property to Tile , Center , Stretch , or Zoom . Controls such as buttons, check boxes, and radio buttons have an Image property that you can set to a graphic from the project’s resources.
Setting a Border and Style
Most controls can appear to be three-dimensional or flat. Labels, text boxes, and picture boxes all have a BorderStyle property with choices of None , FixedSingle , or Fixed3D . Text boxes default to Fixed3D ; labels and picture boxes default to None . Of course, you can change the property to the style of your choice.
F i g u r e 2 . 1 0
Point to the smart tag arrow to open the smart tag for a control. For this PictureBox control, you can set the Image, SizeMode, and Dock properties in the smart tag.
Popupsmart tag
Smart tag arrow
➤ Feedback 2.1 Create a picture box control that displays an enlarged icon and appears in a 3D box. Make up a name that conforms to this textbook’s naming conventions.
Property Setting
Name
BorderStyle
SizeMode
Visible
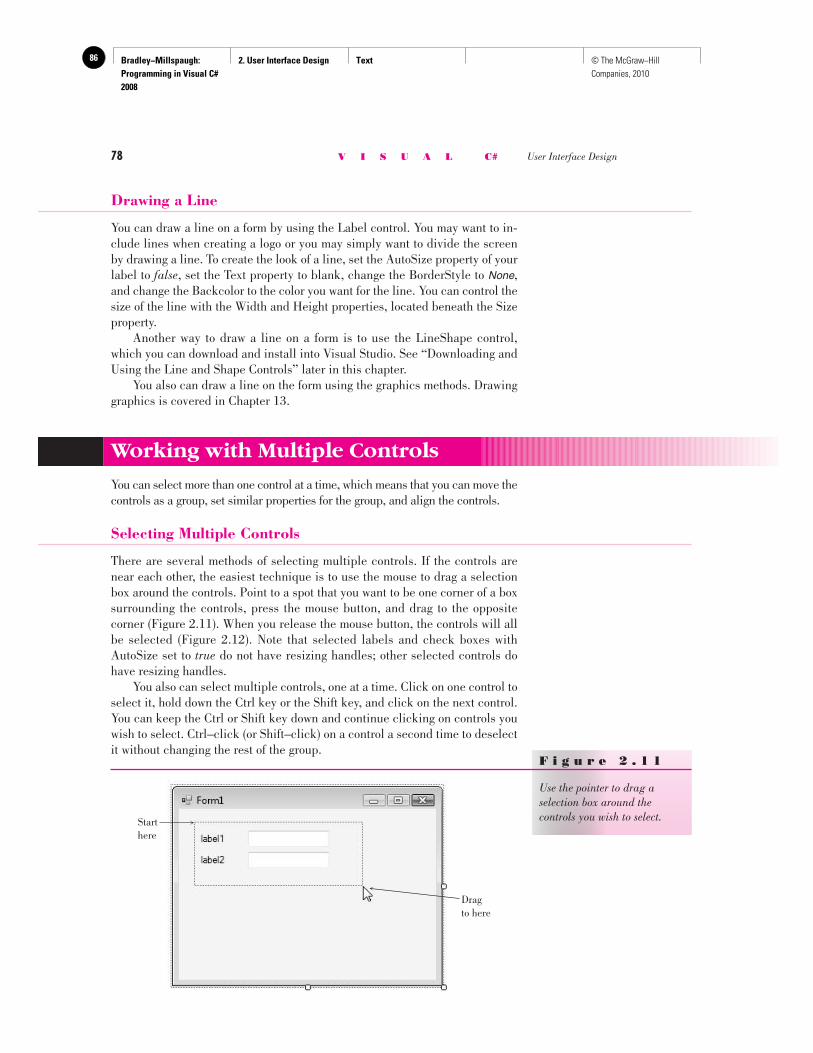
Bradley−Millspaugh: Programming in Visual C# 2008
2. User Interface Design Text86 © The McGraw−Hill Companies, 2010
78 V I S U A L C# User Interface Design
Drawing a Line
You can draw a line on a form by using the Label control. You may want to in-clude lines when creating a logo or you may simply want to divide the screen by drawing a line. To create the look of a line, set the AutoSize property of your label to false , set the Text property to blank, change the BorderStyle to None , and change the Backcolor to the color you want for the line. You can control the size of the line with the Width and Height properties, located beneath the Size property. Another way to draw a line on a form is to use the LineShape control, which you can download and install into Visual Studio. See “Downloading and Using the Line and Shape Controls” later in this chapter. You also can draw a line on the form using the graphics methods. Drawing graphics is covered in Chapter 13.
Working with Multiple Controls
You can select more than one control at a time, which means that you can move the controls as a group, set similar properties for the group, and align the controls.
Selecting Multiple Controls
There are several methods of selecting multiple controls. If the controls are near each other, the easiest technique is to use the mouse to drag a selection box around the controls. Point to a spot that you want to be one corner of a box surrounding the controls, press the mouse button, and drag to the opposite corner ( Figure 2.11 ). When you release the mouse button, the controls will all be selected ( Figure 2.12 ). Note that selected labels and check boxes with AutoSize set to true do not have resizing handles; other selected controls do have resizing handles. You also can select multiple controls, one at a time. Click on one control to select it, hold down the Ctrl key or the Shift key, and click on the next control. You can keep the Ctrl or Shift key down and continue clicking on controls you wish to select. Ctrl–click (or Shift–click) on a control a second time to deselect it without changing the rest of the group.
Drag to here
Starthere
F i g u r e 2 . 1 1
Use the pointer to drag a selection box around the controls you wish to select.
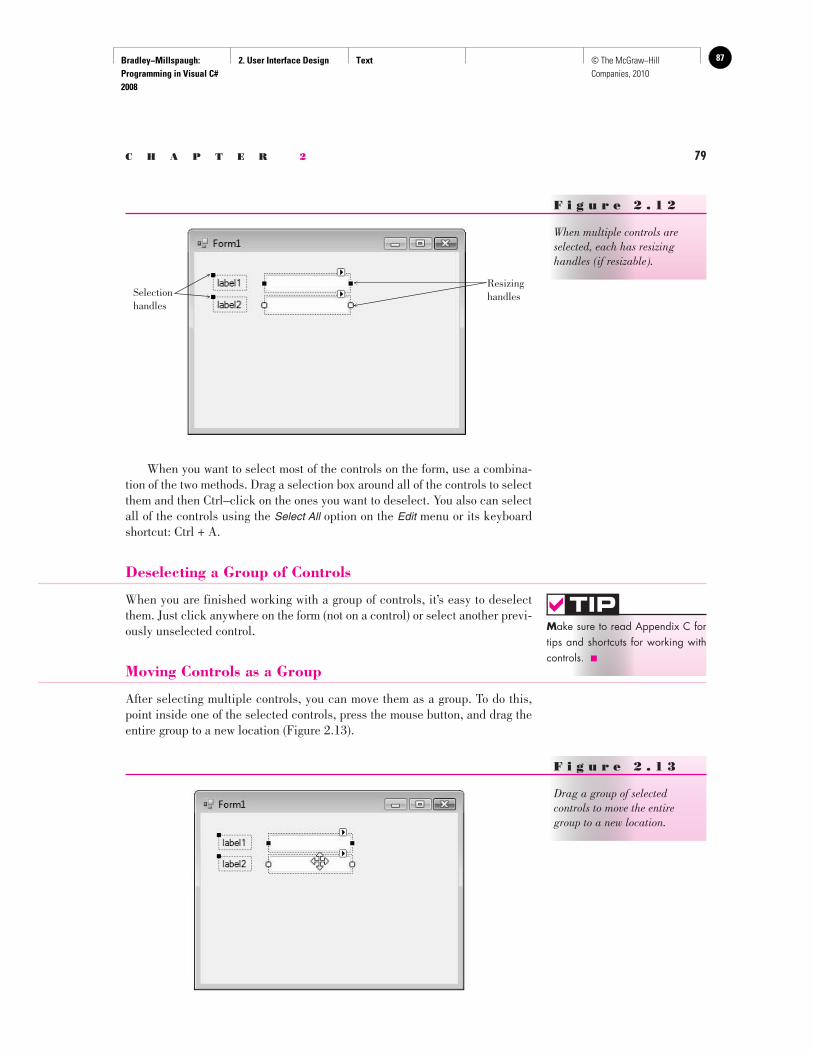
Bradley−Millspaugh: Programming in Visual C# 2008
2. User Interface Design Text 87© The McGraw−Hill Companies, 2010
C H A P T E R 2 79
When you want to select most of the controls on the form, use a combina-tion of the two methods. Drag a selection box around all of the controls to select them and then Ctrl–click on the ones you want to deselect. You also can select all of the controls using the Select All option on the Edit menu or its keyboard shortcut: Ctrl + A.
Deselecting a Group of Controls
When you are finished working with a group of controls, it’s easy to deselect them. Just click anywhere on the form (not on a control) or select another previ-ously unselected control.
Moving Controls as a Group
After selecting multiple controls, you can move them as a group. To do this, point inside one of the selected controls, press the mouse button, and drag the entire group to a new location ( Figure 2.13 ).
Resizing handlesSelection
handles
F i g u r e 2 . 1 2
When multiple controls are selected, each has resizing handles (if resizable).
M ake sure to read Appendix C for tips and shortcuts for working with controls. ■
TIP
F i g u r e 2 . 1 3
Drag a group of selected controls to move the entire group to a new location.

Bradley−Millspaugh: Programming in Visual C# 2008
2. User Interface Design Text88 © The McGraw−Hill Companies, 2010
80 V I S U A L C# User Interface Design
Setting Properties for Multiple Controls
You can set some common properties for groups of controls. After selecting the group, look at the Properties window. Any properties that appear in the window are shared by all of the controls and can be changed all at once. For example, you may want to set the BorderStyle property for a group of controls to three-dimensional or change the font used for a group of labels. Some properties appear empty; even though those properties are common to all the selected controls, they do not share a common value. You can enter a new value that will apply to all selected controls.
Aligning Controls
After you select a group of controls, it is easy to resize and align them using the buttons on the Layout toolbar ( Figure 2.14 ) or the corresponding items on the Format menu. Select your group of controls and choose any of the resizing but-tons. These can make the controls equal in width, height, or both. Then select another button to align the tops, bottoms, or centers of the controls. You also can move the entire group to a new location. Note: The alignment options align the group of controls to the control that is active (indicated by white sizing handles). Referring to Figure 2.13 , the lower text box is the active control. To make another selected control the active control, simply click on it. To set the spacing between controls, use the buttons for horizontal and/or vertical spacing. These buttons enable you to create equal spacing between controls or to increase or decrease the space between controls. Note: If the Layout toolbar is not displaying, select View / Toolbars / Layout .
S etting the font for the form changes the default font for all controls on the form. ■
TIP
F i g u r e 2 . 1 4
Resize and align multiple controls using the Layout toolbar.
Tab Order
Merge Cells
Send To Back
Bring To Front
Center Vertically
Center Horizontally
Remove Vertical Spacing
Decrease Vertical Spacing
Increase Vertical Spacing
Make Vertical Spacing Equal
Remove Horizontal Spacing
Decrease Horizontal Spacing
Increase Horizontal Spacing
Make Horizontal Spacing Equal
Size To Grid
Make Same Size
Make Same Height
Make Same Width
Align Bottoms
Align Middles
Align Tops
Align Rights
Align Centers
Align Lefts
Align to Grid
Designing Your Applications for User Convenience
One of the goals of good programming is to create programs that are easy to use. Your user interface should be clear and consistent. One school of thought says that if users misuse a program, it’s the fault of the programmer, not the us-ers. Because most of your users will already know how to operate Windows programs, you should strive to make your programs look and behave like other Windows programs. Some of the ways to accomplish this are to make the
Bradley−Millspaugh: Programming in Visual C# 2008
2. User Interface Design Text 89© The McGraw−Hill Companies, 2010
C H A P T E R 2 81
controls operate in the standard way, define keyboard access keys, set an Accept button, and make the Tab key work correctly. You also can define ToolTips, which are those small labels that pop up when the user pauses the mouse pointer over a control.
Designing the User Interface
The design of the screen should be easy to understand and “comfortable” for the user. The best way that we can accomplish these goals is to follow industry standards for the color, size, and placement of controls. Once users become accustomed to a screen design, they will expect (and feel more familiar with) applications that follow the same design criteria. You should design your applications to match other Windows applications. Microsoft has done extensive program testing with users of different ages, gen-ders, nationalities, and disabilities. We should take advantage of this research and follow their guidelines. Take some time to examine the screens and dialog boxes in Microsoft Office as well as those in Visual Studio. One recommendation about interface design concerns color. You have probably noticed that Windows applications are predominantly gray. A reason for this choice is that many people are color blind. Also, research shows that gray is easiest for the majority of users. Although you may personally prefer brighter colors, you will stick with gray, or the system palette the user chooses, if you want your applications to look professional. Note: By default the BackColor property of forms and controls is set to Control , which is a color included in the operating system’s palette. If the user changes the system theme or color, your forms and controls will conform to their settings. Colors can indicate to the user what is expected. Use a white background for text boxes to indicate that the user should input information. Use a gray background for labels, which the user cannot change. Labels that will display a message should have a border around them; labels that provide text on the screen should have no border (the default). Group your controls on the form to aid the user. A good practice is to create group boxes to hold related items, especially those controls that require user input. This visual aid helps the user understand the information that is being presented or requested. Use a sans serif font on your forms, such as the default MS Sans Serif, and do not make them boldface. Limit large font sizes to a few items, such as the company name.
Defining Keyboard Access Keys
Many people prefer to use the keyboard, rather than a mouse, for most opera-tions. Windows is set up so that most functions can be done with either the keyboard or a mouse. You can make your projects respond to the keyboard by defining access keys , also called hot keys . For example, in Figure 2.15 you can select the OK button with Alt + o and the Exit button with Alt + x. You can set access keys for buttons, radio buttons, and check boxes when you define their Text properties. Type an ampersand (&) in front of the charac-ter you want for the access key; Visual Studio underlines the character. You
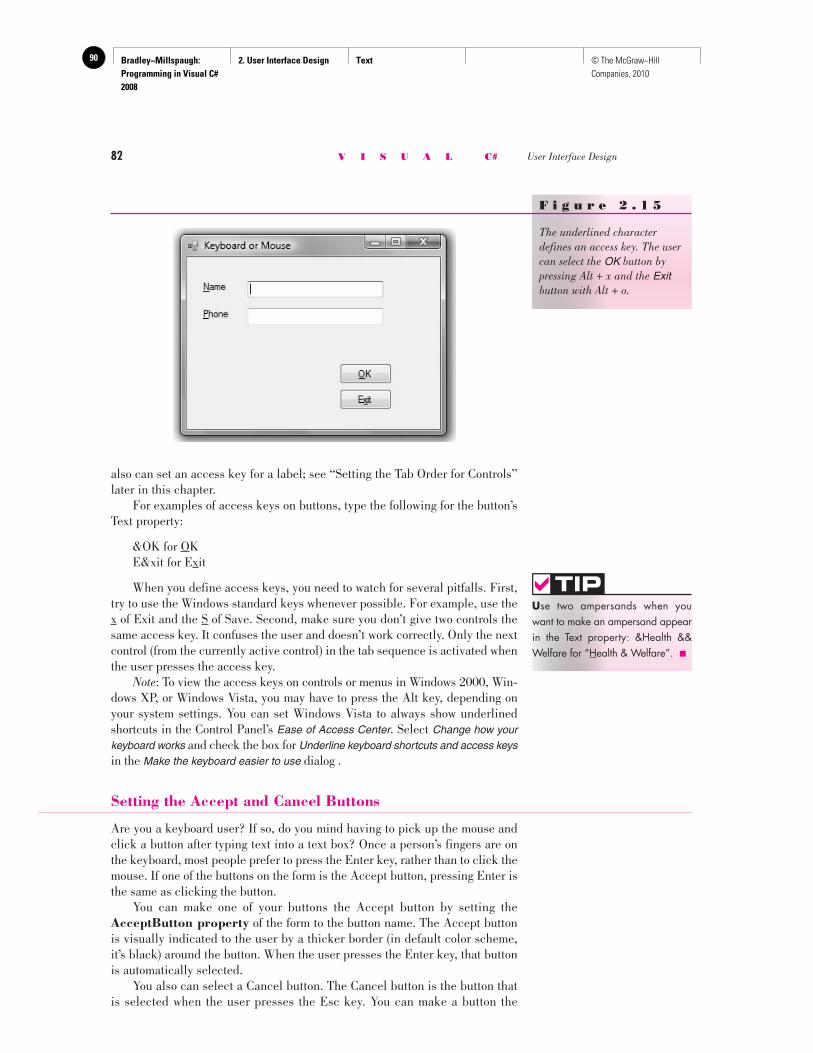
Bradley−Millspaugh: Programming in Visual C# 2008
2. User Interface Design Text90 © The McGraw−Hill Companies, 2010
82 V I S U A L C# User Interface Design
also can set an access key for a label; see “Setting the Tab Order for Controls” later in this chapter. For examples of access keys on buttons, type the following for the button’s Text property:
&OK for OK E&xit for Exit
When you define access keys, you need to watch for several pitfalls. First, try to use the Windows standard keys whenever possible. For example, use the x of Exit and the S of Save. Second, make sure you don’t give two controls the same access key. It confuses the user and doesn’t work correctly. Only the next control (from the currently active control) in the tab sequence is activated when the user presses the access key. Note : To view the access keys on controls or menus in Windows 2000, Win-dows XP, or Windows Vista, you may have to press the Alt key, depending on your system settings. You can set Windows Vista to always show underlined shortcuts in the Control Panel’s Ease of Access Center . Select Change how your keyboard works and check the box for Underline keyboard shortcuts and access keys in the Make the keyboard easier to use dialog .
Setting the Accept and Cancel Buttons
Are you a keyboard user? If so, do you mind having to pick up the mouse and click a button after typing text into a text box? Once a person’s fingers are on the keyboard, most people prefer to press the Enter key, rather than to click the mouse. If one of the buttons on the form is the Accept button, pressing Enter is the same as clicking the button. You can make one of your buttons the Accept button by setting the AcceptButton property of the form to the button name. The Accept button is visually indicated to the user by a thicker border (in default color scheme, it’s black) around the button. When the user presses the Enter key, that button is automatically selected. You also can select a Cancel button. The Cancel button is the button that is selected when the user presses the Esc key. You can make a button the
U se two ampersands when you want to make an ampersand appear in the Text property: &Health && Welfare for “Health & Welfare”. ■
TIP
F i g u r e 2 . 1 5
The underlined character defines an access key. The user can select the OK button by pressing Alt + x and the Exit button with Alt + o.
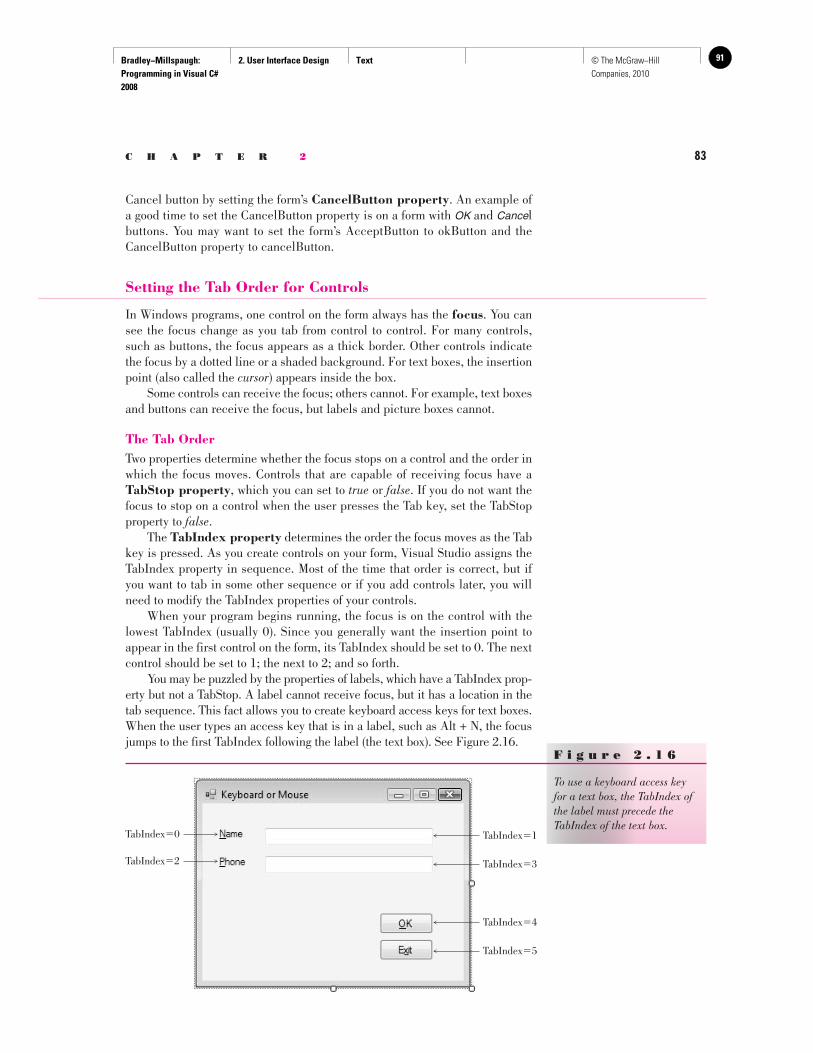
Bradley−Millspaugh: Programming in Visual C# 2008
2. User Interface Design Text 91© The McGraw−Hill Companies, 2010
C H A P T E R 2 83
Cancel button by setting the form’s CancelButton property . An example of a good time to set the CancelButton property is on a form with OK and Cancel buttons. You may want to set the form’s AcceptButton to okButton and the CancelButton property to cancelButton.
Setting the Tab Order for Controls
In Windows programs, one control on the form always has the focus . You can see the focus change as you tab from control to control. For many controls, such as buttons, the focus appears as a thick border. Other controls indicate the focus by a dotted line or a shaded background. For text boxes, the insertion point (also called the cursor ) appears inside the box. Some controls can receive the focus; others cannot. For example, text boxes and buttons can receive the focus, but labels and picture boxes cannot.
The Tab Order Two properties determine whether the focus stops on a control and the order in which the focus moves. Controls that are capable of receiving focus have a TabStop property , which you can set to true or false . If you do not want the focus to stop on a control when the user presses the Tab key, set the TabStop property to false . The TabIndex property determines the order the focus moves as the Tab key is pressed. As you create controls on your form, Visual Studio assigns the TabIndex property in sequence. Most of the time that order is correct, but if you want to tab in some other sequence or if you add controls later, you will need to modify the TabIndex properties of your controls. When your program begins running, the focus is on the control with the lowest TabIndex (usually 0). Since you generally want the insertion point to appear in the first control on the form, its TabIndex should be set to 0. The next control should be set to 1; the next to 2; and so forth. You may be puzzled by the properties of labels, which have a TabIndex prop-erty but not a TabStop. A label cannot receive focus, but it has a location in the tab sequence. This fact allows you to create keyboard access keys for text boxes. When the user types an access key that is in a label, such as Alt + N, the focus jumps to the first TabIndex following the label (the text box). See Figure 2.16 .
F i g u r e 2 . 1 6
To use a keyboard access key for a text box, the TabIndex of the label must precede the TabIndex of the text box.
TabIndex�1
TabIndex�3
TabIndex�4
TabIndex�5
TabIndex�0
TabIndex�2
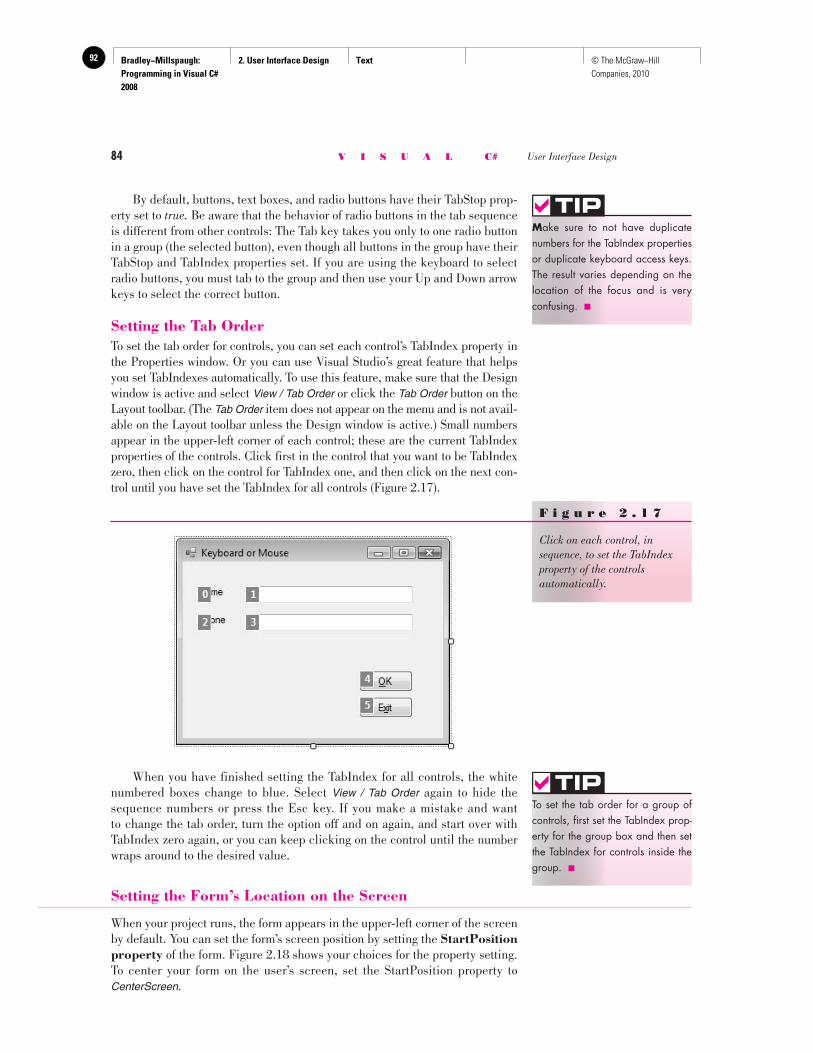
Bradley−Millspaugh: Programming in Visual C# 2008
2. User Interface Design Text92 © The McGraw−Hill Companies, 2010
84 V I S U A L C# User Interface Design
When you have finished setting the TabIndex for all controls, the white numbered boxes change to blue. Select View / Tab Order again to hide the sequence numbers or press the Esc key. If you make a mistake and want to change the tab order, turn the option off and on again, and start over with TabIndex zero again, or you can keep clicking on the control until the number wraps around to the desired value.
Setting the Form’s Location on the Screen
When your project runs, the form appears in the upper-left corner of the screen by default. You can set the form’s screen position by setting the StartPosition property of the form. Figure 2.18 shows your choices for the property setting. To center your form on the user’s screen, set the StartPosition property to CenterScreen .
By default, buttons, text boxes, and radio buttons have their TabStop prop-erty set to true. Be aware that the behavior of radio buttons in the tab sequence is different from other controls: The Tab key takes you only to one radio button in a group (the selected button), even though all buttons in the group have their TabStop and TabIndex properties set. If you are using the keyboard to select radio buttons, you must tab to the group and then use your Up and Down arrow keys to select the correct button.
Setting the Tab Order To set the tab order for controls, you can set each control’s TabIndex property in the Properties window. Or you can use Visual Studio’s great feature that helps you set TabIndexes automatically. To use this feature, make sure that the Design window is active and select View / Tab Order or click the Tab Order button on the Layout toolbar. (The Tab Order item does not appear on the menu and is not avail-able on the Layout toolbar unless the Design window is active.) Small numbers appear in the upper-left corner of each control; these are the current TabIndex properties of the controls. Click first in the control that you want to be TabIndex zero, then click on the control for TabIndex one, and then click on the next con-trol until you have set the TabIndex for all controls ( Figure 2.17 ).
To set the tab order for a group of controls, first set the TabIndex prop-erty for the group box and then set the TabIndex for controls inside the group. ■
TIP
F i g u r e 2 . 1 7
Click on each control, in sequence, to set the TabIndex property of the controls automatically.
M ake sure to not have duplicate numbers for the TabIndex properties or duplicate keyboard access keys. The result varies depending on the location of the focus and is very confusing. ■
TIP
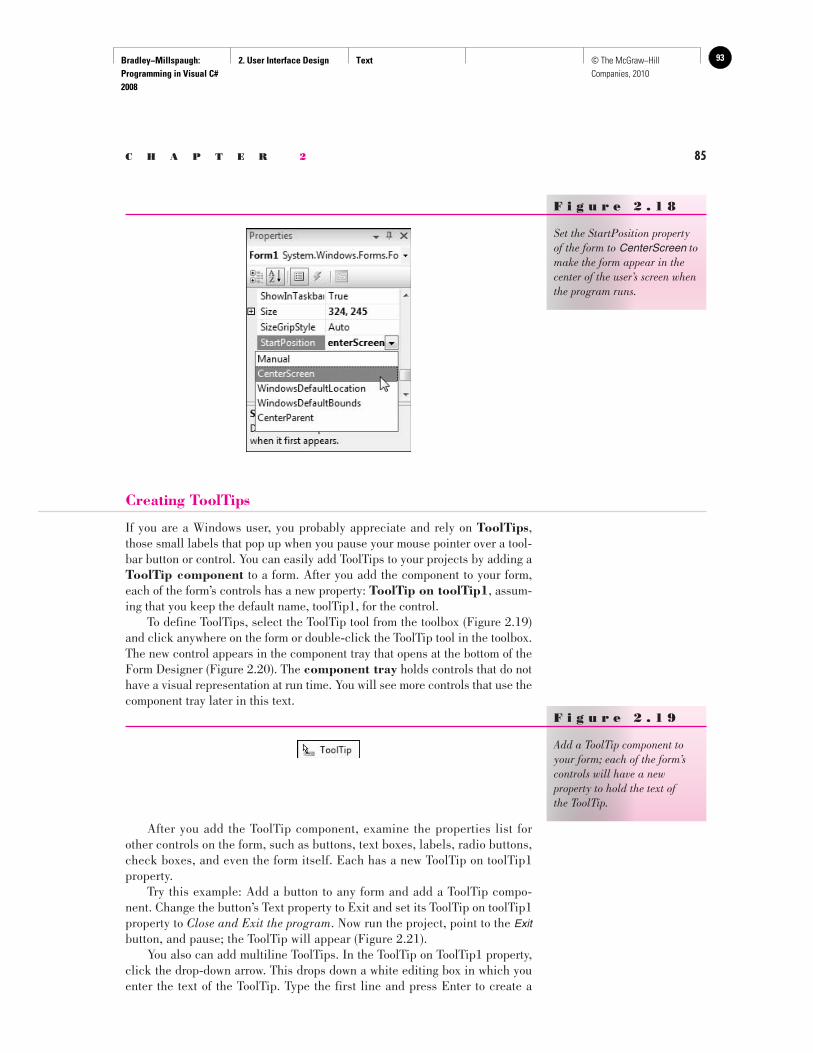
Bradley−Millspaugh: Programming in Visual C# 2008
2. User Interface Design Text 93© The McGraw−Hill Companies, 2010
C H A P T E R 2 85
Creating ToolTips
If you are a Windows user, you probably appreciate and rely on ToolTips , those small labels that pop up when you pause your mouse pointer over a tool-bar button or control. You can easily add ToolTips to your projects by adding a ToolTip component to a form. After you add the component to your form, each of the form’s controls has a new property: ToolTip on toolTip1 , assum-ing that you keep the default name, toolTip1, for the control. To define ToolTips, select the ToolTip tool from the toolbox ( Figure 2.19 ) and click anywhere on the form or double-click the ToolTip tool in the toolbox. The new control appears in the component tray that opens at the bottom of the Form Designer ( Figure 2.20 ). The component tray holds controls that do not have a visual representation at run time. You will see more controls that use the component tray later in this text.
F i g u r e 2 . 1 8
Set the StartPosition property of the form to CenterScreen to make the form appear in the center of the user’s screen when the program runs.
F i g u r e 2 . 1 9
Add a ToolTip component to your form; each of the form’s controls will have a new property to hold the text of the ToolTip.
After you add the ToolTip component, examine the properties list for other controls on the form, such as buttons, text boxes, labels, radio buttons, check boxes, and even the form itself. Each has a new ToolTip on toolTip1 property. Try this example: Add a button to any form and add a ToolTip compo-nent. Change the button’s Text property to Exit and set its ToolTip on toolTip1 property to Close and Exit the program . Now run the project, point to the Exit button, and pause; the ToolTip will appear ( Figure 2.21 ). You also can add multiline ToolTips. In the ToolTip on ToolTip1 property, click the drop-down arrow. This drops down a white editing box in which you enter the text of the ToolTip. Type the first line and press Enter to create a
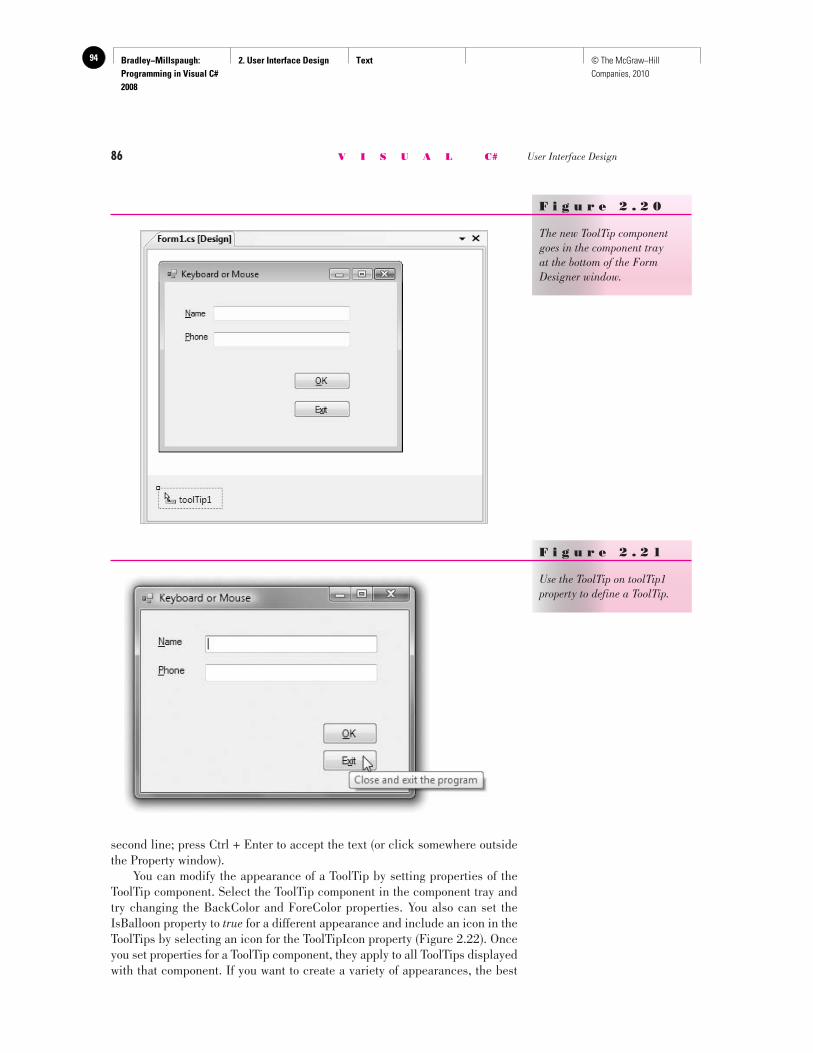
Bradley−Millspaugh: Programming in Visual C# 2008
2. User Interface Design Text94 © The McGraw−Hill Companies, 2010
86 V I S U A L C# User Interface Design
second line; press Ctrl + Enter to accept the text (or click somewhere outside the Property window). You can modify the appearance of a ToolTip by setting properties of the ToolTip component. Select the ToolTip component in the component tray and try changing the BackColor and ForeColor properties. You also can set the IsBalloon property to true for a different appearance and include an icon in the ToolTips by selecting an icon for the ToolTipIcon property ( Figure 2.22 ). Once you set properties for a ToolTip component, they apply to all ToolTips displayed with that component. If you want to create a variety of appearances, the best
F i g u r e 2 . 2 0
The new ToolTip component goes in the component tray at the bottom of the Form Designer window.
F i g u r e 2 . 2 1
Use the ToolTip on toolTip1 property to define a ToolTip.
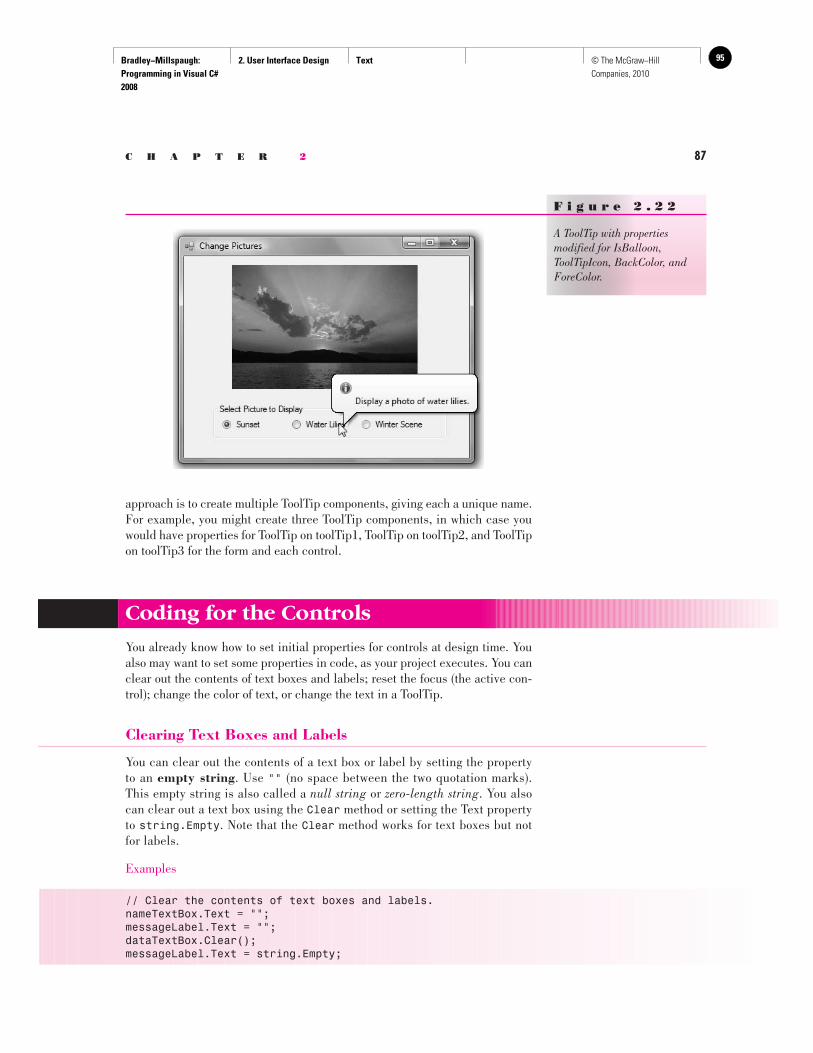
Bradley−Millspaugh: Programming in Visual C# 2008
2. User Interface Design Text 95© The McGraw−Hill Companies, 2010
C H A P T E R 2 87
approach is to create multiple ToolTip components, giving each a unique name. For example, you might create three ToolTip components, in which case you would have properties for ToolTip on toolTip1, ToolTip on toolTip2, and ToolTip on toolTip3 for the form and each control.
F i g u r e 2 . 2 2
A ToolTip with properties modified for IsBalloon, ToolTipIcon, BackColor, and ForeColor.
Coding for the Controls
You already know how to set initial properties for controls at design time. You also may want to set some properties in code, as your project executes. You can clear out the contents of text boxes and labels; reset the focus (the active con-trol); change the color of text, or change the text in a ToolTip.
Clearing Text Boxes and Labels
You can clear out the contents of a text box or label by setting the property to an empty string . Use "" (no space between the two quotation marks). This empty string is also called a null string or zero-length string . You also can clear out a text box using the Clear method or setting the Text property to string.Empty . Note that the Clear method works for text boxes but not for labels.
Examples
// Clear the contents of text boxes and labels.nameTextBox.Text = "";messageLabel.Text = "";dataTextBox.Clear();messageLabel.Text = string.Empty;

Bradley−Millspaugh: Programming in Visual C# 2008
2. User Interface Design Text96 © The McGraw−Hill Companies, 2010
88 V I S U A L C# User Interface Design
Resetting the Focus
As your program runs, you want the insertion point to appear in the text box where the user is expected to type. The focus should therefore begin in the first text box. But what about later? If you clear the form’s text boxes, you should reset the focus to the first text box. The Focus method handles this situation. Remember, the convention is Object.Method, so the statement to set the inser-tion point in the text box called nameTextBox is as follows:
// Make the insertion point appear in this text box. nameTextBox.Focus();
Note: You cannot set the focus to a control that has been disabled. See “Disabling Controls” later in the text.
Setting the Checked Property of Radio Buttons and Check Boxes
Of course, the purpose of radio buttons and check boxes is to allow the user to make selections. However, at times you need to select or deselect a control in code. You can select or deselect radio buttons and check boxes at design time (to set initial status) or at run time (to respond to an event). To make a radio button or check box appear selected initially, set its Checked property to true in the Properties window. In code, assign true to its Checked property:
// Make button selected.redRadioButton.Checked = true;
// Make box checked.displayCheckBox.Checked = true;
// Make box unchecked.displayCheckBox.Checked = false;
At times, you need to reset the selected radio button at run time, usually for a second request. You only need to set the Checked property to true for one button of the group; the rest of the buttons in the group will set to false automatically. Recall that only one radio button of a group can be selected at one time.
Setting Visibility at Run Time
You can set the visibility of a control at run time.
// Make label invisible. messageLabel.Visible = false;
You may want the visibility of a control to depend on the selection a user makes in a check box or radio button. This statement makes the visibility
Bradley−Millspaugh: Programming in Visual C# 2008
2. User Interface Design Text 97© The McGraw−Hill Companies, 2010
C H A P T E R 2 89
match the check box: When the check box is checked (Checked = true ), the label is visible (Visible = true ).
// Make the visibility of the label match the setting in the check box. messageLabel.Visible = displayCheckBox.Checked;
Disabling Controls
The Enabled property of a control determines whether the control is avail-able or “grayed out.” The Enabled property for controls is set to true by default, but you can change the value at either design time or run time. You might want to disable a button or other control initially and enable it in code, depending on an action of the user. If you disable a button control (Enabled = false ) at design time, you can use the following code to enable the button at run time.
displayButton.Enabled = true;
When you have a choice to disable or hide a control, it’s usually best to disable it. Having a control disabled is more understandable to a user than having it disappear. To disable radio buttons, consider disabling the group box holding the but-tons, rather than the buttons themselves. Disabling the group box grays all of the controls in the group box.
departmentGroupBox.Enabled = false;
Note: Even though the control has the TabStop property set to true and the TabIndex is in the proper order, you cannot tab to a control that has been disabled.
Setting Properties Based on User Actions
Often you need to change the Enabled or Visible property of a control based on an action of the user. For example, you may have controls that are disabled or invisible until the user signs in. In the following example, when the user logs in and clicks the Sign In button, a rich text box becomes visible and the radio but-tons are enabled:
private void signInButton_Click(object sender, EventArgs e){ // Set visibility and enable controls.
welcomeRichTextBox.Visible = true; clothingRadioButton.Enabled = true; equipmentRadioButton.Enabled = true; juiceBarRadioButton.Enabled = true; membershipRadioButton.Enabled = true; personalTrainingRadioButton.Enabled = true;}

Bradley−Millspaugh: Programming in Visual C# 2008
2. User Interface Design Text98 © The McGraw−Hill Companies, 2010
90 V I S U A L C# User Interface Design
➤ Feedback 2.2 1. Write the statements to clear the text box called companyTextBox and
reset the insertion point into the box. 2. Write the statements to clear the label called customerLabel and place
the insertion point into a text box called orderTextBox. 3. What will be the effect of each of these C# statements?
(a) printCheckBox.Checked = true; (b) colorRadioButton.Checked = true; (c) drawingPictureBox.Visible = false; (d) locationLabel.BorderStyle = BorderStyle.Fixed3D; ( e) cityLabel.Text = cityTextBox.Text; (f ) redRadioButton.Enabled = true;
Changing the Color of Text
You can change the color of text by changing the ForeColor property of a control. Actually, most controls have a ForeColor and a BackColor property. The ForeColor property changes the color of the text; the BackColor property determines the color around the text.
The Color Constants C# provides an easy way to specify a large number of colors. These color constants are in the Color class. If you type the keyword Color and a period in the editor, you can see a full list of colors. Some of the colors are listed below.
Color.AliceBlue Color.AntiqueWhite Color.Bisque Color.BlanchedAlmond Color.Blue
Examples
nameTextBox.ForeColor = Color.Red; messageLabel.ForeColor = Color.White;
Using Radio Buttons for Selecting Colors Here is a small example ( Figure 2.23 ) that demonstrates using two groups of radio buttons to change the color of the form (the form’s BackColor property) and the color of the text (the form’s ForeColor property). The radio buttons in each group box operate together, independently from those in the other group box.
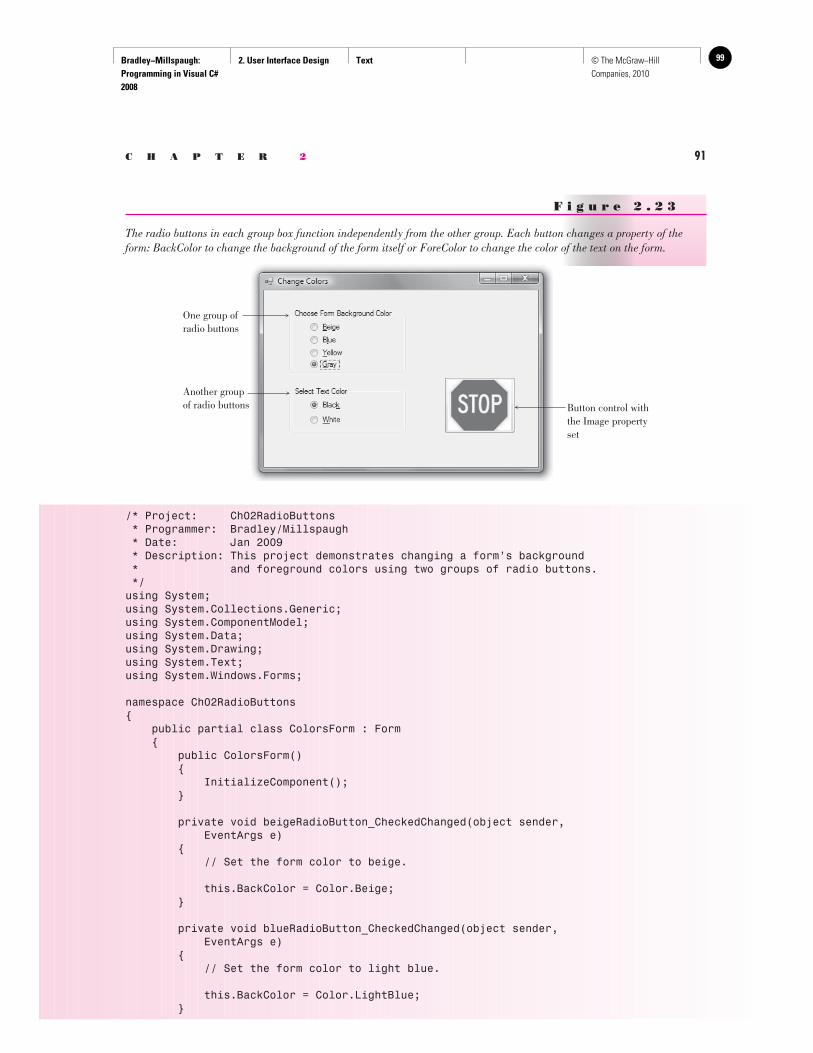
Bradley−Millspaugh: Programming in Visual C# 2008
2. User Interface Design Text 99© The McGraw−Hill Companies, 2010
C H A P T E R 2 91
/* Project: Ch02RadioButtons * Programmer: Bradley/Millspaugh * Date: Jan 2009 * Description: This project demonstrates changing a form’s background * and foreground colors using two groups of radio buttons. */using System;using System.Collections.Generic;using System.ComponentModel;using System.Data;using System.Drawing;using System.Text;using System.Windows.Forms;
namespace Ch02RadioButtons{ public partial class ColorsForm : Form { public ColorsForm() { InitializeComponent(); }
private void beigeRadioButton_CheckedChanged(object sender, EventArgs e) { // Set the form color to beige.
this.BackColor = Color.Beige; }
private void blueRadioButton_CheckedChanged(object sender, EventArgs e) { // Set the form color to light blue.
this.BackColor = Color.LightBlue; }
F i g u r e 2 . 2 3
The radio buttons in each group box function independently from the other group. Each button changes a property of the form: BackColor to change the background of the form itself or ForeColor to change the color of the text on the form.
One group ofradio buttons
Another groupof radio buttons Button control with
the Image propertyset
Bradley−Millspaugh: Programming in Visual C# 2008
2. User Interface Design Text100 © The McGraw−Hill Companies, 2010
92 V I S U A L C# User Interface Design
private void yellowRadioButton_CheckedChanged(object sender, EventArgs e) { // Set the form color to yellow.
this.BackColor = Color.LightGoldenrodYellow; }
private void grayRadioButton_CheckedChanged(object sender, EventArgs e) { // Set the form color to the default color.
this.BackColor = SystemColors.Control; }
private void blackRadioButton_CheckedChanged(object sender, EventArgs e) { // Set the Text color to black.
this.ForeColor = Color.Black; }
private void whiteRadioButton_CheckedChanged(object sender, EventArgs e) { // Set the Text color to white.
this.ForeColor = Color.White; }
private void exitButton_Click(object sender, EventArgs e) { // End the project.
this.Close(); } }}
Concatenating Text
At times you need to join strings of text. For example, you may want to join a literal and a property. You can “tack” one string of characters to the end of another in the process called concatenation . Use a plus sign (+) between the two strings.
Examples
messageLabel.Text = "Your name is: " + nameTextBox.Text; nameAndAddressLabel.Text = nameTextBox.Text + " " + addressTextBox.Text;
You also can concatenate a NewLine character (Environment.NewLine) into a long line to set up multiple lines:
welcomeRichTextBox.Text = "Welcome Member #" + memberIDMaskedTextBox.Text + Environment.NewLine + nameTextBox.Text;
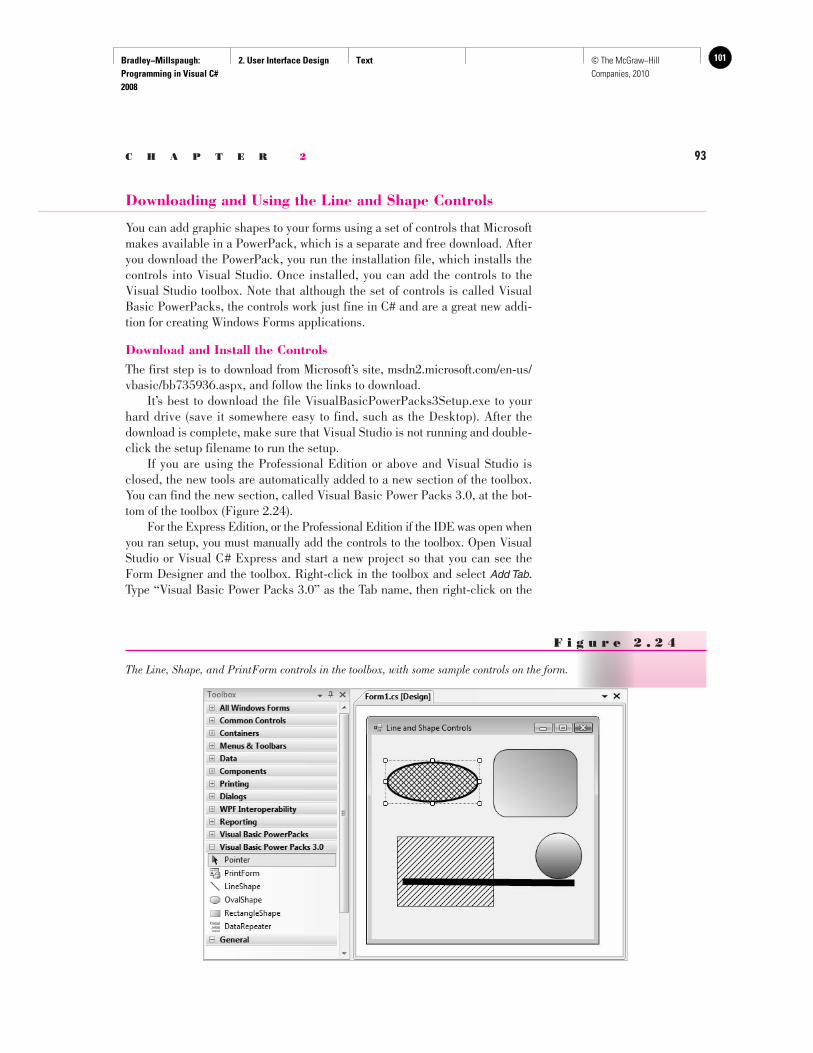
Bradley−Millspaugh: Programming in Visual C# 2008
2. User Interface Design Text 101© The McGraw−Hill Companies, 2010
C H A P T E R 2 93
Downloading and Using the Line and Shape Controls
You can add graphic shapes to your forms using a set of controls that Microsoft makes available in a PowerPack, which is a separate and free download. After you download the PowerPack, you run the installation file, which installs the controls into Visual Studio. Once installed, you can add the controls to the Visual Studio toolbox. Note that although the set of controls is called Visual Basic PowerPacks, the controls work just fine in C# and are a great new addi-tion for creating Windows Forms applications.
Download and Install the Controls The first step is to download from Microsoft’s site, msdn2.microsoft.com/en-us/vbasic/bb735936.aspx , and follow the links to download. It’s best to download the file VisualBasicPowerPacks3Setup.exe to your hard drive (save it somewhere easy to find, such as the Desktop). After the download is complete, make sure that Visual Studio is not running and double-click the setup filename to run the setup. If you are using the Professional Edition or above and Visual Studio is closed, the new tools are automatically added to a new section of the toolbox. You can find the new section, called Visual Basic Power Packs 3.0, at the bot-tom of the toolbox ( Figure 2.24 ). For the Express Edition, or the Professional Edition if the IDE was open when you ran setup, you must manually add the controls to the toolbox. Open Visual Studio or Visual C# Express and start a new project so that you can see the Form Designer and the toolbox. Right-click in the toolbox and select Add Tab . Type “Visual Basic Power Packs 3.0” as the Tab name, then right-click on the
F i g u r e 2 . 2 4
The Line, Shape, and PrintForm controls in the toolbox, with some sample controls on the form.
Bradley−Millspaugh: Programming in Visual C# 2008
2. User Interface Design Text102 © The McGraw−Hill Companies, 2010
94 V I S U A L C# User Interface Design
new tab, and select Choose Items from the context menu. The Choose Toolbox Items dialog box appears with the list of all available tools. You can save some time by typing “Power” in the Filter box, which will limit the list to the PowerPack con-trols. Then select LineShape , OvalShape , RectangleShape , and PrintForm . If you have multiple versions of the controls listed, choose the highest version number (9.0.0.0 as of this writing). Then click OK to return to the toolbox. The new tools should appear in the Visual Basic PowerPacks 3.0 tab of the toolbox. Note : The controls appear in the section of the toolbox that is active when you select Choose Toolbox Items .
Place the Controls on a Form To place a control on the form, click on the tool in the toolbox and use the mouse pointer to draw the shape that you want on the form. Alternately, you can double-click one of the tools to create a default size control that you can move and resize as desired. The Line and Shape controls have many properties that you can set, as well as events, such as Click and DoubleClick, for which you can write event handlers. Properties of a Line include BorderStyle ( Solid , Dot , Dash , and a few more), BorderWidth (the width of the line, in pixels), BorderColor, and the locations for the two endpoints of the line (X1, X2, X3, X4). Of course, you can move and resize the line visually, but it sometimes is more precise to set the pixel location exactly. The properties of the Shape controls are more interesting. You can set transparency with the BackStyle property and the border with BorderColor, BorderStyle, and BorderWidth. Set the interior of the shape using FillColor, FillGradientColor, FillGradientStyle, and FillStyle. You can make a rectangle have rounded corners by setting the CornerRadius, which defaults to zero for square corners.
Printing a Form
Would you like to print an image of a form while the application is running? You can use the new PrintForm component that you added to the toolbox in the preceding section (refer to Figure 2.24 ). When you add the PrintForm compo-nent to your form, it appears in the component tray, as it has no visual repre-sentation on the form. Note that this is similar to the ToolTip component that you used earlier in this chapter. You can choose to send the printer output to the printer or to the Print Pre-view window, which saves paper while you are testing your program. To add printing to a Windows Form, add a PrintForm component and a Print button to the form so that the user can select the print option. You can leave the default name of the component as printForm1 and change the name of the button to printButton. In the printButton_Click event handler, use the PrintForm’s Print method to send the form to the printer:
// Print the form on the printer. printForm1.Print();
To send the output to the Print Preview window, set the PrintForm’s Print-Action property before executing the Print method. Allow IntelliSense to help you select the PrintAction property.
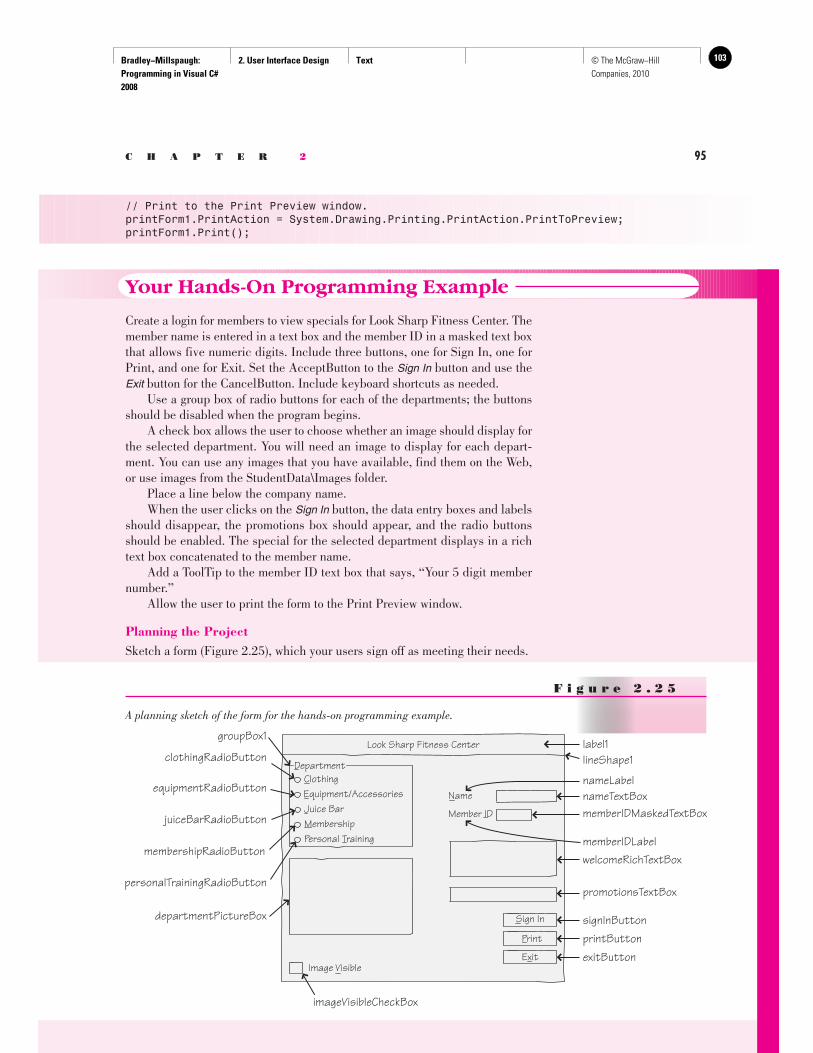
Bradley−Millspaugh: Programming in Visual C# 2008
2. User Interface Design Text 103© The McGraw−Hill Companies, 2010
C H A P T E R 2 95
// Print to the Print Preview window. printForm1.PrintAction = System.Drawing.Printing.PrintAction.PrintToPreview; printForm1.Print();
Your Hands-On Programming Example
Create a login for members to view specials for Look Sharp Fitness Center. The member name is entered in a text box and the member ID in a masked text box that allows five numeric digits. Include three buttons, one for Sign In, one for Print, and one for Exit. Set the AcceptButton to the Sign In button and use the E xit button for the CancelButton. Include keyboard shortcuts as needed. Use a group box of radio buttons for each of the departments; the buttons should be disabled when the program begins. A check box allows the user to choose whether an image should display for the selected department. You will need an image to display for each depart-ment. You can use any images that you have available, find them on the Web, or use images from the StudentData\Images folder. Place a line below the company name. When the user clicks on the Sign In button, the data entry boxes and labels should disappear, the promotions box should appear, and the radio buttons should be enabled. The special for the selected department displays in a rich text box concatenated to the member name. Add a ToolTip to the member ID text box that says, “Your 5 digit member number.” Allow the user to print the form to the Print Preview window.
Planning the Project Sketch a form ( Figure 2.25 ), which your users sign off as meeting their needs.
F i g u r e 2 . 2 5
A planning sketch of the form for the hands-on programming example.
imageVisibleCheckBox
Look Sharp Fitness Center
Department
label1lineShape1
nameTextBox
welcomeRichTextBox
promotionsTextBox
signInButton
exitButtonprintButton
memberIDMaskedTextBox
memberIDLabel
nameLabelClothingEquipment/AccessoriesJuice BarMembershipPersonal Training
Name
Member ID
Sign In
Exit
groupBox1
clothingRadioButton
equipmentRadioButton
juiceBarRadioButton
membershipRadioButton
personalTrainingRadioButton
departmentPictureBox
Image Visible
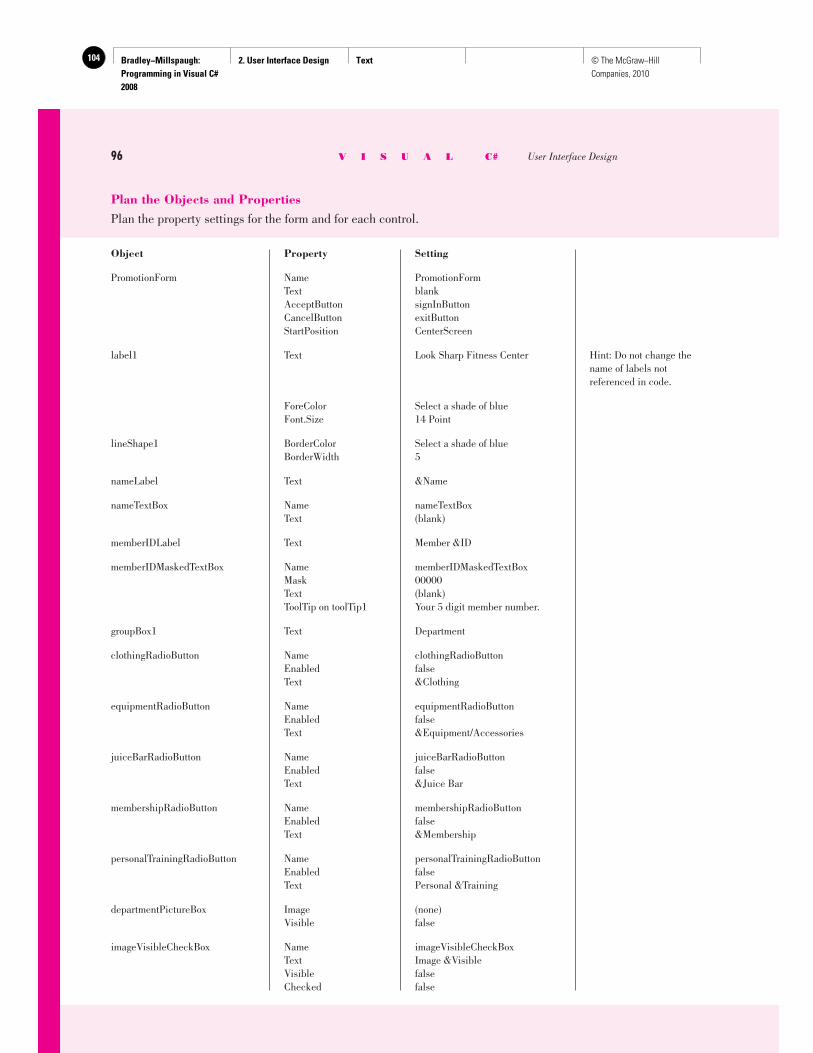
Bradley−Millspaugh: Programming in Visual C# 2008
2. User Interface Design Text104 © The McGraw−Hill Companies, 2010
96 V I S U A L C# User Interface Design
Plan the Objects and Properties Plan the property settings for the form and for each control.
Object Property Setting
PromotionForm Name PromotionForm Text blank AcceptButton signInButton CancelButton exitButton StartPosition CenterScreen
label1 Text Look Sharp Fitness Center Hint: Do not change the name of labels not referenced in code.
ForeColor Select a shade of blue Font.Size 14 Point
lineShape1 BorderColor Select a shade of blue BorderWidth 5
nameLabel Text &Name
nameTextBox Name nameTextBox Text (blank)
memberIDLabel Text Member &ID
memberIDMaskedTextBox Name memberIDMaskedTextBox Mask 00000 Text (blank) ToolTip on toolTip1 Your 5 digit member number.
groupBox1 Text Department
clothingRadioButton Name clothingRadioButton Enabled false Text &Clothing
equipmentRadioButton Name equipmentRadioButton Enabled false Text &Equipment/Accessories
juiceBarRadioButton Name juiceBarRadioButton Enabled false Text &Juice Bar
membershipRadioButton Name membershipRadioButton Enabled false Text &Membership
personalTrainingRadioButton Name personalTrainingRadioButton Enabled false Text Personal &Training
departmentPictureBox Image (none) Visible false
imageVisibleCheckBox Name imageVisibleCheckBox Text Image &Visible Visible false Checked false
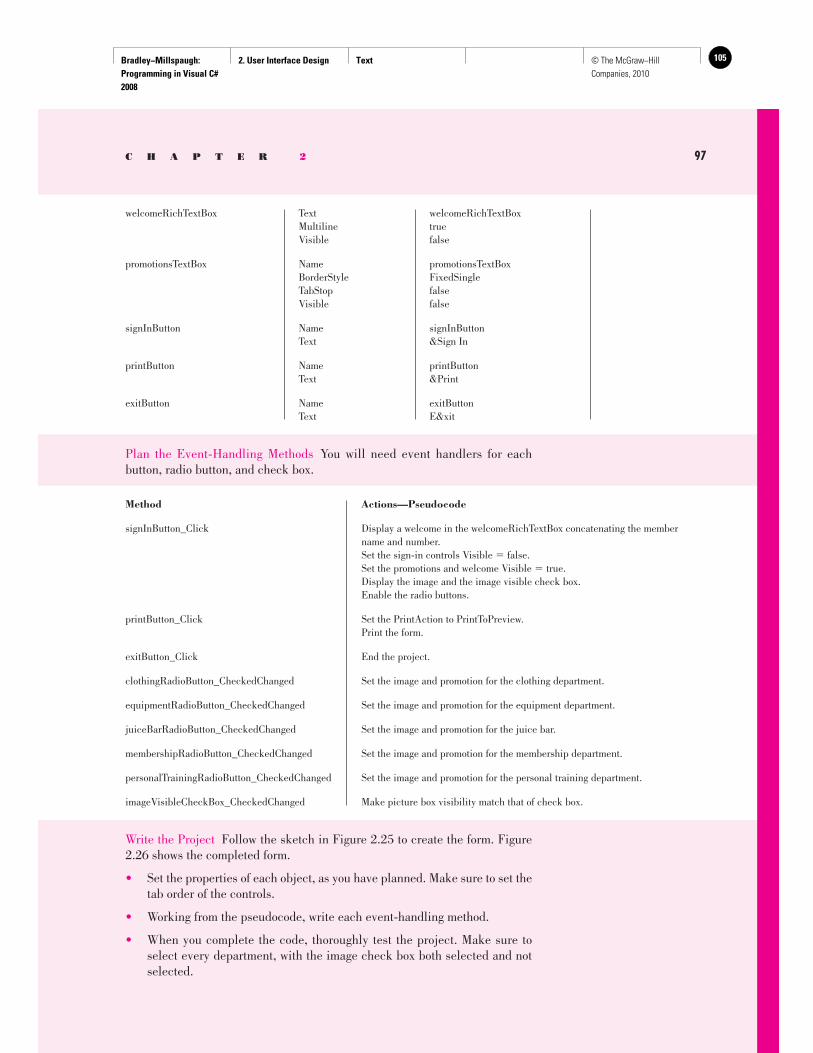
Bradley−Millspaugh: Programming in Visual C# 2008
2. User Interface Design Text 105© The McGraw−Hill Companies, 2010
C H A P T E R 2 97
welcomeRichTextBox Text welcomeRichTextBox Multiline true Visible false
promotionsTextBox Name promotionsTextBox BorderStyle FixedSingle TabStop false Visible false
signInButton Name signInButton Text &Sign In
printButton Name printButton Text &Print
exitButton Name exitButton Text E&xit
Plan the Event-Handling Methods You will need event handlers for each button, radio button, and check box.
Method Actions—Pseudocode
signInButton_Click Display a welcome in the welcomeRichTextBox concatenating the member name and number. Set the sign-in controls Visible � false. Set the promotions and welcome Visible � true. Display the image and the image visible check box. Enable the radio buttons.
printButton_Click Set the PrintAction to PrintToPreview. Print the form.
exitButton_Click End the project.
clothingRadioButton_CheckedChanged Set the image and promotion for the clothing department.
equipmentRadioButton_CheckedChanged Set the image and promotion for the equipment department.
juiceBarRadioButton_CheckedChanged Set the image and promotion for the juice bar.
membershipRadioButton_CheckedChanged Set the image and promotion for the membership department.
personalTrainingRadioButton_CheckedChanged Set the image and promotion for the personal training department.
imageVisibleCheckBox_CheckedChanged Make picture box visibility match that of check box.
Write the Project Follow the sketch in Figure 2.25 to create the form. Figure 2.26 shows the completed form.
• Set the properties of each object, as you have planned. Make sure to set the tab order of the controls.
• Working from the pseudocode, write each event-handling method.
• When you complete the code, thoroughly test the project. Make sure to select every department, with the image check box both selected and not selected.
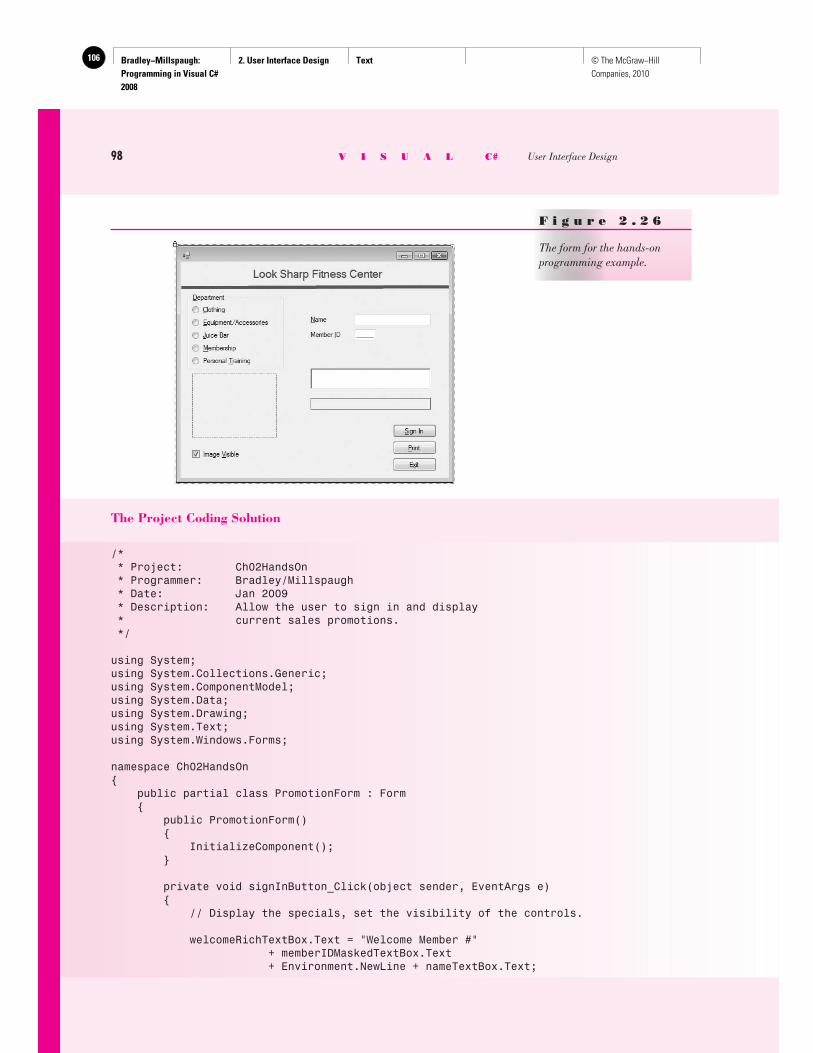
Bradley−Millspaugh: Programming in Visual C# 2008
2. User Interface Design Text106 © The McGraw−Hill Companies, 2010
98 V I S U A L C# User Interface Design
F i g u r e 2 . 2 6
The form for the hands-on programming example.
The Project Coding Solution
/* * Project: Ch02HandsOn * Programmer: Bradley/Millspaugh * Date: Jan 2009 * Description: Allow the user to sign in and display * current sales promotions. */
using System;using System.Collections.Generic;using System.ComponentModel;using System.Data;using System.Drawing;using System.Text;using System.Windows.Forms;
namespace Ch02HandsOn{ public partial class PromotionForm : Form { public PromotionForm() { InitializeComponent(); }
private void signInButton_Click(object sender, EventArgs e) { // Display the specials, set the visibility of the controls.
welcomeRichTextBox.Text = "Welcome Member #" + memberIDMaskedTextBox.Text + Environment.NewLine + nameTextBox.Text;
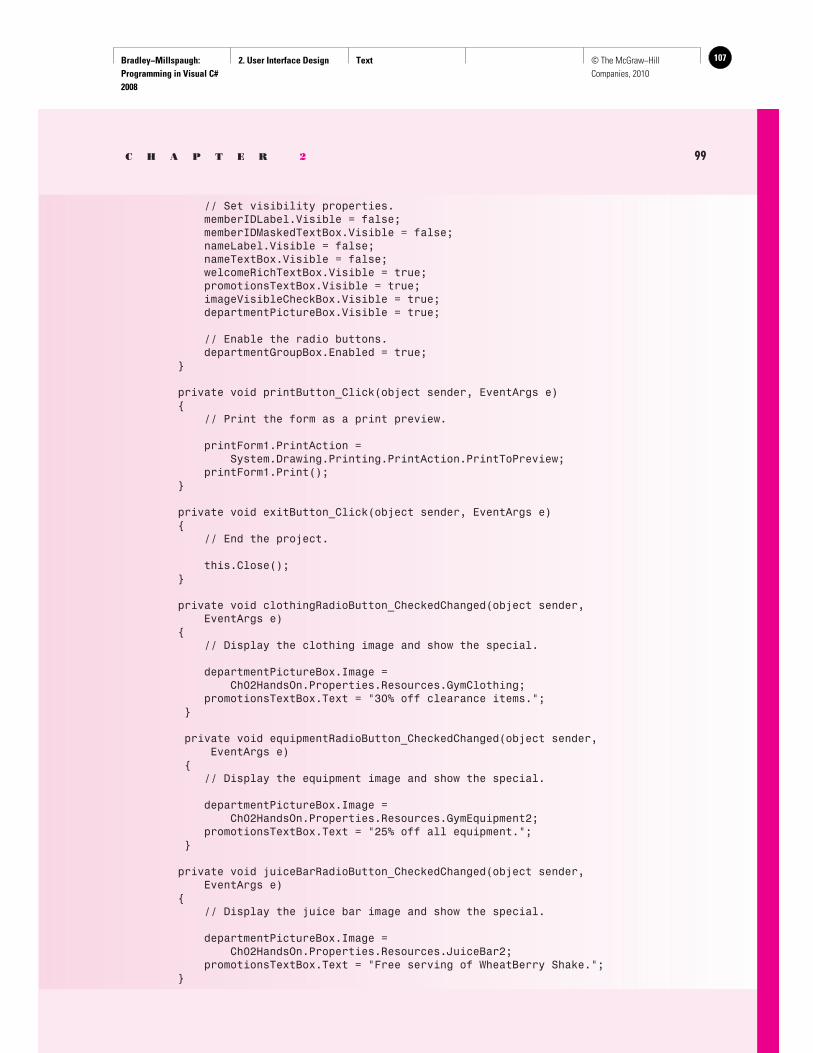
Bradley−Millspaugh: Programming in Visual C# 2008
2. User Interface Design Text 107© The McGraw−Hill Companies, 2010
C H A P T E R 2 99
// Set visibility properties. memberIDLabel.Visible = false; memberIDMaskedTextBox.Visible = false; nameLabel.Visible = false; nameTextBox.Visible = false; welcomeRichTextBox.Visible = true; promotionsTextBox.Visible = true; imageVisibleCheckBox.Visible = true; departmentPictureBox.Visible = true;
// Enable the radio buttons. departmentGroupBox.Enabled = true; }
private void printButton_Click(object sender, EventArgs e) { // Print the form as a print preview.
printForm1.PrintAction = System.Drawing.Printing.PrintAction.PrintToPreview; printForm1.Print(); }
private void exitButton_Click(object sender, EventArgs e) { // End the project.
this.Close(); }
private void clothingRadioButton_CheckedChanged(object sender, EventArgs e) { // Display the clothing image and show the special.
departmentPictureBox.Image = Ch02HandsOn.Properties.Resources.GymClothing; promotionsTextBox.Text = "30% off clearance items."; } private void equipmentRadioButton_CheckedChanged(object sender, EventArgs e) { // Display the equipment image and show the special.
departmentPictureBox.Image = Ch02HandsOn.Properties.Resources.GymEquipment2; promotionsTextBox.Text = "25% off all equipment."; }
private void juiceBarRadioButton_CheckedChanged(object sender, EventArgs e) { // Display the juice bar image and show the special.
departmentPictureBox.Image = Ch02HandsOn.Properties.Resources.JuiceBar2; promotionsTextBox.Text = "Free serving of WheatBerry Shake."; }
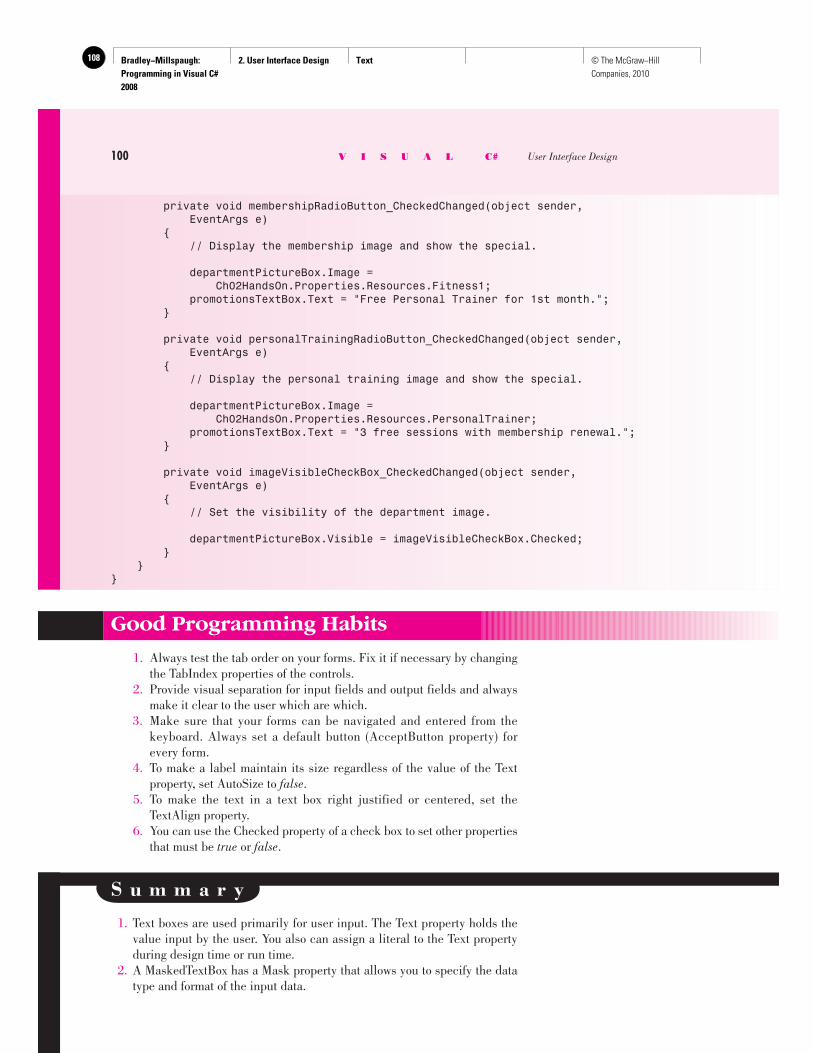
Bradley−Millspaugh: Programming in Visual C# 2008
2. User Interface Design Text108 © The McGraw−Hill Companies, 2010
private void membershipRadioButton_CheckedChanged(object sender, EventArgs e) { // Display the membership image and show the special.
departmentPictureBox.Image = Ch02HandsOn.Properties.Resources.Fitness1; promotionsTextBox.Text = "Free Personal Trainer for 1st month."; }
private void personalTrainingRadioButton_CheckedChanged(object sender, EventArgs e) { // Display the personal training image and show the special.
departmentPictureBox.Image = Ch02HandsOn.Properties.Resources.PersonalTrainer; promotionsTextBox.Text = "3 free sessions with membership renewal."; }
private void imageVisibleCheckBox_CheckedChanged(object sender, EventArgs e) { // Set the visibility of the department image.
departmentPictureBox.Visible = imageVisibleCheckBox.Checked; } }}
100 V I S U A L C# User Interface Design
Good Programming Habits
1. Always test the tab order on your forms. Fix it if necessary by changing the TabIndex properties of the controls.
2. Provide visual separation for input fields and output fields and always make it clear to the user which are which.
3. Make sure that your forms can be navigated and entered from the keyboard. Always set a default button (AcceptButton property) for every form.
4. To make a label maintain its size regardless of the value of the Text property, set AutoSize to false .
5. To make the text in a text box right justified or centered, set the TextAlign property.
6. You can use the Checked property of a check box to set other properties that must be true or false .
S u m m a r y
1. Text boxes are used primarily for user input. The Text property holds the value input by the user. You also can assign a literal to the Text property during design time or run time.
2. A MaskedTextBox has a Mask property that allows you to specify the data type and format of the input data.
Bradley−Millspaugh: Programming in Visual C# 2008
2. User Interface Design Text 109© The McGraw−Hill Companies, 2010
C H A P T E R 2 101
3. A RichTextBox is a specialized text box that allows additional formatting to the text.
4. Both text boxes and rich text boxes have Multiline and WordWrap proper-ties that can allow a long Text property to wrap to multiple lines. The text will wrap to the width of the control, which must be tall enough to display multiple lines. A NewLine character can be included in the text to specify the location to split the line.
5. Group boxes are used as containers for other controls and to group like items on a form.
6. Check boxes and radio buttons allow the user to make choices. In a group of radio buttons, only one can be selected; but in a group of check boxes, any number of the boxes may be selected.
7. The current state of check boxes and radio buttons is stored in the Checked property; the CheckedChanged event occurs when the user clicks on one of the controls.
8. Picture box controls hold a graphic, which is assigned to the Image prop-erty. Set the SizeMode property to StretchImage to make the image resize to fit the control.
9. The Resources tab of the Project Designer can be used to add, remove, and rename images in the project Resources folder.
10. The BorderStyle property of many controls can be set to None , FixedSingle , or Fixed3D , to determine whether the control appears flat or three-dimensional.
11. Forms and controls can display images from the project’s resources. Use the form’s BackgroundImage property and a control’s Image property.
12. To create a line on a form, you can use a Label control or use the new LineShape control included in the Power Packs.
13. You can select multiple controls and treat them as a group, including setting common properties at once, moving them, or aligning them.
14. Make your programs easier to use by following Windows standard guide-lines for colors, control size and placement, access keys, Accept and Can-cel buttons, and tab order.
15. Define keyboard access keys by including an ampersand (&) in the Text property of buttons, radio buttons, check boxes, and labels. Use a double ampersand (&&) when you want an ampersand to actually display.
16. Set the AcceptButton property of the form to the desired button so that the user can press Enter to select the button. If you set the form’s CancelBut-ton property to a button, that button will be selected when the user presses the Esc key.
17. The focus moves from control to control as the user presses the Tab key. The sequence for tabbing is determined by the TabIndex properties of the controls. The Tab key stops only on controls that have their TabStop prop-erty set to true and are enabled.
18. Set the form’s location on the screen by setting the StartPosition property. 19. Add a ToolTip control to a form and then set the ToolTip on toolTip1 prop-
erty of a control to make a ToolTip appear when the user pauses the mouse pointer over the control. You can set properties of the ToolTip component to modify the background, foreground, shape, and an icon for the ToolTips.
20. Clear the Text property of a text box or a label by setting it to an empty string. Text boxes also can be cleared using the Clear method.
21. To make a control have the focus, which makes it the active control, use the Focus method. Using the Focus method of a text box makes the insertion point appear in the text box. You cannot set the focus to a disabled control.

Bradley−Millspaugh: Programming in Visual C# 2008
2. User Interface Design Text110 © The McGraw−Hill Companies, 2010
102 V I S U A L C# User Interface Design
22. You can set the Checked property of a radio button or check box at run time and also set the Visible property of controls in code.
23. Controls can be disabled by setting the Enabled property to false . 24. Change the color of text in a control by changing its ForeColor property. 25. You can use the color constants to change colors during run time. 26. Joining two strings of text is called concatenation and is accomplished by
placing a plus sign between the two elements. 27. You can download and use PowerPack controls for LineShape, OvalShape,
RectangleShape, and a PrintForm component.
K e y T e r m s AcceptButton property 82 access key 81 BorderStyle property 77 CancelButton property 83 check box 73 Checked property 73 color constant 90 component tray 85 concatenation 92 container 72 empty string 87 Enabled property 89 focus 83 Focus method 88 ForeColor property 90 GroupBox 72 Image property 74 MaskedTextBox 70 Multiline property 71
NewLine character 72 PictureBox control 74 Project Designer 76 radio button 73 RichTextBox 70 Select Resource dialog box 74 SizeMode property 75 StartPosition property 84 StretchImage 75 TabIndex property 83 TabStop property 83 text box 68 Text property 69 TextAlign property 69 ToolTip 85 ToolTip component 85 ToolTip on toolTip1 property 85 Visible property 75 WordWrap property 71
R e v i e w Q u e s t i o n s
1. You can display program output in a text box or a label. When should you use a text box? When is a label appropriate?
2. What would be the advantage of using a masked text box rather than a text box?
3. When would it be appropriate to use a rich text box instead of a text box? 4. What properties of a TextBox and RichTextBox must be set to allow a long
Text property to wrap to multiple lines? 5. How does the behavior of radio buttons differ from the behavior of check
boxes? 6. If you want two groups of radio buttons on a form, how can you make the
groups operate independently? 7. Explain how to make a graphic appear in a picture box control. 8. Describe how to select several labels and set them all to 12-point font size
at once.
Bradley−Millspaugh: Programming in Visual C# 2008
2. User Interface Design Text 111© The McGraw−Hill Companies, 2010
C H A P T E R 2 103
9. What is the purpose of keyboard access keys? How can you define them in your project? How do they operate at run time?
10. Explain the purpose of the AcceptButton and CancelButton properties of the form. Give an example of a good use for each.
11. What is the focus? How can you control which object has the focus? 12. Assume you are testing your project and don’t like the initial position of
the insertion point. Explain how to make the insertion point appear in a different text box when the program begins.
13. During program execution, you want to return the insertion point to a text box called addressTextBox. What statement will you use to make that happen?
14. What is a ToolTip? How can you make a ToolTip appear? 15. What statements will clear the current contents of a text box and a label? 16. What is concatenation and when would it be useful?
P r o g r a m m i n g E x e r c i s e s
Graphics Files: The StudentData folder, which is available on the text Web site ( www.mhhe.com/csharp2008 ), holds many graphic files. You also can use any graphics that you have available or find on the Web.
2.1 Create a project for the Pamper Your Soles Shoe Sales catalog. Allow the user to select either women’s or men’s shoes. Have a group box for each, which contains radio buttons for shoe styles. The styles for women are dress shoes, running shoes, boots, and sandals. Men’s styles are dress shoes, work boots, western boots, tennis shoes, and sandals. ( Hint : When the user selects the radio button for women’s shoes, make the group box of women’s styles visible; the radio button for men’s shoes displays the men’s styles.)
Download two appropriate pictures from the Web for each style and give a name to the style. Display the name of the style in a text box below the image for the shoes along with the category. For example, the Cinderella-style heels should display the concatenated style: “Women’s Dress Shoe Cinderella”.
Include an Exit button that is set as both the Cancel and Accept but-tons of the form. A Clear button should set the user interface to display only a logo and the options for Men’s or Women’s shoes. A Print button should send the form to the Print Preview window. Use keyboard access keys and include ToolTips.
2.2 Write a project to display the flags of four different countries, depending on the setting of the radio buttons. In addition, display the name of the country in the large label under the flag picture box. The user also can choose to display or hide the form’s title, the country name, and the name of the programmer. Use check boxes for the display/hide choices.
Include keyboard access keys for all radio buttons, check boxes, and buttons. Make the Exit button the Cancel button. Include a Print button and ToolTips.
You can choose the countries and flags. (The StudentData\Images\MicrosoftIcons folder holds flag icons for four countries, which you can use if you wish.)
Bradley−Millspaugh: Programming in Visual C# 2008
2. User Interface Design Text112 © The McGraw−Hill Companies, 2010
104 V I S U A L C# User Interface Design
Hints : When a project begins running, the focus goes to the control with the lowest TabIndex. Because that control likely is a radio button, one button will appear selected. You must either display the first flag to match the radio button or make the focus begin in a different control. You might consider beginning the focus on a button.
Set the Visible property of a control to the Checked property of the corresponding check box. That way when the check box is selected, the control becomes visible.
Because all three selectable controls will be visible when the project begins, set the Checked property of the three check boxes to true at design time.
2.3 Write a project to display a weather report for a Sporting Goods Store. The user will input his or her name in a text box and can choose one of the radio buttons for the weather—rain, snow, cloudy, and sunny. Display an image and a message. The message should give the weather report in words and include the person’s name (taken from the text box at the top of the form). For example, if the user chooses the Sunny button, you might display “It looks like a good day for golf, John” (assuming that the user entered John in the text box).
Include keyboard access keys for the buttons and radio buttons. Make the Exit button the Cancel button and include a Print button and ToolTips.
Note : The StudentData\Images\MicrosoftIcons folder has icon files that you can use, if you wish. Available are Cloud.ico, Rain.ico, Snow.ico, and Sun.ico.
2.4 BratPack BackPacks needs an application to display products. The cat-egories are school bags, sling backpacks, daypacks, weekend hiking backpacks, and cycling backpacks. When the user selects a category, display an image of the appropriate style. Include a Print button, a Clear button, and an Exit button.
2.5 Create a project that allows the user to input name and address informa-tion and then display the lines of output for a mailing label in a rich text box.
Use text boxes for entry of the first name, last name, street address, city, and state, and a masked text box for the ZIP code. Give meaningful names to the text boxes and set the initial Text properties to blank. Add appropriate labels to each text box to tell the user which data will be entered into each box and also provide ToolTips.
Use buttons for Display Label Info , Clear , Print , and Exit . Make the Display button the Accept button and the Clear button the Cancel button.
When the user clicks on the Display Label Info button, display the fol-lowing in a rich text box:
Line 1—The first name and last name concatenated together, with a space between the two.
Line 2—The street address. Line 3—The city, state, and ZIP code concatenated together. (Make sure
to concatenate a comma and a space between the city and state, using "," and two spaces between the state and ZIP code.)
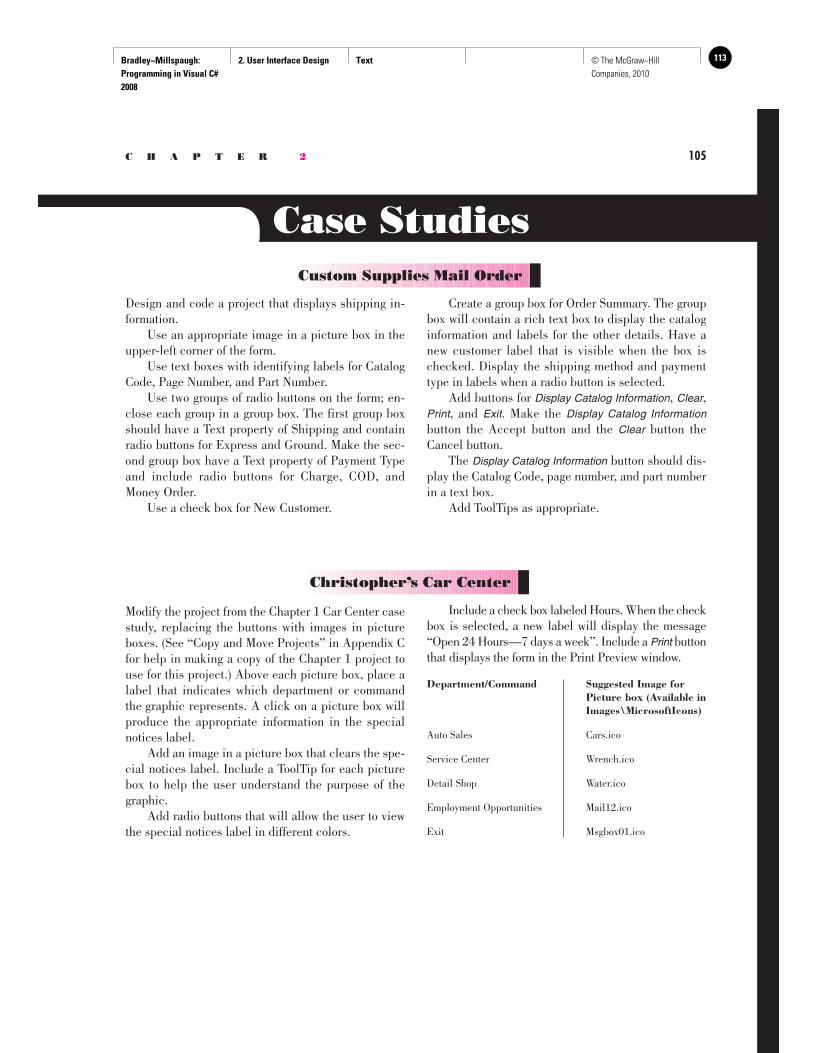
Bradley−Millspaugh: Programming in Visual C# 2008
2. User Interface Design Text 113© The McGraw−Hill Companies, 2010
C H A P T E R 2 105
Case Studies Custom Supplies Mail Order
Design and code a project that displays shipping in-formation. Use an appropriate image in a picture box in the upper-left corner of the form. Use text boxes with identifying labels for Catalog Code, Page Number, and Part Number. Use two groups of radio buttons on the form; en-close each group in a group box. The first group box should have a Text property of Shipping and contain radio buttons for Express and Ground. Make the sec-ond group box have a Text property of Payment Type and include radio buttons for Charge, COD, and Money Order. Use a check box for New Customer.
Create a group box for Order Summary. The group box will contain a rich text box to display the catalog information and labels for the other details. Have a new customer label that is visible when the box is checked. Display the shipping method and payment type in labels when a radio button is selected. Add buttons for Display Catalog Information, Clear, Print , and Exit. Make the Display Catalog Information button the Accept button and the Clear button the Cancel button. The Display Catalog Information button should dis-play the Catalog Code, page number, and part number in a text box. Add ToolTips as appropriate.
Modify the project from the Chapter 1 Car Center case study, replacing the buttons with images in picture boxes. (See “Copy and Move Projects” in Appendix C for help in making a copy of the Chapter 1 project to use for this project.) Above each picture box, place a label that indicates which department or command the graphic represents. A click on a picture box will produce the appropriate information in the special notices label. Add an image in a picture box that clears the spe-cial notices label. Include a ToolTip for each picture box to help the user understand the purpose of the graphic. Add radio buttons that will allow the user to view the special notices label in different colors.
Christopher’s Car Center
Include a check box labeled Hours. When the check box is selected, a new label will display the message “Open 24 Hours—7 days a week”. Include a Print button that displays the form in the Print Preview window.
Department/Command Suggested Image for Picture box (Available in Images\MicrosoftIcons)
Auto Sales Cars.ico
Service Center Wrench.ico
Detail Shop Water.ico
Employment Opportunities Mail12.ico
Exit Msgbox01.ico
Bradley−Millspaugh: Programming in Visual C# 2008
2. User Interface Design Text114 © The McGraw−Hill Companies, 2010
106 V I S U A L C# User Interface Design
Xtreme Cinema
Design and code a project that displays the location of videos using radio buttons. Use a radio button for each of the movie categories and a label to display the aisle number. A check box will allow the user to display or hide a message for members. When the check box is selected, a message stating “All Members Receive a 10% Discount” will appear. Include buttons (with keyboard access keys) for Clear , Print , and Exit . The Clear button should be set as the Accept button and the Exit as the Cancel button. Place a label on the form in a 24-point font that reads Xtreme Cinema . Use a line to separate the label from the rest of the user interface. Include an image in a picture box.
Radio Button Location
Comedy Aisle 1
Drama Aisle 2
Action Aisle 3
Sci-Fi Aisle 4
Horror Aisle 5
New Releases Back wall
Cool Boards
Create a project to display an advertising screen for Cool Boards. Include the company name, programmer name, a slogan (use “The very best in boards” or make up your own slogan), and a graphic image for a logo. You may use the graphic Skateboard.gif from StudentData\Images or use one of your own. Allow the user to select the color for the slogan text using radio buttons. Additionally, the user may choose to display or hide the company name, the slogan, and the logo. Use check boxes for the dis-play options so that the user can select each option independently. Include keyboard access keys for the radio but-tons and the buttons. Make the Exit button the Cancel
button; the Print button should display the form in the Print Preview window. Create ToolTips for the com-pany name (“Our company name”), the slogan (“Our slogan”), and the logo (“Our logo”). When the project begins execution, the slogan text should be red and the Red radio button selected. When the user selects a new color, change the color of the slogan text to match. Each of the check boxes must appear selected ini-tially, since the company name, slogan, logo, and pro-grammer name display when the form appears. Each time the user selects or deselects a check box, make the corresponding item display or hide. Make the form appear in the center of the screen.
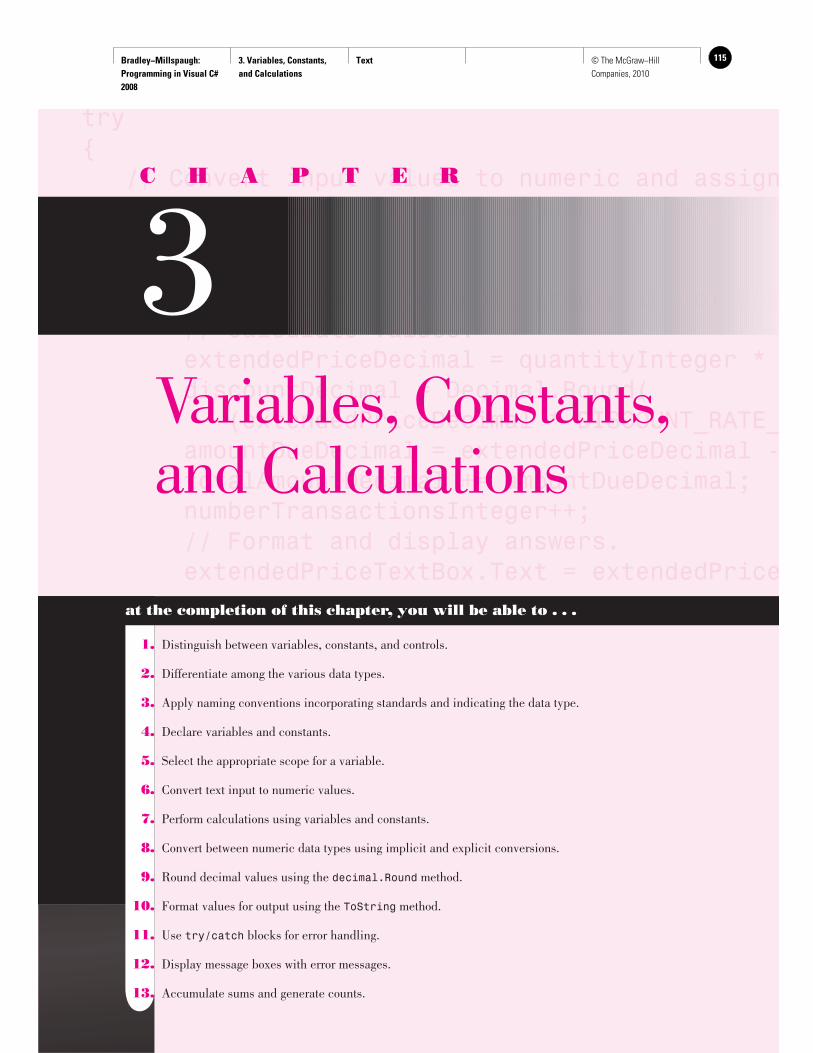
Bradley−Millspaugh: Programming in Visual C# 2008
3. Variables, Constants, and Calculations
Text 115© The McGraw−Hill Companies, 2010
try{ // Convert input values to numeric and assign quantityInteger = int.Parse(quantityTextBox.T try { priceDecimal = decimal.Parse(priceTextBox // Calculate values. extendedPriceDecimal = quantityInteger * discountDecimal = Decimal.Round( (extendedPriceDecimal * DISCOUNT_RATE_ amountDueDecimal = extendedPriceDecimal - totalAmountDecimal += amountDueDecimal; numberTransactionsInteger++; // Format and display answers. extendedPriceTextBox.Text = extendedPrice
C H A P T E R
3 Variables, Constants, and Calculations
at the completion of this chapter, you will be able to . . .
1. Distinguish between variables, constants, and controls.
2. Differentiate among the various data types.
3. Apply naming conventions incorporating standards and indicating the data type.
4. Declare variables and constants.
5. Select the appropriate scope for a variable.
6. Convert text input to numeric values.
7. Perform calculations using variables and constants.
8. Convert between numeric data types using implicit and explicit conversions.
9. Round decimal values using the decimal.Round method.
10. Format values for output using the ToString method.
11. Use try/catch blocks for error handling.
12. Display message boxes with error messages.
13. Accumulate sums and generate counts.
Bradley−Millspaugh: Programming in Visual C# 2008
3. Variables, Constants, and Calculations
Text116 © The McGraw−Hill Companies, 2010
108 V I S U A L C# Variables, Constants, and Calculations
Data—Variables and Constants
So far, all data you have used in your projects have been properties of objects. You have worked with the Text property of text boxes and labels. Now you will work with values that are not properties. C# allows you to set up locations in memory and give each location a name. You can visualize each memory loca-tion as a scratch pad; the contents of the scratch pad can change as the need arises. In this example, the memory location is called maximumInteger .
maximumInteger = 100;
After executing this statement, the value of maximumInteger is 100. You can change the value of maximumInteger, use it in calculations, or display it in a control. In the preceding example, the memory location called maximumInteger is a variable . Memory locations that hold data that can be changed during proj-ect execution are called variables ; locations that hold data that cannot change during execution are called constants . For example, the customer’s name will vary as the information for each individual is processed. However, the name of the company and the sales tax rate will remain the same (at least for that day). When you declare a variable or a named constant , C# reserves an area of memory and assigns it a name, called an identifier . You specify identifier names according to the rules of C# as well as some recommended naming conventions.
In this chapter you will learn to do calculations. You will start with text values input by the user, convert them to numeric values, and perform calculations on them. You also learn to format the results of your calculations and display them for the user. Although the calculations themselves are quite simple (addition, subtrac-tion, multiplication, and division), there are some important issues to discuss first. You must learn about variables and constants, the various types of data used by Visual C#, and how and where to declare variables and constants. Variables are declared differently, depending on where you want to use them and how long you need to retain their values. The code below is a small preview to show the calculation of the product of two text boxes. The first group of statements declares the variables and their data types. The second group of statements converts the text box contents to numeric and places the values into the variables. The last line performs the multiplication and places the result into a variable. The following sections of this chapter describe how to set up your code for calculations.
// Declare the variables.int quantityInteger;decimal priceDecimal, extendedPriceDecimal;
// Convert input text to numeric and assign values to variables.quantityInteger = int.Parse(quantityTextBox.Text);priceDecimal = decimal.Parse(priceTextBox.Text);
// Calculate the product.extendedPriceDecimal = quantityInteger * priceDecimal;
maximumInteger
100
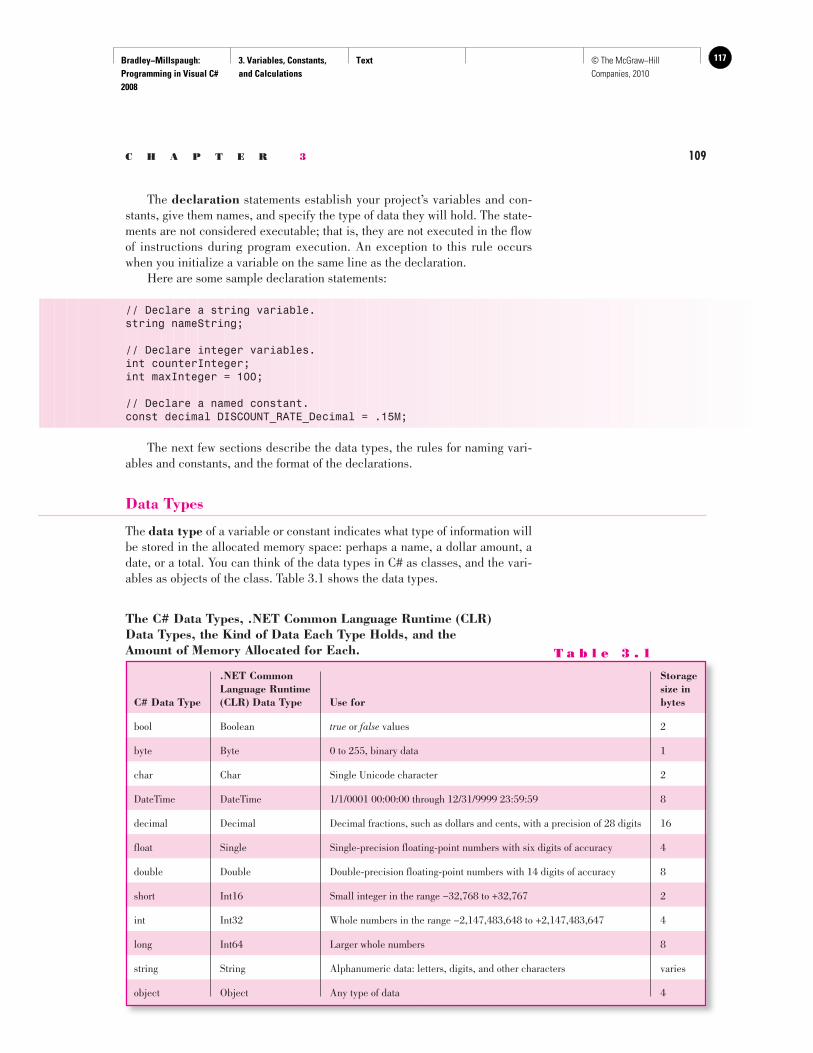
Bradley−Millspaugh: Programming in Visual C# 2008
3. Variables, Constants, and Calculations
Text 117© The McGraw−Hill Companies, 2010
C H A P T E R 3 109
The declaration statements establish your project’s variables and con-stants, give them names, and specify the type of data they will hold. The state-ments are not considered executable; that is, they are not executed in the flow of instructions during program execution. An exception to this rule occurs when you initialize a variable on the same line as the declaration. Here are some sample declaration statements:
// Declare a string variable.string nameString;
// Declare integer variables.int counterInteger;int maxInteger = 100;
// Declare a named constant.const decimal DISCOUNT_RATE_Decimal = .15M;
The next few sections describe the data types, the rules for naming vari-ables and constants, and the format of the declarations.
Data Types
The data type of a variable or constant indicates what type of information will be stored in the allocated memory space: perhaps a name, a dollar amount, a date, or a total. You can think of the data types in C# as classes, and the vari-ables as objects of the class. Table 3.1 shows the data types.
The C# Data Types, .NET Common Language Runtime (CLR) Data Types, the Kind of Data Each Type Holds, and the Amount of Memory Allocated for Each. T a b l e 3 . 1
.NET Common Storage Language Runtime size in C# Data Type (CLR) Data Type Use for bytes
bool Boolean true or false values 2
byte Byte 0 to 255, binary data 1
char Char Single Unicode character 2
DateTime DateTime 1/1/0001 00:00:00 through 12/31/9999 23:59:59 8
decimal Decimal Decimal fractions, such as dollars and cents, with a precision of 28 digits 16
float Single Single-precision floating-point numbers with six digits of accuracy 4
double Double Double-precision floating-point numbers with 14 digits of accuracy 8
short Int16 Small integer in the range −32,768 to +32,767 2
int Int32 Whole numbers in the range −2,147,483,648 to +2,147,483,647 4
long Int64 Larger whole numbers 8
string String Alphanumeric data: letters, digits, and other characters varies
object Object Any type of data 4
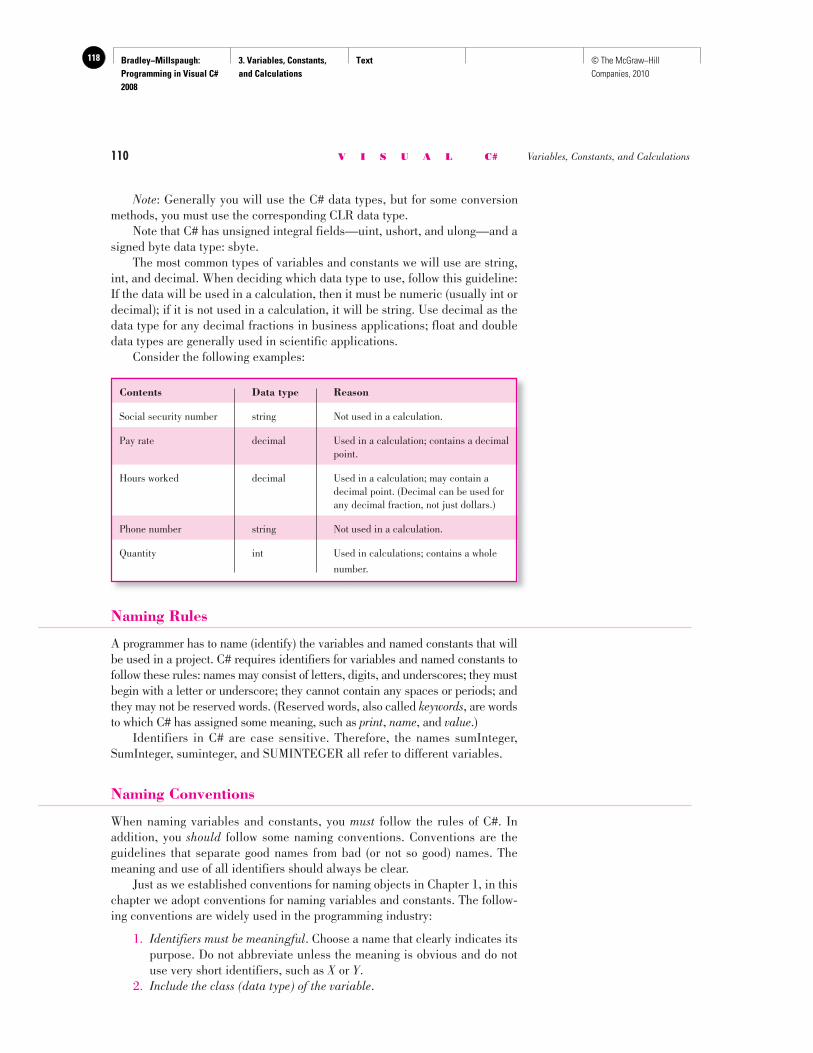
Bradley−Millspaugh: Programming in Visual C# 2008
3. Variables, Constants, and Calculations
Text118 © The McGraw−Hill Companies, 2010
110 V I S U A L C# Variables, Constants, and Calculations
Note: Generally you will use the C# data types, but for some conversion methods, you must use the corresponding CLR data type. Note that C# has unsigned integral fields—uint, ushort, and ulong—and a signed byte data type: sbyte. The most common types of variables and constants we will use are string, int, and decimal. When deciding which data type to use, follow this guideline: If the data will be used in a calculation, then it must be numeric (usually int or decimal); if it is not used in a calculation, it will be string. Use decimal as the data type for any decimal fractions in business applications; float and double data types are generally used in scientific applications. Consider the following examples:
Contents Data type Reason
Social security number string Not used in a calculation.
Pay rate decimal Used in a calculation; contains a decimal point.
Hours worked decimal Used in a calculation; may contain a decimal point. (Decimal can be used for any decimal fraction, not just dollars.)
Phone number string Not used in a calculation.
Quantity int Used in calculations; contains a whole
number.
Naming Rules
A programmer has to name (identify) the variables and named constants that will be used in a project. C# requires identifiers for variables and named constants to follow these rules: names may consist of letters, digits, and underscores; they must begin with a letter or underscore; they cannot contain any spaces or periods; and they may not be reserved words. (Reserved words, also called keywords , are words to which C# has assigned some meaning, such as print , name , and value .) Identifiers in C# are case sensitive. Therefore, the names sumInteger, SumInteger, suminteger, and SUMINTEGER all refer to different variables.
Naming Conventions
When naming variables and constants, you must follow the rules of C#. In addition, you should follow some naming conventions. Conventions are the guidelines that separate good names from bad (or not so good) names. The meaning and use of all identifiers should always be clear. Just as we established conventions for naming objects in Chapter 1, in this chapter we adopt conventions for naming variables and constants. The follow-ing conventions are widely used in the programming industry:
1. Identifiers must be meaningful . Choose a name that clearly indicates its purpose. Do not abbreviate unless the meaning is obvious and do not use very short identifiers, such as X or Y .
2. Include the class (data type) of the variable .
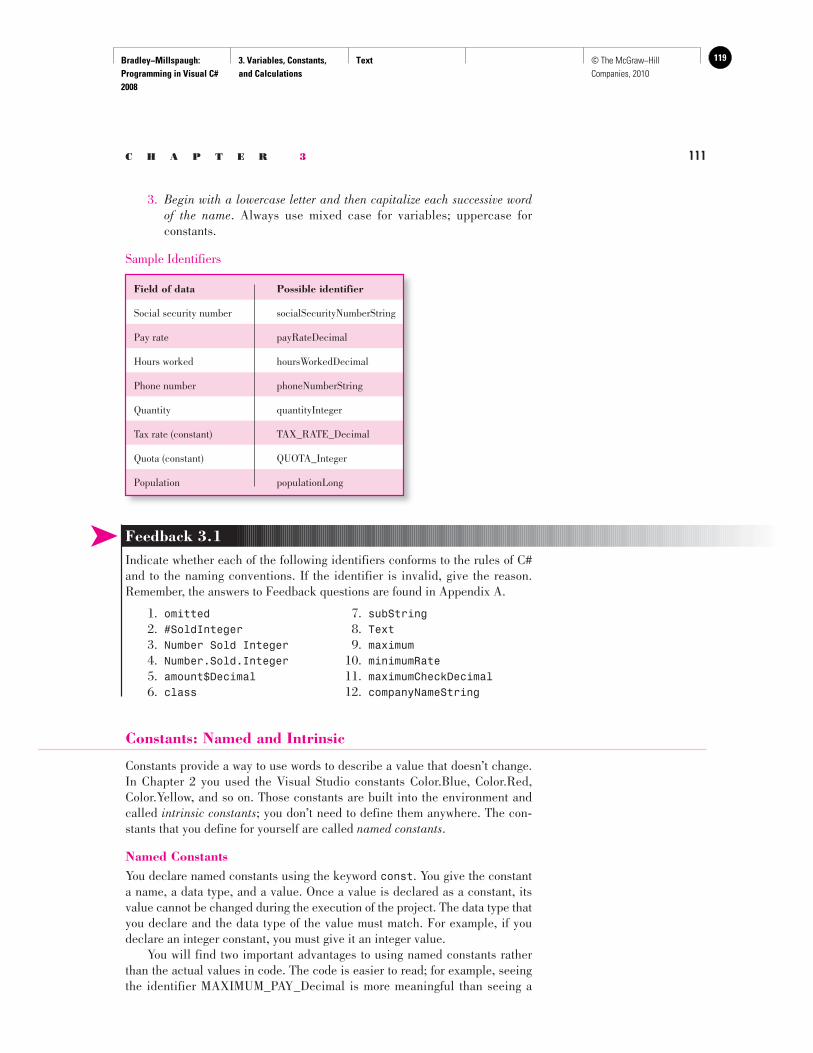
Bradley−Millspaugh: Programming in Visual C# 2008
3. Variables, Constants, and Calculations
Text 119© The McGraw−Hill Companies, 2010
C H A P T E R 3 111
3. Begin with a lowercase letter and then capitalize each successive word of the name . Always use mixed case for variables; uppercase for constants.
Sample Identifiers
Field of data Possible identifier
Social security number socialSecurityNumberString
Pay rate payRateDecimal
Hours worked hoursWorkedDecimal
Phone number phoneNumberString
Quantity quantityInteger
Tax rate (constant) TAX_RATE_Decimal
Quota (constant) QUOTA_Integer
Population populationLong
➤ Feedback 3.1 Indicate whether each of the following identifiers conforms to the rules of C# and to the naming conventions. If the identifier is invalid, give the reason. Remember, the answers to Feedback questions are found in Appendix A.
1. omitted 2. #SoldInteger 3. Number Sold Integer 4. Number.Sold.Integer 5. amount$Decimal 6. class
7. subString 8. Text 9. maximum 10. minimumRate 11. maximumCheckDecimal 12. companyNameString
Constants: Named and Intrinsic
Constants provide a way to use words to describe a value that doesn’t change. In Chapter 2 you used the Visual Studio constants Color.Blue, Color.Red, Color.Yellow, and so on. Those constants are built into the environment and called intrinsic constants ; you don’t need to define them anywhere. The con-stants that you define for yourself are called named constants .
Named Constants You declare named constants using the keyword const . You give the constant a name, a data type, and a value. Once a value is declared as a constant, its value cannot be changed during the execution of the project. The data type that you declare and the data type of the value must match. For example, if you declare an integer constant, you must give it an integer value. You will find two important advantages to using named constants rather than the actual values in code. The code is easier to read; for example, seeing the identifier MAXIMUM_PAY_Decimal is more meaningful than seeing a
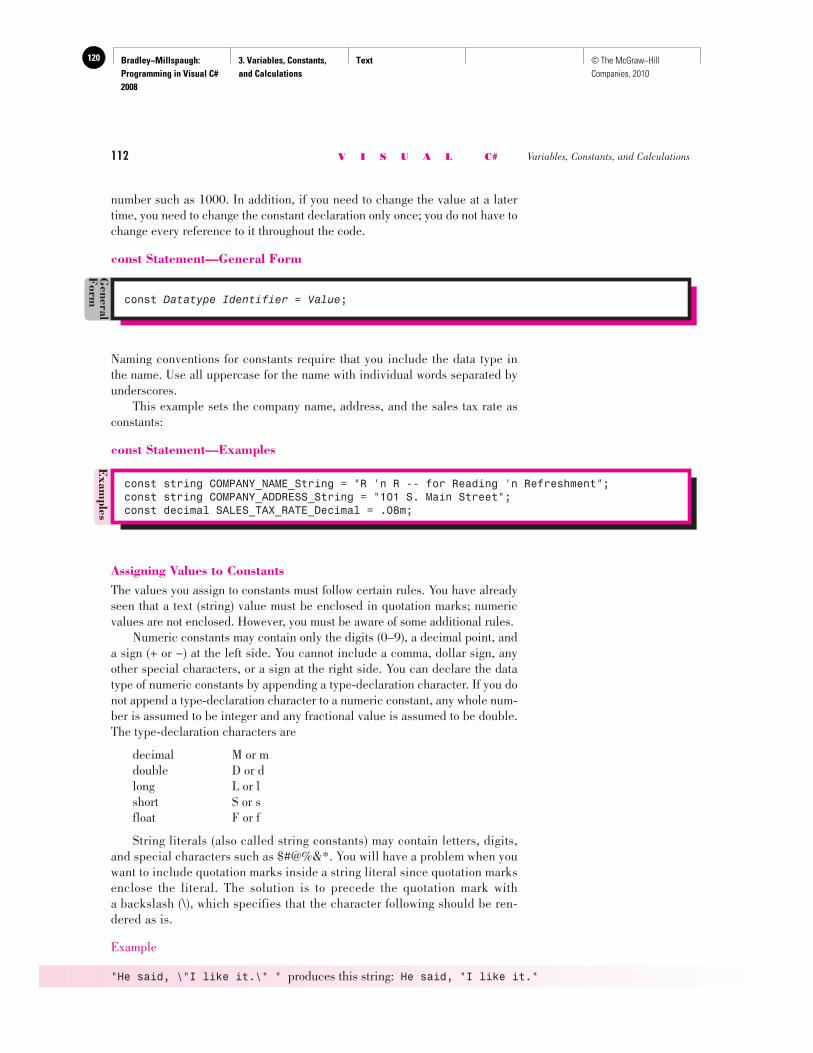
Bradley−Millspaugh: Programming in Visual C# 2008
3. Variables, Constants, and Calculations
Text120 © The McGraw−Hill Companies, 2010
112 V I S U A L C# Variables, Constants, and Calculations
number such as 1000. In addition, if you need to change the value at a later time, you need to change the constant declaration only once; you do not have to change every reference to it throughout the code.
const Statement—General Form
const Datatype Identifier = Value ;
General
Form
Naming conventions for constants require that you include the data type in the name. Use all uppercase for the name with individual words separated by underscores. This example sets the company name, address, and the sales tax rate as constants:
const Statement—Examples
Exam
ples
const string COMPANY_NAME_String = "R 'n R -- for Reading 'n Refreshment";const string COMPANY_ADDRESS_String = "101 S. Main Street";const decimal SALES_TAX_RATE_Decimal = .08m;
Assigning Values to Constants The values you assign to constants must follow certain rules. You have already seen that a text (string) value must be enclosed in quotation marks; numeric values are not enclosed. However, you must be aware of some additional rules. Numeric constants may contain only the digits (0–9), a decimal point, and a sign (+ or −) at the left side. You cannot include a comma, dollar sign, any other special characters, or a sign at the right side. You can declare the data type of numeric constants by appending a type-declaration character. If you do not append a type-declaration character to a numeric constant, any whole num-ber is assumed to be integer and any fractional value is assumed to be double. The type-declaration characters are
decimal M or m double D or d long L or l short S or s float F or f
String literals (also called string constants) may contain letters, digits, and special characters such as $#@%&*. You will have a problem when you want to include quotation marks inside a string literal since quotation marks enclose the literal. The solution is to precede the quotation mark with a backslash (\), which specifies that the character following should be ren-dered as is.
Example
"He said, \"I like it.\" " produces this string: He said, "I like it."
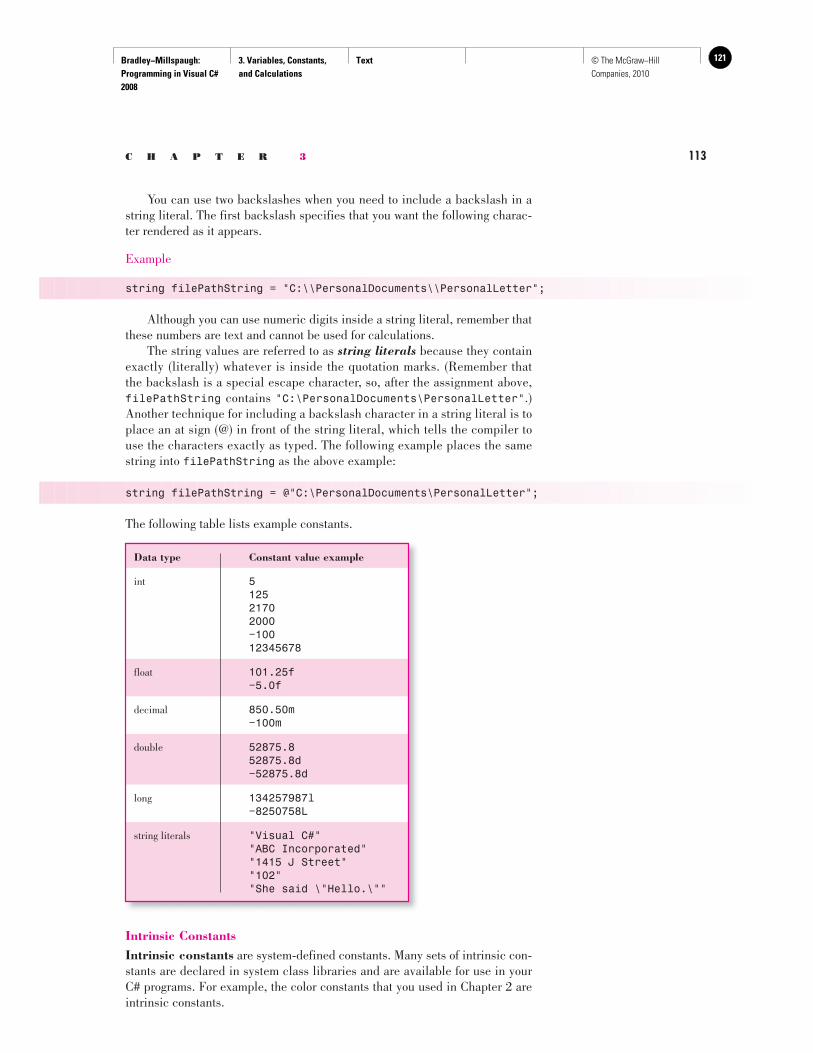
Bradley−Millspaugh: Programming in Visual C# 2008
3. Variables, Constants, and Calculations
Text 121© The McGraw−Hill Companies, 2010
C H A P T E R 3 113
You can use two backslashes when you need to include a backslash in a string literal. The first backslash specifies that you want the following charac-ter rendered as it appears.
Example
string filePathString = "C:\\PersonalDocuments\\PersonalLetter";
Although you can use numeric digits inside a string literal, remember that these numbers are text and cannot be used for calculations. The string values are referred to as string literals because they contain exactly (literally) whatever is inside the quotation marks. (Remember that the backslash is a special escape character, so, after the assignment above, filePathString contains " C:\PersonalDocuments\PersonalLetter ".) Another technique for including a backslash character in a string literal is to place an at sign (@) in front of the string literal, which tells the compiler to use the characters exactly as typed. The following example places the same string into filePathString as the above example:
string filePathString = @ " C:\PersonalDocuments\PersonalLetter " ;
The following table lists example constants.
Intrinsic Constants Intrinsic constants are system-defined constants. Many sets of intrinsic con-stants are declared in system class libraries and are available for use in your C# programs. For example, the color constants that you used in Chapter 2 are intrinsic constants.
Data type Constant value example
int 5 125 2170 2000 − 100 12345678
float 101.25f − 5.0f
decimal 850.50m − 100m
double 52875.8 52875.8d − 52875.8d
long 134257987l − 8250758L
string literals " Visual C# " " ABC Incorporated" "1415 J Street" "102" "She said \"Hello.\""
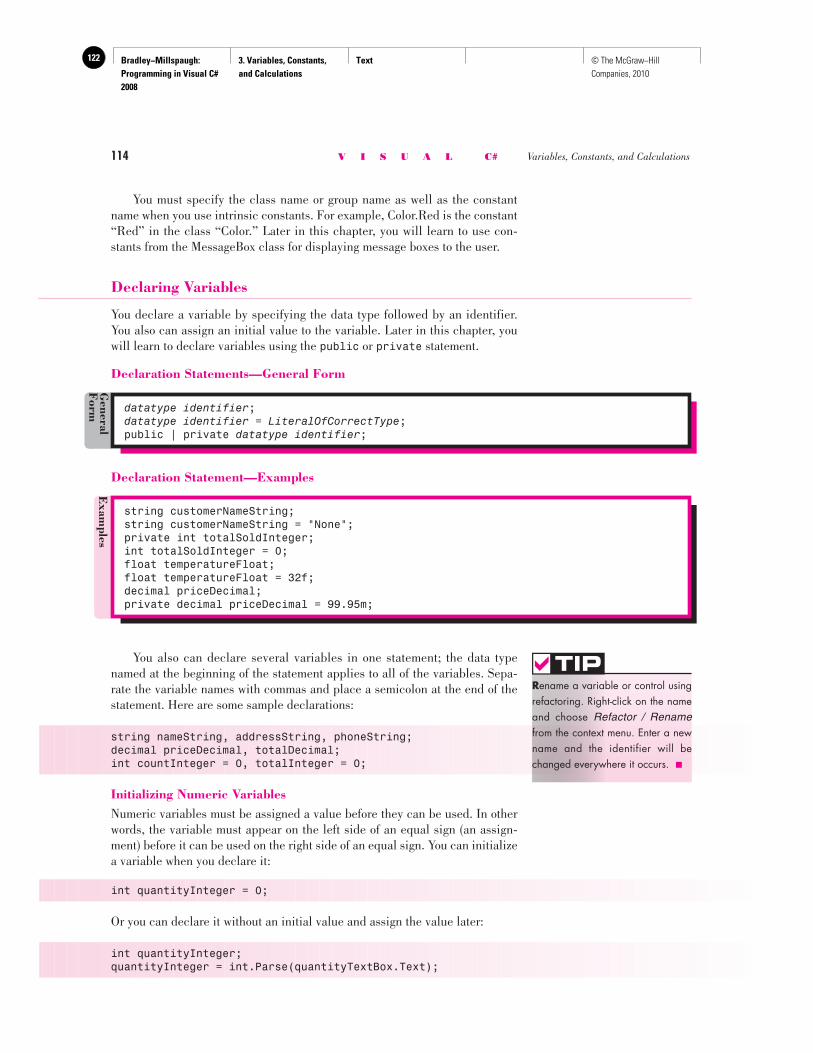
Bradley−Millspaugh: Programming in Visual C# 2008
3. Variables, Constants, and Calculations
Text122 © The McGraw−Hill Companies, 2010
114 V I S U A L C# Variables, Constants, and Calculations
You must specify the class name or group name as well as the constant name when you use intrinsic constants. For example, Color.Red is the constant “Red” in the class “Color.” Later in this chapter, you will learn to use con-stants from the MessageBox class for displaying message boxes to the user.
Declaring Variables
You declare a variable by specifying the data type followed by an identifier. You also can assign an initial value to the variable. Later in this chapter, you will learn to declare variables using the public or private statement.
Declaration Statements—General Form
datatype identifier ;datatype identifier = LiteralOfCorrectType;public | private datatype identifier ;
General
Form
Declaration Statement—Examples
You also can declare several variables in one statement; the data type named at the beginning of the statement applies to all of the variables. Sepa-rate the variable names with commas and place a semicolon at the end of the statement. Here are some sample declarations:
string nameString, addressString, phoneString; decimal priceDecimal, totalDecimal; int countInteger = 0, totalInteger = 0;
Initializing Numeric Variables Numeric variables must be assigned a value before they can be used. In other words, the variable must appear on the left side of an equal sign (an assign-ment) before it can be used on the right side of an equal sign. You can initialize a variable when you declare it:
int quantityInteger = 0;
Or you can declare it without an initial value and assign the value later:
int quantityInteger; quantityInteger = int.Parse(quantityTextBox.Text);
Rename a variable or control using refactoring. Right-click on the name and choose Refactor / Rename from the context menu. Enter a new name and the identifier will be changed everywhere it occurs. ■
TIP
Exam
ples
string customerNameString;string customerNameString = "None";private int totalSoldInteger;int totalSoldInteger = 0;float temperatureFloat;float temperatureFloat = 32f;decimal priceDecimal;private decimal priceDecimal = 99.95m;
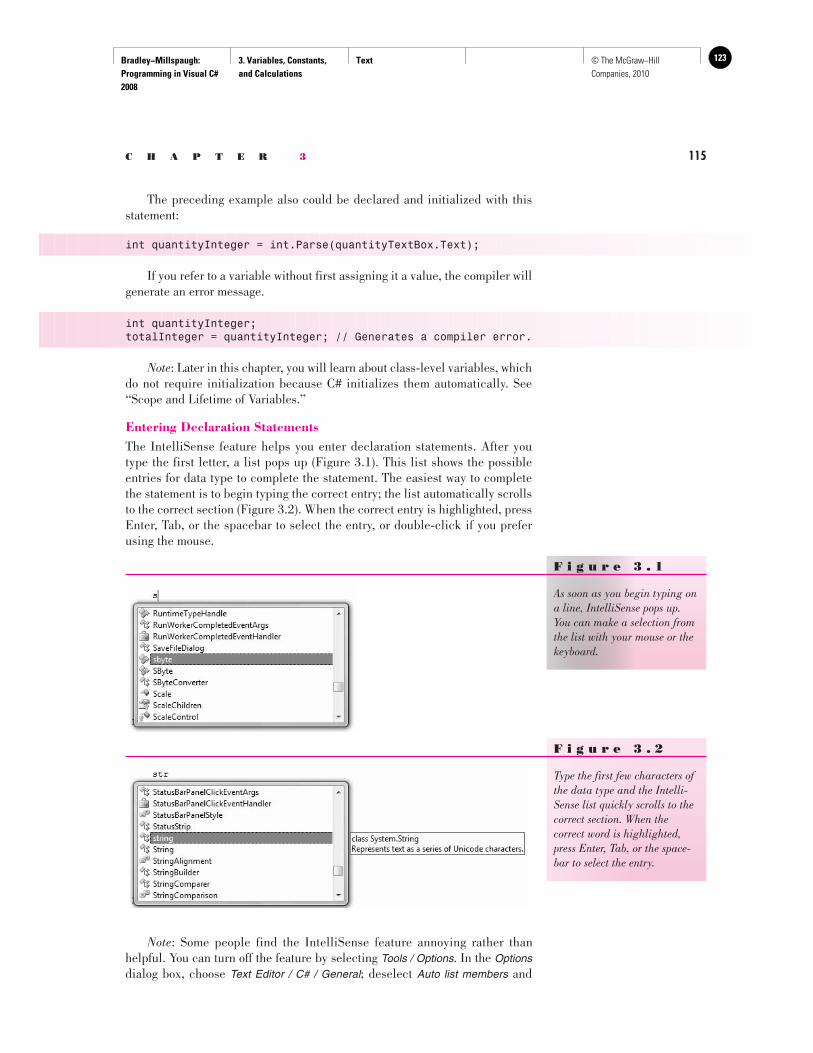
Bradley−Millspaugh: Programming in Visual C# 2008
3. Variables, Constants, and Calculations
Text 123© The McGraw−Hill Companies, 2010
C H A P T E R 3 115
The preceding example also could be declared and initialized with this statement:
int quantityInteger = int.Parse(quantityTextBox.Text);
If you refer to a variable without first assigning it a value, the compiler will generate an error message.
int quantityInteger;totalInteger = quantityInteger; // Generates a compiler error.
Note : Later in this chapter, you will learn about class-level variables, which do not require initialization because C# initializes them automatically. See “Scope and Lifetime of Variables.”
Entering Declaration Statements The IntelliSense feature helps you enter declaration statements. After you type the first letter, a list pops up ( Figure 3.1 ). This list shows the possible entries for data type to complete the statement. The easiest way to complete the statement is to begin typing the correct entry; the list automatically scrolls to the correct section ( Figure 3.2 ). When the correct entry is highlighted, press Enter, Tab, or the spacebar to select the entry, or double-click if you prefer using the mouse.
F i g u r e 3 . 1
As soon as you begin typing on a line, IntelliSense pops up. You can make a selection from the list with your mouse or the keyboard.
F i g u r e 3 . 2
Type the first few characters of the data type and the Intelli-Sense list quickly scrolls to the correct section. When the correct word is highlighted, press Enter, Tab, or the space-bar to select the entry.
Note : Some people find the IntelliSense feature annoying rather than helpful. You can turn off the feature by selecting Tools / Options . In the Options dialog box, choose Text Editor / C# / General ; deselect Auto list members and
Bradley−Millspaugh: Programming in Visual C# 2008
3. Variables, Constants, and Calculations
Text124 © The McGraw−Hill Companies, 2010
116 V I S U A L C# Variables, Constants, and Calculations
Parameter information . If you are using the C# Express Edition, you must select Show all settings in the Options dialog box to make the selections.
➤ Feedback 3.2 Write a declaration for the following situations; make up appropriate variable identifiers.
1. You need variables for payroll processing to store the following: ( a) Number of hours, which can hold a decimal value. (b) Employee’s name. (c) Department number (not used in calculations).
2. You need variables for inventory control to store the following: (a) Integer quantity. (b) Description of the item. (c) Part number. (d) Cost. (e) Selling price.
Scope and Lifetime of Variables
A variable may exist and be visible for all classes in a project, a single class, a single form (which is a class), a single method in a class, or inside a single block in a method. The visibility of a variable is referred to as its scope . Visibility really means “this variable can be used or ‘seen’ in this location.” The scope is said to be namespace, class level, local, or block. A namespace variable may be used in all methods of the namespace, which is generally the entire project. Class-level variables are accessible in all methods of a form or other class. A local variable may be used only within the method in which it is declared, and a block variable is used only within a block of code inside a method. A block is defined as the code enclosed in curly braces. You declare the scope of a variable by choosing where to declare it. Note : Some programming languages and some programmers refer to namespace variables as global variables .
Variable Lifetime When you create a variable, you must be aware of its lifetime . The lifetime of a variable is the period of time that the variable exists. The lifetime of a local or block variable is normally one execution of a method. For example, each time you execute a method, the local declarations are executed. Each variable is created as a “fresh” new one, with the initial value that you assign for it. When the method finishes, its variables disappear; that is, their memory loca-tions are released. The lifetime of a class-level variable is the entire time the class is loaded, generally the lifetime of the entire project. If you want to maintain the value of a variable for multiple executions of a method, for example, to calculate a
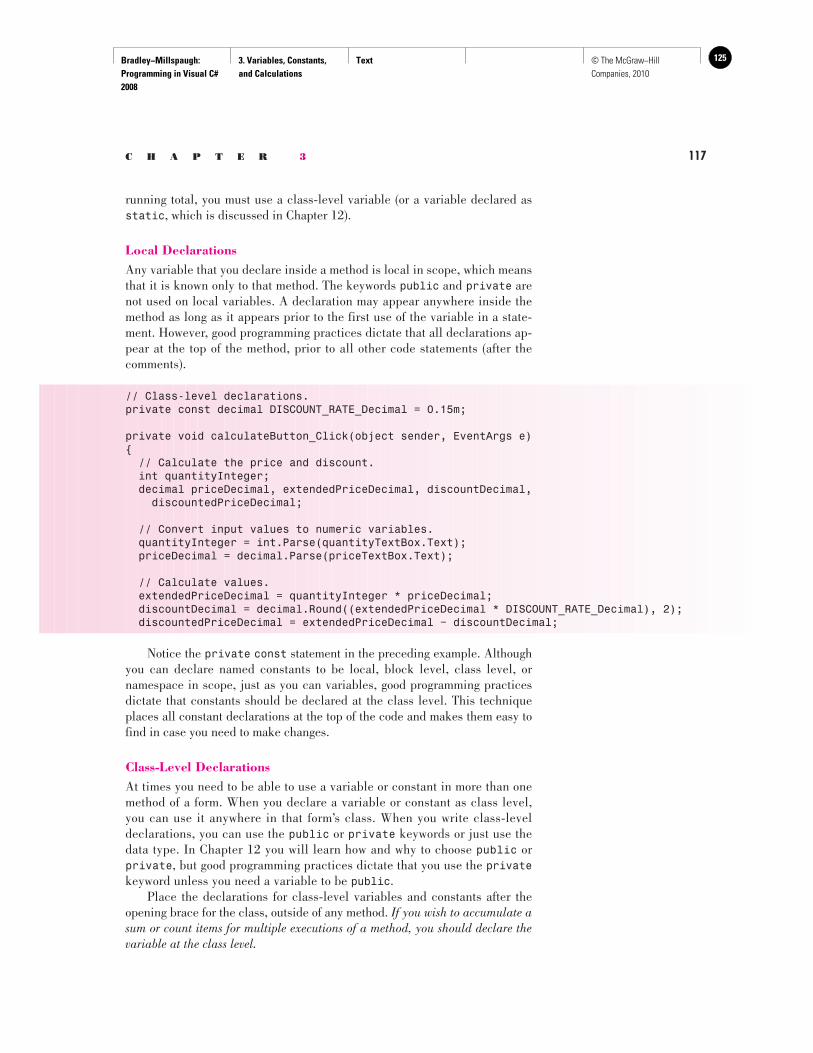
Bradley−Millspaugh: Programming in Visual C# 2008
3. Variables, Constants, and Calculations
Text 125© The McGraw−Hill Companies, 2010
C H A P T E R 3 117
running total, you must use a class-level variable (or a variable declared as static , which is discussed in Chapter 12).
Local Declarations Any variable that you declare inside a method is local in scope, which means that it is known only to that method. The keywords public and private are not used on local variables. A declaration may appear anywhere inside the method as long as it appears prior to the first use of the variable in a state-ment. However, good programming practices dictate that all declarations ap-pear at the top of the method, prior to all other code statements (after the comments).
// Class-level declarations.private const decimal DISCOUNT_RATE_Decimal = 0.15m;
private void calculateButton_Click(object sender, EventArgs e){ // Calculate the price and discount. int quantityInteger; decimal priceDecimal, extendedPriceDecimal, discountDecimal, discountedPriceDecimal;
// Convert input values to numeric variables. quantityInteger = int.Parse(quantityTextBox.Text); priceDecimal = decimal.Parse(priceTextBox.Text);
// Calculate values. extendedPriceDecimal = quantityInteger * priceDecimal; discountDecimal = decimal.Round((extendedPriceDecimal * DISCOUNT_RATE_Decimal), 2); discountedPriceDecimal = extendedPriceDecimal − discountDecimal;
Notice the private const statement in the preceding example. Although you can declare named constants to be local, block level, class level, or namespace in scope, just as you can variables, good programming practices dictate that constants should be declared at the class level. This technique places all constant declarations at the top of the code and makes them easy to find in case you need to make changes.
Class-Level Declarations At times you need to be able to use a variable or constant in more than one method of a form. When you declare a variable or constant as class level, you can use it anywhere in that form’s class. When you write class-level declarations, you can use the public or private keywords or just use the data type. In Chapter 12 you will learn how and why to choose public or private , but good programming practices dictate that you use the private keyword unless you need a variable to be public. Place the declarations for class-level variables and constants after the opening brace for the class, outside of any method. If you wish to accumulate a sum or count items for multiple executions of a method, you should declare the variable at the class level.
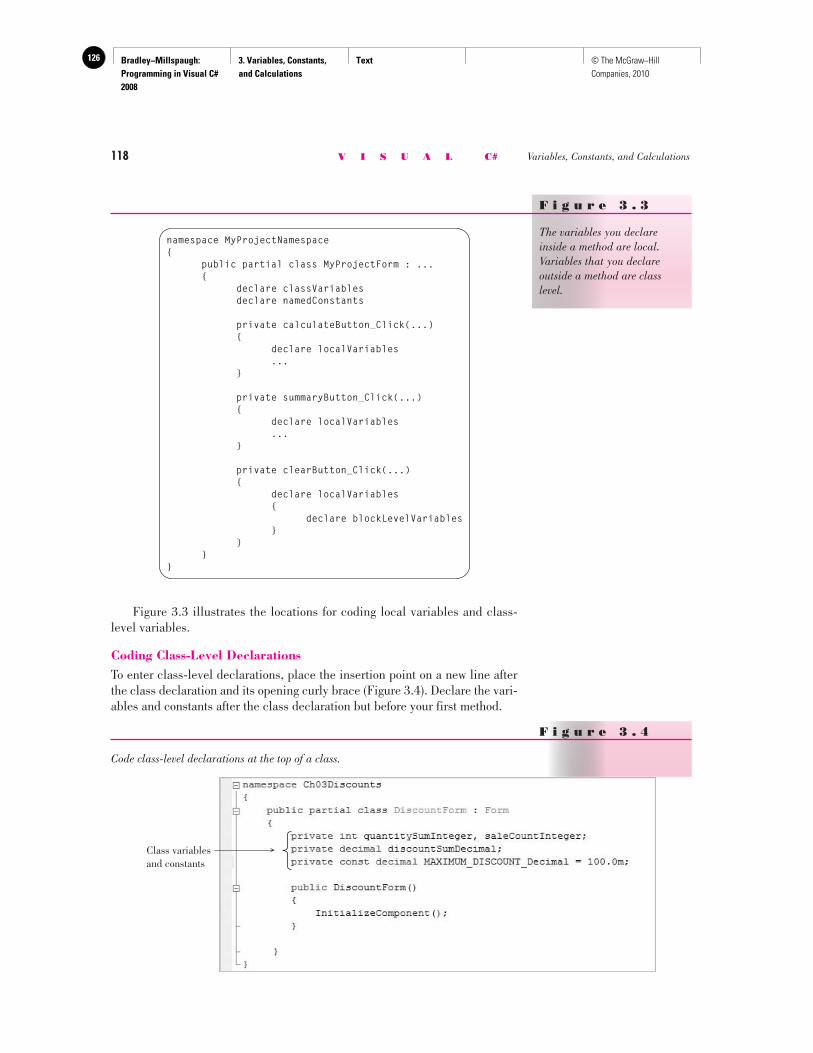
Bradley−Millspaugh: Programming in Visual C# 2008
3. Variables, Constants, and Calculations
Text126 © The McGraw−Hill Companies, 2010
118 V I S U A L C# Variables, Constants, and Calculations
Figure 3.3 illustrates the locations for coding local variables and class-level variables.
Coding Class-Level Declarations To enter class-level declarations, place the insertion point on a new line after the class declaration and its opening curly brace ( Figure 3.4 ). Declare the vari-ables and constants after the class declaration but before your first method.
F i g u r e 3 . 3
The variables you declare inside a method are local. Variables that you declare outside a method are class level.
namespace MyProjectNamespace{ public partial class MyProjectForm : ... { declare classVariables declare namedConstants
private calculateButton_Click(...) { declare localVariables ... }
private summaryButton_Click(...) { declare localVariables ... }
private clearButton_Click(...) { declare localVariables { declare blockLevelVariables } } }}
F i g u r e 3 . 4
Code class-level declarations at the top of a class.
Class variablesand constants
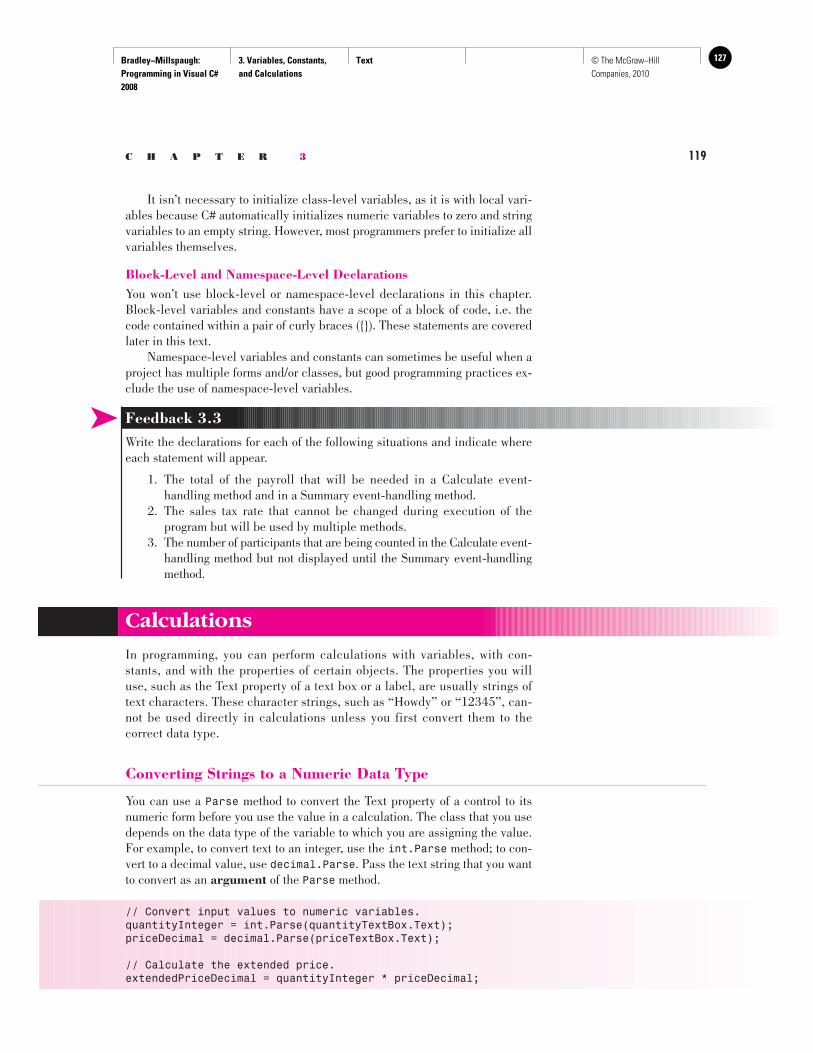
Bradley−Millspaugh: Programming in Visual C# 2008
3. Variables, Constants, and Calculations
Text 127© The McGraw−Hill Companies, 2010
C H A P T E R 3 119
It isn’t necessary to initialize class-level variables, as it is with local vari-ables because C# automatically initializes numeric variables to zero and string variables to an empty string. However, most programmers prefer to initialize all variables themselves.
Block-Level and Namespace-Level Declarations You won’t use block-level or namespace-level declarations in this chapter. Block-level variables and constants have a scope of a block of code, i.e. the code contained within a pair of curly braces ({}). These statements are covered later in this text. Namespace-level variables and constants can sometimes be useful when a project has multiple forms and/or classes, but good programming practices ex-clude the use of namespace-level variables.
➤ Feedback 3.3 Write the declarations for each of the following situations and indicate where each statement will appear.
1. The total of the payroll that will be needed in a Calculate event- handling method and in a Summary event-handling method.
2. The sales tax rate that cannot be changed during execution of the program but will be used by multiple methods.
3. The number of participants that are being counted in the Calculate event-handling method but not displayed until the Summary event-handling method.
Calculations
In programming, you can perform calculations with variables, with con-stants, and with the properties of certain objects. The properties you will use, such as the Text property of a text box or a label, are usually strings of text characters. These character strings, such as “Howdy” or “12345”, can-not be used directly in calculations unless you first convert them to the correct data type.
Converting Strings to a Numeric Data Type
You can use a Parse method to convert the Text property of a control to its numeric form before you use the value in a calculation. The class that you use depends on the data type of the variable to which you are assigning the value. For example, to convert text to an integer, use the int.Parse method; to con-vert to a decimal value, use decimal.Parse . Pass the text string that you want to convert as an argument of the Parse method.
// Convert input values to numeric variables.quantityInteger = int.Parse(quantityTextBox.Text);priceDecimal = decimal.Parse(priceTextBox.Text);
// Calculate the extended price.extendedPriceDecimal = quantityInteger * priceDecimal;
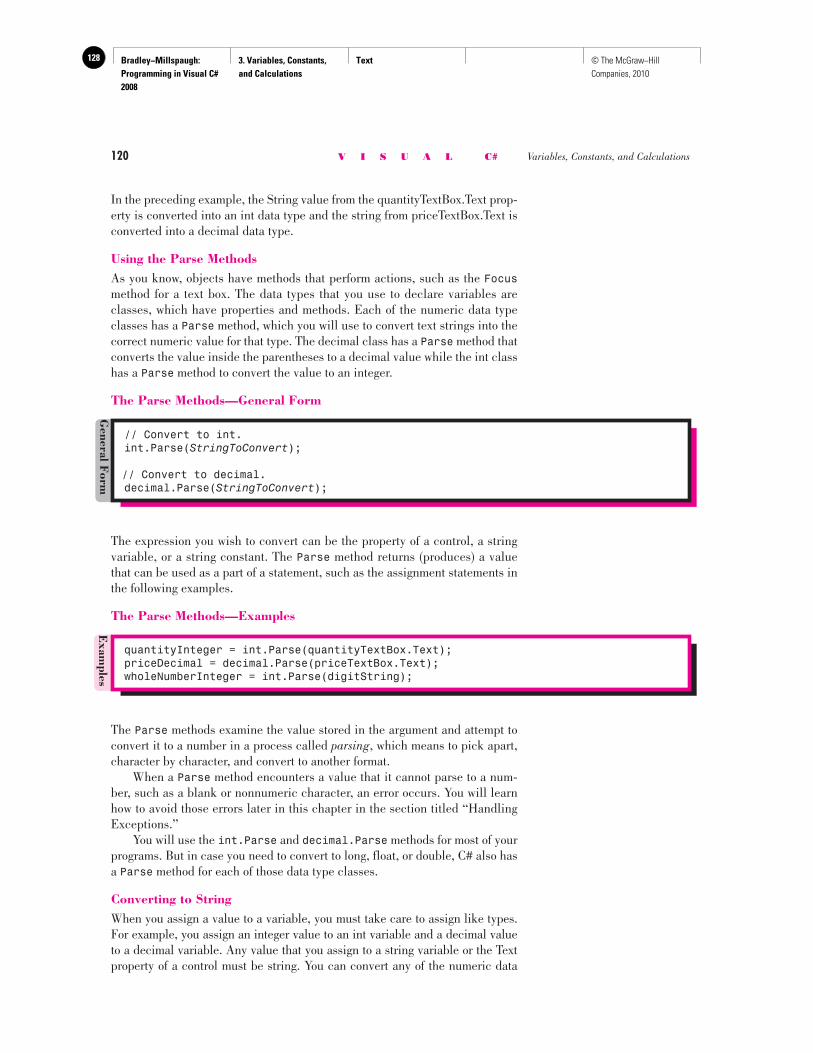
Bradley−Millspaugh: Programming in Visual C# 2008
3. Variables, Constants, and Calculations
Text128 © The McGraw−Hill Companies, 2010
120 V I S U A L C# Variables, Constants, and Calculations
In the preceding example, the String value from the quantityTextBox.Text prop-erty is converted into an int data type and the string from priceTextBox.Text is converted into a decimal data type.
Using the Parse Methods As you know, objects have methods that perform actions, such as the Focus method for a text box. The data types that you use to declare variables are classes, which have properties and methods. Each of the numeric data type classes has a Parse method, which you will use to convert text strings into the correct numeric value for that type. The decimal class has a Parse method that converts the value inside the parentheses to a decimal value while the int class has a Parse method to convert the value to an integer.
The Parse Methods—General Form
The expression you wish to convert can be the property of a control, a string variable, or a string constant. The Parse method returns (produces) a value that can be used as a part of a statement, such as the assignment statements in the following examples.
The Parse Methods—Examples
The Parse methods examine the value stored in the argument and attempt to convert it to a number in a process called parsing, which means to pick apart, character by character, and convert to another format. When a Parse method encounters a value that it cannot parse to a num-ber, such as a blank or nonnumeric character, an error occurs. You will learn how to avoid those errors later in this chapter in the section titled “Handling Exceptions.” You will use the int.Parse and decimal.Parse methods for most of your programs. But in case you need to convert to long, float, or double, C# also has a Parse method for each of those data type classes.
Converting to String When you assign a value to a variable, you must take care to assign like types. For example, you assign an integer value to an int variable and a decimal value to a decimal variable. Any value that you assign to a string variable or the Text property of a control must be string. You can convert any of the numeric data
// Convert to int.int.Parse( StringToConvert );
// Convert to decimal.decimal.Parse( StringToConvert ) ;
General F
orm
Exam
ples
quantityInteger = int.Parse(quantityTextBox.Text);priceDecimal = decimal.Parse(priceTextBox.Text);wholeNumberInteger = int.Parse(digitString);
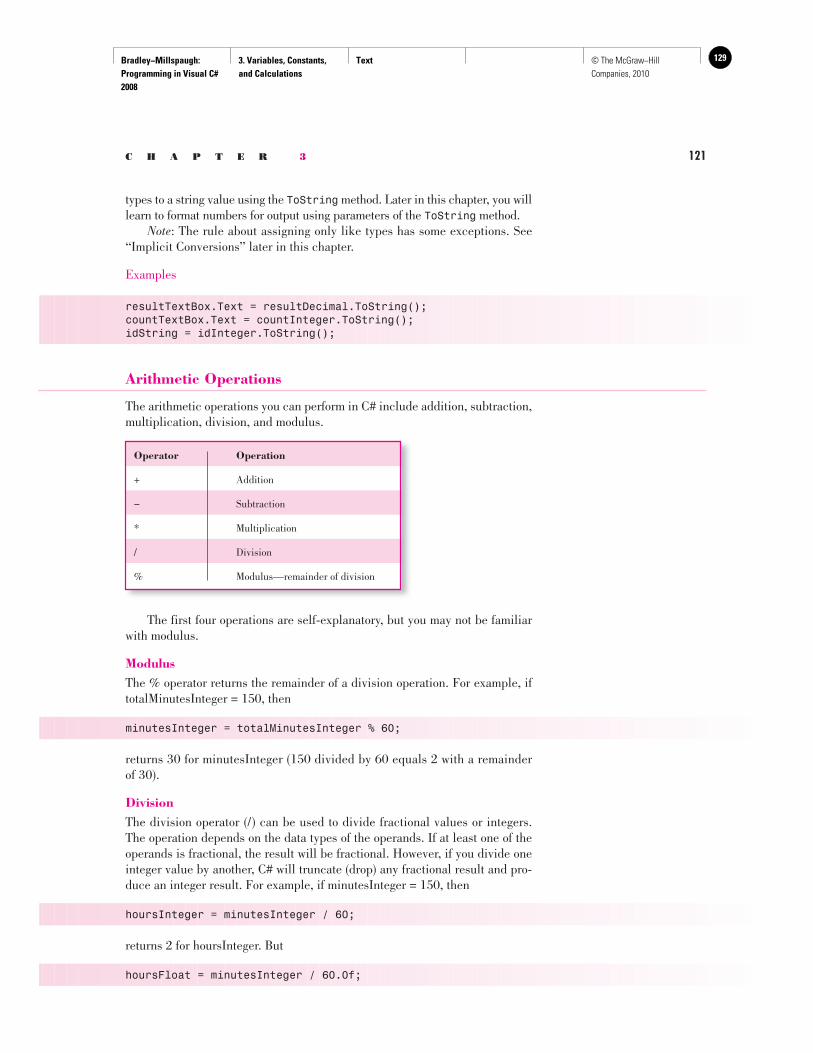
Bradley−Millspaugh: Programming in Visual C# 2008
3. Variables, Constants, and Calculations
Text 129© The McGraw−Hill Companies, 2010
C H A P T E R 3 121
types to a string value using the ToString method. Later in this chapter, you will learn to format numbers for output using parameters of the ToString method. Note : The rule about assigning only like types has some exceptions. See “Implicit Conversions” later in this chapter.
Examples
resultTextBox.Text = resultDecimal.ToString();countTextBox.Text = countInteger.ToString();idString = idInteger.ToString();
Operator Operation
+ Addition
− Subtraction
* Multiplication
/ Division
% Modulus—remainder of division
Arithmetic Operations
The arithmetic operations you can perform in C# include addition, subtraction, multiplication, division, and modulus.
The first four operations are self-explanatory, but you may not be familiar with modulus.
Modulus The % operator returns the remainder of a division operation. For example, if totalMinutesInteger = 150, then
minutesInteger = totalMinutesInteger % 60;
returns 30 for minutesInteger (150 divided by 60 equals 2 with a remainder of 30).
Division The division operator (/) can be used to divide fractional values or integers. The operation depends on the data types of the operands. If at least one of the operands is fractional, the result will be fractional. However, if you divide one integer value by another, C# will truncate (drop) any fractional result and pro-duce an integer result. For example, if minutesInteger = 150, then
hoursInteger = minutesInteger / 60;
returns 2 for hoursInteger. But
hoursFloat = minutesInteger / 60.0f;
Bradley−Millspaugh: Programming in Visual C# 2008
3. Variables, Constants, and Calculations
Text130 © The McGraw−Hill Companies, 2010
122 V I S U A L C# Variables, Constants, and Calculations
returns 2.5 for hoursFloat. Note that if you omit the “f” on the divisor, C# performs integer division and returns 2.0 for hoursFloat.
Exponentiation C# does not have an operator for exponentiation; instead, it uses the Pow method of the Math class. You can refer to Appendix B for the Math methods. Additionally, Chapter 5 has an example that uses the Pow method in the sec-tion titled “Writing a Method with Multiple Arguments.”
Order of Operations
The order in which operations are performed determines the result. Consider the expression 3 + 4 * 2. What is the result? If the addition is done first, the result is 14. However, if the multiplication is done first, the result is 11. The hierarchy of operations, or order of precedence , in arithmetic expressions from highest to lowest is
1. Any operation inside parentheses. 2. Multiplication and division. 3. Modulus. 4. Addition and subtraction
In the previous example, the multiplication is performed before the addi-tion, yielding a result of 11. To change the order of evaluation, use parentheses. The expression
(3 + 4) * 2
will yield 14 as the result. One set of parentheses may be used inside another set. In that case, the parentheses are said to be nested . The following is an example of nested parentheses:
((score1Integer + score2Integer + score3Integer) / 3.0f) * 1.2f
Extra parentheses can always be used for clarity. The expressions
2 * costDecimal * rateDecimal and (2 * costDecimal) * rateDecimal
are equivalent, but the second is easier to understand. Multiple operations at the same level (such as multiplication and division) are performed from left to right. The example 8 / 4 * 2 yields 4 as its result, not 1. The first operation is 8 / 4, and 2 * 2 is the second. Evaluation of an expression occurs in this order:
1. All operations within parentheses. Multiple operations within the parentheses are performed according to the rules of precedence.
2. All multiplication and division. Multiple operations are performed from left to right.
3. Modulus operations. Multiple operations are performed from left to right. 4. All addition and subtraction are performed from left to right.
Although the precedence of operations in C# is the same as in algebra, take note of one important difference: There are no implied operations in C#.
U se extra parentheses to make the precedence clearer. The operation will be easier to understand and the parentheses have no negative effect on execution. ■
TIP
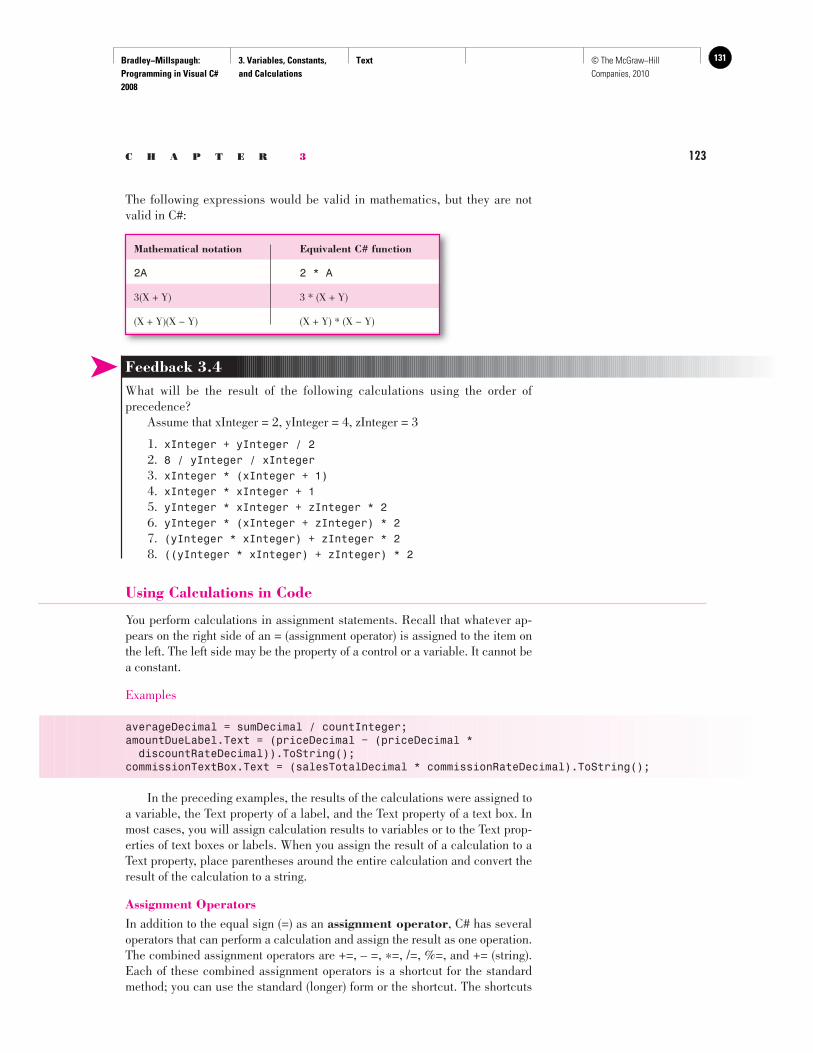
Bradley−Millspaugh: Programming in Visual C# 2008
3. Variables, Constants, and Calculations
Text 131© The McGraw−Hill Companies, 2010
C H A P T E R 3 123
The following expressions would be valid in mathematics, but they are not valid in C#:
Mathematical notation Equivalent C# function
2A 2 * A
3(X + Y) 3 * (X + Y)
(X + Y)(X − Y) (X + Y) * (X − Y)
Using Calculations in Code
You perform calculations in assignment statements. Recall that whatever ap-pears on the right side of an = (assignment operator) is assigned to the item on the left. The left side may be the property of a control or a variable. It cannot be a constant.
Examples
averageDecimal = sumDecimal / countInteger;amountDueLabel.Text = (priceDecimal − (priceDecimal * discountRateDecimal)).ToString(); commissionTextBox.Text = (salesTotalDecimal * commissionRateDecimal).ToString();
In the preceding examples, the results of the calculations were assigned to a variable, the Text property of a label, and the Text property of a text box. In most cases, you will assign calculation results to variables or to the Text prop-erties of text boxes or labels. When you assign the result of a calculation to a Text property, place parentheses around the entire calculation and convert the result of the calculation to a string.
Assignment Operators In addition to the equal sign (=) as an assignment operator , C# has several operators that can perform a calculation and assign the result as one operation. The combined assignment operators are +=, – =, *=, /=, %=, and += (string). Each of these combined assignment operators is a shortcut for the standard method; you can use the standard (longer) form or the shortcut. The shortcuts
➤ Feedback 3.4 What will be the result of the following calculations using the order of precedence? Assume that xInteger = 2, yInteger = 4, zInteger = 3
1. xInteger + yInteger / 2 2. 8 / yInteger / xInteger 3. xInteger * (xInteger + 1) 4. xInteger * xInteger + 1 5. yInteger * xInteger + zInteger * 2 6. yInteger * (xInteger + zInteger) * 2 7. (yInteger * xInteger) + zInteger * 2 8. ((yInteger * xInteger) + zInteger) * 2
Bradley−Millspaugh: Programming in Visual C# 2008
3. Variables, Constants, and Calculations
Text132 © The McGraw−Hill Companies, 2010
124 V I S U A L C# Variables, Constants, and Calculations
allow you to type a variable name only once instead of having to type it on both sides of the equal sign. For example, to add salesDecimal to totalSalesDecimal, the long version is
// Accumulate a total.totalSalesDecimal = totalSalesDecimal + salesDecimal;
Instead you can use the shortcut assignment operator:
// Accumulate a total.totalSalesDecimal += salesDecimal;
The two statements have the same effect. To subtract 1 from a variable, the long version is
// Subtract 1 from a variable.countDownInteger = countDownInteger − 1;
and the shortcut, using the – = operator:
// Subtract 1 from a variable.countDownInteger −= 1;
The assignment operators that you will use most often are += and – =. The following are examples of other assignment operators:
// Multiply resultInteger by 2 and assign the result to resultInteger.resultInteger *= 2;
// Divide sumDecimal by countInteger and assign the result to sumDecimal.sumDecimal /= countInteger;
// Concatenate smallString to the end of bigString.bigString += smallString;// If bigString = "Large" and smallString = "Tiny" then// bigString will equal "LargeTiny" after the assignment.
Increment and Decrement Operators C# also has operators that allow you to add 1 or subtract 1 from a number. The increment operator (++) adds 1 to a variable:
countInteger++;
The decrement operator (−−) subtracts 1 from the variable:
countDownInteger−−;
You can place the increment or decrement operator before the variable, called a prefix notation . If you prefix the operator, the order of calculation changes, which can modify the result if there are multiple operations:
resultInteger = 100 − ++countInteger;
means “add 1 to countInteger before subtracting it from 100.”
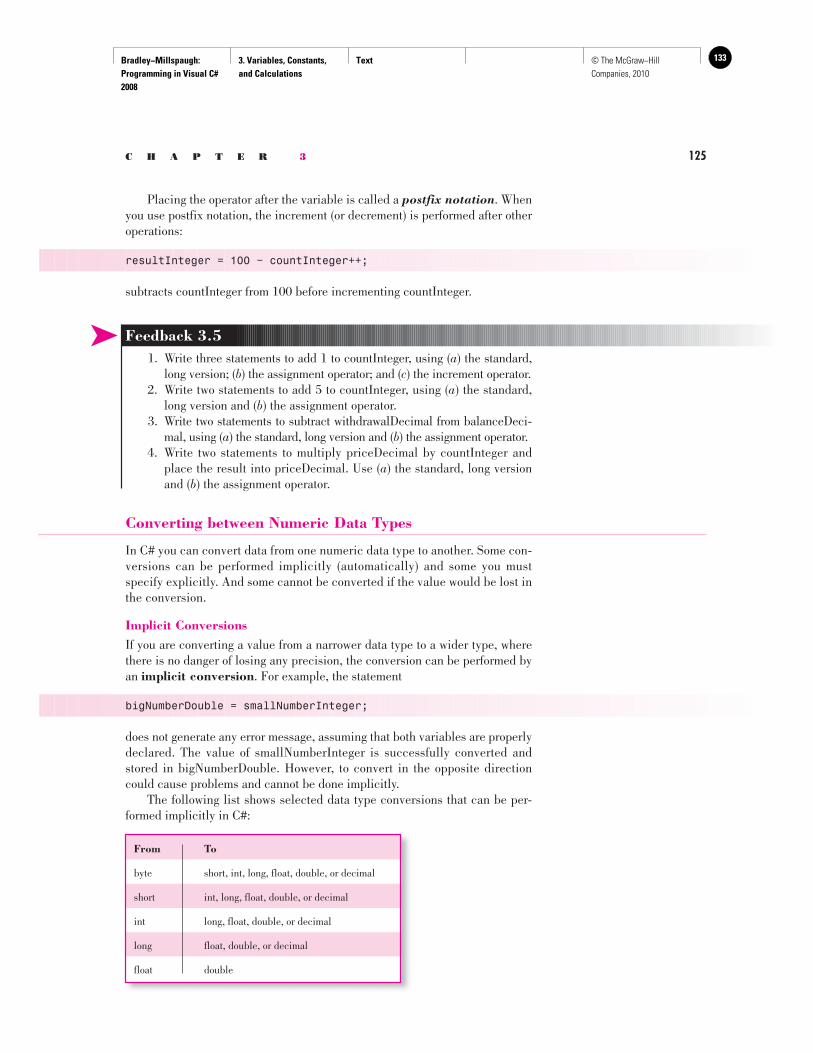
Bradley−Millspaugh: Programming in Visual C# 2008
3. Variables, Constants, and Calculations
Text 133© The McGraw−Hill Companies, 2010
C H A P T E R 3 125
Placing the operator after the variable is called a postfix notation . When you use postfix notation, the increment (or decrement) is performed after other operations:
resultInteger = 100 − countInteger++;
subtracts countInteger from 100 before incrementing countInteger.
➤ Feedback 3.5 1. Write three statements to add 1 to countInteger, using ( a ) the standard,
long version; ( b ) the assignment operator; and ( c ) the increment operator. 2. Write two statements to add 5 to countInteger, using ( a ) the standard,
long version and ( b ) the assignment operator. 3. Write two statements to subtract withdrawalDecimal from balanceDeci-
mal, using ( a ) the standard, long version and ( b ) the assignment operator. 4. Write two statements to multiply priceDecimal by countInteger and
place the result into priceDecimal. Use ( a ) the standard, long version and ( b ) the assignment operator.
Converting between Numeric Data Types
In C# you can convert data from one numeric data type to another. Some con-versions can be performed implicitly (automatically) and some you must specify explicitly. And some cannot be converted if the value would be lost in the conversion.
Implicit Conversions If you are converting a value from a narrower data type to a wider type, where there is no danger of losing any precision, the conversion can be performed by an implicit conversion . For example, the statement
bigNumberDouble = smallNumberInteger;
does not generate any error message, assuming that both variables are properly declared. The value of smallNumberInteger is successfully converted and stored in bigNumberDouble. However, to convert in the opposite direction could cause problems and cannot be done implicitly. The following list shows selected data type conversions that can be per-formed implicitly in C#:
From To
byte short, int, long, float, double, or decimal
short int, long, float, double, or decimal
int long, float, double, or decimal
long float, double, or decimal
float double
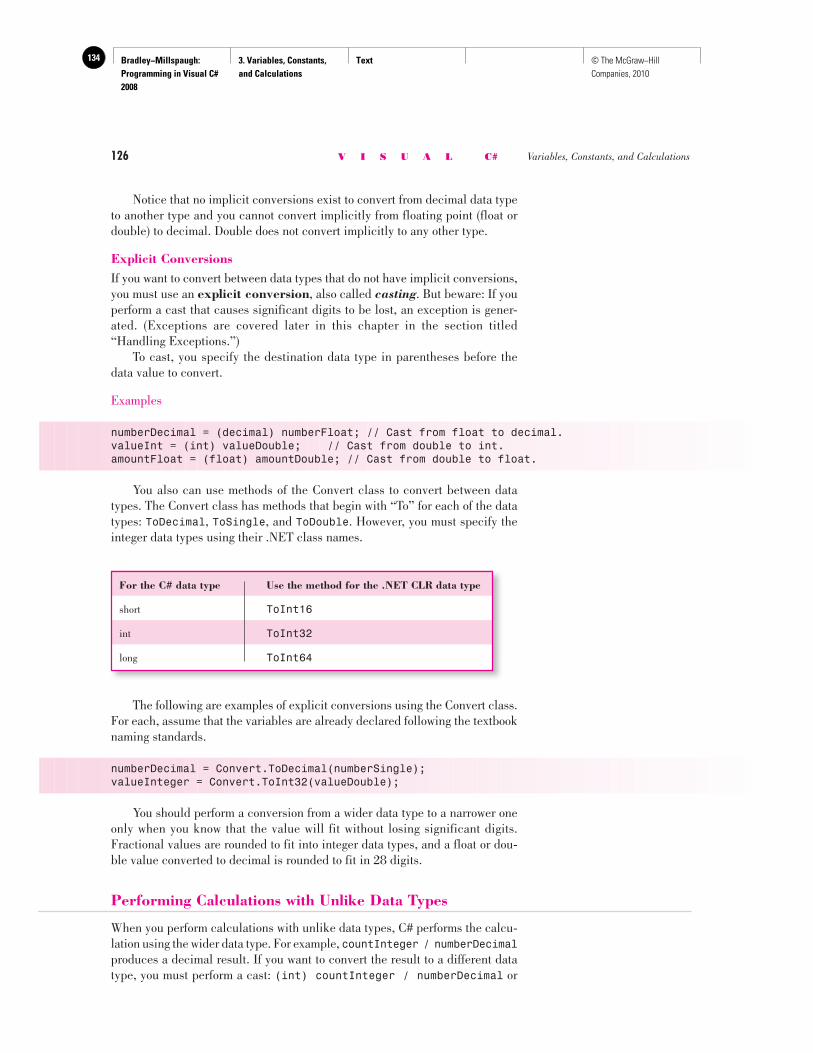
Bradley−Millspaugh: Programming in Visual C# 2008
3. Variables, Constants, and Calculations
Text134 © The McGraw−Hill Companies, 2010
126 V I S U A L C# Variables, Constants, and Calculations
Notice that no implicit conversions exist to convert from decimal data type to another type and you cannot convert implicitly from floating point (float or double) to decimal. Double does not convert implicitly to any other type.
Explicit Conversions If you want to convert between data types that do not have implicit conversions, you must use an explicit conversion , also called casting . But beware: If you perform a cast that causes significant digits to be lost, an exception is gener-ated. (Exceptions are covered later in this chapter in the section titled “Handling Exceptions.”) To cast, you specify the destination data type in parentheses before the data value to convert.
Examples
numberDecimal = (decimal) numberFloat; // Cast from float to decimal.valueInt = (int) valueDouble; // Cast from double to int.amountFloat = (float) amountDouble; // Cast from double to float.
You also can use methods of the Convert class to convert between data types. The Convert class has methods that begin with “To” for each of the data types: ToDecimal , ToSingle , and ToDouble . However, you must specify the integer data types using their .NET class names.
For the C# data type Use the method for the .NET CLR data type
short ToInt16
int ToInt32
long ToInt64
The following are examples of explicit conversions using the Convert class. For each, assume that the variables are already declared following the textbook naming standards.
numberDecimal = Convert.ToDecimal(numberSingle);valueInteger = Convert.ToInt32(valueDouble);
You should perform a conversion from a wider data type to a narrower one only when you know that the value will fit without losing significant digits. Fractional values are rounded to fit into integer data types, and a float or dou-ble value converted to decimal is rounded to fit in 28 digits.
Performing Calculations with Unlike Data Types
When you perform calculations with unlike data types, C# performs the calcu-lation using the wider data type. For example, countInteger / numberDecimal produces a decimal result. If you want to convert the result to a different data type, you must perform a cast: (int) countInteger / numberDecimal or
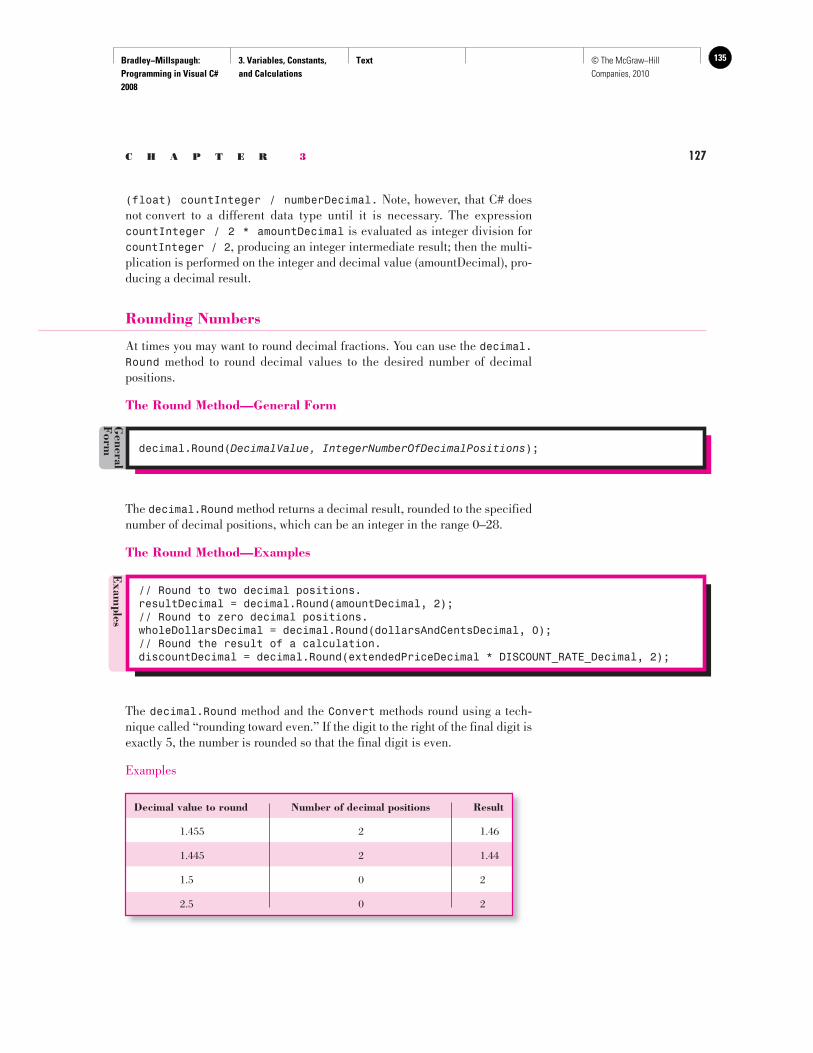
Bradley−Millspaugh: Programming in Visual C# 2008
3. Variables, Constants, and Calculations
Text 135© The McGraw−Hill Companies, 2010
C H A P T E R 3 127
(float) countInteger / numberDecimal . Note, however, that C# does not convert to a different data type until it is necessary. The expression countInteger / 2 * amountDecimal is evaluated as integer division for countInteger / 2 , producing an integer intermediate result; then the multi-plication is performed on the integer and decimal value (amountDecimal), pro-ducing a decimal result.
Rounding Numbers
At times you may want to round decimal fractions. You can use the decimal.Round method to round decimal values to the desired number of decimal positions.
The Round Method—General Form
decimal.Round( DecimalValue, IntegerNumberOfDecimalPositions );
General
Form
The decimal.Round method returns a decimal result, rounded to the specified number of decimal positions, which can be an integer in the range 0–28.
The Round Method—Examples
Exam
ples
// Round to two decimal positions.resultDecimal = decimal.Round(amountDecimal, 2);// Round to zero decimal positions.wholeDollarsDecimal = decimal.Round(dollarsAndCentsDecimal, 0);// Round the result of a calculation.discountDecimal = decimal.Round(extendedPriceDecimal * DISCOUNT_RATE_Decimal, 2);
The decimal.Round method and the Convert methods round using a tech-nique called “rounding toward even.” If the digit to the right of the final digit is exactly 5, the number is rounded so that the final digit is even.
Examples
Decimal value to round Number of decimal positions Result
1.455 2 1.46
1.445 2 1.44
1.5 0 2
2.5 0 2
Bradley−Millspaugh: Programming in Visual C# 2008
3. Variables, Constants, and Calculations
Text136 © The McGraw−Hill Companies, 2010
128 V I S U A L C# Variables, Constants, and Calculations
In addition to the decimal.Round method, you can use the Round method of the Math class to round either decimal or double values. See Appendix B for the methods of the Math class.
Formatting Data for Display
When you want to display numeric data in the Text property of a label or text box, you must first convert the value to string. You also can format the data for display, which controls the way the output looks. For example, 12 is just a num-ber, but $12.00 conveys more meaning for dollar amounts. Using the ToString method and formatting codes, you can choose to display a dollar sign, a percent sign, and commas. You also can specify the number of digits to appear to the right of the decimal point. C# rounds the value to return the requested number of decimal positions. If you use the ToString method with an empty argument, the method returns an unformatted string. This is perfectly acceptable when displaying integer values. For example, the following statement converts numberInteger to a string and displays it in displayTextBox.Text.
displayTextBox.Text = numberInteger.ToString();
Using Format Specifier Codes
You can use the format specifier codes to format the display of output. These predefined codes can format a numeric value to have commas and dollar signs, if you wish. Note : The default format of each of the formatting codes is based on the computer’s regional setting. The formats presented here are for the default English (United States) values.
// Display as currency.extendedPriceTextBox.Text = (quantityInteger * priceDecimal).ToString("C");
The "C" code specifies currency . By default, the string will be formatted with a dollar sign, commas separating each group of three digits, and two digits to the right of the decimal point.
// Display as numeric.discountTextBox.Text = discountDecimal.ToString("N");
The " N " code stands for number . By default, the string will be formatted with commas separating each group of three digits, with two digits to the right of the decimal point. You can specify the number of decimal positions by placing a numeric digit following the code. For example, " C0" displays as currency with zero digits to the right of the decimal point. The value is rounded to the specified number of decimal positions.
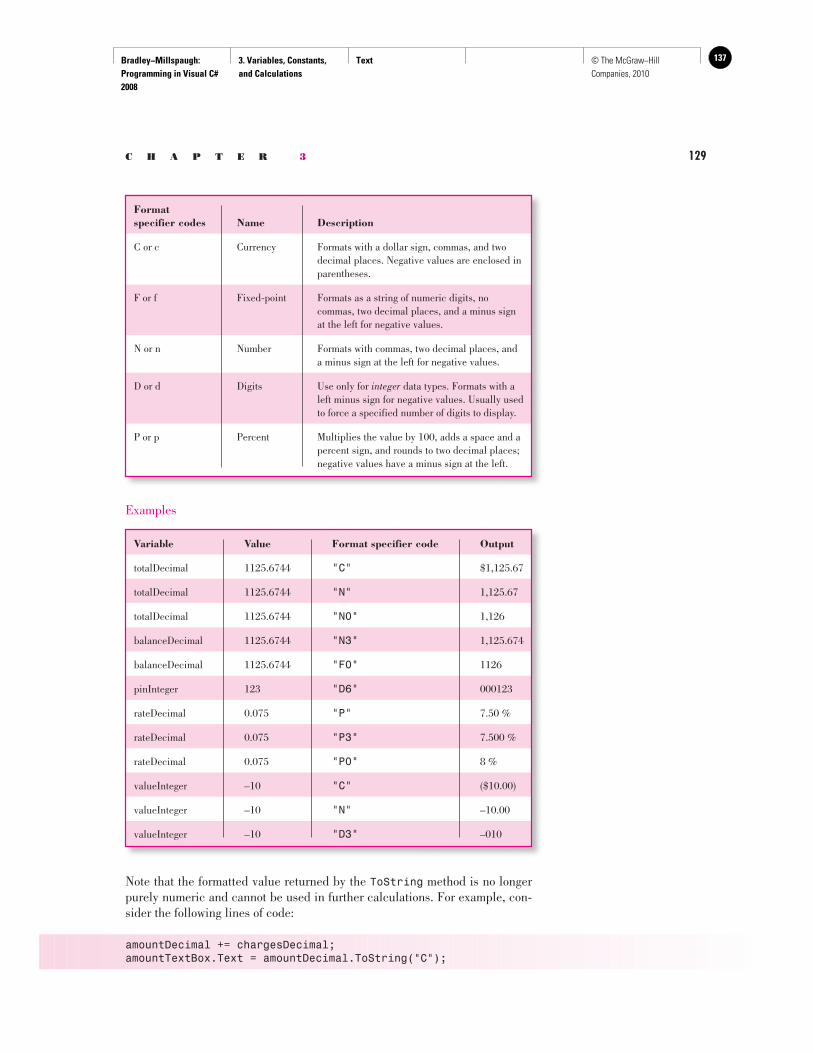
Bradley−Millspaugh: Programming in Visual C# 2008
3. Variables, Constants, and Calculations
Text 137© The McGraw−Hill Companies, 2010
C H A P T E R 3 129
Formatspecifier codes Name Description
C or c Currency Formats with a dollar sign, commas, and two decimal places. Negative values are enclosed in parentheses.
F or f Fixed-point Formats as a string of numeric digits, no commas, two decimal places, and a minus sign at the left for negative values.
N or n Number Formats with commas, two decimal places, and a minus sign at the left for negative values.
D or d Digits Use only for integer data types. Formats with a left minus sign for negative values. Usually used to force a specified number of digits to display.
P or p Percent Multiplies the value by 100, adds a space and a percent sign, and rounds to two decimal places; negative values have a minus sign at the left.
Examples
Note that the formatted value returned by the ToString method is no longer purely numeric and cannot be used in further calculations. For example, con-sider the following lines of code:
amountDecimal += chargesDecimal;amountTextBox.Text = amountDecimal.ToString("C");
Variable Value Format specifier code Output
totalDecimal 1125.6744 " C" $1,125.67
totalDecimal 1125.6744 " N " 1,125.67
totalDecimal 1125.6744 " N0 " 1,126
balanceDecimal 1125.6744 " N3 " 1,125.674
balanceDecimal 1125.6744 " F0 " 1126
pinInteger 123 " D6 " 000123
rateDecimal 0.075 " P " 7.50 %
rateDecimal 0.075 " P3 " 7.500 %
rateDecimal 0.075 " P0 " 8 %
valueInteger –10 " C " ($10.00)
valueInteger –10 " N " –10.00
valueInteger –10 " D3 " –010
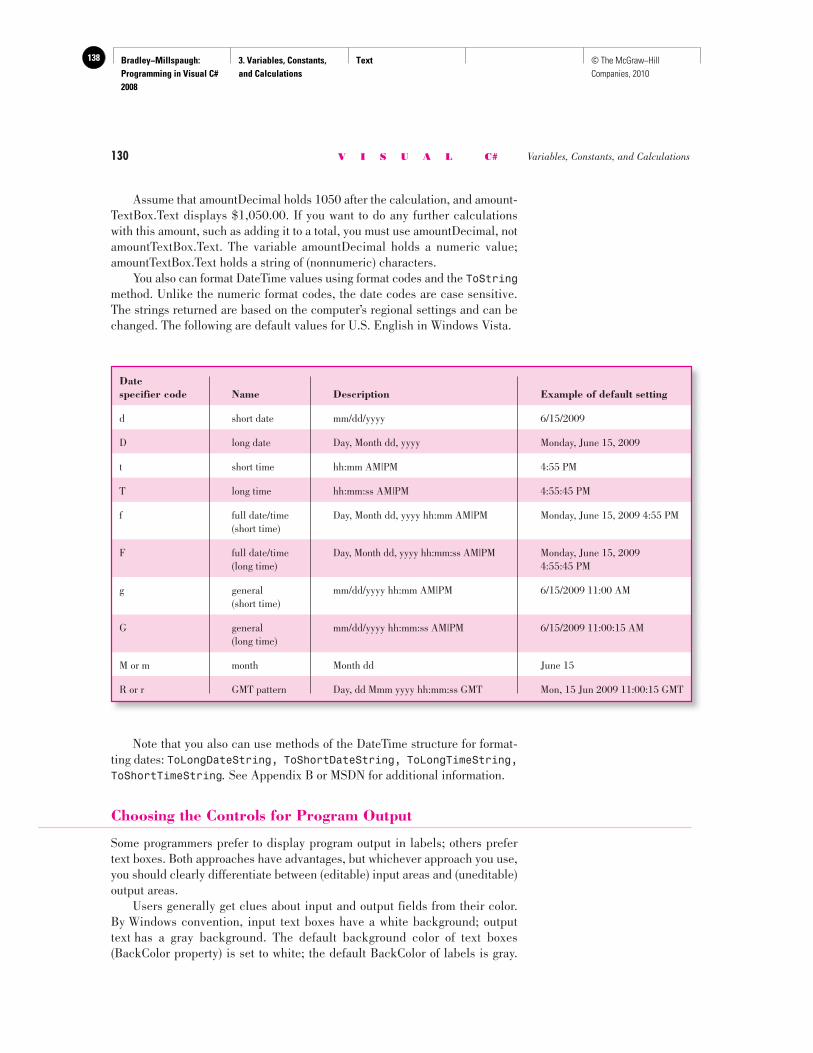
Bradley−Millspaugh: Programming in Visual C# 2008
3. Variables, Constants, and Calculations
Text138 © The McGraw−Hill Companies, 2010
130 V I S U A L C# Variables, Constants, and Calculations
Assume that amountDecimal holds 1050 after the calculation, and amount-TextBox.Text displays $1,050.00. If you want to do any further calculations with this amount, such as adding it to a total, you must use amountDecimal, not amountTextBox.Text. The variable amountDecimal holds a numeric value; amountTextBox.Text holds a string of (nonnumeric) characters. You also can format DateTime values using format codes and the ToString method. Unlike the numeric format codes, the date codes are case sensitive. The strings returned are based on the computer’s regional settings and can be changed. The following are default values for U.S. English in Windows Vista.
Datespecifier code Name Description Example of default setting
d short date mm/dd/yyyy 6/15/2009
D long date Day, Month dd, yyyy Monday, June 15, 2009
t short time hh:mm AM|PM 4:55 PM
T long time hh:mm:ss AM|PM 4:55:45 PM
f full date/time Day, Month dd, yyyy hh:mm AM|PM Monday, June 15, 2009 4:55 PM (short time)
F full date/time Day, Month dd, yyyy hh:mm:ss AM|PM Monday, June 15, 2009 (long time) 4:55:45 PM
g general mm/dd/yyyy hh:mm AM|PM 6/15/2009 11:00 AM (short time)
G general mm/dd/yyyy hh:mm:ss AM|PM 6/15/2009 11:00:15 AM (long time)
M or m month Month dd June 15
R or r GMT pattern Day, dd Mmm yyyy hh:mm:ss GMT Mon, 15 Jun 2009 11:00:15 GMT
Note that you also can use methods of the DateTime structure for format-ting dates: ToLongDateString, ToShortDateString, ToLongTimeString, ToShortTimeString. See Appendix B or MSDN for additional information.
Choosing the Controls for Program Output
Some programmers prefer to display program output in labels; others prefer text boxes. Both approaches have advantages, but whichever approach you use, you should clearly differentiate between (editable) input areas and (uneditable) output areas. Users generally get clues about input and output fields from their color. By Windows convention, input text boxes have a white background; output text has a gray background. The default background color of text boxes (BackColor property) is set to white; the default BackColor of labels is gray.
Bradley−Millspaugh: Programming in Visual C# 2008
3. Variables, Constants, and Calculations
Text 139© The McGraw−Hill Companies, 2010
C H A P T E R 3 131
However, you can change the BackColor property and the BorderStyle prop-erty of both text boxes and labels so that the two controls look very similar. You might wonder why a person would want to do that, but there are some very good reasons. Using text boxes for output can provide some advantages: The controls do not disappear when the Text property is cleared, and the borders and sizes of the output boxes can match those of the input boxes, making the form more visually uniform. Also, the user can select the text and copy it to another pro-gram using the Windows clipboard. If you choose to display output in labels (the traditional approach), set the AutoSize property to false so that the label does not disappear when the Text property is blank. You also generally set the BorderStyle property of the labels to Fixed3D or FixedSingle so that the outline of the label appears. To use a text box for output, set its ReadOnly property to true (to prevent the user from attempting to edit the text) and set its TabStop property to false , so that the focus will not stop on that control when the user tabs from one con-trol to the next. Notice that when you set ReadOnly to true , the BackColor property automatically changes to Control, which is the system default for labels. The example programs in this chapter use text boxes, rather than labels, for output.
T o change the ForeColor property of a ReadOnly text box in code, set the control’s BackColor property as well. You can set BackColor to SystemColors.Control, which is the default for a ReadOnly text box, and the ForeColor change will show up. ■
TIP
➤ Feedback 3.6 Give the line of code that assigns the formatted output and explain how the output will display for the specified value.
1. A calculated variable called averagePayDecimal has a value of 123.456 and should display in a text box called averagePayTextBox.
2. The variable quantityInteger, which contains 176123, must be dis-played in the text box called quantityTextBox.
3. The total amount collected in a fund drive is being accumulated in a variable called totalCollectedDecimal. What statement will display the variable in a text box called totalTextBox with commas and two decimal positions but no dollar signs?
A Calculation Programming Example
Look Sharp Fitness Center needs to calculate prices and discounts for clothing sold. The company is currently having a big sale, offering a 30 percent dis-count on all clearance clothing items. In this project, you will calculate the amount due for items sold, determine the 30 percent discount, and deduct the discount, giving the new amount due—the discounted amount. Use text boxes with the ReadOnly property set to true for the output fields.
Planning the Project
Sketch a form ( Figure 3.5 ) that meets the needs of your users.
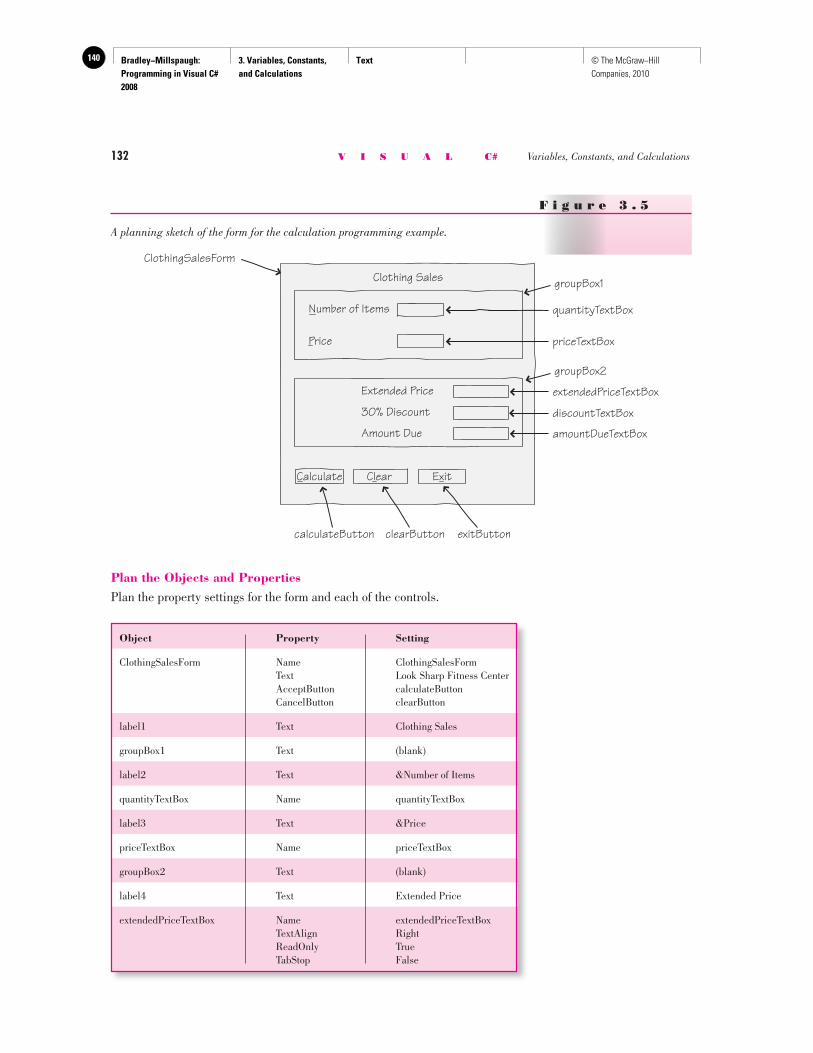
Bradley−Millspaugh: Programming in Visual C# 2008
3. Variables, Constants, and Calculations
Text140 © The McGraw−Hill Companies, 2010
132 V I S U A L C# Variables, Constants, and Calculations
Plan the Objects and Properties Plan the property settings for the form and each of the controls.
F i g u r e 3 . 5
A planning sketch of the form for the calculation programming example.
groupBox1
exitButtonclearButtoncalculateButton
ExitCalculate
groupBox2
extendedPriceTextBox
amountDueTextBox
discountTextBox
Extended Price
Amount Due
30% Discount
quantityTextBoxNumber of Items
priceTextBoxPrice
Clear
ClothingSalesForm
Clothing Sales
Object Property Setting
ClothingSalesForm Name ClothingSalesForm Text Look Sharp Fitness Center AcceptButton calculateButton CancelButton clearButton
label1 Text Clothing Sales
groupBox1 Text (blank)
label2 Text &Number of Items
quantityTextBox Name quantityTextBox
label3 Text &Price
priceTextBox Name priceTextBox
groupBox2 Text (blank)
label4 Text Extended Price
extendedPriceTextBox Name extendedPriceTextBox TextAlign Right ReadOnly True TabStop False

Bradley−Millspaugh: Programming in Visual C# 2008
3. Variables, Constants, and Calculations
Text 141© The McGraw−Hill Companies, 2010
C H A P T E R 3 133
Plan the Event Handlers Since you have three buttons, you need to plan the actions for three event- handling methods.
label5 Text 30% Discount
discountTextBox Name discountTextBox TextAlign Right ReadOnly True TabStop False
label6 Text Amount Due
amountDueTextBox Name amountDueTextBox TextAlign Right ReadOnly True TabStop False
calculateButton Name calculateButton Text &Calculate
clearButton Name clearButton Text C&lear
exitButton Name exitButton Text E&xit
Event handlers Actions—Pseudocode
calculateButton_Click Declare the variables. Convert the input Quantity and Price to numeric. Calculate Extended Price = Quantity * Price. Calculate and round: Discount = Extended Price * Discount Rate. Calculate Discounted Price = Extended Price – Discount. Format and display the output in text boxes.
clearButton_Click Clear each text box. Set the focus in the first text box.
exitButton_Click Exit the project.
Write the Project
Follow the sketch in Figure 3.5 to create the form. Figure 3.6 shows the com-pleted form.
1. Set the properties of each object, as you have planned. 2. Write the code. Working from the pseudocode, write each event
method. 3. When you complete the code, use a variety of test data to thoroughly
test the project.
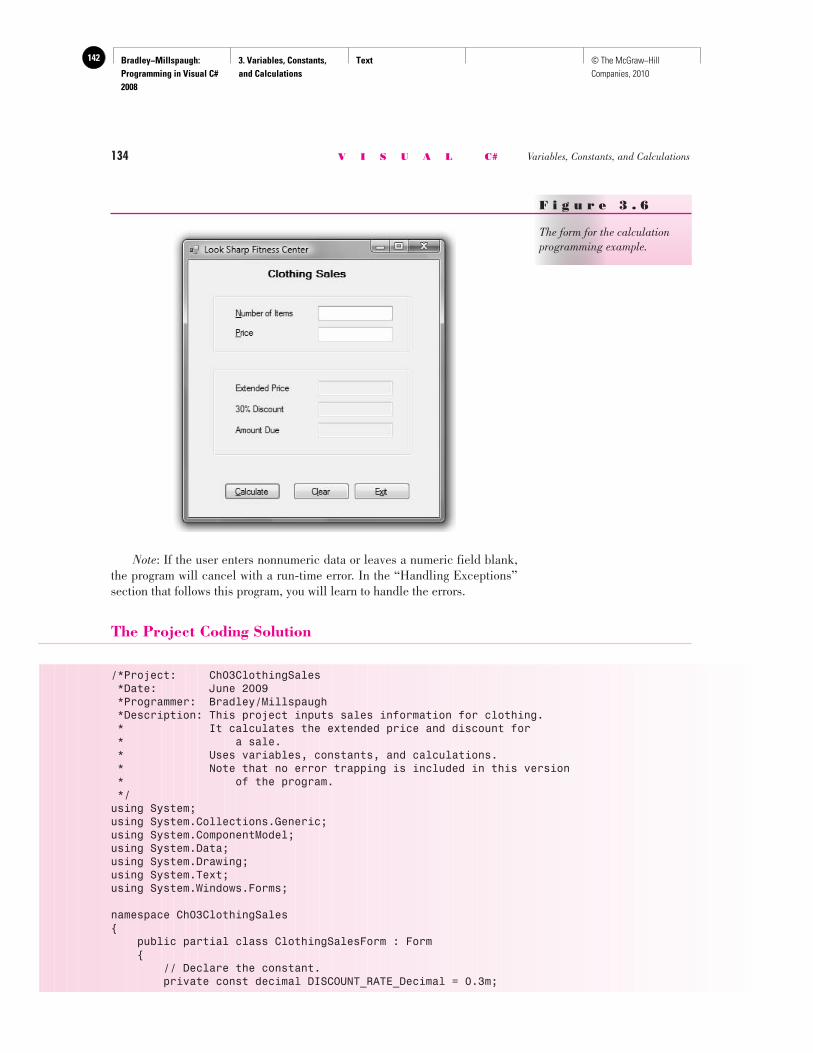
Bradley−Millspaugh: Programming in Visual C# 2008
3. Variables, Constants, and Calculations
Text142 © The McGraw−Hill Companies, 2010
134 V I S U A L C# Variables, Constants, and Calculations
Note : If the user enters nonnumeric data or leaves a numeric field blank, the program will cancel with a run-time error. In the “Handling Exceptions” section that follows this program, you will learn to handle the errors.
The Project Coding Solution
/*Project: Ch03ClothingSales *Date: June 2009 *Programmer: Bradley/Millspaugh *Description: This project inputs sales information for clothing. * It calculates the extended price and discount for * a sale. * Uses variables, constants, and calculations. * Note that no error trapping is included in this version * of the program. */using System;using System.Collections.Generic;using System.ComponentModel;using System.Data;using System.Drawing;using System.Text;using System.Windows.Forms;
namespace Ch03ClothingSales{ public partial class ClothingSalesForm : Form { // Declare the constant. private const decimal DISCOUNT_RATE_Decimal = 0.3m;
F i g u r e 3 . 6
The form for the calculation programming example.
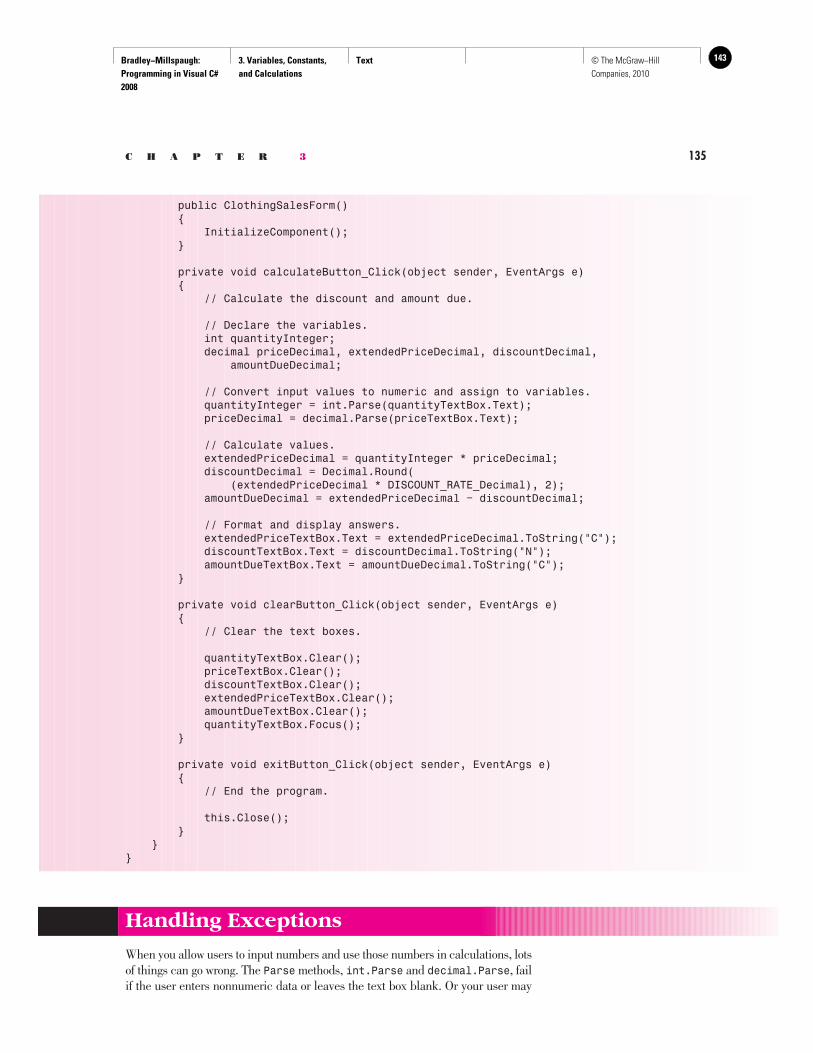
Bradley−Millspaugh: Programming in Visual C# 2008
3. Variables, Constants, and Calculations
Text 143© The McGraw−Hill Companies, 2010
C H A P T E R 3 135
public ClothingSalesForm() { InitializeComponent(); }
private void calculateButton_Click(object sender, EventArgs e) { // Calculate the discount and amount due.
// Declare the variables. int quantityInteger; decimal priceDecimal, extendedPriceDecimal, discountDecimal, amountDueDecimal;
// Convert input values to numeric and assign to variables. quantityInteger = int.Parse(quantityTextBox.Text); priceDecimal = decimal.Parse(priceTextBox.Text);
// Calculate values. extendedPriceDecimal = quantityInteger * priceDecimal; discountDecimal = Decimal.Round( (extendedPriceDecimal * DISCOUNT_RATE_Decimal), 2); amountDueDecimal = extendedPriceDecimal − discountDecimal;
// Format and display answers. extendedPriceTextBox.Text = extendedPriceDecimal.ToString("C"); discountTextBox.Text = discountDecimal.ToString("N"); amountDueTextBox.Text = amountDueDecimal.ToString("C"); }
private void clearButton_Click(object sender, EventArgs e) { // Clear the text boxes.
quantityTextBox.Clear(); priceTextBox.Clear(); discountTextBox.Clear(); extendedPriceTextBox.Clear(); amountDueTextBox.Clear(); quantityTextBox.Focus(); }
private void exitButton_Click(object sender, EventArgs e) { // End the program.
this.Close(); } }}
Handling Exceptions
When you allow users to input numbers and use those numbers in calculations, lots of things can go wrong. The Parse methods, int.Parse and decimal.Parse , fail if the user enters nonnumeric data or leaves the text box blank. Or your user may
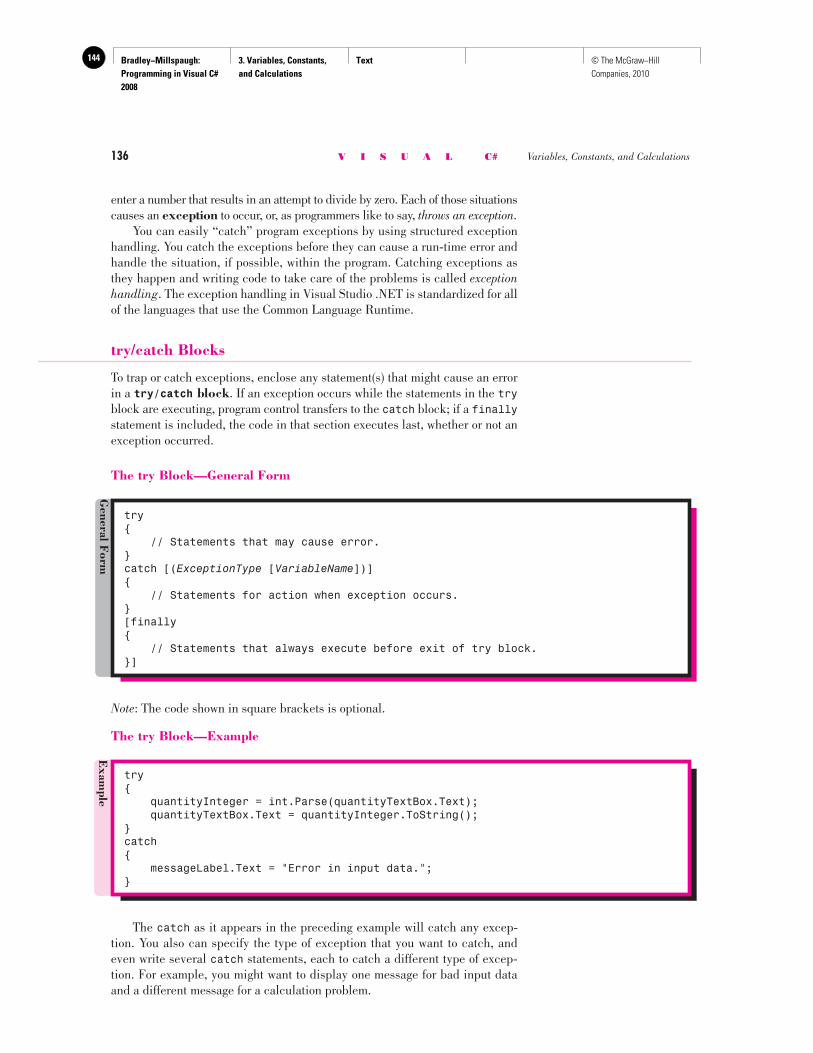
Bradley−Millspaugh: Programming in Visual C# 2008
3. Variables, Constants, and Calculations
Text144 © The McGraw−Hill Companies, 2010
136 V I S U A L C# Variables, Constants, and Calculations
enter a number that results in an attempt to divide by zero. Each of those situations causes an exception to occur, or, as programmers like to say, throws an exception . You can easily “catch” program exceptions by using structured exception handling. You catch the exceptions before they can cause a run-time error and handle the situation, if possible, within the program. Catching exceptions as they happen and writing code to take care of the problems is called exception handling . The exception handling in Visual Studio .NET is standardized for all of the languages that use the Common Language Runtime.
try/catch Blocks
To trap or catch exceptions, enclose any statement(s) that might cause an error in a try/catch block . If an exception occurs while the statements in the try block are executing, program control transfers to the catch block; if a finally statement is included, the code in that section executes last, whether or not an exception occurred.
The try Block—General Form
try{ // Statements that may cause error.}catch [( ExceptionType [ VariableName ])]{ // Statements for action when exception occurs.}[finally{ // Statements that always execute before exit of try block.}]
General F
orm
Exam
ple
try{ quantityInteger = int.Parse(quantityTextBox.Text); quantityTextBox.Text = quantityInteger.ToString();}catch{ messageLabel.Text = "Error in input data.";}
Note: The code shown in square brackets is optional.
The try Block—Example
The catch as it appears in the preceding example will catch any excep-tion. You also can specify the type of exception that you want to catch, and even write several catch statements, each to catch a different type of excep-tion. For example, you might want to display one message for bad input data and a different message for a calculation problem.
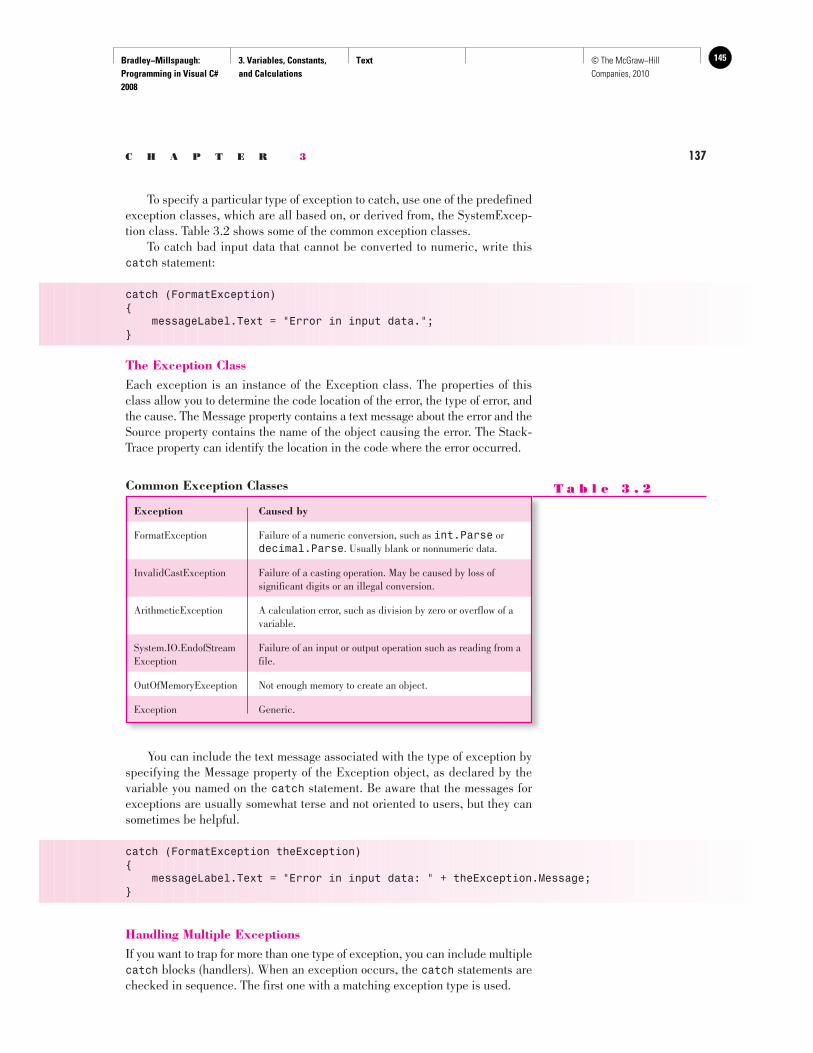
Bradley−Millspaugh: Programming in Visual C# 2008
3. Variables, Constants, and Calculations
Text 145© The McGraw−Hill Companies, 2010
C H A P T E R 3 137
To specify a particular type of exception to catch, use one of the predefined exception classes, which are all based on, or derived from, the SystemExcep-tion class. Table 3.2 shows some of the common exception classes. To catch bad input data that cannot be converted to numeric, write this catch statement:
catch (FormatException){ messageLabel.Text = "Error in input data.";}
The Exception Class Each exception is an instance of the Exception class. The properties of this class allow you to determine the code location of the error, the type of error, and the cause. The Message property contains a text message about the error and the Source property contains the name of the object causing the error. The Stack-Trace property can identify the location in the code where the error occurred.
Common Exception Classes T a b l e 3 . 2
Exception Caused by
FormatException Failure of a numeric conversion, such as int.Parse or decimal.Parse . Usually blank or nonnumeric data.
InvalidCastException Failure of a casting operation. May be caused by loss of significant digits or an illegal conversion.
ArithmeticException A calculation error, such as division by zero or overflow of a variable.
System.IO.EndofStream Failure of an input or output operation such as reading from aException file.
OutOfMemoryException Not enough memory to create an object.
Exception Generic.
You can include the text message associated with the type of exception by specifying the Message property of the Exception object, as declared by the variable you named on the catch statement. Be aware that the messages for exceptions are usually somewhat terse and not oriented to users, but they can sometimes be helpful.
catch (FormatException theException){ messageLabel.Text = "Error in input data: " + theException.Message;}
Handling Multiple Exceptions If you want to trap for more than one type of exception, you can include multiple catch blocks (handlers). When an exception occurs, the catch statements are checked in sequence. The first one with a matching exception type is used.
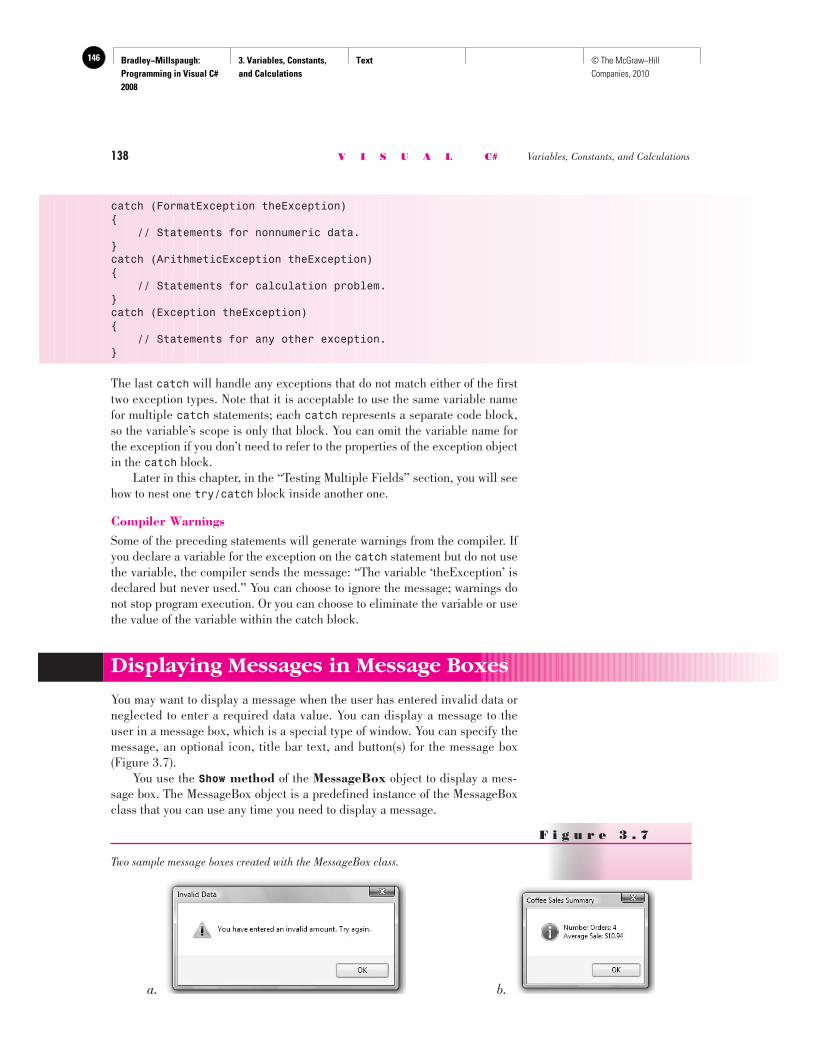
Bradley−Millspaugh: Programming in Visual C# 2008
3. Variables, Constants, and Calculations
Text146 © The McGraw−Hill Companies, 2010
138 V I S U A L C# Variables, Constants, and Calculations
catch (FormatException theException){ // Statements for nonnumeric data.}catch (ArithmeticException theException){ // Statements for calculation problem.}catch (Exception theException){ // Statements for any other exception.}
The last catch will handle any exceptions that do not match either of the first two exception types. Note that it is acceptable to use the same variable name for multiple catch statements; each catch represents a separate code block, so the variable’s scope is only that block. You can omit the variable name for the exception if you don’t need to refer to the properties of the exception object in the catch block. Later in this chapter, in the “Testing Multiple Fields” section, you will see how to nest one try/catch block inside another one.
Compiler Warnings Some of the preceding statements will generate warnings from the compiler. If you declare a variable for the exception on the catch statement but do not use the variable, the compiler sends the message: “The variable ‘theException’ is declared but never used.” You can choose to ignore the message; warnings do not stop program execution. Or you can choose to eliminate the variable or use the value of the variable within the catch block.
Displaying Messages in Message Boxes
You may want to display a message when the user has entered invalid data or neglected to enter a required data value. You can display a message to the user in a message box, which is a special type of window. You can specify the message, an optional icon, title bar text, and button(s) for the message box ( Figure 3.7 ). You use the Show method of the MessageBox object to display a mes-sage box. The MessageBox object is a predefined instance of the MessageBox class that you can use any time you need to display a message.
F i g u r e 3 . 7
Two sample message boxes created with the MessageBox class.
a. b.
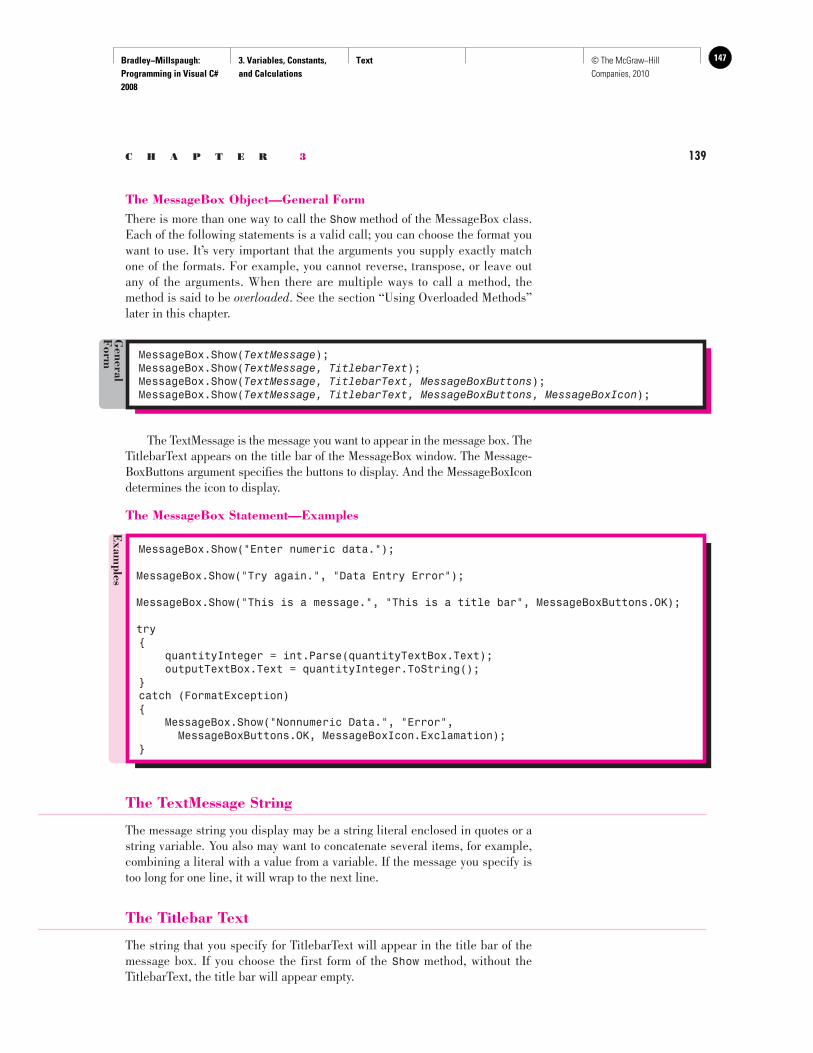
Bradley−Millspaugh: Programming in Visual C# 2008
3. Variables, Constants, and Calculations
Text 147© The McGraw−Hill Companies, 2010
C H A P T E R 3 139
The MessageBox Object—General Form There is more than one way to call the Show method of the MessageBox class. Each of the following statements is a valid call; you can choose the format you want to use. It’s very important that the arguments you supply exactly match one of the formats. For example, you cannot reverse, transpose, or leave out any of the arguments. When there are multiple ways to call a method, the method is said to be overloaded . See the section “Using Overloaded Methods” later in this chapter.
MessageBox.Show( TextMessage );MessageBox.Show( TextMessage, TitlebarText );MessageBox.Show( TextMessage, TitlebarText, MessageBoxButtons );MessageBox.Show( TextMessage, TitlebarText, MessageBoxButtons, MessageBoxIcon );
General
Form
The TextMessage is the message you want to appear in the message box. The TitlebarText appears on the title bar of the MessageBox window. The Message-BoxButtons argument specifies the buttons to display. And the MessageBoxIcon determines the icon to display.
The MessageBox Statement—Examples
Exam
ples
MessageBox.Show("Enter numeric data.");
MessageBox.Show("Try again.", "Data Entry Error");
MessageBox.Show("This is a message.", "This is a title bar", MessageBoxButtons.OK);
try{ quantityInteger = int.Parse(quantityTextBox.Text); outputTextBox.Text = quantityInteger.ToString();}catch (FormatException){ MessageBox.Show("Nonnumeric Data.", "Error", MessageBoxButtons.OK, MessageBoxIcon.Exclamation);}
The TextMessage String
The message string you display may be a string literal enclosed in quotes or a string variable. You also may want to concatenate several items, for example, combining a literal with a value from a variable. If the message you specify is too long for one line, it will wrap to the next line.
The Titlebar Text
The string that you specify for TitlebarText will appear in the title bar of the message box. If you choose the first form of the Show method, without the TitlebarText, the title bar will appear empty.
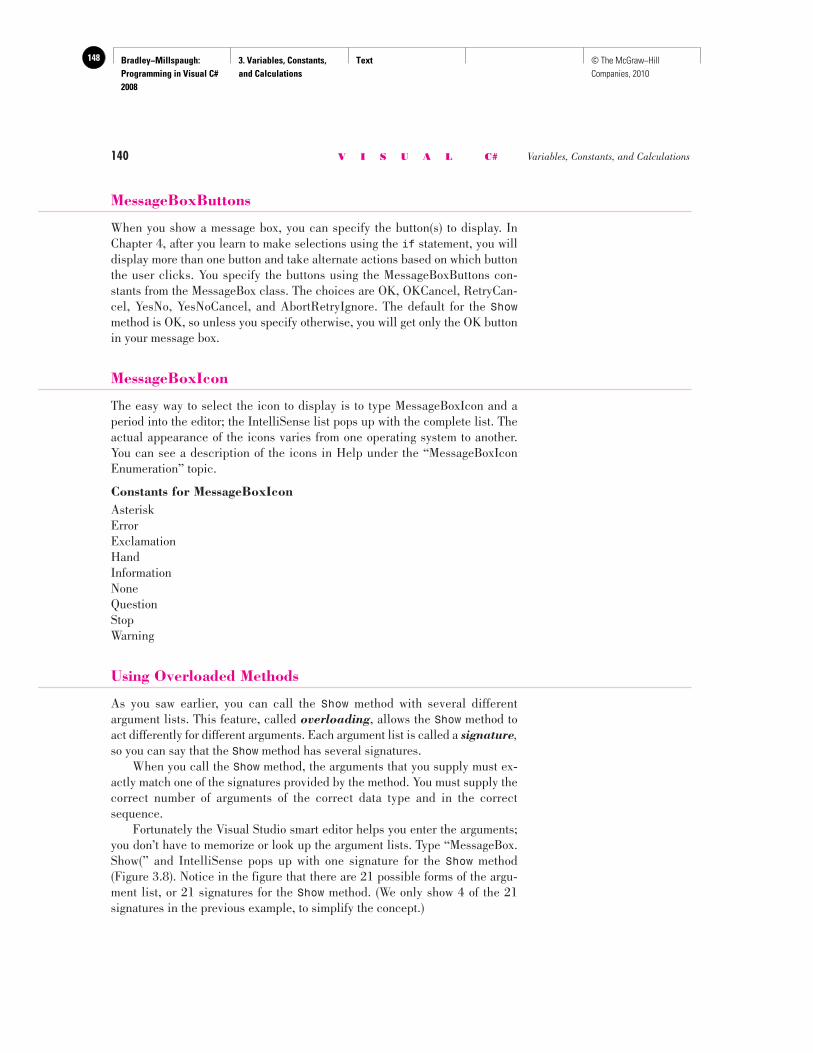
Bradley−Millspaugh: Programming in Visual C# 2008
3. Variables, Constants, and Calculations
Text148 © The McGraw−Hill Companies, 2010
140 V I S U A L C# Variables, Constants, and Calculations
MessageBoxButtons
When you show a message box, you can specify the button(s) to display. In Chapter 4, after you learn to make selections using the if statement, you will display more than one button and take alternate actions based on which button the user clicks. You specify the buttons using the MessageBoxButtons con-stants from the MessageBox class. The choices are OK, OKCancel, RetryCan-cel, YesNo, YesNoCancel, and AbortRetryIgnore. The default for the Show method is OK, so unless you specify otherwise, you will get only the OK button in your message box.
MessageBoxIcon
The easy way to select the icon to display is to type MessageBoxIcon and a period into the editor; the IntelliSense list pops up with the complete list. The actual appearance of the icons varies from one operating system to another. You can see a description of the icons in Help under the “MessageBoxIcon Enumeration” topic.
Constants for MessageBoxIcon Asterisk Error Exclamation Hand Information None Question Stop Warning
Using Overloaded Methods
As you saw earlier, you can call the Show method with several different argument lists. This feature, called overloading , allows the Show method to act differently for different arguments. Each argument list is called a signature , so you can say that the Show method has several signatures. When you call the Show method, the arguments that you supply must ex-actly match one of the signatures provided by the method. You must supply the correct number of arguments of the correct data type and in the correct sequence. Fortunately the Visual Studio smart editor helps you enter the arguments; you don’t have to memorize or look up the argument lists. Type “MessageBox. Show(” and IntelliSense pops up with one signature for the Show method ( Figure 3.8 ). Notice in the figure that there are 21 possible forms of the argu-ment list, or 21 signatures for the Show method. (We only show 4 of the 21 signatures in the previous example, to simplify the concept.)
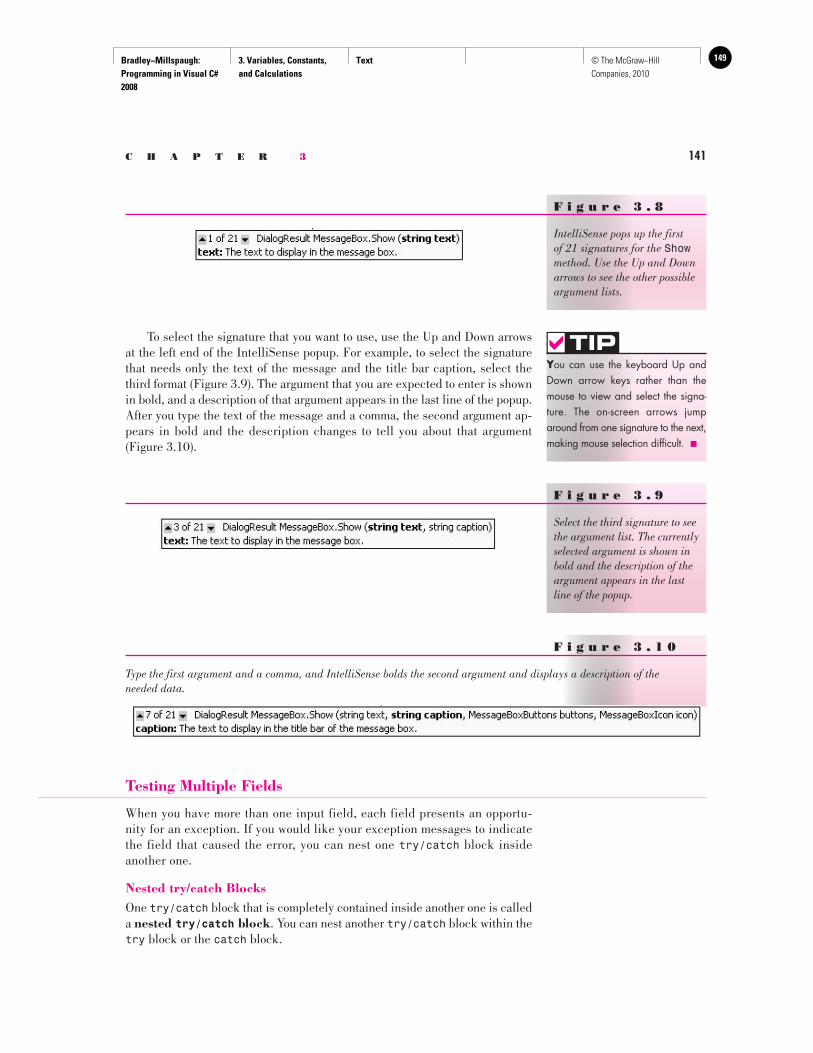
Bradley−Millspaugh: Programming in Visual C# 2008
3. Variables, Constants, and Calculations
Text 149© The McGraw−Hill Companies, 2010
C H A P T E R 3 141
To select the signature that you want to use, use the Up and Down arrows at the left end of the IntelliSense popup. For example, to select the signature that needs only the text of the message and the title bar caption, select the third format ( Figure 3.9 ). The argument that you are expected to enter is shown in bold, and a description of that argument appears in the last line of the popup. After you type the text of the message and a comma, the second argument ap-pears in bold and the description changes to tell you about that argument ( Figure 3.10 ).
F i g u r e 3 . 8
IntelliSense pops up the first of 21 signatures for the Show method. Use the Up and Down arrows to see the other possible argument lists.
Y ou can use the keyboard Up and Down arrow keys rather than the mouse to view and select the signa-ture. The on-screen arrows jump around from one signature to the next, making mouse selection difficult. ■
TIP
F i g u r e 3 . 9
Select the third signature to see the argument list. The currently selected argument is shown in bold and the description of the argument appears in the last line of the popup.
Testing Multiple Fields
When you have more than one input field, each field presents an opportu-nity for an exception. If you would like your exception messages to indicate the field that caused the error, you can nest one try/catch block inside another one.
Nested try/catch Blocks One try/catch block that is completely contained inside another one is called a nested try/catch block . You can nest another try/catch block within the try block or the catch block.
F i g u r e 3 . 1 0
Type the first argument and a comma, and IntelliSense bolds the second argument and displays a description of the needed data.
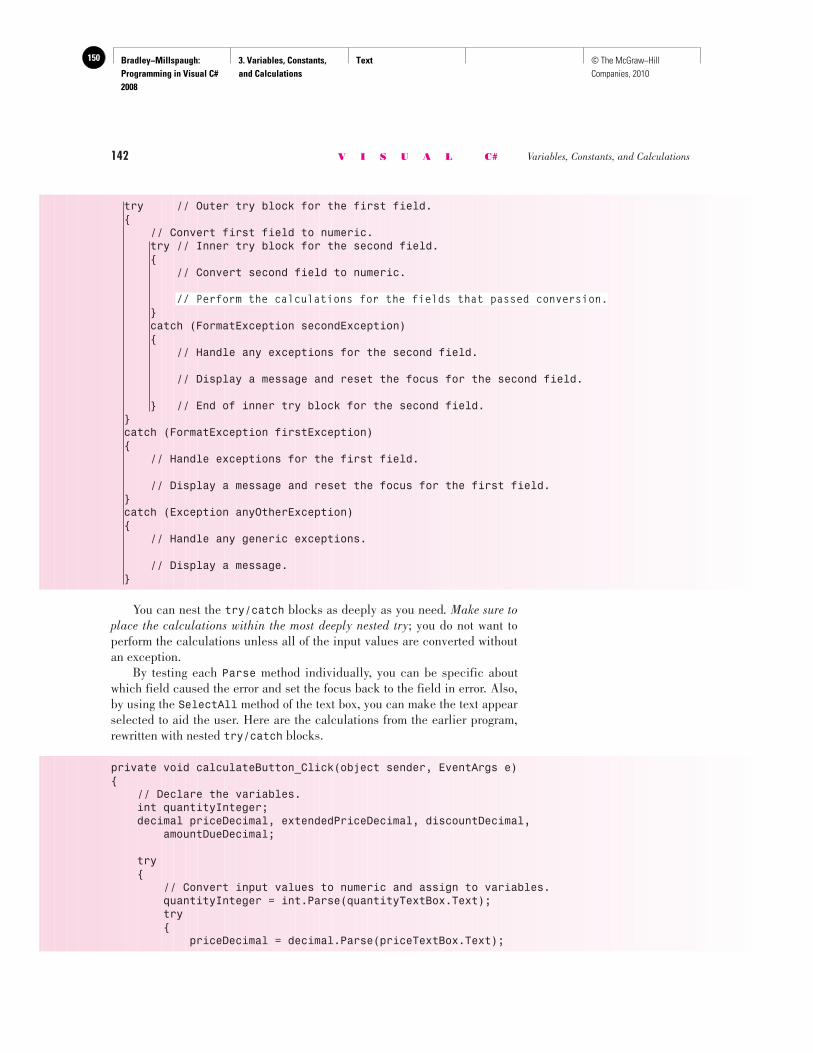
Bradley−Millspaugh: Programming in Visual C# 2008
3. Variables, Constants, and Calculations
Text150 © The McGraw−Hill Companies, 2010
142 V I S U A L C# Variables, Constants, and Calculations
try // Outer try block for the first field. { // Convert first field to numeric. try // Inner try block for the second field. { // Convert second field to numeric.
// Perform the calculations for the fields that passed conversion. } catch (FormatException secondException) { // Handle any exceptions for the second field.
// Display a message and reset the focus for the second field.
} // End of inner try block for the second field. } catch (FormatException firstException) { // Handle exceptions for the first field.
// Display a message and reset the focus for the first field. } catch (Exception anyOtherException) { // Handle any generic exceptions.
// Display a message. }
You can nest the try/catch blocks as deeply as you need . Make sure to place the calculations within the most deeply nested try ; you do not want to perform the calculations unless all of the input values are converted without an exception. By testing each Parse method individually, you can be specific about which field caused the error and set the focus back to the field in error. Also, by using the SelectAll method of the text box, you can make the text appear selected to aid the user. Here are the calculations from the earlier program, rewritten with nested try/catch blocks.
private void calculateButton_Click(object sender, EventArgs e){ // Declare the variables. int quantityInteger; decimal priceDecimal, extendedPriceDecimal, discountDecimal, amountDueDecimal;
try { // Convert input values to numeric and assign to variables. quantityInteger = int.Parse(quantityTextBox.Text); try { priceDecimal = decimal.Parse(priceTextBox.Text);
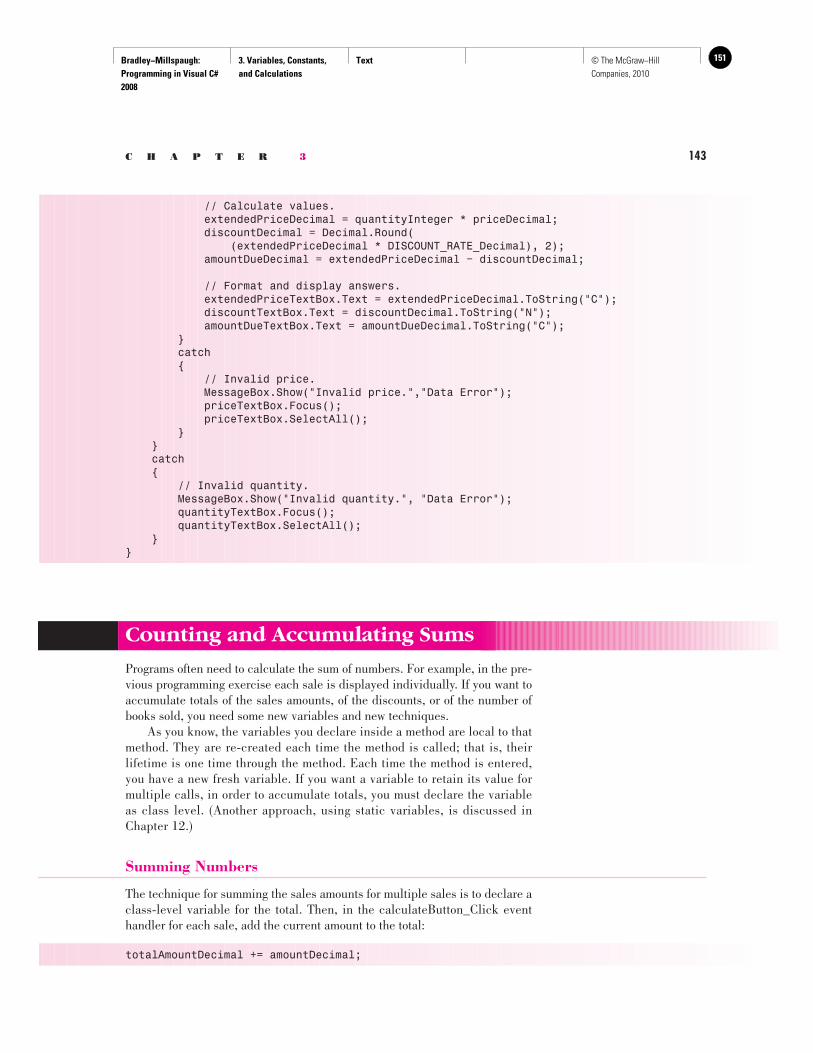
Bradley−Millspaugh: Programming in Visual C# 2008
3. Variables, Constants, and Calculations
Text 151© The McGraw−Hill Companies, 2010
C H A P T E R 3 143
// Calculate values. extendedPriceDecimal = quantityInteger * priceDecimal; discountDecimal = Decimal.Round( (extendedPriceDecimal * DISCOUNT_RATE_Decimal), 2); amountDueDecimal = extendedPriceDecimal − discountDecimal;
// Format and display answers. extendedPriceTextBox.Text = extendedPriceDecimal.ToString("C"); discountTextBox.Text = discountDecimal.ToString("N"); amountDueTextBox.Text = amountDueDecimal.ToString("C"); } catch { // Invalid price. MessageBox.Show("Invalid price.","Data Error"); priceTextBox.Focus(); priceTextBox.SelectAll(); } } catch { // Invalid quantity. MessageBox.Show("Invalid quantity.", "Data Error"); quantityTextBox.Focus(); quantityTextBox.SelectAll(); }}
Counting and Accumulating Sums
Programs often need to calculate the sum of numbers. For example, in the pre-vious programming exercise each sale is displayed individually. If you want to accumulate totals of the sales amounts, of the discounts, or of the number of books sold, you need some new variables and new techniques. As you know, the variables you declare inside a method are local to that method. They are re-created each time the method is called; that is, their lifetime is one time through the method. Each time the method is entered, you have a new fresh variable. If you want a variable to retain its value for multiple calls, in order to accumulate totals, you must declare the variable as class level. (Another approach, using static variables, is discussed in Chapter 12.)
Summing Numbers
The technique for summing the sales amounts for multiple sales is to declare a class-level variable for the total. Then, in the calculateButton_Click event handler for each sale, add the current amount to the total:
totalAmountDecimal += amountDecimal;
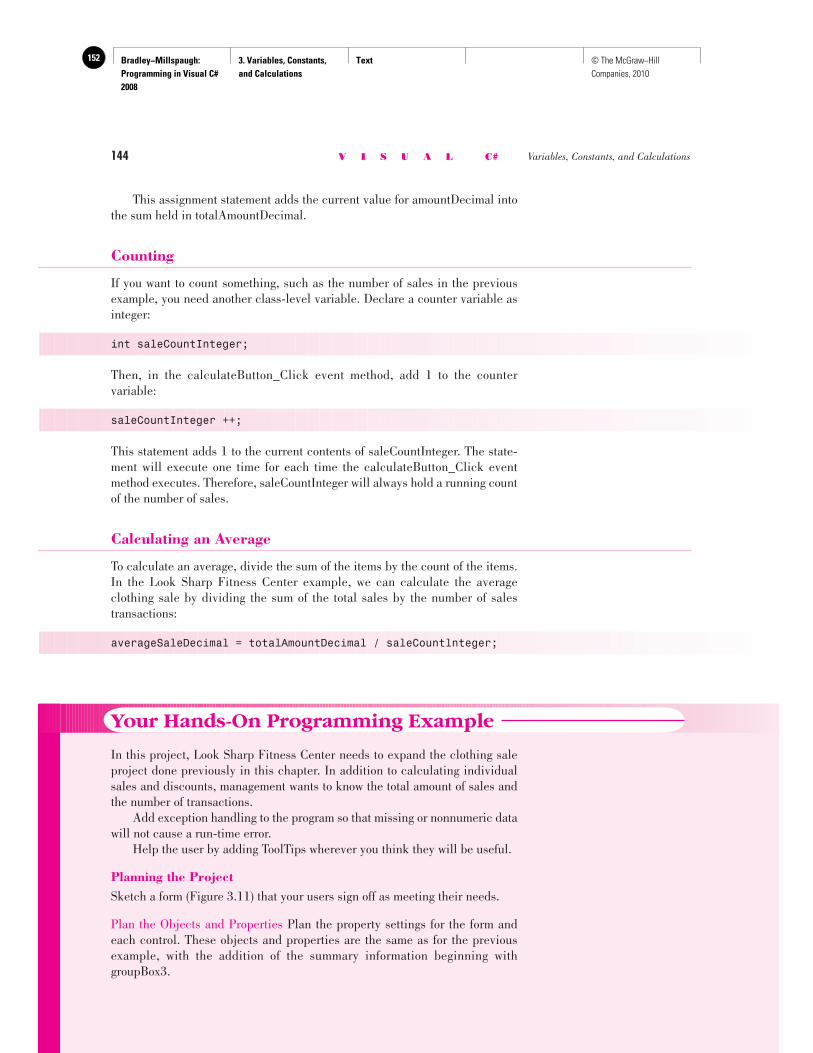
Bradley−Millspaugh: Programming in Visual C# 2008
3. Variables, Constants, and Calculations
Text152 © The McGraw−Hill Companies, 2010
144 V I S U A L C# Variables, Constants, and Calculations
This assignment statement adds the current value for amountDecimal into the sum held in totalAmountDecimal.
Counting
If you want to count something, such as the number of sales in the previous example, you need another class-level variable. Declare a counter variable as integer:
int saleCountInteger;
Then, in the calculateButton_Click event method, add 1 to the counter variable:
saleCountInteger ++;
This statement adds 1 to the current contents of saleCountInteger. The state-ment will execute one time for each time the calculateButton_Click event method executes. Therefore, saleCountInteger will always hold a running count of the number of sales.
Calculating an Average
To calculate an average, divide the sum of the items by the count of the items. In the Look Sharp Fitness Center example, we can calculate the average clothing sale by dividing the sum of the total sales by the number of sales transactions:
averageSaleDecimal = totalAmountDecimal / saleCountlnteger;
Your Hands-On Programming Example
In this project, Look Sharp Fitness Center needs to expand the clothing sale project done previously in this chapter. In addition to calculating individual sales and discounts, management wants to know the total amount of sales and the number of transactions. Add exception handling to the program so that missing or nonnumeric data will not cause a run-time error. Help the user by adding ToolTips wherever you think they will be useful.
Planning the Project Sketch a form ( Figure 3.11 ) that your users sign off as meeting their needs.
Plan the Objects and Properties Plan the property settings for the form and each control. These objects and properties are the same as for the previous example, with the addition of the summary information beginning with groupBox3.
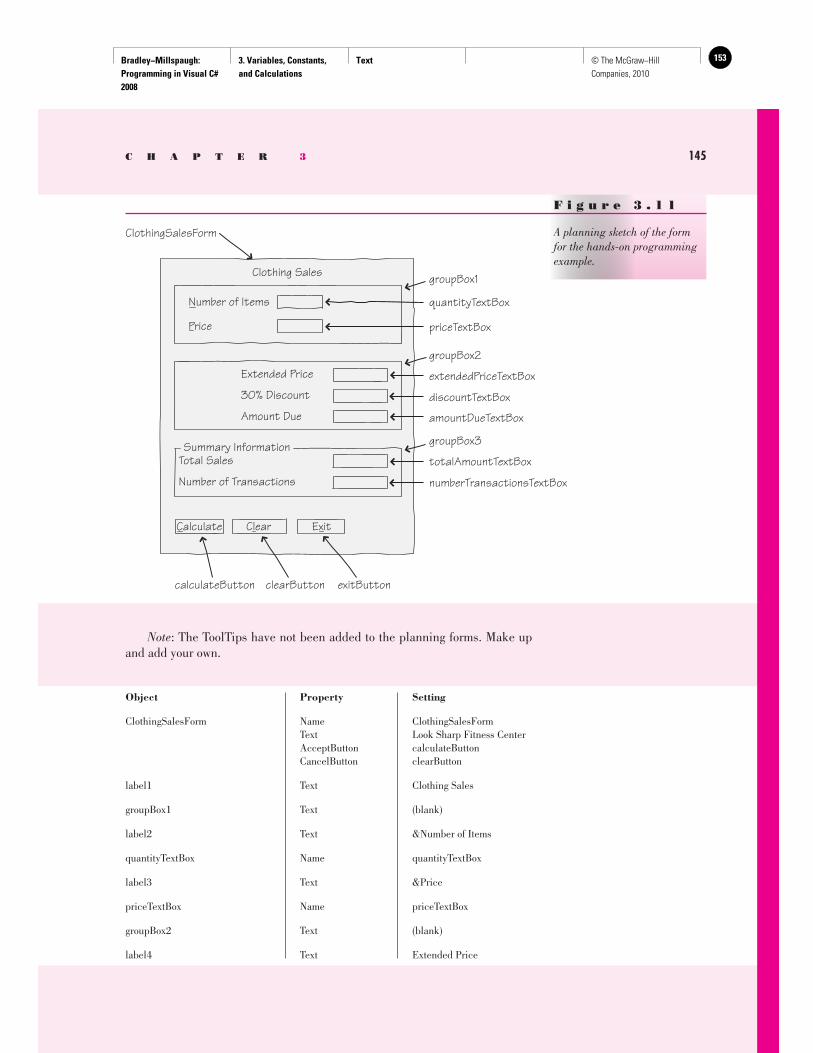
Bradley−Millspaugh: Programming in Visual C# 2008
3. Variables, Constants, and Calculations
Text 153© The McGraw−Hill Companies, 2010
C H A P T E R 3 145
Note : The ToolTips have not been added to the planning forms. Make up and add your own.
Object Property Setting
ClothingSalesForm Name ClothingSalesForm Text Look Sharp Fitness Center AcceptButton calculateButton CancelButton clearButton
label1 Text Clothing Sales
groupBox1 Text (blank)
label2 Text &Number of Items
quantityTextBox Name quantityTextBox
label3 Text &Price
priceTextBox Name priceTextBox
groupBox2 Text (blank)
label4 Text Extended Price
groupBox3
totalAmountTextBox
numberTransactionsTextBox
Total SalesSummary Information
Number of Transactions
Extended Price
Amount Due
30% Discount
Clothing Sales
Calculate Clear Exit
groupBox1
Number of Items quantityTextBox
Price priceTextBox
exitButtonclearButtoncalculateButton
groupBox2
extendedPriceTextBox
amountDueTextBox
discountTextBox
ClothingSalesForm
F i g u r e 3 . 1 1
A planning sketch of the form for the hands-on programming example.
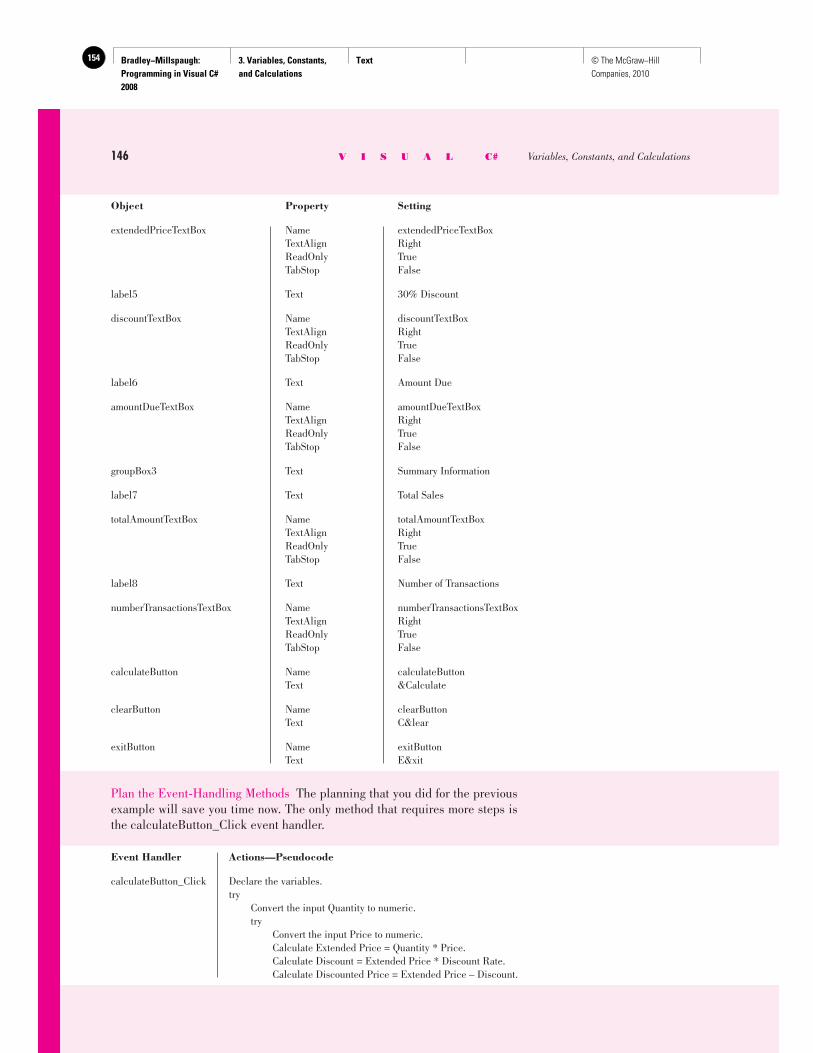
Bradley−Millspaugh: Programming in Visual C# 2008
3. Variables, Constants, and Calculations
Text154 © The McGraw−Hill Companies, 2010
146 V I S U A L C# Variables, Constants, and Calculations
extendedPriceTextBox Name extendedPriceTextBox TextAlign Right ReadOnly True TabStop False
label5 Text 30% Discount
discountTextBox Name discountTextBox TextAlign Right ReadOnly True TabStop False
label6 Text Amount Due
amountDueTextBox Name amountDueTextBox TextAlign Right ReadOnly True TabStop False
groupBox3 Text Summary Information
label7 Text Total Sales
totalAmountTextBox Name totalAmountTextBox TextAlign Right ReadOnly True TabStop False
label8 Text Number of Transactions
numberTransactionsTextBox Name numberTransactionsTextBox TextAlign Right ReadOnly True TabStop False
calculateButton Name calculateButton Text &Calculate
clearButton Name clearButton Text C&lear
exitButton Name exitButton Text E&xit
Plan the Event-Handling Methods The planning that you did for the previous example will save you time now. The only method that requires more steps is the calculateButton_Click event handler.
Event Handler Actions—Pseudocode
calculateButton_Click Declare the variables. try Convert the input Quantity to numeric. try Convert the input Price to numeric. Calculate Extended Price = Quantity * Price. Calculate Discount = Extended Price * Discount Rate. Calculate Discounted Price = Extended Price – Discount.
Object Property Setting
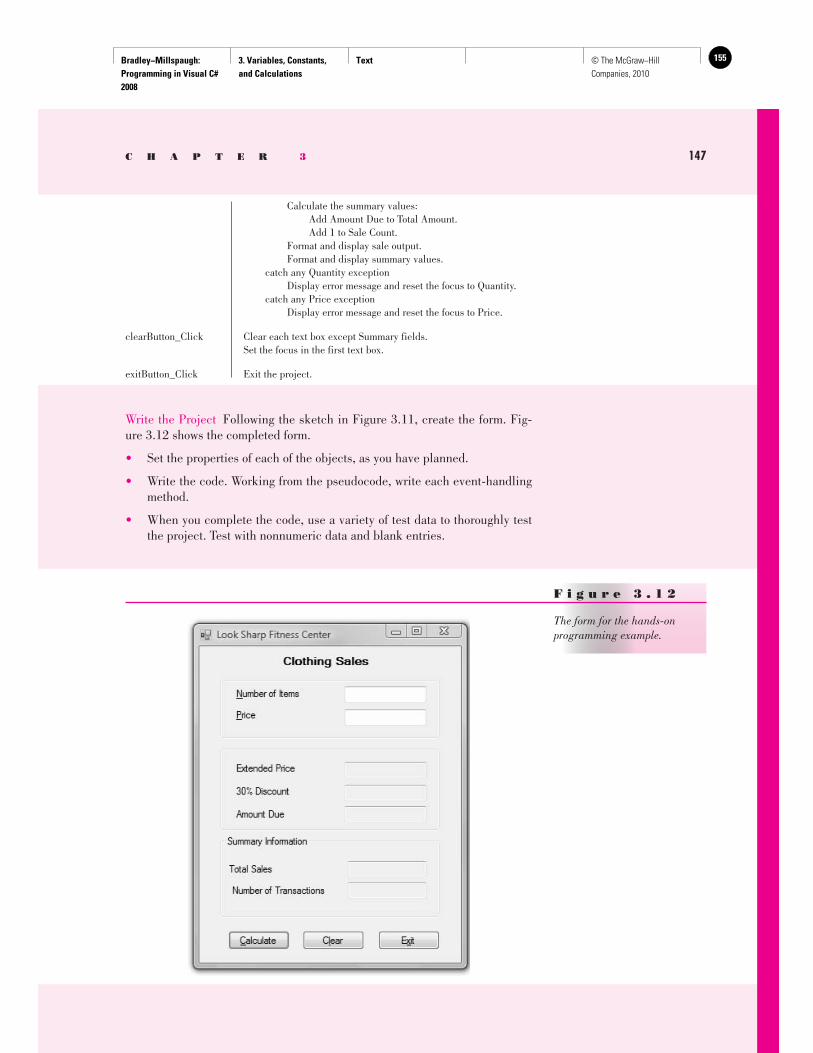
Bradley−Millspaugh: Programming in Visual C# 2008
3. Variables, Constants, and Calculations
Text 155© The McGraw−Hill Companies, 2010
C H A P T E R 3 147
Calculate the summary values: Add Amount Due to Total Amount. Add 1 to Sale Count. Format and display sale output. Format and display summary values. catch any Quantity exception Display error message and reset the focus to Quantity. catch any Price exception Display error message and reset the focus to Price.
clearButton_Click Clear each text box except Summary fields. Set the focus in the first text box.
exitButton_Click Exit the project.
Write the Project Following the sketch in Figure 3.11 , create the form. Fig-ure 3.12 shows the completed form.
• Set the properties of each of the objects, as you have planned.
• Write the code. Working from the pseudocode, write each event-handling method.
• When you complete the code, use a variety of test data to thoroughly test the project. Test with nonnumeric data and blank entries.
F i g u r e 3 . 1 2
The form for the hands-on programming example.
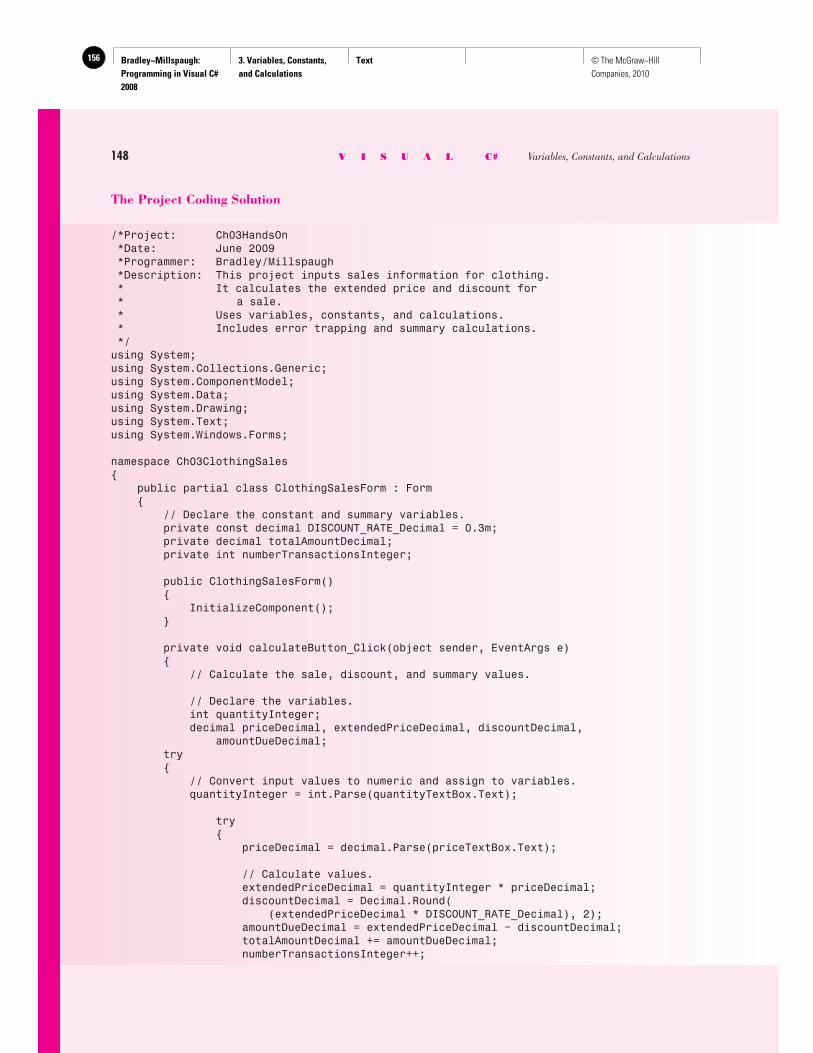
Bradley−Millspaugh: Programming in Visual C# 2008
3. Variables, Constants, and Calculations
Text156 © The McGraw−Hill Companies, 2010
148 V I S U A L C# Variables, Constants, and Calculations
The Project Coding Solution
/*Project: Ch03HandsOn *Date: June 2009 *Programmer: Bradley/Millspaugh *Description: This project inputs sales information for clothing. * It calculates the extended price and discount for * a sale. * Uses variables, constants, and calculations. * Includes error trapping and summary calculations. */using System;using System.Collections.Generic;using System.ComponentModel;using System.Data;using System.Drawing;using System.Text;using System.Windows.Forms;
namespace Ch03ClothingSales{ public partial class ClothingSalesForm : Form { // Declare the constant and summary variables. private const decimal DISCOUNT_RATE_Decimal = 0.3m; private decimal totalAmountDecimal; private int numberTransactionsInteger;
public ClothingSalesForm() { InitializeComponent(); }
private void calculateButton_Click(object sender, EventArgs e) { // Calculate the sale, discount, and summary values.
// Declare the variables. int quantityInteger; decimal priceDecimal, extendedPriceDecimal, discountDecimal, amountDueDecimal; try { // Convert input values to numeric and assign to variables. quantityInteger = int.Parse(quantityTextBox.Text);
try { priceDecimal = decimal.Parse(priceTextBox.Text);
// Calculate values. extendedPriceDecimal = quantityInteger * priceDecimal; discountDecimal = Decimal.Round( (extendedPriceDecimal * DISCOUNT_RATE_Decimal), 2); amountDueDecimal = extendedPriceDecimal − discountDecimal; totalAmountDecimal += amountDueDecimal; numberTransactionsInteger++;
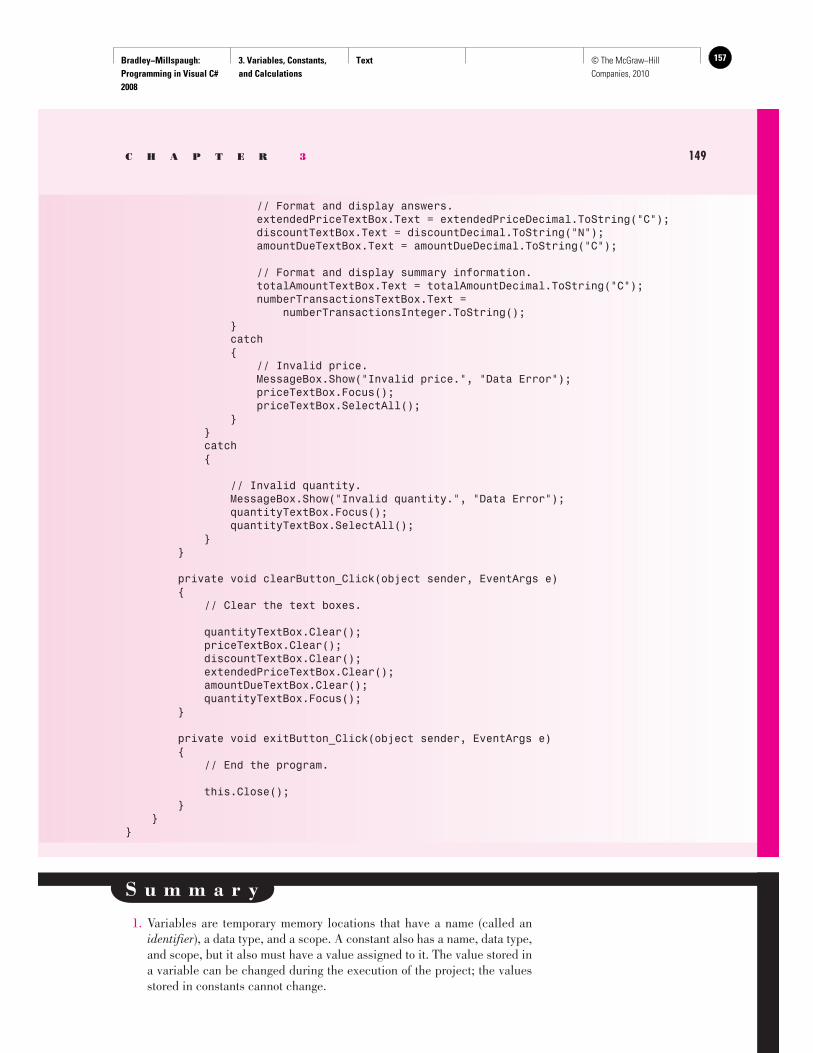
Bradley−Millspaugh: Programming in Visual C# 2008
3. Variables, Constants, and Calculations
Text 157© The McGraw−Hill Companies, 2010
// Format and display answers. extendedPriceTextBox.Text = extendedPriceDecimal.ToString("C"); discountTextBox.Text = discountDecimal.ToString("N"); amountDueTextBox.Text = amountDueDecimal.ToString("C");
// Format and display summary information. totalAmountTextBox.Text = totalAmountDecimal.ToString("C"); numberTransactionsTextBox.Text = numberTransactionsInteger.ToString(); } catch { // Invalid price. MessageBox.Show("Invalid price.", "Data Error"); priceTextBox.Focus(); priceTextBox.SelectAll(); } } catch {
// Invalid quantity. MessageBox.Show("Invalid quantity.", "Data Error"); quantityTextBox.Focus(); quantityTextBox.SelectAll(); } }
private void clearButton_Click(object sender, EventArgs e) { // Clear the text boxes.
quantityTextBox.Clear(); priceTextBox.Clear(); discountTextBox.Clear(); extendedPriceTextBox.Clear(); amountDueTextBox.Clear(); quantityTextBox.Focus(); }
private void exitButton_Click(object sender, EventArgs e) { // End the program.
this.Close(); } }}
C H A P T E R 3 149
S u m m a r y
1. Variables are temporary memory locations that have a name (called an identifier ), a data type, and a scope. A constant also has a name, data type, and scope, but it also must have a value assigned to it. The value stored in a variable can be changed during the execution of the project; the values stored in constants cannot change.
Bradley−Millspaugh: Programming in Visual C# 2008
3. Variables, Constants, and Calculations
Text158 © The McGraw−Hill Companies, 2010
150 V I S U A L C# Variables, Constants, and Calculations
2. The data type determines what type of values may be assigned to a variable or constant. The most common data types are string, int, decimal, single, and bool.
3. Identifiers for variables and constants must follow the C# naming rules and should follow good naming standards, called conventions . An identifier should be meaningful and have the data type appended at the end. Vari-able names should begin with a lowercase character and be mixed upper- and lowercase while constants are all uppercase.
4. Identifiers should include the data type of the variable or constant. 5. Intrinsic constants, such as Color.Red and Color.Blue, are predefined and
built into the .NET Framework. Named constants are programmer-defined constants and are declared using the const statement. The location of the const statement determines the scope of the constant.
6. The location of the declaration statement determines the scope of the vari-able. Use the data type without the private or public keyword to declare local variables inside a method; declare class-level variables at the top of the class, outside of any method; you can use the private keyword to declare class-level variables.
7. The scope of a variable may be namespace, class level, local, or block level. Block level and local variables are available only within the method in which they are declared; class-level variables are accessible in all meth-ods within a class; namespace variables are available in all methods of all classes in a namespace, which is usually the entire project.
8. The lifetime of local and block-level variables is one execution of the method in which they are declared. The lifetime of class-level variables is the length of time that the class is loaded.
9. Use the Parse methods to convert text values to numeric before perform-ing any calculations.
10. Calculations may be performed using the values of numeric variables, con-stants, and the properties of controls. The result of a calculation may be assigned to a numeric variable or to the property of a control.
11. A calculation operation with more than one operator follows the order of precedence in determining the result of the calculation. Parentheses alter the order of operations.
12. To explicitly convert between numeric data types, use casting or the Con-vert class. Some conversions can be performed implicitly.
13. The decimal.Round method rounds a decimal value to the specified num-ber of decimal positions.
14. The ToString method can be used to specify the appearance of values for display. By using formatting codes, you can specify dollar signs, commas, percent signs, and the number of decimal digits to display. The method rounds values to fit the format.
15. try/catch/finally statements provide a method for checking for user errors such as blank or nonnumeric data or an entry that might result in a calculation error.
16. A run-time error is called an exception ; catching and taking care of excep-tions is called exception handling .
17. You can trap for different types of errors by specifying the exception type on the catch statement, and you can have multiple catch statements to catch more than one type of exception. Each exception is an instance of the Exception class; you can refer to the properties of the Exception object for further information.
Bradley−Millspaugh: Programming in Visual C# 2008
3. Variables, Constants, and Calculations
Text 159© The McGraw−Hill Companies, 2010
C H A P T E R 3 151
18. A message box is a window for displaying information to the user. 19. The Show method of the MessageBox class is overloaded, which means that
the method may be called with different argument lists, called signatures . 20. You can calculate a sum by adding each transaction to a class-level vari-
able. In a similar fashion, you can calculate a count by adding to a class-level variable.
K e y T e r m s argument 119 assignment operator 123 block variable 116 casting 126 class-level variable 116 constant 108 data type 109 declaration 109 decrement operator 124 exception 136 explicit conversion 126 format 128 format specifier codes 128 identifier 108 implicit conversion 125 increment operator 124 intrinsic constant 113
lifetime 116 local variable 116 MessageBox 138 named constant 108 namespace variable 116 nested try/catch
block 141 order of precedence 122 overloading 140 postfix notation 125 prefix notation 124 scope 116 Show method 138 signature 140 string literal 113 try/catch block 136 variable 108
R e v i e w Q u e s t i o n s
1. Name and give the purpose of five data types available in C#. 2. What does declaring a variable mean? 3. What effect does the location of a declaration statement have on the
variable it declares? 4. Explain the difference between a constant and a variable. 5. What is the purpose of the int.Parse method? The decimal.Parse
method? 6. Explain the order of precedence of operators for calculations. 7. What statement(s) can be used to declare a variable? 8. Explain how to make an interest rate stored in rateDecimal display in
rateTextBox as a percentage with three decimal digits. 9. What are implicit conversions? explicit conversions? When would each be
used? 10. When should you use try/catch blocks? Why? 11. What is a message box and when should you use one? 12. Explain why the MessageBox.Show method has multiple signatures. 13. Why must you use class-level variables if you want to accumulate a run-
ning total of transactions?
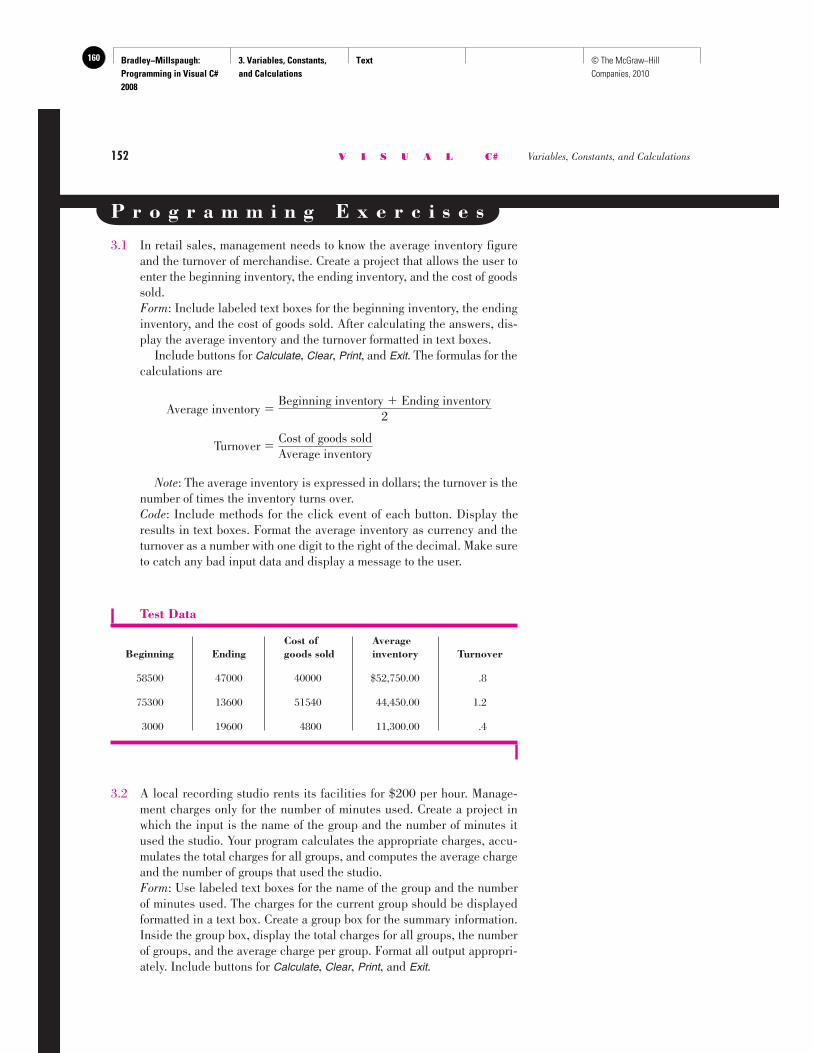
Bradley−Millspaugh: Programming in Visual C# 2008
3. Variables, Constants, and Calculations
Text160 © The McGraw−Hill Companies, 2010
152 V I S U A L C# Variables, Constants, and Calculations
P r o g r a m m i n g E x e r c i s e s
3.1 In retail sales, management needs to know the average inventory figure and the turnover of merchandise. Create a project that allows the user to enter the beginning inventory, the ending inventory, and the cost of goods sold.
Form : Include labeled text boxes for the beginning inventory, the ending inventory, and the cost of goods sold. After calculating the answers, dis-play the average inventory and the turnover formatted in text boxes.
Include buttons for Calculate , Clear , Print , and Exit . The formulas for the calculations are
Average inventory � Beginning inventory � Ending inventory
2
Turnover � Cost of goods soldAverage inventory
Note : The average inventory is expressed in dollars; the turnover is the number of times the inventory turns over.
Code: Include methods for the click event of each button. Display the results in text boxes. Format the average inventory as currency and the turnover as a number with one digit to the right of the decimal. Make sure to catch any bad input data and display a message to the user.
Test Data
Cost of Average Beginning Ending goods sold inventory Turnover
58500 47000 40000 $52,750.00 .8
75300 13600 51540 44,450.00 1.2
3000 19600 4800 11,300.00 .4
3.2 A local recording studio rents its facilities for $200 per hour. Manage-ment charges only for the number of minutes used. Create a project in which the input is the name of the group and the number of minutes it used the studio. Your program calculates the appropriate charges, accu-mulates the total charges for all groups, and computes the average charge and the number of groups that used the studio.
Form : Use labeled text boxes for the name of the group and the number of minutes used. The charges for the current group should be displayed formatted in a text box. Create a group box for the summary information. Inside the group box, display the total charges for all groups, the number of groups, and the average charge per group. Format all output appropri-ately. Include buttons for Calculate, Clear , Print , and Exit .
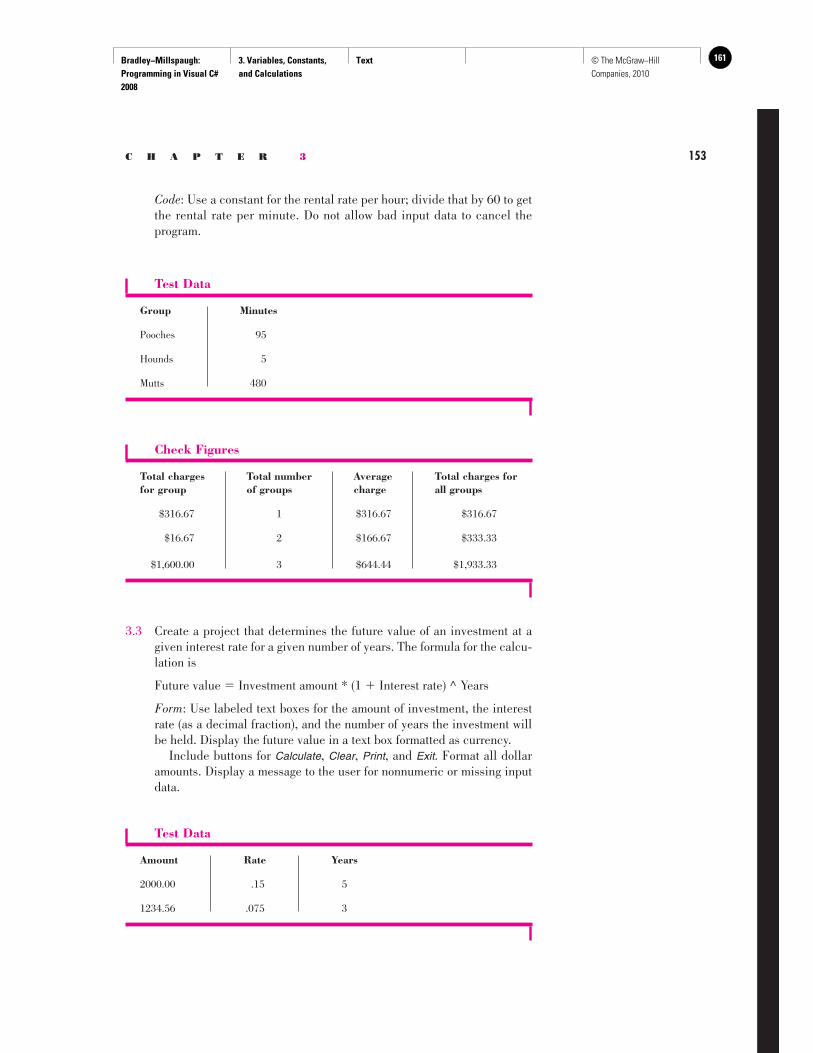
Bradley−Millspaugh: Programming in Visual C# 2008
3. Variables, Constants, and Calculations
Text 161© The McGraw−Hill Companies, 2010
C H A P T E R 3 153
Code : Use a constant for the rental rate per hour; divide that by 60 to get the rental rate per minute. Do not allow bad input data to cancel the program.
Test Data
Group Minutes
Pooches 95
Hounds 5
Mutts 480
3.3 Create a project that determines the future value of an investment at a given interest rate for a given number of years. The formula for the calcu-lation is
Future value � Investment amount * (1 � Interest rate) ^ Years
Form : Use labeled text boxes for the amount of investment, the interest rate (as a decimal fraction), and the number of years the investment will be held. Display the future value in a text box formatted as currency.
Include buttons for Calculate , Clear , Print , and Exit . Format all dollar amounts. Display a message to the user for nonnumeric or missing input data.
Check Figures
Total charges Total number Average Total charges for for group of groups charge all groups
$316.67 1 $316.67 $316.67
$16.67 2 $166.67 $333.33
$1,600.00 3 $644.44 $1,933.33
Test Data
Amount Rate Years
2000.00 .15 5
1234.56 .075 3
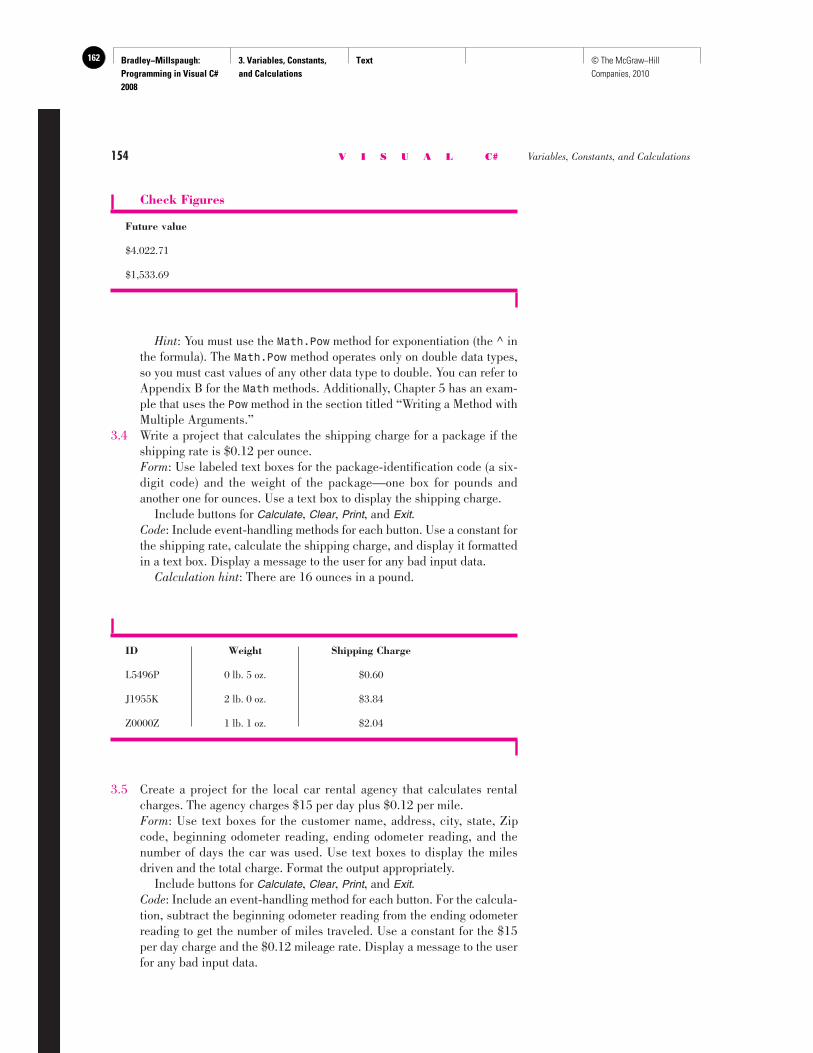
Bradley−Millspaugh: Programming in Visual C# 2008
3. Variables, Constants, and Calculations
Text162 © The McGraw−Hill Companies, 2010
154 V I S U A L C# Variables, Constants, and Calculations
Hint : You must use the Math.Pow method for exponentiation (the ^ in the formula). The Math.Pow method operates only on double data types, so you must cast values of any other data type to double. You can refer to Appendix B for the Math methods. Additionally, Chapter 5 has an exam-ple that uses the Pow method in the section titled “Writing a Method with Multiple Arguments.”
3.4 Write a project that calculates the shipping charge for a package if the shipping rate is $0.12 per ounce.
Form : Use labeled text boxes for the package-identification code (a six-digit code) and the weight of the package—one box for pounds and another one for ounces. Use a text box to display the shipping charge.
Include buttons for Calculate , Clear , Print , and Exit . Code : Include event-handling methods for each button. Use a constant for
the shipping rate, calculate the shipping charge, and display it formatted in a text box. Display a message to the user for any bad input data.
Calculation hint : There are 16 ounces in a pound.
Check Figures
Future value
$4.022.71
$1,533.69
ID Weight Shipping Charge
L5496P 0 lb. 5 oz. $0.60
J1955K 2 lb. 0 oz. $3.84
Z0000Z 1 lb. 1 oz. $2.04
3.5 Create a project for the local car rental agency that calculates rental charges. The agency charges $15 per day plus $0.12 per mile.
Form : Use text boxes for the customer name, address, city, state, Zip code, beginning odometer reading, ending odometer reading, and the number of days the car was used. Use text boxes to display the miles driven and the total charge. Format the output appropriately.
Include buttons for Calculate , Clear , Print , and Exit . Code : Include an event-handling method for each button. For the calcula-
tion, subtract the beginning odometer reading from the ending odometer reading to get the number of miles traveled. Use a constant for the $15 per day charge and the $0.12 mileage rate. Display a message to the user for any bad input data.
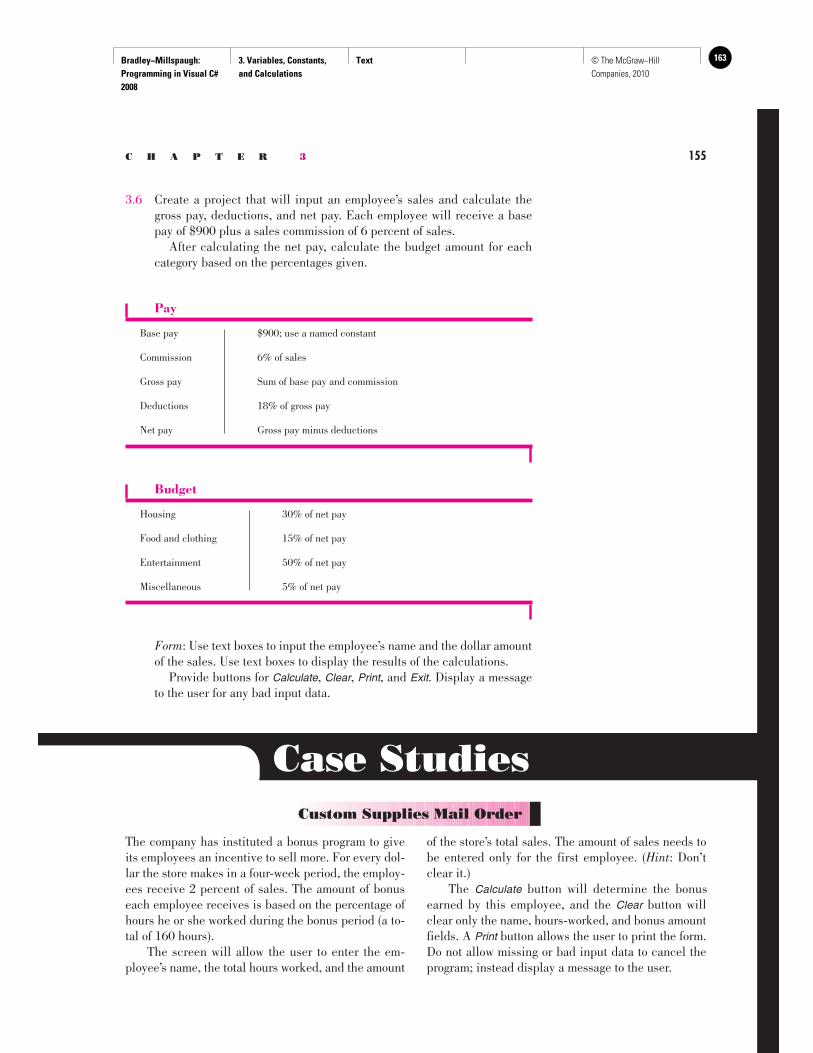
Bradley−Millspaugh: Programming in Visual C# 2008
3. Variables, Constants, and Calculations
Text 163© The McGraw−Hill Companies, 2010
C H A P T E R 3 155
3.6 Create a project that will input an employee’s sales and calculate the gross pay, deductions, and net pay. Each employee will receive a base pay of $900 plus a sales commission of 6 percent of sales.
After calculating the net pay, calculate the budget amount for each category based on the percentages given.
Pay
Base pay $900; use a named constant
Commission 6% of sales
Gross pay Sum of base pay and commission
Deductions 18% of gross pay
Net pay Gross pay minus deductions
Budget
Housing 30% of net pay
Food and clothing 15% of net pay
Entertainment 50% of net pay
Miscellaneous 5% of net pay
Form : Use text boxes to input the employee’s name and the dollar amount of the sales. Use text boxes to display the results of the calculations.
Provide buttons for Calculate , Clear , Print , and Exit . Display a message to the user for any bad input data.
Case Studies Custom Supplies Mail Order
The company has instituted a bonus program to give its employees an incentive to sell more. For every dol-lar the store makes in a four-week period, the employ-ees receive 2 percent of sales. The amount of bonus each employee receives is based on the percentage of hours he or she worked during the bonus period (a to-tal of 160 hours). The screen will allow the user to enter the em-ployee’s name, the total hours worked, and the amount
of the store’s total sales. The amount of sales needs to be entered only for the first employee. ( Hint : Don’t clear it.) The Calculate button will determine the bonus earned by this employee, and the Clear button will clear only the name, hours-worked, and bonus amount fields. A Print button allows the user to print the form. Do not allow missing or bad input data to cancel the program; instead display a message to the user.
Bradley−Millspaugh: Programming in Visual C# 2008
3. Variables, Constants, and Calculations
Text164 © The McGraw−Hill Companies, 2010
156 V I S U A L C# Variables, Constants, and Calculations
Salespeople for used cars are compensated using a commission system. The commission is based on the costs incurred for the vehicle.
Commission � Commission rate * (Sales price � Cost value)
The form will allow the user to enter the salesper-son’s name, the selling price of the vehicle, and the
Christopher’s Car Center
cost value of the vehicle. Use a constant of 20 percent for the commission rate. The Calculate button will determine the com-mission earned by the salesperson; the Clear button will clear the text boxes. A Print button allows the user to print the form. Do not allow bad input data to cancel the program; instead, display a message to the user.
Xtreme Cinema
Design and code a project to calculate the amount due and provide a summary of rentals. All movies rent for $4.50 and all customers receive a 10 percent discount. The form should contain input for the member number and the number of movies rented. Inside a group box, display the rental amount, the 10 percent discount, and the amount due. Inside a second group
box, display the number of customers served and the total rental income (after discount). Include buttons for Calculate , Clear , Print , and Exit . The Clear button clears the information for the current rental but does not clear the summary infor-mation. Do not allow bad input data to cancel the pro-gram; instead, display a message to the user.
Cool Boards
Cool Boards rents snowboards during the snow sea-son. A person can rent a snowboard without boots or with boots. Create a project that will calculate and display the information for each customer’s rentals. In addition, calculate the summary information for each day’s rentals. For each rental, input the person’s name, the driv-er’s license or ID number, the number of snowboards, and the number of snowboards with boots. Snowboards without boots rent for $20; snowboards with boots rent for $30. Calculate and display the charges for snowboards and snowboards with boots, and the rental total. In ad-dition, maintain summary totals. Use constants for the snowboard rental rate and the snowboard with boots rental rate.
Create a summary frame with boxes to indicate the day’s totals for the number of snowboards and snowboards with boots rented, total charges, and aver-age charge per customer. Include buttons for Calculate Order , Clear , Clear All , Print , and Exit . The Clear All button should clear the summary totals to begin a new day’s summary. Hint : You must set each of the summary variables to zero as well as clear the summary boxes. Make your buttons easy to use for keyboard entry. Make the Calculate button the Accept button and the Clear button the Cancel button. Do not allow bad input data to cancel the program; instead, display a message to the user.
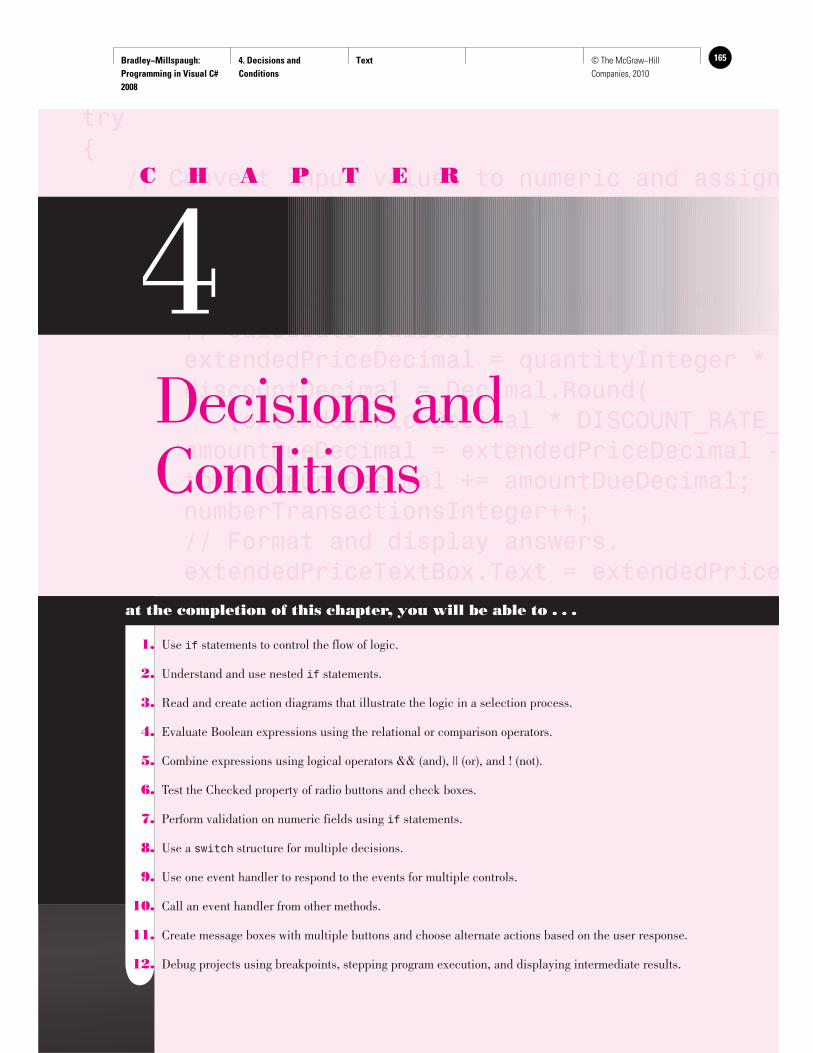
Bradley−Millspaugh: Programming in Visual C# 2008
4. Decisions and Conditions
Text 165© The McGraw−Hill Companies, 2010
try{ // Convert input values to numeric and assign quantityInteger = int.Parse(quantityTextBox.T try { priceDecimal = decimal.Parse(priceTextBox // Calculate values. extendedPriceDecimal = quantityInteger * discountDecimal = Decimal.Round( (extendedPriceDecimal * DISCOUNT_RATE_ amountDueDecimal = extendedPriceDecimal - totalAmountDecimal += amountDueDecimal; numberTransactionsInteger++; // Format and display answers. extendedPriceTextBox.Text = extendedPrice
C H A P T E R
4 Decisions and Conditions
at the completion of this chapter, you will be able to . . .
1. Use if statements to control the flow of logic.
2. Understand and use nested if statements.
3. Read and create action diagrams that illustrate the logic in a selection process.
4. Evaluate Boolean expressions using the relational or comparison operators.
5. Combine expressions using logical operators && (and), || (or), and ! (not).
6. Test the Checked property of radio buttons and check boxes.
7. Perform validation on numeric fields using if statements.
8. Use a switch structure for multiple decisions.
9. Use one event handler to respond to the events for multiple controls.
10. Call an event handler from other methods.
11. Create message boxes with multiple buttons and choose alternate actions based on the user response.
12. Debug projects using breakpoints, stepping program execution, and displaying intermediate results.

Bradley−Millspaugh: Programming in Visual C# 2008
4. Decisions and Conditions
Text166 © The McGraw−Hill Companies, 2010
158 V I S U A L C# Decisions and Conditions
In this chapter, you will learn to write applications that can take one action or another, based on a condition. For example, you may need to keep track of sales separately for different classes of employees, different sections of the country, or different departments. You also will learn alternate techniques for checking the validity of input data and how to display multiple buttons in a message box and take different actions depending on the user response.
F i g u r e 4 . 1
The logic of an if/else statement in Unified Modeling Language (UML) activity diagram form.
Go to class Go to beach
[Sun is not shining] [Sun is shining]
if Statements
A powerful capability of the computer is its ability to make decisions and to take alternate courses of action based on the outcome. A decision made by the computer is formed as a question: Is a given condi-tion true or false? If it is true, do one thing; if it is false, do something else.
if the sun is shining (condition) go to the beach (action to take if condition is true) else go to class (action to take if condition is false) (See Figure 4.1 .)
or
if you don’t succeed (condition) try, try again (action) (See Figure 4.2 .)
F i g u r e 4 . 2
The logic of an if statement without an else action in UML activity diagram form.
Try again
[No success]
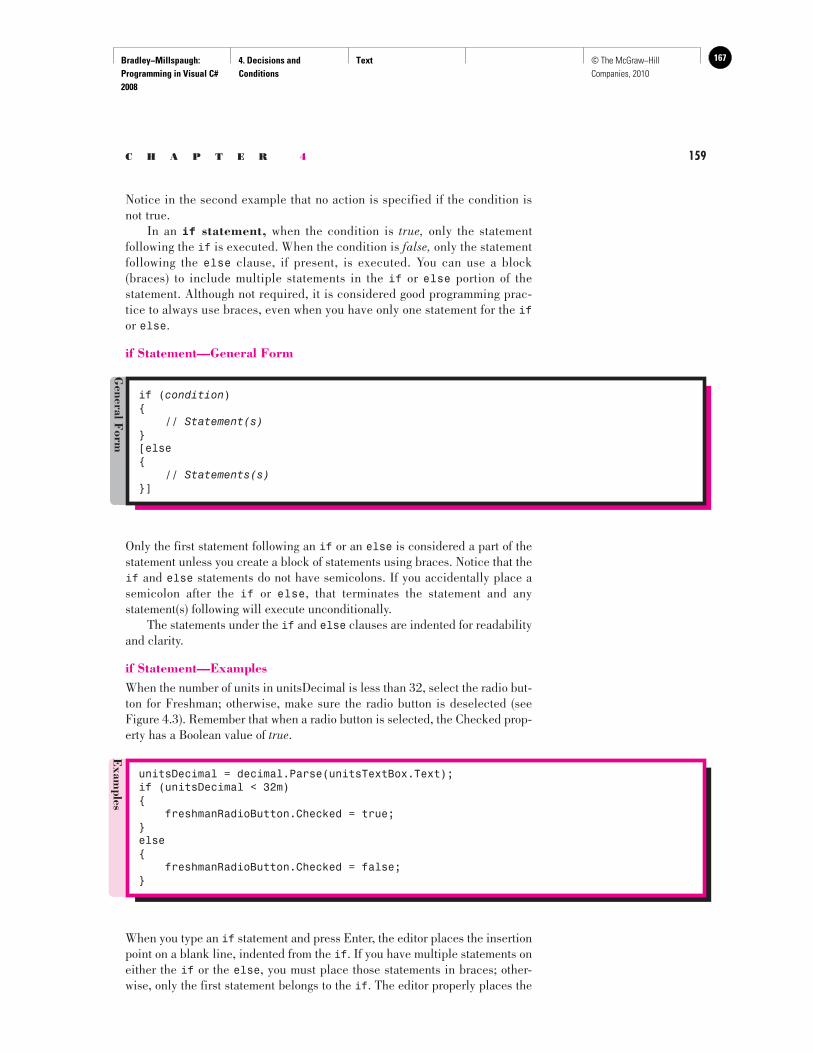
Bradley−Millspaugh: Programming in Visual C# 2008
4. Decisions and Conditions
Text 167© The McGraw−Hill Companies, 2010
C H A P T E R 4 159
Notice in the second example that no action is specified if the condition is not true. In an if statement , when the condition is true, only the statement following the if is executed. When the condition is false, only the statement following the else clause, if present, is executed. You can use a block (braces) to include multiple statements in the if or else portion of the statement. Although not required, it is considered good programming prac-tice to always use braces, even when you have only one statement for the if or else .
if Statement—General Form
if ( condition ){ // Statement(s) }[else{ // Statements(s) }]
General F
orm
Exam
ples
unitsDecimal = decimal.Parse(unitsTextBox.Text);if (unitsDecimal < 32m){ freshmanRadioButton.Checked = true;}else{ freshmanRadioButton.Checked = false;}
Only the first statement following an if or an else is considered a part of the statement unless you create a block of statements using braces. Notice that the if and else statements do not have semicolons. If you accidentally place a semicolon after the if or else , that terminates the statement and any statement(s) following will execute unconditionally. The statements under the if and else clauses are indented for readability and clarity.
if Statement—Examples When the number of units in unitsDecimal is less than 32, select the radio but-ton for Freshman; otherwise, make sure the radio button is deselected (see Figure 4.3 ). Remember that when a radio button is selected, the Checked prop-erty has a Boolean value of true .
When you type an if statement and press Enter, the editor places the insertion point on a blank line, indented from the if . If you have multiple statements on either the if or the else , you must place those statements in braces; other-wise, only the first statement belongs to the if . The editor properly places the
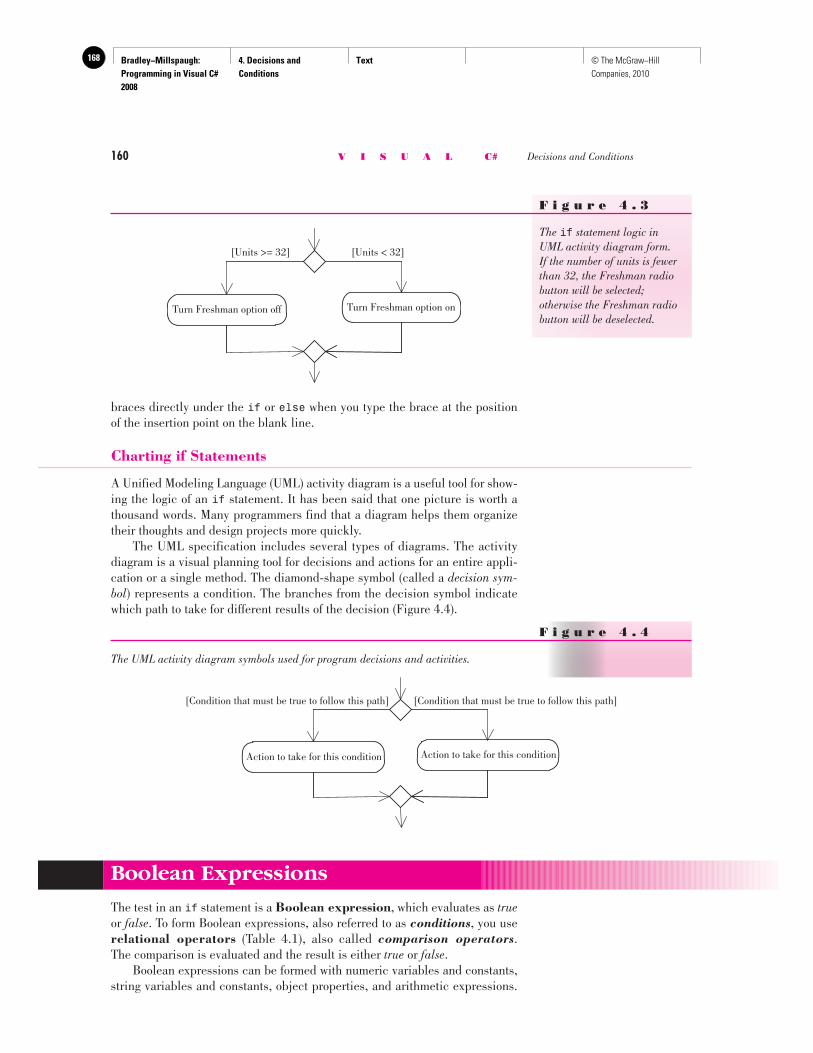
Bradley−Millspaugh: Programming in Visual C# 2008
4. Decisions and Conditions
Text168 © The McGraw−Hill Companies, 2010
160 V I S U A L C# Decisions and Conditions
braces directly under the if or else when you type the brace at the position of the insertion point on the blank line.
Charting if Statements
A Unified Modeling Language (UML) activity diagram is a useful tool for show-ing the logic of an if statement. It has been said that one picture is worth a thousand words. Many programmers find that a diagram helps them organize their thoughts and design projects more quickly. The UML specification includes several types of diagrams. The activity diagram is a visual planning tool for decisions and actions for an entire appli-cation or a single method. The diamond-shape symbol (called a decision sym-bol ) represents a condition. The branches from the decision symbol indicate which path to take for different results of the decision ( Figure 4.4 ).
F i g u r e 4 . 3
The if statement logic in UML activity diagram form. If the number of units is fewer than 32, the Freshman radio button will be selected; otherwise the Freshman radio button will be deselected.
Turn Freshman option off Turn Freshman option on
[Units >= 32] [Units < 32]
F i g u r e 4 . 4
The UML activity diagram symbols used for program decisions and activities.
Action to take for this condition Action to take for this condition
[Condition that must be true to follow this path] [Condition that must be true to follow this path]
Boolean Expressions
The test in an if statement is a Boolean expression , which evaluates as true or false . To form Boolean expressions, also referred to as conditions , you use relational operators ( Table 4.1 ), also called comparison operators . The comparison is evaluated and the result is either true or false . Boolean expressions can be formed with numeric variables and constants, string variables and constants, object properties, and arithmetic expressions.
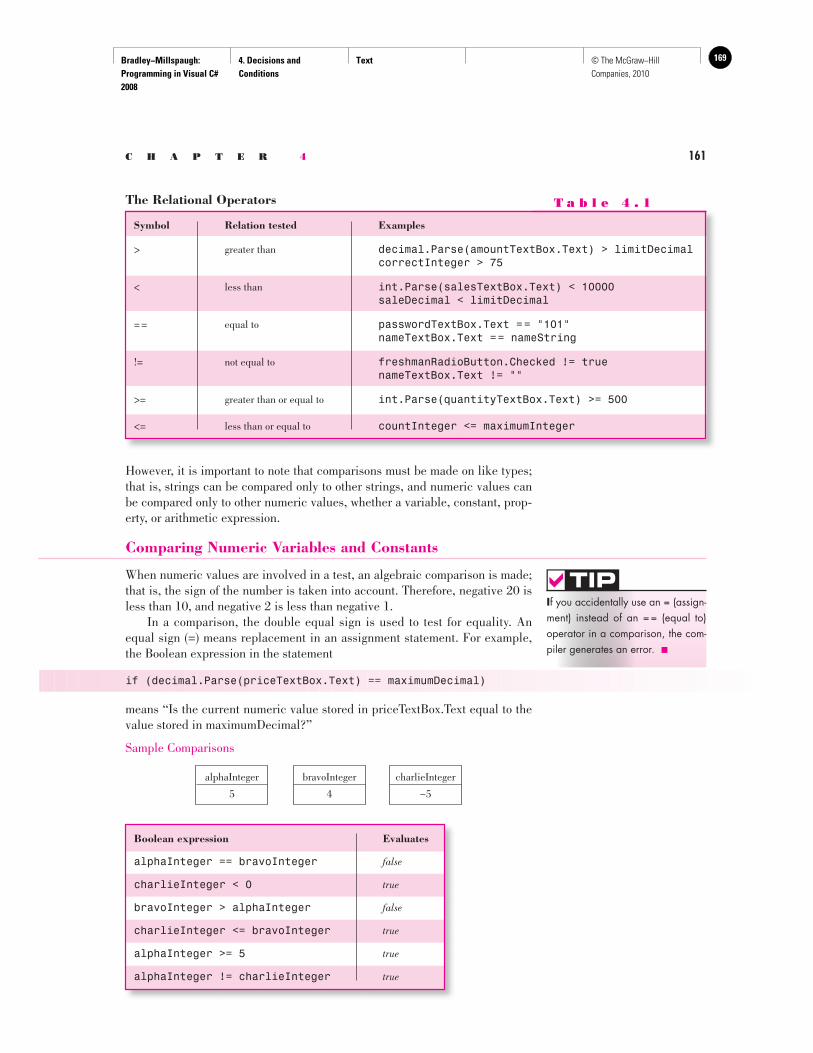
Bradley−Millspaugh: Programming in Visual C# 2008
4. Decisions and Conditions
Text 169© The McGraw−Hill Companies, 2010
C H A P T E R 4 161
The Relational Operators T a b l e 4 . 1
Symbol Relation tested Examples
> greater than decimal.Parse(amountTextBox.Text) > limitDecimal correctInteger > 75
< less than int.Parse(salesTextBox.Text) < 10000 saleDecimal < limitDecimal
= = equal to passwordTextBox.Text = = "101" nameTextBox.Text = = nameString
!= not equal to freshmanRadioButton.Checked != true nameTextBox.Text != ""
>= greater than or equal to int.Parse(quantityTextBox.Text) >= 500
<= less than or equal to countInteger <= maximumInteger
However, it is important to note that comparisons must be made on like types; that is, strings can be compared only to other strings, and numeric values can be compared only to other numeric values, whether a variable, constant, prop-erty, or arithmetic expression.
Comparing Numeric Variables and Constants
When numeric values are involved in a test, an algebraic comparison is made; that is, the sign of the number is taken into account. Therefore, negative 20 is less than 10, and negative 2 is less than negative 1. In a comparison, the double equal sign is used to test for equality. An equal sign (=) means replacement in an assignment statement. For example, the Boolean expression in the statement
if (decimal.Parse(priceTextBox.Text) == maximumDecimal)
means “Is the current numeric value stored in priceTextBox.Text equal to the value stored in maximumDecimal?”
Sample Comparisons
I f you accidentally use an = (assign-ment) instead of an = = (equal to) operator in a comparison, the com-piler generates an error. ■
TIP
alphaInteger
5
bravoInteger
4
charlieInteger
−5
Boolean expression Evaluates
alphaInteger == bravoInteger false
charlieInteger < 0 true
bravoInteger > alphaInteger false
charlieInteger <= bravoInteger true
alphaInteger >= 5 true
alphaInteger != charlieInteger true
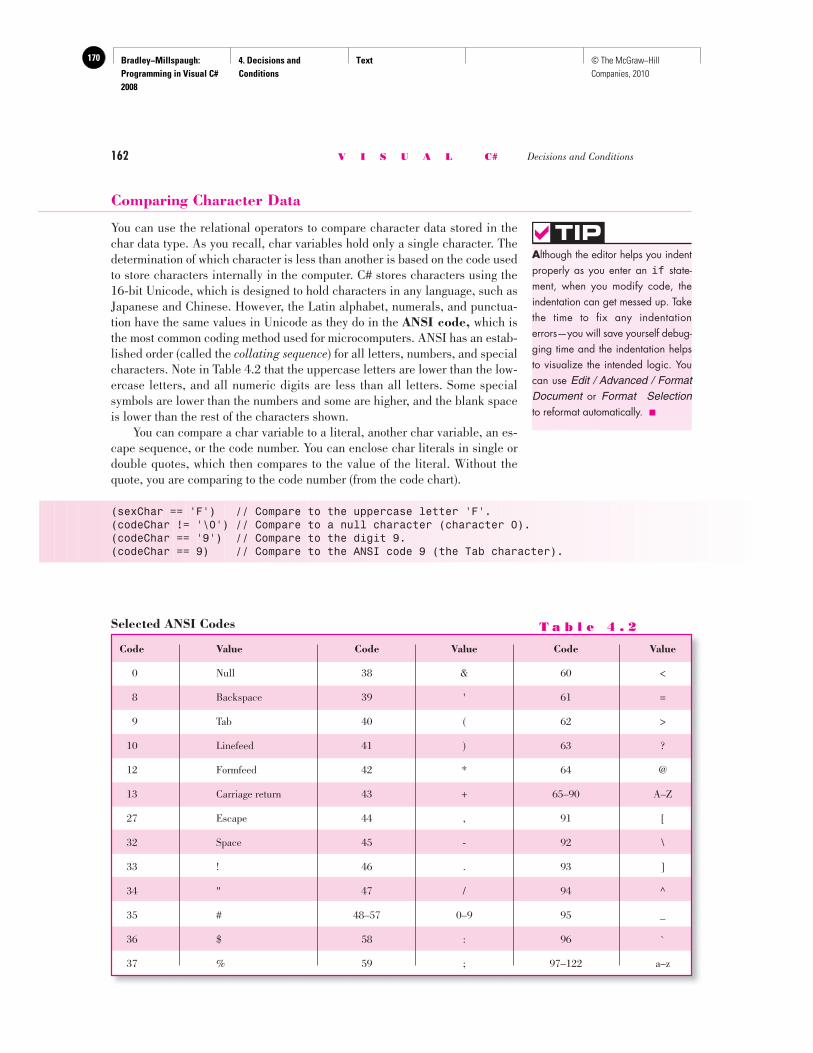
Bradley−Millspaugh: Programming in Visual C# 2008
4. Decisions and Conditions
Text170 © The McGraw−Hill Companies, 2010
162 V I S U A L C# Decisions and Conditions
Comparing Character Data
You can use the relational operators to compare character data stored in the char data type. As you recall, char variables hold only a single character. The determination of which character is less than another is based on the code used to store characters internally in the computer. C# stores characters using the 16-bit Unicode, which is designed to hold characters in any language, such as Japanese and Chinese. However, the Latin alphabet, numerals, and punctua-tion have the same values in Unicode as they do in the ANSI code , which is the most common coding method used for microcomputers. ANSI has an estab-lished order (called the collating sequence ) for all letters, numbers, and special characters. Note in Table 4.2 that the uppercase letters are lower than the low-ercase letters, and all numeric digits are less than all letters. Some special symbols are lower than the numbers and some are higher, and the blank space is lower than the rest of the characters shown. You can compare a char variable to a literal, another char variable, an es-cape sequence, or the code number. You can enclose char literals in single or double quotes, which then compares to the value of the literal. Without the quote, you are comparing to the code number (from the code chart).
(sexChar == 'F') // Compare to the uppercase letter 'F'. (codeChar != '\0') // Compare to a null character (character 0). (codeChar == '9') // Compare to the digit 9. (codeChar == 9) // Compare to the ANSI code 9 (the Tab character).
A lthough the editor helps you indent properly as you enter an if state-ment, when you modify code, the indentation can get messed up. Take the time to fix any indentation errors—you will save yourself debug-ging time and the indentation helps to visualize the intended logic. You can use Edit / Advanced / Format Document or Format Selection to reformat automatically. ■
TIP
Selected ANSI Codes T a b l e 4 . 2
Code Value Code Value Code Value
0 Null 38 & 60 <
8 Backspace 39 ' 61 =
9 Tab 40 ( 62 >
10 Linefeed 41 ) 63 ?
12 Formfeed 42 * 64 @
13 Carriage return 43 + 65–90 A–Z
27 Escape 44 , 91 [
32 Space 45 - 92 \
33 ! 46 . 93 ]
34 " 47 / 94 ̂
35 # 48–57 0–9 95 _
36 $ 58 : 96 ̀
37 % 59 ; 97–122 a–z
Bradley−Millspaugh: Programming in Visual C# 2008
4. Decisions and Conditions
Text 171© The McGraw−Hill Companies, 2010
C H A P T E R 4 163
Examples
char upperCaseChar = 'C'; char lowerCaseChar = 'c';
The expression (lowerCaseChar > upperCaseChar) is true because the ANSI code for ' C' is 67, while the code for ' c ' is 99.
char questionMarkChar = '?'; char exclamationChar = '!';
The expression (questionMarkChar < exclamationChar) is false because the ANSI code for ' ? ' is 63 while the ANSI code for ' !' is 33.
Comparing Strings
You can use the equal to ( = = ) and not equal to ( ! = ) relational operators for comparing strings. The comparison begins with the leftmost character and pro-ceeds one character at a time from left to right. As soon as a character in one string is not equal to the corresponding character in the second string, the com-parison is terminated and the Boolean expression returns false .
Example
string name1String = "Joan"; string name2String = "John";
The expression
if (name1String = = name2String)
evaluates to false . The a in Joan is lower ranking than the h in John. However, when you need to compare for less than or greater than, such as arranging strings alphabetically, you cannot use the relational operators, but you can use the CompareTo method.
The CompareTo Method Use the CompareTo method to determine less than or greater than . The CompareTo method returns an integer with one of three possible values.
aString.CompareTo(bString)
If the two strings are equal, the method returns zero; when aString is greater than bString, a positive number returns. A negative number is returned when bString is greater than aString. To use this method effectively, you can set up a condition using the return value and a relational operator.
if (aString.CompareTo(bString) = = 0) // Are the strings equal? if (aString.CompareTo(bString) != 0) // Are the strings different? if (aString.CompareTo(bString) > 0) // Is aString greater than bString?
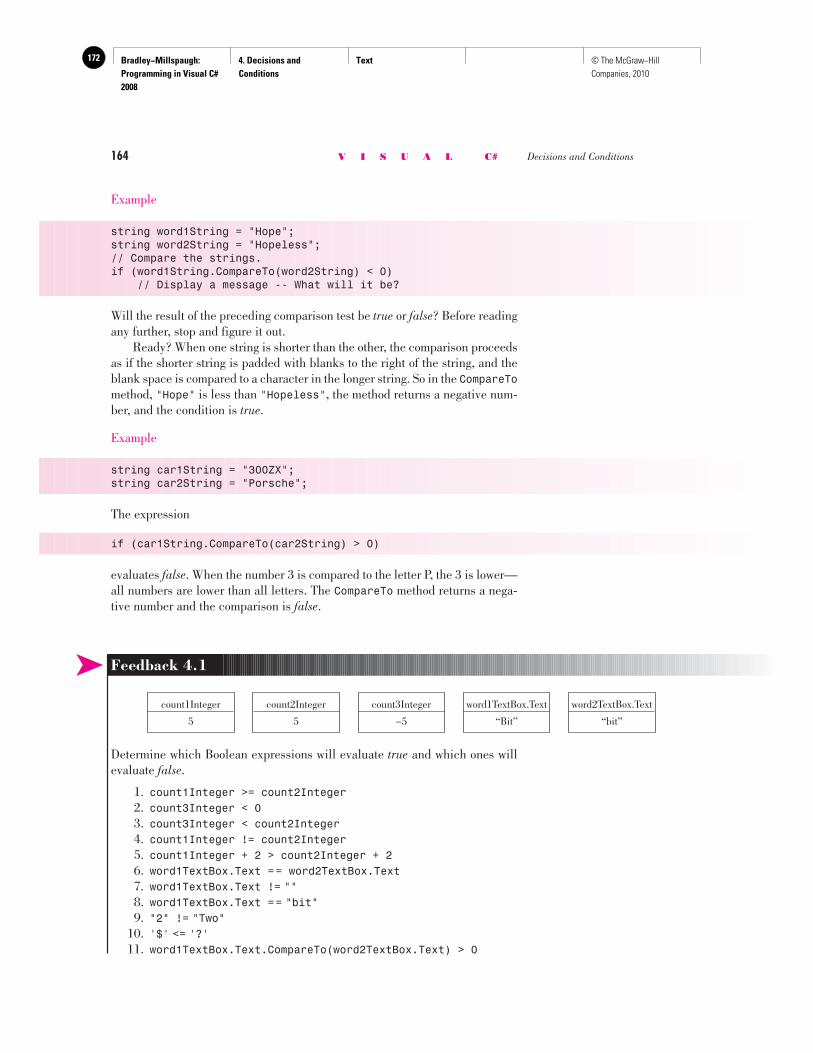
Bradley−Millspaugh: Programming in Visual C# 2008
4. Decisions and Conditions
Text172 © The McGraw−Hill Companies, 2010
164 V I S U A L C# Decisions and Conditions
Example
string word1String = "Hope";string word2String = "Hopeless";// Compare the strings.if (word1String.CompareTo(word2String) < 0) // Display a message -- What will it be?
Will the result of the preceding comparison test be true or false ? Before reading any further, stop and figure it out. Ready? When one string is shorter than the other, the comparison proceeds as if the shorter string is padded with blanks to the right of the string, and the blank space is compared to a character in the longer string. So in the CompareTo method, " Hope" is less than " Hopeless" , the method returns a negative num-ber, and the condition is true .
Example
string car1String = "300ZX"; string car2String = "Porsche";
The expression
if (car1String.CompareTo(car2String) > 0)
evaluates false . When the number 3 is compared to the letter P, the 3 is lower—all numbers are lower than all letters. The CompareTo method returns a nega-tive number and the comparison is false .
➤ Feedback 4.1
Determine which Boolean expressions will evaluate true and which ones will evaluate false .
1. count1Integer >= count2Integer 2. count3Integer < 0 3. count3Integer < count2Integer 4. count1Integer != count2Integer 5. count1Integer + 2 > count2Integer + 2 6. word1TextBox.Text = = word2TextBox.Text 7. word1TextBox.Text != "" 8. word1TextBox.Text = = " bit" 9. " 2 " != " Two " 10. ' $ ' <= ' ? ' 11. word1TextBox.Text.CompareTo(word2TextBox.Text) > 0
count1Integer
5
count2Integer
5
count3Integer
−5
word1TextBox.Text
“Bit”
word2TextBox.Text
“bit”
Bradley−Millspaugh: Programming in Visual C# 2008
4. Decisions and Conditions
Text 173© The McGraw−Hill Companies, 2010
C H A P T E R 4 165
Testing for True or False
You can use shortcuts when testing for true or false . C# evaluates the expres-sion in an if statement. If the condition is a Boolean variable or property, it holds the values true or false .
Example
if (blueRadioButton.Checked = = true)
is equivalent to
if (blueRadioButton.Checked)
Comparing Uppercase and Lowercase Characters
When comparing strings, the case of the characters is important. An uppercase Y is not equal to a lowercase y . Because the user may type a name or word in uppercase, in lowercase, or as a combination of cases, we must check user in-put for all possibilities. The best way is to use the ToUpper and ToLower methods of the string class, which return the uppercase or lowercase equiva-lent of a string, respectively.
The ToUpper and ToLower Methods—General Form
The ToUpper and ToLower Methods—Examples
TextString .ToUpper() TextString .ToLower()
General
Form
E
xamples
nameTextBox.Text Value nameTextBox.Text.ToUpper() nameTextBox.Text.ToLower()
Richard RICHARD richard
PROGRAMMING PROGRAMMING programming
Robert Jones ROBERT JONES robert jones
hello HELLO hello
An example of a Boolean expression using the ToUpper method follows.
if (nameTextBox.Text.ToUpper() = = "PROGRAMMING"){ // Do something.}
Bradley−Millspaugh: Programming in Visual C# 2008
4. Decisions and Conditions
Text174 © The McGraw−Hill Companies, 2010
166 V I S U A L C# Decisions and Conditions
Note that when you convert nameTextBox.Text to uppercase, you must compare it to an uppercase literal (“PROGRAMMING”) if you want it to evalu-ate as true .
Compound Boolean Expressions
You can use compound Boolean expressions to test more than one condition. Create compound expressions by joining conditions with logical operators , which compare each expression and return a boolean result. The logical opera-tors are || (or), && (and), and ! (not).
Logicaloperator Meaning Example Explanation
|| (or) If one expression int.Parse(numberLabel.Text) = = 1 || Evaluates true when or both expressions int.Parse(numberLabel.Text) = = 2 numberLabel.Text is either are true , the entire “1” or “2”. expression is true .
&& (and) Both expressions int.Parse(numberTextBox.Text) > 0 && Evaluates true when must be true for the int.Parse(numberTextBox.Text) < 10 numberTextBox.Text is entire expression to “1”, “2”, “3”, “4”, “5”, be true . “6”, “7”, “8”, or “9”.
! (not) Reverses the Boolean ! foundBool Evaluates true when the expression so that a true Boolean value is false . expression will evaluate false and vice versa.
Compound Boolean Expression Examples
Exam
ples if (maleRadioButton.Checked && int.Parse(ageTextBox.Text) < 21){ minorMaleCountInteger++;}if (juniorRadioButton.Checked || seniorRadioButton.Checked){ upperClassmanInteger++;}
The first example requires that both the radio button test and the age test be true for the count to be incremented. In the second example, only one of the conditions must be true. One caution when using compound Boolean expressions: Each side of the logical operator must be a complete expression. For example,
countInteger > 10 || < 0
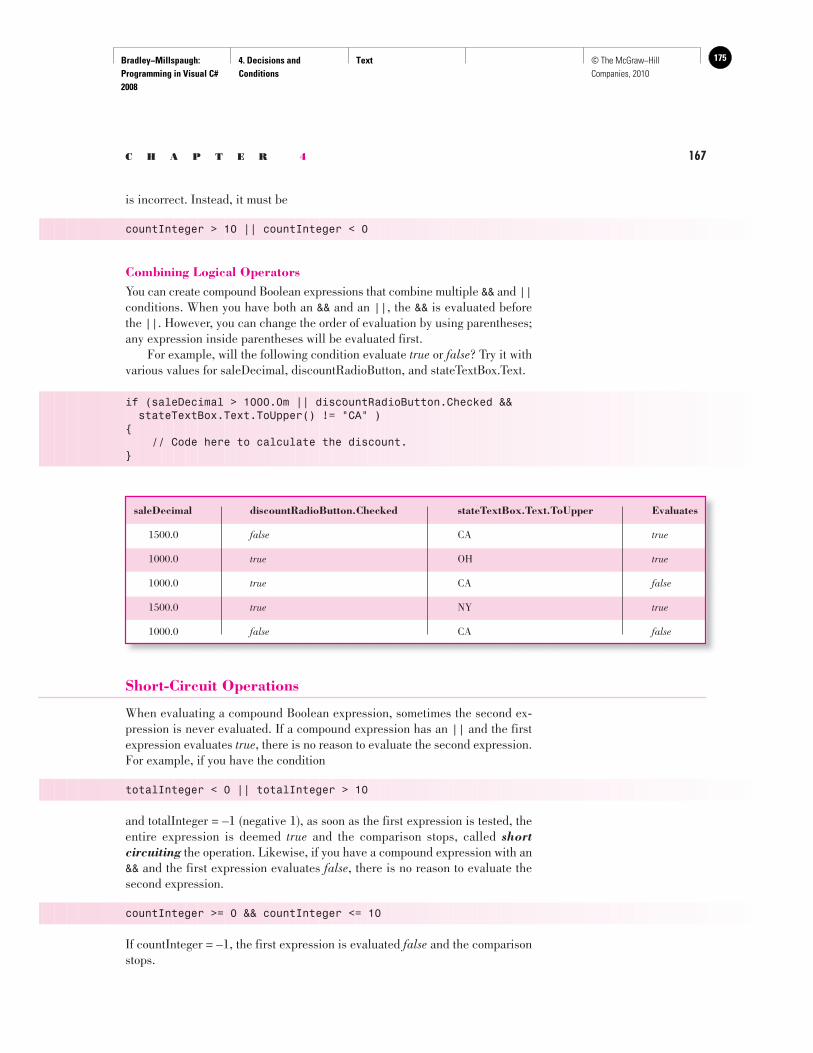
Bradley−Millspaugh: Programming in Visual C# 2008
4. Decisions and Conditions
Text 175© The McGraw−Hill Companies, 2010
C H A P T E R 4 167
is incorrect. Instead, it must be
countInteger > 10 || countInteger < 0
Combining Logical Operators You can create compound Boolean expressions that combine multiple && and || conditions. When you have both an && and an || , the && is evaluated before the || . However, you can change the order of evaluation by using parentheses; any expression inside parentheses will be evaluated first. For example, will the following condition evaluate true or false ? Try it with various values for saleDecimal, discountRadioButton, and stateTextBox.Text.
if (saleDecimal > 1000.0m || discountRadioButton.Checked && stateTextBox.Text.ToUpper() != "CA" ){ // Code here to calculate the discount.}
saleDecimal discountRadioButton.Checked stateTextBox.Text.ToUpper Evaluates
1500.0 false CA true
1000.0 true OH true
1000.0 true CA false
1500.0 true NY true
1000.0 false CA false
Short-Circuit Operations
When evaluating a compound Boolean expression, sometimes the second ex-pression is never evaluated. If a compound expression has an || and the first expression evaluates true, there is no reason to evaluate the second expression. For example, if you have the condition
totalInteger < 0 || totalInteger > 10
and totalInteger = –1 (negative 1), as soon as the first expression is tested, the entire expression is deemed true and the comparison stops, called short circuiting the operation. Likewise, if you have a compound expression with an && and the first expression evaluates false, there is no reason to evaluate the second expression.
countInteger >= 0 && countInteger <= 10
If countInteger = –1, the first expression is evaluated false and the comparison stops.
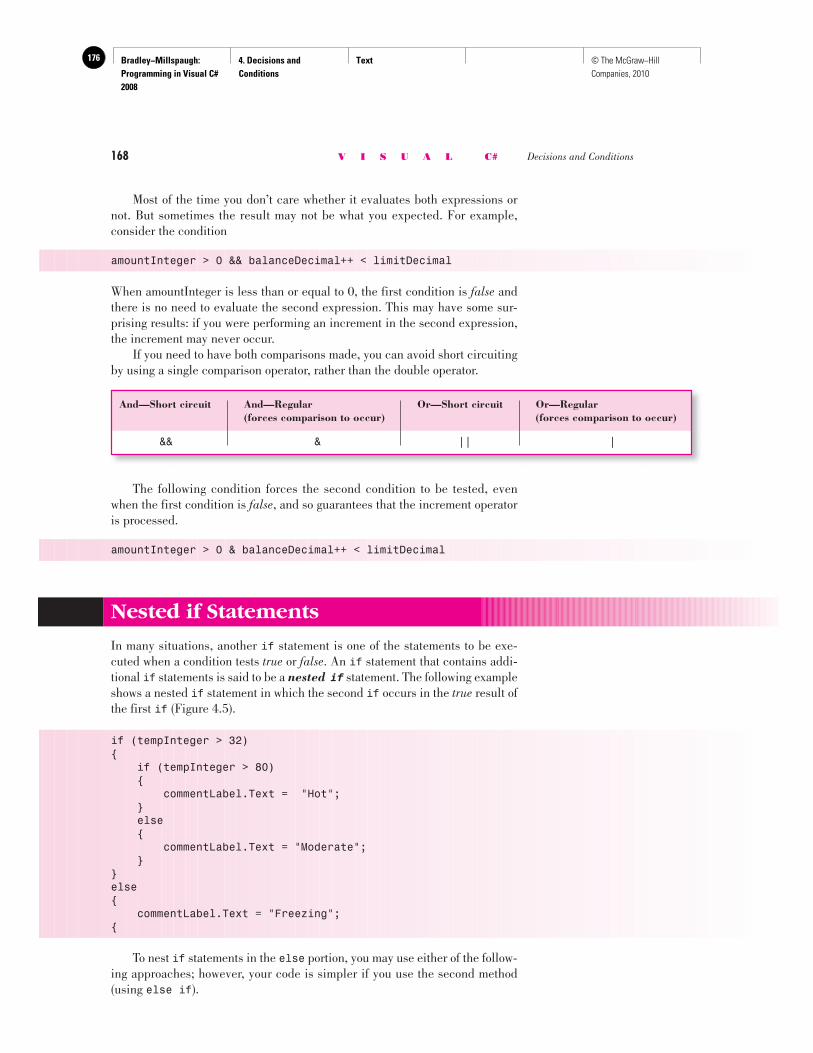
Bradley−Millspaugh: Programming in Visual C# 2008
4. Decisions and Conditions
Text176 © The McGraw−Hill Companies, 2010
168 V I S U A L C# Decisions and Conditions
Most of the time you don’t care whether it evaluates both expressions or not. But sometimes the result may not be what you expected. For example, consider the condition
amountInteger > 0 && balanceDecimal++ < limitDecimal
When amountInteger is less than or equal to 0, the first condition is false and there is no need to evaluate the second expression. This may have some sur-prising results: if you were performing an increment in the second expression, the increment may never occur. If you need to have both comparisons made, you can avoid short circuiting by using a single comparison operator, rather than the double operator.
The following condition forces the second condition to be tested, even when the first condition is false, and so guarantees that the increment operator is processed.
amountInteger > 0 & balanceDecimal++ < limitDecimal
And—Short circuit And—Regular Or—Short circuit Or—Regular (forces comparison to occur) (forces comparison to occur)
&& & || |
Nested if Statements
In many situations, another if statement is one of the statements to be exe-cuted when a condition tests true or false . An if statement that contains addi-tional if statements is said to be a nested if statement. The following example shows a nested if statement in which the second if occurs in the true result of the first if ( Figure 4.5 ).
if (tempInteger > 32){ if (tempInteger > 80) { commentLabel.Text = "Hot"; } else { commentLabel.Text = "Moderate"; }}else{ commentLabel.Text = "Freezing";{
To nest if statements in the else portion, you may use either of the follow-ing approaches; however, your code is simpler if you use the second method (using else if ).
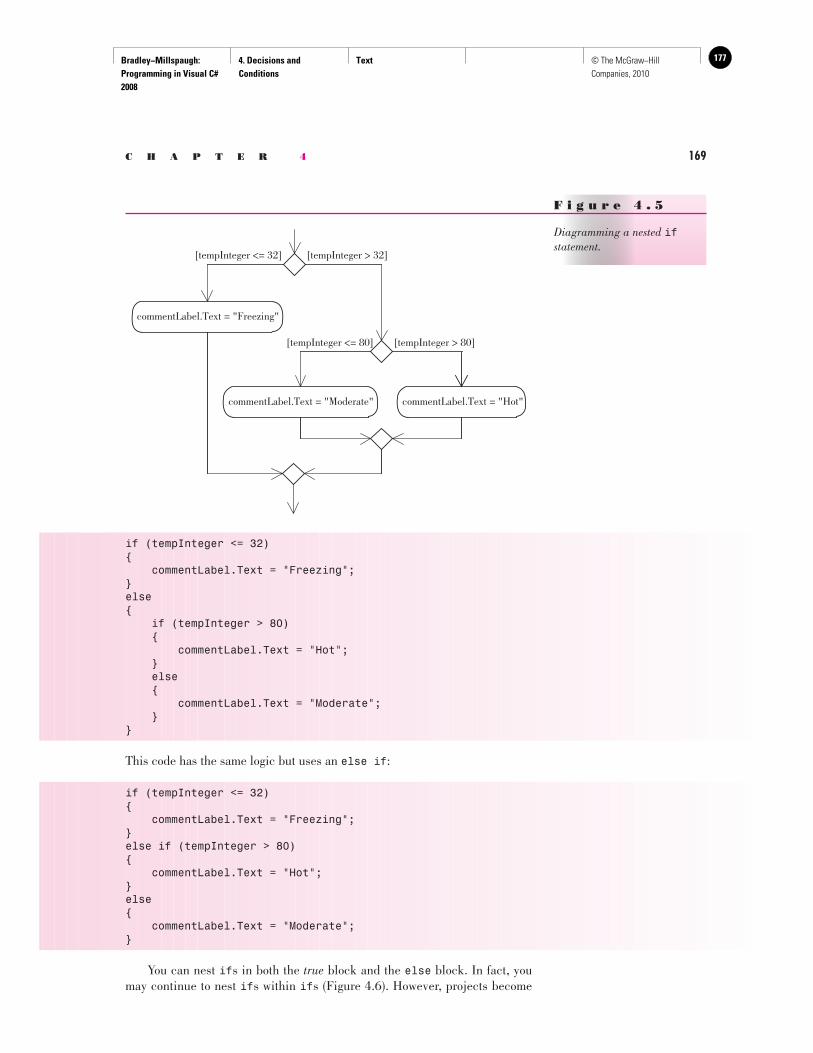
Bradley−Millspaugh: Programming in Visual C# 2008
4. Decisions and Conditions
Text 177© The McGraw−Hill Companies, 2010
C H A P T E R 4 169
if (tempInteger <= 32){ commentLabel.Text = "Freezing";}else{ if (tempInteger > 80) { commentLabel.Text = "Hot"; } else { commentLabel.Text = "Moderate"; }}
This code has the same logic but uses an else if :
if (tempInteger <= 32){ commentLabel.Text = "Freezing";}else if (tempInteger > 80){ commentLabel.Text = "Hot";}else{ commentLabel.Text = "Moderate";}
You can nest if s in both the true block and the else block. In fact, you may continue to nest if s within if s ( Figure 4.6 ). However, projects become
commentLabel.Text = "Freezing"
commentLabel.Text = "Hot"
[tempInteger <= 32] [tempInteger > 32]
[tempInteger > 80]
commentLabel.Text = "Moderate"
[tempInteger <= 80]
F i g u r e 4 . 5
Diagramming a nested if statement.
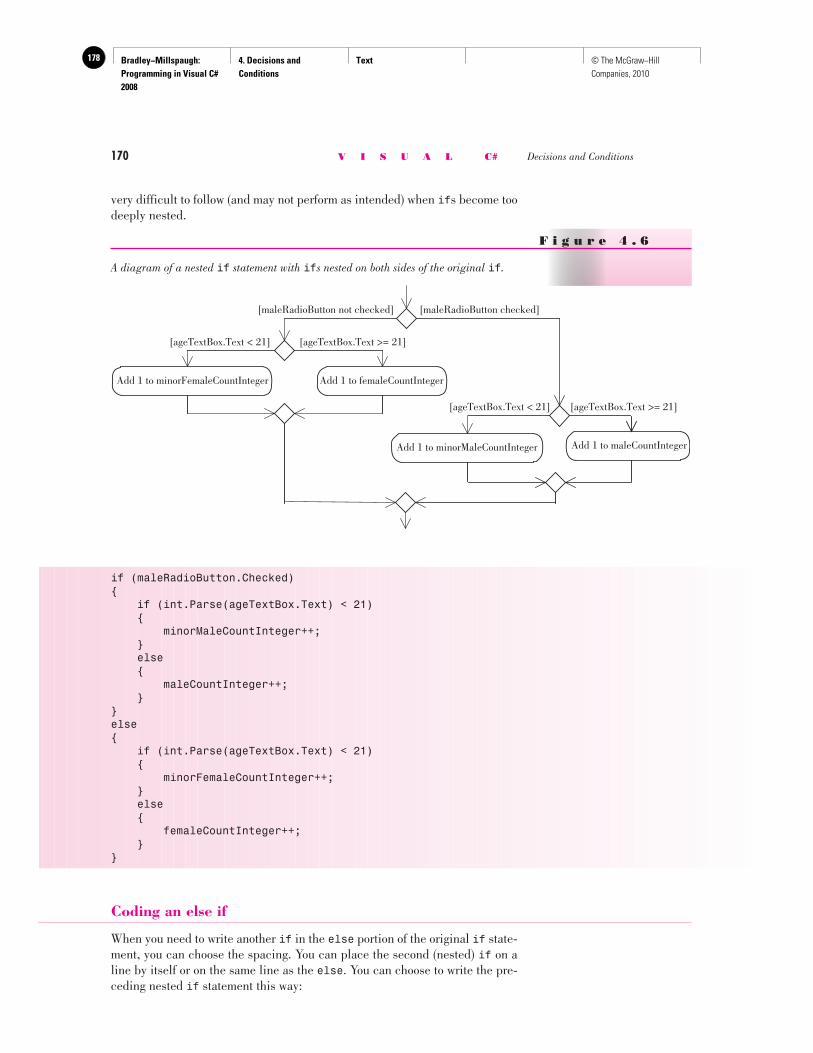
Bradley−Millspaugh: Programming in Visual C# 2008
4. Decisions and Conditions
Text178 © The McGraw−Hill Companies, 2010
170 V I S U A L C# Decisions and Conditions
if (maleRadioButton.Checked){ if (int.Parse(ageTextBox.Text) < 21) { minorMaleCountInteger++; } else { maleCountInteger++; }}else{ if (int.Parse(ageTextBox.Text) < 21) { minorFemaleCountInteger++; } else { femaleCountInteger++; }}
F i g u r e 4 . 6
A diagram of a nested if statement with if s nested on both sides of the original if .
Add 1 to minorFemaleCountInteger
Add 1 to maleCountInteger
[maleRadioButton not checked] [maleRadioButton checked]
[ageTextBox.Text >= 21]
Add 1 to minorMaleCountInteger
[ageTextBox.Text < 21]
Add 1 to femaleCountInteger
[ageTextBox.Text >= 21][ageTextBox.Text < 21]
very difficult to follow (and may not perform as intended) when if s become too deeply nested.
Coding an else if
When you need to write another if in the else portion of the original if state-ment, you can choose the spacing. You can place the second (nested) if on a line by itself or on the same line as the else . You can choose to write the pre-ceding nested if statement this way:
Bradley−Millspaugh: Programming in Visual C# 2008
4. Decisions and Conditions
Text 179© The McGraw−Hill Companies, 2010
C H A P T E R 4 171
if (maleRadioButton.Checked){ if (int.Parse(ageTextBox.Text) < 21) { minorMaleCountInteger++; } else { maleCountInteger++; }}else if (int.Parse(ageTextBox.Text) < 21){ minorFemaleCountInteger++;}else{ femaleCountInteger++;}
Notice that the indentation changes when you write else if on one line, and the logic of the entire nested if may not be quite as clear. Most program-mers code else if on one line when they must test multiple conditions.
if (twelveOunceRadioButton.Checked){ itemPriceDecimal = 3m;}else if (sixteenOunceRadioButton.Checked){ itemPriceDecimal = 3.5m;}else if (twentyOunceRadioButton.Checked){ itemPriceDecimal = 4m;else{ MessageBox.Show("Select the desired size", "Required Entry");}
➤ Feedback 4.2 Assume that frogsInteger = 10 , toadsInteger = 5 , and polliwogsInteger = 6 . What will be displayed for each of the following statements?
1. if (frogsInteger > polliwogsInteger) { frogsRadioButton.Checked = true; } else { polliwogsRadioButton.Checked = true; }
Bradley−Millspaugh: Programming in Visual C# 2008
4. Decisions and Conditions
Text180 © The McGraw−Hill Companies, 2010
172 V I S U A L C# Decisions and Conditions
2. if (frogsInteger > toadsInteger + polliwogsInteger) { resultLabel.Text = "It's the frogs"; } else { resultLabel.Text = "It's the toads and the polliwogs"; } 3. if (polliwogsInteger > toadsInteger && frogsInteger != 0 || toadsInteger == 0) { resultLabel.Text = "It's true"; } else { resultLabel.Text = "It's false"; } 4. Write the statements necessary to compare the numeric values stored
in applesTextBox.Text and orangesTextBox.Text. Display in most TextBox.Text which has more, the apples or the oranges, or a tie.
5. Write the statements that will test the current value of balanceDecimal. When balanceDecimal is greater than zero, the check box for Funds Available, called fundsCheckBox, should be selected, balanceDecimal is set back to zero, and countInteger is incremented by one. When balanceDecimal is zero or less, fundsCheckBox should not be selected (do not change the value of balanceDecimal or increment the counter).
Using if Statements with Radio Buttons and Check Boxes
In Chapter 2 you used the CheckedChanged event for radio buttons and check boxes to carry out the desired action. Now that you can use if state-ments, you should not take action in the CheckedChanged event handlers for these controls. Instead, use if statements to determine which options are selected. To conform to good programming practice and make your programs consis-tent with standard Windows applications, place your code in the Click event handler of buttons, such as an OK button or an Apply button. For example, refer to the Visual Studio Options dialog box ( Figure 4.7 ); no action will occur when you click on a radio button or check box. Instead, when you click on the OK button, VS checks to see which options are selected. In an application such as the radio button project in Chapter 2 (refer to Figure 2.23), you could modify the code for the button to include code similar to the following:
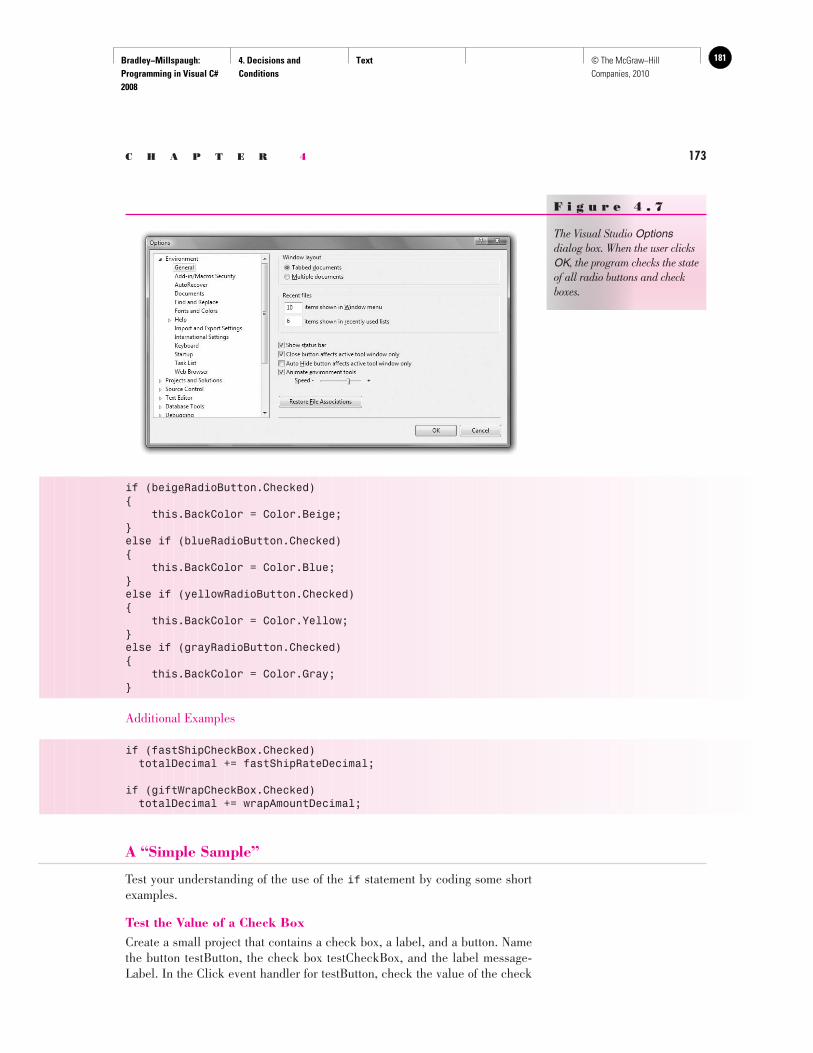
Bradley−Millspaugh: Programming in Visual C# 2008
4. Decisions and Conditions
Text 181© The McGraw−Hill Companies, 2010
C H A P T E R 4 173
if (beigeRadioButton.Checked){ this.BackColor = Color.Beige;}else if (blueRadioButton.Checked){ this.BackColor = Color.Blue;}else if (yellowRadioButton.Checked){ this.BackColor = Color.Yellow;}else if (grayRadioButton.Checked){ this.BackColor = Color.Gray;}
Additional Examples
if (fastShipCheckBox.Checked) totalDecimal += fastShipRateDecimal;
if (giftWrapCheckBox.Checked) totalDecimal += wrapAmountDecimal;
A “Simple Sample”
Test your understanding of the use of the if statement by coding some short examples.
Test the Value of a Check Box Create a small project that contains a check box, a label, and a button. Name the button testButton, the check box testCheckBox, and the label message-Label. In the Click event handler for testButton, check the value of the check
F i g u r e 4 . 7
The Visual Studio Options dialog box. When the user clicks OK, the program checks the state of all radio buttons and check boxes.
Bradley−Millspaugh: Programming in Visual C# 2008
4. Decisions and Conditions
Text182 © The McGraw−Hill Companies, 2010
174 V I S U A L C# Decisions and Conditions
box. If the check box is currently checked, display “Check box is checked” in messageLabel.
private void testButton_Click(object sender, EventArgs e){ // Test the value of the check box. if (testCheckBox.Checked) { messageLabel.Text = "Check box is checked."; }}
Test your project. When it works, add an else to the code that displays “Check box is not checked”.
Test the State of Radio Buttons Remove the check box from the previous project and replace it with two radio buttons, named freshmanRadioButton and sophomoreRadioButton and labeled “< 30 units” and “>= 30 units”. Now change the if statement to display “Freshman” or “Sophomore” in the label.
if (freshmanRadioButton.Checked){ messageLabel.Text = "Freshman";}else{ messageLabel.Text = "Sophomore";}
Can you modify the sample to work for Freshman, Sophomore, Junior, and Senior? In the sections that follow, you will see code for testing multiple radio buttons and check boxes.
Checking the State of a Radio Button Group
Nested if statements work very well for determining which button of a radio button group is selected. Recall that in any group of radio buttons, only one button can be selected. Assume that your form has a group of radio buttons for Freshman, Sophomore, Junior, and Senior. In a calculation method, you want to add 1 to one of four counter variables, depending on which radio button is selected:
if (freshmanRadioButton.Checked){ freshmanCountInteger++;}else if (sophomoreRadioButton.Checked){ sophomoreCountInteger++;}
Bradley−Millspaugh: Programming in Visual C# 2008
4. Decisions and Conditions
Text 183© The McGraw−Hill Companies, 2010
C H A P T E R 4 175
else if (juniorRadioButton.Checked){ juniorCountInteger++;}else if (seniorRadioButton.Checked){ seniorCountInteger++;}
Note that, in most situations, the final test is unnecessary. You should be able to just code an else and add to seniorRadioButton if the first three ex-pressions are false . You might prefer to code the expression to make the state-ment more clear, or if no radio button is set initially, or if the program sets all radio buttons to false.
Clearing and Testing Radio Buttons You can clear all radio buttons in a group by setting the Checked property of each to false . However, this leads to a lot of programming if you have a long list of radio buttons. Remember : When you set one button to true , all of the others are automatically set to false . You can use this fact to easily clear a set of radio buttons. Add an extra button to the group and set its Visible property to false . When you want to clear the visible buttons, set the Checked property of the invisible radio button to true .
noColorRadioButton.Checked = true;
If you are using this technique, you should set the initial value of the invis-ible radio button to Checked = true in the Form Designer.
Testing whether the User Has Selected an Option When you use an invisible radio button, you can verify in code that the user has made a selection by test-ing the Checked property of the button:
if (noColorRadioButton.Checked){ MessageBox.Show("Please select a color.", "Required Entry");}else{ // A selection was made; take any appropriate action.}
Checking the State of Multiple Check Boxes
Although nested if statements work very well for groups of radio buttons, the same is not true for a series of check boxes. Recall that if you have a series of check boxes, any number of the boxes may be selected. In this situation, as-sume that you have check boxes for Discount, Taxable, and Delivery. You will need separate if statements for each condition.
Bradley−Millspaugh: Programming in Visual C# 2008
4. Decisions and Conditions
Text184 © The McGraw−Hill Companies, 2010
176 V I S U A L C# Decisions and Conditions
if (discountCheckBox.Checked){ // Calculate the discount.}if (taxableCheckBox.Checked){ // Calculate the tax.}if (deliveryCheckBox.Checked){ // Calculate the delivery charges.}
Enhancing Message Boxes
In Chapter 3 you learned to display a message box to the user. Now it’s time to add such features as controlling the format of the message, displaying multiple buttons, checking which button the user clicks, and performing alternate ac-tions depending on the user’s selection.
Displaying the Message String
The message string you display in a message box may be a string literal enclosed in quotes or a string variable. You also may want to concatenate several items, for example, combining a literal with a value from a variable. It’s usually a good idea to create a variable for the message and format the message before calling the Show method; if nothing else, it makes your code easier to read and follow.
Combining Values into a Message String You can concatenate a literal such as “Total Sales: ” with the value from a vari-able. You may need to include an extra space inside the literal to make sure that the value is separated from the literal.
string messageString = "Total Sales: " + totalDecimalSales.ToString("C"); MessageBox.Show(messageString, "Sales Summary", MessageBoxButtons.OK);
Creating Multiple Lines of Output If your message is too long for one line, the message wraps to a second line. But if you would like to control the line length and position of the split, you can insert a NewLine (\n) character into the string message. You can concate-nate this constant into a message string to set up multiple lines. In this example, a second line is added to the MessageBox from the previ-ous example.
string formattedTotalString = totalSalesDecimal.ToString("N"); string formattedAvgString = averageSaleDecimal.ToString("N"); string messageString = "Total Sales: " + formattedTotalString + "\n" + "Average Sale: " + formattedAvgString; MessageBox.Show(messageString, "Sales Summary", MessageBoxButtons.OK);
S pecify only the message for a “quick and dirty” message box for debugging purposes. It will display an OK button and an empty title bar: MessageBox.Show("I'm here."); . ■
TIP
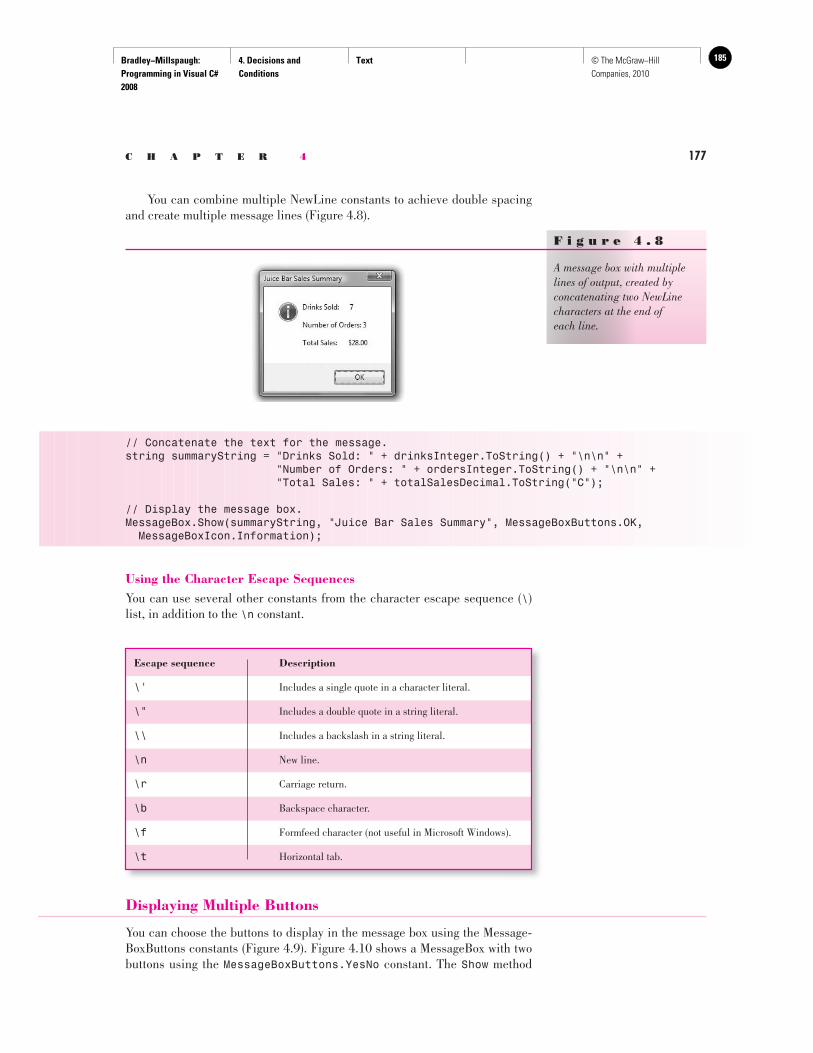
Bradley−Millspaugh: Programming in Visual C# 2008
4. Decisions and Conditions
Text 185© The McGraw−Hill Companies, 2010
C H A P T E R 4 177
// Concatenate the text for the message.string summaryString = "Drinks Sold: " + drinksInteger.ToString() + "\n\n" + "Number of Orders: " + ordersInteger.ToString() + "\n\n" + "Total Sales: " + totalSalesDecimal.ToString("C");
// Display the message box.MessageBox.Show(summaryString, "Juice Bar Sales Summary", MessageBoxButtons.OK, MessageBoxIcon.Information);
Using the Character Escape Sequences You can use several other constants from the character escape sequence ( \ ) list, in addition to the \n constant.
F i g u r e 4 . 8
A message box with multiple lines of output, created by concatenating two NewLine characters at the end of each line.
Escape sequence Description
\' Includes a single quote in a character literal.
\" Includes a double quote in a string literal.
\\ Includes a backslash in a string literal.
\n New line.
\r Carriage return.
\b Backspace character.
\f Formfeed character (not useful in Microsoft Windows).
\t Horizontal tab.
You can combine multiple NewLine constants to achieve double spacing and create multiple message lines ( Figure 4.8 ).
Displaying Multiple Buttons
You can choose the buttons to display in the message box using the Message-BoxButtons constants ( Figure 4.9 ). Figure 4.10 shows a MessageBox with two buttons using the MessageBoxButtons.YesNo constant. The Show method
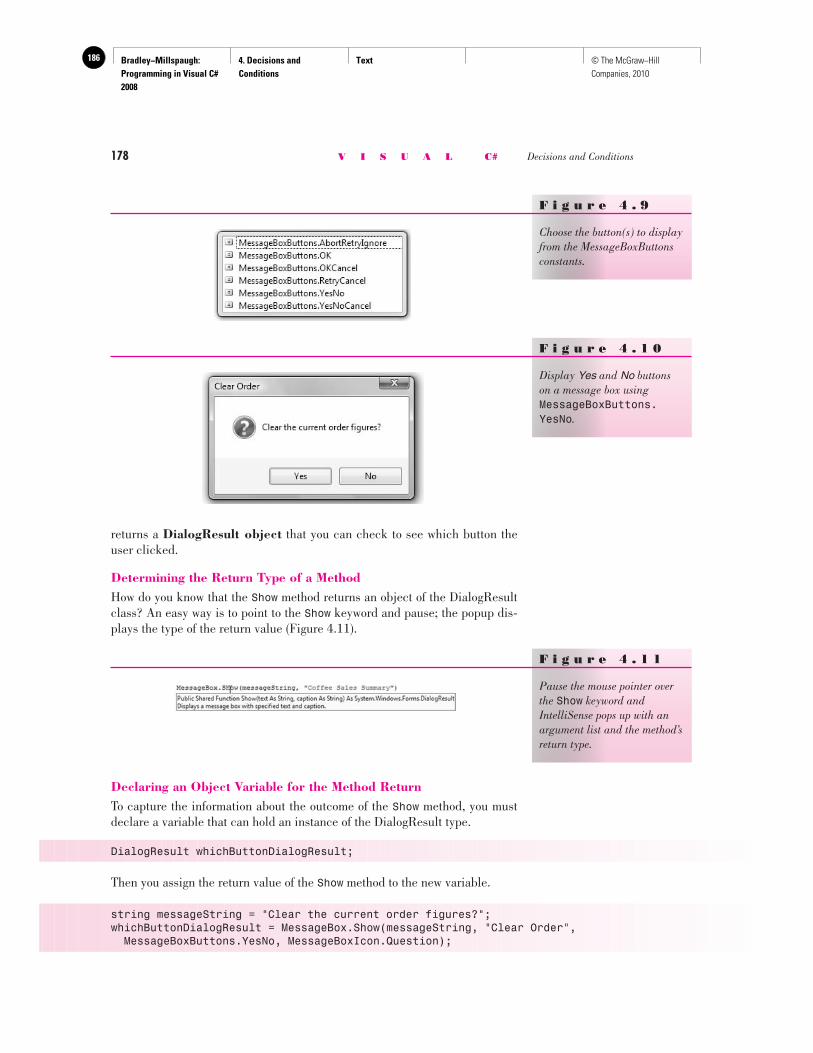
Bradley−Millspaugh: Programming in Visual C# 2008
4. Decisions and Conditions
Text186 © The McGraw−Hill Companies, 2010
178 V I S U A L C# Decisions and Conditions
F i g u r e 4 . 9
Choose the button(s) to display from the MessageBoxButtons constants.
F i g u r e 4 . 1 0
Display Yes and No buttons on a message box using MessageBoxButtons. YesNo .
F i g u r e 4 . 1 1
Pause the mouse pointer over the Show keyword and IntelliSense pops up with an argument list and the method’s return type.
returns a DialogResult object that you can check to see which button the user clicked.
Determining the Return Type of a Method How do you know that the Show method returns an object of the DialogResult class? An easy way is to point to the Show keyword and pause; the popup dis-plays the type of the return value ( Figure 4.11 ).
Declaring an Object Variable for the Method Return To capture the information about the outcome of the Show method, you must declare a variable that can hold an instance of the DialogResult type.
DialogResult whichButtonDialogResult;
Then you assign the return value of the Show method to the new variable.
string messageString = "Clear the current order figures?"; whichButtonDialogResult = MessageBox.Show(messageString, "Clear Order", MessageBoxButtons.YesNo, MessageBoxIcon.Question);
Bradley−Millspaugh: Programming in Visual C# 2008
4. Decisions and Conditions
Text 187© The McGraw−Hill Companies, 2010
C H A P T E R 4 179
The next step is to check the value of the return, comparing to the DialogResult constants, such as Yes , No , OK , Retry , Abort , and Cancel .
if (whichButtonDialogResult == DialogResult.Yes){ // Code to clear the order.}
MessageBox.Show( TextMessage, TitlebarText, MessageBoxButtons, MessageBoxIcons, MessageBoxDefaultButton );MessageBox.Show( TextMessage, TitlebarText, MessageBoxButtons, MessageBoxIcons, MessageBoxDefaultButton, MessageBoxOptions );
General
Form
When you display multiple buttons, you may want one of the buttons to be the default (the Accept button). For example, to make the second button (the No button) the default, use this statement:
string messageString = "Clear the current order figures?"; whichButtonDialogResult = MessageBox.Show(messageString, "Clear Order", MessageBoxButtons.YesNo, MessageBoxIcon.Question, MessageBoxDefaultButton.Button2);
You can right-align the text in the message box by setting the MessageBox-Options argument:
string messageString = "Clear the current order figures?"; whichButtonDialogResult = MessageBox.Show(messageString, "Clear Order", MessageBoxButtons.YesNo, MessageBoxIcon.Question, MessageBoxDefaultButton.Button2, MessageBoxOptions.RightAlign);
Input Validation
Careful programmers check the values entered into text boxes before begin-ning the calculations. Validation is a form of self-protection; it is better to re-ject bad data than to spend hours (and sometimes days) trying to find an error, only to discover that the problem was caused by a “user error.” Finding and correcting the error early can often keep the program from producing erroneous results or halting with a run-time error.
Specifying a Default Button and Options Two additional signatures for the MessageBox.Show method are as follows:
Bradley−Millspaugh: Programming in Visual C# 2008
4. Decisions and Conditions
Text188 © The McGraw−Hill Companies, 2010
180 V I S U A L C# Decisions and Conditions
Checking to verify that appropriate values have been provided as input is called validation . The validation may include making sure that the input is numeric, checking for specific values, checking a range of values, or making sure that required items are entered. In Chapter 3 you learned to use try/catch blocks to trap for nonnumeric values. This chapter presents some additional validation techniques using if statements. Note : Chapter 14 covers some advanced validation techniques using the Validating event and error providers.
Checking for a Range of Values
Data validation may include checking the reasonableness of a value. Assume you are using a text box to input the number of hours worked in a day. Even with overtime, the company does not allow more than 10 work hours in a single day. You could check the input for reasonableness with this code:
if (int.Parse(hoursTextBox.Text) > 10){ MessageBox.Show("Too many hours.", "Invalid Data", MessageBoxButtons.OK);}
Checking for a Required Field
Sometimes you need to be certain that a value has been entered into a text box before proceeding. You can compare a text box value to an empty string literal.
if (nameTextBox.Text != ""){ // Good data -- Perform some action.}else{ MessageBox.Show("Required entry.", "Invalid Data", MessageBoxButtons.OK);}
Many programmers prefer to reverse the test in an if statement, so that invalid entries are caught in the true portion of the test. This practice can be easier to read and understand. The preceding validation could be written as follows, which does not require the use of not ( ! ).
if (nameTextBox.Text == ""){ MessageBox.Show("Required entry.", "Invalid Data", MessageBoxButtons.OK);}else{ // Good data -- Perform some action.}
Bradley−Millspaugh: Programming in Visual C# 2008
4. Decisions and Conditions
Text 189© The McGraw−Hill Companies, 2010
C H A P T E R 4 181
By checking separately for blank or nonnumeric data, you can display a better message to the user. Make sure to check for blanks first, since a blank field will throw an exception with a parsing method. For example, if you reverse the order of the if and try blocks in the following example, blanks in quantityTextBox will always trigger the nonnumeric message in the catch block.
if (quantityTextBox.Text != "") // Not blank.{ try quantityDecimal = decimal.Parse(quantityTextBox.Text); catch // Nonnumeric data. { messageString = "Nonnumeric data entered for quantity."; MessageBox.Show(messageString, "Data Entry Error"); }}else // Missing data.{ messageString = "The quantity is required."; MessageBox.Show(messageString, "Data entry error");}
Performing Multiple Validations
When you need to validate several input fields, how many message boxes do you want to display for the user? Assume that the user has neglected to fill five text boxes or make a required selection and clicked on Calculate . You can avoid displaying multiple message boxes in a row by using a nested if statement. This way you check the second value only if the first one passes, and you can exit the processing if a problem is found with a single field.
if (nameTextBox.Text != ""){ try { unitsDecimal = decimal.Parse(unitsTextBox.Text); if (freshmanRadioButton.Checked || sophomoreRadioButton.Checked || juniorRadioButton.Checked || seniorRadioButton.Checked) { // Data valid -- Do calculations or processing here. } else { MessageBox.Show("Please select a grade level.", "Data Entry Error", MessageBoxButtons.OK); } } catch(FormatException) { MessageBox.Show("Enter number of units.", "Data Entry Error", MessageBoxButtons.OK); unitsTextBox.Focus(); }}
Bradley−Millspaugh: Programming in Visual C# 2008
4. Decisions and Conditions
Text190 © The McGraw−Hill Companies, 2010
182 V I S U A L C# Decisions and Conditions
else{ MessageBox.Show ("Please enter a name", "Data Entry Error", MessageBoxButtons.OK); nameTextBox.Focus();}
The switch Statement
Earlier you used the if statement for testing conditions and making decisions. Whenever you want to test a single variable for multiple values, the switch statement provides a flexible and powerful solution. Any decisions that you can code with a switch statement also can be coded with nested if statements, but usually the switch statement is simpler and more clear.
The switch Statement—General Form
switch ( expression ){ case testValue1 : [ statement(s) ; break ;] [case testValue2 : statement(s) ; break ;] . . . [default:] statement(s) ; break ;] }
General F
orm
The expression in a switch statement is usually a variable or property that you wish to test. The test values are the values that you want to match; they may be numeric or string constants or variables, and must match the data type of the expression you are testing. There is no limit to the number of case blocks that you can include, and no limit to the number of statements that can follow a case statement. After all of the statements for a case statement, you must place a break statement. The break causes the switch to terminate.
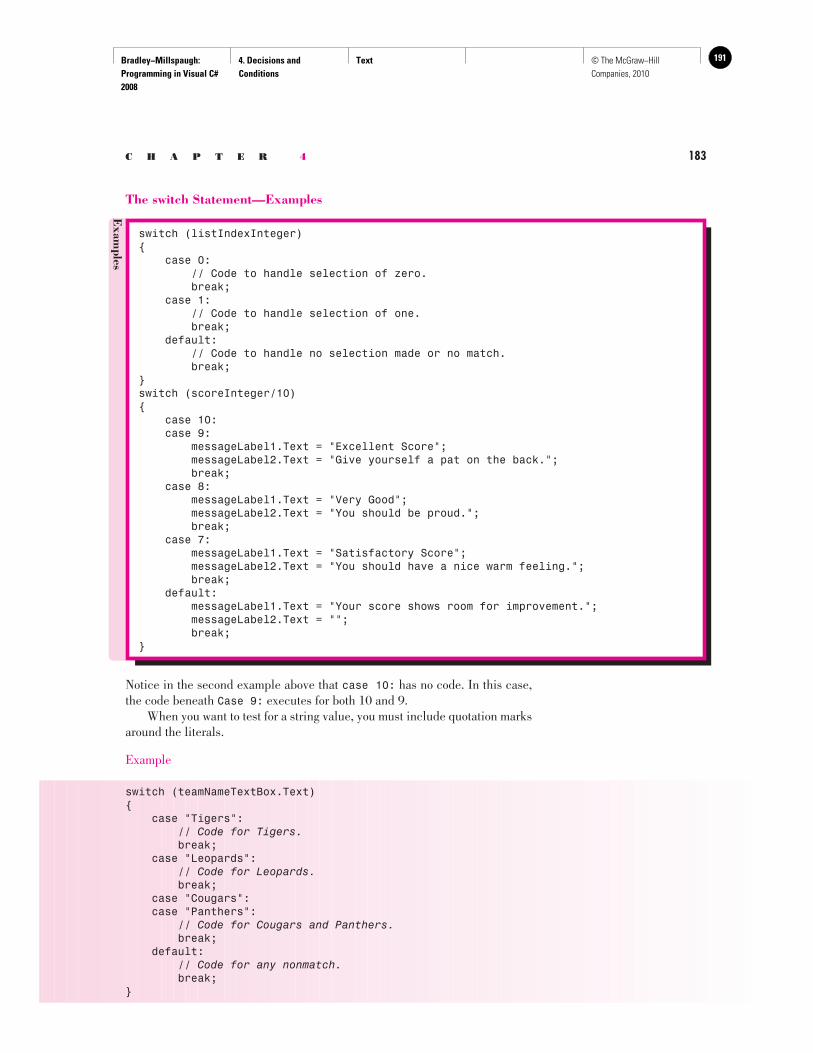
Bradley−Millspaugh: Programming in Visual C# 2008
4. Decisions and Conditions
Text 191© The McGraw−Hill Companies, 2010
C H A P T E R 4 183
The switch Statement—Examples
Exam
ples
switch (listIndexInteger){ case 0: // Code to handle selection of zero. break; case 1: // Code to handle selection of one. break; default: // Code to handle no selection made or no match. break;}switch (scoreInteger/10){ case 10: case 9: messageLabel1.Text = "Excellent Score"; messageLabel2.Text = "Give yourself a pat on the back."; break; case 8: messageLabel1.Text = "Very Good"; messageLabel2.Text = "You should be proud."; break; case 7: messageLabel1.Text = "Satisfactory Score"; messageLabel2.Text = "You should have a nice warm feeling."; break; default: messageLabel1.Text = "Your score shows room for improvement."; messageLabel2.Text = ""; break;}
Notice in the second example above that case 10: has no code. In this case, the code beneath Case 9: executes for both 10 and 9. When you want to test for a string value, you must include quotation marks around the literals.
Example
switch (teamNameTextBox.Text){ case "Tigers": // Code for Tigers. break; case "Leopards": // Code for Leopards. break; case "Cougars": case "Panthers": // Code for Cougars and Panthers. break; default: // Code for any nonmatch. break;}
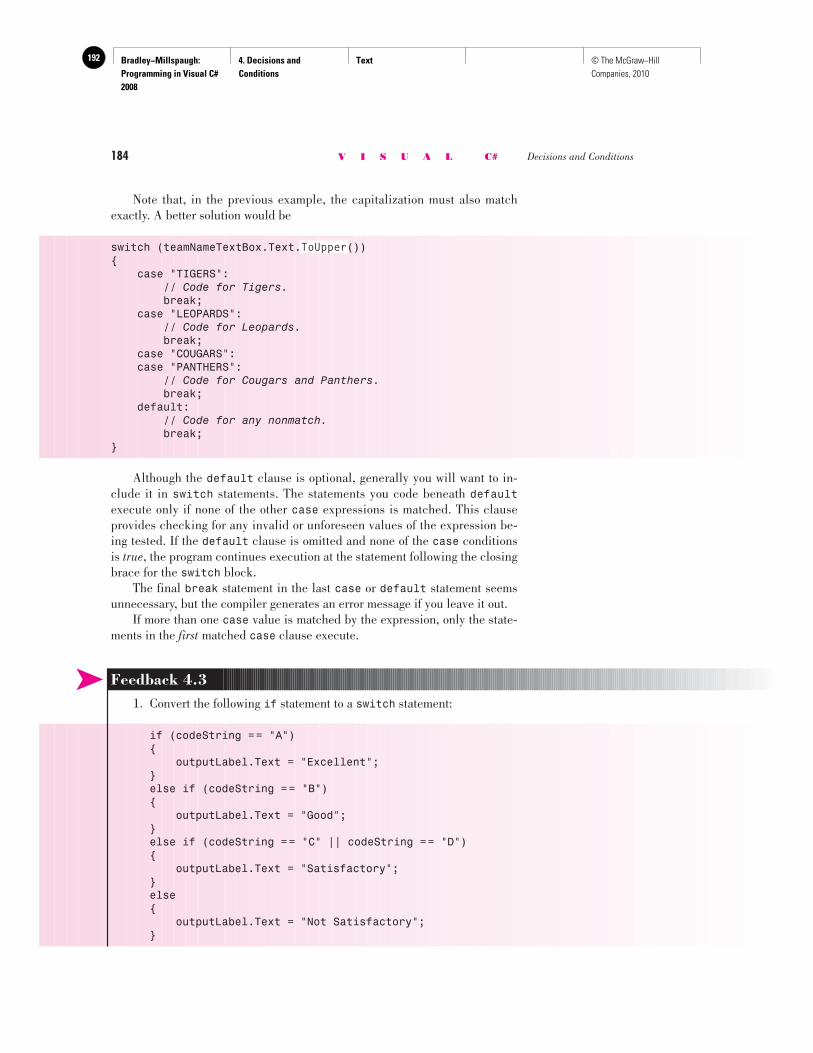
Bradley−Millspaugh: Programming in Visual C# 2008
4. Decisions and Conditions
Text192 © The McGraw−Hill Companies, 2010
184 V I S U A L C# Decisions and Conditions
➤ Feedback 4.3 1. Convert the following if statement to a switch statement:
if (codeString = = "A"){ outputLabel.Text = "Excellent";}else if (codeString = = "B"){ outputLabel.Text = "Good";}else if (codeString = = "C" || codeString = = "D"){ outputLabel.Text = "Satisfactory";}else{ outputLabel.Text = "Not Satisfactory";}
Note that, in the previous example, the capitalization must also match exactly. A better solution would be
switch (teamNameTextBox.Text.ToUpper()){ case "TIGERS": // Code for Tigers. break; case "LEOPARDS": // Code for Leopards. break; case "COUGARS": case "PANTHERS": // Code for Cougars and Panthers. break; default: // Code for any nonmatch. break;}
Although the default clause is optional, generally you will want to in-clude it in switch statements. The statements you code beneath default execute only if none of the other case expressions is matched. This clause provides checking for any invalid or unforeseen values of the expression be-ing tested. If the default clause is omitted and none of the case conditions is true , the program continues execution at the statement following the closing brace for the switch block. The final break statement in the last case or default statement seems unnecessary, but the compiler generates an error message if you leave it out. If more than one case value is matched by the expression, only the state-ments in the first matched case clause execute.
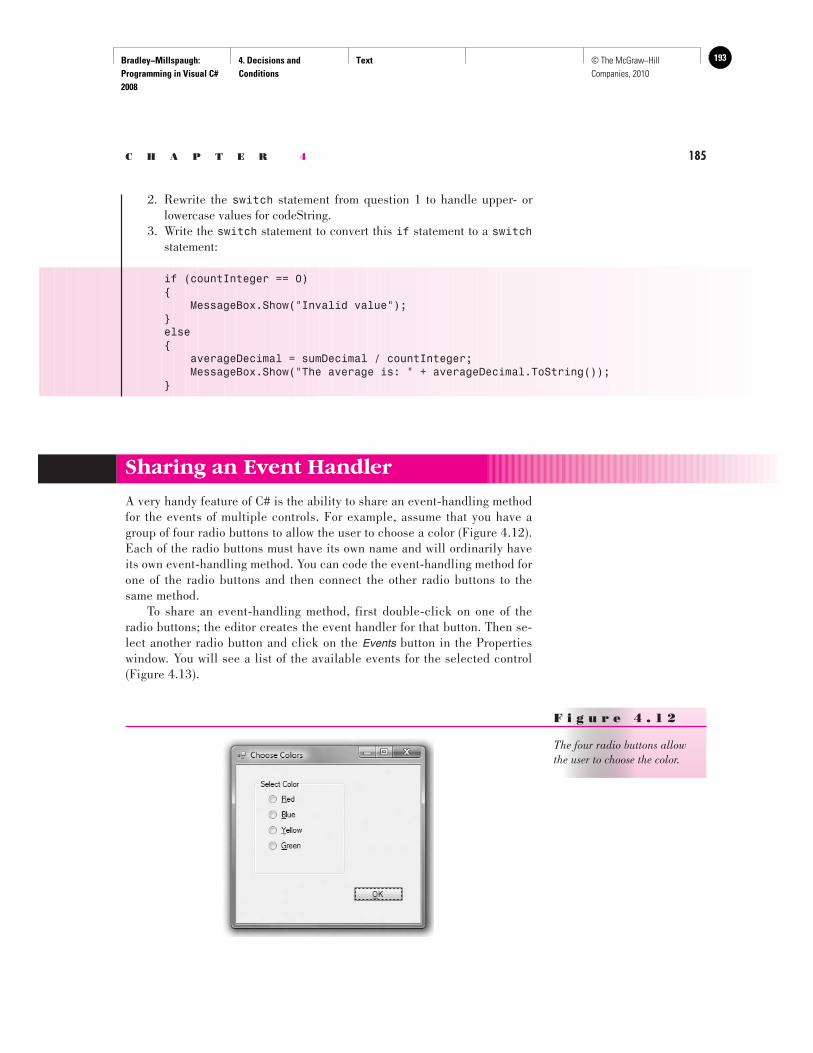
Bradley−Millspaugh: Programming in Visual C# 2008
4. Decisions and Conditions
Text 193© The McGraw−Hill Companies, 2010
C H A P T E R 4 185
2. Rewrite the switch statement from question 1 to handle upper- or lowercase values for codeString.
3. Write the switch statement to convert this if statement to a switch statement:
if (countInteger == 0){ MessageBox.Show("Invalid value");}else{ averageDecimal = sumDecimal / countInteger; MessageBox.Show("The average is: " + averageDecimal.ToString());}
Sharing an Event Handler
A very handy feature of C# is the ability to share an event-handling method for the events of multiple controls. For example, assume that you have a group of four radio buttons to allow the user to choose a color ( Figure 4.12 ). Each of the radio buttons must have its own name and will ordinarily have its own event-handling method. You can code the event-handling method for one of the radio buttons and then connect the other radio buttons to the same method. To share an event-handling method, first double-click on one of the radio buttons; the editor creates the event handler for that button. Then se-lect another radio button and click on the Events button in the Properties window. You will see a list of the available events for the selected control ( Figure 4.13 ).
F i g u r e 4 . 1 2
The four radio buttons allow the user to choose the color.
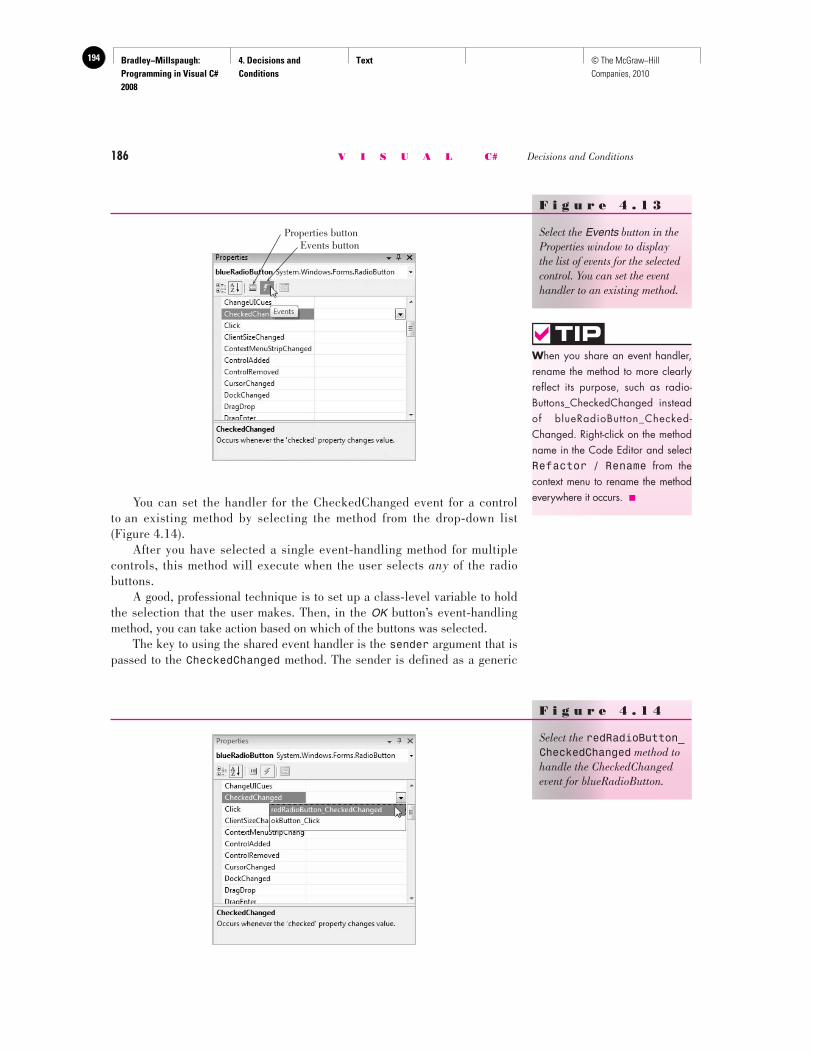
Bradley−Millspaugh: Programming in Visual C# 2008
4. Decisions and Conditions
Text194 © The McGraw−Hill Companies, 2010
186 V I S U A L C# Decisions and Conditions
You can set the handler for the CheckedChanged event for a control to an existing method by selecting the method from the drop-down list ( Figure 4.14 ). After you have selected a single event-handling method for multiple controls, this method will execute when the user selects any of the radio buttons. A good, professional technique is to set up a class-level variable to hold the selection that the user makes. Then, in the OK button’s event-handling method, you can take action based on which of the buttons was selected. The key to using the shared event handler is the sender argument that is passed to the CheckedChanged method. The sender is defined as a generic
F i g u r e 4 . 1 3
Select the Events button in the Properties window to display the list of events for the selected control. You can set the event handler to an existing method.
Properties buttonEvents button
When you share an event handler, rename the method to more clearly reflect its purpose, such as radio-Buttons_CheckedChanged instead of blueRadioButton_Checked-Changed. Right-click on the method name in the Code Editor and select Refactor / Rename from the con text menu to rename the method everywhere it occurs. ■
TIP
F i g u r e 4 . 1 4
Select the redRadioButton_CheckedChanged method to handle the CheckedChanged event for blueRadioButton.
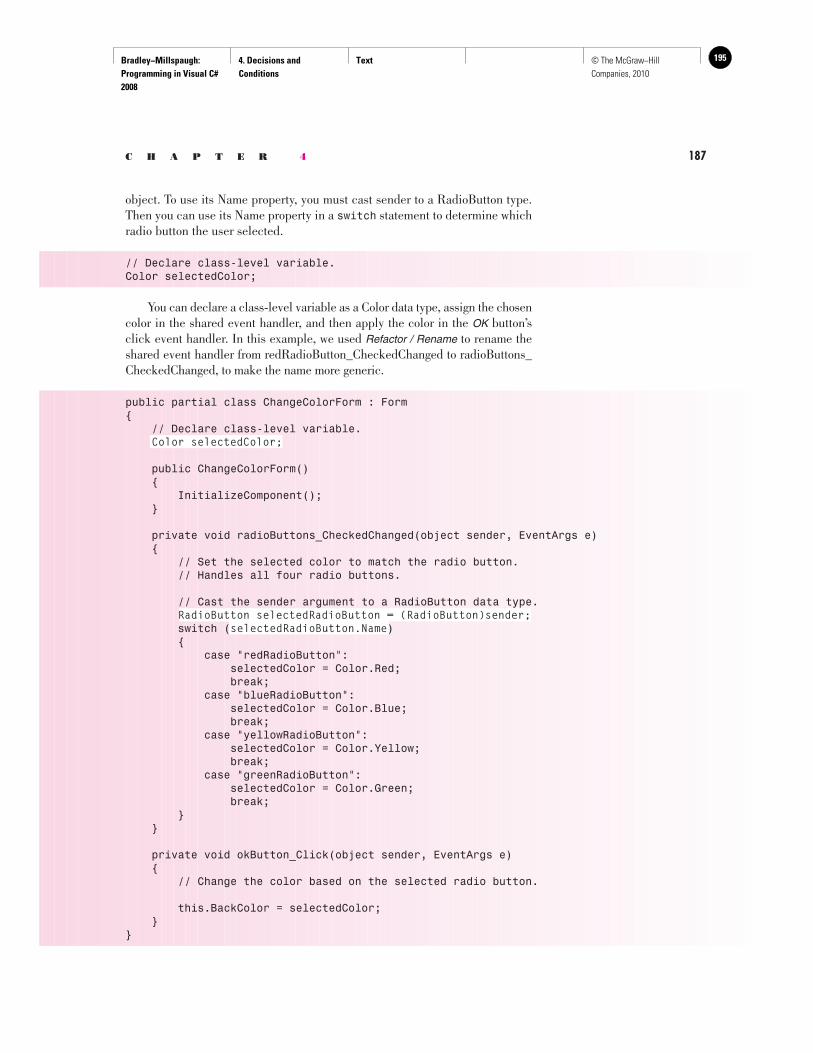
Bradley−Millspaugh: Programming in Visual C# 2008
4. Decisions and Conditions
Text 195© The McGraw−Hill Companies, 2010
C H A P T E R 4 187
object. To use its Name property, you must cast sender to a RadioButton type. Then you can use its Name property in a switch statement to determine which radio button the user selected.
// Declare class-level variable. Color selectedColor;
You can declare a class-level variable as a Color data type, assign the chosen color in the shared event handler, and then apply the color in the OK button’s click event handler. In this example, we used Refactor / Rename to rename the shared event handler from redRadioButton_CheckedChanged to radioButtons_CheckedChanged, to make the name more generic.
public partial class ChangeColorForm : Form{ // Declare class-level variable. Color selectedColor;
public ChangeColorForm() { InitializeComponent(); }
private void radioButtons_CheckedChanged(object sender, EventArgs e) { // Set the selected color to match the radio button. // Handles all four radio buttons.
// Cast the sender argument to a RadioButton data type. RadioButton selectedRadioButton = (RadioButton)sender; switch (selectedRadioButton.Name) { case "redRadioButton": selectedColor = Color.Red; break; case "blueRadioButton": selectedColor = Color.Blue; break; case "yellowRadioButton": selectedColor = Color.Yellow; break; case "greenRadioButton": selectedColor = Color.Green; break; } }
private void okButton_Click(object sender, EventArgs e) { // Change the color based on the selected radio button.
this.BackColor = selectedColor; }}
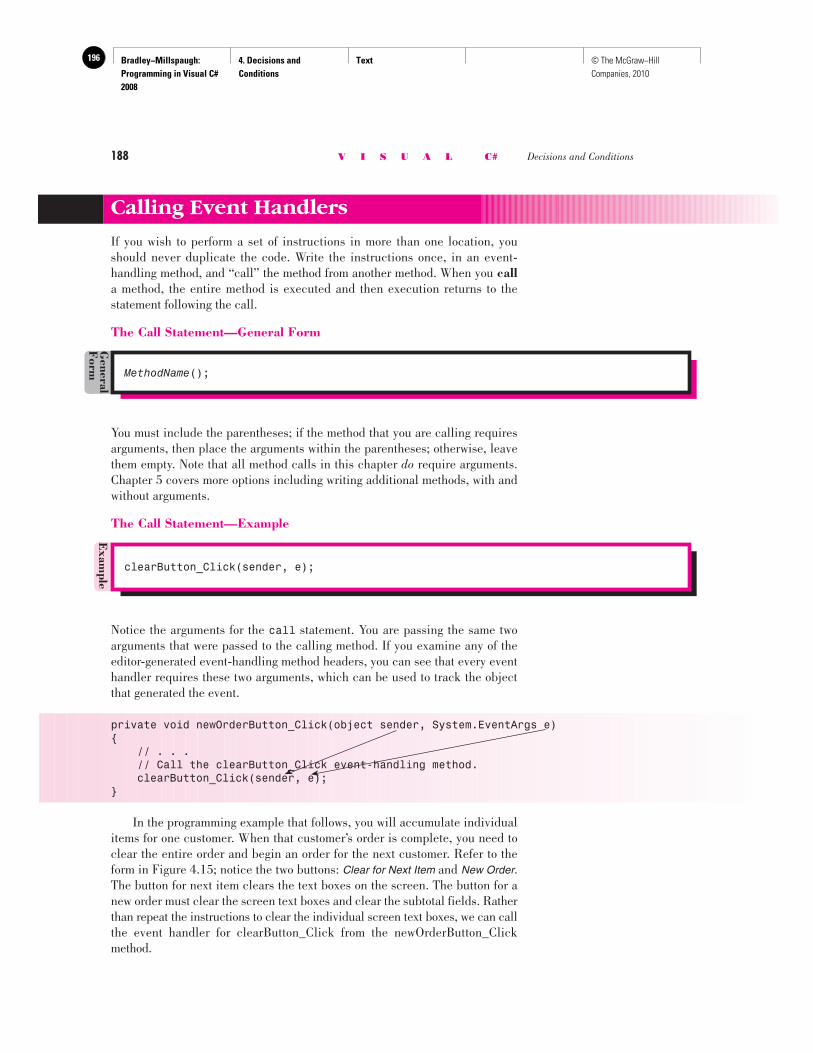
Bradley−Millspaugh: Programming in Visual C# 2008
4. Decisions and Conditions
Text196 © The McGraw−Hill Companies, 2010
188 V I S U A L C# Decisions and Conditions
Calling Event Handlers
If you wish to perform a set of instructions in more than one location, you should never duplicate the code. Write the instructions once, in an event- handling method, and “call” the method from another method. When you call a method, the entire method is executed and then execution returns to the statement following the call.
The Call Statement—General Form
MethodName ();
General
Form
You must include the parentheses; if the method that you are calling requires arguments, then place the arguments within the parentheses; otherwise, leave them empty. Note that all method calls in this chapter do require arguments. Chapter 5 covers more options including writing additional methods, with and without arguments.
The Call Statement—Example
Exam
ple
clearButton_Click(sender, e);
Notice the arguments for the call statement. You are passing the same two arguments that were passed to the calling method. If you examine any of the editor-generated event-handling method headers, you can see that every event handler requires these two arguments, which can be used to track the object that generated the event.
private void newOrderButton_Click(object sender, System.EventArgs e){ // . . . // Call the clearButton_Click event-handling method. clearButton_Click(sender, e);}
In the programming example that follows, you will accumulate individual items for one customer. When that customer’s order is complete, you need to clear the entire order and begin an order for the next customer. Refer to the form in Figure 4.15 ; notice the two buttons: Clear for Next Item and New Order . The button for next item clears the text boxes on the screen. The button for a new order must clear the screen text boxes and clear the subtotal fields. Rather than repeat the instructions to clear the individual screen text boxes, we can call the event handler for clearButton_Click from the newOrderButton_Click method.
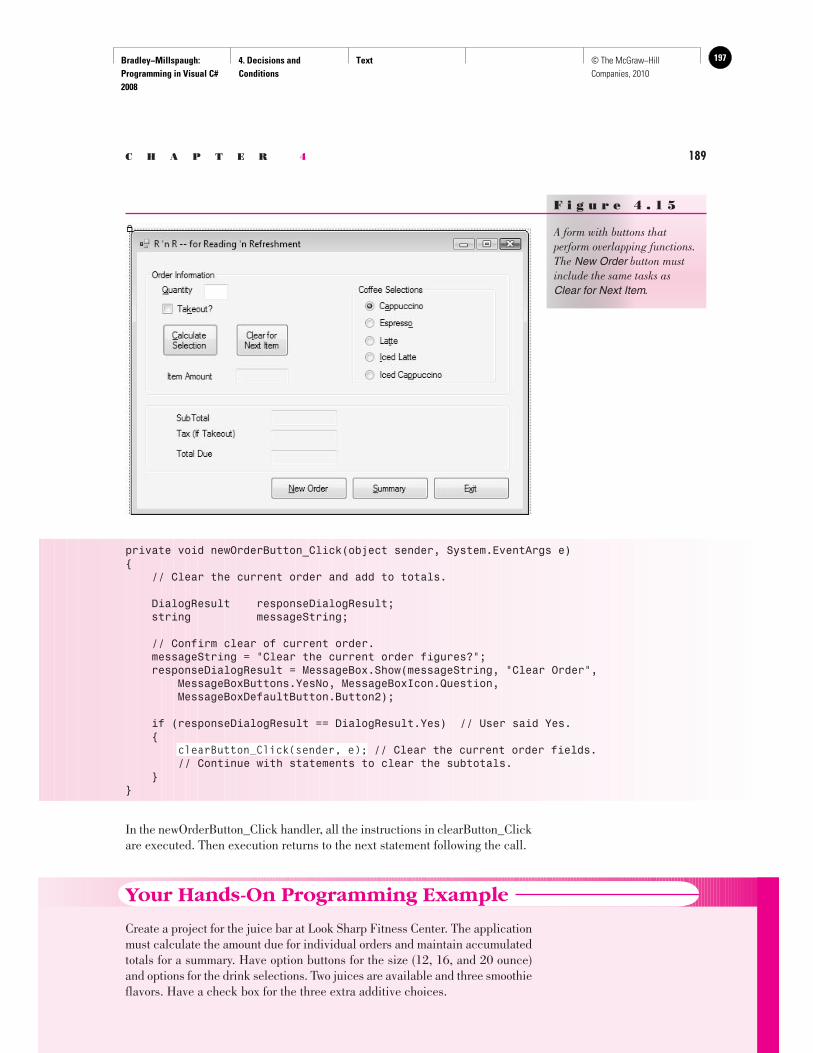
Bradley−Millspaugh: Programming in Visual C# 2008
4. Decisions and Conditions
Text 197© The McGraw−Hill Companies, 2010
C H A P T E R 4 189
private void newOrderButton_Click(object sender, System.EventArgs e){ // Clear the current order and add to totals.
DialogResult responseDialogResult; string messageString;
// Confirm clear of current order. messageString = "Clear the current order figures?"; responseDialogResult = MessageBox.Show(messageString, "Clear Order", MessageBoxButtons.YesNo, MessageBoxIcon.Question, MessageBoxDefaultButton.Button2);
if (responseDialogResult == DialogResult.Yes) // User said Yes. { clearButton_Click(sender, e); // Clear the current order fields. // Continue with statements to clear the subtotals. }}
In the newOrderButton_Click handler, all the instructions in clearButton_Click are executed. Then execution returns to the next statement following the call .
F i g u r e 4 . 1 5
A form with buttons that perform overlapping functions. The New Order button must include the same tasks as Clear for Next Item .
Your Hands-On Programming Example
Create a project for the juice bar at Look Sharp Fitness Center. The application must calculate the amount due for individual orders and maintain accumulated totals for a summary. Have option buttons for the size (12, 16, and 20 ounce) and options for the drink selections. Two juices are available and three smoothie flavors. Have a check box for the three extra additive choices.
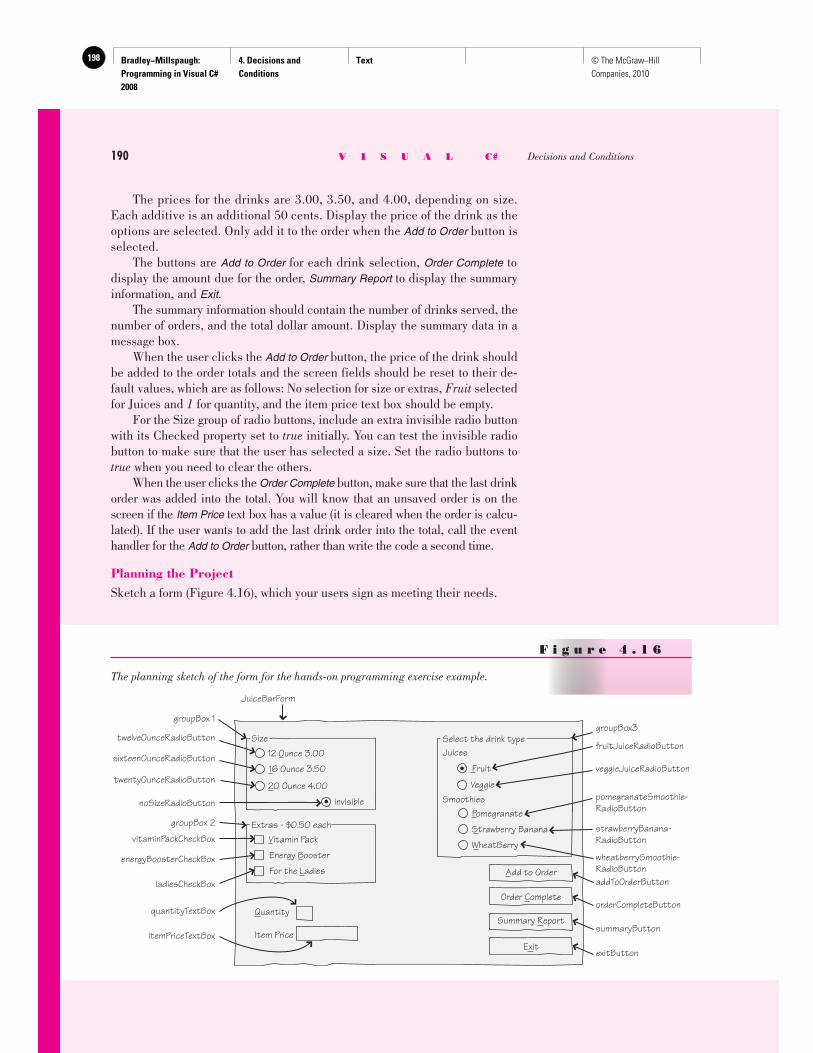
Bradley−Millspaugh: Programming in Visual C# 2008
4. Decisions and Conditions
Text198 © The McGraw−Hill Companies, 2010
190 V I S U A L C# Decisions and Conditions
The prices for the drinks are 3.00, 3.50, and 4.00, depending on size. Each additive is an additional 50 cents. Display the price of the drink as the options are selected. Only add it to the order when the Add to Order button is selected. The buttons are Add to Order for each drink selection, Order Complete to display the amount due for the order, Summary Report to display the summary information, and Exit . The summary information should contain the number of drinks served, the number of orders, and the total dollar amount. Display the summary data in a message box. When the user clicks the Add to Order button, the price of the drink should be added to the order totals and the screen fields should be reset to their de-fault values, which are as follows: No selection for size or extras, Fruit selected for Juices and 1 for quantity, and the item price text box should be empty. For the Size group of radio buttons, include an extra invisible radio button with its Checked property set to true initially. You can test the invisible radio button to make sure that the user has selected a size. Set the radio buttons to true when you need to clear the others. When the user clicks the Order Complete button, make sure that the last drink order was added into the total. You will know that an unsaved order is on the screen if the Item Price text box has a value (it is cleared when the order is calcu-lated). If the user wants to add the last drink order into the total, call the event handler for the Add to Order button, rather than write the code a second time.
Planning the Project Sketch a form ( Figure 4.16 ), which your users sign as meeting their needs.
F i g u r e 4 . 1 6
The planning sketch of the form for the hands-on programming exercise example.
Size
groupBox 1
invisible
Select the drink typeJuices
Item Price
Smoothies
Fruit
Veggie
Extras - $0.50 eachVitamin Pack
Energy Booster
For the Ladies
Quantity
JuiceBarForm
quantityTextBox
itemPriceTextBox
addToOrderButton
orderCompleteButton
summaryButton
exitButton
twelveOunceRadioButton
sixteenOunceRadioButton
twentyOunceRadioButton
groupBox 2
vitaminPackCheckBox
energyBoosterCheckBox
ladiesCheckBox
noSizeRadioButton
12 Ounce 3.00
16 Ounce 3.50
20 Ounce 4.00
Order Complete
Summary Report
Exit
Add to Order
Pomegranate
Strawberry Banana
WheatBerry
fruitJuiceRadioButton
groupBox3
veggieJuiceRadioButton
pomegranateSmoothie-RadioButton
strawberryBanana-RadioButton
wheatberrySmoothie-RadioButton
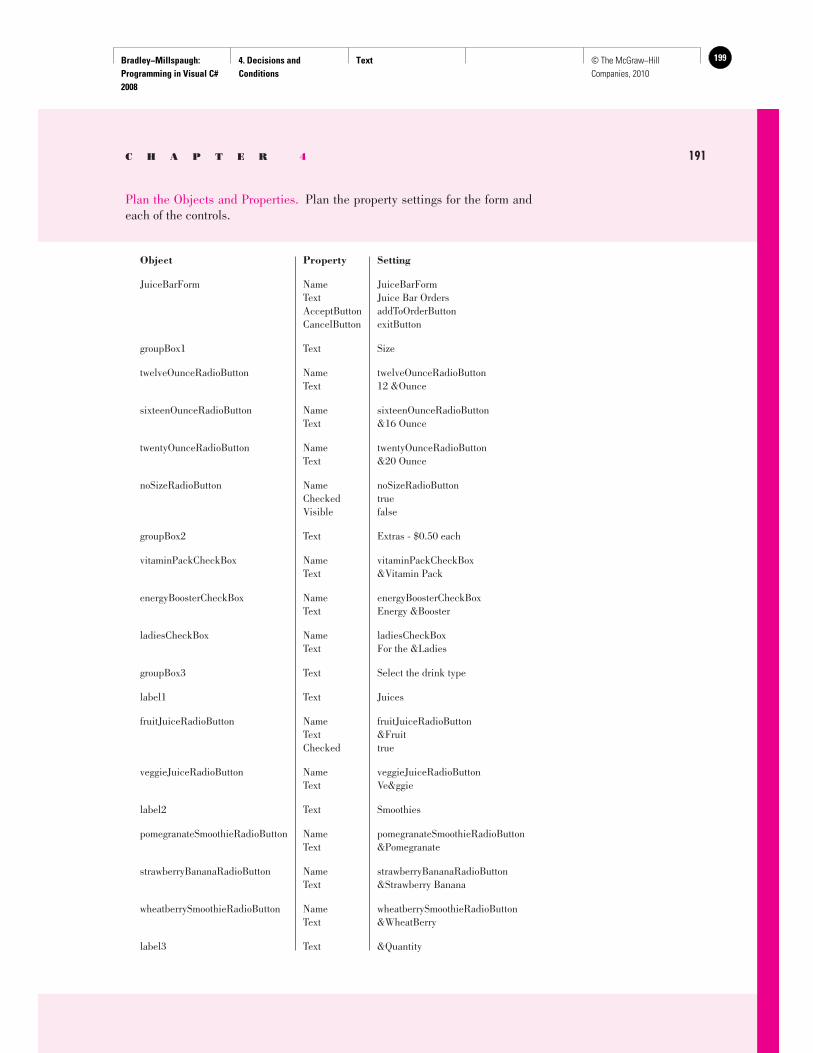
Bradley−Millspaugh: Programming in Visual C# 2008
4. Decisions and Conditions
Text 199© The McGraw−Hill Companies, 2010
C H A P T E R 4 191
Plan the Objects and Properties. Plan the property settings for the form and each of the controls.
Object Property Setting
JuiceBarForm Name JuiceBarForm Text Juice Bar Orders AcceptButton addToOrderButton CancelButton exitButton
groupBox1 Text Size
twelveOunceRadioButton Name twelveOunceRadioButton Text 12 &Ounce
sixteenOunceRadioButton Name sixteenOunceRadioButton Text &16 Ounce
twentyOunceRadioButton Name twentyOunceRadioButton Text &20 Ounce
noSizeRadioButton Name noSizeRadioButton Checked true Visible false
groupBox2 Text Extras - $0.50 each
vitaminPackCheckBox Name vitaminPackCheckBox Text &Vitamin Pack
energyBoosterCheckBox Name energyBoosterCheckBox Text Energy &Booster
ladiesCheckBox Name ladiesCheckBox Text For the &Ladies
groupBox3 Text Select the drink type
label1 Text Juices
fruitJuiceRadioButton Name fruitJuiceRadioButton Text &Fruit Checked true
veggieJuiceRadioButton Name veggieJuiceRadioButton Text Ve&ggie
label2 Text Smoothies
pomegranateSmoothieRadioButton Name pomegranateSmoothieRadioButton Text &Pomegranate
strawberryBananaRadioButton Name strawberryBananaRadioButton Text &Strawberry Banana
wheatberrySmoothieRadioButton Name wheatberrySmoothieRadioButton Text &WheatBerry
label3 Text &Quantity
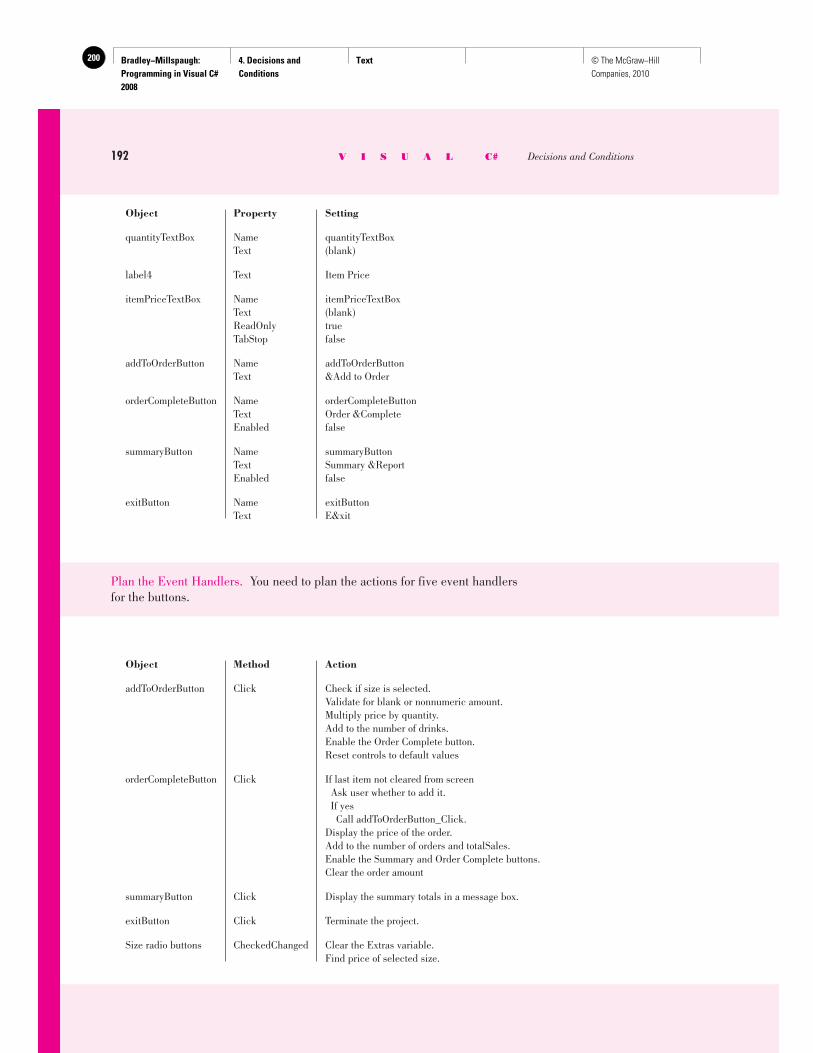
Bradley−Millspaugh: Programming in Visual C# 2008
4. Decisions and Conditions
Text200 © The McGraw−Hill Companies, 2010
192 V I S U A L C# Decisions and Conditions
Object Property Setting
quantityTextBox Name quantityTextBox Text (blank)
label4 Text Item Price
itemPriceTextBox Name itemPriceTextBox Text (blank) ReadOnly true TabStop false
addToOrderButton Name addToOrderButton Text &Add to Order
orderCompleteButton Name orderCompleteButton Text Order &Complete Enabled false
summaryButton Name summaryButton Text Summary &Report Enabled false
exitButton Name exitButton Text E&xit
Plan the Event Handlers. You need to plan the actions for five event handlers for the buttons.
Object Method Action
addToOrderButton Click Check if size is selected. Validate for blank or nonnumeric amount. Multiply price by quantity. Add to the number of drinks. Enable the Order Complete button. Reset controls to default values
orderCompleteButton Click If last item not cleared from screen Ask user whether to add it. If yes Call addToOrderButton_Click. Display the price of the order. Add to the number of orders and totalSales. Enable the Summary and Order Complete buttons. Clear the order amount
summaryButton Click Display the summary totals in a message box.
exitButton Click Terminate the project.
Size radio buttons CheckedChanged Clear the Extras variable. Find price of selected size.
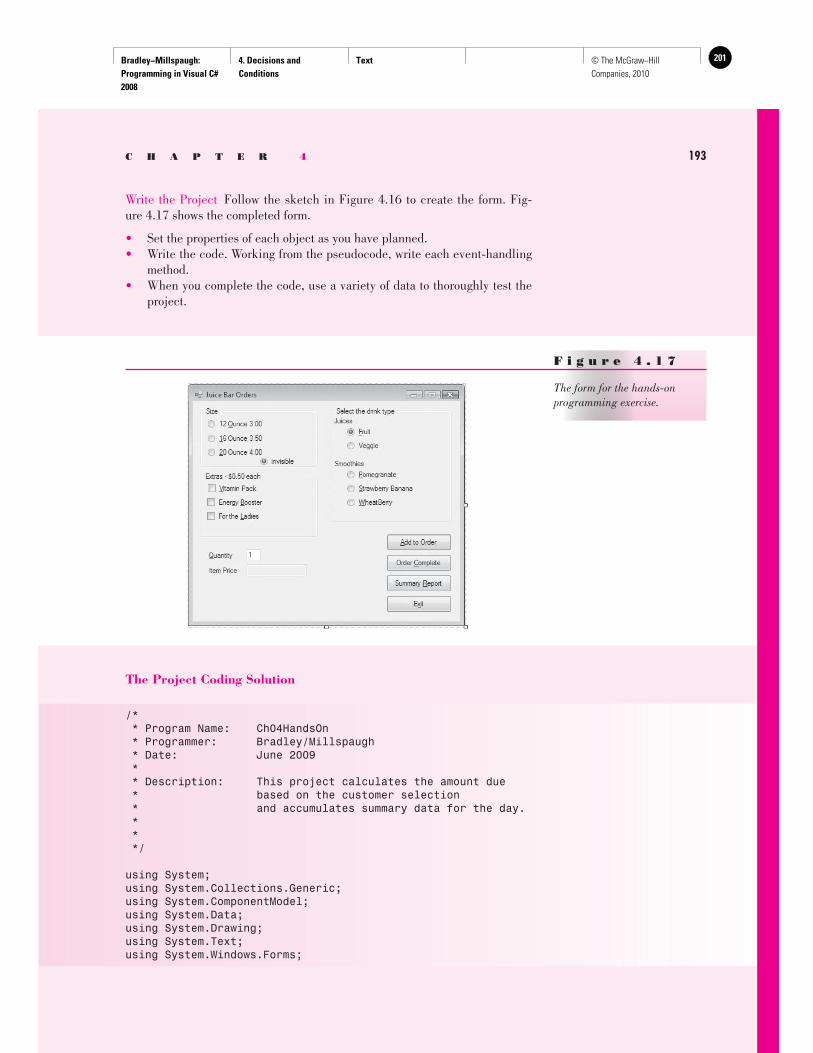
Bradley−Millspaugh: Programming in Visual C# 2008
4. Decisions and Conditions
Text 201© The McGraw−Hill Companies, 2010
C H A P T E R 4 193
Write the Project Follow the sketch in Figure 4.16 to create the form. Fig-ure 4.17 shows the completed form.
• Set the properties of each object as you have planned. • Write the code. Working from the pseudocode, write each event-handling
method. • When you complete the code, use a variety of data to thoroughly test the
project.
F i g u r e 4 . 1 7
The form for the hands-on programming exercise.
The Project Coding Solution
/* * Program Name: Ch04HandsOn * Programmer: Bradley/Millspaugh * Date: June 2009 * * Description: This project calculates the amount due * based on the customer selection * and accumulates summary data for the day. * * */
using System;using System.Collections.Generic;using System.ComponentModel;using System.Data;using System.Drawing;using System.Text;using System.Windows.Forms;
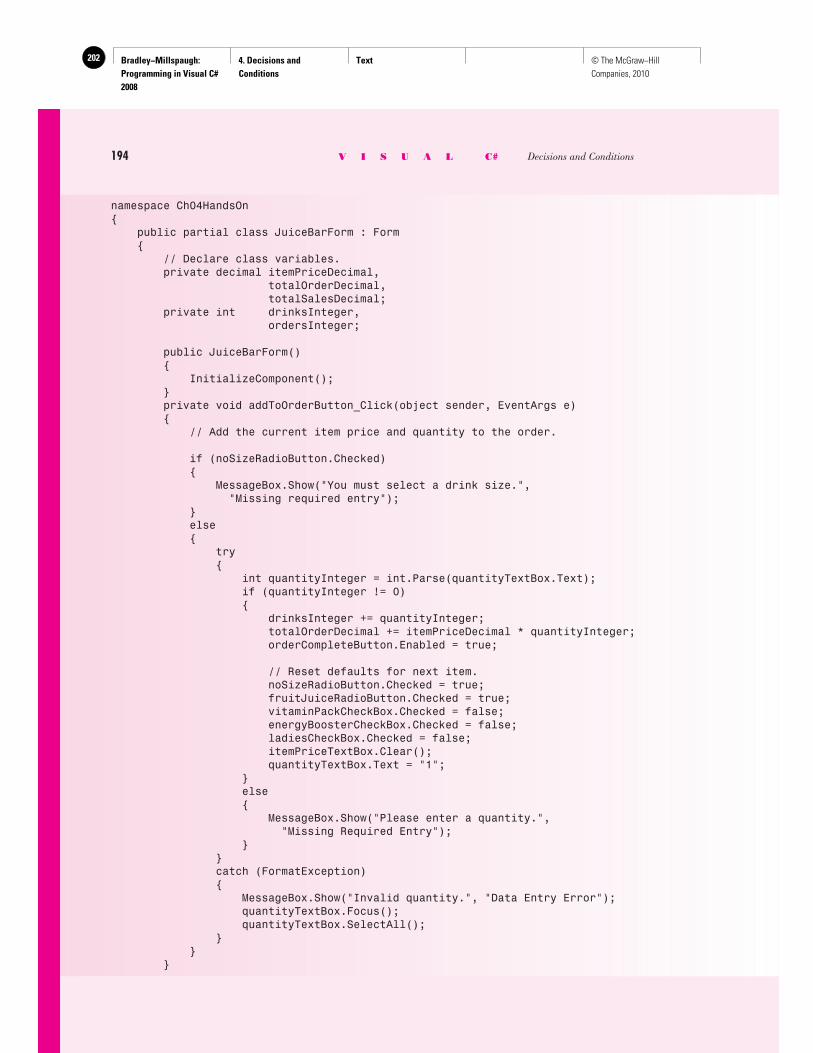
Bradley−Millspaugh: Programming in Visual C# 2008
4. Decisions and Conditions
Text202 © The McGraw−Hill Companies, 2010
194 V I S U A L C# Decisions and Conditions
namespace Ch04HandsOn{ public partial class JuiceBarForm : Form { // Declare class variables. private decimal itemPriceDecimal, totalOrderDecimal, totalSalesDecimal; private int drinksInteger, ordersInteger;
public JuiceBarForm() { InitializeComponent(); } private void addToOrderButton_Click(object sender, EventArgs e) { // Add the current item price and quantity to the order.
if (noSizeRadioButton.Checked) { MessageBox.Show("You must select a drink size.", "Missing required entry"); } else { try { int quantityInteger = int.Parse(quantityTextBox.Text); if (quantityInteger != 0) { drinksInteger += quantityInteger; totalOrderDecimal += itemPriceDecimal * quantityInteger; orderCompleteButton.Enabled = true;
// Reset defaults for next item. noSizeRadioButton.Checked = true; fruitJuiceRadioButton.Checked = true; vitaminPackCheckBox.Checked = false; energyBoosterCheckBox.Checked = false; ladiesCheckBox.Checked = false; itemPriceTextBox.Clear(); quantityTextBox.Text = "1"; } else { MessageBox.Show("Please enter a quantity.", "Missing Required Entry"); } } catch (FormatException) { MessageBox.Show("Invalid quantity.", "Data Entry Error"); quantityTextBox.Focus(); quantityTextBox.SelectAll(); } } }
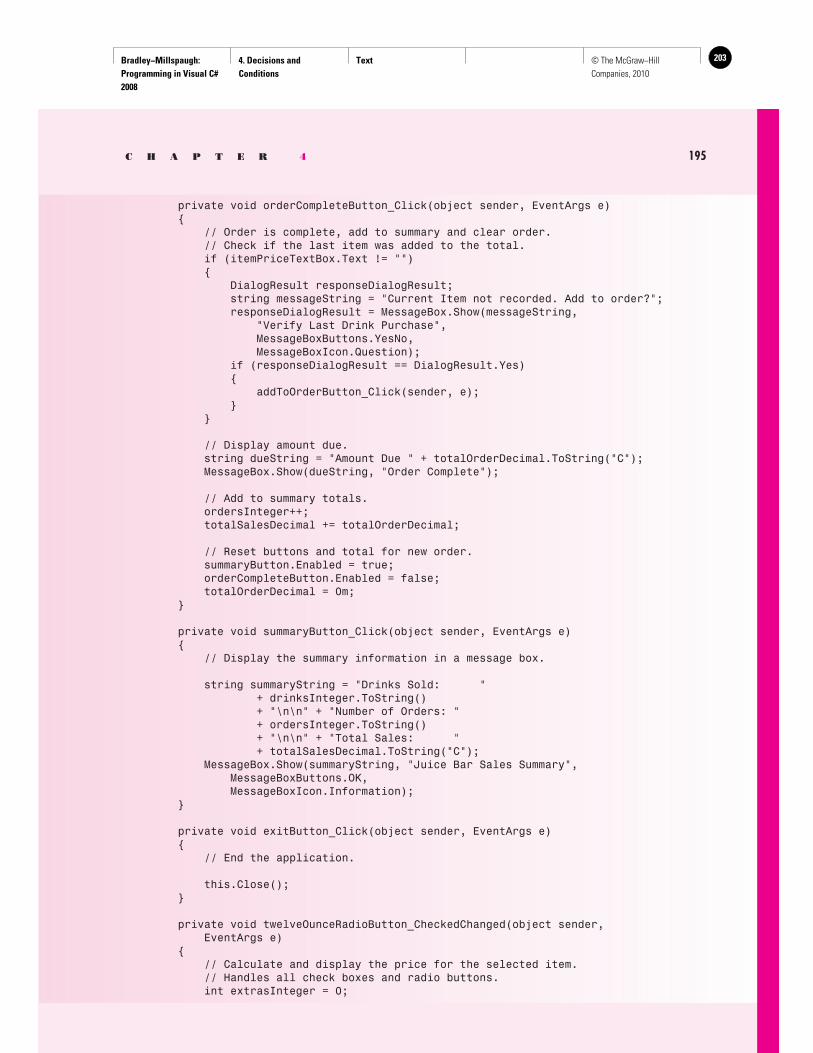
Bradley−Millspaugh: Programming in Visual C# 2008
4. Decisions and Conditions
Text 203© The McGraw−Hill Companies, 2010
C H A P T E R 4 195
private void orderCompleteButton_Click(object sender, EventArgs e) { // Order is complete, add to summary and clear order. // Check if the last item was added to the total. if (itemPriceTextBox.Text != "") { DialogResult responseDialogResult; string messageString = "Current Item not recorded. Add to order?"; responseDialogResult = MessageBox.Show(messageString, "Verify Last Drink Purchase", MessageBoxButtons.YesNo, MessageBoxIcon.Question); if (responseDialogResult == DialogResult.Yes) { addToOrderButton_Click(sender, e); } }
// Display amount due. string dueString = "Amount Due " + totalOrderDecimal.ToString("C"); MessageBox.Show(dueString, "Order Complete");
// Add to summary totals. ordersInteger++; totalSalesDecimal += totalOrderDecimal;
// Reset buttons and total for new order. summaryButton.Enabled = true; orderCompleteButton.Enabled = false; totalOrderDecimal = 0m; }
private void summaryButton_Click(object sender, EventArgs e) { // Display the summary information in a message box.
string summaryString = "Drinks Sold: " + drinksInteger.ToString() + "\n\n" + "Number of Orders: " + ordersInteger.ToString() + "\n\n" + "Total Sales: " + totalSalesDecimal.ToString("C"); MessageBox.Show(summaryString, "Juice Bar Sales Summary", MessageBoxButtons.OK, MessageBoxIcon.Information); }
private void exitButton_Click(object sender, EventArgs e) { // End the application.
this.Close(); }
private void twelveOunceRadioButton_CheckedChanged(object sender, EventArgs e) { // Calculate and display the price for the selected item. // Handles all check boxes and radio buttons. int extrasInteger = 0;
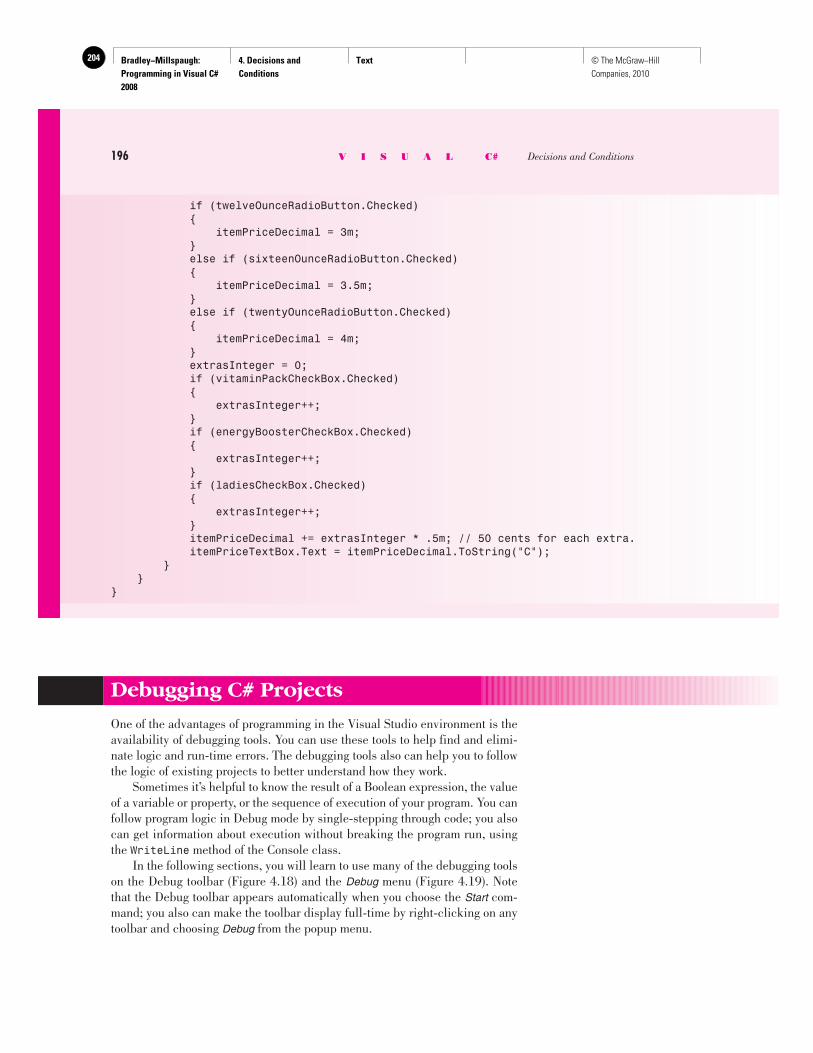
Bradley−Millspaugh: Programming in Visual C# 2008
4. Decisions and Conditions
Text204 © The McGraw−Hill Companies, 2010
if (twelveOunceRadioButton.Checked) { itemPriceDecimal = 3m; } else if (sixteenOunceRadioButton.Checked) { itemPriceDecimal = 3.5m; } else if (twentyOunceRadioButton.Checked) { itemPriceDecimal = 4m; } extrasInteger = 0; if (vitaminPackCheckBox.Checked) { extrasInteger++; } if (energyBoosterCheckBox.Checked) { extrasInteger++; } if (ladiesCheckBox.Checked) { extrasInteger++; } itemPriceDecimal += extrasInteger * .5m; // 50 cents for each extra. itemPriceTextBox.Text = itemPriceDecimal.ToString("C"); } }}
196 V I S U A L C# Decisions and Conditions
Debugging C# Projects
One of the advantages of programming in the Visual Studio environment is the availability of debugging tools. You can use these tools to help find and elimi-nate logic and run-time errors. The debugging tools also can help you to follow the logic of existing projects to better understand how they work. Sometimes it’s helpful to know the result of a Boolean expression, the value of a variable or property, or the sequence of execution of your program. You can follow program logic in Debug mode by single-stepping through code; you also can get information about execution without breaking the program run, using the WriteLine method of the Console class. In the following sections, you will learn to use many of the debugging tools on the Debug toolbar ( Figure 4.18 ) and the Debug menu ( Figure 4.19 ). Note that the Debug toolbar appears automatically when you choose the Start com-mand; you also can make the toolbar display full-time by right-clicking on any toolbar and choosing Debug from the popup menu.
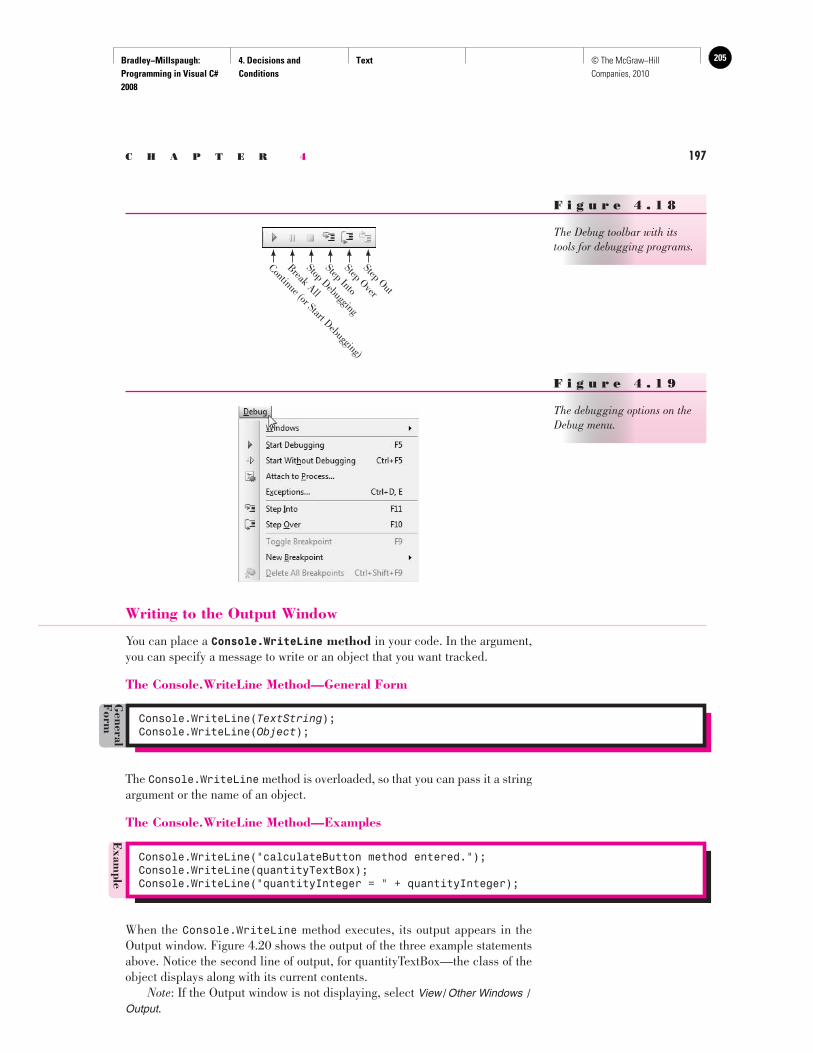
Bradley−Millspaugh: Programming in Visual C# 2008
4. Decisions and Conditions
Text 205© The McGraw−Hill Companies, 2010
C H A P T E R 4 197
Writing to the Output Window
You can place a Console.WriteLine method in your code. In the argument, you can specify a message to write or an object that you want tracked.
The Console.WriteLine Method—General Form
F i g u r e 4 . 1 8
The Debug toolbar with its tools for debugging programs.
Step Out
Step Over
Step Into
Stop Debugging
Break All
Continue (or Start Debugging)
F i g u r e 4 . 1 9
The debugging options on the Debug menu.
Console.WriteLine( TextString ); Console.WriteLine( Object );
General
Form
E
xample
Console.WriteLine("calculateButton method entered."); Console.WriteLine(quantityTextBox); Console.WriteLine("quantityInteger = " + quantityInteger);
The Console.WriteLine method is overloaded, so that you can pass it a string argument or the name of an object.
The Console.WriteLine Method—Examples
When the Console.WriteLine method executes, its output appears in the Output window. Figure 4.20 shows the output of the three example statements above. Notice the second line of output, for quantityTextBox—the class of the object displays along with its current contents. Note: If the Output window is not displaying, select View/Other Windows / Output .
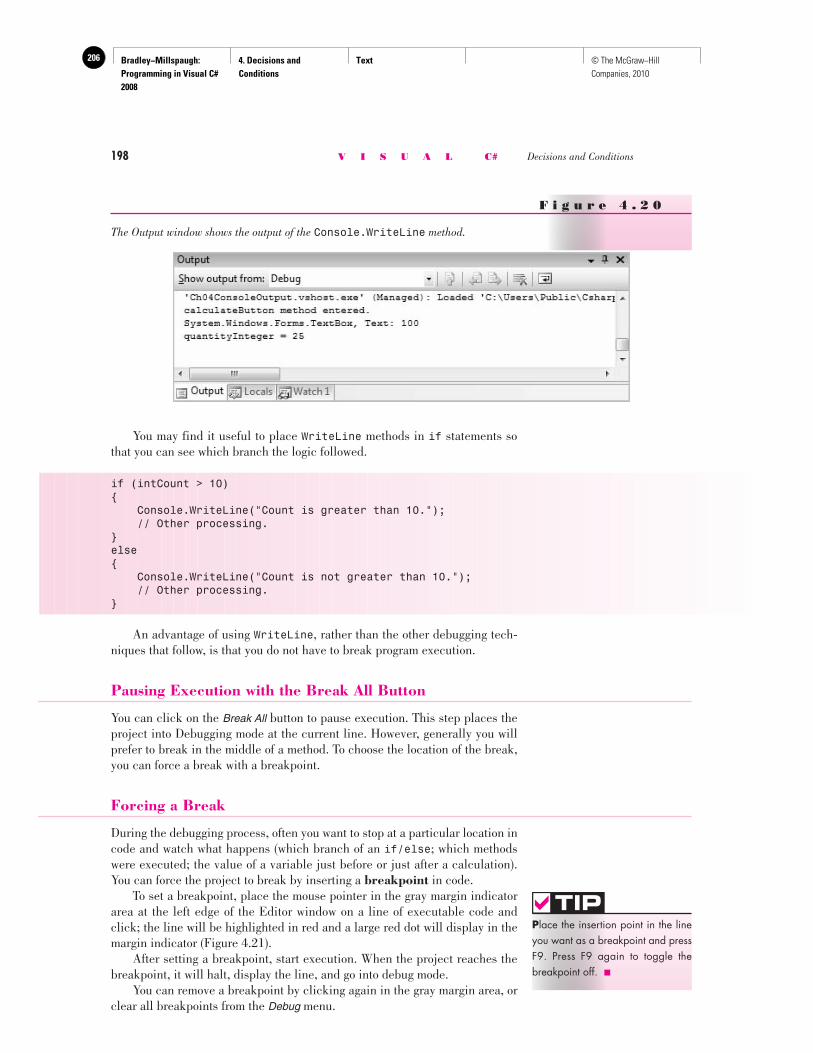
Bradley−Millspaugh: Programming in Visual C# 2008
4. Decisions and Conditions
Text206 © The McGraw−Hill Companies, 2010
198 V I S U A L C# Decisions and Conditions
You may find it useful to place WriteLine methods in if statements so that you can see which branch the logic followed.
if (intCount > 10){ Console.WriteLine("Count is greater than 10."); // Other processing.}else{ Console.WriteLine("Count is not greater than 10."); // Other processing.}
An advantage of using WriteLine , rather than the other debugging tech-niques that follow, is that you do not have to break program execution.
Pausing Execution with the Break All Button
You can click on the Break All button to pause execution. This step places the project into Debugging mode at the current line. However, generally you will prefer to break in the middle of a method. To choose the location of the break, you can force a break with a breakpoint.
Forcing a Break
During the debugging process, often you want to stop at a particular location in code and watch what happens (which branch of an if/else ; which methods were executed; the value of a variable just before or just after a calculation). You can force the project to break by inserting a breakpoint in code. To set a breakpoint, place the mouse pointer in the gray margin indicator area at the left edge of the Editor window on a line of executable code and click; the line will be highlighted in red and a large red dot will display in the margin indicator ( Figure 4.21 ). After setting a breakpoint, start execution. When the project reaches the breakpoint, it will halt, display the line, and go into debug mode. You can remove a breakpoint by clicking again in the gray margin area, or clear all breakpoints from the Debug menu.
F i g u r e 4 . 2 0
The Output window shows the output of the Console.WriteLine method.
P lace the insertion point in the line you want as a breakpoint and press F9. Press F9 again to toggle the breakpoint off. ■
TIP
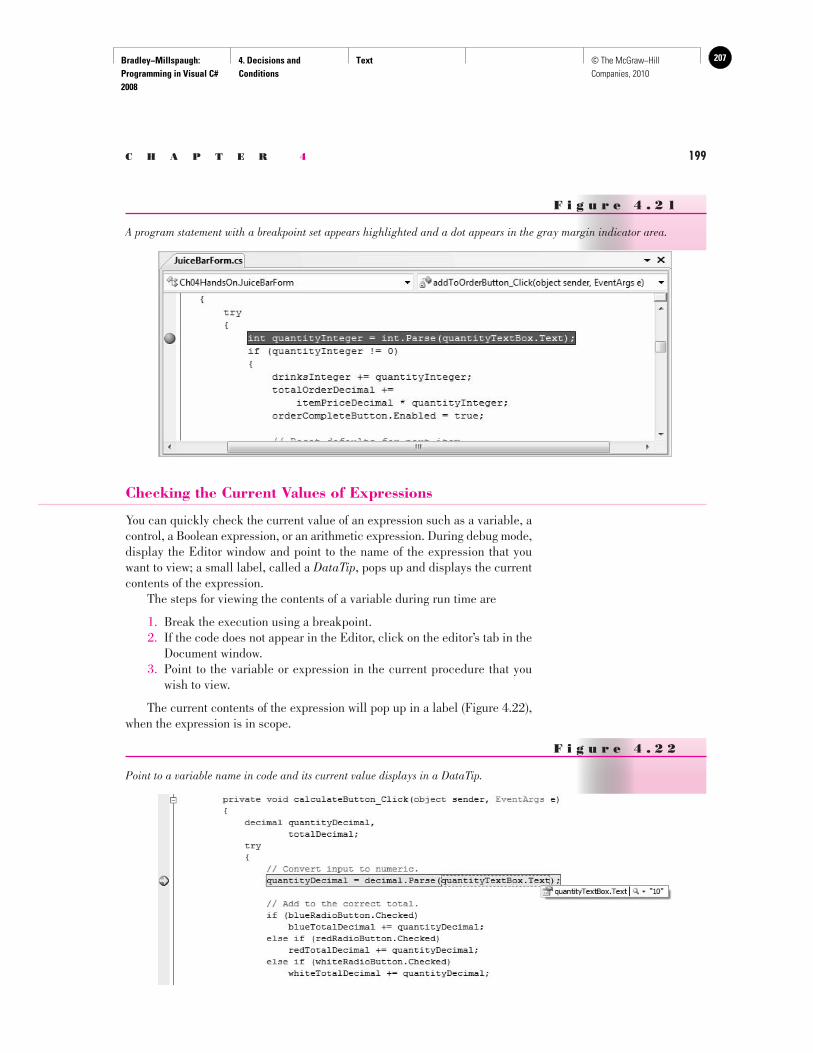
Bradley−Millspaugh: Programming in Visual C# 2008
4. Decisions and Conditions
Text 207© The McGraw−Hill Companies, 2010
C H A P T E R 4 199
Checking the Current Values of Expressions
You can quickly check the current value of an expression such as a variable, a control, a Boolean expression, or an arithmetic expression. During debug mode, display the Editor window and point to the name of the expression that you want to view; a small label, called a DataTip , pops up and displays the current contents of the expression. The steps for viewing the contents of a variable during run time are
1. Break the execution using a breakpoint. 2. If the code does not appear in the Editor, click on the editor’s tab in the
Document window. 3. Point to the variable or expression in the current procedure that you
wish to view.
The current contents of the expression will pop up in a label ( Figure 4.22 ), when the expression is in scope.
F i g u r e 4 . 2 1
A program statement with a breakpoint set appears highlighted and a dot appears in the gray margin indicator area.
F i g u r e 4 . 2 2
Point to a variable name in code and its current value displays in a DataTip.
Bradley−Millspaugh: Programming in Visual C# 2008
4. Decisions and Conditions
Text208 © The McGraw−Hill Companies, 2010
200 V I S U A L C# Decisions and Conditions
Stepping through Code
The best way to debug a project is to thoroughly understand what the project is doing every step of the way. Previously, this task was performed by following each line of code manually to understand its effect. You can now use the Visual Studio stepping tools to trace program execution line by line and see the pro-gression of the program as it executes through your code. You step through code at debug time. You can use one of the techniques already mentioned to break execution or choose one of the stepping commands at design time; the program will begin running and immediately transfer to debug time. The three stepping commands on the Debug menu are Step Into , Step Over , and Step Out . You also can use the toolbar buttons for stepping or the keyboard shortcuts shown on the menu (refer to Figure 4.19 ). These commands force the project to execute a single line at a time and to display the Editor window with the current statement highlighted. As you exe-cute the program, by clicking a button, for example, the Click event occurs. Execution transfers to the event-handling method, the Editor window for that method appears on the screen, and you can follow line-by-line execution.
Step Into Most likely you will use the Step Into command more than the other two step-ping commands. When you choose Step Into (from the menu, the toolbar button, or F11), the next line of code executes and the program pauses again in debug time. If the line of code is a call to another method, the first line of code of the called method displays. To continue stepping through your program execution, continue choosing the Step Into command. When a method is completed, your form will display again, awaiting an event. You can click on one of the form’s buttons to continue stepping through code in an event-handling method. If you want to continue execution without stepping, choose the Continue command (from the menu, the toolbar button, or F5). Note: The keyboard shortcuts may differ, depending on the keyboard mapping selected in the Options dialog box. The shortcuts shown here are for C# development settings; if you are using general development settings, perhaps in a shared environment with other language development, the keyboard shortcuts may differ.
Step Over The Step Over command also executes one line of code at a time. The differ-ence between Step Over and Step Into occurs when your code has calls to other methods. Step Over displays only the lines of code in the current method being analyzed; it does not display lines of code in the called methods. You can choose Step Over from the menu, from the toolbar button, or by pressing F10. Each time you choose the command, one more program state-ment executes.
Step Out You use the third stepping command when you are stepping through a called method. The Step Out command continues rapid execution until the called method completes, and then returns to debug mode at the statement following the call, that is, the next line of the calling method.
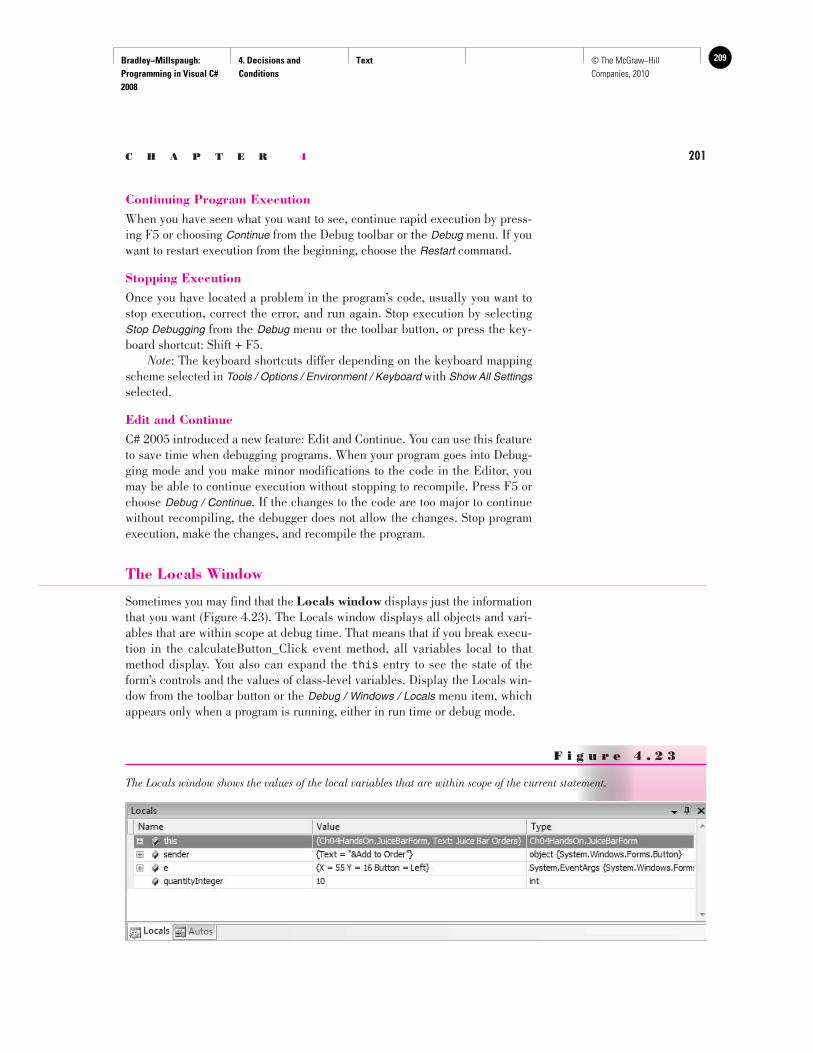
Bradley−Millspaugh: Programming in Visual C# 2008
4. Decisions and Conditions
Text 209© The McGraw−Hill Companies, 2010
C H A P T E R 4 201
Continuing Program Execution When you have seen what you want to see, continue rapid execution by press-ing F5 or choosing Continue from the Debug toolbar or the Debug menu. If you want to restart execution from the beginning, choose the Restart command.
Stopping Execution Once you have located a problem in the program’s code, usually you want to stop execution, correct the error, and run again. Stop execution by selecting Stop Debugging from the Debug menu or the toolbar button, or press the key-board shortcut: Shift + F5. Note : The keyboard shortcuts differ depending on the keyboard mapping scheme selected in Tools / Options / Environment / Keyboard with Show All Settings selected.
Edit and Continue C# 2005 introduced a new feature: Edit and Continue. You can use this feature to save time when debugging programs. When your program goes into Debug-ging mode and you make minor modifications to the code in the Editor, you may be able to continue execution without stopping to recompile. Press F5 or choose Debug / Continue . If the changes to the code are too major to continue without recompiling, the debugger does not allow the changes. Stop program execution, make the changes, and recompile the program.
The Locals Window
Sometimes you may find that the Locals window displays just the information that you want ( Figure 4.23 ). The Locals window displays all objects and vari-ables that are within scope at debug time. That means that if you break execu-tion in the calculateButton_Click event method, all variables local to that method display. You also can expand the this entry to see the state of the form’s controls and the values of class-level variables. Display the Locals win-dow from the toolbar button or the Debug / Windows / Locals menu item, which appears only when a program is running, either in run time or debug mode.
F i g u r e 4 . 2 3
The Locals window shows the values of the local variables that are within scope of the current statement.
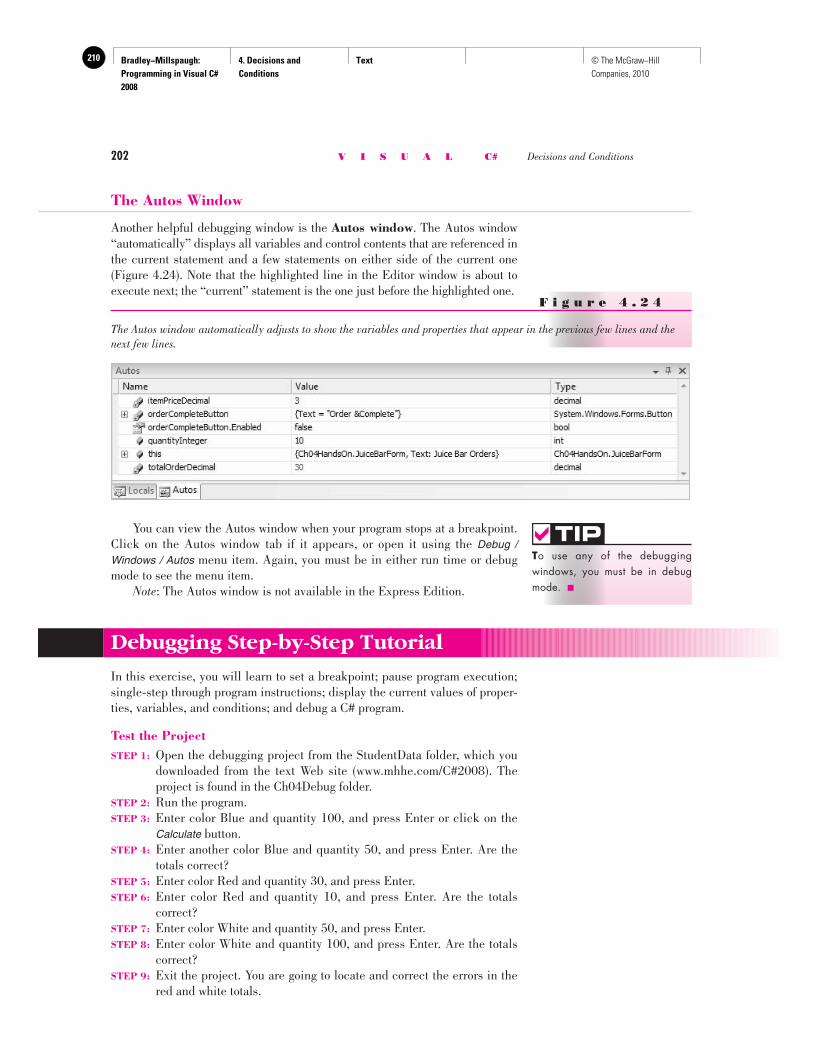
Bradley−Millspaugh: Programming in Visual C# 2008
4. Decisions and Conditions
Text210 © The McGraw−Hill Companies, 2010
202 V I S U A L C# Decisions and Conditions
The Autos Window
Another helpful debugging window is the Autos window . The Autos window “automatically” displays all variables and control contents that are referenced in the current statement and a few statements on either side of the current one ( Figure 4.24 ). Note that the highlighted line in the Editor window is about to execute next; the “current” statement is the one just before the highlighted one.
T o use any of the debugging windows, you must be in debug mode. ■
TIP
F i g u r e 4 . 2 4
The Autos window automatically adjusts to show the variables and properties that appear in the previous few lines and the next few lines.
You can view the Autos window when your program stops at a breakpoint. Click on the Autos window tab if it appears, or open it using the Debug / Windows / Autos menu item. Again, you must be in either run time or debug mode to see the menu item. Note: The Autos window is not available in the Express Edition.
Debugging Step-by-Step Tutorial
In this exercise, you will learn to set a breakpoint; pause program execution; single-step through program instructions; display the current values of proper-ties, variables, and conditions; and debug a C# program.
Test the Project STEP 1: Open the debugging project from the StudentData folder, which you
downloaded from the text Web site ( www.mhhe.com/C#2008 ). The project is found in the Ch04Debug folder.
STEP 2: Run the program. STEP 3: Enter color Blue and quantity 100, and press Enter or click on the
Calculate button. STEP 4: Enter another color Blue and quantity 50, and press Enter. Are the
totals correct? STEP 5: Enter color Red and quantity 30, and press Enter. STEP 6: Enter color Red and quantity 10, and press Enter. Are the totals
correct? STEP 7: Enter color White and quantity 50, and press Enter. STEP 8: Enter color White and quantity 100, and press Enter. Are the totals
correct? STEP 9: Exit the project. You are going to locate and correct the errors in the
red and white totals.
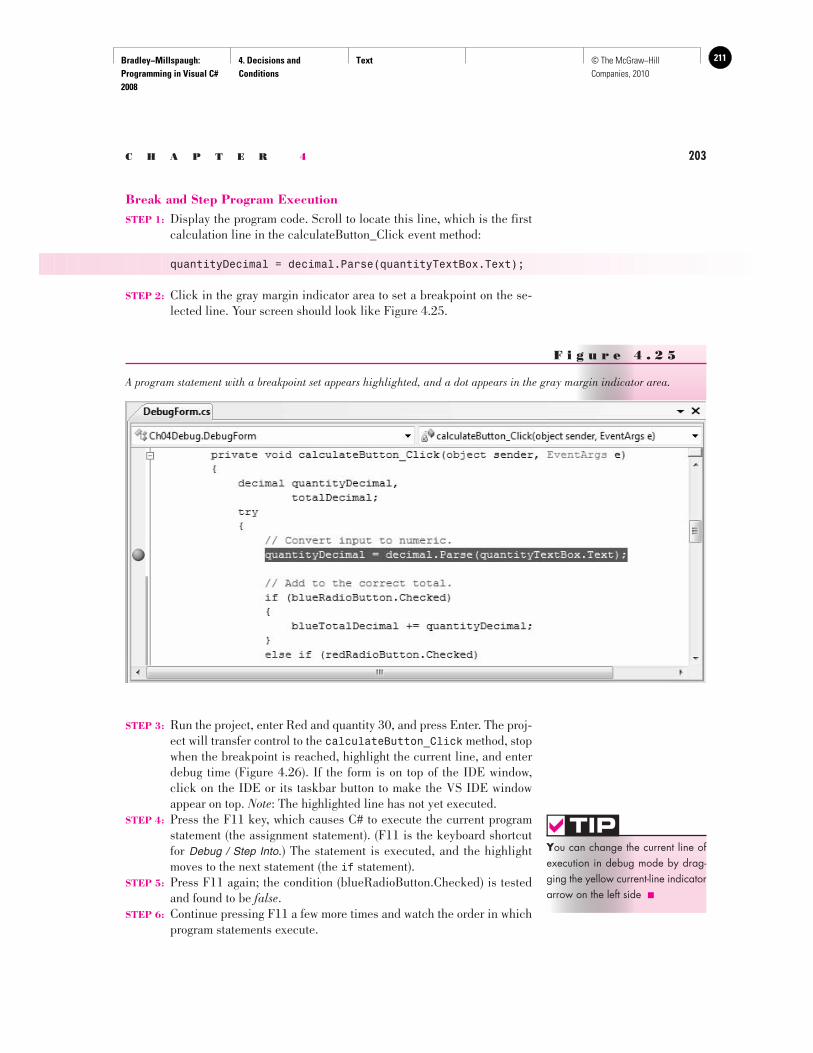
Bradley−Millspaugh: Programming in Visual C# 2008
4. Decisions and Conditions
Text 211© The McGraw−Hill Companies, 2010
C H A P T E R 4 203
Break and Step Program Execution STEP 1: Display the program code. Scroll to locate this line, which is the first
calculation line in the calculateButton_Click event method:
quantityDecimal = decimal.Parse(quantityTextBox.Text);
STEP 2: Click in the gray margin indicator area to set a breakpoint on the se-lected line. Your screen should look like Figure 4.25 .
F i g u r e 4 . 2 5
A program statement with a breakpoint set appears highlighted, and a dot appears in the gray margin indicator area.
STEP 3: Run the project, enter Red and quantity 30, and press Enter. The proj-ect will transfer control to the calculateButton_Click method, stop when the breakpoint is reached, highlight the current line, and enter debug time ( Figure 4.26 ). If the form is on top of the IDE window, click on the IDE or its taskbar button to make the VS IDE window appear on top. Note : The highlighted line has not yet executed.
STEP 4: Press the F11 key, which causes C# to execute the current program statement (the assignment statement). (F11 is the keyboard shortcut for Debug / Step Into .) The statement is executed, and the highlight moves to the next statement (the if statement).
STEP 5: Press F11 again; the condition (blueRadioButton.Checked) is tested and found to be false .
STEP 6: Continue pressing F11 a few more times and watch the order in which program statements execute.
Y ou can change the current line of execution in debug mode by drag-ging the yellow current-line indicator arrow on the left side ■
TIP
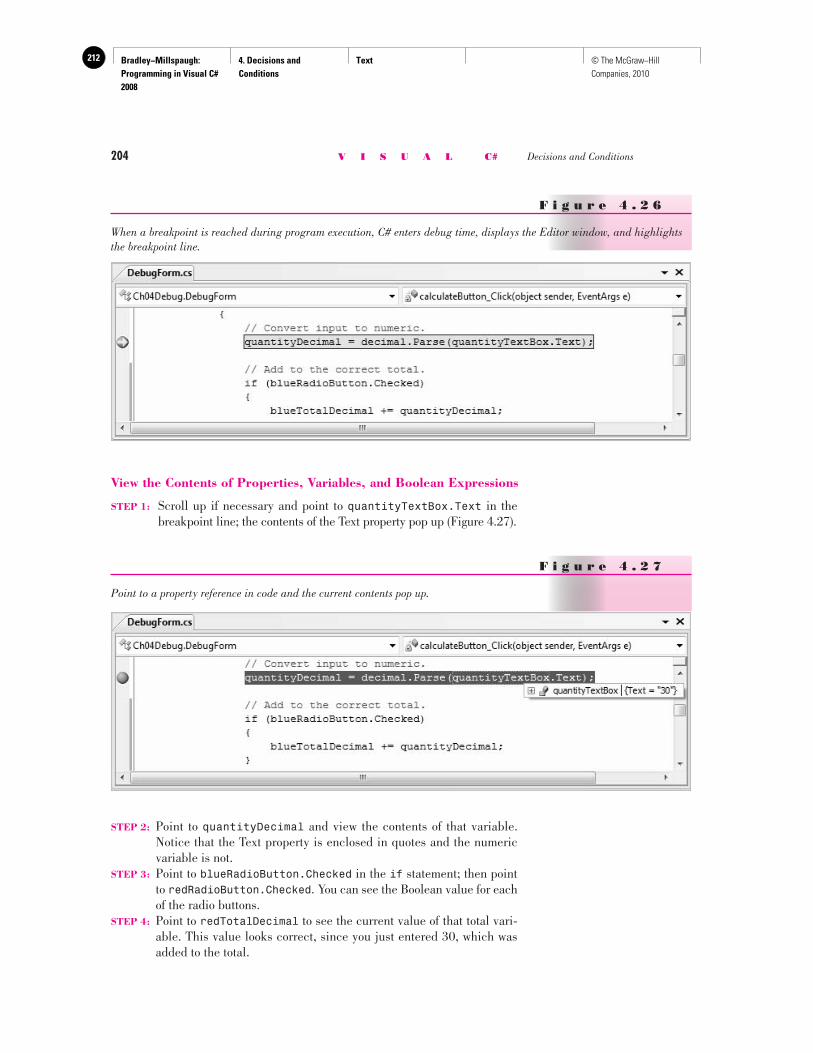
Bradley−Millspaugh: Programming in Visual C# 2008
4. Decisions and Conditions
Text212 © The McGraw−Hill Companies, 2010
204 V I S U A L C# Decisions and Conditions
View the Contents of Properties, Variables, and Boolean Expressions
STEP 1: Scroll up if necessary and point to quantityTextBox.Text in the breakpoint line; the contents of the Text property pop up ( Figure 4.27 ).
F i g u r e 4 . 2 6
When a breakpoint is reached during program execution, C# enters debug time, displays the Editor window, and highlights the breakpoint line.
F i g u r e 4 . 2 7
Point to a property reference in code and the current contents pop up.
STEP 2: Point to quantityDecimal and view the contents of that variable. Notice that the Text property is enclosed in quotes and the numeric variable is not.
STEP 3: Point to blueRadioButton.Checked in the if statement; then point to redRadioButton.Checked . You can see the Boolean value for each of the radio buttons.
STEP 4: Point to redTotalDecimal to see the current value of that total vari-able. This value looks correct, since you just entered 30, which was added to the total.
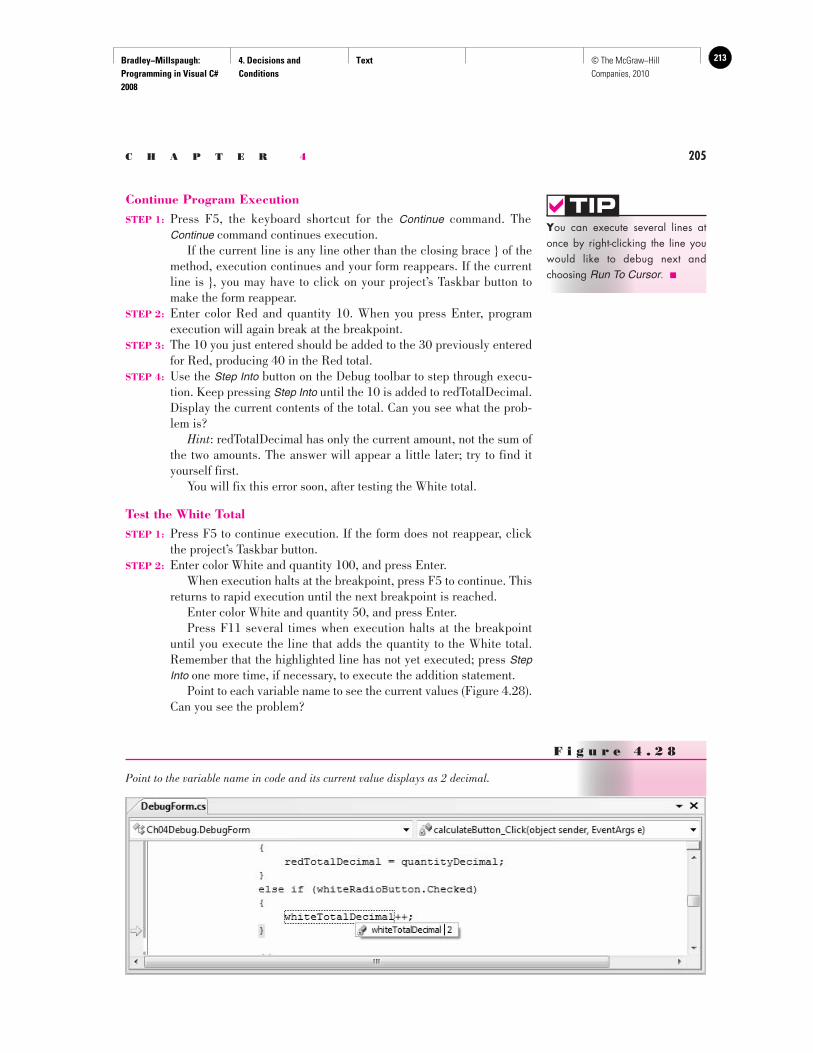
Bradley−Millspaugh: Programming in Visual C# 2008
4. Decisions and Conditions
Text 213© The McGraw−Hill Companies, 2010
C H A P T E R 4 205
Continue Program Execution STEP 1: Press F5, the keyboard shortcut for the Continue command. The
Continue command continues execution. If the current line is any line other than the closing brace } of the
method, execution continues and your form reappears. If the current line is }, you may have to click on your project’s Taskbar button to make the form reappear.
STEP 2: Enter color Red and quantity 10. When you press Enter, program execution will again break at the breakpoint.
STEP 3: The 10 you just entered should be added to the 30 previously entered for Red, producing 40 in the Red total.
STEP 4: Use the Step Into button on the Debug toolbar to step through execu-tion. Keep pressing Step Into until the 10 is added to redTotalDecimal. Display the current contents of the total. Can you see what the prob-lem is?
Hint : redTotalDecimal has only the current amount, not the sum of the two amounts. The answer will appear a little later; try to find it yourself first.
You will fix this error soon, after testing the White total.
Test the White Total STEP 1: Press F5 to continue execution. If the form does not reappear, click
the project’s Taskbar button. STEP 2: Enter color White and quantity 100, and press Enter. When execution halts at the breakpoint, press F5 to continue. This
returns to rapid execution until the next breakpoint is reached. Enter color White and quantity 50, and press Enter. Press F11 several times when execution halts at the breakpoint
until you execute the line that adds the quantity to the White total. Remember that the highlighted line has not yet executed; press Step Into one more time, if necessary, to execute the addition statement.
Point to each variable name to see the current values ( Figure 4.28 ). Can you see the problem?
F i g u r e 4 . 2 8
Point to the variable name in code and its current value displays as 2 decimal.
Y ou can execute several lines at once by right-clicking the line you would like to debug next and choosing Run To Cursor. ■
TIP
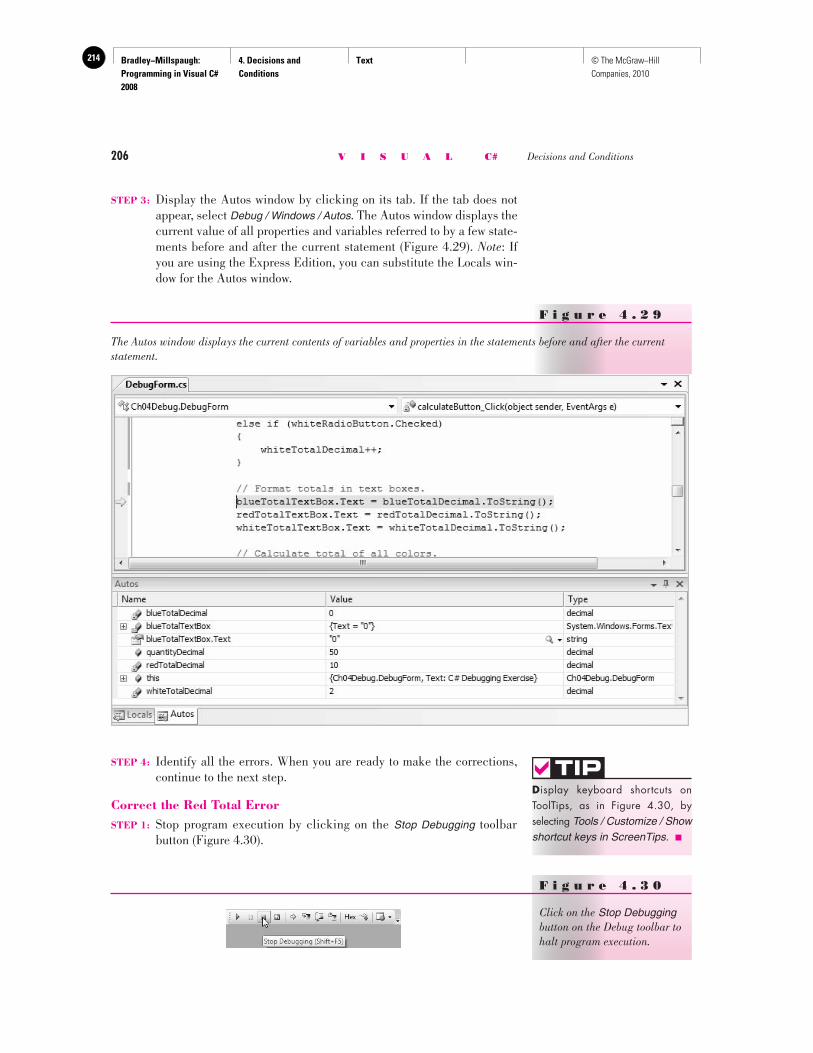
Bradley−Millspaugh: Programming in Visual C# 2008
4. Decisions and Conditions
Text214 © The McGraw−Hill Companies, 2010
206 V I S U A L C# Decisions and Conditions
STEP 3: Display the Autos window by clicking on its tab. If the tab does not appear, select Debug / Windows / Autos . The Autos window displays the current value of all properties and variables referred to by a few state-ments before and after the current statement ( Figure 4.29 ). Note: If you are using the Express Edition, you can substitute the Locals win-dow for the Autos window.
F i g u r e 4 . 2 9
The Autos window displays the current contents of variables and properties in the statements before and after the current statement.
STEP 4: Identify all the errors. When you are ready to make the corrections, continue to the next step.
Correct the Red Total Error STEP 1: Stop program execution by clicking on the Stop Debugging toolbar
button ( Figure 4.30 ).
D isplay keyboard shortcuts on ToolTips, as in Figure 4.30 , by selecting Tools / Customize / Show shortcut keys in ScreenTips. ■
TIP
F i g u r e 4 . 3 0
Click on the Stop Debugging button on the Debug toolbar to halt program execution.
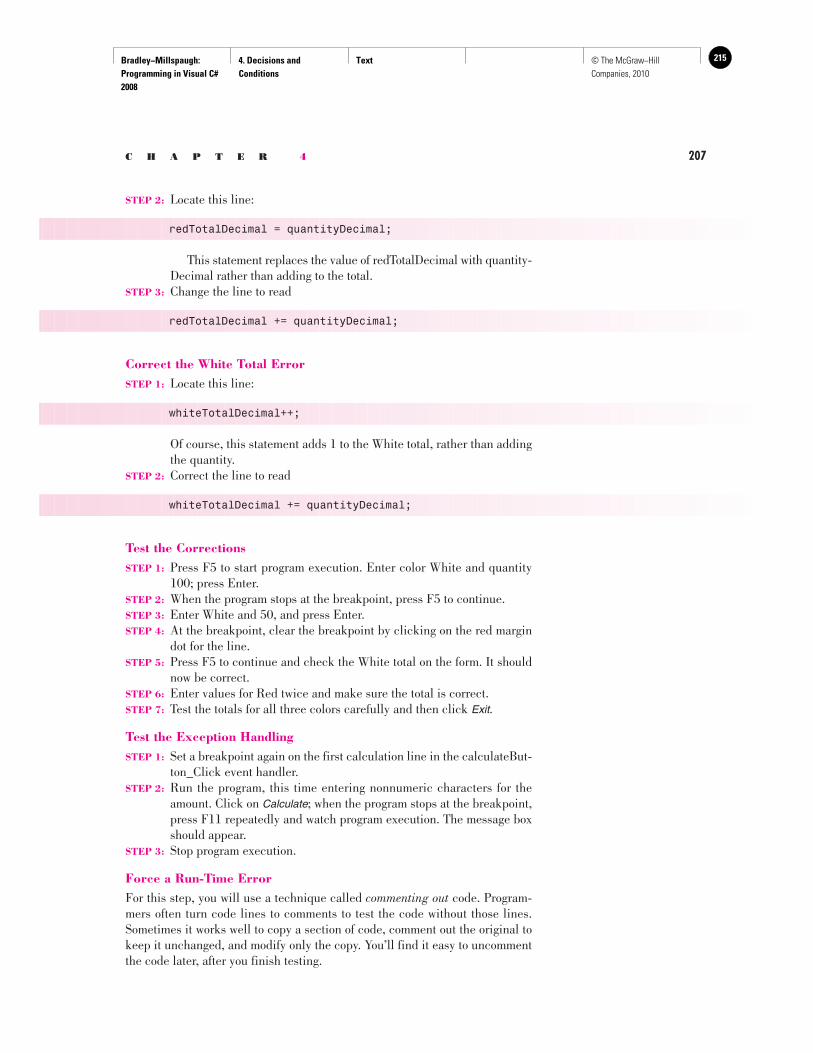
Bradley−Millspaugh: Programming in Visual C# 2008
4. Decisions and Conditions
Text 215© The McGraw−Hill Companies, 2010
C H A P T E R 4 207
STEP 2: Locate this line:
redTotalDecimal = quantityDecimal;
This statement replaces the value of redTotalDecimal with quantity-Decimal rather than adding to the total.
STEP 3: Change the line to read
redTotalDecimal += quantityDecimal;
Correct the White Total Error STEP 1: Locate this line:
whiteTotalDecimal++;
Of course, this statement adds 1 to the White total, rather than adding the quantity.
STEP 2: Correct the line to read
whiteTotalDecimal += quantityDecimal;
Test the Corrections STEP 1: Press F5 to start program execution. Enter color White and quantity
100; press Enter. STEP 2: When the program stops at the breakpoint, press F5 to continue. STEP 3: Enter White and 50, and press Enter. STEP 4: At the breakpoint, clear the breakpoint by clicking on the red margin
dot for the line. STEP 5: Press F5 to continue and check the White total on the form. It should
now be correct. STEP 6: Enter values for Red twice and make sure the total is correct. STEP 7: Test the totals for all three colors carefully and then click Exit .
Test the Exception Handling STEP 1: Set a breakpoint again on the first calculation line in the calculateBut-
ton_Click event handler. STEP 2: Run the program, this time entering nonnumeric characters for the
amount. Click on Calculate ; when the program stops at the breakpoint, press F11 repeatedly and watch program execution. The message box should appear.
STEP 3: Stop program execution.
Force a Run-Time Error For this step, you will use a technique called commenting out code. Program-mers often turn code lines to comments to test the code without those lines. Sometimes it works well to copy a section of code, comment out the original to keep it unchanged, and modify only the copy. You’ll find it easy to uncomment the code later, after you finish testing.
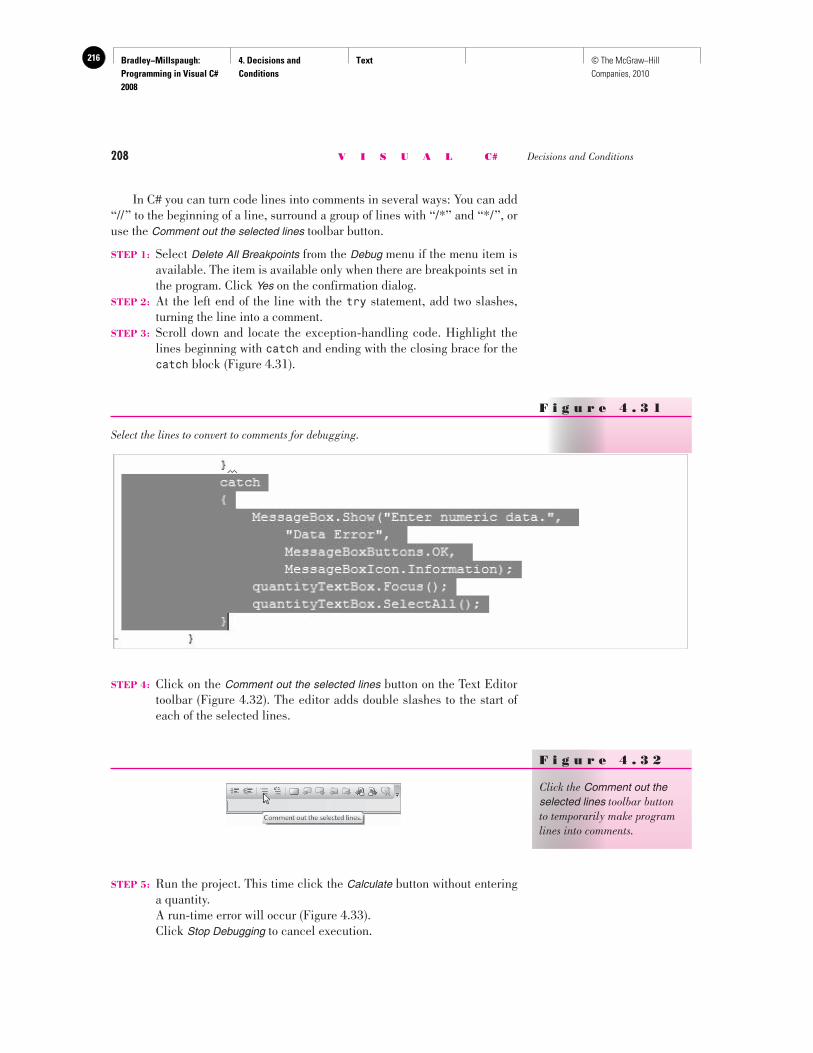
Bradley−Millspaugh: Programming in Visual C# 2008
4. Decisions and Conditions
Text216 © The McGraw−Hill Companies, 2010
208 V I S U A L C# Decisions and Conditions
In C# you can turn code lines into comments in several ways: You can add “//” to the beginning of a line, surround a group of lines with “/*” and “*/”, or use the Comment out the selected lines toolbar button.
STEP 1: Select Delete All Breakpoints from the Debug menu if the menu item is available. The item is available only when there are breakpoints set in the program. Click Yes on the confirmation dialog.
STEP 2: At the left end of the line with the try statement, add two slashes, turning the line into a comment.
STEP 3: Scroll down and locate the exception-handling code. Highlight the lines beginning with catch and ending with the closing brace for the catch block ( Figure 4.31 ).
F i g u r e 4 . 3 1
Select the lines to convert to comments for debugging.
F i g u r e 4 . 3 2
Click the Comment out the selected lines toolbar button to temporarily make program lines into comments.
STEP 4: Click on the Comment out the selected lines button on the Text Editor toolbar ( Figure 4.32 ). The editor adds double slashes to the start of each of the selected lines.
STEP 5: Run the project. This time click the Calculate button without entering a quantity.
A run-time error will occur ( Figure 4.33 ). Click Stop Debugging to cancel execution.
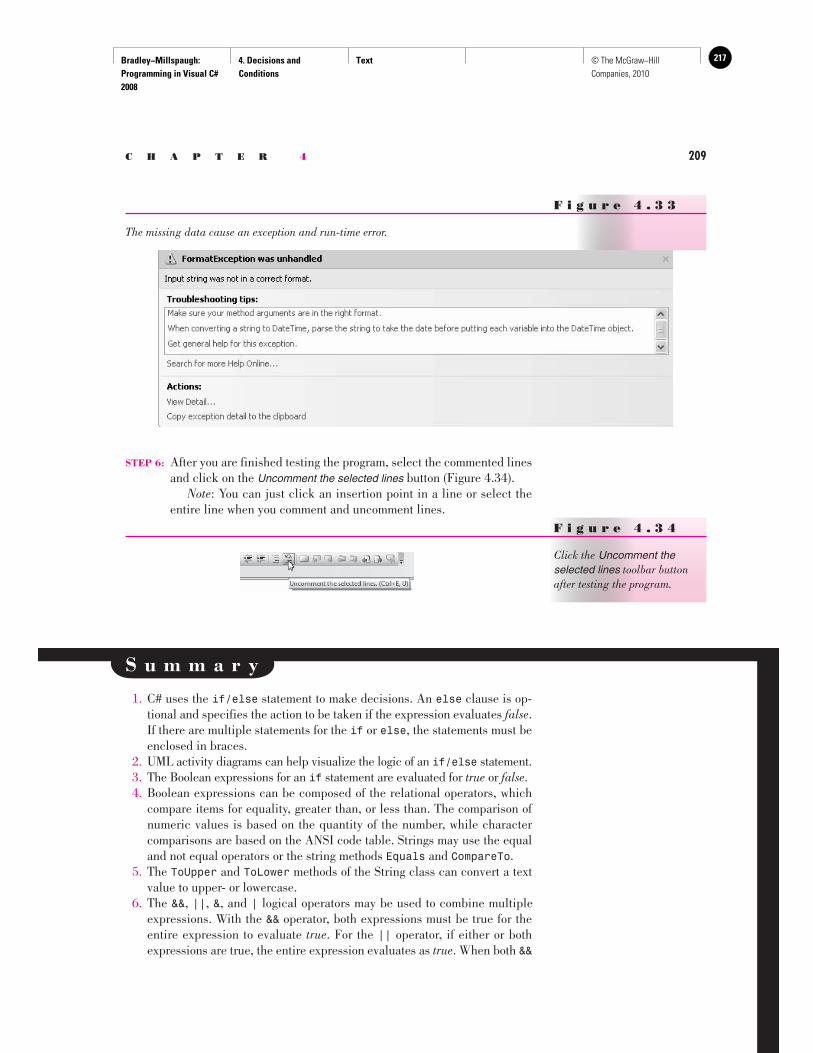
Bradley−Millspaugh: Programming in Visual C# 2008
4. Decisions and Conditions
Text 217© The McGraw−Hill Companies, 2010
C H A P T E R 4 209
STEP 6: After you are finished testing the program, select the commented lines and click on the Uncomment the selected lines button ( Figure 4.34 ).
Note : You can just click an insertion point in a line or select the entire line when you comment and uncomment lines.
F i g u r e 4 . 3 3
The missing data cause an exception and run-time error.
F i g u r e 4 . 3 4
Click the Uncomment the selected lines toolbar button after testing the program.
S u m m a r y
1. C# uses the if/else statement to make decisions. An else clause is op-tional and specifies the action to be taken if the expression evaluates false . If there are multiple statements for the if or else , the statements must be enclosed in braces.
2. UML activity diagrams can help visualize the logic of an if/else statement. 3. The Boolean expressions for an if statement are evaluated for true or false . 4. Boolean expressions can be composed of the relational operators, which
compare items for equality, greater than, or less than. The comparison of numeric values is based on the quantity of the number, while character comparisons are based on the ANSI code table. Strings may use the equal and not equal operators or the string methods Equals and CompareTo .
5. The ToUpper and ToLower methods of the String class can convert a text value to upper- or lowercase.
6. The && , || , & , and | logical operators may be used to combine multiple expressions. With the && operator, both expressions must be true for the entire expression to evaluate true . For the || operator, if either or both expressions are true, the entire expression evaluates as true . When both &&
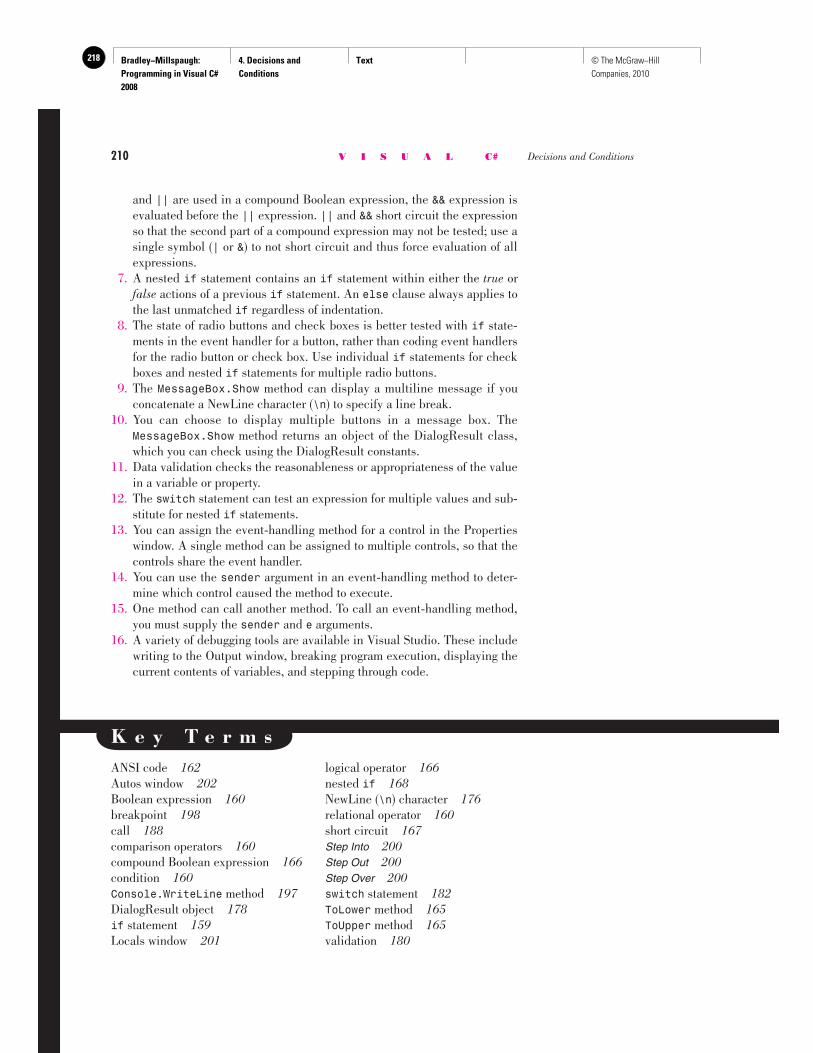
Bradley−Millspaugh: Programming in Visual C# 2008
4. Decisions and Conditions
Text218 © The McGraw−Hill Companies, 2010
210 V I S U A L C# Decisions and Conditions
and || are used in a compound Boolean expression, the && expression is evaluated before the || expression. || and && short circuit the expression so that the second part of a compound expression may not be tested; use a single symbol ( | or & ) to not short circuit and thus force evaluation of all expressions.
7. A nested if statement contains an if statement within either the true or false actions of a previous if statement. An else clause always applies to the last unmatched if regardless of indentation.
8. The state of radio buttons and check boxes is better tested with if state-ments in the event handler for a button, rather than coding event handlers for the radio button or check box. Use individual if statements for check boxes and nested if statements for multiple radio buttons.
9. The MessageBox.Show method can display a multiline message if you concatenate a NewLine character ( \n ) to specify a line break.
10. You can choose to display multiple buttons in a message box. The MessageBox.Show method returns an object of the DialogResult class, which you can check using the DialogResult constants.
11. Data validation checks the reasonableness or appropriateness of the value in a variable or property.
12. The switch statement can test an expression for multiple values and sub-stitute for nested if statements.
13. You can assign the event-handling method for a control in the Properties window. A single method can be assigned to multiple controls, so that the controls share the event handler.
14. You can use the sender argument in an event-handling method to deter-mine which control caused the method to execute.
15. One method can call another method. To call an event-handling method, you must supply the sender and e arguments.
16. A variety of debugging tools are available in Visual Studio. These include writing to the Output window, breaking program execution, displaying the current contents of variables, and stepping through code.
K e y T e r m s ANSI code 162 Autos window 202 Boolean expression 160 breakpoint 198 call 188 comparison operators 160 compound Boolean expression 166 condition 160 Console.WriteLine method 197 DialogResult object 178 if statement 159 Locals window 201
logical operator 166 nested if 168 NewLine (\n) character 176 relational operator 160 short circuit 167 Step Into 200 Step Out 200 Step Over 200 switch statement 182 ToLower method 165 ToUpper method 165 validation 180
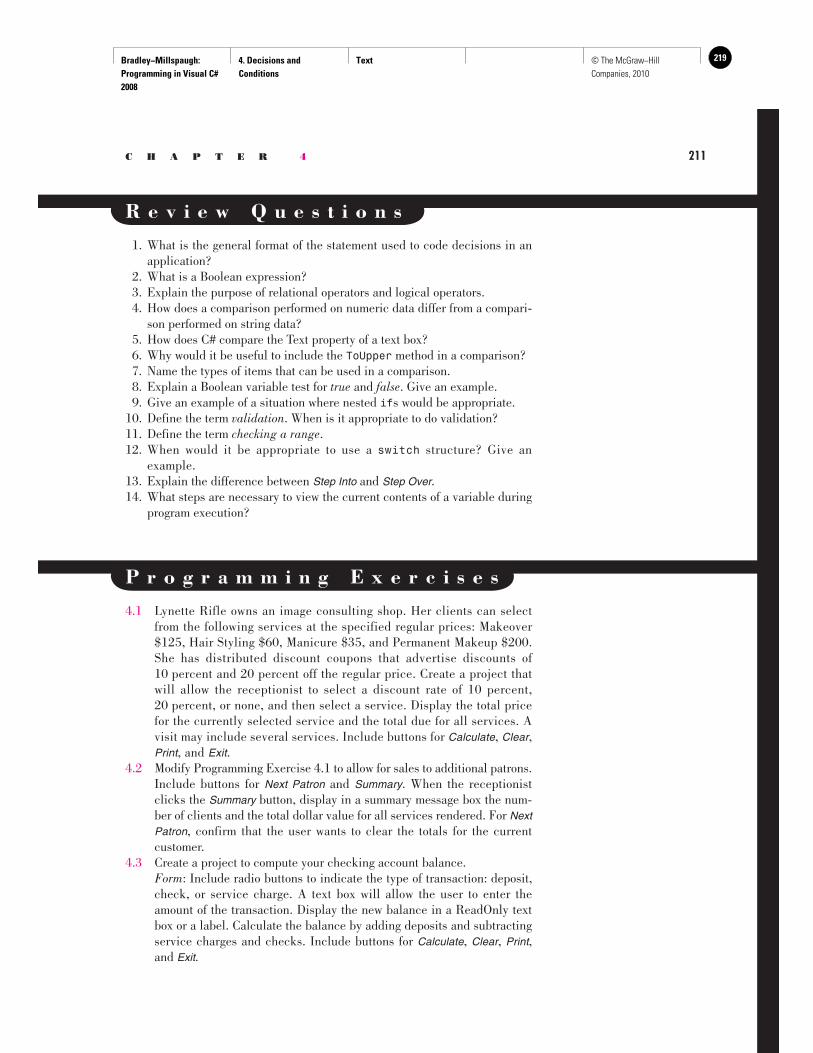
Bradley−Millspaugh: Programming in Visual C# 2008
4. Decisions and Conditions
Text 219© The McGraw−Hill Companies, 2010
C H A P T E R 4 211
R e v i e w Q u e s t i o n s
1. What is the general format of the statement used to code decisions in an application?
2. What is a Boolean expression? 3. Explain the purpose of relational operators and logical operators. 4. How does a comparison performed on numeric data differ from a compari-
son performed on string data? 5. How does C# compare the Text property of a text box? 6. Why would it be useful to include the ToUpper method in a comparison? 7. Name the types of items that can be used in a comparison. 8. Explain a Boolean variable test for true and false . Give an example. 9. Give an example of a situation where nested if s would be appropriate. 10. Define the term validation . When is it appropriate to do validation? 11. Define the term checking a range . 12. When would it be appropriate to use a switch structure? Give an
example. 13. Explain the difference between Step Into and Step Over . 14. What steps are necessary to view the current contents of a variable during
program execution?
P r o g r a m m i n g E x e r c i s e s
4.1 Lynette Rifle owns an image consulting shop. Her clients can select from the following services at the specified regular prices: Makeover $125, Hair Styling $60, Manicure $35, and Permanent Makeup $200. She has distributed discount coupons that advertise discounts of 10 percent and 20 percent off the regular price. Create a project that will allow the receptionist to select a discount rate of 10 percent, 20 percent, or none, and then select a service. Display the total price for the currently selected service and the total due for all services. A visit may include several services. Include buttons for Calculate , Clear , Print , and Exit .
4.2 Modify Programming Exercise 4.1 to allow for sales to additional patrons. Include buttons for Next Patron and Summary . When the receptionist clicks the Summary button, display in a summary message box the num-ber of clients and the total dollar value for all services rendered. For Next Patron , confirm that the user wants to clear the totals for the current customer.
4.3 Create a project to compute your checking account balance. Form: Include radio buttons to indicate the type of transaction: deposit,
check, or service charge. A text box will allow the user to enter the amount of the transaction. Display the new balance in a ReadOnly text box or a label. Calculate the balance by adding deposits and subtracting service charges and checks. Include buttons for Calculate , Clear , Print , and Exit .
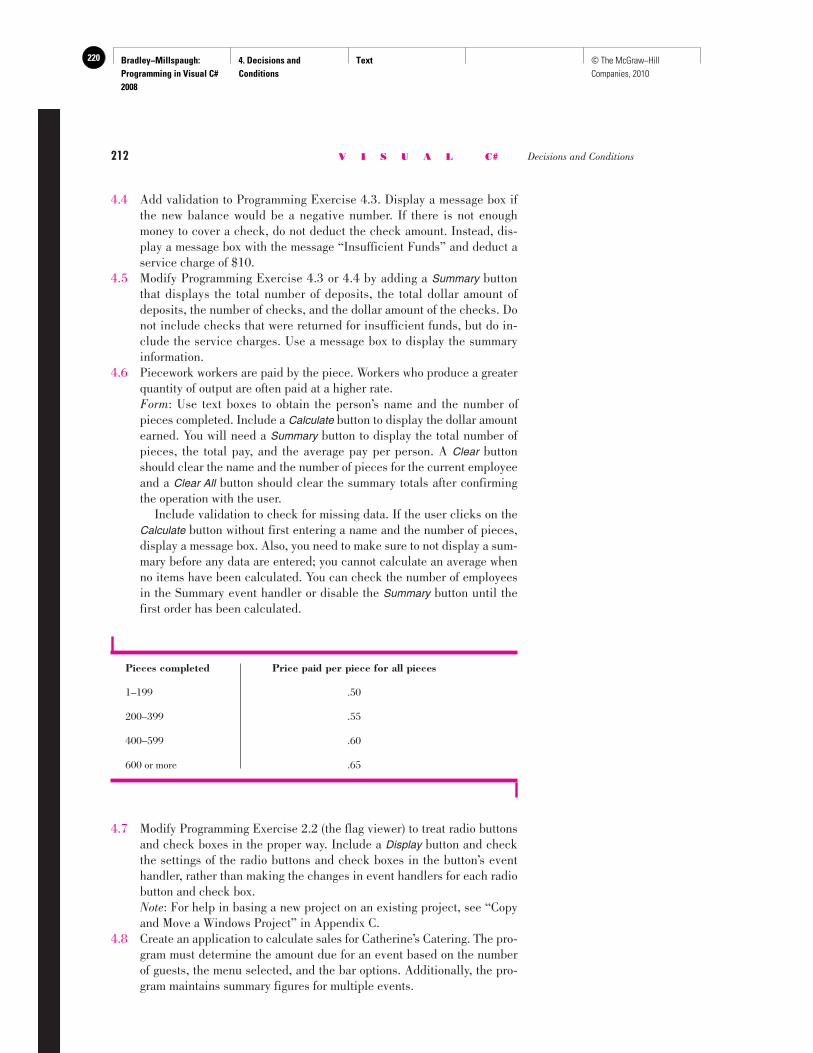
Bradley−Millspaugh: Programming in Visual C# 2008
4. Decisions and Conditions
Text220 © The McGraw−Hill Companies, 2010
212 V I S U A L C# Decisions and Conditions
4.4 Add validation to Programming Exercise 4.3. Display a message box if the new balance would be a negative number. If there is not enough money to cover a check, do not deduct the check amount. Instead, dis-play a message box with the message “Insufficient Funds” and deduct a service charge of $10.
4.5 Modify Programming Exercise 4.3 or 4.4 by adding a Summary button that displays the total number of deposits, the total dollar amount of deposits, the number of checks, and the dollar amount of the checks. Do not include checks that were returned for insufficient funds, but do in-clude the service charges. Use a message box to display the summary information.
4.6 Piecework workers are paid by the piece. Workers who produce a greater quantity of output are often paid at a higher rate.
Form: Use text boxes to obtain the person’s name and the number of pieces completed. Include a Calculate button to display the dollar amount earned. You will need a Summary button to display the total number of pieces, the total pay, and the average pay per person. A Clear button should clear the name and the number of pieces for the current employee and a Clear All button should clear the summary totals after confirming the operation with the user.
Include validation to check for missing data. If the user clicks on the Calculate button without first entering a name and the number of pieces, display a message box. Also, you need to make sure to not display a sum-mary before any data are entered; you cannot calculate an average when no items have been calculated. You can check the number of employees in the Summary event handler or disable the Summary button until the first order has been calculated.
Pieces completed Price paid per piece for all pieces
1–199 .50
200–399 .55
400–599 .60
600 or more .65
4.7 Modify Programming Exercise 2.2 (the flag viewer) to treat radio buttons and check boxes in the proper way. Include a Display button and check the settings of the radio buttons and check boxes in the button’s event handler, rather than making the changes in event handlers for each radio button and check box.
Note: For help in basing a new project on an existing project, see “Copy and Move a Windows Project” in Appendix C.
4.8 Create an application to calculate sales for Catherine’s Catering. The pro-gram must determine the amount due for an event based on the number of guests, the menu selected, and the bar options. Additionally, the pro-gram maintains summary figures for multiple events.
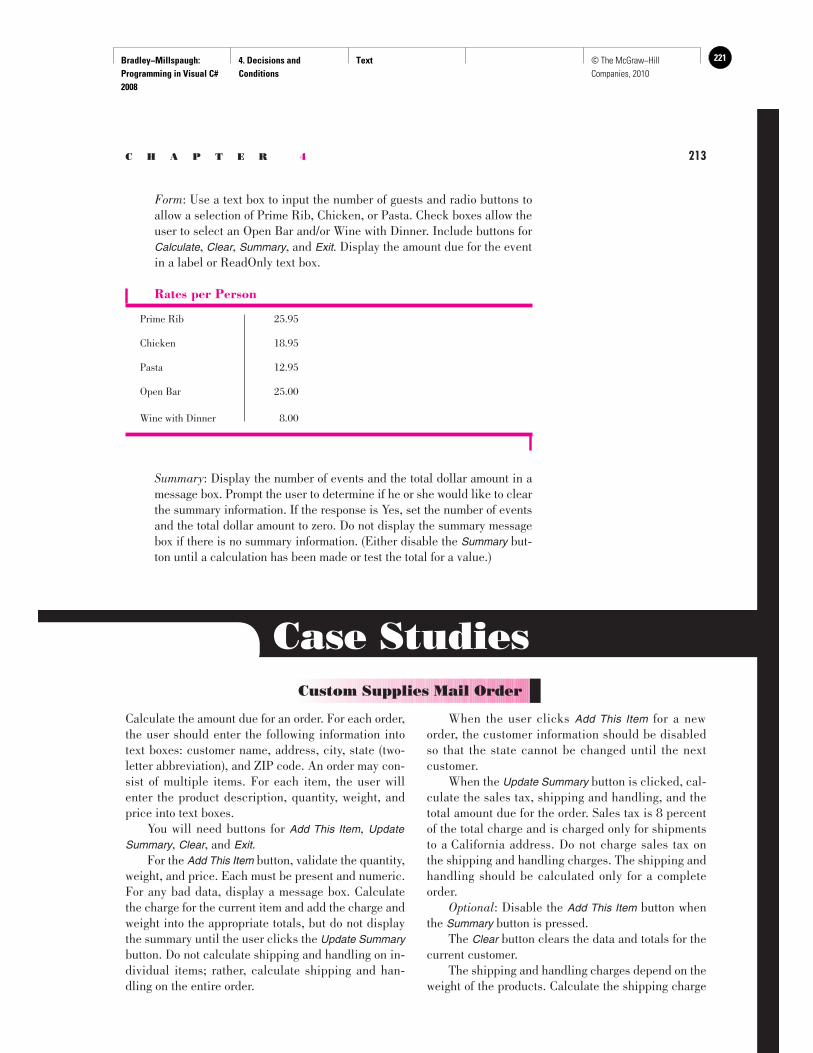
Bradley−Millspaugh: Programming in Visual C# 2008
4. Decisions and Conditions
Text 221© The McGraw−Hill Companies, 2010
C H A P T E R 4 213
Form: Use a text box to input the number of guests and radio buttons to allow a selection of Prime Rib, Chicken, or Pasta. Check boxes allow the user to select an Open Bar and/or Wine with Dinner. Include buttons for Calculate , Clear , Summary , and Exit . Display the amount due for the event in a label or ReadOnly text box.
Rates per Person
Prime Rib 25.95
Chicken 18.95
Pasta 12.95
Open Bar 25.00
Wine with Dinner 8.00
Case Studies Custom Supplies Mail Order
Calculate the amount due for an order. For each order, the user should enter the following information into text boxes: customer name, address, city, state (two-letter abbreviation), and ZIP code. An order may con-sist of multiple items. For each item, the user will enter the product description, quantity, weight, and price into text boxes. You will need buttons for Add This Item , Update Summary , Clear , and Exit . For the Add This Item button, validate the quantity, weight, and price. Each must be present and numeric. For any bad data, display a message box. Calculate the charge for the current item and add the charge and weight into the appropriate totals, but do not display the summary until the user clicks the Update Summary button. Do not calculate shipping and handling on in-dividual items; rather, calculate shipping and han-dling on the entire order.
When the user clicks Add This Item for a new order, the customer information should be disabled so that the state cannot be changed until the next customer. When the Update Summary button is clicked, cal-culate the sales tax, shipping and handling, and the total amount due for the order. Sales tax is 8 percent of the total charge and is charged only for shipments to a California address. Do not charge sales tax on the shipping and handling charges. The shipping and handling should be calculated only for a complete order. Optional : Disable the Add This Item button when the Summary button is pressed. The Clear button clears the data and totals for the current customer. The shipping and handling charges depend on the weight of the products. Calculate the shipping charge
Summary: Display the number of events and the total dollar amount in a message box. Prompt the user to determine if he or she would like to clear the summary information. If the response is Yes, set the number of events and the total dollar amount to zero. Do not display the summary message box if there is no summary information. (Either disable the Summary but-ton until a calculation has been made or test the total for a value.)
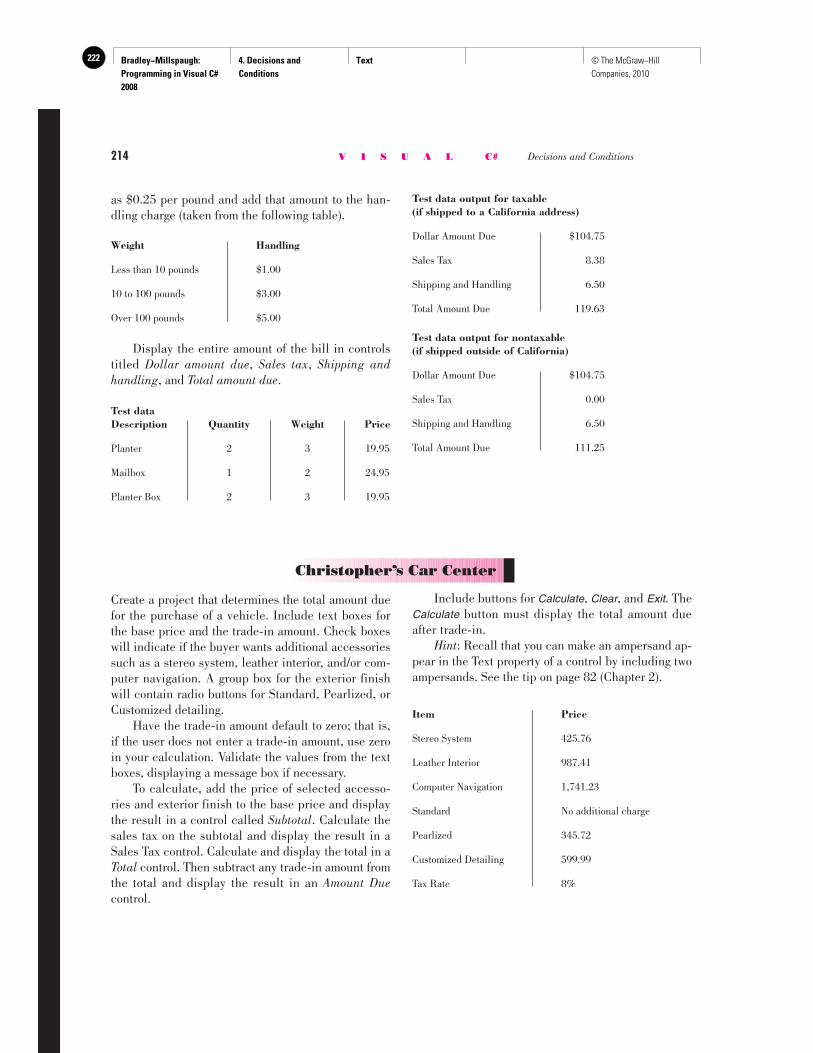
Bradley−Millspaugh: Programming in Visual C# 2008
4. Decisions and Conditions
Text222 © The McGraw−Hill Companies, 2010
214 V I S U A L C# Decisions and Conditions
Test data output for taxable (if shipped to a California address)
Dollar Amount Due $104.75
Sales Tax 8.38
Shipping and Handling 6.50
Total Amount Due 119.63
Test data output for nontaxable (if shipped outside of California)
Dollar Amount Due $104.75
Sales Tax 0.00
Shipping and Handling 6.50
Total Amount Due 111.25
Create a project that determines the total amount due for the purchase of a vehicle. Include text boxes for the base price and the trade-in amount. Check boxes will indicate if the buyer wants additional accessories such as a stereo system, leather interior, and/or com-puter navigation. A group box for the exterior finish will contain radio buttons for Standard, Pearlized, or Customized detailing. Have the trade-in amount default to zero; that is, if the user does not enter a trade-in amount, use zero in your calculation. Validate the values from the text boxes, displaying a message box if necessary. To calculate, add the price of selected accesso-ries and exterior finish to the base price and display the result in a control called Subtotal . Calculate the sales tax on the subtotal and display the result in a Sales Tax control. Calculate and display the total in a Total control. Then subtract any trade-in amount from the total and display the result in an Amount Due control.
Christopher’s Car Center
Include buttons for Calculate , Clear , and Exit . The Calculate button must display the total amount due after trade-in. Hint : Recall that you can make an ampersand ap-pear in the Text property of a control by including two ampersands. See the tip on page 82 (Chapter 2).
Item Price
Stereo System 425.76
Leather Interior 987.41
Computer Navigation 1,741.23
Standard No additional charge
Pearlized 345.72
Customized Detailing 599.99
Tax Rate 8%
Weight Handling
Less than 10 pounds $1.00
10 to 100 pounds $3.00
Over 100 pounds $5.00
Display the entire amount of the bill in controls titled Dollar amount due , Sales tax , Shipping and handling , and Total amount due .
Test data Description Quantity Weight Price
Planter 2 3 19.95
Mailbox 1 2 24.95
Planter Box 2 3 19.95
as $0.25 per pound and add that amount to the han-dling charge (taken from the following table).
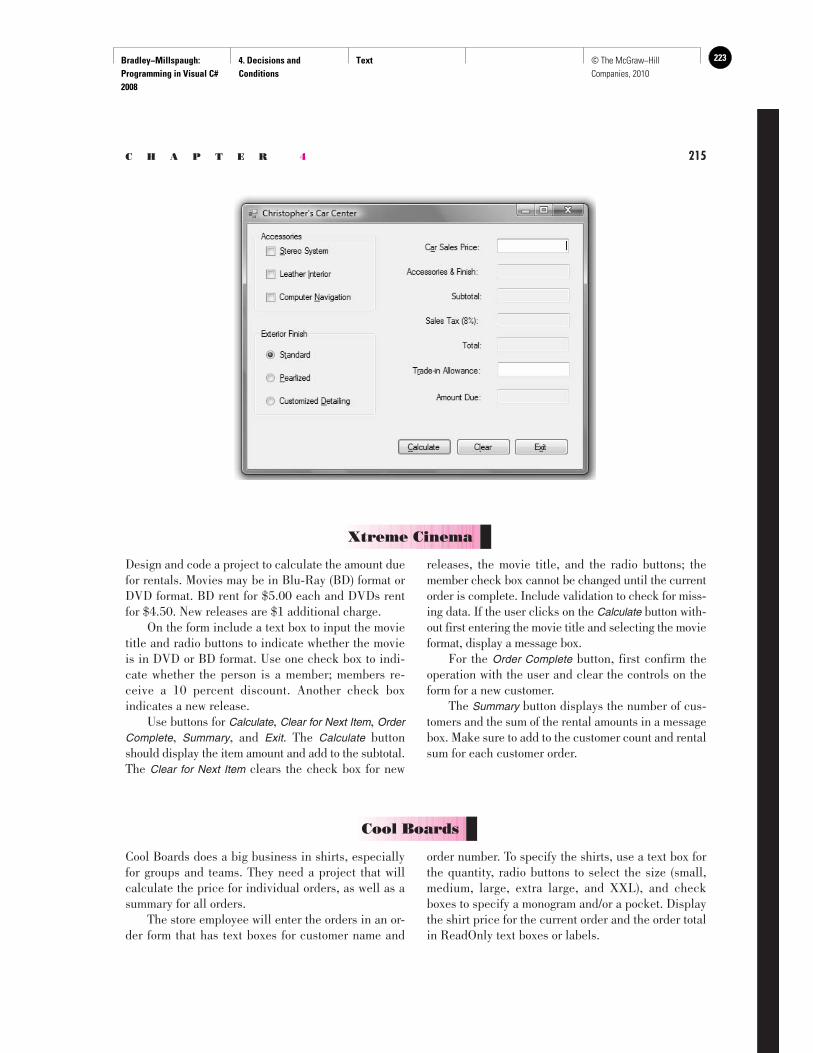
Bradley−Millspaugh: Programming in Visual C# 2008
4. Decisions and Conditions
Text 223© The McGraw−Hill Companies, 2010
C H A P T E R 4 215
Xtreme Cinema
Design and code a project to calculate the amount due for rentals. Movies may be in Blu-Ray (BD) format or DVD format. BD rent for $5.00 each and DVDs rent for $4.50. New releases are $1 additional charge. On the form include a text box to input the movie title and radio buttons to indicate whether the movie is in DVD or BD format. Use one check box to indi-cate whether the person is a member; members re-ceive a 10 percent discount. Another check box indicates a new release. Use buttons for Calculate , Clear for Next Item , Order Complete , Summary , and Exit . The Calculate button should display the item amount and add to the subtotal. The Clear for Next Item clears the check box for new
releases, the movie title, and the radio buttons; the member check box cannot be changed until the current order is complete. Include validation to check for miss-ing data. If the user clicks on the Calculate button with-out first entering the movie title and selecting the movie format, display a message box. For the Order Complete button, first confirm the operation with the user and clear the controls on the form for a new customer. The Summary button displays the number of cus-tomers and the sum of the rental amounts in a message box. Make sure to add to the customer count and rental sum for each customer order.
Cool Boards
Cool Boards does a big business in shirts, especially for groups and teams. They need a project that will calculate the price for individual orders, as well as a summary for all orders. The store employee will enter the orders in an or-der form that has text boxes for customer name and
order number. To specify the shirts, use a text box for the quantity, radio buttons to select the size (small, medium, large, extra large, and XXL), and check boxes to specify a monogram and/or a pocket. Display the shirt price for the current order and the order total in ReadOnly text boxes or labels.
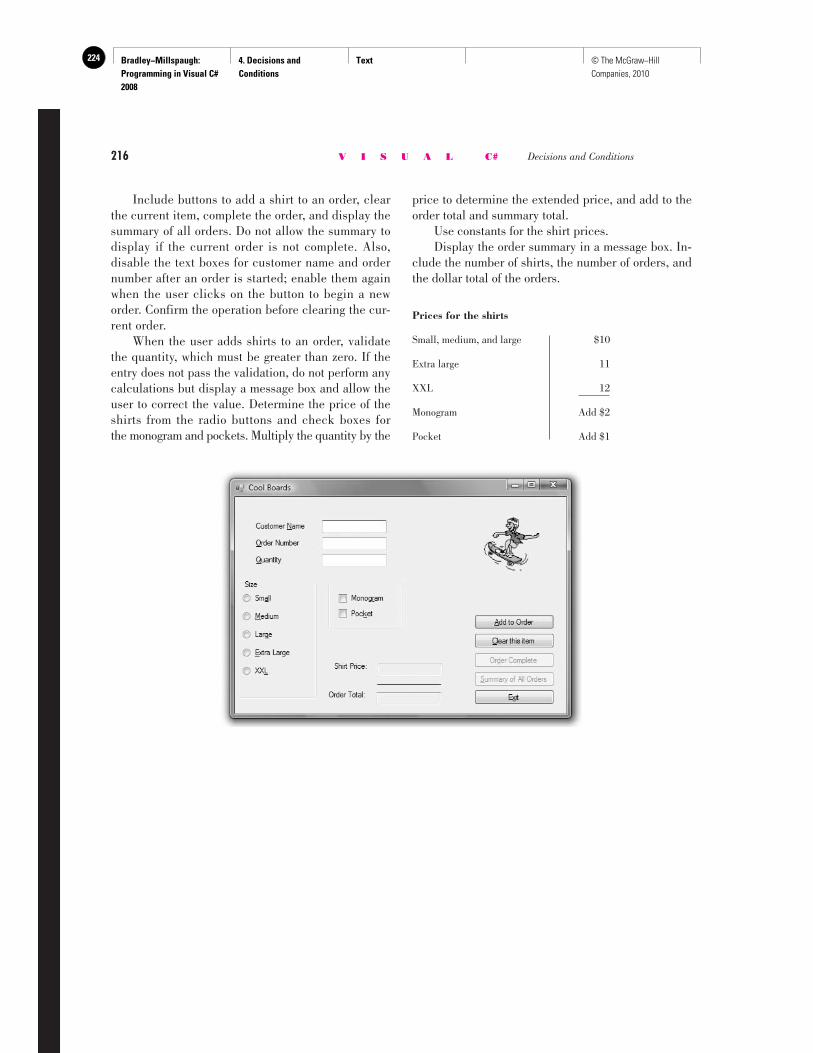
Bradley−Millspaugh: Programming in Visual C# 2008
4. Decisions and Conditions
Text224 © The McGraw−Hill Companies, 2010
216 V I S U A L C# Decisions and Conditions
Include buttons to add a shirt to an order, clear the current item, complete the order, and display the summary of all orders. Do not allow the summary to display if the current order is not complete. Also, disable the text boxes for customer name and order number after an order is started; enable them again when the user clicks on the button to begin a new order. Confirm the operation before clearing the cur-rent order. When the user adds shirts to an order, validate the quantity, which must be greater than zero. If the entry does not pass the validation, do not perform any calculations but display a message box and allow the user to correct the value. Determine the price of the shirts from the radio buttons and check boxes for the monogram and pockets. Multiply the quantity by the
price to determine the extended price, and add to the order total and summary total. Use constants for the shirt prices. Display the order summary in a message box. In-clude the number of shirts, the number of orders, and the dollar total of the orders.
Prices for the shirts
Small, medium, and large $10
Extra large 11
XXL 12
Monogram Add $2
Pocket Add $1
Bradley−Millspaugh: Programming in Visual C# 2008
5. Menus, Common Dialog Boxes, and Methods
Text 225© The McGraw−Hill Companies, 2010
try{ // Convert input values to numeric and assign quantityInteger = int.Parse(quantityTextBox.T try { priceDecimal = decimal.Parse(priceTextBox // Calculate values. extendedPriceDecimal = quantityInteger * discountDecimal = Decimal.Round( (extendedPriceDecimal * DISCOUNT_RATE_ amountDueDecimal = extendedPriceDecimal - totalAmountDecimal += amountDueDecimal; numberTransactionsInteger++; // Format and display answers. extendedPriceTextBox.Text = extendedPrice
C H A P T E R
5 Menus, Common Dialog Boxes, and Methods
at the completion of this chapter, you will be able to . . .
1. Create menus and submenus for program control.
2. Display and use the Windows common dialog boxes.
3. Create context menus for controls and the form.
4. Write reusable code in methods and call the methods from other locations.
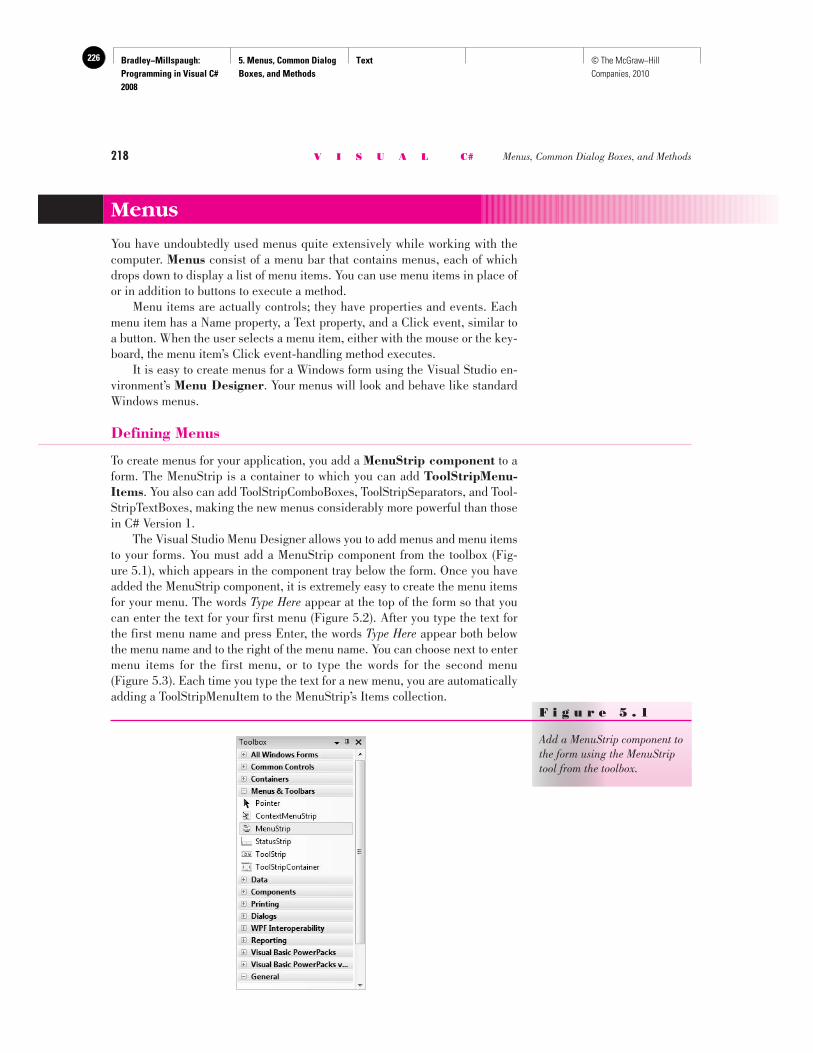
Bradley−Millspaugh: Programming in Visual C# 2008
5. Menus, Common Dialog Boxes, and Methods
Text226 © The McGraw−Hill Companies, 2010
218 V I S U A L C# Menus, Common Dialog Boxes, and Methods
Menus
You have undoubtedly used menus quite extensively while working with the computer. Menus consist of a menu bar that contains menus, each of which drops down to display a list of menu items. You can use menu items in place of or in addition to buttons to execute a method. Menu items are actually controls; they have properties and events. Each menu item has a Name property, a Text property, and a Click event, similar to a button. When the user selects a menu item, either with the mouse or the key-board, the menu item’s Click event-handling method executes. It is easy to create menus for a Windows form using the Visual Studio en-vironment’s Menu Designer . Your menus will look and behave like standard Windows menus.
Defining Menus
To create menus for your application, you add a MenuStrip component to a form. The MenuStrip is a container to which you can add ToolStripMenu-Items . You also can add ToolStripComboBoxes, ToolStripSeparators, and Tool-StripTextBoxes, making the new menus considerably more powerful than those in C# Version 1. The Visual Studio Menu Designer allows you to add menus and menu items to your forms. You must add a MenuStrip component from the toolbox ( Fig-ure 5.1 ), which appears in the component tray below the form. Once you have added the MenuStrip component, it is extremely easy to create the menu items for your menu. The words Type Here appear at the top of the form so that you can enter the text for your first menu ( Figure 5.2 ). After you type the text for the first menu name and press Enter, the words Type Here appear both below the menu name and to the right of the menu name. You can choose next to enter menu items for the first menu, or to type the words for the second menu ( Figure 5.3 ). Each time you type the text for a new menu, you are automatically adding a ToolStripMenuItem to the MenuStrip’s Items collection.
F i g u r e 5 . 1
Add a MenuStrip component to the form using the MenuStrip tool from the toolbox.
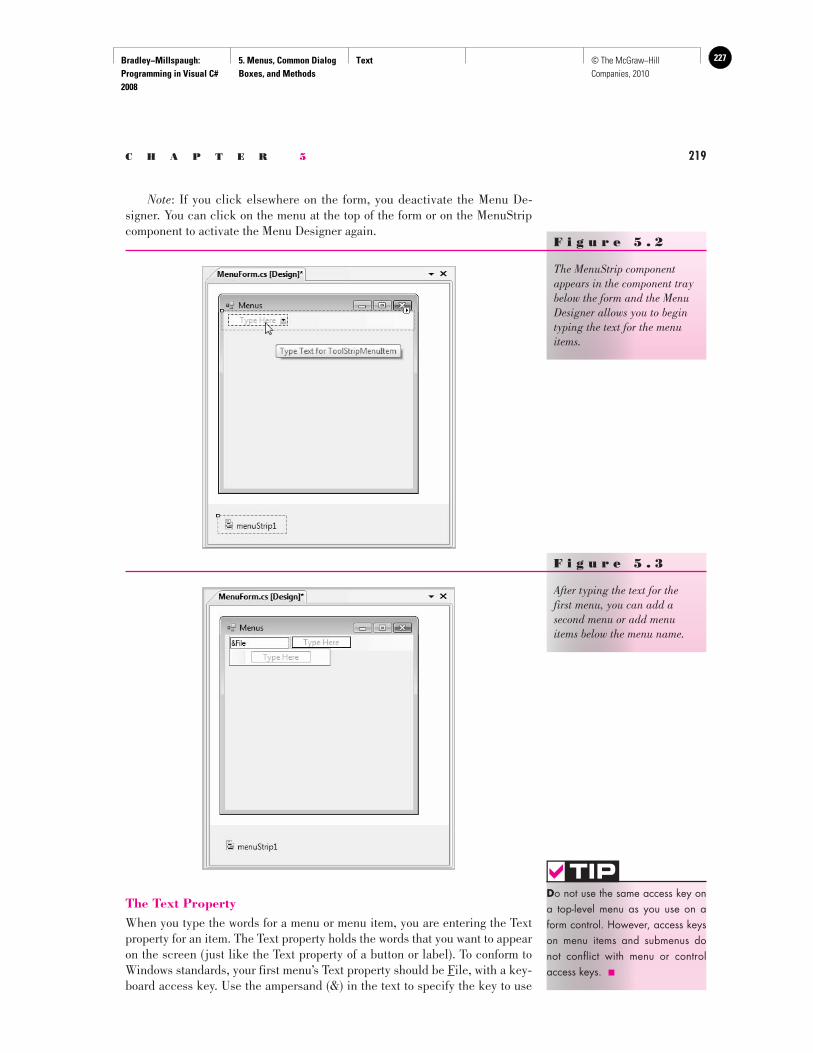
Bradley−Millspaugh: Programming in Visual C# 2008
5. Menus, Common Dialog Boxes, and Methods
Text 227© The McGraw−Hill Companies, 2010
C H A P T E R 5 219
Note : If you click elsewhere on the form, you deactivate the Menu De-signer. You can click on the menu at the top of the form or on the MenuStrip component to activate the Menu Designer again.
F i g u r e 5 . 2
The MenuStrip component appears in the component tray below the form and the Menu Designer allows you to begin typing the text for the menu items.
F i g u r e 5 . 3
After typing the text for the first menu, you can add a second menu or add menu items below the menu name.
The Text Property When you type the words for a menu or menu item, you are entering the Text property for an item. The Text property holds the words that you want to appear on the screen (just like the Text property of a button or label). To conform to Windows standards, your first menu’s Text property should be F ile, with a key-board access key. Use the ampersand (&) in the text to specify the key to use
D o not use the same access key on a top-level menu as you use on a form control. However, access keys on menu items and submenus do not conflict with menu or control access keys. ■
TIP
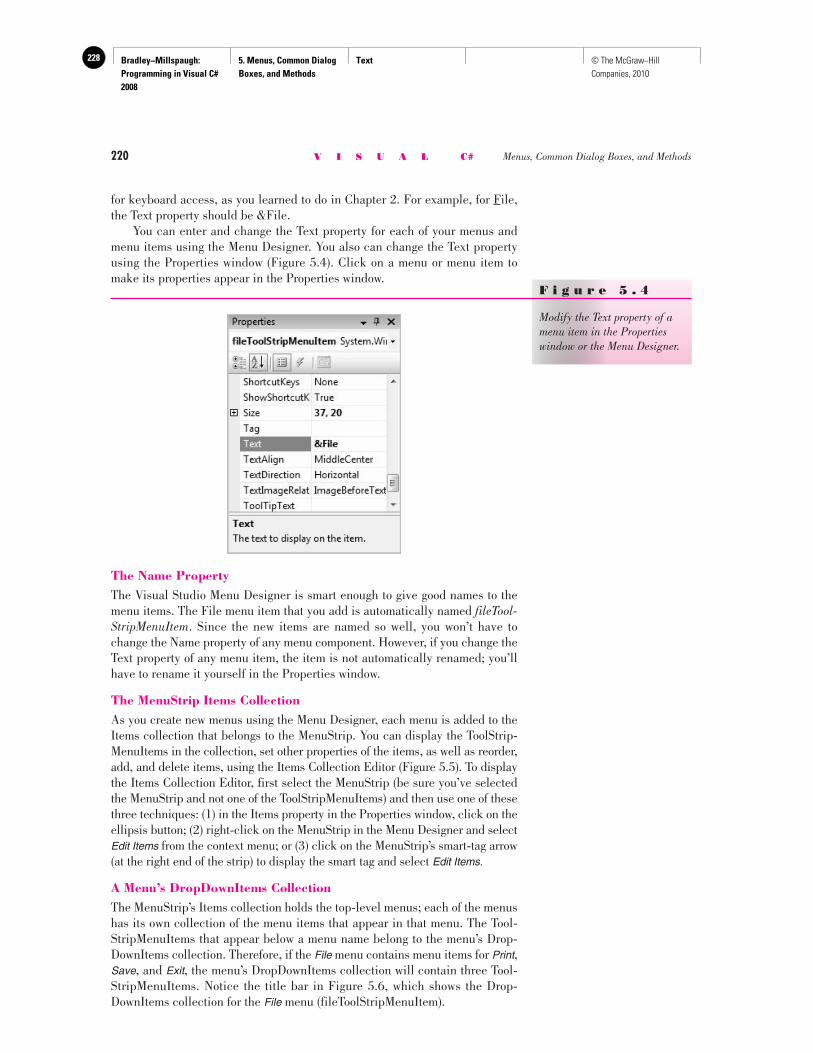
Bradley−Millspaugh: Programming in Visual C# 2008
5. Menus, Common Dialog Boxes, and Methods
Text228 © The McGraw−Hill Companies, 2010
220 V I S U A L C# Menus, Common Dialog Boxes, and Methods
for keyboard access, as you learned to do in Chapter 2. For example, for F ile, the Text property should be &File. You can enter and change the Text property for each of your menus and menu items using the Menu Designer. You also can change the Text property using the Properties window ( Figure 5.4 ). Click on a menu or menu item to make its properties appear in the Properties window.
F i g u r e 5 . 4
Modify the Text property of a menu item in the Properties window or the Menu Designer.
The Name Property The Visual Studio Menu Designer is smart enough to give good names to the menu items. The File menu item that you add is automatically named fileTool-StripMenuItem . Since the new items are named so well, you won’t have to change the Name property of any menu component. However, if you change the Text property of any menu item, the item is not automatically renamed; you’ll have to rename it yourself in the Properties window.
The MenuStrip Items Collection As you create new menus using the Menu Designer, each menu is added to the Items collection that belongs to the MenuStrip. You can display the ToolStrip-MenuItems in the collection, set other properties of the items, as well as reorder, add, and delete items, using the Items Collection Editor ( Figure 5.5 ). To display the Items Collection Editor, first select the MenuStrip (be sure you’ve selected the MenuStrip and not one of the ToolStripMenuItems) and then use one of these three techniques: (1) in the Items property in the Properties window, click on the ellipsis button; (2) right-click on the MenuStrip in the Menu Designer and select Edit Items from the context menu; or (3) click on the MenuStrip’s smart-tag arrow (at the right end of the strip) to display the smart tag and select Edit Items.
A Menu’s DropDownItems Collection The MenuStrip’s Items collection holds the top-level menus; each of the menus has its own collection of the menu items that appear in that menu. The Tool-StripMenuItems that appear below a menu name belong to the menu’s Drop-DownItems collection. Therefore, if the File menu contains menu items for Print , Save , and Exit , the menu’s DropDownItems collection will contain three Tool-StripMenuItems. Notice the title bar in Figure 5.6 , which shows the Drop-DownItems collection for the File menu (fileToolStripMenuItem).
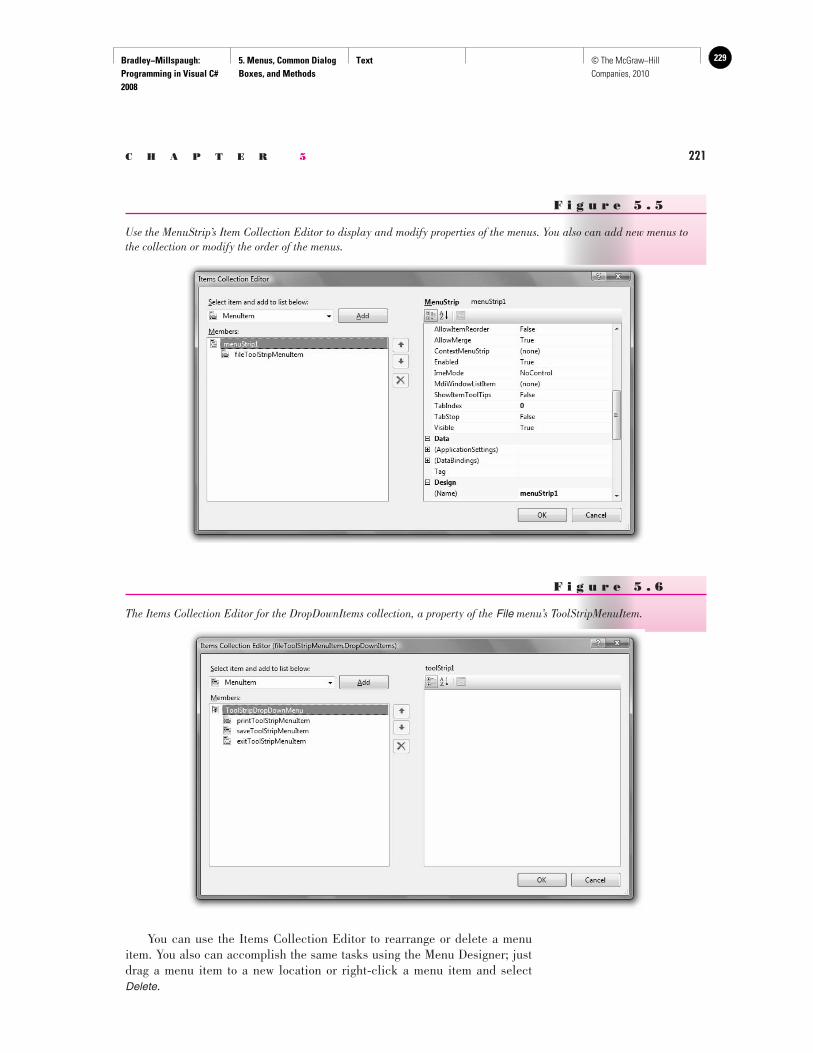
Bradley−Millspaugh: Programming in Visual C# 2008
5. Menus, Common Dialog Boxes, and Methods
Text 229© The McGraw−Hill Companies, 2010
C H A P T E R 5 221
You can use the Items Collection Editor to rearrange or delete a menu item. You also can accomplish the same tasks using the Menu Designer; just drag a menu item to a new location or right-click a menu item and select Delete .
F i g u r e 5 . 5
Use the MenuStrip’s Item Collection Editor to display and modify properties of the menus. You also can add new menus to the collection or modify the order of the menus.
F i g u r e 5 . 6
The Items Collection Editor for the DropDownItems collection, a property of the File menu’s ToolStripMenuItem.

Bradley−Millspaugh: Programming in Visual C# 2008
5. Menus, Common Dialog Boxes, and Methods
Text230 © The McGraw−Hill Companies, 2010
222 V I S U A L C# Menus, Common Dialog Boxes, and Methods
Submenus The drop-down list of items below a menu name is called a menu item . When an item on the menu has another list of items that pops up, the new list is called a submenu . A filled triangle to the right of the item indicates that a menu item has a submenu ( Figure 5.7 ). You create a submenu in the Menu Designer by moving to the right of a menu item and typing the next item’s text ( Figure 5.8 ).
F i g u r e 5 . 7
A filled triangle on a menu item indicates that a submenu will appear.
Entersubmenu here
F i g u r e 5 . 8
Create a submenu by typing to the right of the parent menu item.
Separator Bars When you have many items in a menu, you should group the items according to their purpose. You can create a separator bar in a menu, which draws a bar across the entire menu. To create a separator bar, add a new menu item and click on its drop-down arrow ( Figure 5.9 ). Drop down the list and select Separator ( Figure 5.10 ).
Other Features of ToolStrip Controls You also can select ComboBox and TextBox for the type of menu item from the drop-down list. Using these features, you can create very powerful and profes-sional menus and toolbars.
Y ou can create a separator by typing a single hyphen where it says “Type Here” in the Menu Designer. ■
TIP
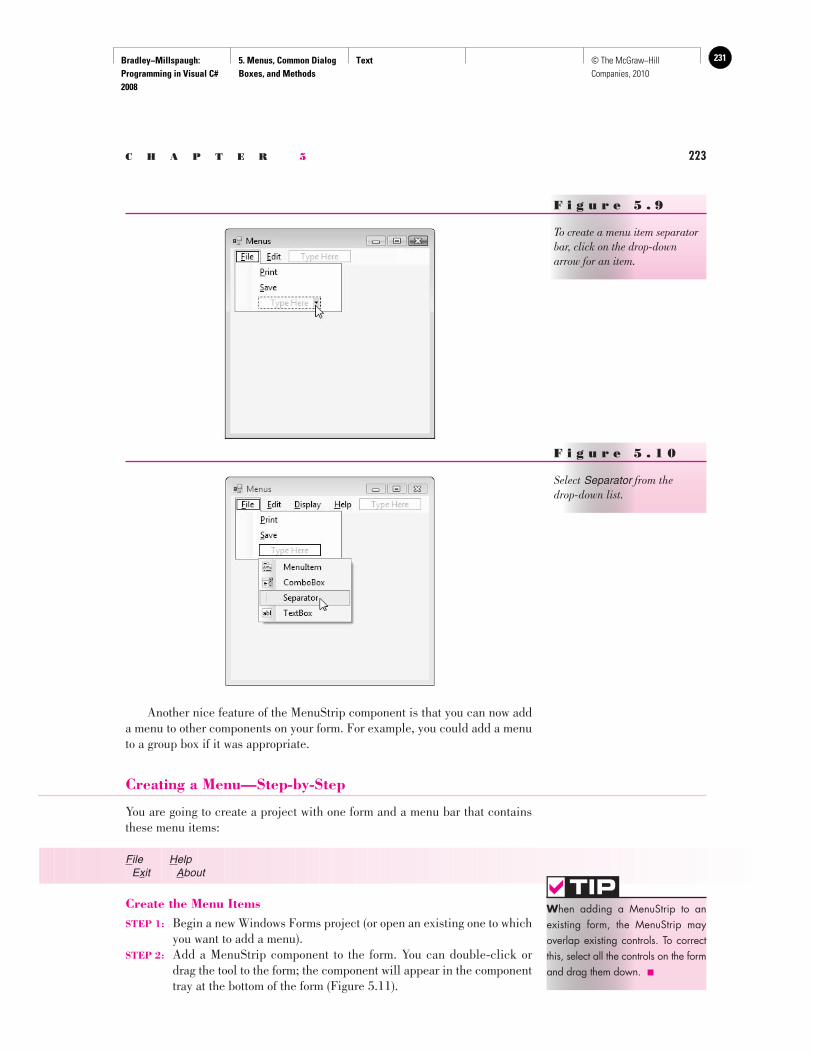
Bradley−Millspaugh: Programming in Visual C# 2008
5. Menus, Common Dialog Boxes, and Methods
Text 231© The McGraw−Hill Companies, 2010
C H A P T E R 5 223
F i g u r e 5 . 9
To create a menu item separator bar, click on the drop-down arrow for an item.
F i g u r e 5 . 1 0
Select Separator from the drop-down list.
Another nice feature of the MenuStrip component is that you can now add a menu to other components on your form. For example, you could add a menu to a group box if it was appropriate.
Creating a Menu—Step-by-Step
You are going to create a project with one form and a menu bar that contains these menu items:
F ile H elp E x it A bout
Create the Menu Items STEP 1: Begin a new Windows Forms project (or open an existing one to which
you want to add a menu). STEP 2: Add a MenuStrip component to the form. You can double-click or
drag the tool to the form; the component will appear in the component tray at the bottom of the form ( Figure 5.11 ).
W hen adding a MenuStrip to an existing form, the MenuStrip may overlap existing controls. To correct this, select all the controls on the form and drag them down. ■
TIP
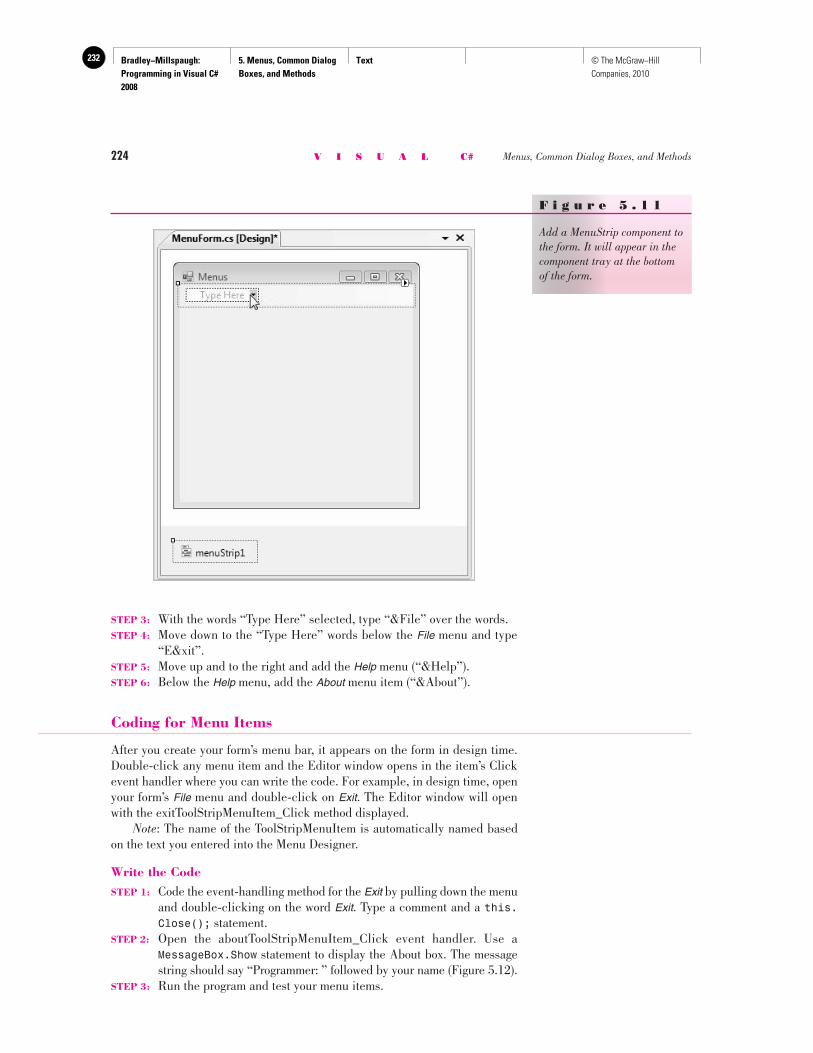
Bradley−Millspaugh: Programming in Visual C# 2008
5. Menus, Common Dialog Boxes, and Methods
Text232 © The McGraw−Hill Companies, 2010
224 V I S U A L C# Menus, Common Dialog Boxes, and Methods
F i g u r e 5 . 1 1
Add a MenuStrip component to the form. It will appear in the component tray at the bottom of the form.
STEP 3: With the words “Type Here” selected, type “&File” over the words. STEP 4: Move down to the “Type Here” words below the File menu and type
“E&xit”. STEP 5: Move up and to the right and add the Help menu (“&Help”). STEP 6: Below the Help menu, add the About menu item (“&About”).
Coding for Menu Items
After you create your form’s menu bar, it appears on the form in design time. Double-click any menu item and the Editor window opens in the item’s Click event handler where you can write the code. For example, in design time, open your form’s File menu and double-click on Exit . The Editor window will open with the exitToolStripMenuItem_Click method displayed. Note : The name of the ToolStripMenuItem is automatically named based on the text you entered into the Menu Designer.
Write the Code STEP 1: Code the event-handling method for the Exit by pulling down the menu
and double-clicking on the word Exit . Type a comment and a this. Close(); statement.
STEP 2: Open the aboutToolStripMenuItem_Click event handler. Use a MessageBox.Show statement to display the About box. The message string should say “Programmer: ” followed by your name ( Figure 5.12 ).
STEP 3: Run the program and test your menu items.
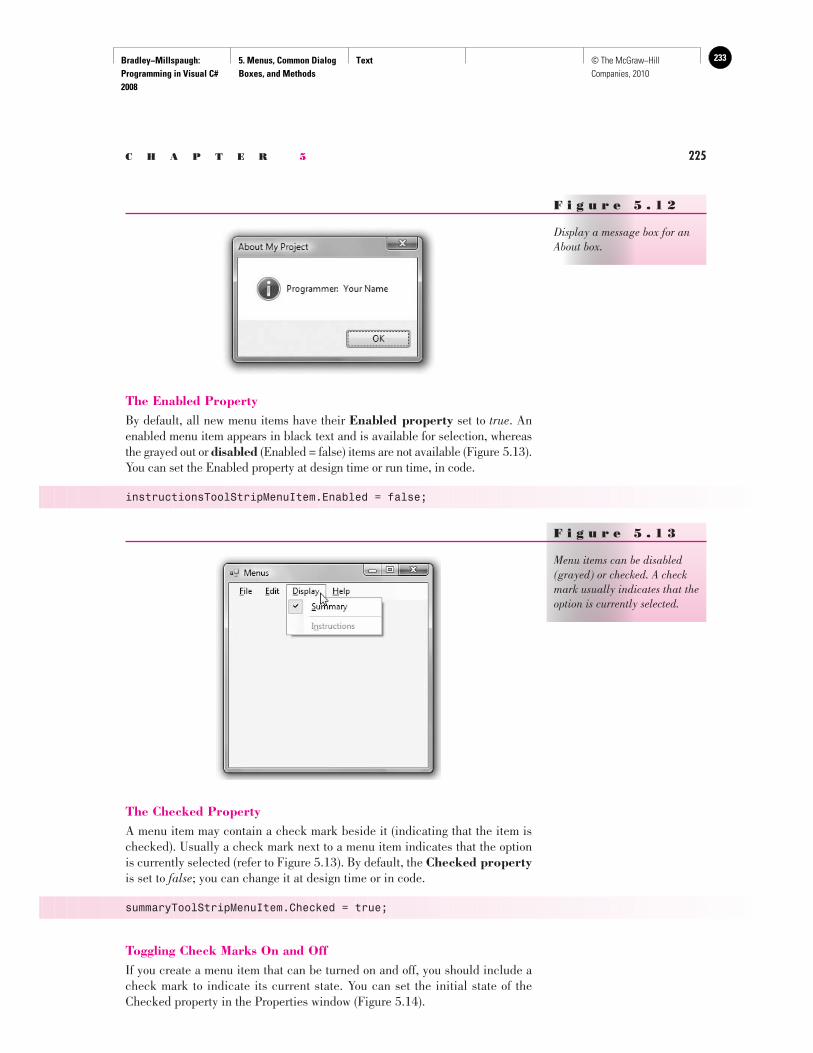
Bradley−Millspaugh: Programming in Visual C# 2008
5. Menus, Common Dialog Boxes, and Methods
Text 233© The McGraw−Hill Companies, 2010
C H A P T E R 5 225
F i g u r e 5 . 1 2
Display a message box for an About box.
The Enabled Property By default, all new menu items have their Enabled property set to true . An enabled menu item appears in black text and is available for selection, whereas the grayed out or disabled (Enabled = false) items are not available ( Figure 5.13 ). You can set the Enabled property at design time or run time, in code.
instructionsToolStripMenuItem.Enabled = false;
F i g u r e 5 . 1 3
Menu items can be disabled (grayed) or checked. A check mark usually indicates that the option is currently selected.
The Checked Property A menu item may contain a check mark beside it (indicating that the item is checked). Usually a check mark next to a menu item indicates that the option is currently selected (refer to Figure 5.13 ). By default, the Checked property is set to false ; you can change it at design time or in code.
summaryToolStripMenuItem.Checked = true;
Toggling Check Marks On and Off If you create a menu item that can be turned on and off, you should include a check mark to indicate its current state. You can set the initial state of the Checked property in the Properties window ( Figure 5.14 ).
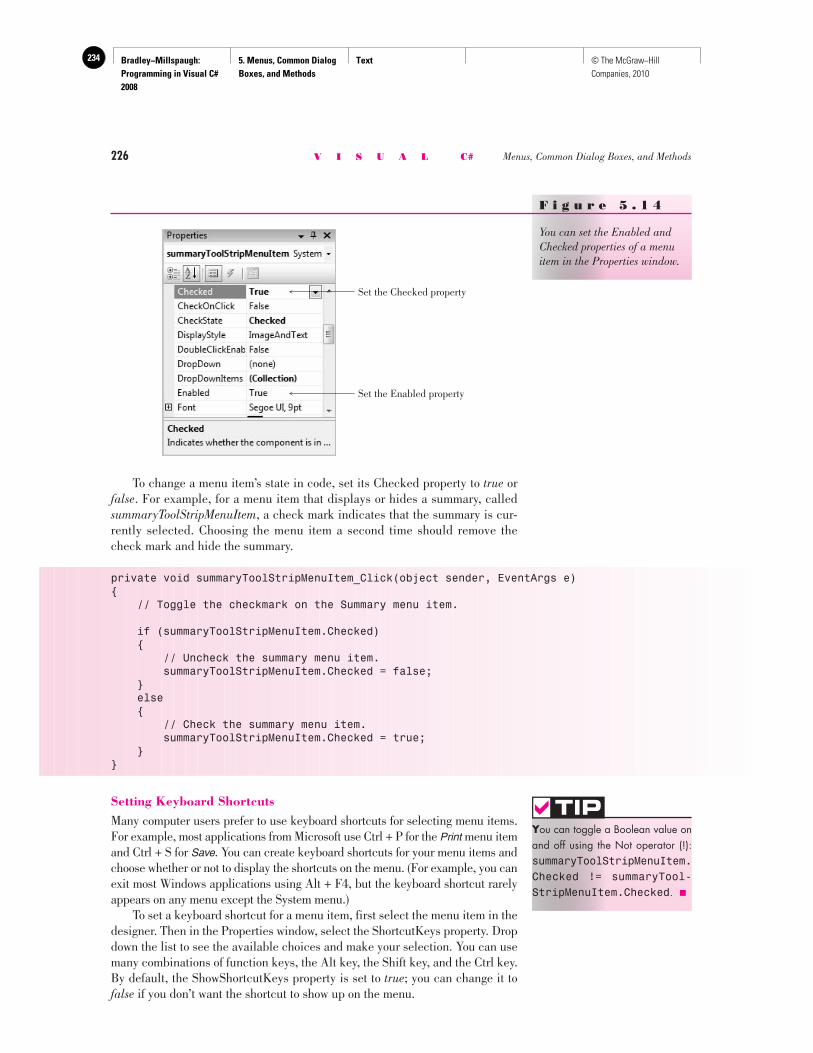
Bradley−Millspaugh: Programming in Visual C# 2008
5. Menus, Common Dialog Boxes, and Methods
Text234 © The McGraw−Hill Companies, 2010
226 V I S U A L C# Menus, Common Dialog Boxes, and Methods
F i g u r e 5 . 1 4
You can set the Enabled and Checked properties of a menu item in the Properties window.
Set the Checked property
Set the Enabled property
To change a menu item’s state in code, set its Checked property to true or false . For example, for a menu item that displays or hides a summary, called summaryToolStripMenuItem , a check mark indicates that the summary is cur-rently selected. Choosing the menu item a second time should remove the check mark and hide the summary.
private void summaryToolStripMenuItem_Click(object sender, EventArgs e){ // Toggle the checkmark on the Summary menu item.
if (summaryToolStripMenuItem.Checked) { // Uncheck the summary menu item. summaryToolStripMenuItem.Checked = false; } else { // Check the summary menu item. summaryToolStripMenuItem.Checked = true; }}
Setting Keyboard Shortcuts Many computer users prefer to use keyboard shortcuts for selecting menu items. For example, most applications from Microsoft use Ctrl + P for the Print menu item and Ctrl + S for Save . You can create keyboard shortcuts for your menu items and choose whether or not to display the shortcuts on the menu. (For example, you can exit most Windows applications using Alt + F4, but the keyboard shortcut rarely appears on any menu except the System menu.) To set a keyboard shortcut for a menu item, first select the menu item in the designer. Then in the Properties window, select the ShortcutKeys prop erty. Drop down the list to see the available choices and make your selec tion. You can use many combinations of function keys, the Alt key, the Shift key, and the Ctrl key. By default, the ShowShortcutKeys property is set to true ; you can change it to false if you don’t want the shortcut to show up on the menu.
Y ou can toggle a Boolean value on and off using the Not operator (!): summaryToolStripMenuItem.Checked != summaryTool-StripMenuItem.Checked . ■
TIP
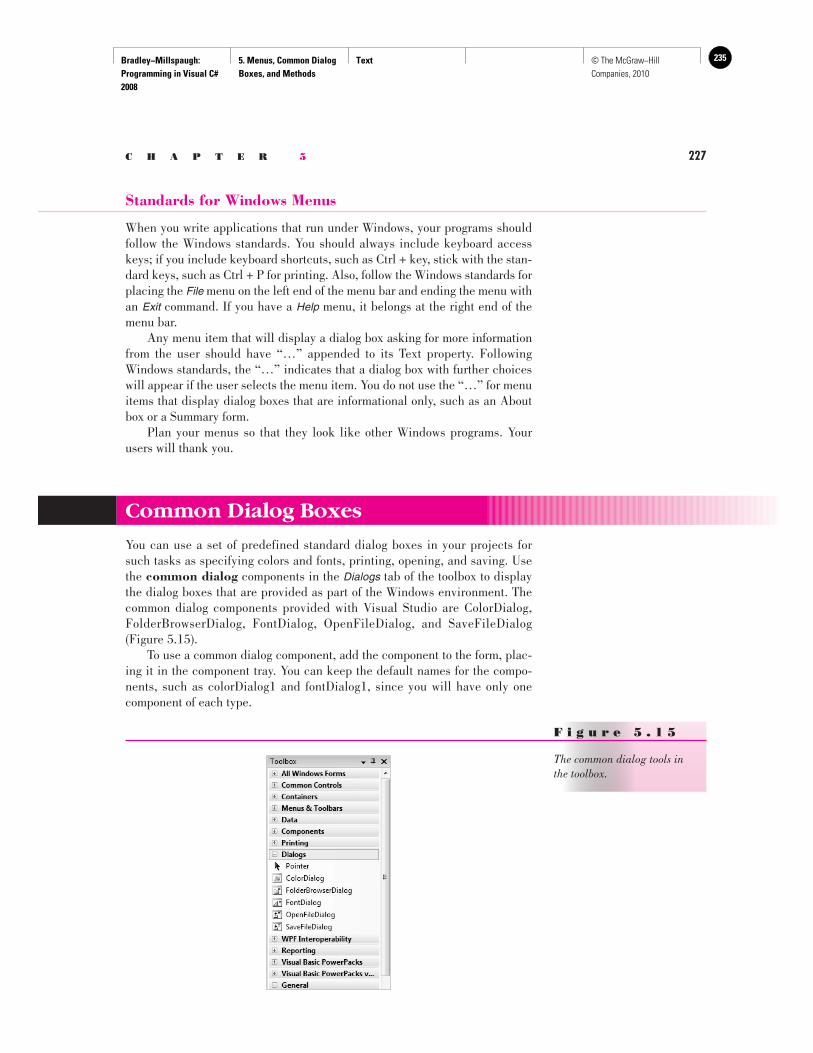
Bradley−Millspaugh: Programming in Visual C# 2008
5. Menus, Common Dialog Boxes, and Methods
Text 235© The McGraw−Hill Companies, 2010
C H A P T E R 5 227
Standards for Windows Menus
When you write applications that run under Windows, your programs should follow the Windows standards. You should always include keyboard access keys; if you include keyboard shortcuts, such as Ctrl + key, stick with the stan-dard keys, such as Ctrl + P for printing. Also, follow the Windows standards for placing the File menu on the left end of the menu bar and ending the menu with an Exit command. If you have a Help menu, it belongs at the right end of the menu bar. Any menu item that will display a dialog box asking for more information from the user should have “…” appended to its Text property. Following Windows standards, the “…” indicates that a dialog box with further choices will appear if the user selects the menu item. You do not use the “…” for menu items that display dialog boxes that are informational only, such as an About box or a Summary form. Plan your menus so that they look like other Windows programs. Your users will thank you.
Common Dialog Boxes
You can use a set of predefined standard dialog boxes in your projects for such tasks as specifying colors and fonts, printing, opening, and saving. Use the common dialog components in the Dialogs tab of the toolbox to display the dialog boxes that are provided as part of the Windows environment. The common dialog components provided with Visual Studio are ColorDialog, FolderBrowserDialog, FontDialog, OpenFileDialog, and SaveFileDialog ( Figure 5.15 ). To use a common dialog component, add the component to the form, plac-ing it in the component tray. You can keep the default names for the compo-nents, such as colorDialog1 and fontDialog1, since you will have only one component of each type.
F i g u r e 5 . 1 5
The common dialog tools in the toolbox.
Bradley−Millspaugh: Programming in Visual C# 2008
5. Menus, Common Dialog Boxes, and Methods
Text236 © The McGraw−Hill Companies, 2010
228 V I S U A L C# Menus, Common Dialog Boxes, and Methods
Displaying a Windows Common Dialog Box
After you place a common dialog component on your form, you can display the dialog box at run time using the ShowDialog method .
ShowDialog Method—General Form
dialogObject .ShowDialog();
General
Form
E
xamples
colorDialog1.ShowDialog(); fontDialog1.ShowDialog();
The dialogObject is the name of the common dialog component that you placed on the form. The name will be the default name, such as colorDialog1 or font-Dialog1.
ShowDialog Method—Examples
Place the code to show the dialog in the event handler for a menu item or button.
Modal versus Modeless Windows You probably have noticed that when you display a Windows dialog box, it re-mains on top until you respond. But in many applications, you can display ad-ditional windows and switch back and forth between the windows. A dialog box is said to be modal , which means that it stays on top of the application and must be responded to. You use the ShowDialog method to display a dialog box, which is just a window displayed modally. In Chapter 6 you will learn to dis-play additional windows that are modeless , which do not demand that you respond. You will use the Show method to display a modeless window.
Using the Information from the Dialog Box
Displaying the Color dialog box ( Figure 5.16 ) doesn’t make the color of any-thing change. You must take care of that in your program code. When the user clicks on OK , the selected color is stored in a property that you can access. You can assign the value to the properties of controls in your project.
Using the Color Dialog Box
The color selected by the user is stored in the Color property. You can assign this property to another object, such as a control.
titleLabel.BackColor = colorDialog1.Color;
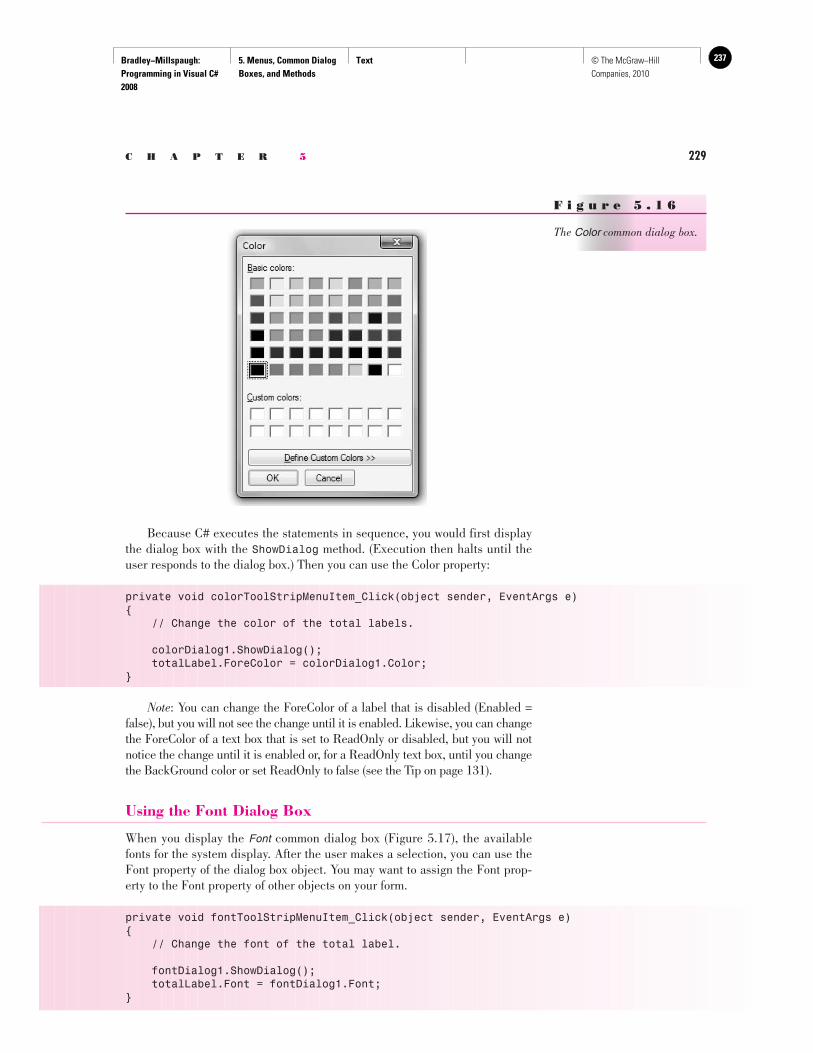
Bradley−Millspaugh: Programming in Visual C# 2008
5. Menus, Common Dialog Boxes, and Methods
Text 237© The McGraw−Hill Companies, 2010
C H A P T E R 5 229
Because C# executes the statements in sequence, you would first display the dialog box with the ShowDialog method. (Execution then halts until the user responds to the dialog box.) Then you can use the Color property:
private void colorToolStripMenuItem_Click(object sender, EventArgs e){ // Change the color of the total labels.
colorDialog1.ShowDialog(); totalLabel.ForeColor = colorDialog1.Color;}
Note : You can change the ForeColor of a label that is disabled (Enabled = false), but you will not see the change until it is enabled. Likewise, you can change the ForeColor of a text box that is set to ReadOnly or disabled, but you will not notice the change until it is enabled or, for a ReadOnly text box, until you change the BackGround color or set ReadOnly to false (see the Tip on page 131).
Using the Font Dialog Box
When you display the Font common dialog box ( Figure 5.17 ), the available fonts for the system display. After the user makes a selection, you can use the Font property of the dialog box object. You may want to assign the Font prop-erty to the Font property of other objects on your form.
private void fontToolStripMenuItem_Click(object sender, EventArgs e){ // Change the font of the total label.
fontDialog1.ShowDialog(); totalLabel.Font = fontDialog1.Font;}
F i g u r e 5 . 1 6
The Color common dialog box.
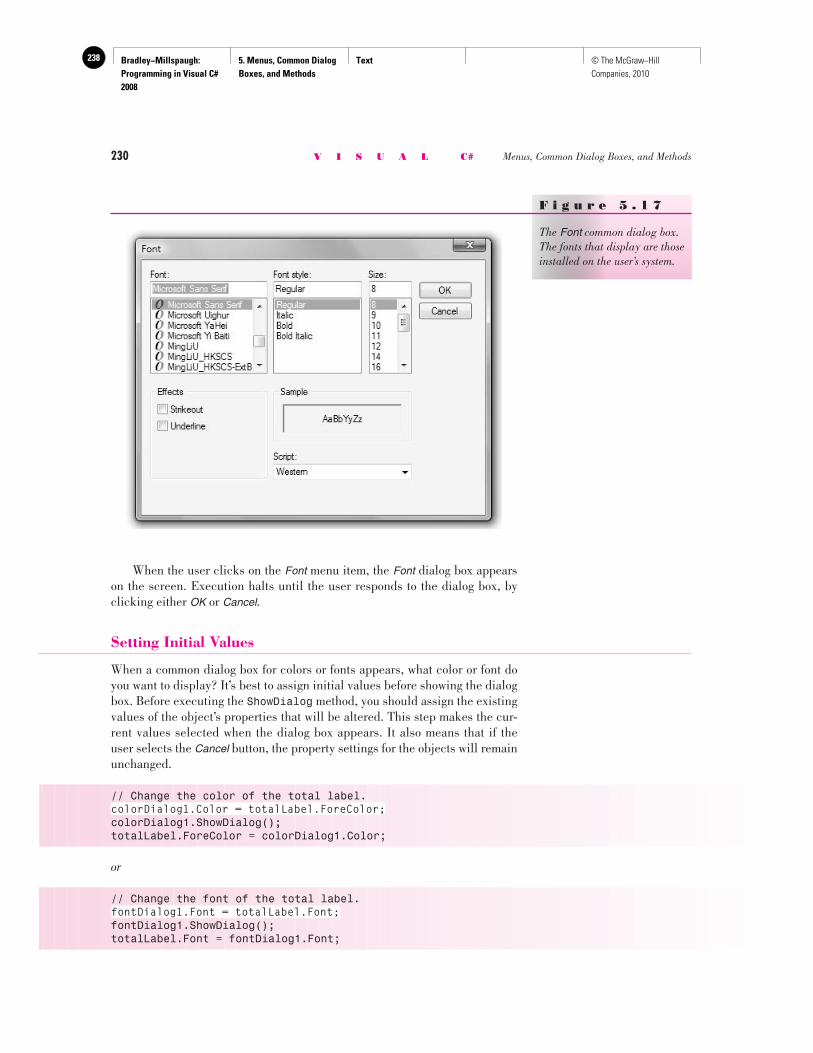
Bradley−Millspaugh: Programming in Visual C# 2008
5. Menus, Common Dialog Boxes, and Methods
Text238 © The McGraw−Hill Companies, 2010
230 V I S U A L C# Menus, Common Dialog Boxes, and Methods
F i g u r e 5 . 1 7
The Font common dialog box. The fonts that display are those installed on the user’s system.
When the user clicks on the Font menu item, the Font dialog box appears on the screen. Execution halts until the user responds to the dialog box, by clicking either OK or Cancel .
Setting Initial Values
When a common dialog box for colors or fonts appears, what color or font do you want to display? It’s best to assign initial values before showing the dialog box. Before executing the ShowDialog method, you should assign the existing values of the object’s properties that will be altered. This step makes the cur-rent values selected when the dialog box appears. It also means that if the user selects the Cancel button, the property settings for the objects will remain unchanged.
// Change the color of the total label.colorDialog1.Color = totalLabel.ForeColor;colorDialog1.ShowDialog();totalLabel.ForeColor = colorDialog1.Color;
or
// Change the font of the total label.fontDialog1.Font = totalLabel.Font;fontDialog1.ShowDialog();totalLabel.Font = fontDialog1.Font;
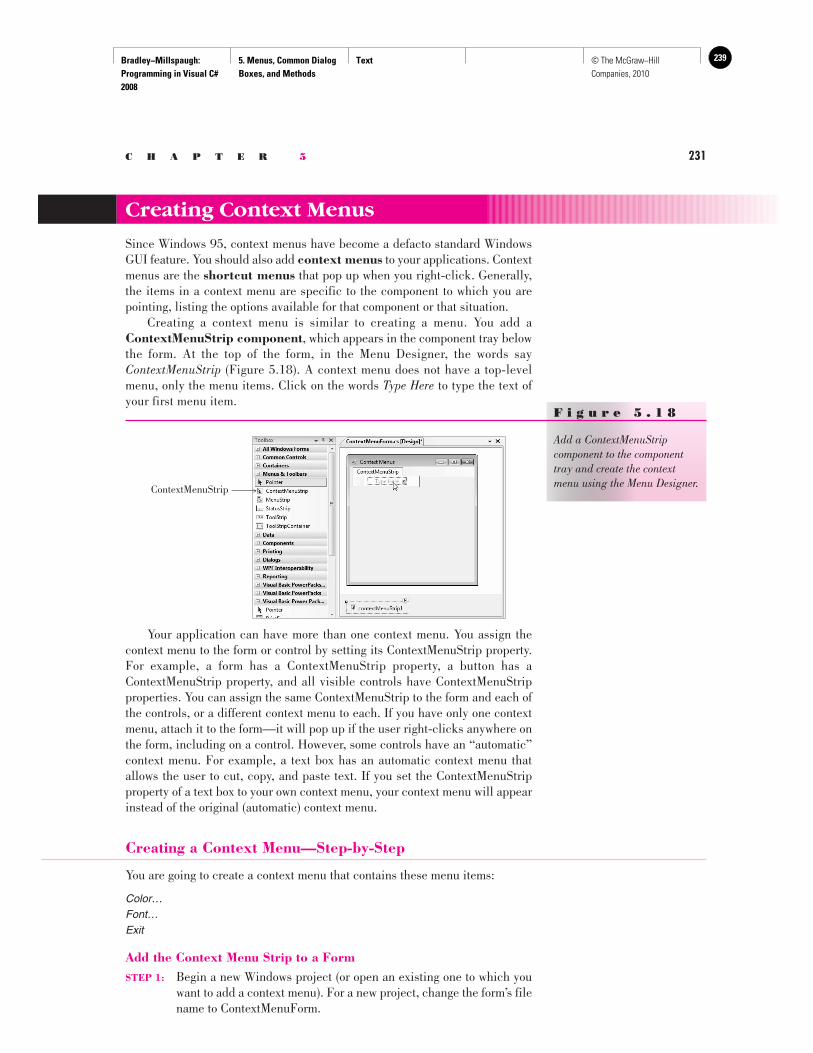
Bradley−Millspaugh: Programming in Visual C# 2008
5. Menus, Common Dialog Boxes, and Methods
Text 239© The McGraw−Hill Companies, 2010
C H A P T E R 5 231
Creating Context Menus
Since Windows 95, context menus have become a defacto standard Windows GUI feature. You should also add context menus to your applications. Context menus are the shortcut menus that pop up when you right-click. Generally, the items in a context menu are specific to the component to which you are pointing, listing the options available for that component or that situation. Creating a context menu is similar to creating a menu. You add a ContextMenuStrip component , which appears in the component tray below the form. At the top of the form, in the Menu Designer, the words say ContextMenuStrip ( Figure 5.18 ). A context menu does not have a top-level menu, only the menu items. Click on the words Type Here to type the text of your first menu item.
F i g u r e 5 . 1 8
Add a ContextMenuStrip component to the component tray and create the context menu using the Menu Designer. ContextMenuStrip
Your application can have more than one context menu. You assign the context menu to the form or control by setting its ContextMenuStrip property. For example, a form has a ContextMenuStrip property, a button has a ContextMenuStrip property, and all visible controls have ContextMenuStrip properties. You can assign the same ContextMenuStrip to the form and each of the controls, or a different context menu to each. If you have only one context menu, attach it to the form—it will pop up if the user right-clicks anywhere on the form, including on a control. However, some controls have an “automatic” context menu. For example, a text box has an automatic context menu that allows the user to cut, copy, and paste text. If you set the ContextMenuStrip property of a text box to your own context menu, your context menu will appear instead of the original (automatic) context menu.
Creating a Context Menu—Step-by-Step
You are going to create a context menu that contains these menu items:
Color… Font… Exit
Add the Context Menu Strip to a Form STEP 1: Begin a new Windows project (or open an existing one to which you
want to add a context menu). For a new project, change the form’s file name to ContextMenuForm.

Bradley−Millspaugh: Programming in Visual C# 2008
5. Menus, Common Dialog Boxes, and Methods
Text240 © The McGraw−Hill Companies, 2010
232 V I S U A L C# Menus, Common Dialog Boxes, and Methods
STEP 2: Add a ContextMenuStrip component to the form; the component will appear in the component tray at the bottom of the form (refer to Figure 5.18 ).
STEP 3: Click on the words Type Here below the words “ContextMenuStrip” in the Menu Designer.
STEP 4: Type the text for the first menu item: “&Color…”. STEP 5: Type the text for the second and third menu items: “&Font…” and
“E&xit”. STEP 6: Add a label named messageLabel to your form and set the Text prop-
erty to “ Right-click for the Context Menu ”. STEP 7: Set the form’s ContextMenuStrip property to contextMenuStrip1. No-
tice that the property box has a drop-down list. If you have more than one context menu defined, you can choose from the list.
STEP 8: Add a ColorDialog component from the Dialogs tab of the toolbox. STEP 9: Add a FontDialog component from the toolbox.
In this example, right-clicking anywhere on the form allows you to change the foreground color or the font of the form. As you know, if you haven’t set those properties for individual controls, the form’s properties apply to all con-trols on the form.
STEP 10: Code the form as follows:
/* Program: Ch05ContextMenus * Programmer: Your Name * Date: Today’s date * Description: Create and apply a context menu. */
using System;using System.Collections.Generic;using System.ComponentModel;using System.Data;using System.Drawing;using System.Text;using System.Windows.Forms;
namespace Ch05ContextMenus{ public partial class ContextMenuForm : Form { public ContextMenuForm() { InitializeComponent(); }
private void colorToolStripMenuItem_Click(object sender, EventArgs e) { // Change the form’s ForeColor. // Applies to all conrols on the form that haven’t had their // ForeColor explicitly modified.
// Initialize the dialog box. colorDialog1.Color = this.ForeColor; // Display the dialog box. colorDialog1.ShowDialog(); // Assign the new color. this.ForeColor = colorDialog1.Color; }
I t’s a good idea to set a ContextMenu property for all controls and for the form to allow users the option of using context menus. ■
TIP
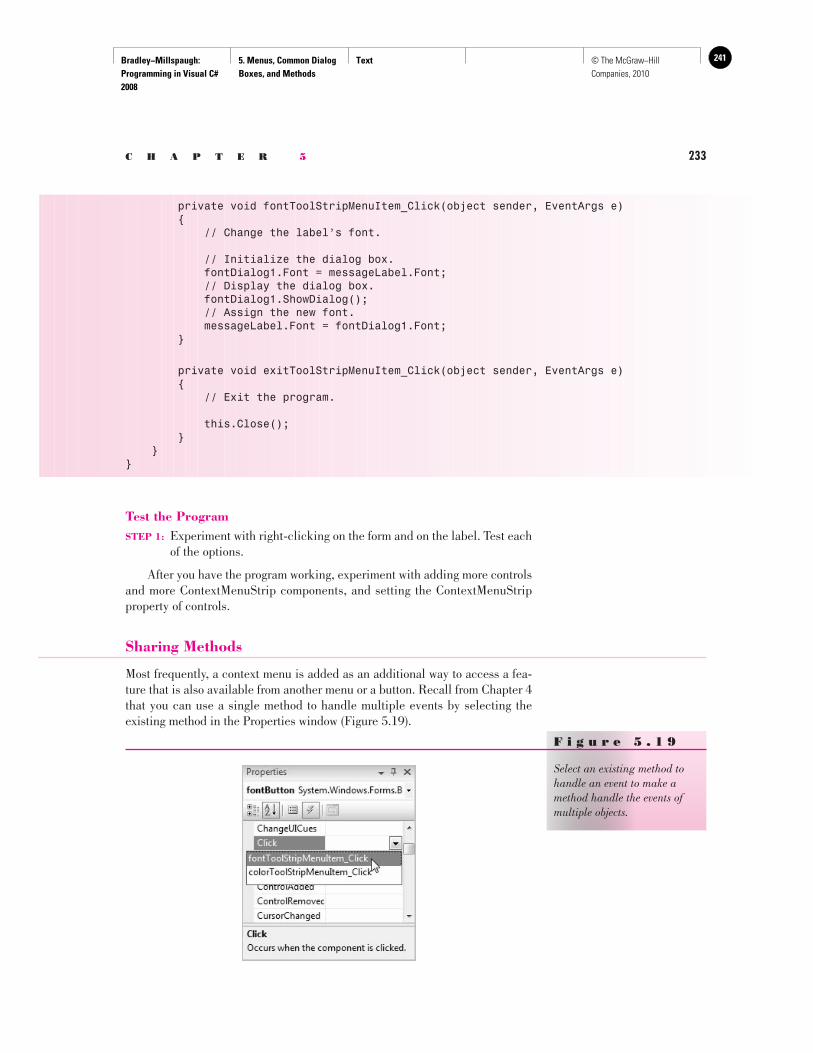
Bradley−Millspaugh: Programming in Visual C# 2008
5. Menus, Common Dialog Boxes, and Methods
Text 241© The McGraw−Hill Companies, 2010
C H A P T E R 5 233
private void fontToolStripMenuItem_Click(object sender, EventArgs e) { // Change the label’s font.
// Initialize the dialog box. fontDialog1.Font = messageLabel.Font; // Display the dialog box. fontDialog1.ShowDialog(); // Assign the new font. messageLabel.Font = fontDialog1.Font; }
private void exitToolStripMenuItem_Click(object sender, EventArgs e) { // Exit the program.
this.Close(); } }}
Test the Program STEP 1: Experiment with right-clicking on the form and on the label. Test each
of the options.
After you have the program working, experiment with adding more controls and more ContextMenuStrip components, and setting the ContextMenuStrip property of controls.
Sharing Methods
Most frequently, a context menu is added as an additional way to access a fea-ture that is also available from another menu or a button. Recall from Chapter 4 that you can use a single method to handle multiple events by selecting the existing method in the Properties window ( Figure 5.19 ).
F i g u r e 5 . 1 9
Select an existing method to handle an event to make a method handle the events of multiple objects.
Bradley−Millspaugh: Programming in Visual C# 2008
5. Menus, Common Dialog Boxes, and Methods
Text242 © The McGraw−Hill Companies, 2010
234 V I S U A L C# Menus, Common Dialog Boxes, and Methods
Writing General Methods
Often you will encounter programming situations in which multiple methods perform the same operation. This condition can occur when the user can select either a button or a menu item to do the same thing. Rather than retyping the code, you should write reusable code in a general method and call it from both event handlers. General methods are also useful in breaking down large sections of code into smaller units that perform a specific task. By breaking down your calcula-tions into smaller tasks, you simplify any maintenance that needs to be done in a program in the future. For example, bowling statistics for a league may re-quire calculations for handicap and series total. If the formula for calculating handicaps changes, wouldn’t it be nice to have a method that calculates hand-icaps only instead of one that performs all the calculations? Your method may return a value or not. You specify that the method returns a value by placing the return type of the method preceding the method name. You can return a value for any method that you create. Notice the event handlers:
private void fontToolStripMenuItem_Click(object sender, EventArgs e)
The keyword void indicates that the method does not return a value.
Creating a New Method
You can create a method in the Editor window by writing a method header and then enclosing the desired lines of code within a set of braces.
private void selectColor(){ // Display the color dialog box.
colorDialog1.ShowDialog();}
Note that C# has choices other than private for the access, such as public , internal , and protected . In Chapter 6 you will learn about the other types of methods; for now use private for all methods. The coding for the new method is similar to the other methods we have been coding but is not yet attached to any event. Therefore, this code cannot be executed unless we specifically call the method from another method. To call a method, just give the method a name, which in this case is selectColor .
private void changeColorButton_Click(object sender, EventArgs e){ // Change the color of the message.
selectColor(); messageLabel.ForeColor = colorDialog1.Color;}
Bradley−Millspaugh: Programming in Visual C# 2008
5. Menus, Common Dialog Boxes, and Methods
Text 243© The McGraw−Hill Companies, 2010
C H A P T E R 5 235
private void changeTitleButton_Click(object sender, EventArgs e){ // Change the color of the title.
selectColor(); titleLabel.ForeColor = colorDialog1.Color;}
Passing Arguments to Methods
At times you may need to use the value of a variable in one method and also in a second method that is called from the first. In this situation, you could declare the variable as class level, but that approach makes the variable visible to all other methods. To keep the scope of a variable as narrow as possi ble, consider declaring the variable as local and passing it to any called methods. As an example, we will expand the capabilities of the previous selectColor method to display the original color when the dialog box appears. Because the selectColor method can be called from various locations, the original color must be passed to the method.
private void selectColor(Color incomingColor){ // Display the color dialog box.
colorDialog1.Color = incomingColor; colorDialog1.ShowDialog();}
private void changeMessageButton_Click(object sender, EventArgs e){ // Change the color of the message.
Color originalColor = messageLabel.ForeColor; selectColor(originalColor); messageLabel.ForeColor = colorDialog1.Color;}
private void changeTitleButton_Click(object sender, EventArgs e){ // Change the color of the title.
Color originalColor = titleLabel.ForeColor; selectColor(originalColor); titleLabel.ForeColor = colorDialog1.Color;}
Notice that, in this example, the selectColor method now has a parame-ter inside the parentheses. This syntax specifies that, when called, an argu-ment must be supplied. When a method definition names a parameter, any call to that method must supply a value, called an argument. In addition, the data type of the parameter and the supplied argument must be the same. Notice that in the two calling methods (the changeMessageButton_Click and changeTitleButton_Click meth-ods), the variable originalColor is declared as a Color data type.
Bradley−Millspaugh: Programming in Visual C# 2008
5. Menus, Common Dialog Boxes, and Methods
Text244 © The McGraw−Hill Companies, 2010
236 V I S U A L C# Menus, Common Dialog Boxes, and Methods
Another important point is that the names of the parameter and the sup-plied argument do not have to be the same. The selectColor method will take whatever Color value it is passed and refer to it as incomingColor inside the method. You may specify multiple parameters in the method header and supply multiple arguments in the call to the method. The number of arguments, their sequence, and their data types must match the parameter list ! You will see some examples of multiple parameters in the sections that follow.
Writing Methods That Return Values
As a programmer, you may need to calculate a value that will be needed in several different methods or programs. You can write your own method that will calculate a value and return it to the place where the method is called. As an example, we will create a method called commission , which calculates and returns a salesperson’s commission. Since the method returns a value, you must specify a data type for the value.
A Method That Returns a Value—General Form
private DataType MethodName (){
}
General
Form
E
xample
private decimal commission(){ // Statements in method. }
The method header includes a data type, which is the type of the value re-turned by the method.
A Method That Returns a Value—Example
Remember that methods can have parameters. You supply arguments to a method that returns a value by placing a value or values inside the parentheses. When you write a method, you declare the parameter(s) that the method needs. You give each parameter a data type and an identifier. The name that you give a parameter in the method header is the identifier that you will use inside the method to refer to the value passed as an argument.
Example
private decimal commission(decimal salesAmountDecimal)
In the method header, the parameter list you enter establishes the number of parameters, their type, and their sequence. When using multiple parameters, the sequence of the supplied arguments is critical, just as when you use pre-defined methods.

Bradley−Millspaugh: Programming in Visual C# 2008
5. Menus, Common Dialog Boxes, and Methods
Text 245© The McGraw−Hill Companies, 2010
C H A P T E R 5 237
Returning the Result of a Method A method can return one value, which must be the same data type as that named in the method header. The return value is passed back with a return statement . The keyword return is followed by a variable or expression that contains the value to return to the caller. Note that if the method header specifies void rather than a data type, you do not use the return keyword. Figure 5.20 shows a method header for a method that returns a value.
Writing a commission Method The following commission method returns a commission amount of 15 percent for sales between $1,000 and $2,000. Sales over $2,000 earn 20 percent.
private decimal commission(decimal salesAmountDecimal){ // Calculate the sales commission.
if (salesAmountDecimal < 1000M) { return 0M; } else if (salesAmountDecimal <= 2000M) { return 0.15M * salesAmountDecimal; } else { return 0.2M * salesAmountDecimal; }}
Calling the commission Method In another method in the project, you can call your new commission method by using it in an expression.
private void calculateButton_Click(object sender, EventArgs e){ // Calculate the commission. decimal salesDecimal;
salesDecimal = decimal.Parse(salesTextBox.Text); commissionTextBox.Text = commission(salesDecimal).ToString("C");}
Notice in the preceding example that the parameter named in the method call does not have the same name as the parameter named in the method definition. When the commission method is called, a copy of the value of
private decimal commission (decimal salesAmountDecimal)
Access modifierReturn data type Parameter
Method name Parameter data type
F i g u r e 5 . 2 0
Include a data type on a method header for a method that returns a value.
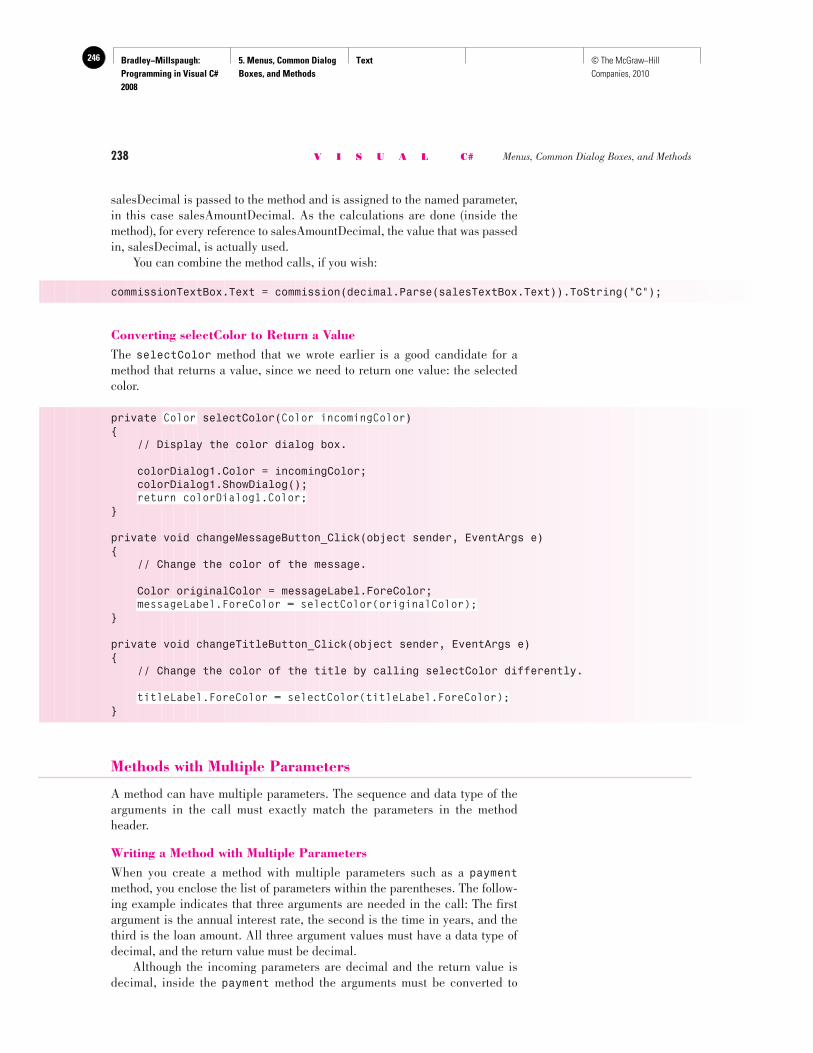
Bradley−Millspaugh: Programming in Visual C# 2008
5. Menus, Common Dialog Boxes, and Methods
Text246 © The McGraw−Hill Companies, 2010
238 V I S U A L C# Menus, Common Dialog Boxes, and Methods
salesDecimal is passed to the method and is assigned to the named parameter, in this case salesAmountDecimal. As the calculations are done (inside the method), for every reference to salesAmountDecimal, the value that was passed in, salesDecimal, is actually used. You can combine the method calls, if you wish:
commissionTextBox.Text = commission(decimal.Parse(salesTextBox.Text)).ToString("C");
Converting selectColor to Return a Value The selectColor method that we wrote earlier is a good candidate for a method that returns a value, since we need to return one value: the selected color.
private Color selectColor(Color incomingColor){ // Display the color dialog box.
colorDialog1.Color = incomingColor; colorDialog1.ShowDialog(); return colorDialog1.Color;}
private void changeMessageButton_Click(object sender, EventArgs e){ // Change the color of the message.
Color originalColor = messageLabel.ForeColor; messageLabel.ForeColor = selectColor(originalColor);}
private void changeTitleButton_Click(object sender, EventArgs e){ // Change the color of the title by calling selectColor differently.
titleLabel.ForeColor = selectColor(titleLabel.ForeColor);}
Methods with Multiple Parameters
A method can have multiple parameters. The sequence and data type of the arguments in the call must exactly match the parameters in the method header.
Writing a Method with Multiple Parameters When you create a method with multiple parameters such as a payment method, you enclose the list of parameters within the parentheses. The follow-ing example indicates that three arguments are needed in the call: The first argument is the annual interest rate, the second is the time in years, and the third is the loan amount. All three argument values must have a data type of decimal, and the return value must be decimal. Although the incoming parameters are decimal and the return value is decimal, inside the payment method the arguments must be converted to
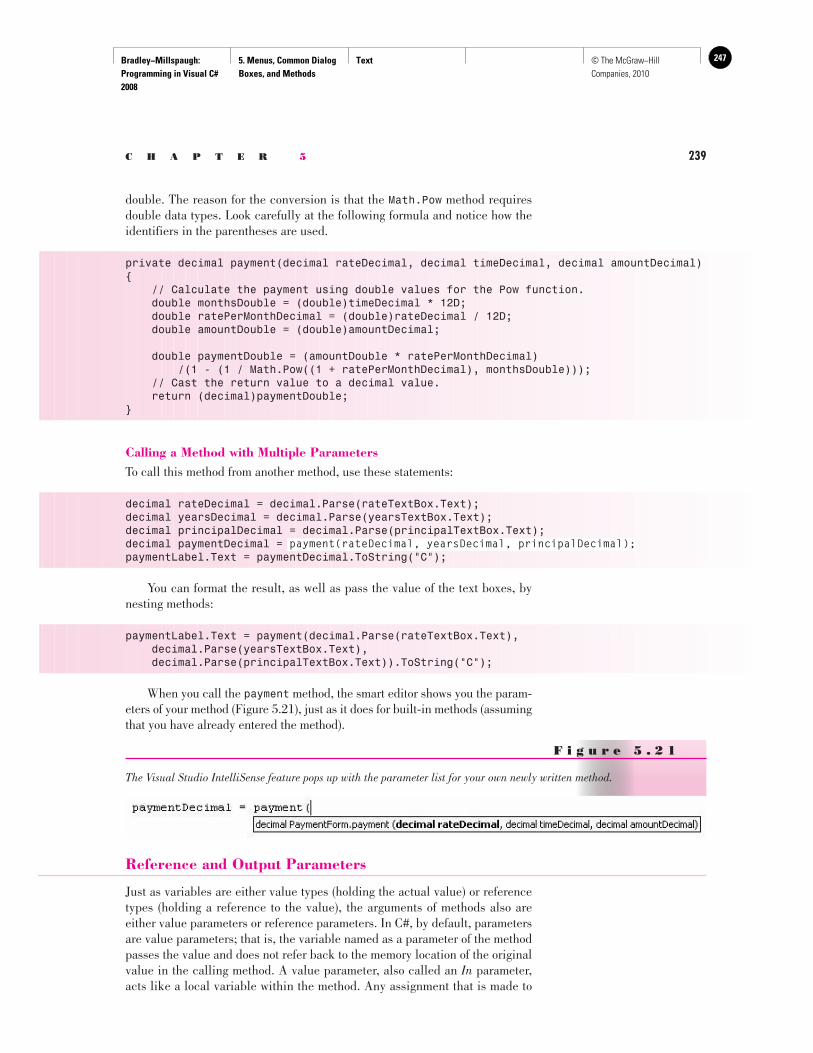
Bradley−Millspaugh: Programming in Visual C# 2008
5. Menus, Common Dialog Boxes, and Methods
Text 247© The McGraw−Hill Companies, 2010
C H A P T E R 5 239
double. The reason for the conversion is that the Math.Pow method requires double data types. Look carefully at the following formula and notice how the identifiers in the parentheses are used.
private decimal payment(decimal rateDecimal, decimal timeDecimal, decimal amountDecimal){ // Calculate the payment using double values for the Pow function. double monthsDouble = (double)timeDecimal * 12D; double ratePerMonthDecimal = (double)rateDecimal / 12D; double amountDouble = (double)amountDecimal;
double paymentDouble = (amountDouble * ratePerMonthDecimal) /(1 - (1 / Math.Pow((1 + ratePerMonthDecimal), monthsDouble))); // Cast the return value to a decimal value. return (decimal)paymentDouble;}
Calling a Method with Multiple Parameters To call this method from another method, use these statements:
decimal rateDecimal = decimal.Parse(rateTextBox.Text); decimal yearsDecimal = decimal.Parse(yearsTextBox.Text); decimal principalDecimal = decimal.Parse(principalTextBox.Text); decimal paymentDecimal = payment(rateDecimal, yearsDecimal, principalDecimal); paymentLabel.Text = paymentDecimal.ToString("C");
You can format the result, as well as pass the value of the text boxes, by nesting methods:
paymentLabel.Text = payment(decimal.Parse(rateTextBox.Text), decimal.Parse(yearsTextBox.Text), decimal.Parse(principalTextBox.Text)).ToString("C");
When you call the payment method, the smart editor shows you the param-eters of your method ( Figure 5.21 ), just as it does for built-in methods (assuming that you have already entered the method).
F i g u r e 5 . 2 1
The Visual Studio IntelliSense feature pops up with the parameter list for your own newly written method.
Reference and Output Parameters
Just as variables are either value types (holding the actual value) or reference types (holding a reference to the value), the arguments of methods also are either value parameters or reference parameters. In C#, by default, parameters are value parameters; that is, the variable named as a parameter of the method passes the value and does not refer back to the memory location of the original value in the calling method. A value parameter, also called an In parameter, acts like a local variable within the method. Any assignment that is made to
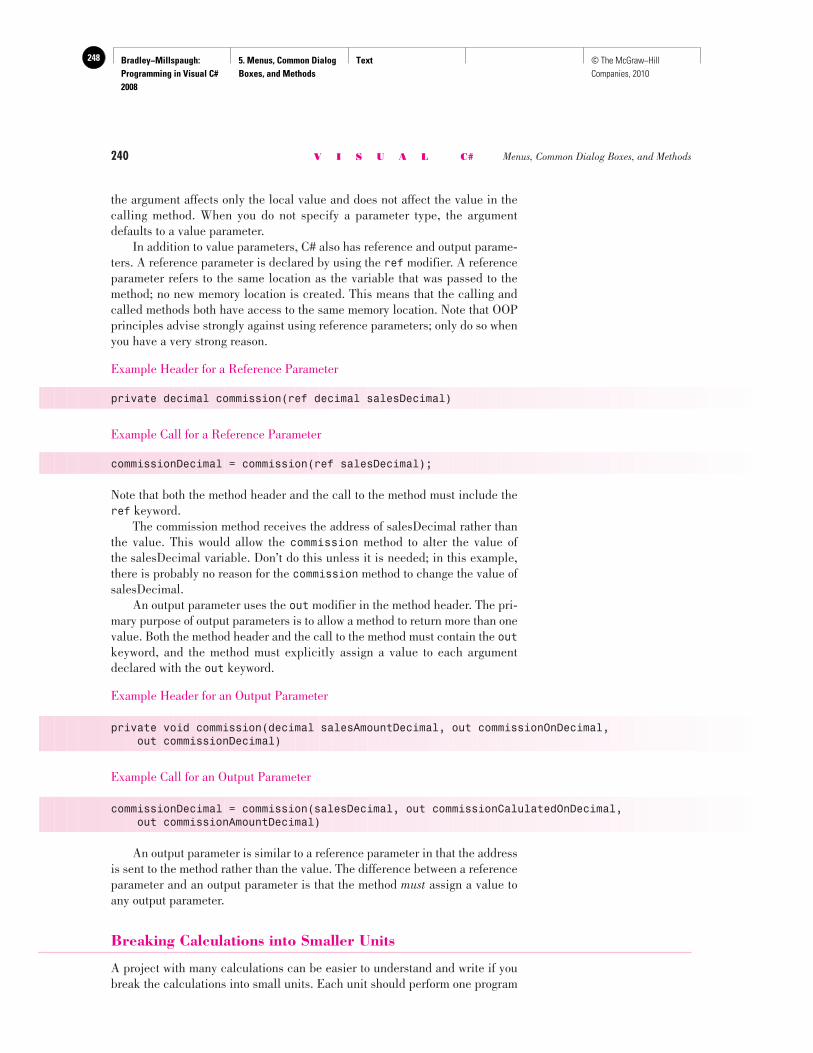
Bradley−Millspaugh: Programming in Visual C# 2008
5. Menus, Common Dialog Boxes, and Methods
Text248 © The McGraw−Hill Companies, 2010
240 V I S U A L C# Menus, Common Dialog Boxes, and Methods
the argument affects only the local value and does not affect the value in the calling method. When you do not specify a parameter type, the argument defaults to a value parameter. In addition to value parameters, C# also has reference and output parame-ters. A reference parameter is declared by using the ref modifier. A reference parameter refers to the same location as the variable that was passed to the method; no new memory location is created. This means that the calling and called methods both have access to the same memory location. Note that OOP principles advise strongly against using reference parameters; only do so when you have a very strong reason.
Example Header for a Reference Parameter
private decimal commission(ref decimal salesDecimal)
Example Call for a Reference Parameter
commissionDecimal = commission(ref salesDecimal);
Note that both the method header and the call to the method must include the ref keyword. The commission method receives the address of salesDecimal rather than the value. This would allow the commission method to alter the value of the salesDecimal variable. Don’t do this unless it is needed; in this example, there is probably no reason for the commission method to change the value of salesDecimal. An output parameter uses the out modifier in the method header. The pri-mary purpose of output parameters is to allow a method to return more than one value. Both the method header and the call to the method must contain the out keyword, and the method must explicitly assign a value to each argument declared with the out keyword.
Example Header for an Output Parameter
private void commission(decimal salesAmountDecimal, out commissionOnDecimal, out commissionDecimal)
Example Call for an Output Parameter
commissionDecimal = commission(salesDecimal, out commissionCalulatedOnDecimal, out commissionAmountDecimal)
An output parameter is similar to a reference parameter in that the address is sent to the method rather than the value. The difference between a reference parameter and an output parameter is that the method must assign a value to any output parameter.
Breaking Calculations into Smaller Units
A project with many calculations can be easier to understand and write if you break the calculations into small units. Each unit should perform one program
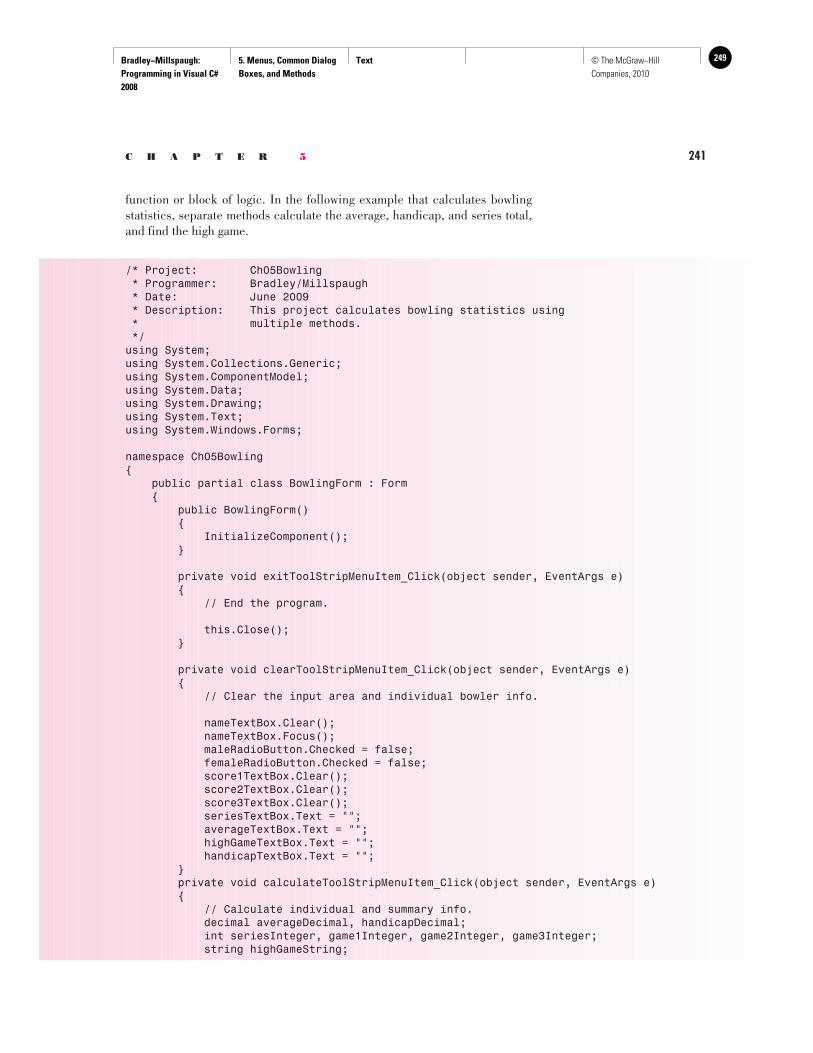
Bradley−Millspaugh: Programming in Visual C# 2008
5. Menus, Common Dialog Boxes, and Methods
Text 249© The McGraw−Hill Companies, 2010
C H A P T E R 5 241
function or block of logic. In the following example that calculates bowling statistics, separate methods calculate the average, handicap, and series total, and find the high game.
/* Project: Ch05Bowling * Programmer: Bradley/Millspaugh * Date: June 2009 * Description: This project calculates bowling statistics using * multiple methods. */using System;using System.Collections.Generic;using System.ComponentModel;using System.Data;using System.Drawing;using System.Text;using System.Windows.Forms;
namespace Ch05Bowling{ public partial class BowlingForm : Form { public BowlingForm() { InitializeComponent(); }
private void exitToolStripMenuItem_Click(object sender, EventArgs e) { // End the program.
this.Close(); }
private void clearToolStripMenuItem_Click(object sender, EventArgs e) { // Clear the input area and individual bowler info.
nameTextBox.Clear(); nameTextBox.Focus(); maleRadioButton.Checked = false; femaleRadioButton.Checked = false; score1TextBox.Clear(); score2TextBox.Clear(); score3TextBox.Clear(); seriesTextBox.Text = ""; averageTextBox.Text = ""; highGameTextBox.Text = ""; handicapTextBox.Text = ""; } private void calculateToolStripMenuItem_Click(object sender, EventArgs e) { // Calculate individual and summary info. decimal averageDecimal, handicapDecimal; int seriesInteger, game1Integer, game2Integer, game3Integer; string highGameString;

Bradley−Millspaugh: Programming in Visual C# 2008
5. Menus, Common Dialog Boxes, and Methods
Text250 © The McGraw−Hill Companies, 2010
242 V I S U A L C# Menus, Common Dialog Boxes, and Methods
try { game1Integer = int.Parse(score1TextBox.Text); game2Integer = int.Parse(score2TextBox.Text); game3Integer = int.Parse(score3TextBox.Text);
// Perform all calculations. averageDecimal = findAverage(game1Integer, game2Integer, game3Integer); seriesInteger = findSeries(game1Integer, game2Integer, game3Integer); highGameString = findHighGame(game1Integer, game2Integer, game3Integer); handicapDecimal = findHandicap(averageDecimal);
// Format the output. averageTextBox.Text = averageDecimal.ToString("N1"); highGameTextBox.Text = highGameString; seriesTextBox.Text = seriesInteger.ToString() ; handicapTextBox.Text = handicapDecimal.ToString("N1"); } catch { MessageBox.Show("Please Enter three scores.", "Missing Data", MessageBoxButtons.OK); } }
private decimal findAverage(int score1Integer,int score2Integer, int score3Integer) { // Return the average of three games.
return (score1Integer + score2Integer + score3Integer) / 3M; }
private decimal findHandicap(decimal averageDecimal) { // Calculate the handicap. if (averageDecimal >= 200M) return 0; else return (200M — averageDecimal) * 0.8M; }
private int findSeries(int game1Integer,int game2Integer, int game3Integer) { // Calculate the series total.
return game1Integer + game2Integer + game3Integer; }
private string findHighGame(int game1Integer,int game2Integer, int game3Integer) { // Find the highest game in the series.
Bradley−Millspaugh: Programming in Visual C# 2008
5. Menus, Common Dialog Boxes, and Methods
Text 251© The McGraw−Hill Companies, 2010
C H A P T E R 5 243
if (game1Integer > game2Integer && game1Integer > game3Integer) return "1"; else if (game2Integer > game1Integer && game2Integer > game3Integer) return "2"; else if (game3Integer > game1Integer && game3Integer > game2Integer) return "3"; else return "Tie"; } }}
➤ Feedback 5.1 You need to write a method to calculate and return the average of three decimal values.
1. Write the header line of the method. 2. Write the calculation. 3. How is the calculated average passed back to the calling method?
Basing a New Project on an Existing Project
In this chapter, you will base a new project on an existing project but keep the previous project unchanged. To create a new project based on a previous one, you should copy the project folder. Then you can move it as necessary. You can copy an entire Windows project folder from one location to an-other using the Windows Explorer. Make sure that the project is not open in Visual Studio and copy the entire folder.
• Make sure the project is not open (very important).
• Copy the folder to a new location using the Windows Explorer.
• Rename the new folder for the new project name, still using the Windows Explorer.
• Open the new project (the copy) in the Visual Studio IDE.
• In the IDE’s Solution Explorer, rename the solution and the project. The best way to do this is to right-click on the name and choose the Rename command from the shortcut menu. To rename the solution, you must set the option to display the solution: Tools / Options / Projects and Solutions / General / Always show solution .
• Rename the forms, if desired.
• Open the Project Designer ( Project / ProjectName Properties ) and change the Assembly name and Default namespace entries to match your new project name.
Warning : Do not try to copy a project that is open using the Save As command, attempting to place a copy in a new location.
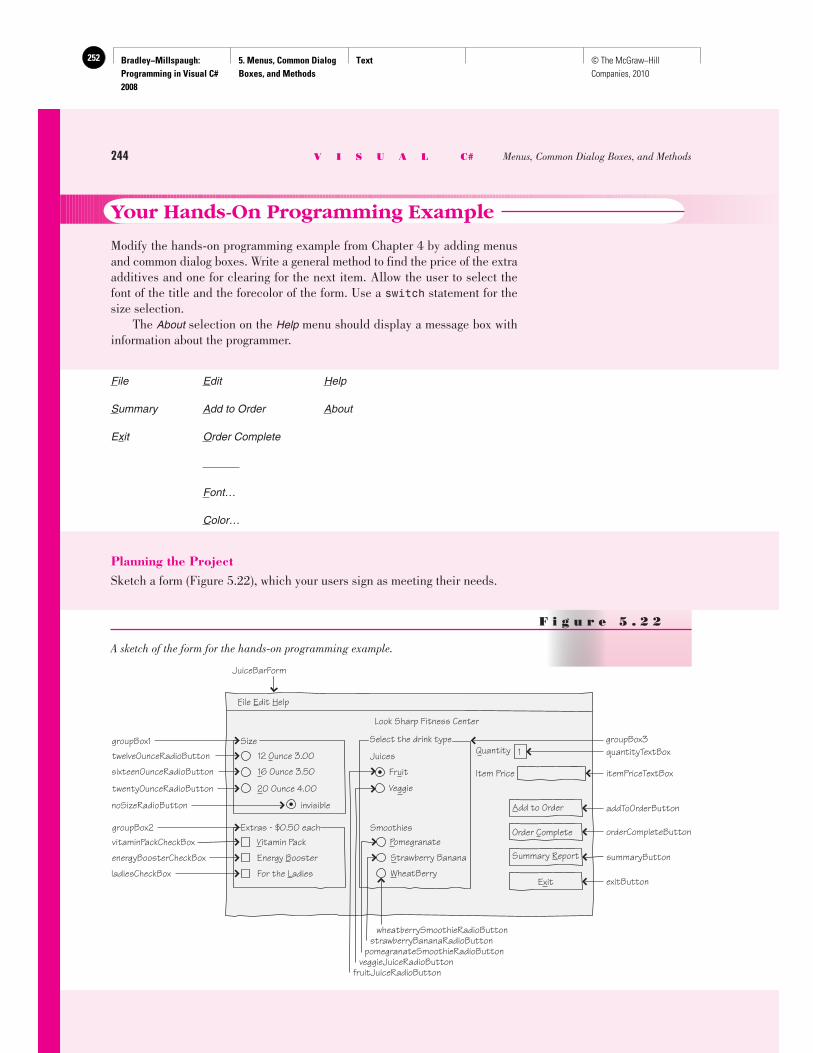
Bradley−Millspaugh: Programming in Visual C# 2008
5. Menus, Common Dialog Boxes, and Methods
Text252 © The McGraw−Hill Companies, 2010
Your Hands-On Programming Example
Modify the hands-on programming example from Chapter 4 by adding menus and common dialog boxes. Write a general method to find the price of the extra additives and one for clearing for the next item. Allow the user to select the font of the title and the forecolor of the form. Use a switch statement for the size selection. The About selection on the Help menu should display a message box with information about the programmer.
F ile E dit H elp
S ummary A dd to Order A bout
E x it O rder Complete
F ont…
C olor…
Planning the Project Sketch a form ( Figure 5.22 ), which your users sign as meeting their needs.
F i g u r e 5 . 2 2
A sketch of the form for the hands-on programming example.
SizegroupBox112 Ounce 3.00
invisible
Extras - $0.50 each
Select the drink type
Juices
Fruit
Veggie
Quantity quantityTextBoxgroupBox3
Item Price
1
Add to Order
Order Complete
Exit
Smoothies
16 Ounce 3.50
20 Ounce 4.00
Look Sharp Fitness Center
File Edit Help
Vitamin Pack
Energy Booster
For the Ladies
JuiceBarForm
itemPriceTextBox
addToOrderButton
orderCompleteButton
summaryButton
exitButton
twelveOunceRadioButton
sixteenOunceRadioButton
twentyOunceRadioButton
groupBox2vitaminPackCheckBox
energyBoosterCheckBox
ladiesCheckBox
noSizeRadioButton
Pomegranate
Strawberry Banana
WheatBerry
wheatberrySmoothieRadioButtonstrawberryBananaRadioButton
pomegranateSmoothieRadioButtonveggieJuiceRadioButton
fruitJuiceRadioButton
Summary Report
244 V I S U A L C# Menus, Common Dialog Boxes, and Methods
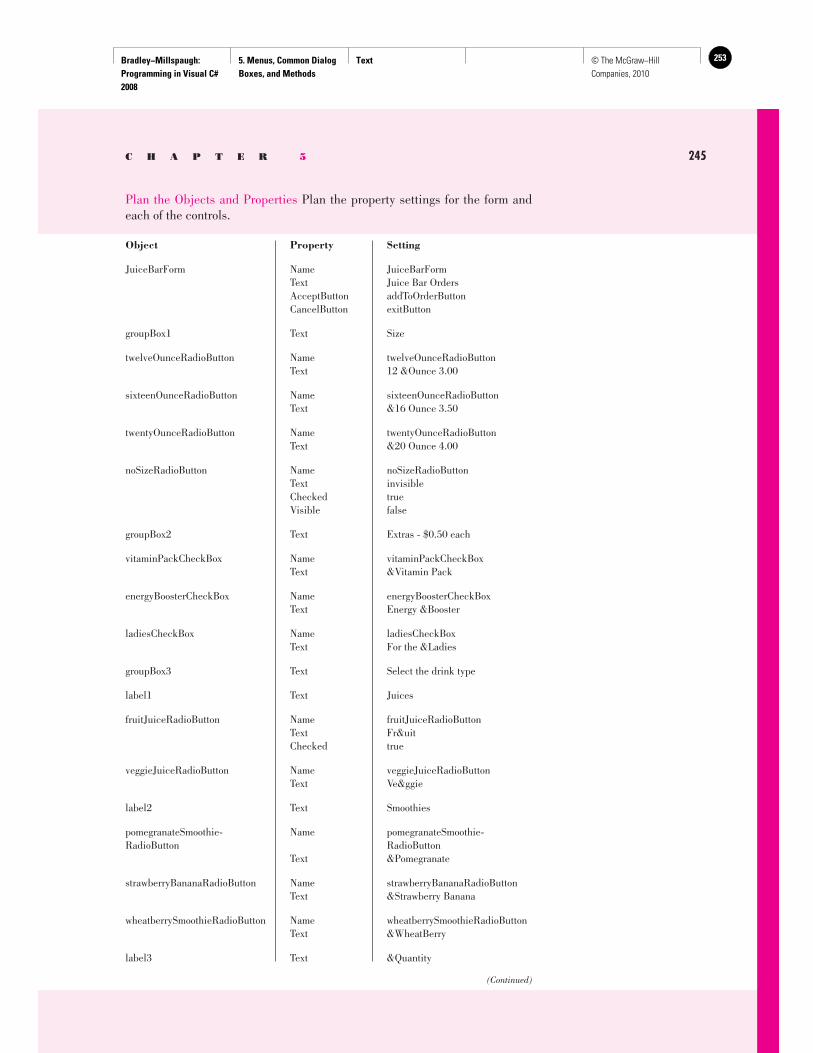
Bradley−Millspaugh: Programming in Visual C# 2008
5. Menus, Common Dialog Boxes, and Methods
Text 253© The McGraw−Hill Companies, 2010
C H A P T E R 5 245
Plan the Objects and Properties Plan the property settings for the form and each of the controls.
JuiceBarForm Name JuiceBarForm Text Juice Bar Orders AcceptButton addToOrderButton CancelButton exitButton
groupBox1 Text Size
twelveOunceRadioButton Name twelveOunceRadioButton Text 12 &Ounce 3.00
sixteenOunceRadioButton Name sixteenOunceRadioButton Text &16 Ounce 3.50
twentyOunceRadioButton Name twentyOunceRadioButton Text &20 Ounce 4.00
noSizeRadioButton Name noSizeRadioButton Text invisible Checked true Visible false
groupBox2 Text Extras - $0.50 each
vitaminPackCheckBox Name vitaminPackCheckBox Text &Vitamin Pack
energyBoosterCheckBox Name energyBoosterCheckBox Text Energy &Booster
ladiesCheckBox Name ladiesCheckBox Text For the &Ladies
groupBox3 Text Select the drink type
label1 Text Juices
fruitJuiceRadioButton Name fruitJuiceRadioButton Text Fr&uit Checked true
veggieJuiceRadioButton Name veggieJuiceRadioButton Text Ve&ggie
label2 Text Smoothies
pomegranateSmoothie- Name pomegranateSmoothie- RadioButton RadioButton Text &Pomegranate
strawberryBananaRadioButton Name strawberryBananaRadioButton Text &Strawberry Banana
wheatberrySmoothieRadioButton Name wheatberrySmoothieRadioButton Text &WheatBerry
label3 Text &Quantity
Object Property Setting
(Continued)
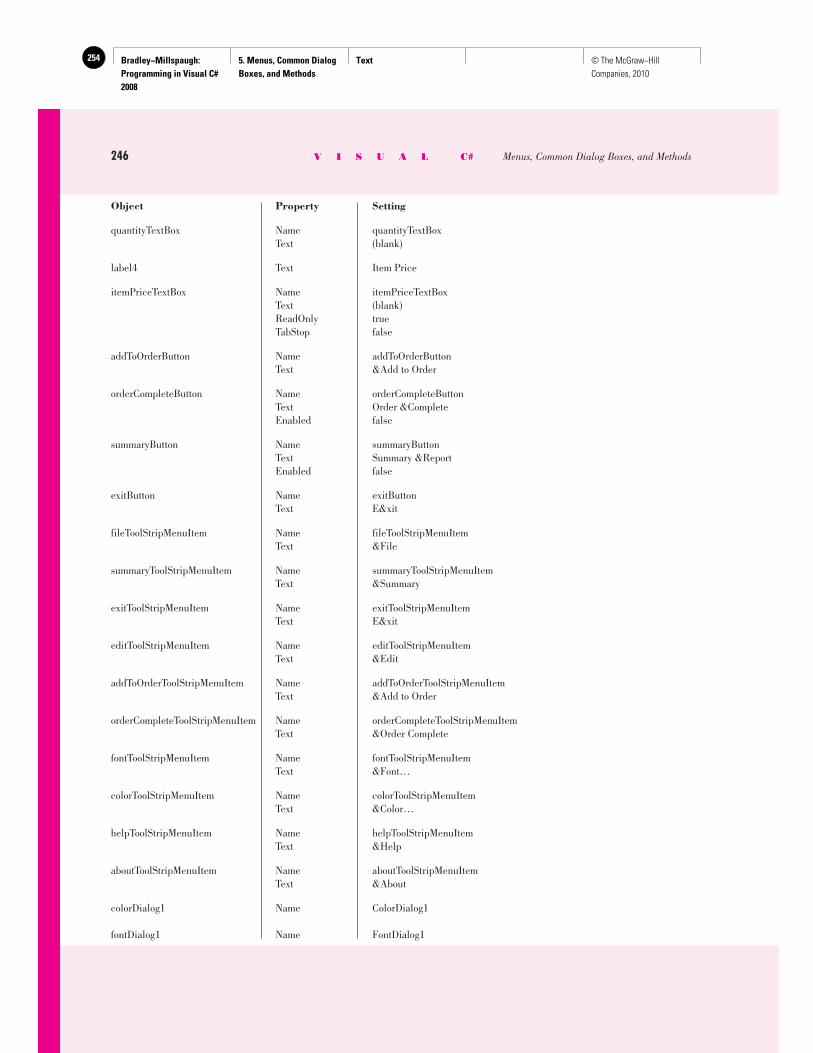
Bradley−Millspaugh: Programming in Visual C# 2008
5. Menus, Common Dialog Boxes, and Methods
Text254 © The McGraw−Hill Companies, 2010
246 V I S U A L C# Menus, Common Dialog Boxes, and Methods
quantityTextBox Name quantityTextBox Text (blank)
label4 Text Item Price
itemPriceTextBox Name itemPriceTextBox Text (blank) ReadOnly true TabStop false
addToOrderButton Name addToOrderButton Text &Add to Order
orderCompleteButton Name orderCompleteButton Text Order &Complete Enabled false
summaryButton Name summaryButton Text Summary &Report Enabled false
exitButton Name exitButton Text E&xit
fileToolStripMenuItem Name fileToolStripMenuItem Text &File
summaryToolStripMenuItem Name summaryToolStripMenuItem Text &Summary
exitToolStripMenuItem Name exitToolStripMenuItem Text E&xit
editToolStripMenuItem Name editToolStripMenuItem Text &Edit
addToOrderToolStripMenuItem Name addToOrderToolStripMenuItem Text &Add to Order
orderCompleteToolStripMenuItem Name orderCompleteToolStripMenuItem Text &Order Complete
fontToolStripMenuItem Name fontToolStripMenuItem Text &Font…
colorToolStripMenuItem Name colorToolStripMenuItem Text &Color…
helpToolStripMenuItem Name helpToolStripMenuItem Text &Help
aboutToolStripMenuItem Name aboutToolStripMenuItem Text &About
colorDialog1 Name ColorDialog1
fontDialog1 Name FontDialog1
Object Property Setting
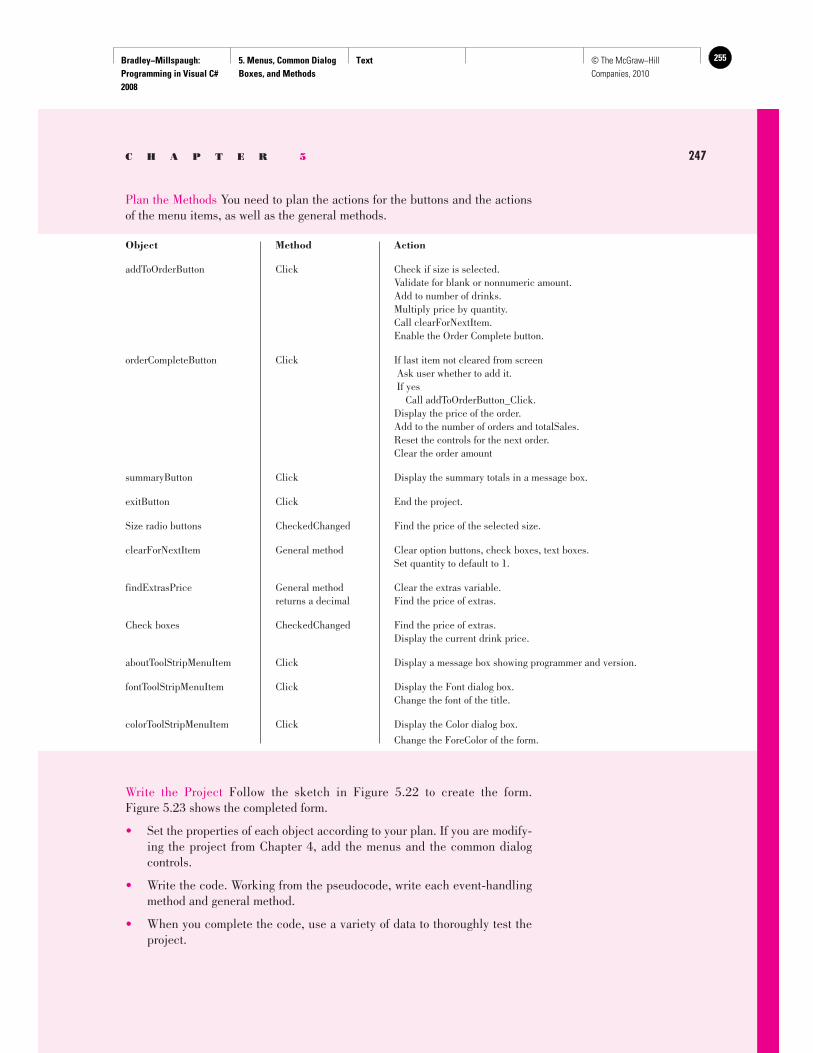
Bradley−Millspaugh: Programming in Visual C# 2008
5. Menus, Common Dialog Boxes, and Methods
Text 255© The McGraw−Hill Companies, 2010
C H A P T E R 5 247
Object Method Action
addToOrderButton Click Check if size is selected. Validate for blank or nonnumeric amount. Add to number of drinks. Multiply price by quantity. Call clearForNextItem. Enable the Order Complete button.
orderCompleteButton Click If last item not cleared from screen Ask user whether to add it. If yes Call addToOrderButton_Click. Display the price of the order. Add to the number of orders and totalSales. Reset the controls for the next order. Clear the order amount
summaryButton Click Display the summary totals in a message box.
exitButton Click End the project.
Size radio buttons CheckedChanged Find the price of the selected size.
clearForNextItem General method Clear option buttons, check boxes, text boxes. Set quantity to default to 1.
findExtrasPrice General method Clear the extras variable. returns a decimal Find the price of extras.
Check boxes CheckedChanged Find the price of extras. Display the current drink price.
aboutToolStripMenuItem Click Display a message box showing programmer and version.
fontToolStripMenuItem Click Display the Font dialog box. Change the font of the title.
colorToolStripMenuItem Click Display the Color dialog box.
Change the ForeColor of the form.
Plan the Methods You need to plan the actions for the buttons and the actions of the menu items, as well as the general methods.
Write the Project Follow the sketch in Figure 5.22 to create the form. Figure 5.23 shows the completed form.
• Set the properties of each object according to your plan. If you are modify-ing the project from Chapter 4, add the menus and the common dialog controls.
• Write the code. Working from the pseudocode, write each event-handling method and general method.
• When you complete the code, use a variety of data to thoroughly test the project.
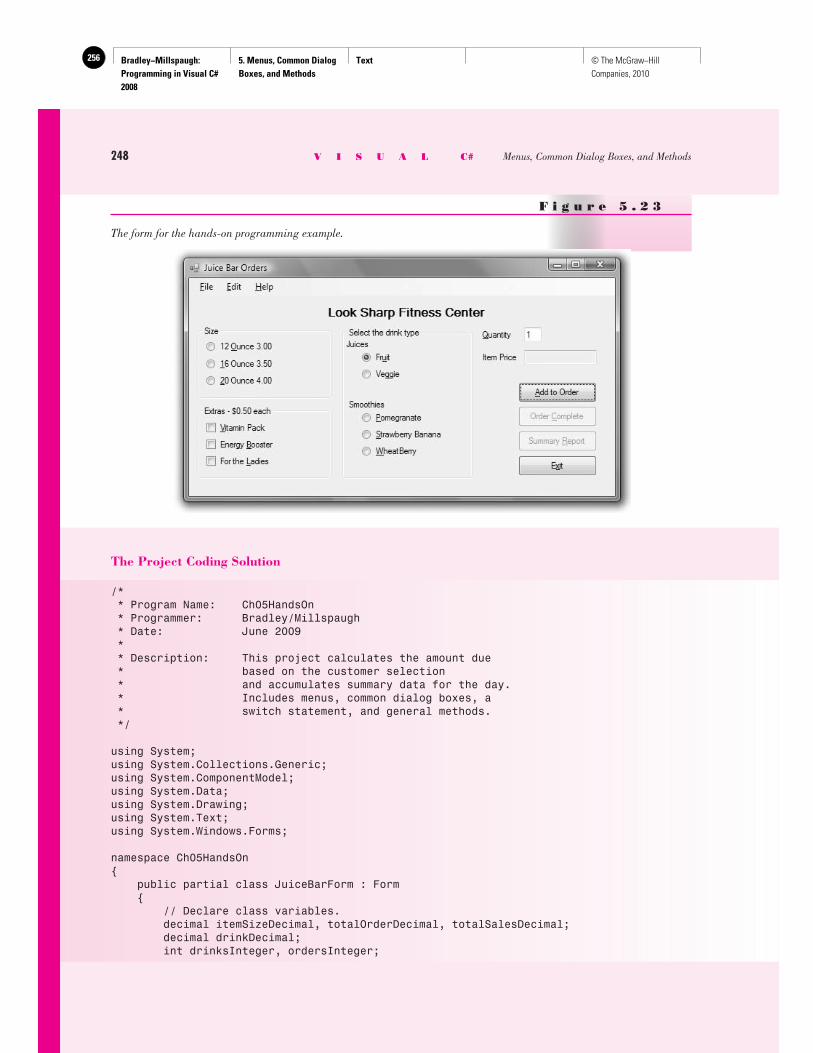
Bradley−Millspaugh: Programming in Visual C# 2008
5. Menus, Common Dialog Boxes, and Methods
Text256 © The McGraw−Hill Companies, 2010
248 V I S U A L C# Menus, Common Dialog Boxes, and Methods
F i g u r e 5 . 2 3
The form for the hands-on programming example.
The Project Coding Solution
/* * Program Name: Ch05HandsOn * Programmer: Bradley/Millspaugh * Date: June 2009 * * Description: This project calculates the amount due * based on the customer selection * and accumulates summary data for the day. * Includes menus, common dialog boxes, a * switch statement, and general methods. */
using System;using System.Collections.Generic;using System.ComponentModel;using System.Data;using System.Drawing;using System.Text;using System.Windows.Forms;
namespace Ch05HandsOn{ public partial class JuiceBarForm : Form { // Declare class variables. decimal itemSizeDecimal, totalOrderDecimal, totalSalesDecimal; decimal drinkDecimal; int drinksInteger, ordersInteger;
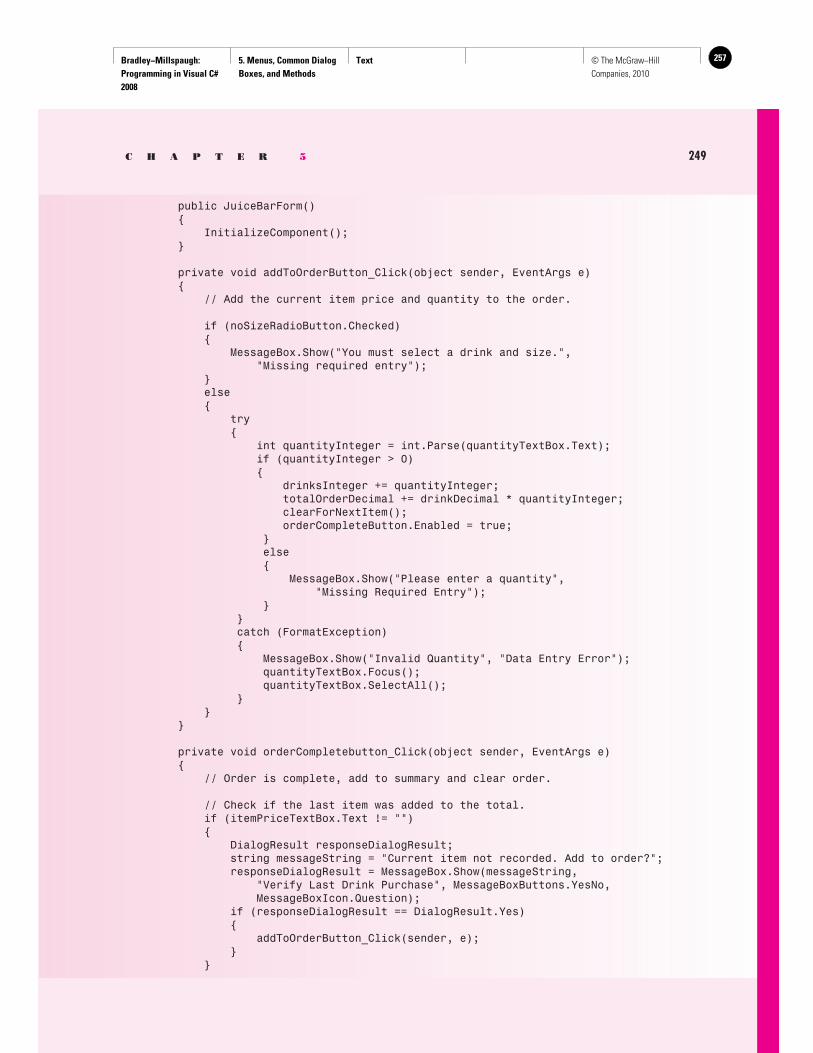
Bradley−Millspaugh: Programming in Visual C# 2008
5. Menus, Common Dialog Boxes, and Methods
Text 257© The McGraw−Hill Companies, 2010
C H A P T E R 5 249
public JuiceBarForm() { InitializeComponent(); }
private void addToOrderButton_Click(object sender, EventArgs e) { // Add the current item price and quantity to the order.
if (noSizeRadioButton.Checked) { MessageBox.Show("You must select a drink and size.", "Missing required entry"); } else { try { int quantityInteger = int.Parse(quantityTextBox.Text); if (quantityInteger > 0) { drinksInteger += quantityInteger; totalOrderDecimal += drinkDecimal * quantityInteger; clearForNextItem(); orderCompleteButton.Enabled = true; } else { MessageBox.Show("Please enter a quantity", "Missing Required Entry"); } } catch (FormatException) { MessageBox.Show("Invalid Quantity", "Data Entry Error"); quantityTextBox.Focus(); quantityTextBox.SelectAll(); } } }
private void orderCompletebutton_Click(object sender, EventArgs e) { // Order is complete, add to summary and clear order.
// Check if the last item was added to the total. if (itemPriceTextBox.Text != "") { DialogResult responseDialogResult; string messageString = "Current item not recorded. Add to order?"; responseDialogResult = MessageBox.Show(messageString, "Verify Last Drink Purchase", MessageBoxButtons.YesNo, MessageBoxIcon.Question); if (responseDialogResult == DialogResult.Yes) { addToOrderButton_Click(sender, e); } }
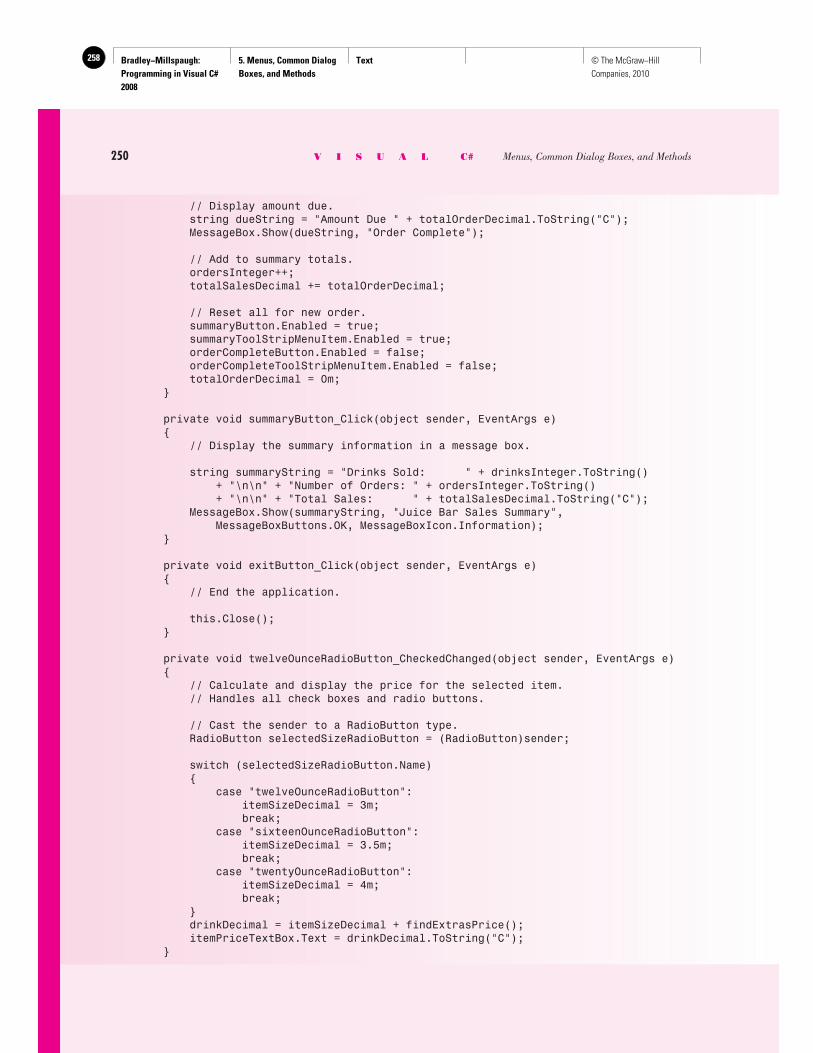
Bradley−Millspaugh: Programming in Visual C# 2008
5. Menus, Common Dialog Boxes, and Methods
Text258 © The McGraw−Hill Companies, 2010
250 V I S U A L C# Menus, Common Dialog Boxes, and Methods
// Display amount due. string dueString = "Amount Due " + totalOrderDecimal.ToString("C"); MessageBox.Show(dueString, "Order Complete");
// Add to summary totals. ordersInteger++; totalSalesDecimal += totalOrderDecimal;
// Reset all for new order. summaryButton.Enabled = true; summaryToolStripMenuItem.Enabled = true; orderCompleteButton.Enabled = false; orderCompleteToolStripMenuItem.Enabled = false; totalOrderDecimal = 0m; }
private void summaryButton_Click(object sender, EventArgs e) { // Display the summary information in a message box.
string summaryString = "Drinks Sold: " + drinksInteger.ToString() + "\n\n" + "Number of Orders: " + ordersInteger.ToString() + "\n\n" + "Total Sales: " + totalSalesDecimal.ToString("C"); MessageBox.Show(summaryString, "Juice Bar Sales Summary", MessageBoxButtons.OK, MessageBoxIcon.Information); }
private void exitButton_Click(object sender, EventArgs e) { // End the application.
this.Close(); }
private void twelveOunceRadioButton_CheckedChanged(object sender, EventArgs e) { // Calculate and display the price for the selected item. // Handles all check boxes and radio buttons.
// Cast the sender to a RadioButton type. RadioButton selectedSizeRadioButton = (RadioButton)sender;
switch (selectedSizeRadioButton.Name) { case "twelveOunceRadioButton": itemSizeDecimal = 3m; break; case "sixteenOunceRadioButton": itemSizeDecimal = 3.5m; break; case "twentyOunceRadioButton": itemSizeDecimal = 4m; break; } drinkDecimal = itemSizeDecimal + findExtrasPrice(); itemPriceTextBox.Text = drinkDecimal.ToString("C"); }
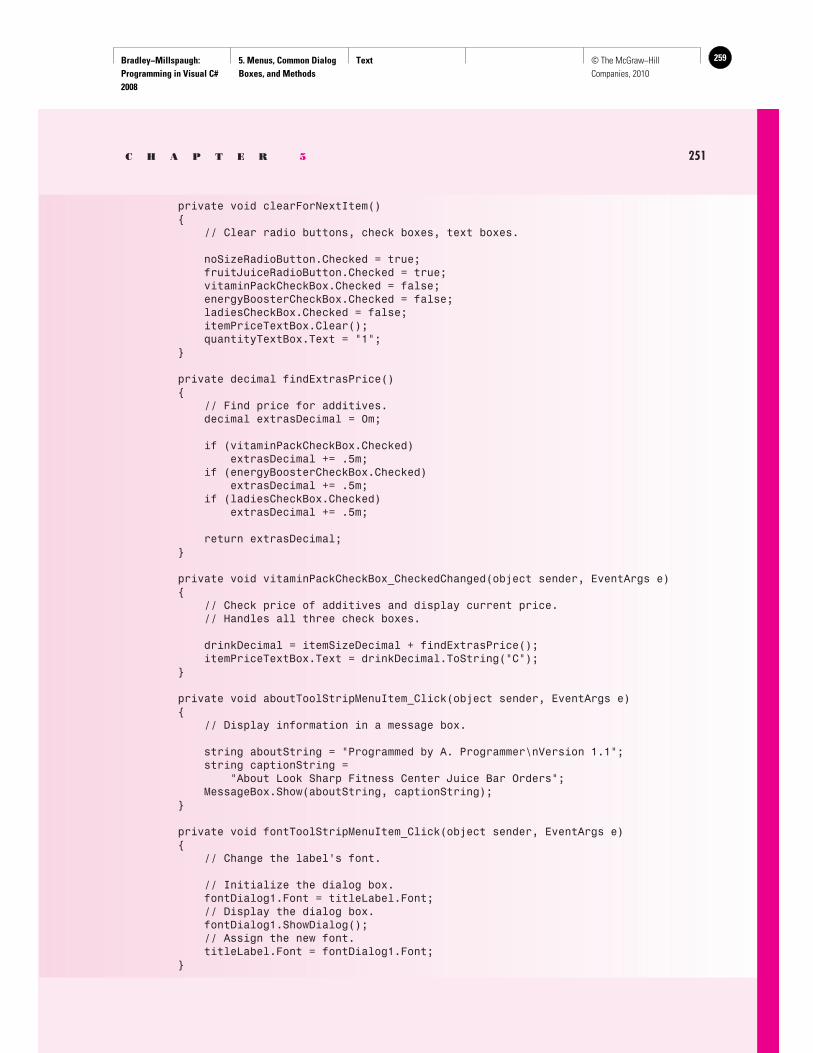
Bradley−Millspaugh: Programming in Visual C# 2008
5. Menus, Common Dialog Boxes, and Methods
Text 259© The McGraw−Hill Companies, 2010
C H A P T E R 5 251
private void clearForNextItem() { // Clear radio buttons, check boxes, text boxes.
noSizeRadioButton.Checked = true; fruitJuiceRadioButton.Checked = true; vitaminPackCheckBox.Checked = false; energyBoosterCheckBox.Checked = false; ladiesCheckBox.Checked = false; itemPriceTextBox.Clear(); quantityTextBox.Text = "1"; }
private decimal findExtrasPrice() { // Find price for additives. decimal extrasDecimal = 0m;
if (vitaminPackCheckBox.Checked) extrasDecimal += .5m; if (energyBoosterCheckBox.Checked) extrasDecimal += .5m; if (ladiesCheckBox.Checked) extrasDecimal += .5m;
return extrasDecimal; }
private void vitaminPackCheckBox_CheckedChanged(object sender, EventArgs e) { // Check price of additives and display current price. // Handles all three check boxes.
drinkDecimal = itemSizeDecimal + findExtrasPrice(); itemPriceTextBox.Text = drinkDecimal.ToString("C"); }
private void aboutToolStripMenuItem_Click(object sender, EventArgs e) { // Display information in a message box.
string aboutString = "Programmed by A. Programmer\nVersion 1.1"; string captionString = "About Look Sharp Fitness Center Juice Bar Orders"; MessageBox.Show(aboutString, captionString); }
private void fontToolStripMenuItem_Click(object sender, EventArgs e) { // Change the label’s font.
// Initialize the dialog box. fontDialog1.Font = titleLabel.Font; // Display the dialog box. fontDialog1.ShowDialog(); // Assign the new font. titleLabel.Font = fontDialog1.Font; }
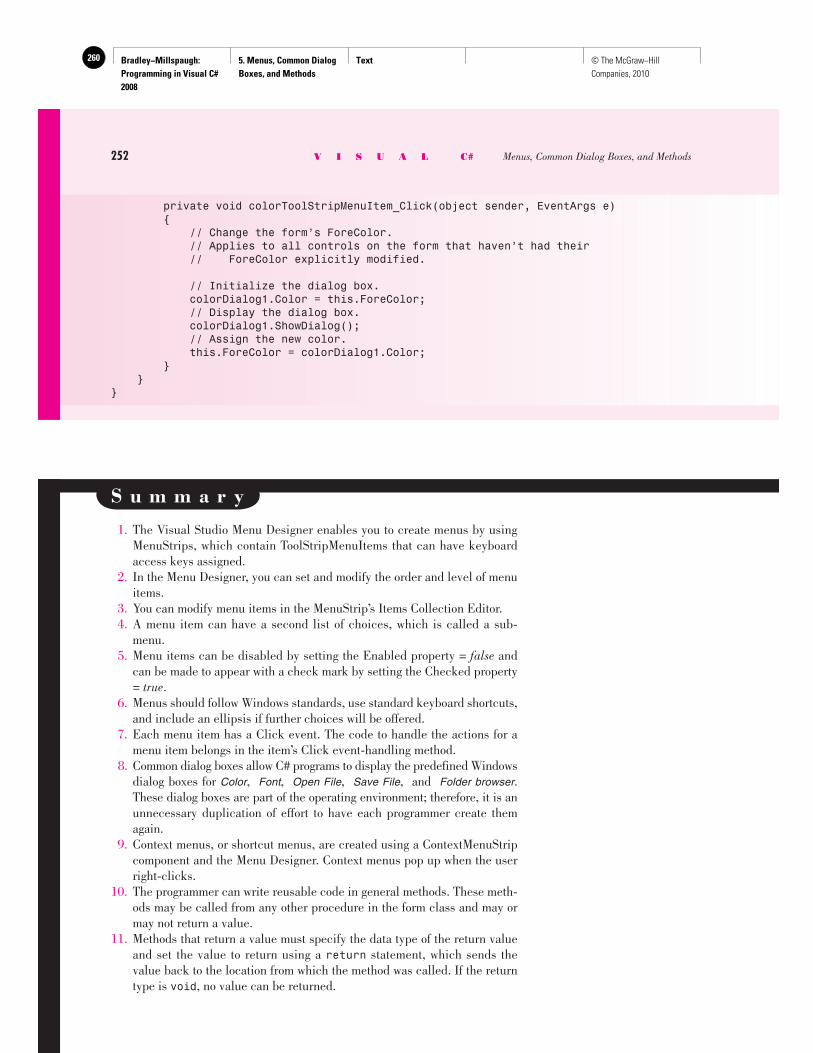
Bradley−Millspaugh: Programming in Visual C# 2008
5. Menus, Common Dialog Boxes, and Methods
Text260 © The McGraw−Hill Companies, 2010
private void colorToolStripMenuItem_Click(object sender, EventArgs e) { // Change the form’s ForeColor. // Applies to all controls on the form that haven’t had their // ForeColor explicitly modified.
// Initialize the dialog box. colorDialog1.Color = this.ForeColor; // Display the dialog box. colorDialog1.ShowDialog(); // Assign the new color. this.ForeColor = colorDialog1.Color; } }}
S u m m a r y
1. The Visual Studio Menu Designer enables you to create menus by using MenuStrips, which contain ToolStripMenuItems that can have keyboard access keys assigned.
2. In the Menu Designer, you can set and modify the order and level of menu items.
3. You can modify menu items in the MenuStrip’s Items Collection Editor. 4. A menu item can have a second list of choices, which is called a sub-
menu. 5. Menu items can be disabled by setting the Enabled property = false and
can be made to appear with a check mark by setting the Checked property = true .
6. Menus should follow Windows standards, use standard keyboard shortcuts, and include an ellipsis if further choices will be offered.
7. Each menu item has a Click event. The code to handle the actions for a menu item belongs in the item’s Click event-handling method.
8. Common dialog boxes allow C# programs to display the predefined Windows dialog boxes for Color , Font , Open File , Save File , and Folder browser . These dialog boxes are part of the operating environment; therefore, it is an unnecessary duplication of effort to have each programmer create them again.
9. Context menus, or shortcut menus, are created using a ContextMenuStrip component and the Menu Designer. Context menus pop up when the user right-clicks.
10. The programmer can write reusable code in general methods. These meth-ods may be called from any other procedure in the form class and may or may not return a value.
11. Methods that return a value must specify the data type of the return value and set the value to return using a return statement, which sends the value back to the location from which the method was called. If the return type is void , no value can be returned.
252 V I S U A L C# Menus, Common Dialog Boxes, and Methods
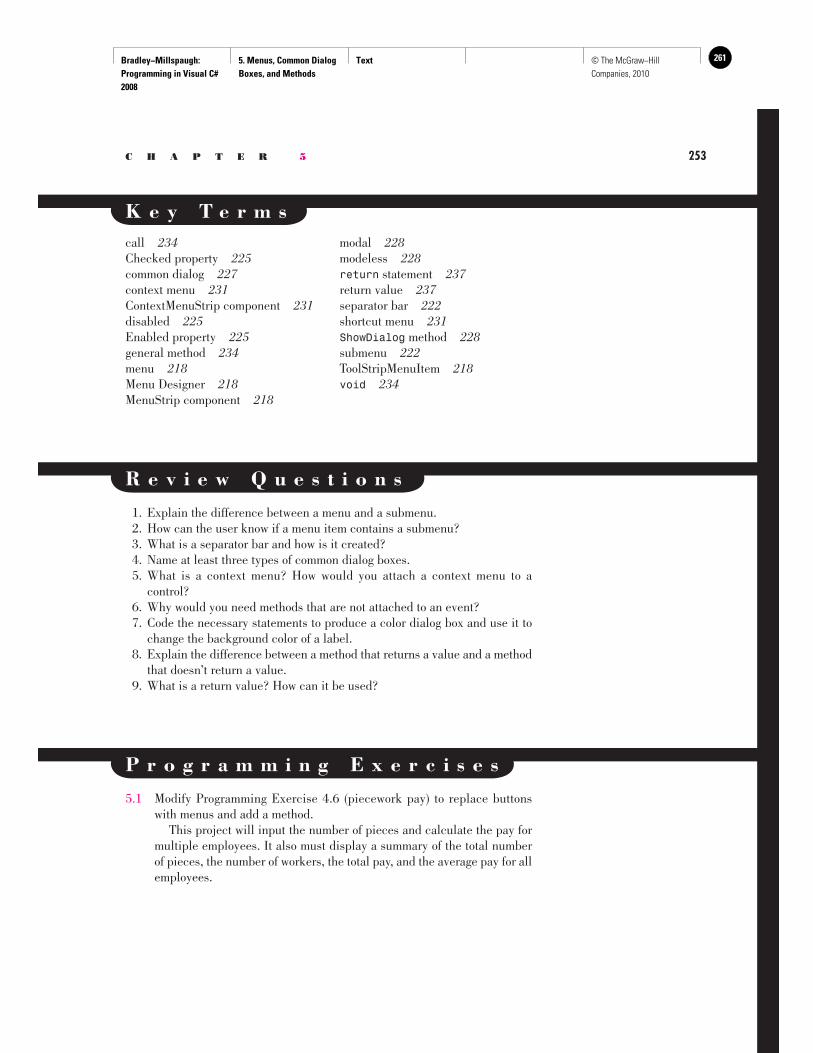
Bradley−Millspaugh: Programming in Visual C# 2008
5. Menus, Common Dialog Boxes, and Methods
Text 261© The McGraw−Hill Companies, 2010
C H A P T E R 5 253
K e y T e r m s call 234 Checked property 225 common dialog 227 context menu 231 ContextMenuStrip component 231 disabled 225 Enabled property 225 general method 234 menu 218 Menu Designer 218 MenuStrip component 218
modal 228 modeless 228 return statement 237 return value 237 separator bar 222 shortcut menu 231 ShowDialog method 228 submenu 222 ToolStripMenuItem 218 void 234
R e v i e w Q u e s t i o n s
1. Explain the difference between a menu and a submenu. 2. How can the user know if a menu item contains a submenu? 3. What is a separator bar and how is it created? 4. Name at least three types of common dialog boxes. 5. What is a context menu? How would you attach a context menu to a
control? 6. Why would you need methods that are not attached to an event? 7. Code the necessary statements to produce a color dialog box and use it to
change the background color of a label. 8. Explain the difference between a method that returns a value and a method
that doesn’t return a value. 9. What is a return value? How can it be used?
P r o g r a m m i n g E x e r c i s e s
5.1 Modify Programming Exercise 4.6 (piecework pay) to replace buttons with menus and add a method.
This project will input the number of pieces and calculate the pay for multiple employees. It also must display a summary of the total number of pieces, the number of workers, the total pay, and the average pay for all employees.
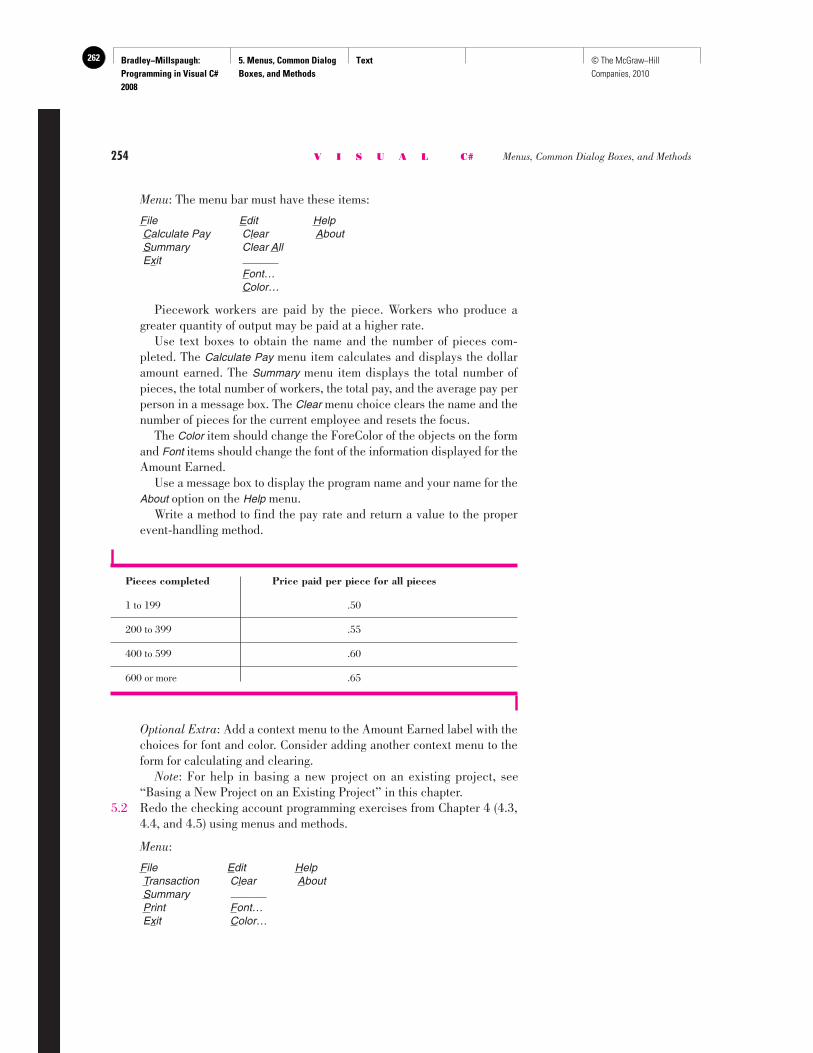
Bradley−Millspaugh: Programming in Visual C# 2008
5. Menus, Common Dialog Boxes, and Methods
Text262 © The McGraw−Hill Companies, 2010
254 V I S U A L C# Menus, Common Dialog Boxes, and Methods
Pieces completed Price paid per piece for all pieces
1 to 199 .50
200 to 399 .55
400 to 599 .60
600 or more .65
Menu : The menu bar must have these items:
F ile E dit H elp C alculate Pay C l ear A bout S ummary Clear A ll E x it F ont… C olor…
Piecework workers are paid by the piece. Workers who produce a greater quantity of output may be paid at a higher rate.
Use text boxes to obtain the name and the number of pieces com-pleted. The Calculate Pay menu item calculates and displays the dollar amount earned. The Summary menu item displays the total number of pieces, the total number of workers, the total pay, and the average pay per person in a message box. The Clear menu choice clears the name and the number of pieces for the current employee and resets the focus.
The Color item should change the ForeColor of the objects on the form and Font items should change the font of the information displayed for the Amount Earned.
Use a message box to display the program name and your name for the About option on the Help menu.
Write a method to find the pay rate and return a value to the proper event-handling method.
Optional Extra : Add a context menu to the Amount Earned label with the choices for font and color. Consider adding another context menu to the form for calculating and clearing.
Note : For help in basing a new project on an existing project, see “Basing a New Project on an Existing Project” in this chapter.
5.2 Redo the checking account programming exercises from Chapter 4 (4.3, 4.4, and 4.5) using menus and methods.
Menu :
F ile E dit H elp Transaction C l ear A bout S ummary Print Font… E x it C olor…
Bradley−Millspaugh: Programming in Visual C# 2008
5. Menus, Common Dialog Boxes, and Methods
Text 263© The McGraw−Hill Companies, 2010
C H A P T E R 5 255
Form : Use radio buttons to indicate the type of transaction—deposit, check, or service charge. Use a text box to allow the user to enter the amount of the transaction. Display the balance in a label or ReadOnly text box.
Include validation that displays a message box if the amount of the transaction is a negative number. If there is not enough money to cover a check, display a message box with the message “Insufficient Funds.” Do not pay the check, but deduct a service charge of $10.
Write methods for processing deposits, checks, and service charges. The deposit method adds the deposit to the balance; the check method subtracts the transaction amount from the balance; the service charge method subtracts the transaction amount from the balance. Each of the methods must return the updated balance.
The Summary menu item displays the total number of deposits and the dollar amount of deposits, the number of checks, and the dollar amount of the checks in a message box.
The Clear menu item clears the radio buttons and the amount and re-sets the focus.
The Color menu item should change the form’s ForeColor and the Font menu item should change the font of the information displayed for the balance.
Use a message box to display the program name and your name as the programmer for the About option on the Help menu.
Note : For help in basing a new project on an existing project, see “Basing a New Project on an Existing Project” in this chapter.
5.3 A salesperson earns a weekly base salary plus a commission when sales are at or above quota. Create a project that allows the user to input the weekly sales and the salesperson name, calculates the commission, and displays summary information.
Form : The form should have text boxes for the salesperson name and his or her weekly sales.
Menu :
F ile E dit H elp Pay C l ear A bout S ummary Print Font… E x it C olor…
Use constants to establish the base pay, the quota, and the commis-sion rate.
The Pay menu item calculates and displays the commission and the total pay for that person. However, if there is no commission, do not display the commission amount (do not display a zero-commission amount).
Write a method to calculate and return the commission. The method must compare sales to the quota. When the sales are equal to or greater than the quota, calculate the commission by multiplying sales by the commission rate.
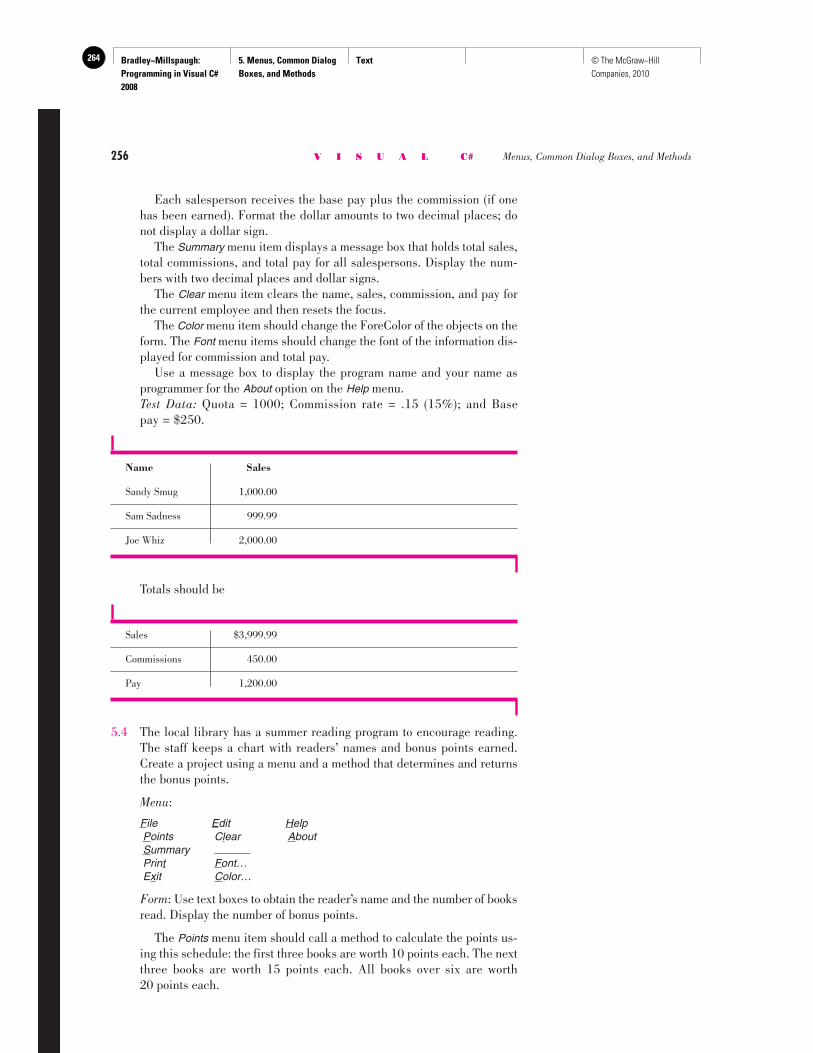
Bradley−Millspaugh: Programming in Visual C# 2008
5. Menus, Common Dialog Boxes, and Methods
Text264 © The McGraw−Hill Companies, 2010
256 V I S U A L C# Menus, Common Dialog Boxes, and Methods
Each salesperson receives the base pay plus the commission (if one has been earned). Format the dollar amounts to two decimal places; do not display a dollar sign.
The Summary menu item displays a message box that holds total sales, total commissions, and total pay for all salespersons. Display the num-bers with two decimal places and dollar signs.
The Clear menu item clears the name, sales, commission, and pay for the current employee and then resets the focus.
The Color menu item should change the ForeColor of the objects on the form. The Font menu items should change the font of the information dis-played for commission and total pay.
Use a message box to display the program name and your name as programmer for the About option on the Help menu.
Test Data: Quota = 1000; Commission rate = .15 (15%); and Base pay = $250.
Name Sales
Sandy Smug 1,000.00
Sam Sadness 999.99
Joe Whiz 2,000.00
Sales $3,999.99
Commissions 450.00
Pay 1,200.00
Totals should be
5.4 The local library has a summer reading program to encourage reading. The staff keeps a chart with readers’ names and bonus points earned. Create a project using a menu and a method that determines and returns the bonus points.
Menu :
F ile E dit H elp P oints C l ear A bout S ummary Print Font… E x it Color…
Form : Use text boxes to obtain the reader’s name and the number of books read. Display the number of bonus points.
The Points menu item should call a method to calculate the points us-ing this schedule: the first three books are worth 10 points each. The next three books are worth 15 points each. All books over six are worth 20 points each.
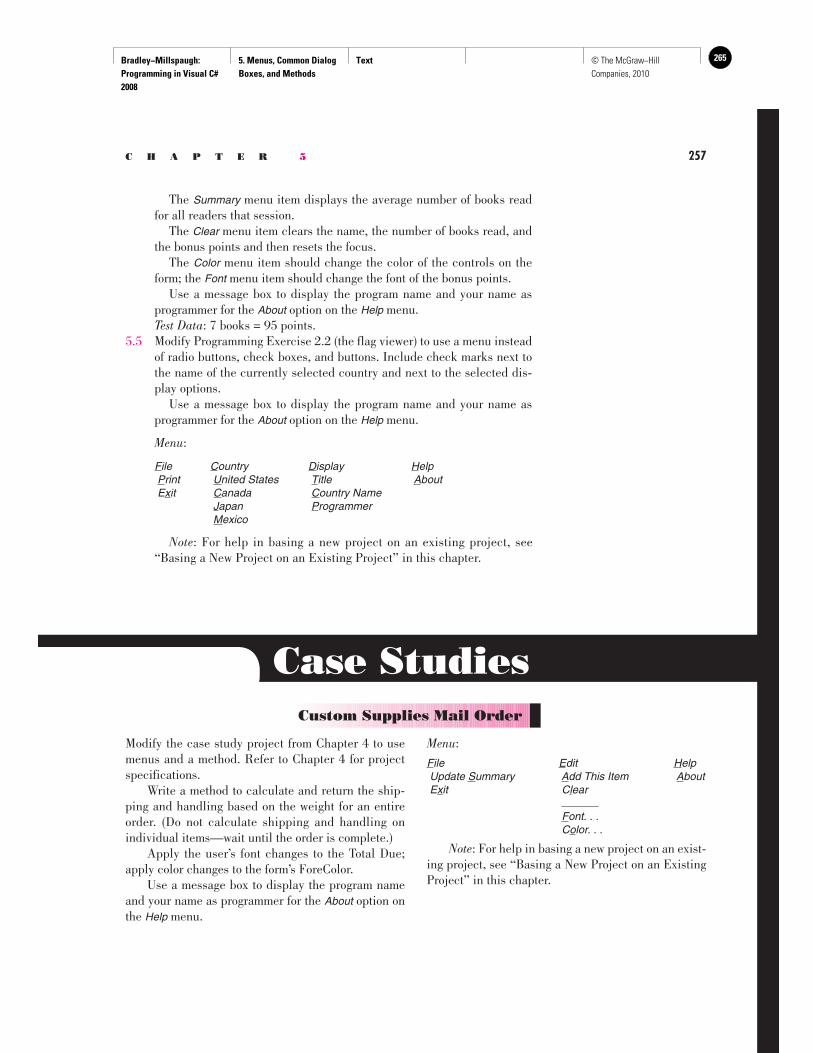
Bradley−Millspaugh: Programming in Visual C# 2008
5. Menus, Common Dialog Boxes, and Methods
Text 265© The McGraw−Hill Companies, 2010
C H A P T E R 5 257
The Summary menu item displays the average number of books read for all readers that session.
The Clear menu item clears the name, the number of books read, and the bonus points and then resets the focus.
The Color menu item should change the color of the controls on the form; the Font menu item should change the font of the bonus points.
Use a message box to display the program name and your name as programmer for the About option on the Help menu.
Test Data : 7 books = 95 points. 5.5 Modify Programming Exercise 2.2 (the flag viewer) to use a menu instead
of radio buttons, check boxes, and buttons. Include check marks next to the name of the currently selected country and next to the selected dis-play options.
Use a message box to display the program name and your name as programmer for the About option on the Help menu.
Menu :
F ile C ountry D isplay H elp P rint U nited States T itle A bout E xit C anada C ountry Name J apan P rogrammer M exico
Note : For help in basing a new project on an existing project, see “Basing a New Project on an Existing Project” in this chapter.
Case Studies Custom Supplies Mail Order
Modify the case study project from Chapter 4 to use menus and a method. Refer to Chapter 4 for project specifications. Write a method to calculate and return the ship-ping and handling based on the weight for an entire order. (Do not calculate shipping and handling on individual items—wait until the order is complete.) Apply the user’s font changes to the Total Due; apply color changes to the form’s ForeColor. Use a message box to display the program name and your name as programmer for the About option on the Help menu.
Menu :
F ile E dit H elp Update S ummary A dd This Item A bout E x it C l ear F ont. . . C o lor. . .
Note : For help in basing a new project on an exist-ing project, see “Basing a New Project on an Existing Project” in this chapter.
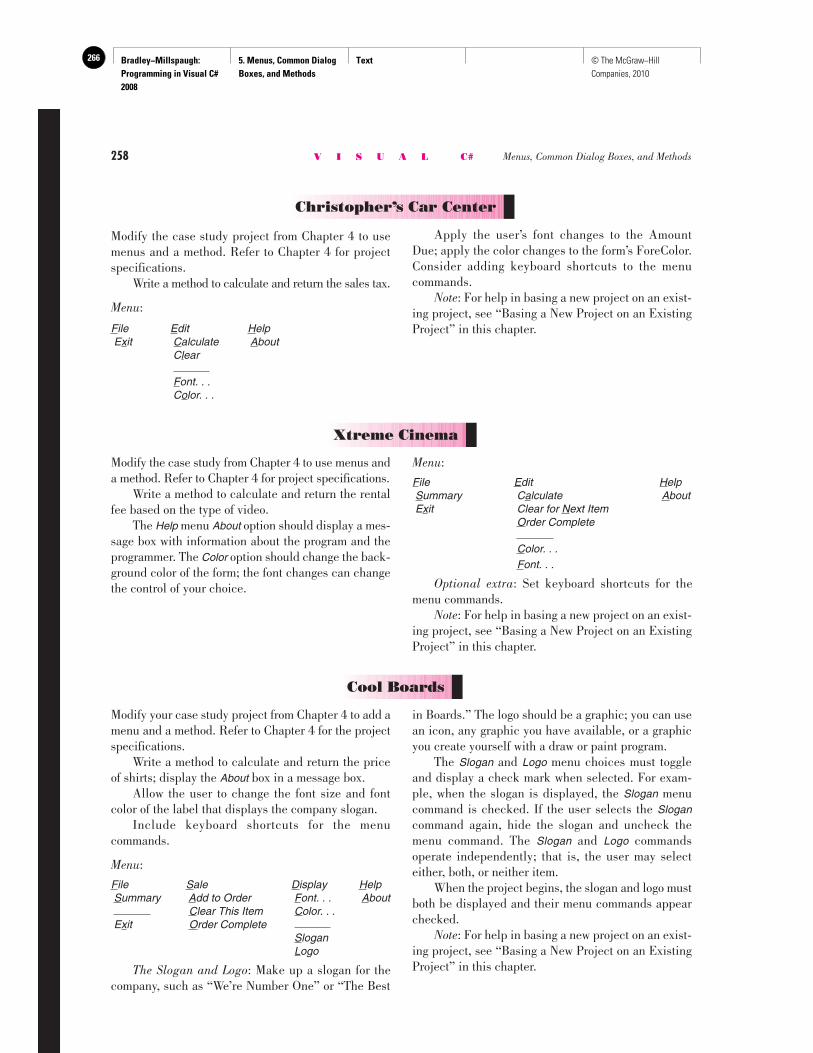
Bradley−Millspaugh: Programming in Visual C# 2008
5. Menus, Common Dialog Boxes, and Methods
Text266 © The McGraw−Hill Companies, 2010
258 V I S U A L C# Menus, Common Dialog Boxes, and Methods
Modify the case study project from Chapter 4 to use menus and a method. Refer to Chapter 4 for project specifications. Write a method to calculate and return the sales tax.
Menu :
F ile E dit H elp E x it C alculate A bout C l ear F ont. . . C o lor. . .
Christopher’s Car Center
Apply the user’s font changes to the Amount Due; apply the color changes to the form’s ForeColor. Consider adding keyboard shortcuts to the menu commands. Note : For help in basing a new project on an exist-ing project, see “Basing a New Project on an Existing Project” in this chapter.
Xtreme Cinema
Modify the case study from Chapter 4 to use menus and a method. Refer to Chapter 4 for project specifications. Write a method to calculate and return the rental fee based on the type of video. The Help menu About option should display a mes-sage box with information about the program and the programmer. The Color option should change the back-ground color of the form; the font changes can change the control of your choice.
Menu :
F ile E dit H elp S ummary C a lculate A bout E x it Clear for N ext Item O rder Complete C o lor. . . F ont. . .
Optional extra : Set keyboard shortcuts for the menu commands. Note : For help in basing a new project on an exist-ing project, see “Basing a New Project on an Existing Project” in this chapter.
Cool Boards
Modify your case study project from Chapter 4 to add a menu and a method. Refer to Chapter 4 for the project specifications. Write a method to calculate and return the price of shirts; display the About box in a message box. Allow the user to change the font size and font color of the label that displays the company slogan. Include keyboard shortcuts for the menu commands.
Menu :
F ile S ale D isplay H elp S ummary A dd to Order F ont. . . A bout C lear This Item C olor. . . E x it O rder Complete S logan L ogo
The Slogan and Logo : Make up a slogan for the company, such as “We’re Number One” or “The Best
in Boards.” The logo should be a graphic; you can use an icon, any graphic you have available, or a graphic you create yourself with a draw or paint program. The Slogan and Logo menu choices must toggle and display a check mark when selected. For exam-ple, when the slogan is displayed, the Slogan menu command is checked. If the user selects the Slogan command again, hide the slogan and uncheck the menu command. The Slogan and Logo commands operate independently; that is, the user may select either, both, or neither item. When the project begins, the slogan and logo must both be displayed and their menu commands appear checked. Note : For help in basing a new project on an exist-ing project, see “Basing a New Project on an Existing Project” in this chapter.
Bradley−Millspaugh: Programming in Visual C# 2008
6. Multiform Projects Text 267© The McGraw−Hill Companies, 2010
try{ // Convert input values to numeric and assign quantityInteger = int.Parse(quantityTextBox.T try { priceDecimal = decimal.Parse(priceTextBox // Calculate values. extendedPriceDecimal = quantityInteger * discountDecimal = Decimal.Round( (extendedPriceDecimal * DISCOUNT_RATE_ amountDueDecimal = extendedPriceDecimal - totalAmountDecimal += amountDueDecimal; numberTransactionsInteger++; // Format and display answers. extendedPriceTextBox.Text = extendedPrice
C H A P T E R
6 Multiform Projects
at the completion of this chapter, you will be able to . . .
1. Include multiple forms in an application.
2. Use a template to create an About box form.
3. Create a new instance of a form’s class and show the new form.
4. Use the Show, ShowDialog, and Hide methods to display and hide forms.
5. Understand the various form events and select the best method for your code.
6. Declare variables with the correct scope and access level for multiform projects.
7. Create new properties of a form and pass data values from one form to another.
8. Create and display a splash screen.
9. Run your project outside of the IDE.
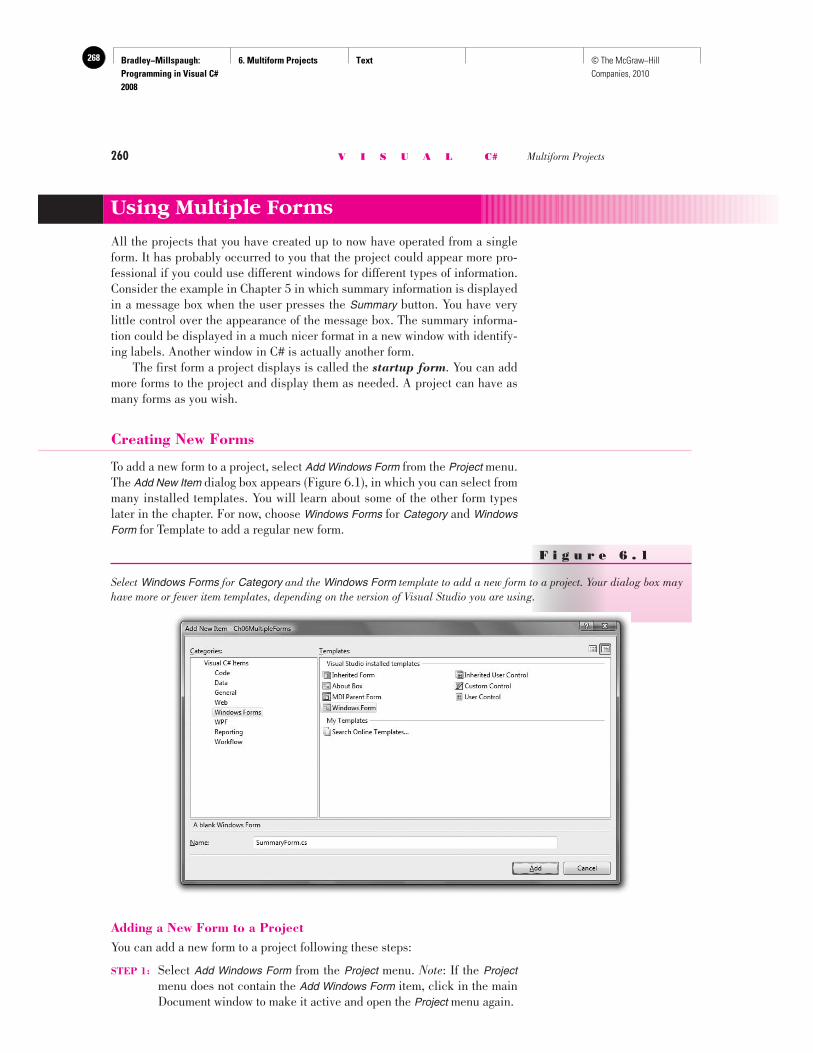
Bradley−Millspaugh: Programming in Visual C# 2008
6. Multiform Projects Text268 © The McGraw−Hill Companies, 2010
260 V I S U A L C# Multiform Projects
Using Multiple Forms
All the projects that you have created up to now have operated from a single form. It has probably occurred to you that the project could appear more pro-fessional if you could use different windows for different types of information. Consider the example in Chapter 5 in which summary information is displayed in a message box when the user presses the Summary button. You have very little control over the appearance of the message box. The summary informa-tion could be displayed in a much nicer format in a new window with identify-ing labels. Another window in C# is actually another form. The first form a project displays is called the startup form . You can add more forms to the project and display them as needed. A project can have as many forms as you wish.
Creating New Forms
To add a new form to a project, select Add Windows Form from the Project menu. The Add New Item dialog box appears ( Figure 6.1 ), in which you can select from many installed templates. You will learn about some of the other form types later in the chapter. For now, choose Windows Forms for Category and Windows Form for Template to add a regular new form.
F i g u r e 6 . 1
Select Windows Forms for Category and the Windows Form template to add a new form to a project. Your dialog box may have more or fewer item templates, depending on the version of Visual Studio you are using.
Adding a New Form to a Project You can add a new form to a project following these steps:
STEP 1: Select Add Windows Form from the Project menu. Note: If the Project menu does not contain the Add Windows Form item, click in the main Document window to make it active and open the Project menu again.
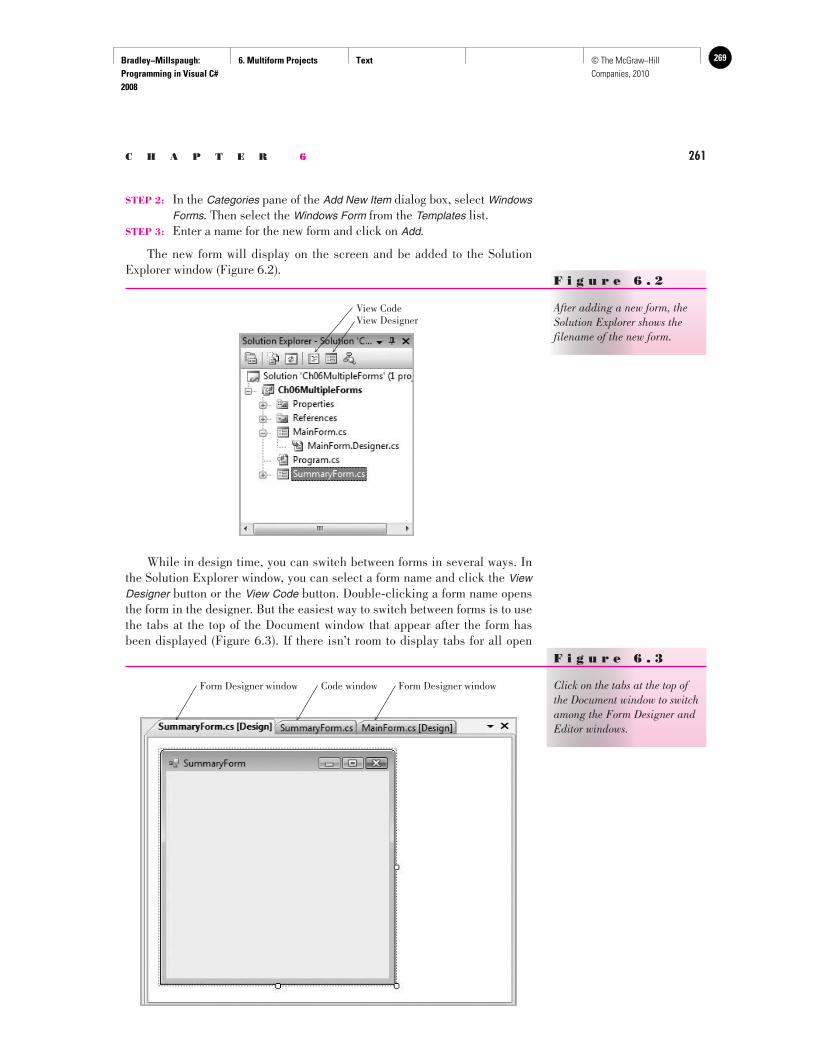
Bradley−Millspaugh: Programming in Visual C# 2008
6. Multiform Projects Text 269© The McGraw−Hill Companies, 2010
C H A P T E R 6 261
STEP 2: In the Categories pane of the Add New Item dialog box, select Windows Forms . Then select the Windows Form from the Templates list.
STEP 3: Enter a name for the new form and click on Add .
The new form will display on the screen and be added to the Solution Explorer window ( Figure 6.2 ).
F i g u r e 6 . 2
After adding a new form, the Solution Explorer shows the filename of the new form.
View DesignerView Code
While in design time, you can switch between forms in several ways. In the Solution Explorer window, you can select a form name and click the View Designer button or the View Code button. Double-clicking a form name opens the form in the designer. But the easiest way to switch between forms is to use the tabs at the top of the Document window that appear after the form has been displayed ( Figure 6.3 ). If there isn’t room to display tabs for all open
F i g u r e 6 . 3
Click on the tabs at the top of the Document window to switch among the Form Designer and Editor windows.
Form Designer window Code window Form Designer window
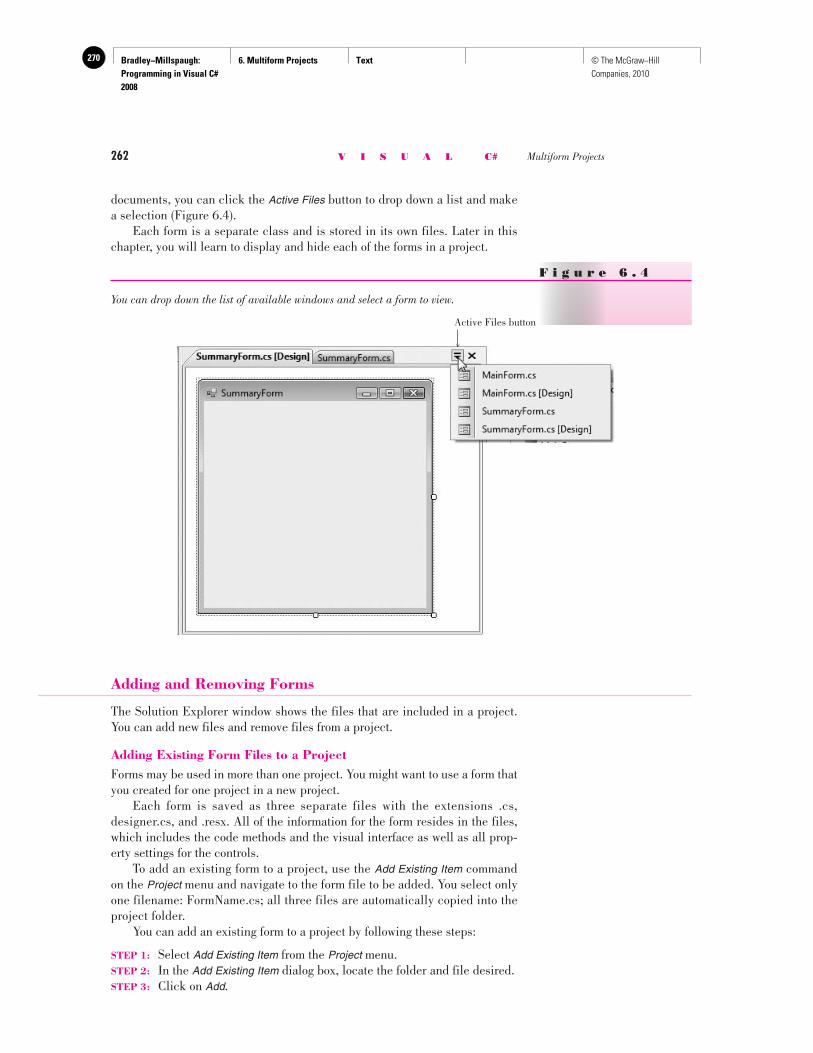
Bradley−Millspaugh: Programming in Visual C# 2008
6. Multiform Projects Text270 © The McGraw−Hill Companies, 2010
262 V I S U A L C# Multiform Projects
documents, you can click the Active Files button to drop down a list and make a selection ( Figure 6.4 ). Each form is a separate class and is stored in its own files. Later in this chapter, you will learn to display and hide each of the forms in a project.
F i g u r e 6 . 4
You can drop down the list of available windows and select a form to view.
Active Files button
Adding and Removing Forms
The Solution Explorer window shows the files that are included in a project. You can add new files and remove files from a project.
Adding Existing Form Files to a Project Forms may be used in more than one project. You might want to use a form that you created for one project in a new project. Each form is saved as three separate files with the extensions .cs, designer.cs, and .resx. All of the information for the form resides in the files, which includes the code methods and the visual interface as well as all prop-erty settings for the controls. To add an existing form to a project, use the Add Existing Item command on the Project menu and navigate to the form file to be added. You select only one filename: FormName.cs; all three files are automatically copied into the project folder. You can add an existing form to a project by following these steps:
STEP 1: Select Add Existing Item from the Project menu. STEP 2: In the Add Existing Item dialog box, locate the folder and file desired. STEP 3: Click on Add .
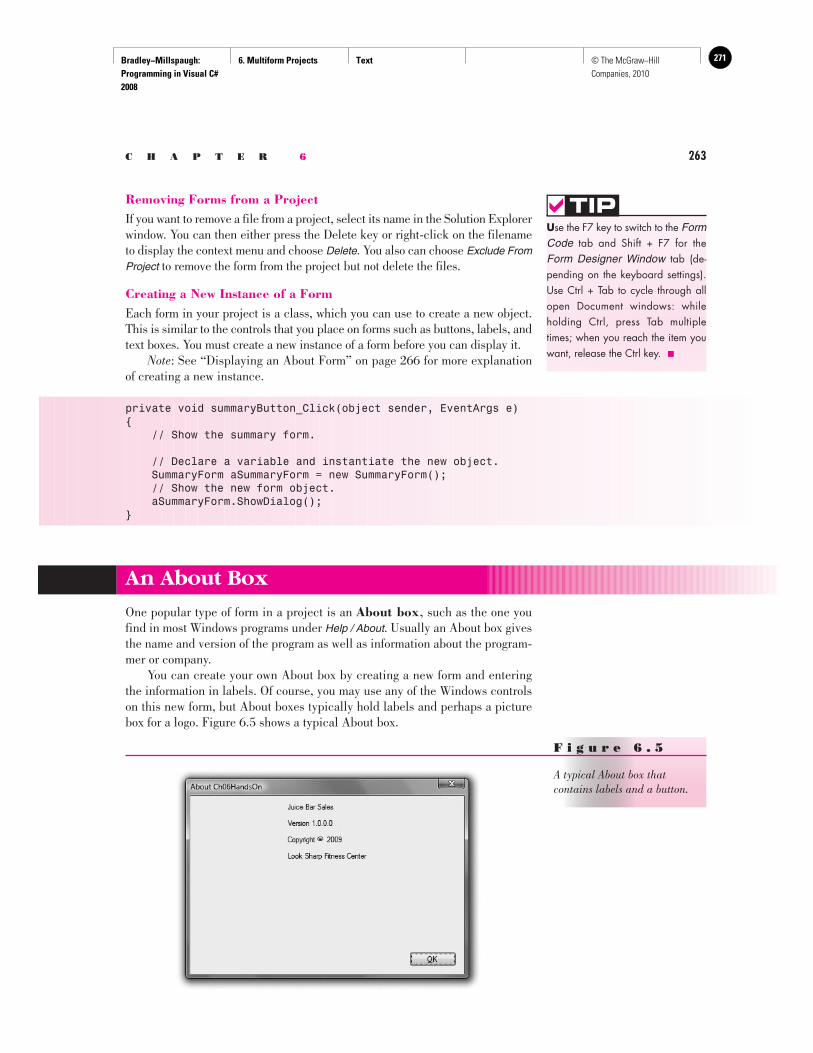
Bradley−Millspaugh: Programming in Visual C# 2008
6. Multiform Projects Text 271© The McGraw−Hill Companies, 2010
C H A P T E R 6 263
Removing Forms from a Project If you want to remove a file from a project, select its name in the Solution Explorer window. You can then either press the Delete key or right-click on the filename to display the context menu and choose Delete . You also can choose Exclude From Project to remove the form from the project but not delete the files.
Creating a New Instance of a Form Each form in your project is a class, which you can use to create a new object. This is similar to the controls that you place on forms such as buttons, labels, and text boxes. You must create a new instance of a form before you can display it. Note : See “Displaying an About Form” on page 266 for more explanation of creating a new instance.
private void summaryButton_Click(object sender, EventArgs e){ // Show the summary form.
// Declare a variable and instantiate the new object. SummaryForm aSummaryForm = new SummaryForm(); // Show the new form object. aSummaryForm.ShowDialog();}
U se the F7 key to switch to the Form Code tab and Shift + F7 for the Form Designer Window tab (de-pending on the keyboard settings). Use Ctrl + Tab to cycle through all open Document windows: while holding Ctrl, press Tab multiple times; when you reach the item you want, release the Ctrl key. ■
TIP
An About Box
One popular type of form in a project is an About box , such as the one you find in most Windows programs under Help / About . Usually an About box gives the name and version of the program as well as information about the program-mer or company. You can create your own About box by creating a new form and entering the information in labels. Of course, you may use any of the Windows controls on this new form, but About boxes typically hold labels and perhaps a picture box for a logo. Figure 6.5 shows a typical About box.
F i g u r e 6 . 5
A typical About box that contains labels and a button.
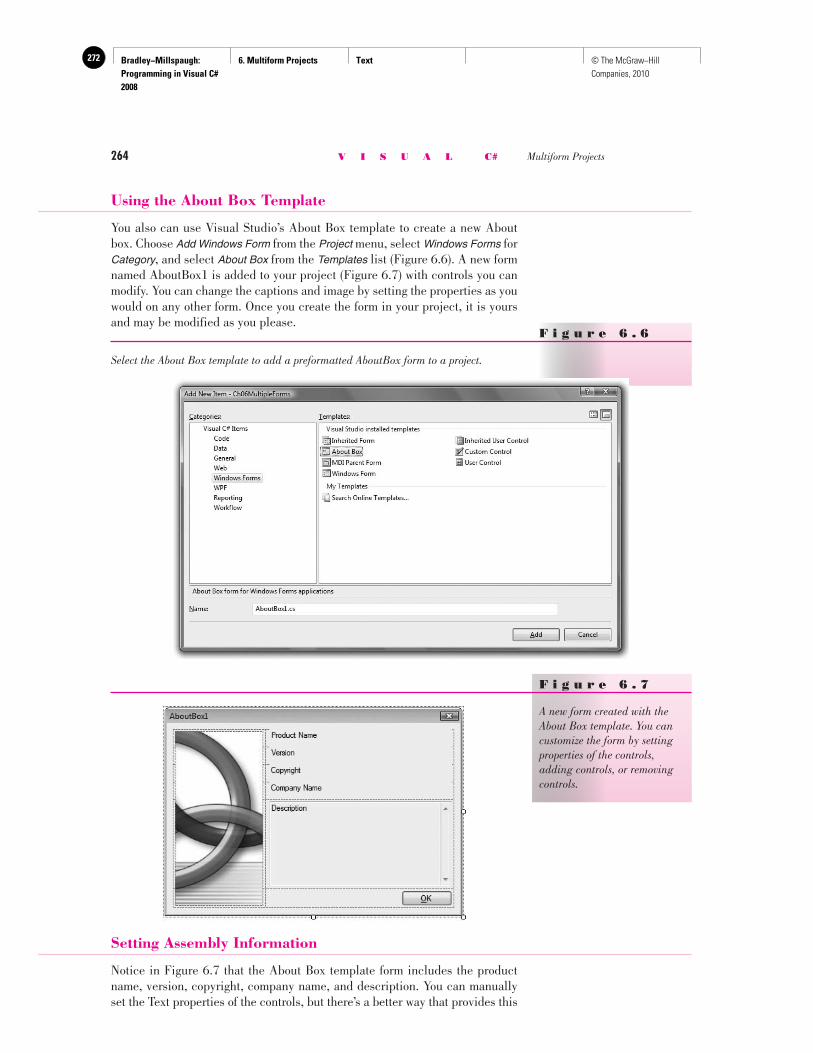
Bradley−Millspaugh: Programming in Visual C# 2008
6. Multiform Projects Text272 © The McGraw−Hill Companies, 2010
264 V I S U A L C# Multiform Projects
Using the About Box Template
You also can use Visual Studio’s About Box template to create a new About box. Choose Add Windows Form from the Project menu, select Windows Forms for Category , and select About Box from the Templates list ( Figure 6.6 ). A new form named AboutBox1 is added to your project ( Figure 6.7 ) with controls you can modify. You can change the captions and image by setting the properties as you would on any other form. Once you create the form in your project, it is yours and may be modified as you please.
F i g u r e 6 . 6
Select the About Box template to add a preformatted AboutBox form to a project.
F i g u r e 6 . 7
A new form created with the About Box template. You can customize the form by setting properties of the controls, adding controls, or removing controls.
Setting Assembly Information
Notice in Figure 6.7 that the About Box template form includes the product name, version, copyright, company name, and description. You can manually set the Text properties of the controls, but there’s a better way that provides this
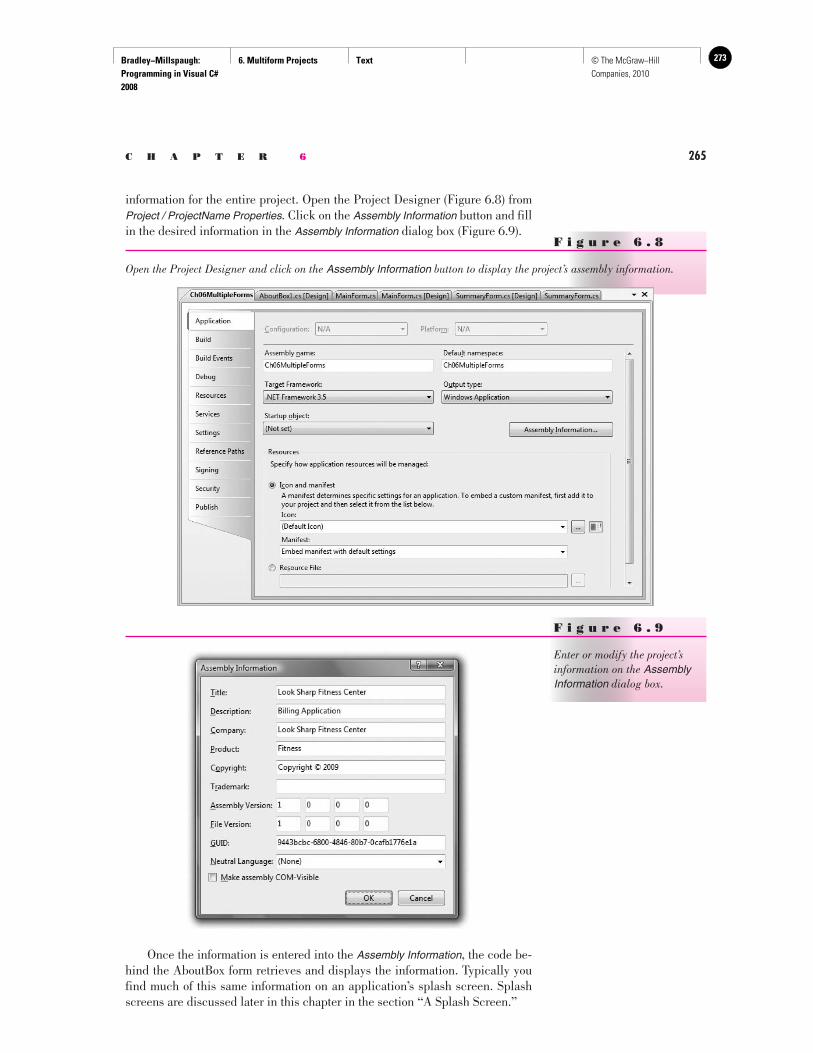
Bradley−Millspaugh: Programming in Visual C# 2008
6. Multiform Projects Text 273© The McGraw−Hill Companies, 2010
C H A P T E R 6 265
information for the entire project. Open the Project Designer ( Figure 6.8 ) from Project / ProjectName Properties . Click on the Assembly Information button and fill in the desired information in the Assembly Information dialog box ( Figure 6.9 ).
F i g u r e 6 . 9
Enter or modify the project’s information on the Assembly Information dialog box.
F i g u r e 6 . 8
Open the Project Designer and click on the Assembly Information button to display the project’s assembly information.
Once the information is entered into the Assembly Information , the code be-hind the AboutBox form retrieves and displays the information. Typically you find much of this same information on an application’s splash screen. Splash screens are discussed later in this chapter in the section “A Splash Screen.”
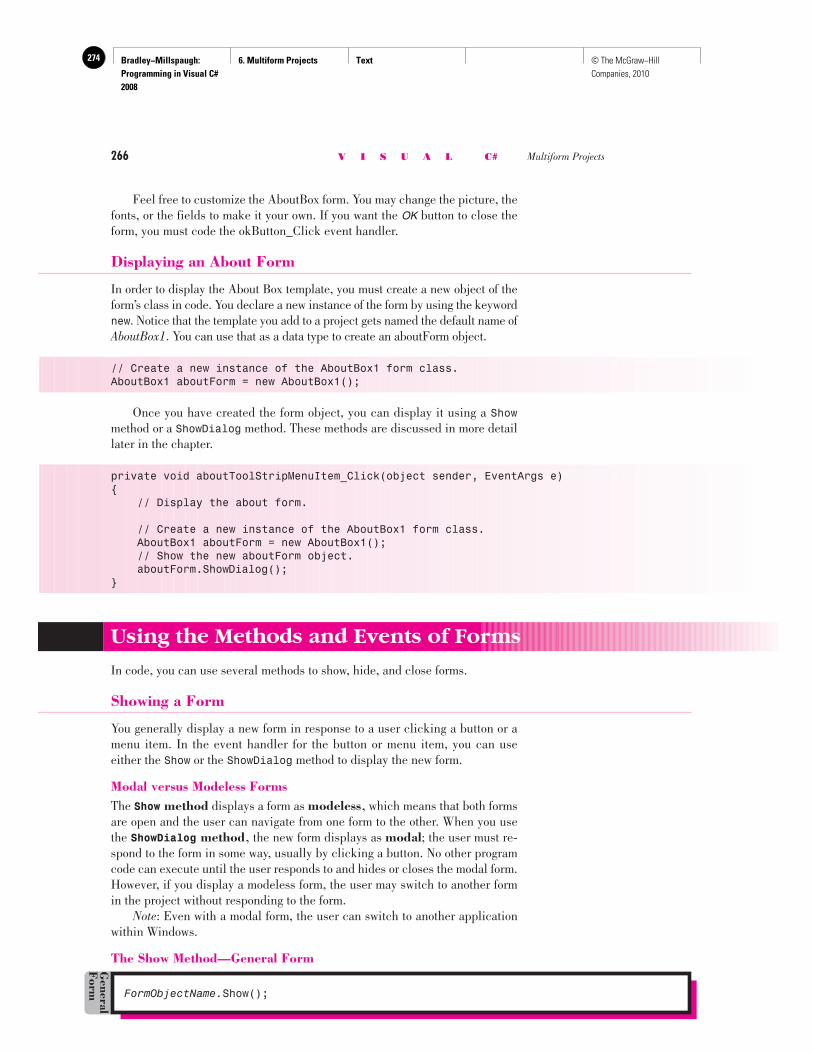
Bradley−Millspaugh: Programming in Visual C# 2008
6. Multiform Projects Text274 © The McGraw−Hill Companies, 2010
266 V I S U A L C# Multiform Projects
Feel free to customize the AboutBox form. You may change the picture, the fonts, or the fields to make it your own. If you want the OK button to close the form, you must code the okButton_Click event handler.
Displaying an About Form
In order to display the About Box template, you must create a new object of the form’s class in code. You declare a new instance of the form by using the keyword new . Notice that the template you add to a project gets named the default name of AboutBox1 . You can use that as a data type to create an aboutForm object.
// Create a new instance of the AboutBox1 form class. AboutBox1 aboutForm = new AboutBox1();
Once you have created the form object, you can display it using a Show method or a ShowDialog method. These methods are discussed in more detail later in the chapter.
private void aboutToolStripMenuItem_Click(object sender, EventArgs e){ // Display the about form.
// Create a new instance of the AboutBox1 form class. AboutBox1 aboutForm = new AboutBox1(); // Show the new aboutForm object. aboutForm.ShowDialog();}
Using the Methods and Events of Forms
In code, you can use several methods to show, hide, and close forms.
Showing a Form
You generally display a new form in response to a user clicking a button or a menu item. In the event handler for the button or menu item, you can use either the Show or the ShowDialog method to display the new form.
Modal versus Modeless Forms The Show method displays a form as modeless , which means that both forms are open and the user can navigate from one form to the other. When you use the ShowDialog method , the new form displays as modal ; the user must re-spond to the form in some way, usually by clicking a button. No other program code can execute until the user responds to and hides or closes the modal form. However, if you display a modeless form, the user may switch to another form in the project without responding to the form. Note : Even with a modal form, the user can switch to another application within Windows.
The Show Method—General Form
FormObjectName. Show();
General
Form
Bradley−Millspaugh: Programming in Visual C# 2008
6. Multiform Projects Text 275© The McGraw−Hill Companies, 2010
C H A P T E R 6 267
The Show method displays a form object modelessly. The FormObjectName is the name of the form you wish to display. Note that you must first declare a form object in order to show it. Each time you use the new keyword you create a new object.
The Show Method—Example
Exam
ple
SummaryForm aSummaryForm = new SummaryForm(); aSummaryForm.Show();
The ShowDialog Method—General Form
FormObjectName. ShowDialog();
General
Form
Use the ShowDialog method when you want the user to notice, respond to, and close the form before proceeding with the application.
The ShowDialog Method—Example
Exam
ple
SummaryForm aSummaryForm = new SummaryForm(); aSummaryForm.ShowDialog();
You generally place this code in a menu item or a button’s click event handler:
private void summaryButton_Click(object sender, EventArgs e){ // Show the summary form.
// Create a new instance of the summary form. SummaryForm aSummaryForm = new SummaryForm(); // Show the new form. aSummaryForm.ShowDialog();}
Hiding or Closing a Form
You already know how to close the current form: this.Close(); . You also can use the Close method to close any other form:
aSummaryForm.Close();
The Close method behaves differently for a modeless form (using the Show method) compared to a modal form (using the ShowDialog method). For a mode-less form, Close destroys the form instance and removes it from memory; for a modal form, the form is only hidden. A second ShowDialog method of the same object displays the same form instance, which can have data left from the previous time the form was displayed. In contrast, a second Show method cre-ates a new instance, so no leftover data can appear.

Bradley−Millspaugh: Programming in Visual C# 2008
6. Multiform Projects Text276 © The McGraw−Hill Companies, 2010
268 V I S U A L C# Multiform Projects
Note : Each time you use the new keyword, you create a new object. If you want to display the same form object several times, you must not use the new keyword each time. You also can choose to use a form’s Hide method , which sets the form’s Visible property to false and keeps the form instance in memory.
The Hide Method—General Form
FormObjectName. Hide();
General
Form
Hiding conceals a form but keeps it in memory, ready to be redisplayed. Use the Hide method rather than Close when the user is likely to display the form again. A good example might be a form with instructions or Help text, which the user may display multiple times.
The Hide Method—Example
Exam
ple
aSummaryForm.Hide();
Responding to Form Events
The two primary events for which you may need to write code are the Form-Name .Load and FormName .Activated. The first time a form is shown in an application, both the Load and Activated events occur. The Load event occurs when the form is loaded into memory; the Activated event occurs after the Load event, just as control is passed to the form. Each subsequent time the form is shown, the Activated event occurs but the Load event does not. Therefore, if a form may be displayed multiple times, you may want to place initializing steps into the Activated event handler rather than into the Load. Also, if you wish to set the focus in a particular place on the new form, place the Focus method in the FormName_Activated method.
The Sequence of Form Events
Although you don’t need to write event handlers for all of these form events, it’s helpful to know the order in which they occur:
Load Occurs before the form is displayed for the first time. Happens only once for any one form unless the form is closed rather than hidden.
Activated Occurs each time the form is shown. This event handler is the correct location for initialization or SetFocus .
Paint Occurs each time any portion of the form is redrawn, which happens each time a change is made or the form is moved or uncovered.
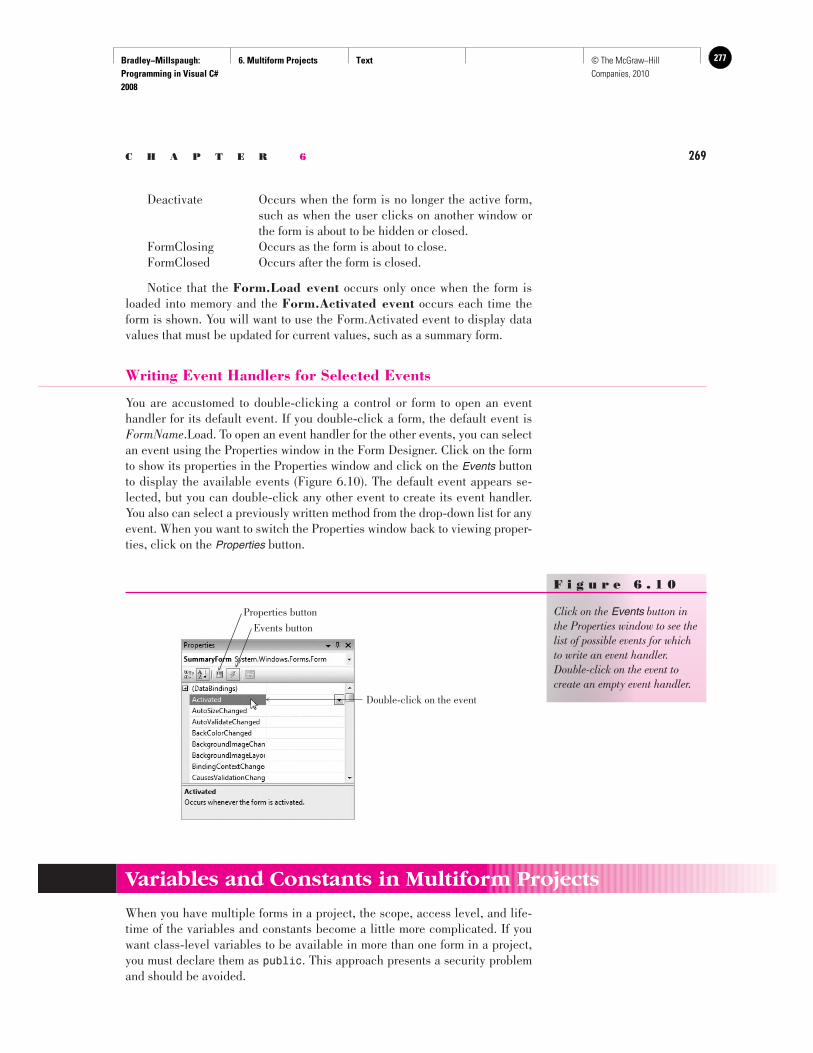
Bradley−Millspaugh: Programming in Visual C# 2008
6. Multiform Projects Text 277© The McGraw−Hill Companies, 2010
C H A P T E R 6 269
Deactivate Occurs when the form is no longer the active form, such as when the user clicks on another window or the form is about to be hidden or closed.
FormClosing Occurs as the form is about to close. FormClosed Occurs after the form is closed.
Notice that the Form.Load event occurs only once when the form is loaded into memory and the Form.Activated event occurs each time the form is shown. You will want to use the Form.Activated event to display data values that must be updated for current values, such as a summary form.
Writing Event Handlers for Selected Events
You are accustomed to double-clicking a control or form to open an event handler for its default event. If you double-click a form, the default event is FormName .Load. To open an event handler for the other events, you can select an event using the Properties window in the Form Designer. Click on the form to show its properties in the Properties window and click on the Events button to display the available events ( Figure 6.10 ). The default event appears se-lected, but you can double-click any other event to create its event handler. You also can select a previously written method from the drop-down list for any event. When you want to switch the Properties window back to viewing proper-ties, click on the Properties button.
F i g u r e 6 . 1 0
Click on the Events button in the Properties window to see the list of possible events for which to write an event handler. Double-click on the event to create an empty event handler.
Properties button
Events button
Double-click on the event
Variables and Constants in Multiform Projects
When you have multiple forms in a project, the scope, access level, and life-time of the variables and constants become a little more complicated. If you want class-level variables to be available in more than one form in a project, you must declare them as public . This approach presents a security problem and should be avoided.
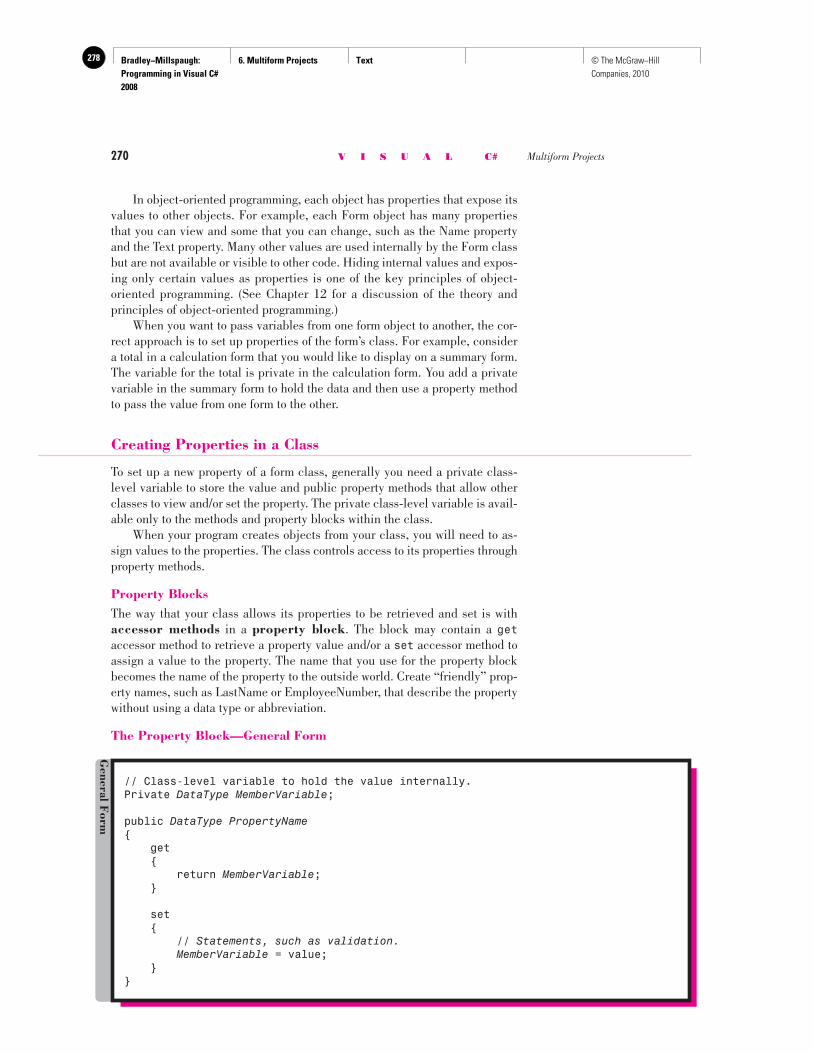
Bradley−Millspaugh: Programming in Visual C# 2008
6. Multiform Projects Text278 © The McGraw−Hill Companies, 2010
270 V I S U A L C# Multiform Projects
In object-oriented programming, each object has properties that expose its values to other objects. For example, each Form object has many properties that you can view and some that you can change, such as the Name property and the Text property. Many other values are used internally by the Form class but are not available or visible to other code. Hiding internal values and expos-ing only certain values as properties is one of the key principles of object- oriented programming. (See Chapter 12 for a discussion of the theory and principles of object-oriented programming.) When you want to pass variables from one form object to another, the cor-rect approach is to set up properties of the form’s class. For example, consider a total in a calculation form that you would like to display on a summary form. The variable for the total is private in the calculation form. You add a private variable in the summary form to hold the data and then use a property method to pass the value from one form to the other.
Creating Properties in a Class
To set up a new property of a form class, generally you need a private class-level variable to store the value and public property methods that allow other classes to view and/or set the property. The private class-level variable is avail-able only to the methods and property blocks within the class. When your program creates objects from your class, you will need to as-sign values to the properties. The class controls access to its properties through property methods.
Property Blocks The way that your class allows its properties to be retrieved and set is with accessor methods in a property block . The block may contain a get accessor method to retrieve a property value and/or a set accessor method to assign a value to the property. The name that you use for the property block becomes the name of the property to the outside world. Create “friendly” prop-erty names, such as LastName or EmployeeNumber, that describe the property without using a data type or abbreviation.
The Property Block—General Form
// Class-level variable to hold the value internally.Private DataType MemberVariable ;
public DataType PropertyName { get { return MemberVariable ; }
set { // Statements, such as validation. MemberVariable = value; }}
General F
orm
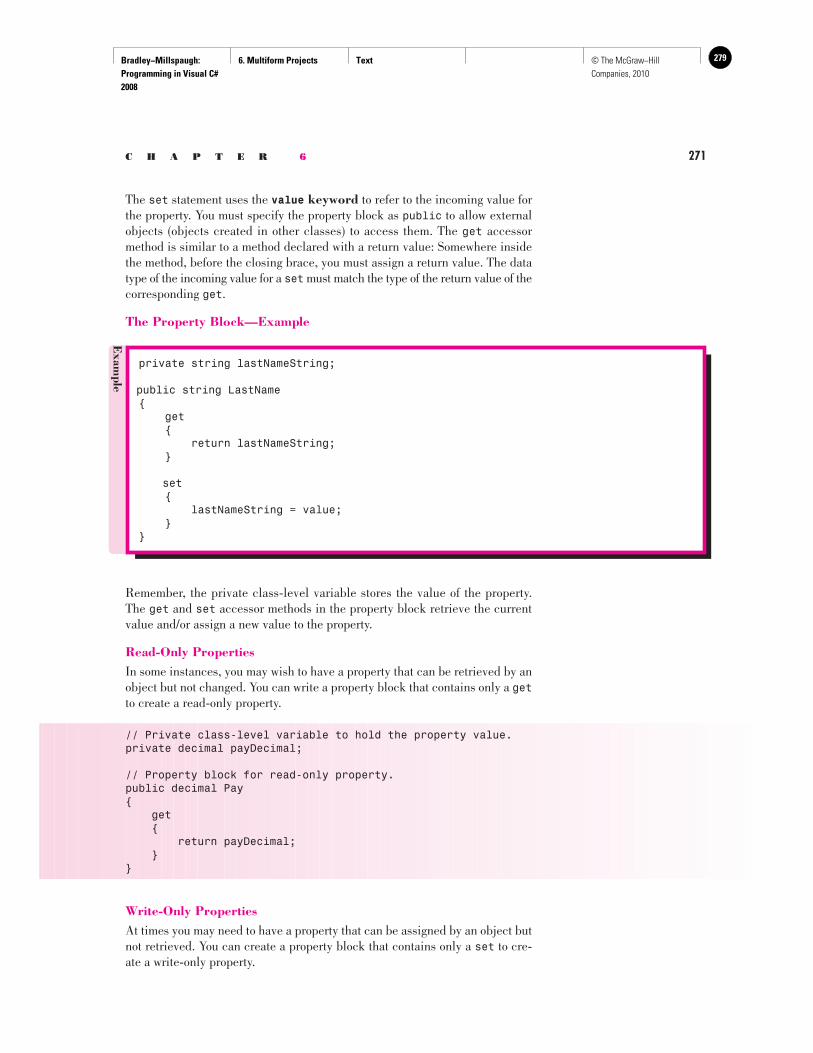
Bradley−Millspaugh: Programming in Visual C# 2008
6. Multiform Projects Text 279© The McGraw−Hill Companies, 2010
C H A P T E R 6 271
The set statement uses the value keyword to refer to the incoming value for the property. You must specify the property block as public to allow external objects (objects created in other classes) to access them. The get accessor method is similar to a method declared with a return value: Somewhere inside the method, before the closing brace, you must assign a return value. The data type of the incoming value for a set must match the type of the return value of the corresponding get .
The Property Block—Example
Exam
ple
private string lastNameString;
public string LastName{ get { return lastNameString; }
set { lastNameString = value; }}
Remember, the private class-level variable stores the value of the property. The get and set accessor methods in the property block retrieve the current value and/or assign a new value to the property.
Read-Only Properties In some instances, you may wish to have a property that can be retrieved by an object but not changed. You can write a property block that contains only a get to create a read-only property.
// Private class-level variable to hold the property value.private decimal payDecimal;
// Property block for read-only property.public decimal Pay{ get { return payDecimal; }}
Write-Only Properties At times you may need to have a property that can be assigned by an object but not retrieved. You can create a property block that contains only a set to cre-ate a write-only property.
Bradley−Millspaugh: Programming in Visual C# 2008
6. Multiform Projects Text280 © The McGraw−Hill Companies, 2010
272 V I S U A L C# Multiform Projects
// Private class-level variable to hold the property value.private decimal hoursDecimal;
// Property block for write-only property.public decimal Hours{ set { hoursDecimal = value; }}
Applying the Properties to Multiple Forms
Now let’s apply this theory to display a total on a separate summary form. The hands-on projects in Chapters 4 and 5 calculate a decimal variable that holds the total sales. In those two projects, the total is displayed in a message box, but now it’s time to create a new summary form to display a nicely formatted total. The summary form must contain a private variable to hold the value for the total sales as well as a property set method to allow the value to be assigned. The name TotalSales is the “friendly” property name and totalSummarySalesDecimal is the private class-level variable to hold the value inside the class.
public partial class SummaryForm : Form{ private decimal totalSummarySalesDecimal;
public decimal TotalSales { set { totalSummarySalesDecimal = value; } } // . . . More code for the rest of the Form class.
You already know how to display the summary form from another form, but first we need to pass the value from the private variable totalSalesDecimal in the main calculation form to the property of the summary form called Total-Sales, which will be stored internally in the SummaryForm as totalSummary-SalesDecimal. The following code appears on the main calculation form, which has a button or menu item to display the summary information. Notice that you assign the private variable totalSalesDecimal from the calculation form to the property TotalSales that is a property of the summary form.
// Event-handling method in the main calculation form.private void summaryButton_Click(object sender, EventArgs e){ // Display the summary form. SummaryForm aSummaryForm = new SummaryForm();
aSummaryForm.TotalSales = totalSalesDecimal; aSummaryForm.ShowDialog();}
Bradley−Millspaugh: Programming in Visual C# 2008
6. Multiform Projects Text 281© The McGraw−Hill Companies, 2010
C H A P T E R 6 273
Passing Summary Values among Forms
Occasionally, you may need to calculate in one form and display summary in-formation in another form, but the summary form is not displayed from the calculation form. This situation can occur when a main form instantiates and displays both a data entry form, where the calculations are performed, and the summary form. The menu on the main form allows the user to display either the data entry form or the summary form as desired. Earlier you learned to create a public property of a form, which is available to other objects in the project. But consider the example of a main form, a data entry form, and a summary form; each time the main form instantiates and dis-plays the data entry form, a new fresh version of each property is created. If you want to maintain the value of a property for multiple instances of a class, you must declare the property as static . You can declare as static a total or a count that you wish to use in a summary calculation.
private static decimal totalDueDecimal;
Static variables retain their values for every object that is instantiated us-ing the new keyword. Therefore, every call to the data entry form continues to increase the total. You use the static keyword on both the private variable and the property method. When you use the static keyword in a property method, you are creat-ing a public property that can be accessed from anywhere in the project without instantiating a specific object of the class. For more information about static properties, see “Instance Variables versus Static Variables” in Chapter 12. In the following example, the data entry form, called OrderForm, accumu-lates the static variable totalDueDecimal. The OrderForm object exposes the total with a ReadOnly property called Total. The summary form can retrieve the current value of the property by referring to OrderForm.Total.
// OrderForm
private static decimal totalDueDecimal;
public static decimal Total{ get { return totalDueDecimal; }}
By placing the static variable and property method in the data entry form, you can now access the total in the summary form.
// SummaryForm
private void SummaryForm_Activated(object sender, EventArgs e){ // Display the total.
totalTextBox.Text = OrderForm.Total.ToString("C");}
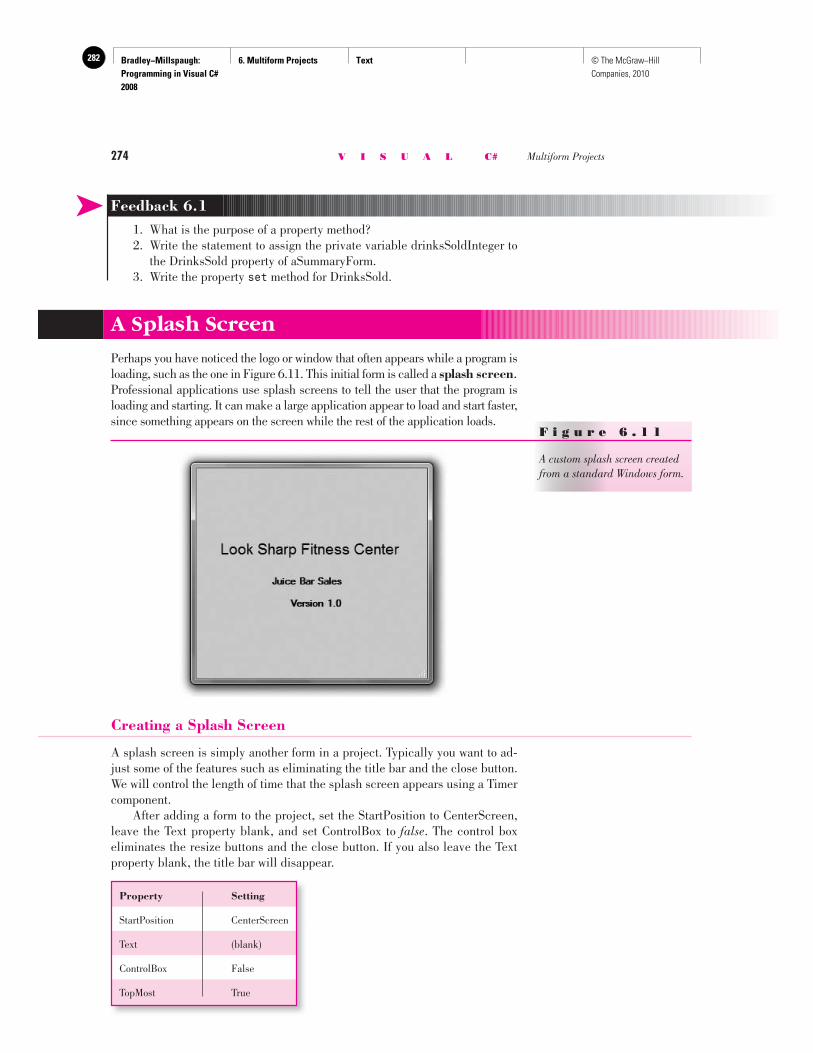
Bradley−Millspaugh: Programming in Visual C# 2008
6. Multiform Projects Text282 © The McGraw−Hill Companies, 2010
274 V I S U A L C# Multiform Projects
➤ Feedback 6.1 1. What is the purpose of a property method? 2. Write the statement to assign the private variable drinksSoldInteger to
the DrinksSold property of aSummaryForm. 3. Write the property set method for DrinksSold.
A Splash Screen
Perhaps you have noticed the logo or window that often appears while a program is loading, such as the one in Figure 6.11 . This initial form is called a splash screen . Professional applications use splash screens to tell the user that the program is loading and starting. It can make a large application appear to load and start faster, since something appears on the screen while the rest of the application loads.
F i g u r e 6 . 1 1
A custom splash screen created from a standard Windows form.
Creating a Splash Screen
A splash screen is simply another form in a project. Typically you want to ad-just some of the features such as eliminating the title bar and the close button. We will control the length of time that the splash screen appears using a Timer component. After adding a form to the project, set the StartPosition to CenterScreen, leave the Text property blank, and set ControlBox to false . The control box eliminates the resize buttons and the close button. If you also leave the Text property blank, the title bar will disappear.
Property Setting
StartPosition CenterScreen
Text (blank)
ControlBox False
TopMost True
Bradley−Millspaugh: Programming in Visual C# 2008
6. Multiform Projects Text 283© The McGraw−Hill Companies, 2010
C H A P T E R 6 275
Add these statements to display the splash form
Name of the startup form
On the form, add graphics and any information about your program that you wish to display. Many programs will use the same AssemblyInfo that dis-plays on the AboutBox. In this example, we’re going to just use text.
Controlling the Time a Splash Form Displays
In an application that must load data or has other time-consuming activities, the length of time the splash screen displays is governed by those activities. But in smaller applications, such as the ones you are writing, the splash form disappears before you have a chance to see it. So for these applications, we will control the display using a Timer component . To use a timer on a splash screen form, you add a Timer component from the Components section of the toolbox. Then you can set properties of the timer to fire an event at a specified time interval and write code for the event in an event-handling method. When you add a Timer component to a form, you must set two properties: Enabled and Interval. By default, the timer is not enabled, so you must set the Enabled property to true . Note that you can set the Enabled property either at design time or in code, but for a splash form, you will set it at design time. Set the timer’s Interval property for the number of milliseconds the splash screen should display. For example, to make the form display for approximately five seconds, set the Interval to 5000.
Timer property Setting
Enabled True
Interval Number of milliseconds to pass before firing an event.
When the specified interval passes, the timer’s Tick event fires. This code for the timer closes the splash screen.
private void timer1_Tick(object sender, EventArgs e){ // Close the splash form.
this.Close();}
Making the Splash Form Display First
C# programs actually begin execution in the file called Program.cs, which you can see in the Solution Explorer. Double-click on the filename to open the file and locate the Main method; you add code to the Main method to create the splash screen before the program begins execution.
static void Main(){ Application.EnableVisualStyles(); Application.SetCompatibleTextRenderingDefault(false); SplashForm aSplashForm = new SplashForm(); aSplashForm.ShowDialog(); Application.Run(new MainForm());}
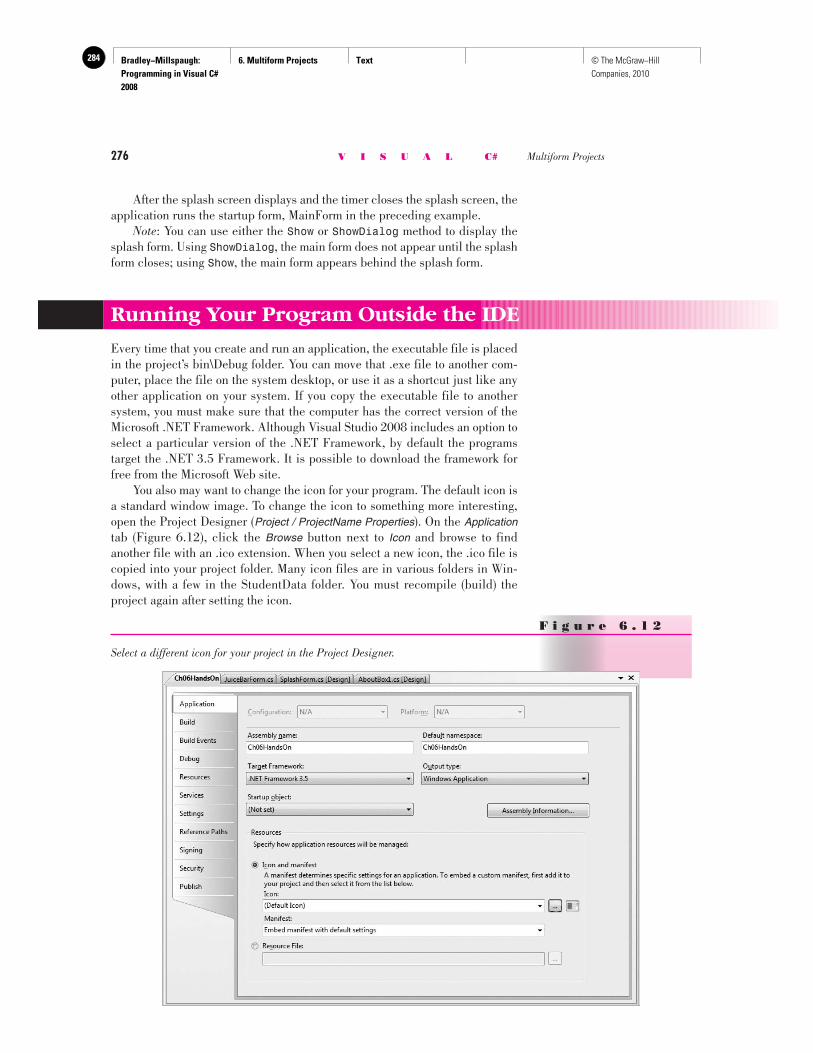
Bradley−Millspaugh: Programming in Visual C# 2008
6. Multiform Projects Text284 © The McGraw−Hill Companies, 2010
276 V I S U A L C# Multiform Projects
After the splash screen displays and the timer closes the splash screen, the application runs the startup form, MainForm in the preceding example. Note : You can use either the Show or ShowDialog method to display the splash form. Using ShowDialog , the main form does not appear until the splash form closes; using Show , the main form appears behind the splash form.
Running Your Program Outside the IDE
Every time that you create and run an application, the executable file is placed in the project’s bin\Debug folder. You can move that .exe file to another com-puter, place the file on the system desktop, or use it as a shortcut just like any other application on your system. If you copy the executable file to another system, you must make sure that the computer has the correct version of the Microsoft .NET Framework. Although Visual Studio 2008 includes an option to select a particular version of the .NET Framework, by default the programs target the .NET 3.5 Framework. It is possible to download the framework for free from the Microsoft Web site. You also may want to change the icon for your program. The default icon is a standard window image. To change the icon to something more interesting, open the Project Designer ( Project / ProjectName Properties ). On the Application tab ( Figure 6.12 ), click the Browse button next to Icon and browse to find another file with an .ico extension. When you select a new icon, the .ico file is copied into your project folder. Many icon files are in various folders in Win-dows, with a few in the StudentData folder. You must recompile (build) the project again after setting the icon.
F i g u r e 6 . 1 2
Select a different icon for your project in the Project Designer.
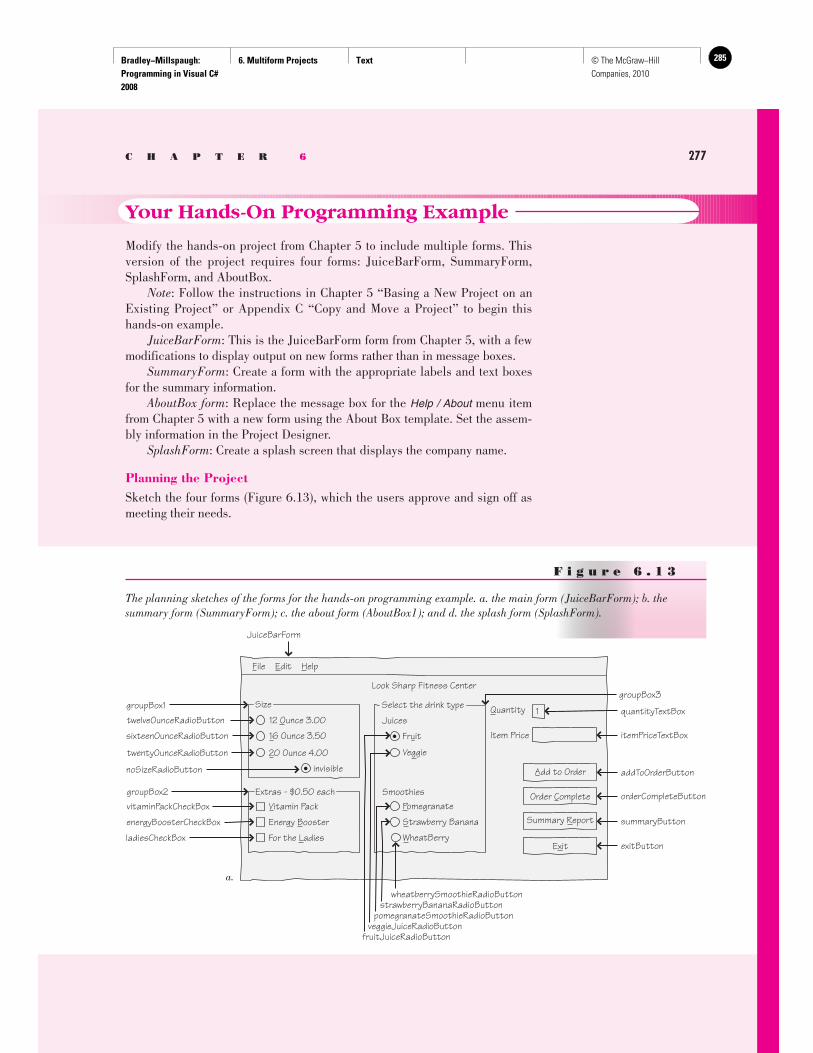
Bradley−Millspaugh: Programming in Visual C# 2008
6. Multiform Projects Text 285© The McGraw−Hill Companies, 2010
C H A P T E R 6 277
Your Hands-On Programming Example
Modify the hands-on project from Chapter 5 to include multiple forms. This version of the project requires four forms: JuiceBarForm, SummaryForm, SplashForm, and AboutBox. Note : Follow the instructions in Chapter 5 “Basing a New Project on an Existing Project” or Appendix C “Copy and Move a Project” to begin this hands-on example. JuiceBarForm : This is the JuiceBarForm form from Chapter 5, with a few modifications to display output on new forms rather than in message boxes. SummaryForm : Create a form with the appropriate labels and text boxes for the summary information. AboutBox form : Replace the message box for the Help / About menu item from Chapter 5 with a new form using the About Box template. Set the assem-bly information in the Project Designer. SplashForm : Create a splash screen that displays the company name.
Planning the Project Sketch the four forms ( Figure 6.13 ), which the users approve and sign off as meeting their needs.
F i g u r e 6 . 1 3
The planning sketches of the forms for the hands-on programming example. a. the main form (JuiceBarForm); b. the summary form (SummaryForm); c. the about form (AboutBox1); and d. the splash form (SplashForm).
SizegroupBox112 Ounce 3.00
invisible
Extras - $0.50 each
Select the drink type
Juices
Fruit
Veggie
Quantity quantityTextBox
Item Price
1
Smoothies
16 Ounce 3.50
20 Ounce 4.00
Look Sharp Fitness Center
File Edit Help
Add to Order
Order Complete
Exit
Vitamin Pack
Energy Booster
For the Ladies
JuiceBarForm
groupBox3
itemPriceTextBox
addToOrderButton
orderCompleteButton
summaryButton
exitButton
twelveOunceRadioButton
sixteenOunceRadioButton
twentyOunceRadioButton
groupBox2vitaminPackCheckBox
energyBoosterCheckBox
ladiesCheckBox
noSizeRadioButton
Pomegranate
Strawberry Banana
WheatBerry
wheatberrySmoothieRadioButtonstrawberryBananaRadioButton
pomegranateSmoothieRadioButtonveggieJuiceRadioButton
fruitJuiceRadioButton
Summary Report
a.
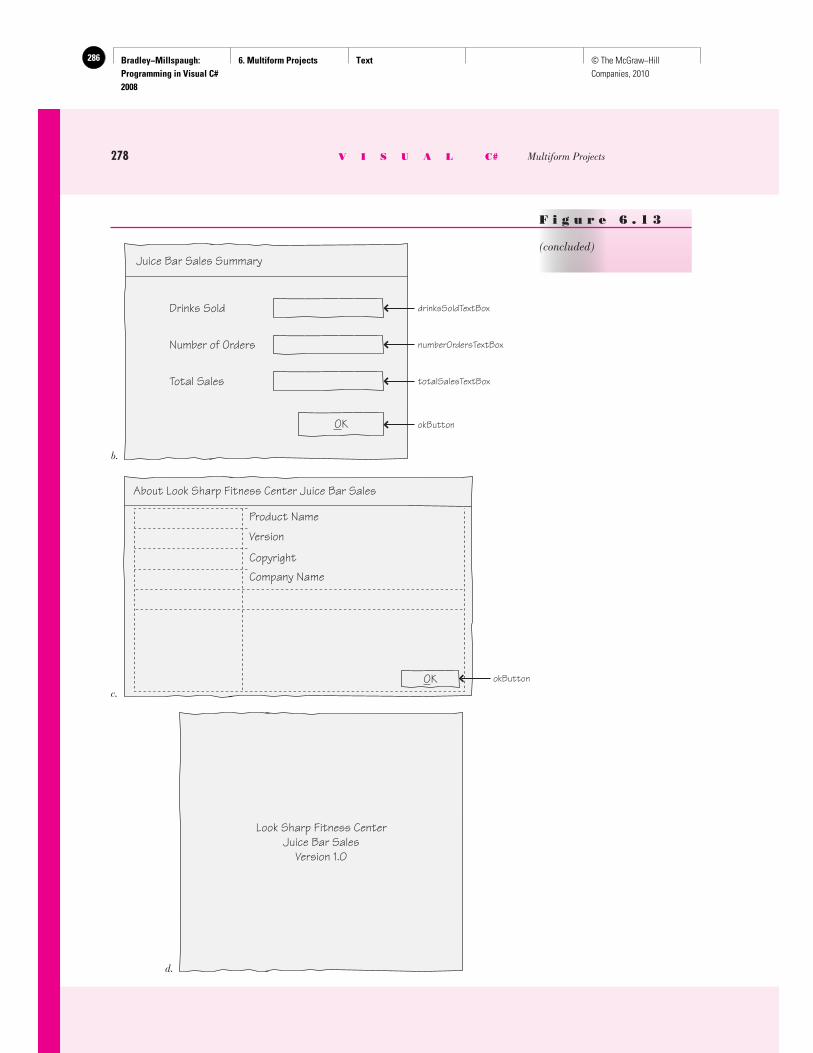
Bradley−Millspaugh: Programming in Visual C# 2008
6. Multiform Projects Text286 © The McGraw−Hill Companies, 2010
278 V I S U A L C# Multiform Projects
F i g u r e 6 . 1 3
(concluded)Juice Bar Sales Summary
Drinks Sold
Number of Orders
Total Sales
OK
b.
drinksSoldTextBox
numberOrdersTextBox
totalSalesTextBox
okButton
OK
About Look Sharp Fitness Center Juice Bar Sales
Product Name
Version
Copyright
Company Name
c.
okButton
d.
Look Sharp Fitness Center Juice Bar Sales
Version 1.0
Bradley−Millspaugh: Programming in Visual C# 2008
6. Multiform Projects Text 287© The McGraw−Hill Companies, 2010
C H A P T E R 6 279
Plan the Objects and Properties for the Main Form (JuiceBarForm) See the hands-on exercise for Chapter 5 for the objects and properties of JuiceBar-Form, which are unchanged for this project. The only changes are to the meth-ods that display the summary form and the About form.
Plan the Methods for the JuiceBarForm Most of the methods for JuiceBar-Form are unchanged from the project in Chapter 5.You need two additional methods:
Object Method Actions
summaryButton Click Pass values to summary form properties. Display the summary form.
aboutToolStripMenuItem Click Display the About Box form.
Plan the Objects and Properties for the Summary Form
Object Property Setting
SummaryForm Name SummaryForm AcceptButton okButton Title Juice Bar Sales Summary
label1 Name label1 Text Drinks Sold
drinksSoldTextBox Name drinksSoldTextBox ReadOnly true
label2 Name label2 Text Number Orders
numberOrdersTextBox Name numberOrdersTextBox ReadOnly true
label3 Name label3 Text Total Sales
totalSalesTextBox Name totalSalesTextBox ReadOnly true
okButton Name okButton Text &OK
Plan the Methods for the Summary Form
Object Method Actions
SummaryForm Activated Set the values of the labels from the form properties.
okButton Click Close this form.
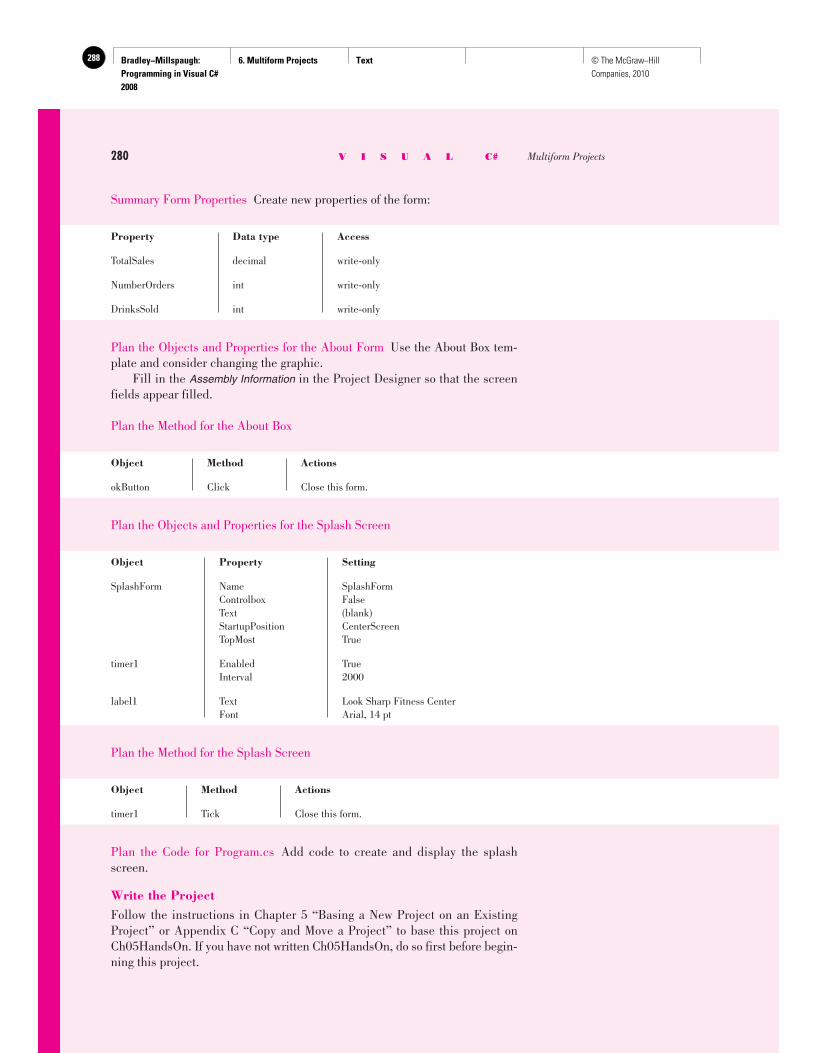
Bradley−Millspaugh: Programming in Visual C# 2008
6. Multiform Projects Text288 © The McGraw−Hill Companies, 2010
280 V I S U A L C# Multiform Projects
Summary Form Properties Create new properties of the form:
Property Data type Access
TotalSales decimal write-only
NumberOrders int write-only
DrinksSold int write-only
Plan the Objects and Properties for the About Form Use the About Box tem-plate and consider changing the graphic. Fill in the Assembly Information in the Project Designer so that the screen fields appear filled.
Plan the Method for the About Box
Object Method Actions
okButton Click Close this form.
Plan the Objects and Properties for the Splash Screen
Object Property Setting
SplashForm Name SplashForm Controlbox False Text (blank) StartupPosition CenterScreen TopMost True
timer1 Enabled True Interval 2000
label1 Text Look Sharp Fitness Center Font Arial, 14 pt
Plan the Method for the Splash Screen
Object Method Actions
timer1 Tick Close this form.
Plan the Code for Program.cs Add code to create and display the splash screen.
Write the Project Follow the instructions in Chapter 5 “Basing a New Project on an Existing Project” or Appendix C “Copy and Move a Project” to base this project on Ch05HandsOn. If you have not written Ch05HandsOn, do so first before begin-ning this project.
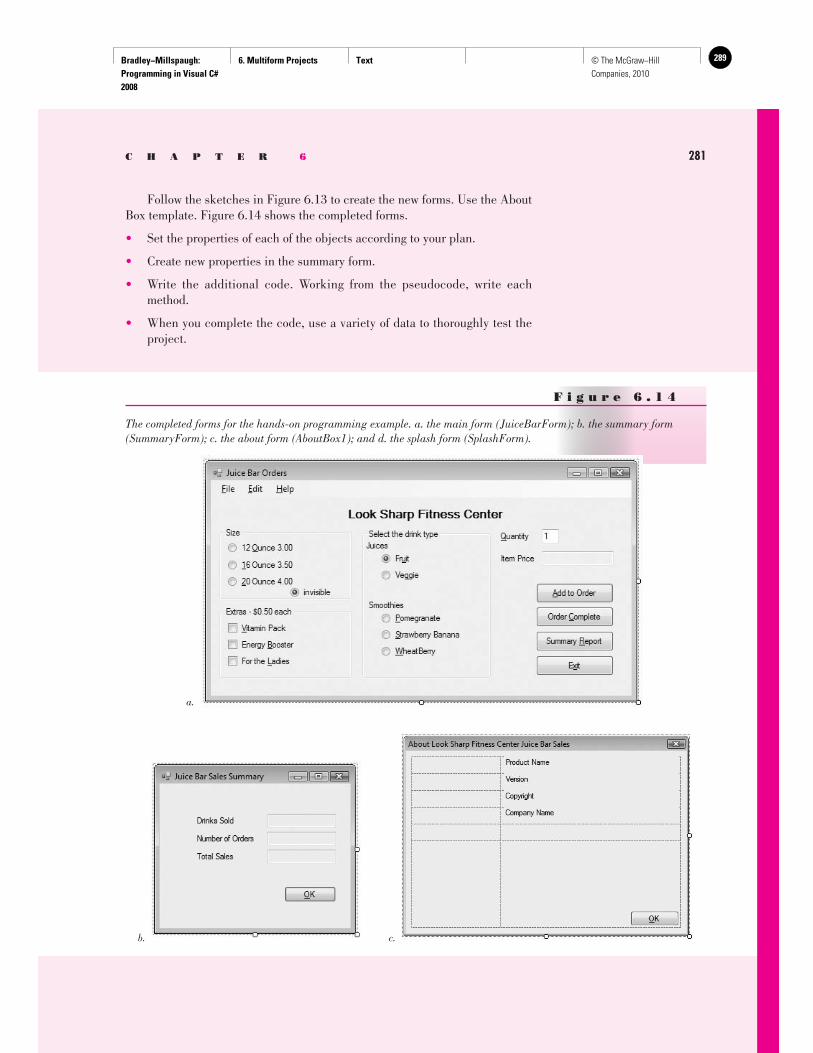
Bradley−Millspaugh: Programming in Visual C# 2008
6. Multiform Projects Text 289© The McGraw−Hill Companies, 2010
C H A P T E R 6 281
F i g u r e 6 . 1 4
The completed forms for the hands-on programming example. a. the main form (JuiceBarForm); b. the summary form (SummaryForm); c. the about form (AboutBox1); and d. the splash form (SplashForm).
a.
b. c.
Follow the sketches in Figure 6.13 to create the new forms. Use the About Box template. Figure 6.14 shows the completed forms.
• Set the properties of each of the objects according to your plan.
• Create new properties in the summary form.
• Write the additional code. Working from the pseudocode, write each method.
• When you complete the code, use a variety of data to thoroughly test the project.
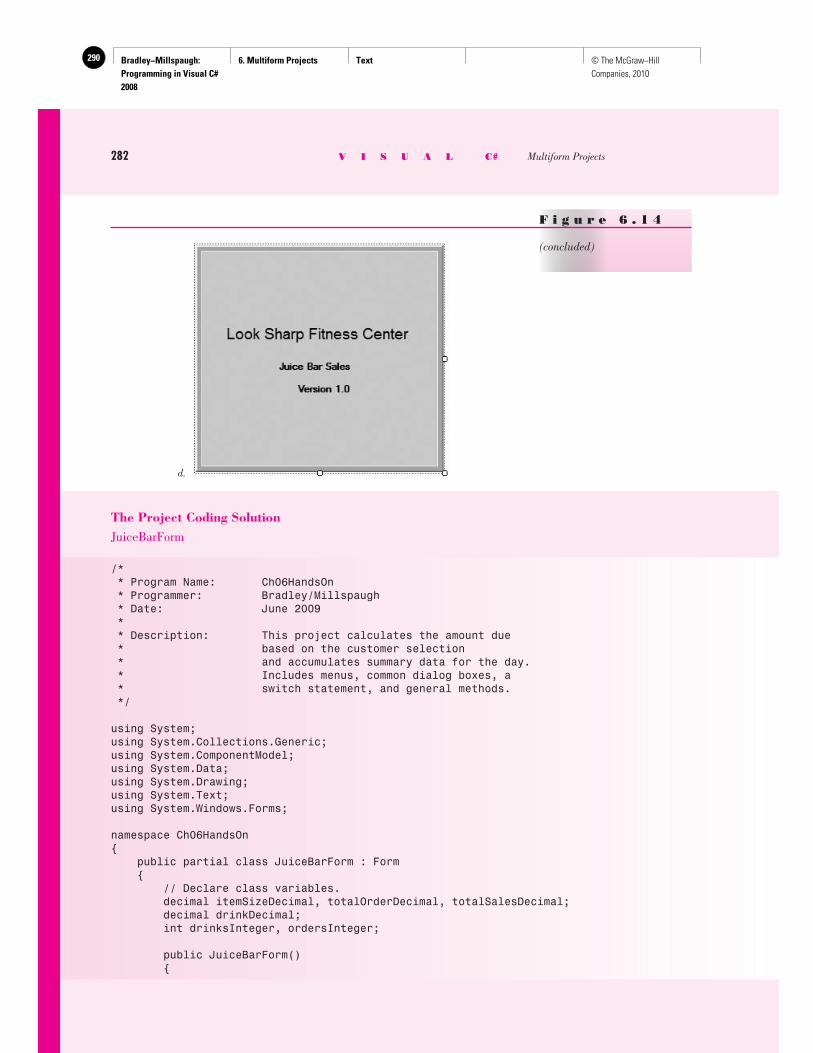
Bradley−Millspaugh: Programming in Visual C# 2008
6. Multiform Projects Text290 © The McGraw−Hill Companies, 2010
282 V I S U A L C# Multiform Projects
The Project Coding Solution JuiceBarForm
/* * Program Name: Ch06HandsOn * Programmer: Bradley/Millspaugh * Date: June 2009 * * Description: This project calculates the amount due * based on the customer selection * and accumulates summary data for the day. * Includes menus, common dialog boxes, a * switch statement, and general methods. */
using System;using System.Collections.Generic;using System.ComponentModel;using System.Data;using System.Drawing;using System.Text;using System.Windows.Forms;
namespace Ch06HandsOn{ public partial class JuiceBarForm : Form { // Declare class variables. decimal itemSizeDecimal, totalOrderDecimal, totalSalesDecimal; decimal drinkDecimal; int drinksInteger, ordersInteger;
public JuiceBarForm() {
F i g u r e 6 . 1 4
(concluded)
d.
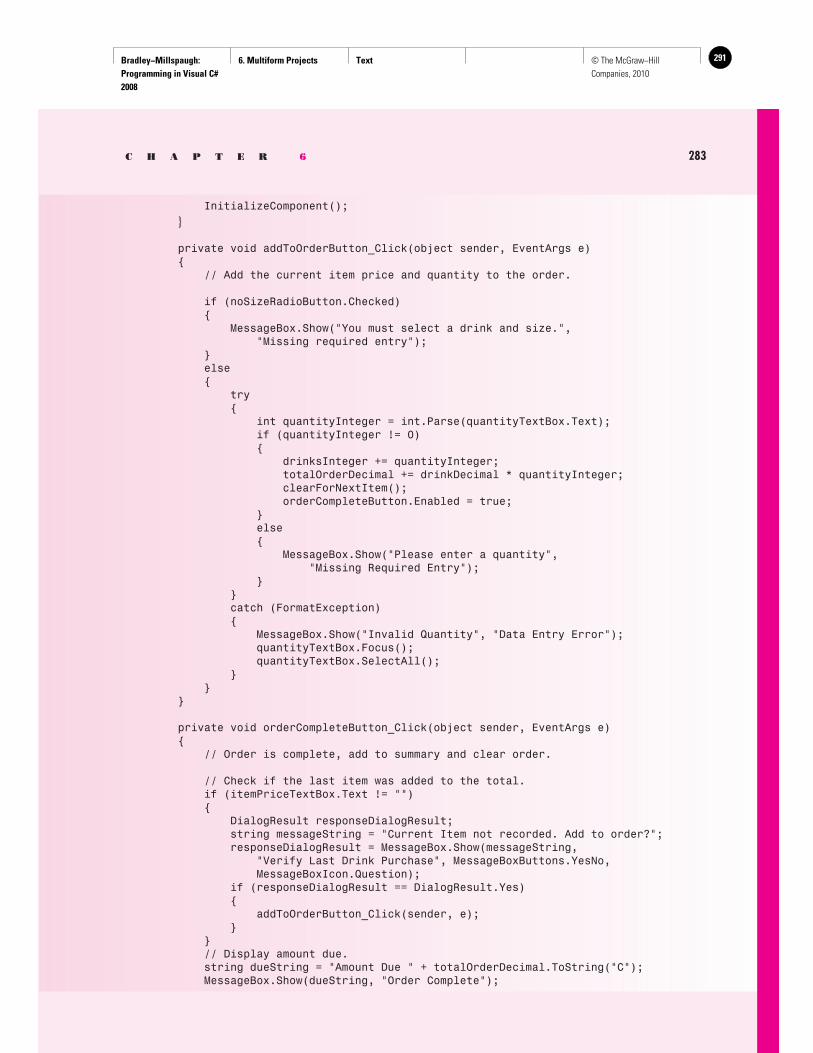
Bradley−Millspaugh: Programming in Visual C# 2008
6. Multiform Projects Text 291© The McGraw−Hill Companies, 2010
C H A P T E R 6 283
InitializeComponent(); }
private void addToOrderButton_Click(object sender, EventArgs e) { // Add the current item price and quantity to the order.
if (noSizeRadioButton.Checked) { MessageBox.Show("You must select a drink and size.", "Missing required entry"); } else { try { int quantityInteger = int.Parse(quantityTextBox.Text); if (quantityInteger != 0) { drinksInteger += quantityInteger; totalOrderDecimal += drinkDecimal * quantityInteger; clearForNextItem(); orderCompleteButton.Enabled = true; } else { MessageBox.Show("Please enter a quantity", "Missing Required Entry"); } } catch (FormatException) { MessageBox.Show("Invalid Quantity", "Data Entry Error"); quantityTextBox.Focus(); quantityTextBox.SelectAll(); } } }
private void orderCompleteButton_Click(object sender, EventArgs e) { // Order is complete, add to summary and clear order.
// Check if the last item was added to the total. if (itemPriceTextBox.Text != "") { DialogResult responseDialogResult; string messageString = "Current Item not recorded. Add to order?"; responseDialogResult = MessageBox.Show(messageString, "Verify Last Drink Purchase", MessageBoxButtons.YesNo, MessageBoxIcon.Question); if (responseDialogResult == DialogResult.Yes) { addToOrderButton_Click(sender, e); } } // Display amount due. string dueString = "Amount Due " + totalOrderDecimal.ToString("C"); MessageBox.Show(dueString, "Order Complete");
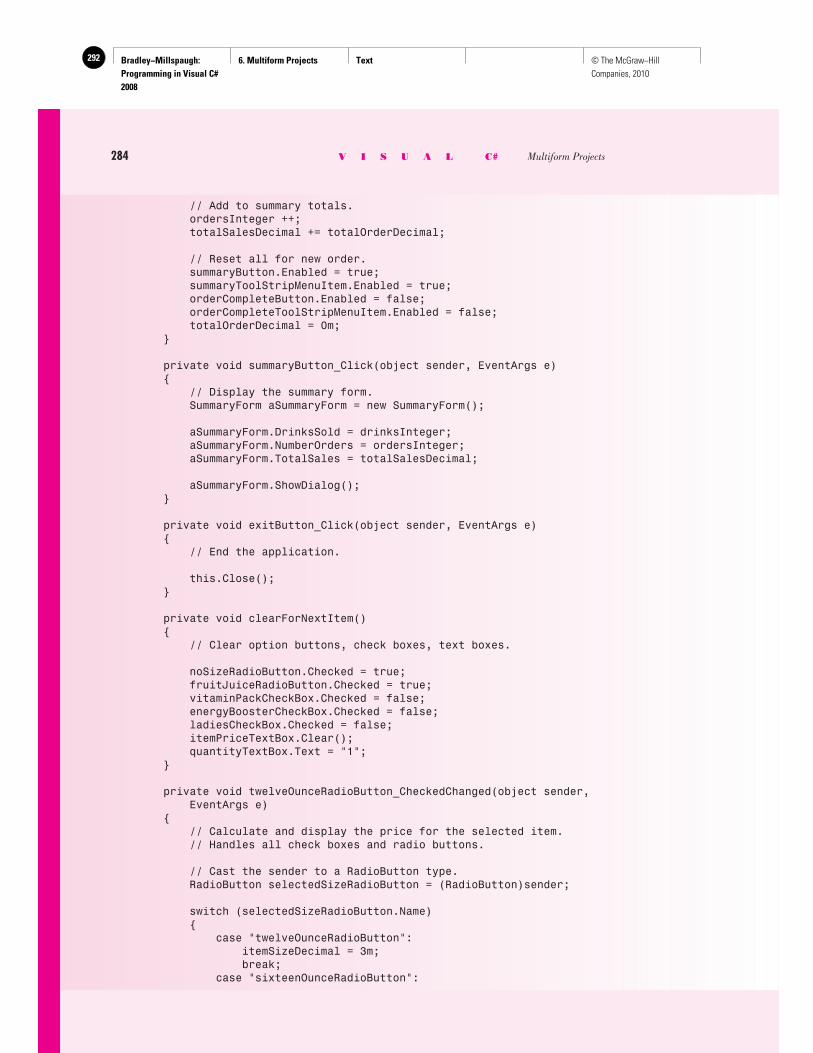
Bradley−Millspaugh: Programming in Visual C# 2008
6. Multiform Projects Text292 © The McGraw−Hill Companies, 2010
284 V I S U A L C# Multiform Projects
// Add to summary totals. ordersInteger ++; totalSalesDecimal += totalOrderDecimal;
// Reset all for new order. summaryButton.Enabled = true; summaryToolStripMenuItem.Enabled = true; orderCompleteButton.Enabled = false; orderCompleteToolStripMenuItem.Enabled = false; totalOrderDecimal = 0m; }
private void summaryButton_Click(object sender, EventArgs e) { // Display the summary form. SummaryForm aSummaryForm = new SummaryForm();
aSummaryForm.DrinksSold = drinksInteger; aSummaryForm.NumberOrders = ordersInteger; aSummaryForm.TotalSales = totalSalesDecimal;
aSummaryForm.ShowDialog(); }
private void exitButton_Click(object sender, EventArgs e) { // End the application.
this.Close(); }
private void clearForNextItem() { // Clear option buttons, check boxes, text boxes.
noSizeRadioButton.Checked = true; fruitJuiceRadioButton.Checked = true; vitaminPackCheckBox.Checked = false; energyBoosterCheckBox.Checked = false; ladiesCheckBox.Checked = false; itemPriceTextBox.Clear(); quantityTextBox.Text = "1"; }
private void twelveOunceRadioButton_CheckedChanged(object sender, EventArgs e) { // Calculate and display the price for the selected item. // Handles all check boxes and radio buttons.
// Cast the sender to a RadioButton type. RadioButton selectedSizeRadioButton = (RadioButton)sender;
switch (selectedSizeRadioButton.Name) { case "twelveOunceRadioButton": itemSizeDecimal = 3m; break; case "sixteenOunceRadioButton":
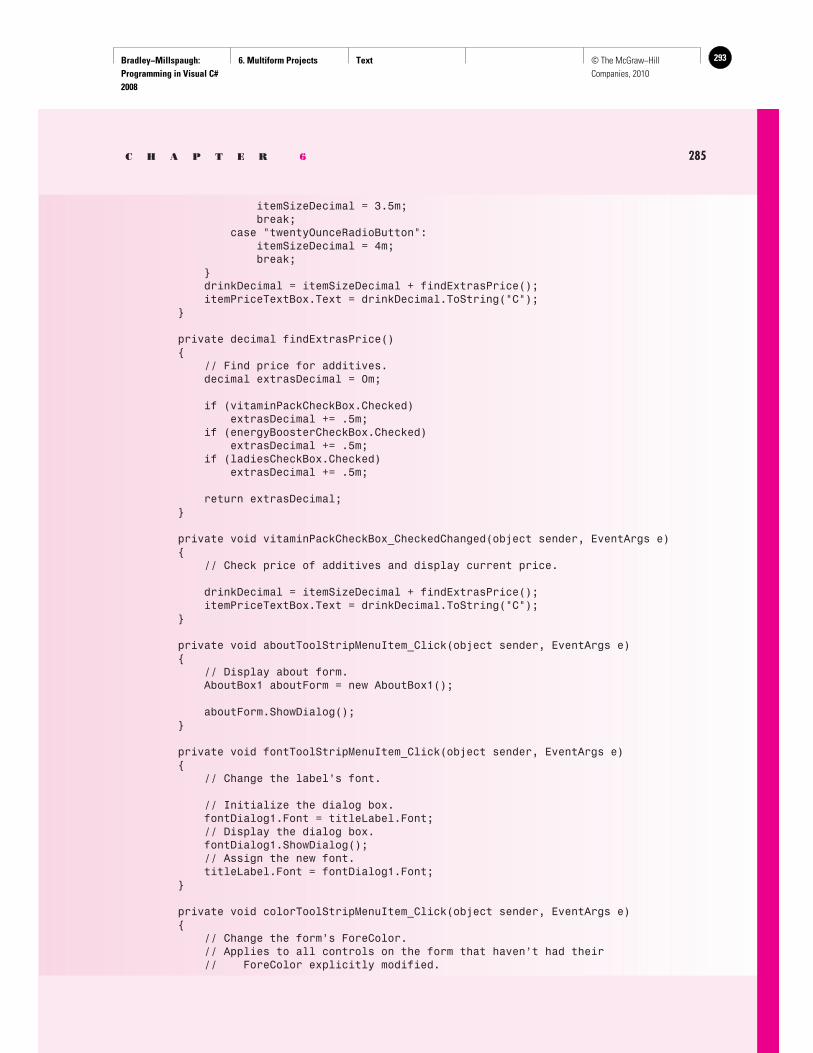
Bradley−Millspaugh: Programming in Visual C# 2008
6. Multiform Projects Text 293© The McGraw−Hill Companies, 2010
C H A P T E R 6 285
itemSizeDecimal = 3.5m; break; case "twentyOunceRadioButton": itemSizeDecimal = 4m; break; } drinkDecimal = itemSizeDecimal + findExtrasPrice(); itemPriceTextBox.Text = drinkDecimal.ToString("C"); }
private decimal findExtrasPrice() { // Find price for additives. decimal extrasDecimal = 0m;
if (vitaminPackCheckBox.Checked) extrasDecimal += .5m; if (energyBoosterCheckBox.Checked) extrasDecimal += .5m; if (ladiesCheckBox.Checked) extrasDecimal += .5m;
return extrasDecimal; }
private void vitaminPackCheckBox_CheckedChanged(object sender, EventArgs e) { // Check price of additives and display current price.
drinkDecimal = itemSizeDecimal + findExtrasPrice(); itemPriceTextBox.Text = drinkDecimal.ToString("C"); }
private void aboutToolStripMenuItem_Click(object sender, EventArgs e) { // Display about form. AboutBox1 aboutForm = new AboutBox1();
aboutForm.ShowDialog(); }
private void fontToolStripMenuItem_Click(object sender, EventArgs e) { // Change the label’s font.
// Initialize the dialog box. fontDialog1.Font = titleLabel.Font; // Display the dialog box. fontDialog1.ShowDialog(); // Assign the new font. titleLabel.Font = fontDialog1.Font; }
private void colorToolStripMenuItem_Click(object sender, EventArgs e) { // Change the form’s ForeColor. // Applies to all controls on the form that haven’t had their // ForeColor explicitly modified.
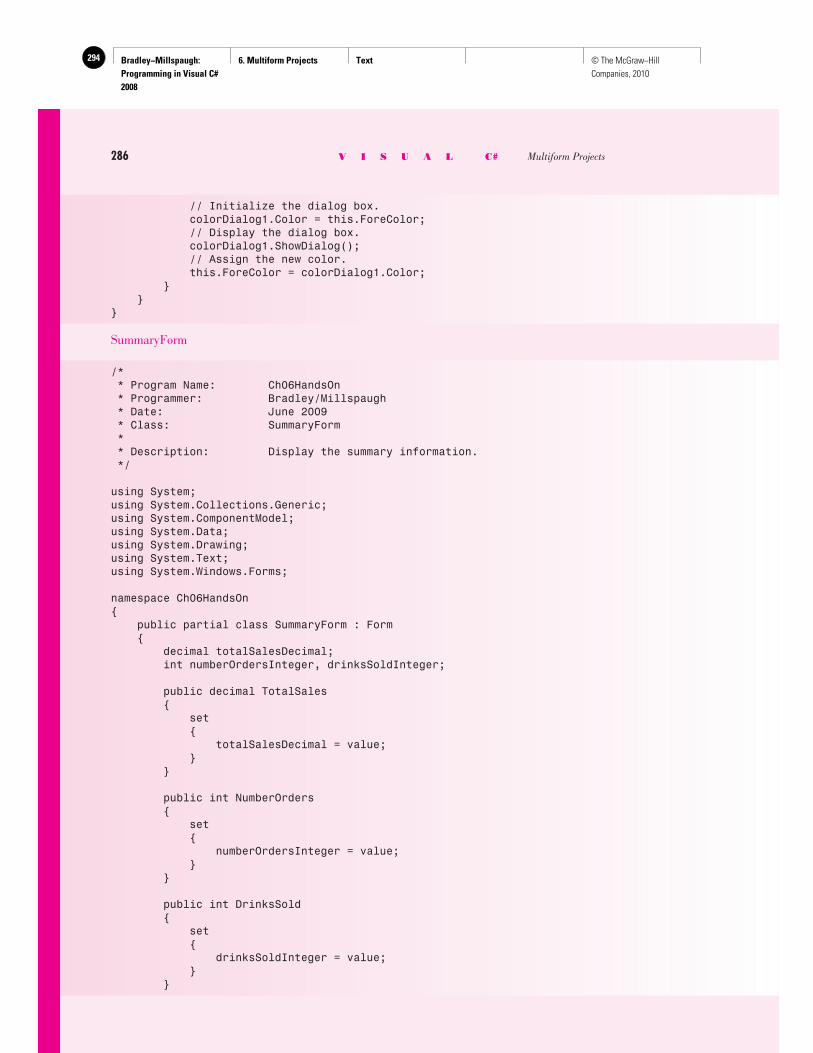
Bradley−Millspaugh: Programming in Visual C# 2008
6. Multiform Projects Text294 © The McGraw−Hill Companies, 2010
286 V I S U A L C# Multiform Projects
// Initialize the dialog box. colorDialog1.Color = this.ForeColor; // Display the dialog box. colorDialog1.ShowDialog(); // Assign the new color. this.ForeColor = colorDialog1.Color; } }}
SummaryForm
/* * Program Name: Ch06HandsOn * Programmer: Bradley/Millspaugh * Date: June 2009 * Class: SummaryForm * * Description: Display the summary information. */
using System;using System.Collections.Generic;using System.ComponentModel;using System.Data;using System.Drawing;using System.Text;using System.Windows.Forms;
namespace Ch06HandsOn{ public partial class SummaryForm : Form { decimal totalSalesDecimal; int numberOrdersInteger, drinksSoldInteger;
public decimal TotalSales { set { totalSalesDecimal = value; } }
public int NumberOrders { set { numberOrdersInteger = value; } }
public int DrinksSold { set { drinksSoldInteger = value; } }
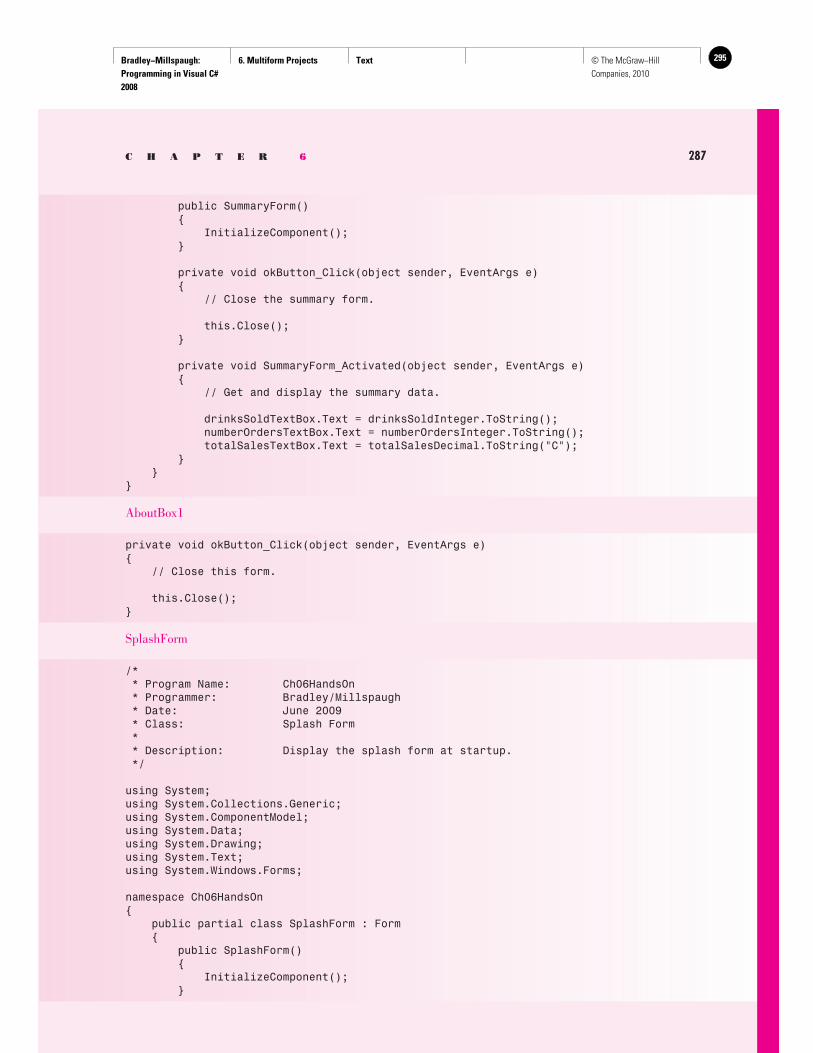
Bradley−Millspaugh: Programming in Visual C# 2008
6. Multiform Projects Text 295© The McGraw−Hill Companies, 2010
C H A P T E R 6 287
public SummaryForm() { InitializeComponent(); }
private void okButton_Click(object sender, EventArgs e) { // Close the summary form.
this.Close(); }
private void SummaryForm_Activated(object sender, EventArgs e) { // Get and display the summary data.
drinksSoldTextBox.Text = drinksSoldInteger.ToString(); numberOrdersTextBox.Text = numberOrdersInteger.ToString(); totalSalesTextBox.Text = totalSalesDecimal.ToString("C"); } }}
AboutBox1
private void okButton_Click(object sender, EventArgs e){ // Close this form.
this.Close();}
SplashForm
/* * Program Name: Ch06HandsOn * Programmer: Bradley/Millspaugh * Date: June 2009 * Class: Splash Form * * Description: Display the splash form at startup. */
using System;using System.Collections.Generic;using System.ComponentModel;using System.Data;using System.Drawing;using System.Text;using System.Windows.Forms;
namespace Ch06HandsOn{ public partial class SplashForm : Form { public SplashForm() { InitializeComponent(); }

Bradley−Millspaugh: Programming in Visual C# 2008
6. Multiform Projects Text296 © The McGraw−Hill Companies, 2010
private void timer1_Tick(object sender, EventArgs e) { // Close the splash form.
this.Close(); } }}
Program.cs
/* * Program Name: Ch06HandsOn * Programmer: Bradley/Millspaugh * Date: June 2009 * Class: Program * * Description: Control program execution. */
using System;using System.Collections.Generic;using System.Windows.Forms;
namespace Ch06HandsOn{ static class Program { /// <summary> /// The main entry point for the application. /// </summary> [STAThread] static void Main() { Application.EnableVisualStyles(); Application.SetCompatibleTextRenderingDefault(false); SplashForm aSplashForm = new SplashForm(); aSplashForm.ShowDialog(); Application.Run(new JuiceBarForm()); } }}
288 V I S U A L C# Multiform Projects
S u m m a r y
1. Projects may need more than one form—there is virtually no limit to the number of forms that can be used within a single project. The first form in the application (after the splash form) is called the startup form .
2. Forms used for one project can be added to another project. Forms also can be removed from a project.
3. To display a new form, you must declare and instantiate a form object. 4. An About box, which typically contains information about the version of an
application and the programmer and copyrights, may be created by adding a new form. C# has an About Box template form that you can use to create an About box.
Bradley−Millspaugh: Programming in Visual C# 2008
6. Multiform Projects Text 297© The McGraw−Hill Companies, 2010
C H A P T E R 6 289
5. The About Box template automatically inserts information on the form from the project’s assembly information; you can enter the information in the Assembly Information dialog box.
6. The Show (modeless) and ShowDialog (modal) methods are used to display a form on the screen.
7. A form displayed as modal requires a response from the user; it must be closed or unloaded before any execution continues. When a form is dis-played as modeless, the user can switch to another form without closing the form.
8. The Form.Hide method hides the form but keeps it loaded in memory; the Form.Close method removes a modeless form from memory; the Form.Close method for a modal form actually hides the form rather than closing it.
9. The form’s Load event occurs once for each loaded form; the form’s Acti-vated event can occur multiple times, each time the form is shown.
10. The form’s FormClosing event occurs just before the form closes. You can write event handlers for any of the form’s events.
11. Use property methods to transfer the values from the private variables in one form to the private variables in a second form.
12. To create a new property of a form, set up a private class-level variable to hold the value internally and write public accessor methods to allow the property to be set and retrieved. A property may be ReadOnly or WriteOnly if the property block contains only the appropriate get or set method.
13. To display a second form and pass a value to a property of the form, instan-tiate a new form object, assign a value to the form object’s property, and show the form.
14. A splash screen is a form that appears as an application loads, before the main or startup form. A splash screen is created as a form without the title bar and the control buttons. Code to display the splash form belongs in the Main method of Program.cs.
15. Use a Timer component to control the length of time the form appears. Set the timer’s Interval property to the number of milliseconds; the compo-nent’s Tick event fires when the interval passes.
16. You can run a project outside the VS IDE by moving and running the .exe file. The target machine must have the correct version of the .NET Frame-work installed.
K e y T e r m s About box 263 accessor methods 270 Form.Activated event 269 Form.Load event 269 Hide method 268 modal 266 modeless 266 property block 270
Show method 266 ShowDialog method 266 splash screen 274 startup form 260 static keyword 273 Timer component 275 value keyword 271
Bradley−Millspaugh: Programming in Visual C# 2008
6. Multiform Projects Text298 © The McGraw−Hill Companies, 2010
290 V I S U A L C# Multiform Projects
P r o g r a m m i n g E x e r c i s e s
Note: For help in basing a new project on an existing project, see “Copy and Move a Project” in Appendix C.
6.1 Modify Programming Exercise 5.5 (the flag viewer) to include a splash screen and an About box.
6.2 Create a project that will produce a summary of the amounts due for Pat’s Auto Repair Shop. Display a splash screen first; then display the Job Information form. If you wish, you can add a graphic to the form.
The Job Information Form Menu :
File Edit Help Exit Calculate About Clear
Job Information Form : The Job Information form must have text boxes for the user to enter the job number, customer name, amount charged for parts, and the hours of labor. Include labels and text boxes for Parts, Labor, Subtotal, Sales Tax, and Total.
The Calculate menu item finds the charges and displays them in labels. The tax rate and the hourly labor charge should be set up as named con-stants so that they can be easily modified if either changes. Current charges are $50 per hour for labor and 8 percent (.08) for the sales tax rate. Sales tax is charged only on parts, not on labor.
The Clear menu item clears the text boxes and resets the focus in the first text box.
The Exit menu item closes the Job Information form. 6.3 Modify Programming Exercise 6.2 so that summary information is main-
tained for the total dollar amount for parts, labor, sales tax, and total for all customers.
R e v i e w Q u e s t i o n s
1. List some of the items generally found in an About box. 2. What is the purpose of a splash screen? 3. What is the term used for the first form to display in a project? 4. Explain how to include an existing form in a new project. 5. What is the assembly information ? How can you change the information?
How can you use the information? 6. Explain the difference between modal and modeless . 7. How does the Show method differ from the ShowDialog method? 8. Explain when the form’s Load event and Activated event occur. In which
event handler should you place code to initialize screen fields? Is the answer always the same?
9. How are variable values passed from one form to another? 10. How can you run a compiled C# program outside the Visual Studio IDE?
Bradley−Millspaugh: Programming in Visual C# 2008
6. Multiform Projects Text 299© The McGraw−Hill Companies, 2010
C H A P T E R 6 291
Add a Summary menu item under the File menu before the Exit item; include a separator bar between the two menu items. When the user se-lects the Summary menu item, display the summary information in a Sum-mary form. The Summary form should have an OK button that closes the Summary form and returns the user to the Job Information form.
6.4 A battle is raging over the comparative taste of Prune Punch and Apple Ade. Each taste tester rates the two drinks on a scale of 1 to 10 (10 being best). The proof of the superiority of one over the other will be the average score for the two drinks.
Display a splash screen and then the New Tester form. You can add a graphic if you wish.
New Tester Form Menus :
File Ratings Help Exit Add Your Scores About
Summary
The New Tester form allows the user to input test scores for each drink. When the user clicks the Add Your Scores menu item, add the score
for each type of drink to the drink’s total, clear the text boxes, and reset the focus. If either score is blank when the menu item is selected, dis-play a message in a message box and reset the focus to the box for the missing data.
Summary Menu Item : The Summary item displays a form that contains the current results of the taste test. It should display the winner, the total number of taste testers, and the average rating for each drink. The form contains an OK button that returns to the New Tester form. (The user will be able to display the summary at any time and as often as desired.)
About Box : The About box should display information about the program and the programmer. Include an OK button that returns the user to the New Tester form.
6.5 Modify Programming Exercise 5.1 (piecework pay) to add a Splash form, an About box, and a Summary form. Add a slogan and a logo that the user can hide or display from menu choices on the main form.
Splash Form : The Splash form must appear when the project begins exe-cution. It should display the project name, programmer name, and at least one graphic.
About Box : The About box should have the program name, version num-ber, and programmer name, as well as a graphic and an OK button. It must be displayed as modal.
Summary Form : The Summary form should display the summary infor-mation. Note that in Chapter 5 the summary information was displayed in a message box. You must remove the message box and display the summary information only on the Summary form. An OK button closes the form.
Slogan and Logo : Make up a slogan for the company, such as “We’re Number One” or “We Do Chicken Right.” For the logo, you can use an icon or any graphic you have available, or create one yourself with a draw or paint program.
Bradley−Millspaugh: Programming in Visual C# 2008
6. Multiform Projects Text300 © The McGraw−Hill Companies, 2010
292 V I S U A L C# Multiform Projects
The Slogan and Logo menu choices must toggle and display a check mark when selected. For example, when the slogan is displayed, the Slogan menu item is checked. If the user selects the Slogan command again, hide the slogan and uncheck the menu item. The Slogan and Logo commands operate independently; that is, the user may select either, both, or neither item.
When the project begins, the slogan and logo must both be displayed on the main form and their menu items appear checked.
Case Studies Custom Supplies Mail Order
Modify the Custom Supplies Mail Order project from Chapter 5 to include a Splash screen, an About box, and a summary form.
Delete the summary information from the form from Chapter 5 and display the information on the summary form. Include an image on both the Splash form and the About box.
Create a project that uses four forms. Add the form from the Chapter 5 Christopher’s Car Center case study and create a Main form, a Splash screen, and an About box. Main Form : The Main form should display a large label with the words “Christopher’s Car Center—Meeting all your vehicle’s needs” and appropriate image(s). You must change the project’s startup form to the new Main form. See page 275 for help in chang-ing the startup form.
Christopher’s Car Center
Main Form Menus :
File Edit Help Input Sale Color. . . About Exit Font. . .
The Input Sale item should display the form from Chapter 5. The Color and Font items should allow the user to change the large label on the form.
Xtreme Cinema
Modify the Xtreme Cinema project from Chapter 5 to separate the project into multiple forms. Include
a summary form, a Splash screen, and an About box.
Cool Boards
Modify the Cool Boards project from Chapter 5 to separate the project into multiple forms. Include
a summary form, a Splash screen, and an About box.
Bradley−Millspaugh: Programming in Visual C# 2008
7. Lists, Loops, and Printing Text 301© The McGraw−Hill Companies, 2010
try{ // Convert input values to numeric and assign quantityInteger = int.Parse(quantityTextBox.T try { priceDecimal = decimal.Parse(priceTextBox // Calculate values. extendedPriceDecimal = quantityInteger * discountDecimal = Decimal.Round( (extendedPriceDecimal * DISCOUNT_RATE_ amountDueDecimal = extendedPriceDecimal - totalAmountDecimal += amountDueDecimal; numberTransactionsInteger++; // Format and display answers. extendedPriceTextBox.Text = extendedPrice
C H A P T E R
7 Lists, Loops, and Printing
at the completion of this chapter, you will be able to . . .
1. Create and use list boxes and combo boxes.
2. Differentiate among the available types of combo boxes.
3. Enter items into list boxes using the Items collection in the Properties window.
4. Add and remove items in a list at run time.
5. Determine which item in a list is selected.
6. Use the Items.Count property to determine the number of items in a list.
7. Display a selected item from a list.
8. Use do, while, and for loops to execute a series of statements.
9. Skip to the next iteration of a loop by using the continue statement.
10. Send information to the printer or the Print Preview window using the PrintDocument class.
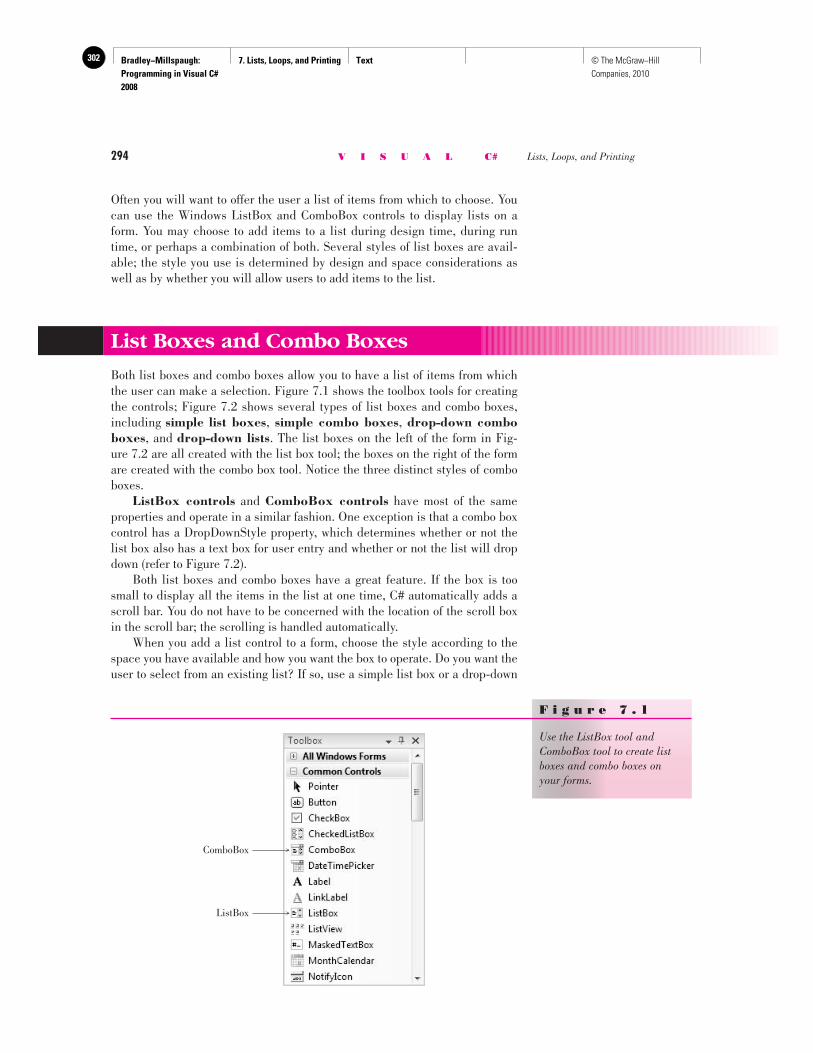
Bradley−Millspaugh: Programming in Visual C# 2008
7. Lists, Loops, and Printing Text302 © The McGraw−Hill Companies, 2010
294 V I S U A L C# Lists, Loops, and Printing
Often you will want to offer the user a list of items from which to choose. You can use the Windows ListBox and ComboBox controls to display lists on a form. You may choose to add items to a list during design time, during run time, or perhaps a combination of both. Several styles of list boxes are avail-able; the style you use is determined by design and space considerations as well as by whether you will allow users to add items to the list.
List Boxes and Combo Boxes
Both list boxes and combo boxes allow you to have a list of items from which the user can make a selection. Figure 7.1 shows the toolbox tools for creating the controls; Figure 7.2 shows several types of list boxes and combo boxes, including simple list boxes , simple combo boxes , drop-down combo boxes , and drop-down lists . The list boxes on the left of the form in Fig-ure 7.2 are all created with the list box tool; the boxes on the right of the form are created with the combo box tool. Notice the three distinct styles of combo boxes. ListBox controls and ComboBox controls have most of the same properties and operate in a similar fashion. One exception is that a combo box control has a DropDownStyle property, which determines whether or not the list box also has a text box for user entry and whether or not the list will drop down (refer to Figure 7.2 ). Both list boxes and combo boxes have a great feature. If the box is too small to display all the items in the list at one time, C# automatically adds a scroll bar. You do not have to be concerned with the location of the scroll box in the scroll bar; the scrolling is handled automatically. When you add a list control to a form, choose the style according to the space you have available and how you want the box to operate. Do you want the user to select from an existing list? If so, use a simple list box or a drop-down
ComboBox
ListBox
F i g u r e 7 . 1
Use the ListBox tool and ComboBox tool to create list boxes and combo boxes on your forms.
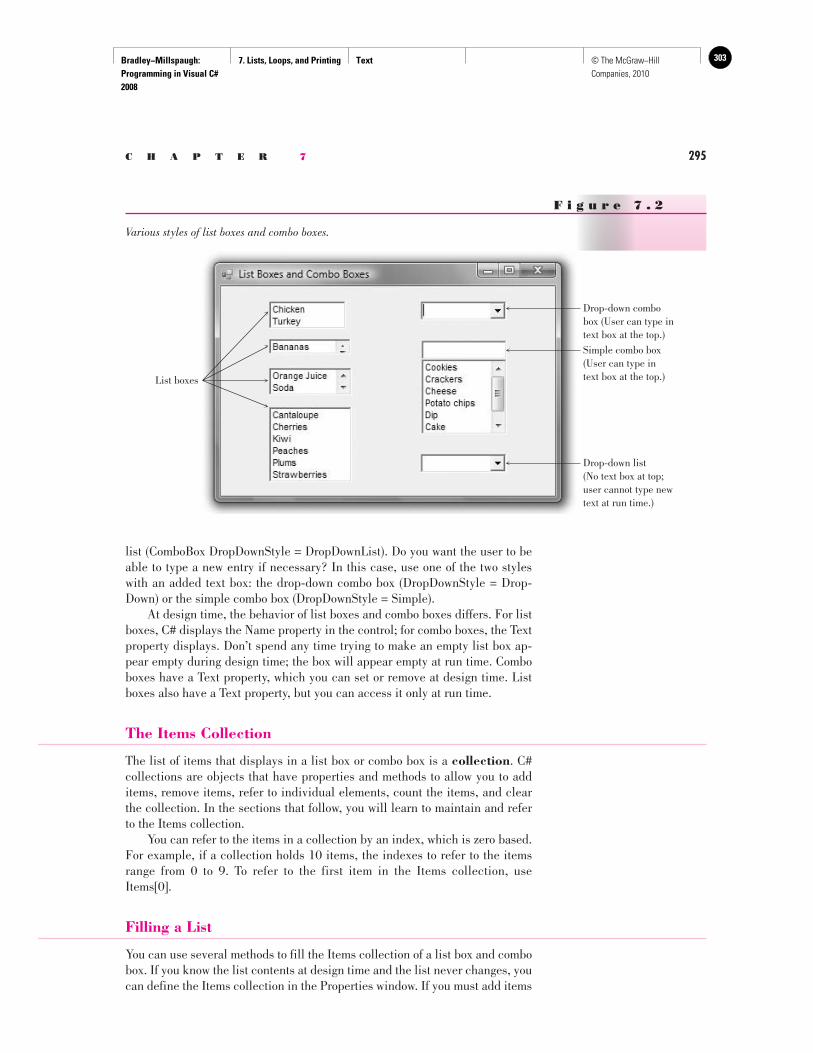
Bradley−Millspaugh: Programming in Visual C# 2008
7. Lists, Loops, and Printing Text 303© The McGraw−Hill Companies, 2010
C H A P T E R 7 295
list (ComboBox DropDownStyle = DropDownList). Do you want the user to be able to type a new entry if necessary? In this case, use one of the two styles with an added text box: the drop-down combo box (DropDownStyle = Drop-Down) or the simple combo box (DropDownStyle = Simple). At design time, the behavior of list boxes and combo boxes differs. For list boxes, C# displays the Name property in the control; for combo boxes, the Text property displays. Don’t spend any time trying to make an empty list box ap-pear empty during design time; the box will appear empty at run time. Combo boxes have a Text property, which you can set or remove at design time. List boxes also have a Text property, but you can access it only at run time.
The Items Collection
The list of items that displays in a list box or combo box is a collection . C# collections are objects that have properties and methods to allow you to add items, remove items, refer to individual elements, count the items, and clear the collection. In the sections that follow, you will learn to maintain and refer to the Items collection. You can refer to the items in a collection by an index, which is zero based. For example, if a collection holds 10 items, the indexes to refer to the items range from 0 to 9. To refer to the first item in the Items collection, use Items[0].
Filling a List
You can use several methods to fill the Items collection of a list box and combo box. If you know the list contents at design time and the list never changes, you can define the Items collection in the Properties window. If you must add items
F i g u r e 7 . 2
Various styles of list boxes and combo boxes.
Drop-down combo box (User can type in text box at the top.)
Simple combo box (User can type in text box at the top.)
Drop-down list (No text box at top; user cannot type new text at run time.)
List boxes
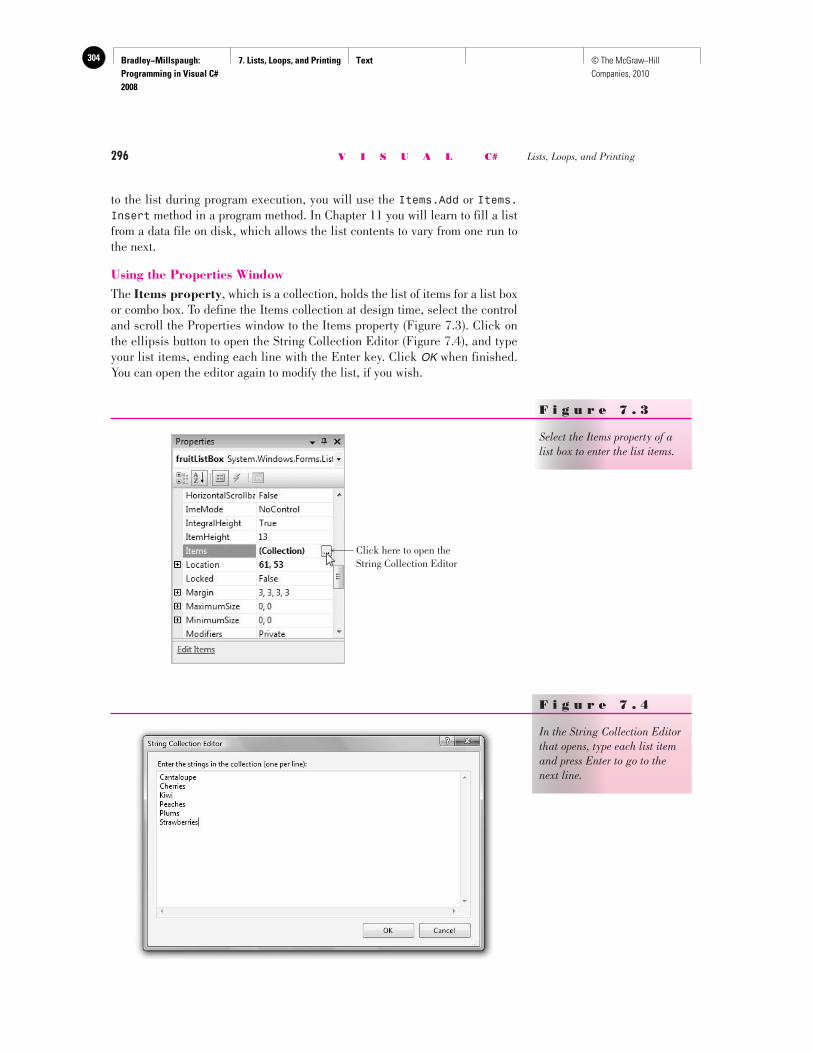
Bradley−Millspaugh: Programming in Visual C# 2008
7. Lists, Loops, and Printing Text304 © The McGraw−Hill Companies, 2010
296 V I S U A L C# Lists, Loops, and Printing
to the list during program execution, you will use the Items.Add or Items.Insert method in a program method. In Chapter 11 you will learn to fill a list from a data file on disk, which allows the list contents to vary from one run to the next.
Using the Properties Window The Items property , which is a collection, holds the list of items for a list box or combo box. To define the Items collection at design time, select the control and scroll the Properties window to the Items property ( Figure 7.3 ). Click on the ellipsis button to open the String Collection Editor ( Figure 7.4 ), and type your list items, ending each line with the Enter key. Click OK when finished. You can open the editor again to modify the list, if you wish.
F i g u r e 7 . 3
Select the Items property of a list box to enter the list items.
Click here to open the String Collection Editor
F i g u r e 7 . 4
In the String Collection Editor that opens, type each list item and press Enter to go to the next line.
Bradley−Millspaugh: Programming in Visual C# 2008
7. Lists, Loops, and Printing Text 305© The McGraw−Hill Companies, 2010
C H A P T E R 7 297
Using the Items.Add Method To add an item to a list at run time, use the Items.Add method . You can choose to add a variable, a constant, the contents of the text box at the top of a combo box, or the Text property of another control.
The Items.Add Method—General Form
Object .Items.Add( ItemValue );
General
Form
E
xamples
schoolsListBox.Items.Add("Harvard"); schoolsListBox.Items.Add("Stanford"); schoolsListBox.Items.Add(schoolsTextBox.Text); majorsComboBox.Items.Add(majorsComboBox.Text); majorsComboBox.Items.Add(majorString);
Object .Items.Insert( IndexPosition, ItemValue );
General
Form
ItemValue is the string value to add to the list. If the value is a string literal, enclose it in quotation marks. The new item generally goes at the end of the list. However, you can alter the placement by setting the control’s Sorted property to true . Then the new item will be placed alphabetically in the list.
The Items.Add Method—Examples
When the user types a new value in the text box portion of a combo box, that item is not automatically added to the list. If you want to add the newly entered text to the list, use the Items.Add method:
coffeeComboBox.Items.Add(coffeeComboBox.Text);
Similarly, you can add the contents of a text box to a list box.
schoolsListBox.Items.Add(schoolTextBox.Text);
Using the Items.Insert Method You can choose the location for a new item added to the list. In the Items.Insert method , you specify the index position for the new item, which must be an existing position or the end of the list.
The Items.Insert Method—General Form
The index position is zero based. To insert a new item in the first position, use index position = 0.
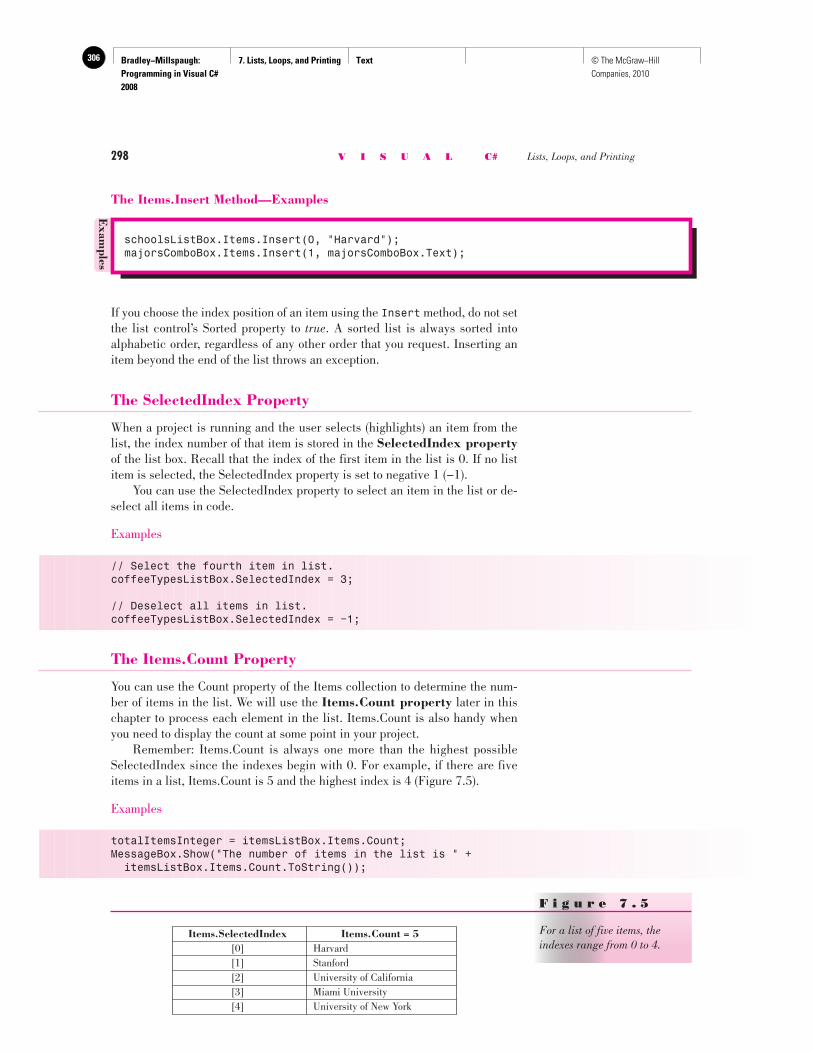
Bradley−Millspaugh: Programming in Visual C# 2008
7. Lists, Loops, and Printing Text306 © The McGraw−Hill Companies, 2010
298 V I S U A L C# Lists, Loops, and Printing
The Items.Insert Method—Examples
Exam
ples
schoolsListBox.Items.Insert(0, "Harvard"); majorsComboBox.Items.Insert(1, majorsComboBox.Text);
If you choose the index position of an item using the Insert method, do not set the list control’s Sorted property to true . A sorted list is always sorted into alphabetic order, regardless of any other order that you request. Inserting an item beyond the end of the list throws an exception.
The SelectedIndex Property
When a project is running and the user selects (highlights) an item from the list, the index number of that item is stored in the SelectedIndex property of the list box. Recall that the index of the first item in the list is 0. If no list item is selected, the SelectedIndex property is set to negative 1 (−1). You can use the SelectedIndex property to select an item in the list or de-select all items in code.
Examples
// Select the fourth item in list.coffeeTypesListBox.SelectedIndex = 3;
// Deselect all items in list.coffeeTypesListBox.SelectedIndex = −1;
The Items.Count Property
You can use the Count property of the Items collection to determine the num-ber of items in the list. We will use the Items.Count property later in this chapter to process each element in the list. Items.Count is also handy when you need to display the count at some point in your project. Remember: Items.Count is always one more than the highest possible SelectedIndex since the indexes begin with 0. For example, if there are five items in a list, Items.Count is 5 and the highest index is 4 ( Figure 7.5 ).
Examples
totalItemsInteger = itemsListBox.Items.Count; MessageBox.Show("The number of items in the list is " + itemsListBox.Items.Count.ToString());
Items.SelectedIndex[0]
[1] [2][3][4]
Items.Count = 5HarvardStanfordUniversity of CaliforniaMiami UniversityUniversity of New York
F i g u r e 7 . 5
For a list of five items, the indexes range from 0 to 4.
Bradley−Millspaugh: Programming in Visual C# 2008
7. Lists, Loops, and Printing Text 307© The McGraw−Hill Companies, 2010
C H A P T E R 7 299
Referencing the Items Collection
If you need to display one item from a list, you can refer to one element of the Items collection. The Items collection of a list box or combo box holds the text of all list elements. You specify which element you want by including an index. This technique can be useful if you need to display a list item in a label or on another form. Later in this chapter, we will use the Items property to send the contents of the list box to the printer.
Using the Items Collection—General Form
U se square brackets to reference the index position of a list; use parentheses for method arguments: namesListBox.Items[indexInteger]; and namesListBox.Items.Add( " New Name " ); . ■
TIP
Object .Items[ IndexPosition ];
General
Form
The index of the first list element is 0, so the highest index is Items.Count − 1. Notice that you use brackets, rather than parentheses. You can retrieve the value of a list element or set an element to a different value.
Using the Items Collection—Examples
Exam
ples
schoolsListBox.Items[2] = "University of California"; majorLabel.Text = majorsComboBox.Items[indexInteger].ToString(); selectedMajorLabel.Text = majorsComboBox.Items[majorsComboBox.SelectedIndex].ToString(); selectedMajorLabel.Text = majorsComboBox.Text;
To refer to the currently selected element of a list, you combine the Items prop-erty and the SelectedIndex property:
selectedFlavorString = flavorListBox.Items[flavorListBox.SelectedIndex].ToString();
You also can retrieve the selected list item by referring to the Text property of the control:
selectedMajorLabel.Text = majorsComboBox.Text;
Note that if you assign a value to a particular item, you replace the previ-ous contents of that position. For example,
schoolsListBox.Items[0] = "My School";
places “My School” into the first position, replacing whatever was there already. It does not insert the item into the list or increase the value in Items.Count.
Removing an Item from a List
You can remove individual items from a list by specifying either the index of the item or the text of the item. Use the Items.RemoveAt method to remove

Bradley−Millspaugh: Programming in Visual C# 2008
7. Lists, Loops, and Printing Text308 © The McGraw−Hill Companies, 2010
300 V I S U A L C# Lists, Loops, and Printing
an item by index and the Items.Remove method to remove by specifying the text.
The Items.RemoveAt Method—General Form
Object .Items.RemoveAt( IndexPosition );
General
Form
Object .Items.Remove( TextString );
General
Form
Object .Items.Clear();
General
Form
E
xamples
// Remove the first name from the list.namesListBox.Items.RemoveAt(0);// Remove the item in position indexInteger.schoolsComboBox.Items.RemoveAt(indexInteger);// Remove the currently selected item.coffeeComboBox.Items.RemoveAt(coffeeComboBox.SelectedIndex);
Exam
ples
// Remove the specified item.namesListBox.Items.Remove("My School");// Remove the matching item.schoolsComboBox.Items.Remove(schoolTextBox.Text);// Remove the currently selected item.coffeeComboBox.Items.Remove(coffeeComboBox.Text);
The index is required; it specifies which element to remove. The index of the first list element is 0, and the index of the last element is Items.Count − 1. If you specify an invalid index, the system throws an IndexOutOfRange exception.
The Items.RemoveAt Method—Examples
The Items.Remove Method—General Form
The Items.Remove method looks for the specified string in the Items collec-tion. If the string is found, it is removed; however, if it is not found, no excep-tion is generated.
The Items.Remove Method—Examples
Clearing a List
In addition to removing individual items at run time, you also can clear all items from a list. Use the Items.Clear method to empty a combo box or list box.
The Items.Clear Method—General Form
Bradley−Millspaugh: Programming in Visual C# 2008
7. Lists, Loops, and Printing Text 309© The McGraw−Hill Companies, 2010
C H A P T E R 7 301
The Items.Clear Method—Examples
Exam
ples
schoolsListBox.Items.Clear(); majorsComboBox.Items.Clear();
// Confirm clearing the majors list.DialogResult responseDialogResult;
responseDialogResult = MessageBox.Show("Clear the majors list?", "Clear Majors List", MessageBoxButtons.YesNo, MessageBoxIcon.Question);
if (responseDialogResult == DialogResult.Yes){ majorsComboBox.Items.Clear();}
List Box and Combo Box Events
Later in the chapter, we will perform actions in event-handling methods for events of list boxes and combo boxes. Some useful events are the SelectedIn-dexChanged, TextChanged, Enter, and Leave. Note : Although we haven’t used these events up until this point, many other controls have similar events. For example, you can code event-handling methods for the TextChanged, Enter, and Leave events of text boxes.
The TextChanged Event As the user types text into the text box portion of a combo box, the TextChanged event occurs. Each keystroke generates another TextChanged event. A list box does not have a TextChanged event because list boxes do not have associated text boxes.
The Enter Event When a control receives the focus, an Enter event occurs. As the user tabs from control to control, an Enter event fires for each control. Later you will learn to make any existing text appear selected when the user tabs to a text box or the text portion of a combo box.
The Leave Event You also can write code for the Leave event of a control. The Leave event fires when the control loses focus. Often Leave event handlers are used for validat-ing input data. When the user tabs from one control to another, the Leave event is triggered before the Enter event of the next control.
T o write a method for an event that isn’t the default event, you cannot just double-click the control. Instead, select the control, click on the Events button in the Properties window, and double-click on the event for which you want to write a handler; the Editor window will open with the method header written for you. ■
TIP
➤ Feedback 7.1 Describe the purpose of each of the following methods or properties for a list box or combo box control.
1. Sorted 2. SelectedIndex 3. Items (continued on next page)
Bradley−Millspaugh: Programming in Visual C# 2008
7. Lists, Loops, and Printing Text310 © The McGraw−Hill Companies, 2010
302 V I S U A L C# Lists, Loops, and Printing
4. DropDownStyle 5. Items.Count 6. Items.Add 7. Items.Insert 8. Items.Clear 9. Items.RemoveAt 10. Items.Remove
The while and do/while Loops
Until now, there has been no way to repeat the same steps in a method without calling it a second time. The computer is capable of repeating a group of in-structions many times without calling the method for each new set of data. The process of repeating a series of instructions is called looping . The group of re-peated instructions is called a loop . An iteration is a single execution of the statement(s) in the loop. In this section, you will learn about the while and do/while loops. Later in this chapter, you will learn about another type of loop—a for loop. A while or do/while loop terminates based on a condition that you spec-ify. Execution of the statements in the loop continues while a condition is true . Generally, you use while or do/while loops when you don’t know ahead of time the exact number of iterations needed. (Later you will learn about for loops, which you use when you do know the exact number of iterations.)
The while and do/while Loop Statements—General Form
while ( Condition ) { // Statements in loop. }
or
do { // Statements in loop . } while ( Condition );
General F
orm
The first form shown above, the while loop, tests for completion at the top of the loop. With this type of loop, also called a pretest or entry test , the state-ments inside the loop may never be executed if the terminating condition is true the first time it is tested.
Example
totalInteger = 0;while (totalInteger != 0){ // Statements in loop (will never be done).}
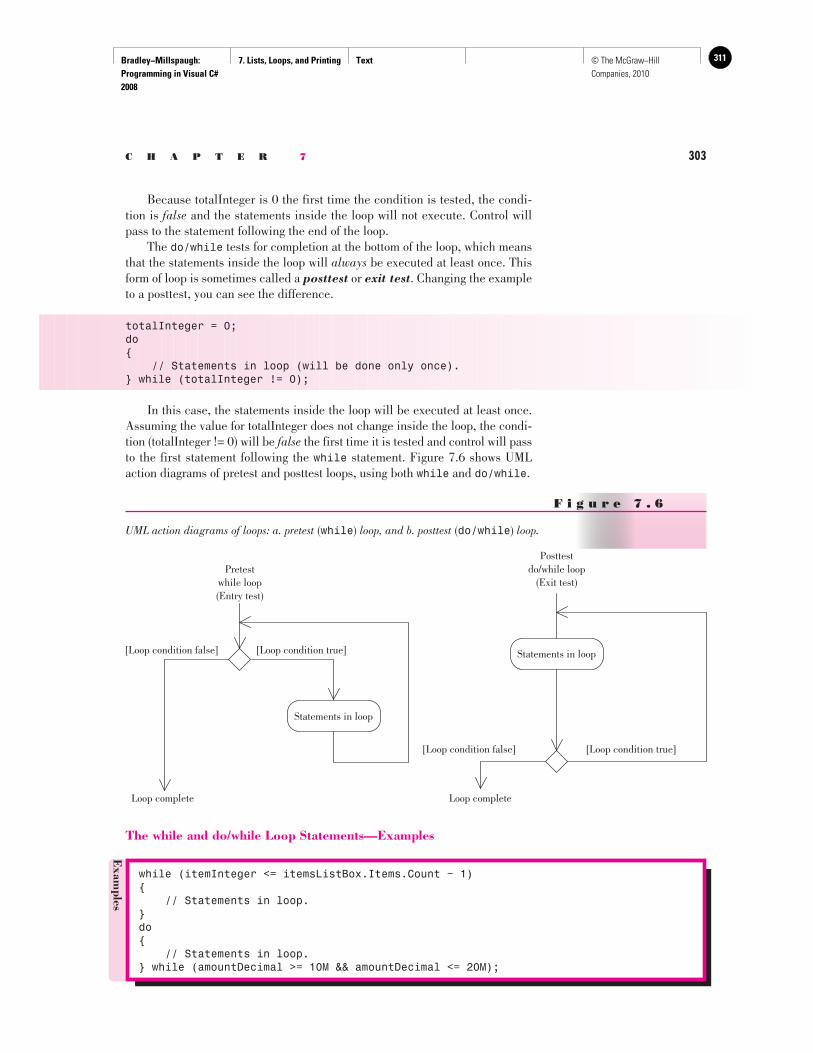
Bradley−Millspaugh: Programming in Visual C# 2008
7. Lists, Loops, and Printing Text 311© The McGraw−Hill Companies, 2010
C H A P T E R 7 303
Because totalInteger is 0 the first time the condition is tested, the condi-tion is false and the statements inside the loop will not execute. Control will pass to the statement following the end of the loop. The do/while tests for completion at the bottom of the loop, which means that the statements inside the loop will always be executed at least once. This form of loop is sometimes called a posttest or exit test . Changing the example to a posttest, you can see the difference.
totalInteger = 0;do{ // Statements in loop (will be done only once).} while (totalInteger != 0);
In this case, the statements inside the loop will be executed at least once. Assuming the value for totalInteger does not change inside the loop, the condi-tion (totalInteger != 0) will be false the first time it is tested and control will pass to the first statement following the while statement. Figure 7.6 shows UML action diagrams of pretest and posttest loops, using both while and do/while .
F i g u r e 7 . 6
UML action diagrams of loops: a. pretest ( while ) loop, and b. posttest ( do/while ) loop.
Statements in loop
[Loop condition false] [Loop condition true]
Pretestwhile loop(Entry test)
Loop complete
Statements in loop
[Loop condition false] [Loop condition true]
Posttestdo/while loop
(Exit test)
Loop complete
The while and do/while Loop Statements—Examples
Exam
ples
while (itemInteger <= itemsListBox.Items.Count − 1){ // Statements in loop.}do{ // Statements in loop.} while (amountDecimal >= 10M && amountDecimal <= 20M);
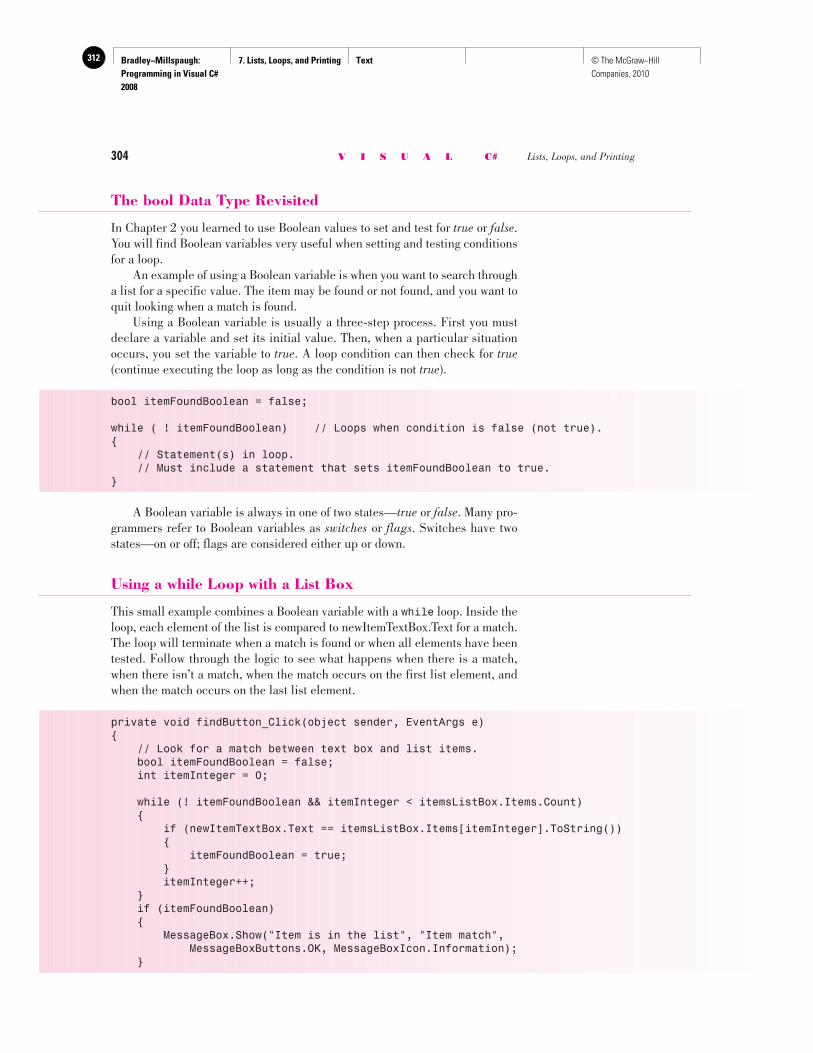
Bradley−Millspaugh: Programming in Visual C# 2008
7. Lists, Loops, and Printing Text312 © The McGraw−Hill Companies, 2010
304 V I S U A L C# Lists, Loops, and Printing
The bool Data Type Revisited
In Chapter 2 you learned to use Boolean values to set and test for true or false . You will find Boolean variables very useful when setting and testing conditions for a loop. An example of using a Boolean variable is when you want to search through a list for a specific value. The item may be found or not found, and you want to quit looking when a match is found. Using a Boolean variable is usually a three-step process. First you must declare a variable and set its initial value. Then, when a particular situation occurs, you set the variable to true . A loop condition can then check for true (continue executing the loop as long as the condition is not true ).
bool itemFoundBoolean = false;
while ( ! itemFoundBoolean) // Loops when condition is false (not true).{ // Statement(s) in loop. // Must include a statement that sets itemFoundBoolean to true.}
A Boolean variable is always in one of two states— true or false . Many pro-grammers refer to Boolean variables as switches or flags . Switches have two states—on or off; flags are considered either up or down.
Using a while Loop with a List Box
This small example combines a Boolean variable with a while loop. Inside the loop, each element of the list is compared to newItemTextBox.Text for a match. The loop will terminate when a match is found or when all elements have been tested. Follow through the logic to see what happens when there is a match, when there isn’t a match, when the match occurs on the first list element, and when the match occurs on the last list element.
private void findButton_Click(object sender, EventArgs e){ // Look for a match between text box and list items. bool itemFoundBoolean = false; int itemInteger = 0;
while (! itemFoundBoolean && itemInteger < itemsListBox.Items.Count) { if (newItemTextBox.Text == itemsListBox.Items[itemInteger].ToString()) { itemFoundBoolean = true; } itemInteger++; } if (itemFoundBoolean) { MessageBox.Show("Item is in the list", "Item match", MessageBoxButtons.OK, MessageBoxIcon.Information); }
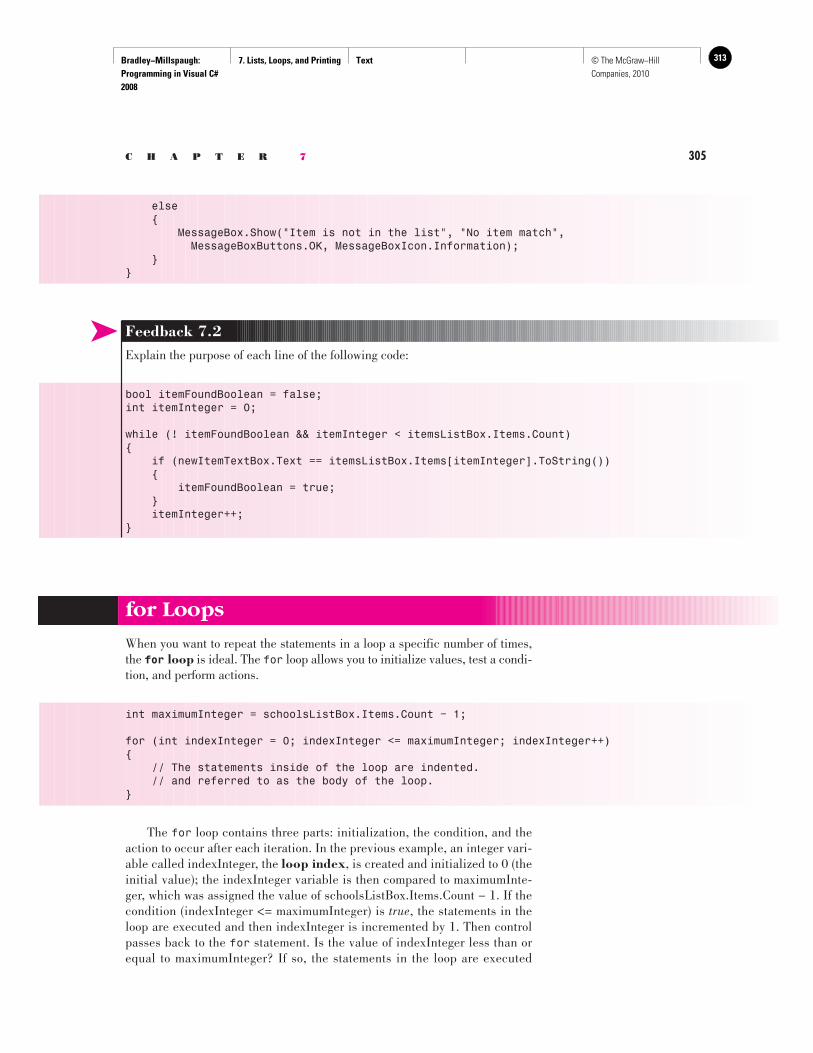
Bradley−Millspaugh: Programming in Visual C# 2008
7. Lists, Loops, and Printing Text 313© The McGraw−Hill Companies, 2010
C H A P T E R 7 305
else { MessageBox.Show("Item is not in the list", "No item match", MessageBoxButtons.OK, MessageBoxIcon.Information); }}
➤ Feedback 7.2 Explain the purpose of each line of the following code:
bool itemFoundBoolean = false;int itemInteger = 0;
while (! itemFoundBoolean && itemInteger < itemsListBox.Items.Count){ if (newItemTextBox.Text == itemsListBox.Items[itemInteger].ToString()) { itemFoundBoolean = true; } itemInteger++;}
for Loops
When you want to repeat the statements in a loop a specific number of times, the for loop is ideal. The for loop allows you to initialize values, test a condi-tion, and perform actions.
int maximumInteger = schoolsListBox.Items.Count − 1;
for (int indexInteger = 0; indexInteger <= maximumInteger; indexInteger++){ // The statements inside of the loop are indented. // and referred to as the body of the loop.}
The for loop contains three parts: initialization, the condition, and the action to occur after each iteration. In the previous example, an integer vari-able called indexInteger, the loop index , is created and initialized to 0 (the initial value); the indexInteger variable is then compared to maximumInte-ger, which was assigned the value of schoolsListBox.Items.Count − 1. If the condition (indexInteger <= maximumInteger) is true , the statements in the loop are executed and then indexInteger is incremented by 1. Then control passes back to the for statement. Is the value of indexInteger less than or equal to maximumInteger? If so, the statements in the loop are executed

Bradley−Millspaugh: Programming in Visual C# 2008
7. Lists, Loops, and Printing Text314 © The McGraw−Hill Companies, 2010
306 V I S U A L C# Lists, Loops, and Printing
again. When the test is made and the loop index is greater than the final value, control passes to the statement immediately following the loop’s closing brace. Use a semicolon to separate the three parts of the for statement. You can include more than one initialization action by separating each with commas. You also can write more than one action to execute at the end of each iteration of the loop. The most common use of a for is to count the number of iterations when you know the number of times the loop must execute such as iterating through the items in a list box. A counter-controlled loop generally has three elements (see Figure 7.7 for a UML action diagram of loop logic).
1. Initialize the counter. 2. Test the counter to determine when it is time to terminate the loop. 3. Increment the counter.
A for loop handles all three steps for you.
The for Loop—General Form
for ( initialization [, additional initialization ]; condition ; action [, additional action ]){ // ( Body of loop ).}
General F
orm
For the initialization, the loop index must be a properly initialized numeric variable. The condition should test the value of the loop index variable. The action is generally to add to or subtract from the loop index variable.
F i g u r e 7 . 7
A UML action diagram of the logic of a for loop.
Statements in loop
[Ending limit not reached][Ending limit reached]
Loop complete
Increment loop index
Initialize index variable
Bradley−Millspaugh: Programming in Visual C# 2008
7. Lists, Loops, and Printing Text 315© The McGraw−Hill Companies, 2010
C H A P T E R 7 307
The for Statement—Examples
All statements between the pair of braces that follows the for statement are considered to be the body of the loop and will be executed the specified num-ber of times. The first for statement example will count from 2 to 100 by 2. The statements in the body of the loop will be executed 50 times—first with in-dexInteger = 2, next with indexInteger = 4, next with indexInteger = 6, and so forth. When the comparison is done, the program checks the condition. If the condition is true , then it continues executing the loop; if the condition is false , then it exits the loop. When indexInteger = 100 in the preceding example, the body of the loop will execute one more time. Then, at the end of the loop, indexInteger will be incremented to 102, the test will be made, and control will pass to the statement following the closing brace.
Negative Increment or Counting Backward
You can decrement the counter variable, rather than increment it. In that case, you must write the condition to test for the lower bound. The loop will continue as long as the index variable is greater than the test value.
// Count down.for (int countInteger = 10; countInteger > 0; countInteger−−){ // Statements in the body of the loop.}
Conditions Satisfied before Entry
At times, the final value will be reached before entry into the loop. In that case, the statements in the body of the loop will not be executed at all.
// An unexecutable loop.int finalInteger = 5;for (int indexInteger = 6; indexInteger < finalInteger; indexInteger++){ // The execution will never reach here.}
Exam
ples
for (int indexInteger = 2; indexInteger <= 100; indexInteger += 2) for (countInteger = startInteger; countInteger < endInteger; countInteger += incrementInteger) for (int countInteger = 0; countInteger <= coffeeTypeComboBox.Items.Count − 1; countInteger++) for (numberInteger = (numberCorrectInteger − 5); numberInteger < totalPossibleInteger; numberInteger++) for (rateDecimal = 0.05M; rateDecimal < 0.25M; rateDecimal += 0.05M) for (int countDownInteger = 10; countDownInteger > 0; countDownInteger−−)
U se a for loop when you know the number of iterations needed for the loop. Use a while or do/while when the loop should end based on a condition. ■
TIP
Bradley−Millspaugh: Programming in Visual C# 2008
7. Lists, Loops, and Printing Text316 © The McGraw−Hill Companies, 2010
308 V I S U A L C# Lists, Loops, and Printing
Endless Loops
Changing the value of a loop index variable not only is considered a poor prac-tice but also may lead to an endless loop. Your code could get into a loop that is impossible to exit. Consider the following example; when will the loop end?
// Poor Programming.for (int indexInteger = 1; indexInteger < 10; indexInteger++){ indexInteger = 1;}
Exiting for Loops
In the previous example of an endless loop, you will have to break the program execution manually. You can click on your form’s close box or use the VS IDE menu bar or toolbar to stop the program. If you can’t see the menu bar or tool-bar, you can usually move or resize your application’s form to bring it into view. You may want to set a breakpoint and step program execution to see what is causing the problem. Usually loops should proceed to normal completion. However, on occasion you may need to terminate a loop before the loop index reaches its final value. You can use the C# break statement for this situation. You have already seen the break statement as part of a switch statement. You also can use break to exit a for loop, a while loop, or a do/while loop. However, good program-ming practices dictate that you exit loops properly rather than use break .
Skipping to the Next Iteration of a Loop
At times you may be finished in the current iteration of a loop and want to skip to the next. The continue statement transfers control to the end of the loop and retests the loop exit condition. This effectively skips to the next iteration of the loop. Generally, the continue statement is part of an if statement.
Examples
// Continue a for loop.for (int loopInteger = 0; loopInteger <= nameListBox.Items.Count — 1; loopInteger++){ if (nameListBox.Items[loopInteger].ToString() = = string.Empty) { continue; } // Code to do something with the name found. Console.WriteLine("Name = " + nameListBox.Items[loopInteger].ToString());}
// Continue a while loop.int indexInteger = −1;while (indexInteger < nameListBox.Items.Count − 1){
Bradley−Millspaugh: Programming in Visual C# 2008
7. Lists, Loops, and Printing Text 317© The McGraw−Hill Companies, 2010
C H A P T E R 7 309
indexInteger++; if (nameListBox.Items[indexInteger].ToString() = = string.Empty) { continue; } // Code to do something with the name found. Console.WriteLine("Name = " + nameListBox.Items[indexInteger].ToString());}
Note : The two above examples do the same thing, but you’ll notice that the for loop has two fewer lines of code. Because the number of iterations is known ( Items.Count ), the for statement is the preferred solution.
➤ Feedback 7.3 1. Identify the statements that are correctly formed and those that have
errors. For those with errors, state what is wrong and how to correct it. You can assume that all variables are properly declared.
( a) for (indexDecimal = 3.5M, indexDecimal < 6.0M, indexDecimal += 0.5M) ( b) for (indexInteger = beginInteger; incrementInteger < endInteger; incrementInteger++) ( c) for (4 = 1; 4 < 10; 4 += 2) ( d) for (indexInteger = 100; indexInteger > 0; indexInteger − = 25) ( e) for (indexInteger = 0; indexInteger < —10; indexInteger − = 1)
2. How many times will the body of the loop be executed for each of these examples?
( a) for (countInteger = 1; countInteger < 3; countInteger++) ( b) for (countInteger = 2; countInteger < 11; countInteger += 3) ( c) for (countInteger = 10; countInteger > 0; countInteger−−) ( d) for (countDecimal = 3.0M; countDecimal < 6.0M; countDecimal += 0.5M)
Making Entries Appear Selected
You can use several techniques to make the text in a text box or list appear selected.
Selecting the Entry in a Text Box
When the user tabs into a text box that already has an entry, how do you want the text to appear? Should the insertion point appear at either the left or right end of the text? Or should the entire entry appear selected? You also can apply this question to a text box that failed validation; shouldn’t the entire entry be selected? The most user-friendly approach is to select the text, which you can do with the SelectAll method of the text box, which you saw in Chapter 3.

Bradley−Millspaugh: Programming in Visual C# 2008
7. Lists, Loops, and Printing Text318 © The McGraw−Hill Companies, 2010
310 V I S U A L C# Lists, Loops, and Printing
A good location to select the text is in the text box’s Enter event handler, which occurs when the control receives the focus.
private void newItemTextBox_Enter(object sender, System.EventArgs e){ // Select any existing text. newItemTextBox.SelectAll();}
Reminder : You can write the Enter event handler for a text box by double-clicking the Enter event in the Events list of the control’s Properties window.
Sending Information to the Printer
So far, all program output has been on the screen. You can use the .NET Print-Document and PrintPreviewDialog components to produce output for the printer and also to preview the output on the screen. These components appear in the Printing tab of the toolbox. C# was designed to run under Windows. The printing is done through the Windows environment, allowing you to take advantage of the fonts installed on any given system. The printing dialogs and page setup are the same ones that you have become familiar with using Microsoft products. It is easy to create forms for interactive programs, but it is not as easy to print on the printer. Several companies sell utilities that do a nice job of designing and printing reports. The C# Professional Edition and Team System Edition include Crystal Reports for creating reports from database files.
The PrintDocument Component
You set up output for the printer using the methods and events of the PrintDocument component . When you add a PrintDocument component to a form, the component appears in the component tray below the form ( Figure 7.8 ).
The PrintDocument Print Method The Print method of the PrintDocument component sends the command to print the information according to the layout that you specify in the PrintPage event handler. The Print method belongs in the Click event handler for the Print button or menu item that the user selects to begin printing.
private void printButton_Click(object sender, System.EventArgs e){ // Print output on the printer. printDocument1.Print(); // Start the print process.}
Setting Up the Print Output The code that you write to set up the printed page belongs in the PrintDocu-ment’s PrintPage event handler . The PrintPage event is fired once for each page to be printed. This technique is referred to as a callback and is different from anything we have done so far. In a callback, the object notifies the program
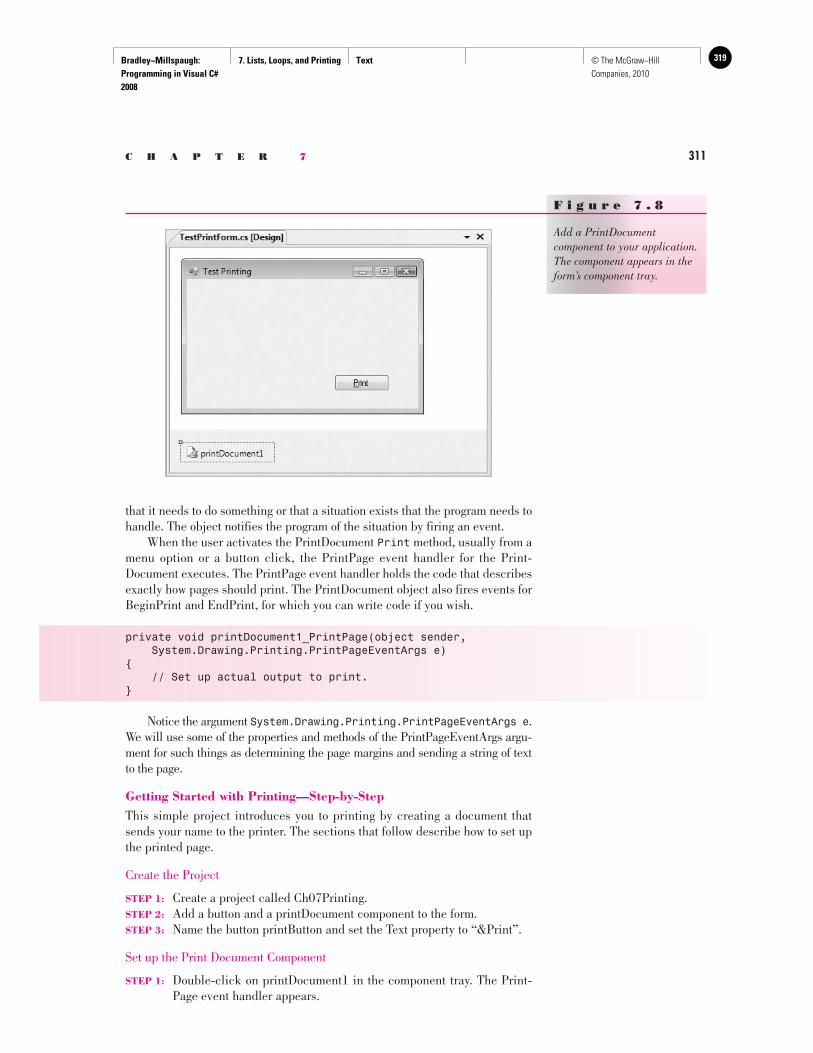
Bradley−Millspaugh: Programming in Visual C# 2008
7. Lists, Loops, and Printing Text 319© The McGraw−Hill Companies, 2010
C H A P T E R 7 311
that it needs to do something or that a situation exists that the program needs to handle. The object notifies the program of the situation by firing an event. When the user activates the PrintDocument Print method, usually from a menu option or a button click, the PrintPage event handler for the Print-Document executes. The PrintPage event handler holds the code that describes exactly how pages should print. The PrintDocument object also fires events for BeginPrint and EndPrint, for which you can write code if you wish.
private void printDocument1_PrintPage(object sender, System.Drawing.Printing.PrintPageEventArgs e){ // Set up actual output to print.}
Notice the argument System.Drawing.Printing.PrintPageEventArgs e . We will use some of the properties and methods of the PrintPageEventArgs argu-ment for such things as determining the page margins and sending a string of text to the page.
Getting Started with Printing—Step-by-Step This simple project introduces you to printing by creating a document that sends your name to the printer. The sections that follow describe how to set up the printed page.
Create the Project
STEP 1: Create a project called Ch07Printing. STEP 2: Add a button and a printDocument component to the form. STEP 3: Name the button printButton and set the Text property to “&Print”.
Set up the Print Document Component
STEP 1: Double-click on printDocument1 in the component tray. The Print-Page event handler appears.
F i g u r e 7 . 8
Add a PrintDocument component to your application. The component appears in the form’s component tray.
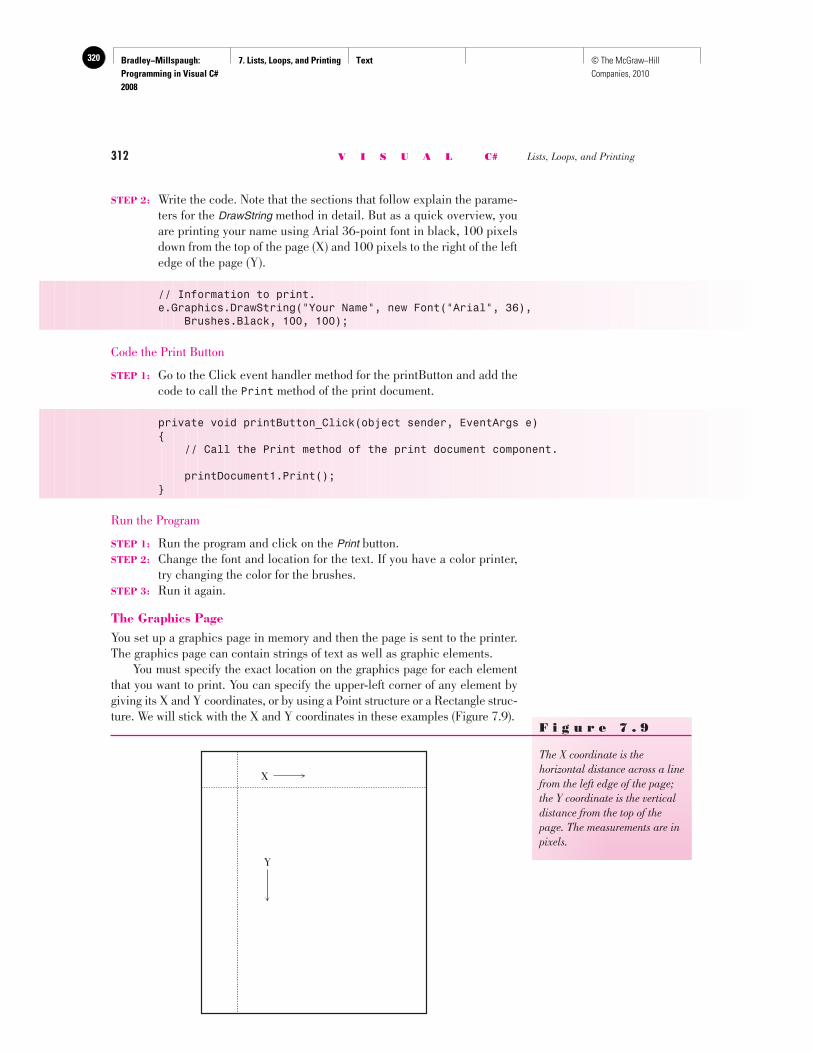
Bradley−Millspaugh: Programming in Visual C# 2008
7. Lists, Loops, and Printing Text320 © The McGraw−Hill Companies, 2010
312 V I S U A L C# Lists, Loops, and Printing
STEP 2: Write the code. Note that the sections that follow explain the parame-ters for the DrawString method in detail. But as a quick overview, you are printing your name using Arial 36-point font in black, 100 pixels down from the top of the page (X) and 100 pixels to the right of the left edge of the page (Y).
// Information to print.e.Graphics.DrawString("Your Name", new Font("Arial", 36), Brushes.Black, 100, 100);
Code the Print Button
STEP 1: Go to the Click event handler method for the printButton and add the code to call the Print method of the print document.
private void printButton_Click(object sender, EventArgs e){ // Call the Print method of the print document component.
printDocument1.Print();}
Run the Program
STEP 1: Run the program and click on the Print button. STEP 2: Change the font and location for the text. If you have a color printer,
try changing the color for the brushes. STEP 3: Run it again.
The Graphics Page You set up a graphics page in memory and then the page is sent to the printer. The graphics page can contain strings of text as well as graphic elements. You must specify the exact location on the graphics page for each element that you want to print. You can specify the upper-left corner of any element by giving its X and Y coordinates, or by using a Point structure or a Rectangle struc-ture. We will stick with the X and Y coordinates in these examples ( Figure 7.9 ).
F i g u r e 7 . 9
The X coordinate is the horizontal distance across a line from the left edge of the page; the Y coordinate is the vertical distance from the top of the page. The measurements are in pixels.
X
Y
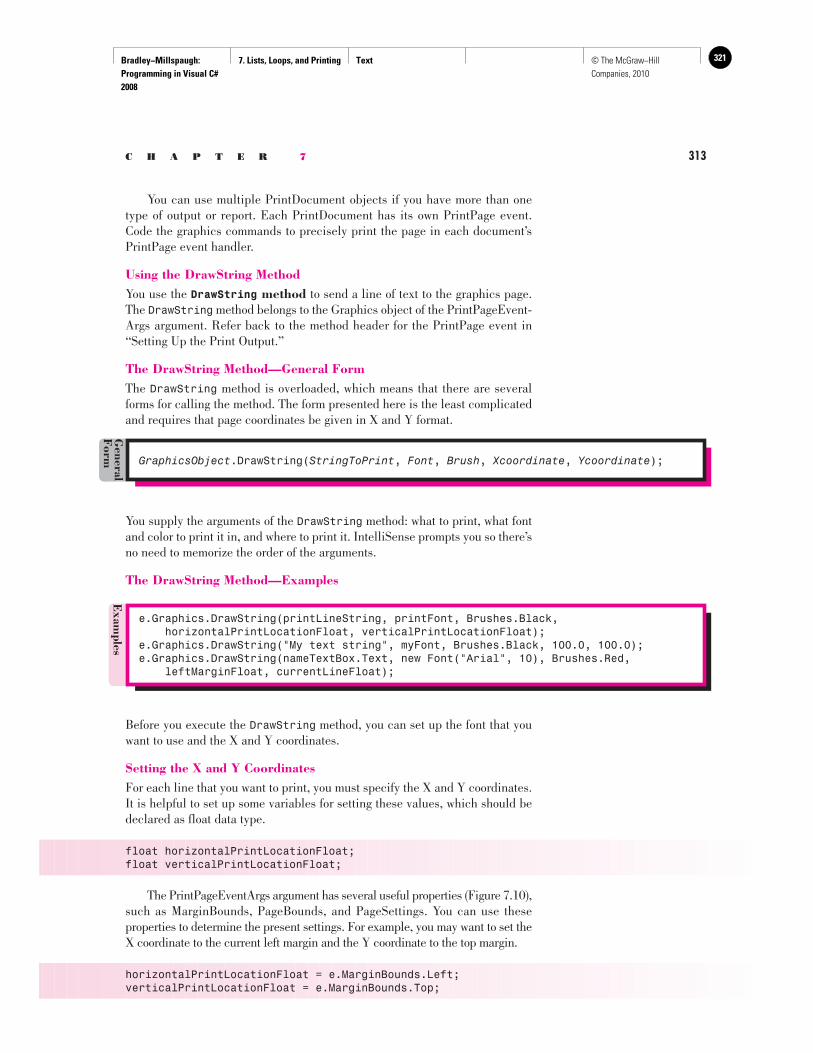
Bradley−Millspaugh: Programming in Visual C# 2008
7. Lists, Loops, and Printing Text 321© The McGraw−Hill Companies, 2010
C H A P T E R 7 313
You supply the arguments of the DrawString method: what to print, what font and color to print it in, and where to print it. IntelliSense prompts you so there’s no need to memorize the order of the arguments.
The DrawString Method—Examples
Exam
ples
e.Graphics.DrawString(printLineString, printFont, Brushes.Black, horizontalPrintLocationFloat, verticalPrintLocationFloat); e.Graphics.DrawString("My text string", myFont, Brushes.Black, 100.0, 100.0); e.Graphics.DrawString(nameTextBox.Text, new Font("Arial", 10), Brushes.Red, leftMarginFloat, currentLineFloat);
Before you execute the DrawString method, you can set up the font that you want to use and the X and Y coordinates.
Setting the X and Y Coordinates For each line that you want to print, you must specify the X and Y coordinates. It is helpful to set up some variables for setting these values, which should be declared as float data type.
float horizontalPrintLocationFloat; float verticalPrintLocationFloat;
The PrintPageEventArgs argument has several useful properties ( Figure 7.10 ), such as MarginBounds, PageBounds, and PageSettings. You can use these properties to determine the present settings. For example, you may want to set the X coordinate to the current left margin and the Y coordinate to the top margin.
horizontalPrintLocationFloat = e.MarginBounds.Left; verticalPrintLocationFloat = e.MarginBounds.Top;
GraphicsObject .DrawString( StringToPrint , Font , Brush , Xcoordinate , Ycoordinate );
General
Form
You can use multiple PrintDocument objects if you have more than one type of output or report. Each PrintDocument has its own PrintPage event. Code the graphics commands to precisely print the page in each document’s PrintPage event handler.
Using the DrawString Method You use the DrawString method to send a line of text to the graphics page. The DrawString method belongs to the Graphics object of the PrintPageEvent-Args argument. Refer back to the method header for the PrintPage event in “Setting Up the Print Output.”
The DrawString Method—General Form The DrawString method is overloaded, which means that there are several forms for calling the method. The form presented here is the least complicated and requires that page coordinates be given in X and Y format.
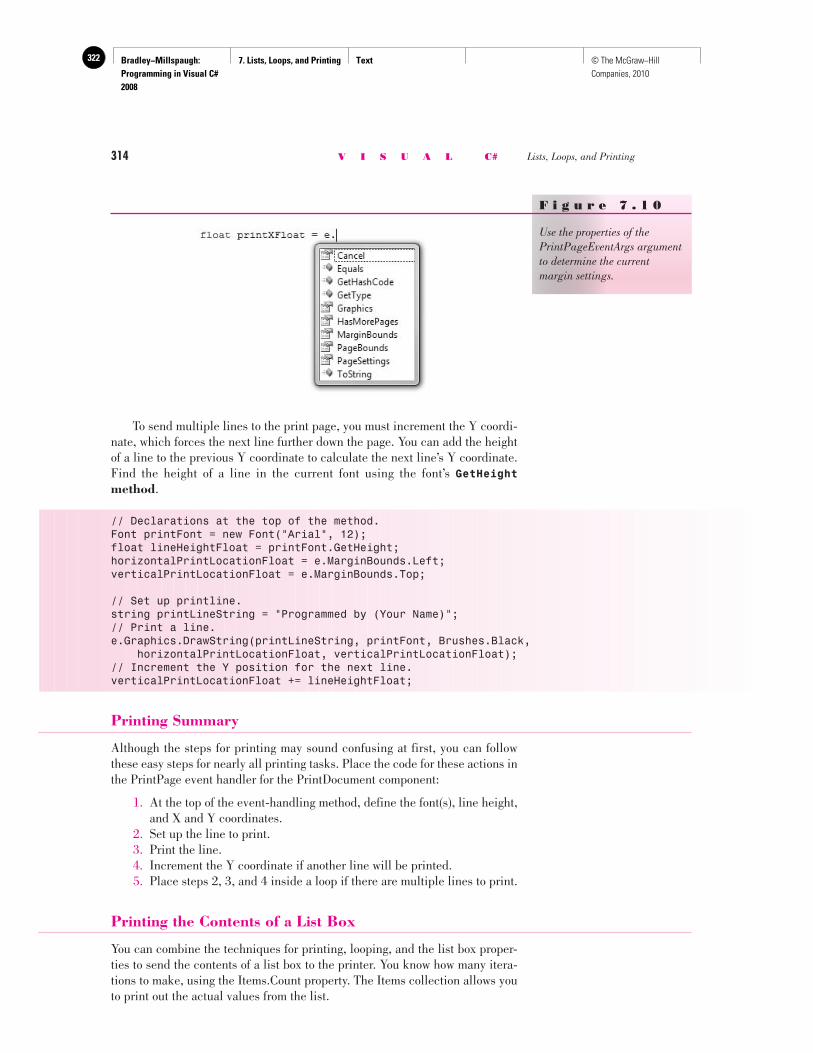
Bradley−Millspaugh: Programming in Visual C# 2008
7. Lists, Loops, and Printing Text322 © The McGraw−Hill Companies, 2010
314 V I S U A L C# Lists, Loops, and Printing
To send multiple lines to the print page, you must increment the Y coordi-nate, which forces the next line further down the page. You can add the height of a line to the previous Y coordinate to calculate the next line’s Y coordinate. Find the height of a line in the current font using the font’s GetHeight method .
// Declarations at the top of the method.Font printFont = new Font("Arial", 12);float lineHeightFloat = printFont.GetHeight;horizontalPrintLocationFloat = e.MarginBounds.Left;verticalPrintLocationFloat = e.MarginBounds.Top;
// Set up printline.string printLineString = "Programmed by (Your Name)";// Print a line.e.Graphics.DrawString(printLineString, printFont, Brushes.Black, horizontalPrintLocationFloat, verticalPrintLocationFloat);// Increment the Y position for the next line.verticalPrintLocationFloat += lineHeightFloat;
Printing Summary
Although the steps for printing may sound confusing at first, you can follow these easy steps for nearly all printing tasks. Place the code for these actions in the PrintPage event handler for the PrintDocument component:
1. At the top of the event-handling method, define the font(s), line height, and X and Y coordinates.
2. Set up the line to print. 3. Print the line. 4. Increment the Y coordinate if another line will be printed. 5. Place steps 2, 3, and 4 inside a loop if there are multiple lines to print.
Printing the Contents of a List Box
You can combine the techniques for printing, looping, and the list box proper-ties to send the contents of a list box to the printer. You know how many itera-tions to make, using the Items.Count property. The Items collection allows you to print out the actual values from the list.
F i g u r e 7 . 1 0
Use the properties of the PrintPageEventArgs argument to determine the current margin settings.
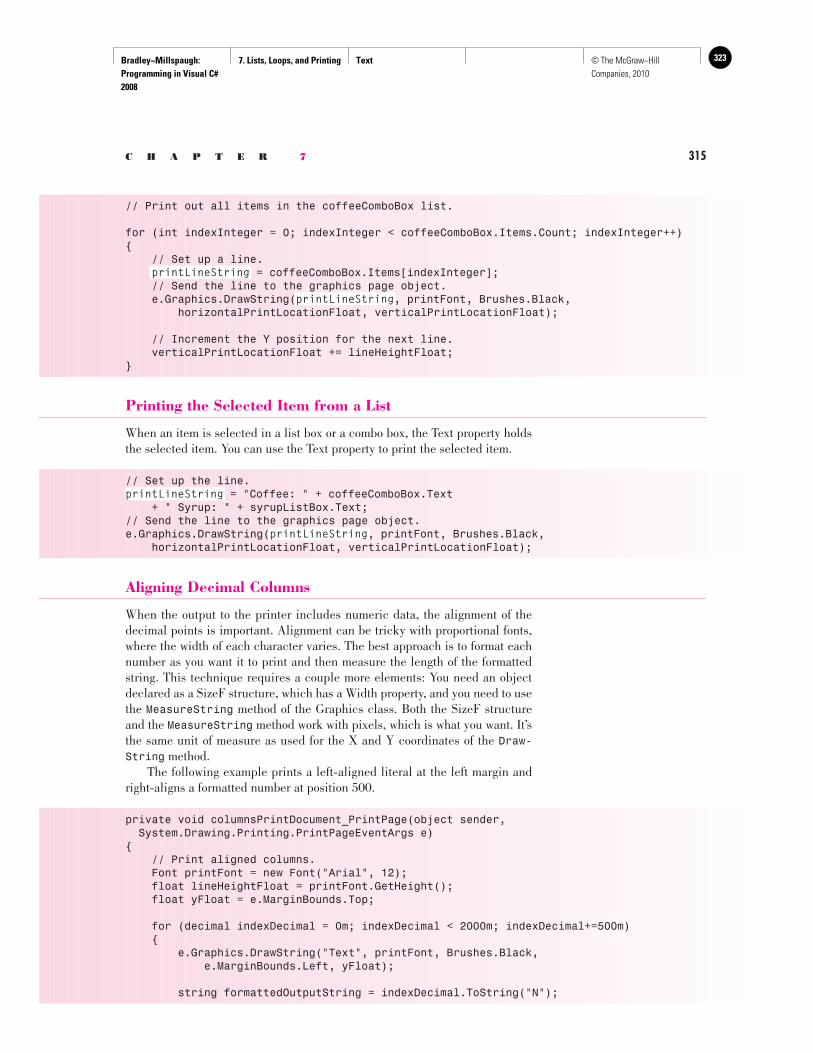
Bradley−Millspaugh: Programming in Visual C# 2008
7. Lists, Loops, and Printing Text 323© The McGraw−Hill Companies, 2010
C H A P T E R 7 315
// Print out all items in the coffeeComboBox list.
for (int indexInteger = 0; indexInteger < coffeeComboBox.Items.Count; indexInteger++){ // Set up a line. printLineString = coffeeComboBox.Items[indexInteger]; // Send the line to the graphics page object. e.Graphics.DrawString(printLineString, printFont, Brushes.Black, horizontalPrintLocationFloat, verticalPrintLocationFloat);
// Increment the Y position for the next line. verticalPrintLocationFloat += lineHeightFloat;}
Printing the Selected Item from a List
When an item is selected in a list box or a combo box, the Text property holds the selected item. You can use the Text property to print the selected item.
// Set up the line.printLineString = "Coffee: " + coffeeComboBox.Text + " Syrup: " + syrupListBox.Text;// Send the line to the graphics page object.e.Graphics.DrawString(printLineString, printFont, Brushes.Black, horizontalPrintLocationFloat, verticalPrintLocationFloat);
Aligning Decimal Columns
When the output to the printer includes numeric data, the alignment of the decimal points is important. Alignment can be tricky with proportional fonts, where the width of each character varies. The best approach is to format each number as you want it to print and then measure the length of the formatted string. This technique requires a couple more elements: You need an object declared as a SizeF structure, which has a Width property, and you need to use the MeasureString method of the Graphics class. Both the SizeF structure and the MeasureString method work with pixels, which is what you want. It’s the same unit of measure as used for the X and Y coordinates of the Draw-String method. The following example prints a left-aligned literal at the left margin and right-aligns a formatted number at position 500.
private void columnsPrintDocument_PrintPage(object sender, System.Drawing.Printing.PrintPageEventArgs e){ // Print aligned columns. Font printFont = new Font("Arial", 12); float lineHeightFloat = printFont.GetHeight(); float yFloat = e.MarginBounds.Top;
for (decimal indexDecimal = 0m; indexDecimal < 2000m; indexDecimal+=500m) { e.Graphics.DrawString("Text", printFont, Brushes.Black, e.MarginBounds.Left, yFloat);
string formattedOutputString = indexDecimal.ToString("N");
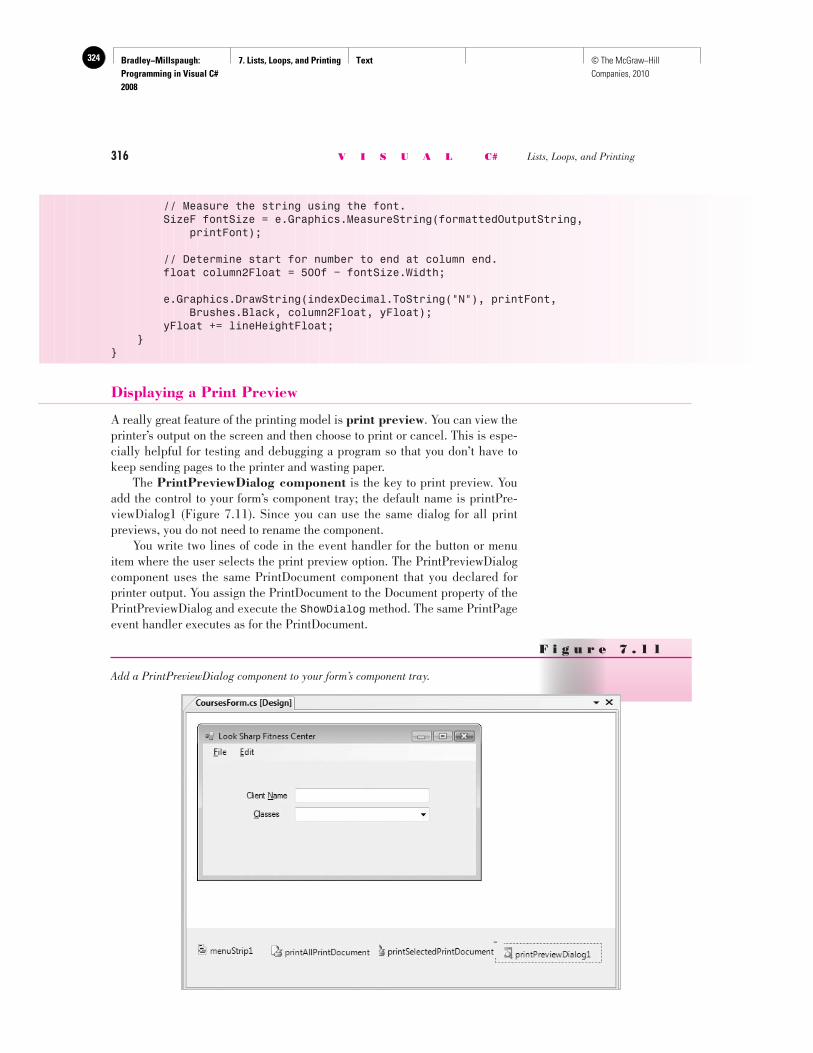
Bradley−Millspaugh: Programming in Visual C# 2008
7. Lists, Loops, and Printing Text324 © The McGraw−Hill Companies, 2010
316 V I S U A L C# Lists, Loops, and Printing
// Measure the string using the font. SizeF fontSize = e.Graphics.MeasureString(formattedOutputString, printFont);
// Determine start for number to end at column end. float column2Float = 500f − fontSize.Width;
e.Graphics.DrawString(indexDecimal.ToString("N"), printFont, Brushes.Black, column2Float, yFloat); yFloat += lineHeightFloat; }}
Displaying a Print Preview
A really great feature of the printing model is print preview . You can view the printer’s output on the screen and then choose to print or cancel. This is espe-cially helpful for testing and debugging a program so that you don’t have to keep sending pages to the printer and wasting paper. The PrintPreviewDialog component is the key to print preview. You add the control to your form’s component tray; the default name is printPre-viewDialog1 ( Figure 7.11 ). Since you can use the same dialog for all print previews, you do not need to rename the component. You write two lines of code in the event handler for the button or menu item where the user selects the print preview option. The PrintPreviewDialog component uses the same PrintDocument component that you declared for printer output. You assign the PrintDocument to the Document property of the PrintPreviewDialog and execute the ShowDialog method. The same PrintPage event handler executes as for the PrintDocument.
F i g u r e 7 . 1 1
Add a PrintPreviewDialog component to your form’s component tray.
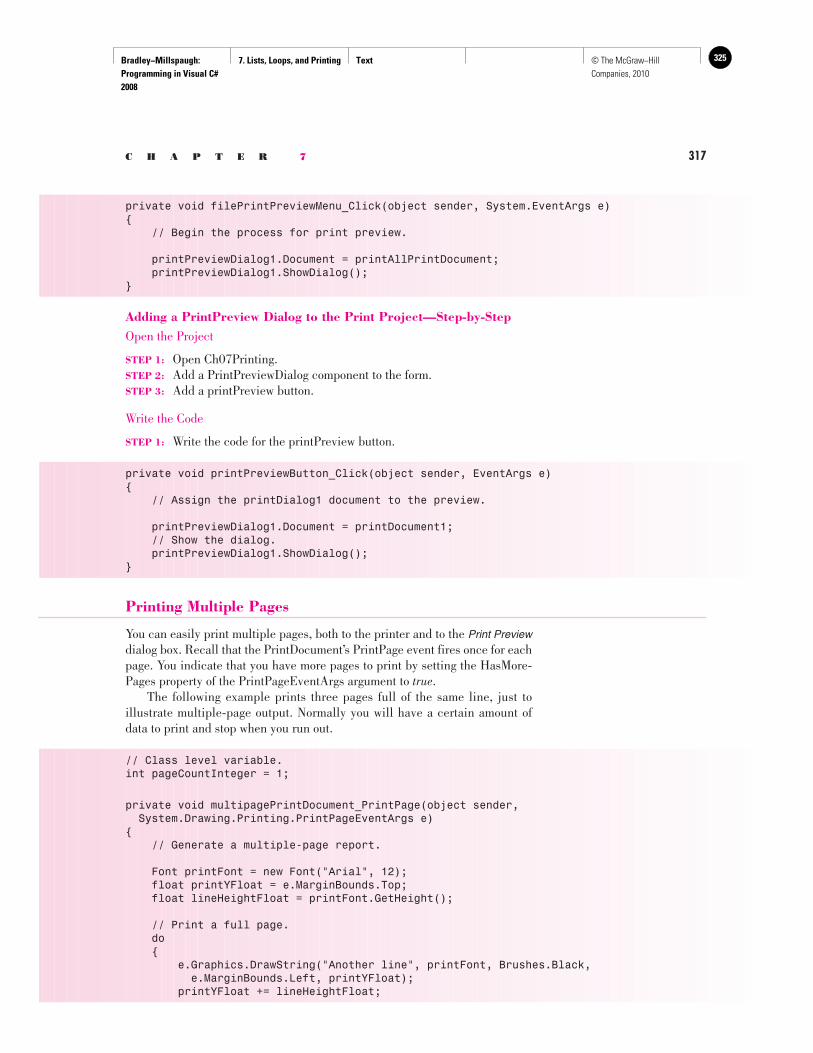
Bradley−Millspaugh: Programming in Visual C# 2008
7. Lists, Loops, and Printing Text 325© The McGraw−Hill Companies, 2010
C H A P T E R 7 317
private void filePrintPreviewMenu_Click(object sender, System.EventArgs e){ // Begin the process for print preview.
printPreviewDialog1.Document = printAllPrintDocument; printPreviewDialog1.ShowDialog();}
Adding a PrintPreview Dialog to the Print Project—Step-by-Step Open the Project
STEP 1: Open Ch07Printing. STEP 2: Add a PrintPreviewDialog component to the form.STEP 3: Add a printPreview button.
Write the Code
STEP 1: Write the code for the printPreview button.
private void printPreviewButton_Click(object sender, EventArgs e){ // Assign the printDialog1 document to the preview.
printPreviewDialog1.Document = printDocument1; // Show the dialog. printPreviewDialog1.ShowDialog();}
Printing Multiple Pages
You can easily print multiple pages, both to the printer and to the Print Preview dialog box. Recall that the PrintDocument’s PrintPage event fires once for each page. You indicate that you have more pages to print by setting the HasMore-Pages property of the PrintPageEventArgs argument to true . The following example prints three pages full of the same line, just to illustrate multiple-page output. Normally you will have a certain amount of data to print and stop when you run out.
// Class level variable.int pageCountInteger = 1;
private void multipagePrintDocument_PrintPage(object sender, System.Drawing.Printing.PrintPageEventArgs e){ // Generate a multiple-page report.
Font printFont = new Font("Arial", 12); float printYFloat = e.MarginBounds.Top; float lineHeightFloat = printFont.GetHeight();
// Print a full page. do { e.Graphics.DrawString("Another line", printFont, Brushes.Black, e.MarginBounds.Left, printYFloat); printYFloat += lineHeightFloat;
Bradley−Millspaugh: Programming in Visual C# 2008
7. Lists, Loops, and Printing Text326 © The McGraw−Hill Companies, 2010
318 V I S U A L C# Lists, Loops, and Printing
// Stop at bottom margin. } while (printYFloat <= e.MarginBounds.Bottom); pageCountInteger++;
if (pageCountInteger <= 3) { e.HasMorePages = true; } else { e.HasMorePages = false; pageCountInteger = 1; //Reset the page counter. }}
➤ Feedback 7.4 What is the purpose of each of these elements? Where and how is each used?
1. The PrintDocument component. 2. The Print method. 3. The PrintPage event. 4. The DrawString method. 5. System.Drawing.Printing.PrintPageEventArgs . 6. MarginBounds.Left . 7. The PrintPreviewDialog component.
Your Hands-On Programming Example
Create a project for Look Sharp Fitness Center that contains a drop-down combo box of the current class offerings. Initially the items collection should contain Pilates, Step, Kickboxing, Body Sculpting, and Spinning. Include a text box for the client name. Print the name when printing the selected course. An Edit menu will contain options for adding or removing a course, clearing the list, or displaying a count of courses. Use a loop to check for duplicates when adding a new course. Verify that the user wants to clear the list before removing all items. When removing an item, check that a course is selected. The File menu should contain menu items for Print All Courses and for Print Selected Course . Use a separator bar between the Print s and the Exit . Send all printer output to the Print Preview window.
Planning the Project Sketch a form ( Figure 7.12 ), which your users sign off as meeting their needs.
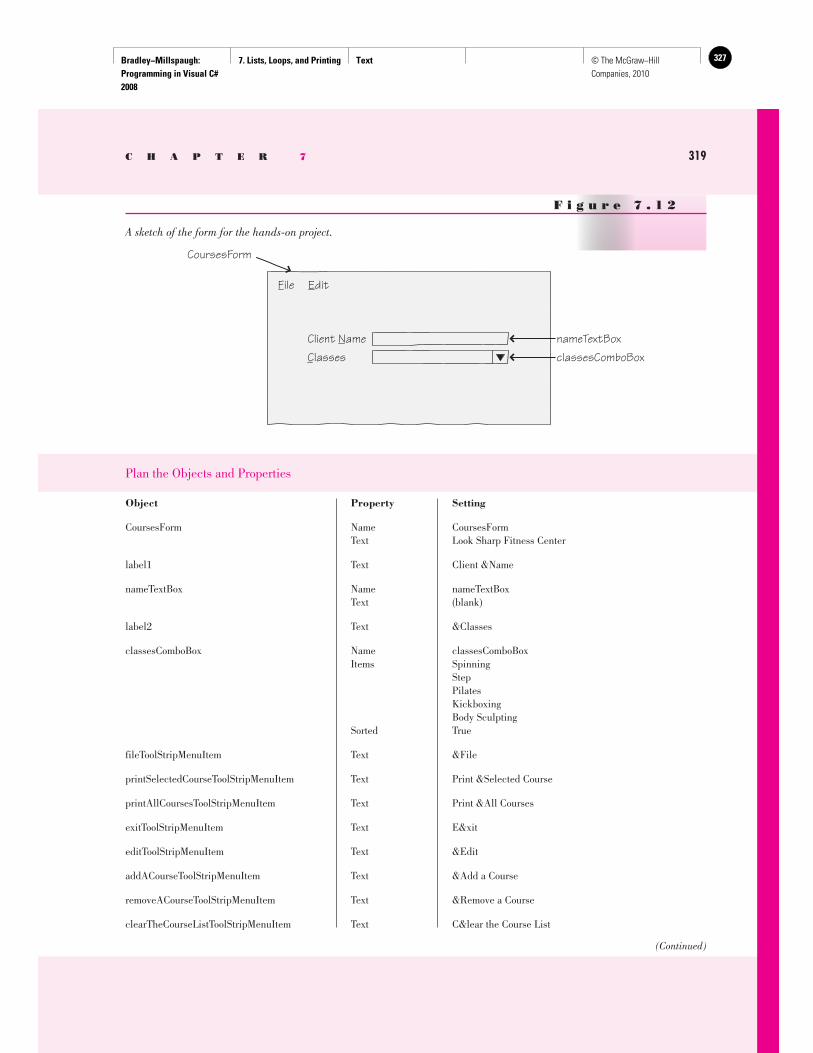
Bradley−Millspaugh: Programming in Visual C# 2008
7. Lists, Loops, and Printing Text 327© The McGraw−Hill Companies, 2010
C H A P T E R 7 319
Plan the Objects and Properties
Object Property Setting
CoursesForm Name CoursesForm Text Look Sharp Fitness Center
label1 Text Client &Name
nameTextBox Name nameTextBox Text (blank)
label2 Text &Classes
classesComboBox Name classesComboBox Items Spinning Step Pilates Kickboxing Body Sculpting Sorted True
fileToolStripMenuItem Text &File
printSelectedCourseToolStripMenuItem Text Print &Selected Course
printAllCoursesToolStripMenuItem Text Print &All Courses
exitToolStripMenuItem Text E&xit
editToolStripMenuItem Text &Edit
addACourseToolStripMenuItem Text &Add a Course
removeACourseToolStripMenuItem Text &Remove a Course
clearTheCourseListToolStripMenuItem Text C&lear the Course List
F i g u r e 7 . 1 2
A sketch of the form for the hands-on project.
nameTextBoxclassesComboBox
CoursesForm
File Edit
Client NameClasses
(Continued)
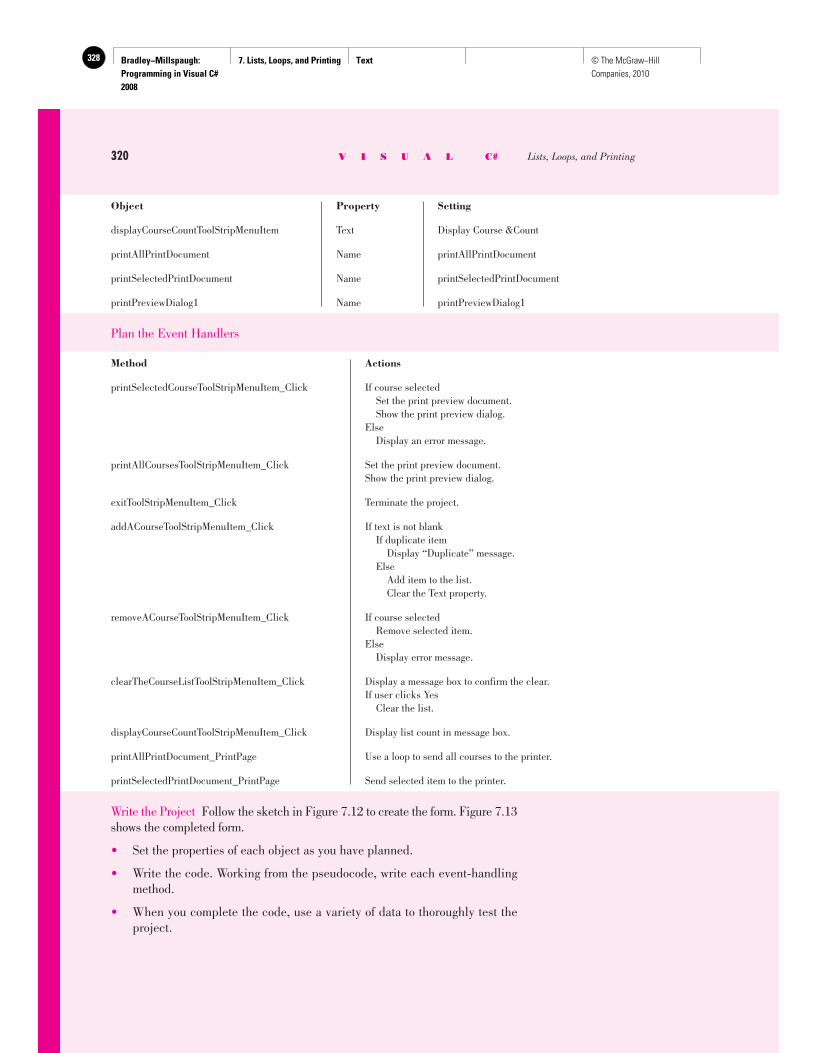
Bradley−Millspaugh: Programming in Visual C# 2008
7. Lists, Loops, and Printing Text328 © The McGraw−Hill Companies, 2010
320 V I S U A L C# Lists, Loops, and Printing
displayCourseCountToolStripMenuItem Text Display Course &Count
printAllPrintDocument Name printAllPrintDocument
printSelectedPrintDocument Name printSelectedPrintDocument
printPreviewDialog1 Name printPreviewDialog1
Plan the Event Handlers
Method Actions
printSelectedCourseToolStripMenuItem_Click If course selected Set the print preview document. Show the print preview dialog. Else Display an error message.
printAllCoursesToolStripMenuItem_Click Set the print preview document. Show the print preview dialog.
exitToolStripMenuItem_Click Terminate the project.
addACourseToolStripMenuItem_Click If text is not blank If duplicate item Display “Duplicate” message. Else Add item to the list. Clear the Text property.
removeACourseToolStripMenuItem_Click If course selected Remove selected item. Else Display error message.
clearTheCourseListToolStripMenuItem_Click Display a message box to confirm the clear. If user clicks Yes Clear the list.
displayCourseCountToolStripMenuItem_Click Display list count in message box.
printAllPrintDocument_PrintPage Use a loop to send all courses to the printer.
printSelectedPrintDocument_PrintPage Send selected item to the printer.
Write the Project Follow the sketch in Figure 7.12 to create the form. Figure 7.13 shows the completed form.
• Set the properties of each object as you have planned.
• Write the code. Working from the pseudocode, write each event-handling method.
• When you complete the code, use a variety of data to thoroughly test the project.
Object Property Setting
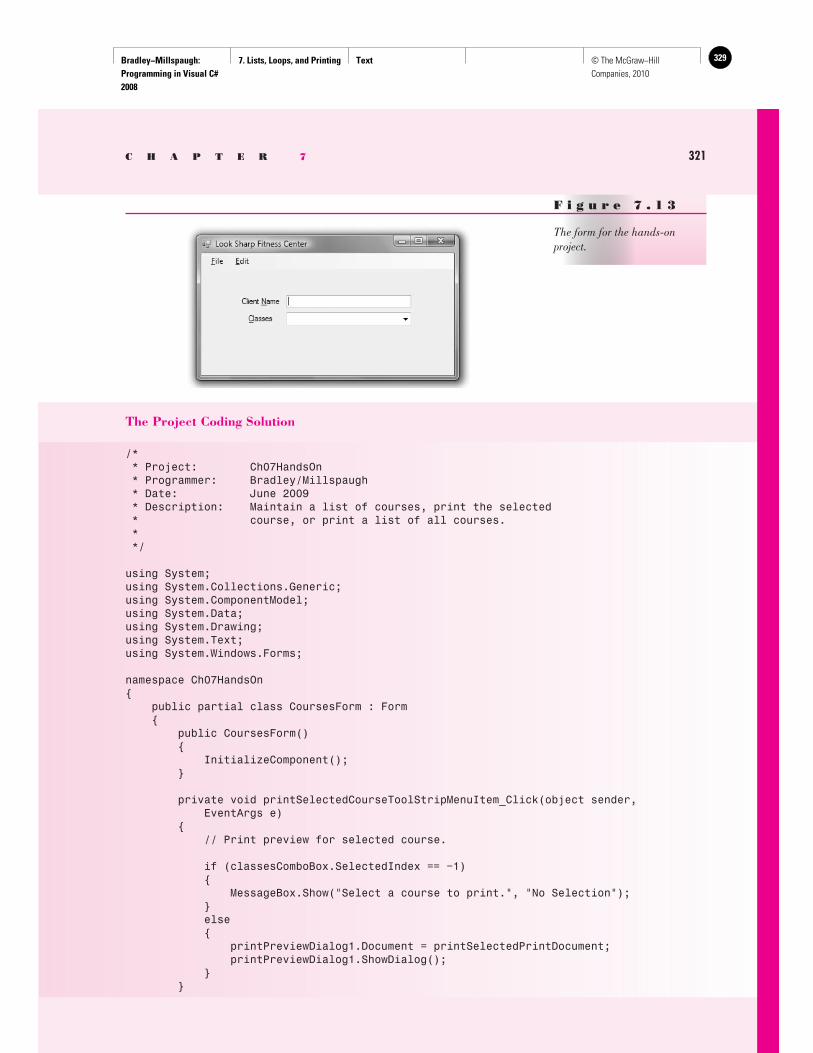
Bradley−Millspaugh: Programming in Visual C# 2008
7. Lists, Loops, and Printing Text 329© The McGraw−Hill Companies, 2010
C H A P T E R 7 321
The Project Coding Solution
/* * Project: Ch07HandsOn * Programmer: Bradley/Millspaugh * Date: June 2009 * Description: Maintain a list of courses, print the selected * course, or print a list of all courses. * */
using System;using System.Collections.Generic;using System.ComponentModel;using System.Data;using System.Drawing;using System.Text;using System.Windows.Forms;
namespace Ch07HandsOn{ public partial class CoursesForm : Form { public CoursesForm() { InitializeComponent(); }
private void printSelectedCourseToolStripMenuItem_Click(object sender, EventArgs e) { // Print preview for selected course.
if (classesComboBox.SelectedIndex == −1) { MessageBox.Show("Select a course to print.", "No Selection"); } else { printPreviewDialog1.Document = printSelectedPrintDocument; printPreviewDialog1.ShowDialog(); } }
F i g u r e 7 . 1 3
The form for the hands-on project.
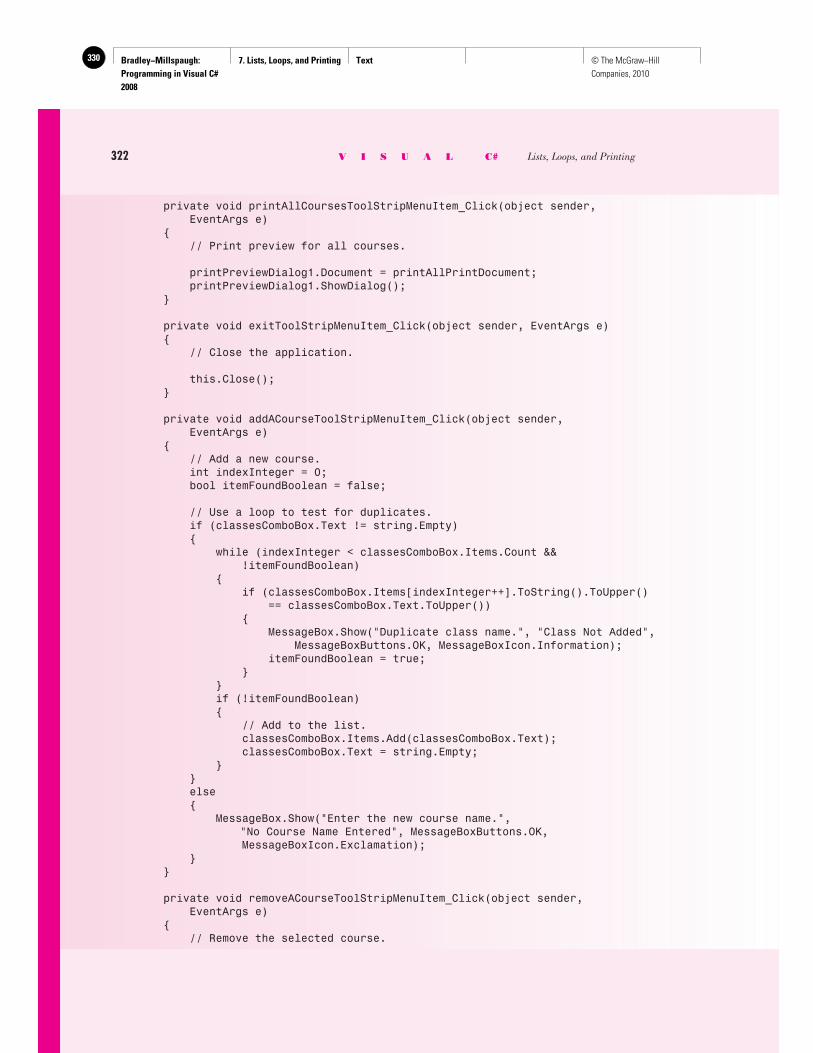
Bradley−Millspaugh: Programming in Visual C# 2008
7. Lists, Loops, and Printing Text330 © The McGraw−Hill Companies, 2010
322 V I S U A L C# Lists, Loops, and Printing
private void printAllCoursesToolStripMenuItem_Click(object sender, EventArgs e) { // Print preview for all courses.
printPreviewDialog1.Document = printAllPrintDocument; printPreviewDialog1.ShowDialog(); }
private void exitToolStripMenuItem_Click(object sender, EventArgs e) { // Close the application.
this.Close(); }
private void addACourseToolStripMenuItem_Click(object sender, EventArgs e) { // Add a new course. int indexInteger = 0; bool itemFoundBoolean = false;
// Use a loop to test for duplicates. if (classesComboBox.Text != string.Empty) { while (indexInteger < classesComboBox.Items.Count && !itemFoundBoolean) { if (classesComboBox.Items[indexInteger++].ToString().ToUpper() == classesComboBox.Text.ToUpper()) { MessageBox.Show("Duplicate class name.", "Class Not Added", MessageBoxButtons.OK, MessageBoxIcon.Information); itemFoundBoolean = true; } } if (!itemFoundBoolean) { // Add to the list. classesComboBox.Items.Add(classesComboBox.Text); classesComboBox.Text = string.Empty; } } else { MessageBox.Show("Enter the new course name.", "No Course Name Entered", MessageBoxButtons.OK, MessageBoxIcon.Exclamation); } }
private void removeACourseToolStripMenuItem_Click(object sender, EventArgs e) { // Remove the selected course.
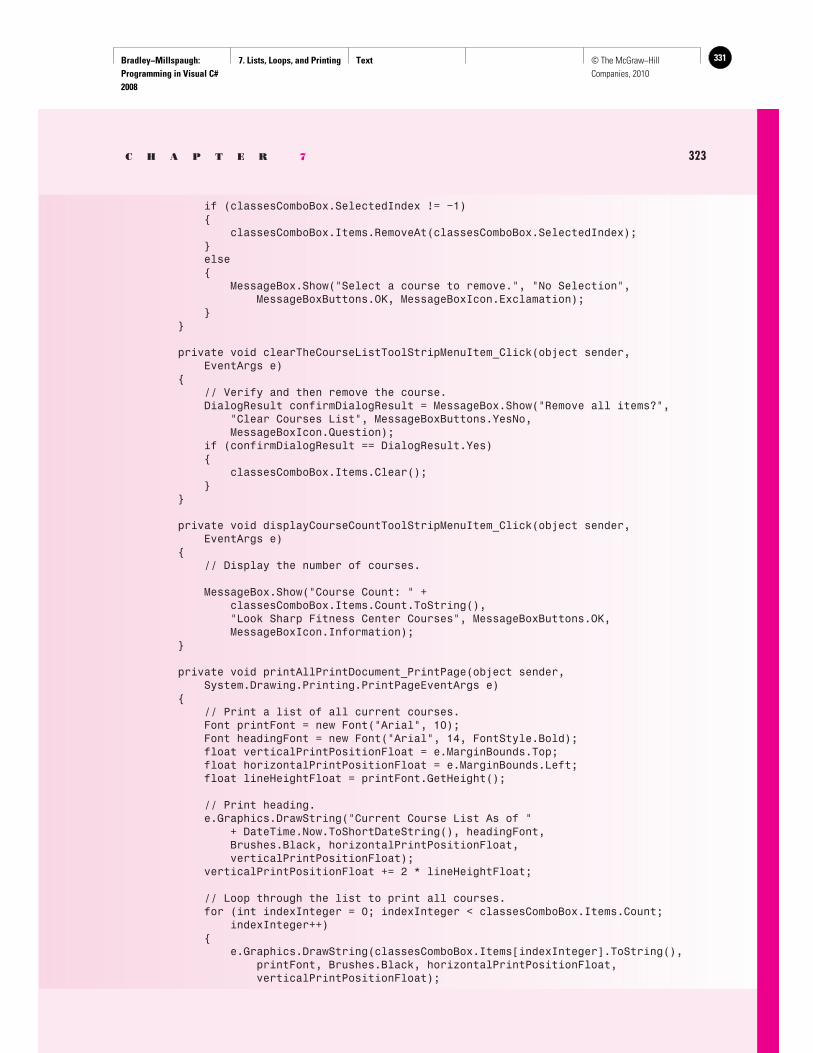
Bradley−Millspaugh: Programming in Visual C# 2008
7. Lists, Loops, and Printing Text 331© The McGraw−Hill Companies, 2010
C H A P T E R 7 323
if (classesComboBox.SelectedIndex != −1) { classesComboBox.Items.RemoveAt(classesComboBox.SelectedIndex); } else { MessageBox.Show("Select a course to remove.", "No Selection", MessageBoxButtons.OK, MessageBoxIcon.Exclamation); } }
private void clearTheCourseListToolStripMenuItem_Click(object sender, EventArgs e) { // Verify and then remove the course. DialogResult confirmDialogResult = MessageBox.Show("Remove all items?", "Clear Courses List", MessageBoxButtons.YesNo, MessageBoxIcon.Question); if (confirmDialogResult == DialogResult.Yes) { classesComboBox.Items.Clear(); } }
private void displayCourseCountToolStripMenuItem_Click(object sender, EventArgs e) { // Display the number of courses.
MessageBox.Show("Course Count: " + classesComboBox.Items.Count.ToString(), "Look Sharp Fitness Center Courses", MessageBoxButtons.OK, MessageBoxIcon.Information); }
private void printAllPrintDocument_PrintPage(object sender, System.Drawing.Printing.PrintPageEventArgs e) { // Print a list of all current courses. Font printFont = new Font("Arial", 10); Font headingFont = new Font("Arial", 14, FontStyle.Bold); float verticalPrintPositionFloat = e.MarginBounds.Top; float horizontalPrintPositionFloat = e.MarginBounds.Left; float lineHeightFloat = printFont.GetHeight();
// Print heading. e.Graphics.DrawString("Current Course List As of " + DateTime.Now.ToShortDateString(), headingFont, Brushes.Black, horizontalPrintPositionFloat, verticalPrintPositionFloat); verticalPrintPositionFloat += 2 * lineHeightFloat;
// Loop through the list to print all courses. for (int indexInteger = 0; indexInteger < classesComboBox.Items.Count; indexInteger++) { e.Graphics.DrawString(classesComboBox.Items[indexInteger].ToString(), printFont, Brushes.Black, horizontalPrintPositionFloat, verticalPrintPositionFloat);
Bradley−Millspaugh: Programming in Visual C# 2008
7. Lists, Loops, and Printing Text332 © The McGraw−Hill Companies, 2010
verticalPrintPositionFloat += lineHeightFloat; } }
private void printSelectedPrintDocument_PrintPage(object sender, System.Drawing.Printing.PrintPageEventArgs e) { // Set up output for selected item. Font printFont = new Font("Arial", 12);
// Print heading. e.Graphics.DrawString("Selected Course:", printFont, Brushes.Black, 100, 100); e.Graphics.DrawString(nameTextBox.Text + " \t" + classesComboBox.SelectedItem.ToString(), printFont, Brushes.Black, 100, 140); } }}
324 V I S U A L C# Lists, Loops, and Printing
S u m m a r y
1. List boxes and combo boxes hold lists of values. The three styles of combo boxes are simple combo boxes, drop-down combo boxes, and drop-down lists.
2. The size of a list box or combo box is determined at design time. If all of the items will not fit into the box, C# automatically adds scroll bars.
3. The values for the items in a list are stored in the Items property, which is a collection. The items can be entered in the Items property in the String Collection Editor. At run time, items are added to lists using the Items.Add or Items.Insert method.
4. The SelectedIndex property can be used to select an item in the list or to determine which item is selected.
5. The Items.Count property holds the number of elements in the list. 6. The Items collection holds all elements of the list. The individual elements
can be referenced by using an index. 7. The Items.Remove and Items.RemoveAt methods remove one element
from a list. 8. The Items.Clear method may be used to clear all of the contents of a list
box’s Items collection at once. 9. Code can be written for several events of list boxes and combo boxes.
Combo boxes have a TextChanged event; both combo boxes and list boxes have Enter and Leave events.
10. A loop allows a statement or series of statements to be repeated. while and do/while loops continue to execute the statements in the loop until a con-dition is met. Each pass through a loop is called an iteration.
11. do loops can have the condition test at the bottom of the loop and while loops test the condition at the top of the loop.
12. A do loop can be used to locate a selected item in a combo box. 13. A loop index controls for loops; the index is initialized to an initial value.
After each iteration, the loop index is incremented. The loop is terminated when the condition is met.
Bradley−Millspaugh: Programming in Visual C# 2008
7. Lists, Loops, and Printing Text 333© The McGraw−Hill Companies, 2010
C H A P T E R 7 325
14. The PrintDocument and PrintPreviewDialog components can be used to send program output to the printer or the screen.
15. The Print method of the PrintDialog control begins a print operation. The control’s PrintPage event fires once for each page to print. All printing logic belongs in the PrintPage event handler. The PrintPage event contin-ues to fire as long as the HasMorePages property of the PrintDocument component has a value of true .
16. The page to print or display is a graphics object. Use the DrawString method to send a string of text to the page, specifying X and Y coordinates for the string.
17. Aligning columns of numbers is difficult using proportional fonts. Num-bers can be right-aligned by formatting the number, measuring the length of the formatted string in pixels, and subtracting the length from the right end of the column for the X coordinate.
K e y T e r m s callback 310 collection 295 ComboBox control 294 do/while loop 302 DrawString method 313 drop-down combo box 294 drop-down list 294 entry test 302 exit test 303 for loop 305 GetHeight method 314 Items property 296 Items.Add method 297 Items.Clear method 300 Items.Count property 298 Items.Insert method 297 Items.Remove method 300
Items.RemoveAt method 299 iteration 302 ListBox control 294 loop 302 loop index 305 posttest 303 pretest 302 Print method 310 print preview 316 PrintDocument component 310 PrintPage event handler 310 PrintPreviewDialog component 316 SelectedIndex property 298 simple combo box 294 simple list box 294 Sorted property 297 while loop 302
R e v i e w Q u e s t i o n s
1. What is a list box? a combo box? 2. Name and describe the three styles of combo boxes. 3. How can you make scroll bars appear on a list box or combo box? 4. Explain the purpose of the SelectedIndex property and the Items.Count
property. 5. When and how is information placed inside a list box or a combo box? 6. In what situation would a loop be used in a method? 7. Explain the difference between a pretest and a posttest in a loop. 8. Explain the differences between a do and a while loop. 9. What are the steps in processing a for loop?
Bradley−Millspaugh: Programming in Visual C# 2008
7. Lists, Loops, and Printing Text334 © The McGraw−Hill Companies, 2010
326 V I S U A L C# Lists, Loops, and Printing
10. Discuss how and when the values of the loop index change throughout the processing of the loop.
11. What is the purpose of the PrintDocument component? the PrintPreview-Dialog component?
12. In what method do you write the logic for sending output to the printer? 13. What is the purpose of the X and Y coordinates on a print page?
P r o g r a m m i n g E x e r c i s e s
7.1 Create a project that obtains student information, prints the data entered on the form, and prints a list of the schools in the list.
The Form :
• Text boxes for entering the name and units completed.
• Radio buttons for Freshman, Sophomore, Junior, and Senior.
• Check box for Dean’s List.
• A list box for the following majors: Accounting, Business, Computer Information Systems, and Marketing.
• A simple combo box for the name of the high school—initially loaded with Franklin, Highland, Midtown, and West Highland. If the user types in a new school name, it should be added to the list. The list should be sorted.
• Print button that prints the data from the form. Include a title and identifying labels for the data. Use the Print Preview dialog box.
• An OK button that clears the entries from the form and resets the focus. The button should be the Accept button for the form.
Menus : The File menu should have an item for Print Schools and Exit . The Edit menu should have an item for Add High School ; the Help menu should have an item for About that displays the About box. Include appropriate access keys on your menu items.
Note : Print your name at the top of the printer output for the schools and include a report title. Display the printer output in the Print Preview dialog box.
7.2 R ’n R—for Reading ’n Refreshment needs a project that contains a form for entering book information, prints the information on the screen, and prints out the subjects from the list box.
The Form :
• Text boxes for author and title.
• Radio buttons for type: fiction or nonfiction.
• Drop-down list for subject that will include Best-Seller, Fantasy, Reli-gion, Romance, Humor, Science Fiction, Business, Philosophy, Edu-cation, Self-Help, and Mystery. Make the list sorted.
• List box for shelf number containing RC-1111, RC-1112, RC-1113, and RC-1114.
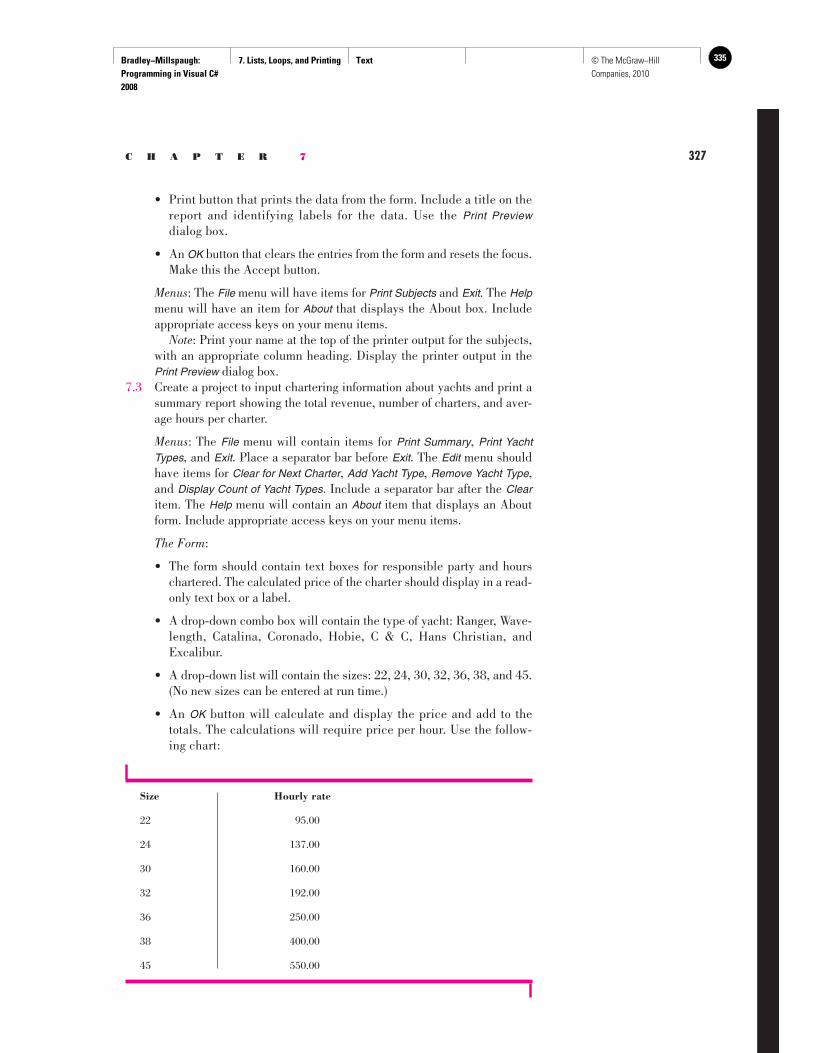
Bradley−Millspaugh: Programming in Visual C# 2008
7. Lists, Loops, and Printing Text 335© The McGraw−Hill Companies, 2010
C H A P T E R 7 327
• Print button that prints the data from the form. Include a title on the report and identifying labels for the data. Use the Print Preview dialog box.
• An OK button that clears the entries from the form and resets the focus. Make this the Accept button.
Menus : The File menu will have items for Print Subjects and Exit . The Help menu will have an item for About that displays the About box. Include appropriate access keys on your menu items.
Note : Print your name at the top of the printer output for the subjects, with an appropriate column heading. Display the printer output in the Print Preview dialog box.
7.3 Create a project to input chartering information about yachts and print a summary report showing the total revenue, number of charters, and aver-age hours per charter.
Menus : The File menu will contain items for Print Summary , Print Yacht Types , and Exit . Place a separator bar before Exit . The Edit menu should have items for Clear for Next Charter , Add Yacht Type , Remove Yacht Type , and Display Count of Yacht Types . Include a separator bar after the Clear item. The Help menu will contain an About item that displays an About form. Include appropriate access keys on your menu items.
The Form :
• The form should contain text boxes for responsible party and hours chartered. The calculated price of the charter should display in a read-only text box or a label.
• A drop-down combo box will contain the type of yacht: Ranger, Wave-length, Catalina, Coronado, Hobie, C & C, Hans Christian, and Excalibur.
• A drop-down list will contain the sizes: 22, 24, 30, 32, 36, 38, and 45. (No new sizes can be entered at run time.)
• An OK button will calculate and display the price and add to the totals. The calculations will require price per hour. Use the follow-ing chart:
Size Hourly rate
22 95.00
24 137.00
30 160.00
32 192.00
36 250.00
38 400.00
45 550.00
Bradley−Millspaugh: Programming in Visual C# 2008
7. Lists, Loops, and Printing Text336 © The McGraw−Hill Companies, 2010
328 V I S U A L C# Lists, Loops, and Printing
• A Clear button will clear the contents of the screen controls. The func-tions of the Clear button are the same as for the Clear for Next Charter menu item.
• Make the OK button the Accept button and the Clear button the form’s Cancel button.
Summary Report : The summary report will print the summary information and send the report to a Print Preview dialog box. The summary informa-tion will include Number of Charters, Total Revenue, and Average Hours Chartered. Include your name on the output, a report title, and identify-ing labels for the summary information.
Yacht Types Report : Display the yacht types in the combo box in the Print Preview dialog box. Include your name and a title at the top of the report.
7.4 Maintain a list of bagel types for Bradley’s Bagels. Use a drop-down combo box to hold the bagel types and use buttons or menu choices to Add Bagel Type , Remove Bagel Type , Clear Bagel List , Print Bagel List , Display Bagel Type Count , and Exit . Keep the list sorted in alphabetic order. Include appropriate access keys on your menu items.
Do not allow a blank type to be added to the list. Display an error message if the user selects Remove without first selecting a bagel type.
Before clearing the list, display a message box to confirm the operation. Here are some suggested bagel types. You can make up your own list.
Plain Poppy seed Egg Sesame seed Rye Banana nut Salt Blueberry
7.5 Modify Programming Exercise 7.4 to not allow duplicate bagel types to be added to the list.
Case Studies Custom Supplies Mail Order
Create a project for Custom Supplies Mail Order to maintain a list of catalogs. Use a drop-down combo box for the catalog names and allow the user to enter new catalog names, delete catalog names, display a count of the number of catalogs, clear the catalog list, or print the catalog list. Do not allow a blank catalog name to be added to the list. Display an error message if the user selects Remove without first selecting a catalog name. Before
clearing the list, display a message box to confirm the operation. To begin, the catalog list should hold these cata-log names: Odds and Ends, Solutions, Camping Needs, ToolTime, Spiegel, The Outlet, and The Large Size. Display the printed output in the Print Preview dia-log box. Include your name and a heading at the top of the report.
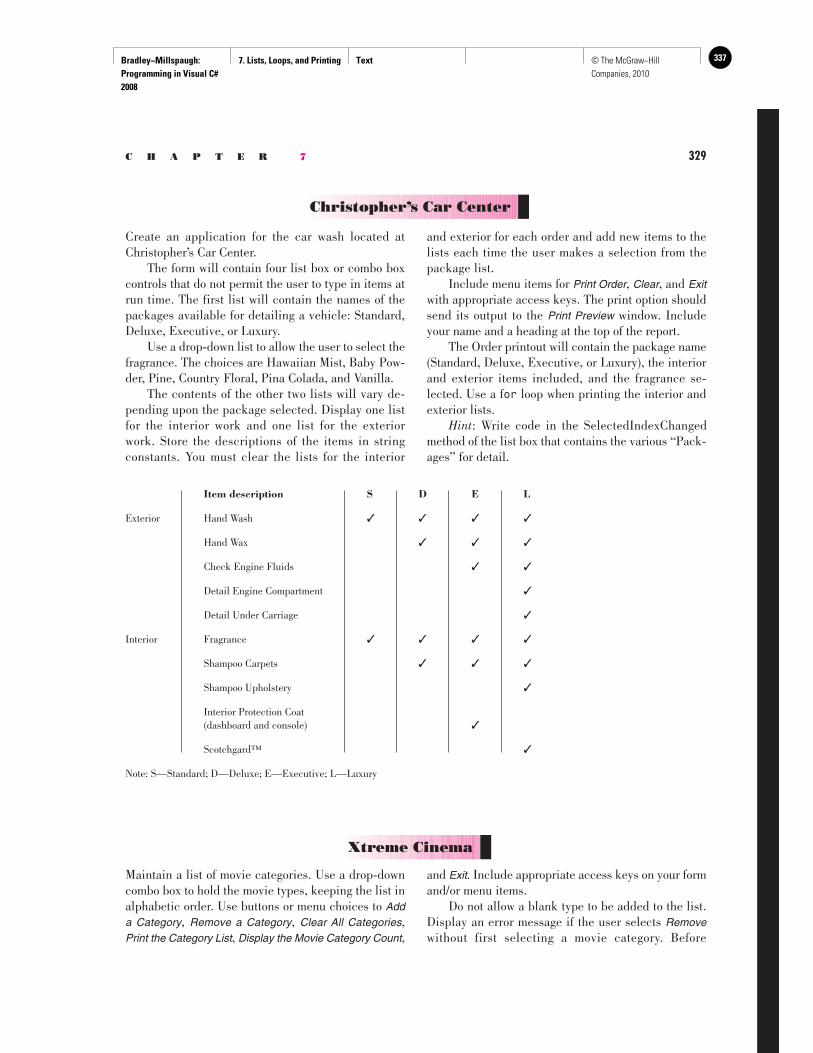
Bradley−Millspaugh: Programming in Visual C# 2008
7. Lists, Loops, and Printing Text 337© The McGraw−Hill Companies, 2010
C H A P T E R 7 329
Create an application for the car wash located at Christopher’s Car Center. The form will contain four list box or combo box controls that do not permit the user to type in items at run time. The first list will contain the names of the packages available for detailing a vehicle: Standard, Deluxe, Executive, or Luxury. Use a drop-down list to allow the user to select the fragrance. The choices are Hawaiian Mist, Baby Pow-der, Pine, Country Floral, Pina Colada, and Vanilla. The contents of the other two lists will vary de-pending upon the package selected. Display one list for the interior work and one list for the exterior work. Store the descriptions of the items in string constants. You must clear the lists for the interior
Christopher’s Car Center
and exterior for each order and add new items to the lists each time the user makes a selection from the package list. Include menu items for Print Order , Clear , and Exit with appropriate access keys. The print option should send its output to the Print Preview window. Include your name and a heading at the top of the report. The Order printout will contain the package name (Standard, Deluxe, Executive, or Luxury), the interior and exterior items included, and the fragrance se-lected. Use a f or loop when printing the interior and exterior lists. Hint : Write code in the SelectedIndexChanged method of the list box that contains the various “Pack-ages” for detail.
Item description S D E L
Exterior Hand Wash ✓ ✓ ✓ ✓
Hand Wax ✓ ✓ ✓
Check Engine Fluids ✓ ✓
Detail Engine Compartment ✓
Detail Under Carriage ✓
Interior Fragrance ✓ ✓ ✓ ✓
Shampoo Carpets ✓ ✓ ✓
Shampoo Upholstery ✓
Interior Protection Coat (dashboard and console) ✓
Scotchgard™ ✓
Note: S—Standard; D—Deluxe; E—Executive; L—Luxury
Xtreme Cinema
Maintain a list of movie categories. Use a drop-down combo box to hold the movie types, keeping the list in alphabetic order. Use buttons or menu choices to Add a Category , Remove a Category , Clear All Categories , Print the Category List , Display the Movie Category Count ,
and Exit . Include appropriate access keys on your form and/or menu items. Do not allow a blank type to be added to the list. Display an error message if the user selects Remove without first selecting a movie category. Before
Bradley−Millspaugh: Programming in Visual C# 2008
7. Lists, Loops, and Printing Text338 © The McGraw−Hill Companies, 2010
330 V I S U A L C# Lists, Loops, and Printing
Cool Boards
Write a project to maintain a list of shirt styles. Keep the styles in a drop-down combo box, with styles such as crew, turtleneck, or crop top. Add a Style menu with options to Add Style , Remove Style , Clear Style List , and Count Styles . Add a
Print Style List to the File menu and include access keys and keyboard shortcuts for the menu items. Display the printed output in the Print Preview dialog box. Include your name and a heading at the top of the report.
clearing the list, display a message box to confirm the operation. The starting categories are Comedy, Drama, Action, Sci-Fi, and Horror.
Display the printed output in the Print Preview dialog box. Include your name and a heading at the top of the report.
Bradley−Millspaugh: Programming in Visual C# 2008
8. Arrays Text 339© The McGraw−Hill Companies, 2010
try{ // Convert input values to numeric and assign quantityInteger = int.Parse(quantityTextBox.T try { priceDecimal = decimal.Parse(priceTextBox // Calculate values. extendedPriceDecimal = quantityInteger * discountDecimal = Decimal.Round( (extendedPriceDecimal * DISCOUNT_RATE_ amountDueDecimal = extendedPriceDecimal - totalAmountDecimal += amountDueDecimal; numberTransactionsInteger++; // Format and display answers. extendedPriceTextBox.Text = extendedPrice
C H A P T E R
8 Arrays
at the completion of this chapter, you will be able to . . .
1. Establish an array and refer to individual elements in the array with subscripts.
2. Use a foreach loop to traverse the elements of an array.
3. Create a structure for multiple fields of related data.
4. Accumulate totals using arrays.
5. Distinguish between direct access and indirect access of a table.
6. Write a table lookup for matching an array element.
7. Combine the advantages of list box controls with arrays.
8. Store and look up data in multidimensional arrays.
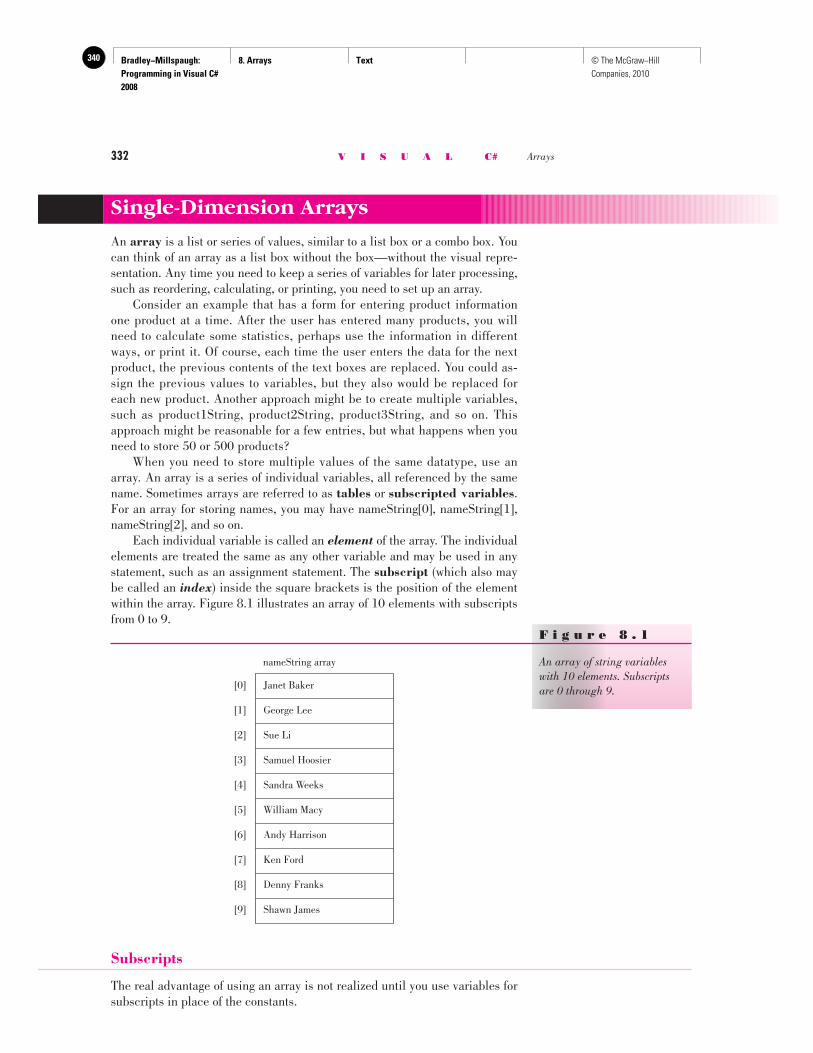
Bradley−Millspaugh: Programming in Visual C# 2008
8. Arrays Text340 © The McGraw−Hill Companies, 2010
332 V I S U A L C# Arrays
Subscripts
The real advantage of using an array is not realized until you use variables for subscripts in place of the constants.
Single-Dimension Arrays
An array is a list or series of values, similar to a list box or a combo box. You can think of an array as a list box without the box—without the visual repre-sentation. Any time you need to keep a series of variables for later processing, such as reordering, calculating, or printing, you need to set up an array. Consider an example that has a form for entering product information one product at a time. After the user has entered many products, you will need to calculate some statistics, perhaps use the information in different ways, or print it. Of course, each time the user enters the data for the next product, the previous contents of the text boxes are replaced. You could as-sign the previous values to variables, but they also would be replaced for each new product. Another approach might be to create multiple variables, such as product1String, product2String, product3String, and so on. This approach might be reasonable for a few entries, but what happens when you need to store 50 or 500 products? When you need to store multiple values of the same datatype, use an array. An array is a series of individual variables, all referenced by the same name. Sometimes arrays are referred to as tables or subscripted variables . For an array for storing names, you may have nameString[0], nameString[1], nameString[2], and so on. Each individual variable is called an element of the array. The individual elements are treated the same as any other variable and may be used in any statement, such as an assignment statement. The subscript (which also may be called an index ) inside the square brackets is the position of the element within the array. Figure 8.1 illustrates an array of 10 elements with subscripts from 0 to 9.
F i g u r e 8 . 1
An array of string variables with 10 elements. Subscripts are 0 through 9. [0] Janet Baker
[1] George Lee
[2] Sue Li
[3] Samuel Hoosier
[4] Sandra Weeks
[5] William Macy
[6] Andy Harrison
[7] Ken Ford
[8] Denny Franks
[9] Shawn James
nameString array
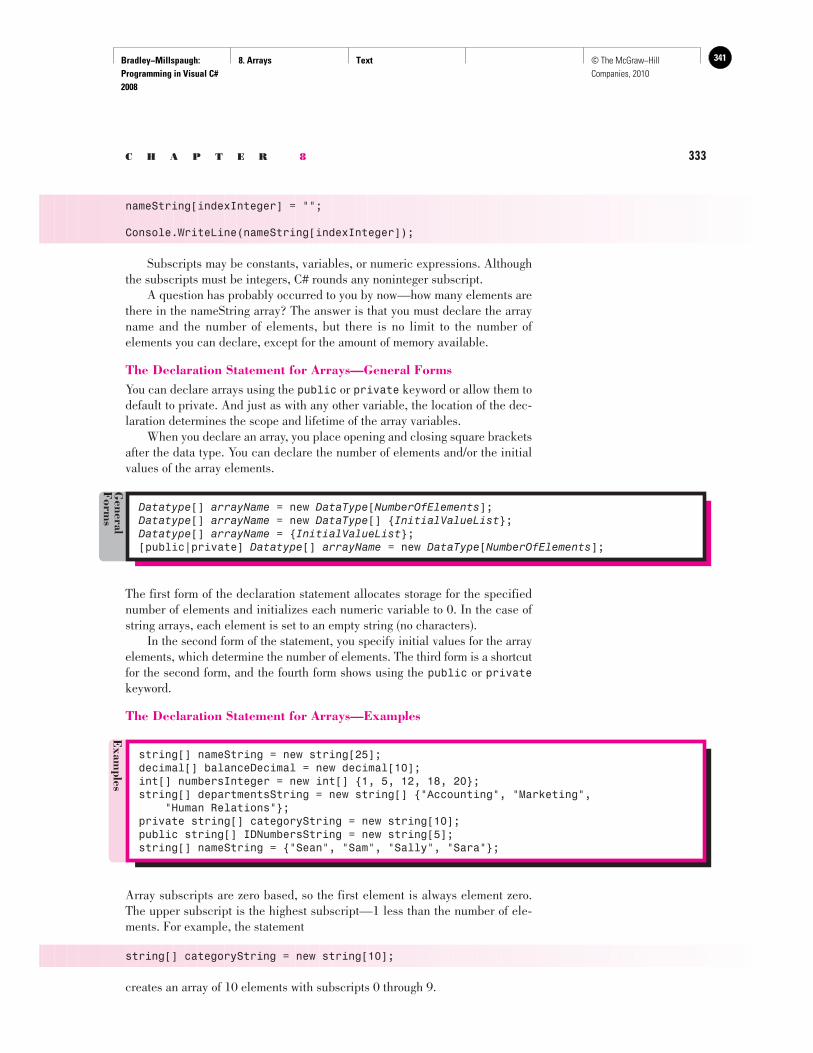
Bradley−Millspaugh: Programming in Visual C# 2008
8. Arrays Text 341© The McGraw−Hill Companies, 2010
C H A P T E R 8 333
nameString[indexInteger] = "";
Console.WriteLine(nameString[indexInteger]);
Subscripts may be constants, variables, or numeric expressions. Although the subscripts must be integers, C# rounds any noninteger subscript. A question has probably occurred to you by now—how many elements are there in the nameString array? The answer is that you must declare the array name and the number of elements, but there is no limit to the number of elements you can declare, except for the amount of memory available.
The Declaration Statement for Arrays—General Forms You can declare arrays using the public or private keyword or allow them to default to private. And just as with any other variable, the location of the dec-laration determines the scope and lifetime of the array variables. When you declare an array, you place opening and closing square brackets after the data type. You can declare the number of elements and/or the initial values of the array elements.
Datatype [] arrayName = new DataType [ NumberOfElements ]; Datatype [] arrayName = new DataType [] { InitialValueList }; Datatype [] arrayName = { InitialValueList }; [public|private] Datatype [] arrayName = new DataType [ NumberOfElements ];
General
Form
s
The first form of the declaration statement allocates storage for the specified number of elements and initializes each numeric variable to 0. In the case of string arrays, each element is set to an empty string (no characters). In the second form of the statement, you specify initial values for the array elements, which determine the number of elements. The third form is a shortcut for the second form, and the fourth form shows using the public or private keyword.
The Declaration Statement for Arrays—Examples
Exam
ples
string[] nameString = new string[25]; decimal[] balanceDecimal = new decimal[10]; int[] numbersInteger = new int[] {1, 5, 12, 18, 20}; string[] departmentsString = new string[] {"Accounting", "Marketing", "Human Relations"}; private string[] categoryString = new string[10]; public string[] IDNumbersString = new string[5]; string[] nameString = {"Sean", "Sam", "Sally", "Sara"};
Array subscripts are zero based, so the first element is always element zero. The upper subscript is the highest subscript—1 less than the number of ele-ments. For example, the statement
string[] categoryString = new string[10];
creates an array of 10 elements with subscripts 0 through 9.
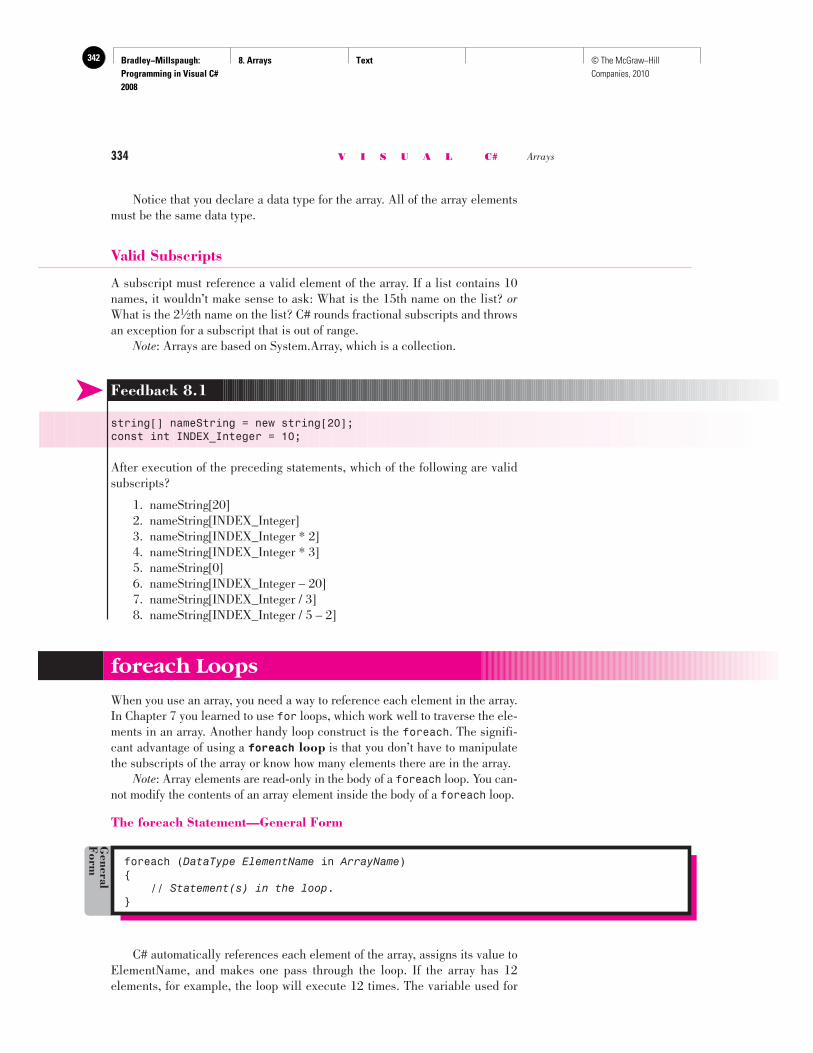
Bradley−Millspaugh: Programming in Visual C# 2008
8. Arrays Text342 © The McGraw−Hill Companies, 2010
334 V I S U A L C# Arrays
Notice that you declare a data type for the array. All of the array elements must be the same data type.
Valid Subscripts
A subscript must reference a valid element of the array. If a list contains 10 names, it wouldn’t make sense to ask: What is the 15th name on the list? or What is the 21⁄2th name on the list? C# rounds fractional subscripts and throws an exception for a subscript that is out of range. Note : Arrays are based on System.Array, which is a collection.
➤ Feedback 8.1
string[] nameString = new string[20]; const int INDEX_Integer = 10;
After execution of the preceding statements, which of the following are valid subscripts?
1. nameString[20] 2. nameString[INDEX_Integer] 3. nameString[INDEX_Integer * 2] 4. nameString[INDEX_Integer * 3] 5. nameString[0] 6. nameString[INDEX_Integer – 20] 7. nameString[INDEX_Integer / 3] 8. nameString[INDEX_Integer / 5 – 2]
foreach Loops
When you use an array, you need a way to reference each element in the array. In Chapter 7 you learned to use for loops, which work well to traverse the ele-ments in an array. Another handy loop construct is the foreach . The signifi-cant advantage of using a foreach loop is that you don’t have to manipulate the subscripts of the array or know how many elements there are in the array. Note: Array elements are read-only in the body of a foreach loop. You can-not modify the contents of an array element inside the body of a foreach loop.
The foreach Statement—General Form
foreach ( DataType ElementName in ArrayName ){ // Statement(s) in the loop .}
General
Form
C# automatically references each element of the array, assigns its value to ElementName, and makes one pass through the loop. If the array has 12 elements, for example, the loop will execute 12 times. The variable used for
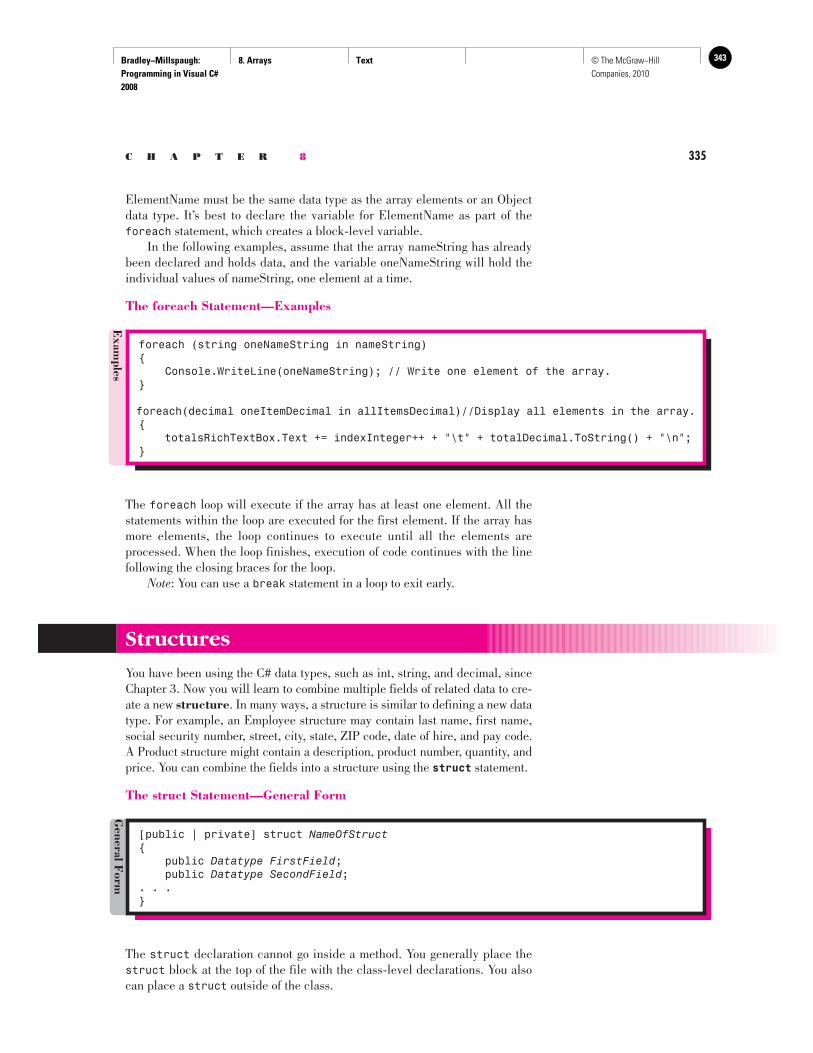
Bradley−Millspaugh: Programming in Visual C# 2008
8. Arrays Text 343© The McGraw−Hill Companies, 2010
C H A P T E R 8 335
ElementName must be the same data type as the array elements or an Object data type. It’s best to declare the variable for ElementName as part of the foreach statement, which creates a block-level variable. In the following examples, assume that the array nameString has already been declared and holds data, and the variable oneNameString will hold the individual values of nameString, one element at a time.
The foreach Statement—Examples
Exam
ples
foreach (string oneNameString in nameString){ Console.WriteLine(oneNameString); // Write one element of the array.}
foreach(decimal oneItemDecimal in allItemsDecimal)//Display all elements in the array.{ totalsRichTextBox.Text += indexInteger++ + "\t" + totalDecimal.ToString() + "\n";}
The foreach loop will execute if the array has at least one element. All the statements within the loop are executed for the first element. If the array has more elements, the loop continues to execute until all the elements are processed. When the loop finishes, execution of code continues with the line following the closing braces for the loop. Note : You can use a break statement in a loop to exit early.
Structures
You have been using the C# data types, such as int, string, and decimal, since Chapter 3. Now you will learn to combine multiple fields of related data to cre-ate a new structure . In many ways, a structure is similar to defining a new data type. For example, an Employee structure may contain last name, first name, social security number, street, city, state, ZIP code, date of hire, and pay code. A Product structure might contain a description, product number, quantity, and price. You can combine the fields into a structure using the struct statement.
The struct Statement—General Form
The struct declaration cannot go inside a method. You generally place the struct block at the top of the file with the class-level declarations. You also can place a struct outside of the class.
[public | private] struct NameOfStruct { public Datatype FirstField ; public Datatype SecondField ;. . .}
General F
orm
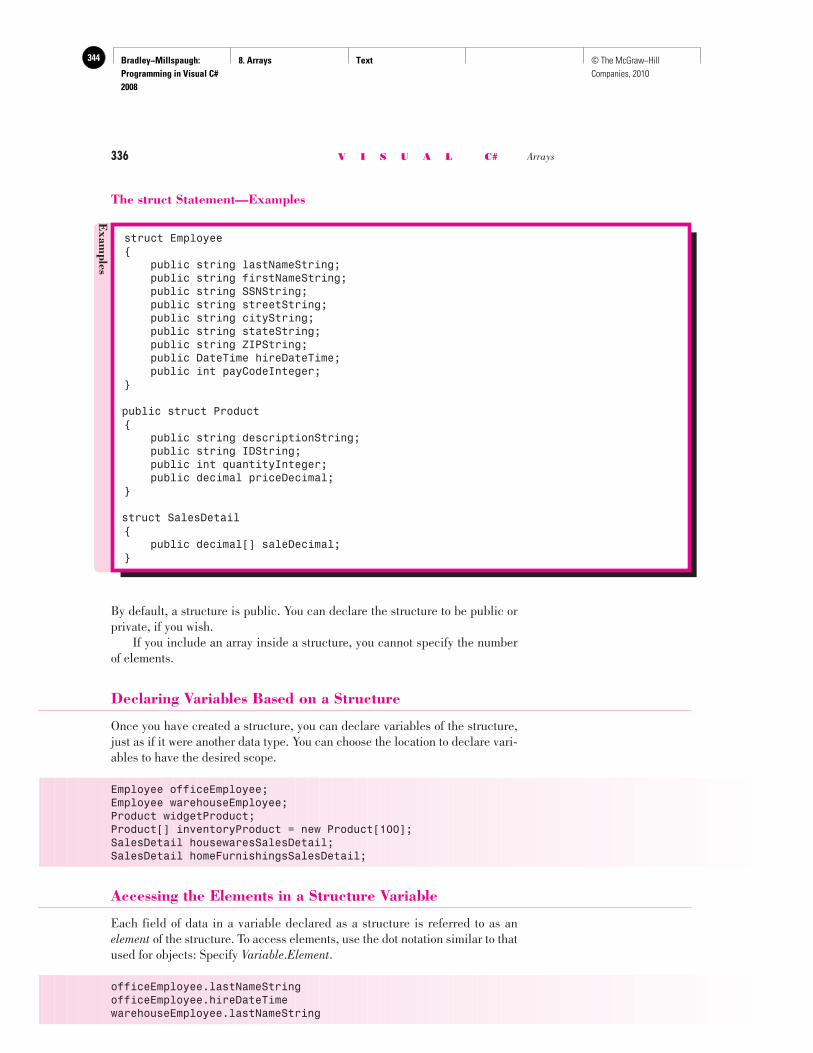
Bradley−Millspaugh: Programming in Visual C# 2008
8. Arrays Text344 © The McGraw−Hill Companies, 2010
336 V I S U A L C# Arrays
The struct Statement—Examples
By default, a structure is public. You can declare the structure to be public or private, if you wish. If you include an array inside a structure, you cannot specify the number of elements.
Declaring Variables Based on a Structure
Once you have created a structure, you can declare variables of the structure, just as if it were another data type. You can choose the location to declare vari-ables to have the desired scope.
Employee officeEmployee; Employee warehouseEmployee; Product widgetProduct; Product[] inventoryProduct = new Product[100]; SalesDetail housewaresSalesDetail; SalesDetail homeFurnishingsSalesDetail;
Accessing the Elements in a Structure Variable
Each field of data in a variable declared as a structure is referred to as an element of the structure. To access elements, use the dot notation similar to that used for objects: Specify Variable . Element .
officeEmployee.lastNameString officeEmployee.hireDateTime warehouseEmployee.lastNameString
Exam
ples
struct Employee{ public string lastNameString; public string firstNameString; public string SSNString; public string streetString; public string cityString; public string stateString; public string ZIPString; public DateTime hireDateTime; public int payCodeInteger;}
public struct Product{ public string descriptionString; public string IDString; public int quantityInteger; public decimal priceDecimal;}
struct SalesDetail{ public decimal[] saleDecimal;}
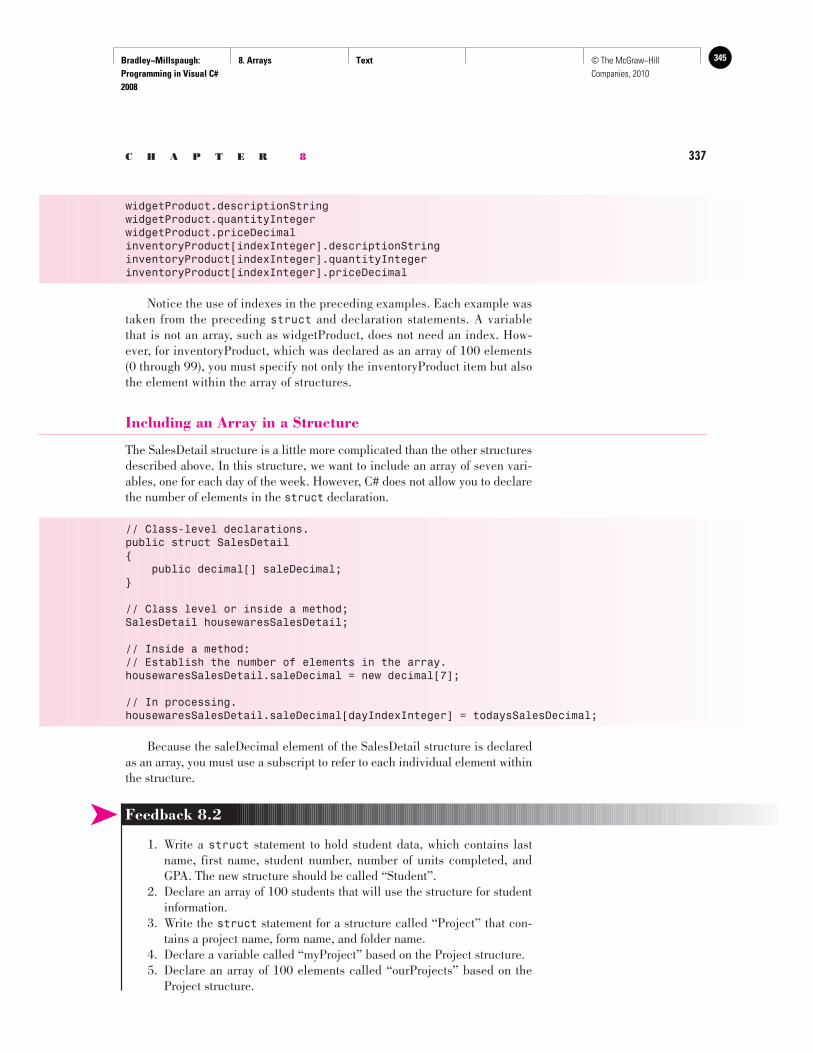
Bradley−Millspaugh: Programming in Visual C# 2008
8. Arrays Text 345© The McGraw−Hill Companies, 2010
C H A P T E R 8 337
widgetProduct.descriptionString widgetProduct.quantityInteger widgetProduct.priceDecimal inventoryProduct[indexInteger].descriptionString inventoryProduct[indexInteger].quantityInteger inventoryProduct[indexInteger].priceDecimal
Notice the use of indexes in the preceding examples. Each example was taken from the preceding struct and declaration statements. A variable that is not an array, such as widgetProduct, does not need an index. How-ever, for inventoryProduct, which was declared as an array of 100 elements (0 through 99), you must specify not only the inventoryProduct item but also the element within the array of structures.
Including an Array in a Structure
The SalesDetail structure is a little more complicated than the other structures described above. In this structure, we want to include an array of seven vari-ables, one for each day of the week. However, C# does not allow you to declare the number of elements in the struct declaration.
// Class-level declarations.public struct SalesDetail{ public decimal[] saleDecimal;}
// Class level or inside a method;SalesDetail housewaresSalesDetail;
// Inside a method:// Establish the number of elements in the array.housewaresSalesDetail.saleDecimal = new decimal[7];
// In processing.housewaresSalesDetail.saleDecimal[dayIndexInteger] = todaysSalesDecimal;
Because the saleDecimal element of the SalesDetail structure is declared as an array, you must use a subscript to refer to each individual element within the structure.
➤ Feedback 8.2
1. Write a struct statement to hold student data, which contains last name, first name, student number, number of units completed, and GPA. The new structure should be called “Student”.
2. Declare an array of 100 students that will use the structure for student information.
3. Write the struct statement for a structure called “Project” that con-tains a project name, form name, and folder name.
4. Declare a variable called “myProject” based on the Project structure. 5. Declare an array of 100 elements called “ourProjects” based on the
Project structure.
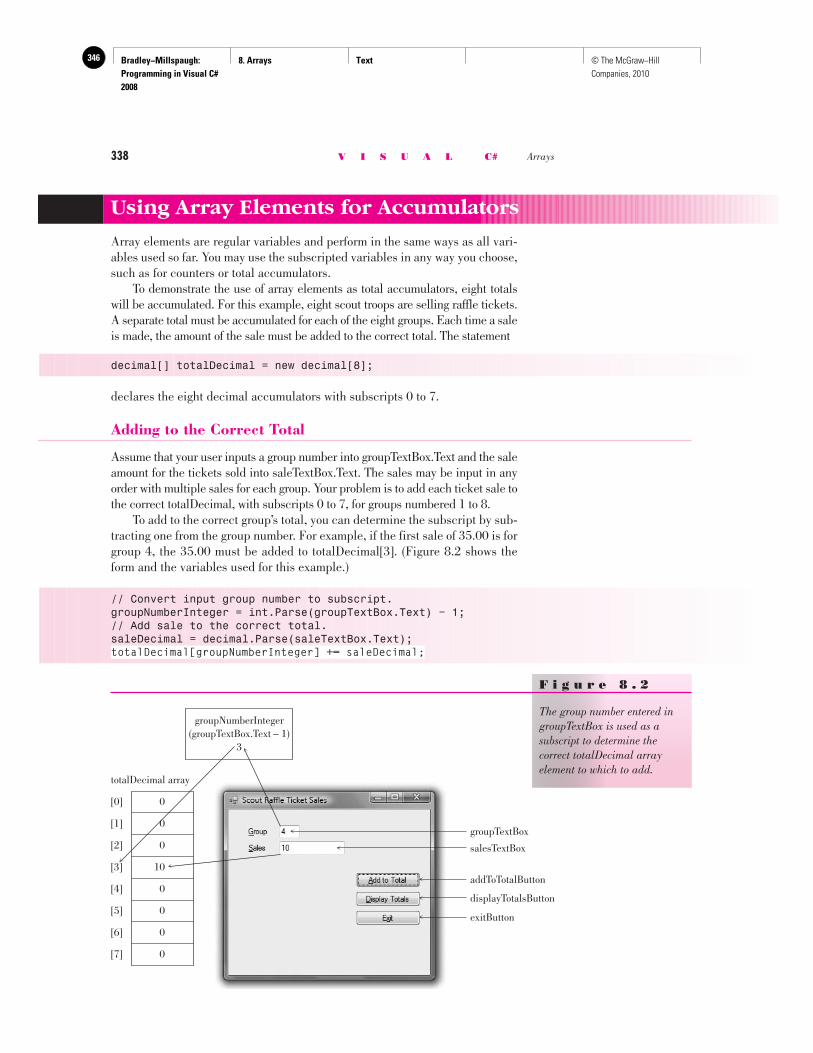
Bradley−Millspaugh: Programming in Visual C# 2008
8. Arrays Text346 © The McGraw−Hill Companies, 2010
338 V I S U A L C# Arrays
Using Array Elements for Accumulators
Array elements are regular variables and perform in the same ways as all vari-ables used so far. You may use the subscripted variables in any way you choose, such as for counters or total accumulators. To demonstrate the use of array elements as total accumulators, eight totals will be accumulated. For this example, eight scout troops are selling raffle tickets. A separate total must be accumulated for each of the eight groups. Each time a sale is made, the amount of the sale must be added to the correct total. The statement
decimal[] totalDecimal = new decimal[8];
declares the eight decimal accumulators with subscripts 0 to 7.
Adding to the Correct Total
Assume that your user inputs a group number into groupTextBox.Text and the sale amount for the tickets sold into saleTextBox.Text. The sales may be input in any order with multiple sales for each group. Your problem is to add each ticket sale to the correct totalDecimal, with subscripts 0 to 7, for groups numbered 1 to 8. To add to the correct group’s total, you can determine the subscript by sub-tracting one from the group number. For example, if the first sale of 35.00 is for group 4, the 35.00 must be added to totalDecimal[3]. ( Figure 8.2 shows the form and the variables used for this example.)
// Convert input group number to subscript.groupNumberInteger = int.Parse(groupTextBox.Text) − 1;// Add sale to the correct total.saleDecimal = decimal.Parse(saleTextBox.Text);totalDecimal[groupNumberInteger] += saleDecimal;
totalDecimal array
[0] 0
[1] 0
[2] 0
[3] 10
[4] 0
[5] 0
[6] 0
[7] 0
groupNumberInteger(groupTextBox.Text – 1)
3
addToTotalButton
displayTotalsButton
exitButton
salesTextBox
groupTextBox
F i g u r e 8 . 2
The group number entered in groupTextBox is used as a subscript to determine the correct totalDecimal array element to which to add.
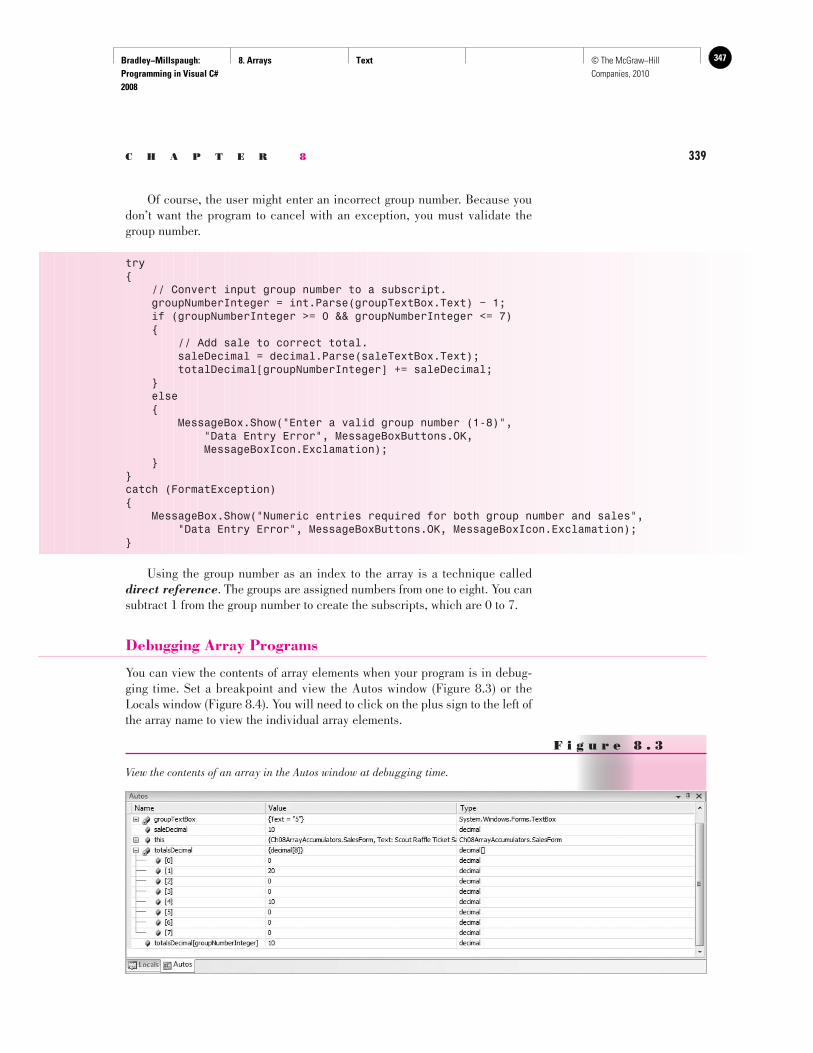
Bradley−Millspaugh: Programming in Visual C# 2008
8. Arrays Text 347© The McGraw−Hill Companies, 2010
C H A P T E R 8 339
Of course, the user might enter an incorrect group number. Because you don’t want the program to cancel with an exception, you must validate the group number.
try{ // Convert input group number to a subscript. groupNumberInteger = int.Parse(groupTextBox.Text) − 1; if (groupNumberInteger >= 0 && groupNumberInteger <= 7) { // Add sale to correct total. saleDecimal = decimal.Parse(saleTextBox.Text); totalDecimal[groupNumberInteger] += saleDecimal; } else { MessageBox.Show("Enter a valid group number (1-8)", "Data Entry Error", MessageBoxButtons.OK, MessageBoxIcon.Exclamation); }}catch (FormatException){ MessageBox.Show("Numeric entries required for both group number and sales", "Data Entry Error", MessageBoxButtons.OK, MessageBoxIcon.Exclamation);}
Using the group number as an index to the array is a technique called direct reference . The groups are assigned numbers from one to eight. You can subtract 1 from the group number to create the subscripts, which are 0 to 7.
Debugging Array Programs
You can view the contents of array elements when your program is in debug-ging time. Set a breakpoint and view the Autos window ( Figure 8.3 ) or the Locals window ( Figure 8.4 ). You will need to click on the plus sign to the left of the array name to view the individual array elements.
F i g u r e 8 . 3
View the contents of an array in the Autos window at debugging time.
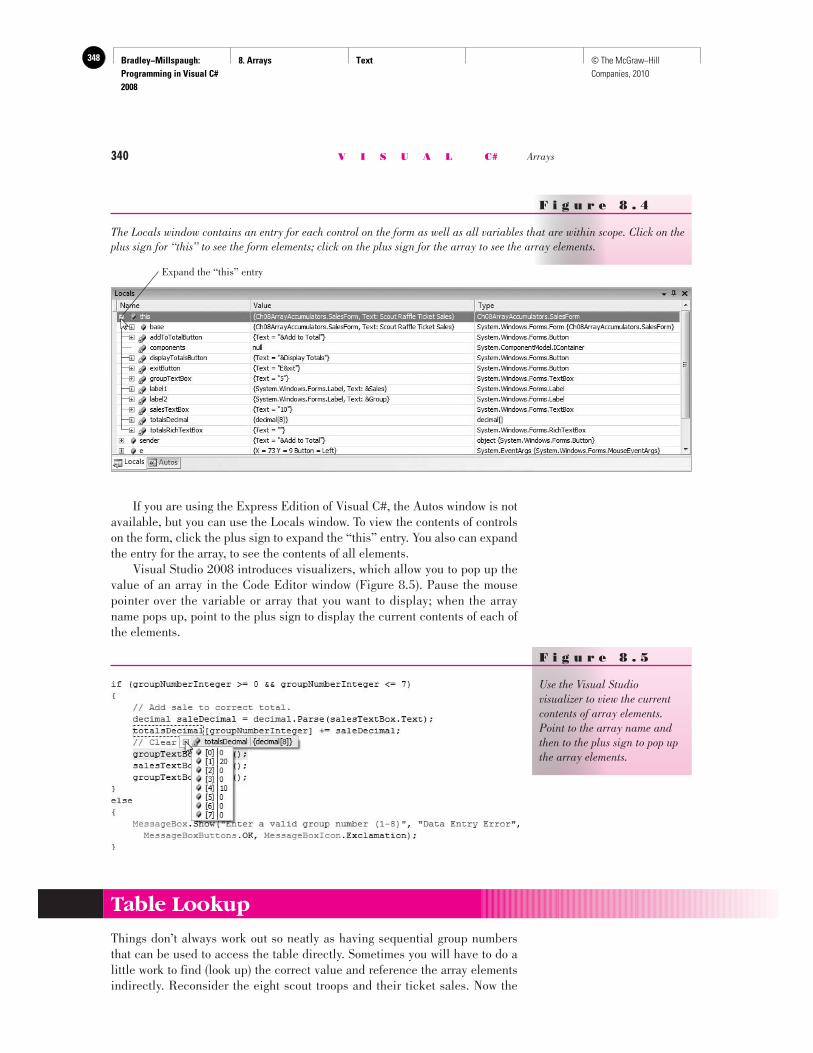
Bradley−Millspaugh: Programming in Visual C# 2008
8. Arrays Text348 © The McGraw−Hill Companies, 2010
340 V I S U A L C# Arrays
If you are using the Express Edition of Visual C#, the Autos window is not available, but you can use the Locals window. To view the contents of controls on the form, click the plus sign to expand the “this” entry. You also can expand the entry for the array, to see the contents of all elements. Visual Studio 2008 introduces visualizers, which allow you to pop up the value of an array in the Code Editor window ( Figure 8.5 ). Pause the mouse pointer over the variable or array that you want to display; when the array name pops up, point to the plus sign to display the current contents of each of the elements.
Expand the “this” entry
F i g u r e 8 . 4
The Locals window contains an entry for each control on the form as well as all variables that are within scope. Click on the plus sign for “this” to see the form elements; click on the plus sign for the array to see the array elements.
F i g u r e 8 . 5
Use the Visual Studio visualizer to view the current contents of array elements. Point to the array name and then to the plus sign to pop up the array elements.
Table Lookup
Things don’t always work out so neatly as having sequential group numbers that can be used to access the table directly. Sometimes you will have to do a little work to find (look up) the correct value and reference the array elements indirectly. Reconsider the eight scout troops and their ticket sales. Now the
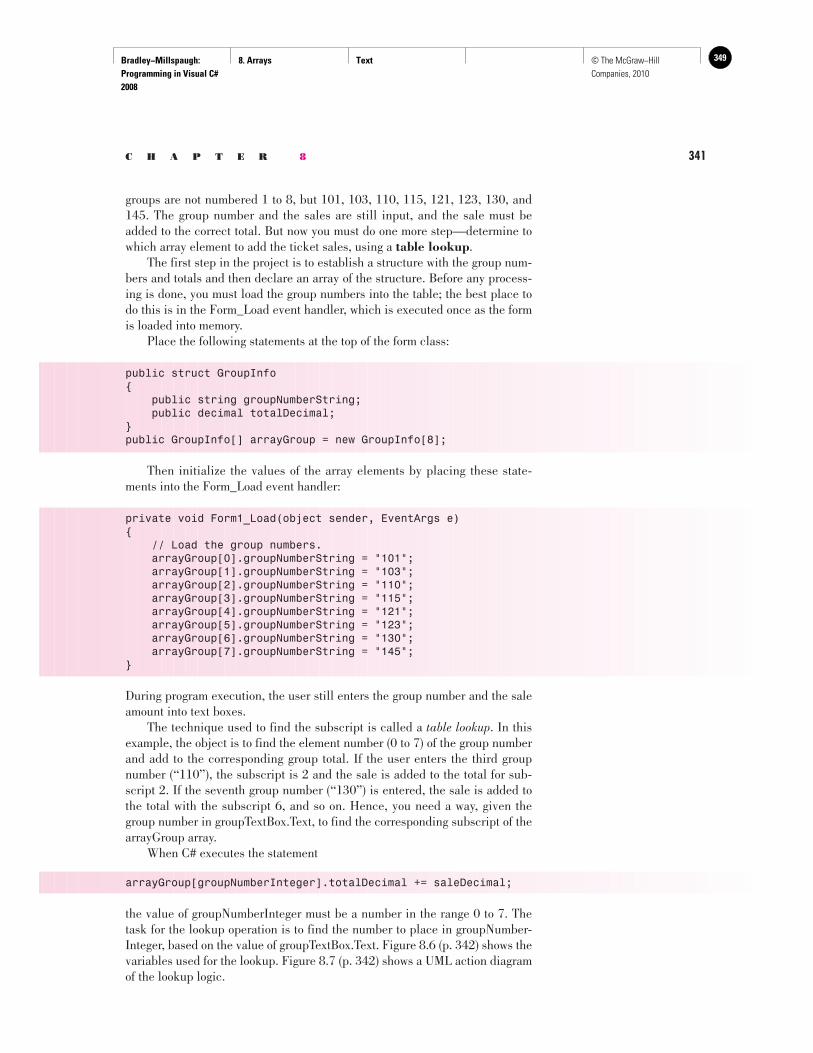
Bradley−Millspaugh: Programming in Visual C# 2008
8. Arrays Text 349© The McGraw−Hill Companies, 2010
C H A P T E R 8 341
groups are not numbered 1 to 8, but 101, 103, 110, 115, 121, 123, 130, and 145. The group number and the sales are still input, and the sale must be added to the correct total. But now you must do one more step—determine to which array element to add the ticket sales, using a table lookup . The first step in the project is to establish a structure with the group num-bers and totals and then declare an array of the structure. Before any process-ing is done, you must load the group numbers into the table; the best place to do this is in the Form_Load event handler, which is executed once as the form is loaded into memory. Place the following statements at the top of the form class:
public struct GroupInfo{ public string groupNumberString; public decimal totalDecimal;}public GroupInfo[] arrayGroup = new GroupInfo[8];
Then initialize the values of the array elements by placing these state-ments into the Form_Load event handler:
private void Form1_Load(object sender, EventArgs e){ // Load the group numbers. arrayGroup[0].groupNumberString = "101"; arrayGroup[1].groupNumberString = "103"; arrayGroup[2].groupNumberString = "110"; arrayGroup[3].groupNumberString = "115"; arrayGroup[4].groupNumberString = "121"; arrayGroup[5].groupNumberString = "123"; arrayGroup[6].groupNumberString = "130"; arrayGroup[7].groupNumberString = "145";}
During program execution, the user still enters the group number and the sale amount into text boxes. The technique used to find the subscript is called a table lookup . In this example, the object is to find the element number (0 to 7) of the group number and add to the corresponding group total. If the user enters the third group number (“110”), the subscript is 2 and the sale is added to the total for sub-script 2. If the seventh group number (“130”) is entered, the sale is added to the total with the subscript 6, and so on. Hence, you need a way, given the group number in groupTextBox.Text, to find the corresponding subscript of the arrayGroup array. When C# executes the statement
arrayGroup[groupNumberInteger].totalDecimal += saleDecimal;
the value of groupNumberInteger must be a number in the range 0 to 7. The task for the lookup operation is to find the number to place in groupNumber-Integer, based on the value of groupTextBox.Text. Figure 8.6 (p. 342) shows the variables used for the lookup. Figure 8.7 (p. 342) shows a UML action diagram of the lookup logic.
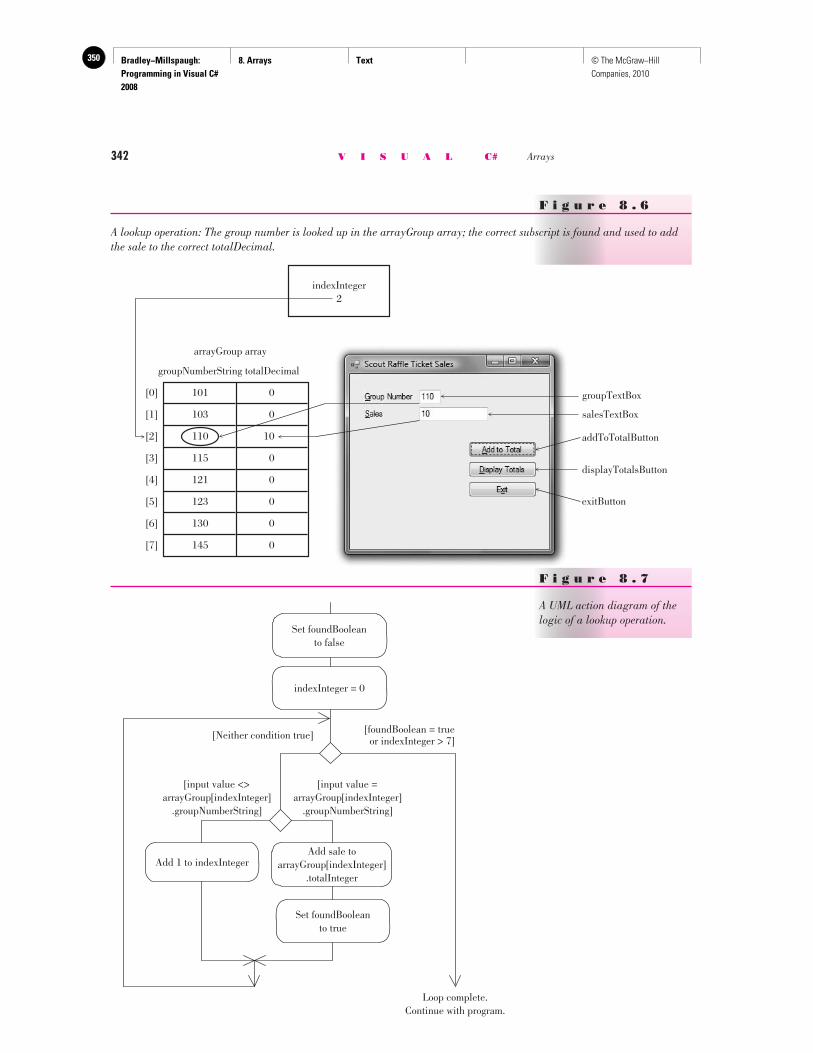
Bradley−Millspaugh: Programming in Visual C# 2008
8. Arrays Text350 © The McGraw−Hill Companies, 2010
342 V I S U A L C# Arrays
groupNumberString totalDecimal
[0] 101 0
[1] 103 0
[2] 110 10
[3] 115 0
[4] 121 0
[5] 123 0
[6] 130 0
[7] 145 0
indexInteger2
groupTextBox
salesTextBox
arrayGroup array
addToTotalButton
displayTotalsButton
exitButton
F i g u r e 8 . 6
A lookup operation: The group number is looked up in the arrayGroup array; the correct subscript is found and used to add the sale to the correct totalDecimal.
[foundBoolean = trueor indexInteger > 7][Neither condition true]
Loop complete.Continue with program.
[input value =arrayGroup[indexInteger]
.groupNumberString]
Add sale toarrayGroup[indexInteger]
.totalInteger
Set foundBooleanto true
Set foundBooleanto false
indexInteger = 0
Add 1 to indexInteger
[input value <>arrayGroup[indexInteger]
.groupNumberString]
F i g u r e 8 . 7
A UML action diagram of the logic of a lookup operation.
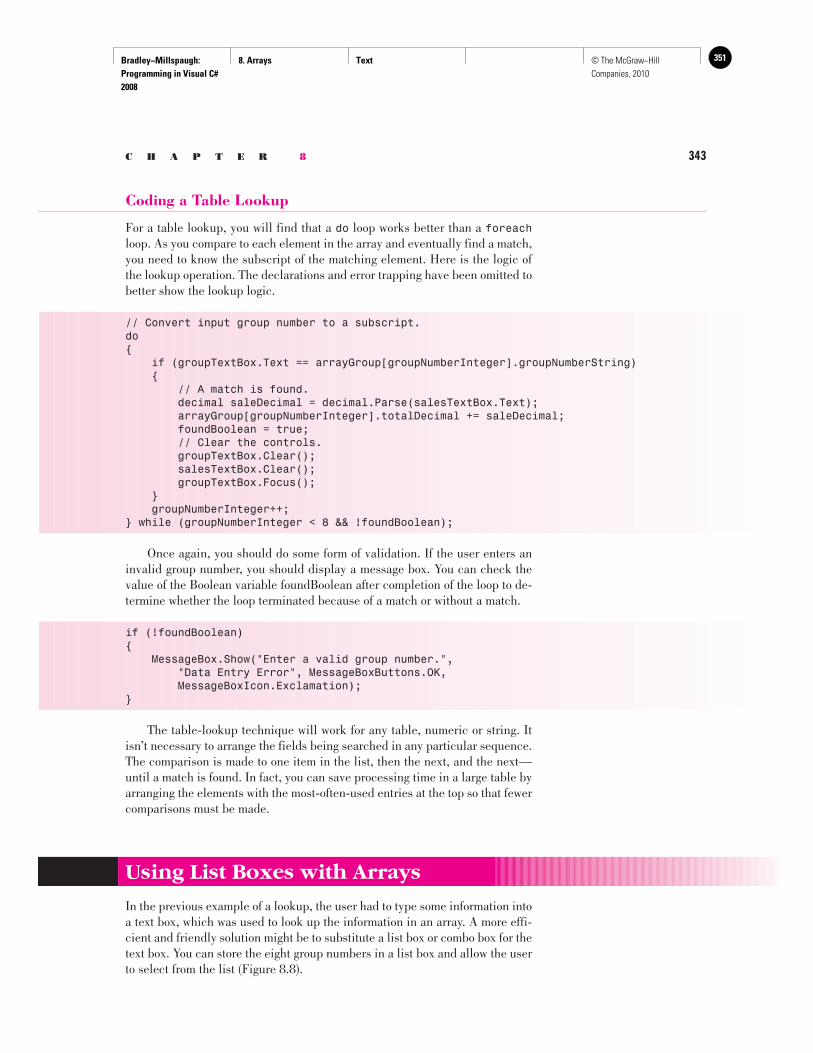
Bradley−Millspaugh: Programming in Visual C# 2008
8. Arrays Text 351© The McGraw−Hill Companies, 2010
C H A P T E R 8 343
Coding a Table Lookup
For a table lookup, you will find that a do loop works better than a foreach loop. As you compare to each element in the array and eventually find a match, you need to know the subscript of the matching element. Here is the logic of the lookup operation. The declarations and error trapping have been omitted to better show the lookup logic.
// Convert input group number to a subscript.do{ if (groupTextBox.Text == arrayGroup[groupNumberInteger].groupNumberString) { // A match is found. decimal saleDecimal = decimal.Parse(salesTextBox.Text); arrayGroup[groupNumberInteger].totalDecimal += saleDecimal; foundBoolean = true; // Clear the controls. groupTextBox.Clear(); salesTextBox.Clear(); groupTextBox.Focus(); } groupNumberInteger++;} while (groupNumberInteger < 8 && !foundBoolean);
Once again, you should do some form of validation. If the user enters an invalid group number, you should display a message box. You can check the value of the Boolean variable foundBoolean after completion of the loop to de-termine whether the loop terminated because of a match or without a match.
if (!foundBoolean){ MessageBox.Show("Enter a valid group number.", "Data Entry Error", MessageBoxButtons.OK, MessageBoxIcon.Exclamation);}
The table-lookup technique will work for any table, numeric or string. It isn’t necessary to arrange the fields being searched in any particular sequence. The comparison is made to one item in the list, then the next, and the next—until a match is found. In fact, you can save processing time in a large table by arranging the elements with the most-often-used entries at the top so that fewer comparisons must be made.
Using List Boxes with Arrays
In the previous example of a lookup, the user had to type some information into a text box, which was used to look up the information in an array. A more effi-cient and friendly solution might be to substitute a list box or combo box for the text box. You can store the eight group numbers in a list box and allow the user to select from the list ( Figure 8.8 ).
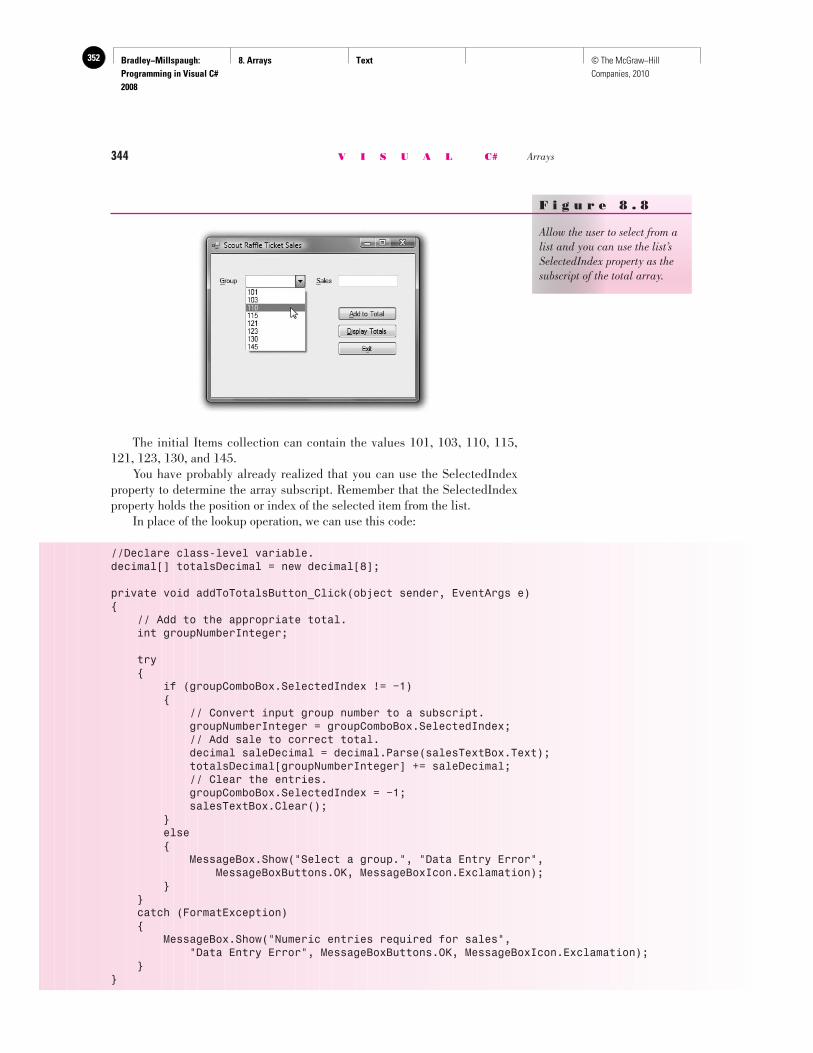
Bradley−Millspaugh: Programming in Visual C# 2008
8. Arrays Text352 © The McGraw−Hill Companies, 2010
344 V I S U A L C# Arrays
The initial Items collection can contain the values 101, 103, 110, 115, 121, 123, 130, and 145. You have probably already realized that you can use the SelectedIndex property to determine the array subscript. Remember that the SelectedIndex property holds the position or index of the selected item from the list. In place of the lookup operation, we can use this code:
//Declare class-level variable.decimal[] totalsDecimal = new decimal[8];
private void addToTotalsButton_Click(object sender, EventArgs e){ // Add to the appropriate total. int groupNumberInteger;
try { if (groupComboBox.SelectedIndex != −1) { // Convert input group number to a subscript. groupNumberInteger = groupComboBox.SelectedIndex; // Add sale to correct total. decimal saleDecimal = decimal.Parse(salesTextBox.Text); totalsDecimal[groupNumberInteger] += saleDecimal; // Clear the entries. groupComboBox.SelectedIndex = −1; salesTextBox.Clear(); } else { MessageBox.Show("Select a group.", "Data Entry Error", MessageBoxButtons.OK, MessageBoxIcon.Exclamation); } } catch (FormatException) { MessageBox.Show("Numeric entries required for sales", "Data Entry Error", MessageBoxButtons.OK, MessageBoxIcon.Exclamation); } }
F i g u r e 8 . 8
Allow the user to select from a list and you can use the list’s SelectedIndex property as the subscript of the total array.
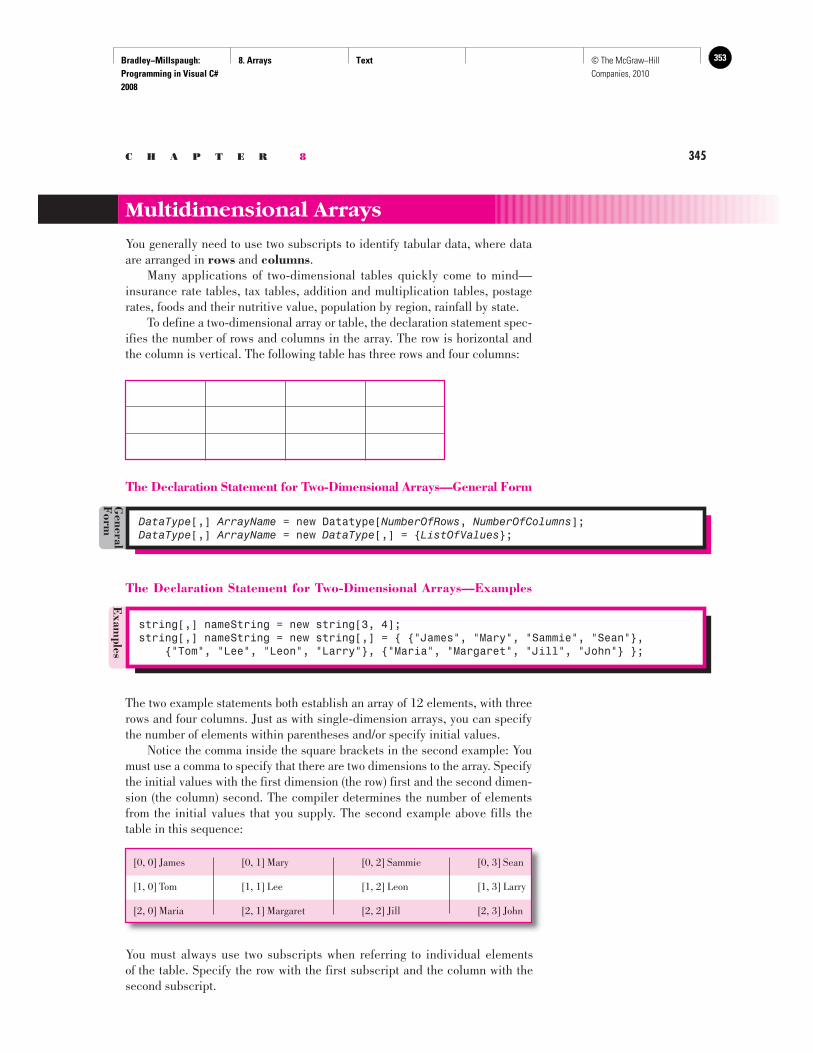
Bradley−Millspaugh: Programming in Visual C# 2008
8. Arrays Text 353© The McGraw−Hill Companies, 2010
C H A P T E R 8 345
The Declaration Statement for Two-Dimensional Arrays—General Form
Multidimensional Arrays
You generally need to use two subscripts to identify tabular data, where data are arranged in rows and columns . Many applications of two-dimensional tables quickly come to mind— insurance rate tables, tax tables, addition and multiplication tables, postage rates, foods and their nutritive value, population by region, rainfall by state. To define a two-dimensional array or table, the declaration statement spec-ifies the number of rows and columns in the array. The row is horizontal and the column is vertical. The following table has three rows and four columns:
DataType [,] ArrayName = new Datatype[ NumberOfRows , NumberOfColumns ]; DataType [,] ArrayName = new DataType [,] = { ListOfValues };
General
Form
E
xamples
string[,] nameString = new string[3, 4];string[,] nameString = new string[,] = { {"James", "Mary", "Sammie", "Sean"}, {"Tom", "Lee", "Leon", "Larry"}, {"Maria", "Margaret", "Jill", "John"} };
The Declaration Statement for Two-Dimensional Arrays—Examples
The two example statements both establish an array of 12 elements, with three rows and four columns. Just as with single-dimension arrays, you can specify the number of elements within parentheses and/or specify initial values. Notice the comma inside the square brackets in the second example: You must use a comma to specify that there are two dimensions to the array. Specify the initial values with the first dimension (the row) first and the second dimen-sion (the column) second. The compiler determines the number of elements from the initial values that you supply. The second example above fills the table in this sequence:
[0, 0] James [0, 1] Mary [0, 2] Sammie [0, 3] Sean
[1, 0] Tom [1, 1] Lee [1, 2] Leon [1, 3] Larry
[2, 0] Maria [2, 1] Margaret [2, 2] Jill [2, 3] John
You must always use two subscripts when referring to individual elements of the table. Specify the row with the first subscript and the column with the second subscript.
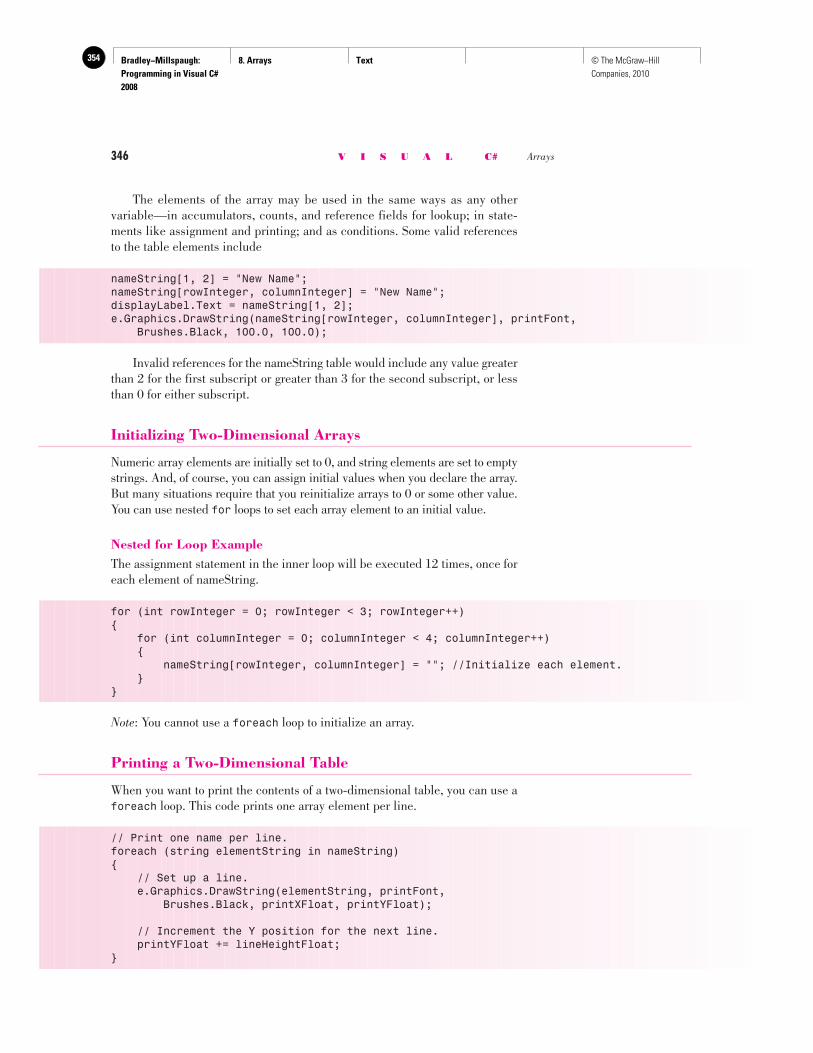
Bradley−Millspaugh: Programming in Visual C# 2008
8. Arrays Text354 © The McGraw−Hill Companies, 2010
346 V I S U A L C# Arrays
The elements of the array may be used in the same ways as any other variable—in accumulators, counts, and reference fields for lookup; in state-ments like assignment and printing; and as conditions. Some valid references to the table elements include
nameString[1, 2] = "New Name"; nameString[rowInteger, columnInteger] = "New Name"; displayLabel.Text = nameString[1, 2]; e.Graphics.DrawString(nameString[rowInteger, columnInteger], printFont, Brushes.Black, 100.0, 100.0);
Invalid references for the nameString table would include any value greater than 2 for the first subscript or greater than 3 for the second subscript, or less than 0 for either subscript.
Initializing Two-Dimensional Arrays
Numeric array elements are initially set to 0, and string elements are set to empty strings. And, of course, you can assign initial values when you declare the array. But many situations require that you reinitialize arrays to 0 or some other value. You can use nested for loops to set each array element to an initial value.
Nested for Loop Example The assignment statement in the inner loop will be executed 12 times, once for each element of nameString.
for (int rowInteger = 0; rowInteger < 3; rowInteger++){ for (int columnInteger = 0; columnInteger < 4; columnInteger++) { nameString[rowInteger, columnInteger] = ""; //Initialize each element. }}
Note : You cannot use a foreach loop to initialize an array.
Printing a Two-Dimensional Table
When you want to print the contents of a two-dimensional table, you can use a foreach loop. This code prints one array element per line.
// Print one name per line.foreach (string elementString in nameString){ // Set up a line. e.Graphics.DrawString(elementString, printFont, Brushes.Black, printXFloat, printYFloat);
// Increment the Y position for the next line. printYFloat += lineHeightFloat;}
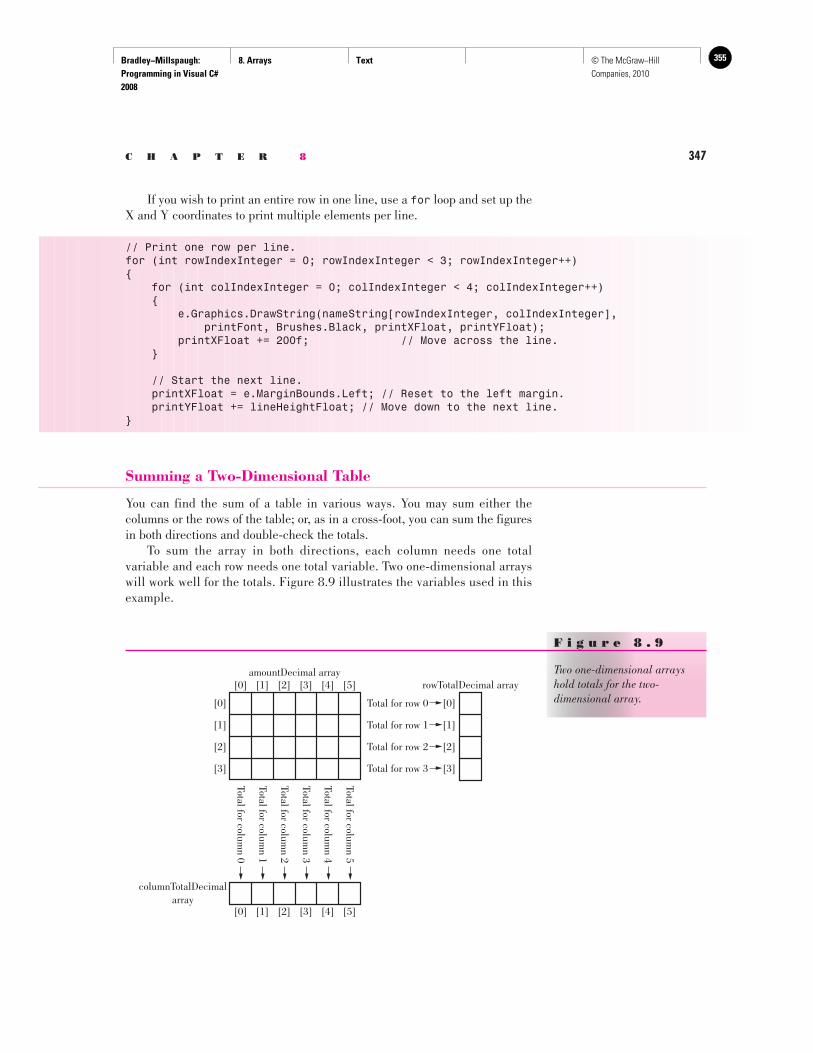
Bradley−Millspaugh: Programming in Visual C# 2008
8. Arrays Text 355© The McGraw−Hill Companies, 2010
C H A P T E R 8 347
If you wish to print an entire row in one line, use a for loop and set up the X and Y coordinates to print multiple elements per line.
// Print one row per line.for (int rowIndexInteger = 0; rowIndexInteger < 3; rowIndexInteger++){ for (int colIndexInteger = 0; colIndexInteger < 4; colIndexInteger++) { e.Graphics.DrawString(nameString[rowIndexInteger, colIndexInteger], printFont, Brushes.Black, printXFloat, printYFloat); printXFloat += 200f; // Move across the line. }
// Start the next line. printXFloat = e.MarginBounds.Left; // Reset to the left margin. printYFloat += lineHeightFloat; // Move down to the next line.}
Summing a Two-Dimensional Table
You can find the sum of a table in various ways. You may sum either the columns or the rows of the table; or, as in a cross-foot, you can sum the figures in both directions and double-check the totals. To sum the array in both directions, each column needs one total variable and each row needs one total variable. Two one-dimensional arrays will work well for the totals. Figure 8.9 illustrates the variables used in this example.
[0]
[1]
[2]
[3]
Total for row 0 [0]
Total for row 1 [1]
Total for row 2 [2]
Total for row 3 [3]
amountDecimal arrayrowTotalDecimal array
columnTotalDecimalarray
[0] [1] [2] [3] [4] [5]
[0] [1] [2] [3] [4] [5]
Total for column 5
Total for column 4
Total for column 3
Total for column 2
Total for column 1
Total for column 0
F i g u r e 8 . 9
Two one-dimensional arrays hold totals for the two-dimensional array.
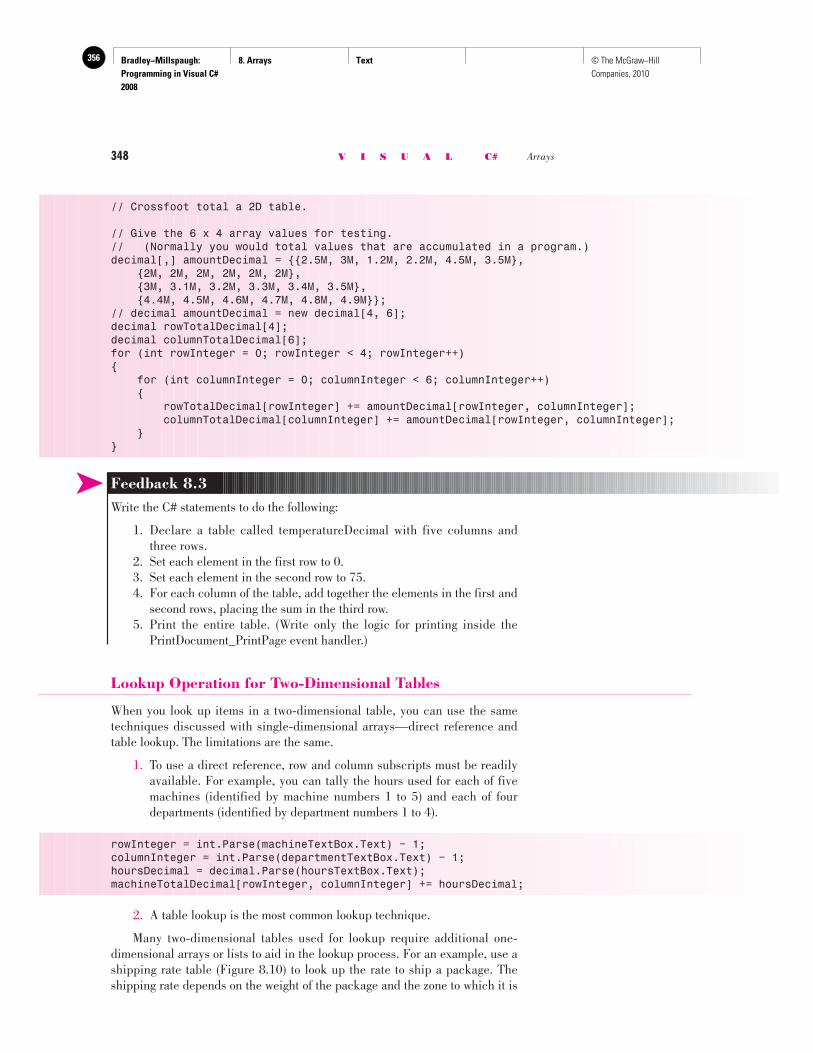
Bradley−Millspaugh: Programming in Visual C# 2008
8. Arrays Text356 © The McGraw−Hill Companies, 2010
348 V I S U A L C# Arrays
// Crossfoot total a 2D table.
// Give the 6 x 4 array values for testing.// (Normally you would total values that are accumulated in a program.)decimal[,] amountDecimal = {{2.5M, 3M, 1.2M, 2.2M, 4.5M, 3.5M}, {2M, 2M, 2M, 2M, 2M, 2M}, {3M, 3.1M, 3.2M, 3.3M, 3.4M, 3.5M}, {4.4M, 4.5M, 4.6M, 4.7M, 4.8M, 4.9M}};// decimal amountDecimal = new decimal[4, 6];decimal rowTotalDecimal[4];decimal columnTotalDecimal[6];for (int rowInteger = 0; rowInteger < 4; rowInteger++){ for (int columnInteger = 0; columnInteger < 6; columnInteger++) { rowTotalDecimal[rowInteger] += amountDecimal[rowInteger, columnInteger]; columnTotalDecimal[columnInteger] += amountDecimal[rowInteger, columnInteger]; }}
➤ Feedback 8.3 Write the C# statements to do the following:
1. Declare a table called temperatureDecimal with five columns and three rows.
2. Set each element in the first row to 0. 3. Set each element in the second row to 75. 4. For each column of the table, add together the elements in the first and
second rows, placing the sum in the third row. 5. Print the entire table. (Write only the logic for printing inside the
PrintDocument_PrintPage event handler.)
Lookup Operation for Two-Dimensional Tables
When you look up items in a two-dimensional table, you can use the same techniques discussed with single-dimensional arrays—direct reference and table lookup. The limitations are the same.
1. To use a direct reference, row and column subscripts must be readily available. For example, you can tally the hours used for each of five machines (identified by machine numbers 1 to 5) and each of four departments (identified by department numbers 1 to 4).
rowInteger = int.Parse(machineTextBox.Text) − 1; columnInteger = int.Parse(departmentTextBox.Text) − 1; hoursDecimal = decimal.Parse(hoursTextBox.Text); machineTotalDecimal[rowInteger, columnInteger] += hoursDecimal;
2. A table lookup is the most common lookup technique.
Many two-dimensional tables used for lookup require additional one- dimensional arrays or lists to aid in the lookup process. For an example, use a shipping rate table ( Figure 8.10 ) to look up the rate to ship a package. The shipping rate depends on the weight of the package and the zone to which it is
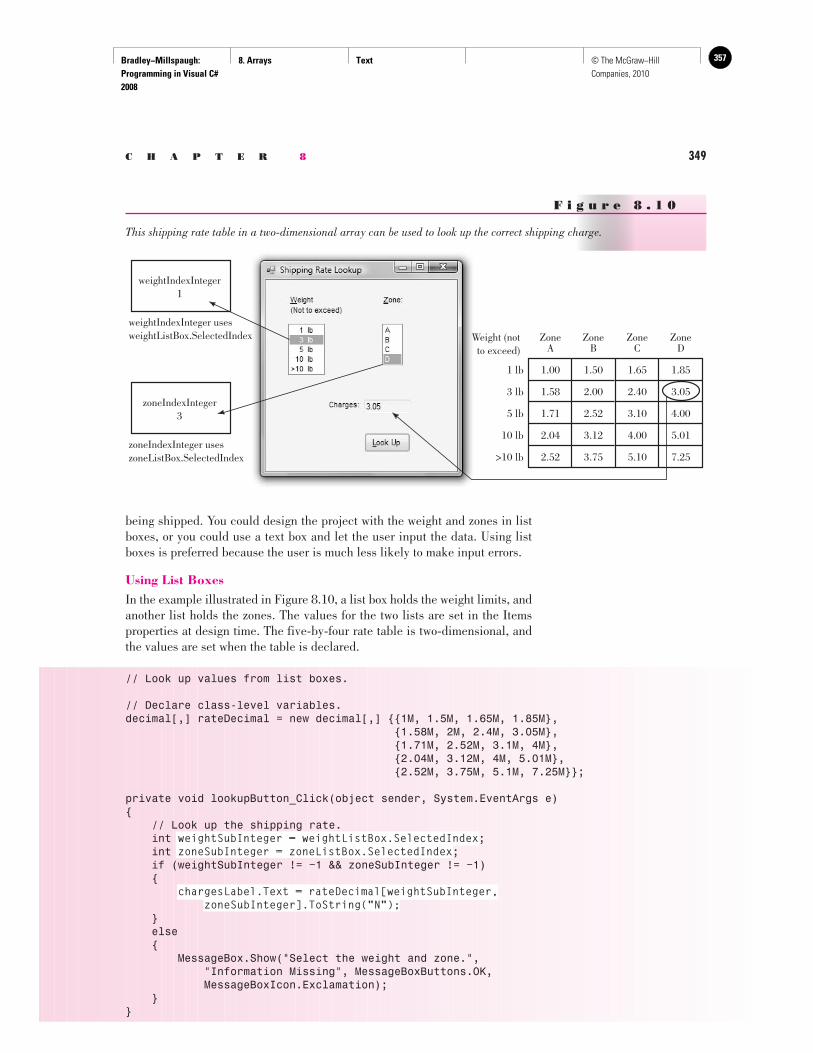
Bradley−Millspaugh: Programming in Visual C# 2008
8. Arrays Text 357© The McGraw−Hill Companies, 2010
C H A P T E R 8 349
Zone Zone Zone Zone A B C D
1 lb 1.00 1.50 1.65 1.85
3 lb 1.58 2.00 2.40 3.05
5 lb 1.71 2.52 3.10 4.00
10 lb 2.04 3.12 4.00 5.01
>10 lb 2.52 3.75 5.10 7.25
weightIndexInteger1
weightIndexInteger usesweightListBox.SelectedIndex Weight (not
to exceed)
zoneIndexInteger3
zoneIndexInteger useszoneListBox.SelectedIndex
F i g u r e 8 . 1 0
This shipping rate table in a two-dimensional array can be used to look up the correct shipping charge.
being shipped. You could design the project with the weight and zones in list boxes, or you could use a text box and let the user input the data. Using list boxes is preferred because the user is much less likely to make input errors.
Using List Boxes In the example illustrated in Figure 8.10 , a list box holds the weight limits, and another list holds the zones. The values for the two lists are set in the Items properties at design time. The five-by-four rate table is two-dimensional, and the values are set when the table is declared.
// Look up values from list boxes.
// Declare class-level variables.decimal[,] rateDecimal = new decimal[,] {{1M, 1.5M, 1.65M, 1.85M}, {1.58M, 2M, 2.4M, 3.05M}, {1.71M, 2.52M, 3.1M, 4M}, {2.04M, 3.12M, 4M, 5.01M}, {2.52M, 3.75M, 5.1M, 7.25M}};
private void lookupButton_Click(object sender, System.EventArgs e){ // Look up the shipping rate. int weightSubInteger = weightListBox.SelectedIndex; int zoneSubInteger = zoneListBox.SelectedIndex; if (weightSubInteger != −1 && zoneSubInteger != −1) { chargesLabel.Text = rateDecimal[weightSubInteger, zoneSubInteger].ToString("N"); } else { MessageBox.Show("Select the weight and zone.", "Information Missing", MessageBoxButtons.OK, MessageBoxIcon.Exclamation); }}
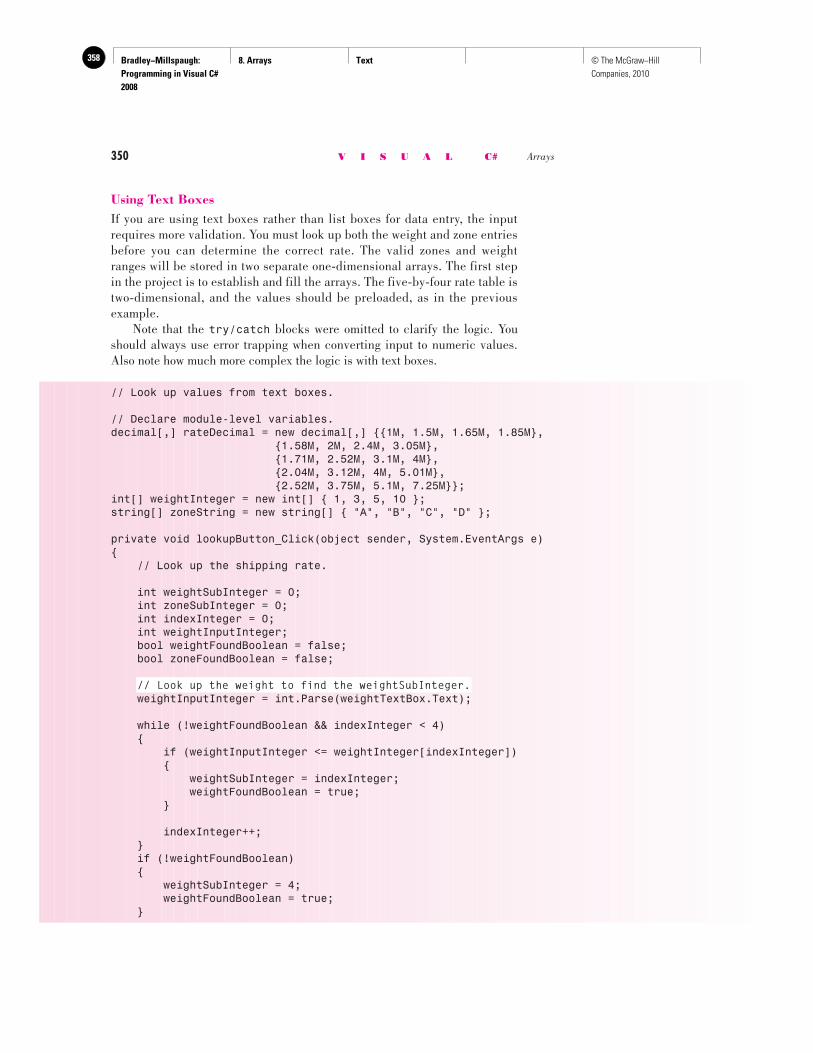
Bradley−Millspaugh: Programming in Visual C# 2008
8. Arrays Text358 © The McGraw−Hill Companies, 2010
350 V I S U A L C# Arrays
Using Text Boxes If you are using text boxes rather than list boxes for data entry, the input requires more validation. You must look up both the weight and zone entries before you can determine the correct rate. The valid zones and weight ranges will be stored in two separate one-dimensional arrays. The first step in the project is to establish and fill the arrays. The five-by-four rate table is two-dimensional, and the values should be preloaded, as in the previous example. Note that the try/catch blocks were omitted to clarify the logic. You should always use error trapping when converting input to numeric values. Also note how much more complex the logic is with text boxes.
// Look up values from text boxes.
// Declare module-level variables.decimal[,] rateDecimal = new decimal[,] {{1M, 1.5M, 1.65M, 1.85M}, {1.58M, 2M, 2.4M, 3.05M}, {1.71M, 2.52M, 3.1M, 4M}, {2.04M, 3.12M, 4M, 5.01M}, {2.52M, 3.75M, 5.1M, 7.25M}};int[] weightInteger = new int[] { 1, 3, 5, 10 };string[] zoneString = new string[] { "A", "B", "C", "D" };
private void lookupButton_Click(object sender, System.EventArgs e){ // Look up the shipping rate.
int weightSubInteger = 0; int zoneSubInteger = 0; int indexInteger = 0; int weightInputInteger; bool weightFoundBoolean = false; bool zoneFoundBoolean = false;
// Look up the weight to find the weightSubInteger. weightInputInteger = int.Parse(weightTextBox.Text);
while (!weightFoundBoolean && indexInteger < 4) { if (weightInputInteger <= weightInteger[indexInteger]) { weightSubInteger = indexInteger; weightFoundBoolean = true; }
indexInteger++; } if (!weightFoundBoolean) { weightSubInteger = 4; weightFoundBoolean = true; }
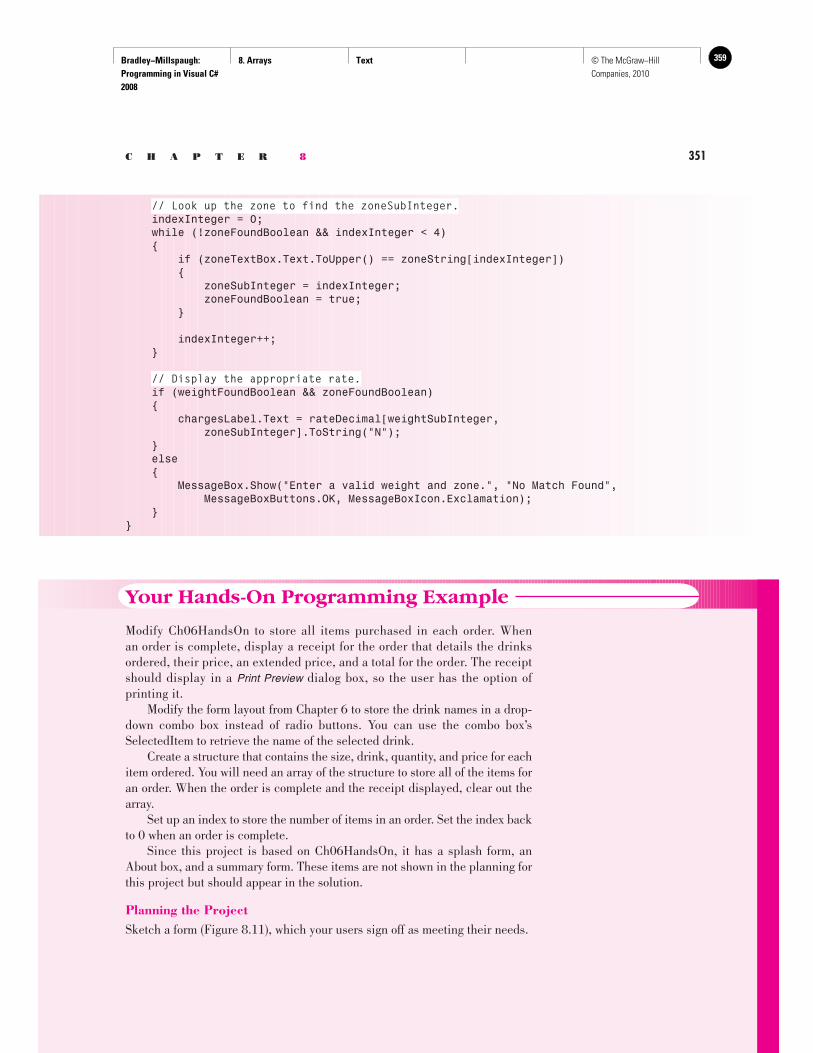
Bradley−Millspaugh: Programming in Visual C# 2008
8. Arrays Text 359© The McGraw−Hill Companies, 2010
C H A P T E R 8 351
Your Hands-On Programming Example
Modify Ch06HandsOn to store all items purchased in each order. When an order is complete, display a receipt for the order that details the drinks ordered, their price, an extended price, and a total for the order. The receipt should display in a Print Preview dialog box, so the user has the option of printing it. Modify the form layout from Chapter 6 to store the drink names in a drop-down combo box instead of radio buttons. You can use the combo box’s SelectedItem to retrieve the name of the selected drink. Create a structure that contains the size, drink, quantity, and price for each item ordered. You will need an array of the structure to store all of the items for an order. When the order is complete and the receipt displayed, clear out the array. Set up an index to store the number of items in an order. Set the index back to 0 when an order is complete. Since this project is based on Ch06HandsOn, it has a splash form, an About box, and a summary form. These items are not shown in the planning for this project but should appear in the solution.
Planning the Project Sketch a form ( Figure 8.11 ), which your users sign off as meeting their needs.
// Look up the zone to find the zoneSubInteger. indexInteger = 0; while (!zoneFoundBoolean && indexInteger < 4) { if (zoneTextBox.Text.ToUpper() == zoneString[indexInteger]) { zoneSubInteger = indexInteger; zoneFoundBoolean = true; }
indexInteger++; }
// Display the appropriate rate. if (weightFoundBoolean && zoneFoundBoolean) { chargesLabel.Text = rateDecimal[weightSubInteger, zoneSubInteger].ToString("N"); } else { MessageBox.Show("Enter a valid weight and zone.", "No Match Found", MessageBoxButtons.OK, MessageBoxIcon.Exclamation); }}
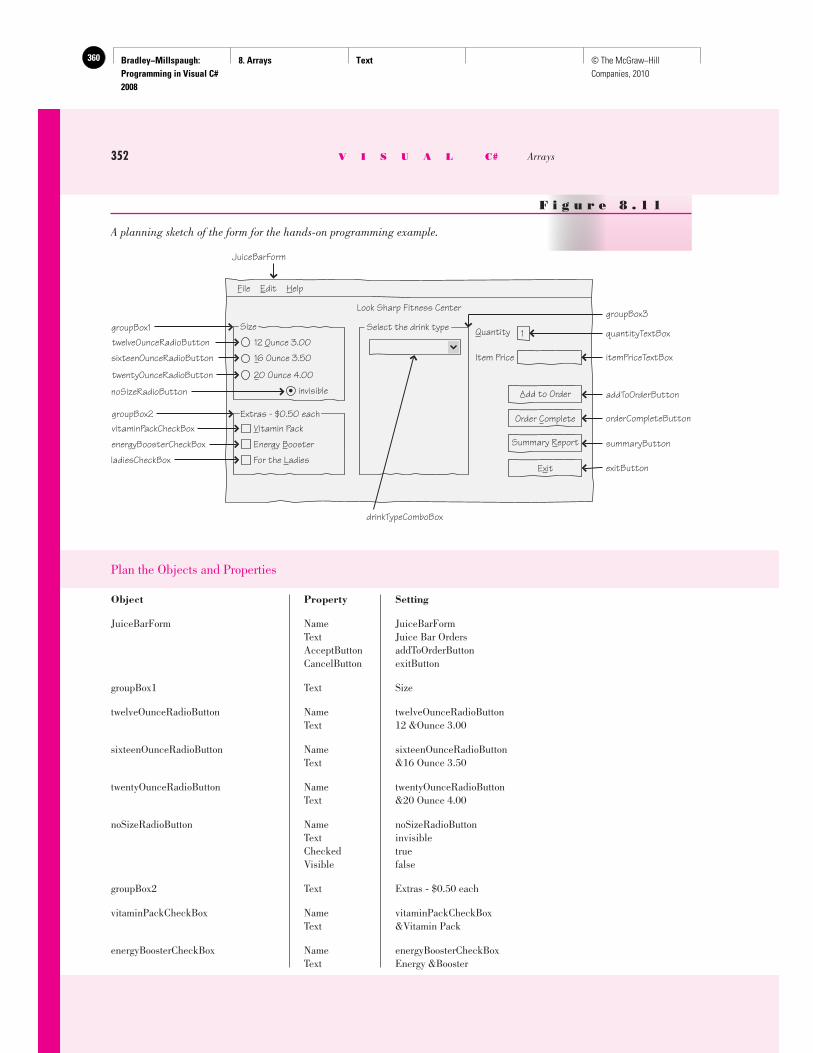
Bradley−Millspaugh: Programming in Visual C# 2008
8. Arrays Text360 © The McGraw−Hill Companies, 2010
352 V I S U A L C# Arrays
SizegroupBox112 Ounce 3.00
invisible
Extras - $0.50 each
Select the drink type Quantity quantityTextBox
Item Price
1
16 Ounce 3.50
20 Ounce 4.00
Look Sharp Fitness Center
File Edit Help
Add to Order
Order Complete
Exit
Energy Booster
Vitamin Pack
For the Ladies
JuiceBarForm
groupBox3
itemPriceTextBox
addToOrderButton
orderCompleteButton
summaryButton
exitButton
twelveOunceRadioButton
sixteenOunceRadioButton
twentyOunceRadioButton
groupBox2vitaminPackCheckBox
energyBoosterCheckBox
ladiesCheckBox
noSizeRadioButton
drinkTypeComboBox
Summary Report
F i g u r e 8 . 1 1
A planning sketch of the form for the hands-on programming example.
Plan the Objects and Properties
Object Property Setting
JuiceBarForm Name JuiceBarForm Text Juice Bar Orders AcceptButton addToOrderButton CancelButton exitButton
groupBox1 Text Size
twelveOunceRadioButton Name twelveOunceRadioButton Text 12 &Ounce 3.00
sixteenOunceRadioButton Name sixteenOunceRadioButton Text &16 Ounce 3.50
twentyOunceRadioButton Name twentyOunceRadioButton Text &20 Ounce 4.00
noSizeRadioButton Name noSizeRadioButton Text invisible Checked true Visible false
groupBox2 Text Extras - $0.50 each
vitaminPackCheckBox Name vitaminPackCheckBox Text &Vitamin Pack
energyBoosterCheckBox Name energyBoosterCheckBox Text Energy &Booster
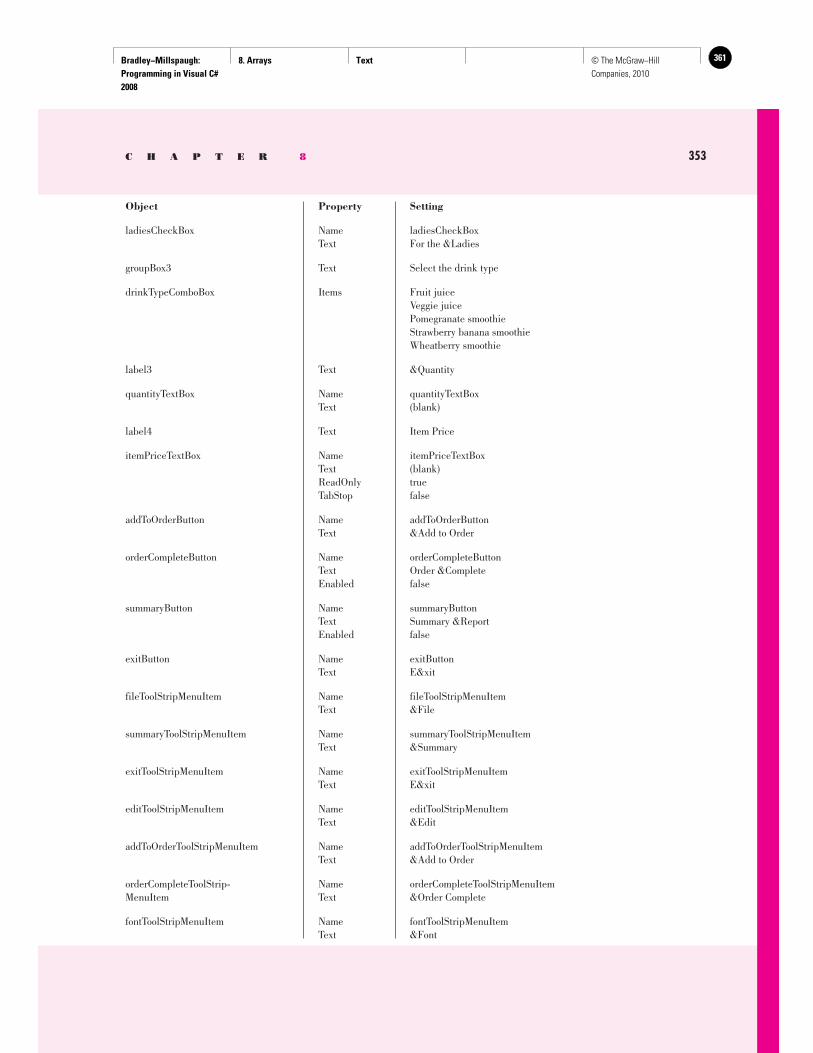
Bradley−Millspaugh: Programming in Visual C# 2008
8. Arrays Text 361© The McGraw−Hill Companies, 2010
C H A P T E R 8 353
ladiesCheckBox Name ladiesCheckBox Text For the &Ladies
groupBox3 Text Select the drink type
drinkTypeComboBox Items Fruit juice Veggie juice Pomegranate smoothie Strawberry banana smoothie Wheatberry smoothie
label3 Text &Quantity
quantityTextBox Name quantityTextBox Text (blank)
label4 Text Item Price
itemPriceTextBox Name itemPriceTextBox Text (blank) ReadOnly true TabStop false
addToOrderButton Name addToOrderButton Text &Add to Order
orderCompleteButton Name orderCompleteButton Text Order &Complete Enabled false
summaryButton Name summaryButton Text Summary &Report Enabled false
exitButton Name exitButton Text E&xit
fileToolStripMenuItem Name fileToolStripMenuItem Text &File
summaryToolStripMenuItem Name summaryToolStripMenuItem Text &Summary
exitToolStripMenuItem Name exitToolStripMenuItem Text E&xit
editToolStripMenuItem Name editToolStripMenuItem Text &Edit
addToOrderToolStripMenuItem Name addToOrderToolStripMenuItem Text &Add to Order
orderCompleteToolStrip- Name orderCompleteToolStripMenuItem MenuItem Text &Order Complete
fontToolStripMenuItem Name fontToolStripMenuItem Text &Font
Object Property Setting
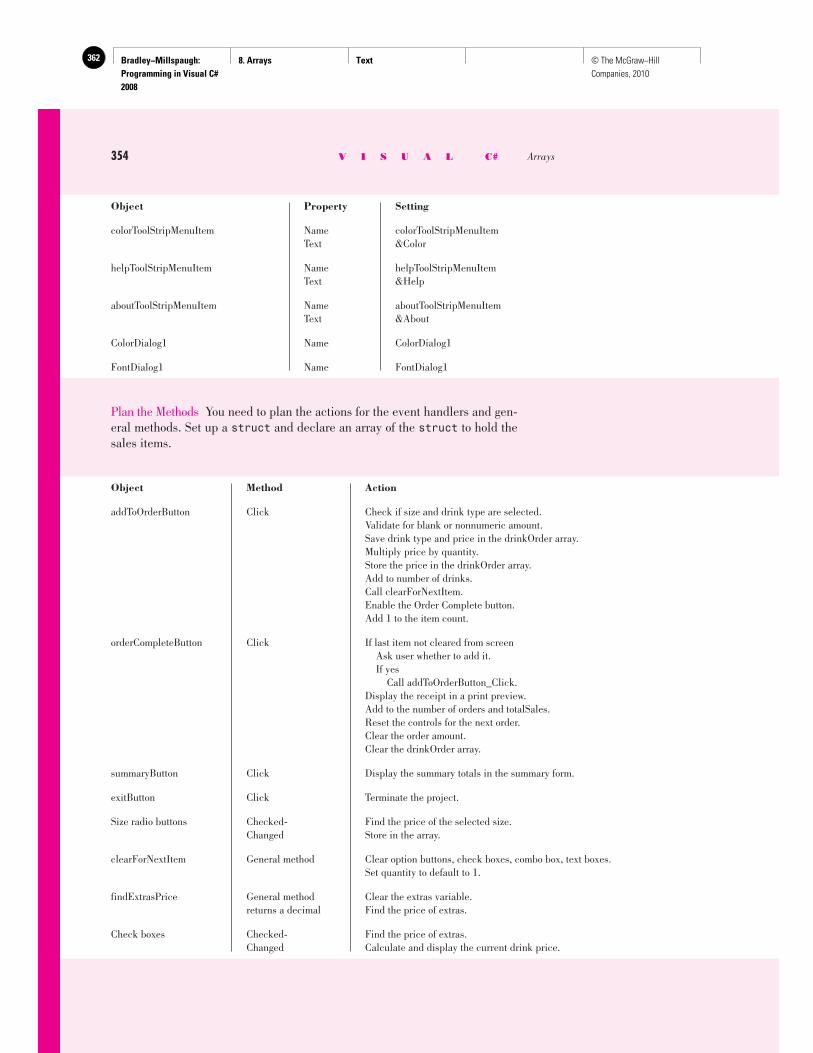
Bradley−Millspaugh: Programming in Visual C# 2008
8. Arrays Text362 © The McGraw−Hill Companies, 2010
354 V I S U A L C# Arrays
colorToolStripMenuItem Name colorToolStripMenuItem Text &Color
helpToolStripMenuItem Name helpToolStripMenuItem Text &Help
aboutToolStripMenuItem Name aboutToolStripMenuItem Text &About
ColorDialog1 Name ColorDialog1
FontDialog1 Name FontDialog1
Plan the Methods You need to plan the actions for the event handlers and gen-eral methods. Set up a struct and declare an array of the struct to hold the sales items.
Object Property Setting
Object Method Action
addToOrderButton Click Check if size and drink type are selected. Validate for blank or nonnumeric amount. Save drink type and price in the drinkOrder array. Multiply price by quantity. Store the price in the drinkOrder array. Add to number of drinks. Call clearForNextItem. Enable the Order Complete button. Add 1 to the item count.
orderCompleteButton Click If last item not cleared from screen Ask user whether to add it. If yes Call addToOrderButton_Click. Display the receipt in a print preview. Add to the number of orders and totalSales. Reset the controls for the next order. Clear the order amount. Clear the drinkOrder array.
summaryButton Click Display the summary totals in the summary form.
exitButton Click Terminate the project.
Size radio buttons Checked- Find the price of the selected size. Changed Store in the array.
clearForNextItem General method Clear option buttons, check boxes, combo box, text boxes. Set quantity to default to 1.
findExtrasPrice General method Clear the extras variable. returns a decimal Find the price of extras.
Check boxes Checked- Find the price of extras. Changed Calculate and display the current drink price.

Bradley−Millspaugh: Programming in Visual C# 2008
8. Arrays Text 363© The McGraw−Hill Companies, 2010
C H A P T E R 8 355
summaryToolStrip Click Share summaryButton_Click handler. MenuItem
exitToolStripMenuItem Click Share exitButton_Click handler.
aboutToolStripMenuItem Click Display the About box form.
fontToolStripMenuItem Click Display the Font dialog box. Change the font of the title.
colorToolStrip MenuItem Click Display the Color dialog box. Change the ForeColor of the form.
printDocument1 PrintPage Send heading lines to the print page. Loop through the drinkOrder array. Print one line for each item in the order. Calculate the extended price = price * quantity. Print the order total.
Write the Project Follow the sketch in Figure 8.11 to create the form. Fig-ure 8.12 shows the completed form and Figure 8.13 shows sample report output.
• Set the properties of each object, according to your plan.
• Write the code. Working from the pseudo code, write each event handler and the class-level struct and variables needed.
• When you complete the code, use a variety of data to thoroughly test the project. Make sure that the receipt has accurate amounts for each item and for the order total.
F i g u r e 8 . 1 2
The form for the hands-on programming example.
Object Method Action
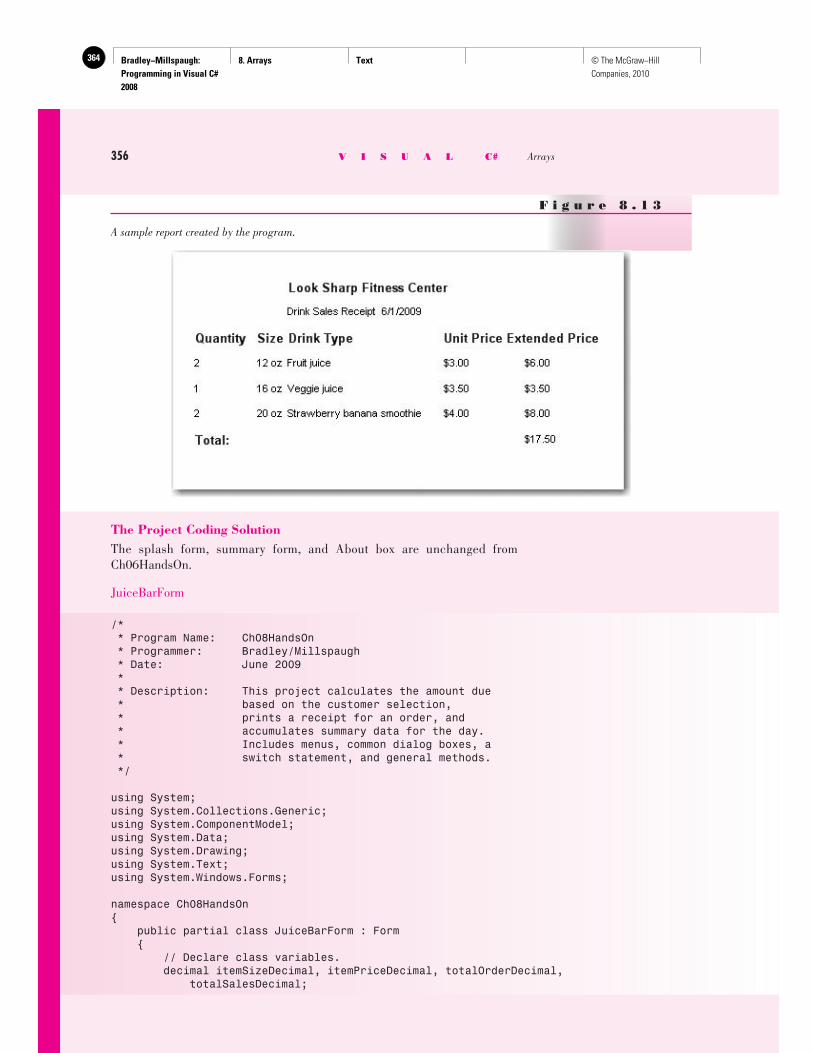
Bradley−Millspaugh: Programming in Visual C# 2008
8. Arrays Text364 © The McGraw−Hill Companies, 2010
356 V I S U A L C# Arrays
The Project Coding Solution The splash form, summary form, and About box are unchanged from Ch06HandsOn.
JuiceBarForm
/* * Program Name: Ch08HandsOn * Programmer: Bradley/Millspaugh * Date: June 2009 * * Description: This project calculates the amount due * based on the customer selection, * prints a receipt for an order, and * accumulates summary data for the day. * Includes menus, common dialog boxes, a * switch statement, and general methods. */
using System;using System.Collections.Generic;using System.ComponentModel;using System.Data;using System.Drawing;using System.Text;using System.Windows.Forms;
namespace Ch08HandsOn{ public partial class JuiceBarForm : Form { // Declare class variables. decimal itemSizeDecimal, itemPriceDecimal, totalOrderDecimal, totalSalesDecimal;
F i g u r e 8 . 1 3
A sample report created by the program.
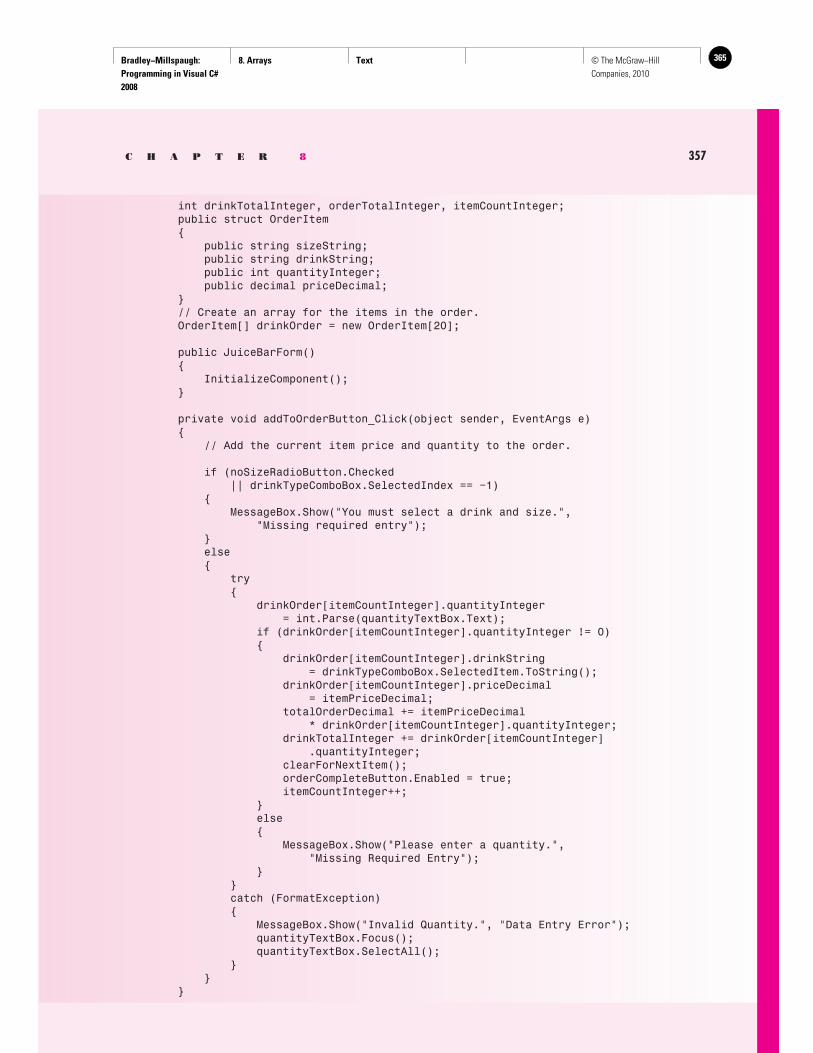
Bradley−Millspaugh: Programming in Visual C# 2008
8. Arrays Text 365© The McGraw−Hill Companies, 2010
C H A P T E R 8 357
int drinkTotalInteger, orderTotalInteger, itemCountInteger; public struct OrderItem { public string sizeString; public string drinkString; public int quantityInteger; public decimal priceDecimal; } // Create an array for the items in the order. OrderItem[] drinkOrder = new OrderItem[20];
public JuiceBarForm() { InitializeComponent(); }
private void addToOrderButton_Click(object sender, EventArgs e) { // Add the current item price and quantity to the order.
if (noSizeRadioButton.Checked || drinkTypeComboBox.SelectedIndex == −1) { MessageBox.Show("You must select a drink and size.", "Missing required entry"); } else { try { drinkOrder[itemCountInteger].quantityInteger = int.Parse(quantityTextBox.Text); if (drinkOrder[itemCountInteger].quantityInteger != 0) { drinkOrder[itemCountInteger].drinkString = drinkTypeComboBox.SelectedItem.ToString(); drinkOrder[itemCountInteger].priceDecimal = itemPriceDecimal; totalOrderDecimal += itemPriceDecimal * drinkOrder[itemCountInteger].quantityInteger; drinkTotalInteger += drinkOrder[itemCountInteger] .quantityInteger; clearForNextItem(); orderCompleteButton.Enabled = true; itemCountInteger++; } else { MessageBox.Show("Please enter a quantity.", "Missing Required Entry"); } } catch (FormatException) { MessageBox.Show("Invalid Quantity.", "Data Entry Error"); quantityTextBox.Focus(); quantityTextBox.SelectAll(); } } }
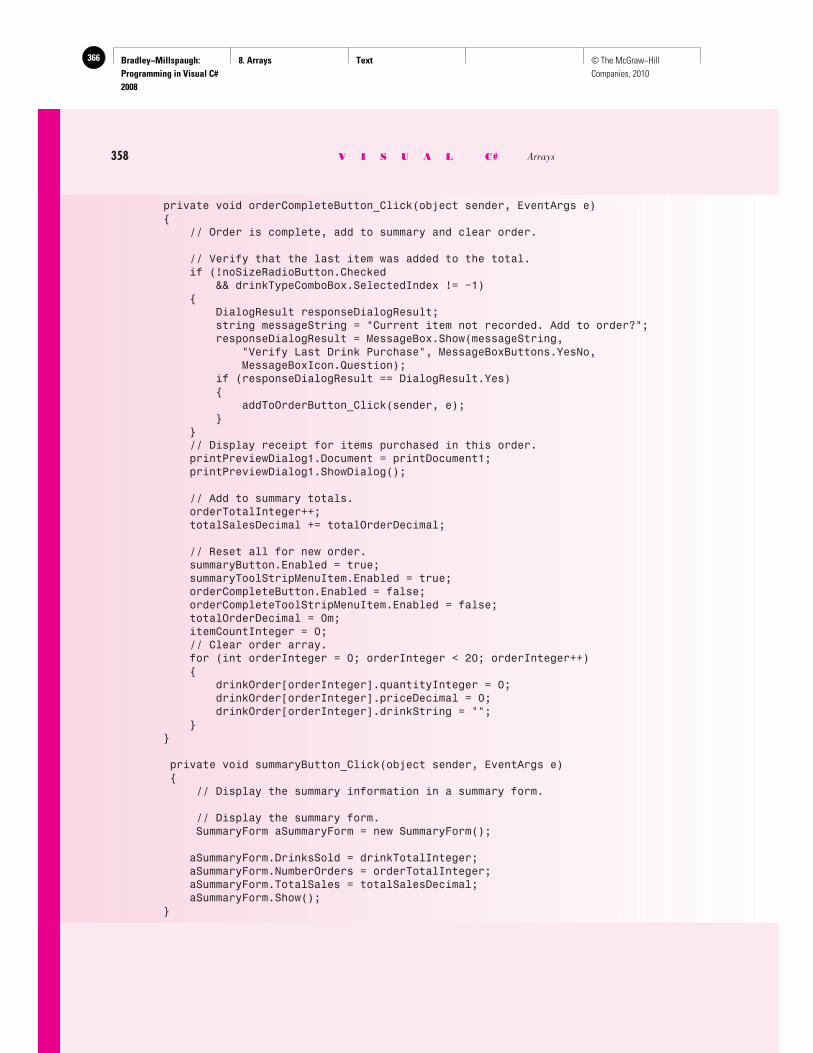
Bradley−Millspaugh: Programming in Visual C# 2008
8. Arrays Text366 © The McGraw−Hill Companies, 2010
358 V I S U A L C# Arrays
private void orderCompleteButton_Click(object sender, EventArgs e) { // Order is complete, add to summary and clear order.
// Verify that the last item was added to the total. if (!noSizeRadioButton.Checked && drinkTypeComboBox.SelectedIndex != −1) { DialogResult responseDialogResult; string messageString = "Current item not recorded. Add to order?"; responseDialogResult = MessageBox.Show(messageString, "Verify Last Drink Purchase", MessageBoxButtons.YesNo, MessageBoxIcon.Question); if (responseDialogResult == DialogResult.Yes) { addToOrderButton_Click(sender, e); } } // Display receipt for items purchased in this order. printPreviewDialog1.Document = printDocument1; printPreviewDialog1.ShowDialog();
// Add to summary totals. orderTotalInteger++; totalSalesDecimal += totalOrderDecimal;
// Reset all for new order. summaryButton.Enabled = true; summaryToolStripMenuItem.Enabled = true; orderCompleteButton.Enabled = false; orderCompleteToolStripMenuItem.Enabled = false; totalOrderDecimal = 0m; itemCountInteger = 0; // Clear order array. for (int orderInteger = 0; orderInteger < 20; orderInteger++) { drinkOrder[orderInteger].quantityInteger = 0; drinkOrder[orderInteger].priceDecimal = 0; drinkOrder[orderInteger].drinkString = ""; } }
private void summaryButton_Click(object sender, EventArgs e) { // Display the summary information in a summary form.
// Display the summary form. SummaryForm aSummaryForm = new SummaryForm();
aSummaryForm.DrinksSold = drinkTotalInteger; aSummaryForm.NumberOrders = orderTotalInteger; aSummaryForm.TotalSales = totalSalesDecimal; aSummaryForm.Show(); }
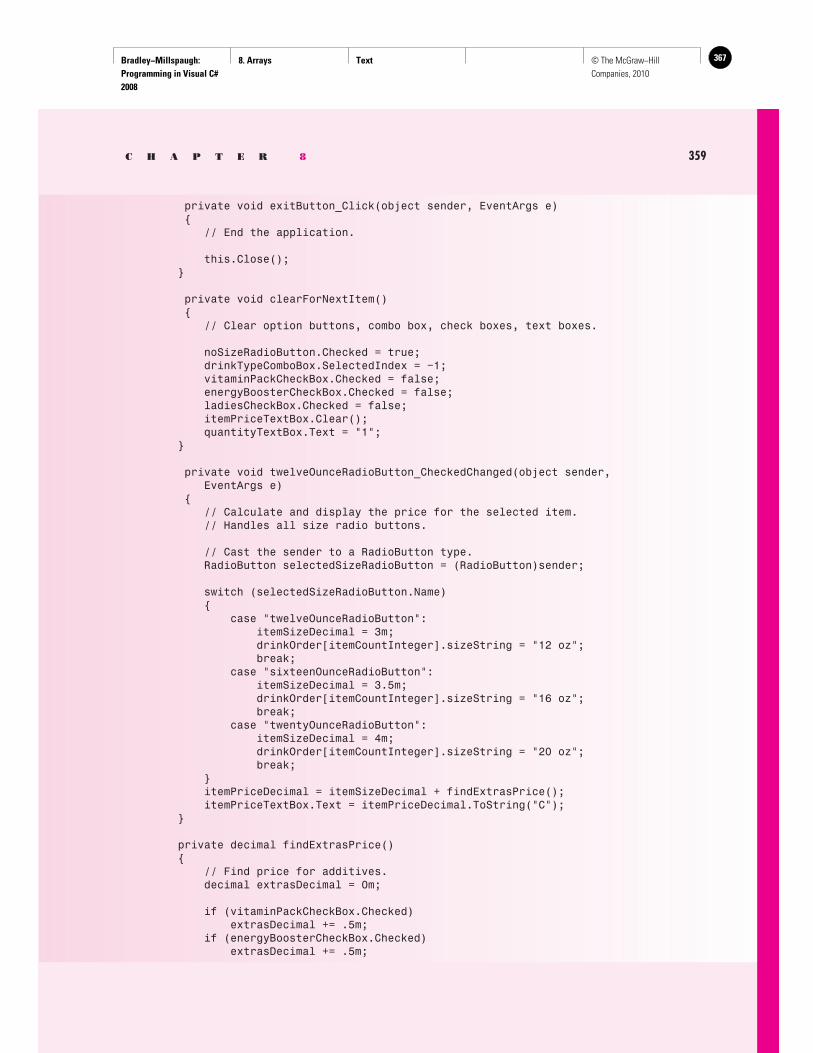
Bradley−Millspaugh: Programming in Visual C# 2008
8. Arrays Text 367© The McGraw−Hill Companies, 2010
C H A P T E R 8 359
private void exitButton_Click(object sender, EventArgs e) { // End the application.
this.Close(); }
private void clearForNextItem() { // Clear option buttons, combo box, check boxes, text boxes.
noSizeRadioButton.Checked = true; drinkTypeComboBox.SelectedIndex = −1; vitaminPackCheckBox.Checked = false; energyBoosterCheckBox.Checked = false; ladiesCheckBox.Checked = false; itemPriceTextBox.Clear(); quantityTextBox.Text = "1"; }
private void twelveOunceRadioButton_CheckedChanged(object sender, EventArgs e) { // Calculate and display the price for the selected item. // Handles all size radio buttons.
// Cast the sender to a RadioButton type. RadioButton selectedSizeRadioButton = (RadioButton)sender;
switch (selectedSizeRadioButton.Name) { case "twelveOunceRadioButton": itemSizeDecimal = 3m; drinkOrder[itemCountInteger].sizeString = "12 oz"; break; case "sixteenOunceRadioButton": itemSizeDecimal = 3.5m; drinkOrder[itemCountInteger].sizeString = "16 oz"; break; case "twentyOunceRadioButton": itemSizeDecimal = 4m; drinkOrder[itemCountInteger].sizeString = "20 oz"; break; } itemPriceDecimal = itemSizeDecimal + findExtrasPrice(); itemPriceTextBox.Text = itemPriceDecimal.ToString("C"); }
private decimal findExtrasPrice() { // Find price for additives. decimal extrasDecimal = 0m;
if (vitaminPackCheckBox.Checked) extrasDecimal += .5m; if (energyBoosterCheckBox.Checked) extrasDecimal += .5m;
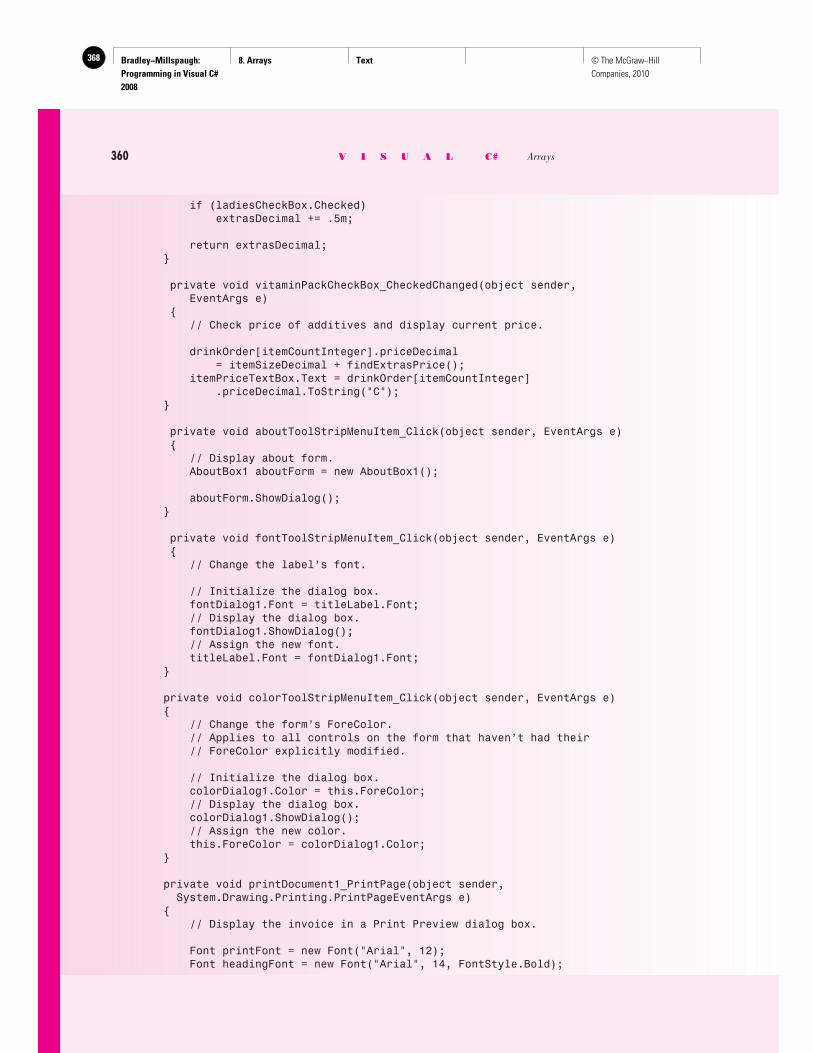
Bradley−Millspaugh: Programming in Visual C# 2008
8. Arrays Text368 © The McGraw−Hill Companies, 2010
360 V I S U A L C# Arrays
if (ladiesCheckBox.Checked) extrasDecimal += .5m;
return extrasDecimal; }
private void vitaminPackCheckBox_CheckedChanged(object sender, EventArgs e) { // Check price of additives and display current price.
drinkOrder[itemCountInteger].priceDecimal = itemSizeDecimal + findExtrasPrice(); itemPriceTextBox.Text = drinkOrder[itemCountInteger] .priceDecimal.ToString("C"); }
private void aboutToolStripMenuItem_Click(object sender, EventArgs e) { // Display about form. AboutBox1 aboutForm = new AboutBox1();
aboutForm.ShowDialog(); }
private void fontToolStripMenuItem_Click(object sender, EventArgs e) { // Change the label’s font.
// Initialize the dialog box. fontDialog1.Font = titleLabel.Font; // Display the dialog box. fontDialog1.ShowDialog(); // Assign the new font. titleLabel.Font = fontDialog1.Font; }
private void colorToolStripMenuItem_Click(object sender, EventArgs e) { // Change the form’s ForeColor. // Applies to all controls on the form that haven’t had their // ForeColor explicitly modified.
// Initialize the dialog box. colorDialog1.Color = this.ForeColor; // Display the dialog box. colorDialog1.ShowDialog(); // Assign the new color. this.ForeColor = colorDialog1.Color; }
private void printDocument1_PrintPage(object sender, System.Drawing.Printing.PrintPageEventArgs e) { // Display the invoice in a Print Preview dialog box.
Font printFont = new Font("Arial", 12); Font headingFont = new Font("Arial", 14, FontStyle.Bold);
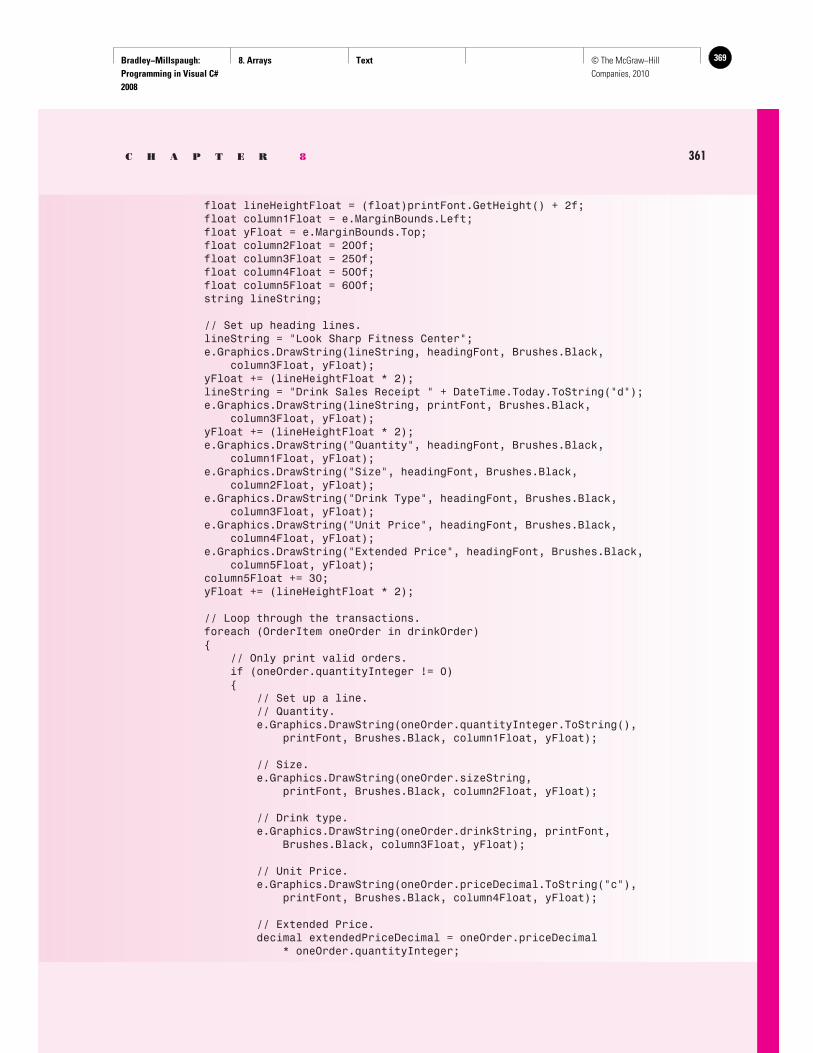
Bradley−Millspaugh: Programming in Visual C# 2008
8. Arrays Text 369© The McGraw−Hill Companies, 2010
float lineHeightFloat = (float)printFont.GetHeight() + 2f; float column1Float = e.MarginBounds.Left; float yFloat = e.MarginBounds.Top; float column2Float = 200f; float column3Float = 250f; float column4Float = 500f; float column5Float = 600f; string lineString;
// Set up heading lines. lineString = "Look Sharp Fitness Center"; e.Graphics.DrawString(lineString, headingFont, Brushes.Black, column3Float, yFloat); yFloat += (lineHeightFloat * 2); lineString = "Drink Sales Receipt " + DateTime.Today.ToString("d"); e.Graphics.DrawString(lineString, printFont, Brushes.Black, column3Float, yFloat); yFloat += (lineHeightFloat * 2); e.Graphics.DrawString("Quantity", headingFont, Brushes.Black, column1Float, yFloat); e.Graphics.DrawString("Size", headingFont, Brushes.Black, column2Float, yFloat); e.Graphics.DrawString("Drink Type", headingFont, Brushes.Black, column3Float, yFloat); e.Graphics.DrawString("Unit Price", headingFont, Brushes.Black, column4Float, yFloat); e.Graphics.DrawString("Extended Price", headingFont, Brushes.Black, column5Float, yFloat); column5Float += 30; yFloat += (lineHeightFloat * 2);
// Loop through the transactions. foreach (OrderItem oneOrder in drinkOrder) { // Only print valid orders. if (oneOrder.quantityInteger != 0) { // Set up a line. // Quantity. e.Graphics.DrawString(oneOrder.quantityInteger.ToString(), printFont, Brushes.Black, column1Float, yFloat);
// Size. e.Graphics.DrawString(oneOrder.sizeString, printFont, Brushes.Black, column2Float, yFloat);
// Drink type. e.Graphics.DrawString(oneOrder.drinkString, printFont, Brushes.Black, column3Float, yFloat);
// Unit Price. e.Graphics.DrawString(oneOrder.priceDecimal.ToString("c"), printFont, Brushes.Black, column4Float, yFloat);
// Extended Price. decimal extendedPriceDecimal = oneOrder.priceDecimal * oneOrder.quantityInteger;
C H A P T E R 8 361
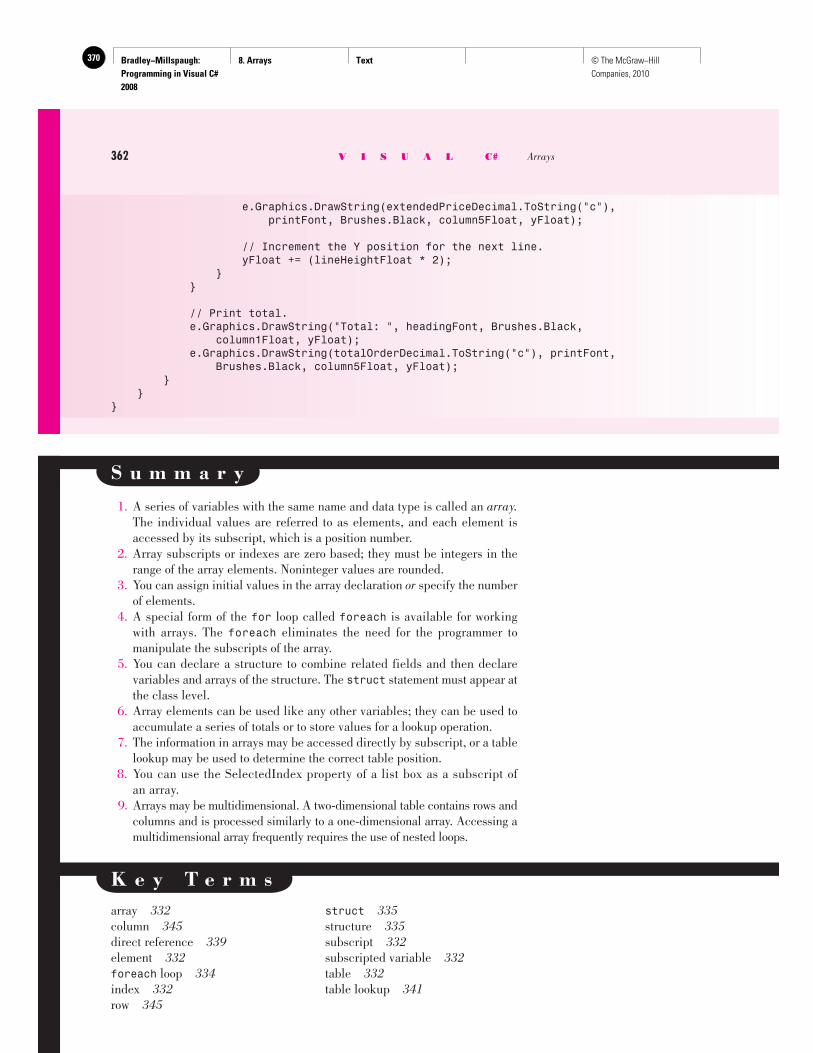
Bradley−Millspaugh: Programming in Visual C# 2008
8. Arrays Text370 © The McGraw−Hill Companies, 2010
K e y T e r m s array 332 column 345 direct reference 339 element 332 foreach loop 334 index 332 row 345
struct 335 structure 335 subscript 332 subscripted variable 332 table 332 table lookup 341
S u m m a r y
1. A series of variables with the same name and data type is called an array. The individual values are referred to as elements, and each element is accessed by its subscript, which is a position number.
2. Array subscripts or indexes are zero based; they must be integers in the range of the array elements. Noninteger values are rounded.
3. You can assign initial values in the array declaration or specify the number of elements.
4. A special form of the for loop called foreach is available for working with arrays. The foreach eliminates the need for the programmer to manipulate the subscripts of the array.
5. You can declare a structure to combine related fields and then declare variables and arrays of the structure. The struct statement must appear at the class level.
6. Array elements can be used like any other variables; they can be used to accumulate a series of totals or to store values for a lookup operation.
7. The information in arrays may be accessed directly by subscript, or a table lookup may be used to determine the correct table position.
8. You can use the SelectedIndex property of a list box as a subscript of an array.
9. Arrays may be multidimensional. A two-dimensional table contains rows and columns and is processed similarly to a one-dimensional array. Accessing a multidimensional array frequently requires the use of nested loops.
e.Graphics.DrawString(extendedPriceDecimal.ToString("c"), printFont, Brushes.Black, column5Float, yFloat);
// Increment the Y position for the next line. yFloat += (lineHeightFloat * 2); } }
// Print total. e.Graphics.DrawString("Total: ", headingFont, Brushes.Black, column1Float, yFloat); e.Graphics.DrawString(totalOrderDecimal.ToString("c"), printFont, Brushes.Black, column5Float, yFloat); } }}
362 V I S U A L C# Arrays
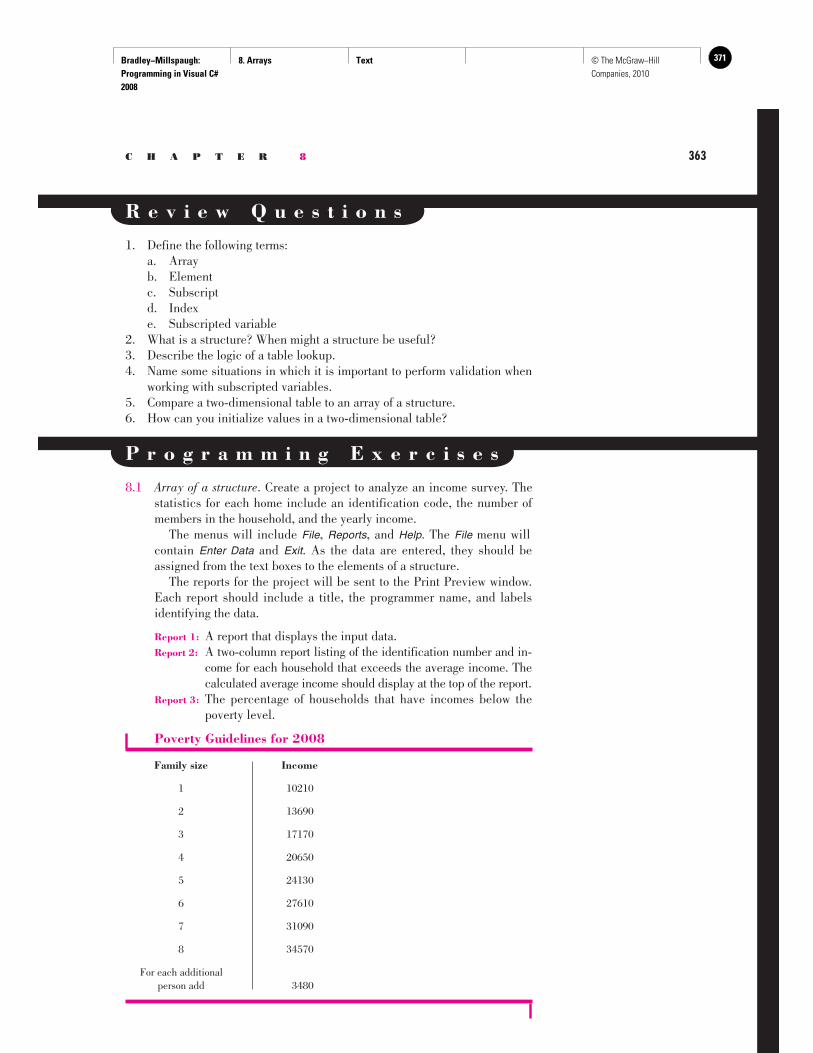
Bradley−Millspaugh: Programming in Visual C# 2008
8. Arrays Text 371© The McGraw−Hill Companies, 2010
C H A P T E R 8 363
Poverty Guidelines for 2008
Family size Income
1 10210
2 13690
3 17170
4 20650
5 24130
6 27610
7 31090
8 34570
For each additional person add 3480
P r o g r a m m i n g E x e r c i s e s
8.1 Array of a structure . Create a project to analyze an income survey. The statistics for each home include an identification code, the number of members in the household, and the yearly income.
The menus will include File , Reports , and Help . The File menu will contain Enter Data and Exit . As the data are entered, they should be assigned from the text boxes to the elements of a structure.
The reports for the project will be sent to the Print Preview window. Each report should include a title, the programmer name, and labels identifying the data.
Report 1: A report that displays the input data. Report 2: A two-column report listing of the identification number and in-
come for each household that exceeds the average income. The calculated average income should display at the top of the report.
Report 3: The percentage of households that have incomes below the poverty level.
R e v i e w Q u e s t i o n s
1. Define the following terms: a. Array b. Element c. Subscript d. Index e. Subscripted variable
2. What is a structure? When might a structure be useful? 3. Describe the logic of a table lookup. 4. Name some situations in which it is important to perform validation when
working with subscripted variables. 5. Compare a two-dimensional table to an array of a structure.6. How can you initialize values in a two-dimensional table?
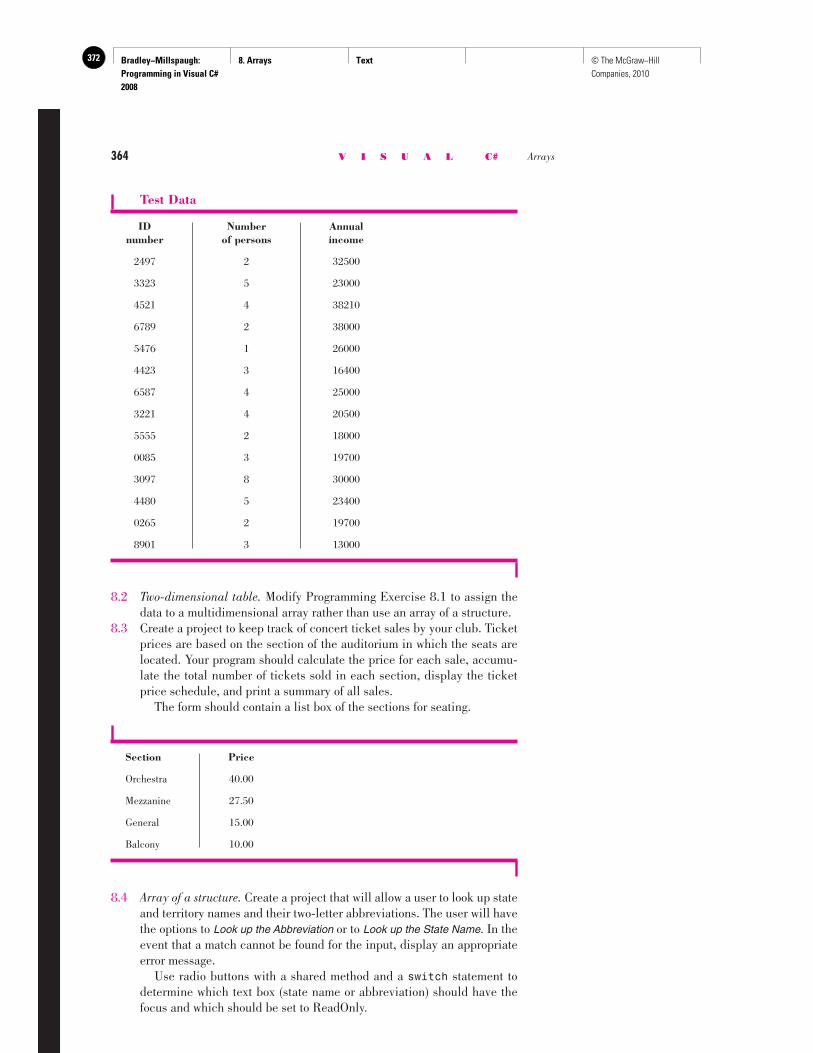
Bradley−Millspaugh: Programming in Visual C# 2008
8. Arrays Text372 © The McGraw−Hill Companies, 2010
364 V I S U A L C# Arrays
8.2 Two-dimensional table. Modify Programming Exercise 8.1 to assign the data to a multidimensional array rather than use an array of a structure.
8.3 Create a project to keep track of concert ticket sales by your club. Ticket prices are based on the section of the auditorium in which the seats are located. Your program should calculate the price for each sale, accumu-late the total number of tickets sold in each section, display the ticket price schedule, and print a summary of all sales.
The form should contain a list box of the sections for seating.
Section Price
Orchestra 40.00
Mezzanine 27.50
General 15.00
Balcony 10.00
Test Data
ID Number Annual number of persons income
2497 2 32500
3323 5 23000
4521 4 38210
6789 2 38000
5476 1 26000
4423 3 16400
6587 4 25000
3221 4 20500
5555 2 18000
0085 3 19700
3097 8 30000
4480 5 23400
0265 2 19700
8901 3 13000
8.4 Array of a structure. Create a project that will allow a user to look up state and territory names and their two-letter abbreviations. The user will have the options to Look up the Abbreviation or to Look up the State Name . In the event that a match cannot be found for the input, display an appropriate error message.
Use radio buttons with a shared method and a switch statement to determine which text box (state name or abbreviation) should have the focus and which should be set to ReadOnly.

Bradley−Millspaugh: Programming in Visual C# 2008
8. Arrays Text 373© The McGraw−Hill Companies, 2010
C H A P T E R 8 365
8.5 Two-dimensional table. Create a project that looks up the driving distance between two cities. Use two drop-down lists that contain the names of the cities. Label one list Departure and the other Destination . Use a Look Up button to calculate the distance.
Store the distances in a two-dimensional table.
Data
AL Alabama MT Montana
AK Alaska NE Nebraska
AS American Samoa NV Nevada
AZ Arizona NH New Hampshire
AR Arkansas NJ New Jersey
CA California NM New Mexico
CO Colorado NY New York
CT Connecticut NC North Carolina
DE Delaware ND North Dakota
DC District of Columbia OH Ohio
FL Florida OK Oklahoma
GA Georgia OR Oregon
GU Guam PA Pennsylvania
HI Hawaii PR Puerto Rico
ID Idaho RI Rhode Island
IL Illinois SC South Carolina
IN Indiana SD South Dakota
IA Iowa TN Tennessee
KS Kansas TX Texas
KY Kentucky TT Trust Territories
LA Louisiana UT Utah
ME Maine VT Vermont
MD Maryland VA Virginia
MA Massachusetts VI Virgin Islands
MI Michigan WA Washington
MN Minnesota WV West Virginia
MS Mississippi WI Wisconsin
MO Missouri WY Wyoming
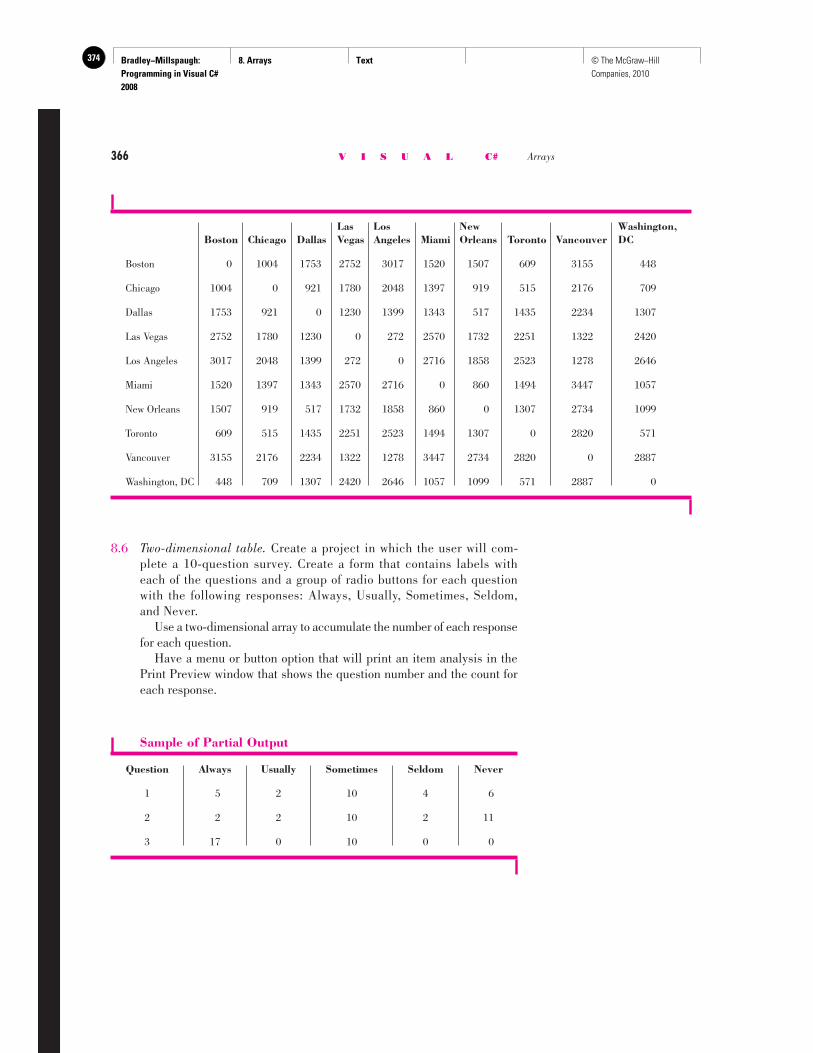
Bradley−Millspaugh: Programming in Visual C# 2008
8. Arrays Text374 © The McGraw−Hill Companies, 2010
366 V I S U A L C# Arrays
8.6 Two-dimensional table. Create a project in which the user will com-plete a 10-question survey. Create a form that contains labels with each of the questions and a group of radio buttons for each question with the following responses: Always, Usually, Sometimes, Seldom, and Never.
Use a two-dimensional array to accumulate the number of each response for each question.
Have a menu or button option that will print an item analysis in the Print Preview window that shows the question number and the count for each response.
Sample of Partial Output
Question Always Usually Sometimes Seldom Never
1 5 2 10 4 6
2 2 2 10 2 11
3 17 0 10 0 0
Las Los New Washington, Boston Chicago Dallas Vegas Angeles Miami Orleans Toronto Vancouver DC
Boston 0 1004 1753 2752 3017 1520 1507 609 3155 448
Chicago 1004 0 921 1780 2048 1397 919 515 2176 709
Dallas 1753 921 0 1230 1399 1343 517 1435 2234 1307
Las Vegas 2752 1780 1230 0 272 2570 1732 2251 1322 2420
Los Angeles 3017 2048 1399 272 0 2716 1858 2523 1278 2646
Miami 1520 1397 1343 2570 2716 0 860 1494 3447 1057
New Orleans 1507 919 517 1732 1858 860 0 1307 2734 1099
Toronto 609 515 1435 2251 2523 1494 1307 0 2820 571
Vancouver 3155 2176 2234 1322 1278 3447 2734 2820 0 2887
Washington, DC 448 709 1307 2420 2646 1057 1099 571 2887 0
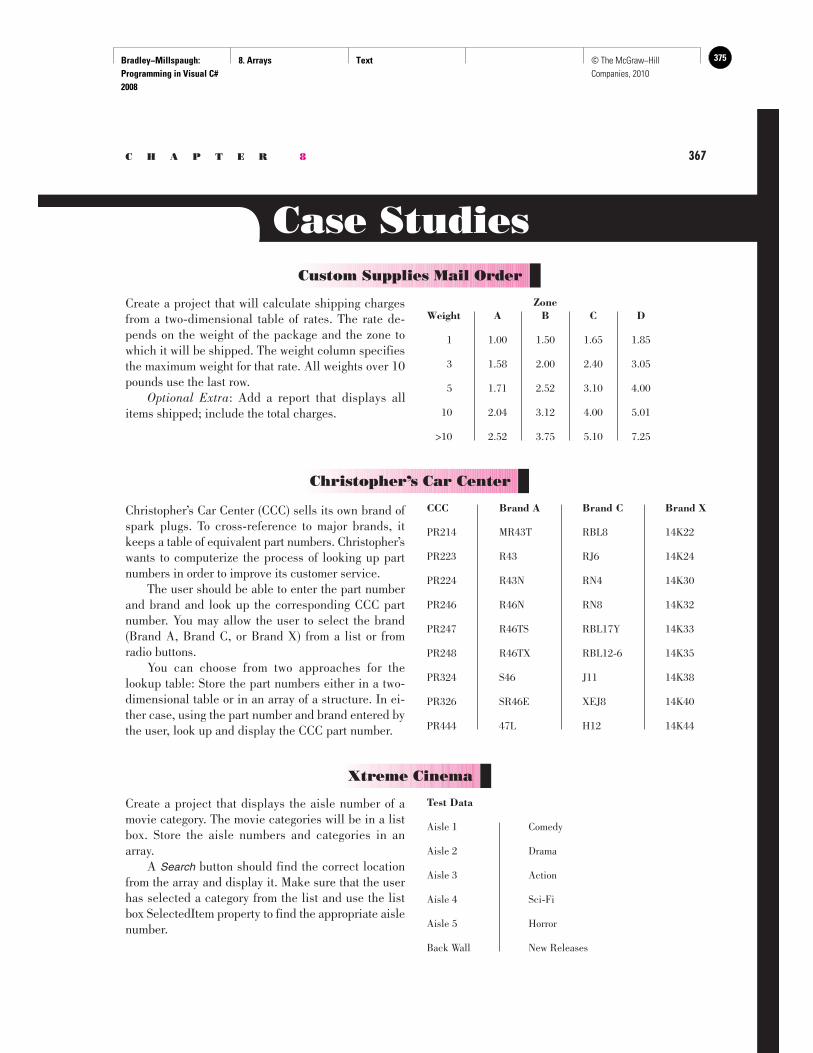
Bradley−Millspaugh: Programming in Visual C# 2008
8. Arrays Text 375© The McGraw−Hill Companies, 2010
C H A P T E R 8 367
Xtreme Cinema
Create a project that displays the aisle number of a movie category. The movie categories will be in a list box. Store the aisle numbers and categories in an array. A Search button should find the correct location from the array and display it. Make sure that the user has selected a category from the list and use the list box SelectedItem property to find the appropriate aisle number.
Test Data
Aisle 1 Comedy
Aisle 2 Drama
Aisle 3 Action
Aisle 4 Sci-Fi
Aisle 5 Horror
Back Wall New Releases
Case Studies Custom Supplies Mail Order
Create a project that will calculate shipping charges from a two-dimensional table of rates. The rate de-pends on the weight of the package and the zone to which it will be shipped. The weight column specifies the maximum weight for that rate. All weights over 10 pounds use the last row. Optional Extra : Add a report that displays all items shipped; include the total charges.
Zone Weight A B C D
1 1.00 1.50 1.65 1.85
3 1.58 2.00 2.40 3.05
5 1.71 2.52 3.10 4.00
10 2.04 3.12 4.00 5.01
>10 2.52 3.75 5.10 7.25
Christopher’s Car Center (CCC) sells its own brand of spark plugs. To cross-reference to major brands, it keeps a table of equivalent part numbers. Christopher’s wants to computerize the process of looking up part numbers in order to improve its customer service. The user should be able to enter the part number and brand and look up the corresponding CCC part number. You may allow the user to select the brand (Brand A, Brand C, or Brand X) from a list or from radio buttons. You can choose from two approaches for the lookup table: Store the part numbers either in a two-dimensional table or in an array of a structure. In ei-ther case, using the part number and brand entered by the user, look up and display the CCC part number.
Christopher’s Car Center
CCC Brand A Brand C Brand X
PR214 MR43T RBL8 14K22
PR223 R43 RJ6 14K24
PR224 R43N RN4 14K30
PR246 R46N RN8 14K32
PR247 R46TS RBL17Y 14K33
PR248 R46TX RBL12-6 14K35
PR324 S46 J11 14K38
PR326 SR46E XEJ8 14K40
PR444 47L H12 14K44
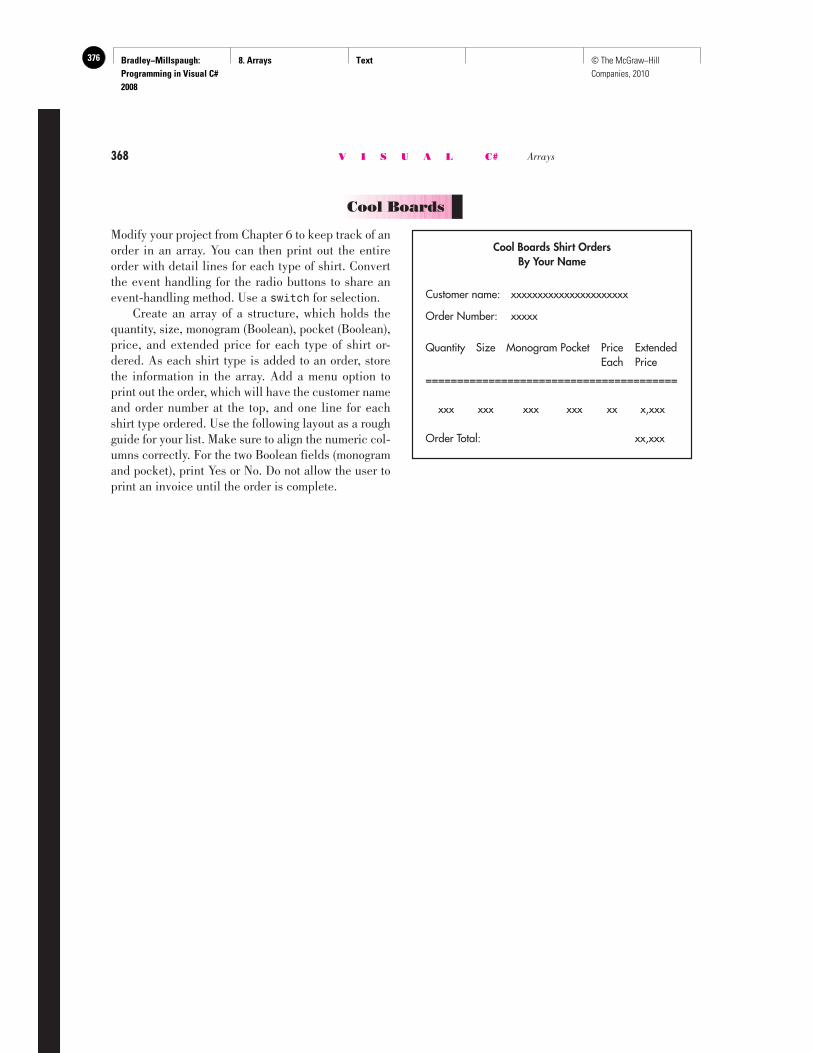
Bradley−Millspaugh: Programming in Visual C# 2008
8. Arrays Text376 © The McGraw−Hill Companies, 2010
368 V I S U A L C# Arrays
Cool Boards
Modify your project from Chapter 6 to keep track of an order in an array. You can then print out the entire order with detail lines for each type of shirt. Convert the event handling for the radio buttons to share an event-handling method. Use a switch for selection. Create an array of a structure, which holds the quantity, size, monogram (Boolean), pocket (Boolean), price, and extended price for each type of shirt or-dered. As each shirt type is added to an order, store the information in the array. Add a menu option to print out the order, which will have the customer name and order number at the top, and one line for each shirt type ordered. Use the following layout as a rough guide for your list. Make sure to align the numeric col-umns correctly. For the two Boolean fields (monogram and pocket), print Yes or No. Do not allow the user to print an invoice until the order is complete.
Cool Boards Shirt OrdersBy Your Name
Customer name: xxxxxxxxxxxxxxxxxxxxxx
Order Number: xxxxx
Quantity Size Monogram Pocket Price ExtendedEach Price
========================================
xxx xxx xxx xxx xx x,xxx
Order Total: xx,xxx
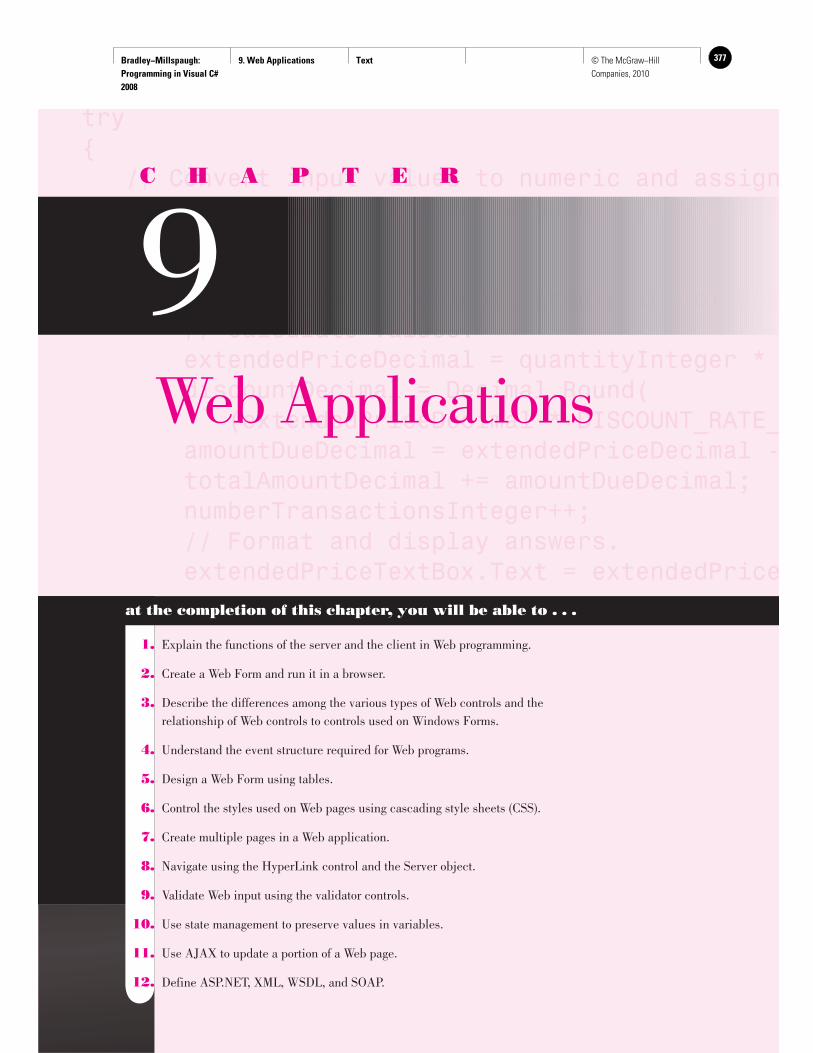
Bradley−Millspaugh: Programming in Visual C# 2008
9. Web Applications Text 377© The McGraw−Hill Companies, 2010
try{ // Convert input values to numeric and assign quantityInteger = int.Parse(quantityTextBox.T try { priceDecimal = decimal.Parse(priceTextBox // Calculate values. extendedPriceDecimal = quantityInteger * discountDecimal = Decimal.Round( (extendedPriceDecimal * DISCOUNT_RATE_ amountDueDecimal = extendedPriceDecimal - totalAmountDecimal += amountDueDecimal; numberTransactionsInteger++; // Format and display answers. extendedPriceTextBox.Text = extendedPrice
C H A P T E R
9 Web Applications
at the completion of this chapter, you will be able to . . .
1. Explain the functions of the server and the client in Web programming.
2. Create a Web Form and run it in a browser.
3. Describe the differences among the various types of Web controls and the relationship of Web controls to controls used on Windows Forms.
4. Understand the event structure required for Web programs.
5. Design a Web Form using tables.
6. Control the styles used on Web pages using cascading style sheets (CSS).
7. Create multiple pages in a Web application.
8. Navigate using the HyperLink control and the Server object.
9. Validate Web input using the validator controls.
10. Use state management to preserve values in variables.
11. Use AJAX to update a portion of a Web page.
12. Define ASP.NET, XML, WSDL, and SOAP.
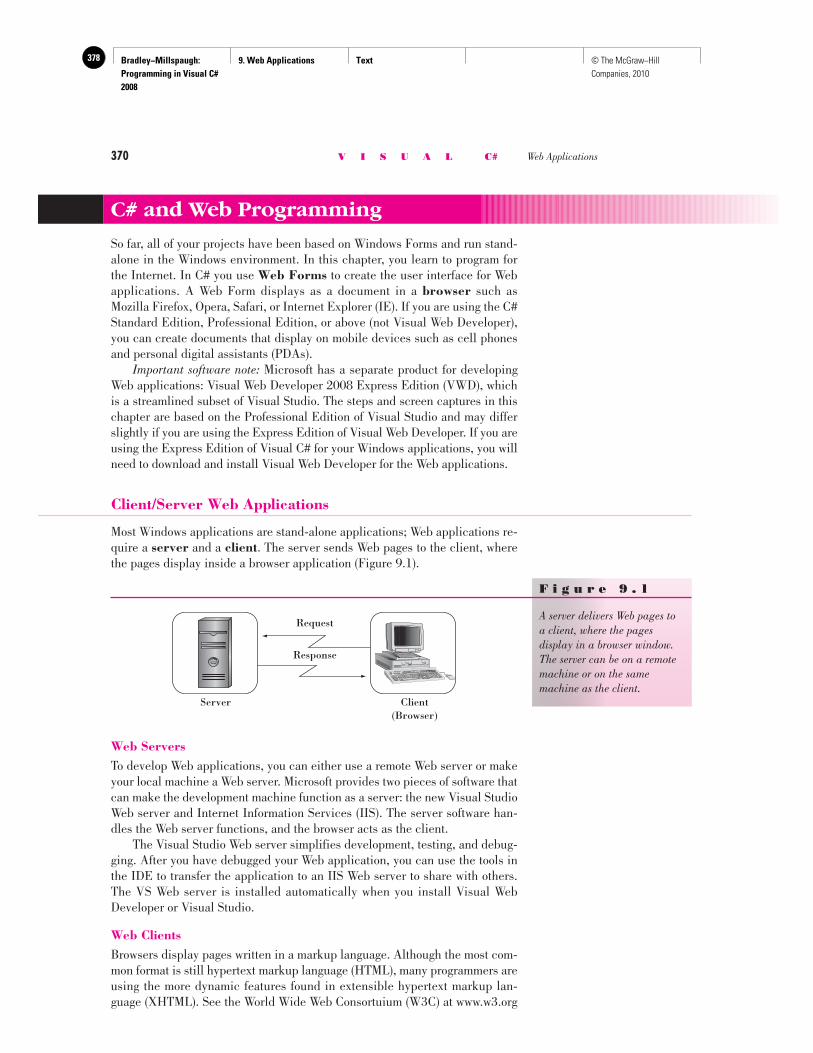
Bradley−Millspaugh: Programming in Visual C# 2008
9. Web Applications Text378 © The McGraw−Hill Companies, 2010
370 V I S U A L C# Web Applications
C# and Web Programming
So far, all of your projects have been based on Windows Forms and run stand-alone in the Windows environment. In this chapter, you learn to program for the Internet. In C# you use Web Forms to create the user interface for Web applications. A Web Form displays as a document in a browser such as Mozilla Firefox, Opera, Safari, or Internet Explorer (IE). If you are using the C# Standard Edition, Professional Edition, or above (not Visual Web Developer), you can create documents that display on mobile devices such as cell phones and personal digital assistants (PDAs). Important software note: Microsoft has a separate product for developing Web applications: Visual Web Developer 2008 Express Edition (VWD), which is a streamlined subset of Visual Studio. The steps and screen captures in this chapter are based on the Professional Edition of Visual Studio and may differ slightly if you are using the Express Edition of Visual Web Developer. If you are using the Express Edition of Visual C# for your Windows applications, you will need to download and install Visual Web Developer for the Web applications.
Client/Server Web Applications
Most Windows applications are stand-alone applications; Web applications re-quire a server and a client . The server sends Web pages to the client, where the pages display inside a browser application ( Figure 9.1 ).
F i g u r e 9 . 1
A server delivers Web pages to a client, where the pages display in a browser window. The server can be on a remote machine or on the same machine as the client.
Request
Server Client(Browser)
Response
Web Servers To develop Web applications, you can either use a remote Web server or make your local machine a Web server. Microsoft provides two pieces of software that can make the development machine function as a server: the new Visual Studio Web server and Internet Information Services (IIS). The server software han-dles the Web server functions, and the browser acts as the client. The Visual Studio Web server simplifies development, testing, and debug-ging. After you have debugged your Web application, you can use the tools in the IDE to transfer the application to an IIS Web server to share with others. The VS Web server is installed automatically when you install Visual Web Developer or Visual Studio.
Web Clients Browsers display pages written in a markup language. Although the most com-mon format is still hypertext markup language (HTML), many programmers are using the more dynamic features found in extensible hypertext markup lan-guage (XHTML). See the World Wide Web Consortuium (W3C) at www.w3.org
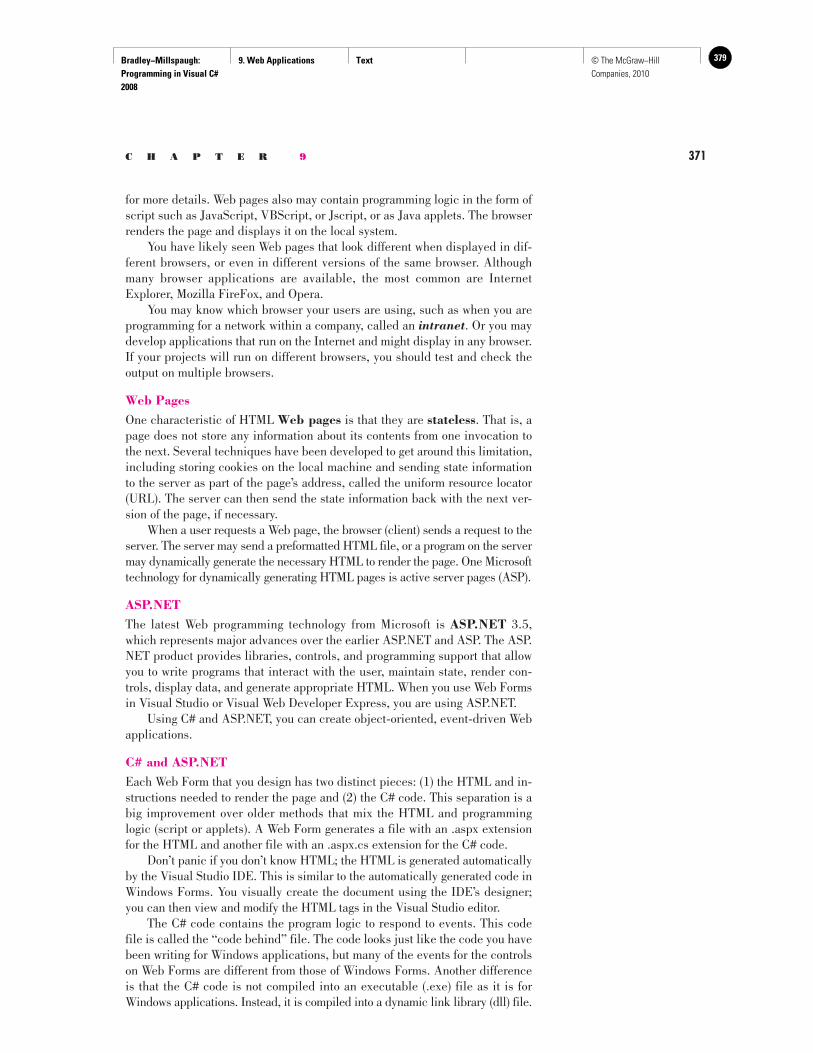
Bradley−Millspaugh: Programming in Visual C# 2008
9. Web Applications Text 379© The McGraw−Hill Companies, 2010
C H A P T E R 9 371
for more details. Web pages also may contain programming logic in the form of script such as JavaScript, VBScript, or Jscript, or as Java applets. The browser renders the page and displays it on the local system. You have likely seen Web pages that look different when displayed in dif-ferent browsers, or even in different versions of the same browser. Although many browser applications are available, the most common are Internet Explorer, Mozilla FireFox, and Opera. You may know which browser your users are using, such as when you are programming for a network within a company, called an intranet . Or you may develop applications that run on the Internet and might display in any browser. If your projects will run on different browsers, you should test and check the output on multiple browsers.
Web Pages One characteristic of HTML Web pages is that they are stateless . That is, a page does not store any information about its contents from one invocation to the next. Several techniques have been developed to get around this limitation, including storing cookies on the local machine and sending state information to the server as part of the page’s address, called the uniform resource locator (URL). The server can then send the state information back with the next ver-sion of the page, if necessary. When a user requests a Web page, the browser (client) sends a request to the server. The server may send a preformatted HTML file, or a program on the server may dynamically generate the necessary HTML to render the page. One Microsoft technology for dynamically generating HTML pages is active server pages (ASP).
ASP.NET The latest Web programming technology from Microsoft is ASP.NET 3.5, which represents major advances over the earlier ASP.NET and ASP. The ASP.NET product provides libraries, controls, and programming support that allow you to write programs that interact with the user, maintain state, render con-trols, display data, and generate appropriate HTML. When you use Web Forms in Visual Studio or Visual Web Developer Express, you are using ASP.NET. Using C# and ASP.NET, you can create object-oriented, event-driven Web applications.
C# and ASP.NET Each Web Form that you design has two distinct pieces: (1) the HTML and in-structions needed to render the page and (2) the C# code. This separation is a big improvement over older methods that mix the HTML and programming logic (script or applets). A Web Form generates a file with an .aspx extension for the HTML and another file with an .aspx.cs extension for the C# code. Don’t panic if you don’t know HTML; the HTML is generated automatically by the Visual Studio IDE. This is similar to the automatically generated code in Windows Forms. You visually create the document using the IDE’s designer; you can then view and modify the HTML tags in the Visual Studio editor. The C# code contains the program logic to respond to events. This code file is called the “code behind” file. The code looks just like the code you have been writing for Windows applications, but many of the events for the controls on Web Forms are different from those of Windows Forms. Another difference is that the C# code is not compiled into an executable (.exe) file as it is for Windows applications. Instead, it is compiled into a dynamic link library (dll) file.
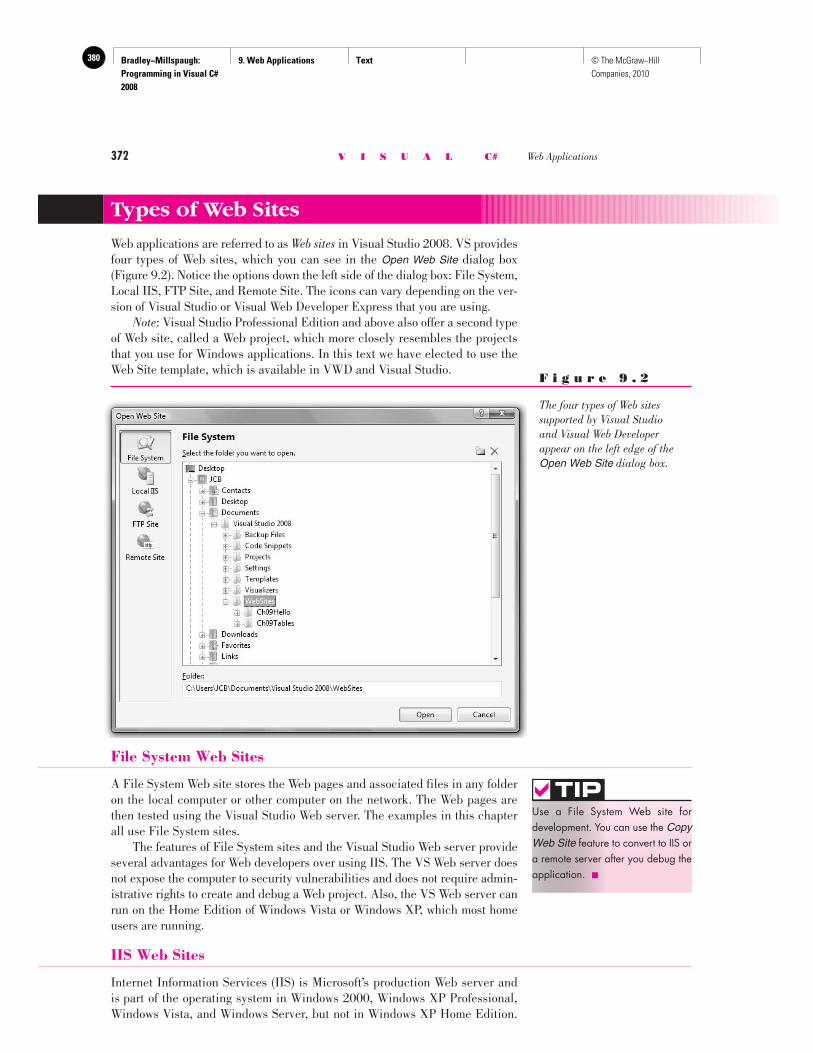
Bradley−Millspaugh: Programming in Visual C# 2008
9. Web Applications Text380 © The McGraw−Hill Companies, 2010
372 V I S U A L C# Web Applications
Types of Web Sites
Web applications are referred to as Web sites in Visual Studio 2008. VS provides four types of Web sites, which you can see in the Open Web Site dialog box ( Figure 9.2 ). Notice the options down the left side of the dialog box: File System, Local IIS, FTP Site, and Remote Site. The icons can vary depending on the ver-sion of Visual Studio or Visual Web Developer Express that you are using. Note : Visual Studio Professional Edition and above also offer a second type of Web site, called a Web project, which more closely resembles the projects that you use for Windows applications. In this text we have elected to use the Web Site template, which is available in VWD and Visual Studio.
F i g u r e 9 . 2
The four types of Web sites supported by Visual Studio and Visual Web Developer appear on the left edge of the Open Web Site dialog box.
File System Web Sites
A File System Web site stores the Web pages and associated files in any folder on the local computer or other computer on the network. The Web pages are then tested using the Visual Studio Web server. The examples in this chapter all use File System sites. The features of File System sites and the Visual Studio Web server provide several advantages for Web developers over using IIS. The VS Web server does not expose the computer to security vulnerabilities and does not require admin-istrative rights to create and debug a Web project. Also, the VS Web server can run on the Home Edition of Windows Vista or Windows XP, which most home users are running.
IIS Web Sites
Internet Information Services (IIS) is Microsoft’s production Web server and is part of the operating system in Windows 2000, Windows XP Professional, Windows Vista, and Windows Server, but not in Windows XP Home Edition.
Use a File System Web site for development. You can use the CopyWeb Site feature to convert to IIS or a remote server after you debug the application. ■
TIP
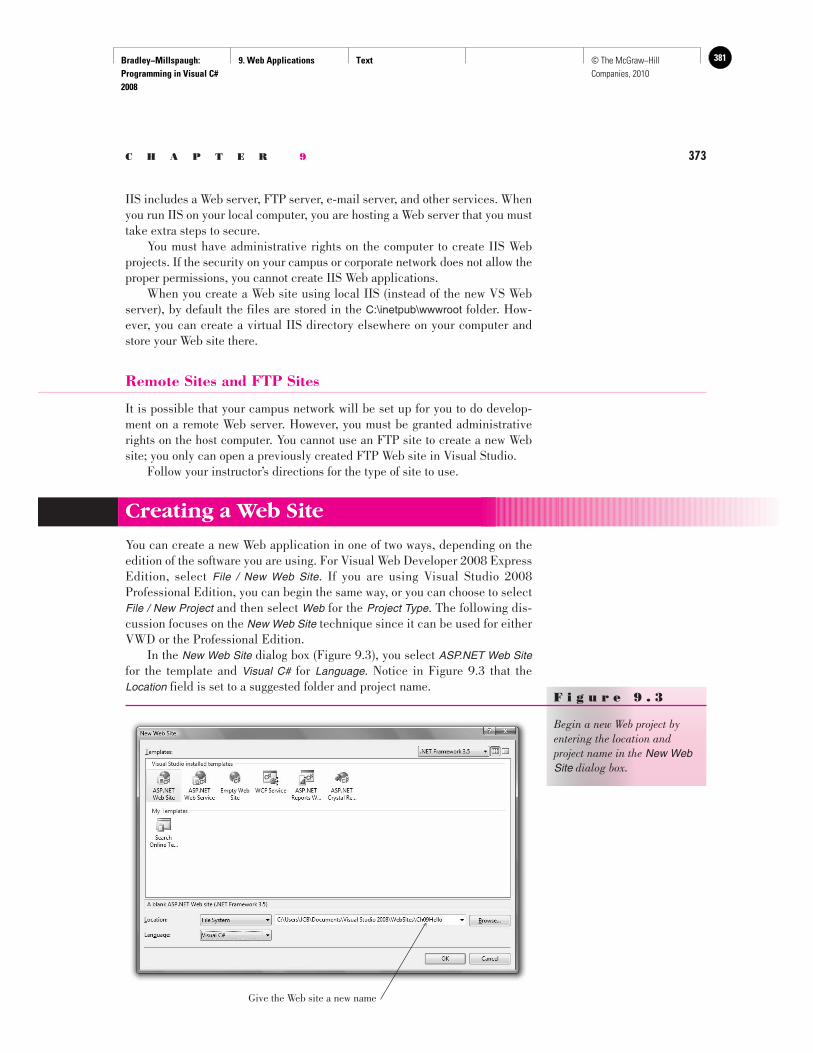
Bradley−Millspaugh: Programming in Visual C# 2008
9. Web Applications Text 381© The McGraw−Hill Companies, 2010
C H A P T E R 9 373
IIS includes a Web server, FTP server, e-mail server, and other services. When you run IIS on your local computer, you are hosting a Web server that you must take extra steps to secure. You must have administrative rights on the computer to create IIS Web projects. If the security on your campus or corporate network does not allow the proper permissions, you cannot create IIS Web applications. When you create a Web site using local IIS (instead of the new VS Web server), by default the files are stored in the C:\inetpub\wwwroot folder. How-ever, you can create a virtual IIS directory elsewhere on your computer and store your Web site there.
Remote Sites and FTP Sites
It is possible that your campus network will be set up for you to do develop-ment on a remote Web server. However, you must be granted administrative rights on the host computer. You cannot use an FTP site to create a new Web site; you only can open a previously created FTP Web site in Visual Studio. Follow your instructor’s directions for the type of site to use.
Creating a Web Site
You can create a new Web application in one of two ways, depending on the edition of the software you are using. For Visual Web Developer 2008 Express Edition, select File / New Web Site . If you are using Visual Studio 2008 Professional Edition, you can begin the same way, or you can choose to select File / New Project and then select Web for the Project Type . The following dis-cussion focuses on the New Web Site technique since it can be used for either VWD or the Professional Edition. In the New Web Site dialog box ( Figure 9.3 ), you select ASP.NET Web Sitefor the template and Visual C# for Language . Notice in Figure 9.3 that the Location field is set to a suggested folder and project name.
Give the Web site a new name
F i g u r e 9 . 3
Begin a new Web project by entering the location and project name in the New Web Site dialog box.
Bradley−Millspaugh: Programming in Visual C# 2008
9. Web Applications Text382 © The McGraw−Hill Companies, 2010
374 V I S U A L C# Web Applications
The default for a File System Web site project location and name is C:\Users\UserName\Documents\Visual Studio 2008\WebSites\WebSite1 . You can browse to select a different folder, if you wish. Give your project a name by changing the name on the end (WebSite1) in the Location box. Note : The default for a local IIS project location and name is http://localhost/ProjectName (localhost is translated by IIS to your local virtual directory, usually C:\Inetpub\wwwroot).
Web Page Files
A new Web site automatically contains one Web page, called Default.aspx, which contains the visual representation of the page. A second file, Default.aspx.cs holds the C# code for the page. This model is very similar to a Win-dows Form, which also keeps the visual elements separate from the code. But in the case of Web pages, the visual elements are created with HTML tags rather than C# code. ASP.NET provides two models for managing controls and code. In addi-tion to the code separation model described in the preceding paragraph, you also can use a single-file model , which combines the visible elements and the C# code in a single file. In early versions of ASP (before .NET), the single-file model was the only format available, so you may see old applica-tions created in this style. We will use the code separation model for all pro-grams in this text. Caution : Visual Studio also creates a folder for the project’s .sln and .suo files. This additional folder appears in the location specified as the Visual Studio projects location, which you can check and modify in Tools / Options / Projects and Solutions / General .
Web Forms in the Visual Studio IDE
As soon as you open a new C# Web application, you notice many differences from Windows Forms. Instead of a Windows Form, you see a new Web Form ( Figure 9.4 ), also called a Web page or Web document . The toolbar is different as is the list of files in the Solution Explorer. The toolbox has different controls, and even those that look the same, such as TextBoxes, Buttons, and Labels, are actually different from their Windows counterparts and have some different properties and events. For example, Web controls have an ID property rather than a Name property. The IDE allows you to view the Design, the Source (HTML and ASP.NET), or a Split window. Click on the Design tab at the bottom of the window ( Figure 9.4 ) to display the page. The Properties window may not appear automatically; press the Properties button or select View / Properties Window to display it.
Creating Your First Web Form—Step-by-Step
This simple step-by-step exercise creates a Web application that displays a Hello message on a document in a browser window. If you are using the Express version of Visual Web Developer, the menu choices will be slightly different.
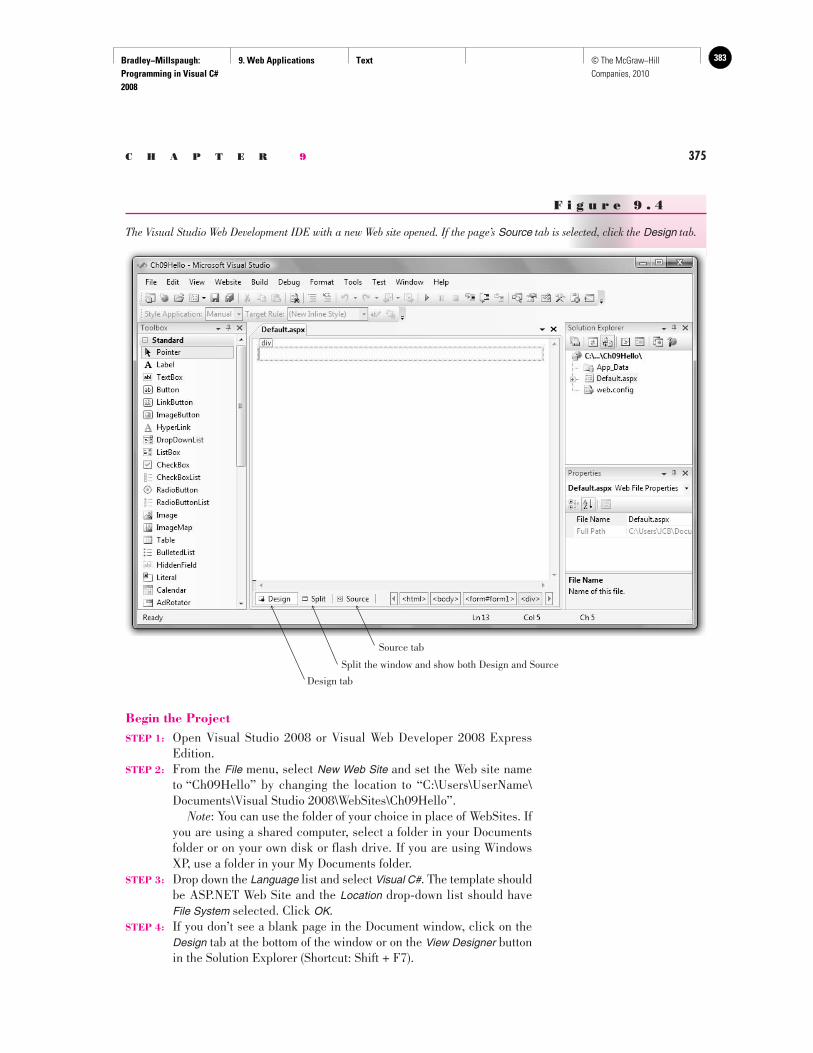
Bradley−Millspaugh: Programming in Visual C# 2008
9. Web Applications Text 383© The McGraw−Hill Companies, 2010
C H A P T E R 9 375
Begin the Project STEP 1: Open Visual Studio 2008 or Visual Web Developer 2008 Express
Edition. STEP 2: From the File menu, select New Web Site and set the Web site name
to “Ch09Hello” by changing the location to “C:\Users\UserName\Documents\Visual Studio 2008\WebSites\Ch09Hello”.
Note : You can use the folder of your choice in place of WebSites. If you are using a shared computer, select a folder in your Documents folder or on your own disk or flash drive. If you are using Windows XP, use a folder in your My Documents folder.
STEP 3: Drop down the Language list and select Visual C# . The template should be ASP.NET Web Site and the Location drop-down list should have File System selected. Click OK .
STEP 4: If you don’t see a blank page in the Document window, click on the Design tab at the bottom of the window or on the View Designer button in the Solution Explorer (Shortcut: Shift + F7).
F i g u r e 9 . 4
The Visual Studio Web Development IDE with a new Web site opened. If the page’s Source tab is selected, click the Design tab.
Design tab
Source tab
Split the window and show both Design and Source
Bradley−Millspaugh: Programming in Visual C# 2008
9. Web Applications Text384 © The McGraw−Hill Companies, 2010
376 V I S U A L C# Web Applications
Create the User Interface You add elements to a Web page in a manner similar to writing text in a word processor. You must press Enter to move to a new line and press the spacebar to move across a line.
STEP 1: Click underneath the box at the top of the page, press Enter a few times, and type “Enter Name: ”. (Do not include the quotes, but do include the space after the colon to provide separation between the elements.)
STEP 2: Add a TextBox control from the Standard section of the toolbox. You can drag the text box onto the form or double-click the tool in the toolbox; the text box will appear at the insertion point in either case.
Note : The text box is a server control, and the text “Enter Name: ” is static HTML. You will learn more about these elements later in this chapter.
STEP 3: Set the ID property of the text box to nameTextBox. You may want to click the Alphabetical button in the Properties window to sort the properties. The ID property appears at the top of the list due to the parentheses, just as the Name property appears at the top of the list in Windows Forms.
STEP 4: Click after the text box, press Enter twice, and add a Label control. STEP 5: Set the Label’s ID property to messageLabel and delete the Text property.
The label will display its ID property at design time but not at run time. STEP 6: Click after the label, press Enter a couple of times, and add a Button
control. Set the ID property to submitButton and the Text property to “Submit”.
STEP 7: In the Properties window, drop down the list of objects and select DOCUMENT, which is the Web Form. Set the BgColor property (back-ground color) to a color of your choice.
STEP 8: Set the document’s Title property to “Hello Application”. The Title property displays in the title bar of the browser when you run the ap-plication. Make sure to press Enter after entering the title.
Note : The Title property sometimes is lost and reverts to “Untitled Page”. Make sure to press Enter and save the file after entering the Title property.
STEP 9: Click the Save All button to save the application.
Add Code STEP 1: Double-click on the Submit button to go to the Code Editor. Add the
following code at the top of the code window.
/* * Web site: Ch09Hello * Web page: Default.aspx * Programmer: Bradley/Millspaugh * Date: June 2009 * Description: Display a Hello message on a Web page. * Concatenate the name and display in a label. */
STEP 2: Add the following in the submitButton_Click event handler.
// Display the name and a message.
messageLabel.Text = "Hello " + nameTextBox.Text;
Bradley−Millspaugh: Programming in Visual C# 2008
9. Web Applications Text 385© The McGraw−Hill Companies, 2010
C H A P T E R 9 377
Run the Web Application STEP 1: Run the project without debugging using Ctrl + F5 or by selecting
Start without Debugging from the Debug menu. Note : You also can display a page preview, without actually run-
ning the program: Right-click on the aspx file or on the page in the Document window and select View in Browser .
STEP 2: The default browser should launch and open the page with your page showing.
Trouble? If you are running the Windows XP firewall, you may re-ceive a message that the firewall has blocked the Web Server and asking what you would like to do; choose Unblock to permit the server to render your page and then refresh the page in the browser window.
STEP 3: Enter a name and press the Submit button. A “Hello” message should appear in the label.
STEP 4: Close the browser window to end execution.
Viewing the HTML Code
When you are viewing your Web Form in the designer, you can see three tabs at the bottom of the form: Design , Split , and Source . You can click on the Sourcetab to see the static HTML code. The HTML creates the visual elements on the page and is automatically generated, like the Windows-generated code in a Windows Form. The Split tab splits the Document window horizontally and shows you both the design and the source.
Controls
Several types of controls are available for Web Forms. You can mix the control types on a single form. For most of your work, you will use the controls in the Standard section of the toolbox. Refer to Figure 9.5 to view the toolbox.
• Standard (ASP.NET server controls) . These are the richest, most powerful controls provided by ASP.NET and the .NET framework. Web server con-trols do not directly correspond to HTML controls, but are rendered differ-ently for different browsers in order to achieve the desired look and feel. Some of the special-purpose Web server controls are Calendar, CheckBox-List, AdRotator, and RadioButtonList.
• Data . This list of controls includes the GridView and DataList for display-ing database data.
• Validation . These controls are used to validate user input before it is sent to the server.
• Navigation . This list includes a Menu control.
• Login . Visual Studio includes login controls and wizards.
• WebParts . The WebParts set of components enables users to change the appearance and behavior of the interface from the browser.
• AJAX Extensions . These are a set of AJAX (Asynchronous JavaScript and XML) controls that provide for faster Web page loading and richer interfaces.
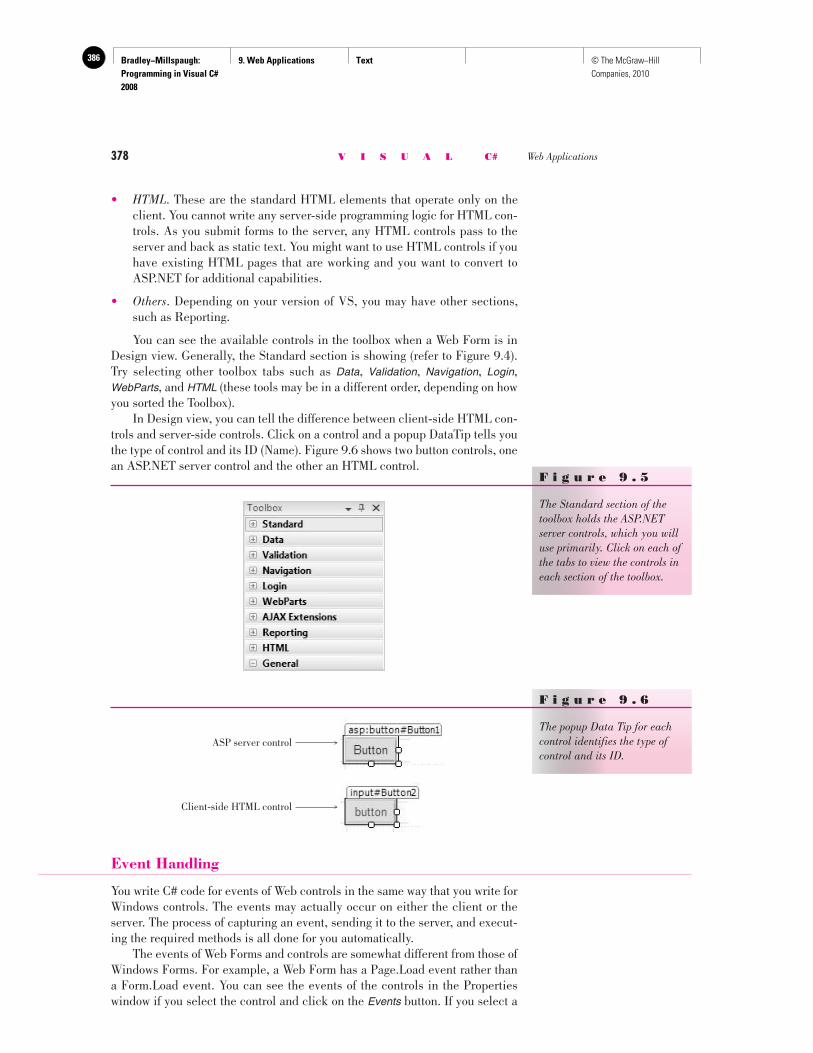
Bradley−Millspaugh: Programming in Visual C# 2008
9. Web Applications Text386 © The McGraw−Hill Companies, 2010
378 V I S U A L C# Web Applications
• HTML . These are the standard HTML elements that operate only on the client. You cannot write any server-side programming logic for HTML con-trols. As you submit forms to the server, any HTML controls pass to the server and back as static text. You might want to use HTML controls if you have existing HTML pages that are working and you want to convert to ASP.NET for additional capabilities.
• Others . Depending on your version of VS, you may have other sections, such as Reporting.
You can see the available controls in the toolbox when a Web Form is in Design view. Generally, the Standard section is showing (refer to Figure 9.4 ). Try selecting other toolbox tabs such as Data , Validation , Navigation , Login , WebParts , and HTML (these tools may be in a different order, depending on how you sorted the Toolbox). In Design view, you can tell the difference between client-side HTML con-trols and server-side controls. Click on a control and a popup DataTip tells you the type of control and its ID (Name). Figure 9.6 shows two button controls, one an ASP.NET server control and the other an HTML control.
ASP server control
Client-side HTML control
F i g u r e 9 . 6
The popup Data Tip for each control identifies the type of control and its ID.
Event Handling
You write C# code for events of Web controls in the same way that you write for Windows controls. The events may actually occur on either the client or the server. The process of capturing an event, sending it to the server, and execut-ing the required methods is all done for you automatically. The events of Web Forms and controls are somewhat different from those of Windows Forms. For example, a Web Form has a Page.Load event rather than a Form.Load event. You can see the events of the controls in the Properties window if you select the control and click on the Events button. If you select a
F i g u r e 9 . 5
The Standard section of the toolbox holds the ASP.NET server controls, which you will use primarily. Click on each of the tabs to view the controls in each section of the toolbox.
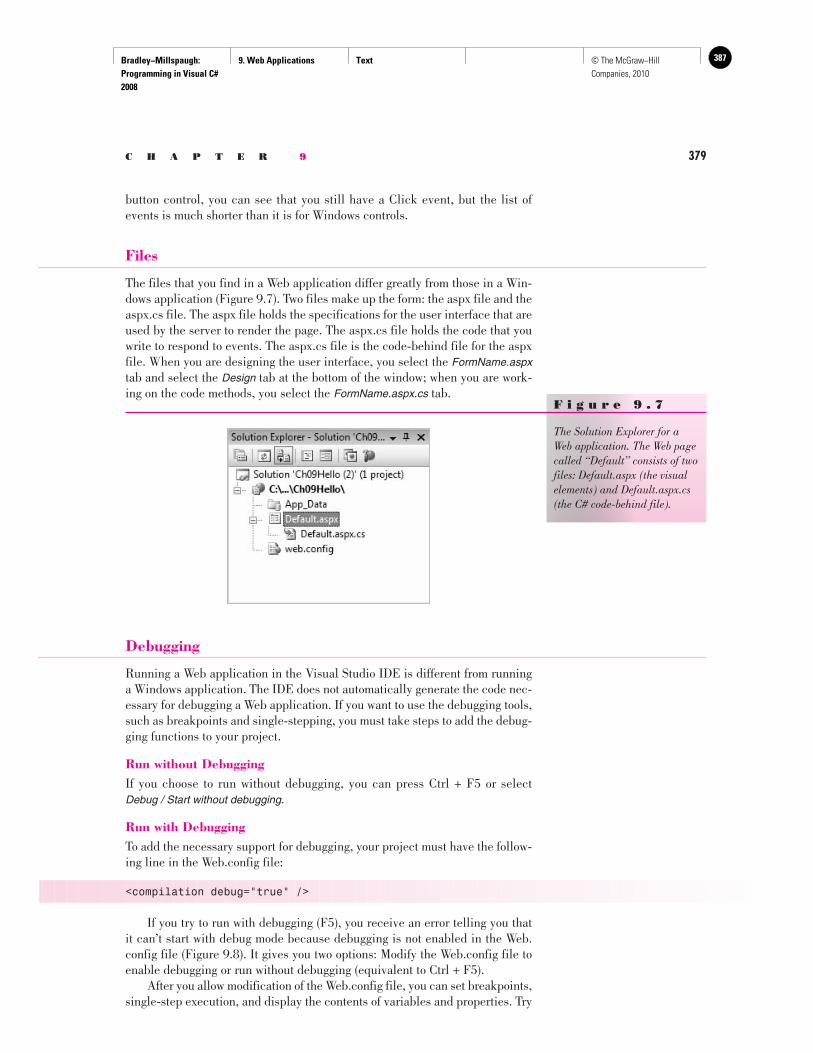
Bradley−Millspaugh: Programming in Visual C# 2008
9. Web Applications Text 387© The McGraw−Hill Companies, 2010
C H A P T E R 9 379
button control, you can see that you still have a Click event, but the list of events is much shorter than it is for Windows controls.
Files
The files that you find in a Web application differ greatly from those in a Win-dows application ( Figure 9.7 ). Two files make up the form: the aspx file and the aspx.cs file. The aspx file holds the specifications for the user interface that are used by the server to render the page. The aspx.cs file holds the code that you write to respond to events. The aspx.cs file is the code-behind file for the aspx file. When you are designing the user interface, you select the FormName.aspxtab and select the Design tab at the bottom of the window; when you are work-ing on the code methods, you select the FormName.aspx.cs tab.
F i g u r e 9 . 7
The Solution Explorer for a Web application. The Web page called “Default” consists of two files: Default.aspx (the visual elements) and Default.aspx.cs (the C# code-behind file).
Debugging
Running a Web application in the Visual Studio IDE is different from running a Windows application. The IDE does not automatically generate the code nec-essary for debugging a Web application. If you want to use the debugging tools, such as breakpoints and single-stepping, you must take steps to add the debug-ging functions to your project.
Run without Debugging If you choose to run without debugging, you can press Ctrl + F5 or select Debug / Start without debugging .
Run with Debugging To add the necessary support for debugging, your project must have the follow-ing line in the Web.config file:
<compilation debug="true" />
If you try to run with debugging (F5), you receive an error telling you that it can’t start with debug mode because debugging is not enabled in the Web.config file ( Figure 9.8 ). It gives you two options: Modify the Web.config file to enable debugging or run without debugging (equivalent to Ctrl + F5). After you allow modification of the Web.config file, you can set breakpoints, single-step execution, and display the contents of variables and properties. Try
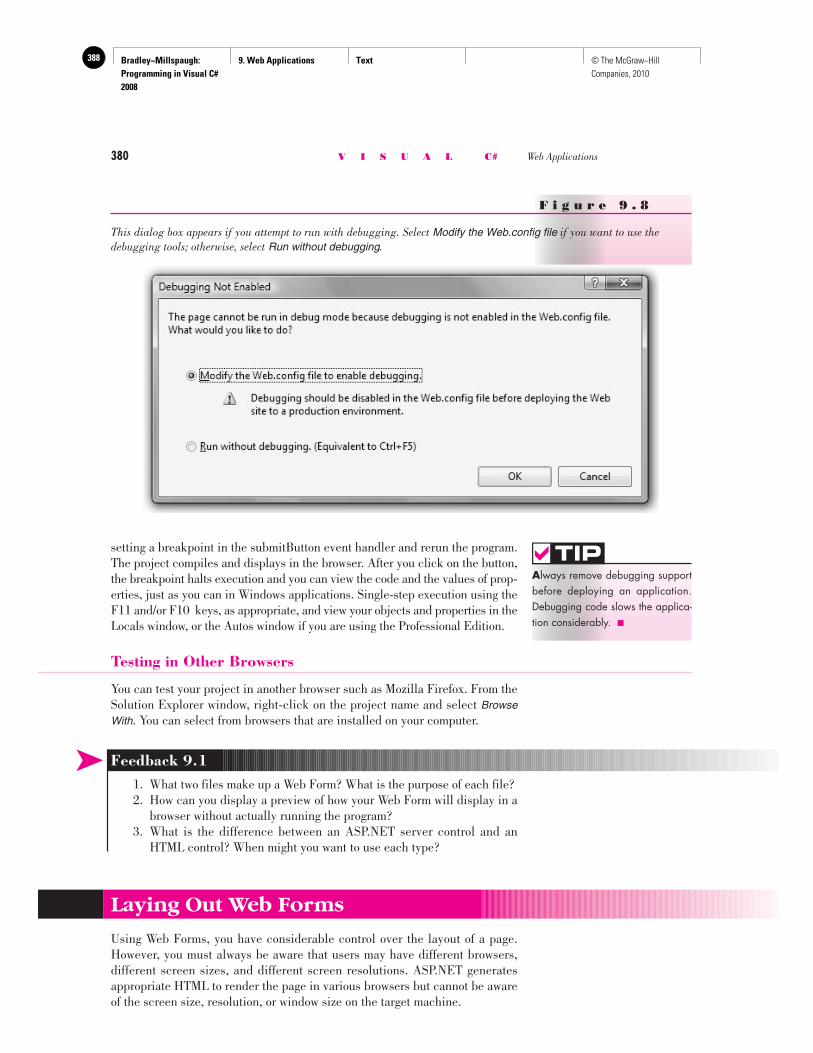
Bradley−Millspaugh: Programming in Visual C# 2008
9. Web Applications Text388 © The McGraw−Hill Companies, 2010
380 V I S U A L C# Web Applications
setting a breakpoint in the submitButton event handler and rerun the program. The project compiles and displays in the browser. After you click on the button, the breakpoint halts execution and you can view the code and the values of prop-erties, just as you can in Windows applications. Single-step execution using the F11 and/or F10 keys, as appropriate, and view your objects and properties in the Locals window, or the Autos window if you are using the Professional Edition.
Testing in Other Browsers
You can test your project in another browser such as Mozilla Firefox. From the Solution Explorer window, right-click on the project name and select BrowseWith . You can select from browsers that are installed on your computer.
F i g u r e 9 . 8
This dialog box appears if you attempt to run with debugging. Select Modify the Web.config file if you want to use the debugging tools; otherwise, select Run without debugging .
Always remove debugging support before deploying an application. Debugging code slows the applica-tion considerably. ■
TIP
➤ Feedback 9.1 1. What two files make up a Web Form? What is the purpose of each file? 2. How can you display a preview of how your Web Form will display in a
browser without actually running the program? 3. What is the difference between an ASP.NET server control and an
HTML control? When might you want to use each type?
Laying Out Web Forms
Using Web Forms, you have considerable control over the layout of a page. However, you must always be aware that users may have different browsers, different screen sizes, and different screen resolutions. ASP.NET generates appropriate HTML to render the page in various browsers but cannot be aware of the screen size, resolution, or window size on the target machine.
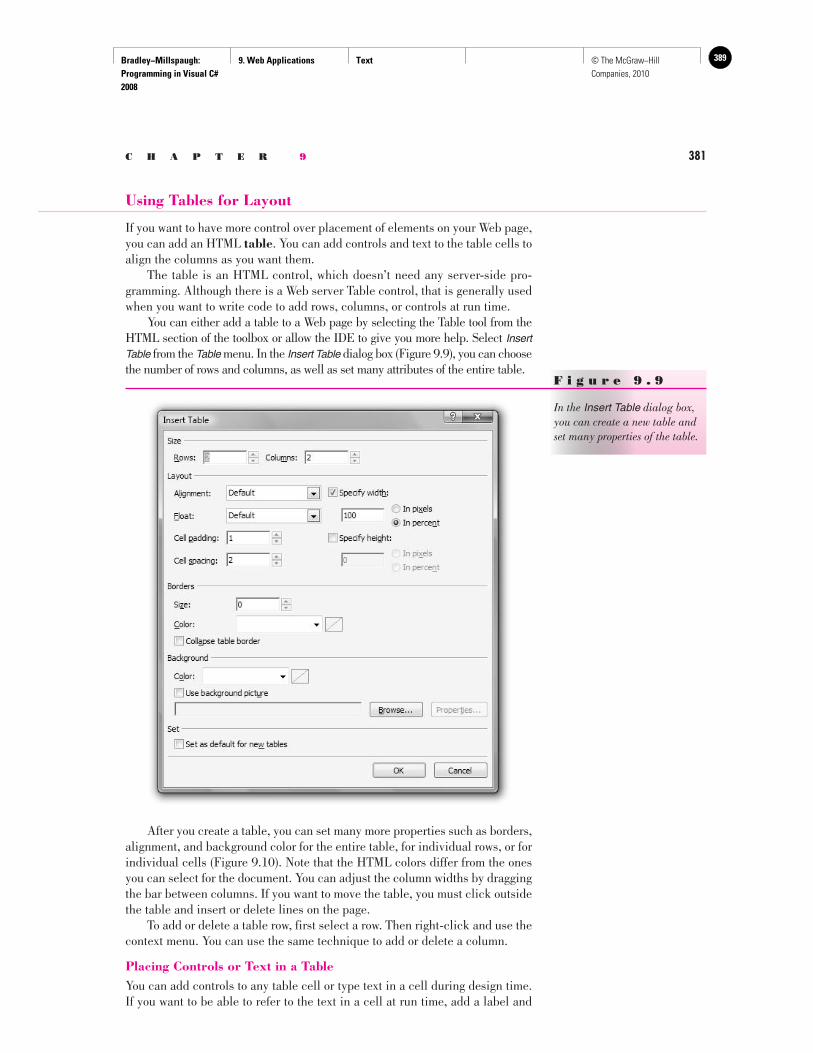
Bradley−Millspaugh: Programming in Visual C# 2008
9. Web Applications Text 389© The McGraw−Hill Companies, 2010
C H A P T E R 9 381
Using Tables for Layout
If you want to have more control over placement of elements on your Web page, you can add an HTML table . You can add controls and text to the table cells to align the columns as you want them. The table is an HTML control, which doesn’t need any server-side pro-gramming. Although there is a Web server Table control, that is generally used when you want to write code to add rows, columns, or controls at run time. You can either add a table to a Web page by selecting the Table tool from the HTML section of the toolbox or allow the IDE to give you more help. Select Insert Table from the Table menu. In the Insert Table dialog box ( Figure 9.9 ), you can choose the number of rows and columns, as well as set many attributes of the entire table.
F i g u r e 9 . 9
In the Insert Table dialog box, you can create a new table and set many properties of the table.
After you create a table, you can set many more properties such as borders, alignment, and background color for the entire table, for individual rows, or for individual cells ( Figure 9.10 ). Note that the HTML colors differ from the ones you can select for the document. You can adjust the column widths by dragging the bar between columns. If you want to move the table, you must click outside the table and insert or delete lines on the page. To add or delete a table row, first select a row. Then right-click and use the context menu. You can use the same technique to add or delete a column.
Placing Controls or Text in a Table You can add controls to any table cell or type text in a cell during design time. If you want to be able to refer to the text in a cell at run time, add a label and
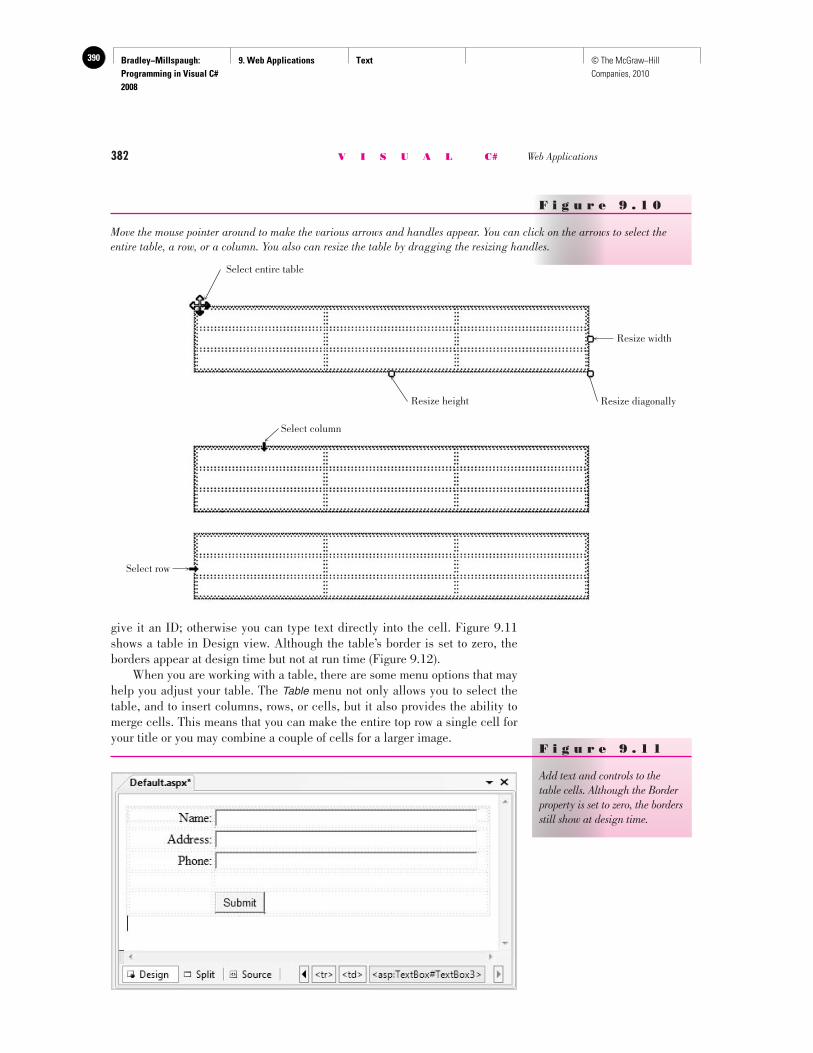
Bradley−Millspaugh: Programming in Visual C# 2008
9. Web Applications Text390 © The McGraw−Hill Companies, 2010
382 V I S U A L C# Web Applications
give it an ID; otherwise you can type text directly into the cell. Figure 9.11 shows a table in Design view. Although the table’s border is set to zero, the borders appear at design time but not at run time ( Figure 9.12 ). When you are working with a table, there are some menu options that may help you adjust your table. The Table menu not only allows you to select the table, and to insert columns, rows, or cells, but it also provides the ability to merge cells. This means that you can make the entire top row a single cell for your title or you may combine a couple of cells for a larger image.
F i g u r e 9 . 1 0
Move the mouse pointer around to make the various arrows and handles appear. You can click on the arrows to select the entire table, a row, or a column. You also can resize the table by dragging the resizing handles.
Select row
Select entire table
Resize height
Resize width
Resize diagonally
Select column
F i g u r e 9 . 1 1
Add text and controls to the table cells. Although the Border property is set to zero, the borders still show at design time.
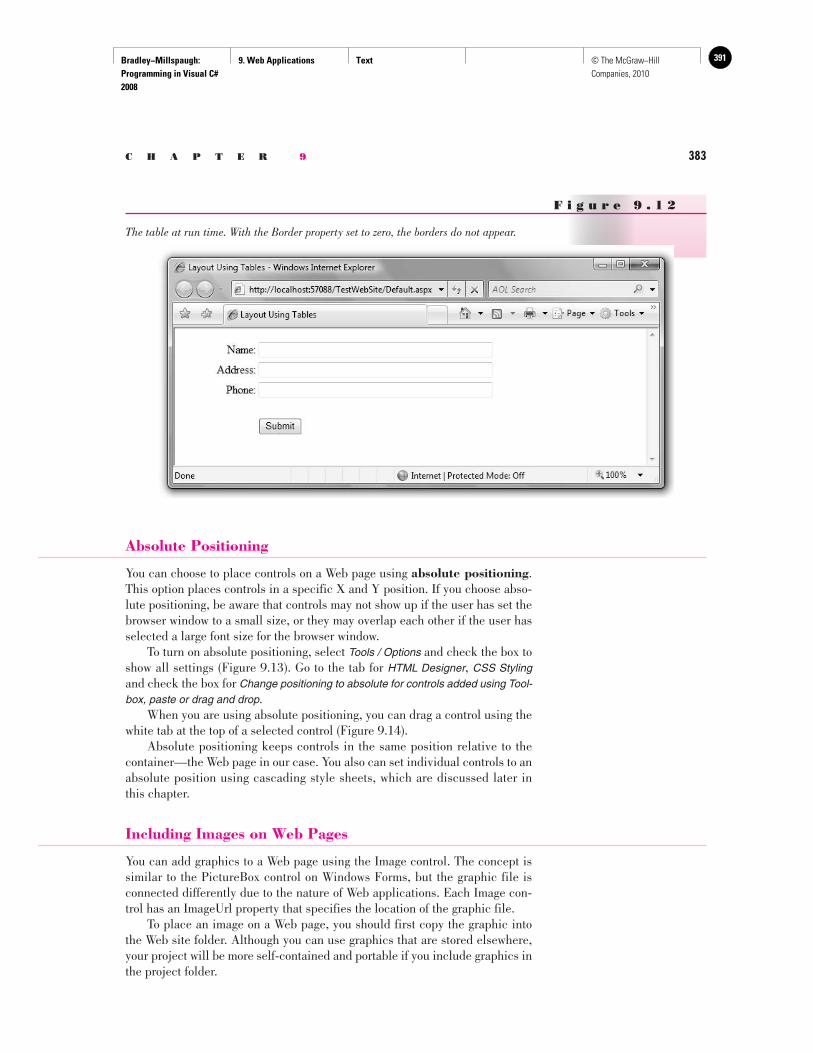
Bradley−Millspaugh: Programming in Visual C# 2008
9. Web Applications Text 391© The McGraw−Hill Companies, 2010
C H A P T E R 9 383
Absolute Positioning
You can choose to place controls on a Web page using absolute positioning . This option places controls in a specific X and Y position. If you choose abso-lute positioning, be aware that controls may not show up if the user has set the browser window to a small size, or they may overlap each other if the user has selected a large font size for the browser window. To turn on absolute positioning, select Tools / Options and check the box to show all settings ( Figure 9.13 ). Go to the tab for HTML Designer , CSS Styling and check the box for Change positioning to absolute for controls added using Tool-box, paste or drag and drop . When you are using absolute positioning, you can drag a control using the white tab at the top of a selected control ( Figure 9.14 ). Absolute positioning keeps controls in the same position relative to the container—the Web page in our case. You also can set individual controls to an absolute position using cascading style sheets, which are discussed later in this chapter.
Including Images on Web Pages
You can add graphics to a Web page using the Image control. The concept is similar to the PictureBox control on Windows Forms, but the graphic file is connected differently due to the nature of Web applications. Each Image con-trol has an ImageUrl property that specifies the location of the graphic file. To place an image on a Web page, you should first copy the graphic into the Web site folder. Although you can use graphics that are stored elsewhere, your project will be more self-contained and portable if you include graphics in the project folder.
F i g u r e 9 . 1 2
The table at run time. With the Border property set to zero, the borders do not appear.
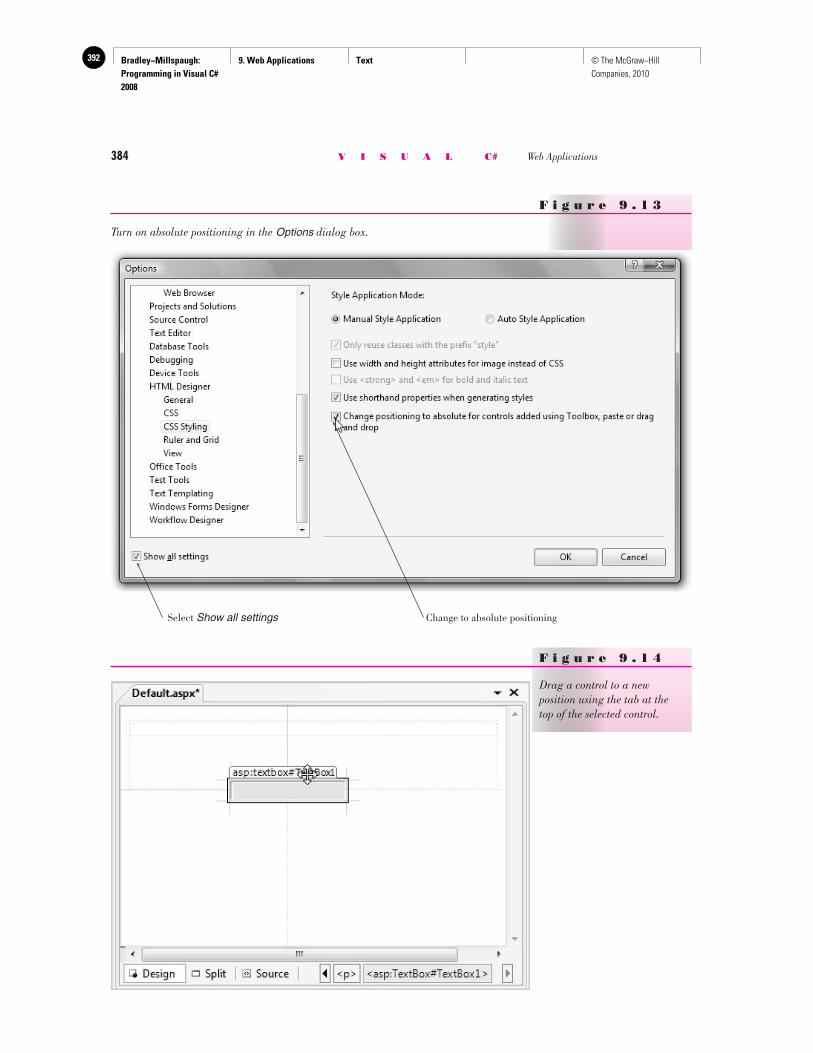
Bradley−Millspaugh: Programming in Visual C# 2008
9. Web Applications Text392 © The McGraw−Hill Companies, 2010
384 V I S U A L C# Web Applications
F i g u r e 9 . 1 3
Turn on absolute positioning in the Options dialog box.
Select Show all settings Change to absolute positioning
F i g u r e 9 . 1 4
Drag a control to a new position using the tab at the top of the selected control.
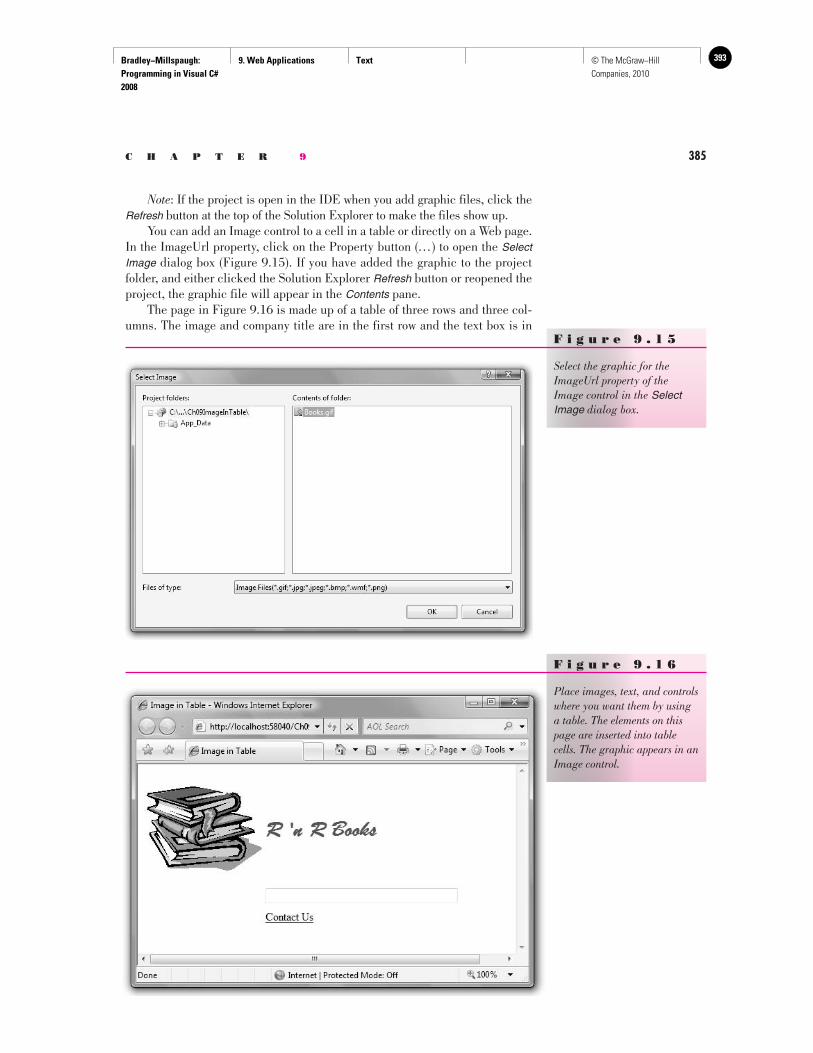
Bradley−Millspaugh: Programming in Visual C# 2008
9. Web Applications Text 393© The McGraw−Hill Companies, 2010
C H A P T E R 9 385
Note : If the project is open in the IDE when you add graphic files, click the Refresh button at the top of the Solution Explorer to make the files show up. You can add an Image control to a cell in a table or directly on a Web page. In the ImageUrl property, click on the Property button ( … ) to open the SelectImage dialog box ( Figure 9.15 ). If you have added the graphic to the project folder, and either clicked the Solution Explorer Refresh button or reopened the project, the graphic file will appear in the Contents pane. The page in Figure 9.16 is made up of a table of three rows and three col-umns. The image and company title are in the first row and the text box is in
F i g u r e 9 . 1 5
Select the graphic for the ImageUrl property of the Image control in the SelectImage dialog box.
F i g u r e 9 . 1 6
Place images, text, and controls where you want them by using a table. The elements on this page are inserted into table cells. The graphic appears in an Image control.
Bradley−Millspaugh: Programming in Visual C# 2008
9. Web Applications Text394 © The McGraw−Hill Companies, 2010
386 V I S U A L C# Web Applications
the second row. The hyperlink shown in the last row is discussed in the section “Navigating Web Pages” later in this chapter.
➤ Feedback 9.2 1. Name two ways to place a button at the bottom of a Web page. 2. What is the difference between an HTML Table control and a Web
Table control? 3. Where should you store images for a Web application?
Cascading Style Sheets
One huge improvement in Visual Studio 2008 is the new tools for using styles in Web applications. These new tools, called Expression Web , expand, en-hance, and simplify using cascading style sheets (CSS) . You can use cascading style sheets to create, modify, and apply styles to single elements on a page, one entire page, all pages of an application, or all applications of an organization.
Using Styles Styles are rules that can specify page layout, position, font, color, alignment, margins, borders, background, and bullet and numbering formats. You can cre-ate and apply new styles within a page, attach an external .css file and apply the styles, and even save the styles in a page to an external .css file for use on other pages or Web sites. You can choose to define styles in several locations, including on the Web page for individual elements, called an inline style ; in a style section of a Web page, called a page style ; or in an external style sheet (.css file) that is linked or imported into the Web page. Generally programmers use inline styles for elements that appear only once on a page, page styles for elements that may be used in more than one location on the page, and external style sheets for elements that may appear on more than one page of a Web site or in multiple Web sites. The term “cascading” in cascading style sheets refers to the order of pre-cedence of style rules. More locally created styles override the rules of the more globally created styles. For example, you might apply an h1 style from the style sheet (global) that sets the font, color, size, and alignment. And if you also apply a style defined in the page for the color and size, the local (page-defined) color and size take precedence, but the font and alignment of the style-sheet style are still in effect. And if you also apply an inline style for the size, the inline (more local) style will override the size but keep the color of the page-defined style and the font and alignment of the style-sheet style.
Types of Styles In Visual Studio, you will use several new tools to define, apply, modify, and change the location of styles. The Apply Styles window and the Manage Styles window, both of which you will learn about in the next section, use the icons in Table 9.1 to identify the various types of styles.
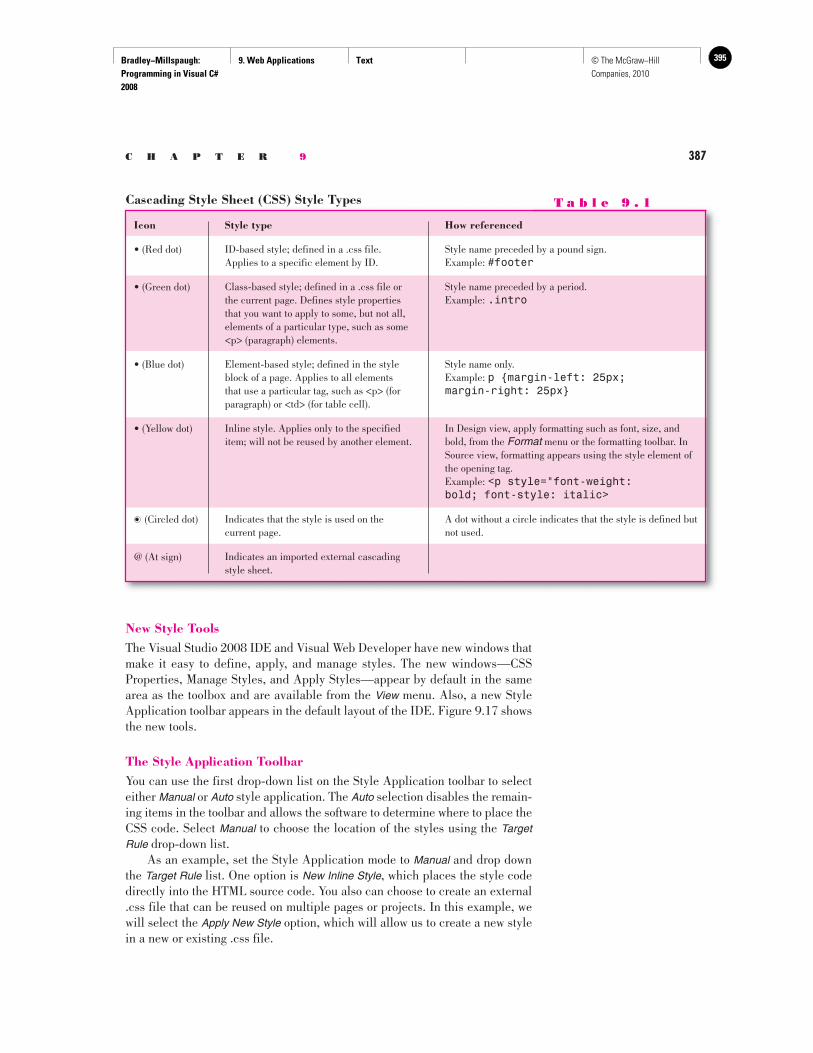
Bradley−Millspaugh: Programming in Visual C# 2008
9. Web Applications Text 395© The McGraw−Hill Companies, 2010
C H A P T E R 9 387
New Style Tools The Visual Studio 2008 IDE and Visual Web Developer have new windows that make it easy to define, apply, and manage styles. The new windows—CSS Properties, Manage Styles, and Apply Styles—appear by default in the same area as the toolbox and are available from the View menu. Also, a new Style Application toolbar appears in the default layout of the IDE. Figure 9.17 shows the new tools.
The Style Application Toolbar You can use the first drop-down list on the Style Application toolbar to select either Manual or Auto style application. The Auto selection disables the remain-ing items in the toolbar and allows the software to determine where to place the CSS code. Select Manual to choose the location of the styles using the Target Rule drop-down list. As an example, set the Style Application mode to Manual and drop down the Target Rule list. One option is New Inline Style , which places the style code directly into the HTML source code. You also can choose to create an external .css file that can be reused on multiple pages or projects. In this example, we will select the Apply New Style option, which will allow us to create a new style in a new or existing .css file.
Cascading Style Sheet (CSS) Style Types T a b l e 9 . 1
Icon Style type How referenced
• (Red dot)
• (Green dot)
• (Blue dot)
• (Yellow dot)
• (Circled dot)
@ (At sign)
ID-based style; defined in a .css file. Applies to a specific element by ID.
Class-based style; defined in a .css file or the current page. Defines style properties that you want to apply to some, but not all, elements of a particular type, such as some <p> (paragraph) elements.
Element-based style; defined in the style block of a page. Applies to all elements that use a particular tag, such as <p> (for paragraph) or <td> (for table cell).
Inline style. Applies only to the specified item; will not be reused by another element.
Indicates that the style is used on the current page.
Indicates an imported external cascading style sheet.
Style name preceded by a pound sign. Example: #footer
Style name preceded by a period. Example: .intro
Style name only. Example: p {margin-left: 25px; margin-right: 25px}
In Design view, apply formatting such as font, size, and bold, from the Format menu or the formatting toolbar. In Source view, formatting appears using the style element of the opening tag. Example: <p style="font-weight: bold; font-style: italic>
A dot without a circle indicates that the style is defined but not used.
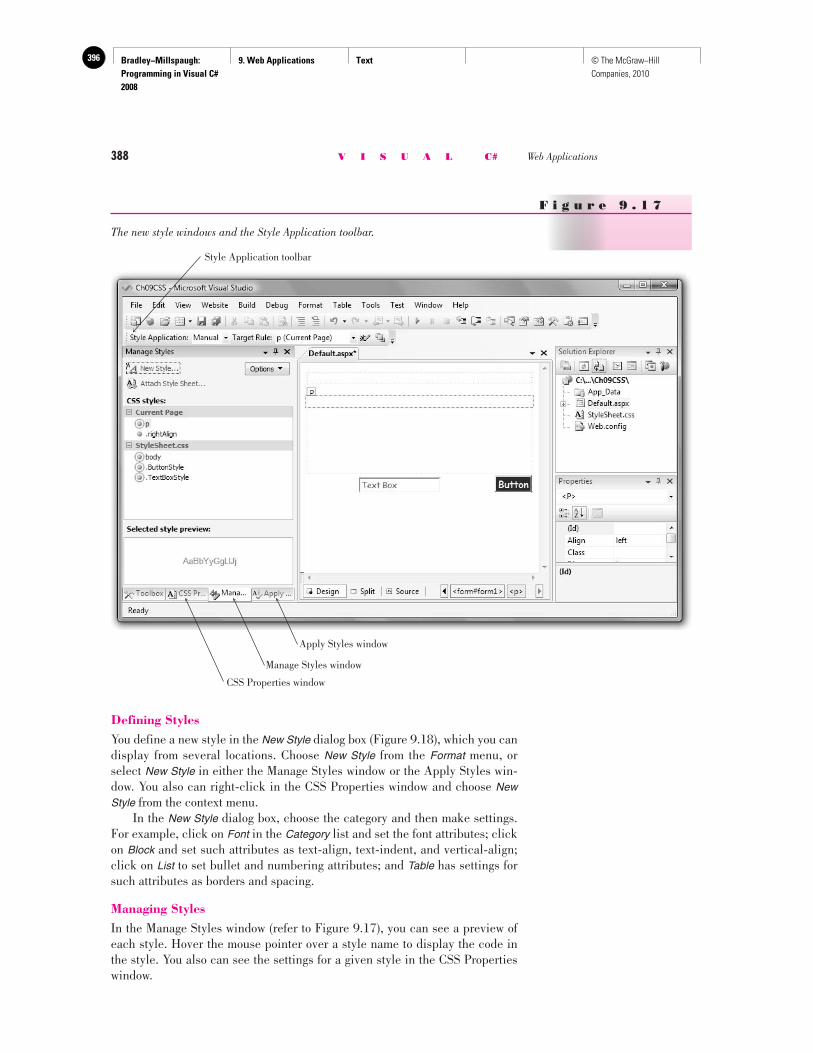
Bradley−Millspaugh: Programming in Visual C# 2008
9. Web Applications Text396 © The McGraw−Hill Companies, 2010
388 V I S U A L C# Web Applications
Defining Styles You define a new style in the New Style dialog box ( Figure 9.18 ), which you can display from several locations. Choose New Style from the Format menu, or select New Style in either the Manage Styles window or the Apply Styles win-dow. You also can right-click in the CSS Properties window and choose New Style from the context menu. In the New Style dialog box, choose the category and then make settings. For example, click on Font in the Category list and set the font attributes; click on Block and set such attributes as text-align, text-indent, and vertical-align; click on List to set bullet and numbering attributes; and Table has settings for such attributes as borders and spacing.
Managing Styles In the Manage Styles window (refer to Figure 9.17 ), you can see a preview of each style. Hover the mouse pointer over a style name to display the code in the style. You also can see the settings for a given style in the CSS Properties window.
Apply Styles window
Style Application toolbar
Manage Styles window
CSS Properties window
F i g u r e 9 . 1 7
The new style windows and the Style Application toolbar.
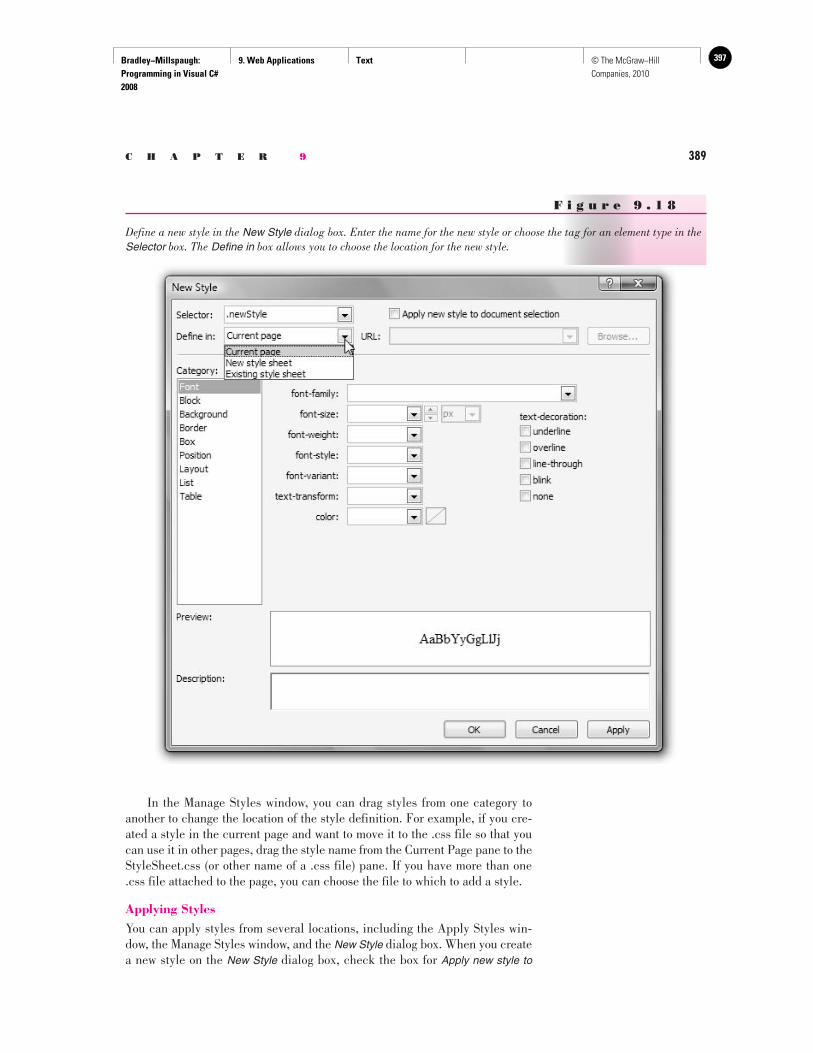
Bradley−Millspaugh: Programming in Visual C# 2008
9. Web Applications Text 397© The McGraw−Hill Companies, 2010
C H A P T E R 9 389
In the Manage Styles window, you can drag styles from one category to another to change the location of the style definition. For example, if you cre-ated a style in the current page and want to move it to the .css file so that you can use it in other pages, drag the style name from the Current Page pane to the StyleSheet.css (or other name of a .css file) pane. If you have more than one .css file attached to the page, you can choose the file to which to add a style.
Applying Styles You can apply styles from several locations, including the Apply Styles win-dow, the Manage Styles window, and the New Style dialog box. When you create a new style on the New Style dialog box, check the box for Apply new style to
F i g u r e 9 . 1 8
Define a new style in the New Style dialog box. Enter the name for the new style or choose the tag for an element type in the Selector box. The Define in box allows you to choose the location for the new style.
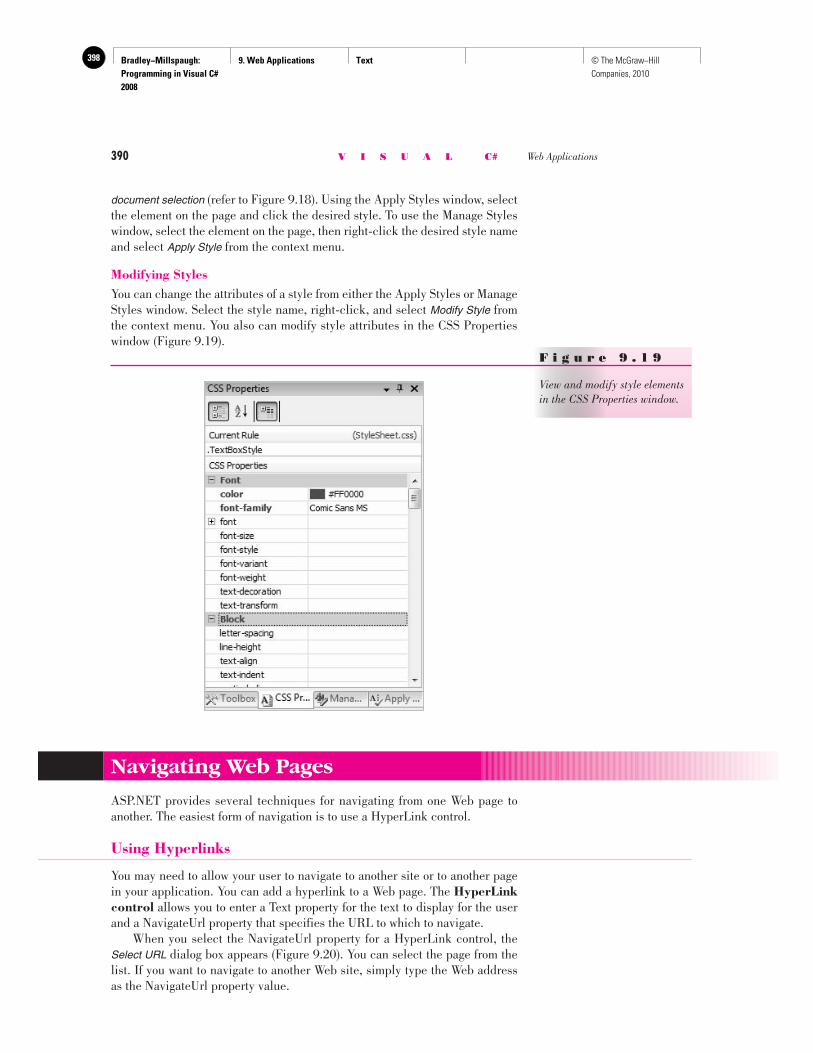
Bradley−Millspaugh: Programming in Visual C# 2008
9. Web Applications Text398 © The McGraw−Hill Companies, 2010
390 V I S U A L C# Web Applications
document selection (refer to Figure 9.18 ). Using the Apply Styles window, select the element on the page and click the desired style. To use the Manage Styles window, select the element on the page, then right-click the desired style name and select Apply Style from the context menu.
Modifying Styles You can change the attributes of a style from either the Apply Styles or Manage Styles window. Select the style name, right-click, and select Modify Style from the context menu. You also can modify style attributes in the CSS Properties window ( Figure 9.19 ).
Navigating Web Pages
ASP.NET provides several techniques for navigating from one Web page to another. The easiest form of navigation is to use a HyperLink control.
Using Hyperlinks
You may need to allow your user to navigate to another site or to another page in your application. You can add a hyperlink to a Web page. The HyperLinkcontrol allows you to enter a Text property for the text to display for the user and a NavigateUrl property that specifies the URL to which to navigate. When you select the NavigateUrl property for a HyperLink control, the Select URL dialog box appears ( Figure 9.20 ). You can select the page from the list. If you want to navigate to another Web site, simply type the Web address as the NavigateUrl property value.
F i g u r e 9 . 1 9
View and modify style elements in the CSS Properties window.
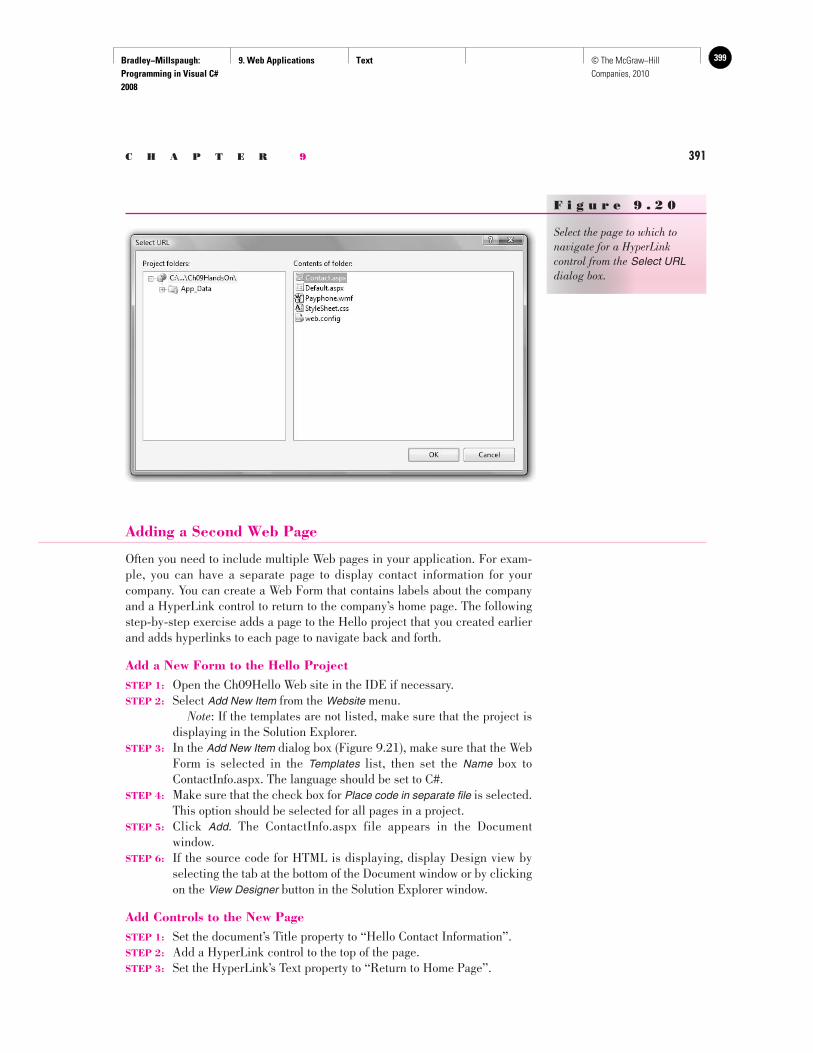
Bradley−Millspaugh: Programming in Visual C# 2008
9. Web Applications Text 399© The McGraw−Hill Companies, 2010
C H A P T E R 9 391
Adding a Second Web Page
Often you need to include multiple Web pages in your application. For exam-ple, you can have a separate page to display contact information for your company. You can create a Web Form that contains labels about the company and a HyperLink control to return to the company’s home page. The following step-by-step exercise adds a page to the Hello project that you created earlier and adds hyperlinks to each page to navigate back and forth.
Add a New Form to the Hello Project STEP 1: Open the Ch09Hello Web site in the IDE if necessary. STEP 2: Select Add New Item from the Website menu. Note : If the templates are not listed, make sure that the project is
displaying in the Solution Explorer. STEP 3: In the Add New Item dialog box ( Figure 9.21 ), make sure that the Web
Form is selected in the Templates list, then set the Name box to ContactInfo.aspx. The language should be set to C#.
STEP 4: Make sure that the check box for Place code in separate file is selected. This option should be selected for all pages in a project.
STEP 5: Click Add . The ContactInfo.aspx file appears in the Document window.
STEP 6: If the source code for HTML is displaying, display Design view by selecting the tab at the bottom of the Document window or by clicking on the View Designer button in the Solution Explorer window.
Add Controls to the New Page STEP 1: Set the document’s Title property to “Hello Contact Information”. STEP 2: Add a HyperLink control to the top of the page. STEP 3: Set the HyperLink’s Text property to “Return to Home Page”.
F i g u r e 9 . 2 0
Select the page to which to navigate for a HyperLink control from the Select URL dialog box.
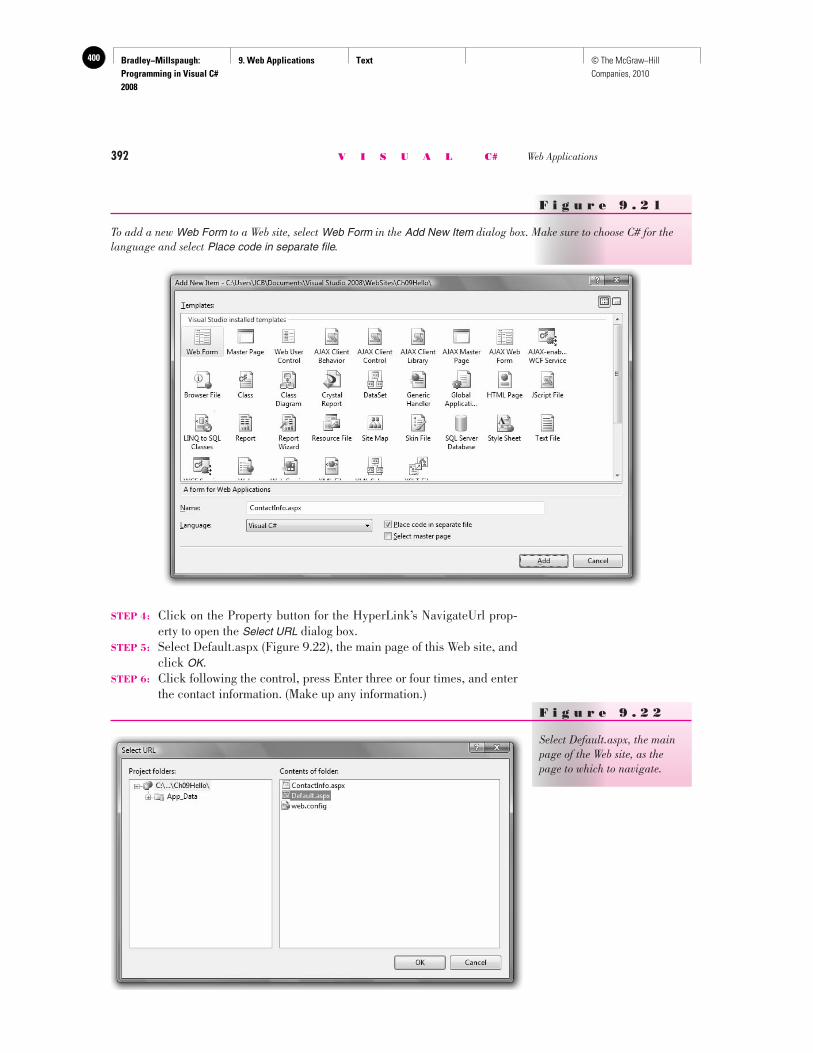
Bradley−Millspaugh: Programming in Visual C# 2008
9. Web Applications Text400 © The McGraw−Hill Companies, 2010
392 V I S U A L C# Web Applications
STEP 4: Click on the Property button for the HyperLink’s NavigateUrl prop-erty to open the Select URL dialog box.
STEP 5: Select Default.aspx ( Figure 9.22 ), the main page of this Web site, and click OK .
STEP 6: Click following the control, press Enter three or four times, and enter the contact information. (Make up any information.)
F i g u r e 9 . 2 1
To add a new Web Form to a Web site, select Web Form in the Add New Item dialog box. Make sure to choose C# for the language and select Place code in separate file .
F i g u r e 9 . 2 2
Select Default.aspx, the main page of the Web site, as the page to which to navigate.
Bradley−Millspaugh: Programming in Visual C# 2008
9. Web Applications Text 401© The McGraw−Hill Companies, 2010
C H A P T E R 9 393
Add a HyperLink to the Main Page
STEP 1: Display Default.aspx in the designer and add a HyperLink control to the bottom of the page.
STEP 2: Set the Text property of the control to “Contact Information”. Set the NavigateUrl property to ContactInfo.aspx.
Set the Start Page For a Web site with multiple pages, you need to set the start page.
STEP 1: In the Solution Explorer, right-click on Default.aspx and choose Setas Start Page .
Run the application. Test the links on both pages, which should navigate back and forth between the two pages.
Transferring Pages in Code
Sometimes you cannot use the hyperlink to navigate because you need to per-form some other action in code prior to the transfer. To transfer to another page in code, use the Server.Transfer method.
Server.Transfer("Offer.aspx");
➤ Feedback 9.3 1. What property of a HyperLink control indicates to which Web page the
control is linked? 2. Describe how to set up the HyperLinks to navigate from a main page to
a second page and back again to the main page. 3. Write the line of code for the submitButton that transfers to
ThankYou.aspx.
Using the Validator Controls
ASP.NET provides several controls that can automatically validate input data. You add a validator control , attach it to an input control such as a text box, and set the error message. At run time, when the user inputs data, the error message displays if the validation rule is violated. These validation controls run on the client-side, so the page does not have to be submitted to the server to view and clear the message. Table 9.2 lists the ASP.NET vali-dator controls. Note that a blank entry passes the validation for each of the controls except the RequiredFieldValidator. If you want to ensure that the field is not blank and that it passes a range check, for example, attach both a RangeValidator and a RequiredFieldValidator control to a field. For the ErrorMessage property of the validator controls, you can either enter a complete message or set the property to an asterisk. When the user leaves the field blank or enters invalid data, the asterisk will appear.
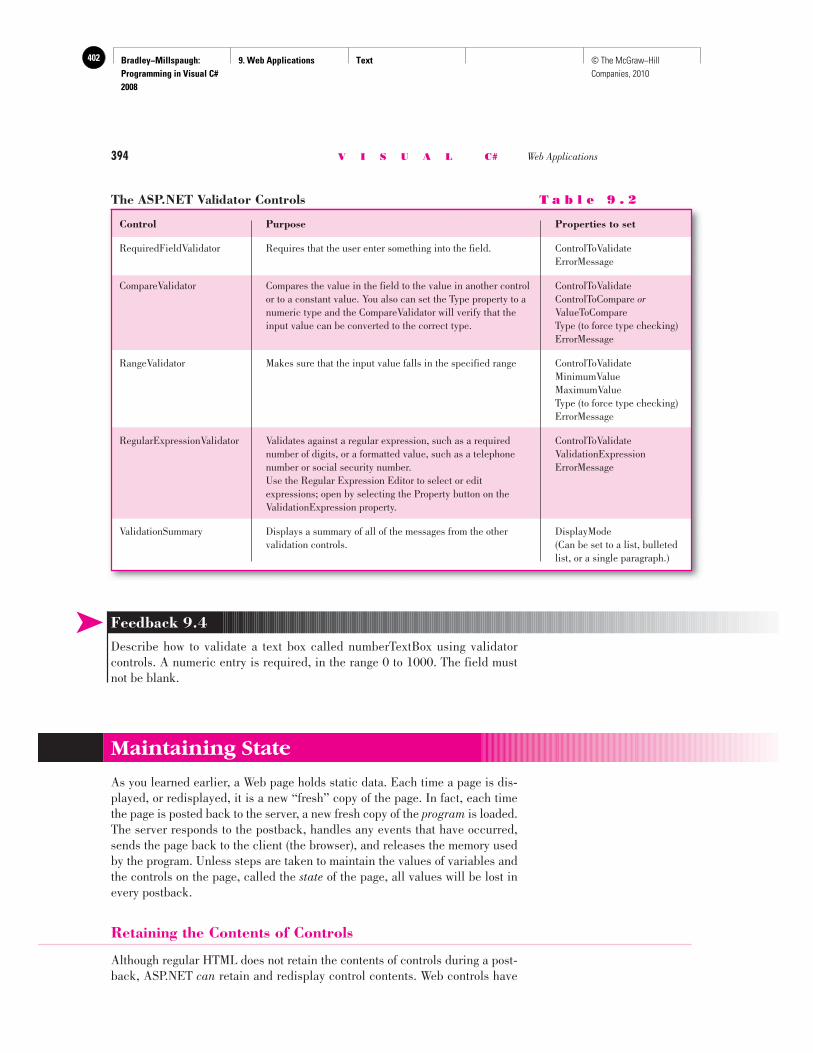
Bradley−Millspaugh: Programming in Visual C# 2008
9. Web Applications Text402 © The McGraw−Hill Companies, 2010
394 V I S U A L C# Web Applications
Maintaining State
As you learned earlier, a Web page holds static data. Each time a page is dis-played, or redisplayed, it is a new “fresh” copy of the page. In fact, each time the page is posted back to the server, a new fresh copy of the program is loaded. The server responds to the postback, handles any events that have occurred, sends the page back to the client (the browser), and releases the memory used by the program. Unless steps are taken to maintain the values of variables and the controls on the page, called the state of the page, all values will be lost in every postback.
Retaining the Contents of Controls
Although regular HTML does not retain the contents of controls during a post-back, ASP.NET can retain and redisplay control contents. Web controls have
The ASP.NET Validator Controls T a b l e 9 . 2
Control Purpose Properties to set
RequiredFieldValidator Requires that the user enter something into the field. ControlToValidate ErrorMessage
CompareValidator Compares the value in the field to the value in another control ControlToValidate or to a constant value. You also can set the Type property to a ControlToCompare or numeric type and the CompareValidator will verify that the ValueToCompare input value can be converted to the correct type. Type (to force type checking) ErrorMessage
RangeValidator Makes sure that the input value falls in the specified range ControlToValidate MinimumValue
MaximumValue Type (to force type checking) ErrorMessage
RegularExpressionValidator Validates against a regular expression, such as a required ControlToValidate number of digits, or a formatted value, such as a telephone ValidationExpression number or social security number. ErrorMessage Use the Regular Expression Editor to select or edit expressions; open by selecting the Property button on the ValidationExpression property.
ValidationSummary Displays a summary of all of the messages from the other DisplayMode validation controls. (Can be set to a list, bulleted list, or a single paragraph.)
➤ Feedback 9.4 Describe how to validate a text box called numberTextBox using validator controls. A numeric entry is required, in the range 0 to 1000. The field must not be blank.
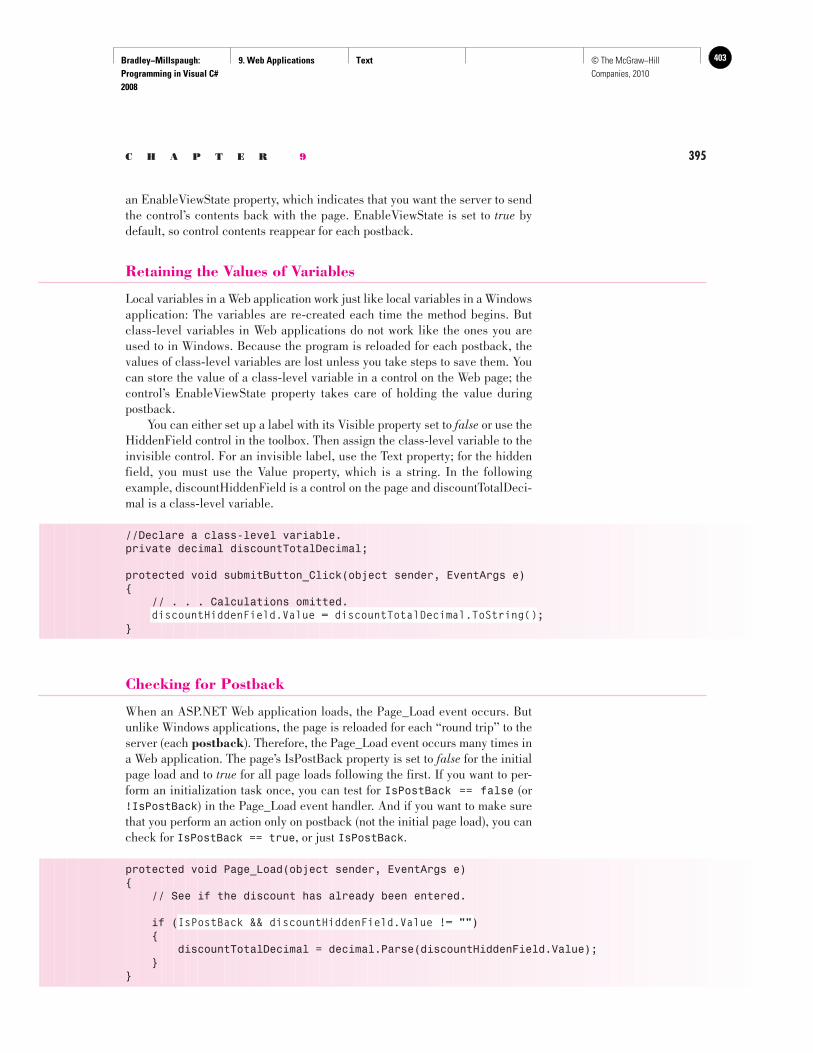
Bradley−Millspaugh: Programming in Visual C# 2008
9. Web Applications Text 403© The McGraw−Hill Companies, 2010
C H A P T E R 9 395
an EnableViewState property, which indicates that you want the server to send the control’s contents back with the page. EnableViewState is set to true by default, so control contents reappear for each postback.
Retaining the Values of Variables
Local variables in a Web application work just like local variables in a Windows application: The variables are re-created each time the method begins. But class-level variables in Web applications do not work like the ones you are used to in Windows. Because the program is reloaded for each postback, the values of class-level variables are lost unless you take steps to save them. You can store the value of a class-level variable in a control on the Web page; the control’s EnableViewState property takes care of holding the value during postback. You can either set up a label with its Visible property set to false or use the HiddenField control in the toolbox. Then assign the class-level variable to the invisible control. For an invisible label, use the Text property; for the hidden field, you must use the Value property, which is a string. In the following example, discountHiddenField is a control on the page and discountTotalDeci-mal is a class-level variable.
//Declare a class-level variable.private decimal discountTotalDecimal;
protected void submitButton_Click(object sender, EventArgs e){ // . . . Calculations omitted.
discountHiddenField.Value = discountTotalDecimal.ToString();}
Checking for Postback
When an ASP.NET Web application loads, the Page_Load event occurs. But unlike Windows applications, the page is reloaded for each “round trip” to the server (each postback ). Therefore, the Page_Load event occurs many times in a Web application. The page’s IsPostBack property is set to false for the initial page load and to true for all page loads following the first. If you want to per-form an initialization task once, you can test for IsPostBack == false (or !IsPostBack ) in the Page_Load event handler. And if you want to make sure that you perform an action only on postback (not the initial page load), you can check for IsPostBack == true, or just IsPostBack .
protected void Page_Load(object sender, EventArgs e){ // See if the discount has already been entered.
if (IsPostBack && discountHiddenField.Value != "") { discountTotalDecimal = decimal.Parse(discountHiddenField.Value); }}
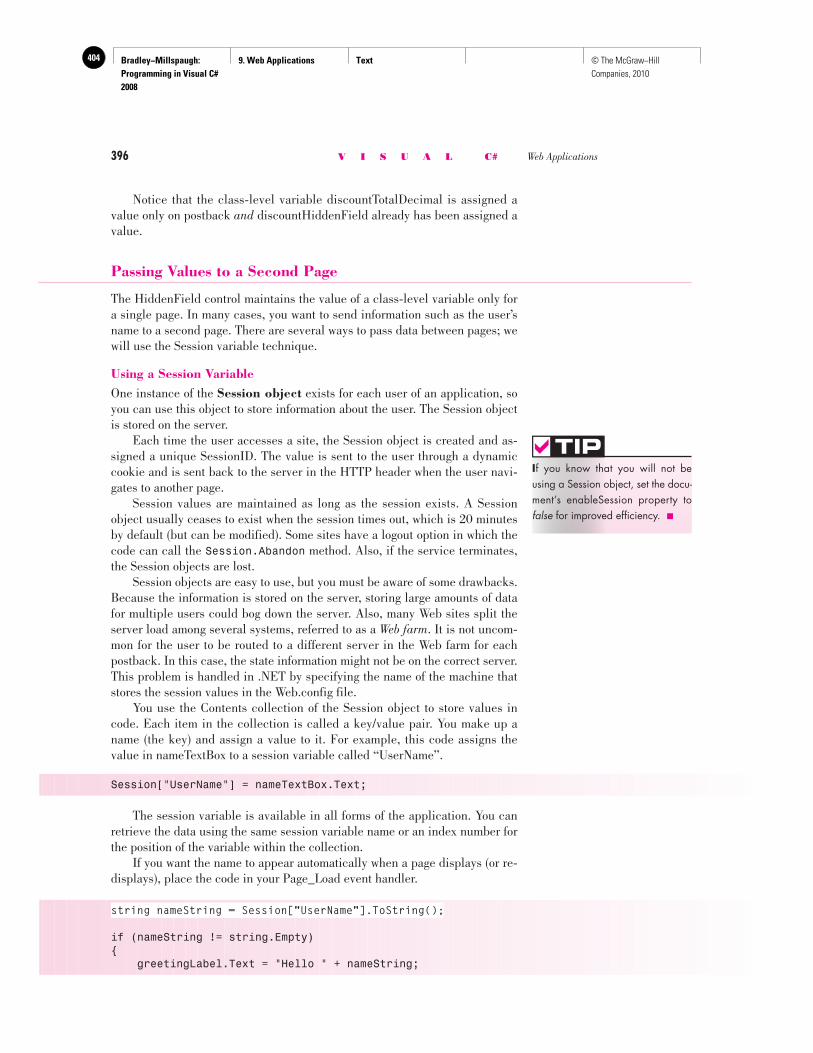
Bradley−Millspaugh: Programming in Visual C# 2008
9. Web Applications Text404 © The McGraw−Hill Companies, 2010
396 V I S U A L C# Web Applications
If you know that you will not be using a Session object, set the docu-ment’s enableSession property to false for improved efficiency. ■
TIP
Notice that the class-level variable discountTotalDecimal is assigned a value only on postback and discountHiddenField already has been assigned a value.
Passing Values to a Second Page
The HiddenField control maintains the value of a class-level variable only for a single page. In many cases, you want to send information such as the user’s name to a second page. There are several ways to pass data between pages; we will use the Session variable technique.
Using a Session Variable One instance of the Session object exists for each user of an application, so you can use this object to store information about the user. The Session object is stored on the server. Each time the user accesses a site, the Session object is created and as-signed a unique SessionID. The value is sent to the user through a dynamic cookie and is sent back to the server in the HTTP header when the user navi-gates to another page. Session values are maintained as long as the session exists. A Session object usually ceases to exist when the session times out, which is 20 minutes by default (but can be modified). Some sites have a logout option in which the code can call the Session.Abandon method. Also, if the service terminates, the Session objects are lost. Session objects are easy to use, but you must be aware of some drawbacks. Because the information is stored on the server, storing large amounts of data for multiple users could bog down the server. Also, many Web sites split the server load among several systems, referred to as a Web farm . It is not uncom-mon for the user to be routed to a different server in the Web farm for each postback. In this case, the state information might not be on the correct server. This problem is handled in .NET by specifying the name of the machine that stores the session values in the Web.config file. You use the Contents collection of the Session object to store values in code. Each item in the collection is called a key/value pair. You make up a name (the key) and assign a value to it. For example, this code assigns the value in nameTextBox to a session variable called “UserName”.
Session["UserName"] = nameTextBox.Text;
The session variable is available in all forms of the application. You can retrieve the data using the same session variable name or an index number for the position of the variable within the collection. If you want the name to appear automatically when a page displays (or re-displays), place the code in your Page_Load event handler.
string nameString = Session["UserName"].ToString();
if (nameString != string.Empty){ greetingLabel.Text = "Hello " + nameString;
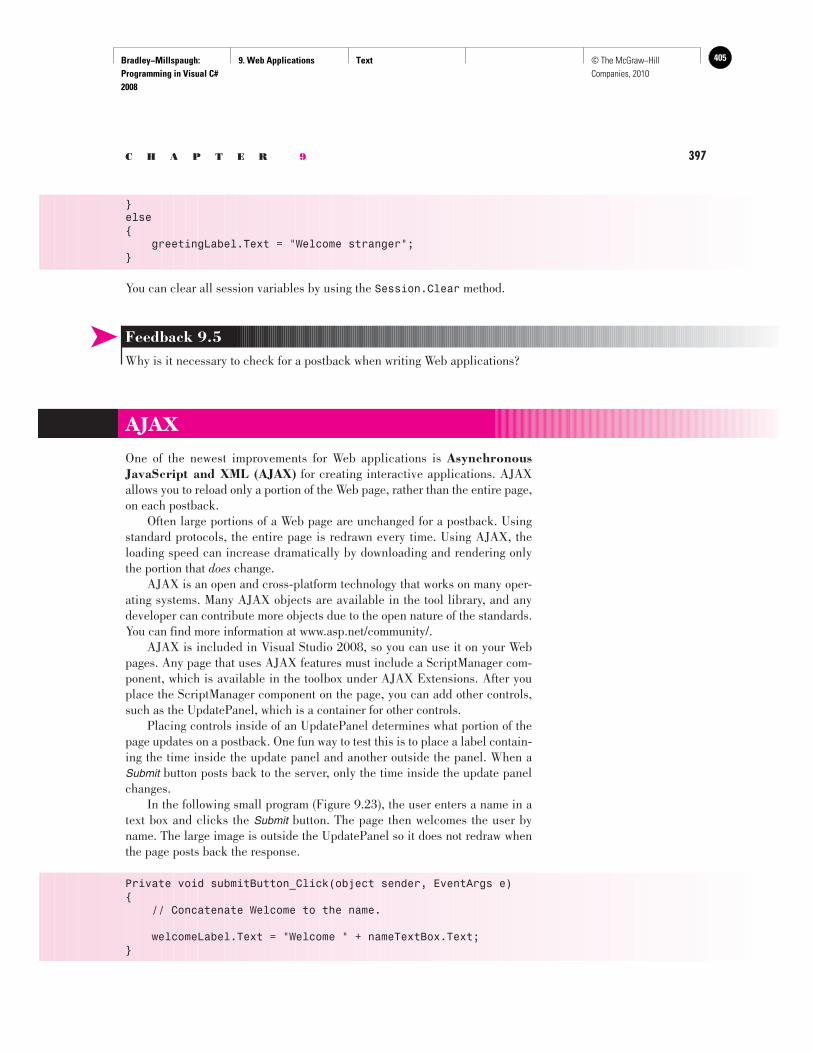
Bradley−Millspaugh: Programming in Visual C# 2008
9. Web Applications Text 405© The McGraw−Hill Companies, 2010
C H A P T E R 9 397
}else{ greetingLabel.Text = "Welcome stranger";}
You can clear all session variables by using the Session.Clear method.
➤ Feedback 9.5 Why is it necessary to check for a postback when writing Web applications?
AJAX
One of the newest improvements for Web applications is Asynchronous JavaScript and XML (AJAX) for creating interactive applications. AJAX allows you to reload only a portion of the Web page, rather than the entire page, on each postback. Often large portions of a Web page are unchanged for a postback. Using standard protocols, the entire page is redrawn every time. Using AJAX, the loading speed can increase dramatically by downloading and rendering only the portion that does change. AJAX is an open and cross-platform technology that works on many oper-ating systems. Many AJAX objects are available in the tool library, and any developer can contribute more objects due to the open nature of the standards. You can find more information at www.asp.net/community/ . AJAX is included in Visual Studio 2008, so you can use it on your Web pages. Any page that uses AJAX features must include a ScriptManager com-ponent, which is available in the toolbox under AJAX Extensions. After you place the ScriptManager component on the page, you can add other controls, such as the UpdatePanel, which is a container for other controls. Placing controls inside of an UpdatePanel determines what portion of the page updates on a postback. One fun way to test this is to place a label contain-ing the time inside the update panel and another outside the panel. When a Submit button posts back to the server, only the time inside the update panel changes. In the following small program ( Figure 9.23 ), the user enters a name in a text box and clicks the Submit button. The page then welcomes the user by name. The large image is outside the UpdatePanel so it does not redraw when the page posts back the response.
Private void submitButton_Click(object sender, EventArgs e){ // Concatenate Welcome to the name.
welcomeLabel.Text = "Welcome " + nameTextBox.Text;}
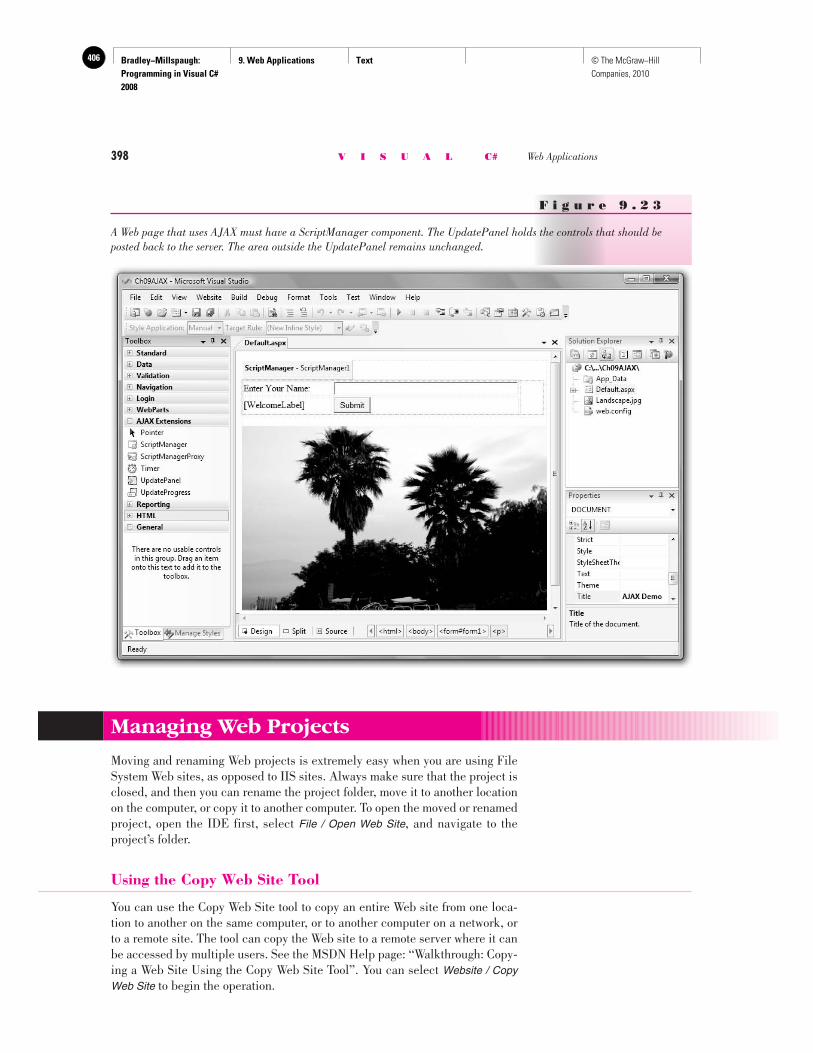
Bradley−Millspaugh: Programming in Visual C# 2008
9. Web Applications Text406 © The McGraw−Hill Companies, 2010
398 V I S U A L C# Web Applications
F i g u r e 9 . 2 3
A Web page that uses AJAX must have a ScriptManager component. The UpdatePanel holds the controls that should be posted back to the server. The area outside the UpdatePanel remains unchanged.
Managing Web Projects
Moving and renaming Web projects is extremely easy when you are using File System Web sites, as opposed to IIS sites. Always make sure that the project is closed, and then you can rename the project folder, move it to another location on the computer, or copy it to another computer. To open the moved or renamed project, open the IDE first, select File / Open Web Site , and navigate to the project’s folder.
Using the Copy Web Site Tool
You can use the Copy Web Site tool to copy an entire Web site from one loca-tion to another on the same computer, or to another computer on a network, or to a remote site. The tool can copy the Web site to a remote server where it can be accessed by multiple users. See the MSDN Help page: “Walkthrough: Copy-ing a Web Site Using the Copy Web Site Tool”. You can select Website / Copy Web Site to begin the operation.
Bradley−Millspaugh: Programming in Visual C# 2008
9. Web Applications Text 407© The McGraw−Hill Companies, 2010
C H A P T E R 9 399
Some Web Acronyms
You have seen many acronyms in this chapter, such as HTML, ASP, IIS, and URL. But we have only scratched the surface. As you read the Help files for Visual Studio and begin developing Web applications, you will want to know the meaning of many more. These include the following:
XML Extensible Markup Language. This popular tag-based no-tation is used to define data and their format and transmit the data over the Web. XML is entirely text-based, does not follow any one manufacturer’s specifications, and can pass through firewalls.
See the pages “XML” and “XML Tools in Visual Studio”in Help for further information.
SOAP Simple Object Access Protocol. An XML-based protocol for exchanging component information among distributed systems of many different types. Since it is based on XML, its messages can pass through network firewalls. See www.w3.org/TR/soap12-part1/
HTTP Hypertext Transfer Protocol. The protocol used to send and receive Web pages over the Internet using standard-ized request and response messages.
Web Service Code in classes used to provide middle-tier services over the Internet.
WSDL Web Services Description Language. An XML document using specific syntax that defines how a Web service behaves and how clients interact with the service.
Your Hands-On Programming Example
Look Sharp Fitness Center needs a Web site to display promotional offers and contact information. The site should contain three pages: the Default page, a Contact Information page, and an Offer page. On the Default page, the user should enter his or her name, e-mail ad-dress, and the promotion code. The name and e-mail address are required fields. Use a regular expression validator to make sure that the e-mail address is properly formed. The current promotion codes are
A1876 A Free Step Class
E7770 Equipment Training
D5420 30% discount on clothing
Create a style sheet with a style that defines the background color and font color. Apply the style to all three pages.
Planning the Project Sketch the Web Forms ( Figure 9.24 ), which your users sign off as meeting their needs.
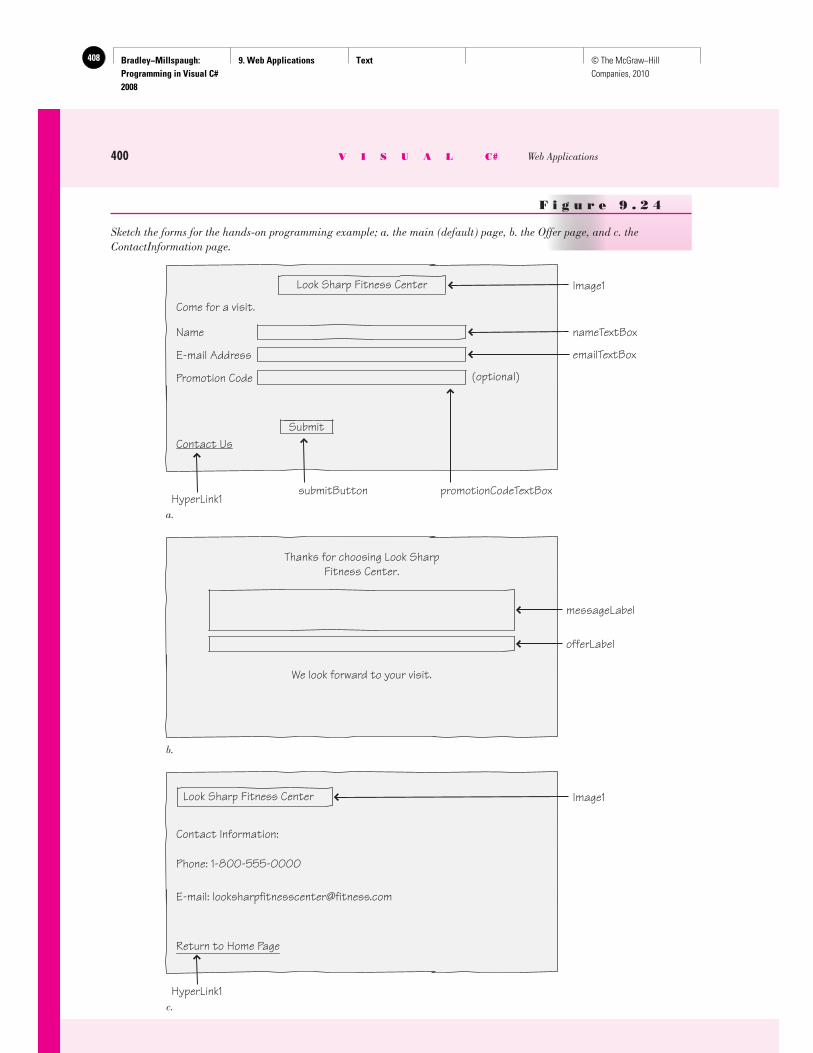
Bradley−Millspaugh: Programming in Visual C# 2008
9. Web Applications Text408 © The McGraw−Hill Companies, 2010
400 V I S U A L C# Web Applications
F i g u r e 9 . 2 4
Sketch the forms for the hands-on programming example; a. the main (default) page, b. the Offer page, and c. the ContactInformation page.
submitButton promotionCodeTextBox HyperLink1
a.
(optional)
Look Sharp Fitness Center
Contact Us
Image1
Come for a visit.
Name
E-mail Address
Promotion Code
nameTextBox
emailTextBox
Submit
We look forward to your visit.
messageLabel
offerLabel
Thanks for choosing Look SharpFitness Center.
b.
HyperLink1
Return to Home Page
Image1
Contact Information:
Phone: 1-800-555-0000
E-mail: [email protected]
Look Sharp Fitness Center
c.

Bradley−Millspaugh: Programming in Visual C# 2008
9. Web Applications Text 409© The McGraw−Hill Companies, 2010
C H A P T E R 9 401
Plan the Objects and Properties
The Default Page
Object Property Setting
Document Title Look Sharp Promotions
HTML Table (9 rows by 3 columns)
Image ImageUrl ~/LookSharp.gif
HTML Label Text Come for a visit.
HTML Label Text Name
HTML Label Text E-mail Address
HTML Label Text Promotion Code
nameTextBox ID nameTextBox
emailTextBox ID emailTextBox
promotionCodeTextBox ID promotionCodeTextBox
submitButton ID submitButton Text Submit
nameRequiredFieldValidator ID nameRequiredFieldValidator ControlToValidate nameTextBox ErrorMessage *
emailRegularExpressionValidator ID emailRegularExpressionValidator ControlToValidate emailTextBox ErrorMessage Invalid email address. Validator Expression Internet email address
emailRequiredFieldValidator ID emailRequiredFieldValidator ControlToValidate emailTextBox ErrorMessage *
HyperLink1 Text Contact Us NavigateUrl ContactInformation.aspx
The Offer Page
Object Property Setting
Document Title Look Sharp Promotions
HTML Table (6 rows by 2 columns)
Static text Text Thanks for choosing Look Sharp Fitness Center.
messageLabel Text (blank)
offerLabel Text (blank)
Static text Text We look forward to your visit.
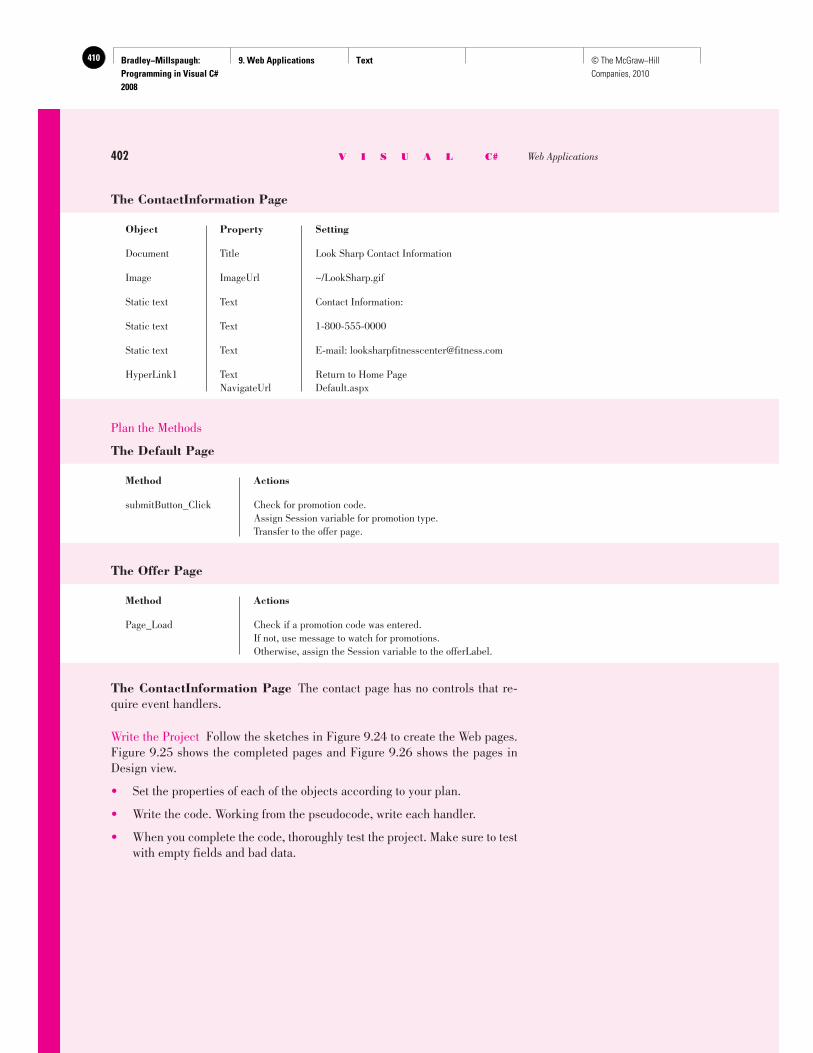
Bradley−Millspaugh: Programming in Visual C# 2008
9. Web Applications Text410 © The McGraw−Hill Companies, 2010
402 V I S U A L C# Web Applications
The ContactInformation Page
Object Property Setting
Document Title Look Sharp Contact Information
Image ImageUrl ~/LookSharp.gif
Static text Text Contact Information:
Static text Text 1-800-555-0000
Static text Text E-mail: [email protected]
HyperLink1 Text Return to Home Page NavigateUrl Default.aspx
Plan the Methods
The Default Page
Method Actions
submitButton_Click Check for promotion code. Assign Session variable for promotion type. Transfer to the offer page.
The Offer Page
Method Actions
Page_Load Check if a promotion code was entered. If not, use message to watch for promotions. Otherwise, assign the Session variable to the offerLabel.
The ContactInformation Page The contact page has no controls that re-quire event handlers.
Write the Project Follow the sketches in Figure 9.24 to create the Web pages. Figure 9.25 shows the completed pages and Figure 9.26 shows the pages in Design view.
• Set the properties of each of the objects according to your plan.
• Write the code. Working from the pseudocode, write each handler.
• When you complete the code, thoroughly test the project. Make sure to test with empty fields and bad data.
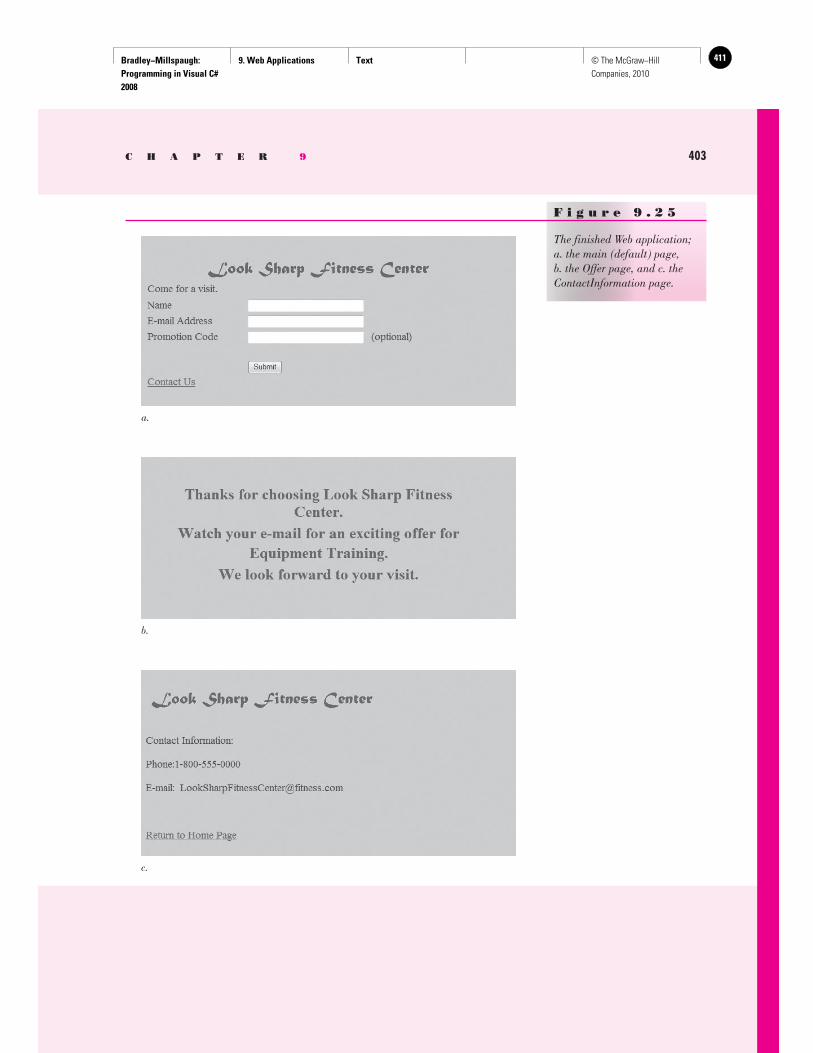
Bradley−Millspaugh: Programming in Visual C# 2008
9. Web Applications Text 411© The McGraw−Hill Companies, 2010
C H A P T E R 9 403
F i g u r e 9 . 2 5
The finished Web application; a. the main (default) page, b. the Offer page, and c. the ContactInformation page.
a.
b.
c.
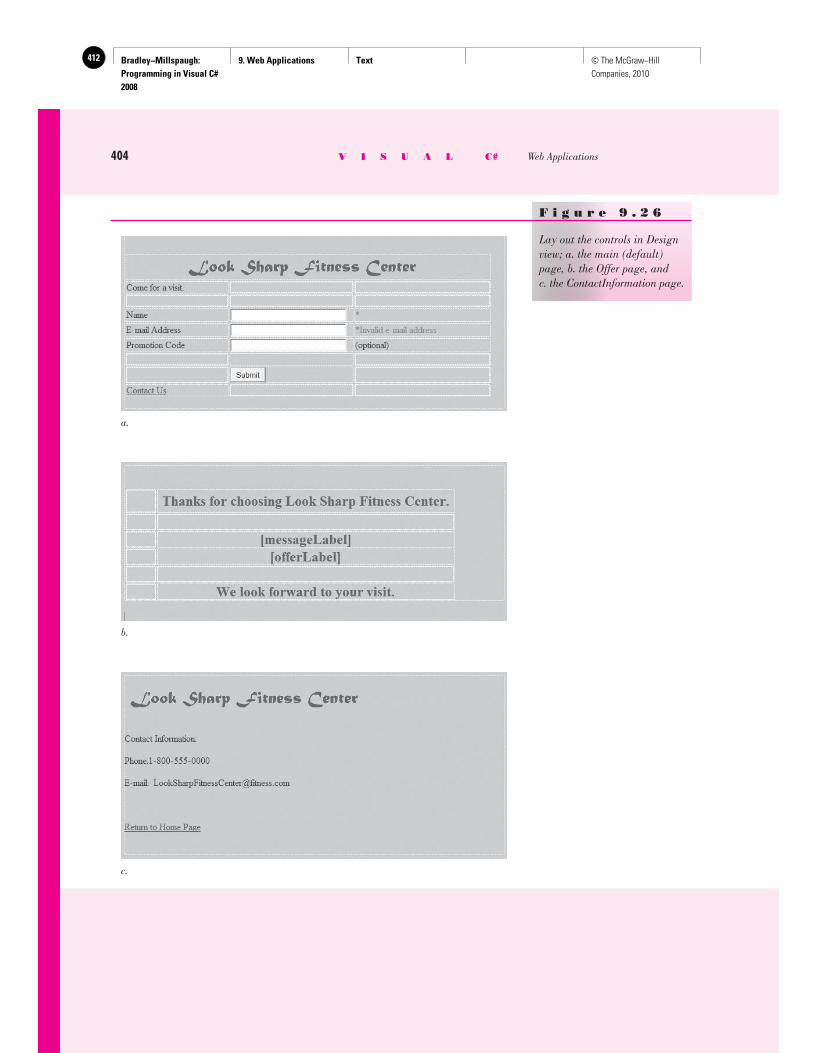
Bradley−Millspaugh: Programming in Visual C# 2008
9. Web Applications Text412 © The McGraw−Hill Companies, 2010
404 V I S U A L C# Web Applications
F i g u r e 9 . 2 6
Lay out the controls in Design view; a. the main (default) page, b. the Offer page, and c. the ContactInformation page.
a.
b.
c.
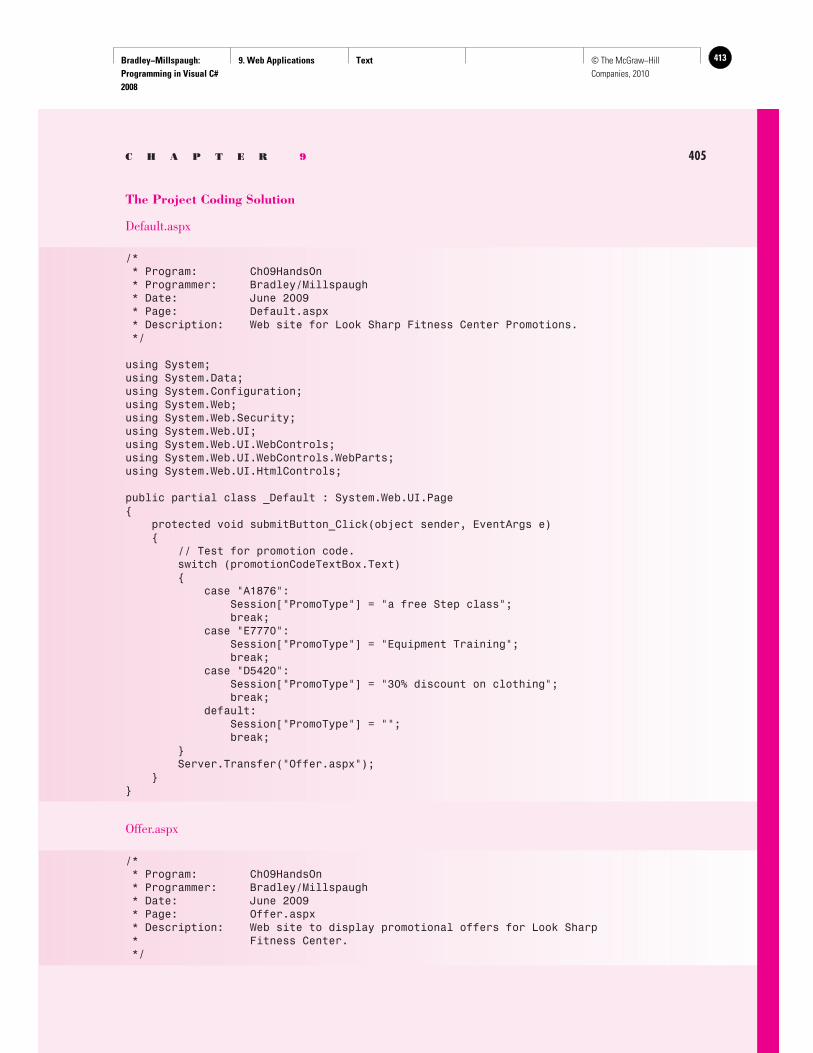
Bradley−Millspaugh: Programming in Visual C# 2008
9. Web Applications Text 413© The McGraw−Hill Companies, 2010
C H A P T E R 9 405
The Project Coding Solution
Default.aspx
/* * Program: Ch09HandsOn * Programmer: Bradley/Millspaugh * Date: June 2009 * Page: Default.aspx * Description: Web site for Look Sharp Fitness Center Promotions. */
using System;using System.Data;using System.Configuration;using System.Web;using System.Web.Security;using System.Web.UI;using System.Web.UI.WebControls;using System.Web.UI.WebControls.WebParts;using System.Web.UI.HtmlControls;
public partial class _Default : System.Web.UI.Page{ protected void submitButton_Click(object sender, EventArgs e) { // Test for promotion code. switch (promotionCodeTextBox.Text) { case "A1876": Session["PromoType"] = "a free Step class"; break; case "E7770": Session["PromoType"] = "Equipment Training"; break; case "D5420": Session["PromoType"] = "30% discount on clothing"; break; default: Session["PromoType"] = ""; break; } Server.Transfer("Offer.aspx"); }}
Offer.aspx
/* * Program: Ch09HandsOn * Programmer: Bradley/Millspaugh * Date: June 2009 * Page: Offer.aspx * Description: Web site to display promotional offers for Look Sharp * Fitness Center. */
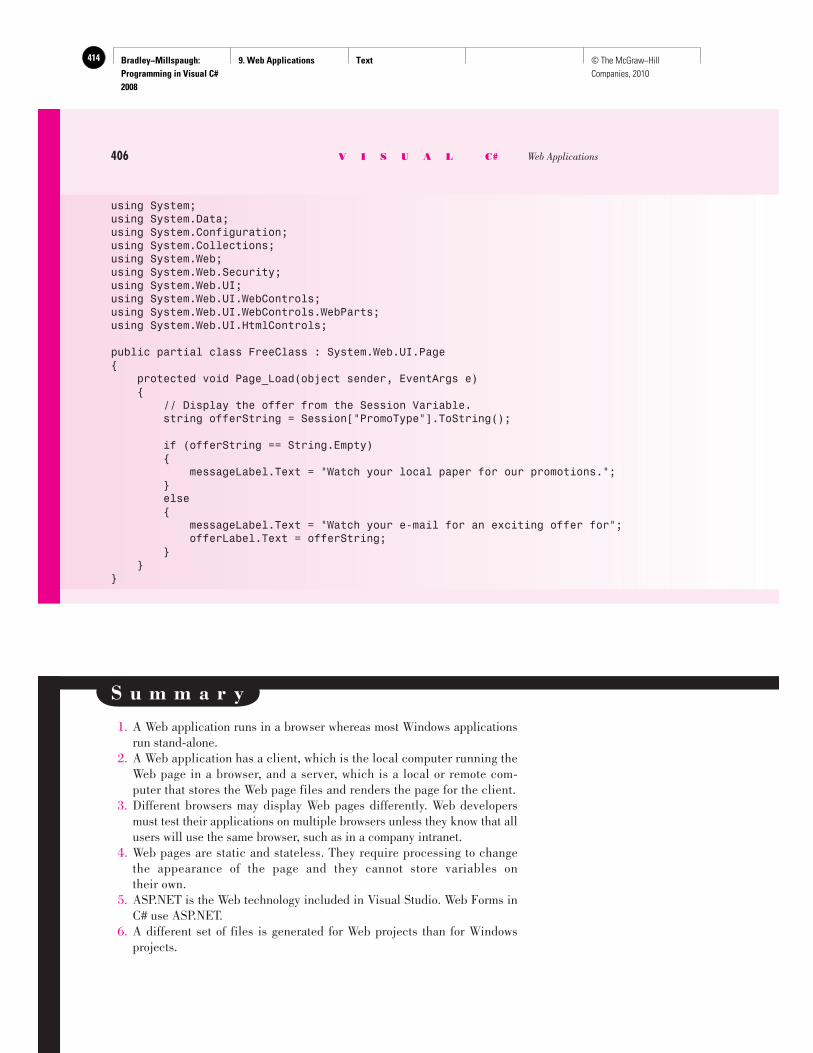
Bradley−Millspaugh: Programming in Visual C# 2008
9. Web Applications Text414 © The McGraw−Hill Companies, 2010
using System;using System.Data;using System.Configuration;using System.Collections;using System.Web;using System.Web.Security;using System.Web.UI;using System.Web.UI.WebControls;using System.Web.UI.WebControls.WebParts;using System.Web.UI.HtmlControls;
public partial class FreeClass : System.Web.UI.Page{ protected void Page_Load(object sender, EventArgs e) { // Display the offer from the Session Variable. string offerString = Session["PromoType"].ToString();
if (offerString == String.Empty) { messageLabel.Text = "Watch your local paper for our promotions."; } else { messageLabel.Text = "Watch your e-mail for an exciting offer for"; offerLabel.Text = offerString; } }}
406 V I S U A L C# Web Applications
S u m m a r y
1. A Web application runs in a browser whereas most Windows applications run stand-alone.
2. A Web application has a client, which is the local computer running the Web page in a browser, and a server, which is a local or remote com-puter that stores the Web page files and renders the page for the client.
3. Different browsers may display Web pages differently. Web developers must test their applications on multiple browsers unless they know that all users will use the same browser, such as in a company intranet.
4. Web pages are static and stateless. They require processing to change the appearance of the page and they cannot store variables on their own.
5. ASP.NET is the Web technology included in Visual Studio. Web Forms in C# use ASP.NET.
6. A different set of files is generated for Web projects than for Windows projects.
Bradley−Millspaugh: Programming in Visual C# 2008
9. Web Applications Text 415© The McGraw−Hill Companies, 2010
C H A P T E R 9 407
7. A Web Form consists of two files: the .aspx file that holds the code to render the user interface and the .aspx.cs file that holds the C# code.
8. The controls for Web pages are different from those used on Windows Forms.
9. In Design view, the Source tab displays the HTML that is automatically generated.
10. You can display a page preview as it will appear in a browser. 11. Controls on Web pages may be HTML (client-side) controls or Web server
controls, which are the controls provided by ASP.NET. Web server controls are rendered specifically for the browser being used.
12. Although the events of Web controls are somewhat different from those for Windows controls, coding for the events is the same.
13. In a Web page, controls are placed one after another, from top to bottom, similar to a word processing document.
14. You can use an HTML table to lay out controls and text in rows and columns.
15. The positioning of a page or a control may be set to absolute, which allows you to set the location by dragging the control to the desired position.
16. Add graphics to a page using an Image control. The control’s ImageUrl property holds the location of the file.
17. Cascading style sheets can be used to set font properties, position, border, and the background for Web pages and controls. The location of the style definition determines the type of style—inline, page, or .css file.
18. A HyperLink control is used for navigation. Set the NavigateUrl property to the page to which to navigate, which can be in the current project or another Web site.
19. You can add multiple pages to a Web application and set up navigation between the pages.
20. Validator controls allow testing for a required field, proper type of data, or a range of values.
21. The EnableViewState property of a Web control determines whether the control maintains its value during postback. To maintain the value of a program class-level variable, assign the variable’s value to a hidden or invisible control.
22. A postback occurs for every round trip to the server. The form is reloaded for every postback, so you often must check in the Form_Load event han-dler to determine whether it is the first time the page is loaded (for initial-ization steps) or a postback (to handle a second request).
23. Use a Session variable to pass a data value to a second page. Session variables are key/value pairs that exist for each user of the application.
24. To move a Web project from one computer to another, make sure the proj-ect is not open in the IDE and copy the project’s folder. You also can use the Copy Web Site tool in Visual Studio to copy a Web project.
25. AJAX (Asynchronous JavaScript and XML) improves the speed of Web applications. By using the Update Panel, only a portion of a Web page is submitted and reloaded on a postback.

Bradley−Millspaugh: Programming in Visual C# 2008
9. Web Applications Text416 © The McGraw−Hill Companies, 2010
408 V I S U A L C# Web Applications
R e v i e w Q u e s t i o n s
1. Explain the differences between the execution of a Windows application and a Web application.
2. Differentiate between the client and the server for a Web application. 3. What is meant by the statement that Web pages are stateless? 4. What options are available for locations of Web site files? 5. What are the differences between HTML controls and standard
controls? 6. How does event handling differ from that for Windows applications? 7. Describe at least two methods for controlling the layout of controls on a
Web page. 8. What functions are done by validator controls? How can you set up a
validator control? 9. Describe the purpose and functionality of AJAX. What is meant by open
standards? 10. What is a Session object and how would it be used? 11. What is the purpose of XML? of SOAP?
P r o g r a m m i n g E x e r c i s e s
9.1 Rewrite your project from Chapter 3 to be a Web project; include validation.
9.2 Rough Riders Rodeo wants to sell tickets online. Allow the user to enter the number of tickets needed. The data entry screen also should include the shipping address for the tickets, a credit card number,
K e y T e r m s absolute position 383 Asynchronous JavaScript and
XML (AJAX) 397 ASP.NET 371 browser 370 cascading style sheet (CSS) 386 client 370 code separation model 374 HyperLink control 390 intranet 371
postback 395 server 370 Session object 396 single-file model 374 stateless 371 table 381 validator control 393 Web Form 370 Web page 371
26. XML is used to store and transfer data on the Internet. XML is tag-based and text-only and can be transmitted through network firewalls. SOAP and WSDL are based on XML.
Bradley−Millspaugh: Programming in Visual C# 2008
9. Web Applications Text 417© The McGraw−Hill Companies, 2010
C H A P T E R 9 409
expiration date, and a drop-down box allowing the user to select the type of credit card. Also include a check box for attending the Awards Event. Include a hyperlink for confirming the order. Make the link invisible to begin but display it after the Submit button has been clicked. The confirmation page should say “Thank you for your order.” and display the amount due. The tickets are $15 for just the rodeo, $25 if they want to attend the Awards Event. Note that all members of the party must select the same type of tickets. When the user selects the Submit button, display the amount due and display a link to confirm the order (make the existing link visible).
9.3 Create a Web page for entering new customer information. The fields in-clude name, e-mail, username, and password. Include a second text box to confirm the password. Set the TextMode property of the two password fields to “Password”. Use a table to lay out your controls. Validate that all fields contain information. Display appropriate mes-sages for any empty fields. Include a Submit button. When all information is entered and the Submit button is pressed, compare the two password fields to see if they are equal. If not, clear both text boxes and display a message to reenter the password information. When the passwords match, display a message that says “Welcome” and the name of the customer.
9.4 Create a Web page for a company of your choosing. Include multiple pages, a HyperLink control, and validator controls.
Case Studies Custom Supplies Mail Order
Write the Custom Supplies Mail Order project from Chapter 4 as a Web application. Use validator controls for the validation. Place an image or logo on the page
located outside an AJAX Update Panel. Include a sec-ond page with contact information for the company.
Write the Christopher’s Car Center project from Chap-ter 3 as a Web application. Use validator controls for
Christopher’s Car Center
the validation. Include a second page with contact information for the company.
Suggestion : Use a RadioButtonList control.
Bradley−Millspaugh: Programming in Visual C# 2008
9. Web Applications Text418 © The McGraw−Hill Companies, 2010
410 V I S U A L C# Web Applications
Xtreme Cinema
Write the Xtreme Cinema project from Chapter 3 or Chapter 4 as a Web application. Use validator controls
for the validation. Include a second page with contact information for the company.
Suggestion : Use a RadioButtonList control.
Cool Boards
Write the Cool Boards project from Chapter 4 as a Web application. Use validator controls for the vali-dation, including a range validator for the quantity.
Include a second page with contact information for the company. Suggestion: Use a RadioButtonList control.
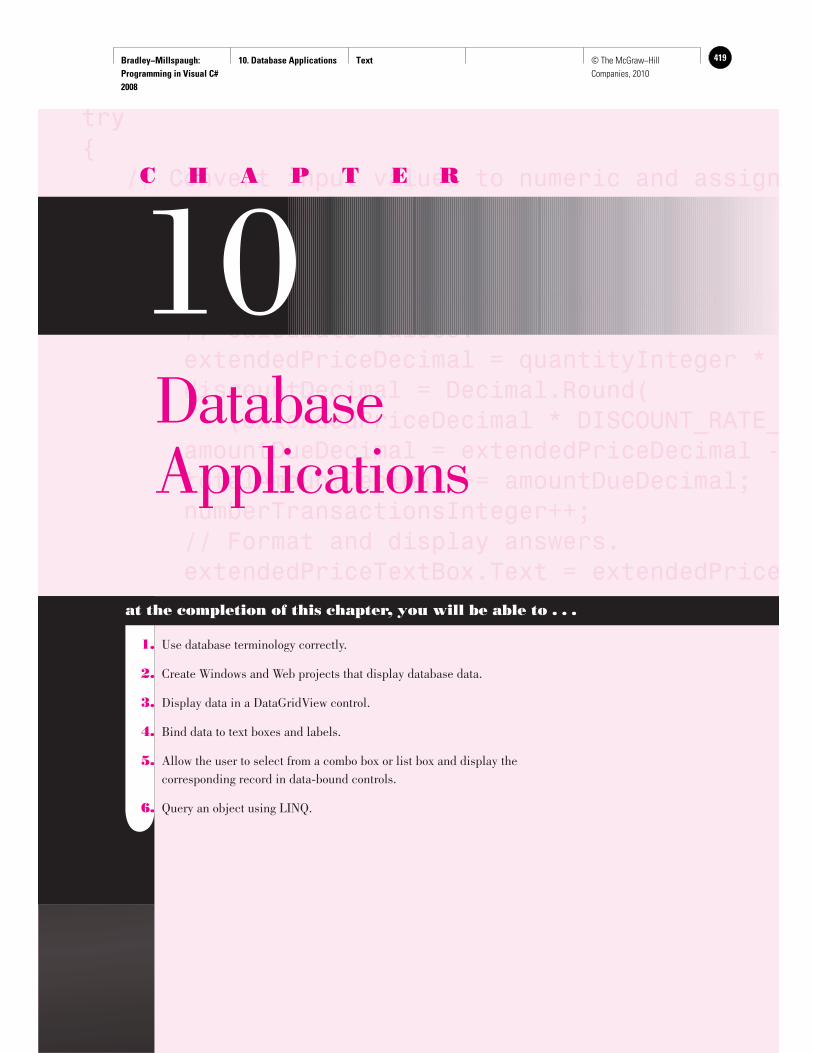
Bradley−Millspaugh: Programming in Visual C# 2008
10. Database Applications Text 419© The McGraw−Hill Companies, 2010
try{ // Convert input values to numeric and assign quantityInteger = int.Parse(quantityTextBox.T try { priceDecimal = decimal.Parse(priceTextBox // Calculate values. extendedPriceDecimal = quantityInteger * discountDecimal = Decimal.Round( (extendedPriceDecimal * DISCOUNT_RATE_ amountDueDecimal = extendedPriceDecimal - totalAmountDecimal += amountDueDecimal; numberTransactionsInteger++; // Format and display answers. extendedPriceTextBox.Text = extendedPrice
C H A P T E R
10 Database Applications
at the completion of this chapter, you will be able to . . .
1. Use database terminology correctly.
2. Create Windows and Web projects that display database data.
3. Display data in a DataGridView control.
4. Bind data to text boxes and labels.
5. Allow the user to select from a combo box or list box and display the corresponding record in data-bound controls.
6. Query an object using LINQ.
Bradley−Millspaugh: Programming in Visual C# 2008
10. Database Applications Text420 © The McGraw−Hill Companies, 2010
412 V I S U A L C# Database Applications
Databases
Most data handling today is done with relational databases. Many manufactur-ers produce database management systems (DBMS), each with its own propri-etary format. One challenge for software developers has been accessing data from multiple sources that are stored in different formats. Most of the new tools available to developers, including Microsoft’s Visual Studio, attempt to handle data from multiple locations (servers) and data stored in different formats.
C# and Databases
You can use C# to write applications that display and update the data from databases. C# uses ADO.NET, which is the next generation of database tech-nology, based on Microsoft’s previous version called ActiveX Data Objects (ADO) . One big advantage of ADO.NET is that information is stored and trans-ferred in Extensible Markup Language (XML). You will find more information about XML in the section “XML Data” later in this chapter. ADO.NET allows you to access database data in many formats. The basic types of providers are OleDb, SQLClient for SQL Server (Microsoft’s propri-etary DBMS), Odbc, and Oracle. Using OleDb you can obtain data from sources such as Access, Oracle, Sybase, or DB2. The examples in this text use Microsoft’s SQL Server Express (SSE), which installs automatically with Visual Studio.
Database Terminology
To use databases, you must understand the standard terminology of rela-tional databases. Although there are various definitions of standard data-base terms, we will stick with the most common terms, those used in SQL Server and Access. A database file (with an .mdf or .mdb extension) can hold multiple tables. Each table can be viewed like a spreadsheet, with rows and columns. Each row in a table represents the data for one item, person, or transaction and is called a record . Each column in a table is used to store a different element of data, such as an account number, a name, an address, or a numeric amount. The ele-ments represented in columns are called fields . You can think of the table in Figure 10.1 as consisting of rows and columns or of records and fields. Most tables use a primary key field (or combination of fields) to identify each record. The primary key field is often a number such as an employee number, account number, identification number, or social security number; or it may be a text field such as a last name or a combination such as a last name and first name. A relational database generally contains multiple tables and relationships between the tables. For example, an Employee table may have an Employee ID field, and the Payroll table also will have an Employee ID field. The two tables are related by Employee ID. You can find the employee information for one payroll record by retrieving the record for the corresponding Employee ID in the Employee table. One reason to create relationships between tables is to keep the data compact and easy to maintain. By having multiple payroll re-cords related to one employee record through the Employee ID, an employee’s
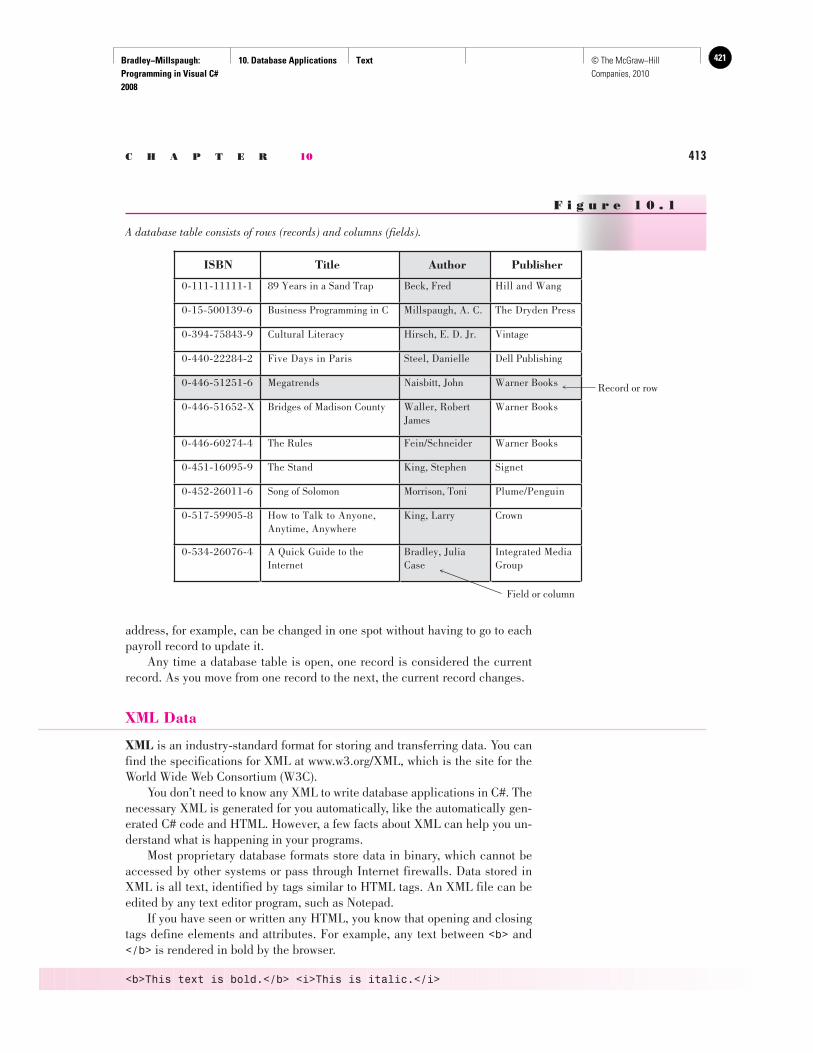
Bradley−Millspaugh: Programming in Visual C# 2008
10. Database Applications Text 421© The McGraw−Hill Companies, 2010
C H A P T E R 10 413
address, for example, can be changed in one spot without having to go to each payroll record to update it. Any time a database table is open, one record is considered the current record. As you move from one record to the next, the current record changes.
XML Data
XML is an industry-standard format for storing and transferring data. You can find the specifications for XML at www.w3.org/XML , which is the site for the World Wide Web Consortium (W3C). You don’t need to know any XML to write database applications in C#. The necessary XML is generated for you automatically, like the automatically gen-erated C# code and HTML. However, a few facts about XML can help you un-derstand what is happening in your programs. Most proprietary database formats store data in binary, which cannot be accessed by other systems or pass through Internet firewalls. Data stored in XML is all text, identified by tags similar to HTML tags. An XML file can be edited by any text editor program, such as Notepad. If you have seen or written any HTML, you know that opening and closing tags define elements and attributes. For example, any text between <b> and</b> is rendered in bold by the browser.
<b>This text is bold.</b> <i>This is italic.</i>
F i g u r e 1 0 . 1
A database table consists of rows (records) and columns (fields).
Record or row
ISBN Title Author Publisher
0-111-11111-1 89 Years in a Sand Trap Beck, Fred Hill and Wang
0-15-500139-6 Business Programming in C Millspaugh, A. C. The Dryden Press
0-394-75843-9 Cultural Literacy Hirsch, E. D. Jr. Vintage
0-440-22284-2 Five Days in Paris Steel, Danielle Dell Publishing
0-446-51251-6 Megatrends Naisbitt, John Warner Books
0-446-51652-X Bridges of Madison County Waller, RobertJames
Warner Books
0-446-60274-4 The Rules Fein/Schneider Warner Books
0-451-16095-9 The Stand King, Stephen Signet
0-452-26011-6 Song of Solomon Morrison, Toni Plume/Penguin
0-517-59905-8 How to Talk to Anyone,Anytime, Anywhere
King, Larry Crown
0-534-26076-4 A Quick Guide to the Internet
Bradley, Julia Case
Integrated MediaGroup
Field or column
Bradley−Millspaugh: Programming in Visual C# 2008
10. Database Applications Text422 © The McGraw−Hill Companies, 2010
414 V I S U A L C# Database Applications
The tags in XML are not predefined as they are in HTML. The tags can identify fields by name. For example, following are three records of a database exported to XML.
<?xml version="1.0" encoding="UTF-8"?><dataroot xmlns:od="urn:schemas-microsoft-com:officedata"> <Books> <ISBN>0-15-500139-6</ISBN> <Title>Business Programming in C</Title> <Author>Millspaugh, A. C.</Author> <Publisher>The Dryden Press</Publisher> </Books> <Books> <ISBN>0-446-51652-X</ISBN> <Title>Bridges of Madison County</Title> <Author>Waller, Robert James</Author> <Publisher>Warner Books</Publisher> </Books> <Books> <ISBN>0-451-16095-9</ISBN> <Title>The Stand</Title> <Author>King, Stephen</Author> <Publisher>Signet</Publisher> </Books></dataroot>
In addition to an XML data file, you usually also have an XML schema file. The schema describes the fields, data types, and any constraints, such as re-quired fields. ADO.NET validates the data against the schema and checks for constraint violations. The schema also is defined with XML tags and can be viewed or edited in a text editor. The format of XML data offers several advantages for programming. Be-cause an XML schema provides for strong data typing, the various data types can be handled properly. And ADO.NET can treat the XML data as objects, allowing the IntelliSense feature of the Visual Studio environment to provide information for the programmer. In addition, data handling in XML and ADO.NET executes faster than in earlier forms of ADO.
➤ Feedback 10.1 1. Assume you have a database containing the names and phone numbers
of your friends. Describe how the terms file, table, row, column, record, field, and key field apply to your database.
2. What is an advantage of transferring data as XML, rather than a propri-etary format such as Access or SQLServer?
Using ADO.NET and C#
In C#, you can display data from a database on a Windows Form or a Web Form. You add controls to the form and bind data to the controls. The controls may be labels or text boxes or one of the special controls designed just for data, such as the DataGridView or DataList. However, just as you found in
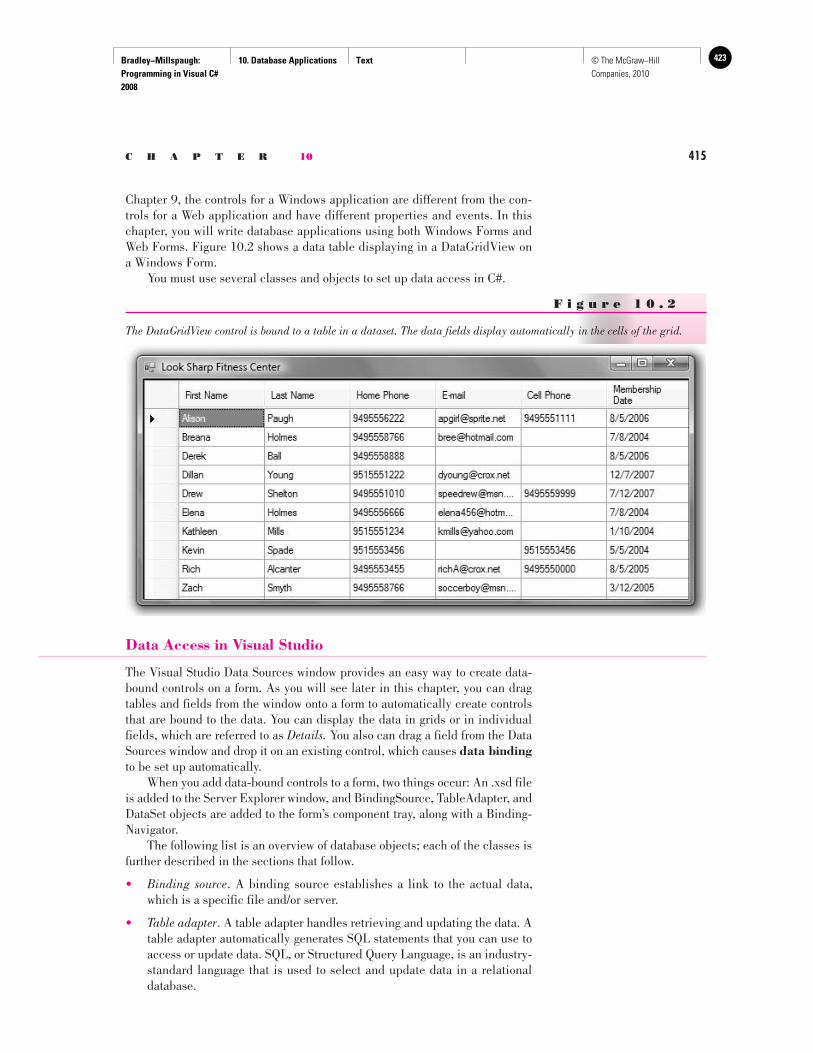
Bradley−Millspaugh: Programming in Visual C# 2008
10. Database Applications Text 423© The McGraw−Hill Companies, 2010
C H A P T E R 10 415
Chapter 9, the controls for a Windows application are different from the con-trols for a Web application and have different properties and events. In this chapter, you will write database applications using both Windows Forms and Web Forms. Figure 10.2 shows a data table displaying in a DataGridView on a Windows Form. You must use several classes and objects to set up data access in C#.
F i g u r e 1 0 . 2
The DataGridView control is bound to a table in a dataset. The data fields display automatically in the cells of the grid.
Data Access in Visual Studio
The Visual Studio Data Sources window provides an easy way to create data-bound controls on a form. As you will see later in this chapter, you can drag tables and fields from the window onto a form to automatically create controls that are bound to the data. You can display the data in grids or in individual fields, which are referred to as Details. You also can drag a field from the Data Sources window and drop it on an existing control, which causes data binding to be set up automatically. When you add data-bound controls to a form, two things occur: An .xsd file is added to the Server Explorer window, and BindingSource, TableAdapter, and DataSet objects are added to the form’s component tray, along with a Binding-Navigator. The following list is an overview of database objects; each of the classes is further described in the sections that follow.
• Binding source . A binding source establishes a link to the actual data, which is a specific file and/or server.
• Table adapter . A table adapter handles retrieving and updating the data. A table adapter automatically generates SQL statements that you can use to access or update data. SQL, or Structured Query Language, is an industry-standard language that is used to select and update data in a relational database.
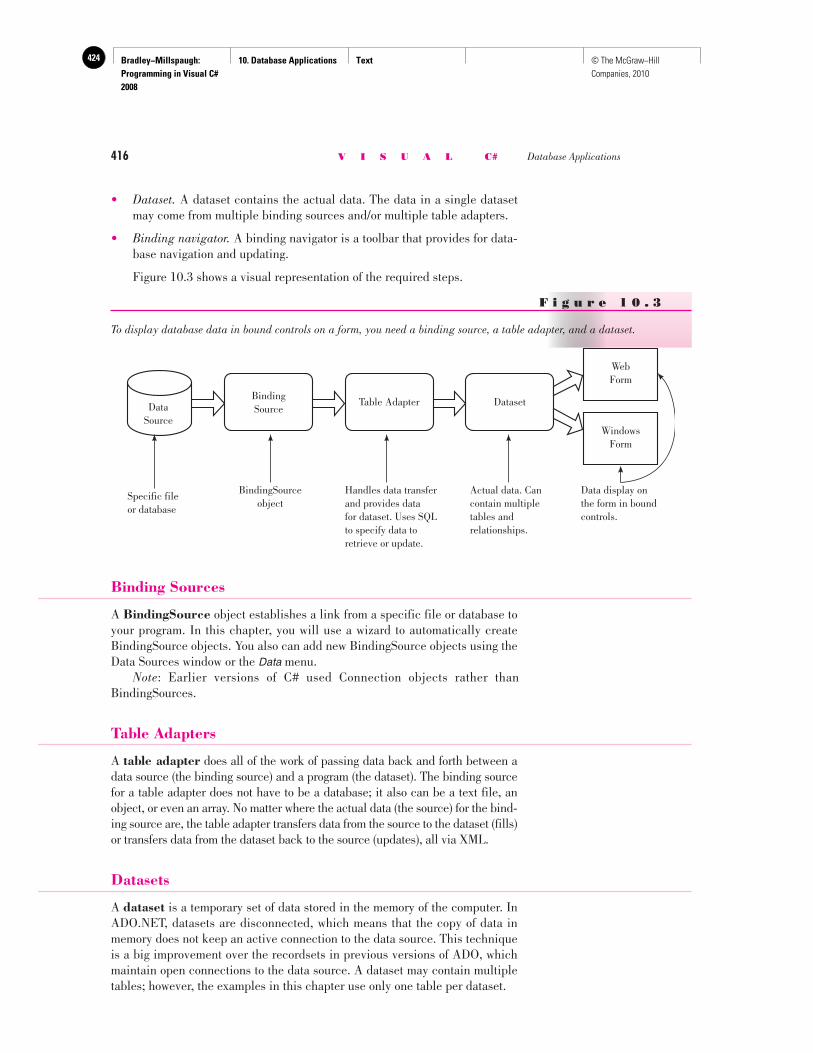
Bradley−Millspaugh: Programming in Visual C# 2008
10. Database Applications Text424 © The McGraw−Hill Companies, 2010
416 V I S U A L C# Database Applications
• Dataset. A dataset contains the actual data. The data in a single dataset may come from multiple binding sources and/or multiple table adapters.
• Binding navigator. A binding navigator is a toolbar that provides for data-base navigation and updating.
Figure 10.3 shows a visual representation of the required steps.
F i g u r e 1 0 . 3
To display database data in bound controls on a form, you need a binding source, a table adapter, and a dataset.
BindingSourceData
Source
Specific fileor database
BindingSourceobject
Handles data transferand provides data for dataset. Uses SQLto specify data toretrieve or update.
Actual data. Cancontain multipletables andrelationships.
Data display onthe form in boundcontrols.
Table Adapter Dataset
WebForm
WindowsForm
Binding Sources
A BindingSource object establishes a link from a specific file or database to your program. In this chapter, you will use a wizard to automatically create BindingSource objects. You also can add new BindingSource objects using the Data Sources window or the Data menu. Note: Earlier versions of C# used Connection objects rather than BindingSources.
Table Adapters
A table adapter does all of the work of passing data back and forth between a data source (the binding source) and a program (the dataset). The binding source for a table adapter does not have to be a database; it also can be a text file, an object, or even an array. No matter where the actual data (the source) for the bind-ing source are, the table adapter transfers data from the source to the dataset (fills) or transfers data from the dataset back to the source (updates), all via XML.
Datasets
A dataset is a temporary set of data stored in the memory of the computer. In ADO.NET, datasets are disconnected, which means that the copy of data in memory does not keep an active connection to the data source. This technique is a big improvement over the recordsets in previous versions of ADO, which maintain open connections to the data source. A dataset may contain multiple tables; however, the examples in this chapter use only one table per dataset.
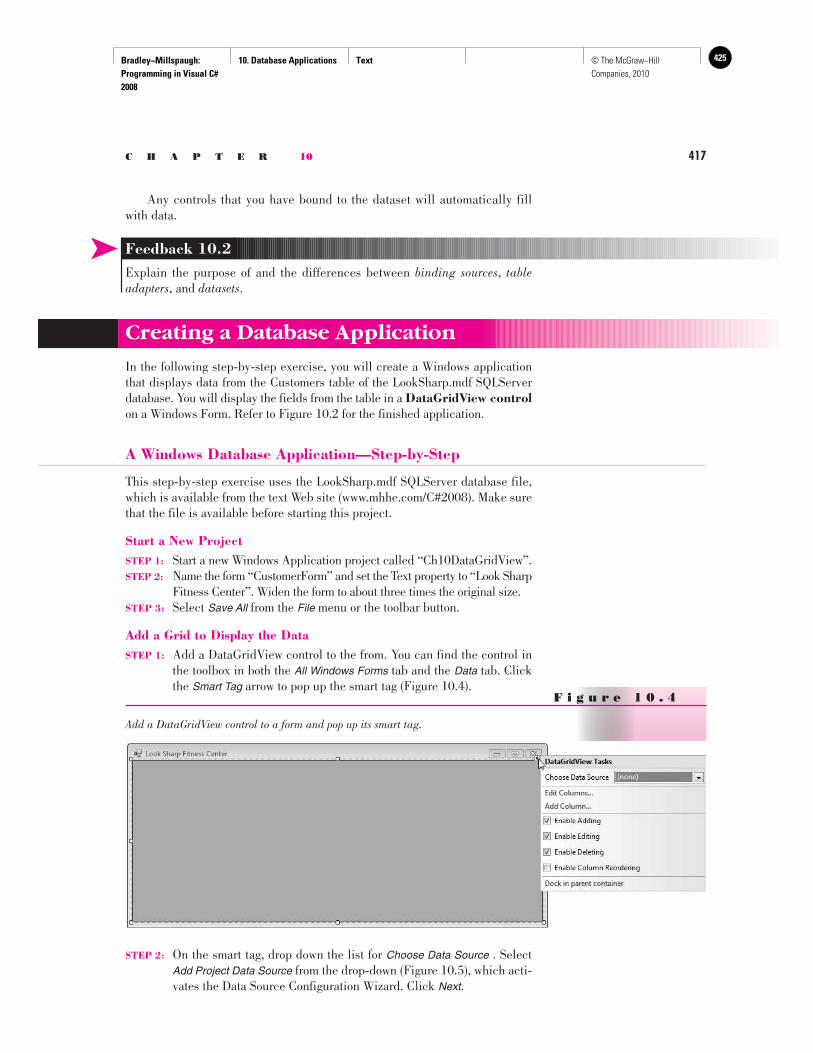
Bradley−Millspaugh: Programming in Visual C# 2008
10. Database Applications Text 425© The McGraw−Hill Companies, 2010
C H A P T E R 10 417
Any controls that you have bound to the dataset will automatically fill with data.
➤ Feedback 10.2 Explain the purpose of and the differences between binding sources , table adapters , and datasets .
Creating a Database Application
In the following step-by-step exercise, you will create a Windows application that displays data from the Customers table of the LookSharp.mdf SQLServer database. You will display the fields from the table in a DataGridView control on a Windows Form. Refer to Figure 10.2 for the finished application.
A Windows Database Application—Step-by-Step
This step-by-step exercise uses the LookSharp.mdf SQLServer database file, which is available from the text Web site ( www.mhhe.com/C#2008 ). Make sure that the file is available before starting this project.
Start a New Project STEP 1: Start a new Windows Application project called “Ch10DataGridView”. STEP 2: Name the form “CustomerForm” and set the Text property to “Look Sharp
Fitness Center”. Widen the form to about three times the original size. STEP 3: Select Save All from the File menu or the toolbar button.
Add a Grid to Display the Data STEP 1: Add a DataGridView control to the from. You can find the control in
the toolbox in both the All Windows Forms tab and the Data tab. Click the Smart Tag arrow to pop up the smart tag ( Figure 10.4 ).
F i g u r e 1 0 . 4
Add a DataGridView control to a form and pop up its smart tag.
STEP 2: On the smart tag, drop down the list for Choose Data Source . Select Add Project Data Source from the drop-down ( Figure 10.5 ), which acti-vates the Data Source Configuration Wizard. Click Next .
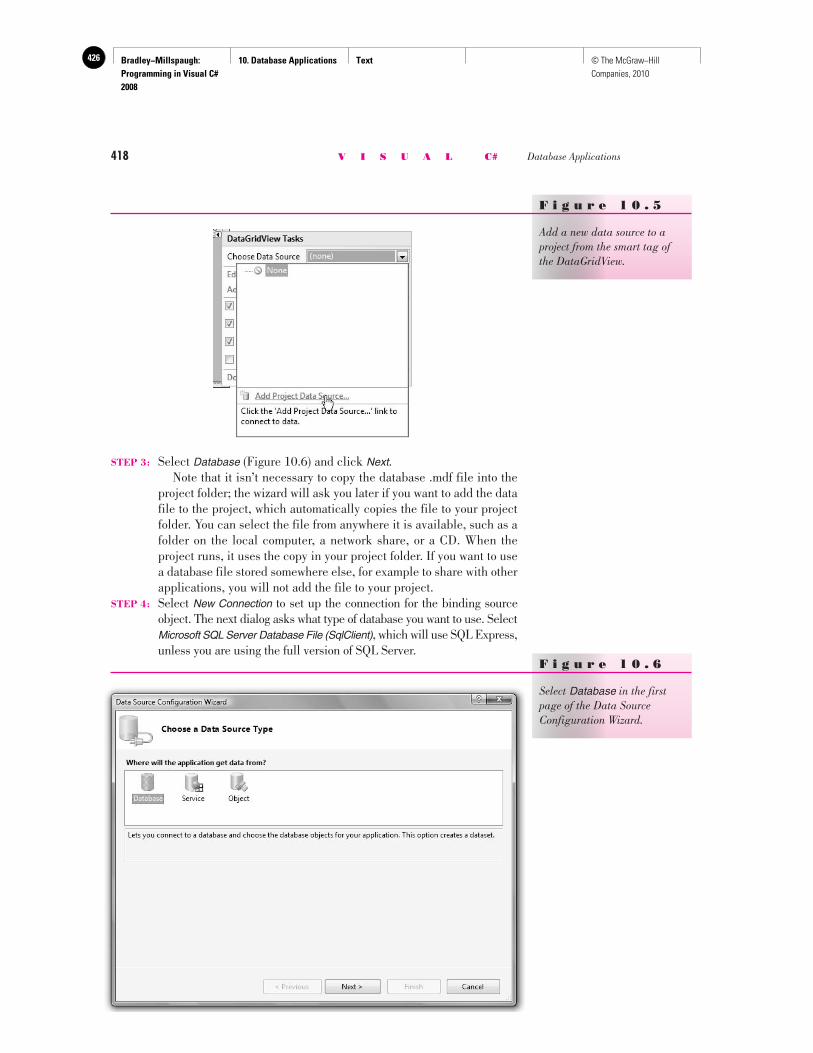
Bradley−Millspaugh: Programming in Visual C# 2008
10. Database Applications Text426 © The McGraw−Hill Companies, 2010
418 V I S U A L C# Database Applications
F i g u r e 1 0 . 5
Add a new data source to a project from the smart tag of the DataGridView.
STEP 3: Select Database ( Figure 10.6 ) and click Next . Note that it isn’t necessary to copy the database .mdf file into the
project folder; the wizard will ask you later if you want to add the data file to the project, which automatically copies the file to your project folder. You can select the file from anywhere it is available, such as a folder on the local computer, a network share, or a CD. When the project runs, it uses the copy in your project folder. If you want to use a database file stored somewhere else, for example to share with other applications, you will not add the file to your project.
STEP 4: Select New Connection to set up the connection for the binding source object. The next dialog asks what type of database you want to use. Select Microsoft SQL Server Database File (SqlClient), which will use SQL Express, unless you are using the full version of SQL Server.
F i g u r e 1 0 . 6
Select Database in the first page of the Data Source Configuration Wizard.
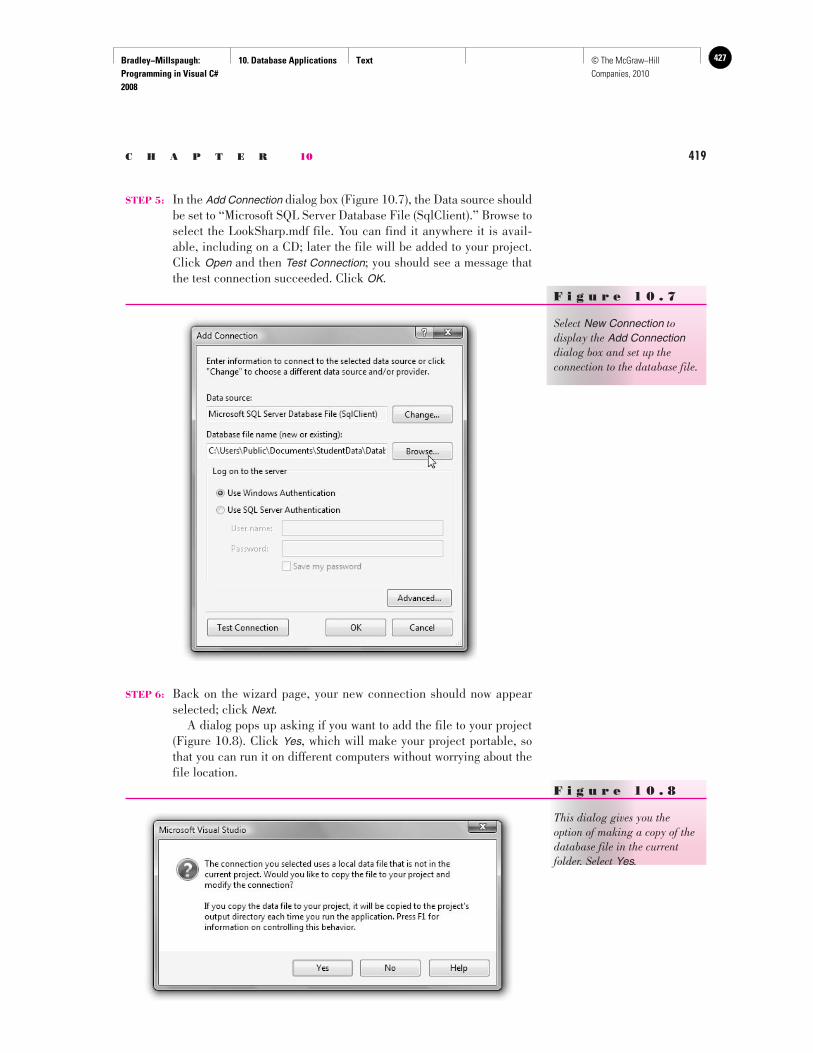
Bradley−Millspaugh: Programming in Visual C# 2008
10. Database Applications Text 427© The McGraw−Hill Companies, 2010
C H A P T E R 10 419
STEP 5: In the Add Connection dialog box ( Figure 10.7 ), the Data source should be set to “Microsoft SQL Server Database File (SqlClient).” Browse to select the LookSharp.mdf file. You can find it anywhere it is avail-able, including on a CD; later the file will be added to your project. Click Open and then Test Connection ; you should see a message that the test connection succeeded. Click OK .
F i g u r e 1 0 . 7
Select New Connection to display the Add Connectiondialog box and set up the connection to the database file.
STEP 6: Back on the wizard page, your new connection should now appear selected; click Next .
A dialog pops up asking if you want to add the file to your project ( Figure 10.8 ). Click Yes , which will make your project portable, so that you can run it on different computers without worrying about the file location.
F i g u r e 1 0 . 8
This dialog gives you the option of making a copy of the database file in the current folder. Select Yes.
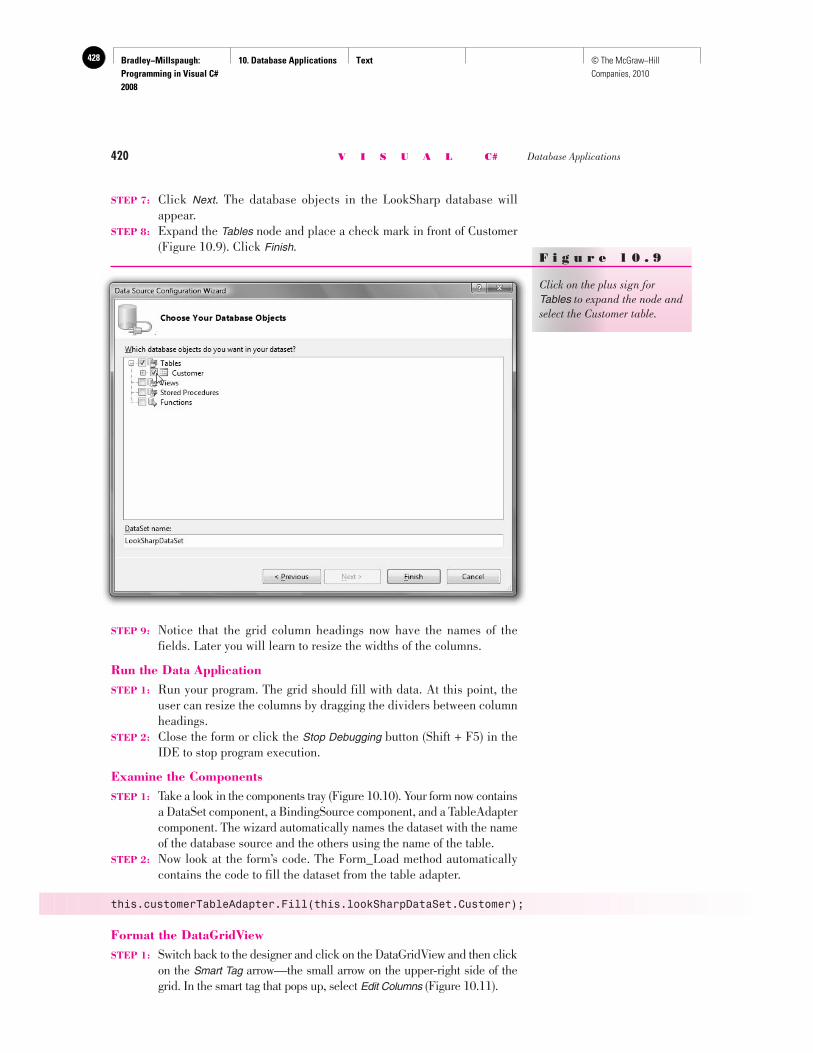
Bradley−Millspaugh: Programming in Visual C# 2008
10. Database Applications Text428 © The McGraw−Hill Companies, 2010
420 V I S U A L C# Database Applications
STEP 7: Click Next . The database objects in the LookSharp database will appear.
STEP 8: Expand the Tables node and place a check mark in front of Customer ( Figure 10.9 ). Click Finish .
F i g u r e 1 0 . 9
Click on the plus sign for Tables to expand the node and select the Customer table.
STEP 9: Notice that the grid column headings now have the names of the fields. Later you will learn to resize the widths of the columns.
Run the Data Application STEP 1: Run your program. The grid should fill with data. At this point, the
user can resize the columns by dragging the dividers between column headings.
STEP 2: Close the form or click the Stop Debugging button (Shift + F5) in the IDE to stop program execution.
Examine the Components STEP 1: Take a look in the components tray ( Figure 10.10 ). Your form now contains
a DataSet component, a BindingSource component, and a TableAdapter component. The wizard automatically names the dataset with the name of the database source and the others using the name of the table.
STEP 2: Now look at the form’s code. The Form_Load method automatically contains the code to fill the dataset from the table adapter.
this.customerTableAdapter.Fill(this.lookSharpDataSet.Customer);
Format the DataGridView STEP 1: Switch back to the designer and click on the DataGridView and then click
on the Smart Tag arrow—the small arrow on the upper-right side of the grid. In the smart tag that pops up, select Edit Columns ( Figure 10.11 ).
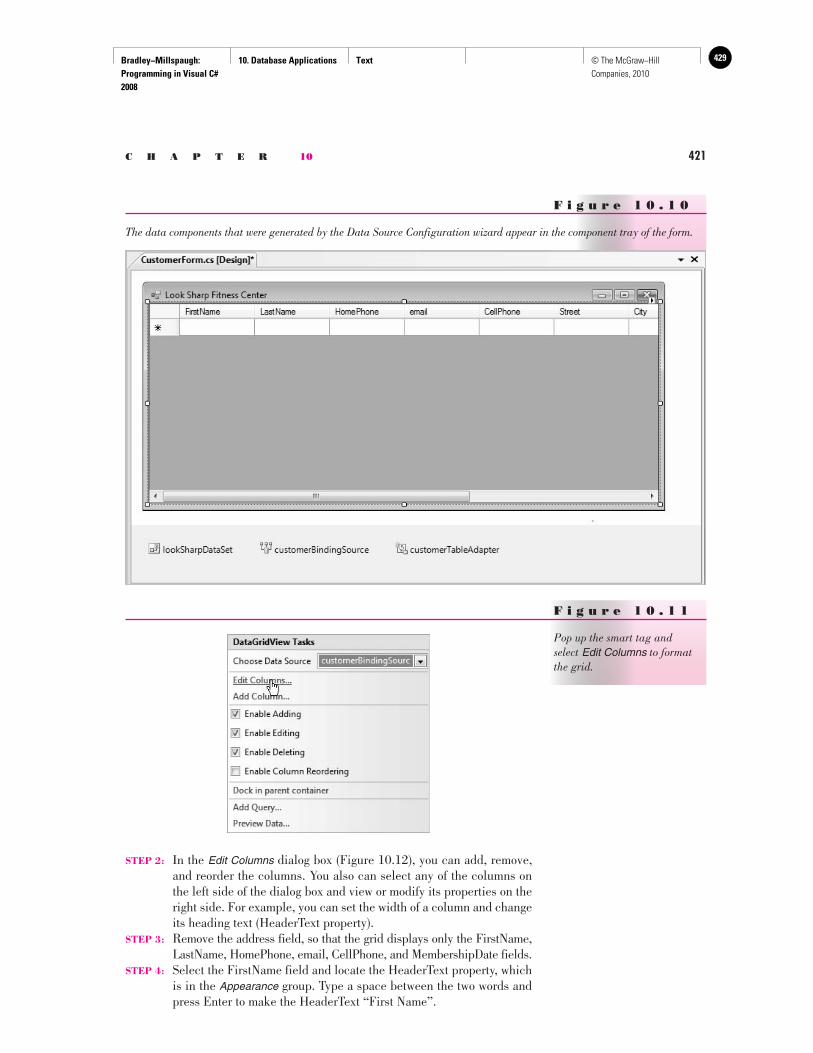
Bradley−Millspaugh: Programming in Visual C# 2008
10. Database Applications Text 429© The McGraw−Hill Companies, 2010
C H A P T E R 10 421
F i g u r e 1 0 . 1 0
The data components that were generated by the Data Source Configuration wizard appear in the component tray of the form.
F i g u r e 1 0 . 1 1
Pop up the smart tag and select Edit Columns to format the grid.
STEP 2: In the Edit Columns dialog box ( Figure 10.12 ), you can add, remove, and reorder the columns. You also can select any of the columns on the left side of the dialog box and view or modify its properties on the right side. For example, you can set the width of a column and change its heading text (HeaderText property).
STEP 3: Remove the address field, so that the grid displays only the FirstName, LastName, HomePhone, email, CellPhone, and MembershipDate fields.
STEP 4: Select the FirstName field and locate the HeaderText property, which is in the Appearance group. Type a space between the two words and press Enter to make the HeaderText “First Name”.
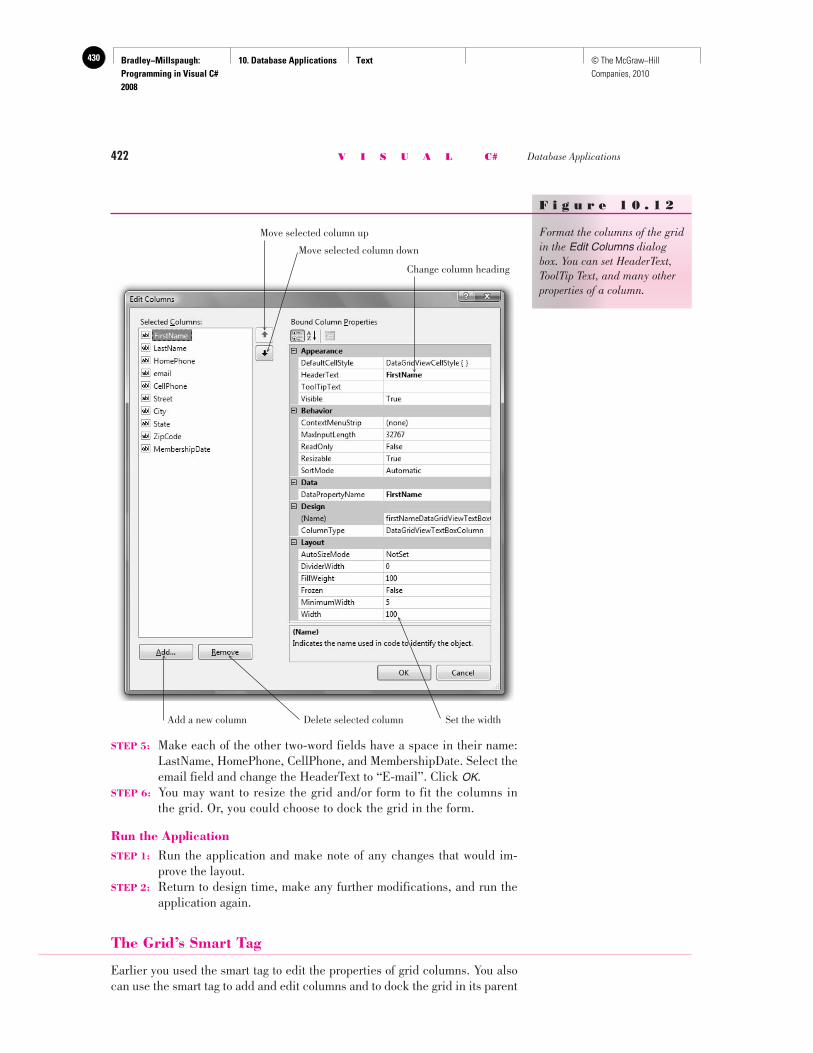
Bradley−Millspaugh: Programming in Visual C# 2008
10. Database Applications Text430 © The McGraw−Hill Companies, 2010
422 V I S U A L C# Database Applications
STEP 5: Make each of the other two-word fields have a space in their name: LastName, HomePhone, CellPhone, and MembershipDate. Select the email field and change the HeaderText to “E-mail”. Click OK .
STEP 6: You may want to resize the grid and/or form to fit the columns in the grid. Or, you could choose to dock the grid in the form.
Run the Application STEP 1: Run the application and make note of any changes that would im-
prove the layout. STEP 2: Return to design time, make any further modifications, and run the
application again.
The Grid’s Smart Tag
Earlier you used the smart tag to edit the properties of grid columns. You also can use the smart tag to add and edit columns and to dock the grid in its parent
F i g u r e 1 0 . 1 2
Format the columns of the grid in the Edit Columns dialog box. You can set HeaderText, ToolTip Text, and many other properties of a column.
Delete selected column
Move selected column up
Move selected column down
Add a new column Set the width
Change column heading
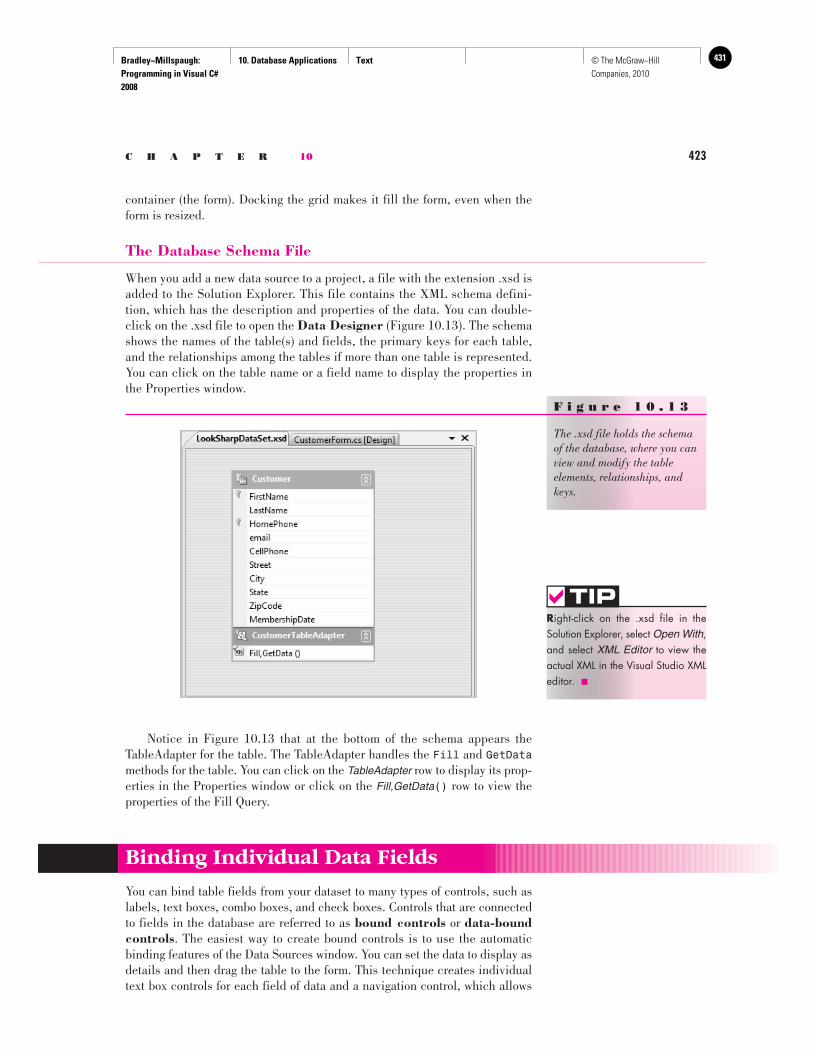
Bradley−Millspaugh: Programming in Visual C# 2008
10. Database Applications Text 431© The McGraw−Hill Companies, 2010
C H A P T E R 10 423
container (the form). Docking the grid makes it fill the form, even when the form is resized.
The Database Schema File
When you add a new data source to a project, a file with the extension .xsd is added to the Solution Explorer. This file contains the XML schema defini-tion, which has the description and properties of the data. You can double-click on the .xsd file to open the Data Designer ( Figure 10.13 ). The schema shows the names of the table(s) and fields, the primary keys for each table, and the relationships among the tables if more than one table is represented. You can click on the table name or a field name to display the properties in the Properties window.
F i g u r e 1 0 . 1 3
The .xsd file holds the schema of the database, where you can view and modify the table elements, relationships, and keys.
Notice in Figure 10.13 that at the bottom of the schema appears the TableAdapter for the table. The TableAdapter handles the Fill and GetDatamethods for the table. You can click on the TableAdapter row to display its prop-erties in the Properties window or click on the Fill,GetData() row to view the properties of the Fill Query.
Right-click on the .xsd file in the Solution Explorer, select Open With,and select XML Editor to view the actual XML in the Visual Studio XML editor. ■
TIP
Binding Individual Data Fields
You can bind table fields from your dataset to many types of controls, such as labels, text boxes, combo boxes, and check boxes. Controls that are connected to fields in the database are referred to as bound controls or data-bound controls . The easiest way to create bound controls is to use the automatic binding features of the Data Sources window. You can set the data to display as details and then drag the table to the form. This technique creates individual text box controls for each field of data and a navigation control, which allows
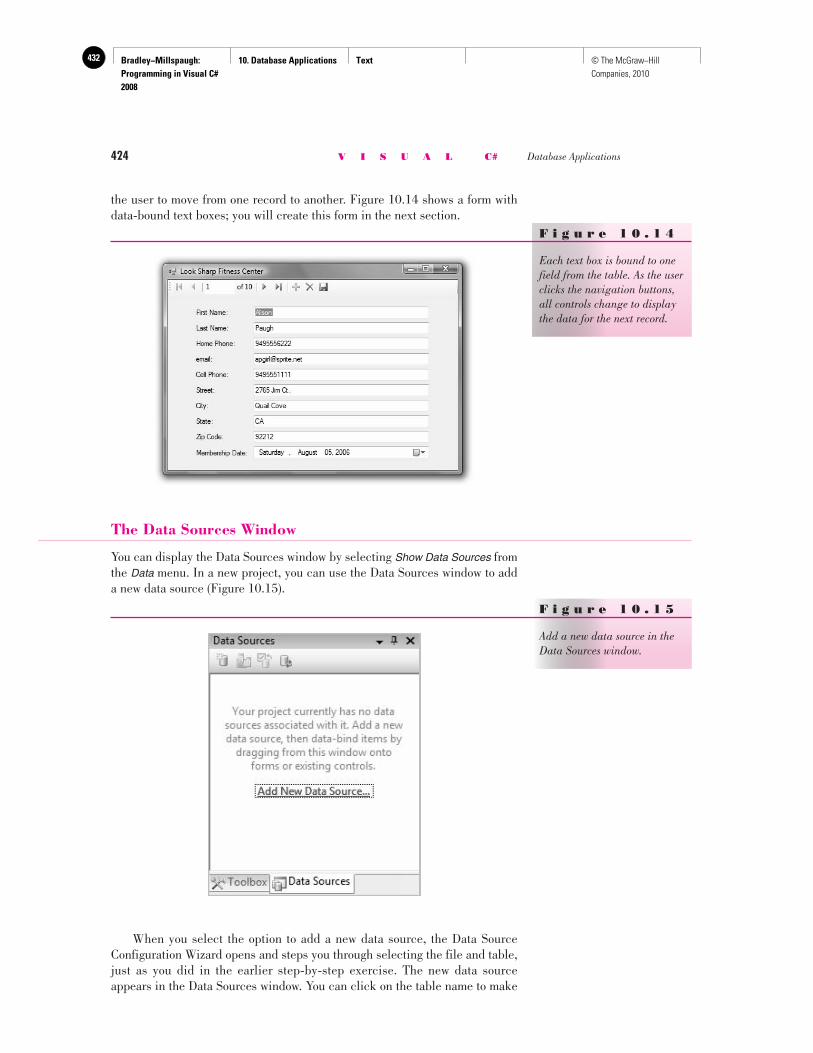
Bradley−Millspaugh: Programming in Visual C# 2008
10. Database Applications Text432 © The McGraw−Hill Companies, 2010
424 V I S U A L C# Database Applications
the user to move from one record to another. Figure 10.14 shows a form with data-bound text boxes; you will create this form in the next section.
F i g u r e 1 0 . 1 4
Each text box is bound to one field from the table. As the user clicks the navigation buttons, all controls change to display the data for the next record.
The Data Sources Window
You can display the Data Sources window by selecting Show Data Sources from the Data menu. In a new project, you can use the Data Sources window to add a new data source ( Figure 10.15 ).
F i g u r e 1 0 . 1 5
Add a new data source in the Data Sources window.
When you select the option to add a new data source, the Data Source Configuration Wizard opens and steps you through selecting the file and table, just as you did in the earlier step-by-step exercise. The new data source appears in the Data Sources window. You can click on the table name to make
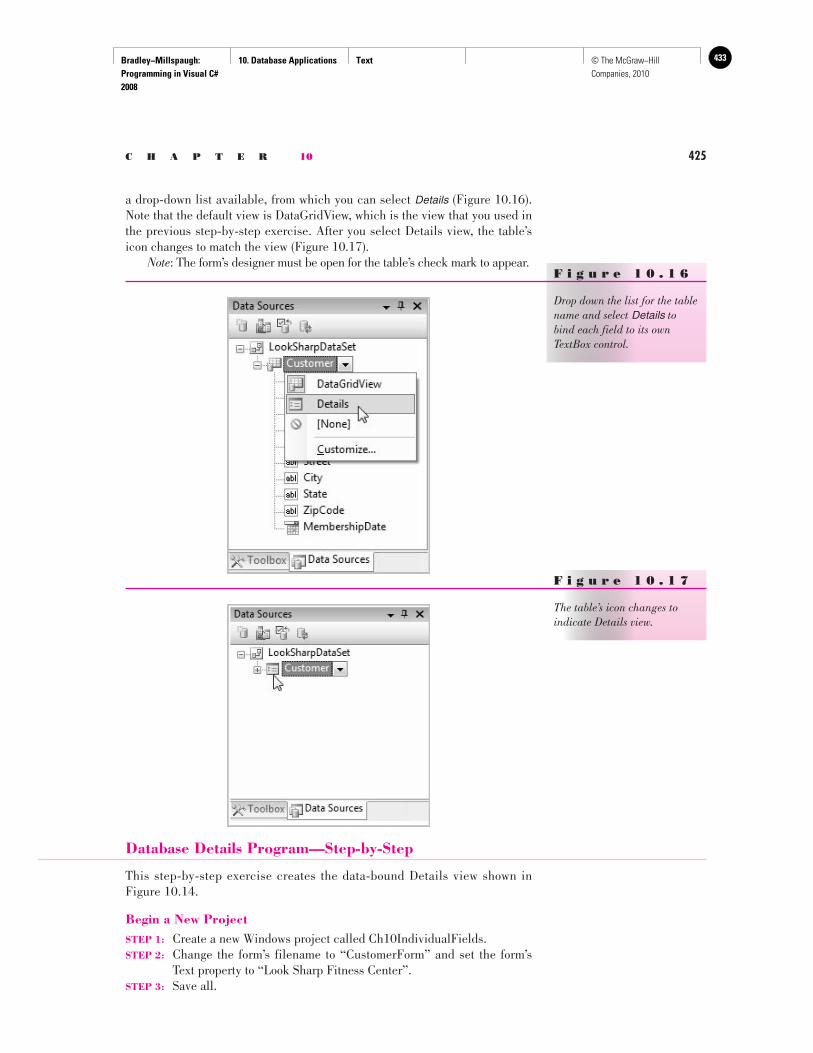
Bradley−Millspaugh: Programming in Visual C# 2008
10. Database Applications Text 433© The McGraw−Hill Companies, 2010
C H A P T E R 10 425
a drop-down list available, from which you can select Details ( Figure 10.16 ). Note that the default view is DataGridView, which is the view that you used in the previous step-by-step exercise. After you select Details view, the table’s icon changes to match the view ( Figure 10.17 ). Note : The form’s designer must be open for the table’s check mark to appear.
F i g u r e 1 0 . 1 6
Drop down the list for the table name and select Details to bind each field to its own TextBox control.
F i g u r e 1 0 . 1 7
The table’s icon changes to indicate Details view.
Database Details Program—Step-by-Step
This step-by-step exercise creates the data-bound Details view shown in Figure 10.14 .
Begin a New Project STEP 1: Create a new Windows project called Ch10IndividualFields. STEP 2: Change the form’s filename to “CustomerForm” and set the form’s
Text property to “Look Sharp Fitness Center”. STEP 3: Save all.
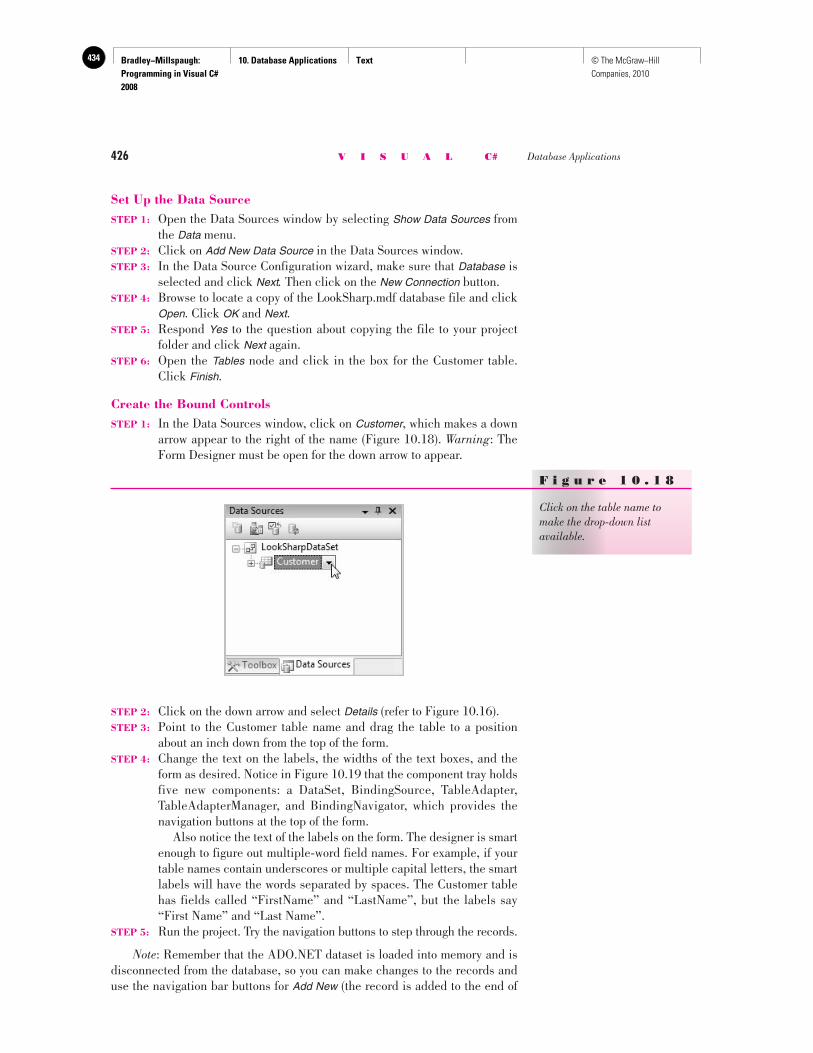
Bradley−Millspaugh: Programming in Visual C# 2008
10. Database Applications Text434 © The McGraw−Hill Companies, 2010
426 V I S U A L C# Database Applications
Set Up the Data Source STEP 1: Open the Data Sources window by selecting Show Data Sources from
the Data menu. STEP 2: Click on Add New Data Source in the Data Sources window . STEP 3: In the Data Source Configuration wizard, make sure that Database is
selected and click Next. Then click on the New Connection button. STEP 4: Browse to locate a copy of the LookSharp.mdf database file and click
Open . Click OK and Next . STEP 5: Respond Yes to the question about copying the file to your project
folder and click Next again. STEP 6: Open the Tables node and click in the box for the Customer table.
Click Finish .
Create the Bound Controls STEP 1: In the Data Sources window, click on Customer , which makes a down
arrow appear to the right of the name ( Figure 10.18 ). Warning : The Form Designer must be open for the down arrow to appear.
F i g u r e 1 0 . 1 8
Click on the table name to make the drop-down list available.
STEP 2: Click on the down arrow and select Details (refer to Figure 10.16 ). STEP 3: Point to the Customer table name and drag the table to a position
about an inch down from the top of the form. STEP 4: Change the text on the labels, the widths of the text boxes, and the
form as desired. Notice in Figure 10.19 that the component tray holds five new components: a DataSet, BindingSource, TableAdapter, TableAdapterManager, and BindingNavigator, which provides the navigation buttons at the top of the form.
Also notice the text of the labels on the form. The designer is smart enough to figure out multiple-word field names. For example, if your table names contain underscores or multiple capital letters, the smart labels will have the words separated by spaces. The Customer table has fields called “FirstName” and “LastName”, but the labels say “First Name” and “Last Name”.
STEP 5: Run the project. Try the navigation buttons to step through the records.
Note : Remember that the ADO.NET dataset is loaded into memory and is disconnected from the database, so you can make changes to the records and use the navigation bar buttons for Add New (the record is added to the end of
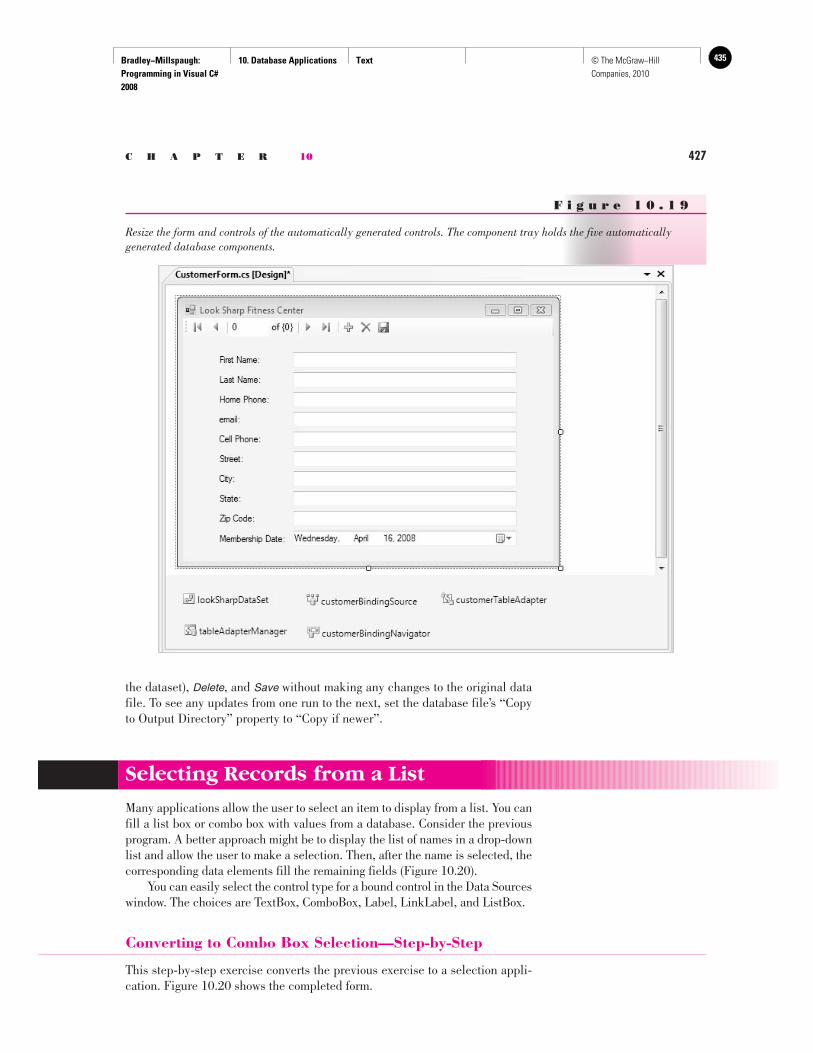
Bradley−Millspaugh: Programming in Visual C# 2008
10. Database Applications Text 435© The McGraw−Hill Companies, 2010
C H A P T E R 10 427
the dataset), Delete , and Save without making any changes to the original data file. To see any updates from one run to the next, set the database file’s “Copy to Output Directory” property to “Copy if newer”.
F i g u r e 1 0 . 1 9
Resize the form and controls of the automatically generated controls. The component tray holds the five automatically generated database components.
Selecting Records from a List
Many applications allow the user to select an item to display from a list. You can fill a list box or combo box with values from a database. Consider the previous program. A better approach might be to display the list of names in a drop-down list and allow the user to make a selection. Then, after the name is selected, the corresponding data elements fill the remaining fields ( Figure 10.20 ). You can easily select the control type for a bound control in the Data Sources window. The choices are TextBox, ComboBox, Label, LinkLabel, and ListBox.
Converting to Combo Box Selection—Step-by-Step
This step-by-step exercise converts the previous exercise to a selection appli-cation. Figure 10.20 shows the completed form.
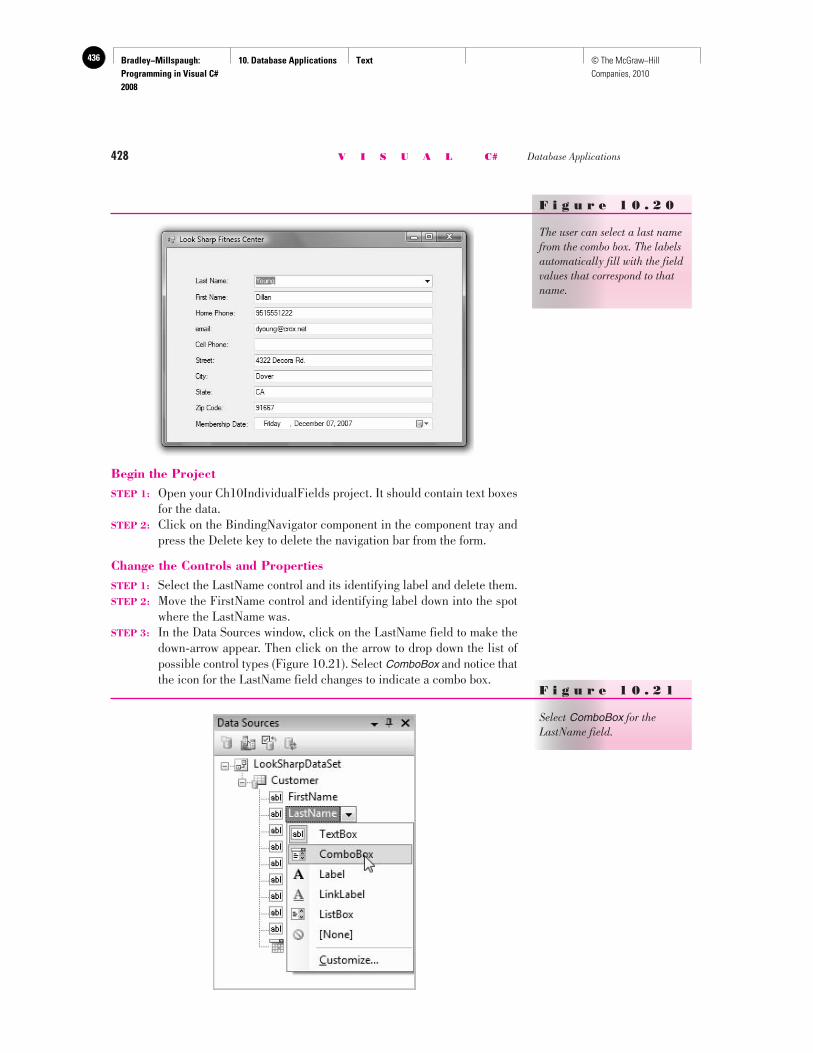
Bradley−Millspaugh: Programming in Visual C# 2008
10. Database Applications Text436 © The McGraw−Hill Companies, 2010
428 V I S U A L C# Database Applications
Begin the Project STEP 1: Open your Ch10IndividualFields project. It should contain text boxes
for the data. STEP 2: Click on the BindingNavigator component in the component tray and
press the Delete key to delete the navigation bar from the form.
Change the Controls and Properties STEP 1: Select the LastName control and its identifying label and delete them. STEP 2: Move the FirstName control and identifying label down into the spot
where the LastName was. STEP 3: In the Data Sources window, click on the LastName field to make the
down-arrow appear. Then click on the arrow to drop down the list of possible control types ( Figure 10.21 ). Select ComboBox and notice that the icon for the LastName field changes to indicate a combo box.
F i g u r e 1 0 . 2 0
The user can select a last name from the combo box. The labels automatically fill with the field values that correspond to that name.
F i g u r e 1 0 . 2 1
Select ComboBox for the LastName field.
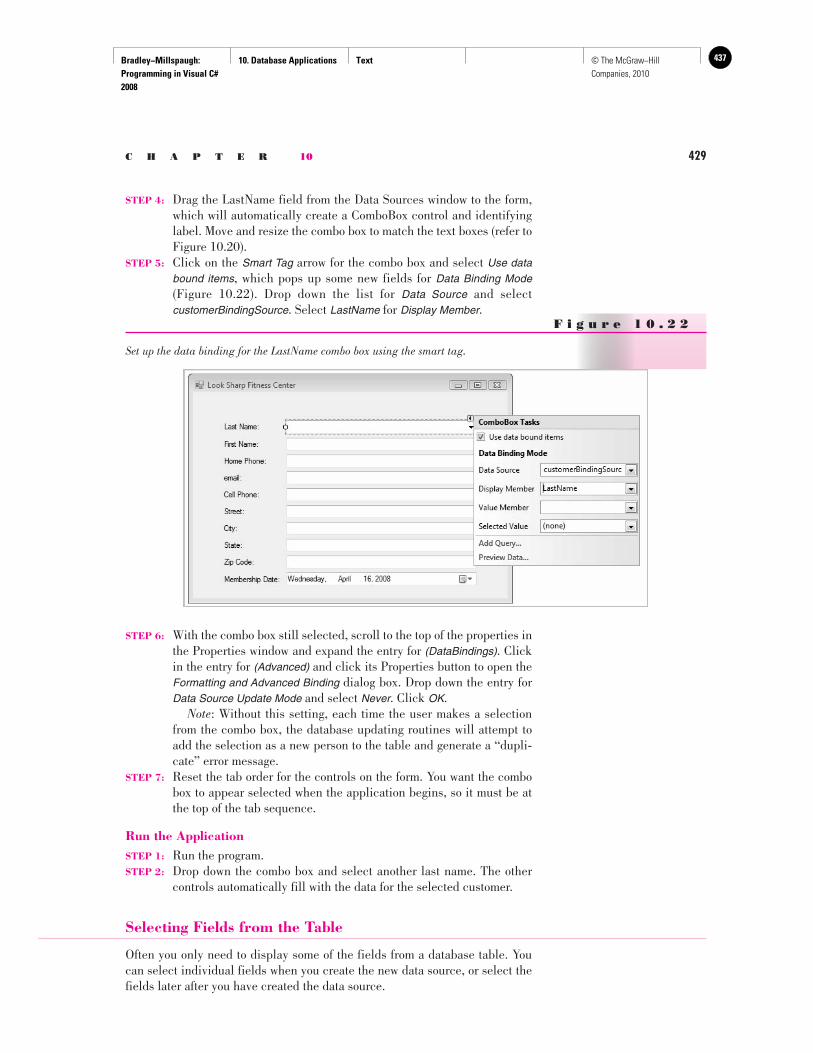
Bradley−Millspaugh: Programming in Visual C# 2008
10. Database Applications Text 437© The McGraw−Hill Companies, 2010
C H A P T E R 10 429
STEP 4: Drag the LastName field from the Data Sources window to the form, which will automatically create a ComboBox control and identifying label. Move and resize the combo box to match the text boxes (refer to Figure 10.20 ).
STEP 5: Click on the Smart Tag arrow for the combo box and select Use data bound items , which pops up some new fields for Data Binding Mode( Figure 10.22 ). Drop down the list for Data Source and select customerBindingSource . Select LastName for Display Member .
F i g u r e 1 0 . 2 2
Set up the data binding for the LastName combo box using the smart tag.
STEP 6: With the combo box still selected, scroll to the top of the properties in the Properties window and expand the entry for (DataBindings). Click in the entry for (Advanced) and click its Properties button to open the Formatting and Advanced Binding dialog box. Drop down the entry for Data Source Update Mode and select Never. Click OK.
Note: Without this setting, each time the user makes a selection from the combo box, the database updating routines will attempt to add the selection as a new person to the table and generate a “dupli-cate” error message.
STEP 7: Reset the tab order for the controls on the form. You want the combo box to appear selected when the application begins, so it must be at the top of the tab sequence.
Run the Application STEP 1: Run the program. STEP 2: Drop down the combo box and select another last name. The other
controls automatically fill with the data for the selected customer.
Selecting Fields from the Table
Often you only need to display some of the fields from a database table. You can select individual fields when you create the new data source, or select the fields later after you have created the data source.
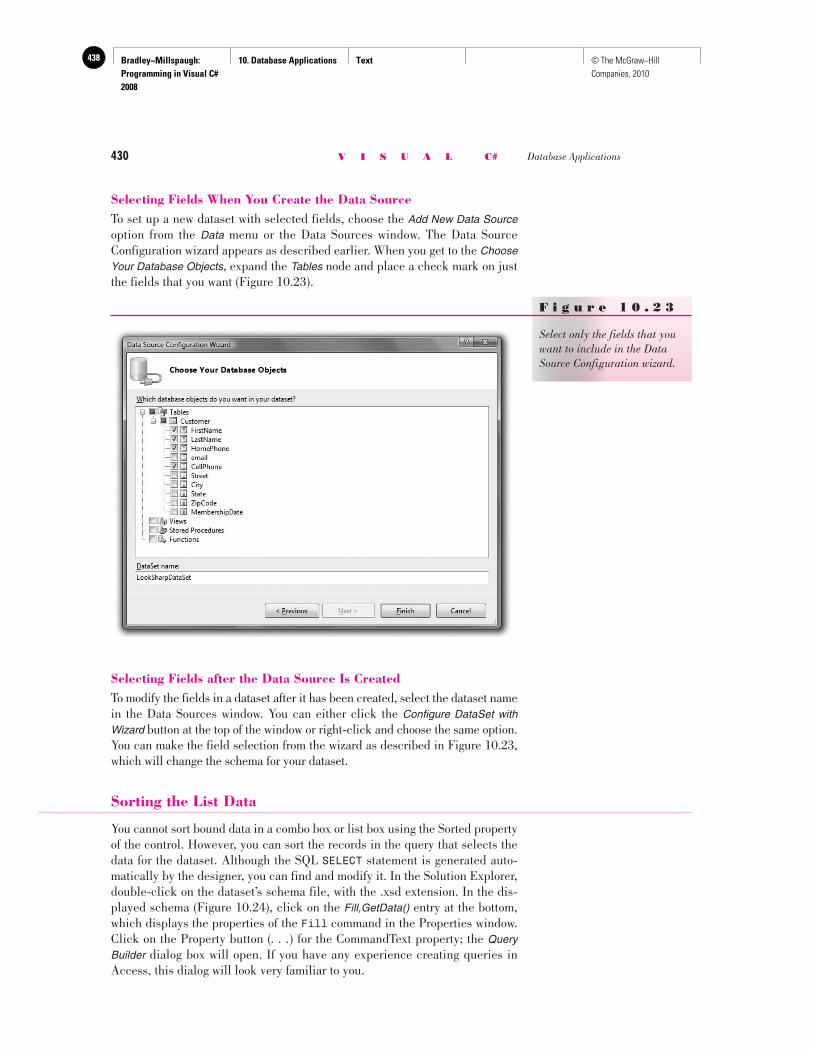
Bradley−Millspaugh: Programming in Visual C# 2008
10. Database Applications Text438 © The McGraw−Hill Companies, 2010
430 V I S U A L C# Database Applications
Selecting Fields after the Data Source Is Created To modify the fields in a dataset after it has been created, select the dataset name in the Data Sources window. You can either click the Configure DataSet with Wizard button at the top of the window or right-click and choose the same option. You can make the field selection from the wizard as described in Figure 10.23 ,which will change the schema for your dataset.
Sorting the List Data
You cannot sort bound data in a combo box or list box using the Sorted property of the control. However, you can sort the records in the query that selects the data for the dataset. Although the SQL SELECT statement is generated auto-matically by the designer, you can find and modify it. In the Solution Explorer, double-click on the dataset’s schema file, with the .xsd extension. In the dis-played schema ( Figure 10.24 ), click on the Fill,GetData() entry at the bottom, which displays the properties of the Fill command in the Properties window. Click on the Property button ( . . . ) for the CommandText property; the Query Builder dialog box will open. If you have any experience creating queries in Access, this dialog will look very familiar to you.
F i g u r e 1 0 . 2 3
Select only the fields that you want to include in the Data Source Configuration wizard.
Selecting Fields When You Create the Data Source To set up a new dataset with selected fields, choose the Add New Data Sourceoption from the Data menu or the Data Sources window. The Data Source Configuration wizard appears as described earlier. When you get to the ChooseYour Database Objects , expand the Tables node and place a check mark on just the fields that you want ( Figure 10.23 ).
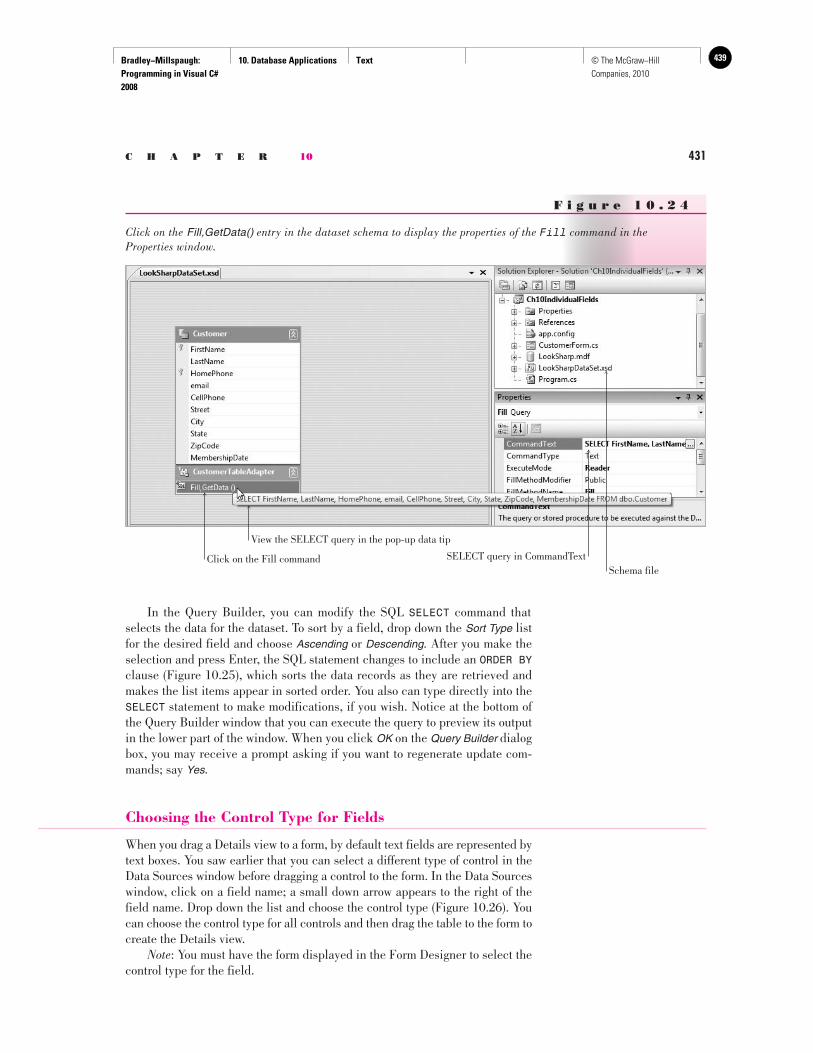
Bradley−Millspaugh: Programming in Visual C# 2008
10. Database Applications Text 439© The McGraw−Hill Companies, 2010
C H A P T E R 10 431
In the Query Builder, you can modify the SQL SELECT command that selects the data for the dataset. To sort by a field, drop down the Sort Type list for the desired field and choose Ascending or Descending . After you make the selection and press Enter, the SQL statement changes to include an ORDER BY clause ( Figure 10.25 ), which sorts the data records as they are retrieved and makes the list items appear in sorted order. You also can type directly into the SELECT statement to make modifications, if you wish. Notice at the bottom of the Query Builder window that you can execute the query to preview its output in the lower part of the window. When you click OK on the Query Builder dialogbox, you may receive a prompt asking if you want to regenerate update com-mands; say Yes .
Choosing the Control Type for Fields
When you drag a Details view to a form, by default text fields are represented by text boxes. You saw earlier that you can select a different type of control in the Data Sources window before dragging a control to the form. In the Data Sources window, click on a field name; a small down arrow appears to the right of the field name. Drop down the list and choose the control type ( Figure 10.26 ). You can choose the control type for all controls and then drag the table to the form to create the Details view. Note : You must have the form displayed in the Form Designer to select the control type for the field.
F i g u r e 1 0 . 2 4
Click on the Fill,GetData() entry in the dataset schema to display the properties of the Fill command in the Properties window.
Click on the Fill command SELECT query in CommandTextSchema file
View the SELECT query in the pop-up data tip

Bradley−Millspaugh: Programming in Visual C# 2008
10. Database Applications Text440 © The McGraw−Hill Companies, 2010
432 V I S U A L C# Database Applications
F i g u r e 1 0 . 2 5
Select Ascending for the Sort Type to sort the data by the LastName field. The SQL statement changes to include an ORDER BY clause.
F i g u r e 1 0 . 2 6
Select the control type for each control before creating the Details view.
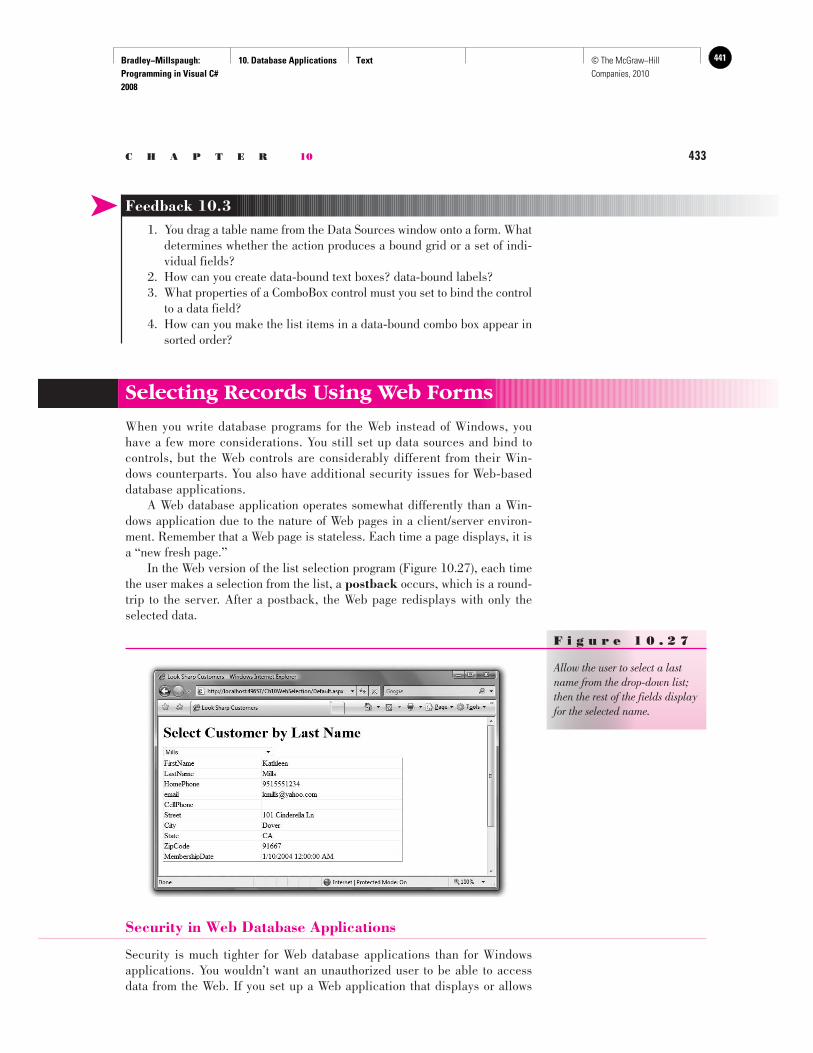
Bradley−Millspaugh: Programming in Visual C# 2008
10. Database Applications Text 441© The McGraw−Hill Companies, 2010
C H A P T E R 10 433
➤ Feedback 10.3 1. You drag a table name from the Data Sources window onto a form. What
determines whether the action produces a bound grid or a set of indi-vidual fields?
2. How can you create data-bound text boxes? data-bound labels? 3. What properties of a ComboBox control must you set to bind the control
to a data field? 4. How can you make the list items in a data-bound combo box appear in
sorted order?
Selecting Records Using Web Forms
When you write database programs for the Web instead of Windows, you have a few more considerations. You still set up data sources and bind to controls, but the Web controls are considerably different from their Win-dows counterparts. You also have additional security issues for Web-based database applications. A Web database application operates somewhat differently than a Win-dows application due to the nature of Web pages in a client/server environ-ment. Remember that a Web page is stateless. Each time a page displays, it is a “new fresh page.” In the Web version of the list selection program ( Figure 10.27 ), each time the user makes a selection from the list, a postback occurs, which is a round-trip to the server. After a postback, the Web page redisplays with only the selected data.
F i g u r e 1 0 . 2 7
Allow the user to select a last name from the drop-down list; then the rest of the fields display for the selected name.
Security in Web Database Applications
Security is much tighter for Web database applications than for Windows applications. You wouldn’t want an unauthorized user to be able to access data from the Web. If you set up a Web application that displays or allows
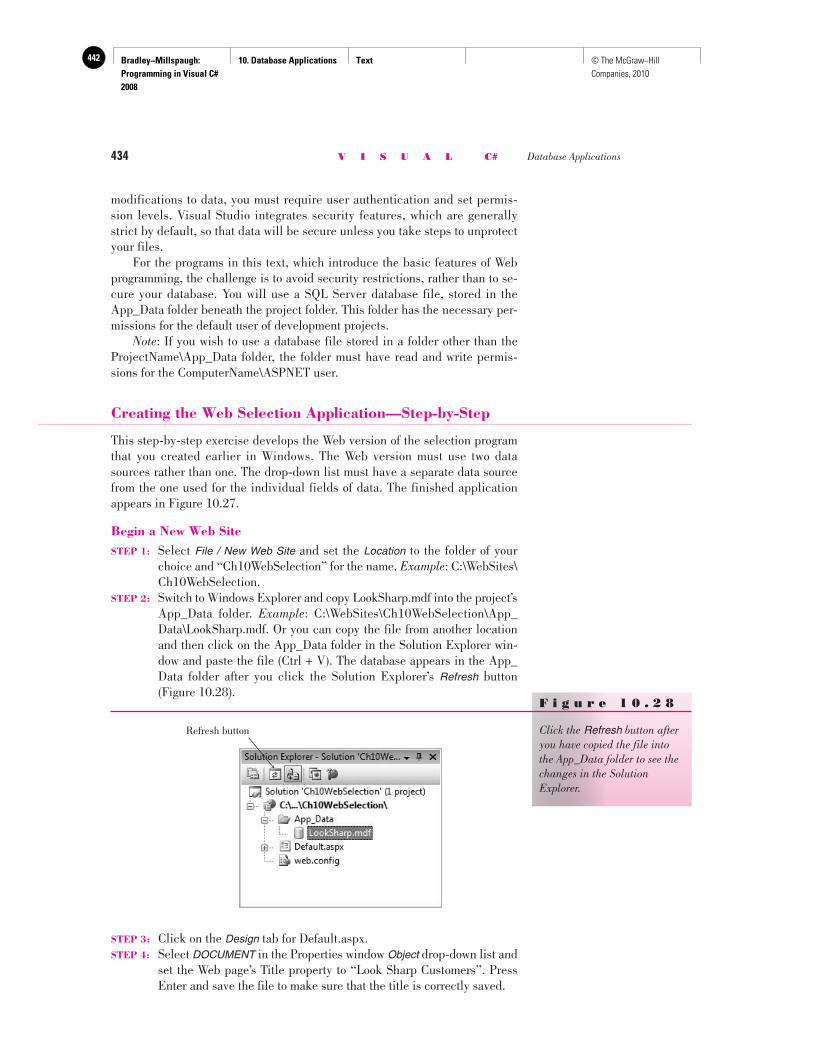
Bradley−Millspaugh: Programming in Visual C# 2008
10. Database Applications Text442 © The McGraw−Hill Companies, 2010
434 V I S U A L C# Database Applications
modifications to data, you must require user authentication and set permis-sion levels. Visual Studio integrates security features, which are generally strict by default, so that data will be secure unless you take steps to unprotect your files. For the programs in this text, which introduce the basic features of Web programming, the challenge is to avoid security restrictions, rather than to se-cure your database. You will use a SQL Server database file, stored in the App_Data folder beneath the project folder. This folder has the necessary per-missions for the default user of development projects. Note : If you wish to use a database file stored in a folder other than the ProjectName\App_Data folder, the folder must have read and write permis-sions for the ComputerName\ASPNET user.
Creating the Web Selection Application—Step-by-Step
This step-by-step exercise develops the Web version of the selection program that you created earlier in Windows. The Web version must use two data sources rather than one. The drop-down list must have a separate data source from the one used for the individual fields of data. The finished application appears in Figure 10.27 .
Begin a New Web Site STEP 1: Select File / New Web Site and set the Location to the folder of your
choice and “Ch10WebSelection” for the name. Example : C:\WebSites\Ch10WebSelection.
STEP 2: Switch to Windows Explorer and copy LookSharp.mdf into the project’s App_Data folder. Example : C:\WebSites\Ch10WebSelection\App_Data\LookSharp.mdf. Or you can copy the file from another location and then click on the App_Data folder in the Solution Explorer win-dow and paste the file (Ctrl + V). The database appears in the App_Data folder after you click the Solution Explorer’s Refresh button ( Figure 10.28 ).
F i g u r e 1 0 . 2 8
Click the Refresh button after you have copied the file into the App_Data folder to see the changes in the Solution Explorer.
Refresh button
STEP 3: Click on the Design tab for Default.aspx. STEP 4: Select DOCUMENT in the Properties window Object drop-down list and
set the Web page’s Title property to “Look Sharp Customers”. Press Enter and save the file to make sure that the title is correctly saved.
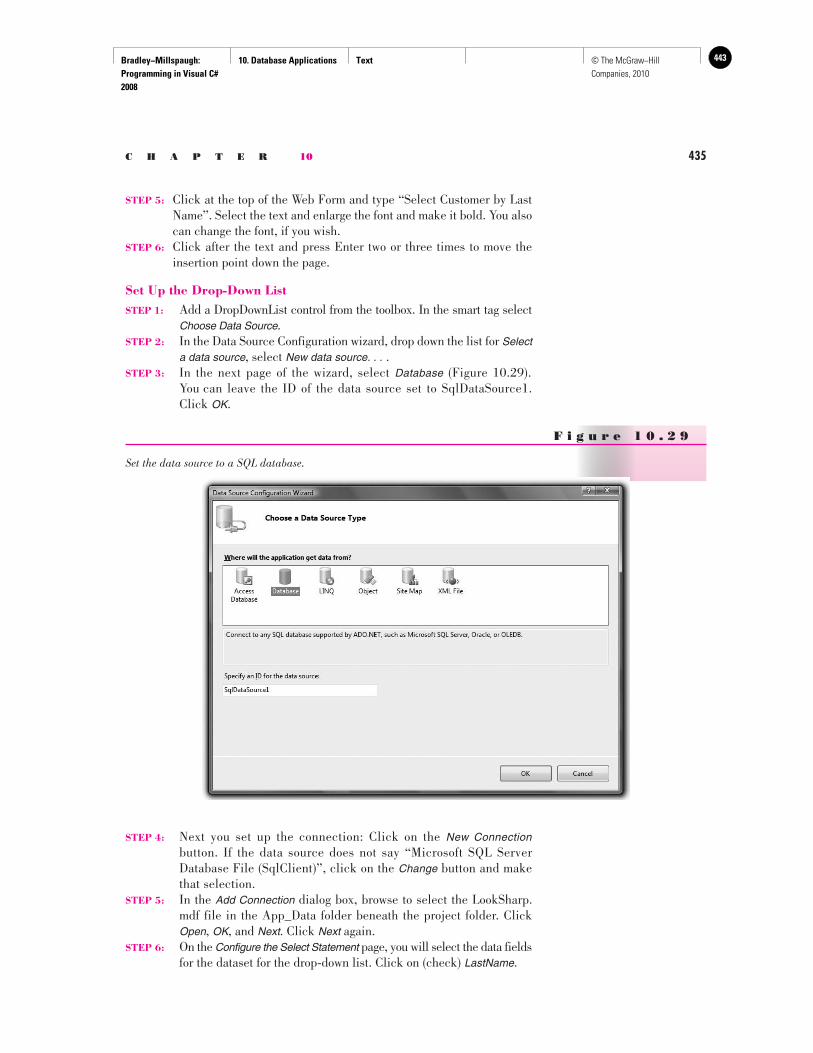
Bradley−Millspaugh: Programming in Visual C# 2008
10. Database Applications Text 443© The McGraw−Hill Companies, 2010
C H A P T E R 10 435
STEP 5: Click at the top of the Web Form and type “Select Customer by Last Name”. Select the text and enlarge the font and make it bold. You also can change the font, if you wish.
STEP 6: Click after the text and press Enter two or three times to move the insertion point down the page.
Set Up the Drop-Down List STEP 1: Add a DropDownList control from the toolbox. In the smart tag select
Choose Data Source . STEP 2: In the Data Source Configuration wizard, drop down the list for Select
a data source , select New data source. . . . STEP 3: In the next page of the wizard, select Database ( Figure 10.29 ).
You can leave the ID of the data source set to SqlDataSource1. Click OK .
F i g u r e 1 0 . 2 9
Set the data source to a SQL database.
STEP 4: Next you set up the connection: Click on the New Connection button. If the data source does not say “Microsoft SQL Server Database File (SqlClient)”, click on the Change button and make that selection.
STEP 5: In the Add Connection dialog box, browse to select the LookSharp.mdf file in the App_Data folder beneath the project folder. Click Open , OK , and Next . Click Next again.
STEP 6: On the Configure the Select Statement page, you will select the data fields for the dataset for the drop-down list. Click on (check) LastName .
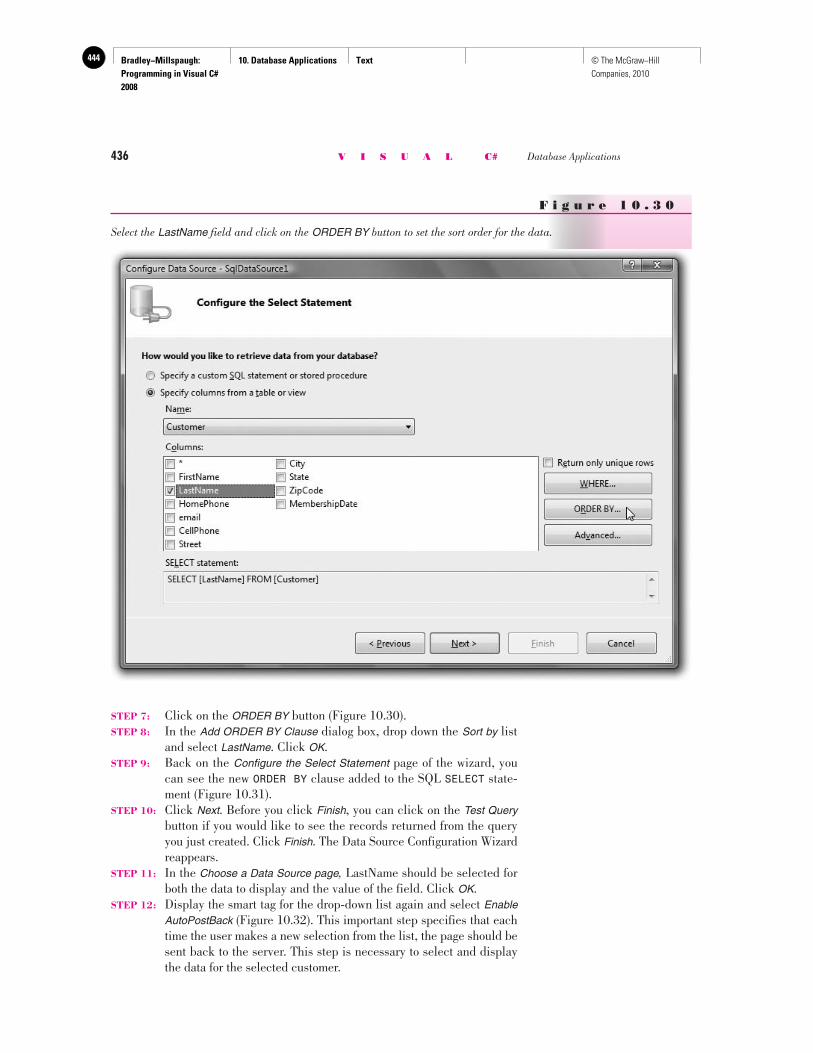
Bradley−Millspaugh: Programming in Visual C# 2008
10. Database Applications Text444 © The McGraw−Hill Companies, 2010
436 V I S U A L C# Database Applications
STEP 7: Click on the ORDER BY button ( Figure 10.30 ). STEP 8: In the Add ORDER BY Clause dialog box, drop down the Sort by list
and select LastName . Click OK . STEP 9: Back on the Configure the Select Statement page of the wizard, you
can see the new ORDER BY clause added to the SQL SELECT state-ment ( Figure 10.31 ).
STEP 10: Click Next . Before you click Finish , you can click on the Test Querybutton if you would like to see the records returned from the query you just created. Click Finish . The Data Source Configuration Wizard reappears.
STEP 11: In the Choose a Data Source page, LastName should be selected for both the data to display and the value of the field. Click OK .
STEP 12: Display the smart tag for the drop-down list again and select EnableAutoPostBack ( Figure 10.32 ). This important step specifies that each time the user makes a new selection from the list, the page should be sent back to the server. This step is necessary to select and display the data for the selected customer.
F i g u r e 1 0 . 3 0
Select the LastName field and click on the ORDER BY button to set the sort order for the data.
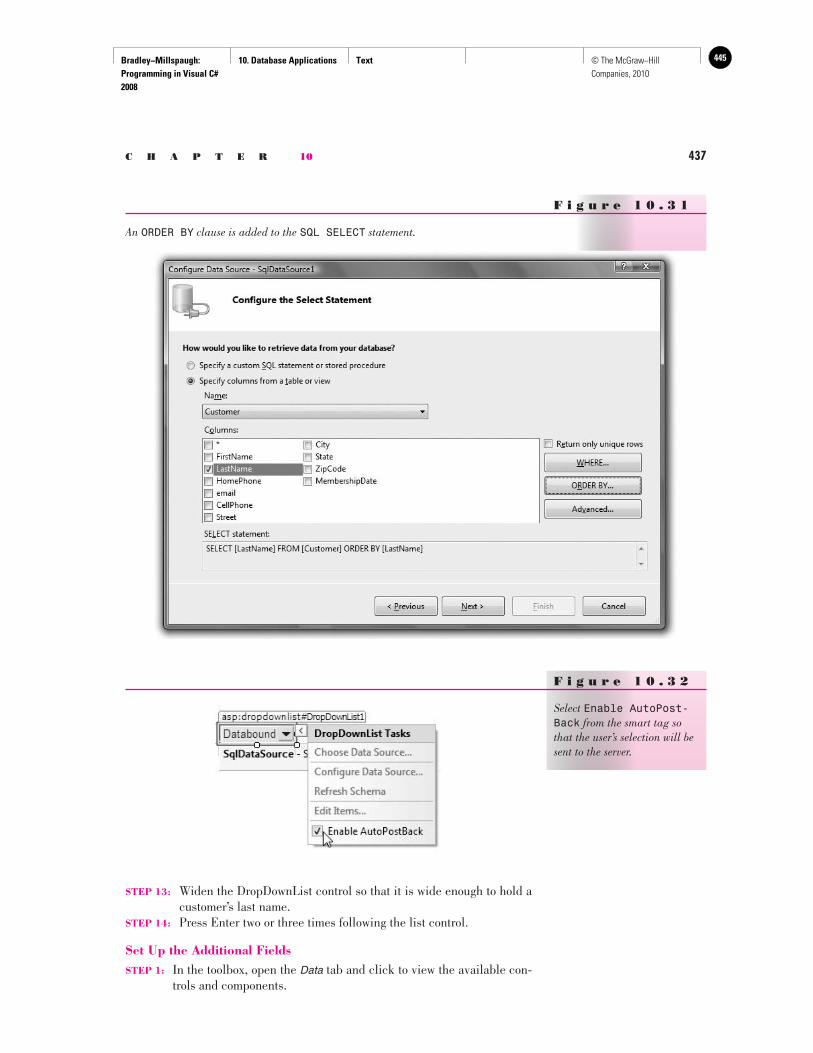
Bradley−Millspaugh: Programming in Visual C# 2008
10. Database Applications Text 445© The McGraw−Hill Companies, 2010
C H A P T E R 10 437
STEP 13: Widen the DropDownList control so that it is wide enough to hold a customer’s last name.
STEP 14: Press Enter two or three times following the list control.
Set Up the Additional Fields STEP 1: In the toolbox, open the Data tab and click to view the available con-
trols and components.
F i g u r e 1 0 . 3 1
An ORDER BY clause is added to the SQL SELECT statement.
F i g u r e 1 0 . 3 2
Select Enable AutoPost-Back from the smart tag so that the user’s selection will be sent to the server.
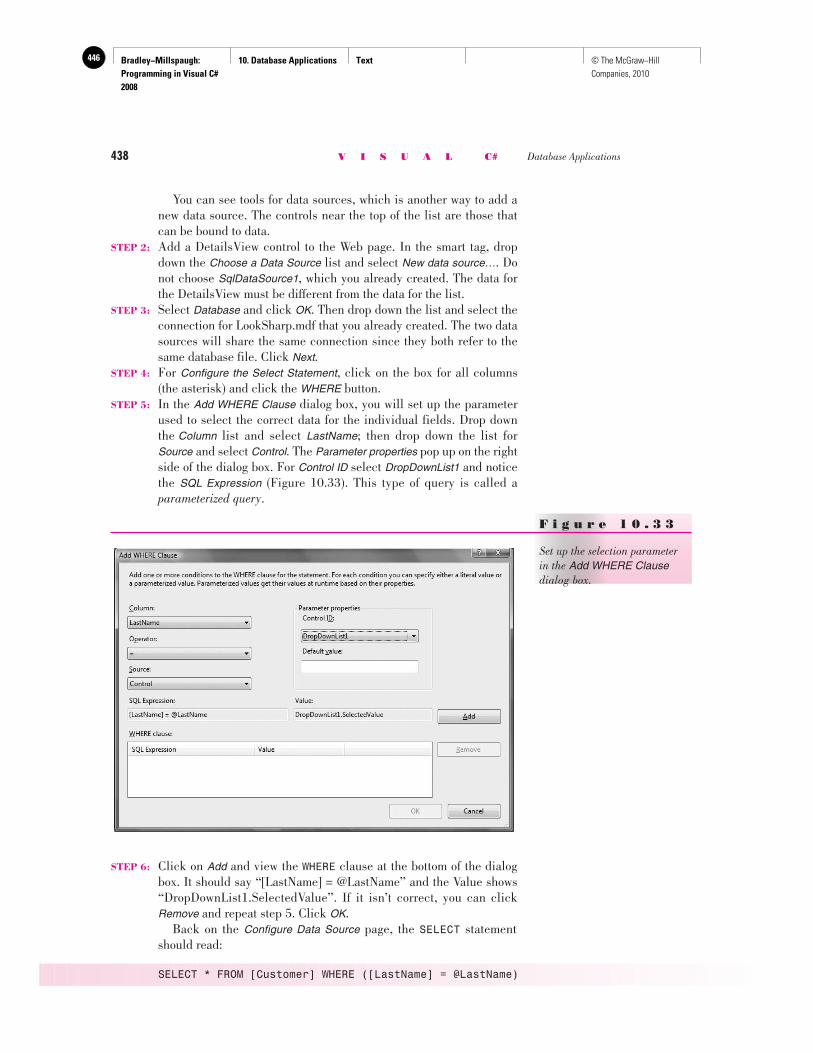
Bradley−Millspaugh: Programming in Visual C# 2008
10. Database Applications Text446 © The McGraw−Hill Companies, 2010
438 V I S U A L C# Database Applications
You can see tools for data sources, which is another way to add a new data source. The controls near the top of the list are those that can be bound to data.
STEP 2: Add a DetailsView control to the Web page. In the smart tag, drop down the Choose a Data Source list and select New data source… . Do not choose SqlDataSource1 , which you already created. The data for the DetailsView must be different from the data for the list.
STEP 3: Select Database and click OK . Then drop down the list and select the connection for LookSharp.mdf that you already created. The two data sources will share the same connection since they both refer to the same database file. Click Next .
STEP 4: For Configure the Select Statement , click on the box for all columns (the asterisk) and click the WHERE button.
STEP 5: In the Add WHERE Clause dialog box, you will set up the parameter used to select the correct data for the individual fields. Drop down the Column list and select LastName ; then drop down the list for Source and select Control . The Parameter properties pop up on the right side of the dialog box. For Control ID select DropDownList1 and notice the SQL Expression ( Figure 10.33 ). This type of query is called a parameterized query .
F i g u r e 1 0 . 3 3
Set up the selection parameter in the Add WHERE Clausedialog box.
STEP 6: Click on Add and view the WHERE clause at the bottom of the dialog box. It should say “[LastName] = @LastName” and the Value shows “DropDownList1.SelectedValue”. If it isn’t correct, you can click Remove and repeat step 5. Click OK . Back on the Configure Data Source page, the SELECT statement should read:
SELECT * FROM [Customer] WHERE ([LastName] = @LastName)
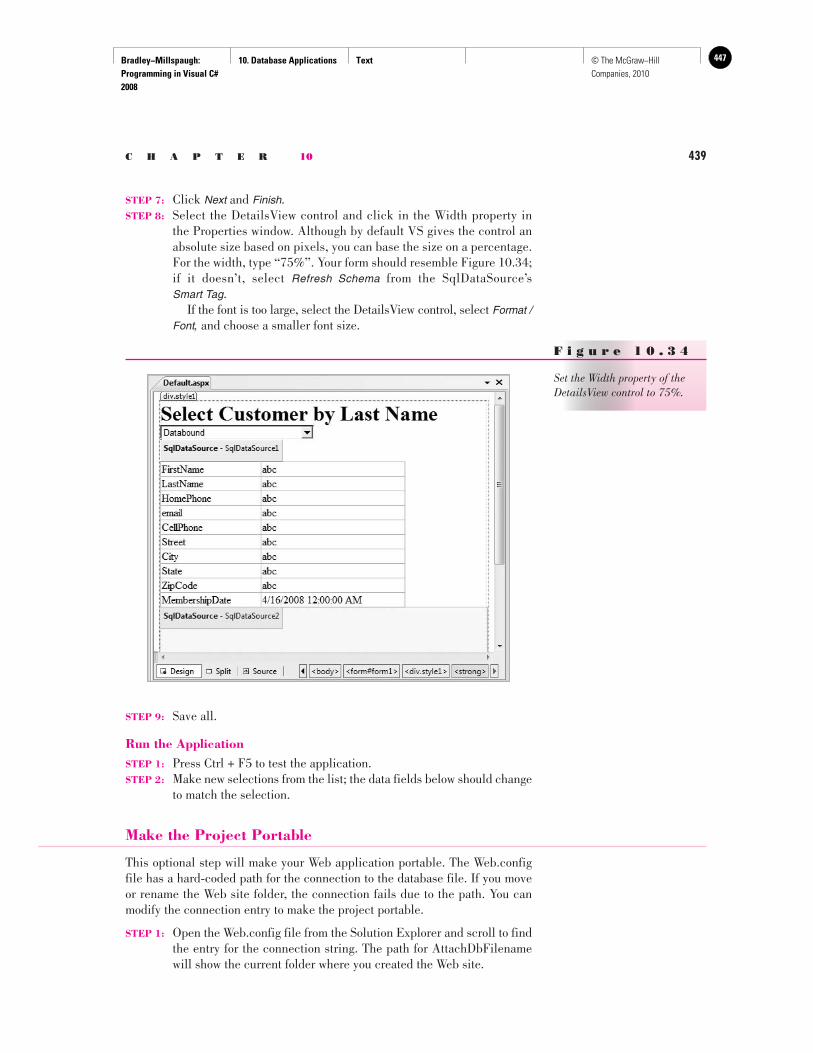
Bradley−Millspaugh: Programming in Visual C# 2008
10. Database Applications Text 447© The McGraw−Hill Companies, 2010
C H A P T E R 10 439
STEP 7: Click Next and Finish . STEP 8: Select the DetailsView control and click in the Width property in
the Properties window. Although by default VS gives the control an absolute size based on pixels, you can base the size on a percentage. For the width, type “75%”. Your form should resemble Figure 10.34 ;if it doesn’t, select Refresh Schema from the SqlDataSource’s Smart Tag . If the font is too large, select the DetailsView control, select Format / Font, and choose a smaller font size.
F i g u r e 1 0 . 3 4
Set the Width property of the DetailsView control to 75%.
STEP 9: Save all.
Run the Application STEP 1: Press Ctrl + F5 to test the application. STEP 2: Make new selections from the list; the data fields below should change
to match the selection.
Make the Project Portable
This optional step will make your Web application portable. The Web.config file has a hard-coded path for the connection to the database file. If you move or rename the Web site folder, the connection fails due to the path. You can modify the connection entry to make the project portable.
STEP 1: Open the Web.config file from the Solution Explorer and scroll to find the entry for the connection string. The path for AttachDbFilename will show the current folder where you created the Web site.
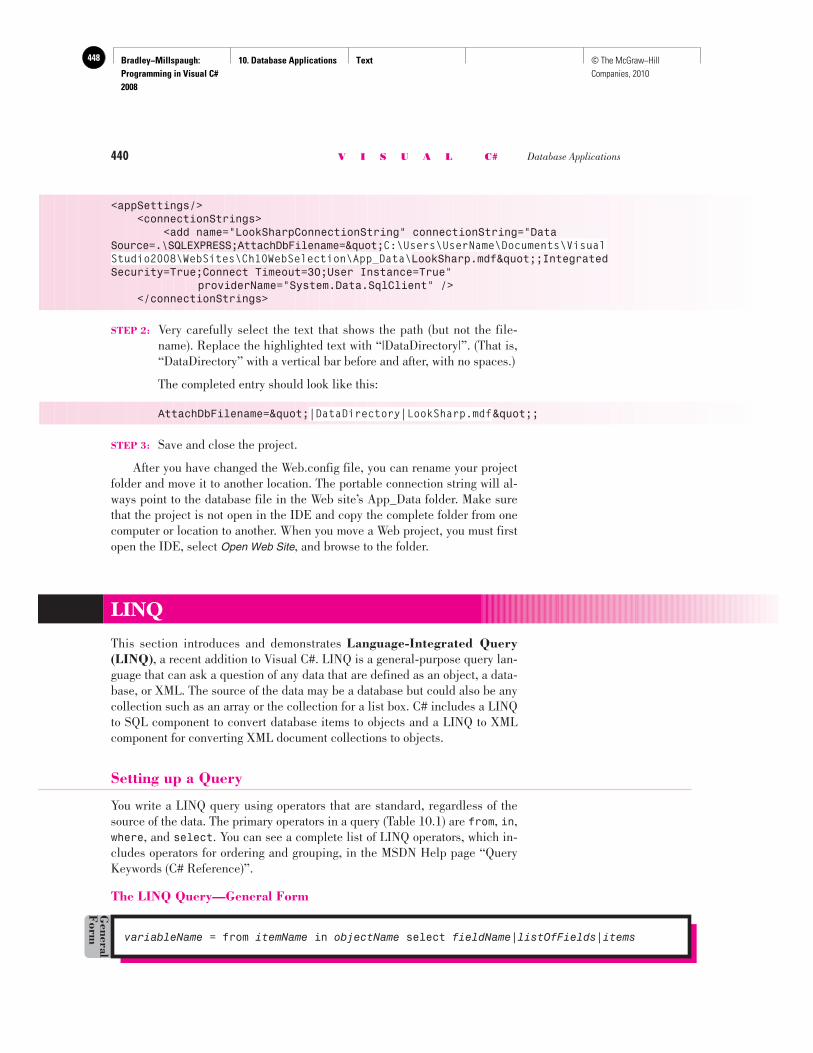
Bradley−Millspaugh: Programming in Visual C# 2008
10. Database Applications Text448 © The McGraw−Hill Companies, 2010
440 V I S U A L C# Database Applications
<appSettings/> <connectionStrings> <add name="LookSharpConnectionString" connectionString="Data Source=.\SQLEXPRESS;AttachDbFilename="C:\Users\UserName\Documents\Visual Studio2008\WebSites\Ch10WebSelection\App_Data\LookSharp.mdf";IntegratedSecurity=True;Connect Timeout=30;User Instance=True" providerName="System.Data.SqlClient" /> </connectionStrings>
STEP 2: Very carefully select the text that shows the path (but not the file-name). Replace the highlighted text with “|DataDirectory|”. (That is, “DataDirectory” with a vertical bar before and after, with no spaces.)
The completed entry should look like this:
AttachDbFilename="|DataDirectory|LookSharp.mdf";
STEP 3: Save and close the project.
After you have changed the Web.config file, you can rename your project folder and move it to another location. The portable connection string will al-ways point to the database file in the Web site’s App_Data folder. Make sure that the project is not open in the IDE and copy the complete folder from one computer or location to another. When you move a Web project, you must first open the IDE, select Open Web Site , and browse to the folder.
LINQ
This section introduces and demonstrates Language-Integrated Query (LINQ) , a recent addition to Visual C#. LINQ is a general-purpose query lan-guage that can ask a question of any data that are defined as an object, a data-base, or XML. The source of the data may be a database but could also be any collection such as an array or the collection for a list box. C# includes a LINQ to SQL component to convert database items to objects and a LINQ to XML component for converting XML document collections to objects.
Setting up a Query
You write a LINQ query using operators that are standard, regardless of the source of the data. The primary operators in a query ( Table 10.1 ) are from , in , where , and select . You can see a complete list of LINQ operators, which in-cludes operators for ordering and grouping, in the MSDN Help page “Query Keywords (C# Reference)”.
The LINQ Query—General Form
variableName = from itemName in objectName select fieldName|listOfFields|items
General
Form
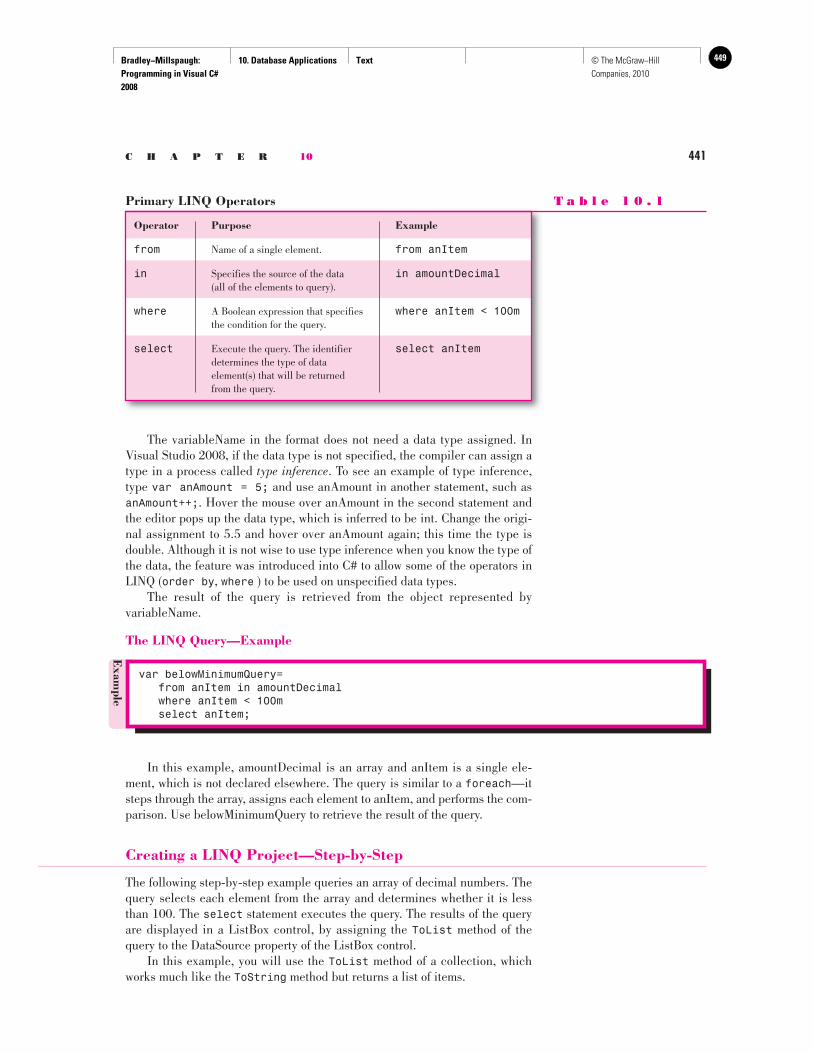
Bradley−Millspaugh: Programming in Visual C# 2008
10. Database Applications Text 449© The McGraw−Hill Companies, 2010
C H A P T E R 10 441
The variableName in the format does not need a data type assigned. In Visual Studio 2008, if the data type is not specified, the compiler can assign a type in a process called type inference . To see an example of type inference, type var anAmount = 5; and use anAmount in another statement, such as anAmount++; . Hover the mouse over anAmount in the second statement and the editor pops up the data type, which is inferred to be int. Change the origi-nal assignment to 5.5 and hover over anAmount again; this time the type is double. Although it is not wise to use type inference when you know the type of the data, the feature was introduced into C# to allow some of the operators in LINQ ( order by , where ) to be used on unspecified data types. The result of the query is retrieved from the object represented by variableName.
The LINQ Query—Example
Primary LINQ Operators T a b l e 1 0 . 1
Operator Purpose Example
from Name of a single element. from anItem
in Specifies the source of the data in amountDecimal (all of the elements to query).
where A Boolean expression that specifies where anItem < 100m the condition for the query.
select Execute the query. The identifier select anItem determines the type of data element(s) that will be returned from the query.
Exam
ple
var belowMinimumQuery= from anItem in amountDecimal where anItem < 100m select anItem;
In this example, amountDecimal is an array and anItem is a single ele-ment, which is not declared elsewhere. The query is similar to a foreach —it steps through the array, assigns each element to anItem, and performs the com-parison. Use belowMinimumQuery to retrieve the result of the query.
Creating a LINQ Project—Step-by-Step
The following step-by-step example queries an array of decimal numbers. The query selects each element from the array and determines whether it is less than 100. The select statement executes the query. The results of the query are displayed in a ListBox control, by assigning the ToList method of the query to the DataSource property of the ListBox control. In this example, you will use the ToList method of a collection, which works much like the ToString method but returns a list of items.
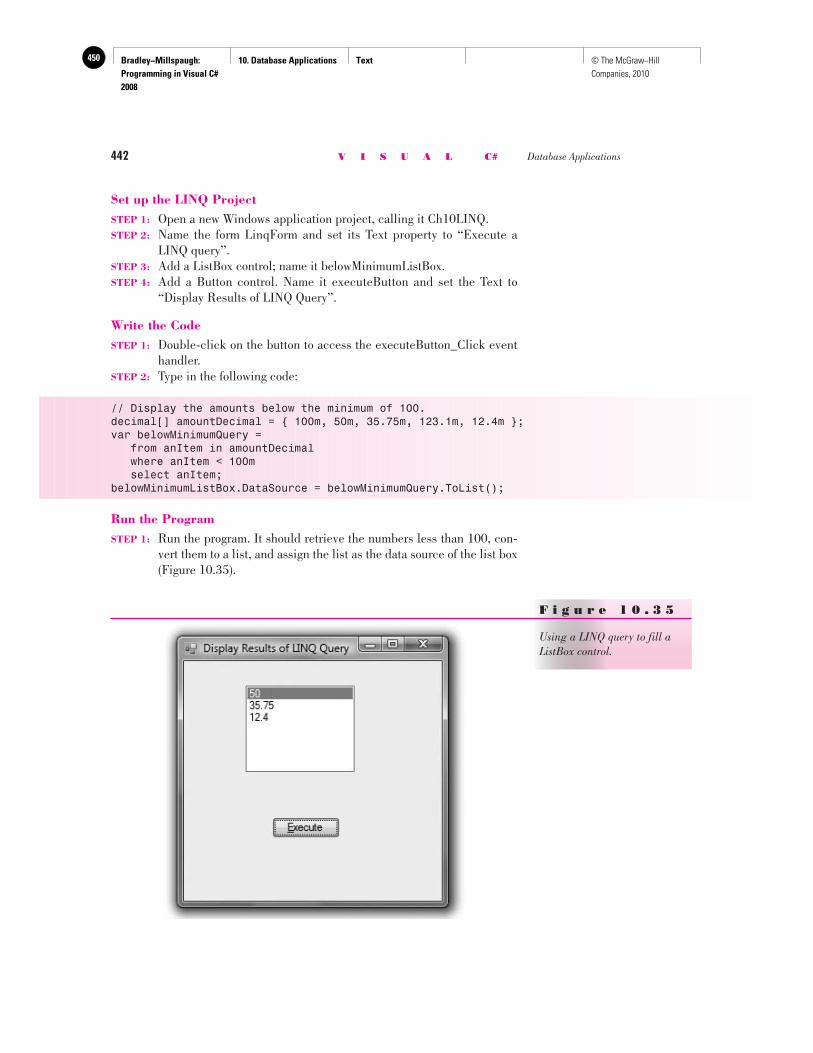
Bradley−Millspaugh: Programming in Visual C# 2008
10. Database Applications Text450 © The McGraw−Hill Companies, 2010
442 V I S U A L C# Database Applications
Set up the LINQ Project STEP 1: Open a new Windows application project, calling it Ch10LINQ. STEP 2: Name the form LinqForm and set its Text property to “Execute a
LINQ query”. STEP 3: Add a ListBox control; name it belowMinimumListBox. STEP 4: Add a Button control. Name it executeButton and set the Text to
“Display Results of LINQ Query”.
Write the Code STEP 1: Double-click on the button to access the executeButton_Click event
handler. STEP 2: Type in the following code:
// Display the amounts below the minimum of 100.decimal[] amountDecimal = { 100m, 50m, 35.75m, 123.1m, 12.4m };var belowMinimumQuery = from anItem in amountDecimal where anItem < 100m select anItem;belowMinimumListBox.DataSource = belowMinimumQuery.ToList();
Run the Program STEP 1: Run the program. It should retrieve the numbers less than 100, con-
vert them to a list, and assign the list as the data source of the list box ( Figure 10.35 ).
F i g u r e 1 0 . 3 5
Using a LINQ query to fill a ListBox control.
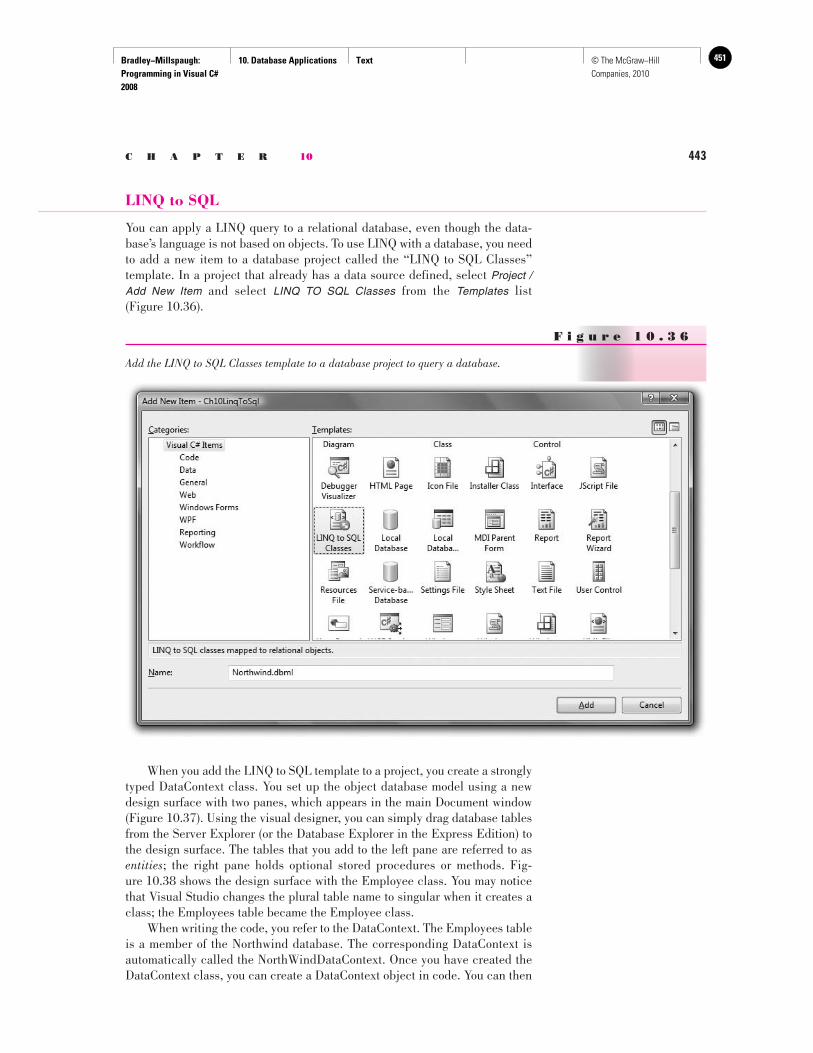
Bradley−Millspaugh: Programming in Visual C# 2008
10. Database Applications Text 451© The McGraw−Hill Companies, 2010
C H A P T E R 10 443
LINQ to SQL
You can apply a LINQ query to a relational database, even though the data-base’s language is not based on objects. To use LINQ with a database, you need to add a new item to a database project called the “LINQ to SQL Classes” template. In a project that already has a data source defined, select Project / Add New Item and select LINQ TO SQL Classes from the Templates list ( Figure 10.36 ).
F i g u r e 1 0 . 3 6
Add the LINQ to SQL Classes template to a database project to query a database.
When you add the LINQ to SQL template to a project, you create a strongly typed DataContext class. You set up the object database model using a new design surface with two panes, which appears in the main Document window ( Figure 10.37 ). Using the visual designer, you can simply drag database tables from the Server Explorer (or the Database Explorer in the Express Edition) to the design surface. The tables that you add to the left pane are referred to as entities ; the right pane holds optional stored procedures or methods. Fig-ure 10.38 shows the design surface with the Employee class. You may notice that Visual Studio changes the plural table name to singular when it creates a class; the Employees table became the Employee class. When writing the code, you refer to the DataContext. The Employees table is a member of the Northwind database. The corresponding DataContext is automatically called the NorthWindDataContext. Once you have created the DataContext class, you can create a DataContext object in code. You can then
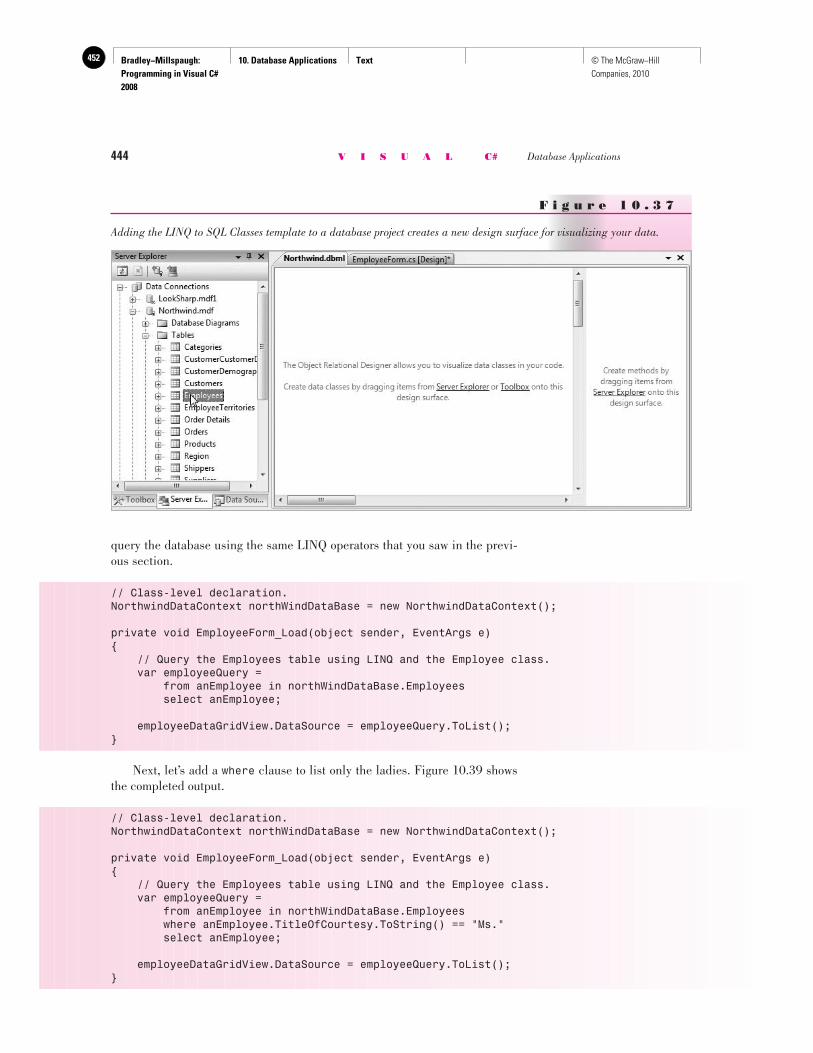
Bradley−Millspaugh: Programming in Visual C# 2008
10. Database Applications Text452 © The McGraw−Hill Companies, 2010
444 V I S U A L C# Database Applications
F i g u r e 1 0 . 3 7
Adding the LINQ to SQL Classes template to a database project creates a new design surface for visualizing your data.
query the database using the same LINQ operators that you saw in the previ-ous section.
// Class-level declaration.NorthwindDataContext northWindDataBase = new NorthwindDataContext();
private void EmployeeForm_Load(object sender, EventArgs e){ // Query the Employees table using LINQ and the Employee class. var employeeQuery = from anEmployee in northWindDataBase.Employees select anEmployee;
employeeDataGridView.DataSource = employeeQuery.ToList();}
Next, let’s add a where clause to list only the ladies. Figure 10.39 shows the completed output.
// Class-level declaration.NorthwindDataContext northWindDataBase = new NorthwindDataContext();
private void EmployeeForm_Load(object sender, EventArgs e){ // Query the Employees table using LINQ and the Employee class. var employeeQuery = from anEmployee in northWindDataBase.Employees where anEmployee.TitleOfCourtesy.ToString() == "Ms." select anEmployee;
employeeDataGridView.DataSource = employeeQuery.ToList();}
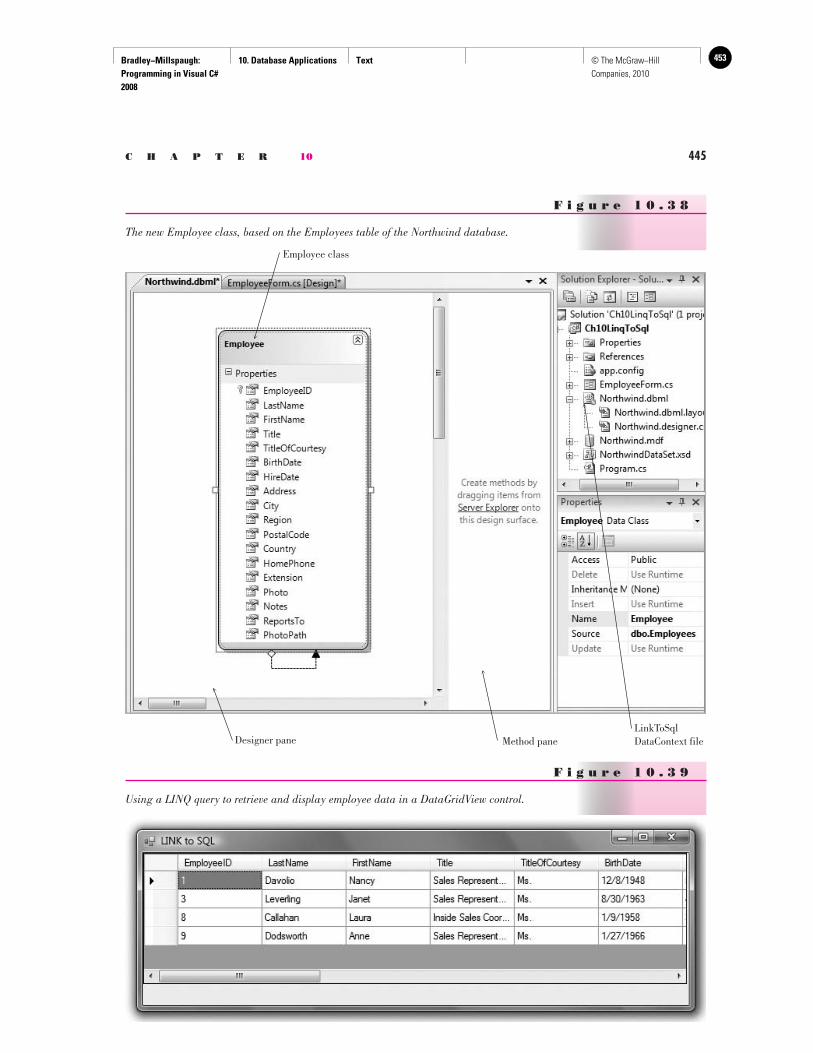
Bradley−Millspaugh: Programming in Visual C# 2008
10. Database Applications Text 453© The McGraw−Hill Companies, 2010
C H A P T E R 10 445
Employee class
Designer pane Method pane LinkToSql DataContext file
F i g u r e 1 0 . 3 8
The new Employee class, based on the Employees table of the Northwind database.
F i g u r e 1 0 . 3 9
Using a LINQ query to retrieve and display employee data in a DataGridView control.
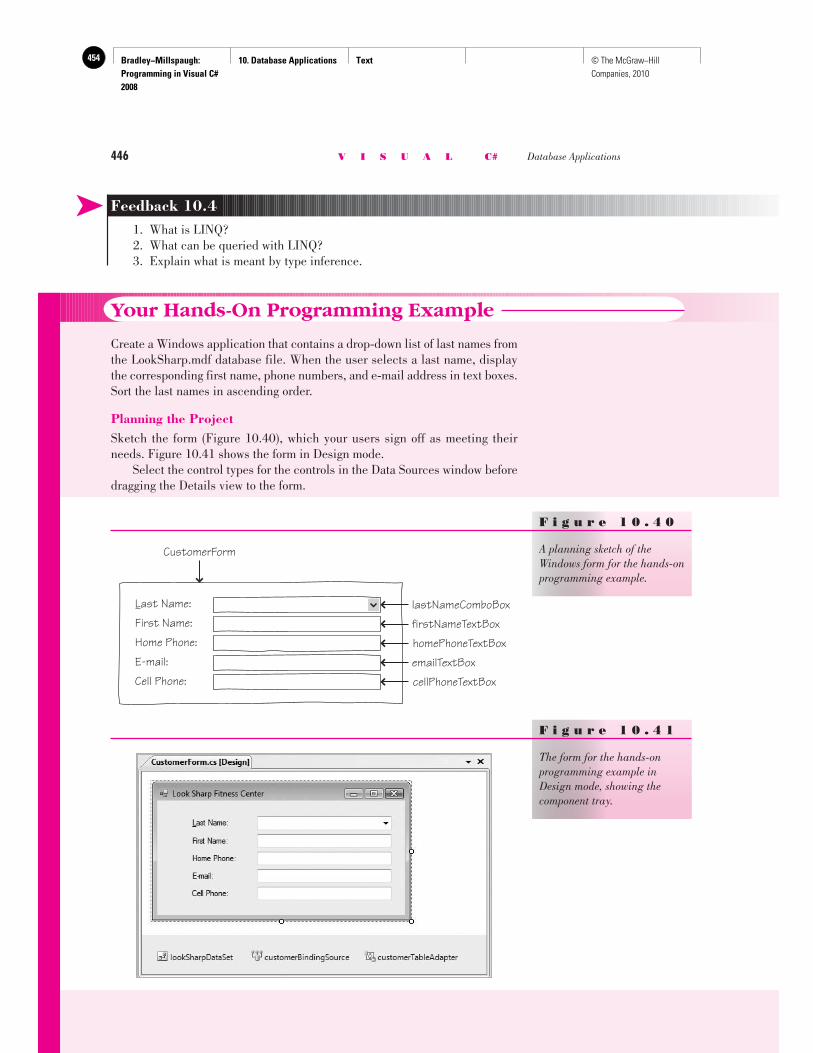
Bradley−Millspaugh: Programming in Visual C# 2008
10. Database Applications Text454 © The McGraw−Hill Companies, 2010
446 V I S U A L C# Database Applications
➤ Feedback 10.4 1. What is LINQ? 2. What can be queried with LINQ? 3. Explain what is meant by type inference.
Your Hands-On Programming Example
Create a Windows application that contains a drop-down list of last names from the LookSharp.mdf database file. When the user selects a last name, display the corresponding first name, phone numbers, and e-mail address in text boxes. Sort the last names in ascending order.
Planning the Project Sketch the form ( Figure 10.40 ), which your users sign off as meeting their needs. Figure 10.41 shows the form in Design mode. Select the control types for the controls in the Data Sources window before dragging the Details view to the form.
F i g u r e 1 0 . 4 0
A planning sketch of the Windows form for the hands-on programming example.
Last Name:
CustomerForm
lastNameComboBox
firstNameTextBox
homePhoneTextBox
emailTextBox
cellPhoneTextBox
First Name:
Home Phone:
E-mail:
Cell Phone:
F i g u r e 1 0 . 4 1
The form for the hands-on programming example in Design mode, showing the component tray.
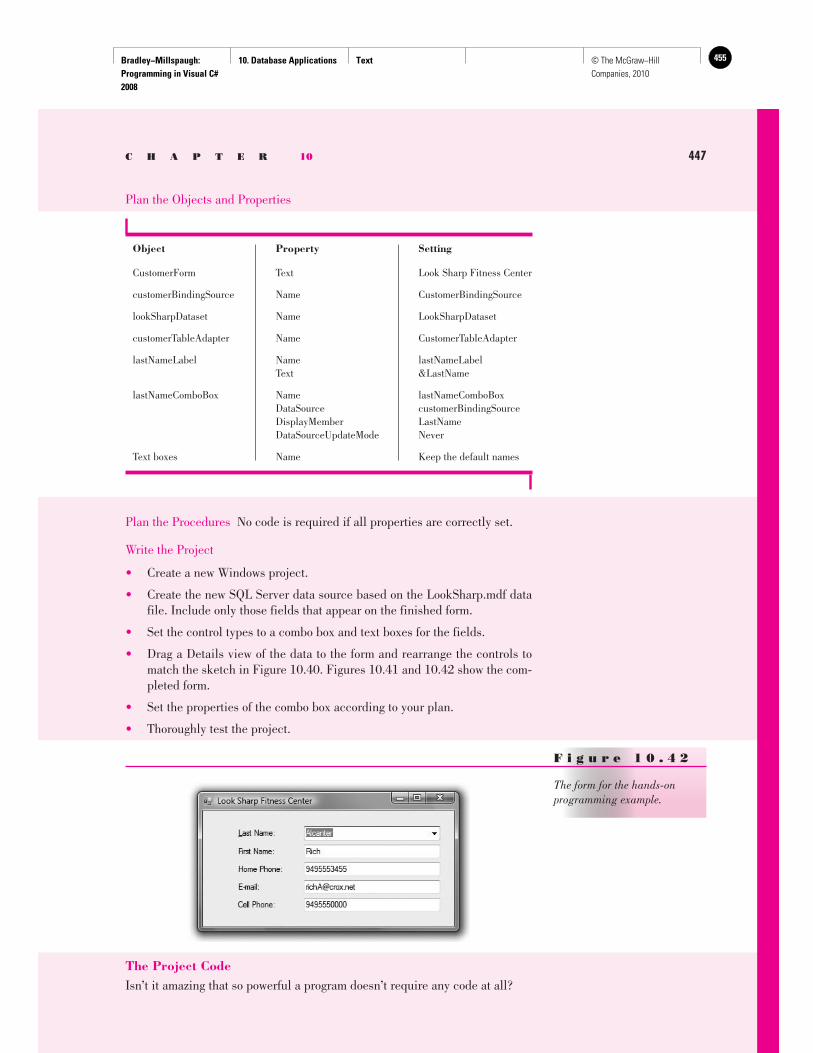
Bradley−Millspaugh: Programming in Visual C# 2008
10. Database Applications Text 455© The McGraw−Hill Companies, 2010
C H A P T E R 10 447
Plan the Objects and Properties
Object Property Setting
CustomerForm Text Look Sharp Fitness Center
customerBindingSource Name CustomerBindingSource
lookSharpDataset Name LookSharpDataset
customerTableAdapter Name CustomerTableAdapter
lastNameLabel Name lastNameLabel Text &LastName
lastNameComboBox Name lastNameComboBox DataSource customerBindingSource DisplayMember LastName DataSourceUpdateMode Never
Text boxes Name Keep the default names
Plan the Procedures No code is required if all properties are correctly set.
Write the Project
• Create a new Windows project.
• Create the new SQL Server data source based on the LookSharp.mdf data file. Include only those fields that appear on the finished form.
• Set the control types to a combo box and text boxes for the fields.
• Drag a Details view of the data to the form and rearrange the controls to match the sketch in Figure 10.40 . Figures 10.41 and 10.42 show the com-pleted form.
• Set the properties of the combo box according to your plan.
• Thoroughly test the project.
F i g u r e 1 0 . 4 2
The form for the hands-on programming example.
The Project Code Isn’t it amazing that so powerful a program doesn’t require any code at all?
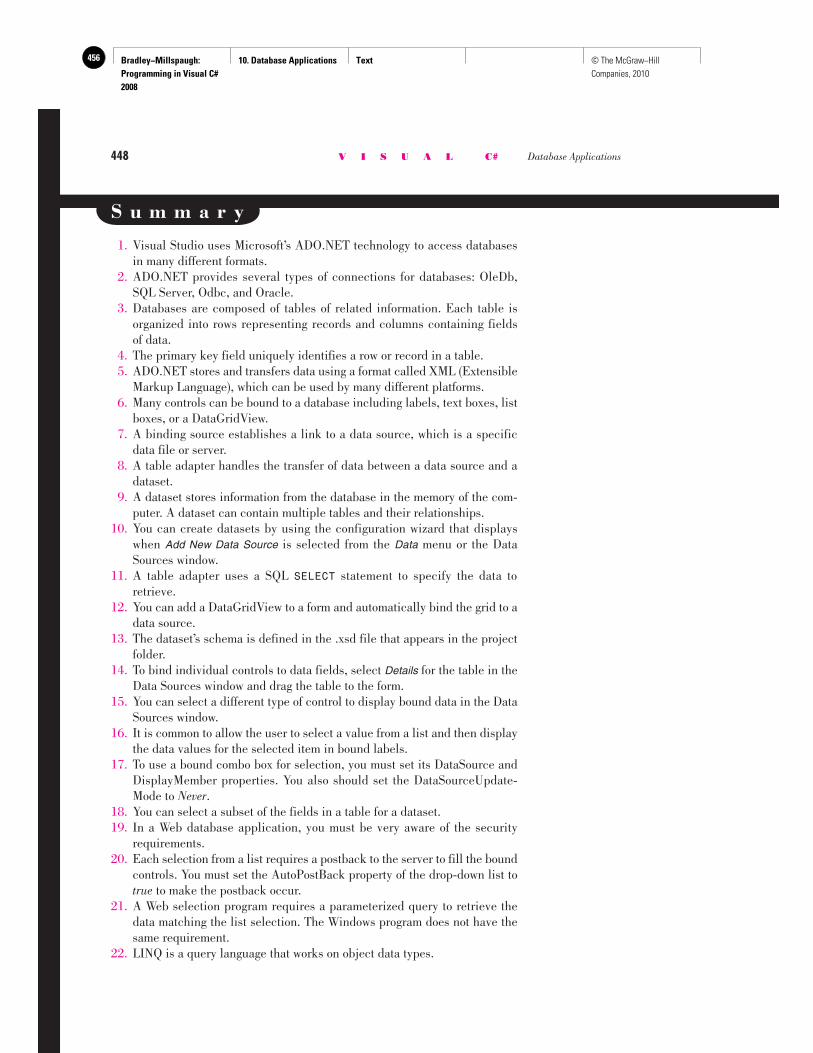
Bradley−Millspaugh: Programming in Visual C# 2008
10. Database Applications Text456 © The McGraw−Hill Companies, 2010
448 V I S U A L C# Database Applications
S u m m a r y
1. Visual Studio uses Microsoft’s ADO.NET technology to access databases in many different formats.
2. ADO.NET provides several types of connections for databases: OleDb, SQL Server, Odbc, and Oracle.
3. Databases are composed of tables of related information. Each table is organized into rows representing records and columns containing fields of data.
4. The primary key field uniquely identifies a row or record in a table. 5. ADO.NET stores and transfers data using a format called XML (Extensible
Markup Language), which can be used by many different platforms. 6. Many controls can be bound to a database including labels, text boxes, list
boxes, or a DataGridView. 7. A binding source establishes a link to a data source, which is a specific
data file or server. 8. A table adapter handles the transfer of data between a data source and a
dataset. 9. A dataset stores information from the database in the memory of the com-
puter. A dataset can contain multiple tables and their relationships. 10. You can create datasets by using the configuration wizard that displays
when Add New Data Source is selected from the Data menu or the Data Sources window.
11. A table adapter uses a SQL SELECT statement to specify the data to retrieve.
12. You can add a DataGridView to a form and automatically bind the grid to a data source.
13. The dataset’s schema is defined in the .xsd file that appears in the project folder.
14. To bind individual controls to data fields, select Details for the table in the Data Sources window and drag the table to the form.
15. You can select a different type of control to display bound data in the Data Sources window.
16. It is common to allow the user to select a value from a list and then display the data values for the selected item in bound labels.
17. To use a bound combo box for selection, you must set its DataSource and DisplayMember properties. You also should set the DataSourceUpdate-Mode to Never .
18. You can select a subset of the fields in a table for a dataset. 19. In a Web database application, you must be very aware of the security
requirements. 20. Each selection from a list requires a postback to the server to fill the bound
controls. You must set the AutoPostBack property of the drop-down list to true to make the postback occur.
21. A Web selection program requires a parameterized query to retrieve the data matching the list selection. The Windows program does not have the same requirement.
22. LINQ is a query language that works on object data types.
Bradley−Millspaugh: Programming in Visual C# 2008
10. Database Applications Text 457© The McGraw−Hill Companies, 2010
C H A P T E R 10 449
K e y T e r m s BindingSource 416 bound controls 423 column 412 data binding 415 Data Designer 423 data-bound controls 423 DataGridView control 417 dataset 416 field 412
Language-Integrated Query (LINQ) 440
postback 433 primary key field 412 record 412 row 412 table 412 table adapter 416 XML 413
R e v i e w Q u e s t i o n s
1. Explain the purpose of a binding source. 2. Explain the purpose of the table adapter component. 3. What is a dataset? 4. How is a DataGridView control used? 5. Explain the steps to change a data source from DataGridView to Details. 6. What options are available for styles of a bound control? 7. What is the purpose of the Data Sources window? 8. How do a Windows and a Web version of a list selection program
vary? Why? 9. What is a parameterized query? When would it be used? 10. What is a postback? When does it occur? 11. What is the purpose of LINQ? Name three operators.
P r o g r a m m i n g E x e r c i s e s
Each of the database files can be found in the StudentData folder on the text Web site (www.mhhe.com/C#2008).
Note : Each of these exercises can be written as a Windows applica-tion or as a Web application.
10.1: Write an application to display book information from the RnrBooks.mdf database. Display the Books table in a grid. Hint: For a Web appli-cation, use a DataList or GridView control for the grid.
Optional: Use a LINQ query. 10.2: Write an application to display book information from the RnrBooks.
mdf database. Display an alphabetized list of titles in a drop-down list for selection. When the user selects the Title, display the corresponding ISBN, Author, and Publisher in labels.
10.3: Write a project to display the Publishers table from the Contacts.mdf database. The Publishers table has the following fields: PubID (the key field), Name, Company Name, Address, City, State, Zip, Telephone, and Fax. Allow the user to select the publisher name from a sorted drop-down list; display the rest of the fields in labels or text boxes.
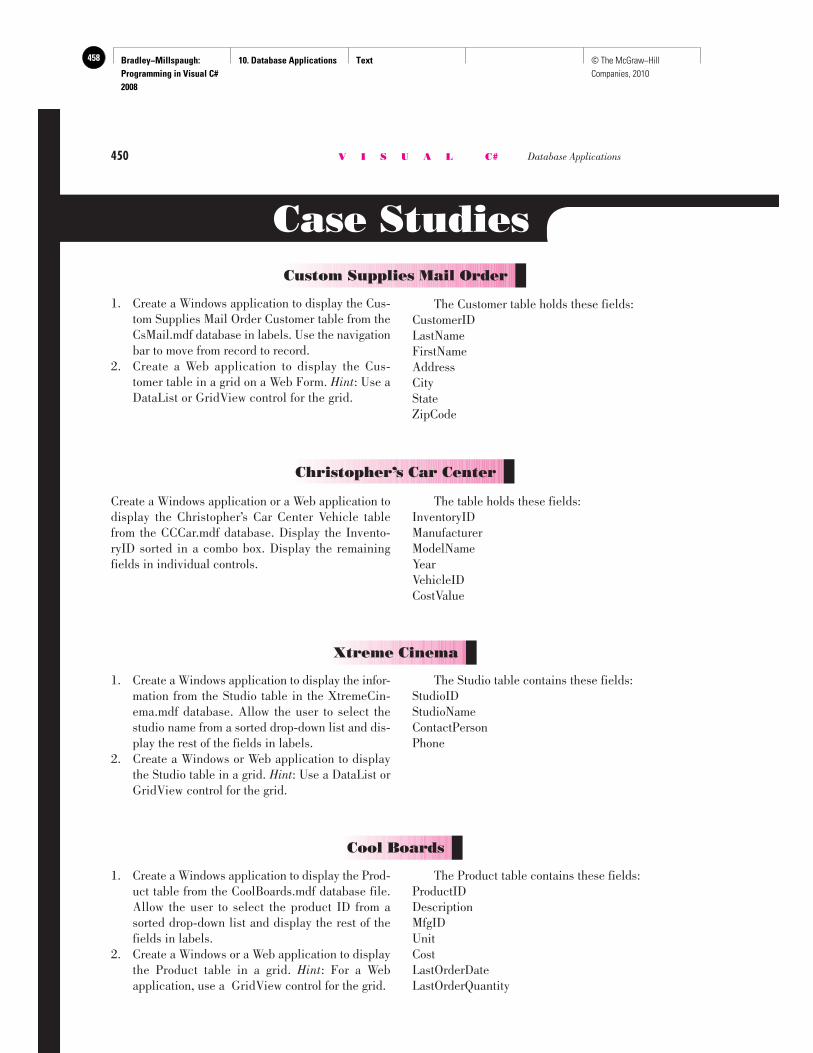
Bradley−Millspaugh: Programming in Visual C# 2008
10. Database Applications Text458 © The McGraw−Hill Companies, 2010
450 V I S U A L C# Database Applications
Case Studies Custom Supplies Mail Order
1. Create a Windows application to display the Cus-tom Supplies Mail Order Customer table from the CsMail.mdf database in labels. Use the navigation bar to move from record to record.
2. Create a Web application to display the Cus-tomer table in a grid on a Web Form. Hint: Use a DataList or GridView control for the grid.
The Customer table holds these fields: CustomerID LastName FirstName Address City State ZipCode
Create a Windows application or a Web application to display the Christopher’s Car Center Vehicle table from the CCCar.mdf database. Display the Invento-ryID sorted in a combo box. Display the remaining fields in individual controls.
Christopher’s Car Center
The table holds these fields: InventoryID Manufacturer ModelName Year VehicleID CostValue
Xtreme Cinema
1. Create a Windows application to display the infor-mation from the Studio table in the XtremeCin-ema.mdf database. Allow the user to select the studio name from a sorted drop-down list and dis-play the rest of the fields in labels.
2. Create a Windows or Web application to display the Studio table in a grid. Hint: Use a DataList or GridView control for the grid.
The Studio table contains these fields: StudioID StudioName ContactPerson Phone
Cool Boards
1. Create a Windows application to display the Prod-uct table from the CoolBoards.mdf database file. Allow the user to select the product ID from a sorted drop-down list and display the rest of the fields in labels.
2. Create a Windows or a Web application to display the Product table in a grid. Hint: For a Web application, use a GridView control for the grid.
The Product table contains these fields: ProductID Description MfgID Unit Cost LastOrderDateLastOrderQuantity
Bradley−Millspaugh: Programming in Visual C# 2008
11. Data Files Text 459© The McGraw−Hill Companies, 2010
try{ // Convert input values to numeric and assign quantityInteger = int.Parse(quantityTextBox.T try { priceDecimal = decimal.Parse(priceTextBox // Calculate values. extendedPriceDecimal = quantityInteger * discountDecimal = Decimal.Round( (extendedPriceDecimal * DISCOUNT_RATE_ amountDueDecimal = extendedPriceDecimal - totalAmountDecimal += amountDueDecimal; numberTransactionsInteger++; // Format and display answers. extendedPriceTextBox.Text = extendedPrice
C H A P T E R
11 Data Files
at the completion of this chapter, you will be able to . . .
1. Store and retrieve data in files using streams.
2. Save the values from a list box and reload for the next program run.
3. Check for the end of file.
4. Test whether a file exists.
5. Display the standard Open File and Save File As dialog boxes to allow the user to choose the file.
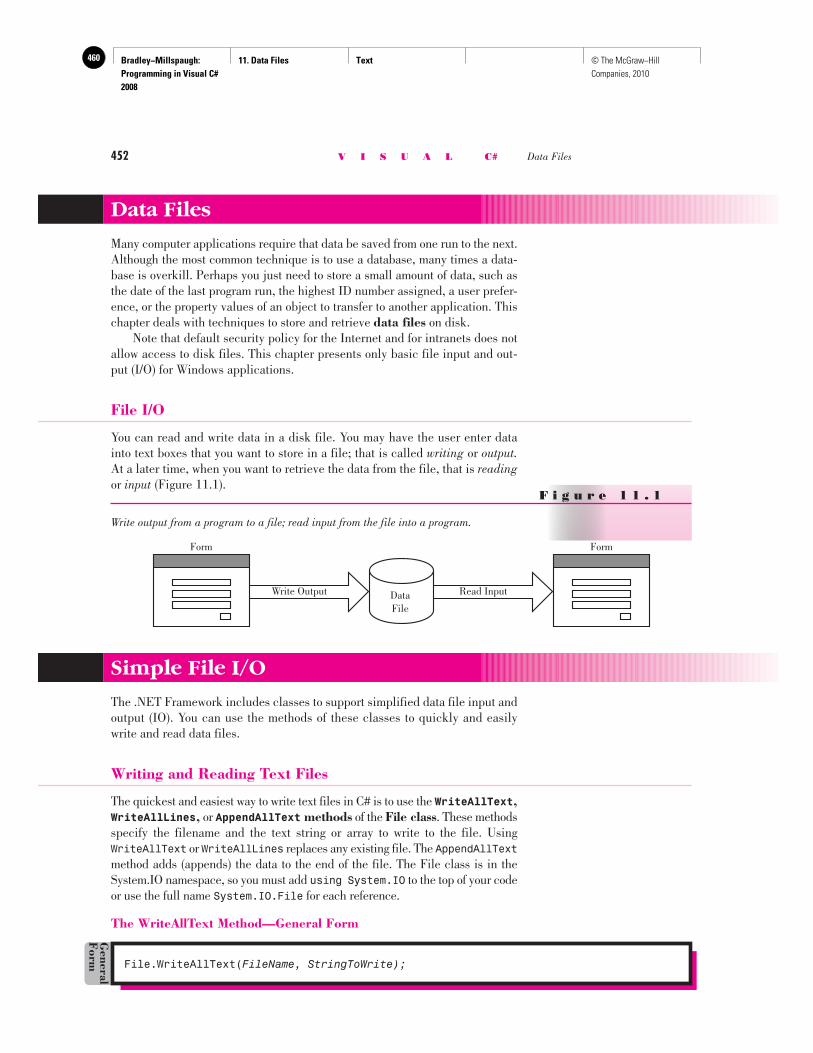
Bradley−Millspaugh: Programming in Visual C# 2008
11. Data Files Text460 © The McGraw−Hill Companies, 2010
452 V I S U A L C# Data Files
Data Files
Many computer applications require that data be saved from one run to the next. Although the most common technique is to use a database, many times a data-base is overkill. Perhaps you just need to store a small amount of data, such as the date of the last program run, the highest ID number assigned, a user prefer-ence, or the property values of an object to transfer to another application. This chapter deals with techniques to store and retrieve data files on disk. Note that default security policy for the Internet and for intranets does not allow access to disk files. This chapter presents only basic file input and out-put (I/O) for Windows applications.
File I/O
You can read and write data in a disk file. You may have the user enter data into text boxes that you want to store in a file; that is called writing or output.At a later time, when you want to retrieve the data from the file, that is readingor input ( Figure 11.1 ).
Form
Read InputDataFile
Write Output
Form
F i g u r e 1 1 . 1
Write output from a program to a file; read input from the file into a program.
Simple File I/O
The .NET Framework includes classes to support simplified data file input and output (IO). You can use the methods of these classes to quickly and easily write and read data files.
Writing and Reading Text Files
The quickest and easiest way to write text files in C# is to use the WriteAllText, WriteAllLines, or AppendAllText methods of the File class . These methods specify the filename and the text string or array to write to the file. Using WriteAllText or WriteAllLines replaces any existing file. The AppendAllTextmethod adds (appends) the data to the end of the file. The File class is in the System.IO namespace, so you must add using System.IO to the top of your code or use the full name System.IO.File for each reference.
The WriteAllText Method—General Form
File.WriteAllText( FileName, StringToWrite);
General
Form
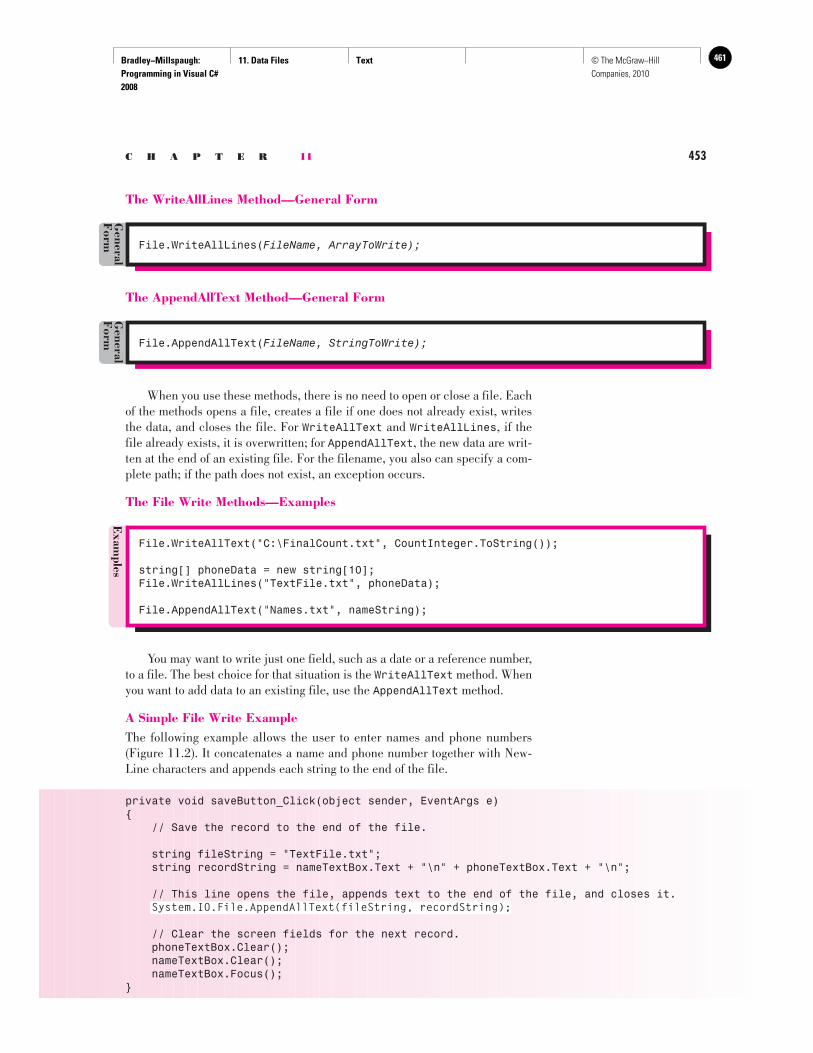
Bradley−Millspaugh: Programming in Visual C# 2008
11. Data Files Text 461© The McGraw−Hill Companies, 2010
C H A P T E R 11 453
The WriteAllLines Method—General Form
File.WriteAllLines(FileName, ArrayToWrite);
General
Form
The AppendAllText Method—General Form
File.WriteAllLines( FileName, ArrayToWrite);
General
Form
File.AppendAllText( FileName, StringToWrite);
General
Form
When you use these methods, there is no need to open or close a file. Each of the methods opens a file, creates a file if one does not already exist, writes the data, and closes the file. For WriteAllText and WriteAllLines , if the file already exists, it is overwritten; for AppendAllText , the new data are writ-ten at the end of an existing file. For the filename, you also can specify a com-plete path; if the path does not exist, an exception occurs.
The File Write Methods—Examples
Exam
ples
File.WriteAllText("C:\FinalCount.txt", CountInteger.ToString());
string[] phoneData = new string[10];File.WriteAllLines("TextFile.txt", phoneData);
File.AppendAllText("Names.txt", nameString);
You may want to write just one field, such as a date or a reference number, to a file. The best choice for that situation is the WriteAllText method. When you want to add data to an existing file, use the AppendAllText method.
A Simple File Write Example The following example allows the user to enter names and phone numbers ( Figure 11.2 ). It concatenates a name and phone number together with New-Line characters and appends each string to the end of the file.
private void saveButton_Click(object sender, EventArgs e){ // Save the record to the end of the file.
string fileString = "TextFile.txt"; string recordString = nameTextBox.Text + "\n" + phoneTextBox.Text + "\n";
// This line opens the file, appends text to the end of the file, and closes it.System.IO.File.AppendAllText(fileString, recordString);
// Clear the screen fields for the next record. phoneTextBox.Clear(); nameTextBox.Clear(); nameTextBox.Focus();}
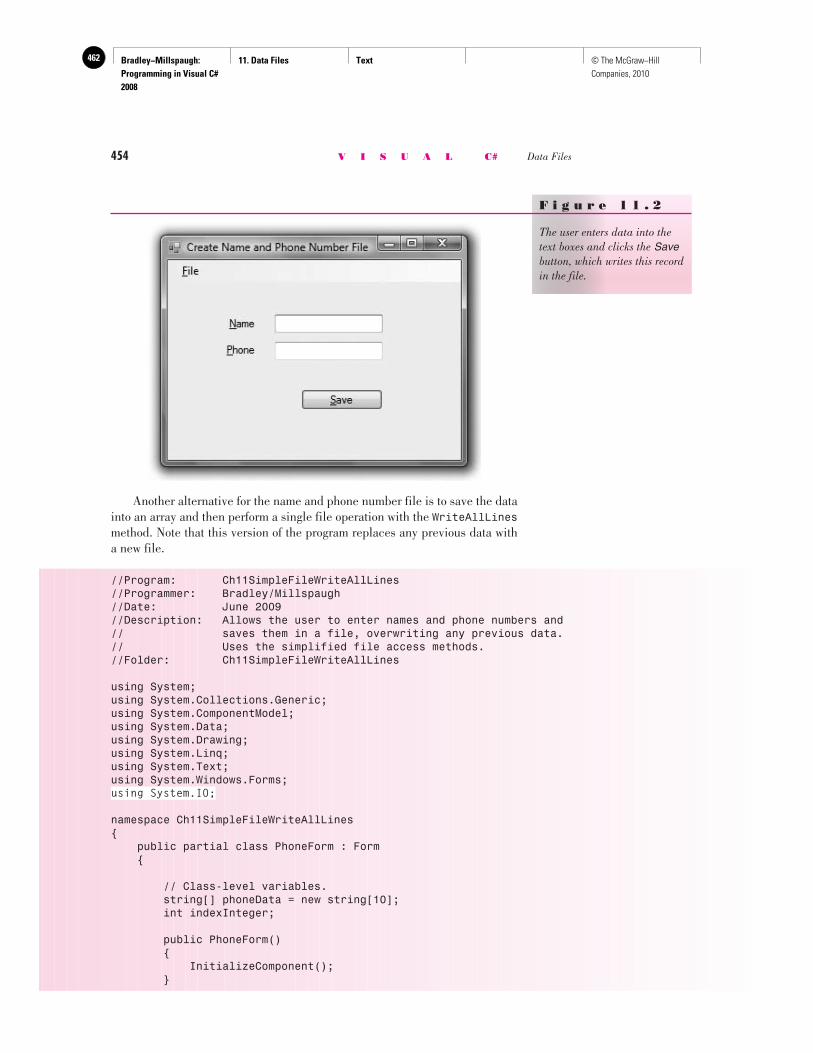
Bradley−Millspaugh: Programming in Visual C# 2008
11. Data Files Text462 © The McGraw−Hill Companies, 2010
454 V I S U A L C# Data Files
Another alternative for the name and phone number file is to save the data into an array and then perform a single file operation with the WriteAllLinesmethod. Note that this version of the program replaces any previous data with a new file.
//Program: Ch11SimpleFileWriteAllLines//Programmer: Bradley/Millspaugh//Date: June 2009//Description: Allows the user to enter names and phone numbers and// saves them in a file, overwriting any previous data.// Uses the simplified file access methods.//Folder: Ch11SimpleFileWriteAllLines
using System;using System.Collections.Generic;using System.ComponentModel;using System.Data;using System.Drawing;using System.Linq;using System.Text;using System.Windows.Forms;using System.IO;
namespace Ch11SimpleFileWriteAllLines{ public partial class PhoneForm : Form {
// Class-level variables. string[] phoneData = new string[10]; int indexInteger;
public PhoneForm() { InitializeComponent(); }
F i g u r e 1 1 . 2
The user enters data into the text boxes and clicks the Savebutton, which writes this record in the file.
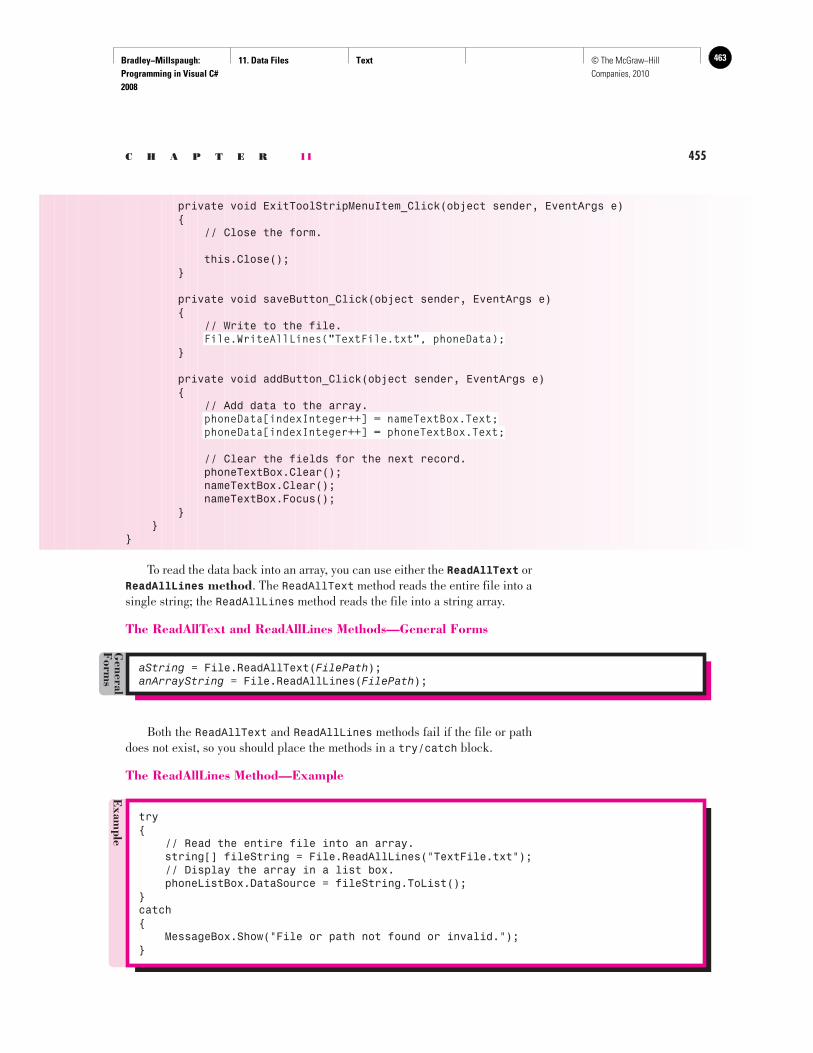
Bradley−Millspaugh: Programming in Visual C# 2008
11. Data Files Text 463© The McGraw−Hill Companies, 2010
C H A P T E R 11 455
private void ExitToolStripMenuItem_Click(object sender, EventArgs e) { // Close the form.
this.Close(); }
private void saveButton_Click(object sender, EventArgs e) { // Write to the file.
File.WriteAllLines("TextFile.txt", phoneData); }
private void addButton_Click(object sender, EventArgs e) { // Add data to the array.
phoneData[indexInteger++] = nameTextBox.Text;phoneData[indexInteger++] = phoneTextBox.Text;
// Clear the fields for the next record. phoneTextBox.Clear(); nameTextBox.Clear(); nameTextBox.Focus(); } }}
To read the data back into an array, you can use either the ReadAllText or ReadAllLines method . The ReadAllText method reads the entire file into a single string; the ReadAllLines method reads the file into a string array.
The ReadAllText and ReadAllLines Methods—General Forms
aString = File.ReadAllText( FilePath );anArrayString = File.ReadAllLines( FilePath );
General
Form
s
Both the ReadAllText and ReadAllLines methods fail if the file or path does not exist, so you should place the methods in a try/catch block.
The ReadAllLines Method—Example
Exam
ple
try{ // Read the entire file into an array. string[] fileString = File.ReadAllLines("TextFile.txt"); // Display the array in a list box. phoneListBox.DataSource = fileString.ToList();}catch{ MessageBox.Show("File or path not found or invalid.");}
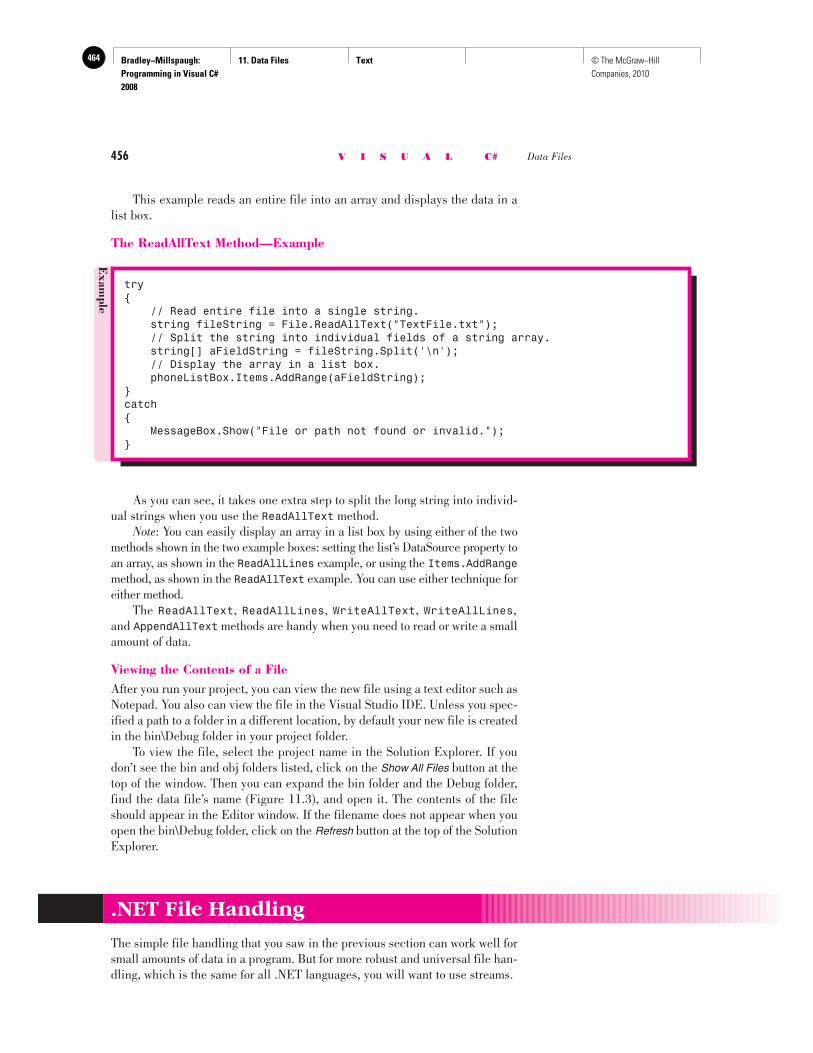
Bradley−Millspaugh: Programming in Visual C# 2008
11. Data Files Text464 © The McGraw−Hill Companies, 2010
456 V I S U A L C# Data Files
This example reads an entire file into an array and displays the data in a list box.
The ReadAllText Method—Example
Exam
ple
try{ // Read entire file into a single string. string fileString = File.ReadAllText("TextFile.txt"); // Split the string into individual fields of a string array. string[] aFieldString = fileString.Split('\n'); // Display the array in a list box. phoneListBox.Items.AddRange(aFieldString);}catch{ MessageBox.Show("File or path not found or invalid.");}
As you can see, it takes one extra step to split the long string into individ-ual strings when you use the ReadAllText method. Note : You can easily display an array in a list box by using either of the two methods shown in the two example boxes: setting the list’s DataSource property to an array, as shown in the ReadAllLines example, or using the Items.AddRangemethod, as shown in the ReadAllText example. You can use either technique for either method. The ReadAllText , ReadAllLines , WriteAllText , WriteAllLines , and AppendAllText methods are handy when you need to read or write a small amount of data.
Viewing the Contents of a File After you run your project, you can view the new file using a text editor such as Notepad. You also can view the file in the Visual Studio IDE. Unless you spec-ified a path to a folder in a different location, by default your new file is created in the bin\Debug folder in your project folder. To view the file, select the project name in the Solution Explorer. If you don’t see the bin and obj folders listed, click on the Show All Files button at the top of the window. Then you can expand the bin folder and the Debug folder, find the data file’s name ( Figure 11.3 ), and open it. The contents of the file should appear in the Editor window. If the filename does not appear when you open the bin\Debug folder, click on the Refresh button at the top of the Solution Explorer.
.NET File Handling
The simple file handling that you saw in the previous section can work well for small amounts of data in a program. But for more robust and universal file han-dling, which is the same for all .NET languages, you will want to use streams.

Bradley−Millspaugh: Programming in Visual C# 2008
11. Data Files Text 465© The McGraw−Hill Companies, 2010
C H A P T E R 11 457
File Handling Using Streams
.NET uses streams for file input and output. A stream is designed to transfer a series of bytes from one location to another. Streams are classes that have methods and properties, just like any other class. The stream classes are found in the System.IO namespace . You can save the trouble of fully qualifying references by adding a using statement to the top of the file, before the namespace statement.
using System.IO;
namespace Ch11WriteFile
In C#, the most straightforward way to read and write small amounts of data is to use the StreamReader and StreamWriter classes. Generally, you write the StreamWriter code first, to create the data file. Then you can write the StreamReader code to read the file that you just created.
Writing Data in a File Using a StreamWriter
To write data to a file, you first have the user input the data into text boxes and then write the data to the disk. The steps for writing data are
• Declare a new StreamWriter object, which also declares the name of the data file.
F i g u r e 1 1 . 3
View the contents of your new file in the Visual Studio IDE.
Show All Files button
bin\Debug folder New file
Select the project nameRefresh button
Bradley−Millspaugh: Programming in Visual C# 2008
11. Data Files Text466 © The McGraw−Hill Companies, 2010
458 V I S U A L C# Data Files
• Use the StreamWriter’s WriteLine method to copy the data to a buffer in memory. (A buffer is just a temporary storage location.)
• Call the StreamWriter’s Close method, which transfers the data from the buffer to the file and releases the system resources used by the stream.
Instantiating a StreamWriter Object—General Form
StreamWriter ObjectName = new StreamWriter(" FileName ");StreamWriter ObjectName = new StreamWriter(" FileName", BooleanAppend );
General
Form
Use .txt as your extension to follow conventions and allow for easy viewing of the file in Notepad. ■
TIP
You declare a new StreamWriter object for writing data to a file. The first argu-ment in the constructor specifies the name of the file. The default location for the file is where the program executable (.exe) is placed, which is the bin\Debug folder beneath the folder for the current project. You also can specify the com-plete path of the file. In the second version of the StreamWriter constructor, you can specify that you want to append data to an existing file. Specify true to append. By default, the option is set to false , and the old data file is deleted and a new data file is created, in effect overwriting any existing data. Instantiating a new StreamWriter object opens the file. The file must be open before you can write in the file. If the file does not already exist, a new one is created. If you don’t use a full qualifying path, then the file is opened or created in the project’s bin\Debug folder where the program executable is lo-cated. Because no exception occurs whether or not the file exists, you can de-clare the StreamWriter object at the top of the class or inside a method. If you do use a full path in the filename, then you should instantiate the StreamWriter object in a try/catch block in case the path does not exist.
Instantiating a StreamWriter Object—Examples
Exam
ples
StreamWriter phoneStreamWriter = new StreamWriter("Phone.txt");StreamWriter namesStreamWriter = new StreamWriter("C:\\MyFiles\\Names.txt");StreamWriter logStreamWriter = new StreamWriter("C:\\MyFiles\\LogFile.txt", true);StreamWriter namesStreamWriter = new StreamWriter(@"C:\MyFiles\Names.txt");
Note : To include a literal backslash in a string, you can either use the es-cape sequence ( \\) or place an at-sign (@) before the literal, which specifies that a backslash not be treated as an escape sequence. You also can replace the backslash in a path with a forward slash, which is easier to do and works perfectly well. The StreamWriter object has both a Write and a WriteLine method . The difference between the two is a carriage-return character. The Writemethod places items consecutively in the file with no delimiter (separator). The WriteLine method places an Enter (carriage return) between items. We will use the WriteLine in this chapter because we want to easily retrieve the individual data elements later.
The WriteLine Method—General Form
ObjectName .WriteLine( DataToWrite );
General
Form
Bradley−Millspaugh: Programming in Visual C# 2008
11. Data Files Text 467© The McGraw−Hill Companies, 2010
C H A P T E R 11 459
The DataToWrite argument may be string or numeric. The WriteLine method converts any numeric data to string and actually writes string data in the file.
The WriteLine Method—Examples
Exam
ples
phoneStreamWriter.WriteLine(nameTextBox.Text);phoneStreamWriter.WriteLine(phoneTextBox.Text);namesStreamWriter.WriteLine("Sammy");bankBalanceStreamWriter.WriteLine(balanceDecimal.ToString());
If you are inputting data from the user and writing in a file, you generally place the WriteLine in a button click event handler. The following phone list ex-ample is similar to the earlier file-writing program but uses a StreamWriter object, rather than the AppendAllText method. You can refer to Figure 11.2 to see the data entry form.
private void saveButton_Click(object sender, System.EventArgs e){ // Save the record to the file.
phoneStreamWriter.WriteLine(nameTextBox.Text); phoneStreamWriter.WriteLine(phoneTextBox.Text); nameTextBox.Clear(); phoneTextBox.Clear(); nameTextBox.Focus();}
The Save button writes the data from the screen to the StreamWriter object and then clears the screen.
Closing a File After you finish writing data in a file, you must close the file. Closing a file is good housekeeping; it finishes writing all data from the stream’s buffer to the disk and releases the system resources. Use the StreamWriter’s Close method , which is similar to closing a form. A common location for the Close method is in your program’s Exit command or the form’s FormClosing event handler (see page 470).
private void exitButton_Click(object sender, System.EventArgs e){ // End the project.
phoneStreamWriter.Close(); this.Close();}
If you fail to close a file when you are finished with it, the file may remain open for an indefinite time and sometimes may become unusable. See “The Form_FormClosing Event Handler” section later in this chapter. It’s best to open a file only when it is
needed and close it as soon as you are done with it so that you don’t tie up system resources unnecessarily. ■
TIP
Bradley−Millspaugh: Programming in Visual C# 2008
11. Data Files Text468 © The McGraw−Hill Companies, 2010
460 V I S U A L C# Data Files
Reading Data from a File Using a StreamReader
You use the StreamReader class to read the data from a file that you created with a StreamWriter. The steps for reading the data from a file are the following:
• Declare an object of the StreamReader class. The constructor declares the filename and optional path. This statement opens the file so that you can read from it.
• Use the ReadLine method to read the data. You may need to use a loop to retrieve multiple records.
• When finished, close the stream using the StreamReader’s Close method.
Declaring and Instantiating a StreamReader Object—General Form
// Declare a class-level variable.private StreamReader ObjectName;
// Inside a method.ObjectName = new StreamReader(" FileName ");
General F
orm
The StreamReader class works in much the same way as the StreamWriter. However, the file must exist in the location where the application expects it. If no such file exists, an exception occurs. For this reason, you must instantiate the StreamReader object in a method so that you can enclose it in a try/catchblock.
Declaring and Instantiating a StreamReader Object—Examples
Exam
ples
try{ StreamReader namesStreamReader = new StreamReader("C:\\MyFiles\\Names.txt");}catch{ MessageBox.Show("File does not exist.");}
// Declare a class-level variable.StreamReader phoneStreamReader;...// In a method, to catch an exception for a missing file.try{ phoneStreamReader = new StreamReader("Phone.txt");}catch{ MessageBox.Show("File does not exist.");}
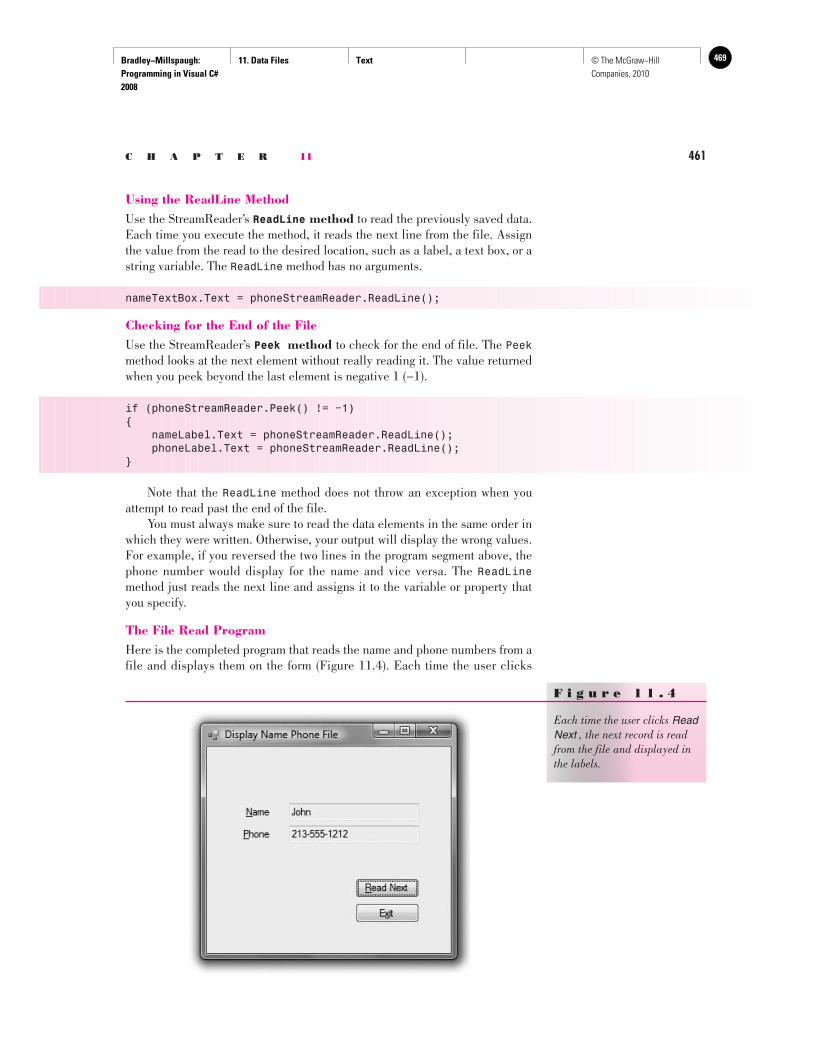
Bradley−Millspaugh: Programming in Visual C# 2008
11. Data Files Text 469© The McGraw−Hill Companies, 2010
C H A P T E R 11 461
Using the ReadLine Method Use the StreamReader’s ReadLine method to read the previously saved data. Each time you execute the method, it reads the next line from the file. Assign the value from the read to the desired location, such as a label, a text box, or a string variable. The ReadLine method has no arguments.
nameTextBox.Text = phoneStreamReader.ReadLine();
Checking for the End of the File Use the StreamReader’s Peek method to check for the end of file. The Peekmethod looks at the next element without really reading it. The value returned when you peek beyond the last element is negative 1 (−1).
if (phoneStreamReader.Peek() != −1){ nameLabel.Text = phoneStreamReader.ReadLine(); phoneLabel.Text = phoneStreamReader.ReadLine();}
Note that the ReadLine method does not throw an exception when you attempt to read past the end of the file. You must always make sure to read the data elements in the same order in which they were written. Otherwise, your output will display the wrong values. For example, if you reversed the two lines in the program segment above, the phone number would display for the name and vice versa. The ReadLinemethod just reads the next line and assigns it to the variable or property that you specify.
The File Read Program Here is the completed program that reads the name and phone numbers from a file and displays them on the form ( Figure 11.4 ). Each time the user clicks
F i g u r e 1 1 . 4
Each time the user clicks ReadNext , the next record is read from the file and displayed in the labels.
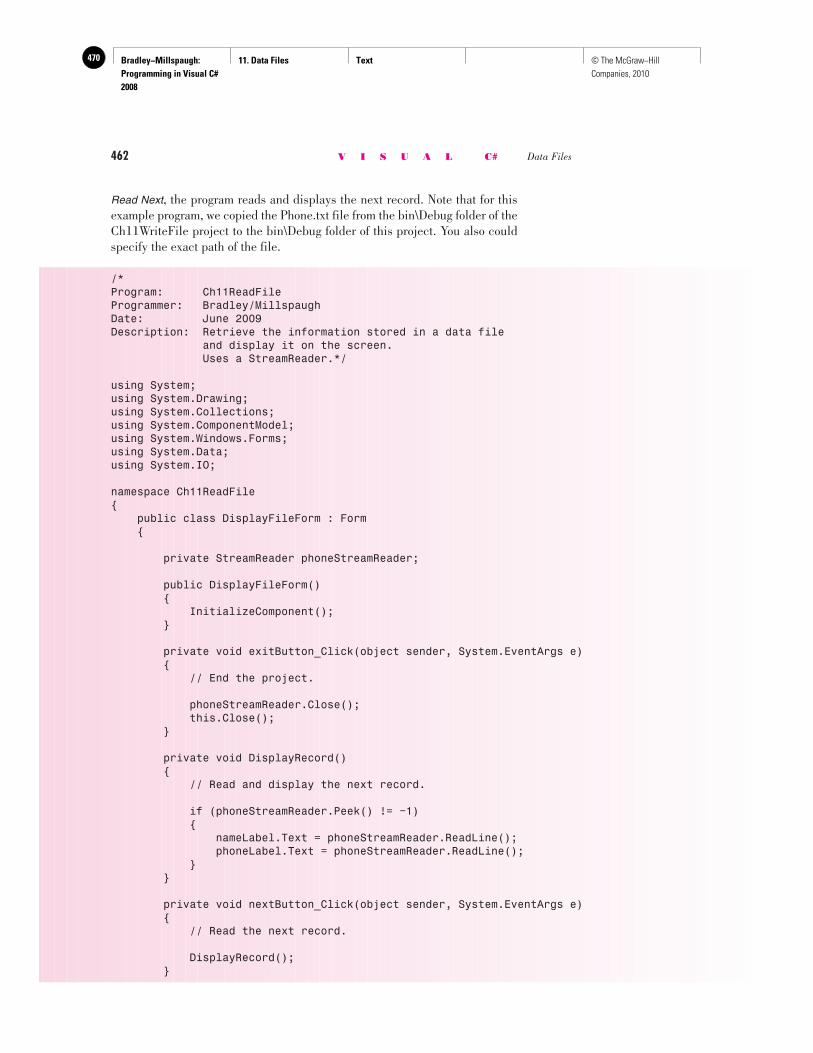
Bradley−Millspaugh: Programming in Visual C# 2008
11. Data Files Text470 © The McGraw−Hill Companies, 2010
462 V I S U A L C# Data Files
Read Next , the program reads and displays the next record. Note that for this example program, we copied the Phone.txt file from the bin\Debug folder of the Ch11WriteFile project to the bin\Debug folder of this project. You also could specify the exact path of the file.
/*Program: Ch11ReadFileProgrammer: Bradley/MillspaughDate: June 2009Description: Retrieve the information stored in a data file and display it on the screen. Uses a StreamReader.*/
using System;using System.Drawing;using System.Collections;using System.ComponentModel;using System.Windows.Forms;using System.Data;using System.IO;
namespace Ch11ReadFile{ public class DisplayFileForm : Form {
private StreamReader phoneStreamReader;
public DisplayFileForm() { InitializeComponent(); }
private void exitButton_Click(object sender, System.EventArgs e) { // End the project.
phoneStreamReader.Close(); this.Close(); }
private void DisplayRecord() { // Read and display the next record.
if (phoneStreamReader.Peek() != −1) { nameLabel.Text = phoneStreamReader.ReadLine(); phoneLabel.Text = phoneStreamReader.ReadLine(); } }
private void nextButton_Click(object sender, System.EventArgs e) { // Read the next record.
DisplayRecord(); }
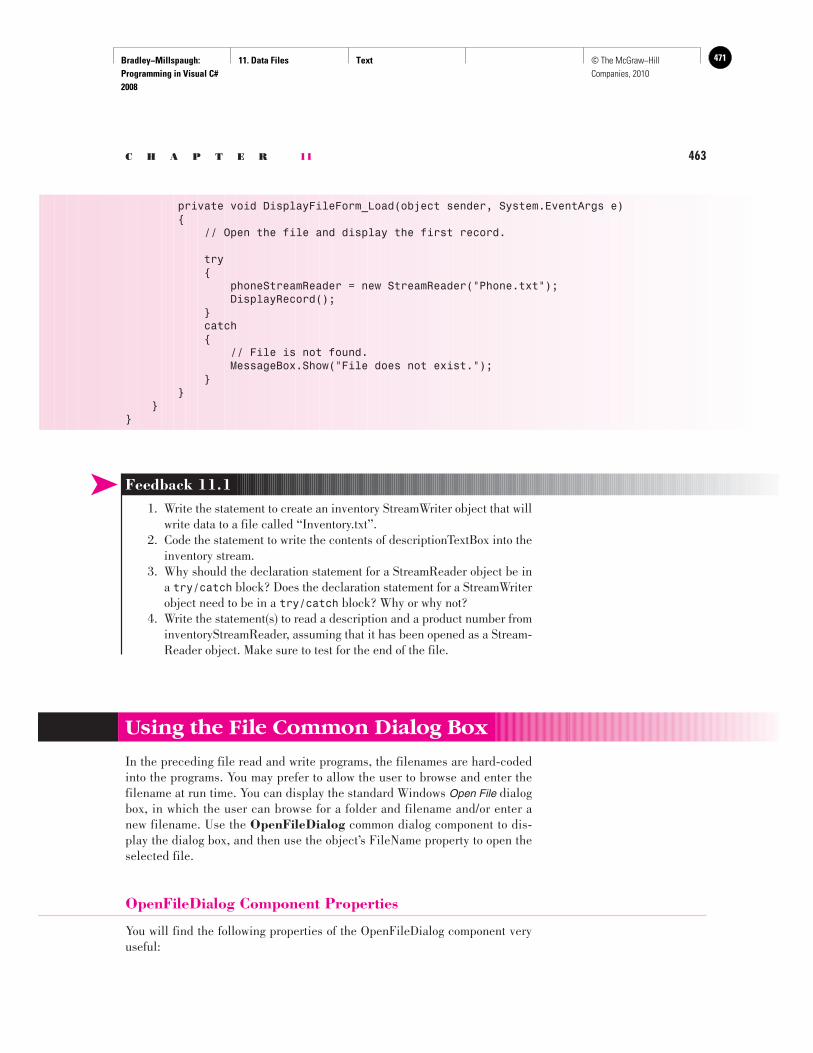
Bradley−Millspaugh: Programming in Visual C# 2008
11. Data Files Text 471© The McGraw−Hill Companies, 2010
C H A P T E R 11 463
➤ Feedback 11.1 1. Write the statement to create an inventory StreamWriter object that will
write data to a file called “Inventory.txt”. 2. Code the statement to write the contents of descriptionTextBox into the
inventory stream. 3. Why should the declaration statement for a StreamReader object be in
a try/catch block? Does the declaration statement for a StreamWriter object need to be in a try/catch block? Why or why not?
4. Write the statement(s) to read a description and a product number from inventoryStreamReader, assuming that it has been opened as a Stream-Reader object. Make sure to test for the end of the file.
Using the File Common Dialog Box
In the preceding file read and write programs, the filenames are hard-coded into the programs. You may prefer to allow the user to browse and enter the filename at run time. You can display the standard Windows Open File dialog box, in which the user can browse for a folder and filename and/or enter a new filename. Use the OpenFileDialog common dialog component to dis-play the dialog box, and then use the object’s FileName property to open the selected file.
OpenFileDialog Component Properties
You will find the following properties of the OpenFileDialog component very useful:
private void DisplayFileForm_Load(object sender, System.EventArgs e) { // Open the file and display the first record.
try { phoneStreamReader = new StreamReader("Phone.txt"); DisplayRecord(); } catch { // File is not found. MessageBox.Show("File does not exist."); } } }}
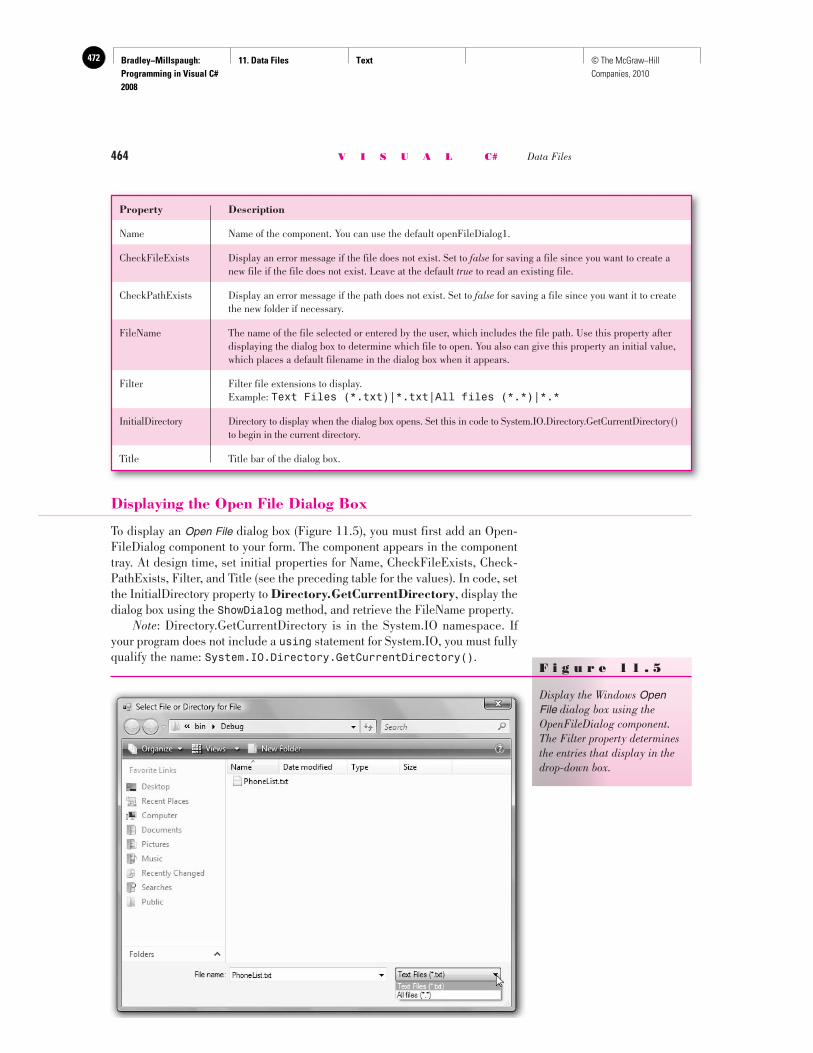
Bradley−Millspaugh: Programming in Visual C# 2008
11. Data Files Text472 © The McGraw−Hill Companies, 2010
464 V I S U A L C# Data Files
Displaying the Open File Dialog Box
To display an Open File dialog box ( Figure 11.5 ), you must first add an Open-FileDialog component to your form. The component appears in the component tray. At design time, set initial properties for Name, CheckFileExists, Check-PathExists, Filter, and Title (see the preceding table for the values). In code, set the InitialDirectory property to Directory.GetCurrentDirectory , display the dialog box using the ShowDialog method, and retrieve the FileName property. Note : Directory.GetCurrentDirectory is in the System.IO namespace. If your program does not include a using statement for System.IO, you must fully qualify the name: System.IO.Directory.GetCurrentDirectory() .
F i g u r e 1 1 . 5
Display the Windows OpenFile dialog box using the OpenFileDialog component. The Filter property determines the entries that display in the drop-down box.
Property Description
Name Name of the component. You can use the default openFileDialog1.
CheckFileExists Display an error message if the file does not exist. Set to false for saving a file since you want to create a new file if the file does not exist. Leave at the default true to read an existing file.
CheckPathExists Display an error message if the path does not exist. Set to false for saving a file since you want it to create the new folder if necessary.
FileName The name of the file selected or entered by the user, which includes the file path. Use this property after displaying the dialog box to determine which file to open. You also can give this property an initial value, which places a default filename in the dialog box when it appears.
Filter Filter file extensions to display. Example: Text Files (*.txt)|*.txt|All files (*.*)|*.*
InitialDirectory Directory to display when the dialog box opens. Set this in code to System.IO.Directory.GetCurrentDirectory() to begin in the current directory.
Title Title bar of the dialog box.
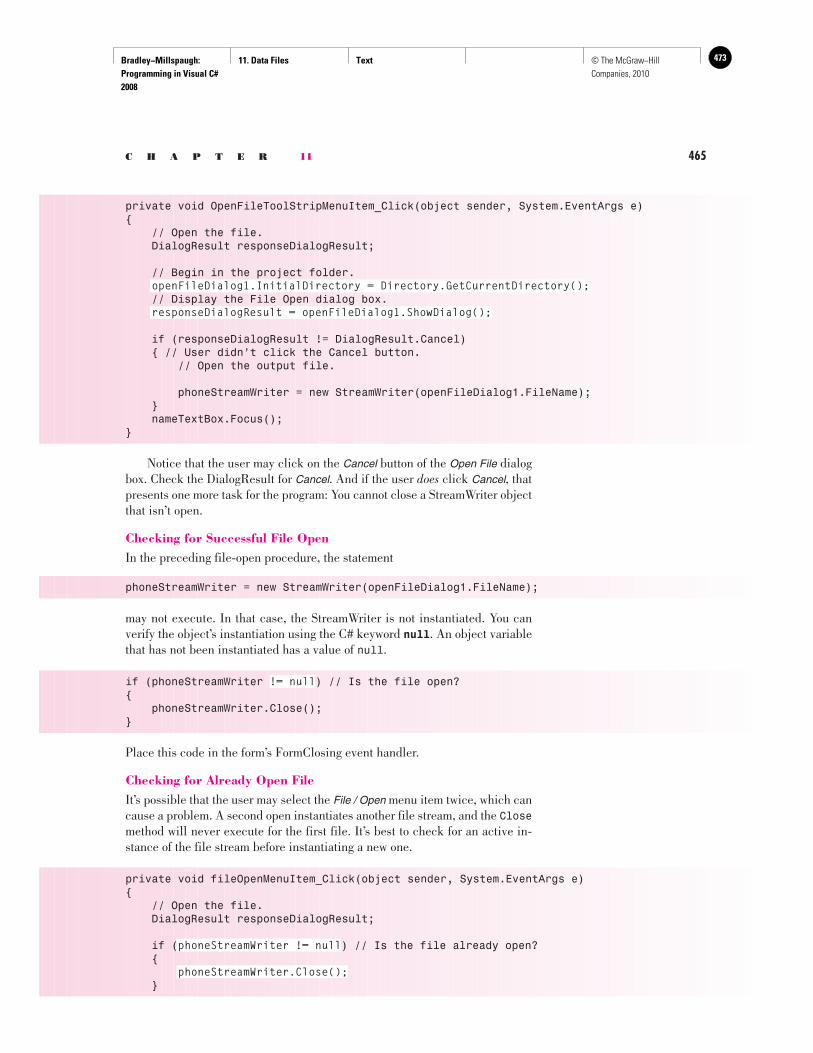
Bradley−Millspaugh: Programming in Visual C# 2008
11. Data Files Text 473© The McGraw−Hill Companies, 2010
C H A P T E R 11 465
private void OpenFileToolStripMenuItem_Click(object sender, System.EventArgs e){ // Open the file. DialogResult responseDialogResult;
// Begin in the project folder.openFileDialog1.InitialDirectory = Directory.GetCurrentDirectory();
// Display the File Open dialog box.responseDialogResult = openFileDialog1.ShowDialog();
if (responseDialogResult != DialogResult.Cancel) { // User didn’t click the Cancel button. // Open the output file.
phoneStreamWriter = new StreamWriter(openFileDialog1.FileName); } nameTextBox.Focus();}
Notice that the user may click on the Cancel button of the Open File dialog box. Check the DialogResult for Cancel . And if the user does click Cancel , that presents one more task for the program: You cannot close a StreamWriter object that isn’t open.
Checking for Successful File Open In the preceding file-open procedure, the statement
phoneStreamWriter = new StreamWriter(openFileDialog1.FileName);
may not execute. In that case, the StreamWriter is not instantiated. You can verify the object’s instantiation using the C# keyword null . An object variable that has not been instantiated has a value of null .
if (phoneStreamWriter != null) // Is the file open?{ phoneStreamWriter.Close();}
Place this code in the form’s FormClosing event handler.
Checking for Already Open File It’s possible that the user may select the File / Open menu item twice, which can cause a problem. A second open instantiates another file stream, and the Closemethod will never execute for the first file. It’s best to check for an active in-stance of the file stream before instantiating a new one.
private void fileOpenMenuItem_Click(object sender, System.EventArgs e){ // Open the file. DialogResult responseDialogResult;
if (phoneStreamWriter != null) // Is the file already open? {
phoneStreamWriter.Close(); }
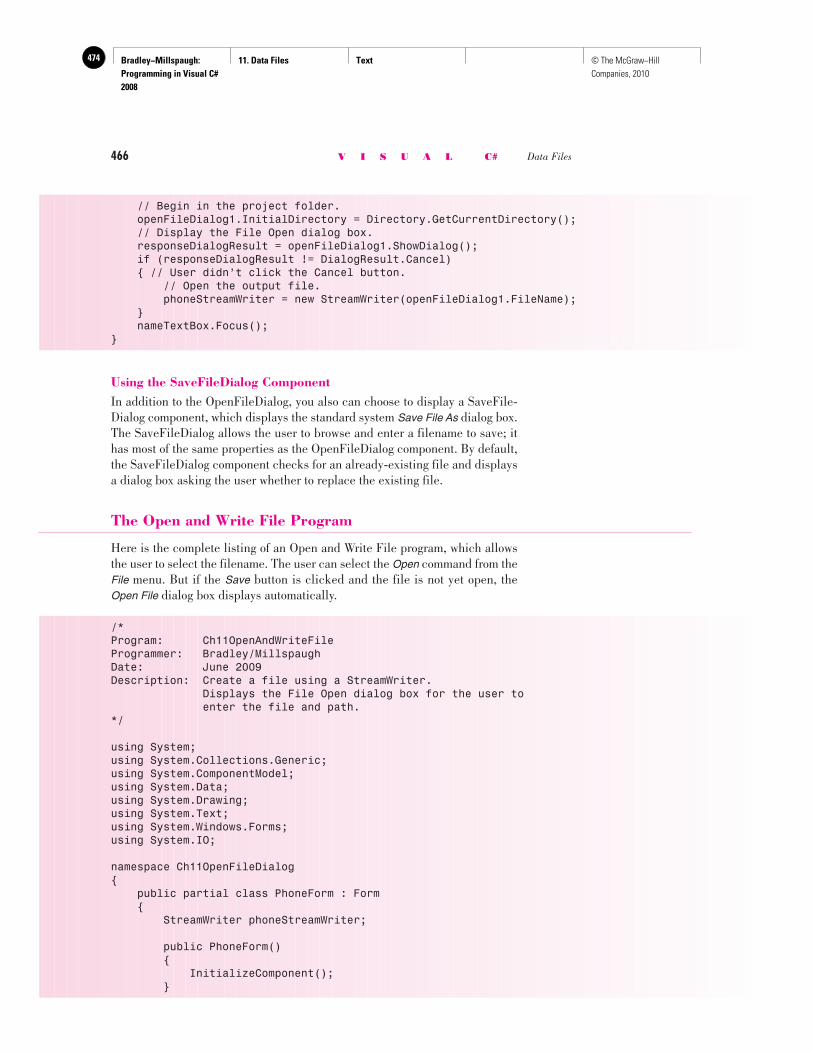
Bradley−Millspaugh: Programming in Visual C# 2008
11. Data Files Text474 © The McGraw−Hill Companies, 2010
466 V I S U A L C# Data Files
// Begin in the project folder. openFileDialog1.InitialDirectory = Directory.GetCurrentDirectory(); // Display the File Open dialog box. responseDialogResult = openFileDialog1.ShowDialog(); if (responseDialogResult != DialogResult.Cancel) { // User didn’t click the Cancel button. // Open the output file. phoneStreamWriter = new StreamWriter(openFileDialog1.FileName); } nameTextBox.Focus();}
Using the SaveFileDialog Component In addition to the OpenFileDialog, you also can choose to display a SaveFile-Dialog component, which displays the standard system Save File As dialog box. The SaveFileDialog allows the user to browse and enter a filename to save; it has most of the same properties as the OpenFileDialog component. By default, the SaveFileDialog component checks for an already-existing file and displays a dialog box asking the user whether to replace the existing file.
The Open and Write File Program
Here is the complete listing of an Open and Write File program, which allows the user to select the filename. The user can select the Open command from the File menu. But if the Save button is clicked and the file is not yet open, the Open File dialog box displays automatically.
/*Program: Ch11OpenAndWriteFileProgrammer: Bradley/MillspaughDate: June 2009Description: Create a file using a StreamWriter. Displays the File Open dialog box for the user to enter the file and path.*/
using System;using System.Collections.Generic;using System.ComponentModel;using System.Data;using System.Drawing;using System.Text;using System.Windows.Forms;using System.IO;
namespace Ch11OpenFileDialog{ public partial class PhoneForm : Form { StreamWriter phoneStreamWriter;
public PhoneForm() { InitializeComponent(); }
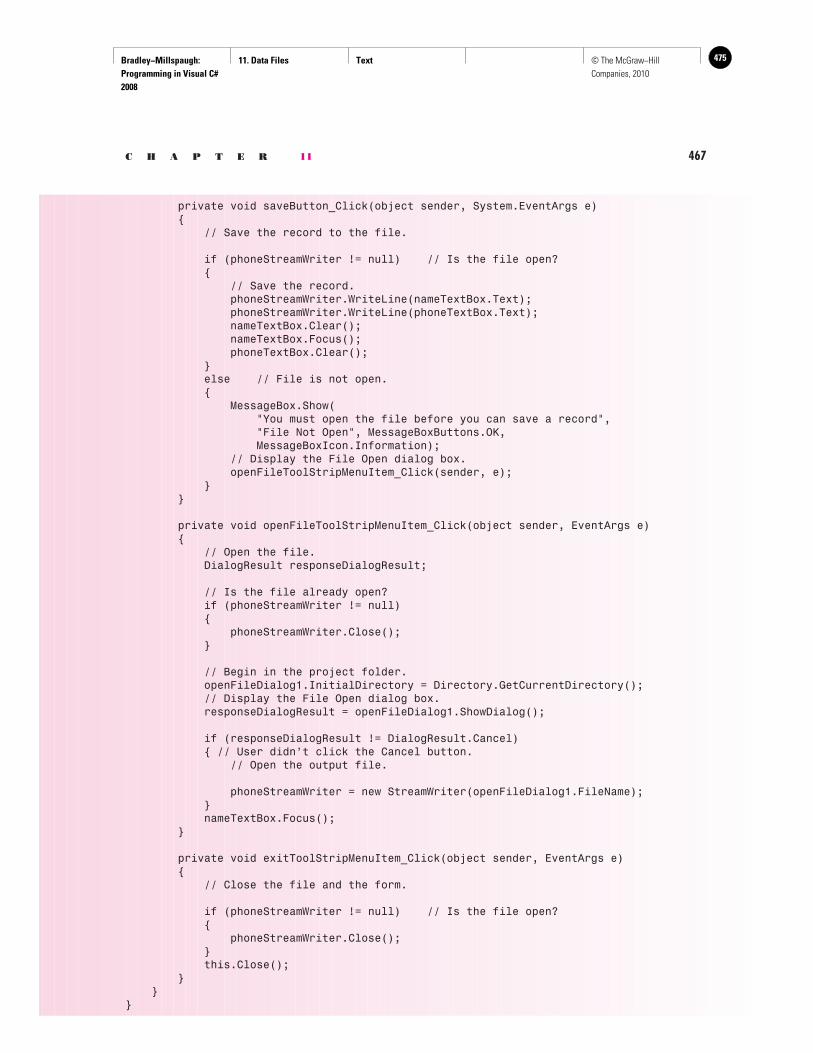
Bradley−Millspaugh: Programming in Visual C# 2008
11. Data Files Text 475© The McGraw−Hill Companies, 2010
C H A P T E R 11 467
private void saveButton_Click(object sender, System.EventArgs e) { // Save the record to the file.
if (phoneStreamWriter != null) // Is the file open? { // Save the record. phoneStreamWriter.WriteLine(nameTextBox.Text); phoneStreamWriter.WriteLine(phoneTextBox.Text); nameTextBox.Clear(); nameTextBox.Focus(); phoneTextBox.Clear(); } else // File is not open. { MessageBox.Show( "You must open the file before you can save a record", "File Not Open", MessageBoxButtons.OK, MessageBoxIcon.Information); // Display the File Open dialog box. openFileToolStripMenuItem_Click(sender, e); } }
private void openFileToolStripMenuItem_Click(object sender, EventArgs e) { // Open the file. DialogResult responseDialogResult;
// Is the file already open? if (phoneStreamWriter != null) { phoneStreamWriter.Close(); }
// Begin in the project folder. openFileDialog1.InitialDirectory = Directory.GetCurrentDirectory(); // Display the File Open dialog box. responseDialogResult = openFileDialog1.ShowDialog();
if (responseDialogResult != DialogResult.Cancel) { // User didn’t click the Cancel button. // Open the output file.
phoneStreamWriter = new StreamWriter(openFileDialog1.FileName); } nameTextBox.Focus(); }
private void exitToolStripMenuItem_Click(object sender, EventArgs e) { // Close the file and the form.
if (phoneStreamWriter != null) // Is the file open? { phoneStreamWriter.Close(); } this.Close(); } }}
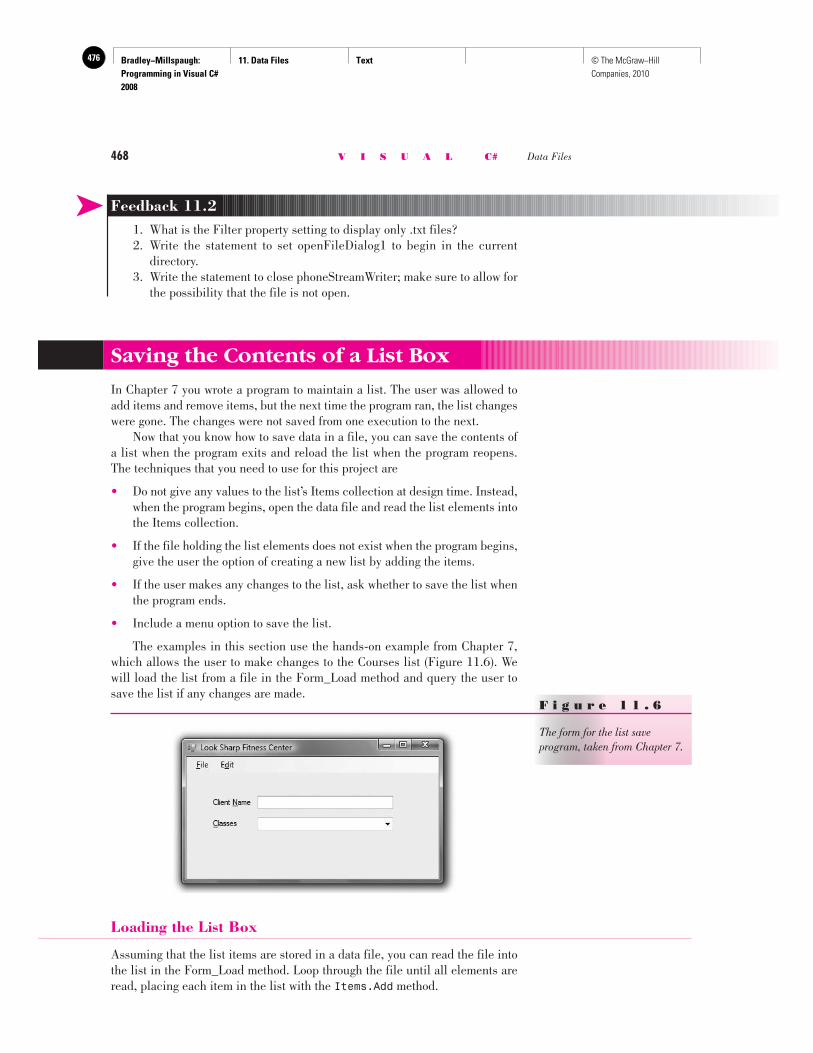
Bradley−Millspaugh: Programming in Visual C# 2008
11. Data Files Text476 © The McGraw−Hill Companies, 2010
468 V I S U A L C# Data Files
➤ Feedback 11.2 1. What is the Filter property setting to display only .txt files? 2. Write the statement to set openFileDialog1 to begin in the current
directory. 3. Write the statement to close phoneStreamWriter; make sure to allow for
the possibility that the file is not open.
Saving the Contents of a List Box
In Chapter 7 you wrote a program to maintain a list. The user was allowed to add items and remove items, but the next time the program ran, the list changes were gone. The changes were not saved from one execution to the next. Now that you know how to save data in a file, you can save the contents of a list when the program exits and reload the list when the program reopens. The techniques that you need to use for this project are
• Do not give any values to the list’s Items collection at design time. Instead, when the program begins, open the data file and read the list elements into the Items collection.
• If the file holding the list elements does not exist when the program begins, give the user the option of creating a new list by adding the items.
• If the user makes any changes to the list, ask whether to save the list when the program ends.
• Include a menu option to save the list.
The examples in this section use the hands-on example from Chapter 7, which allows the user to make changes to the Courses list ( Figure 11.6 ). We will load the list from a file in the Form_Load method and query the user to save the list if any changes are made.
F i g u r e 1 1 . 6
The form for the list save program, taken from Chapter 7.
Loading the List Box
Assuming that the list items are stored in a data file, you can read the file into the list in the Form_Load method. Loop through the file until all elements are read, placing each item in the list with the Items.Add method.
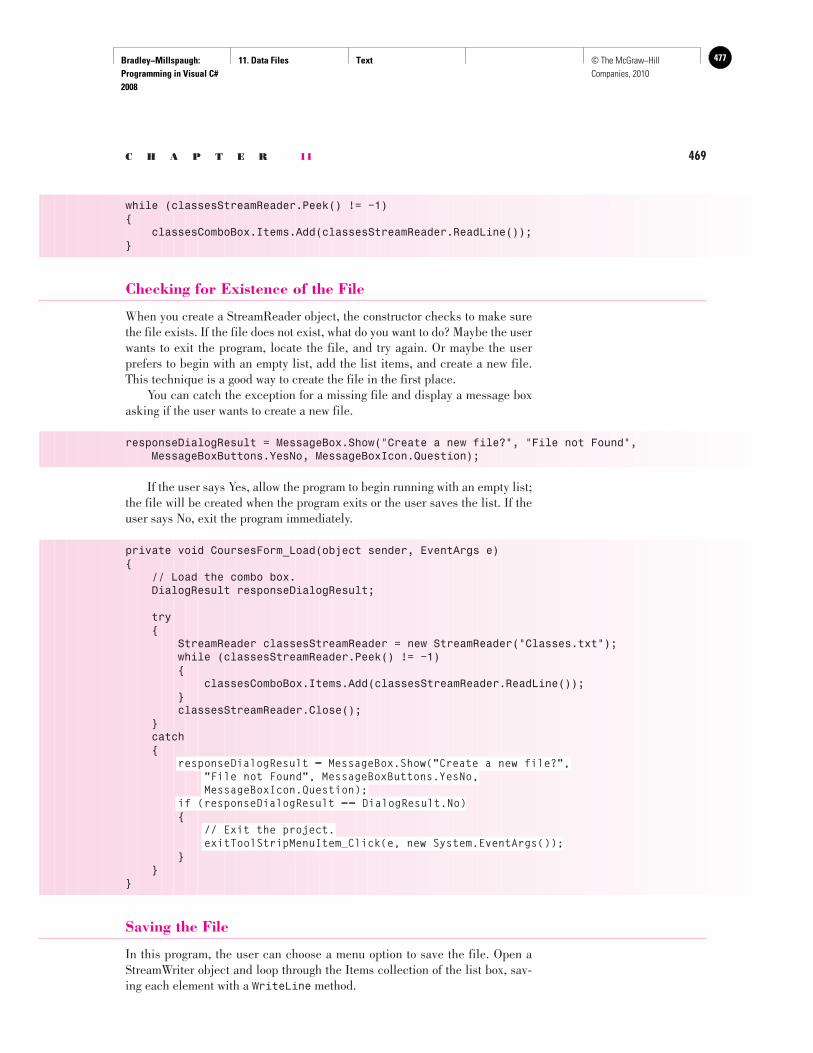
Bradley−Millspaugh: Programming in Visual C# 2008
11. Data Files Text 477© The McGraw−Hill Companies, 2010
C H A P T E R 11 469
while (classesStreamReader.Peek() != −1){ classesComboBox.Items.Add(classesStreamReader.ReadLine());}
Checking for Existence of the File
When you create a StreamReader object, the constructor checks to make sure the file exists. If the file does not exist, what do you want to do? Maybe the user wants to exit the program, locate the file, and try again. Or maybe the user prefers to begin with an empty list, add the list items, and create a new file. This technique is a good way to create the file in the first place. You can catch the exception for a missing file and display a message box asking if the user wants to create a new file.
responseDialogResult = MessageBox.Show("Create a new file?", "File not Found", MessageBoxButtons.YesNo, MessageBoxIcon.Question);
If the user says Yes, allow the program to begin running with an empty list; the file will be created when the program exits or the user saves the list. If the user says No, exit the program immediately.
private void CoursesForm_Load(object sender, EventArgs e){ // Load the combo box. DialogResult responseDialogResult;
try { StreamReader classesStreamReader = new StreamReader("Classes.txt"); while (classesStreamReader.Peek() != −1) { classesComboBox.Items.Add(classesStreamReader.ReadLine()); } classesStreamReader.Close(); } catch {
responseDialogResult = MessageBox.Show("Create a new file?","File not Found", MessageBoxButtons.YesNo,MessageBoxIcon.Question);
if (responseDialogResult == DialogResult.No) {
// Exit the project.exitToolStripMenuItem_Click(e, new System.EventArgs());
} }}
Saving the File
In this program, the user can choose a menu option to save the file. Open a StreamWriter object and loop through the Items collection of the list box, sav-ing each element with a WriteLine method.
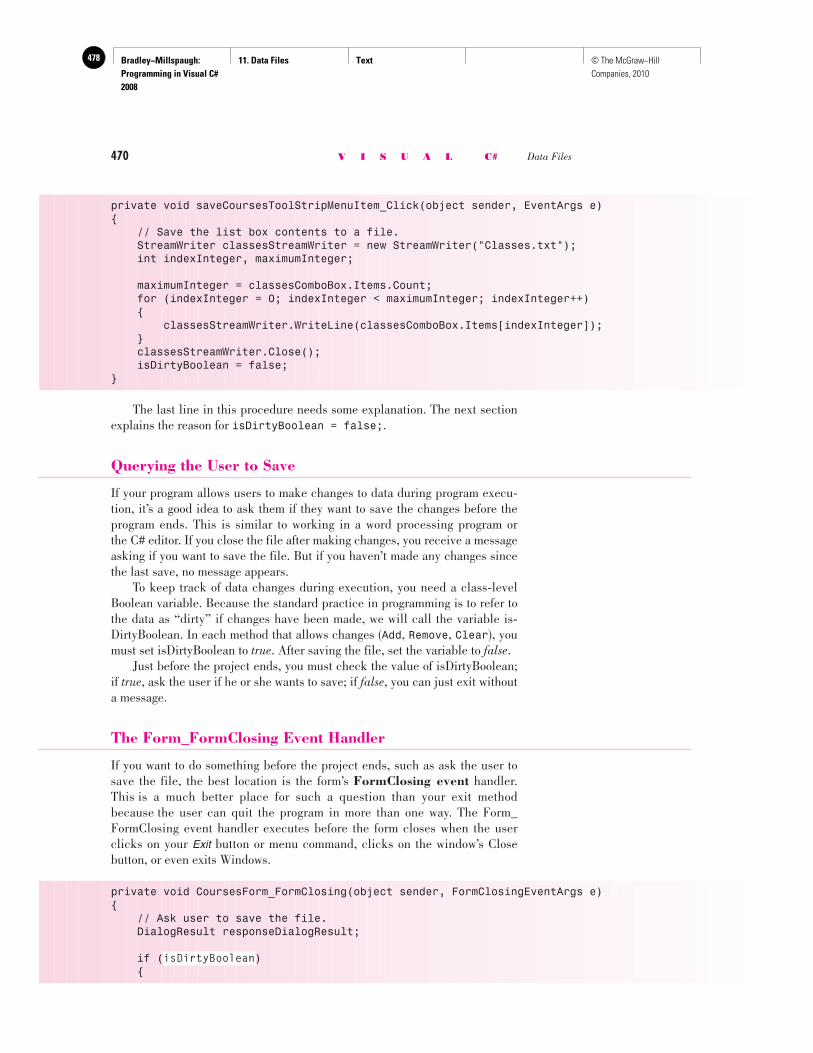
Bradley−Millspaugh: Programming in Visual C# 2008
11. Data Files Text478 © The McGraw−Hill Companies, 2010
470 V I S U A L C# Data Files
private void saveCoursesToolStripMenuItem_Click(object sender, EventArgs e){ // Save the list box contents to a file. StreamWriter classesStreamWriter = new StreamWriter("Classes.txt"); int indexInteger, maximumInteger;
maximumInteger = classesComboBox.Items.Count; for (indexInteger = 0; indexInteger < maximumInteger; indexInteger++) { classesStreamWriter.WriteLine(classesComboBox.Items[indexInteger]); } classesStreamWriter.Close(); isDirtyBoolean = false;}
The last line in this procedure needs some explanation. The next section explains the reason for isDirtyBoolean = false; .
Querying the User to Save
If your program allows users to make changes to data during program execu-tion, it’s a good idea to ask them if they want to save the changes before the program ends. This is similar to working in a word processing program or the C# editor. If you close the file after making changes, you receive a message asking if you want to save the file. But if you haven’t made any changes since the last save, no message appears. To keep track of data changes during execution, you need a class-level Boolean variable. Because the standard practice in programming is to refer to the data as “dirty” if changes have been made, we will call the variable is-DirtyBoolean. In each method that allows changes ( Add , Remove , Clear ), you must set isDirtyBoolean to true . After saving the file, set the variable to false . Just before the project ends, you must check the value of isDirtyBoolean; if true , ask the user if he or she wants to save; if false , you can just exit without a message.
The Form_FormClosing Event Handler
If you want to do something before the project ends, such as ask the user to save the file, the best location is the form’s FormClosing event handler. This is a much better place for such a question than your exit method because the user can quit the program in more than one way. The Form_ FormClosing event handler executes before the form closes when the user clicks on your Exit button or menu command, clicks on the window’s Close button, or even exits Windows.
private void CoursesForm_FormClosing(object sender, FormClosingEventArgs e){ // Ask user to save the file. DialogResult responseDialogResult;
if (isDirtyBoolean) {
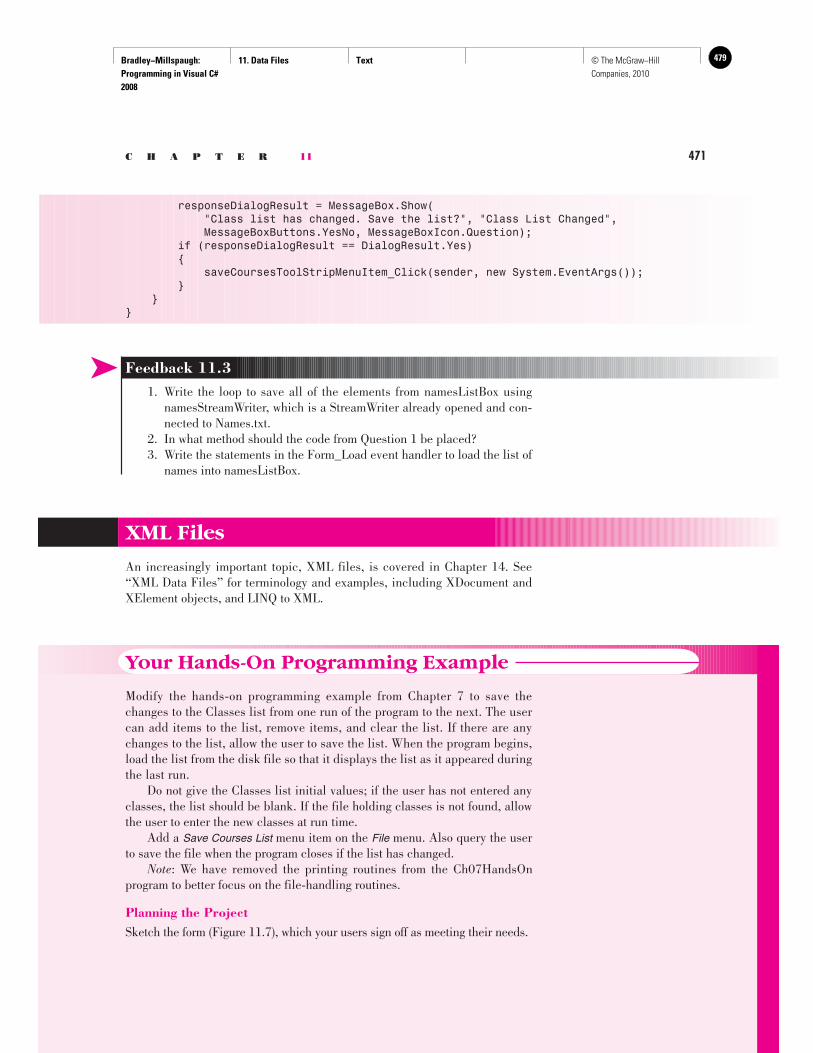
Bradley−Millspaugh: Programming in Visual C# 2008
11. Data Files Text 479© The McGraw−Hill Companies, 2010
C H A P T E R 11 471
responseDialogResult = MessageBox.Show( "Class list has changed. Save the list?", "Class List Changed", MessageBoxButtons.YesNo, MessageBoxIcon.Question); if (responseDialogResult == DialogResult.Yes) { saveCoursesToolStripMenuItem_Click(sender, new System.EventArgs()); } }}
➤ Feedback 11.3 1. Write the loop to save all of the elements from namesListBox using
namesStreamWriter, which is a StreamWriter already opened and con-nected to Names.txt.
2. In what method should the code from Question 1 be placed? 3. Write the statements in the Form_Load event handler to load the list of
names into namesListBox.
XML Files
An increasingly important topic, XML files, is covered in Chapter 14. See “XML Data Files” for terminology and examples, including XDocument and XElement objects, and LINQ to XML.
Your Hands-On Programming Example
Modify the hands-on programming example from Chapter 7 to save the changes to the Classes list from one run of the program to the next. The user can add items to the list, remove items, and clear the list. If there are any changes to the list, allow the user to save the list. When the program begins, load the list from the disk file so that it displays the list as it appeared during the last run. Do not give the Classes list initial values; if the user has not entered any classes, the list should be blank. If the file holding classes is not found, allow the user to enter the new classes at run time. Add a Save Courses List menu item on the File menu. Also query the user to save the file when the program closes if the list has changed. Note : We have removed the printing routines from the Ch07HandsOn program to better focus on the file-handling routines.
Planning the Project Sketch the form ( Figure 11.7 ), which your users sign off as meeting their needs.
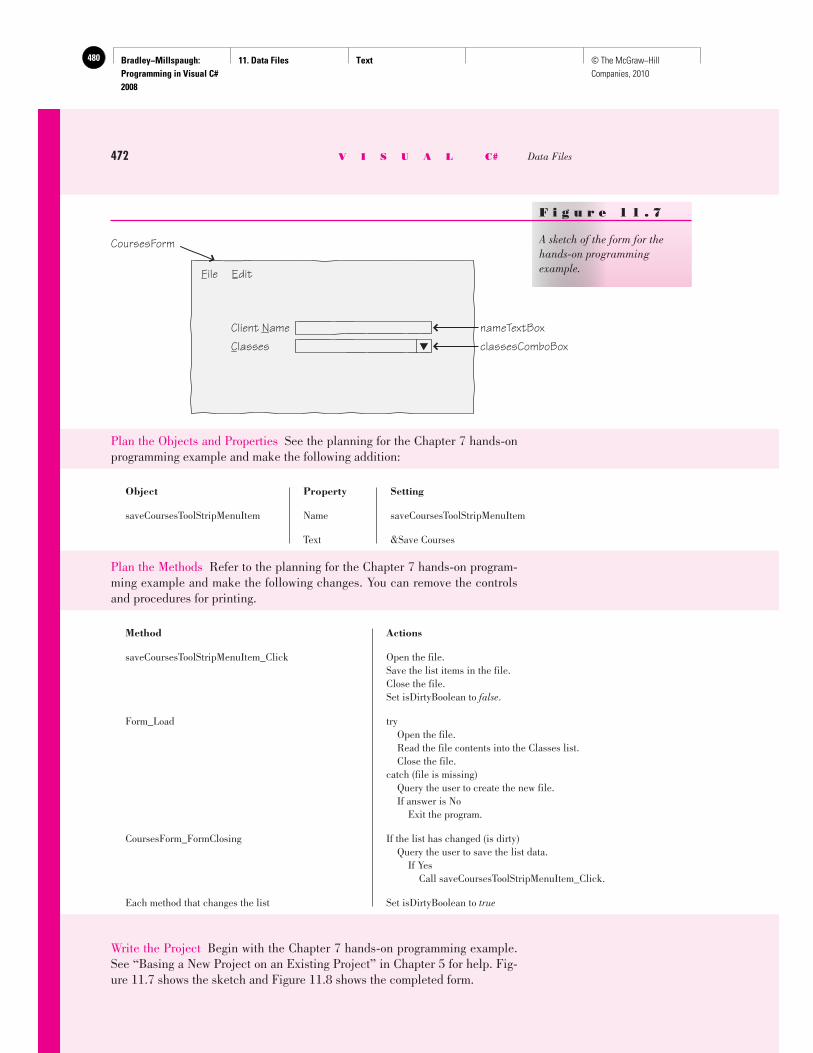
Bradley−Millspaugh: Programming in Visual C# 2008
11. Data Files Text480 © The McGraw−Hill Companies, 2010
472 V I S U A L C# Data Files
nameTextBoxclassesComboBox
CoursesForm
File Edit
Client NameClasses
F i g u r e 1 1 . 7
A sketch of the form for the hands-on programming example.
Plan the Objects and Properties See the planning for the Chapter 7 hands-on programming example and make the following addition:
Object Property Setting
saveCoursesToolStripMenuItem Name saveCoursesToolStripMenuItem
Text &Save Courses
Plan the Methods Refer to the planning for the Chapter 7 hands-on program-ming example and make the following changes. You can remove the controls and procedures for printing.
Method Actions
saveCoursesToolStripMenuItem_Click Open the file. Save the list items in the file. Close the file. Set isDirtyBoolean to false .
Form_Load try Open the file. Read the file contents into the Classes list. Close the file. catch (file is missing) Query the user to create the new file. If answer is No Exit the program.
CoursesForm_FormClosing If the list has changed (is dirty) Query the user to save the list data. If Yes Call saveCoursesToolStripMenuItem_Click.
Each method that changes the list Set isDirtyBoolean to true
Write the Project Begin with the Chapter 7 hands-on programming example. See “Basing a New Project on an Existing Project” in Chapter 5 for help. Fig-ure 11.7 shows the sketch and Figure 11.8 shows the completed form.
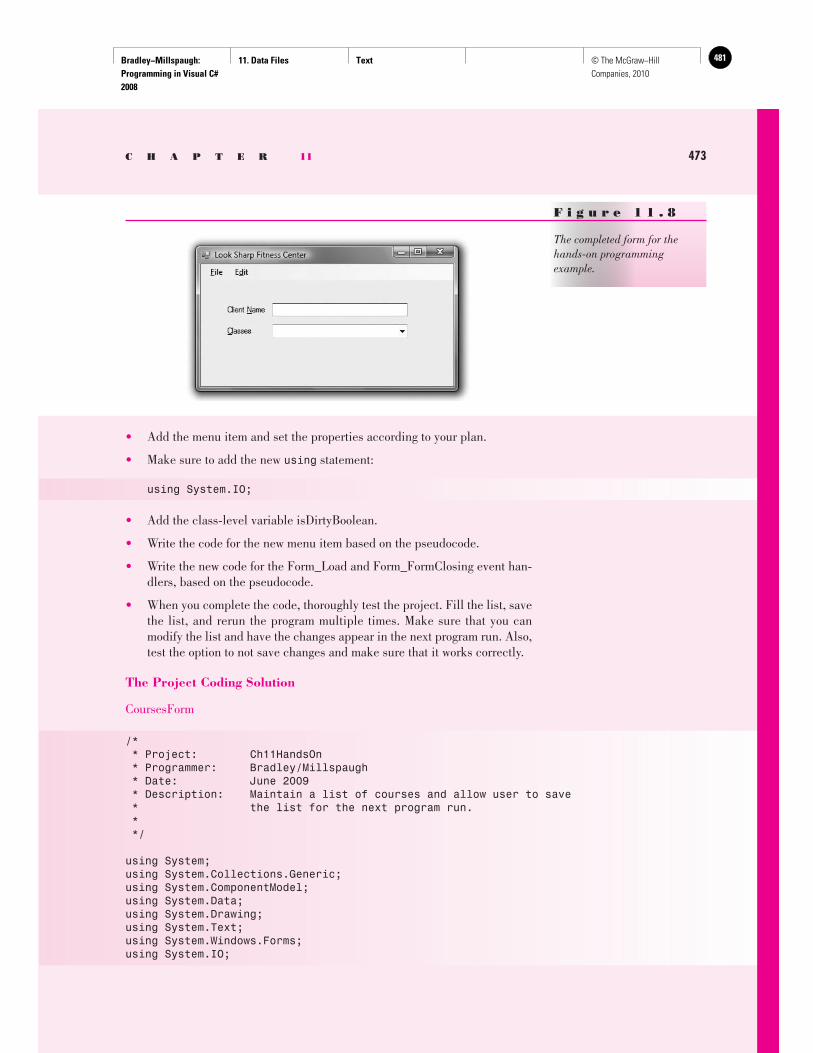
Bradley−Millspaugh: Programming in Visual C# 2008
11. Data Files Text 481© The McGraw−Hill Companies, 2010
C H A P T E R 11 473
• Add the menu item and set the properties according to your plan.
• Make sure to add the new using statement:
using System.IO;
• Add the class-level variable isDirtyBoolean.
• Write the code for the new menu item based on the pseudocode.
• Write the new code for the Form_Load and Form_FormClosing event han-dlers, based on the pseudocode.
• When you complete the code, thoroughly test the project. Fill the list, save the list, and rerun the program multiple times. Make sure that you can modify the list and have the changes appear in the next program run. Also, test the option to not save changes and make sure that it works correctly.
The Project Coding Solution
CoursesForm
/* * Project: Ch11HandsOn * Programmer: Bradley/Millspaugh * Date: June 2009 * Description: Maintain a list of courses and allow user to save * the list for the next program run. * */
using System;using System.Collections.Generic;using System.ComponentModel;using System.Data;using System.Drawing;using System.Text;using System.Windows.Forms;using System.IO;
F i g u r e 1 1 . 8
The completed form for the hands-on programming example.
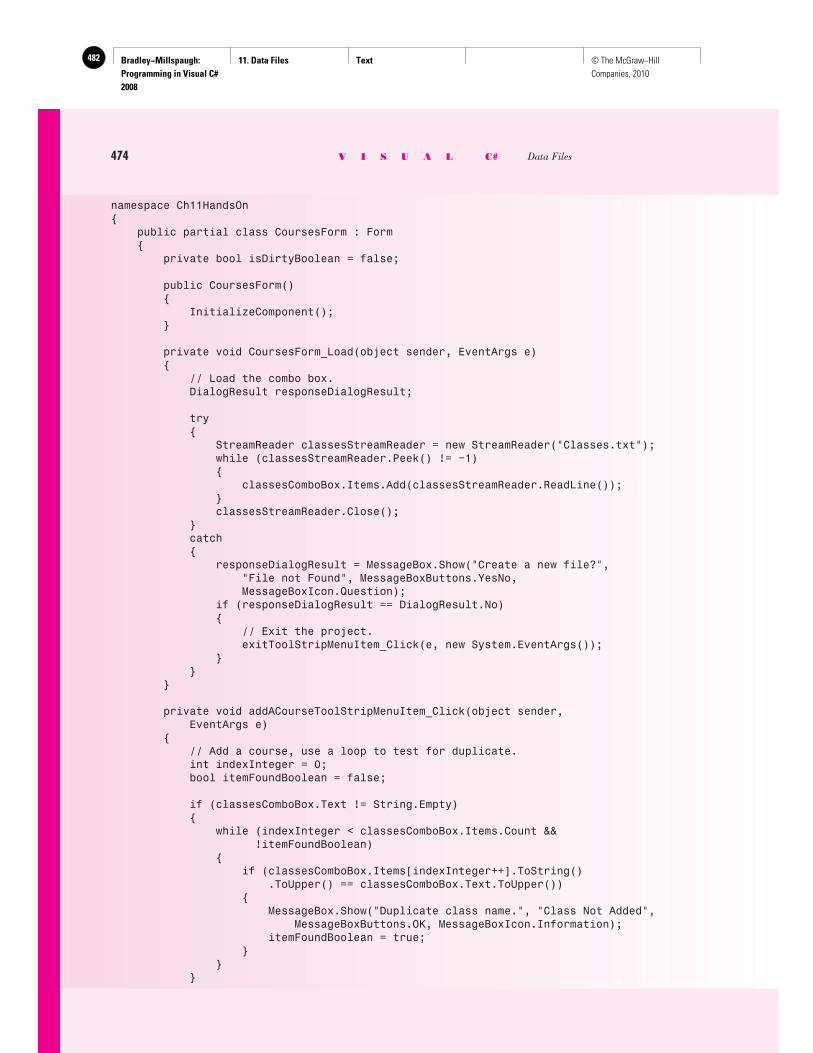
Bradley−Millspaugh: Programming in Visual C# 2008
11. Data Files Text482 © The McGraw−Hill Companies, 2010
474 V I S U A L C# Data Files
namespace Ch11HandsOn{ public partial class CoursesForm : Form { private bool isDirtyBoolean = false;
public CoursesForm() { InitializeComponent(); }
private void CoursesForm_Load(object sender, EventArgs e) { // Load the combo box. DialogResult responseDialogResult;
try { StreamReader classesStreamReader = new StreamReader("Classes.txt"); while (classesStreamReader.Peek() != −1) { classesComboBox.Items.Add(classesStreamReader.ReadLine()); } classesStreamReader.Close(); } catch { responseDialogResult = MessageBox.Show("Create a new file?", "File not Found", MessageBoxButtons.YesNo, MessageBoxIcon.Question); if (responseDialogResult == DialogResult.No) { // Exit the project. exitToolStripMenuItem_Click(e, new System.EventArgs()); } } }
private void addACourseToolStripMenuItem_Click(object sender, EventArgs e) { // Add a course, use a loop to test for duplicate. int indexInteger = 0; bool itemFoundBoolean = false;
if (classesComboBox.Text != String.Empty) { while (indexInteger < classesComboBox.Items.Count && !itemFoundBoolean) { if (classesComboBox.Items[indexInteger++].ToString() .ToUpper() == classesComboBox.Text.ToUpper()) { MessageBox.Show("Duplicate class name.", "Class Not Added", MessageBoxButtons.OK, MessageBoxIcon.Information); itemFoundBoolean = true; } } }
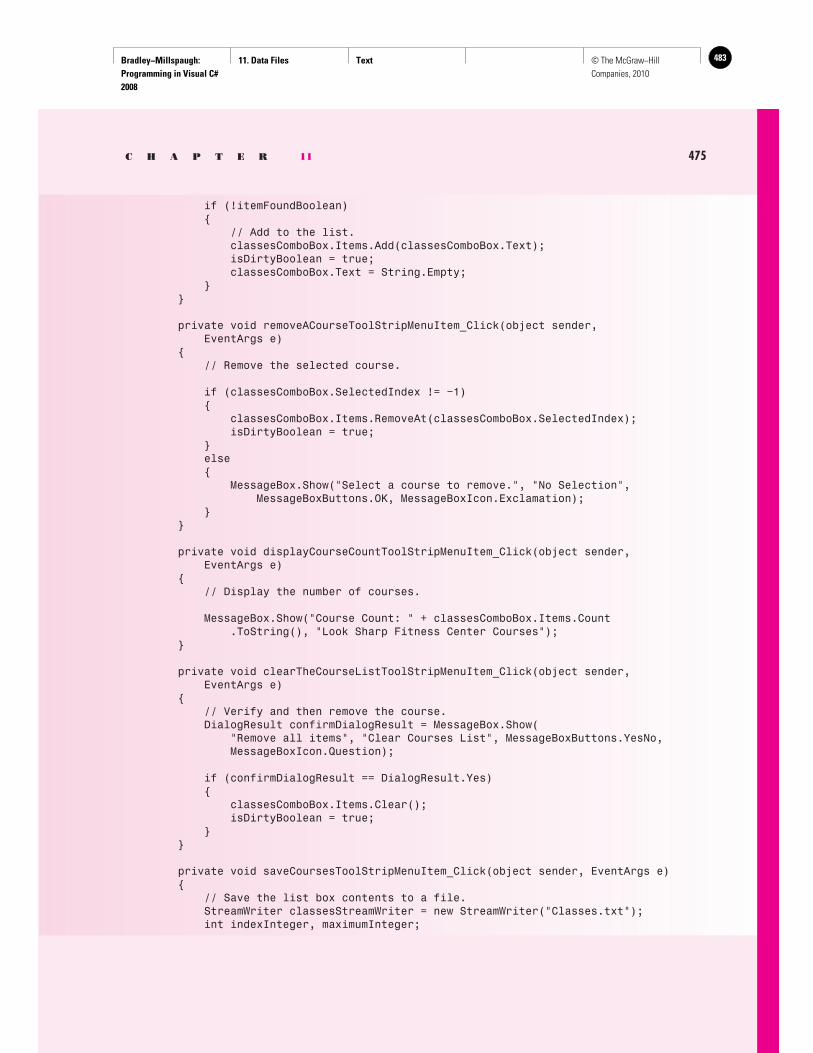
Bradley−Millspaugh: Programming in Visual C# 2008
11. Data Files Text 483© The McGraw−Hill Companies, 2010
C H A P T E R 11 475
if (!itemFoundBoolean) { // Add to the list. classesComboBox.Items.Add(classesComboBox.Text); isDirtyBoolean = true; classesComboBox.Text = String.Empty; } }
private void removeACourseToolStripMenuItem_Click(object sender, EventArgs e) { // Remove the selected course.
if (classesComboBox.SelectedIndex != −1) { classesComboBox.Items.RemoveAt(classesComboBox.SelectedIndex); isDirtyBoolean = true; } else { MessageBox.Show("Select a course to remove.", "No Selection", MessageBoxButtons.OK, MessageBoxIcon.Exclamation); } }
private void displayCourseCountToolStripMenuItem_Click(object sender, EventArgs e) { // Display the number of courses.
MessageBox.Show("Course Count: " + classesComboBox.Items.Count .ToString(), "Look Sharp Fitness Center Courses"); }
private void clearTheCourseListToolStripMenuItem_Click(object sender, EventArgs e) { // Verify and then remove the course. DialogResult confirmDialogResult = MessageBox.Show( "Remove all items", "Clear Courses List", MessageBoxButtons.YesNo, MessageBoxIcon.Question);
if (confirmDialogResult == DialogResult.Yes) { classesComboBox.Items.Clear(); isDirtyBoolean = true; } }
private void saveCoursesToolStripMenuItem_Click(object sender, EventArgs e) { // Save the list box contents to a file. StreamWriter classesStreamWriter = new StreamWriter("Classes.txt"); int indexInteger, maximumInteger;
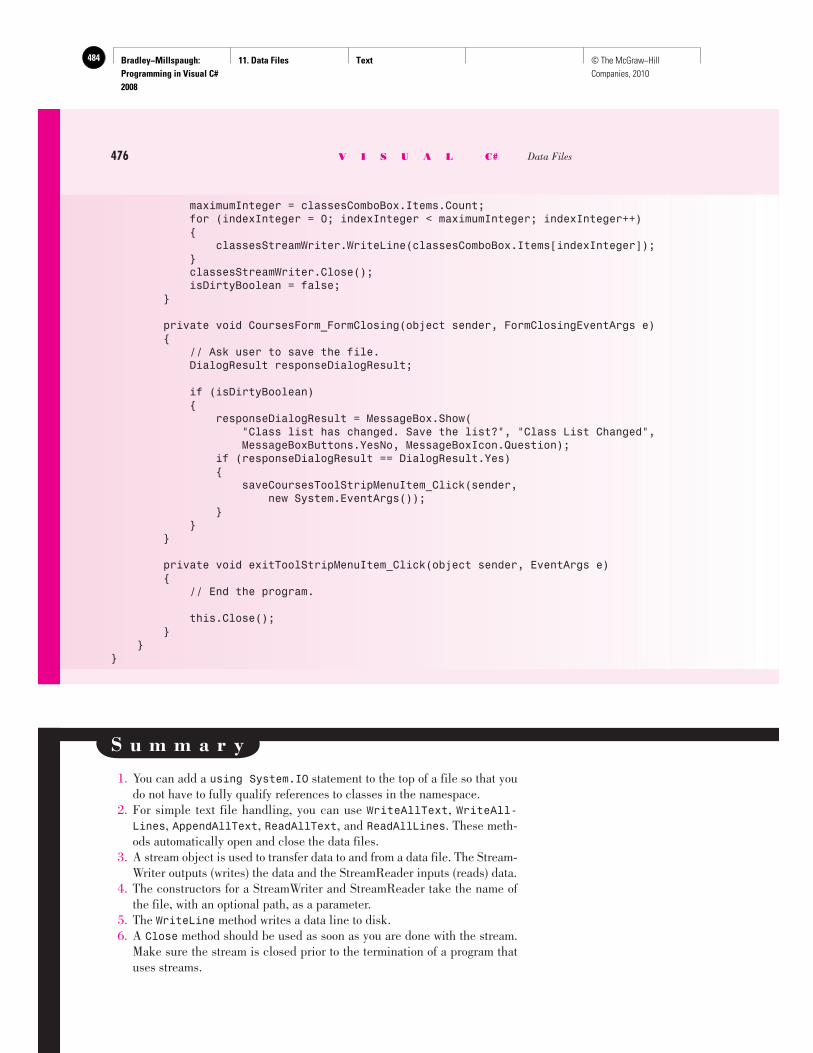
Bradley−Millspaugh: Programming in Visual C# 2008
11. Data Files Text484 © The McGraw−Hill Companies, 2010
maximumInteger = classesComboBox.Items.Count; for (indexInteger = 0; indexInteger < maximumInteger; indexInteger++) { classesStreamWriter.WriteLine(classesComboBox.Items[indexInteger]); } classesStreamWriter.Close(); isDirtyBoolean = false; }
private void CoursesForm_FormClosing(object sender, FormClosingEventArgs e) { // Ask user to save the file. DialogResult responseDialogResult;
if (isDirtyBoolean) { responseDialogResult = MessageBox.Show( "Class list has changed. Save the list?", "Class List Changed", MessageBoxButtons.YesNo, MessageBoxIcon.Question); if (responseDialogResult == DialogResult.Yes) { saveCoursesToolStripMenuItem_Click(sender, new System.EventArgs()); } } }
private void exitToolStripMenuItem_Click(object sender, EventArgs e) { // End the program.
this.Close(); } }}
476 V I S U A L C# Data Files
S u m m a r y
1. You can add a using System.IO statement to the top of a file so that you do not have to fully qualify references to classes in the namespace.
2. For simple text file handling, you can use WriteAllText , WriteAll-Lines , AppendAllText , ReadAllText , and ReadAllLines . These meth-ods automatically open and close the data files.
3. A stream object is used to transfer data to and from a data file. The Stream-Writer outputs (writes) the data and the StreamReader inputs (reads) data.
4. The constructors for a StreamWriter and StreamReader take the name of the file, with an optional path, as a parameter.
5. The WriteLine method writes a data line to disk. 6. A Close method should be used as soon as you are done with the stream.
Make sure the stream is closed prior to the termination of a program that uses streams.
Bradley−Millspaugh: Programming in Visual C# 2008
11. Data Files Text 485© The McGraw−Hill Companies, 2010
C H A P T E R 11 477
7. The Peek method looks at the next element, which allows testing for the end of the file. The Peek method returns −1 at the end of file.
8. List box data may be saved to a stream. The Items collection should be filled in the Form_Load method if the file exists. Any changes should be saved back to the file when the program terminates.
9. A Boolean variable is used to track whether changes have been made to the data.
10. The form’s FormClosing event handler is a good location for the code to prompt the users whether to save any changes.
11. The OpenFileDialog and SaveFileDialog components can be used to dis-play the Open File and Save As dialog boxes and allow the user to select the filename.
K e y T e r m s AppendAllText method 452Close method 459 data file 452 Directory.GetCurrentDirectory 464 File class 452 FormClosing event 470null 465 OpenFileDialog 463Peek method 461 ReadAllLines method 455
ReadAllText method 455ReadLine method 461 stream 457 StreamReader 457 StreamWriter 457 System.IO namespace 457Write method 458 WriteAllLines method 452 WriteAllText method 452WriteLine method 458
R e v i e w Q u e s t i o n s
1. Explain what occurs when a stream object is instantiated. 2. Name two types of stream classes. What is the difference between
the two? 3. What is the difference between a Write method and a WriteLine
method? 4. What steps are necessary for storing the list items from a list box into a
disk file? 5. What is the format for the statements to read and write streams? 6. What method can be used to determine the end of file? 7. When is exception handling necessary for stream handling? 8. Explain when a form’s FormClosing event occurs and what code might be
included in the FormClosing event handler.
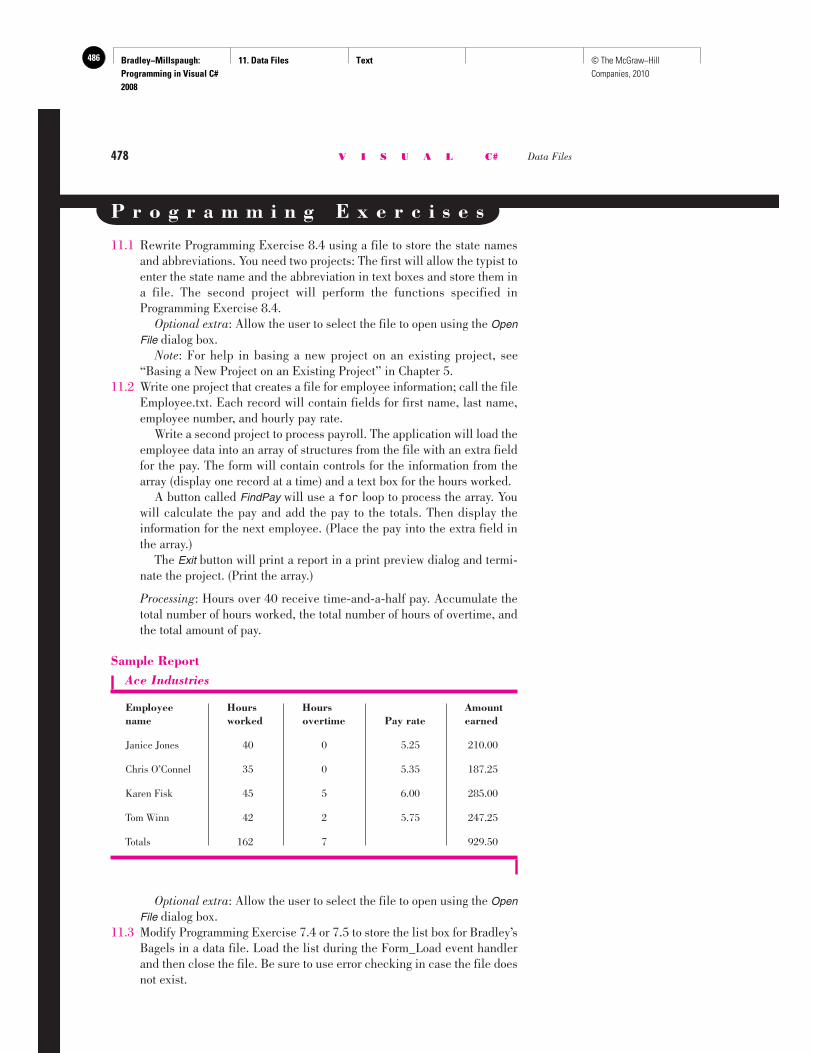
Bradley−Millspaugh: Programming in Visual C# 2008
11. Data Files Text486 © The McGraw−Hill Companies, 2010
478 V I S U A L C# Data Files
Sample ReportAce Industries
Employee Hours Hours Amount name worked overtime Pay rate earned
Janice Jones 40 0 5.25 210.00
Chris O’Connel 35 0 5.35 187.25
Karen Fisk 45 5 6.00 285.00
Tom Winn 42 2 5.75 247.25
Totals 162 7 929.50
P r o g r a m m i n g E x e r c i s e s
11.1 Rewrite Programming Exercise 8.4 using a file to store the state names and abbreviations. You need two projects: The first will allow the typist to enter the state name and the abbreviation in text boxes and store them in a file. The second project will perform the functions specified in Programming Exercise 8.4. Optional extra : Allow the user to select the file to open using the OpenFile dialog box. Note: For help in basing a new project on an existing project, see “Basing a New Project on an Existing Project” in Chapter 5.
11.2 Write one project that creates a file for employee information; call the file Employee.txt. Each record will contain fields for first name, last name, employee number, and hourly pay rate. Write a second project to process payroll. The application will load the employee data into an array of structures from the file with an extra field for the pay. The form will contain controls for the information from the array (display one record at a time) and a text box for the hours worked. A button called FindPay will use a for loop to process the array. You will calculate the pay and add the pay to the totals. Then display the information for the next employee. (Place the pay into the extra field in the array.) The Exit button will print a report in a print preview dialog and termi-nate the project. (Print the array.)
Processing : Hours over 40 receive time-and-a-half pay. Accumulate the total number of hours worked, the total number of hours of overtime, and the total amount of pay.
Optional extra: Allow the user to select the file to open using the OpenFile dialog box.
11.3 Modify Programming Exercise 7.4 or 7.5 to store the list box for Bradley’s Bagels in a data file. Load the list during the Form_Load event handler and then close the file. Be sure to use error checking in case the file does not exist.
Bradley−Millspaugh: Programming in Visual C# 2008
11. Data Files Text 487© The McGraw−Hill Companies, 2010
C H A P T E R 11 479
In the FormClosing method, prompt the user to save the bagel list back to the disk. Optional extra: Allow the user to select the file to open using the OpenFile dialog box. Note: For help in basing a new project on an existing project, see “Basing a New Project on an Existing Project” in Chapter 5.
11.4 Create a simple text editor that has one large rich text box (with its Multiline property set to true ). Set the text control to fill the form and set its Anchor property to all four edges so that the control fills the form even when it is resized. Allow the user to save the contents of the text box in a data file and load a data file into the text box using the Open File dialog box. Use a StreamWriter and StreamReader or File.WriteAllText and File.ReadAllText .
11.5 Create a project that stores personal information for a little electronic “black book.” The fields in the file should include name, phone number, pager number, cell phone number, voice mail number, and e-mail ad-dress. Use text boxes to enter the data. Create a second project to load the names into a list box and use a structure to hold the fields of data. Perform a “look up” and display the appropriate information for the selected name. Optional extra: Allow the user to select the file to open using the OpenFile dialog box.
Case Studies
Custom Supplies Mail Order
Modify your project from Chapter 7 to save the changes to the catalog name combo box from one run to the next. When the program begins, load the list from the data file. If the file does not exist, display a message asking if the user wants to create it. Allow the user to save changes from a Save menu item. When the program terminates, check to see if
there are any unsaved changes. If so, prompt the user to save the changes. Optional extra : Allow the user to select the file to open using the Open File dialog box.
Note : For help in basing a new project on an existing project, see “Basing a New Project on an Existing Project” in Chapter 5.
Write a project to store vehicle information including model, manufacturer, year, and VIN number. Create a second project that loads the data from the file into memory and loads a drop-down combo box with the VIN numbers. When a number is selected
Christopher’s Car Center
from the combo box, display the appropriate informa-tion regarding the vehicle. Optional extra : Allow the user to select the file to open using the Open File dialog box.
Bradley−Millspaugh: Programming in Visual C# 2008
11. Data Files Text488 © The McGraw−Hill Companies, 2010
480 V I S U A L C# Data Files
Xtreme Cinema
Modify your project from Chapter 7 to save the changes to the movie combo box from one run to the next. When the program begins, load the list from the data file. If the file does not exist, display a message asking if the user wants to create it. Allow the user to save changes from a Save menu item. When the program terminates, check to see if
there are any unsaved changes. If so, prompt the user to save the changes. Optional extra : Allow the user to select the file to open using the Open File dialog box.
Cool Boards
Modify your project from Chapter 7 to save the changes to the shirt style combo box from one run to the next. When the program begins, load the list from the data file. If the file does not exist, display a message asking if the user wants to create it. Allow the user to save changes from a Save menu item. When the program terminates, check to see if
there are any unsaved changes. If so, prompt the user to save the changes. Optional extra : Allow the user to select the file to open using the Open File dialog box.
Bradley−Millspaugh: Programming in Visual C# 2008
12. OOP: Creating Object−Oriented Programs
Text 489© The McGraw−Hill Companies, 2010
try{ // Convert input values to numeric and assign quantityInteger = int.Parse(quantityTextBox.T try { priceDecimal = decimal.Parse(priceTextBox // Calculate values. extendedPriceDecimal = quantityInteger * discountDecimal = Decimal.Round( (extendedPriceDecimal * DISCOUNT_RATE_ amountDueDecimal = extendedPriceDecimal - totalAmountDecimal += amountDueDecimal; numberTransactionsInteger++; // Format and display answers. extendedPriceTextBox.Text = extendedPrice
C H A P T E R
12 OOP: Creating Object-Oriented Programs
at the completion of this chapter, you will be able to . . .
1. Use object-oriented terminology correctly.
2. Create a two-tier application that separates the user interface from the business logic.
3. Differentiate between a class and an object.
4. Create a class that has properties and methods.
5. Declare object variables and assign values to the properties with a constructor or property methods.
6. Instantiate an object in a project using your class.
7. Differentiate between static members and instance members.
8. Understand the purpose of the constructor and destructor methods.
9. Inherit a new class from your own class.
10. Use visual inheritance by basing a form on another form.
Bradley−Millspaugh: Programming in Visual C# 2008
12. OOP: Creating Object−Oriented Programs
Text490 © The McGraw−Hill Companies, 2010
482 V I S U A L C# OOP: Creating Object-Oriented Programs
Object-Oriented Programming
You have been using objects since Chapter 1. As you know quite well by now, objects have properties and methods and generate events that you can re-spond to (or ignore) if you choose. Up until now, the classes for all objects in your projects have been predefined; that is, you could choose to create a new object of the form class, a button class, a text box class, or any other class of control in the toolbox. In this chapter, you will learn to define your own new class and create objects based on that class. Object-oriented programming (OOP) is currently the most accepted style of programming. Some computer languages, such as Java, C#, and SmallTalk, were designed to be object oriented (OO) from their inception. Other languages, such as Visual Basic and C++, have been modified in recent years to accom-modate OOP. Writing object-oriented programs is a mind-set—a different way of looking at a problem. You must think in terms of using objects. As your projects be-come more complex, using objects becomes increasingly important.
Objects
Beyond the many built-in choices you have for objects to include in your proj-ects, C# allows you to create your own new object type by creating a class . Just like other object types, your class may have properties, methods, and events. Remember: Properties are characteristics and methods are actions that can be performed by a class of objects. An object is a thing such as a button. You create a button object from the button tool in the toolbox. In other words, button is a class but exitButton is an actual occurrence or instance of the class; the instance is the object. Just as you may have multiple buttons in a project, you may have many objects of a new class type. Defining your own class is like creating a new tool for the toolbox; the pro-cess does not create the object, only a definition of what that type of object looks like and how it behaves. You may then create as many instances of the class as you need using the new keyword. Your class may be a student, an em-ployee, a product, or any other type of object that would be useful in a project. Many people use a cookie analogy to describe the relationship of a class and an object. The cookie cutter is the class. You can’t eat a cookie cutter, but you can use it to make cookies; the cookie is the object. When you make a cookie using a cookie cutter, you instantiate the cookie class, creating an object of the class. You can use the same cookie cutter to make various kinds of cookies. Although all the cookies made will have the same shape, some may be chocolate; others are lemon, or vanilla; some may be frosted or have colored sprin-kles on top. The characteristics of the cookie, such as flavor and topping, are the properties of the object. You could refer to the properties of your cookie object as
Cookie1.Flavor = "Lemon";Cookie1.Topping = "Cream Frosting";
What about methods? Recall that a method is an action or behavior—something the object can do or have done to it, such as Hide , Clear , or Show .
Bradley−Millspaugh: Programming in Visual C# 2008
12. OOP: Creating Object−Oriented Programs
Text 491© The McGraw−Hill Companies, 2010
C H A P T E R 12 483
Possible methods for our cookie object might be Eat, Bake, or Crumble. Using object terminology, you can refer to Object.method:
Cookie1.Crumble();
Sometimes the distinction between a method and an event is somewhat fuzzy. Generally, anything you tell the object to do is a method; if the object does an action and needs to inform you, that’s an event. So if you tell the cookie to crumble, that is a method; if the cookie crumbles on its own and needs to inform you of the fact, that’s an event.
Object-Oriented Terminology
Key features of an object-oriented language are encapsulation, inheritance, and polymorphism.
Encapsulation Encapsulation refers to the combination of characteristics of an object along with its behaviors. You have one “package” that holds the definition of all properties, methods, and events. For example, when you create a button, you can set or retrieve its properties, such as Text, Name, or BackColor. You can execute its methods, such as Focus , Hide , or Show , and you can write code for its events, such as Click or Double-click. But you cannot make up new proper-ties or tell it to do anything that it doesn’t already know how to do. It is a com-plete package; you can think of all of the parts of the package as being in a capsule. You can witness encapsulation by looking at any program. The form is ac-tually a class. All of the methods and events that you code are enclosed within the braces. The variables that you place in your code are actually properties of the specific form class that you are generating. When you understand and use encapsulation successfully, you can imple-ment data hiding . Each object can keep its data (properties) and methods hidden. Through use of the public and private keywords, an object can “expose” only those data elements and methods that it wishes to allow the outside world to see.
Inheritance Inheritance is the ability to create a new class from an existing class. You can add enhancements to an existing class without modifying the original. By creating a new class that inherits from an existing class, you can add or modify class vari-ables and methods. For example, each of the forms that you create is inherited from, or derived from, the existing Form class. The original class is known as the base class , the superclass , or the parent class . The inherited class is called a subclass , a derived class , or a child class . Of course, a new class can inherit from a subclass—that subclass becomes a superclass as well as a subclass. Look closely at the first lines of the class file for a form:
public partial class Form1 : Form
The base class is Form and Form1 is the derived class. Inherited classes have an “is a” relationship with the base class. In the form example, the new Form1 “is a” Form.
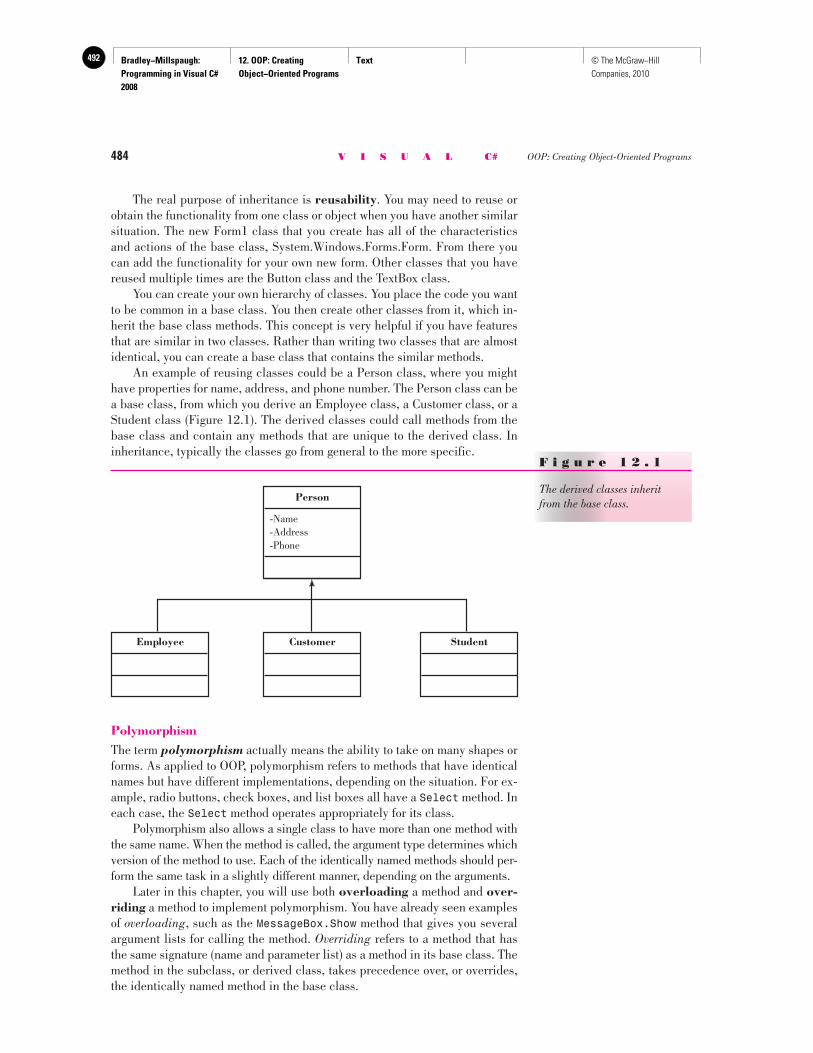
Bradley−Millspaugh: Programming in Visual C# 2008
12. OOP: Creating Object−Oriented Programs
Text492 © The McGraw−Hill Companies, 2010
484 V I S U A L C# OOP: Creating Object-Oriented Programs
The real purpose of inheritance is reusability . You may need to reuse or obtain the functionality from one class or object when you have another similar situation. The new Form1 class that you create has all of the characteristics and actions of the base class, System.Windows.Forms.Form. From there you can add the functionality for your own new form. Other classes that you have reused multiple times are the Button class and the TextBox class. You can create your own hierarchy of classes. You place the code you want to be common in a base class. You then create other classes from it, which in-herit the base class methods. This concept is very helpful if you have features that are similar in two classes. Rather than writing two classes that are almost identical, you can create a base class that contains the similar methods. An example of reusing classes could be a Person class, where you might have properties for name, address, and phone number. The Person class can be a base class, from which you derive an Employee class, a Customer class, or a Student class ( Figure 12.1 ). The derived classes could call methods from the base class and contain any methods that are unique to the derived class. In inheritance, typically the classes go from general to the more specific.
F i g u r e 1 2 . 1
The derived classes inherit from the base class.
Employee Customer
-Name-Address-Phone
Person
Student
Polymorphism The term polymorphism actually means the ability to take on many shapes or forms. As applied to OOP, polymorphism refers to methods that have identical names but have different implementations, depending on the situation. For ex-ample, radio buttons, check boxes, and list boxes all have a Select method. In each case, the Select method operates appropriately for its class. Polymorphism also allows a single class to have more than one method with the same name. When the method is called, the argument type determines which version of the method to use. Each of the identically named methods should per-form the same task in a slightly different manner, depending on the arguments. Later in this chapter, you will use both overloading a method and over-riding a method to implement polymorphism. You have already seen examples of overloading , such as the MessageBox.Show method that gives you several argument lists for calling the method. Overriding refers to a method that has the same signature (name and parameter list) as a method in its base class. The method in the subclass, or derived class, takes precedence over, or overrides, the identically named method in the base class.
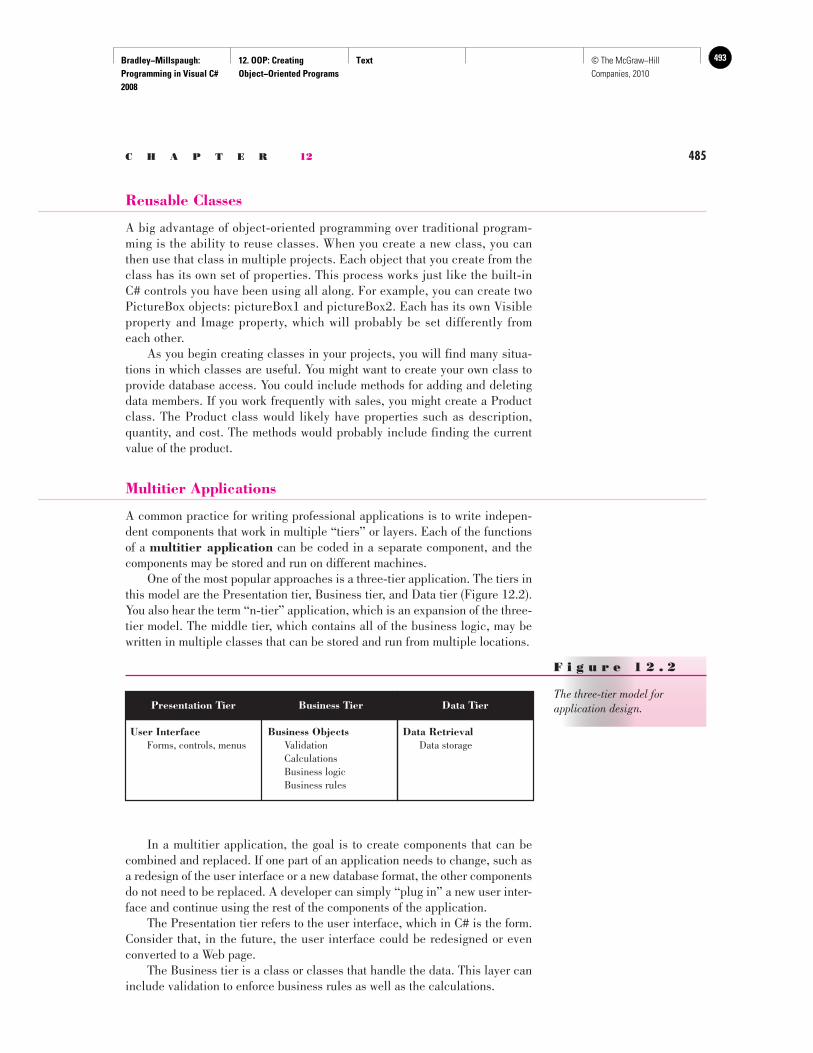
Bradley−Millspaugh: Programming in Visual C# 2008
12. OOP: Creating Object−Oriented Programs
Text 493© The McGraw−Hill Companies, 2010
C H A P T E R 12 485
Reusable Classes
A big advantage of object-oriented programming over traditional program-ming is the ability to reuse classes. When you create a new class, you can then use that class in multiple projects. Each object that you create from the class has its own set of properties. This process works just like the built-in C# controls you have been using all along. For example, you can create two PictureBox objects: pictureBox1 and pictureBox2. Each has its own Visible property and Image property, which will probably be set differently from each other. As you begin creating classes in your projects, you will find many situa-tions in which classes are useful. You might want to create your own class to provide database access. You could include methods for adding and deleting data members. If you work frequently with sales, you might create a Product class. The Product class would likely have properties such as description, quantity, and cost. The methods would probably include finding the current value of the product.
Multitier Applications
A common practice for writing professional applications is to write indepen-dent components that work in multiple “tiers” or layers. Each of the functions of a multitier application can be coded in a separate component, and the components may be stored and run on different machines. One of the most popular approaches is a three-tier application. The tiers in this model are the Presentation tier, Business tier, and Data tier ( Figure 12.2 ).You also hear the term “n-tier” application, which is an expansion of the three-tier model. The middle tier, which contains all of the business logic, may be written in multiple classes that can be stored and run from multiple locations.
F i g u r e 1 2 . 2
The three-tier model for application design.
User Interface Forms, controls, menus
Business Objects Validation Calculations Business logic Business rules
Data Retrieval Data storage
Presentation Tier Business Tier Data Tier
In a multitier application, the goal is to create components that can be combined and replaced. If one part of an application needs to change, such as a redesign of the user interface or a new database format, the other components do not need to be replaced. A developer can simply “plug in” a new user inter-face and continue using the rest of the components of the application. The Presentation tier refers to the user interface, which in C# is the form. Consider that, in the future, the user interface could be redesigned or even converted to a Web page. The Business tier is a class or classes that handle the data. This layer can include validation to enforce business rules as well as the calculations.
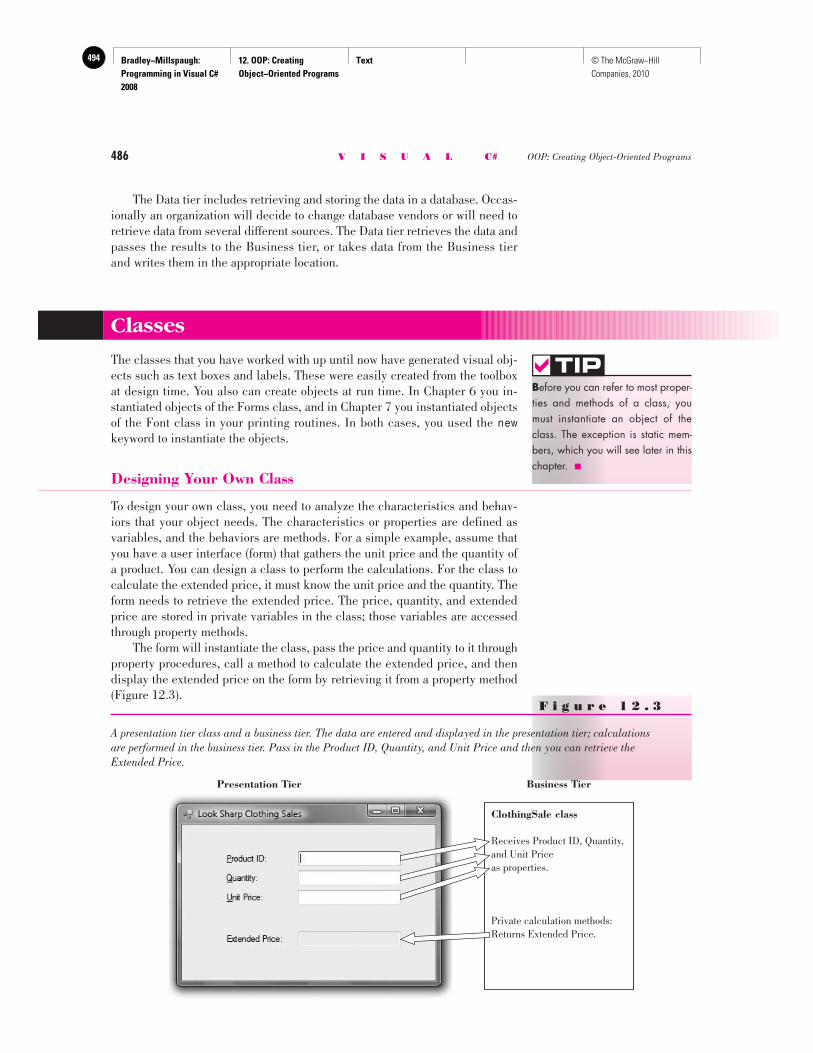
Bradley−Millspaugh: Programming in Visual C# 2008
12. OOP: Creating Object−Oriented Programs
Text494 © The McGraw−Hill Companies, 2010
486 V I S U A L C# OOP: Creating Object-Oriented Programs
The Data tier includes retrieving and storing the data in a database. Occas-ionally an organization will decide to change database vendors or will need to retrieve data from several different sources. The Data tier retrieves the data and passes the results to the Business tier, or takes data from the Business tier and writes them in the appropriate location.
Classes
The classes that you have worked with up until now have generated visual obj-ects such as text boxes and labels. These were easily created from the toolbox at design time. You also can create objects at run time. In Chapter 6 you in-stantiated objects of the Forms class, and in Chapter 7 you instantiated objects of the Font class in your printing routines. In both cases, you used the newkeyword to instantiate the objects.
Designing Your Own Class
To design your own class, you need to analyze the characteristics and behav-iors that your object needs. The characteristics or properties are defined as variables, and the behaviors are methods. For a simple example, assume that you have a user interface (form) that gathers the unit price and the quantity of a product. You can design a class to perform the calculations. For the class to calculate the extended price, it must know the unit price and the quantity. The form needs to retrieve the extended price. The price, quantity, and extended price are stored in private variables in the class; those variables are accessed through property methods. The form will instantiate the class, pass the price and quantity to it through property procedures, call a method to calculate the extended price, and then display the extended price on the form by retrieving it from a property method ( Figure 12.3 ).
Before you can refer to most proper-ties and methods of a class, you must instantiate an object of the class. The exception is static mem-bers, which you will see later in this chapter. ■
TIP
F i g u r e 1 2 . 3
A presentation tier class and a business tier. The data are entered and displayed in the presentation tier; calculations are performed in the business tier. Pass in the Product ID, Quantity, and Unit Price and then you can retrieve the Extended Price.
ClothingSale class
Receives Product ID, Quantity,and Unit Priceas properties.
Private calculation methods:Returns Extended Price.
Business TierPresentation Tier
Bradley−Millspaugh: Programming in Visual C# 2008
12. OOP: Creating Object−Oriented Programs
Text 495© The McGraw−Hill Companies, 2010
C H A P T E R 12 487
Creating Properties in a Class
In Chapter 6 you created properties of the form to pass the summary data. The same concept applies for the classes that you create. Inside your class you define private member variables, which store the values for the properties of the class. Theoretically, you could declare all vari-ables as public so that all other project code could set and retrieve their val-ues. However, this approach violates the rules of encapsulation that require each object to be in charge of its own data. Remember that encapsulation can be used for data hiding . To accomplish data hiding, you will declare all vari-ables in a class as private or protected . Protected variables behave as pri-vate, but are available in any class that inherits from this class. As a private or protected variable, the value is available only to methods within the class, the same way that private class-level variables are available only to methods within a form’s class code. Use property set and get methods to pass the values between your class and the class where objects of your class are instantiated.
Class Methods
You create methods of the new class by coding public methods within the class. Any methods that you declare with the private keyword are available only within the class. Any methods that you declare with the public keyword are available to external objects created from this class or other classes. And a method that you declare with the protected keyword behaves like private in the current class and any classes that inherit from it.
// Private method used for internal calculations.
private void calculateExtendedPrice(){ // Calculate the extended price.
extendedPriceDecimal = quantityInteger * priceDecimal;}
Constructors and Destructors
A constructor is a method that executes automatically when an object is instantiated. A destructor is a method that executes automatically when an object is destroyed. A constructor method has the same name as the class.
Constructors The constructor executes automatically when you create an instance (an object) of the class. Because the constructor method executes before any other code in the class, the constructor is an ideal location for any initialization tasks that you need to do, such as setting the initial values of variables and properties. The constructor must be public because the objects that you create must execute this method. Note : If you do not write a constructor for a class, the compiler creates an implicit default constructor , which has an empty parameter list. If you do write a constructor, the compiler-supplied default constructor is no longer available.
Bradley−Millspaugh: Programming in Visual C# 2008
12. OOP: Creating Object−Oriented Programs
Text496 © The McGraw−Hill Companies, 2010
488 V I S U A L C# OOP: Creating Object-Oriented Programs
Overloading the Constructor Recall from Chapter 3 that overloading means that two methods have the same name but a different list of arguments (the signature). You can create over-loaded methods in your class by giving the same name to multiple methods, each with a different argument list. The following example shows an empty constructor (one without arguments) and a constructor that passes arguments to the class.
public ClothingSale(){ // Empty constructor.}
public ClothingSale(string productNumberString, int quantityInteger, decimal discountRateDecimal){ // Code statements to assign property values.}
Parameterized Constructor The term parameterized constructor refers to a constructor that requires arguments. This popular technique allows you to pass arguments as you create the new object.
ClothingSale aClothingSale = new ClothingSale(productString, int.Parse(quantityTextBox.Text), decimal.Parse(discountRateTextBox.Text));
You must assign the incoming values to the properties of the class. One way would be to just assign each incoming argument to its class-level property vari-able. But the better way is to assign an argument to the property name, which then uses the set method. Often validation is performed in the set methods.
public ClothingSale(string productNumberString, int quantityInteger, decimal discountRateDecimal){ ProductNumber = productNumberString; Quantity = quantityInteger; DiscountRate = discountRateDecimal; calculateExtendedPrice();}
Creating a New Class—Step-by-Step
In this step-by-step exercise, you will create a new class to hold clothing sale information for Look Sharp Fitness Center. The user interface for this project has already been created so that you can focus on writing the class for the middle-tier component. The partially com-pleted project is available in the StudentData folder, which you can download from the text Web site ( www.mhhe.com/C#2008 ). You will open the Windows project and add a new class to perform the calculations.
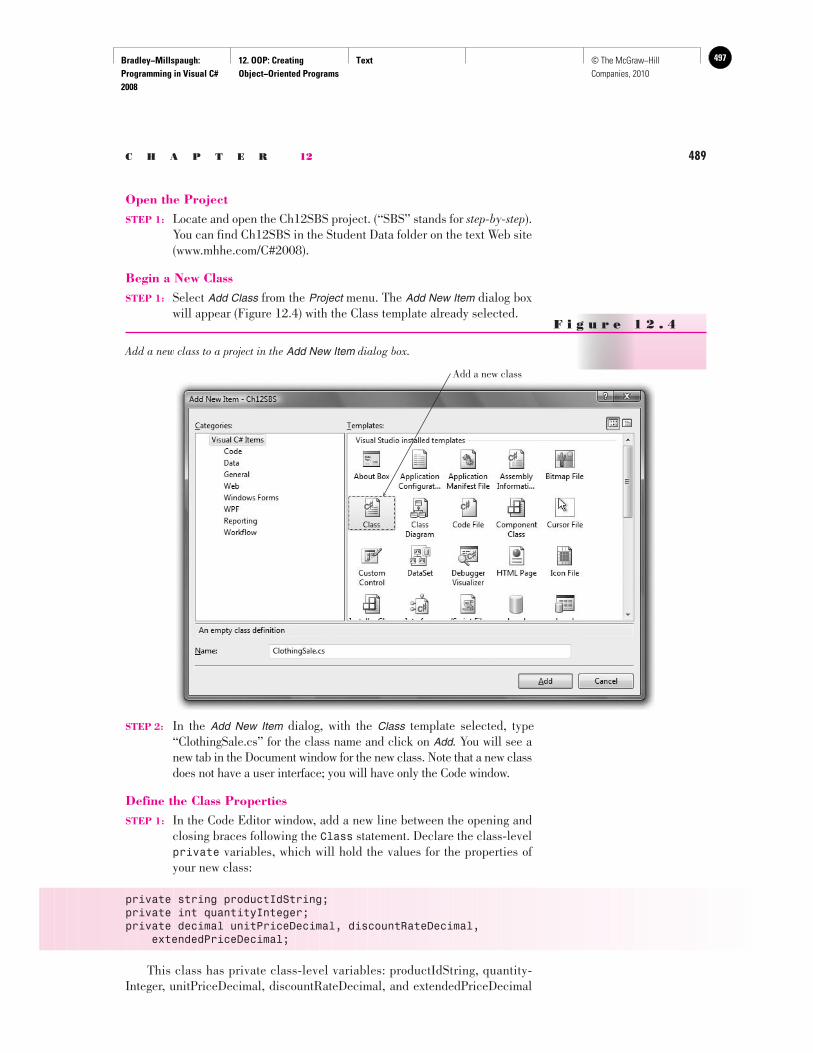
Bradley−Millspaugh: Programming in Visual C# 2008
12. OOP: Creating Object−Oriented Programs
Text 497© The McGraw−Hill Companies, 2010
C H A P T E R 12 489
Open the Project STEP 1: Locate and open the Ch12SBS project. (“SBS” stands for step-by-step ).
You can find Ch12SBS in the Student Data folder on the text Web site ( www.mhhe.com/C#2008 ).
Begin a New Class STEP 1: Select Add Class from the Project menu. The Add New Item dialog box
will appear ( Figure 12.4 ) with the Class template already selected. F i g u r e 1 2 . 4
Add a new class to a project in the Add New Item dialog box.
Add a new class
STEP 2: In the Add New Item dialog, with the Class template selected, type “ClothingSale.cs” for the class name and click on Add . You will see a new tab in the Document window for the new class. Note that a new class does not have a user interface; you will have only the Code window.
Define the Class Properties STEP 1: In the Code Editor window, add a new line between the opening and
closing braces following the Class statement. Declare the class-level private variables, which will hold the values for the properties of your new class:
private string productIdString;private int quantityInteger;private decimal unitPriceDecimal, discountRateDecimal, extendedPriceDecimal;
This class has private class-level variables: productIdString, quantity- Integer, unitPriceDecimal, discountRateDecimal, and extendedPriceDecimal

Bradley−Millspaugh: Programming in Visual C# 2008
12. OOP: Creating Object−Oriented Programs
Text498 © The McGraw−Hill Companies, 2010
490 V I S U A L C# OOP: Creating Object-Oriented Programs
( Figure 12.5 ). Because the variables are declared as private , they can be accessed only by methods within the class. To allow access from outside the class, you must add property methods.
F i g u r e 1 2 . 5
Declare the class-level variables to hold the class properties.
Add the Property Methods STEP 1: In the Code Editor window, after the property declarations, type “public
string ProductId”. Press Enter and type the brace. Inside the property method you will create a public get method and a private set method.
STEP 2: Write the code for the property methods.
public string ProductId{ get { return productIdString; } set { productIdString = value; }}
public int Quantity{ set { quantityInteger = value; }}
public decimal UnitPrice{ set { unitPriceDecimal = value; }}
Follow variable naming conventions for the class-level variable to hold the property value; use a friendly name for the property name in the property method. ■
TIP
Use snippets to automatically create the code for a property. In the Edi-tor, type “prop” and press the Tab key twice. You can enter the data type and property name, or press Tab again to accept the defaults. Press Enter when finished and then fill in the get and set clauses. ■
TIP
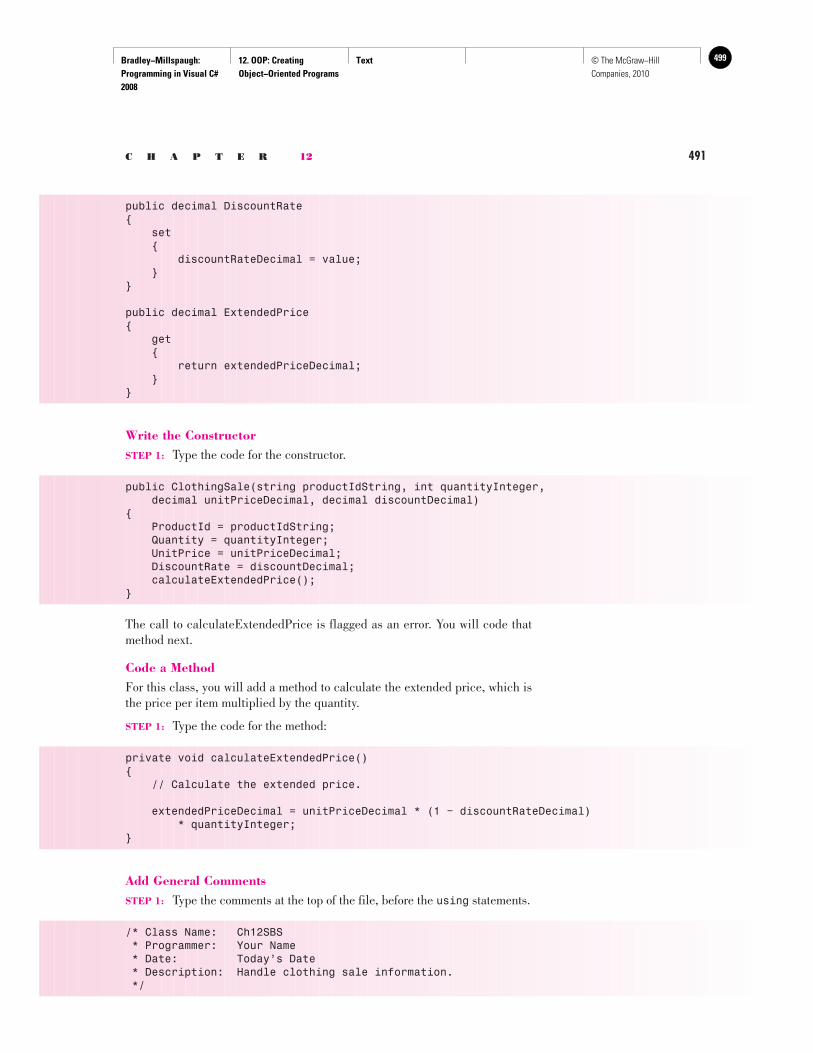
Bradley−Millspaugh: Programming in Visual C# 2008
12. OOP: Creating Object−Oriented Programs
Text 499© The McGraw−Hill Companies, 2010
C H A P T E R 12 491
public decimal DiscountRate{ set { discountRateDecimal = value; }}
public decimal ExtendedPrice{ get { return extendedPriceDecimal; }}
Write the Constructor STEP 1: Type the code for the constructor.
public ClothingSale(string productIdString, int quantityInteger, decimal unitPriceDecimal, decimal discountDecimal){ ProductId = productIdString; Quantity = quantityInteger; UnitPrice = unitPriceDecimal; DiscountRate = discountDecimal; calculateExtendedPrice();}
The call to calculateExtendedPrice is flagged as an error. You will code that method next.
Code a Method For this class, you will add a method to calculate the extended price, which is the price per item multiplied by the quantity.
STEP 1: Type the code for the method:
private void calculateExtendedPrice(){ // Calculate the extended price.
extendedPriceDecimal = unitPriceDecimal * (1 − discountRateDecimal) * quantityInteger;}
Add General Comments STEP 1: Type the comments at the top of the file, before the using statements.
/* Class Name: Ch12SBS * Programmer: Your Name * Date: Today’s Date * Description: Handle clothing sale information. */
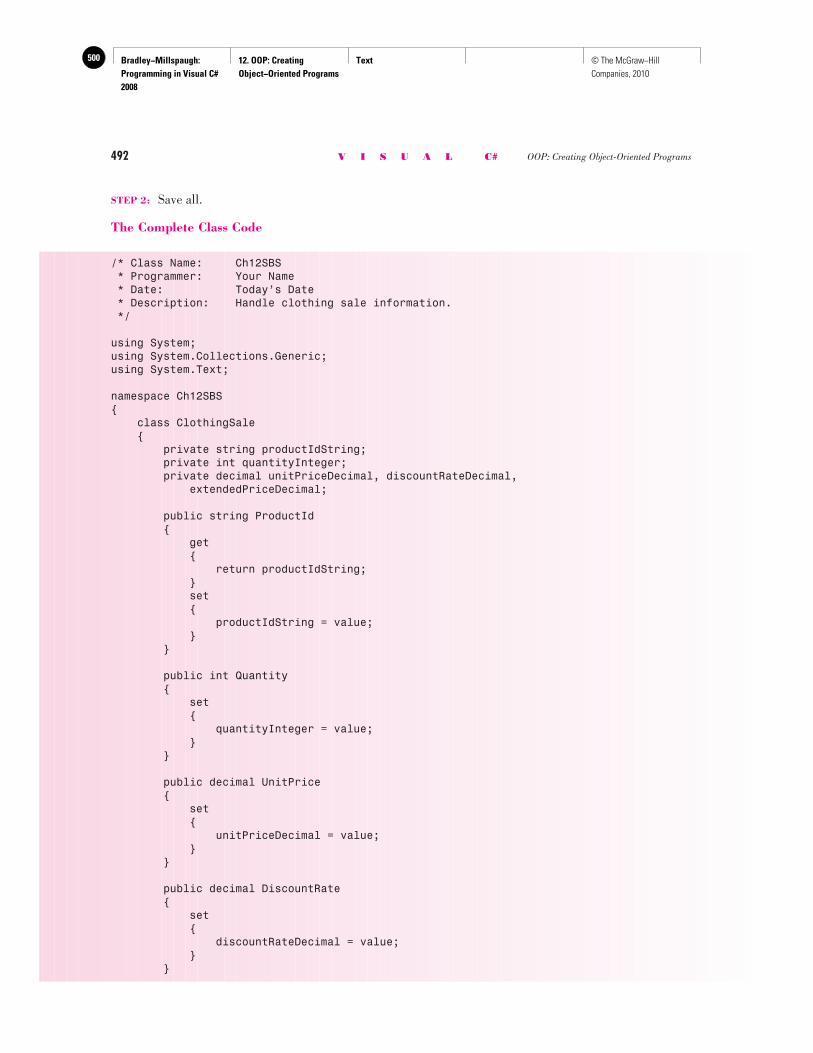
Bradley−Millspaugh: Programming in Visual C# 2008
12. OOP: Creating Object−Oriented Programs
Text500 © The McGraw−Hill Companies, 2010
492 V I S U A L C# OOP: Creating Object-Oriented Programs
STEP 2: Save all.
The Complete Class Code
/* Class Name: Ch12SBS * Programmer: Your Name * Date: Today’s Date * Description: Handle clothing sale information. */
using System;using System.Collections.Generic;using System.Text;
namespace Ch12SBS{ class ClothingSale { private string productIdString; private int quantityInteger; private decimal unitPriceDecimal, discountRateDecimal, extendedPriceDecimal;
public string ProductId { get { return productIdString; } set { productIdString = value; } }
public int Quantity { set { quantityInteger = value; } }
public decimal UnitPrice { set { unitPriceDecimal = value; } }
public decimal DiscountRate { set { discountRateDecimal = value; } }
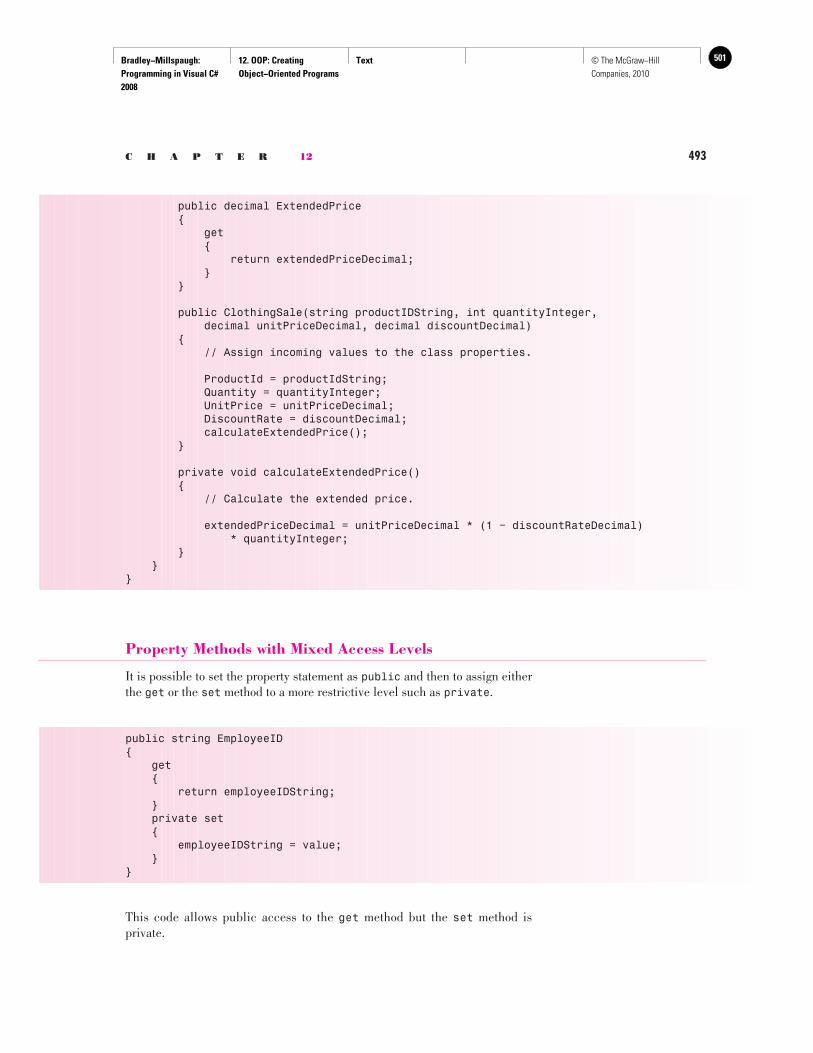
Bradley−Millspaugh: Programming in Visual C# 2008
12. OOP: Creating Object−Oriented Programs
Text 501© The McGraw−Hill Companies, 2010
C H A P T E R 12 493
public decimal ExtendedPrice { get { return extendedPriceDecimal; } }
public ClothingSale(string productIDString, int quantityInteger, decimal unitPriceDecimal, decimal discountDecimal) { // Assign incoming values to the class properties.
ProductId = productIdString; Quantity = quantityInteger; UnitPrice = unitPriceDecimal; DiscountRate = discountDecimal; calculateExtendedPrice(); }
private void calculateExtendedPrice() { // Calculate the extended price.
extendedPriceDecimal = unitPriceDecimal * (1 − discountRateDecimal) * quantityInteger; } }}
Property Methods with Mixed Access Levels
It is possible to set the property statement as public and then to assign either the get or the set method to a more restrictive level such as private .
public string EmployeeID{ get { return employeeIDString; } private set { employeeIDString = value; }}
This code allows public access to the get method but the set method is private.
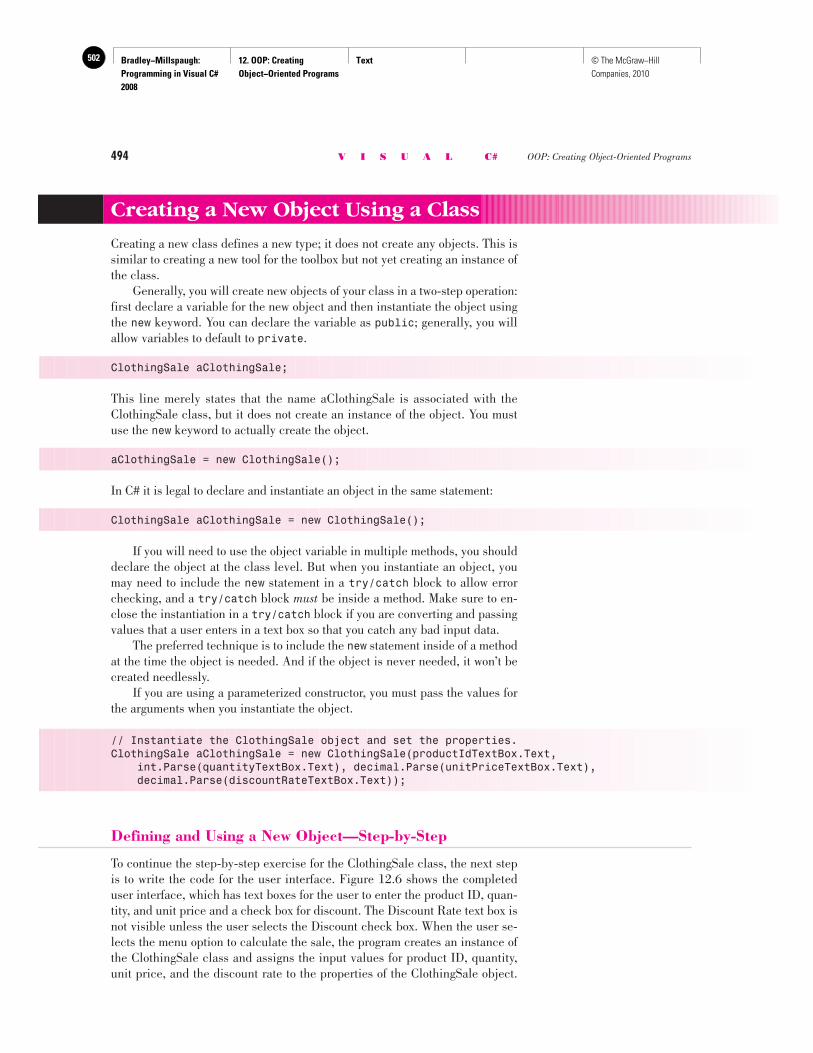
Bradley−Millspaugh: Programming in Visual C# 2008
12. OOP: Creating Object−Oriented Programs
Text502 © The McGraw−Hill Companies, 2010
494 V I S U A L C# OOP: Creating Object-Oriented Programs
Creating a New Object Using a Class
Creating a new class defines a new type; it does not create any objects. This is similar to creating a new tool for the toolbox but not yet creating an instance of the class. Generally, you will create new objects of your class in a two-step operation: first declare a variable for the new object and then instantiate the object using the new keyword. You can declare the variable as public ; generally, you will allow variables to default to private .
ClothingSale aClothingSale;
This line merely states that the name aClothingSale is associated with the ClothingSale class, but it does not create an instance of the object. You must use the new keyword to actually create the object.
aClothingSale = new ClothingSale();
In C# it is legal to declare and instantiate an object in the same statement:
ClothingSale aClothingSale = new ClothingSale();
If you will need to use the object variable in multiple methods, you should declare the object at the class level. But when you instantiate an object, you may need to include the new statement in a try/catch block to allow error checking, and a try/catch block must be inside a method. Make sure to en-close the instantiation in a try/catch block if you are converting and passing values that a user enters in a text box so that you catch any bad input data. The preferred technique is to include the new statement inside of a method at the time the object is needed. And if the object is never needed, it won’t be created needlessly. If you are using a parameterized constructor, you must pass the values for the arguments when you instantiate the object.
// Instantiate the ClothingSale object and set the properties.ClothingSale aClothingSale = new ClothingSale(productIdTextBox.Text, int.Parse(quantityTextBox.Text), decimal.Parse(unitPriceTextBox.Text), decimal.Parse(discountRateTextBox.Text));
Defining and Using a New Object—Step-by-Step
To continue the step-by-step exercise for the ClothingSale class, the next step is to write the code for the user interface. Figure 12.6 shows the completed user interface, which has text boxes for the user to enter the product ID, quan-tity, and unit price and a check box for discount. The Discount Rate text box is not visible unless the user selects the Discount check box. When the user se-lects the menu option to calculate the sale, the program creates an instance of the ClothingSale class and assigns the input values for product ID, quantity, unit price, and the discount rate to the properties of the ClothingSale object.
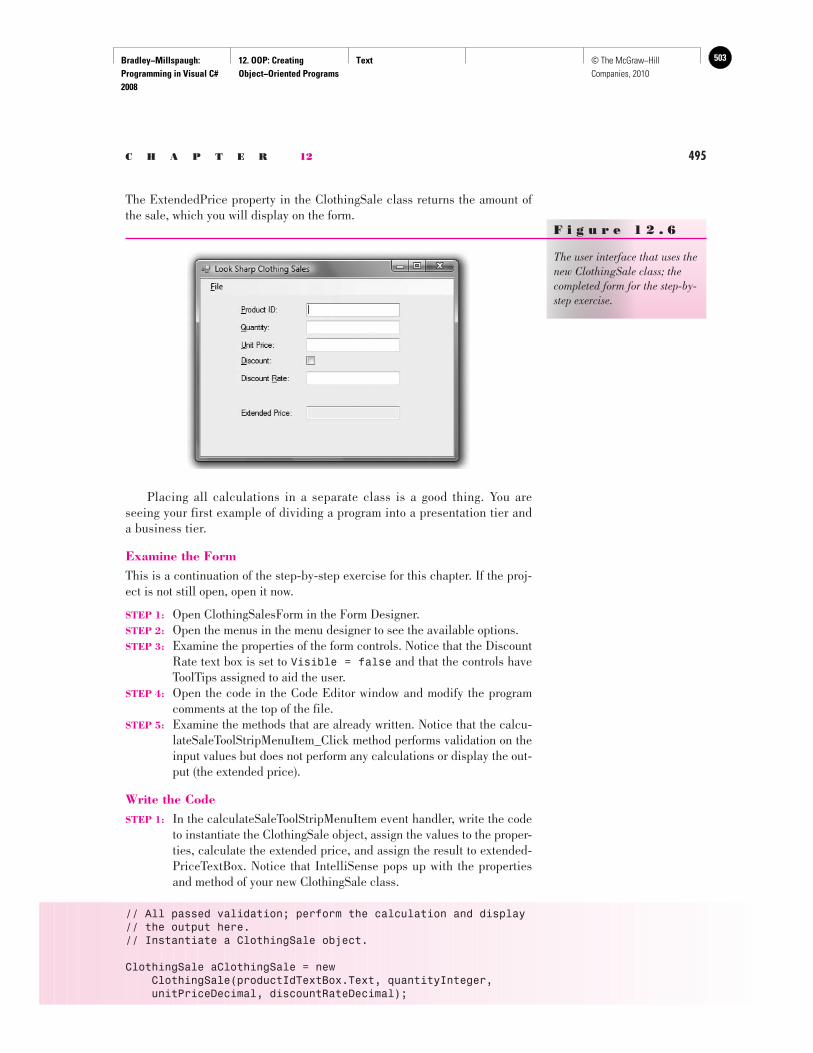
Bradley−Millspaugh: Programming in Visual C# 2008
12. OOP: Creating Object−Oriented Programs
Text 503© The McGraw−Hill Companies, 2010
C H A P T E R 12 495
The ExtendedPrice property in the ClothingSale class returns the amount of the sale, which you will display on the form.
F i g u r e 1 2 . 6
The user interface that uses the new ClothingSale class; the completed form for the step-by-step exercise.
Placing all calculations in a separate class is a good thing. You are seeing your first example of dividing a program into a presentation tier and a business tier.
Examine the Form This is a continuation of the step-by-step exercise for this chapter. If the proj-ect is not still open, open it now.
STEP 1: Open ClothingSalesForm in the Form Designer. STEP 2: Open the menus in the menu designer to see the available options. STEP 3: Examine the properties of the form controls. Notice that the Discount
Rate text box is set to Visible = false and that the controls have ToolTips assigned to aid the user.
STEP 4: Open the code in the Code Editor window and modify the program comments at the top of the file.
STEP 5: Examine the methods that are already written. Notice that the calcu-lateSaleToolStripMenuItem_Click method performs validation on the input values but does not perform any calculations or display the out-put (the extended price).
Write the Code STEP 1: In the calculateSaleToolStripMenuItem event handler, write the code
to instantiate the ClothingSale object, assign the values to the proper-ties, calculate the extended price, and assign the result to extended-PriceTextBox. Notice that IntelliSense pops up with the properties and method of your new ClothingSale class.
// All passed validation; perform the calculation and display// the output here.// Instantiate a ClothingSale object.
ClothingSale aClothingSale = new ClothingSale(productIdTextBox.Text, quantityInteger, unitPriceDecimal, discountRateDecimal);
Bradley−Millspaugh: Programming in Visual C# 2008
12. OOP: Creating Object−Oriented Programs
Text504 © The McGraw−Hill Companies, 2010
496 V I S U A L C# OOP: Creating Object-Oriented Programs
// Display the output. extendedPriceTextBox.Text = aClothingSale.ExtendedPrice.ToString("N");
Save Your Work STEP 1: Click the Save All toolbar button to save the project, class, and form.
Run the Project The next step is to watch the project run—hopefully without errors.
STEP 1: Run the program; your form should appear. STEP 2: Fill in test values. Select the File / Calculate Sale menu item. What did
you get for the extended price? Is it correct? Try entering something other than a number for Quantity. What happens when you calculate the sale?
STEP 3: Stop program execution using the File / Exit menu item.
Single-Step the Execution If you get an error message or an incorrect answer in the output, you will need to debug the project. The quickest and easiest way to debug is to single-step program execution. Single-stepping is an interesting exercise, even if you didget the right answer. To single-step, you need to be in debugging mode. Place a breakpoint on the first line in the calculateSaleToolStripMenuItem_Click method (the trystatement). Run the program, enter test values, and select File / Calculate Sale . When the program stops at the breakpoint, press the F11 key repeatedly and watch each step; you will see execution transfer to the code for the Clothing-Sale class for each property and for the calculateExtendedPrice method. If an error message halts program execution, point to the variable names and property names on the screen to see their current values. When the Click event method finishes, if the form does not reappear, you can click on your project’s taskbar button.
Instance Variables versus Static Variables
The class properties that you have created up to this point belong to each in-stance of the class. Therefore, if you create two ClothingSale objects, each ob-ject has its own set of properties. This is exactly what you want for properties such as quantity and price, but what if you need to find a total or count for all of the ClothingSale objects? You don’t want each new object to have its own count property; there would be nothing to increment. The variables and properties that we have declared thus far are called instance members . A separate memory location exists for each instance of the object. Now we will create static members . A static member is a single vari-able, property, or method that exists, or is available, for all objects of a class. Terminology varies from one OOP language to another. In some languages, static members are called class variables or shared variables. Microsoft docu-mentation refers to instance members and static members , which include both properties and methods. In general, a static member has one copy for all ob-j ects of the class and an instance member has one copy for each instance or
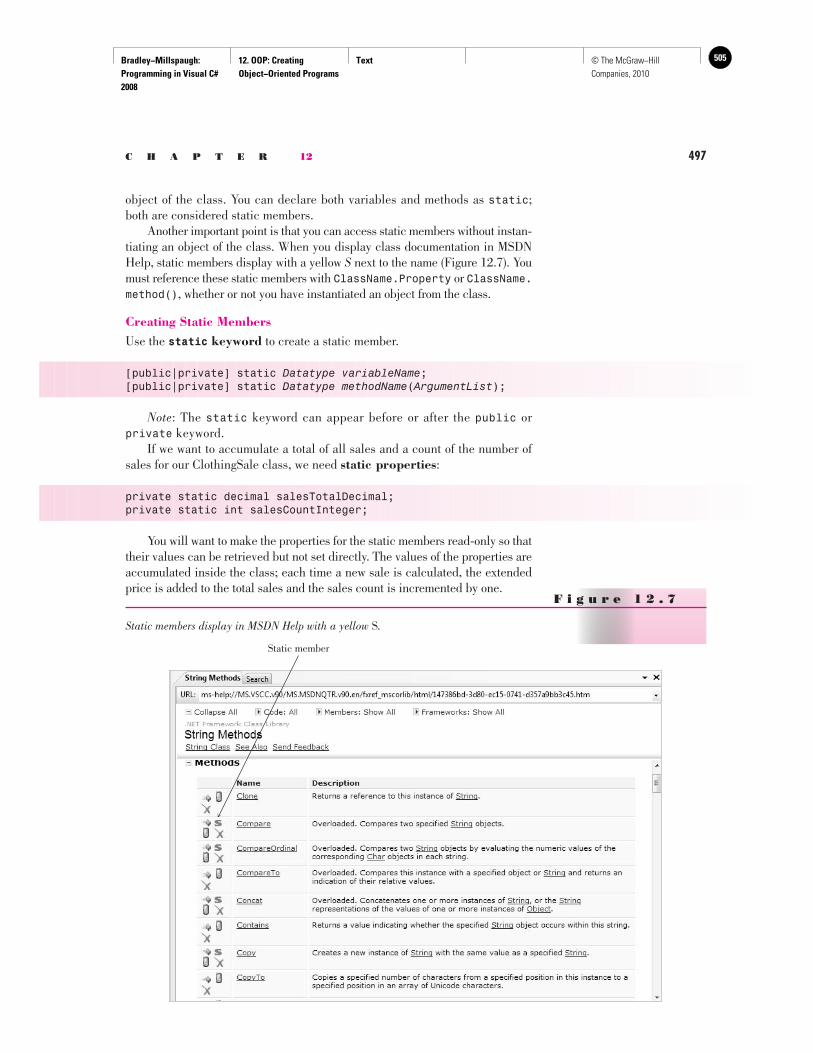
Bradley−Millspaugh: Programming in Visual C# 2008
12. OOP: Creating Object−Oriented Programs
Text 505© The McGraw−Hill Companies, 2010
C H A P T E R 12 497
object of the class. You can declare both variables and methods as static ; both are considered static members. Another important point is that you can access static members without instan-tiating an object of the class. When you display class documentation in MSDN Help, static members display with a yellow S next to the name ( Figure 12.7 ). You must reference these static members with ClassName.Property or ClassName.method() , whether or not you have instantiated an object from the class.
Creating Static Members Use the static keyword to create a static member.
[public|private] static Datatype variableName;[public|private] static Datatype methodName(ArgumentList);
Note: The static keyword can appear before or after the public or private keyword. If we want to accumulate a total of all sales and a count of the number of sales for our ClothingSale class, we need static properties :
private static decimal salesTotalDecimal;private static int salesCountInteger;
You will want to make the properties for the static members read-only so that their values can be retrieved but not set directly. The values of the properties are accumulated inside the class; each time a new sale is calculated, the extended price is added to the total sales and the sales count is incremented by one.
F i g u r e 1 2 . 7
Static members display in MSDN Help with a yellow S.
Static member
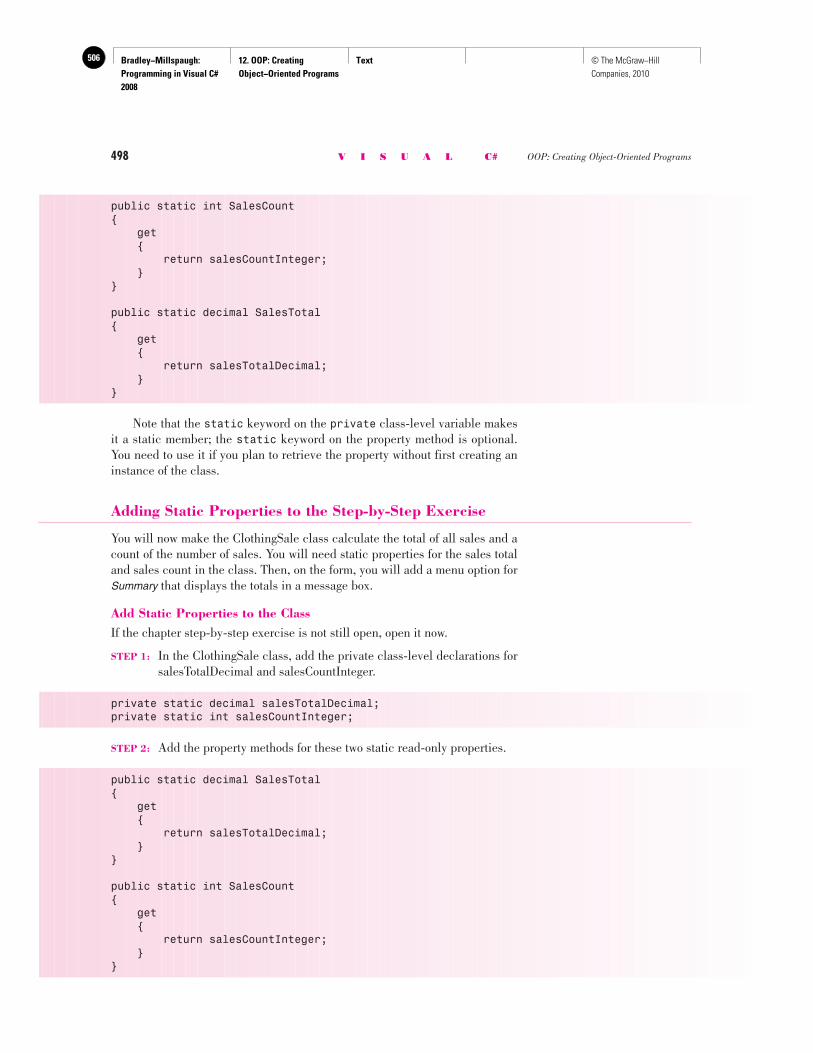
Bradley−Millspaugh: Programming in Visual C# 2008
12. OOP: Creating Object−Oriented Programs
Text506 © The McGraw−Hill Companies, 2010
498 V I S U A L C# OOP: Creating Object-Oriented Programs
public static int SalesCount{ get { return salesCountInteger; }}
public static decimal SalesTotal{ get { return salesTotalDecimal; }}
Note that the static keyword on the private class-level variable makes it a static member; the static keyword on the property method is optional. You need to use it if you plan to retrieve the property without first creating an instance of the class.
Adding Static Properties to the Step-by-Step Exercise
You will now make the ClothingSale class calculate the total of all sales and a count of the number of sales. You will need static properties for the sales total and sales count in the class. Then, on the form, you will add a menu option for Summary that displays the totals in a message box.
Add Static Properties to the Class If the chapter step-by-step exercise is not still open, open it now.
STEP 1: In the ClothingSale class, add the private class-level declarations for salesTotalDecimal and salesCountInteger.
private static decimal salesTotalDecimal;private static int salesCountInteger;
STEP 2: Add the property methods for these two static read-only properties.
public static decimal SalesTotal{ get { return salesTotalDecimal; }}
public static int SalesCount{ get { return salesCountInteger; }}
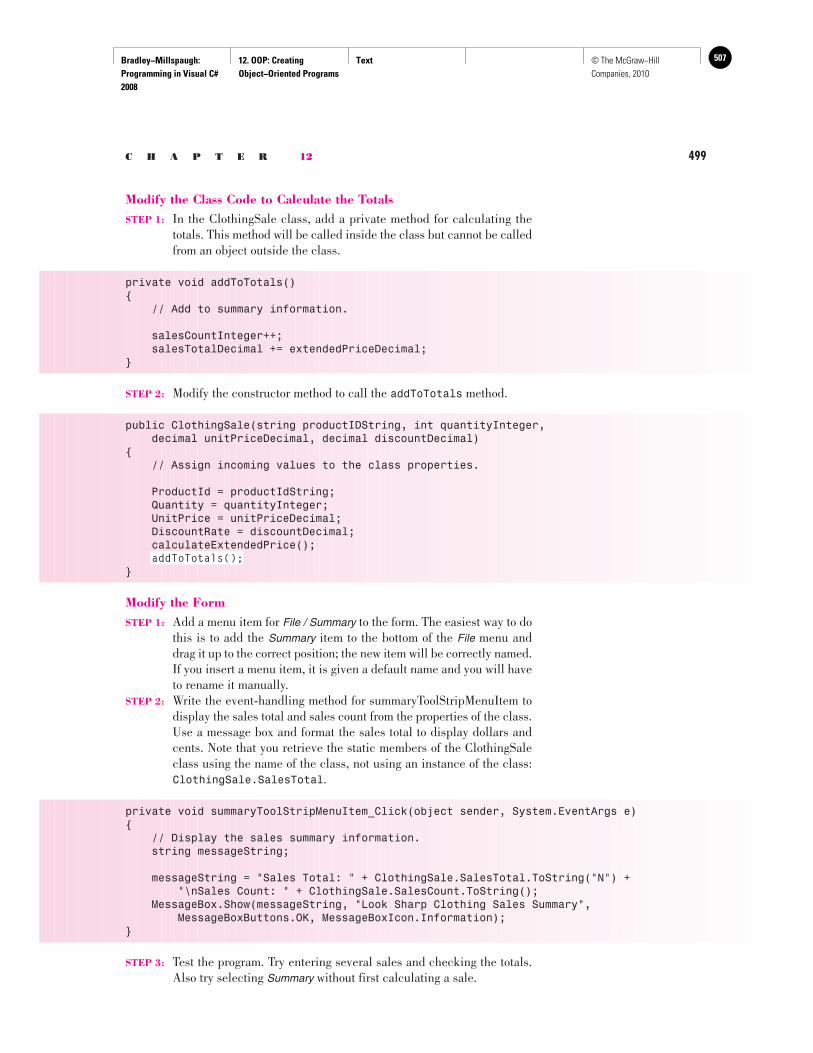
Bradley−Millspaugh: Programming in Visual C# 2008
12. OOP: Creating Object−Oriented Programs
Text 507© The McGraw−Hill Companies, 2010
C H A P T E R 12 499
Modify the Class Code to Calculate the Totals STEP 1: In the ClothingSale class, add a private method for calculating the
totals. This method will be called inside the class but cannot be called from an object outside the class.
private void addToTotals(){ // Add to summary information.
salesCountInteger++; salesTotalDecimal += extendedPriceDecimal;}
STEP 2: Modify the constructor method to call the addToTotals method.
public ClothingSale(string productIDString, int quantityInteger, decimal unitPriceDecimal, decimal discountDecimal){ // Assign incoming values to the class properties.
ProductId = productIdString; Quantity = quantityInteger; UnitPrice = unitPriceDecimal; DiscountRate = discountDecimal; calculateExtendedPrice();
addToTotals();}
Modify the Form STEP 1: Add a menu item for File / Summary to the form. The easiest way to do
this is to add the Summary item to the bottom of the File menu and drag it up to the correct position; the new item will be correctly named. If you insert a menu item, it is given a default name and you will have to rename it manually.
STEP 2: Write the event-handling method for summaryToolStripMenuItem to display the sales total and sales count from the properties of the class. Use a message box and format the sales total to display dollars and cents. Note that you retrieve the static members of the ClothingSale class using the name of the class, not using an instance of the class: ClothingSale.SalesTotal .
private void summaryToolStripMenuItem_Click(object sender, System.EventArgs e){ // Display the sales summary information. string messageString;
messageString = "Sales Total: " + ClothingSale.SalesTotal.ToString("N") + "\nSales Count: " + ClothingSale.SalesCount.ToString(); MessageBox.Show(messageString, "Look Sharp Clothing Sales Summary", MessageBoxButtons.OK, MessageBoxIcon.Information);}
STEP 3: Test the program. Try entering several sales and checking the totals. Also try selecting Summary without first calculating a sale.
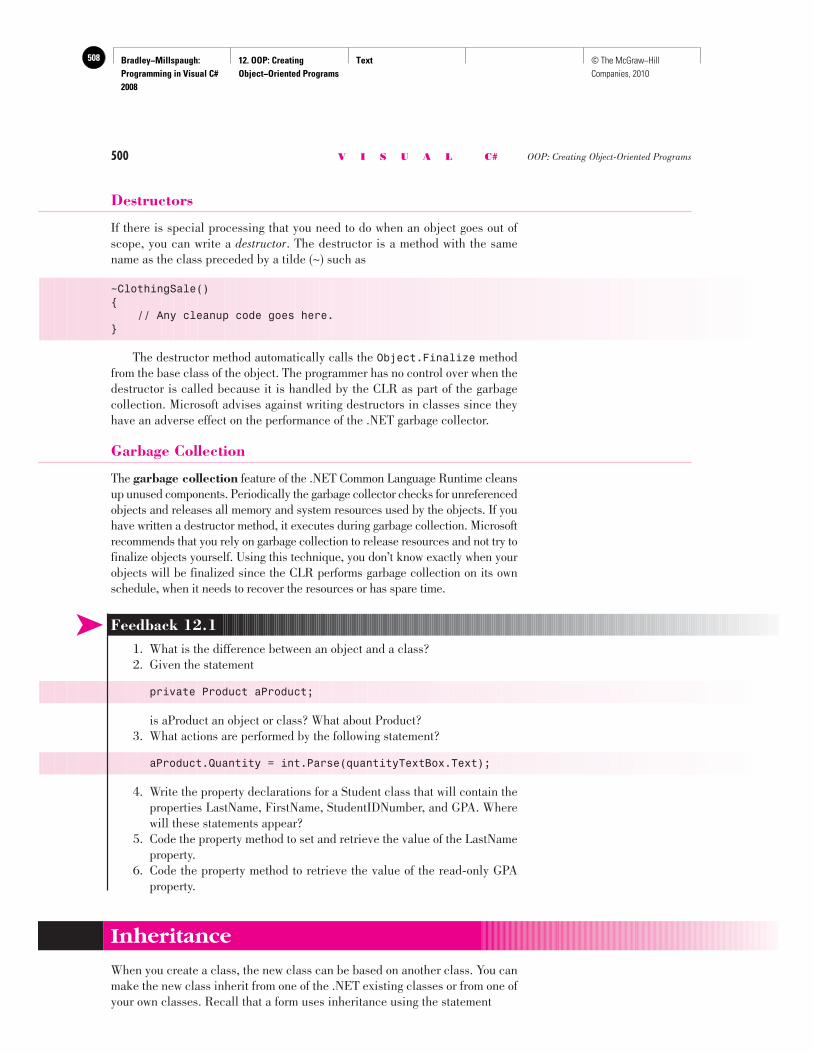
Bradley−Millspaugh: Programming in Visual C# 2008
12. OOP: Creating Object−Oriented Programs
Text508 © The McGraw−Hill Companies, 2010
500 V I S U A L C# OOP: Creating Object-Oriented Programs
Destructors
If there is special processing that you need to do when an object goes out of scope, you can write a destructor . The destructor is a method with the same name as the class preceded by a tilde (~) such as
~ClothingSale(){ // Any cleanup code goes here.}
The destructor method automatically calls the Object.Finalize method from the base class of the object. The programmer has no control over when the destructor is called because it is handled by the CLR as part of the garbage collection. Microsoft advises against writing destructors in classes since they have an adverse effect on the performance of the .NET garbage collector.
Garbage Collection
The garbage collection feature of the .NET Common Language Runtime cleans up unused components. Periodically the garbage collector checks for unreferenced objects and releases all memory and system resources used by the objects. If you have written a destructor method, it executes during garbage collection. Microsoft recommends that you rely on garbage collection to release resources and not try to finalize objects yourself. Using this technique, you don’t know exactly when your objects will be finalized since the CLR performs garbage collection on its own schedule, when it needs to recover the resources or has spare time.
Inheritance
When you create a class, the new class can be based on another class. You can make the new class inherit from one of the .NET existing classes or from one of your own classes. Recall that a form uses inheritance using the statement
➤ Feedback 12.1 1. What is the difference between an object and a class? 2. Given the statement
private Product aProduct;
is aProduct an object or class? What about Product? 3. What actions are performed by the following statement?
aProduct.Quantity = int.Parse(quantityTextBox.Text);
4. Write the property declarations for a Student class that will contain the properties LastName, FirstName, StudentIDNumber, and GPA. Where will these statements appear?
5. Code the property method to set and retrieve the value of the LastName property.
6. Code the property method to retrieve the value of the read-only GPA property.
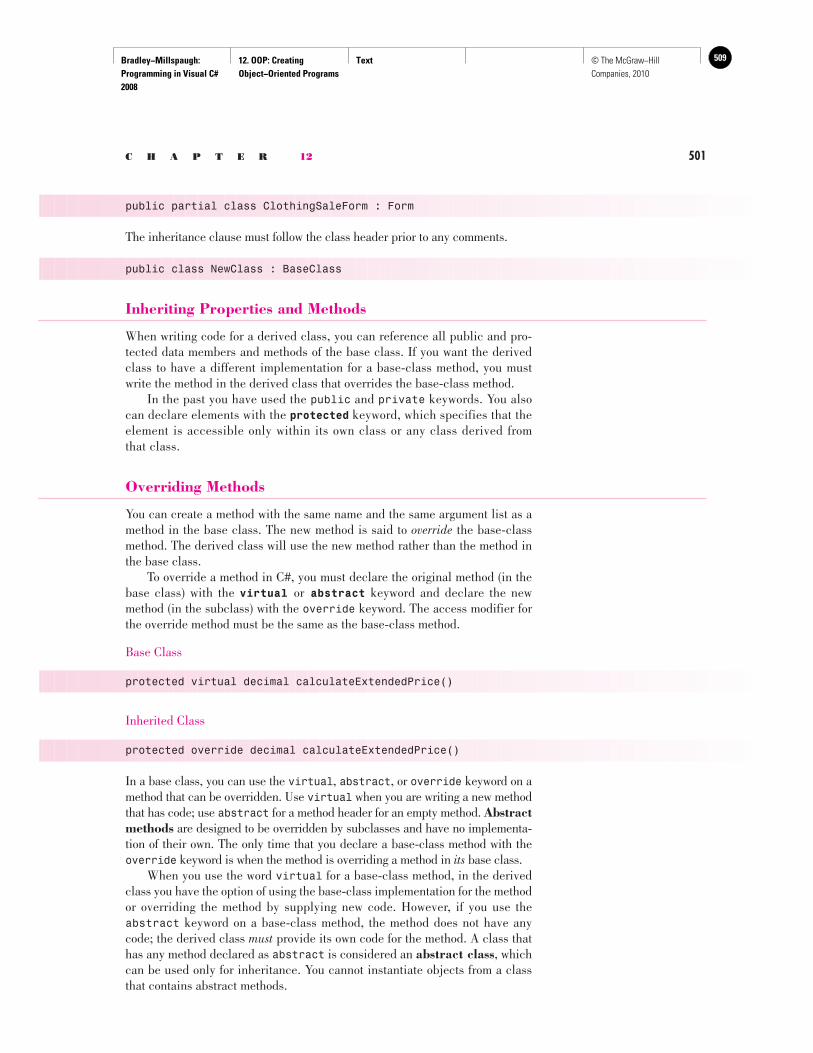
Bradley−Millspaugh: Programming in Visual C# 2008
12. OOP: Creating Object−Oriented Programs
Text 509© The McGraw−Hill Companies, 2010
C H A P T E R 12 501
public partial class ClothingSaleForm : Form
The inheritance clause must follow the class header prior to any comments.
public class NewClass : BaseClass
Inheriting Properties and Methods
When writing code for a derived class, you can reference all public and pro-tected data members and methods of the base class. If you want the derived class to have a different implementation for a base-class method, you must write the method in the derived class that overrides the base-class method. In the past you have used the public and private keywords. You also can declare elements with the protected keyword, which specifies that the element is accessible only within its own class or any class derived from that class.
Overriding Methods
You can create a method with the same name and the same argument list as a method in the base class. The new method is said to override the base-class method. The derived class will use the new method rather than the method in the base class. To override a method in C#, you must declare the original method (in the base class) with the virtual or abstract keyword and declare the new method (in the subclass) with the override keyword. The access modifier for the override method must be the same as the base-class method.
Base Class
protected virtual decimal calculateExtendedPrice()
Inherited Class
protected override decimal calculateExtendedPrice()
In a base class, you can use the virtual , abstract , or override keyword on a method that can be overridden. Use virtual when you are writing a new method that has code; use abstract for a method header for an empty method. Abstract methods are designed to be overridden by subclasses and have no implementa-tion of their own. The only time that you declare a base-class method with the override keyword is when the method is overriding a method in its base class. When you use the word virtual for a base-class method, in the derived class you have the option of using the base-class implementation for the method or overriding the method by supplying new code. However, if you use the abstract keyword on a base-class method, the method does not have any code; the derived class must provide its own code for the method. A class that has any method declared as abstract is considered an abstract class , which can be used only for inheritance. You cannot instantiate objects from a class that contains abstract methods.
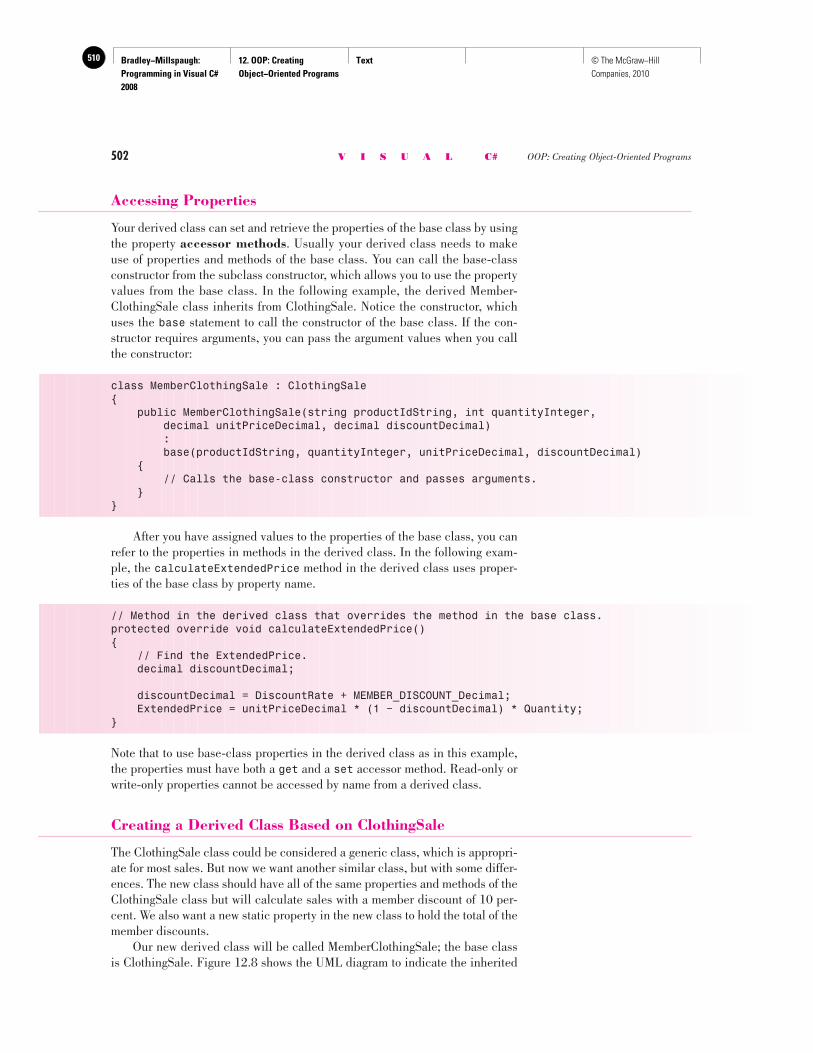
Bradley−Millspaugh: Programming in Visual C# 2008
12. OOP: Creating Object−Oriented Programs
Text510 © The McGraw−Hill Companies, 2010
502 V I S U A L C# OOP: Creating Object-Oriented Programs
Accessing Properties
Your derived class can set and retrieve the properties of the base class by using the property accessor methods . Usually your derived class needs to make use of properties and methods of the base class. You can call the base-class constructor from the subclass constructor, which allows you to use the property values from the base class. In the following example, the derived Member-ClothingSale class inherits from ClothingSale. Notice the constructor, which uses the base statement to call the constructor of the base class. If the con-structor requires arguments, you can pass the argument values when you call the constructor:
class MemberClothingSale : ClothingSale{ public MemberClothingSale(string productIdString, int quantityInteger, decimal unitPriceDecimal, decimal discountDecimal) : base(productIdString, quantityInteger, unitPriceDecimal, discountDecimal) { // Calls the base-class constructor and passes arguments. }}
After you have assigned values to the properties of the base class, you can refer to the properties in methods in the derived class. In the following exam-ple, the calculateExtendedPrice method in the derived class uses proper-ties of the base class by property name.
// Method in the derived class that overrides the method in the base class.protected override void calculateExtendedPrice(){ // Find the ExtendedPrice. decimal discountDecimal;
discountDecimal = DiscountRate + MEMBER_DISCOUNT_Decimal; ExtendedPrice = unitPriceDecimal * (1 − discountDecimal) * Quantity;}
Note that to use base-class properties in the derived class as in this example, the properties must have both a get and a set accessor method. Read-only or write-only properties cannot be accessed by name from a derived class.
Creating a Derived Class Based on ClothingSale
The ClothingSale class could be considered a generic class, which is appropri-ate for most sales. But now we want another similar class, but with some differ-ences. The new class should have all of the same properties and methods of the ClothingSale class but will calculate sales with a member discount of 10 per-cent. We also want a new static property in the new class to hold the total of the member discounts. Our new derived class will be called MemberClothingSale; the base class is ClothingSale. Figure 12.8 shows the UML diagram to indicate the inherited
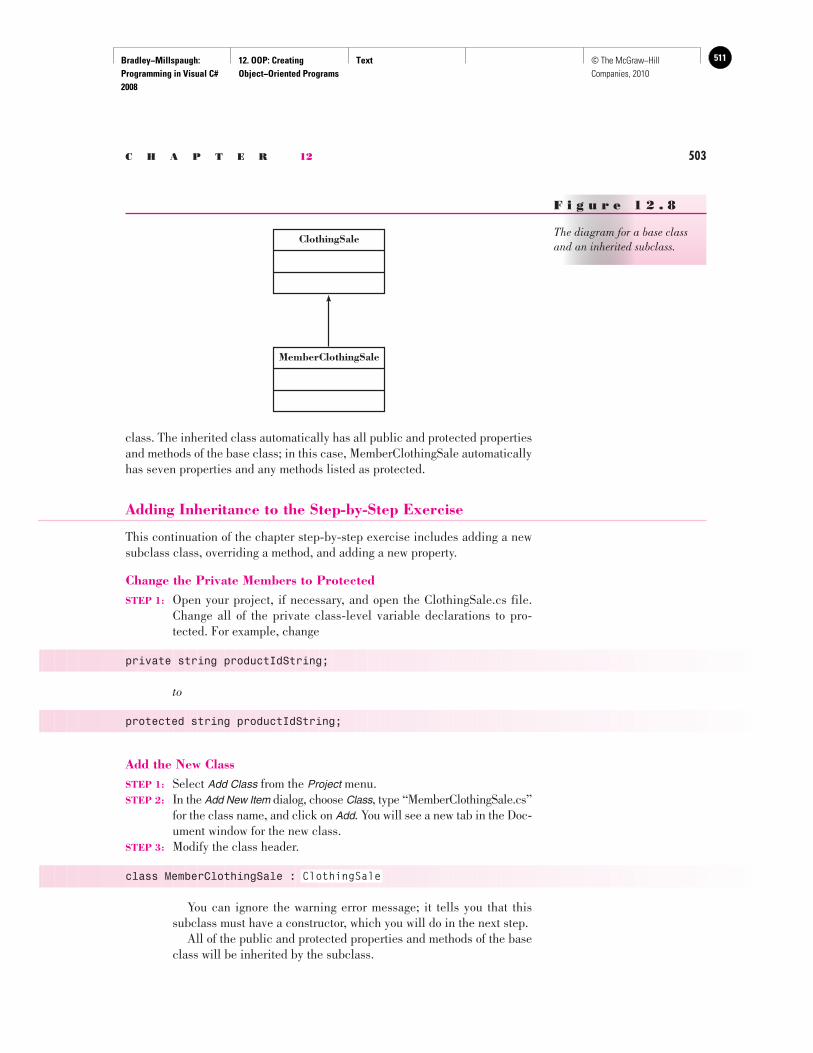
Bradley−Millspaugh: Programming in Visual C# 2008
12. OOP: Creating Object−Oriented Programs
Text 511© The McGraw−Hill Companies, 2010
C H A P T E R 12 503
class. The inherited class automatically has all public and protected properties and methods of the base class; in this case, MemberClothingSale automatically has seven properties and any methods listed as protected.
Adding Inheritance to the Step-by-Step Exercise
This continuation of the chapter step-by-step exercise includes adding a new subclass class, overriding a method, and adding a new property.
Change the Private Members to Protected STEP 1: Open your project, if necessary, and open the ClothingSale.cs file.
Change all of the private class-level variable declarations to pro-tected. For example, change
private string productIdString;
to
protected string productIdString;
Add the New Class STEP 1: Select Add Class from the Project menu. STEP 2: In the Add New Item dialog, choose Class , type “MemberClothingSale.cs”
for the class name, and click on Add . You will see a new tab in the Doc-ument window for the new class.
STEP 3: Modify the class header.
class MemberClothingSale : ClothingSale
You can ignore the warning error message; it tells you that this subclass must have a constructor, which you will do in the next step.
All of the public and protected properties and methods of the base class will be inherited by the subclass.
F i g u r e 1 2 . 8
The diagram for a base class and an inherited subclass.
MemberClothingSale
ClothingSale
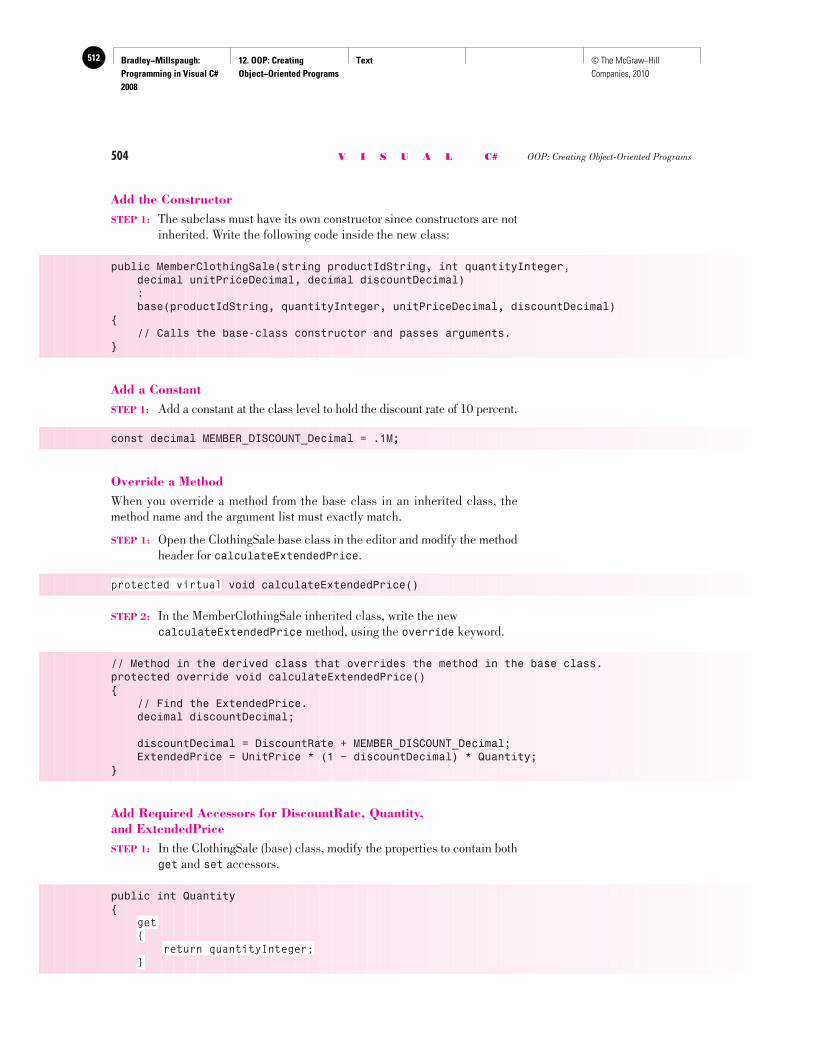
Bradley−Millspaugh: Programming in Visual C# 2008
12. OOP: Creating Object−Oriented Programs
Text512 © The McGraw−Hill Companies, 2010
504 V I S U A L C# OOP: Creating Object-Oriented Programs
Add the Constructor STEP 1: The subclass must have its own constructor since constructors are not
inherited. Write the following code inside the new class:
public MemberClothingSale(string productIdString, int quantityInteger, decimal unitPriceDecimal, decimal discountDecimal) : base(productIdString, quantityInteger, unitPriceDecimal, discountDecimal){ // Calls the base-class constructor and passes arguments.}
Add a Constant STEP 1: Add a constant at the class level to hold the discount rate of 10 percent.
const decimal MEMBER_DISCOUNT_Decimal = .1M;
Override a Method When you override a method from the base class in an inherited class, the method name and the argument list must exactly match.
STEP 1: Open the ClothingSale base class in the editor and modify the method header for calculateExtendedPrice .
protected virtual void calculateExtendedPrice()
STEP 2: In the MemberClothingSale inherited class, write the new calculateExtendedPrice method, using the override keyword.
// Method in the derived class that overrides the method in the base class.protected override void calculateExtendedPrice(){ // Find the ExtendedPrice. decimal discountDecimal;
discountDecimal = DiscountRate + MEMBER_DISCOUNT_Decimal; ExtendedPrice = UnitPrice * (1 − discountDecimal) * Quantity;}
Add Required Accessors for DiscountRate, Quantity, and ExtendedPrice STEP 1: In the ClothingSale (base) class, modify the properties to contain both
get and set accessors.
public int Quantity{
get{
return quantityInteger;}
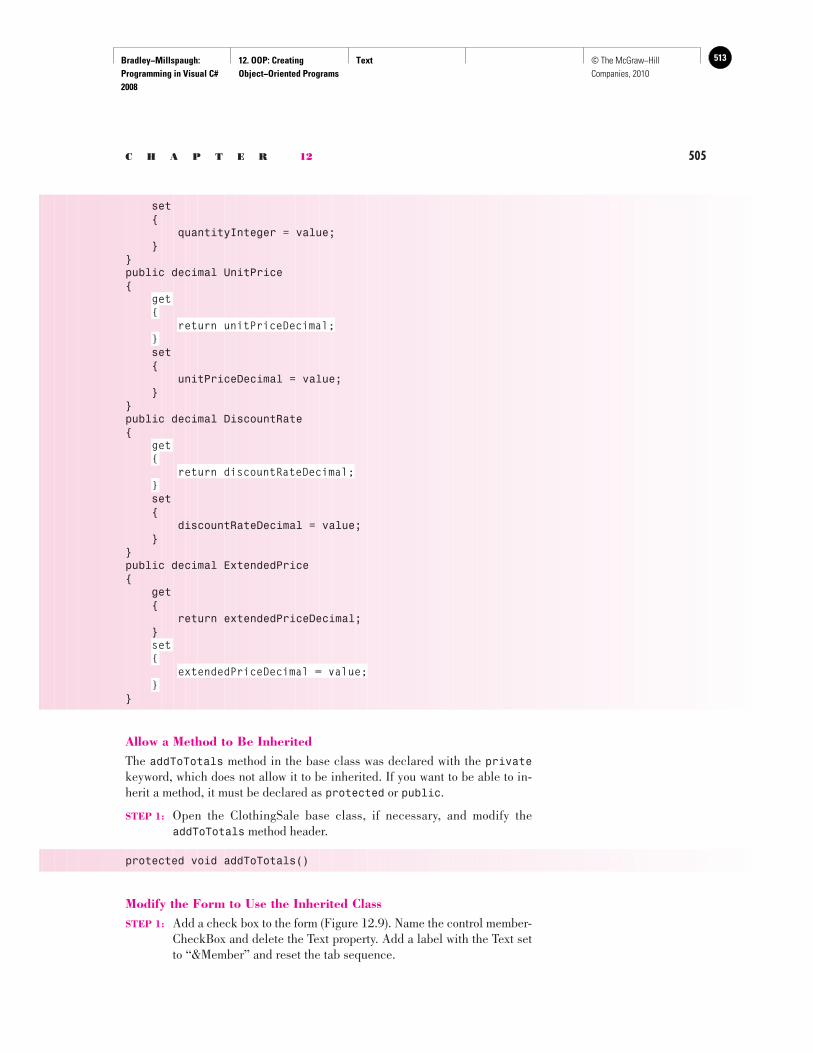
Bradley−Millspaugh: Programming in Visual C# 2008
12. OOP: Creating Object−Oriented Programs
Text 513© The McGraw−Hill Companies, 2010
C H A P T E R 12 505
set { quantityInteger = value; }}public decimal UnitPrice{
get{
return unitPriceDecimal;}
set { unitPriceDecimal = value; }}public decimal DiscountRate{
get{
return discountRateDecimal;}
set { discountRateDecimal = value; }}public decimal ExtendedPrice{ get { return extendedPriceDecimal; }
set{
extendedPriceDecimal = value;}
}
Allow a Method to Be Inherited The addToTotals method in the base class was declared with the privatekeyword, which does not allow it to be inherited. If you want to be able to in-herit a method, it must be declared as protected or public .
STEP 1: Open the ClothingSale base class, if necessary, and modify the addToTotals method header.
protected void addToTotals()
Modify the Form to Use the Inherited Class STEP 1: Add a check box to the form ( Figure 12.9 ). Name the control member-
CheckBox and delete the Text property. Add a label with the Text set to “&Member” and reset the tab sequence.

Bradley−Millspaugh: Programming in Visual C# 2008
12. OOP: Creating Object−Oriented Programs
Text514 © The McGraw−Hill Companies, 2010
506 V I S U A L C# OOP: Creating Object-Oriented Programs
STEP 2: Modify the calculateSaleToolStripMenuItem event method to create the correct object, depending on the state of memberCheckBox.
if (memberCheckBox.Checked){ MemberClothingSale aMemberClothingSale = new MemberClothingSale(productIdTextBox.Text, quantityInteger, unitPriceDecimal, discountRateDecimal); // Display the output. extendedPriceTextBox.Text = aMemberClothingSale.ExtendedPrice.ToString("N");}else{ ClothingSale aClothingSale = new ClothingSale(productIdTextBox.Text, quantityInteger, unitPriceDecimal, discountRateDecimal); // Display the output. extendedPriceTextBox.Text = aClothingSale.ExtendedPrice.ToString("N");}
Notice that the code uses the ExtendedPrice property in either case. But when memberCheckBox is checked, ExtendedPrice is calculated in the sub-class; when the check box is not checked, the ExtendedPrice is calculated in the base class. Both classes add to the static SalesTotal and SalesCount proper-ties of the base class, which will hold the totals for both classes.
STEP 3: Run the program. Try both member and nonmember sales; check the totals.
STEP 4: Close the project.
Creating a Base Class Strictly for Inheritance
Sometimes you may want to create a class solely for the purpose of inheritance by two or more similar classes. For example, you might create a Person class that you don’t intend to instantiate. Instead, you will create subclasses of the Person class, such as Employee, Customer, and Student.
F i g u r e 1 2 . 9
Add a Member check box to the form.
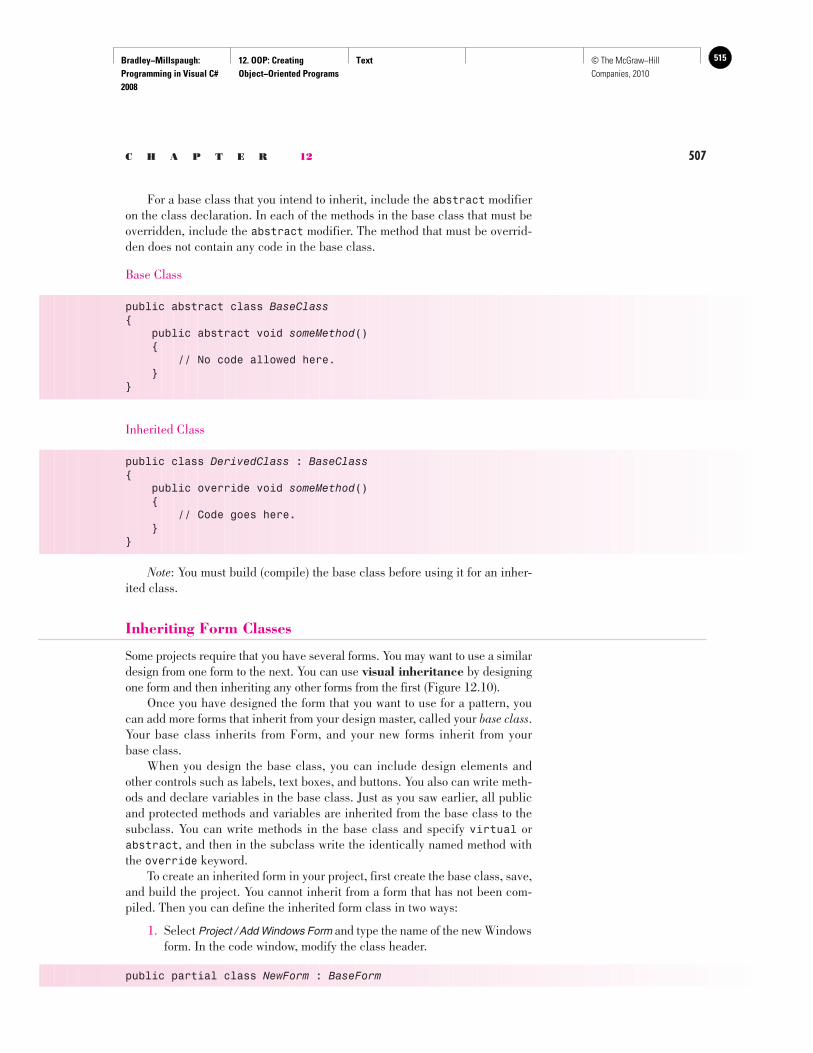
Bradley−Millspaugh: Programming in Visual C# 2008
12. OOP: Creating Object−Oriented Programs
Text 515© The McGraw−Hill Companies, 2010
C H A P T E R 12 507
For a base class that you intend to inherit, include the abstract modifier on the class declaration. In each of the methods in the base class that must be overridden, include the abstract modifier. The method that must be overrid-den does not contain any code in the base class.
Base Class
public abstract class BaseClass{ public abstract void someMethod() { // No code allowed here. }}
Inherited Class
public class DerivedClass : BaseClass{ public override void someMethod() { // Code goes here. }}
Note : You must build (compile) the base class before using it for an inher-ited class.
Inheriting Form Classes
Some projects require that you have several forms. You may want to use a similar design from one form to the next. You can use visual inheritance by designing one form and then inheriting any other forms from the first ( Figure 12.10 ). Once you have designed the form that you want to use for a pattern, you can add more forms that inherit from your design master, called your base class . Your base class inherits from Form, and your new forms inherit from your base class. When you design the base class, you can include design elements and other controls such as labels, text boxes, and buttons. You also can write meth-ods and declare variables in the base class. Just as you saw earlier, all public and protected methods and variables are inherited from the base class to the subclass. You can write methods in the base class and specify virtual or abstract , and then in the subclass write the identically named method with the override keyword. To create an inherited form in your project, first create the base class, save, and build the project. You cannot inherit from a form that has not been com-piled. Then you can define the inherited form class in two ways:
1. Select Project / Add Windows Form and type the name of the new Windows form. In the code window, modify the class header.
public partial class NewForm : BaseForm
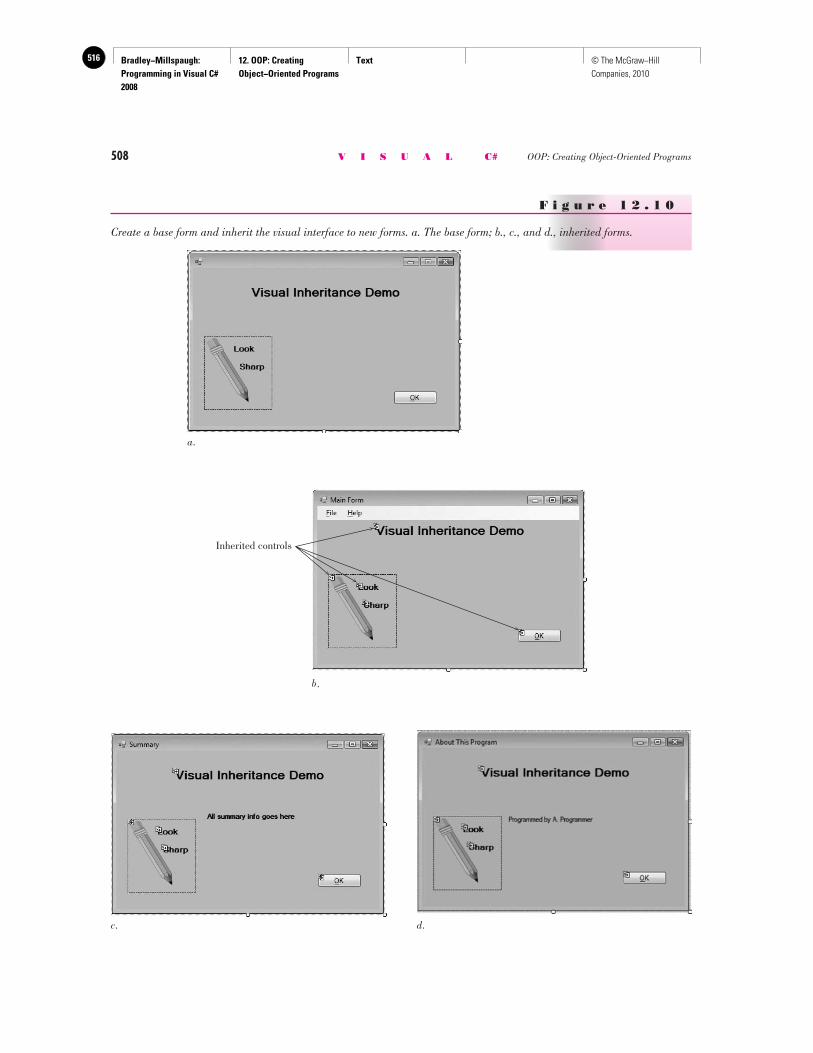
Bradley−Millspaugh: Programming in Visual C# 2008
12. OOP: Creating Object−Oriented Programs
Text516 © The McGraw−Hill Companies, 2010
508 V I S U A L C# OOP: Creating Object-Oriented Programs
F i g u r e 1 2 . 1 0
Create a base form and inherit the visual interface to new forms. a. The base form; b., c., and d., inherited forms.
a.
Inherited controls
b.
c. d.
Bradley−Millspaugh: Programming in Visual C# 2008
12. OOP: Creating Object−Oriented Programs
Text 517© The McGraw−Hill Companies, 2010
C H A P T E R 12 509
Open the new form in the designer and you should see the inherited visual elements.
2. In the Professional Edition, you also can use this technique: Select Project / Add Windows Form and type the name of the new form. Select the InheritedForm icon. After clicking on the Add button, you are shown a dialog displaying the compiled forms in the project from which to select. The InheritedForm template is not available in the Express Edition.
Form Inheritance Example This example has three forms that inherit from a base class. The base class has an OK button, a picture box, and labels. All forms that inherit from the base class will have all of these controls. You cannot delete any of the controls on the inherited forms, but you can make a control invisible. For example, in MainForm, the OK button’s Visible property is set to false . The base class has an okButton_Click event method, which can be over-ridden in the subclasses. Note that the okButton_Click event method must be declared as public or protected to be inherited and overridden in derived classes. In order to set the properties of the okButton (such as Visible) in a derived form, the button must have its Modifiers property set to public or pro-tected (in the designer) and the click event handler must be declared as public or protected. The method access modifier must match in the base class and subclass; for example, if you set the okButton_Click event method to protected, the overriding method in the subclass also must be protected.
BaseForm
public partial class BaseForm : Form{ public BaseForm() { InitializeComponent(); }
protected virtual void okButton_Click(object sender, EventArgs e) { // Close the form.
this.Close(); }}
AboutForm No code required.
MainForm
public partial class MainForm : BaseForm{ public MainForm() { InitializeComponent(); }
If you receive errors when opening the inherited form in Design View, close the form, rebuild the project, and reopen the form. ■
TIP
Bradley−Millspaugh: Programming in Visual C# 2008
12. OOP: Creating Object−Oriented Programs
Text518 © The McGraw−Hill Companies, 2010
510 V I S U A L C# OOP: Creating Object-Oriented Programs
private void MainForm_Load(object sender, EventArgs e) { // Hide the OK button for this form.
this.okButton.Visible = false; }
private void exitToolStripMenuItem_Click(object sender, EventArgs e) { // Close the application.
this.Close(); }
private void summaryToolStripMenuItem_Click(object sender, EventArgs e) { // Display the Summary form. SummaryForm aSummaryForm = new SummaryForm();
aSummaryForm.Show(); }
private void aboutToolStripMenuItem_Click(object sender, EventArgs e) { // Display the About form. AboutForm anAboutForm = new AboutForm();
anAboutForm.ShowDialog(); }}
SummaryForm
public partial class SummaryForm : BaseForm{ public SummaryForm() { InitializeComponent(); }
protected override void okButton_Click(object sender, EventArgs e) { base.okButton_Click(sender, e); // Could write code to alter the behavior here. }}
Coding for Events of an Inherited Class When you derive a new form class from an existing form, you often want to write code for events of inherited controls. Unfortunately, you can’t double-click on an inherited control and have the event method open, like you can for most controls. In the inherited class’s code window, type in “public override ok” and then select the okButton_Click event from IntelliSense. Remember that the code must already have been changed to “protected virtual” in the base class and that you must have recompiled the project.
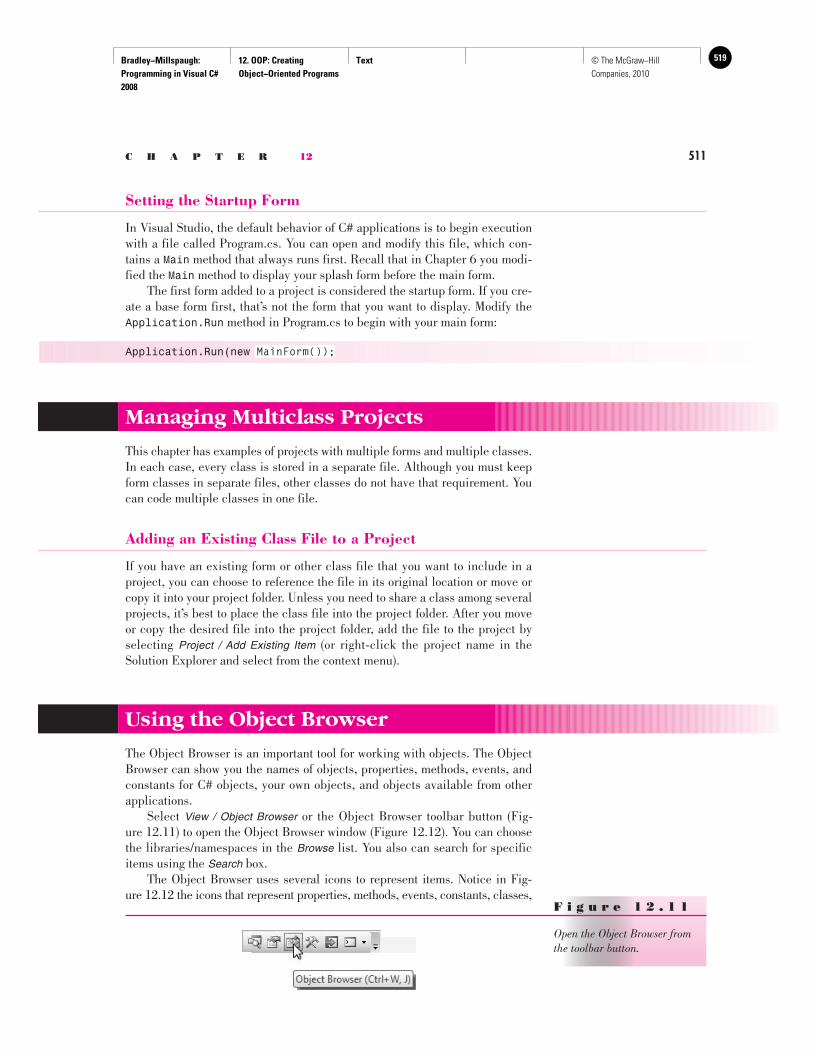
Bradley−Millspaugh: Programming in Visual C# 2008
12. OOP: Creating Object−Oriented Programs
Text 519© The McGraw−Hill Companies, 2010
C H A P T E R 12 511
Setting the Startup Form
In Visual Studio, the default behavior of C# applications is to begin execution with a file called Program.cs. You can open and modify this file, which con-tains a Main method that always runs first. Recall that in Chapter 6 you modi-fied the Main method to display your splash form before the main form. The first form added to a project is considered the startup form. If you cre-ate a base form first, that’s not the form that you want to display. Modify the Application.Run method in Program.cs to begin with your main form:
Application.Run(new MainForm());
Managing Multiclass Projects
This chapter has examples of projects with multiple forms and multiple classes. In each case, every class is stored in a separate file. Although you must keep form classes in separate files, other classes do not have that requirement. You can code multiple classes in one file.
Adding an Existing Class File to a Project
If you have an existing form or other class file that you want to include in a project, you can choose to reference the file in its original location or move or copy it into your project folder. Unless you need to share a class among several projects, it’s best to place the class file into the project folder. After you move or copy the desired file into the project folder, add the file to the project by selecting Project / Add Existing Item (or right-click the project name in the Solution Explorer and select from the context menu).
Using the Object Browser
The Object Browser is an important tool for working with objects. The Object Browser can show you the names of objects, properties, methods, events, and constants for C# objects, your own objects, and objects available from other applications. Select View / Object Browser or the Object Browser toolbar button ( Fig-ure 12.11 ) to open the Object Browser window ( Figure 12.12 ). You can choose the libraries/namespaces in the Browse list. You also can search for specific items using the Search box . The Object Browser uses several icons to represent items. Notice in Fig-ure 12.12 the icons that represent properties, methods, events, constants, classes,
F i g u r e 1 2 . 1 1
Open the Object Browser from the toolbar button.
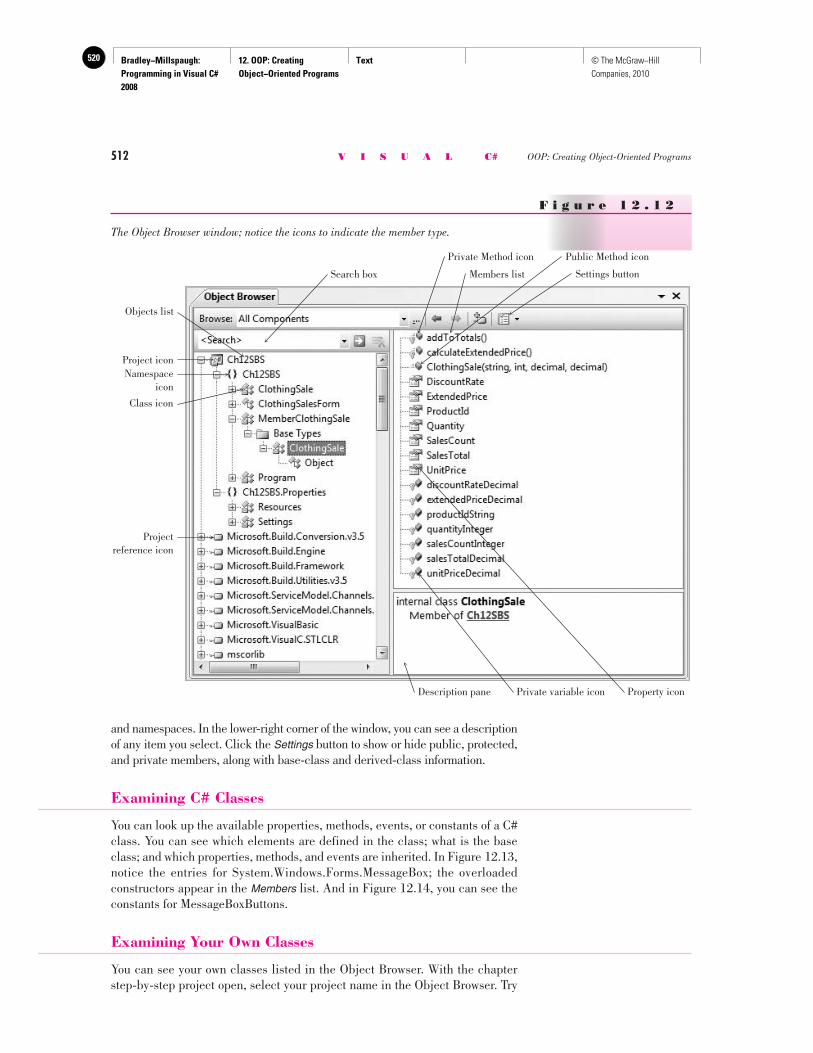
Bradley−Millspaugh: Programming in Visual C# 2008
12. OOP: Creating Object−Oriented Programs
Text520 © The McGraw−Hill Companies, 2010
512 V I S U A L C# OOP: Creating Object-Oriented Programs
and namespaces. In the lower-right corner of the window, you can see a description of any item you select. Click the Settings button to show or hide public, protected, and private members, along with base-class and derived-class information.
Examining C# Classes
You can look up the available properties, methods, events, or constants of a C# class. You can see which elements are defined in the class; what is the base class; and which properties, methods, and events are inherited. In Figure 12.13 ,notice the entries for System.Windows.Forms.MessageBox; the overloaded constructors appear in the Members list. And in Figure 12.14 , you can see the constants for MessageBoxButtons.
Examining Your Own Classes
You can see your own classes listed in the Object Browser. With the chapter step-by-step project open, select your project name in the Object Browser. Try
Project iconNamespace
icon
Projectreference icon
Search box
Objects list
Members list Settings button
Public Method icon
Private variable icon Property iconDescription pane
Class icon
Private Method icon
F i g u r e 1 2 . 1 2
The Object Browser window; notice the icons to indicate the member type.
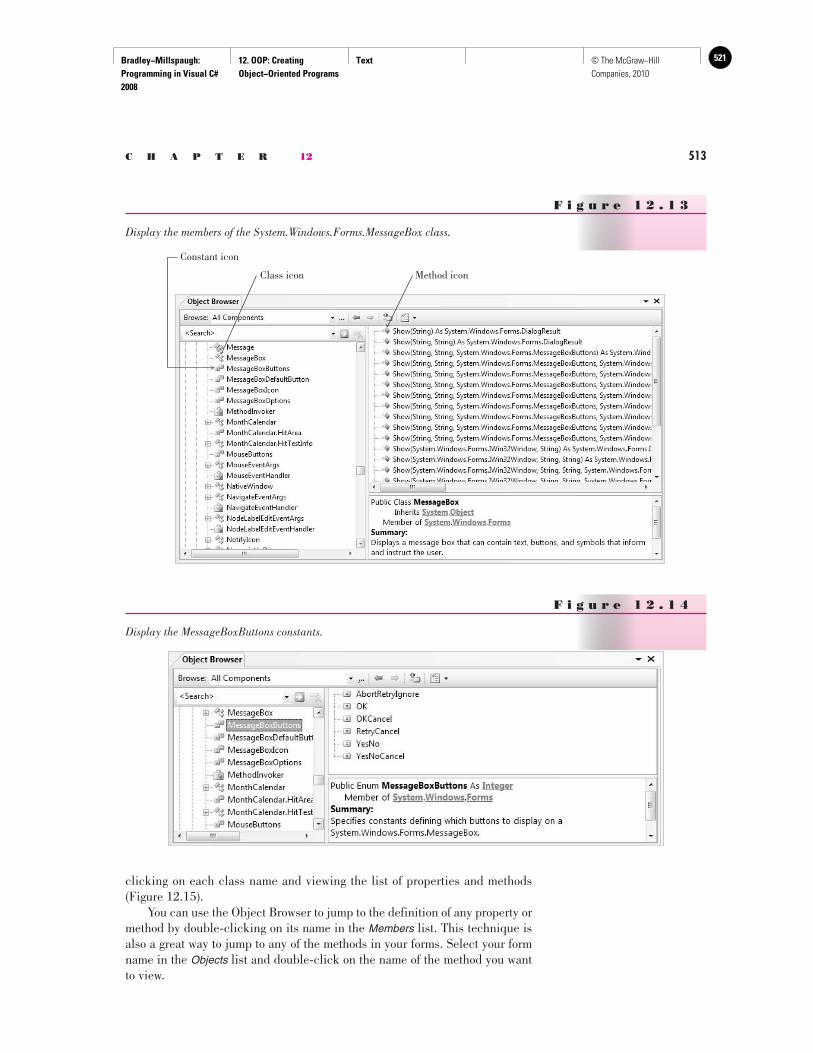
Bradley−Millspaugh: Programming in Visual C# 2008
12. OOP: Creating Object−Oriented Programs
Text 521© The McGraw−Hill Companies, 2010
C H A P T E R 12 513
clicking on each class name and viewing the list of properties and methods ( Figure 12.15 ). You can use the Object Browser to jump to the definition of any property or method by double-clicking on its name in the Members list. This technique is also a great way to jump to any of the methods in your forms. Select your form name in the Objects list and double-click on the name of the method you want to view.
Class icon
Constant icon
Method icon
F i g u r e 1 2 . 1 3
Display the members of the System.Windows.Forms.MessageBox class.
F i g u r e 1 2 . 1 4
Display the MessageBoxButtons constants.
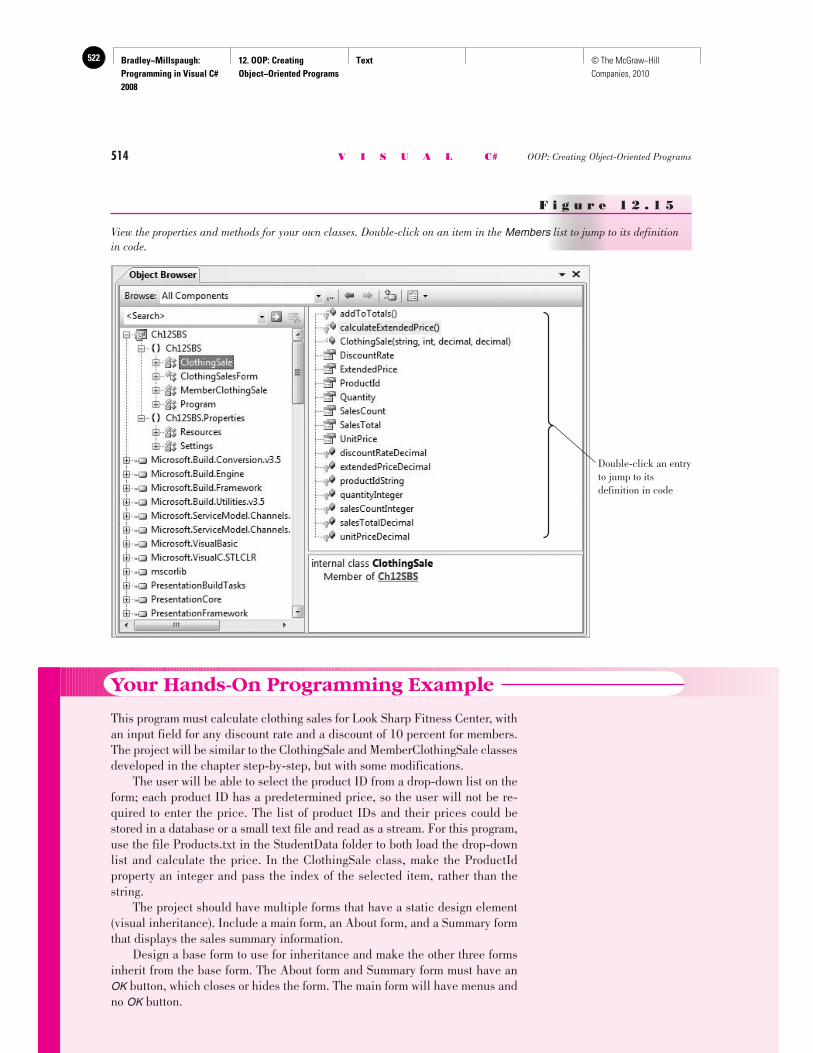
Bradley−Millspaugh: Programming in Visual C# 2008
12. OOP: Creating Object−Oriented Programs
Text522 © The McGraw−Hill Companies, 2010
514 V I S U A L C# OOP: Creating Object-Oriented Programs
F i g u r e 1 2 . 1 5
View the properties and methods for your own classes. Double-click on an item in the Members list to jump to its definition in code.
Double-click an entryto jump to itsdefinition in code
Your Hands-On Programming Example
This program must calculate clothing sales for Look Sharp Fitness Center, with an input field for any discount rate and a discount of 10 percent for members. The project will be similar to the ClothingSale and MemberClothingSale classes developed in the chapter step-by-step, but with some modifications. The user will be able to select the product ID from a drop-down list on the form; each product ID has a predetermined price, so the user will not be re-quired to enter the price. The list of product IDs and their prices could be stored in a database or a small text file and read as a stream. For this program, use the file Products.txt in the StudentData folder to both load the drop-down list and calculate the price. In the ClothingSale class, make the ProductId property an integer and pass the index of the selected item, rather than the string. The project should have multiple forms that have a static design element (visual inheritance). Include a main form, an About form, and a Summary form that displays the sales summary information. Design a base form to use for inheritance and make the other three forms inherit from the base form. The About form and Summary form must have an OK button, which closes or hides the form. The main form will have menus and no OK button.
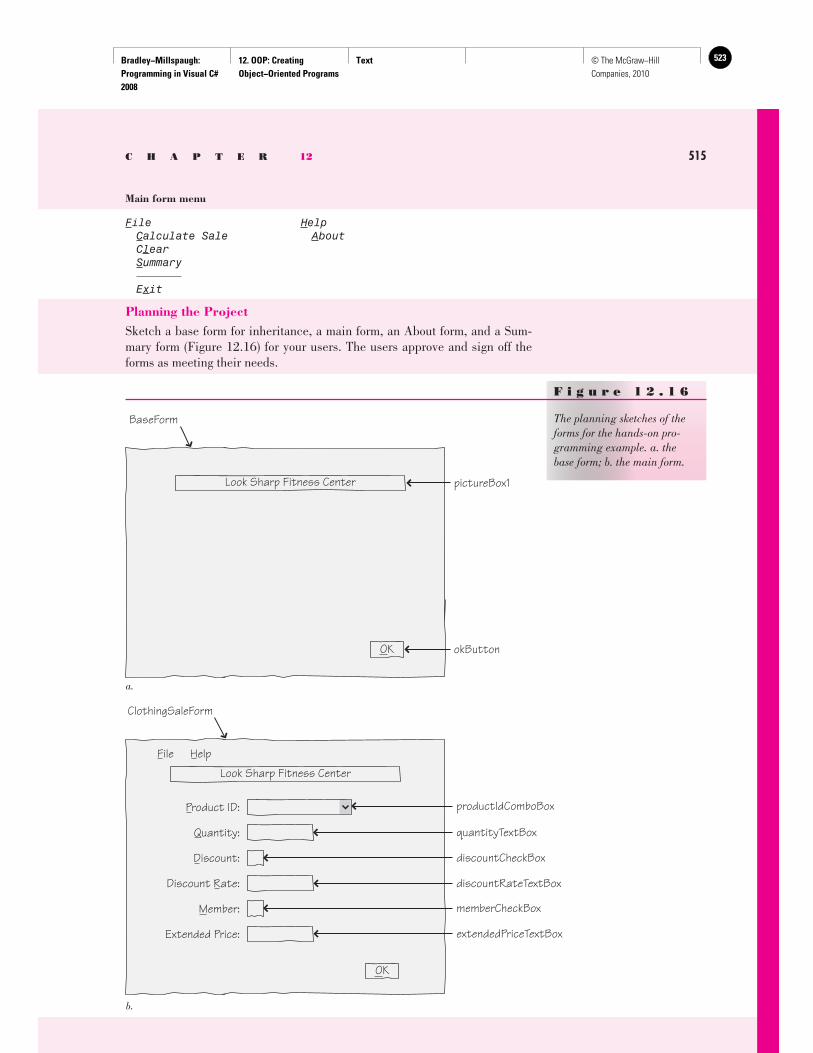
Bradley−Millspaugh: Programming in Visual C# 2008
12. OOP: Creating Object−Oriented Programs
Text 523© The McGraw−Hill Companies, 2010
C H A P T E R 12 515
Main form menu
File Help Calculate Sale About Clear Summary
Exit
Planning the Project Sketch a base form for inheritance, a main form, an About form, and a Sum-mary form ( Figure 12.16 ) for your users. The users approve and sign off the forms as meeting their needs.
F i g u r e 1 2 . 1 6
The planning sketches of the forms for the hands-on pro-gramming example. a. the base form; b. the main form.
Look Sharp Fitness Center
OK
a.
BaseForm
pictureBox1
okButton
File Help
Look Sharp Fitness Center
OK
b.
ClothingSaleForm
productIdComboBox
quantityTextBox
discountCheckBox
discountRateTextBox
memberCheckBox
extendedPriceTextBox
Product ID:
Quantity:
Discount:
Discount Rate:
Member:
Extended Price:
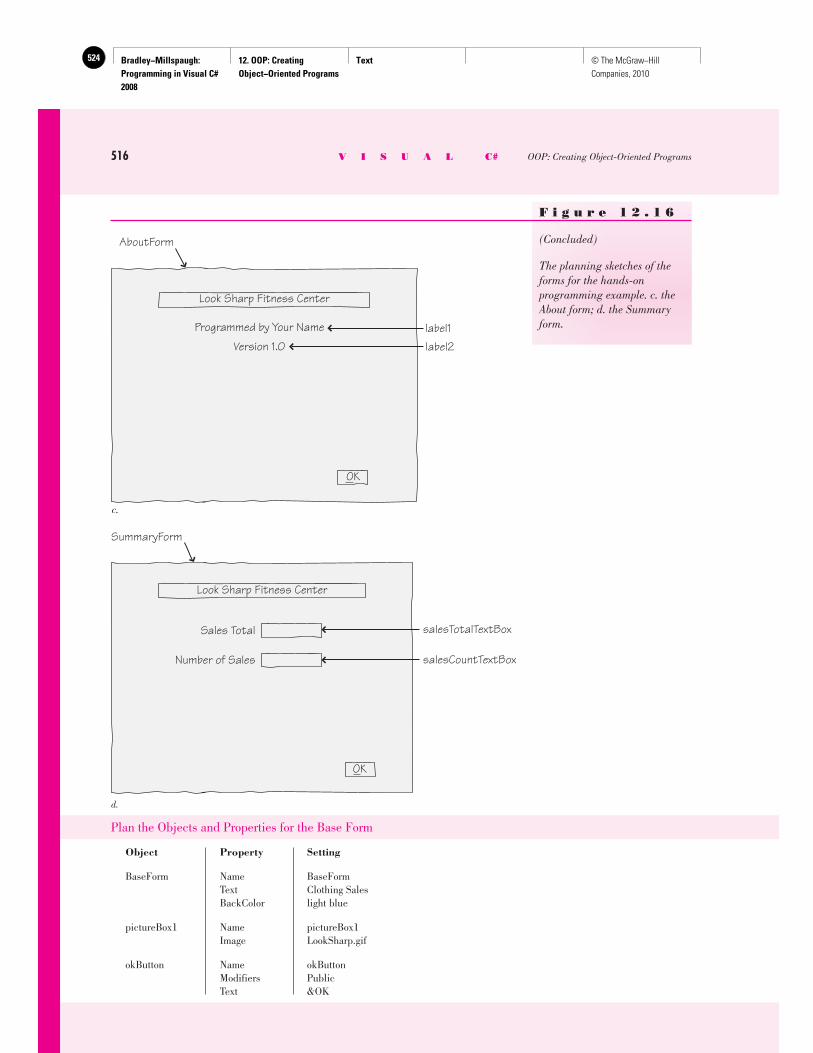
Bradley−Millspaugh: Programming in Visual C# 2008
12. OOP: Creating Object−Oriented Programs
Text524 © The McGraw−Hill Companies, 2010
516 V I S U A L C# OOP: Creating Object-Oriented Programs
Plan the Objects and Properties for the Base Form
Object Property Setting
BaseForm Name BaseForm Text Clothing Sales BackColor light blue
pictureBox1 Name pictureBox1 Image LookSharp.gif
okButton Name okButton Modifiers Public Text &OK
F i g u r e 1 2 . 1 6
(Concluded)
The planning sketches of the forms for the hands-on programming example. c. the About form; d. the Summary form.
Look Sharp Fitness Center
OK
c.
AboutForm
Programmed by Your Name
Version 1.0label1label2
Look Sharp Fitness Center
d.
SummaryForm
salesTotalTextBox
salesCountTextBox
Sales Total
Number of Sales
OK
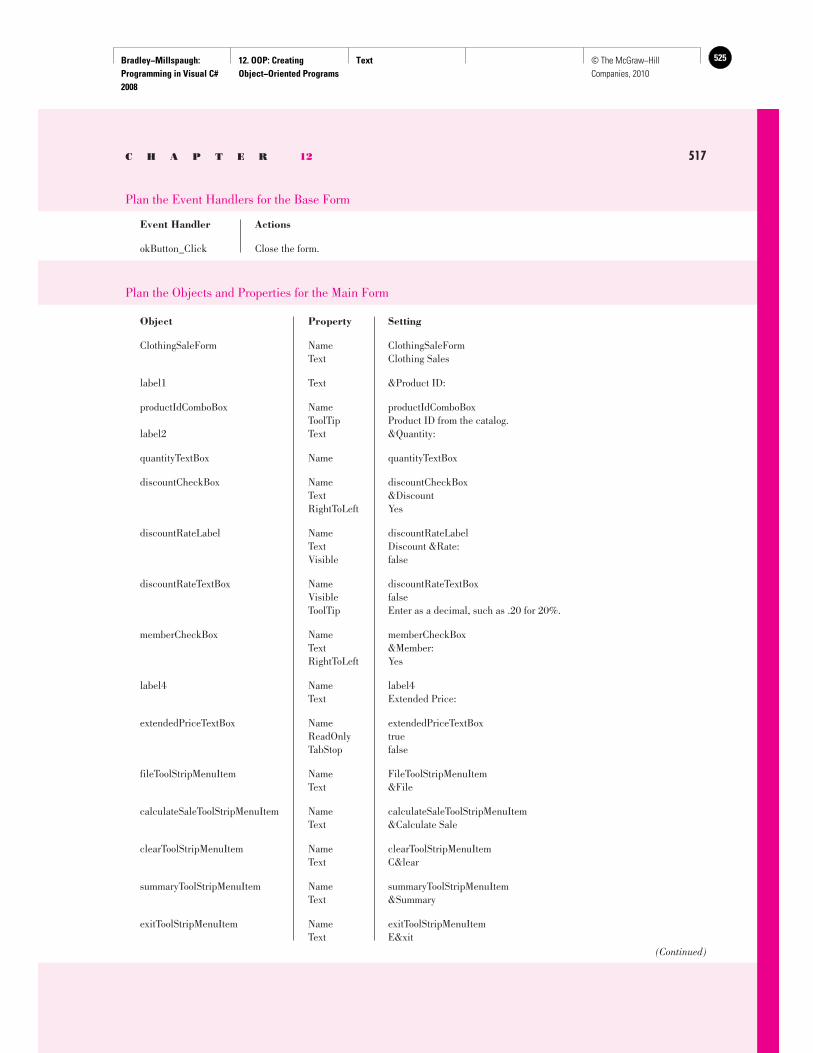
Bradley−Millspaugh: Programming in Visual C# 2008
12. OOP: Creating Object−Oriented Programs
Text 525© The McGraw−Hill Companies, 2010
C H A P T E R 12 517
Plan the Event Handlers for the Base Form
Event Handler Actions
okButton_Click Close the form.
Plan the Objects and Properties for the Main Form
Object Property Setting
ClothingSaleForm Name ClothingSaleForm Text Clothing Sales
label1 Text &Product ID:
productIdComboBox Name productIdComboBox ToolTip Product ID from the catalog. label2 Text &Quantity:
quantityTextBox Name quantityTextBox
discountCheckBox Name discountCheckBox Text &Discount RightToLeft Yes
discountRateLabel Name discountRateLabel Text Discount &Rate: Visible false
discountRateTextBox Name discountRateTextBox Visible false ToolTip Enter as a decimal, such as .20 for 20%.
memberCheckBox Name memberCheckBox Text &Member: RightToLeft Yes
label4 Name label4 Text Extended Price:
extendedPriceTextBox Name extendedPriceTextBox ReadOnly true TabStop false
fileToolStripMenuItem Name FileToolStripMenuItem Text &File
calculateSaleToolStripMenuItem Name calculateSaleToolStripMenuItem Text &Calculate Sale
clearToolStripMenuItem Name clearToolStripMenuItem Text C&lear
summaryToolStripMenuItem Name summaryToolStripMenuItem Text &Summary
exitToolStripMenuItem Name exitToolStripMenuItem Text E&xit
(Continued)
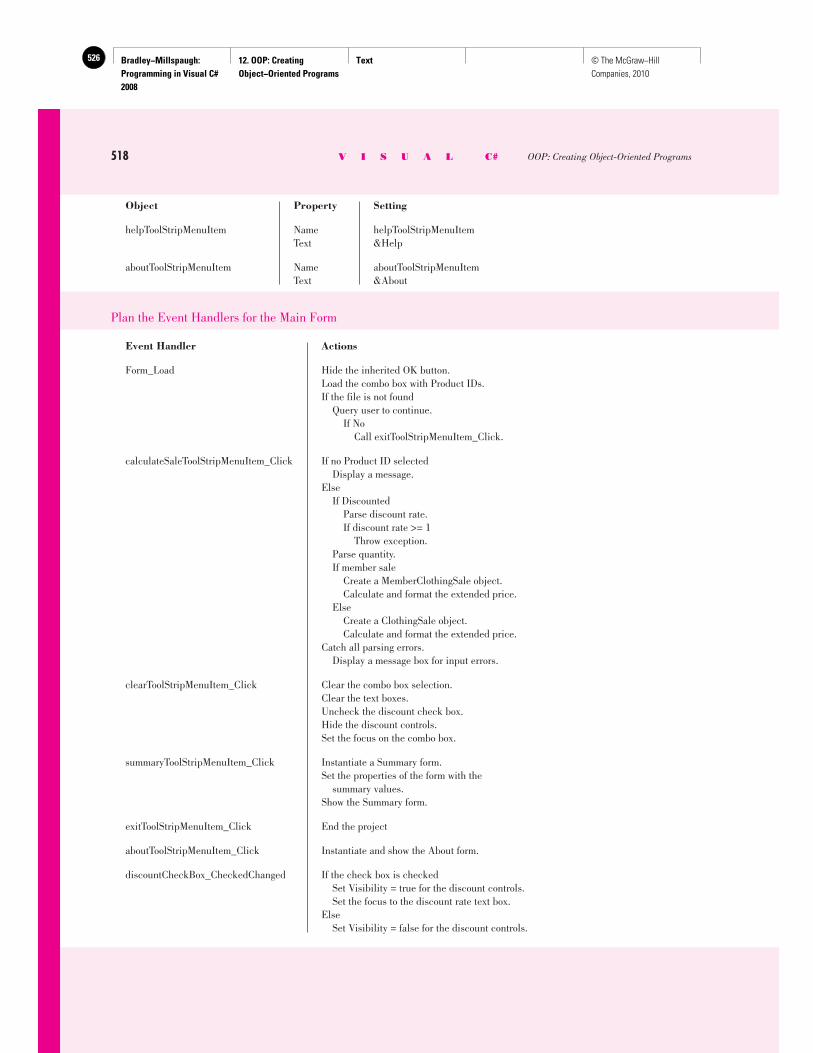
Bradley−Millspaugh: Programming in Visual C# 2008
12. OOP: Creating Object−Oriented Programs
Text526 © The McGraw−Hill Companies, 2010
518 V I S U A L C# OOP: Creating Object-Oriented Programs
Object Property Setting
helpToolStripMenuItem Name helpToolStripMenuItem Text &Help
aboutToolStripMenuItem Name aboutToolStripMenuItem Text &About
Plan the Event Handlers for the Main Form
Event Handler Actions
Form_Load Hide the inherited OK button. Load the combo box with Product IDs. If the file is not found Query user to continue. If No Call exitToolStripMenuItem_Click.
calculateSaleToolStripMenuItem_Click If no Product ID selected Display a message. Else If Discounted Parse discount rate. If discount rate >= 1 Throw exception. Parse quantity. If member sale Create a MemberClothingSale object. Calculate and format the extended price. Else Create a ClothingSale object. Calculate and format the extended price. Catch all parsing errors. Display a message box for input errors.
clearToolStripMenuItem_Click Clear the combo box selection. Clear the text boxes. Uncheck the discount check box. Hide the discount controls. Set the focus on the combo box.
summaryToolStripMenuItem_Click Instantiate a Summary form. Set the properties of the form with the summary values. Show the Summary form.
exitToolStripMenuItem_Click End the project
aboutToolStripMenuItem_Click Instantiate and show the About form.
discountCheckBox_CheckedChanged If the check box is checked Set Visibility = true for the discount controls. Set the focus to the discount rate text box. Else Set Visibility = false for the discount controls.
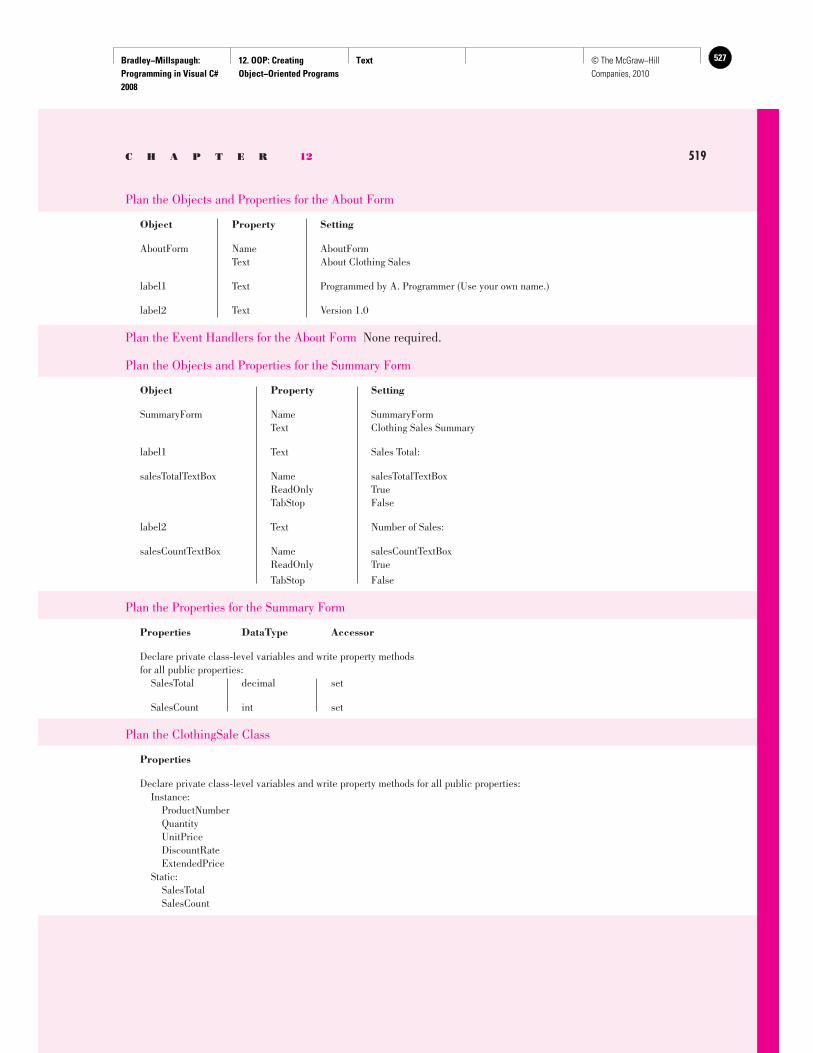
Bradley−Millspaugh: Programming in Visual C# 2008
12. OOP: Creating Object−Oriented Programs
Text 527© The McGraw−Hill Companies, 2010
C H A P T E R 12 519
Plan the Objects and Properties for the About Form
Object Property Setting
AboutForm Name AboutForm Text About Clothing Sales
label1 Text Programmed by A. Programmer (Use your own name.)
label2 Text Version 1.0
Plan the Event Handlers for the About Form None required.
Plan the Objects and Properties for the Summary Form
Object Property Setting
SummaryForm Name SummaryForm Text Clothing Sales Summary
label1 Text Sales Total:
salesTotalTextBox Name salesTotalTextBox ReadOnly True TabStop False
label2 Text Number of Sales:
salesCountTextBox Name salesCountTextBox ReadOnly True
TabStop False
Plan the Properties for the Summary Form
Properties DataType Accessor
Declare private class-level variables and write property methods for all public properties: SalesTotal decimal set
SalesCount int set
Plan the ClothingSale Class
Properties
Declare private class-level variables and write property methods for all public properties: Instance: ProductNumber Quantity UnitPrice DiscountRate ExtendedPrice Static: SalesTotal SalesCount
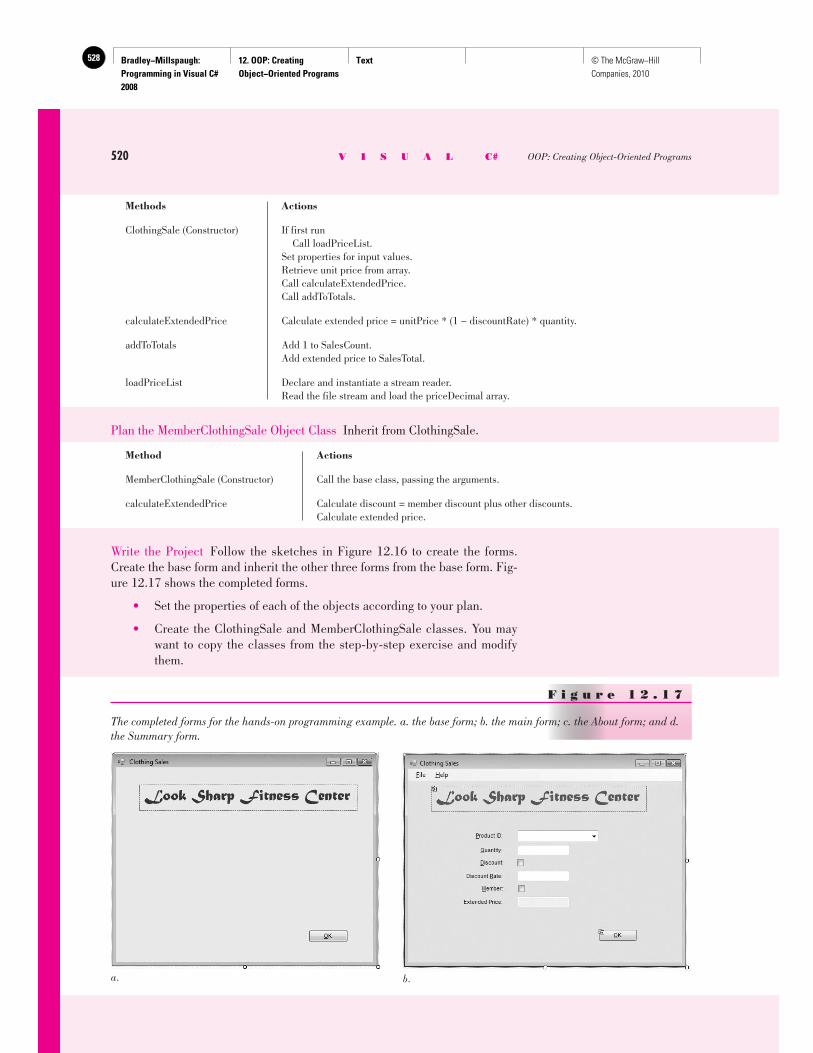
Bradley−Millspaugh: Programming in Visual C# 2008
12. OOP: Creating Object−Oriented Programs
Text528 © The McGraw−Hill Companies, 2010
520 V I S U A L C# OOP: Creating Object-Oriented Programs
Methods Actions
ClothingSale (Constructor) If first run Call loadPriceList. Set properties for input values. Retrieve unit price from array. Call calculateExtendedPrice. Call addToTotals.
calculateExtendedPrice Calculate extended price = unitPrice * (1 − discountRate) * quantity.
addToTotals Add 1 to SalesCount. Add extended price to SalesTotal.
loadPriceList Declare and instantiate a stream reader. Read the file stream and load the priceDecimal array.
Plan the MemberClothingSale Object Class Inherit from ClothingSale.
Method Actions
MemberClothingSale (Constructor) Call the base class, passing the arguments.
calculateExtendedPrice Calculate discount = member discount plus other discounts. Calculate extended price.
Write the Project Follow the sketches in Figure 12.16 to create the forms. Create the base form and inherit the other three forms from the base form. Fig-ure 12.17 shows the completed forms.
• Set the properties of each of the objects according to your plan.
• Create the ClothingSale and MemberClothingSale classes. You may want to copy the classes from the step-by-step exercise and modify them.
F i g u r e 1 2 . 1 7
The completed forms for the hands-on programming example. a. the base form; b. the main form; c. the About form; and d. the Summary form.
a. b.
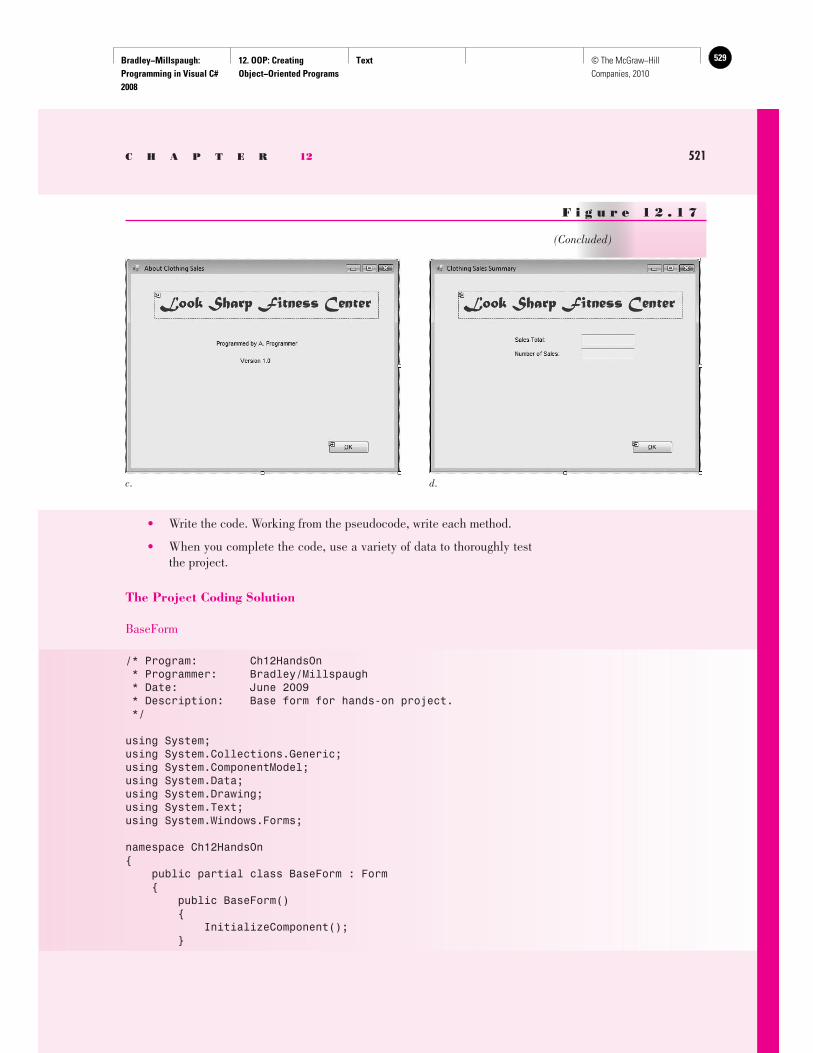
Bradley−Millspaugh: Programming in Visual C# 2008
12. OOP: Creating Object−Oriented Programs
Text 529© The McGraw−Hill Companies, 2010
C H A P T E R 12 521
F i g u r e 1 2 . 1 7
(Concluded)
c. d.
• Write the code. Working from the pseudocode, write each method.
• When you complete the code, use a variety of data to thoroughly test the project.
The Project Coding Solution
BaseForm
/* Program: Ch12HandsOn * Programmer: Bradley/Millspaugh * Date: June 2009 * Description: Base form for hands-on project. */
using System;using System.Collections.Generic;using System.ComponentModel;using System.Data;using System.Drawing;using System.Text;using System.Windows.Forms;
namespace Ch12HandsOn{ public partial class BaseForm : Form { public BaseForm() { InitializeComponent(); }
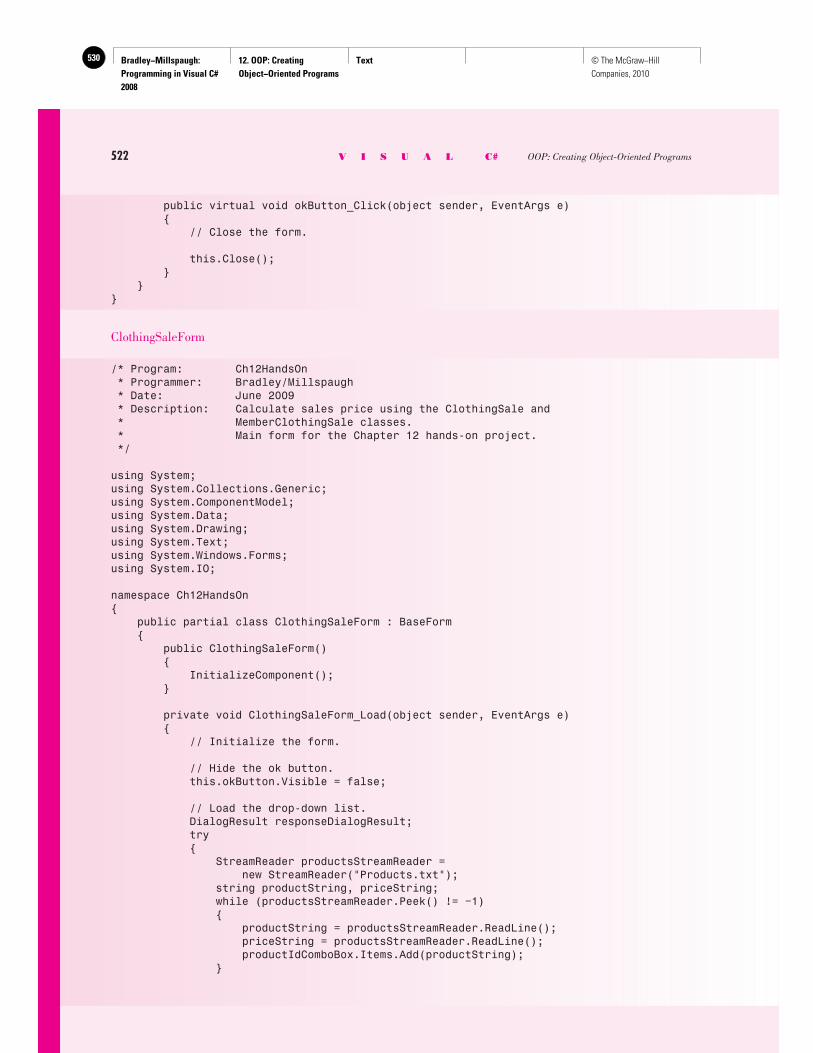
Bradley−Millspaugh: Programming in Visual C# 2008
12. OOP: Creating Object−Oriented Programs
Text530 © The McGraw−Hill Companies, 2010
522 V I S U A L C# OOP: Creating Object-Oriented Programs
public virtual void okButton_Click(object sender, EventArgs e) { // Close the form.
this.Close(); } }}
ClothingSaleForm
/* Program: Ch12HandsOn * Programmer: Bradley/Millspaugh * Date: June 2009 * Description: Calculate sales price using the ClothingSale and * MemberClothingSale classes. * Main form for the Chapter 12 hands-on project. */
using System;using System.Collections.Generic;using System.ComponentModel;using System.Data;using System.Drawing;using System.Text;using System.Windows.Forms;using System.IO;
namespace Ch12HandsOn{ public partial class ClothingSaleForm : BaseForm { public ClothingSaleForm() { InitializeComponent(); }
private void ClothingSaleForm_Load(object sender, EventArgs e) { // Initialize the form.
// Hide the ok button. this.okButton.Visible = false;
// Load the drop-down list. DialogResult responseDialogResult; try { StreamReader productsStreamReader = new StreamReader("Products.txt"); string productString, priceString; while (productsStreamReader.Peek() != −1) { productString = productsStreamReader.ReadLine(); priceString = productsStreamReader.ReadLine(); productIdComboBox.Items.Add(productString); }
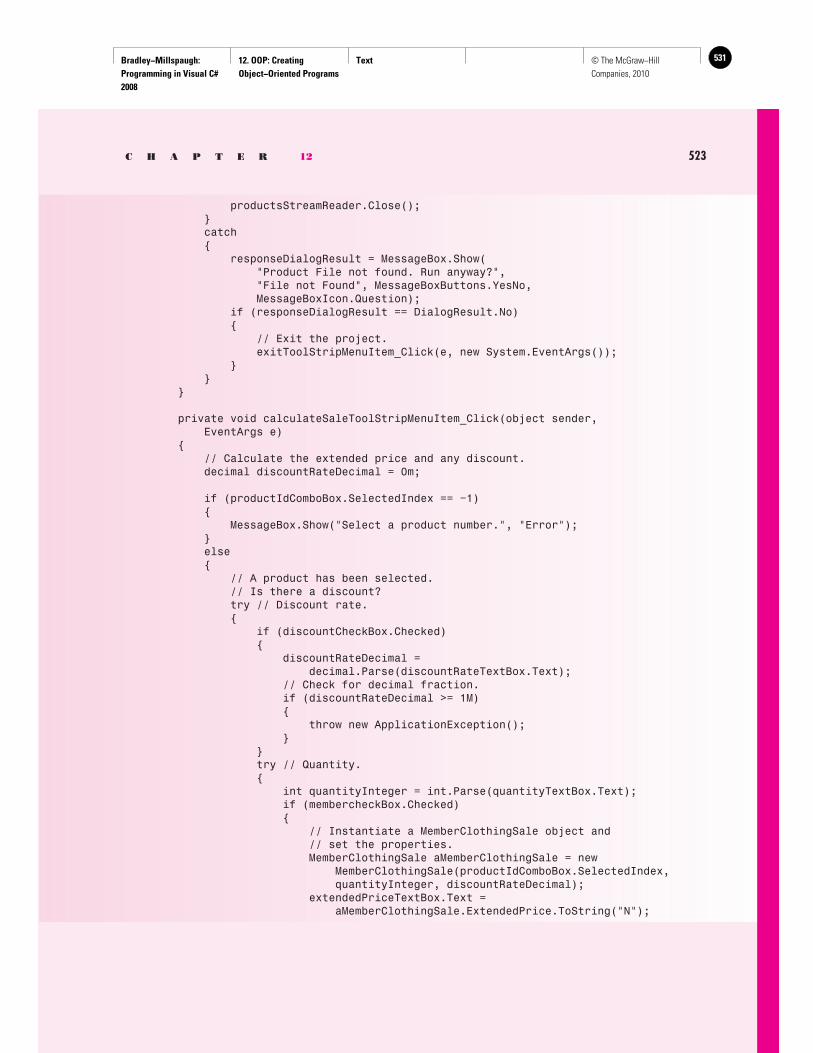
Bradley−Millspaugh: Programming in Visual C# 2008
12. OOP: Creating Object−Oriented Programs
Text 531© The McGraw−Hill Companies, 2010
C H A P T E R 12 523
productsStreamReader.Close(); } catch { responseDialogResult = MessageBox.Show( "Product File not found. Run anyway?", "File not Found", MessageBoxButtons.YesNo, MessageBoxIcon.Question); if (responseDialogResult == DialogResult.No) { // Exit the project. exitToolStripMenuItem_Click(e, new System.EventArgs()); } } }
private void calculateSaleToolStripMenuItem_Click(object sender, EventArgs e) { // Calculate the extended price and any discount. decimal discountRateDecimal = 0m;
if (productIdComboBox.SelectedIndex == −1) { MessageBox.Show("Select a product number.", "Error"); } else { // A product has been selected. // Is there a discount? try // Discount rate. { if (discountCheckBox.Checked) { discountRateDecimal = decimal.Parse(discountRateTextBox.Text); // Check for decimal fraction. if (discountRateDecimal >= 1M) { throw new ApplicationException(); } } try // Quantity. { int quantityInteger = int.Parse(quantityTextBox.Text); if (membercheckBox.Checked) { // Instantiate a MemberClothingSale object and // set the properties. MemberClothingSale aMemberClothingSale = new MemberClothingSale(productIdComboBox.SelectedIndex, quantityInteger, discountRateDecimal); extendedPriceTextBox.Text = aMemberClothingSale.ExtendedPrice.ToString("N");
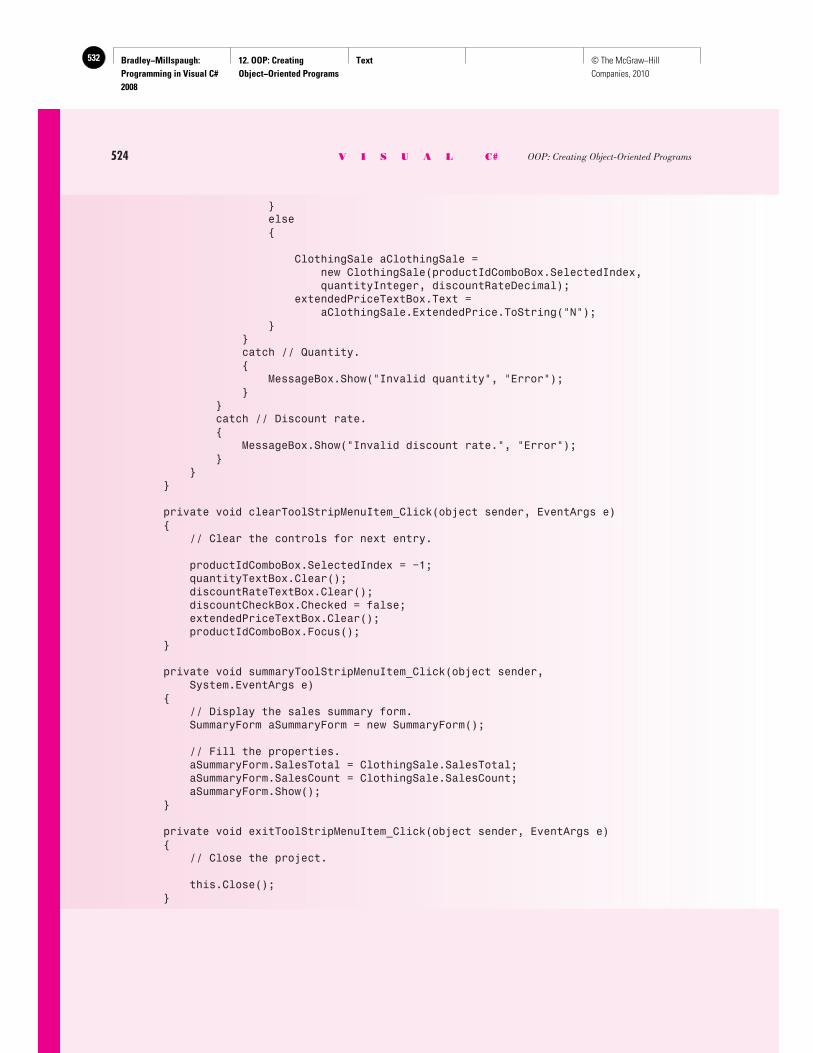
Bradley−Millspaugh: Programming in Visual C# 2008
12. OOP: Creating Object−Oriented Programs
Text532 © The McGraw−Hill Companies, 2010
524 V I S U A L C# OOP: Creating Object-Oriented Programs
} else {
ClothingSale aClothingSale = new ClothingSale(productIdComboBox.SelectedIndex, quantityInteger, discountRateDecimal); extendedPriceTextBox.Text = aClothingSale.ExtendedPrice.ToString("N"); } } catch // Quantity. { MessageBox.Show("Invalid quantity", "Error"); } } catch // Discount rate. { MessageBox.Show("Invalid discount rate.", "Error"); } } }
private void clearToolStripMenuItem_Click(object sender, EventArgs e) { // Clear the controls for next entry.
productIdComboBox.SelectedIndex = −1; quantityTextBox.Clear(); discountRateTextBox.Clear(); discountCheckBox.Checked = false; extendedPriceTextBox.Clear(); productIdComboBox.Focus(); }
private void summaryToolStripMenuItem_Click(object sender, System.EventArgs e) { // Display the sales summary form. SummaryForm aSummaryForm = new SummaryForm();
// Fill the properties. aSummaryForm.SalesTotal = ClothingSale.SalesTotal; aSummaryForm.SalesCount = ClothingSale.SalesCount; aSummaryForm.Show(); }
private void exitToolStripMenuItem_Click(object sender, EventArgs e) { // Close the project.
this.Close(); }
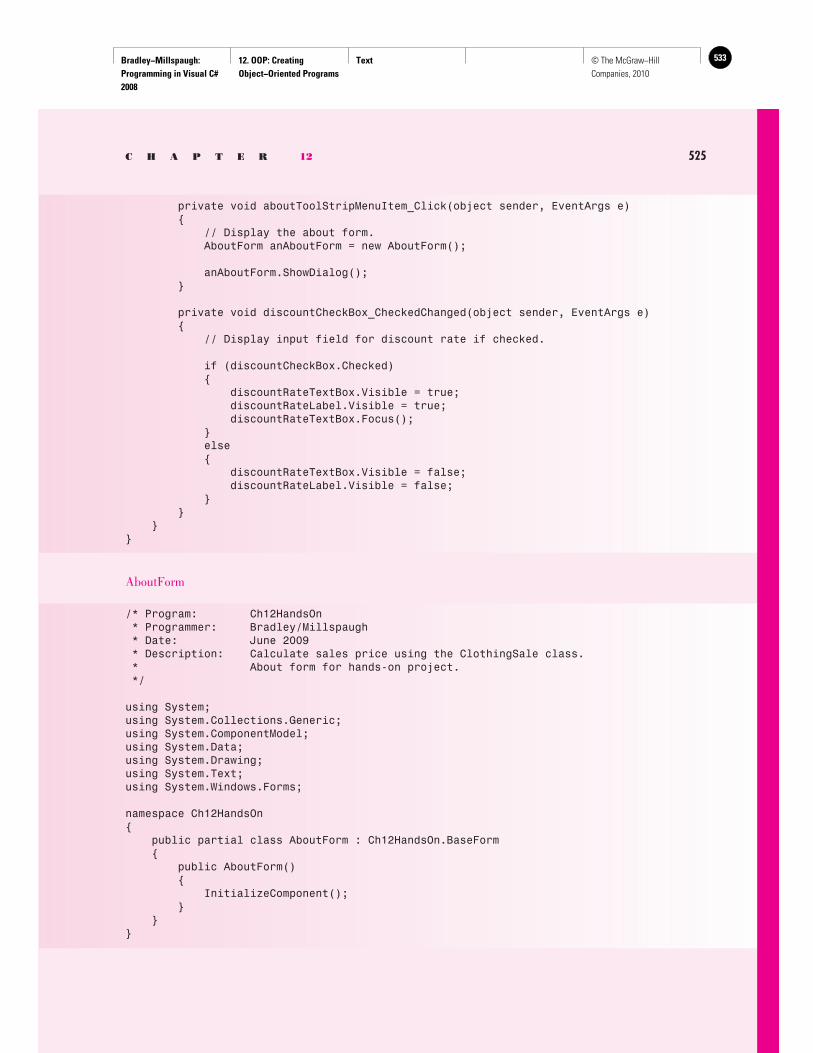
Bradley−Millspaugh: Programming in Visual C# 2008
12. OOP: Creating Object−Oriented Programs
Text 533© The McGraw−Hill Companies, 2010
C H A P T E R 12 525
private void aboutToolStripMenuItem_Click(object sender, EventArgs e) { // Display the about form. AboutForm anAboutForm = new AboutForm();
anAboutForm.ShowDialog(); }
private void discountCheckBox_CheckedChanged(object sender, EventArgs e) { // Display input field for discount rate if checked.
if (discountCheckBox.Checked) { discountRateTextBox.Visible = true; discountRateLabel.Visible = true; discountRateTextBox.Focus(); } else { discountRateTextBox.Visible = false; discountRateLabel.Visible = false; } } }}
AboutForm
/* Program: Ch12HandsOn * Programmer: Bradley/Millspaugh * Date: June 2009 * Description: Calculate sales price using the ClothingSale class. * About form for hands-on project. */
using System;using System.Collections.Generic;using System.ComponentModel;using System.Data;using System.Drawing;using System.Text;using System.Windows.Forms;
namespace Ch12HandsOn{ public partial class AboutForm : Ch12HandsOn.BaseForm { public AboutForm() { InitializeComponent(); } }}
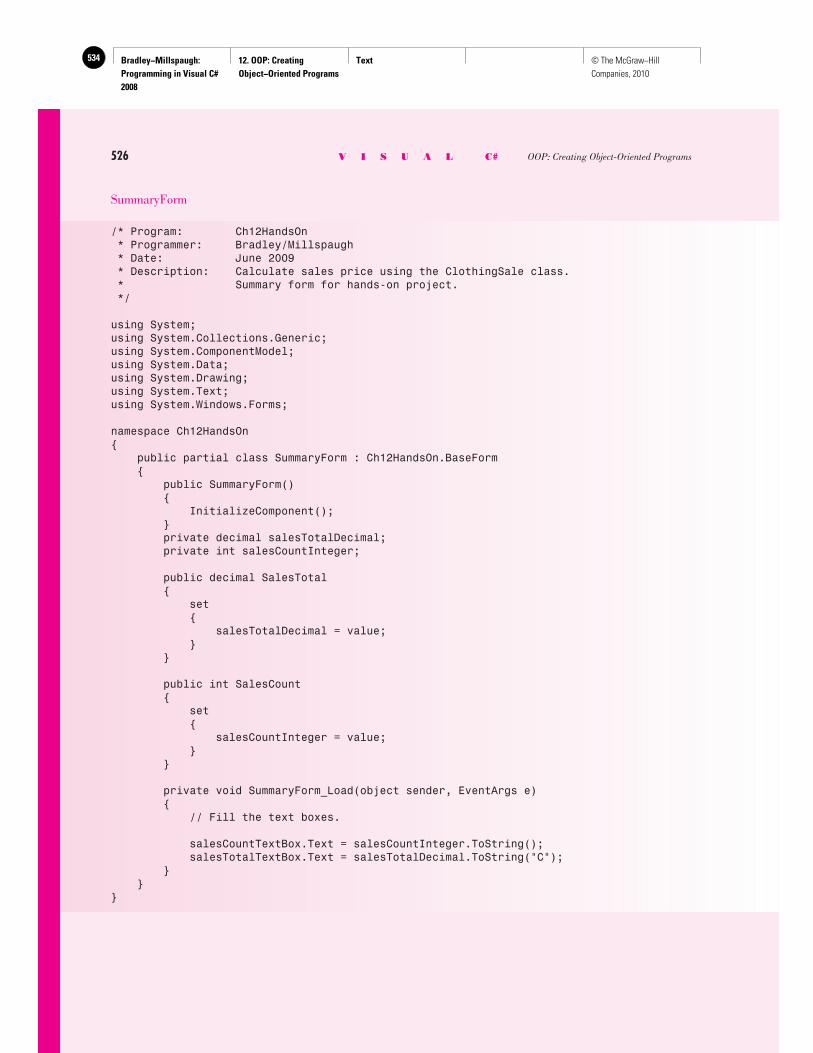
Bradley−Millspaugh: Programming in Visual C# 2008
12. OOP: Creating Object−Oriented Programs
Text534 © The McGraw−Hill Companies, 2010
526 V I S U A L C# OOP: Creating Object-Oriented Programs
SummaryForm
/* Program: Ch12HandsOn * Programmer: Bradley/Millspaugh * Date: June 2009 * Description: Calculate sales price using the ClothingSale class. * Summary form for hands-on project. */
using System;using System.Collections.Generic;using System.ComponentModel;using System.Data;using System.Drawing;using System.Text;using System.Windows.Forms;
namespace Ch12HandsOn{ public partial class SummaryForm : Ch12HandsOn.BaseForm { public SummaryForm() { InitializeComponent(); } private decimal salesTotalDecimal; private int salesCountInteger;
public decimal SalesTotal { set { salesTotalDecimal = value; } }
public int SalesCount { set { salesCountInteger = value; } }
private void SummaryForm_Load(object sender, EventArgs e) { // Fill the text boxes.
salesCountTextBox.Text = salesCountInteger.ToString(); salesTotalTextBox.Text = salesTotalDecimal.ToString("C"); } }}
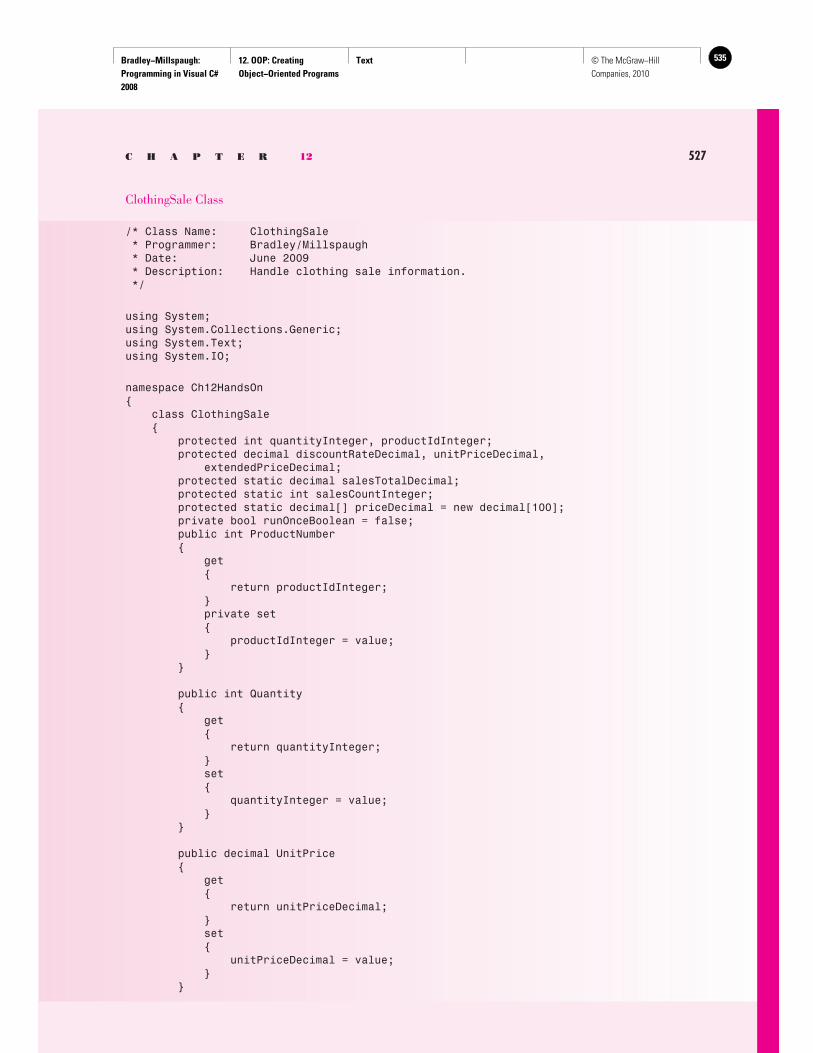
Bradley−Millspaugh: Programming in Visual C# 2008
12. OOP: Creating Object−Oriented Programs
Text 535© The McGraw−Hill Companies, 2010
C H A P T E R 12 527
ClothingSale Class
/* Class Name: ClothingSale * Programmer: Bradley/Millspaugh * Date: June 2009 * Description: Handle clothing sale information. */
using System;using System.Collections.Generic;using System.Text;using System.IO;
namespace Ch12HandsOn{ class ClothingSale { protected int quantityInteger, productIdInteger; protected decimal discountRateDecimal, unitPriceDecimal, extendedPriceDecimal; protected static decimal salesTotalDecimal; protected static int salesCountInteger; protected static decimal[] priceDecimal = new decimal[100]; private bool runOnceBoolean = false; public int ProductNumber { get { return productIdInteger; } private set { productIdInteger = value; } }
public int Quantity { get { return quantityInteger; } set { quantityInteger = value; } }
public decimal UnitPrice { get { return unitPriceDecimal; } set { unitPriceDecimal = value; } }
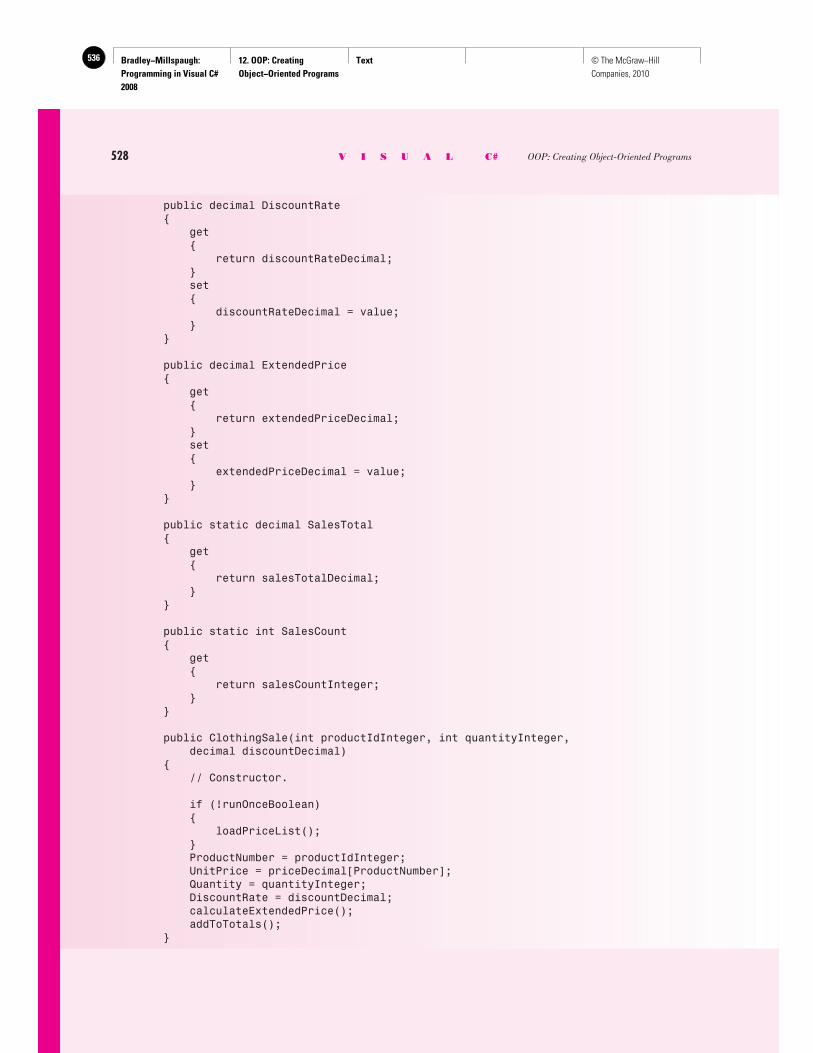
Bradley−Millspaugh: Programming in Visual C# 2008
12. OOP: Creating Object−Oriented Programs
Text536 © The McGraw−Hill Companies, 2010
528 V I S U A L C# OOP: Creating Object-Oriented Programs
public decimal DiscountRate { get { return discountRateDecimal; } set { discountRateDecimal = value; } }
public decimal ExtendedPrice { get { return extendedPriceDecimal; } set { extendedPriceDecimal = value; } }
public static decimal SalesTotal { get { return salesTotalDecimal; } }
public static int SalesCount { get { return salesCountInteger; } }
public ClothingSale(int productIdInteger, int quantityInteger, decimal discountDecimal) { // Constructor.
if (!runOnceBoolean) { loadPriceList(); } ProductNumber = productIdInteger; UnitPrice = priceDecimal[ProductNumber]; Quantity = quantityInteger; DiscountRate = discountDecimal; calculateExtendedPrice(); addToTotals(); }
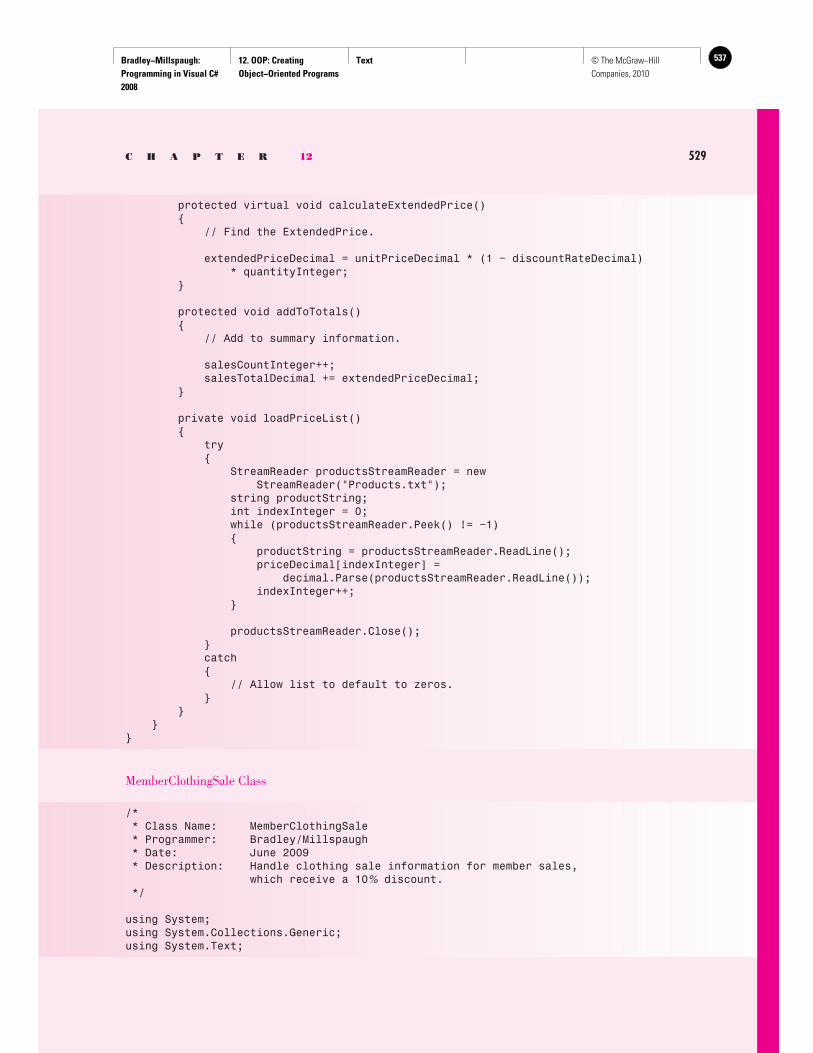
Bradley−Millspaugh: Programming in Visual C# 2008
12. OOP: Creating Object−Oriented Programs
Text 537© The McGraw−Hill Companies, 2010
C H A P T E R 12 529
protected virtual void calculateExtendedPrice() { // Find the ExtendedPrice.
extendedPriceDecimal = unitPriceDecimal * (1 − discountRateDecimal) * quantityInteger; }
protected void addToTotals() { // Add to summary information.
salesCountInteger++; salesTotalDecimal += extendedPriceDecimal; }
private void loadPriceList() { try { StreamReader productsStreamReader = new StreamReader("Products.txt"); string productString; int indexInteger = 0; while (productsStreamReader.Peek() != −1) { productString = productsStreamReader.ReadLine(); priceDecimal[indexInteger] = decimal.Parse(productsStreamReader.ReadLine()); indexInteger++; }
productsStreamReader.Close(); } catch { // Allow list to default to zeros. } } }}
MemberClothingSale Class
/* * Class Name: MemberClothingSale * Programmer: Bradley/Millspaugh * Date: June 2009 * Description: Handle clothing sale information for member sales, which receive a 10% discount. */
using System;using System.Collections.Generic;using System.Text;
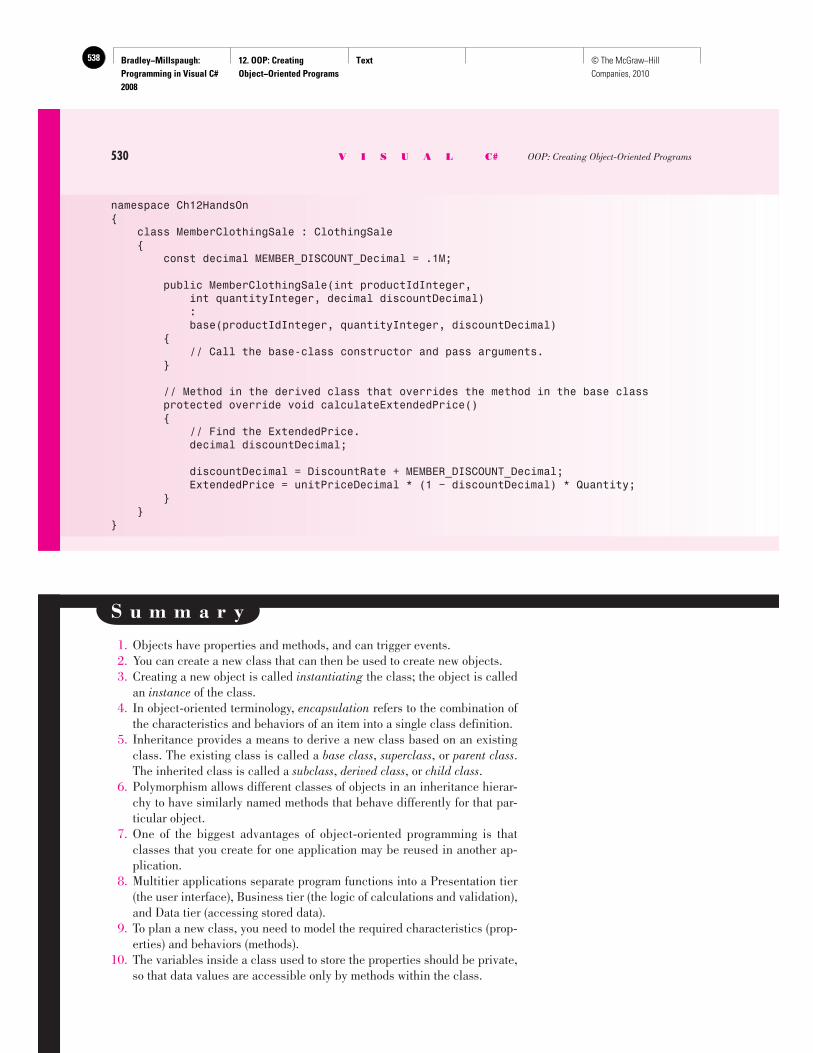
Bradley−Millspaugh: Programming in Visual C# 2008
12. OOP: Creating Object−Oriented Programs
Text538 © The McGraw−Hill Companies, 2010
namespace Ch12HandsOn{ class MemberClothingSale : ClothingSale { const decimal MEMBER_DISCOUNT_Decimal = .1M;
public MemberClothingSale(int productIdInteger, int quantityInteger, decimal discountDecimal) : base(productIdInteger, quantityInteger, discountDecimal) { // Call the base-class constructor and pass arguments. }
// Method in the derived class that overrides the method in the base class protected override void calculateExtendedPrice() { // Find the ExtendedPrice. decimal discountDecimal;
discountDecimal = DiscountRate + MEMBER_DISCOUNT_Decimal; ExtendedPrice = unitPriceDecimal * (1 − discountDecimal) * Quantity; } }}
530 V I S U A L C# OOP: Creating Object-Oriented Programs
S u m m a r y
1. Objects have properties and methods, and can trigger events. 2. You can create a new class that can then be used to create new objects. 3. Creating a new object is called instantiating the class; the object is called
an instance of the class. 4. In object-oriented terminology, encapsulation refers to the combination of
the characteristics and behaviors of an item into a single class definition. 5. Inheritance provides a means to derive a new class based on an existing
class. The existing class is called a base class , superclass , or parent class . The inherited class is called a subclass , derived class , or child class .
6. Polymorphism allows different classes of objects in an inheritance hierar-chy to have similarly named methods that behave differently for that par-ticular object.
7. One of the biggest advantages of object-oriented programming is that classes that you create for one application may be reused in another ap-plication.
8. Multitier applications separate program functions into a Presentation tier (the user interface), Business tier (the logic of calculations and validation), and Data tier (accessing stored data).
9. To plan a new class, you need to model the required characteristics (prop-erties) and behaviors (methods).
10. The variables inside a class used to store the properties should be private, so that data values are accessible only by methods within the class.
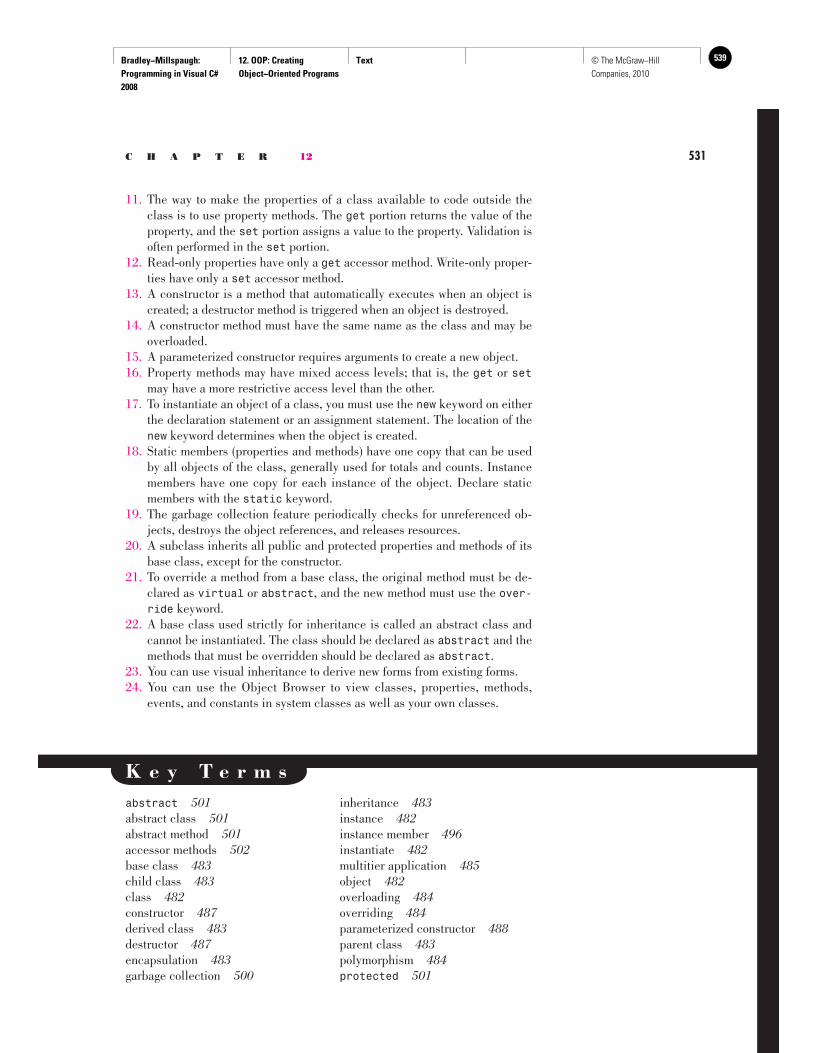
Bradley−Millspaugh: Programming in Visual C# 2008
12. OOP: Creating Object−Oriented Programs
Text 539© The McGraw−Hill Companies, 2010
C H A P T E R 12 531
11. The way to make the properties of a class available to code outside the class is to use property methods. The get portion returns the value of the property, and the set portion assigns a value to the property. Validation is often performed in the set portion.
12. Read-only properties have only a get accessor method. Write-only proper-ties have only a set accessor method.
13. A constructor is a method that automatically executes when an object is created; a destructor method is triggered when an object is destroyed.
14. A constructor method must have the same name as the class and may be overloaded.
15. A parameterized constructor requires arguments to create a new object. 16. Property methods may have mixed access levels; that is, the get or set
may have a more restrictive access level than the other. 17. To instantiate an object of a class, you must use the new keyword on either
the declaration statement or an assignment statement. The location of the new keyword determines when the object is created.
18. Static members (properties and methods) have one copy that can be used by all objects of the class, generally used for totals and counts. Instance members have one copy for each instance of the object. Declare static members with the static keyword.
19. The garbage collection feature periodically checks for unreferenced ob-jects, destroys the object references, and releases resources.
20. A subclass inherits all public and protected properties and methods of its base class, except for the constructor.
21. To override a method from a base class, the original method must be de-clared as virtual or abstract , and the new method must use the over-ride keyword.
22. A base class used strictly for inheritance is called an abstract class and cannot be instantiated. The class should be declared as abstract and the methods that must be overridden should be declared as abstract .
23. You can use visual inheritance to derive new forms from existing forms. 24. You can use the Object Browser to view classes, properties, methods,
events, and constants in system classes as well as your own classes.
K e y T e r m s abstract 501 abstract class 501 abstract method 501 accessor methods 502 base class 483 child class 483 class 482 constructor 487 derived class 483 destructor 487 encapsulation 483 garbage collection 500
inheritance 483 instance 482 instance member 496 instantiate 482 multitier application 485 object 482 overloading 484 overriding 484 parameterized constructor 488 parent class 483 polymorphism 484 protected 501
Bradley−Millspaugh: Programming in Visual C# 2008
12. OOP: Creating Object−Oriented Programs
Text540 © The McGraw−Hill Companies, 2010
532 V I S U A L C# OOP: Creating Object-Oriented Programs
reusability 484 static keyword 497 static member 496 static property 497
subclass 483 superclass 483 virtual 501 visual inheritance 507
R e v i e w Q u e s t i o n s
1. What is an object? a property? a method? 2. What is the purpose of a class? 3. Why should property variables of a class be declared as private? 4. Explain how to create a new object. 5. What steps are needed to assign property values to an object? 6. What actions trigger the constructor and destructor methods of an object? 7. How can you write methods for a new class? 8. What is a static member? How is it created? 9. Explain the steps necessary to inherit a class from another class. 10. Differentiate between overriding and overloading. 11. What is a parameterized constructor? 12. When might you use the protected keyword on a method? 13. What is visual inheritance?
P r o g r a m m i n g E x e r c i s e s
Note : For help in basing a new project on an existing project, see “Copy and Move Projects” in Appendix C.
12.1 Modify the program for Programming Exercise 5.1 (the piecework pay) to separate the business logic into a separate class. The class should have properties for Name and Pieces, as well as static read-only proper-ties to maintain the summary information.
12.2 Modify Programming Exercise 12.1 to include multiple forms. Create a base form that you can use for visual inheritance. Display the summary information and the About box on separate forms, rather than in mes-sage boxes.
12.3 Extra challenge : Modify Programming Exercise 12.2 to have an inher-ited class. Create a derived class for senior workers, who receive 10 percent higher pay for 600 or more pieces. Add a check box to the main form to indicate a senior worker.
12.4 Modify Programming Exercise 5.3 (the salesperson commissions) to separate the business logic into a separate class. The class should have properties for Name and Sales, as well as static read-only properties to maintain the summary information.
12.5 Modify Programming Exercise 12.4 to include multiple forms. Create a base form that you can use for visual inheritance. Display the summary information and the About box on separate forms, rather than in mes-sage boxes.
Bradley−Millspaugh: Programming in Visual C# 2008
12. OOP: Creating Object−Oriented Programs
Text 541© The McGraw−Hill Companies, 2010
C H A P T E R 12 533
12.6 Extra challenge : Modify Programming Exercise 12.5 to have an inher-ited class. Create a derived class for supervisors, who have a different pay scale. The supervisor quota is $2,000, the commission rate is 20 percent, and the base pay is $500. Include a check box on the main form to indicate a supervisor and calculate separate totals for su-pervisors.
12.7 Modify Programming Exercise 5.2 (the check transactions) to separate the business logic from the user interface. Create a Transaction class and derived classes for Deposit, Check, and Service Charges. Display the summary information on a separate form rather than a mes-sage box. Optional extra : Use visual inheritance for the forms.
12.8 Modify Programming Exercise 5.4 (the library reading program) to sep-arate the business logic from the user interface. Create a class with properties for Name and Number of Books. Display the summary infor-mation and About box in separate forms rather than message boxes. Optional extra : Use visual inheritance for the forms.
12.9 Extra challenge : Modify Programming Exercise 12.8 to have inherited classes. Have separate classes and separate totals for elementary, inter-mediate, and high school. Include radio buttons on the form to select the level; display totals for all three groups on the summary.
12.10 Create a project that contains a class for sandwich objects. Each sandwich object should have properties for Name, Bread, Meat, Cheese, and Condiments. Use a form for user input. Assign the input values to the properties of the object, and display the properties on a separate form.
12.11 Create a project that contains a Pet class. Each object will contain pet name, animal type, breed, and color. The form should contain text boxes to enter the information for the pets. A button or menu item should dis-play the pet information on a separate form.
12.12 Modify the project that you created in Chapter 3 to separate the user interface from the business logic (calculations) and return the results through a property.
Case Studies Custom Supplies Mail Order
Modify your Custom Supplies Mail Order project from Chapter 5 to separate the user interface from the busi-ness logic. Create two new classes: one for customer information and one for order items. The order item class should perform the calculations and maintain the summary information. Add a menu option to display the customer infor-mation. Display the properties of the Customer object on a separate form.
Display the About box and the summary informa-tion on forms, rather than in message boxes. Optional extra : Use visual inheritance for the forms. Need a bigger challenge? Create an inherited class for preferred customers. Preferred customers re-ceive an automatic 5 percent discount on all pur-chases. Use a check box to determine if the customer is a preferred customer and instantiate the appropriate
Bradley−Millspaugh: Programming in Visual C# 2008
12. OOP: Creating Object−Oriented Programs
Text542 © The McGraw−Hill Companies, 2010
534 V I S U A L C# OOP: Creating Object-Oriented Programs
class. Maintain and display separate totals for pre-ferred customers.
Note : For help in basing a new project on an existing project, see “Copy and Move Projects” in Appendix C.
Modify your Christopher’s Car Center project from Chapter 5 to separate the business logic from the user interface. Create a class for purchases, with properties for each of the options. The class method will calcu-late the subtotal, tax, total, and amount due. Make the About box display on a separate form, rather than in a message box.
Christopher’s Car Center
Need a bigger challenge? Add summary totals for the number of sales, the total sales, and the total trade-ins. Maintain the totals as static read-only properties of the class and display the summary information on a separate form.
Note : For help in basing a new project on an existing project, see “Copy and Move Projects” in Appendix C.
Xtreme Cinema
Modify the Xtreme Cinema project from Chapter 5 to separate the user interface from the business logic. Create a class for each rental. Include a property for title, Boolean properties for video format and mem-bers, and static read-only properties for the summary information.
Display the summary information and the About box on forms, rather than in message boxes. Note : For help in basing a new project on an existing project, see “Copy and Move Projects” in Appendix C.
Cool Boards
Modify the Cool Boards project from Chapter 5 to sep-arate the user interface from the business logic. Cre-ate a class for each shirt sale with properties for Order Number, Quantity, and Size. Use Boolean properties for Monogram and Pocket and a method to calculate the price. Maintain static read-only properties for the summary information.
Display the summary information and the About box on forms, rather than in message boxes. Optional extra : Use visual inheritance for the forms. Note : For help in basing a new project on an existing project, see “Copy and Move Projects” in Appendix C.
Bradley−Millspaugh: Programming in Visual C# 2008
13. Graphics, Animation, Sound, and Drag−and−Drop
Text 543© The McGraw−Hill Companies, 2010
try{ // Convert input values to numeric and assign quantityInteger = int.Parse(quantityTextBox.T try { priceDecimal = decimal.Parse(priceTextBox // Calculate values. extendedPriceDecimal = quantityInteger * discountDecimal = Decimal.Round( (extendedPriceDecimal * DISCOUNT_RATE_ amountDueDecimal = extendedPriceDecimal - totalAmountDecimal += amountDueDecimal; numberTransactionsInteger++; // Format and display answers. extendedPriceTextBox.Text = extendedPrice
C H A P T E R
13 Graphics, Animation, Sound, and Drag-and-Drop
at the completion of this chapter, you will be able to . . .
1. Use Graphics methods to draw shapes, lines, and filled shapes.
2. Draw on a drawing surface of a Graphics object using Pen and Brush objects.
3. Create animation by changing pictures at run time.
4. Create simple animation by moving images.
5. Automate animation using a Timer component.
6. Move an image using scroll bars.
7. Play sounds in an application using a SoundPlayer object.
8. Play videos on a form.
9. Incorporate drag-and-drop events into your program.
10. Draw a pie chart using the methods of the Graphics object.
Bradley−Millspaugh: Programming in Visual C# 2008
13. Graphics, Animation, Sound, and Drag−and−Drop
Text544 © The McGraw−Hill Companies, 2010
536 V I S U A L C# Graphics, Animation, Sound, and Drag-and-Drop
You had your first introduction to graphics when you learned to print docu-ments in Chapter 7. In this chapter, you will learn to draw shapes such as lines, rectangles, and ellipses using the methods of the Graphics object. You can use the Graphics methods to draw pictures and charts in a business application. You will do simple animation by replacing and moving graphics. You also will use a Timer component to cause events to fire, so that you can create your own animation.
Graphics in Windows and the Web
The term graphics refers to any text, drawing, image, or icon that you display on the screen. You have placed a graphic image in a PictureBox control to dis-play pictures on your forms. A picture box also can display animated .gif files, so you can easily produce animation on the screen. You can display a graphics file on either a Web Form or a Windows Form. Recall that the Web control is an Image control and the Windows control is a PictureBox. Both display graphics files, but the Windows control accepts a few more file formats. Using Windows Forms, you can draw graphics shapes such as circles, lines, and rectangles on a form or control. The Graphics methods work only on Windows Forms, not Web Forms. Therefore, the programs in the next section use Windows Forms only.
The Graphics Environment
The .NET Framework uses a technology called GDI + for drawing graphics. GDI+ is more advanced and an improvement over the previous Graphics Device Interface (GDI) used in previous versions of .NET. GDI+ is designed to be device-independent, so that the programmer doesn’t have to be concerned about the physical characteristics of the output device. For example, the code to draw a circle is the same whether the output goes to a large-screen monitor, a low-resolution monitor, or the printer.
Steps for Drawing Graphics
When you draw a picture, you follow these general steps. The sections that follow describe the steps in more detail.
• Create a Graphics object to use as a drawing surface.
• Instantiate a Pen or Brush object to draw with.
• Call the drawing methods of the Graphics object.
Looking over the steps, you realize that this is what you did for creating printer output in Chapter 7. In that chapter, you used the DrawString method
Bradley−Millspaugh: Programming in Visual C# 2008
13. Graphics, Animation, Sound, and Drag−and−Drop
Text 545© The McGraw−Hill Companies, 2010
C H A P T E R 13 537
You can use the form’s Refresh method to force a Paint event to occur. ■
TIP
to place text on the Graphics object; in this chapter, you will use methods that draw shapes.
The Paint Event Handler
You draw lines and shapes on a form by drawing on a Graphics object. And where do you place the code for the drawing methods? In the Paint event han-dler for the form or the control on which you are drawing. Each time a window is displayed, resized, moved, maximized, restored, or uncovered, the form’s Paint event fires. In the Paint event handler, the form and its controls are redrawn. If you draw some graphics on the form, in say the Form_Load event handler or the click event of a button, the graphics are not automatically redrawn when the form is repainted. The only way to make sure that the graphics appear is to create them in the Paint event handler. Then they are redrawn every time the form is rendered. So far we have ignored the Paint event and allowed the repainting to pro-ceed automatically. Now we will place code in that event handler. You can write code in the form’s Paint event handler to draw on the form or in a control’s Paint event handler to draw graphics on the control. In the Paint event handler, you can use the e.Graphics object or declare a Graphics object. You assign the Graphics property of the handler’s PaintEvent-Args argument to the new Graphics object.
private void GraphicsForm_Paint(object sender, PaintEventArgs e){ // Create a graphics object. Graphics gr = e.Graphics;}
You also can create a graphic object by calling the CreateGraphics method of a form or control. You would use this method when you want to dis-play a graphic from a method other than the Paint event.
Graphics gr = this.CreateGraphics(); // Draw on the form.
Graphics gr = drawGroupBox.CreateGraphics(); // Draw on a group box control.
Pen and Brush Objects
Using a Pen object , you can draw lines or outlined shapes such as rectangles or circles. A Brush object creates filled shapes. You can set the width of a Pen and the color for both a Pen and a Brush. Figure 13.1 shows some lines and shapes created with Pen and Brush objects. When you create a new Pen object, you set the color using the Color con-stants, such as Color.Red, Color.Blue, and Color.Aquamarine. You also can set the pen’s width, which is measured in pixels. The term pixel is an abbrevia-tion of picture element —a dot that makes up a picture. You are probably most familiar with pixels in the determination of the resolution of a monitor. A dis-play of 1,280 by 1,024 is a reference to the number of pixels horizontally and vertically.
To write code for the form’s Paint event, select the form in the Designer, select the Events button in the Prop-erties window, and select the Paint event. ■
TIP
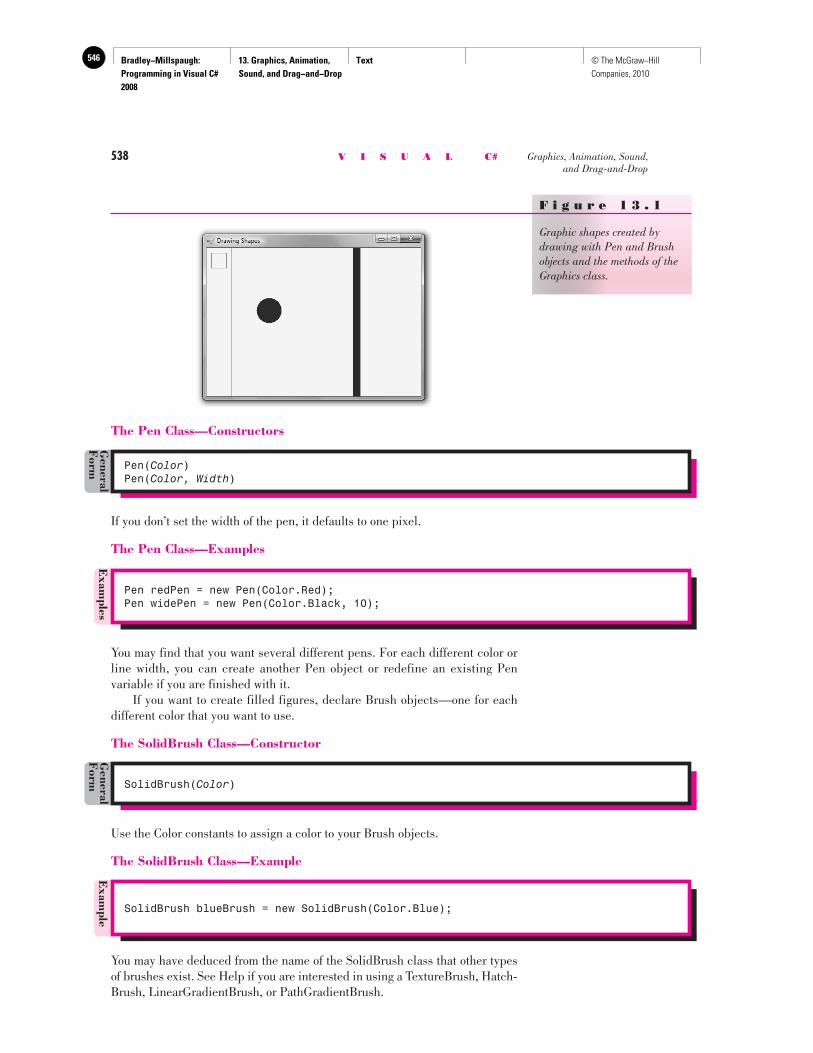
Bradley−Millspaugh: Programming in Visual C# 2008
13. Graphics, Animation, Sound, and Drag−and−Drop
Text546 © The McGraw−Hill Companies, 2010
538 V I S U A L C# Graphics, Animation, Sound, and Drag-and-Drop
The Pen Class—Constructors
F i g u r e 1 3 . 1
Graphic shapes created by drawing with Pen and Brush objects and the methods of the Graphics class.
Pen(Color)Pen(Color, Width)
General
Form
If you don’t set the width of the pen, it defaults to one pixel.
The Pen Class—Examples
Exam
ples
Pen redPen = new Pen(Color.Red);Pen widePen = new Pen(Color.Black, 10);
You may find that you want several different pens. For each different color or line width, you can create another Pen object or redefine an existing Pen variable if you are finished with it. If you want to create filled figures, declare Brush objects—one for each different color that you want to use.
The SolidBrush Class—Constructor
SolidBrush(Color)
General
Form
Use the Color constants to assign a color to your Brush objects.
The SolidBrush Class—Example
Exam
ple
SolidBrush blueBrush = new SolidBrush(Color.Blue);
You may have deduced from the name of the SolidBrush class that other types of brushes exist. See Help if you are interested in using a TextureBrush, Hatch-Brush, LinearGradientBrush, or PathGradientBrush.
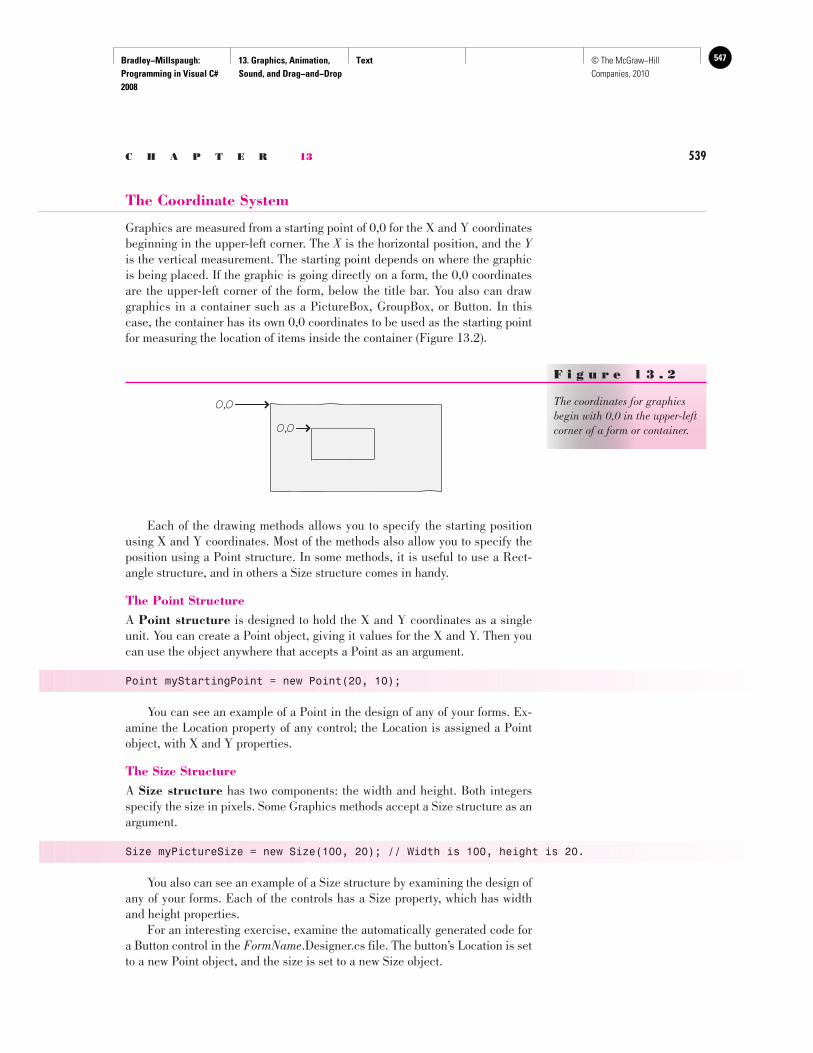
Bradley−Millspaugh: Programming in Visual C# 2008
13. Graphics, Animation, Sound, and Drag−and−Drop
Text 547© The McGraw−Hill Companies, 2010
C H A P T E R 13 539
The Coordinate System
Graphics are measured from a starting point of 0,0 for the X and Y coordinates beginning in the upper-left corner. The X is the horizontal position, and the Y is the vertical measurement. The starting point depends on where the graphic is being placed. If the graphic is going directly on a form, the 0,0 coordinates are the upper-left corner of the form, below the title bar. You also can draw graphics in a container such as a PictureBox, GroupBox, or Button. In this case, the container has its own 0,0 coordinates to be used as the starting point for measuring the location of items inside the container ( Figure 13.2 ).
Each of the drawing methods allows you to specify the starting position using X and Y coordinates. Most of the methods also allow you to specify the position using a Point structure. In some methods, it is useful to use a Rect-angle structure, and in others a Size structure comes in handy.
The Point Structure A Point structure is designed to hold the X and Y coordinates as a single unit. You can create a Point object, giving it values for the X and Y. Then you can use the object anywhere that accepts a Point as an argument.
Point myStartingPoint = new Point(20, 10);
You can see an example of a Point in the design of any of your forms. Ex-amine the Location property of any control; the Location is assigned a Point object, with X and Y properties.
The Size Structure A Size structure has two components: the width and height. Both integers specify the size in pixels. Some Graphics methods accept a Size structure as an argument.
Size myPictureSize = new Size(100, 20); // Width is 100, height is 20.
You also can see an example of a Size structure by examining the design of any of your forms. Each of the controls has a Size property, which has width and height properties. For an interesting exercise, examine the automatically generated code for a Button control in the FormName .Designer.cs file. The button’s Location is set to a new Point object, and the size is set to a new Size object.
F i g u r e 1 3 . 2
The coordinates for graphics begin with 0,0 in the upper-left corner of a form or container.
0,0
0,0
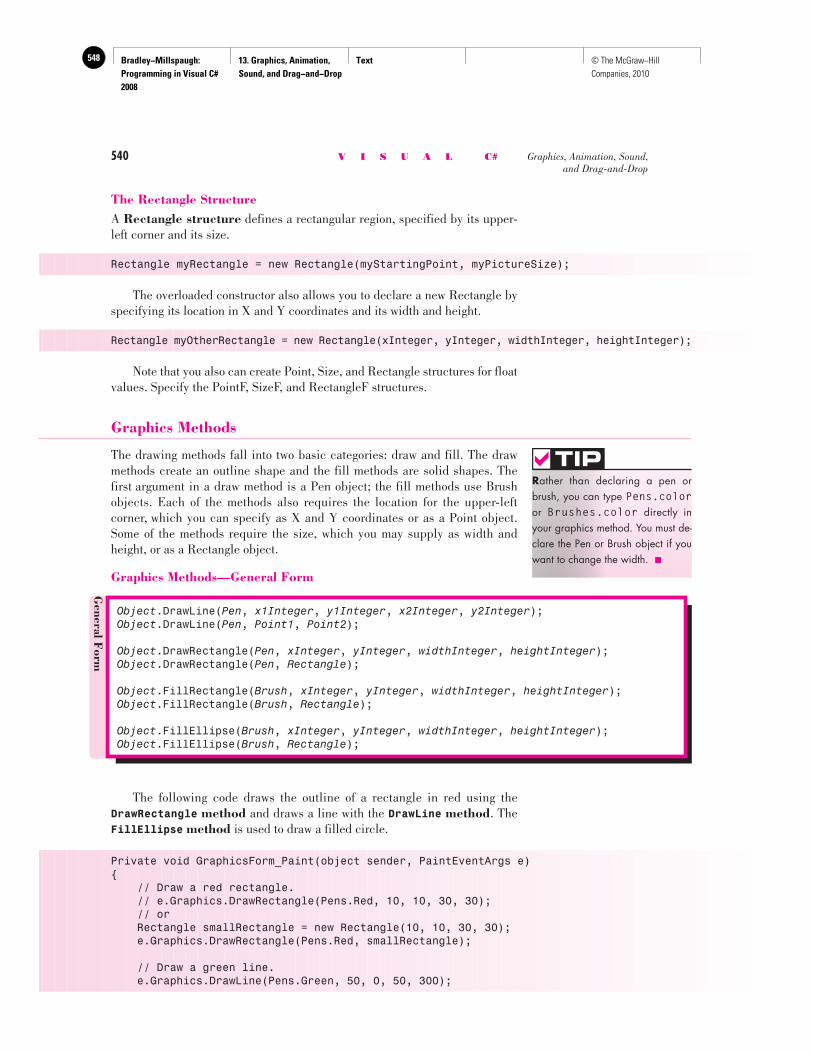
Bradley−Millspaugh: Programming in Visual C# 2008
13. Graphics, Animation, Sound, and Drag−and−Drop
Text548 © The McGraw−Hill Companies, 2010
540 V I S U A L C# Graphics, Animation, Sound, and Drag-and-Drop
The Rectangle Structure A Rectangle structure defines a rectangular region, specified by its upper-left corner and its size.
Rectangle myRectangle = new Rectangle(myStartingPoint, myPictureSize);
The overloaded constructor also allows you to declare a new Rectangle by specifying its location in X and Y coordinates and its width and height.
Rectangle myOtherRectangle = new Rectangle(xInteger, yInteger, widthInteger, heightInteger);
Note that you also can create Point, Size, and Rectangle structures for float values. Specify the PointF, SizeF, and RectangleF structures.
Graphics Methods
The drawing methods fall into two basic categories: draw and fill. The draw methods create an outline shape and the fill methods are solid shapes. The first argument in a draw method is a Pen object; the fill methods use Brush objects. Each of the methods also requires the location for the upper-left corner, which you can specify as X and Y coordinates or as a Point object. Some of the methods require the size, which you may supply as width and height, or as a Rectangle object.
Graphics Methods—General Form
Rather than declaring a pen or brush, you can type Pens.color or Brushes.color directly in your graphics method. You must de-clare the Pen or Brush object if you want to change the width. ■
TIP
General F
orm
Object.DrawLine(Pen, x1Integer, y1Integer, x2Integer, y2Integer);Object.DrawLine(Pen, Point1, Point2);
Object.DrawRectangle(Pen, xInteger, yInteger, widthInteger, heightInteger);Object.DrawRectangle(Pen, Rectangle);
Object.FillRectangle(Brush, xInteger, yInteger, widthInteger, heightInteger);Object.FillRectangle(Brush, Rectangle);
Object.FillEllipse(Brush, xInteger, yInteger, widthInteger, heightInteger);Object.FillEllipse(Brush, Rectangle);
The following code draws the outline of a rectangle in red using the DrawRectangle method and draws a line with the DrawLine method . The FillEllipse method is used to draw a filled circle.
Private void GraphicsForm_Paint(object sender, PaintEventArgs e){ // Draw a red rectangle. // e.Graphics.DrawRectangle(Pens.Red, 10, 10, 30, 30); // or Rectangle smallRectangle = new Rectangle(10, 10, 30, 30); e.Graphics.DrawRectangle(Pens.Red, smallRectangle);
// Draw a green line. e.Graphics.DrawLine(Pens.Green, 50, 0, 50, 300);
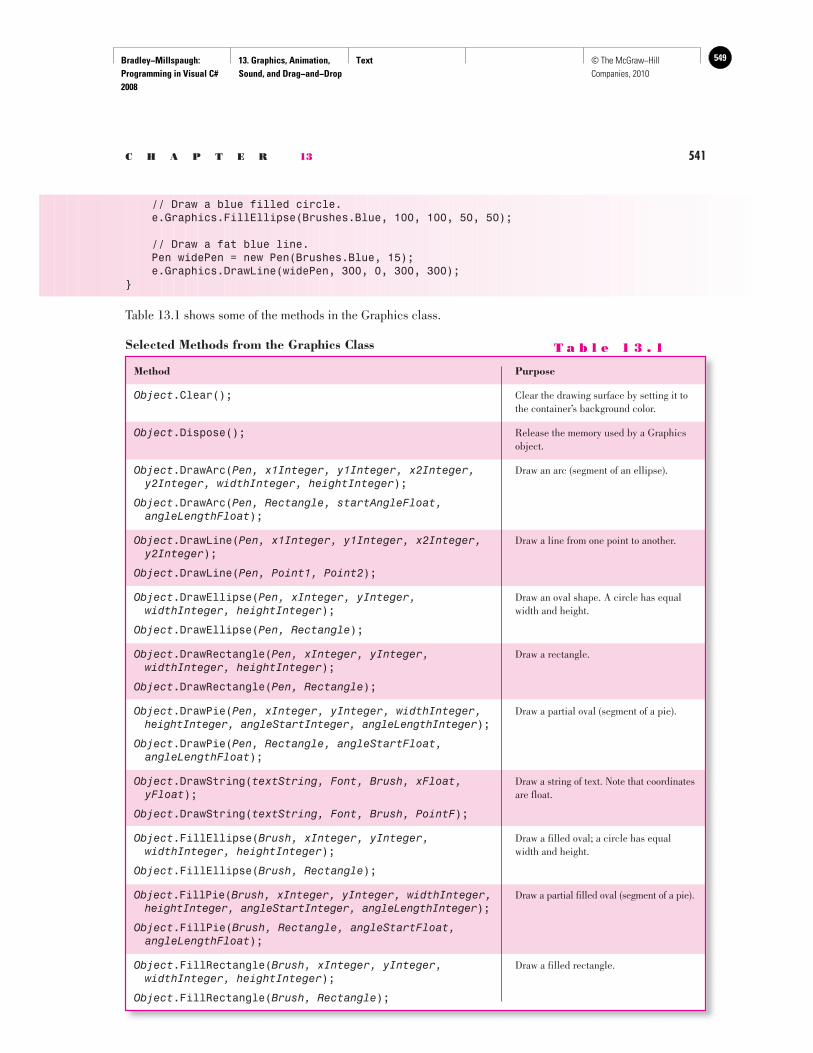
Bradley−Millspaugh: Programming in Visual C# 2008
13. Graphics, Animation, Sound, and Drag−and−Drop
Text 549© The McGraw−Hill Companies, 2010
C H A P T E R 13 541
// Draw a blue filled circle. e.Graphics.FillEllipse(Brushes.Blue, 100, 100, 50, 50);
// Draw a fat blue line. Pen widePen = new Pen(Brushes.Blue, 15); e.Graphics.DrawLine(widePen, 300, 0, 300, 300);}
Table 13.1 shows some of the methods in the Graphics class.
Method Purpose
Object.Clear(); Clear the drawing surface by setting it to the container’s background color.
Object.Dispose(); Release the memory used by a Graphics object.
Object.DrawArc(Pen, x1Integer, y1Integer, x2Integer, Draw an arc (segment of an ellipse). y2Integer, widthInteger, heightInteger);
Object.DrawArc(Pen, Rectangle, startAngleFloat, angleLengthFloat);
Object.DrawLine(Pen, x1Integer, y1Integer, x2Integer, Draw a line from one point to another.y2Integer);
Object.DrawLine(Pen, Point1, Point2);
Object.DrawEllipse(Pen, xInteger, yInteger, Draw an oval shape. A circle has equal widthInteger, heightInteger); width and height.
Object.DrawEllipse(Pen, Rectangle);
Object.DrawRectangle(Pen, xInteger, yInteger, Draw a rectangle. widthInteger, heightInteger);
Object.DrawRectangle(Pen, Rectangle);
Object.DrawPie(Pen, xInteger, yInteger, widthInteger, Draw a partial oval (segment of a pie). heightInteger, angleStartInteger, angleLengthInteger);
Object.DrawPie(Pen, Rectangle, angleStartFloat, angleLengthFloat);
Object.DrawString(textString, Font, Brush, xFloat, Draw a string of text. Note that coordinates yFloat); are float.
Object.DrawString(textString, Font, Brush, PointF);
Object.FillEllipse(Brush, xInteger, yInteger, Draw a filled oval; a circle has equal widthInteger, heightInteger); width and height.
Object.FillEllipse(Brush, Rectangle);
Object.FillPie(Brush, xInteger, yInteger, widthInteger, Draw a partial filled oval (segment of a pie). heightInteger, angleStartInteger, angleLengthInteger);
Object.FillPie(Brush, Rectangle, angleStartFloat, angleLengthFloat);
Object.FillRectangle(Brush, xInteger, yInteger, Draw a filled rectangle. widthInteger, heightInteger);
Object.FillRectangle(Brush, Rectangle);
Selected Methods from the Graphics Class T a b l e 1 3 . 1
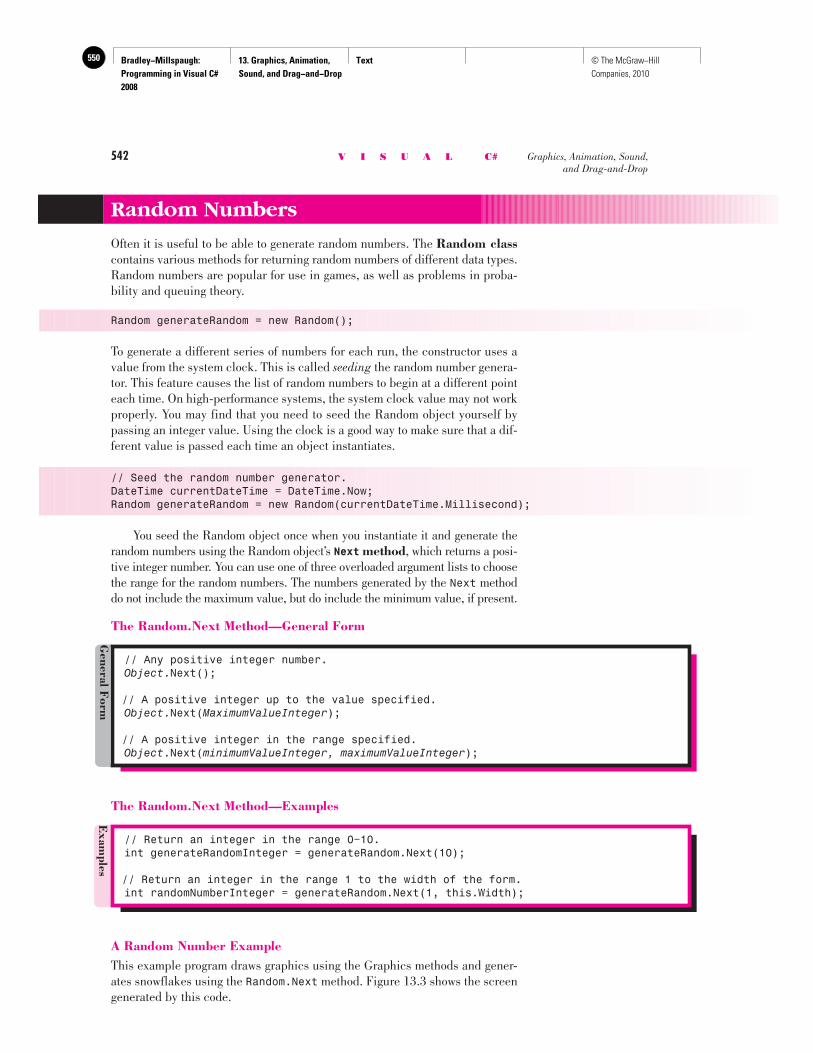
Bradley−Millspaugh: Programming in Visual C# 2008
13. Graphics, Animation, Sound, and Drag−and−Drop
Text550 © The McGraw−Hill Companies, 2010
542 V I S U A L C# Graphics, Animation, Sound, and Drag-and-Drop
A Random Number Example This example program draws graphics using the Graphics methods and gener-ates snowflakes using the Random.Next method. Figure 13.3 shows the screen generated by this code.
Random Numbers
Often it is useful to be able to generate random numbers. The Random class contains various methods for returning random numbers of different data types. Random numbers are popular for use in games, as well as problems in proba-bility and queuing theory.
Random generateRandom = new Random();
To generate a different series of numbers for each run, the constructor uses a value from the system clock. This is called seeding the random number genera-tor. This feature causes the list of random numbers to begin at a different point each time. On high-performance systems, the system clock value may not work properly. You may find that you need to seed the Random object yourself by passing an integer value. Using the clock is a good way to make sure that a dif-ferent value is passed each time an object instantiates.
// Seed the random number generator.DateTime currentDateTime = DateTime.Now;Random generateRandom = new Random(currentDateTime.Millisecond);
You seed the Random object once when you instantiate it and generate the random numbers using the Random object’s Next method , which returns a posi-tive integer number. You can use one of three overloaded argument lists to choose the range for the random numbers. The numbers generated by the Next method do not include the maximum value, but do include the minimum value, if present.
The Random.Next Method—General Form
// Any positive integer number.Object.Next();
// A positive integer up to the value specified.Object.Next(MaximumValueInteger);
// A positive integer in the range specified.Object.Next(minimumValueInteger, maximumValueInteger);
General F
ormE
xamples
// Return an integer in the range 0−10.int generateRandomInteger = generateRandom.Next(10);
// Return an integer in the range 1 to the width of the form.int randomNumberInteger = generateRandom.Next(1, this.Width);
The Random.Next Method—Examples
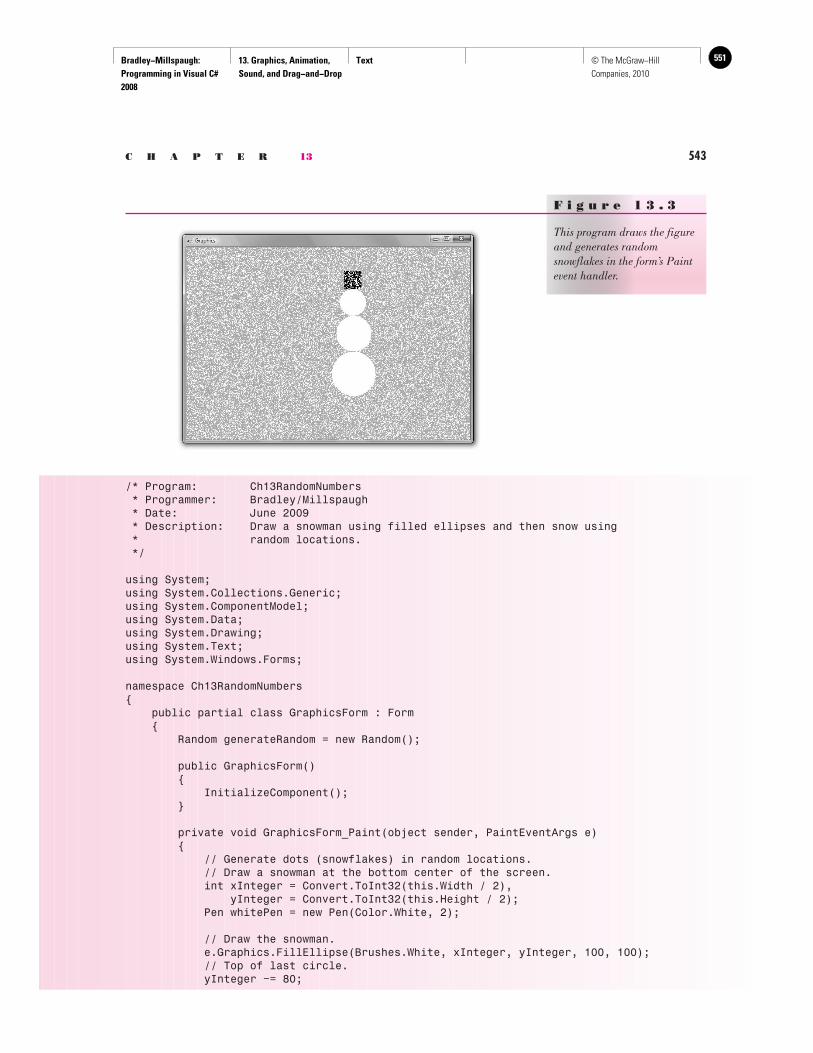
Bradley−Millspaugh: Programming in Visual C# 2008
13. Graphics, Animation, Sound, and Drag−and−Drop
Text 551© The McGraw−Hill Companies, 2010
C H A P T E R 13 543
/* Program: Ch13RandomNumbers * Programmer: Bradley/Millspaugh * Date: June 2009 * Description: Draw a snowman using filled ellipses and then snow using * random locations. */
using System;using System.Collections.Generic;using System.ComponentModel;using System.Data;using System.Drawing;using System.Text;using System.Windows.Forms;
namespace Ch13RandomNumbers{ public partial class GraphicsForm : Form { Random generateRandom = new Random();
public GraphicsForm() { InitializeComponent(); }
private void GraphicsForm_Paint(object sender, PaintEventArgs e) { // Generate dots (snowflakes) in random locations. // Draw a snowman at the bottom center of the screen. int xInteger = Convert.ToInt32(this.Width / 2), yInteger = Convert.ToInt32(this.Height / 2); Pen whitePen = new Pen(Color.White, 2);
// Draw the snowman. e.Graphics.FillEllipse(Brushes.White, xInteger, yInteger, 100, 100); // Top of last circle. yInteger −= 80;
F i g u r e 1 3 . 3
This program draws the figure and generates random snowflakes in the form’s Paint event handler.
Bradley−Millspaugh: Programming in Visual C# 2008
13. Graphics, Animation, Sound, and Drag−and−Drop
Text552 © The McGraw−Hill Companies, 2010
544 V I S U A L C# Graphics, Animation, Sound, and Drag-and-Drop
// Offset for smaller circle. xInteger += 10; e.Graphics.FillEllipse(Brushes.White, xInteger, yInteger, 80, 80); yInteger −= 60; xInteger += 8; e.Graphics.FillEllipse(Brushes.White, xInteger, yInteger, 60, 60);
// Add a top hat. e.Graphics.DrawLine(Pens.Black, xInteger − 10, yInteger, xInteger + 80, yInteger); e.Graphics.FillRectangle(Brushes.Black, xInteger + 10, yInteger − 40, 40, 40);
// Make it snow in random locations. for (int indexInteger = 1; indexInteger < 40000; indexInteger++) { xInteger = generateRandom.Next(1, this.Width); yInteger = generateRandom.Next(1, this.Height); e.Graphics.DrawLine(whitePen, xInteger, yInteger, xInteger + 1, yInteger + 1); } } }}
➤ Feedback 13.1 1. Write the statements necessary to draw a green vertical line down the
center of a form. 2. Write the statements to draw one circle inside another one. 3. Write the statements to define three points and draw lines connecting
the points.
Simple Animation
There are several ways to create animation on a form. The simplest way is to display an animated .gif file in a PictureBox control. The animation is already built into the graphic. Other simple ways to create animation are to replace one graphic with another, move a picture, or rotate through a series of pictures. You also can create graphics with the various graphics methods. If you want to create animation on a Web page, displaying an animated .gif file is the best way. Another way is to write script using a scripting language such as VBScript or JavaScript or to embed a Java applet, which creates the animation on the client side. It doesn’t make any sense to create animation using server-side controls since each movement would require a round-trip to the server.
Displaying an Animated Graphic
You can achieve animation on either a Windows Form or a Web Form by dis-playing an animated .gif file ( Figure 13.4 ). Use a PictureBox control on a Win-dows Form and an Image control on a Web Form.

Bradley−Millspaugh: Programming in Visual C# 2008
13. Graphics, Animation, Sound, and Drag−and−Drop
Text 553© The McGraw−Hill Companies, 2010
C H A P T E R 13 545
Note : You can find the graphics for the programs in this chapter on the text Web site ( www.mhhe.com/C#2008 ).
Controlling Pictures at Run Time
You can add or change a picture at run time using one of several techniques. To speed execution, it is a good idea to have the pictures loaded into controls that you can make invisible until you are ready to display them. Displaying images from the project Resources folder is also very quick. But you can also use the FromFile method of the Image object to load a picture at run time. If you store a picture in an invisible control, you can change the Visible prop-erty to true at run time; or you may decide to copy the picture to another control.
logoPictureBox.Visible = true;logoPictureBox.Image = holdPicture.Image;
To display images from the project Resources folder, as described in Chap-ter 2, refer to ProjectName.Properties.Resources.ResourceName. This is the technique used for the example program that follows. To remove a picture from the display, either hide it or use the null constant.
logoPictureBox.Visible = false;logoPictureBox.Image = null;
Switching Images An easy way to show some animation is to replace one picture with another. Many of the icons in the Visual Studio image library have similar sizes but op-posite states, such as a closed file cabinet and an open file cabinet; a mailbox with the flag up and with the flag down; a closed envelope and an open envelope; or a traffic light in red, yellow, or green. This sample program demonstrates switching between a next page and a previous page image ( Figure 13.5 ). The bitmap files are found in the VS2008ImageLibrary\Actions\16Color bitmaps
F i g u r e 1 3 . 4
Create animation by display-ing an animated .gif file on either a Windows Form or a Web Form.
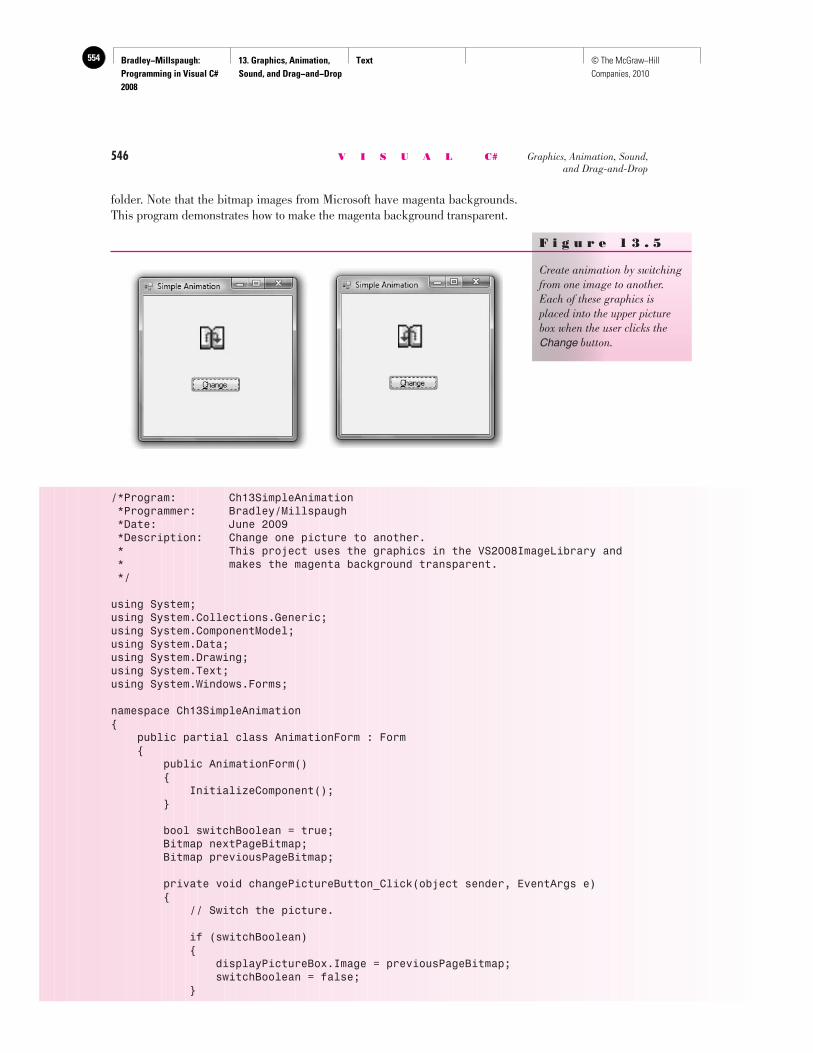
Bradley−Millspaugh: Programming in Visual C# 2008
13. Graphics, Animation, Sound, and Drag−and−Drop
Text554 © The McGraw−Hill Companies, 2010
546 V I S U A L C# Graphics, Animation, Sound, and Drag-and-Drop
folder. Note that the bitmap images from Microsoft have magenta backgrounds. This program demonstrates how to make the magenta background transparent.
F i g u r e 1 3 . 5
Create animation by switching from one image to another. Each of these graphics is placed into the upper picture box when the user clicks the Change button.
/*Program: Ch13SimpleAnimation *Programmer: Bradley/Millspaugh *Date: June 2009 *Description: Change one picture to another. * This project uses the graphics in the VS2008ImageLibrary and * makes the magenta background transparent. */
using System;using System.Collections.Generic;using System.ComponentModel;using System.Data;using System.Drawing;using System.Text;using System.Windows.Forms;
namespace Ch13SimpleAnimation{ public partial class AnimationForm : Form { public AnimationForm() { InitializeComponent(); }
bool switchBoolean = true; Bitmap nextPageBitmap; Bitmap previousPageBitmap;
private void changePictureButton_Click(object sender, EventArgs e) { // Switch the picture.
if (switchBoolean) { displayPictureBox.Image = previousPageBitmap; switchBoolean = false; }
Bradley−Millspaugh: Programming in Visual C# 2008
13. Graphics, Animation, Sound, and Drag−and−Drop
Text 555© The McGraw−Hill Companies, 2010
C H A P T E R 13 547
else { displayPictureBox.Image = nextPageBitmap; switchBoolean = true; } }
private void AnimationForm_Load(object sender, EventArgs e) { // Set up the transparent images.
nextPageBitmap = Ch13SimpleAnimation.Properties.Resources.NextPage; nextPageBitmap.MakeTransparent(Color.Magenta); previousPageBitmap = Ch13SimpleAnimation.Properties.Resources.PreviousPage; previousPageBitmap.MakeTransparent(Color.Magenta); displayPictureBox.Image = nextPageBitmap; } }}
Moving a Picture
The best way to move a control is to use the control’s SetBounds method . The SetBounds method produces a smoother-appearing move than changing the Left and Top properties of controls.
The SetBounds Method—General Form
Exam
ples
planePictureBox.SetBounds(xInteger, yInteger, planeWidth, planeHeight);
enginePictureBox.SetBounds(xInteger, yInteger, widthInteger, heightInteger);
Object.SetBounds(xInteger, yInteger, widthInteger, heightInteger);
General
Form
You can use a control’s SetBounds method to move it to a new location and/or to change its size.
The SetBounds Method—Examples
The program example in the next section uses a timer and the SetBounds method to move a graphic across the screen.
The Timer Component
Generally, events occur when the user takes an action. But what if you want to make events occur at some interval, without user action? You can cause events to occur at a set interval using the Timer component and its Tick event . Timers are very useful for animation; you can move or change an image each time the Tick event occurs. You have used the Timer component to display a splash screen.
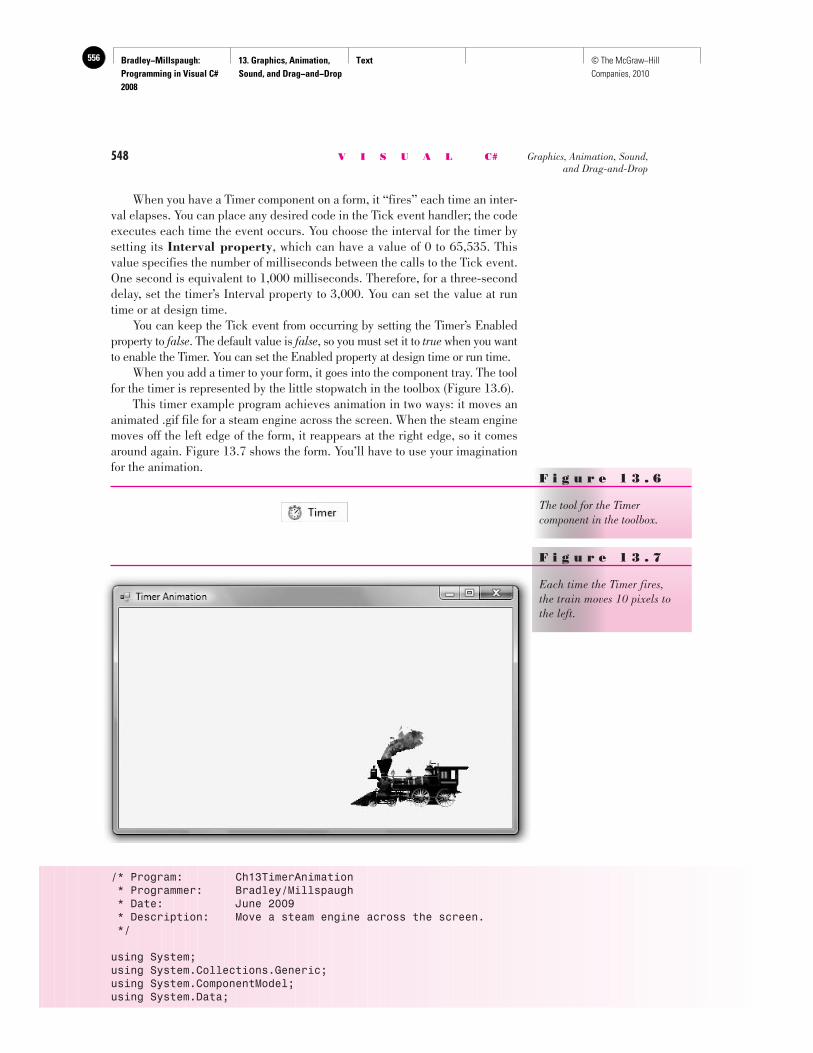
Bradley−Millspaugh: Programming in Visual C# 2008
13. Graphics, Animation, Sound, and Drag−and−Drop
Text556 © The McGraw−Hill Companies, 2010
548 V I S U A L C# Graphics, Animation, Sound, and Drag-and-Drop
When you have a Timer component on a form, it “fires” each time an inter-val elapses. You can place any desired code in the Tick event handler; the code executes each time the event occurs. You choose the interval for the timer by setting its Interval property , which can have a value of 0 to 65,535. This value specifies the number of milliseconds between the calls to the Tick event. One second is equivalent to 1,000 milliseconds. Therefore, for a three-second delay, set the timer’s Interval property to 3,000. You can set the value at run time or at design time. You can keep the Tick event from occurring by setting the Timer’s Enabled property to false . The default value is false , so you must set it to true when you want to enable the Timer. You can set the Enabled property at design time or run time. When you add a timer to your form, it goes into the component tray. The tool for the timer is represented by the little stopwatch in the toolbox ( Figure 13.6 ). This timer example program achieves animation in two ways: it moves an animated .gif file for a steam engine across the screen. When the steam engine moves off the left edge of the form, it reappears at the right edge, so it comes around again. Figure 13.7 shows the form. You’ll have to use your imagination for the animation.
F i g u r e 1 3 . 6
The tool for the Timer component in the toolbox.
F i g u r e 1 3 . 7
Each time the Timer fires, the train moves 10 pixels to the left.
/* Program: Ch13TimerAnimation * Programmer: Bradley/Millspaugh * Date: June 2009 * Description: Move a steam engine across the screen. */
using System;using System.Collections.Generic;using System.ComponentModel;using System.Data;
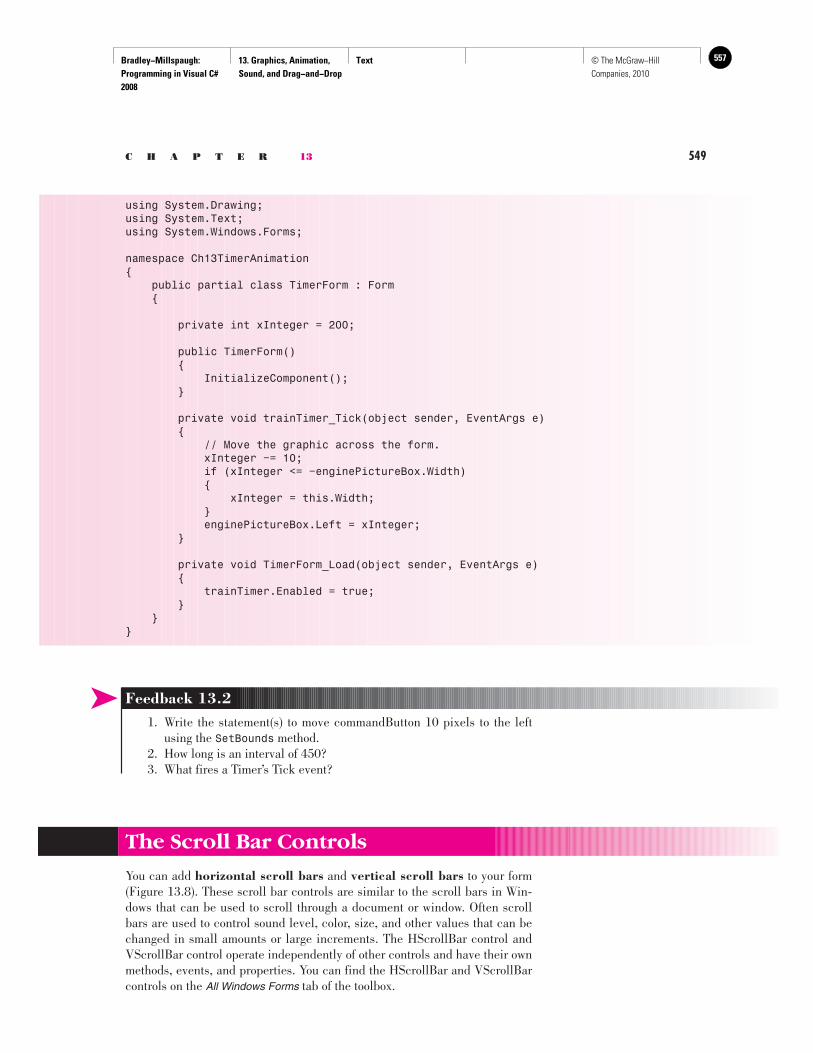
Bradley−Millspaugh: Programming in Visual C# 2008
13. Graphics, Animation, Sound, and Drag−and−Drop
Text 557© The McGraw−Hill Companies, 2010
C H A P T E R 13 549
using System.Drawing;using System.Text;using System.Windows.Forms;
namespace Ch13TimerAnimation{ public partial class TimerForm : Form {
private int xInteger = 200;
public TimerForm() { InitializeComponent(); }
private void trainTimer_Tick(object sender, EventArgs e) { // Move the graphic across the form. xInteger −= 10; if (xInteger <= −enginePictureBox.Width) { xInteger = this.Width; } enginePictureBox.Left = xInteger; }
private void TimerForm_Load(object sender, EventArgs e) { trainTimer.Enabled = true; } }}
➤ Feedback 13.2 1. Write the statement(s) to move commandButton 10 pixels to the left
using the SetBounds method. 2. How long is an interval of 450? 3. What fires a Timer’s Tick event?
The Scroll Bar Controls
You can add horizontal scroll bars and vertical scroll bars to your form ( Figure 13.8 ). These scroll bar controls are similar to the scroll bars in Win-dows that can be used to scroll through a document or window. Often scroll bars are used to control sound level, color, size, and other values that can be changed in small amounts or large increments. The HScrollBar control and VScrollBar control operate independently of other controls and have their own methods, events, and properties. You can find the HScrollBar and VScrollBar controls on the All Windows Forms tab of the toolbox.
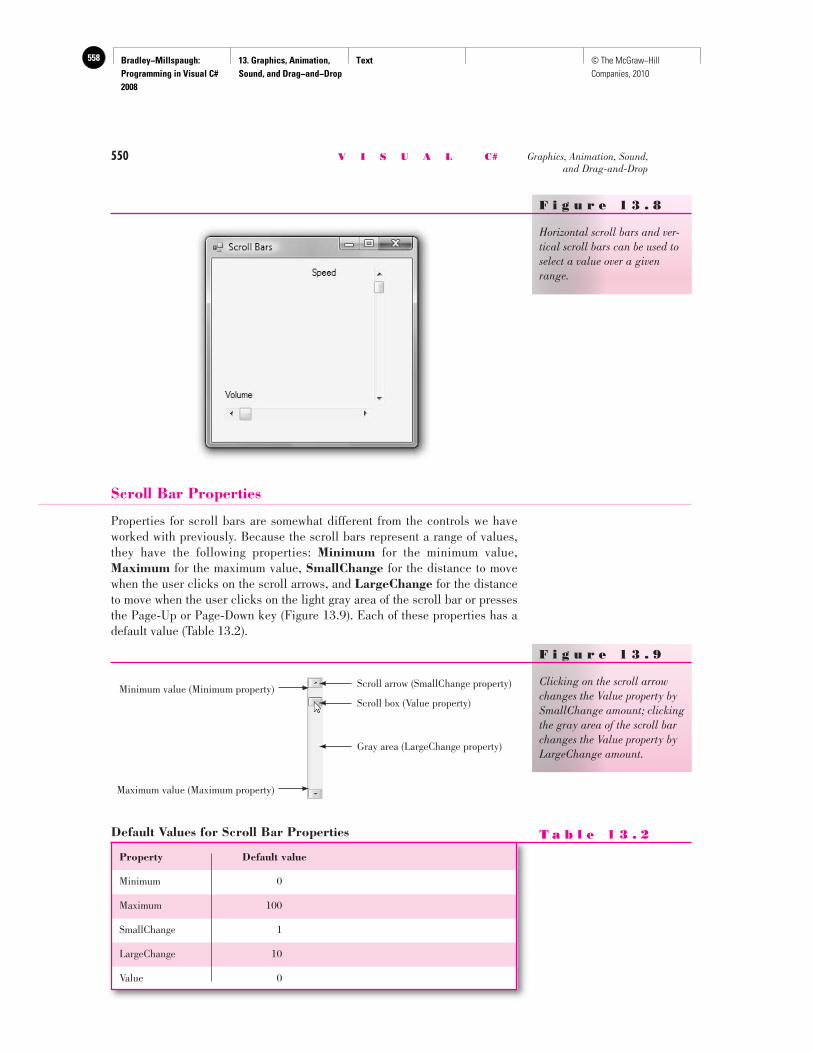
Bradley−Millspaugh: Programming in Visual C# 2008
13. Graphics, Animation, Sound, and Drag−and−Drop
Text558 © The McGraw−Hill Companies, 2010
550 V I S U A L C# Graphics, Animation, Sound, and Drag-and-Drop
Scroll Bar Properties
Properties for scroll bars are somewhat different from the controls we have worked with previously. Because the scroll bars represent a range of values, they have the following properties: Minimum for the minimum value, Maximum for the maximum value, SmallChange for the distance to move when the user clicks on the scroll arrows, and LargeChange for the distance to move when the user clicks on the light gray area of the scroll bar or presses the Page-Up or Page-Down key ( Figure 13.9 ). Each of these properties has a default value ( Table 13.2 ).
F i g u r e 1 3 . 8
Horizontal scroll bars and ver-tical scroll bars can be used to select a value over a given range.
Scroll arrow (SmallChange property)
Scroll box (Value property)Minimum value (Minimum property)
Maximum value (Maximum property)
Gray area (LargeChange property)
F i g u r e 1 3 . 9
Clicking on the scroll arrow changes the Value property by SmallChange amount; clicking the gray area of the scroll bar changes the Value property by LargeChange amount.
Property Default value
Minimum 0
Maximum 100
SmallChange 1
LargeChange 10
Value 0
Default Values for Scroll Bar Properties T a b l e 1 3 . 2
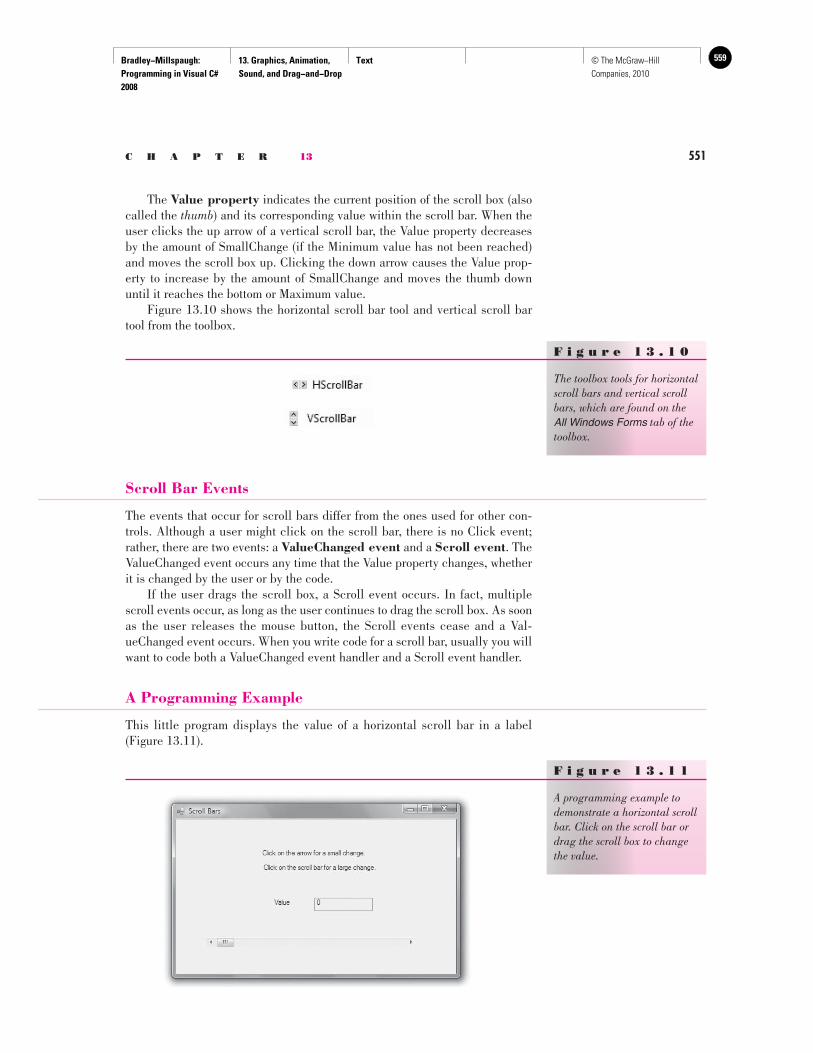
Bradley−Millspaugh: Programming in Visual C# 2008
13. Graphics, Animation, Sound, and Drag−and−Drop
Text 559© The McGraw−Hill Companies, 2010
C H A P T E R 13 551
The Value property indicates the current position of the scroll box (also called the thumb ) and its corresponding value within the scroll bar. When the user clicks the up arrow of a vertical scroll bar, the Value property decreases by the amount of SmallChange (if the Minimum value has not been reached) and moves the scroll box up. Clicking the down arrow causes the Value prop-erty to increase by the amount of SmallChange and moves the thumb down until it reaches the bottom or Maximum value. Figure 13.10 shows the horizontal scroll bar tool and vertical scroll bar tool from the toolbox.
F i g u r e 1 3 . 1 0
The toolbox tools for horizontal scroll bars and vertical scroll bars, which are found on the All Windows Forms tab of the toolbox.
Scroll Bar Events
The events that occur for scroll bars differ from the ones used for other con-trols. Although a user might click on the scroll bar, there is no Click event; rather, there are two events: a ValueChanged event and a Scroll event . The ValueChanged event occurs any time that the Value property changes, whether it is changed by the user or by the code. If the user drags the scroll box, a Scroll event occurs. In fact, multiple scroll events occur, as long as the user continues to drag the scroll box. As soon as the user releases the mouse button, the Scroll events cease and a Val-ueChanged event occurs. When you write code for a scroll bar, usually you will want to code both a ValueChanged event handler and a Scroll event handler.
A Programming Example
This little program displays the value of a horizontal scroll bar in a label ( Figure 13.11 ).
F i g u r e 1 3 . 1 1
A programming example to demonstrate a horizontal scroll bar. Click on the scroll bar or drag the scroll box to change the value.
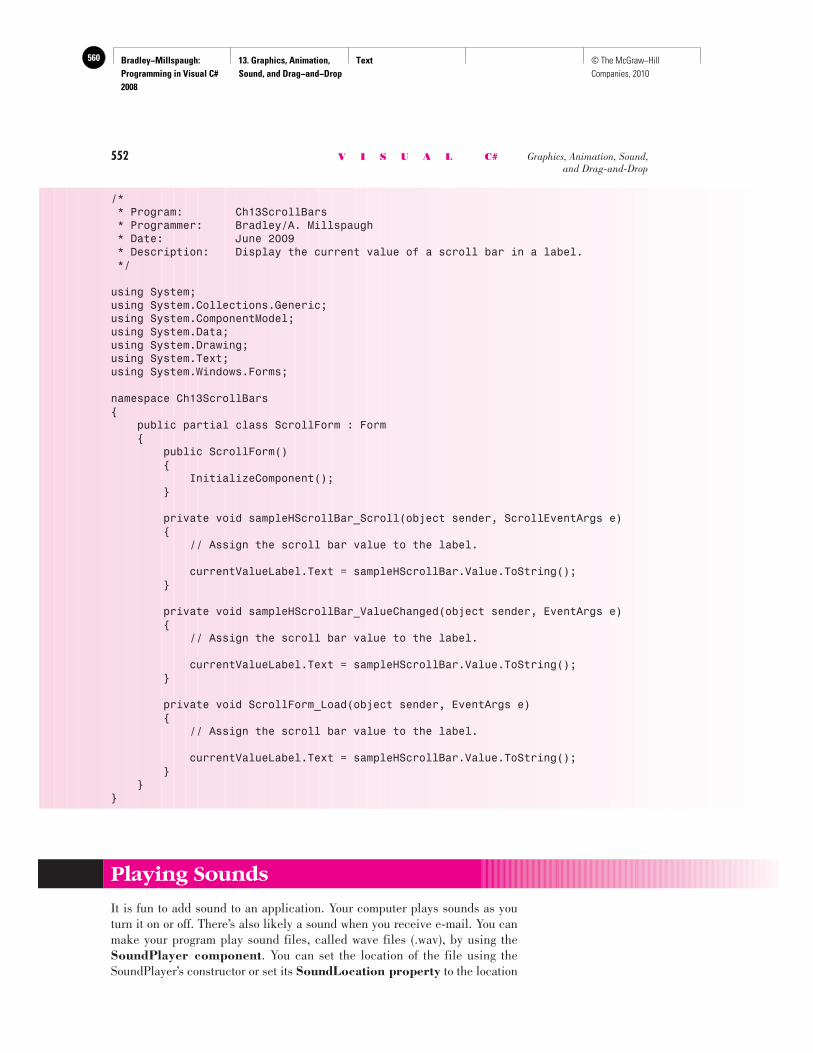
Bradley−Millspaugh: Programming in Visual C# 2008
13. Graphics, Animation, Sound, and Drag−and−Drop
Text560 © The McGraw−Hill Companies, 2010
552 V I S U A L C# Graphics, Animation, Sound, and Drag-and-Drop
/* * Program: Ch13ScrollBars * Programmer: Bradley/A. Millspaugh * Date: June 2009 * Description: Display the current value of a scroll bar in a label. */
using System;using System.Collections.Generic;using System.ComponentModel;using System.Data;using System.Drawing;using System.Text;using System.Windows.Forms;
namespace Ch13ScrollBars{ public partial class ScrollForm : Form { public ScrollForm() { InitializeComponent(); }
private void sampleHScrollBar_Scroll(object sender, ScrollEventArgs e) { // Assign the scroll bar value to the label.
currentValueLabel.Text = sampleHScrollBar.Value.ToString(); }
private void sampleHScrollBar_ValueChanged(object sender, EventArgs e) { // Assign the scroll bar value to the label.
currentValueLabel.Text = sampleHScrollBar.Value.ToString(); }
private void ScrollForm_Load(object sender, EventArgs e) { // Assign the scroll bar value to the label.
currentValueLabel.Text = sampleHScrollBar.Value.ToString(); } }}
Playing Sounds
It is fun to add sound to an application. Your computer plays sounds as you turn it on or off. There’s also likely a sound when you receive e-mail. You can make your program play sound files, called wave files (.wav), by using the SoundPlayer component . You can set the location of the file using the SoundPlayer’s constructor or set its SoundLocation property to the location
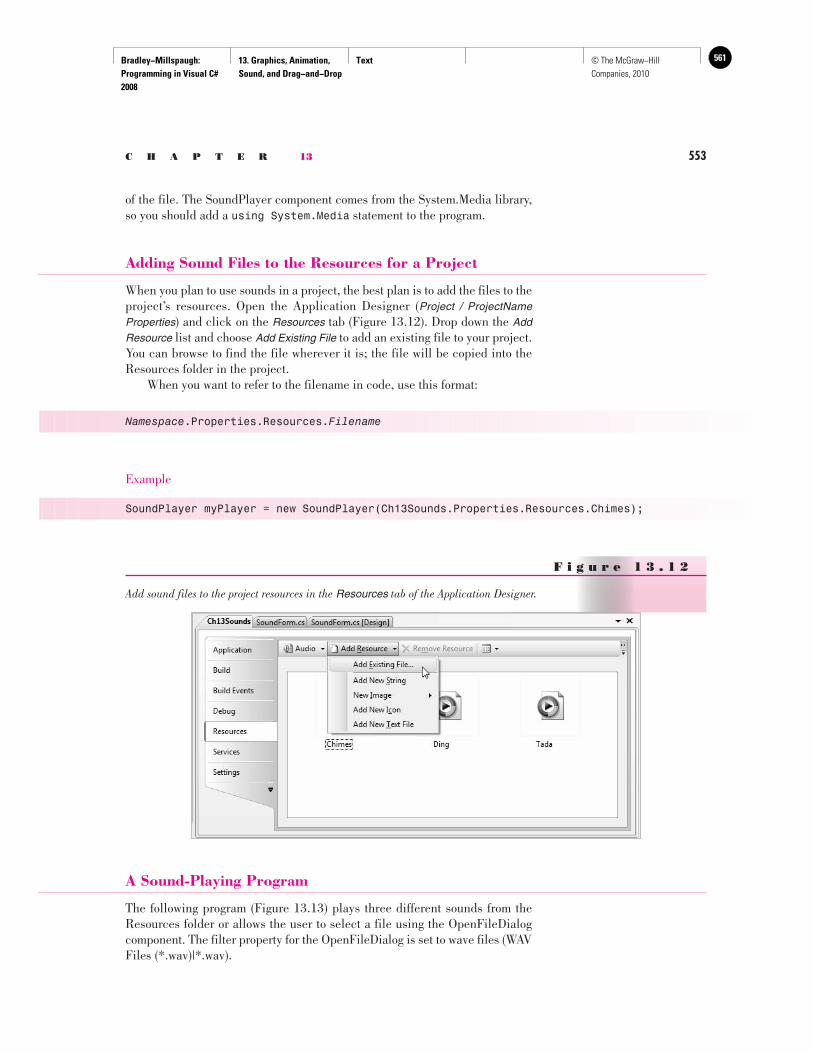
Bradley−Millspaugh: Programming in Visual C# 2008
13. Graphics, Animation, Sound, and Drag−and−Drop
Text 561© The McGraw−Hill Companies, 2010
C H A P T E R 13 553
of the file. The SoundPlayer component comes from the System.Media library, so you should add a using System.Media statement to the program.
Adding Sound Files to the Resources for a Project
When you plan to use sounds in a project, the best plan is to add the files to the project’s resources. Open the Application Designer ( Project / ProjectName Properties ) and click on the Resources tab ( Figure 13.12 ). Drop down the Add Resource list and choose Add Existing File to add an existing file to your project. You can browse to find the file wherever it is; the file will be copied into the Resources folder in the project. When you want to refer to the filename in code, use this format:
Namespace.Properties.Resources.Filename
Example
SoundPlayer myPlayer = new SoundPlayer(Ch13Sounds.Properties.Resources.Chimes);
F i g u r e 1 3 . 1 2
Add sound files to the project resources in the Resources tab of the Application Designer.
A Sound-Playing Program
The following program ( Figure 13.13 ) plays three different sounds from the Resources folder or allows the user to select a file using the OpenFileDialog component. The filter property for the OpenFileDialog is set to wave files (WAV Files (*.wav)|*.wav).
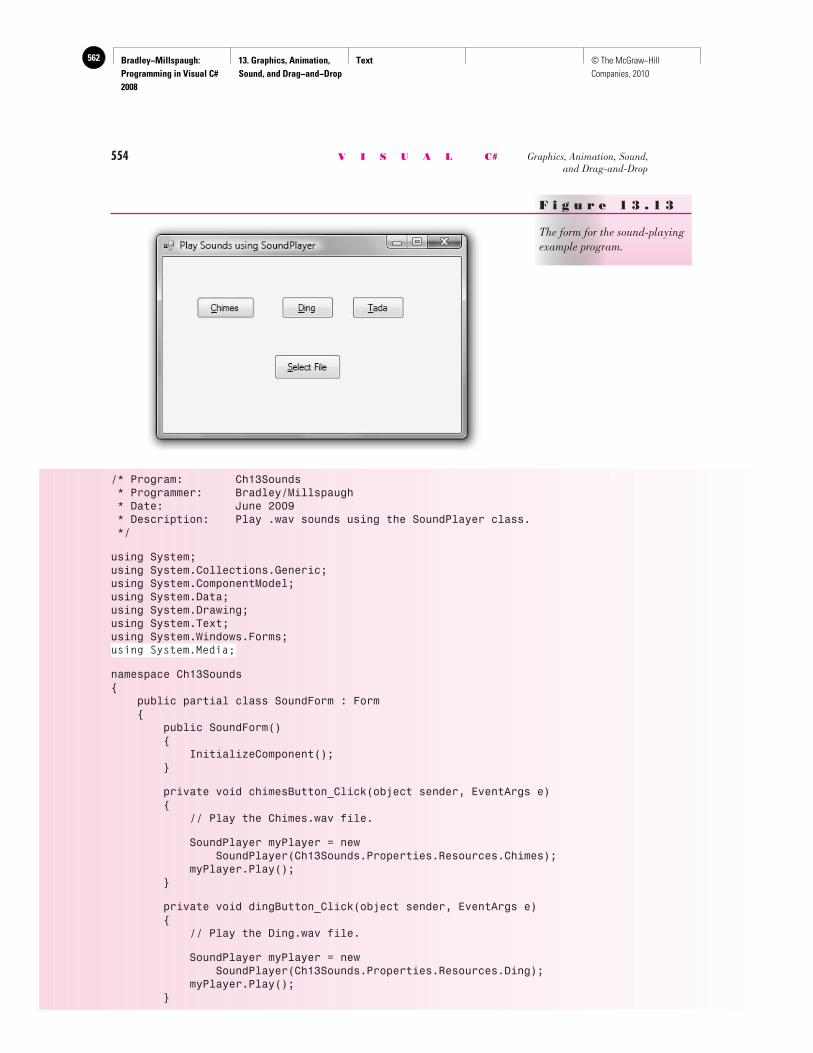
Bradley−Millspaugh: Programming in Visual C# 2008
13. Graphics, Animation, Sound, and Drag−and−Drop
Text562 © The McGraw−Hill Companies, 2010
554 V I S U A L C# Graphics, Animation, Sound, and Drag-and-Drop
F i g u r e 1 3 . 1 3
The form for the sound-playing example program.
/* Program: Ch13Sounds * Programmer: Bradley/Millspaugh * Date: June 2009 * Description: Play .wav sounds using the SoundPlayer class. */
using System;using System.Collections.Generic;using System.ComponentModel;using System.Data;using System.Drawing;using System.Text;using System.Windows.Forms;using System.Media;
namespace Ch13Sounds{ public partial class SoundForm : Form { public SoundForm() { InitializeComponent(); }
private void chimesButton_Click(object sender, EventArgs e) { // Play the Chimes.wav file.
SoundPlayer myPlayer = new SoundPlayer(Ch13Sounds.Properties.Resources.Chimes); myPlayer.Play(); }
private void dingButton_Click(object sender, EventArgs e) { // Play the Ding.wav file.
SoundPlayer myPlayer = new SoundPlayer(Ch13Sounds.Properties.Resources.Ding); myPlayer.Play(); }
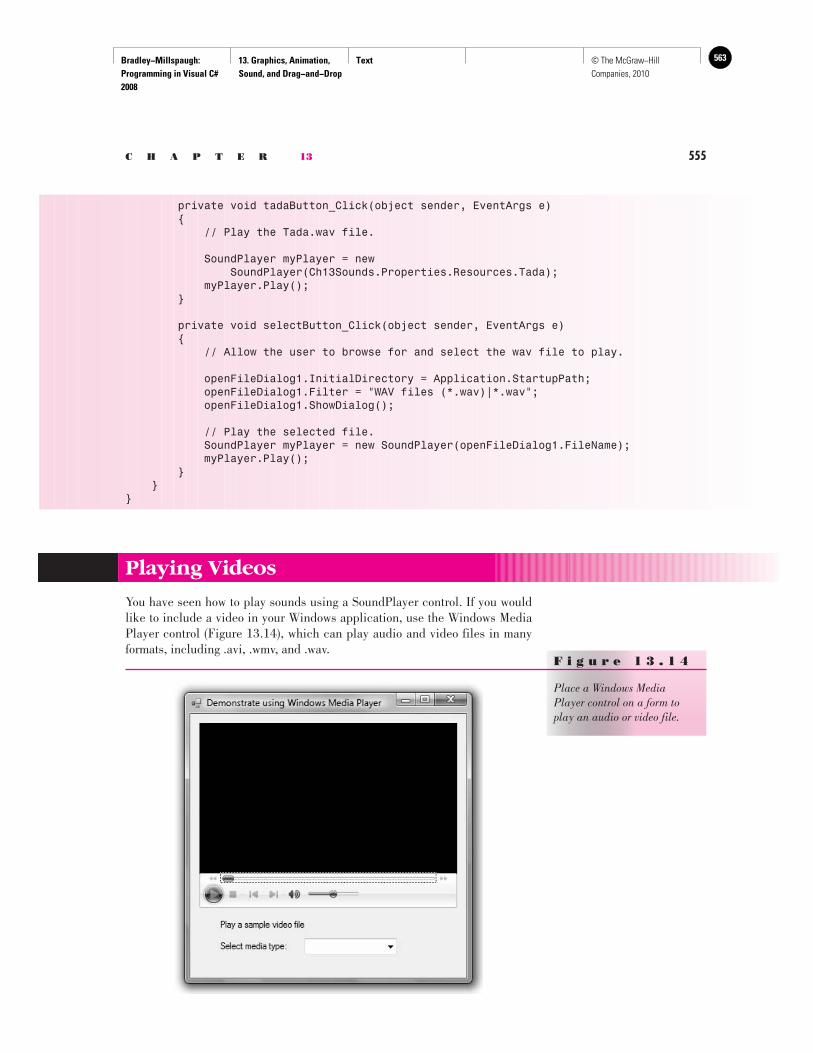
Bradley−Millspaugh: Programming in Visual C# 2008
13. Graphics, Animation, Sound, and Drag−and−Drop
Text 563© The McGraw−Hill Companies, 2010
C H A P T E R 13 555
private void tadaButton_Click(object sender, EventArgs e) { // Play the Tada.wav file.
SoundPlayer myPlayer = new SoundPlayer(Ch13Sounds.Properties.Resources.Tada); myPlayer.Play(); }
private void selectButton_Click(object sender, EventArgs e) { // Allow the user to browse for and select the wav file to play.
openFileDialog1.InitialDirectory = Application.StartupPath; openFileDialog1.Filter = "WAV files (*.wav)|*.wav"; openFileDialog1.ShowDialog();
// Play the selected file. SoundPlayer myPlayer = new SoundPlayer(openFileDialog1.FileName); myPlayer.Play(); } }}
Playing Videos
You have seen how to play sounds using a SoundPlayer control. If you would like to include a video in your Windows application, use the Windows Media Player control ( Figure 13.14 ), which can play audio and video files in many formats, including .avi, .wmv, and .wav.
F i g u r e 1 3 . 1 4
Place a Windows Media Player control on a form to play an audio or video file.
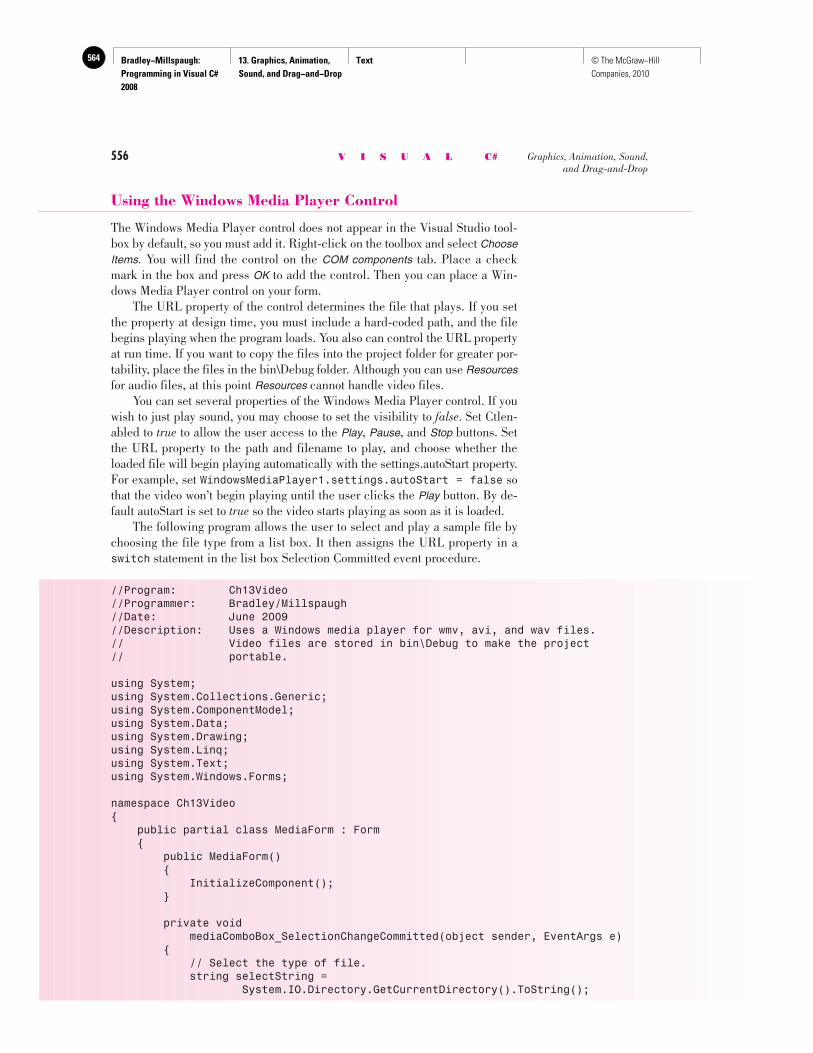
Bradley−Millspaugh: Programming in Visual C# 2008
13. Graphics, Animation, Sound, and Drag−and−Drop
Text564 © The McGraw−Hill Companies, 2010
556 V I S U A L C# Graphics, Animation, Sound, and Drag-and-Drop
Using the Windows Media Player Control
The Windows Media Player control does not appear in the Visual Studio tool-box by default, so you must add it. Right-click on the toolbox and select Choose Items . You will find the control on the COM components tab. Place a check mark in the box and press OK to add the control. Then you can place a Win-dows Media Player control on your form. The URL property of the control determines the file that plays. If you set the property at design time, you must include a hard-coded path, and the file begins playing when the program loads. You also can control the URL property at run time. If you want to copy the files into the project folder for greater por-tability, place the files in the bin\Debug folder. Although you can use Resources for audio files, at this point Resources cannot handle video files. You can set several properties of the Windows Media Player control. If you wish to just play sound, you may choose to set the visibility to false . Set Ctlen-abled to true to allow the user access to the Play , Pause , and Stop buttons. Set the URL property to the path and filename to play, and choose whether the loaded file will begin playing automatically with the settings.autoStart property. For example, set WindowsMediaPlayer1.settings.autoStart = false so that the video won’t begin playing until the user clicks the Play b utton. By de-fault autoStart is set to true so the video starts playing as soon as it is loaded. The following program allows the user to select and play a sample file by choosing the file type from a list box. It then assigns the URL property in a switch statement in the list box Selection Committed event procedure.
//Program: Ch13Video//Programmer: Bradley/Millspaugh//Date: June 2009//Description: Uses a Windows media player for wmv, avi, and wav files.// Video files are stored in bin\Debug to make the project// portable.
using System;using System.Collections.Generic;using System.ComponentModel;using System.Data;using System.Drawing;using System.Linq;using System.Text;using System.Windows.Forms;
namespace Ch13Video{ public partial class MediaForm : Form { public MediaForm() { InitializeComponent(); }
private void mediaComboBox_SelectionChangeCommitted(object sender, EventArgs e) { // Select the type of file. string selectString = System.IO.Directory.GetCurrentDirectory().ToString();
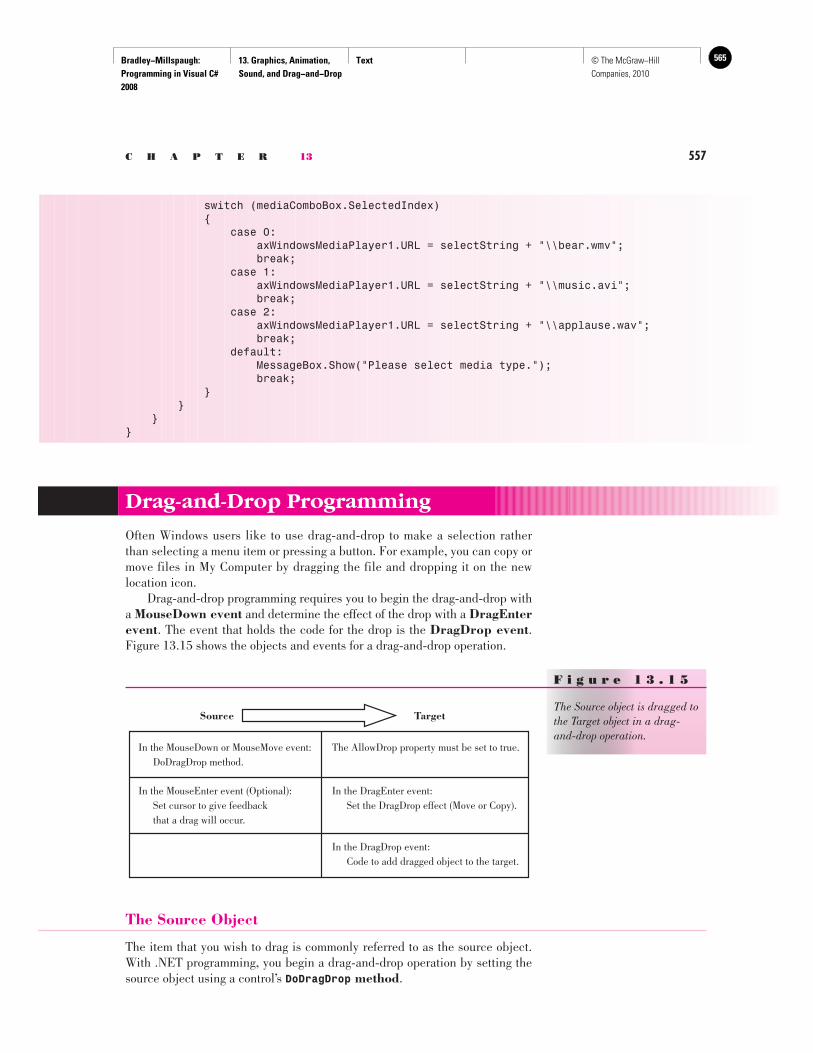
Bradley−Millspaugh: Programming in Visual C# 2008
13. Graphics, Animation, Sound, and Drag−and−Drop
Text 565© The McGraw−Hill Companies, 2010
C H A P T E R 13 557
switch (mediaComboBox.SelectedIndex) { case 0: axWindowsMediaPlayer1.URL = selectString + "\\bear.wmv"; break; case 1: axWindowsMediaPlayer1.URL = selectString + "\\music.avi"; break; case 2: axWindowsMediaPlayer1.URL = selectString + "\\applause.wav"; break; default: MessageBox.Show("Please select media type."); break; } } }}
Drag-and-Drop Programming
Often Windows users like to use drag-and-drop to make a selection rather than selecting a menu item or pressing a button. For example, you can copy or move files in My Computer by dragging the file and dropping it on the new location icon. Drag-and-drop programming requires you to begin the drag-and-drop with a MouseDown event and determine the effect of the drop with a DragEnter event . The event that holds the code for the drop is the DragDrop event . Figure 13.15 shows the objects and events for a drag-and-drop operation.
F i g u r e 1 3 . 1 5
The Source object is dragged to the Target object in a drag-and-drop operation.
In the MouseDown or MouseMove event: DoDragDrop method.
In the MouseEnter event (Optional): Set cursor to give feedback that a drag will occur.
Source
The AllowDrop property must be set to true.
In the DragEnter event: Set the DragDrop effect (Move or Copy).
In the DragDrop event: Code to add dragged object to the target.
Target
The Source Object
The item that you wish to drag is commonly referred to as the source object. With .NET programming, you begin a drag-and-drop operation by setting the source object using a control’s DoDragDrop method .
Bradley−Millspaugh: Programming in Visual C# 2008
13. Graphics, Animation, Sound, and Drag−and−Drop
Text566 © The McGraw−Hill Companies, 2010
558 V I S U A L C# Graphics, Animation, Sound, and Drag-and-Drop
The DoDragDrop Method—General Form
Object.DoDragDrop(DataToDrag, DesiredDragDropEffect);
General
Form
Exam
ple
nameTextBox.DoDragDrop(nameTextBox.SelectedText, DragDropEffects.Move);
The DragDrop effect specifies the requested action for the operation. Choices include
• DragDropEffects.Copy
• DragDropEffects.Move
• DragDropEffects.None
The DoDragDrop Method—Example
Look at the following MouseDown event handler. First, an if statement checks to see if the user pressed the left mouse button. If so, the contents of the text box are selected and the effect of the drag is set to a move operation.
private void nameTextBox_MouseDown(object sender, MouseEventArgs e){ // Select contents of the text box and invoke the drag/drop.
if (e.Button == MouseButtons.Left) { nameTextBox.SelectAll(); nameTextBox.DoDragDrop(nameTextBox.SelectedText, DragDropEffects.Move); nameTextBox.Clear(); }}
The Target Object
The location where a user releases the mouse, a drop, is the target. A form may have multiple targets. To set a control to be a target, set its AllowDrop property to true . The target control needs a DragEnter event handler that sets the effect and a DragDrop event handler that executes the action to take when the drop takes place. In the following example program ( Figure 13.16 ) the value in a text box can be transferred to one of two list boxes. Each list box would be a potential target and must have its AllowDrop property set to true . And each target object needs a DragEnter event handler and a DragDrop event handler.
The DragEnter Event When the user drags a source object over the target, the target control’s DragEnter event fires. Notice in the DragEnter’s handler header that the e argument is defined as DragEventArgs , which has some special properties for the drag operation. You assign the desired effect to the e argument.
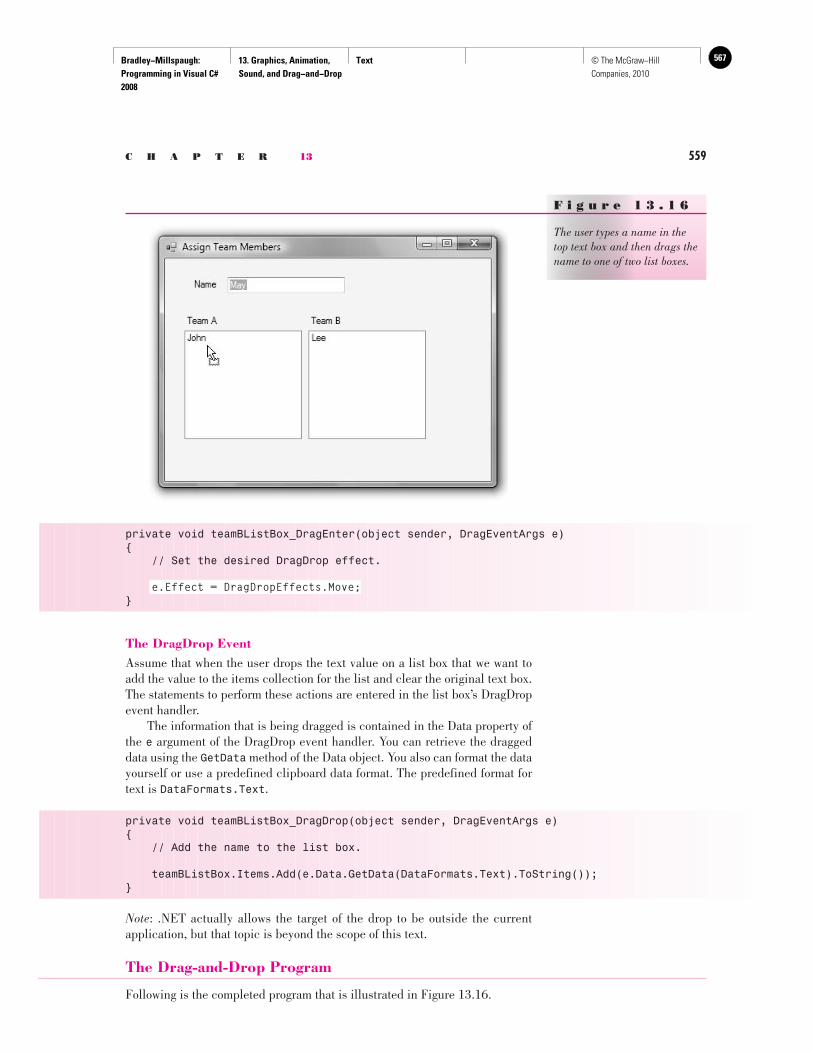
Bradley−Millspaugh: Programming in Visual C# 2008
13. Graphics, Animation, Sound, and Drag−and−Drop
Text 567© The McGraw−Hill Companies, 2010
C H A P T E R 13 559
F i g u r e 1 3 . 1 6
The user types a name in the top text box and then drags the name to one of two list boxes.
private void teamBListBox_DragEnter(object sender, DragEventArgs e){ // Set the desired DragDrop effect.
e.Effect = DragDropEffects.Move;}
The DragDrop Event Assume that when the user drops the text value on a list box that we want to add the value to the items collection for the list and clear the original text box. The statements to perform these actions are entered in the list box’s DragDrop event handler. The information that is being dragged is contained in the Data property of the e argument of the DragDrop event handler. You can retrieve the dragged data using the GetData method of the Data object. You also can format the data yourself or use a predefined clipboard data format. The predefined format for text is DataFormats.Text .
private void teamBListBox_DragDrop(object sender, DragEventArgs e){ // Add the name to the list box.
teamBListBox.Items.Add(e.Data.GetData(DataFormats.Text).ToString());}
Note : .NET actually allows the target of the drop to be outside the current application, but that topic is beyond the scope of this text.
The Drag-and-Drop Program
Following is the completed program that is illustrated in Figure 13.16 .
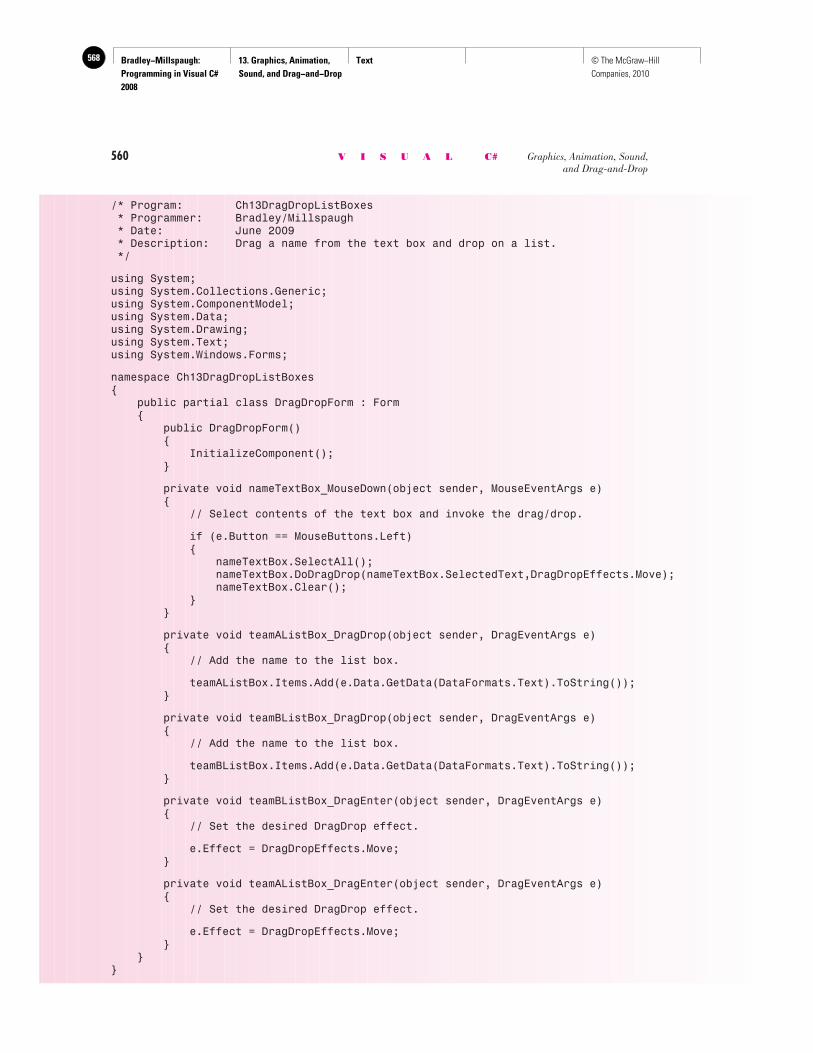
Bradley−Millspaugh: Programming in Visual C# 2008
13. Graphics, Animation, Sound, and Drag−and−Drop
Text568 © The McGraw−Hill Companies, 2010
560 V I S U A L C# Graphics, Animation, Sound, and Drag-and-Drop
/* Program: Ch13DragDropListBoxes * Programmer: Bradley/Millspaugh * Date: June 2009 * Description: Drag a name from the text box and drop on a list. */
using System;using System.Collections.Generic;using System.ComponentModel;using System.Data;using System.Drawing;using System.Text;using System.Windows.Forms;
namespace Ch13DragDropListBoxes{ public partial class DragDropForm : Form { public DragDropForm() { InitializeComponent(); }
private void nameTextBox_MouseDown(object sender, MouseEventArgs e) { // Select contents of the text box and invoke the drag/drop.
if (e.Button == MouseButtons.Left) { nameTextBox.SelectAll(); nameTextBox.DoDragDrop(nameTextBox.SelectedText,DragDropEffects.Move); nameTextBox.Clear(); } }
private void teamAListBox_DragDrop(object sender, DragEventArgs e) { // Add the name to the list box.
teamAListBox.Items.Add(e.Data.GetData(DataFormats.Text).ToString()); }
private void teamBListBox_DragDrop(object sender, DragEventArgs e) { // Add the name to the list box.
teamBListBox.Items.Add(e.Data.GetData(DataFormats.Text).ToString()); }
private void teamBListBox_DragEnter(object sender, DragEventArgs e) { // Set the desired DragDrop effect.
e.Effect = DragDropEffects.Move; }
private void teamAListBox_DragEnter(object sender, DragEventArgs e) { // Set the desired DragDrop effect.
e.Effect = DragDropEffects.Move; } }}
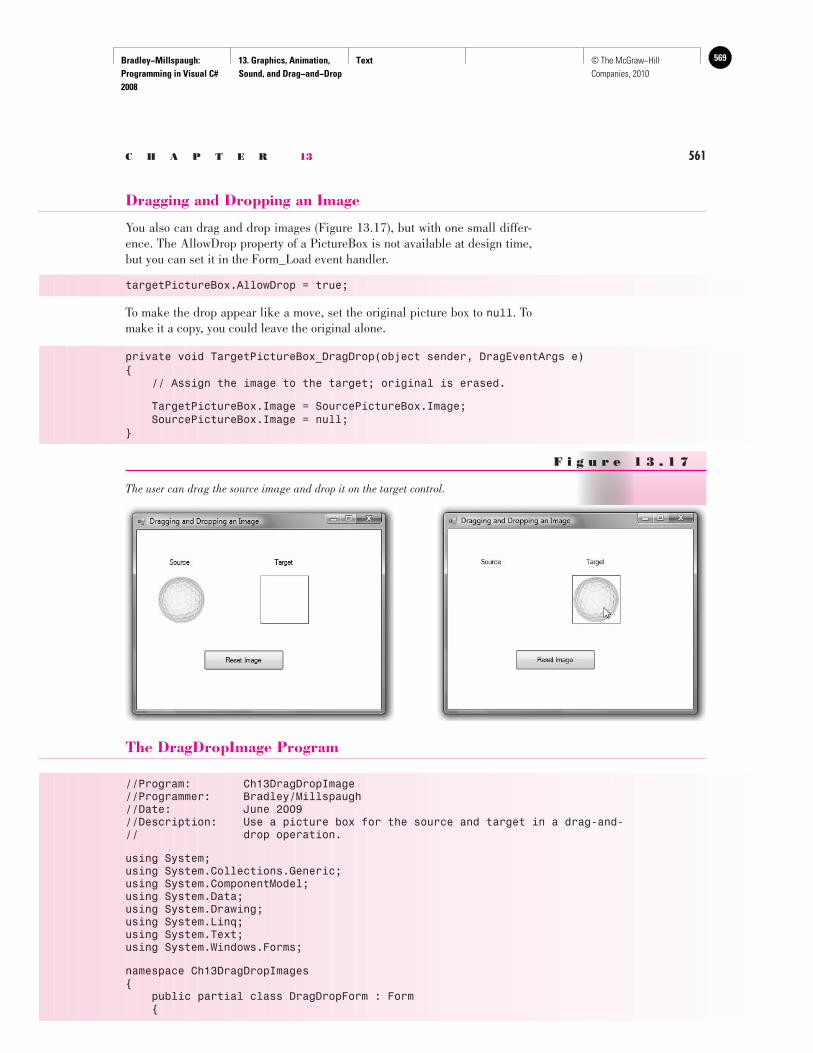
Bradley−Millspaugh: Programming in Visual C# 2008
13. Graphics, Animation, Sound, and Drag−and−Drop
Text 569© The McGraw−Hill Companies, 2010
C H A P T E R 13 561
Dragging and Dropping an Image
You also can drag and drop images ( Figure 13.17 ), but with one small differ-ence. The AllowDrop property of a PictureBox is not available at design time, but you can set it in the Form_Load event handler.
targetPictureBox.AllowDrop = true;
To make the drop appear like a move, set the original picture box to null . To make it a copy, you could leave the original alone.
private void TargetPictureBox_DragDrop(object sender, DragEventArgs e){ // Assign the image to the target; original is erased.
TargetPictureBox.Image = SourcePictureBox.Image; SourcePictureBox.Image = null;}
//Program: Ch13DragDropImage//Programmer: Bradley/Millspaugh//Date: June 2009//Description: Use a picture box for the source and target in a drag-and-// drop operation.
using System;using System.Collections.Generic;using System.ComponentModel;using System.Data;using System.Drawing;using System.Linq;using System.Text;using System.Windows.Forms;
namespace Ch13DragDropImages{ public partial class DragDropForm : Form {
F i g u r e 1 3 . 1 7
The user can drag the source image and drop it on the target control.
The DragDropImage Program
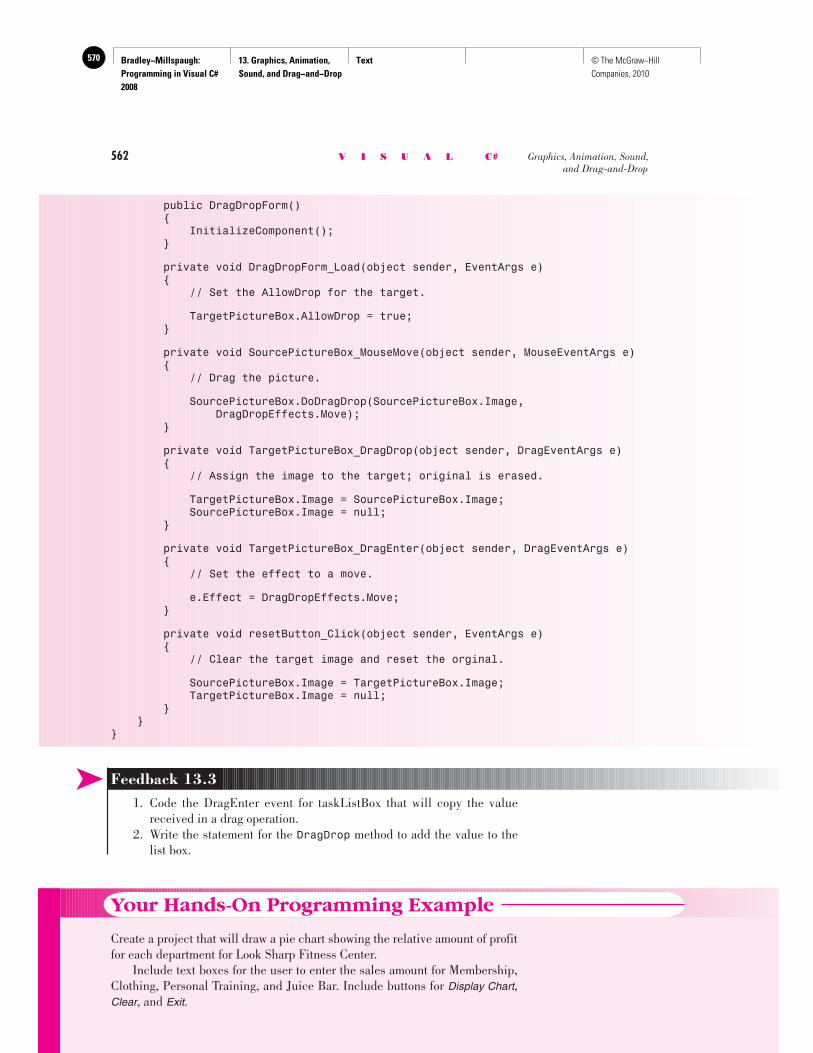
Bradley−Millspaugh: Programming in Visual C# 2008
13. Graphics, Animation, Sound, and Drag−and−Drop
Text570 © The McGraw−Hill Companies, 2010
➤ Feedback 13.3 1. Code the DragEnter event for taskListBox that will copy the value
received in a drag operation. 2. Write the statement for the DragDrop method to add the value to the
list box.
Your Hands-On Programming Example
Create a project that will draw a pie chart showing the relative amount of profit for each department for Look Sharp Fitness Center. Include text boxes for the user to enter the sales amount for Membership, Clothing, Personal Training, and Juice Bar. Include buttons for Display Chart , Clear , and Exit .
public DragDropForm() { InitializeComponent(); }
private void DragDropForm_Load(object sender, EventArgs e) { // Set the AllowDrop for the target.
TargetPictureBox.AllowDrop = true; }
private void SourcePictureBox_MouseMove(object sender, MouseEventArgs e) { // Drag the picture.
SourcePictureBox.DoDragDrop(SourcePictureBox.Image, DragDropEffects.Move); }
private void TargetPictureBox_DragDrop(object sender, DragEventArgs e) { // Assign the image to the target; original is erased.
TargetPictureBox.Image = SourcePictureBox.Image; SourcePictureBox.Image = null; }
private void TargetPictureBox_DragEnter(object sender, DragEventArgs e) { // Set the effect to a move.
e.Effect = DragDropEffects.Move; }
private void resetButton_Click(object sender, EventArgs e) { // Clear the target image and reset the orginal.
SourcePictureBox.Image = TargetPictureBox.Image; TargetPictureBox.Image = null; } }}
562 V I S U A L C# Graphics, Animation, Sound, and Drag-and-Drop
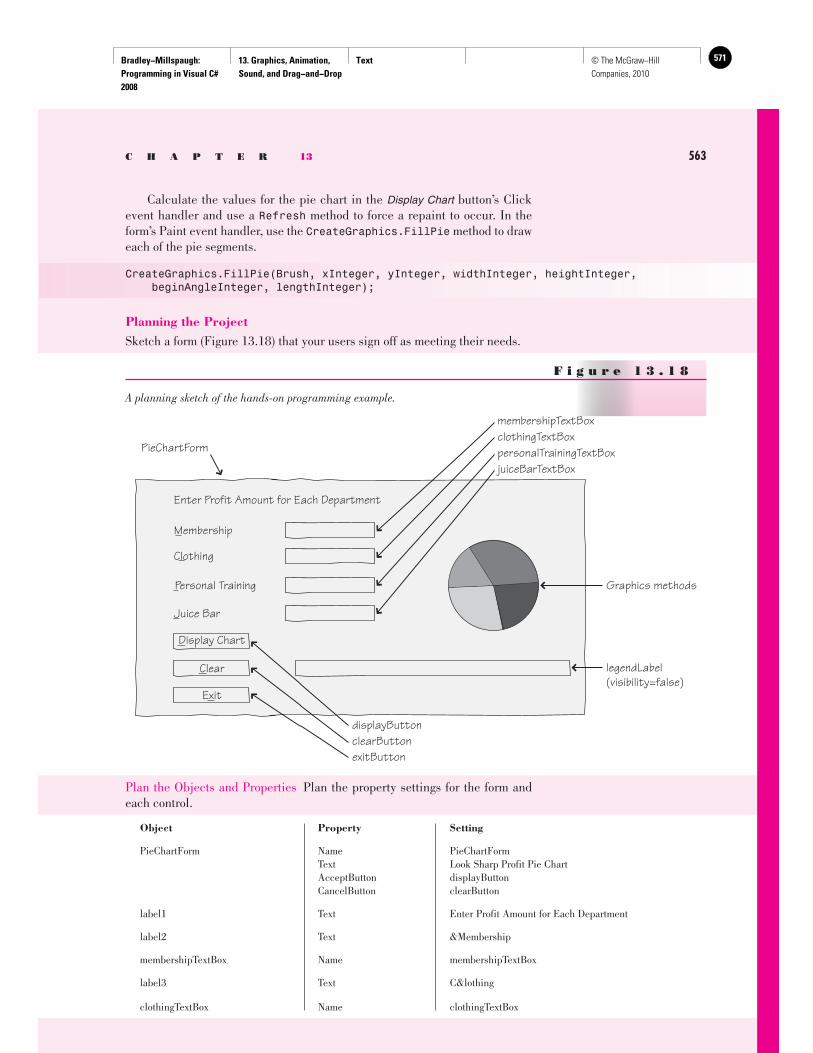
Bradley−Millspaugh: Programming in Visual C# 2008
13. Graphics, Animation, Sound, and Drag−and−Drop
Text 571© The McGraw−Hill Companies, 2010
C H A P T E R 13 563
Plan the Objects and Properties Plan the property settings for the form and each control.
Object Property Setting
PieChartForm Name PieChartForm Text Look Sharp Profit Pie Chart AcceptButton displayButton CancelButton clearButton
label1 Text Enter Profit Amount for Each Department
label2 Text &Membership
membershipTextBox Name membershipTextBox
label3 Text C&lothing
clothingTextBox Name clothingTextBox
F i g u r e 1 3 . 1 8
A planning sketch of the hands-on programming example.
PieChartForm
juiceBarTextBoxpersonalTrainingTextBoxclothingTextBoxmembershipTextBox
displayButton clearButtonexitButton
legendLabel(visibility=false)
Enter Profit Amount for Each Department
Clothing
Membership
Personal Training
Juice Bar
Display Chart
Clear
Exit
Graphics methods
Calculate the values for the pie chart in the Display Chart button’s Click event handler and use a Refresh method to force a repaint to occur. In the form’s Paint event handler, use the CreateGraphics.FillPie method to draw each of the pie segments.
CreateGraphics.FillPie(Brush, xInteger, yInteger, widthInteger, heightInteger, beginAngleInteger, lengthInteger);
Planning the Project Sketch a form ( Figure 13.18 ) that your users sign off as meeting their needs.
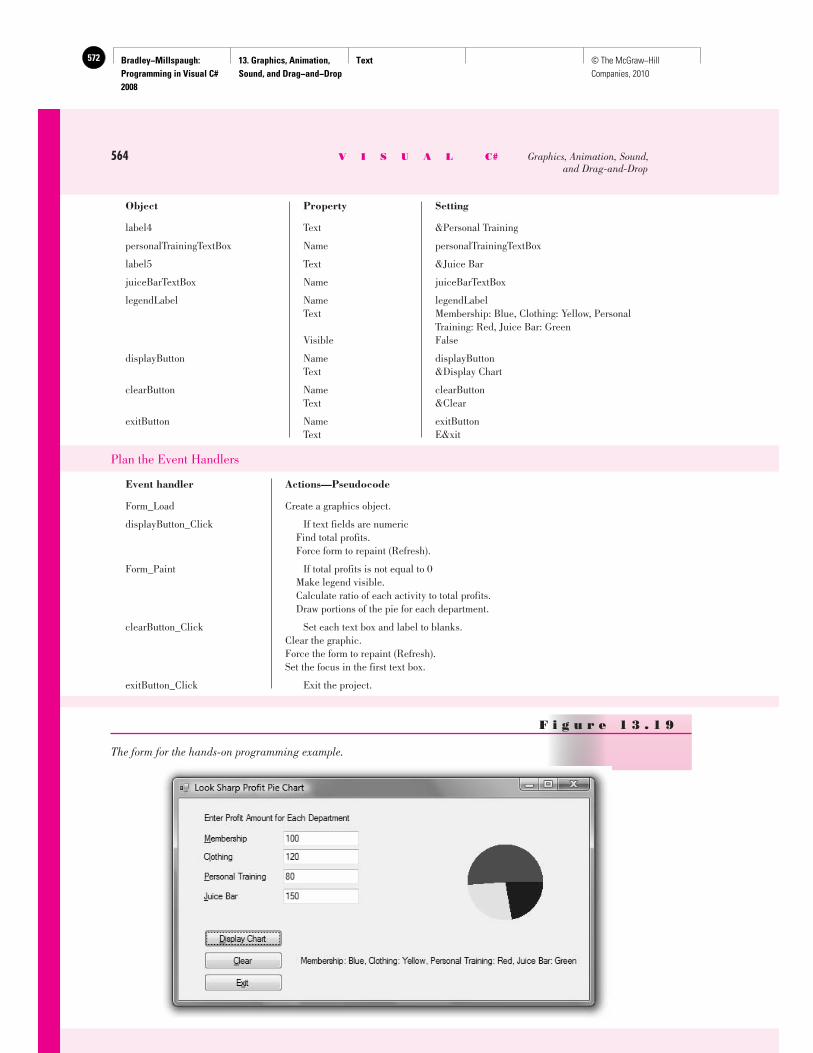
Bradley−Millspaugh: Programming in Visual C# 2008
13. Graphics, Animation, Sound, and Drag−and−Drop
Text572 © The McGraw−Hill Companies, 2010
Object Property Setting
label4 Text &Personal Training
personalTrainingTextBox Name personalTrainingTextBox
label5 Text &Juice Bar
juiceBarTextBox Name juiceBarTextBox
legendLabel Name legendLabel Text Membership: Blue, Clothing: Yellow, Personal Training: Red, Juice Bar: Green Visible False
displayButton Name displayButton Text &Display Chart
clearButton Name clearButton Text &Clear
exitButton Name exitButton Text E&xit
Plan the Event Handlers
Event handler Actions—Pseudocode
Form_Load Create a graphics object.
displayButton_Click If text fields are numeric Find total profits. Force form to repaint (Refresh).
Form_Paint If total profits is not equal to 0 Make legend visible. Calculate ratio of each activity to total profits. Draw portions of the pie for each department.
clearButton_Click Set each text box and label to blanks. Clear the graphic. Force the form to repaint (Refresh). Set the focus in the first text box.
exitButton_Click Exit the project.
F i g u r e 1 3 . 1 9
The form for the hands-on programming example.
564 V I S U A L C# Graphics, Animation, Sound, and Drag-and-Drop
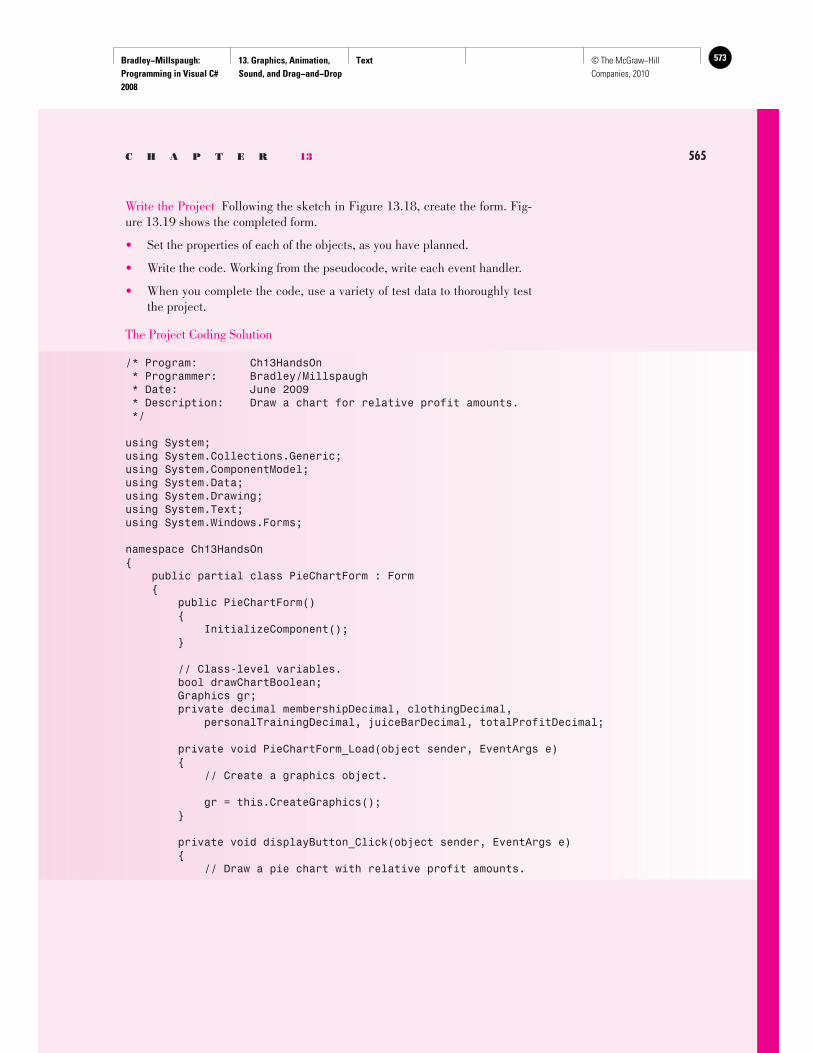
Bradley−Millspaugh: Programming in Visual C# 2008
13. Graphics, Animation, Sound, and Drag−and−Drop
Text 573© The McGraw−Hill Companies, 2010
C H A P T E R 13 565
Write the Project Following the sketch in Figure 13.18 , create the form. Fig-ure 13.19 shows the completed form.
• Set the properties of each of the objects, as you have planned.
• Write the code. Working from the pseudocode, write each event handler.
• When you complete the code, use a variety of test data to thoroughly test the project.
The Project Coding Solution
/* Program: Ch13HandsOn * Programmer: Bradley/Millspaugh * Date: June 2009 * Description: Draw a chart for relative profit amounts. */
using System;using System.Collections.Generic;using System.ComponentModel;using System.Data;using System.Drawing;using System.Text;using System.Windows.Forms;
namespace Ch13HandsOn{ public partial class PieChartForm : Form { public PieChartForm() { InitializeComponent(); }
// Class-level variables. bool drawChartBoolean; Graphics gr; private decimal membershipDecimal, clothingDecimal, personalTrainingDecimal, juiceBarDecimal, totalProfitDecimal;
private void PieChartForm_Load(object sender, EventArgs e) { // Create a graphics object.
gr = this.CreateGraphics(); }
private void displayButton_Click(object sender, EventArgs e) { // Draw a pie chart with relative profit amounts.
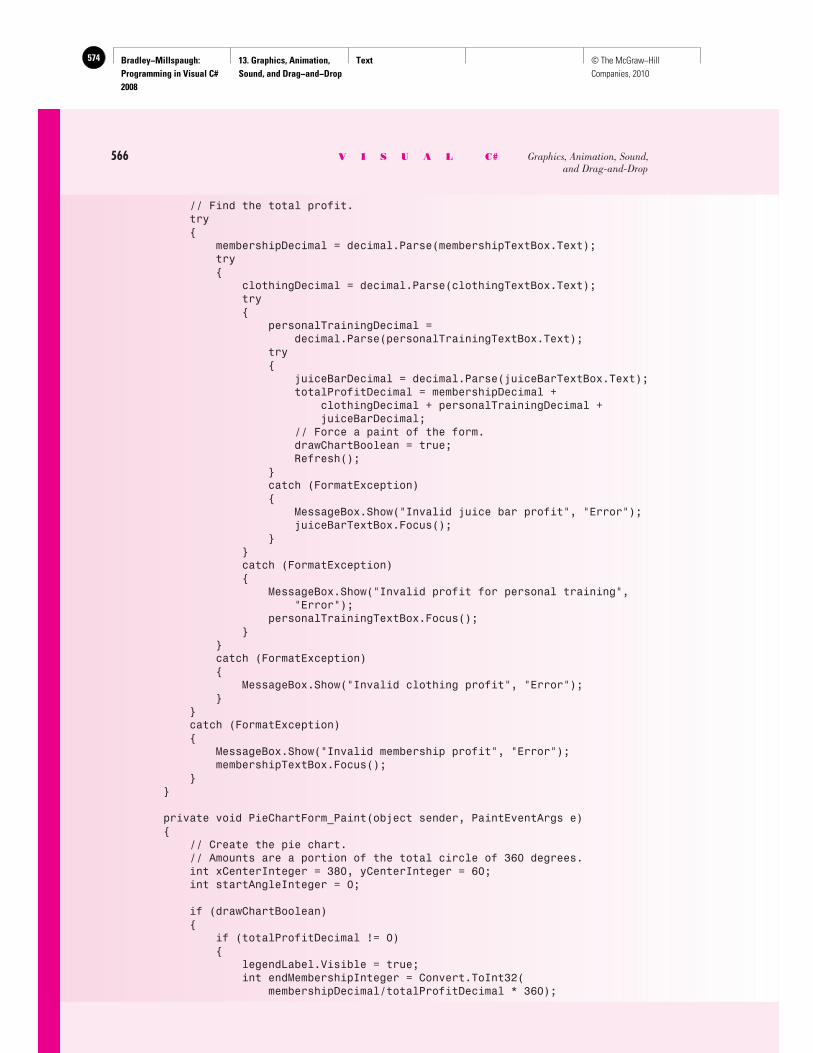
Bradley−Millspaugh: Programming in Visual C# 2008
13. Graphics, Animation, Sound, and Drag−and−Drop
Text574 © The McGraw−Hill Companies, 2010
566 V I S U A L C# Graphics, Animation, Sound, and Drag-and-Drop
// Find the total profit. try { membershipDecimal = decimal.Parse(membershipTextBox.Text); try { clothingDecimal = decimal.Parse(clothingTextBox.Text); try { personalTrainingDecimal = decimal.Parse(personalTrainingTextBox.Text); try { juiceBarDecimal = decimal.Parse(juiceBarTextBox.Text); totalProfitDecimal = membershipDecimal + clothingDecimal + personalTrainingDecimal + juiceBarDecimal; // Force a paint of the form. drawChartBoolean = true; Refresh(); } catch (FormatException) { MessageBox.Show("Invalid juice bar profit", "Error"); juiceBarTextBox.Focus(); } } catch (FormatException) { MessageBox.Show("Invalid profit for personal training", "Error"); personalTrainingTextBox.Focus(); } } catch (FormatException) { MessageBox.Show("Invalid clothing profit", "Error"); } } catch (FormatException) { MessageBox.Show("Invalid membership profit", "Error"); membershipTextBox.Focus(); } }
private void PieChartForm_Paint(object sender, PaintEventArgs e) { // Create the pie chart. // Amounts are a portion of the total circle of 360 degrees. int xCenterInteger = 380, yCenterInteger = 60; int startAngleInteger = 0;
if (drawChartBoolean) { if (totalProfitDecimal != 0) { legendLabel.Visible = true; int endMembershipInteger = Convert.ToInt32( membershipDecimal/totalProfitDecimal * 360);
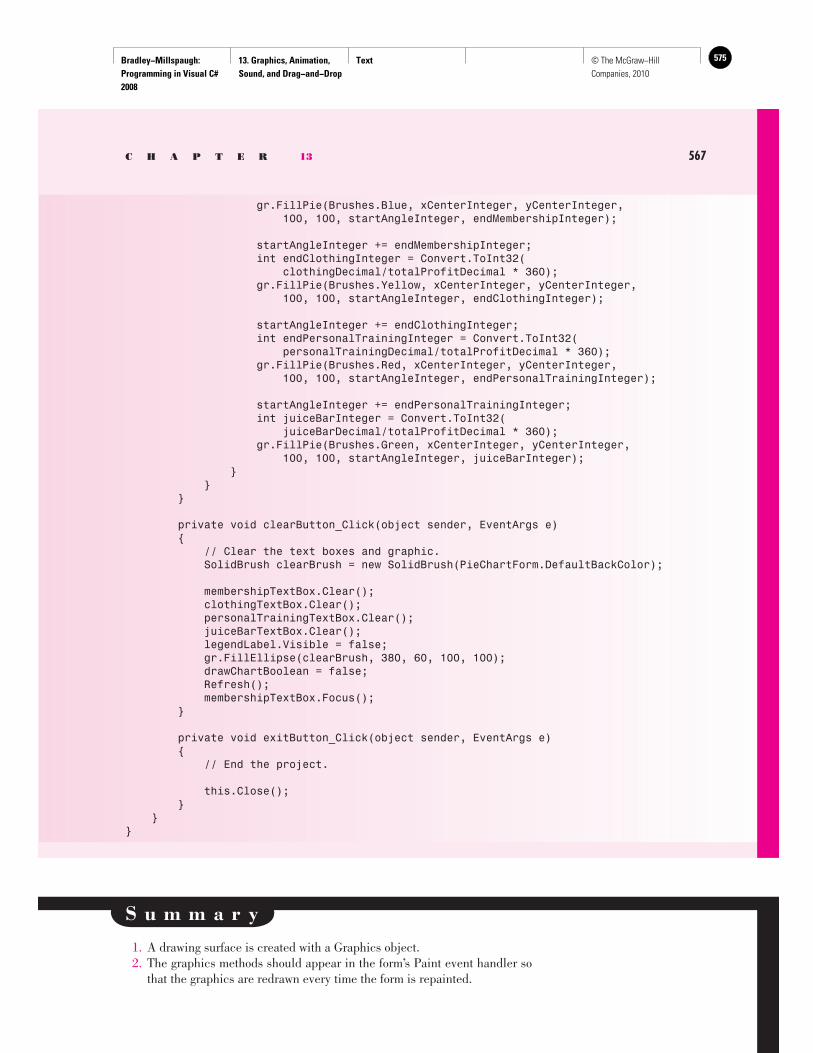
Bradley−Millspaugh: Programming in Visual C# 2008
13. Graphics, Animation, Sound, and Drag−and−Drop
Text 575© The McGraw−Hill Companies, 2010
gr.FillPie(Brushes.Blue, xCenterInteger, yCenterInteger, 100, 100, startAngleInteger, endMembershipInteger);
startAngleInteger += endMembershipInteger; int endClothingInteger = Convert.ToInt32( clothingDecimal/totalProfitDecimal * 360); gr.FillPie(Brushes.Yellow, xCenterInteger, yCenterInteger, 100, 100, startAngleInteger, endClothingInteger);
startAngleInteger += endClothingInteger; int endPersonalTrainingInteger = Convert.ToInt32( personalTrainingDecimal/totalProfitDecimal * 360); gr.FillPie(Brushes.Red, xCenterInteger, yCenterInteger, 100, 100, startAngleInteger, endPersonalTrainingInteger);
startAngleInteger += endPersonalTrainingInteger; int juiceBarInteger = Convert.ToInt32( juiceBarDecimal/totalProfitDecimal * 360); gr.FillPie(Brushes.Green, xCenterInteger, yCenterInteger, 100, 100, startAngleInteger, juiceBarInteger); } } }
private void clearButton_Click(object sender, EventArgs e) { // Clear the text boxes and graphic. SolidBrush clearBrush = new SolidBrush(PieChartForm.DefaultBackColor);
membershipTextBox.Clear(); clothingTextBox.Clear(); personalTrainingTextBox.Clear(); juiceBarTextBox.Clear(); legendLabel.Visible = false; gr.FillEllipse(clearBrush, 380, 60, 100, 100); drawChartBoolean = false; Refresh(); membershipTextBox.Focus(); }
private void exitButton_Click(object sender, EventArgs e) { // End the project.
this.Close(); } }}
C H A P T E R 13 567
S u m m a r y
1. A drawing surface is created with a Graphics object. 2. The graphics methods should appear in the form’s Paint event handler so
that the graphics are redrawn every time the form is repainted.
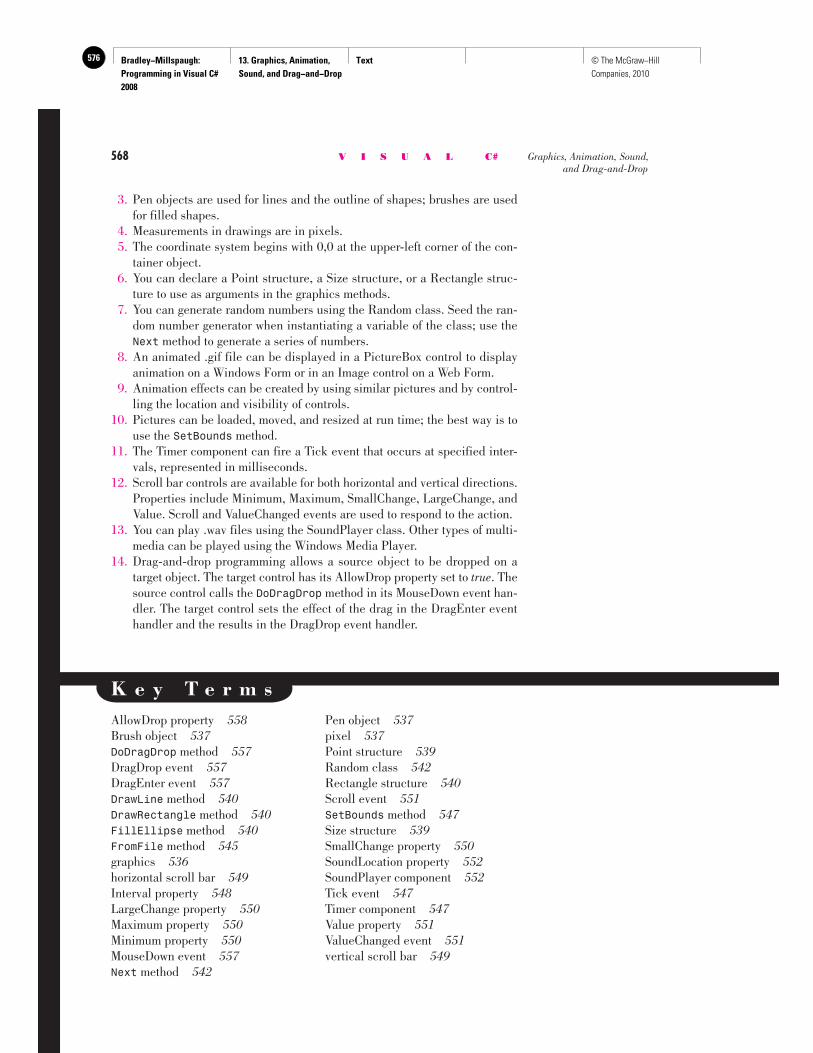
Bradley−Millspaugh: Programming in Visual C# 2008
13. Graphics, Animation, Sound, and Drag−and−Drop
Text576 © The McGraw−Hill Companies, 2010
568 V I S U A L C# Graphics, Animation, Sound, and Drag-and-Drop
K e y T e r m s AllowDrop property 558 Brush object 537 DoDragDrop method 557 DragDrop event 557 DragEnter event 557 DrawLine method 540 DrawRectangle method 540 FillEllipse method 540 FromFile method 545 graphics 536 horizontal scroll bar 549 Interval property 548 LargeChange property 550 Maximum property 550 Minimum property 550 MouseDown event 557 Next method 542
Pen object 537 pixel 537 Point structure 539 Random class 542 Rectangle structure 540 Scroll event 551 SetBounds method 547 Size structure 539 SmallChange property 550 SoundLocation property 552 SoundPlayer component 552 Tick event 547 Timer component 547 Value property 551 ValueChanged event 551 vertical scroll bar 549
3. Pen objects are used for lines and the outline of shapes; brushes are used for filled shapes.
4. Measurements in drawings are in pixels. 5. The coordinate system begins with 0,0 at the upper-left corner of the con-
tainer object. 6. You can declare a Point structure, a Size structure, or a Rectangle struc-
ture to use as arguments in the graphics methods. 7. You can generate random numbers using the Random class. Seed the ran-
dom number generator when instantiating a variable of the class; use the Next method to generate a series of numbers.
8. An animated .gif file can be displayed in a PictureBox control to display animation on a Windows Form or in an Image control on a Web Form.
9. Animation effects can be created by using similar pictures and by control-ling the location and visibility of controls.
10. Pictures can be loaded, moved, and resized at run time; the best way is to use the SetBounds method.
11. The Timer component can fire a Tick event that occurs at specified inter-vals, represented in milliseconds.
12. Scroll bar controls are available for both horizontal and vertical directions. Properties include Minimum, Maximum, SmallChange, LargeChange, and Value. Scroll and ValueChanged events are used to respond to the action.
13. You can play .wav files using the SoundPlayer class. Other types of multi-media can be played using the Windows Media Player.
14. Drag-and-drop programming allows a source object to be dropped on a target object. The target control has its AllowDrop property set to true . The source control calls the DoDragDrop method in its MouseDown event han-dler. The target control sets the effect of the drag in the DragEnter event handler and the results in the DragDrop event handler.
Bradley−Millspaugh: Programming in Visual C# 2008
13. Graphics, Animation, Sound, and Drag−and−Drop
Text 577© The McGraw−Hill Companies, 2010
C H A P T E R 13 569
R e v i e w Q u e s t i o n s
1. What is a pixel? 2. What class contains the graphics methods? 3. Describe two ways to add a graphics object to a form. 4. Name three methods available for drawing graphics. 5. How is a pie-shaped wedge created? 6. Differentiate between using a Brush and a Pen object. 7. Which function loads a picture at run time? 8. How can you remove a picture at run time? 9. What steps are necessary to change an image that contains a turned-off
light bulb to a turned-on light bulb? 10. What is the purpose of the Timer component? 11. Explain the purpose of these scroll bar properties: Minimum, Maximum,
SmallChange, LargeChange, Value. 12. What determines the file to be played by a SoundPlayer? 13. Explain the purpose of the following events for a drag-and-drop operation: a. MouseDown b. DragEnter c. DragDrop 14. Explain the parameters of the DoDragDrop method.
P r o g r a m m i n g E x e r c i s e s
13.1 Create a project that contains two buttons labeled “Smile” and “Frown”. The Smile button will display a happy face; Frown will display a sad face. Use graphics methods to draw the two faces.
Optional : Add sound effects when the faces appear. 13.2 Use graphics methods to create the background of a form. Draw a picture
of a house, including a front door, a window, and a chimney. 13.3 Use a PictureBox control with a .bmp file from Windows. Set the Size-
Mode property to StretchImage. Use scroll bars to change the size of the image.
13.4 Use graphics from any clip art collection to create a project that has a button for each month of the year. Have an appropriate image display in a PictureBox for each month.
13.5 Use a bicycle image and a Timer component to move the bicycle around the screen. Add a Start button and a Stop button. The Stop button will return the bicycle to its original position.
13.6 Modify the snowman project (“Random Numbers”) from earlier in the chapter by adding eyes, a mouth, and buttons. Play an appropriate sound file; you can play it in the Form_Load, in the Form_Activated, or at the end of the Form_Paint method. Do not place the sound in the middle of the graphics code in the Form_Paint method.
13.7 Modify the chapter hands-on example to add two more categories: Drinks and Gifts. Allow the user to enter the additional values and make the pie chart reflect all six categories. Make sure to set the legend label at the bottom of the form to include the new categories.
Bradley−Millspaugh: Programming in Visual C# 2008
13. Graphics, Animation, Sound, and Drag−and−Drop
Text578 © The McGraw−Hill Companies, 2010
570 V I S U A L C# Graphics, Animation, Sound, and Drag-and-Drop
Xtreme Cinema
Use the Timer component and the random number generator to create a promotional game for Xtreme Cinema customers. Create three image controls that will display an image selected from five possible choices. When the user clicks on the Start button, a randomly selected image will display in each of the
image controls and continue to change for a few sec-onds (like a “slot machine”) until the user presses the Stop button. If all three images are the same, the cus-tomer receives a free video rental. Display a message that says “Congratulations” or “Better Luck Next Visit”.
Cool Boards
Modify your Cool Boards project from Chapter 8 or 12 to add a moving graphic to the About form. Use the graphic Skateboard.wmf or other graphic of your choice. Include a Timer component to move the graphic across the form. When the graphic reaches the edge of the form, reset it so that the graphic
appears at the opposite edge of the form and begins the trip again. Note : For help in basing a new project on an exist-ing project, see “Copy and Move a Windows Project” in Appendix C.
Have the startup screen initially fill with random dots in your choice of colors. Use graphics methods to draw a Car Center advertisement that will appear on
Christopher’s Car Center
the screen. Have various appropriate images appear in different locations, remain momentarily, and then disappear.
13.8 Write a project that has list boxes for a potluck party: appetizers, salad, entrée, and dessert. Have a text box for entering attendees’ names and then drag them to the appropriate list box.
Optional extra : Code a save feature to save the contents of each of the list boxes to a separate file. Then add a feature to load the list boxes when the program begins.
Case Studies Custom Supplies Mail Order
Create a logo for Custom Supplies Mail Order using graphics methods. Place the logo in the startup form for the project from Chapter 12. Add appropriate
images and graphics to enhance each form. The graph-ics may come from .bmp files, .gif files, clip art, or your own creation from Paintbrush.
Bradley−Millspaugh: Programming in Visual C# 2008
14. Additional Topics in C# Text 579© The McGraw−Hill Companies, 2010
try{ // Convert input values to numeric and assign quantityInteger = int.Parse(quantityTextBox.T try { priceDecimal = decimal.Parse(priceTextBox // Calculate values. extendedPriceDecimal = quantityInteger * discountDecimal = Decimal.Round( (extendedPriceDecimal * DISCOUNT_RATE_ amountDueDecimal = extendedPriceDecimal - totalAmountDecimal += amountDueDecimal; numberTransactionsInteger++; // Format and display answers. extendedPriceTextBox.Text = extendedPrice
C H A P T E R
14 Additional Topics in C#
at the completion of this chapter, you will be able to . . .
1. Validate user input in the Validating event handler and display messages using an ErrorProvider component.
2. Capture and check an individual keystroke from the user.
3. Use code snippets in the editor.
4. Create a multiple-document project with parent and child forms.
5. Arrange child forms vertically, horizontally, or cascaded.
6. Add toolbars and status bars to your forms using tool strip and status strip controls.
7. Use calendar controls and date methods.
8. Display a Web page on a Windows Form using a WebBrowser control.
9. Use WPF Interoperablility to add Windows Presentation Framework controls to a Windows Form.
10. Create a WPF application.
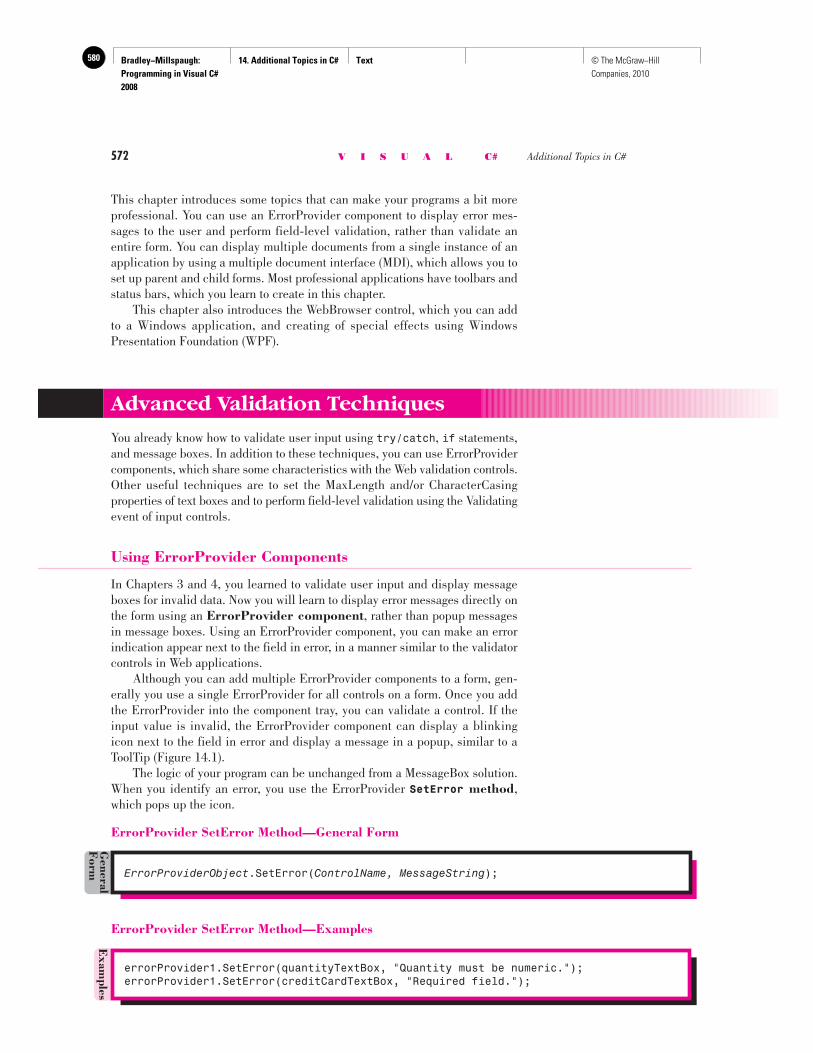
Bradley−Millspaugh: Programming in Visual C# 2008
14. Additional Topics in C# Text580 © The McGraw−Hill Companies, 2010
572 V I S U A L C# Additional Topics in C#
This chapter introduces some topics that can make your programs a bit more professional. You can use an ErrorProvider component to display error mes-sages to the user and perform field-level validation, rather than validate an entire form. You can display multiple documents from a single instance of an application by using a multiple document interface (MDI), which allows you to set up parent and child forms. Most professional applications have toolbars and status bars, which you learn to create in this chapter. This chapter also introduces the WebBrowser control, which you can add to a Windows application, and creating of special effects using Windows Presentation Foundation (WPF).
Advanced Validation Techniques
You already know how to validate user input using try/catch , if statements, and message boxes. In addition to these techniques, you can use ErrorProvider components, which share some characteristics with the Web validation controls. Other useful techniques are to set the MaxLength and/or CharacterCasing properties of text boxes and to perform field-level validation using the Validating event of input controls.
Using ErrorProvider Components
In Chapters 3 and 4, you learned to validate user input and display message boxes for invalid data. Now you will learn to display error messages directly on the form using an ErrorProvider component , rather than popup messages in message boxes. Using an ErrorProvider component, you can make an error indication appear next to the field in error, in a manner similar to the validator controls in Web applications. Although you can add multiple ErrorProvider components to a form, gen-erally you use a single ErrorProvider for all controls on a form. Once you add the ErrorProvider into the component tray, you can validate a control. If the input value is invalid, the ErrorProvider component can display a blinking icon next to the field in error and display a message in a popup, similar to a ToolTip ( Figure 14.1 ). The logic of your program can be unchanged from a MessageBox solution. When you identify an error, you use the ErrorProvider SetError method , which pops up the icon.
ErrorProvider SetError Method—General Form
ErrorProviderObject .SetError( ControlName, MessageString );
General
Form
Exam
ples
errorProvider1.SetError(quantityTextBox, "Quantity must be numeric.");errorProvider1.SetError(creditCardTextBox, "Required field.");
ErrorProvider SetError Method—Examples

Bradley−Millspaugh: Programming in Visual C# 2008
14. Additional Topics in C# Text 581© The McGraw−Hill Companies, 2010
C H A P T E R 14 573
F i g u r e 1 4 . 1
The ErrorProvider displays a blinking icon next to the field in error. When the user points to the icon, the error message appears in a popup.
The following example is taken from Chapter 3. The message boxes have been removed and replaced with ErrorProvider icons and messages. Notice that all messages are cleared at the top of the calculateButton_Click method so that no icons appear for fields that have passed validation. Figure 14.2 shows the form in Design view.
private void calculateButton_Click(object sender, EventArgs e){ // Declare the variables. int quantityInteger; decimal priceDecimal, extendedPriceDecimal, discountDecimal, amountDueDecimal;
// Clear any error messages.errorProvider1.SetError(quantityTextBox, "");errorProvider1.SetError(priceTextBox, String.Empty);
try { // Convert input values to numeric and assign to variables. quantityInteger = int.Parse(quantityTextBox.Text); try { priceDecimal = decimal.Parse(priceTextBox.Text);
// Calculate values. extendedPriceDecimal = quantityInteger * priceDecimal; discountDecimal = Decimal.Round( (extendedPriceDecimal * DISCOUNT_RATE_Decimal), 2); amountDueDecimal = extendedPriceDecimal – discountDecimal; totalAmountDecimal += amountDueDecimal; numberTransactionsInteger++;
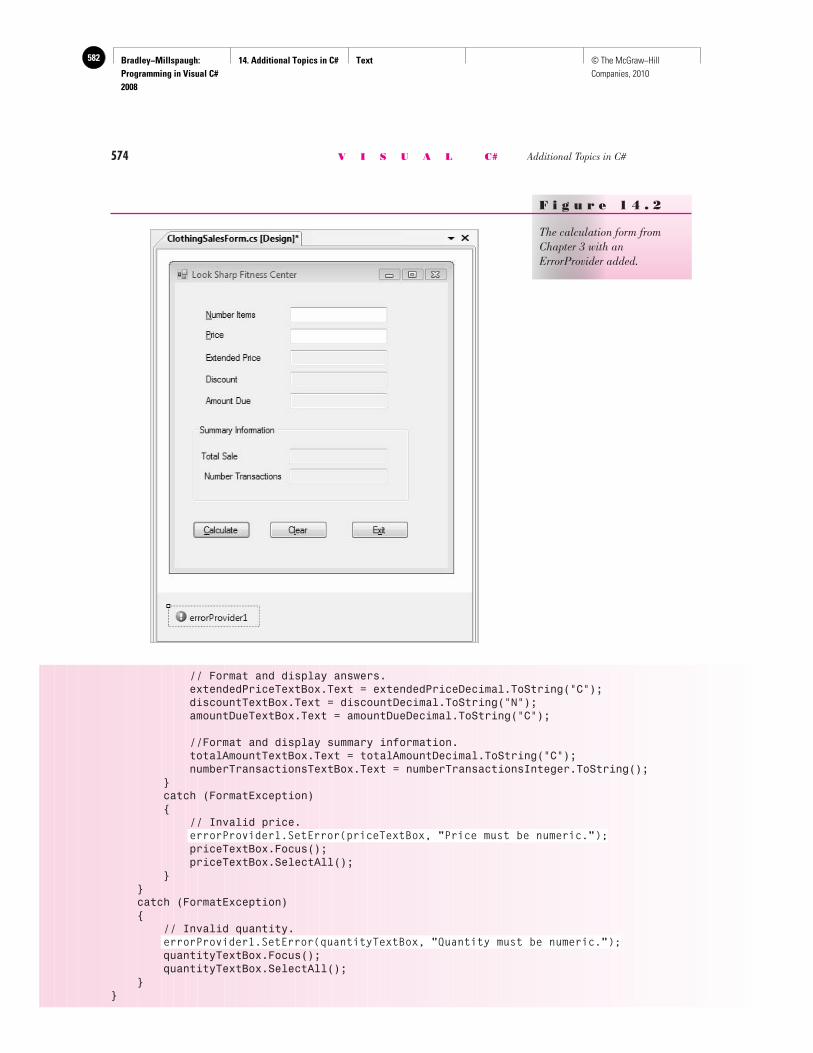
Bradley−Millspaugh: Programming in Visual C# 2008
14. Additional Topics in C# Text582 © The McGraw−Hill Companies, 2010
574 V I S U A L C# Additional Topics in C#
F i g u r e 1 4 . 2
The calculation form from Chapter 3 with an ErrorProvider added.
// Format and display answers. extendedPriceTextBox.Text = extendedPriceDecimal.ToString("C"); discountTextBox.Text = discountDecimal.ToString("N"); amountDueTextBox.Text = amountDueDecimal.ToString("C");
//Format and display summary information. totalAmountTextBox.Text = totalAmountDecimal.ToString("C"); numberTransactionsTextBox.Text = numberTransactionsInteger.ToString(); } catch (FormatException) { // Invalid price.
errorProvider1.SetError(priceTextBox, "Price must be numeric."); priceTextBox.Focus(); priceTextBox.SelectAll(); } } catch (FormatException) { // Invalid quantity.
errorProvider1.SetError(quantityTextBox, "Quantity must be numeric."); quantityTextBox.Focus(); quantityTextBox.SelectAll(); }}
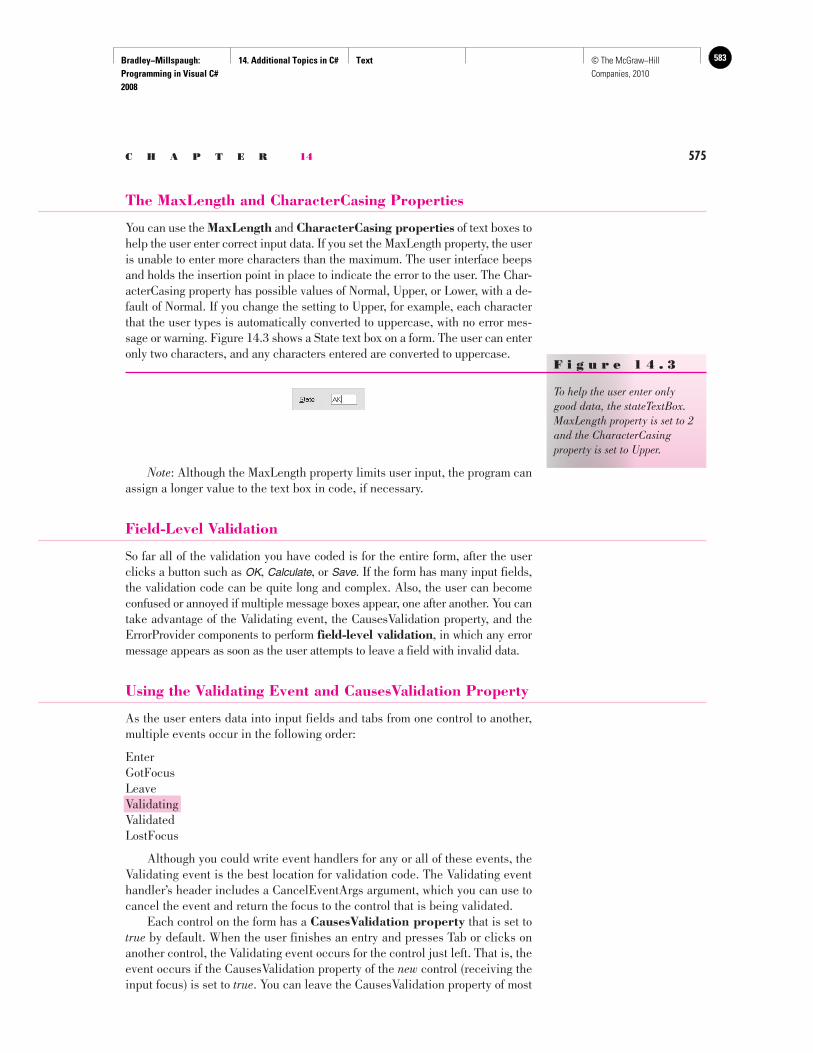
Bradley−Millspaugh: Programming in Visual C# 2008
14. Additional Topics in C# Text 583© The McGraw−Hill Companies, 2010
C H A P T E R 14 575
The MaxLength and CharacterCasing Properties
You can use the MaxLength and CharacterCasing properties of text boxes to help the user enter correct input data. If you set the MaxLength property, the user is unable to enter more characters than the maximum. The user interface beeps and holds the insertion point in place to indicate the error to the user. The Char-acterCasing property has possible values of Normal, Upper, or Lower, with a de-fault of Normal. If you change the setting to Upper, for example, each character that the user types is automatically converted to uppercase, with no error mes-sage or warning. Figure 14.3 shows a State text box on a form. The user can enter only two characters, and any characters entered are converted to uppercase.
F i g u r e 1 4 . 3
To help the user enter only good data, the stateTextBox. MaxLength property is set to 2 and the CharacterCasing property is set to Upper.
Note : Although the MaxLength property limits user input, the program can assign a longer value to the text box in code, if necessary.
Field-Level Validation
So far all of the validation you have coded is for the entire form, after the user clicks a button such as OK , Calculate , or Save . If the form has many input fields, the validation code can be quite long and complex. Also, the user can become confused or annoyed if multiple message boxes appear, one after another. You can take advantage of the Validating event, the CausesValidation property, and the ErrorProvider components to perform field-level validation , in which any error message appears as soon as the user attempts to leave a field with invalid data.
Using the Validating Event and CausesValidation Property
As the user enters data into input fields and tabs from one control to another, multiple events occur in the following order:
Enter GotFocus Leave Validating Validated LostFocus
Although you could write event handlers for any or all of these events, the Validating event is the best location for validation code. The Validating event handler’s header includes a CancelEventArgs argument, which you can use to cancel the event and return the focus to the control that is being validated. Each control on the form has a CausesValidation property that is set to true by default. When the user finishes an entry and presses Tab or clicks on another control, the Validating event occurs for the control just left. That is, the event occurs if the CausesValidation property of the new control (receiving the input focus) is set to true . You can leave the CausesValidation property of most
Bradley−Millspaugh: Programming in Visual C# 2008
14. Additional Topics in C# Text584 © The McGraw−Hill Companies, 2010
576 V I S U A L C# Additional Topics in C#
controls set to true so that validation occurs. Set CausesValidation to false on a control such as Cancel or Exit to give the user a way to bypass the validation if he or she doesn’t want to complete the transaction. In the Validating event handler, you can perform any error checking and dis-play a message for the user. If the data value does not pass the error checking, set the Cancel property for the e argument of the event to true . This cancels the Vali-dating event and returns the focus to the text box, making the text box “sticky.” The user is not allowed to leave the control until the input passes validation.
private void nameTextBox_Validating(object sender, CancelEventArgs e){ // Validate for a required entry.
// Clear any previous error. errorProvider1.SetError(nameTextBox, "");
// Check for an empty string. if (nameTextBox.Text == String.Empty) { // Cancel the event.
e.Cancel = true; errorProvider1.SetError(nameTextBox, "Required Field"); }}
One note of caution: If you use the validating event on the field that receives focus when the form is first displayed and require an entry, the user will be un-able to close the form without filling in the text box. You can work around this problem by setting e.Cancel = false in the form’s FormClosing event handler.
private void ValidationForm_FormClosing(object sender, FormClosingEventArgs e){ // Do not allow validation to cancel the form’s closing.
e.Cancel = false;}
A Validation Example Program The following program combines many of the techniques presented in this sec-tion. The form ( Figure 14.4 ) has an ErrorProvider component, and all controls have their CausesValidation property set to true . The stateTextBox has its MaxLength property set to 2 and its CharacterCasing property set to Upper. The amountTextBox shows an example of numeric range validation.
/* * Program: Ch14FieldLevelValidation * Programmer: Bradley/Millspaugh * Date: June 2009 * Description: Demonstrate validation using the Validating event * and an Error Provider component. */
using System;using System.Collections.Generic;using System.ComponentModel;

Bradley−Millspaugh: Programming in Visual C# 2008
14. Additional Topics in C# Text 585© The McGraw−Hill Companies, 2010
C H A P T E R 14 577
using System.Data;using System.Drawing;using System.Text;using System.Windows.Forms;
namespace Ch14FieldLevelValidation{ public partial class ValidationForm : Form { public ValidationForm() { InitializeComponent(); }
private void nameTextBox_Validating(object sender, CancelEventArgs e) { // Validate for a required entry.
// Clear any previous error. errorProvider1.SetError(nameTextBox, "");
// Check for an empty string. if (nameTextBox.Text == String.Empty) { // Cancel the event. e.Cancel = true; // Display the error message. errorProvider1.SetError(nameTextBox, "Required Field"); } }
private void ValidationForm_FormClosing(object sender, FormClosingEventArgs e) { // Do not allow validation to cancel the form’s closing.
F i g u r e 1 4 . 4
The Validation example form, which provides field-level validation.
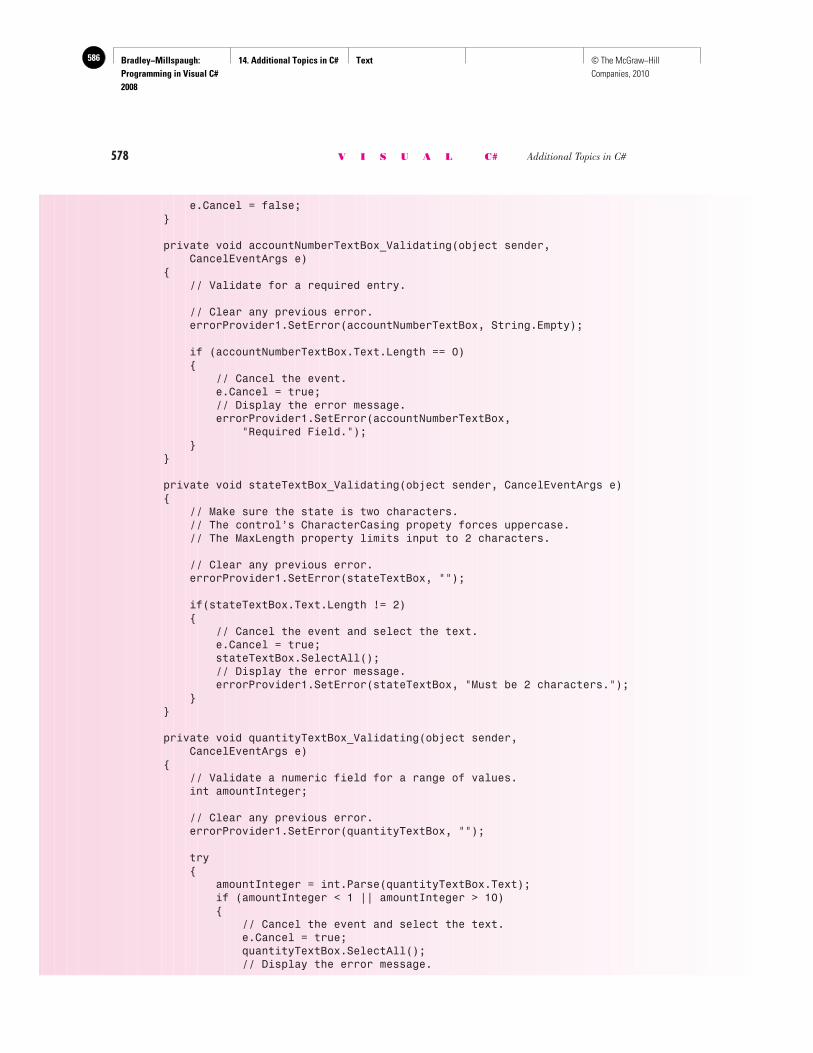
Bradley−Millspaugh: Programming in Visual C# 2008
14. Additional Topics in C# Text586 © The McGraw−Hill Companies, 2010
578 V I S U A L C# Additional Topics in C#
e.Cancel = false; }
private void accountNumberTextBox_Validating(object sender, CancelEventArgs e) { // Validate for a required entry.
// Clear any previous error. errorProvider1.SetError(accountNumberTextBox, String.Empty);
if (accountNumberTextBox.Text.Length == 0) { // Cancel the event. e.Cancel = true; // Display the error message. errorProvider1.SetError(accountNumberTextBox, "Required Field."); } }
private void stateTextBox_Validating(object sender, CancelEventArgs e) { // Make sure the state is two characters. // The control’s CharacterCasing propety forces uppercase. // The MaxLength property limits input to 2 characters.
// Clear any previous error. errorProvider1.SetError(stateTextBox, "");
if(stateTextBox.Text.Length != 2) { // Cancel the event and select the text. e.Cancel = true; stateTextBox.SelectAll(); // Display the error message. errorProvider1.SetError(stateTextBox, "Must be 2 characters."); } }
private void quantityTextBox_Validating(object sender, CancelEventArgs e) { // Validate a numeric field for a range of values. int amountInteger;
// Clear any previous error. errorProvider1.SetError(quantityTextBox, "");
try { amountInteger = int.Parse(quantityTextBox.Text); if (amountInteger < 1 || amountInteger > 10) { // Cancel the event and select the text. e.Cancel = true; quantityTextBox.SelectAll(); // Display the error message.
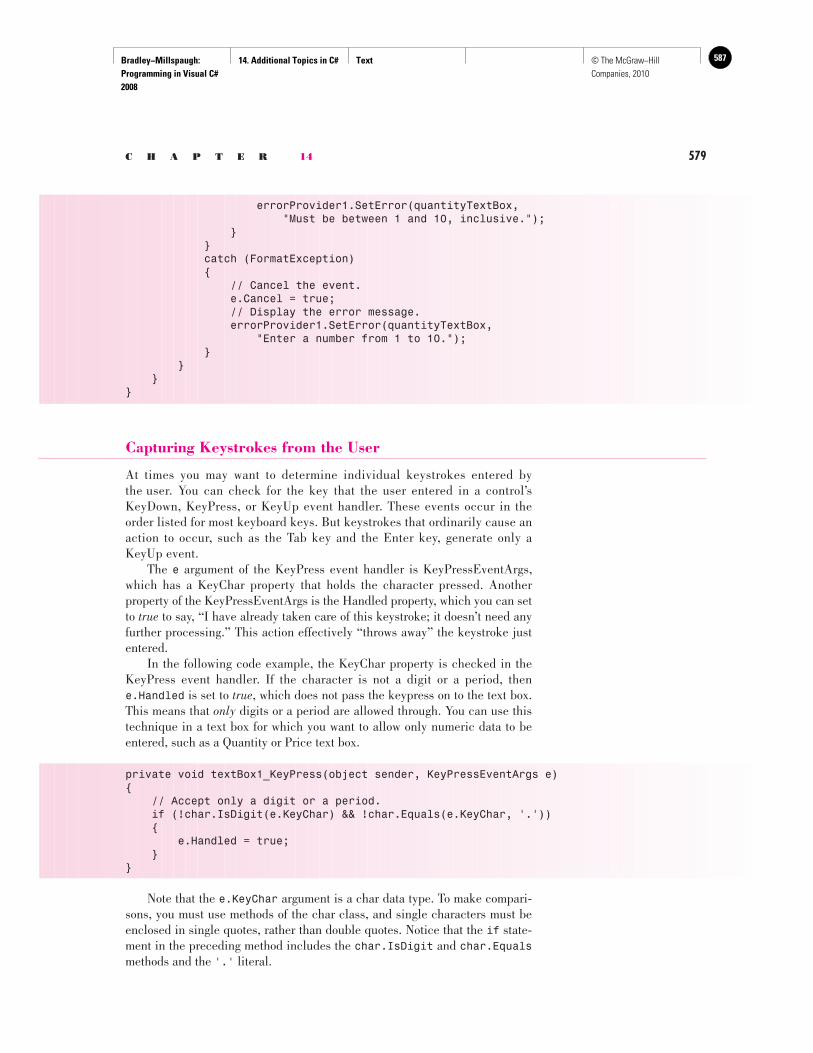
Bradley−Millspaugh: Programming in Visual C# 2008
14. Additional Topics in C# Text 587© The McGraw−Hill Companies, 2010
C H A P T E R 14 579
errorProvider1.SetError(quantityTextBox, "Must be between 1 and 10, inclusive."); } } catch (FormatException) { // Cancel the event. e.Cancel = true; // Display the error message. errorProvider1.SetError(quantityTextBox, "Enter a number from 1 to 10."); } } }}
Capturing Keystrokes from the User
At times you may want to determine individual keystrokes entered by the user. You can check for the key that the user entered in a control’s KeyDown, KeyPress, or KeyUp event handler. These events occur in the order listed for most keyboard keys. But keystrokes that ordinarily cause an action to occur, such as the Tab key and the Enter key, generate only a KeyUp event. The e argument of the KeyPress event handler is KeyPressEventArgs, which has a KeyChar property that holds the character pressed. Another property of the KeyPressEventArgs is the Handled property, which you can set to true to say, “I have already taken care of this keystroke; it doesn’t need any further processing.” This action effectively “throws away” the keystroke just entered. In the following code example, the KeyChar property is checked in the KeyPress event handler. If the character is not a digit or a period, thene.Handled is set to true , which does not pass the keypress on to the text box. This means that only digits or a period are allowed through. You can use this technique in a text box for which you want to allow only numeric data to be entered, such as a Quantity or Price text box.
private void textBox1_KeyPress(object sender, KeyPressEventArgs e){ // Accept only a digit or a period. if (!char.IsDigit(e.KeyChar) && !char.Equals(e.KeyChar, '.')) { e.Handled = true; }}
Note that the e.KeyChar argument is a char data type. To make compari-sons, you must use methods of the char class, and single characters must be enclosed in single quotes, rather than double quotes. Notice that the if state-ment in the preceding method includes the char.IsDigit and char.Equalsmethods and the '.' literal.
Bradley−Millspaugh: Programming in Visual C# 2008
14. Additional Topics in C# Text588 © The McGraw−Hill Companies, 2010
580 V I S U A L C# Additional Topics in C#
Using the Masked Text Box for Validation
Although you learned about the masked text box in Chapter 2, you may not have thought about using it to aid data validation. You can set the Mask prop-erty of a masked text box to any of the predefined masks or write your own. The easiest way to write your own is to modify one of the existing masks, or you can follow the syntax rules of a regular expression (see “Regular Expression Syntax” in MSDN Help). The predefined masks include date, time, phone number, social security number, and Zip code formats. If the user enters invalid data for the mask, such as a letter for a numeric month in the date mask, the character is not accepted.
➤ Feedback 14.1 1. What is the purpose of the following code:
errorProvider1.SetError(quantityTextBox, "Quantity must be numeric.");
2. Name two properties of a TextBox control that help the user enter cor-rect input data. Describe the function of each.
3. What is meant by field-level validation?
Code Snippets and Samples
A great time-saving feature in Visual C# is the ability to add segments of code for a variety of topics directly in the editor. You may wonder why this topic wasn’t covered earlier, but it was really necessary for you to understand the code that you add to your program. Now that you understand the basic concepts, you will find that many of your new tools and techniques come from looking at sample projects. Visual Studio includes many sample projects as well as code snippets.
Code Snippets
Code snippets are small samples of code that can show you how to accom-plish many programming tasks. The Insert Snippet menu option is available on the context menu (right-click) of the Code Editor window ( Figure 14.5 ). The Snippet categories include the various structures including loops, decisions, exception handling, and arrays. When you select a snippet keyword, the editor places the code right in your program, where you can study it and/or modify and use it. Snippets also appear in IntelliSence when you are typing in the editor.
Sample Projects
Visual Studio includes many sample projects (all editions except the Express Edition) that you can use to learn new techniques. From the Help menu, select Contents . Expand the nodes for Development Tools and Languages / Visual Studio / Visual C# to find the Visual C# Samples node. Make sure to have the filter set to Visual C#.

Bradley−Millspaugh: Programming in Visual C# 2008
14. Additional Topics in C# Text 589© The McGraw−Hill Companies, 2010
C H A P T E R 14 581
The walkthroughs in Help are another way to learn to program in C#. These tutorials give a step-by-step introduction to many techniques and controls.
F i g u r e 1 4 . 5
a. Right-click in the Code Editor window and select Insert Snippet ; select Visual C# to see the list of available snippets; b . the code appears in the Code Editor window, where you can modify it for your own use.
Multiple Document Interface
All of the projects so far have been single document interface (SDI) . Using SDI, each form in the project acts independently from the other forms. How-ever, C# also allows you to create a multiple document interface (MDI) . For an example of MDI, consider an application such as Microsoft Word 2003. Word has a parent form (the main window) and child forms (each document window). You can open multiple child windows and maximize, minimize, re-store, or close each child window, which always stays within the boundaries of the parent window. And when you close the parent window, all child windows close automatically. Figure 14.6 shows an MDI parent window with two open child windows.
a.
b.
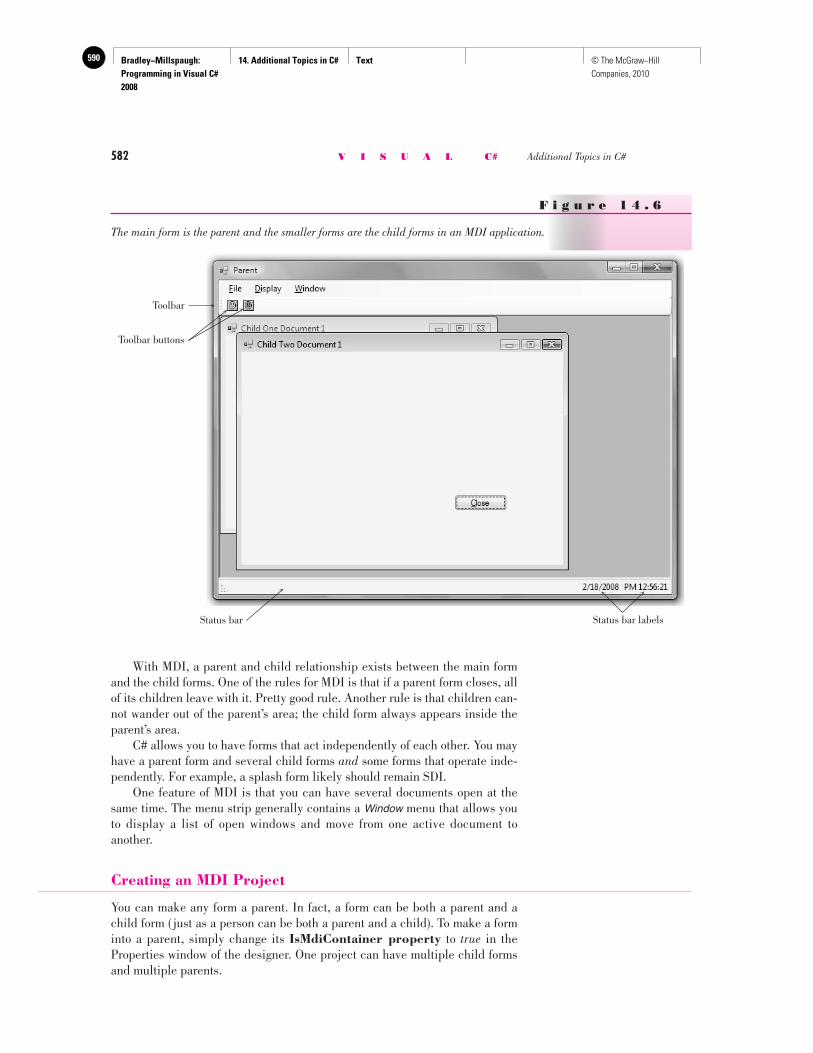
Bradley−Millspaugh: Programming in Visual C# 2008
14. Additional Topics in C# Text590 © The McGraw−Hill Companies, 2010
582 V I S U A L C# Additional Topics in C#
With MDI, a parent and child relationship exists between the main form and the child forms. One of the rules for MDI is that if a parent form closes, all of its children leave with it. Pretty good rule. Another rule is that children can-not wander out of the parent’s area; the child form always appears inside the parent’s area. C# allows you to have forms that act independently of each other. You may have a parent form and several child forms and some forms that operate inde-pendently. For example, a splash form likely should remain SDI. One feature of MDI is that you can have several documents open at the same time. The menu strip generally contains a Window menu that allows you to display a list of open windows and move from one active document to another.
Creating an MDI Project
You can make any form a parent. In fact, a form can be both a parent and a child form ( just as a person can be both a parent and a child). To make a form into a parent, simply change its IsMdiContainer property to true in the Properties window of the designer. One project can have multiple child forms and multiple parents.
F i g u r e 1 4 . 6
The main form is the parent and the smaller forms are the child forms in an MDI application.
Status bar labelsStatus bar
Toolbar buttons
Toolbar
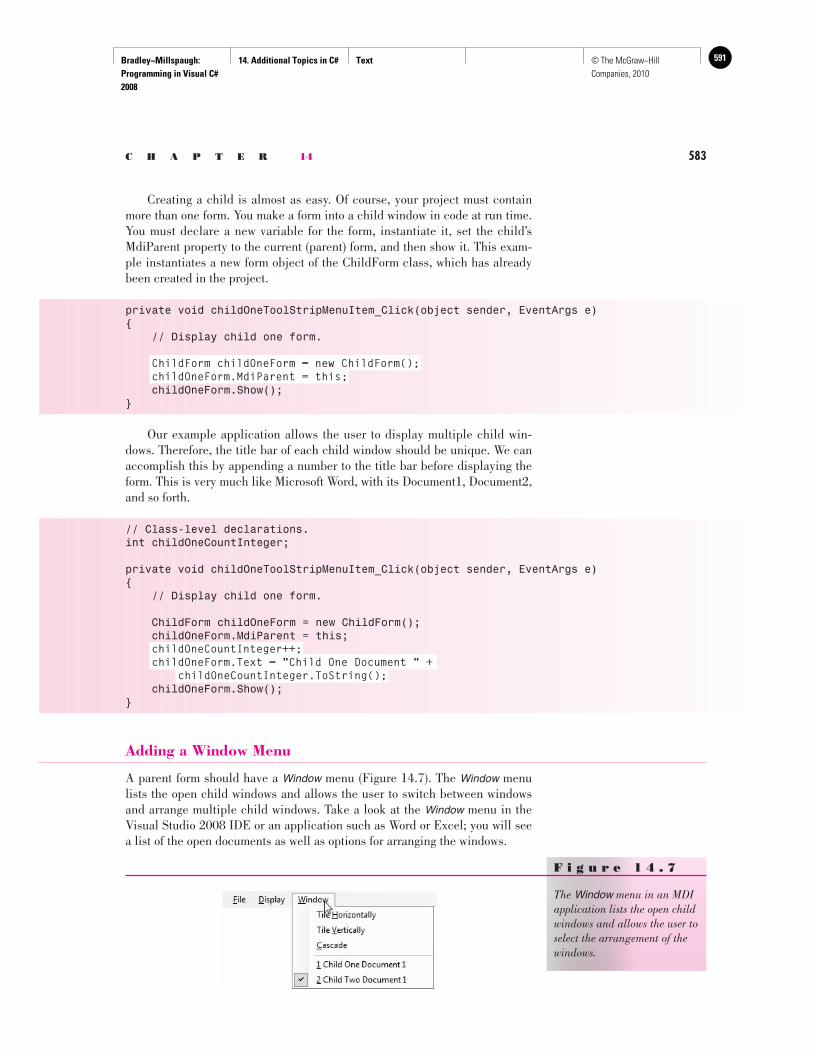
Bradley−Millspaugh: Programming in Visual C# 2008
14. Additional Topics in C# Text 591© The McGraw−Hill Companies, 2010
C H A P T E R 14 583
F i g u r e 1 4 . 7
The Window menu in an MDI application lists the open child windows and allows the user to select the arrangement of the windows.
Creating a child is almost as easy. Of course, your project must contain more than one form. You make a form into a child window in code at run time. You must declare a new variable for the form, instantiate it, set the child’s MdiParent property to the current (parent) form, and then show it. This exam-ple instantiates a new form object of the ChildForm class, which has already been created in the project.
private void childOneToolStripMenuItem_Click(object sender, EventArgs e){ // Display child one form.
ChildForm childOneForm = new ChildForm();childOneForm.MdiParent = this;
childOneForm.Show();}
Our example application allows the user to display multiple child win-dows. Therefore, the title bar of each child window should be unique. We can accomplish this by appending a number to the title bar before displaying the form. This is very much like Microsoft Word, with its Document1, Document2, and so forth.
// Class-level declarations.int childOneCountInteger;
private void childOneToolStripMenuItem_Click(object sender, EventArgs e){ // Display child one form.
ChildForm childOneForm = new ChildForm(); childOneForm.MdiParent = this;
childOneCountInteger++;childOneForm.Text = "Child One Document " +
childOneCountInteger.ToString(); childOneForm.Show();}
Adding a Window Menu
A parent form should have a Window menu ( Figure 14.7 ). The Window menu lists the open child windows and allows the user to switch between windows and arrange multiple child windows. Take a look at the Window menu in the Visual Studio 2008 IDE or an application such as Word or Excel; you will see a list of the open documents as well as options for arranging the windows.

Bradley−Millspaugh: Programming in Visual C# 2008
14. Additional Topics in C# Text592 © The McGraw−Hill Companies, 2010
584 V I S U A L C# Additional Topics in C#
After you create the menus for a MenuStrip control, you can make one of the menus display the list of open child windows. Display the properties of the MenuStrip (not a menu item) in the Properties window. Drop down the list for the MdiWindowListItem property , which shows all of the menu items that belong to the MenuStrip, and select windowToolStripMenuItem ( Figure 14.8 ).Include a separator bar at the bottom of the Window menu, which will separate the open window list from the other menu choices.
F i g u r e 1 4 . 8
Set the MdiWindowListItem property to make the Window menu display the list of open MDI child windows.
Layout Options When several child windows are open, the windows may be arranged in several different layouts: tiled vertically, tiled horizontally, or cascaded. You set the type of layout in code with an argument of the LayoutMdi method .
LayoutMdi(MdiLayout.TileHorizontal);
You can use one of the three constants: TileHorizontal, TileVertical, and Cascade.
private void tileVerticallyToolStripMenuItem_Click(object sender, EventArgs e){ // Arrange the child forms vertically.
LayoutMdi(MdiLayout.TileVertical);}
private void tileHorizontallyToolStripMenuItem_Click(object sender, EventArgs e){ // Arrange the child forms horizontally.
LayoutMdi(MdiLayout.TileHorizontal);}
private void cascadeToolStripMenuItem_Click(object sender, EventArgs e){ // Cascade the child forms.
LayoutMdi(MdiLayout.Cascade);}
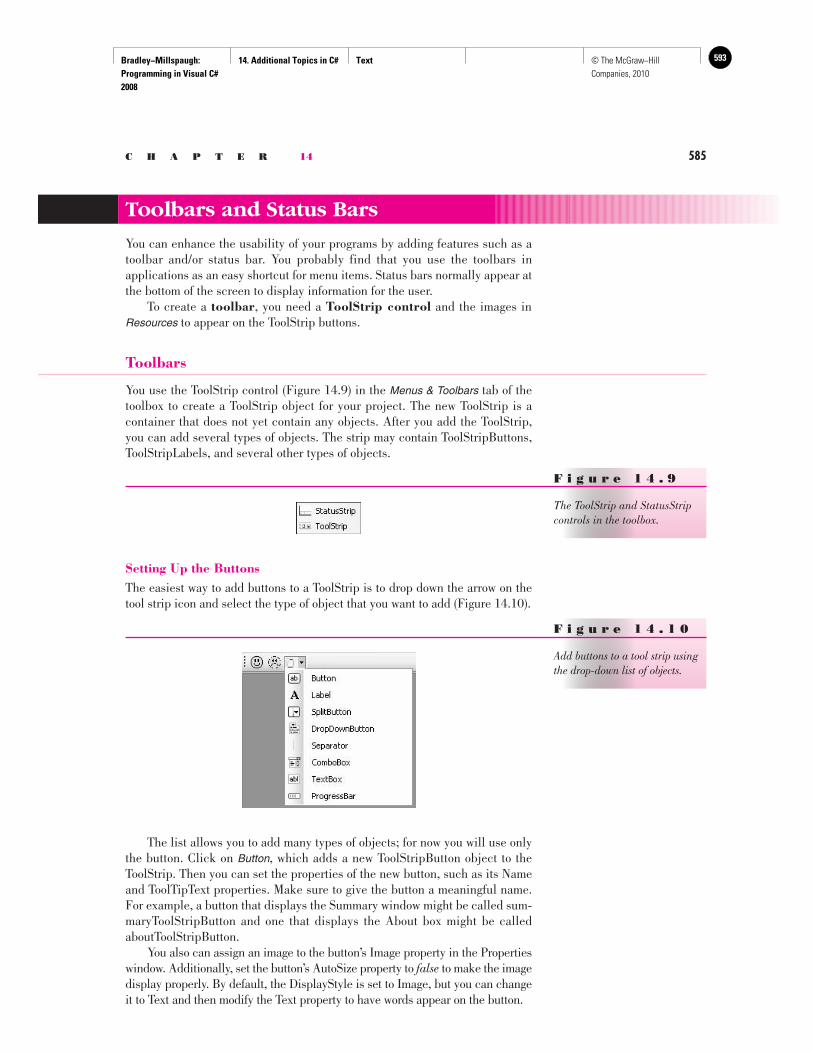
Bradley−Millspaugh: Programming in Visual C# 2008
14. Additional Topics in C# Text 593© The McGraw−Hill Companies, 2010
C H A P T E R 14 585
Setting Up the Buttons The easiest way to add buttons to a ToolStrip is to drop down the arrow on the tool strip icon and select the type of object that you want to add ( Figure 14.10 ).
Toolbars and Status Bars
You can enhance the usability of your programs by adding features such as a toolbar and/or status bar. You probably find that you use the toolbars in applications as an easy shortcut for menu items. Status bars normally appear at the bottom of the screen to display information for the user. To create a toolbar , you need a ToolStrip control and the images in Resources to appear on the ToolStrip buttons.
Toolbars
You use the ToolStrip control ( Figure 14.9 ) in the Menus & Toolbars tab of the toolbox to create a ToolStrip object for your project. The new ToolStrip is a container that does not yet contain any objects. After you add the ToolStrip, you can add several types of objects. The strip may contain ToolStripButtons, ToolStripLabels, and several other types of objects.
F i g u r e 1 4 . 9
The ToolStrip and StatusStrip controls in the toolbox.
F i g u r e 1 4 . 1 0
Add buttons to a tool strip using the drop-down list of objects.
The list allows you to add many types of objects; for now you will use only the button. Click on Button , which adds a new ToolStripButton object to the ToolStrip. Then you can set the properties of the new button, such as its Name and ToolTipText properties. Make sure to give the button a meaningful name. For example, a button that displays the Summary window might be called sum-maryToolStripButton and one that displays the About box might be called aboutToolStripButton. You also can assign an image to the button’s Image property in the Properties window. Additionally, set the button’s AutoSize property to false to make the image display properly. By default, the DisplayStyle is set to Image, but you can change it to Text and then modify the Text property to have words appear on the button.
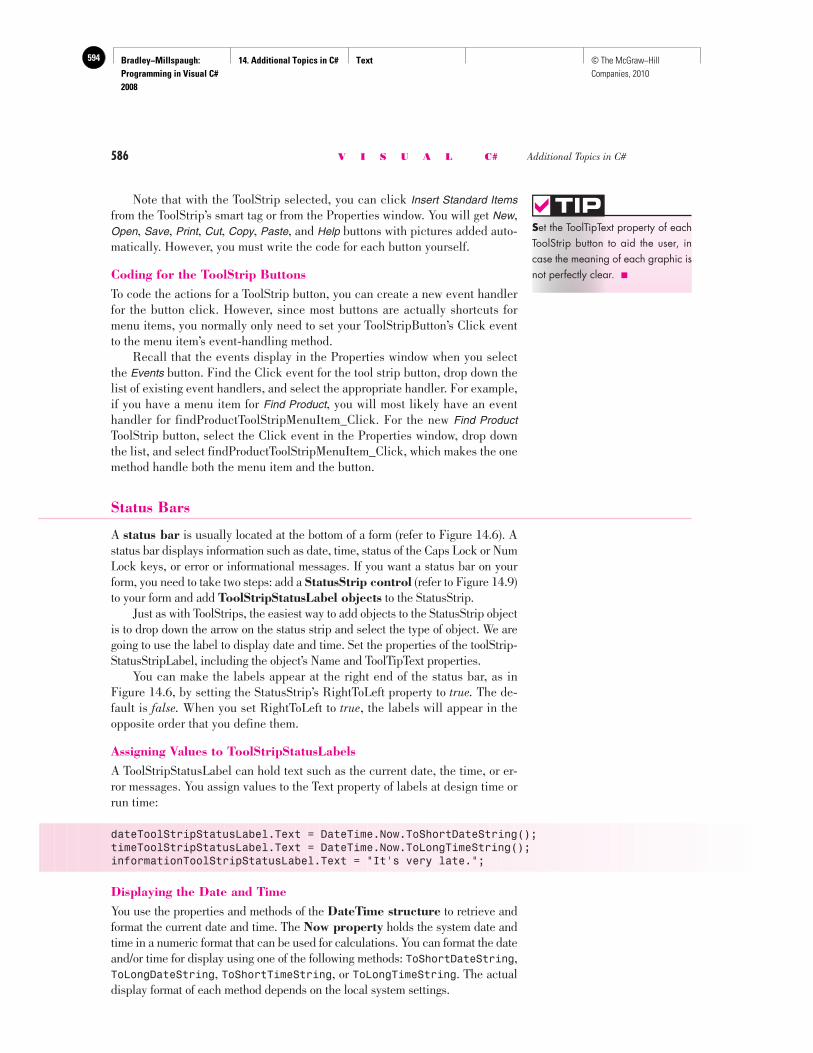
Bradley−Millspaugh: Programming in Visual C# 2008
14. Additional Topics in C# Text594 © The McGraw−Hill Companies, 2010
586 V I S U A L C# Additional Topics in C#
Note that with the ToolStrip selected, you can click Insert Standard Itemsfrom the ToolStrip’s smart tag or from the Properties window. You will get New , Open , Save , Print , Cut , Copy , Paste , and Help buttons with pictures added auto-matically. However, you must write the code for each button yourself.
Coding for the ToolStrip Buttons To code the actions for a ToolStrip button, you can create a new event handler for the button click. However, since most buttons are actually shortcuts for menu items, you normally only need to set your ToolStripButton’s Click event to the menu item’s event-handling method. Recall that the events display in the Properties window when you select the Events button. Find the Click event for the tool strip button, drop down the list of existing event handlers, and select the appropriate handler. For example, if you have a menu item for Find Product , you will most likely have an event handler for findProductToolStripMenuItem_Click. For the new Find ProductToolStrip button, select the Click event in the Properties window, drop down the list, and select findProductToolStripMenuItem_Click, which makes the one method handle both the menu item and the button.
Status Bars
A status bar is usually located at the bottom of a form (refer to Figure 14.6 ). A status bar displays information such as date, time, status of the Caps Lock or Num Lock keys, or error or informational messages. If you want a status bar on your form, you need to take two steps: add a StatusStrip control (refer to Figure 14.9 )to your form and add ToolStripStatusLabel objects to the StatusStrip. Just as with ToolStrips, the easiest way to add objects to the StatusStrip object is to drop down the arrow on the status strip and select the type of object. We are going to use the label to display date and time. Set the properties of the toolStrip-StatusStripLabel, including the object’s Name and ToolTipText properties. You can make the labels appear at the right end of the status bar, as in Figure 14.6 , by setting the StatusStrip’s RightToLeft property to true. The de-fault is false. When you set RightToLeft to true, the labels will appear in the opposite order that you define them.
Assigning Values to ToolStripStatusLabels A ToolStripStatusLabel can hold text such as the current date, the time, or er-ror messages. You assign values to the Text property of labels at design time or run time:
dateToolStripStatusLabel.Text = DateTime.Now.ToShortDateString();timeToolStripStatusLabel.Text = DateTime.Now.ToLongTimeString();informationToolStripStatusLabel.Text = "It's very late.";
Displaying the Date and Time You use the properties and methods of the DateTime structure to retrieve and format the current date and time. The Now property holds the system date and time in a numeric format that can be used for calculations. You can format the date and/or time for display using one of the following methods: ToShortDateString , ToLongDateString , ToShortTimeString , or ToLongTimeString . The actual display format of each method depends on the local system settings.
Set the ToolTipText property of each ToolStrip button to aid the user, in case the meaning of each graphic is not perfectly clear. ■
TIP
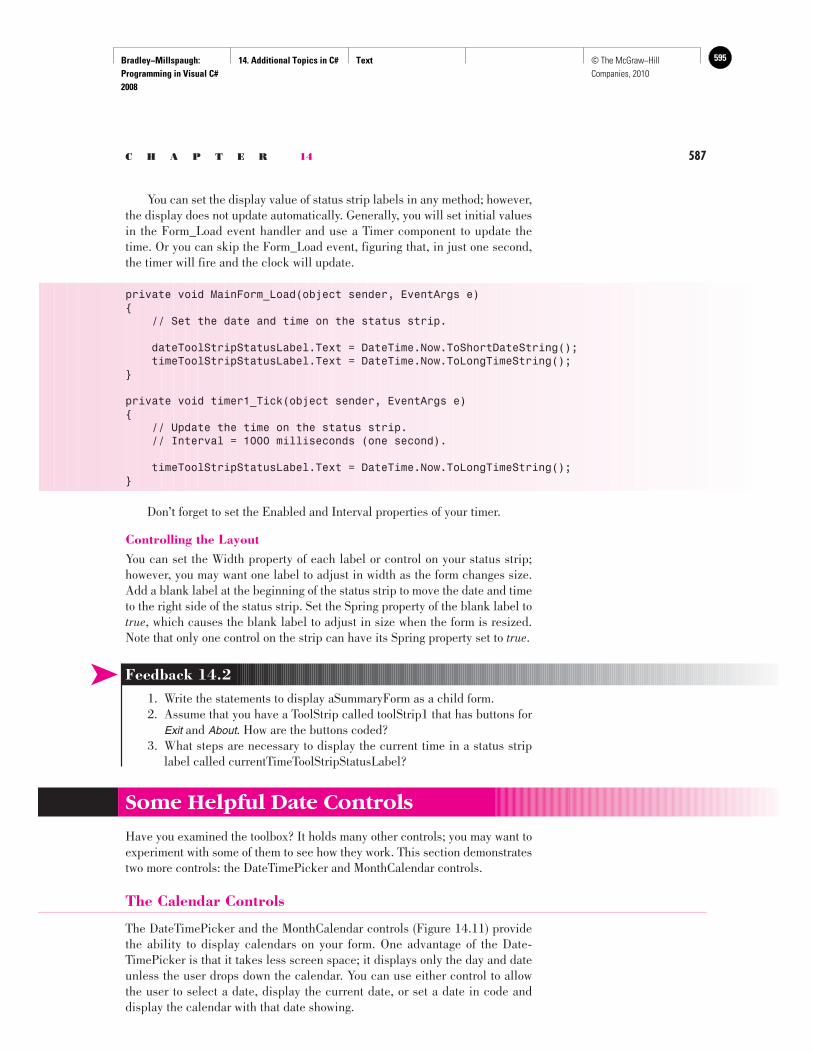
Bradley−Millspaugh: Programming in Visual C# 2008
14. Additional Topics in C# Text 595© The McGraw−Hill Companies, 2010
C H A P T E R 14 587
You can set the display value of status strip labels in any method; however, the display does not update automatically. Generally, you will set initial values in the Form_Load event handler and use a Timer component to update the time. Or you can skip the Form_Load event, figuring that, in just one second, the timer will fire and the clock will update.
private void MainForm_Load(object sender, EventArgs e){ // Set the date and time on the status strip.
dateToolStripStatusLabel.Text = DateTime.Now.ToShortDateString(); timeToolStripStatusLabel.Text = DateTime.Now.ToLongTimeString();}
private void timer1_Tick(object sender, EventArgs e){ // Update the time on the status strip. // Interval = 1000 milliseconds (one second).
timeToolStripStatusLabel.Text = DateTime.Now.ToLongTimeString();}
Don’t forget to set the Enabled and Interval properties of your timer.
Controlling the Layout You can set the Width property of each label or control on your status strip; however, you may want one label to adjust in width as the form changes size. Add a blank label at the beginning of the status strip to move the date and time to the right side of the status strip. Set the Spring property of the blank label to true , which causes the blank label to adjust in size when the form is resized. Note that only one control on the strip can have its Spring property set to true .
➤ Feedback 14.2 1. Write the statements to display aSummaryForm as a child form. 2. Assume that you have a ToolStrip called toolStrip1 that has buttons for
Exit and About . How are the buttons coded? 3. What steps are necessary to display the current time in a status strip
label called currentTimeToolStripStatusLabel?
Some Helpful Date Controls
Have you examined the toolbox? It holds many other controls; you may want to experiment with some of them to see how they work. This section demonstrates two more controls: the DateTimePicker and MonthCalendar controls.
The Calendar Controls
The DateTimePicker and the MonthCalendar controls ( Figure 14.11 ) provide the ability to display calendars on your form. One advantage of the Date-TimePicker is that it takes less screen space; it displays only the day and date unless the user drops down the calendar. You can use either control to allow the user to select a date, display the current date, or set a date in code and display the calendar with that date showing.
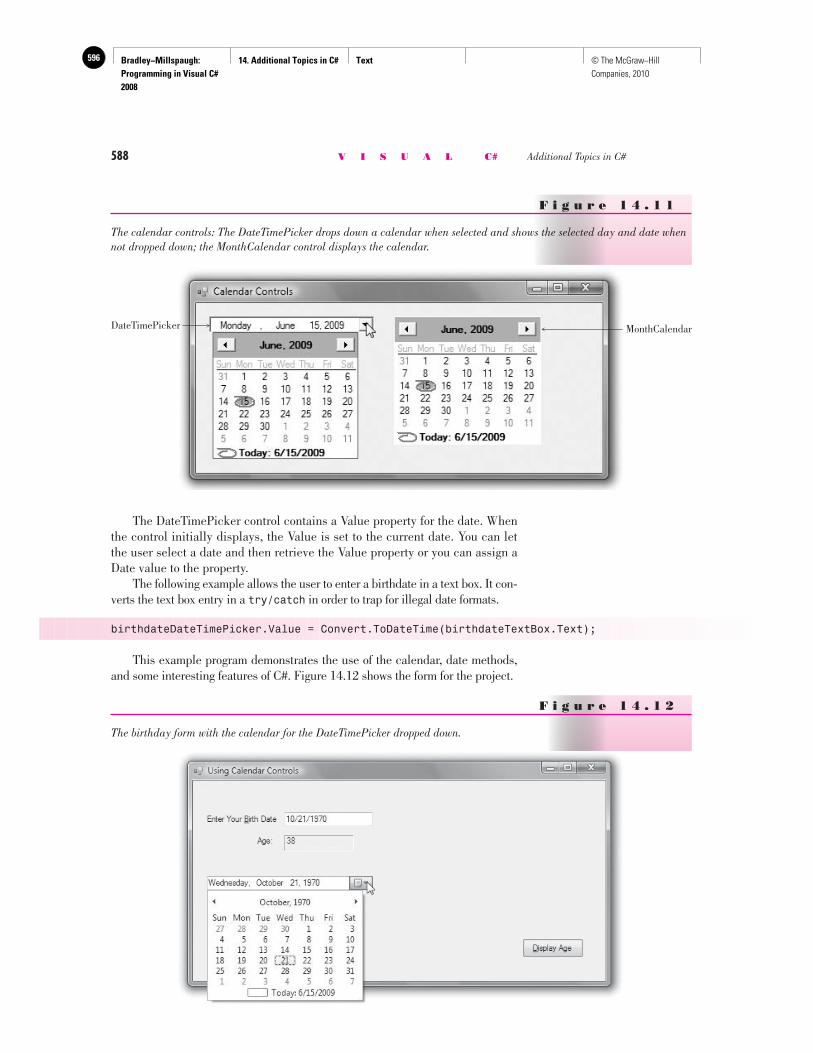
Bradley−Millspaugh: Programming in Visual C# 2008
14. Additional Topics in C# Text596 © The McGraw−Hill Companies, 2010
588 V I S U A L C# Additional Topics in C#
F i g u r e 1 4 . 1 1
The calendar controls: The DateTimePicker drops down a calendar when selected and shows the selected day and date when not dropped down; the MonthCalendar control displays the calendar.
DateTimePicker MonthCalendar
The DateTimePicker control contains a Value property for the date. When the control initially displays, the Value is set to the current date. You can let the user select a date and then retrieve the Value property or you can assign a Date value to the property. The following example allows the user to enter a birthdate in a text box. It con-verts the text box entry in a try/catch in order to trap for illegal date formats.
birthdateDateTimePicker.Value = Convert.ToDateTime(birthdateText Box.Text);
This example program demonstrates the use of the calendar, date methods, and some interesting features of C#. Figure 14.12 shows the form for the project.
F i g u r e 1 4 . 1 2
The birthday form with the calendar for the DateTimePicker dropped down.
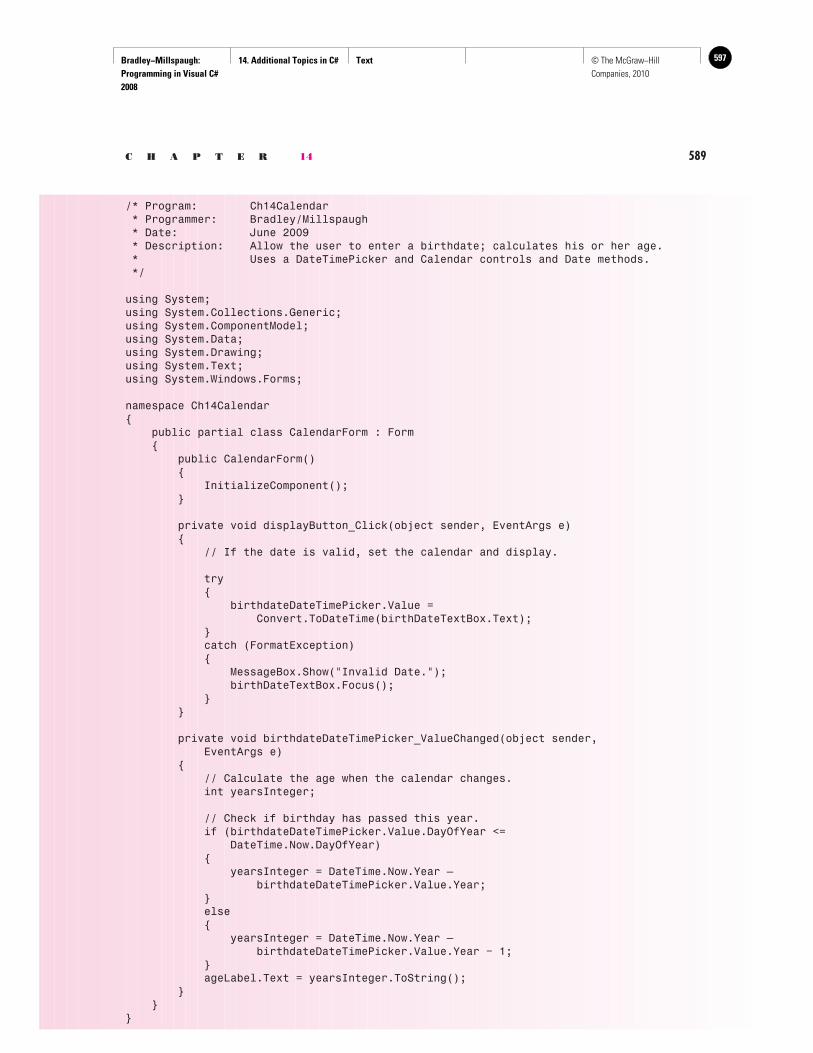
Bradley−Millspaugh: Programming in Visual C# 2008
14. Additional Topics in C# Text 597© The McGraw−Hill Companies, 2010
C H A P T E R 14 589
/* Program: Ch14Calendar * Programmer: Bradley/Millspaugh * Date: June 2009 * Description: Allow the user to enter a birthdate; calculates his or her age. * Uses a DateTimePicker and Calendar controls and Date methods. */
using System;using System.Collections.Generic;using System.ComponentModel;using System.Data;using System.Drawing;using System.Text;using System.Windows.Forms;
namespace Ch14Calendar{ public partial class CalendarForm : Form { public CalendarForm() { InitializeComponent(); }
private void displayButton_Click(object sender, EventArgs e) { // If the date is valid, set the calendar and display.
try { birthdateDateTimePicker.Value = Convert.ToDateTime(birthDateTextBox.Text); } catch (FormatException) { MessageBox.Show("Invalid Date."); birthDateTextBox.Focus(); } }
private void birthdateDateTimePicker_ValueChanged(object sender, EventArgs e) { // Calculate the age when the calendar changes. int yearsInteger;
// Check if birthday has passed this year. if (birthdateDateTimePicker.Value.DayOfYear <= DateTime.Now.DayOfYear) { yearsInteger = DateTime.Now.Year — birthdateDateTimePicker.Value.Year; } else { yearsInteger = DateTime.Now.Year — birthdateDateTimePicker.Value.Year − 1; } ageLabel.Text = yearsInteger.ToString(); } }}
Bradley−Millspaugh: Programming in Visual C# 2008
14. Additional Topics in C# Text598 © The McGraw−Hill Companies, 2010
590 V I S U A L C# Additional Topics in C#
Notice the statements in the ValueChanged event handler for the Date-TimePicker. You can use all of the properties of the system time on the Value property of the control.
yearsInteger = DateTime.Now.Year — birthdateDateTimePicker.Value.Year;
You can see all of the methods and properties using Visual Studio’s Intel-liSense feature. Type “Now.” to see the list of methods and properties.
➤ Feedback 14.3 1. Write the code to assign the date from appointmentDateTimePicker to
the variable appointmentDateTime. 2. Use the IntelliSense feature or Help to list five of the properties of the
Value property for a DateTimePicker control. 3. Which of the five properties listed in Question 2 are also available for
the Now property?
Displaying Web Pages on a Windows Form
You can add a WebBrowser control to a Windows Form and display Web pages on the form. The toolbox includes a WebBrowser control ( Figure 14.13 ).The WebBrowser control can make your form resemble a browser window in Internet Explorer, or you can use the control to display any HTML page, online or offline. Note that you must have a live Internet connection to display Web pages in the WebBrowser control.
F i g u r e 1 4 . 1 3
The Windows WebBrowser control in the toolbox.
The WebBrowser Control
When you add a WebBrowser control to an empty Windows Form, by default the control is set to fill the entire form ( Dock = Fill ). You can add a ToolStrip control to provide navigation. Some useful properties, methods, and events of the WebBrowser control follow:
Url property Set this property to a URL at design time or run time to navigate to the entered page.
webBrowser1.Url = New Uri(@" http://www.microsoft.com/" );
Navigate method Execute this method at run time to navigate to the desired page.
webBrowser1.Navigate(New Uri(@" http://www.microsoft.com/" ));
DocumentCompleted event A page has finished loading. You can use this event to add the page to the Items property of the combo box.
toolStripComboBox1.Items.Add (webBrowser1.Url);
DocumentTitle property Retrieves the title of the current Web page.
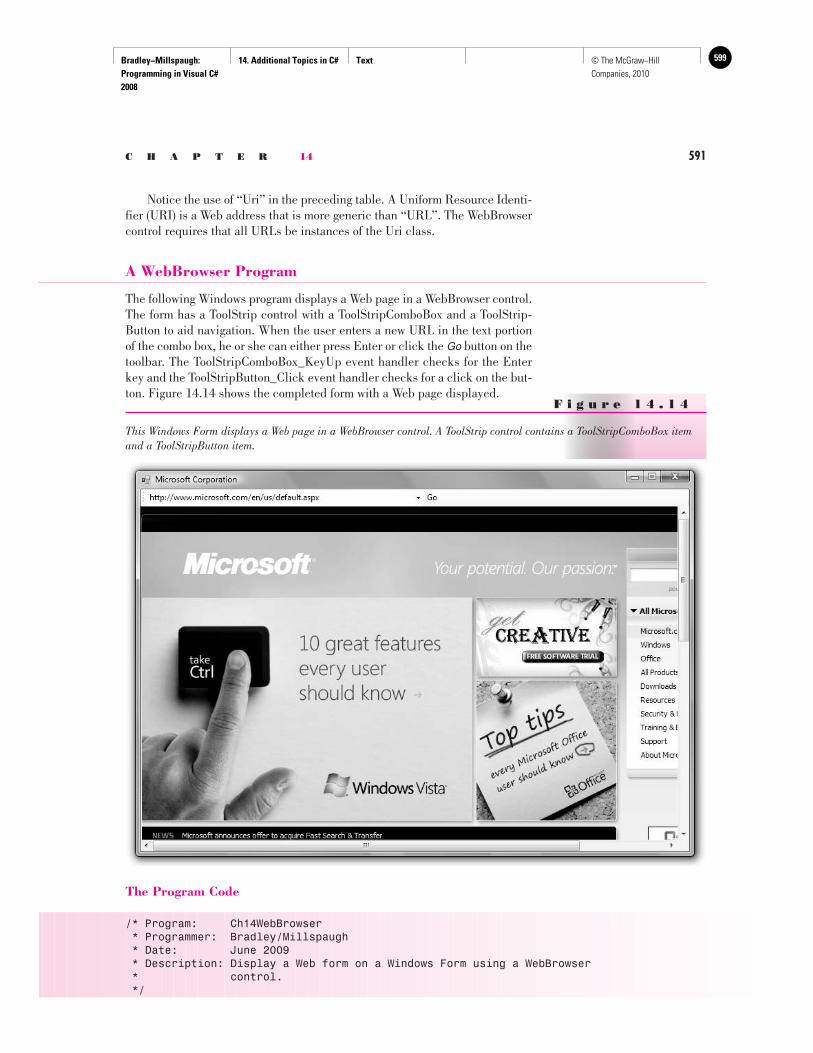
Bradley−Millspaugh: Programming in Visual C# 2008
14. Additional Topics in C# Text 599© The McGraw−Hill Companies, 2010
C H A P T E R 14 591
Notice the use of “Uri” in the preceding table. A Uniform Resource Identi-fier (URI) is a Web address that is more generic than “URL”. The WebBrowser control requires that all URLs be instances of the Uri class.
A WebBrowser Program
The following Windows program displays a Web page in a WebBrowser control. The form has a ToolStrip control with a ToolStripComboBox and a ToolStrip-Button to aid navigation. When the user enters a new URL in the text portion of the combo box, he or she can either press Enter or click the Go button on the toolbar. The ToolStripComboBox_KeyUp event handler checks for the Enter key and the ToolStripButton_Click event handler checks for a click on the but-ton. Figure 14.14 shows the completed form with a Web page displayed.
F i g u r e 1 4 . 1 4
This Windows Form displays a Web page in a WebBrowser control. A ToolStrip control contains a ToolStripComboBox item and a ToolStripButton item.
The Program Code
/* Program: Ch14WebBrowser * Programmer: Bradley/Millspaugh * Date: June 2009 * Description: Display a Web form on a Windows Form using a WebBrowser * control. */
Bradley−Millspaugh: Programming in Visual C# 2008
14. Additional Topics in C# Text600 © The McGraw−Hill Companies, 2010
592 V I S U A L C# Additional Topics in C#
using System;using System.Collections.Generic;using System.ComponentModel;using System.Data;using System.Drawing;using System.Text;using System.Windows.Forms;
namespace Ch14WebBrowser{ public partial class BrowserForm : Form {
public BrowserForm() { InitializeComponent(); }
private void webBrowser1_DocumentCompleted(object sender, WebBrowserDocumentCompletedEventArgs e) { // New document loaded. Add the Url to the combo box.
toolStripComboBox1.Text = webBrowser1.Url.ToString(); toolStripComboBox1.Items.Add(toolStripComboBox1.Text); this.Text = webBrowser1.DocumentTitle; }
private void toolStripButton1_Click(object sender, EventArgs e) { // Go button clicked; navigate to requested page.
try { string testString = toolStripComboBox1.Text.Substring(0,7).ToUpper(); if (testString != "HTTP://") { toolStripComboBox1.Text = "http://" + toolStripComboBox1.Text; } webBrowser1.Url = new Uri(toolStripComboBox1.Text); } catch { MessageBox.Show("Unable to locate the requested page."); } }
private void toolStripComboBox1_KeyUp(object sender, KeyEventArgs e) { // Check for Enter key and navigate to the requested URL.
if (e.KeyCode = = Keys.Enter) { toolStripButton1_Click(sender, e); } }
Bradley−Millspaugh: Programming in Visual C# 2008
14. Additional Topics in C# Text 601© The McGraw−Hill Companies, 2010
C H A P T E R 14 593
private void BrowserForm_Load(object sender, EventArgs e) { this.webBrowser1.Url = new Uri(@" http://www.microsoft.com/"); } }}
Checking for the Enter Key
You may have noticed a strange statement in the previous section:
if (e.KeyCode = = Keys.Enter)
This statement checks to see if the key pressed is the Enter key. As you learned earlier in this chapter, you can check for the key that the user entered in a control’s KeyDown, KeyPress, or KeyUp event handler. But keystrokes that ordinarily cause an action to occur, such as the Tab key and the Enter key, generate only a KeyUp event. The e argument of the KeyUp event handler is KeyEventArgs, which has KeyCode and KeyData properties. These properties hold a numeric representa-tion of the key pressed, but you can use the constants in the Keys enumeration to call the keys by name. For example, the Enter key has a KeyCode of 13. You can check for the Enter key with either of these statements:
if (e.KeyCode = = 13)
or
if (e.KeyCode = = Keys.Enter)
In the program in the previous section, the user is expected to type a URL into the combo box and press Enter or click a button. To check for the Enter key, you need to code the combo box’s KeyUp event handler. Notice that the line of code compares the event argument e with the desired Keys constant.
private void toolStripComboBox1_KeyUp(object sender, KeyEventArgs e){ // Check for Enter key and navigate to the requested URL.
if (e.KeyCode = = Keys.Enter) { toolStripButton1_Click(sender, e); }}
XML Data Files
More and more documents are being stored as XML files. In Chapter 10 we discussed XML as a part of database files. The same format is also used for word processing and other types of office files.
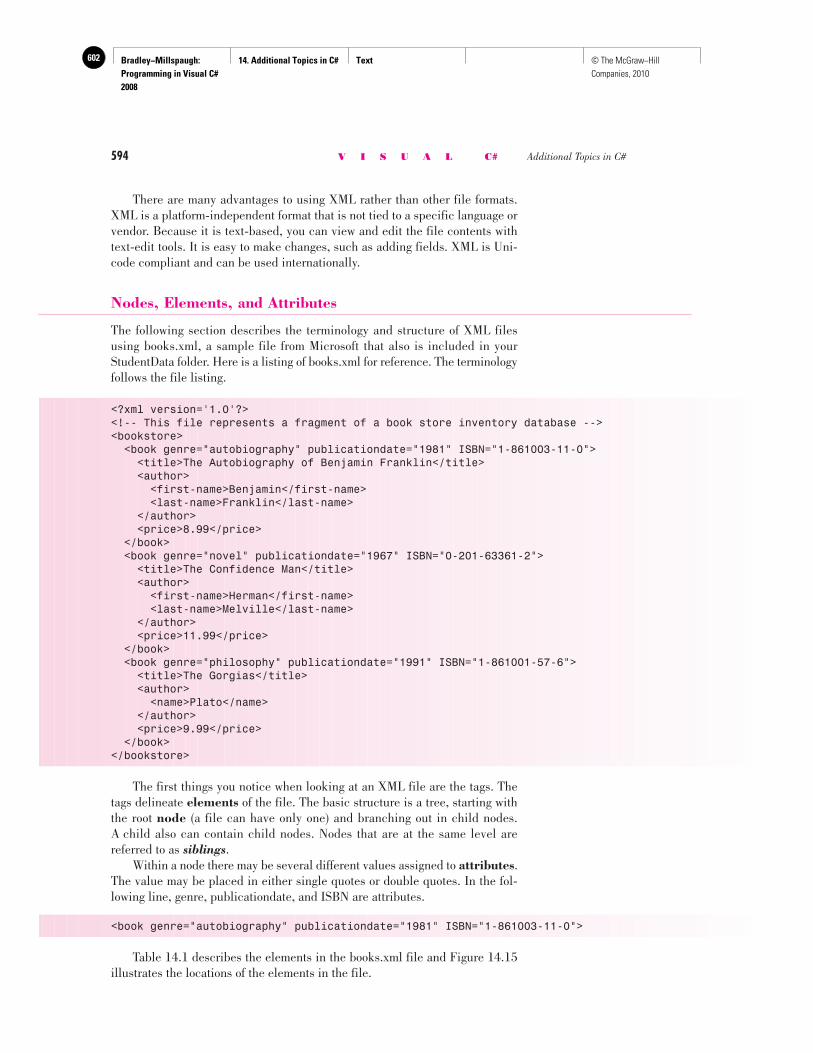
Bradley−Millspaugh: Programming in Visual C# 2008
14. Additional Topics in C# Text602 © The McGraw−Hill Companies, 2010
594 V I S U A L C# Additional Topics in C#
There are many advantages to using XML rather than other file formats. XML is a platform-independent format that is not tied to a specific language or vendor. Because it is text-based, you can view and edit the file contents with text-edit tools. It is easy to make changes, such as adding fields. XML is Uni-code compliant and can be used internationally.
Nodes, Elements, and Attributes
The following section describes the terminology and structure of XML files using books.xml, a sample file from Microsoft that also is included in your StudentData folder. Here is a listing of books.xml for reference. The terminology follows the file listing.
<?xml version='1.0'?><!-- This file represents a fragment of a book store inventory database --><bookstore> <book genre="autobiography" publicationdate="1981" ISBN="1-861003-11-0"> <title>The Autobiography of Benjamin Franklin</title> <author> <first-name>Benjamin</first-name> <last-name>Franklin</last-name> </author> <price>8.99</price> </book> <book genre="novel" publicationdate="1967" ISBN="0-201-63361-2"> <title>The Confidence Man</title> <author> <first-name>Herman</first-name> <last-name>Melville</last-name> </author> <price>11.99</price> </book> <book genre="philosophy" publicationdate="1991" ISBN="1-861001-57-6"> <title>The Gorgias</title> <author> <name>Plato</name> </author> <price>9.99</price> </book></bookstore>
The first things you notice when looking at an XML file are the tags. The tags delineate elements of the file. The basic structure is a tree, starting with the root node (a file can have only one) and branching out in child nodes. A child also can contain child nodes. Nodes that are at the same level are referred to as siblings . Within a node there may be several different values assigned to attributes . The value may be placed in either single quotes or double quotes. In the fol-lowing line, genre, publicationdate, and ISBN are attributes.
<book genre="autobiography" publicationdate="1981" ISBN="1-861003-11-0">
Table 14.1 describes the elements in the books.xml file and Figure 14.15 illustrates the locations of the elements in the file.
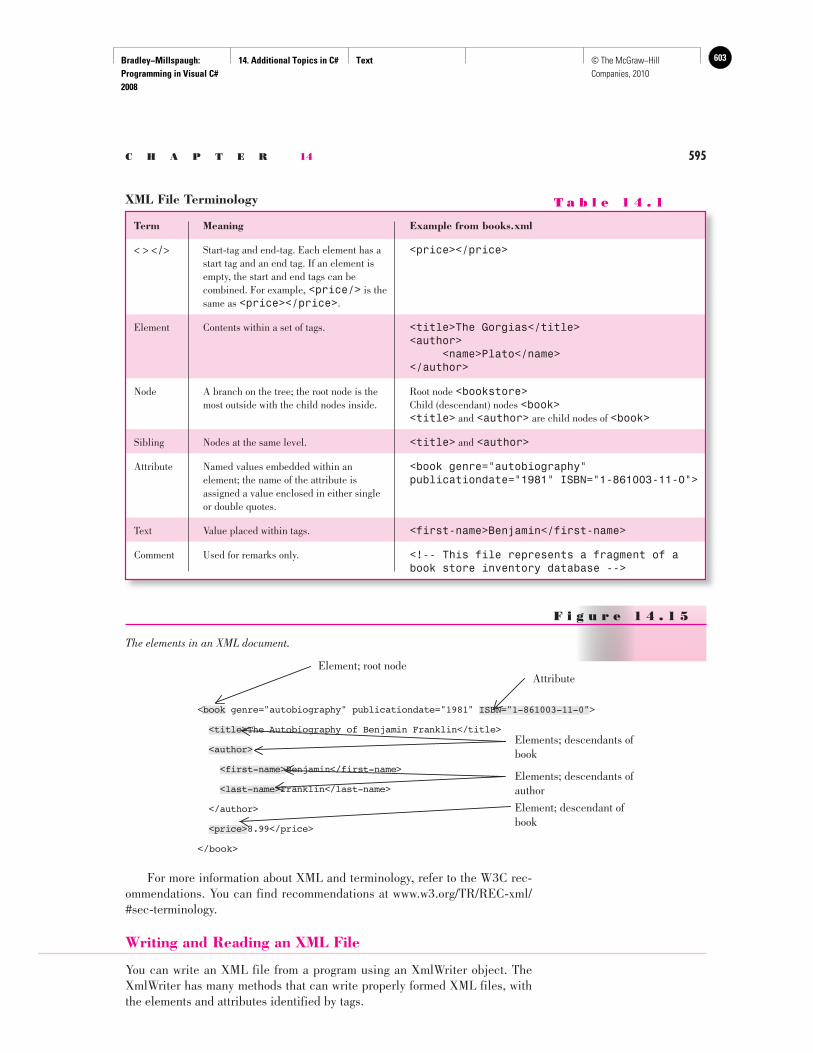
Bradley−Millspaugh: Programming in Visual C# 2008
14. Additional Topics in C# Text 603© The McGraw−Hill Companies, 2010
C H A P T E R 14 595
For more information about XML and terminology, refer to the W3C rec-ommendations. You can find recommendations at www.w3.org/TR/REC-xml/#sec-terminology .
Writing and Reading an XML File
You can write an XML file from a program using an XmlWriter object. The XmlWriter has many methods that can write properly formed XML files, with the elements and attributes identified by tags.
XML File Terminology T a b l e 1 4 . 1
Term Meaning Example from books.xml
< > </> Start-tag and end-tag. Each element has a <price></price> start tag and an end tag. If an element is
empty, the start and end tags can be combined. For example, <price/> is the same as <price></price>.
Element Contents within a set of tags. <title>The Gorgias</title> <author> <name>Plato</name></author>
Node A branch on the tree; the root node is the Root node <bookstore> most outside with the child nodes inside. Child (descendant) nodes <book> <title> and <author> are child nodes of <book>
Sibling Nodes at the same level. <title> and <author>
Attribute Named values embedded within an <book genre="autobiography" element; the name of the attribute is publicationdate="1981" ISBN="1-861003-11-0"> assigned a value enclosed in either single or double quotes.
Text Value placed within tags. <first-name>Benjamin</first-name>
Comment Used for remarks only. <!-- This file represents a fragment of abook store inventory database -->
F i g u r e 1 4 . 1 5
The elements in an XML document.
<book genre="autobiography" publicationdate="1981" ISBN="1-861003-11-0">
<title>The Autobiography of Benjamin Franklin</title>
<author>
<first-name>Benjamin</first-name>
<last-name>Franklin</last-name>
<
</book>
/author>
<price>8.99</price>
AttributeElement; root node
Elements; descendants ofbook
Elements; descendants ofauthor
Element; descendant ofbook
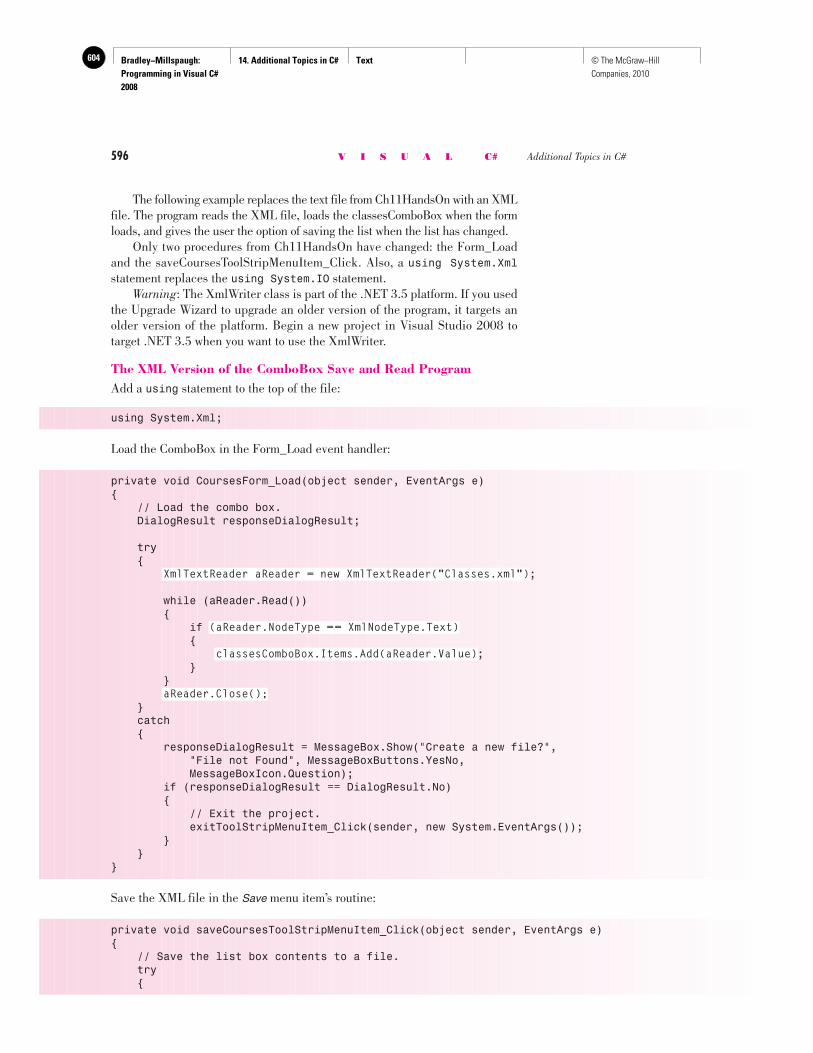
Bradley−Millspaugh: Programming in Visual C# 2008
14. Additional Topics in C# Text604 © The McGraw−Hill Companies, 2010
596 V I S U A L C# Additional Topics in C#
The following example replaces the text file from Ch11HandsOn with an XML file. The program reads the XML file, loads the classesComboBox when the form loads, and gives the user the option of saving the list when the list has changed. Only two procedures from Ch11HandsOn have changed: the Form_Load and the saveCoursesToolStripMenuItem_Click. Also, a using System.Xmlstatement replaces the using System.IO statement. Warning : The XmlWriter class is part of the .NET 3.5 platform. If you used the Upgrade Wizard to upgrade an older version of the program, it targets an older version of the platform. Begin a new project in Visual Studio 2008 to target .NET 3.5 when you want to use the XmlWriter.
The XML Version of the ComboBox Save and Read Program Add a using statement to the top of the file:
using System.Xml;
Load the ComboBox in the Form_Load event handler:
private void CoursesForm_Load(object sender, EventArgs e){ // Load the combo box. DialogResult responseDialogResult;
try {
XmlTextReader aReader = new XmlTextReader("Classes.xml");
while (aReader.Read()) { if (aReader.NodeType = = XmlNodeType.Text) {
classesComboBox.Items.Add(aReader.Value); } }
aReader.Close(); } catch { responseDialogResult = MessageBox.Show("Create a new file?", "File not Found", MessageBoxButtons.YesNo, MessageBoxIcon.Question); if (responseDialogResult == DialogResult.No) { // Exit the project. exitToolStripMenuItem_Click(sender, new System.EventArgs()); } }}
Save the XML file in the Save menu item’s routine:
private void saveCoursesToolStripMenuItem_Click(object sender, EventArgs e){ // Save the list box contents to a file. try {
Bradley−Millspaugh: Programming in Visual C# 2008
14. Additional Topics in C# Text 605© The McGraw−Hill Companies, 2010
C H A P T E R 14 597
var identifier = XDocument.Load(" Filename ");XDocument identifier = XDocument.Load( "Filename") ;
General
Form
s
For the Filename entry, you can specify a complete path or a URI; otherwise the Load method looks in the current directory, which is bin\Debug in your C# project. Notice in the first format that the data type is not specified. The Visual Studio editor’s new type inference takes care of determining and assigning a strong data type.
XmlWriter aWriter = XmlWriter.Create("Classes.xml");
aWriter.WriteStartElement("Classes");
int indexInteger, maximumInteger;
maximumInteger = classesComboBox.Items.Count; for (indexInteger = 0; indexInteger < maximumInteger; indexInteger++) {
aWriter.WriteElementString("Class", classesComboBox.Items[indexInteger].ToString());
}aWriter.WriteEndElement();aWriter.Flush();
isDirtyBoolean = false; } catch { MessageBox.Show("Unable to create the file."); }}
The XML File The Classes.xml file is created by the program. To see the file properly formatted, double-click on the filename in the bin\Debug folder. If the file is not formatted properly, select Edit / Advanced / Format Document.
<?xml version="1.0" encoding="utf-8"?><Classes> <Class>Body Sculpting</Class> <Class>Kickboxing</Class> <Class>Pilates</Class> <Class>Spinning</Class> <Class>Step</Class></Classes>
C# Tools for Reading XML Files
Visual C# 2008 includes some new tools that make working with XML files easier than in the past. In this section you will see XDocument objects, XEle-ment objects, and how to use LINQ to XML queries.
Loading an XML File into an XDocument Object You can use the Load method of an XDocument to read an XML file.
The XDocument.Load Method—General Forms
Bradley−Millspaugh: Programming in Visual C# 2008
14. Additional Topics in C# Text606 © The McGraw−Hill Companies, 2010
598 V I S U A L C# Additional Topics in C#
The XDocument.Load Method—Examples
Exam
ples
var bookXDocument = XDocument.Load("books.xml");private XDocument customerXDocument = XDocument.Load (@"C:\Data\customers.xml");XDocument inventoryDocument = XDocument.Load(System.IO.Directory.GetCurrentDirectory() + "\\inventory.xml") ;
The third example uses System.IO.Directory.GetCurrentDirectory() to refer to the current directory. The following method displays the books.xml file in the Output window, which you can view with View / Other Windows / Output :
private void readFileButton_Click(object sender, EventArgs e){ // Read the XML file into an XDocument and display the file // in the Output window.
XDocument bookXDocument = XDocument.Load(System.IO.Directory.GetCurrentDirectory() + "\\books.xml"); Console.WriteLine(bookXDocument);}
Output
<!-- This file represents a fragment of a book store inventory database --><bookstore> <book genre="autobiography" publicationdate="1981" ISBN="1-861003-11-0"> <title>The Autobiography of Benjamin Franklin</title> <author> <first-name>Benjamin</first-name> <last-name>Franklin</last-name> </author> <price>8.99</price> </book> <book genre="novel" publicationdate="1967" ISBN="0-201-63361-2"> <title>The Confidence Man</title> <author> <first-name>Herman</first-name> <last-name>Melville</last-name> </author> <price>11.99</price> </book> <book genre="philosophy" publicationdate="1991" ISBN="1-861001-57-6"> <title>The Gorgias</title> <author> <name>Plato</name> </author> <price>9.99</price> </book></bookstore>
Loading an XML File into an XElement Object In addition to using an XDocument, you also can load an XML file into an XElement object. The difference between the two is that the XDocument
Bradley−Millspaugh: Programming in Visual C# 2008
14. Additional Topics in C# Text 607© The McGraw−Hill Companies, 2010
C H A P T E R 14 599
contains the information about the document from the top of the file, while the root node is the first item in an XElement object.
XElement bookData = XElement.Load("books.xml");
Using LINQ to XML to Query an XElement Object You can use LINQ to XML to retrieve data elements from an XElement or XDocument object. The following examples select data from the bookData XDocument and display the data in a list box. The bookData object was loaded with books.xml in the previous section. You can refer to the elements in the XElement object on the In clause of LINQ as well as in the Select clause. Use bookData.Elements("") to refer to all child elements of the “book” root node. Use queryName.Element("ElementName") to refer to an element that is a descendant of one child.
// Read the XML file into an XElement and use LINQ to query the data.XElement bookData = XElement.Load("books.xml");
// Retrieve the titles.var bookQuery = from aBook in bookData.Elements() select aBook.Element("title").Value; // Get the titles.titlesListBox.DataSource = bookQuery.ToList();
You also can combine the XElement.Load and the query:
// Retrieve the titles. Combined load and query.var bookQuery = from aBook in XElement.Load("books.xml").Elements() select aBook.Element("title").Value;titlesListBox.DataSource = bookQuery.ToList();
LINQ offers many operators beyond what we have covered up to this point. The next two examples demonstrate orderby , which is used for sorting, and where , which is used for conditions.
// LINQ query that sorts by book title.var bookQuery = from aBook in bookData.Elements() orderby aBook.Element("title").Value ascending select aBook.Element("title").Value; // Get the titles.titlesListBox.DataSource = bookQuery.ToList();
// LINQ query that selects a particular book by using a where clause.var bookQuery = from aBook in bookData.Elements() where aBook.Element("title").Value = = "The Confidence Man" select aBook.Element("price").Value + " " + aBook.Element("title").Value;titlesListBox.DataSource = bookQuery.ToList();
Stepping through Query Output If you want to refer to individual attributes in the results of a query, or manipu-late the output in some way, you can use a foreach statement.
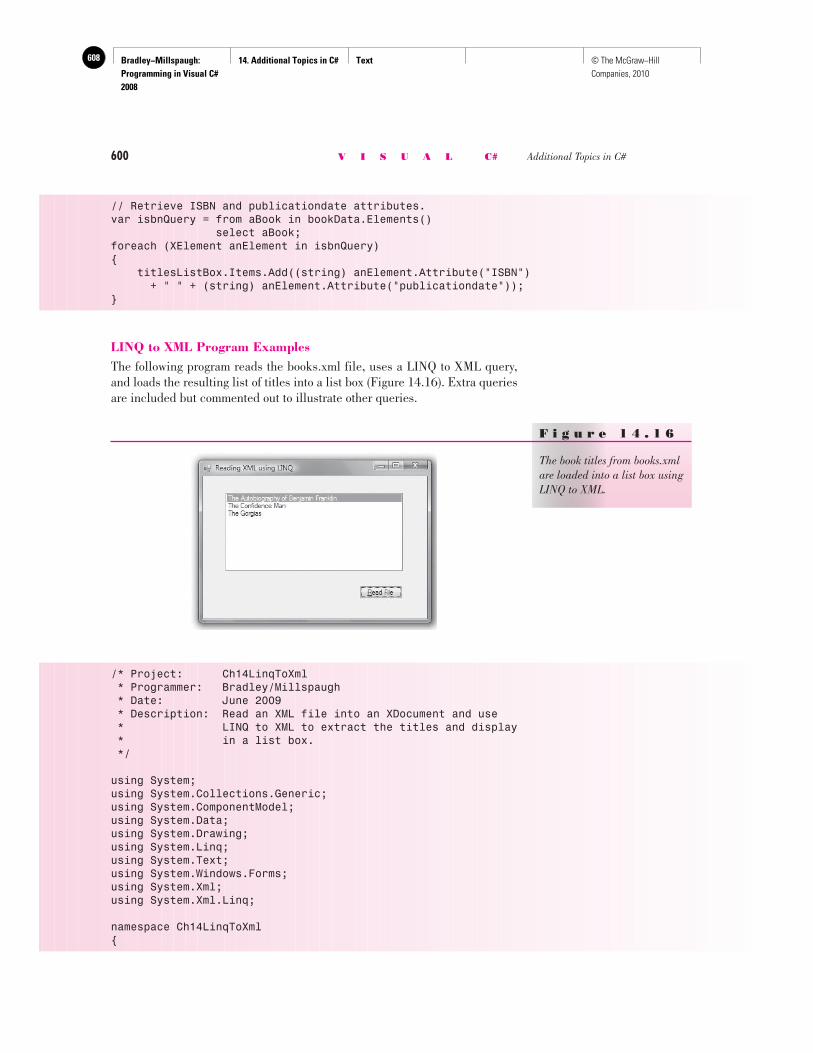
Bradley−Millspaugh: Programming in Visual C# 2008
14. Additional Topics in C# Text608 © The McGraw−Hill Companies, 2010
600 V I S U A L C# Additional Topics in C#
// Retrieve ISBN and publicationdate attributes.var isbnQuery = from aBook in bookData.Elements() select aBook;foreach (XElement anElement in isbnQuery){ titlesListBox.Items.Add((string) anElement.Attribute("ISBN") + " " + (string) anElement.Attribute("publicationdate"));}
LINQ to XML Program Examples The following program reads the books.xml file, uses a LINQ to XML query, and loads the resulting list of titles into a list box ( Figure 14.16 ). Extra queries are included but commented out to illustrate other queries.
F i g u r e 1 4 . 1 6
The book titles from books.xml are loaded into a list box using LINQ to XML.
/* Project: Ch14LinqToXml * Programmer: Bradley/Millspaugh * Date: June 2009 * Description: Read an XML file into an XDocument and use * LINQ to XML to extract the titles and display * in a list box. */
using System;using System.Collections.Generic;using System.ComponentModel;using System.Data;using System.Drawing;using System.Linq;using System.Text;using System.Windows.Forms;using System.Xml;using System.Xml.Linq;
namespace Ch14LinqToXml{
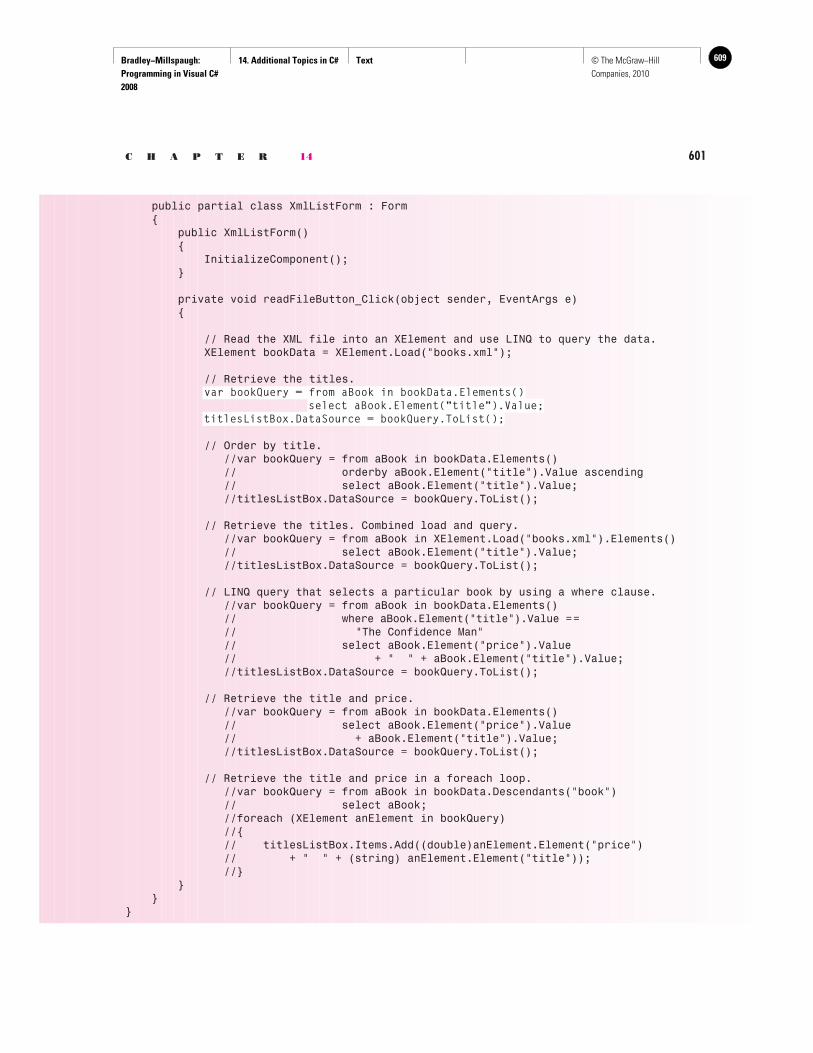
Bradley−Millspaugh: Programming in Visual C# 2008
14. Additional Topics in C# Text 609© The McGraw−Hill Companies, 2010
C H A P T E R 14 601
public partial class XmlListForm : Form { public XmlListForm() { InitializeComponent(); }
private void readFileButton_Click(object sender, EventArgs e) {
// Read the XML file into an XElement and use LINQ to query the data. XElement bookData = XElement.Load("books.xml");
// Retrieve the titles.var bookQuery = from aBook in bookData.Elements()
select aBook.Element("title").Value; titlesListBox.DataSource = bookQuery.ToList();
// Order by title. //var bookQuery = from aBook in bookData.Elements() // orderby aBook.Element("title").Value ascending // select aBook.Element("title").Value; //titlesListBox.DataSource = bookQuery.ToList();
// Retrieve the titles. Combined load and query. //var bookQuery = from aBook in XElement.Load("books.xml").Elements() // select aBook.Element("title").Value; //titlesListBox.DataSource = bookQuery.ToList();
// LINQ query that selects a particular book by using a where clause. //var bookQuery = from aBook in bookData.Elements() // where aBook.Element("title").Value = = // "The Confidence Man" // select aBook.Element("price").Value // + " " + aBook.Element("title").Value; //titlesListBox.DataSource = bookQuery.ToList();
// Retrieve the title and price. //var bookQuery = from aBook in bookData.Elements() // select aBook.Element("price").Value // + aBook.Element("title").Value; //titlesListBox.DataSource = bookQuery.ToList();
// Retrieve the title and price in a foreach loop. //var bookQuery = from aBook in bookData.Descendants("book") // select aBook; //foreach (XElement anElement in bookQuery) //{ // titlesListBox.Items.Add((double)anElement.Element("price") // + " " + (string) anElement.Element("title")); //} } }}
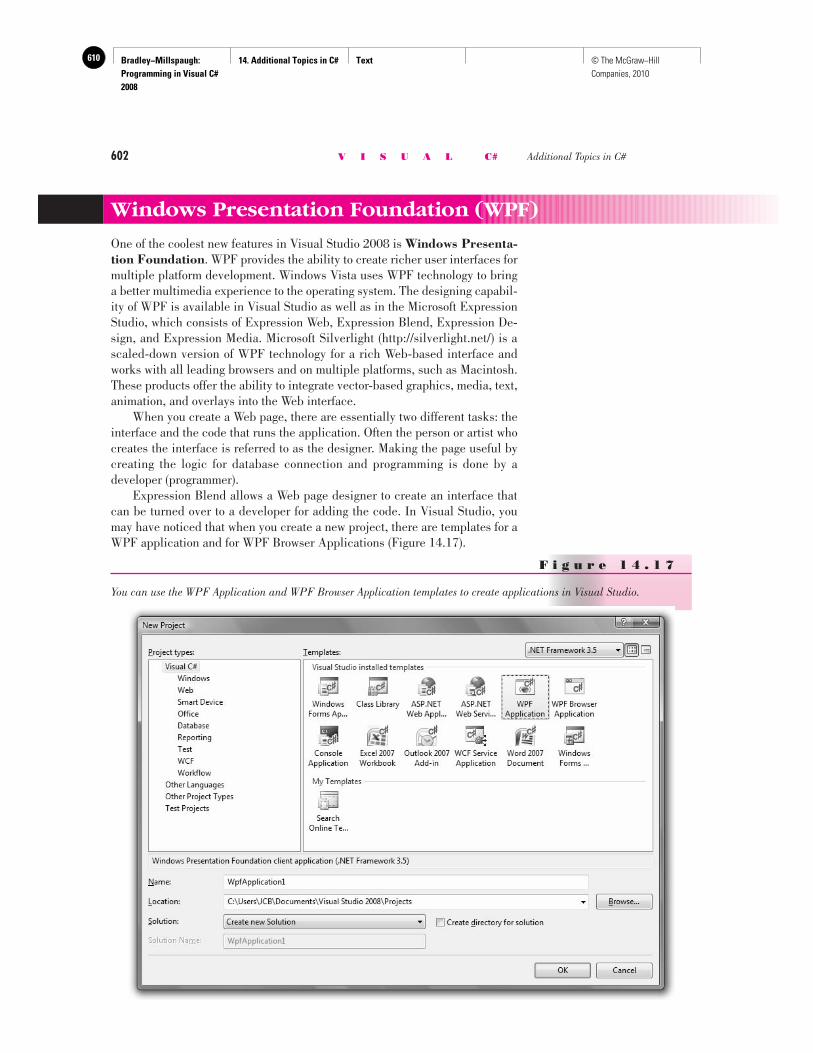
Bradley−Millspaugh: Programming in Visual C# 2008
14. Additional Topics in C# Text610 © The McGraw−Hill Companies, 2010
602 V I S U A L C# Additional Topics in C#
Windows Presentation Foundation (WPF)
One of the coolest new features in Visual Studio 2008 is Windows Presenta-tion Foundation . WPF provides the ability to create richer user interfaces for multiple platform development. Windows Vista uses WPF technology to bring a better multimedia experience to the operating system. The designing capabil-ity of WPF is available in Visual Studio as well as in the Microsoft Expression Studio, which consists of Expression Web, Expression Blend, Expression De-sign, and Expression Media. Microsoft Silverlight ( http://silverlight.net/ ) is a scaled-down version of WPF technology for a rich Web-based interface and works with all leading browsers and on multiple platforms, such as Macintosh. These products offer the ability to integrate vector-based graphics, media, text, animation, and overlays into the Web interface. When you create a Web page, there are essentially two different tasks: the interface and the code that runs the application. Often the person or artist who creates the interface is referred to as the designer. Making the page useful by creating the logic for database connection and programming is done by a developer (programmer). Expression Blend allows a Web page designer to create an interface that can be turned over to a developer for adding the code. In Visual Studio, you may have noticed that when you create a new project, there are templates for a WPF application and for WPF Browser Applications ( Figure 14.17 ).
F i g u r e 1 4 . 1 7
You can use the WPF Application and WPF Browser Application templates to create applications in Visual Studio.
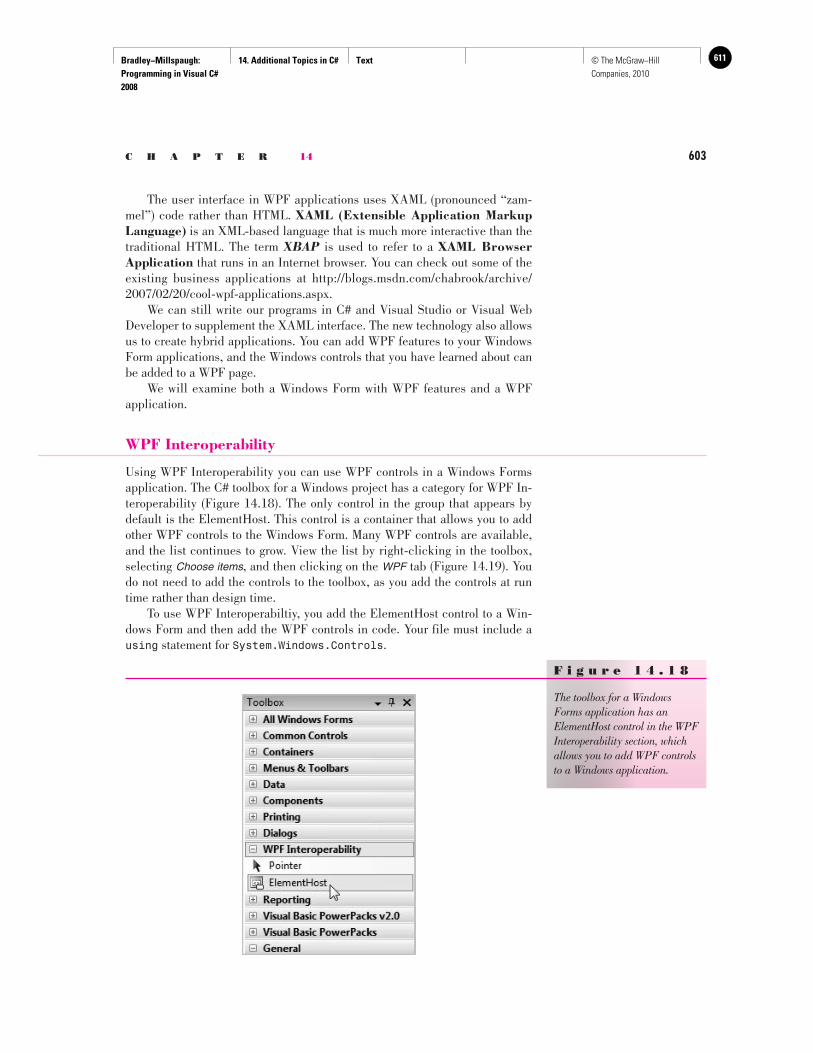
Bradley−Millspaugh: Programming in Visual C# 2008
14. Additional Topics in C# Text 611© The McGraw−Hill Companies, 2010
C H A P T E R 14 603
The user interface in WPF applications uses XAML (pronounced “zam-mel”) code rather than HTML. XAML (Extensible Application Markup Language) is an XML-based language that is much more interactive than the traditional HTML. The term XBAP is used to refer to a XAML Browser Application that runs in an Internet browser. You can check out some of the existing business applications at http://blogs.msdn.com/chabrook/archive/2007/02/20/cool-wpf-applications.aspx . We can still write our programs in C# and Visual Studio or Visual Web Developer to supplement the XAML interface. The new technology also allows us to create hybrid applications. You can add WPF features to your Windows Form applications, and the Windows controls that you have learned about can be added to a WPF page. We will examine both a Windows Form with WPF features and a WPF application.
WPF Interoperability
Using WPF Interoperability you can use WPF controls in a Windows Forms application. The C# toolbox for a Windows project has a category for WPF In-teroperability ( Figure 14.18 ). The only control in the group that appears by default is the ElementHost. This control is a container that allows you to add other WPF controls to the Windows Form. Many WPF controls are available, and the list continues to grow. View the list by right-clicking in the toolbox, selecting Choose items , and then clicking on the WPF tab ( Figure 14.19 ). You do not need to add the controls to the toolbox, as you add the controls at run time rather than design time. To use WPF Interoperabiltiy, you add the ElementHost control to a Win-dows Form and then add the WPF controls in code. Your file must include a using statement for System.Windows.Controls .
F i g u r e 1 4 . 1 8
The toolbox for a Windows Forms application has an ElementHost control in the WPF Interoperability section, which allows you to add WPF controls to a Windows application.
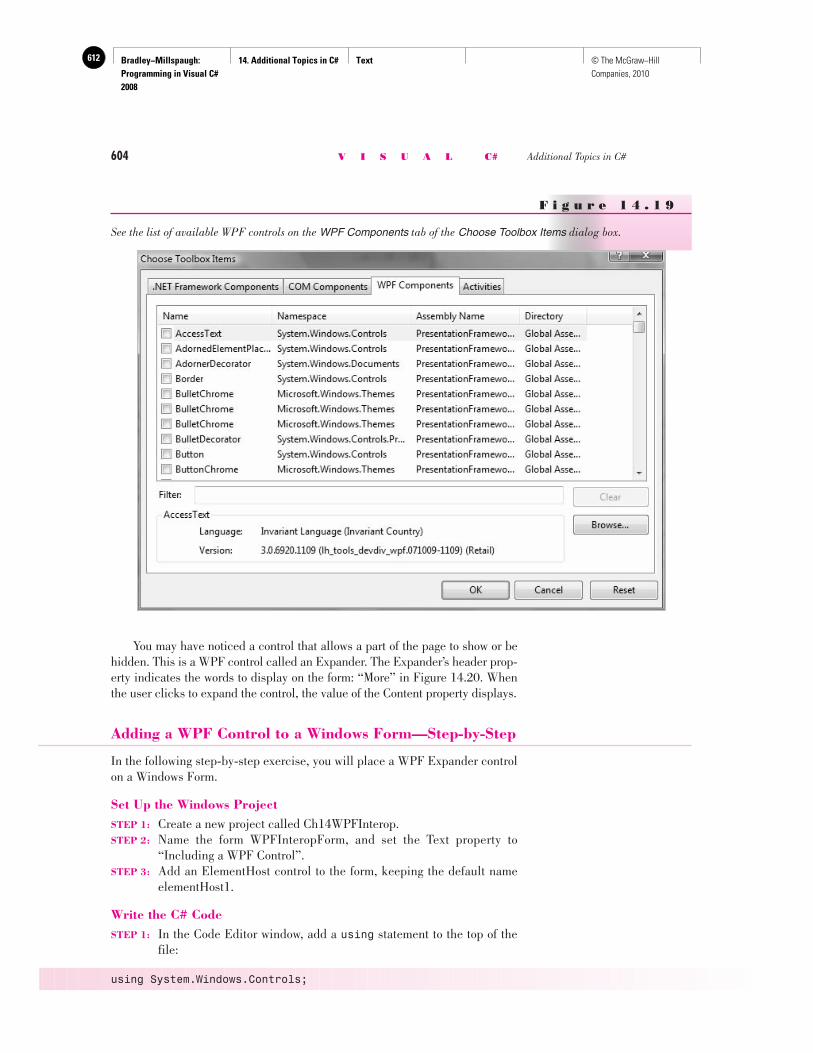
Bradley−Millspaugh: Programming in Visual C# 2008
14. Additional Topics in C# Text612 © The McGraw−Hill Companies, 2010
604 V I S U A L C# Additional Topics in C#
You may have noticed a control that allows a part of the page to show or be hidden. This is a WPF control called an Expander. The Expander’s header prop-erty indicates the words to display on the form: “More” in Figure 14.20 . When the user clicks to expand the control, the value of the Content property displays.
Adding a WPF Control to a Windows Form—Step-by-Step
In the following step-by-step exercise, you will place a WPF Expander control on a Windows Form.
Set Up the Windows Project STEP 1: Create a new project called Ch14WPFInterop. STEP 2: Name the form WPFInteropForm, and set the Text property to
“Including a WPF Control”. STEP 3: Add an ElementHost control to the form, keeping the default name
elementHost1.
Write the C# Code STEP 1: In the Code Editor window, add a using statement to the top of the
file:
using System.Windows.Controls;
F i g u r e 1 4 . 1 9
See the list of available WPF controls on the WPF Components tab of the Choose Toolbox Items dialog box.
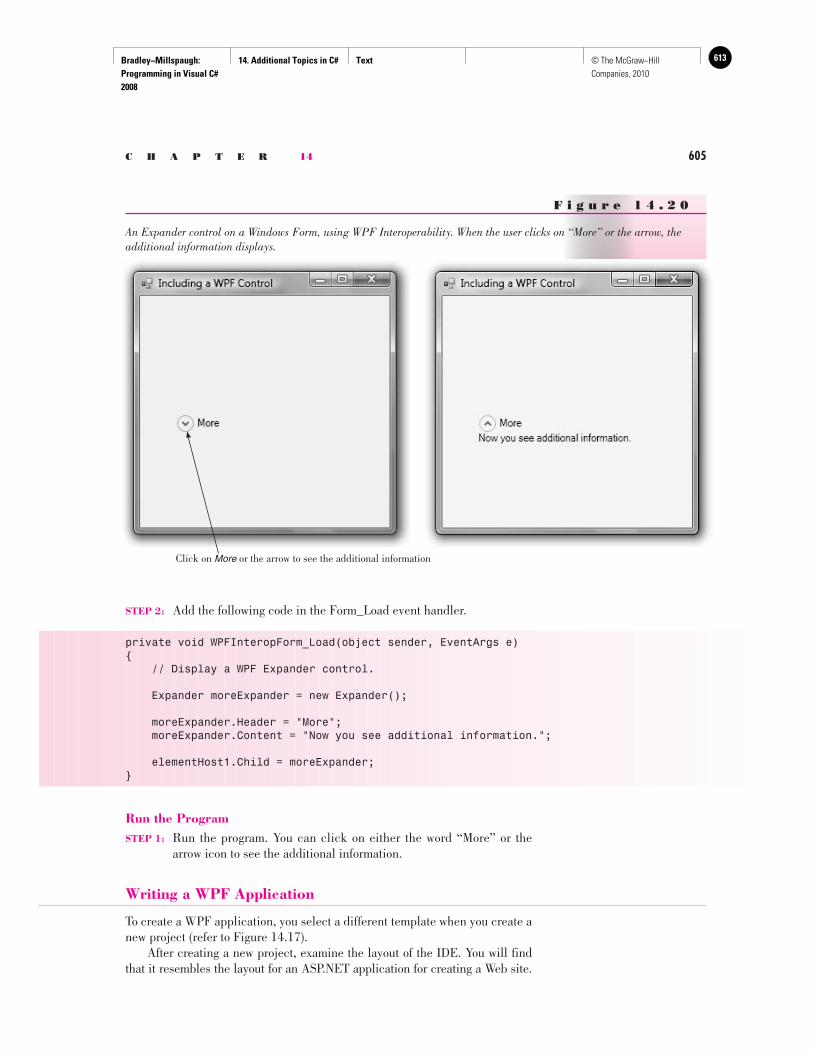
Bradley−Millspaugh: Programming in Visual C# 2008
14. Additional Topics in C# Text 613© The McGraw−Hill Companies, 2010
C H A P T E R 14 605
STEP 2: Add the following code in the Form_Load event handler.
private void WPFInteropForm_Load(object sender, EventArgs e){ // Display a WPF Expander control.
Expander moreExpander = new Expander();
moreExpander.Header = "More"; moreExpander.Content = "Now you see additional information.";
elementHost1.Child = moreExpander;}
Run the Program STEP 1: Run the program. You can click on either the word “More” or the
arrow icon to see the additional information.
Writing a WPF Application
To create a WPF application, you select a different template when you create a new project (refer to Figure 14.17 ). After creating a new project, examine the layout of the IDE. You will find that it resembles the layout for an ASP.NET application for creating a Web site.
Click on More or the arrow to see the additional information
F i g u r e 1 4 . 2 0
An Expander control on a Windows Form, using WPF Interoperability. When the user clicks on “More” or the arrow, the additional information displays.
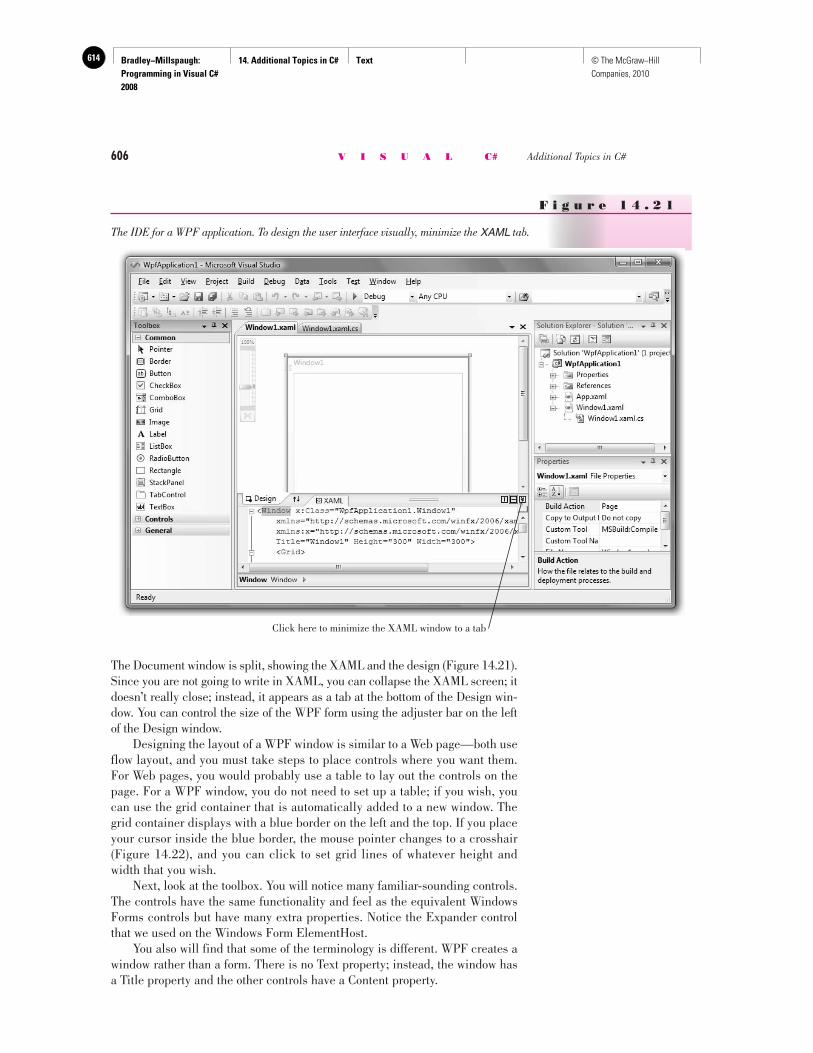
Bradley−Millspaugh: Programming in Visual C# 2008
14. Additional Topics in C# Text614 © The McGraw−Hill Companies, 2010
606 V I S U A L C# Additional Topics in C#
The Document window is split, showing the XAML and the design ( Figure 14.21 ). Since you are not going to write in XAML, you can collapse the XAML screen; it doesn’t really close; instead, it appears as a tab at the bottom of the Design win-dow. You can control the size of the WPF form using the adjuster bar on the left of the Design window. Designing the layout of a WPF window is similar to a Web page—both use flow layout, and you must take steps to place controls where you want them. For Web pages, you would probably use a table to lay out the controls on the page. For a WPF window, you do not need to set up a table; if you wish, you can use the grid container that is automatically added to a new window. The grid container displays with a blue border on the left and the top. If you place your cursor inside the blue border, the mouse pointer changes to a crosshair ( Figure 14.22 ), and you can click to set grid lines of whatever height and width that you wish. Next, look at the toolbox. You will notice many familiar-sounding controls. The controls have the same functionality and feel as the equivalent Windows Forms controls but have many extra properties. Notice the Expander control that we used on the Windows Form ElementHost. You also will find that some of the terminology is different. WPF creates a window rather than a form. There is no Text property; instead, the window has a Title property and the other controls have a Content property.
F i g u r e 1 4 . 2 1
The IDE for a WPF application. To design the user interface visually, minimize the XAML tab.
Click here to minimize the XAML window to a tab
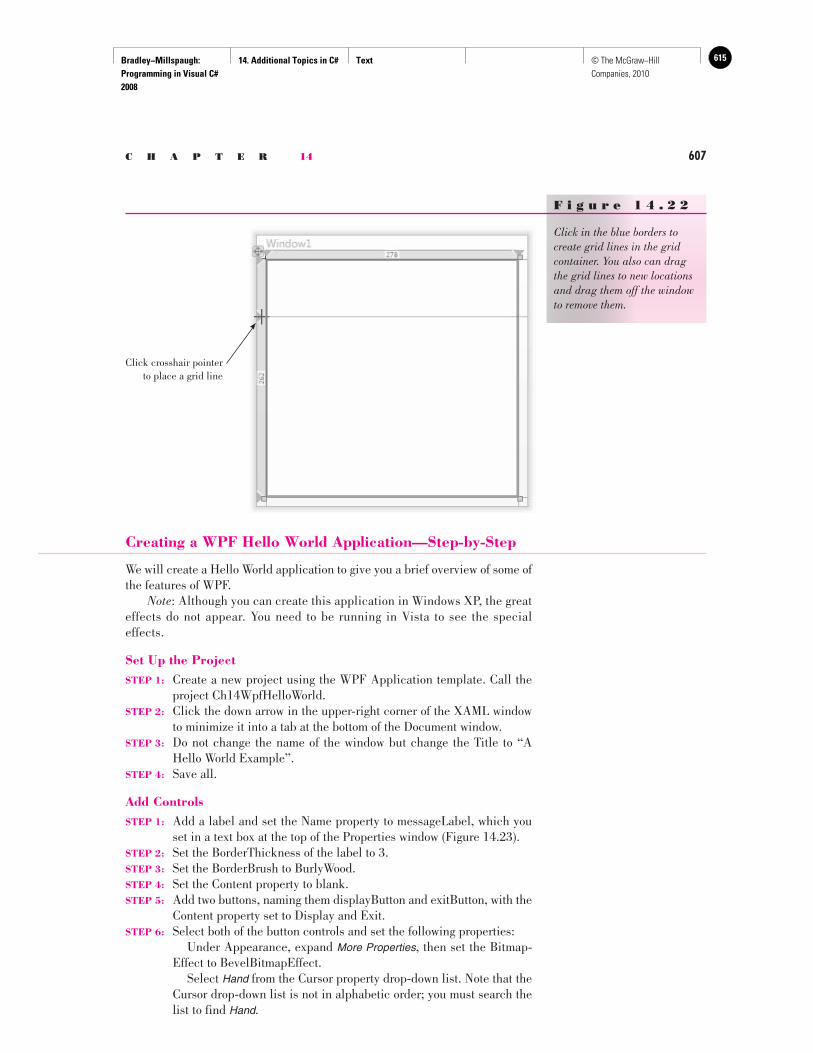
Bradley−Millspaugh: Programming in Visual C# 2008
14. Additional Topics in C# Text 615© The McGraw−Hill Companies, 2010
C H A P T E R 14 607
Creating a WPF Hello World Application—Step-by-Step
We will create a Hello World application to give you a brief overview of some of the features of WPF. Note : Although you can create this application in Windows XP, the great effects do not appear. You need to be running in Vista to see the special effects.
Set Up the Project STEP 1: Create a new project using the WPF Application template. Call the
project Ch14WpfHelloWorld. STEP 2: Click the down arrow in the upper-right corner of the XAML window
to minimize it into a tab at the bottom of the Document window. STEP 3: Do not change the name of the window but change the Title to “A
Hello World Example”. STEP 4: Save all.
Add Controls STEP 1: Add a label and set the Name property to messageLabel, which you
set in a text box at the top of the Properties window ( Figure 14.23 ). STEP 2: Set the BorderThickness of the label to 3. STEP 3: Set the BorderBrush to BurlyWood. STEP 4: Set the Content property to blank. STEP 5: Add two buttons, naming them displayButton and exitButton, with the
Content property set to Display and Exit. STEP 6: Select both of the button controls and set the following properties:
Under Appearance, expand More Properties , then set the Bitmap-Effect to BevelBitmapEffect. Select Hand from the Cursor property drop-down list. Note that the Cursor drop-down list is not in alphabetic order; you must search the list to find Hand .
Click crosshair pointerto place a grid line
F i g u r e 1 4 . 2 2
Click in the blue borders to create grid lines in the grid container. You also can drag the grid lines to new locations and drag them off the window to remove them.
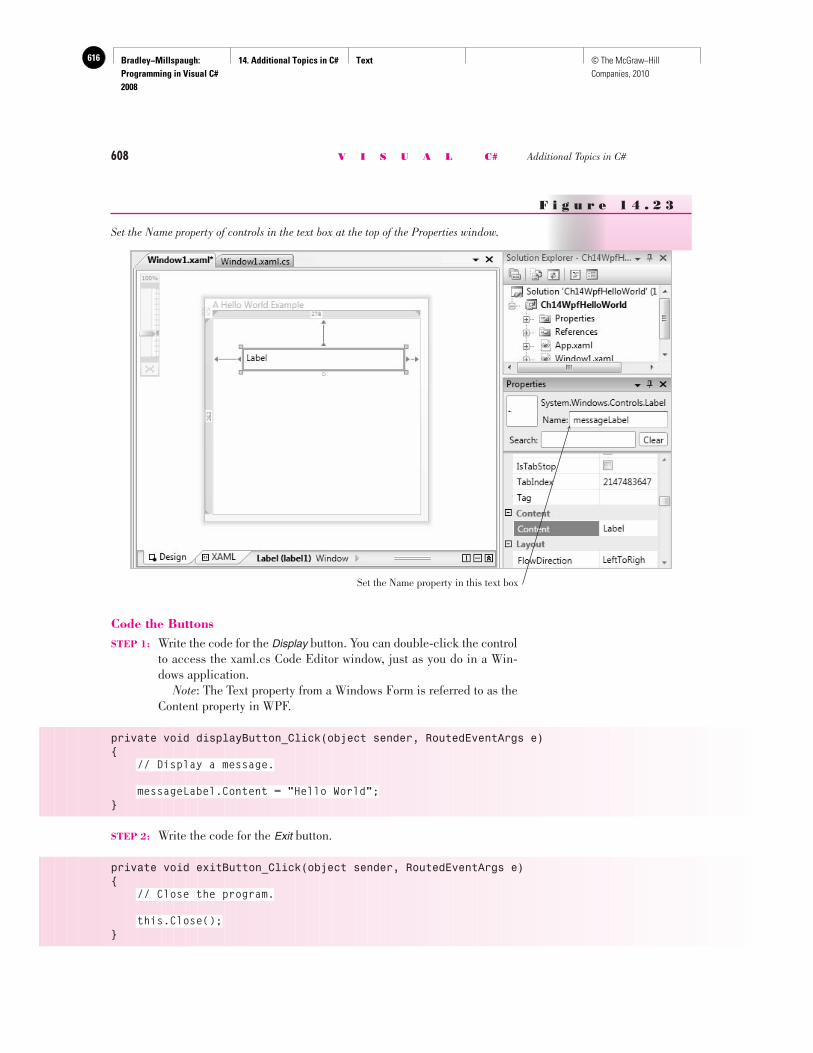
Bradley−Millspaugh: Programming in Visual C# 2008
14. Additional Topics in C# Text616 © The McGraw−Hill Companies, 2010
608 V I S U A L C# Additional Topics in C#
Code the Buttons STEP 1: Write the code for the Display button. You can double-click the control
to access the xaml.cs Code Editor window, just as you do in a Win-dows application.
Note : The Text property from a Windows Form is referred to as the Content property in WPF.
private void displayButton_Click(object sender, RoutedEventArgs e){
// Display a message.
messageLabel.Content = "Hello World";}
STEP 2: Write the code for the Exit button.
private void exitButton_Click(object sender, RoutedEventArgs e){
// Close the program.
this.Close();}
Set the Name property in this text box
F i g u r e 1 4 . 2 3
Set the Name property of controls in the text box at the top of the Properties window.
Bradley−Millspaugh: Programming in Visual C# 2008
14. Additional Topics in C# Text 617© The McGraw−Hill Companies, 2010
C H A P T E R 14 609
STEP 3: Write the remarks at the top of the file.
//Program: Ch14WPFHelloWorld//Programmer: Your Name//Date: Today’s date//Description: Displays Hello World in a label.
Run the Program As you move your cursor over the buttons, the color changes to blue. Also notice the cursor that we set. You can easily add a ToolTip to the button. There is no need to drag any extra components; the ToolTip property is already on each control.
The Role of Expression Blend
Earlier we mentioned that the XAML code is the same for developers in Visual Studio and for designers in Expression. The project that we just created could be opened in Expression, for a designer to add even more dramatic features. Watch the video at http://channel9.msdn.com/Showpost.aspx?postid=359715for more information.
S u m m a r y
1. An ErrorProvider component can provide an icon and popup error message next to the field that does not pass validation. Specify the text box and the message in the ErrorProvider’s SetError method.
2. A text box MaxLength property limits the number of characters the user is allowed to enter into the control.
3. The CharacterCasing property of a text box can automatically convert user input to uppercase or lowercase.
4. You can validate individual fields in the Validating event handler for the controls. The Validating event occurs when the user attempts to move the focus to another control that has its CausesValidation property set to true .
5. C# code snippets are small samples of code that illustrate coding tech-niques. You can add code snippets in the editor.
6. Visual Studio includes many sample programs and quick-start tutorials. 7. A multiple document interface (MDI) contains parent and child forms.
Closing the parent also closes all child forms. The child forms stay within the bounds of the parent form.
8. To create an MDI parent form, set a form’s IsMdiContainer property to true . To create a child form, instantiate a new form object and set its MdiParent property to the parent form in code.
9. MDI applications generally have a Window menu, which displays a list of open child windows and provides choices for arranging the child windows.
10. To create a toolbar, add a ToolStrip control and add buttons to the control. 11. A toolbar generally provides shortcuts to menu options. 12. A status bar contains information for the user along the bottom of a form.
After adding a StatusStrip control to a form, add ToolStripStatusLabels, which you can use to display text.
13. The date can be assigned to the Text property of a ToolStripStatusLabel during the Form_Load event handler, but the time display requires an update routine using a Timer component.
Bradley−Millspaugh: Programming in Visual C# 2008
14. Additional Topics in C# Text618 © The McGraw−Hill Companies, 2010
610 V I S U A L C# Additional Topics in C#
14. The DateTimePicker and MonthCalendar controls have accurate calendars for displaying and inputting dates.
15. The WebBrowser control provides the ability to display Web pages on a Windows Form.
16. You can check the e (KeyEventArgs) argument of a control’s KeyUp event handler to determine which key was pressed. The e.KeyCode and e.Key-Data properties hold a numeric code for the key, which you can check using the constants in the Keys enumeration.
17. XML files are used to store data as text identified by tags. The files are platform independent and extremely flexible.
18. XML files consist of nodes, elements, and attributes. Each file can have one root node and many child (descendant) nodes. Child nodes at the same level are called siblings.
19. You can save data into an XML file using an XmlWriter object, which in-serts the correct tags into the file.
20. Two objects that you can use to read an XML file are XDocument and XElement. You can use a LINQ to XML query to select data elements.
21. Windows Presentation Foundation (WPF) can be used to create rich user interfaces, such as those in Windows Vista.
22. A WPF user interface is coded in XAML; a XAML Browser Application is called XBAP.
23. Using WPF Interoperability you can add an ElementHost control and WPF controls to a Windows Form. WPF controls are added to the ElementHost at run time.
24. WPF applications are similar to Web applications in that they are created as two files: one for the user interface and one for the programming logic.
K e y T e r m s attribute 594 CausesValidation property 575 CharacterCasing property 575 child form 581 code snippets 580 DateTime structure 586 element 594 ErrorProvider component 572 field-level validation 575 IsMdiContainer property 582LayoutMdi method 584 MaxLength property 575 MdiWindowListItem
property 584 multiple document interface
(MDI) 581 node 594 Now property 586
parent form 581SetError method 572 sibling 594 single document interface
(SDI) 581 status bar 586 StatusStrip control 586 toolbar 585 ToolStrip control 585 ToolStripStatusLabel object 586 WebBrowser control 590 Windows Presentation Foundation
(WPF) 602 XAML (Extensible Application
Markup Language) 603 XBAP (XAML Browser
Application) 603
Bradley−Millspaugh: Programming in Visual C# 2008
14. Additional Topics in C# Text 619© The McGraw−Hill Companies, 2010
C H A P T E R 14 611
R e v i e w Q u e s t i o n s
1. Explain how to use an ErrorProvider component when validating the value in a text box.
2. What properties of a text box determine the number of characters a user can enter and the case (upper or lower) of the input?
3. What are code snippets? How might they be used? 4. What is meant by MDI ? 5. What are the advantages of having parent and child forms? 6. What are the layouts available for arranging child windows? 7. How can a child form be created? a parent form? 8. What steps are necessary to create a toolbar and have its buttons execute
menu methods? 9. What must be done to create a status bar? to display a label with the cur-
rent time? to keep the time display current? 10. Describe two controls that you can use for displaying dates on a form. 11. What property is used to navigate to a Web page at design time using the
WebBrowser control? How is this task accomplished at run time? 12. What is the advantage of using XML files over other file types? 13. What is WPF? How does it apply to Windows and Web applications?
P r o g r a m m i n g E x e r c i s e s
14.1 Convert any of your earlier programs that use message boxes for error messages to use an ErrorProvider component. Remove all error message boxes from the program and display meaningful messages in the popup Error text.
14.2 Write an MDI application that is a simple text editor. Allow the user to open multiple documents, each in a separate child form. For the text edi-tor, use one big TextBox control with its Multiline property set to true or a RichTextBox control. Set the control’s Anchor property to all four edges so the control fills its form. The main form should have an Open menu item to open previously saved files; the child forms should have a Save menu item to save their text to a file. Use the file handling that you learned about in Chapter 11 and display the name of the file in the form’s title bar.
14.3 Add a toolbar and a status bar to a previous project to provide shortcuts to the menu items.
14.4 Add a toolbar and a status bar to the calendar program from this chapter. You can first create the calendar program, or your instructor may provide it to you.
14.5 Create an application for displaying movie listings. Add a WebBrowser control that navigates to a page showing the movies.
14.6 Convert your text file project from Chapter 11 to use an XML file.
Bradley−Millspaugh: Programming in Visual C# 2008
14. Additional Topics in C# Text620 © The McGraw−Hill Companies, 2010
612 V I S U A L C# Additional Topics in C#
Xtreme Cinema
Convert any of your earlier Xtreme Cinema programs that use message boxes for error messages to use an ErrorProvider component. Remove all error message boxes from the program and display meaningful messages in the popup Error text.
Add a toolbar and a status bar to the project to provide shortcuts to the menu items.
Cool Boards
Convert any of your earlier Cool Boards programs that use message boxes for error messages to use an ErrorProvider component. Remove all error message boxes from the program and display meaningful messages in the popup Error text.
Add a toolbar and a status bar to the project to provide shortcuts to the menu items.
Convert any of your earlier Christopher’s Car Center programs that use message boxes for error messages to use an ErrorProvider component. Remove all error message boxes from the program and display mean-ingful messages in the popup Error text.
Christopher’s Car Center
Add a toolbar and a status bar to the project to provide shortcuts to the menu items.
Case Studies
Custom Supplies Mail Order
Convert any of your earlier Custom Supplies Mail Order programs that use message boxes for error mes-sages to use an ErrorProvider component. Remove all error message boxes from the program and display meaningful messages in the popup Error text.
Add a toolbar and a status bar to the project to provide shortcuts to the menu items.
Note : For help in basing a new project on an existing project, see “Basing a New Project on an Existing Project” in Appendix C.
Bradley−Millspaugh: Programming in Visual C# 2008
Back Matter Appendix A: Answers to Feedback Questions
621© The McGraw−Hill Companies, 2010
A P P E N D I X
A Answers to Feedback Questions
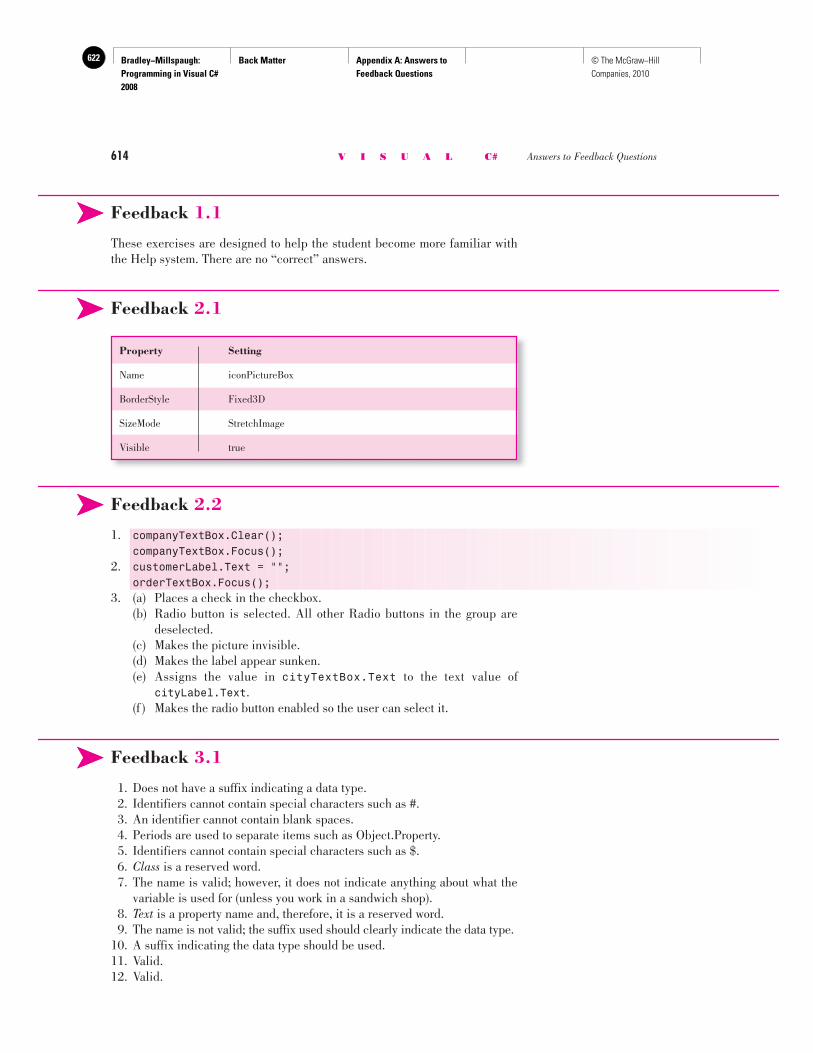
Bradley−Millspaugh: Programming in Visual C# 2008
Back Matter Appendix A: Answers to Feedback Questions
622 © The McGraw−Hill Companies, 2010
614 V I S U A L C# Answers to Feedback Questions
Feedback 1.1
These exercises are designed to help the student become more familiar with the Help system. There are no “correct” answers.
Feedback 2.1
Feedback 2.2
1. companyTextBox.Clear(); companyTextBox.Focus(); 2. customerLabel.Text = ""; orderTextBox.Focus(); 3. (a) Places a check in the checkbox. (b) Radio button is selected. All other Radio buttons in the group are
deselected. (c) Makes the picture invisible. (d) Makes the label appear sunken. (e) Assigns the value in cityTextBox.Text to the text value of
city Label.Text . (f ) Makes the radio button enabled so the user can select it.
Feedback 3.1
1. Does not have a suffix indicating a data type. 2. Identifiers cannot contain special characters such as #. 3. An identifier cannot contain blank spaces. 4. Periods are used to separate items such as Object.Property. 5. Identifiers cannot contain special characters such as $. 6. Class is a reserved word. 7. The name is valid; however, it does not indicate anything about what the
variable is used for (unless you work in a sandwich shop). 8. Text is a property name and, therefore, it is a reserved word. 9. The name is not valid; the suffix used should clearly indicate the data type. 10. A suffix indicating the data type should be used. 11. Valid. 12. Valid.
➤➤
➤➤
➤➤
➤➤
Property Setting
Name iconPictureBox
BorderStyle Fixed3D
SizeMode StretchImage
Visible true
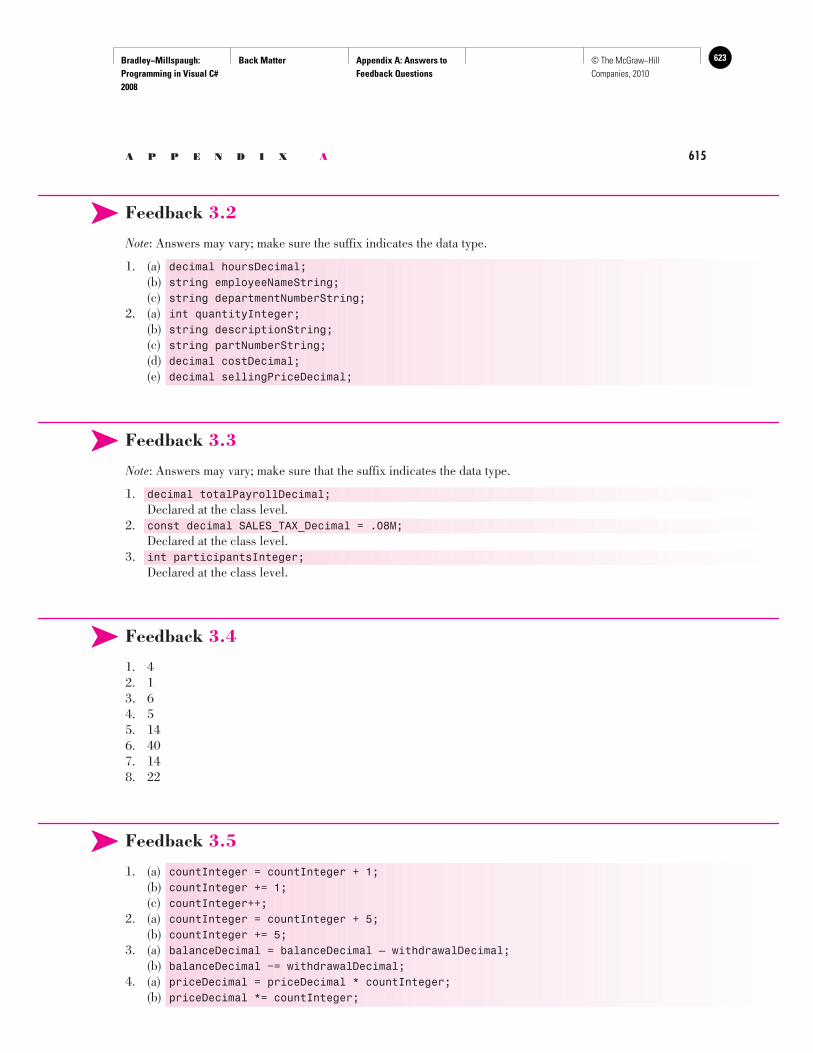
Bradley−Millspaugh: Programming in Visual C# 2008
Back Matter Appendix A: Answers to Feedback Questions
623© The McGraw−Hill Companies, 2010
A P P E N D I X A 615
Feedback 3.2
Note : Answers may vary; make sure the suffix indicates the data type.
1. (a) decimal hoursDecimal; (b) string employeeNameString; (c) string departmentNumberString; 2. (a) int quantityInteger; (b) string descriptionString; (c) string partNumberString; (d) decimal costDecimal; (e) decimal sellingPriceDecimal;
Feedback 3.3
Note : Answers may vary; make sure that the suffix indicates the data type.
1. decimal totalPayrollDecimal; Declared at the class level. 2. const decimal SALES_TAX_Decimal = .08M; Declared at the class level. 3. int participantsInteger; Declared at the class level.
Feedback 3.4
1. 4 2. 1 3. 6 4. 5 5. 14 6. 40 7. 14 8. 22
Feedback 3.5
1. (a) countInteger = countInteger + 1; (b) countInteger += 1; (c) countInteger++; 2. (a) countInteger = countInteger + 5; (b) countInteger += 5; 3. (a) balanceDecimal = balanceDecimal — withdrawalDecimal; (b) balanceDecimal −= withdrawalDecimal; 4. ( a) priceDecimal = priceDecimal * countInteger; (b) priceDecimal *= countInteger;
➤➤
➤➤
➤➤
➤➤
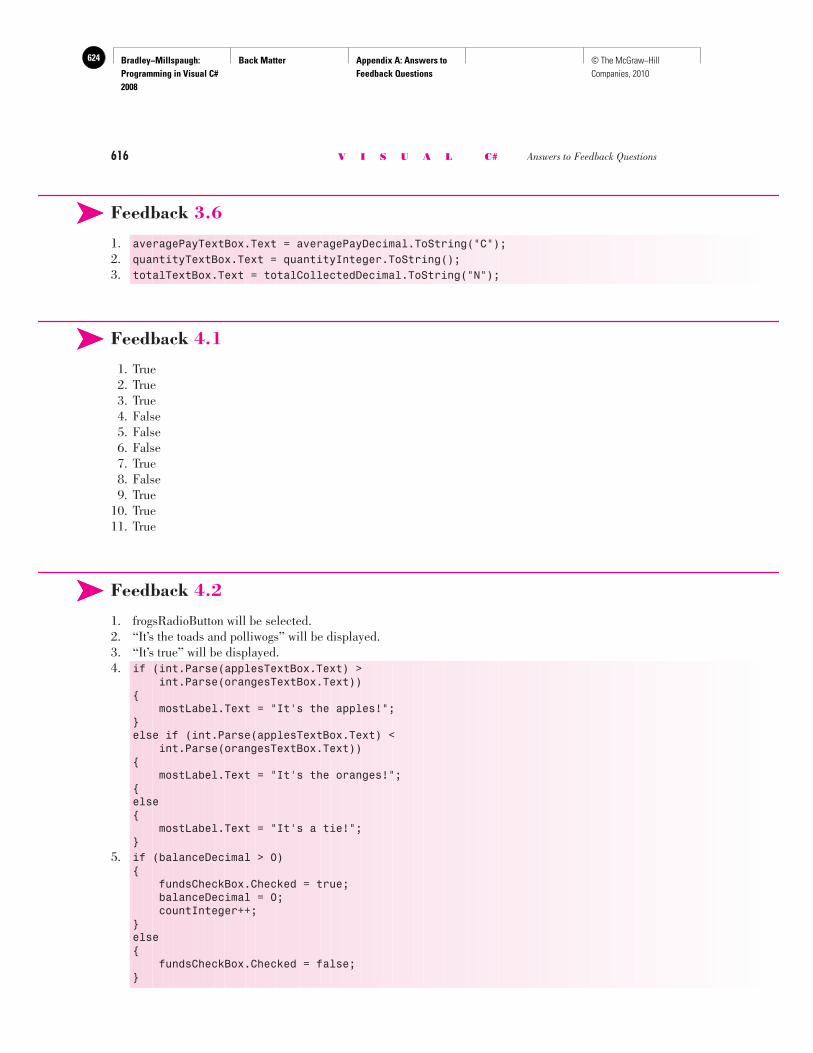
Bradley−Millspaugh: Programming in Visual C# 2008
Back Matter Appendix A: Answers to Feedback Questions
624 © The McGraw−Hill Companies, 2010
616 V I S U A L C# Answers to Feedback Questions
Feedback 3.6
1. averagePayTextBox.Text = averagePayDecimal.ToString("C"); 2. quantityTextBox.Text = quantityInteger.ToString(); 3. totalTextBox.Text = totalCollectedDecimal.ToString("N");
Feedback 4.1
1. True 2. True 3. True 4. False 5. False 6. False 7. True 8. False 9. True 10. True 11. True
Feedback 4.2
1. frogsRadioButton will be selected. 2. “It’s the toads and polliwogs” will be displayed. 3. “It’s true” will be displayed. 4. if (int.Parse(applesTextBox.Text) >
int.Parse(orangesTextBox.Text)){ mostLabel.Text = "It's the apples!";}else if (int.Parse(applesTextBox.Text) < int.Parse(orangesTextBox.Text)){ mostLabel.Text = "It's the oranges!";{else{ mostLabel.Text = "It's a tie!";}
5. if (balanceDecimal > 0){ fundsCheckBox.Checked = true; balanceDecimal = 0; countInteger++;}else{ fundsCheckBox.Checked = false;}
➤➤
➤➤
➤➤
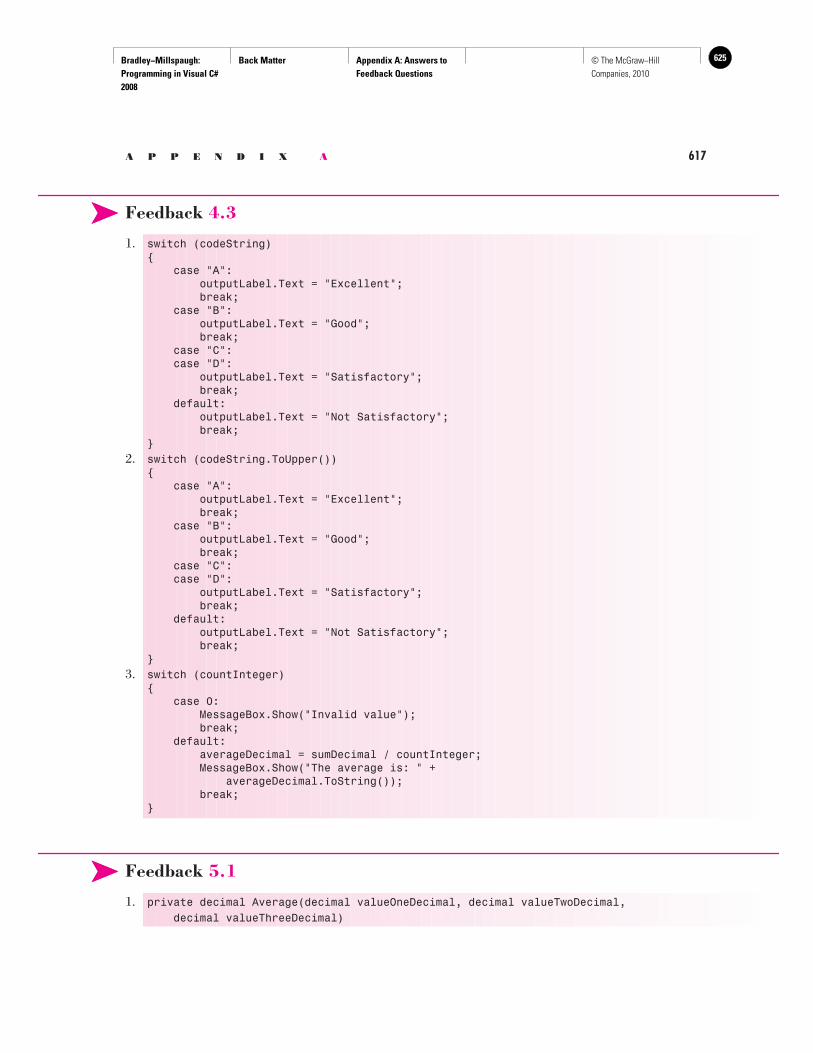
Bradley−Millspaugh: Programming in Visual C# 2008
Back Matter Appendix A: Answers to Feedback Questions
625© The McGraw−Hill Companies, 2010
A P P E N D I X A 617
Feedback 4.3
1. switch (codeString){ case "A": outputLabel.Text = "Excellent"; break; case "B": outputLabel.Text = "Good"; break; case "C": case "D": outputLabel.Text = "Satisfactory"; break; default: outputLabel.Text = "Not Satisfactory"; break;}
2. switch (codeString.ToUpper()){ case "A": outputLabel.Text = "Excellent"; break; case "B": outputLabel.Text = "Good"; break; case "C": case "D": outputLabel.Text = "Satisfactory"; break; default: outputLabel.Text = "Not Satisfactory"; break;}
3. switch (countInteger){ case 0: MessageBox.Show("Invalid value"); break; default: averageDecimal = sumDecimal / countInteger; MessageBox.Show("The average is: " + averageDecimal.ToString()); break;}
Feedback 5.1
1. private decimal Average(decimal valueOneDecimal, decimal valueTwoDecimal, decimal valueThreeDecimal)
➤➤
➤➤
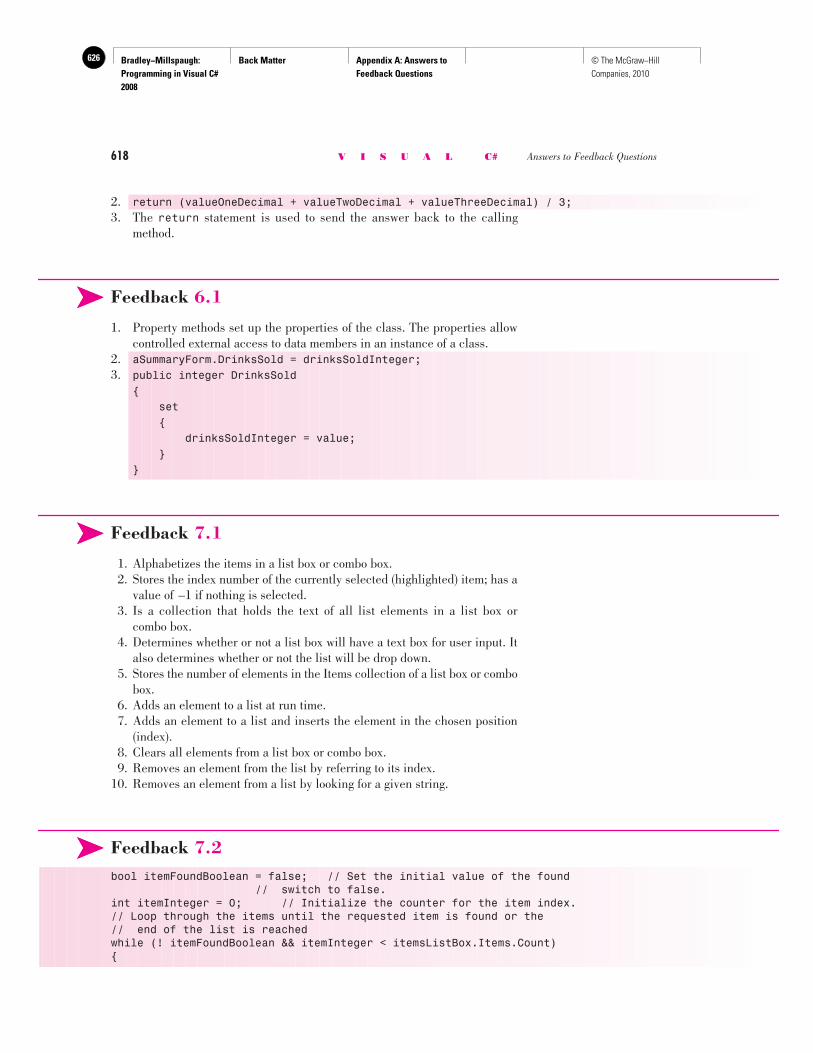
Bradley−Millspaugh: Programming in Visual C# 2008
Back Matter Appendix A: Answers to Feedback Questions
626 © The McGraw−Hill Companies, 2010
618 V I S U A L C# Answers to Feedback Questions
2. return (valueOneDecimal + valueTwoDecimal + valueThree Decimal) / 3; 3. The return statement is used to send the answer back to the calling
method.
Feedback 6.1
1. Property methods set up the properties of the class. The properties allow controlled external access to data members in an instance of a class.
2. aSummaryForm.DrinksSold = drinksSoldInteger; 3. public integer DrinksSold
{ set { drinksSoldInteger = value; }}
Feedback 7.1
1. Alphabetizes the items in a list box or combo box. 2. Stores the index number of the currently selected (highlighted) item; has a
value of –1 if nothing is selected. 3. Is a collection that holds the text of all list elements in a list box or
combo box. 4. Determines whether or not a list box will have a text box for user input. It
also determines whether or not the list will be drop down. 5. Stores the number of elements in the Items collection of a list box or combo
box. 6. Adds an element to a list at run time. 7. Adds an element to a list and inserts the element in the chosen position
(index). 8. Clears all elements from a list box or combo box. 9. Removes an element from the list by referring to its index. 10. Removes an element from a list by looking for a given string.
Feedback 7.2 bool itemFoundBoolean = false; // Set the initial value of the found // switch to false.int itemInteger = 0; // Initialize the counter for the item index.// Loop through the items until the requested item is found or the// end of the list is reachedwhile (! itemFoundBoolean && itemInteger < itemsListBox.Items.Count){
➤➤
➤➤
➤➤
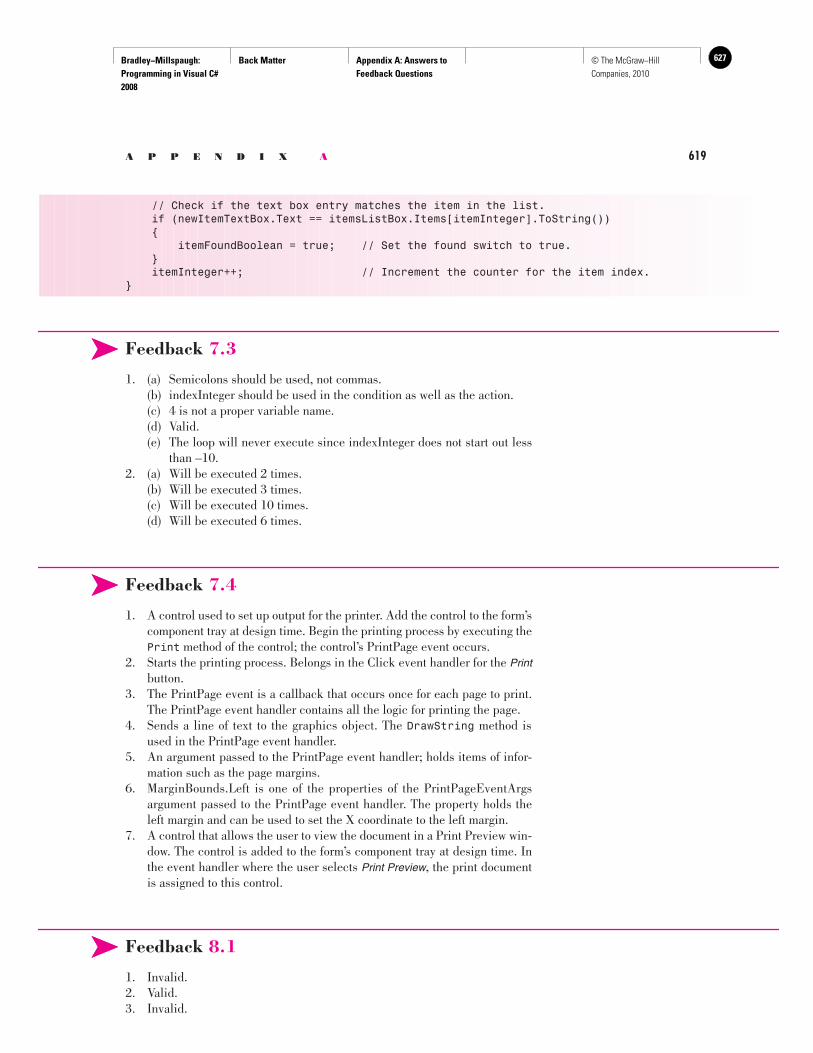
Bradley−Millspaugh: Programming in Visual C# 2008
Back Matter Appendix A: Answers to Feedback Questions
627© The McGraw−Hill Companies, 2010
A P P E N D I X A 619
// Check if the text box entry matches the item in the list. if (newItemTextBox.Text == itemsListBox.Items[itemInteger].ToString()) { itemFoundBoolean = true; // Set the found switch to true. } itemInteger++; // Increment the counter for the item index.}
Feedback 7.3
1. (a) Semicolons should be used, not commas. (b) indexInteger should be used in the condition as well as the action. (c) 4 is not a proper variable name. (d) Valid. (e) The loop will never execute since indexInteger does not start out less
than –10. 2. (a) Will be executed 2 times. (b) Will be executed 3 times. (c) Will be executed 10 times. (d) Will be executed 6 times.
Feedback 7.4
1. A control used to set up output for the printer. Add the control to the form’s component tray at design time. Begin the printing process by executing the Print method of the control; the control’s PrintPage event occurs.
2. Starts the printing process. Belongs in the Click event handler for the Print button.
3. The PrintPage event is a callback that occurs once for each page to print. The PrintPage event handler contains all the logic for printing the page.
4. Sends a line of text to the graphics object. The DrawString method is used in the PrintPage event handler.
5. An argument passed to the PrintPage event handler; holds items of infor-mation such as the page margins.
6. MarginBounds.Left is one of the properties of the PrintPageEventArgs argument passed to the PrintPage event handler. The property holds the left margin and can be used to set the X coordinate to the left margin.
7. A control that allows the user to view the document in a Print Preview win-dow. The control is added to the form’s component tray at design time. In the event handler where the user selects Print Preview , the print document is assigned to this control.
Feedback 8.1
1. Invalid. 2. Valid. 3. Invalid.
➤➤
➤➤
➤➤
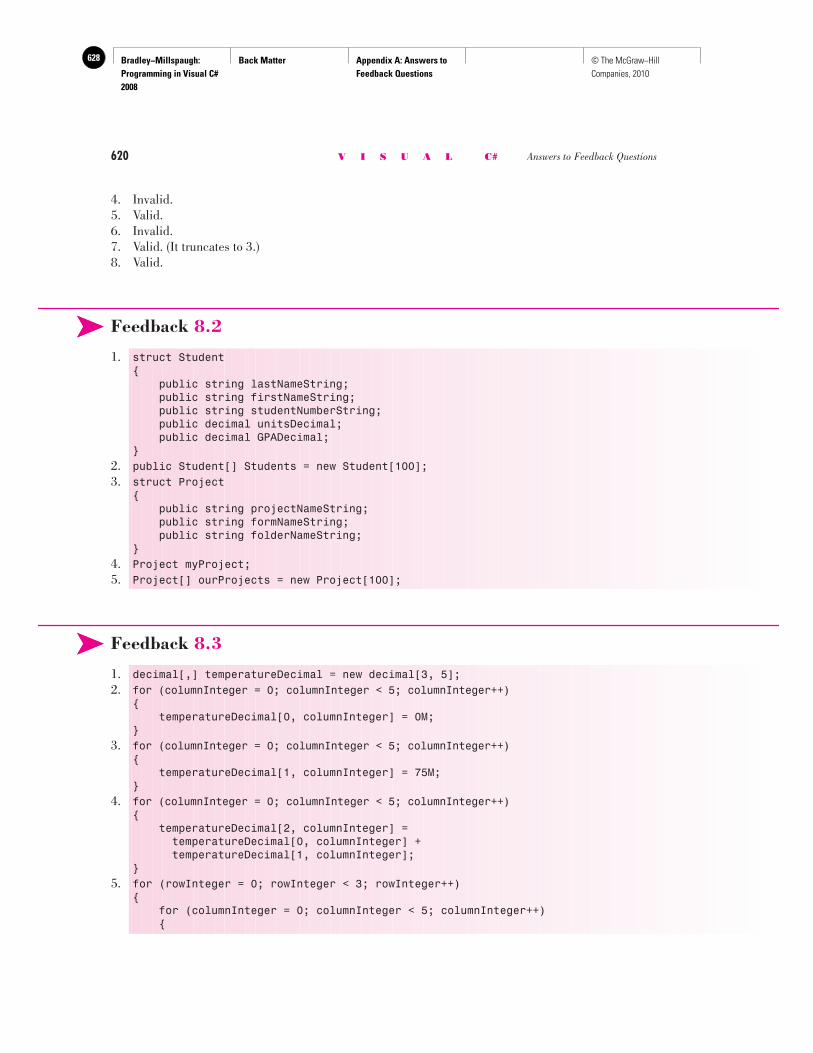
Bradley−Millspaugh: Programming in Visual C# 2008
Back Matter Appendix A: Answers to Feedback Questions
628 © The McGraw−Hill Companies, 2010
620 V I S U A L C# Answers to Feedback Questions
4. Invalid. 5. Valid. 6. Invalid. 7. Valid. (It truncates to 3.) 8. Valid.
Feedback 8.2
1. struct Student{ public string lastNameString; public string firstNameString; public string studentNumberString; public decimal unitsDecimal; public decimal GPADecimal;}
2. public Student[] Students = new Student[100]; 3. struct Project
{ public string projectNameString; public string formNameString; public string folderNameString;}
4. Project myProject; 5. Project[] ourProjects = new Project[100];
Feedback 8.3
1. decimal[,] temperatureDecimal = new decimal[3, 5]; 2. for (columnInteger = 0; columnInteger < 5; columnInteger++)
{ temperatureDecimal[0, columnInteger] = 0M;}
3. for (columnInteger = 0; columnInteger < 5; columnInteger++){ temperatureDecimal[1, columnInteger] = 75M;}
4. for (columnInteger = 0; columnInteger < 5; columnInteger++){ temperatureDecimal[2, columnInteger] = temperatureDecimal[0, columnInteger] + temperatureDecimal[1, columnInteger];}
5. for (rowInteger = 0; rowInteger < 3; rowInteger++){ for (columnInteger = 0; columnInteger < 5; columnInteger++) {
➤➤
➤➤
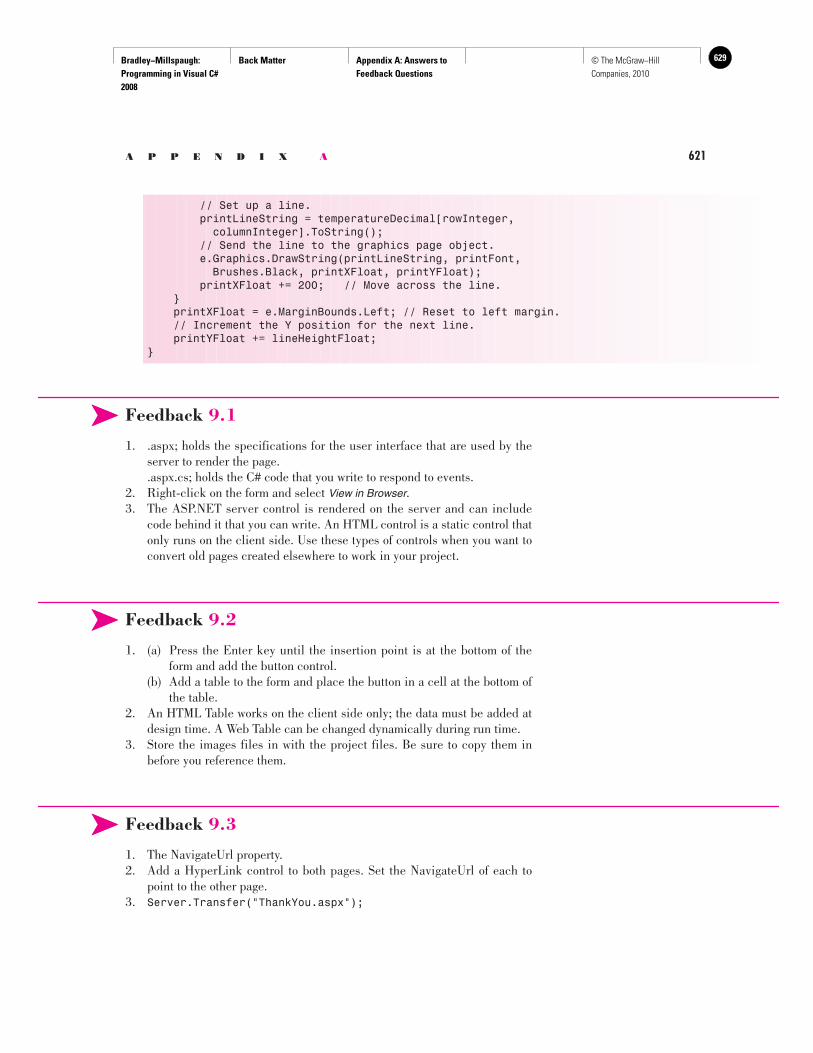
Bradley−Millspaugh: Programming in Visual C# 2008
Back Matter Appendix A: Answers to Feedback Questions
629© The McGraw−Hill Companies, 2010
A P P E N D I X A 621
// Set up a line. printLineString = temperatureDecimal[rowInteger, columnInteger].ToString(); // Send the line to the graphics page object. e.Graphics.DrawString(printLineString, printFont, Brushes.Black, printXFloat, printYFloat); printXFloat += 200; // Move across the line. } printXFloat = e.MarginBounds.Left; // Reset to left margin. // Increment the Y position for the next line. printYFloat += lineHeightFloat;}
Feedback 9.1
1. .aspx; holds the specifications for the user interface that are used by the server to render the page.
.aspx.cs; holds the C# code that you write to respond to events. 2. Right-click on the form and select View in Browser . 3. The ASP.NET server control is rendered on the server and can include
code behind it that you can write. An HTML control is a static control that only runs on the client side. Use these types of controls when you want to convert old pages created elsewhere to work in your project.
Feedback 9.2
1. (a) Press the Enter key until the insertion point is at the bottom of the form and add the button control.
(b) Add a table to the form and place the button in a cell at the bottom of the table.
2. An HTML Table works on the client side only; the data must be added at design time. A Web Table can be changed dynamically during run time.
3. Store the images files in with the project files. Be sure to copy them in before you reference them.
Feedback 9.3
1. The NavigateUrl property. 2. Add a HyperLink control to both pages. Set the NavigateUrl of each to
point to the other page. 3. Server.Transfer("ThankYou.aspx");
➤➤
➤➤
➤➤
Bradley−Millspaugh: Programming in Visual C# 2008
Back Matter Appendix A: Answers to Feedback Questions
630 © The McGraw−Hill Companies, 2010
622 V I S U A L C# Answers to Feedback Questions
Feedback 9.4
Attach a RequiredFieldValidator control so that the field cannot be left blank. Attach a RangeValidator to check if the input falls within the specified range by setting the MinimumValue = 0 and the MaximumValue = 1000 and set the Type to make sure that the entry can be converted to numeric. Change the ErrorMessage property to reflect the error.
Feedback 9.5
The Page_Load event occurs and the page is redisplayed for every round-trip to the server. If you have initialization code in the Page_Load event handler, you don’t want to perform the initialization each time the handler executes.
Feedback 10.1
1. The file is the database. The table contains the rows and columns , which hold the information about
your friends. Each row/record contains information about an individual friend. A column or field contains an element of data, such as the name or phone
number. The key field is the field used to organize the file; it contains a unique
value that identifies a particular record, for example, the name field. 2. XML is stored as text, which can pass through Internet firewalls and can
be edited using any text editor.
Feedback 10.2
The binding source object creates a link between the original data source and the program. The table adapter passes information back and forth between the data source and the dataset. The dataset holds a copy of the data retrieved from the data source and is used in your program to access the data, either field by field (for labels and text boxes) or by connecting it to a grid.
Feedback 10.3
1. The drop-down list in the Data Sources window allows you to select Data-GridView or Details view.
➤➤
➤➤
➤➤
➤➤
➤➤
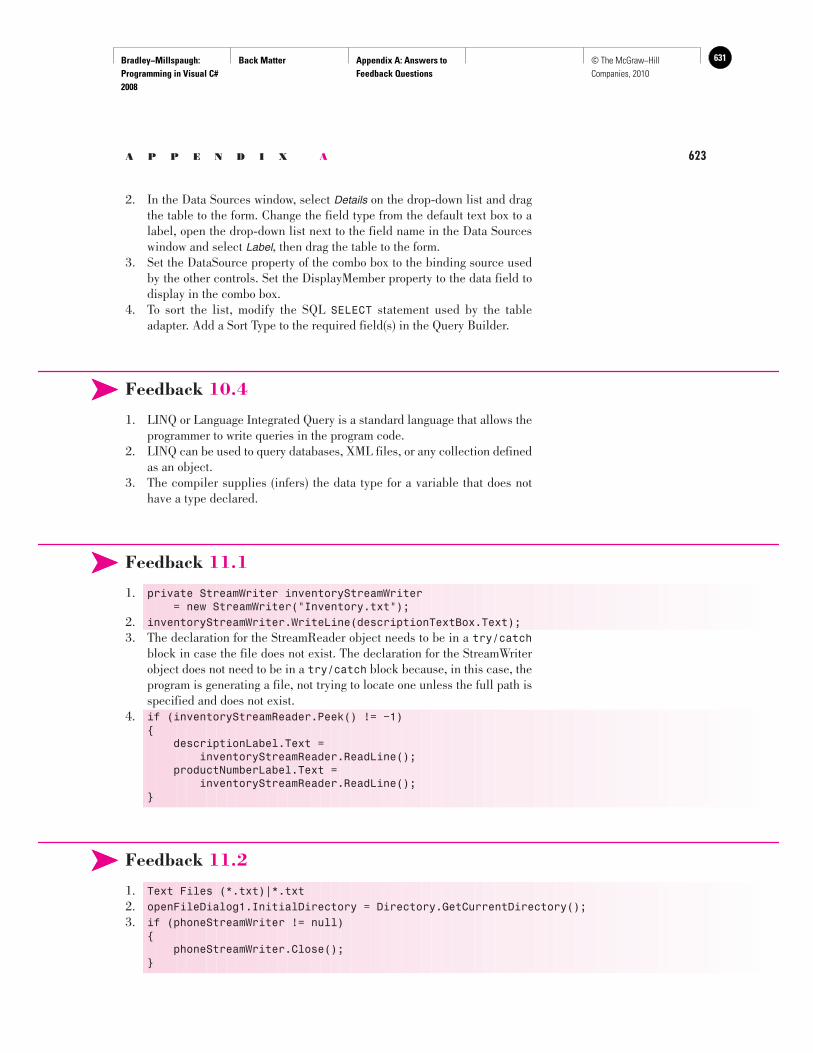
Bradley−Millspaugh: Programming in Visual C# 2008
Back Matter Appendix A: Answers to Feedback Questions
631© The McGraw−Hill Companies, 2010
A P P E N D I X A 623
2. In the Data Sources window, select Details on the drop-down list and drag the table to the form. Change the field type from the default text box to a label, open the drop-down list next to the field name in the Data Sources window and select Label , then drag the table to the form.
3. Set the DataSource property of the combo box to the binding source used by the other controls. Set the DisplayMember property to the data field to display in the combo box.
4. To sort the list, modify the SQL SELECT statement used by the table adapter. Add a Sort Type to the required field(s) in the Query Builder.
Feedback 10.4
1. LINQ or Language Integrated Query is a standard language that allows the programmer to write queries in the program code.
2. LINQ can be used to query databases, XML files, or any collection defined as an object.
3. The compiler supplies (infers) the data type for a variable that does not have a type declared.
Feedback 11.1
1. private StreamWriter inventoryStreamWriter = new StreamWriter("Inventory.txt");
2. inventoryStreamWriter.WriteLine(descriptionTextBox.Text); 3. The declaration for the StreamReader object needs to be in a try/catch
block in case the file does not exist. The declaration for the StreamWriter object does not need to be in a try/catch block because, in this case, the program is generating a file, not trying to locate one unless the full path is specified and does not exist.
4. if (inventoryStreamReader.Peek() != −1){ descriptionLabel.Text = inventoryStreamReader.ReadLine(); productNumberLabel.Text = inventoryStreamReader.ReadLine();}
Feedback 11.2
1. Text Files (*.txt)|*.txt 2. openFileDialog1.InitialDirectory = Directory.GetCurrent Directory(); 3. if (phoneStreamWriter != null)
{ phoneStreamWriter.Close();}
➤➤
➤➤
➤➤
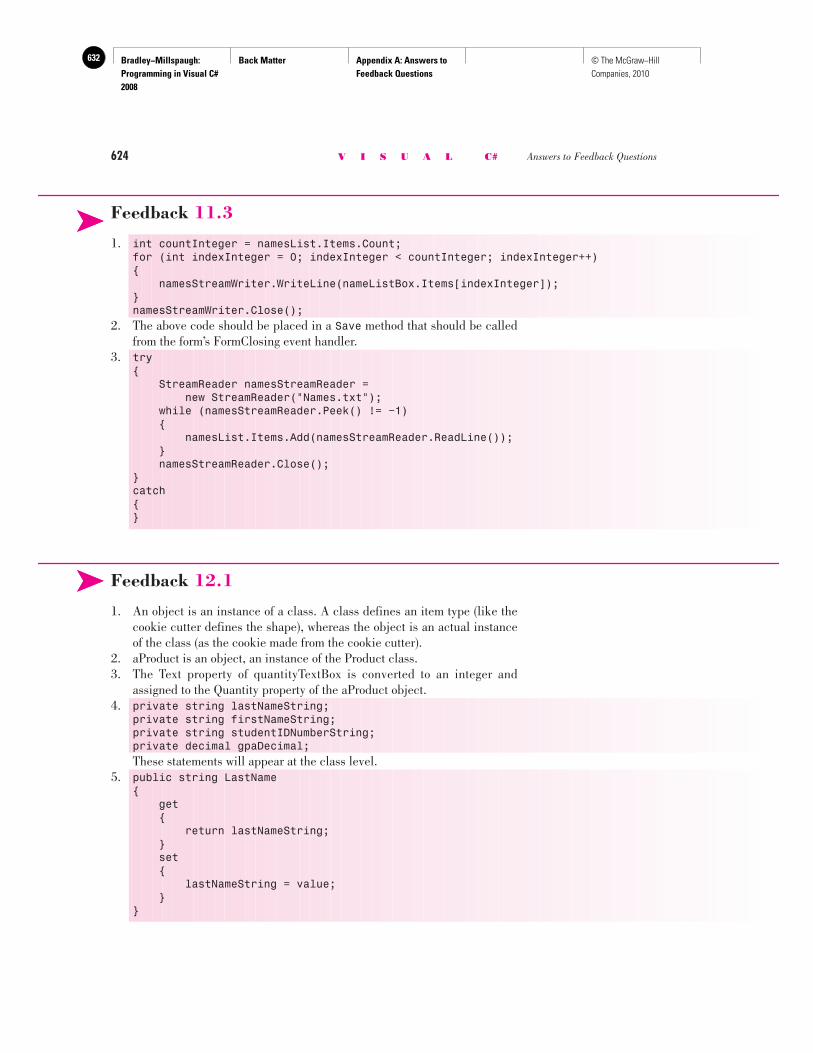
Bradley−Millspaugh: Programming in Visual C# 2008
Back Matter Appendix A: Answers to Feedback Questions
632 © The McGraw−Hill Companies, 2010
624 V I S U A L C# Answers to Feedback Questions
Feedback 11.3
1. int countInteger = namesList.Items.Count; for (int indexInteger = 0; indexInteger < countInteger; indexInteger++){ namesStreamWriter.WriteLine(nameListBox.Items[indexInteger]);}namesStreamWriter.Close();
2. The above code should be placed in a Save method that should be called from the form’s FormClosing event handler.
3. try{ StreamReader namesStreamReader = new StreamReader("Names.txt"); while (namesStreamReader.Peek() != −1) { namesList.Items.Add(namesStreamReader.ReadLine()); } namesStreamReader.Close();}catch{}
Feedback 12.1
1. An object is an instance of a class. A class defines an item type (like the cookie cutter defines the shape), whereas the object is an actual instance of the class (as the cookie made from the cookie cutter).
2. aProduct is an object, an instance of the Product class. 3. The Text property of quantityTextBox is converted to an integer and
assigned to the Quantity property of the aProduct object. 4. private string lastNameString;
private string firstNameString;private string studentIDNumberString;private decimal gpaDecimal;
These statements will appear at the class level. 5. public string LastName
{ get { return lastNameString; } set { lastNameString = value; }}
➤➤
➤➤
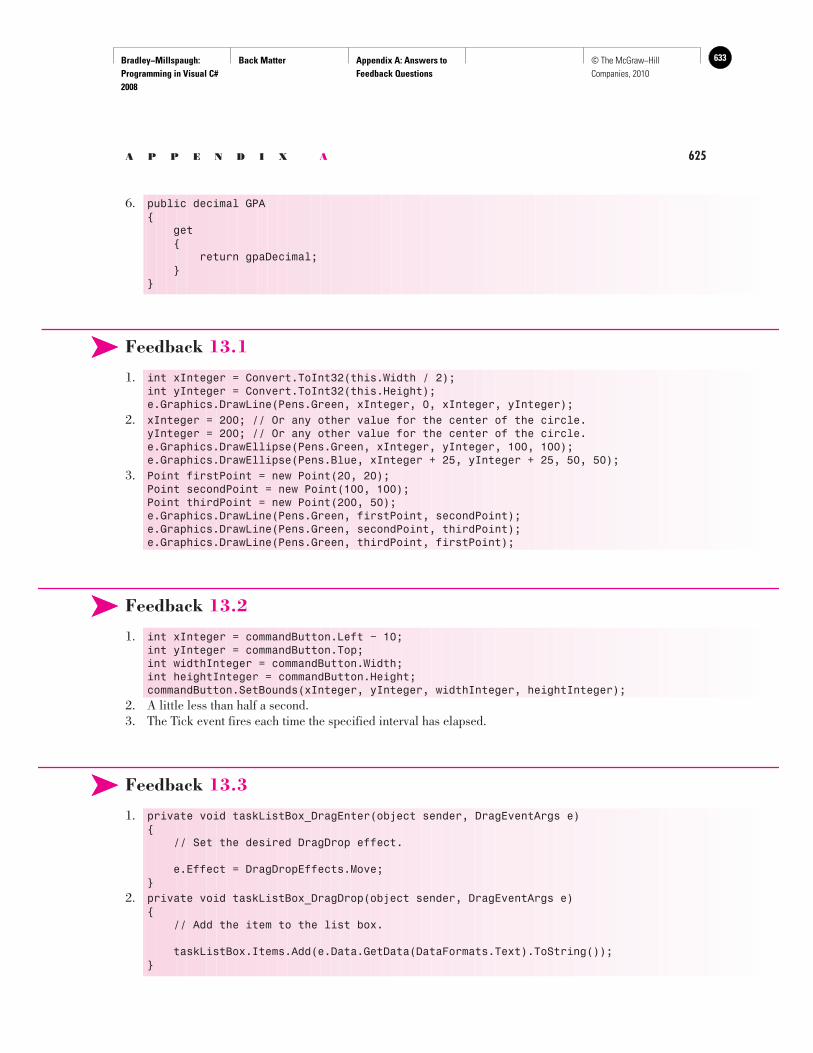
Bradley−Millspaugh: Programming in Visual C# 2008
Back Matter Appendix A: Answers to Feedback Questions
633© The McGraw−Hill Companies, 2010
A P P E N D I X A 625
6. public decimal GPA{ get { return gpaDecimal; }}
Feedback 13.1
1. int xInteger = Convert.ToInt32(this.Width / 2);int yInteger = Convert.ToInt32(this.Height);e.Graphics.DrawLine(Pens.Green, xInteger, 0, xInteger, yInteger);
2. xInteger = 200; // Or any other value for the center of the circle.yInteger = 200; // Or any other value for the center of the circle.e.Graphics.DrawEllipse(Pens.Green, xInteger, yInteger, 100, 100);e.Graphics.DrawEllipse(Pens.Blue, xInteger + 25, yInteger + 25, 50, 50);
3. Point firstPoint = new Point(20, 20);Point secondPoint = new Point(100, 100);Point thirdPoint = new Point(200, 50);e.Graphics.DrawLine(Pens.Green, firstPoint, secondPoint);e.Graphics.DrawLine(Pens.Green, secondPoint, thirdPoint);e.Graphics.DrawLine(Pens.Green, thirdPoint, firstPoint);
Feedback 13.2
1. int xInteger = commandButton.Left − 10;int yInteger = commandButton.Top;int widthInteger = commandButton.Width;int heightInteger = commandButton.Height;commandButton.SetBounds(xInteger, yInteger, widthInteger, heightInteger);
2. A little less than half a second. 3. The Tick event fires each time the specified interval has elapsed.
Feedback 13.3
1. private void taskListBox_DragEnter(object sender, DragEventArgs e){ // Set the desired DragDrop effect.
e.Effect = DragDropEffects.Move;}
2. private void taskListBox_DragDrop(object sender, DragEventArgs e){ // Add the item to the list box.
taskListBox.Items.Add(e.Data.GetData(DataFormats.Text).ToString());}
➤➤
➤➤
➤➤
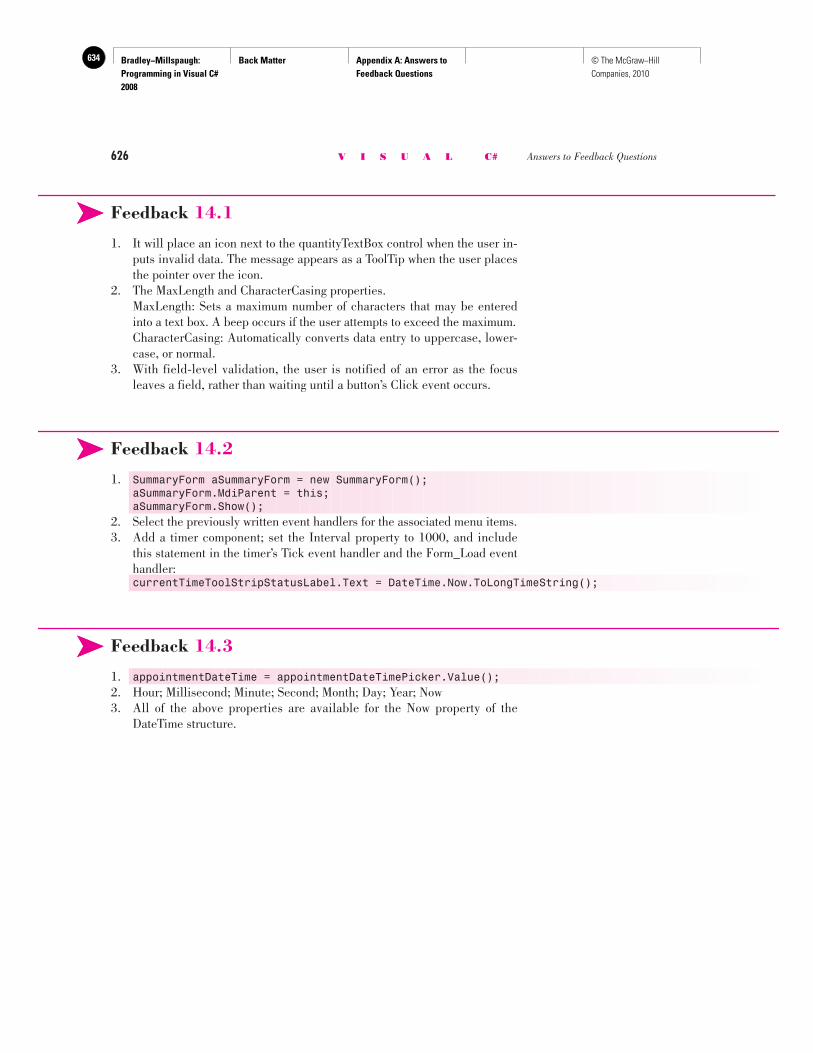
Bradley−Millspaugh: Programming in Visual C# 2008
Back Matter Appendix A: Answers to Feedback Questions
634 © The McGraw−Hill Companies, 2010
626 V I S U A L C# Answers to Feedback Questions
Feedback 14.1
1. It will place an icon next to the quantityTextBox control when the user in-puts invalid data. The message appears as a ToolTip when the user places the pointer over the icon.
2. The MaxLength and CharacterCasing properties. MaxLength: Sets a maximum number of characters that may be entered
into a text box. A beep occurs if the user attempts to exceed the maximum. CharacterCasing: Automatically converts data entry to uppercase, lower-
case, or normal. 3. With field-level validation, the user is notified of an error as the focus
leaves a field, rather than waiting until a button’s Click event occurs.
Feedback 14.2
1. SummaryForm aSummaryForm = new SummaryForm();aSummaryForm.MdiParent = this;aSummaryForm.Show();
2. Select the previously written event handlers for the associated menu items. 3. Add a timer component; set the Interval property to 1000, and include
this statement in the timer’s Tick event handler and the Form_Load event handler: currentTimeToolStripStatusLabel.Text = DateTime.Now.ToLongTimeString();
Feedback 14.3
1. appointmentDateTime = appointmentDateTimePicker.Value(); 2. Hour; Millisecond; Minute; Second; Month; Day; Year; Now 3. All of the above properties are available for the Now property of the
DateTime structure.
➤➤
➤➤
➤➤
Bradley−Millspaugh: Programming in Visual C# 2008
Back Matter Appendix B: Methods for Working with Dates, Mathematics, and String Operations
635© The McGraw−Hill Companies, 2010
A P P E N D I X
B Methods for Working with Dates, Mathematics, and String Operations

Bradley−Millspaugh: Programming in Visual C# 2008
Back Matter Appendix B: Methods for Working with Dates, Mathematics, and String Operations
636 © The McGraw−Hill Companies, 2010
628 V I S U A L C# Dates, Mathematics, and String Operations
The .NET Framework includes many functions and methods that you can use in your C# projects. This appendix introduces functions and methods for han-dling dates, for mathematical operations, and for performing string operations.
Working with Dates
Chapter 14 has a section introducing dates and the Calendar control. You can use the date functions and the methods of the DateTime structure to retrieve the system date, break down a date into component parts, test whether the con-tents of a field are compatible with the DateTime data type, and convert other data types to a DateTime.
The DateTime Structure
When you declare a variable of DateTime data type in C#, you can use its extensive list of properties and methods. You can use the static members of the DateTime structure (identified by a yellow “S” in the MSDN Help lists) without declaring an instance of DateTime. For example, to use the Now property:
DateTime todayDateTime = DateTime.Now;
To use the nonstatic members, you must reference an instance of a Date-Time structure, such as a variable of DateTime type.
Example
timeLabel.Text = todayDateTime.ToShortTimeString();
Following is a partial list of some useful properties and methods of the Date-Time structure:
Property or method Purpose
Add Add the specified number to an instance of a date/time. Variations include AddDays, AddHours, AddMilliseconds, AddMinutes, AddMonths, AddSeconds, AddTicks, AddYears. Add positive valuesto increase a date; add negative values to decrease a date.
Date Date component.
Day Integer day of month; 1–31.
DayOfWeek Enum expression for each day in the form of DayOfWeek.Sunday.
DayOfYear Integer day; 1–366
(continued)
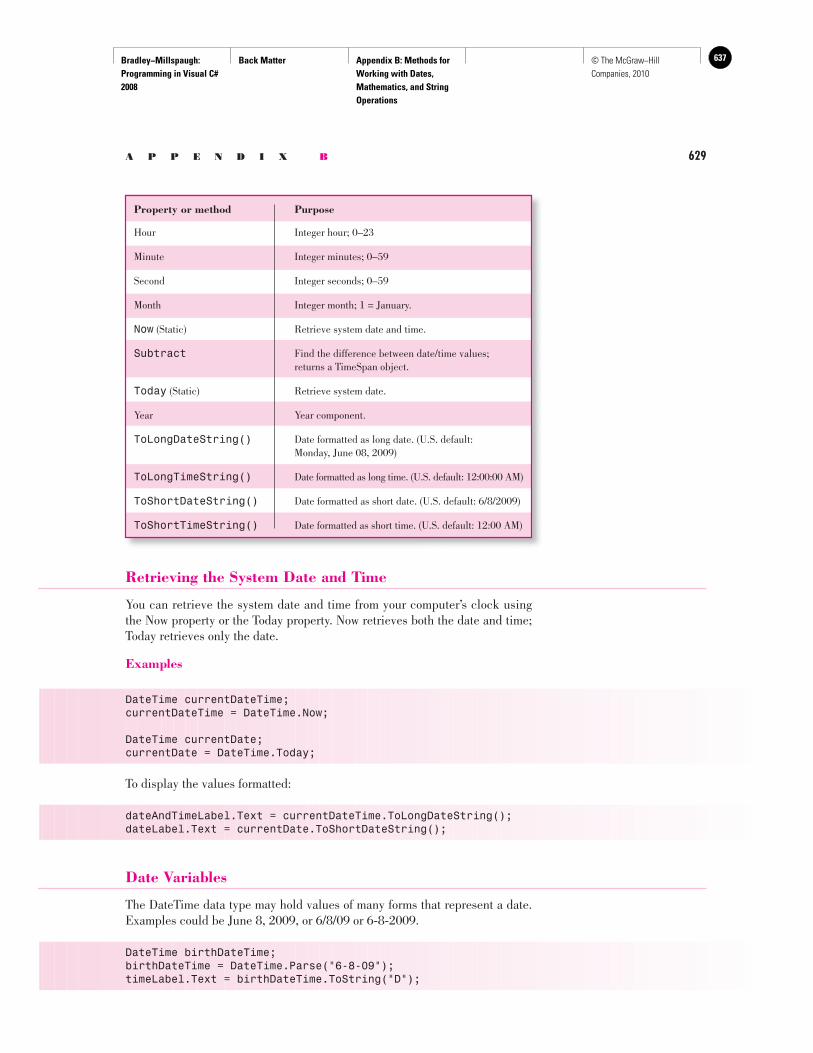
Bradley−Millspaugh: Programming in Visual C# 2008
Back Matter Appendix B: Methods for Working with Dates, Mathematics, and String Operations
637© The McGraw−Hill Companies, 2010
A P P E N D I X B 629
Retrieving the System Date and Time
You can retrieve the system date and time from your computer’s clock using the Now property or the Today property. Now retrieves both the date and time; Today retrieves only the date.
Examples
DateTime currentDateTime; currentDateTime = DateTime.Now;
DateTime currentDate; currentDate = DateTime.Today;
To display the values formatted:
dateAndTimeLabel.Text = currentDateTime.ToLongDateString(); dateLabel.Text = currentDate.ToShortDateString();
Date Variables
The DateTime data type may hold values of many forms that represent a date. Examples could be June 8, 2009, or 6/8/09 or 6-8-2009.
DateTime birthDateTime;birthDateTime = DateTime.Parse("6-8-09");timeLabel.Text = birthDateTime.ToString("D");
Property or method Purpose
Hour Integer hour; 0–23
Minute Integer minutes; 0–59
Second Integer seconds; 0–59
Month Integer month; 1 = January.
Now (Static) Retrieve system date and time.
Subtract Find the difference between date/time values; returns a TimeSpan object.
Today (Static) Retrieve system date.
Year Year component.
ToLongDateString() Date formatted as long date. (U.S. default: Monday, June 08, 2009)
ToLongTimeString() Date formatted as long time. (U.S. default: 12:00:00 AM)
ToShortDateString() Date formatted as short date. (U.S. default: 6/8/2009)
ToShortTimeString() Date formatted as short time. (U.S. default: 12:00 AM)
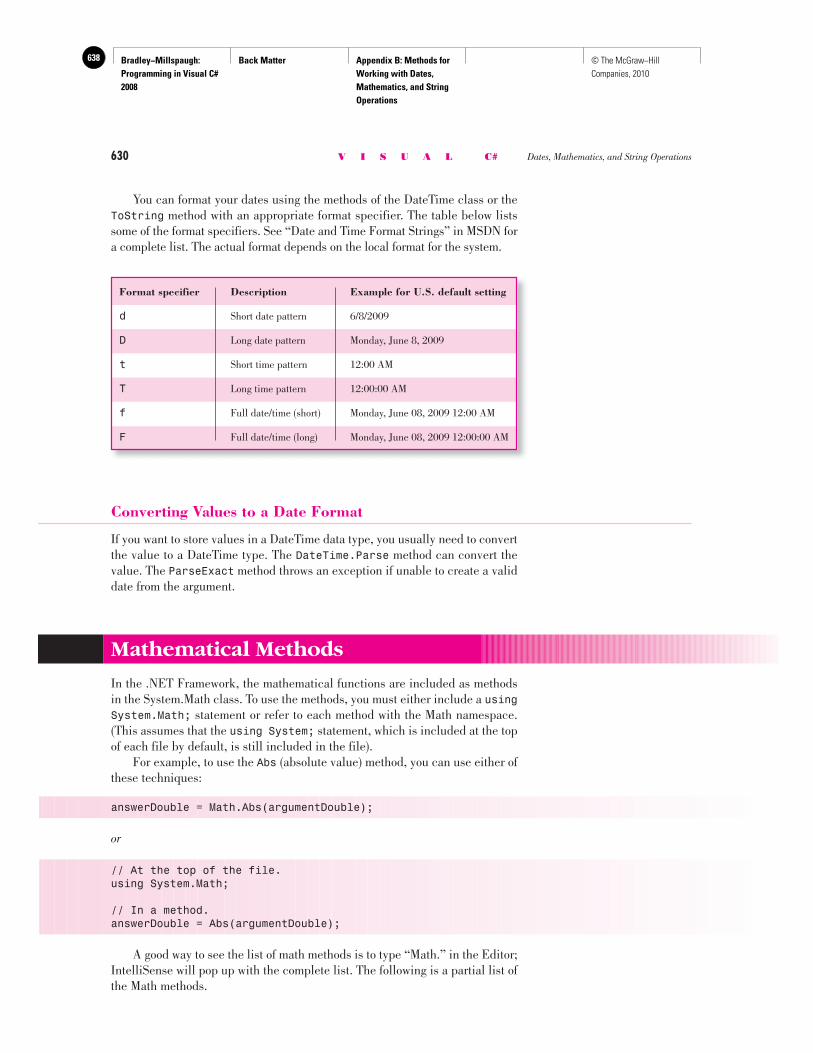
Bradley−Millspaugh: Programming in Visual C# 2008
Back Matter Appendix B: Methods for Working with Dates, Mathematics, and String Operations
638 © The McGraw−Hill Companies, 2010
630 V I S U A L C# Dates, Mathematics, and String Operations
You can format your dates using the methods of the DateTime class or the ToString method with an appropriate format specifier. The table below lists some of the format specifiers. See “Date and Time Format Strings” in MSDN for a complete list. The actual format depends on the local format for the system.
Format specifier Description Example for U.S. default setting
d Short date pattern 6/8/2009
D Long date pattern Monday, June 8, 2009
t Short time pattern 12:00 AM
T Long time pattern 12:00:00 AM
f Full date/time (short) Monday, June 08, 2009 12:00 AM
F Full date/time (long) Monday, June 08, 2009 12:00:00 AM
Converting Values to a Date Format
If you want to store values in a DateTime data type, you usually need to convert the value to a DateTime type. The DateTime.Parse method can convert the value. The ParseExact method throws an exception if unable to create a valid date from the argument.
Mathematical Methods
In the .NET Framework, the mathematical functions are included as methods in the System.Math class. To use the methods, you must either include a using System.Math; statement or refer to each method with the Math namespace. (This assumes that the using System; statement, which is included at the top of each file by default, is still included in the file). For example, to use the Abs (absolute value) method, you can use either of these techniques:
answerDouble = Math.Abs(argumentDouble);
or
// At the top of the file.using System.Math;
// In a method.answerDouble = Abs(argumentDouble);
A good way to see the list of math methods is to type “Math.” in the Editor; IntelliSense will pop up with the complete list. The following is a partial list of the Math methods.
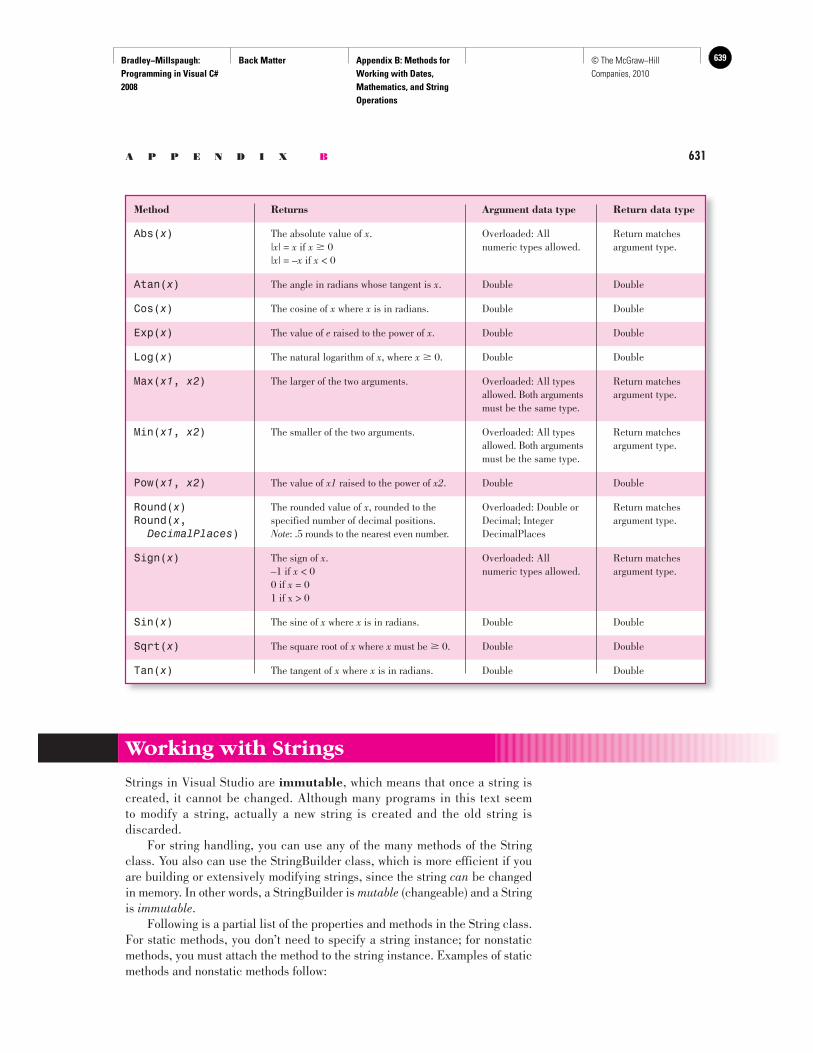
Bradley−Millspaugh: Programming in Visual C# 2008
Back Matter Appendix B: Methods for Working with Dates, Mathematics, and String Operations
639© The McGraw−Hill Companies, 2010
A P P E N D I X B 631
Method Returns Argument data type Return data type
Abs(x) The absolute value of x. Overloaded: All Return matches |x| = x if x � 0 numeric types allowed. argument type. |x| = –x if x < 0
Atan(x) The angle in radians whose tangent is x. Double Double
Cos(x) The cosine of x where x is in radians. Double Double
Exp(x) The value of e raised to the power of x. Double Double
Log(x) The natural logarithm of x, where x � 0. Double Double
Max(x1, x2) The larger of the two arguments. Overloaded: All types Return matches allowed. Both arguments argument type. must be the same type.
Min(x1, x2) The smaller of the two arguments. Overloaded: All types Return matches allowed. Both arguments argument type. must be the same type.
Pow(x1, x2) The value of x1 raised to the power of x2. Double Double
Round(x) The rounded value of x, rounded to the Overloaded: Double or Return matchesRound(x, specified number of decimal positions. Decimal; Integer argument type. DecimalPlaces) Note: .5 rounds to the nearest even number. DecimalPlaces
Sign(x) The sign of x. Overloaded: All Return matches –1 if x < 0 numeric types allowed. argument type. 0 if x = 0 1 if x > 0
Sin(x) The sine of x where x is in radians. Double Double
Sqrt(x) The square root of x where x must be � 0. Double Double
Tan(x) The tangent of x where x is in radians. Double Double
Working with Strings
Strings in Visual Studio are immutable , which means that once a string is created, it cannot be changed. Although many programs in this text seem to modify a string, actually a new string is created and the old string is discarded. For string handling, you can use any of the many methods of the String class. You also can use the StringBuilder class, which is more efficient if you are building or extensively modifying strings, since the string can be changed in memory. In other words, a StringBuilder is mutable (changeable) and a String is immutable . Following is a partial list of the properties and methods in the String class. For static methods, you don’t need to specify a string instance; for nonstatic methods, you must attach the method to the string instance. Examples of static methods and nonstatic methods follow:

Bradley−Millspaugh: Programming in Visual C# 2008
Back Matter Appendix B: Methods for Working with Dates, Mathematics, and String Operations
640 © The McGraw−Hill Companies, 2010
632 V I S U A L C# Dates, Mathematics, and String Operations
Static Method
if (Compare(aString, bString) > 0) // Code to execute if true.
Nonstatic Method
if (aString.EndsWith("ed")) // Code to execute if true.
Method or property Returns
EndsWith(aString) Boolean. True if the string instance ends with the value in aString. Case sensitive.
Equals(aString) Boolean. True if the string instance has the same value as aString. Case sensitive.
Insert(startIndexInteger, New string with aString inserted in the string instance, beginning at aString) startIndexInteger.
Length Returns the length of the string.
Remove() Removes the specified character.
Replace() Replaces all occurrences of a character within the string.
ToString() Converts from another data type to string.
The ANSI Collating Sequence The comparison of strings is based on the sequence of characters in the collating sequence.
Code Character Code Character Code Character
32 Space (blank) 44 , (comma) 56 8
33 ! 45 − 57 9
34 " 46 . 58 :
35 # 47 / 59 ;
36 $ 48 0 60 <
37 % 49 1 61 =
38 & 50 2 62 >
39 ' (apostrophe) 51 3 63 ?
40 ( 52 4 64 @
41 ) 53 5 65 A
42 * 54 6 66 B
43 + 55 7 67 C
(continued)

Bradley−Millspaugh: Programming in Visual C# 2008
Back Matter Appendix B: Methods for Working with Dates, Mathematics, and String Operations
641© The McGraw−Hill Companies, 2010
A P P E N D I X B 633
Comparing Strings See “Comparing Strings” in Chapter 4, page 163.
Code Character Code Character Code Character
68 D 88 X 108 l
69 E 89 Y 109 m
70 F 90 Z 110 n
71 G 91 [ 111 o
72 H 92 \ 112 p
73 I 93 ] 113 q
74 J 94 ^ 114 r
75 K 95 _ 115 s
76 L 96 ` 116 t
77 M 97 a 117 u
78 N 98 b 118 v
79 O 99 c 119 w
80 P 100 d 120 x
81 Q 101 e 121 y
82 R 102 f 122 z
83 S 103 g 123 {
84 T 104 h 124 |
85 U 105 i 125 }
86 V 106 j 126 ~
87 W 107 k 127 Del
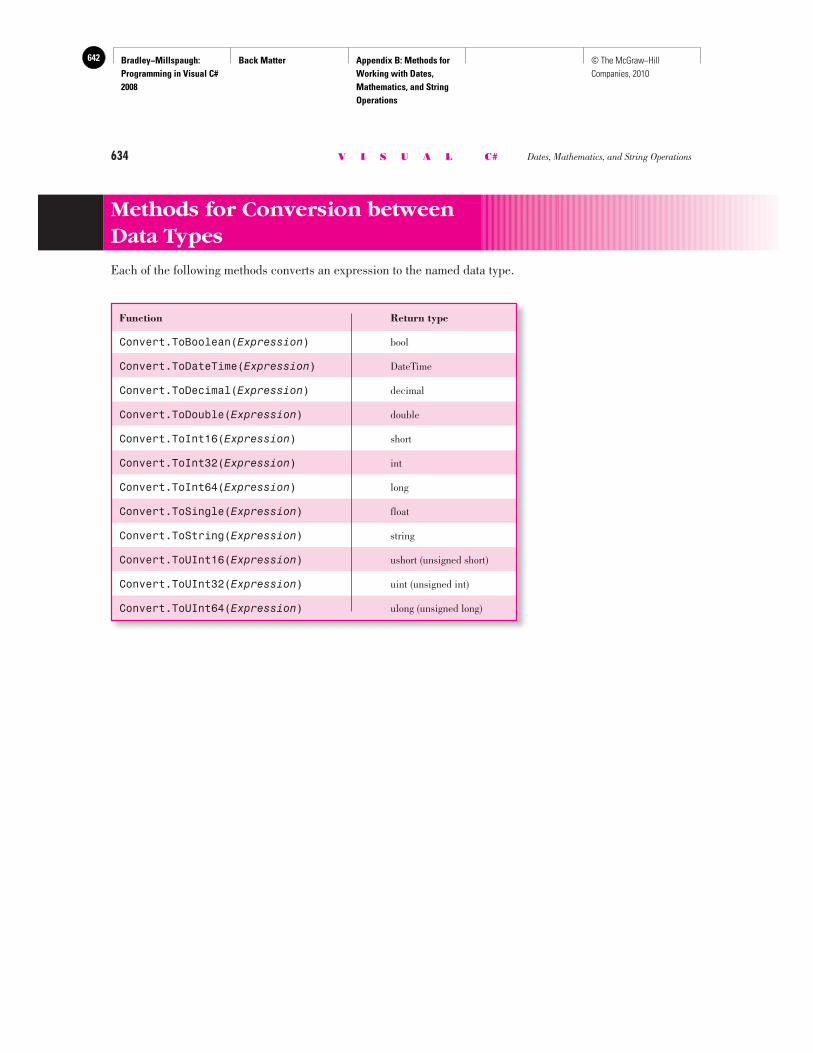
Bradley−Millspaugh: Programming in Visual C# 2008
Back Matter Appendix B: Methods for Working with Dates, Mathematics, and String Operations
642 © The McGraw−Hill Companies, 2010
634 V I S U A L C# Dates, Mathematics, and String Operations
Methods for Conversion betweenData Types
Each of the following methods converts an expression to the named data type.
Function Return type
Convert.ToBoolean(Expression) bool
Convert.ToDateTime(Expression) DateTime
Convert.ToDecimal(Expression) decimal
Convert.ToDouble(Expression) double
Convert.ToInt16(Expression) short
Convert.ToInt32(Expression) int
Convert.ToInt64(Expression) long
Convert.ToSingle(Expression) float
Convert.ToString(Expression) string
Convert.ToUInt16(Expression) ushort (unsigned short)
Convert.ToUInt32(Expression) uint (unsigned int)
Convert.ToUInt64(Expression) ulong (unsigned long)

Bradley−Millspaugh: Programming in Visual C# 2008
Back Matter Appendix C: Tips and Shortcuts for Mastering the Environment
643© The McGraw−Hill Companies, 2010
A P P E N D I X
C Tips and Shortcuts for Mastering the Environment
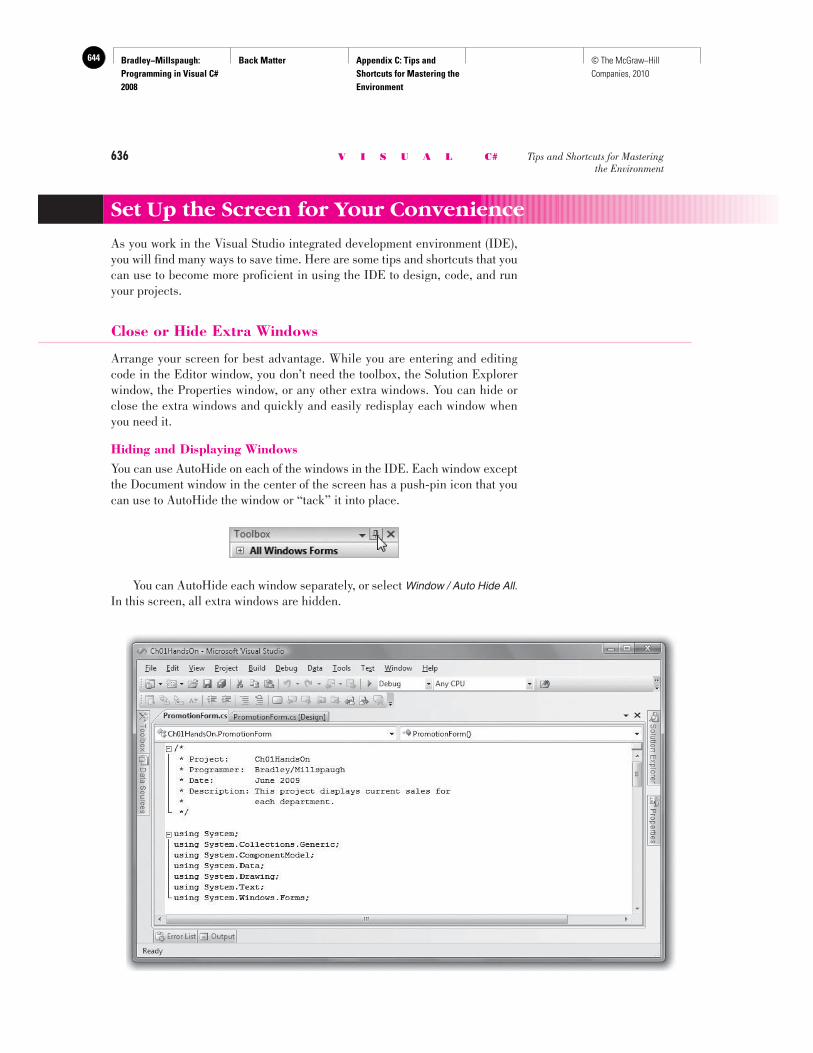
Bradley−Millspaugh: Programming in Visual C# 2008
Back Matter Appendix C: Tips and Shortcuts for Mastering the Environment
644 © The McGraw−Hill Companies, 2010
636 V I S U A L C# Tips and Shortcuts for Mastering the Environment
Set Up the Screen for Your Convenience
As you work in the Visual Studio integrated development environment (IDE), you will find many ways to save time. Here are some tips and shortcuts that you can use to become more proficient in using the IDE to design, code, and run your projects.
Close or Hide Extra Windows
Arrange your screen for best advantage. While you are entering and editing code in the Editor window, you don’t need the toolbox, the Solution Explorer window, the Properties window, or any other extra windows. You can hide or close the extra windows and quickly and easily redisplay each window when you need it.
Hiding and Displaying Windows You can use AutoHide on each of the windows in the IDE. Each window except the Document window in the center of the screen has a push-pin icon that you can use to AutoHide the window or “tack” it into place.
You can AutoHide each window separately, or select Window / Auto Hide All. In this screen, all extra windows are hidden.
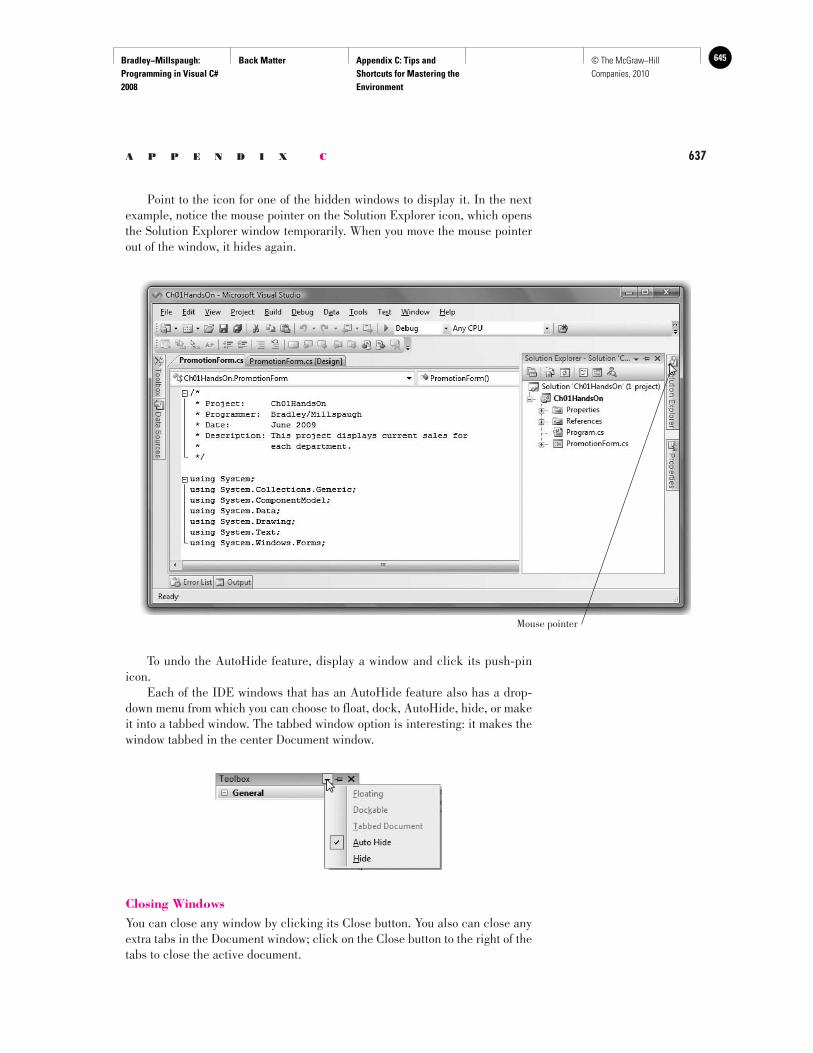
Bradley−Millspaugh: Programming in Visual C# 2008
Back Matter Appendix C: Tips and Shortcuts for Mastering the Environment
645© The McGraw−Hill Companies, 2010
A P P E N D I X C 637
Point to the icon for one of the hidden windows to display it. In the next example, notice the mouse pointer on the Solution Explorer icon, which opens the Solution Explorer window temporarily. When you move the mouse pointer out of the window, it hides again.
Mouse pointer
To undo the AutoHide feature, display a window and click its push-pin icon. Each of the IDE windows that has an AutoHide feature also has a drop-down menu from which you can choose to float, dock, AutoHide, hide, or make it into a tabbed window. The tabbed window option is interesting: it makes the window tabbed in the center Document window.
Closing Windows You can close any window by clicking its Close button. You also can close any extra tabs in the Document window; click on the Close button to the right of the tabs to close the active document.

Bradley−Millspaugh: Programming in Visual C# 2008
Back Matter Appendix C: Tips and Shortcuts for Mastering the Environment
646 © The McGraw−Hill Companies, 2010
638 V I S U A L C# Tips and Shortcuts for Mastering the Environment
Displaying Windows You can quickly and easily open each window when you need it. Each window is listed on the View menu, or use the buttons on the Standard toolbar.
Solution Explorer
Properties Window
Object Browser
Toolbox
Start Page
Command Window
Display Windows Using Keyboard Shortcuts
Solution Explorer window Ctrl + Alt + L
Properties window F4
Toolbox Ctrl + Alt + X
Display the keyboard shortcuts as part of the popup tooltips: select Tools / Customize / Toolbars tab / Show shortcut keys in ScreenTips .
Switch between Documents When you have several tabs open in the Docu-ment window, you can switch by clicking on their tabs or using keyboard shortcuts.
Switch from a form’s Designer window to the Editor window. F7
Switch from a form’s Editor window to the Designer window. Shift + F7
Cycle through open document tabs. Ctrl + F6
Pop up a list of all active windows. Ctrl + Tab
Visual Studio displays only as many tabs as fit in the current size of the Document window. If you have more documents open than displayed tabs, you can use the drop-down list of active files.
Active files
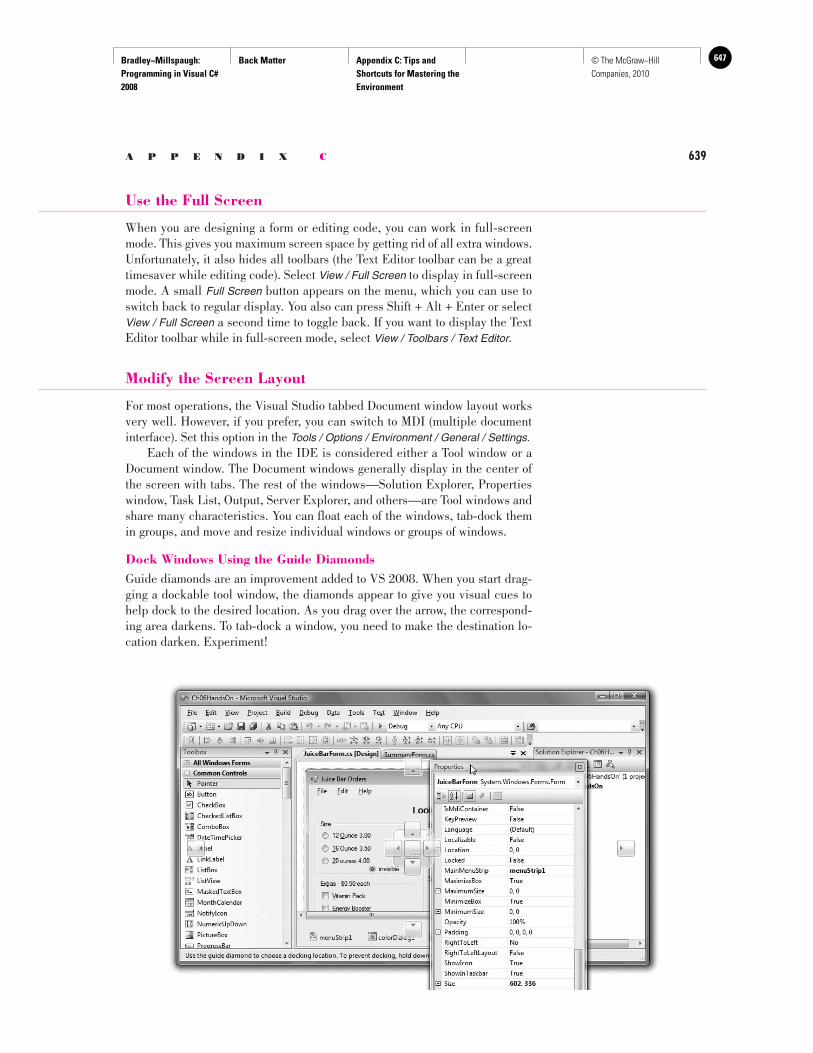
Bradley−Millspaugh: Programming in Visual C# 2008
Back Matter Appendix C: Tips and Shortcuts for Mastering the Environment
647© The McGraw−Hill Companies, 2010
A P P E N D I X C 639
Use the Full Screen
When you are designing a form or editing code, you can work in full-screen mode. This gives you maximum screen space by getting rid of all extra windows. Unfortunately, it also hides all toolbars (the Text Editor toolbar can be a great timesaver while editing code). Select View / Full Screen to display in full-screen mode. A small Full Screen button appears on the menu, which you can use to switch back to regular display. You also can press Shift + Alt + Enter or select View / Full Screen a second time to toggle back. If you want to display the Text Editor toolbar while in full-screen mode, select View / Toolbars / Text Editor .
Modify the Screen Layout
For most operations, the Visual Studio tabbed Document window layout works very well. However, if you prefer, you can switch to MDI (multiple document interface). Set this option in the Tools / Options / Environment / General / Settings. Each of the windows in the IDE is considered either a Tool window or a Document window. The Document windows generally display in the center of the screen with tabs. The rest of the windows—Solution Explorer, Properties window, Task List, Output, Server Explorer, and others—are Tool windows and share many characteristics. You can float each of the windows, tab-dock them in groups, and move and resize individual windows or groups of windows.
Dock Windows Using the Guide Diamonds Guide diamonds are an improvement added to VS 2008. When you start drag-ging a dockable tool window, the diamonds appear to give you visual cues to help dock to the desired location. As you drag over the arrow, the correspond-ing area darkens. To tab-dock a window, you need to make the destination lo-cation darken. Experiment!
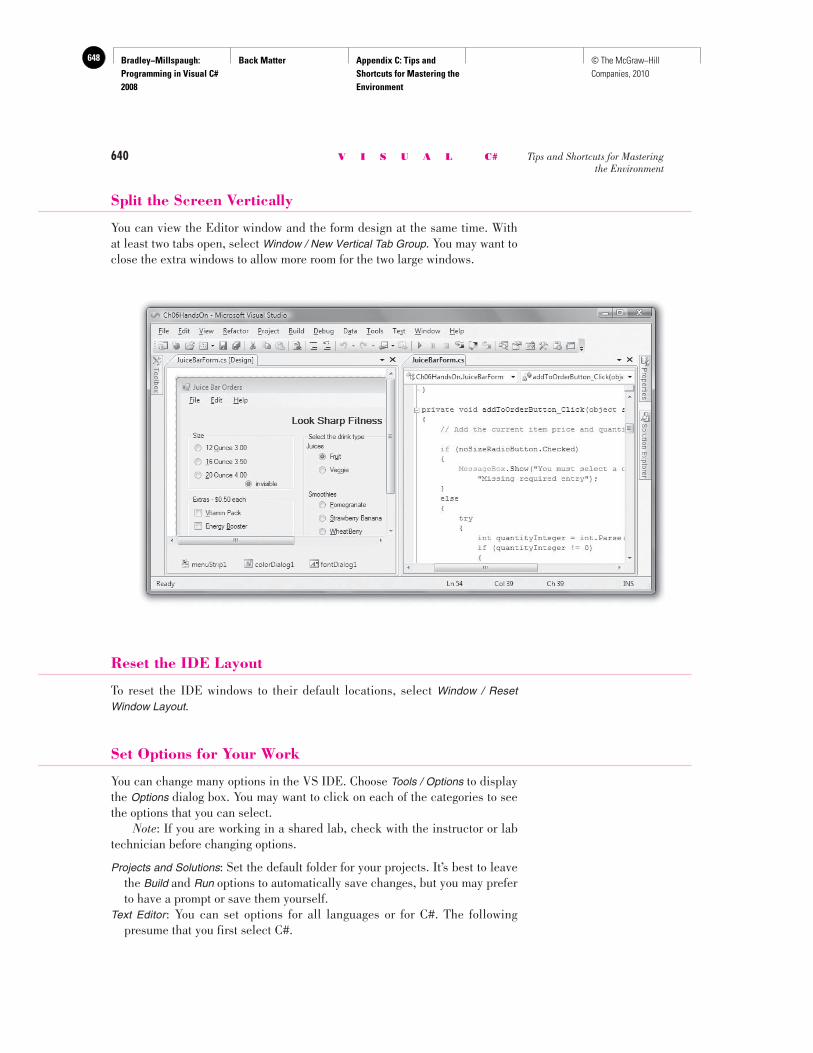
Bradley−Millspaugh: Programming in Visual C# 2008
Back Matter Appendix C: Tips and Shortcuts for Mastering the Environment
648 © The McGraw−Hill Companies, 2010
640 V I S U A L C# Tips and Shortcuts for Mastering the Environment
Split the Screen Vertically
You can view the Editor window and the form design at the same time. With at least two tabs open, select Window / New Vertical Tab Group . You may want to close the extra windows to allow more room for the two large windows.
Reset the IDE Layout
To reset the IDE windows to their default locations, select Window / Reset Window Layout .
Set Options for Your Work
You can change many options in the VS IDE. Choose Tools / Options to display the Options dialog box. You may want to click on each of the categories to see the options that you can select. Note : If you are working in a shared lab, check with the instructor or lab technician before changing options.
Projects and Solutions : Set the default folder for your projects. It’s best to leave the Build and Run options to automatically save changes, but you may prefer to have a prompt or save them yourself.
Text Editor : You can set options for all languages or for C#. The following presume that you first select C#.
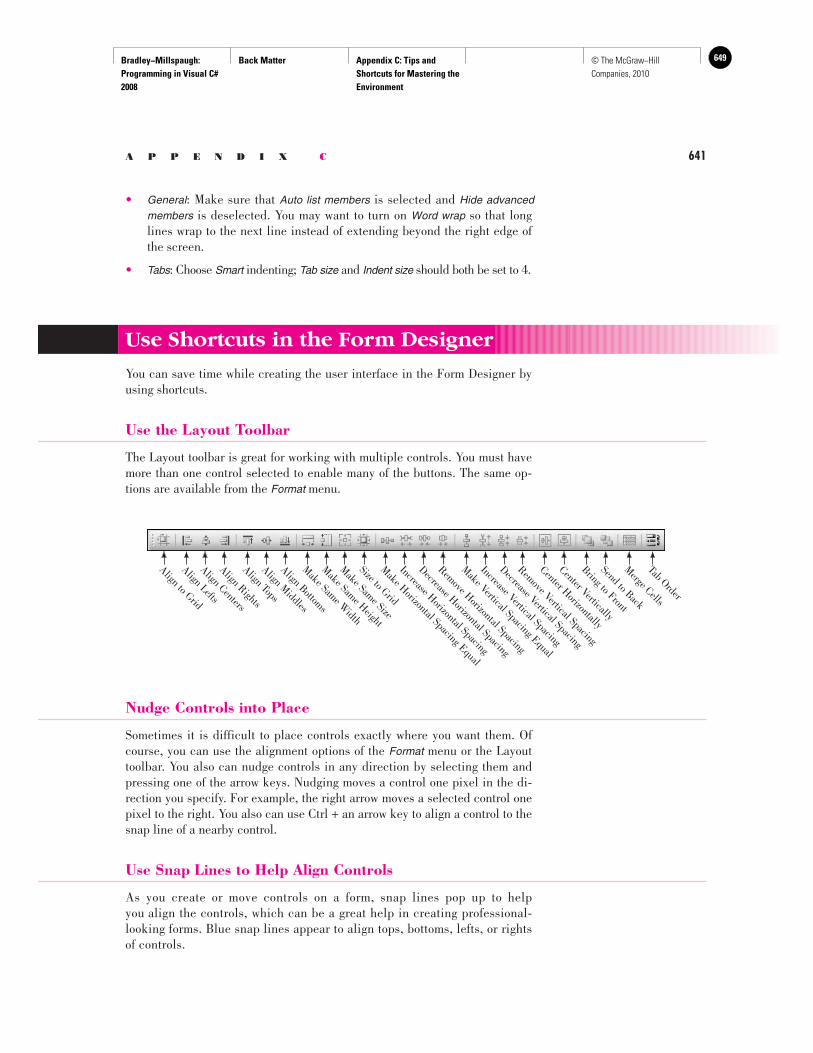
Bradley−Millspaugh: Programming in Visual C# 2008
Back Matter Appendix C: Tips and Shortcuts for Mastering the Environment
649© The McGraw−Hill Companies, 2010
A P P E N D I X C 641
• General : Make sure that Auto list members is selected and Hide advanced members is deselected. You may want to turn on Word wrap so that long lines wrap to the next line instead of extending beyond the right edge of the screen.
• Tabs : Choose Smart indenting; Tab size and Indent size should both be set to 4.
Use Shortcuts in the Form Designer
You can save time while creating the user interface in the Form Designer by using shortcuts.
Use the Layout Toolbar
The Layout toolbar is great for working with multiple controls. You must have more than one control selected to enable many of the buttons. The same op-tions are available from the Format menu.
Align Tops
Align Middles
Align Bottoms
Make Same Width
Make Same Height
Make Same Size
Size to Grid
Make Horizontal Spacing Equal
Increase Horizontal Spacing
Decrease Horizontal Spacing
Remove Horizontal Spacing
Make Vertical Spacing Equal
Increase Vertical Spacing
Decrease Vertical Spacing
Remove Vertical Spacing
Center Horizontally
Center Vertically
Bring to Front
Send to Back
Merge Cells
Tab Order
Align Rights
Align Centers
Align Lefts
Align to Grid
Nudge Controls into Place
Sometimes it is difficult to place controls exactly where you want them. Of course, you can use the alignment options of the Format menu or the Layout toolbar. You also can nudge controls in any direction by selecting them and pressing one of the arrow keys. Nudging moves a control one pixel in the di-rection you specify. For example, the right arrow moves a selected control one pixel to the right. You also can use Ctrl + an arrow key to align a control to the snap line of a nearby control.
Use Snap Lines to Help Align Controls
As you create or move controls on a form, snap lines pop up to help you align the controls, which can be a great help in creating professional- looking forms. Blue snap lines appear to align tops, bottoms, lefts, or rights of controls.
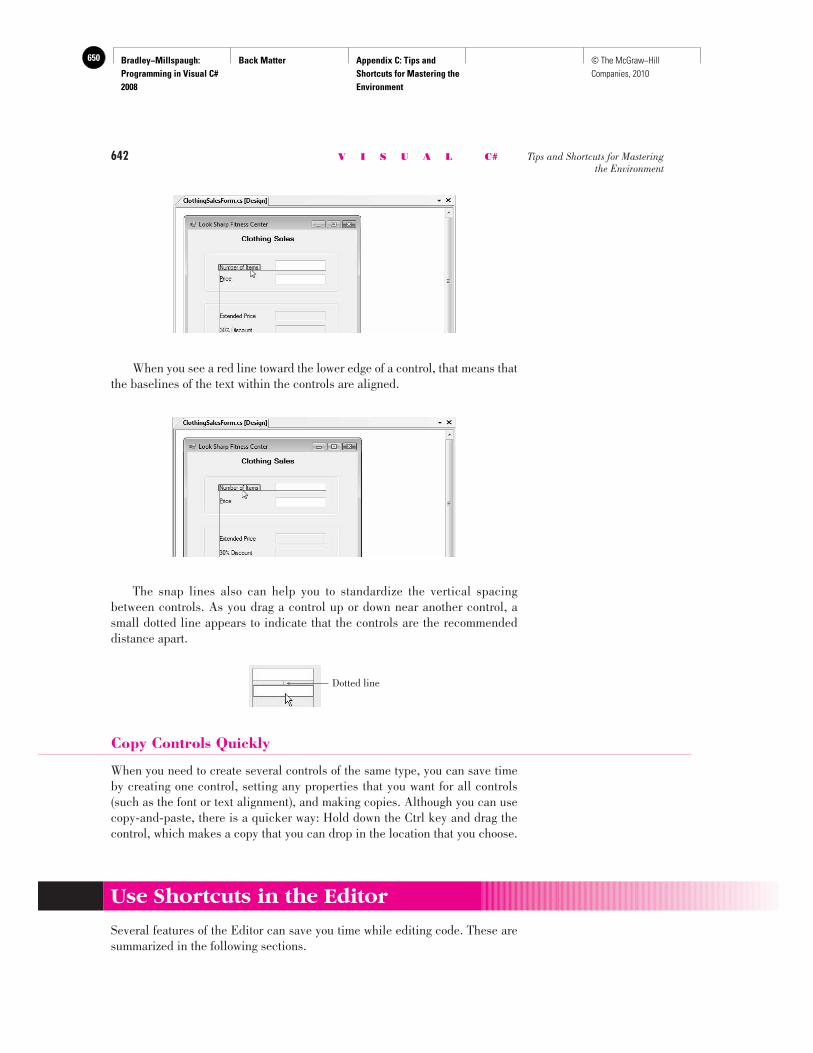
Bradley−Millspaugh: Programming in Visual C# 2008
Back Matter Appendix C: Tips and Shortcuts for Mastering the Environment
650 © The McGraw−Hill Companies, 2010
642 V I S U A L C# Tips and Shortcuts for Mastering the Environment
When you see a red line toward the lower edge of a control, that means that the baselines of the text within the controls are aligned.
The snap lines also can help you to standardize the vertical spacing between controls. As you drag a control up or down near another control, a small dotted line appears to indicate that the controls are the recommended distance apart.
Copy Controls Quickly
When you need to create several controls of the same type, you can save time by creating one control, setting any properties that you want for all controls (such as the font or text alignment), and making copies. Although you can use copy-and-paste, there is a quicker way: Hold down the Ctrl key and drag the control, which makes a copy that you can drop in the location that you choose.
Dotted line
Use Shortcuts in the Editor
Several features of the Editor can save you time while editing code. These are summarized in the following sections.
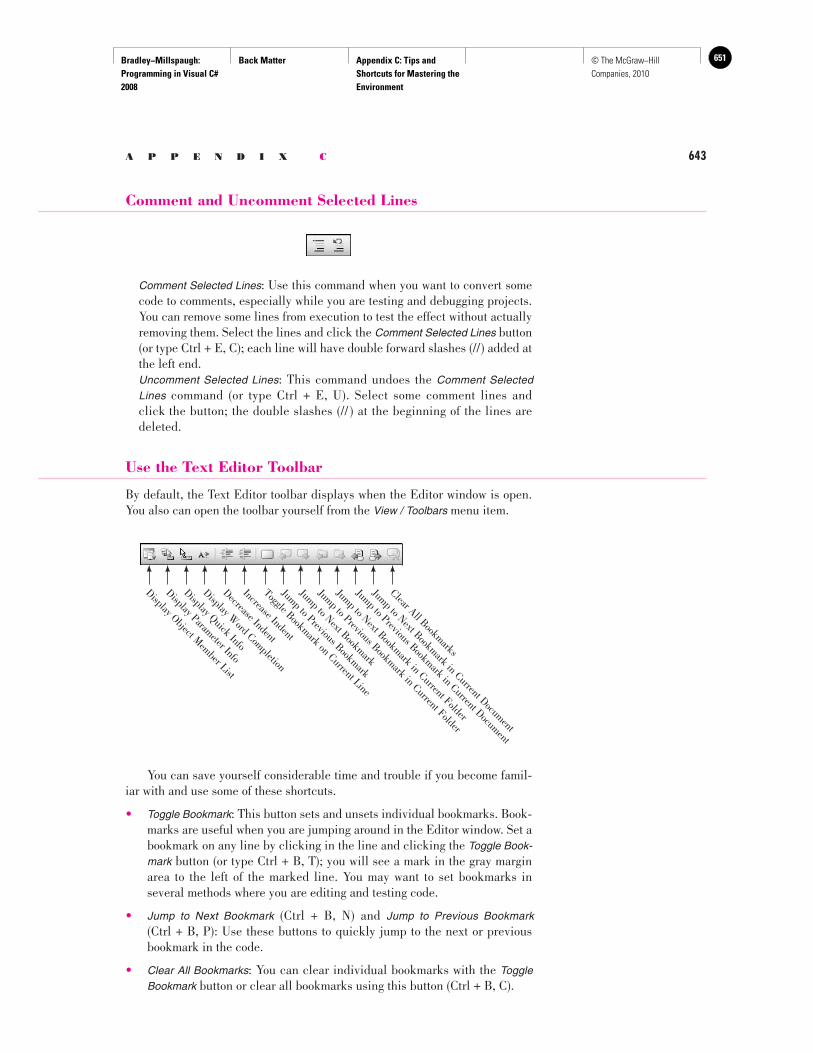
Bradley−Millspaugh: Programming in Visual C# 2008
Back Matter Appendix C: Tips and Shortcuts for Mastering the Environment
651© The McGraw−Hill Companies, 2010
A P P E N D I X C 643
Comment and Uncomment Selected Lines
Increase Indent
Decrease Indent
Toggle Bookmark on Current Line
Jump to Previous Bookmark
Jump to Previous Bookmark in Current Folder
Jump to Next Bookmark in Current Document
Jump to Previous Bookmark in Current Document
Clear All Bookmarks
Jump to Next Bookmark
Jump to Next Bookmark in Current Folder
Display Word Completion
Display Quick Info
Display Parameter Info
Display Object Member List
Comment Selected Lines : Use this command when you want to convert some code to comments, especially while you are testing and debugging projects. You can remove some lines from execution to test the effect without actually removing them. Select the lines and click the Comment Selected Lines button (or type Ctrl + E, C); each line will have double forward slashes (//) added at the left end.
Uncomment Selected Lines : This command undoes the Comment Selected Lines command (or type Ctrl + E, U). Select some comment lines and click the button; the double slashes (// ) at the beginning of the lines are deleted.
Use the Text Editor Toolbar
By default, the Text Editor toolbar displays when the Editor window is open. You also can open the toolbar yourself from the View / Toolbars menu item.
You can save yourself considerable time and trouble if you become famil-iar with and use some of these shortcuts.
• Toggle Bookmark : This button sets and unsets individual bookmarks. Book-marks are useful when you are jumping around in the Editor window. Set a bookmark on any line by clicking in the line and clicking the Toggle Book-mark button (or type Ctrl + B, T); you will see a mark in the gray margin area to the left of the marked line. You may want to set bookmarks in several methods where you are editing and testing code.
• Jump to Next Bookmark (Ctrl + B, N) and Jump to Previous Bookmark (Ctrl + B, P): Use these buttons to quickly jump to the next or previous bookmark in the code.
• Clear All Bookmarks : You can clear individual bookmarks with the Toggle Bookmark button or clear all bookmarks using this button (Ctrl + B, C).
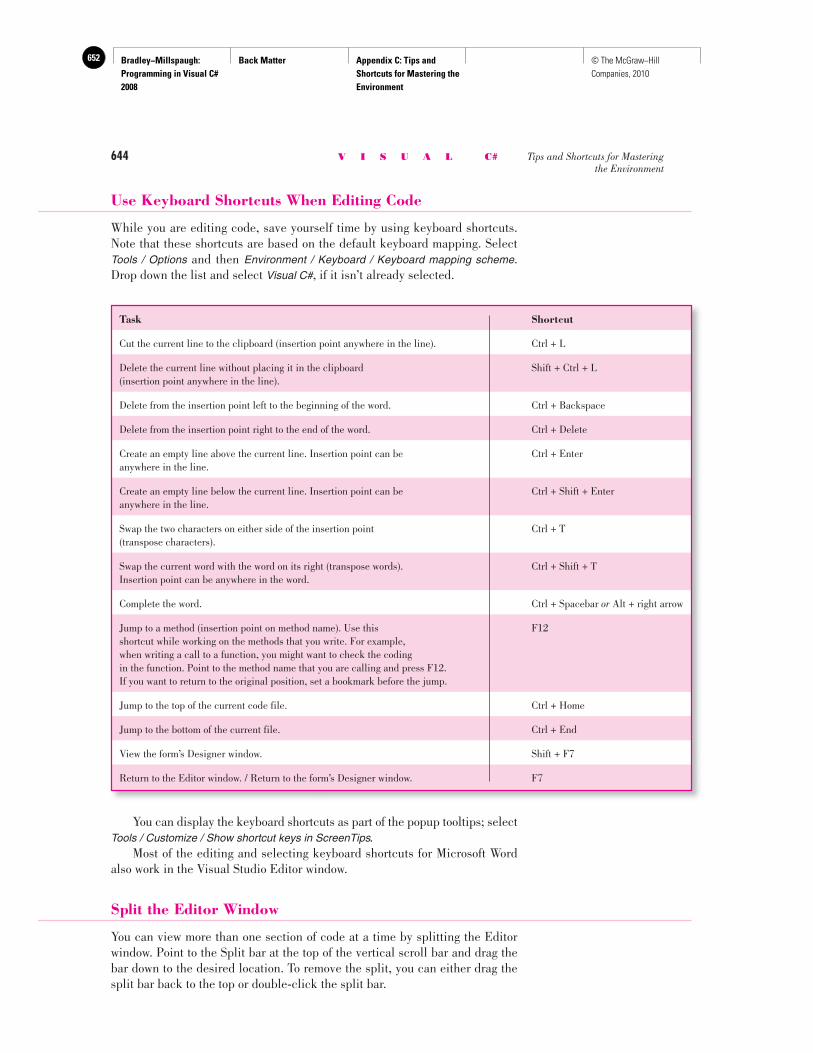
Bradley−Millspaugh: Programming in Visual C# 2008
Back Matter Appendix C: Tips and Shortcuts for Mastering the Environment
652 © The McGraw−Hill Companies, 2010
644 V I S U A L C# Tips and Shortcuts for Mastering the Environment
Use Keyboard Shortcuts When Editing Code
While you are editing code, save yourself time by using keyboard shortcuts. Note that these shortcuts are based on the default keyboard mapping. Select Tools / Options and then Environment / Keyboard / Keyboard mapping scheme . Drop down the list and select Visual C# , if it isn’t already selected.
Task Shortcut
Cut the current line to the clipboard (insertion point anywhere in the line). Ctrl + L
Delete the current line without placing it in the clipboard Shift + Ctrl + L (insertion point anywhere in the line).
Delete from the insertion point left to the beginning of the word. Ctrl + Backspace
Delete from the insertion point right to the end of the word. Ctrl + Delete
Create an empty line above the current line. Insertion point can be Ctrl + Enter anywhere in the line.
Create an empty line below the current line. Insertion point can be Ctrl + Shift + Enter anywhere in the line.
Swap the two characters on either side of the insertion point Ctrl + T (transpose characters).
Swap the current word with the word on its right (transpose words). Ctrl + Shift + T Insertion point can be anywhere in the word.
Complete the word. Ctrl + Spacebar or Alt + right arrow
Jump to a method (insertion point on method name). Use this F12 shortcut while working on the methods that you write. For example,when writing a call to a function, you might want to check the codingin the function. Point to the method name that you are calling and press F12.If you want to return to the original position, set a bookmark before the jump.
Jump to the top of the current code file. Ctrl + Home
Jump to the bottom of the current file. Ctrl + End
View the form’s Designer window. Shift + F7
Return to the Editor window. / Return to the form’s Designer window. F7
You can display the keyboard shortcuts as part of the popup tooltips; select Tools / Customize / Show shortcut keys in ScreenTips. Most of the editing and selecting keyboard shortcuts for Microsoft Word also work in the Visual Studio Editor window.
Split the Editor Window
You can view more than one section of code at a time by splitting the Editor window. Point to the Split bar at the top of the vertical scroll bar and drag the bar down to the desired location. To remove the split, you can either drag the split bar back to the top or double-click the split bar.
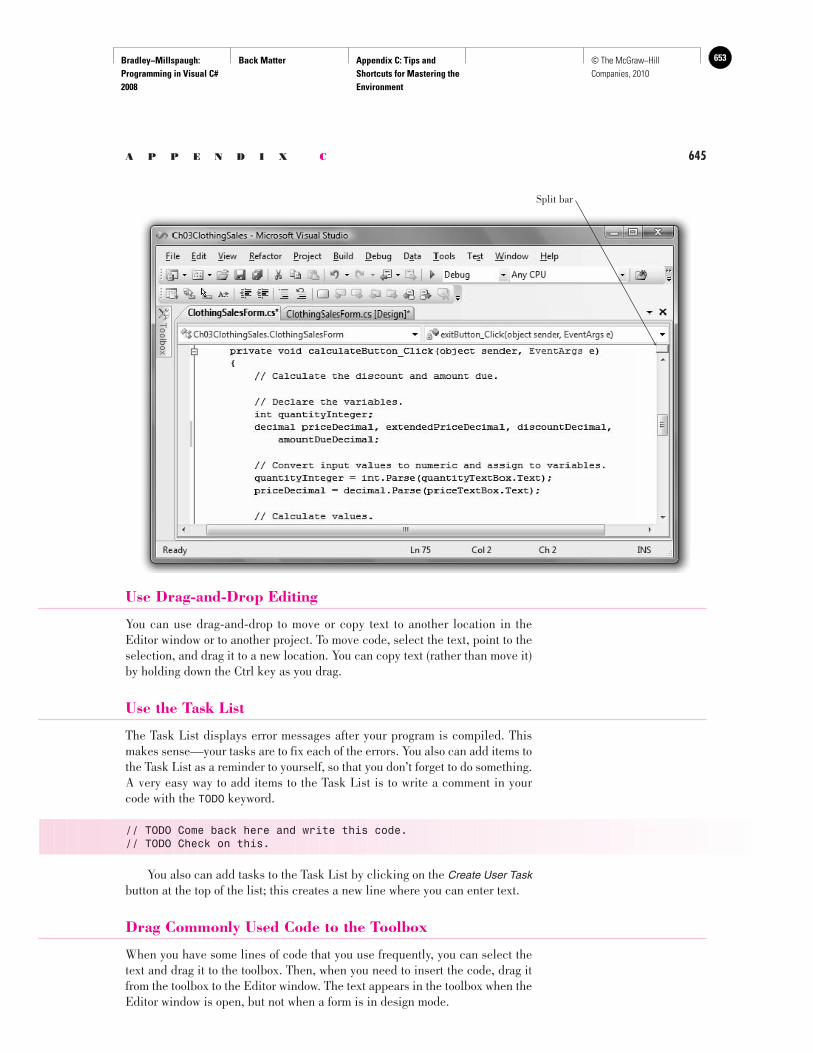
Bradley−Millspaugh: Programming in Visual C# 2008
Back Matter Appendix C: Tips and Shortcuts for Mastering the Environment
653© The McGraw−Hill Companies, 2010
A P P E N D I X C 645
Use Drag-and-Drop Editing
You can use drag-and-drop to move or copy text to another location in the Editor window or to another project. To move code, select the text, point to the selection, and drag it to a new location. You can copy text (rather than move it) by holding down the Ctrl key as you drag.
Use the Task List
The Task List displays error messages after your program is compiled. This makes sense—your tasks are to fix each of the errors. You also can add items to the Task List as a reminder to yourself, so that you don’t forget to do something. A very easy way to add items to the Task List is to write a comment in your code with the TODO keyword.
// TODO Come back here and write this code. // TODO Check on this.
You also can add tasks to the Task List by clicking on the Create User Task button at the top of the list; this creates a new line where you can enter text.
Drag Commonly Used Code to the Toolbox
When you have some lines of code that you use frequently, you can select the text and drag it to the toolbox. Then, when you need to insert the code, drag it from the toolbox to the Editor window. The text appears in the toolbox when the Editor window is open, but not when a form is in design mode.
Split bar
Bradley−Millspaugh: Programming in Visual C# 2008
Back Matter Appendix C: Tips and Shortcuts for Mastering the Environment
654 © The McGraw−Hill Companies, 2010
646 V I S U A L C# Tips and Shortcuts for Mastering the Environment
Caution : This shortcut should not be used on shared computers in a class-room or lab, as the text remains in the toolbox. Use it only on your own com-puter. You can delete previously stored text from the toolbox by right-clicking and selecting Delete from the context menu. For another way to handle small pieces of code that you reuse often, see “Code Snippets and Samples” in Chapter 14.
Rename Variables and Objects
Use Refactor / Rename to automatically rename all occurrences of a variable or object. In the Editor window, right-click on a variable name or an object name and select Refactor / Rename . In the Rename dialog box, you can enter the new name and the item is renamed everywhere in that form. For a multiform proj-ect, the Rename dialog box offers the choice of renaming in only the current form or all forms. This feature, called Symbol Rename , is part of a more robust feature called refactoring , which allows the programmer to modify the name and class of variables and objects.
Reformat the File
Visual Studio offers some advanced formatting options, which can help you to keep the file properly formatted. When you choose to reformat, the Editor formats the file to match the options you have selected in Tools / Options / Text Editor / C# . With the Editor window open, select Edit / Advanced . Many options appear on the submenu, including Format Document and Format Selection (which reformats only the selected text). If you have an XML document open in the XML Editor, the format options will properly format and indent the XML tags.
Use Context-Sensitive Help
The quickest way to get Help is to use context-sensitive Help. Click on a con-trol or a line of code and press F1; Help displays the closest-matching item it can locate. You also can get help on the IDE elements: Click in any area of the IDE and press Shift + F1; the Help explanation will be about using the current window or IDE element, rather than about the objects and language.
Use the Debugging Tools
The VS IDE provides many tools to help you debug programs. The most helpful techniques are to examine the values of variables during program execution and to single-step through the program and watch what happens.
The Debug Toolbar and Menu
You can use the Debug menu or the tools on the Debug toolbar for debugging. The Debug toolbar appears automatically during run time, or you can display the toolbar by right-clicking any toolbar and selecting Debug . The most useful items for debugging your programs are shown in the following table.
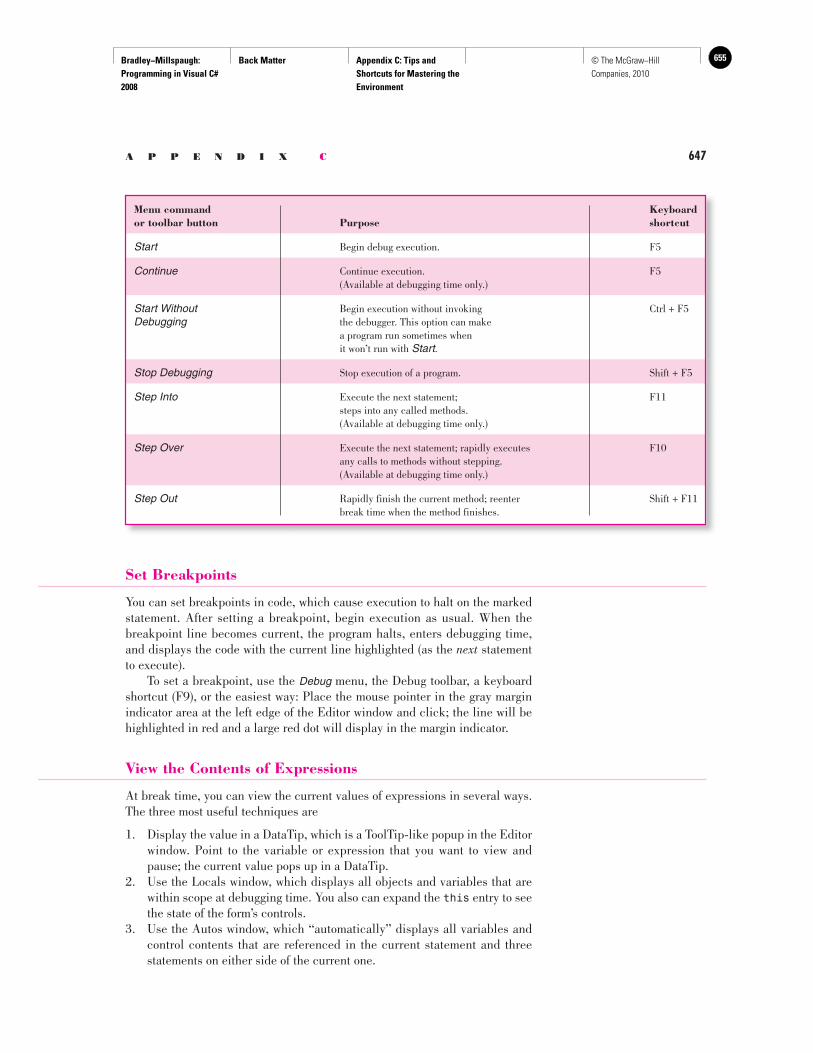
Bradley−Millspaugh: Programming in Visual C# 2008
Back Matter Appendix C: Tips and Shortcuts for Mastering the Environment
655© The McGraw−Hill Companies, 2010
A P P E N D I X C 647
Set Breakpoints
You can set breakpoints in code, which cause execution to halt on the marked statement. After setting a breakpoint, begin execution as usual. When the breakpoint line becomes current, the program halts, enters debugging time, and displays the code with the current line highlighted (as the next statement to execute). To set a breakpoint, use the Debug menu, the Debug toolbar, a keyboard shortcut (F9), or the easiest way: Place the mouse pointer in the gray margin indicator area at the left edge of the Editor window and click; the line will be highlighted in red and a large red dot will display in the margin indicator.
View the Contents of Expressions
At break time, you can view the current values of expressions in several ways. The three most useful techniques are
1. Display the value in a DataTip, which is a ToolTip-like popup in the Editor window. Point to the variable or expression that you want to view and pause; the current value pops up in a DataTip.
2. Use the Locals window, which displays all objects and variables that are within scope at debugging time. You also can expand the this entry to see the state of the form’s controls.
3. Use the Autos window, which “automatically” displays all variables and control contents that are referenced in the current statement and three statements on either side of the current one.
Menu command Keyboardor toolbar button Purpose shortcut
Start Begin debug execution. F5
Continue Continue execution. F5 (Available at debugging time only.)
Start Without Begin execution without invoking Ctrl + F5 Debugging the debugger. This option can make a program run sometimes when it won’t run with Start .
Stop Debugging Stop execution of a program. Shift + F5
Step Into Execute the next statement; F11 steps into any called methods. (Available at debugging time only.)
Step Over Execute the next statement; rapidly executes F10 any calls to methods without stepping. (Available at debugging time only.)
Step Out Rapidly finish the current method; reenter Shift + F11 break time when the method finishes.
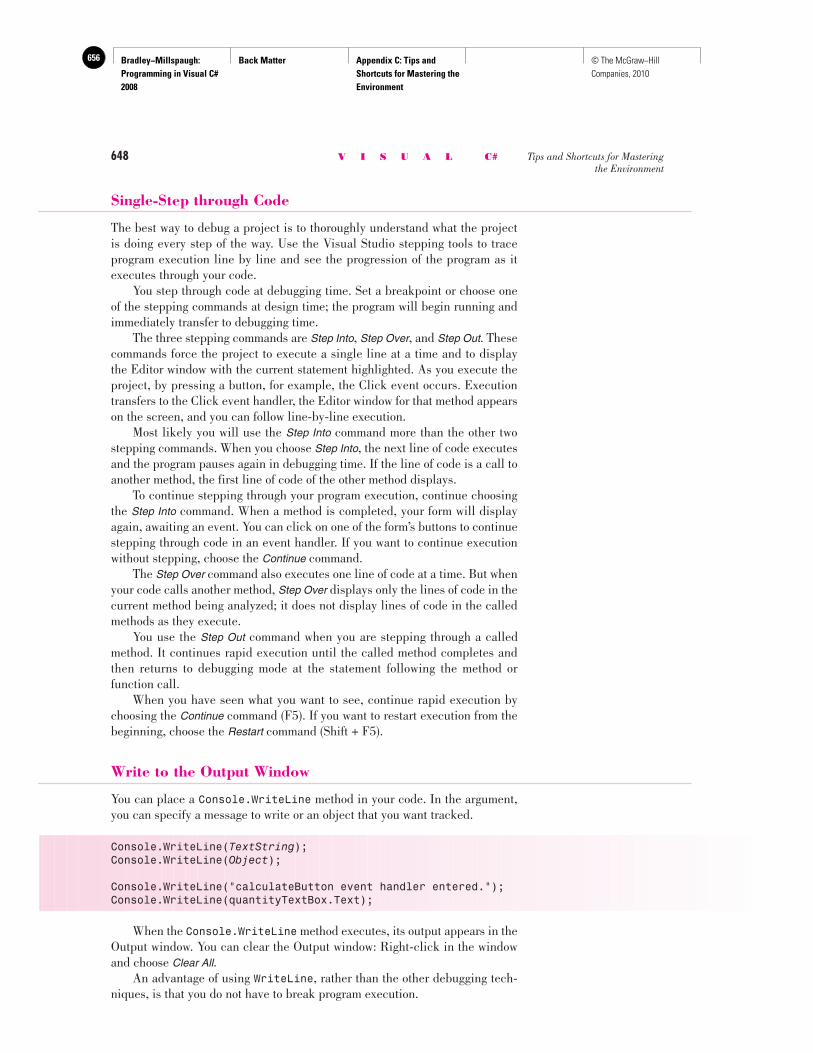
Bradley−Millspaugh: Programming in Visual C# 2008
Back Matter Appendix C: Tips and Shortcuts for Mastering the Environment
656 © The McGraw−Hill Companies, 2010
648 V I S U A L C# Tips and Shortcuts for Mastering the Environment
Single-Step through Code
The best way to debug a project is to thoroughly understand what the project is doing every step of the way. Use the Visual Studio stepping tools to trace program execution line by line and see the progression of the program as it executes through your code. You step through code at debugging time. Set a breakpoint or choose one of the stepping commands at design time; the program will begin running and immediately transfer to debugging time. The three stepping commands are Step Into , Step Over , and Step Out . These commands force the project to execute a single line at a time and to display the Editor window with the current statement highlighted. As you execute the project, by pressing a button, for example, the Click event occurs. Execution transfers to the Click event handler, the Editor window for that method appears on the screen, and you can follow line-by-line execution. Most likely you will use the Step Into command more than the other two stepping commands. When you choose Step Into , the next line of code executes and the program pauses again in debugging time. If the line of code is a call to another method, the first line of code of the other method displays. To continue stepping through your program execution, continue choosing the Step Into command. When a method is completed, your form will display again, awaiting an event. You can click on one of the form’s buttons to continue stepping through code in an event handler. If you want to continue execution without stepping, choose the Continue command. The Step Over command also executes one line of code at a time. But when your code calls another method, Step Over displays only the lines of code in the current method being analyzed; it does not display lines of code in the called methods as they execute. You use the Step Out command when you are stepping through a called method. It continues rapid execution until the called method completes and then returns to debugging mode at the statement following the method or function call . When you have seen what you want to see, continue rapid execution by choosing the Continue command (F5). If you want to restart execution from the beginning, choose the Restart command (Shift + F5).
Write to the Output Window
You can place a Console.WriteLine method in your code. In the argument, you can specify a message to write or an object that you want tracked.
Console.WriteLine(TextString); Console.WriteLine(Object);
Console.WriteLine("calculateButton event handler entered."); Console.WriteLine(quantityTextBox.Text);
When the Console.WriteLine method executes, its output appears in the Output window. You can clear the Output window: Right-click in the window and choose Clear All . An advantage of using WriteLine , rather than the other debugging tech-niques, is that you do not have to break program execution.
Bradley−Millspaugh: Programming in Visual C# 2008
Back Matter Appendix C: Tips and Shortcuts for Mastering the Environment
657© The McGraw−Hill Companies, 2010
A P P E N D I X C 649
Copy and Move Projects
In a programming class, you often must move projects from one computer to another and must base one project on another one. To create a new project based on a previous one, you should copy the project folder. Then you can move and rename it as necessary.
Copy and Move a Windows Project
You can copy an entire project folder from one location to another using Windows Explorer. Make sure that the project is not open in Visual Studio and copy the entire folder. To base one project on a previous project, take the following steps:
• Make sure the project is not open. Note : This is extremely important.
• Copy the folder to a new location using Windows Explorer.
• Rename the new folder for the new project name, still using Windows Explorer.
• Open the new project (the copy) in the Visual Studio IDE.
• In the IDE’s Solution Explorer, rename the solution and the project. The best way to do this is to right-click on the name and choose the Rename command from the shortcut menu. To rename the solution, you must have the solution name displaying. Select Tools / Options / Projects and Solutions / General / Always show solution .
• Rename the forms, if desired. If you rename the startup form, you must open the Program.cs file and change the argument in the Application. Run method.
• Open the Project Designer ( Project / Properties ) and change the assembly name and root namespace to match your new project name.
Warning : Do not try to copy a project that is open using the Save As com-mand, attempting to place a copy in a new location.
Copy and Move a Web Project
You can move the folder for a File System Web site from one location to an-other. You also can rename the folder, which renames the site. To open the moved project, first open Visual Studio, select File / Open Web Site , and browse to locate the folder.
Rename and Remove Event Handlers
You can run into problems when you rename or remove an existing event han-dler unless you understand how C# and the VS IDE set up the event handlers. Once you have set up an event handler for a control, you must be careful when you rename or remove it.
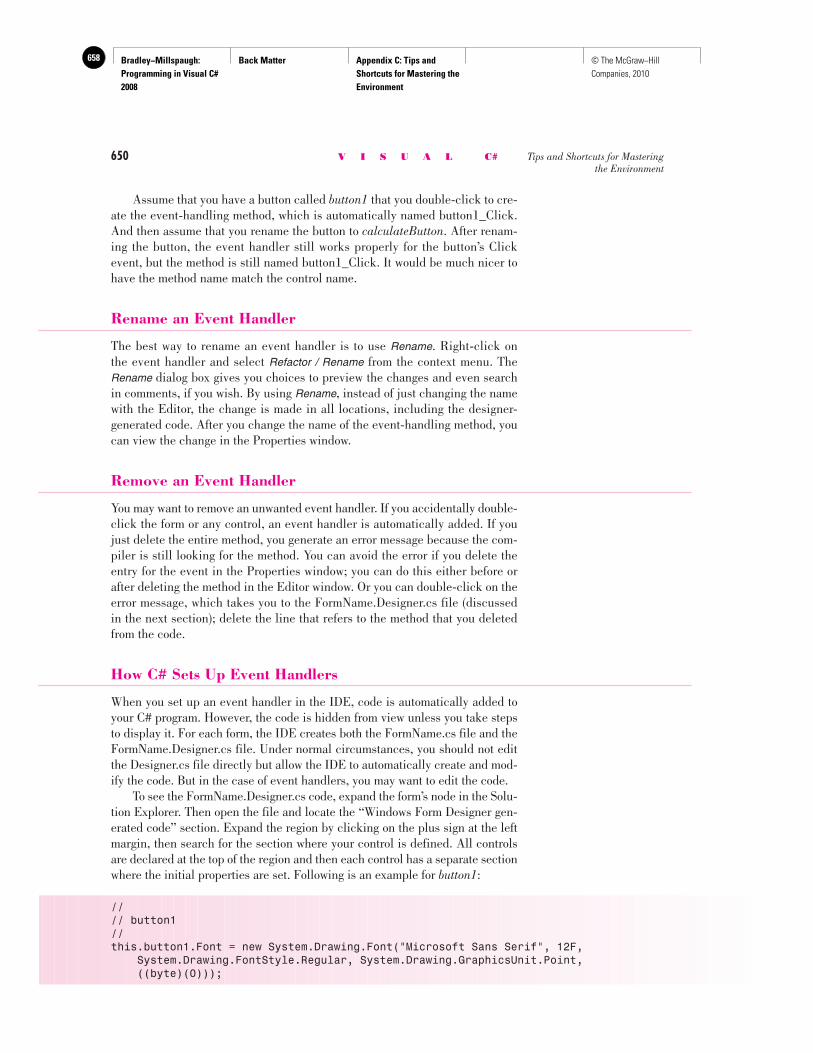
Bradley−Millspaugh: Programming in Visual C# 2008
Back Matter Appendix C: Tips and Shortcuts for Mastering the Environment
658 © The McGraw−Hill Companies, 2010
650 V I S U A L C# Tips and Shortcuts for Mastering the Environment
Assume that you have a button called button1 that you double-click to cre-ate the event-handling method, which is automatically named button1_Click. And then assume that you rename the button to calculateButton . After renam-ing the button, the event handler still works properly for the button’s Click event, but the method is still named button1_Click. It would be much nicer to have the method name match the control name.
Rename an Event Handler
The best way to rename an event handler is to use Rename . Right-click on the event handler and select Refactor / Rename from the context menu. The Rename dialog box gives you choices to preview the changes and even search in comments, if you wish. By using Rename , instead of just changing the name with the Editor, the change is made in all locations, including the designer-generated code. After you change the name of the event-handling method, you can view the change in the Properties window.
Remove an Event Handler
You may want to remove an unwanted event handler. If you accidentally double-click the form or any control, an event handler is automatically added. If you just delete the entire method, you generate an error message because the com-piler is still looking for the method. You can avoid the error if you delete the entry for the event in the Properties window; you can do this either before or after deleting the method in the Editor window. Or you can double-click on the error message, which takes you to the FormName.Designer.cs file (discussed in the next section); delete the line that refers to the method that you deleted from the code.
How C# Sets Up Event Handlers
When you set up an event handler in the IDE, code is automatically added to your C# program. However, the code is hidden from view unless you take steps to display it. For each form, the IDE creates both the FormName.cs file and the FormName.Designer.cs file. Under normal circumstances, you should not edit the Designer.cs file directly but allow the IDE to automatically create and mod-ify the code. But in the case of event handlers, you may want to edit the code. To see the FormName.Designer.cs code, expand the form’s node in the Solu-tion Explorer. Then open the file and locate the “Windows Form Designer gen-erated code” section. Expand the region by clicking on the plus sign at the left margin, then search for the section where your control is defined. All controls are declared at the top of the region and then each control has a separate section where the initial properties are set. Following is an example for button1 :
//// button1//this.button1.Font = new System.Drawing.Font("Microsoft Sans Serif", 12F, System.Drawing.FontStyle.Regular, System.Drawing.GraphicsUnit.Point, ((byte)(0)));
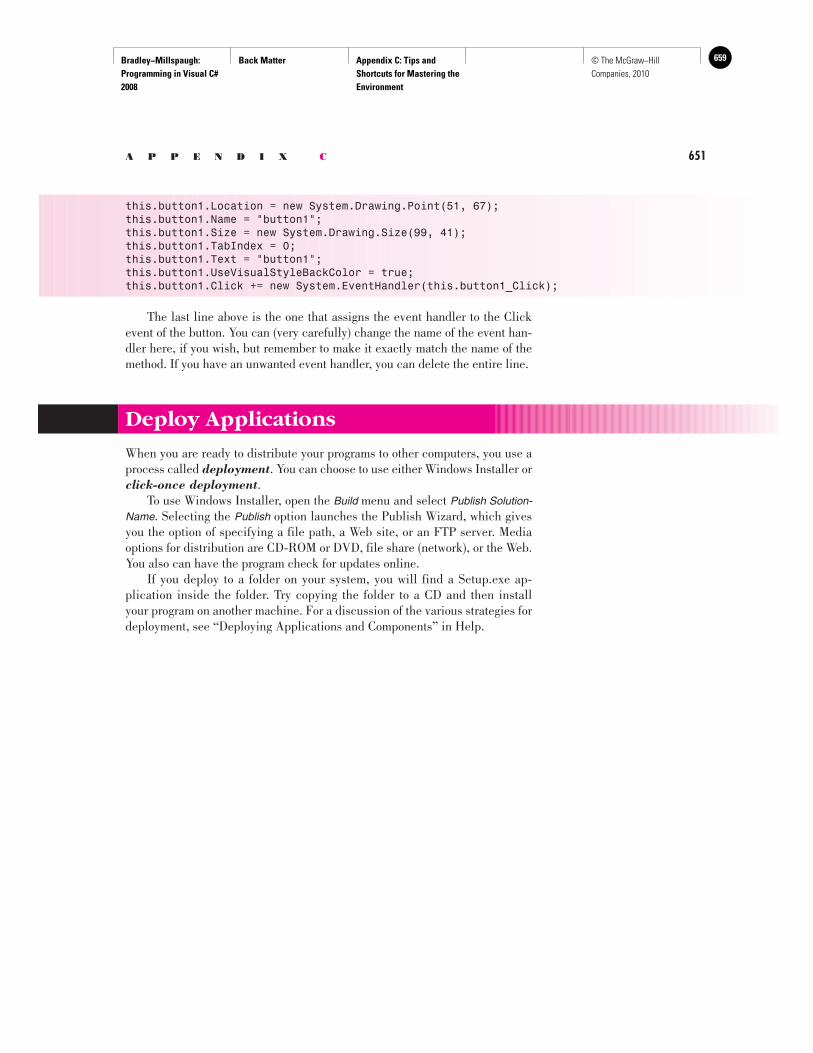
Bradley−Millspaugh: Programming in Visual C# 2008
Back Matter Appendix C: Tips and Shortcuts for Mastering the Environment
659© The McGraw−Hill Companies, 2010
A P P E N D I X C 651
this.button1.Location = new System.Drawing.Point(51, 67);this.button1.Name = "button1";this.button1.Size = new System.Drawing.Size(99, 41);this.button1.TabIndex = 0;this.button1.Text = "button1";this.button1.UseVisualStyleBackColor = true;this.button1.Click += new System.EventHandler(this.button1_Click);
The last line above is the one that assigns the event handler to the Click event of the button. You can (very carefully) change the name of the event han-dler here, if you wish, but remember to make it exactly match the name of the method. If you have an unwanted event handler, you can delete the entire line.
Deploy Applications
When you are ready to distribute your programs to other computers, you use a process called deployment . You can choose to use either Windows Installer or click-once deployment . To use Windows Installer, open the Build menu and select Publish Solution-Name . Selecting the Publish option launches the Publish Wizard, which gives you the option of specifying a file path, a Web site, or an FTP server. Media options for distribution are CD-ROM or DVD, file share (network), or the Web. You also can have the program check for updates online. If you deploy to a folder on your system, you will find a Setup.exe ap-plication inside the folder. Try copying the folder to a CD and then install your program on another machine. For a discussion of the various strategies for deployment, see “Deploying Applications and Components” in Help.

660 Notes
Bradley−Millspaugh: Programming in Visual C# 2008
Back Matter Appendix D: Security 661© The McGraw−Hill Companies, 2010
A P P E N D I X
D Security
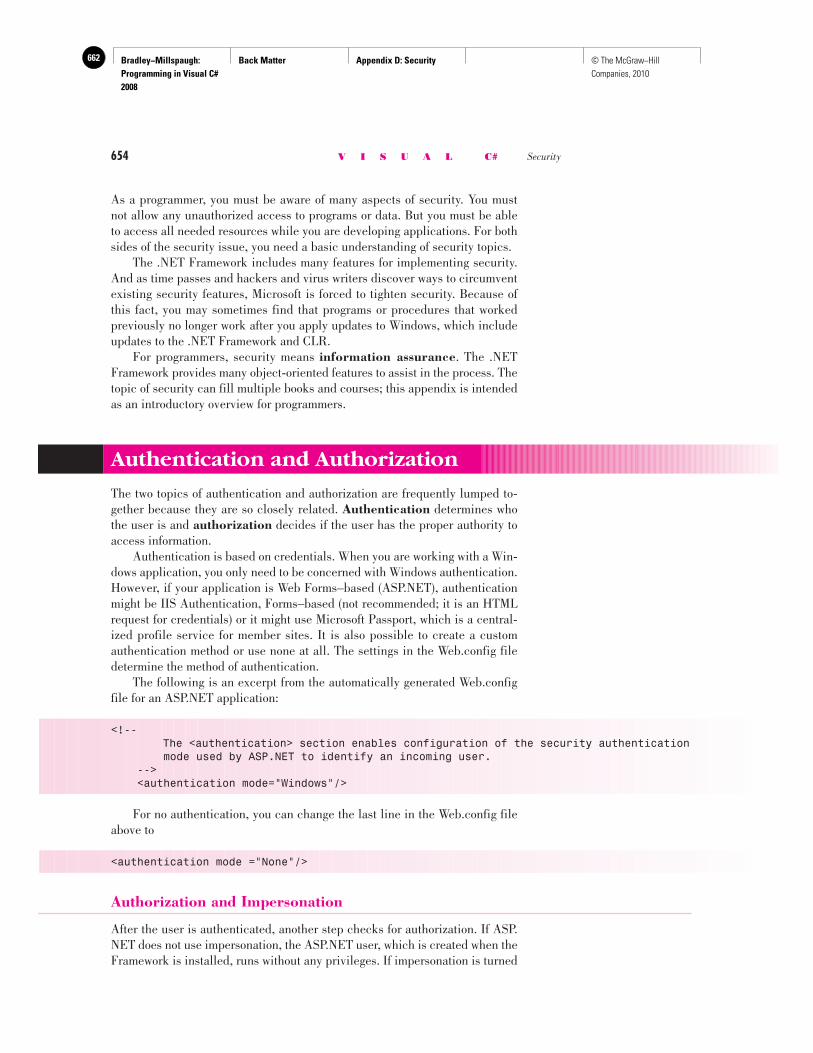
Bradley−Millspaugh: Programming in Visual C# 2008
Back Matter Appendix D: Security662 © The McGraw−Hill Companies, 2010
654 V I S U A L C# Security
As a programmer, you must be aware of many aspects of security. You must not allow any unauthorized access to programs or data. But you must be able to access all needed resources while you are developing applications. For both sides of the security issue, you need a basic understanding of security topics. The .NET Framework includes many features for implementing security. And as time passes and hackers and virus writers discover ways to circumvent existing security features, Microsoft is forced to tighten security. Because of this fact, you may sometimes find that programs or procedures that worked previously no longer work after you apply updates to Windows, which include updates to the .NET Framework and CLR. For programmers, security means information assurance . The .NET Framework provides many object-oriented features to assist in the process. The topic of security can fill multiple books and courses; this appendix is intended as an introductory overview for programmers.
Authentication and Authorization
The two topics of authentication and authorization are frequently lumped to-gether because they are so closely related. Authentication determines who the user is and authorization decides if the user has the proper authority to access information. Authentication is based on credentials. When you are working with a Win-dows application, you only need to be concerned with Windows authentication. However, if your application is Web Forms–based (ASP.NET), authentication might be IIS Authentication, Forms–based (not recommended; it is an HTML request for credentials) or it might use Microsoft Passport, which is a central-ized profile service for member sites. It is also possible to create a custom authentication method or use none at all. The settings in the Web.config file determine the method of authentication. The following is an excerpt from the automatically generated Web.config file for an ASP.NET application:
<!-- The <authentication> section enables configuration of the security authentication mode used by ASP.NET to identify an incoming user. --> <authentication mode="Windows"/>
For no authentication, you can change the last line in the Web.config file above to
<authentication mode ="None"/>
Authorization and Impersonation
After the user is authenticated, another step checks for authorization. If ASP.NET does not use impersonation, the ASP.NET user, which is created when the Framework is installed, runs without any privileges. If impersonation is turned
Bradley−Millspaugh: Programming in Visual C# 2008
Back Matter Appendix D: Security 663© The McGraw−Hill Companies, 2010
A P P E N D I X D 655
on, ASP.NET takes on the identity from IIS. If anonymous access is turned off, ASP.NET takes on the credentials of the authenticated user; otherwise it im-personates the account that IIS uses. This is where the following code applies:
<identity impersonate = "true"/>
For a specific user, you can use
<identity impersonate = "true" name = " Domain/username " password = " password "/>
Writing Secure Code
Programmers need to be aware of how hackers are able to gain access to a data-base or a network through code. Two primary areas of importance are string in-jections and error messages that may give away important information about a data source.
SQL Injection
Proper validation of the code is extremely important. A system vulnerability occurs when code is “injected” into a string. A text box or a combo box control allows the user to type in information. It is the responsibility of the programmer to make sure that the input does not contain any scripting code or disruptive characters. When a program is working with a database, there must be no way for the user to inject code into that database. It is wise to validate the keystrokes to be sure that the input text contains only valid characters.
Error Messages
Another technique that hackers use to find information about a database is to input wrong data, hoping that the error message will give significant informa-tion. The default error messages indicate the name of the field containing an error. Plan your error messages so that you don’t allow someone to determine valid field names or values. You also can create custom error pages and denote the link in the Web.config file.
Code Access Security
Basically code access security determines what code is allowed to do on a computer; specifically, what resources such as hardware or files the code can access. The settings of the computer ultimately determine if the code can execute or if a resource can be used by the code. Code access security is based on several Permission classes. The Permis-sion classes are organized into three types: Code Access, Identity, and Role-based. Examples of the code access type include the PrintingPermission class
Bradley−Millspaugh: Programming in Visual C# 2008
Back Matter Appendix D: Security664 © The McGraw−Hill Companies, 2010
656 V I S U A L C# Security
and the RegistryPermission class; SiteIdentityPermission and the UrlIdentity Permission class fall into the Identity permission type. The PrincipalPermis-sion class is the Role-based type for user credentials. If your program has an OpenFileDialog component, it may be necessary to request permission to access the files from a given system. The following code would appear at the top of the file:
using System.Security.Permissions ;
Then you can apply the attribute to a public/private method in code. Example:
[FileDialogPermissionAttribute(SecurityAction.PermitOnly, Unrestricted=true)]private void OpenFile(){ //Place code here to show the Open dialog and read the file.}
Further Reading About Security
You can learn more about security from many locations. Microsoft publishes a free security newsletter; sign up at www.microsoft.com/security/default.mspx. For development information, check out the MSDN Security Developer Center at msdn.microsoft.com/en-us/security/default.aspx. The site provides tutorials, information about community resources, and downloads. See msdn.microsoft.com/en-us/library/aa302369.aspx for an overview of security in the .NET Framework.
Bradley−Millspaugh: Programming in Visual C# 2008
Back Matter Glossary 665© The McGraw−Hill Companies, 2010
Glossary
A About box A window that displays information about the program; usually displayed from the Help / About menu item.
absolute positioning Placing an element on a Web page by X and Y coordinates.
abstract Modifier on a class definition or a method header. On a class, indicates that the class cannot be instantiated, but instead must be used for inheritance; on a method definition, requires that the method be overridden in an inherited class.
abstract class A class that cannot be instantiated, but instead must be used for inheritance.
abstract method A method that must be overridden in an inheriting class.
AcceptButton property Form property that sets the accept (default) button, which is activated when the user presses the Enter key.
access key Underlined character that allows the user to select using the keyboard rather than the mouse; also called a hot key .
accessor method get and set methods written to allow external objects to access the private properties of a class.
AJAX Asynchonous JavaScript and XML; method of speeding Web page display by updating only the part of the page that has changes.
AllowDrop property A property of a form or control used for a drag-and-drop operation.
ANSI code A coding method used to represent characters on a microcomputer (American National Standards Institute).
AppendAllText method Simplified file handling; opens the file, writes all data at the end of an existing file, and closes the file.
argument The expression to operate upon in a method; a value being passed to a method.
array A series of variables; each individual element can be referenced by its index position. Also called a list .
ASP.NET Microsoft’s technology for Web applications.
assignment operator An equal sign (=); assigns a value to the variable or property named on the left side of the sign.
assignment statement Assigns a value to a variable or property using an assignment operator.
attribute Application information found in the Assembly Info file.
attribute (XML) Supplies additional information about an XML element; must appear within single or double quotes.
authentication Determining who the user is.
authorization Deciding if the user has the proper authority to access information.
Autos window Window that opens in IDE during execution; automatically displays all variables and control contents that are referenced in the current statement and three statements on either side of the current one.
B base class Class that is inherited from; also called a superclass or parent class .
BindingSource Object that establishes a link to a data source.
block variable A variable declared inside a block of code; only accessible within that block.
Boolean expression An expression that will evaluate true or false . May be a comparison of two values (variables, properties, constants) using relational operators.
BorderStyle property Property of a control that allows the control to appear flat or three-dimensional.
bound control A control that automatically displays the contents of database fields.
breakpoint Indicated point in project code where execution should break; used for debugging.
657
Bradley−Millspaugh: Programming in Visual C# 2008
Back Matter Glossary666 © The McGraw−Hill Companies, 2010
658 Glossary
browser An application used to render and display HTML code; used to display Web pages; in C# used to display the output of Web Forms.
Brush object Graphical object for drawing filled shapes.
Button Control used to activate an event-handling method.
C call (method call) Execute a method.
callback An object notifies the program that it needs to do something or that a situation exists that the program needs to handle. The object notifies the program of the situation by firing an event.
camel casing The naming convention that specifies mixed-case names; the first character must be lowercase and the first character of each word within the name must be uppercase; the rest of the characters must be lowercase.
CancelButton property Form property that sets the Cancel button, which is activated when the user presses the Esc key.
cascading style sheet (CSS) A s et of styles for formatting elements of Web pages.
case structure Selection structure; implemented in C# with a switch statement, which can be used in place of an if statement.
casting Converting from one data type to another.
CausesValidation property Determines whether the Validating event occurs for a control when the control loses focus; set to true by default.
CharacterCasing property Controls upper- and lowercase data entry in a text box.
check box A control used to indicate a value that may be true or false . In any group of check boxes, any number may be selected.
Checked property Determines if a check box is checked or not. Also used to determine if a radio button is selected or not.
child class A class that inherits from another class, called the parent . Also called a derived class or subclass .
child form Multiple Document Interface. A child form belongs to a parent form, is displayed inside the parent, and closes when the parent does.
class A prototype or blueprint for an object; includes specifications for the properties and methods.
class-level variable A variable or method that can be used in any method within the current class.
clean compile Code compiles to Common Language Runtime without errors.
click-once deployment Simplified method of deploying C# applications to another computer. Provides for installation and automatic updates via the Web.
client A system that accesses a Web site.
Close method Closes forms or files; releases resources used by the object.
code Programming statements in the C# language.
code separation model A style of Web Form in which the C# code is in a separate file from the HTML code.
code snippets Small samples of code that illustrate coding techniques; can be added to a program in the editor.
collection An object that can contain a series of objects; has properties and methods.
color constant Values assigned in the Color class. Examples: Color.Red and Color.Blue.
column A vertical section of a grid control. In a database, a field or data element.
ComboBox control A control that is a combination of a list box and a text box.
comment A C# statement used for documentation; not interpreted by the compiler.
common dialog A set of Windows dialog boxes available to C# programmers for Open , Save , Fonts , Print , and Color .
comparison operator See relational operator .
component tray Area across the lower edge of a Form Designer window in the IDE; used to store components that are not visible on the form.
compound Boolean expression Multiple Boolean expressions that are combined by using the logical operators, && or || .
concatenation Joining string (text) fields. The plus sign (+) is used to concatenate text.
condition See Boolean expressions .
Console.WriteLine method A method that writes one line to the Output window.
constant A value that cannot change during program execution.
Bradley−Millspaugh: Programming in Visual C# 2008
Back Matter Glossary 667© The McGraw−Hill Companies, 2010
G L O S S A R Y 659
constructor A method that runs automatically when an object is instantiated from that class. In C#, the constructor has the same name as the class.
container An object that holds other objects, such as a group box, a form, or a list box.
context menu A popup menu, sometimes referred to as a shortcut menu or a right-mouse menu .
context-sensitive Help Display of the Help topic that relates to the currently selected object or statement; displayed by pressing the F1 function.
ContextMenuStrip component A container control used to create context menus.
control An object used on a graphical interface, such as a radio button, text box, button, or label.
D data binding Connecting a control or property to one or more data elements.
data-bound controls Controls that can be set up to display the data from a database.
Data Designer A window of the VS IDE that shows a visual representation of the schema of a database; allows modification of the schema.
data file A file used to store small amounts of information such as the contents of a list box.
data source The original source of database data; may be a file, a server, an array, or other object.
data type Specifies the type of data a variable or constant can hold, such as integer, decimal, or string.
DataGridView control Web control used to display record information in rows and columns.
dataset A temporary set of data stored in the memory of the computer.
DateTime structure Used to retrieve and format the current date and time.
debug time Temporary break in program execution; used for debugging.
debugging Finding and eliminating computer program errors.
declaration Statements to establish a project’s variables and constants, give them names, and specify the type of data they will hold.
decrement operator Operator to subtract 1 from the named variable(--).
deployment Distribution of a compiled application to another computer; normally done through a setup.exe file. See click-once deployment .
derived class A class that inherits from a base class. Also known as a subclass or child class.
design time The status of the Visual Studio environment while a project is being developed, as opposed to run time or debug time.
destructor A method that is called as an object goes out of scope.
DialogResult object Used to determine which button the user clicked on a message box.
direct reference Accessing an element of an array by a subscript when the value of the subscript is known.
Directory.GetCurrentDirectory The folder from which the application begins execution; in a C# program running from the VS IDE, the project’s bin\Debug folder.
disabled Enabled property set to false ; user can see the control but cannot access it.
do/while loop A series of statements that will be executed as long as a condition is true . The condition is written on the while statement and is a posttest loop structure.
Document window IDE window that displays the Form Designer, the Code Editor, the Object Browser, and the Application Designer.
DoDragDrop method Sets an object as a source object for a drag-and-drop operation.
DragDrop event The event that occurs when the user drags an object and drops it on a form or control that has its AllowDrop property set to true .
DragEnter event The event that occurs when the user drags an object over a form or control that has its AllowDrop property set to true ; occurs before the DragDrop event.
DrawLine method Method of the Graphics class.
DrawRectangle method Method of the Graphics class; used to draw squares and rectangles.
DrawString method Method of the Graphics class; sends a line of text to the graphics page.
drop-down combo box A combo box control with a down-pointing arrow that allows the user to drop down the list. Allows efficient use of space on a form.
Bradley−Millspaugh: Programming in Visual C# 2008
Back Matter Glossary668 © The McGraw−Hill Companies, 2010
660 Glossary
drop-down list A list box with a down-pointing arrow that allows the user to drop down the list. Allows efficient use of space on a form.
E element Single item within a table, array, list, grid, or structure.
element (XML) An item in an XML file surrounded by tags.
empty string A string containing no characters; also called a null string or zero-length string .
Enabled property Boolean property that determines whether the control is available to the user.
encapsulation OOP feature that specifies that all methods and properties of a class be coded within the class. The class can hide or expose the methods and properties, as needed.
entry test A loop that has its test condition at the top. See pretest.
ErrorProvider component A component that can display an error icon and message when a validation rule is violated for the specified text box; used to perform field-level validation.
event An action that may be caused by the user, such as a click, drag, key press, or scroll. Events also can be triggered by an internal action, such as repainting the form or validating user input. A message sent by an object, to which the application can respond.
event handler A method written to execute when an event occurs.
event-handling method See event handler .
exception An error that occurs at run time.
exit test A loop that has its test condition at the bottom. See posttest.
explicit conversion Writing the code to convert from one data type to another; as opposed to implicit conversion.
Express Edition A “light” version of Visual C#. Available for download at msdn.microsoft.com/ express.
Extensible Application Markup Language (XAML) Extension of HTML used to create the visual elements of a Windows Presentation Foundation (WPF) window.
F field A group of related characters used to represent one characteristic or attribute of an entity in a data file or database.
field-level validation Checking the validity of input data in each control as they are entered, rather than waiting until the user clicks a button.
file A collection of related records.
File class A class in the System.IO namespace used for reading and writing simple text files, using the WriteAllText, WriteAllLines, AppendAllText, ReadAllText, and ReadAllLines methods.
FillEllipse method Method of the Graphics object; used to draw filled circles and ovals.
focus The currently selected control on the user interface. For controls such as buttons, the focus appears as a light dotted line. For text boxes, the insertion point (also called the cursor ) appears inside the box.
Focus method Sets the focus to a control, which makes it the active control.
for loop A pretest loop structure; usually used when the number of iterations is known.
foreach loop A pretest loop structure that can automatically iterate through a collection or array.
ForeColor property Property that determines the color of the text.
form An object that acts as a container for the controls in a graphical interface.
Form.Activated event Occurs when a form receives focus.
Form Designer The IDE window for creating the user interface.
Form.Load event Occurs when a form is loaded into memory.
format A specification for the way information will be displayed, including dollar signs, percent signs, and number of decimal positions.
format specifier codes Codes used as arguments for the ToString method; used to make the output easier to read. Can specify dollar signs, commas, decimal positions, percents, and date formats.
FormClosing event Occurs before a form unloads. A good location to place the code to prompt the users if they wish to save any changes.
FromFile method Retrieves an image from a file.
G garbage collection Automatic deletion of objects from memory after they are out of scope.
general method A method not attached to an event.
Bradley−Millspaugh: Programming in Visual C# 2008
Back Matter Glossary 669© The McGraw−Hill Companies, 2010
G L O S S A R Y 661
GetHeight method A method of the Font class that returns the height of the current font in pixels.
graphical user interface (GUI) Program application containing icons, buttons, and menu bars.
graphics Lines, shapes, and images. An image file assigned to a PictureBox control; methods of the Graphics class, such as DrawString , DrawLine , and DrawEllipse .
GroupBox A control used as a container for other controls, such as a group of radio buttons.
H handle A small square on a selected control at design time; used to resize a control. Also called a resizing handle .
Help The collection of reference pages about programming in C# and using the Visual Studio IDE.
Hide method Method of a form or a control that makes it invisible but does not unload it from memory.
horizontal scroll bar A Windows control that provides a scroll bar that appears horizontally on the form.
HyperLink control Used to navigate among Web pages; may link to an external or internal page.
I IDE Integrated development environment. See Visual Studio environment .
identifier A name for a variable, method, and named constant; supplied by the programmer.
if statement Statement for testing a condition and taking alternate actions based on the outcome of the test.
Image property A graphic file with an extension of .bmp, .gif, .jpg, .png, .ico, .emf, or .wmf.
immutable The inability of a string to be modified once it is created. A new string must be created for any modifications.
implicit conversion A conversion from one data type to another that occurs automatically or by default according to specified rules.
increment operator Shortcut operator for increasing the value of a variable by 1 (++).
index Position within a list or array.
information assurance Secure programming measure to provide accurate and timely transfer of information.
inheritance Ability to create a new class based on an existing class.
instance An object created from a class.
instance member Each object created from the class has a separate occurrence of the variable or method.
instantiate Create an object using the new keyword.
integrated development environment (IDE) Tool for writing projects and solutions; includes an editor, tools, debugger, and other features for faster development.
Interval property Determines the amount of time until a Timer component fires a Tick event; measured in milliseconds.
intranet Network within a company.
intrinsic constant Constants supplied with a language or application such as Color.Blue.
IsMdiContainer property Used to create a parent form for MDI.
Items property Collection of elements for a list box or combo box control.
Items.Add method Adds elements to the Items collection of a list box or combo box.
Items.Clear method Clears all elements from a list box or combo box.
Items.Count property Property that holds the number of elements in a list box or combo box.
Items.Insert method Inserts an element in a list for a list box or combo box.
Items.Remove method Removes the currently selected item from a list box or combo box.
Items.RemoveAt method Removes the specified item from a list box or combo box.
iteration A single pass through the statements in a loop.
L Label A control that displays text; cannot be altered by the user.
Language-Integrated Query (LINQ) New .NET feature that allows SQL-like queries to be written in C# code.
LargeChange property A property of a scroll bar that determines how far to scroll for a click in the gray area of the scroll bar.
Bradley−Millspaugh: Programming in Visual C# 2008
Back Matter Glossary670 © The McGraw−Hill Companies, 2010
662 Glossary
LayoutMdi method Arranges MDI child windows vertically, horizontally, or cascaded.
lifetime The period of time that a variable exists.
ListBox control A control that holds a list of values; the user cannot add new values at run time.
local variable The scope of a variable or constant that limits its visibility to the current method.
Locals window Window that opens in IDE during execution; displays all objects and variables that are within scope at break time.
logic error An error in a project that does not halt execution but causes erroneous results in the output.
logical operator The operators && (And), || (Or), and ! (Not); used to construct compound Boolean expressions and to reverse the truth of an expression.
loop A control structure that provides for the repetition of statements.
loop index A counter variable used in a for loop.
M MaskedTextBox A specialized form of text box that includes a Mask property, which can indicate to the user the format of data expected and require the correct data type and format of input.
Maximum property Scroll bar property for the highest possible value.
MaxLength property Property of text boxes that limits the number of characters the user can enter as input.
MdiWindowListItem property Determines whether the menu will display a list of open MDI child windows; used on the Window menu.
menu A list of choices; the available commands displayed in a menu bar.
Menu Designer Feature of the development environment for creating menus, accessed by adding a MenuStrip component to the component tray.
MenuStrip component A control used to create menus for forms.
MessageBox A dialog box that displays a message to the user.
method Predefined actions provided with objects. A unit of code that performs an action and may or may not return a value.
Minimum property Scroll bar property for the smallest possible value.
modal A dialog box that requires a user response before continuing program execution.
modeless A dialog box that does not require a user response before continuing program execution.
MouseDown event The event of a form or control that occurs when the user presses the mouse button.
Multiline property Boolean property of many controls, including labels and text boxes, that allows text to appear on multiple lines. WordWrap must also be set to true .
multiple document interface (MDI) Multiple-form project that has parent and child forms.
multitier application A program designed in components or services, where each segment performs part of the necessary actions. Each of the functions of a multitier application can be coded in a separate component and the components may be stored and run on different machines.
N named constant Constant created and named by the developer.
namespace Used to organize a group of classes in the language library; the hierarchy used to locate the class. No two classes may have the same name within a namespace.
namespace variable A variable that can be used in any method within the current namespace; generally the current project.
nested if An if statement completely contained within another if statement.
nested try/catch block A try/catch block completely contained within another try/catch block.
new keyword Used to instantiate an object; creates an object and assigns memory for property values.
NewLine character Used to set line endings in a string literal. Can use \n in strings; in a text box, use Environment.NewLine.
Next method Random class method for generating a random number.
node (XML) A branch of the tree. The file can have only one root node and multiple child nodes.
Bradley−Millspaugh: Programming in Visual C# 2008
Back Matter Glossary 671© The McGraw−Hill Companies, 2010
G L O S S A R Y 663
Now property Current date and time from the Date structure.
null An object variable or string variable that does not have an instance of an object assigned.
O object An occurrence of a class type that has properties and methods; a specific instance of a control type, form, or other class.
object-oriented programming (OOP) An approach to programming that uses classes to define the properties and methods for objects. Classes may inherit from other classes.
OpenFileDialog Common dialog component used to display the Windows Open File dialog box; allows the user to view files and select the file to open.
order of precedence Hierarchy of operations; the order in which operations are performed.
overloading Allows a method to act differently for different arguments. Multiple methods in the same class with the same name but with different argument lists.
overriding A method in a derived (inherited) class with the same name and argument list as a method in the parent (base) class. The method in the derived class overrides (supersedes) the one in the parent class for objects of the derived class.
P parameterized constructor A constructor that defines a parameter list; as opposed to a default constructor, which has an empty parameter list.
parameterized query A database query that allows a value to be supplied at run time.
parent class A class from which other classes inherit; also called a superclass or base class.
parent form MDI container for child forms.
pascal casing The naming convention that specifies mixed-case names; the first character must be uppercase and the first character of each word within the name must be uppercase; the rest of the characters must be lowercase.
Peek method Used to look ahead to determine if records remain in a file stream.
Pen object Graphical object for drawing lines and shapes.
PictureBox control A control used to display an image.
pixel Picture element; a single dot on the screen; a unit of measurement for displaying graphics.
Point structure Holds X and Y coordinates as a single unit.
polymorphism OOP feature that allows methods to take different actions depending on the situation. Methods may have the same name but different argument lists. Also refers to the naming convention of naming methods with similar actions the same in each class.
postback A round-trip to the Web server.
postfix operator Increment or decrement operator placed after the variable; calculation is performed after other operations.
posttest A loop that has its test condition after the body of the
loop; the statements within the loop will always be executed at least once; also called an exit test .
prefix operator Increment or decrement operator placed before the variable; calculation is performed before other operations.
pretest A loop that has its test condition at the top; the statements inside the loop may never be executed; also called an entry test .
primary key field The field (or fields) which uniquely identifies a record in a data file.
Print method A method of the PrintDocument class to begin executing code for printing.
print preview View the printer’s output on the screen and then choose to print or cancel.
PrintDocument component Contains methods and events to set up output for the printer.
PrintForm A method of a form that prints the form in its current state; can be set to print on the printer or the Print Preview window.
PrintPage event handler Contains the logic for printing.
PrintPreviewDialog component Used to allow printer output to be sent to a Print Preview window.
private Variable or procedure declared with the private keyword; available only inside the current class.
Professional Edition A version of Visual Studio that includes fewer features than the Team System editions. The trial edition included with this text is based on the Professional Edition.
Bradley−Millspaugh: Programming in Visual C# 2008
Back Matter Glossary672 © The McGraw−Hill Companies, 2010
664 Glossary
Project Designer A tabbed window of the IDE used to view and set the project’s properties. Displayed from Project / ProjectName Properties .
project file A text file that contains information about the current project. Displays in the Solution Explorer and can be viewed and edited in a text editor.
Properties window A window in the IDE used to set values for properties at design time.
property Characteristic or attribute of an object; control properties may be set at design time or run time depending on the specific property.
property accessor Methods written with set and get keywords to pass values to and from private variables in a class.
property block See property accessor .
protected Access modifier for a variable or method; behaves as private but allows inheritance.
pseudocode Planning tool for code using an English expression or comment that describes the action.
public The access-level specifier that allows access from all classes.
R radio button A control used to indicate a value that may be true or false (selected or not selected). In any group of radio buttons, only one button may be selected.
Random class Used to create random numbers.
ReadAllLines method Simplified file handling; opens a text file, reads all elements of
the file into an array, and closes the file.
ReadAllText method Simplified file handling; opens a text file, reads all elements of the file into a string variable, and closes the file.
ReadLine method Reads one record from a file; reads to the end of the line.
record A group of related fields; relates to data files and database tables.
Rectangle structure Defines a rectangular region, specified by its upper-left corner and its size.
refactoring A feature of the IDE that allows the programmer to change the name and/or class of objects.
relational operator Used to compare two values and return a Boolean (true/false) result.
resizing handle Handle on a control or window that may be used to resize the object.
return statement Returns a value from a method.
return value Value returned from a function or method.
reusability Code classes that can be used in multiple projects.
RichTextBox A specialized form of a TextBox control that allows the text to be formatted in a variety of ways, including character and paragraph formatting.
row A horizontal section of a grid control; one record of a table.
run time During the time a project is executing.
run-time error An error that occurs as a program executes; causes execution to break.
S scope The extent of visibility of a variable or constant. The scope may be namespace, class, local, or block level.
Scroll event Scroll bar event that occurs as the user moves the scroll box.
Select Resource dialog box A dialog box in which the image and other resource files of a project can be added and selected.
SelectedIndex property Index of the item currently selected in a list box or combo box.
separator bar A horizontal line used to separate groups of menu commands.
server Machine on which a Web application resides.
Session object An object that exists for one round-trip to the server in a Web application; can be used to store information about the user or program variables.
SetBounds method Set the location of a control; used to move a control.
SetError method ErrorProvider method to set up and display a message for the specified control; used for validating input data.
short circuit Skipping the evaluation of parts of a compound condition that are not required.
shortcut menu The menu that pops up when the right mouse button is clicked. Also called a popup menu , context menu , or right mouse menu .
Show method Displays a form or message box. A form displayed with the Show method is modeless.
Bradley−Millspaugh: Programming in Visual C# 2008
Back Matter Glossary 673© The McGraw−Hill Companies, 2010
G L O S S A R Y 665
ShowDialog method Displays a common dialog box or a form; the form is displayed modally.
siblings (XML) Elements at the same level as each other.
signature The name and parameter list of a method.
simple binding Connecting a single data field to a single control, such as a label or text box.
simple combo box Fixed-size combo box.
simple list box Fixed-size list box.
single document interface (SDI) Forms act independently in a multiple-form project.
single-file mode A style of Web Form in which the C# code and HTML are contained in the same file.
Size structure A size specified by width and height; measured in pixels.
SizeMode property Allows the size of an image in a picture box to stretch.
SmallChange property A property of a scroll bar that determines how far to scroll for a click on the scroll arrow.
snap lines Guide lines that pop up on a form during design time to help align the controls.
snippet See code snippet .
solution A C# application; can consist of one or more projects.
Solution Explorer window An IDE window that holds the filenames for the files included in your project and a list of the classes it references.
solution file A text file that holds information about the
solution and the projects it contains.
Sorted property Property of a list box and combo box that specifies that the list items should be sorted.
SoundLocation property A property of a SoundPlayer component that is set to the location of the sound file to play.
SoundPlayer component A component that can play the sound in a .wav file from a Windows form.
splash screen A window that appears before the main application window; generally displays program information and gives the appearance of quicker application loading.
Standard Edition A version of Visual Studio with fewer features than the Professional and Team System editions.
StartPosition property Determines the screen location of a form when it first appears.
startup form The main form; the first form to display after the splash screen.
stateless Does not store any information about its contents from one invocation to the next.
static keyword Keyword used to designate that a property or method can be shared.
static member A method that may be accessed without instantiating an object of the class.
static property Property that can be used by all objects of the class; often used for totals and counts. Only one copy exists for all objects of the class.
status bar An area along the lower edge of a window used to display information for the user.
StatusStrip control A container control that creates a status bar across the lower edge of a form.
Step Into Debugging command; executes each statement, including those in called methods.
Step Out Debugging command; continues rapid execution until the called method completes, and then returns to break mode at the statement following the call.
Step Over Debugging command; executes each statement in the current method but does not show statements in called methods.
stream An object used to transfer a series of bytes from one location to another.
StreamReader Object used to input small amounts of information stored in a disk file.
StreamWriter Object used to write small amounts of information to disk.
StretchImage Setting for the value of the SizeMode property of a PictureBox control.
string literal A constant enclosed in quotation marks.
struct Keyword used to create a structure.
structure A grouping that combines multiple fields of related data.
style Formatting for a Web form.
subclass A that inherits from another class; also called a child class or a derived class.
submenu A menu within a menu.
Bradley−Millspaugh: Programming in Visual C# 2008
Back Matter Glossary674 © The McGraw−Hill Companies, 2010
666 Glossary
subscript The position of an element within an array; also called an index .
subscripted variable An element of an array.
superclass A class from which other classes inherit; also called a parent class or base class.
switch statement C# statement to implement a case structure.
syntax error An error caused by failure to follow the syntax rules of the language; often caused by typographical errors. The Editor informs you of syntax errors.
System.IO namespace Holds the stream objects for reading and writing data files.
T TabIndex property Determines the order the focus moves as the Tab key is pressed.
table A two-dimensional array.
table (Web) Used for easier page formatting.
table adapter An object that handles retrieving and updating of the data in a dataset.
table lookup Logic to find an element within an array.
TabStop property Determines if a control can receive focus.
Team System Full version of Visual Studio, which contains project management tools in addition to the items found in the Professional Edition.
text box A control for data entry; its value can be entered and changed by the user.
Text property The value that displays on a control such as the words in a text box or label.
TextAlign property Used to change the alignment of text within the control.
this A reference to the current object. In a form’s code, reference to the current form.
Tick event One firing of a Timer component; each time the interval passes, another Tick event occurs.
Timer component Fires Tick events at a specified time interval.
ToLower method Converts text to lowercase letters.
toolbar The bar beneath the menu bar that holds buttons; used as shortcuts for menu commands.
toolbox A window that holds icons for tools; used to create controls and components on a form.
ToolStrip control A container control used to create a toolbar on a Windows form.
ToolStripMenuItem Individual controls added to a ToolStrip; each menu name and menu item is a separate control
ToolStripStatusLabel object Area of a ToolStrip control for displaying information.
ToolTip Small label that pops up when the mouse pointer pauses over a toolbar button or control.
ToolTip component Placed on a form to allow the individual controls to display ToolTips. A ToolTip property is added to each control.
ToolTip on ToolTip1 property The new property added to each control when a ToolTip component is added to the form.
ToUpper method Converts text to all uppercase.
try/catch block Traps user errors or program errors.
U user interface The display and commands seen by a user; how the user interacts with an application. In Windows, the graphical display of an application containing controls and menus.
V validation Checking to verify that appropriate values have been entered.
validator controls Controls that can automatically validate input data; used on Web Forms.
value keyword Incoming value for a set clause in a property method.
Value property Holds the current setting of a scroll bar control.
ValueChanged event Event that occurs when a scroll bar control is scrolled.
variable Memory location that holds data that can be changed during project execution.
vertical scroll bar A Windows control that provides a scroll bar that appears vertically on the form.
virtual Modifier keyword on a member (property or method) that specifies that, at run time, the member may be replaced by an identically named member of a derived class.
Visible property Determines if a control can be seen or not.
visual inheritance Inheritance of the visual elements of a form.
Visual Studio environment The development environment including tools for designing the

Bradley−Millspaugh: Programming in Visual C# 2008
Back Matter Glossary 675© The McGraw−Hill Companies, 2010
G L O S S A R Y 667
interface, editing program code, running, and debugging applications; also called the IDE .
void Keyword that indicates that a method does not return a value.
W Web Form Form in Visual Studio for creating pages that display in a browser.
Web page A static page that displays in a browser application.
WebBrowser control Allows Internet access from a Windows application.
while loop A series of statements that will be executed as long as a condition is true . The condition is written on the while statement and is a pretest loop structure.
Windows Presentation Foundation (WPF) Technology for creating rich user interfaces,
such as those used in Windows Vista. Can use WPF Interoperability to include WPF controls on a Windows Form, use a WPF Application template to write a WPF application, or use a WPF Browser Application template to create a browser application.
WordWrap property A Boolean property of a TextBox and RichTextBox control that determines whether a long line will be continued to another line. In order to display text on a second line, both WordWrap and MultiLine must be set to true.
Write method Writes one record to a stream object; does not include a carriage return.
WriteAllLines method Simplified file handling; opens the file, writes all data from an array, and closes the file.
WriteAllText method Simplified file handling; opens the file, writes all data from a string, and closes the file.
WriteLine method Writes one record to a stream object; includes a carriage return character at the end.
X XAML Browser Application (XBAP) A WPF application that runs in a browser. The user interface is created using XAML. See Extensible Application Markup Language.
XML Extensible markup language. A format for data; popular for data storage and transfer on the Internet.
XMLTextReader Class used to access information from an XML file.
Bradley−Millspaugh: Programming in Visual C# 2008
Back Matter Index676 © The McGraw−Hill Companies, 2010
668 Index
Index
SYMBOLS % (modulus) operator, 121 & (ampersand)
in front of an access key, 81 specifying a keyboard access key, 219–220
& (and) operator, 168 && (logical and) operator, 166, 167 * (multiplication) operator, 121 /* and */ (comment delimiters), 30, 208 * = (assignment) operator, 124 … (ellipsis), in menus, 227 // (comment indicator), 208 [] (square brackets), referencing the index position of
an array, 299 {} (braces), 159–160 | (or) operator, 168 || (logical or) operator, 166, 167 ~ (tilde), preceding a destructor, 500 -- (decrement) operator, 124 – (subtraction) operator, 121 + (addition) operator, 121 ++ (increment) operator, 124 += (assignment) operator, 124 < (less than) operator, 161 <= (less than or equal to) operator, 161 = (assignment) operator, 123, 161 ! = (not equal to) operator, 161 = = (equal to) operator, 161, 163 –= (assignment) operator, 124 / = (assignment) operator, 124 > (greater than) operator, 161 > = (greater than or equal to) operator, 161 \ (backslash)
preceding a quotation mark with, 112 in string literals, 113
/ (division) operator, 121–122 ! (logical not) operator, 166, 226 ; (semicolon)
in if and else statements, 159 separating parts of a for statement, 306 terminating a statement, 31
(). See parentheses 16-bit Unicode, 162
A Abandon method, 396 About box, 263–266 About form, 266 Abs (absolute value) method, 630, 631 absolute positioning, 383, 384 abstract methods, 501 abstract modifier, 507 Academic Alliance. See Microsoft Academic
Alliance program Accept button, 82–83 access keys. See also keyboard shortcuts
defining, 81–82 duplicate, 84 on menu items and submenus, 219–220 for text boxes, 83 viewing on controls or menus, 82
accessor methods of base class properties, 502 in a property block, 270–271
accessors, 504–505 accumulators, 338–340 Activated event, 268 active control, 80 Active Files button, 262 active server pages (ASP), 371 ActiveX Data Objects (ADO), 412 activity diagram, 160
Add Connection dialog box, 419 Add Existing Item command, 262 Add method, 297, 468–469, 628 Add New Data Source option, 430 Add New Item dialog box, 260, 391, 392
Class template, 489 selecting a template from, 264
Add ORDER BY Clause dialog box, 436 Add Project Data Source, 417 Add WHERE Clause dialog box, 438 Add Windows Form, 260 addition (+) operator, 121 addToTotals method, 505 ADO.NET, 412, 414 AJAX (Asynchronous JavaScript and XML), 377, 397–398 algebra, precedence of operations in, 122–123 algebraic comparison, 161 AllowDrop property, 558, 561 Alphabetical button, 23 ampersand (&)
in front of an access key, 81 specifying a keyboard access key, 219–220
animation, 544–545 ANSI
code, 162 collating sequence, 632–633
APL, 5 AppendAllText method, 453 application(s)
deploying, 651 designing for user convenience, 80–87 multitier, 485–486
application design, three-tier model for, 485 Application Designer, 553 application files, 7–8 Application tab, of Product Designer, 276 Apply Styles window, 386, 387, 388, 389, 390 arguments, 235–236 arithmetic expressions, order of
precedence, 122–123 arithmetic operations, 121–122 ArithmeticException exception, 137 array elements
for accumulators, 338 current contents of, 340
array programs, debugging, 339–340 arrays, 332
declaring, 333–334 including in structures, 337 list boxes with, 343–344
multidimensional, 345–351 reading data back into, 455 single-dimension, 332–334
ASP (active server pages), 371 ASP.NET, 371
models for managing controls and code, 374
retaining and redisplaying control contents, 394–395
server controls, 377, 378 validator controls, 393–394 Web Site template, 373 Web.config file for, 654
.aspx extension, 371 aspx file, 379 .aspx.cs extension, 371 aspx.cs file, 379 assembly information, 264–266 assignment operators, 123 assignment statements, 31
entering, 33–34 performing calculations in, 123
Asynchronous JavaScript and XML. See AJAX
at sign (@), before a literal, 113, 458 Atan method, 631 attributes, XML file, 594, 595 authentication, 654 authorization, 654–655 Auto Hide pushpin icon, 16, 17 AutoHide
undoing, 637 on windows in the IDE, 636
automatic context menus, 231 AutoPostBack, 436, 437 Autos window, 202, 206, 339, 647 AutoSize property
of a button, 585 of a label, 40, 78 selecting, 24
average, calculating, 144
B BackColor property
of a control, 90, 91, 131 of forms and controls, 81
BackgroundImage property, 77 backslash (\)
preceding a quotation mark with, 112 in string literals, 113
base class, 483 creating, 484, 506–507 forms inherited from, 507 forms inheriting from, 509–510
base statement, 502 bin folder, expanding, 456 binding navigator, 416 binding source, 415, 416 bitmap images, 546 blank fields, checking for, 181 blank line, creating in code, 41
668
Bradley−Millspaugh: Programming in Visual C# 2008
Back Matter Index 677© The McGraw−Hill Companies, 2010
I N D E X 669
block variables, 116 blue snap lines. See snap lines body, of a loop, 307 bookmarks, 643 books.xml sample file, 594 bool data type, 109, 304 Boolean expressions, 160–168, 204 Boolean variable, 304, 470 Border property, in an HTML table, 383 borders, setting, 77 BorderStyle property, 77, 78 bound controls, 423
creating, 426–427 selecting the control type for, 427
braces, in if statements, 159–160 break, forcing, 198–199 break statement, 182, 308, 335 breakpoints
inserting in code, 198–199 setting, 203, 647
browsers listing of, 370, 371 testing in other, 380
Brush objects creating filled shapes, 537, 538
declaring, 538 in fill methods, 540
brushes, types of, 538 Business tier, 485, 486 button(s)
adding event handlers for, 41 adding to a form, 40 adding to a ToolStrip, 585–586 changing text in, 40 clicking in a form, 36 coding for a WPF application, 608–609 displaying in message boxes, 140, 177–179 drawing on a form, 19–20, 21, 22 example, 2 in a form, 69 performing overlapping functions, 189
Button control, 376 Button tool, in the toolbox, 19, 20 byte data type, 109, 125
C C (currency) code, 128, 129 C#
applications in, 6–8 ASP.NET and, 371 code statements, 30–32 data types, 109, 110 databases and, 412 Development Settings, 8, 9 displaying data from a database, 414 editions of, 5 modes, 14 projects, writing, 15–43 rules for naming objects, methods, and
variables, 52 writing programs in, 6–8 writing Windows applications with, 2–3
calculations, 108, 119–128 breaking into smaller units, 240–243 in code, 123–125 programming example, 131–135 with unlike data types, 126–127
calendar controls, 587–590 call statements, 188–189 callback, 310–311 calling, methods, 188, 234–235 camel casing, 52 Cancel button, 82–83, 465
CancelButton property, 83 Cascade constant, 584 cascading style sheets (CSS), 386, 387 case
comparing, 165–166 mixed for variables, 111 uppercase for constants, 111
case blocks, in a switch statement, 182 case sensitive, identifiers as, 110 casting, 120, 126 catch statements, 136, 137–138. See also try/catch
blocks Causes Validation property, 575–576 cells, merging in HTML tables, 382 CenterScreen, setting to, 85 char data type, 109, 579 character data, comparing, 162–163 character escape sequences, 177 CharacterCasing property, 575 check boxes, 73
adding to forms, 506 checking the state of multiple, 175–176 example, 2 in a form, 69 naming, 73 setting the Checked property of, 88 testing the value of, 173–174
check marks, in menu items, 225–226 Checked property
of a check box, 73 of a menu item, 225 of a radio button, 73 setting for radio buttons and check
boxes, 88 CheckedChanged event, 73 CheckedChanged method, 186–187 CheckFileExists property, 464 CheckPathExists property, 464 child class, 483 child forms, 581, 583 child nodes, of an XML file, 594 child windows
displaying multiple, 583 displaying the list of open, 584 of the IDE, 11 layout options for, 584
Choose Default Environment Settings dialog box, 8, 9
Choose Toolbox Items dialog box, 604 class-based styles, 387 class code, complete, 492–493 class files, adding to a project, 511 class-level declarations, 117–119 class-level variables
lifetime of, 116–117 storing values of, 395
class name, of a form, 28, 29 class statement, automatically generated, 45 Class template, in the Add New Item dialog
box, 489 class variables. See static members classes, 4, 486
abstract, 501 adding, 503 adding static properties to, 498 code organized into, 45 creating, 482, 488–493 creating a hierarchy of, 484 creating objects using, 494–500 creating properties in, 270–272, 487 declaring new, 45 defining properties for, 489–490 designing, 486
examining, 512–514 planning, 6 reusable, 485
clean compile, 48 Clear All Bookmarks button, 643 Clear method
clearing out a text box, 87 of the Items collection, 300–301
clearing labels, 87 lists, 300–301 picture boxes, 76 radio buttons, 175 text boxes, 87 visible buttons, 175
Click event handler, 34 click-once deployment, 651 clients, required for Web applications, 370 client/server Web applications, 370 client-side HTML controls, 378 Close button, for a window, 637 Close method
closing forms, 267 of StreamWriter, 458, 459
COBOL, 5 code
automatically generated, 44–45 calculations in, 123–125 commenting out, 207 creating a blank line in, 41 injecting into a string, 655 for particular events, 29 placing in Click events, 172 planning, 6 printing, 42–44 stepping through, 200–201, 648 in a table lookup, 343 writing, 7, 29 writing for menu items, 224, 225 writing secure, 655
Code Access permission type, 655 code access security, 655–656 code-behind file, 371, 379 Code Editor. See also Editor
opening, 376 using shortcuts in, 642–646
Code Editor window. See also Editor window Insert Snippet menu option, 580, 581 popping up value of an array in, 340
code separation model, 374 code snippets, 580 code statements, 30–32 collating sequence, of ANSI, 162 collection, 295 Color dialog box, 228–229 colors
changing for text, 90–92 radio buttons for selecting, 90–92 in the user interface, 81
columns formatting in the Edit Columns dialog
box, 422 selecting in HTML tables, 382 in a table, 412, 413 in tabular data, 345
Combo Box selection, converting to, 427–429
combo boxes, 294, 295 Comment out the selected lines toolbar
button, 208, 209 Comment Selected Lines command, 643 comment statements, 30, 33, 34 commenting out code, 207
Bradley−Millspaugh: Programming in Visual C# 2008
Back Matter Index678 © The McGraw−Hill Companies, 2010
670 Index
comments adding, 41, 491 turning code lines into, 208 in an XML file, 595
commission method, 237–238 common controls, for Windows Forms, 13 common dialog boxes, 227–230 CompareTo method, 163–164 CompareValidator control, 394 comparison operators, 168. See also relational
operators compile error, 45 compiler, warnings from, 138 compiling, 48 component tray, 85 compound Boolean expressions, 166–167 concatenation, 72, 92 conditions, 160 Configure the Select Statement page,
435–436, 437 const keyword, 111 const statement, 117 constants, 108, 111
adding at the class level, 504 assigning values to, 112–113 comparing, 161 example, 113 for MessageBoxIcon, 140 naming, 110, 112
constructors, 487–488 adding for a new class, 504 overloading, 488 parameterized, 488 writing, 491
containers, group boxes as, 72 Contents collection, of the Session object, 396 context menus
creating, 231–233 displaying, 25
context-sensitive Help, 56, 646 Continue command, 200, 205, 647, 648 continue statement, 308 control type
choosing for fields, 431–432 selecting for a bound control, 427
controls, 3, 4 adding to a new Web page, 391–392 aligning, 80 available for Web Forms, 377–378 choosing for program output, 130–131 coding for, 87–94 common for Windows Forms, 13 copying quickly, 642 deselecting a group of, 79 disabling, 89 focus of, 83 grouping in a form, 81 images for, 77 locking, 25–26, 41 making active, 80 making invisible, 509 moving, 21, 79, 547 naming, 52 nudging into place, 641 placing on a form, 19–21, 94 placing on an HTML table, 381–383 renaming, 49–51, 114 retaining the contents of, 394–395 selecting, 25, 78–79 selecting, deleting, moving, and resizing, 21 setting properties for multiple, 80 setting the tab order for, 83–84 setting the Width property of, 587
snap lines to aligning, 641–642 types of, 68–78 working with multiple, 78–80
conventions, for naming variables and constants, 110–111
conversions, implicit, 125–126 Convert class, 126 Convert methods, 127 Convert.To… methods, 634 coordinate system, 539–540 Copy Web Site feature, 372 Copy Web Site tool, 398 copying
controls, 642 executable files, 276 project folders, 243 projects, 649 Web projects, 649 Web sites, 398
corrections, testing during debugging, 207 Cos method, 631 Count property, 298 counter-controlled loop, 306 counter variables
declaring, 144 decrementing, 307
counting, 144 counting backward, in loops, 307 CreateGraphics method, 537 credentials, authentication based on, 654 CRL data types, 109, 110 cross-hair mouse pointer, 606, 607 Crystal Reports, 310 .cs extension, retaining, 27 .cs files, 7, 8 CSS Properties window, 387, 388, 390 currency, C code specifying, 128, 129
D D (digits) code, 129 data, formatting for display, 128–131 data access, in Visual Studio, 415–416 data applications, running, 420 data binding, 415, 429 data-bound controls, 415, 423 data-bound Details view, 425–427 data components, examining, 420, 421 Data Designer, 423 data fields, binding individual, 423–427 data file input and output (IO)
objects, 452–456 data files, 452 data hiding, 483, 487 Data property, 559 Data section, of the Web Forms toolbox, 377 data source
adding in the Data Sources window, 424 selecting fields after creation of, 430 setting up, 426
Data Source Configuration Wizard, 417–421, 424, 426, 430, 435–437
Data Sources window, 424–425 binding features of, 423 listing control types, 428 selecting a control type, 431, 432
Data tier, 485, 486 data types, 109–110
methods for conversion between, 634 performing calculations with unlike,
126–127 specifying for values, 236
database applications, creating, 417–423 database items, converting to objects, 440
database management systems (DBMS), 412 database objects, 415–416 database schema file, 423 database tables. See tables databases
C# and, 412 terminology of, 412–413 users injecting code into, 655
DataContext class, 443 DataGridView control
adding to a form, 417–420 displaying fields from a table in, 417 formatting, 420–422 retrieving and displaying data in a, 445 on a Windows Form, 415
datasets, 416–417, 430 DataTip, 199, 378, 647 date(s)
displaying, 586–587 formatting, 630 working with, 628–630
date controls, 587–590 date formats
converting values to, 630 trapping for illegal, 588
date masks, numeric digits in, 70 Date property, 628 date variables, 629–630 DateTime data type, 109 DateTime structure, 586, 628–629 DateTime values, 130 DateTimePicker control, 587–590 Day property, 628 DayOfWeek property, 628 DayOfYear property, 628 DBMS (database management systems), 412 Debug folder, 456 Debug menu, 196, 197, 200–201, 646 debug mode, 203 debug time, 14, 203, 204 Debug toolbar, 646
debugging tools on, 196, 197 Stop Debugging button on, 206
debugging, 48 array programs, 339–340 functions, 379 projects, 196–202 step-by-step tutorial, 202–209 Web applications, 379–380
Debugging Not Enabled dialog box, 380 debugging tools, 196, 646–648 decimal class, 120 decimal columns, aligning, 315–316 decimal data type, 109, 110, 113 decimal fractions, rounding, 127–128 decimal numbers, querying an array of, 441 decision symbol, 160 declaration(s)
class-level, 117–118 coding class-level, 118–119 local, 117
declaration statements, 109 for arrays, 333–334 entering, 115–116 for two-dimensional arrays, 345 for variables, 114
decrement operator (--), 124 default button, in a message box, 179 default clause, in a switch statement, 184 default constructor, 487 default environment settings, for the IDE, 8–9 default namespace, 44 default values, for scroll bar properties, 550
Bradley−Millspaugh: Programming in Visual C# 2008
Back Matter Index 679© The McGraw−Hill Companies, 2010
I N D E X 671
Default.aspx file, 374 Default.aspx.cs file, 374 Delete All Breakpoints, 208 deleting
controls, 21 event handlers, 49, 50 menu items, 221
deployment, 380, 651 derived classes, 483
creating, 502–503 inheriting from the base class, 484 using base-class properties in, 502
design surface for a new class, 443, 445 for visualizing data, 443, 444
Design tab, 374, 375 design time, 14
setting the Text property, 72 switching between forms, 261
Design view, HTML table in, 382 Designer window, 11 destructors, 487, 500 Details view, selecting, 425 DetailsView control
adding to a Web page, 438 Width property, 439
DetectUrl property, 71 dialog boxes
common, 227–230 displaying, 228 information from, 228–230
direct reference technique, 339 in a two-dimensional table, 348
dirty data, 470 disabled menu items, 225 disabling, controls, 89 disconnected datasets, 416 disk files, reading and writing
data in, 452 display, formatting data for, 128–131 DisplayStyle property, 585 division operator (/), 121–122 do loop, for a table lookup, 343 do/while loop, 302–303 document(s), 638 Document window, 12, 639
resizing a form in, 19 tabs at the top of, 261 in Visual Studio IDE, 17
documentation adding, 41 of projects, 30
DocumentCompleted event, 590 DocumentTitle property, 590 DoDragDrop method, 557–558 double data types, 109, 110
in a constant, 113 required for Math.Pow, 239
double spacing, in a message box, 177 drag-and-drop editing, 645 drag-and-drop programming, 557–562 DragDrop event, 557 DragDrop event handler, 559 DragDropImage program, 561–562 DragEnter event, 557, 558–559 draw methods, 540 drawing, lines, 78 drawing methods, categories of, 540–541 DrawLine method, 540 DrawRectangle method, 540 DrawString method, 313 drop-down combo boxes, 294, 295
drop-down lists, 294, 295 example, 2 setting up, 435–437
DropDownItems collection, 220–221 DropDownStyle property, 294
E e argument
assigning an effect to, 558, 559 of the KeyPress event handler, 579 of the KeyUp event handler, 593
Edit and Continue feature, 48, 201 Edit Columns dialog box, 421–422 Editor. See Code Editor editor, for the Text property, 72 Editor window, 11. See also Code Editor window
creating a method in, 234 in debug mode, 199 splitting, 644–645
e.Graphics object, 537 element-based styles, 387 ElementHost control, 603 elements
of arrays, 332 of structures, 336 in XML, 594, 595
else clause, in an if statement, 159 else if
coding, 170–171 nesting if statements, 169
else portion, nesting if statements in, 168–169
empty string comparing a text box value to, 180–181 setting a property to, 87
Enable AutoPostBack, 436, 437 Enable ViewState property, 395 Enabled property
of a control, 89 of menu items, 225, 226 of a Timer, 275, 548
encapsulation, 483, 487 endless loops, 308 EndsWith method, 632 Enter event, 301 Enter event handler, 310 Enter key, checking for, 593 entities, on the design surface, 443 entry test form of a loop, 302 environment, customizing, 16–18 environment settings, for the IDE, 8–9 equal to ( = = ) operator, 161, 163 Equals method, 632 error line, jumping to, 46 Error List window
for a clean compile, 48 displaying, 45, 46
error messages displaying directly on a form, 572 giving away important information, 655
ErrorMessage property, 393, 394 ErrorProvider component, 572 errors, 45–51 event(s), 4, 483
in C# projects, 29 causing to occur at set intervals, 547 coding for an inherited class, 510 of menu items, 218 for scroll bars, 551
event driven programming, 3 event handlers
adding for buttons, 41 C# setting up, 650–651
calling, 188–189 coding for Hello World, 32–34 deleting, 49, 50 modifying, 48–51 naming, 29 placing code in, 537 removing, 650 renaming, 49–51, 649–651 sharing, 185–187 viewing, 42–43 writing for selected events, 269
event handling, for Web Forms, 378–379 event-handling methods. See event handlers Events button, in the Properties window, 42, 43, 49,
50, 185, 186, 269 exception handling, 136, 207 exceptions, 135–138. See also run-time errors executable file, copying, 276 execution
breaking and stepping, 203 continuing, 201, 205 pausing with Break All button, 198 restarting from the beginning, 201 stopping, 201, 206
exit test form of a loop, 303 exiting, for loops, 308 Exp method, 631 Expander WPF control, 604, 605 explicit conversions, 126 exponentiation, Pow method for, 154 Express Edition, of C#, 5, 6 Expression Blend, 602, 609 Expression Web, 386 expressions
checking the current values of, 199 evaluating, 122 viewing the contents of, 647
extensible hypertext markup language (XHTML), 370 extensions, 8 external style sheet (.css file), 386
F F (fixed-point) code, 129 false, testing for, 165 field-level validation, 575 field names, determining valid, 655 fields
checking for required, 180–181 choosing the control type for, 431–432 in databases, 412 selecting after data source creation, 430 selecting during data source creation, 430 selecting from tables, 429–430 setting up additional, 437–439 testing multiple, 141–143
File class, methods of, 452–453 file extensions, 8 file handling, using streams, 457 file I/O, 452 File menu
DropDownItems collection for, 220, 221
Save All option, 36 file-open procedure, 465 File Read program, 461–463 File System Web sites, 372 FileName property, 464 files
checking for already open, 465–466 checking for existence of, 469 closing, 459 reformatting, 646 saving, 36, 469–470
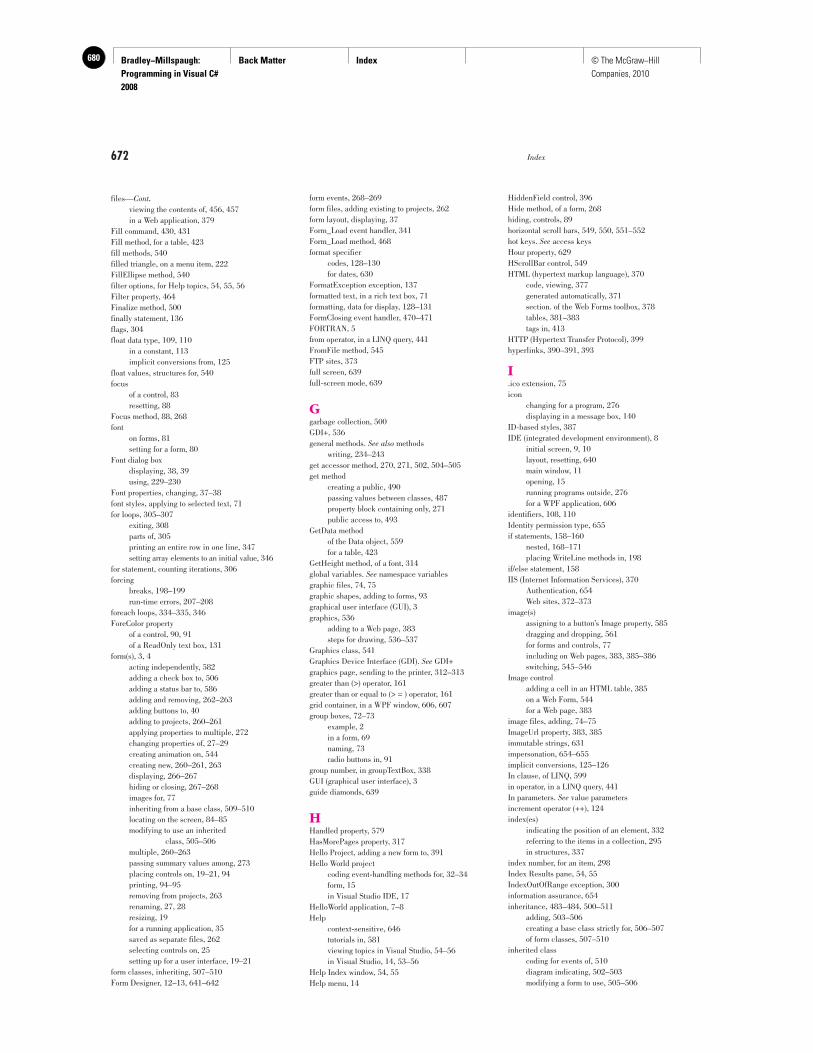
Bradley−Millspaugh: Programming in Visual C# 2008
Back Matter Index680 © The McGraw−Hill Companies, 2010
672 Index
files—Cont. viewing the contents of, 456, 457 in a Web application, 379
Fill command, 430, 431 Fill method, for a table, 423 fill methods, 540 filled triangle, on a menu item, 222 FillEllipse method, 540 filter options, for Help topics, 54, 55, 56 Filter property, 464 Finalize method, 500 finally statement, 136 flags, 304 float data type, 109, 110
in a constant, 113 implicit conversions from, 125
float values, structures for, 540 focus
of a control, 83 resetting, 88
Focus method, 88, 268 font
on forms, 81 setting for a form, 80
Font dialog box displaying, 38, 39 using, 229–230
Font properties, changing, 37–38 font styles, applying to selected text, 71 for loops, 305–307
exiting, 308 parts of, 305 printing an entire row in one line, 347 setting array elements to an initial value, 346
for statement, counting iterations, 306 forcing
breaks, 198–199 run-time errors, 207–208
foreach loops, 334–335, 346 ForeColor property
of a control, 90, 91 of a ReadOnly text box, 131
form(s), 3, 4 acting independently, 582 adding a check box to, 506 adding a status bar to, 586 adding and removing, 262–263 adding buttons to, 40 adding to projects, 260–261 applying properties to multiple, 272 changing properties of, 27–29 creating animation on, 544 creating new, 260–261, 263 displaying, 266–267 hiding or closing, 267–268 images for, 77 inheriting from a base class, 509–510 locating on the screen, 84–85 modifying to use an inherited
class, 505–506 multiple, 260–263 passing summary values among, 273 placing controls on, 19–21, 94 printing, 94–95 removing from projects, 263 renaming, 27, 28 resizing, 19 for a running application, 35 saved as separate files, 262 selecting controls on, 25 setting up for a user interface, 19–21
form classes, inheriting, 507–510 Form Designer, 12–13, 641–642
form events, 268–269 form files, adding existing to projects, 262 form layout, displaying, 37 Form_Load event handler, 341 Form_Load method, 468 format specifier
codes, 128–130 for dates, 630
FormatException exception, 137 formatted text, in a rich text box, 71 formatting, data for display, 128–131 FormClosing event handler, 470–471 FORTRAN, 5 from operator, in a LINQ query, 441 FromFile method, 545 FTP sites, 373 full screen, 639 full-screen mode, 639
G garbage collection, 500 GDI+, 536 general methods. See also methods
writing, 234–243 get accessor method, 270, 271, 502, 504–505 get method
creating a public, 490 passing values between classes, 487 property block containing only, 271 public access to, 493
GetData method of the Data object, 559 for a table, 423
GetHeight method, of a font, 314 global variables. See namespace variables graphic files, 74, 75 graphic shapes, adding to forms, 93 graphical user interface (GUI), 3 graphics, 536
adding to a Web page, 383 steps for drawing, 536–537
Graphics class, 541 Graphics Device Interface (GDI). See GDI+ graphics page, sending to the printer, 312–313 greater than (>) operator, 161 greater than or equal to (> = ) operator, 161 grid container, in a WPF window, 606, 607 group boxes, 72–73
example, 2 in a form, 69 naming, 73 radio buttons in, 91
group number, in groupTextBox, 338 GUI (graphical user interface), 3 guide diamonds, 639
H Handled property, 579 HasMorePages property, 317 Hello Project, adding a new form to, 391 Hello World project
coding event-handling methods for, 32–34 form, 15 in Visual Studio IDE, 17
HelloWorld application, 7–8 Help
context-sensitive, 646 tutorials in, 581 viewing topics in Visual Studio, 54–56 in Visual Studio, 14, 53–56
Help Index window, 54, 55 Help menu, 14
HiddenField control, 396 Hide method, of a form, 268 hiding, controls, 89 horizontal scroll bars, 549, 550, 551–552 hot keys. See access keys Hour property, 629 HScrollBar control, 549 HTML (hypertext markup language), 370
code, viewing, 377 generated automatically, 371 section. of the Web Forms toolbox, 378 tables, 381–383 tags in, 413
HTTP (Hypertext Transfer Protocol), 399 hyperlinks, 390–391, 393
I .ico extension, 75 icon
changing for a program, 276 displaying in a message box, 140
ID-based styles, 387 IDE (integrated development environment), 8
initial screen, 9, 10 layout, resetting, 640 main window, 11 opening, 15 running programs outside, 276 for a WPF application, 606
identifiers, 108, 110 Identity permission type, 655 if statements, 158–160
nested, 168–171 placing WriteLine methods in, 198
if/else statement, 158 IIS (Internet Information Services), 370
Authentication, 654 Web sites, 372–373
image(s) assigning to a button’s Image property, 585 dragging and dropping, 561 for forms and controls, 77 including on Web pages, 383, 385–386 switching, 545–546
Image control adding a cell in an HTML table, 385 on a Web Form, 544 for a Web page, 383
image files, adding, 74–75 ImageUrl property, 383, 385 immutable strings, 631 impersonation, 654–655 implicit conversions, 125–126 In clause, of LINQ, 599 in operator, in a LINQ query, 441 In parameters. See value parameters increment operator (++), 124 index(es)
indicating the position of an element, 332 referring to the items in a collection, 295 in structures, 337
index number, for an item, 298 Index Results pane, 54, 55 IndexOutOfRange exception, 300 information assurance, 654 inheritance, 483–484, 500–511
adding, 503–506 creating a base class strictly for, 506–507 of form classes, 507–510
inherited class coding for events of, 510 diagram indicating, 502–503 modifying a form to use, 505–506
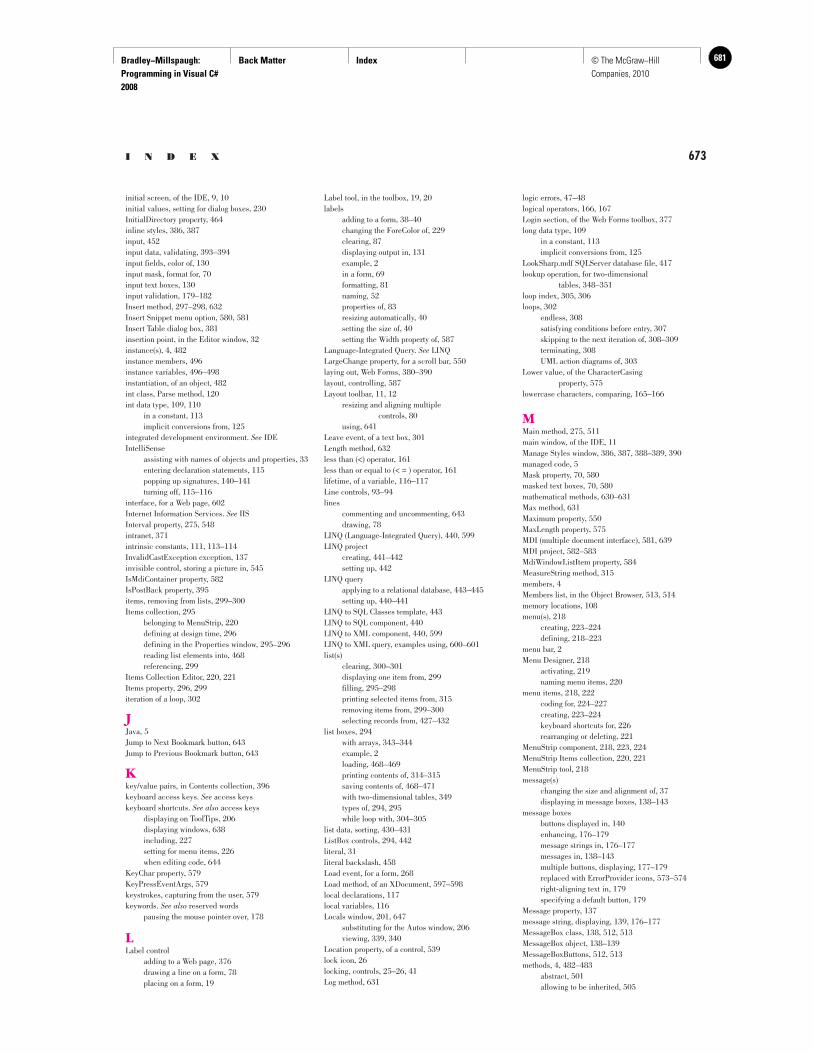
Bradley−Millspaugh: Programming in Visual C# 2008
Back Matter Index 681© The McGraw−Hill Companies, 2010
I N D E X 673
initial screen, of the IDE, 9, 10 initial values, setting for dialog boxes, 230 InitialDirectory property, 464 inline styles, 386, 387 input, 452 input data, validating, 393–394 input fields, color of, 130 input mask, format for, 70 input text boxes, 130 input validation, 179–182 Insert method, 297–298, 632 Insert Snippet menu option, 580, 581 Insert Table dialog box, 381 insertion point, in the Editor window, 32 instance(s), 4, 482 instance members, 496 instance variables, 496–498 instantiation, of an object, 482 int class, Parse method, 120 int data type, 109, 110
in a constant, 113 implicit conversions from, 125
integrated development environment. See IDE IntelliSense
assisting with names of objects and properties, 33 entering declaration statements, 115 popping up signatures, 140–141 turning off, 115–116
interface, for a Web page, 602 Internet Information Services. See IIS Interval property, 275, 548 intranet, 371 intrinsic constants, 111, 113–114 InvalidCastException exception, 137 invisible control, storing a picture in, 545 IsMdiContainer property, 582 IsPostBack property, 395 items, removing from lists, 299–300 Items collection, 295
belonging to MenuStrip, 220 defining at design time, 296 defining in the Properties window, 295–296 reading list elements into, 468 referencing, 299
Items Collection Editor, 220, 221 Items property, 296, 299 iteration of a loop, 302
J Java, 5 Jump to Next Bookmark button, 643 Jump to Previous Bookmark button, 643
K key/value pairs, in Contents collection, 396 keyboard access keys. See access keys keyboard shortcuts. See also access keys
displaying on ToolTips, 206 displaying windows, 638 including, 227 setting for menu items, 226 when editing code, 644
KeyChar property, 579 KeyPressEventArgs, 579 keystrokes, capturing from the user, 579 keywords. See also reserved words
pausing the mouse pointer over, 178
L Label control
adding to a Web page, 376 drawing a line on a form, 78 placing on a form, 19
Label tool, in the toolbox, 19, 20 labels
adding to a form, 38–40 changing the ForeColor of, 229 clearing, 87 displaying output in, 131 example, 2 in a form, 69 formatting, 81 naming, 52 properties of, 83 resizing automatically, 40 setting the size of, 40 setting the Width property of, 587
Language-Integrated Query. See LINQ LargeChange property, for a scroll bar, 550 laying out, Web Forms, 380–390 layout, controlling, 587 Layout toolbar, 11, 12
resizing and aligning multiple controls, 80
using, 641 Leave event, of a text box, 301 Length method, 632 less than (<) operator, 161 less than or equal to (< = ) operator, 161 lifetime, of a variable, 116–117 Line controls, 93–94 lines
commenting and uncommenting, 643 drawing, 78
LINQ (Language-Integrated Query), 440, 599 LINQ project
creating, 441–442 setting up, 442
LINQ query applying to a relational database, 443–445 setting up, 440–441
LINQ to SQL Classes template, 443 LINQ to SQL component, 440 LINQ to XML component, 440, 599 LINQ to XML query, examples using, 600–601 list(s)
clearing, 300–301 displaying one item from, 299 filling, 295–298 printing selected items from, 315 removing items from, 299–300 selecting records from, 427–432
list boxes, 294 with arrays, 343–344 example, 2 loading, 468–469 printing contents of, 314–315 saving contents of, 468–471 with two-dimensional tables, 349 types of, 294, 295 while loop with, 304–305
list data, sorting, 430–431 ListBox controls, 294, 442 literal, 31 literal backslash, 458 Load event, for a form, 268 Load method, of an XDocument, 597–598 local declarations, 117 local variables, 116 Locals window, 201, 647
substituting for the Autos window, 206 viewing, 339, 340
Location property, of a control, 539 lock icon, 26 locking, controls, 25–26, 41 Log method, 631
logic errors, 47–48 logical operators, 166, 167 Login section, of the Web Forms toolbox, 377 long data type, 109
in a constant, 113 implicit conversions from, 125
LookSharp.mdf SQLServer database file, 417 lookup operation, for two-dimensional
tables, 348–351 loop index, 305, 306 loops, 302
endless, 308 satisfying conditions before entry, 307 skipping to the next iteration of, 308–309 terminating, 308 UML action diagrams of, 303
Lower value, of the CharacterCasing property, 575
lowercase characters, comparing, 165–166
M Main method, 275, 511 main window, of the IDE, 11 Manage Styles window, 386, 387, 388–389, 390 managed code, 5 Mask property, 70, 580 masked text boxes, 70, 580 mathematical methods, 630–631 Max method, 631 Maximum property, 550 MaxLength property, 575 MDI (multiple document interface), 581, 639 MDI project, 582–583 MdiWindowListItem property, 584 MeasureString method, 315 members, 4 Members list, in the Object Browser, 513, 514 memory locations, 108 menu(s), 218
creating, 223–224 defining, 218–223
menu bar, 2 Menu Designer, 218
activating, 219 naming menu items, 220
menu items, 218, 222 coding for, 224–227 creating, 223–224 keyboard shortcuts for, 226 rearranging or deleting, 221
MenuStrip component, 218, 223, 224 MenuStrip Items collection, 220, 221 MenuStrip tool, 218 message(s)
changing the size and alignment of, 37 displaying in message boxes, 138–143
message boxes buttons displayed in, 140 enhancing, 176–179 message strings in, 176–177 messages in, 138–143 multiple buttons, displaying, 177–179 replaced with ErrorProvider icons, 573–574 right-aligning text in, 179 specifying a default button, 179
Message property, 137 message string, displaying, 139, 176–177 MessageBox class, 138, 512, 513 MessageBox object, 138–139 MessageBoxButtons, 512, 513 methods, 4, 482–483
abstract, 501 allowing to be inherited, 505
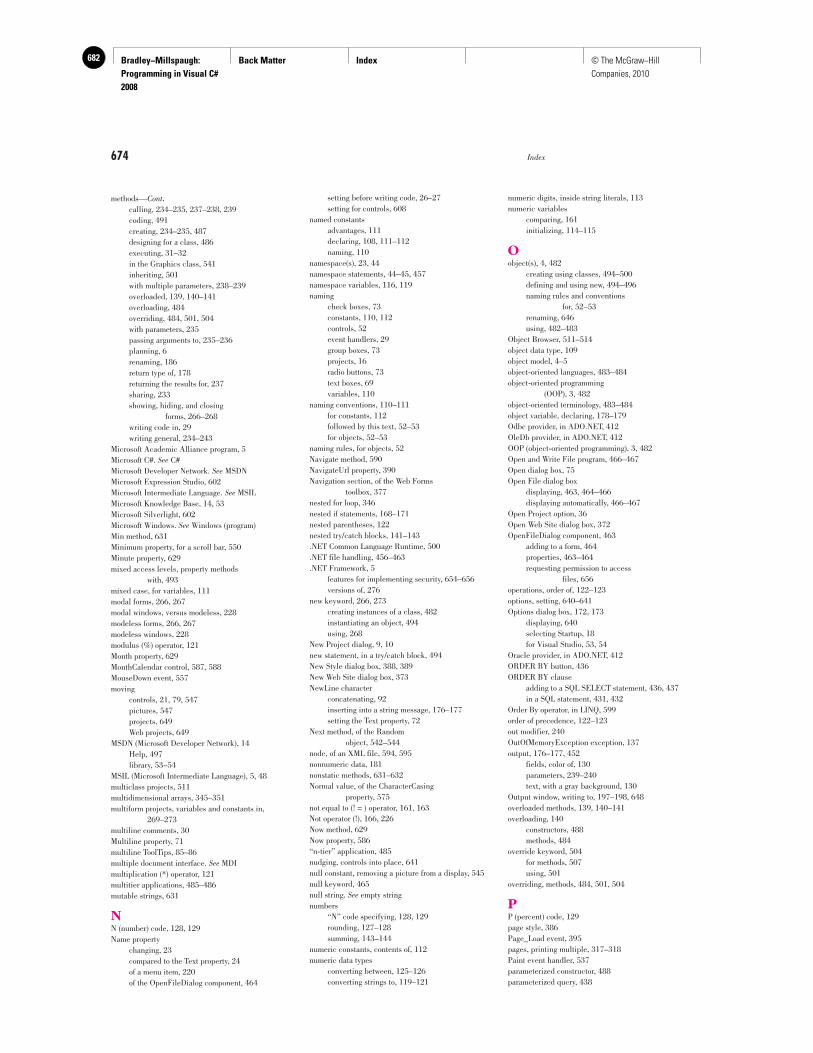
Bradley−Millspaugh: Programming in Visual C# 2008
Back Matter Index682 © The McGraw−Hill Companies, 2010
674 Index
methods—Cont. calling, 234–235, 237–238, 239 coding, 491 creating, 234–235, 487 designing for a class, 486 executing, 31–32 in the Graphics class, 541 inheriting, 501 with multiple parameters, 238–239 overloaded, 139, 140–141 overloading, 484 overriding, 484, 501, 504 with parameters, 235 passing arguments to, 235–236 planning, 6 renaming, 186 return type of, 178 returning the results for, 237 sharing, 233 showing, hiding, and closing
forms, 266–268 writing code in, 29 writing general, 234–243
Microsoft Academic Alliance program, 5 Microsoft C#. See C# Microsoft Developer Network. See MSDN Microsoft Expression Studio, 602 Microsoft Intermediate Language. See MSIL Microsoft Knowledge Base, 14, 53 Microsoft Silverlight, 602 Microsoft Windows. See Windows (program) Min method, 631 Minimum property, for a scroll bar, 550 Minute property, 629 mixed access levels, property methods
with, 493 mixed case, for variables, 111 modal forms, 266, 267 modal windows, versus modeless, 228 modeless forms, 266, 267 modeless windows, 228 modulus (%) operator, 121 Month property, 629 MonthCalendar control, 587, 588 MouseDown event, 557 moving
controls, 21, 79, 547 pictures, 547 projects, 649 Web projects, 649
MSDN (Microsoft Developer Network), 14 Help, 497 library, 53–54
MSIL (Microsoft Intermediate Language), 5, 48 multiclass projects, 511 multidimensional arrays, 345–351 multiform projects, variables and constants in,
269–273 multiline comments, 30 Multiline property, 71 multiline ToolTips, 85–86 multiple document interface. See MDI multiplication (*) operator, 121 multitier applications, 485–486 mutable strings, 631
N N (number) code, 128, 129 Name property
changing, 23 compared to the Text property, 24 of a menu item, 220 of the OpenFileDialog component, 464
setting before writing code, 26–27 setting for controls, 608
named constants advantages, 111 declaring, 108, 111–112 naming, 110
namespace(s), 23, 44 namespace statements, 44–45, 457 namespace variables, 116, 119 naming
check boxes, 73 constants, 110, 112 controls, 52 event handlers, 29 group boxes, 73 projects, 16 radio buttons, 73 text boxes, 69 variables, 110
naming conventions, 110–111 for constants, 112 followed by this text, 52–53 for objects, 52–53
naming rules, for objects, 52 Navigate method, 590 NavigateUrl property, 390 Navigation section, of the Web Forms
toolbox, 377 nested for loop, 346 nested if statements, 168–171 nested parentheses, 122 nested try/catch blocks, 141–143 .NET Common Language Runtime, 500 .NET file handling, 456–463 .NET Framework, 5
features for implementing security, 654–656 versions of, 276
new keyword, 266, 273 creating instances of a class, 482 instantiating an object, 494 using, 268
New Project dialog, 9, 10 new statement, in a try/catch block, 494 New Style dialog box, 388, 389 New Web Site dialog box, 373 NewLine character
concatenating, 92 inserting into a string message, 176–177 setting the Text property, 72
Next method, of the Random object, 542–544
node, of an XML file, 594, 595 nonnumeric data, 181 nonstatic methods, 631–632 Normal value, of the CharacterCasing
property, 575 not equal to (! = ) operator, 161, 163 Not operator (!), 166, 226 Now method, 629 Now property, 586 “n-tier” application, 485 nudging, controls into place, 641 null constant, removing a picture from a display, 545 null keyword, 465 null string. See empty string numbers
“N” code specifying, 128, 129 rounding, 127–128 summing, 143–144
numeric constants, contents of, 112 numeric data types
converting between, 125–126 converting strings to, 119–121
numeric digits, inside string literals, 113 numeric variables
comparing, 161 initializing, 114–115
O object(s), 4, 482
creating using classes, 494–500 defining and using new, 494–496 naming rules and conventions
for, 52–53 renaming, 646 using, 482–483
Object Browser, 511–514 object data type, 109 object model, 4–5 object-oriented languages, 483–484 object-oriented programming
(OOP), 3, 482 object-oriented terminology, 483–484 object variable, declaring, 178–179 Odbc provider, in ADO.NET, 412 OleDb provider, in ADO.NET, 412 OOP (object-oriented programming), 3, 482 Open and Write File program, 466–467 Open dialog box, 75 Open File dialog box
displaying, 463, 464–466 displaying automatically, 466–467
Open Project option, 36 Open Web Site dialog box, 372 OpenFileDialog component, 463
adding to a form, 464 properties, 463–464 requesting permission to access
files, 656 operations, order of, 122–123 options, setting, 640–641 Options dialog box, 172, 173
displaying, 640 selecting Startup, 18 for Visual Studio, 53, 54
Oracle provider, in ADO.NET, 412 ORDER BY button, 436 ORDER BY clause
adding to a SQL SELECT statement, 436, 437 in a SQL statement, 431, 432
Order By operator, in LINQ, 599 order of precedence, 122–123 out modifier, 240 OutOfMemoryException exception, 137 output, 176–177, 452
fields, color of, 130 parameters, 239–240 text, with a gray background, 130
Output window, writing to, 197–198, 648 overloaded methods, 139, 140–141 overloading, 140
constructors, 488 methods, 484
override keyword, 504 for methods, 507 using, 501
overriding, methods, 484, 501, 504
P P (percent) code, 129 page style, 386 Page_Load event, 395 pages, printing multiple, 317–318 Paint event handler, 537 parameterized constructor, 488 parameterized query, 438
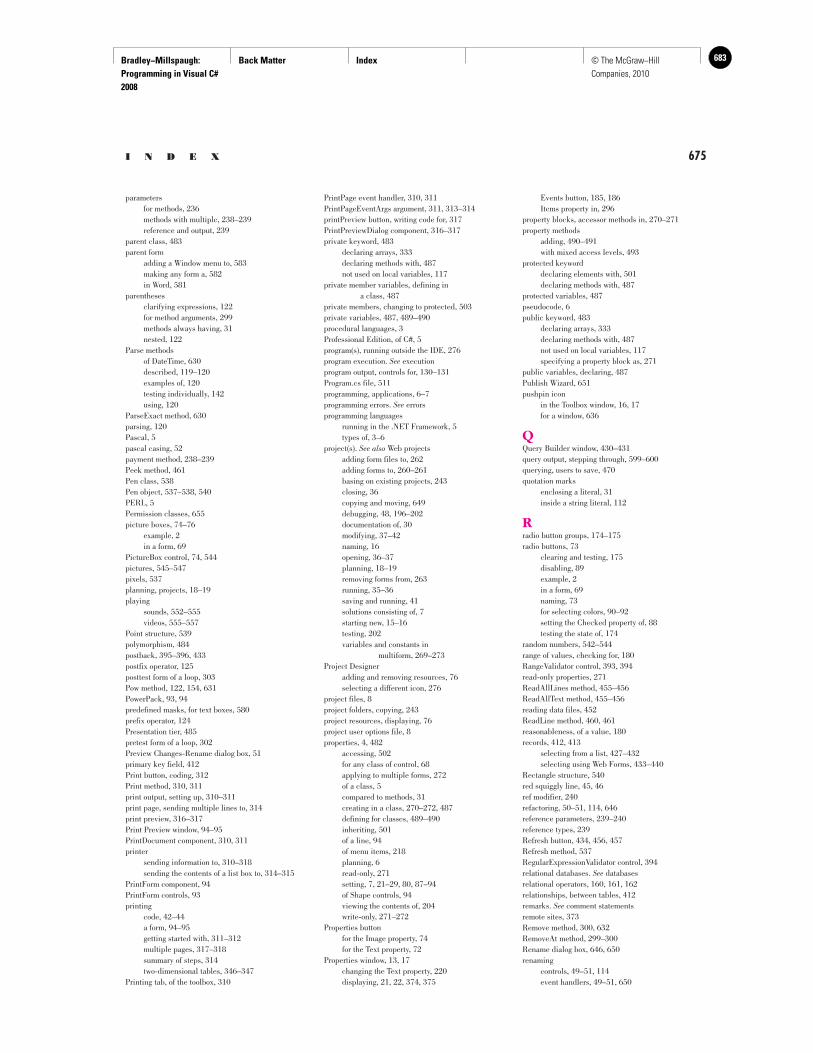
Bradley−Millspaugh: Programming in Visual C# 2008
Back Matter Index 683© The McGraw−Hill Companies, 2010
I N D E X 675
parameters for methods, 236 methods with multiple, 238–239 reference and output, 239
parent class, 483 parent form
adding a Window menu to, 583 making any form a, 582 in Word, 581
parentheses clarifying expressions, 122 for method arguments, 299 methods always having, 31 nested, 122
Parse methods of DateTime, 630 described, 119–120 examples of, 120 testing individually, 142 using, 120
ParseExact method, 630 parsing, 120 Pascal, 5 pascal casing, 52 payment method, 238–239 Peek method, 461 Pen class, 538 Pen object, 537–538, 540 PERL, 5 Permission classes, 655 picture boxes, 74–76
example, 2 in a form, 69
PictureBox control, 74, 544 pictures, 545–547 pixels, 537 planning, projects, 18–19 playing
sounds, 552–555 videos, 555–557
Point structure, 539 polymorphism, 484 postback, 395–396, 433 postfix operator, 125 posttest form of a loop, 303 Pow method, 122, 154, 631 PowerPack, 93, 94 predefined masks, for text boxes, 580 prefix operator, 124 Presentation tier, 485 pretest form of a loop, 302 Preview Changes-Rename dialog box, 51 primary key field, 412 Print button, coding, 312 Print method, 310, 311 print output, setting up, 310–311 print page, sending multiple lines to, 314 print preview, 316–317 Print Preview window, 94–95 PrintDocument component, 310, 311 printer
sending information to, 310–318 sending the contents of a list box to, 314–315
PrintForm component, 94 PrintForm controls, 93 printing
code, 42–44 a form, 94–95 getting started with, 311–312 multiple pages, 317–318 summary of steps, 314 two-dimensional tables, 346–347
Printing tab, of the toolbox, 310
PrintPage event handler, 310, 311 PrintPageEventArgs argument, 311, 313–314 printPreview button, writing code for, 317 PrintPreviewDialog component, 316–317 private keyword, 483
declaring arrays, 333 declaring methods with, 487 not used on local variables, 117
private member variables, defining in a class, 487
private members, changing to protected, 503 private variables, 487, 489–490 procedural languages, 3 Professional Edition, of C#, 5 program(s), running outside the IDE, 276 program execution. See execution program output, controls for, 130–131 Program.cs file, 511 programming, applications, 6–7 programming errors. See errors programming languages
running in the .NET Framework, 5 types of, 3–6
project(s). See also Web projects adding form files to, 262 adding forms to, 260–261 basing on existing projects, 243 closing, 36 copying and moving, 649 debugging, 48, 196–202 documentation of, 30 modifying, 37–42 naming, 16 opening, 36–37 planning, 18–19 removing forms from, 263 running, 35–36 saving and running, 41 solutions consisting of, 7 starting new, 15–16 testing, 202 variables and constants in
multiform, 269–273 Project Designer
adding and removing resources, 76 selecting a different icon, 276
project files, 8 project folders, copying, 243 project resources, displaying, 76 project user options file, 8 properties, 4, 482
accessing, 502 for any class of control, 68 applying to multiple forms, 272 of a class, 5 compared to methods, 31 creating in a class, 270–272, 487 defining for classes, 489–490 inheriting, 501 of a line, 94 of menu items, 218 planning, 6 read-only, 271 setting, 7, 21–29, 80, 87–94 of Shape controls, 94 viewing the contents of, 204 write-only, 271–272
Properties button for the Image property, 74 for the Text property, 72
Properties window, 13, 17 changing the Text property, 220 displaying, 21, 22, 374, 375
Events button, 185, 186 Items property in, 296
property blocks, accessor methods in, 270–271 property methods
adding, 490–491 with mixed access levels, 493
protected keyword declaring elements with, 501 declaring methods with, 487
protected variables, 487 pseudocode, 6 public keyword, 483
declaring arrays, 333 declaring methods with, 487 not used on local variables, 117 specifying a property block as, 271
public variables, declaring, 487 Publish Wizard, 651 pushpin icon
in the Toolbox window, 16, 17 for a window, 636
Q Query Builder window, 430–431 query output, stepping through, 599–600 querying, users to save, 470 quotation marks
enclosing a literal, 31 inside a string literal, 112
R radio button groups, 174–175 radio buttons, 73
clearing and testing, 175 disabling, 89 example, 2 in a form, 69 naming, 73 for selecting colors, 90–92 setting the Checked property of, 88 testing the state of, 174
random numbers, 542–544 range of values, checking for, 180 RangeValidator control, 393, 394 read-only properties, 271 ReadAllLines method, 455–456 ReadAllText method, 455–456 reading data files, 452 ReadLine method, 460, 461 reasonableness, of a value, 180 records, 412, 413
selecting from a list, 427–432 selecting using Web Forms, 433–440
Rectangle structure, 540 red squiggly line, 45, 46 ref modifier, 240 refactoring, 50–51, 114, 646 reference parameters, 239–240 reference types, 239 Refresh button, 434, 456, 457 Refresh method, 537 RegularExpressionValidator control, 394 relational databases. See databases relational operators, 160, 161, 162 relationships, between tables, 412 remarks. See comment statements remote sites, 373 Remove method, 300, 632 RemoveAt method, 299–300 Rename dialog box, 646, 650 renaming
controls, 49–51, 114 event handlers, 49–51, 650
Bradley−Millspaugh: Programming in Visual C# 2008
Back Matter Index684 © The McGraw−Hill Companies, 2010
676 Index
renaming—Cont. form, 27, 28 methods, 186 solutions, 243 variables, 114, 646
Replace method, 632 required fields, checking for, 180–181 RequiredFieldValidator control, 393, 394 reserved words, 110 resizing, controls, 21 resizing handles, 20, 79 resource files, 7 resources
adding and removing, 76 adding sound files to, 553
Resources folder displaying images from, 545 playing sounds from, 553
Resources tab of Application Designer, 553 of Project Designer, 76
Restart command, 201, 648 return keyword, 237 return statement, 237 return type, for a method, 178 return value, 237 reusability, 484 reusable classes, 485 rich text boxes, 70–72 RichTextBox control, 70–71 Role-based permission type, 655 Round method, 631
of the Math class, 128 rounding decimal values, 127
rounding numbers, 127–128 rounding toward even technique, 127 rows
selecting in HTML tables, 382 in a table, 412, 413 in tabular data, 345
RPG, 5 .rtf file, 71 run time, 14
controlling pictures at, 545–547 resetting the selected radio button, 88 setting visibility at, 88–89
run-time errors, 46–47, 207–208. See also exceptions
running, projects, 35–36
S sample projects, in Visual Studio, 580–581 sans serif font, on forms, 81 Save All option, 36 Save File As dialog box, 466 saving
contents of list boxes, 468–471 files, 36, 469–470 projects, 41 work, 36
sbyte data type, 110 schema files, in XML, 414 scope, of a variable, 116 screen
locating a form on, 84–85 setting up, 636–641 splitting vertically, 640
screen layout, modifying, 639 ScriptManager component, 397, 398 scroll bar controls, 549 scroll bars
automatically added to list boxes and combo boxes, 294
events, 551 properties for, 550–551
SDI (singe document interface), 581 Second property, 629 secure code, writing, 655 security
implementing in the .NET Framework, 654–656 in Web database applications, 433–434
seeding, a random number generator, 542 Select clause, of LINQ, 599 Select Image dialog box, 385 Select method, 484 select operator, 441 Select Resource dialog box, 74–75 Select URL dialog box, 390–391, 392 SelectAll method, 142 selectColor method, 238 SelectedIndex property, 298, 299, 344 selection handles, 79 semicolon (;)
in if and else statements, 159 separating parts of a for statement, 306 terminating a statement, 31
sender argument, 186–187 separator bars, in menus, 222, 223 sequence, of form events, 268–269 server-side controls, 378 servers, for Web applications, 370 Session object, 396 session variable, 396–397 set accessor method, 270, 502, 504–505 set intervals, 547 set methods
creating private, 490 passing values between classes, 487 private access to, 493 property block containing only, 271 validation performed in, 488
set statement, using a value keyword, 271 SetBounds method, 547 SetError method, 572–573 Settings box, 23 Shape controls, 93–94 shared variables. See static members shipping rate table, 349 short circuiting
avoiding, 168 an operation, 167
short data type, 109, 125 shortcut assignment operators, 124 shortcut menus, 231 ShortcutKeys property, 226 shortcuts, in the Form Designer, 641–642 Show empty environment, 18 Show keyword, 178 Show method
displaying a form, 266–267 of the MessageBox object, 138–139 signatures of, 140–141
ShowDialog method, 228, 229 displaying a form, 266, 267 executing, 316–317
ShowShortcutKeys property, 226 siblings, in an XML file, 594, 595 Sign method, 631 signatures, 140 Silverlight. See Microsoft Silverlight simple combo boxes, 294, 295 simple list boxes, 294, 295 Sin method, 631 Single CRL data type, 109 single-dimension arrays, 332–334 single document interface (SDI), 581
single-file model, 374 single-stepping
program execution, 496 through code, 648
Size structure, components of, 539 SizeF structure, 315 SizeMode property, 75 slashes, beginning comments, 30 .sln file, 7, 8 SmallChange property, 550 smart editor, finding syntax errors, 45 Smart Tag arrow, 417, 420 smart tags, 76–77, 422–423.
See also tags snap lines, 20, 641–642 SOAP (Simple Object Access Protocol), 399 SolidBrush class, 538 solution(s), 243 solution (.sln) file, 13 Solution Explorer
showing the filename of a new form, 261
for a Web application, 379 Solution Explorer window, 13, 17 solution file, 7, 8 solutions, 7 Sort Type, selecting Ascending, 431, 432 Sorted property, of a control, 297 sorting, list data, 430–431 sound files, 553 sound-playing program, 553–555 SoundLocation property, 552 SoundPlayer component, 552–553 sounds, playing, 552–555 Source object, 557–558 Source property, 137 Source tab, 377 splash forms, 275–276 splash screen, 274–275 Split bar, 644, 645 Split tab, 377 splitting
the Editor window, 644–645 the screen, 640
Spring property, 587 SQL (Structured Query Language), 415 SQL SELECT statement, 430, 431 SQL Server Express (SSE), 412 SQLClient provider, in ADO.NET, 412 Sqrt method, 631 square brackets [], referencing the index position
of an array, 299 StackTrace property, 137 Standard Edition, of C#, 5 Standard section, of the toolbox for Web Forms,
377–378 Standard toolbar
toolbar buttons on, 11, 12 windows buttons on, 638
standards, followed by programmers, 52 Start command, for debugging, 647 Start Debugging button, 48 Start Page
contents of, 9, 10 setting, 393 showing, 18
Start Without Debugging command, 647 StartPosition property, 27, 84–85 startup form, 260, 511 state, for a Web page, 394–397 stateless Web pages, 371 statements, terminating, 31 static HTML code, 377
Bradley−Millspaugh: Programming in Visual C# 2008
Back Matter Index 685© The McGraw−Hill Companies, 2010
I N D E X 677
static keyword creating a static member, 497 declaring for a property, 273 on a private class-level variables, 498 in a property method, 273
static members, 496–497 static methods, 631–632 static properties, 497, 498–499 static variables, 273, 496–498 status bars, 585, 586 status strip labels, 587 StatusStrip control, 586 Step Into button, 205 Step Into command, 200, 647, 648 Step Out command, 200, 647, 648 Step Over command, 200, 647, 648 stepping commands, 200–201, 647, 648 stepping through, query output, 599–600 sticky text box, 576 Stop Debugging command, 201, 647 Stop Debugging toolbar button, 206 Stream Writer object, 457–460 StreamReader object
reading data from a file using, 460–463 using, 457
streams, 457 String class, methods, 631 String Collection Editor, 296 string constants. See string literals string data type, 109, 110 string handling, 631 string injections, 655 string literals, 112, 113, 176 StringBuilder class, 631 strings
comparing, 163–164, 632–633 converting to, 120–121 converting to numeric data types, 119–121 joining, 92 working with, 631–633
struct statement, 335–336 structured exception handling, 136 structures, 335–337
accessing elements of, 336–337 declaring variables of, 336 establishing, 341 including arrays in, 337
Style Application toolbar, 387–388 style rules, order of precedence of, 386 style tools, 387 styles
applying, 389–390 defining, 388, 389 dragging from one category to another, 389 managing, 388–389 modifying, 390 setting, 77 types of, 386–387 using, 386
subclass, 483 submenus, 222 subscripted variables, referring to arrays as, 332 subscripts, 332–334 Subtract method, 629 subtraction (-) operator, 121 summary form, displaying a total, 272 summary values, passing among forms, 273 summing, two-dimensional tables, 347–348 sums, counting and accumulating, 143–144 superclass, 483 switch statement, 182–184 switches, 304 switching, images, 545–546
Symbol Rename, 646 syntax errors, 45–46, 47 system date and time, 586, 629 System.IO namespace, 457 System.IO.EndofStreamException exception, 137
T tab order, for controls, 83–84 tabbed Document window, 639 TabIndex property, 83, 84 table adapters, 415, 416 table lookup, 340–343
coding, 343 in a two-dimensional table, 348–349
Table tool, 381 TableAdapter, 423 tables, 412
referring to arrays as, 332 selecting fields from, 429–430
TabStop property, 83–84 tabular data, 345 tags. See also smart tags
in HTML, 413 in XML, 414, 594
Tan method, 631 target object, 557, 558–559 Task List, 645 Team System Editions, of C#, 5 terminating, loops, 308 text
aligning in a text box, 69 changing in a button, 40 changing the color of, 90–92 concatenating, 92 displaying on multiple lines in text
boxes, 71–72 placing on an HTML table, 381–383 right-aligning in a message box, 179 in an XML file, 595
text boxes, 68–69 calculation of the product of, 108 changing the ForeColor of, 229 clearing, 87 for data entry, 350–351 displaying text on multiple lines, 71–72 events of, 301 example, 2 in a form, 69 keyboard access keys for, 83 naming, 69 for output, 131 returning focus to, 576 selecting entries in, 309–310
Text Editor toolbar, 11, 12, 208, 209, 643 text files, writing and reading, 452–456 text properties, 26–27 Text property
of a button, 585 of a check box, 73 of a control, 24–25 converting, 119 of a form, 27, 28 of a label, 38, 39, 78 for a menu item, 219–220 printing selected items, 315 of a radio button, 73 of a text box, 69
TextAlign property selecting, 38, 39 of text boxes, 69
TextBox control, 376 TextChanged event, 301 “There were build errors. Continue?” message, 48
this keyword, 32 three-tier application, 485 throwing, exceptions, 136 Tick event, 275, 547 Tick event handler, 548 tilde (~), preceding a destructor, 500 TileHorizontal constant, 584 TileVertical constant, 584 time, displaying, 586–587 time masks, 70 Timer component, 275, 547–549 timer example program, 548–549 title bar, of the message box, 139 Title property
of the OpenFileDialog component, 464 for a Web document, 376
Today method, 629 TODO keyword, 645 Toggle Bookmark button, 643 ToList method, 441 ToLongDateString method, 629 ToLongTimeString method, 629 ToLower method, 165–166 Tool windows, 639 toolbars
buttons on, 11–12 creating, 585 displaying or hiding, 11
toolbox, 3 adding MenuStrip components from, 218 dragging commonly used code to, 645–646 tools for horizontal and vertical scroll bars, 551 for Visual Studio Windows Forms, 13
Toolbox window, 16, 17 tools
for debugging, 646–648 sorting in the toolbox, 13
ToolStrip buttons, 586 ToolStrip controls, 222–223, 585 ToolStripButton object, 585 ToolStripMenuItems, 218 ToolStripStatusLabel objects, 586 ToolTips
adding multiline, 85–86 creating, 85–87 described, 81
ToShortDateString method, 629 ToShortTimeString method, 629 ToString method, 632
converting numeric data types to a string value, 121
DateTime values, 130 formatted value returned by, 129–130 with formatting codes, 128
total accumulators, 338 totals
adding to the correct, 338–339 modifying class code to calculate, 499
ToUpper method, 165–166 Transfer method, 393 true, testing for, 165 try/catch blocks, 136–137
enclosing a StreamReader object, 460 enclosing an instantiation in, 494 nested, 141–143 new statement in, 494
tutorials, in Help, 581 two-dimensional arrays, 345–346 two-dimensional tables
lookup operation for, 348–351 printing, 346–347 summing, 347–348
.txt extension, 458
Bradley−Millspaugh: Programming in Visual C# 2008
Back Matter Index686 © The McGraw−Hill Companies, 2010
678 Index
type-declaration character, 112 type interference, 441
U UML action diagrams, 158
if statement logic in, 160 of the logic of a for loop, 306 of lookup operation logic, 342 of pretest and posttest loops, 303
Uncomment Selected Lines command, 643 Uniform Resource Identifier (URI), 591 units, breaking calculations into smaller, 240–243 UpdatePanel, placing controls inside, 397, 398 Upper value, of the CharacterCasing property, 575 uppercase, for constants, 111 uppercase characters, comparing, 165–166 Url property
of the WebBrowser control, 590 Windows Media Player control, 556
URLs, showing formatted, 71 user(s)
capturing keystrokes from, 579 querying to save, 470
user actions, setting properties based on, 89 user convenience, designing applications
for, 80–87 user interface
defining, 6, 19–21 designing, 6, 18–19, 81 for a Web page, 376 writing code for, 494
using statements automatic generation of, 44 for System.IO, 464 for System.Windows.Controls, 603
V valid subscripts, 334 Validating event, 575 Validating event handler, 576 validation(s)
field-level, 575 of input values, 179–182 masked text box for, 580 performed in set methods, 488 performing multiple, 181–182 techniques, 572–580
validation example program, 576–579 Validation section, of the Web Forms toolbox, 377 ValidationSummary control, 394 validator controls, 393–394 value keyword, 271 value parameters, 239–240 Value property, of a scroll bar, 551 value types, variables as, 239 ValueChanged event, for a scroll bar, 551 ValueChanged event handler, 590 values
assigning to constants, 112–113 checking for a range of, 180 combining into a message string, 176 determining valid from error messages, 655 methods returning, 234, 236–238 passing to a second Web page, 396–397
variables, 108 declaring, 114, 118, 235, 336 designing for a class, 486 namespace-level, 119 passing from one form object to
another, 270 renaming, 114, 646 retaining the values of, 395 scope and lifetime of, 116–119
testing, 205 viewing the contents of, 204
vertical scroll bar tool, 551 vertical scroll bars, 549 videos, playing, 555–557 View Code button, 261 View Designer button, 37, 261 View in Browser option, 377 View menu, 11, 638 virtual keyword, declaring a method with, 501 visibility
setting at run time, 88–89 of a variable, 116
visible buttons, clearing, 175 Visible property
of a control, 89 for PictureBox controls, 75 setting for a form, 268
Visual Basic Power Packs 3.0 section, 93 Visual C#. See C# visual inheritance, 507, 508 Visual Studio 2008
components of, 5–6 data access in, 415–416 environment, 8–14 Help facility, 53–56 managing windows in, 56 running, 15
Visual Studio Data Sources window, 415 Visual Studio IDE, viewing file contents in, 456, 457 Visual Studio Options dialog box, 172, 173 Visual Studio Web Development IDE, Design tab,
374, 375 Visual Studio Web server, 370 Visual Web Developer 2008 Express Edition, 370 VisualBasicPowerPackSetup.msi file, 93 VisualBasicPowerPacks3Setup.exe file, 93 visualizers, in Visual Studio 2008, 340 void keyword, 234 VScrollBar control, 549
W wave files (.wav), 552 Web, acronyms, 399 Web applications
client/server, 370 creating, 373, 374–377, 397–398 debugging, 379–380 files in, 379 making portable, 439–440 retaining values of variables, 395 running, 377 separate product for developing, 370 styles in, 386–390
Web clients, 370–371 Web.config file
debugging in, 379 settings in, 654
Web database applications, 433–434 Web Forms, 370, 374, 396
application, 2, 3 controls available for, 377–378 creating, 374–377 event handling for, 378–379 laying out, 380–390 pieces of, 371 selecting records using, 433–440 viewing in the designer, 377 in the Visual Studio IDE, 374
Web pages. See also Web Forms adding a second, 391–393 displaying in a WebBrowser control, 590, 591 displaying on a Windows Form, 590–593
files for, 374 including images on, 383, 385–386 maintaining state, 394–397 navigating, 390–393 preview, displaying, 377 as stateless, 371 tasks in creating, 602 transferring in code, 393
Web programming, 370–371 Web projects. See also project(s)
copying and moving, 649 managing, 398
Web selection application, 434–439 Web server controls, 377 Web servers, 370 Web Service, 399 Web sites
beginning new, 434–435 copying entire, 398 creating, 373–380 types of, 372–373
WebBrowser control, 590–591 WebBrowser program, 591–593 WebParts section, of the Web Forms toolbox, 377 Where operators
in LINQ, 599 in a LINQ query, 441
while loop, 302–303 with a list box, 304–305
Window menu, 583–584 windows
closing or hiding, 636–637 creating, 2 customizing, 16 displaying, 637, 638 hiding and displaying, 636–637 in the IDE, 11 managing in Visual Studio, 56
Windows (program) authentication, 654 making programs look and behave like, 80–81 standards for programs, 227 user interfaces, 2
Windows applications creating, 417–422 designing applications to match, 81 including videos in, 555 writing with Visual C#, 2–3
Windows Form Designer generated code section, 650–651
Windows Forms adding printing, 94 adding WebBrowser controls, 590–591 adding WPF controls, 604–605 displaying Web pages on, 590–593 drawing graphics shapes, 536
Windows Forms Application template, 9, 10 Windows GUI. See GUI Windows Installer, 651 Windows Media Player control, 555, 556–557 Windows menus, standards for, 227 Windows Presentation Foundation. See WPF Windows projects, copying and moving, 649 Windows Vista
displaying file extensions, 8 setting to show underlined shortcuts, 82 using WPF technology, 602
Windows XP, displaying file extensions, 8 WordWrap property, 71 work, saving, 36 workspace, setting up, 15–16 WPF (Windows Presentation
Foundation), 602–609
Bradley−Millspaugh: Programming in Visual C# 2008
Back Matter Index 687© The McGraw−Hill Companies, 2010
I N D E X 679
WPF Application template, 602 WPF applications, writing, 605–607 WPF Browser Application template, 602 WPF controls
adding to Windows Forms, 604–605 in a Windows Forms application, 603–604 on the WPF Components tab, 604
WPF Hello World application, 607–609 WPF Interoperability, 603–604 WPF window, designing the layout of, 606 Write method, 458 write-only properties, 271–272 WriteAllLines method
of the File class, 453 single file operation with, 454–455
WriteAllText method, 452, 453 WriteLine method, 197–198, 648
saving elements with, 469 of StreamWriter, 458–459
WSDL (Web Services Description Language), 399
X X and Y coordinates
measuring graphics, 539 setting, 313–314
X coordinate, 312 XAML (Extensible Application Markup
Language), 603 XAML window, 606 XBAP, 603 XDocument objects
compared to XElement, 598–599 loading XML files into, 597–598
XElement object, 598–599 XHTML (extensible hypertext markup language), 370 XML (extensible markup language), 399, 413
advantages to using, 594 document, 440 schema definition, 423 tags in, 414
XML Editor, 423
XML files C# tools for reading, 597–601 loading into XElement objects, 598–599 terminology and structure of, 594 writing and reading, 595–597
XML version, of the ComboBox Save and Read program, 596–597
XmlWriter class, 596 XmlWriter object, 595 .xsd file, 423
Y Y coordinate, 312. See also X and
Y coordinates Year property, 629
Z zero-length string. See empty string

Related Documents