PROGRAMMABLE USB FAN INSTRUCTION MANUAL Insert the DISC into your computer’s disc drive. Choose the needed program for your operating system and save it on the hard drive of your computer Installing your Software Double click on the LedFan Editor Icon to start the program. Using your Software Data Display Open Option Middle Option Close Option Language Use Middle Option Note Sampling Window Function Buttons Character& Symbol Library Status Start: Activate sampling window Stop: Deactivate sampling window Open: Open a saved message file Download: Download a message file from the computer to the Fan Save: Save the display message Clear: Clear selected data box Exit: Exit from the program Editor: Activate the editing window DOWNLOADING FILES 1.Connect the USB Data Cable to a USB port on your computer and to the Data Input Port on your fan. Make sure your fan is OFF, To connect the computer to download the file. After connecting with the USB fan, the computer will find the software of the USB fan automatically. The send button will change from gray to black while the LED lights flash one by one, which proves that the connection is successful. (Fig.2). 2.Using the mouse, move the cursor to the Data Display area(Fig.3) of the Editor screen. Click on a blank message line and type in desired letters or numbers and/or click on the symbols area (Fig.4)to insert the desired symbols. You can create up to eight (8) messages at a maximum of 20 characters each including paces. Fig.2 Fig.1 WARNINGS FUNCTION BUTTONS: Data Display Window Character & Symbol Library Fig. 3 Fig. 4 3.After creating your message click on the Open Option Button (Fig. 5) to select how the fan will display your message. 4.Once you have selected your Open Options, click on the Close Screen Option button to select how the program closes the message on the fan. The same options as the Open Options are available (Fig. 6) 5.You can also select how the program handles the message once displayed by clicking on the Turn Option button. (Fig. 7) The Use Middle Option must be chosen Fig. 5 Fig. 6 Fig. 7 6.Upon completion of the above steps you may preview your message in the sampling window by clicking on the Start button (Fig. 8) 7.To end the preview, click the Stop button in the sampling window (Fig. 9). Fig. 8 Fig. 9 8.To save the message click on the save button. 9. The programmed display message will be sent to the USB fan after pressing the send button. The connection status will be shown in green while the data is transmitting. The connection status will be full of green when the data transfer is completed. (Fig. 10). 10.Disconnect the Data Cable from the Fan and your computer. Insert USB plug into the computer and your fan Press the power switch to start the fan and display your messages.(Fig.11) CONTENTS: 1 x Programmable Usb Fan 1 x USB Data Cable 1 x Instruction Manual SYSTEM REQUIREMENTS This software is designed for use on computers running Windows XP, Vista , Windows 7 operating systems Minimum 6 MB storage space required on your hard drive. Fig.11 Fig.12 Specifications Working Volt: DC 5 V Working Current: ≤350 mA Product Length 40c m Weight 58 g Fan Diameter Ø90 mm Switch Keyswitch With the help of the editor, it is possible to modify and create characters or symbols of your own. Move the cursor to the editor button on the right of the data display area. The editing window will open. You can manually click into any field box in the window. The display area will be in black. The data can be easy to clear, which will be in white. THE EDITOR

Welcome message from author
This document is posted to help you gain knowledge. Please leave a comment to let me know what you think about it! Share it to your friends and learn new things together.
Transcript
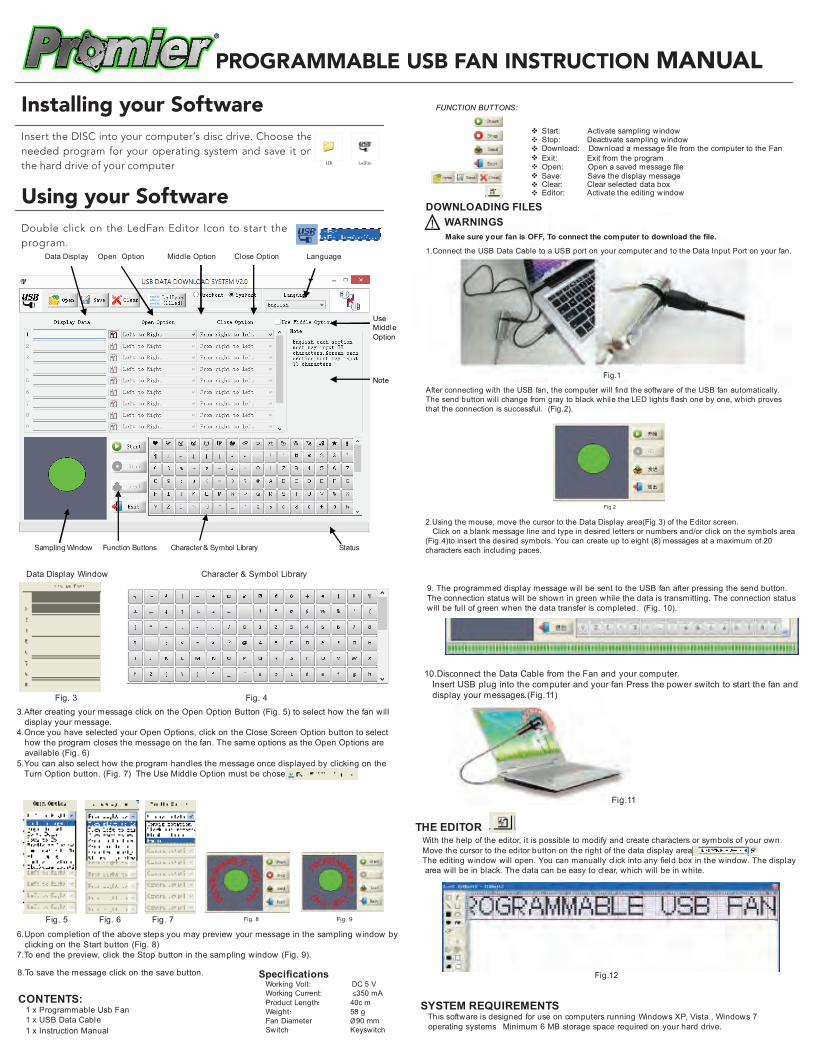
PROGRAMMABLE USB FAN INSTRUCTION MANUAL
Insert the DISC into your computer’s disc drive. Choose the needed program for your operating system and save it on the hard drive of your computer
Installing your Software
Double click on the LedFan Editor Icon to start the program.
Using your Software
Data Display Open Option Middle Option Close Option Language
UseMiddleOption
Note
Sampling Window Function Buttons Character& Symbol Library Status
Start: Activate sampling windowStop: Deactivate sampling window
Open: Open a saved message file
Download: Download a message file from the computer to the Fan
Save: Save the display messageClear: Clear selected data box
Exit: Exit from the program
Editor: Activate the editing window
DOWNLOADING FILES
1.Connect the USB Data Cable to a USB port on your computer and to the Data Input Port on your fan.
Make sure your fan is OFF, To connect the computer to download the file.
After connecting with the USB fan, the computer will find the software of the USB fan automatically.The send button wil l change from gray to black while the LED lights flash one by one, which provesthat the connection is successful. (Fig.2).
2.Using the mouse, move the cursor to the Data Display area(Fig.3) of the Editor screen.Click on a blank message line and type in desired letters or numbers and/or cl ick on the symbols area
(Fig.4)to insert the desired symbols. You can create up to eight (8) messages at a maximum of 20characters each including paces.
Fig.2
Fig.1
WARNINGS
FUNCTION BUTTONS:
Data Display Window Character & Symbol Library
Fig. 3 Fig. 43.After creating your message click on the Open Option Button (Fig. 5) to select how the fan will
display your message.4.Once you have selected your Open Options, click on the Close Screen Option button to select
how the program closes the message on the fan. The same options as the Open Options areavailable (Fig. 6)
5.You can also select how the program handles the message once displayed by clicking on the Turn Option button. (Fig. 7) The Use Middle Option must be chosen
Fig. 5 Fig. 6 Fig. 7
6.Upon completion of the above steps you may preview your message in the sampling window byclicking on the Start button (Fig. 8)
7.To end the preview, click the Stop button in the sampling window (Fig. 9).
Fig. 8 Fig. 9
8.To save the message click on the save button.
9. The programmed display message will be sent to the USB fan after pressing the send button.The connection status wil l be shown in green while the data is transmitting. The connection statuswill be ful l of green when the data transfer is completed. (Fig. 10).
10.Disconnect the Data Cable from the Fan and your computer.Insert USB plug into the computer and your fan Press the power switch to start the fan and
display your messages.(Fig.11)
CONTENTS:1 x Programmable Usb Fan1 x USB Data Cable1 x Instruction Manual
SYSTEM REQUIREMENTS This software is designed for use on computers running Windows XP, Vista , Windows 7
operating systems Minimum 6 MB storage space required on your hard drive.
Fig.11
Fig.12SpecificationsWorking Volt: DC 5 VWorking Current: ≤350 mAProduct Length 40c mWeight 58 gFan Diameter Ø90 mmSwitch Keyswitch
With the help of the editor, it is possible to modify and create characters or symbols of your own.Move the cursor to the editor button on the right of the data display area.The editing window will open. You can manually cl ick into any field box in the window. The displayarea will be in black. The data can be easy to clear, which will be in white.
THE EDITOR
Related Documents