Technology beyond the Dreams ™ Copyright © 2006 Pantech Solutions Pvt Ltd. Digital Signal Controller TMS320F2812 Chapter 2 : Program Development Tools

Welcome message from author
This document is posted to help you gain knowledge. Please leave a comment to let me know what you think about it! Share it to your friends and learn new things together.
Transcript

Technology beyond the Dreams™ Copyright © 2006 Pantech Solutions Pvt Ltd.
Digital Signal Controller TMS320F2812
Chapter 2 : Program Development Tools

Technology beyond the Dreams™ Copyright © 2006 Pantech Solutions Pvt Ltd.
Help CPU Window
Memory windowGraph window
Project Manager:Source & object filesFile dependenciesCompiler, Assembler & Linker build options
Status window
Full C/C++ & Assembly Debugging:C & ASM SourceMixed modeDisassembly (patch)Set Break PointsSet probe Points
Watch windowProductive Editor:Structure Expansion
Menus or IconsCode Composer Studio® IDE

Technology beyond the Dreams™ Copyright © 2006 Pantech Solutions Pvt Ltd.
Code Composer Studio
• Code Composer Studio includes:– Integrated Edit/Debug GUI– Code Generation Tools– DSP/BIOS
AsmAsm LinkLink
EditEdit
DebugDebug
CompileCompile Probe InProbe In
Probe OutProbe OutGraphsGraphsProfilingProfiling
SIMSIM
eZdspeZdsp™™
EVMEVM
Third Third PartyParty
XDSXDS
DSPDSPBoardBoard
DSP/BIOSDSP/BIOSConfigConfigToolTool
DSP/BIOSDSP/BIOSLibrariesLibraries
lnk.cmdlnk.cmdBuildBuild

Technology beyond the Dreams™ Copyright © 2006 Pantech Solutions Pvt Ltd.
Code Composer Studio: IDE
• Integrates: edit, code generation, and debug
• Single-click access using buttons
• Powerful graphing/profiling tools
• Automated tasks using GEL scripts
• Built-in access to BIOS functions
• Support TI or 3rd party plug-ins

Technology beyond the Dreams™ Copyright © 2006 Pantech Solutions Pvt Ltd.
The CCS Project
• Source files (by reference)– Source (C, assembly)– Libraries– DSP/BIOS configuration– Linker command files
• Project settings:– Build Options (compiler and
assembler)– Build configurations– DSP/BIOS– Linker
Project (.pjt) files contain:

Technology beyond the Dreams™ Copyright © 2006 Pantech Solutions Pvt Ltd.
Build Options GUI - Compiler
• GUI has 8 pages of categories for code generation tools
• Controls many aspects of the build process, such as:– Optimization level– Target device– Compiler/assembly/link options
Technology beyond the Dreams™ Copyright © 2006 Pantech Solutions Pvt Ltd.
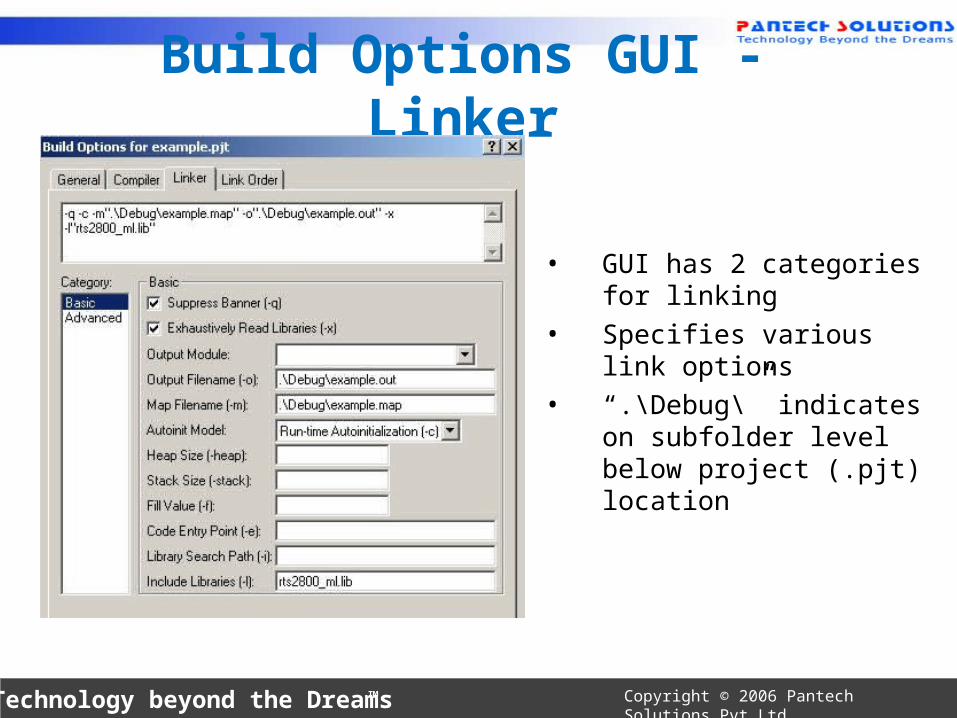
Build Options GUI - Linker
• GUI has 2 categories for linking
• Specifies various link options• “.\Debug\” indicates on
subfolder level below project (.pjt) location

Technology beyond the Dreams™ Copyright © 2006 Pantech Solutions Pvt Ltd.
Default Build Configurations
• Add/Remove your own custom build configurations using Project Configurations
• Edit a configuration:1. Set it active2. Modify build options3. Save project
• For new projects, CCS automatically creates two build configurations:
– Debug (unoptimized)– Release (optimized)
• Use the drop-down menu to quickly select the build configuration

Technology beyond the Dreams™ Copyright © 2006 Pantech Solutions Pvt Ltd.
Learning by doing - Step by Step
Code Composer Studio - The Basics
1. The Start-up - Window2. Create a F28x - project, based on C language3. Debug your program4. Watch your variables5. Perform a Single Step Debug6. Use Breakpoints7. What is a Probe Point for ?8. Other View Commands9. GEL - General Extension Language

Technology beyond the Dreams™ Copyright © 2006 Pantech Solutions Pvt Ltd.
1. The Startup - Window
Working Area
Project-tree

Technology beyond the Dreams™ Copyright © 2006 Pantech Solutions Pvt Ltd.
2. Create a F28x - project• Project ==> New give your project a name : “Lab1”, select a target and a suitable location of your hard disk:
Note : The project file (“Lab1.pjt) is a plain ASCII-text file and stores all set-ups and options of the project. This is very useful for a version management.

Technology beyond the Dreams™ Copyright © 2006 Pantech Solutions Pvt Ltd.
• Write a C-Source Code :
File New Source File
unsigned int i=0,k=0;void main (void){while(1)
{ for (i=0;i<100;i++)
k=i*i;
} }
File Save as : “lab1.c”

Technology beyond the Dreams™ Copyright © 2006 Pantech Solutions Pvt Ltd.

Technology beyond the Dreams™ Copyright © 2006 Pantech Solutions Pvt Ltd.
• Add your file to the project : Project Add files to project– Add: “lab1.c”
• Compile your source code : Project Compile File – active window will be compiled– in the event of syntax errors : modify your source code as needed
• Add the C-runtime-library to your project : Project Build Options Linker Library Search Path : c:\
ti\c2000\cgtools\lib Project Build Options Linker Include Libraries :
rts2800_ml.lib
• Add the stack- size of 0x400 Project Build Options Linker Stack Size : 0x400

Technology beyond the Dreams™ Copyright © 2006 Pantech Solutions Pvt Ltd.
Close the build-window by ‘OK’

Technology beyond the Dreams™ Copyright © 2006 Pantech Solutions Pvt Ltd.
• Add the Linker - Command File to your project: Project Add Files to Project ..\cmd\EzDSP_RAM_lnk.cmd
• Finally : Build the code ( compile / assemble / link ) :Project Build

Technology beyond the Dreams™ Copyright © 2006 Pantech Solutions Pvt Ltd.
Placing Sections in Memory
.ebss
.cinit
.text
Memory
M0SARAM(0x400)
0x00 00000x00 0000
0x3D 80000x3D 8000
0x00 04000x00 0400 M1SARAM(0x400)
FLASH(0x20000)
Sections
.stack

Technology beyond the Dreams™ Copyright © 2006 Pantech Solutions Pvt Ltd.
Linking
Linker
name.cmd
..map
.obj .out.out
Memory description How to place s/w into h/w
Memory description How to place s/w into h/w
Technology beyond the Dreams™ Copyright © 2006 Pantech Solutions Pvt Ltd.
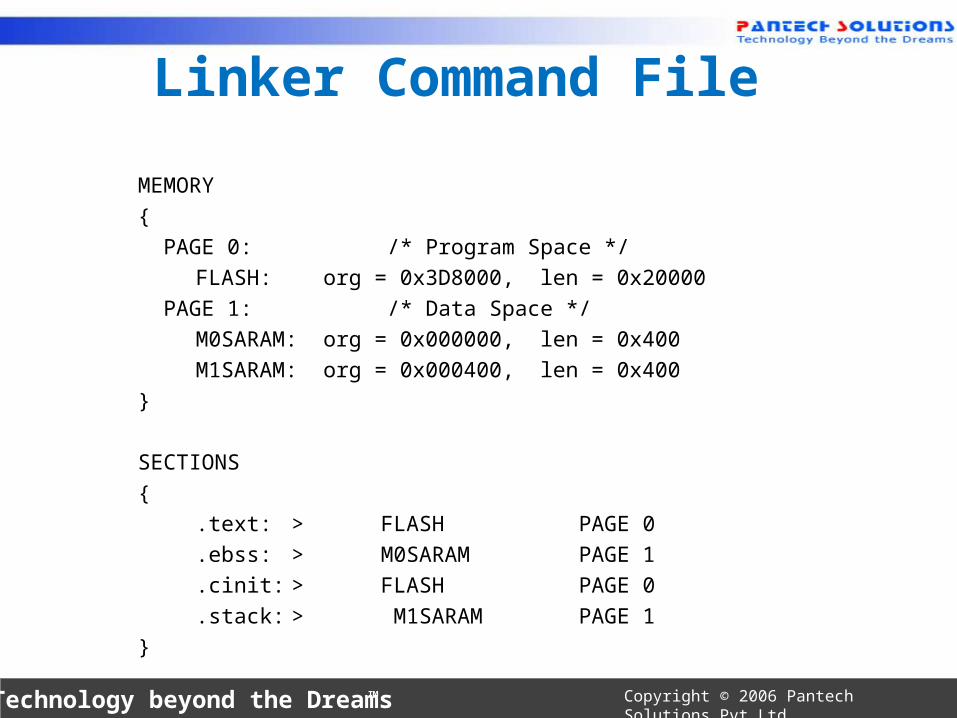
Linker Command File
MEMORY{ PAGE 0: /* Program Space */ FLASH: org = 0x3D8000, len = 0x20000 PAGE 1: /* Data Space */ M0SARAM: org = 0x000000, len = 0x400 M1SARAM: org = 0x000400, len = 0x400}
SECTIONS{ .text: > FLASH PAGE 0 .ebss: > M0SARAM PAGE 1 .cinit: > FLASH PAGE 0
.stack: > M1SARAM PAGE 1}

Technology beyond the Dreams™ Copyright © 2006 Pantech Solutions Pvt Ltd.
• Load the binary code into the DSP :File Load Program Debug\Lab1.out
– Note: a new binary code can be downloaded automatically into the target. This is done by Option Customize Program Load Options Load Program after Build. This setup will be stored for permanently.
• Run the program until label “main”
Debug Go main.

Technology beyond the Dreams™ Copyright © 2006 Pantech Solutions Pvt Ltd.
yellow arrow :current PC

Technology beyond the Dreams™ Copyright © 2006 Pantech Solutions Pvt Ltd.
3. Debug your code !• Perform a real time run :
Debug Run (F5)Note 1: the bottom left corner will be marked as : “DSP Running”. You’ll see no activity on the peripherals of the Adapter Board because our first example program does not use any of them ! Note 2: the yellow arrow is no longer visible – that’s another sign of a real time run.
• Stop the real time run : Debug Halt
• Reset the DSP :Debug Reset CPUDebug Restart
• Run again to main : Debug Go Main
Technology beyond the Dreams™ Copyright © 2006 Pantech Solutions Pvt Ltd.
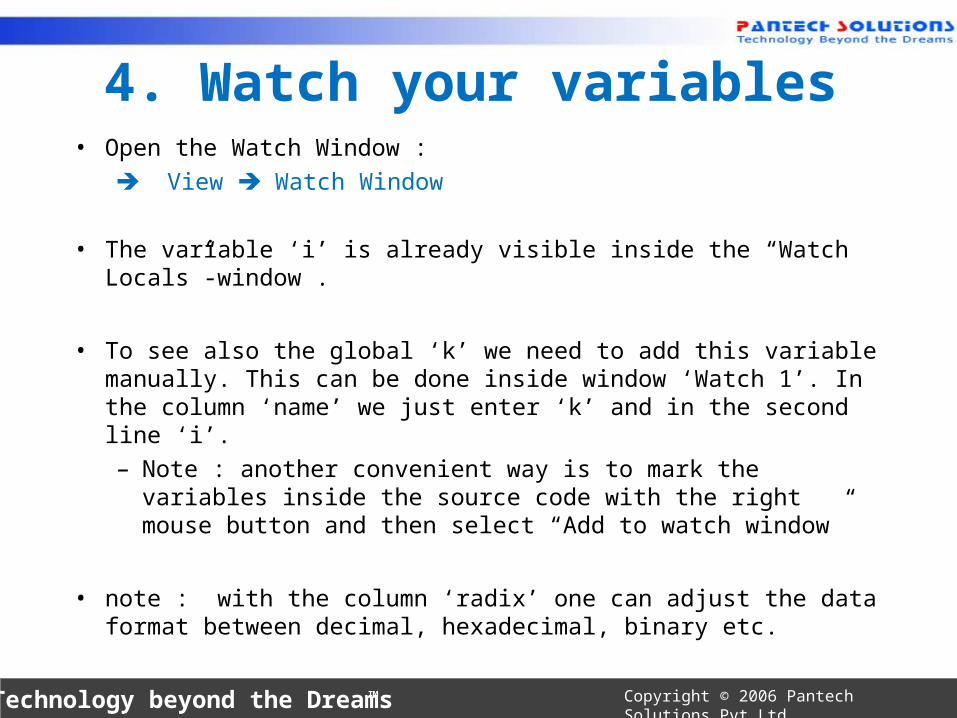
4. Watch your variables• Open the Watch Window :
View Watch Window
• The variable ‘i’ is already visible inside the “Watch Locals”-window .
• To see also the global ‘k’ we need to add this variable manually. This can be done inside window ‘Watch 1’. In the column ‘name’ we just enter ‘k’ and in the second line ‘i’.– Note : another convenient way is to mark the variables inside the
source code with the right mouse button and then select “Add to watch window”
• note : with the column ‘radix’ one can adjust the data format between decimal, hexadecimal, binary etc.

Technology beyond the Dreams™ Copyright © 2006 Pantech Solutions Pvt Ltd.
Watch-Window
Watch your variables

Technology beyond the Dreams™ Copyright © 2006 Pantech Solutions Pvt Ltd.
5. Perform a Single Step Debug • Perform a single step trough the program :
Debug Step Into ( or F8 )
• Watch the current PC ( yellow arrow) and the numerical values of i and k in Watch Window while you single step through the code !
• There are more debug - commands available, see next slide

Technology beyond the Dreams™ Copyright © 2006 Pantech Solutions Pvt Ltd.
Source Single Step
RunHaltRun to cursor
Source Step Over
Step Out
Perform a Single Step Debug
Assembly Single Step
Assembly Step Over

Technology beyond the Dreams™ Copyright © 2006 Pantech Solutions Pvt Ltd.
6. Adding a Breakpoint• Set a Breakpoint :
– Place the Cursor in Lab1.c on line : k = i * i;– Click right mouse and select ‘Toggle Breakpoint’– the line is marked with a red dot ( = active breakpoint ) Note : most Code Composer Studio Commands are also available through
buttons or trough Command -Keys ( see manual, or help )• Reset the Program
Debug Reset CPU Debug Restart
• Perform a real time run Debug Run ( or F5)
• DSP stops when reaching an active breakpoint • Repeat ‘Run’ and watch your variables• Remove the breakpoint ( Toggle again) when you’re done.

Technology beyond the Dreams™ Copyright © 2006 Pantech Solutions Pvt Ltd.
Red dot :activeBreakpoint
Yellow arrow :Current PC
Toggle Breakpoint
Remove all Breakpoints
Adding a Breakpoint

Technology beyond the Dreams™ Copyright © 2006 Pantech Solutions Pvt Ltd.
7. Set a Probe Point • Causes an update of a particular window at a specific point in your program.
• When a window is created it is updated at every breakpoint. However, you can change this so the window is updated only when the program reaches the connected Probe Point. When the window is updated, execution of the program is continued.
• To set a Probe - Point :– Click right mouse on the line ‘k = i*i;’ in the program first.c – select : ‘Toggle Probe Point ‘ ( indicated by a blue dot ) – select Debug Probe Points...– In the Probe Point Window click on the line ‘first.c line 13 -> no
Connection’– in the ‘Connect to’ - selector select ‘Watch Window’– exit this dialog with the ‘Replace’ and ‘OK’ – Button
• Run the program and verify that the watch window is updated continuously.

Technology beyond the Dreams™ Copyright © 2006 Pantech Solutions Pvt Ltd.
Set a Probe Point

Technology beyond the Dreams™ Copyright © 2006 Pantech Solutions Pvt Ltd.
8. Other View Commands• The View menu includes more useful windows to monitor and control
the DSP
• View Registers Core• View Registers Status
– click right mouse inside the new windows and select ‘Float in Main Window’
– double click on line ‘ACC’ and modify the value inside the Accumulator ACC

Technology beyond the Dreams™ Copyright © 2006 Pantech Solutions Pvt Ltd.
• To view both the Assembler code and the C Source Code :
• click right mouse inside “Lab1.c” and select “Mixed Mode”
• The Assembler Instruction Code generated by the Compiler is added and printed in grey colour
• Single Step ( ‘Assembly Step Into’ ) is now possible on instruction level– Perform : Debug Reset DSP
Debug Restart Debug Go Main Debug Step Into (F8)
– You’ll see two arrows , a yellow one on C-lines and a green one for assembler instruction-lines

Technology beyond the Dreams™ Copyright © 2006 Pantech Solutions Pvt Ltd.
Current C - line
Current Instruction
8. View C and Disassembly
Technology beyond the Dreams™ Copyright © 2006 Pantech Solutions Pvt Ltd.
9. GEL - General Extension Language • language similar to C • lets you create functions to extend Code Composer's features• to create GEL functions use the GEL grammar • load GEL-files into Code Composer
• With GEL, you can:– access actual/simulated target memory locations– add options to Code Composer’s GEL menu
• GEL is useful for automated testing and user workspace adjustment .
• GEL - files are ASCII with extension *.gel
Related Documents