GEH-6745D Proficy*-based Historian with ControlST* Software Suite System Guide June 2017 For public disclosure

Welcome message from author
This document is posted to help you gain knowledge. Please leave a comment to let me know what you think about it! Share it to your friends and learn new things together.
Transcript

GEH-6745D
Proficy*-based Historian withControlST* Software SuiteSystem Guide
June 2017
For public disclosure

These instructions do not purport to cover all details or variations in equipment, nor to provide for every possiblecontingency to be met during installation, operation, and maintenance. The information is supplied for informationalpurposes only, and GE makes no warranty as to the accuracy of the information included herein. Changes, modifications,and/or improvements to equipment and specifications are made periodically and these changes may or may not be reflectedherein. It is understood that GE may make changes, modifications, or improvements to the equipment referenced herein or tothe document itself at any time. This document is intended for trained personnel familiar with the GE products referencedherein.
GE may have patents or pending patent applications covering subject matter in this document. The furnishing of thisdocument does not provide any license whatsoever to any of these patents.
Public – This document is approved for public disclosure.
GE provides the following document and the information included therein as is and without warranty of any kind,expressed or implied, including but not limited to any implied statutory warranty of merchantability or fitness forparticular purpose.
For further assistance or technical information, contact the nearest GE Sales or Service Office, or an authorized GE SalesRepresentative.
Revised: June 2017Issued: June 2009
© 2009 - 2017 General Electric Company.___________________________________* Indicates a trademark of General Electric Company and/or its subsidiaries.All other trademarks are the property of their respective owners.
We would appreciate your feedback about our documentation.Please send comments or suggestions to [email protected]
For public disclosure
Document UpdatesLocation Description
Proficy Historian 7.0 Installation New section to provide installation procedures for Proficy Historian 7.0 usingWindows 10
Add and Configure DataStores in ProficyHistorian 7.0
New section to provide procedure to add and configure DataStores for ProficyHistorian 7.0
Acronyms and AbbreviationsBOP Balance of Plant
DA Data Access
DB Database
EGD Ethernet Global Data, a control network and communication protocol
EMT Ethernet Global Data Management Tool
HDA Historical Data Access
HMI Human-machine Interface
IIS Internet Information Services
ODBC Open Database Connectivity
OEM Original Equipment Manufacturer
OPC® OLE for Process Control, a standard for data exchange in the industrial environment.
PDH Plant Data Highway
SCADA Supervisory Control And Data Acquisition
SDK Software Development Kit
SIM Software Improvement Modules
SOE Sequence of Events
UDH Unit Data Highway
GEH-6745D System Guide 3For public disclosure
Related DocumentsDoc # TitleGEI-100628 WorkstationST* HistorianGEI-100752 Historian Report ConfigurationGEI-100753 Historian Report Post-installation Instruction GuideGEH-6422 Turbine Historian System GuideGEH-6700 ToolboxS*T User Guide for Mark* Controls PlatformGEH-6721 Vol II Mark VIe and Mark VIeS Control Systems
GEH-6723 Mark VIeS Safety Control Functional Safety Instruction Guide
GEH-6808ControlST Software Suite How-to Guide (How to Analyze Historical Alarm Data Using theWorkstationST* Alarm Viewer - Offline Mode)
4 GEH-6745D Proficy-based Historian with ControlST Software SuiteFor public disclosure
Contents1 Overview............................................................................................................................................. 71.1 Data Collection and Storage.......................................................................................................................91.2 Proficy-based Historian Applications......................................................................................................... 10
2 Installation........................................................................................................................................ 112.1 Proficy Historian 7.0 Installation .............................................................................................................. 122.2 Proficy Historian 6.0 Installation .............................................................................................................. 352.3 Proficy Historian 6.0 Excel Add-in Installation............................................................................................ 432.4 Proficy Historian 4.5 Installation .............................................................................................................. 452.5 Proficy WebSpace V4.8 Installation .......................................................................................................... 542.6 GlobalView Installation .......................................................................................................................... 582.7 Historian Reports Installation................................................................................................................... 59
3 Configuration................................................................................................................................... 613.1 Historian Excel Add-in Options................................................................................................................ 613.2 Historian Archives ................................................................................................................................. 643.2.1 Data Compression ........................................................................................................................... 643.2.2 Archive Compression ...................................................................................................................... 653.2.3 Naming Conventions ....................................................................................................................... 653.2.4 Add and Configure DataStores in Proficy Historian 7.0 .......................................................................... 673.2.5 Add and Configure DataStores in Proficy Historian 6.0 .......................................................................... 763.2.6 Add and Configure Archives in Proficy Historian 4.5............................................................................. 843.2.7 Setting Archive Size ........................................................................................................................ 88
3.3 Historian Variables................................................................................................................................. 903.4 WorkstationST Historian ......................................................................................................................... 923.4.1 Configuring Historian ...................................................................................................................... 923.4.2 Configuring Variables for Data Collection............................................................................................ 963.4.3 Configuring Historian Reports ..........................................................................................................1013.4.4 Configuring Continuous Data Storage ................................................................................................112
3.5 Archive Backup Management .................................................................................................................1143.5.1 Backing up Historical Data ..............................................................................................................1143.5.2 Proficy-based Backup Procedure.......................................................................................................1143.5.3 Storing Proficy-based Archives.........................................................................................................1153.5.4 Restoring Offline Proficy-based Archives ...........................................................................................115
3.6 Historian Reports..................................................................................................................................1163.7 Variable Aliasing ..................................................................................................................................1163.8 Upgrade Existing Historian System for Variable Aliasing .............................................................................118
4 User Guide...................................................................................................................................... 1194.1 Proficy-based Historian Server Tags .........................................................................................................1194.1.1 Exporting Tags ..............................................................................................................................119
4.2 Proficy Advanced Trender ......................................................................................................................1224.2.1 Using Proficy Advanced Trender ......................................................................................................1234.2.2 Customizing a Trend.......................................................................................................................1284.2.3 Using Proficy Advanced Trender from a Remote Computer ...................................................................1324.2.4 Changing Main.cim Display.............................................................................................................1334.2.5 Editing Trend Screens .....................................................................................................................137
GEH-6745D System Guide 5For public disclosure

4.2.6 Adding a Screen to the Navigation Bar...............................................................................................1404.3 Deleting Tags from the Proficy-based Historian ..........................................................................................1444.4 Scheduling Directory Backups ................................................................................................................147
5 Troubleshooting ...........................................................................................................................1495.1 Verifying Data Flow..............................................................................................................................1495.2 Report Configuration Errors....................................................................................................................1525.2.1 Automatic Report Generation Errors ..................................................................................................152
6 GEH-6745D Proficy-based Historian with ControlST Software SuiteFor public disclosure
1 OverviewThe ControlST* Historian is a data archival system, based on Proficy®-based Historian client-server technology. TheHistorian system provides data collection and storage of power distribution and auxiliary process data for display in theWorkstationST* application. It can be configured for turbine-related data and balance of plant (BOP) process data.
The Mark* VI and Mark VIe controllers use the Unit Data Highway (UDH) as the communications network betweenindividual turbine unit controllers and system operator components, as well as Human-machine Interfaces (HMI).
Note On a Historian computer, the folder E:\docs contains customer documentation.
The Historian system comes with a standard upgradable license, which is required for a functional Historian. TheProficy-based Historian server has limited connections. There are six interface licenses, which can be used to collect andplace data in the Historian system. The normal interface is an OLE for Process Control Data Access (OPC® DA) client to theWorkstationST OPC DA server installed on the same computer as the Proficy-based Historian application.
The Proficy-based Historian OPC HDA server is also supplied with the Proficy-based Historian server. With the OPC HDAserver, the ToolboxST* Trender can retrieve historical data from the Proficy-based Historian server through theWorkstationST application installed on the Historian computer. The OPC HDA connection only retrieves the data. Thisfeature is available in WorkstationST version 4.0 and above.
The Excel® Add-in feature allows the use of historical data in third-party applications such as Microsoft® Excel.
Overview GEH-6745D System Guide 7For public disclosure
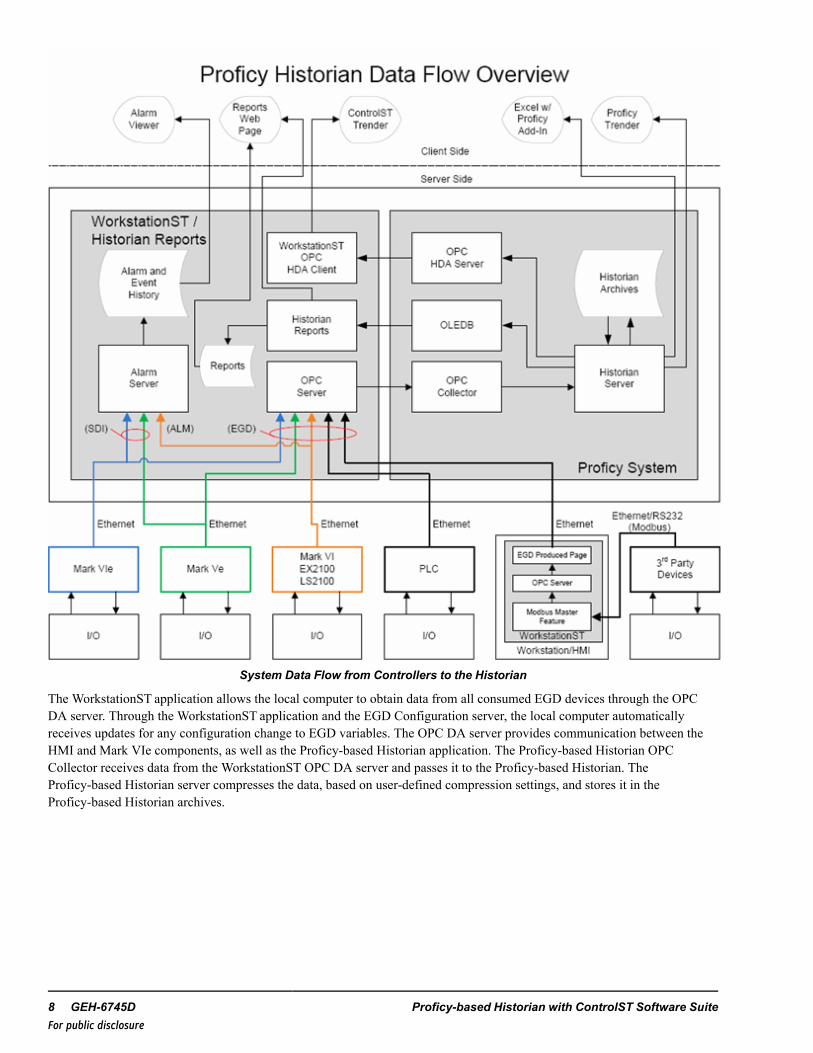
System Data Flow from Controllers to the Historian
The WorkstationST application allows the local computer to obtain data from all consumed EGD devices through the OPCDA server. Through the WorkstationST application and the EGD Configuration server, the local computer automaticallyreceives updates for any configuration change to EGD variables. The OPC DA server provides communication between theHMI and Mark VIe components, as well as the Proficy-based Historian application. The Proficy-based Historian OPCCollector receives data from the WorkstationST OPC DA server and passes it to the Proficy-based Historian. TheProficy-based Historian server compresses the data, based on user-defined compression settings, and stores it in theProficy-based Historian archives.
8 GEH-6745D Proficy-based Historian with ControlST Software SuiteFor public disclosure
1.1 Data Collection and Storage
Note Further setup is required to configure the WorkstationST and Proficy-based Historian applications if the Proficy-basedHistorian OPC DA Collector and the Proficy-based Historian server are on separate computers.
The Historian communicates on a plant data highway (PDH) and a unit data highway (UDH). Supervisory data is exchangedbetween Historian and operator stations, engineering workstations, and printers on the Information Network in redundant ornon-redundant configurations. Data is sent from components on the UDH, using the EGD protocol, to the WorkstationSTOPC DA server. The Proficy-based Historian OPC Collector connects the Proficy-based Historian system to the OPC DAserver. The Collector does not need to be installed on the same computer as the Proficy-based Historian application.
The Historian samples data from control systems on the control network once per second. Data values and time stampsoriginate in the controller. For alarms, events, and sequence of events (SOE), data is received on an exception basis. Sincetime synchronization is essential for determining the root cause of an event, the data can be synchronized to ±1 ms timeaccuracy between a controller and local time server or ±2 ms time coherence between control systems.
The Proficy-based Historian stores data in a series of archives. As each archive fills, the data rolls over to the next archiveuntil all archives are full. The oldest archive is then overwritten. Exception data is stored by the alarm server in files matchingthe exception data type: alarm, event, SOE, holds, or diagnostics.
The actual amount of data storage depends on the data exception and compression settings. Tighter deadbands produceincreased data storage and looser deadbands have less data storage.
Overview GEH-6745D System Guide 9For public disclosure
1.2 Proficy-based Historian ApplicationsThe Historian Administrator allows you to monitor, supervise, archive, retrieve, and control data gathering functions from theserver, a client, or one or more remote web or non-web-based nodes.
The Historian Administrator allows you to:
• Examine key operating statistics for archives and collectors, and display or search system alerts and messages• Perform archive maintenance, including:
− Setting archive size− Selecting options and parameters− Displaying security parameters− Adding and restoring archives− Performing routine backup and restoration tasks
• Perform tag maintenance, including:− Adding, deleting, and copying tags− Searching for tags in a data source or in the Historian Database− Starting and stopping collection on a tag− Configuring, displaying, and editing tag parameters and options− Displaying trend data for selected tags
• Perform data collector maintenance, including:− Adding or deleting collectors− Configuring, displaying, and editing parameters for all types of collectors− Creating calculation formulas− Displaying performance trends for selected collectors
The Proficy-based Historian Excel Add-in feature provides a connection between the Proficy-based Historian system andMicrosoft Excel to create reports and perform complex data analysis in a familiar environment. Through Excel, you canimport, export, and manipulate data from different Proficy-based Historian servers.
10 GEH-6745D Proficy-based Historian with ControlST Software SuiteFor public disclosure
2 Installation
Attention
The Proficy-based Historian application is typically pre-installed on the Historiansystem.
The Proficy-based Historian application allows you to install each system component.
To install a data collector, you must first install the source software. If you have added new source software since installingHistorian, you must install the Historian again. Keep currently installed components checked when reinstalling Historian.Some components may be restarted when installing new data collectors.
Note After installing CIMPLICITY Server or Proficy-based Historian, install the latest software improvement modules(SIMs). Sims are available from GE Automation & Controls.
If you are installing all system components on a single computer, run the single step installer (Historian Installer) on thatcomputer only. If you plan to use multiple computers as server, data collector, administrator, and other clients, run therespective installer (Historian Server, Historian Collectors, or Historian Client Tools) on each computer to install the specificcomponents needed for that computer.
If you are installing system components on a machine with any previous Historian components installed, those items areselected in the components screen. Select the new components, and continue with the upgrade.
Installation GEH-6745D System Guide 11For public disclosure
2.1 Proficy Historian 7.0 InstallationPrerequisites
Attention
It is recommended that older versions of CIMPLICITY, Proficy Historian, andWebSpace be uninstalled prior to installing the latest release.
The following must be completed prior to starting the installation process:
• Download the installation folder to a local drive (do not install from the network location).• Install Office 2013 (64–bit) to be able to install the Proficy Historian Excel Add-in.• Verify that the Computer (PC) Name is set to the desired system name before installing the software.• Verify that the computer has a local drive (D:) on which to configure the Archives and to install the Historian Reports
Package.− Create the folder D:\Proficy_DataArchiver for the Proficy Historian archives and log files.− Create the folder D:\HstData to install the Historian Reports Package.
• Install WorkstationST on the computer to be able to select the GeCssOpcServer during the Historian install. You may alsoneed to build and download WorkstationSTwith only OPC DA server enabled to get GeCssOpcServer entry in theregistry.
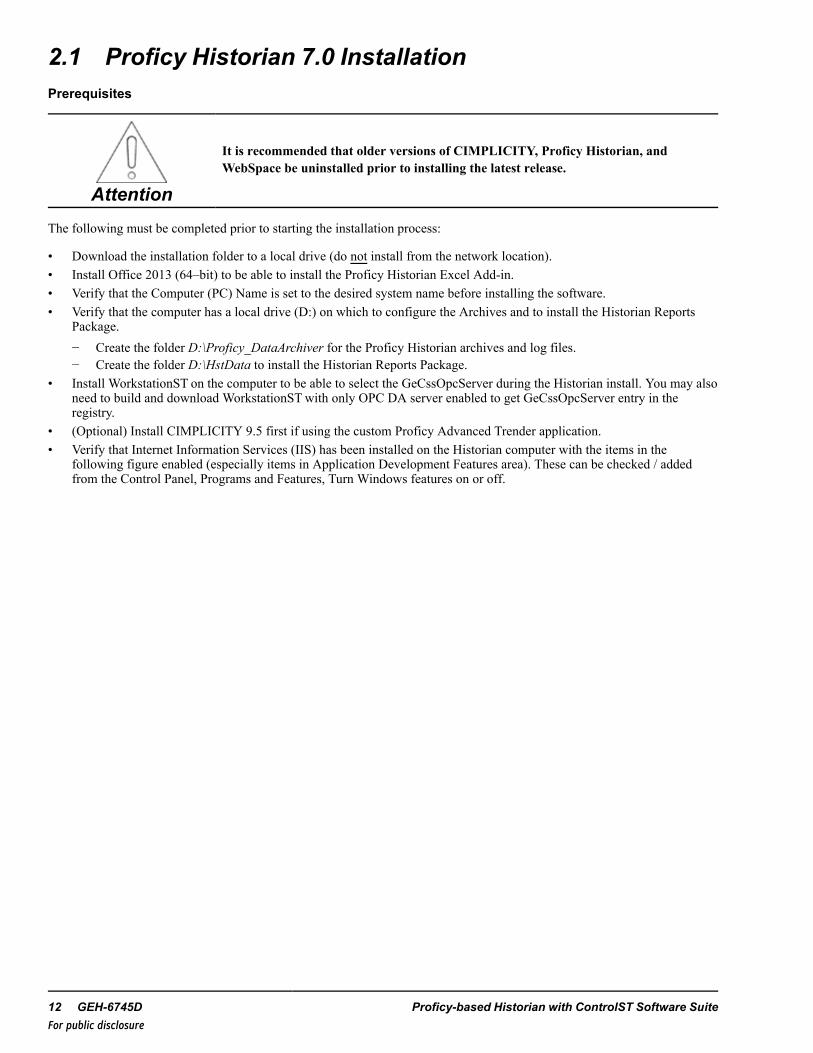
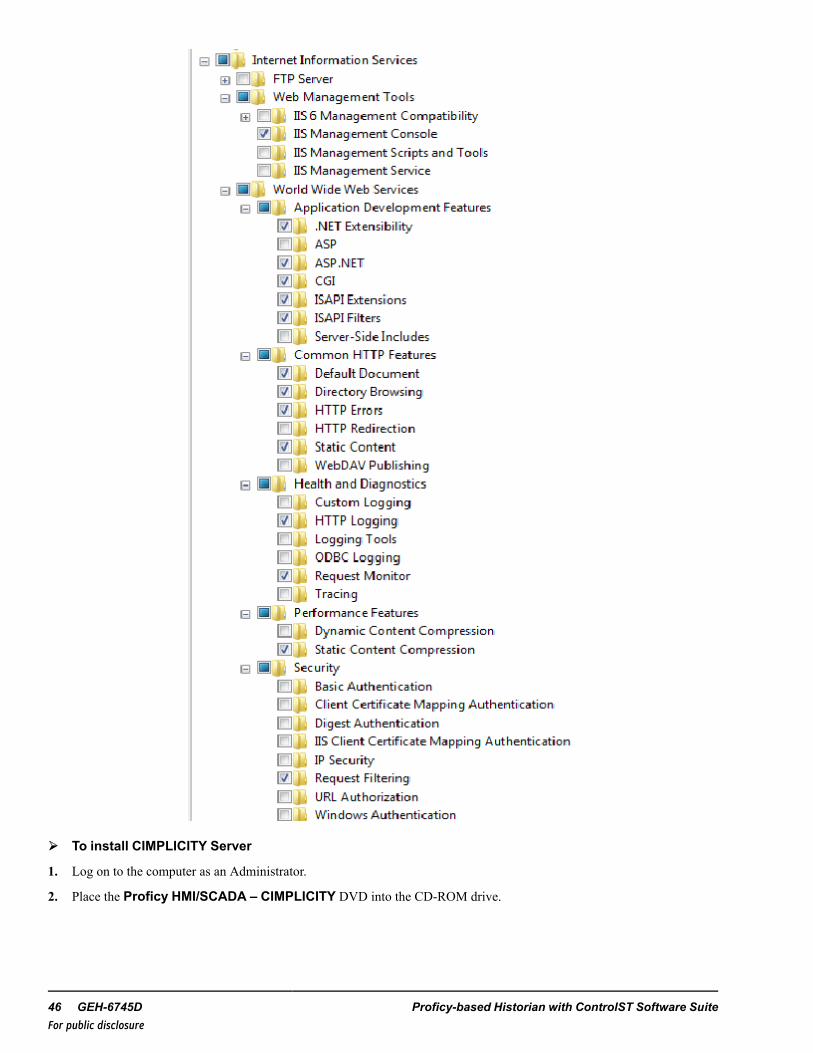
• (Optional) Install CIMPLICITY 9.5 first if using the custom Proficy Advanced Trender application.• Verify that Internet Information Services (IIS) has been installed on the Historian computer with the items in the
following figure enabled (especially items in Application Development Features area). These can be checked / addedfrom the Control Panel, Programs and Features, Turn Windows features on or off.
12 GEH-6745D Proficy-based Historian with ControlST Software SuiteFor public disclosure
IIS Enabled Settings
Installation GEH-6745D System Guide 13For public disclosure
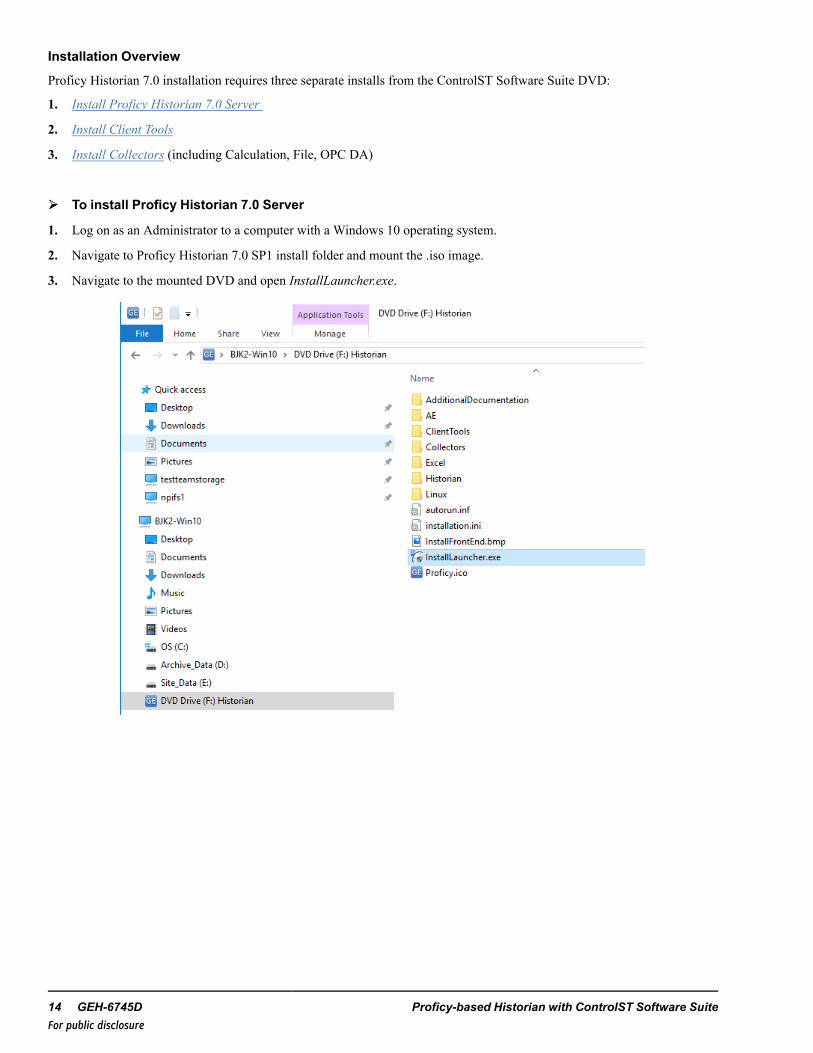
Installation Overview
Proficy Historian 7.0 installation requires three separate installs from the ControlST Software Suite DVD:
1. Install Proficy Historian 7.0 Server
2. Install Client Tools
3. Install Collectors (including Calculation, File, OPC DA)
➢➢ To install Proficy Historian 7.0 Server
1. Log on as an Administrator to a computer with a Windows 10 operating system.
2. Navigate to Proficy Historian 7.0 SP1 install folder and mount the .iso image.
3. Navigate to the mounted DVD and open InstallLauncher.exe.
14 GEH-6745D Proficy-based Historian with ControlST Software SuiteFor public disclosure
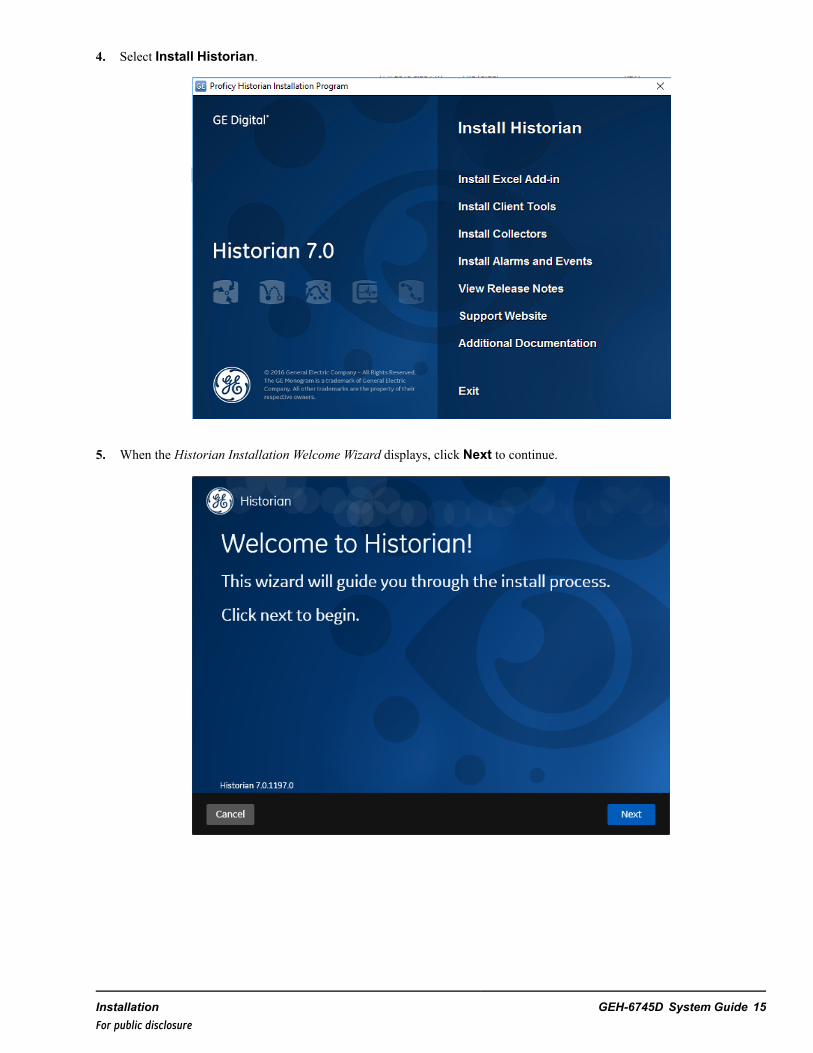
4. Select Install Historian.
5. When the Historian Installation Welcome Wizard displays, click Next to continue.
Installation GEH-6745D System Guide 15For public disclosure
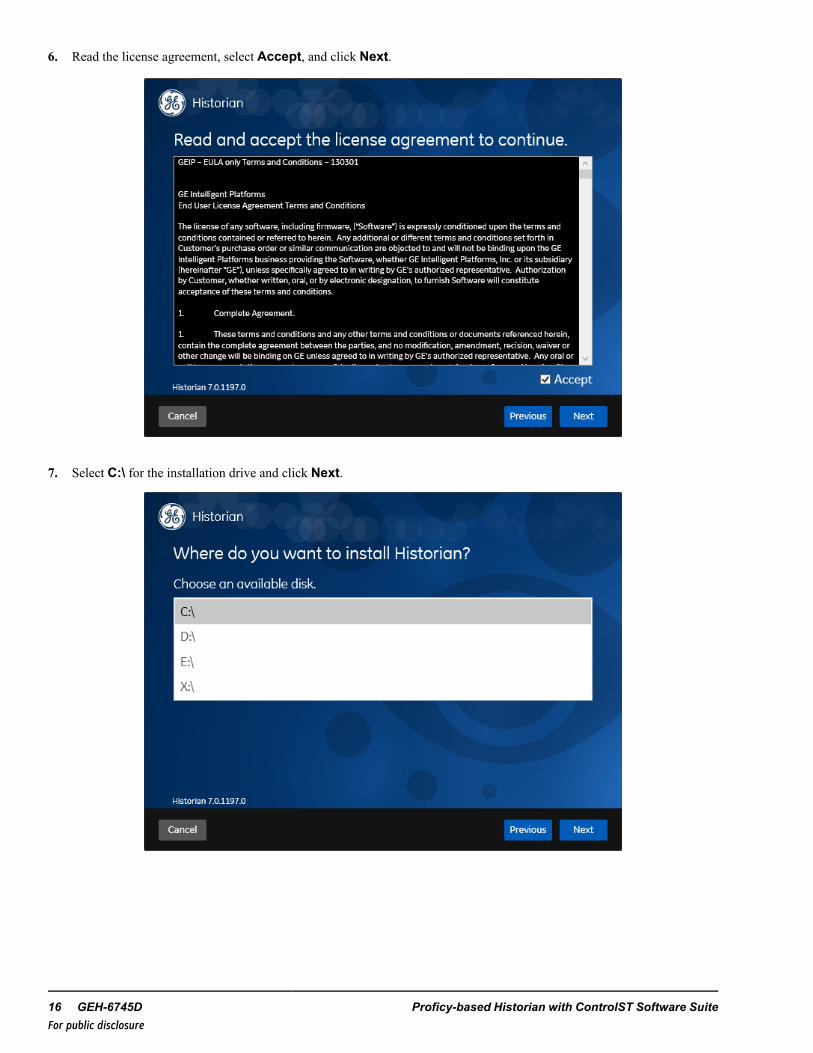
6. Read the license agreement, select Accept, and click Next.
7. Select C:\ for the installation drive and click Next.
16 GEH-6745D Proficy-based Historian with ControlST Software SuiteFor public disclosure
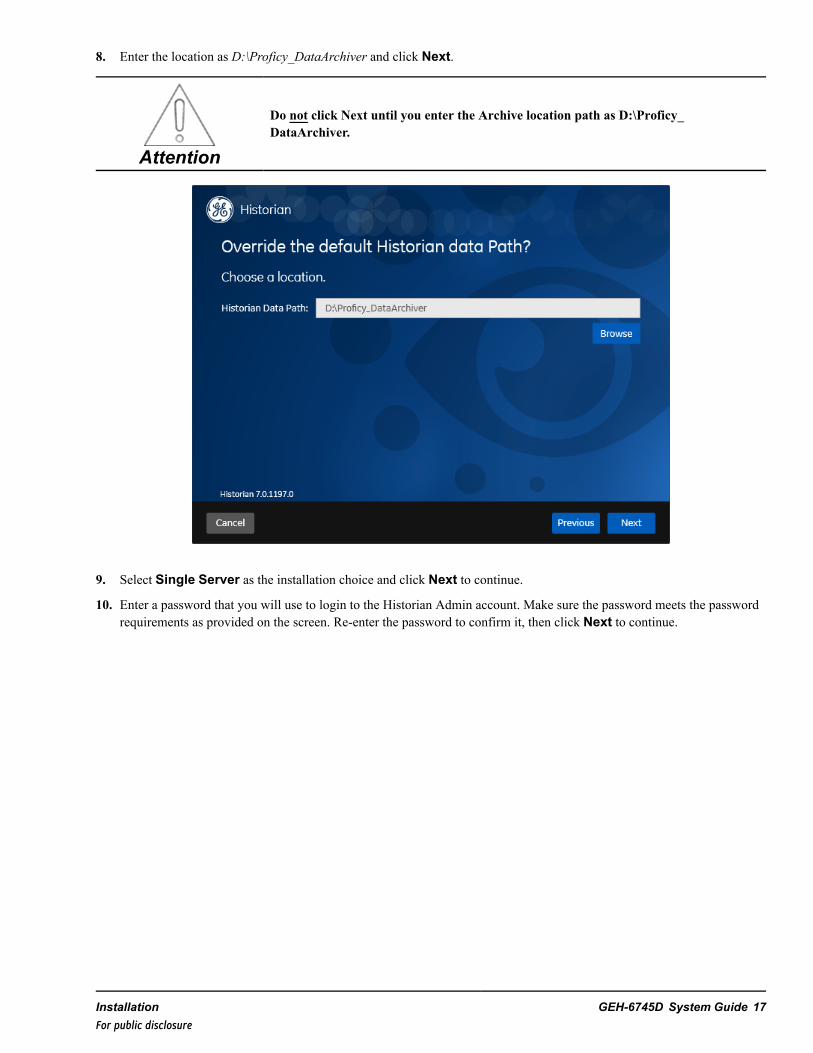
8. Enter the location as D:\Proficy_DataArchiver and click Next.
Attention
Do not click Next until you enter the Archive location path as D:\Proficy_DataArchiver.
9. Select Single Server as the installation choice and click Next to continue.
10. Enter a password that you will use to login to the Historian Admin account. Make sure the password meets the passwordrequirements as provided on the screen. Re-enter the password to confirm it, then click Next to continue.
Installation GEH-6745D System Guide 17For public disclosure
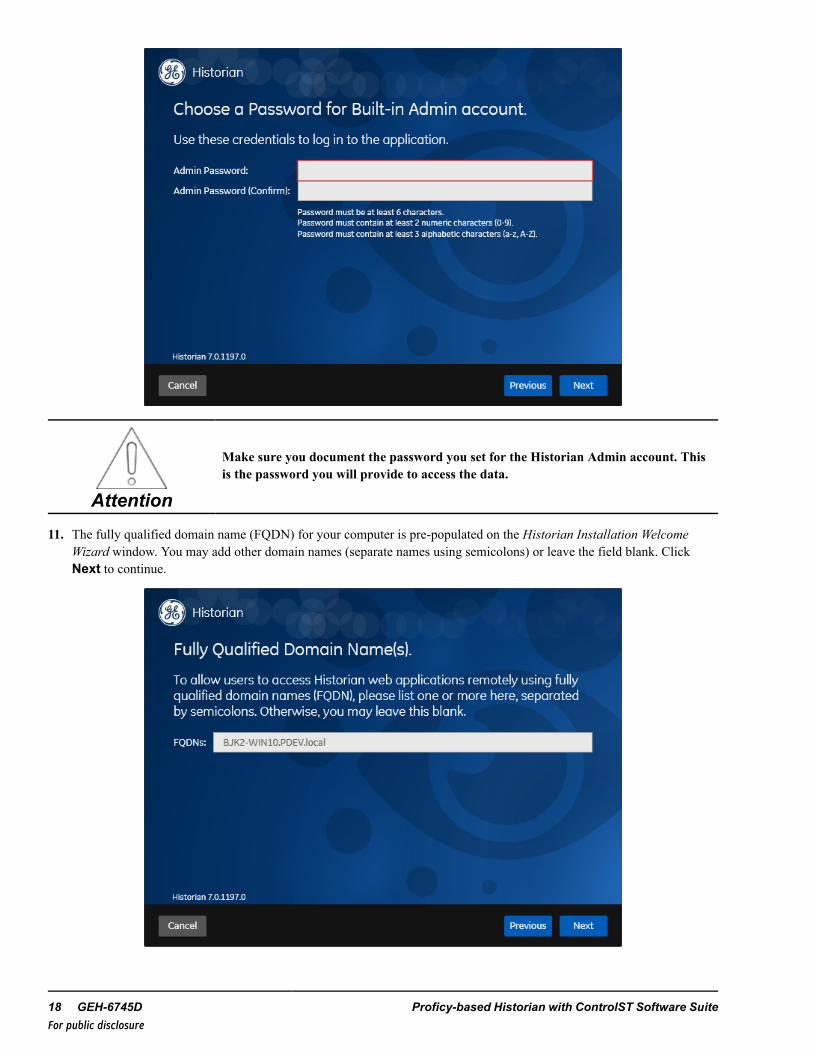
Attention
Make sure you document the password you set for the Historian Admin account. Thisis the password you will provide to access the data.
11. The fully qualified domain name (FQDN) for your computer is pre-populated on the Historian Installation WelcomeWizard window. You may add other domain names (separate names using semicolons) or leave the field blank. ClickNext to continue.
18 GEH-6745D Proficy-based Historian with ControlST Software SuiteFor public disclosure
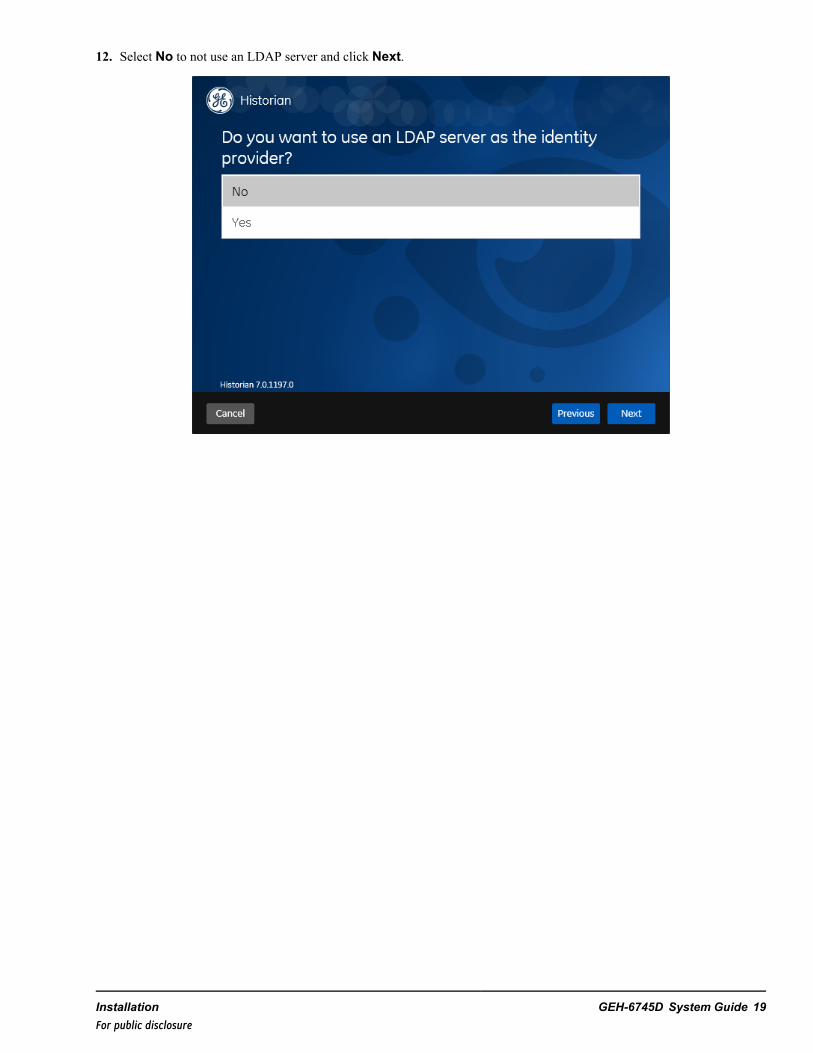
12. Select No to not use an LDAP server and click Next.
Installation GEH-6745D System Guide 19For public disclosure
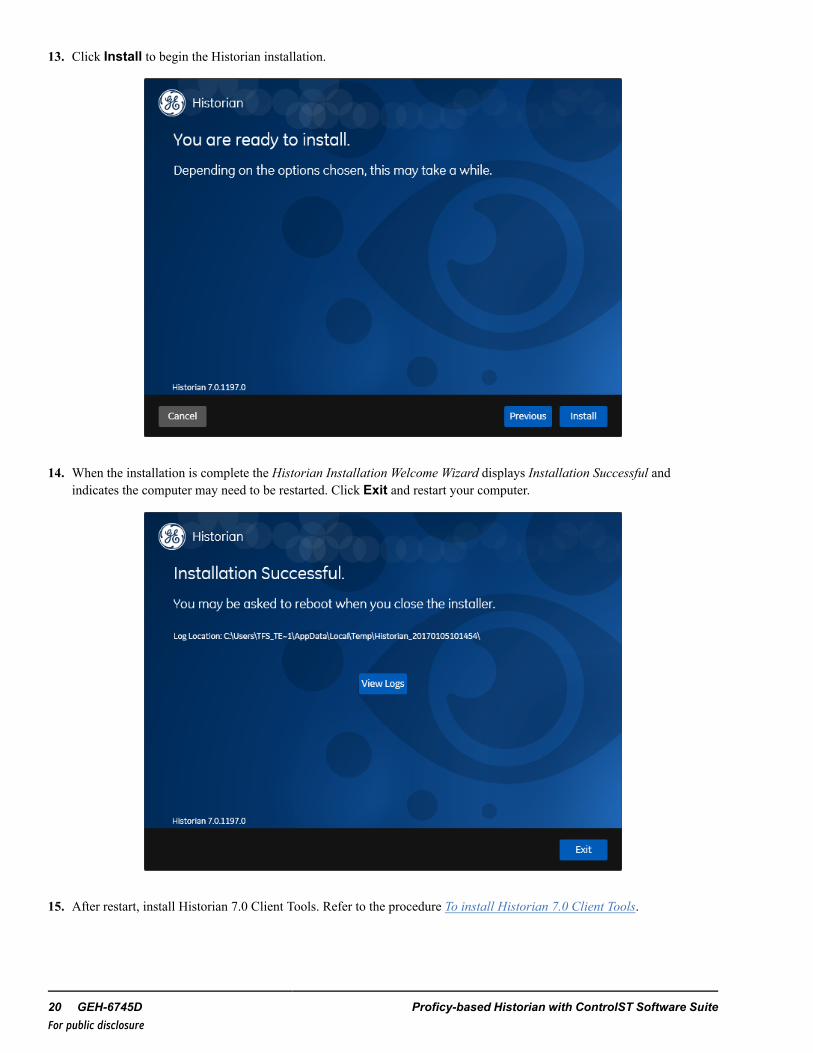
13. Click Install to begin the Historian installation.
14. When the installation is complete the Historian Installation Welcome Wizard displays Installation Successful andindicates the computer may need to be restarted. Click Exit and restart your computer.
15. After restart, install Historian 7.0 Client Tools. Refer to the procedure To install Historian 7.0 Client Tools.
20 GEH-6745D Proficy-based Historian with ControlST Software SuiteFor public disclosure
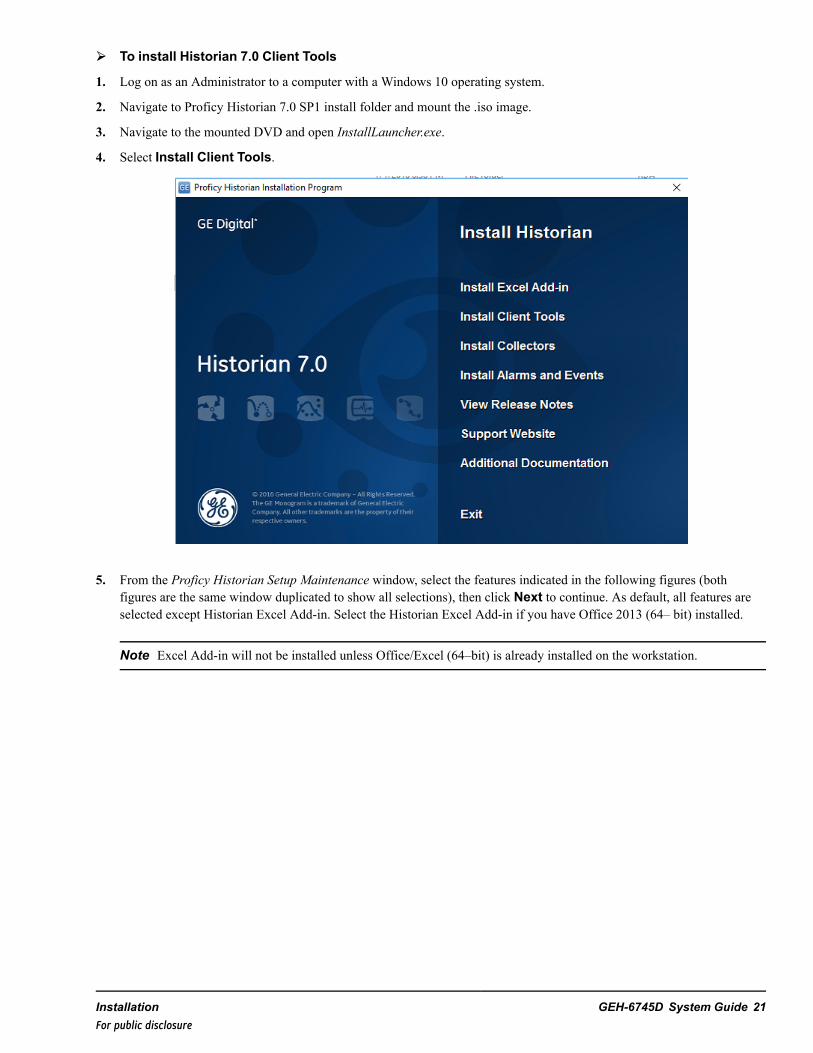
➢➢ To install Historian 7.0 Client Tools
1. Log on as an Administrator to a computer with a Windows 10 operating system.
2. Navigate to Proficy Historian 7.0 SP1 install folder and mount the .iso image.
3. Navigate to the mounted DVD and open InstallLauncher.exe.
4. Select Install Client Tools.
5. From the Proficy Historian Setup Maintenance window, select the features indicated in the following figures (bothfigures are the same window duplicated to show all selections), then click Next to continue. As default, all features areselected except Historian Excel Add-in. Select the Historian Excel Add-in if you have Office 2013 (64– bit) installed.
Note Excel Add-in will not be installed unless Office/Excel (64–bit) is already installed on the workstation.
Installation GEH-6745D System Guide 21For public disclosure

22 GEH-6745D Proficy-based Historian with ControlST Software SuiteFor public disclosure
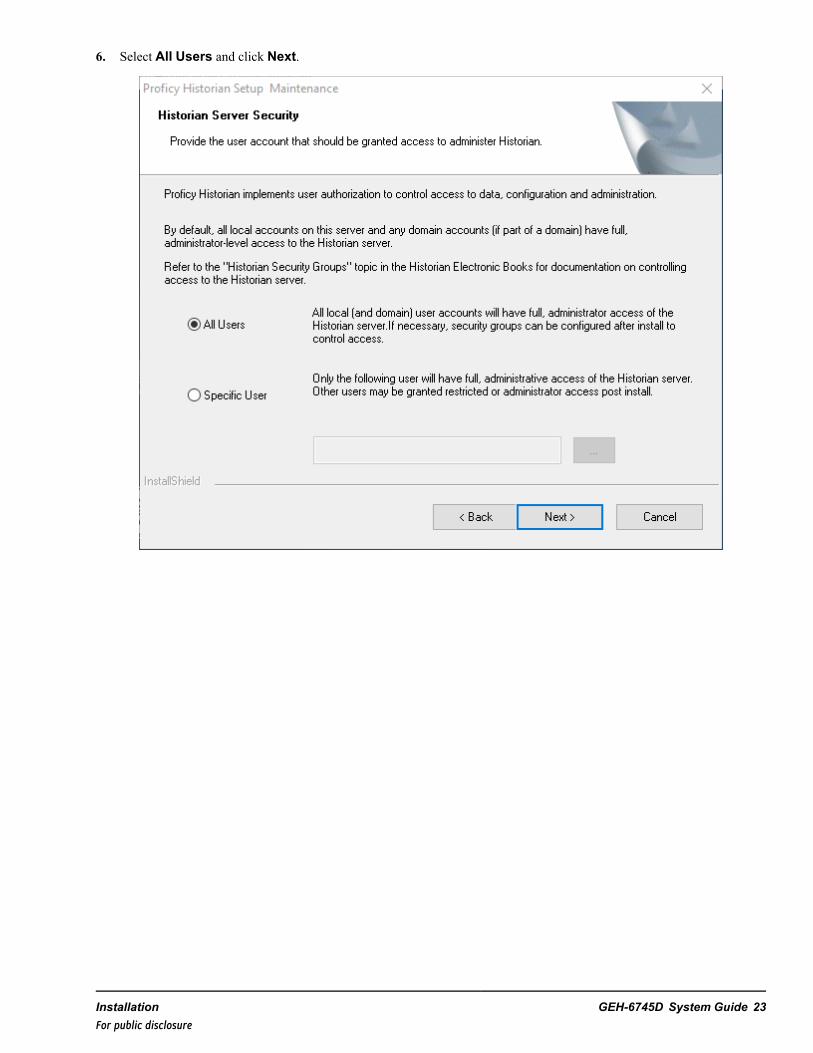
6. Select All Users and click Next.
Installation GEH-6745D System Guide 23For public disclosure
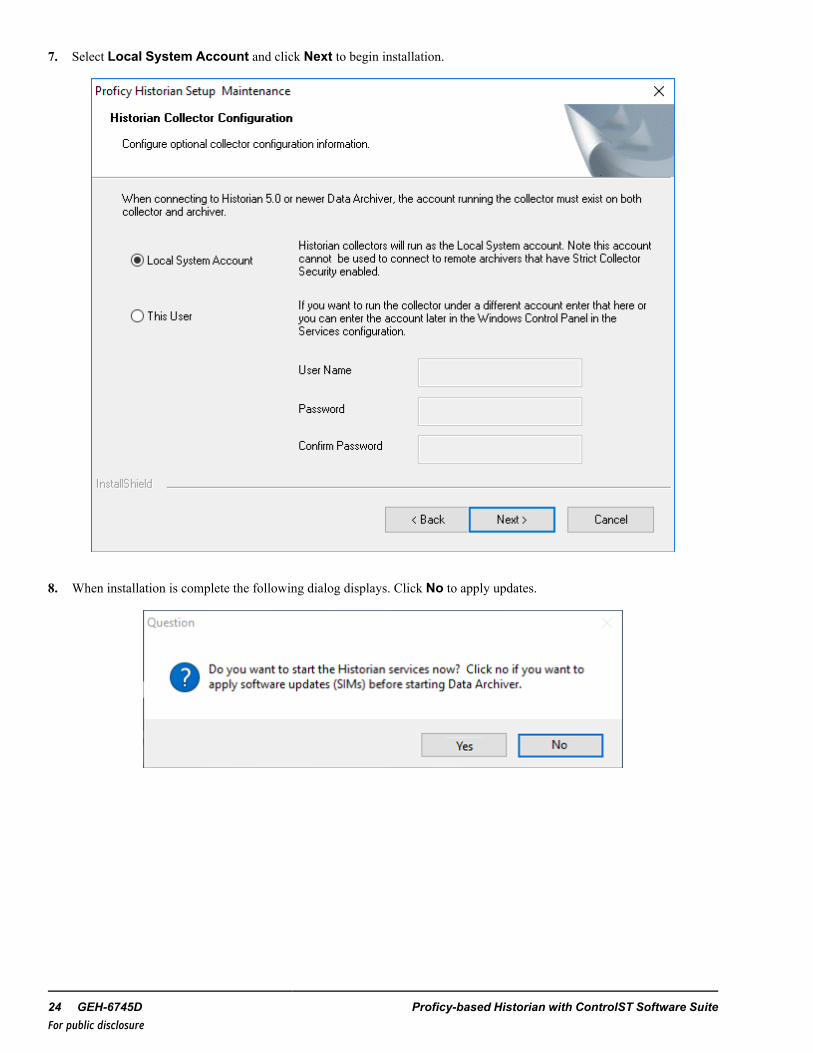
7. Select Local System Account and click Next to begin installation.
8. When installation is complete the following dialog displays. Click No to apply updates.
24 GEH-6745D Proficy-based Historian with ControlST Software SuiteFor public disclosure
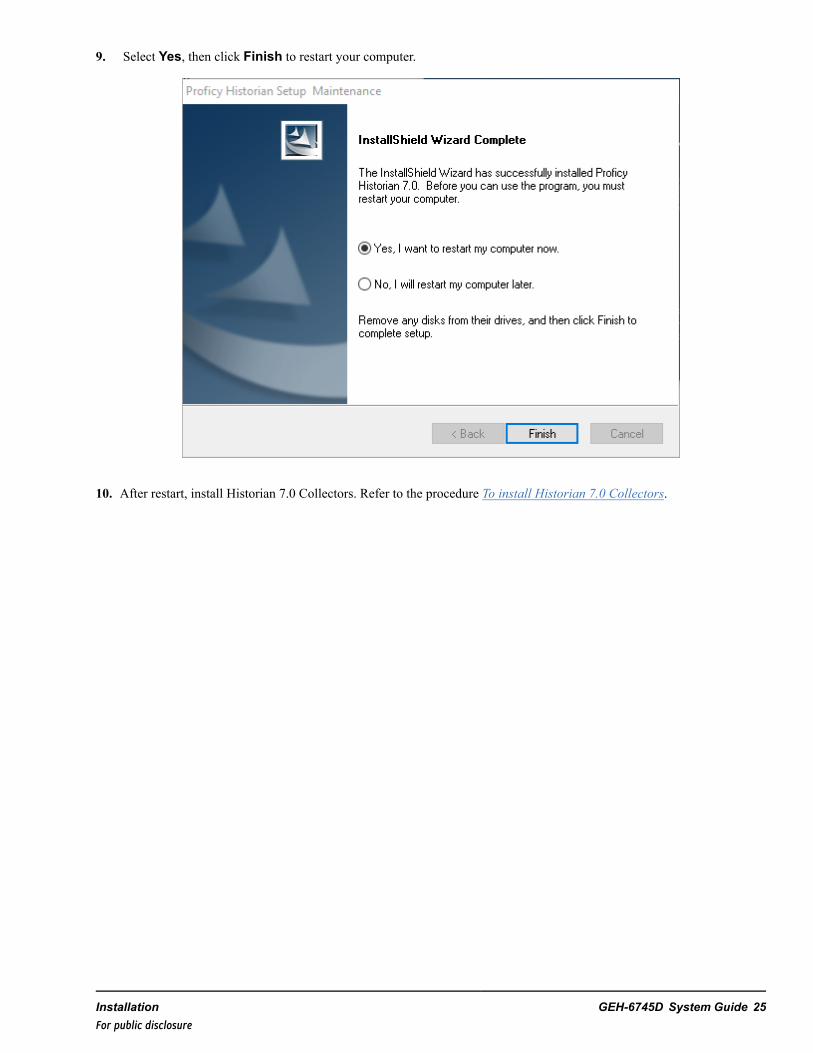
9. Select Yes, then click Finish to restart your computer.
10. After restart, install Historian 7.0 Collectors. Refer to the procedure To install Historian 7.0 Collectors.
Installation GEH-6745D System Guide 25For public disclosure
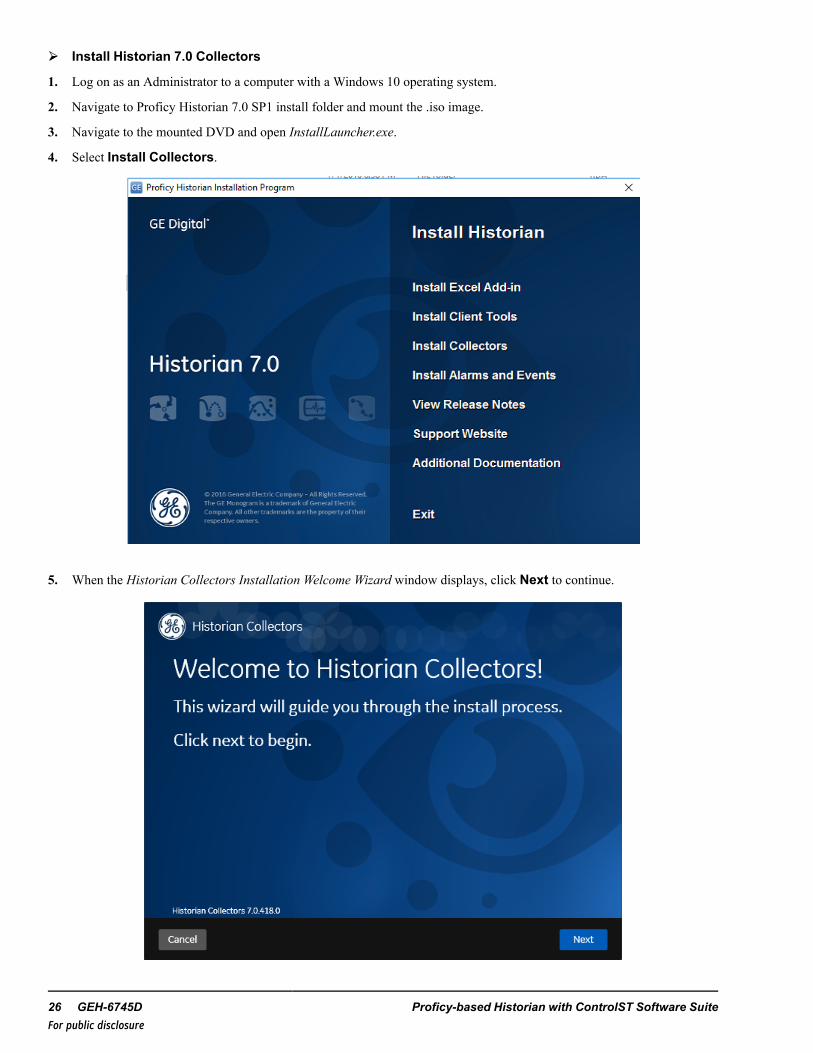
➢➢ Install Historian 7.0 Collectors
1. Log on as an Administrator to a computer with a Windows 10 operating system.
2. Navigate to Proficy Historian 7.0 SP1 install folder and mount the .iso image.
3. Navigate to the mounted DVD and open InstallLauncher.exe.
4. Select Install Collectors.
5. When the Historian Collectors Installation Welcome Wizard window displays, click Next to continue.
26 GEH-6745D Proficy-based Historian with ControlST Software SuiteFor public disclosure
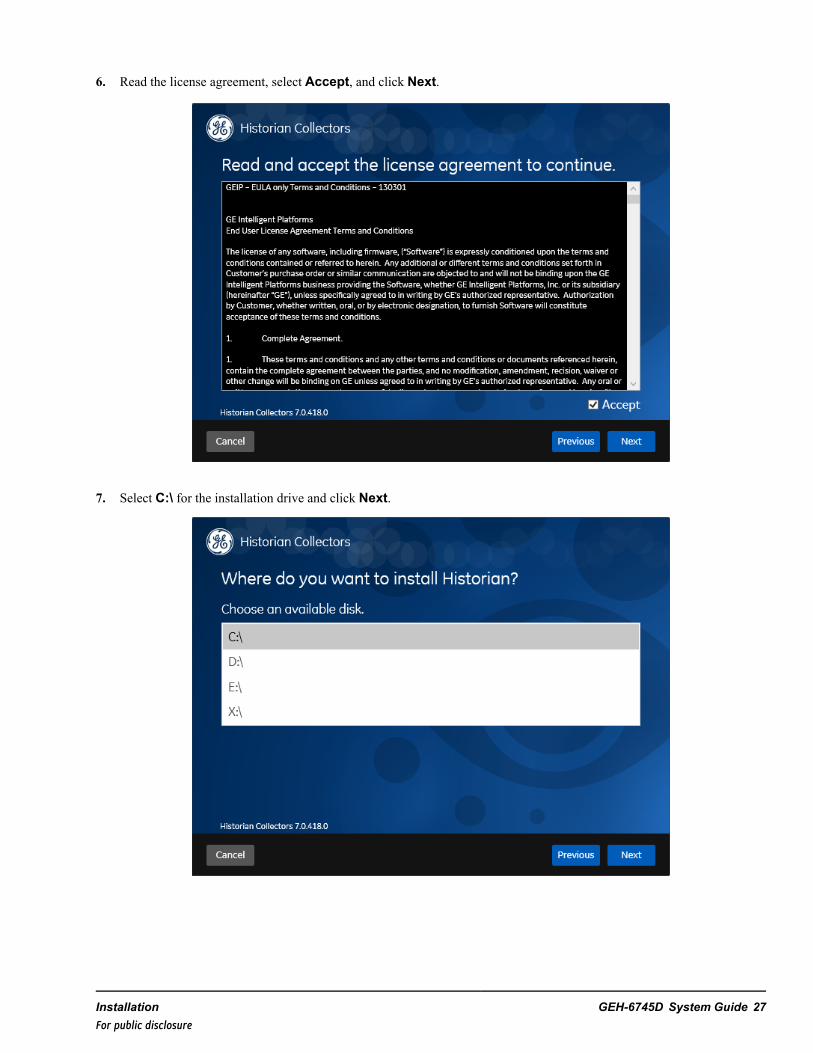
6. Read the license agreement, select Accept, and click Next.
7. Select C:\ for the installation drive and click Next.
Installation GEH-6745D System Guide 27For public disclosure
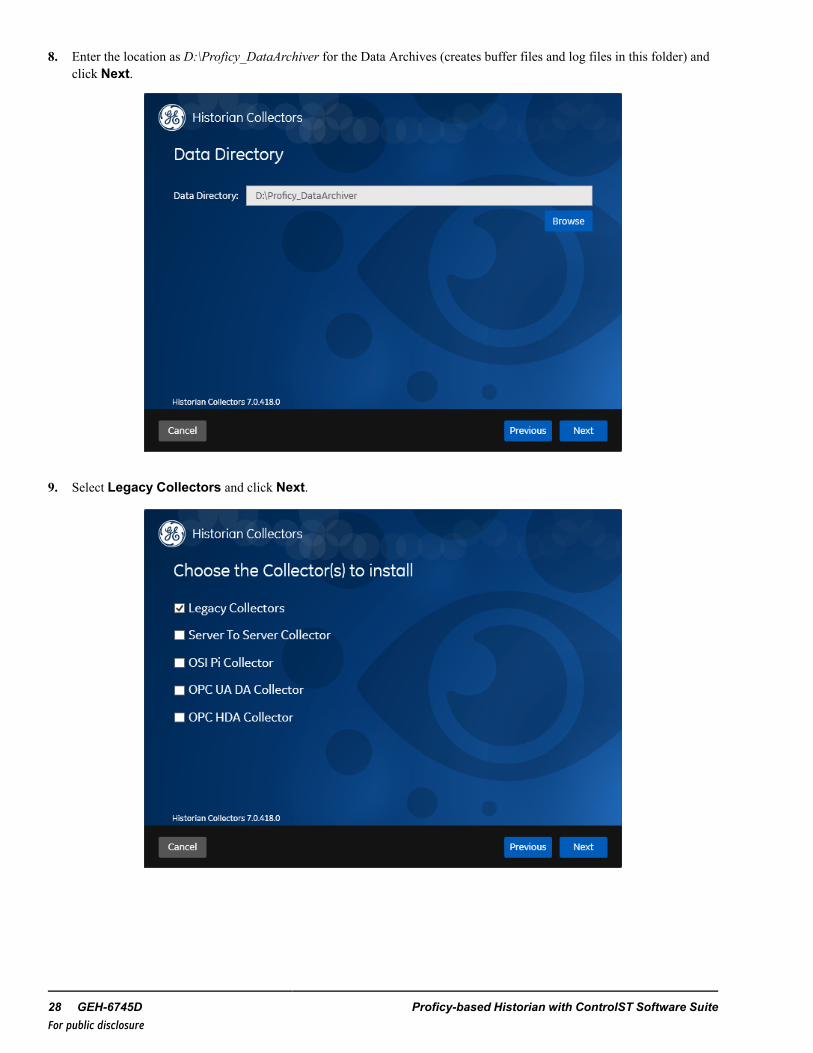
8. Enter the location as D:\Proficy_DataArchiver for the Data Archives (creates buffer files and log files in this folder) andclick Next.
9. Select Legacy Collectors and click Next.
28 GEH-6745D Proficy-based Historian with ControlST Software SuiteFor public disclosure
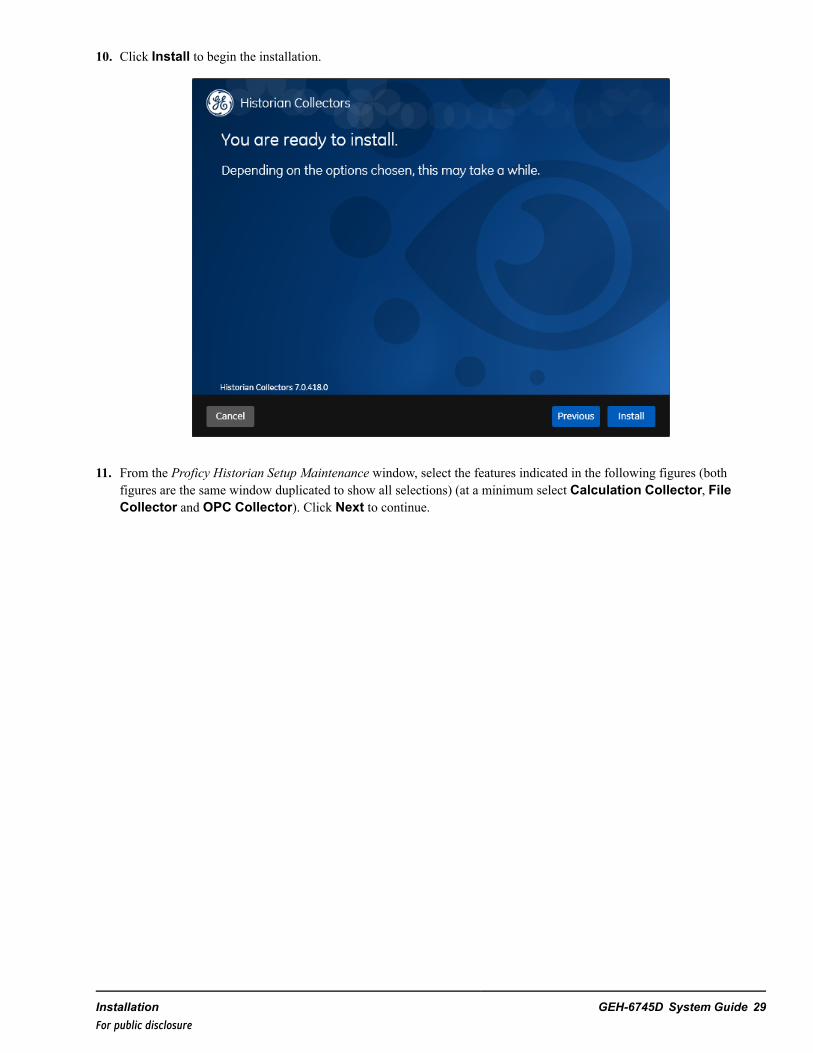
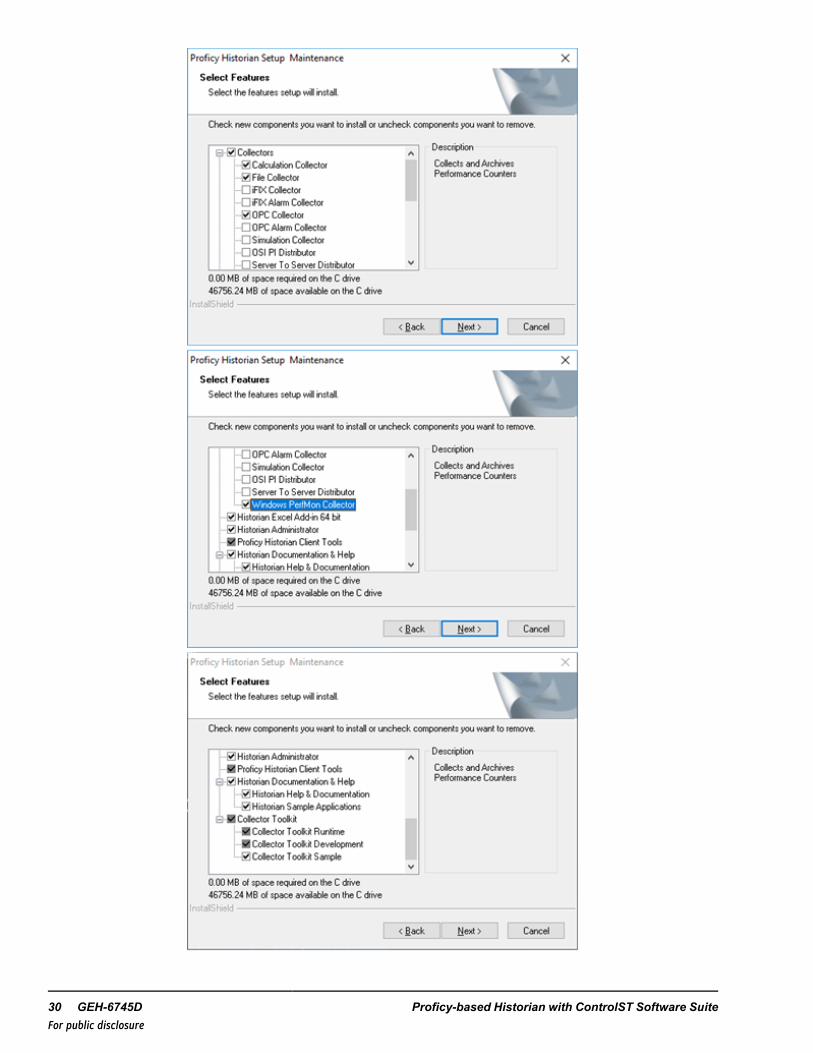
10. Click Install to begin the installation.
11. From the Proficy Historian Setup Maintenance window, select the features indicated in the following figures (bothfigures are the same window duplicated to show all selections) (at a minimum select Calculation Collector, FileCollector and OPC Collector). Click Next to continue.
Installation GEH-6745D System Guide 29For public disclosure
30 GEH-6745D Proficy-based Historian with ControlST Software SuiteFor public disclosure
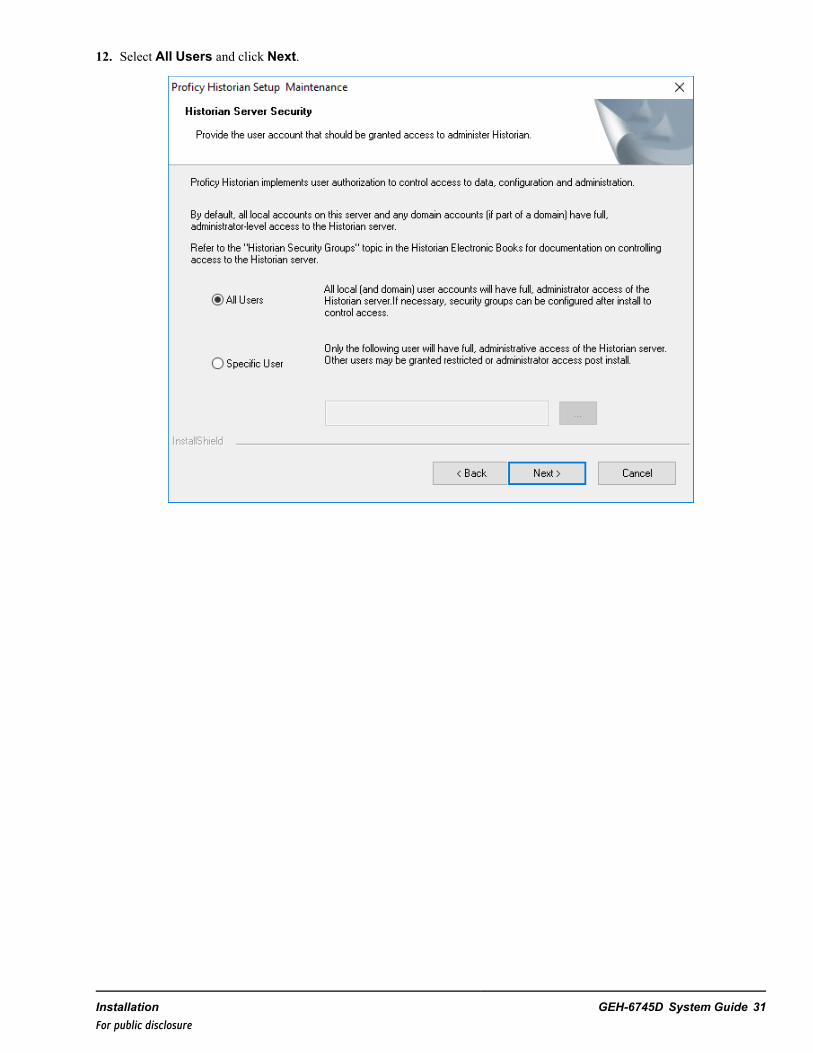
12. Select All Users and click Next.
Installation GEH-6745D System Guide 31For public disclosure
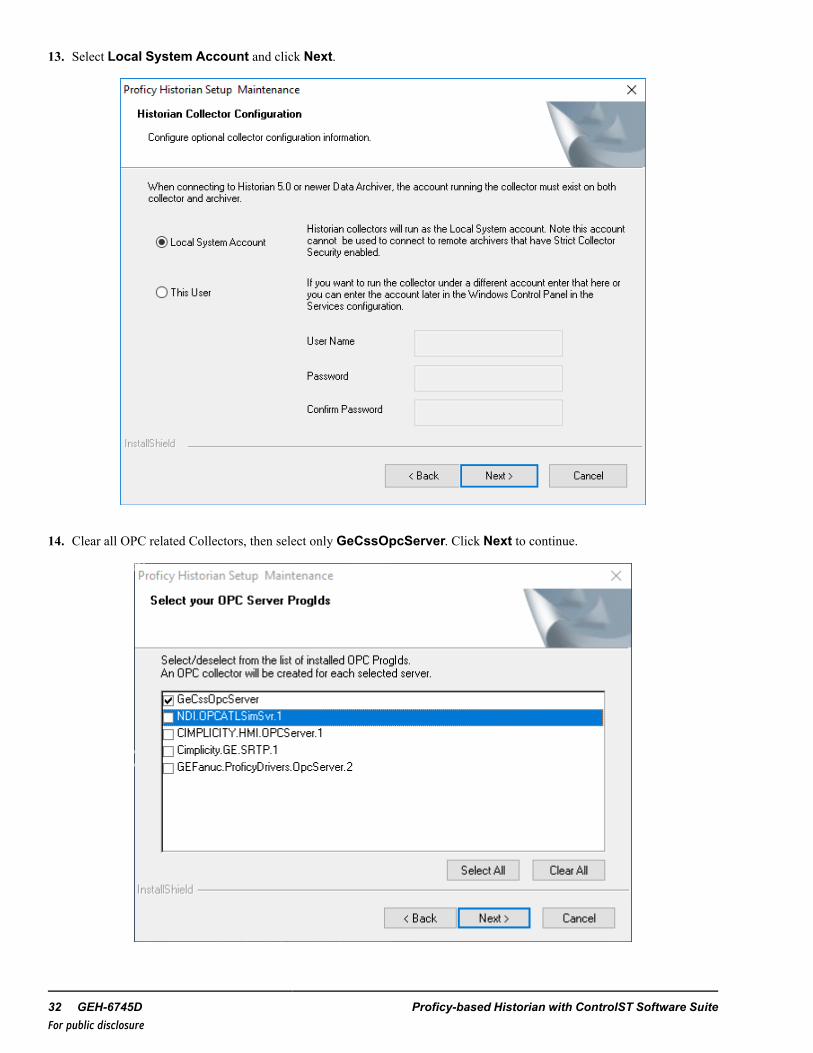
13. Select Local System Account and click Next.
14. Clear all OPC related Collectors, then select only GeCssOpcServer. Click Next to continue.
32 GEH-6745D Proficy-based Historian with ControlST Software SuiteFor public disclosure
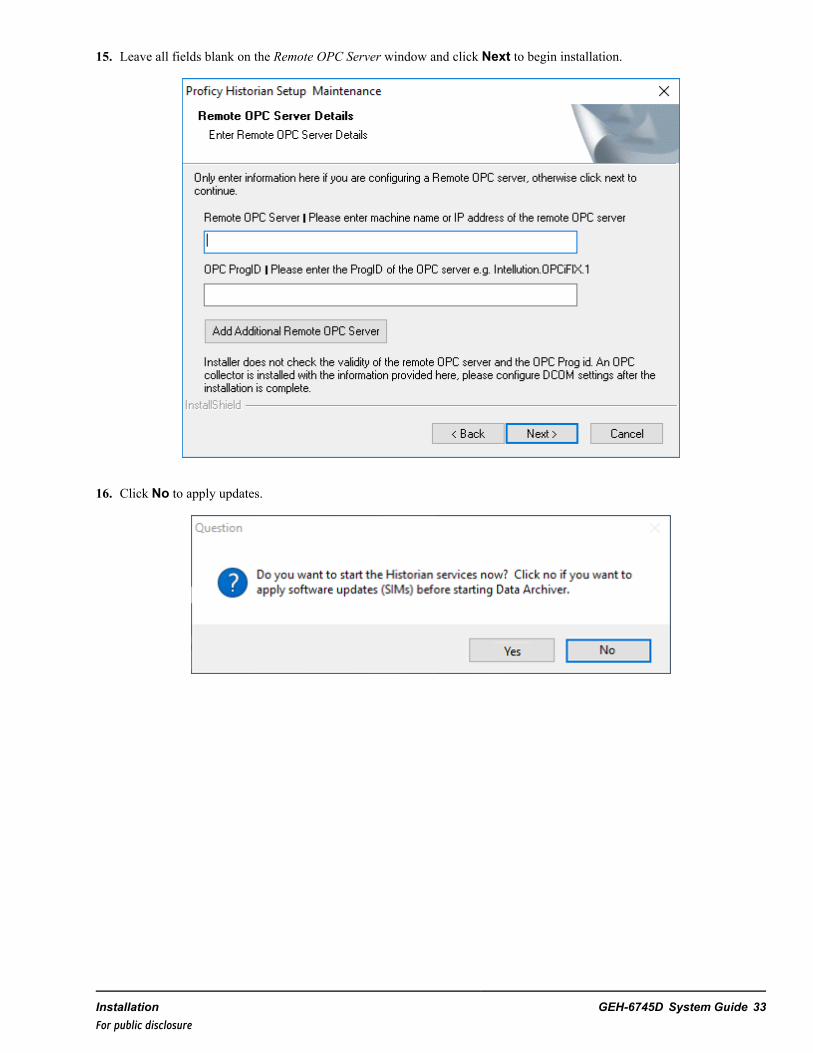
15. Leave all fields blank on the Remote OPC Server window and click Next to begin installation.
16. Click No to apply updates.
Installation GEH-6745D System Guide 33For public disclosure
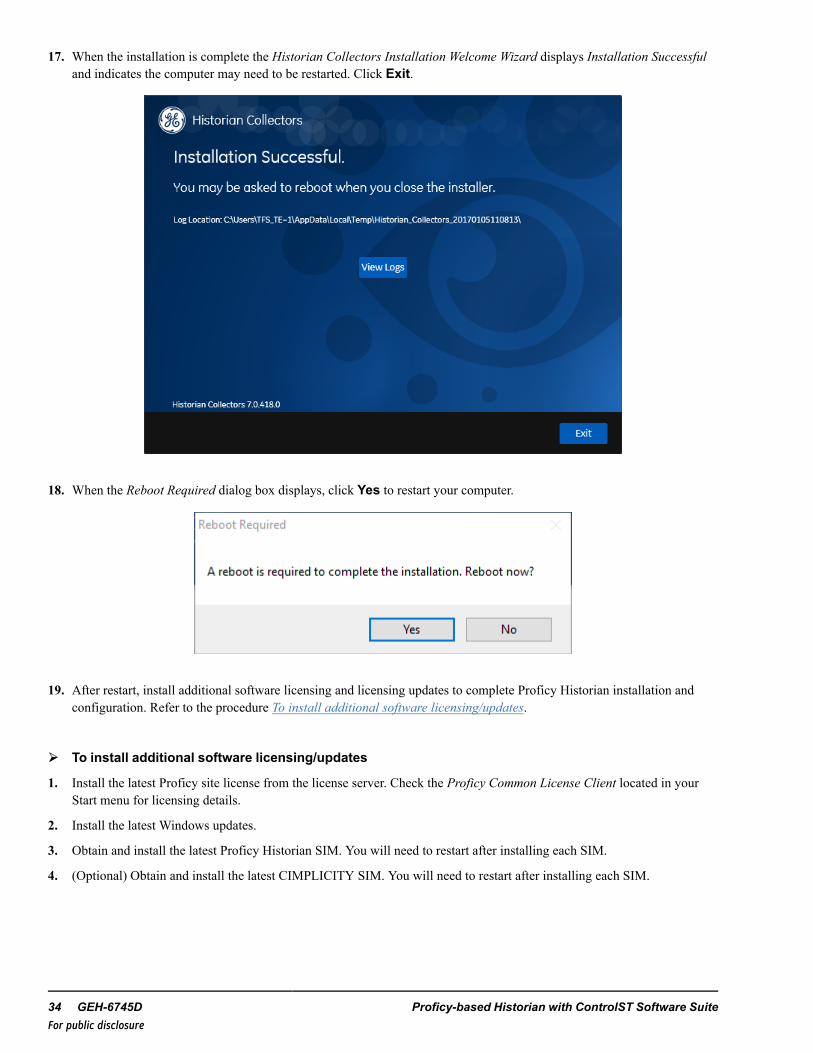
17. When the installation is complete the Historian Collectors Installation Welcome Wizard displays Installation Successfuland indicates the computer may need to be restarted. Click Exit.
18. When the Reboot Required dialog box displays, click Yes to restart your computer.
19. After restart, install additional software licensing and licensing updates to complete Proficy Historian installation andconfiguration. Refer to the procedure To install additional software licensing/updates.
➢➢ To install additional software licensing/updates
1. Install the latest Proficy site license from the license server. Check the Proficy Common License Client located in yourStart menu for licensing details.
2. Install the latest Windows updates.
3. Obtain and install the latest Proficy Historian SIM. You will need to restart after installing each SIM.
4. (Optional) Obtain and install the latest CIMPLICITY SIM. You will need to restart after installing each SIM.
34 GEH-6745D Proficy-based Historian with ControlST Software SuiteFor public disclosure
2.2 Proficy Historian 6.0 InstallationPrerequisites
The following must be completed prior to starting the installation process:
• CIMPLICITY V9.0 must be installed first, if you are going to use Proficy Advanced Trender.• The computer must be running Server 2012 R2• Verify the computer name is set to the desired system name before installing the software.• To isolate data from the operating system, it is recommended to use a separate D: drive for the DataStores and the
Historian Reports package.• The WorkstationST application must be installed and configured with the OPC DA Server enabled, as a minimum, to
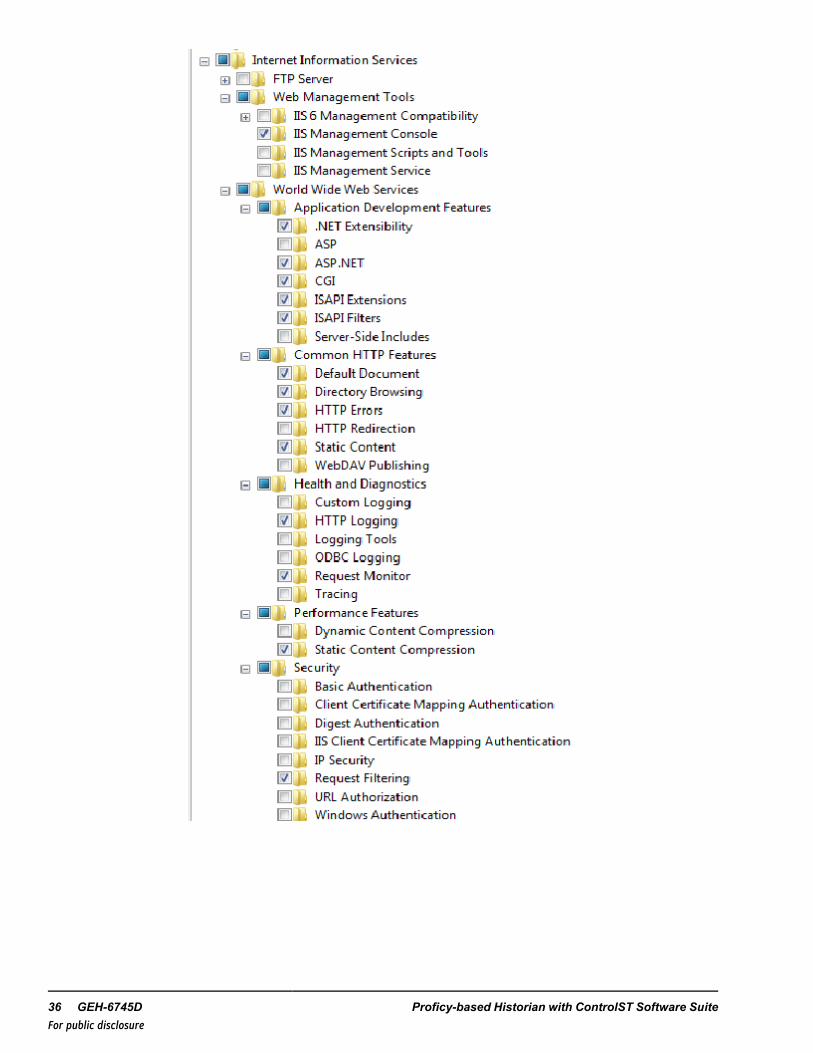
allow selecting the GeCssOpcServer during the historian install.• Verify Internet Information Services (IIS) has been installed on the Historian computer as shown in the following figure.
Installation GEH-6745D System Guide 35For public disclosure
36 GEH-6745D Proficy-based Historian with ControlST Software SuiteFor public disclosure
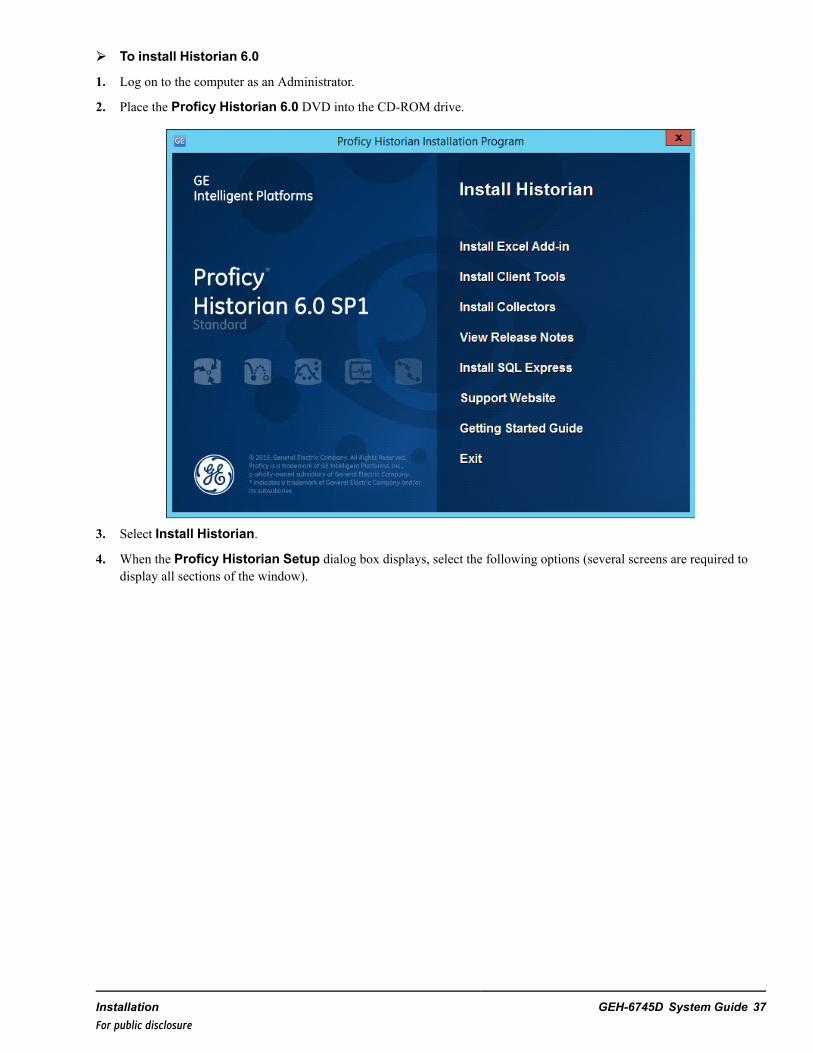
➢➢ To install Historian 6.0
1. Log on to the computer as an Administrator.
2. Place the Proficy Historian 6.0 DVD into the CD-ROM drive.
3. Select Install Historian.
4. When the Proficy Historian Setup dialog box displays, select the following options (several screens are required todisplay all sections of the window).
Installation GEH-6745D System Guide 37For public disclosure
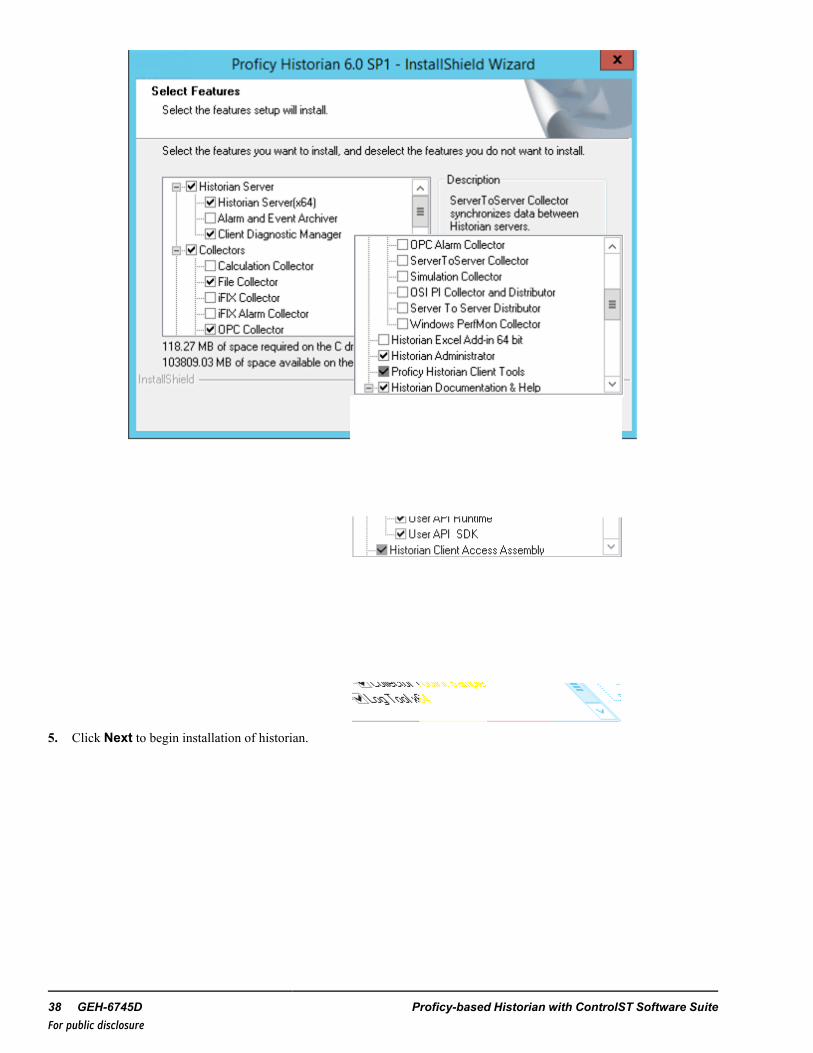
5. Click Next to begin installation of historian.
38 GEH-6745D Proficy-based Historian with ControlST Software SuiteFor public disclosure
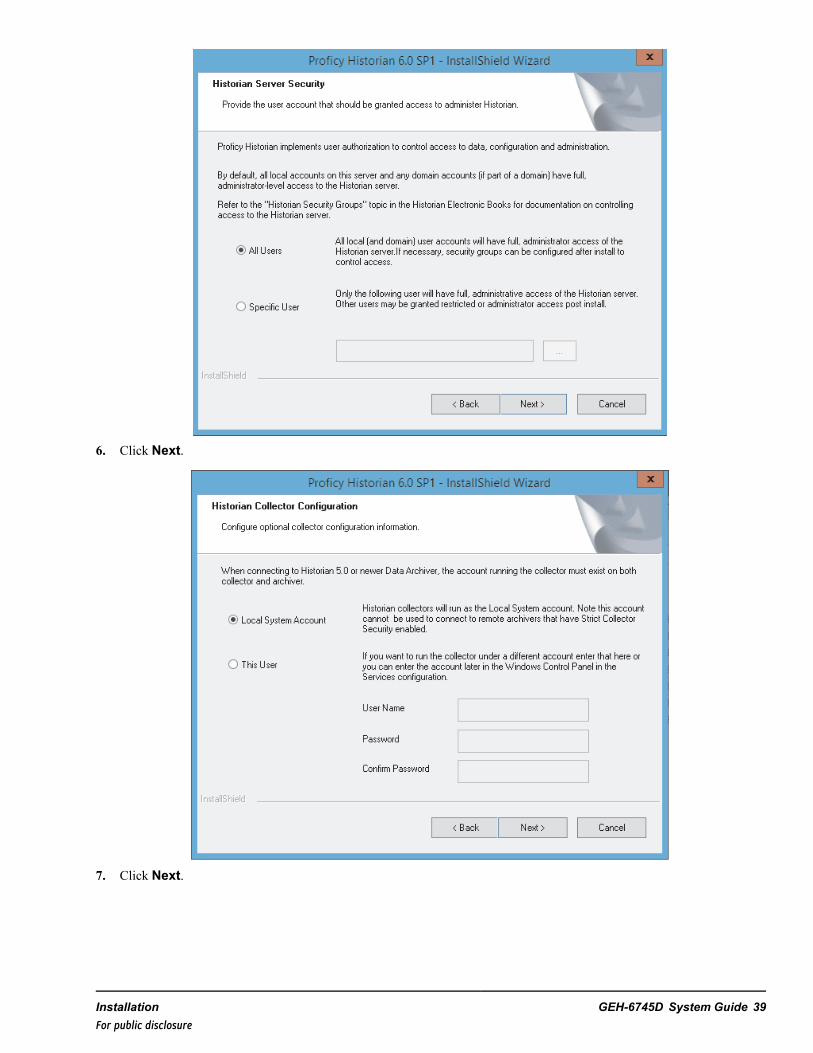
6. Click Next.
7. Click Next.
Installation GEH-6745D System Guide 39For public disclosure
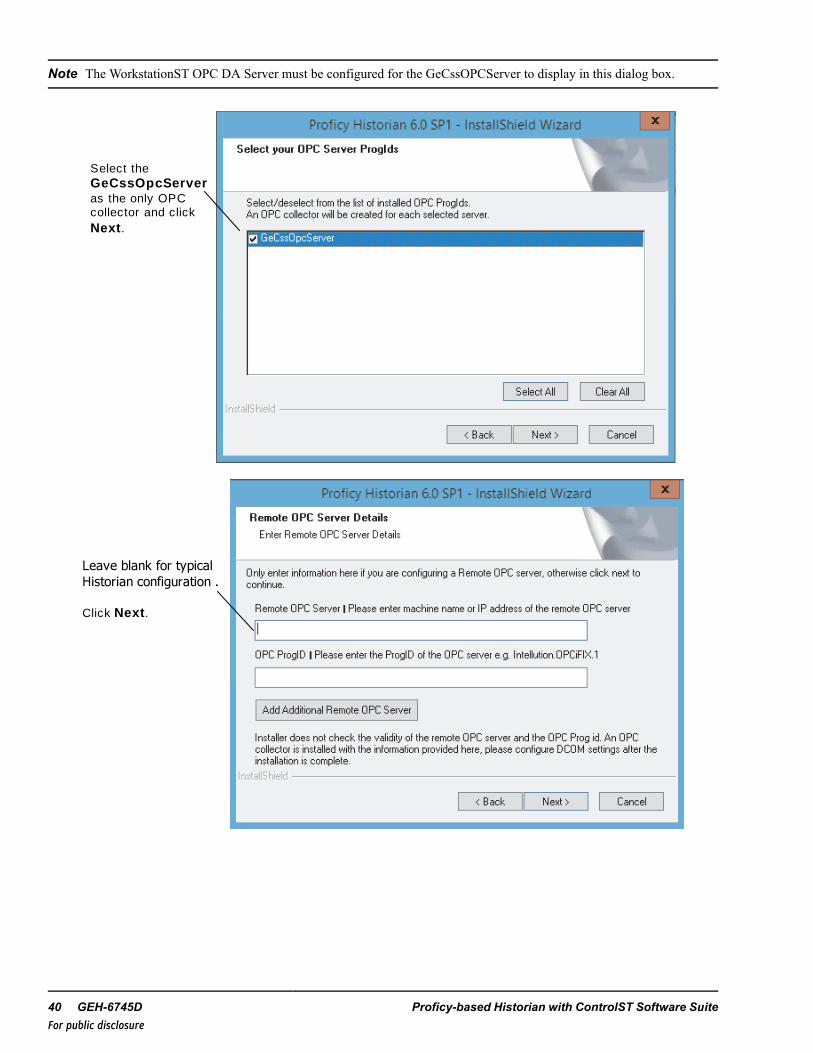
Note The WorkstationST OPC DA Server must be configured for the GeCssOPCServer to display in this dialog box.
Select the GeCssOpcServeras the only OPC collector and click Next .
Leave blank for typical Historian configuration .
Click Next .
40 GEH-6745D Proficy-based Historian with ControlST Software SuiteFor public disclosure

Leave blank for typical Historian configuration .
Click Next .
Installation GEH-6745D System Guide 41For public disclosure
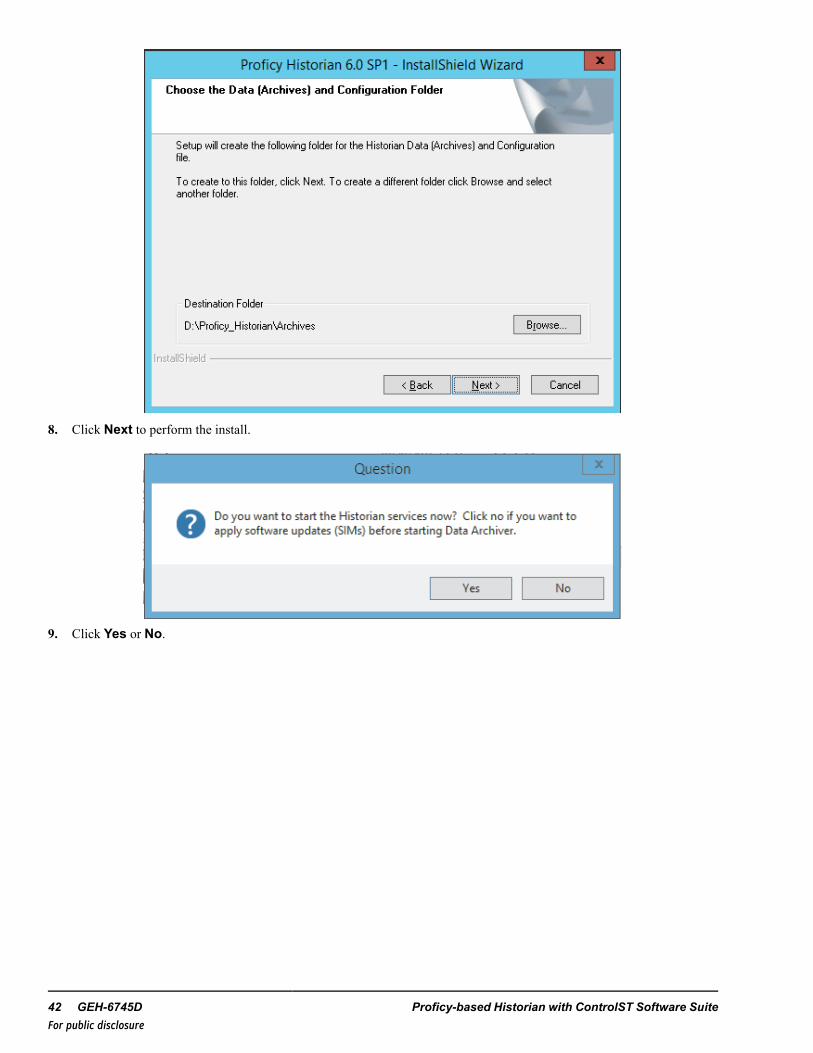
8. Click Next to perform the install.
9. Click Yes or No.
42 GEH-6745D Proficy-based Historian with ControlST Software SuiteFor public disclosure
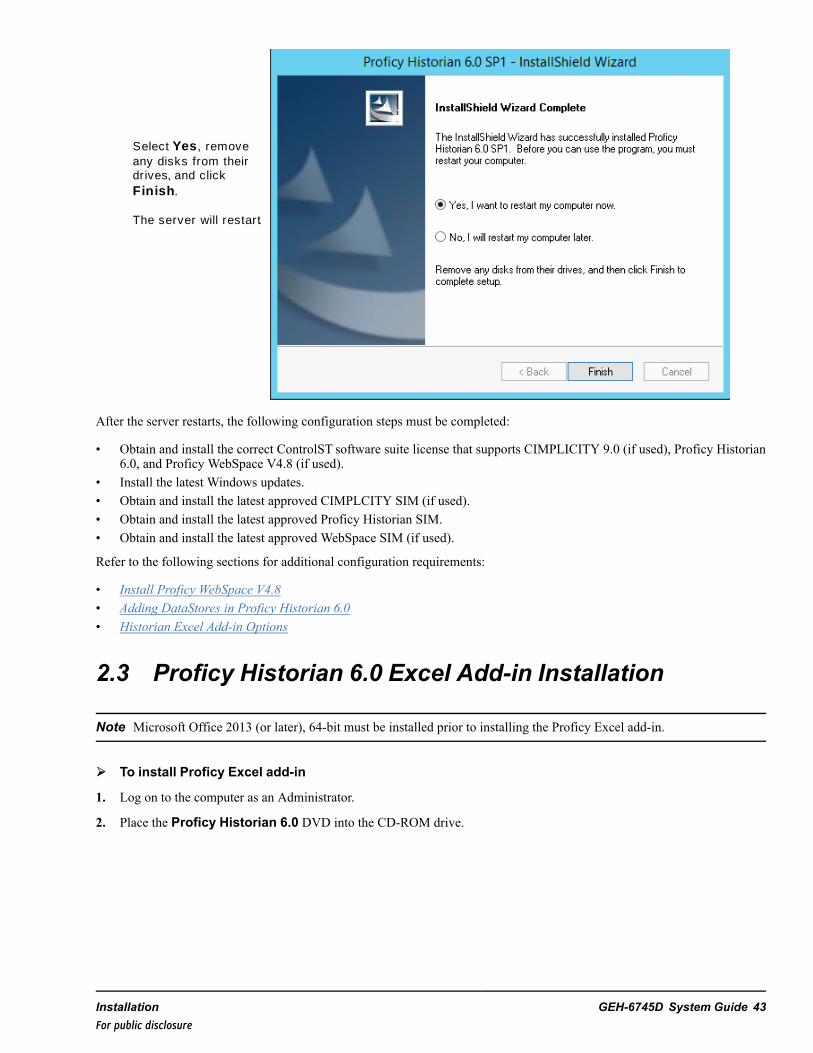
Select Yes , remove any disks from their drives, and click Fin ish.
The server will restart.
After the server restarts, the following configuration steps must be completed:
• Obtain and install the correct ControlST software suite license that supports CIMPLICITY 9.0 (if used), Proficy Historian6.0, and Proficy WebSpace V4.8 (if used).
• Install the latest Windows updates.• Obtain and install the latest approved CIMPLCITY SIM (if used).• Obtain and install the latest approved Proficy Historian SIM.• Obtain and install the latest approved WebSpace SIM (if used).
Refer to the following sections for additional configuration requirements:
• Install Proficy WebSpace V4.8• Adding DataStores in Proficy Historian 6.0• Historian Excel Add-in Options
2.3 Proficy Historian 6.0 Excel Add-in Installation
Note Microsoft Office 2013 (or later), 64-bit must be installed prior to installing the Proficy Excel add-in.
➢➢ To install Proficy Excel add-in
1. Log on to the computer as an Administrator.
2. Place the Proficy Historian 6.0 DVD into the CD-ROM drive.
Installation GEH-6745D System Guide 43For public disclosure
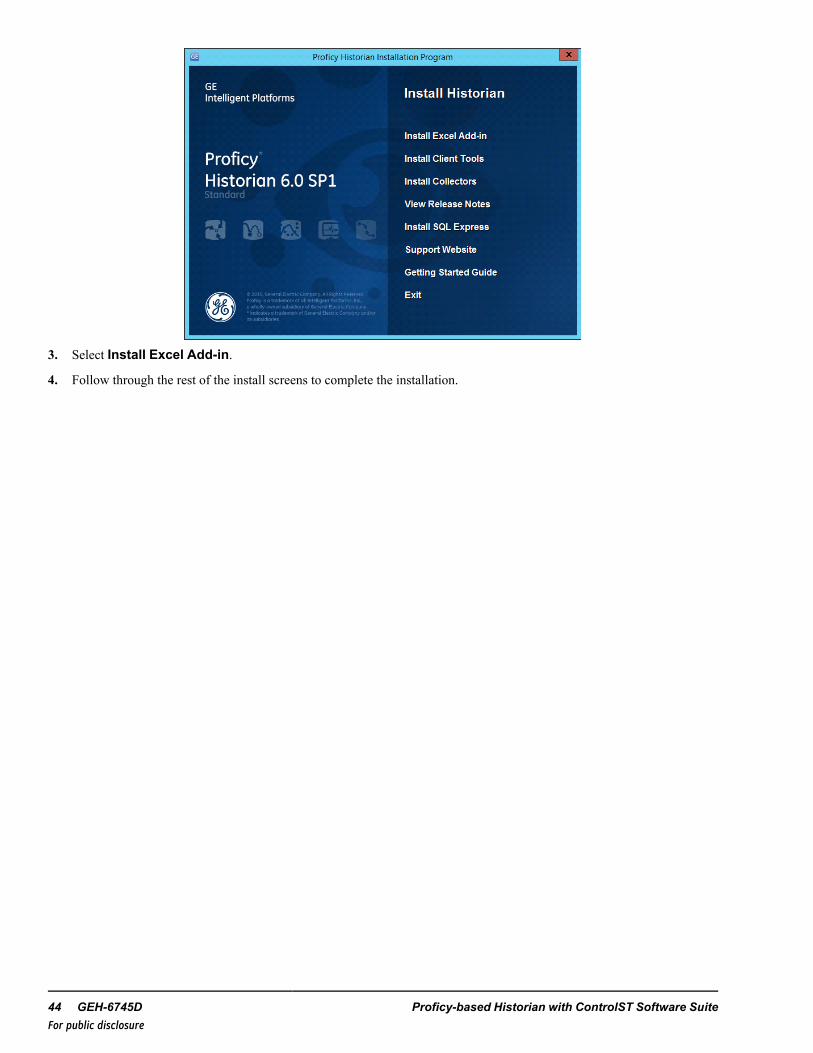
3. Select Install Excel Add-in.
4. Follow through the rest of the install screens to complete the installation.
44 GEH-6745D Proficy-based Historian with ControlST Software SuiteFor public disclosure
2.4 Proficy Historian 4.5 InstallationPrerequisites
The following must be completed prior to starting the installation process:
• CIMPLICITY V8.2 must be installed first• The computer should be running Windows® 7 - 64–bit• Verify the computer name is set to the desired system name before installing the software.• The computer will need a D: drive to configure the archives and to install the historian reports package.• The WorkstationST application should be installed on the computer to allow selecting the GeCssOpcServer during the
historian install.• Verify Internet Information Services (IIS) has been installed on the Historian computer as shown in the following figure.
Installation GEH-6745D System Guide 45For public disclosure
➢➢ To install CIMPLICITY Server
1. Log on to the computer as an Administrator.
2. Place the Proficy HMI/SCADA – CIMPLICITY DVD into the CD-ROM drive.
46 GEH-6745D Proficy-based Historian with ControlST Software SuiteFor public disclosure
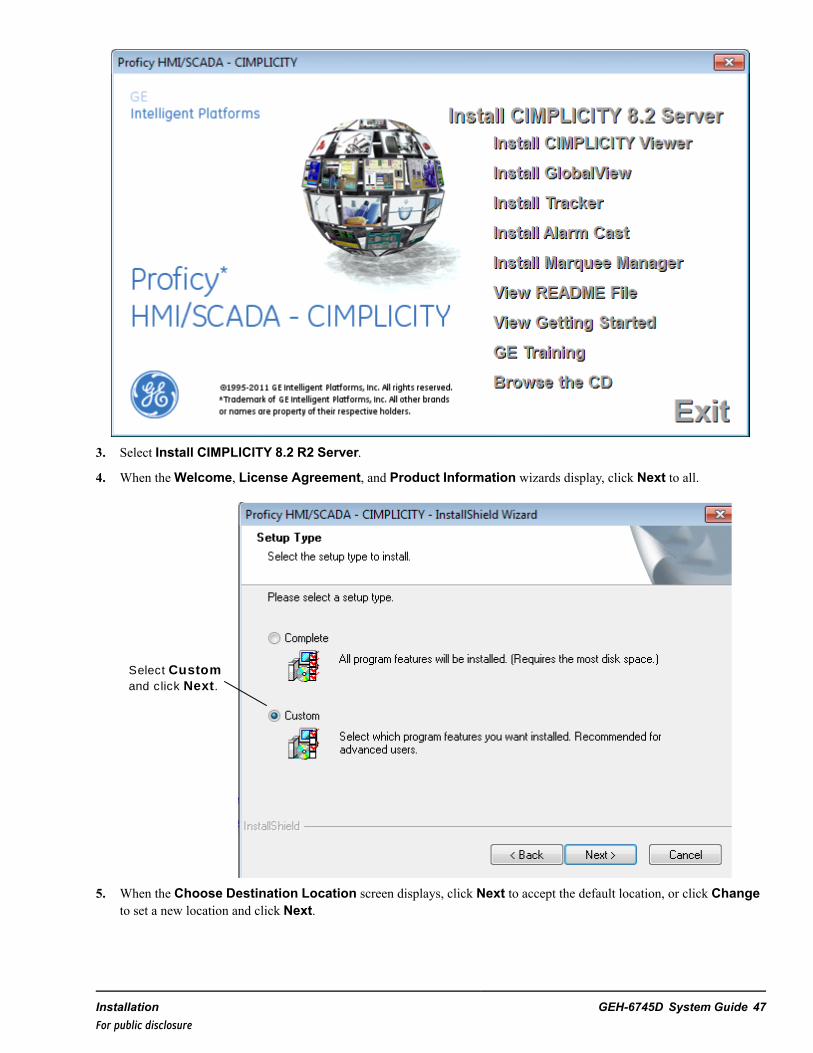
3. Select Install CIMPLICITY 8.2 R2 Server.
4. When theWelcome, License Agreement, and Product Information wizards display, click Next to all.
Select Custom and click Next .
5. When the Choose Destination Location screen displays, click Next to accept the default location, or click Changeto set a new location and click Next.
Installation GEH-6745D System Guide 47For public disclosure
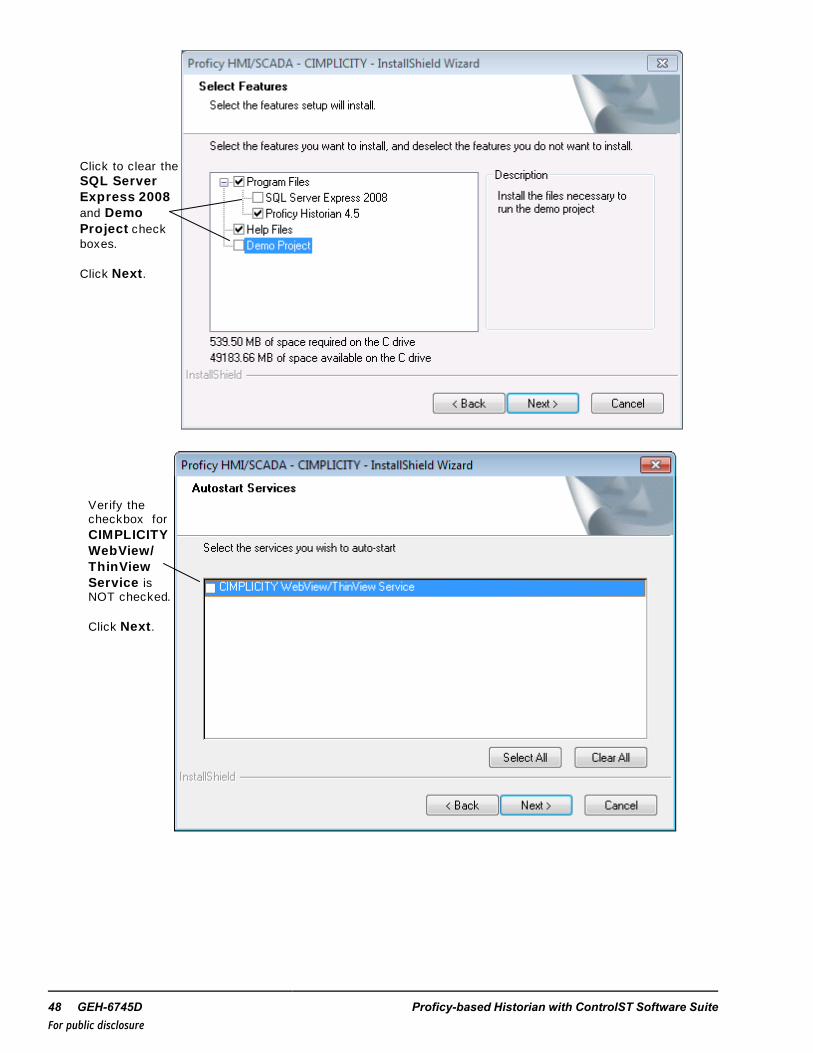
Click to clear the SQL Server Exp ress 2008and Demo Pro jec t check boxes.
Click Next .
Verify the checkbox for CIMPL ICITY WebView/Th inView Serv ice is NOT checked.
Click Next .
48 GEH-6745D Proficy-based Historian with ControlST Software SuiteFor public disclosure
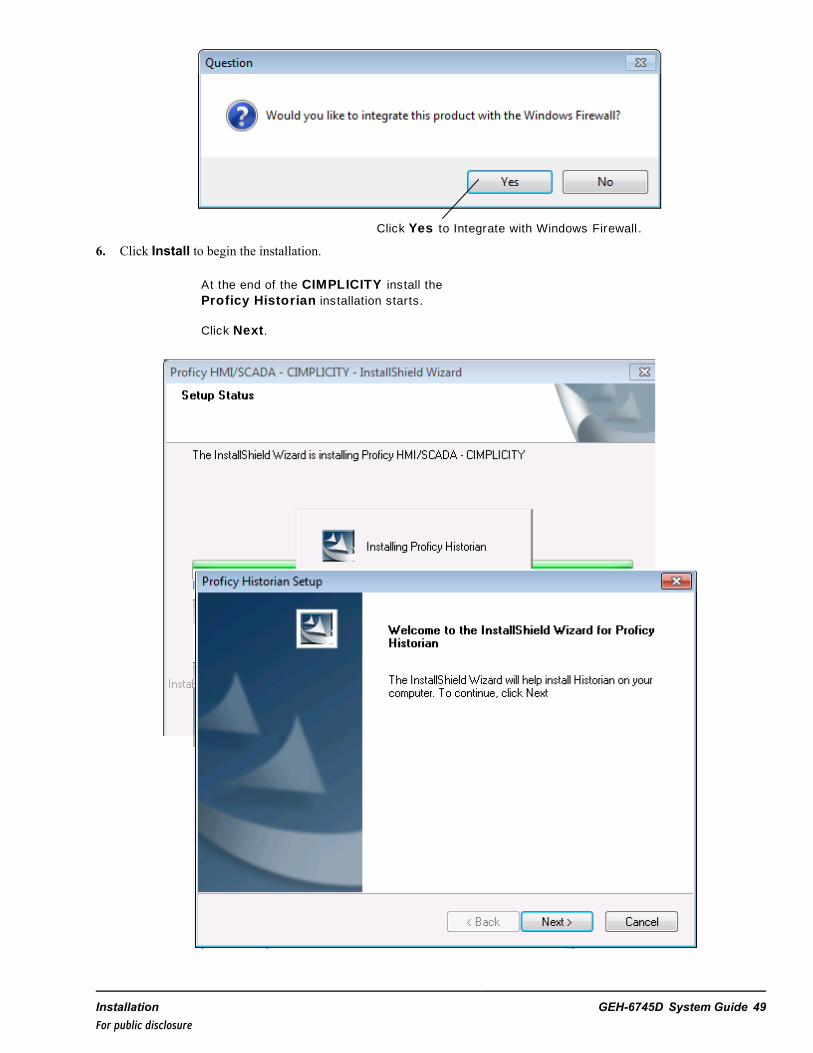
Click Yes to Integrate with Windows Firewall .
6. Click Install to begin the installation.
At the end of the CIMPL ICITY install the Pro f icy His to r ian installation starts.
Click Next .
Installation GEH-6745D System Guide 49For public disclosure

Select ���������������� � � ������� ���� ����������������� ������������� ���� ���� �������� ��
Note Make sure to de-select (uncheck) the OPC Alarm collector.
7. Click Next to begin installation of historian.
50 GEH-6745D Proficy-based Historian with ControlST Software SuiteFor public disclosure
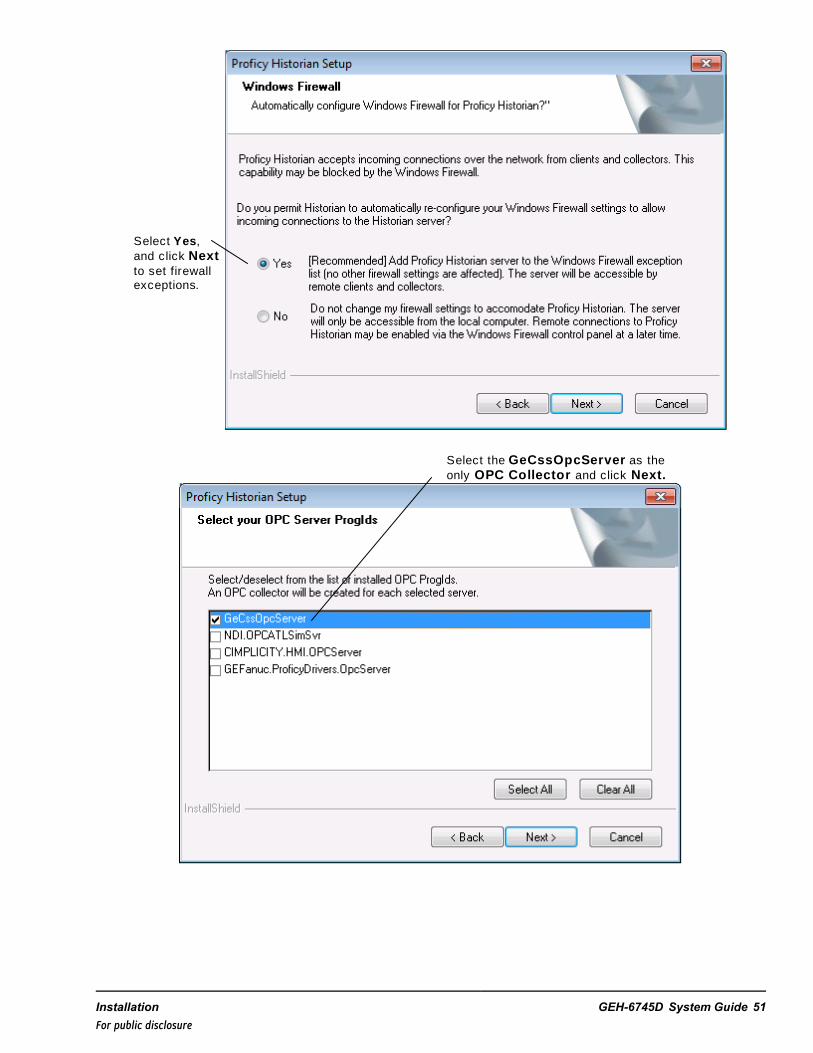
Select Yes, and click Next to set firewall exceptions.
Select the GeCssOpcServer as the only OPC Co llec to r and click Next .
Installation GEH-6745D System Guide 51For public disclosure

Click Next to select the default His to r ian location.
Click Browse and change the archive location to D:\Pro f icy_Arch(create the folder if it does not exist).
Click Next .
52 GEH-6745D Proficy-based Historian with ControlST Software SuiteFor public disclosure
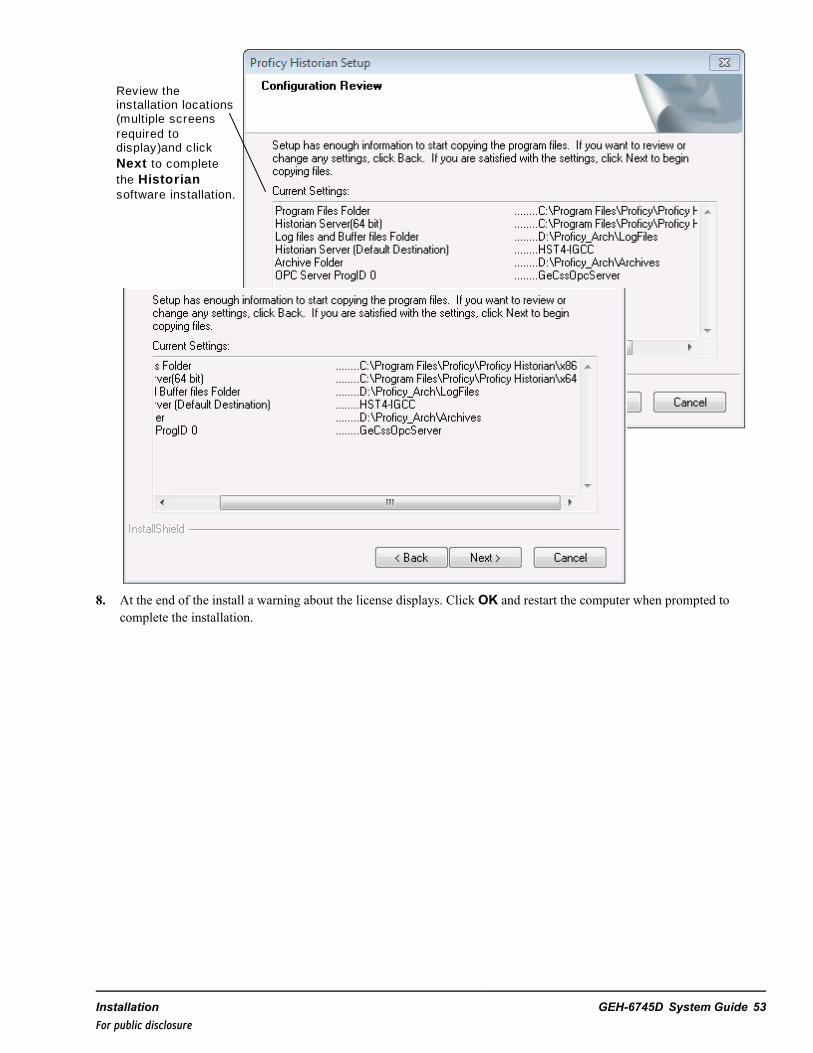
Review the installation locations (multiple screens required to display)and click Next to complete the His to r ian software installation.
8. At the end of the install a warning about the license displays. Click OK and restart the computer when prompted tocomplete the installation.
Installation GEH-6745D System Guide 53For public disclosure
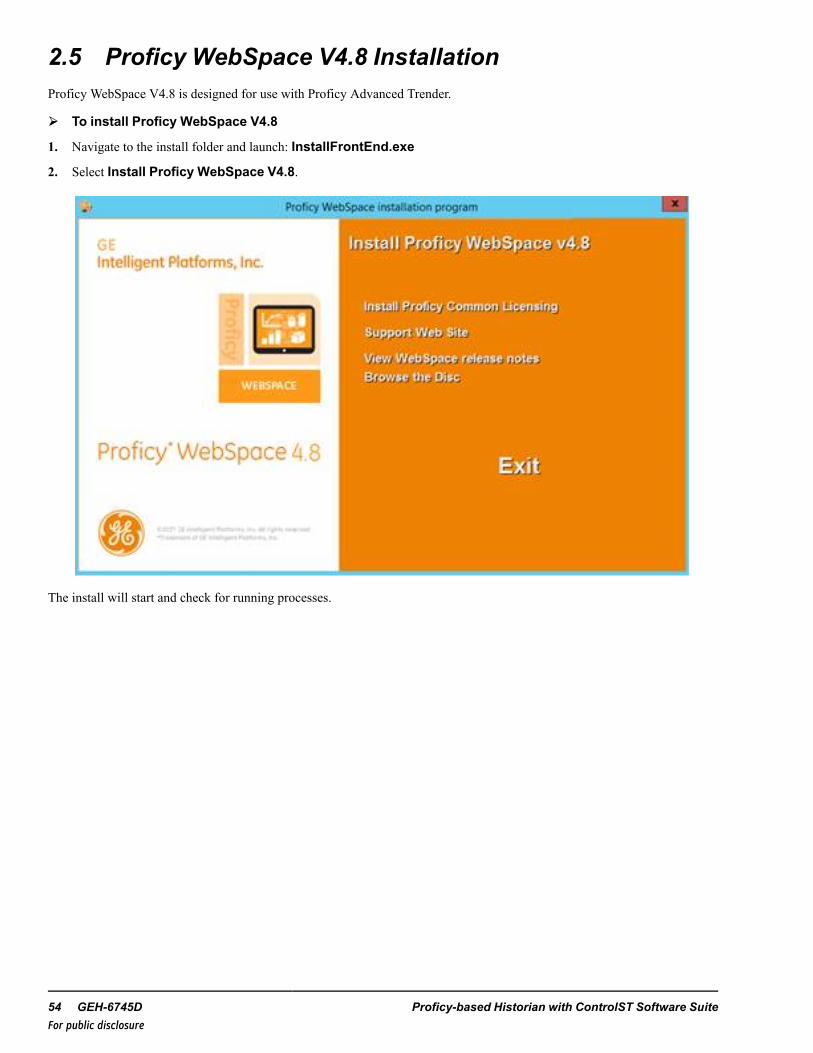
2.5 Proficy WebSpace V4.8 InstallationProficy WebSpace V4.8 is designed for use with Proficy Advanced Trender.
➢➢ To install Proficy WebSpace V4.8
1. Navigate to the install folder and launch: InstallFrontEnd.exe
2. Select Install Proficy WebSpace V4.8.
The install will start and check for running processes.
54 GEH-6745D Proficy-based Historian with ControlST Software SuiteFor public disclosure
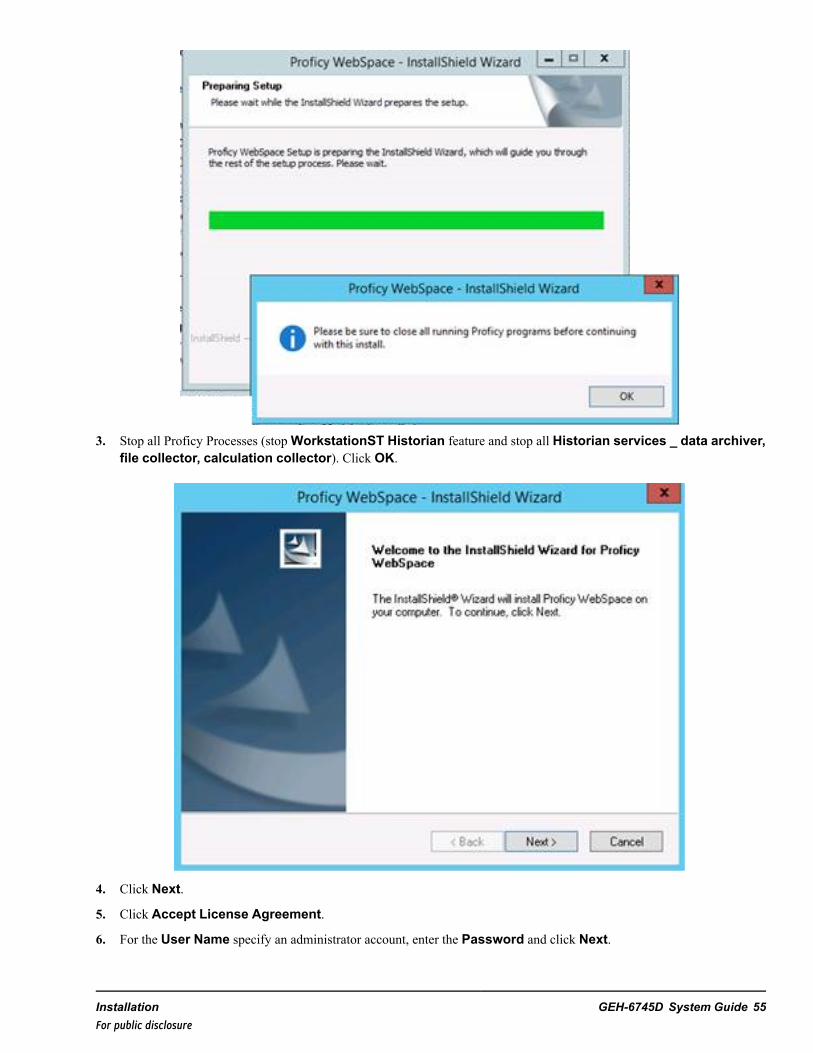
3. Stop all Proficy Processes (stopWorkstationST Historian feature and stop all Historian services _ data archiver,file collector, calculation collector). Click OK.
4. Click Next.
5. Click Accept License Agreement.
6. For the User Name specify an administrator account, enter the Password and click Next.
Installation GEH-6745D System Guide 55For public disclosure
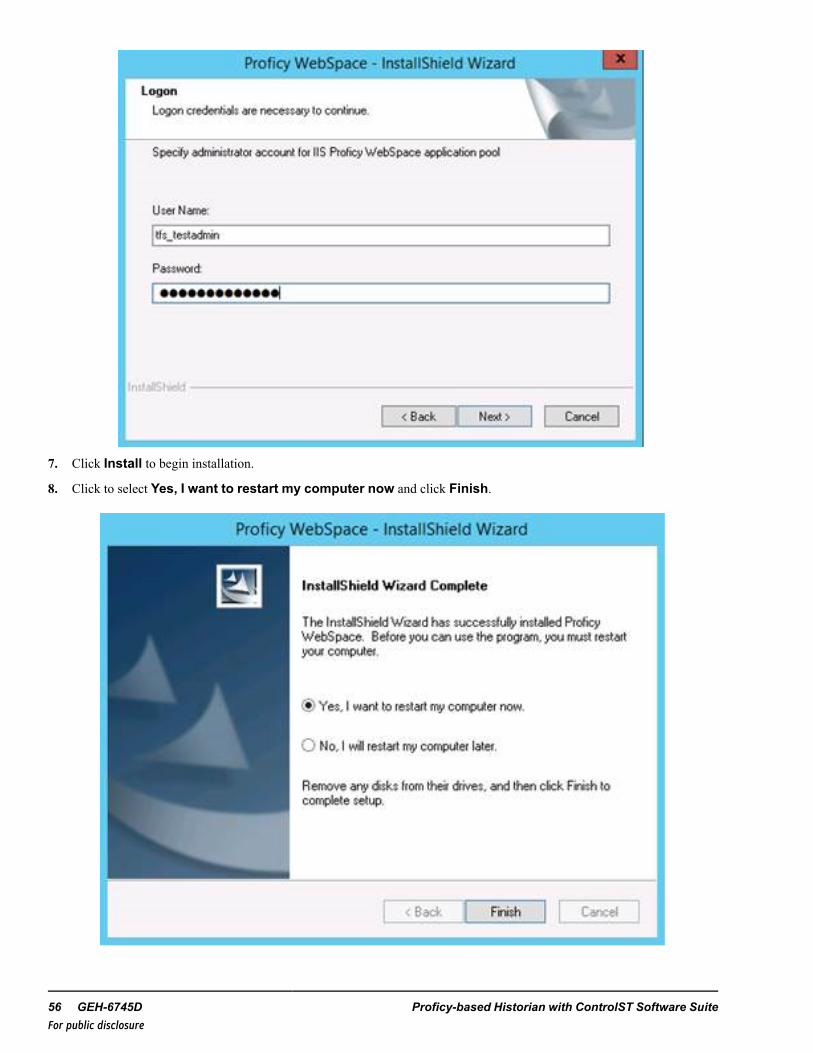
7. Click Install to begin installation.
8. Click to select Yes, I want to restart my computer now and click Finish.
56 GEH-6745D Proficy-based Historian with ControlST Software SuiteFor public disclosure
After the restart is complete, finish configuring WebSpace for operation.
9. From CIMPLICITY, select Options andWebSpace - frommain.cim create default.htm startup page. Save the copyin C:\Program Files\Proficy\Proficy WebSpace\Web.
10. InstallWebSpace client on all client HMI’s (including the Proficy Historian pc).
a. From the Proficy Historian, install the WebSpace client plugin with the following file:C:\Program Files\Proficy\Proficy WebSpace\Web\Clients\proficy-client.windows.exe
b. From the Proficy Historian, use Internet Explorer and go to //pcname/ProficyWebSpace/default.htm to checkWebSpace operation.(When it is working, a prompt displays for User Name and Password, then starts cimview and displays screen.)
c. From the Proficy Historian, copy the file C:\Program Files\Proficy\Proficy WebSpace\Web\Clients\proficy-client.windows.exe to each client machine.
d. Install the proficy-client.exe file on each client machine.
e. Check WebSpace operation from each of the clients.
Installation GEH-6745D System Guide 57For public disclosure
2.6 GlobalView Installation
Note The CIMPLCITY GlobalView application has been replaced by Proficy WebSpace.
58 GEH-6745D Proficy-based Historian with ControlST Software SuiteFor public disclosure
2.7 Historian Reports Installation
Note Historian Reports requires a D: drive.
Historian Reports allows you to generate periodic and real-time reports using the historical data.
➢➢ To install the Historian Reports
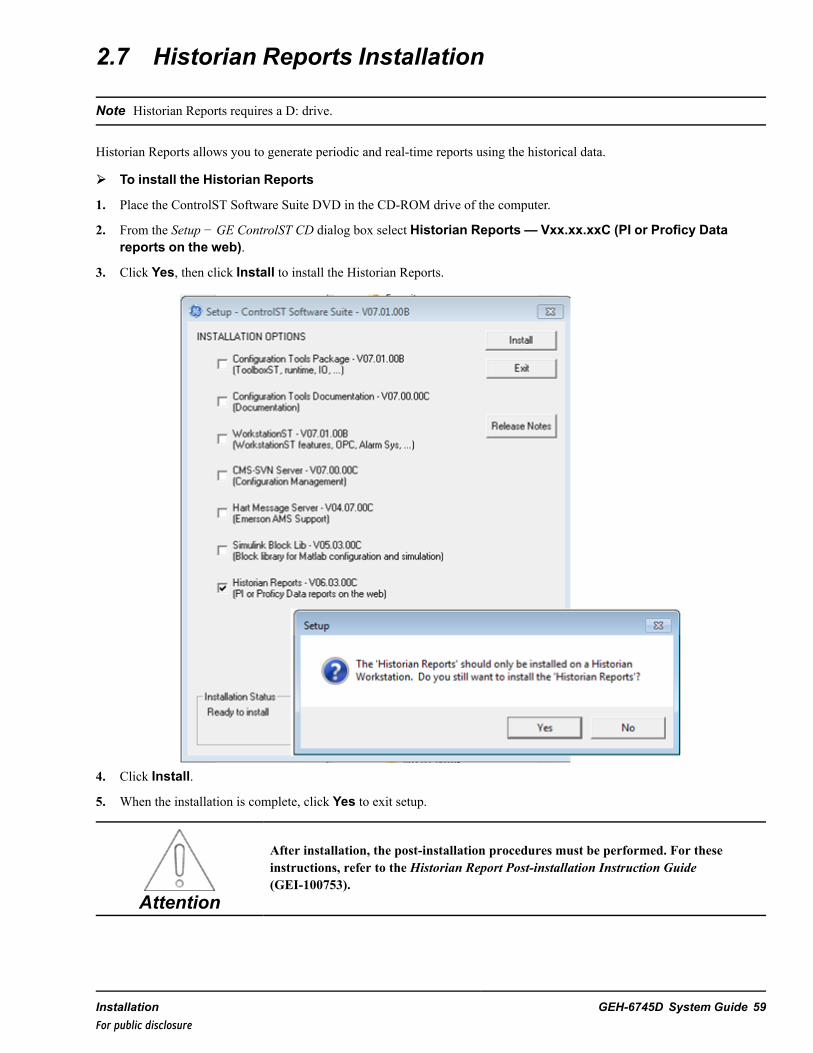
1. Place the ControlST Software Suite DVD in the CD-ROM drive of the computer.
2. From the Setup − GE ControlST CD dialog box select Historian Reports — Vxx.xx.xxC (PI or Proficy Datareports on the web).
3. Click Yes, then click Install to install the Historian Reports.
4. Click Install.
5. When the installation is complete, click Yes to exit setup.
Attention
After installation, the post-installation procedures must be performed. For theseinstructions, refer to the Historian Report Post-installation Instruction Guide(GEI-100753).
Installation GEH-6745D System Guide 59For public disclosure

Notes
60 GEH-6745D Proficy-based Historian with ControlST Software SuiteFor public disclosure
3 Configuration3.1 Historian Excel Add-in Options
Attention
For Proficy Historian 6.0, the Proficy Excel Add-in option requires Microsoft OfficeExcel 2013 (or later), 64 bit. All other steps in the procedure remain the same.
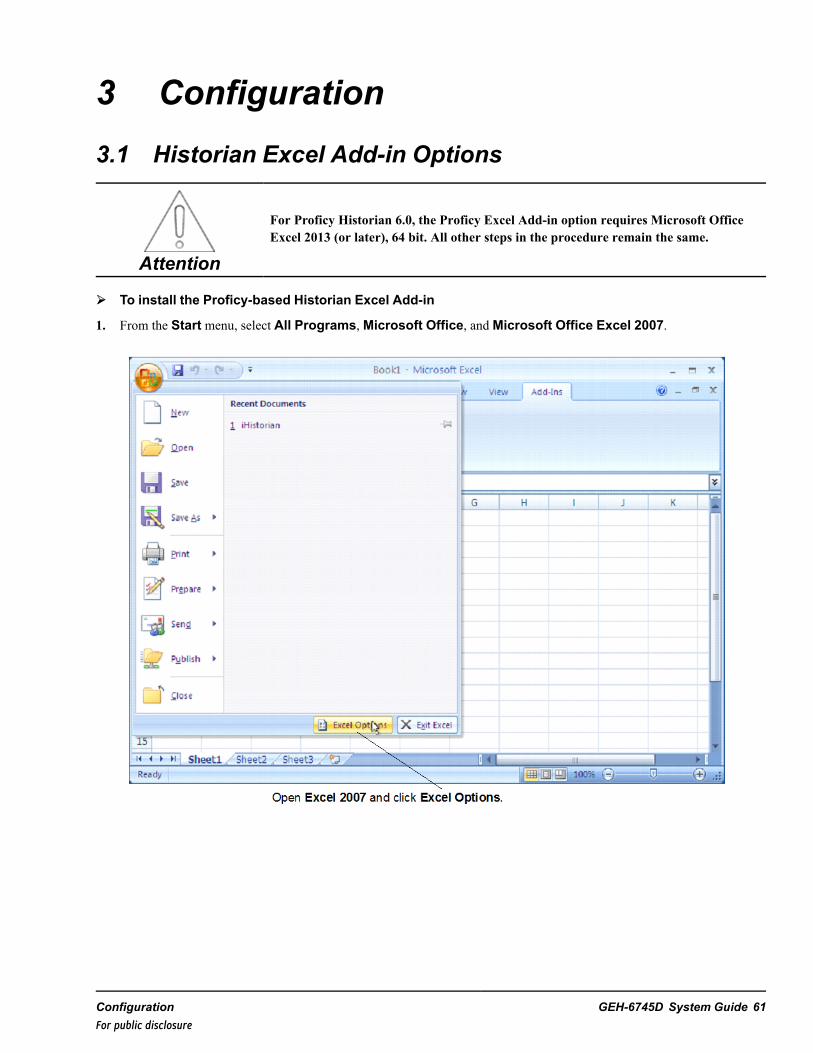
➢➢ To install the Proficy-based Historian Excel Add-in
1. From the Start menu, select All Programs,Microsoft Office, andMicrosoft Office Excel 2007.
Configuration GEH-6745D System Guide 61For public disclosure
62 GEH-6745D Proficy-based Historian with ControlST Software SuiteFor public disclosure
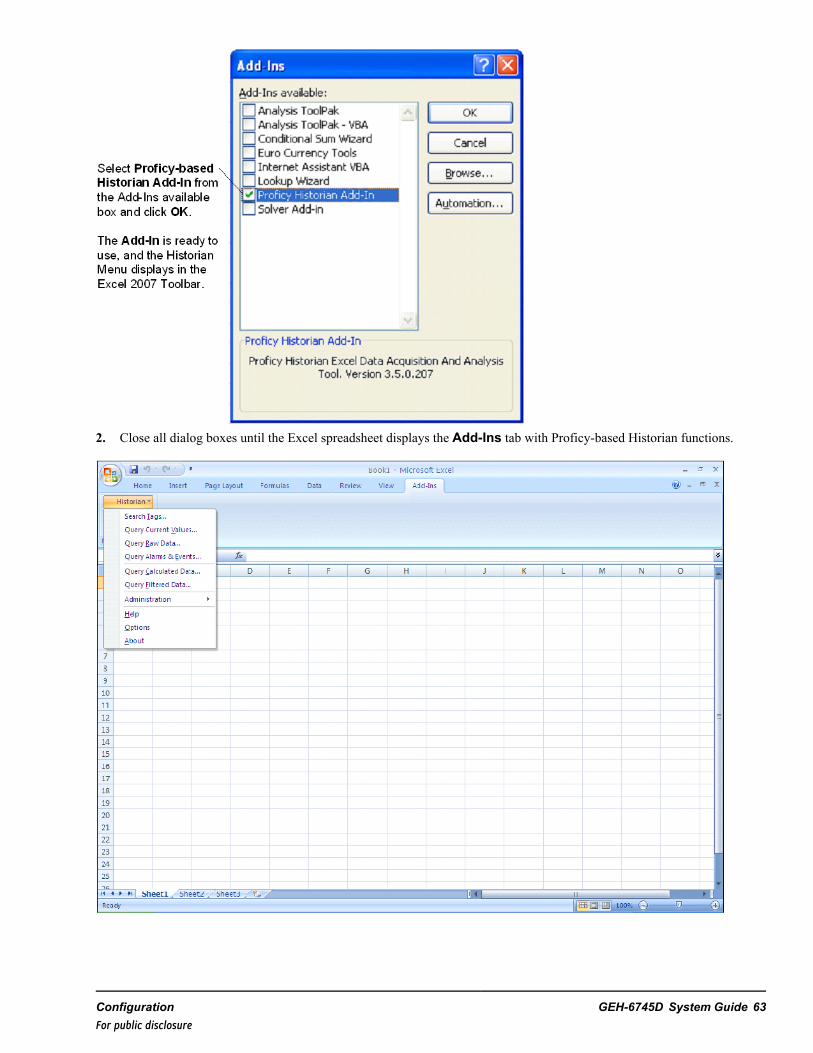
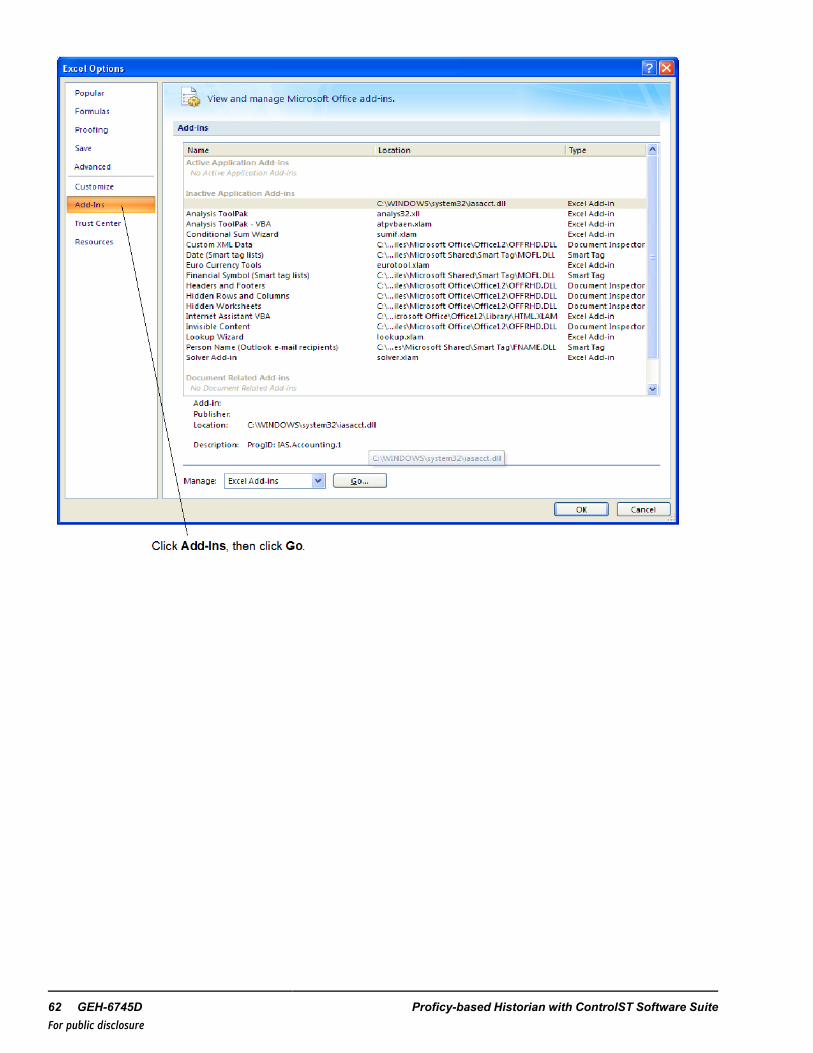
2. Close all dialog boxes until the Excel spreadsheet displays the Add-Ins tab with Proficy-based Historian functions.
Configuration GEH-6745D System Guide 63For public disclosure
3.2 Historian ArchivesArchives are created as fixed length files and initially contain no data. They are located on the history disk in the Archivesdirectory, typically D:\Proficy_Arch\ on the computer with the Historian installed. The archives are named ArchiveXXX.iha,where x equals a three-digit number that increments for each new archive. The typical archive size is 512 MB. Proficy-basedHistorian archives use 75% of the history disk. The number of available archives depends on the size of the history disk.
Note Refer to the Historian Electronic Book (from the Help menu) for more information.
The list of archives displays in the Historian Administrator in reverse chronological order with the primary archive listed first.Each archive listed has the associated Start Time and End Time. The archive with a valid Start Time (such as 5-Nov-9805:37:48) and the value Current Time for the End Time, is the primary archive and should be the first archive listed. Anarchive with a valid Start and End Time was previously the primary archive. Archives with the value Current Time for theStart and End Times are empty.
Applications residing on the Historian system are responsible for sending data from the controllers to the Proficy-basedHistorian system. The Proficy-based Historian system shifts from the current primary archive to the next available archive(making it the new primary archive) when an archive reaches its size limit. This next available archive is either an emptyarchive or the oldest used archive (if an empty one is not available). The Proficy-based Historian system uses these archivesin a circular queue.
3.2.1 Data CompressionCollector compression applies a smoothing filter to data retrieved from the data source. By ignoring small changes in valuesthat fall within a deadband centered around the last reported value, only significant changes are reported to the archiver. Thedefinition of significant changes is determined by setting the collector compression deadband value.
The Historian Administrator calculates and displays the deadband in engineering units if you enter a deadband percentage. Ifyou later change the high and low EGU limits, the deadband is a percentage of the new limits. A 20% deadband on 0 to 500EGU span is 100 engineering units. When you change the limits to 100 and 200, the 20% is now 20 engineering units.
Note Historical filtering determines whether a variable value is archived or discarded.
The deadband is centered around the last reported sample, not added to it or subtracted from it. If you want a deadband of 1unit between reported samples, you must have a compression deadband of 2 so that it is one to each side of the last reportedsample. In an example of 0 to 500 EGU range, with a deadband of 20%, the deadband is 100 units, and the value has tochange by more than 50 units from the last reported value.
Changes in data quality automatically bypass collector compression and are reported to the archiver. Any data reported to thecollector that is out of time order automatically bypasses collector compression.
It is possible for collected tags with no compression to appear in the Historian system if the collector or archive compressionoptions are disabled. The Historian Administrator System Statistics screen displays the amount of compression for eachcollector. The amount of Archive Compression also displays.
64 GEH-6745D Proficy-based Historian with ControlST Software SuiteFor public disclosure

When a succession of bad data quality samples occurs, the Historian system collects only the first sample. No new samplesare collected until the data quality changes. The Historian system does not collect the redundant bad data quality samples, andthis is reflected in the Collector compression percentage statistic.
The effect of Collector Compression Timeout is to behave, for one poll cycle, as if the collector compression feature is notbeing used. The sample collected from the data source is sent to the archiver. The compression is then turned back on, asconfigured, for the next poll cycle with new samples being compared to the value sent to the archiver.
3.2.2 Archive CompressionArchive compression is used to reduce the number of samples stored when data values for a tag form a straight line in anydirection. For a horizontal line (a non-changing value), the behavior is similar to collector compression. However, in archivecompression, it is not the values that are being compared to a deadband, but the slope of line those values produce whenplotted value against time.
Archive compression logic is run in the data archiver, and can be applied to tags populated by methods other than collectors.Archive compression can be used on tags where data is being added to a tag by migration, by the File Collector, or by aSoftware Development Kit (SDK) program.
Note The Proficy-based Historian Tag Database contains the variable configuration. The database is created by the FileCollector.
Each time the archiver receives a new value for a tag, a line is computed between this incoming data point and the lastarchived value. The deadband is calculated as a tolerance centered about the slope of this line. The slope is tested to see if itfalls within the deadband tolerance calculated for the previous point. If the new point does not exceed the tolerance, it is heldby the archiver rather than being archived. This process repeats with subsequent points. When an incoming value exceeds thetolerance, the value held by the archiver is written to disk and the incoming sample becomes held.
The effect of the archive compression timeout is that the incoming sample is automatically considered to have exceededcompression. The held sample is archived, and the incoming sample becomes the new held sample.
If the archive compression value on the System Statistics screen indicates that archive compression is occurring, and archivecompression was not enabled for the tags, internal statistics tags with archive compression may be enabled.
3.2.3 Naming ConventionsHistorian tag names vary according to the type of collector. By default, the tag name is the source address prepended with astring.
In the Historian system, a unit name and a variable uniquely identify values. The scheme allows unit definitions to beduplicated easily by only changing the unit name. The design of the database requires that each tag name be unique. The tagname is a simple string. The Historian uses the unit's controller name concatenated with a period and the variable name touniquely identify each tag, for example T1.TNH is the tag name for unit T1 speed point.
Note Tag names should only use characters available for folders and filenames to avoid the limitations with some clients andfiltering.
3.2.3.1 File CollectorThe File Collector service configures the Proficy-based Historian Tag Database. It uses the ImportFiles folder for itsoperations, which is found in the Proficy-based Historian program folder. The ImportFiles folder contains the followingsubdirectories:
Configuration GEH-6745D System Guide 65For public disclosure
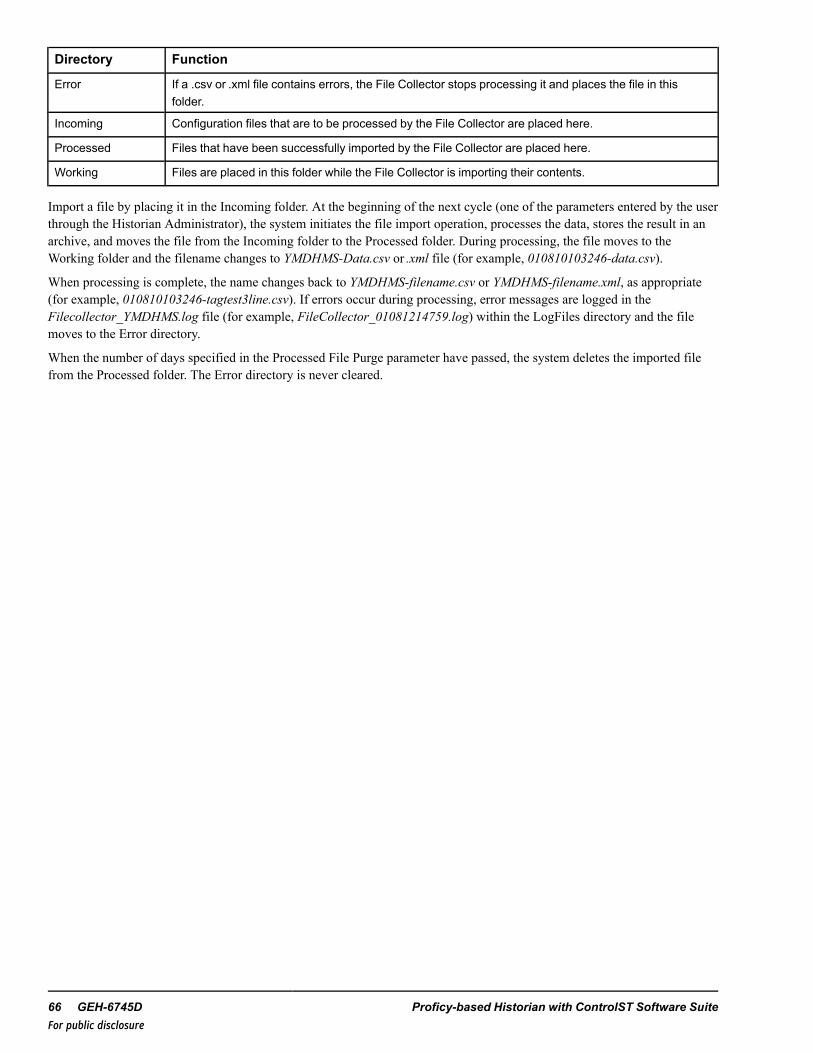
Directory Function
Error If a .csv or .xml file contains errors, the File Collector stops processing it and places the file in thisfolder.
Incoming Configuration files that are to be processed by the File Collector are placed here.
Processed Files that have been successfully imported by the File Collector are placed here.
Working Files are placed in this folder while the File Collector is importing their contents.
Import a file by placing it in the Incoming folder. At the beginning of the next cycle (one of the parameters entered by the userthrough the Historian Administrator), the system initiates the file import operation, processes the data, stores the result in anarchive, and moves the file from the Incoming folder to the Processed folder. During processing, the file moves to theWorking folder and the filename changes to YMDHMS-Data.csv or .xml file (for example, 010810103246-data.csv).
When processing is complete, the name changes back to YMDHMS-filename.csv or YMDHMS-filename.xml, as appropriate(for example, 010810103246-tagtest3line.csv). If errors occur during processing, error messages are logged in theFilecollector_YMDHMS.log file (for example, FileCollector_01081214759.log) within the LogFiles directory and the filemoves to the Error directory.
When the number of days specified in the Processed File Purge parameter have passed, the system deletes the imported filefrom the Processed folder. The Error directory is never cleared.
66 GEH-6745D Proficy-based Historian with ControlST Software SuiteFor public disclosure
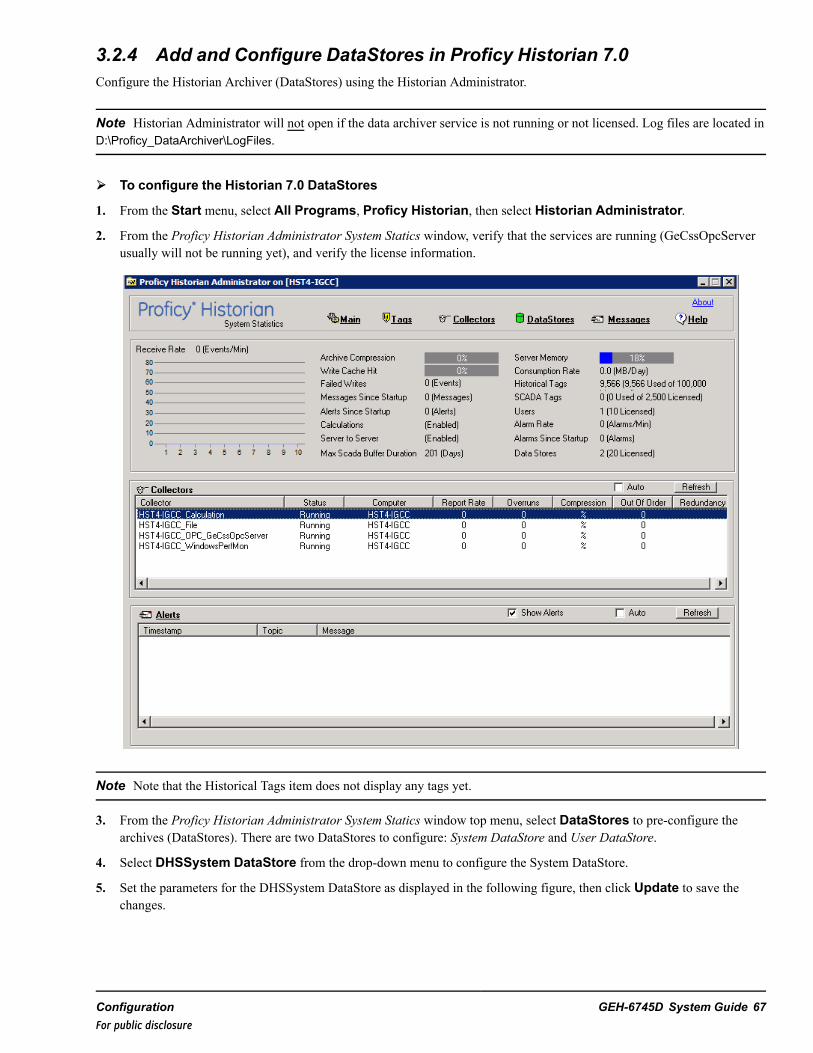
3.2.4 Add and Configure DataStores in Proficy Historian 7.0Configure the Historian Archiver (DataStores) using the Historian Administrator.
Note Historian Administrator will not open if the data archiver service is not running or not licensed. Log files are located inD:\Proficy_DataArchiver\LogFiles.
➢➢ To configure the Historian 7.0 DataStores
1. From the Start menu, select All Programs, Proficy Historian, then select Historian Administrator.
2. From the Proficy Historian Administrator System Statics window, verify that the services are running (GeCssOpcServerusually will not be running yet), and verify the license information.
Note Note that the Historical Tags item does not display any tags yet.
3. From the Proficy Historian Administrator System Statics window top menu, select DataStores to pre-configure thearchives (DataStores). There are two DataStores to configure: System DataStore and User DataStore.
4. Select DHSSystem DataStore from the drop-down menu to configure the System DataStore.
5. Set the parameters for the DHSSystem DataStore as displayed in the following figure, then click Update to save thechanges.
Configuration GEH-6745D System Guide 67For public disclosure
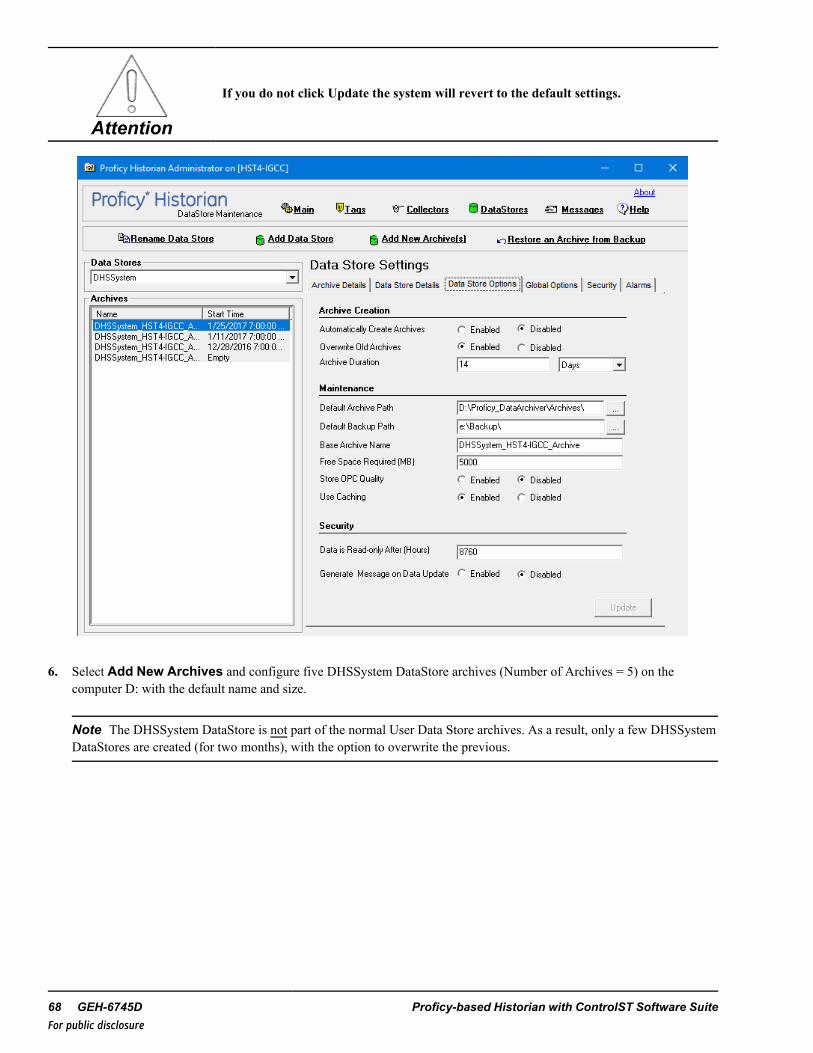
Attention
If you do not click Update the system will revert to the default settings.
6. Select Add New Archives and configure five DHSSystem DataStore archives (Number of Archives = 5) on thecomputer D: with the default name and size.
Note The DHSSystem DataStore is not part of the normal User Data Store archives. As a result, only a few DHSSystemDataStores are created (for two months), with the option to overwrite the previous.
68 GEH-6745D Proficy-based Historian with ControlST Software SuiteFor public disclosure
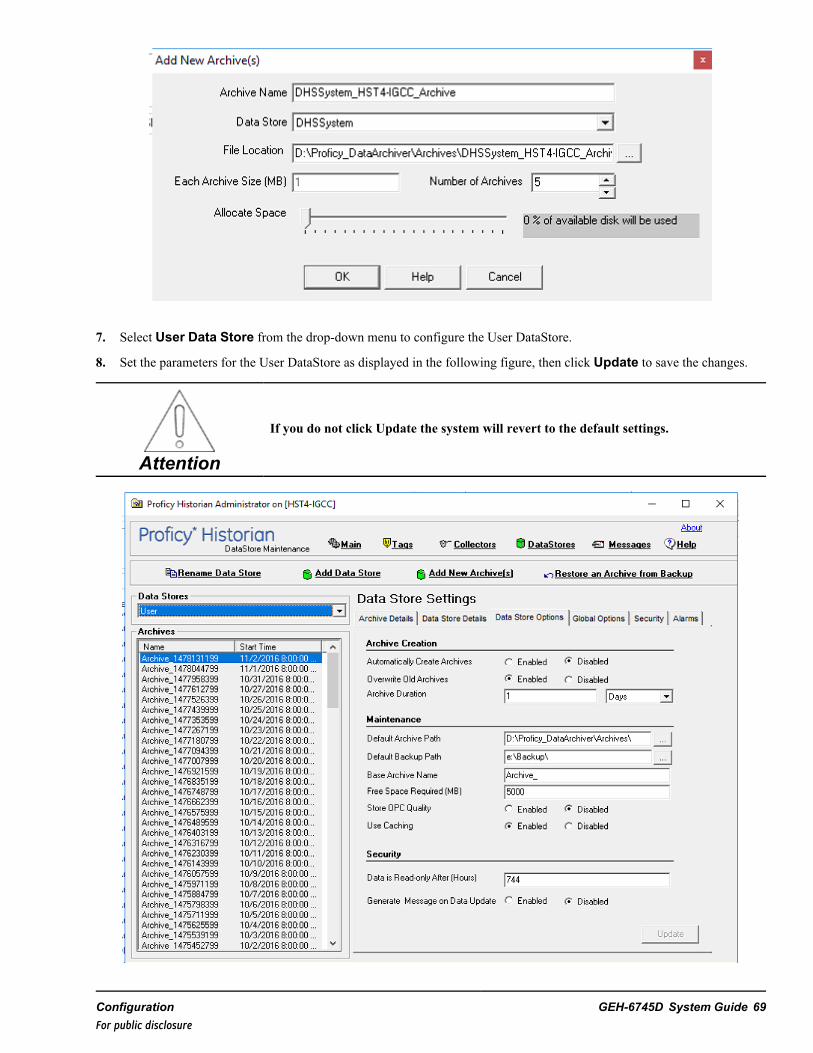
7. Select User Data Store from the drop-down menu to configure the User DataStore.
8. Set the parameters for the User DataStore as displayed in the following figure, then click Update to save the changes.
Attention
If you do not click Update the system will revert to the default settings.
Configuration GEH-6745D System Guide 69For public disclosure
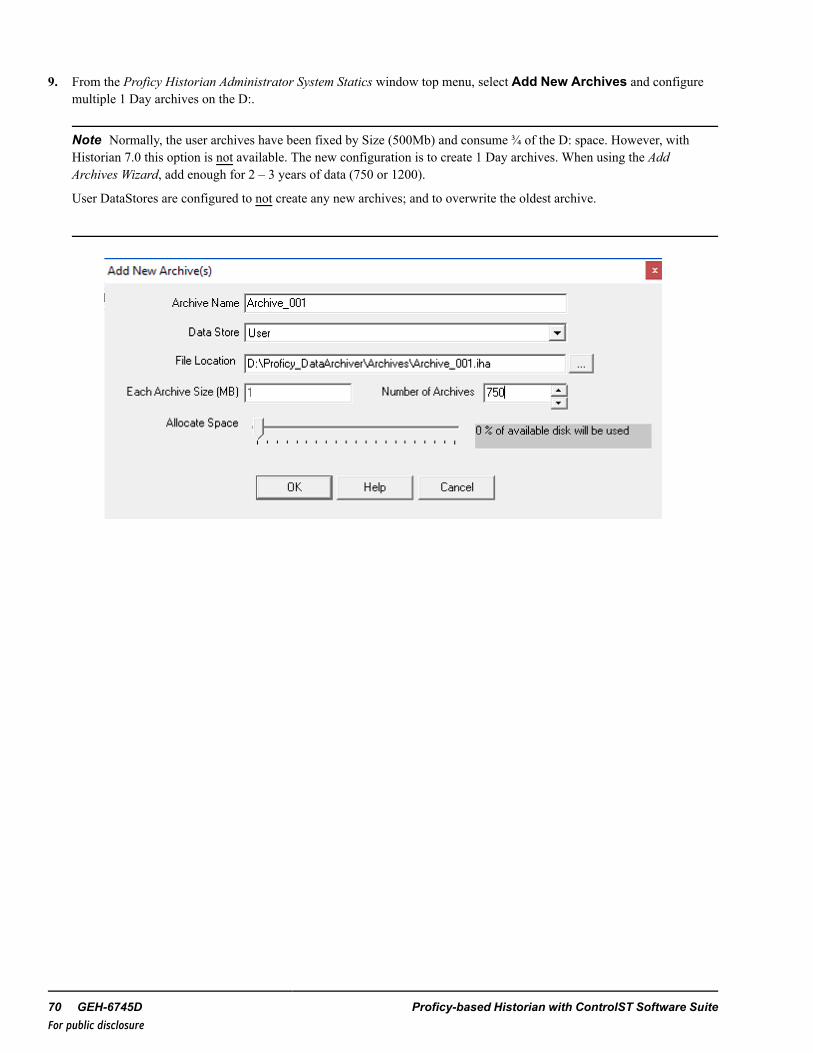
9. From the Proficy Historian Administrator System Statics window top menu, select Add New Archives and configuremultiple 1 Day archives on the D:.
Note Normally, the user archives have been fixed by Size (500Mb) and consume ¾ of the D: space. However, withHistorian 7.0 this option is not available. The new configuration is to create 1 Day archives. When using the AddArchives Wizard, add enough for 2 – 3 years of data (750 or 1200).
User DataStores are configured to not create any new archives; and to overwrite the oldest archive.
70 GEH-6745D Proficy-based Historian with ControlST Software SuiteFor public disclosure
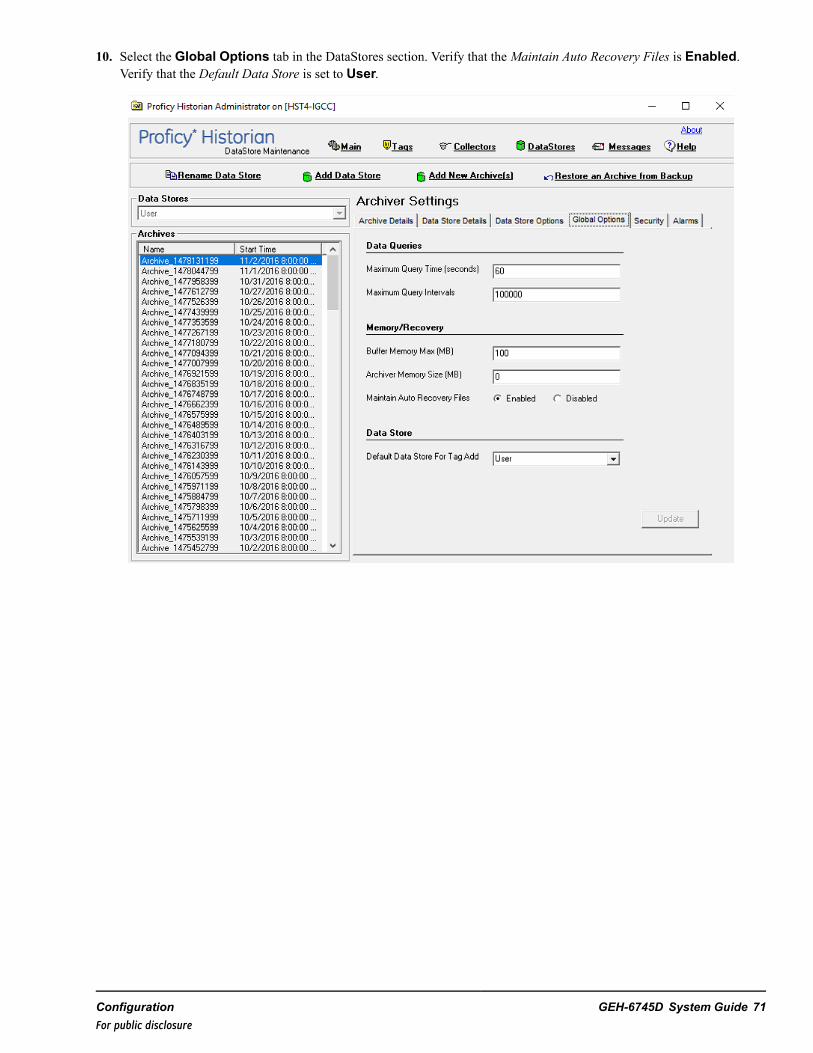
10. Select the Global Options tab in the DataStores section. Verify that the Maintain Auto Recovery Files is Enabled.Verify that the Default Data Store is set to User.
Configuration GEH-6745D System Guide 71For public disclosure

11. Select the Security tab to display Security Options.
12. Set both parameters Enforce Strict Client Authorization and Enforce Strict Collector Authentication to Disabled.
72 GEH-6745D Proficy-based Historian with ControlST Software SuiteFor public disclosure
➢➢ To configure Collectors
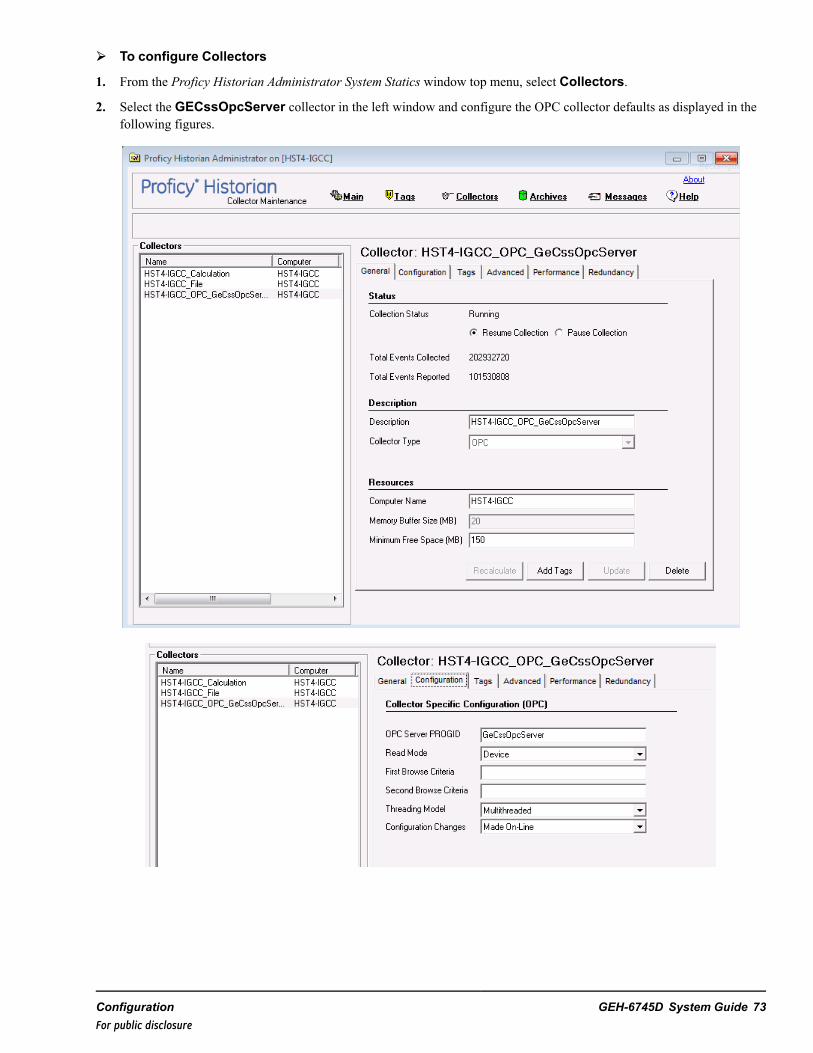
1. From the Proficy Historian Administrator System Statics window top menu, select Collectors.
2. Select the GECssOpcServer collector in the left window and configure the OPC collector defaults as displayed in thefollowing figures.
Configuration GEH-6745D System Guide 73For public disclosure
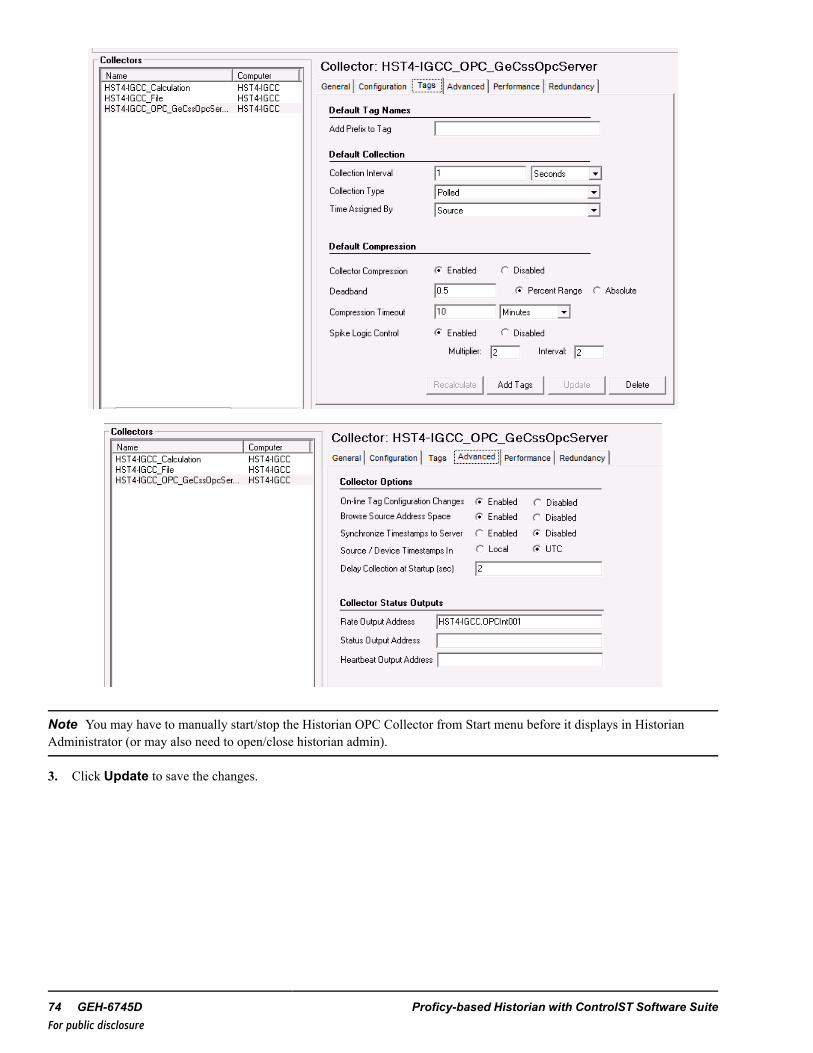
Note You may have to manually start/stop the Historian OPC Collector from Start menu before it displays in HistorianAdministrator (or may also need to open/close historian admin).
3. Click Update to save the changes.
74 GEH-6745D Proficy-based Historian with ControlST Software SuiteFor public disclosure

➢➢ To configure the OPC HDA Server
1. From the Proficy Historian Administrator System Statics window top menu, selectMain.
2. SelectMain again to display the Proficy Historian Administrator Login window.
3. Click the ellipsis button (…) next to the Server name.
4. Select the Is Default Server check box and click Set Selected Server as Target of HDA Server.
5. Click Update to save the changes.
6. Click OK to close the dialog box.
Configuration GEH-6745D System Guide 75For public disclosure
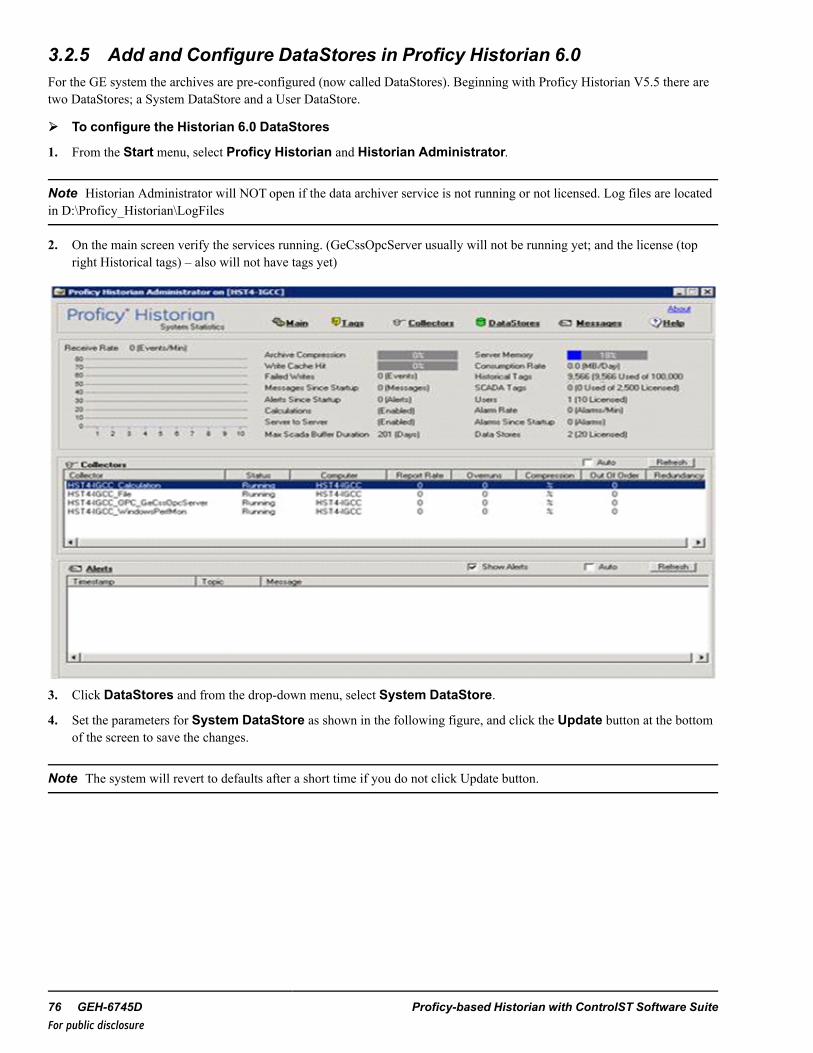
3.2.5 Add and Configure DataStores in Proficy Historian 6.0For the GE system the archives are pre-configured (now called DataStores). Beginning with Proficy Historian V5.5 there aretwo DataStores; a System DataStore and a User DataStore.
➢➢ To configure the Historian 6.0 DataStores
1. From the Start menu, select Proficy Historian and Historian Administrator.
Note Historian Administrator will NOT open if the data archiver service is not running or not licensed. Log files are locatedin D:\Proficy_Historian\LogFiles
2. On the main screen verify the services running. (GeCssOpcServer usually will not be running yet; and the license (topright Historical tags) – also will not have tags yet)
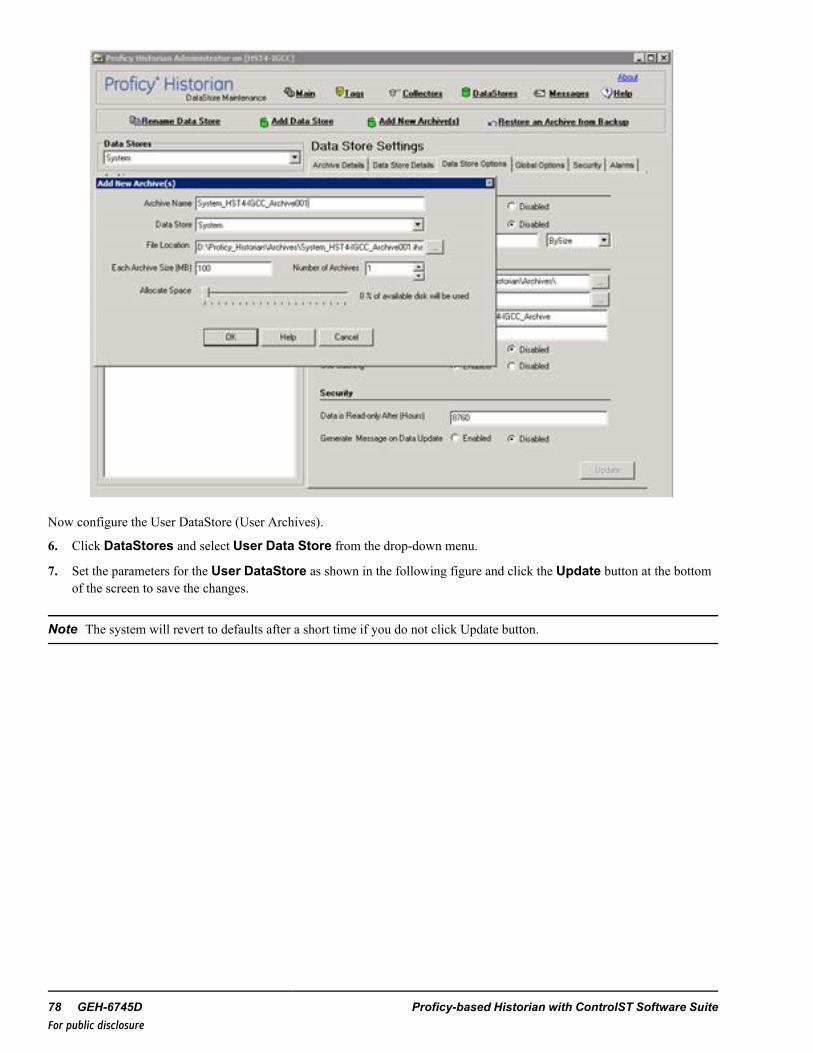
3. Click DataStores and from the drop-down menu, select System DataStore.
4. Set the parameters for System DataStore as shown in the following figure, and click the Update button at the bottomof the screen to save the changes.
Note The system will revert to defaults after a short time if you do not click Update button.
76 GEH-6745D Proficy-based Historian with ControlST Software SuiteFor public disclosure

5. Click Add New Archive(s) and configure only one (1) System DataStore archive on the D: Drive with the defaultname and size.
Note The System DataStore is NOT part of the normal User data archives. As a result, only one System DataStore iscreated, with the option to create new ones as needed.
Configuration GEH-6745D System Guide 77For public disclosure
Now configure the User DataStore (User Archives).
6. Click DataStores and select User Data Store from the drop-down menu.
7. Set the parameters for the User DataStore as shown in the following figure and click the Update button at the bottomof the screen to save the changes.
Note The system will revert to defaults after a short time if you do not click Update button.
78 GEH-6745D Proficy-based Historian with ControlST Software SuiteFor public disclosure
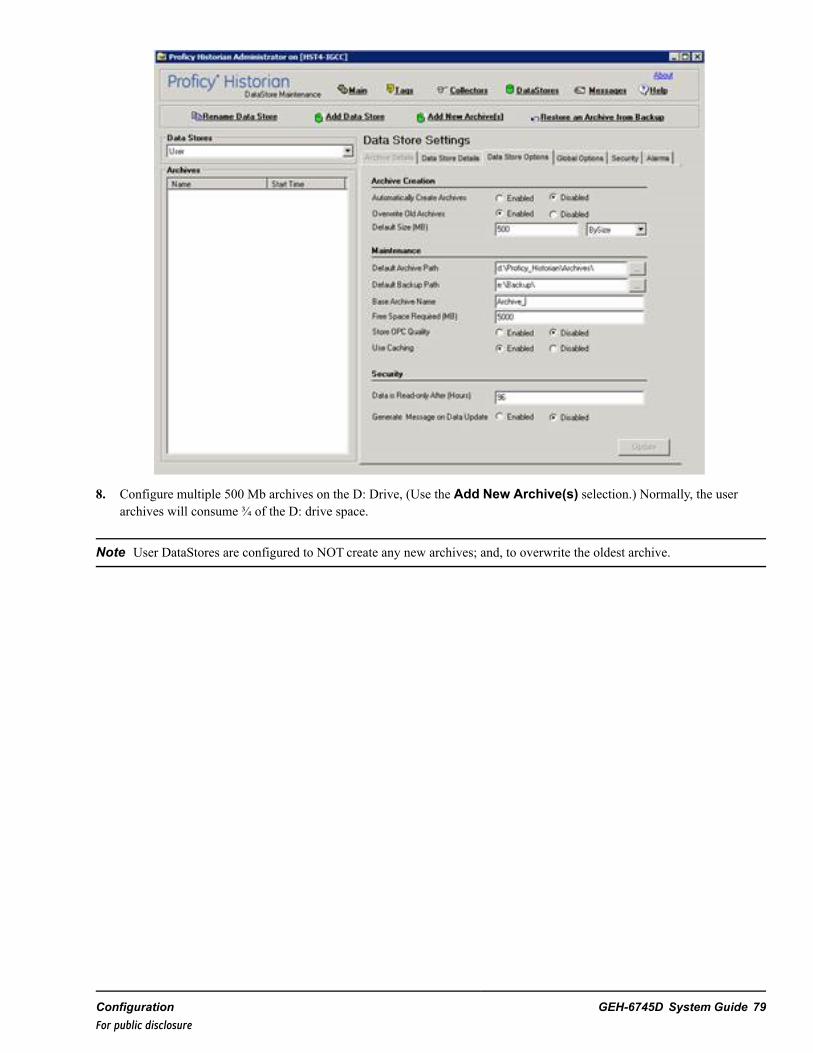
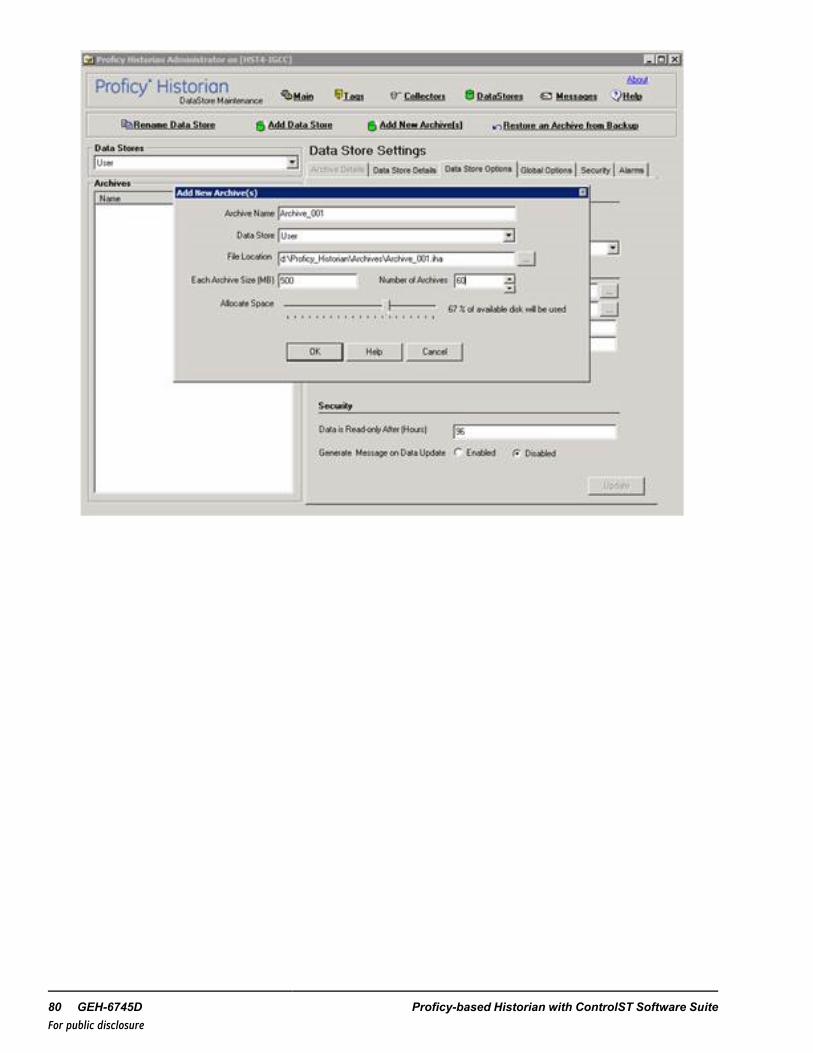
8. Configure multiple 500 Mb archives on the D: Drive, (Use the Add New Archive(s) selection.) Normally, the userarchives will consume ¾ of the D: drive space.
Note User DataStores are configured to NOT create any new archives; and, to overwrite the oldest archive.
Configuration GEH-6745D System Guide 79For public disclosure
80 GEH-6745D Proficy-based Historian with ControlST Software SuiteFor public disclosure
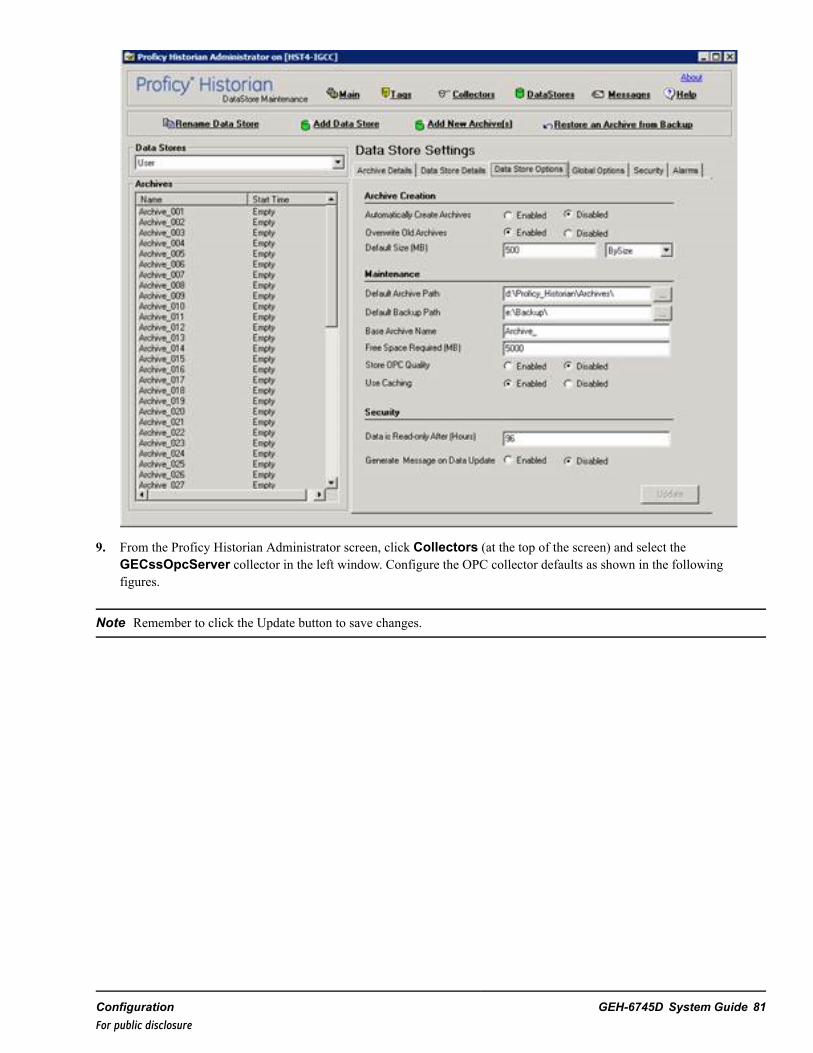
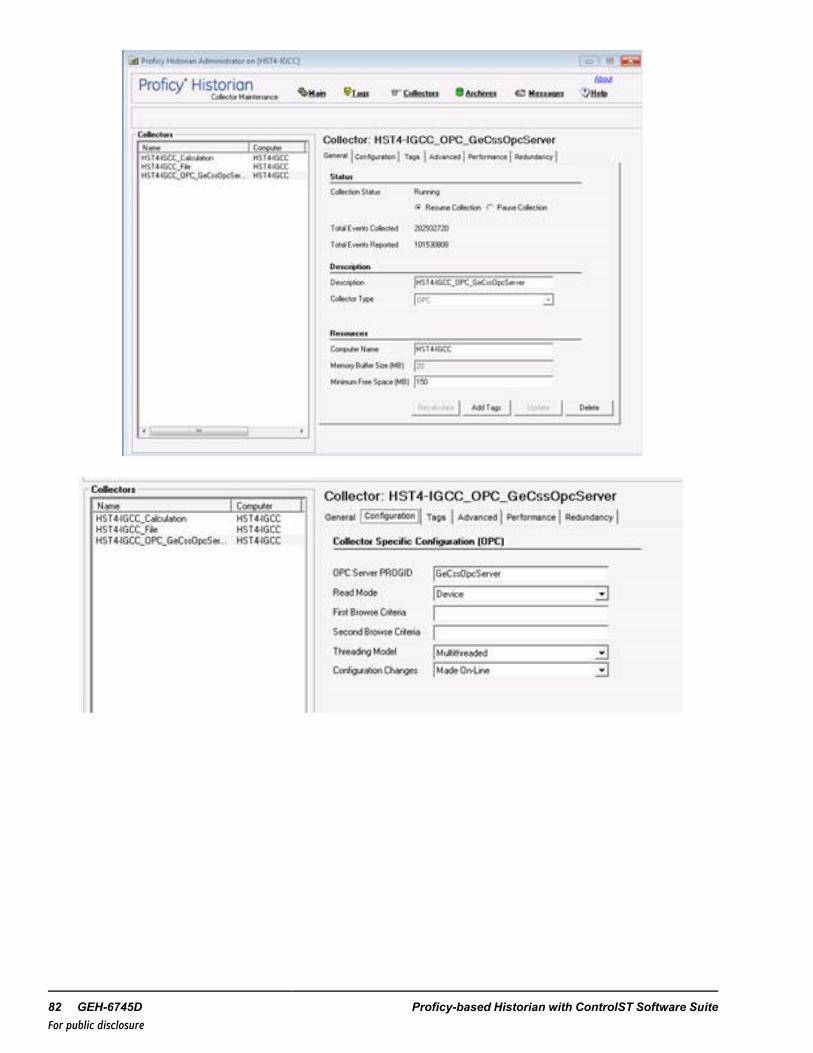
9. From the Proficy Historian Administrator screen, click Collectors (at the top of the screen) and select theGECssOpcServer collector in the left window. Configure the OPC collector defaults as shown in the followingfigures.
Note Remember to click the Update button to save changes.
Configuration GEH-6745D System Guide 81For public disclosure
82 GEH-6745D Proficy-based Historian with ControlST Software SuiteFor public disclosure

10. Enable Proficy Historian as an OPC HDA Server.
a. Click Main (at the top of the screen) to return to the main display and click Main again to display the login screen.
Configuration GEH-6745D System Guide 83For public disclosure
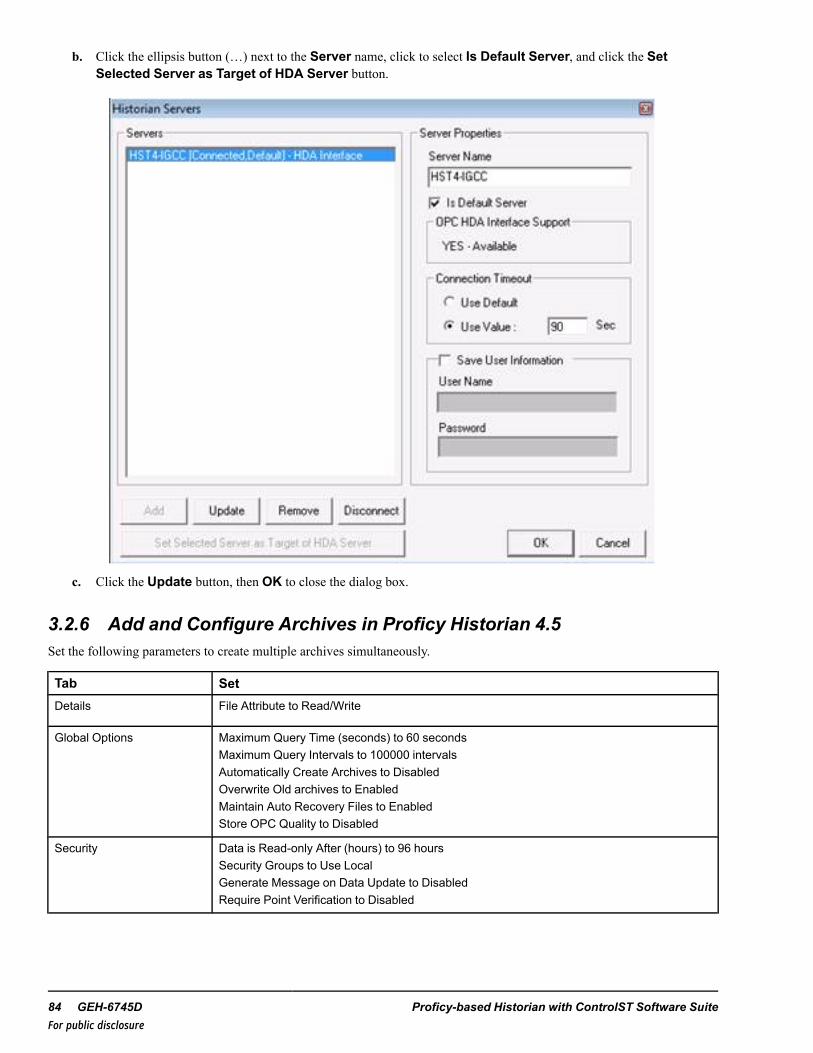
b. Click the ellipsis button (…) next to the Server name, click to select Is Default Server, and click the SetSelected Server as Target of HDA Server button.
c. Click the Update button, then OK to close the dialog box.
3.2.6 Add and Configure Archives in Proficy Historian 4.5Set the following parameters to create multiple archives simultaneously.
Tab SetDetails File Attribute to Read/Write
Global Options Maximum Query Time (seconds) to 60 secondsMaximum Query Intervals to 100000 intervalsAutomatically Create Archives to DisabledOverwrite Old archives to EnabledMaintain Auto Recovery Files to EnabledStore OPC Quality to Disabled
Security Data is Read-only After (hours) to 96 hoursSecurity Groups to Use LocalGenerate Message on Data Update to DisabledRequire Point Verification to Disabled
84 GEH-6745D Proficy-based Historian with ControlST Software SuiteFor public disclosure
Attention
Because the Allocate Space slider does not indicate available hard-drive space, verifythat enough space is available when creating multiple archives on a remote machine. Ifthere is not enough space, the following error message displays; Runtime error 330Invalid Property Value. Click OK, create more space, and restart the HistorianAdministrator.
• Default size to 500• Default Archive Path to D:\Proficy_Arch\• Default Backup Path to E:\Backup\• Base Archive Name to ARCHIVE
Configuration GEH-6745D System Guide 85For public disclosure
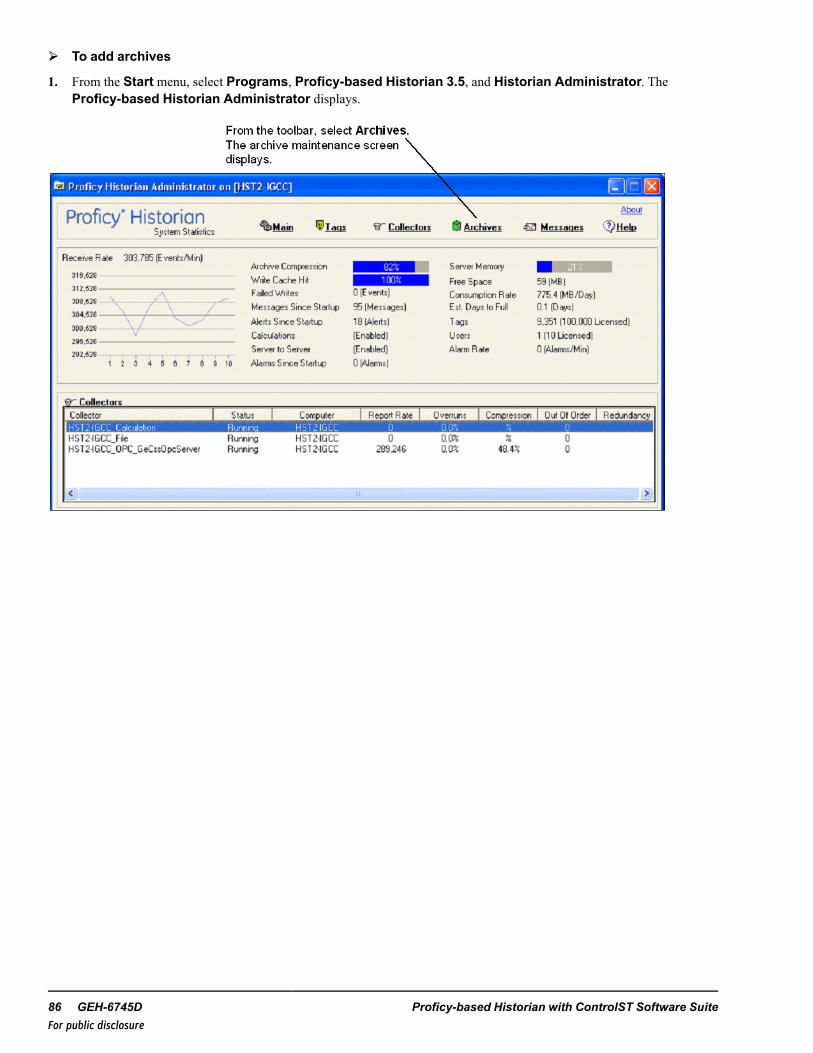
➢➢ To add archives
1. From the Start menu, select Programs, Proficy-based Historian 3.5, and Historian Administrator. TheProficy-based Historian Administrator displays.
86 GEH-6745D Proficy-based Historian with ControlST Software SuiteFor public disclosure

Note As an option, use the Allocate Space slider to set a local machine disk space and the number of archives to be createdbased on each archive size.
2. Click OK. A progress status bar displays.
3. Click Cancel to stop the operation. If you stop the operation in the middle of creating archives, the created archives aredeleted.
Note When the current archive is full, the system writes to the next archive in the sequence in which it was created.
Configuration GEH-6745D System Guide 87For public disclosure
3.2.7 Setting Archive Size
Note For each archive, you need approximately 1MB of archive space for every 1000 tags.
Archive files grow to a user-configured maximum size as data is recorded by the server. When an archive becomes full, thesystem can automatically open a new, empty archive file of the same user-specified size. If the automatic feature is notenabled, however, you must open a new archive manually.
Archive size is a function of the rate at which you archive data and the time period you want the archive to cover (forexample, 30 days). Factors that affect the rate at which you archive data are as follows:
• a large number of tags increases the data rate• high polling frequency increases the data rate• disabling compression or setting narrow deadband parameters increases the data rate• selecting data types that increase the number of bytes per value increases the data rate
The following is an example of manually calculating the required archive size using typical parameter values:
Assumptions
Number of tags: 5000
Polling rate: 1 value/5 seconds
Note Pass compression is the number of data values archived relative to the number of values read, expressed as percent.
% Pass compression: 5%
Bytes/value: 4
Duration: 30 days
88 GEH-6745D Proficy-based Historian with ControlST Software SuiteFor public disclosure
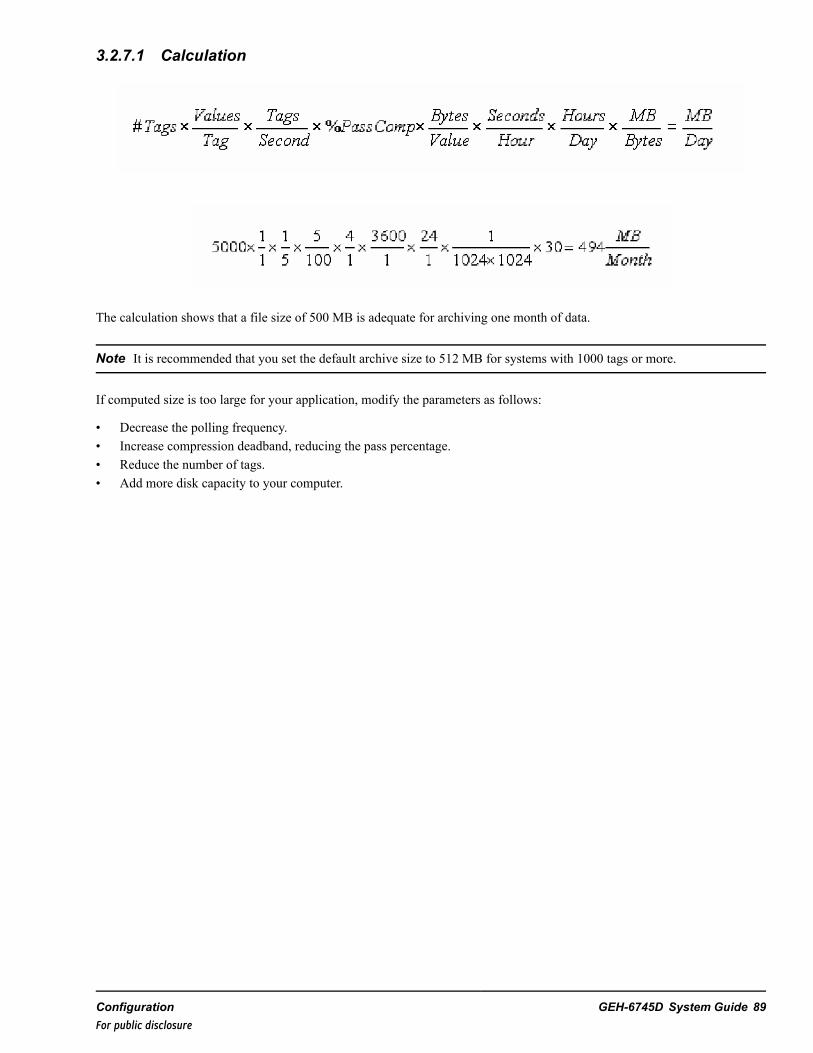
3.2.7.1 Calculation
The calculation shows that a file size of 500 MB is adequate for archiving one month of data.
Note It is recommended that you set the default archive size to 512 MB for systems with 1000 tags or more.
If computed size is too large for your application, modify the parameters as follows:
• Decrease the polling frequency.• Increase compression deadband, reducing the pass percentage.• Reduce the number of tags.• Add more disk capacity to your computer.
Configuration GEH-6745D System Guide 89For public disclosure
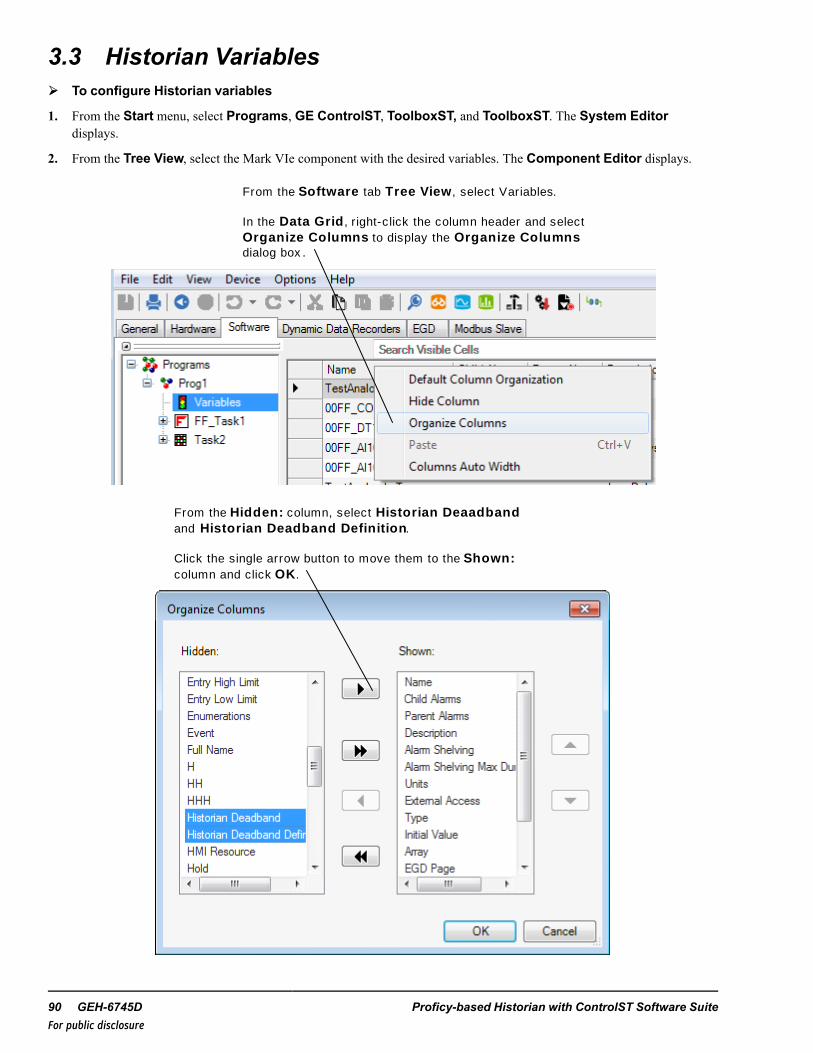
3.3 Historian Variables➢➢ To configure Historian variables
1. From the Start menu, select Programs, GE ControlST, ToolboxST, and ToolboxST. The System Editordisplays.
2. From the Tree View, select the Mark VIe component with the desired variables. The Component Editor displays.
From the So ftware tab Tree View , select Variables.
In the Data Gr id , right-click the column header and select Organ ize Co lumns to display the Organ ize Co lumnsdialog box .
From the Hidden : column, select His to r ian Deaadbandand His to r ian Deadband Def in it ion.
Click the single arrow button to move them to the Shown : column and click OK .
90 GEH-6745D Proficy-based Historian with ControlST Software SuiteFor public disclosure
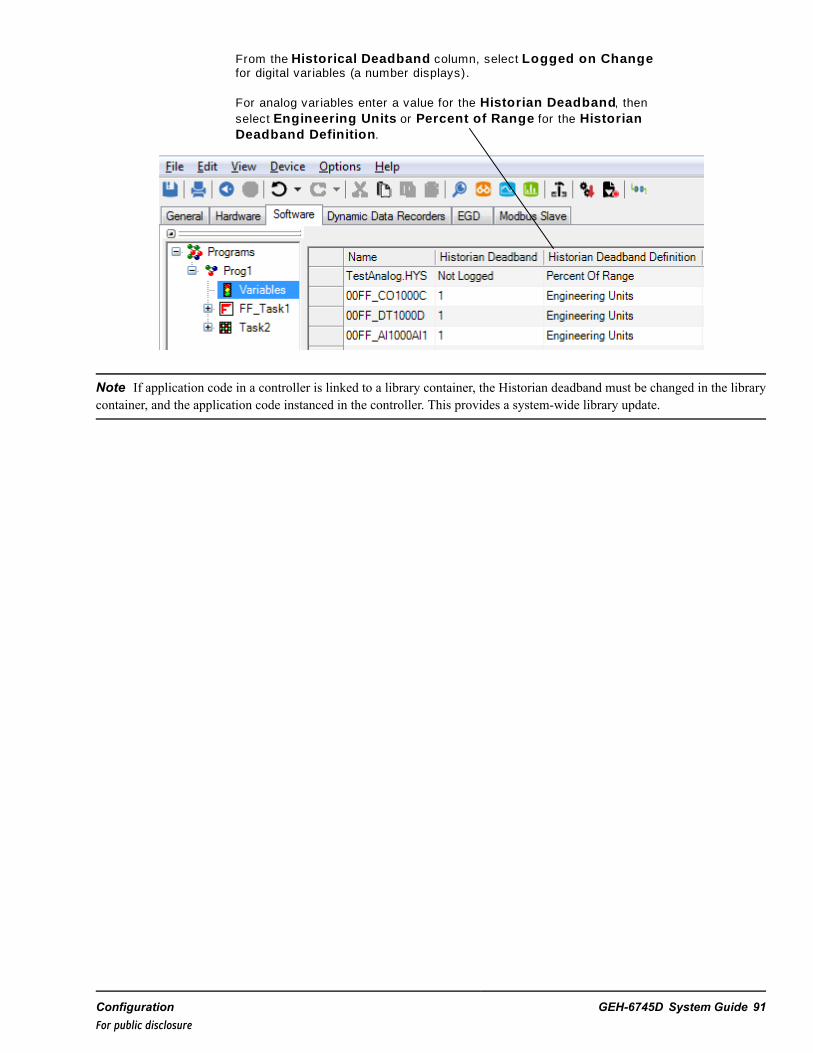
From the Histo r ical Deadband column, select Lo gged on Chang efor digital variables (a number displays).
For analog variables enter a value for the His to r ian Deadband, then select Eng ineer ing Un its or Percen t o f Range for the His to r ian Deadband Def in i t ion.
Note If application code in a controller is linked to a library container, the Historian deadband must be changed in the librarycontainer, and the application code instanced in the controller. This provides a system-wide library update.
Configuration GEH-6745D System Guide 91For public disclosure
3.4 WorkstationST HistorianThe WorkstationST Historian is a feature of the WorkstationST application that allows you to configure supported third-partyHistorians to collect long-term data from the system components. The third-party Historian’s OPC® client is configured toread the data from the WorkstationST OPC Data Access (DA) server. The collected data is accessible through the ToolboxSTTrender as well as the third-party Historian’s data access applications. The WorkstationST Historian supports the GE’sAutomation & Controls Proficy-based Historian and the OSIsoft PI System* products. This feature allows you to:
• Configure storage of all data available through the WorkstationST OPC DA server• Automatically configure variables with a defined Historian Deadband• Override pre-configured variables• Add non-configured variables• Configure Historian reports• Configure Archive Backup Management
3.4.1 Configuring Historian
Note Refer to the ToolboxST User Guide for Mark* Controls Platform (GEH-6700), the chapters System Configuration andWorkstationST Component Editor for information on creating and editing components.
AWorkstationST component is required for the computer that has the third-party Historian software installed. TheWorkstationST Historian is configured through the Historian tab on the WorkstationST component. Variables that have aHistorian Deadband and valid EGD page defined are automatically configured for data collection for each consumed device.For Mark Vand local WorkstationST variables, only the Historian Deadband must be defined. Refer to the ToolboxST UserGuide for Mark Controls Platform (GEH-6700), the chapterMark VIe Component Editor for information on configuringvariables.
Note At least one WorkstationST component must be configured as the EGD Config Server for the system.
92 GEH-6745D Proficy-based Historian with ControlST Software SuiteFor public disclosure
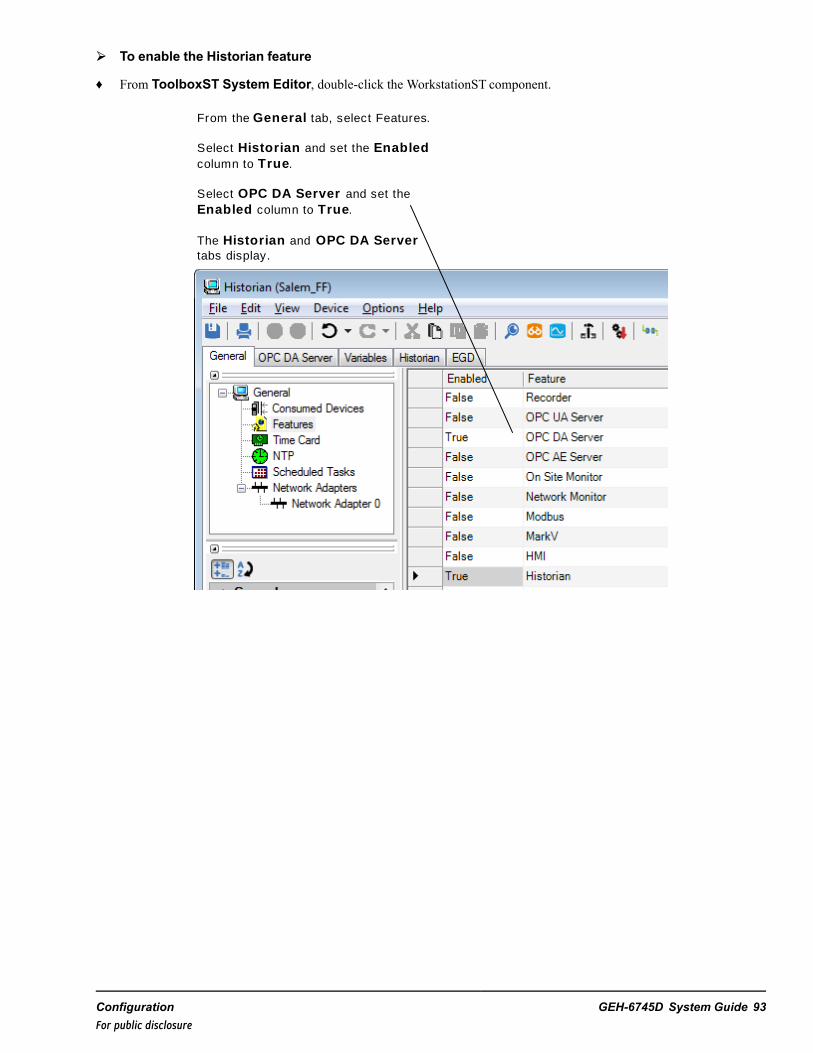
➢➢ To enable the Historian feature
♦ From ToolboxST System Editor, double-click the WorkstationST component.
From the General tab, select Features.
Select His to r ian and set the Enab led column to True.
Select OPC DA Server and set the Enab led column to True.
The His to r ian and OPC DA Servertabs display.
Configuration GEH-6745D System Guide 93For public disclosure
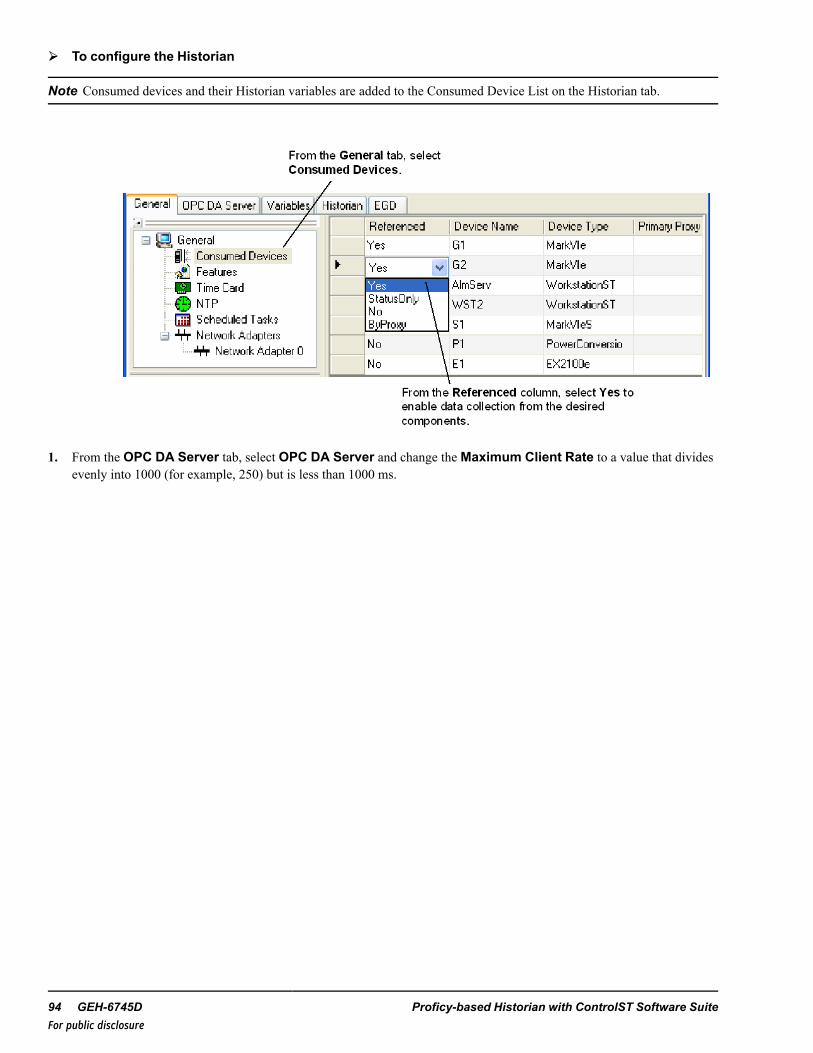
➢➢ To configure the Historian
Note Consumed devices and their Historian variables are added to the Consumed Device List on the Historian tab.
1. From the OPC DA Server tab, select OPC DA Server and change theMaximum Client Rate to a value that dividesevenly into 1000 (for example, 250) but is less than 1000 ms.
94 GEH-6745D Proficy-based Historian with ControlST Software SuiteFor public disclosure
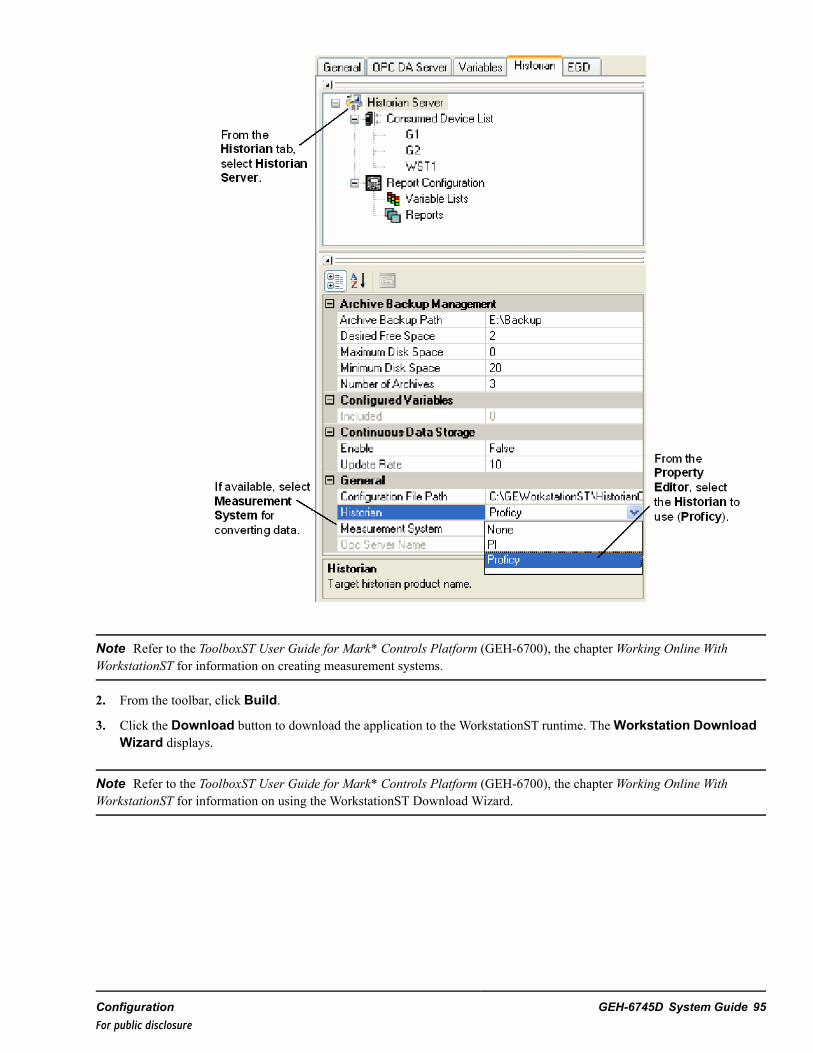
Note Refer to the ToolboxST User Guide for Mark* Controls Platform (GEH-6700), the chapterWorking Online WithWorkstationST for information on creating measurement systems.
2. From the toolbar, click Build.
3. Click the Download button to download the application to the WorkstationST runtime. TheWorkstation DownloadWizard displays.
Note Refer to the ToolboxST User Guide for Mark* Controls Platform (GEH-6700), the chapterWorking Online WithWorkstationST for information on using the WorkstationST Download Wizard.
Configuration GEH-6745D System Guide 95For public disclosure
Downloading the workstation configures the third-party Historian and restarts data collection using the new configuration.Data configured for a collection can be viewed by selecting a component from the Consumed Device list in the Historian tabTree View.
Note Data configured for a collection can be viewed by selecting a component from the Consumed Device list in theHistorian tab Tree View.
Once the Historian is downloaded, further downloads are only required if configuration changes are made on the HistorianWorkstation (for example, add a variable for collection on the Historian tab, modify a parameter on the OPC DA Server tab,or add a new Feature such as Alarm Server). When a variable in a ToolboxST component that the Historian consumes has itsHistorian Deadband defined and the component is saved (the component does not need to be downloaded), the HistorianFeature in WorkstationST runtime is notified of the change. The variable is configured in the third-party Historian, and datacollection is enabled.
3.4.2 Configuring Variables for Data CollectionAvariable is configured for collection if its Historian Deadband property is defined and its EGD Page property is assigned.For Boolean variables, the deadband property must be changed from Not Logged to Logged on Change. When the data valuefor a Boolean variable changes, the data value is stored by the Historian. For variables with numeric data types, the deadbandproperty must be changed from Not Logged to a non-negative number. When the data value for a numeric data type variablechanges by the defined Historian deadband, the value is written to the Historian. The Historian’s archive algorithm determineswhen a value is stored.
If a variable’s Format Specification property is defined, the Format Specification Engineering Min and Engineering Max areused to configure the Historian’s display and engineering limits, and are used when converting data from one measurementsystem to another. The Format Specification Units and Precision properties are used to configure the Historian’s engineeringunits and precision properties.
Note Defining the variable’s Display Low Limit, Display High Limit, Units, and/or Precision overrides the FormatSpecification Engineering Min, Engineering Max, Units, and Precision properties at configuration time.
96 GEH-6745D Proficy-based Historian with ControlST Software SuiteFor public disclosure
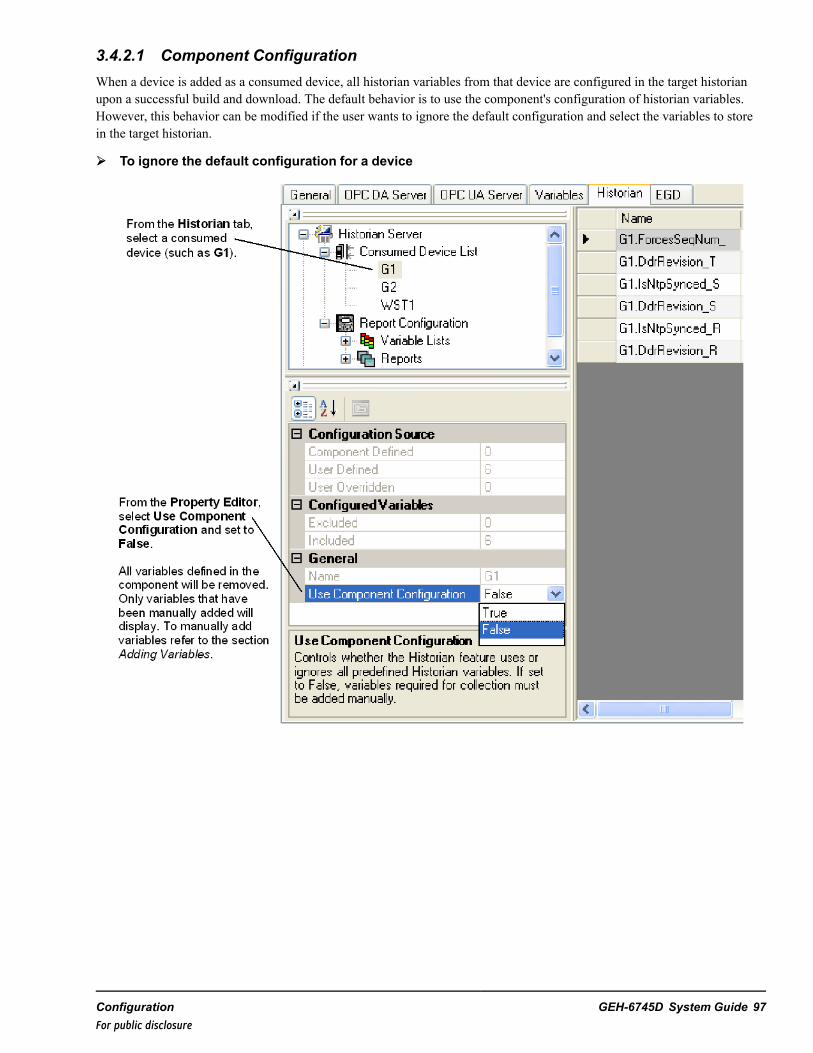
3.4.2.1 Component ConfigurationWhen a device is added as a consumed device, all historian variables from that device are configured in the target historianupon a successful build and download. The default behavior is to use the component's configuration of historian variables.However, this behavior can be modified if the user wants to ignore the default configuration and select the variables to storein the target historian.
➢➢ To ignore the default configuration for a device
Configuration GEH-6745D System Guide 97For public disclosure
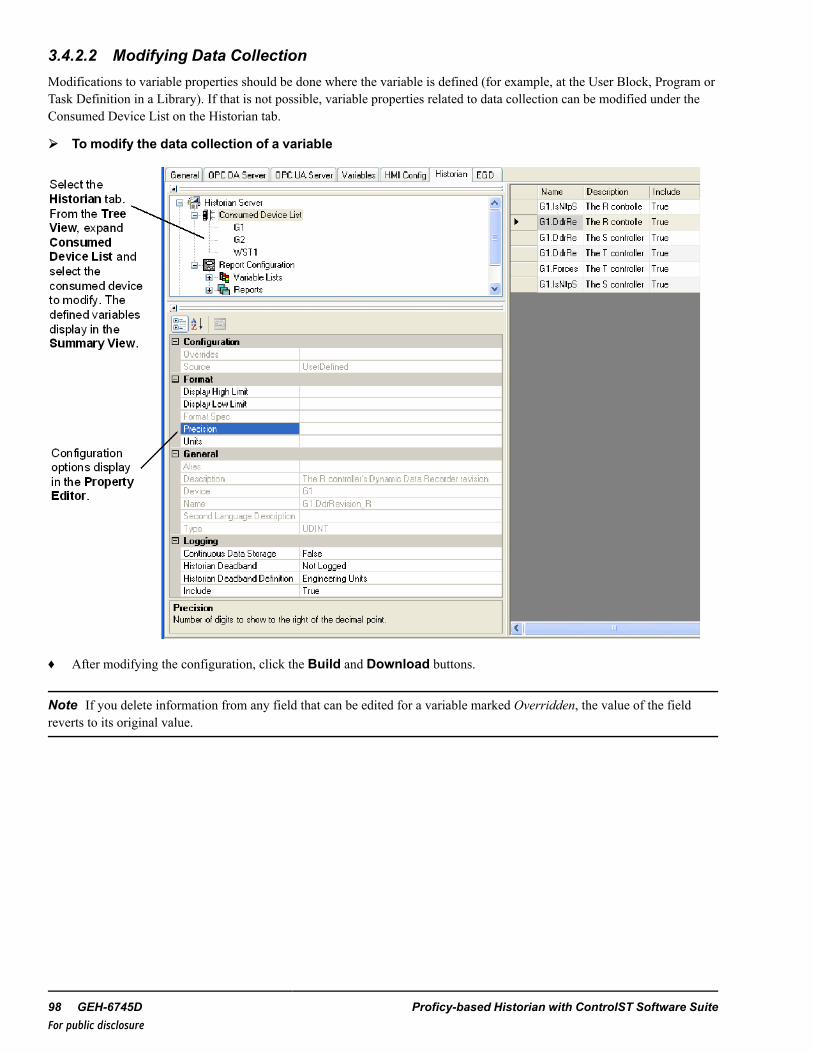
3.4.2.2 Modifying Data CollectionModifications to variable properties should be done where the variable is defined (for example, at the User Block, Program orTask Definition in a Library). If that is not possible, variable properties related to data collection can be modified under theConsumed Device List on the Historian tab.
➢➢ To modify the data collection of a variable
♦ After modifying the configuration, click the Build and Download buttons.
Note If you delete information from any field that can be edited for a variable marked Overridden, the value of the fieldreverts to its original value.
98 GEH-6745D Proficy-based Historian with ControlST Software SuiteFor public disclosure
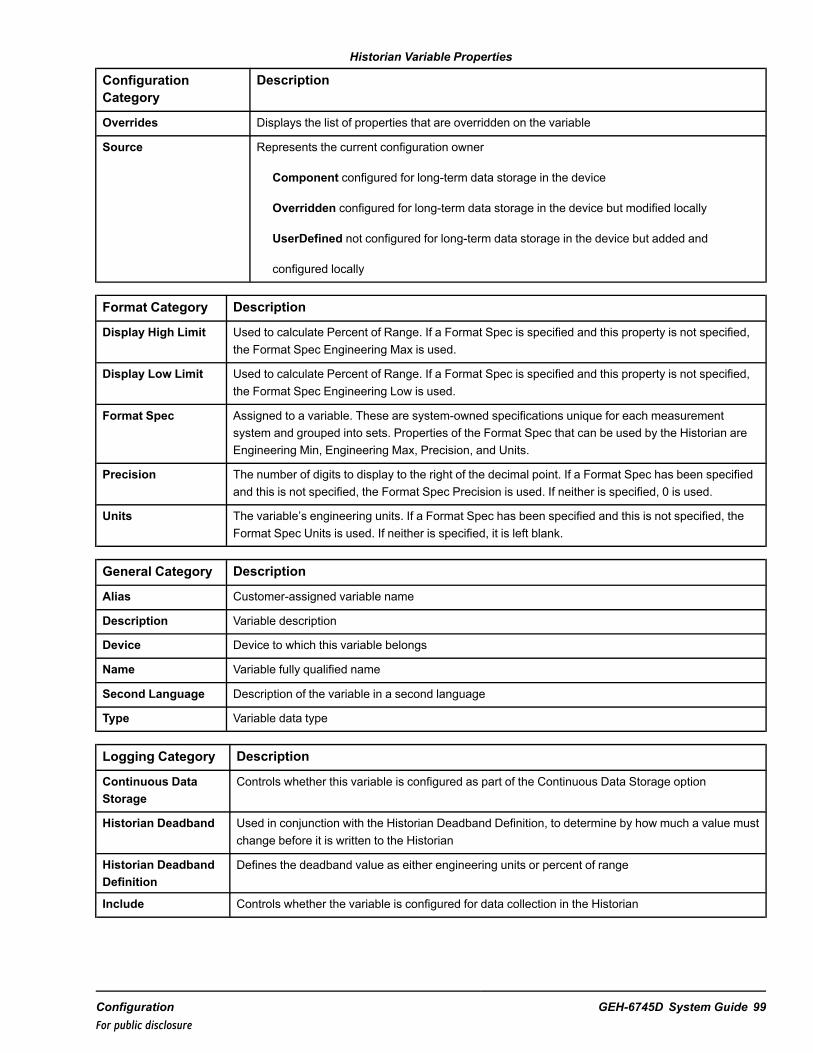
Historian Variable Properties
ConfigurationCategory
Description
Overrides Displays the list of properties that are overridden on the variable
Source Represents the current configuration owner
Component configured for long-term data storage in the device
Overridden configured for long-term data storage in the device but modified locally
UserDefined not configured for long-term data storage in the device but added and
configured locally
Format Category Description
Display High Limit Used to calculate Percent of Range. If a Format Spec is specified and this property is not specified,the Format Spec Engineering Max is used.
Display Low Limit Used to calculate Percent of Range. If a Format Spec is specified and this property is not specified,the Format Spec Engineering Low is used.
Format Spec Assigned to a variable. These are system-owned specifications unique for each measurementsystem and grouped into sets. Properties of the Format Spec that can be used by the Historian areEngineering Min, Engineering Max, Precision, and Units.
Precision The number of digits to display to the right of the decimal point. If a Format Spec has been specifiedand this is not specified, the Format Spec Precision is used. If neither is specified, 0 is used.
Units The variable’s engineering units. If a Format Spec has been specified and this is not specified, theFormat Spec Units is used. If neither is specified, it is left blank.
General Category Description
Alias Customer-assigned variable name
Description Variable description
Device Device to which this variable belongs
Name Variable fully qualified name
Second Language Description of the variable in a second language
Type Variable data type
Logging Category Description
Continuous DataStorage
Controls whether this variable is configured as part of the Continuous Data Storage option
Historian Deadband Used in conjunction with the Historian Deadband Definition, to determine by how much a value mustchange before it is written to the Historian
Historian DeadbandDefinition
Defines the deadband value as either engineering units or percent of range
Include Controls whether the variable is configured for data collection in the Historian
Configuration GEH-6745D System Guide 99For public disclosure

3.4.2.3 Adding Variables
➢➢ To add a variable(s) not configured for a Consumed Device
1. From the Historian tab, right-click the Consumed Device List or on a consumed device and select Add Variable todisplay the Select a Variable dialog box.
2. Select the variable(s) and click OK to return to theWorkstationST Component Editor. The variable(s) is added tothe Summary View.
3. From the Property Editor, select Historian Deadband and enter the appropriate value for the variable.
Note If the Historian Deadband Definition is set to Percent of Range, either the Format Specification or the Display LowLimit and Display High Limit must be defined.
4. Override or define the Units, Precision, and Display Low/High Limits properties if the variable does not have aformat specification defined.
5. After adding or modifying the variables, click the Build and Download buttons.
100 GEH-6745D Proficy-based Historian with ControlST Software SuiteFor public disclosure
3.4.2.4 Deleting User-defined Variables
Note Only a user-defined variable can be deleted from the Summary View of the WorkstationST Historian tab. It is removedfrom the configuration, and after the next Build and Download, the data for the variable is no longer stored. However,deleting the variable from the Historian tab does not delete it in the Historian System, so previously stored data for thevariable remains.
➢➢ To delete a user-defined variable
1. From theWorkstationST Component Editor, select the Historian tab.
2. From the Summary View, right-click the user-defined variable you want to delete and select Delete Selected Row(s).
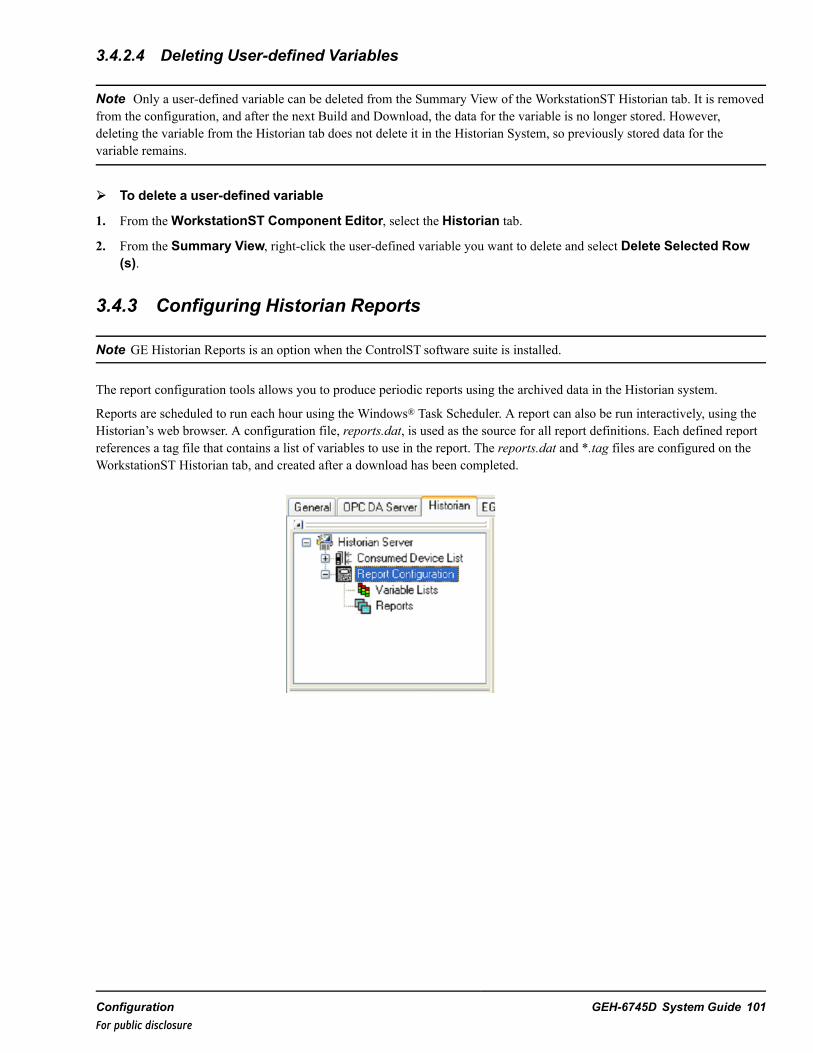
3.4.3 Configuring Historian Reports
Note GE Historian Reports is an option when the ControlST software suite is installed.
The report configuration tools allows you to produce periodic reports using the archived data in the Historian system.
Reports are scheduled to run each hour using the Windows® Task Scheduler. A report can also be run interactively, using theHistorian’s web browser. A configuration file, reports.dat, is used as the source for all report definitions. Each defined reportreferences a tag file that contains a list of variables to use in the report. The reports.dat and *.tag files are configured on theWorkstationST Historian tab, and created after a download has been completed.
Configuration GEH-6745D System Guide 101For public disclosure
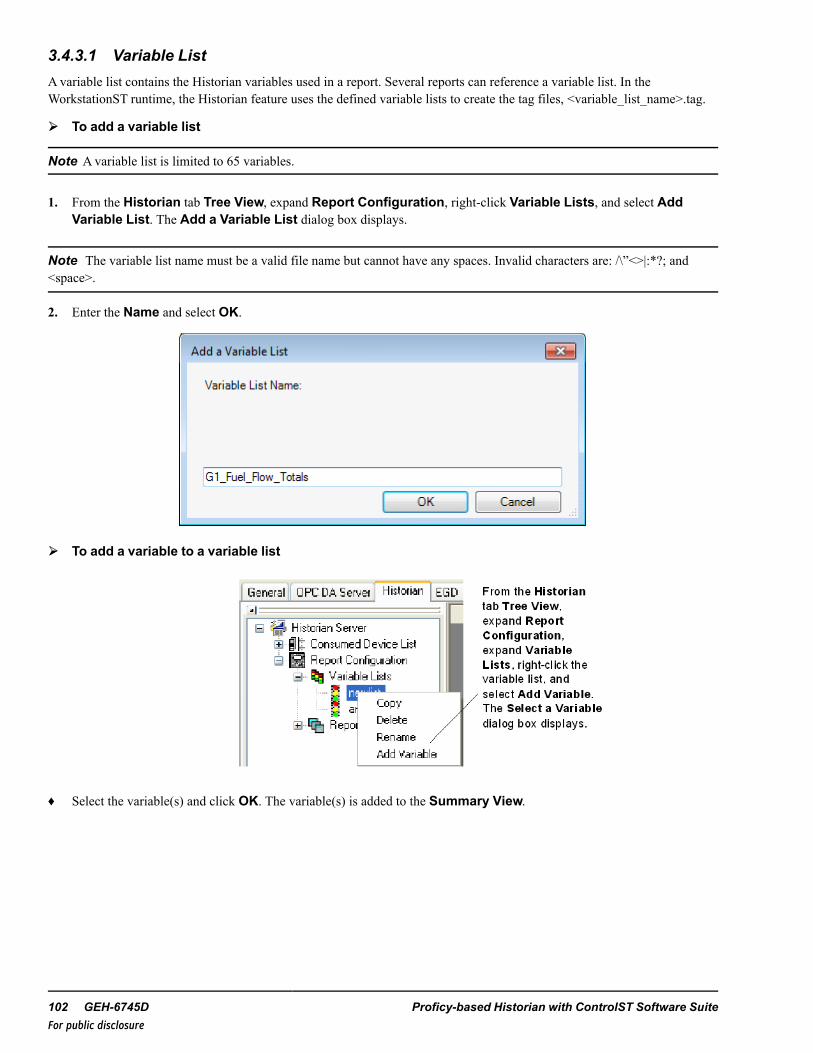
3.4.3.1 Variable ListAvariable list contains the Historian variables used in a report. Several reports can reference a variable list. In theWorkstationST runtime, the Historian feature uses the defined variable lists to create the tag files, <variable_list_name>.tag.
➢➢ To add a variable list
Note Avariable list is limited to 65 variables.
1. From the Historian tab Tree View, expand Report Configuration, right-click Variable Lists, and select AddVariable List. The Add a Variable List dialog box displays.
Note The variable list name must be a valid file name but cannot have any spaces. Invalid characters are: /\”<>|:*?; and<space>.
2. Enter the Name and select OK.
➢➢ To add a variable to a variable list
♦ Select the variable(s) and click OK. The variable(s) is added to the Summary View.
102 GEH-6745D Proficy-based Historian with ControlST Software SuiteFor public disclosure
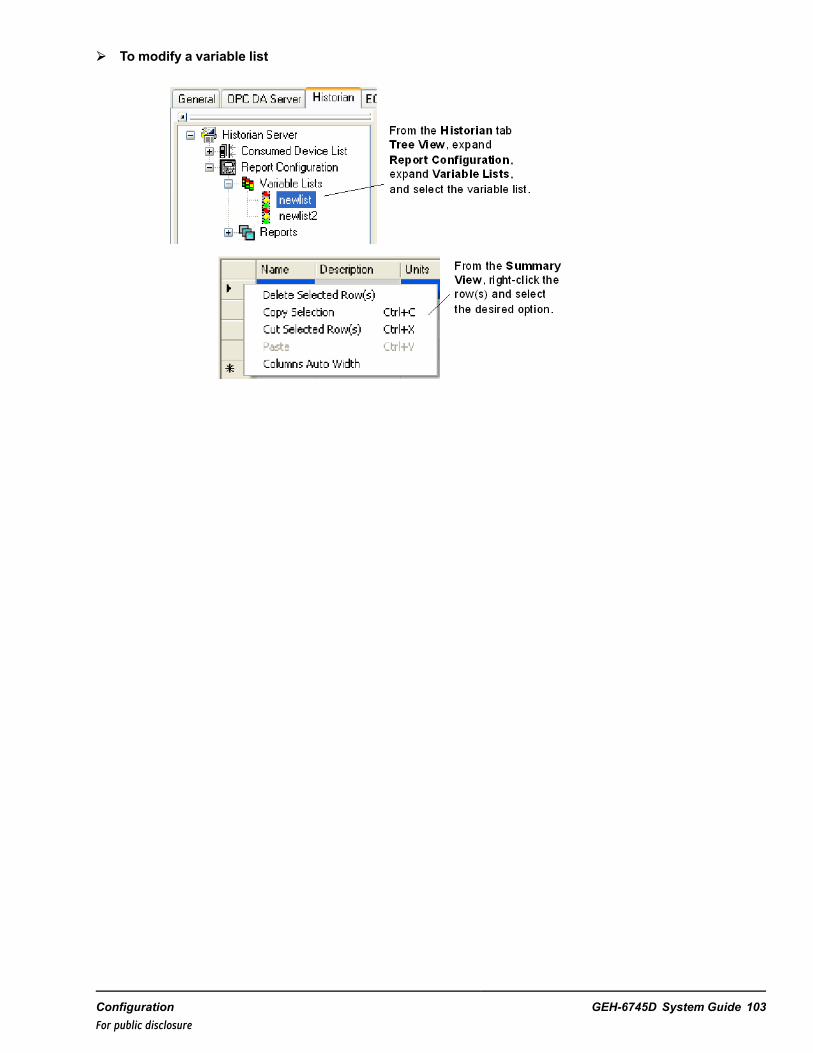
➢➢ To modify a variable list
Configuration GEH-6745D System Guide 103For public disclosure
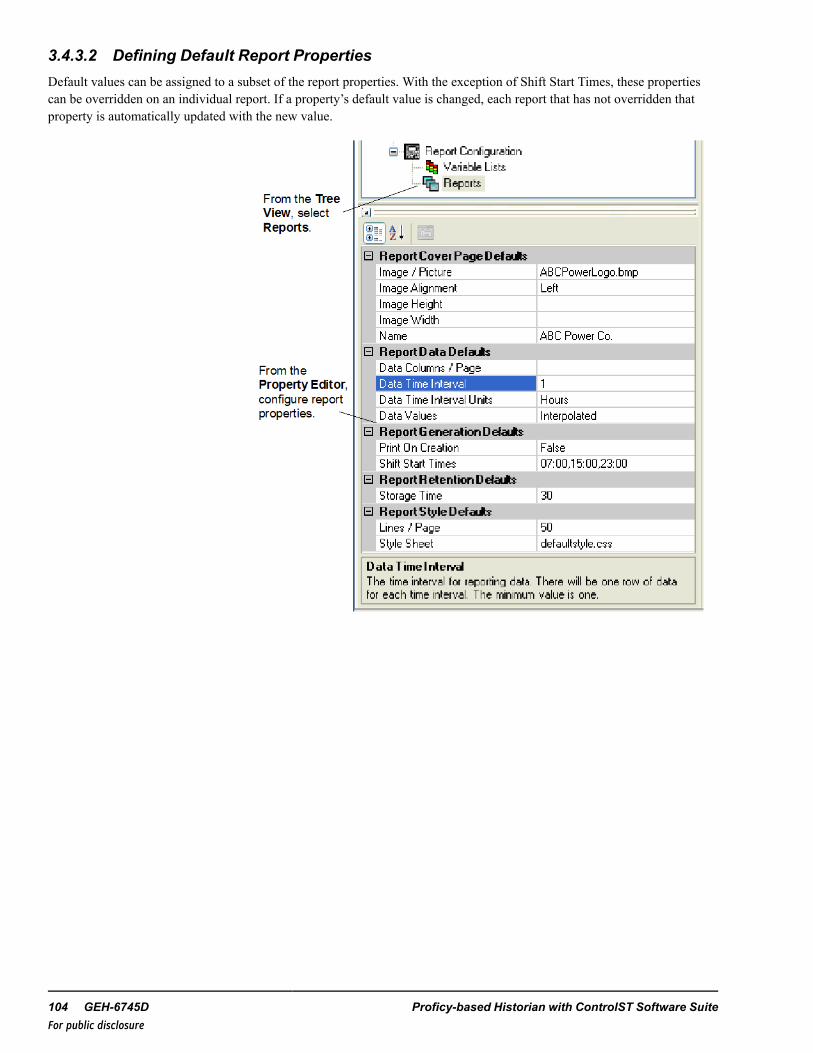
3.4.3.2 Defining Default Report PropertiesDefault values can be assigned to a subset of the report properties. With the exception of Shift Start Times, these propertiescan be overridden on an individual report. If a property’s default value is changed, each report that has not overridden thatproperty is automatically updated with the new value.
104 GEH-6745D Proficy-based Historian with ControlST Software SuiteFor public disclosure
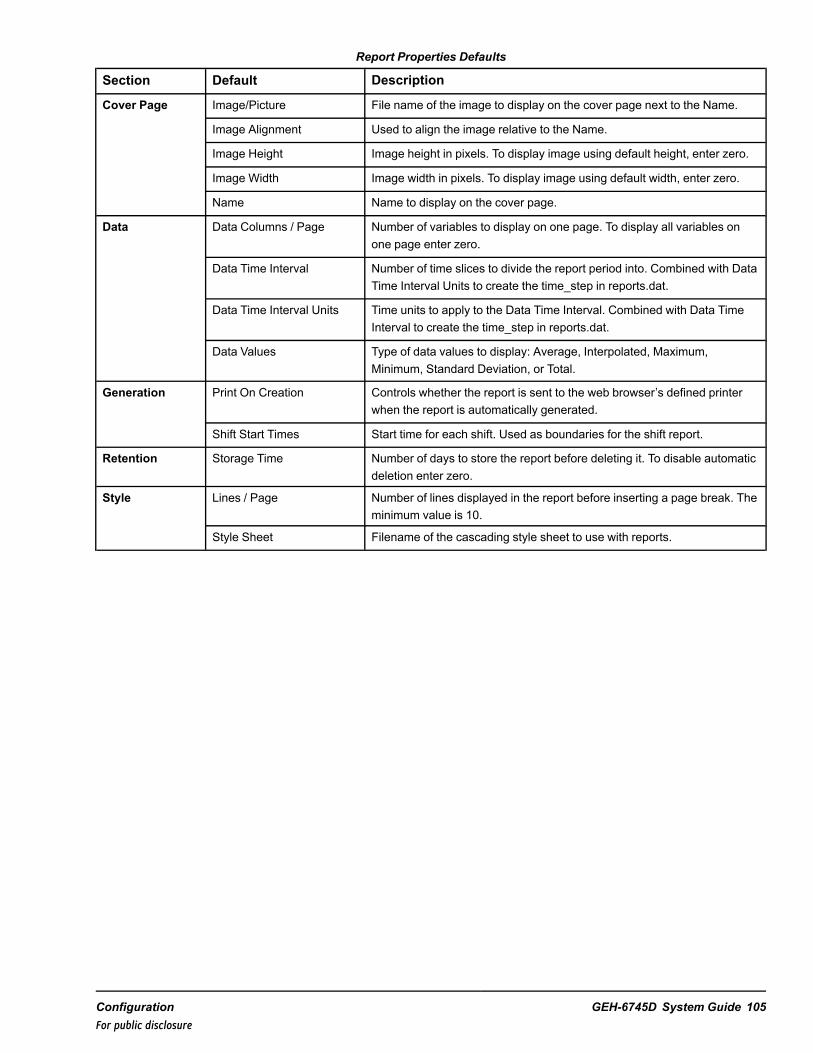
Report Properties Defaults
Section Default Description
Cover Page Image/Picture File name of the image to display on the cover page next to the Name.
Image Alignment Used to align the image relative to the Name.
Image Height Image height in pixels. To display image using default height, enter zero.
Image Width Image width in pixels. To display image using default width, enter zero.
Name Name to display on the cover page.
Data Data Columns / Page Number of variables to display on one page. To display all variables onone page enter zero.
Data Time Interval Number of time slices to divide the report period into. Combined with DataTime Interval Units to create the time_step in reports.dat.
Data Time Interval Units Time units to apply to the Data Time Interval. Combined with Data TimeInterval to create the time_step in reports.dat.
Data Values Type of data values to display: Average, Interpolated, Maximum,Minimum, Standard Deviation, or Total.
Generation Print On Creation Controls whether the report is sent to the web browser’s defined printerwhen the report is automatically generated.
Shift Start Times Start time for each shift. Used as boundaries for the shift report.
Retention Storage Time Number of days to store the report before deleting it. To disable automaticdeletion enter zero.
Style Lines / Page Number of lines displayed in the report before inserting a page break. Theminimum value is 10.
Style Sheet Filename of the cascading style sheet to use with reports.
Configuration GEH-6745D System Guide 105For public disclosure
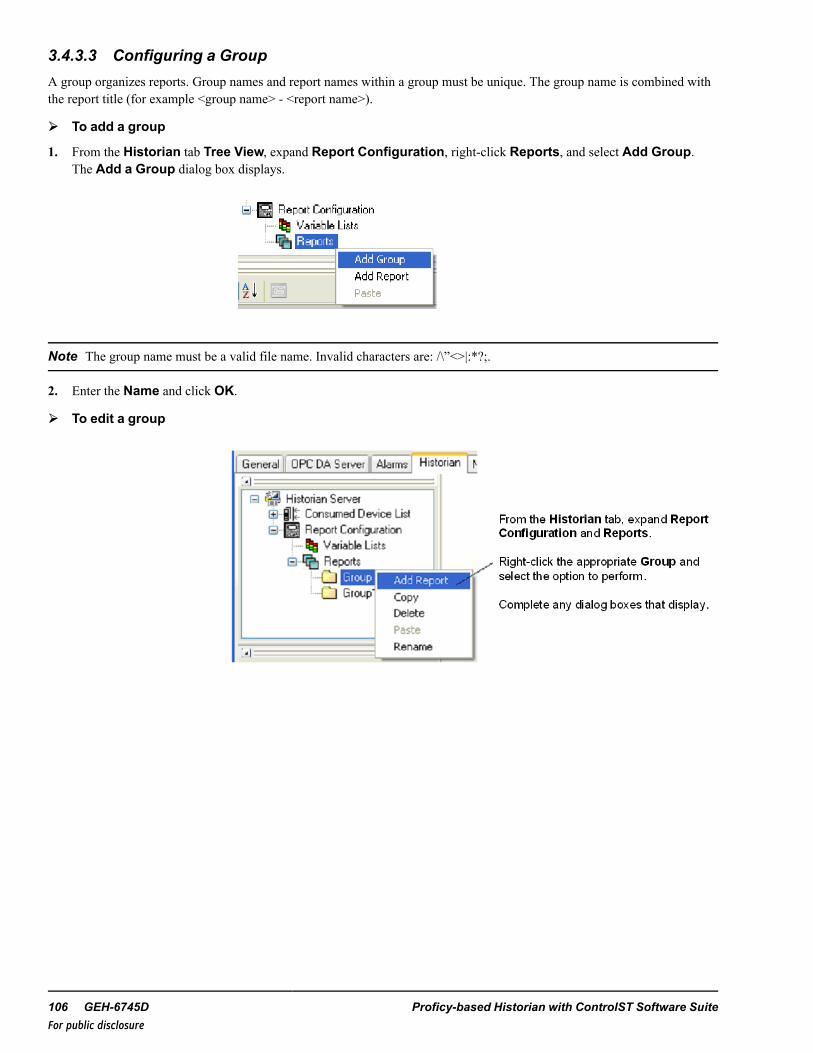
3.4.3.3 Configuring a GroupA group organizes reports. Group names and report names within a group must be unique. The group name is combined withthe report title (for example <group name> - <report name>).
➢➢ To add a group
1. From the Historian tab Tree View, expand Report Configuration, right-click Reports, and select Add Group.The Add a Group dialog box displays.
Note The group name must be a valid file name. Invalid characters are: /\”<>|:*?;.
2. Enter the Name and click OK.
➢➢ To edit a group
106 GEH-6745D Proficy-based Historian with ControlST Software SuiteFor public disclosure
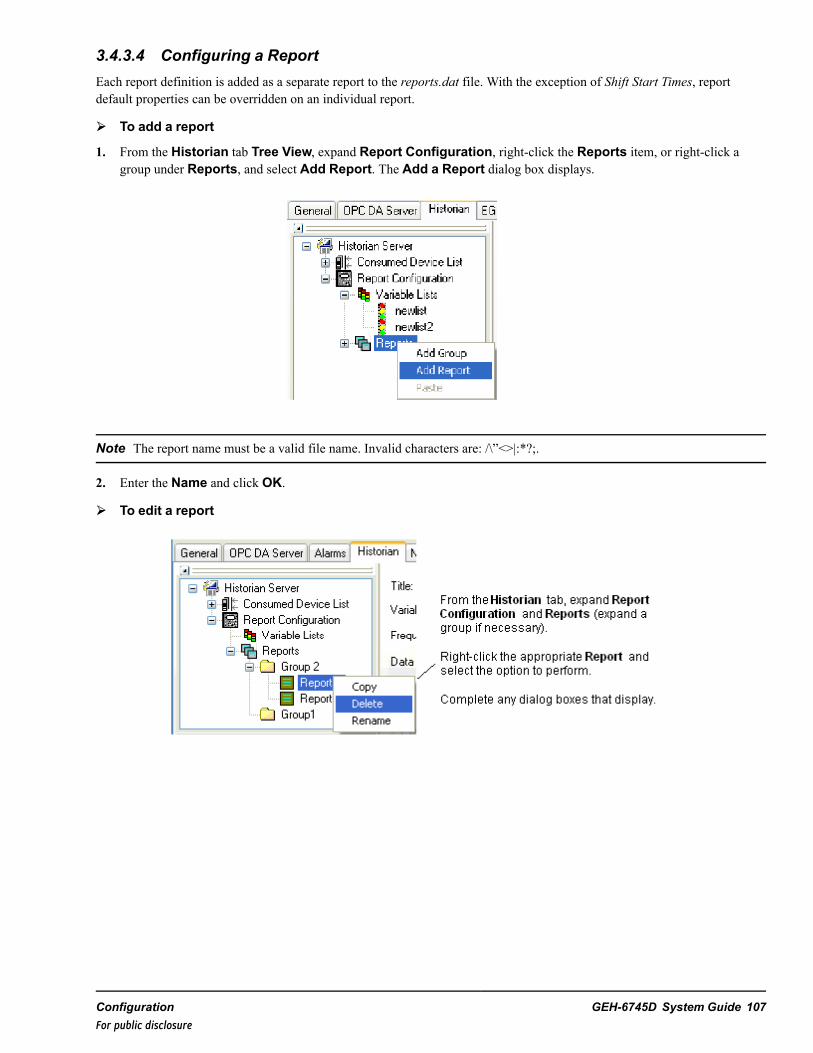
3.4.3.4 Configuring a ReportEach report definition is added as a separate report to the reports.dat file. With the exception of Shift Start Times, reportdefault properties can be overridden on an individual report.
➢➢ To add a report
1. From the Historian tab Tree View, expand Report Configuration, right-click the Reports item, or right-click agroup under Reports, and select Add Report. The Add a Report dialog box displays.
Note The report name must be a valid file name. Invalid characters are: /\”<>|:*?;.
2. Enter the Name and click OK.
➢➢ To edit a report
Configuration GEH-6745D System Guide 107For public disclosure
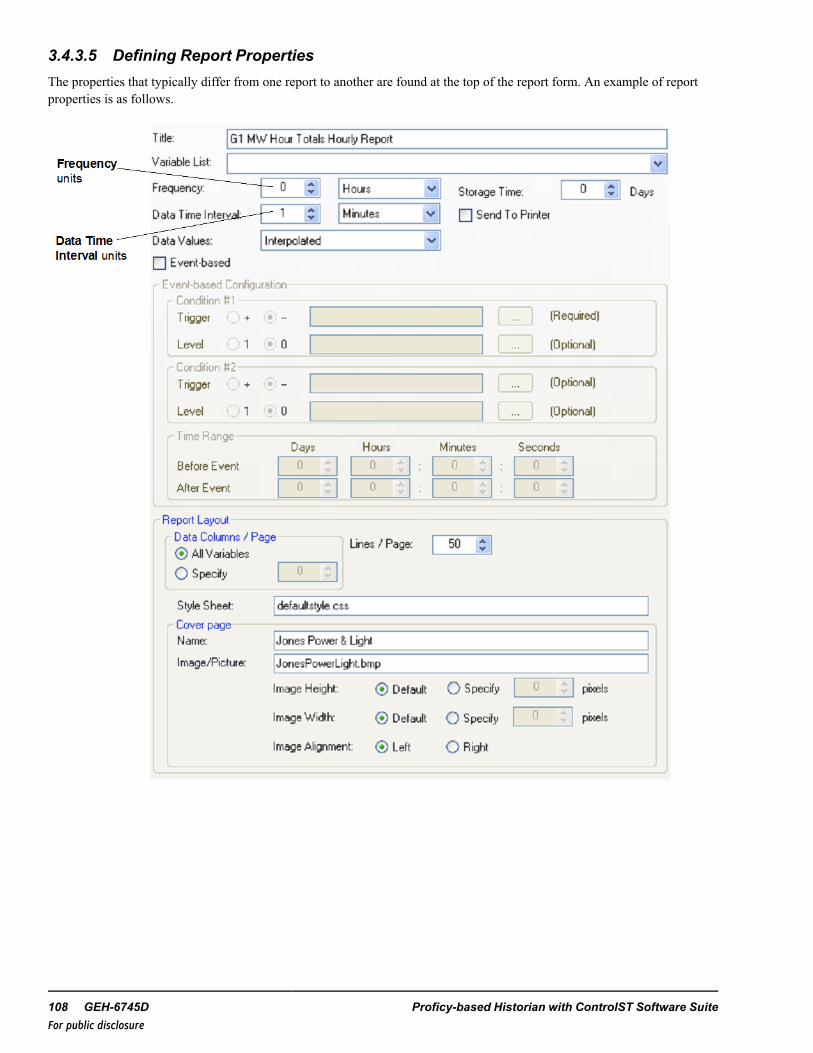
3.4.3.5 Defining Report PropertiesThe properties that typically differ from one report to another are found at the top of the report form. An example of reportproperties is as follows.
108 GEH-6745D Proficy-based Historian with ControlST Software SuiteFor public disclosure
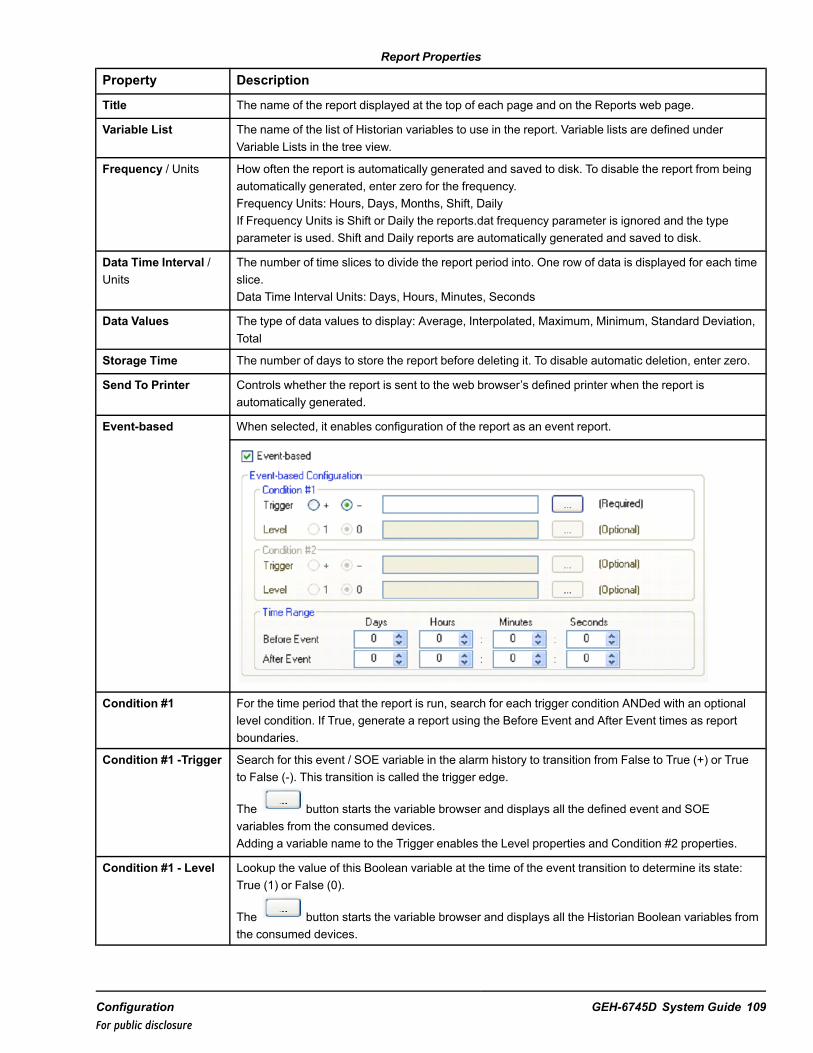
Report Properties
Property Description
Title The name of the report displayed at the top of each page and on the Reports web page.
Variable List The name of the list of Historian variables to use in the report. Variable lists are defined underVariable Lists in the tree view.
Frequency / Units How often the report is automatically generated and saved to disk. To disable the report from beingautomatically generated, enter zero for the frequency.Frequency Units: Hours, Days, Months, Shift, DailyIf Frequency Units is Shift or Daily the reports.dat frequency parameter is ignored and the typeparameter is used. Shift and Daily reports are automatically generated and saved to disk.
Data Time Interval /Units
The number of time slices to divide the report period into. One row of data is displayed for each timeslice.Data Time Interval Units: Days, Hours, Minutes, Seconds
Data Values The type of data values to display: Average, Interpolated, Maximum, Minimum, Standard Deviation,Total
Storage Time The number of days to store the report before deleting it. To disable automatic deletion, enter zero.
Send To Printer Controls whether the report is sent to the web browser’s defined printer when the report isautomatically generated.
Event-based When selected, it enables configuration of the report as an event report.
Condition #1 For the time period that the report is run, search for each trigger condition ANDed with an optionallevel condition. If True, generate a report using the Before Event and After Event times as reportboundaries.
Condition #1 -Trigger Search for this event / SOE variable in the alarm history to transition from False to True (+) or Trueto False (-). This transition is called the trigger edge.
The button starts the variable browser and displays all the defined event and SOEvariables from the consumed devices.Adding a variable name to the Trigger enables the Level properties and Condition #2 properties.
Condition #1 - Level Lookup the value of this Boolean variable at the time of the event transition to determine its state:True (1) or False (0).
The button starts the variable browser and displays all the Historian Boolean variables fromthe consumed devices.
Configuration GEH-6745D System Guide 109For public disclosure
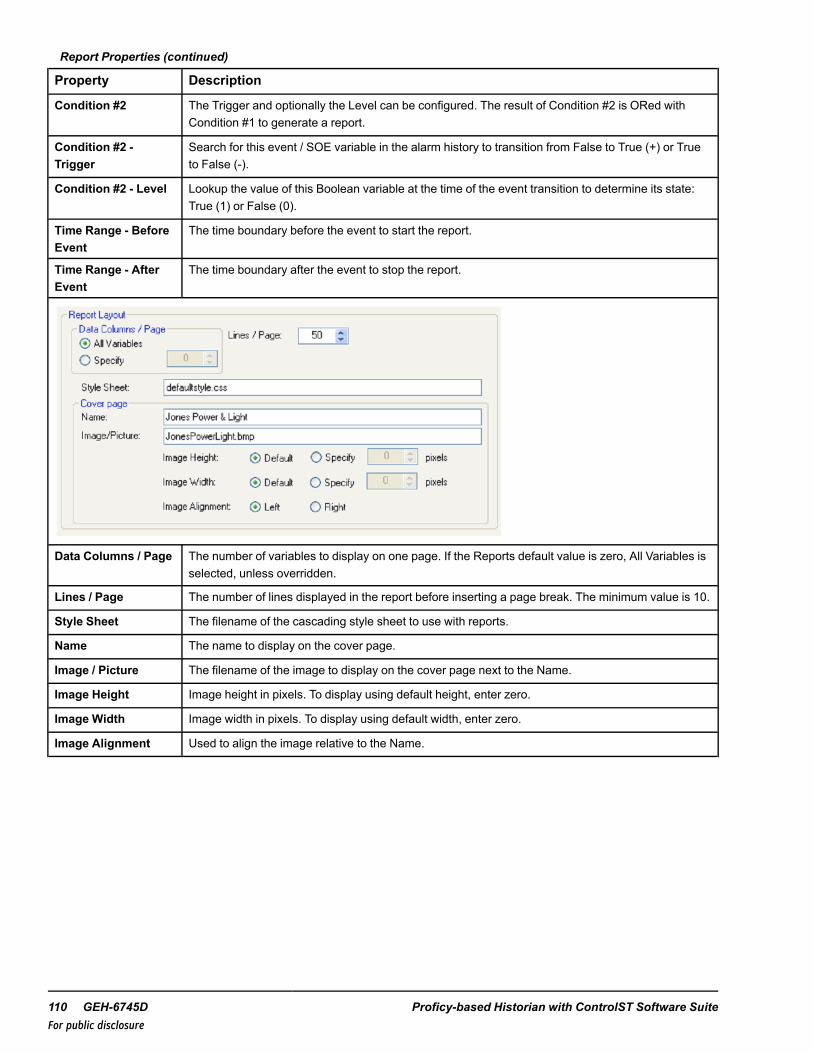
Report Properties (continued)
Property Description
Condition #2 The Trigger and optionally the Level can be configured. The result of Condition #2 is ORed withCondition #1 to generate a report.
Condition #2 -Trigger
Search for this event / SOE variable in the alarm history to transition from False to True (+) or Trueto False (-).
Condition #2 - Level Lookup the value of this Boolean variable at the time of the event transition to determine its state:True (1) or False (0).
Time Range - BeforeEvent
The time boundary before the event to start the report.
Time Range - AfterEvent
The time boundary after the event to stop the report.
Data Columns / Page The number of variables to display on one page. If the Reports default value is zero, All Variables isselected, unless overridden.
Lines / Page The number of lines displayed in the report before inserting a page break. The minimum value is 10.
Style Sheet The filename of the cascading style sheet to use with reports.
Name The name to display on the cover page.
Image / Picture The filename of the image to display on the cover page next to the Name.
Image Height Image height in pixels. To display using default height, enter zero.
Image Width Image width in pixels. To display using default width, enter zero.
Image Alignment Used to align the image relative to the Name.
110 GEH-6745D Proficy-based Historian with ControlST Software SuiteFor public disclosure
3.4.3.6 Importing ReportsWhen upgrading from a Control Systems Solutions (toolbox) Historian to a ControlST Historian, the existing reportsconfiguration must be imported into the Historian’s WorkstationST component through an Import wizard.
Note When the Historian feature runs, it creates the backup folder E:\Site\Reports\Original (if it does not exist) and copiesthe existing reports.dat file and all tag files to this folder when it is created. This ensures that the original files are notaccidently overwritten before an import can take place. If you are upgrading and the E:\Site\Reports\Original folder exists,select this as the source folder.
As a result of the import, reports and variable lists are created. Any existing report or variable list is overwritten. If a report inthe reports.dat file is associated with a tag file that does not exist, the report is created, a warning is issued, and an emptyvariable list is created. When creating a variable list, each variable from the tag file is added to the list. If the variable does notexist in the system, the variable’s device is not consumed by the Historian. If the variable is not defined as a Historianvariable, an error is generated.
➢➢ To import existing reports
♦ From the Historian tab Tree View, right-click Report Configuration, and select Import Reports. The ImportExisting Reports wizard displays.
Configuration GEH-6745D System Guide 111For public disclosure
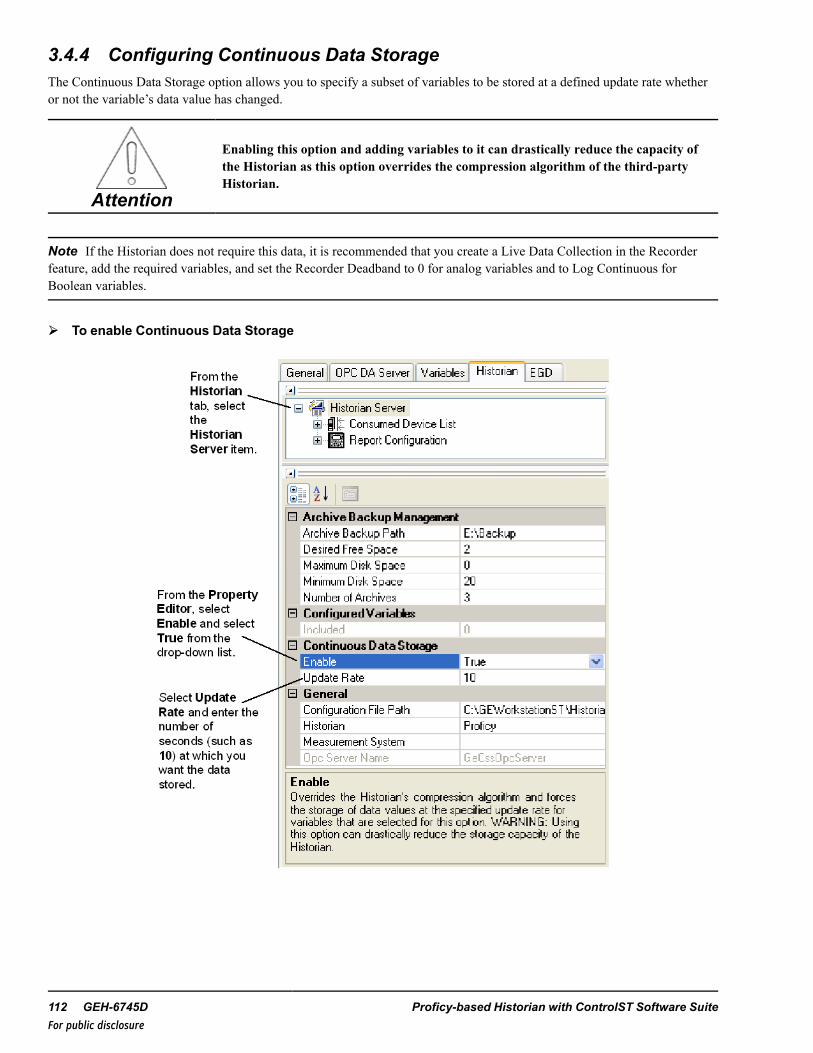
3.4.4 Configuring Continuous Data StorageThe Continuous Data Storage option allows you to specify a subset of variables to be stored at a defined update rate whetheror not the variable’s data value has changed.
Attention
Enabling this option and adding variables to it can drastically reduce the capacity ofthe Historian as this option overrides the compression algorithm of the third-partyHistorian.
Note If the Historian does not require this data, it is recommended that you create a Live Data Collection in the Recorderfeature, add the required variables, and set the Recorder Deadband to 0 for analog variables and to Log Continuous forBoolean variables.
➢➢ To enable Continuous Data Storage
112 GEH-6745D Proficy-based Historian with ControlST Software SuiteFor public disclosure
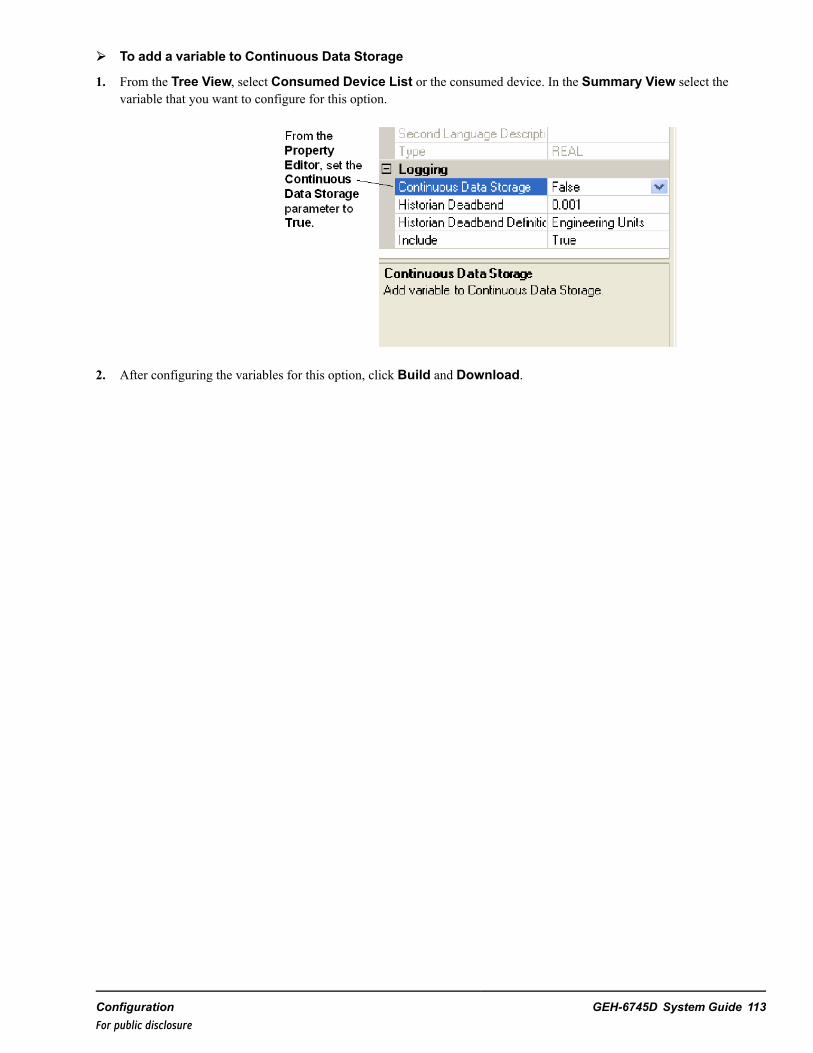
➢➢ To add a variable to Continuous Data Storage
1. From the Tree View, select Consumed Device List or the consumed device. In the Summary View select thevariable that you want to configure for this option.
2. After configuring the variables for this option, click Build and Download.
Configuration GEH-6745D System Guide 113For public disclosure
3.5 Archive Backup Management
3.5.1 Backing up Historical DataThe supported third-party Historian products use archives to store data. Each archive is a fixed length file. A set number ofarchive files are created during factory setup. Once these archives become filled, the oldest, writable archive is re-used.Therefore, archives should be backed up regularly. Each third-party Historian provides a procedure for backing up archivesand configuration information.
Note Third-party backup procedures can be changed by the third-party software supplier without notice.
An archive backup utility is automatically installed on your system. The default path for this file is typically C:\Program Files\GE Intelligent Platforms\Proficy-based Historian\Server\ihArchiveBackup.exe.
3.5.2 Proficy-based Backup ProcedureThe application supplied with the Proficy-based Historian for backing up archives and archive configuration information isihArchiveBackup.exe. It is located in the Proficy install directory under the \server folder (typically C:\Program Files\GE Intelligent Platforms\Proficy-based Historian\Server\ihArchiveBackup.exe). TheihArchiveBackup.exe file backs up the current archive, additional archives (if specified), and a site-specific configuration file.The backup procedure does not delete any previously backed-up files. As data is accumulated and the current archive shifts tothe next archive, the older archive remains in the backup directory.
Note Do not schedule ihArchiveBackup.exe if the Historian Archive Backup manager is scheduled to run.
The ihArchiveBackup.exe file can be run interactively from a Command Prompt, or run at regular intervals using the TaskScheduler.
Note For detailed information on backing up a Proficy-based Historian, from the Start menu, select Programs, Proficy-basedHistorian x.x, and Historian Electronic Book.
Note It is recommended that backups be scheduled regularly.
The ihArchiveBackup.exe file accepts the following optional arguments. If no arguments are supplied, ihArchiveBackup.exebacks up the current Historian archive.
Parameter Description
-s serverNodeName The Historian node from which to access archive data
-u Username The username required to connect to the Historian archive
-p Password The password required to connect to the Historian archive
-t TimeoutSecs The time, in seconds, to wait before timing out and failing
-n NumberOfArchives The number of archives to back up, counting backwards from the current archive
-a ArchiveName The name of a specific archive to back up
-c Backs up only the historian configuration (IHC) file
114 GEH-6745D Proficy-based Historian with ControlST Software SuiteFor public disclosure
➢➢ To schedule regular backups
1. Create a backup directory (such as E:\backup).
2. From the Start menu, select All Programs, Proficy-based Historian n.n, and Historian Administrator. TheProficy-based Historian Administrator displays.
3. Select Archives.
4. From the Global Options tab, Archive Maintenance, enter E:\backup in the Default Backup Path field.
5. From the tool, under
6. Open a Command Prompt and run the following command:
AT 03:15 /EVERY:M,T,W,Th,F,S,Su “C:\Program Files\GE Intelligent Platforms\Proficy-based Historian\Server\ihArchiveBackup.exe” –n 3
The Task Scheduler is now configured to run ihArchiveBackup.exe every day at 03:15 AM, backing up the current archiveand the two previous archives, as well as configuration information, to E:\backup.
➢➢ To view or edit the task in the Task Scheduler
1. From the Control Panel, double-click on Scheduled Tasks. The task is named at#, where # is a number.
2. Right-click the name and select Properties.
3. Right-click the name and select Rename. Rename the task to Proficy-based Historian Backup.
3.5.3 Storing Proficy-based ArchivesStore archives and configuration information that are backed up nightly on DVD, CD, or tape.
Attention
If the backup directory used by ihArchiveBackup.exe is not on a separate disk that issized to hold all of the archives and configuration information, move the olderarchives to an offline storage medium.
3.5.4 Restoring Offline Proficy-based ArchivesWhen required data is no longer available online, restore the necessary archives to a temporary directory. Use theProficy-based Historian Administrator tool to restore the archive. Refer to the Historian Electronic Book, the sectionRestoring an Archive.
Configuration GEH-6745D System Guide 115For public disclosure
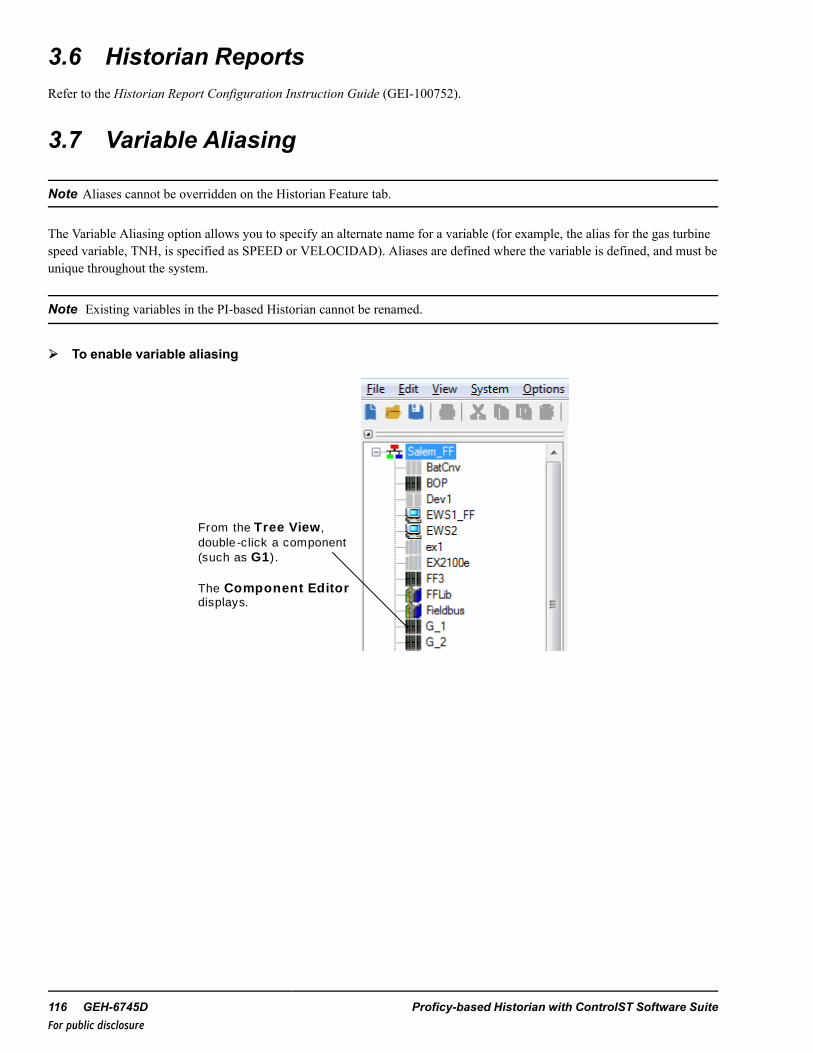
3.6 Historian ReportsRefer to the Historian Report Configuration Instruction Guide (GEI-100752).
3.7 Variable Aliasing
Note Aliases cannot be overridden on the Historian Feature tab.
The Variable Aliasing option allows you to specify an alternate name for a variable (for example, the alias for the gas turbinespeed variable, TNH, is specified as SPEED or VELOCIDAD). Aliases are defined where the variable is defined, and must beunique throughout the system.
Note Existing variables in the PI-based Historian cannot be renamed.
➢➢ To enable variable aliasing
From the Tree View , double-click a component (such as G1).
The Componen t Ed ito rdisplays.
116 GEH-6745D Proficy-based Historian with ControlST Software SuiteFor public disclosure
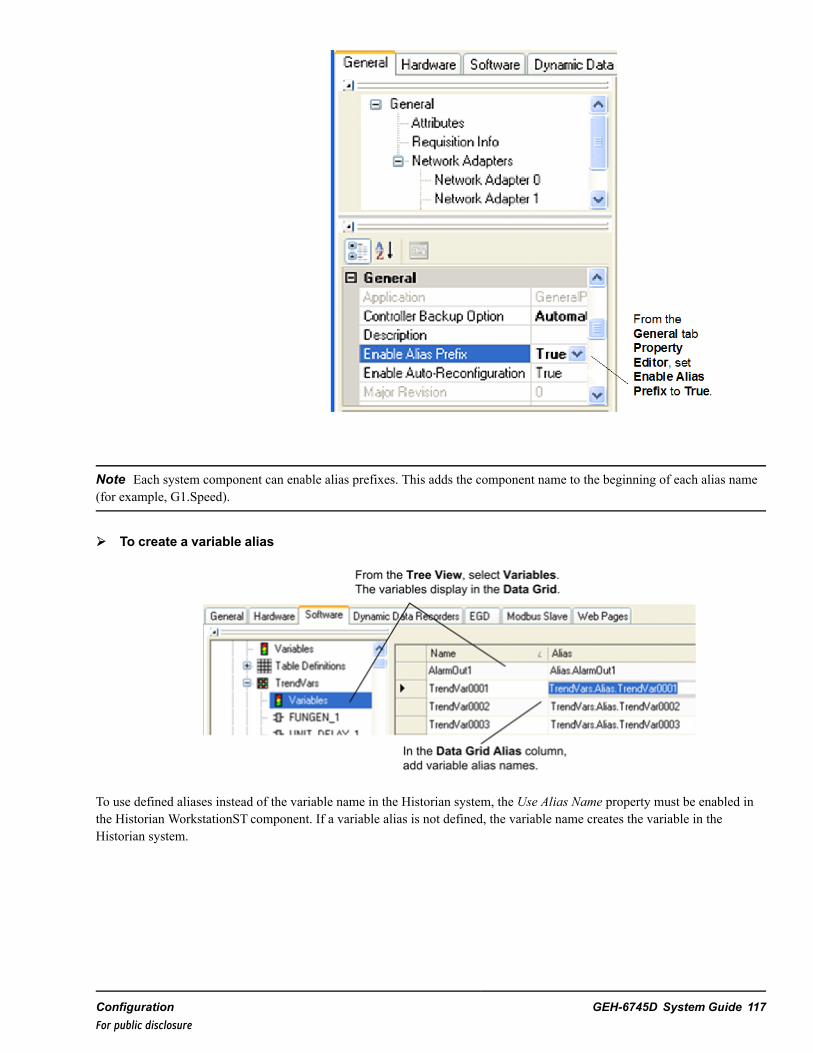
Note Each system component can enable alias prefixes. This adds the component name to the beginning of each alias name(for example, G1.Speed).
➢➢ To create a variable alias
To use defined aliases instead of the variable name in the Historian system, the Use Alias Name property must be enabled inthe Historian WorkstationST component. If a variable alias is not defined, the variable name creates the variable in theHistorian system.
Configuration GEH-6745D System Guide 117For public disclosure
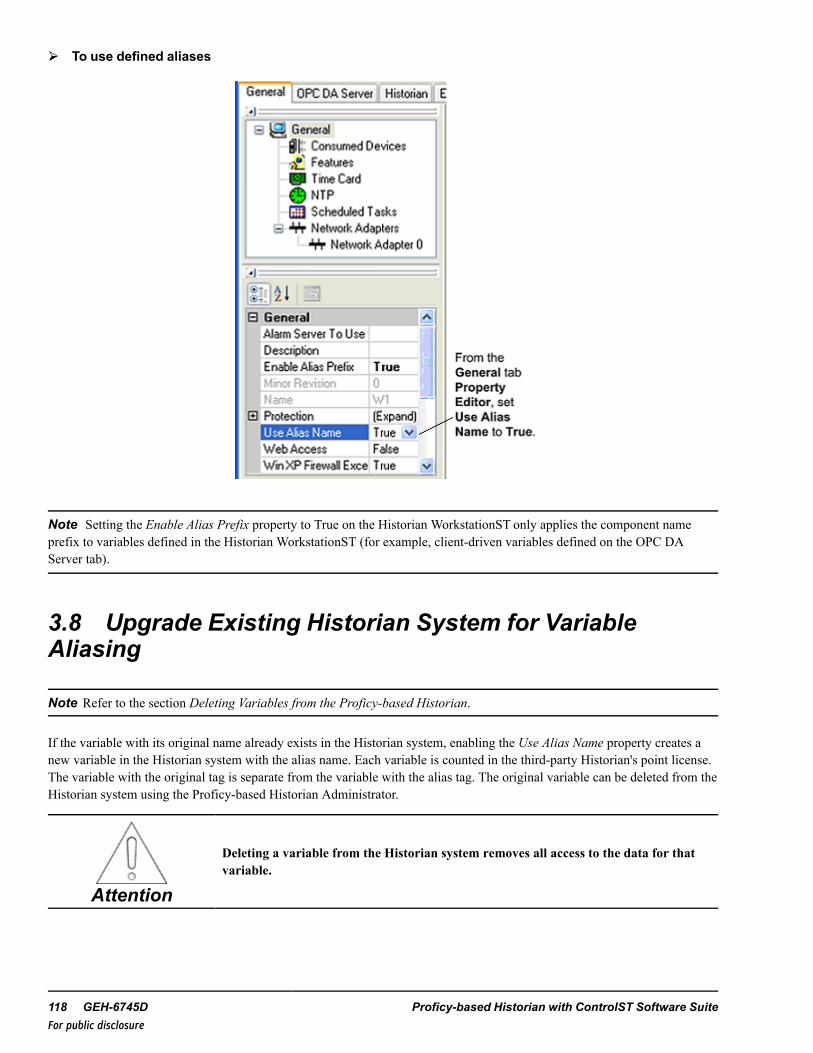
➢➢ To use defined aliases
Note Setting the Enable Alias Prefix property to True on the Historian WorkstationST only applies the component nameprefix to variables defined in the Historian WorkstationST (for example, client-driven variables defined on the OPC DAServer tab).
3.8 Upgrade Existing Historian System for VariableAliasing
Note Refer to the section Deleting Variables from the Proficy-based Historian.
If the variable with its original name already exists in the Historian system, enabling the Use Alias Name property creates anew variable in the Historian system with the alias name. Each variable is counted in the third-party Historian's point license.The variable with the original tag is separate from the variable with the alias tag. The original variable can be deleted from theHistorian system using the Proficy-based Historian Administrator.
Attention
Deleting a variable from the Historian system removes all access to the data for thatvariable.
118 GEH-6745D Proficy-based Historian with ControlST Software SuiteFor public disclosure
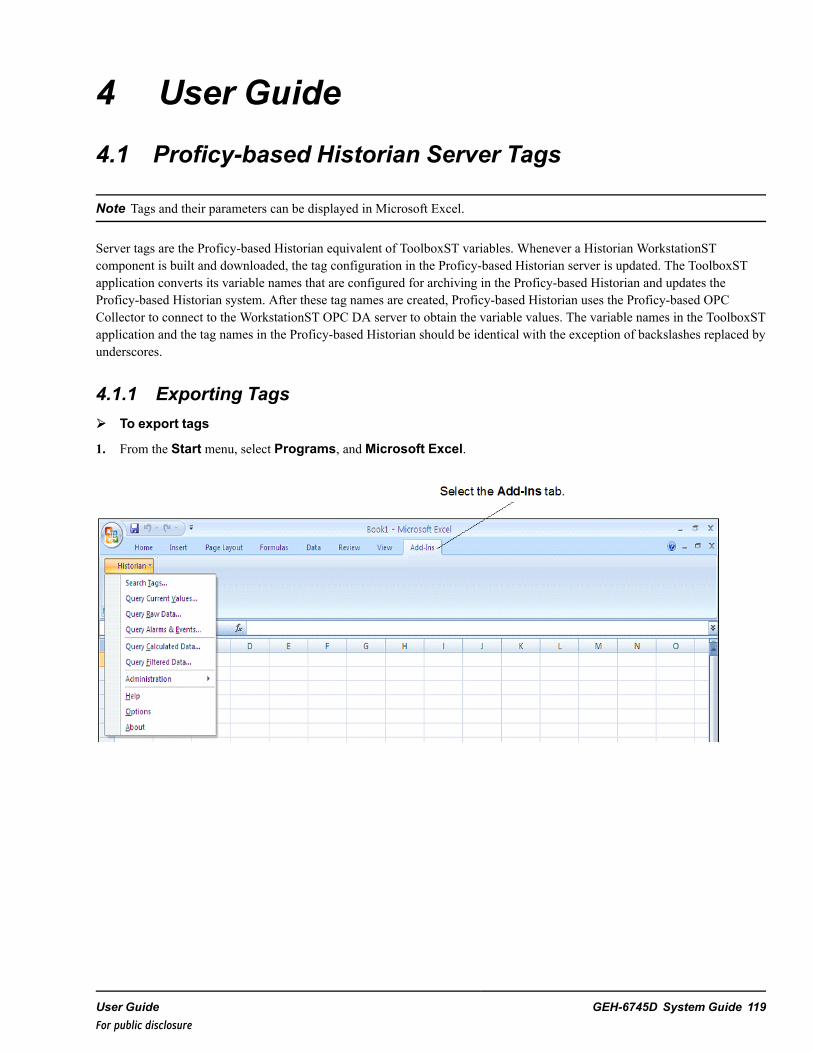
4 User Guide4.1 Proficy-based Historian Server Tags
Note Tags and their parameters can be displayed in Microsoft Excel.
Server tags are the Proficy-based Historian equivalent of ToolboxST variables. Whenever a Historian WorkstationSTcomponent is built and downloaded, the tag configuration in the Proficy-based Historian server is updated. The ToolboxSTapplication converts its variable names that are configured for archiving in the Proficy-based Historian and updates theProficy-based Historian system. After these tag names are created, Proficy-based Historian uses the Proficy-based OPCCollector to connect to the WorkstationST OPC DA server to obtain the variable values. The variable names in the ToolboxSTapplication and the tag names in the Proficy-based Historian should be identical with the exception of backslashes replaced byunderscores.
4.1.1 Exporting Tags➢➢ To export tags
1. From the Start menu, select Programs, andMicrosoft Excel.
User Guide GEH-6745D System Guide 119For public disclosure
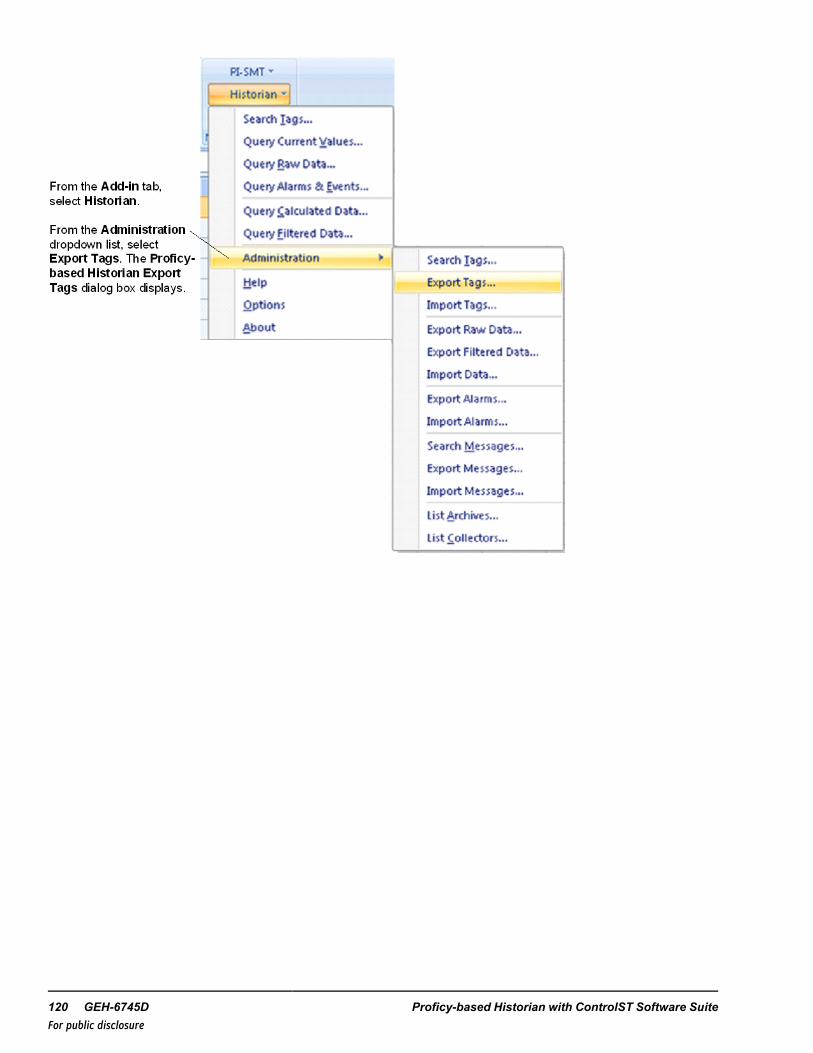
120 GEH-6745D Proficy-based Historian with ControlST Software SuiteFor public disclosure
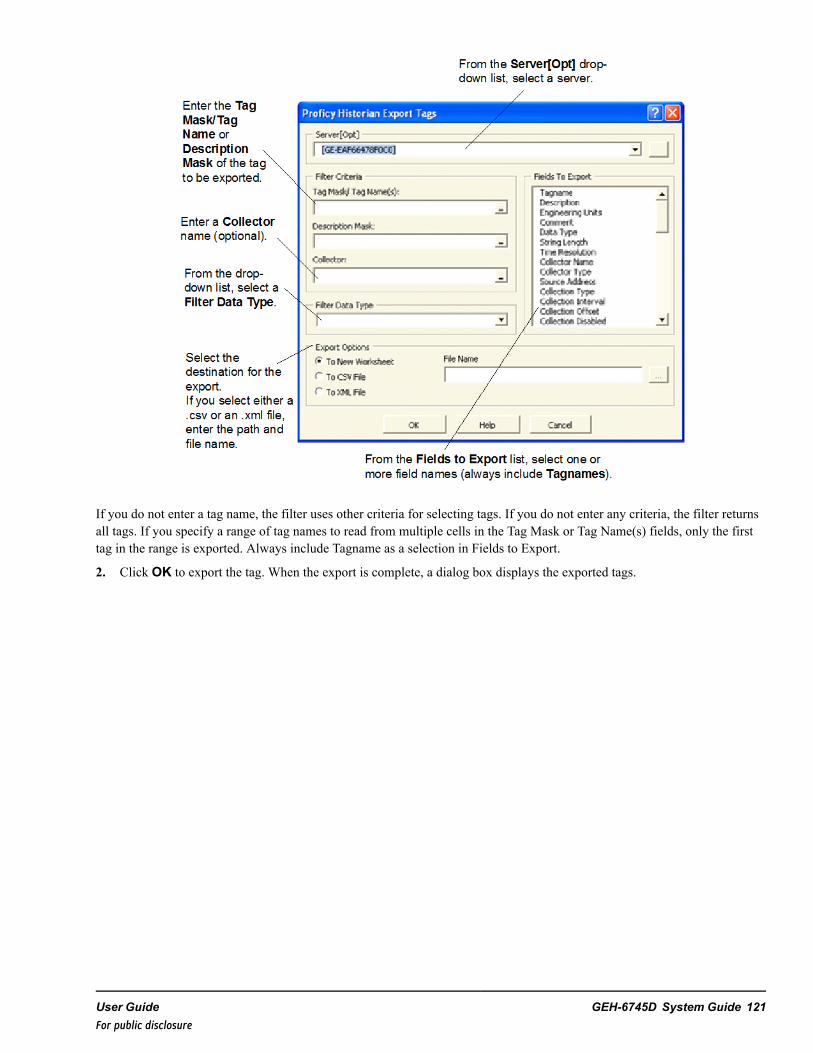
If you do not enter a tag name, the filter uses other criteria for selecting tags. If you do not enter any criteria, the filter returnsall tags. If you specify a range of tag names to read from multiple cells in the Tag Mask or Tag Name(s) fields, only the firsttag in the range is exported. Always include Tagname as a selection in Fields to Export.
2. Click OK to export the tag. When the export is complete, a dialog box displays the exported tags.
User Guide GEH-6745D System Guide 121For public disclosure
4.2 Proficy Advanced TrenderThe Proficy Advanced Trender allows you to display archived data from the Proficy-based Historian.
Note Proficy Advanced Trender, which provides two client licenses, requires Proficy CIMPLICITY HMI/SCADA version8.0.2 or higher.
Data is organized by data type (for example, vibration or exhaust temperatures) and the designated turbine. Up to nine trendobjects display data versus time. Each trend can be configured from templates stored in a configuration database ordynamically at runtime.Custom trends can also be created or edited using CimEdit.
Attention
This package is installed and configured by the requisition team and is job specific. Itis not part of the ControlST installation.
Product VersionProficy Historian 4.5 6.0
CIMPLICITY 8.2 9.0
Proficy Advanced Trender ✓ Optional
Components are as follows:
• Proficy-based Historian Server, which holds system historical data in archives. Proficy-based Historian is configured as aWorkstationST component in the ToolboxST application.
• Proficy CIMPLICITY HMI/SCADA Advanced Viewer, which provides screens, graphic objects, charts, and connectivityto Proficy-based Historian archives. The CimEdit screen editor and CimView screen viewer are included inCIMPLICITYAdvanced Viewer.
• Navigation bar, which allows you to design and build the navigation. CIMPLICITYallows you to modify the initialnavigation bar configuration file.
122 GEH-6745D Proficy-based Historian with ControlST Software SuiteFor public disclosure

Trender Data Flow
4.2.1 Using Proficy Advanced Trender➢➢ To create a shortcut for the Main.cim screen
1. Right-click the desktop and select New and Shortcut. The Create Shortcut wizard displays.
User Guide GEH-6745D System Guide 123For public disclosure

2. When the Select a Title for the Program wizard displays, enter a name for the shortcut (for example, shortcut1) andclick Finish. The shortcut is created.
3. Right-click shortcut1 and select Properties. The Proficy Trender Properties dialog box displays.
4. In the Target text box, enter CimView.exe /maximized /zoomtobestfit and click OK. The text box populates withthe folder path.
➢➢ To open a trend
124 GEH-6745D Proficy-based Historian with ControlST Software SuiteFor public disclosure
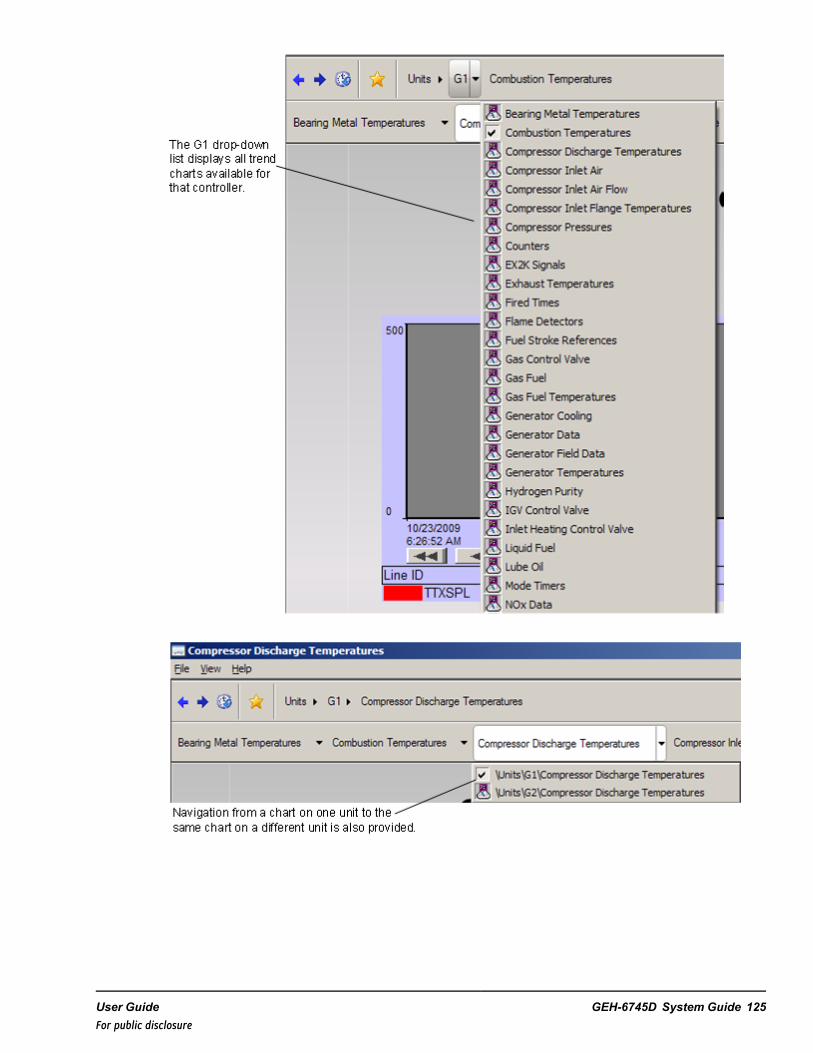
User Guide GEH-6745D System Guide 125For public disclosure
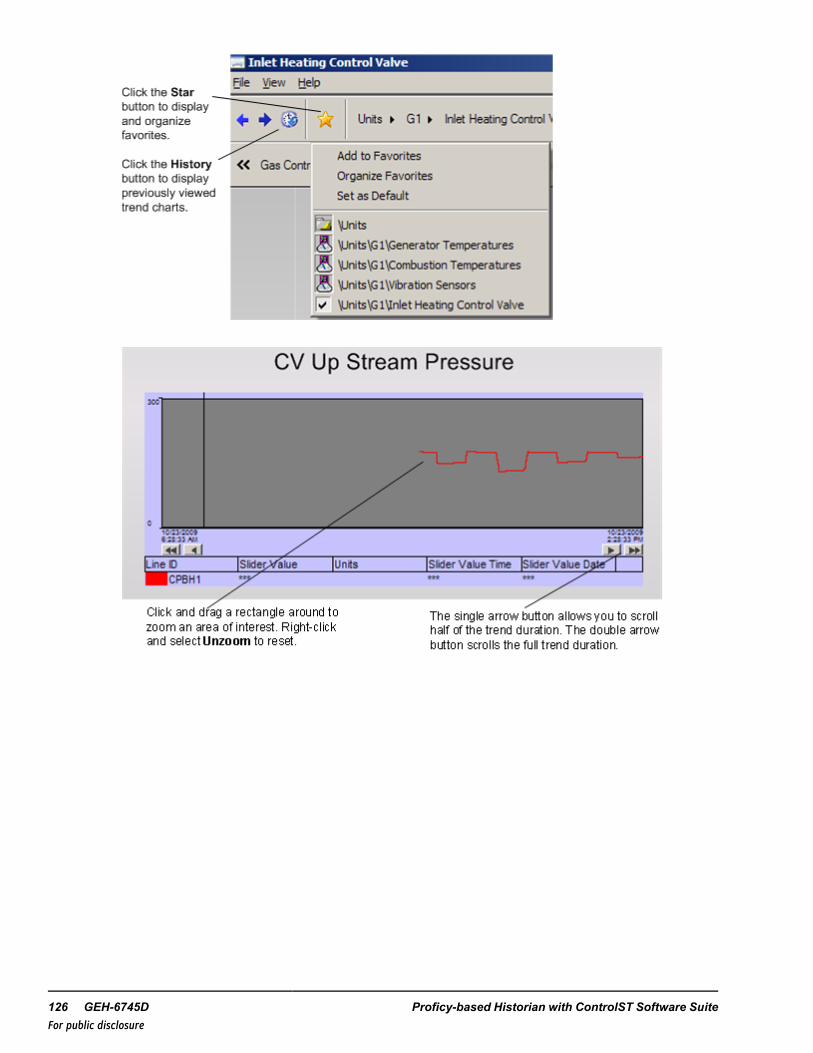
126 GEH-6745D Proficy-based Historian with ControlST Software SuiteFor public disclosure
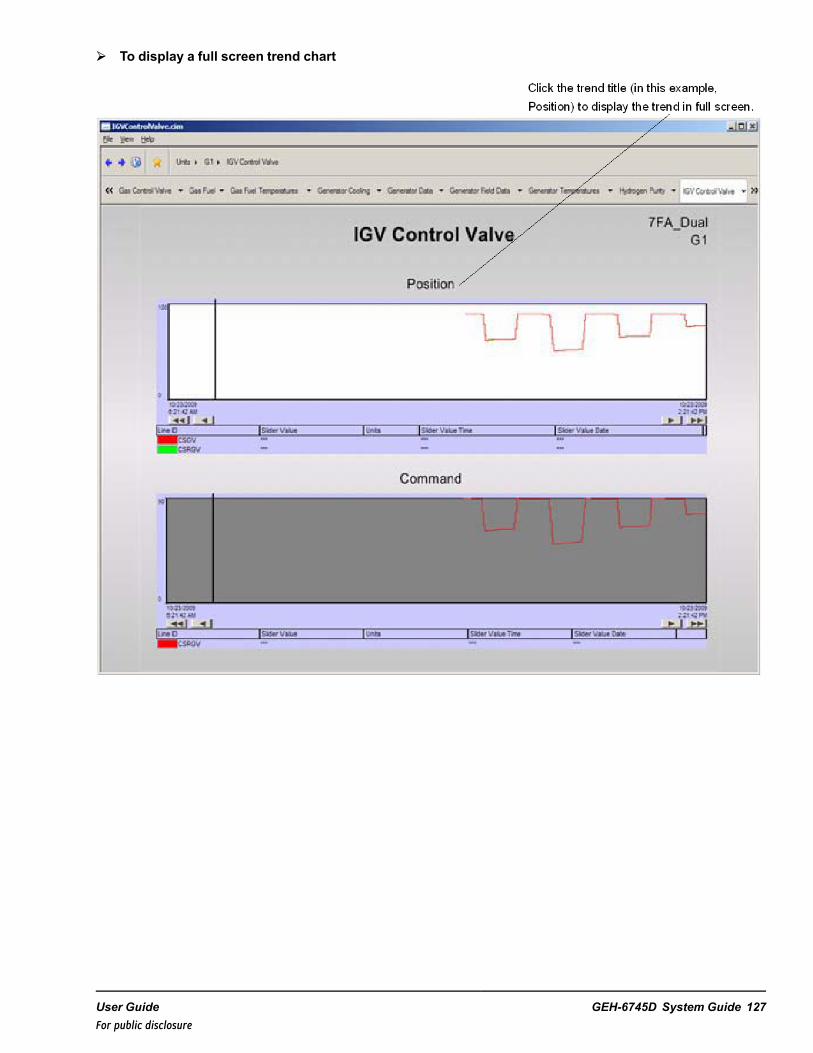
➢➢ To display a full screen trend chart
User Guide GEH-6745D System Guide 127For public disclosure
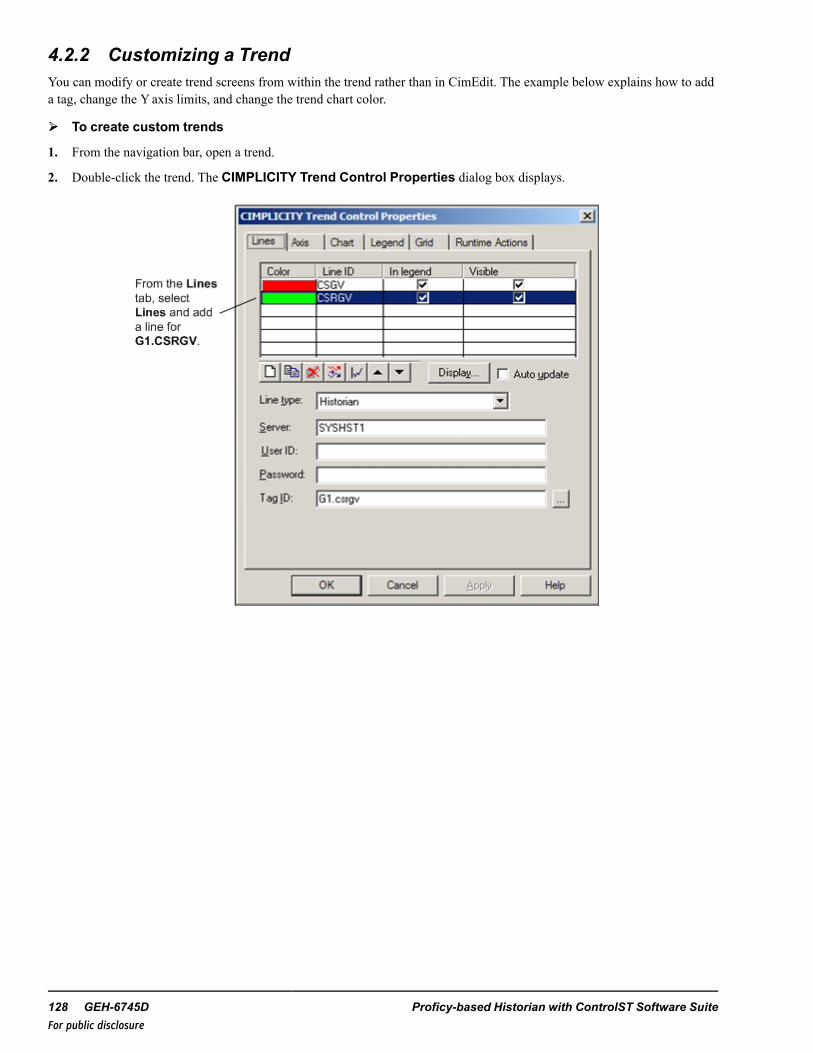
4.2.2 Customizing a TrendYou can modify or create trend screens from within the trend rather than in CimEdit. The example below explains how to adda tag, change the Y axis limits, and change the trend chart color.
➢➢ To create custom trends
1. From the navigation bar, open a trend.
2. Double-click the trend. The CIMPLICITY Trend Control Properties dialog box displays.
128 GEH-6745D Proficy-based Historian with ControlST Software SuiteFor public disclosure
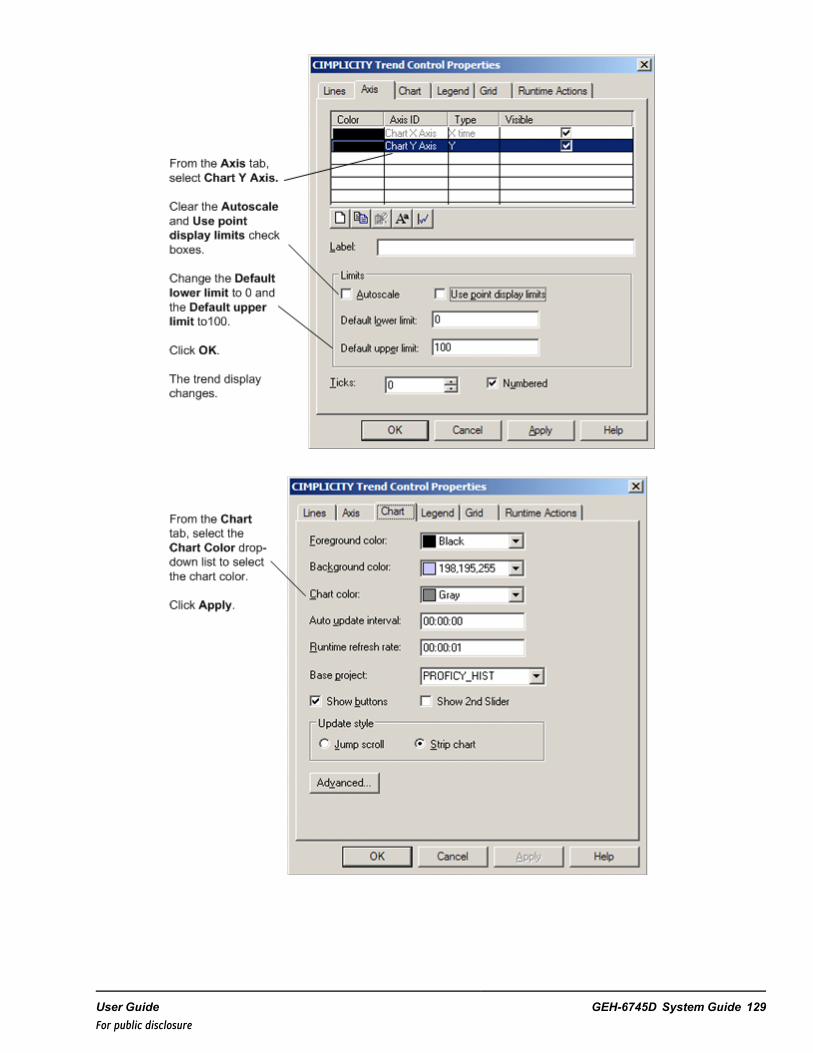
User Guide GEH-6745D System Guide 129For public disclosure
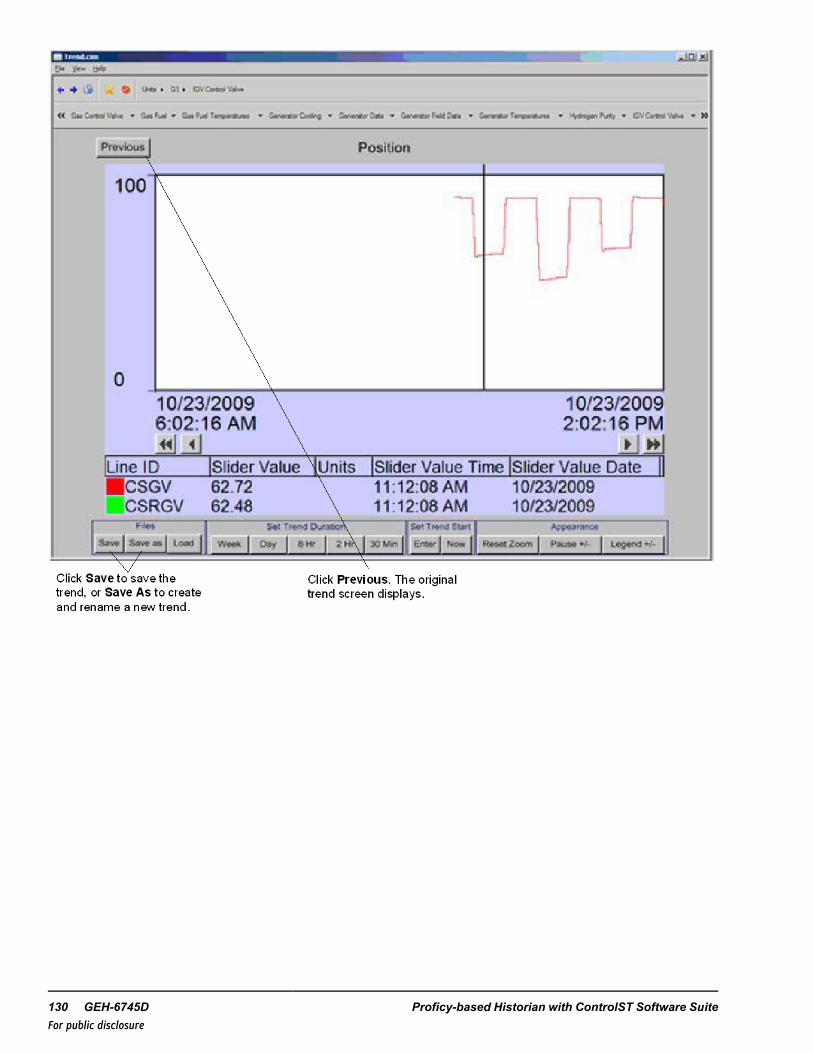
130 GEH-6745D Proficy-based Historian with ControlST Software SuiteFor public disclosure

User Guide GEH-6745D System Guide 131For public disclosure
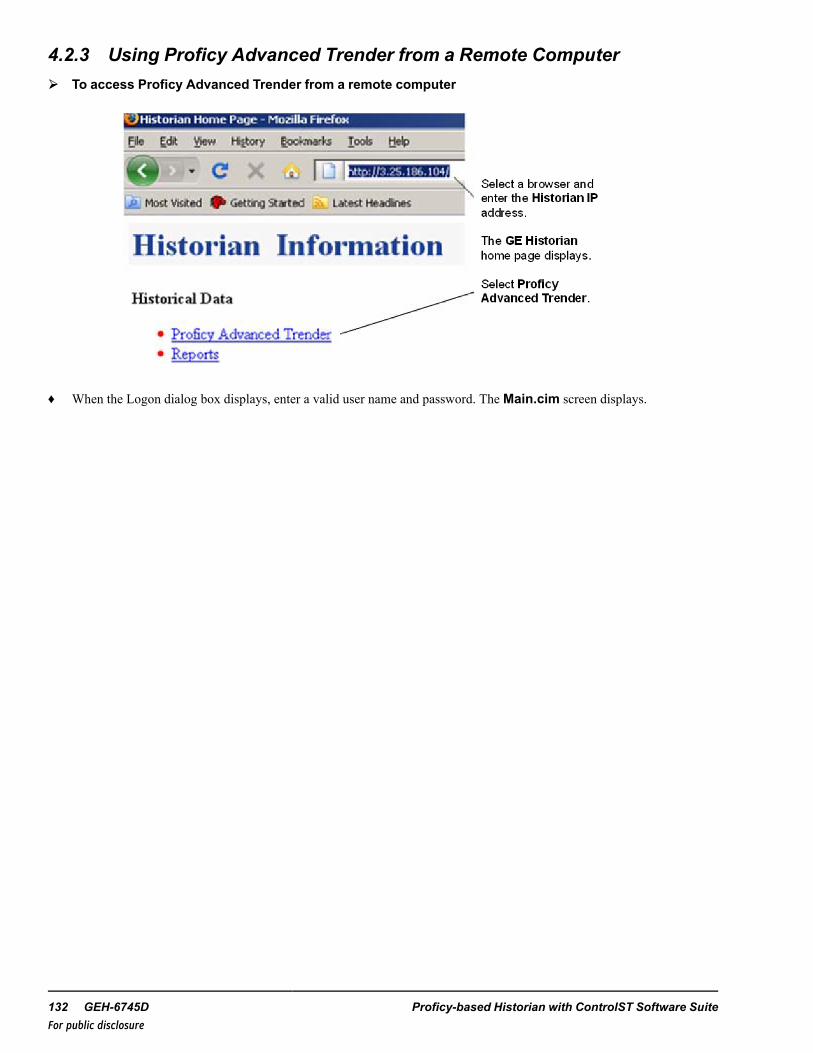
4.2.3 Using Proficy Advanced Trender from a Remote Computer➢➢ To access Proficy Advanced Trender from a remote computer
♦ When the Logon dialog box displays, enter a valid user name and password. TheMain.cim screen displays.
132 GEH-6745D Proficy-based Historian with ControlST Software SuiteFor public disclosure
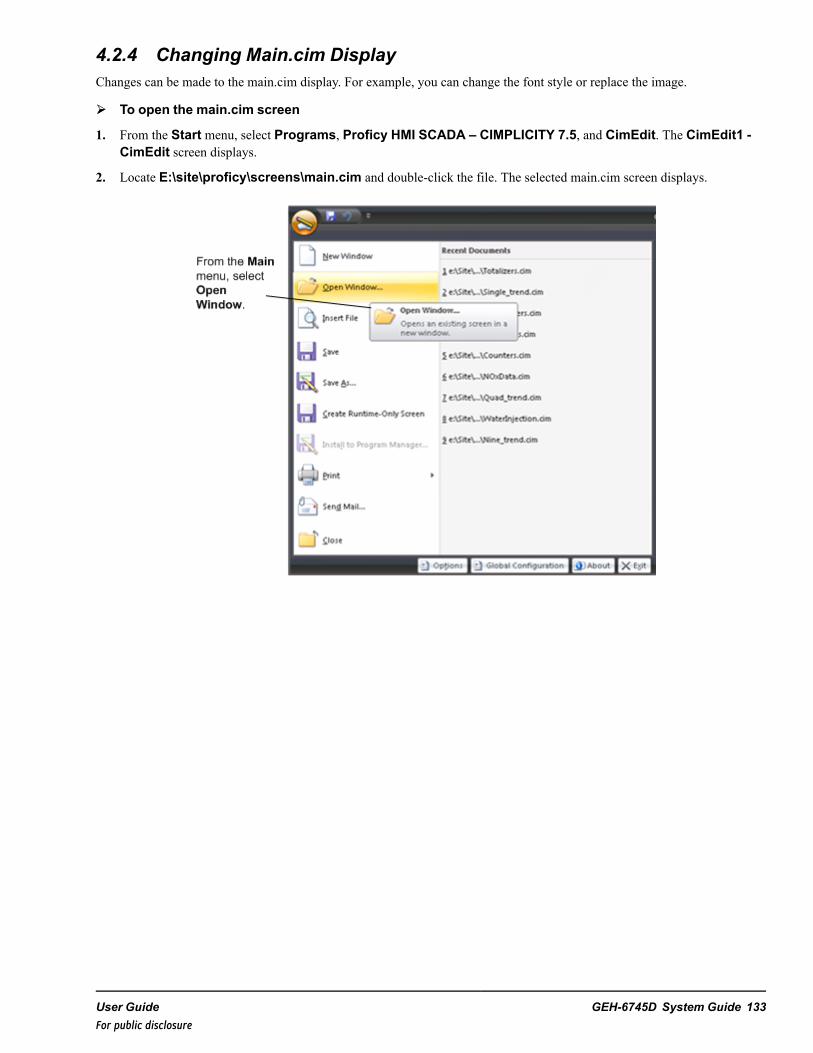
4.2.4 Changing Main.cim DisplayChanges can be made to the main.cim display. For example, you can change the font style or replace the image.
➢➢ To open the main.cim screen
1. From the Start menu, select Programs, Proficy HMI SCADA – CIMPLICITY 7.5, and CimEdit. The CimEdit1 -CimEdit screen displays.
2. Locate E:\site\proficy\screens\main.cim and double-click the file. The selected main.cim screen displays.
User Guide GEH-6745D System Guide 133For public disclosure
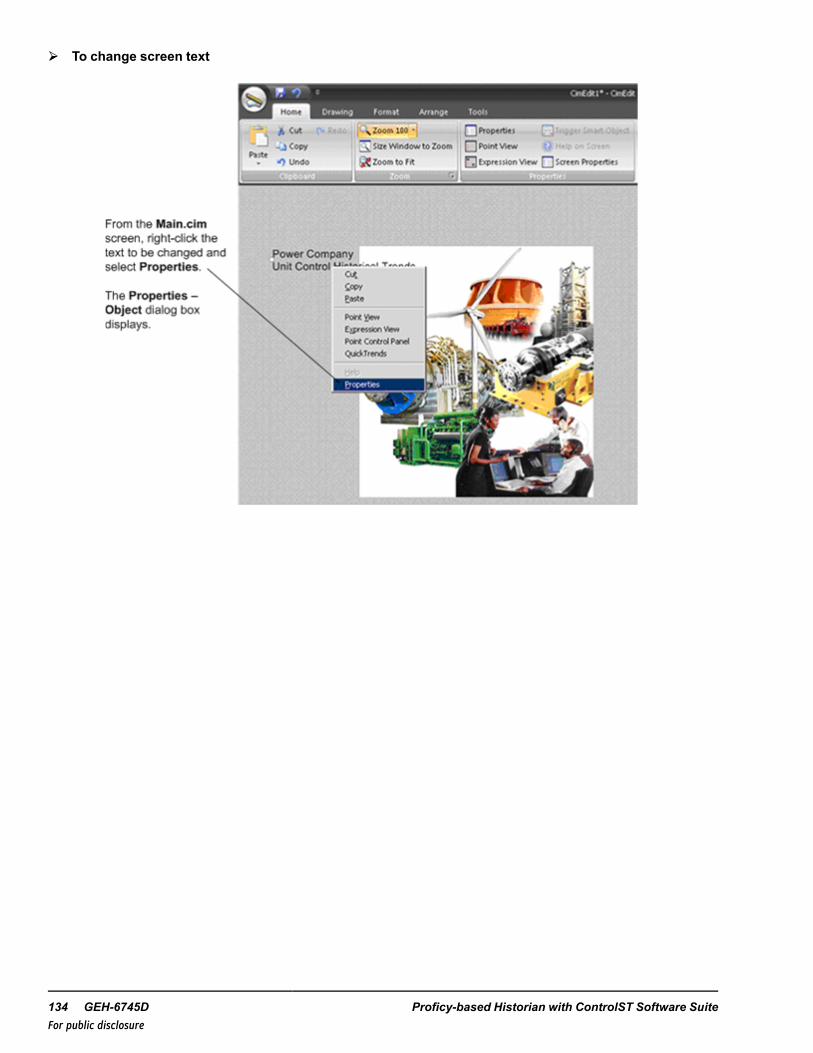
➢➢ To change screen text
134 GEH-6745D Proficy-based Historian with ControlST Software SuiteFor public disclosure
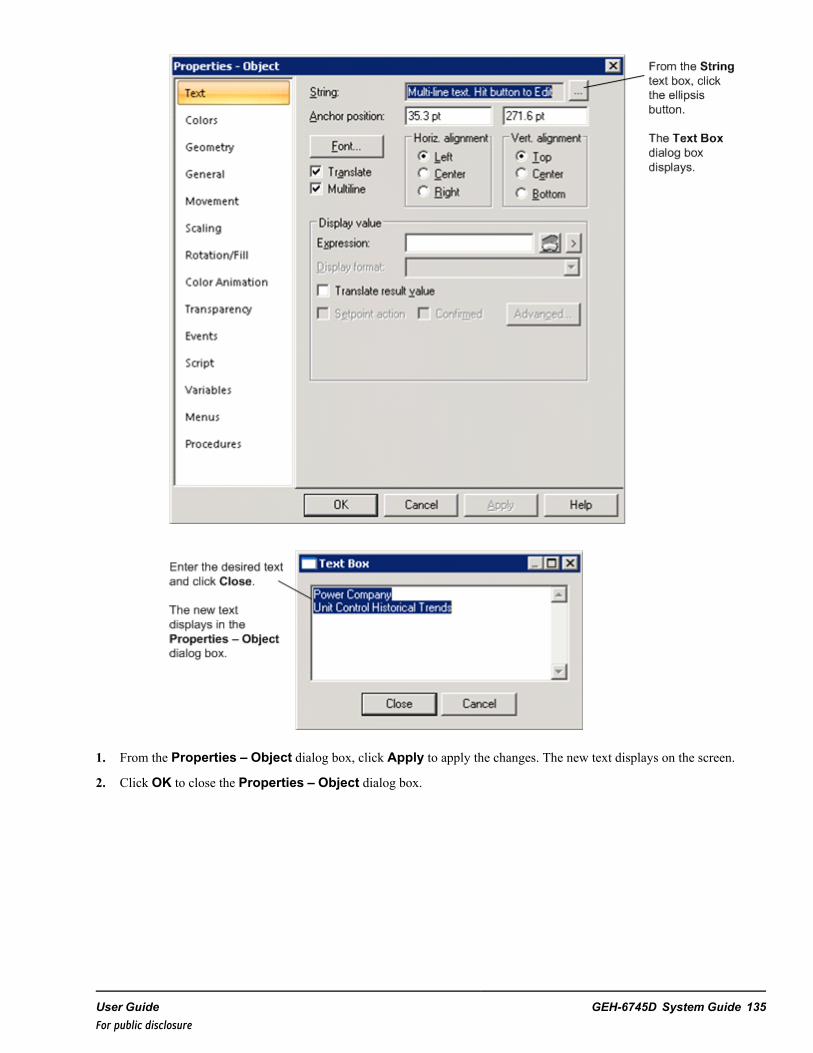
1. From the Properties – Object dialog box, click Apply to apply the changes. The new text displays on the screen.
2. Click OK to close the Properties – Object dialog box.
User Guide GEH-6745D System Guide 135For public disclosure
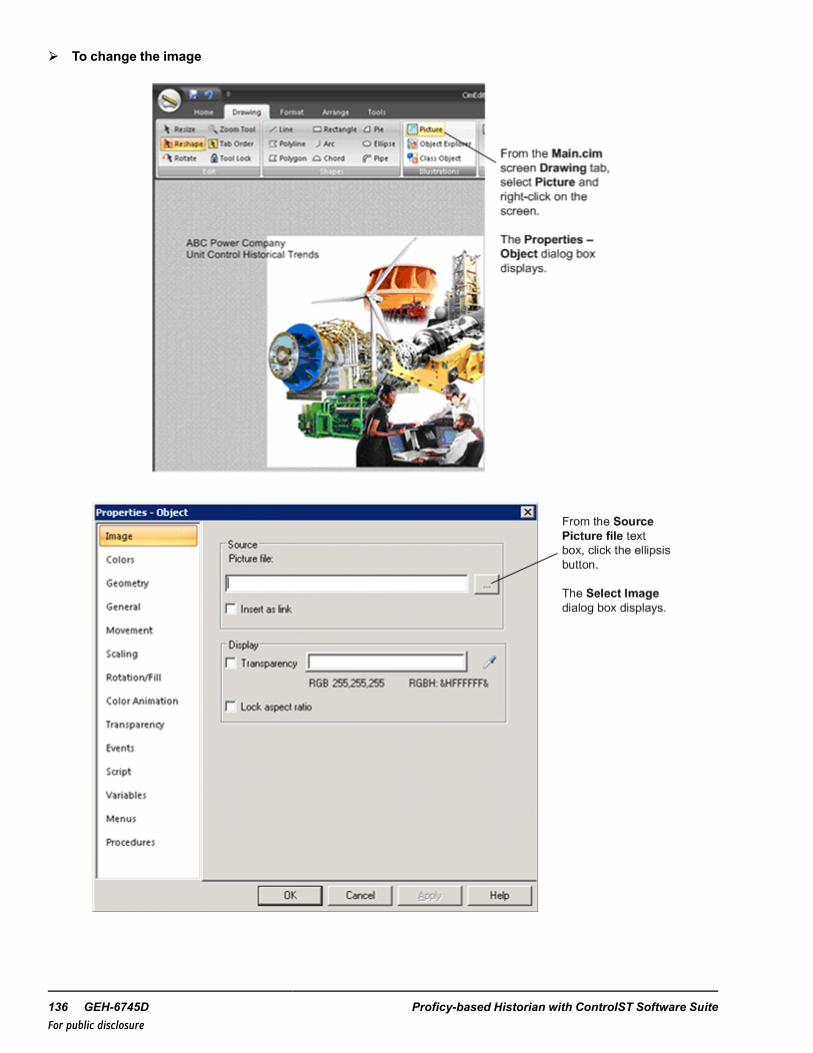
➢➢ To change the image
136 GEH-6745D Proficy-based Historian with ControlST Software SuiteFor public disclosure
Note Use the drag-and-drop feature to move the image.
♦ Locate the desired image and click Open. The path to the image displays in the Properties – Object dialog box.Click OK. The new image displays on the .cim screen.
➢➢ To delete an image
1. Right-click the image and select Cut. The image is deleted.
2. Click Save.
4.2.5 Editing Trend Screens➢➢ To edit trend screens
1. From the Start menu, select Programs, Proficy HMI SCADA – CIMPLICITY 8.0, and CimEdit. The CimEdit1 -CimEdit screen displays.
Note Trends can only be edited in CimEdit.
2. From CimEdit, select the Drawing tab.
3. Click the trend object in the Objects group.
User Guide GEH-6745D System Guide 137For public disclosure
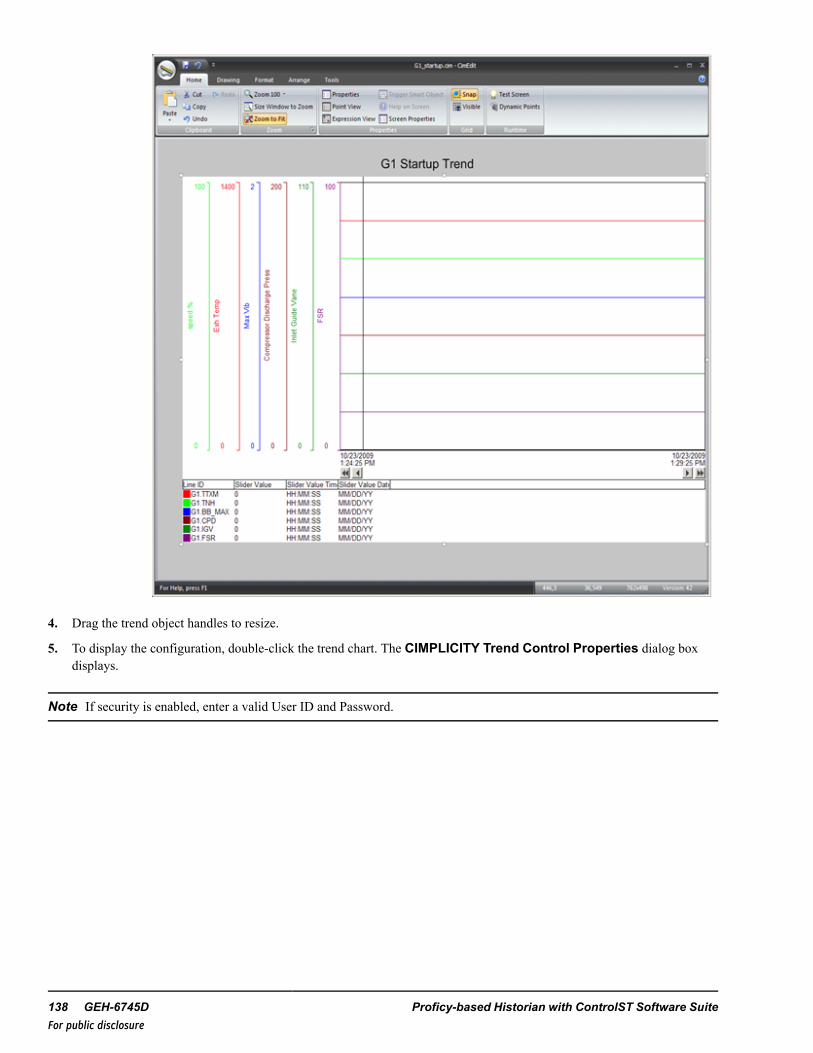
4. Drag the trend object handles to resize.
5. To display the configuration, double-click the trend chart. The CIMPLICITY Trend Control Properties dialog boxdisplays.
Note If security is enabled, enter a valid User ID and Password.
138 GEH-6745D Proficy-based Historian with ControlST Software SuiteFor public disclosure
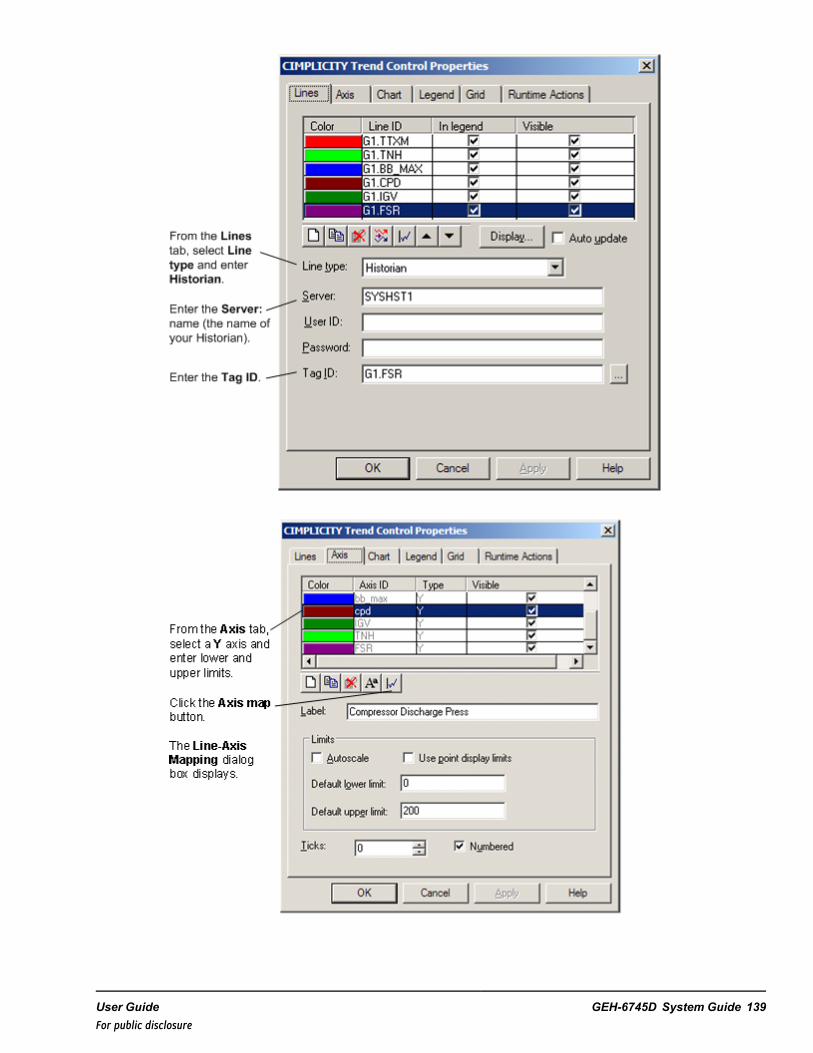
User Guide GEH-6745D System Guide 139For public disclosure
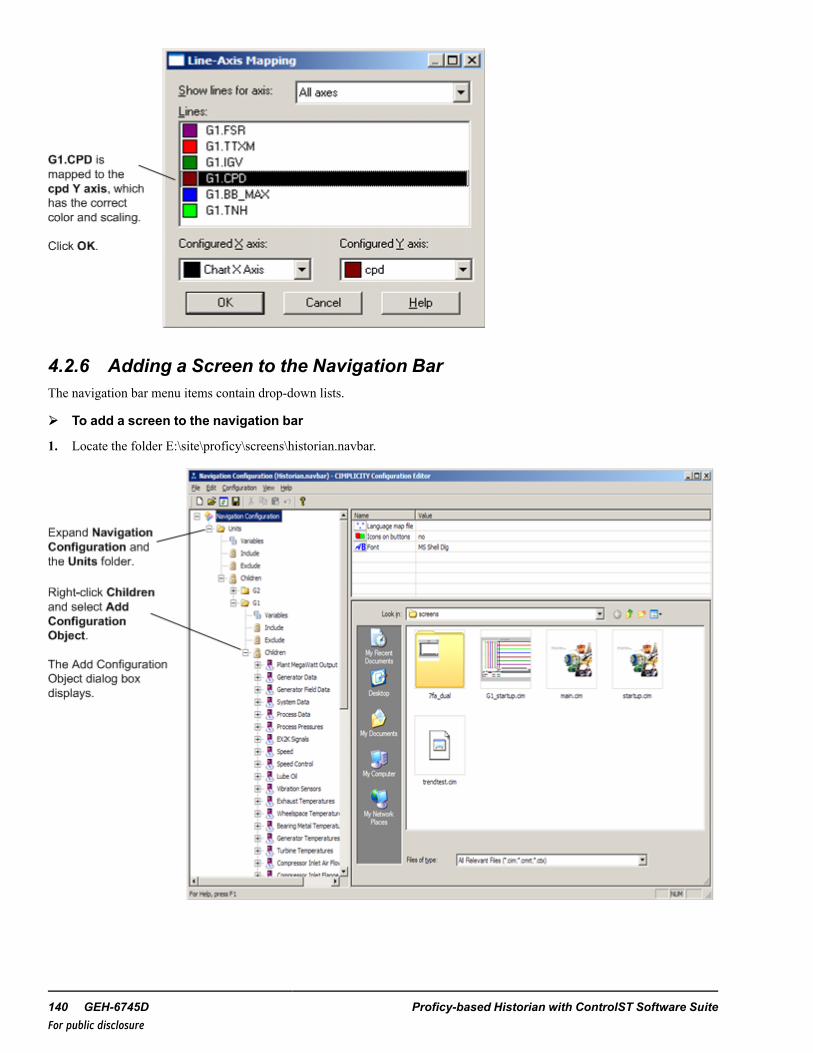
4.2.6 Adding a Screen to the Navigation BarThe navigation bar menu items contain drop-down lists.
➢➢ To add a screen to the navigation bar
1. Locate the folder E:\site\proficy\screens\historian.navbar.
140 GEH-6745D Proficy-based Historian with ControlST Software SuiteFor public disclosure
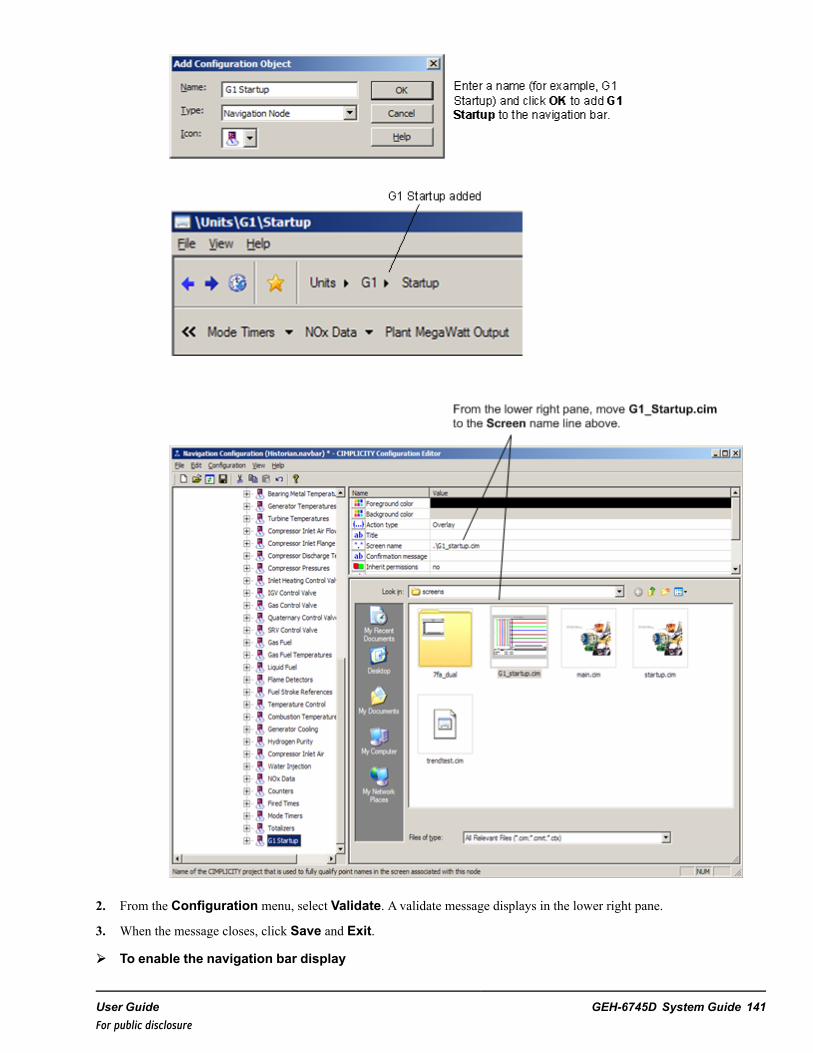
2. From the Configuration menu, select Validate. A validate message displays in the lower right pane.
3. When the message closes, click Save and Exit.
➢➢ To enable the navigation bar display
User Guide GEH-6745D System Guide 141For public disclosure
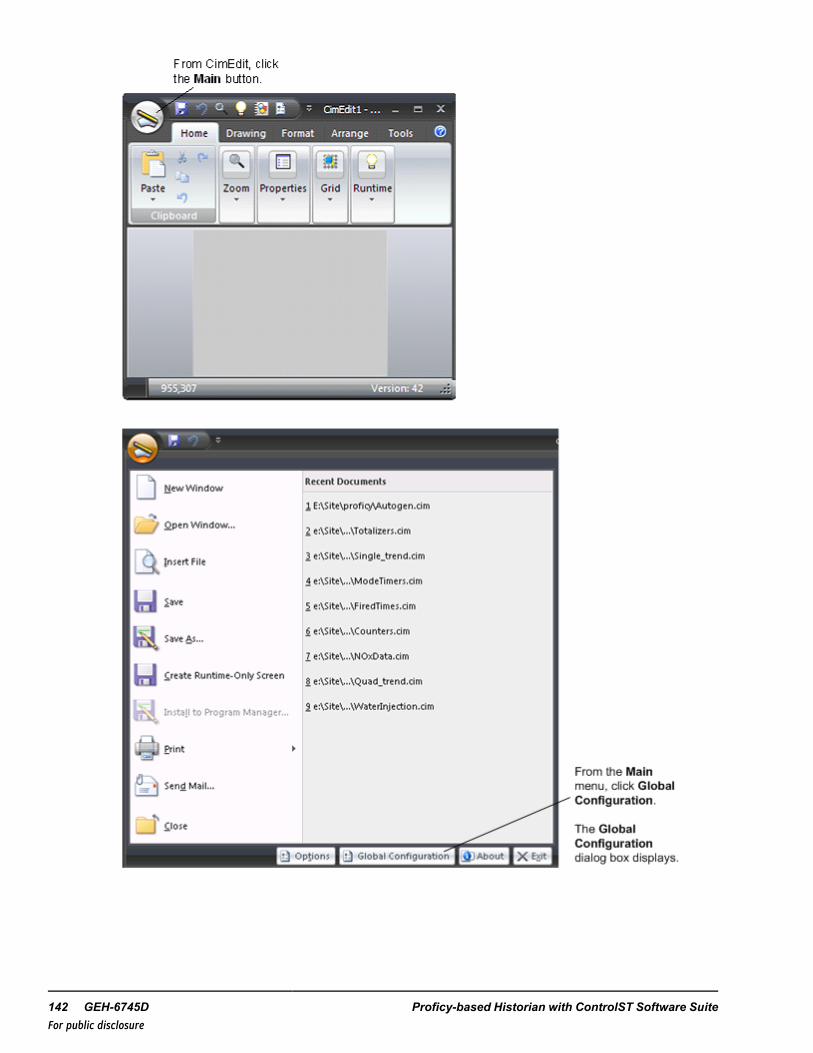
142 GEH-6745D Proficy-based Historian with ControlST Software SuiteFor public disclosure
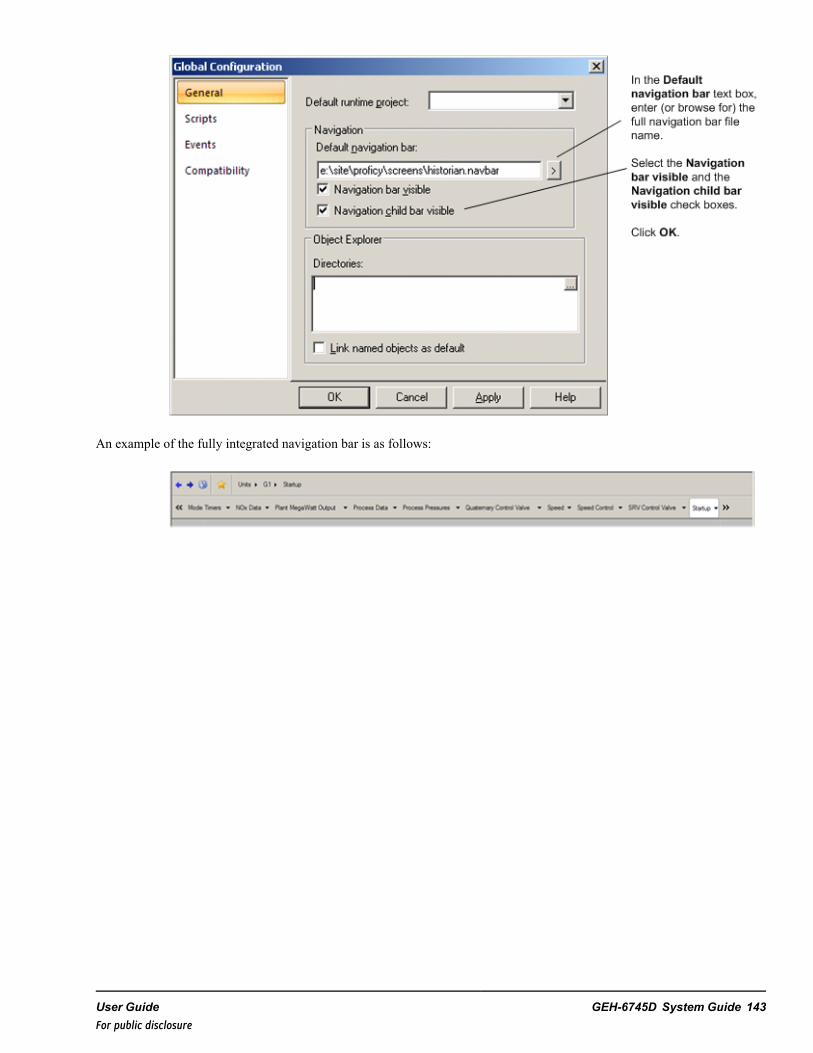
An example of the fully integrated navigation bar is as follows:
User Guide GEH-6745D System Guide 143For public disclosure
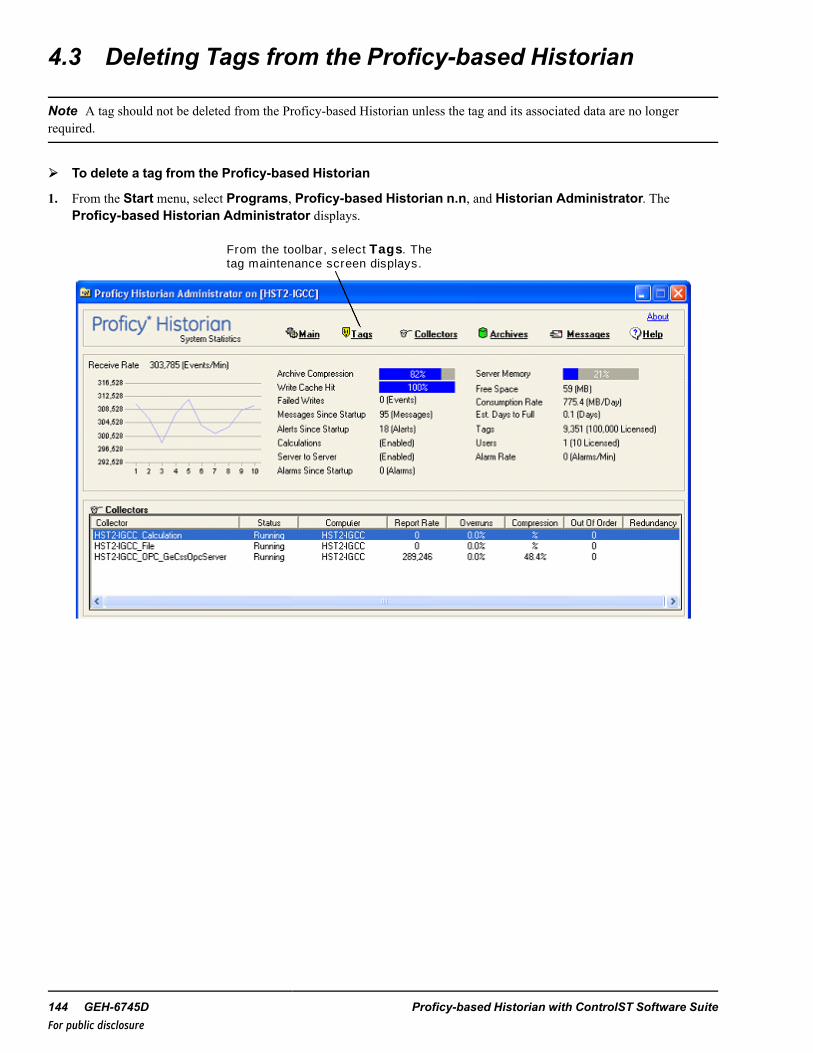
4.3 Deleting Tags from the Proficy-based Historian
Note A tag should not be deleted from the Proficy-based Historian unless the tag and its associated data are no longerrequired.
➢➢ To delete a tag from the Proficy-based Historian
1. From the Start menu, select Programs, Proficy-based Historian n.n, and Historian Administrator. TheProficy-based Historian Administrator displays.
From the toolbar, select Tags. The tag maintenance screen displays.
144 GEH-6745D Proficy-based Historian with ControlST Software SuiteFor public disclosure
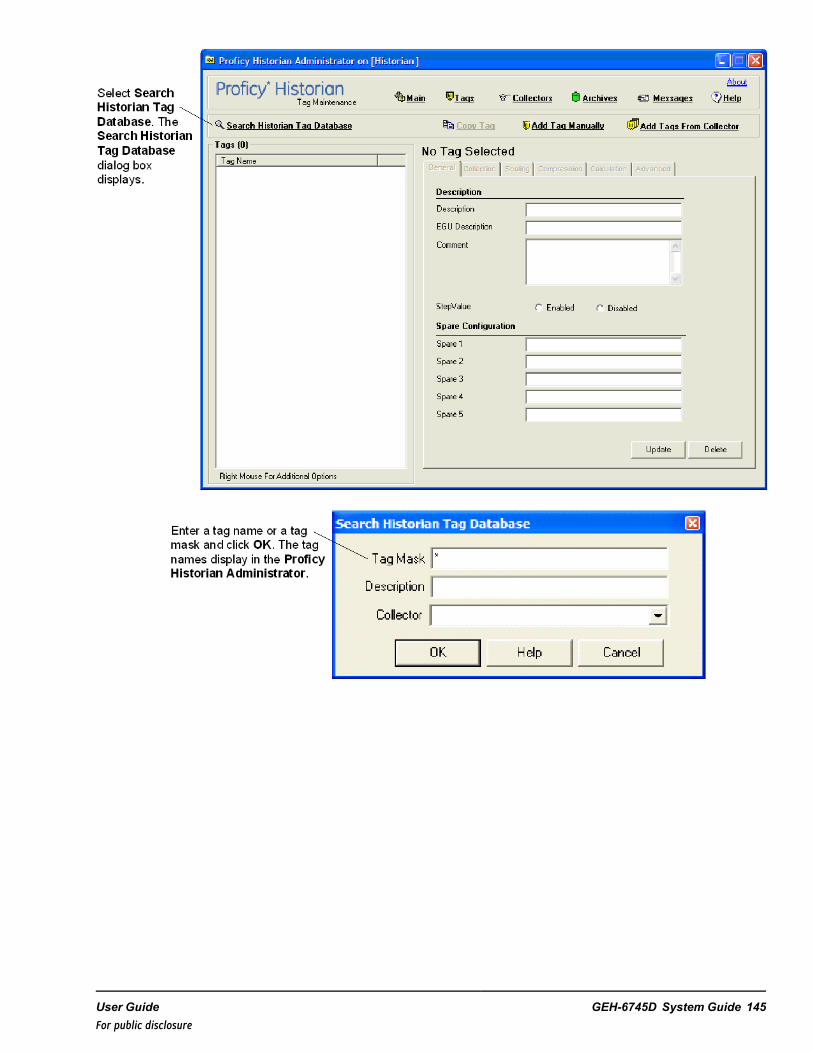
User Guide GEH-6745D System Guide 145For public disclosure
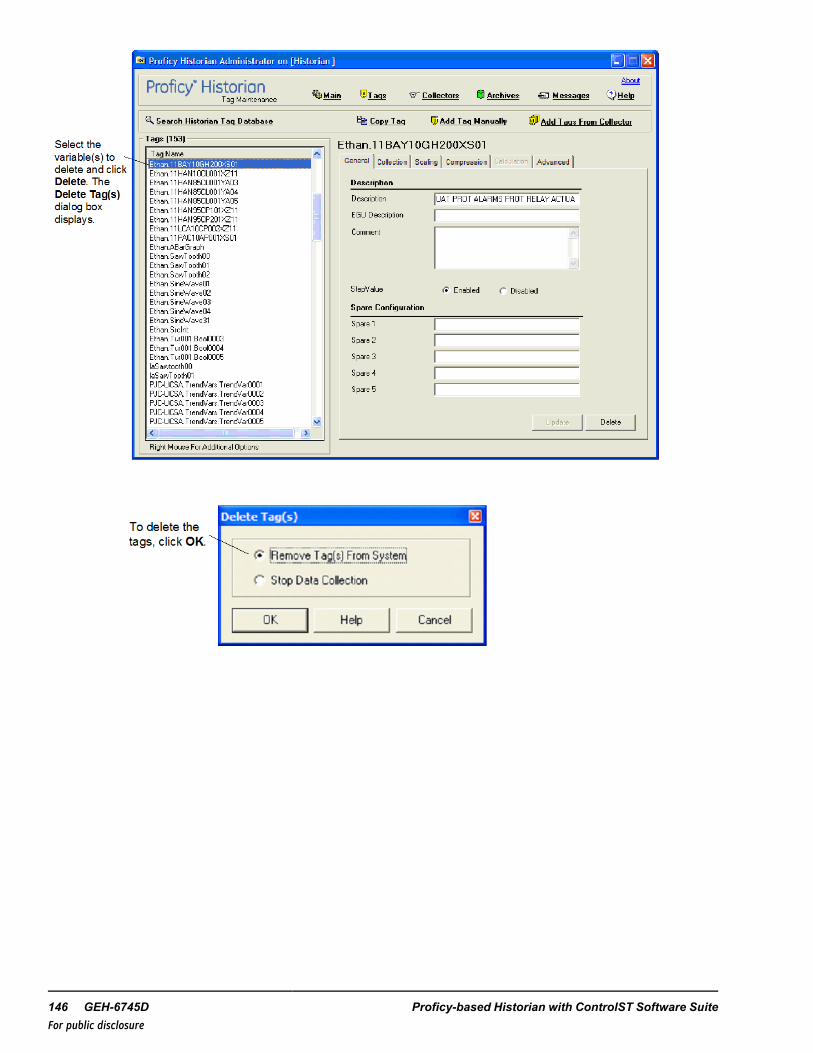
146 GEH-6745D Proficy-based Historian with ControlST Software SuiteFor public disclosure
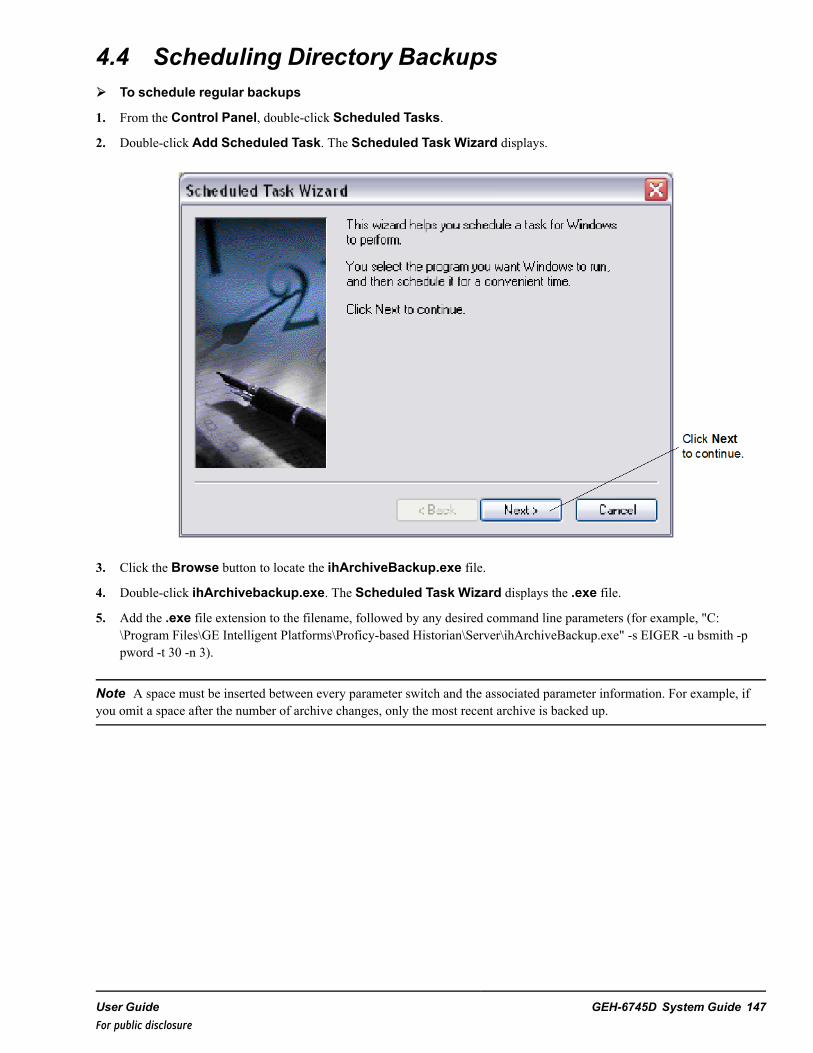
4.4 Scheduling Directory Backups➢➢ To schedule regular backups
1. From the Control Panel, double-click Scheduled Tasks.
2. Double-click Add Scheduled Task. The Scheduled Task Wizard displays.
3. Click the Browse button to locate the ihArchiveBackup.exe file.
4. Double-click ihArchivebackup.exe. The Scheduled Task Wizard displays the .exe file.
5. Add the .exe file extension to the filename, followed by any desired command line parameters (for example, "C:\Program Files\GE Intelligent Platforms\Proficy-based Historian\Server\ihArchiveBackup.exe" -s EIGER -u bsmith -ppword -t 30 -n 3).
Note A space must be inserted between every parameter switch and the associated parameter information. For example, ifyou omit a space after the number of archive changes, only the most recent archive is backed up.
User Guide GEH-6745D System Guide 147For public disclosure
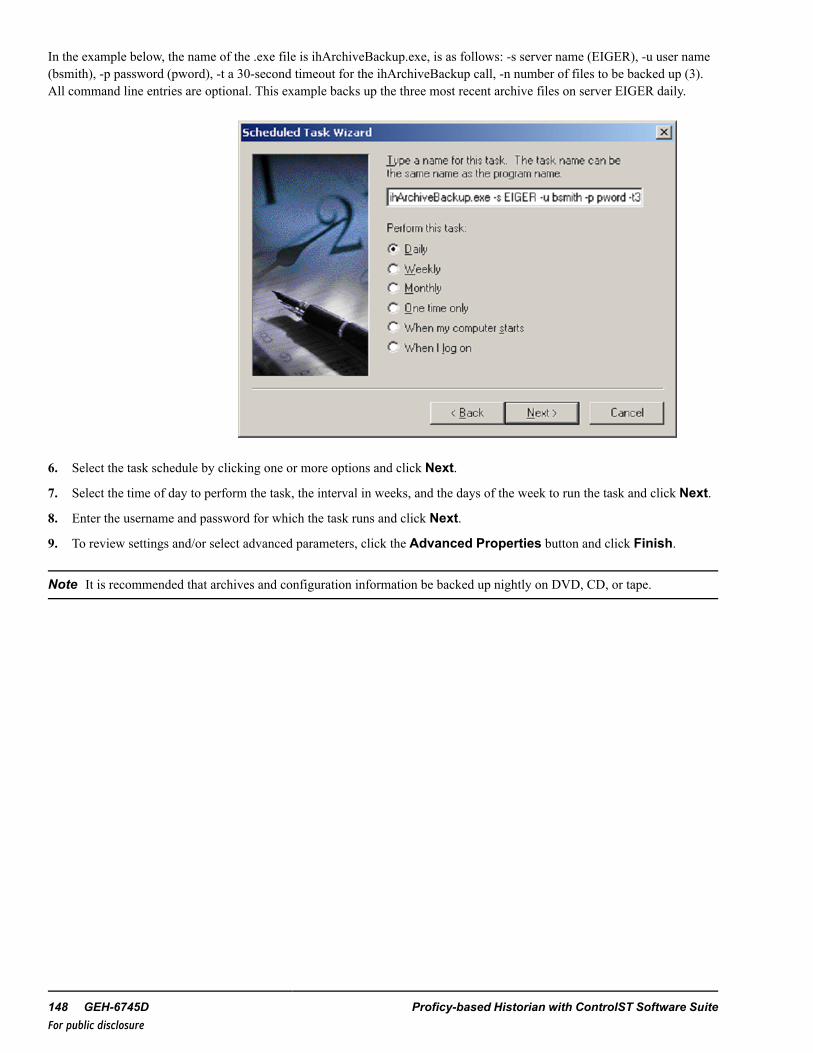
In the example below, the name of the .exe file is ihArchiveBackup.exe, is as follows: -s server name (EIGER), -u user name(bsmith), -p password (pword), -t a 30-second timeout for the ihArchiveBackup call, -n number of files to be backed up (3).All command line entries are optional. This example backs up the three most recent archive files on server EIGER daily.
6. Select the task schedule by clicking one or more options and click Next.
7. Select the time of day to perform the task, the interval in weeks, and the days of the week to run the task and click Next.
8. Enter the username and password for which the task runs and click Next.
9. To review settings and/or select advanced parameters, click the Advanced Properties button and click Finish.
Note It is recommended that archives and configuration information be backed up nightly on DVD, CD, or tape.
148 GEH-6745D Proficy-based Historian with ControlST Software SuiteFor public disclosure
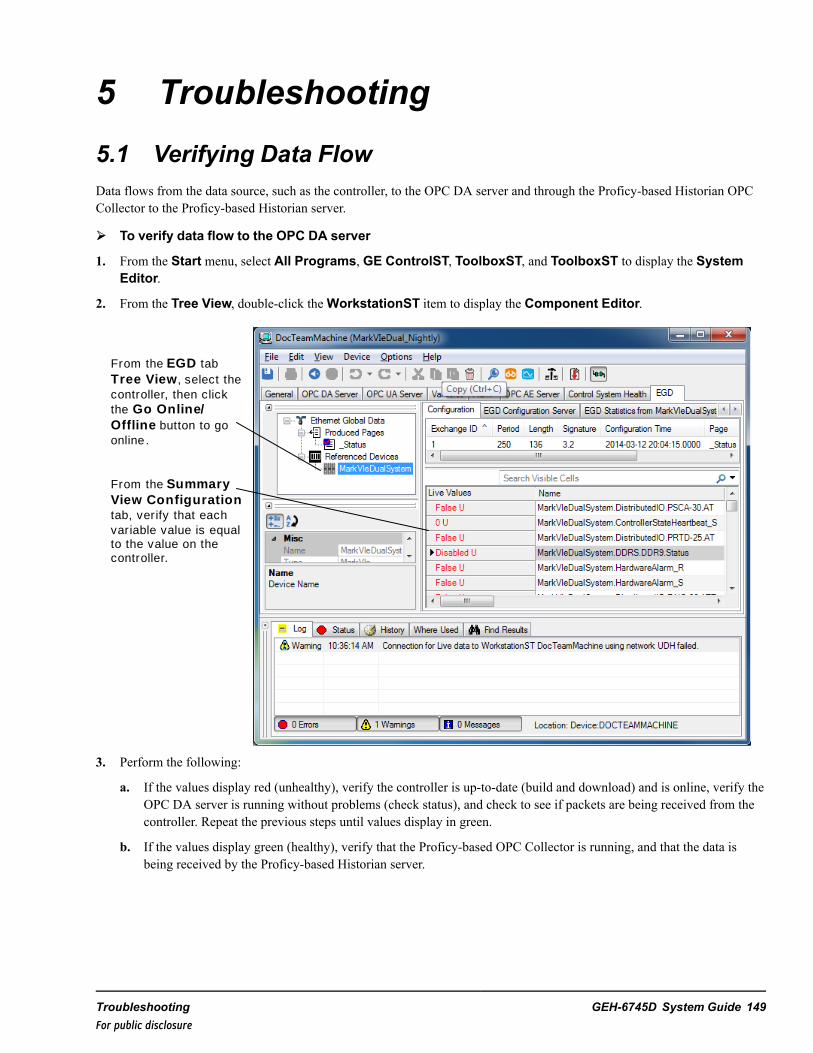
5 Troubleshooting5.1 Verifying Data FlowData flows from the data source, such as the controller, to the OPC DA server and through the Proficy-based Historian OPCCollector to the Proficy-based Historian server.
➢➢ To verify data flow to the OPC DA server
1. From the Start menu, select All Programs, GE ControlST, ToolboxST, and ToolboxST to display the SystemEditor.
2. From the Tree View, double-click theWorkstationST item to display the Component Editor.
From the EGD tab Tree View , select the controller, then click the Go On line/Of f l ine button to go online.
From the Summary View Con f igu rat ion tab, verify that each variable value is equal to the value on the controller.
3. Perform the following:
a. If the values display red (unhealthy), verify the controller is up-to-date (build and download) and is online, verify theOPC DA server is running without problems (check status), and check to see if packets are being received from thecontroller. Repeat the previous steps until values display in green.
b. If the values display green (healthy), verify that the Proficy-based OPC Collector is running, and that the data isbeing received by the Proficy-based Historian server.
Troubleshooting GEH-6745D System Guide 149For public disclosure
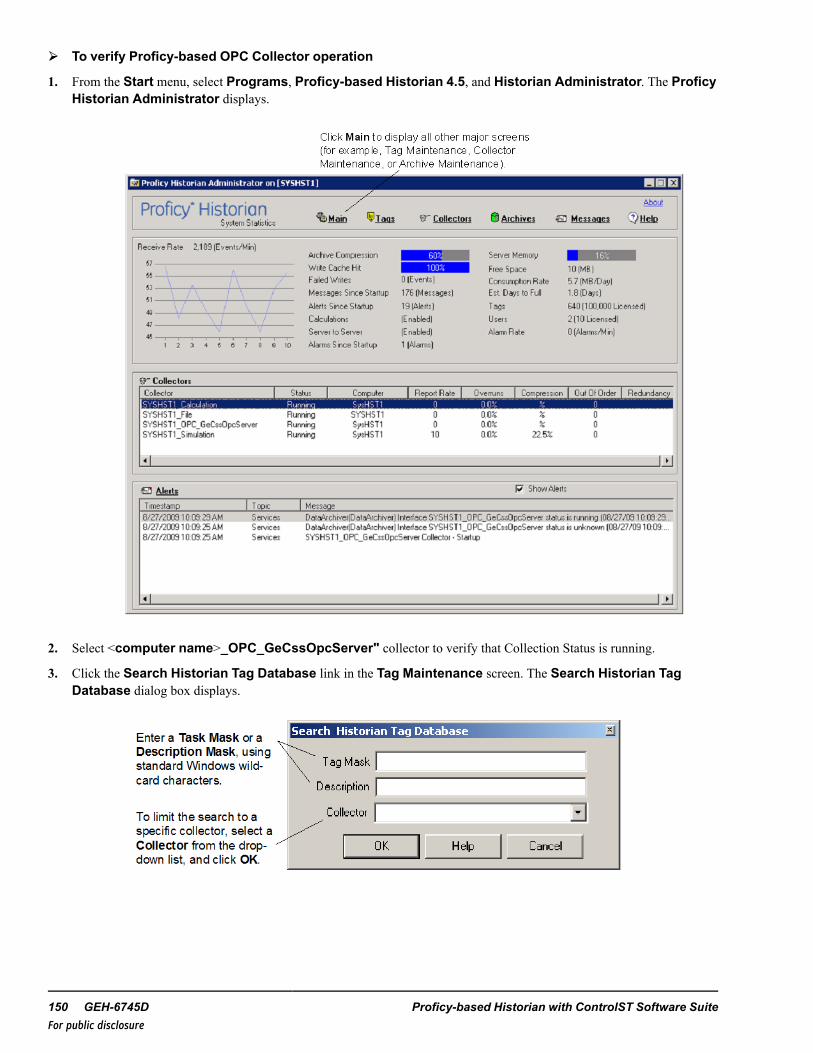
➢➢ To verify Proficy-based OPC Collector operation
1. From the Start menu, select Programs, Proficy-based Historian 4.5, and Historian Administrator. The ProficyHistorian Administrator displays.
2. Select <computer name>_OPC_GeCssOpcServer" collector to verify that Collection Status is running.
3. Click the Search Historian Tag Database link in the Tag Maintenance screen. The Search Historian TagDatabase dialog box displays.
150 GEH-6745D Proficy-based Historian with ControlST Software SuiteFor public disclosure
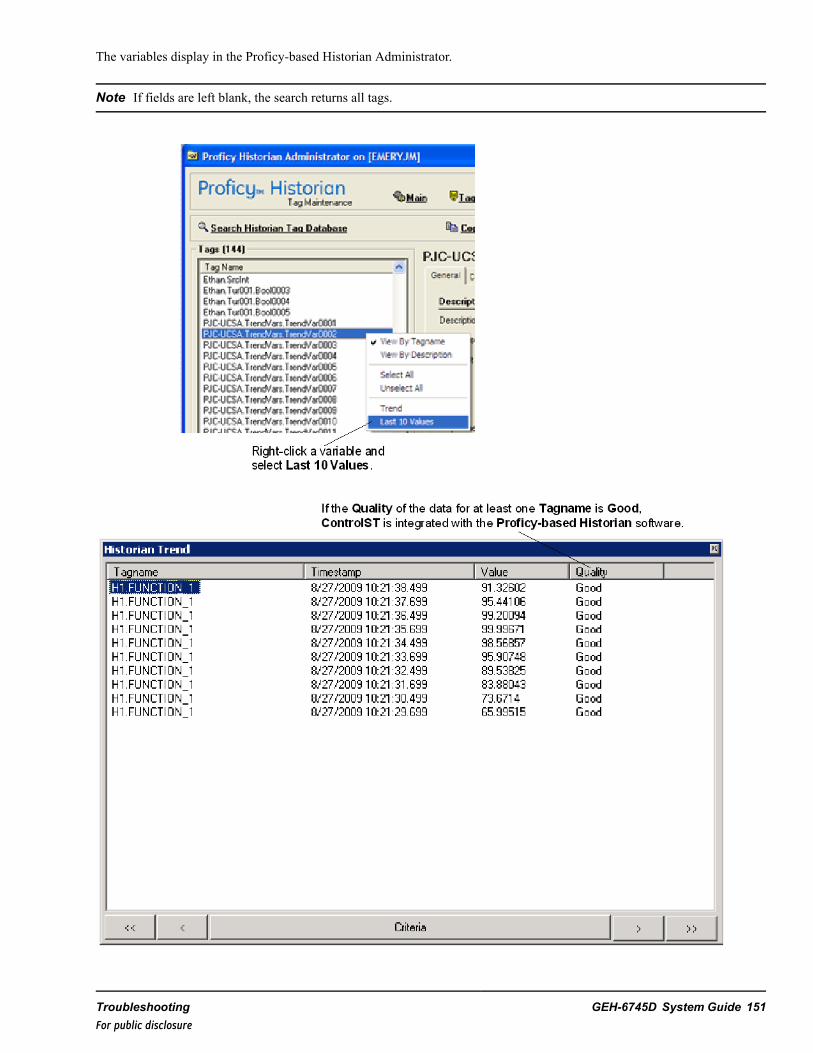
The variables display in the Proficy-based Historian Administrator.
Note If fields are left blank, the search returns all tags.
Troubleshooting GEH-6745D System Guide 151For public disclosure

5.2 Report Configuration ErrorsReport errors, which display when the report is run from the web browser, are controlled by the file E:\site\reports\defaultstyle.css. This file specifies font types, sizes, colors, and the default background colors. Background image filesreferenced in the defaultstyle.css file are located in the E:\site\reports\images directory. Correct logos are specified in thereports.dat file, with the logo image file located in E:\site\reports\images.
Other report configuration errors, such as incorrect start and stop times, report frequency, or event triggers display when thereport is run with an incorrect time period. To correct these errors, adjust the report parameters as needed in the E:\site\reports\reports.dat file .
When incorrect variable names display in the tag file, the following message displays in the report.
Error executing query: OLE exception from "Microsoft OLE DB Provider for ODBC Drivers": [OSI][PI DBC][PI]Tag
< G1.AFPAF > not found Win32::OLE(0.15) error 0x80004005: "Unspecified error" in METHOD/PROPERTYGET
"Execute" SELECT tag, descriptor, engunits, pointtype FROM pipoint WHERE tag = 'G1.DWATT' or tag =
'G1.AFPAF' or tag = 'G1.MVARHR' or tag = 'G1.MWATTHR'
This is typically the SQL command that the script is trying to run to get the data, along with the returned error message.Careful examination of the error message indicates the source of the problem (in this case G1.AFPAF was not found – pointname should have been G1.AFPAP).
5.2.1 Automatic Report Generation ErrorsAutomatic report generation errors are usually related to scheduler problems. Verify that the chain.pl task is scheduled to runevery hour. The tasks currently scheduled can be verified on a Windows NT system by opening a command window, andentering at. On a Windows 2000 or later system, the scheduled tasks can be monitored by selecting Start, Programs,Accessories, System Tools, and Scheduled Tasks. Additional information about each task displays in the scheduled taskfolder. Once the task is scheduled, actions are logged to E:\site\reports\LOG\rpt.log each time the task runs. Any problemsencountered, as well as successful completion messages, are logged to this file.
152 GEH-6745D Proficy-based Historian with ControlST Software SuiteFor public disclosure


For public disclosure
Related Documents