BIRLA INSTITUTE OF TECHNOLOGY AND SCIENCE, PILANI Gym Cycle Section 2 Group 3 ANUMOLU AKHIL SAI 2012A4PS272P NEMISH KANWAR 2012A4PS305P P VIKRAMADITYA REDDY 2012A4PS290P SHASHANK BAVEJA 2012A4PS288P SAHIB SINGH DHANJAL 2012A4PS289P TAIZOON CHUNAWALA 2012A4PS298P KUNAL MANCHANDA 2012A4PS279P Prepared in Partial Fulfillment Of Production Techniques 2 ME F313

Welcome message from author
This document is posted to help you gain knowledge. Please leave a comment to let me know what you think about it! Share it to your friends and learn new things together.
Transcript

BIRLA INSTITUTE OF TECHNOLOGY AND SCIENCE, PILANI Gym Cycle Section 2 Group 3 ANUMOLU AKHIL SAI 2012A4PS272P
NEMISH KANWAR 2012A4PS305P P VIKRAMADITYA REDDY 2012A4PS290P
SHASHANK BAVEJA 2012A4PS288P SAHIB SINGH DHANJAL 2012A4PS289P TAIZOON CHUNAWALA 2012A4PS298P KUNAL MANCHANDA 2012A4PS279P
Prepared in Partial FulfillmentOf
Production Techniques 2 ME F313

Acknowledgement We would like to express our special thanks of gratitude to Dr T C Bera, who gave us the opportunity to do this project, which also helped us to get Hands-on experience of various Production Technique process
Secondly, we would like to thank the entire Workshop instructors who helped us a lot in finalizing this project within the limited time frame
Introduction The gym cycle as the name suggests is used for incorporating cycling as a physical exercise in the gym. The physical exercise gained from cycling is generally linked with increased health and well-being. It improves fitness and cardiovascular health.
The gym cycle converts muscular energy to kinetic energy. Cycling drives a heavy flywheel, generally with the help of a chain. The torque required to drive the flywheel can be varied with the help of a brake which increases the strain on the muscles and hence gradually enhances its strength.
ABSTRACT We aim to fabricate a self- styled functional gym cycle using the materials, instruments and machines present in our workshop. Here, in this abstract, we will describe in brief how we went about making this model.
The design of the model was done on Solid Works. The design involved taking into consideration material and fabrication facilities available in our workshop. The cycle was designed to suit the dimensions of the average male. After the design was approved, we began its fabrication.
Construction involved using a variety of machines and tools for creating the ideal size and shapes of all our individual parts.
Welding was used primarily for joining since steel has been extensively used because of the strength requirements. The lathe was used for turning of our pedal shaft to ensure that it just press-fits into the bearing. Shear cutter was used to cut mild steel sheets for the flywheel and the pedal. The finishing of these approximate cuts was done on band saw and then later on the grinding wheel We also used wood for our seat, pedals and the flywheel. Drilling was one of the most important processes in this project like in most other projects.
Various tools such as drill bits, chucks, turning tools, vernier calipers were used throughout our construction process.
The entire team thoroughly enjoyed this long, interesting and educational experience especially so since the project produced a working model as planned.

University BITS pilaniAssembly Gym Cycle Quantity 1
Details For exercising the the Leg Muscles
AssemblyItemOrder Part Quantity
1 Rear Bearing assembly 12 Front axle assembly 13 Belt Drive 14 Fly Wheel 15 H-Shaped Base 16 Seat 17 Pedal 28 Pedal Shaft 19 Handle Assembly 110 Chassis 1
ItemOrder Process Operation Quantity1 weld1 Arc Welding: H-Shaped Base to Chassis 42 weld2 Arc Welding: Rear bearing to chassis 23 weld3 Arc Welding: Belt drive1 to Flywheel 24 weld4 Arc Welding: Belt drive1 to axle 15 weld5 Arc Welding: Chassis to Hand Assembly 26 weld6 Arc Welding: Chassis to Seat 17 D-spanner Fastening: Front Axle Assembly to Chassis 4
ItemOrder Fastener Use Quantity1 Bolt (M6) Fastening: Front Axle Assembly to Chassis 41 Nut (M6) Fastening: Front Axle Assembly to Chassis 4
29/11/14 Page 1 of 11

University BITS pilaniSubassembly Rear Bearing assembly Quantity 1
Details To mount the rear axle
AssemblyItemOrder Part Quantity
1 Circular Billet 12 Bearing 2 (push fit)3 Rod 1
ItemOrder Process Operation Quantity1 Boring Machining 22 Facing Machining 13 Turning Machining 1
Part : Circular BilletItemOrder Material Type Size1 dim1 Size2 dim2 Quantity
1 Mild Steel Circular 3" Diameter 2" length
ItemOrder Process Size Quantity1 Facing - 4.5 cm 12 Boring - 3 cm 2 (push fit bearing)
Part : BearingItemOrder Bearing Type Size1 dim1 Size2 dim2 Quantity
1 - - 3 cm Diameter - - 2
Part : RodItemOrder Material Type Size1 dim1 Size2 dim2 Quantity
1 Mild Steel Rod 1cm Diameter 15 cm length
ItemOrder Process Size Quantity1 Turning - 9 mm 1
29/11/14 Page 2 of 11

University BITS pilaniSubassembly Front axle assembly Quantity 1
Details To mount the front axle
AssemblyItemOrder Part Quantity
1 Pillow Bearing 22 Circular Tube 1
ItemOrder Process Operation Quantity1 Cutting Machining 1
Part : Circular RodItemOrder Material Type Size1 dim1 Size2 dim2 Quantity
1 Mild Steel Circular 1" Diameter 30 cm length 1
29/11/14 Page 3 of 11
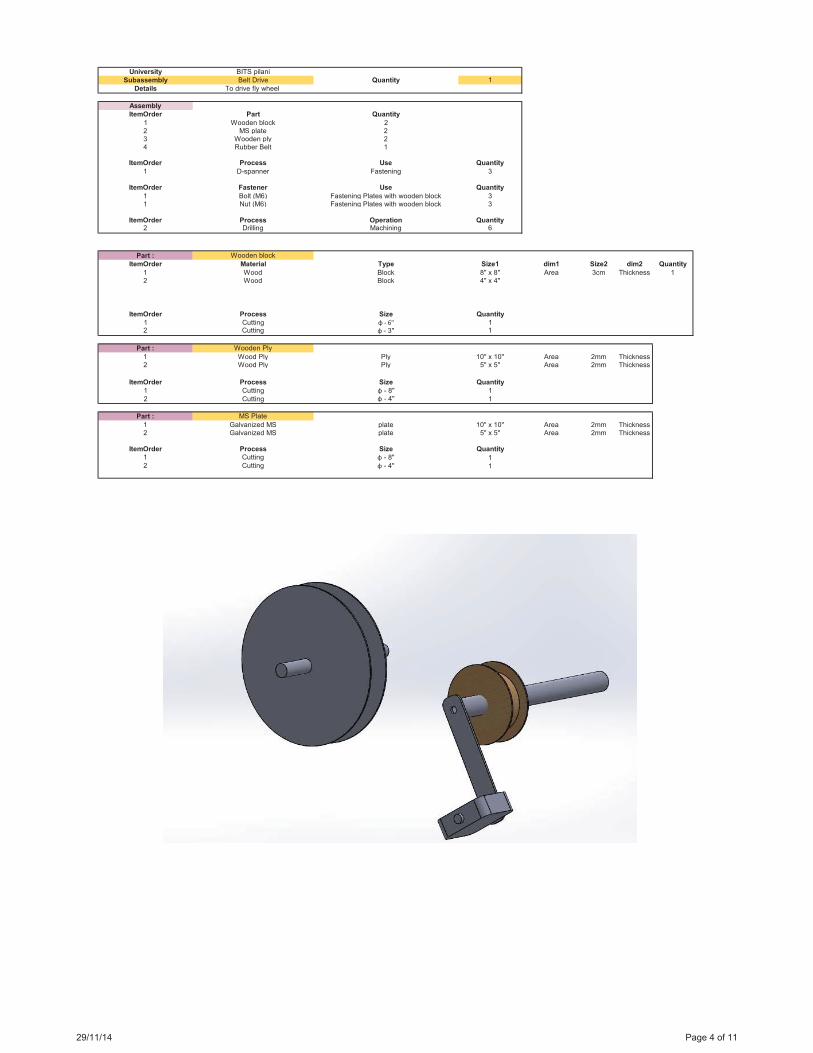
University BITS pilaniSubassembly Belt Drive Quantity 1
Details To drive fly wheel
AssemblyItemOrder Part Quantity
1 Wooden block 22 MS plate 23 Wooden ply 24 Rubber Belt 1
ItemOrder Process Use Quantity1 D-spanner Fastening 3
ItemOrder Fastener Use Quantity1 Bolt (M6) Fastening Plates with wooden block 31 Nut (M6) Fastening Plates with wooden block 3
ItemOrder Process Operation Quantity2 Drilling Machining 6
Part : Wooden blockItemOrder Material Type Size1 dim1 Size2 dim2 Quantity
1 Wood Block 8" x 8" Area 3cm Thickness 12 Wood Block 4" x 4"
ItemOrder Process Size Quantity1 Cutting 12 Cutting - 3" 1
Part : Wooden Ply1 Wood Ply Ply 10" x 10" Area 2mm Thickness2 Wood Ply Ply 5" x 5" Area 2mm Thickness
ItemOrder Process Size Quantity1 Cutting - 8" 12 Cutting - 4" 1
Part : MS Plate1 Galvanized MS plate 10" x 10" Area 2mm Thickness2 Galvanized MS plate 5" x 5" Area 2mm Thickness
ItemOrder Process Size Quantity1 Cutting - 8" 12 Cutting - 4" 1
29/11/14 Page 4 of 11

University BITS pilaniSubassembly Fly Wheel Quantity 1
Details
AssemblyItemOrder Part Quantity
1 Wodden block 12 MS Plate 2
ItemOrder Process Use Quantity1 D-spanner Fastening 4
ItemOrder Fastener Use Quantity1 Bolt (M6) Fastening Plates with wooden block 41 Nut (M6) Fastening Plates with wooden block 4
ItemOrder Process Operation Quantity1 Drilling Machining 5
Part : Wodden blockItemOrder Material Type Size1 dim1 Size2 dim2 Quantity
1 Wood Block 16" x 16" Area 1cm Thickness 1
ItemOrder Process Size Quantity1 Cutting - 35 cm 1
Part : MS plateItemOrder Material Type Size1 dim1 Size2 dim2 Quantity
1 Mild Steel Plate 35 cm Diameter 3mm Thickness 2
ItemOrder Process Size Quantity1 Cutting - 35 cm 2
29/11/14 Page 5 of 11

University BITS pilaniSubassembly H-Shaped Base Quantity 1
Details Mechanism required to rotate Belt drive
AssemblyItemOrder Part Quantity
1 Rectangular Tube 1 22 Rectangular Tube 2 1
ItemOrder Process Use Quantity1 Welding Joining 2
Part : Rectangular Tube 1ItemOrder Material Type Size1 dim1 Size2 dim2 Quantity
1 Mild Steel NA 2in x 1in x 2.5mm cross sectional
area 60cm length
ItemOrder Process Size Quantity1 Cutting 60cm 2
Part : Rectangular Tube 2ItemOrder Material Type Size1 dim1 Size2 dim2 Quantity
1 Mild Steel NA 3.5in x 2in x 2.5mm area 90cm length 1
ItemOrder Process Size Quantity1 Cutting 90cm 1
29/11/14 Page 6 of 11

University BITS pilaniSubassembly Seat Quantity 1
Details Base required for the driver to sit
AssemblyItemOrder Part Quantity
1 Metal Seat 12 Wooden Seat 13 Foam 1
ItemOrder Process Use Quantity1 D-spanner Fastening 22 Sticking with Fevicol Foam to Wood 1
ItemOrder Fastener Use Quantity1 Bolt (M6) Fastening seat with metal Plate 21 Nut (M6) Fastening seat with metal Plate 2
Part : Metal SeatItemOrder Material Type Size1 dim1 Size2 dim2 Quantity
1 Plate 24cm*24cm area 1in thick 1
Part : Wooden SeatItemOrder Material Type Size1 dim1 Size2 dim2 Quantity
1 Wood Shesham 24cm*24cm area 1in thick 1
ItemOrder Process Size Quantity1 Drilling 2mm 22 Sawing Triangulation 1
Part : FoamItemOrder Material Type Size1 dim1 Size2 dim2 Quantity
1 Foam Foam 1/2in thickness 1
ItemOrder Process Length Quantity1 Cutting Triangulation 1
29/11/14 Page 7 of 11

University BITS pilaniSubassembly Pedal Quantity 2
Details To drive the pedal assembly
AssemblyItemOrder Part Quantity
1 Pedal Plate 12 Pedal rod 13 Wood Base 1
ItemOrder Process Use Quantity1 weld1 Pedal Plate to Pedal rod 12 weld2 Pedal Plate to shaft 1
Part : Pedal PlateItemOrder Material Type Size1 dim1 Size2 dim2 Quantity
1 Plate MS 3cm*15cm area 3mm thick 1
ItemOrder Process Use1 Sawing Cutting
Part : Pedal rodItemOrder Material Type Size1 dim1 Size2 dim2 Quantity
1 rod MS round 12mm diameter 10cm length 1
ItemOrder Process Size1 Drilling 2mm
Part : Wood BaseItemOrder Material Type Size1 dim1 Size2 dim2 Quantity
1 Wood Shesham 4cm x 6cm area 1in thick 1
ItemOrder Process Size1 Drilling 12mm
29/11/14 Page 8 of 11

University BITS pilaniSubassembly Pedal Shaft Quantity 1
Details Sits over Bearing
AssemblyItemOrder Part Quantity
1 Shaft 1
Part : ShaftItemOrder Material Type Size1 dim1 Size2 dim2 Quantity
1 Rod MS 12mm diameter 8in length 1
ItemOrder Process Size1 Turning to 9.26mm2 Grinding Finishing
29/11/14 Page 9 of 11

University BITS pilaniSubassembly Handle Assembly Quantity 1
Details Handle acting as arm rest
AssemblyItemOrder Part Quantity
1 Rectangular Tube 1 22 Rectangular Tube 2 23 Circular Tube 1
ItemOrder Process Use Quantity1 Welding Joining 6
Part : Rectangular Tube 1ItemOrder Material Type Size1 dim1 Size2 dim2 Quantity
1 Mild Steel NA 1in x 1in x 2mm area 150cm length 1
ItemOrder Process Size Quantity1 Cutting 70cm 2
Part : Rectangular Tube 2ItemOrder Material Type Size1 dim1 Size2 dim2 Quantity
1 Mild Steel NA 1in x 1in x 2mm area 5in length 1
ItemOrder Process Size Quantity1 Cutting 1.5in 4
Part : Circular TubeItemOrder Material Type Size1 dim1 Size2 dim2 Quantity
1 Mild Steel NA 2in x 1in x 2.5mm area 60cm length 1
ItemOrder Process Size Quantity1 Cutting 60cm 22 Bending 5" from each side 2
29/11/14 Page 10 of 11

University BITS pilaniSubassembly Chassis Quantity 1
Details Main Supporting Structure
AssemblyItemOrder Part Quantity
1 Rectangular Tube 1 22 Rectangular Tube 2 2
ItemOrder Process Use Quantity1 Welding Joining 2
Part : Rectangular Tube 1ItemOrder Material Type Size1 dim1 Size2 dim2 Quantity
1 Mild Steel NA 2in x 1in x 2.5mm cross sectionalarea 200cm length 1
ItemOrder Process Size Quantity1 Cutting 90cm 22 Drilling 2
Part : Rectangular Tube 2ItemOrder Material Type Size1 dim1 Size2 dim2 Quantity
1 Mild Steel NA 2in x 1in x 2.5mm area 110cm length 1
ItemOrder Process Size Quantity1 Cutting 50cm 22 Drilling 1
29/11/14 Page 11 of 11