improving since 1908. Wood wool by Heraklith ® PROCESSING INSTRUCTIONS www.heraklith.co.uk

Welcome message from author
This document is posted to help you gain knowledge. Please leave a comment to let me know what you think about it! Share it to your friends and learn new things together.
Transcript

improving since 1908.Wood wool by Heraklith®
PROCESSING INSTRUCTIONS
www.heraklith.co.uk
2 PROCESSING INSTRUCTIONS
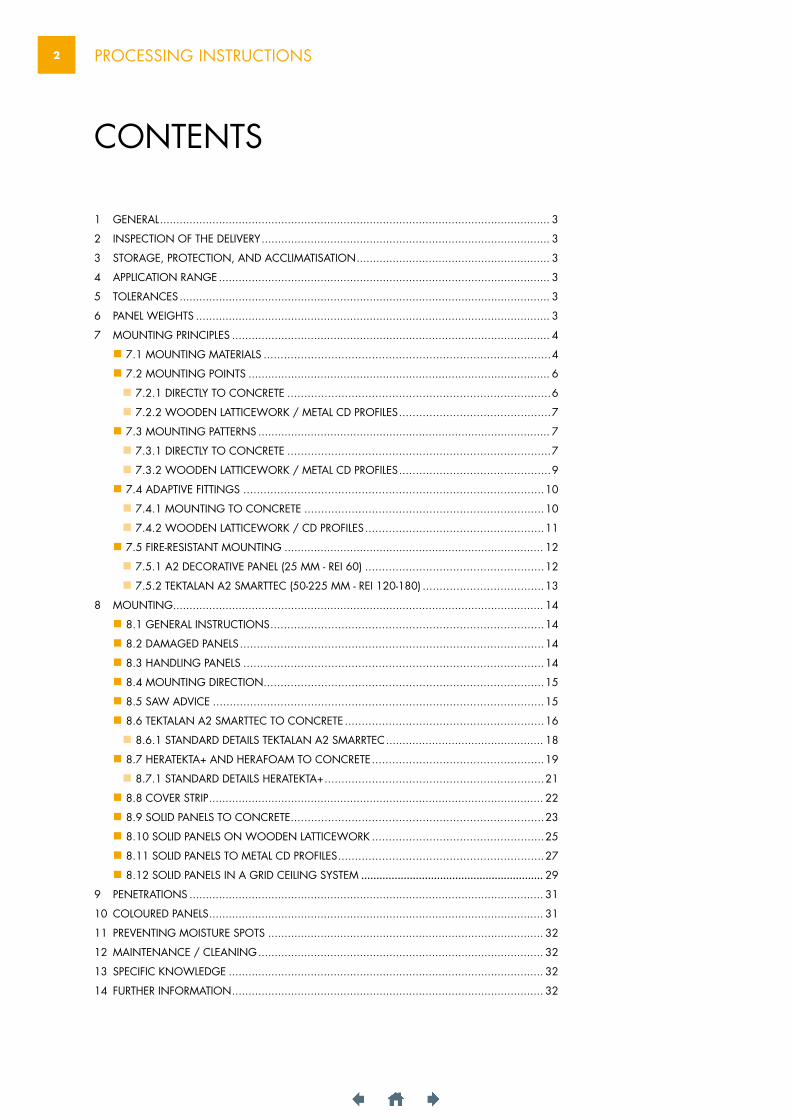
CONTENTS
1 GENERAL ....................................................................................................................... 3
2 INSPECTION OF THE DELIVERY ........................................................................................ 3
3 STORAGE, PROTECTION, AND ACCLIMATISATION ........................................................... 3
4 APPLICATION RANGE ..................................................................................................... 3
5 TOLERANCES ................................................................................................................. 3
6 PANEL WEIGHTS ............................................................................................................ 3
7 MOUNTING PRINCIPLES ................................................................................................. 4
7.1 MOUNTING MATERIALS .....................................................................................4
7.2 MOUNTING POINTS ............................................................................................ 6
7.2.1 DIRECTLY TO CONCRETE ..............................................................................6
7.2.2 WOODEN LATTICEWORK / METAL CD PROFILES .............................................7
7.3 MOUNTING PATTERNS ......................................................................................... 7
7.3.1 DIRECTLY TO CONCRETE ..............................................................................7
7.3.2 WOODEN LATTICEWORK / METAL CD PROFILES .............................................9
7.4 ADAPTIVE FITTINGS .........................................................................................10
7.4.1 MOUNTING TO CONCRETE .......................................................................10
7.4.2 WOODEN LATTICEWORK / CD PROFILES .....................................................11
7.5 FIRE-RESISTANT MOUNTING ............................................................................... 12
7.5.1 A2 DECORATIVE PANEL (25 MM - REI 60) .....................................................12
7.5.2 TEKTALAN A2 SMARTTEC (50-225 MM - REI 120-180) ....................................13
8 MOUNTING ................................................................................................................. 14
8.1 GENERAL INSTRUCTIONS .................................................................................14
8.2 DAMAGED PANELS ..........................................................................................14
8.3 HANDLING PANELS .........................................................................................14
8.4 MOUNTING DIRECTION ...................................................................................15
8.5 SAW ADVICE ..................................................................................................15
8.6 TEKTALAN A2 SMARTTEC TO CONCRETE ...........................................................16
8.6.1 STANDARD DETAILS TEKTALAN A2 SMARRTEC ................................................ 18
8.7 HERATEKTA+ AND HERAFOAM TO CONCRETE ...................................................19
8.7.1 STANDARD DETAILS HERATEKTA+ .................................................................21
8.8 COVER STRIP ...................................................................................................... 22
8.9 SOLID PANELS TO CONCRETE ...........................................................................23
8.10 SOLID PANELS ON WOODEN LATTICEWORK ...................................................25
8.11 SOLID PANELS TO METAL CD PROFILES .............................................................27
8.12 SOLID PANELS IN A GRID CEILING SYSTEM ............................................................ 29
9 PENETRATIONS ............................................................................................................ 31
10 COLOURED PANELS ...................................................................................................... 31
11 PREVENTING MOISTURE SPOTS .................................................................................... 32
12 MAINTENANCE / CLEANING ....................................................................................... 32
13 SPECIFIC KNOWLEDGE ................................................................................................ 32
14 FURTHER INFORMATION ............................................................................................... 32
3 PROCESSING INSTRUCTIONS
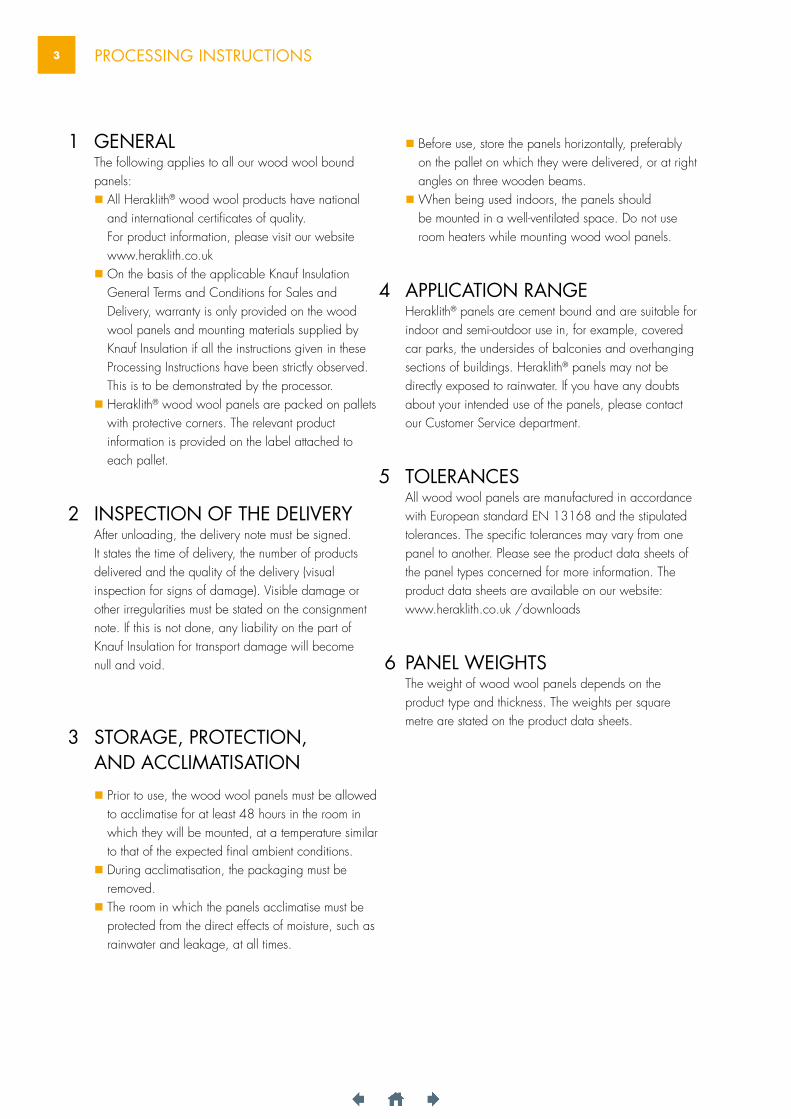
GENERAL The following applies to all our wood wool bound panels: All Heraklith® wood wool products have national
and international certificates of quality. For product information, please visit our website www.heraklith.co.uk
On the basis of the applicable Knauf Insulation General Terms and Conditions for Sales and Delivery, warranty is only provided on the wood wool panels and mounting materials supplied by Knauf Insulation if all the instructions given in these Processing Instructions have been strictly observed. This is to be demonstrated by the processor.
Heraklith® wood wool panels are packed on pallets with protective corners. The relevant product information is provided on the label attached to each pallet.
INSPECTION OF THE DELIVERYAfter unloading, the delivery note must be signed. It states the time of delivery, the number of products delivered and the quality of the delivery (visual inspection for signs of damage). Visible damage or other irregularities must be stated on the consignment note. If this is not done, any liability on the part of Knauf Insulation for transport damage will become null and void.
STORAGE, PROTECTION, AND ACCLIMATISATION
Prior to use, the wood wool panels must be allowed to acclimatise for at least 48 hours in the room in which they will be mounted, at a temperature similar to that of the expected final ambient conditions.
During acclimatisation, the packaging must be removed.
The room in which the panels acclimatise must be protected from the direct effects of moisture, such as rainwater and leakage, at all times.
1
2
3
Before use, store the panels horizontally, preferably on the pallet on which they were delivered, or at right angles on three wooden beams.
When being used indoors, the panels should be mounted in a well-ventilated space. Do not use room heaters while mounting wood wool panels.
APPLICATION RANGEHeraklith® panels are cement bound and are suitable for indoor and semi-outdoor use in, for example, covered car parks, the undersides of balconies and overhanging sections of buildings. Heraklith® panels may not be directly exposed to rainwater. If you have any doubts about your intended use of the panels, please contact our Customer Service department.
TOLERANCESAll wood wool panels are manufactured in accordance with European standard EN 13168 and the stipulated tolerances. The specific tolerances may vary from one panel to another. Please see the product data sheets of the panel types concerned for more information. The product data sheets are available on our website: www.heraklith.co.uk /downloads
PANEL WEIGHTSThe weight of wood wool panels depends on the product type and thickness. The weights per square metre are stated on the product data sheets.
4
5
6
4 PROCESSING INSTRUCTIONS
(DDS)
(MSP)
min.30 mm
Ø 6,5 mmØ 6-6,5 mm
Ø 6 mm
≥ 30 mm
≥ 30 mm
1 32
MOUNTING PRINCIPLES 7.1 MOUNTING MATERIALS
The Heraklith® range contains various mountingmaterials. When mounting directly onto standarddensity concrete (2000-2600 kg/m3), use ‘MSPfixings screws’ and ‘DDS plus concrete screws’.When mounting on wooden latticework or metal CD profiles, use Heraklith® wood screws or metalscrews, respectively.
All mounting materials should be positionedaccording the pattern for mounting points(paragraph 7.2) and the mounting patterns(paragraph 7.3) that match the specific paneltype.
7
Tip: Check which drill bit diameter and length
you will need for mounting your wood wool
panels correctly. More information is available
on the product data sheets for our mounting
materials at www.heraklith.co.uk /downloads
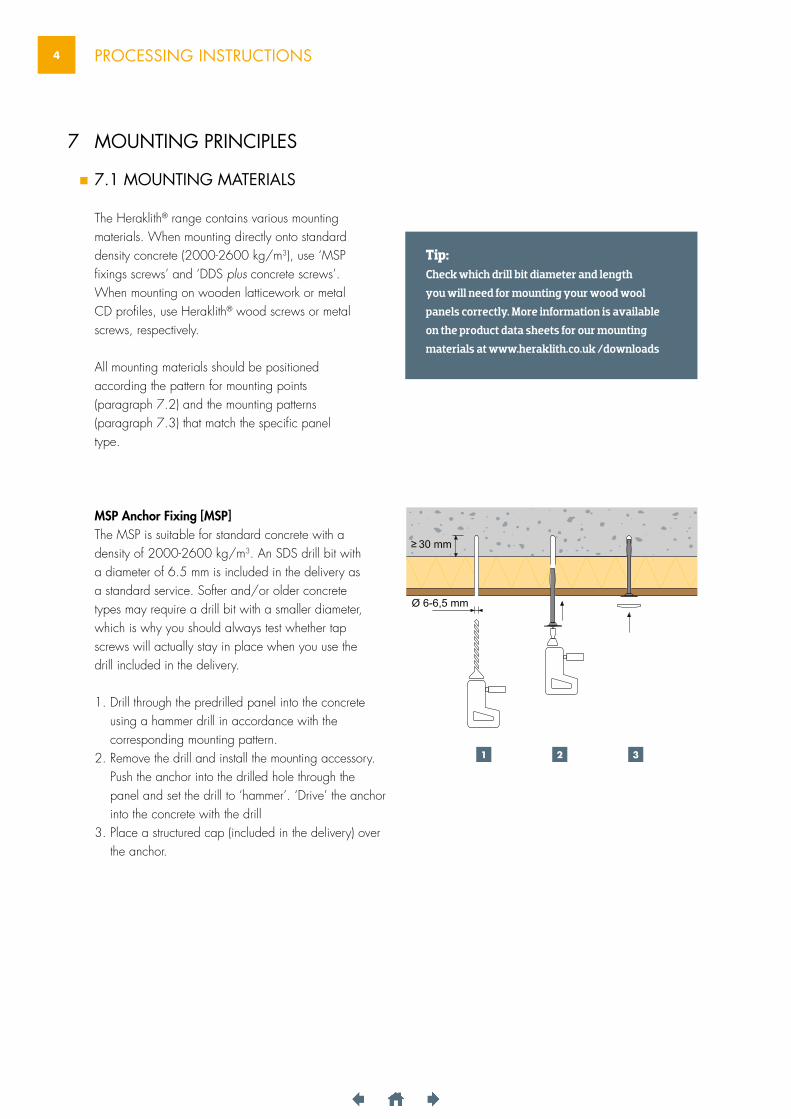
MSP Anchor Fixing [MSP]The MSP is suitable for standard concrete with adensity of 2000-2600 kg/m3. An SDS drill bit witha diameter of 6.5 mm is included in the delivery asa standard service. Softer and/or older concretetypes may require a drill bit with a smaller diameter,which is why you should always test whether tapscrews will actually stay in place when you use thedrill included in the delivery.
1. Drill through the predrilled panel into the concrete using a hammer drill in accordance with the corresponding mounting pattern.
2. Remove the drill and install the mounting accessory. Push the anchor into the drilled hole through the panel and set the drill to ‘hammer’. ‘Drive’ the anchor into the concrete with the drill
3. Place a structured cap (included in the delivery) over the anchor.
5 PROCESSING INSTRUCTIONS
Ø 4/6 mm
≥ 30 mm
≥ 25 mm
20 mm
≥ 15 mm
20 mm
1 2
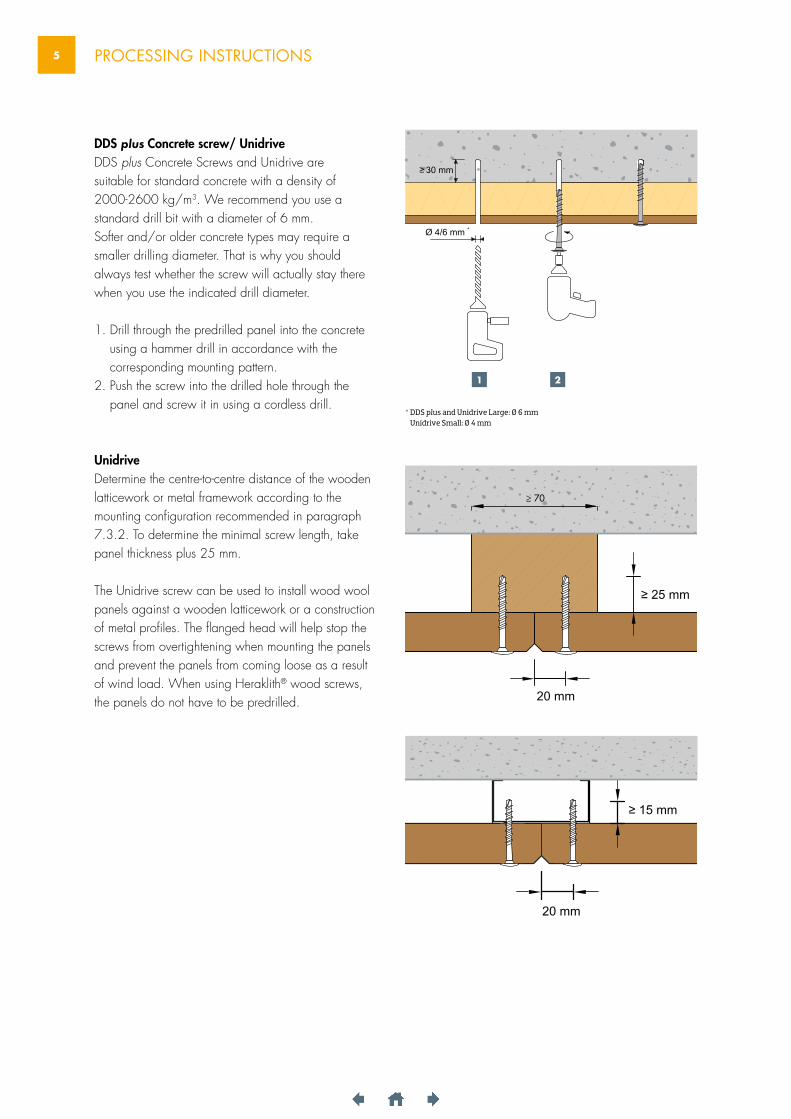
DDS plus Concrete screw/ UnidriveDDS plus Concrete Screws and Unidrive are suitable for standard concrete with a density of 2000-2600 kg/m3. We recommend you use a standard drill bit with a diameter of 6 mm. Softer and/or older concrete types may require a smaller drilling diameter. That is why you should always test whether the screw will actually stay there when you use the indicated drill diameter.
1. Drill through the predrilled panel into the concrete using a hammer drill in accordance with the corresponding mounting pattern.
2. Push the screw into the drilled hole through the panel and screw it in using a cordless drill.
UnidriveDetermine the centre-to-centre distance of the wooden latticework or metal framework according to the mounting configuration recommended in paragraph 7.3.2. To determine the minimal screw length, take panel thickness plus 25 mm.
The Unidrive screw can be used to install wood wool panels against a wooden latticework or a construction of metal profiles. The flanged head will help stop the screws from overtightening when mounting the panels and prevent the panels from coming loose as a result of wind load. When using Heraklith® wood screws,the panels do not have to be predrilled.
Ø 4/6 mm
≥ 30 mm
≥ 25 mm
20 mm
≥ 15 mm
20 mm
Ø 4/6 mm
≥ 30 mm
≥ 25 mm
20 mm
≥ 15 mm
20 mm
≥ 70
* DDS plus and Unidrive Large: Ø 6 mm Unidrive Small: Ø 4 mm
*
6 PROCESSING INSTRUCTIONS
A2 Decorative panel
Decorative panel
Basic
Tektalan A2 SmartTec
Heratekta+ / Herafoam
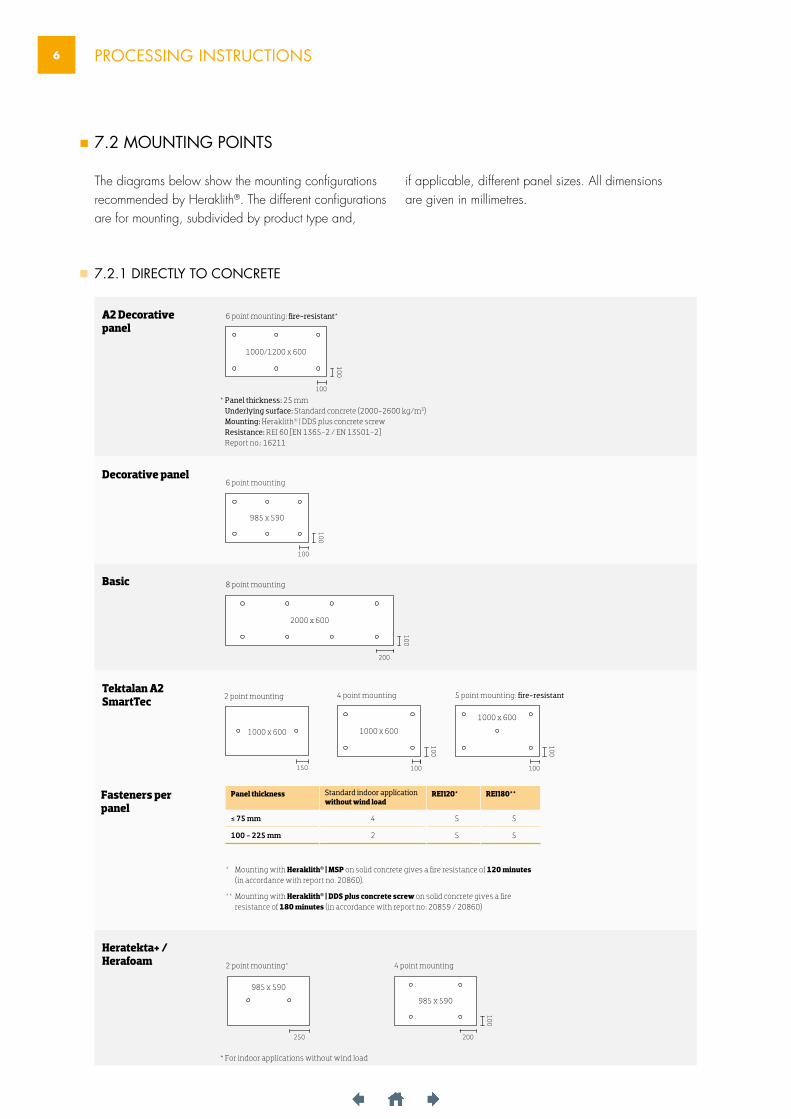
7.2 MOUNTING POINTS
The diagrams below show the mounting configurations recommended by Heraklith®. The different configurations are for mounting, subdivided by product type and,
7.2.1 DIRECTLY TO CONCRETE
6 point mounting: fire-resistant*
8 point mounting
* Panel thickness: 25 mm Underlying surface: Standard concrete (2000-2600 kg/m3) Mounting: Heraklith® | DDS plus concrete screw Resistance: REI 60 [EN 1365-2 / EN 13501-2] Report no.: 16211
* Mounting with Heraklith® | MSP on solid concrete gives a fire resistance of 120 minutes (in accordance with report no. 20860).
** Mounting with Heraklith® | DDS plus concrete screw on solid concrete gives a fire resistance of 180 minutes (in accordance with report no: 20859 / 20860)
* For indoor applications without wind load
1000/1200 x 600
100
100
2000 x 600
200
100
if applicable, different panel sizes. All dimensions are given in millimetres.
5 point mounting: fire-resistant
1000 x 600
100
100
4 point mounting
100
985 x 590
200
2 point mounting*
985 x 590
250
2 point mounting
1000 x 600
150
1000 x 600
100
4 point mounting
100
6 point mounting
100
985 x 590
100
Fasteners per panel
Panel thickness Standard indoor application without wind load
REI120* REI180**
≤ 75 mm 4 5 5
100 - 225 mm 2 5 5
7 PROCESSING INSTRUCTIONS
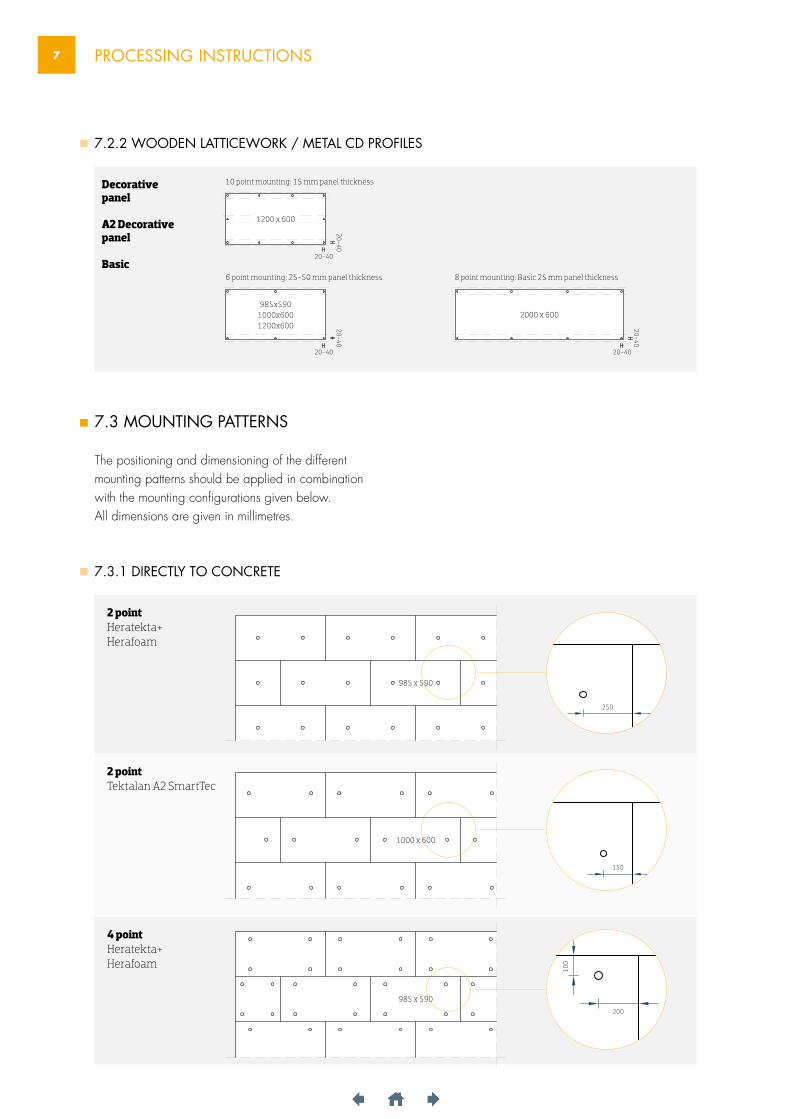
7.2.2 WOODEN LATTICEWORK / METAL CD PROFILES
Decorativepanel
A2 Decorative panel
Basic
10 point mounting: 15 mm panel thickness
6 point mounting: 25-50 mm panel thickness 8 point mounting: Basic 25 mm panel thickness
1200 x 600
20-40
20-40
985x5901000x6001200x600
20-40
20-40
2000 x 600
20-40
20-40
2 pointHeratekta+ Herafoam
2 pointTektalan A2 SmartTec
4 pointHeratekta+ Herafoam
100
200
250
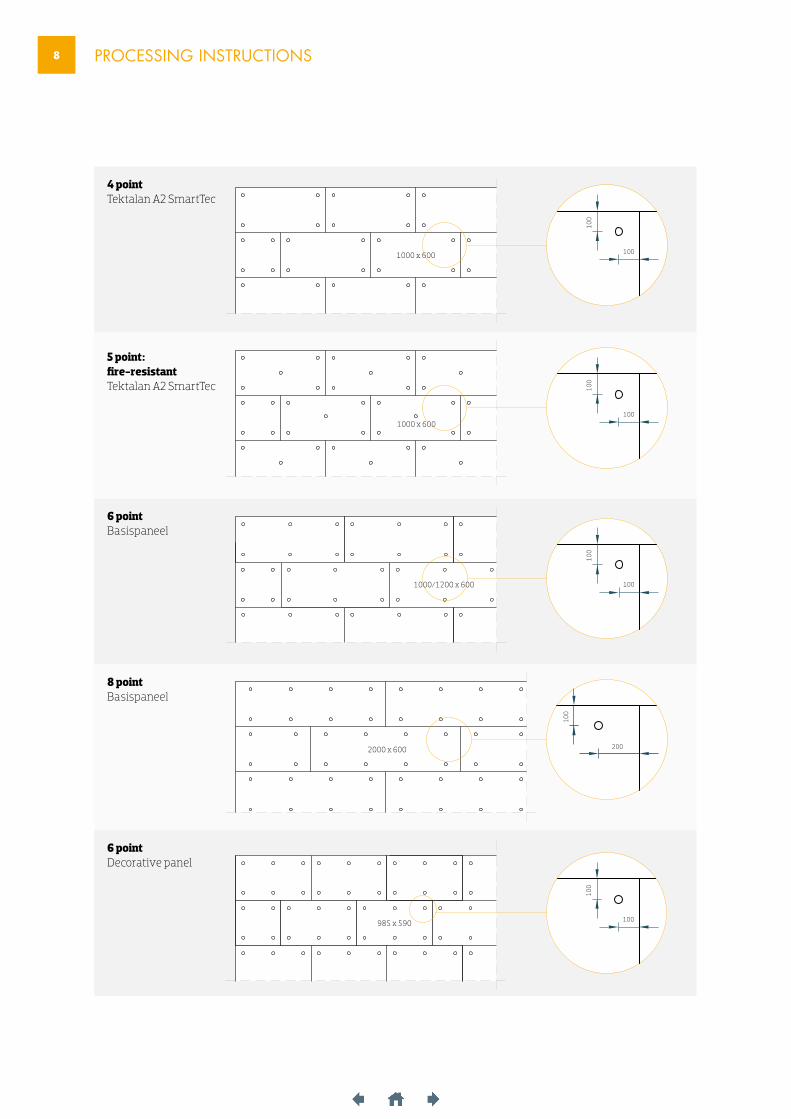
7.3 MOUNTING PATTERNS
The positioning and dimensioning of the differentmounting patterns should be applied in combinationwith the mounting configurations given below.All dimensions are given in millimetres.
7.3.1 DIRECTLY TO CONCRETE
985 x 590
985 x 590
1000 x 600
150
8 PROCESSING INSTRUCTIONS
4 pointTektalan A2 SmartTec
5 point: fire-resistantTektalan A2 SmartTec
6 pointBasispaneel
8 pointBasispaneel
6 pointDecorative panel
100
100
100
100
200
100
10010
0
1000 x 600
1000/1200 x 600
2000 x 600
1000 x 600
100
100
985 x 590
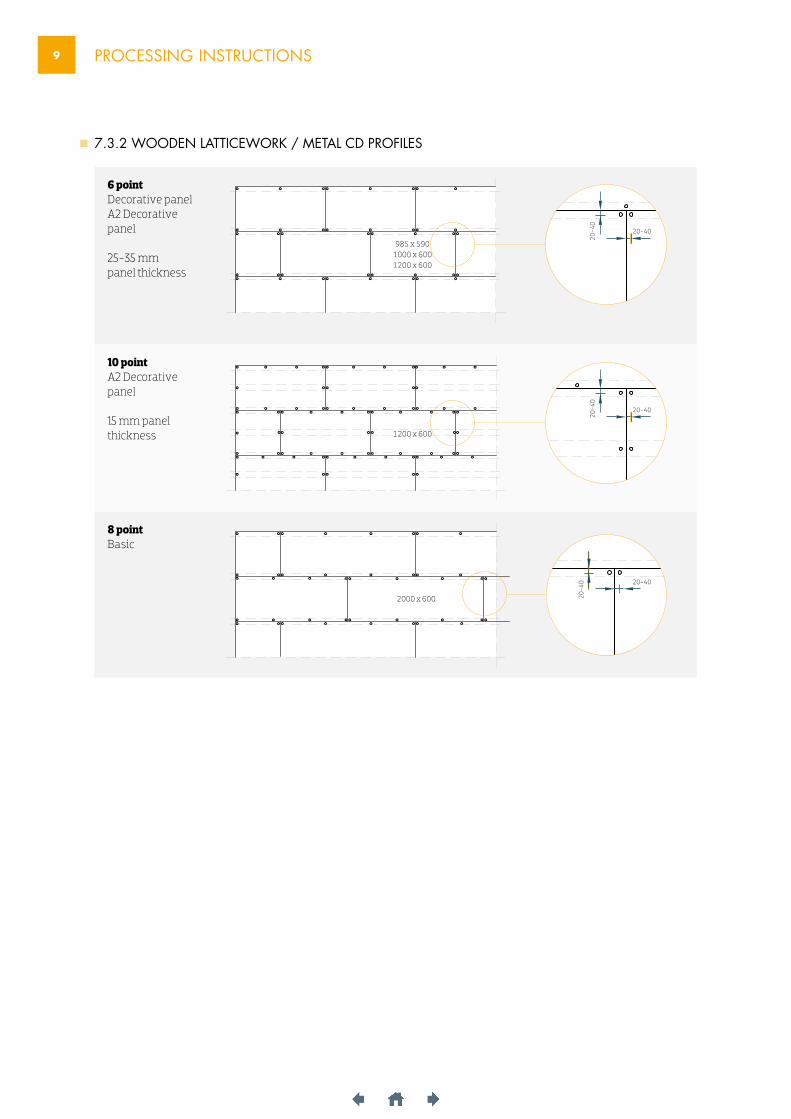
9 PROCESSING INSTRUCTIONS
6 pointDecorative panelA2 Decorative panel
25-35 mm panel thickness
10 pointA2 Decorative panel
15 mm panel thickness
8 pointBasic
20-4
0
20-40
20-4
0 20-4020
-40
20-40
7.3.2 WOODEN LATTICEWORK / METAL CD PROFILES
985 x 5901000 x 6001200 x 600
1200 x 600
2000 x 600

10 PROCESSING INSTRUCTIONS
L = Length W = Width
7.4 ADAPTIVE FITTINGS
7.4.1 MOUNTING TO CONCRETE
Attention!Never use less than two fixings per adaptive fitting.
8 point and 6 point mounting
W 100 - 300
100
100
W 300 - 600
100
B 3
00 -
600
B 3
00 -
600
B 1
00 -
300
100
W 1200 - 2000
B 3
00 -
600
100
100
W 1200 - 2000
100
W 600 - 1200
B 1
00 -
300
B 3
00 -
600
100
100
W 600 - 1200
W 250 - 500
2 point mounting Tektalan A2 SmartTec
150
W 500 - 1000
B 3
00 -
600
150
100
W 500 - 1000
B 1
00 -
300
B 1
00 -
300
W 250 - 50010
0
B 3
00 -
600
W 100 - 250
100
B 3
00 -
600
4 point mounting Tektalan A2 SmartTec
100
W 250 - 500
100
B 3
00 -
600
W100 - 250
100
B 3
00 -
600
W 500 - 1000
100
B 3
00 -
600
100
100
W 500 - 1000
B 1
00 -
300
100
W 250 - 500
B 1
00 -
300
5 point mounting Tektalan A2 SmartTec
100
W 250 - 500
B 1
00 -
300
B 3
00 -
600
100
100
W 500 - 1000
100
W 250 -500
100
B 3
00 -
600
W 100 - 250
100
B 3
00 -
600
100
W 500 - 1000
B 1
00 -
300
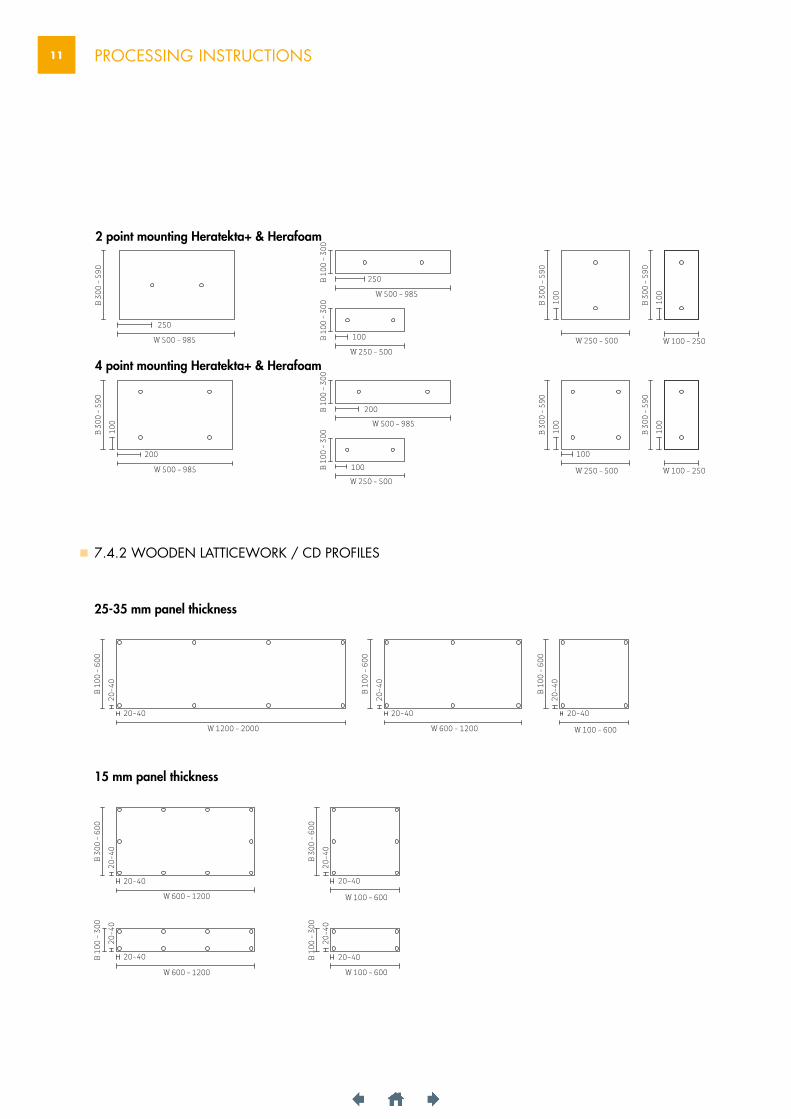
11 PROCESSING INSTRUCTIONS
25-35 mm panel thickness
15 mm panel thickness
B 1
00 -
600
W 600 - 1200 W 100 - 600
B 1
00 -
600
B 1
00 -
600
W 1200 - 2000
20-40
20-4
0
20-4
0
20-4
0
7.4.2 WOODEN LATTICEWORK / CD PROFILES
20-40 20-40
20-40
20-40
20-4
020
-40
W 600 - 1200
B 3
00 -
600
W 600 - 1200
B 1
00 -
300
W 100 - 600
B 3
00 -
600
20-4
020
-40
20-40
20-40
W 100 - 600
B 1
00 -
300
4 point mounting Heratekta+ & Herafoam
100
W 250 - 500
100
B 3
00 -
590
W 100 - 250
100
B 3
00 -
590
W 500 - 985
100
B 3
00 -
590
200
200
100
W 250 - 500
B 1
00 -
300
W 500 - 985
B 1
00 -
300
2 point mounting Heratekta+ & Herafoam
250
W 500 - 985
B 3
00 -
590
250
100
W 500 - 985
W 250 - 500
B 1
00 -
300
B 1
00 -
300
W 250 - 500
100
B 3
00 -
590
W 100 - 250
100
B 3
00 -
590
12 PROCESSING INSTRUCTIONS
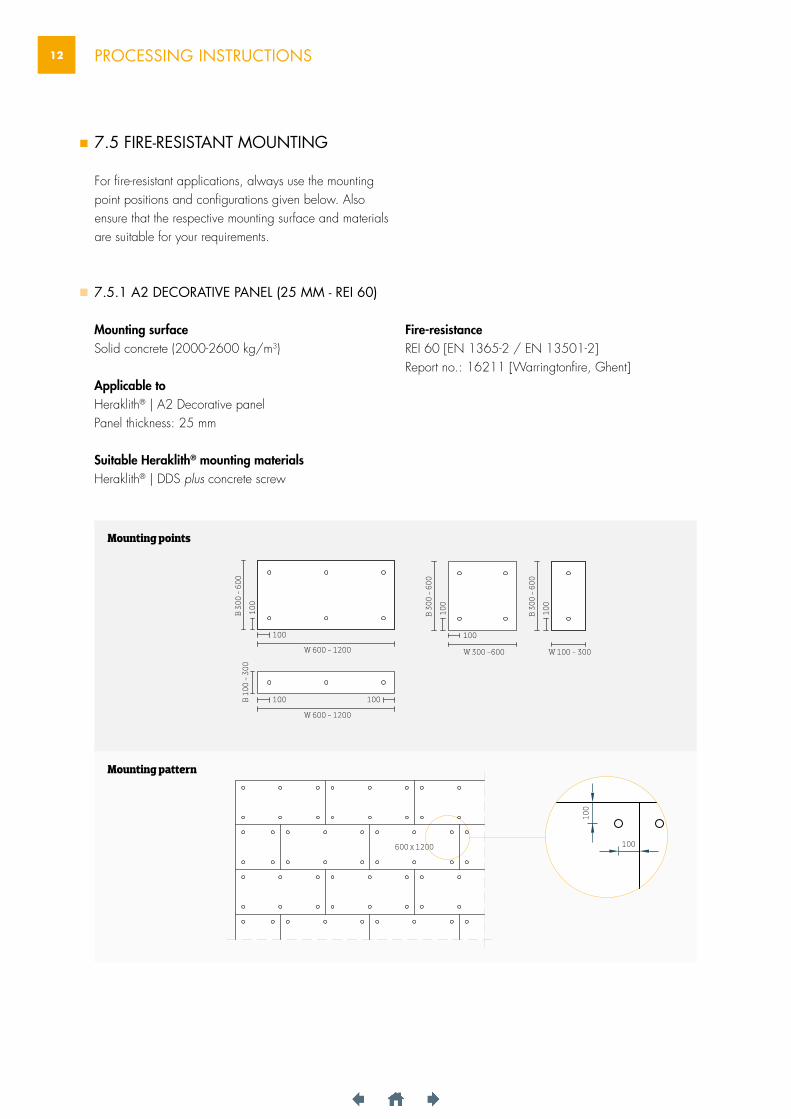
Mounting points
Mounting pattern
Mounting surfaceSolid concrete (2000-2600 kg/m3)
Applicable to Heraklith® | A2 Decorative panel Panel thickness: 25 mm
Suitable Heraklith® mounting materialsHeraklith® | DDS plus concrete screw
Fire-resistanceREI 60 [EN 1365-2 / EN 13501-2] Report no.: 16211 [Warringtonfire, Ghent]
7.5 FIRE-RESISTANT MOUNTING
For fire-resistant applications, always use the mounting point positions and configurations given below. Also ensure that the respective mounting surface and materials are suitable for your requirements.
7.5.1 A2 DECORATIVE PANEL (25 MM - REI 60)
100
100
B 3
00 -
600
100
100
100
W 600 - 1200
W 600 - 1200
100
W 300 -600 W 100 - 300
100
100
B 3
00 -
600
B 3
00 -
600
B 1
00 -
300
100
600 x 1200
13 PROCESSING INSTRUCTIONS
Mounting points
Mounting pattern
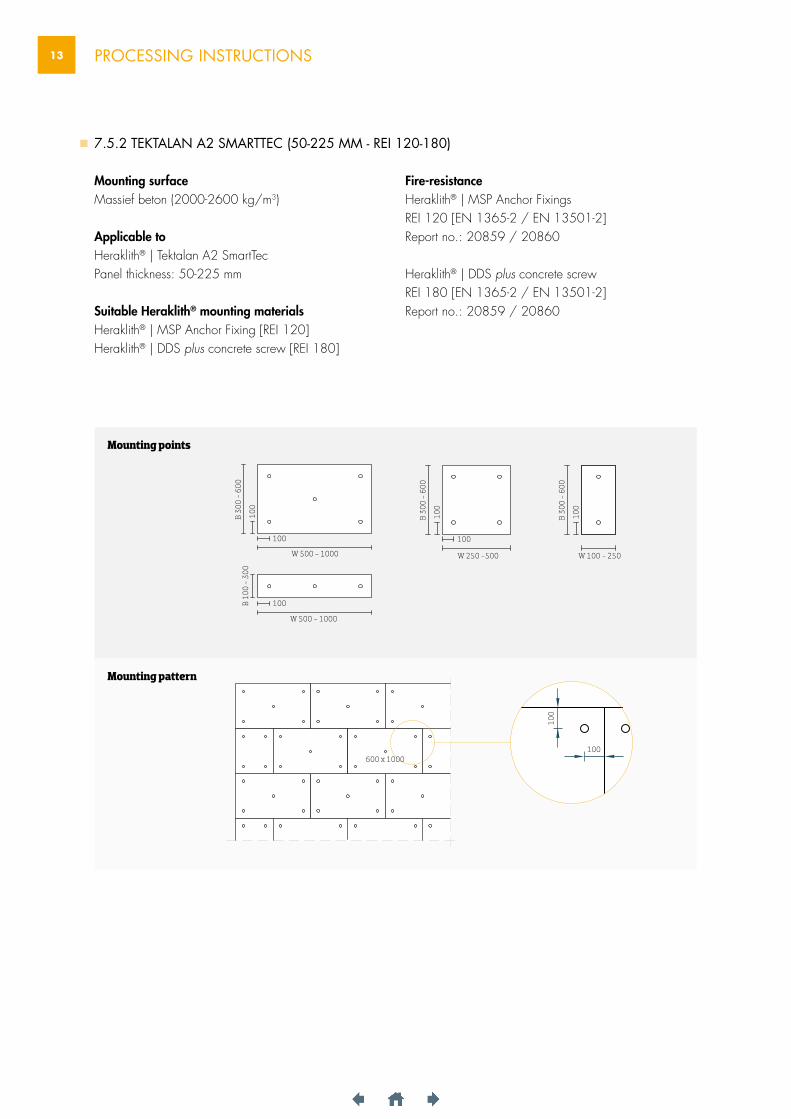
Mounting surfaceMassief beton (2000-2600 kg/m3)
Applicable to Heraklith® | Tektalan A2 SmartTec Panel thickness: 50-225 mm
Suitable Heraklith® mounting materialsHeraklith® | MSP Anchor Fixing [REI 120]Heraklith® | DDS plus concrete screw [REI 180]
Fire-resistanceHeraklith® | MSP Anchor FixingsREI 120 [EN 1365-2 / EN 13501-2]Report no.: 20859 / 20860
Heraklith® | DDS plus concrete screwREI 180 [EN 1365-2 / EN 13501-2]Report no.: 20859 / 20860
7.5.2 TEKTALAN A2 SMARTTEC (50-225 MM - REI 120-180)
100
W 500 - 1000
B 3
00 -
600
100
100
W 500 - 1000
100
W 250 -500
100
B 3
00 -
600
W 100 - 250
100
B 3
00 -
600
B 1
00 -
300
100
100
600 x 1000
14 PROCESSING INSTRUCTIONS
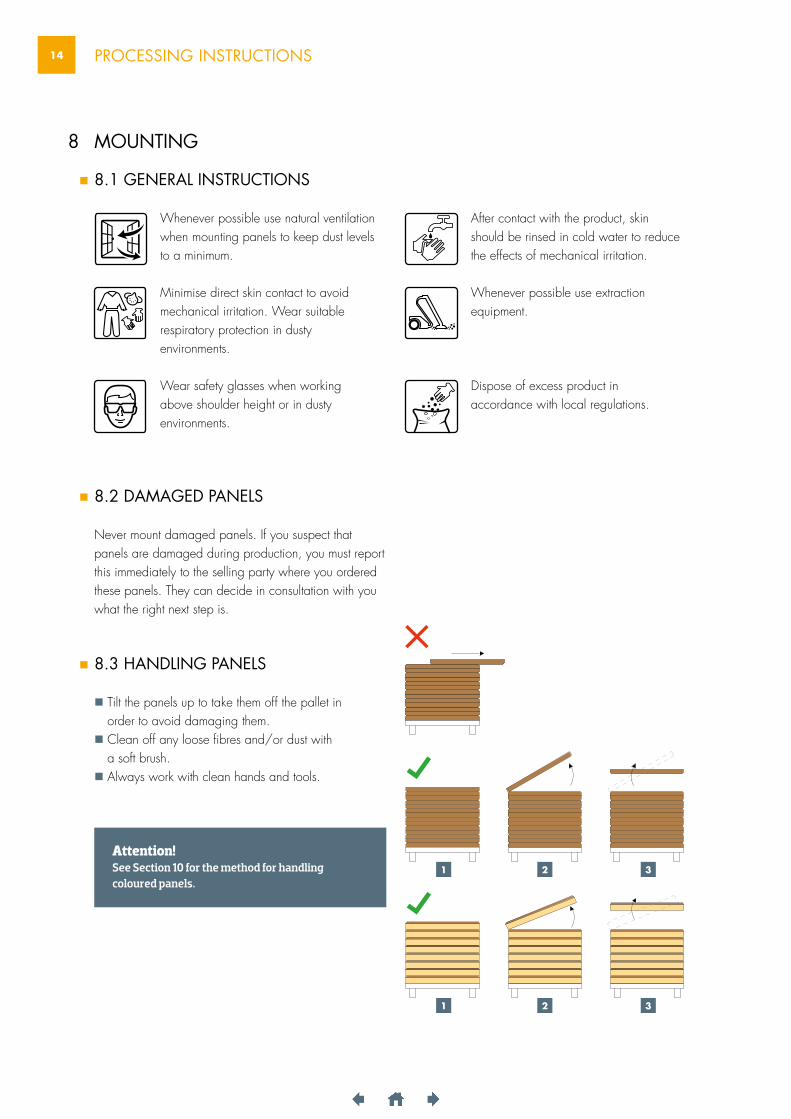
Whenever possible use natural ventilation when mounting panels to keep dust levels to a minimum.
Minimise direct skin contact to avoidmechanical irritation. Wear suitablerespiratory protection in dustyenvironments.
Wear safety glasses when workingabove shoulder height or in dustyenvironments.
After contact with the product, skinshould be rinsed in cold water to reducethe effects of mechanical irritation.
Whenever possible use extractionequipment.
Dispose of excess product inaccordance with local regulations.
8.2 DAMAGED PANELS
Never mount damaged panels. If you suspect that panels are damaged during production, you must report this immediately to the selling party where you ordered these panels. They can decide in consultation with you what the right next step is.
8.3 HANDLING PANELS
Tilt the panels up to take them off the pallet in order to avoid damaging them.
Clean off any loose fibres and/or dust with a soft brush.
Always work with clean hands and tools.
MOUNTING
8.1 GENERAL INSTRUCTIONS
8
Attention!See Section 10 for the method for handling coloured panels.
1
1
3
3
2
2
15 PROCESSING INSTRUCTIONS
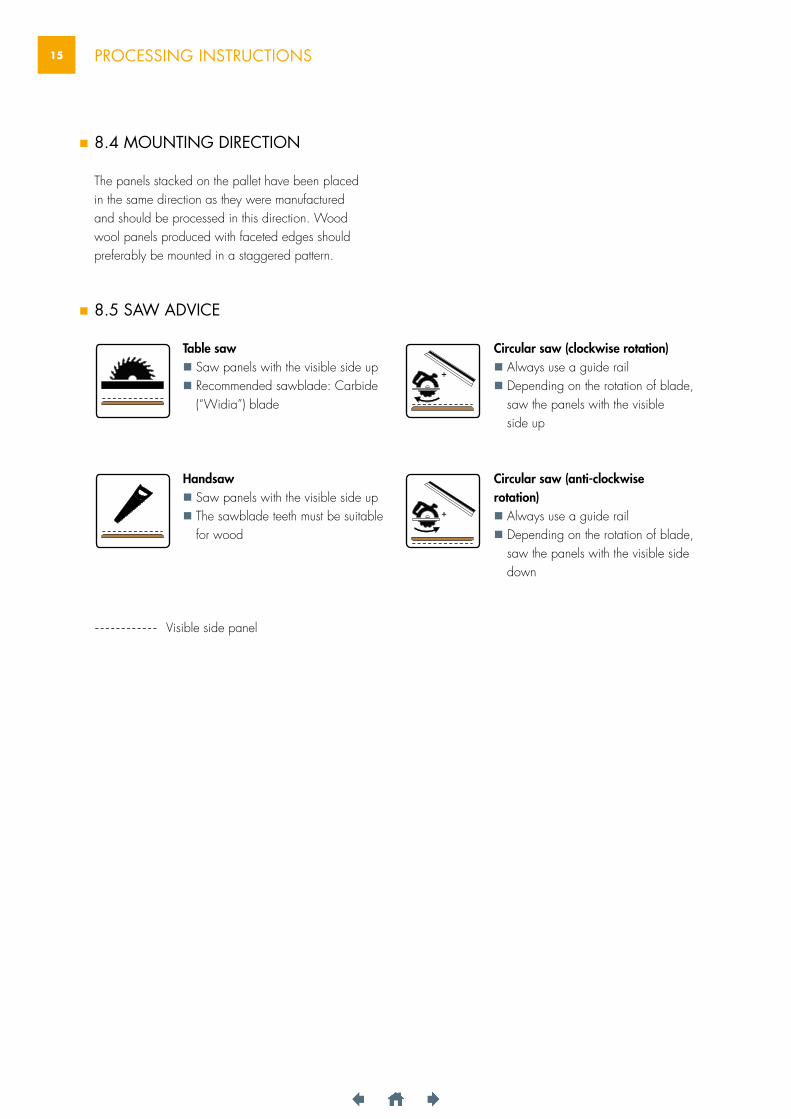
8.4 MOUNTING DIRECTION The panels stacked on the pallet have been placed in the same direction as they were manufactured and should be processed in this direction. Wood wool panels produced with faceted edges should preferably be mounted in a staggered pattern.
Visible side panel
8.5 SAW ADVICE
Table saw Saw panels with the visible side up Recommended sawblade: Carbide
(“Widia”) blade
Handsaw Saw panels with the visible side up The sawblade teeth must be suitable
for wood
Circular saw (clockwise rotation) Always use a guide rail Depending on the rotation of blade,
saw the panels with the visible side up
Circular saw (anti-clockwiserotation) Always use a guide rail Depending on the rotation of blade,
saw the panels with the visible side down
+
+
16 PROCESSING INSTRUCTIONS
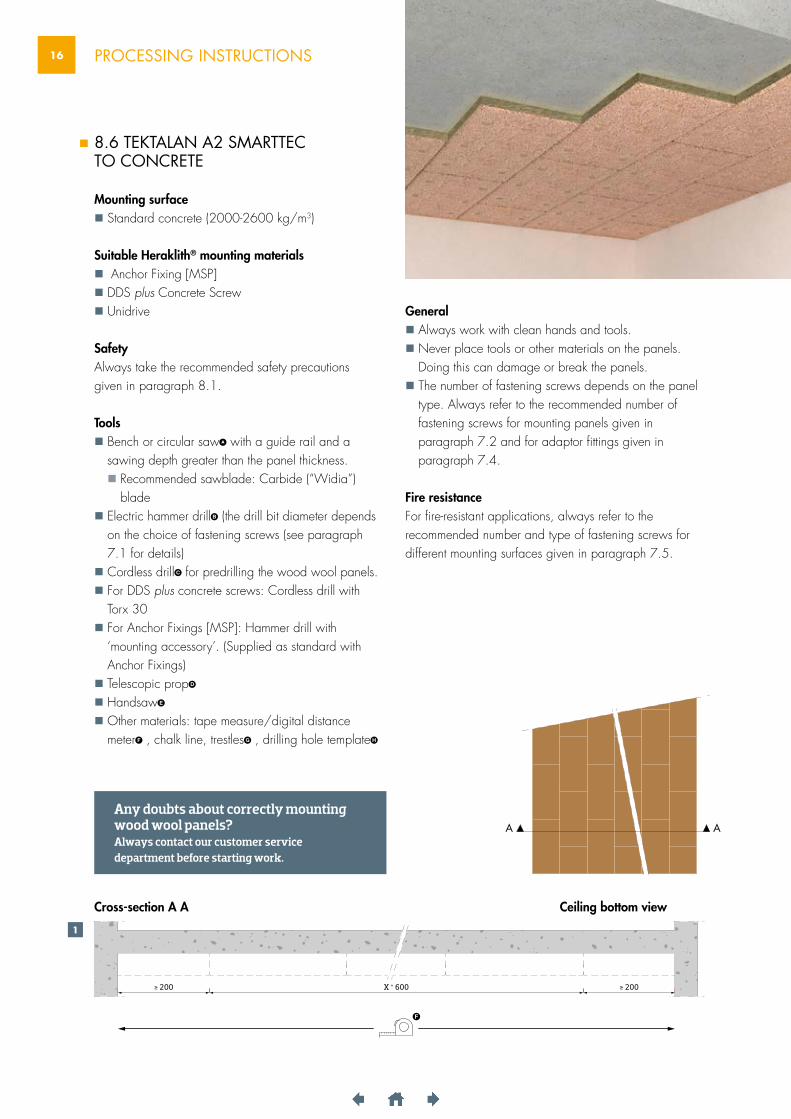
General Always work with clean hands and tools. Never place tools or other materials on the panels.
Doing this can damage or break the panels. The number of fastening screws depends on the panel
type. Always refer to the recommended number of fastening screws for mounting panels given in paragraph 7.2 and for adaptor fittings given in paragraph 7.4.
Fire resistanceFor fire-resistant applications, always refer to the recommended number and type of fastening screws for different mounting surfaces given in paragraph 7.5.
8.6 TEKTALAN A2 SMARTTEC TO CONCRETE
Mounting surface Standard concrete (2000-2600 kg/m3)
Suitable Heraklith® mounting materials Anchor Fixing [MSP] DDS plus Concrete Screw Unidrive
SafetyAlways take the recommended safety precautionsgiven in paragraph 8.1.
Tools Bench or circular saw A with a guide rail and a
sawing depth greater than the panel thickness. Recommended sawblade: Carbide (“Widia”)
blade Electric hammer drill B (the drill bit diameter depends
on the choice of fastening screws (see paragraph 7.1 for details)
Cordless drill C for predrilling the wood wool panels. For DDS plus concrete screws: Cordless drill with
Torx 30 For Anchor Fixings [MSP]: Hammer drill with
‘mounting accessory’. (Supplied as standard with Anchor Fixings)
Telescopic prop D
Handsaw E
Other materials: tape measure/digital distance meter F , chalk line, trestles G , drilling hole template H
H
F
1
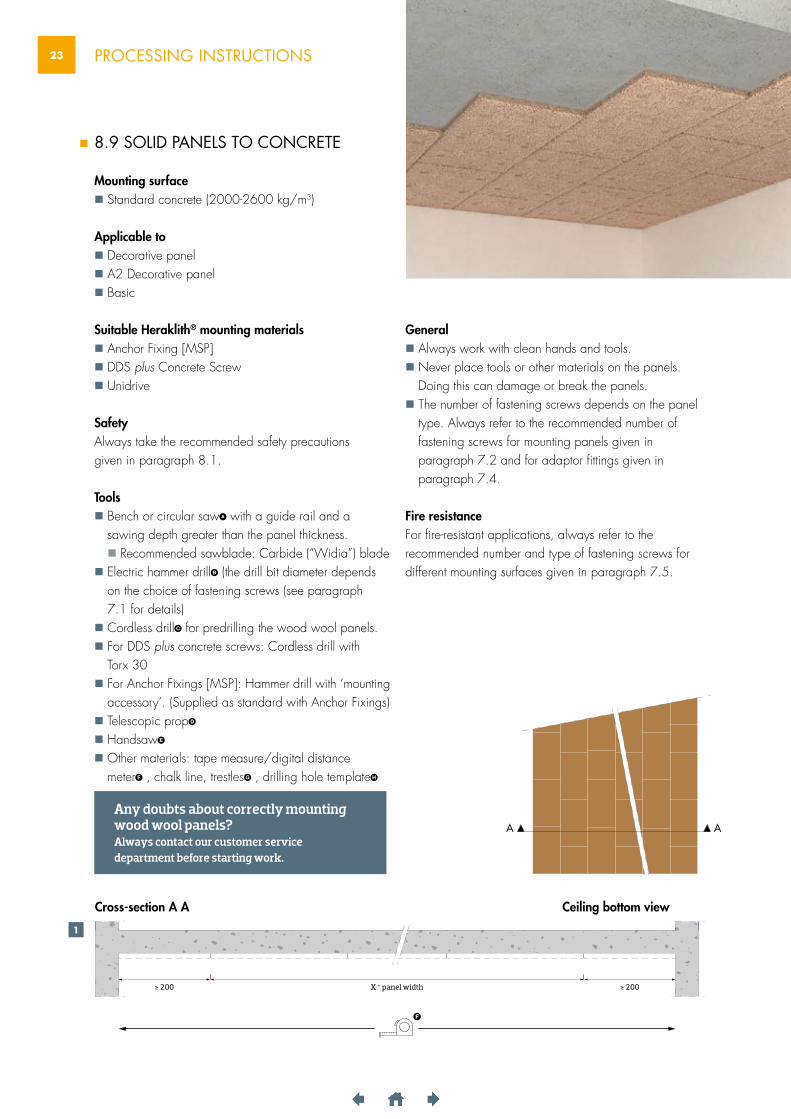
≥ 200 ≥ 200X * 600
Cross-section A A Ceiling bottom view
A A
Any doubts about correctly mounting wood wool panels? Always contact our customer servicedepartment before starting work.
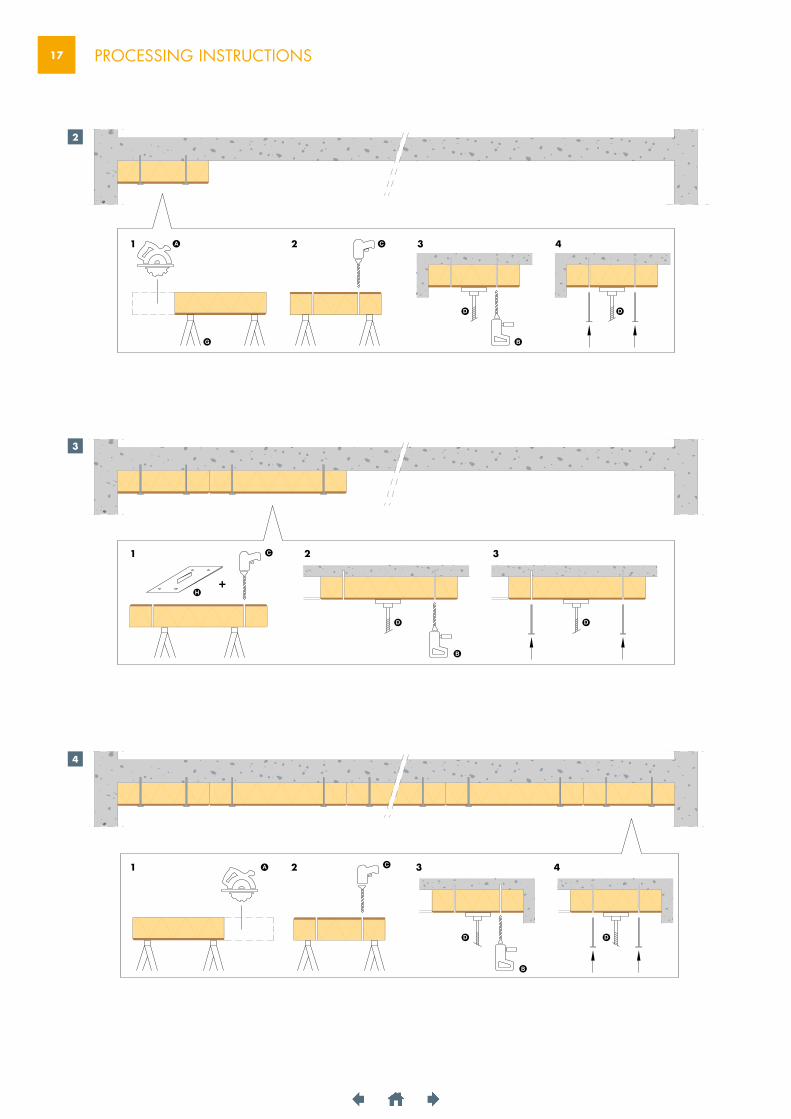
17 PROCESSING INSTRUCTIONS
2
3
4
1
1
1 2 3 4
2 3
2 3 4A C
D D
G B
D D
H
B
+
C
A C
D D
B
18 PROCESSING INSTRUCTIONS
A
A
AE
E
E
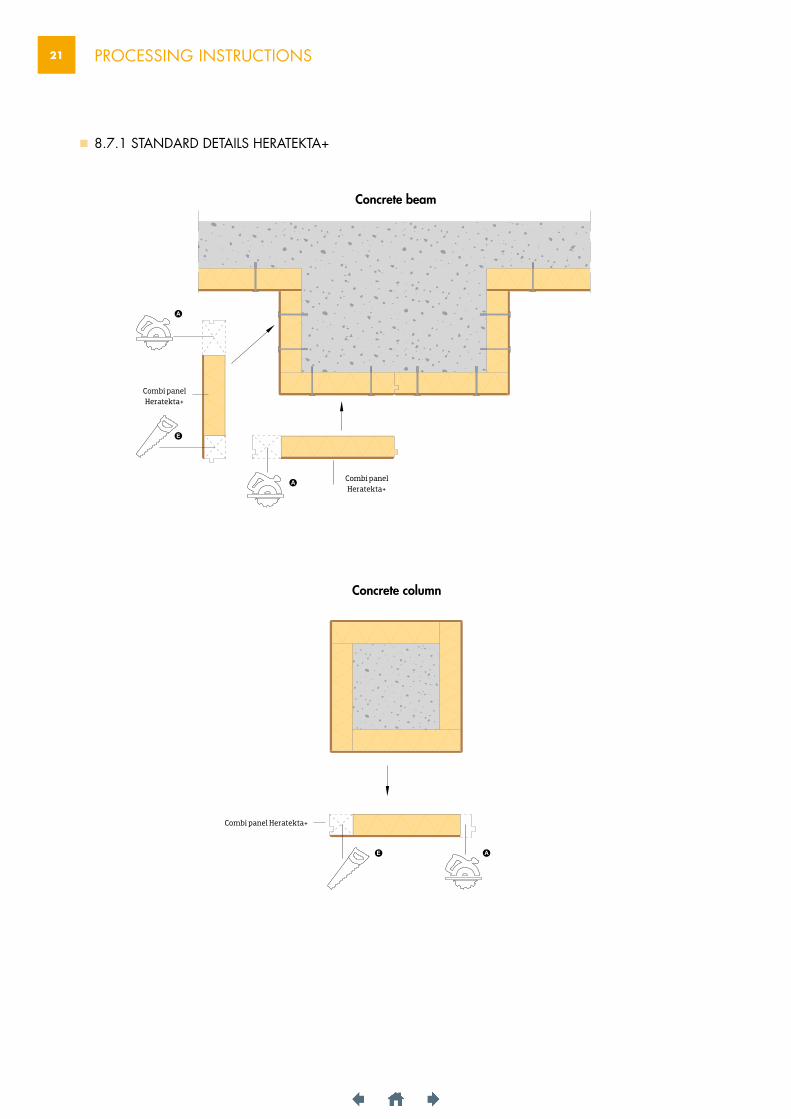
Combi panel
Combi panel
Combi panel
End panel
Combi panel
Betonnen Balk
Sluitpaneel Betonnen Kolom
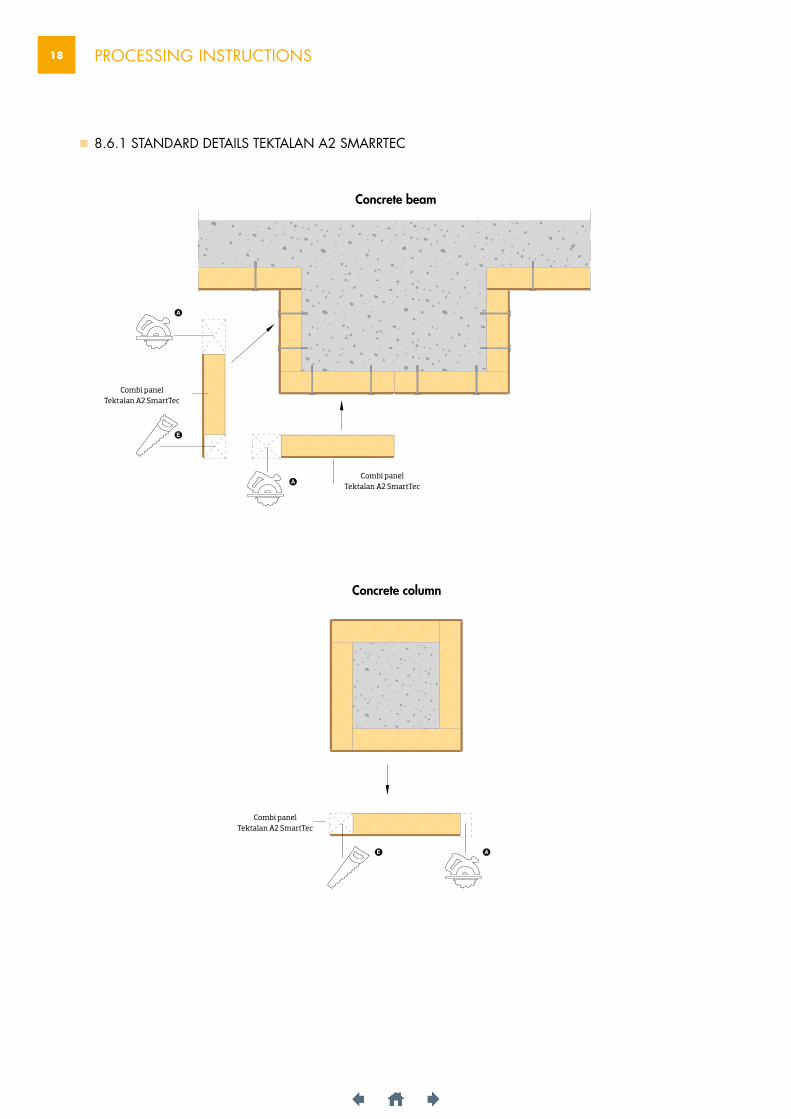
Concrete beam
Concrete column
8.6.1 STANDARD DETAILS TEKTALAN A2 SMARRTEC
Combi panel Tektalan A2 SmartTec
Combi panelTektalan A2 SmartTec
Combi panelTektalan A2 SmartTec
A
A
AE
E
E
Combi panel
Combi panel
Combi panel
End panel
Combi panel
Betonnen Balk
Sluitpaneel Betonnen Kolom
19 PROCESSING INSTRUCTIONS
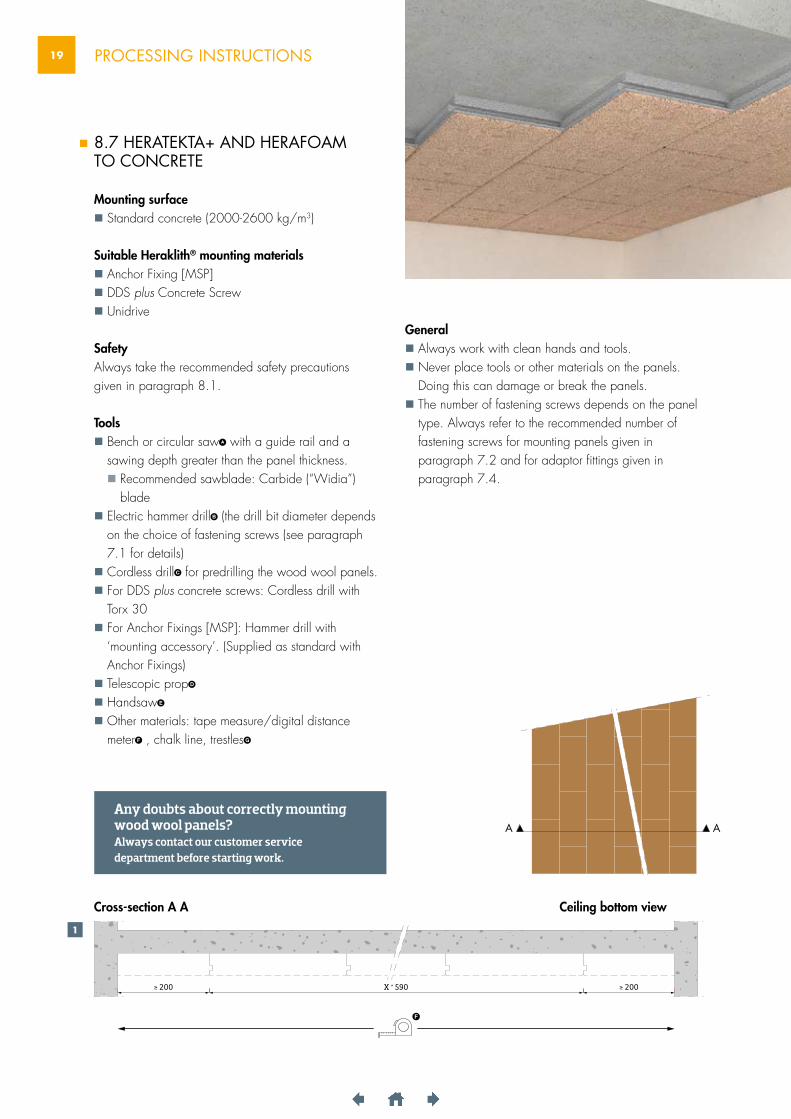
8.7 HERATEKTA+ AND HERAFOAM TO CONCRETE
Mounting surface Standard concrete (2000-2600 kg/m3)
Suitable Heraklith® mounting materials Anchor Fixing [MSP] DDS plus Concrete Screw Unidrive
SafetyAlways take the recommended safety precautionsgiven in paragraph 8.1.
Tools Bench or circular saw A with a guide rail and a
sawing depth greater than the panel thickness. Recommended sawblade: Carbide (“Widia”)
blade Electric hammer drill B (the drill bit diameter depends
on the choice of fastening screws (see paragraph 7.1 for details)
Cordless drill C for predrilling the wood wool panels. For DDS plus concrete screws: Cordless drill with
Torx 30 For Anchor Fixings [MSP]: Hammer drill with
‘mounting accessory’. (Supplied as standard with Anchor Fixings)
Telescopic prop D
Handsaw E
Other materials: tape measure/digital distance meter F , chalk line, trestles G
General Always work with clean hands and tools. Never place tools or other materials on the panels.
Doing this can damage or break the panels. The number of fastening screws depends on the panel
type. Always refer to the recommended number of fastening screws for mounting panels given in paragraph 7.2 and for adaptor fittings given in paragraph 7.4.
F
1
≥ 200 ≥ 200X * 590
Cross-section A A Ceiling bottom view
A A
Any doubts about correctly mounting wood wool panels? Always contact our customer servicedepartment before starting work.
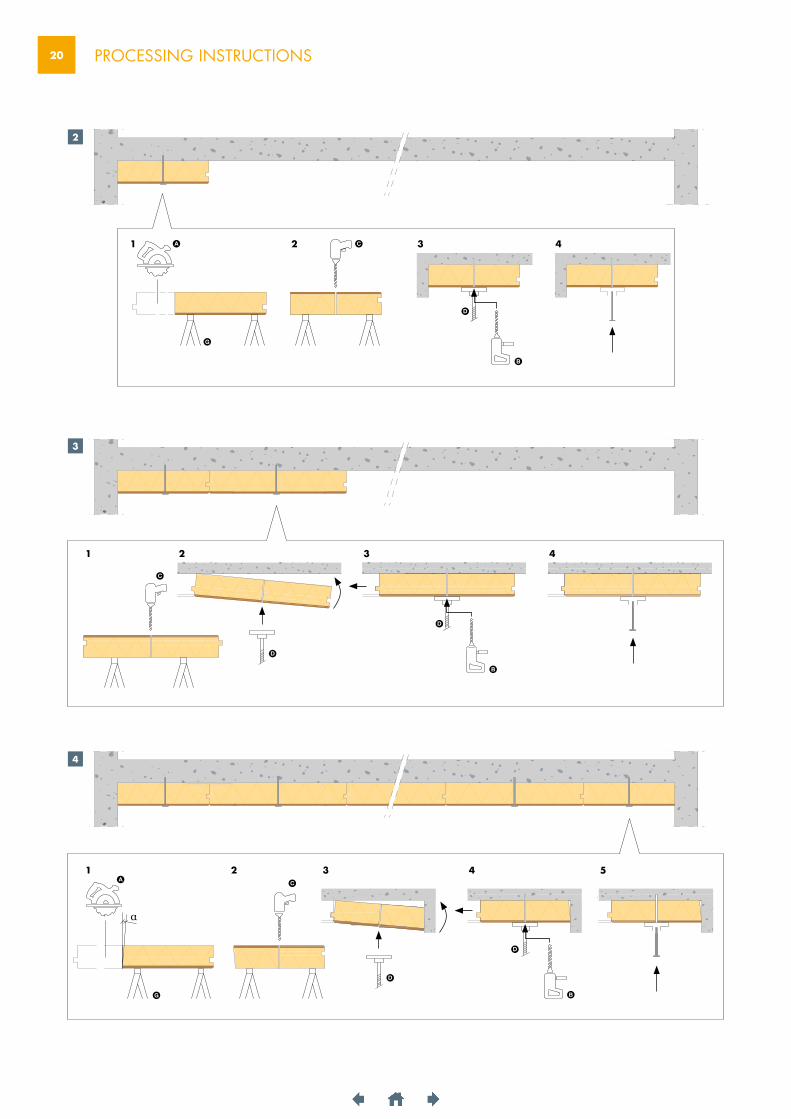
20 PROCESSING INSTRUCTIONS
2
1 2 3 4A
D
D
D
D
D
G
B
B
B
C
B
3
1
1
2
2 3 4 5
3 4
C
C
4
A
G
α
21 PROCESSING INSTRUCTIONS
A
A
AE
E
E
Combi panel
Combi panel
Combi panel
End panel
Combi panel
Betonnen Balk
Sluitpaneel Betonnen Kolom
Concrete beam
Concrete column
8.7.1 STANDARD DETAILS HERATEKTA+
Combi panelHeratekta+
Combi panel Heratekta+
Combi panel Heratekta+
A
A
AE
E
E
Combi panel
Combi panel
Combi panel
End panel
Combi panel
Betonnen Balk
Sluitpaneel Betonnen Kolom
22 PROCESSING INSTRUCTIONS
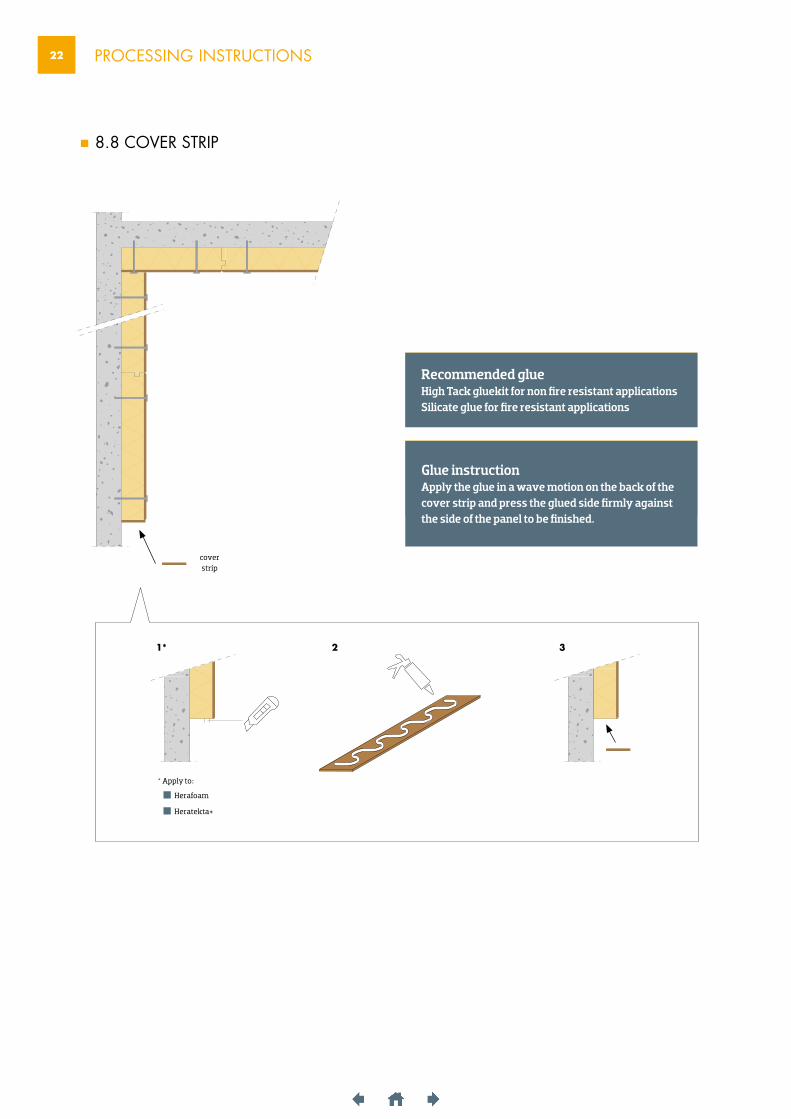
8.8 COVER STRIP
cover strip
1* 2 3
* Apply to:
Herafoam
Heratekta+
Twijfels over het juist monteren? Neem dan altijd eerst contact op met de customer service afdeling, voordat u verder werkt.
Twijfels over het juist monteren? Neem dan altijd eerst contact op met de customer service afdeling, voordat u verder werkt.
Glue instruction Apply the glue in a wave motion on the back of the cover strip and press the glued side firmly against the side of the panel to be finished.
Recommended glue High Tack gluekit for non fire resistant applicationsSilicate glue for fire resistant applications
23 PROCESSING INSTRUCTIONS
1
Cross-section A A
F
≥ 200 ≥ 200X * panel width
Ceiling bottom view
A A
8.9 SOLID PANELS TO CONCRETE
Mounting surface Standard concrete (2000-2600 kg/m3)
Applicable to Decorative panel A2 Decorative panel Basic
Suitable Heraklith® mounting materials Anchor Fixing [MSP] DDS plus Concrete Screw Unidrive
SafetyAlways take the recommended safety precautionsgiven in paragraph 8.1.
Tools Bench or circular saw A with a guide rail and a
sawing depth greater than the panel thickness. Recommended sawblade: Carbide (“Widia”) blade
Electric hammer drill B (the drill bit diameter depends on the choice of fastening screws (see paragraph 7.1 for details)
Cordless drill C for predrilling the wood wool panels. For DDS plus concrete screws: Cordless drill with
Torx 30 For Anchor Fixings [MSP]: Hammer drill with ‘mounting
accessory’. (Supplied as standard with Anchor Fixings) Telescopic prop D
Handsaw E
Other materials: tape measure/digital distance meter F , chalk line, trestles G , drilling hole template H
General Always work with clean hands and tools. Never place tools or other materials on the panels.
Doing this can damage or break the panels. The number of fastening screws depends on the panel
type. Always refer to the recommended number of fastening screws for mounting panels given in paragraph 7.2 and for adaptor fittings given in paragraph 7.4.
Fire resistanceFor fire-resistant applications, always refer to the recommended number and type of fastening screws for different mounting surfaces given in paragraph 7.5.
Any doubts about correctly mounting wood wool panels? Always contact our customer servicedepartment before starting work.
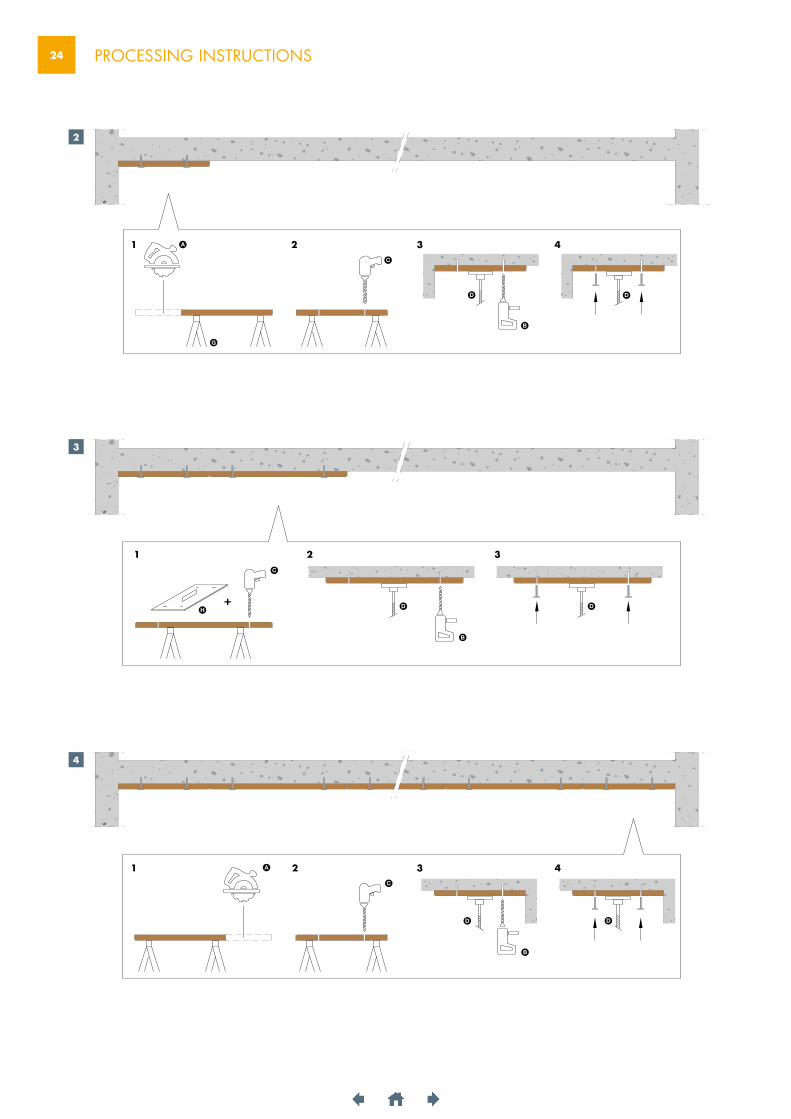
24 PROCESSING INSTRUCTIONS
2
3
4
A
C
D D
G
B
1
1
2
2
3
3
4
DH
+
C
D
B
1 2 3 4A
C
D D
B
25 PROCESSING INSTRUCTIONS
1
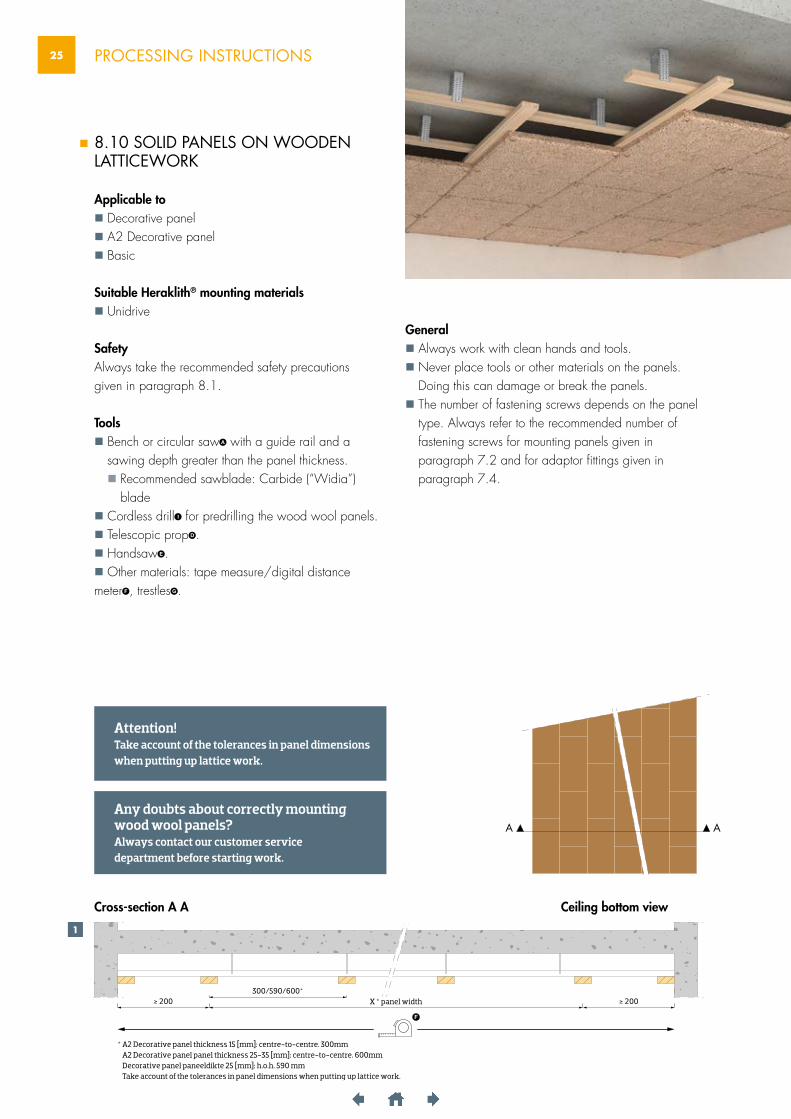
8.10 SOLID PANELS ON WOODEN LATTICEWORK
Applicable to Decorative panel A2 Decorative panel Basic
Suitable Heraklith® mounting materials Unidrive
SafetyAlways take the recommended safety precautionsgiven in paragraph 8.1.
Tools Bench or circular saw A with a guide rail and a
sawing depth greater than the panel thickness. Recommended sawblade: Carbide (“Widia”)
blade Cordless drill I for predrilling the wood wool panels. Telescopic prop D . Handsaw E . Other materials: tape measure/digital distance meter F , trestles G .
General Always work with clean hands and tools. Never place tools or other materials on the panels.
Doing this can damage or break the panels. The number of fastening screws depends on the panel
type. Always refer to the recommended number of fastening screws for mounting panels given in paragraph 7.2 and for adaptor fittings given in paragraph 7.4.
Attention! Take account of the tolerances in panel dimensionswhen putting up lattice work.
Any doubts about correctly mounting wood wool panels? Always contact our customer servicedepartment before starting work.
* A2 Decorative panel thickness 15 [mm]: centre-to-centre. 300mm A2 Decorative panel panel thickness 25-35 [mm]: centre-to-centre. 600mm Decorative panel paneeldikte 25 [mm]: h.o.h. 590 mm Take account of the tolerances in panel dimensions when putting up lattice work.
Cross-section A A Ceiling bottom view
A A
≥ 200 ≥ 200300/590/600*
X * panel width
F
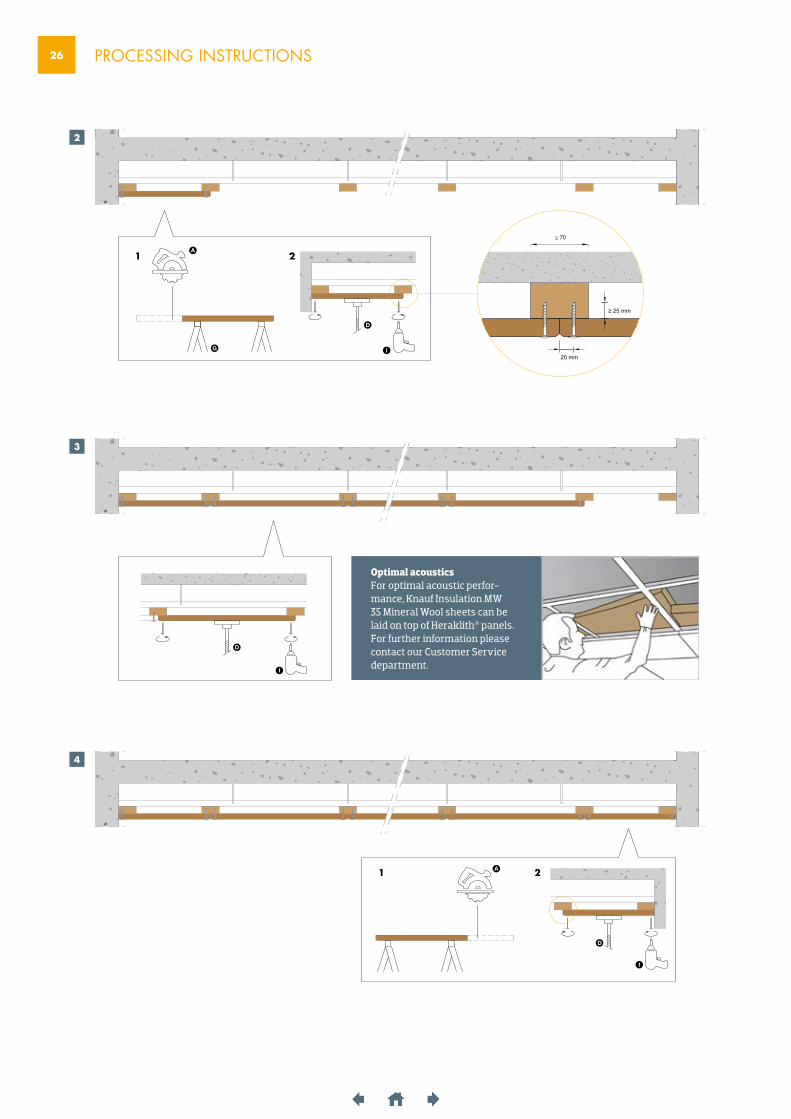
26 PROCESSING INSTRUCTIONS
2
3
Ø 4/6 mm
≥ 30 mm
≥ 25 mm
20 mm
≥ 15 mm
20 mm
A
G
D
I
1
1
2
2
D
I
Optimal acousticsFor optimal acoustic perfor-mance, Knauf Insulation MW 35 Mineral Wool sheets can be laid on top of Heraklith® panels. For further information please contact our Customer Service department.
4
A
D
I
≥ 70
27 PROCESSING INSTRUCTIONS
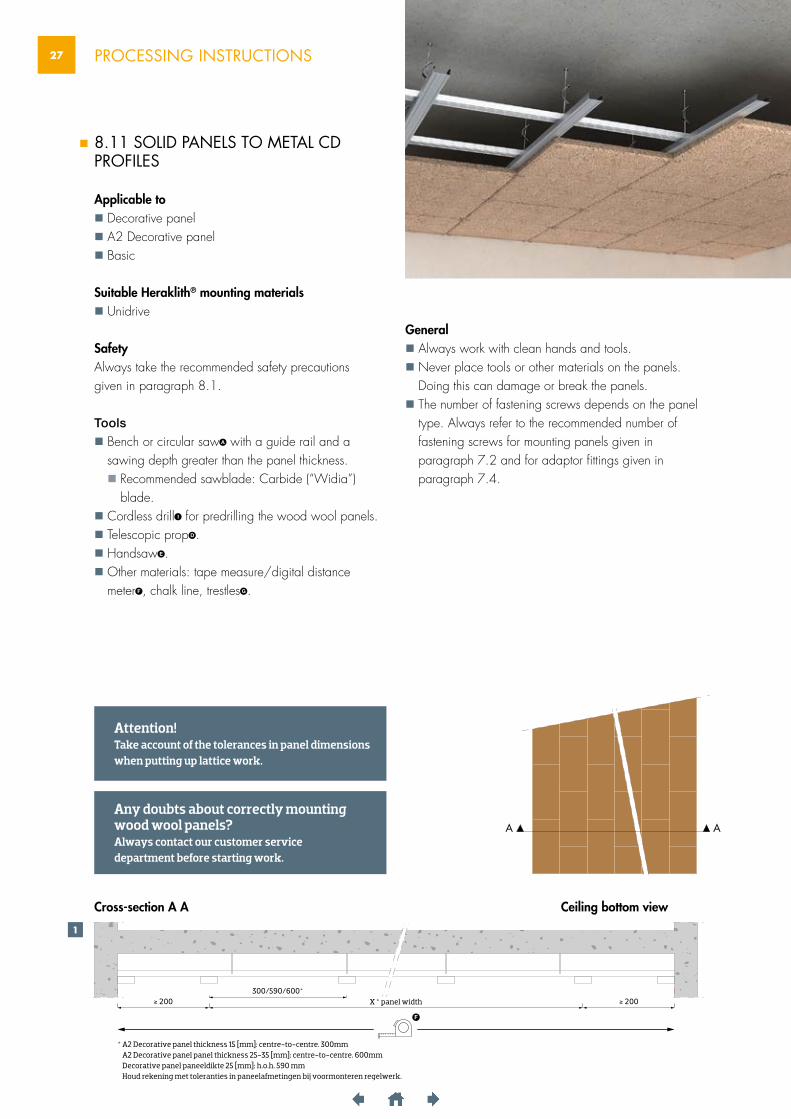
8.11 SOLID PANELS TO METAL CD PROFILES
Applicable to Decorative panel A2 Decorative panel Basic
Suitable Heraklith® mounting materials Unidrive
SafetyAlways take the recommended safety precautionsgiven in paragraph 8.1.
Tools
Bench or circular saw A with a guide rail and a sawing depth greater than the panel thickness. Recommended sawblade: Carbide (“Widia”)
blade. Cordless drill I for predrilling the wood wool panels. Telescopic prop D . Handsaw E . Other materials: tape measure/digital distance
meter F , chalk line, trestles G .
General Always work with clean hands and tools. Never place tools or other materials on the panels.
Doing this can damage or break the panels. The number of fastening screws depends on the panel
type. Always refer to the recommended number of fastening screws for mounting panels given in paragraph 7.2 and for adaptor fittings given in paragraph 7.4.
F
Cross-section A A
≥ 200 ≥ 200X * panel width
Ceiling bottom view
A A
1
300/590/600*
* A2 Decorative panel thickness 15 [mm]: centre-to-centre. 300mm A2 Decorative panel panel thickness 25-35 [mm]: centre-to-centre. 600mm Decorative panel paneeldikte 25 [mm]: h.o.h. 590 mm Houd rekening met toleranties in paneelafmetingen bij voormonteren regelwerk.
Attention! Take account of the tolerances in panel dimensionswhen putting up lattice work.
Any doubts about correctly mounting wood wool panels? Always contact our customer servicedepartment before starting work.
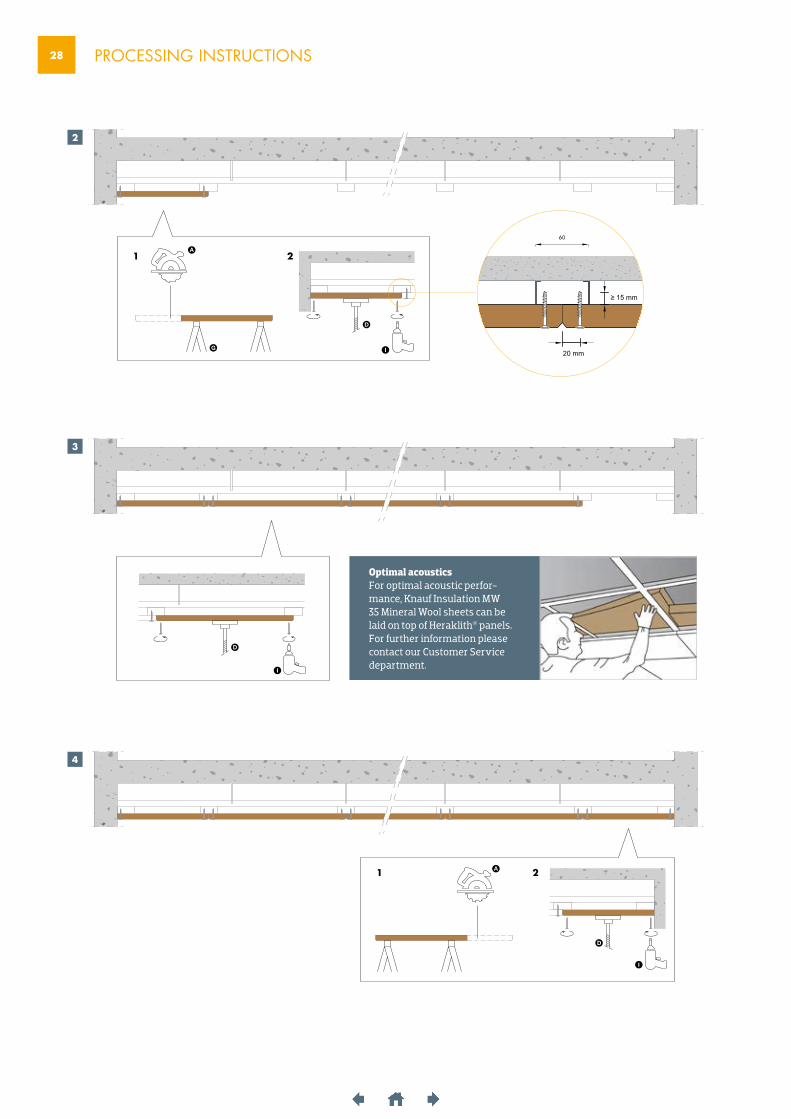
28 PROCESSING INSTRUCTIONS
2
3
4
A
G
D
I
1 2
D
I
Optimal acousticsFor optimal acoustic perfor-mance, Knauf Insulation MW 35 Mineral Wool sheets can be laid on top of Heraklith® panels. For further information please contact our Customer Service department.
A
D
I
1 2
Ø 4/6 mm
≥ 30 mm
≥ 25 mm
20 mm
≥ 15 mm
20 mm
60
29 PROCESSING INSTRUCTIONS
F
Cross-section A A
≥ 200
≥ 20
0
≥ 200X * 600
Ceiling bottom view
A A
1
25
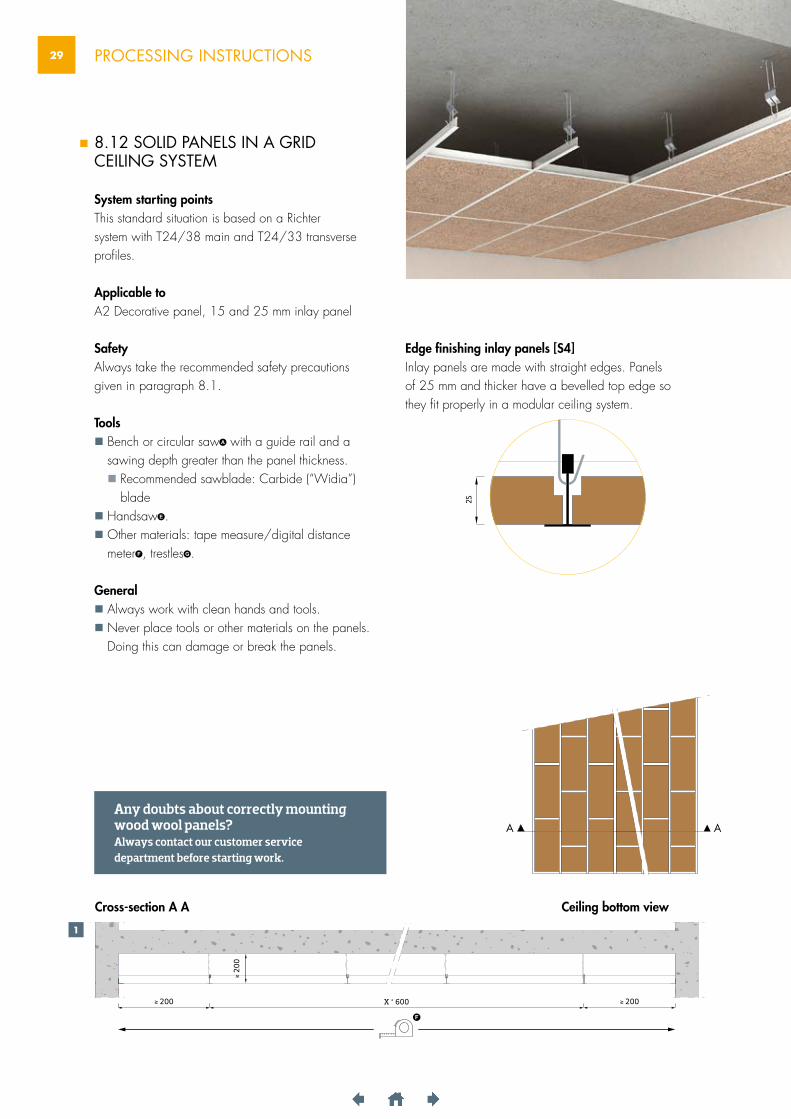
8.12 SOLID PANELS IN A GRID CEILING SYSTEM
System starting pointsThis standard situation is based on a Richtersystem with T24/38 main and T24/33 transverseprofiles.
Applicable toA2 Decorative panel, 15 and 25 mm inlay panel
SafetyAlways take the recommended safety precautionsgiven in paragraph 8.1.
Tools Bench or circular saw A with a guide rail and a
sawing depth greater than the panel thickness. Recommended sawblade: Carbide (“Widia”)
blade Handsaw E . Other materials: tape measure/digital distance
meter F , trestles G .
General Always work with clean hands and tools. Never place tools or other materials on the panels.
Doing this can damage or break the panels.
Edge finishing inlay panels [S4]Inlay panels are made with straight edges. Panelsof 25 mm and thicker have a bevelled top edge sothey fit properly in a modular ceiling system.
Any doubts about correctly mounting wood wool panels? Always contact our customer servicedepartment before starting work.
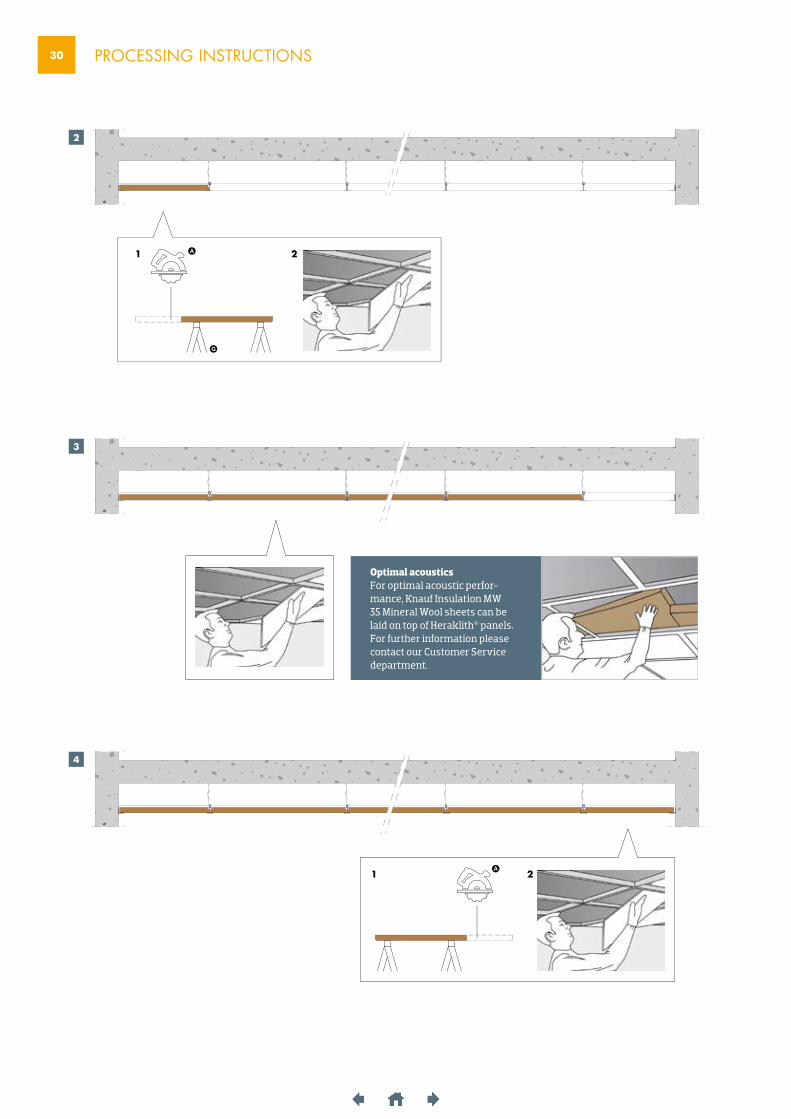
30 PROCESSING INSTRUCTIONS
2
3
4
A
G
Optimal acousticsFor optimal acoustic perfor-mance, Knauf Insulation MW 35 Mineral Wool sheets can be laid on top of Heraklith® panels. For further information please contact our Customer Service department.
A
1
1
2
2
31 PROCESSING INSTRUCTIONS
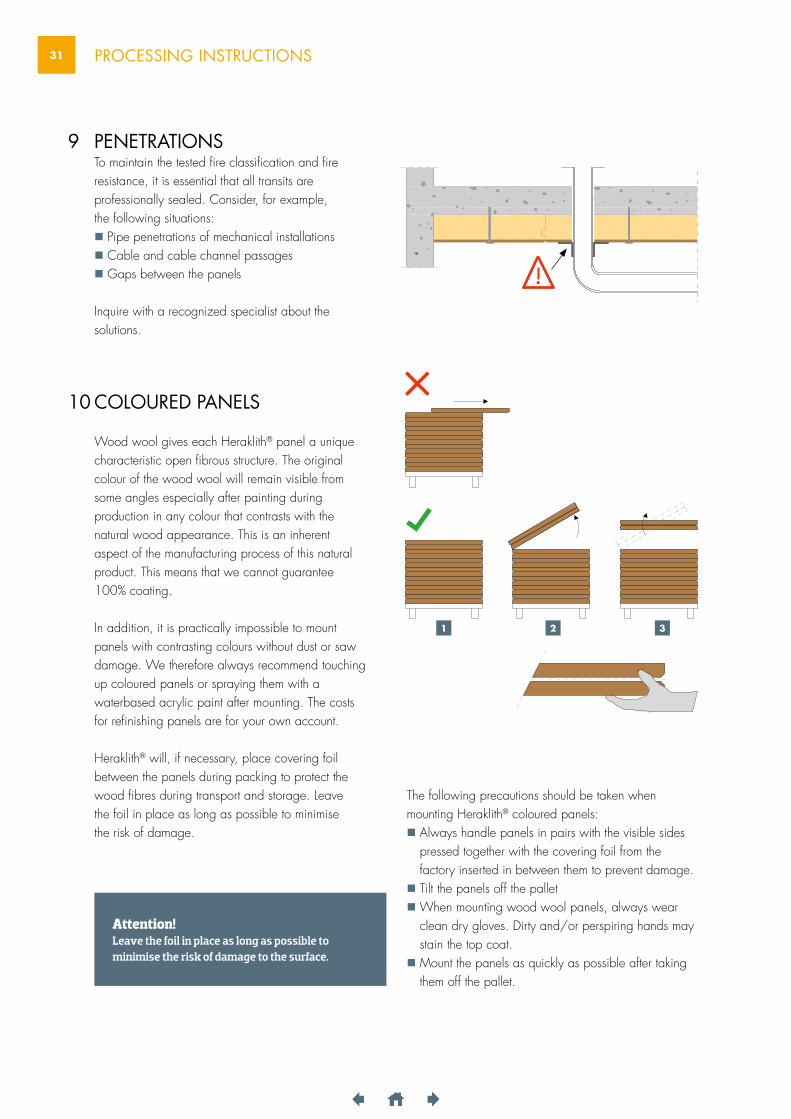
COLOURED PANELS
Wood wool gives each Heraklith® panel a uniquecharacteristic open fibrous structure. The originalcolour of the wood wool will remain visible fromsome angles especially after painting duringproduction in any colour that contrasts with thenatural wood appearance. This is an inherentaspect of the manufacturing process of this naturalproduct. This means that we cannot guarantee100% coating.
In addition, it is practically impossible to mountpanels with contrasting colours without dust or sawdamage. We therefore always recommend touchingup coloured panels or spraying them with awaterbased acrylic paint after mounting. The costsfor refinishing panels are for your own account.
Heraklith® will, if necessary, place covering foilbetween the panels during packing to protect thewood fibres during transport and storage. Leavethe foil in place as long as possible to minimisethe risk of damage.
10
The following precautions should be taken whenmounting Heraklith® coloured panels: Always handle panels in pairs with the visible sides
pressed together with the covering foil from the factory inserted in between them to prevent damage.
Tilt the panels off the pallet When mounting wood wool panels, always wear
clean dry gloves. Dirty and/or perspiring hands may stain the top coat.
Mount the panels as quickly as possible after taking them off the pallet.
PENETRATIONSTo maintain the tested fire classification and fire resistance, it is essential that all transits are professionally sealed. Consider, for example, the following situations: Pipe penetrations of mechanical installations Cable and cable channel passages Gaps between the panels
Inquire with a recognized specialist about the solutions.
9
1 32
Attention!Leave the foil in place as long as possible to minimise the risk of damage to the surface.
32 PROCESSING INSTRUCTIONS
DisclaimerOur general sales and delivery conditions apply to all our offers, communications and agreements, notwithstanding any provision to the contrary that can be found on our order forms or elsewhere. An overview of our general terms and conditions can be found on: www.heraklith.co.uk/downloads. Extreme caution was observed when putting together and processing the information, texts and illustrations in this document. Nevertheless, errors cannot quite be ruled out. The publisher and editors cannot assume legal responsibility or any liability whatever for incorrect information and the consequences thereof.
PREVENTING MOISTURE SPOTS
Wood wool panels are insensitive to moisture. However, the coating provided in Knauf Insulation’s factory may turn brown after contact with water. This is caused by the penetrating water dissolving pigments in the wood and transporting these pigments to the visible side of the panel. The following solutions can be applied: Water in panels can be prevented with proper
detailing, protecting and finishing in accordance with our guidelines.
After drying, lightly scour the panels with fine sand paper (grit no. 80).
You can get rid of small moisture by applying a light coat of Herapaint in the same RAL colour.
For serious damp spots, we advise you to apply an insulating layer (primer) and then paint over the wood wool panels
MAINTENANCE / CLEANINGWood wool panels are easy to clean using a softbrush or compressed air. Do not use water toclean the panels.
11
12
SPECIFIC KNOWLEDGE
Although Heraklith® wood wool panels are delivered in combination with detailed processing instructions, the processing party must have sufficient specific knowledge of the way such products are processed in order to be able to apply the processing instructions correctly. The processing party is also entirely responsible for correctly processing the wood wool panels Knauf Insulation cannot be held liable in any way at all for any incorrect application. If in doubt, make sure to contact your supplier or visit our website www.heraklith.co.uk for additional information and product data.
FURTHER INFORMATION
For more information and terms & conditions,please contact your supplier:
If you are unable to get in touch with your supplier,please send an e-mail to: [email protected]
13
14
V1-UK 12/2021
www.heraklith.co.uk
Heraklith® is a registered trademark of
Knauf Insulation B.V.Dakota 7 5126 RL Gilze
Tel: + 31 (0)162 - 42 12 45 e-mail: [email protected]
www.heraklith.co.uk
Related Documents