Pro-face/Xycom OpenHMI ™ Getting Started P/N 340060 Revision F Xycom Automation, LLC.

Welcome message from author
This document is posted to help you gain knowledge. Please leave a comment to let me know what you think about it! Share it to your friends and learn new things together.
Transcript

Pro-face/Xycom OpenHMI™
Getting StartedP/N 340060
Revision F
Xycom Automation, LLC.

R evision Description Date
A Preliminary Manual 1/99B Manual Released 2/99C Revision 3/99D Revision 4/99
Trademark Information Xycom and OpenHMI are trademarks of Xycom Automation, LLC. Xycom Automation, L.L.C. now is referred to as Pro-face through a D.B.A. The Pro-face name and logo will replace the Xycom name and logo on all documents where possible. Pro-face is a trademark of Digital Electronics Corporation. Brand or product names are registered trademarks of their respective owners.Windows is a registered trademark of Microsoft Corp. in the United States and other countries. Wonderware FactorySuite, InTouch, WindowMaker, WindowViewer, SQL Access Manager, RecipeManager, SPC Pro, DBDump, DBLoadd, HDMerge, HistData, Wonderware Logger, InControl, InTrack,InBatch, IndustrialSQL, FactoryOffice, Scout, SuiteLink and NetDDE are trademarks of Wonderware Corporation. Copyright Information This document is copyrighted by Xycom Automation, L.L.C. (Xycom) and shall not be reproduced or copied without expressed written authorization from Xycom Automation, L.L.C. The information contained within this document is subject to change without notice. Pro-face does not guarantee the accuracy of the information.
B rand or product names are registered trademarks of their respective owners.
Xycom Automation, LLC.750 North Maple RoadSaline, MI 48176–1292734-429-4971 (phone)734-429-1010 (fax)
E Revision 11/03 F Name change. correct where applicable with document 4/07
www.profaceamerica.com
Owner
Rectangle

C H A P T E R 1
Welcome to OpenHMI™Welcome to the quickest and easiest way to create human-machine interface(HMI) applications for the Microsoft Windows operating systems. UsingOpenHMI , the application developer can create powerful, full-featuredapplications that exploit the key features of Microsoft Windows, includingDynamic Data Exchange (DDE), Object Linking and Embedding (OLE),graphics, and more. OpenHMI can also be extended by adding customwizards, generic objects, and script extensions.
The OpenHMI ™ application software consists of two parts: the developmentsystem (software running on a desktop, laptop, or industrial PC) and theruntime workstation (an OpenHMI operator interface workstation). Youinstall the OpenHMI software on the PC you would like to use for adevelopment system. The runtime software is preloaded on the OpenHMIworkstation. On the development PC you can use the OpenHMI software’sWindowMaker to create animated operator interface display windows.
These operator interface display windows can connect to industrial I/O systemsand other Windows applications in the OpenHMI runtime environment—anOpenHMI workstation with the WindowViewer runtime software. After youcomplete an HMI application in WindowMaker , you download the displays tothe OpenHMI runtime workstation and run them with the OpenHMIsoftware’s WindowViewer. The OpenHMI workstation processes scanneddata from the connected devices according to parameters defined in yourapplication and displays the data in the graphic display windows.
Note: OpenHMI is a modified version of the popular commercial HMIsoftware package, InTouch® by Wonderware® corporation. For this reasonyou will see references to InTouch on the software’s dialogs and editors.For the purposes of developing your application with OpenHMI softwaresupplied by Pro-face, you may consider references to InTouchand OpenHMI as references to the same software product.
Note: Applications built with OpenHMI software can only run on a Pro-face/XycomOpenHMI workstation.
Note: After you install the development software, you can access morecomprehensive documentation on the OpenHMI WindowMaker byaccessing the PDF documentation through the shortcut on yourdevelopment PCs desktop.

Welcome to OpenHMI™ 1-2
System RequirementsTo develop an OpenHMI application with the OpenHMI software, werecommend the following:
• Any IBM compatible machine with an 5x86 processor or higher
• At least 100MB of free hard disk space
• At least 16MB of random-access memory (RAM)
• SVGA display adapter
• Parallel printer port
• Pointing device (e.g., mouse, trackball, joystick)
• Windows 95 or Windows NT operating systems
To run a developed application, you must have an OpenHMI workstationwith a runtime license.

Welcome to OpenHMI™ 1-3
C onfiguration P ac kage C ontentsIn addition to this Getting Started guide, your configuration package shouldcontain the following items:
- OpenH M I Softwar e (on two C Ds labeled, “ OpenH M I , Pr oductivityPack” and “ I /O Ser ver s” )
- C onfigur ator L icense (on floppy diskette labeled, “ consign 1000tag/100 window” )
- Univer sal ser ial file tr ansfer cable
- R ead M e F ir st sheet
Welcome to OpenHMI™ 1-4
Installing the OpenHMI SoftwareOpenHMI software runs on Microsoft Windows 95 or Windows NToperating systems. The installation program creates directories as needed,copies files to your hard drive, and creates the OpenHMI icons in adesktop folder.
To install OpenHMI on a Windows 95 or Windows NT operating system:
Note: If your laptop or PC does not have a CD-ROM drive available, makesure that you have a portable CD-ROM drive (and appropriate devicedrivers installed) attached to the printer port and powered on.
1. Power up your development PC with Windows NT or 95.
2. Insert OpenHMI CD#1 into your CD-ROM drive.
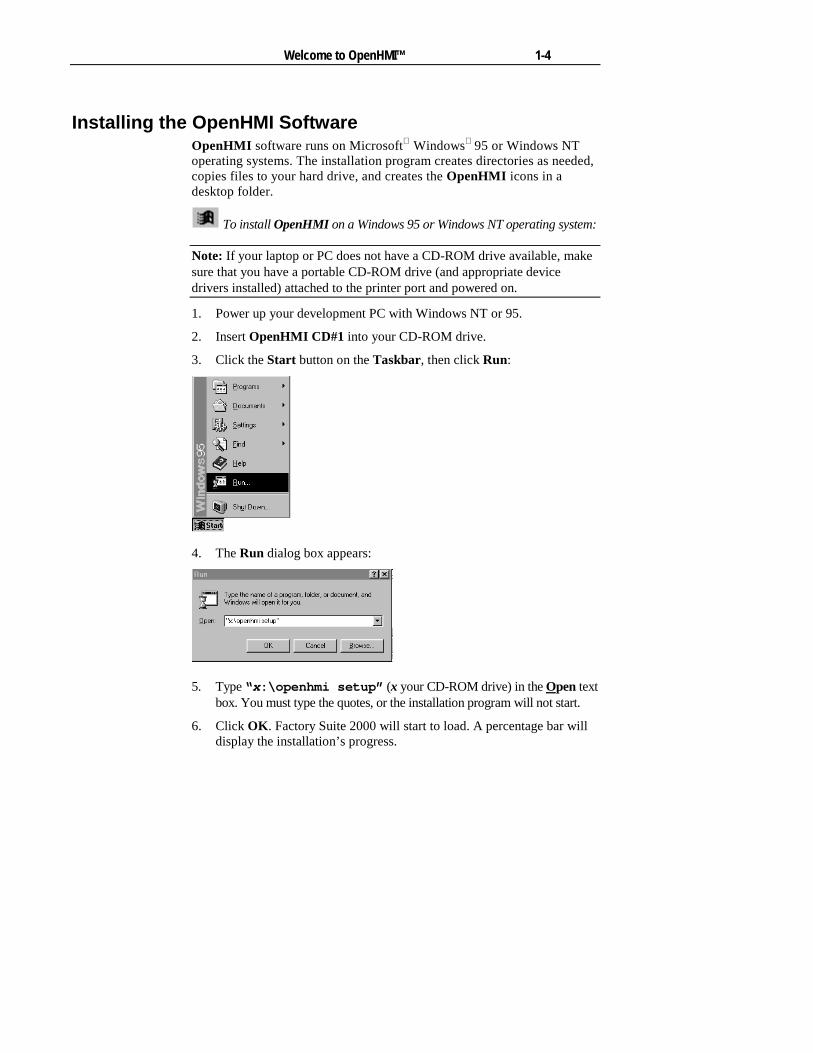
3. Click the Start button on the Taskbar, then click Run:
4. The Run dialog box appears:
5. Type “ x:\openhmi setup” (x your CD-ROM drive) in the Open textbox. You must type the quotes, or the installation program will not start.
6. Click OK . Factory Suite 2000 will start to load. A percentage bar willdisplay the installation’s progress.

Welcome to OpenHMI™ 1-5
7. When the “Welcome to the system files setup program.” screenappears, click Next, then Next, again, at the second welcome screen.
Note: The installation program will update existing registry entries (forTCP/IP, user registration, DLLs, etc.). Depending on the existingentries on your development system, these registry updates may causethe Windows operating system to restart the workstation before theinstallation is complete. If you have not selected components (step 15)before you are asked to restart the operating system, you will have tofollow the installation procedure, again, from the beginning.
8. When the license information screen appears, click Yes, if you agree withthe terms of the license. You must select “Yes” to complete the setup.
9. Enter your name and company to complete the user information screenand click Next.
10. Click OK to verify the name and company.
11. When prompted to specify a directory for common components, clickNext to accept the default. The installation program will display aprogress bar as it loads some common program components.
12. If you get a “Version Conflict” message, click Yes to keep theexisting file.
13. When prompted to specify an Intouch Destination directory, click Nextto keep the default.
14. If you don’t already have the Acrobat Reader installed on your system,a sequence will begin to install the Acrobat Reader onto your system.This reader allows you to view the online documentation that the installprogram saves to hard disk in PDF format. Click Next through eachstep of this sequence, then OK when the sequence is complete.
15. Select components when prompted. Pro-face recommends:IntouchDemos that match your OpenHMI workstation’s resolution (640 x 480or 800 x 600)Intouch 7.0 Recipe ManagerOnline ManualsWhen you finish selecting components, Click Next.
Note: The SPC and SQL components are not supported by theOpenHMI runtime workstations.
16. When the configuration options screen appears, verify thatDevelopment System and Help Files are checked and that Factory

Welcome to OpenHMI™ 1-6
Focus and Runtime are not checked, then click Next. The installationprogram will copy the remaining files to the hard drive.
17. A screen will display the components that you have selected to install.Click Next to continue. The installation program will display a progressbar as it completes installation.
18. When installation is complete, you may select OK to review the releasenotes.
19. Before you can start the development software, you must click OKwhen prompted to restart the computer, so that the required settingsmay take effect.
Note: Setup can be run as many times as necessary to install optionalprogram modules or I/O Servers.

Welcome to OpenHMI™ 1-7
Installing an I/O ServerThe WindowViewer software, preloaded on your OpenHMI runtimeworkstation, acquires the data values from PLCs and other devices throughI/O Servers that support the Windows DDE protocol. You must install anI/O server that corresponds to your I/O device onto your developmentsystem. Through I/O server configuration, you will specify the parametersthat are required for communication between your I/O and workstation.
Note: This procedure is given for your information when developing a real-world application. The demo application covered by this Getting StartedGuide uses a simulated server that is automatically installed with thedevelopment software.
Version 7.0 ServersFollow these steps to install a version 7.0 I/O server.
1. Insert OpenHMI CD#2 into your CD-ROM drive.
2. Click the Start button on the Taskbar, then click Run:
3. The Run dialog box appears:
4. Type “ x:\io server setup” (x is your CD-ROM drive) in the Open textbox. You must type the quotes, or the installation program will not start.
5. Click OK . Factory Suite 2000 will start to load. A percentage bar willdisplay the installation’s progress.

Welcome to OpenHMI™ 1-8
6. When prompted with a list of I/O servers, select a server and click Next.
Note: The versions of the servers are indicated on the server list. If youselect a server that is below version 7.0, then the rest of the installationprocess will differ slightly from the installation of version 7.0 drivers. Youmay refer to the next section to complete installation of an older driver.
7. When prompted to verify setup information, click Next.
8. When prompted to review the I/O server release notes, in the nextinstallation dialog, you may select Yes or No.
9. Click Yes to continue the installation.
10. When the “Welcome to the system files setup program.” screenappears, click Next, then Next, again, at the second welcome screen.
11. When the license information screen appears, click Yes, if you agree withthe terms of the license. You must select “Yes” to complete the setup.
12. Verify the name and company in the user information screen andclick Next.
13. Click Yes to confirm registration.
14. When prompted to specify an Intouch Destination directory, click Nextto keep the default. The I/O Server setup program will install thecommon components.
15. If you don’t already have the Acrobat Reader installed on your system,a sequence will begin to install the Acrobat Reader onto your system.This reader allows you to view the online documentation that the installprogram saves to hard disk in PDF format. Click Next through eachstep of this sequence, then OK when the sequence is complete.
16. When prompted again to specify an Intouch Destination directory, clickNext to keep the default.
17. You will be prompted to select the components to install. Click Next toaccept the default of all components.
18. Click Next to verify setup information and complete I/O Serverinstallation. The I/O Server setup program will install files for yourspecific server.
20. At the final prompt select Yes (then Finish) if you do not need to addmore servers and No if you need to install more servers. The systemwill restart. If you selected “No”, the system the installation programwill close. After you have installed all required servers, you mustrestart the system, so that the required settings may take effect.

Welcome to OpenHMI™ 1-9
Installing Older I/O Servers (Versionsbelow 7.0)Note: These steps show how to complete I/O server installation if youselected an older driver in step 6 of the previous procedure.
1. When prompted to verify setup information, click Next.
2. When prompted to review the I/O server release notes, in the nextinstallation dialog, you may select Yes or No.
3. Click Yes to continue the installation.
4. When the “Welcome to the system files setup program.” screenappears, click Next.
5. When the license information screen appears, click Yes, if you agree withthe terms of the license. You must select “Yes” to complete the setup.
6. When prompted to specify an Intouch Destination directory, click Nextto keep the default.
7. You will be prompted to select the components to install. Click Next toaccept the default of all components.
8. Click Next to verify setup information and complete I/O Serverinstallation.
9. When prompted to add icons to the Windows Start menu, click Yes.
10. When installation is complete, click OK to exit the setup program.
Note: Depending on your system and other drivers that you haveinstalled, you may have to restart the operating system.

Welcome to OpenHMI™ 1-10
Installing the Productivity PackSome advanced applications features will not function if the productivitypack is not installed.
1. Insert OpenHMI CD#1 into your CD-ROM drive.
2. Click the Start button on the Taskbar, then click Run. The Run dialogbox appears.
3. Type “x:\productivity pack setup” (x your CD-ROMdrive) in the Open text box. You must type the quotes, or theinstallation program will not start. Click OK .
4. When the “Welcome to the system files setup program.” screenappears, click Next.
5. When the license information screen appears, click Yes, if you agreewith the terms of the license. You must select “Yes” to complete thesetup.
6. Enter your name and company to complete the user information screenand click Next.
7. Click Yes to verify the name and company.
8. When prompted to specify a directory for common components, clickNext to accept the default. The installation program will display aprogress bar as it loads some common program components.
9. If you don’t already have the Acrobat Reader installed on your system,a sequence will begin to install the Acrobat Reader onto your system.This reader allows you to view the online documentation that the installprogram saves to hard disk in PDF format. Click Next through eachstep of this sequence, then OK when the sequence is complete.
10. When prompted to specify an Intouch Destination directory, click Nextto keep the default.
11. You will be prompted to select the components to install. Select thecomponents you want to install, then click Next.
Note: The SPC and SQL components are not supported by theOpenHMI runtime workstations.
12. Click Next to verify setup information and complete installation.
13. When installation is complete, the program will recommend that youread the release notes. Click OK .
14. At the final prompt click OK . The system will restart.
Welcome to OpenHMI™ 1-11
Enable Configurator LicenseBefore you can run the installed OpenHMI software, you must run theprogram on the Open HMI Consignment license floppy diskette (labeled,“consign 1000 tag/100 window”) that enables the program’s software.(Runtime licenses for OpenHMI workstations are preloaded.) If you do notenable the license and attempt to run the software, the OpenHMI programdisplays a warning message and denies access.
Note: The configurator enables the WindowMaker software for a one-yearperiod from date of manufacture.
Tag Database Size: The OpenHMI tag database supports up to 1,000 tags;however, the number of tags supported is dependent on the licenseinformation provided by the configurator (either 500 or 1000 tag license).The database may be limited to less than the maximum number of tags.
1. To open Windows Explorer, click the Start button on the Taskbar, andthen select Programs and Windows Explorer.
2. Insert your Pro-face/Xycom Open HMI Consignment license disk into the A:drive of either your laptop or your PC.
3. Click on 3 ½ floppy (A:) icon in Windows Explorer.
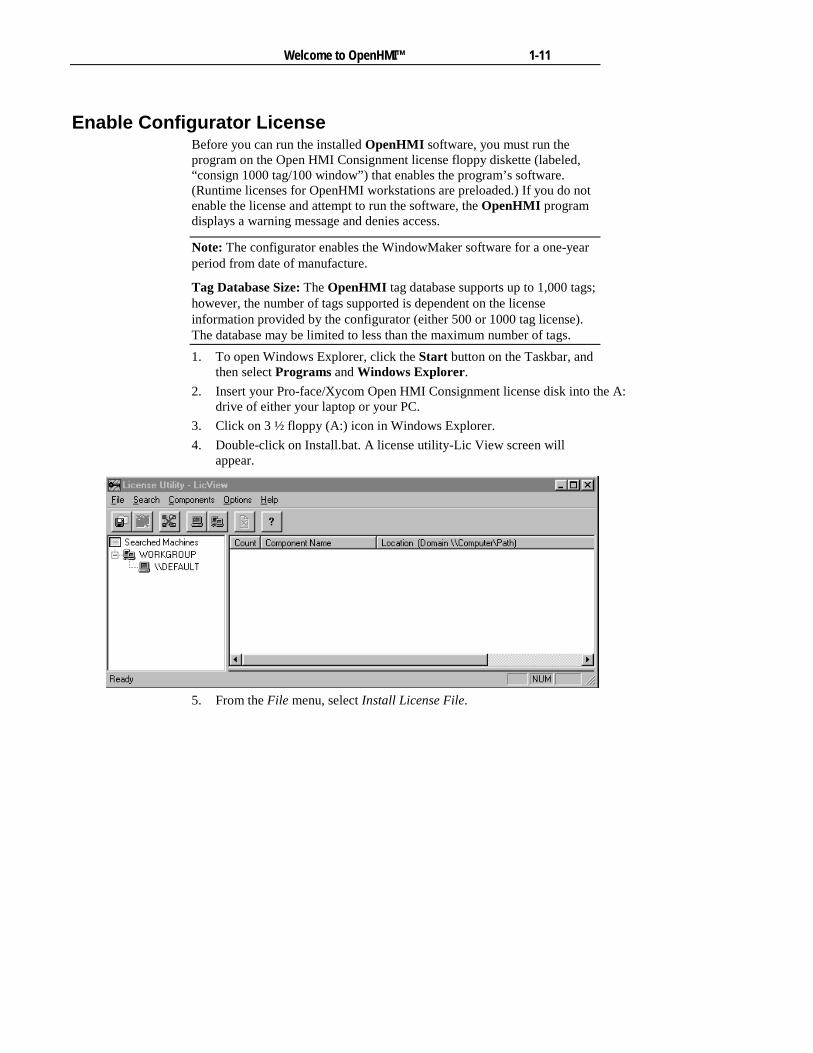
4. Double-click on Install.bat. A license utility-Lic View screen willappear.
5. From the File menu, select Install License File.
Welcome to OpenHMI™ 1-12
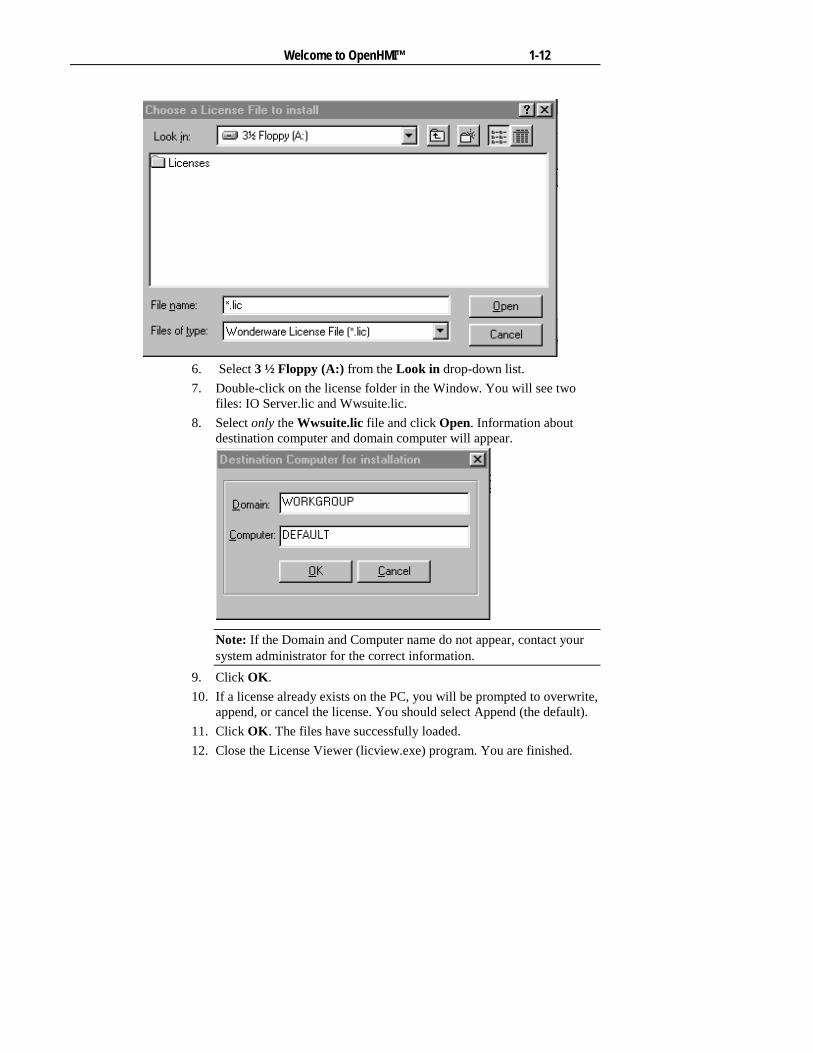
6. Select 3 ½ Floppy (A:) from the Look in drop-down list.
7. Double-click on the license folder in the Window. You will see twofiles: IO Server.lic and Wwsuite.lic.
8. Select only the Wwsuite.lic file and click Open. Information aboutdestination computer and domain computer will appear.
Note: If the Domain and Computer name do not appear, contact yoursystem administrator for the correct information.
9. Click OK .
10. If a license already exists on the PC, you will be prompted to overwrite,append, or cancel the license. You should select Append (the default).
11. Click OK . The files have successfully loaded.
12. Close the License Viewer (licview.exe) program. You are finished.

C H A P T E R 2
This Getting Started with OpenHMI guide is designed for first time usersof OpenHMI . Its objective is to allow you, the user, to quickly familiarizeyourself with the basic functions of OpenHMI . It acts as a step by step"workbook" in which you go through the process required to create yourfirst working OpenHMI application. This tutorial will include creation ofthe application, the window/screen, graphic components, animation linksand the database. For more detailed technical information refer to theOpenHMI User's Guide.
Throughout this guide you will see checkboxes (�) followed by bold text.These checkboxes and text indicate the development steps required tocomplete this application. You can place a check mark in these boxes asyou proceed so that no steps will be omitted. This allows you to completethe application at your leisure, taking time to read the text.
�Hint This symbol implies that the following text is a hint, useful increating future applications.
If you are unfamiliar with Windows 95 or Windows NT, we suggest thatyou first select Help from the Windows Start menu before you continuingwith this guide.
Creating Your First Application
Creating Your First Application 2-2
Let’s Get StartedThis is a simple application that quickly runs your through all the majorsteps to develop and run an HMI application. For more information on in-depth applications, take a look at the demo applications included with yourOpenHMI software.
To create your first application:
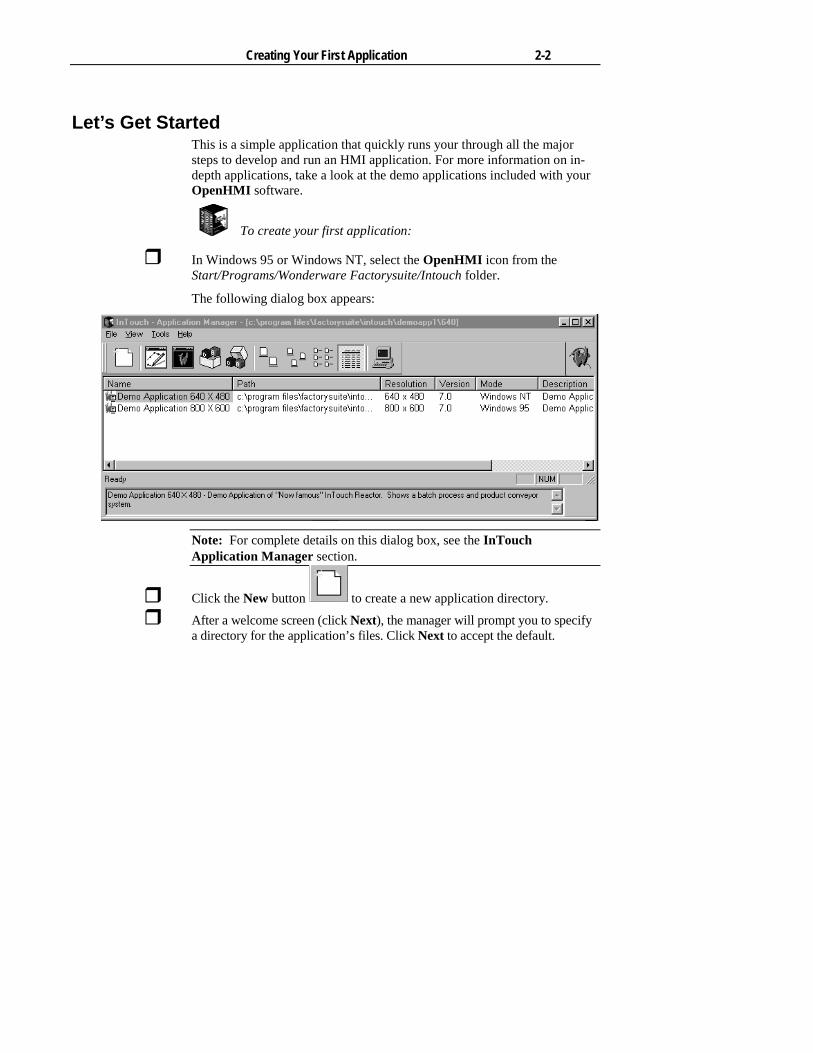
� In Windows 95 or Windows NT, select the OpenHMI icon from theStart/Programs/Wonderware Factorysuite/Intouch folder.
The following dialog box appears:
Note: For complete details on this dialog box, see the InTouchApplication Manager section.
� Click the New button to create a new application directory.
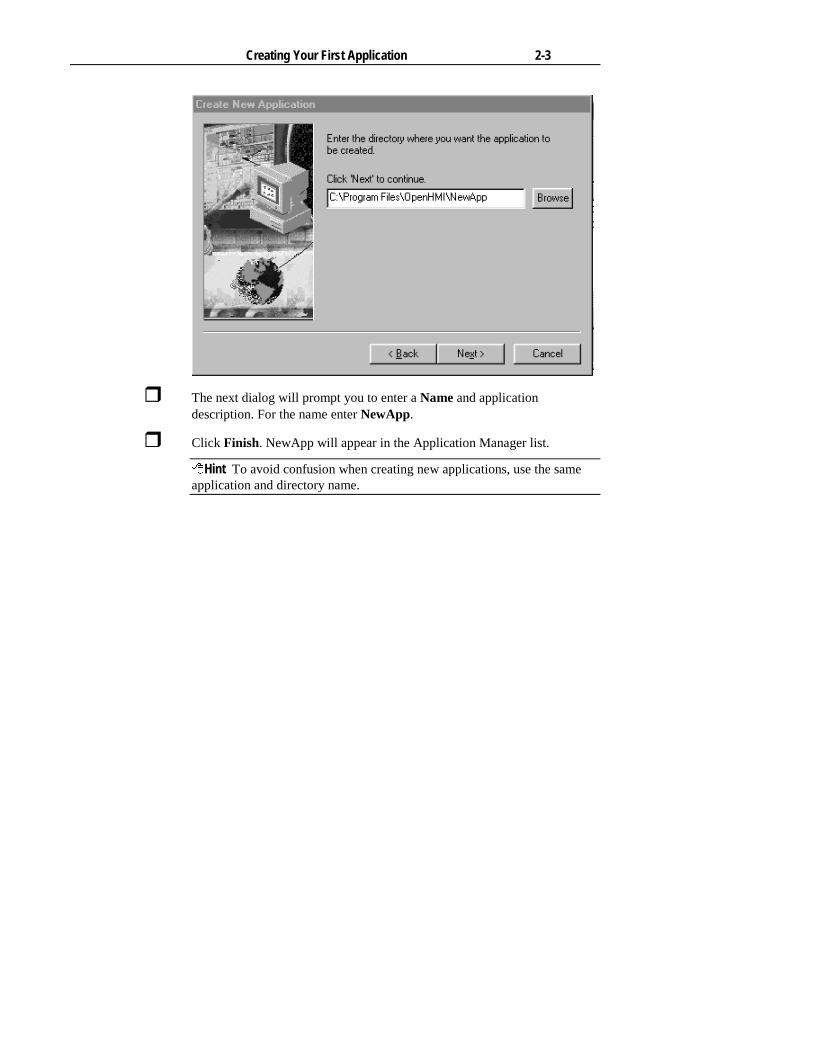
� After a welcome screen (click Next), the manager will prompt you to specifya directory for the application’s files. Click Next to accept the default.
Creating Your First Application 2-3
� The next dialog will prompt you to enter a Name and applicationdescription. For the name enter NewApp.
� Click Finish. NewApp will appear in the Application Manager list.
�Hint To avoid confusion when creating new applications, use the sameapplication and directory name.

Creating Your First Application 2-4
Build a Window
� Highlight NewApp in the Intouch Application Manager.
� Click on the WindowMaker button to run the OpenHMIdevelopment environment.
An OpenHMI application is built as a set of related windows or screensthat are created in WindowMaker , the development environment. Awindow may occupy all or only a portion of the screen as required by theapplication. The number of windows that can be displayed at one time isgoverned by the size of the windows in relation to the space available on thescreen. The runtime environment of OpenHMI is called WindowViewer.This is the environment that displays what was created in WindowMakerand maintains communication links.
� If prompted for Network Interface Selection, click Done. TheWindowMaker will appear.
Creating Your First Application 2-5
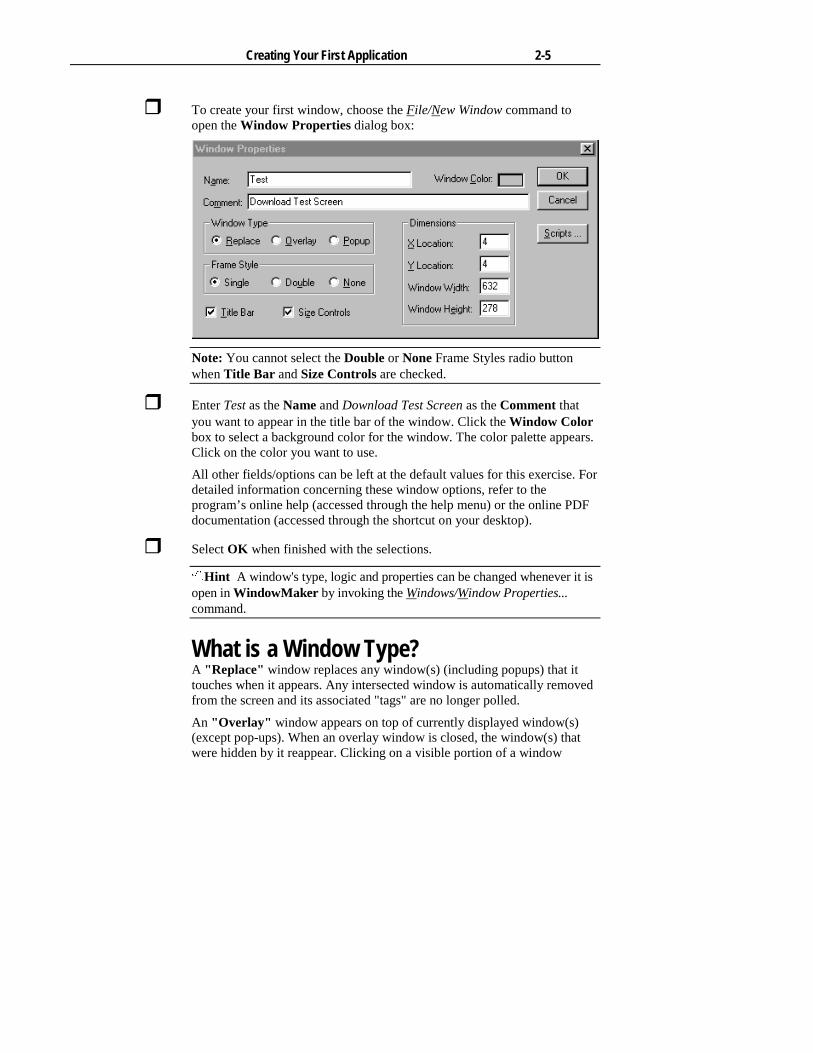
� To create your first window, choose the File/New Window command toopen the Window Properties dialog box:
Note: You cannot select the Double or None Frame Styles radio buttonwhen Title Bar and Size Controls are checked.
� Enter Test as the Name and Download Test Screen as the Comment thatyou want to appear in the title bar of the window. Click the Window Colorbox to select a background color for the window. The color palette appears.Click on the color you want to use.
All other fields/options can be left at the default values for this exercise. Fordetailed information concerning these window options, refer to theprogram’s online help (accessed through the help menu) or the online PDFdocumentation (accessed through the shortcut on your desktop).
� Select OK when finished with the selections.
�Hint A window's type, logic and properties can be changed whenever it isopen in WindowMaker by invoking the Windows/Window Properties...command.
What is a Window Type?A "Replace" window replaces any window(s) (including popups) that ittouches when it appears. Any intersected window is automatically removedfrom the screen and its associated "tags" are no longer polled.
An "Overlay" window appears on top of currently displayed window(s)(except pop-ups). When an overlay window is closed, the window(s) thatwere hidden by it reappear. Clicking on a visible portion of a window

Creating Your First Application 2-6
beneath an overlay window will cause that window to be brought to theforeground as the active window.
A "Popup" window is similar to an overlay window except that it alwaysstays on top of all other open windows, even if another window is clickedon. Popup windows usually require a response from the user in order to beremoved (i.e., acknowledging alarms).
�Hint Whenever possible, use Replace type windows. Replace windowswill remove any window(s) it touches, improving performance by nothaving to poll the "points" that were on the previous window(s) PLUS the"points" on the new window being shown.
Creating the Graphic ObjectsNow that you have a window on the screen, the WindowMaker toolboxshould be visible. If you do not want the grid to show, click on the Snap toGrid Tool in the View toolbar. (Default location of this toolbar is thelower left corner of the WindowMaker editor. The Snap to Grid Tool turnsthe visible grid off in addition to turning off the snap function.
�Hint The key combination, Shift+F1, will cause a question mark (?) toappear on the cursor. Click on any menu item or tool in the toolbox forquick, on-line help.
� To begin, select the Wizard icon from the toolbar.

Creating Your First Application 2-7
� In the Wizard Selection dialog that appears, select Lights in the left paneand then double-click on the Round Siren icon.
� The arrow cursor will change: . Move the cursor in the window area toselect a position for the siren.
� Click the left mouse button to place the siren.
Creating Your First Application 2-8
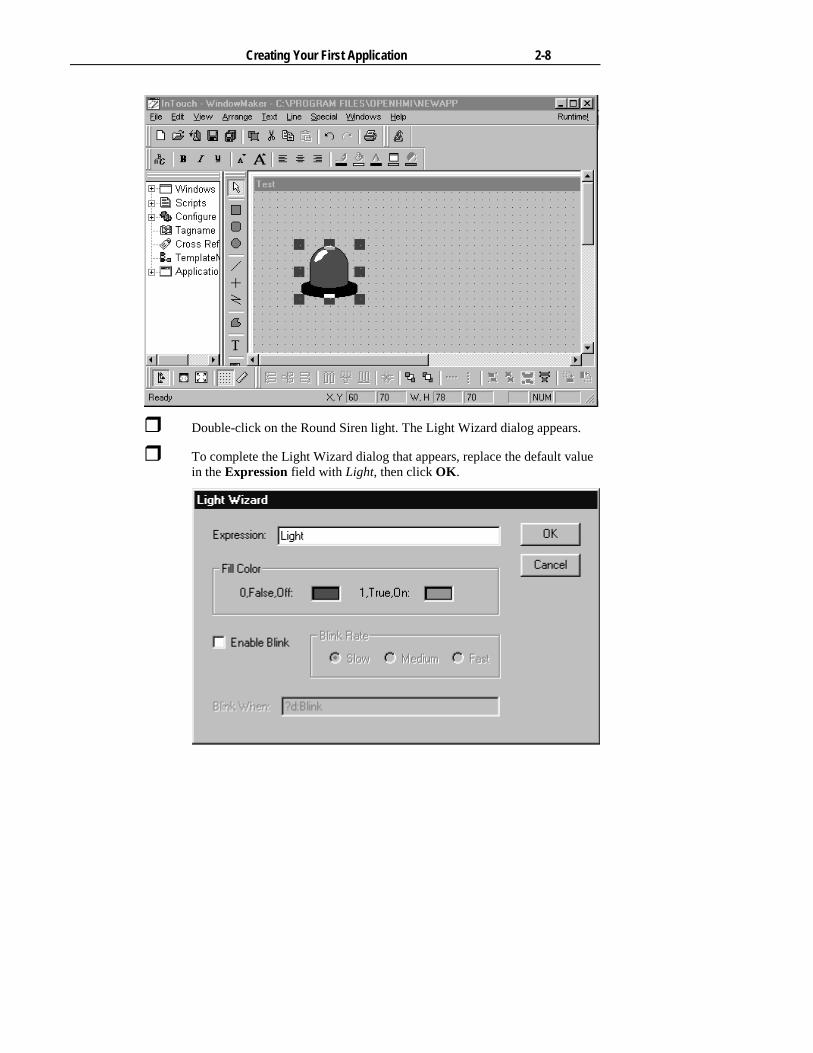
� Double-click on the Round Siren light. The Light Wizard dialog appears.
� To complete the Light Wizard dialog that appears, replace the default valuein the Expression field with Light, then click OK .
Creating Your First Application 2-9
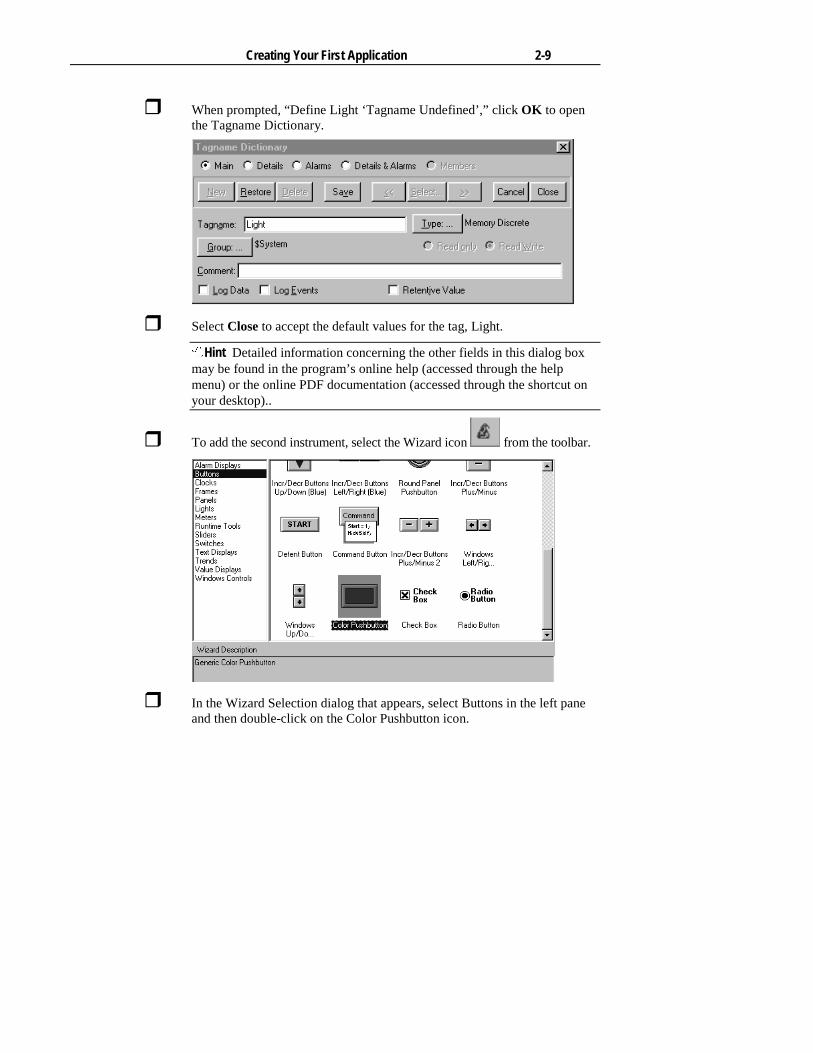
� When prompted, “Define Light ‘Tagname Undefined’,” click OK to openthe Tagname Dictionary.
� Select Close to accept the default values for the tag, Light.
�Hint Detailed information concerning the other fields in this dialog boxmay be found in the program’s online help (accessed through the helpmenu) or the online PDF documentation (accessed through the shortcut onyour desktop)..
� To add the second instrument, select the Wizard icon from the toolbar.
� In the Wizard Selection dialog that appears, select Buttons in the left paneand then double-click on the Color Pushbutton icon.
Creating Your First Application 2-10
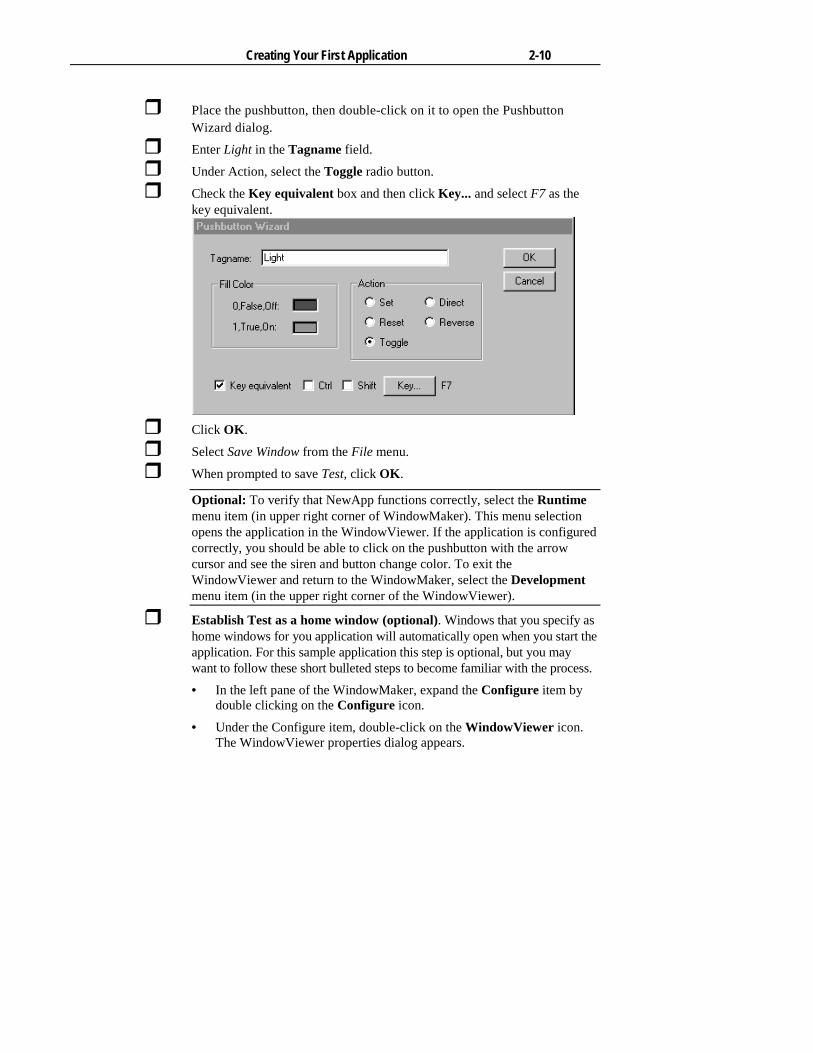
� Place the pushbutton, then double-click on it to open the PushbuttonWizard dialog.
� Enter Light in the Tagname field.
� Under Action, select the Toggle radio button.
� Check the Key equivalent box and then click Key... and select F7 as thekey equivalent.
� Click OK .
� Select Save Window from the File menu.
� When prompted to save Test, click OK .
Optional: To verify that NewApp functions correctly, select the Runtimemenu item (in upper right corner of WindowMaker). This menu selectionopens the application in the WindowViewer. If the application is configuredcorrectly, you should be able to click on the pushbutton with the arrowcursor and see the siren and button change color. To exit theWindowViewer and return to the WindowMaker, select the Developmentmenu item (in the upper right corner of the WindowViewer).
� Establish Test as a home window (optional). Windows that you specify ashome windows for you application will automatically open when you start theapplication. For this sample application this step is optional, but you maywant to follow these short bulleted steps to become familiar with the process.
• In the left pane of the WindowMaker, expand the Configure item bydouble clicking on the Configure icon.
• Under the Configure item, double-click on the WindowViewer icon.The WindowViewer properties dialog appears.
Creating Your First Application 2-11
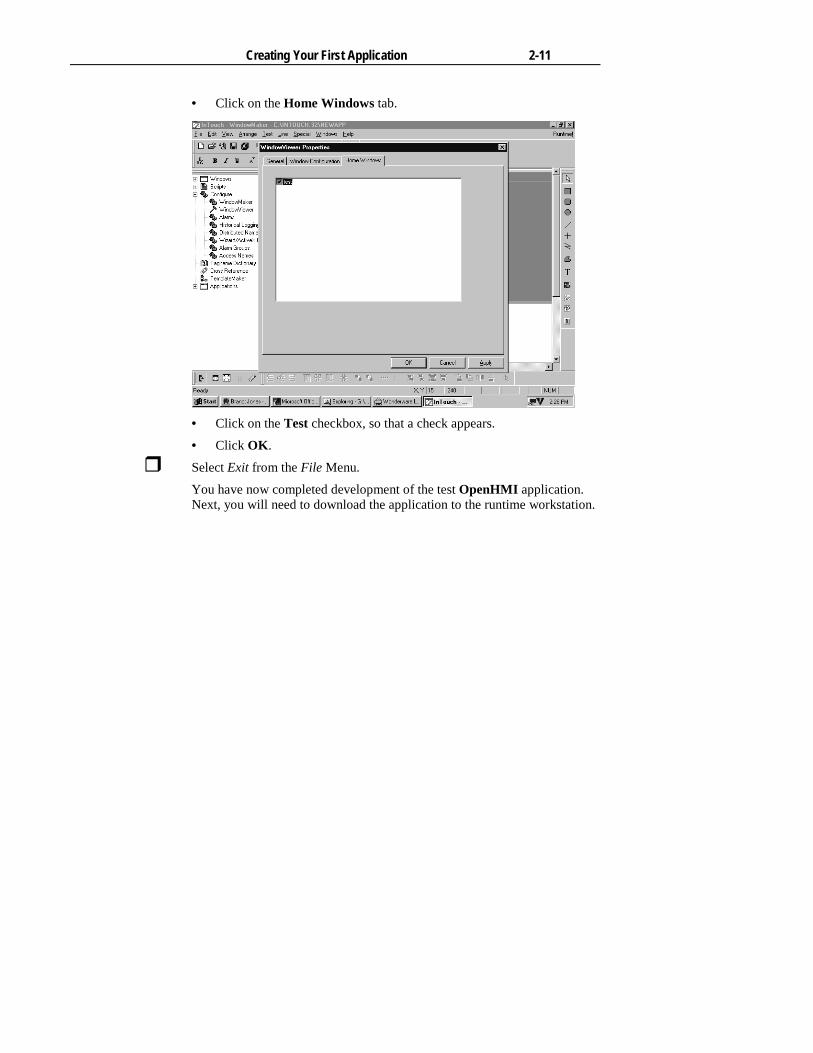
• Click on the Home Windows tab.
• Click on the Test checkbox, so that a check appears.
• Click OK .
� Select Exit from the File Menu.
You have now completed development of the test OpenHMI application.Next, you will need to download the application to the runtime workstation.

Creating Your First Application 2-12
Runtime Workstation Quick Start-upBefore you download applications to your runtime workstation, followthese steps to get the system running.
Note: Do not attach a PS/2 mouse to touchscreen units. The mouse port isnot available on touchscreen units. If COM2 is not being used (by the IrDAport or another serial device) on a Windows 95 system, you may connect aserial mouse to the unit. COM2 will be disabled on touchscreen modelswith a Windows NT operating system.
Note: To meet compliance for hazardous locations ratings, OpenHMIworkstations do not include powercords. You will need to follow theinstructions to create a power cord in your OpenHMI System Guide.
Warning: Disconnect the powercord before making any adjustments to theinside or outside of the computer.
Perform the following steps before downloading a developed OpenHMIapplication to the workstation:
1. Attach optional equipment (a floppy drive is required to download thesample application in this manual, refer to the System Guide for moreinformation):
2. Create a power cable (refer to System Guide).
3. Turn on power to the unit. The system will boot up.
4. If you have a unit with an STN display you will need to adjust thedisplay contrast. (TFT displays don’t require adjustment; the unitautomatically adjusts the contrast.) On units with keypads, press andhold the F/A key, then press the left or right cursor keys to increase ordecrease contrast. On units without keypads use the controls locatedbelow the flat panel display.
5. Before the Windows operating system will start, the Windows SetupWizard appears. The first dialog prompts you to enter your Name andCompany.
6. When the license agreement appears, click Accept to agree to the termsand continue the load and installation. (If select Don’t Accept, theoperating system will shut down.
7. When prompted for your Product ID, you must locate the Windowsoperating system backup kit (shipped with the unit) and type in theProduct ID on the package.

Creating Your First Application 2-13
8. Click Next.
9. Answer Yes to all prompts about keeping newer files.
10. Click FINISH to complete the load and installation.
11. Enter your Windows username and password:
Note: You can omit the password at this time and assign it later: click OK .
12. New screens will appear:• New Hardware Found
• Copying Files
• Version Conflicts (click Yes when prompted with version conflictdialog windows)
13. Date and Time properties appear. To change the time zone, click on thedrop down box and then choose the appropriate zone.
14. Add the Printer Wizard:• Ask your IS Department and follow instructions or consult your printer
manual.
• Click Next. If no printer is attached, click CANCEL .
15. The Welcome to windows screen appears. Either take the optional touror click CLOSE.
Creating Your First Application 2-14
Transferring the Application to the WorkstationDepending on your operating system and the networking options availableto you, you can transfer your application through many different media.This sample application fits easily on a floppy diskette. Larger applicationsmay require a compression program or alternate download method. For anyapplication that you create, you should refer to the downloading instructionsin chapter 3 and determine the best method for your application.To load your test application, NewApp, onto the workstation, this sectionwill cover a transfer with floppy diskette. First, you will copy theapplication from your development PC to a diskette, then you transfer theapplication to the workstation.
Copy Application from Development PC� Insert a blank, formatted diskette into the development PC’s floppy drive.
� Click the Start button, then select the Windows Explorer icon from thePrograms folder.
� Under the C-drive (in the left pane of the Windows Explorer), expand theProgram Files folder, then expand the Factory Suite folder, then select theInTouch folder.
� Select the folder NewApp (in the right pane of the Windows Explorer) anddrag it to the A drive icon (in the left pane of the Windows Explorer).
� After the copying finishes, remove the diskette and label it, NewApp.
Transfer Application to Runtime Workstation� Insert the diskette (with NewApp copied onto it) into the runtime
workstation’s floppy drive into the runtime workstation.
� Click the Start button, then select the Windows Explorer icon from thePrograms folder.
� Under the C-drive (in the left pane of the Windows Explorer), expand theProgram Files folder, then expand the Factory Suite folder.
� Select the A-drive icon.
� Select the folder NewApp (in the right pane of the Windows Explorer) anddrag it to the InTouch folder (under c:\program files\factory suite, in theleft pane of the Windows Explorer).
� After the copying finishes, you may close or minimize the WindowsExplorer to return to the desktop.

Creating Your First Application 2-15
Launch the Test Application on Runtime Workstation� Double-click OpenHMI shortcut on the Windows desktop.
� On the Tools menu, click Find Applications. The Starting directory forsearch dialog box appears. Make sure that the Look in drop-down listspecifies the c:\Program Files\FactorySuite\Intouch directory.
� Select the NewApp folder in the main window and click OK .
Note: Although other icons will appear on the main toolbar, theWindowMaker is not licensed to run on an OpenHMI workstation.
� Click on the WindowViewer icon.
� You may be prompted to convert screen size. You should select Yes toanswer this prompt.
� If you are launching the application on a Windows 95 workstation, a nodescreen appears. Click Cancel.
� When the Windows to Show dialog appears, select the Test check box andclick OK . (This dialog will not appear if you have specified Test as a Homewindow.)
� The WindowViewer appears and displays the Test window. The pushbuttonand siren will toggle between two colors when pressed through touchscreeninput or an F7 keypress.
� Select Exit from the File menu to exit the application.

C H A P T E R 3
You've created a simple OpenHMI application that involves only the mostbasic elements of the product. You should be aware that there is far more toOpenHMI . The sample application is intended simply to give you anintroduction to OpenHMI .
Now that you've had a taste of what you can do with it, you may want toexplore its other more advanced capabilities:
• Alarm and Event Monitoring• Security• Real-time Trending• Logic Script Implementation• Networking• Recipe Management• Application Bullet proofing• Intelligent Wizard Objects, and more...
In addition to these OpenHMI application development features, Pro-face also offers:
• A complete line of I/O Servers that provide an I/O interface to allmajor manufacturers' PLCs and other control devices.
• Network interfaces to communicate with other hardware platforms.Before you start to develop more complex applications, you should read thischapter for a fuller overview of the application manager and the proceduresto download applications to a workstation. We also urge you to readthrough the OpenHMI User's Guide, which is installed with your programas a PDF file, to investigate all of the program’s capabilities. For additionalapplication samples, you can preview any of the demo applications(preloaded on your runtime workstation) by selecting and opening them inthe application manager.
Creating and Maintaining More ComplexApplications
Creating and Maintaining More Complex Applications 3-2
InTouch Application ManagerYou will use the InTouch Application Manager to create new applications,open existing applications in either WindowMaker or WindowViewer,delete applications, and run the OpenHMI DBDump and DBLoad TagnameDictionary utility programs.
� To run the InTouch Application Manager:
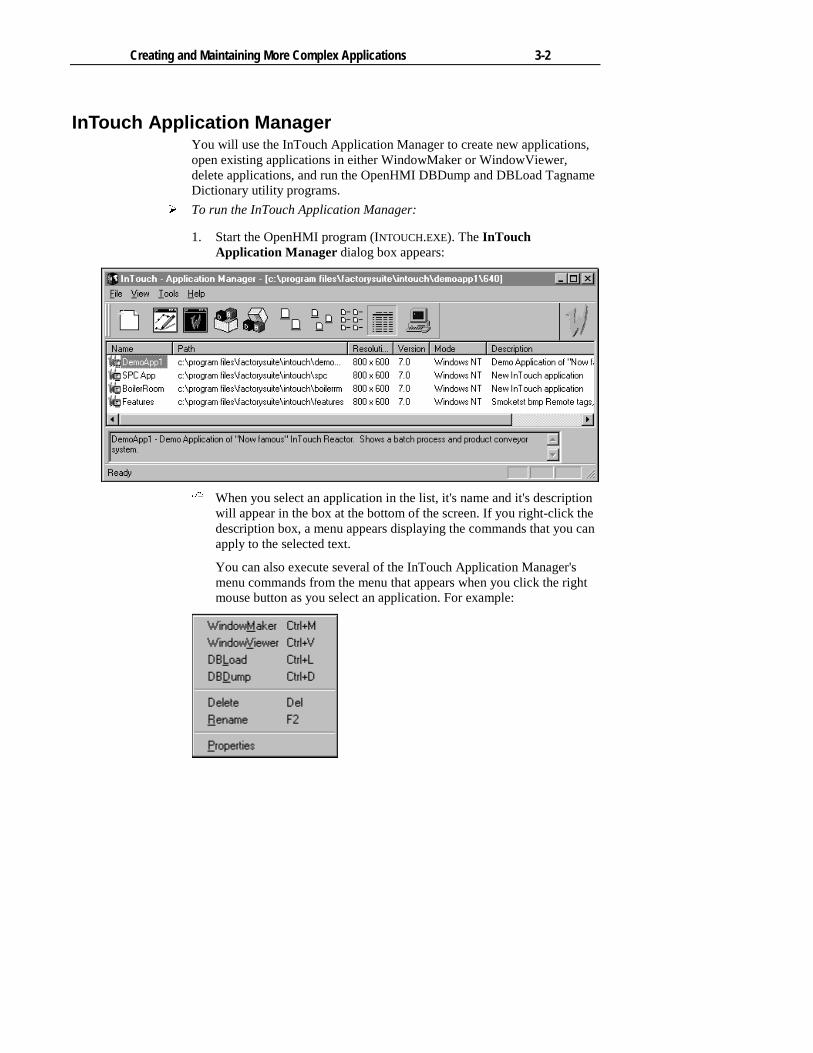
1. Start the OpenHMI program (INTOUCH.EXE). The InTouchApplication Manager dialog box appears:
� When you select an application in the list, it's name and it's descriptionwill appear in the box at the bottom of the screen. If you right-click thedescription box, a menu appears displaying the commands that you canapply to the selected text.
You can also execute several of the InTouch Application Manager'smenu commands from the menu that appears when you click the rightmouse button as you select an application. For example:
Creating and Maintaining More Complex Applications 3-3
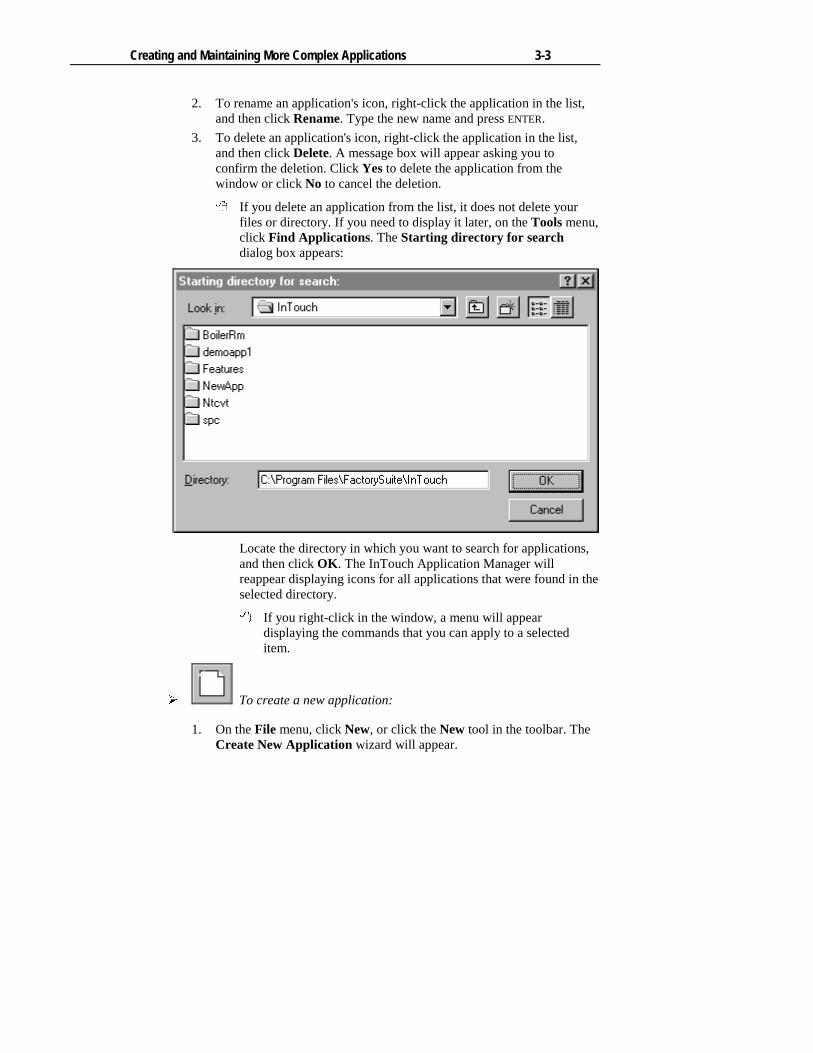
2. To rename an application's icon, right-click the application in the list,and then click Rename. Type the new name and press ENTER.
3. To delete an application's icon, right-click the application in the list,and then click Delete. A message box will appear asking you toconfirm the deletion. Click Yes to delete the application from thewindow or click No to cancel the deletion.
� If you delete an application from the list, it does not delete yourfiles or directory. If you need to display it later, on the Tools menu,click Find Applications. The Starting directory for searchdialog box appears:
Locate the directory in which you want to search for applications,and then click OK . The InTouch Application Manager willreappear displaying icons for all applications that were found in theselected directory.
� If you right-click in the window, a menu will appeardisplaying the commands that you can apply to a selecteditem.
� To create a new application:
1. On the File menu, click New, or click the New tool in the toolbar. TheCreate New Application wizard will appear.
Creating and Maintaining More Complex Applications 3-4
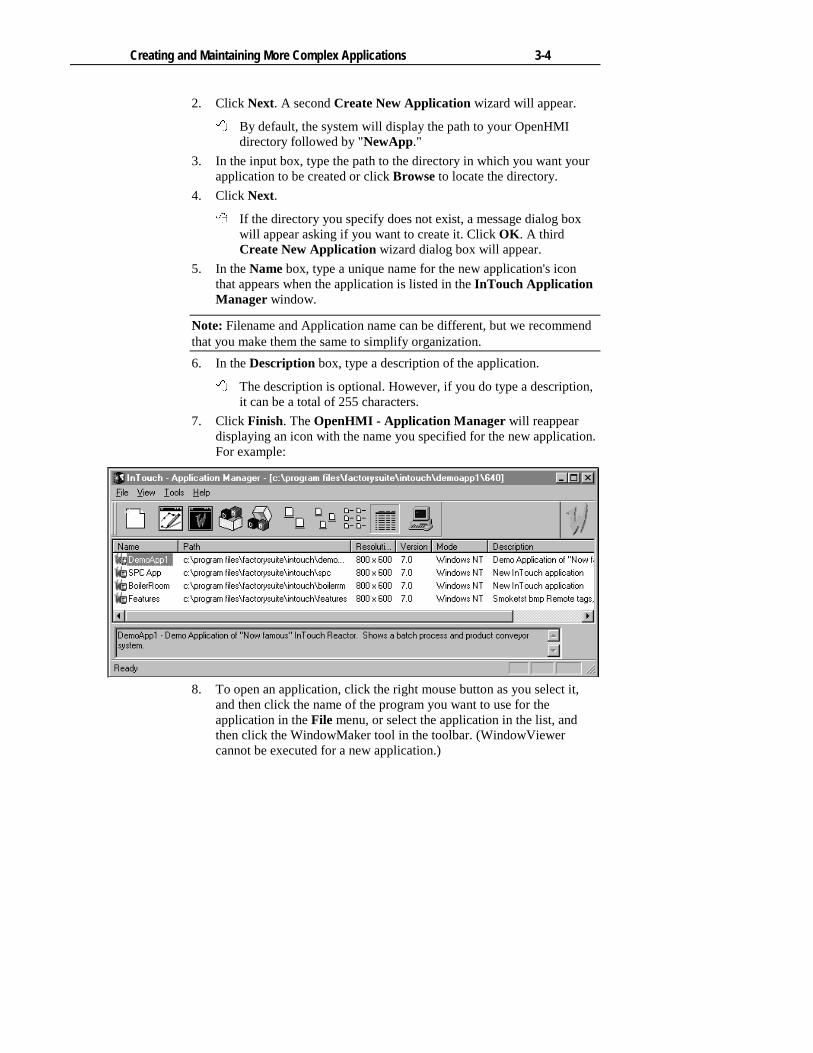
2. Click Next. A second Create New Application wizard will appear.
� By default, the system will display the path to your OpenHMIdirectory followed by "NewApp."
3. In the input box, type the path to the directory in which you want yourapplication to be created or click Browse to locate the directory.
4. Click Next.
� If the directory you specify does not exist, a message dialog boxwill appear asking if you want to create it. Click OK . A thirdCreate New Application wizard dialog box will appear.
5. In the Name box, type a unique name for the new application's iconthat appears when the application is listed in the InTouch ApplicationManager window.
Note: Filename and Application name can be different, but we recommendthat you make them the same to simplify organization.
6. In the Description box, type a description of the application.
� The description is optional. However, if you do type a description,it can be a total of 255 characters.
7. Click Finish. The OpenHMI - Application Manager will reappeardisplaying an icon with the name you specified for the new application.For example:
8. To open an application, click the right mouse button as you select it,
and then click the name of the program you want to use for theapplication in the File menu, or select the application in the list, andthen click the WindowMaker tool in the toolbar. (WindowViewercannot be executed for a new application.)

Creating and Maintaining More Complex Applications 3-5
To quickly open the application, double-click it's icon or select it, and thenpress ENTER.
The Application Manager's ToolsBy default when OpenHMI is initially run, the Application Manager'stoolbar and status bar are displayed.
� To hide the toolbar:
On the View menu, select Toolbar. To show it again, repeat this step.
� To hide the status bar:
On the View menu select Status Bar. To show it again, repeat this step.
The following briefly describes each of the Application Manager's toolbarbuttons:
Button Description
Executes the New command on the File menu to createa new application.
Executes the WindowMaker command on the Filemenu to open the selected application inWindowMaker.
� To quickly open an application in WindowMaker,double-click it's icon or select it, and then press ENTER.)
Executes the WindowViewer command on the Filemenu to open the selected application inWindowViewer.
Executes the DBLoad command on the File menu torun the DBLoad utility used to load a TagnameDictionary input file.
Executes the DBDump command on the File menu torun the DBDump utility program used to extract anapplication's Tagname Dictionary.
Executes the Large Icons command on the View menuto display large icons for the listed applications.
Creating and Maintaining More Complex Applications 3-6
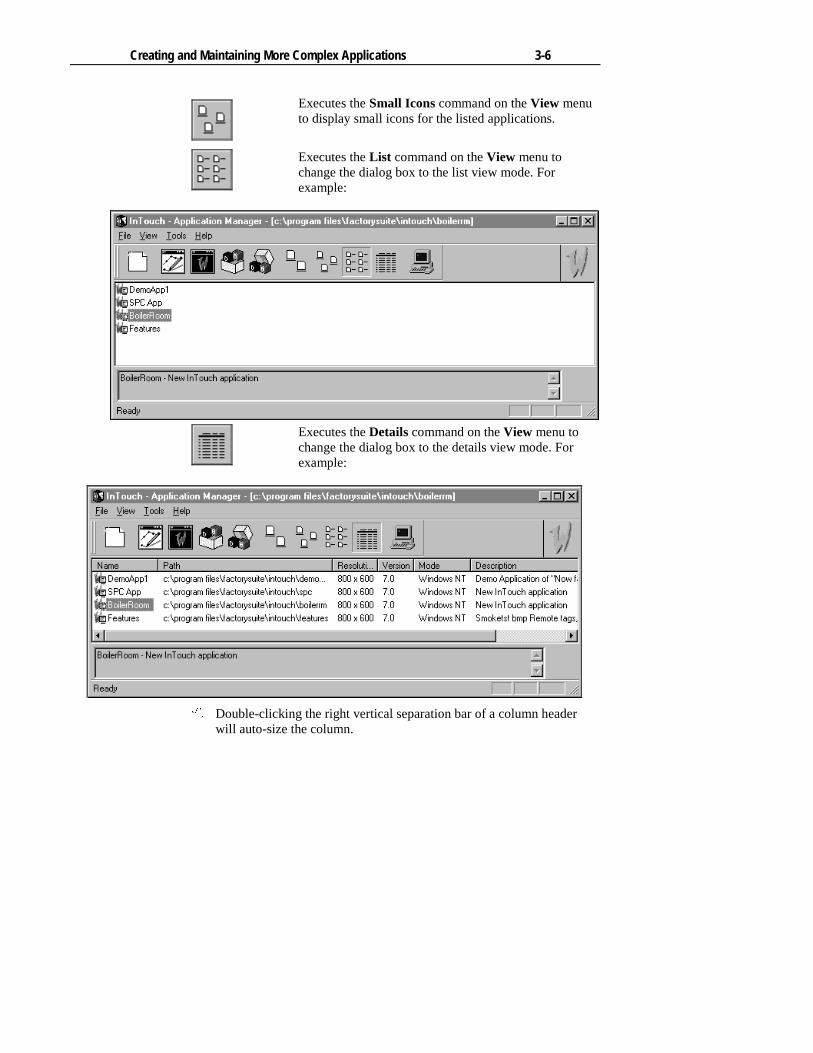
Executes the Small Icons command on the View menuto display small icons for the listed applications.
Executes the List command on the View menu tochange the dialog box to the list view mode. Forexample:
Executes the Details command on the View menu tochange the dialog box to the details view mode. Forexample:
� Double-clicking the right vertical separation bar of a column headerwill auto-size the column.
Creating and Maintaining More Complex Applications 3-7
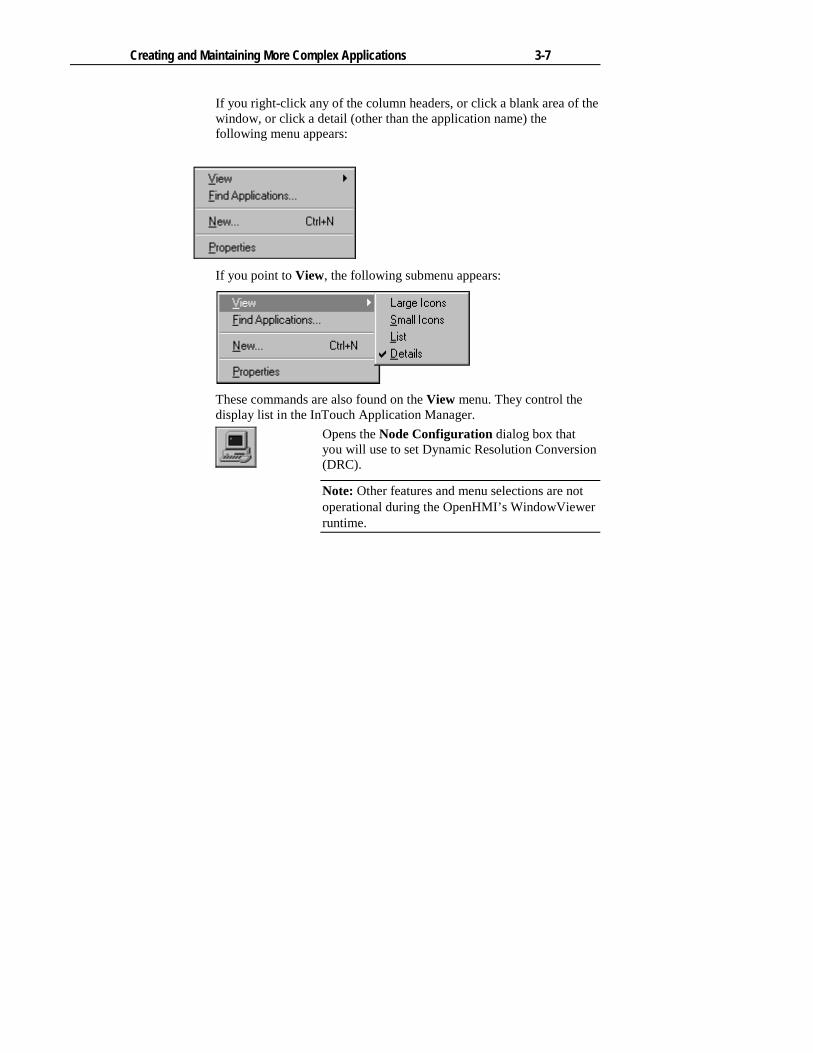
If you right-click any of the column headers, or click a blank area of thewindow, or click a detail (other than the application name) thefollowing menu appears:
If you point to View, the following submenu appears:
These commands are also found on the View menu. They control thedisplay list in the InTouch Application Manager.
Opens the Node Configuration dialog box thatyou will use to set Dynamic Resolution Conversion(DRC).
Note: Other features and menu selections are notoperational during the OpenHMI’s WindowViewerruntime.
Creating and Maintaining More Complex Applications 3-8
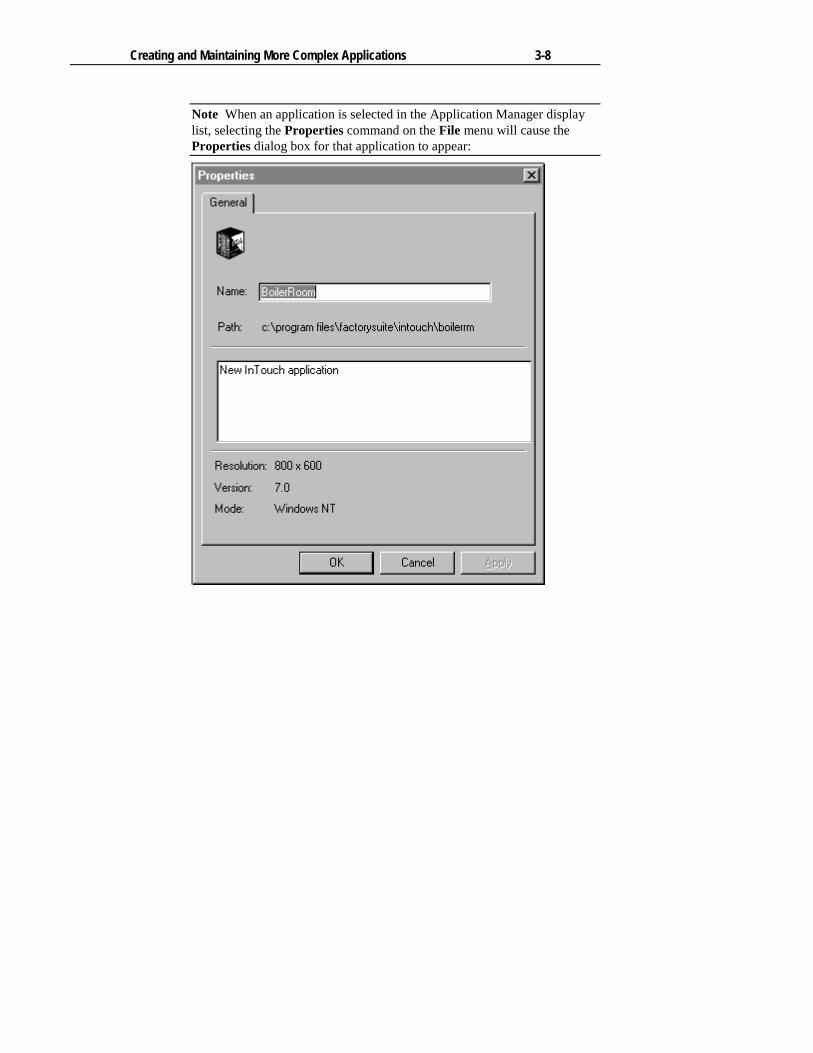
Note When an application is selected in the Application Manager displaylist, selecting the Properties command on the File menu will cause theProperties dialog box for that application to appear:
Creating and Maintaining More Complex Applications 3-9
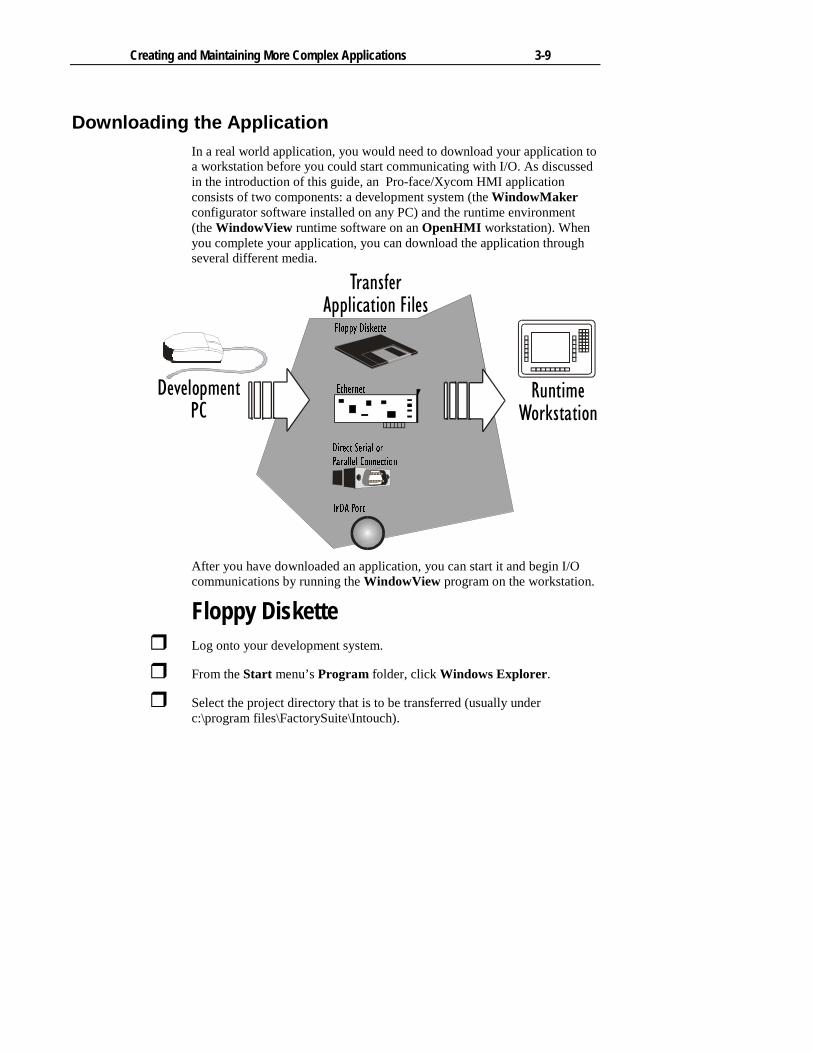
Downloading the ApplicationIn a real world application, you would need to download your application toa workstation before you could start communicating with I/O. As discussedin the introduction of this guide, an Pro-face/Xycom HMI applicationconsists of two components: a development system (the WindowMakerconfigurator software installed on any PC) and the runtime environment(the WindowView runtime software on an OpenHMI workstation). Whenyou complete your application, you can download the application throughseveral different media.
After you have downloaded an application, you can start it and begin I/Ocommunications by running the WindowView program on the workstation.
Floppy Diskette� Log onto your development system.
� From the Start menu’s Program folder, click Windows Explorer.
� Select the project directory that is to be transferred (usually underc:\program files\FactorySuite\Intouch).
�����������
�������� � �������������
������������������������
����� ����� ������ � ���������
� ���� ��������
���� ����
Creating and Maintaining More Complex Applications 3-10
� Copy the entire folder to another directory location and rename the folder.We recommend using YourAppname_Backup as a naming convention.
� In the backup folder delete the files with the following extensions:
• .wbk
• .wvw
• .avl
� Compress the remaining files with a compression utility, such as WinZip®,and copy to a floppy diskette.
� Log onto your runtime system.
� Extract the compressed files to a file folder with the original project name.
Note: Don’t plug in the floppy drive while the diskette is in the drive. Youmay corrupt the data on the diskette.
Peer-to-Peer Direct Ethernet ConnectionTo download the application through a direct network connection, you willneed an install and configure an Ethernet card in the development systemthat connects to the runtime workstation’s built-in Ethernet.
Configure Card and ConnectionFollow these procedures to configure the Ethernet card on the developmentsystem and configure the network communications on both systems.
The Connecting CableUse only four of the eight pins. Pins 1 and 2 must be a pair, and pins 3 and 6must be a pair. Wire the cable as follows:Function Pin# Pin# FunctionTX+ 1 <————> 3 RX+TX- 2 <————> 6 RX-RX+ 3 <————> 1 TX+RX- 6 <————> 2 TX-
Windows 95 Systems
� Open the Control Panel and double-click on the Network icon.
� In the Network dialog select the Configuration tab.

Creating and Maintaining More Complex Applications 3-11
� Under the Configuration tab, click on the Add button
� Development PCs require a configured adapter. Follow these steps if theEthernet adapter is not configured on your development PC:
1. Select Adapter and click on the Add button.
2. From the list box select the driver for your type of adapter or click onHave Disk if you have unlisted third party drivers. (You will need tospecify a directory or drive to select unlisted third party drivers from.)
3. Click OK .
4. Select Protocol and click on the Add button.
5. From the list box select Microsoft from the Manufacturers list box andNet BEUI from the Network Protocols list box.
6. Click OK .
� Select Client and click on the Add button.
� From the list box select Microsoft from the Manufacturers list box andClient for Microsoft Networks from the Network Clients list box.
� Click OK .
� Under the Configuration tab, click on the Add button
� Click on the File and Print Sharing button.
� Check the I want to be able to give others access to my files item.
� Click OK .
� Select the Identification tab.
� Enter the computer name (different name for each computer) andworkgroup (enter same workgroup name for each computer).
� Select the Access Control tab.
� Select the Share-level Access Control radio button.
� Click on the Network dialog’s OK button.
� When prompted to restart the computer, select Yes.

Creating and Maintaining More Complex Applications 3-12
Windows NT Systems
� Open the Control Panel and double-click on the Network icon.
� In the Network dialog select the Configuration tab.
� Under the Configuration tab, click on the Add button
� Development PCs require a configured adapter. Follow these steps if theEthernet adapter is not configured on your development PC:
1. Select Adapter and click on the Add button.
2. From the list box select the driver for your type of adapter or click onHave Disk if you have unlisted third party drivers. (You will need tospecify a directory or drive to select unlisted third party drivers from.)
3. Click OK .
4. Under the Configuration tab, click on the Add button
5. Select Protocol and click on the Add button.
6. From the list box select Microsoft from the Manufacturers list box andNet BEUI from the Network Protocols list box.
7. Click OK .
� Under the Configuration tab, click on the Add button
� Select the Identification tab.
� Enter the computer name (different name for each computer) andworkgroup (enter same workgroup name for each computer).
� Click on the Network dialog’s OK button.
� • When prompted to restart the computer, select Yes.
Transfer Application FilesTo transfer your files you will first need to set up file sharing on yourruntime PC. You will than access the shared folder from the developmentsystem and transfer the files to the runtime system.
File Sharing on a Windows 95 Runtime Workstation
� Log onto your runtime system.
� Open Windows Explorer.

Creating and Maintaining More Complex Applications 3-13
� Find and select the folder that you want to copy your OpenHMI applicationfiles into.
� Select File/Properties.
� Select the Sharing tab, then select the Shared As radio button.
� Enter a share name.
� Set the access type to Full .
Note: After you set the sharing properties for the project folder, you cantransfer files when needed to update the workstation with applicationchanges.
� Click OK .
File Sharing on a Windows NT Runtime Workstation
� Log onto the runtime system as an administrator.
� From the Start menu open the User Manager (Programs/AdministrativeTools (Common)/User Manager).
� Create a new user and enter the username and password of the developmentsystem that the application files will be transferred from.
� Unless your application requirements demand otherwise, select thePassword Never Expires radio button.
� Click OK to save the new user.
� Close the User Manager.
� Open Windows Explorer.
� Find and select the folder that you want to copy your OpenHMI applicationfiles into.
� Select File/Properties.
� Select the Sharing tab, then select the Shared As radio button.
� Click on the Permissions button.
Creating and Maintaining More Complex Applications 3-14
� Access to the shared directory defaults to full access for everyone. If moresecurity is desired, click on the Remove button to remove the access.
� To add the new (development system) user from the Sharing tab:
1. Click on the Add button, then click on the Show Users button.
2. Select the new user from the list box.
3. Set the access type to Full .
Note: After you set the given permissions for the project folder, you cantransfer files when needed to update the workstation with applicationchanges.
Transfer Files to Shared Runtime Workstation Folder
� To transfer the files between two Windows NT systems, two Windows 95systems, or from a Windows NT development system to a Windows 95runtime system:
1. Log onto the runtime workstation.
2. Open the Windows Explorer and locate the runtime workstations nameand shared folder under the Network Neighborhood icon.
3. Drag the development system’s application files into the shared runtimefolder.
� To transfer the files from a Windows 95 development system to a WindowsNT runtime system:
1. Log onto the development workstation.
2. Open the Windows Explorer and select Find Computer from theTools menu.
3. In the Find Computer dialog enter the name of the runtime workstation.
4. Click Find Now.
5. Double-click on the computer icon that appears.
6. Drag the development system’s application files into the shared runtimefolder.
Existing Ethernet Network ConnectionYou will need installed Ethernet cards in the development system and theruntime workstation that are physically connected to the Ethernet network.

Creating and Maintaining More Complex Applications 3-15
Configuring your Ethernet ConnectionThese steps are assuming that your network adapter on your runtimeworkstation is functioning properly and you can go out on the network.
Windows 95 Systems
� Open the Control Panel and double-click on the Network icon.
� In the Network dialog select the Configuration tab.
� Under the Configuration tab, click on the Add button
� Select Client and click on the Add button.
� From the list box select Microsoft from the Manufacturers list box andClient for Microsoft Networks from the Network Clients list box.
� Click OK .
� Click on the File and Print Sharing button.
� Verify that both check boxes are checked to share folders.
� Click OK .
� Select the Identification tab.
� Enter the computer name (different name for each computer) andworkgroup (enter same workgroup name for development PC and runtimeworkstation).
� Select the Access Control tab.
� Select the Share-level Access Control radio button.
� Click on the Network dialog’s OK button.
� When prompted to restart the computer, select Yes.
Windows NT Systems
� Open the Control Panel and double-click on the Network icon.
� In the Network dialog select the Configuration tab.
Creating and Maintaining More Complex Applications 3-16
� Under the Configuration tab, click on the Add button
� Select Protocol and click on the Add button.
� From the list box select Microsoft from the Manufacturers list box and NetBEUI from the Network Protocols list box.
� Click OK .
� Select the Identification tab.
� Enter the computer name (different name for each computer) andworkgroup (enter same workgroup name for development PC and runtimeworkstation).
� Click on the Network dialog’s OK button.
� • When prompted to restart the computer, select Yes.
Transfer Application FilesTo transfer your files you will first need to set up file sharing on yourruntime PC. You will than access the shared folder from the developmentsystem and transfer the files to the runtime system.
File Sharing on a Windows 95 Runtime Workstation
� Log onto your runtime system.
� Open Windows Explorer.
� Find and select the folder that you want to copy your OpenHMI applicationfiles into.
� Select File/Properties.
� Select the Sharing tab, then select the Shared As radio button.
� Enter a share name.
� Set the access type to Full .
Note: After you set the sharing properties for the project folder, you cantransfer files when needed to update the workstation with application changes.
� Click OK .

Creating and Maintaining More Complex Applications 3-17
File Sharing on a Windows NT Runtime Workstation
� Log onto the runtime system as an administrator.
� From the Start menu open the User Manager (Programs/AdministrativeTools (Common)/User Manager).
� Create a new user and enter the username and password of the developmentsystem that the application files will be transferred from.
� Unless your application requirements demand otherwise, select thePassword Never Expires radio button.
� Click OK to save the new user.
� Close the User Manager.
� Open Windows Explorer.
� Find and select the folder that you want to copy your OpenHMI applicationfiles into.
� Select File/Properties.
� Select the Sharing tab, then select the Shared As radio button.
� Click on the Permissions button.
� Access to the shared directory defaults to full access for everyone. If moresecurity is desired, click on the Remove button to remove the access.
� To add the new (development system) user from the Sharing tab:
1. Click on the Add button, then click on the Show Users button.
2. Select the new user from the list box.
3. Set the access type to Full .
Note: After you set the given permissions for the project folder, you cantransfer files when needed to update the workstation with application changes.
Transfer Files to Shared Runtime Workstation Folder
� To transfer the files between two Windows NT systems, two Windows 95systems, or from a Windows NT development system to a Windows 95runtime system:

Creating and Maintaining More Complex Applications 3-18
1. Log onto the runtime workstation.
2. Open the Windows Explorer and locate the runtime computer and thenthe shared folder under the Network Neighborhood icon.
3. Drag the development system’s application files into the shared runtimefolder.
� To transfer the files from a Windows 95 development system to a WindowsNT runtime system:
1. Log onto the development workstation.
2. Open the Windows Explorer and select Find Computer from theTools menu.
3. In the Find Computer dialog enter the name of the runtime workstation.
4. Click Find Now.
5. Double-click on the computer icon that appears.
6. Drag the development system’s application files into the shared runtimefolder.
Serial Connection (For Windows 95)� Plug serial cable from development system to runtime workstation’s COM1
RS-232 port.
� Plug keyboard into runtime workstations with touchscreen.
� Power up both PCs.
� For both PCs add the File and Print Sharing service.
1. Log onto the PC.
2. Open the Control Panel and double-click on the Network icon.
3. In the Network dialog select the Configuration tab.
4. Under the Configuration tab, click on the Add button
5. Select Services and click on the Add button.
6. From the list box select Microsoft from the Manufacturers list box andPrint and File Sharing for Microsoft Networks from the Services listbox.
7. Click OK .

Creating and Maintaining More Complex Applications 3-19
Transfer Application FilesYou can initiate file transfers from the development PC/host (download) orthe runtime workstation/guest (upload).
� Log onto your development system.
� Open Windows Explorer.
� Select the project directory that is to be transferred (usually underc:\program files\ FactorySuite\Intouch).
� Select File/Properties.
� Select the Sharing tab, then select the Shared As radio button.
� Enter a share name.
� Set the access type:
• To Read-only if you plan to download files from the runtimeworkstation.
• To Full if you plan to upload files from the development system.
Note: After you set the sharing properties for the project folder, you cantransfer files when needed to update the workstation with applicationchanges.
� Click OK .
� Log onto the runtime workstation to set it up as the guest computer.
� From the Start menu, select Programs/Accessories/Direct CableConnection.
� Click on the Change button.
� Select Guest, then click on Next.
� Return to the development PC to set it up as the host computer.
� From the Start menu, select Programs/Accessories/Direct CableConnection.
� Click on the Change button.

Creating and Maintaining More Complex Applications 3-20
� Select Host, then click on Next.
� Select Serial Cable on COM1, then click on Next.
� Click on Finish. Leave the User password protection box unchecked.
� Return to the runtime workstation and click the OK button on thetimeout prompt.
� The workstation will prompt you for the host computer name. Refer to thedevelopment PC to determine the computer name you should enter.(Double-click on the Network icon in the Control Panel, then select theIdentification tab.)
� Click on the OK button.
� To transfer the files from one computer to another:
1. Log onto the development system or runtime workstation.
2. Open the Windows Explorer and locate the shared folder under theNetwork Neighborhood icon.
3. Select the development system’s project folder and drag it into theworkstation’s c:\program files\FactorySuite\Intouch folder.
IrDA Port (For Windows 95)Configure the IrDA PortIf you choose to transfer files through the IrDA port you must firstconfigure the port for the development PC and runtime workstation.
Note: These steps cover IrDA port configuration for the runtimeworkstation. If the development PC’s IrDA port is not already configured,you should refer to the PC’s documentation to configure the port.
� Press the F2 key while the system boots up to enter the CMOS setup of yourOpenHMI workstation. (If you have trouble, please refer to the systemmanual.)
� Use the right arrow to select the Advanced menu.
� Press Enter to select the first item, Integrated Peripherals.
� Use the down arrow to select UART 2 Mode.

Creating and Maintaining More Complex Applications 3-21
� Use the + key to change the UART2 Mode field to IrDA .
� Press the Esc key twice to exit the CMOS submenus.
� Press Enter to save changes, then again to confirm the changes and exit.
� Allow system to boot to Windows 95.
� After Windows 95 has started, open the Control Panel and double-click onthe Add New Hardware icon.
� To complete the Add New Hardware wizard:
1. Click on Next.
2. When prompted if you want Windows to search for new hardwareselect the No radio button, then click on the Next button.
3. Click on Next.
4. Select Infrared from the list box of Hardware Types, then click onNext.
5. Click on Next.
6. Click on Next to accept the defaults of Standard Infrared Devices andBuilt in Infrared Port on laptop or desktop. (If needed change dialogfields to match these default values.)
7. From the Available Ports list box, select the port that this infrareddevice is physically connected to (COM2), then click on Next.
8. Click on Next to accept the default ports COM4 and LPT3. (If neededchange dialog fields to match these default values.) After this prompt,the wizard will begin to install and configure the necessary driver andother files. It may prompt you to insert your Windows 95 CD, so that itcan copy files to the hard drive.
9. Select Finish.
� Double-click on the Infrared icon in the Control Panel. (If the icon doesnot appear in the window, press F5 to refresh the view.)
� Select the Options tab.
� Verify that Enable infrared communication on is set to COM2 and“Providing application support on COM4 and LPT3” appears.
� Click on the OK button to run the driver.

Creating and Maintaining More Complex Applications 3-22
File and Print SharingBefore you can transfer application files through the configured IrDA port,you will need to add the File and Print Sharing service to the PC andruntime workstation.
� For both PCs add the File and Print Sharing service.
� Log onto the PC.
� Open the Control Panel and double-click on the Network icon.
� In the Network dialog select the Configuration tab.
� Under the Configuration tab, click on the Add button
� Select Services and click on the Add button.
� From the list box select Microsoft from the Manufacturers list box andPrint and File Sharing for Microsoft Networks from the Services listbox.
� Click OK . You may need to restart your system.
Transfer Application FilesYou can initiate file transfers from the development PC/host (download) orthe runtime workstation/guest (upload).
� Log onto your development system.
� Open Windows Explorer.
� Select the project directory that is to be transferred (usually underc:\program files\ FactorySuite\Intouch).
� Select File/Properties.
� Select the Sharing tab, then select the Shared As radio button.
� Enter a share name.
� Set the access type:
• To Read-only if you plan to download files from the runtimeworkstation.

Creating and Maintaining More Complex Applications 3-23
• To Full if you plan to upload files from the development system.
Note: After you set the sharing properties for the project folder, you cantransfer files when needed to update the workstation with applicationchanges.
� Click OK .
� Log onto the runtime workstation to set it up as the guest computer.
� From the Start menu, select Programs/Accessories/Direct CableConnection.
� Click on the Change button.
� Select Guest, then click on Next.
� Select Serial Cable on COM4, then click on Next.
� Click on Finish. The will now try to connect using the IrDA port. It maytime out and post a message, “Wait here until the ‘other’ computer is readyto communicate.”
� Return to the development PC to set it up as the host computer.
� From the Start menu, select Programs/Accessories/Direct CableConnection.
� Click on the Change button.
� Select Host, then click on Next.
� Select Serial Cable on COM4, then click on Next.
� Click on Finish. They will now try to connect using the IrDA port. Leavethe User password protection box unchecked.
� Return to the runtime workstation and click the OK button on the timeoutprompt.
Note: Both PCs should now be able to see each other, if in range. The IrDAicon will appear on the Windows taskbar.

Creating and Maintaining More Complex Applications 3-24
� The workstation will prompt you for the host computer name. Refer to thedevelopment PC to determine the computer name you should enter.(Double-click on the Network icon in the Control Panel, then select theIdentification tab.)
� Click on the OK button.
� To transfer the files from one computer to another:
1. Log onto the development system or runtime workstation.
2. Open the Windows Explorer and locate the shared folder under theNetwork Neighborhood icon.
3. Select the development system’s project folder and drag it into theworkstation’s c:\program files\FactorySuite\Intouch folder.

Creating and Maintaining More Complex Applications 3-25
Automatic Application StartupYou can automate some or all of the login and application startup processon an OpenHMI workstation.
Set Automatic LoginOn a Windows 95 workstation you can bypass the login prompt that appearsafter the system boots up. We recommend the Tweek UI utility, which ispreloaded on a Windows 95 OpenHMI workstation.
Note for Windows NT Workstation: Automatic login cannot beconfigured on a Windows NT workstation. When the workstation isrestarted, an administrator must login to the workstation before it will startthe OpenHMI application.
� From the desktop Start menu, select Settings then Control Panel, andchoose the Start Menu Programs tab.
� Double-click on the icon.

Creating and Maintaining More Complex Applications 3-26
� Select the Network tab.
� Check the Log on automatically at startup checkbox.
� Enter your logon user name and password in the text boxes. If you have apassword, you must enter it.
� Click OK .
� From the desktop Start menu, select Shutdown.
� In the Shut Down Windows dialog that appears, select the RestartWindows radio button and click OK .
Creating and Maintaining More Complex Applications 3-27
� After the system restarts, you may be prompted with a welcome screen. If itappears, you should uncheck the Show this welcome screen next timecheckbox, so the welcome screen will not appear when the system restartsand interfere with automatic OpenHMI application startup.
Set Application StartupNote: The default setting for the OpenHMI workstation is to boot into theWindows desktop.
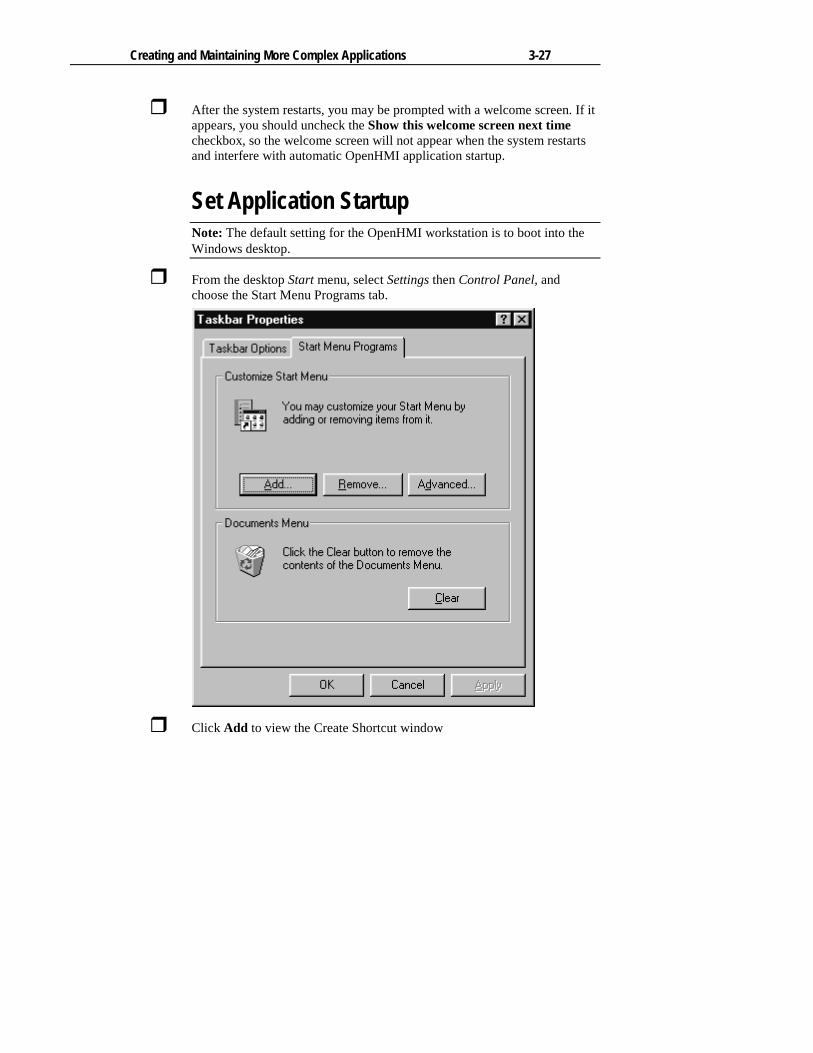
� From the desktop Start menu, select Settings then Control Panel, andchoose the Start Menu Programs tab.
� Click Add to view the Create Shortcut window

Creating and Maintaining More Complex Applications 3-28
� Load your I/O Server using the browse button on this dialog. Locate theI/O Server (EXE) which should be located in a separate folder C:\Servers(pre version 7.0 servers) and C:\Program Files\FactorySuite\IOServer (forversion 7.0 and above)
� Select the I/O Server Program file then select Open. Click Next.
� Click Add again to view the Create Shortcut window
� Type “C:\Program Files\FactorySuite\InTouch\view.exe” “C:\Program Files\FactorySuite\InTouch\ your application folder
name” into the command line and select Next. You must type the quotes.Also, note that there is a space between the items in quotes. For example:“C:\Program Files\FactorySuite\InTouch\view.exe” “C:\
Program Files\FactorySuite\InTouch\demoapp1\640\” .
� In the select program folder window select the startup folder then clickNext.
� The default name for the icon will be view.exe. You may select anothername for the shortcut if you would like. Select Finish when complete.

Creating and Maintaining More Complex Applications 3-29
� Click OK in the Taskbar Properties Window.

Creating and Maintaining More Complex Applications 3-30
Special OpenHMI FeaturesOpenHMI software includes the following features:
� Application Explorer The hierarchical Application Explorer provides you with improved
navigation capabilities. For example, it displays the names of all thewindows you have created, and when you double-click a windowname, the window opens. When you right-click a window name, amenu appears displaying the various commands that you can execute toopen the window, save the window, open the window's QuickScripts,its properties dialog box, and so on.
� Applications Run on Windows NT or 95 Operating System The applications you create on the Windows 95 or the Windows NT
operating systems are interchangeable. They can run on eitheroperating system without requiring conversion.
� ActiveX Container OpenHMI is an ActiveX container. It allows you to install any third-party
ActiveX control and use it in any application window. For easy access toyour installed ActiveX controls, you can add them to yourWindowMaker Wizards/ActiveX Toolbar. By using ActiveX controls,you can handle control events, control methods, and control properties allfrom QuickScripts. You can also associate the ActiveX control propertiesdirectly to tagnames.
� Tag Browser The Tag Browser allows you to select tagnames and tagname .fields
from any tagname source that supports the OpenHMI TagnameDictionary interface. It is your primary tool for editing your TagnameDictionary.
� Tagname Cross Referencing The Tagname Cross Referencing utility allows you to determine in what
window or QuickScript that a specific tagname is used. For convenience,the Tagname Cross Reference utility can remain open in WindowMakerwhile you perform other tasks. It also allows you to view anyQuickScript where a tagname is found.
� Local Variables OpenHMI QuickScripts support the use of local variables to store
temporary results and create complex calculations with intermediatescripting values. By using local variables in QuickScripts, you do notdecrease your licensed tagname count.

Creating and Maintaining More Complex Applications 3-31
� WindowViewer as an NT Service Beginning with OpenHMI 7.0, WindowViewer can be run as an NT
service. This provides NT service capabilities for key OpenHMIcomponents such as providing alarms and I/O data. The servicecapabilities allow continuous operation of WindowViewer throughoperating system log ons and log offs such as, operator shift changes.Another functionality is automatic start up of WindowViewerfollowing power failure or when the machine is turned off and on. Thisprovides unmanned station startup of WindowViewer withoutcompromising NT operating system security.
� Dynamic Resolution ConversionYou can now develop applications in one screen resolution and runthem at another, without affecting the original application. Theapplications can also be run at a user-defined resolution, instead of thedisplay resolution.
� Other OpenHMI features and benefits include:
− Real-time application process viewing.
− Connectivity with many different I/O Servers.
− SuiteLink protocol. SuiteLink allows application commands(reads, writes and updates) and their associated data to be passedbetween client applications and server applications.
− Easily networked with NetDDE.
− Standard Windows 95/NT GUI format featured.
− Right-mouse click support throughout WindowMaker for quickaccess to frequently used commands.
− Floating and docking toolbars
− Customizable color palette that provides 16.7 million colorsupport. (The color support is limited only by your video cardcapability.)
− Windows 95 and Windows NT operating systems long filenamesupport.

Creating and Maintaining More Complex Applications 3-32
Reaching Technical SupportPro-face Technical Support offers a variety of support optionsto answer any questions on Pro-face products and theirimplementation.
In the USA (located in Saline, MI) (734) 429-4971
In Europe (Hoofddorp THE NETHERLANDS) +31 023 55 44 099
Refer to the relevant chapter(s) in your OpenHMI documentation for apossible solution to any problem you may have with your OpenHMIsystem. If you find it necessary to contact OpenHMI Technical Support forassistance, please have the following information at your fingertips:
1. Software serial number and workstation model number.2. The version of OpenHMI you are running.3. The type and version of the operating system (i.e. Microsoft Windows
NT version 4.0).4. Exact wording of system error messages encountered.5. Any relevant output listing from the Wonderware Logger, the
Microsoft Diagnostic utility (MSD), or other diagnostic applications.6. Details of attempts made to rectify the problem(s) and results.7. The log number assigned from Pro-face Technical Support
if this is an on going problem.8. And, if known, the name of the Technical Support Engineer with whom
you last spoke.
Internet AccessPro-face provides both World Wide Web and e-mail access viathe Internet. To access the Pro-face Home Page, usehttp://www. profaceamerica.com. This page contains the newest product datasheets,OpenHMI references by industrial sector, and application notes.
E-mailTo reach Pro-face Technical Support via E-Mail:Saline, MI [email protected] [email protected]
FAXYou can fax your questions to Pro-face Technical Support at:Saline, MI (734) 429-1010Europe +31 23 55 44 090
FAX-On-Demand System
Owner
Rectangle

Creating and Maintaining More Complex Applications 3-33
Xycom Automation, LLC
734-429-4971
Fax: 734-429-1010
http://www.profaceamerica.com
Canada Sales: 905-607-3400
Northern Europe Sales: +44-1604-790-767
Southern Europe Sales: +39-011-770-53-11
340060(F)
Owner
Rectangle
Related Documents