Print Client KM User’s Manual

Welcome message from author
This document is posted to help you gain knowledge. Please leave a comment to let me know what you think about it! Share it to your friends and learn new things together.
Transcript

Print Client KM
User’s Manual
1
Regarding this manual This manual explains how to install Print Client KM and how to use it. Print Client KM can be used with Microsoft Windows 2000 and Windows XP. The intended user of this manual is whom already is aware of Windows 2000 and Windows XP basic operation of “start button”, “task bar”, “mouse”, and “keyboard”. If a user does not have such a background, please refer to operation manual included in the Windows 2000 and Windows XP.

2
Index
1. CONFIGURATION............................................................................. 3
2. INSTALLATION METHOD................................................................. 4
3. REGISTRATION OF PLOTTER ........................................................ 8
4. BASIC OUTPUT PROCEDURE FROM PRINT CLIENT KM ........... 11 4.1. STEP 1: Selection of Output printer ............................................................................... 11 4.2. STEP 2: Output Setting .................................................................................................. 11 4.3. STEP 3: Registration of output file. ................................................................................ 11 4.4. STEP 4: Print starts........................................................................................................ 12
5. OPERATING PRINT CLIENT KM.................................................... 13 5.1. Explanation of Main Window........................................................................................... 13 5.2. Explanation of Custom Size Dialog Box.......................................................................... 27 5.3. Explanation of Stamp Setting Dialog Box........................................................................ 28 5.4. Explanation of Image Placement Dialog Box .................................................................. 31 5.5. Explanation of HPGL Setting Dialog Box ........................................................................ 32 5.6. Explanation of Calcomp Setting Dialog Box.................................................................... 34 5.7. Explanation of Header Setting Dialog Box ...................................................................... 36
3
1. Configuration PC Hardware requirement to install Print Client KM is as follows. OS (Operation System)
Operation guaranteed models, which are equivalent to IBM PC-AT (DOS/V machine), such as Microsoft Windows 2000 and Microsoft Windows XP.
CPU
Celeron 400 MHz or faster is recommended. System Memory
256 MB or more is recommended. Hard Disk
10 GB or more is recommended.
4
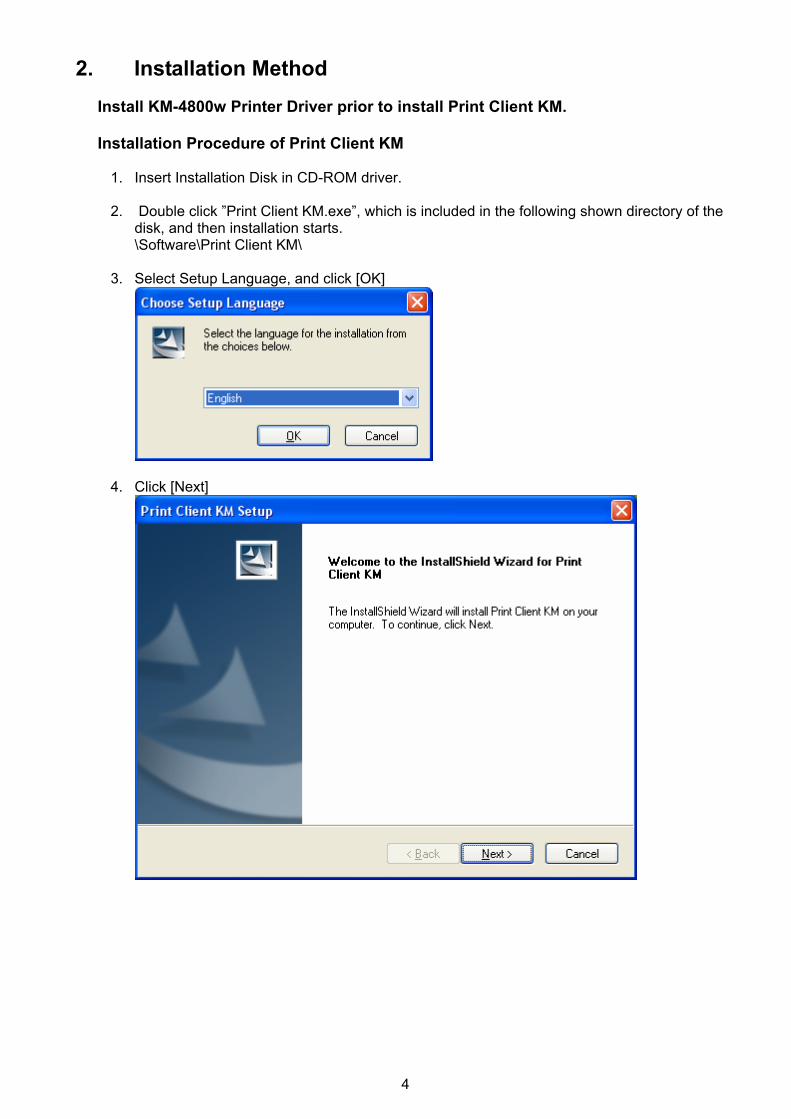
2. Installation Method
Install KM-4800w Printer Driver prior to install Print Client KM. Installation Procedure of Print Client KM
1. Insert Installation Disk in CD-ROM driver. 2. Double click ”Print Client KM.exe”, which is included in the following shown directory of the
disk, and then installation starts. \Software\Print Client KM\
3. Select Setup Language, and click [OK]
4. Click [Next]

5
5. Select Unit, and then click [Next].
6. Select the folder to be installed, and then click [Next].

6
7. Select Program Folder, and then click [Next].
8. Click [Finish], and finish the installation.
9. “Print Client KM” Icon is created on Desk Top.
Installation of Print Client KM is completed.
7
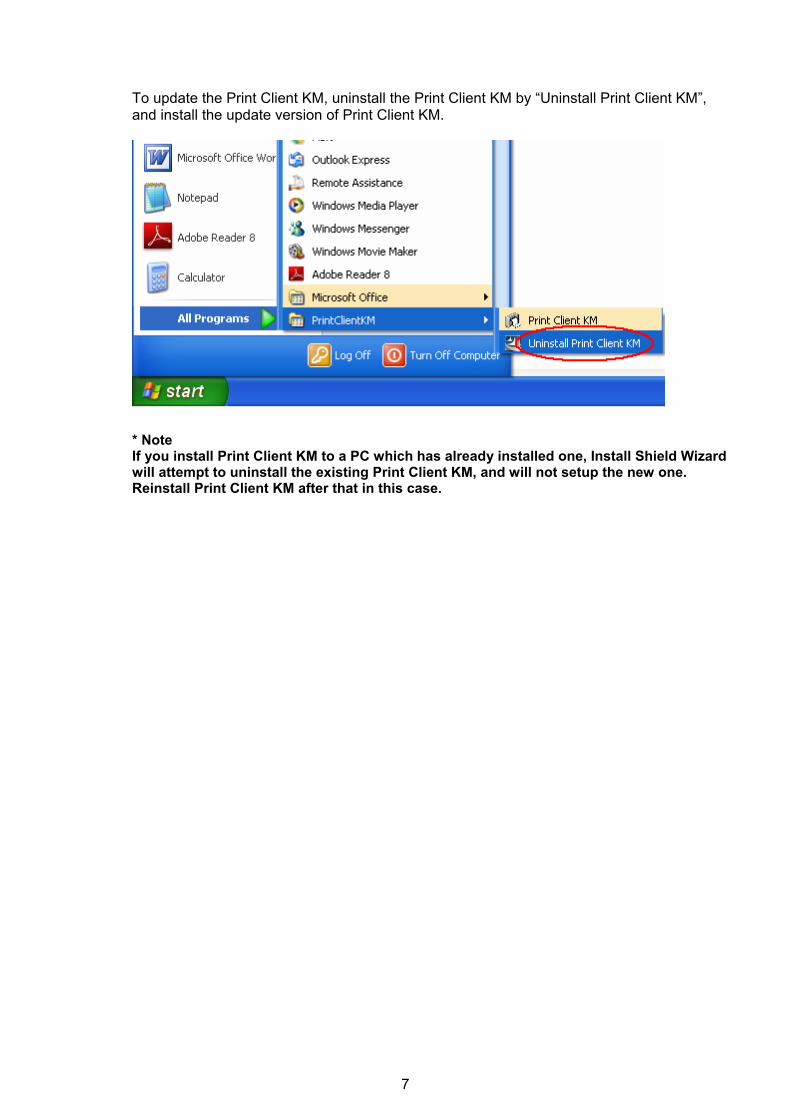
To update the Print Client KM, uninstall the Print Client KM by “Uninstall Print Client KM”, and install the update version of Print Client KM.
* Note If you install Print Client KM to a PC which has already installed one, Install Shield Wizard will attempt to uninstall the existing Print Client KM, and will not setup the new one. Reinstall Print Client KM after that in this case.

8
3. Registration of Plotter
1. Double click “Print Client KM” icon on Desk Top to start the following program.

9
2. Select “Plotter Registration” from the pull-down menu of “Option” on the Menu Bar.
3. Select KM-4800w in “Printer View”, and click [Add].

10
4. Click [OK].
5. The name of printer you have registered is indicated in “Plotter”.
11
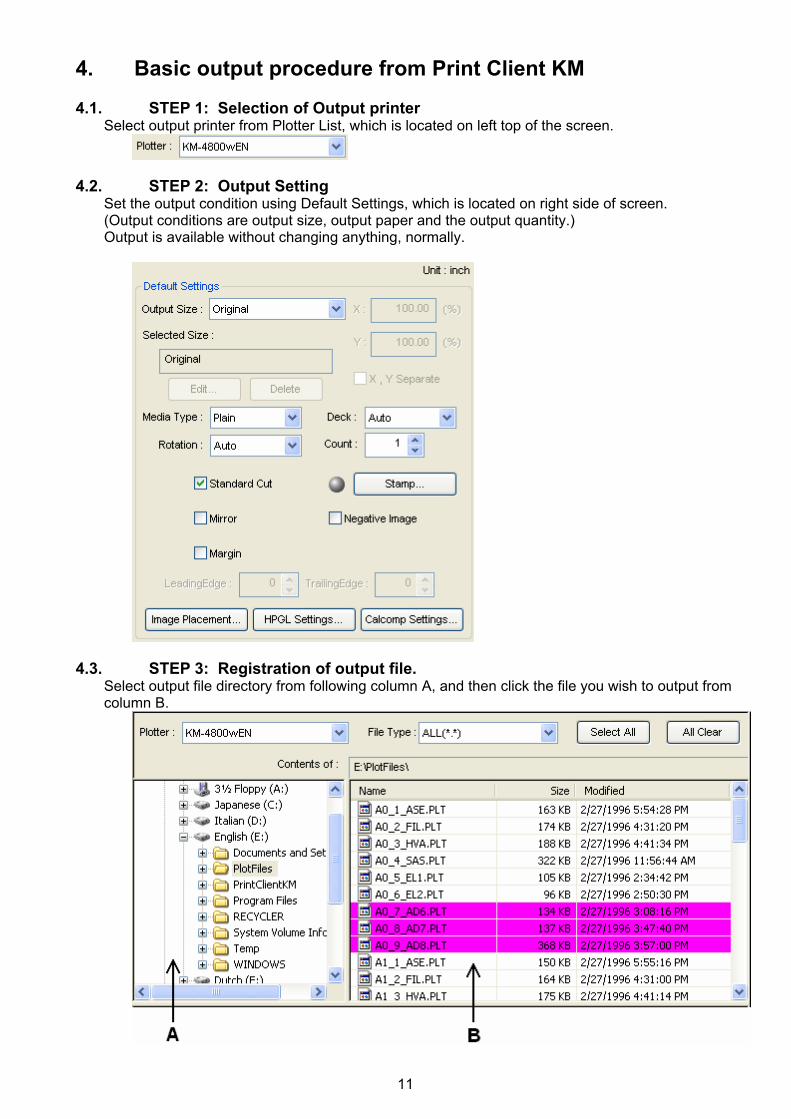
4. Basic output procedure from Print Client KM 4.1. STEP 1: Selection of Output printer
Select output printer from Plotter List, which is located on left top of the screen.
4.2. STEP 2: Output Setting
Set the output condition using Default Settings, which is located on right side of screen. (Output conditions are output size, output paper and the output quantity.) Output is available without changing anything, normally.
4.3. STEP 3: Registration of output file.
Select output file directory from following column A, and then click the file you wish to output from column B.

12
Selected files are registered in the following column.
4.4. STEP 4: Print starts
Click the Print button on the right bottom of the screen when all the necessary files have been registered. Files are printed out from the printer.
Above shown is the brief operation procedure until it is output.

13
5. Operating Print Client KM
5.1. Explanation of Main Window
• Contents of the Menu Bar <File>
Exit : Print Client KM is finished.
<View> View Selected Image : The image of the selected file is displayed in the Viewer. Refresh : The latest information of files and folders is displayed.
<Order> Move File Up One : The selected file is moved up. Move File Down One : The selected file is moved down. Move File Top : The selected file is moved to the top of the list. Move File Bottom : The selected file is moved to the bottom of the list. Reverse File Order : The order of selected files is reversed.
(If only one file is selected, “Reverse File Order” becomes invalid.) Remove File from List : The selected file is deleted from the list. Back to Default Setting : Set Output setting of designated file, to Default setting.

14
<Option> Printer Registration : Register printer to use Print Client KM. Reload Sent Jobs : Refer to 20 jobs which have been done already, and can reload any of them.
Default Value Setting : Specifies the default Pen Width and Gray for HPGL and Calcomp.

15
Unit : Select registered standard size of “Output Size” in Default Settings. case of ISO case of ANSI
Localize Settings : Messages are displayed in a selected language.
<Help> About Print Client KM : Version information of Print Client KM can be referred.
• Selecting Files <Plotter>
Decide which plotter the output job is sent. It is possible to output to only KM-4800w printer. <File Type>
Specify the displayed file type.
All (*.*) Supported Files (*.plt, *.906, *.907, *.tif, *.cal, *.bmp) HPGL (*.plt) Calcomp (*.906, *.907) TIFF (*.tif) CALS (G4) (*.cal) BMP (*.bmp) PDF (*.pdf) Option

16
<Select All>
If you click on “Select All”, you can register all of currently displayed files to the output job.
<All Clear>
If you click on “All Clear”, you can delete all of currently displayed files from the output job.
Select files to be printed out. All files are contained in folders similar to the Explorer.
• Adding / Removing Files to be output If you select some file by left clicking, that file is registered to the output job and its filename is colored with violet. If you again select the registered file (Filename is colored with violet.) by left clicking, it is deleted from the output job and its filename is not colored. It is possible to register some files if you click each file pressing the Shift Key. If you select the file, which has already been registered to, the output job (Filename is colored with violet.) by right clicking then click on “Add”, you can register that file again to the same output job and that file is colored with red. If you select the file, which has never been registered to the output job (Filename is not colored.) by right clicking then click on “Add”, you can register that file normally to the output job. If you select some file by right clicking then click on “View”, the image of that file is displayed in the Viewer uses existent application.
17
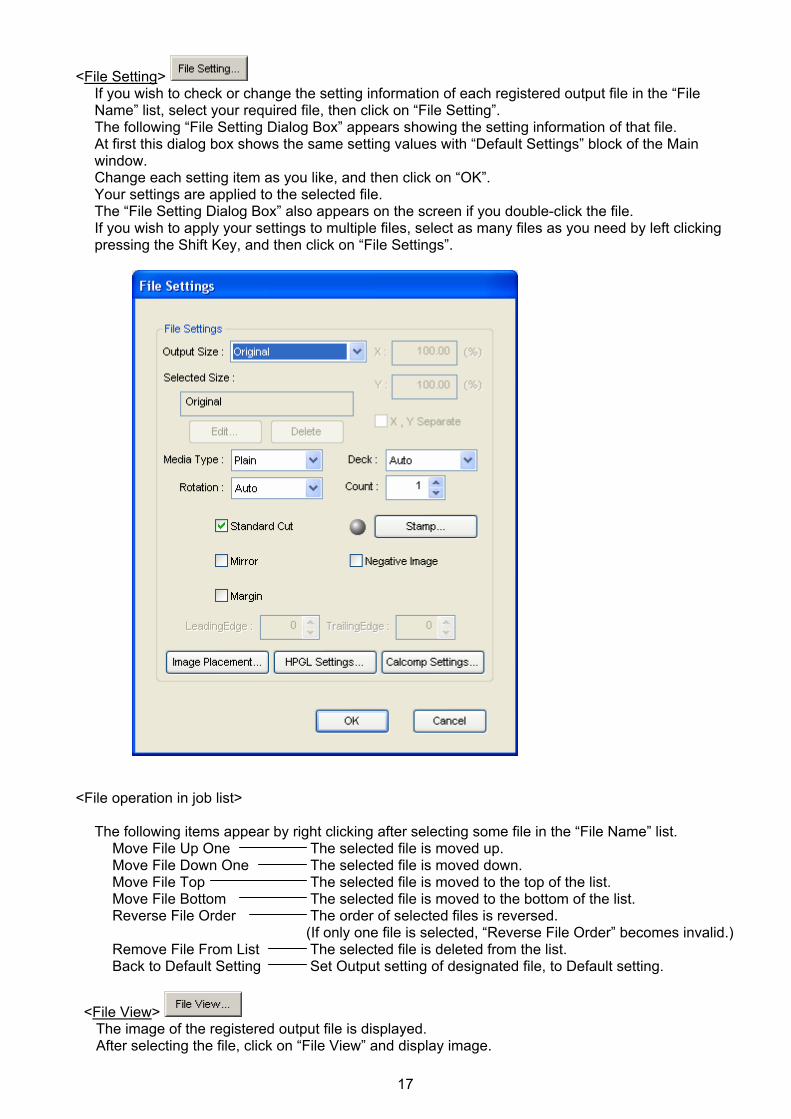
<File Setting> If you wish to check or change the setting information of each registered output file in the “File Name” list, select your required file, then click on “File Setting”. The following “File Setting Dialog Box” appears showing the setting information of that file. At first this dialog box shows the same setting values with “Default Settings” block of the Main window. Change each setting item as you like, and then click on “OK”. Your settings are applied to the selected file. The “File Setting Dialog Box” also appears on the screen if you double-click the file. If you wish to apply your settings to multiple files, select as many files as you need by left clicking pressing the Shift Key, and then click on “File Settings”.
<File operation in job list>
The following items appear by right clicking after selecting some file in the “File Name” list. Move File Up One The selected file is moved up. Move File Down One The selected file is moved down. Move File Top The selected file is moved to the top of the list. Move File Bottom The selected file is moved to the bottom of the list. Reverse File Order The order of selected files is reversed.
(If only one file is selected, “Reverse File Order” becomes invalid.) Remove File From List The selected file is deleted from the list. Back to Default Setting Set Output setting of designated file, to Default setting.
<File View> The image of the registered output file is displayed. After selecting the file, click on “File View” and display image.

18
<Delete All> Click on “Delete All” to delete all of registered output files from the “File Name” list.
<Load> Click on “Load” to load the output job that has been registered already.
<Save> Click on “Save” to save the output job.
<Last Job> Click on “Last Job” to reload the output job that has been outputted at the latest opportunity. <Job Name> Job name is indicated. <XX Selected> It is indicate how many files are registered. <File Name> Registered file names are listed including their “path”. <Copies> It is indicated how many sheets each file is printed out. <Output Size> The selected output size for each output file is indicated. <Media> It is indicated which material of printing media is used for printing of each output file. <Stamp> It is indicated whether some Stamp Image is provided (on) or not (off) to each output file. <Paper Information> Real-time information about roll media in the plotter is indicated. <Printer Information> Real-time information about printer is indicated.

19
• About Default Settings
<Output Size> Select any of the following output sizes from the pull-down menu.
(1) Original The output size is as large as output file’s original size. Default setting is “Original”.
(2) Percent
Both “X : 100.00%” and “X,Y Separate” are validated. If you decide the percentage for “X%”, output file’s original size is enlarged or reduced depending on your percentage setting. If you check “X,Y Separate”, “Y : 100.00%” is validated also and it becomes possible to decide horizontal output size (X) and vertical one (Y) separately. Setting range is from 10.00% to 1000.00% in 0.01% increment.
(3) Standard inch size or standard ISO A series size
Output file’s original size is enlarged or reduced to be the selected standard size.
(4) Custom The following “Custom Size Dialog Box” appears and you can register your preferable output size optionally. As for the detail, refer to “Explanation of Custom Size Dialog Box”.

20
<Edit> To change the registered “Custom Size”, click on “Edit” to pop up the “Custom Size
Dialog Box”. If you select other output size than “Custom”, “Edit” is invalid. <Delete> To delete the registered “Custom Size”, click on “Delete”. If you select other output size than “Custom”, “Edit” is invalid.
<Media Type> Decide which material of printing media is used for printing. Select any of the following materials from the pull-down menu. Default setting is “Plain”. Plain Vellum Film Any If you select “Any”, a roll media that suit the output size is selected regardless of the material. <Deck> Decide the paper Deck. Default setting is “Auto”. Auto Deck 1 Deck 2 Bypass <Rotation> Select any of the following rotation. Default setting is “Auto”. Auto 0 degree 90 degree 180 degree 270 degree

21
<Count> Decide how many sheets each file is printed out. Setting range is from 1 to 999.
<Format Cut> Select either “Standard Cut” or “Synchronous Cut”. If “Standard Cut” is checked, you select the “Standard Cut” and the printing media is cut in some standard size. If it is not checked, you select the “Synchronous Cut” and the printing media is cut as long as printed image. Default setting is “Standard Cut”.
<Mirror> The printed image is turned over. If it is not checked, the printed image is not turned over.
<Negative Image> A negative image can be printed. If it is not checked, the image is not inverted.
<Margin> Add a preferable margin to the Leading Edge and the Trailing edge of output print.
<Stamp> Its indicator lights up and the following “Stamp Setting Dialog Box” appears. Some Stamp Image is provided to the print when the indicator is lighting up. If you click on “Stamp” when the indicator is lighting up, it is put out and no Stamp Image is printed. As for the detail, refer to “Explanation of Stamp Setting Dialog Box”.

22
<Image Placement> The following “Image Placement Dialog Box” appears. As for the detail, refer to “Explanation of Image Placement Dialog Box”.

23
<HPGL Settings> The following “HPGL Setting Dialog Box” appears. As for the detail, refer to “Explanation of HPGL Setting Dialog Box”.

24
<Calcomp Settings> The following “Calcomp Setting Dialog Box” appears. As for the detail, refer to “Explanation of Calcomp Setting Dialog Box”.

25
• About Job Settings
<Job Count> Decide how many times a job is outputted. Setting range is from 1 to 999. <Collate> When “Collate” is checked (ON), collation is done. When it is not checked (OFF), collation is not done. Default setting is “Collate ON”. Example : Files A, B and C are printed out 3 jobs for each one. Collate ON ABC, ABC and ABC Collate OFF AAA, BBB and CCC <Density> Decide the density of the printed image. Setting range is from 1 to 13. Default value is 10. <Header>
Its indicator lights up and the following “Header Setting Dialog Box” appears. Header Information is printed when the indicator is lighting up. If you click on “Header” when the indicator is lighting up, it is put out and no Header Information is printed. In addition to the following shown “Requester” and “Job Number”, “Filename” and “Date/Time” can be printed as the Header Information. As for the detail, refer to “Explanation of Header Setting Dialog Box”.

26
<Output Job>
Print: Ordinal printing. Job is sent to Wait Queue. Pause: Job is sent to Pause Queue.
27
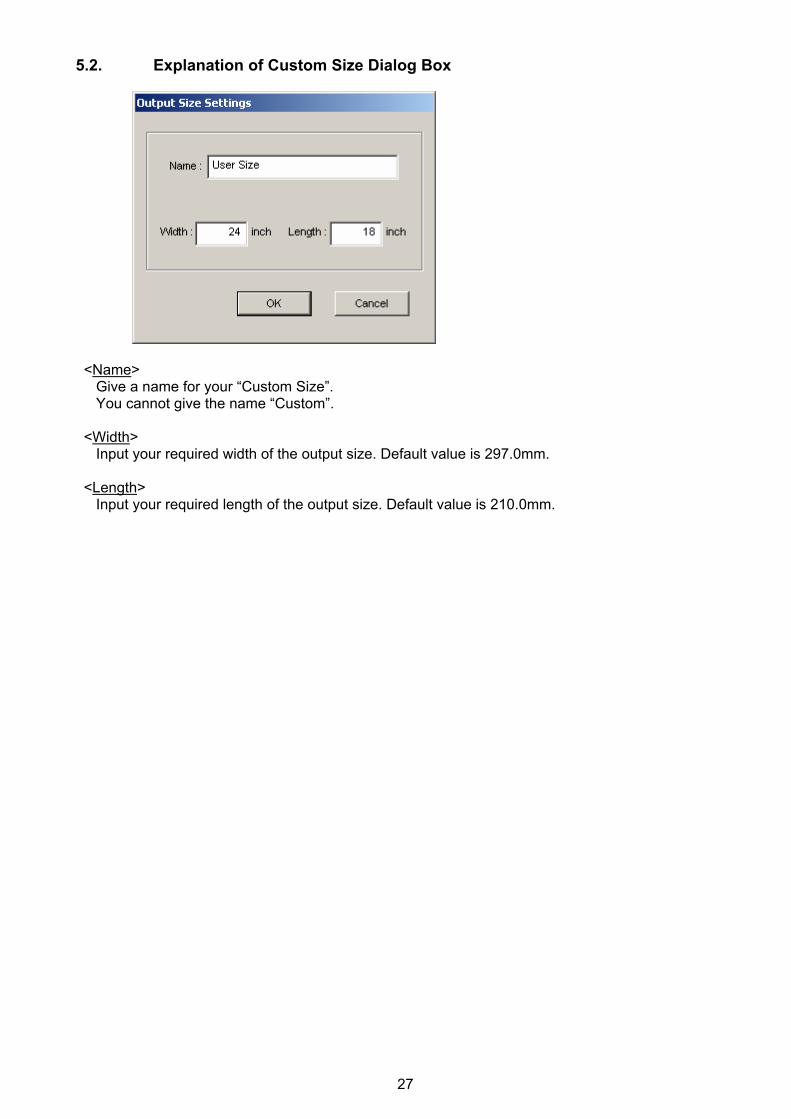
5.2. Explanation of Custom Size Dialog Box
<Name> Give a name for your “Custom Size”. You cannot give the name “Custom”. <Width> Input your required width of the output size. Default value is 297.0mm. <Length> Input your required length of the output size. Default value is 210.0mm.

28
5.3. Explanation of Stamp Setting Dialog Box Click [Stamp] in Default Settings region to pop up “Stamp Settings”.
<Stamp Setting> Enter the name to save the new stamp setting. If you click on , you can select any of existent stamp settings from the pull-down menu. <Save> Click on “Save” after inputting the name to save the new stamp setting. <Delete> Click on “Delete” to delete the existent stamp setting.
29
<Merge Type> If Stamp Image and output image overlaps with each other, the following process is done according to your selection.
Opaque Transparent (This function is not valid at raster file) <Gray> Decide the density of the Stamp Image. From 1% to 100% Default value is 100%. <Rotation> Decide the angle of the Stamp Image. 0 to 360 degrees arc counter-clockwise Default value is 0 degrees. <Mirror> The Stamp Image is turned over. <Scaling>
The Stamp Image is automatically enlarged or reduced if output size is enlarged or reduced. <Stamp placement> Decide where to print the Stamp Image. (9 positions) <Frame> If you check “Frame”, the Stamp Image is framed. Also, it becomes possible to decide the following settings. Thickness : You can decide the thickness of frame line. Default value is 0.5mm Margin : You can decide how much margin is kept between Stamp Image and frame line.
Default value is 1.0mm <Offset> After deciding “Stamp placement”, you can adjust the position. X : If you increase the setting value, the Stamp Image is moved to the right. If you decrease it, it is moved to the left. Y : If you increase the setting value, the Stamp Image is moved upward. If you decrease it, it is moved downward. Setting ranges of “Offset (Both X; and Y;)” are from -500mm to +500mm in 1mm increment. Default value is 0mm. <Text> It becomes possible to input the text. The inputted text is stamped on the print. <Font> Decide the font of the text. To print a stamp text in Chinese, select a font available for Chinese. <Macros> Select any of the following macros. The selected macro is printed as a text stamp. Date The date of request to output the job is stamped. Time The time of request to output the job is stamped. File Name The filename of output file is stamped. File Data The date that the file is created is stamped. File Time The time that the file is created is stamped. User Name User’s name of outputting computer is stamped. Distribution Distribution (To whom the print is distributed) is stamped.

30
Page Number Page number is printed when multiple pages are filed. Computer Name The name of outputting computer is stamped. <Image> It becomes possible to print the image of selected file as the Stamp Image. <Placement> Decide where to place the image against the text. Left of Text The image is placed to the left of the text. Right of Text The image is placed to the right of the text. Above Text The image is placed above the text. Below Text The image is placed below the text. Center of Text The image is placed at the center of the text. <Margin> You can decide how much margin is kept between image and text. Setting range of “Margin” is from 0.0mm to 50.0mm in 0.1mm increment. Default value is 5.0mm
31
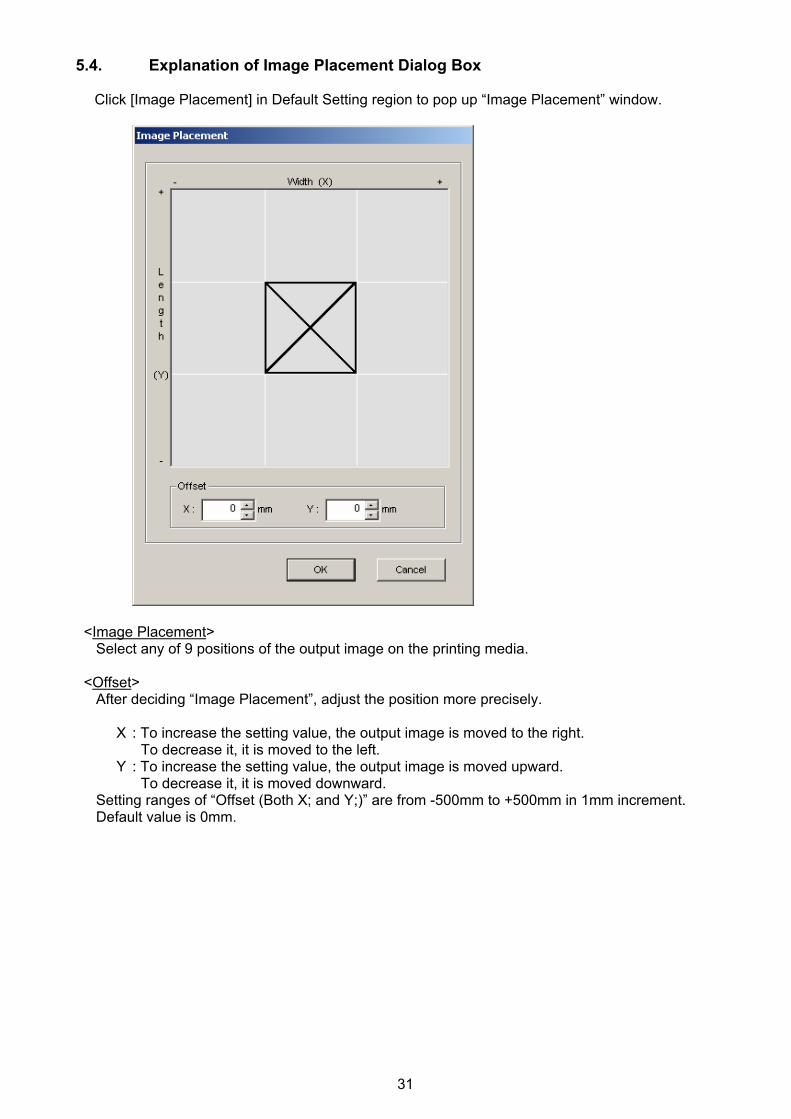
5.4. Explanation of Image Placement Dialog Box Click [Image Placement] in Default Setting region to pop up “Image Placement” window.
<Image Placement> Select any of 9 positions of the output image on the printing media. <Offset> After deciding “Image Placement”, adjust the position more precisely. X : To increase the setting value, the output image is moved to the right. To decrease it, it is moved to the left. Y : To increase the setting value, the output image is moved upward. To decrease it, it is moved downward. Setting ranges of “Offset (Both X; and Y;)” are from -500mm to +500mm in 1mm increment. Default value is 0mm.

32
5.5. Explanation of HPGL Setting Dialog Box Click [HPGL Settings] in Default Settings region to pop up “HPGL Settings” window.
<Setting>
Input the name here if you will save the new HPGL setting. If you click on, you can select any of existent HPGL settings from the pull-down menu.
<Save> Click on “Save” after inputting the name to save the new HPGL setting. <Delete> Click on “Delete” to delete the existent HPGL setting. <Pen Setting>
The setting of each pen is indicated here. This list is used when you check “Use custom setting”.
Pen No. Pen Numbers are indicated. (From 1 to 255) Width The pen width decided by “Custom Setting” is indicated. Gray The gray ratio decided by “Custom Setting” is indicated. <Width>
Use file setting : To use the pen width setting decided in the file. Use custom setting : To use the pen width setting decided by “Custom Setting”. Setting range of “Width” is from 0.04mm to 10.00mm in 0.01mm increment. Default value is 0.25mm.
33
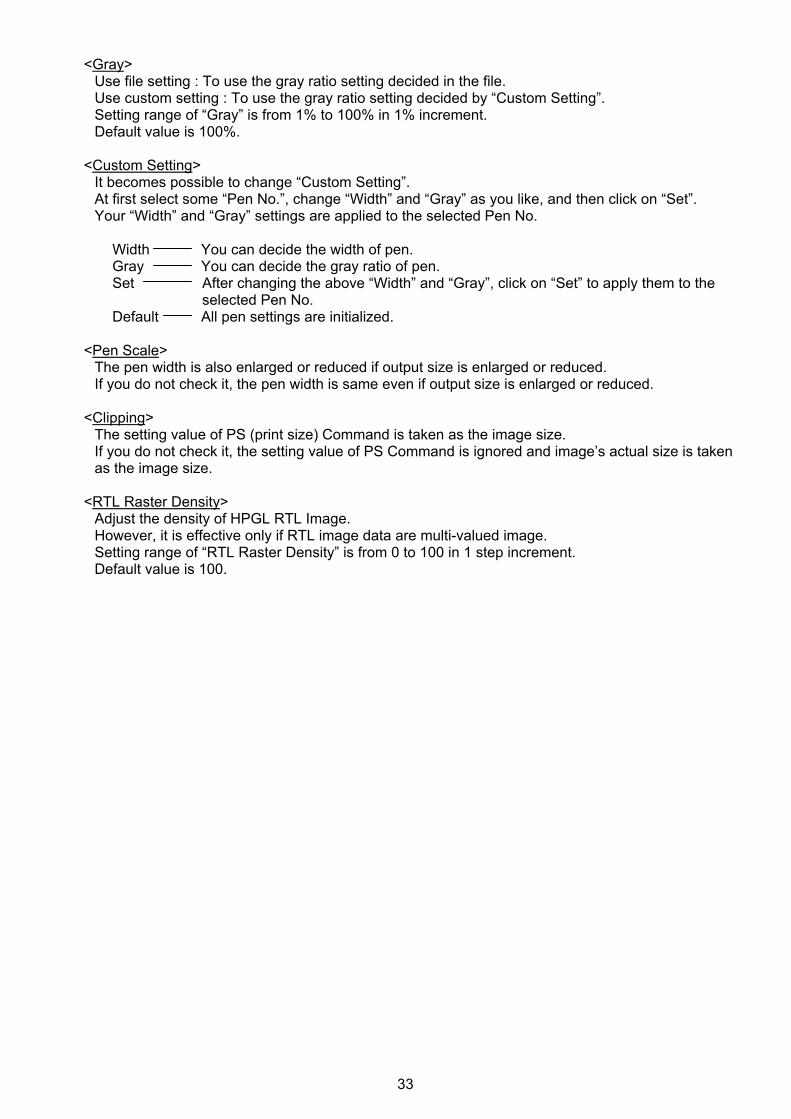
<Gray> Use file setting : To use the gray ratio setting decided in the file. Use custom setting : To use the gray ratio setting decided by “Custom Setting”. Setting range of “Gray” is from 1% to 100% in 1% increment. Default value is 100%.
<Custom Setting> It becomes possible to change “Custom Setting”. At first select some “Pen No.”, change “Width” and “Gray” as you like, and then click on “Set”. Your “Width” and “Gray” settings are applied to the selected Pen No.
Width You can decide the width of pen. Gray You can decide the gray ratio of pen. Set After changing the above “Width” and “Gray”, click on “Set” to apply them to the selected Pen No. Default All pen settings are initialized. <Pen Scale>
The pen width is also enlarged or reduced if output size is enlarged or reduced. If you do not check it, the pen width is same even if output size is enlarged or reduced.
<Clipping> The setting value of PS (print size) Command is taken as the image size. If you do not check it, the setting value of PS Command is ignored and image’s actual size is taken as the image size.
<RTL Raster Density>
Adjust the density of HPGL RTL Image. However, it is effective only if RTL image data are multi-valued image. Setting range of “RTL Raster Density” is from 0 to 100 in 1 step increment. Default value is 100.
34
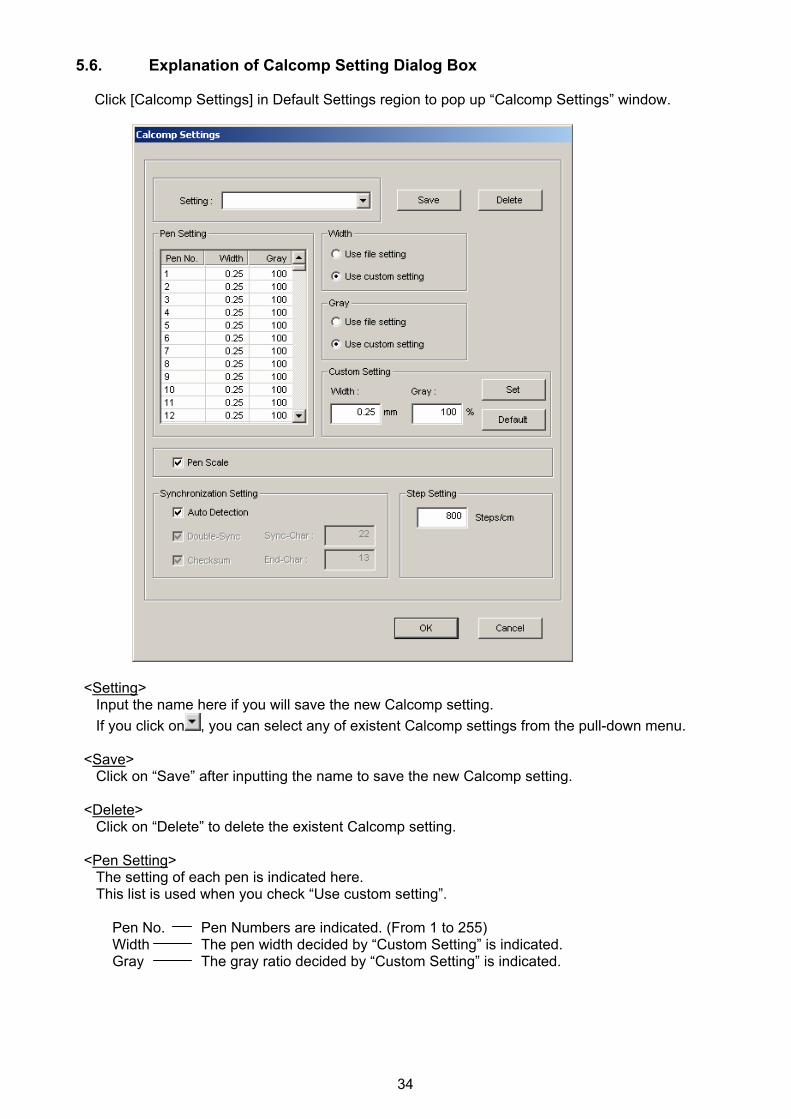
5.6. Explanation of Calcomp Setting Dialog Box Click [Calcomp Settings] in Default Settings region to pop up “Calcomp Settings” window.
<Setting> Input the name here if you will save the new Calcomp setting. If you click on , you can select any of existent Calcomp settings from the pull-down menu. <Save> Click on “Save” after inputting the name to save the new Calcomp setting. <Delete> Click on “Delete” to delete the existent Calcomp setting. <Pen Setting> The setting of each pen is indicated here. This list is used when you check “Use custom setting”. Pen No. Pen Numbers are indicated. (From 1 to 255) Width The pen width decided by “Custom Setting” is indicated. Gray The gray ratio decided by “Custom Setting” is indicated.

35
<Width> Use file setting : To use the pen width setting decided in the file. Use custom setting : To use the pen width setting decided by “Custom Setting”. Setting range of “Width” is from 0.04mm to 10.00mm in 0.01mm increment. Default value is 0.25mm.
<Gray>
Use file setting : To use the gray ratio setting decided in the file. Use custom setting : To use the gray ratio setting decided by “Custom Setting”. Setting range of “Gray” is from 1% to 100% in 1% increment. Default value is 100%.
<Custom Setting> It becomes possible to change “Custom Setting”. At first select some “Pen No.”, change “Width” and “Gray” as you like, and then click on “Set”. Your “Width” and “Gray” settings are applied to the selected Pen No.
Width You can decide the width of pen. Gray You can decide the gray ratio of pen. Set After changing the above “Width” and “Gray”, click on “Set” to apply them to the
selected Pen No. Default All pen settings are initialized. <Pen Scale>
The pen width is also enlarged or reduced if output size is enlarged or reduced. If you do not check it, the pen width is same even if output size is enlarged or reduced.
<Synchronization Setting> Set a preferable Synchronization by either Automatically Setting or Manual Setting. Check “Auto Detection” in normal use. You can manually configure “Double Sync”, “Checksum”, “Sync-Char” and “End-Char”.
<Step Setting> Change the output size of image by setting of a step number. Usually, set to 800 for Step Setting.
36
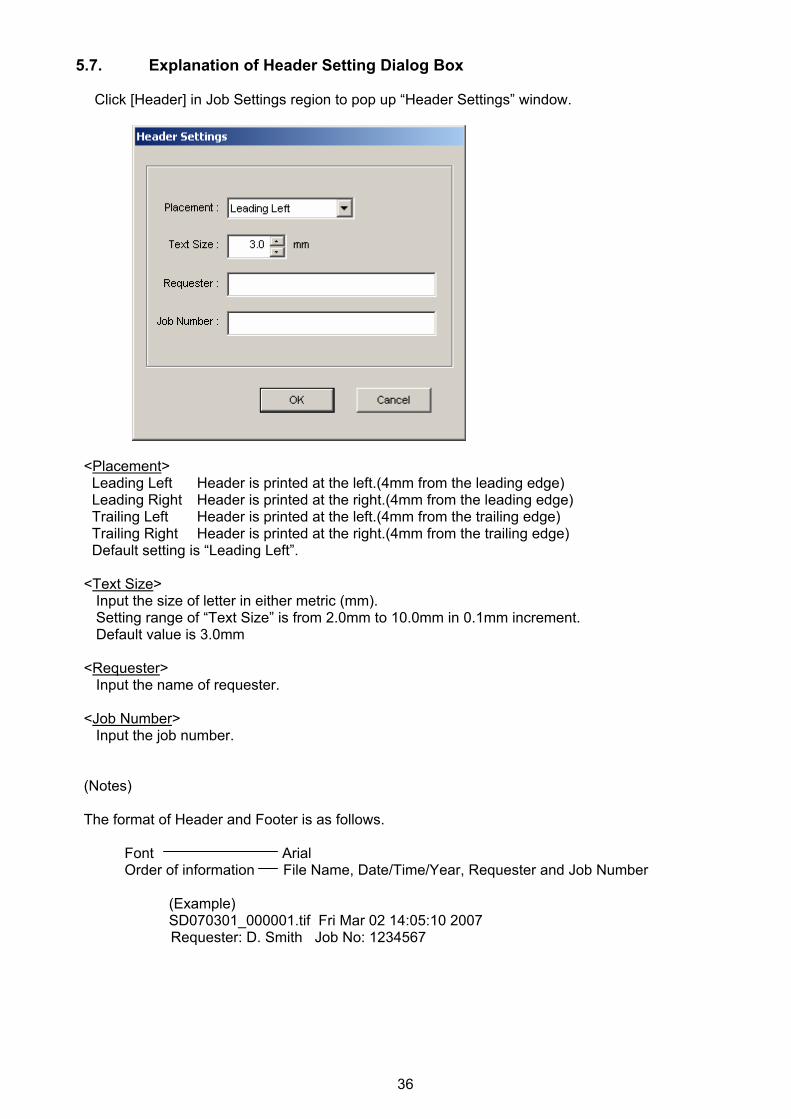
5.7. Explanation of Header Setting Dialog Box Click [Header] in Job Settings region to pop up “Header Settings” window.
<Placement> Leading Left Header is printed at the left.(4mm from the leading edge) Leading Right Header is printed at the right.(4mm from the leading edge) Trailing Left Header is printed at the left.(4mm from the trailing edge) Trailing Right Header is printed at the right.(4mm from the trailing edge) Default setting is “Leading Left”. <Text Size> Input the size of letter in either metric (mm). Setting range of “Text Size” is from 2.0mm to 10.0mm in 0.1mm increment. Default value is 3.0mm <Requester> Input the name of requester. <Job Number> Input the job number. (Notes) The format of Header and Footer is as follows. Font Arial Order of information File Name, Date/Time/Year, Requester and Job Number (Example) SD070301_000001.tif Fri Mar 02 14:05:10 2007
Requester: D. Smith Job No: 1234567

37
Print Client KM User’s Manual 2008. 7 Rev. 1.0
The Copyright Act protects this manual.
It is prohibited to copy or duplicate all or a part of this manual without permission.
Related Documents