4 free printmaking projects: block printing, monoprinting, & other printmaking techniques 1 structure and color RUTH ISSETT 2 floral frenzy: combining colors & monoprint techniques RUTH ISSETT 3 variations on a theme: printing tissue paper VIRGINIA A. SPIEGEL 4 roll out the backgrounds LINDA CALVERLEY presented by cloth paper scissors ® 1 2 3 4

Welcome message from author
This document is posted to help you gain knowledge. Please leave a comment to let me know what you think about it! Share it to your friends and learn new things together.
Transcript

4 free printmaking projects: block printing, monoprinting, & other printmaking techniques
1 structure and color ruth issett
2 floral frenzy: combining colors & monoprint techniques ruth issett
3 variations on a theme: printing tissue paper virginia a. spiegel
4 roll out the backgrounds linda calverley
presented by cloth paper scissors®
1 2
3
4

i f you love mark making and surface design like we do here at Cloth PaPer SCiSSorS®, you’ll love what we’ve
pulled together for your printmaking pleasure. Whether you like to use printmaking as the focus of your art, or just as an integral layer, these workshops will offer you new techniques to try in your next art session.
First up are two workshops by Ruth Issett, that will walk you through the process of printing with string, as well as
4 Free Printmaking Projects: Block Printing, Monoprinting, & Other
Printmaking Techniquespresented by
Cloth Paper Scissors®
editor Jenn Mason
assistant editor Barbara Delaney
creative services division art director Larissa Davis
PhotograPher Larry Stein
Projects and information are for inspiration and personal use only. Cloth paper SCiSSorS® is not responsible for any liability arising from errors, omissions, or mistakes contained in this eBook, and readers should proceed cautiously, especially with respect to technical information.
interweave Press LLc grants permission to photocopy any patterns published in this issue for personal use only.
a great monoprinting technique using a brayer as a no-waste printing tool. In the next Workshop, Virginia Spiegel has you set up a printmaking session with hand-cut stamps and tissue paper that will have you singing in your studio. Finally, Linda Calverley will have you searching through your recycle bins with her workshop full of fantastic ideas for rolling stamps.
Use these techniques alone or partner them with any one of the new techniques we bring to you in each, and every issue of Cloth PaPer SCiSSorS.
Jenn Mason Editor
N e e d f r e s h i N s p i r at i o N ? look inside
cloth paper scissors®
Mixed-media stitch Art journaling Assemblage Working with found objects
Surface design Metal working Printmaking
Encaustic collage Book making
Upcycled art
Available on newsstands worldwide and through subscription.
where you’ll find ideas for:
Toll-free within the U.S. & Canada: 800.406.5283International customers: 760.291.1519 (not toll-free)Cloth PaPer SCiSSorS Magazine, P.O. Box 469087, Escondido, CA 92046-9350
clothpaperscissors.comBlock Printing, Monoprinting, & Other Printmaking Techniques presented by
2 clothpaperscissors.com
©interweave Press LLc

many people who work with textiles, papers, and scissors find it quite difficult to draw with a pencil in their hand. However, if you ask them
to take a thread or piece of string and arrange it in the shape of an object, they often manage to produce a very passable “drawing” or design. Somehow a pencil or stick inhibits their fluency when creating a confident line to represent an image.
adapted from Cloth PaPer SCiSSorS® Fall 2006
by ruth issett
m at e r i a l s•A piece of foam core board cut
to a reasonable size for ease in handling
•Double-sided tape (Carpet tape will work.)
•A dark marking pen
•Well-twisted string (It needs to feel firm between your fingers. “Butcher” string works well.)
•Brayer or print roller (not the soft sponge variety)
•White acrylic paint (Liquitex®, Golden®, or Rowney System 3 brands work well.)
•An assortment of smooth, white papers: watercolor paper, white tissue, tracing paper, and different handmade Asian papers, such as Lokta or fine silk papers
•Stiff plastic sheet or protected sheet of glass for rolling out the paint
•A large sheet of paper or plastic to protect your work surface
optional•Inks, diluted Procion® MX dyes,
•or extended acrylic color
When developing a new series of work I often create a printing block or stamp. Making a string block is very satisfying: manipulating the string into position on a board, developing an elegant, powerful mark that gives structure to the images printed.
The work included in this article was stimulated by a study of winter trees—a bare hedgerow, just the branches, tightly packed and silhouetted against a cold gray sky,
or even against a dramatic sunset. In winter, the twigs are so noticeable when walking or driving. Gradually, as the spring comes, they change color; new bark appears in bright reds, yellows, lime greens, dark burgundy, and oranges.
To record these images, first you need to make your string block. Assemble the materials listed and follow the directions below.
structure and color
Above left: Background paper inked and varnished then roller-printed with white acrylic, inked with Procion MX dye. Further block printing in yellow and orange and then soft pencil detailing were added.
Block Printing, Monoprinting, & Other Printmaking Techniques presented by3
clothpaperscissors.com©interweave Press LLc
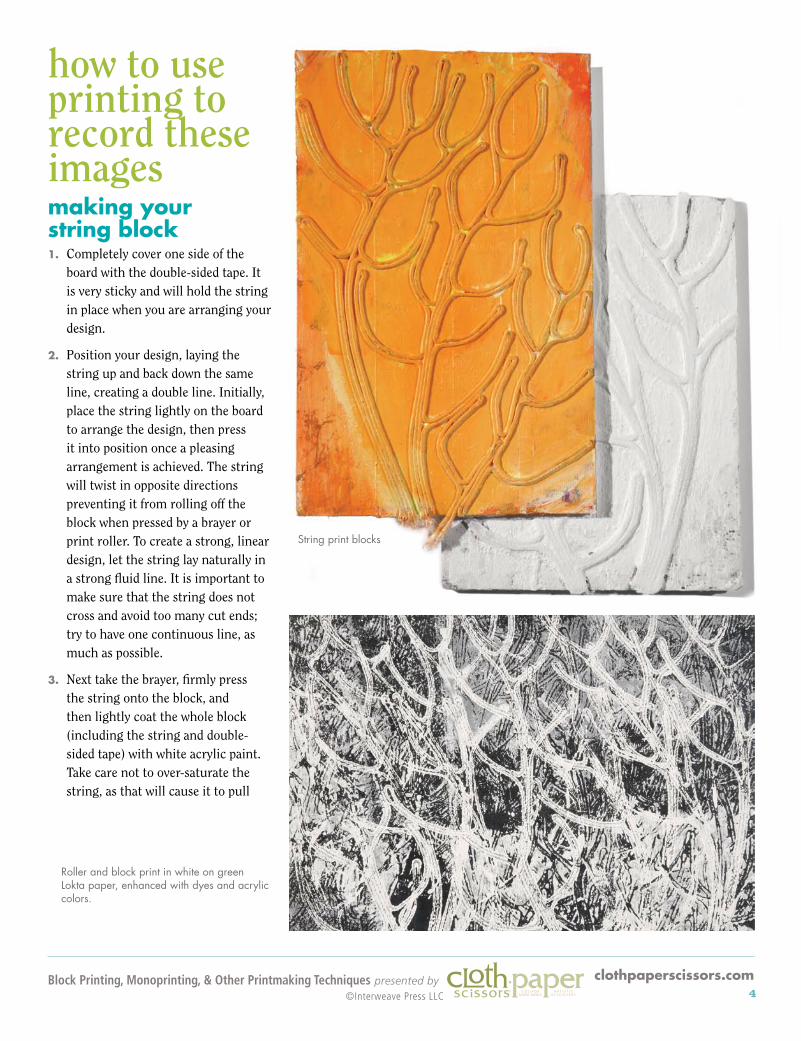
how to use printing to record these imagesmaking your string block1. Completely cover one side of the
board with the double-sided tape. It is very sticky and will hold the string in place when you are arranging your design.
2. Position your design, laying the string up and back down the same line, creating a double line. Initially, place the string lightly on the board to arrange the design, then press it into position once a pleasing arrangement is achieved. The string will twist in opposite directions preventing it from rolling off the block when pressed by a brayer or print roller. To create a strong, linear design, let the string lay naturally in a strong fluid line. It is important to make sure that the string does not cross and avoid too many cut ends; try to have one continuous line, as much as possible.
3. Next take the brayer, firmly press the string onto the block, and then lightly coat the whole block (including the string and double-sided tape) with white acrylic paint. Take care not to over-saturate the string, as that will cause it to pull
String print blocks
Roller and block print in white on green Lokta paper, enhanced with dyes and acrylic colors.
Block Printing, Monoprinting, & Other Printmaking Techniques presented by4
clothpaperscissors.com©interweave Press LLc

printing1. Protect your printing table with a
large sheet of paper and gather your supplies.
2. Arrange your papers so that it is easy to select them once you start printing as ideas will come thick and fast!
3. Squeeze out a generous blob of white acrylic paint and roll the brayer in the acrylic, evenly coating the whole surface. This may be a little difficult at first, but do not press too hard. If you press too hard, your brayer will not turn smoothly, if at all.
Become familiar with your brayer; do not rush, enjoy the feeling of gently coating it with acrylic.
Above: Images were roller- and block-printed in white and then inked with Procion MX dye.
Left: Images were roller-printed in shades of gray onto white paper and then block-printed in black.
away from the double-sided tape. Use the brayer to work the paint into the string to ensure the string absorbs the paint well. This helps to give the block a strong absorbent surface. Let the block dry before printing as this allows the string to tighten and ensures the string stays attached to the board.
Block Printing, Monoprinting, & Other Printmaking Techniques presented by5
clothpaperscissors.com©interweave Press LLc

4. Carefully roll the brayer, coated with acrylic, across the surface of the block. Leave an even coating on the surface of the block; do not push the acrylic down between the string. Once the block is evenly coated, quickly place it onto your chosen paper, press down hard, and then remove.
note: When working with white acrylic it may be difficult to distinguish the printed image on a white paper so try a tinted color instead.
5. Repeat steps 1–4 and then apply the block in another position to gradually build up a repetitive image.
printing from the brayerPrinting from the brayer will broaden the range of images available.
1. Evenly coat the brayer with acrylic paint, making sure it is applied to the whole surface. Press the brayer firmly into the surface of the block and gently roll it across, watching the negative image being revealed on the surface of the brayer.
2. Carefully transfer the brayer print onto your paper by slowly and gently running it across, not pressing too hard, just firmly enough to allow the acrylic to transfer onto the paper surface. But every rotation of the brayer will remove a layer of acrylic,
in your lifetexturePut
More
from photo to ART QUILT
fabric
Thread sketching made easy
for entering QUILT SHOWStips
FROM MISTAKE TO MASTERPIECE
tips
p. 46
p. 14
p. 28
800.406.5283 (U.S. & Canada)
760.291.1519 (International)quiltingarts.comQuilting Arts MAgAzine®, P.O. Box 469087, Escondido, CA 92046-9350
Quilting Arts MAgAzine® explores ideas, textiles, and techniques
related to embellished and contemporary art quilting. Inside,
you’ll find design inspiration, step-by-step directions, gorgeous
photo graphy, and motivation for developing your personal style,
at all skill levels.
so increase the pressure with each rotation.
note: No two brayer images will be the same. The brayer can be rolled across the block a number of times or in different directions. Sometimes the image will even become distorted.
3. Allow the acrylic to dry and then paint over the image with inks, diluted Procion MX dyes, or extended acrylic color. Some of the white acrylic will absorb the inked color giving a tinted surface.
Finally, add additional drawing using colored pencils or pens to give extra emphasis. tips
•Further prints can be added using other acrylic colors to build up the design ideas.
•Try printing on colored papers, previously decorated papers with printed or painted surfaces, or even onto collaged papers.
Block Printing, Monoprinting, & Other Printmaking Techniques presented by6
clothpaperscissors.com©interweave Press LLc

floral frenzy
summertime offers so much inspiration for color. Gardens are full of amazing combinations: suddenly blooms appear in unexpected hues
against lush foliage of citrus greens, olive greys, and deep red russets. Somehow these riotous combinations should be recorded and stored for the dark and dreary days of winter.
adapted from Cloth PaPer SCiSSorS® Winter 2006
by ruth issett
combining color & monoprint techniques
m at e r i a l s•A collection of simple, bold, paper
shapes
•A selection of papers for the background: tissue, watercolor paper, smooth drawing paper, Lokta, cotton rag, etc.
•Lino and cutting tools, such as an X-Acto® knife, for making stamps
•Acrylic paints
•Glass with taped edges, or a laminate sheet, for spreading paint
•Brayer or print roller
•Water-based inks or dyes
•Scissors
•Graphite and/or colored pencils
note: Of course, it would be easier to use ready-made stamps to explore color combinations, but making your own print blocks offers the opportunity to study in detail the shapes and lines of flowers and foliage, adding to your creative repertoire.
Stamps hand-carved out of lino offer great detail.
Building on the Structure and Color Workshop, let us examine how we can use printing to record these color combinations and develop ideas for design, drawing, and collage projects year-round.
Lokta paper, or Lama-Li, is cultivated from the Daphne bush that grows high in the Himalayan mountain region of Nepal. Tibetan refugees create the most
exquisite and versatile handmade lokta papers on the planet. Lokta has four deckled edges and is a very strong fiber. This bush completely regenerates in about four years after being cut to about six inches from the ground. Therefore, the cultivation of this “tree-free paper” is an eco-friendly resource and a reliable revenue stream for the village artisans of Nepal’s rural and urban areas.
directions1. Begin by drawing or collaging simple
flower and foliage shapes. Petals can be oval, angular, frilly, and trumpet-shaped, with the leaves thin, fat, curved, and serrated. If drawing is difficult, try tearing or cutting the shapes from different colored papers, even dividing the leaves where
Block Printing, Monoprinting, & Other Printmaking Techniques presented by7
clothpaperscissors.com©interweave Press LLc

the veins come. Make a collection of these simple, bold shapes that combine to build an interesting arrangement.
2. Take a piece of stamp-printing material such as lino and cut a simple stamp. Choose a piece about 4" × 6", so it is easy to hold in your hand and a good width to ink with a brayer (roller).
3. Select some of the flower and leaf shapes and trace them directly onto the surface of your stamp making sure that the lines are clear and strong, giving a fluid movement, and that both the positive and negative areas read well.
4. Gather a small selection of acrylic colors such as lemon yellow, cadmium yellow, scarlet, magenta, cobalt and turquoise blue, and white. Squeeze a good blob of color onto a flat, shiny surface such as the piece of glass or the laminated sheet. Using
a brush, paint the color onto your stamp, making sure that the whole area is evenly covered with acrylic.
5. Place your papers onto a pad of newspaper and press the coated stamp (block) onto the paper surface. Remove the stamp and reveal the reversed print. Print the stamp repeatedly, altering the color by adding different paint colors to create secondary colors.
rag paperThe symbol of quality is still a paper that is made from 100 percent cotton rags. At one time, rag meant cotton taken exclusively from cotton textile remnants. Now very few cotton papers are made from rags, either entirely or partially. The difference between true rag papers and cotton papers made from linters is that the rags have longer cotton fibers and the weaving seems to add strength. Today rag and cotton are terms that are virtually interchangeable.
Above: Simple block and brayer printing on paper and on cotton muslin (calico), both printed first then over-inked or -dyed.
Right: Various papers were glued together to create a varied surface, printed with shades of yellow and orange, inked with turquoise and magenta ink, and further enhanced with colored pencil.
Block Printing, Monoprinting, & Other Printmaking Techniques presented by8
clothpaperscissors.com©interweave Press LLc
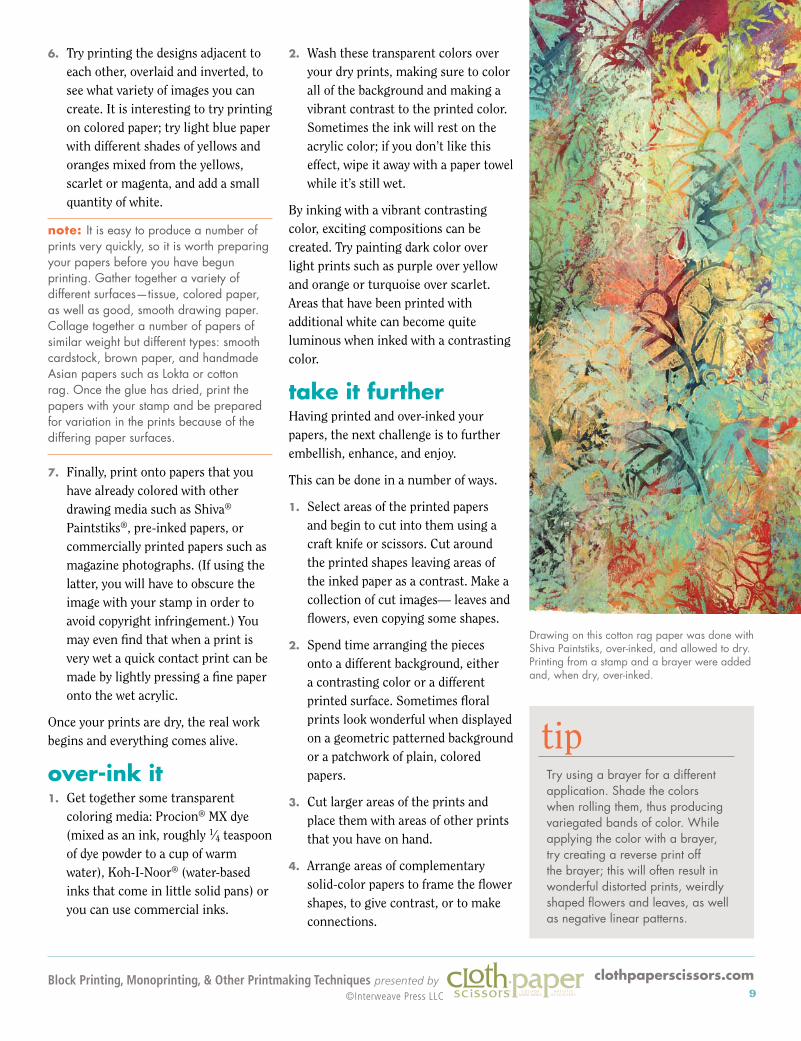
6. Try printing the designs adjacent to each other, overlaid and inverted, to see what variety of images you can create. It is interesting to try printing on colored paper; try light blue paper with different shades of yellows and oranges mixed from the yellows, scarlet or magenta, and add a small quantity of white.
note: It is easy to produce a number of prints very quickly, so it is worth preparing your papers before you have begun printing. Gather together a variety of different surfaces—tissue, colored paper, as well as good, smooth drawing paper. Collage together a number of papers of similar weight but different types: smooth cardstock, brown paper, and handmade Asian papers such as Lokta or cotton rag. Once the glue has dried, print the papers with your stamp and be prepared for variation in the prints because of the differing paper surfaces.
7. Finally, print onto papers that you have already colored with other drawing media such as Shiva® Paintstiks®, pre-inked papers, or commercially printed papers such as magazine photographs. (If using the latter, you will have to obscure the image with your stamp in order to avoid copyright infringement.) You may even find that when a print is very wet a quick contact print can be made by lightly pressing a fine paper onto the wet acrylic.
Once your prints are dry, the real work begins and everything comes alive.
over-ink it1. Get together some transparent
coloring media: Procion® MX dye (mixed as an ink, roughly 1⁄4 teaspoon of dye powder to a cup of warm water), Koh-I-Noor® (water-based inks that come in little solid pans) or you can use commercial inks.
2. Wash these transparent colors over your dry prints, making sure to color all of the background and making a vibrant contrast to the printed color. Sometimes the ink will rest on the acrylic color; if you don’t like this effect, wipe it away with a paper towel while it’s still wet.
By inking with a vibrant contrasting color, exciting compositions can be created. Try painting dark color over light prints such as purple over yellow and orange or turquoise over scarlet. Areas that have been printed with additional white can become quite luminous when inked with a contrasting color.
take it furtherHaving printed and over-inked your papers, the next challenge is to further embellish, enhance, and enjoy.
This can be done in a number of ways.
1. Select areas of the printed papers and begin to cut into them using a craft knife or scissors. Cut around the printed shapes leaving areas of the inked paper as a contrast. Make a collection of cut images— leaves and flowers, even copying some shapes.
2. Spend time arranging the pieces onto a different background, either a contrasting color or a different printed surface. Sometimes floral prints look wonderful when displayed on a geometric patterned background or a patchwork of plain, colored papers.
3. Cut larger areas of the prints and place them with areas of other prints that you have on hand.
4. Arrange areas of complementary solid-color papers to frame the flower shapes, to give contrast, or to make connections.
tipTry using a brayer for a different application. Shade the colors when rolling them, thus producing variegated bands of color. While applying the color with a brayer, try creating a reverse print off the brayer; this will often result in wonderful distorted prints, weirdly shaped flowers and leaves, as well as negative linear patterns.
Drawing on this cotton rag paper was done with Shiva Paintstiks, over-inked, and allowed to dry. Printing from a stamp and a brayer were added and, when dry, over-inked.
Block Printing, Monoprinting, & Other Printmaking Techniques presented by9
clothpaperscissors.com©interweave Press LLc

drawing Once the printing and gluing is finished you may feel very happy with the pieces you have produced.
However, it is still possible to further enhance your work with gentle and sometimes subtle additions. Amazingly, it is quite possible to add additional graphite or colored pencil to both the acrylic printing and/or the background, inked paper.
1. Select a soft pencil or graphite stick and gently draw into the background paper around the printed area, shading and emphasising the printed pattern. Let the shading become darker in some areas, lighter in others.
2. As you work, stand back and view your work, gradually adding greater emphasis in some areas. Take care not to cover the whole print. Be
selective to yield variety and tonal difference.
3. Select some colored pencils that are slightly darker or lighter than the original print and start to draw into the acrylic printing. Gently rub the colored pencil across the print surface, gradually building the color. You may even find that it is exciting to add a small amount of a contrasting color to your piece—bright lime green to a deep orange or a soft salmon color to a bright yellow. As you apply the pencil coloring you will find that the actual print has different surface levels; a ridge along the edge of the print gives a defined line. Draw up to this line to emphasize the color contrasts.
4. Finally, use the colored pencils to enhance the dry, inked surfaces around the print, carefully adding detailed color between the printed
areas. Shade the colors, use complementary colors, or add different tones to the colored paper. Use the pencils to create large slabs of color or fine detailed lines.
Embellishing and enriching the print and the inked surface can be very absorbing and fun.
These paper ideas can be enjoyed for themselves or can be added to a design portfolio to build ideas for future hand-dyed and printed fabrics.
r e s o u r c e sSpecialty papers, inks, dyes, and stamp-carving supplies• artvango.co.uk
• dickblick.com
Below: Printed with a PZ Kut block and a leaf block created from foam core board and Funky Foam. Prints were cut, rearranged, and enhanced with colored and graphite pencils.
Above: Printed, brayer-printed, and inked papers were cut, composed, and enhanced with additional papers and drawing.
Block Printing, Monoprinting, & Other Printmaking Techniques presented by10
clothpaperscissors.com©interweave Press LLc

variations on a theme
adapted from Cloth PaPer SCiSSorS®
March/april 2007
it is ubiquitous, inexpensive, and you’ve been using it for art projects from the time you made “stained glass” in
kindergarten. Yes, tissue paper is one art material we can all afford and find almost everywhere we shop. Visit the right stores and you might even get it for free. There are many easy ways to transform this humble material into art paper that can add layers of depth and translucency to your artwork.
I find the best way to ensure an interesting and complex pattern on tissue paper is to spread it out on a plastic-covered floor or circle of tables and make marks on the individual sheets of tissue paper in a round-robin fashion. Put on some music and think of printing a symphony. Move from sheet to sheet while repeating motifs and mark making among the sheets; you want both repetition and variation. But keep in mind that it’s important to have some plain areas as well as a place to rest your eye in your collage.
printing tissue papermaking your own stampsOf course, you could use commercial stamps to print your tissue paper, but it’s
really quite easy to make your own. You can also be sure your work will be unique if you take a few minutes to make your own stamps.
making printing blocks
On the positive side, making a stamp by carving pre-made printing blocks with linoleum carving tools really is easy. I carve the block freehand, but you can draw your design on the block with a pen before you begin. On the negative side, it is difficult to obtain a good print with the by virginia a. spiegel
11 clothpaperscissors.com
©interweave Press LLc4 Printmaking Workshops for Mixed-media Art presented by
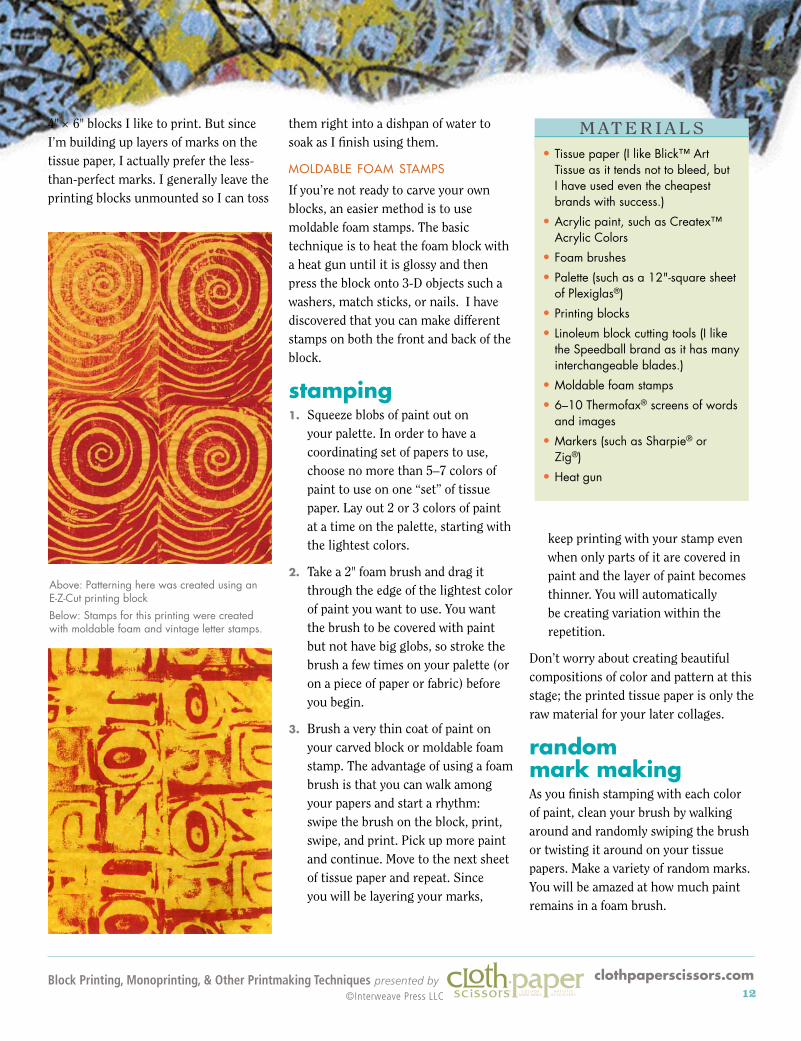
4" × 6" blocks I like to print. But since I’m building up layers of marks on the tissue paper, I actually prefer the less-than-perfect marks. I generally leave the printing blocks unmounted so I can toss
them right into a dishpan of water to soak as I finish using them.
moldable foam stamps
If you’re not ready to carve your own blocks, an easier method is to use moldable foam stamps. The basic technique is to heat the foam block with a heat gun until it is glossy and then press the block onto 3-D objects such a washers, match sticks, or nails. I have discovered that you can make different stamps on both the front and back of the block.
stamping1. Squeeze blobs of paint out on
your palette. In order to have a coordinating set of papers to use, choose no more than 5–7 colors of paint to use on one “set” of tissue paper. Lay out 2 or 3 colors of paint at a time on the palette, starting with the lightest colors.
2. Take a 2" foam brush and drag it through the edge of the lightest color of paint you want to use. You want the brush to be covered with paint but not have big globs, so stroke the brush a few times on your palette (or on a piece of paper or fabric) before you begin.
3. Brush a very thin coat of paint on your carved block or moldable foam stamp. The advantage of using a foam brush is that you can walk among your papers and start a rhythm: swipe the brush on the block, print, swipe, and print. Pick up more paint and continue. Move to the next sheet of tissue paper and repeat. Since you will be layering your marks,
keep printing with your stamp even when only parts of it are covered in paint and the layer of paint becomes thinner. You will automatically be creating variation within the repetition.
Don’t worry about creating beautiful compositions of color and pattern at this stage; the printed tissue paper is only the raw material for your later collages.
random mark makingAs you finish stamping with each color of paint, clean your brush by walking around and randomly swiping the brush or twisting it around on your tissue papers. Make a variety of random marks. You will be amazed at how much paint remains in a foam brush.
Above: Patterning here was created using an E-Z-Cut printing block
Below: Stamps for this printing were created with moldable foam and vintage letter stamps.
m at e r i a l s•Tissue paper (I like Blick™ Art
Tissue as it tends not to bleed, but I have used even the cheapest brands with success.)
•Acrylic paint, such as Createx™ Acrylic Colors
•Foam brushes
•Palette (such as a 12"-square sheet of Plexiglas®)
•Printing blocks
•Linoleum block cutting tools (I like the Speedball brand as it has many interchangeable blades.)
•Moldable foam stamps
•6–10 Thermofax® screens of words and images
•Markers (such as Sharpie® or Zig®)
•Heat gun
Block Printing, Monoprinting, & Other Printmaking Techniques presented by12
clothpaperscissors.com©interweave Press LLc

If you work from light to dark paints, you won’t need to change brushes as you will be “cleaning” the brush as you make your random marks. Just pick up a new paint color and continue with the stamp you were using previously or start with a new stamp.
Before moving on to another technique, it’s time to check your tissue paper. Are there still open spaces on your tissue paper? Good!
screen printing The easiest way to make screens for screenprinting is to use a Thermofax machine or to purchase the screens from a Thermofax printing service. (Quilting arts magazine, Winter 2003, has an article by Maggie Weiss on working with the Thermofax machine.) As with the paint you choose for your tissue paper, you want a coordinated suite of 6–10 screens with images and words related to a topic.
I use a 3" foam brush for screenprinting on tissue paper. I find the normal screenprinting squeegee applies too
much paint and doesn’t give me enough flexibility.
1. Run the foam brush through a blob of paint on your palette and paint once or twice on the palette (or scrap paper or fabric) to make sure the layer of paint is thin and smooth.
2. Take your screen, lay it on a piece of tissue paper, and, grasping the brush very low on the handle, swipe it over the screen. Two or 3 swipes will usually print the entire screen, but I prefer to print just bits and pieces of each screen on each piece of tissue paper.
I don’t clean the screen or the brush between colors, but try to work from the lightest colors of paint to the darkest. When you are done with a screen, lay it immediately in a small dishpan or sink with a couple of inches of water in it. You can then continue painting without having to stop and clean your screens.
markersWriting always adds a layer of information and mystery to a collage, so sometime in the process of painting
I add a layer of writing using markers. I do this even if I have stamped or screenprinted words previously because, as in carving your own stamps, handwriting adds a personal and unique look to your artwork.
Start with a great big marker such as a Super Sharpie, since we are thinking big and swoopy in our actions here. I like writing that can almost be read. To achieve this, write quickly and continuously, letting the marker flow over the paper. Forget about being concise and neat and don’t worry about the content.
Think about your topic and just start writing; emphasize the downward loops of the letters p and f, the upward loops of the letters d and b, and keep the letters either very tight together or very far apart. Again, there is no need to strive for a beautiful composition here; you are creating raw materials to use in your collages.
Above left: Screenprinting on tissue with black and red.
Above right: Handwriting can personalize a piece. Allow it to flow across the page.
In this sample black script is over-written in the opposite direction with red.
Block Printing, Monoprinting, & Other Printmaking Techniques presented by13
clothpaperscissors.com©interweave Press LLc

directions1. Cut a piece of mat board to
21⁄2" × 31⁄
2" for the ATC and 4" × 6" for the fabric postcard.
2. Put a glob of Sobo Glue on a piece of waxed paper. For an easy start to
Virginia’s fabric postcard “Tree, Wood, Paper”.
m at e r i a l s• Mat board
• Sobo Glue®
• 1" inexpensive, natural bristle paintbrush
• Rotary cutter
• Self-sealing cutting mat
• Paint or gold leaf marker
• Prepared tissue papers
r e s o u r c e sblock printing tools and materials•speedballart.com
800-898-7224
•dickblick.com 800-828-4548
Thermofax machine and supplies•welshproducts.com
800-745-3255
•ebay.com
your ATC or fabric postcard, coat the front of the mat board completely with glue using the 1" brush. Adhere a large piece of your printed tissue paper to cover the front of the mat board completely.
3. Smooth down the tissue paper and then turn the mat board over and, using the rotary cutter on the self-healing mat, trim the edges of the tissue paper even with the mat board.
4. Add additional layers of tissue paper to the mat board by coating the back of small pieces of tissue paper with glue and placing them on top of the previous layer.
5. Finish by using a paint or gold leaf marker to color the edges of the ATC or fabric postcard.
www.virginiaspiegel.com
artist trading card or fiber art postcard
Block Printing, Monoprinting, & Other Printmaking Techniques presented by14
clothpaperscissors.com©interweave Press LLc
m at e r i a l s•Recycled items to use as rollers:
anything cylindrical (such as hard cardboard paper towel tubes or a plastic soda bottle) or wheel shaped (round with a flat edge)
•Found objects to use as pattern makers, such as heavy lace, string, or open-weave fabric
•Fun foam (funky foam), available in sheets
•Scissors—large and small (For small fiddly bits, curvy nail scissors work well.)
•All-purpose adhesive such as UHU® (It must be a strong glue, or the shapes will come off when washed.)
•Craft knife
•Pinking shears/decorative edge craft scissors
•Revolving punch pliers for different size holes
•Roller paint—acrylic, poster, ink pads, etc.
•Background paints—acrylic wash, watercolor, Brusho (pigment powder), dye solution, fabric paints, etc.
•Paintbrushes and/or paint rollers
•Paper and/or fabric to print on
•Tape or pins
•Plastic to protect work surface
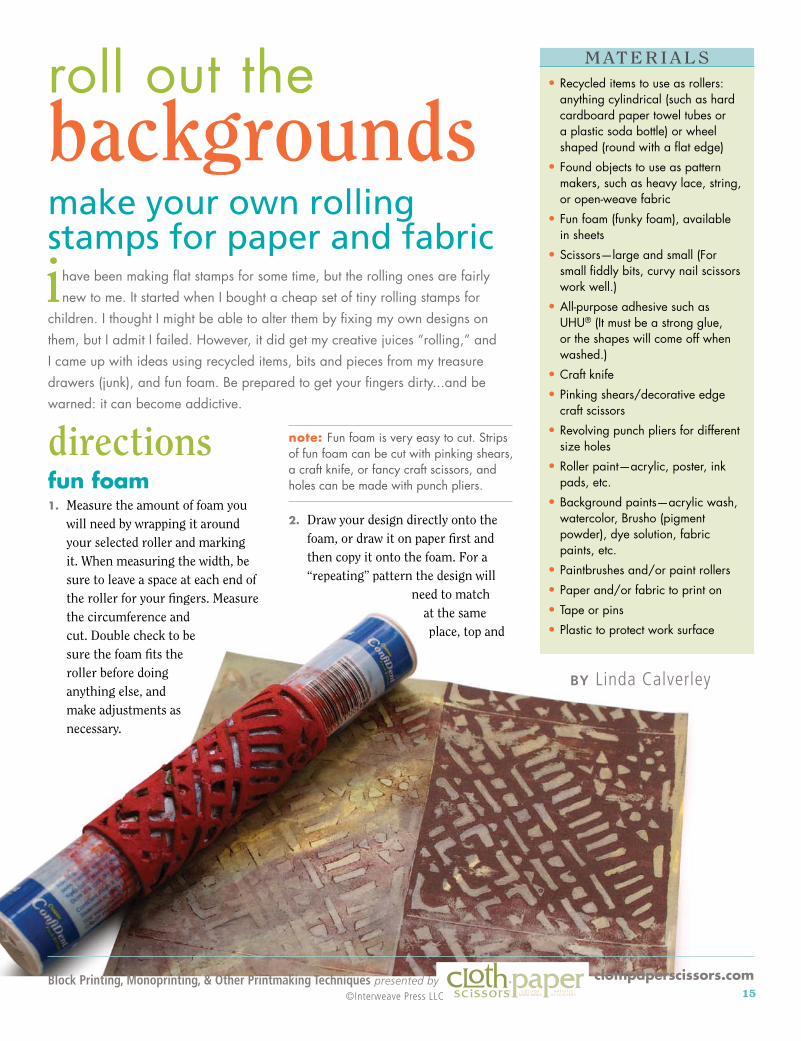
roll out the backgrounds make your own rolling stamps for paper and fabric
ihave been making flat stamps for some time, but the rolling ones are fairly new to me. It started when I bought a cheap set of tiny rolling stamps for
children. I thought I might be able to alter them by fixing my own designs on them, but I admit I failed. However, it did get my creative juices “rolling,” and I came up with ideas using recycled items, bits and pieces from my treasure drawers (junk), and fun foam. Be prepared to get your fingers dirty...and be warned: it can become addictive.
directionsfun foam1. Measure the amount of foam you
will need by wrapping it around your selected roller and marking it. When measuring the width, be sure to leave a space at each end of the roller for your fingers. Measure the circumference and cut. Double check to be sure the foam fits the roller before doing anything else, and make adjustments as necessary.
note: Fun foam is very easy to cut. Strips of fun foam can be cut with pinking shears, a craft knife, or fancy craft scissors, and holes can be made with punch pliers.
2. Draw your design directly onto the foam, or draw it on paper first and then copy it onto the foam. For a “repeating” pattern the design will
need to match at the same place, top and
by Linda calverley
Block Printing, Monoprinting, & Other Printmaking Techniques presented by15
clothpaperscissors.com©interweave Press LLc
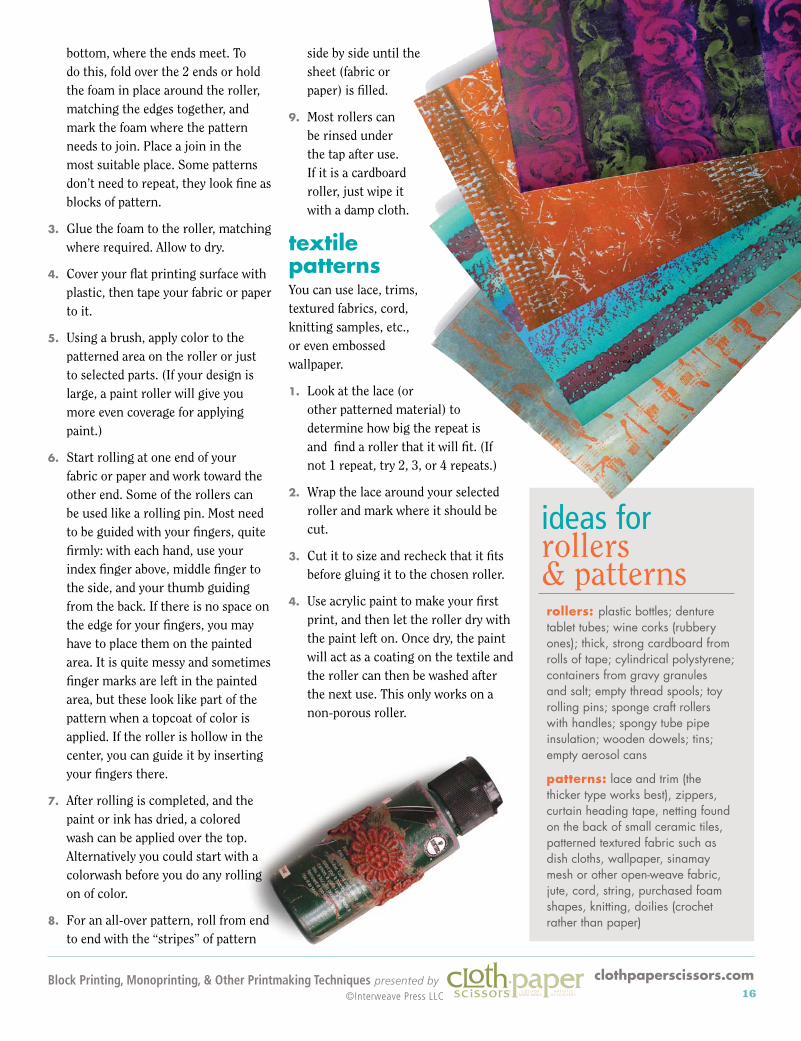
ideas for rollers & patternsrollers: plastic bottles; denture tablet tubes; wine corks (rubbery ones); thick, strong cardboard from rolls of tape; cylindrical polystyrene; containers from gravy granules and salt; empty thread spools; toy rolling pins; sponge craft rollers with handles; spongy tube pipe insulation; wooden dowels; tins; empty aerosol cans
patterns: lace and trim (the thicker type works best), zippers, curtain heading tape, netting found on the back of small ceramic tiles, patterned textured fabric such as dish cloths, wallpaper, sinamay mesh or other open-weave fabric, jute, cord, string, purchased foam shapes, knitting, doilies (crochet rather than paper)
bottom, where the ends meet. To do this, fold over the 2 ends or hold the foam in place around the roller, matching the edges together, and mark the foam where the pattern needs to join. Place a join in the most suitable place. Some patterns don’t need to repeat, they look fine as blocks of pattern.
3. Glue the foam to the roller, matching where required. Allow to dry.
4. Cover your flat printing surface with plastic, then tape your fabric or paper to it.
5. Using a brush, apply color to the patterned area on the roller or just to selected parts. (If your design is large, a paint roller will give you more even coverage for applying paint.)
6. Start rolling at one end of your fabric or paper and work toward the other end. Some of the rollers can be used like a rolling pin. Most need to be guided with your fingers, quite firmly: with each hand, use your index finger above, middle finger to the side, and your thumb guiding from the back. If there is no space on the edge for your fingers, you may have to place them on the painted area. It is quite messy and sometimes finger marks are left in the painted area, but these look like part of the pattern when a topcoat of color is applied. If the roller is hollow in the center, you can guide it by inserting your fingers there.
7. After rolling is completed, and the paint or ink has dried, a colored wash can be applied over the top. Alternatively you could start with a colorwash before you do any rolling on of color.
8. For an all-over pattern, roll from end to end with the “stripes” of pattern
side by side until the sheet (fabric or paper) is filled.
9. Most rollers can be rinsed under the tap after use. If it is a cardboard roller, just wipe it with a damp cloth.
textile patternsYou can use lace, trims, textured fabrics, cord, knitting samples, etc., or even embossed wallpaper.
1. Look at the lace (or other patterned material) to determine how big the repeat is and find a roller that it will fit. (If not 1 repeat, try 2, 3, or 4 repeats.)
2. Wrap the lace around your selected roller and mark where it should be cut.
3. Cut it to size and recheck that it fits before gluing it to the chosen roller.
4. Use acrylic paint to make your first print, and then let the roller dry with the paint left on. Once dry, the paint will act as a coating on the textile and the roller can then be washed after the next use. This only works on a non-porous roller.
Block Printing, Monoprinting, & Other Printmaking Techniques presented by16
clothpaperscissors.com©interweave Press LLc

tips•Acrylic paints can be used with the
stamps, but if you’re printing on fabric, use fabric paint, silk paints, or dyes for the background colors. Acrylics can leave the fabric quite stiff. Thickened dyes are another alternative.
•If some areas don’t print well, you can cut the best areas out for collage, or disguise the bad bits with more stamping on top.
•The paint will last longer on the bigger rollers as they cover a larger area. The paint will become lighter the farther you roll, but there are some nice effects when the paint is quite light. Apply more paint to the roller if it becomes too faint, even if it’s halfway across the page.
•Experiment on scrap paper to check the amount of paint required for your chosen roller and effect. Add water to the paint as required; it may need to be a little runnier for fabric.
•Build up layers of pattern by using one roller on top of another after allowing the first one to dry.
•If you really don’t want to get paint on your fingers, make all your rollers using kids’ craft rollers with handles. Remove the sponge and replace it with fun foam, building up the layers to make it fatter and firmer, but don’t overlap the foam. Decorative paint rollers, wallpaper seam rollers, or lint rollers could also be an option, although I haven’t tried these—yet. Or, just wear gloves when you paint.
•Some of the rollers leave a better impression than others. For instance, a pattern made in fun foam using punch pliers can create a pattern that looks more like lace than real lace.
•Some rollers will last longer than others. Use them as long as possible and then discard.
•If you want a section without patterning, mask the area with paper before rolling.
•Roll some patterns with a deep paint color, allow them to dry, and then scan them into the computer. They make wonderful backgrounds for your digital work.
note: Knitting becomes soggy when washed and takes too long to dry, so it’s better to leave the paint to dry on the roller after each use.
wine bottle corksCorks can be cut (carefully) with a craft knife. Simple marks can make a nice pattern. A simple, long, thin triangle from the edge is an example.
Rolling a pattern with a cork is time consuming as the cork is small so you will have to roll it many times. Also, corks cannot hold a lot of paint so you will probably have to apply paint for every “roll.”
If you want a bigger roller, glue funky foam onto the cork. Let the edges of the ends meet, but don’t overlap them. (I used this system on an old craft sponge roller: I removed the sponge and glued fun foam in its place. I used 2 layers of foam plus a layer with a foam pattern—
3 layers in total.)
spongy tube pipe insulationThis is really easy to cut with a craft knife and it is easy to use.
1. Draw your design on the tube with a marker.
2. Carefully carve out the pattern areas with a craft knife.
3. Apply paint and roll as above. These tubes can be rinsed under tap water after use.
linsart.co.uk
Block Printing, Monoprinting, & Other Printmaking Techniques presented by17
clothpaperscissors.com©interweave Press LLc
Related Documents