Last updated: December 4, 2010 Page 1 of 13 Pre-Install Guide Windows Server 2008 This document lists the required steps to configure Windows Server 2008 for your Blackbaud software. Blackbaud recommends the use of SQL 2008 with Fundware 7.60. You will need the Windows 2008 CD or the i386 folder on the C:\ drive to perform these server changes. Microsoft SQL Server 2000 and MSDE are NOT supported with Fundware 7.60. Please Note: Fundware 7.60 Professional must use SQL Express Fundware 7.60 Enterprise must use SQL Standard Blackbaud does NOT support the use of x64Bit Operating Systems for FundWare 7.60 Blackbaud does NOT support Domain Controllers or Small Business Servers for FundWare 7.60 Fundware 7.60 Server - Configure Windows Server 2008 Fundware 7.60 Server Windows Server 2008 Pre-Install Guide/ Last updated December 4, 2010 To configure Windows Server 2008, you will need to perform the following: Contact Fundware Support for your Fundware 7.60 Registration number Disable User Account Control: • Click Start, and then click Control Panel • In Control Panel with Classic View, click User Accounts • In the User Accounts tasks window, click Turn User Account Control on or off • Clear the Use User Account Control (UAC) to help protect your computer check box, and then click OK • Click Restart Now to apply the change

Welcome message from author
This document is posted to help you gain knowledge. Please leave a comment to let me know what you think about it! Share it to your friends and learn new things together.
Transcript

Last updated: December 4, 2010 Page 1 of 13
Pre-Install Guide Windows Server 2008
This document lists the required steps to configure Windows Server 2008 for your Blackbaud software. Blackbaud recommends the use of SQL 2008 with Fundware 7.60. You will need the Windows 2008 CD or the i386 folder on the C:\ drive to perform these server changes. Microsoft SQL Server 2000 and MSDE are NOT supported with Fundware 7.60.Please Note: Fundware 7.60 Professional must use SQL Express Fundware 7.60 Enterprise must use SQL Standard Blackbaud does NOT support the use of x64Bit Operating Systems for FundWare 7.60 Blackbaud does NOT support Domain Controllers or Small Business Servers for FundWare 7.60
Fundware 7.60 Server - Configure Windows Server 2008
Fundware 7.60 Server Windows Server 2008 Pre-Install Guide/ Last updated December 4, 2010
To configure Windows Server 2008, you will need to perform the following:
Contact Fundware Support for your Fundware 7.60 Registration number
Disable User Account Control: • Click Start, and then click Control Panel
• In Control Panel with Classic View, click User Accounts • In the User Accounts tasks window, click Turn User Account Control on or off • Clear the Use User Account Control (UAC) to help protect your computer check box, and then click OK • Click Restart Now to apply the change

Last updated: December 4, 2010 Page 2 of 13
Fundware 7.60 Server Windows Server 2008 Pre-Install Guide/ Last updated Decemeber 4, 2010
Disable Data Execution Prevention: • Right-click on Computer and select 'Properties'
• Select the Advanced System Settings' link • Under 'Performance,' click the 'Settings' button Select the 'Data Execution Prevention' tab • Change the radio button to the top radio button and click OK • Click OK on the pop up "The changes you have made require you to restart your computer before they can take effect."

Last updated: December 4, 2010 Page 3 of 13
Fundware 7.60 Server Windows Server 2008 Pre-Install Guide/ Last updated December 4, 2010
• Click Roles and then click Add Role
Install Application Server Mode: • From Start, Admin Tools, Server Manager
• On the Before You Begin screen click Next

Last updated: December 4, 2010 Page 4 of 13
Fundware 7.60 Server Windows Server 2008 Pre-Install Guide/ Last updated December 4, 2010
• If prompted to add features, click Add Required Features
• On the Select Server Roles screen mark the check box for Application Server, click Next

Last updated: December 4, 2010 Page 5 of 13
Fundware 7.60 Server Windows Server 2008 Pre-Install Guide/ Last updated December 4, 2010
• On the Confirm Installation Selections screen, click Install • On the Installation Results screen, click Close
• Verify Application Server Foundation and TCP Port Sharing are checked, click Next

Last updated: December 4, 2010 Page 6 of 13
Fundware 7.60 Server Windows Server 2008 Pre-Install Guide/ Last updated December 4, 2010
• On the Introduction to Terminal Services screen click Next
Please Note: If installing FundWare for only 1 or 2 users it is unnecessary to install Terminal Services Install Terminal Services: • From Start, Admin Tools, Server Manager • Click 'Roles' • Click 'Add Role' • Mark the check box for Terminal Services, click Next

Last updated: December 4, 2010 Page 7 of 13
Fundware 7.60 Server Windows Server 2008 Pre-Install Guide/ Last updated December 4, 2010
• On the Uninstall and Reinstall Applications for Compatibility screen, click Next
• On the Select Role Services mark the check box for Terminal Server and TS Licensing, click Next

Last updated: December 4, 2010 Page 8 of 13
Fundware 7.60 Server Windows Server 2008 Pre-Install Guide/ Last updated December 4, 2010
• On the Specify Licensing Mode screen select your terminal services licensing mode. If you do not know your mode, select Configure Later, click Next
• On the Specify Authentication Method for Terminal Server screen select Do not require Network Level Authentication, click Next

Last updated: December 4, 2010 Page 9 of 13
Fundware 7.60 Server Windows Server 2008 Pre-Install Guide/ Last updated December 4, 2010
• On the Confirm Installation Selection screen, click Install • On the Confirm Installation Selection screen, click Finish
• On the Select User Groups Allowed Access To This Terminal Server, add your Active Directory Organizational Unit (ADOU) for your FundWare users group then, click Next • If prompted on the Configure Discovery Scope for TS Licensing, select 'This Domain', click Next

Last updated: December 4, 2010 Page 10 of 13
Fundware 7.60 Server Windows Server 2008 Pre-Install Guide/ Last updated December 4, 2010
• Double-click on the User Logon Mode in the lower 1/2 of the screen
Configure Terminal Services: • Click Start, Admin Tools, Terminal Services, Terminal Services Configuration

Last updated: December 4, 2010 Page 11 of 13
Fundware 7.60 Server Windows Server 2008 Pre-Install Guide/ Last updated December 4, 2010
• Double-click the RDP-TCP icon
• Unchecked the box for Restrict each user to a single session, click OK

Last updated: December 4, 2010 Page 12 of 13
Fundware 7.60 Server Windows Server 2008 Pre-Install Guide/ Last updated December 4, 2010
• Select the Security tab and add the local Power Users group • Add your Active Directory FundWare user group • Check all security check boxes in the bottom screen, click OK
• Select the Sessions tab, check the two available check boxes • Set “End a Disconnected Session”: 1 Minute • Set “Idle Session Limit”: 3 Hours • Press Apply
Last updated :December 4, 2010 Page 13 of 13
Fundware 7.60 Server Windows Server 2008 Pre-Install Guide/ Last updated December 4, 2010
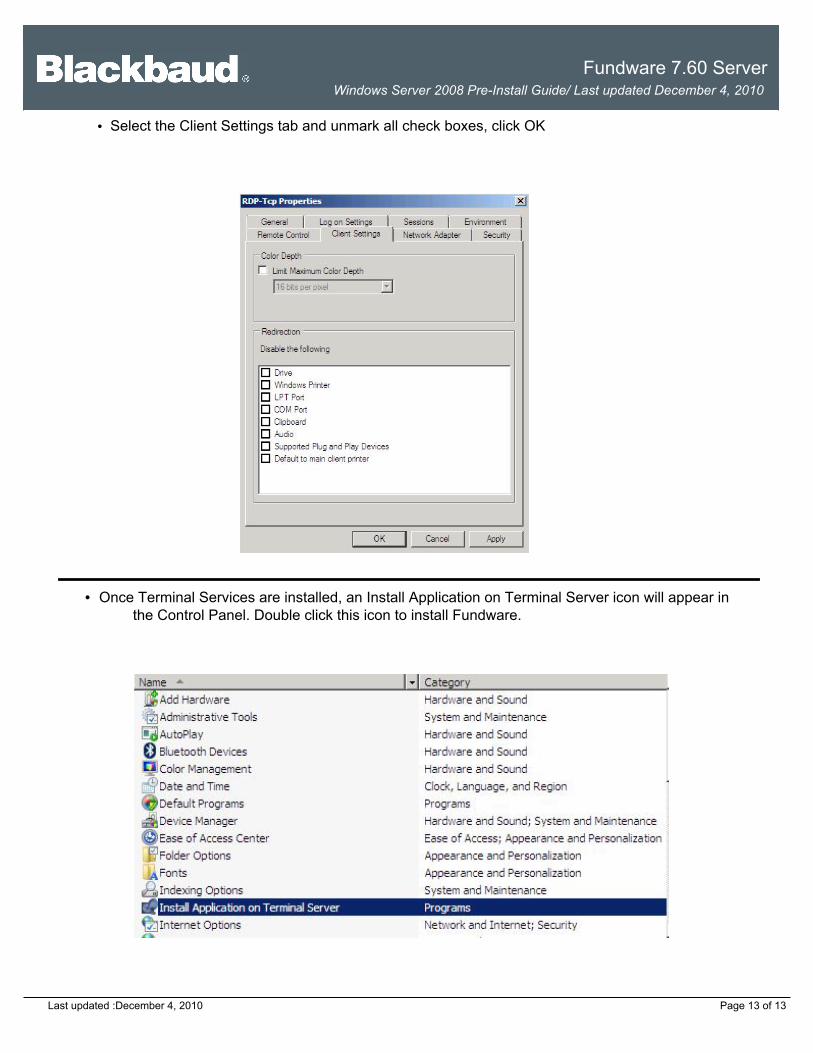
• Once Terminal Services are installed, an Install Application on Terminal Server icon will appear in the Control Panel. Double click this icon to install Fundware.
• Select the Client Settings tab and unmark all check boxes, click OK
Related Documents