Copyright © 2012 Dick Blick Art Materials All rights reserved 800-447-8192 DickBlick.com 1. Materials Gloves, need one per student, select from the following options: Montana™ Latex Gloves, black, assorted sizes (04700-) Latex Powdered Gloves, assorted sizes (35200-) Hy-Gloss™ Gloves for Kids, assorted colors (32935-1100) Nitrile Powder-Free Disposable Gloves, assorted sizes (35200-) Bic ® Mark-It Permanent Markers, 24-color set (22165-1024); share 3-4 sets among class For black gloves, recommend Sakura ® Permapaque ® Fine Point Markers, 16-color set (21377-0169); share among class Polyester Flufferfill (66902-1006); share 2 bags among class Mehndi Art Gloves Practice this art form from India - without staining the skin! (art + social studies) Originating in ancient India, Mehndi is the artistic application of henna to the hands and feet. This tradition is usually part of a wedding ceremony, special occasion or festival as a means of personal adornment. Intricate designs are applied from a cone-shaped tube with a tiny opening for the henna. Repeating patterns, paisley, sun shapes, animals and plants are traditionally used for designs, but Mehndi artists enjoy using their personal creativity and vision. In the classroom, students can practice the art of Mehndi without staining their skin by creating a "Mehndi Glove." This lesson plan leads the way through creating radial point designs in permanent marker while the glove is being worn. The sense of touch as the design is being created is an important part of the process. Students with special needs and children with compulsions may find it especially beneficial. GRADES K-12 Note: instructions and materials are based upon a class size of 25 students. Adjust as needed. Preparation 1. For best results, wash the gloves in warm, soapy water to remove powder. Rinse with clear water and dry. 2. View examples of Mehndi and Hindu art. Resource: Dover Pictura Electronic Clip Art Book and CD; Designs from India (71310-1015). Process 1. Place glove so it fits on hand as snugly as possible. Rings and bracelets should be removed first. Avoid overstretching or puncturing the glove. 2. Mark nine points, as equally spaced as possible, on the front and back side of the hand area of the glove. 3. Choose one point and begin a simple radial design, based on 4, 6 or 8 radius. See page 3 for a handout and illustration of this design process. Repeat the same design on another point on the other side of the glove. 4. Choose another point and create a simple radial design different from the first. Repeat on the other side of the glove. On the last two points, create a radial design different from the first two. 5. Returning to the first design, add another radial design onto it. It could be another layer of the design, or completely different from the first. See page 3 for a handout and illustration of this design process. 6. Continue to the next set of points and add to those designs.

Welcome message from author
This document is posted to help you gain knowledge. Please leave a comment to let me know what you think about it! Share it to your friends and learn new things together.
Transcript

Copyright © 2012Dick Blick Art Materials
All rights reserved
800-447-8192 DickBlick.com
1.
MaterialsGloves, need one per student, select from the following options:
Montana™ Latex Gloves, black, assorted sizes (04700-)
Latex Powdered Gloves, assorted sizes (35200-)
Hy-Gloss™ Gloves for Kids, assorted colors (32935-1100)
Nitrile Powder-Free Disposable Gloves, assorted sizes (35200-)
Bic® Mark-It Permanent Markers, 24-color set (22165-1024); share 3-4 sets among class
For black gloves, recommend Sakura® Permapaque® Fine Point Markers, 16-color set (21377-0169); share among class
Polyester Flufferfill (66902-1006); share 2 bags among class
Mehndi Art GlovesPractice this art form from India - without staining the skin! (art + social studies)
Originating in ancient India, Mehndi is the artistic application of henna to the hands and feet. This tradition is usually part of a wedding ceremony, special occasion or festival as a means of personal adornment. Intricate designs are applied from a cone-shaped tube with a tiny opening for the henna. Repeating patterns, paisley, sun shapes, animals and plants are traditionally used for designs, but Mehndi artists enjoy using their personal creativity and vision.
In the classroom, students can practice the art of Mehndi without staining their skin by creating a "Mehndi Glove." This lesson plan leads the way through creating radial point designs in permanent marker while the glove is being worn. The sense of touch as the design is being created is an important part of the process. Students with special needs and children with compulsions may find it especially beneficial.
GRADES K-12 Note: instructions and materials are based upon a class size of 25 students. Adjust as needed.
Preparation
1. For best results, wash the gloves in warm, soapy water to remove powder. Rinse with clear water and dry.
2. View examples of Mehndi and Hindu art. Resource: Dover Pictura Electronic Clip Art Book and CD; Designs from India (71310-1015).
Process
1. Place glove so it fits on hand as snugly as possible. Rings and bracelets should be removed first. Avoid overstretching or puncturing the glove.
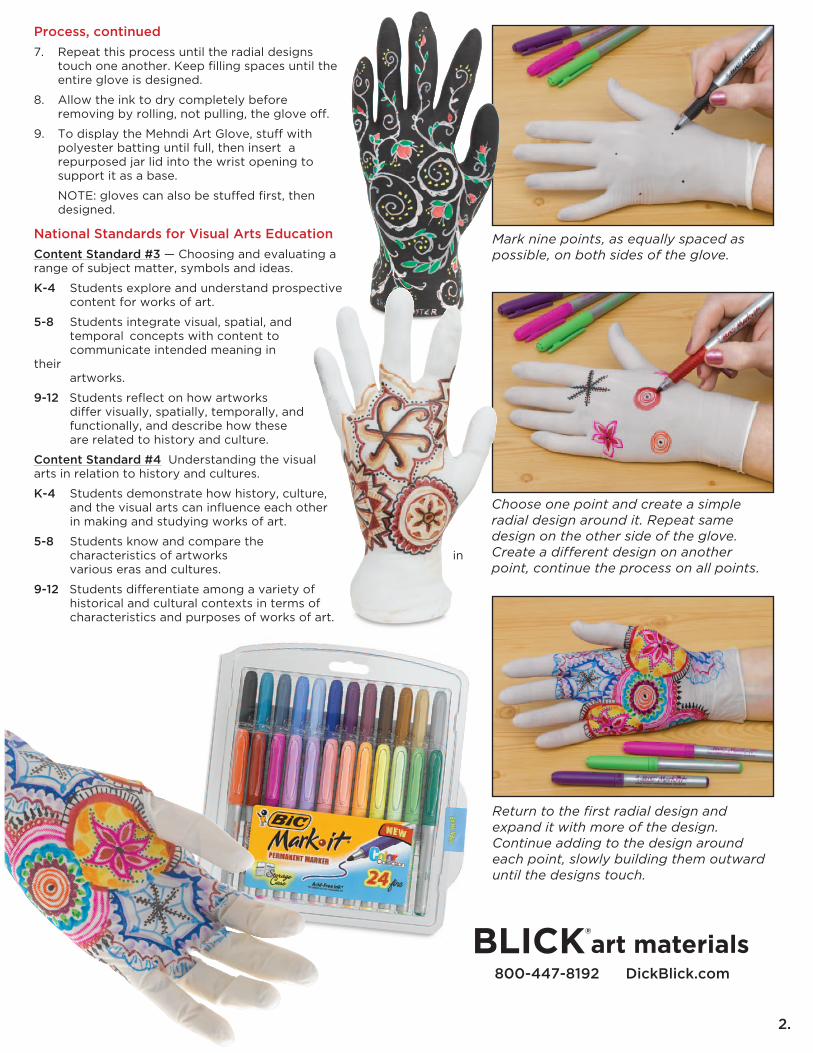
2. Mark nine points, as equally spaced as possible, on the front and back side of the hand area of the glove.
3. Choose one point and begin a simple radial design, based on 4, 6 or 8 radius. See page 3 for a handout and illustration of this design process.
Repeat the same design on another point on the other side of the glove.
4. Choose another point and create a simple radial design different from the first. Repeat on the other side of the glove. On the last two points, create a radial design different from the first two.
5. Returning to the first design, add another radial design onto it. It could be another layer of the design, or completely different from the first. See page 3 for a handout and illustration of this design process.
6. Continue to the next set of points and add to those designs.
800-447-8192 DickBlick.com
Process, continued
7. Repeat this process until the radial designs touch one another. Keep filling spaces until the entire glove is designed.
8. Allow the ink to dry completely before removing by rolling, not pulling, the glove off.
9. To display the Mehndi Art Glove, stuff with polyester batting until full, then insert a repurposed jar lid into the wrist opening to support it as a base.
NOTE: gloves can also be stuffed first, then designed.
National Standards for Visual Arts Education
Content Standard #3 — Choosing and evaluating a range of subject matter, symbols and ideas.
K-4 Students explore and understand prospective content for works of art.
5-8 Students integrate visual, spatial, and temporal concepts with content to communicate intended meaning in their artworks.
9-12 Students reflect on how artworks differ visually, spatially, temporally, and functionally, and describe how these are related to history and culture.
Content Standard #4 Understanding the visual arts in relation to history and cultures.
K-4 Students demonstrate how history, culture, and the visual arts can influence each other in making and studying works of art.
5-8 Students know and compare the characteristics of artworks in various eras and cultures.
9-12 Students differentiate among a variety of historical and cultural contexts in terms of characteristics and purposes of works of art.
Mark nine points, as equally spaced as possible, on both sides of the glove.
Choose one point and create a simple radial design around it. Repeat same design on the other side of the glove. Create a different design on another point, continue the process on all points.
Return to the first radial design and expand it with more of the design. Continue adding to the design around each point, slowly building them outward until the designs touch.
2.

RADIAL Point Design
examples of how to begin....
examples of how to expand....
Related Documents