Oracle WebLogic Server 12c: Configuring JMS Servers and Destinations This tutorial contains the following sections: Purpose Time to Complete Overview Software Requirements Prerequisites Starting Servers Configuring a JMS Server Configuring a JMS Queue and Topic Customizing the Queue/Topic Display Testing the JMS Queue and Topic Monitoring the JMS Queue and Topic Summary Resources Credits Purpose This tutorial shows how to create and configure Java Message Service (JMS) servers, queues, and topics in an instance of Oracle WebLogic Server 12c. Time to Complete Approximately 1/2 hour Overview A JMS server implements the JMS infrastructure on WebLogic server. Destinations, either queues or topics, can be targeted to a WebLogic server instance that has a JMS server configured. This tutorial covers creating and configuring a JMS server, a queue, and a topic. It then shows how to use the provided web application to post messages to the queue and topic. It also shows how to monitor the queue and topic by using the Oracle WebLogic Server 12c (12.1.1) administration console. Software Requirements The following is a list of software requirements: Oracle WebLogic Server 12c (12.1.1) Prerequisites Before starting this tutorial, you should have completed the Oracle by Example tutorials titled Oracle WebLogic Server 12c: Installing WebLogic Server and Creating a Domain and Oracle WebLogic Server 12c: Configuring Managed Servers. Starting Servers To start the administration server and the dizzy1 managed server of the domain, perform the following steps: 1. If the administration server of the domain is not already running, it needs to be started. To start it, in a Terminal window, navigate to the domain directory, and enter the command: $ ./startWebLogic.sh When prompted for a username and password, enter the credentials of the domain administrator. Oracle WebLogic Server 12c: Configuring JMS Servers and Destinations http://www.oracle.com/webfolder/technetwork/tutorials/obe/fmw/wls/1... 1 de 27 19/12/2013 04:51 p.m.

Practice 8
Dec 23, 2015
Practica JMS - Weblogic Server
Welcome message from author
This document is posted to help you gain knowledge. Please leave a comment to let me know what you think about it! Share it to your friends and learn new things together.
Transcript
Oracle WebLogic Server 12c: Configuring JMS Servers and DestinationsThis tutorial contains the following sections:
PurposeTime to CompleteOverviewSoftware RequirementsPrerequisitesStarting ServersConfiguring a JMS ServerConfiguring a JMS Queue and TopicCustomizing the Queue/Topic DisplayTesting the JMS Queue and TopicMonitoring the JMS Queue and TopicSummaryResourcesCredits
Purpose
This tutorial shows how to create and configure Java Message Service (JMS) servers, queues, and topics in an instance ofOracle WebLogic Server 12c.
Time to Complete
Approximately 1/2 hour
Overview
A JMS server implements the JMS infrastructure on WebLogic server. Destinations, either queues or topics, can be targetedto a WebLogic server instance that has a JMS server configured.
This tutorial covers creating and configuring a JMS server, a queue, and a topic. It then shows how to use the provided webapplication to post messages to the queue and topic. It also shows how to monitor the queue and topic by using the OracleWebLogic Server 12c (12.1.1) administration console.
Software Requirements
The following is a list of software requirements:
Oracle WebLogic Server 12c (12.1.1)
Prerequisites
Before starting this tutorial, you should have completed the Oracle by Example tutorials titled Oracle WebLogic Server 12c:Installing WebLogic Server and Creating a Domain and Oracle WebLogic Server 12c: Configuring Managed Servers.
Starting Servers
To start the administration server and the dizzy1 managed server of the domain, perform the following steps:
1. If the administration server of the domain is not already running, it needs to be started. To start it, in a Terminalwindow, navigate to the domain directory, and enter the command:
$ ./startWebLogic.sh
When prompted for a username and password, enter the credentials of the domain administrator.
Oracle WebLogic Server 12c: Configuring JMS Servers and Destinations http://www.oracle.com/webfolder/technetwork/tutorials/obe/fmw/wls/1...
1 de 27 19/12/2013 04:51 p.m.
2. The managed server dizzy1 should also be running. If it is not already running, start it. In another Terminal window,navigate to the domain directory, then cd into the bin subdirectory. Enter the command:
$ ./startManagedWebLogic.sh dizzy1 http://host01.example.com:8001
This runs the script to start the managed server named dizzy1. Also notice the argument that gives the URL of thedomain's administration server:http://host01.example.com:8001.
Note: Use the host name and port of the administration server of your domain.
When prompted for a username and password, enter the credentials of the domain administrator.
Configuring a JMS Server
To create and configure a JMS Server by using the administration console, perform the following steps:
1. After the servers are up and running, access the WebLogic Server administration console. Open a web browser andenter its URL:http://hostname:port/console
In this tutorial, that is: http://host01.example.com:8001/console
Note: Use the host name and port of the administration server of your domain.
On the Welcome screen, log in using the Username and Password entered to start the servers.
Oracle WebLogic Server 12c: Configuring JMS Servers and Destinations http://www.oracle.com/webfolder/technetwork/tutorials/obe/fmw/wls/1...
2 de 27 19/12/2013 04:51 p.m.
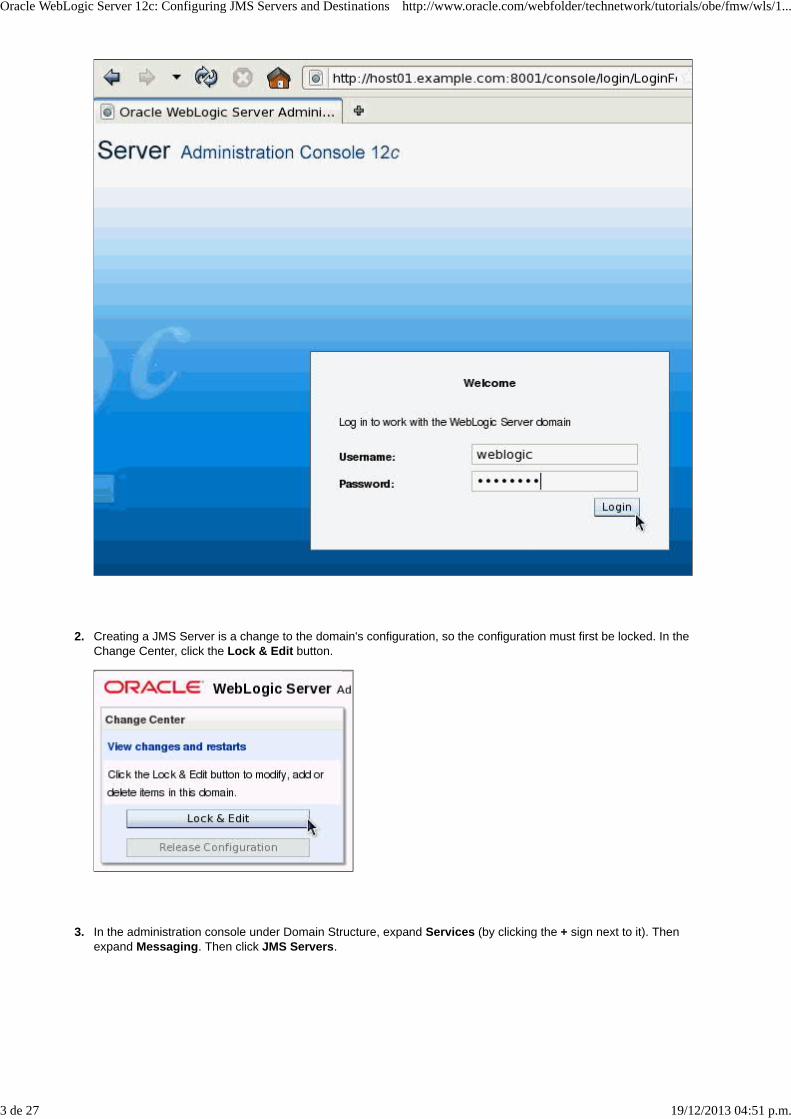
2. Creating a JMS Server is a change to the domain's configuration, so the configuration must first be locked. In theChange Center, click the Lock & Edit button.
3. In the administration console under Domain Structure, expand Services (by clicking the + sign next to it). Thenexpand Messaging. Then click JMS Servers.
Oracle WebLogic Server 12c: Configuring JMS Servers and Destinations http://www.oracle.com/webfolder/technetwork/tutorials/obe/fmw/wls/1...
3 de 27 19/12/2013 04:51 p.m.
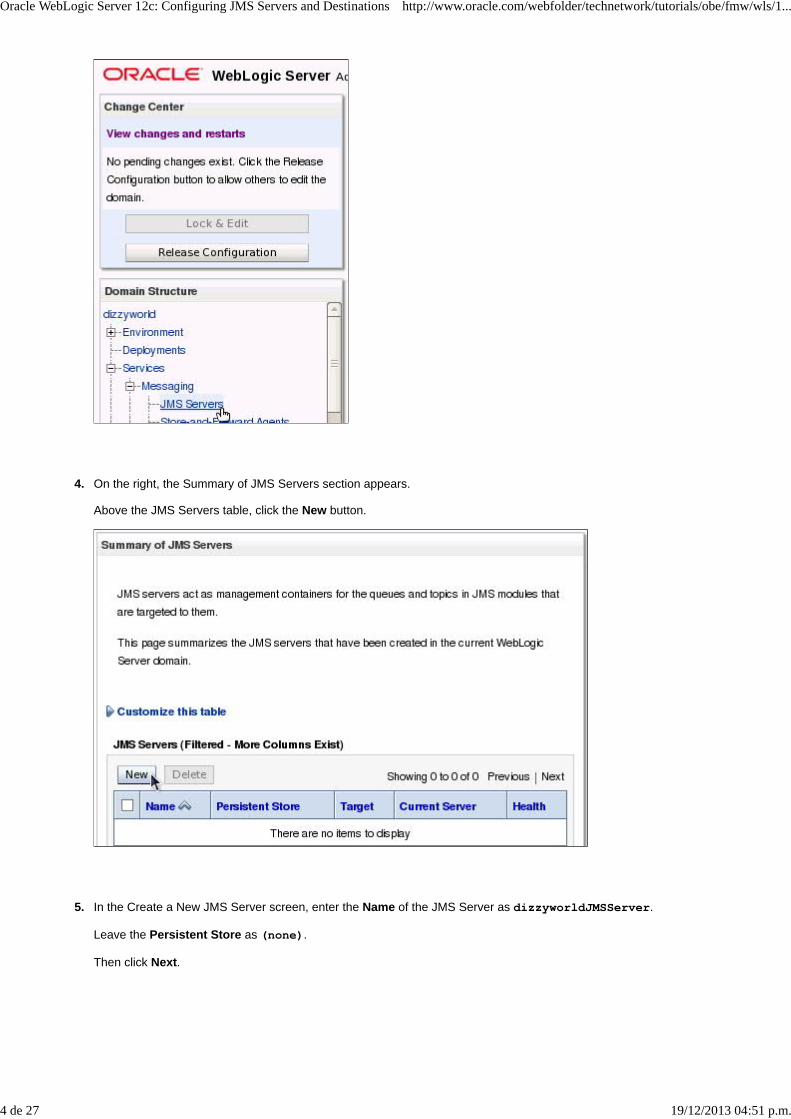
4. On the right, the Summary of JMS Servers section appears.
Above the JMS Servers table, click the New button.
5. In the Create a New JMS Server screen, enter the Name of the JMS Server as dizzyworldJMSServer.
Leave the Persistent Store as (none).
Then click Next.
Oracle WebLogic Server 12c: Configuring JMS Servers and Destinations http://www.oracle.com/webfolder/technetwork/tutorials/obe/fmw/wls/1...
4 de 27 19/12/2013 04:51 p.m.

6. On the next screen, use the Target drop-down list to select dizzy1.
Then click Finish.
The message "JMS Server created successfully." is displayed.
Note: If in your domain, dizzy1 is part of a cluster, you may have noticed you can select either dizzy1 or dizzy1(migratable). What the "migratable" option means is that the JMS Server, which can only be targeted to oneinstance of WebLogic server, can be migrated to another instance of WebLogic server in the cluster in case of failure.
7. In the Change Center click the Activate Changes button.
Oracle WebLogic Server 12c: Configuring JMS Servers and Destinations http://www.oracle.com/webfolder/technetwork/tutorials/obe/fmw/wls/1...
5 de 27 19/12/2013 04:51 p.m.
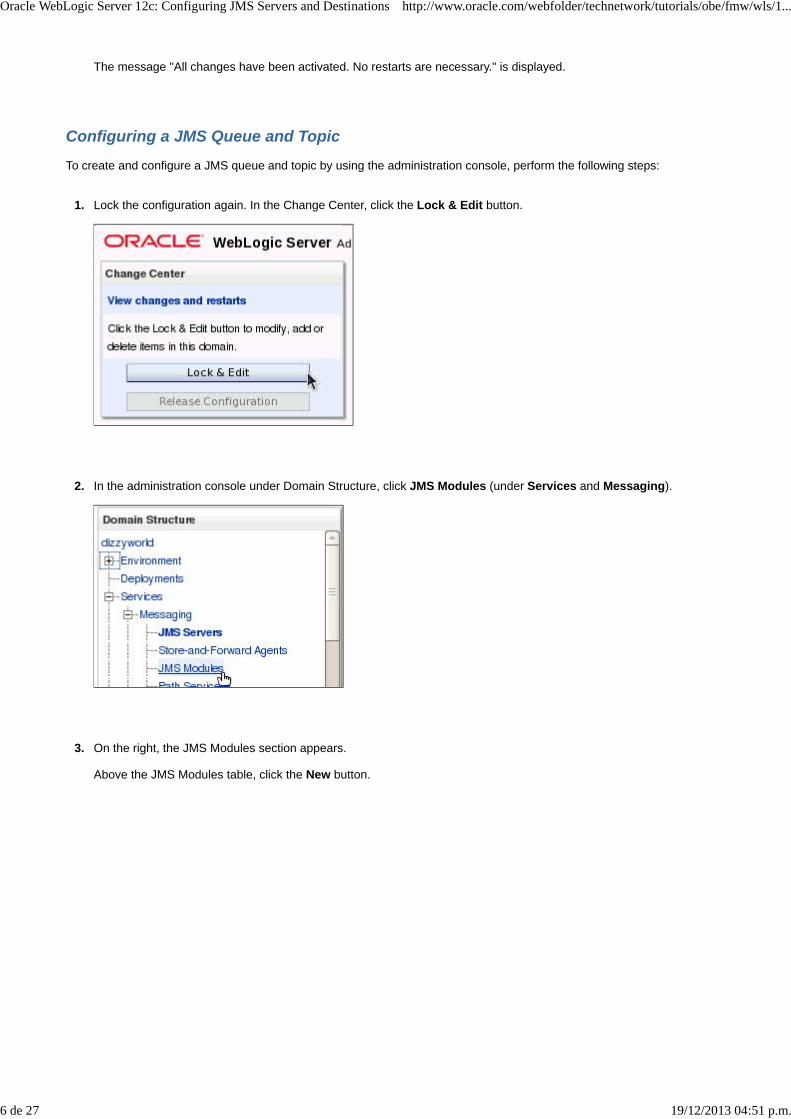
The message "All changes have been activated. No restarts are necessary." is displayed.
Configuring a JMS Queue and Topic
To create and configure a JMS queue and topic by using the administration console, perform the following steps:
1. Lock the configuration again. In the Change Center, click the Lock & Edit button.
2. In the administration console under Domain Structure, click JMS Modules (under Services and Messaging).
3. On the right, the JMS Modules section appears.
Above the JMS Modules table, click the New button.
Oracle WebLogic Server 12c: Configuring JMS Servers and Destinations http://www.oracle.com/webfolder/technetwork/tutorials/obe/fmw/wls/1...
6 de 27 19/12/2013 04:51 p.m.
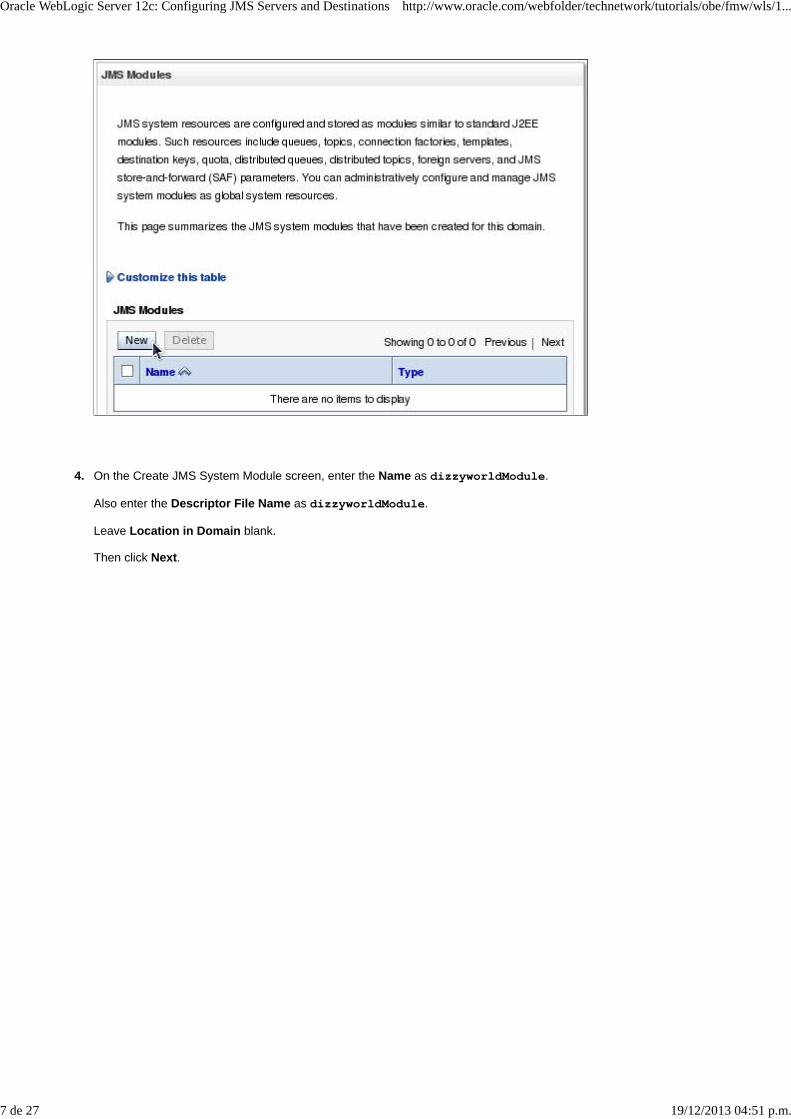
4. On the Create JMS System Module screen, enter the Name as dizzyworldModule.
Also enter the Descriptor File Name as dizzyworldModule.
Leave Location in Domain blank.
Then click Next.
Oracle WebLogic Server 12c: Configuring JMS Servers and Destinations http://www.oracle.com/webfolder/technetwork/tutorials/obe/fmw/wls/1...
7 de 27 19/12/2013 04:51 p.m.

5. On the next screen, select the check box next to dizzy1.
Then click Next.
Oracle WebLogic Server 12c: Configuring JMS Servers and Destinations http://www.oracle.com/webfolder/technetwork/tutorials/obe/fmw/wls/1...
8 de 27 19/12/2013 04:51 p.m.
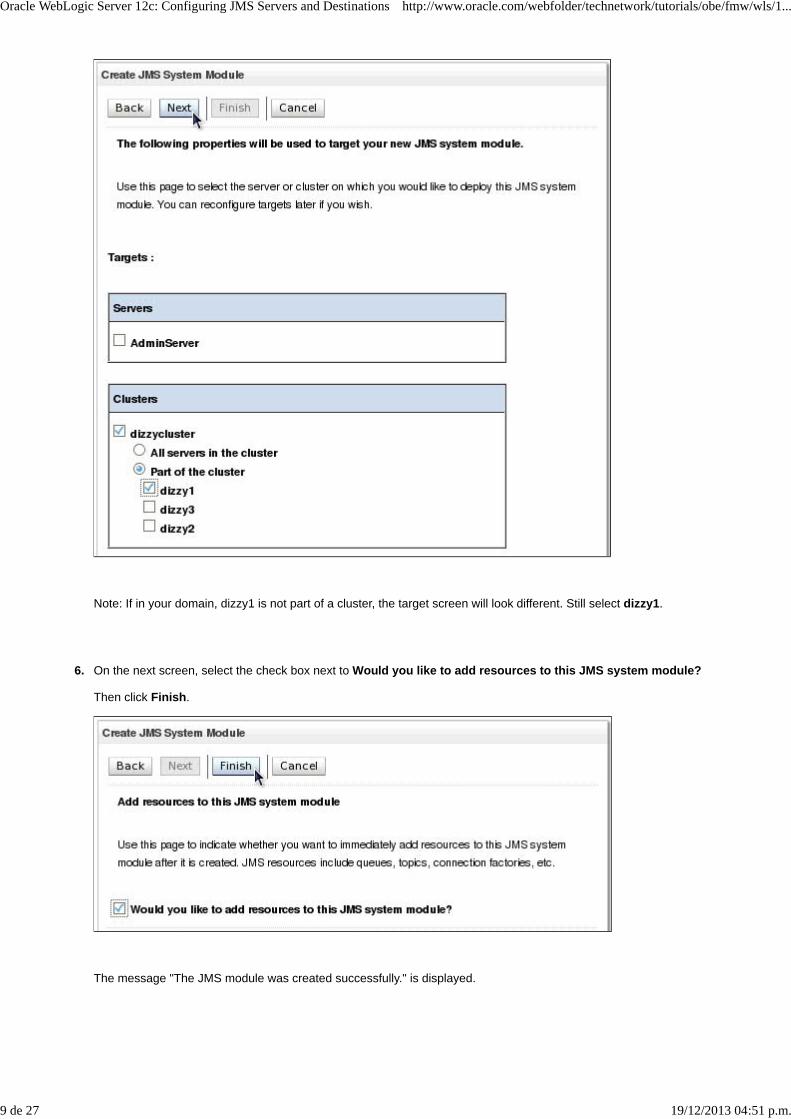
Note: If in your domain, dizzy1 is not part of a cluster, the target screen will look different. Still select dizzy1.
6. On the next screen, select the check box next to Would you like to add resources to this JMS system module?
Then click Finish.
The message "The JMS module was created successfully." is displayed.
Oracle WebLogic Server 12c: Configuring JMS Servers and Destinations http://www.oracle.com/webfolder/technetwork/tutorials/obe/fmw/wls/1...
9 de 27 19/12/2013 04:51 p.m.
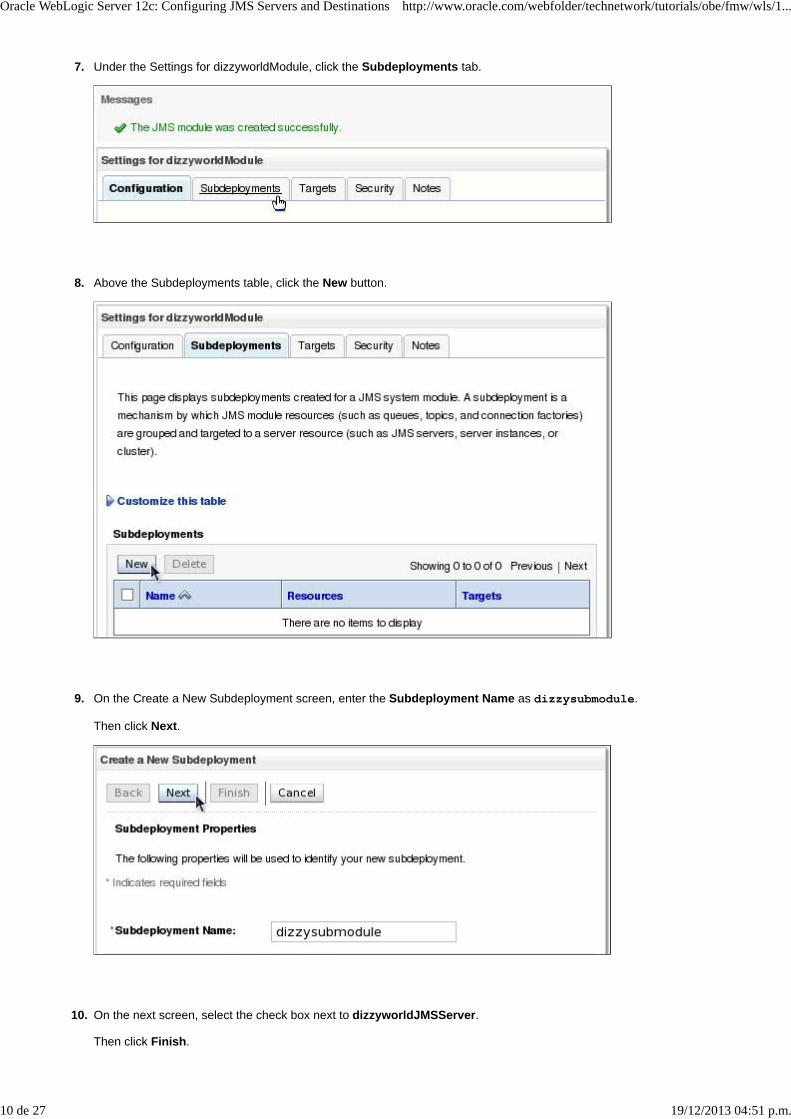
7. Under the Settings for dizzyworldModule, click the Subdeployments tab.
8. Above the Subdeployments table, click the New button.
9. On the Create a New Subdeployment screen, enter the Subdeployment Name as dizzysubmodule.
Then click Next.
10. On the next screen, select the check box next to dizzyworldJMSServer.
Then click Finish.
Oracle WebLogic Server 12c: Configuring JMS Servers and Destinations http://www.oracle.com/webfolder/technetwork/tutorials/obe/fmw/wls/1...
10 de 27 19/12/2013 04:51 p.m.
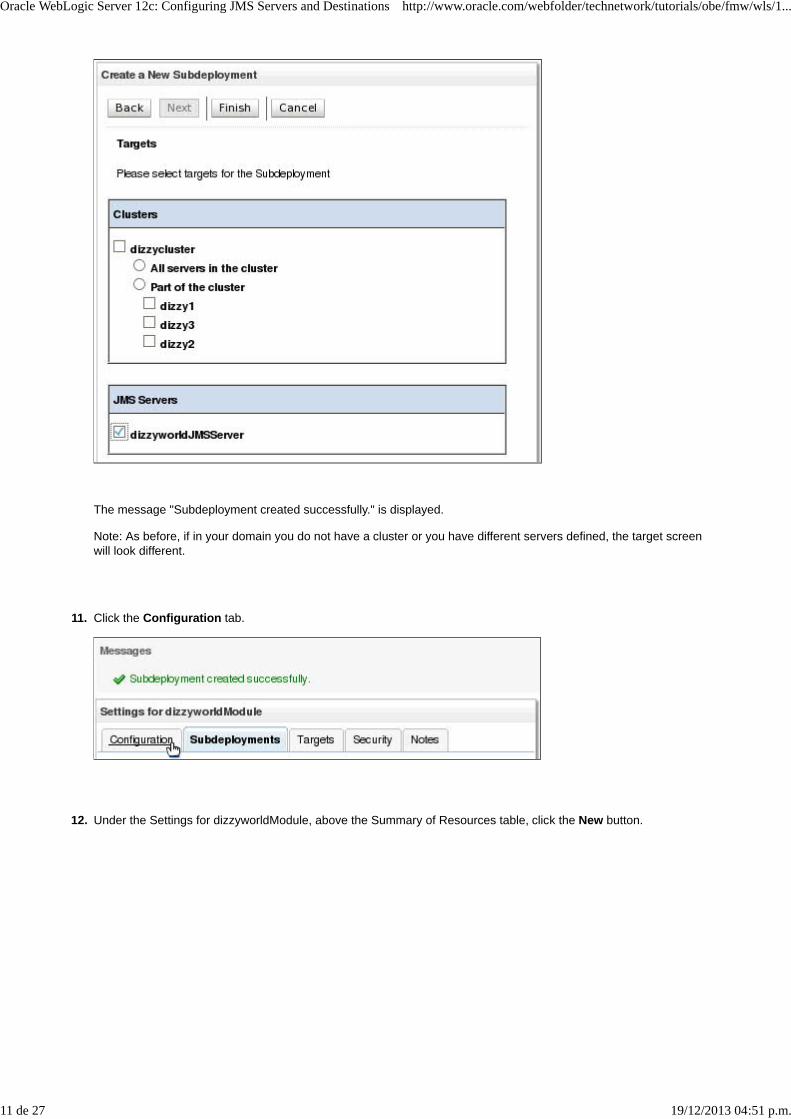
The message "Subdeployment created successfully." is displayed.
Note: As before, if in your domain you do not have a cluster or you have different servers defined, the target screenwill look different.
11. Click the Configuration tab.
12. Under the Settings for dizzyworldModule, above the Summary of Resources table, click the New button.
Oracle WebLogic Server 12c: Configuring JMS Servers and Destinations http://www.oracle.com/webfolder/technetwork/tutorials/obe/fmw/wls/1...
11 de 27 19/12/2013 04:51 p.m.
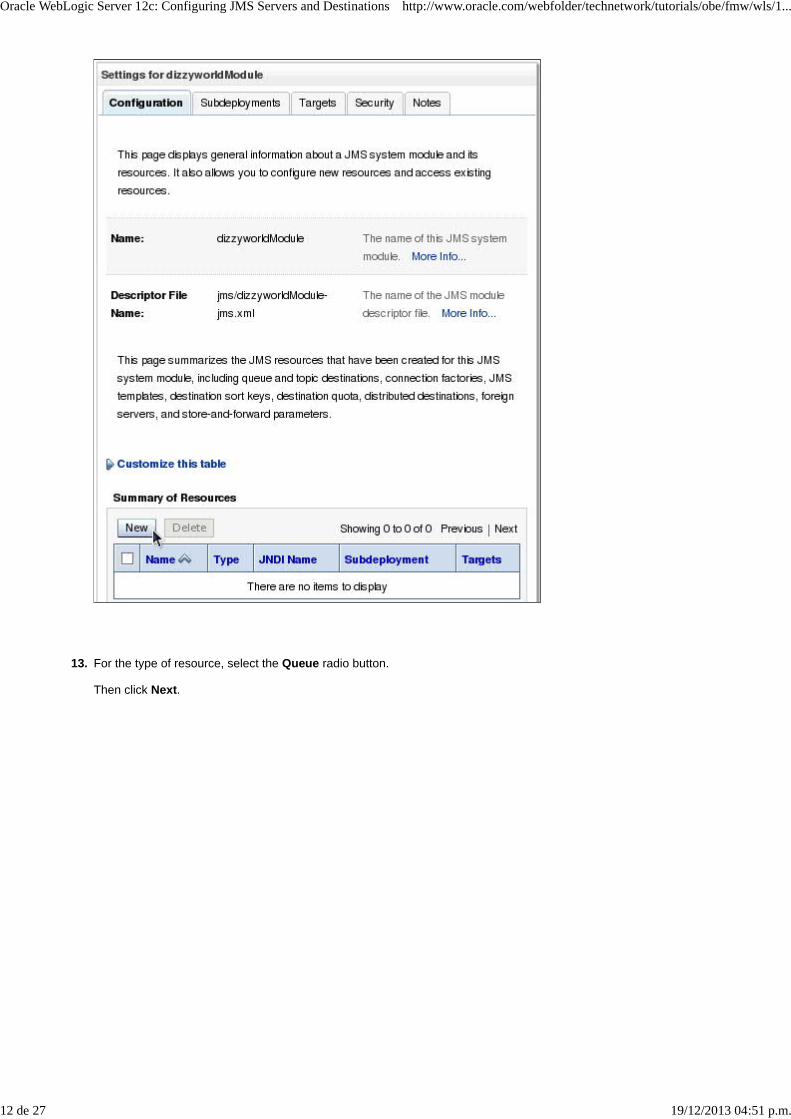
13. For the type of resource, select the Queue radio button.
Then click Next.
Oracle WebLogic Server 12c: Configuring JMS Servers and Destinations http://www.oracle.com/webfolder/technetwork/tutorials/obe/fmw/wls/1...
12 de 27 19/12/2013 04:51 p.m.

14. On the next screen, enter the Name as dizzyworldQueue.
Also enter the JNDI Name as dizzyworldQueue.
Leave the Template as None.
Then click Next.
Oracle WebLogic Server 12c: Configuring JMS Servers and Destinations http://www.oracle.com/webfolder/technetwork/tutorials/obe/fmw/wls/1...
13 de 27 19/12/2013 04:51 p.m.
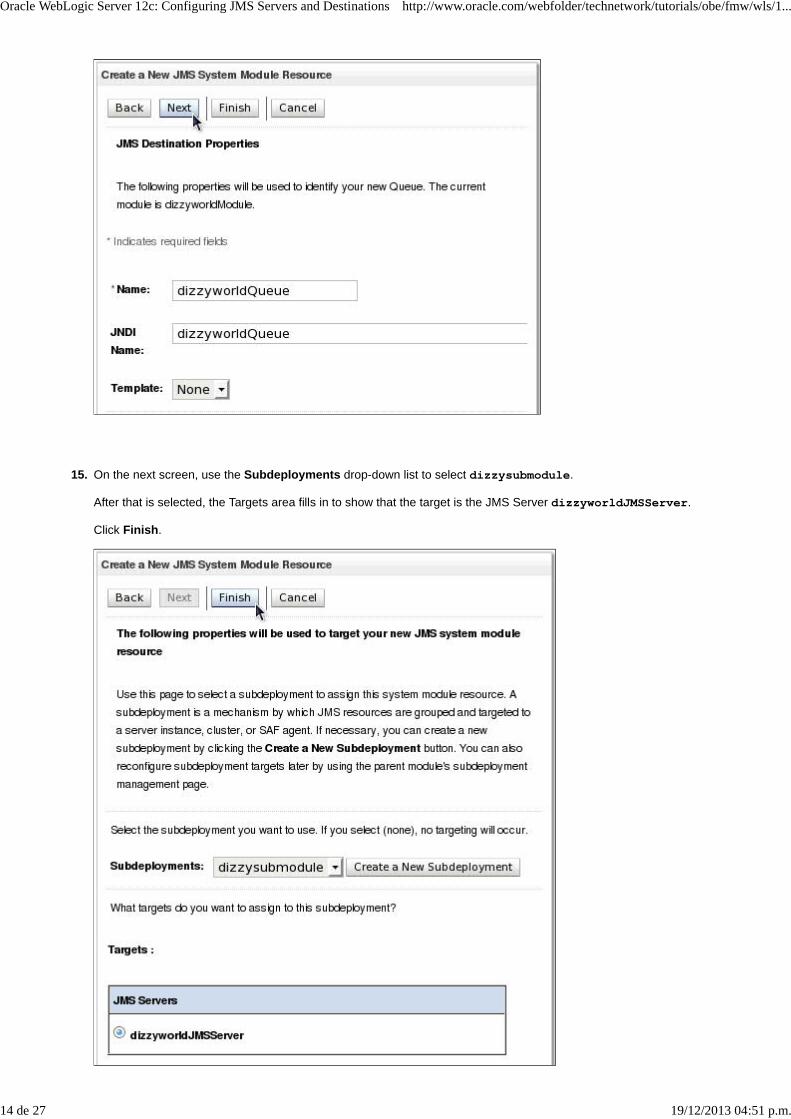
15. On the next screen, use the Subdeployments drop-down list to select dizzysubmodule.
After that is selected, the Targets area fills in to show that the target is the JMS Server dizzyworldJMSServer.
Click Finish.
Oracle WebLogic Server 12c: Configuring JMS Servers and Destinations http://www.oracle.com/webfolder/technetwork/tutorials/obe/fmw/wls/1...
14 de 27 19/12/2013 04:51 p.m.

The message "The JMS Queue was created successfully" is displayed.
16. Under the Settings for dizzyworldModule, above the Summary of Resources table, click the New button again.
17. This time, for the type of resource, select the Topic radio button.
Then click Next.
Oracle WebLogic Server 12c: Configuring JMS Servers and Destinations http://www.oracle.com/webfolder/technetwork/tutorials/obe/fmw/wls/1...
15 de 27 19/12/2013 04:51 p.m.
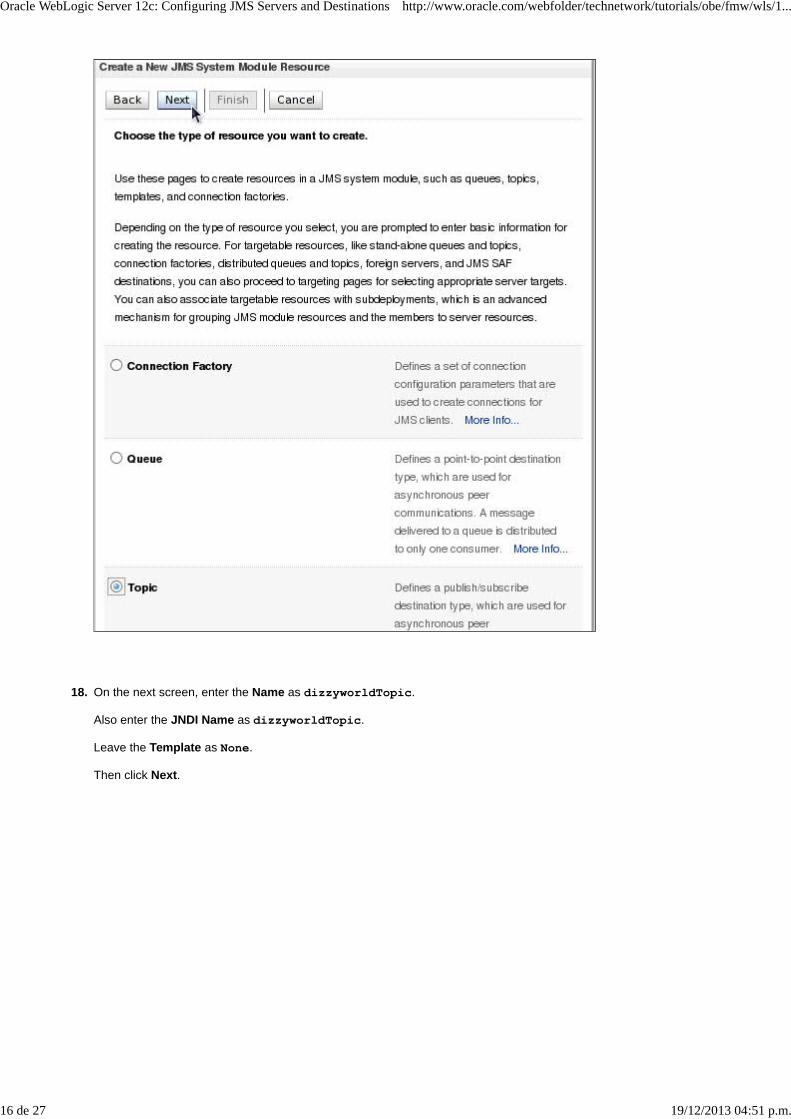
18. On the next screen, enter the Name as dizzyworldTopic.
Also enter the JNDI Name as dizzyworldTopic.
Leave the Template as None.
Then click Next.
Oracle WebLogic Server 12c: Configuring JMS Servers and Destinations http://www.oracle.com/webfolder/technetwork/tutorials/obe/fmw/wls/1...
16 de 27 19/12/2013 04:51 p.m.

19. On the next screen, use the Subdeployments drop-down list to select dizzysubmodule.
After that is selected, the Targets area fills in to show that the target is the JMS Server dizzyworldJMSServer.
Click Finish.
Oracle WebLogic Server 12c: Configuring JMS Servers and Destinations http://www.oracle.com/webfolder/technetwork/tutorials/obe/fmw/wls/1...
17 de 27 19/12/2013 04:51 p.m.
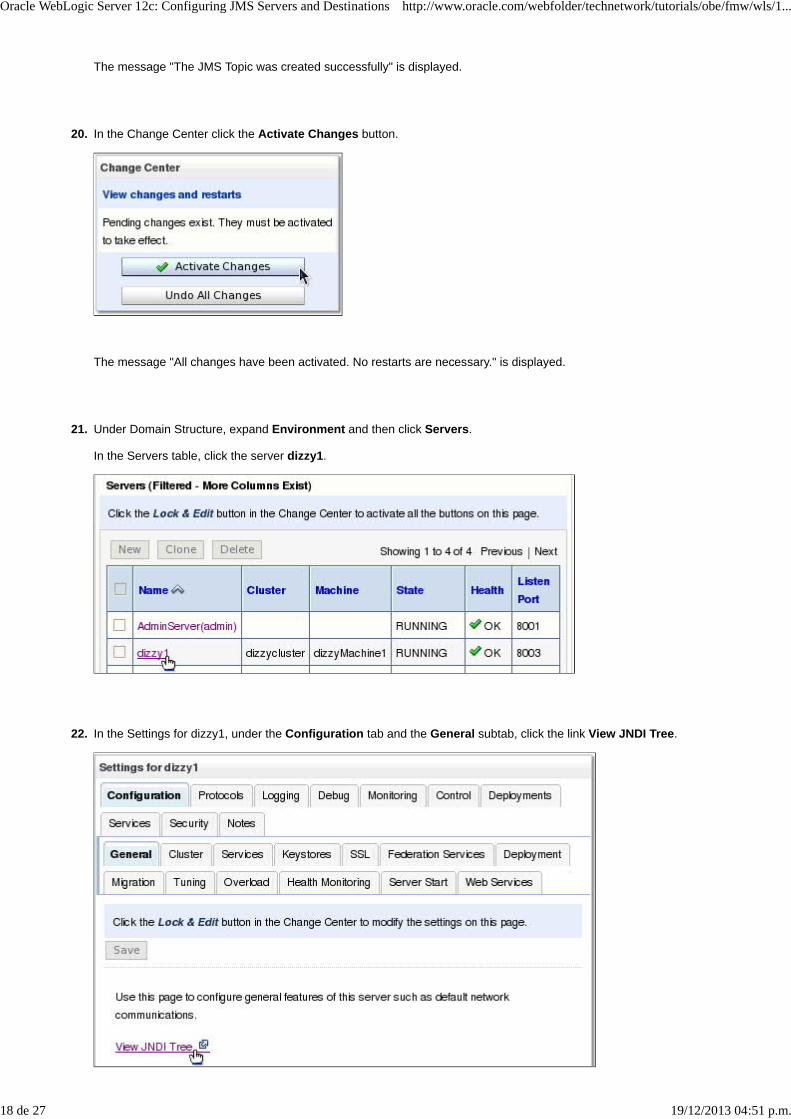
The message "The JMS Topic was created successfully" is displayed.
20. In the Change Center click the Activate Changes button.
The message "All changes have been activated. No restarts are necessary." is displayed.
21. Under Domain Structure, expand Environment and then click Servers.
In the Servers table, click the server dizzy1.
22. In the Settings for dizzy1, under the Configuration tab and the General subtab, click the link View JNDI Tree.
Oracle WebLogic Server 12c: Configuring JMS Servers and Destinations http://www.oracle.com/webfolder/technetwork/tutorials/obe/fmw/wls/1...
18 de 27 19/12/2013 04:51 p.m.

23. The JNDI tree opens in a new browser window (or tab). Notice that dizzyworldQueue and dizzyworldTopic appearin the JNDI tree.
Note: Other entries in the JNDI tree of your server can be very different from what is shown here. It all depends uponwhat resources your server has.
Customizing the Queue/Topic Display
To customize how queues and topics are displayed in the administration console, perform the following steps:
1. In the administration console under Domain Structure, go back under Services, then Messaging, and click JMSModules.
In the JMS Modules table, click dizzyworldModule.
2. In the Summary of Resources table, click dizzyworldQueue.
3. Under the Settings for dizzyworldQueue, click the Monitoring tab.
Oracle WebLogic Server 12c: Configuring JMS Servers and Destinations http://www.oracle.com/webfolder/technetwork/tutorials/obe/fmw/wls/1...
19 de 27 19/12/2013 04:51 p.m.

4. Click Customize this table in the Monitoing screen.
5. Select Consumers High and Consumers Total from the Chosen column and click the left arrow to move thoseitems to Available. This will decrease the number of columns in the table.
Then click the Apply button.
Oracle WebLogic Server 12c: Configuring JMS Servers and Destinations http://www.oracle.com/webfolder/technetwork/tutorials/obe/fmw/wls/1...
20 de 27 19/12/2013 04:51 p.m.
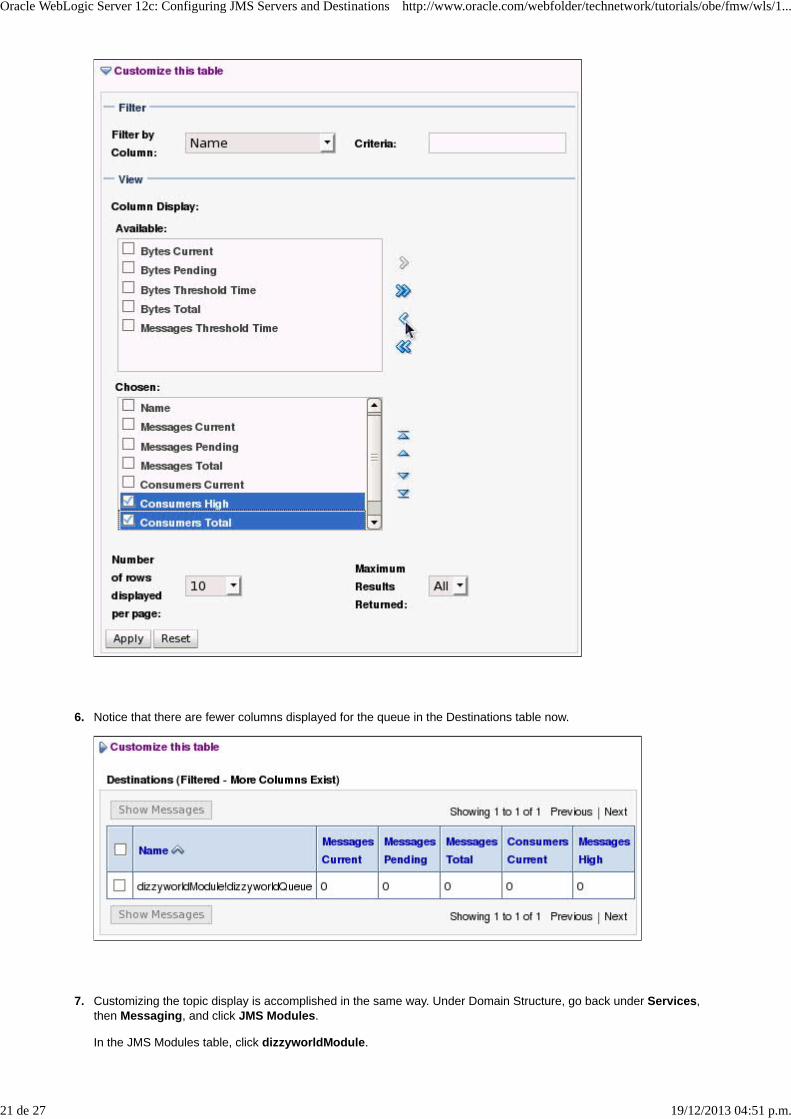
6. Notice that there are fewer columns displayed for the queue in the Destinations table now.
7. Customizing the topic display is accomplished in the same way. Under Domain Structure, go back under Services,then Messaging, and click JMS Modules.
In the JMS Modules table, click dizzyworldModule.
Oracle WebLogic Server 12c: Configuring JMS Servers and Destinations http://www.oracle.com/webfolder/technetwork/tutorials/obe/fmw/wls/1...
21 de 27 19/12/2013 04:51 p.m.
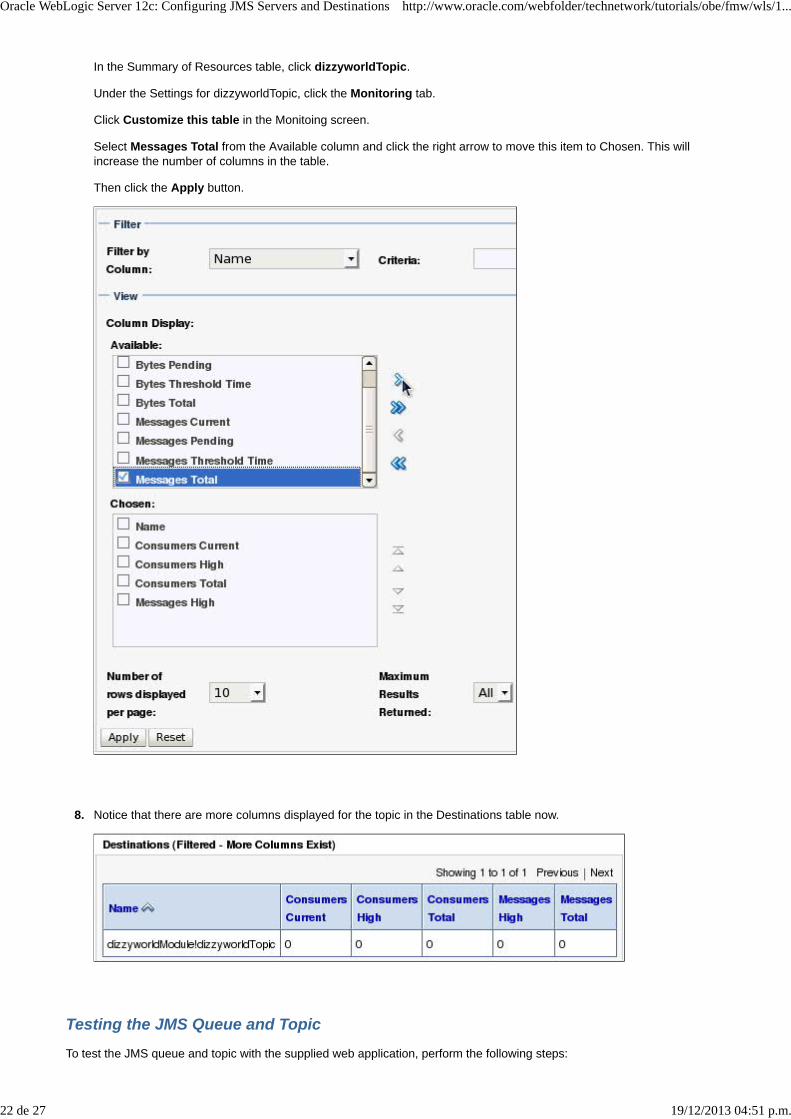
In the Summary of Resources table, click dizzyworldTopic.
Under the Settings for dizzyworldTopic, click the Monitoring tab.
Click Customize this table in the Monitoing screen.
Select Messages Total from the Available column and click the right arrow to move this item to Chosen. This willincrease the number of columns in the table.
Then click the Apply button.
8. Notice that there are more columns displayed for the topic in the Destinations table now.
Testing the JMS Queue and Topic
To test the JMS queue and topic with the supplied web application, perform the following steps:
Oracle WebLogic Server 12c: Configuring JMS Servers and Destinations http://www.oracle.com/webfolder/technetwork/tutorials/obe/fmw/wls/1...
22 de 27 19/12/2013 04:51 p.m.
1. Download the test_jms.zip file to the machine where your WebLogic Server domain and servers are. Extract the filecontents to a local drive. In this tutorial, the files are extracted into the /home/oracle/jmsobe directory. The zip filecontains two files:
messaging.warA simple web application used to post messages to the queue and topicdeploy_testjms.pyA WebLogic Scripting Tool (WLST) script used to deploy the web application
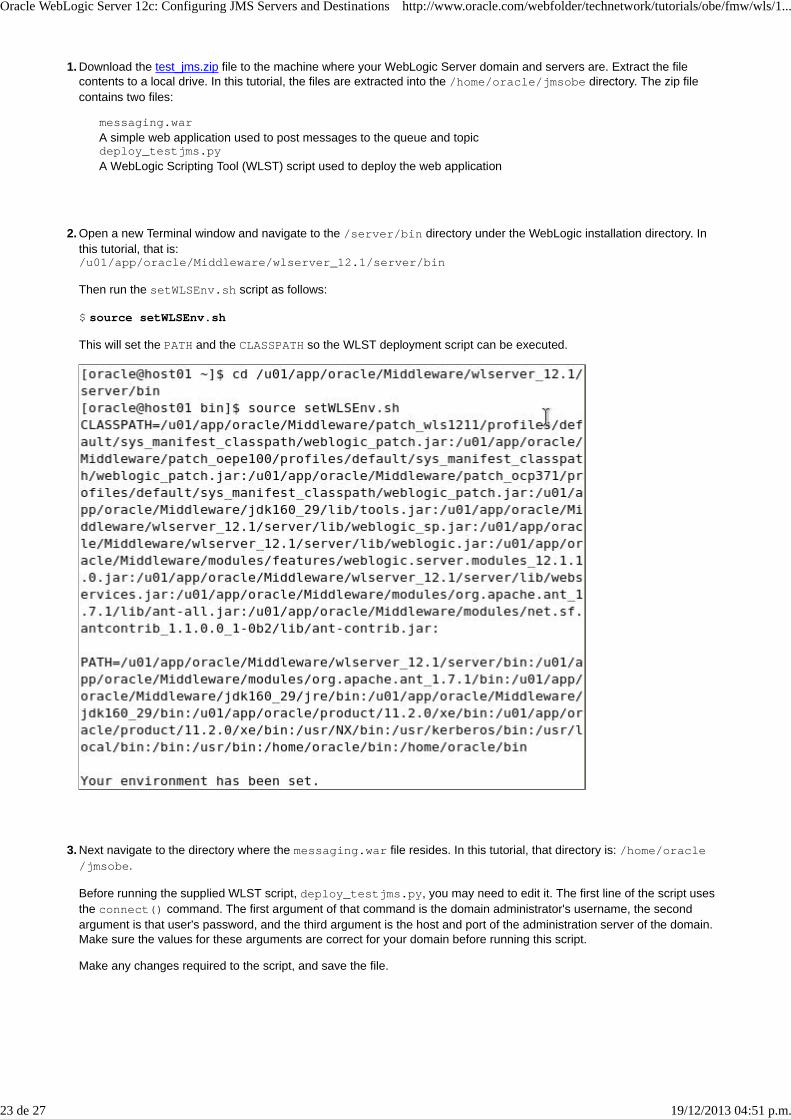
2. Open a new Terminal window and navigate to the /server/bin directory under the WebLogic installation directory. Inthis tutorial, that is:/u01/app/oracle/Middleware/wlserver_12.1/server/bin
Then run the setWLSEnv.sh script as follows:
$ source setWLSEnv.sh
This will set the PATH and the CLASSPATH so the WLST deployment script can be executed.
3. Next navigate to the directory where the messaging.war file resides. In this tutorial, that directory is: /home/oracle/jmsobe.
Before running the supplied WLST script, deploy_testjms.py, you may need to edit it. The first line of the script usesthe connect() command. The first argument of that command is the domain administrator's username, the secondargument is that user's password, and the third argument is the host and port of the administration server of the domain.Make sure the values for these arguments are correct for your domain before running this script.
Make any changes required to the script, and save the file.
Oracle WebLogic Server 12c: Configuring JMS Servers and Destinations http://www.oracle.com/webfolder/technetwork/tutorials/obe/fmw/wls/1...
23 de 27 19/12/2013 04:51 p.m.

4. Run the deploy_testjms.py script to deploy the web application in the messaging.war file and target it to the dizzy1server. Do this by entering the following command:
$ java weblogic.WLST deploy_testjms.py
You should see a message that the deploy operation has succeeded.
Note: You can ignore the warning about Context.close(). That warning is always displayed when running a WLSTscript and is not an issue.
5. To verify the deployment was successful, go to the administration console, and under Domain Structure, clickDeployments. Then in the Deployments table, find Messaging with the "Active" State.
Oracle WebLogic Server 12c: Configuring JMS Servers and Destinations http://www.oracle.com/webfolder/technetwork/tutorials/obe/fmw/wls/1...
24 de 27 19/12/2013 04:51 p.m.
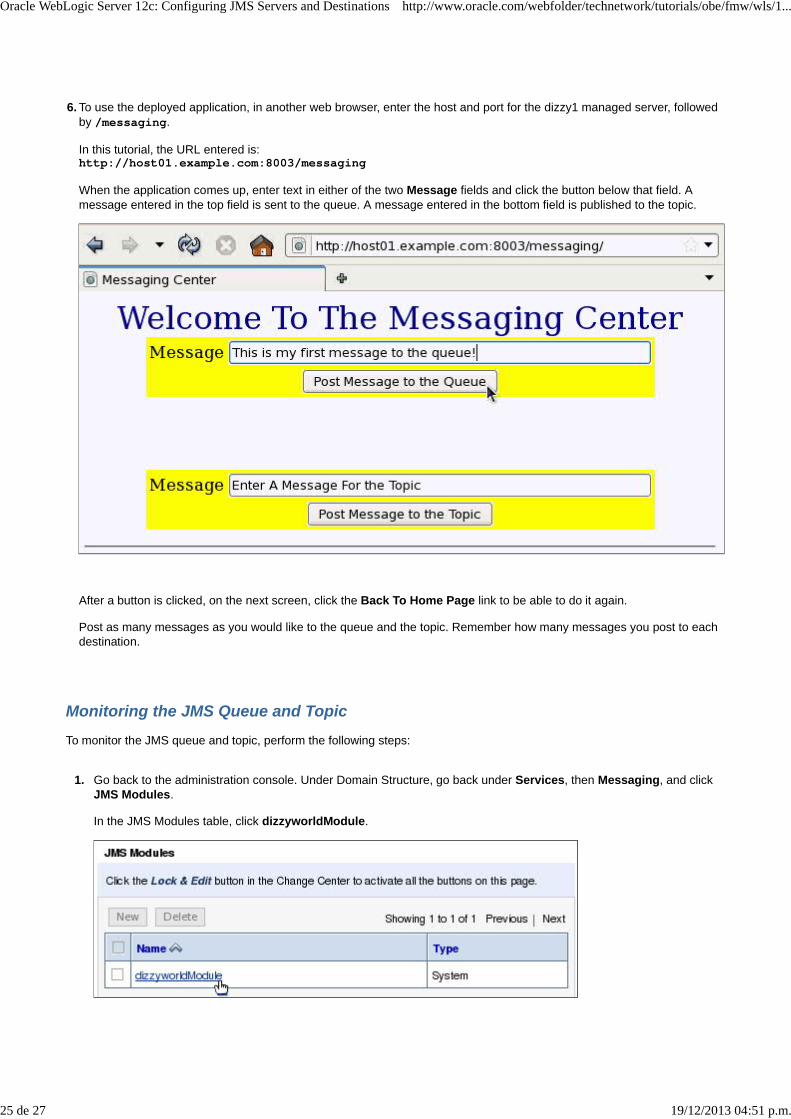
6. To use the deployed application, in another web browser, enter the host and port for the dizzy1 managed server, followedby /messaging.
In this tutorial, the URL entered is:http://host01.example.com:8003/messaging
When the application comes up, enter text in either of the two Message fields and click the button below that field. Amessage entered in the top field is sent to the queue. A message entered in the bottom field is published to the topic.
After a button is clicked, on the next screen, click the Back To Home Page link to be able to do it again.
Post as many messages as you would like to the queue and the topic. Remember how many messages you post to eachdestination.
Monitoring the JMS Queue and Topic
To monitor the JMS queue and topic, perform the following steps:
1. Go back to the administration console. Under Domain Structure, go back under Services, then Messaging, and clickJMS Modules.
In the JMS Modules table, click dizzyworldModule.
Oracle WebLogic Server 12c: Configuring JMS Servers and Destinations http://www.oracle.com/webfolder/technetwork/tutorials/obe/fmw/wls/1...
25 de 27 19/12/2013 04:51 p.m.
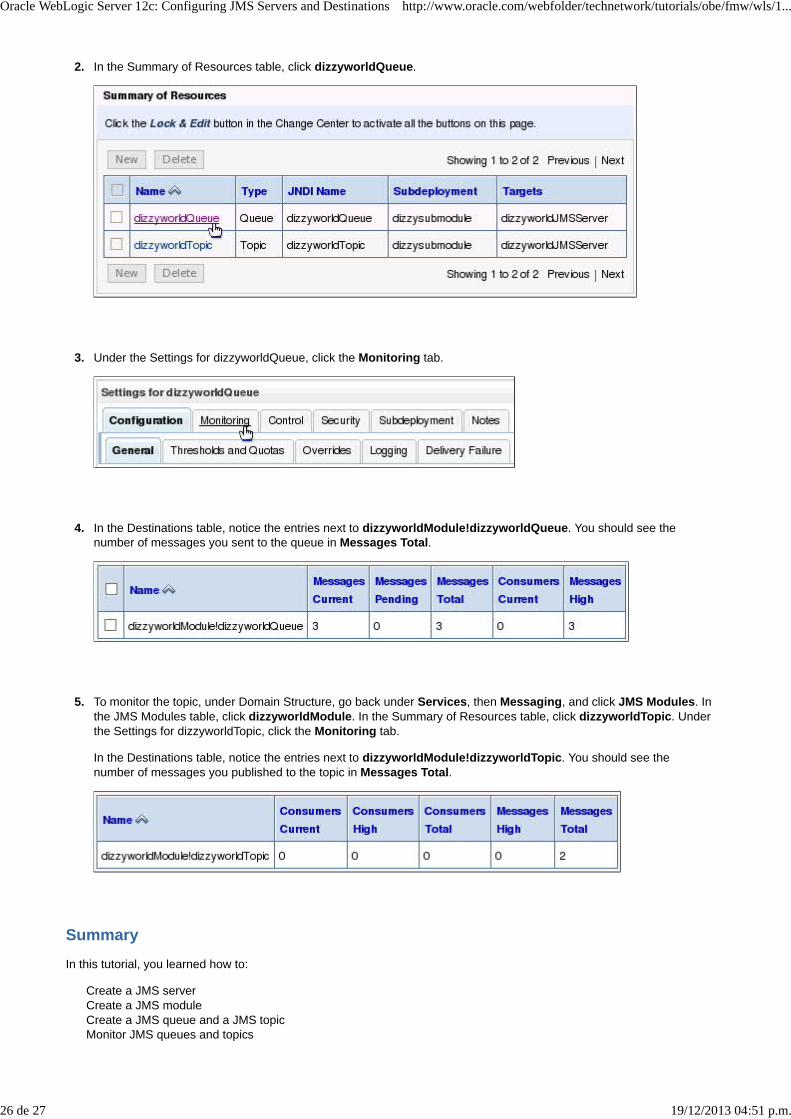
2. In the Summary of Resources table, click dizzyworldQueue.
3. Under the Settings for dizzyworldQueue, click the Monitoring tab.
4. In the Destinations table, notice the entries next to dizzyworldModule!dizzyworldQueue. You should see thenumber of messages you sent to the queue in Messages Total.
5. To monitor the topic, under Domain Structure, go back under Services, then Messaging, and click JMS Modules. Inthe JMS Modules table, click dizzyworldModule. In the Summary of Resources table, click dizzyworldTopic. Underthe Settings for dizzyworldTopic, click the Monitoring tab.
In the Destinations table, notice the entries next to dizzyworldModule!dizzyworldTopic. You should see thenumber of messages you published to the topic in Messages Total.
Summary
In this tutorial, you learned how to:
Create a JMS serverCreate a JMS moduleCreate a JMS queue and a JMS topicMonitor JMS queues and topics
Oracle WebLogic Server 12c: Configuring JMS Servers and Destinations http://www.oracle.com/webfolder/technetwork/tutorials/obe/fmw/wls/1...
26 de 27 19/12/2013 04:51 p.m.

ResourcesFor documentation on Oracle WebLogic Server 12c, visit the Documentation Library.For more information on configuring JMS servers, see the Configure JMS servers section of the Administration ConsoleOnline Help.For more information on configuring JMS modules, see the Configure JMS system modules section of the AdministrationConsole Online Help.For more information on JMS and WebLogic Server, see the Configuring and Managing JMS document.To learn more about Oracle WebLogic Server, refer to additional OBEs in the OLL website.
CreditsLead Curriculum Developer: Bill BellOriginal OBE Created By: TJ Palazzolo
Copyright © 2011, Oracle and/or its affiliates. All rights reserved
Oracle WebLogic Server 12c: Configuring JMS Servers and Destinations http://www.oracle.com/webfolder/technetwork/tutorials/obe/fmw/wls/1...
27 de 27 19/12/2013 04:51 p.m.
Related Documents