1 DPA202T/102/3/2011 DEPARTMENT OF MANAGEMENT ACCOUNTING Tutorial letter 102/2011 ADDITIONAL GUIDANCE FOR STUDY UNITS 1, 2, 3 and 5 (PASTEL) BOTH SEMESTERS Contents Page 1 Purpose and contact details 2 2 Study unit 3 – Software 4 3 Study unit 1 – Data processing 7 4 Study unit 2 – Transaction processing 10 5 Study unit 5 – Accounting software (Pastel Partner Version 11) 16 5.1 Installation and registration 16 5.2 Working in the Demo company 21 5.3 Creating a new company 22 5.4 Using the Auto Setup 25 5.5 The edit menu – Customers 39 5.6 The edit menu – Suppliers 43 5.7 The edit menu – Inventory & general ledger 45 5.8 Creating and editing accounts & inventory items 50 5.9 Process Menu 51 5.10 View Menu 61 5.11 More processing 62 5.12 Sundry processing including Take on balances 63 6 Additional assignment 02 guidance 70 PRACTICAL ACCOUNTING DATA PROCESSING DPA202T

Welcome message from author
This document is posted to help you gain knowledge. Please leave a comment to let me know what you think about it! Share it to your friends and learn new things together.
Transcript
1 DPA202T/102/3/2011
DEPARTMENT OF MANAGEMENT ACCOUNTING
Tutorial letter 102/2011
ADDITIONAL GUIDANCE FOR STUDY UNITS 1, 2, 3 and 5 (PASTEL)
BOTH SEMESTERS
Contents Page
1 Purpose and contact details 2
2 Study unit 3 – Software 4
3 Study unit 1 – Data processing 7
4 Study unit 2 – Transaction processing 10
5 Study unit 5 – Accounting software (Pastel Partner Version 11) 16
5.1 Installation and registration 16
5.2 Working in the Demo company 21
5.3 Creating a new company 22
5.4 Using the Auto Setup 25
5.5 The edit menu – Customers 39
5.6 The edit menu – Suppliers 43
5.7 The edit menu – Inventory & general ledger 45
5.8 Creating and editing accounts & inventory items 50
5.9 Process Menu 51
5.10 View Menu 61
5.11 More processing 62
5.12 Sundry processing including Take on balances 63
6 Additional assignment 02 guidance 70
PRACTICAL ACCOUNTING DATA PROCESSING DPA202T

2 DPA202T/102/3/2011
1 PURPOSE AND CONTACT DETAILS
Dear Student We are in the process of updating the study guide for DPA202T. As the new study guide will only be available in 2013, we issue tutorial letter 102 for the benefit of our 2011 students. You will notice that the order of the study units has been changed to a more logical order. Our main focus with DPA202T is Pastel and Excel, coupled with the supporting theory. To get the most benefit out of this tutorial letter you should study it while working through the Pastel Manual and the applicable paragraphs in the prescribed textbook Wessels, P., Grobbelaar, E., McGee, A. and Prinsloo, G.T.M. 2007. Information Systems in a Business Environment. 4th Edition. Durban: LexisNexis Butterworths. ISBN 9780409100501. A separate tutorial letter 103 with specific guidance on Excel (spreadsheets) will follow shortly. Assessment guidance The examination will include questions based on the competencies learned in tutorial letter 102/2011, tutorial letter 103/2011, the Pastel Manual, as well as the prescribed textbook. More detailed guidance on what to expect is given under the Assessment subheadings for the various study units and Pastel lessons. The answers for all the formative assessment questions in the Pastel Manual are available on the dark grey data CD named “Data files accompanying Pastel courseware” which accompanies the Pastel Manual. Additional questions/aspects are also included under the Assessment subheadings. If you do not know the answers to the additional questions/aspects, you can search for it in your textbook, Pastel Manual, on the Internet with a search engine such as Google (www.google.com), or websites such as www.en.wikipedia.org. You can also post your questions on the myUnisa DPA202T discussion forum for help from fellow students. If you do know the answers to the additional questions/aspects, please assist your fellow students on myUnisa! Remember – this is a practical subject – use your computer and the resources available through your computer! Enjoy putting all the pieces of the computer related theory together and learning Pastel Partner Version 11. You will see the benefits as you progress with your studies and later in the workplace!
This tutorial letter and the examination are based on the textbook Wessels, P., Grobbelaar, E., McGee, A. and Prinsloo, G.T.M. 2007. Information Systems in a Business Environment. 4th Edition. Durban: LexisNexis Butterworths. ISBN 9780409100501. As only the fifth edition is available in bookshops LexisNexis has kindly given permission that the applicable chapters needed for DPA202T can be published on the DPA202T myUnisa site under “Additional resources”. Please note as these chapters are copyright protected you are only allowed to use it for this module and only for your own study purposes. You may not reproduce or transmit this material in any form or by any means to any other student, persons or organisations.

DPA202T/102/3/2011
3
Kind regards, Lecturers: Ms. GM Viviers (Gerda) Ms. C Leonard (Christi) AJH van der Walt room 1-69 AJH van der Walt room 1-70 (012) 429 3914 (012) 429 4025 072 683 6482 072 683 6482 Fax: 086 532 5869 Fax: 086 541 4855 E-mail: First semester: [email protected] Second semester: [email protected] Fax: Department of Management Accounting: (012) 429-4894

4 DPA202T/102/3/2011
2 STUDY UNIT 3 – SOFTWARE
2.1 System software AND application software Refer to Information systems in a business environment (fourth edition) (ISBE) chapter 3. In the DPA202T study guide the heading of study unit 3 refers to ‘Application software’ only. The heading is not correct as the sections to study clearly include both system software and application software. You need to know the whole of ISBE chapter 3 for examination purposes. Software can be categorised into two basic types: system software and application software, both of which can be categorised into further types of software. (see figure 2.1)
Consider what types of software are loaded on your own computer and for what it can be used. Have a look on your computer by doing the following:
• Click on the Windows ‘Start button’ and then click on ‘All programs’ or ‘Programs’; 2.1.1 System software Work through the theory of chapter 3 and while learning about the theoretical aspects, run the applicable software programs to enhance your understanding of how system software works in practice. For example: while studying about File defragmentation software under System support programs run the Disk Defragmenter program by doing the following:
• Click on the Windows ‘Start button’ and then click on ‘All programs’ or ‘Programs’;
• Select ‘Accessories’ and then select ‘System Tools’;
• Select the ‘Disk Defragmenter’ program and then click on the ‘Analyse’ button.
Your screen will look something like this:
Software
System
software
Operating
system
Network
management
Utility
software
Database
management
System
development
System
support
Application
software
General
application
E-commerce
enabling
Figure 2.1: Software types

DPA202T/102/3/2011
5
Although your version of Windows and your computer’s menus might be different from the click and select instructions given, play around or get a friend to help you. Now is the time to use these software applications in practice! Although you will not be examined on the practical aspects thereof, actually using the software will make you understand and remember the theory much better. Similar than the ‘Disk Defragmenter’ example, do the same with the other types of system software installed on your computer as you work through the theory in chapter 3. 2.1.2 Application software Word processing software and spreadsheets are examples of general application software. Web browsers and e-mail are examples of e-commerce enabling software. A company can acquire/purchase existing application software (known as off-the-shelf software) or develop custom designed software (known as propriety software or bespoke software) for a specific application. Custom designed software can be developed by the company’s in-house Information System department; by an external software house or by a combination of the two. Some of the aspects to consider when buying off-the-shelf software are:
• Compatibility: Will the software run on the company’s operating system and hardware?
• Requirements: Does the software satisfy all the company’s business requirements and at least the minimum business requirements?
• Vendor: Is the vendor reliable and financially stable i.e. will the vendor deliver on promises made and still conduct business for the foreseeable future?
• Support: What support is available for example: user training, warranties, detailed user manuals or on-line help facilities, technical program documents, etc?
• Cost: Will the expected business benefits exceed the total cost (purchasing, installing and maintenance) of the software?
• Expandable: Is the software expandable to accommodate growth and changes in future needs? For example in Pastel a Multi-currency module can be added-on to the basic Pastel software.
2.2 Assessment guidance You should know the detail of the whole chapter 3 in ISBE for normal theory questions (these questions would include key words such as list, name, define, describe, explain and give examples), as well as for multiple choice and true/false type questions. You must also know the theory well enough to be able to apply it in case study type questions. This is to prepare you for the real world in which you, as the accountant, will be required to solve real business problems. People will rarely ask you in real life to provide them with definitions or ask you to answer multiple choice questions. They will however need you to solve their business problems! Please have a look at Questions 3 of your optional assignment 03/2011 in tutorial letter 101/2011 for an example of a case study question. You will notice how a short scenario has been described above the questions and how relevant theory questions have been combined with the more practical case study questions.
• Design your own case study questions and post them on the discussion forum of myUnisa, or better still – include some real life business problems relating to software!

6 DPA202T/102/3/2011 • Consider the following:
� Do you think Microsoft Office Excel can be used as a database rather than a formal database with a database management system? What would the risks be?
� Do you think Pastel uses a database to store the accounting data in? What would be the benefits?
• Imagine having your own small business and buying one/more personal computer(s) for it. Let’s assume you have budget constraints in your business. � What type of operating system would you purchase and why? � Make a list of the system software you would probably get as part of the operating software. � Make a list of the application software you will purchase for your business (depending on the number
of employees and type of business). � Would you purchase commercial or open-source software?
• If you have a friend with their own small business or if you are working full/part time in a business – discuss the software needs of the business and consider any improvements.

DPA202T/102/3/2011
7
3 STUDY UNIT 1 – DATA PROCESSING
3.1 Processing data into information Refer to Information systems in a business environment (fourth edition) (ISBE) chapter 5. Data only becomes useful to a business when it is processed into information and information is probably the most expensive commodity of the future. Data is processed into information through the data processing cycle (see figure 3.1).
Data
input
Data
storage
Output
(information)
Data
processing
Some of the methods used to process data into useful information include:
• classifying data into categories using some of the data’s specific characteristics, for example classifying the data according to cash or credit sales;
• sorting data in a specific sequence, for example purchase orders in numerical sequence;
• performing calculations (arithmetical or logical) on data, for example calculating the average sales amount for a month;
• summarising data by only taking out (extracting) specific data, for example extracting all the cash sales for a month
• transforming data by changing the format or medium of the original data, for example numerical (accounting) data is transformed into graphical data (graph)
Figure 3.1: Data processing cycle (Source: Romney M.B., Steinhart P.J. 2009. Accounting Information Systems. Eleventh edition)
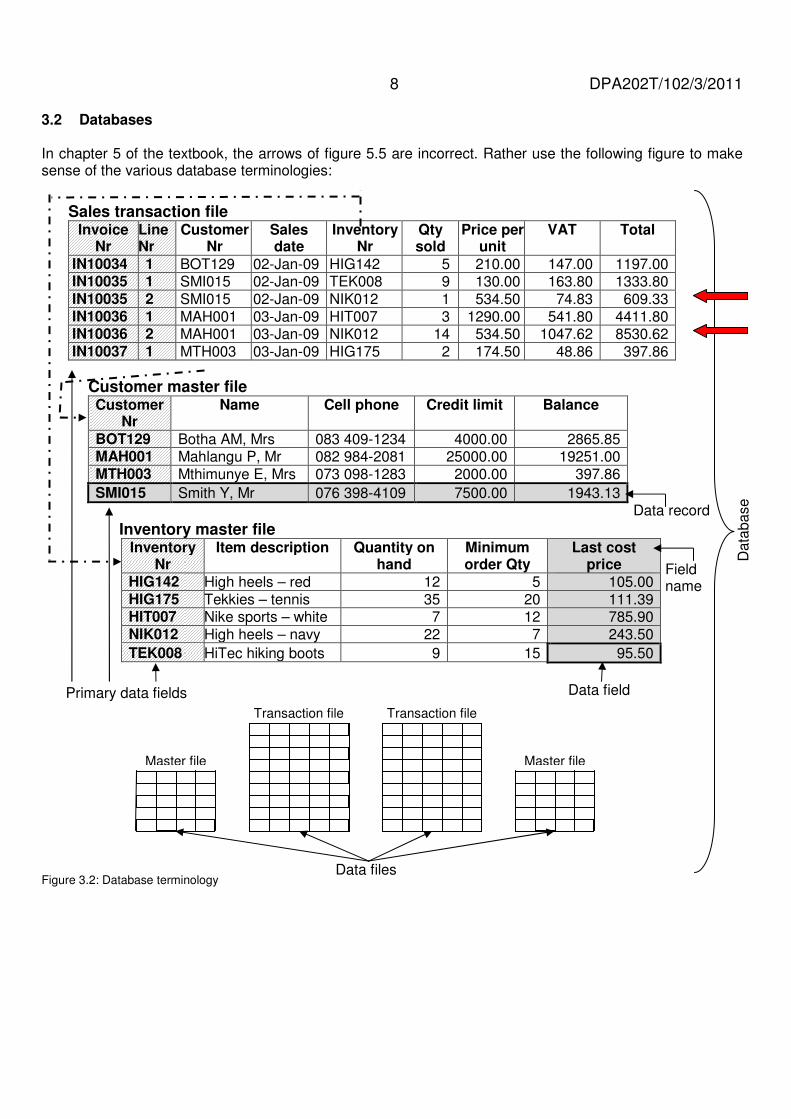
8 DPA202T/102/3/2011 3.2 Databases In chapter 5 of the textbook, the arrows of figure 5.5 are incorrect. Rather use the following figure to make sense of the various database terminologies:
Sales transaction file Invoice
Nr Line Nr
Customer Nr
Sales date
Inventory Nr
Qty sold
Price per unit
VAT Total
IN10034 1 BOT129 02-Jan-09 HIG142 5 210.00 147.00 1197.00 IN10035 1 SMI015 02-Jan-09 TEK008 9 130.00 163.80 1333.80 IN10035 2 SMI015 02-Jan-09 NIK012 1 534.50 74.83 609.33 IN10036 1 MAH001 03-Jan-09 HIT007 3 1290.00 541.80 4411.80 IN10036 2 MAH001 03-Jan-09 NIK012 14 534.50 1047.62 8530.62 IN10037 1 MTH003 03-Jan-09 HIG175 2 174.50 48.86 397.86
Customer master file Customer
Nr Name Cell phone Credit limit Balance
BOT129 Botha AM, Mrs 083 409-1234 4000.00 2865.85 MAH001 Mahlangu P, Mr 082 984-2081 25000.00 19251.00 MTH003 Mthimunye E, Mrs 073 098-1283 2000.00 397.86
SMI015 Smith Y, Mr 076 398-4109 7500.00 1943.13
Inventory master file Inventory
Nr Item description Quantity on
hand Minimum order Qty
Last cost price
HIG142 High heels – red 12 5 105.00 HIG175 Tekkies – tennis 35 20 111.39 HIT007 Nike sports – white 7 12 785.90 NIK012 High heels – navy 22 7 243.50
TEK008 HiTec hiking boots 9 15 95.50
Data
base
Master file
Transaction file
Master file
Transaction file
Data files
Data field
Data record
Primary data fields
Figure 3.2: Database terminology
Field name

DPA202T/102/3/2011
9
• Note the following in figure 3.2: � Each file has a unique data field (called the primary data field) that can be used to uniquely identify
each data record. The combination of the Invoice Nr and the Line Nr fields together make a unique data field (see the left block arrows at the top right hand side of the figure).
� The transaction file links to the master files using the primary data fields. This prevents the duplication of data.
� The master files have been sorted into a different order, but individual data records can still be found using the unique primary field reference.
� Each of the files shown is only an extract – the real transaction and master files contain many, many more data fields!
Microsoft Access and OpenOffice Base are examples of specialist database software. For additional insight into database terminology and the design of a database, visit the Internet and do the following:
• Type the following URL: http://office.microsoft.com/en-us/support
• Select the ‘Support’ menu and click on ‘Get Started with Office 2007’
• Underneath the heading ‘Office 2007 training’ find and click on ‘Access 2007’
• Complete the online training (+/- 30-40 minutes) This is a free tutorial! Imagine what else is available for free on the Internet to improve your computer skills. The world of accountancy is constantly changing and improving. As future accountants you are expected to keep up with these changes.
3.3 Assessment guidance
You should know the detail of the whole chapter 5 in ISBE, as well as the tutorial letter guidance provided above for normal theory questions (these questions would include key words such as list, name, define, describe, explain and give examples), as well as for multiple choice and true/false type questions.
You must also know the theory well enough to be able to apply it in case study type questions.
• Design your own case study questions and post them on the discussion forum of myUnisa, or better still – include some real life business problems relating to data processing!
Pastel uses a relational database to store the multitude of accounting data.
• Make a note that you must return to chapter 5 once you have mastered Pastel and consider the following: � In which files are the various types of information, captured during each Pastel lesson, stored? � What are the field names of each file? � Which files are master files and which are transaction files? What about reference files? � How are the various files linked to one another? � How are the various files updated with each type of transaction processed? � Where did the debits and credits go?
An Excel spreadsheet contains lots of data and, once manipulated, lots of information.
• Make a note that you must return to chapter 5 once you have mastered Excel (detailed guidance is provided in tutorial letter 103/2011) and then review the following: � Match the four ways of processing information to the various Excel functions and features which you
have learned. � Find examples of constants and different types of variables in the spreadsheet examples of tutorial
letter 103/2011.

10 DPA202T/102/3/2011
4 STUDY UNIT 2 – TRANSACTION PROCESSING
4.1 Using a transaction processing system in a business Refer to Information systems in a business environment (fourth edition) (ISBE) chapter 6. Transaction processing is a specialised type of data processing. Accounting software is a transaction processing system that captures the financial transactions of a business. The accounting software (such as Pastel) will convert the financial transaction data into financial information to be used for decision making in the business.
Create new company
Set up common defaults
Create/edit customers
Create/edit suppliers
Create/edit inventory
Create/edit general ledger
Monthly/Ad-hoc transaction processing:
• Journals
• Cashbook
Daily transaction processing:
• Purchases
• Sales
• Payments (cash book)
• Receipts (cash book)
Monthly/Annual Reporting
• Suppliers
• Customers
• Inventory
• Taxation
• Monthly: I/S, B/S, T/B, Cash flow
Take on balances
Year-end procedures
Daily b
acku
ps
Monthly controls:
• Bank reconciliation
• Supplier reconciliations
• Petty cash count
Figure 4.1: Using a transaction processing system
DPA202T/102/3/2011
11
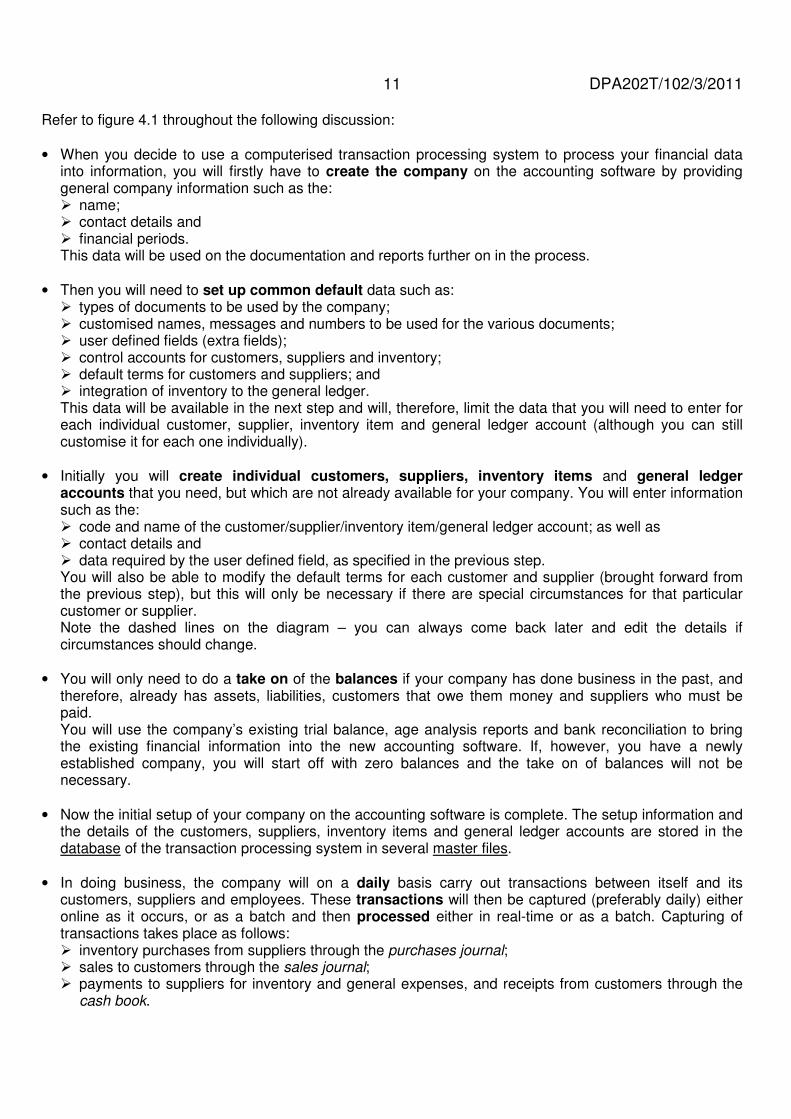
Refer to figure 4.1 throughout the following discussion:
• When you decide to use a computerised transaction processing system to process your financial data into information, you will firstly have to create the company on the accounting software by providing general company information such as the: � name; � contact details and � financial periods. This data will be used on the documentation and reports further on in the process.
• Then you will need to set up common default data such as: � types of documents to be used by the company; � customised names, messages and numbers to be used for the various documents; � user defined fields (extra fields); � control accounts for customers, suppliers and inventory; � default terms for customers and suppliers; and � integration of inventory to the general ledger. This data will be available in the next step and will, therefore, limit the data that you will need to enter for each individual customer, supplier, inventory item and general ledger account (although you can still customise it for each one individually).
• Initially you will create individual customers, suppliers, inventory items and general ledger
accounts that you need, but which are not already available for your company. You will enter information such as the: � code and name of the customer/supplier/inventory item/general ledger account; as well as � contact details and � data required by the user defined field, as specified in the previous step. You will also be able to modify the default terms for each customer and supplier (brought forward from the previous step), but this will only be necessary if there are special circumstances for that particular customer or supplier. Note the dashed lines on the diagram – you can always come back later and edit the details if circumstances should change.
• You will only need to do a take on of the balances if your company has done business in the past, and
therefore, already has assets, liabilities, customers that owe them money and suppliers who must be paid. You will use the company’s existing trial balance, age analysis reports and bank reconciliation to bring the existing financial information into the new accounting software. If, however, you have a newly established company, you will start off with zero balances and the take on of balances will not be necessary.
• Now the initial setup of your company on the accounting software is complete. The setup information and the details of the customers, suppliers, inventory items and general ledger accounts are stored in the database of the transaction processing system in several master files.
• In doing business, the company will on a daily basis carry out transactions between itself and its customers, suppliers and employees. These transactions will then be captured (preferably daily) either online as it occurs, or as a batch and then processed either in real-time or as a batch. Capturing of transactions takes place as follows: � inventory purchases from suppliers through the purchases journal; � sales to customers through the sales journal; � payments to suppliers for inventory and general expenses, and receipts from customers through the
cash book.

12 DPA202T/102/3/2011
The details of each transaction are stored in a separate data record in the transaction file and the transactions are each linked to the relevant data record(s) in the related master file(s). � E.g. the details of a sales transaction are entered into the sales transaction file and linked to the
specific customer in the customer master file, as well as the specific inventory item(s) in the inventory master file.
Should the daily transaction capturing or processing require changes to the details of a customer, supplier, inventory item or general ledger account, these can be done. � E.g. the delivery address of the customer to whom an inventory item is sold has changed and will be
updated in the customer master file before the sales transaction is finalised; or � A payment is made for entertainment, but an appropriate general ledger account for this expense does
not currently exist and will be created before the payment transaction is finalised. • Financial information is critical for businesses and the importance of daily backups cannot be
emphasised enough, especially when transactions are captured daily.
• Some transactions do not occur on a daily basis, e.g. employee salaries are paid at the end of every month and processing errors need to be corrected. At the end of the month (or as and when the need arises on an ad-hoc basis) the company will have to capture and process these transactions. Salaries and monthly expenses (such as water and electricity and telephone) are captured and processed in the cash book at the end of the month. Transactions such as depreciation, provisions and corrections are captured and processed through various journals at the end of the month or when required. Any of these transactions might need changes to the details of a general ledger account, which will then first be edited before the transaction is finalised.
• To make sure that the daily and monthly processing was accurate, complete and all the transactions processed are valid (you will learn more about this in Auditing), the company’s management will perform certain controls at the end of the month. This will include: � A bank reconciliation (against the bank statement received from the bank); � Several supplier reconciliations (against the customer statements sent by your suppliers to you –
remember that you are your supplier’s customer!); and � A count and reconciliation of your petty cash. Should errors be identified through this process, this will again result in ad-hoc processing through the journals or cash book.
• At the end of the month, you will also print various reports. The information in these reports will be used to: � make business decisions, but may also help to � identify processing errors. Processing errors will again result in ad-hoc processing through the journals or cash book, or even the processing of transactions not yet captured through the daily transaction processing.
• At year-end you will take special measures, such as:
� making an extra backup; � printing detailed ledger reports (transaction reports) for the full financial year; � revaluate foreign currencies (if used by your company); and then � run the official year-end procedure. This official year-end procedure will calculate the profit or loss for the year and post it to the retained earnings account (refer to your Accounting textbook). Your accounting software is now ready to capture the transactions for the new financial year.

DPA202T/102/3/2011
13
4.2 Transactions - from data to information All transaction processing (daily, monthly and ad-hoc) follows a standard path from data to usable information.
Reflect on your basic Accounting knowledge and refer to figure 4.2. You already know that in a manual transaction processing system:
• data is written on source documents, such as a sales invoice, to record the details of a transaction.
• the summary data from each source document is written into the relevant journal, such as a sales journal.
• at the end of the month, the summary information from each column in the journal is transferred to the relevant general ledger accounts, such as sales, VAT and accounts receivable (also sometimes called a debtors/customers control account). In addition, summary information on each individual transaction is also booked to each relevant sub-ledger, which ‘shadows’ the control account. If you should add up the individual balances of all the sub-ledger accounts (e.g. one for every customer), it will equal the total balance in the control account (in this instance the customer control account).
• the debits and credits of each general ledger account are totalled and the total/balance for each general ledger account is taken to the trial balance.
• the various income and expense trial balance accounts are grouped together and used to prepare the income statement (statement of comprehensive income), while the various asset, liability and equity accounts are grouped together and used to prepare the balance sheet (statement of financial position).
As you can see from the above, this is a lot of work which people had to perform manually. Fortunately the computer has made our lives a whole lot easier!
Cust. B Cust. A Cust. C
Journal General ledger
Trial balance:
Income Statement:
Balance sheet:
Source documents
Figure 4.2: Transactions – from data to information (manual process)
General ledger
General ledger (control acc) Customer A
Customer B
Customer C

14 DPA202T/102/3/2011
Refer to figure 4.3 throughout the following discussion: In a computerised transaction processing system, the process is slightly different from a manual system, but the same data processed by a computer will produce the same information:
• Selected data from the handwritten source documents, such as sales orders or sales invoices, can be typed into the accounting software on the computer to record the details of a transaction. However, the data could just as well be scanned in with a barcode scanner or typed directly as the transaction happens into the accounting software (thus without any physical source documents).
• The computer does not require ALL the data to be typed/scanned every time you enter a transaction, because a lot of data is already stored on the computer in the master files, such as the customer name and address in the customer master file and the inventory item description in the inventory master file. The sales transaction file will only record a reference/link to the particular data records in the master file and the other details pertinent to the particular transaction, such as the transaction number, date, quantity sold of each item and the price of each item. The transaction file is the equivalent of the manual journals.
• Different from a manual system, a report can now be printed, e-mailed, viewed on the computer screen or saved onto secondary storage with summary information any time during the month. The computer can reprint source documents, print transaction lists, general ledgers and sub-ledgers, trial balances, income statements (statements of comprehensive income), balance sheets (statements of financial position) and much more – all in a fraction of the time! You just specify the type of report, the date ranges and other parameters and then the accounting software quickly classifies, filters, summarises, sort and calculate the data contained in the transactions files and the linked master file records. If you know the Excel formulas for VLOOKUP, COUNTIF and SUMIF, and the FILTER and SUBTOTAL functions you will understand what the accounting software does. (You will learn some of these formulas and functions in tutorial letter 103/2011) Viewing different reports with different information from the same database is just like putting on multiple glasses each with different coloured lenses and then seeing different images, even though you are looking at the same picture!
Trial balance:
Income Statement:
Balance sheet: Source
documents
Figure 4.3: Transactions – from data to information (computerised process)
Transaction file
Master file
Master file
General ledger
Customer A
Customer B
Customer C

DPA202T/102/3/2011
15
4.3 Assessment guidance You should know the detail of the whole chapter 6 in ISBE, as well as the tutorial letter guidance provided above for normal theory questions (these questions would include key words such as list, name, define, describe, explain and give examples), as well as for multiple choice and true/false type questions. You must also know the theory well enough to be able to apply it in case study type questions.
• Design your own case study questions and post them on the discussion forum of myUnisa, or include some real life business problems relating to transaction processing!
• Refer back to figure 3.2. Make sure you understand how a relational database work and how all the master and transaction files link with each other.
• After reviewing chapter 6, refer to figure 4.3 and make sure you know for each type of transaction: � the source documents used; � the transaction and master files affected; � the accounting debits and credits; � the reports that could be generated.
16 DPA202T/102/3/2011
5 STUDY UNIT 5 – ACCOUNTING SOFTWARE (PASTEL PARTNER VERSION 11)
As stipulated in the yearbook under the heading “General Information” we expect you to have access to a computer. The computer can be your own or the computer of a friend or relative. Note that DPA202T students do NOT have access to the Unisa computer laboratory and access can also NOT be arranged, because Pastel is NOT installed on the Unisa computers. The computer you use must adhere to the minimum hardware requirements as per the yearbook to enable successful installation of the Pastel software. You may only purchase the Pastel Partner Version 11 manual and software from Masterskill. The Masterskill manual have been specially compiled for Unisa students and is made available at a discounted price which includes delivery to your door. The serial number (registration code) for the educational software is printed in the Pastel Partner Version 11 Training Manual. In Tutorial letter 102 ‘Pastel Manual’ will refer to the prescribed Pastel Partner Version 11 Training Manual and ‘Pastel V11’ to Pastel Partner Version 11.
5.1 Lesson 1 - Installation and registration: Before you can install Pastel, you need to make sure your computer has the correct hardware, system software settings and a printer (virtual or physical) installed. 5.1.1 Hardware and system software requirements
• The minimum hardware and software requirements are specified in Lesson 1, section A of your Pastel Manual
• Follow the step-by-step instructions in Lesson 1, Activity 1-1 of your Pastel Manual to verify that your computer meets the minimum hardware and software requirements to install Pastel V11.
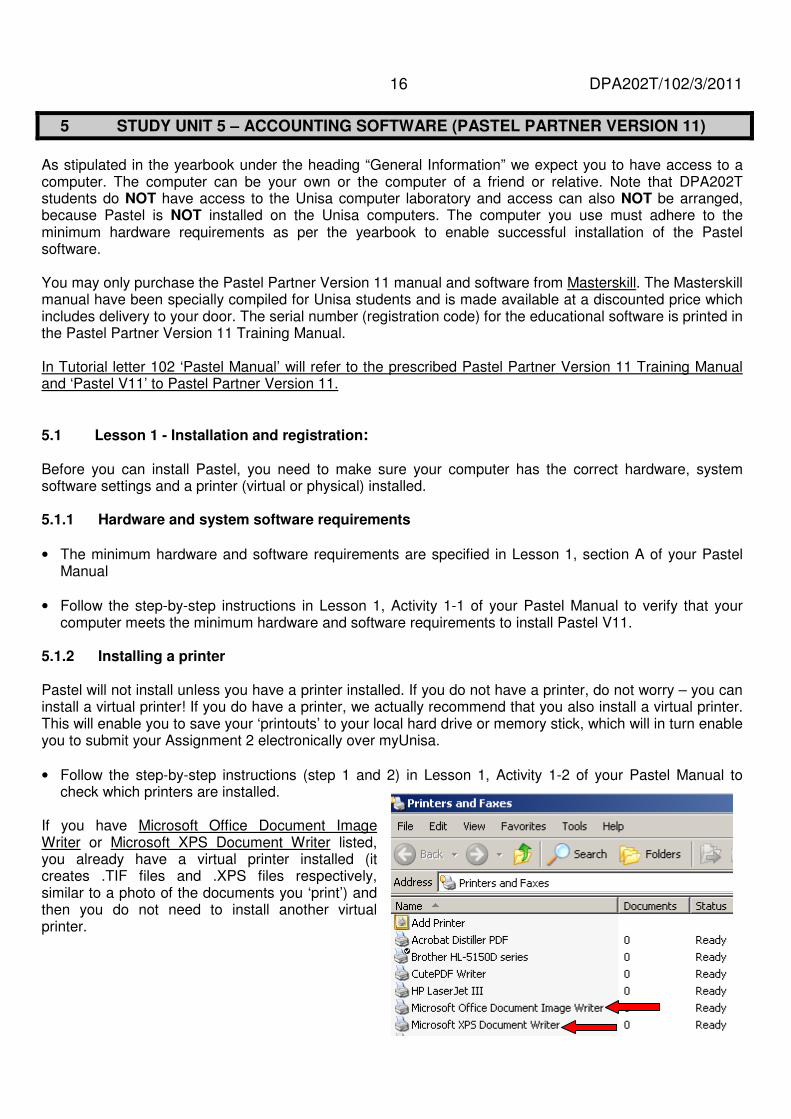
5.1.2 Installing a printer Pastel will not install unless you have a printer installed. If you do not have a printer, do not worry – you can install a virtual printer! If you do have a printer, we actually recommend that you also install a virtual printer. This will enable you to save your ‘printouts’ to your local hard drive or memory stick, which will in turn enable you to submit your Assignment 2 electronically over myUnisa.
• Follow the step-by-step instructions (step 1 and 2) in Lesson 1, Activity 1-2 of your Pastel Manual to check which printers are installed.
If you have Microsoft Office Document Image Writer or Microsoft XPS Document Writer listed, you already have a virtual printer installed (it creates .TIF files and .XPS files respectively, similar to a photo of the documents you ‘print’) and then you do not need to install another virtual printer.

DPA202T/102/3/2011
17
5.1.2.1 Installing a virtual printer If you do not have any printer or no virtual printer, you can download a free virtual PDF printer as follows:
� Type any of the following URL’s into the address bar: http://www.cutepdf.com/ http://www.freepdfcreator.org/
Browse the website for the download area and click to download.
� Do not run, but ‘Save’ the file to your local hard drive (or flash drive if you are downloading at work or an Internet Café).
� Now use My Computer or Explorer to locate the file where you have saved it. E.g. c:\downloads\CuteWriter
18 DPA202T/102/3/2011
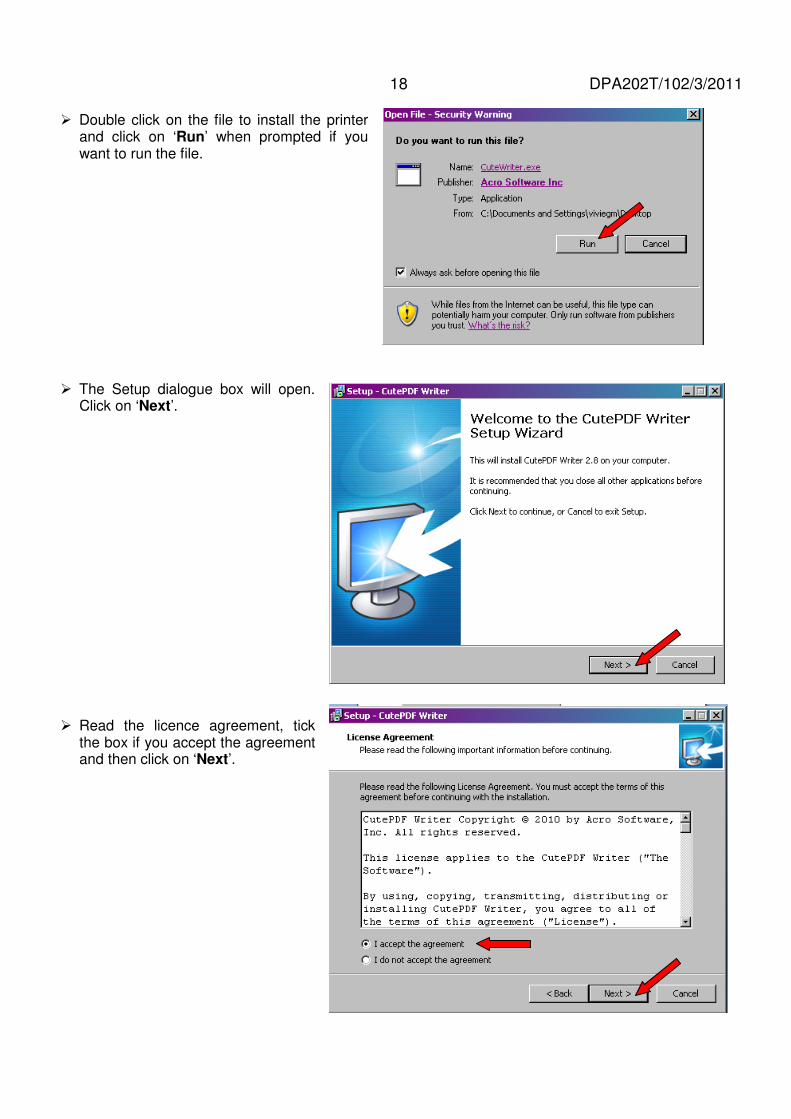
� Double click on the file to install the printer and click on ‘Run’ when prompted if you want to run the file.
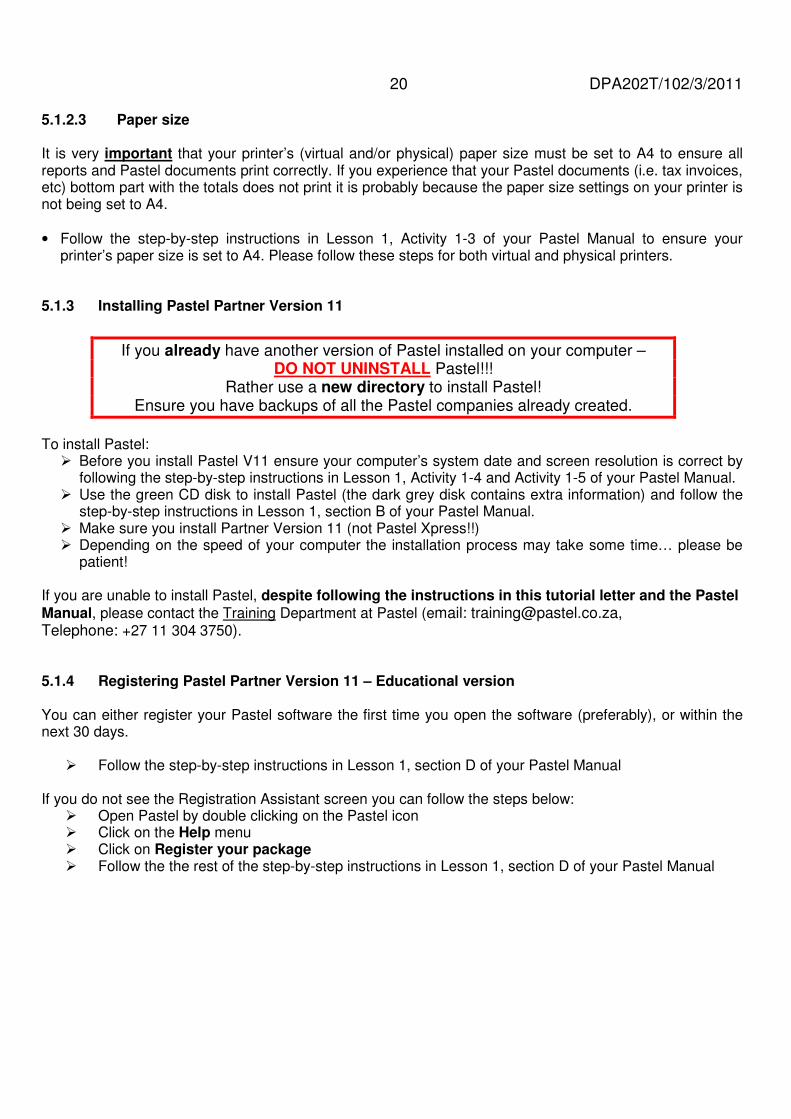
� The Setup dialogue box will open. Click on ‘Next’.
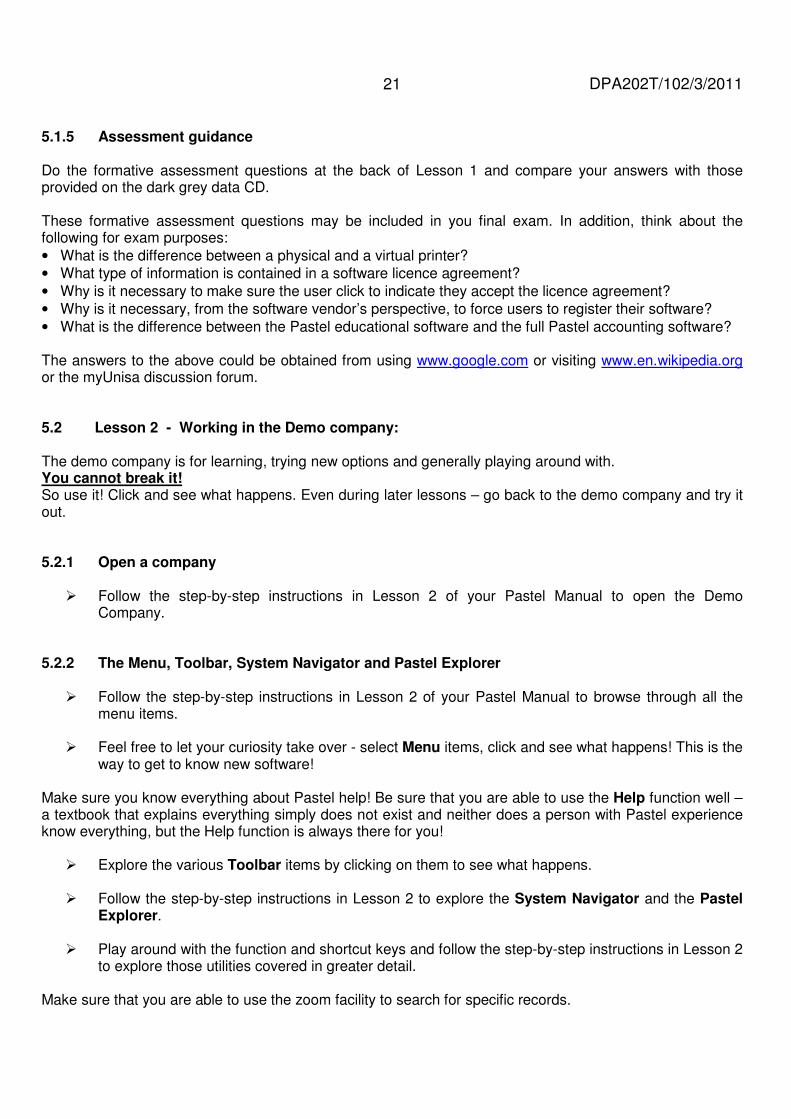
� Read the licence agreement, tick the box if you accept the agreement and then click on ‘Next’.

DPA202T/102/3/2011
19
� Read the End user licence agreement, tick the box if you accept the agreement and then click on ‘Next’.
� Click on Install if you want to continue with the installation of the virtual printer
� It may be necessary to restart your computer. 5.1.2.2 Installing a physical printer
• Follow the step-by-step instructions (step 3 to 13) in Lesson 1, Activity 1-2 of your Pastel Manual to install a physical printer. Please note that you must have a physical printer (a printer that prints to paper) connected to your computer when you complete these steps.
20 DPA202T/102/3/2011 5.1.2.3 Paper size It is very important that your printer’s (virtual and/or physical) paper size must be set to A4 to ensure all reports and Pastel documents print correctly. If you experience that your Pastel documents (i.e. tax invoices, etc) bottom part with the totals does not print it is probably because the paper size settings on your printer is not being set to A4.
• Follow the step-by-step instructions in Lesson 1, Activity 1-3 of your Pastel Manual to ensure your printer’s paper size is set to A4. Please follow these steps for both virtual and physical printers.
5.1.3 Installing Pastel Partner Version 11
To install Pastel:
� Before you install Pastel V11 ensure your computer’s system date and screen resolution is correct by following the step-by-step instructions in Lesson 1, Activity 1-4 and Activity 1-5 of your Pastel Manual.
� Use the green CD disk to install Pastel (the dark grey disk contains extra information) and follow the step-by-step instructions in Lesson 1, section B of your Pastel Manual.
� Make sure you install Partner Version 11 (not Pastel Xpress!!) � Depending on the speed of your computer the installation process may take some time… please be
patient! If you are unable to install Pastel, despite following the instructions in this tutorial letter and the Pastel
Manual, please contact the Training Department at Pastel (email: [email protected], Telephone: +27 11 304 3750). 5.1.4 Registering Pastel Partner Version 11 – Educational version You can either register your Pastel software the first time you open the software (preferably), or within the next 30 days.
� Follow the step-by-step instructions in Lesson 1, section D of your Pastel Manual If you do not see the Registration Assistant screen you can follow the steps below:
� Open Pastel by double clicking on the Pastel icon � Click on the Help menu � Click on Register your package � Follow the the rest of the step-by-step instructions in Lesson 1, section D of your Pastel Manual
If you already have another version of Pastel installed on your computer – DO NOT UNINSTALL Pastel!!!
Rather use a new directory to install Pastel! Ensure you have backups of all the Pastel companies already created.
DPA202T/102/3/2011
21
5.1.5 Assessment guidance Do the formative assessment questions at the back of Lesson 1 and compare your answers with those provided on the dark grey data CD. These formative assessment questions may be included in you final exam. In addition, think about the following for exam purposes:
• What is the difference between a physical and a virtual printer?
• What type of information is contained in a software licence agreement?
• Why is it necessary to make sure the user click to indicate they accept the licence agreement?
• Why is it necessary, from the software vendor’s perspective, to force users to register their software?
• What is the difference between the Pastel educational software and the full Pastel accounting software? The answers to the above could be obtained from using www.google.com or visiting www.en.wikipedia.org or the myUnisa discussion forum. 5.2 Lesson 2 - Working in the Demo company: The demo company is for learning, trying new options and generally playing around with. You cannot break it! So use it! Click and see what happens. Even during later lessons – go back to the demo company and try it out. 5.2.1 Open a company
� Follow the step-by-step instructions in Lesson 2 of your Pastel Manual to open the Demo Company.
5.2.2 The Menu, Toolbar, System Navigator and Pastel Explorer
� Follow the step-by-step instructions in Lesson 2 of your Pastel Manual to browse through all the menu items.
� Feel free to let your curiosity take over - select Menu items, click and see what happens! This is the
way to get to know new software! Make sure you know everything about Pastel help! Be sure that you are able to use the Help function well – a textbook that explains everything simply does not exist and neither does a person with Pastel experience know everything, but the Help function is always there for you!
� Explore the various Toolbar items by clicking on them to see what happens.
� Follow the step-by-step instructions in Lesson 2 to explore the System Navigator and the Pastel Explorer.
� Play around with the function and shortcut keys and follow the step-by-step instructions in Lesson 2
to explore those utilities covered in greater detail. Make sure that you are able to use the zoom facility to search for specific records.
22 DPA202T/102/3/2011 5.2.3 Assessment guidance Do the formative assessment questions at the back of Lesson 2 and compare your answers with those provided on the dark grey data CD. These formative assessment questions may be included in you final exam. In addition, think about the following for exam purposes:
• Explain shortly what each of the menu items does
• Give the correct main menu item on the menu bar to use for a specified function
• Label/identify the various toolbar icons
• Know all the function keys and their operations
• Know all the shortcut keys and their operations
• Fully discuss the how, why and when of backups, the help function and the zoom facility The answers to the above could be obtained from your Pastel Manual or the myUnisa discussion forum. 5.3 Lesson 3 - Creating a new company:
� Refer to the diagram and explanation in 4.1 of tutorial letter 102/2011. As an accountant you may one day have several businesses as clients or you may be the accountant of a group of companies for which you capture their accounting transactions on an accounting software package, such as Pastel. For each of these businesses/companies you will create a separate, new company on the accounting software. In Pastel you can either use the setup assistant, copy from another existing company on Pastel or manually create a new company from scratch. The setup assistant is used most of the time by accountants and is the method you will use. 5.3.1 Gather company information Regardless of the method used to create a new company on Pastel, you will need to know some basic information such as:
• Country - The various tax general ledger accounts, tax rates and display requirements are automatically set up depending on the country selected.
• Company name, contact details and VAT registration number - This information will be included on all your printed company documents e.g. purchase orders and sales invoices;
• Date format - The date format specified will be used to record and display transaction and report dates;
• Start of financial year and period end day - This is used for financial reporting purposes. A business might decide not to use the last day of the month for a period to for example enable them to finalise capturing of their accounting transaction in time for their monthly management reports/budget analysis.
• Number of periods to use in a financial year - This will be used for reporting periods (12 periods would enable monthly reporting, 4 periods quarterly reporting etc.)
• Chart of accounts - The standard chart of accounts already has the most common general ledger accounts setup for the specific industry to save time in setting up your company.
• Cash books/Bank accounts – These are used to create the general ledger accounts and to link the general ledger accounts to the cash book journal entry types.
• Price lists - This links to the inventory items and allows you to specify separate prices for each new inventory item later during the setup process.
• Default customer terms - These defaults will be used initially for each new customer later during the setup process, although you can modify it for each of your customers.
• Paper setup - This will depend on the type of printer you have available in your business for printing your Pastel documents and reports, but can be modified later for each type of document to be printed.

DPA202T/102/3/2011
23
5.3.2 Create a new company (‘Spotless Cleaning Services’)
� Follow the step-by-step instructions in Lesson 3 of your Pastel Manual to gather the information and use the Setup Assistant to create the Spotless Cleaning Services company on Pastel.
� Review again which information is needed and for what purpose each piece of information will be
used. 5.3.3 Create another new company (‘TEST’)
� In addition to Spotless Cleaning Services, create another new company on Pastel using the Setup Assistant. You can call this company ‘TEST’.
� Play around during the setup of your TEST company and explore different industry specific chart of
accounts and different customer terms. Look at the different general ledger accounts available under each chart of accounts, e.g. service, retail, manufacturing, farming, property rental, restaurant, medical practitioner, church and school. Consider several actual businesses and decide which chart of accounts would be best suitable for that particular company.
� Play around during the setup of your TEST company and explore the different customer terms.
Make sure you know the difference between period and day based customer terms, as well as open item and balance forward processing method.
� Use the Pastel help function to obtain additional information on period and day based customer
terms, as well as open item and balance forward processing method.
� NB! Remember to open your Spotless Cleaning Services company again: o Click on File, then Open o Select your Spotless Cleaning Services company.
5.3.4 Assessment guidance Do the formative assessment questions at the back of Lesson 3 and compare your answers with those provided on the dark grey data CD. These formative assessment questions may be included in you final exam. In addition, think about the following for exam purposes:
• What type of information is required to create a new company and explain what each will be used for.
• Recommend the appropriate industry specific chart of account to use for a company.
• Fully explain the difference between period and day based customer terms.
• Fully explain the difference between the open item and balance forward processing methods. The answers to the above could be obtained from your Pastel Manual, this tutorial letter or the myUnisa discussion forum.

24 DPA202T/102/3/2011 5.4 Lesson 4 - Using the Auto Setup:
• Refer back to the diagram and explanation in 4.1 of tutorial letter 102/2011. The Auto Setup guides you, in sequence, through all the menu items in the Pastel setup menu to setup all the common default data so that you need to enter the minimum additional data thereafter for each individual customer, supplier, inventory item and general ledger account. Note: if you should get lost or miss something during Auto Setup, just click Cancel until you reach the end and then you can either click on Auto Setup again, or click the individual menu item to change under the setup menu. (It is preferable to click on each menu item individually as you will then better know where to make changes, when needed.) 5.4.1 Setup company parameters Notice how the information entered in Lesson 3 is brought forward and can be changed (if you should want to) with the setup menu. The educational version of Pastel automatically changes the company name, address details and other information you entered in Lesson 3 to prevent crooked accountants from purchasing the cheaper educational Pastel software in stead of the full version to do the accounting work of their clients. Carefully note the instructions to change the company name to reflect your details with Control + Shift + T, as you will need to do this with your assignment 2 to prove it is your own original work! Also note where the Cash books transfer account number will be entered – you will use it later!
� Follow the step-by-step instructions in Lesson 4 of your Pastel Manual to setup the common default data for the company.
5.4.2 Setup users/passwords Note: Do not click OK after you have specified the user details and access options for the first user, as it will take you to the next section. Rather click on the drop-down list next to the User until all the details and options for all users have been specified. Only then click OK. Although you will be told which access rights to give the different Pastel users for Spotless Cleaning Services, you should be able to decide that for yourself after learning about proper segregation of duties as a control mechanism in Auditing. Usually it is best if the software enforces minimum password requirements (such as password length and composition) and both the password and a username is required for a user to logon. (You will learn about designing proper access controls in Auditing.)
� Follow the step-by-step instructions in Lesson 4 of your Pastel Manual to setup the users.
DPA202T/102/3/2011
25
5.4.3 Setup financial categories and entry types The financial and report writer categories are used as headings in reports such as the income statement and the balance sheet. The official accounting terminology sometimes changes, or you (or your boss) might simply want to call an item something different (e.g. you could change ‘Retained income’ to ‘Future nest egg’ and the balance sheet will display it as such).
� Follow the step-by-step instructions in Lesson 4 of your Pastel Manual to view the financial categories and the report writer categories.
Entry types are similar to the various journals you know from Accounting.
� Examine the Setup Entry Types screen. Every bank account has two separate cash books – one for payments and one for receipts. It is good policy to use descriptive names and therefore you will change the default entry type descriptions during the exercise. Just imagine how confusing it would be if you have 10 or even more bank accounts and have to identify them with numbers! When you are the accountant in a business, you can change any of the entry type descriptions to suit your needs, for example you could use ‘Salaries and wages journal’ in the place of ‘Payroll journal’. The debit/credit column sets the default for the particular journal so that you just have to enter the minimum information and Pastel will automatically allocate the transactions correctly to the specified general ledger accounts. This will limit debit/credit mistakes and enable you to one day delegate the capturing of the transactions to someone with less experience.
When a company has a high volume of transactions, printouts can become very lengthy. When the Contra in Detail column has not been selected, Pastel will summarise the transactions and only show the totals in the general ledger printouts, but not the detail. The detail will, however, be available in separate Entry Type reports. This detail is very important to keep the audit trail in tact! (You will learn about following the audit trail in Auditing.) For each entry type/journal you can set how the date of the transactions should influence the period in which the transaction should be recorded. Reflect on your Accounting knowledge and the importance of recording transactions in the correct financial period. Clearly choosing between ‘Date sets period’ and ‘Period defaults date’ could have a big influence on the fair presentation of your financial results. What if you open a new bank account later during the year? First you will create the general ledger account for the new bank account and then you will setup the payment and receipt cash book for the new bank account at the bottom of the entry type list similar to the other cash books.
� Follow the step-by-step instructions in Lesson 4 of your Pastel Manual to edit the entry types.
Note – we assume you already know your debits from your credits, know which side assets, liabilities and equity is increased and decreased, and will also be able to recommend appropriate journal transactions! As prospective accountant you must know this! Remember that the computer is just a tool and so is accounting software. It makes life easier, but we still need human knowledge and skills to succeed.

26 DPA202T/102/3/2011
� Before you click on OK - browse through the various entry types by scrolling down with the vertical scroll bar. Note the different types available. For each entry type setup and by using your Accounting knowledge, consider whether you agree that: o the majority of the transactions for that specific entry type/journal is a debit or a credit o the account access for that specific entry type/journal is correct.
5.4.4 Setup periods and tax 5.4.4.1 Periods A financial year is very similar to a calendar year. Both a financial year and a calendar covers a 12 month period but where a calendar year starts on the 1st of January and include all the months including December a financial year can start at the beginning of any month. (Please remember there are statutory requirements when a company wants to change their financial year – you will learn more about this in Auditing.) A financial year can, for example, start on 1 July and end on 30 June of each year. When talking about a financial year the year is usually expressed in terms of its last period, for example, a June 2011 financial year will relate to the period 1 July 2010 to 30 June 2011 and an April 2012 financial year will relate to the period 1 May 2011 to 30 April 2012. In any accounting system (manual or software) it is always very important to ensure transactions are entered in the correct accounting period and financial year. If a transaction is processed in the wrong accounting period the financial and business decision information will be incorrect and this can lead to incorrect decisions being made. You will see in Pastel and other accounting software that we usually do not refer to a month we are working in but to an accounting period. Period 1 in our example of a financial year starting 1 July 20XX will be the month from 1 July to 31 July 20XX. Let’s first look at a financial year starting 1 January 20XX year (December 20XX – financial year)
Financial year:
1 January 20XX – 31 December 20XX
Accounting period Corresponding month Period 1 January 20XX Period 2 February 20XX Period 3 March 20XX Period 4 April 20XX Period 5 May 20XX Period 6 June 20XX Period 7 July 20XX Period 8 August 20XX Period 9 September 20XX Period 10 October 20XX Period 11 November 20XX Period 12 December 20XX
Period 6 in the example above will relate to June i.e. if you capture a transaction in accounting period 6 you know that the date for the transaction must be between and including the dates 1 June 20XX to 30 June 20XX. In the example above, in which accounting period will a transaction dated 18 May 20XX be captured?
� In Period 5
DPA202T/102/3/2011
27
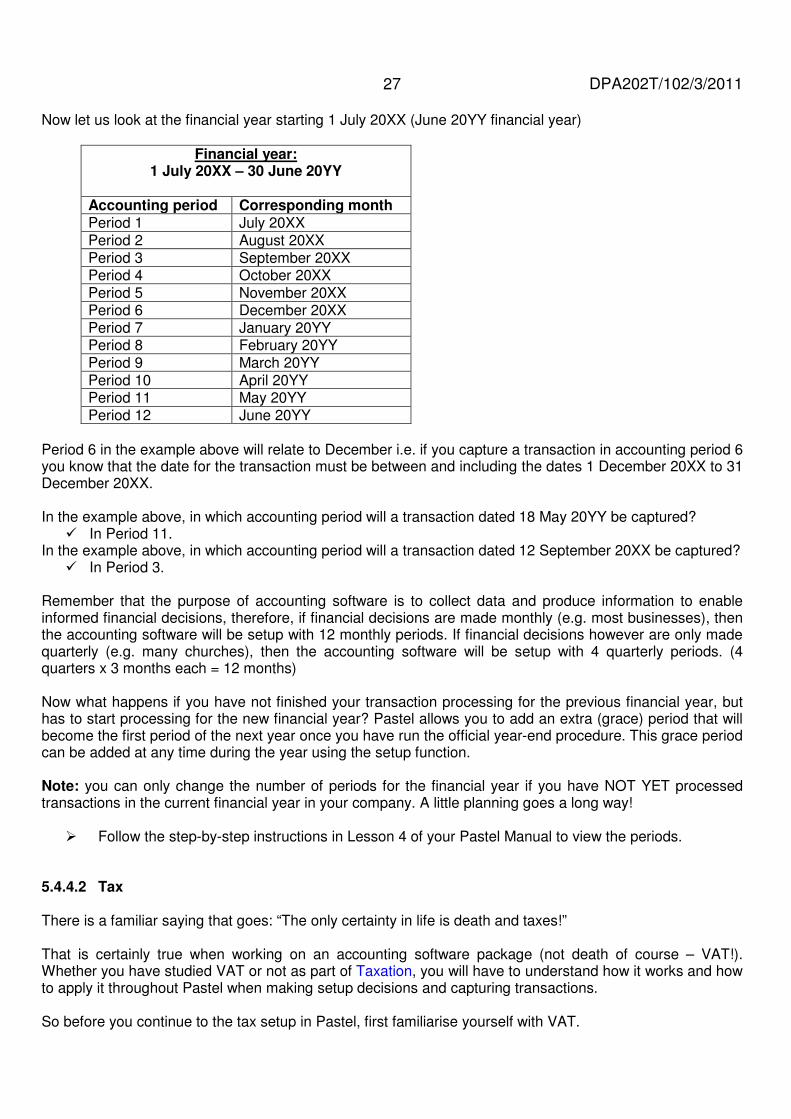
Now let us look at the financial year starting 1 July 20XX (June 20YY financial year)
Financial year: 1 July 20XX – 30 June 20YY
Accounting period Corresponding month Period 1 July 20XX Period 2 August 20XX Period 3 September 20XX Period 4 October 20XX Period 5 November 20XX Period 6 December 20XX Period 7 January 20YY Period 8 February 20YY Period 9 March 20YY Period 10 April 20YY Period 11 May 20YY Period 12 June 20YY
Period 6 in the example above will relate to December i.e. if you capture a transaction in accounting period 6 you know that the date for the transaction must be between and including the dates 1 December 20XX to 31 December 20XX. In the example above, in which accounting period will a transaction dated 18 May 20YY be captured?
� In Period 11. In the example above, in which accounting period will a transaction dated 12 September 20XX be captured?
� In Period 3. Remember that the purpose of accounting software is to collect data and produce information to enable informed financial decisions, therefore, if financial decisions are made monthly (e.g. most businesses), then the accounting software will be setup with 12 monthly periods. If financial decisions however are only made quarterly (e.g. many churches), then the accounting software will be setup with 4 quarterly periods. (4 quarters x 3 months each = 12 months) Now what happens if you have not finished your transaction processing for the previous financial year, but has to start processing for the new financial year? Pastel allows you to add an extra (grace) period that will become the first period of the next year once you have run the official year-end procedure. This grace period can be added at any time during the year using the setup function. Note: you can only change the number of periods for the financial year if you have NOT YET processed transactions in the current financial year in your company. A little planning goes a long way!
� Follow the step-by-step instructions in Lesson 4 of your Pastel Manual to view the periods. 5.4.4.2 Tax There is a familiar saying that goes: “The only certainty in life is death and taxes!” That is certainly true when working on an accounting software package (not death of course – VAT!). Whether you have studied VAT or not as part of Taxation, you will have to understand how it works and how to apply it throughout Pastel when making setup decisions and capturing transactions. So before you continue to the tax setup in Pastel, first familiarise yourself with VAT.
28 DPA202T/102/3/2011 • Read the background information on VAT in your Pastel Manual, as well as extra information on the dark
grey data CD accompanying the manual. Make sure you know and can explain the following: o What is VAT? o How does it work? o What is the difference between output VAT and input VAT? o Who must and who may register (Note: compulsory registration starts at a turnover of R1 million in any
12-month consecutive period)? o What is the difference between normal VAT (invoice-based VAT) and payment/cash based VAT, when
should which option be used and how are the two options treated differently for accounting purposes? o In South Africa – should bad debts and/or discounts given affect the business’ VAT liability? o What is the difference between the various tax types? o Which type of output VAT and what percentage would you charge as a business selling the following
to your customers (in general): � Basic foodstuff (such as brown bread, maize, rice, cooking oil, milk, eggs, fresh fruit and
vegetables) � General items (such as washing powder, pet food, tinned food, toiletries, sweets) � Restaurant food � Delivery vehicles and/or passenger vehicles � Petrol and/or diesel � Computer equipment and/or office equipment � Accounting services
o Which type of output VAT and what percentage would you charge as a business exporting any of the above to customers in other countries (in general)?
o Which type of input VAT and what percentage would you claim as a business purchasing the following from your suppliers (in general) � Basic foodstuff (such as brown bread, maize, rice, cooking oil, milk, eggs, fresh fruit and
vegetables) � General items (such as dishwashing liquid, refreshments (tee, coffee, milk), toilet paper, sweets) � Entertainment (such as taking your staff to the state theatre or having a year-end function) � Delivery vehicles and/or passenger vehicles � Petrol and/or diesel � Computer equipment and/or office equipment � Accounting services � Water and electricity � Rates and taxes to the city council � Telephone � Office rent � Short term insurance (theft, car etc.) � Medical aid contributions � Pension fund contributions
o Would your answer relating to input VAT change if the particular supplier was not registered for VAT or did not provide you with a valid VAT invoice? � It would be good exercise to draw some T-accounts on a piece of paper and work out the debits
and credits (including the VAT) relating to several purchase, sale and expense transactions. (Good old Accounting and Taxation combined!)
Luckily for us, when you chose ‘South Africa’ as the country when you first created the new company in Pastel, the majority of the tax settings (e.g. the parameters, percentages and box names) were automatically done for you! That is why you will need to make limited changes to the tax settings to customise it for Spotless Cleaning Services.
� Follow the step-by-step instructions in Lesson 4 of your Pastel Manual to setup the tax.
DPA202T/102/3/2011
29
5.4.5 Setup customers’ control Remember that we set up the common defaults as part of Auto Setup so that we have to enter minimum additional data thereafter for each individual customer, supplier, inventory item and general ledger account. Keep this in mind when you do the setup for customers, suppliers and inventory.
When doing the setup for the customers’ control, you are specifying the terms and rules you want the majority of your customers to follow, such as 15% interest on late payment or to print the VAT % rather than the VAT amount on the sales invoice. Of course you can modify this later when you create/edit an individual customer, such as only 10% interest for a large customer or printing the VAT amount on their sales invoices as they requested.
� Open the customer control screen as part of the auto setup and first click on all the tabs to see the contents thereof.
Only certain items in the setup of the customers’ control are going to be highlighted, as the rest is sufficiently explained in your Pastel Manual. Configuration tab See how well items relating to one another are grouped together. In lesson 8 you will learn about creating and editing general ledger accounts. The three accounts used here are the default accounts because of the industry specific chart of accounts that you selected when you created the new company. The interest rate you specify will be the default for all your customers, but you can modify it for individual customers when you create them or later by editing the individual customer’s account. Interest will not just happen automatically – you will have to create the accounting entry for the interest. You specify the journal through which you will enter it with the entry type. A warning when a customer’s account is overdue is a good way to help control your (potential) bad debts. Designing controls will be dealt with in detail as part of Auditing – remember to open Pastel again when studying Auditing to see where the controls are implemented! The VAT legislation requires that all customers be identified on the VAT invoices they receive when purchasing for more than R3,000 per invoice. Although you will already have the customer name and VAT number stored in Pastel for your regular customers, your ad-hoc or cash customers will not be recorded separately. The amount entered as the ‘Tax ref. prompt amount’ will help the person capturing the invoice to remember to ask for the required details. The user-defined fields are extra information you may require. The items you type here, basically becomes the field names in the customer master file.
Note – it is very important that you fully understand the difference between a customer and a supplier!
30 DPA202T/102/3/2011 Statements tab “Begin with the end in mind” is what Steven Covey said in his book ‘The Seven Habits of Highly Effective People’. It would be rather difficult for you to understand why you are doing what you are doing with the setup if you do not know what we are working towards (the end we have in mind). Customer statements are documents you print (usually monthly) and send to your customers. It can list the details of transactions yet unpaid together with the most recent payment transactions (open item) or just print the balance owed from previous months together with the details of the most recent transactions (balance forward). Despite having an open item customer, you can still print the monthly statement for the customer in balance forward view, should you or the customer prefer it. Due to the potentially huge number of different items sold to a customer on each separate invoice, one does not usually repeat all the details on the customer statement, but rather only print the total for the invoice. Customer statements also categorises the various transactions according to the age categories you have chosen as the default terms when you created the company. E.g. if you sold R1,000 worth of goods to a customer two months ago and he has not paid you yet, the R1,000 will be shown as 60 days outstanding. You can customise the messages that you want to print automatically to your customers, depending on how long they owe you the money. However, one has to be careful when choosing your wording if you want to keep your customer in the future! Defaults tab The normal payment terms, processing method and most common price list was chosen when you created the new company, but here you have the opportunity to change it. The tax entry method you chose will depend on your business. Remember that most businesses’ sales prices are shown inclusive of VAT! This will make the capturing of the prices inclusive of VAT much easier. So, it depends on your business. Credit limits should always be individually set for your customers. You will do that in Lesson 5. All the factors to take into consideration for determining the credit risk and the process for granting credit form part of Auditing. The early payment terms are plainly the discounts you will give your customers for paying early. The difficult part is to determine exactly how much discount you should offer your customers as an incentive, without diminishing your profits too much. You will learn how to calculate this as part of Management Accounting. Description tab The items you type here become the field names in the customer master file, but different to the field names typed on the configuration tab, Pastel know these are associated with the address of the customer and will use it where required on invoices, statements, etc.
� Follow the step-by-step instructions in Lesson 4 of your Pastel Manual to setup the customers’ control.
� Make sure you understand the difference between open item and balance forward processing well.
DPA202T/102/3/2011
31
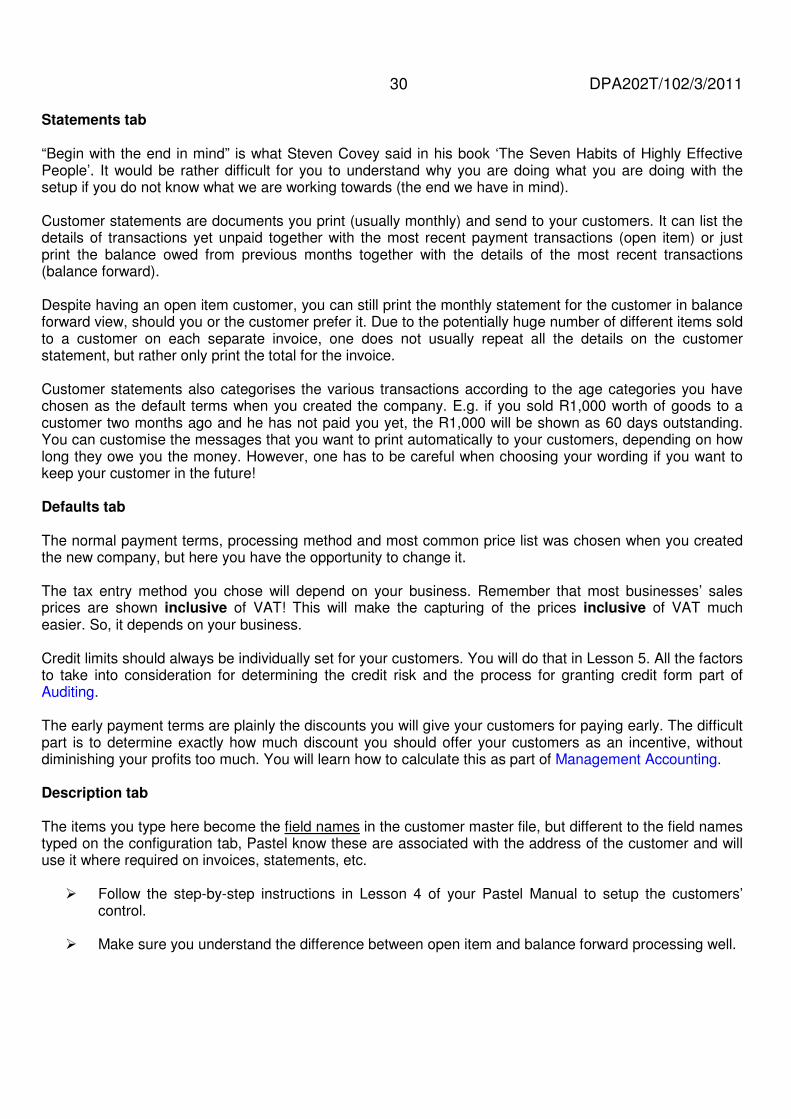
5.4.6 Setup customers’ documents Refer again to Figure 4.2 and to Figure 4.3 in this tutorial letter. The Setup Customer Documents in Pastel contain the various source documents relating to customers. Note that not all of them result in a journal entry and, therefore, not all of them result in an accounting entry in the general ledger and the customer sub-ledgers. The details (data) of these source documents will still be stored in transaction files for reference purposes (you do not want to retype all the data later, if you can just refer to the data already stored and make small amendments if necessary!) Quotations and Sales Orders are optional, depending on the design of the sales process in the particular business (you will learn more about the process and the associated controls in Auditing). Refer to figure 5.1 below to understand the sales process better:
� Make sure you know for each source document: o the order in which the documents are used in the sales process o the purpose of the document o the differences between the various source documents o the entry type (journal) usually used by each source document o the accounting debits and credits by a transaction using the particular source document
(remember to take VAT into consideration too!)
� Open up the customer documents screen as part of the auto setup and first click on all the tabs to see the contents thereof.
Cust. B Cust. A Cust. C
Sales Journal
Figure 5.1 Sales process
Customer control acc
Customer A
Customer B
Customer C
Quotation
Sales invoice
Sales order
Debit note
Credit note Cust. C Cust. B
Sales Return Journal
Receipt Cust. A Cust. C
Receipt Cashbook
Age Analysis
Customer statements
Customer listing

32 DPA202T/102/3/2011 Only certain items in the setup of the customer documents are going to be highlighted, as the rest is sufficiently explained in your Pastel Manual. The various names of the document and the number of copies are determined by the design of your sales process. Refer to Auditing again. Remember that Pastel uses the term ‘entry type’ for a journal. Note how it is greyed out for certain documents. That is because those types of documents do not get posted to the general ledger! Also note that the update options are greyed out when the entry type is greyed out due to the same reason. When the update options are available, you can choose between Update on completion of document and Update in Batch mode. Refer back to study unit 2. Which of the two options will result in real-time processing and which in batch processing? Cost codes are used to track income and expenditure. A cost code can be a branch, department, a job, an employee or anything you want to allocate income and expenses to in order to see the individual profitability or contribution thereof in relation to the business as a whole. E.g. you can use cost codes to prepare a separate income statement for each branch of your business. Sales codes (sales analysis codes) are similar to cost codes, but relate specifically to sales. Sales codes enable analysis of sales by sales representative, geographic areas, market segments etc. Sales codes can be used to calculate commission. Commission need not necessarily be paid to a sales representative – it depends on your sales code descriptions. For example, if you entered a geographic area as a sales code, commission can be calculated for the geographic area and the commission can be split equally between all the sales people in the geographic area. Can you remember where the next numbers of the documents were setup? Many different types of stock and/or service items can be sold on one invoice (and of course the quantity for each type can be 1 or more). Each different type of item will be listed on a new line, but on the same invoice (refer to your supermarket till slip). To save time with data capturing you can set the default for the type of item that will most often be entered on an invoice line.
� Click the drop-down list for the invoice lines default to explore the various defaults. Use the help function (F1) to learn more about each default. You will also learn more about the item code, GL code and remarks when entering transactions in Lesson 9.
When you enter a transaction on a source document and you click on ‘Next document’ or ‘Close’ the document, Pastel will automatically try to print the document (and variations thereof). Why? Because you set it up here in customer documents! When and what to print will depend on how you run your business. E.g. if the majority of your customers walk into your shop to do business, you will want to print the invoice immediately and give it to them, but if you mainly receive telephone or email orders, you will probably want to capture all the transactions in a batch and then print all the invoices and delivery notes at the end of the batch only.
� Follow the step-by-step instructions in Lesson 4 of your Pastel Manual to setup the customer
documents.
Know what you want for your business and then setup Pastel accordingly. Unless your business processes were not effective or efficient, do not try to mould your business to fit in with your accounting package!

DPA202T/102/3/2011
33
5.4.7 Setup suppliers’ control The setup of the suppliers control is very similar to the setup of the customers’ control. When doing the setup for the suppliers’ control, you are specifying the terms and rules you want the majority of your suppliers to follow, such as to enter the supplier prices including or excluding VAT and the standard payment terms. Again you can modify this later when you create/edit an individual supplier.
� Open up the supplier control screen as part of the auto setup and first click on all the tabs to see the contents thereof.
� Compare the contents of the various tabs of the suppliers control setup with the contents of the
customers control setup. Note the similarities and differences. Read the tutorial letter guidance for customers control setup again and apply the same principles to the suppliers control setup.
Only certain items in the setup of the suppliers’ control are going to be highlighted, as the rest is sufficiently explained in your Pastel Manual and above in the customers control setup explanation. Configuration tab Using goods received notes is excellent from a control perspective and will depend on how your business process was designed (which you again learn in Auditing). When you are likely to sell the goods before receiving and processing the supplier invoice for the goods, it would be necessary to use goods received notes, else your accounting system will indicate that you are out of stock, while there will be actual stock available for selling in the storeroom.
� Compare the supplier configuration tab to the customer configuration tab (and the guidance given for it in this tutorial letter).
� Toggle (click first the one and the other one and back again) between ‘Mandatory’ and ‘Never’ for
goods received notes. Notice how the accrual account is greyed out when ‘Never’ is selected.
� Refer again to the chapter on transaction processing in your textbook and read the section on accounting for goods received notes. Draw up the T-accounts (general ledger accounts) and practice posting your debits and credits to the correct accounts (taking VAT into consideration of course!)
Remittances tab Remember that you are your supplier’s customer! Therefore, your supplier will send you a monthly customer statement just like you will send a monthly customer statement to your customers. Customers use the customer statements to pay their suppliers and often the bottom of the customer statement can be cut off and attached as a remittance to the payment made to the supplier. That is why, in practice, separate remittances are rarely printed and sent to suppliers to accompany the payment, but it is still useful to help settle account disputes between customers and suppliers.
� Compare the supplier remittances tab to the customer statements tab (and the guidance given for it in this tutorial letter).
Defaults tab
� Compare the supplier defaults tab to the customer defaults tab (and the guidance given for it in this tutorial letter).

34 DPA202T/102/3/2011 Description tab
� Compare the supplier description tab to the customer description tab (and the guidance given for it in this tutorial letter).
� Follow the step-by-step instructions in Lesson 4 of your Pastel Manual to setup the suppliers’ control.
5.4.8 Setup suppliers’ documents The setup of the suppliers’ documents is very similar to the setup of the customers’ documents. The Setup Supplier Documents in Pastel contains the various source documents relating to suppliers. Refer again to Figure 4.2 and to Figure 4.3 in this tutorial letter.
� Compare the contents of the various tabs of the suppliers’ documents setup with the contents of the customers’ documents setup. Note the similarities and differences. Read the tutorial letter guidance for customers’ documents setup again and apply the same principles to the suppliers’ documents setup.
Only certain items in the setup of the suppliers’ documents are going to be highlighted, as the rest is sufficiently explained in your Pastel Manual and above in the customer’s documents setup explanation.
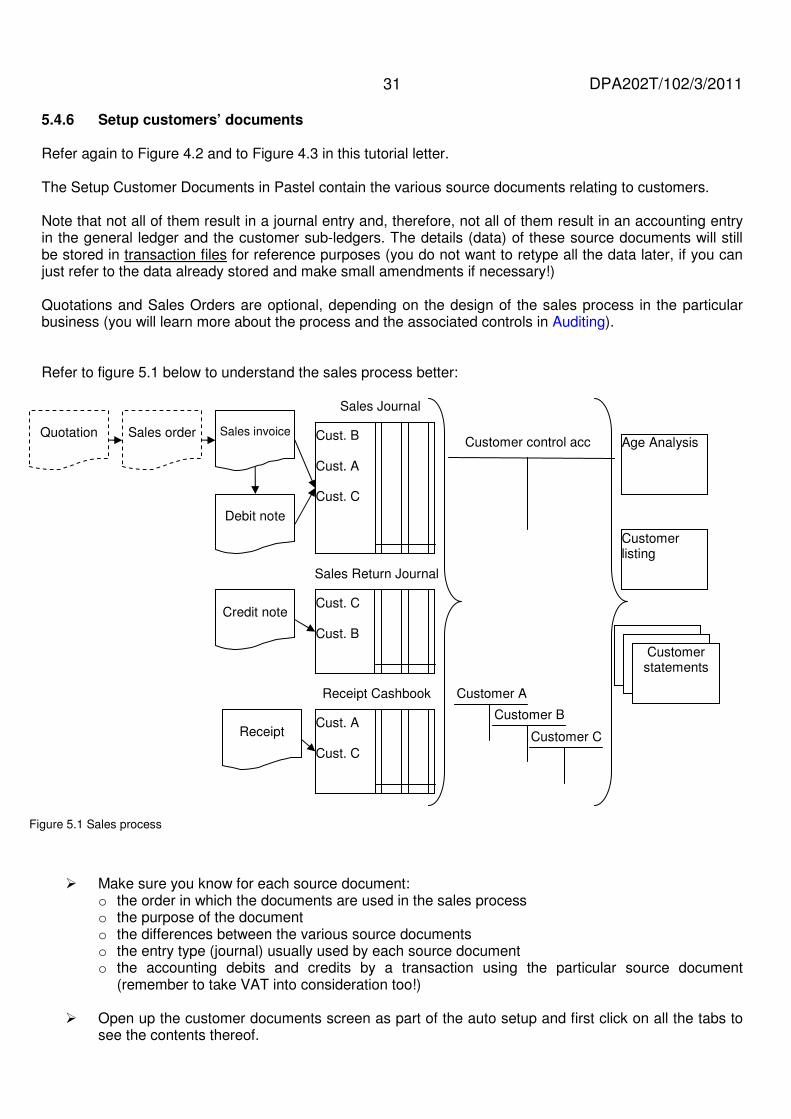
� Refer to figure 5.1 for the sales process and draw your own diagram with the relevant documents, journals, general ledger accounts and reports for the purchase process. You can use the outlines provided on the next page to help you.
Note – it is very important that you fully understand the difference between a customer and a supplier! Likewise, you should know what is ageing and the difference between balance forward and open item processing!
DPA202T/102/3/2011
35
� Make sure you know for each source document: o the order in which the documents are used in the purchase process. o the purpose of the document. o the differences between the various source documents. o the entry type (journal) usually used by each source document. o the accounting debits and credits by a transaction using the particular source document
(remember to take VAT into consideration too). Notice the message details typed in for the purchase order and the return/debit note. Why would a business want to print this additionally on their documents?
� Follow the step-by-step instructions in Lesson 4 of your Pastel Manual to setup the supplier documents.
5.4.9 Setup inventory When doing the setup for the inventory, you are specifying the terms and rules you want the majority of your inventory items to follow, such as the various price lists used for inventory items, the maximum selling prices and discount percentages etc. You can modify this later when you create/edit an individual inventory item.
� Open up the inventory setup as part of the auto setup and first click on all the tabs to see the contents thereof.
Only certain items in the setup of the inventory are going to be highlight, as the rest is sufficiently explained in your Pastel Manual.
Figure 5.2 Purchase process

36 DPA202T/102/3/2011 Configuration tab Many businesses have different price lists. E.g. entertainment businesses may have individual client and corporate client price lists, or tourist attractions may have local or foreigner price lists (the latter often quoted in US dollars). Often employees are given authorisation to make decisions relating to sales and purchases, but only within certain limits. Some of these limits are specified here in Pastel, so that the employees do not overstep their authorisation, be it accidentally or on purpose for extra sales commission or kickbacks on purchases. Again you will learn more about controls (both manual and computerised) in Auditing. The items listed in the processing block refer to computerised controls to help the business owner(s) achieve their profit goal. If you have selected goods received notes to be mandatory and you control your inventory like you should, there should be no reason for inventory quantities to ever fall below zero. You cannot sell something you do not have in your stores, right? You can only select to be warned if inventory falls below zero if you have selected to allow it to go below zero in the first place. The reorder levels and the preferred suppliers will be set later when you create/edit individual inventory items in Lesson 8. Then you must refer back to this inventory configuration tab.
� Think where each of the limits shown and the items in the processing block will have an impact further on in the transaction processing system.
Integration/Groups tab Currently the default inventory groups are Services and Inventory Goods. If you wish, you could set up multiple groups and use different descriptions. E.g. a supermarket can use groups such as Basic food, Luxury food, Fresh produce, Pet food, Cleaning and Other as inventory groups. Why would you want to create multiple inventory groups? For decision making, of course! If you can separate the sales and cost of sales of the various groups, you can make better decisions. To create various groups you type the group names under the description column. However, Pastel will not automatically know how to link (integrate) the groups with the general ledger (remember, this is a transaction processing system, not an artificial intelligence system) so you can extract the information at a later stage. Therefore we will set up the integration here on the Inventory integration/groups tab! When you selected an industry specific chart of accounts during the creation of the new company on Pastel, several standard general ledger accounts were created automatically. These include the customer and supplier control accounts you have seen so far during auto setup, as well as the accounts visible on the integration/groups tab of the inventory setup.
� Use the horizontal sliding ruler to view all the different general ledger accounts impacted on by an integrated inventory system (the default).
� Now unselect the integrate inventory to general ledger tick box and see how the general ledger accounts are affected. Select the same tick box again (and click OK as requested) to see the integrated general ledger accounts again.
Can you remember the difference in accounting between a perpetual inventory system and a periodic inventory system?

DPA202T/102/3/2011
37
� Draw T-accounts and prepare fictitious transactions for both the perpetual and the periodic inventory systems to make sure you remember and understand the related accounting. (Tip: the general ledger accounts visible in Pastel when you select to integrate or not to integrate may help you.)
User Fields tab These user defined fields are similar to those defined for customers and suppliers, i.e. it becomes the field names in the inventory master file. E.g. you will be able to specify the name of each type of inventory item for any business, but you might want to create a special field for ingredients in food that may cause allergic reactions if your business sells food. Other tab The defaults for new items on the inventory setup other tab is similar to the default tabs for customer control and supplier control in that it will use this information as the default for every new inventory item you are going to create in Lesson 8. If you decided to change the description or add more inventory groups on the configuration tab, you’d be able to select it here in the inventory group dropdown list. The encrypted cost price is a very nice feature if you are going to print your own price labels and if you give some flexibility to your sales staff for negotiating sales prices.
� Press F1 (Help) when you are on the inventory setup other tab. Read the additional guidance given on: o when to use fixed descriptions and when not o the difference between physical and service items and when to select which option o encrypted cost price
� Follow the step-by-step instructions in Lesson 4 of your Pastel Manual to setup the inventory.
It is extremely important that you and the Help function (F1) get to know each other very well! Long after you have passed DPA202T the Help function will still be there to give additional guidance and help brush up on those skills which have become rusty from infrequent use.
38 DPA202T/102/3/2011 5.4.10 Backup and restore There is a difference between saving your company and backing up your company! When you close your Pastel after working on it, your company and all the changes you have made is automatically saved to your local hard drive or your network drive (depending on your installation), even if you do not backup. Therefore, it is NOT necessary to restore your backup before starting to work in Pastel again the next day. Remember – it is automatically saved! A backup is a special save (preferably to another location such as a removable disk, internet etc.) You make this special save in case something happens to the Pastel on your local hard drive, or if you are going to effect a major change on Pastel that could result in major errors. Believe me – those people capturing the data work very hard and they do not want to redo their work if it is somehow lost, never mind the cost of lost information on your business’ decision making process! That is why daily backups are necessary and why it is necessary to do it to a different location than your local/network hard drive. ONLY when a disaster has struck your transaction processing system (such as a system crash or if there were major errors in the processing) will you restore your backup.
� Know everything there is to know about backups!!
� Follow the step-by-step instructions in Lesson 4 of your Pastel Manual to make a backup and restore a backup.
Tips for Pastel backups: • Always tick the ‘Ensure files readable’ tick box (would you take a chance that
your backup files are NOT readable when you desperately need to restore?!) • Create a separate ‘Backup’ folder, preferably unto your flash drive, but NOT
under your company name in the Pastel folder (this will result in your file size growing exponentially, as your growing number of backups will then every time be backed up again)
• Create subfolders under your ‘Backup’ folder for each lesson in the Pastel Manual e.g. Lesson 4, Lesson 5 etc.
• Create extra subfolders for Lesson 9, e.g. Lesson 9A to 9D, because Lesson 9 is quite a long lesson with a lot of transactions
• Starting right now, make a backup of Spotless Cleaning Services after every completed lesson in the relevant subfolder!!! (You might make a mistake and want to restore and start over from the previous lesson again, to ensure your printouts agree with those shown in the manual.)
DPA202T/102/3/2011
39
5.4.11 Assessment guidance Do the formative assessment questions at the back of Lesson 4 and compare your answers with those provided on the dark grey data CD. These formative assessment questions may be included in you final exam. In addition, think about the following for exam purposes:
• If presented with a screen print of any auto setup section, explain and criticize (if need be) the chosen settings
• Explain the various VAT concepts, requirements and types, choose the correct VAT type and percentage for a given transaction, as well as explain the effect thereof in the general ledger;
• Explain the sales and purchases processes, including the associated debit and credit accounting entries
• Be able to fully discuss the how, why and when of backups. The answers to the above could be obtained from your Pastel Manual, the Pastel Help file, this tutorial letter or the myUnisa discussion forum.
5.5 Lesson 5 - The edit menu – Customers:
� Refer back to the diagram and explanation in 4.1 of tutorial letter 102/2011. 5.5.1 Creating customer categories and sales analysis codes
� Follow the step-by-step instructions in Lesson 5 of your Pastel Manual to create the customer categories.
� Open the ‘Demo’ company again:
o Click on Edit – Customers – Categories. o See how different customer categories can be used for reporting purposes. o Stop and think which categories could be used for various types of businesses. o Now open the ‘Spotless Cleaning Services’ company again.
� Follow the step-by-step instructions in Lesson 5 of your Pastel Manual to create the sales analysis
codes.
� Open the ‘Demo’ company again: o Click on Edit – Customers – Sales Analysis Codes. o See how the demo company was setup for commission. Also click on the tabs for ’This year
totals’ and ‘Last year totals’ to see the resulting commission. o Remember that sales analysis codes need not only be used to calculate commission. o Now open the ‘Spotless Cleaning Services’ company again.
The setup of a new company after creation is so important, that I highly recommend you open your extra ‘TEST’ company and do the setup again. Go through this setup section in the tutorial letter again, but this time play around and click and try out different options. (You cannot break it – try!! And if something does go horribly wrong – delete the company and create another test company!) Then open your ‘Spotless Cleaning Services’ company again to continue with the instructions in the Pastel Manual.

40 DPA202T/102/3/2011 5.5.2 Creating customer accounts When creating the customer accounts you will use the setup information you created as part of the ‘Setup customer control’ in Lesson 4, as well as the ‘Customer categories’ and ‘Sales analysis codes’
You can control how each customer’s transactions will be processed, which will then affect how their transactions will be displayed in the customer statements.
� Review the Balance Forward and Open Item processing methods in Lesson 4 of your Pastel Manual. You really need to understand this well.
The Customer Codes will be used as the primary keys in the customer master file to uniquely identify each customer. Although it can be changed later, it is much better to do it correctly from the start.
� Review how to design customer codes and enter customer names in Lesson 5 of your Pastel Manual.
When you create the customer accounts on Pastel for each customer, you are actually creating a sub ledger account for that customer and specifying the how, where and when of the processing and output for that customer.
� Open the ‘Demo’ company.
� Click on Edit – Customers – Accounts and then click on all the various tabs to familiarise yourself with the contents.
� Point your mouse (do not click yet!) over each of the icons at the top of the ‘edit customer account’ screen to see the name of each icon. Make sure you know what each one will be used for.
� When working through the customer account setup you should ask yourself continually: o where did this default information/setup come from? o where will it be used further on in the transaction processing system? o why is it necessary (what is the purpose)?
� If you do not know what something will be used for, click on F1 (Help)! (It is really important that you should learn to help yourself when using software.)
Top section
The ‘account code’ will have to be created with the guidelines given previously.
Can you remember where the ‘customer category’ was setup, the variations possible and what it will be used for?
Why would you setup a ‘cash sale account’ if you can just create a separate sub ledger for every customer and what is the blocked tick box for?
Contacts tab
When typing the addresses for a customer, notice how the name for the particular address line is displayed in the yellow textbox to aid with the data entry. Can you remember where you did the setup for these names?
What can the email address of a customer be used for and where did you have the option to email something to your customers? What is a ‘sales code’ again, where did you set it up and what can it be used for?

DPA202T/102/3/2011
41
Processing tab Can you remember where you did the setup for all the default information contained on this tab? See how you can change (customise) it here for every individual customer – your initial setup was just the setup you wanted for the majority of your customers. Where and for what purpose do you think this information will be used further on in the transaction processing system? Why do you need to capture the ‘tax reference’ number for each customer? Terms tab Can you remember where you did the setup for all the default information contained on this tab? Where and for what do you think this information will be used further on in the transaction processing system? The credit limit is determined separately for each customer by the credit manager of the business. The credit limit you grant is basically the maximum amount a customer can buy for without paying up front (think of your Edgars/Ackermans cards). Allowing sales on credit increases the risk of bad debts. In Auditing the process for granting and monitoring customer credit is discussed in greater detail. User defined tab See how the fields you defined in the customers’ control are listed here. Balances tab and Notes tab
� Click on the ‘balances’ tab and then click repeatedly on the ‘next record’ icon to view the sales and balances information for the various customers of the ‘Demo’ company.
� Click on the ‘notes’ tab and then click repeatedly on the ‘next record’ icon to view the different notes
for the various customers of the ‘Demo’ company. Double click to open and read these notes, then close it again after reading.
What can this information be used for and by whom?
� Open the ‘Spotless Cleaning Services’ company again.
� Follow the step-by-step instructions in Lesson 5 of your Pastel Manual to create the customer account and a note for the customer.
� Follow the step-by-step instructions in Lesson 5 of your Pastel Manual and create the cash
customer account. The differences in the setup of a cash customer account and a normal customer account are: o For a cash account the “Cash Sale account” box is selected.
o Cash account Processing method is Balance forward o Cash account Monthly terms is Current

42 DPA202T/102/3/2011 5.5.3 Changing customer processing and printing the customer master file It is always much better to do things right the first time, but as we know – the only constant in life is change! You can change the processing method of customers and/or suppliers in the ‘Change’ menu, either for all of them, a range of customers/suppliers (just be sure you know which ones will be affected!) or an individual customer/supplier.
� Follow the step-by-step instructions in Lesson 5 of your Pastel Manual to change from open item to balance forward processing.
Documents and reports can be printed from the ‘View’ menu. When viewing a document or a report you are looking at a small subset of the data (like reading with a magnifying glass). Viewing will not change the underlying data, but it sorts, calculates, summarises and classifies the data into useful information.
� Follow the step-by-step instructions in Lesson 5 of your Pastel Manual to print the customer master file listing.
� Click on the ‘rerun’ button and play around with the various report options. Experiment – this is
the way to get to know application software!
� Now is also a good time to experiment with printing to the virtual printer you have installed. Refer to 6.1.2 in tutorial letter 102/2011 for step-by step instructions how to print using a virtual printer
5.5.4 Assessment guidance Do the formative assessment questions at the back of Lesson 5 and compare your answers with those provided on the dark grey data CD. These formative assessment questions may be included in you final exam. In addition, think about the following for exam purposes:
• If presented with a screen print of any edit customer account screen, explain and criticize (if need be) the chosen settings
• Which report and report settings do you use to obtain the required information? The answers to the above could be obtained from your Pastel Manual, the Pastel Help file, this tutorial letter or the myUnisa discussion forum.
Remember to backup into a separate subfolder/directory named Lesson 5!
DPA202T/102/3/2011
43
5.6 Lesson 6 - The edit menu – Suppliers:
� Refer back to the diagram and explanation in 4.1 of tutorial letter 102/2011. 5.6.1 Creating supplier accounts The setup of the supplier accounts is very similar to the setup of the customer accounts. When creating the supplier accounts you will use the setup information you created as part of the ‘Setup supplier control’ in Lesson 4.
� Compare the contents of the various tabs of the ‘edit supplier accounts’ with the contents of the ‘edit customer accounts’. Note the similarities and differences. Read the tutorial letter guidance for ‘edit customer accounts’ again and apply the same principles to the ‘edit supplier accounts’.
Only certain items in the ‘edit supplier accounts’ are going to be highlighted, as the rest is sufficiently explained in your Pastel Manual and above in ‘edit customer accounts’ explanation.
� Open the ‘Demo’ company.
� Click on Edit – Suppliers and then click on all the various tabs to familiarise yourself with the contents.
� When working through the supplier account setup you should ask yourself continually:
o where did this default information/setup come from? o where will it be used further on in the transaction processing system? o why is it necessary (what is the purpose)?
� If you do not know what something will be used for, click on … F1 (Help)!
Processing tab Why do you need to capture the ‘tax reference’ number for each supplier? When you purchase inventory items, you will generally enter the stock item code on the supplier invoice, together with the quantity and price per item. However, an organisation needs to purchase several other non-inventory items and services to enable them to run their business. You will still capture the details on these supplier’s invoices into Pastel, but will then enter the general ledger account rather than a stock item code onto the invoice. Examples of such purchases are stationery and electricity. Be careful, though – if your business is to sell stationery then you will have plenty of stationery inventory items, but those stationery items you purchase to use in your business (i.e. not for resell) would be allocated to the stationery expense account in the general ledger. Now, it may be that some of your suppliers of non-inventory expenses only supply a single type of service or non-inventory type item to you. Then, to save time with data capturing, you will enter the general ledger code of the associated expense in the ‘default contra account’ text box. Then Pastel will automatically use that general ledger code for that supplier’s invoice and you need not look up the code every time. E.g. if Hollard is your short term insurer, you will enter 3850/000 as the ‘default contra account’ which is the general ledger code for insurance in your chart of accounts.
44 DPA202T/102/3/2011 Remember that you are your supplier’s customer! Just like you grant a credit limit to your customer, they will each grant a credit limit to you (depending on your credit worthiness). If you know the credit limit you have at each supplier, it will enable you to plan and spread your inventory purchases to optimise your cash flow. As a business you want you customers to pay you as quickly as possible, but you want to delay paying your suppliers. Budgeting and cash flow projections are dealt with in detail in Management Accounting.
� Open the ‘Spotless Cleaning Services’ company again.
� Follow the step-by-step instructions in Lesson 6 of your Pastel Manual to create the supplier account.
5.6.2 Printing the supplier master file
� Follow the step-by-step instructions in Lesson 6 of your Pastel Manual to print the supplier master file listing.
� Click on the ‘rerun’ button and play around with the various report options and also your virtual
printer.
5.6.3 Assessment guidance Do the formative assessment questions at the back of Lesson 6 and compare your answers with those provided on the dark grey data CD. These formative assessment questions may be included in you final exam. In addition, think about the following for exam purposes:
• If presented with a screen print of any edit supplier account screen, explain and criticize (if need be) the chosen settings
• Which report and report settings do you use to obtain the required information? The answers to the above could be obtained from your Pastel Manual, the Pastel Help file, this tutorial letter or the myUnisa discussion forum.
Remember to backup into a separate subfolder/directory named Lesson 6!

DPA202T/102/3/2011
45
5.7 Lesson 7 - The edit menu – Inventory & General ledger:
� Refer back to the diagram and explanation in 4.1 of tutorial letter 102/2011. 5.7.1 Creating inventory categories Similar to customer categories, inventory categories are used to classify the inventory items and inventory item transactions, then summarise, calculate and sort the information in those categories and thereby increase and improve the information in the reports for management. The purpose being better decision making!
� Follow the step-by-step instructions in Lesson 7 of your Pastel Manual to create the inventory categories.
5.7.2 Creating service inventory accounts When creating the inventory accounts you will use the setup information you created as part of the ‘Setup inventory’ in Lesson 4, as well as the ‘Inventory categories’.
� Review the differences between physical and service inventory items in Lesson 7 of your Pastel Manual. Alternatively use F1 (Help) and research the differences in Pastel. You really need to understand this well.
When you are creating the inventory accounts on Pastel for each inventory item, you are actually also creating a sub-ledger account for that inventory item and specifying the how, where and when of the processing and output for that inventory item – just like customer and supplier accounts.
� Open the ‘Demo’ company.
� Click on Edit – Inventory – Item File and then click on all the various tabs to familiarise yourself with the contents.
� When working through the inventory account setup you should ask yourself continually:
o where did this default information/setup come from? o where will it be used further on in the transaction processing system? o why is it necessary (what is the purpose)?
� The F1 (Help) function should be a familiar friend by now.
Top section The inventory code will have to be created with the same guidelines as for the customer and supplier account codes. See the inventory categories you have created in the drop-down box. This is for reporting purposes. Can you still remember the four ways of processing data into information from chapter 5 in your textbook? Details tab Where did you setup the Inventory groups? Quickly page back to Lesson 4 to refresh your memory.

46 DPA202T/102/3/2011
Can you think why Pastel allows you to set different VAT types for purchases and sales? Review your VAT notes and decide how you would set up the VAT on the ‘details’ tab for those items listed in 5.4.4.2 of tutorial letter 102/2011. Do you think there is a fraud risk in allowing your employees to change the descriptions of the inventory items while invoicing? Fraud, fraud risk and controls are dealt with as part of Auditing. How does the Sales Commission Item link to the Customers and Sales Analysis codes? Prices tab Where did you setup the various price lists that are displayed here? Note: You have to be able to convert VAT included prices to VAT exclusive prices with your calculator AND by using Excel formulas (refer to Tutorial letter 103/2011). Pastel will however do the calculations for us. How will we determine what sales price to ask for each item? Refer to the pricing decisions section covered as part of Management Accounting. Reorder tab On the ‘reorder’ tab you set all the details of where your inventory items can be purchased. This is very handy if you want to use the ‘Reorder Assistant’ to help you with ordering inventory when the stock levels drop below a certain level.
� While on the ‘Reorder’ tab – use F1 to research the various fields on the tab, as well as the ‘Reorder Assistant’.
� In the ‘Demo’ company: select ‘Service item’ on the ‘details’ tab and see what happens to the
‘reorder’ tab. Now select ‘Physical item’ on the ‘details’ tab and see what happens to the ‘reorder’ tab. Why do you think this happens?
Can you remember a control setting relating to preferred suppliers as part of the Inventory setup? Why do you think you want to record the supplier’s inventory code on your inventory records? The minimum and maximum quantities determine when Pastel will warn you to order more stock and is used by the ‘Reorder Assistant’ to know how many items should be ordered on the purchase order. So how do you determine the minimum and maximum quantities? Refer to the re-order point as per Management Accounting. User field tab Where could you setup the names of the user fields so that it is correctly displayed here?
In any accounting software application it is very important that you always know where the data you are currently entering is going to be used in future processes and where the data you see, came from. Remember that you will be asked for expert advice, therefore prepare yourself for the real world.

DPA202T/102/3/2011
47
Activity tab and Notes tab
� Click on the ‘activity’ tab and then click repeatedly on the ‘next record’ icon to view the quantity information for the various inventory of the ‘Demo’ company.
� Click on the ‘notes’ tab and then click repeatedly on the ‘next record’ icon to view the different notes
for the various customers of the ‘Demo’ company. Double click to open and read these notes, then close it again after reading.
What can this information be used for and by whom? Picture tab If you decide you want to include pictures of your inventory items, you would be wise to back them up too when backing up your other accounting data.
� Click on File – Backup and make sure you understand the backup settings. � You can cancel the backup, as we will only backup at the end of the lesson.
� Open the ‘Spotless Cleaning Services’ company again.
� Follow the step-by-step instructions in Lesson 7 of your Pastel Manual to create a service
inventory item.
5.7.3 Creating physical inventory accounts Because we wanted separate inventory categories for physical inventory items, and wanted to track their profitability separately in the general ledger, you first had to create the required sub-accounts, then set the integration and now only can you create those physical items.
� Quickly go back to 5.7.2 in this tutorial letter and read the section on creating service inventory items again.
� Follow the step-by-step instructions in Lesson 7 of your Pastel Manual to create a physical
inventory item.
What are the differences between a service and a physical inventory item? How does the setup differ and how will the accounting entries be different? 5.7.4 Renumbering inventory codes Remember the guidelines for choosing the codes for your customers, suppliers and inventory items? These codes are the primary keys in the relevant master files to uniquely identify each customer, supplier and inventory item. As always – doing things right the first time is the best! But, if it so happens you need to change it, you can do so in the change menu.
� Follow the step-by-step instructions in Lesson 7 of your Pastel Manual to renumber inventory codes and to create the additional stock items.
48 DPA202T/102/3/2011 Now, you will play around with the ‘renumber code assistant’ in the Demo company to change the customer and supplier codes.
� Open the ‘Demo’ company.
� Click on Change – Renumber codes and then first select Customers and follow the instructions on the screen. Now go and view the result of your change. (Think where you will do that – similar to Inventory!)
� Click on Change – Renumber codes and now select Suppliers and follow the instructions on the
screen. Now go and view the result of your change. (I know you know where to check this – similar to Customers!)
5.7.5 Creating and editing general ledger accounts
� Open the Explorer and click on ‘General ledger’ under tasks. Sort according to code. (You learned how to do all of this in Lesson 2 – Working in the Demo Company.)
� Browse through all the existing general ledger accounts. Take a closer look at the account number
in the ‘Fixed Assets’ financial category. The 4 numbers before the ‘/’ is the main account number and the 4 numbers thereafter is the sub-account number of the general ledger account.
� Review the section on ‘Main and subaccounts’ in Lesson 7 of your Pastel Manual.
� Open the ‘Demo’ company.
� Click on Edit – General ledger – Accounts and then click on all the various tabs to familiarise yourself with the contents.
Top section When you selected the most relevant industry chart of accounts when you created your company, Pastel automatically created numerous balance sheet and income statement general ledger accounts for your business. However, as every business is unique, you may need to add some general ledger accounts or delete some that you will not use. I personally recommend that you must rather block an account, than delete it. That way it cannot be used for transaction processing, but if you need the account later, you can just unblock it again.
� Click repeatedly on the ‘next record’ icon until you reach a general ledger account with a description in the control account block. Continue and notice the various control accounts.
Do these control accounts look familiar? Can you remember where an account is setup as a control account? Details tab
� Select Income statement and click to see which financial categories and report writer categories are available in the drop-down boxes. Now repeat this for the Balance sheet option.
You have to know your Accounting framework in order to classify your new/existing accounts correctly as assets/liabilities/equity/income/expenditure etc.!

DPA202T/102/3/2011
49
The external reference is a handy field if you want to export and compare the financial results of various companies using different account numbers. You enter the same external reference and can then manipulate the information in Excel for a comparison. See how you can set the tax processing already for the general ledger. This can save time later during transaction processing and more importantly, it allows you (the knowledgeable accountant) to set it up correctly so that the data capturers are less likely to make mistakes during transaction processing.
� Open the ‘Spotless Cleaning Services’ company again.
� Follow the step-by-step instructions in Lesson 7 of your Pastel Manual to create a general ledger main account and general ledger sub-accounts.
5.7.6 Integrating the general ledger inventory accounts to the inventory groups
� Quickly go back to 5.4.9 in this tutorial letter and read the section beneath Integration/Groups tab again.
Only after you have created the appropriate general ledger accounts and sub-accounts, can you link the various inventory groups to those general ledger accounts. Remember that a computer is not intelligent on its own, everything has to be specified in detail! As you will later learn, you can also create general ledger, customer, supplier and inventory accounts as and when you need it (without going to the separate menu). You will create these accounts ‘on the fly’ by using the F6 shortcut key.
� Follow the step-by-step instructions in Lesson 7 of your Pastel Manual to integrate the general ledger accounts with the inventory groups.
5.7.7 View Master file listing and price list Viewing any report is a good opportunity to check that you have captured everything correctly and completely to date. Before you run these reports (any reports for that matter) – form a mental picture during the setup of how the information will be presented and what detail entries should be listed. Then compare it with the report results.
� Follow the step-by-step instructions in Lesson 7 of your Pastel Manual to print the inventory master file listing.
� Click on the ‘rerun’ button and play around with the various report options and also your virtual
printer. If you do not have all the inventory items listed as shown in the Pastel Manual, you have to go back and capture them now, as you will need it for your transaction processing.
� Follow the step-by-step instructions in Lesson 7 of your Pastel Manual to print the price list.
� Again click on the ‘rerun’ button and play around with the various report options. What do you think will be the result if you have incorrectly setup your price list?

50 DPA202T/102/3/2011
5.7.8 Assessment guidance Do the formative assessment questions at the back of Lesson 7 and compare your answers with those provided on the dark grey data CD. These formative assessment questions may be included in you final exam. In addition, think about the following for exam purposes:
• If presented with a screen print of any edit inventory account screen, explain and criticise (if need be) the chosen settings.
• If presented with a screen print of any setup inventory integration/group screen, explain and criticise (if need be) the chosen settings.
• Choose the correct financial and report writer categories for income statement and balance sheet general ledger accounts.
• The differences between service and physical inventory items.
• Which report and report settings you would use to obtain the required information? The answers to the above could be obtained from your Pastel Manual, the Pastel Help file, this tutorial letter or the myUnisa discussion forum.
5.8 Lesson 8 - Creating /editing accounts and inventory items: In this lesson, you will be practicing the skills you have learned from Lessons 5 to 7. While doing the exercises, please think! You are not training to be data capturers, but to be thinking accountants! So think where the information you use came from and where it will be used. Play around in the ‘Demo’ company, but remember to switch to the ‘Spotless Cleaning Services’ company for the exercises in the manual.
� Follow the step-by-step instructions in Lesson 8 of your Pastel Manual. � Click on the ‘rerun’ button and play around with the various report options.
5.8.1 Assessment guidance Do the formative assessment questions at the back of Lesson 8 and compare your answers with those provided on the dark grey data CD. These formative assessment questions may be included in you final exam. In addition, think about the following for exam purposes:
• If presented with a screen print of any edit customer/supplier/inventory account screen, explain and criticise (if need be) the chosen settings
• Which report and report settings would you use to obtain the required information? The answers to the above could be obtained from your Pastel Manual, the Pastel Help file, this tutorial letter or the myUnisa discussion forum.
Remember that you learn how to use software by playing around with it and by making mistakes. (That is why you will be making a backup after every lesson – so go for it!)
Remember to backup into a separate subfolder/directory named Lesson 7!
Remember to backup into a separate subfolder/directory named Lesson 8!
DPA202T/102/3/2011
51
5.9 Lesson 9 - Processing: In this processing lesson, Pastel will use the setup documentation data from Lesson 4. You will specify which customers and inventory items or which suppliers and inventory items from the relevant master files to use (you created the master file records in Lesson 5 to 8) when processing the various transactions, which will all be recorded in various transaction files.
� Refer back to the diagram and explanation in 4.1 of tutorial letter 102/2011 to understand where we are in the overall transaction processing process.
� Review diagram 5.1 on the sales process and diagram 5.2 on the purchase process (which you
completed).
� Review diagram 4.2 on the converting of transaction data into information (computerised process). Before you continue – be very sure about:
• the difference between master files, transaction files and table files.
• the difference between batch input, online input, between batch processing and real-time processing and between batch output and interactive output.
• the difference between suppliers and customers.
• the various source documents and how it fits into the sales and purchases processes.
• the accounting entries created by the various source documents. 5.9.1 Entering transaction data onto source documents Transactions can be entered by capturing the data on screens that look similar to the source documents, or it can be entered directly into a journal. The benefit of entering the transaction onto a source document is that it is more understandable for most data capturers, less error prone and the transaction processing system will take care of the debits and credits for you. Source document data entry fields - familiarisation
� Open the ‘Demo’ company.
� Click on Process – Suppliers and familiarise yourself with the screen layout. � Click on the drop-down list for ‘Document type’ in the top-left corner and select the various supplier
source documents one after another. Notice how similar the layout for the various source documents is in Pastel. This increases the speed of data capturing and limits data capturing errors as far as possible. However – make double sure when capturing a transaction that you are using the correct document! (Why do you think Pastel uses different colours for the different source documents?) You will also notice with the processing of the various customer and supplier transactions, that the document/screen has been designed to limit typing. There are fields which uses drop-down boxes, fields which are automatically completed by Pastel from setup information or based on your drop-down selection and ‘zoom’ boxes for looking up details. This again increases speed and limits errors.
� Click on Process – Customers and compare these customer documents with the supplier documents you just scrutinised.

52 DPA202T/102/3/2011
� Click on the drop-down list for ‘Document type’ in the top-left corner and select the various
customer source documents one after another. There are many data entry fields for all (supplier AND customer) source documents, but all of them can be classified into three main types of data which are:
• Details relating to the particular transaction.
• Details relating to the party with whom the company is doing business (customer or supplier).
• Details relating to the inventory purchased/sold. There are also options and buttons displayed on each source document which will not be printed on the document, but is there to help with the display on the screen (for capturing purposes) and special functions.
� Choose any source document and classify all the data entry fields into one of the three main types of data listed above.
� Play around in the ‘Demo’ company. Process a purchase order and a sales quotation without
looking at the detailed guidance in the Pastel Manual. o Use your computer instinct! o Click and follow the onscreen guidance where provided. o Click on the magnifying glass to access master file records. o Click F1 for help when stuck.
� Think where each data field comes from and where the data will be used further on in the process.
Source document data entry fields - detail Data fields with details relating to the particular transaction:
• Document number – this field is automatically inserted by Pastel in number sequence. The number sequence of document numbers is very important for Auditing purposes to ensure completeness and also validity.
• Period in which the transaction must be recorded for accounting purposes – the periods available in the drop-down box depend on the number of periods you created during setup. The period is linked to the date (or vice versa) depending on your setup (can you remember where?). Accounting requires transactions to be recorded in the correct accounting period.
• Transaction date of the document – it is critical to process transactions on the correct date. Not the date when you capture the transactions, but the date risk was transferred! (Please refer to your Accounting notes for the theory on this.) Be careful when capturing your transactions – e.g. wrong dates for goods received notes may result in your inventory records being incorrect and then you will not be able to sell the items as required by the tasks in the Pastel Manual!
• Reference to other documents – when you receive a document from outside your organisation, you will enter the document number from that document as a reference so that you can locate the relevant document again where you filed it for Auditing. Examples of documents you receive from outside your organisation are a purchase order from your customer, or a quotation, delivery note or sales invoice from your supplier (ARE you sure what the differences are between customers and suppliers and the documents they use?!))
• Transaction discounts and terms – if you specified a specific discount or terms during setup, those discounts and terms will automatically be shown here. You can always modify it for each individual document, provided you allowed that in the setup of course. Refer back to where you set it up for the particular documents, individual customers or suppliers etc. Do you now see where those setup details were going to be used and for what?
• Latest action date – this date is for information purposes, to indicate to the customer or supplier when the document expires or when the last date is for delivery or payment.

DPA202T/102/3/2011
53
• Message box – remember you could have included a default message for each source document type already during setup. You can still modify it here, or type a new message from scratch. Take a moment to think what may be appropriate messages for each source document.
• Summary of total amounts – right down in the right-bottom corner is the total discount, tax and grand total for the whole document.
Data fields with details relating to the party with whom the company is doing business (customer or supplier):
• Supplier/customer code – this is the primary field, which is unique and used by Pastel to look up the rest of the details from the relevant master file. Those master file details of the supplier or customer are then displayed on screen (and printed later). This saves a lot of time with the capturing of the transactions.
• Supplier/customer name – inserted by Pastel based on supplier/customer selected.
• Supplier/customer address – inserted by Pastel based on supplier/customer selected. (Please take note how the displayed delivery address can still be modified. This is a fraud risk for the business.)
• Supplier/customer shipping – inserted by Pastel based on supplier/customer selected. Data fields with details relating to the inventory being purchased/sold:
• Inventory code/general ledger code – what you enter here, will depend on the type of code that has been set. If you click on the zoom icon (magnifying glass) next to ‘4 Item Code’ you will see a familiar list. Depending on what you choose here, the zoom list available under Code will differ. Can you remember where you chose the type you wanted during setup? You will use the ‘Item code’, ‘GL code’ and ‘Remarks’ types the most.
• Inventory/general ledger description – inserted by Pastel based on code selected
• Quantity – What do you think will happen if you type a quantity exceeding the quantity on hand for the inventory item? Can you remember where you selected this control during setup?
• Price – You set up your customers and suppliers globally to enter prices either including or excluding VAT. You can also modify this per individual customer or supplier when you create them. This price column is displayed according to your settings. Should you however need to enter the prices suddenly different from the setup, you just need to tick the tick box in the top-left corner before you start entering the invoice lines. Customer prices will automatically reflect the customer price list you specified when you created the customer. If you zoom on the customer price, it will display all the prices available while still highlighting the price list linked to the particular customer. The purchase prices displayed for suppliers will be the latest cost price at which you purchased the inventory item. (NB! It is strongly recommended that you already enter the purchase prices on the purchase orders, as when you link your goods received notes and invoices to the previous source documents, you need not enter the prices again and then your general ledger entries will be at the correct values.) Overriding of the prices is possible, depending on you controls selected during setup.
• Tax – the display as inclusive or exclusive, or the non-display of VAT on your documents depends on your setup. So is the VAT type. Do you remember where to setup the VAT type per supplier/customer and inventory item? Do you know when to use which type of VAT?
• Nett (total) for transaction line – the nett total is simply quantity times price.

54 DPA202T/102/3/2011 Source document options and buttons Link/Create button:
• When you refer to your sales and purchases processes, you will notice that certain documents follow logically on documents used earlier in the process. Now, in a manual transaction processing system you would have had to rewrite everything, but in a computerised transaction processing system you need to merely ‘link’ the current document to the earlier documents and all the line item details will be brought forward to limit typing. Thank you, Pastel!
• Pastel will automatically prompt you to link to the previous document. Do not do it! Sometimes after linking you will be unable to change the dates and/or period on the current document. Then everything will be a mess going forward with transactions out of period, out of inventory situations, reports not agreeing with the Training Manual printouts etc. So please decline the prompt to link automatically and rather click on the link button AFTER you have set the date correctly!
• It may happen that you have ordered a quantity of say 20 for a particular inventory item, but the supplier is delivering only 15. When you link, just click on the inventory item you have received and do not worry about the quantity brought forward from the linked document, as you will correct the quantity on the current document by just typing over it.
Inclusive/Exclusive tick box:
• Depending on your setup, the source documents for suppliers and customers will allow you to enter prices either inclusive or exclusive of VAT. If you suddenly need to change it while entering the document details, just tick this tick box BEFORE entering the document lines (else just delete the lines with the ‘Delete/Insert’ button). Tick and untick this tick box and see how the price column changes.
User defined fields tick box:
• Can you remember where you can define/setup these fields to display on the source documents? Batch button:
• If you use batch processing, you will capture documents but it will not reflect in your reports or general ledger before you update it. The batch button is where you come to update your batches and you have to do it separately for each type of document. (You will learn later to view all the outstanding/open batches and then jump to them to update it.)
• Can you remember where you specified whether you will use batch processing or real time processing during setup?
• You can also print a list of all the transactions in the particular batch from the ‘Batch’ button, print documents that have not yet been printed in the past (outstanding) or print documents again.
Delete/Insert button:
• You can insert document lines and delete document lines/whole documents or even the whole batch.
• Please use the delete function with great caution! Edit document button: • You can make changes to saved documents, but only if you have not yet updated your batch! Once
you have updated your batch, you will have to effect changes with debit notes, credit notes and inventory journals.
• This is to give the accountant/manager an opportunity to review the data capturing of those reporting to him and making corrections where necessary. Just remember that some documents are not subject to batch processing, but is processed in real time – so no quick editing of those documents!

DPA202T/102/3/2011
55
Next document button/Close button and X:
• These buttons will automatically save your document. It does NOT cancel your document in case of a mistake!
You will process the supplier transactions first, because Spotless Cleaning Services is a new company and you cannot start selling if you have not purchased any inventory yet. If you should happen to make mistakes somewhere during the practical exercises – just continue so that you can get the learning experience. If you want to do it over, then use the ‘Restore’ function in the ‘File’ menu and restore the backup of the latest lesson that does not contain an error.
5.9.2 9A – Supplier transactions
� Follow the step-by-step instructions in Lesson 9A of your Pastel Manual, taking the guidance in 5.9.1 into consideration.
� For reports - click on the ‘rerun’ button and play around with the various report options.
5.9.3 9B – Customer transactions
� Follow the step-by-step instructions in Lesson 9B of your Pastel Manual, taking the guidance in 5.9.1 into consideration.
� For reports - click on the ‘rerun’ button and play around with the various report options.
5.9.4 Entering transactions directly into a journal In Lesson 9A and 9B you have entered the transaction into Pastel with a screen looking similar to the source document, such as a goods received note or a tax invoice, and from there Pastel automatically entered the transaction details into a transaction file (refer to Figure 4.3 again). However, Pastel also allows transaction details to be entered into Pastel with a screen looking similar to a journal. Sales transactions can be entered directly into Pastel through a Customer Sales Journal and purchases through a Supplier Purchases Journal.
There is a reason why Accounting and Accuracy both start with the same three letters - Accuracy is critical for Accounting!!! When processing your transactions – be careful and be accurate.
Remember to backup into a separate subfolder/directory named Lesson 9A!
Remember to backup into a separate subfolder/directory named Lesson 9B!

56 DPA202T/102/3/2011
� Open the ‘Demo’ company.
� Click on Process – Journals and view the variety of journals available (click on the + sign to expand the list of options).
� Select a few familiar journals and see how similar it looks to the manual type journals you learned
about in Accounting.
All these journals do is to make the entry of transaction details easier by already setting up the contra accounts and relevant column details, as well as whether the transaction should debit or credit the specified accounts.
Cash book data entry fields - familiarisation The journals you will use most often during this course are the cash payment journal and the cash receipt journal.
� Open the ‘Demo’ company.
� Click on Process – Cash book and familiarise yourself with the screen layout. Alternate between the cash payment journal and the cash receipt journal by clicking on the ‘Payments’ and ‘Receipts’ tabs alternatively.
� Play around in the ‘Demo’ company. Process several cash payments and cash receipts without
looking at the detailed guidance in the Pastel Manual. o Use your computer instinct! o Click and follow the onscreen guidance where provided. o Click on the magnifying glass to access master file records. o Click F1 for help when stuck.
� Think where each data field comes from and where the data will be used further on in the process.
Note: just because you enter the transaction directly into the journal does not, even for a second, mean that there is no source document! It is critical that there should be source documents to preserve the audit trail. The Pastel manual creates the impression that a cheque counterfoil and a bank statement is part of your source documents. This is not the case! All payments made should have supplier invoices or contracts to support the expenses and pre-numbered receipts should be issued for all payments received from customers. If not, your Auditor and/or the Receiver of Revenue (SARS) will be decidedly unhappy! In addition you will be creating numerous opportunities for fraud in your business!

DPA202T/102/3/2011
57
When entering a transaction directly into a journal, it is very important to always make sure that:
• you are using the correct journal.
• you are using the correct bank account.
• you are on the correct tab (payments/receipts).
• your settings are correct! Cash book data entry fields - detail
• Period – refer to the discussion in 5.9.1 for data entry into source documents.
• Transaction date – refer to the discussion in 5.9.1 for data entry into source documents.
• GCS – your selection in this column will determine the selection available in the Account field. G is for general ledger account, C is for customer and S is for supplier. Can you work out why only G and S are available under the ‘Payments’ tab and why only G and C are available under the ‘Receipts’ tab? Refer back to where you set up the entry types for the cash books. Do you now see where those setup details are going to be used and for what?
• Account – the drop-down lists depends on your GCS selection.
• Reference – you will type the unique number of your source document in here – you audit trail! Note that Pastel will combine all line items with the same reference number for bank reconciliation purposes, which is great. This will enable you to split a transaction and book it to different general ledger accounts to ensure your classification audit objective is met, and will lead to better management control when analysing the information. E.g. your municipality account will be paid with one cheque, but you may decide to split the cheque and book the relevant parts to separate general ledger accounts for electricity, water and rates.
• Description – this description will show in your detail cash book and general ledger printouts and help you to remember what the expense/income was for. The more descriptive your description is of the actual transaction, the better. If later you find you rely a lot on the descriptions to analyse your expenses or income, it may be time to create additional subaccounts or separate general ledger accounts.
• Bank amount – your settings will determine whether you enter the amount including or excluding VAT. The amount you actually paid (including VAT if VAT was applicable) will display for the bank reconciliation.
• Tax – refer back to 5.4.4.2. It is especially in the cash book that your knowledge of VAT will be tested.
• Discount – you should enter/calculate the amount of discount when you give a discount to your customer or receive a discount from your supplier and enter it here. This will enable the successful open item matching of payments/receipts with the respective purchases/sales.
Cash book options and buttons Cash book drop-down box:
• Some companies have 10 or more different bank accounts and almost all have at least one bank account and petty cash. Step one should always be to confirm that you are entering your transactions in the correct cash book, else you will have to retype your transactions or worse – process cancellation entries if you have already updated your incorrect cash book batch!
Batch type drop-down box:
• You can create cash book batches and save it, then at a later date update it (post dated batches) or copy and reuse the cash book transactions every month or as needed (recurring batches), or just type it in as needed for the current period (normal batch).
• Post dated batches is very useful if you know you have little time at month end to finalise your accounting entries and recurring batches saves a lot of time for journals that repeat every month e.g. salaries, rent etc.
• Recurring batches are never updated as you will copy from them again and again into your normal batches.
58 DPA202T/102/3/2011 Delete button:
• This will delete the selected transaction line. Match button:
• If the settings was not setup correctly to invoke open item processing, it can manually be matched by clicking this button and then the screen to match payments/receipts with the respective purchases/sales will open up.
Reconcile button:
• From an Auditing perspective it is recommended that this button is NEVER used! Reconciliation should take place properly through the separate reconciliation function by a different person from the one entering the cash book transactions!
Inc /Exc button:
• Although you can set the tax entry method as part of the cash book settings as either including or excluding VAT, individual transactions might differ from the settings and if you click this button it will allow the amounts to be entered different from the settings you chose.
Preview button:
• Every cash book and journal was created so that the debit and credit accounts were already setup as usually required for this type of transaction, with the double entry taken to the account you specify as the contra account.
• Click on the preview button to view the actual debits and credits as it will be saved in the transaction file if you want to make sure Pastel did not assume too much or you did not specify correctly.
Transfer button:
• Pastel has a complicated method to transfer money from one cash book to another.
• You MUST use the transfer button when transferring money between different bank accounts or if you draw cash to use as petty cash. Else the transfer will not be visible as part of the bank/petty cash reconciliation!
• If you do not use the transfer button, but record it as a ‘payment’ from the one cash book and a receipt into the other cash book, you will have processed the transaction twice!
• Can you remember how and where you setup the bank transfer clearing account? Update button:
• Remember, if you use batch processing, you will capture transactions but it will not reflect in your reports or general ledger before you update it. The cash book update button is what you click to update your cash book batches. (You will learn later to view all the outstanding/open batches and then jump to them to update it.)
Batch button: • You use this button to sort your cash book transactions, copy from your recurring/post dated batches
into your normal cash book batch, delete the whole batch or use the remittance assistant! Settings button:
• Step two should always be to set the settings before entering your cash book transactions.
• Here you will set the contra account (for non-cash book journals), the processing options, the reference options and the tax processing.
• These settings are what you will mostly use to make life easier when entering your transaction. However, all the settings you chose can be changed during entering of the transactions should you need to, by simply overtyping, or clicking the appropriate button.

DPA202T/102/3/2011
59
5.9.5 Bank reconciliations
A bank reconciliation is one of the most important controls in a business. Bank reconciliations could identify cash book transaction processing errors, fraud and theft, and even mistakes by the bank. Because banks make mistakes and fraudsters can obtain funds from your bank account, the bank statement should not be used as a source document, except for bank interest and bank charges. With a bank reconciliation you will be simultaneously checking up on your bank and your accounting personnel. It is critical that the bank reconciliation is done by a staff member who does not capture the payment and/or receipt transactions into the accounting system. This explains why we do not support using the ‘Reconcile’ button on the cash book – the correct process should be followed without shortcuts! The Pastel manual recommends that the cash book transactions should not be updated until the bank reconciliation is done. While this may work for a very small organisation with an accountant coming in at the end of every month to quickly capture the few transactions, this is NOT recommended for any other business due to the following reasons:
• Only updated transactions are reflected in the general ledger. Therefore you will have to wait for the bank reconciliation to be completed before drawing information from the system and making decisions.
• You could have received payments from your customers during the month, but their accounts will not be updated until the cash book is updated. Therefore their credit limits could be incorrect and you could be losing out on some sales (and customer goodwill!)
• The Remittance Assistant (as you will see in Lesson 11) is a wonderful time saver to make payments to suppliers. However, if you have not updated your cash book payments made to them during the month, it will not work accurately and you may overpay your suppliers!
• This encourages careless transaction capturing as any mistakes are just corrected with the bank reconciliation (then again assuming the bank statement is 100% correct, which is not the case!)
• This encourages the roles of capturer and reconciler to be done by the same person, but the bank reconciliation is a control procedure!
Even your petty cash should be reconciled monthly – do a count of the cash in the petty cash tin and use that as the bank balance, then tick off all the recorded petty cash transactions to make sure no cash is missing.
The creditor of the one business is always the debtor of the other business, similarly the supplier of one business is always the customer of the other business. You have to understand this, as well as debits and credits, else bank statements and bank reconciliations will be very confusing! When you owe money to the bank, your bank account will have a credit balance in your books (it is a liability), but a debit balance on the bank statement you receive from them (you will be an asset for the bank). Equally, when you have excess money in the bank, your bank account will have a debit balance in your books (it is an asset), but a credit balance on the bank statement you receive from them (you will be a liability for the bank). Before you do a bank reconciliation you must fully understand the principles above!
60 DPA202T/102/3/2011
� Open the ‘Demo’ company.
� Click on Process – Bank reconciliation and follow the instructions of the Bank Reconciliation wizard. o Use your computer instinct! o Click and follow the onscreen guidance where provided o Click F1 for help when stuck.
5.9.6 9C – Cash book transactions
� Follow the step-by-step instructions in Lesson 9C of your Pastel Manual taking the guidance in 5.9.4 and 5.9.5 into consideration.
� Make sure you know and understand the various source documents related to cash books.
� Notice how cash book transactions that were captured with the same reference number is
displayed as a single amount in the bank reconciliation. Why would this be?
� For reports - click on the ‘rerun’ button and play around with the various report options.
5.9.7 9D – General journal transactions You will notice how similar the layout of the other journals and the cash book journals are, each just slightly adjusted for the specific functions they are designed for. Before you process any journal – do yourself a favour and draw the relevant T-accounts on a piece of paper, then only process the journal in Pastel, preview the journals before updating and make sure your debit and credit entries agree with those of Pastel. If you disagree, maybe your settings (such as contra account) were incorrect, or you chose the wrong type of journal or specified your debits and credits incorrectly? Maybe your T-accounts were incorrect?
� Follow the step-by-step instructions in Lesson 9D of your Pastel Manual.
Remember to backup into a separate subfolder/directory named Lesson 9C!
Remember to backup into a separate subfolder/directory named Lesson 9D!
DPA202T/102/3/2011
61
5.9.8 Assessment guidance Do the formative assessment questions at the back of Lesson 9 and compare your answers with those provided on the dark grey data CD. These formative assessment questions may be included in you final exam. In addition, think about the following for exam purposes:
• If presented with a screen print of any source document, journal or cash book screen, explain and criticise (if need be) the chosen settings.
• Explain the various VAT concepts, requirements and types, choose the correct VAT type and percentage for a given transaction, as well as explain the effect thereof in the general ledger.
• Explain the various purchases, sales, cash book and journal processes, including the associated debit and credit accounting entries.
• Explain and substantiate the types of input, processing and output used by Pastel.
• Recommend the appropriate source documents, cash books or journal to use for transactions, as well as the settings.
• Which report and report settings would you use to obtain the required information? The answers to the above could be obtained from your Pastel Manual, the Pastel Help file, this tutorial letter or the myUnisa discussion forum. 5.10 Lesson 10 - The view menu: In this lesson, you are going to view various reports. While viewing the report, please think where the information you see came from and what it can be used for. Play around in the ‘Demo’ company, but remember to switch to the ‘Spotless Cleaning Services’ company for the exercises in the manual.
� Follow the step-by-step instructions in Lesson 10 of your Pastel Manual.
� Compare the details of your reports with those in the manual, as it will give you an indication of the accuracy of your setup actions and your transaction capturing. If there are differences between your reports and those in the manual – just note the difference, consider where you might have made mistakes (so as to not repeat them in future) and continue with the exercises in the manual. Spotless Cleaning Services does not count for marks and will not be marked by your lecturers – you have a separate project!
� Click on the ‘rerun’ button and play around with the various report options
� Experiment with printing to the virtual printer you have installed. Refer to 6.1.2 in tutorial letter
102/2011 for a step-by-step guide on how to print using a virtual printer.
62 DPA202T/102/3/2011 5.10.1 Assessment guidance Do the formative assessment questions at the back of Lesson 10 and compare your answers with those provided on the dark grey data CD. These formative assessment questions may be included in you final exam. In addition, think about the following for exam purposes:
• If presented with a screen print of any report setup screen, explain and criticise (if need be) the chosen settings.
• Which report and report settings would you use to obtain the required information? The answers to the above could be obtained from your Pastel Manual, the Pastel Help file, this tutorial letter or the myUnisa discussion forum.
5.11 Lesson 11 - The second month of trading: In this lesson, you are going to practise your transaction processing skills, learn to capture some additional source documents and learn to use the Remittance Assistant.
� Refer back to Figure 5.1 and Figure 5.2 to see where the various documents fit into the sales and purchasing processes.
� Refer back to the guidance given in 5.9. Play around in the ‘Demo’ company, but remember to switch to the ‘Spotless Cleaning Services’ company for the exercises in the manual.
� Follow the step-by-step instructions in Lesson 11 of your Pastel Manual. 5.11.1 Assessment guidance Do the formative assessment questions at the back of Lesson 11 and compare your answers with those provided on the dark grey data CD. These formative assessment questions may be included in you final exam. In addition, think about the following for exam purposes:
• If presented with a screen print of any source document, journal or cash book screen, explain and criticise (if need be) the chosen settings.
• Explain the various VAT concepts, requirements and types, choose the correct VAT type and percentage for a given transaction, as well as explain the effect thereof in the general ledger.
• Explain the various purchases, sales, cash book and journal processes, including the associated debit and credit accounting entries.
• Explain and substantiate the types of input, processing and output used by Pastel.
• Recommend the appropriate source documents, cash books or journal to use for transactions, as well as the settings.
• What can the Remittance Assistant be used for, what are the benefits and requirements for using the Remittance Assistant?
The answers to the above could be obtained from your Pastel Manual, the Pastel Help file, this tutorial letter or the myUnisa discussion forum.
Can you explain why it is NOT necessary to make a backup after Lesson 10?
Remember to backup into a separate subfolder/directory named Lesson 11!
DPA202T/102/3/2011
63
5.12 Lesson 12 - Sundry processing: In this lesson, you are going to learn to set up printers and fonts, make corrections and do a ‘take on of balances’. 5.12.1 Correction of errors Accuracy is always the best when it comes to accounting. The motto of every person working in the accounting department should be ‘Do it right the first time!’ Errors increase the workload, create opportunities for fraud (and even more mistakes), and could also create a confusing audit trail.
� Refer back to Figure 5.1 and 5.2. o Think what type of capturing errors and other mistakes are likely in each of the processes. o Think which source documents or journals you will use to correct various types of errors. o Think where you would enter these correction transactions into Pastel and how it will affect the
general ledger and the subsidiary ledgers. o Think on which reports these correction transactions could be viewed.
� Follow the step-by-step instructions in Lesson 12 of your Pastel Manual, to just before the ‘take on
balances’ section.
5.12.2 Take on balances The majority of businesses you will work at will not be new businesses starting from scratch like ‘Spotless Cleaning Services’, they will already have been operating for a number of years and now expect you to either computerise their records for the first time (unlikely in today’s day and age) or to convert from their previous accounting software to the new accounting software (such as Pastel). A take on of balances is simply the process where you (the accountant) takes the existing balances of the business (as per the trial balance) and enters it onto the newly created, but still empty, business on Pastel (or whatever new accounting software will be used). So what type of balances will an existing business have to be entered onto the new accounting software?
• Equity accounts
• Liability accounts
• Asset accounts
• Income and expense accounts (only if the take on is during and not at the beginning a financial year, or if you want comparative figures).
Your newly created general ledger accounts as per the trial balance should reflect your existing general ledger accounts, although this would be a perfect opportunity to make some changes should you wish to. According to the double entry method, there has to be a debit for every credit. That is why it is imperative that your old/existing trial balance which will be used to create the new trial balance on Pastel does in fact balance!
� Reflect a moment on the type of journal and the accounts you can possibly use to bring the take on balances into the company.
Remember to backup into a separate subfolder/directory named Lesson 12!
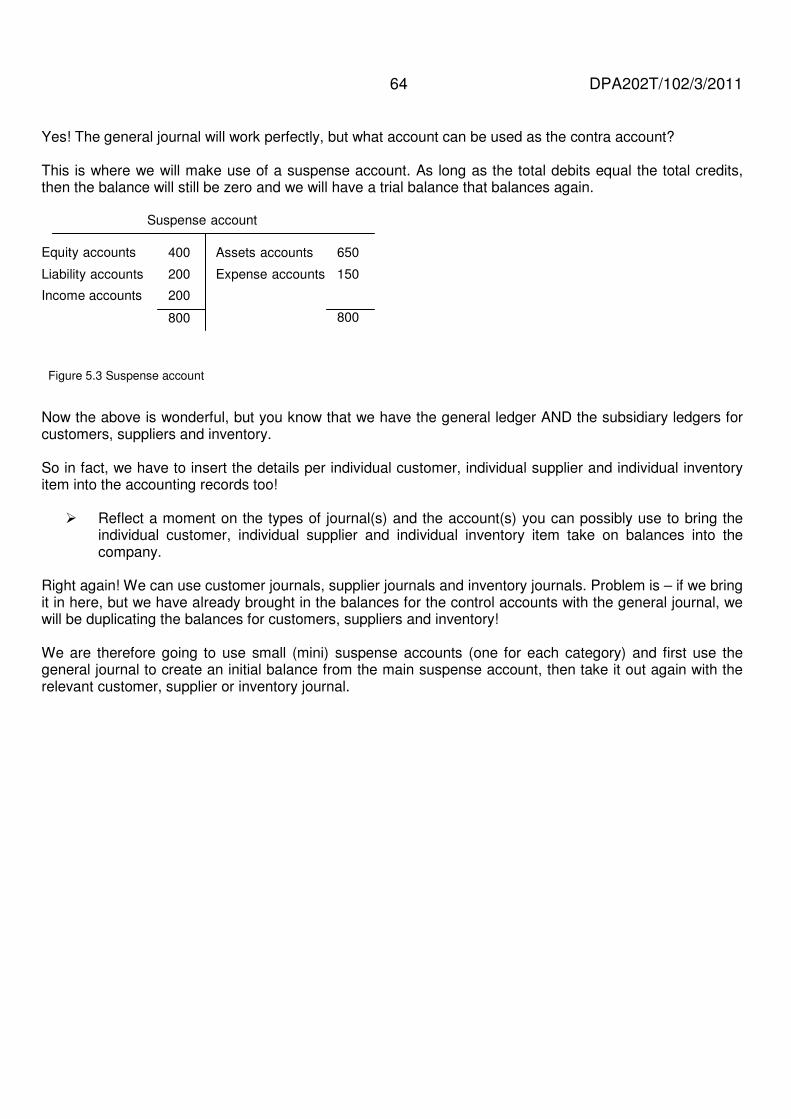
64 DPA202T/102/3/2011 Yes! The general journal will work perfectly, but what account can be used as the contra account? This is where we will make use of a suspense account. As long as the total debits equal the total credits, then the balance will still be zero and we will have a trial balance that balances again.
Now the above is wonderful, but you know that we have the general ledger AND the subsidiary ledgers for customers, suppliers and inventory. So in fact, we have to insert the details per individual customer, individual supplier and individual inventory item into the accounting records too!
� Reflect a moment on the types of journal(s) and the account(s) you can possibly use to bring the individual customer, individual supplier and individual inventory item take on balances into the company.
Right again! We can use customer journals, supplier journals and inventory journals. Problem is – if we bring it in here, but we have already brought in the balances for the control accounts with the general journal, we will be duplicating the balances for customers, suppliers and inventory! We are therefore going to use small (mini) suspense accounts (one for each category) and first use the general journal to create an initial balance from the main suspense account, then take it out again with the relevant customer, supplier or inventory journal.
800
Suspense account
Liability accounts
Equity accounts Assets accounts
Income accounts
Expense accounts 200
400
200
650
150
800
Figure 5.3 Suspense account

DPA202T/102/3/2011
65
Wonderful! But we still have a slight problem with the cash books. When viewing transactions in the cash book, Pastel only allows you to see transactions entered via the cash book (this also results in the round about way in which transfers between cash books have to be made). So, if we use the above methods everything would balance, but we will not be able to do a bank reconciliation for any of our cash books, as the opening balance of the bank was entered via a general journal (refer above) and not via the cash book interface. To solve this, we will use another mini suspense account and use the cash book to enter the opening bank balance. This is just like we used a customer journal, supplier journal and inventory journal to bring the individual customer, individual supplier and individual inventory item balances into the accounting records. (As you will see later during the exercises in the Pastel Manual, Pastel only recommends using four suspense sub-accounts. However, I personally recommend using five with the additional suspense sub-account to be used for all the company’s cash books, because it is much clearer what we are doing and it is much more consistent with the way we deal with the take on of customers, suppliers and inventory. The more cash books a company has (remember this includes petty cash!) the more important it will be to use an additional, separate suspense sub-account for cash books during take on of balances.)
Figure 5.4 Main and sub-suspense accounts
800
Main suspense account
Liability accounts
Equity accounts Assets accounts
Income accounts
Expense accounts 50
400
200
200
150
800
Customer suspense 200
Inventory suspense 250Supplier suspense 150
150
Supplier suspense account
Supplier X Main suspense Supplier Y
50 150
70
150
Supplier Z 30
250
Inventory suspense account
Main suspense Inv item 1
Inv item 2
250 95
35
250
Inv item 3 120
200
Customer suspense account
Main suspense Customer A
Customer B
200 75
25
200
Customer C 100
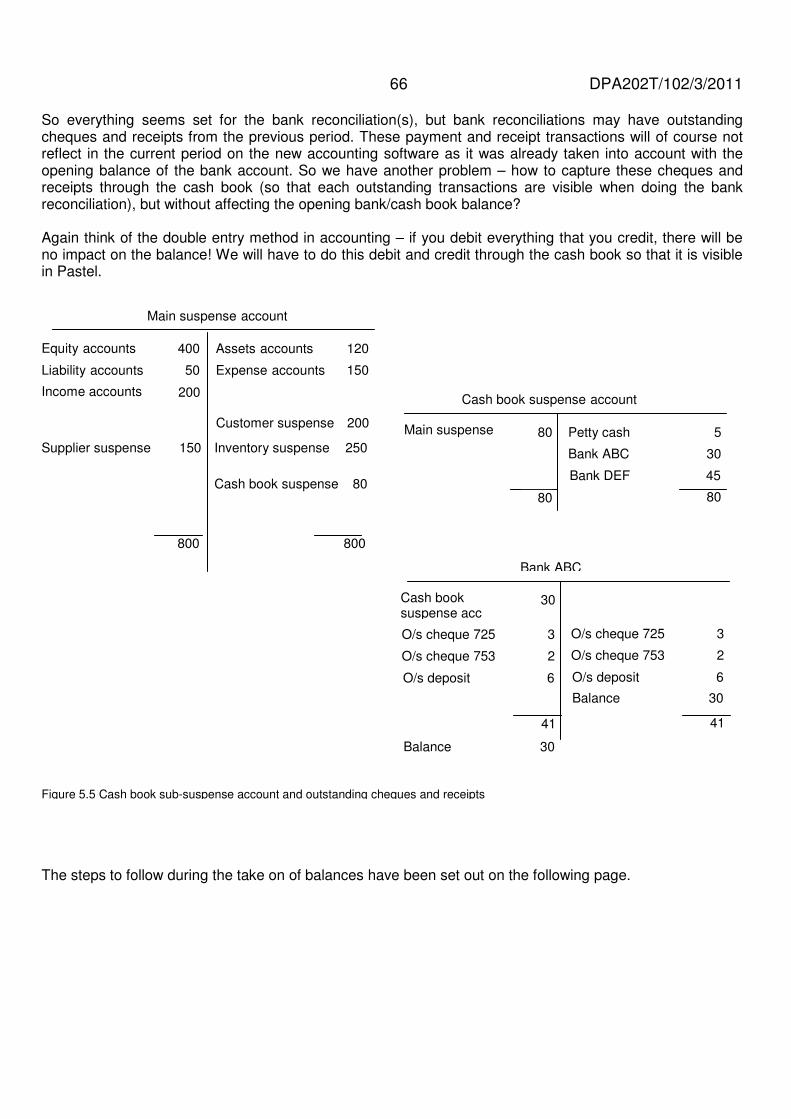
66 DPA202T/102/3/2011 So everything seems set for the bank reconciliation(s), but bank reconciliations may have outstanding cheques and receipts from the previous period. These payment and receipt transactions will of course not reflect in the current period on the new accounting software as it was already taken into account with the opening balance of the bank account. So we have another problem – how to capture these cheques and receipts through the cash book (so that each outstanding transactions are visible when doing the bank reconciliation), but without affecting the opening bank/cash book balance? Again think of the double entry method in accounting – if you debit everything that you credit, there will be no impact on the balance! We will have to do this debit and credit through the cash book so that it is visible in Pastel.
The steps to follow during the take on of balances have been set out on the following page.
41
Figure 5.5 Cash book sub-suspense account and outstanding cheques and receipts
800
Main suspense account
Liability accounts
Equity accounts Assets accounts
Income accounts
Expense accounts 50
400
200
120
150
800
Cash book suspense 80
Inventory suspense 250Supplier suspense 150
80
Cash book suspense account
Main suspense Petty cash
Bank ABC
80 5
30
80
Bank DEF 45
Customer suspense 200
41
Bank ABC
Cash book suspense acc
O/s cheque 725
O/s cheque 753
30
3
2
O/s deposit 6
O/s cheque 725
O/s cheque 753
3
2
O/s deposit 6
Balance 30
Balance 30

67 DPA202T/102/3/2011
TAKE ON BALANCES : STEP BY STEP Step 1: Ensure the old trial balance balances and the subsidiary ledgers agree with this trial balance Step 2: Create the new company on Pastel (using one of the three methods available) Step 3: Ensure the trial balance accounts in Pastel exist and that the descriptions are correct (else edit
the general ledger accounts) Step 4: Create the customer accounts, supplier accounts and inventory accounts for the business’
existing customers, suppliers and inventory items Step 5: Create the four (or five) sub-accounts of the Opening Balances suspense account Step 6: Make a ‘before take on’ backup Step 7: Trial balance balances:
• Capture and update the take on for the trial balance balances into the new company’s general journal (using all the relevant sub-accounts of the Opening Balances suspense account for bank, customers, suppliers and inventory)
• View the trial balance report to ensure you have correctly captured the trial balance balances
• Make an ‘after trial balance take on’ backup Step 8: Customer balances:
• Capture and update the take on for the customer balances into the new company’s customer journal (using the customer sub-account of the Opening Balances suspense account as the contra account)
• View the customer age analysis report and the customer detailed ledger report to ensure you have correctly captured the customer balances
• Make an ‘after customer take on’ backup Step 9: Supplier balances:
• Capture and update the take on for the supplier balances into the new company’s supplier journal (using the supplier sub-account of the Opening Balances suspense account as the contra account)
• View the supplier age analysis report and the supplier detailed ledger report to ensure you have correctly captured the supplier balances
• Make an ‘after supplier take on’ backup Step 10: Inventory balances:
• Capture and update the take on for the inventory balances into the new company’s inventory journal (using the inventory sub-account of the Opening Balances suspense account as the contra account)
• View the inventory valuation report to ensure you have correctly captured the inventory balances
• Make an ‘after inventory take on’ backup Step 11: Cash book balances:
• Capture and update the take on for the cash book balances into the new company’s relevant payment OR receipt cash books (using the general ledger sub-account of the Opening Balances suspense account as the contra account, but preferably the cash book sub-account of the Opening Balances suspense account)
• View the cash book details report to ensure you have correctly captured the cash book balances
• Make an ‘after cash book take on’ backup Step 12: Bank reconciliation:
• Capture and update the outstanding cheques and receipts into the new company’s relevant payment OR receipt cash books (using the bank account itself as the contra account)
• View the cash book details report to ensure you have correctly captured the outstanding cheques and receipts (and that the closing bank balance is still the same as per the take on trial balance!)
• Do and update the bank reconciliation of the bank opening balance
• View the bank reconciliation report to ensure you have correctly captured the outstanding cheques and receipts
• Make an ‘after bank reconciliation take on’ backup
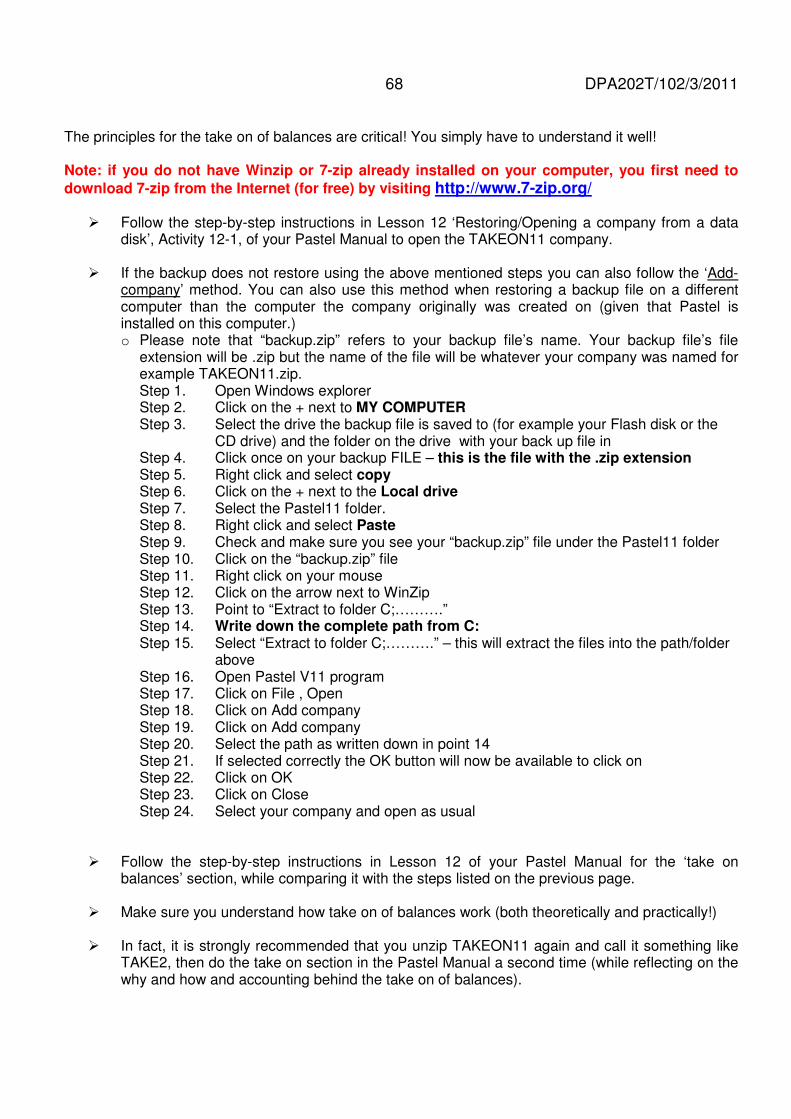
68 DPA202T/102/3/2011
The principles for the take on of balances are critical! You simply have to understand it well! Note: if you do not have Winzip or 7-zip already installed on your computer, you first need to
download 7-zip from the Internet (for free) by visiting http://www.7-zip.org/
� Follow the step-by-step instructions in Lesson 12 ‘Restoring/Opening a company from a data disk’, Activity 12-1, of your Pastel Manual to open the TAKEON11 company.
� If the backup does not restore using the above mentioned steps you can also follow the ‘Add-
company’ method. You can also use this method when restoring a backup file on a different computer than the computer the company originally was created on (given that Pastel is installed on this computer.) o Please note that “backup.zip” refers to your backup file’s name. Your backup file’s file
extension will be .zip but the name of the file will be whatever your company was named for example TAKEON11.zip. Step 1. Open Windows explorer Step 2. Click on the + next to MY COMPUTER Step 3. Select the drive the backup file is saved to (for example your Flash disk or the
CD drive) and the folder on the drive with your back up file in Step 4. Click once on your backup FILE – this is the file with the .zip extension Step 5. Right click and select copy Step 6. Click on the + next to the Local drive Step 7. Select the Pastel11 folder. Step 8. Right click and select Paste Step 9. Check and make sure you see your “backup.zip” file under the Pastel11 folder Step 10. Click on the “backup.zip” file Step 11. Right click on your mouse Step 12. Click on the arrow next to WinZip Step 13. Point to “Extract to folder C;……….” Step 14. Write down the complete path from C: Step 15. Select “Extract to folder C;……….” – this will extract the files into the path/folder
above Step 16. Open Pastel V11 program Step 17. Click on File , Open Step 18. Click on Add company Step 19. Click on Add company Step 20. Select the path as written down in point 14 Step 21. If selected correctly the OK button will now be available to click on Step 22. Click on OK Step 23. Click on Close Step 24. Select your company and open as usual
� Follow the step-by-step instructions in Lesson 12 of your Pastel Manual for the ‘take on balances’ section, while comparing it with the steps listed on the previous page.
� Make sure you understand how take on of balances work (both theoretically and practically!)
� In fact, it is strongly recommended that you unzip TAKEON11 again and call it something like
TAKE2, then do the take on section in the Pastel Manual a second time (while reflecting on the why and how and accounting behind the take on of balances).

DPA202T/102/3/2011
69
5.12.3 Assessment guidance Do the formative assessment questions at the back of Lesson 11 and compare your answers with those provided on the dark grey data CD. These formative assessment questions may be included in you final exam. In addition, think about the following for exam purposes:
• Recommend the appropriate correction for various errors in the accounting records.
• Explain the methodology and reasons behind the take on of balances procedures.
• List and explain the steps for the take on of balances. The answers to the above could be obtained from your Pastel Manual, the Pastel Help file, this tutorial letter or the myUnisa discussion forum.
Congratulations – you have finished working through your Pastel Manual! We hope you have enjoyed learning about Pastel and will be able to apply what you have learned in the workplace!

70 DPA202T/102/3/2011
6 ADDITIONAL ASSIGNMENT GUIDANCE
6.1 Printing your assignment
Note: You cannot complete your Pastel project and then only make all your printouts – the data would have changed and some of the documents might not be available for printing anymore. You have to immediately print the document/report when the assignment task instructs you to do so! • The options for printing depend on whether you have a physical (real) printer or a virtual printer.
� Follow the step-by-step instructions (step 1 and 2) in Lesson 1, Activity 1-2 of your Pastel Manual to check which printers are installed.
6.1.1 Physical printer If you have a physical printer you should:
• print your assignment printouts;
• write the individual task number at the top of each page;
• sort all tasks in numerical sequence;
• make an extra copy of the whole assignment for yourself; and
• post your assignment. OR you could:
• print your assignment printouts;
• have your printouts and declaration scanned in at Q-photo, Postnet, an Internet Café or similar business into PDF format. (Remember to take a memory stick with you or a CD to save and take the files home with you again!);
• then submit your assignment electronically on myUnisa (the preferred option).
Please do Question 1 (Pastel) of your compulsory assignment 02/2011 in tutorial letter 101/2011 now! Remember that you will not be able to complete Assignment 02 without working through the Pastel Training Manual in conjunction with Tutorial letter 102 (Pastel) as well as Tutorial letter 103 (spreadsheets)! This will require a significant time investment – do not leave it too late! WE HIGHLY RECOMMEND THAT YOU SUBMIT YOUR ASSIGNMENT ELECTRONICALLY ON myUNISA RATHER THAN BY POST TO AVOID MISSING DEADLINES AND ASSIGNMENTS LOST IN THE POST!!! LET’S USE TECHNOLOGY TO OUR ADVANTAGE!
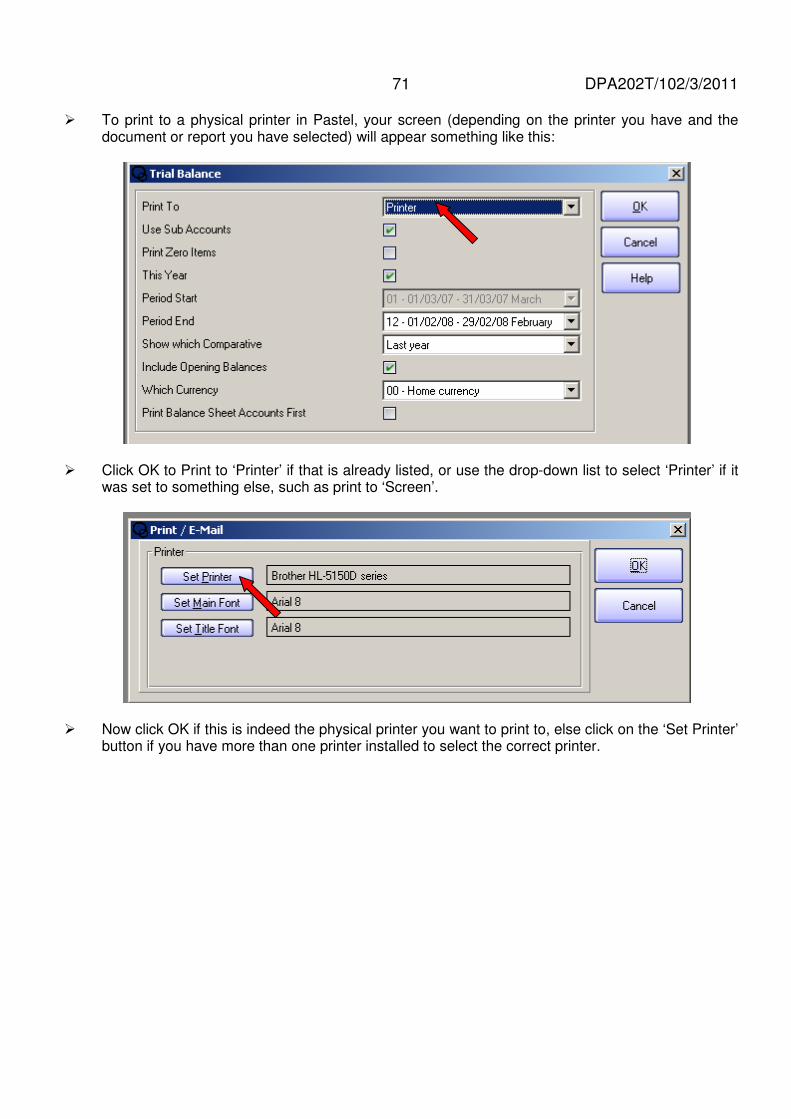
DPA202T/102/3/2011
71
� To print to a physical printer in Pastel, your screen (depending on the printer you have and the document or report you have selected) will appear something like this:
� Click OK to Print to ‘Printer’ if that is already listed, or use the drop-down list to select ‘Printer’ if it
was set to something else, such as print to ‘Screen’.
� Now click OK if this is indeed the physical printer you want to print to, else click on the ‘Set Printer’
button if you have more than one printer installed to select the correct printer.

72 DPA202T/102/3/2011 6.1.2 Virtual printer Refer to 5.1.2.1 in this tutorial letter 102/2011 how to download and install a virtual printer if you do not already have a virtual printer installed. You still have to print all your ‘printouts’ to the virtual printer, just as if you had a real printer! You will get 0% if you submit a backup of your Pastel project with the Pastel backup function. � To print to your virtual printer in Pastel, your screen (depending on the virtual printer you have and
the document or report you have selected) will appear something like this:
� Click OK to Print to ‘Printer’ if that is already listed, or use the dropdown box to select ‘Printer’ if it
was set to something else, such as print to ‘Screen’. � Click on the ‘Set Printer’ button to change to your virtual printer.
DO NOT select Print To: Microsoft Excel or Microsoft Word or PDF!!! This distorts the printouts and the Microsoft options enable editing of the printouts
and will thus NOT BE ACCEPTED!!!

DPA202T/102/3/2011
73
� Highlight your own virtual printer (such as PDF Creator, CutePDF, Microsoft XPS Document Writer or Microsoft Office Document Image Writer). DO NOT select: Send to OneNote!
� Now click OK.
� Now click OK again to print. � Depending on the type of virtual printer you have, a screen similar to the following will appear:
� Browse until you get to the special DPA202T folder (subdirectory) you created for all your virtual
files and double click that folder to select it (in this example ‘DPA202T Assignment02’).

74 DPA202T/102/3/2011 � Type the individual task name (in this example ‘Task14.1’) of your printout and click on the ‘Save’
button.
6.2 Other important information • Do not start with Assignment 02 without first completing the training exercises in the Pastel Partner
training manual – the whole manual, including lesson 12! If you make a mistake while working through the exercises for Spotless Cleaning Services in the Pastel manual – do not worry! It will not count for marks. Learn from your mistakes and continue. Do not waste too much time on correcting it. Mistakes will however affect the results on some of your reports, so do not worry if your reports then do not perfectly match those printed in the manual.
• Students seem to struggle with the take on of balances. Read 5.12.2 in tutorial letter 102/2011 very carefully until you understand the reasons behind the take on process fully. Now do the special take on exercises in a separate company in lesson 12. And only after all of this, attempt to do Assignment 02. Your take on balances affect almost all your printouts!
• When you start your Assignment 02, create a separate company for Shimla’s. Do not attempt to enter the details of Shimla’s as part of Spotless Cleaning Services or any other company in Pastel. This is similar to doing the accounting work for your local grocery store, butchery and hairdresser – everyone should be done in a separate company in Pastel!
• Make regular backups while doing Shimla’s. Make these backups into separate subdirectories. The task numbers should be used as the names for the subdirectories for Shimla’s so that you know up to what task number you have last made a backup of your data. If you make a mistake after the backup, you can restore your backup from the last task number before the error and just continue.
This will save you redoing the same work over and over again. Please backup regularly!!!
• Read through paragraph 8.6.2 in tutorial letter 101/2011 again as it contains very important information with regards to the submission of Assignment 02.
All your files should be virtually ‘printed’ to the same subdirectory.
Related Documents


