AIX Version 6.1 PowerSC

Welcome message from author
This document is posted to help you gain knowledge. Please leave a comment to let me know what you think about it! Share it to your friends and learn new things together.
Transcript

AIX Version 6.1
PowerSC
���


AIX Version 6.1
PowerSC
���

NoteBefore using this information and the product it supports, read the information in “Notices” on page 35.
This edition applies to IBM PowerSC Version 1.1.1.0 and to all subsequent releases and modifications untilotherwise indicated in new editions.
© Copyright IBM Corporation 2011, 2012.US Government Users Restricted Rights – Use, duplication or disclosure restricted by GSA ADP Schedule Contractwith IBM Corp.

Contents
About this document . . . . . . . . . v
PowerSC . . . . . . . . . . . . . . 1What's new in PowerSC . . . . . . . . . . 1PowerSC concepts . . . . . . . . . . . . 1Installing PowerSC . . . . . . . . . . . . 2PowerSC Express Edition . . . . . . . . . . 3
Security and Compliance Automation . . . . . 3PowerSC Standard Edition . . . . . . . . . 11
Trusted Boot . . . . . . . . . . . . . 11
Trusted Firewall . . . . . . . . . . . . 16Trusted Logging . . . . . . . . . . . . 22Trusted Network Connect and Patchmanagement . . . . . . . . . . . . . 25
Notices . . . . . . . . . . . . . . 35Trademarks . . . . . . . . . . . . . . 37
Index . . . . . . . . . . . . . . . 39
© Copyright IBM Corp. 2011, 2012 iii
||

iv AIX Version 6.1: PowerSC

About this document
This document provides system administrators with complete information about file, system, andnetwork security.
Highlighting
The following highlighting conventions are used in this document:
Bold Identifies commands, subroutines, keywords, files, structures, directories, and other items whose namesare predefined by the system. Also identifies graphical objects such as buttons, labels, and icons that theuser selects.
Italics Identifies parameters whose actual names or values are to be supplied by the user.Monospace Identifies examples of specific data values, examples of text similar to what you might see displayed,
examples of portions of program code similar to what you might write as a programmer, messages fromthe system, or information you should actually type.
Case-sensitivity in AIX®
Everything in the AIX operating system is case-sensitive, which means that it distinguishes betweenuppercase and lowercase letters. For example, you can use the ls command to list files. If you type LS, thesystem responds that the command is not found. Likewise, FILEA, FiLea, and filea are three distinct filenames, even if they reside in the same directory. To avoid causing undesirable actions to be performed,always ensure that you use the correct case.
ISO 9000
ISO 9000 registered quality systems were used in the development and manufacturing of this product.
© Copyright IBM Corp. 2011, 2012 v

vi AIX Version 6.1: PowerSC

PowerSC
PowerSC provides advanced security to help manage systems within cloud or virtualized data centers.
To view or download the PDF version of this topic, select PowerSC.
Downloading Adobe Reader: You need Adobe Reader installed on your system to view or print thisPDF. You can download a free copy from the Adobe website (www.adobe.com/products/acrobat/readstep.html).
What's new in PowerSCRead about new or significantly changed information for the PowerSC topic collection.
May 2012
Documentation for “Trusted Firewall” on page 16
How to see what's new or changed
In this PDF file, you might see revision bars (|) in the left margin that identifies new and changedinformation.
PowerSC conceptsThis overview of PowerSC explains the features, components, and the hardware support related toPowerSC feature.
PowerSC provides security and control of the systems operating within a cloud or in virtualized datacenters, and provides an enterprise view and management capabilities. PowerSC is a suite of features thatincludes Security and Compliance Automation, Trusted Boot, Trusted Firewall, Trusted Logging, andTrusted Network Connect and Patch management. The security technology that is placed within thevirtualization layer provides additional security to the stand-alone systems.
The PowerSC feature includes the following editions:v PowerSC Express Editionv PowerSC Standard Edition
The following table provides details about the editions, the features included in the editions, thecomponents, and the processor-based hardware on which each component is available.
Table 1. PowerSC components, editions, and hardware support
Components Description Editions Hardware Support
Security and ComplianceAutomation
Automates the setting,monitoring, and auditing ofsecurity and complianceconfiguration for PaymentCard Industry Data SecurityStandard (PCI DSS),Sarbanes-Oxley Act and COBITcompliance (SOX/COBIT), andU.S. Department of Defense(DoD) STIG.
v PowerSC Express Edition
v PowerSC Standard Edition
v POWER5
v POWER6®
v POWER7®
© Copyright IBM Corp. 2011, 2012 1
|||||

Table 1. PowerSC components, editions, and hardware support (continued)
Components Description Editions Hardware Support
Trusted Boot Measures the boot image,operating system, andapplications, and attests theirtrust by using the virtualtrusted platform module (TPM)technology.
PowerSC Standard Edition POWER7 firmware eFW7.4, orlater
Trusted Firewall Saves time and resources byenabling direct routing acrossspecified virtual LANs(VLANs) that are controlled bythe same Virtual I/O Server.
PowerSC Standard Editionv POWER6
v POWER7
v Virtual I/O Server Version6.1S, or later
Trusted Logging The logs of AIX are centrallylocated on the Virtual I/OServer (VIOS) in real time. Thisfeature provides tamperprooflogging and convenient logbackup and management.
PowerSC Standard Editionv POWER5
v POWER6
v POWER7
Trusted Network Connect andpatch management
Verifies that all AIX systems inthe virtual environment are atthe specified software andpatch level and providesmanagement tools to ensurethat all AIX systems are at thespecified software level.Provides alerts if a down-levelvirtual system is added to thenetwork or if a security patchis issued that affects thesystems.
PowerSC Standard Editionv POWER5
v POWER6
v POWER7
Related concepts:“PowerSC Express Edition” on page 3The PowerSC Express Edition includes the security and compliance automation feature that managespredefined profiles for security and compliance.“PowerSC Standard Edition” on page 11PowerSC Standard Edition includes the Trusted Boot, Trusted Firewall, Trusted Logging, Trusted NetworkConnect and Patch management, and Security and Compliance Automation features.
Installing PowerSCInstall PowerSC on AIX to use the security functions.
To install the required features of PowerSC, you can choose to install one of the following editions:v PowerSC Express Editionv PowerSC Standard Edition
Installing PowerSC Express Edition
PowerSC Express Edition includes the powerscExp.ice package. The powerscExp.ice package supportsAIX 5.3, AIX 6.1 and AIX Version 7.1. The powerscExp.ice package must be installed on all AIX systemsthat require the security and compliance feature of the PowerSC Express Edition.
Install PowerSC Express Edition by using one of the following interfaces:v The installp command from the command-line interface (CLI)v The SMIT interface
2 AIX Version 6.1: PowerSC
||||||
|||||

Installing the PowerSC Express Edition by using the SMIT interface
To install the PowerSC Express Edition by using the SMIT interface, complete the following steps:1. Run the following command:
% smitty installp
2. Select the Install Software option.3. Select the input device or directory for the software to specify the location and the installation file of
the IBM Compliance Expert installation image. For example, if the installation image has the directorypath and file name /usr/sys/inst.images/powerscExp.ice, you must specify the file path in theINPUT field.
4. View and accept the license agreement. Accept the license agreement by using the down arrow toselect ACCEPT new license agreements, and press the tab key to change the value to Yes.
5. Press Enter to start the installation.6. Verify that the command status is OK after the installation is complete.7. To exit Smitty and return to the command prompt, press the Escape key + 0.
Installing PowerSC Standard Edition
PowerSC Standard Edition includes five packages. The packages and the features that are available witheach package follow:v powerscExp.ice: Installed on AIX systems that require the Security and Compliance Automation feature
of PowerSC.v powerscStd.vtpm: Installed on AIX systems that require the Trusted Boot feature of PowerSC.v powerscStd.vlog: Installed on AIX systems that require the Trusted Logging feature of PowerSC.v powerscStd.tnc_pm: Installed on the AIX Version 7.1 Service Update Management Assistant (SUMA)
console system within the SUMA environment for patch management.v powerscStd.svm: Installed on AIX systems that might benefit from the routing feature of PowerSC.
Viewing software license
The software license can be viewed in the CLI by using the following command:% installp –lE –d path/filename
Where path/filename specifies the PowerSC installation image.
For example, you can enter the following command using the CLI to specify the license informationrelated to the PowerSC Express Edition:% installp -lE -d /usr/sys/inst.images/powerscExp.ice
Related concepts:Hardware requirements for installing PowerSCThis overview of PowerSC explains the features, components, and the hardware support related toPowerSC feature.
PowerSC Express EditionThe PowerSC Express Edition includes the security and compliance automation feature that managespredefined profiles for security and compliance.
Security and Compliance AutomationAIX Profile Manager manages predefined profiles for security and compliance.
PowerSC 3
||
||
|
|
||
|

The XML profiles automate the recommended AIX system configuration of IBM to be consistent with thePayment Card Data Security Standard, the Sarbanes-Oxley Act, or the U.S. Department of Defense UNIXSecurity Technical Implementation Guide. The organizations that comply with the security standardsmust use the predefined system security settings.
The AIX Profile Manager operates as an IBM® Systems Director plug-in that simplifies applying securitysettings, monitoring security settings, and auditing security settings for both AIX and Virtual I/O Server(VIOS systems. To use the security compliance feature, the PowerSC application must be installed on theAIX managed systems that conform to the compliance standards. The Security and ComplianceAutomation feature is included in the PowerSC Express Edition, and the PowerSC Standard Edition.
The PowerSC Express Edition installation package, 5765-G82, must be installed on AIX managed systems.The installation package installs the powerscExp.ice fileset that can be implemented on the system byusing the AIX Profile Manager or the aixpert command. PowerSC with IBM Compliance Expert Express®
(ICEE) compliance is enabled to manage and improve the XML profiles. The XML profiles are managedby the AIX Profile Manager.Related information:AIX Profile Manager
IBM Systems Director
Security and Compliance Automation conceptsThe PowerSC security and compliance feature is an automated method to configure and audit AIXsystems in accordance with the U.S. Department of Defense (DoD) Security Technical ImplementationGuide (STIG).
PowerSC helps to automate the configuration and monitoring of systems that must be compliant with thePayment Card Industry (PCI) data security standard (DSS) version 1.2. Therefore, PowerSC security andcompliance feature is an accurate and complete method of security configuration automation that is usedto meet the IT compliance requirements of DoD UNIX STIG, PCI DSS, and Sarbanes-Oxley act andCOBIT compliance (SOX/COBIT).
Note: PowerSC security and compliance updates the existing xml profiles that are used by IBMCompliance Expert express (ICEE) edition. The PowerSC Express Edition xml profiles can be used withthe aixpert command, similar to ICEE.
The preconfigured compliance profiles delivered with the PowerSC Express Edition reduce theadministrative workload of interpreting compliance documentation and implementing the standards asspecific system configuration parameters. This technology reduces the cost of compliance configurationand auditing by automating the processes. IBM PowerSC Express Edition is designed to help effectivelymanage the system requirement associated with external standard compliance that can potentially reducecosts and improve compliance.
Department of Defense STIG compliance:
The U.S. Department of Defense (DoD) requires highly secure computer systems. This level of securityand quality defined by DoD meets with the quality and customer base of AIX on Power Systems™ server.
A secure operating system, such as AIX, must be configured accurately to attain the specified securitygoals. The DoD recognized the need for security configurations of all operating systems in Directive8500.1. This directive established the policy and assigned the responsibility to the U.S. defenseinformation security agency (DISA) to provide security configuration guidance.
DISA developed the principles and guidelines in the UNIX STIG that provides an environment that meetsor exceeds the security requirements of DoD systems operating at the mission assurance category (MAC)II sensitive level, which contains sensitive information. The U.S. DoD has stringent IT security
4 AIX Version 6.1: PowerSC

requirements and enumerated the details of the required configuration settings to ensure that the systemoperates in a secure manner. You can leverage the required expert guidance. PowerSC Express Editionhelps to automate the process of configuring the settings as defined by DoD.Related information:
Department of Defense STIG compliance
Payment card industry Data Security Standard compliance:
The Payment Card Industry Data Security Standard (PCI DSS) categorizes IT security into 12 sections thatare called 12 commandments.
The 12 commandments of the IT security that are defined by PCI DSS include the following items:1. Install and maintain a firewall configuration to protect the data of the cardholder.2. Avoid the use of vendor-supplied defaults for system passwords and other security parameters.3. Protect the stored data of the cardholder.4. Encrypt the data of the cardholder, when transmitting the data across open public networks.5. Use antivirus software or programs and regularly update the applications.6. Develop and maintain secure systems and applications.7. Restrict access to the data of the cardholder, depending on the business requirement.8. Assign a unique ID to each person who has access to the computer.9. Restrict physical access to the data of the cardholder.
10. Track and monitor all access to network resources and the cardholder data.11. Regularly test the security systems and processes.12. Maintain a policy that includes information security for employees and contractors.
PowerSC Express Edition reduces the configuration management that is required to meet the guidelinesdefined by PCI DSS. However, the entire process cannot be automated.
For example, restricting access to the data of the cardholder depending on the business requirementcommandment cannot be automated. This is because the AIX operating system provides strong securitytechnologies, such as Role Based Access Control (RBAC); however, PowerSC Express Edition cannotautomate this configuration because it cannot determine the individuals who require access and theindividuals who do not. IBM Compliance Expert can automate the configuration of other security settingsthat are consistent with the PCI requirements.Related information:
Payment card industry DSS compliance
Sarbanes-Oxley Act and COBIT compliance:
The Sarbanes-Oxley (SOX) Act of 2002 that is based on the 107th congress of the United States of Americaoversees the audit of public companies that are subject to the securities laws, and related matters, inorder to protect the interests of investors.
SOX Section 404 mandates the management assessment over internal controls. For most organizations,internal controls span their information technology systems, which process and report the financial dataof the company. The SOX Act provides specific details on IT and IT security. Many SOX auditors rely onstandards, such as COBIT as a method to gauge and audit proper IT governance and control. ThePowerSC Express Edition SOX/COBIT XML configuration option provides the security configuration ofAIX and Virtual I/O Server (VIOS systems that is required to meet the COBIT compliance guidelines.
The IBM Compliance Expert Express Edition runs on AIX 7.1, AIX 6.1, and AIX 5.3.
PowerSC 5

Compliance with external standards is a responsibility of an AIX system administrator’s workload. TheIBM Compliance Expert Express Edition is designed to simplify managing the operating system settingsand the reports that are required for standards compliance.
The preconfigured compliance profiles delivered with the IBM Compliance Expert Express Edition reducethe administrative workload of interpreting compliance documentation and implementing thosestandards as specific system configuration parameters.
The capabilities of the IBM Compliance Expert Express Edition are designed to help clients to effectivelymanage the system requirements, which are associated with external standard compliance that canpotentially reduce costs while improving compliance. All external security standards include aspectsother than the system configuration settings. The use of IBM Compliance Expert Express Edition cannotensure standards compliance. The Compliance Expert is designed to simplify the management of systemsconfiguration setting that helps administrators to focus on other aspects of standards compliance.Related information:
COBIT compliance
Sarbanes-Oxley (SOX) Act
Managing Security and Compliance AutomationLearn about the process of planning and deploying PowerSC Security and Compliance Automationprofiles on a group of systems in accordance with the accepted IT governance and complianceprocedures.
As part of compliance and IT governance, systems running similar workload and security classes of datamust be managed and configured consistently. To plan and deploy compliance on systems, complete thefollowing tasks:
Identifying the work groups of the system
The compliance and IT governance guidelines state that the systems running on similar workload andsecurity classes of data must be managed and configured consistently. Therefore, you must identify allsystems in a similar workgroup.
Using a nonproduction test system for the initial setup
Apply the appropriate PowerSC compliance profile to the test system.
Consider the following examples for applying compliance profiles to the AIX operating system.
Example 1: Applying DoD.xml
% aixpert -f /etc/security/aixpert/custom/DoD.xmlProcessedrules=38 Passedrules=38 Failedrules=0 Level=AllRules
Input file=/etc/security/aixpert/custom/DoD.xml
In this example, there are no failed rules, that is, Failedrules=0. This means that all rules are successfullyapplied, and the test phase can be started. If there are failures, detailed output is generated.
Example 2: Applying PCI.xml with a failure# aixpert -f /etc/security/aixpert/custom/PCI.xmldo_action(): rule(pci_grpck) : failed.Processedrules=85 Passedrules=84 Failedrules=1 Level=AllRules
Input file=/etc/security/aixpert/custom/PCI.xml
6 AIX Version 6.1: PowerSC
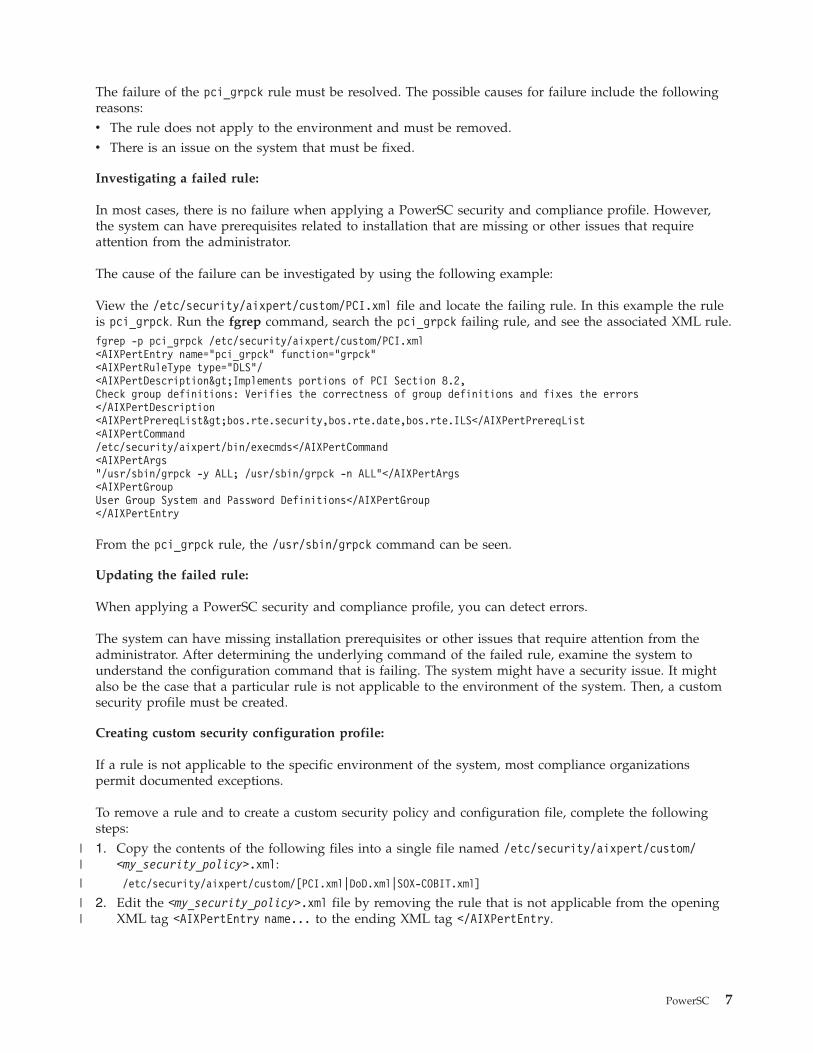
The failure of the pci_grpck rule must be resolved. The possible causes for failure include the followingreasons:v The rule does not apply to the environment and must be removed.v There is an issue on the system that must be fixed.
Investigating a failed rule:
In most cases, there is no failure when applying a PowerSC security and compliance profile. However,the system can have prerequisites related to installation that are missing or other issues that requireattention from the administrator.
The cause of the failure can be investigated by using the following example:
View the /etc/security/aixpert/custom/PCI.xml file and locate the failing rule. In this example the ruleis pci_grpck. Run the fgrep command, search the pci_grpck failing rule, and see the associated XML rule.fgrep -p pci_grpck /etc/security/aixpert/custom/PCI.xml<AIXPertEntry name="pci_grpck" function="grpck"<AIXPertRuleType type="DLS"/<AIXPertDescription>Implements portions of PCI Section 8.2,Check group definitions: Verifies the correctness of group definitions and fixes the errors</AIXPertDescription<AIXPertPrereqList>bos.rte.security,bos.rte.date,bos.rte.ILS</AIXPertPrereqList<AIXPertCommand/etc/security/aixpert/bin/execmds</AIXPertCommand<AIXPertArgs"/usr/sbin/grpck -y ALL; /usr/sbin/grpck -n ALL"</AIXPertArgs<AIXPertGroupUser Group System and Password Definitions</AIXPertGroup</AIXPertEntry
From the pci_grpck rule, the /usr/sbin/grpck command can be seen.
Updating the failed rule:
When applying a PowerSC security and compliance profile, you can detect errors.
The system can have missing installation prerequisites or other issues that require attention from theadministrator. After determining the underlying command of the failed rule, examine the system tounderstand the configuration command that is failing. The system might have a security issue. It mightalso be the case that a particular rule is not applicable to the environment of the system. Then, a customsecurity profile must be created.
Creating custom security configuration profile:
If a rule is not applicable to the specific environment of the system, most compliance organizationspermit documented exceptions.
To remove a rule and to create a custom security policy and configuration file, complete the followingsteps:1. Copy the contents of the following files into a single file named /etc/security/aixpert/custom/
<my_security_policy>.xml:/etc/security/aixpert/custom/[PCI.xml|DoD.xml|SOX-COBIT.xml]
2. Edit the <my_security_policy>.xml file by removing the rule that is not applicable from the openingXML tag <AIXPertEntry name... to the ending XML tag </AIXPertEntry.
PowerSC 7
||
|
||

You can insert additional configuration rules for security. Insert the additional rules to the XMLAIXPertSecurityHardening schema. You cannot change the PowerSC profiles directly, but you cancustomize the profiles.
For most environments, you must create a custom XML policy. To distribute a customer profile to othersystems, you must securely copy the customized XML policy to the system that requires the sameconfiguration. A secure protocol, such as secure file transfer protocol (SFTP), is used to distribute acustom XML policy to other systems, and the profile is stored in a secure location /etc/security/aixpert/custom/<my_security_policy.xml>/etc/security/aixpert/custom/
Log on to the system where a custom profile must be created, and run the following command:aixpert –f : /etc/security/aixpert/custom/<my_security_policy>.xml
Testing the applications with AIX Profile Manager:
The security configurations can affect applications and the way the system is accessed and managed. It isimportant to test the applications and the expected management methods of the system before deployingthe system into a production environment.
The regulatory compliance standards impose a security configuration that is more stringent than anout-of-the-box configuration. To test the system, complete the following steps:1. Select View and Manage profiles from the right pane of the AIX Profile Manager welcome page.2. Select the profile that is used by the template for deploying to the systems to be monitored.3. Click Compare.4. Select the managed group, or select individual systems within the group and click Add, to add them
to the selected box.5. Click OK.
The compare operation starts.
Monitoring systems for continued compliance with AIX Profile Manager:
The security configurations can affect applications and the way the system is accessed and managed. It isimportant to monitor the applications and the expected management methods of the system whendeploying the system into a production environment.
To use AIX Profile Manager to monitor an AIX system, complete the following steps:1. Select View and Manage profiles from the right pane of the AIX Profile Manager welcome page.2. Select the profile that is used by the template for deploying to the systems to be monitored.3. Click Compare.4. Select the managed group, or select individual systems within the group and add them to the selected
box.5. Click OK.
The compare operation starts.
Configuring PowerSC Security and Compliance AutomationLearn the procedure to configure PowerSC for Security and Compliance Automation from thecommand-line and by using AIX Profile Manager.
Configuring PowerSC compliance options settings:
Learn the basics of PowerSC security and compliance automation feature, test the configuration onnonproduction test systems, and plan and deploy the settings. When you apply a complianceconfiguration, the settings change numerous configuration settings on the operating system.
8 AIX Version 6.1: PowerSC

Note: Some compliance standards and profiles disable Telnet, because Telnet uses clear text passwords.Therefore, you must have Open SSH installed, configured, and working. You can use any other securemeans of communication with the system being configured. These compliance standards require the rootlogin to be disabled. Configure one or more non-root users before you continue applying theconfiguration changes. This configuration does not disable root, and you can log in as a non-root userand run the su command to root. Test if you can establish the SSH connection to the system, log in as thenon-root user, and run command to root.
To access the DoD, PCI, SOX, or COBIT configuration profiles, use the following directory:v The profiles in the AIX operating system are placed in the /etc/security/aixpert/custom directory.v The profiles in Virtual I/O Server (VIOS) are placed in the /etc/security/aixpert/core directory.
Configuring PowerSC compliance from the command line:
Implement or check the compliance profile by using the aixpert command on the AIX system, and theviosecure command on the Virtual I/O Server (VIOS).
To apply the PowerSC compliance profiles on an AIX system, enter one of the following command, whichdepends on the level of security compliance you want to apply.
Table 2. PowerSC command for AIX
Command Compliance standard
% aixpert -f /etc/security/aixpert/custom/DoD.xml US Department of Defense UNIX security technical implementationguide
% aixpert -f /etc/security/aixpert/custom/PCI.xml Payment card industry-Data security standard
% aixpert -f /etc/security/aixpert/custom/SOX-COBIT.xml Sarbanes-Oxley Act of 2002 – COBIT IT Governance
To apply the PowerSC compliance profiles on a VIOS system, enter one of the following commands forthe level of security compliance you want to apply.
Table 3. PowerSC command for the Virtual I/O Server
Command Compliance Standard
% viosecure -file /etc/security/aixpert/custom/DoD.xml US Department of Defense UNIX security technical implementationguide
% viosecure -file /etc/security/aixpert/custom/PCI.xml Payment card industry-Data security standard
% viosecure -file /etc/security/aixpert/custom/SOX-COBIT.xml Sarbanes-Oxley Act of 2002 – COBIT IT Governance
The aixpert command on the AIX system and the viosecure command in VIOS can take time to runbecause they are checking or setting the entire system, and making security-related configurationchanges. The output is similar to the following example:Processedrules=38 Passedrules=38 Failedrules=0 Level=AllRules
However, some rules fail depending on the AIX environment, installation set, and the previousconfiguration.
For example, a prerequisite rule can fail because the system does not have the required installation fileset.It is necessary to understand each failure and resolve it before deploying the compliance profilesthroughout the data center.
PowerSC 9

Related concepts:Planning Security and Compliance AutomationLearn about the process of planning and deploying PowerSC Security and Compliance Automationprofiles on a group of systems in accordance with the accepted IT governance and complianceprocedures.
Configuring PowerSC compliance with AIX Profile Manager:
Learn the procedure to configure PowerSC security and compliance profiles and to deploy theconfiguration onto an AIX managed system by using the AIX Profile Manager.
To configure PowerSC security and compliance profiles by using AIX Profile Manager, complete thefollowing steps:1. Log in to IBM Systems Director and select AIX Profile Manager.2. Create a template that is based on one of the PowerSC security and compliance profiles by completing
the following steps:a. Click View and manage templates from the right pane of the AIX Profile Manager welcome page.b. Click Create.c. Click Operating System from the Template type list.d. Provide a name for the template in the Configuration template name field.e. Click Continue > Save.
3. Select the profile to use with the template by selecting Browse under the Select which profile to usefor this template option. The profiles display the following items:v ice_DLS.xml is the default security level of the AIX operating system.v ice_DoD.xml is the Department of Defense Security and Implementation Guide for UNIX settings.v ice_HLS.xml is a generic high-level security for AIX settings.v ice_LLS.xml is the low-level security for AIX settings.v ice_MLS.xml is the medium level security for AIX settings.v ice_PCI.xml is the Payment Card Industry setting for the AIX operating system.v ice_SOX.xml is the SOX or COBIT settings for the AIX operating system.
4. Remove any profile from the selected box.5. Select Add to move the required profile into the selected box.6. Click Save.
To deploy the configuration onto an AIX managed system, complete the following steps:1. Select View and Manage Templates from the right pane of the AIX Profile Manager welcome page.2. Select the required template to deploy.3. Click Deploy.4. Select the systems to deploy the profile, and click Add to move the required profile into the selected
box.5. Click OK to deploy the configuration template. The system is configured according to the selected
template of the profile.
For the deployment to be successful for DoD, PCI, or SOX, PowerSC Express Edition or PowerSCStandard Edition must be installed at the end point of the AIX system. If the system that is beingdeployed does not have PowerSC installed, the deployment fails. The IBM Systems Director deploys theconfiguration template to the selected AIX system end points and configures them according to thecompliance requirements.
10 AIX Version 6.1: PowerSC
Related information:AIX Profile ManagerIBM Systems Director
PowerSC Standard Edition
PowerSC Standard Edition includes the Trusted Boot, Trusted Firewall, Trusted Logging, Trusted NetworkConnect and Patch management, and Security and Compliance Automation features.
Trusted BootThe Trusted Boot feature uses the Virtual Trusted Platform Module (VTPM), which is a virtual instance ofthe Trusted Computing Group's TPM. The VTPM is used to securely store measurements of the systemboot for future verification.
Trusted Boot conceptsIt is important to understand the integrity of the boot process and how to classify the boot as a trustedboot or a nontrusted boot.
You can configure a maximum of 60 VTPM-enabled logical partitions (LPAR) for each physical system byusing the Hardware Management Console (HMC). When configured, the VTPM is unique to each LPAR.When used with the AIX Trusted Execution technology, the VTPM provides security and assurance to thefollowing partitions:v The boot image on the diskv The entire operating systemv The application layers
An administrator can view trusted and nontrusted systems from a central console that is installed withthe openpts verifier that is available on the AIX expansion pack. The openpts console manages one ormore Power Systems servers, and monitors or attests the trusted state of AIX systems throughout thedata center. Attestation is the process where the verifier determines (or attests) if a collector hasperformed a trusted boot.
Trusted boot status
A partition is said to be trusted if the verifier successfully attests the integrity of the collector. The verifieris the remote partition that determines if a collector has performed a trusted boot. The collector is the AIXpartition that has a Virtual Trusted Platform Module (VTPM) attached and the Trusted Software Stack(TSS) installed. It indicates that the measurements that are recorded within the VTPM match a referenceset held by the verifier. A trusted boot state indicates whether the partition booted in a trusted manner.This statement is about the integrity of the system boot process and does not indicate the current orongoing level of the security of the system.
Nontrusted boot status
A partition enters a nontrusted state if the verifier cannot successfully attest the integrity of the bootprocess. The nontrusted state indicates that some aspect of the boot process is inconsistent with thereference information held by the verifier. The possible causes for a failed attestation include bootingfrom a different boot device, booting a different kernel image, and changing the existing boot image.
PowerSC 11
||

Related concepts:Troubleshooting Trusted BootThere are some of the common scenarios and remedial steps that are required to help identify the reasonfor attestation failure when using Trusted Boot.
Planning for Trusted BootLearn about the hardware and software configurations that are required to install Trusted Boot.
Trusted Boot prerequisites:
The installation of Trusted Boot involves configuring the collector and the verifier.
Collector
The configuration requirements to install a collector involves the following prerequisites:v POWER7 hardware that is running on a 740 firmware release.v Install IBM AIX 6 with Technology Level 7 or install IBM AIX 7 with Technology Level 1.v Install Hardware Management Console (HMC) version 7.4 or later.v Configure the partition with the VTPM and a minimum of 1 GB memory.v Install Secure Shell (SSH), specifically OpenSSH or equivalent.
Verifier
The openpts verifier can be accessed from the command-line interface and the graphical user interfacethat is designed to run on a range of platforms. The AIX version of the OpenPTS verifier is available onthe AIX expansion pack. The versions of OpenPTS verifier for Linux and other platforms are availablethrough a web download. The configuration requirements include the following prerequisites:v Install SSH, specifically OpenSSH or equivalent.v Establish network connectivity (through SSH) to the collector.v Install Java 1.6 or later to access the openpts console from the graphical interface.
Preparing for remediation:
The Trusted Boot information that is described here serves as a guide to identifying situations that mightrequire remediation. It does not affect the boot process.
There are many circumstances that can cause an attestation to fail, and it is difficult to predict thecircumstance you might encounter. You must decide on the appropriate action depending on thecircumstance. However, it is good practice to prepare for some of the severe scenarios and have a policyor a workflow to help you to handle such incidents. Remediation is the corrective action that must betaken when attestation reports one or more collectors are not trusted.
For example, if an attestation failure occurred due to the boot image differing from the verifier'sreference, consider having answers to the following questions:v How can you verify that the threat is credible?v Was there any planned maintenance that was carried out, an AIX upgrade, or new hardware that was
recently installed?v Can you contact the administrator who has access to this information?v When was the system last booted in a trusted state?v If the security threat looks legitimate, what action must you take? (Suggestions include collecting audit
logs, disconnecting the system from the network, powering the system down, and alerting users).v Were there any other systems compromised that must be checked?
12 AIX Version 6.1: PowerSC

Related concepts:Troubleshooting Trusted BootThere are some of the common scenarios and remedial steps that are required to help identify the reasonfor attestation failure when using Trusted Boot.
Migration considerations:
Consider these prerequisites before you migrate a partition enables for virtual trusted platform module(VTPM).
An advantage of a VTPM over a physical TPM is that it allows the partition to move between systemswhile retaining the VTPM. To securely migrate the logical partition, the firmware encrypts the VTPMdata before transmission. To ensure a secure migration, the following security measures must beimplemented before migration:v Enable IPSEC between the Virtual I/O Server (VIOS) that is performing the migration.v Set the trusted system key through the Hardware Management Console (HMC) to control the managed
systems that are capable of decrypting the VTPM data after migration. The migration destinationsystem must have the same key as that of the source system to successfully migrate the data.
Related information:
Using HMC
VIOS migration
Installing Trusted BootThere are some required hardware and software configurations that are required to install Trusted Boot.
Installing the collector:
You must install the collector by using the fileset from the AIX base CD.
To install the collector, install the powerscStd.vtpm and openpts.collector packages which are on thebase CD, by using the smit or installp command.
Installing the verifier:
The verifier can be installed from the fileset by using the expansion pack.
To install the verifier on the AIX operating system, install the openpts.verifier package from the AIXexpansion pack by using the smit or installp command. This installs both the command line andgraphical interface versions of the verifier.
Configuring Trusted BootLearn the procedure to enroll a system and to attest a system for Trusted Boot.
Enrolling a system:
Learn the procedure to enroll a system with the verifier.
Enrolling a system is the process of providing an initial set of measurements to the verifier, which formsthe basis for subsequent attestation requests. To enroll a system from the command line, use thefollowing command from the verifier:openpts -i <hostname>
PowerSC 13

Information about the enrolled partition is located in the $HOME/.openpts directory. Each new partition isassigned with a unique identifier during the enrollment process and information related to the enrolledpartitions is stored in the directory corresponding to the unique ID.
To enroll a system from the graphical interface, complete the following steps:1. Launch the graphical interface by using /opt/ibm/openpts_gui/openpts_GUI.sh command.2. Select Enroll from the navigation menu.3. Enter the host name and the SSH credentials of the system.4. Click Enroll.Related concepts:Enrolling and attesting a system without a passwordLearn the procedure to attest a system from the command-line and by using the graphical interface.
Attesting a system:
Learn the procedure to attest a system from the command-line and by using the graphical interface.
To query the integrity of a system boot, use the following command from the verifier:openpts <hostname>
To attest a system from the graphical interface, complete the following steps:1. Select a category from the navigation menu.2. Select one or more systems to attest.3. Click Attest.
Enrolling and attesting a system without a password
The attestation request is sent through the Secure Shell (SSH). Install the verifier’s certificate on thecollector to permit SSH connections without a password.
To set up the verifier's certificate on the collector’s system, complete the following steps :v On the verifier, run the following commands:
ssh-keygen # No passphrasescp ~/.ssh/id_rsa.pub <collector>:/tmp
v On the collector, run the following command:cat /tmp/id_rsa.pub >> ~/.ssh/authorized_keys
Managing Trusted BootLearn the procedure to manage the attestation results of Trusted Boot.
Interpreting attestation results:
Learn the procedure to view and understand the attestation results.
An attestation can result in one of following states:1. Attestation request failed: The attestation request did not complete successfully. See the
Troubleshooting section to understand the possible causes for the failure.2. System integrity valid: The attestation completed successfully, and the system boot matches the
reference information that is held by the verifier. This indicates a successful Trusted Boot.3. System integrity invalid: The attestation request completed, but a discrepancy was detected between
the information that is collected during system boot and the reference information that is held by theverifier. This indicates a nontrusted boot.
14 AIX Version 6.1: PowerSC

The attestation also reports whether an update was applied to the collector by using the followingmessage:
System update available: This message indicates that an update was applied on the collector and a set ofupdated reference information is available that is effective for the next boot. The user is prompted on theverifier to accept or reject the updates. For example, the user can choose to accept these updates if theuser is aware of the maintenance occurring on the collector.
To investigate an attestation failure by using the graphical interface, complete the following steps:1. Select a category from the navigation menu.2. Select a system to investigate.3. Double-click the entry corresponding to the system. A properties window is displayed. This window
contains log information about the failed attestation.
Deleting systems:
Learn the procedure to delete a system from the verifier’s database.
To remove a system from the database of the verifier, run the following command:openpts -r <hostname>
Troubleshooting Trusted BootThere are some of the common scenarios and remedial steps that are required to help identify the reasonfor attestation failure when using Trusted Boot.
The openpts command declares a system as invalid if the current boot state of the system does not matchthe reference information that is held on the verifier. The openpts command determines the possiblereason for the integrity to be invalid. There are several variables in a full AIX boot, and a failedattestation requires analysis to determine the cause of the failure.
The following table lists some of the common scenarios and remedial steps to identify the reason for thefailure:
Table 4. Troubleshooting some of the common scenarios for failure
Reason for failure Possible causes of failure Suggested remediation
Attestation did notcomplete.
v Incorrect host name.
v No network route between thesource and destination.
v Incorrect security credentials.
Check the Secure Shell (SSH) connection using the following command:
ssh ptsc@hostname
If the SSH connection is successful, then check for the following reasonsfor attestation failure:
v The system that is being attested is not running the tcsd daemon.
v The system that is being attested was not initialized by the ptsccommand. This process should occur automatically during the systemstartup but check for the presence of a /var/ptsc/ directory on thecollector. If the /var/ptsc/ directory does not exist, run the followingcommand on the collector:
ptsc -i
The CEC firmwarewas changed.
v A firmware upgrade wasapplied.
v The LPAR was migrated to asystem that was running adifferent version of the firmware.
Check the firmware level of the system that is hosting the LPAR.
PowerSC 15

Table 4. Troubleshooting some of the common scenarios for failure (continued)
Reason for failure Possible causes of failure Suggested remediation
The resourcesallocated to theLPAR changed.
The CPU or memory allocated tothe LPAR changed.
Check the partition profile in the HMC.
The firmwarechanged for theadapters that areavailable in theLPAR.
A hardware device was added orremoved from the LPAR.
Check the partition profile in the HMC.
The list of devicesattached to theLPAR waschanged.
A hardware device was added orremoved from the LPAR.
Check the partition profile in the HMC.
The boot imagechanged, whichincludes theoperating systemkernel.
v An AIX update was applied andthe verifier was unaware of theupdate.
v The bosboot command was run.
v Confirm with the administrator of the collector whether anymaintenance was performed before the latest reboot operation.
v Check the logs on the collector for maintenance activity.
The LPAR isbooted from adifferent device.
v Enrollment was carried outimmediately after networkinstallation.
v The system is booted from amaintenance device.
The boot device and flags can be checked by using the bootinfocommand. If enrollment was carried out immediately after NetworkInstallation Management (NIM) installation and before the rebootoperation, the enrolled details pertain to the network installation andnot to the next disk boot. This enrollment can be repaired by removingthe enrollment and re-enrolling the logical partition.
The interactiveSystemManagementServices (SMS) bootmenu was called.
The boot process must run uninterrupted without user interaction for asystem to be trusted. Entering the SMS boot menu causes the boot to beinvalid.
The trustedexecution (TE)database wasaltered.
v Binary files were added orremoved from the TE database.
v Binary files in the database wereupdated.
Run the trustchk command to verify the database.
Related information:
Using HMC
Trusted FirewallThe Trusted Firewall feature provides virtualization-layer security that improves performance andresource efficiency when communicating between different virtual LAN (VLAN) security zones on thesame Power Systems server. Trusted Firewall decreases the load on the external network by moving thefiltering capability of firewall packets meeting specified rules to the virtualization layer. This filteringcapability is controlled by easily defined network filter rules, which allow trusted network traffic to crossbetween VLAN security zones without leaving the virtual environment. Trusted Firewall protects androutes internal network traffic between AIX, IBM i, and Linux operating systems.
Trusted Firewall conceptsThere are some basic concepts to understand when using Trusted Firewall.
Power Systems hardware can be configured with multiple virtual LAN (VLAN) security zones. Auser-configured policy, created as a Trusted Firewall filter rule, permits some trusted network traffic tocross VLAN security zones and remain internal to the virtualization layer. This is similar to introducing anetwork-attached physical firewall into the virtualized environment, which provides a moreperformance-efficient method of implementing firewall capabilities for virtualized data centers.
16 AIX Version 6.1: PowerSC
|
|||||||
||
|||||

With Trusted Firewall, you can configure rules to allow certain types of traffic to transfer directly fromone VLAN on a Virtual I/O Server (VIOS) to another VLAN on the same VIOS, while still maintaining ahigh level of security by limiting other types of traffic. It is a configurable firewall within thevirtualization layer of Power Systems servers.
Using the example in Figure 1, the goal is to be able to transfer information securely and efficiently fromLPAR1 on VLAN 200 and from LPAR2 on VLAN 100. Without Trusted Firewall, information targeted forLPAR2 from LPAR1 is sent out of the internal network to the router, which routes the information back toLPAR2.
Using Trusted Firewall, you can configure rules to allow the information to pass from LPAR1 to LPAR2without leaving the internal network. This path is shown in Figure 2 on page 18.
VIOS
PowerVM Hypervisor
VLAN 100
VLAN 200
PV
ID=
399
PV
ID=
499
HMC
Service Processor
PV
ID=
200
PV
ID=
100
LPAR1 AIX LPAR2 AIX
ent0(virtual)
ent0(virtual)
en0 en0
ent2(virtual)
System p
ent3(virtual)
Router
ent0(physical)
Shared Ethernet Adapter
ent1(physical)
TF
W502-1
Figure 1. Example of cross-VLAN information transfer without Trusted Firewall
PowerSC 17
|
||
||||
|||||
||

Configuration rules that allow certain information to pass securely across VLANs shorten the path to itsdestination. The Trusted Firewall uses the Shared Ethernet Adapter (SEA) and the Security VirtualMachine (SVM) kernel extension to enable the communication.
Shared Ethernet AdapterThe SEA is where the routing begins and ends. When the SVM is registered, the SEA receives thepackets and forwards them to the SVM. If the SVM determines that the packet is for an LPAR onthe same Power Systems server, it updates the packet's layer 2 header. The packet is returned tothe SEA for forwarding to the final destination either within the system or on the externalnetwork.
Security Virtual MachineThe SVM is where the filtering rules are applied. The filtering rules are necessary to maintainsecurity on the internal network. After registering the SVM with the SEA, the packets areforwarded to the SVM before being sent to the external network. Based on the active filter rules,the SVM determines whether a packet stays in the internal network or moves to the externalnetwork.
VIOS
PowerVM Hypervisor
VLAN 100
VLAN 200
Router
ent0(physical)
PV
ID=
399
PV
ID=
499
HMC
Service Processor
PV
ID=
200
PV
ID=
100
LPAR1 AIX LPAR2 AIX
ent0(virtual)
ent0(virtual)
en0 en0
ent2(virtual)
System p
ent3(virtual)
ent1(physical)
TF
W503-2
Shared Ethernet Adapterwith Trusted Firewallextension
Figure 2. Example of cross-VLAN information transfer with Trusted Firewall
18 AIX Version 6.1: PowerSC
|
||
|
|||
||||||
||||||

Installing Trusted FirewallInstalling the PowerSC Trusted Firewall is similar to installing other PowerSC features.
Prerequisites:v PowerSC versions prior to 1.1.1.0 did not have the required fileset to install Trusted Firewall. Ensure
that you have the PowerSC installation CD for version 1.1.1.0, or later.v To take advantage of Trusted Firewall, you must have already used the Hardware Management
Console (HMC) or Virtual I/O Server (VIOS) to configure your Virtual LANs (VLANs).
Trusted Firewall is provided as an additional fileset on the PowerSC Standard Edition installation CD.The file name is powerscStd.svm. You can add the Trusted Firewall to an existing instance of PowerSCVersion 1.1.0.0, or later, or install it as part of a new installation of PowerSC Version 1.1.1.0, or later.
To add the Trusted Firewall function to an existing PowerSC instance:1. Ensure that you are running VIOS Version 6.1S, or later.2. Insert the PowerSC installation CD for version 1.1.1.0 or download the image of the installation CD.3. From the main menu of the installation CD, select Trusted Firewall.
The Trusted Firewall fileset will be installed in the PowerSC folder.
Configuring Trusted FirewallAdditional configuration settings are required for the Trusted Firewall feature after it is installed.
Multiple Shared Ethernet Adapters:
You can configure Trusted Firewall on systems that use multiple Shared Ethernet Adapters.
Some configurations use multiple Shared Ethernet Adapters (SEAs) on the same Virtual I/O Server(VIOS). Multiple SEAs can provide benefits of failover protection and resource leveling. Trusted Firewallsupports routing across multiple SEAs, provided they are on the same VIOS.
Figure 3 on page 20 shows an environment using multiple SEAs.
PowerSC 19
||
|
||
||
|||
|
|
|
|
|
||
|
|
|||
||

The following are examples of multiple SEA configurations that are supported by Trusted Firewall:v The SEAs are configured with trunk adapters on the same Power® hypervisor virtual switch. This
configuration is supported because each SEA receives network traffic with different VLAN IDs.v The SEAs are configured with trunk adapters on different Power hypervisor virtual switches, and each
trunk adapter is on a different VLAN ID. In this configuration, each SEA still receives network trafficby using different VLAN IDs.
v The SEAs are configured with trunk adapters on different Power hypervisor virtual switches, and thesame VLAN IDs are reused on the virtual switches. In this case, the traffic for both SEAs has the sameVLAN IDs.An example of this configuration is having LPAR2 on VLAN200 with virtual switch 10 and LPAR3 onVLAN200 with virtual switch 20. Because both LPARs and their corresponding SEAs use the sameVLAN ID (VLAN200), both of the SEAs have access to the packets with that VLAN ID.
You cannot enable bridging on more than one VIOS. For this reason, the following multiple SEAconfigurations are not supported by Trusted Firewall:v Multiple VIOS and multiple SEA drivers.
VIOS
ent3(virtual)
PowerVM Hypervisor
VLAN 100
VLAN 200
Firmware Management CLI
ent1(physical)
ent0(physical)
PV
ID=
399
PV
ID=
499
HMC
External switch
Servce Processor
PV
ID=
200
PV
ID=
100
LPAR1 LPAR2
ent0(virtual)
ent0(virtual)
en0 en0
ent2(virtual)
TF
W501-2
Shared EthernetAdapter withTrusted Firewallextension
Shared EthernetAdapter withTrusted Firewallextension
Figure 3. Configuration using multiple Shared Ethernet Adapters on a single VIOS
20 AIX Version 6.1: PowerSC
|
||
|
||
|||
|||
|||
||
|

v Redundant SEA load sharing: Trunk adapters that are configured for inter-VLAN routing cannot besplit between VIOS servers.
Removing Shared Ethernet Adapters:
The steps to remove Shared Ethernet Adapter devices from the system must be performed in a specificorder.
To remove a Shared Ethernet Adapter (SEA) from your system, complete the following steps:1. Remove the Security Virtual Machine that is associated with the SEA by entering the following
command:rmdev -dev svm
2. Remove the SEA by entering the following command:rmdev -dev shared ethernet adapter ID
Note: Removing the SEA before removing the SVM can result in system failure.
Creating rules:
You can create rules to enable Trusted Firewall cross-VLAN routing.
To enable the routing features of Trusted Firewall, you must create rules specifying whichcommunications are allowed. For enhanced security, there is no single rule that allows communicationbetween all of the VLANs on the system. Each allowed connection requires its own rule, though eachrule that is activated allows communication in both directions for its specified endpoints.
Because the rule creation is created in the Virtual I/O Server (VIOS) interface, additional informationabout the commands is available in the VIOS topic collection in the Power Systems HardwareInformation Center.
To create a rule, complete the following steps:1. Open the VIOS command-line interface.2. Initialize the SVM driver by entering the following command:
mksvm
3. Start Trusted Firewall by entering the start command:vlantfw -s
4. To display all known LPAR IP and MAC addresses, enter the following command:vlantfw -d
You will need the IP and MAC addresses of the logical partitions (LPARs) for which you are creatingrules.
5. Create the filter rule to allow communication between the two LPARs (LPAR1 and LPAR2) byentering one of the following commands:v genvfilt -v4 -a P -z [lpar1vlanid] -Z [lpar2vlanid] -s [lpar1ipaddress] -d [lpar2ipaddress]v genvfilt -v4 -a P -z [lpar1vlanid] -Z [lpar2vlanid] -s [lpar1ipaddress] -d [lpar2ipaddress]-o
lt -p 0 -O gt -P 23
Note: One filter rule allows communication in both directions by default, depending on port andprotocol entries. For example, you can enable Telnet for LPAR1 to LPAR2 by running the followingcommand:genvfilt -v4 -a-P -z [lpar1vlanid] -Z [lpar2vlanid] -s [lpar1ipaddress] -d [lpar2ipaddress] -oany -p 0 -O eq -P 23
6. Activate all of the filter rules in the kernel by entering the following command:
PowerSC 21
||
|
||
|
||
|
|
|
|
|
|
||||
|||
|
|
|
|
|
|
|
|
||
|||||
|||
||
|

mkvfilt -u
Note: This procedure activates this rule and any other filtering rules that exist on the system.Related concepts:“Deactivating rules”You can deactivate rules that enable cross-VLAN routing in the Trusted Firewall feature.Related information:Virtual I/O Servergenvfilt commandmkvfilt commandvlantfw command
Deactivating rules:
You can deactivate rules that enable cross-VLAN routing in the Trusted Firewall feature.
Because the rules are deactivated in the Virtual I/O Server (VIOS) interface, additional information aboutthe commands and process are available in the VIOS topic collection in the Power Systems HardwareInformation Center.
To deactivate a rule, complete the following steps:1. Open the VIOS command-line interface.2. To display all active filter rules, enter the following command:
lsvfilt -a
You will need the identification number for the filter that you are deactivating. For this example, thefilter number is 23.
3. Deactivate filter rule 23 by entering the following command:rmvfilt -n 23
To deactivate all filter rules, enter the following command:rmvfilt -n all
Related concepts:“Creating rules” on page 21You can create rules to enable Trusted Firewall cross-VLAN routing.Related information:lsvfilt commandrmvfilt command
Trusted LoggingPowerVM® Trusted Logging lets AIX LPARs write to log files that are stored on an attached Virtual I/OServer (VIOS). Data is transmitted to the VIOS directly through the hypervisor, and network connectivityis not required between the client LPAR and the VIOS.
The prerequisites for installing Trusted Logging are VIOS 2.2.1.0 and IBM AIX 6 with Technology Level 7or IBM AIX 7 with Technology Level 1.
Virtual logsThe Virtual I/O Server (VIOS) administrator creates and manages the log files, and they are presented tothe AIX operating system as virtual log devices in the /dev directory, similar to the virtual disks orvirtual optical media.
22 AIX Version 6.1: PowerSC
|
|
|
||
|
|
|
|
|
|
|
|||
|
|
|
|
||
|
|
|
|
|
||
|
|
|

Storing log files as virtual logs increases the level of trust in the records because they cannot be changedby a user with root privileges on the client LPAR where they were generated. Multiple virtual log devicescan be attached to the same client LPAR and each log is a different file in the /dev directory.
Trusted Logging lets log data from multiple client LPARs be consolidated into a single file system, whichis accessible from the VIOS. Therefore, the VIOS provides a single location on the system for log analysisand archival. The client LPAR administrator can configure applications and the AIX operating system towrite data to the virtual log devices, which is similar to writing data to the local files. The AIX Auditsubsystem can be configured to direct the audit records to virtual logs, and other AIX services, such assyslog, work with their existing configuration to direct data to virtual logs.
To configure the virtual log, the VIOS administrator must specify a name for the virtual log, which hasthe following separate components:v Client namev Log name
The names of the two components can be set by the VIOS administrator to any value, but the client nameis typically the same for all virtual logs that are attached to a given LPAR (for example, the LPAR’s hostname). The log name is used to identify the purpose of the log (for example, audit or syslog).
On an AIX LPAR, each virtual log device is present as two functionally equivalent files in the /dev filesystem. The first file is named after the device, for example, /dev/vlog0, and the second file is named byconcatenating a vl prefix with the log name and the device number. For example, if the virtual log devicevlog0 has audit as the log name, it is present in the /dev file system as both vlog0 and vlaudit0.Related information:
Creating virtual logs
Detecting virtual log devicesAfter a VIOS administrator has created virtual log devices and attached them to a client LPAR, the clientLPAR device configuration must be refreshed for the devices to be visible.
The client LPAR administrator refreshes the settings by using one of the following methods:v Rebooting the client LPARv Running the cfgmgr command
Run the lsdev command to display the virtual log devices. The devices are prefixed with vlog by default.An example of the lsdev command output on an AIX LPAR on which two virtual logs devices arepresent is as follows:lsdevvlog0 Virtual Log Devicevlog1 Virtual Log Device
Inspect the properties of an individual virtual log device by using the lsattr –El <device name>command, which produces output that is similar to the following :lsattr –El vlog0PCM Path Control Module Falseclient_name dev-lpar-05 Client Name Falsedevice_name vlsyslog0 Device Name Falselog_name syslog Log Name Falsemax_log_size 4194304 Maximum Size of Log Data File Falsemax_state_size 2097152 Maximum Size of Log State File Falsepvid none Physical Volume Identifier False
This output displays the client name, device name, and the amount of log data that VIOS can store.
PowerSC 23

The virtual log stores two types of log data, which are:v Log data: The raw log data generated by applications on the AIX LPAR.v State data: Information about when the devices were configured, opened, closed, and other operations
that are used to analyze log activity.
The VIOS administrator specifies the amount of log data and state data that can be stored for eachvirtual log, and the amount is indicated by the max_log_size, and max_state_size attributes. When theamount of stored data exceeds the specified limit, the earliest log data is overwritten. The VIOSadministrator must ensure that the log data is collected and archived frequently to preserve the logs.
Configuring Trusted LoggingLearn the procedure to configure Trusted Logging on the AIX Audit subsystem, and syslog.
Configuring the AIX Audit subsystem:
The AIX Audit subsystem can be configured to write binary data to a virtual log device in addition towriting logs to the local file system.
Note: Before you configure the AIX Audit subsystem, you must complete the procedure in “Detectingvirtual log devices” on page 23.
To configure the AIX Audit subsystem, complete the following steps:1. Configure the AIX Audit subsystem to log data in binary (auditbin) mode.2. Activate Trusted Logging for AIX auditing by editing the /etc/security/audit/config configuration
file.3. Add a virtual_log = /dev/vlog0 parameter to bin: stanza.
Note: The instruction is valid if the LPAR administrator wants auditbin data to be written to the/dev/vlog0.
4. Restart the AIX Audit subsystem in the following sequence:audit shutdownaudit start
The audit records are written to Virtual I/O Server (VIOS) through the specified virtual log device inaddition to writing logs to the local file system. The logs are stored under control of the existing bin1 andbin2 parameters in the bin: stanza of the /etc/security/audit/config configuration file.Related information:
Auditing subsystem
Configuring syslog:
Syslog can be configured to write messages to virtual logs by adding rules to the /etc/syslog.conf file.
Note: Before you configure the /etc/syslog.conf file, you must complete the procedure in “Detectingvirtual log devices” on page 23.
You can edit the /etc/syslog.conf file to match the log messages, which are based on the followingcriteria:v Facilityv Priority level
To use the virtual logs for syslog messages, the /etc/syslog.conf file must be configured with rules towrite the desired messages to the appropriate virtual log in the /dev directory.
24 AIX Version 6.1: PowerSC

For example, to send debug-level messages that are generated by any facility to the vlog0 virtual log, addthe following line to the /etc/syslog.conf file:*.debug /dev/vlog0
Note: Do not use the log rotation facilities that are available in the syslogd daemon for any commandthat writes data to virtual logs. The files in the /dev file system are not regular files and they cannot berenamed and moved. The VIOS administrator must configure virtual log rotation within the VIOS.
The syslogd daemon must be restarted after the configuration by using the following command:refresh -s syslogd
Related information:
Syslogd
Writing data to virtual log devices:
Arbitrary data is written to a virtual log device by opening the appropriate file in the /dev directory andwriting data to the file. A virtual log can be opened by one process at a time.
For example:
To write messages to the virtual log devices by using the echo command, enter the following command:echo “Log Message” > /dev/vlog0
To store files to the virtual log devices by using the cat command, enter the following command:cat /etc/passwd > /dev/vlog0
The maximum individual write size is limited to 32 KB, and programs that attempt to write more data ina single write operation receive an I/O (EIO) error. The command-line interface (CLI) utilities, such as thecat command, automatically break up the transfers into 32 KB write operations.
Trusted Network Connect and Patch managementTrusted Network Connect (TNC) is part of the trusted computing group (TCG) that providesspecifications to verify the end-point integrity. TNC has defined open solution architecture that helpsadministrators enforce policies to effectively control access to the network infrastructure.
Trusted Network Connect conceptsLearn about the components, configuring secure communication, and the patch management system ofthe Trusted Network Connect (TNC).
Trusted Network Connect components:
Learn about the components of the Trusted Network Connect (TNC) framework.
The TNC model consists of the following components:
Trusted Network Connect server:
The Trusted Network Connect (TNC) server identifies the clients that are added to the network andinitiates a verification on them.
The TNC client provides the required fileset level information to the server for verification. The serverdetermines whether the client is at the level that is configured by the administrator. If the client is notcompliant, the TNC server notifies the administrator about the remediation that is required.
PowerSC 25

The TNC server initiates verifications on the clients that are trying to access the network. The TNC serverloads a set of integrity measurement verifiers (IMVs) that can request the integrity measurements fromclients and verify them. AIX has a default IMV, which verifies the fileset and security patch level of thesystems. The TNC server is a framework which loads and manages multiple IMV modules. For verifyinga client, it relies on the IMVs to request information from clients and verifies the clients.
Patch management:
The Trusted Network Connect (TNC) server integrates with the SUMA to provide a patch managementsolution.
The AIX SUMA downloads the latest service packs and security fixes available in the IBM ECC and FixCentral. The TNC and patch management daemon pushes the latest updated information to the TNCserver, which serves as a baseline fileset to verify the clients.
The tncpmd daemon must be configured to manage Service Update Management Assistant (SUMA)downloads and to push fileset information to the TNC server. This daemon must be hosted on a systemthat is connected to the Internet to be able to download the updates automatically.
Note: The TNC server and the tncpmd daemon can be hosted on the same system.
Trusted Network Connect client:
The Trusted Network Connect (TNC) client provides the information that is required by the TNC serverfor verification.
The server determines whether the client is at the level configured by the administrator. If the client isnot compliant, the TNC server notifies the administrator about the updates that are required.
The TNC client loads the IMCs on startup and uses the IMCs to gather the required information.
Trusted Network Connect IP referrer:
The Trusted Network Connect (TNC) server can automatically initiate the verification on clients that arepart of the network. The IP referrer running on Virtual I/O Server (VIOS) partition detects the newclients that are serviced by the VIOS and sends their IP addresses to the TNC server. The TNC serververifies the client regarding the policy that is defined.
Trusted Network Connect secure communication:
The Trusted Network Connect (TNC) daemons communicate over the encrypted channels that areenabled by Transport Layer Security (TLS) or Secure Sockets Layer (SSL).
The secure communication is to ensure that the data and commands that flow in the network areauthenticated and secure. Each system must have its own key and certificate, which are generated whenthe initialization command for the components is run. This process is completely transparent to theadministrator and requires less involvement from the administrator.
To verify a new client, its certificate is imported into the database of the server. The certificate is markedas untrusted initially, and then the administrator uses the tncconsole command to view and mark thecertificates as trusted by entering the following command:tncconsole certadd –i<ip> -t<TRUSTED|UNTRUSTED>
To use a different key and certificate, the tncconsole command provides the option to import thecertificate.
26 AIX Version 6.1: PowerSC

To import the certificate on the server, enter the following command:tncconsole import -S -k<key filename> -f<key filename>
To import the certificate on the client, enter the following command:tncconsole import -C -k<key filename> -f<key filename>
Trusted Network Connect protocol:
The Trusted Network Connect (TNC) protocol is used with the TNC framework to maintain networkintegrity.
TNC provides specifications to verify the end-point integrity. The end-points that request access areassessed based on the integrity measurements of critical components that can affect its operationalenvironment. The TNC framework enables administrators to monitor the integrity of the systems in thenetwork. The TNC is integrated with the AIX patch distribution infrastructure to build a complete patchmanagement solution.
TNC specifications must satisfy the requirements of AIX and POWER® family system architecture. Thecomponents of TNC are designed to provide a complete patch management solution on the AIXoperating system. This configuration enables administrators to efficiently manage the softwareconfiguration on AIX deployments. It provides tools to verify the patch levels of the systems andgenerate a report on the clients that are not compliant. Additionally, patch management simplifies theprocess of downloading the patches and installing them.
IMC and IMV modules:
The Trusted Network Connect (TNC) server or client internally use the integrity measurement collector(IMC) and integrity measurement verifier (IMV) modules for server verification.
This framework allows loading of multiple IMC and IMV modules into the server and clients. Themodule that performs the operating system (OS) and fileset level verification is shipped with AIX bydefault. To access the modules that are shipped with AIX, use one of the following paths:v /usr/lib/security/tnc/libfileset_imc.a: Collects the OS level and information about the fileset that
is installed from the client system and sends it to the IMV (TNC server) for verification.v /usr/lib/security/tnc/libfileset_imv.a: Requests the OS level and fileset information from the client
and compares it with the baseline information. It also updates the status of the client into the databaseof the TNC server. To view the status, enter the tncconsole command:tncconsole list -s<COMPLIANT|IGNORE|FAILED|ALL>-i<ip|ALL> [-c] [-q]
Installing Trusted Network ConnectInstalling the components of Trusted Network Connect (TNC) requires you to complete certain steps.
To configure the setup for using the components of TNC, complete the following steps:1. Identify the IP addresses of the systems to setup the TNC server, the Trusted Network Connect and
Patch Management (TNCPM) server, and the TNC IP referrer for the Virtual I/O Server (VIOS).
Note: The TNC server cannot be configured as a TNC client.2. Set up the network installation management (NIM) server. The system that is configured as a server is
the NIM master, and the sets:bos.sysmgt.nim.master filesets must be installed on the client system.3. Configure the TNCPM server. This configuration can be set up on the NIM system. The TNCPM
server uses the SUMA to download the patches from IBM Fix Central and ECC sites. Therefore, thesystem must be connected to Internet to be able to download the updates.tncpmconsole mktncpm [pmport=<port>]tncserver=<host:port>
PowerSC 27

For example:tncpmconsole mktncpm pmport=20000 tncserver=1.1.1.1:10000
4. Configure the policies on the TNC server. To create the policies for verifying the clients, see the clientpolicies section of the document.
5. Configure the TNC IP referrer on VIOS. This configuration is required to use VIOS to trigger theverification on the clients that are connecting to network. Enter the following command to configurethe referrer:tncconsole mkipref tncport=<port> tncserver=<ip:port>
For example:tncconsole mkipref tncport=10000 tncserver=1.1.1.1:10000
Note: The value of the server port and the TNC port, which is a client port must be the same.6. Configure the clients by using the following command:
tncconsole mkclient tncport=<port> tncserver=<serverip>:<port>
For example:tncconsole mkclient tncport=10000 tncserver=10.1.1.1:10000
Related information:Installing NIM
Configuring Trusted Network Connect and Patch managementYou must configure Trusted Network Connect (TNC) as a patch management daemon. The TNC serverintegrates with the SUMA to provide a comprehensive patch management solution.
Configuring Trusted Network Connect server:
Learn the steps to configure the TNC server.
To configure the TNC server, the /etc/tnccs.conf file must have a value similar to the following:component = SERVER
To configure a system as a server, enter the following command:tncconsole mkserver tncport=<port> pmserver=<ip:port>[recheck_interval=<time in mins>]
For example:tncconsole mkserver tncport=10000 pmserver=2.2.2.2:20000 recheck_interval=20
Note: The tncport port and the pmserver port must be set to different values, and if the value of therecheck_interval parameter is not provided, a default value of 1440 minutes is used.
Configuring Trusted Network Connect client:
Learn the steps to configure the Trusted Network Connect (TNC) client and the configuration settingsthat are required for the setup.
To configure the TNC client, the /etc/tnccs.conf file must have a value similar to the following :component = CLIENT
To configure a system as a client, enter the following command:tncconsole mkclient tncport=<port> tncserver=<ip:port>
For example:
28 AIX Version 6.1: PowerSC

tncconsole mkclient tncport=10000 tncserver=1.1.1.1:10000
Note: The value of the server port and the tncport, which is a client port must be the same.
Configuring the patch management server:
Learn the steps to configure a system as a patch management server.
To configure a system as a patch management server, enter the following command:tncconsole mktncpm pmport=<port> tncserver=<ip:port>
For example:tncpmconsole mktncpm pmport=20000 tncserver=1.1.1.1:10000
Note: The pmport and tncserver ports must be different.
Configuring Trusted Network Connect server email notification:
Learn the procedure to configure email notification for the Trusted Network Connect (TNC) server.
The TNC server views the patch level of the client and if the TNC server finds that the client is notcompliant, it sends an email to the administrator with the result and the required remediation.
To configure the email address of the administrator, use the following command:tncconsole add –e <mailed>[ipgroup=[±]G1, G2 ..]
For example:tncconsole add –e [email protected] ipgroup=vayugrp1,vayugrp2
In the preceding example, the email for IP group vayugrp1 and vayugrp2 is sent to the [email protected] emailaddress.
To send the mail to a global email address for the IP group that does not have an email address assignedto it, use the following command:tncconsole add –e <mailaddress>
For example:tncconsole add –e [email protected]
In the preceding example, if an IP group does not have an email address assigned to it, the mail is sent tothe [email protected] email address. It acts as a global email address.
Configuring IP referrer on VIOS:
Learn how to configure the IP referrer on Virtual I/O Server (VIOS) to automatically initiate verification.
To configure the TNC IP Referrer, the /etc/tnccs.conf configuration file must have a setting similar tothe following component = IPREF.
You can configure a system as a client by entering the following command:tncconsole mkipref tncport=<port> tncserver=<ip:port>
For example:tncconsole mkipref tncport=10000 tncserver=1.1.1.1:10000
PowerSC 29

The value of the tncserver port and the tncport, which is the client port must be the same.
Managing Trusted Network Connect and Patch managementLearn how to manage Trusted Network Connect (TNC) to implement tasks, such as adding the clients,policies, logs, verification results, updating clients, and certificates related to TNC.
Viewing the Trusted Network Connect server logs:
Learn how to view the logs of the Trusted Network Connect (TNC) server.
The TNC server logs the verification results of all the clients. To view the log, run the tncconsolecommand:tncconsole list –H –i <ip |ALL>
Creating policies for the Trusted Network Connect client:
Learn how to set up policies related to Trusted Network Connect (TNC) client.
The tncconsole console provides the interface that is required to manage the TNC policies. Each client ora group of clients can be associated with a policy.
The following policies can be created:v An Internet Protocol (IP) group contains multiple client IP addresses.v Each client IP can belong to only one group.v The IP group is associated with a policy group.v A policy group contains different kinds of policies. For example, the fileset policy that specifies what
must be the client’s operating system level (that is, release, technology level, and service pack). Therecan be multiple fileset policies in a policy group and the client that refers to this policy must be at thelevel specified by one of the fileset policies.
The following commands show how to create an IP group, policy group, and fileset policies.
To create an IP group, enter the following command:tncconsole add –G <ipgrpname> ip=[±]<ip1,ip2,ip3 ...>
For example:tncconsole add –G myipgrp ip=1.1.1.1,2.2.2.2
Note: For a group, at least one IP must be provided. Multiple IPs must be separated by a comma.
To create a fileset policy, enter the following command:tncconsole add –F <fspolicyname> <rel00-TL-SP>
For example:tncconsole add –F myfspol 6100-02-03 aparlist=IY0001,IY0002
Note: The build information must be in the <rel00-TL-sp> format.
To create a policy and assign an IP group, enter the following command:tncconsole add –P <policyname> ipgroup=[±] <ipgrp1, ipgrp2 ...]
For example:tncconsole add –P mypol ipgroup=myipgrp,myipgrp1
30 AIX Version 6.1: PowerSC

To assign fileset policy to a policy, enter the following command:tncconsole add –P <policyname> fspolicy=[±]<fspol1, fspol2 ...>
For example:tncconsole add –P mypol fspolicy=myfspol,myfspol1
Note: If multiple fileset policies are provided, the system enforces the best matching policy on the client.For example, if the client is on 6100-02-01 and you mention the fileset policy as 7100-03-04 and6100-02-03, then 6100-02-03 is enforced on the client.
Starting verification for the Trusted Network Connect client:
Learn how to verify the Trusted Network Connect (TNC) client.
Use one of the following methods for client verification :v The IP referrer daemon on the Virtual I/O Server (VIOS) forwards the client IP to the TNC server : The
client LPAR acquires the IP and tries to access the network. The IP referrer daemon on VIOS detectsthe new IP address and forwards it to the TNC server: The TNC server initiates verification onreceiving the new IP address.
v The TNC server verifies the client periodically: The administrator can add the client IPs that are to beverified in the TNC policy database. The TNC server verifies the clients that are in the database. Thereverification happens automatically at regular intervals with reference to the recheck_intervalattribute value that is specified in the /etc/tnccs.conf configuration file.
v The administrator initiates the client verification manually: The administrator can initiate theverification manually to verify whether a client is added to the network by running the followingcommand:tncconsole verify -i <ip>
Viewing the verification results of the Trusted Network Connect:
Learn the procedure to view the verification results of the Trusted Network Connect (TNC) client.
To view the verification results of the clients in the network, run the following command:tncconsole list -s ALL -i ALL
This command displays all clients that have a IGNORED, COMPLAINT, or FAILED status.v IGNORED: The client IP is ignored in the IP list (that is, the client can be exempt from verification).v COMPLAINT: The client passed the verification (that is, the client is compliant with the policy).v FAILED: The client failed verification (that is, the client is not compliant with the policy, and
administration action is required).
To know the reason for the failure, run the tncconsole command with the client IP that has failed:tncconsole list -s ALL -i <ip>
Updating the Trusted Network Connect client:
The Trusted Network Connect (TNC) server verifies a client and updates the database with the status ofthe client and the result of verification. The administrator can view the results and take action to updatethe client.
To update a client that is at a previous level, enter the following command:tncconsole update -i <ip> -r <buildinfo> [-a apar1,apar2...]
For example:
PowerSC 31

tncconsole update –i 4.4.4.4 –r 6100-02-03 –a IY0004
The tncconsole command updates the client with the build and the APAR installations if they are notinstalled.
Managing patch management policies:
The tncpmconsole command is used to configure the patch management policies.
The patch management policies provide information, such as the TNC server IP address and the timeinterval to initiate a SUMA update.
To manage the patch management policy, enter the following command:tncpmconsole mktncpm [pmport=<port>] tncserver=<host:port>
For example:tncpmconsole mktncpm pmport=2000 tncserver=10.1.1.1:1000
Note: The pmport and the tncserver ports must be different.
Importing Trusted Network Connect certificates:
Learn the procedure to import a certificate and to securely transmit data in the network.
The TNC daemons communicate over the encrypted channels enabled by Transport Layer Security (TLS)or Secure Sockets Layer (SSL). This daemon ensures that the data and commands that flow in thenetwork are authenticated and secure. Each system has its own key and certificate, which are generatedwhen the initialization command for the components is run. This process is transparent to theadministrator and requires less involvement from the administrator. When a client is being verified forthe first time, its certificate is imported into the database of the server. The certificate is marked asuntrusted initially, and the administrator uses the tncconsole command to view, and mark the certificatesas trusted by entering the following command:tncconsole certadd –i <ip> -t <TRUSTED|UNTRUSTED>
If the administrator wants to use a different key, and certificate, the tncconsole command provides thefeature to import them.
To import the certificate on server, enter the following command:tncconsole import -S -k <key filename> -f <filename>
To import the certificate on client, enter the following command:tncconsole import -C -k <key filename> -f <filename>
Troubleshooting Trusted Network Connect and Patch managementLearn the possible causes for failure and the steps to troubleshoot the TNC and the patch managementsystem.
To troubleshoot the TNC and the patch management system, verify the configuration settings that arelisted in the following table.
32 AIX Version 6.1: PowerSC

Table 5. Troubleshooting the configuration settings for the TNC and Patch management systems
Problem Solution
TNC server is not starting or respondingv Determine whether the TNC server daemon is running by
entering the command:
ps –eaf | grep “tnccsd"
v Check the /etc/tnccs.conf configuration file for thecomponent = SERVER entry on the TNC server.
The TNC patch management server is not starting orresponding
v Determine whether the TNC patch management serverdaemon is running by entering the following command:
ps –eaf | grep tncpmd
v Check the /etc/tnccs.conf configuration file for thecomponent = TNCPM entry on the TNC patch managementserver.
TNC client is not starting or respondingv Check if the TNC client daemon is running, enter the
following command:
ps –eaf | grep tnccsd
v Check the /etc/tnccs.conf configuration file for thecomponent = CLIENT entry on the TNC client.
TNC IP referrer is not running on Virtual I/O Server (VIOS)v Determine whether the TNC IP referrer daemon is running by
entering the following command:
ps –eaf | grep tnccsd
v Check the /etc/tnccs.conf configuration file for thecomponent = IPREF entry on VIOS.
Unable to configure a system as both a TNC server and client The TNC server and client cannot run simultaneously on thesame system.
Daemons are running but verification does not happen Enable the log messages for the daemons. Set the level=infolog in the /etc/tnccs.conf file. You can analyze the logmessages.
PowerSC 33

34 AIX Version 6.1: PowerSC

Notices
This information was developed for products and services offered in the U.S.A.
IBM may not offer the products, services, or features discussed in this document in other countries.Consult your local IBM representative for information on the products and services currently available inyour area. Any reference to an IBM product, program, or service is not intended to state or imply thatonly that IBM product, program, or service may be used. Any functionally equivalent product, program,or service that does not infringe any IBM intellectual property right may be used instead. However, it isthe user's responsibility to evaluate and verify the operation of any non-IBM product, program, orservice.
IBM may have patents or pending patent applications covering subject matter described in thisdocument. The furnishing of this document does not give you any license to these patents. You can sendlicense inquiries, in writing, to:
IBM Director of LicensingIBM CorporationNorth Castle DriveArmonk, NY 10504-1785U.S.A.
For license inquiries regarding double-byte character set (DBCS) information, contact the IBM IntellectualProperty Department in your country or send inquiries, in writing, to:
Intellectual Property LicensingLegal and Intellectual Property LawIBM Japan, Ltd.1623-14, Shimotsuruma, Yamato-shiKanagawa 242-8502 Japan
The following paragraph does not apply to the United Kingdom or any other country where suchprovisions are inconsistent with local law: INTERNATIONAL BUSINESS MACHINES CORPORATIONPROVIDES THIS PUBLICATION "AS IS" WITHOUT WARRANTY OF ANY KIND, EITHER EXPRESS ORIMPLIED, INCLUDING, BUT NOT LIMITED TO, THE IMPLIED WARRANTIES OFNON-INFRINGEMENT, MERCHANTABILITY OR FITNESS FOR A PARTICULAR PURPOSE. Somestates do not allow disclaimer of express or implied warranties in certain transactions, therefore, thisstatement may not apply to you.
This information could include technical inaccuracies or typographical errors. Changes are periodicallymade to the information herein; these changes will be incorporated in new editions of the publication.IBM may make improvements and/or changes in the product(s) and/or the program(s) described in thispublication at any time without notice.
Any references in this information to non-IBM websites are provided for convenience only and do not inany manner serve as an endorsement of those websites. The materials at those websites are not part ofthe materials for this IBM product and use of those websites is at your own risk.
IBM may use or distribute any of the information you supply in any way it believes appropriate withoutincurring any obligation to you.
Licensees of this program who wish to have information about it for the purpose of enabling: (i) theexchange of information between independently created programs and other programs (including this
© Copyright IBM Corp. 2011, 2012 35

one) and (ii) the mutual use of the information which has been exchanged, should contact:
IBM CorporationDept. LRAS/Bldg. 90311501 Burnet RoadAustin, TX 78758-3400U.S.A.
Such information may be available, subject to appropriate terms and conditions, including in some cases,payment of a fee.
The licensed program described in this document and all licensed material available for it are providedby IBM under terms of the IBM Customer Agreement, IBM International Program License Agreement orany equivalent agreement between us.
Any performance data contained herein was determined in a controlled environment. Therefore, theresults obtained in other operating environments may vary significantly. Some measurements may havebeen made on development-level systems and there is no guarantee that these measurements will be thesame on generally available systems. Furthermore, some measurements may have been estimated throughextrapolation. Actual results may vary. Users of this document should verify the applicable data for theirspecific environment.
Information concerning non-IBM products was obtained from the suppliers of those products, theirpublished announcements or other publicly available sources. IBM has not tested those products andcannot confirm the accuracy of performance, compatibility or any other claims related to non-IBMproducts. Questions on the capabilities of non-IBM products should be addressed to the suppliers ofthose products.
All statements regarding IBM's future direction or intent are subject to change or withdrawal withoutnotice, and represent goals and objectives only.
All IBM prices shown are IBM's suggested retail prices, are current and are subject to change withoutnotice. Dealer prices may vary.
This information is for planning purposes only. The information herein is subject to change before theproducts described become available.
This information contains examples of data and reports used in daily business operations. To illustratethem as completely as possible, the examples include the names of individuals, companies, brands, andproducts. All of these names are fictitious and any similarity to the names and addresses used by anactual business enterprise is entirely coincidental.
COPYRIGHT LICENSE:
This information contains sample application programs in source language, which illustrate programmingtechniques on various operating platforms. You may copy, modify, and distribute these sample programsin any form without payment to IBM, for the purposes of developing, using, marketing or distributingapplication programs conforming to the application programming interface for the operating platform forwhich the sample programs are written. These examples have not been thoroughly tested under allconditions. IBM, therefore, cannot guarantee or imply reliability, serviceability, or function of theseprograms. The sample programs are provided "AS IS", without warranty of any kind. IBM shall not beliable for any damages arising out of your use of the sample programs.
Each copy or any portion of these sample programs or any derivative work, must include a copyrightnotice as follows:
36 AIX Version 6.1: PowerSC

© (your company name) (year). Portions of this code are derived from IBM Corp. Sample Programs. ©Copyright IBM Corp. _enter the year or years_.
If you are viewing this information softcopy, the photographs and color illustrations may not appear.
TrademarksIBM, the IBM logo, and ibm.com are trademarks or registered trademarks of International BusinessMachines Corp., registered in many jurisdictions worldwide. Other product and service names might betrademarks of IBM or other companies. A current list of IBM trademarks is available on the web atCopyright and trademark information at www.ibm.com/legal/copytrade.shtml.
Adobe, the Adobe logo, PostScript, and the PostScript logo are either registered trademarks or trademarksof Adobe Systems Incorporated in the United States, and/or other countries.
Linux is a registered trademark of Linus Torvalds in the United States, other countries, or both.
Java and all Java-based trademarks and logos are trademarks or registered trademarks of Oracle and/orits affiliates.
UNIX is a registered trademark of The Open Group in the United States and other countries.
Other product and service names might be trademarks of IBM or other companies.
Notices 37

38 AIX Version 6.1: PowerSC

Index
AAIX Audit subsystem 24AIX syslog 24Attesting a system 14
CClient Policies 30Client verification 31Components 25concepts 25Configuring 28Configuring client 28Configuring patch management server 29Configuring PowerSC Security and Compliance
Automation 8Configuring server 28Configuring the trusted logging 24Configuring Trusted Boot 13Configuring Trusted Logging 24
DDeleting systems 15Department of Defence STIG compliance 4
Eemail notification 29enrolling a system 13
Hhardware and software requirements 1
IIMC and IMV modules 27import certificates 26Import certificates 32Installing 2, 27Installing PowerSC Express Edition 2Installing PowerSC Standard Edition 2Installing the collector 13Installing the verifier 13Installing Trusted Boot 13Interpreting attestation results 14Investigating a failed rule 7IP Referrer 26IP Referrer on VIOS 29
MManaging policies 32Managing Security and Compliance Automation 6, 7, 8Managing TNC and Patch management 30Managing Trusted Boot 14Migration considerations 13
Monitoring systems for continued compliance 8
Ooverview 1, 25
PPatch management 26Payment card industry DSS compliance 5Planning 12PowerSC 1, 2, 3, 4, 5, 6, 8, 11
Trusted Firewallconfiguring 19configuring with multiple SEAs 19creating rules 21deactivating rules 22installing 19removing SEAs 21
PowerSC Express Edition 3Preparing for remediation 12Prerequisites 12Protocol 27
Ssecure communication 26Server 25SOX and COBIT 5Standard Edition 11SUMA 26
TTesting the applications 8TNC 32TNC client 26troubleshooting 15Troubleshooting TNC and Patch management 32Trusted Boot 11, 12, 13, 14, 15Trusted Boot concepts 11Trusted Firewall 16
configuring 19multiple SEAs 19
creating rules 21deactivating rules 22installing 19removing
SEAs 21Trusted Firewall concepts 16Trusted Logging 22, 23, 25Trusted Logging overview 22Trusted network connect 28, 31, 32Trusted Network Connect 25, 26, 27, 28, 29, 30, 31Trusted Network Connect and Patch management 25Trusted Network Connect server 29, 30
© Copyright IBM Corp. 2011, 2012 39

UUpdating the failed rule 7Updating TNC client 31
VViewing logs 30Viewing verification results 31Viewing virtual log devices 23virtual logs 23
WWriting data to virtual log devices 25
40 AIX Version 6.1: PowerSC


����
Printed in USA
Related Documents