PowerPoint 2016 for Mac Basics

Welcome message from author
This document is posted to help you gain knowledge. Please leave a comment to let me know what you think about it! Share it to your friends and learn new things together.
Transcript

PowerPoint 2016 for Mac
Basics
2
To install Office 2016 for Mac yoursquoll need
bull A Mac that meets these requirements
bull An administrator account on the computer yoursquore using
To activate Office 2016 for Mac yoursquoll need
bull An Office 365 subscription that includes Office 2016 for Mac
bull An account to sign in to Office
Need help
bull See one of the following
bull What to try if you cant install or activate Office 2016 for Mac (work or school account)
bull What to try if you cant install or activate Office 2016 for Mac (home or personal account)
bull Visit the Answers forum (Microsoft community)
bull Contact Office Support (httpssupportofficecomhomecontact)
Make sure yoursquove installed and activated Office 2016 for Mac
3
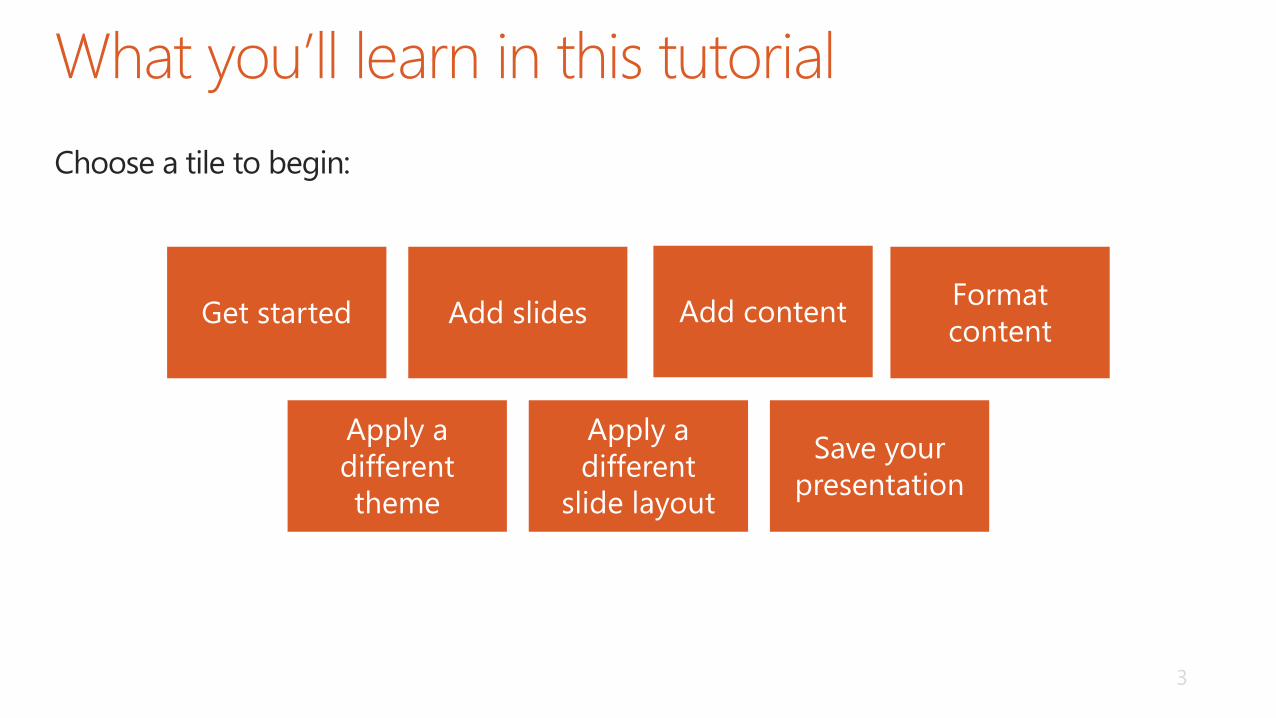
Choose a tile to begin
Get started Add slides Add contentFormat
content
Apply a
different
theme
Apply a
different
slide layout
Save your
presentation
Getting up and running with PowerPoint 2016 for Mac is easy
In this section yoursquoll learn how to
bull Find and open PowerPoint after installation
bull Create a blank presentation
bull Explore PowerPoint 2016 for Mac
bull Explore changes in the ribbon
5
Use one of these two ways to find and open
PowerPoint 2016 for Mac
1 Choose Finder gt Applications and
then double-click Microsoft PowerPoint
- or -
2 Choose Launchpad if itrsquos on the Dock and
then choose Microsoft PowerPoint
TIP To add PowerPoint 2016 to the Dock
drag it there from the Applications
window in Finder or from Launchpad
6
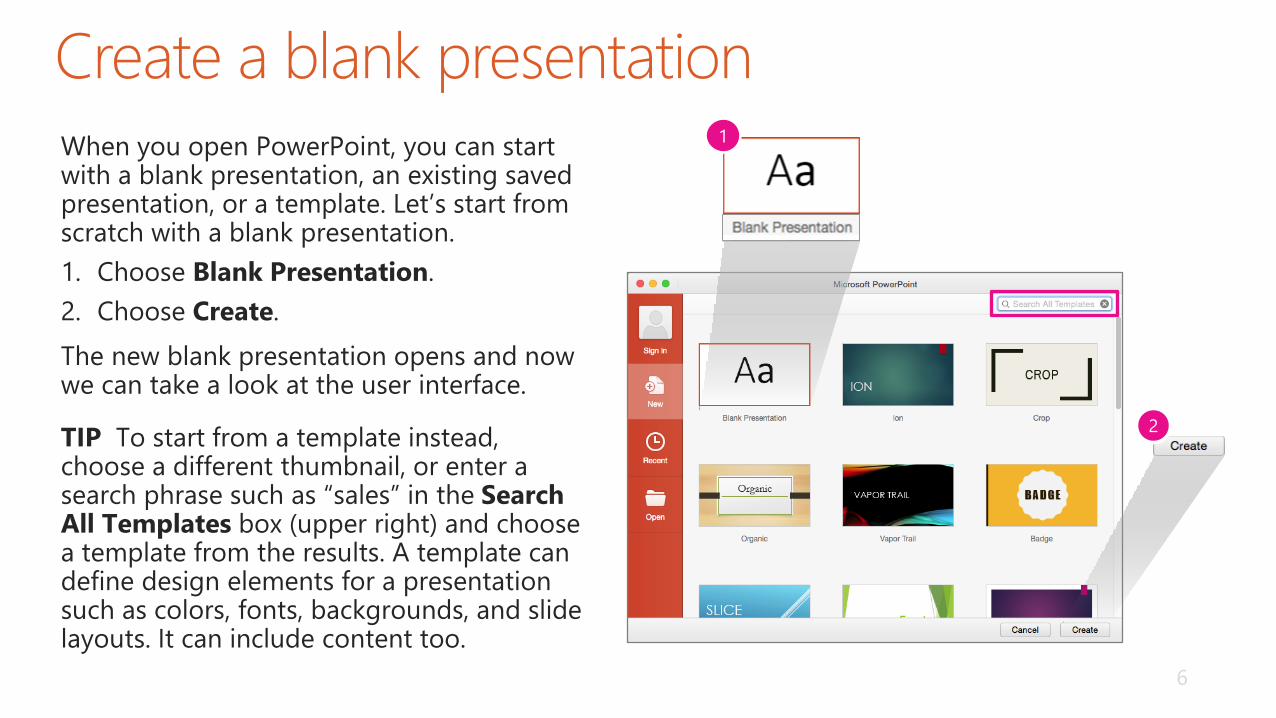
When you open PowerPoint you can start with a blank presentation an existing saved presentation or a template Letrsquos start from scratch with a blank presentation
1 Choose Blank Presentation
2 Choose Create
The new blank presentation opens and now we can take a look at the user interface
TIP To start from a template instead choose a different thumbnail or enter a search phrase such as ldquosalesrdquo in the Search All Templates box (upper right) and choose a template from the results A template can define design elements for a presentation such as colors fonts backgrounds and slide layouts It can include content too
1
2
7
Menu barQuick Access toolbar
Ribbon
Thumbnailpane
Contentplaceholders
Download the PowerPoint for Mac Quick Start Guide
Slide pane
Notes pane
Status bar
8
The ribbon has been reorganized
for consistency with PowerPoint on
other platforms For PowerPoint
2016 ribbon updates include
bull New tabs Insert Design View
The Design and View tabs
include tools and commands
from the PowerPoint 2011
Themes tab which was not
carried forward
bull New contextual tabs that
appear when you work with
elements such as tables charts
shapes or pictures
To work with these features
in PowerPoint 2016
Use these new
PowerPoint 2016 tabs
Inserting charts tables images
SmartArt and other elements
Insert
Themes fonts colors backgrounds Design
Presentation-related views View
Tables Contextual
Table Design and Layout
Charts Contextual
Chart Design and Format
Shapes Contextual
Shape Format
Pictures Contextual
Picture Format
Our new blank presentation came with one slide Now wersquoll add a
couple more
In this section yoursquoll learn how to
bull Add a slide in one easy step
bull Add a slide with a layout you choose
10
Herersquos a quick way to add a slide
On the Home tab choose New Slide
The new slide appears in the
slide pane
A new thumbnail in the left pane
shows that the new slide is second
in the presentation
1
22
1
11
Herersquos another way to add a slide You
choose a layout for the slide when you
add it The layout defines the placeholders
and their formats and positions for the
slide
1 Select thumbnail 2 in the left pane
When you add a slide PowerPoint
places it after the one thatrsquos currently
selected
2 Choose the Home tab
3 Choose the arrow next to New Slide
4 Choose Picture with Caption
Itrsquos time to replace the placeholders on one of your slides with your
own content
In this section yoursquoll learn how to
bull Add text to a slide
bull Add a picture to a slide
bull Resize the picture to fit (if necessary)
13
Letrsquos add text and a picture to slide 3
1 In the left pane choose thumbnail 3
2 On slide 3 select inside the text box that contains the placeholder Clickto add title and enter Vacation time
3 Delete the text box that contains the placeholder Click to add text ndash we donrsquot need it for this slide
a Point to the text-box border and click it when the pointer changes to include a four-headed arrow
b The sizing handles that appear at the sides and corners indicate that the whole text box is selected
c On your keyboard press Delete
12
Text boxsizing handles
3b
3a
14
1 On slide 3 choose the
placeholder for the picture 1
15
2 On the Insert tab choose Pictures
3 To look for a photo by its location or file name among your files choose Picture from File
4 Choose a file thatrsquos a picture and then choose Insert
NOTES
bull To browse photos in apps such as Photos or Photo Booth choose Photo Browser Then choose a photo and drag it to the picture placeholder on the slide
bull Clip art is no longer available To insert an image from a different source choose the image and press Command ()+C to copy it Then choose the picture placeholder and press Command ()+V to paste
2
3
4a
4b
16
Did your picture fit inside the placeholder
If not herersquos how you can resize it to fit
1 Select the picture on the slide
2 On the Picture Format tab choose
the small arrow next to Crop
3 Choose Fit
2
3
Most of the formatting for the text and objects on slides in a
presentation is defined by the theme However you can override the
theme and apply different styles and effects to any slide or object
In this section yoursquoll learn how to
bull Format text on a slide
bull Resize and move a picture on a slide
18
Letrsquos format the text on slide 3
1 Point to the border of the text box that
contains the title Vacation time and then
click when the pointer changes to include a
four-headed arrow
The sizing handles appear and indicate that
all of the text in the box is selected
TIP Alternatively you can choose only the
text you want to format
1
19
2 On the Home tab choose the
arrow next to Font Color
3 Choose Green Accent 6
2
3
20
1 Choose the picture on slide 3
2 To make the picture smaller
a Point to the sizing handle at the upper-
right corner The pointer might change
and resemble a double-headed arrow
b Drag the upper-right corner of the
picture diagonally toward the lower-left
corner until the top of the picture is
slightly lower than the words Vacation
time
3 Move the picture to the right without
changing the size ndash just choose it and drag
it a short distance across the slide
3
2a
2b
1
You can quickly change the design in a presentation by applying a
different theme to the whole presentation or just to selected slides A
theme can define fonts colors backgrounds and effects
In this section yoursquoll learn how to
bull Apply a different theme
bull Compare old and new themes on a slide
22
To apply a different theme to a presentation
1 On the Design tab point to any thumbnail
between the left and right arrows
2 To see all available themes choose the arrow
that appears below the row of thumbnails
3 Choose the Facet theme (Point to any
thumbnail to see the theme name)
TIP To apply a theme to selected slides all at once
press and hold Command () while you choose
thumbnails of slides to apply the new theme to
and then perform the steps in the procedure above
23
Herersquos slide 3 after you applied the Facet theme
Notice how itrsquos different from before
1 The thumbnails in the left pane indicate that
the green and white Facet design was applied
to all slides in the presentation
2 The picture is in landscape mode
3 The title moved and its font size and type
changed
Before
After
2
3
A PowerPoint presentation comes with slide layouts A slide layout is
like a blueprint When you apply it to a slide it defines placeholders
and their formats and positions for that slide
In this section yoursquoll learn how to apply a different layout to an
existing slide
25
We chose the Picture and Caption
layout when we added slide 3 Letrsquos
apply a different layout to that slide
now
1 In the left pane select thumbnail 3
2 On the Home tab choose Layout
3 Choose Title and Content
Itrsquos a good idea to save your changes often You can save your
presentation anywhere and even save it as a template so that
you can start new presentations from it later
In this section yoursquoll learn how to
bull Save a presentation
bull Save a presentation anywhere
bull Save a presentation to your Mac
bull Save a presentation to OneDrive
bull Save a presentation as a template
27
1 To save for the first time or to save to
the same place as last time
a On the Quick Access toolbar
choose Save this presentation
- or -
b On the menu bar choose
File gt Save
2 To save with a different name on the
menu bar choose File gt Save As
2
1a
1b
28
You have options
bull Save to your Mac or to other
offline locations you can access
bull Save to any of these online
locations you can access
Office 365 sites
SharePoint on-premises
OneDrive
OneDrive for Business
for Business
29
TIP Donrsquot choose Online Locations if you want to save to your Mac
1 On the Quick Access toolbar choose Save this presentation
2 In the Save As box enter a name for your presentation
3 In the Where list choose a save location
TIP You can even save to iCloud Drive if itrsquos in the list
4 Choose Save
4
2
30
1 On the Quick Access toolbar choose Save this presentation
2 Choose Online Locations
3 If OneDrive isnrsquot in your online locations list
a Choose + to add it
b Choose Sign in and use your Microsoft account
2
3b
3a
31
1 In the Save As box enter a name for
your presentation
2 Choose a location on your OneDrive
3 Choose Save
TIP Donrsquot choose On my Mac if you
want to save to an online location such
as OneDrive OneDrive for Business or
SharePoint3
2
1
32
1 On the menu bar choose
File gt Save as Template
2 In the Save As box enter a
template name
3 In the File Format box choose
PowerPoint Template (potx)
4 Choose Save
33
Additional resources
PowerPoint 2016 for Mac
bull PowerPoint 2016 for Mac Quick Start Guide
bull PowerPoint 2016 for Mac training
bull PowerPoint 2016 for Mac Help
bull Compare PowerPoint for Mac 2011 with PowerPoint 2016 for Mac
bull Compare PowerPoint 2016 for Mac with PowerPoint 2013 for Windows desktop
bull More about PowerPoint 2016 for Mac at httpsupportofficecom
bull Discover PowerPoint
Office and Office 365
bull Office training and tutorials
bull Office 365 business support
bull Office 365 Modern Learning Yammer group
copy 2015 Microsoft Corporation All rights reserved Microsoft Windows and other product names are or may be registered trademarks andor trademarks in the US andor other countries
The information herein is for informational purposes only and represents the current view of Microsoft Corporation as of the date of this presentation Because Microsoft must respond to changing market conditions it should not be interpreted to be a commitment on the
part of Microsoft and Microsoft cannot guarantee the accuracy of any information provided after the date of this presentation MICROSOFT MAKES NO WARRANTIES EXPRESS IMPLIED OR STATUTORY AS TO THE INFORMATION IN THIS PRESENTATION

2
To install Office 2016 for Mac yoursquoll need
bull A Mac that meets these requirements
bull An administrator account on the computer yoursquore using
To activate Office 2016 for Mac yoursquoll need
bull An Office 365 subscription that includes Office 2016 for Mac
bull An account to sign in to Office
Need help
bull See one of the following
bull What to try if you cant install or activate Office 2016 for Mac (work or school account)
bull What to try if you cant install or activate Office 2016 for Mac (home or personal account)
bull Visit the Answers forum (Microsoft community)
bull Contact Office Support (httpssupportofficecomhomecontact)
Make sure yoursquove installed and activated Office 2016 for Mac
3
Choose a tile to begin
Get started Add slides Add contentFormat
content
Apply a
different
theme
Apply a
different
slide layout
Save your
presentation
Getting up and running with PowerPoint 2016 for Mac is easy
In this section yoursquoll learn how to
bull Find and open PowerPoint after installation
bull Create a blank presentation
bull Explore PowerPoint 2016 for Mac
bull Explore changes in the ribbon
5
Use one of these two ways to find and open
PowerPoint 2016 for Mac
1 Choose Finder gt Applications and
then double-click Microsoft PowerPoint
- or -
2 Choose Launchpad if itrsquos on the Dock and
then choose Microsoft PowerPoint
TIP To add PowerPoint 2016 to the Dock
drag it there from the Applications
window in Finder or from Launchpad
6
When you open PowerPoint you can start with a blank presentation an existing saved presentation or a template Letrsquos start from scratch with a blank presentation
1 Choose Blank Presentation
2 Choose Create
The new blank presentation opens and now we can take a look at the user interface
TIP To start from a template instead choose a different thumbnail or enter a search phrase such as ldquosalesrdquo in the Search All Templates box (upper right) and choose a template from the results A template can define design elements for a presentation such as colors fonts backgrounds and slide layouts It can include content too
1
2
7
Menu barQuick Access toolbar
Ribbon
Thumbnailpane
Contentplaceholders
Download the PowerPoint for Mac Quick Start Guide
Slide pane
Notes pane
Status bar
8
The ribbon has been reorganized
for consistency with PowerPoint on
other platforms For PowerPoint
2016 ribbon updates include
bull New tabs Insert Design View
The Design and View tabs
include tools and commands
from the PowerPoint 2011
Themes tab which was not
carried forward
bull New contextual tabs that
appear when you work with
elements such as tables charts
shapes or pictures
To work with these features
in PowerPoint 2016
Use these new
PowerPoint 2016 tabs
Inserting charts tables images
SmartArt and other elements
Insert
Themes fonts colors backgrounds Design
Presentation-related views View
Tables Contextual
Table Design and Layout
Charts Contextual
Chart Design and Format
Shapes Contextual
Shape Format
Pictures Contextual
Picture Format
Our new blank presentation came with one slide Now wersquoll add a
couple more
In this section yoursquoll learn how to
bull Add a slide in one easy step
bull Add a slide with a layout you choose
10
Herersquos a quick way to add a slide
On the Home tab choose New Slide
The new slide appears in the
slide pane
A new thumbnail in the left pane
shows that the new slide is second
in the presentation
1
22
1
11
Herersquos another way to add a slide You
choose a layout for the slide when you
add it The layout defines the placeholders
and their formats and positions for the
slide
1 Select thumbnail 2 in the left pane
When you add a slide PowerPoint
places it after the one thatrsquos currently
selected
2 Choose the Home tab
3 Choose the arrow next to New Slide
4 Choose Picture with Caption
Itrsquos time to replace the placeholders on one of your slides with your
own content
In this section yoursquoll learn how to
bull Add text to a slide
bull Add a picture to a slide
bull Resize the picture to fit (if necessary)
13
Letrsquos add text and a picture to slide 3
1 In the left pane choose thumbnail 3
2 On slide 3 select inside the text box that contains the placeholder Clickto add title and enter Vacation time
3 Delete the text box that contains the placeholder Click to add text ndash we donrsquot need it for this slide
a Point to the text-box border and click it when the pointer changes to include a four-headed arrow
b The sizing handles that appear at the sides and corners indicate that the whole text box is selected
c On your keyboard press Delete
12
Text boxsizing handles
3b
3a
14
1 On slide 3 choose the
placeholder for the picture 1
15
2 On the Insert tab choose Pictures
3 To look for a photo by its location or file name among your files choose Picture from File
4 Choose a file thatrsquos a picture and then choose Insert
NOTES
bull To browse photos in apps such as Photos or Photo Booth choose Photo Browser Then choose a photo and drag it to the picture placeholder on the slide
bull Clip art is no longer available To insert an image from a different source choose the image and press Command ()+C to copy it Then choose the picture placeholder and press Command ()+V to paste
2
3
4a
4b
16
Did your picture fit inside the placeholder
If not herersquos how you can resize it to fit
1 Select the picture on the slide
2 On the Picture Format tab choose
the small arrow next to Crop
3 Choose Fit
2
3
Most of the formatting for the text and objects on slides in a
presentation is defined by the theme However you can override the
theme and apply different styles and effects to any slide or object
In this section yoursquoll learn how to
bull Format text on a slide
bull Resize and move a picture on a slide
18
Letrsquos format the text on slide 3
1 Point to the border of the text box that
contains the title Vacation time and then
click when the pointer changes to include a
four-headed arrow
The sizing handles appear and indicate that
all of the text in the box is selected
TIP Alternatively you can choose only the
text you want to format
1
19
2 On the Home tab choose the
arrow next to Font Color
3 Choose Green Accent 6
2
3
20
1 Choose the picture on slide 3
2 To make the picture smaller
a Point to the sizing handle at the upper-
right corner The pointer might change
and resemble a double-headed arrow
b Drag the upper-right corner of the
picture diagonally toward the lower-left
corner until the top of the picture is
slightly lower than the words Vacation
time
3 Move the picture to the right without
changing the size ndash just choose it and drag
it a short distance across the slide
3
2a
2b
1
You can quickly change the design in a presentation by applying a
different theme to the whole presentation or just to selected slides A
theme can define fonts colors backgrounds and effects
In this section yoursquoll learn how to
bull Apply a different theme
bull Compare old and new themes on a slide
22
To apply a different theme to a presentation
1 On the Design tab point to any thumbnail
between the left and right arrows
2 To see all available themes choose the arrow
that appears below the row of thumbnails
3 Choose the Facet theme (Point to any
thumbnail to see the theme name)
TIP To apply a theme to selected slides all at once
press and hold Command () while you choose
thumbnails of slides to apply the new theme to
and then perform the steps in the procedure above
23
Herersquos slide 3 after you applied the Facet theme
Notice how itrsquos different from before
1 The thumbnails in the left pane indicate that
the green and white Facet design was applied
to all slides in the presentation
2 The picture is in landscape mode
3 The title moved and its font size and type
changed
Before
After
2
3
A PowerPoint presentation comes with slide layouts A slide layout is
like a blueprint When you apply it to a slide it defines placeholders
and their formats and positions for that slide
In this section yoursquoll learn how to apply a different layout to an
existing slide
25
We chose the Picture and Caption
layout when we added slide 3 Letrsquos
apply a different layout to that slide
now
1 In the left pane select thumbnail 3
2 On the Home tab choose Layout
3 Choose Title and Content
Itrsquos a good idea to save your changes often You can save your
presentation anywhere and even save it as a template so that
you can start new presentations from it later
In this section yoursquoll learn how to
bull Save a presentation
bull Save a presentation anywhere
bull Save a presentation to your Mac
bull Save a presentation to OneDrive
bull Save a presentation as a template
27
1 To save for the first time or to save to
the same place as last time
a On the Quick Access toolbar
choose Save this presentation
- or -
b On the menu bar choose
File gt Save
2 To save with a different name on the
menu bar choose File gt Save As
2
1a
1b
28
You have options
bull Save to your Mac or to other
offline locations you can access
bull Save to any of these online
locations you can access
Office 365 sites
SharePoint on-premises
OneDrive
OneDrive for Business
for Business
29
TIP Donrsquot choose Online Locations if you want to save to your Mac
1 On the Quick Access toolbar choose Save this presentation
2 In the Save As box enter a name for your presentation
3 In the Where list choose a save location
TIP You can even save to iCloud Drive if itrsquos in the list
4 Choose Save
4
2
30
1 On the Quick Access toolbar choose Save this presentation
2 Choose Online Locations
3 If OneDrive isnrsquot in your online locations list
a Choose + to add it
b Choose Sign in and use your Microsoft account
2
3b
3a
31
1 In the Save As box enter a name for
your presentation
2 Choose a location on your OneDrive
3 Choose Save
TIP Donrsquot choose On my Mac if you
want to save to an online location such
as OneDrive OneDrive for Business or
SharePoint3
2
1
32
1 On the menu bar choose
File gt Save as Template
2 In the Save As box enter a
template name
3 In the File Format box choose
PowerPoint Template (potx)
4 Choose Save
33
Additional resources
PowerPoint 2016 for Mac
bull PowerPoint 2016 for Mac Quick Start Guide
bull PowerPoint 2016 for Mac training
bull PowerPoint 2016 for Mac Help
bull Compare PowerPoint for Mac 2011 with PowerPoint 2016 for Mac
bull Compare PowerPoint 2016 for Mac with PowerPoint 2013 for Windows desktop
bull More about PowerPoint 2016 for Mac at httpsupportofficecom
bull Discover PowerPoint
Office and Office 365
bull Office training and tutorials
bull Office 365 business support
bull Office 365 Modern Learning Yammer group
copy 2015 Microsoft Corporation All rights reserved Microsoft Windows and other product names are or may be registered trademarks andor trademarks in the US andor other countries
The information herein is for informational purposes only and represents the current view of Microsoft Corporation as of the date of this presentation Because Microsoft must respond to changing market conditions it should not be interpreted to be a commitment on the
part of Microsoft and Microsoft cannot guarantee the accuracy of any information provided after the date of this presentation MICROSOFT MAKES NO WARRANTIES EXPRESS IMPLIED OR STATUTORY AS TO THE INFORMATION IN THIS PRESENTATION
3
Choose a tile to begin
Get started Add slides Add contentFormat
content
Apply a
different
theme
Apply a
different
slide layout
Save your
presentation
Getting up and running with PowerPoint 2016 for Mac is easy
In this section yoursquoll learn how to
bull Find and open PowerPoint after installation
bull Create a blank presentation
bull Explore PowerPoint 2016 for Mac
bull Explore changes in the ribbon
5
Use one of these two ways to find and open
PowerPoint 2016 for Mac
1 Choose Finder gt Applications and
then double-click Microsoft PowerPoint
- or -
2 Choose Launchpad if itrsquos on the Dock and
then choose Microsoft PowerPoint
TIP To add PowerPoint 2016 to the Dock
drag it there from the Applications
window in Finder or from Launchpad
6
When you open PowerPoint you can start with a blank presentation an existing saved presentation or a template Letrsquos start from scratch with a blank presentation
1 Choose Blank Presentation
2 Choose Create
The new blank presentation opens and now we can take a look at the user interface
TIP To start from a template instead choose a different thumbnail or enter a search phrase such as ldquosalesrdquo in the Search All Templates box (upper right) and choose a template from the results A template can define design elements for a presentation such as colors fonts backgrounds and slide layouts It can include content too
1
2
7
Menu barQuick Access toolbar
Ribbon
Thumbnailpane
Contentplaceholders
Download the PowerPoint for Mac Quick Start Guide
Slide pane
Notes pane
Status bar
8
The ribbon has been reorganized
for consistency with PowerPoint on
other platforms For PowerPoint
2016 ribbon updates include
bull New tabs Insert Design View
The Design and View tabs
include tools and commands
from the PowerPoint 2011
Themes tab which was not
carried forward
bull New contextual tabs that
appear when you work with
elements such as tables charts
shapes or pictures
To work with these features
in PowerPoint 2016
Use these new
PowerPoint 2016 tabs
Inserting charts tables images
SmartArt and other elements
Insert
Themes fonts colors backgrounds Design
Presentation-related views View
Tables Contextual
Table Design and Layout
Charts Contextual
Chart Design and Format
Shapes Contextual
Shape Format
Pictures Contextual
Picture Format
Our new blank presentation came with one slide Now wersquoll add a
couple more
In this section yoursquoll learn how to
bull Add a slide in one easy step
bull Add a slide with a layout you choose
10
Herersquos a quick way to add a slide
On the Home tab choose New Slide
The new slide appears in the
slide pane
A new thumbnail in the left pane
shows that the new slide is second
in the presentation
1
22
1
11
Herersquos another way to add a slide You
choose a layout for the slide when you
add it The layout defines the placeholders
and their formats and positions for the
slide
1 Select thumbnail 2 in the left pane
When you add a slide PowerPoint
places it after the one thatrsquos currently
selected
2 Choose the Home tab
3 Choose the arrow next to New Slide
4 Choose Picture with Caption
Itrsquos time to replace the placeholders on one of your slides with your
own content
In this section yoursquoll learn how to
bull Add text to a slide
bull Add a picture to a slide
bull Resize the picture to fit (if necessary)
13
Letrsquos add text and a picture to slide 3
1 In the left pane choose thumbnail 3
2 On slide 3 select inside the text box that contains the placeholder Clickto add title and enter Vacation time
3 Delete the text box that contains the placeholder Click to add text ndash we donrsquot need it for this slide
a Point to the text-box border and click it when the pointer changes to include a four-headed arrow
b The sizing handles that appear at the sides and corners indicate that the whole text box is selected
c On your keyboard press Delete
12
Text boxsizing handles
3b
3a
14
1 On slide 3 choose the
placeholder for the picture 1
15
2 On the Insert tab choose Pictures
3 To look for a photo by its location or file name among your files choose Picture from File
4 Choose a file thatrsquos a picture and then choose Insert
NOTES
bull To browse photos in apps such as Photos or Photo Booth choose Photo Browser Then choose a photo and drag it to the picture placeholder on the slide
bull Clip art is no longer available To insert an image from a different source choose the image and press Command ()+C to copy it Then choose the picture placeholder and press Command ()+V to paste
2
3
4a
4b
16
Did your picture fit inside the placeholder
If not herersquos how you can resize it to fit
1 Select the picture on the slide
2 On the Picture Format tab choose
the small arrow next to Crop
3 Choose Fit
2
3
Most of the formatting for the text and objects on slides in a
presentation is defined by the theme However you can override the
theme and apply different styles and effects to any slide or object
In this section yoursquoll learn how to
bull Format text on a slide
bull Resize and move a picture on a slide
18
Letrsquos format the text on slide 3
1 Point to the border of the text box that
contains the title Vacation time and then
click when the pointer changes to include a
four-headed arrow
The sizing handles appear and indicate that
all of the text in the box is selected
TIP Alternatively you can choose only the
text you want to format
1
19
2 On the Home tab choose the
arrow next to Font Color
3 Choose Green Accent 6
2
3
20
1 Choose the picture on slide 3
2 To make the picture smaller
a Point to the sizing handle at the upper-
right corner The pointer might change
and resemble a double-headed arrow
b Drag the upper-right corner of the
picture diagonally toward the lower-left
corner until the top of the picture is
slightly lower than the words Vacation
time
3 Move the picture to the right without
changing the size ndash just choose it and drag
it a short distance across the slide
3
2a
2b
1
You can quickly change the design in a presentation by applying a
different theme to the whole presentation or just to selected slides A
theme can define fonts colors backgrounds and effects
In this section yoursquoll learn how to
bull Apply a different theme
bull Compare old and new themes on a slide
22
To apply a different theme to a presentation
1 On the Design tab point to any thumbnail
between the left and right arrows
2 To see all available themes choose the arrow
that appears below the row of thumbnails
3 Choose the Facet theme (Point to any
thumbnail to see the theme name)
TIP To apply a theme to selected slides all at once
press and hold Command () while you choose
thumbnails of slides to apply the new theme to
and then perform the steps in the procedure above
23
Herersquos slide 3 after you applied the Facet theme
Notice how itrsquos different from before
1 The thumbnails in the left pane indicate that
the green and white Facet design was applied
to all slides in the presentation
2 The picture is in landscape mode
3 The title moved and its font size and type
changed
Before
After
2
3
A PowerPoint presentation comes with slide layouts A slide layout is
like a blueprint When you apply it to a slide it defines placeholders
and their formats and positions for that slide
In this section yoursquoll learn how to apply a different layout to an
existing slide
25
We chose the Picture and Caption
layout when we added slide 3 Letrsquos
apply a different layout to that slide
now
1 In the left pane select thumbnail 3
2 On the Home tab choose Layout
3 Choose Title and Content
Itrsquos a good idea to save your changes often You can save your
presentation anywhere and even save it as a template so that
you can start new presentations from it later
In this section yoursquoll learn how to
bull Save a presentation
bull Save a presentation anywhere
bull Save a presentation to your Mac
bull Save a presentation to OneDrive
bull Save a presentation as a template
27
1 To save for the first time or to save to
the same place as last time
a On the Quick Access toolbar
choose Save this presentation
- or -
b On the menu bar choose
File gt Save
2 To save with a different name on the
menu bar choose File gt Save As
2
1a
1b
28
You have options
bull Save to your Mac or to other
offline locations you can access
bull Save to any of these online
locations you can access
Office 365 sites
SharePoint on-premises
OneDrive
OneDrive for Business
for Business
29
TIP Donrsquot choose Online Locations if you want to save to your Mac
1 On the Quick Access toolbar choose Save this presentation
2 In the Save As box enter a name for your presentation
3 In the Where list choose a save location
TIP You can even save to iCloud Drive if itrsquos in the list
4 Choose Save
4
2
30
1 On the Quick Access toolbar choose Save this presentation
2 Choose Online Locations
3 If OneDrive isnrsquot in your online locations list
a Choose + to add it
b Choose Sign in and use your Microsoft account
2
3b
3a
31
1 In the Save As box enter a name for
your presentation
2 Choose a location on your OneDrive
3 Choose Save
TIP Donrsquot choose On my Mac if you
want to save to an online location such
as OneDrive OneDrive for Business or
SharePoint3
2
1
32
1 On the menu bar choose
File gt Save as Template
2 In the Save As box enter a
template name
3 In the File Format box choose
PowerPoint Template (potx)
4 Choose Save
33
Additional resources
PowerPoint 2016 for Mac
bull PowerPoint 2016 for Mac Quick Start Guide
bull PowerPoint 2016 for Mac training
bull PowerPoint 2016 for Mac Help
bull Compare PowerPoint for Mac 2011 with PowerPoint 2016 for Mac
bull Compare PowerPoint 2016 for Mac with PowerPoint 2013 for Windows desktop
bull More about PowerPoint 2016 for Mac at httpsupportofficecom
bull Discover PowerPoint
Office and Office 365
bull Office training and tutorials
bull Office 365 business support
bull Office 365 Modern Learning Yammer group
copy 2015 Microsoft Corporation All rights reserved Microsoft Windows and other product names are or may be registered trademarks andor trademarks in the US andor other countries
The information herein is for informational purposes only and represents the current view of Microsoft Corporation as of the date of this presentation Because Microsoft must respond to changing market conditions it should not be interpreted to be a commitment on the
part of Microsoft and Microsoft cannot guarantee the accuracy of any information provided after the date of this presentation MICROSOFT MAKES NO WARRANTIES EXPRESS IMPLIED OR STATUTORY AS TO THE INFORMATION IN THIS PRESENTATION
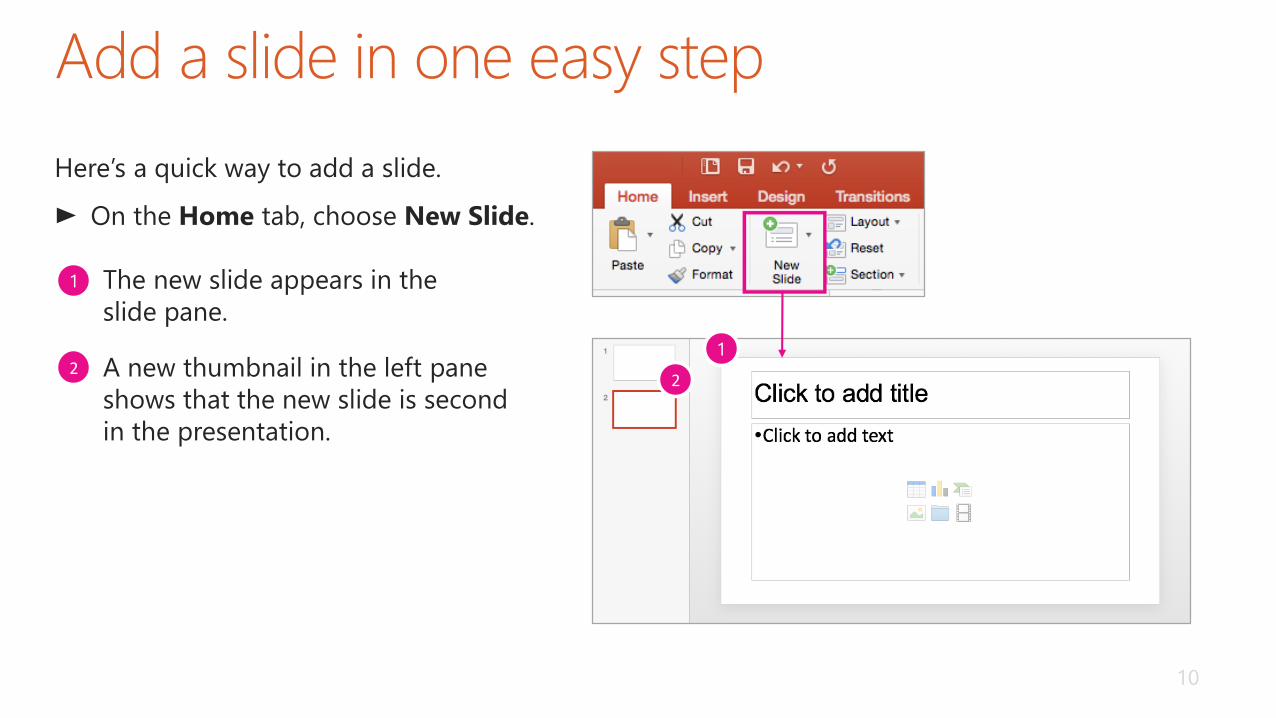
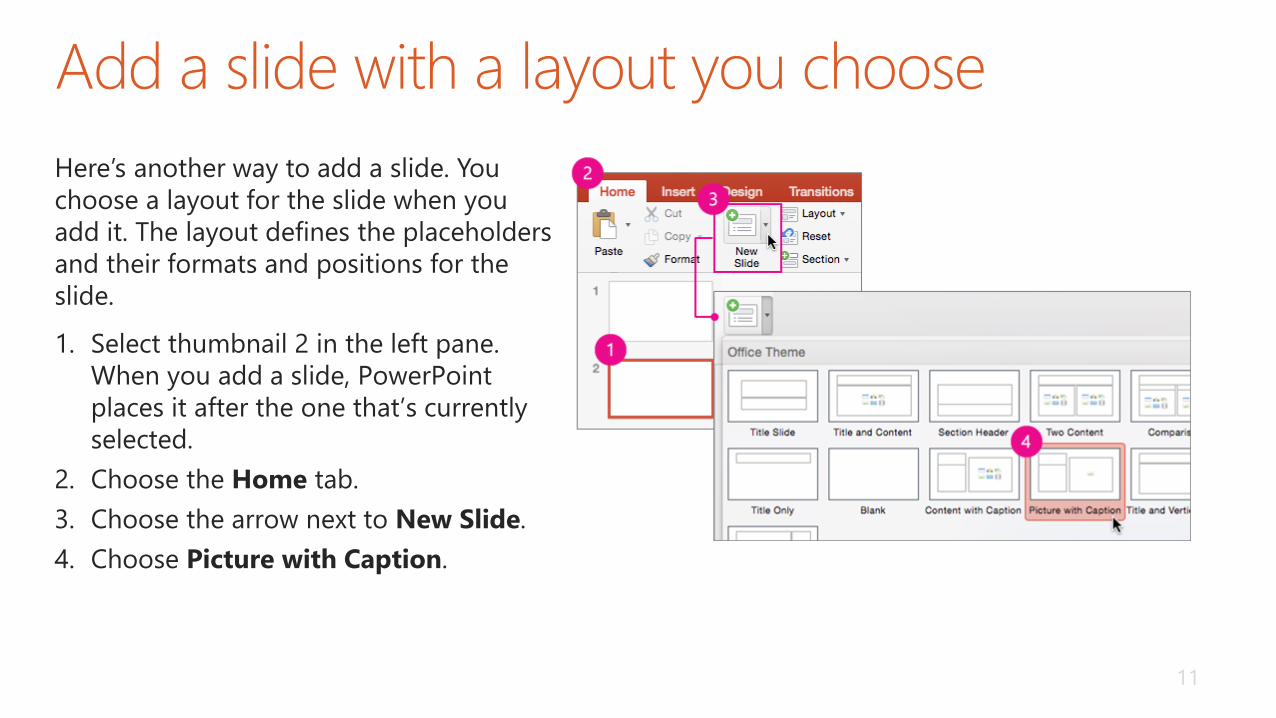
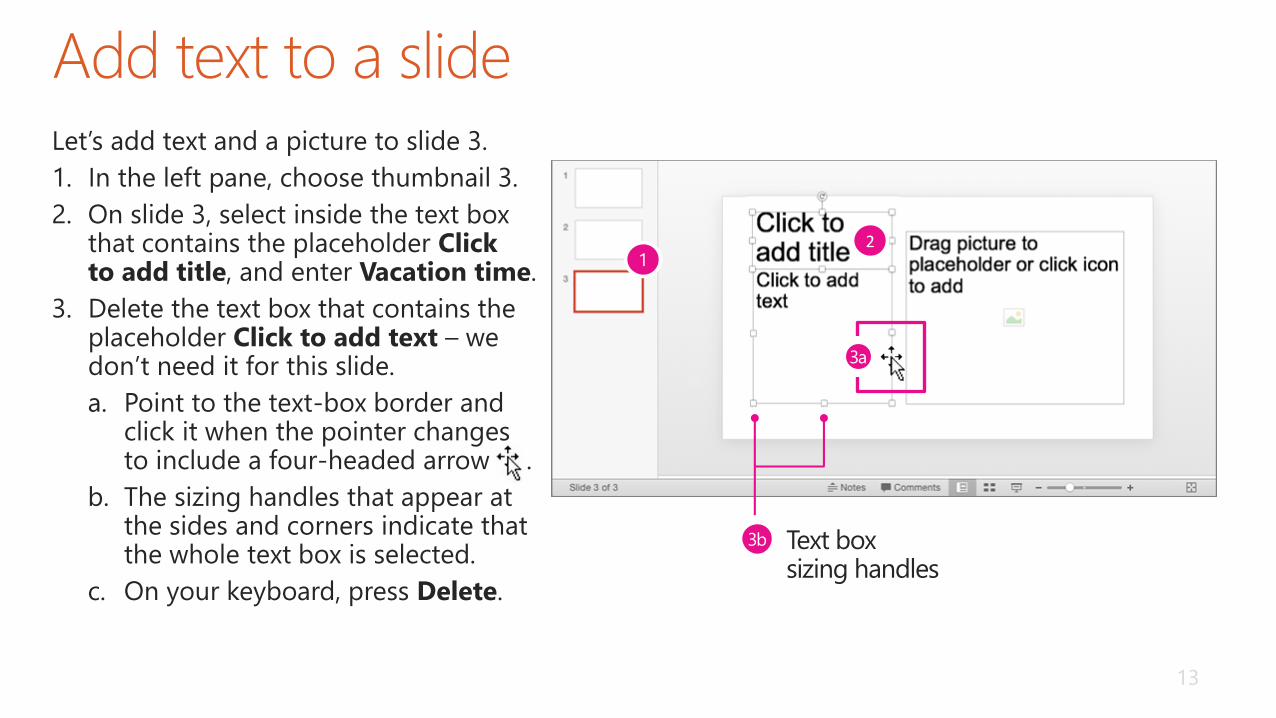
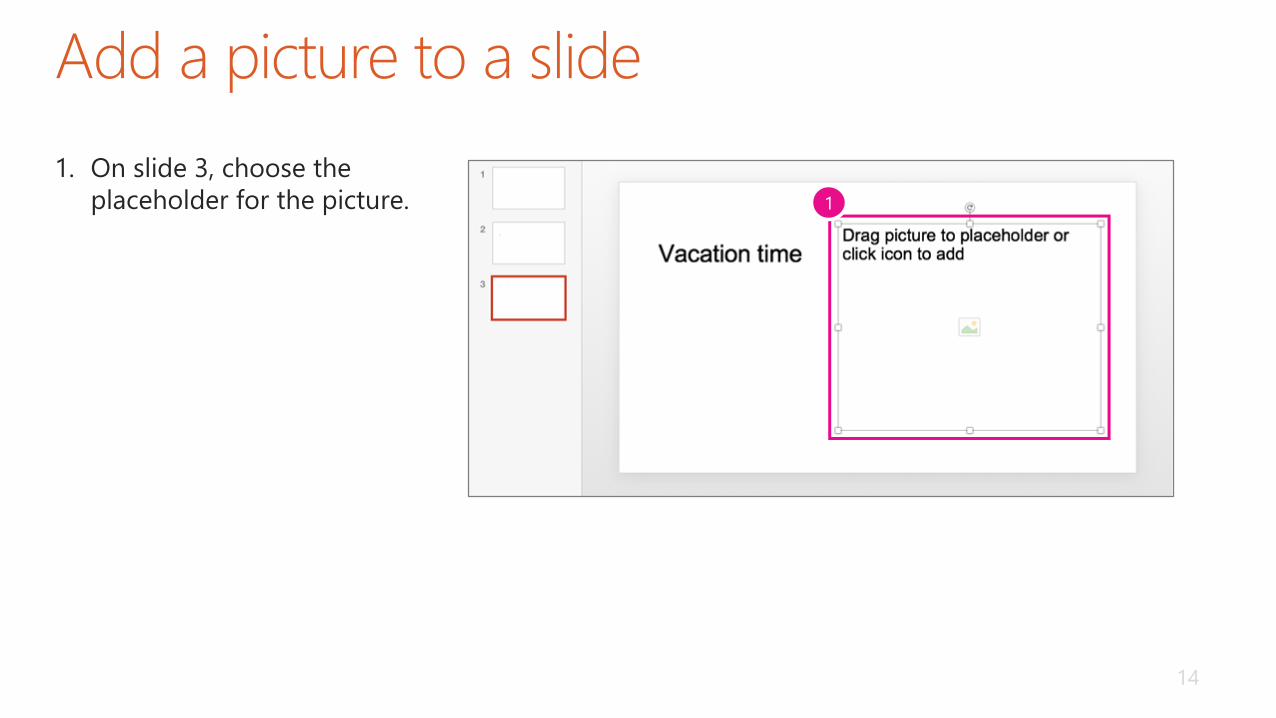
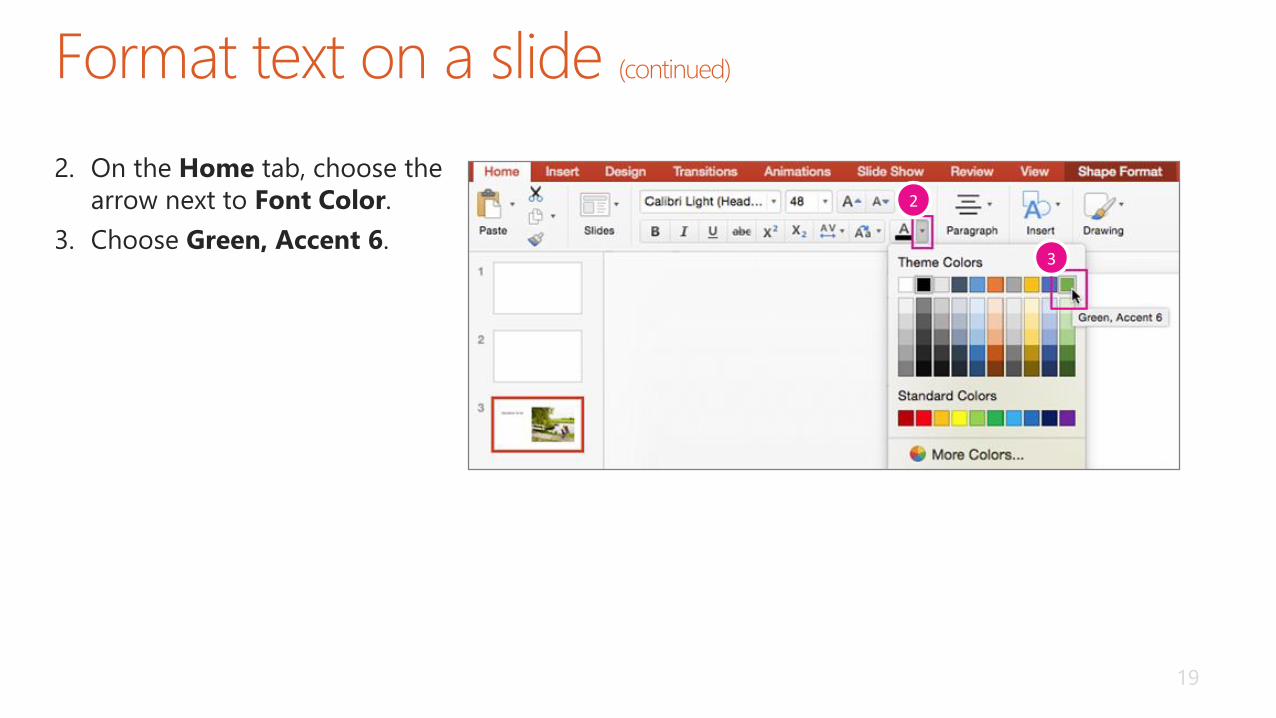
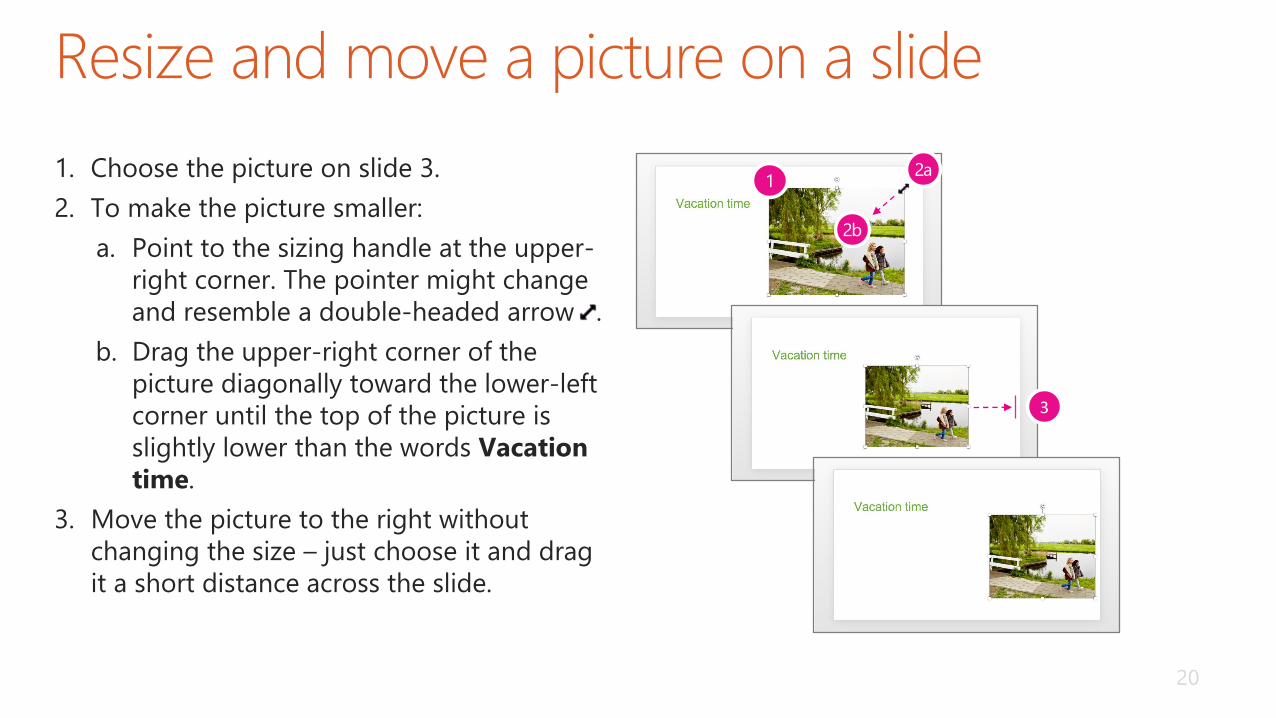
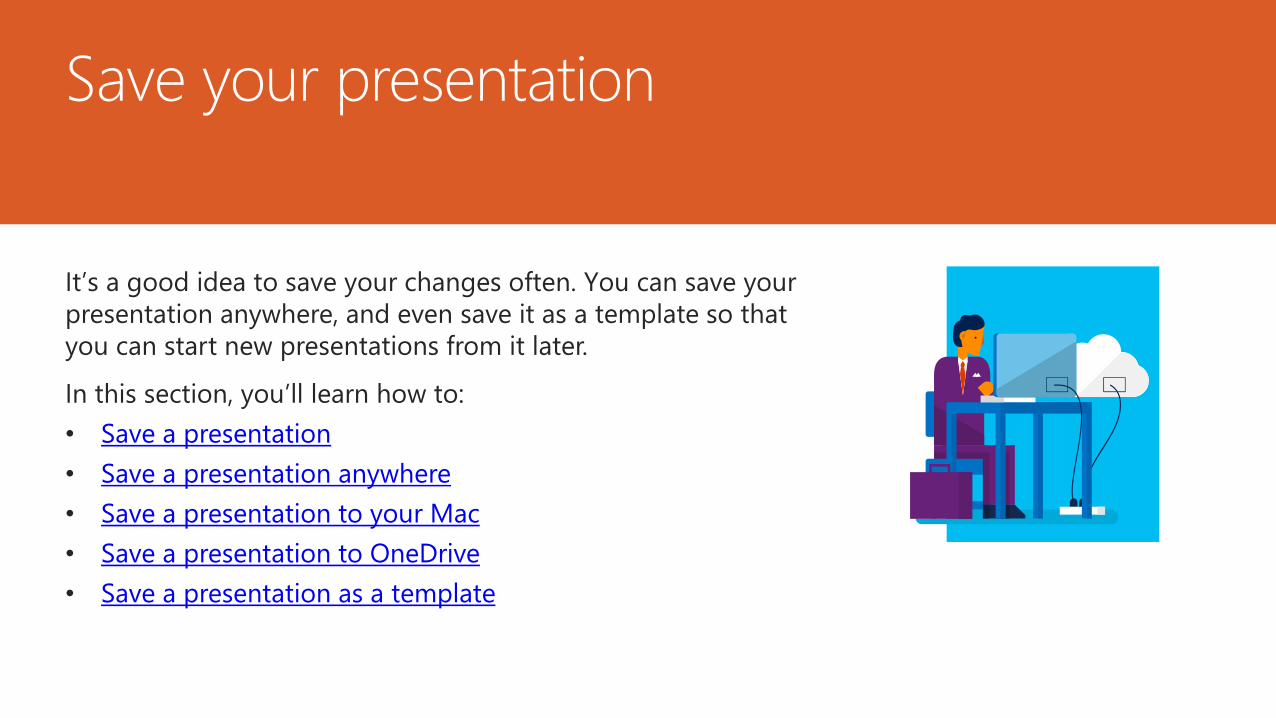
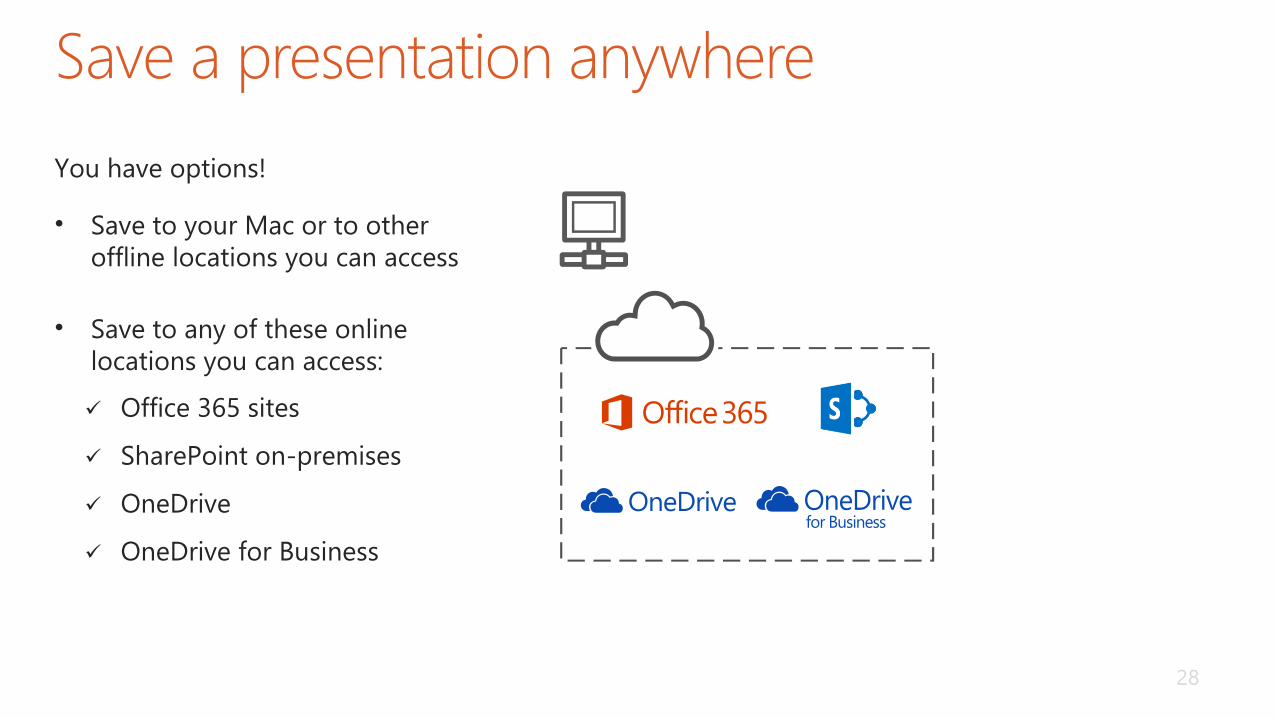
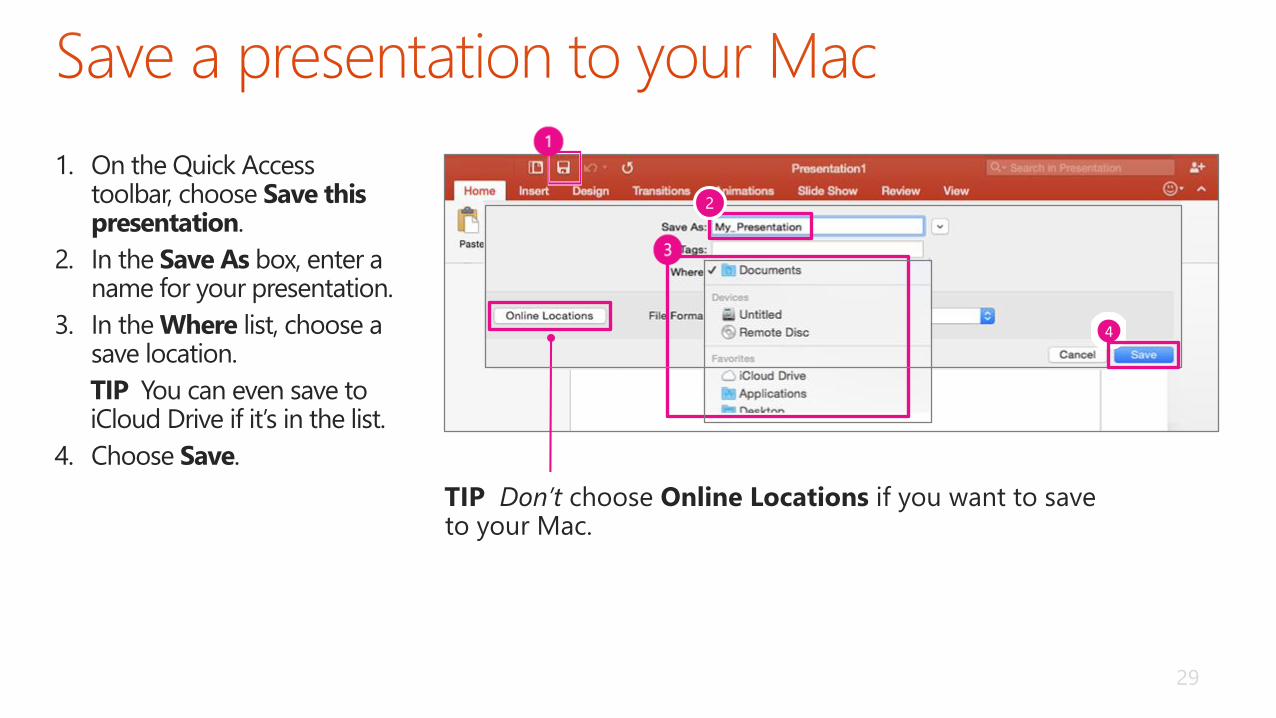
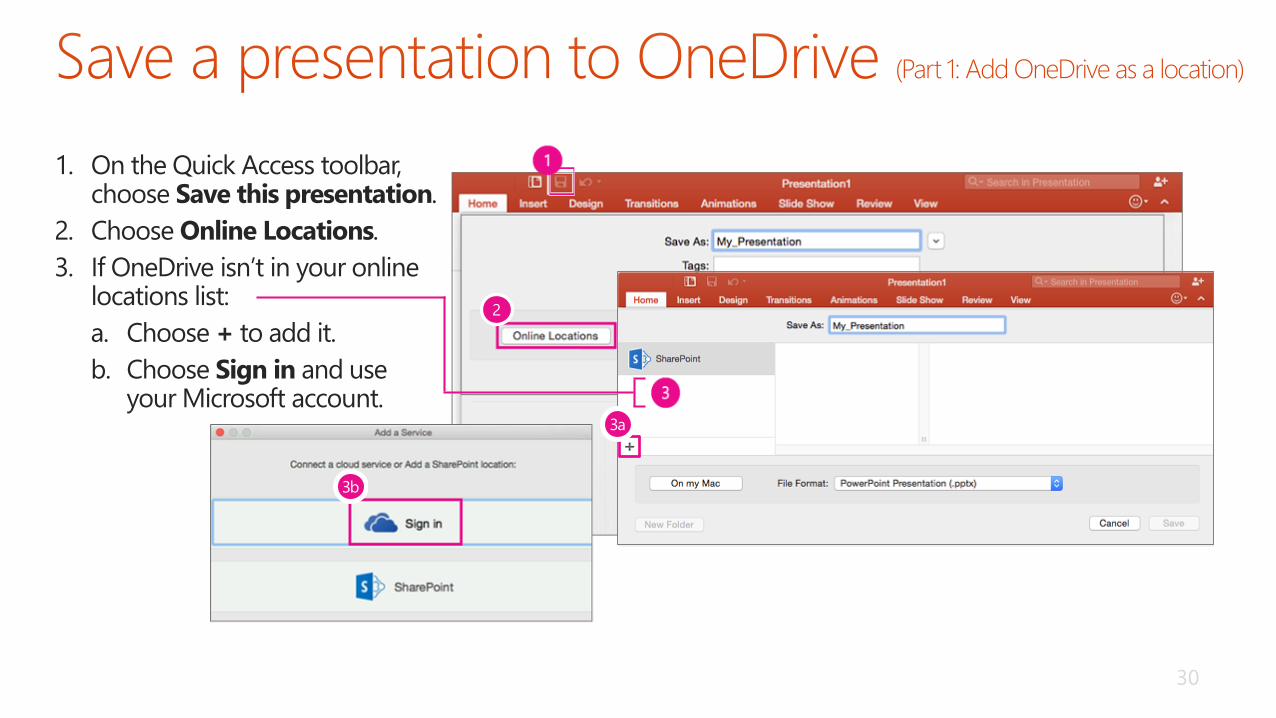
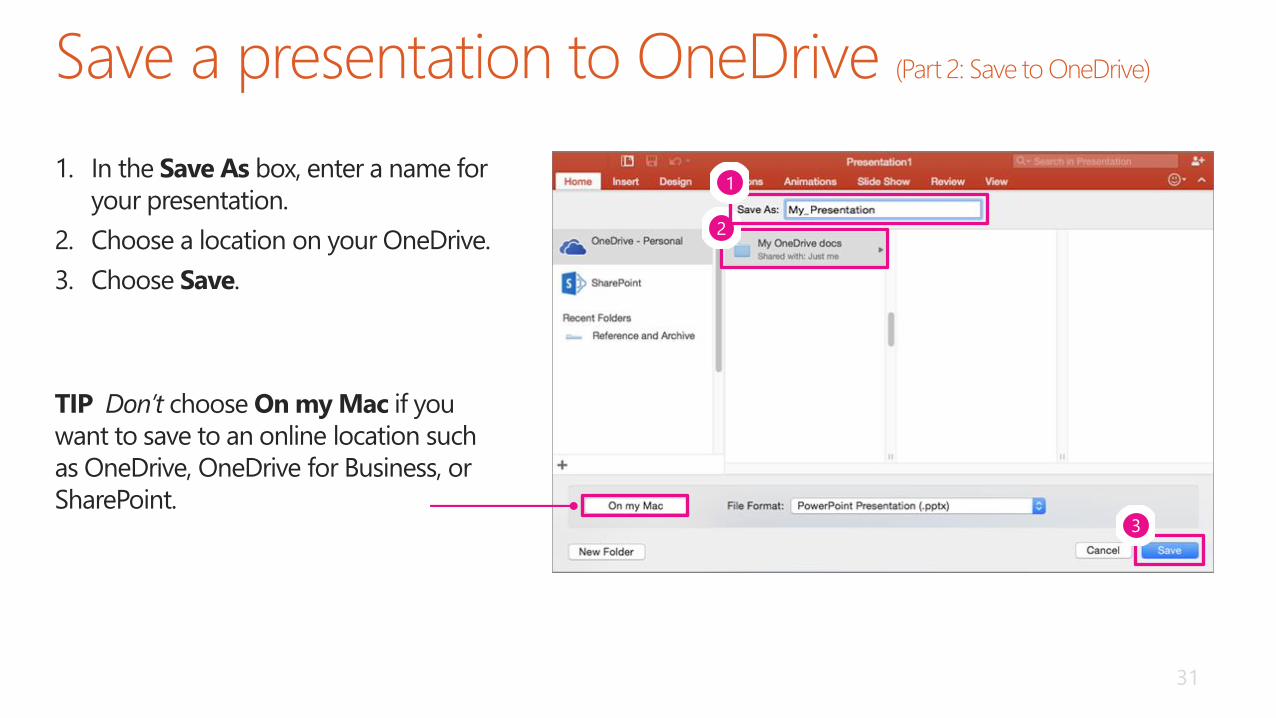
Related Documents