© PowerOptimal (Pty) Ltd 2021. The content of this document is confidential and all rights to the intellectual property and/or information contained herein remain vested in PowerOptimal, except if otherwise agreed in writing. PowerOptimal Elon® 100 User Manual Version number: 2.11 Version date: 2021/09/07 Enquiries: [email protected] Address: PO Box 5 Kleinmond 7195 Patented: GB2583814. Patents pending: ZA2019/02129, PCT/IB2021/050542

Welcome message from author
This document is posted to help you gain knowledge. Please leave a comment to let me know what you think about it! Share it to your friends and learn new things together.
Transcript

© PowerOptimal (Pty) Ltd 2021. The content of this document is confidential and all rights to the intellectual property and/or information contained herein remain vested in PowerOptimal, except if otherwise agreed in writing.
PowerOptimal Elon® 100 User Manual
Version number: 2.11
Version date: 2021/09/07
Enquiries: [email protected]
Address: PO Box 5
Kleinmond
7195
Patented: GB2583814. Patents pending: ZA2019/02129,
PCT/IB2021/050542

© PowerOptimal (Pty) Ltd 2021. The content of this document is confidential and all rights to the intellectual property and/or information contained herein remain vested in PowerOptimal, except if otherwise agreed in writing.
SAFETY WARNING
• Installation of the Elon® 100 should ONLY be performed by an electrical
contractor registered with the Department of Labour (the so-called
“wireman’s licence”) and strictly according to the installation instructions
in this manual. The electrician should provide you with a Certificate of
Compliance (CoC) once installation is completed.
• We strongly recommend that you use a reputable and experienced solar
photovoltaic (PV) system installer to install your solar PV modules.
• Solar PV modules exposed to the sun are live (i.e. will produce electricity)
and can give an electric shock. Special care should be taken and only
trained solar PV installers should install the modules.
• Do not attempt to alter or service the electrical installation, or open the
Elon® 100 unit or controller for any purpose.
• Use the Elon® 100 only for its intended purpose.
• Always make sure that every wiring connection is properly tightened.
• Do not earth either of the solar module wires (but do earth the frames).
• All installation wiring should be at least 2.5mm².
• Avoid coiling, since DC switching can create damaging spikes.
• Keep all wires as short as possible.
Refer to the PowerOptimal website for the following:
Elon® 100 Installation Guide & Quick Reference User Guide
www.poweroptimal.com/manuals
Online User Instructions Video
www.poweroptimal.com/elon100
Online Elon® Basic Training Course
https://moolmaninstitute.com/p/elon-course
PowerOptimal Elon® 100 User Manual Version date: 2021/09/07
Page 3 of 24 Version number: 2.11
© PowerOptimal (Pty) Ltd 2021. The content of this document is confidential and all rights to the intellectual property and/or information contained herein remain vested in PowerOptimal, except if otherwise agreed in writing.
Table of Contents
Table of Contents .................................................................................................................................... 3
1. Introduction ........................................................................................................................................ 4
1.1 System overview ........................................................................................................................... 4
1.2 Main system components ............................................................................................................. 5
1.3 Deciding on size of Elon® system (basic guide) ............................................................................. 5
2. Operation ............................................................................................................................................ 6
2.1 Elon® 100 controller ...................................................................................................................... 6
2.2 Mains and solar indicator lights .................................................................................................... 7
2.3 Control dial settings ...................................................................................................................... 8
2.4 Holiday settings ............................................................................................................................. 9
2.5 How to maximise your savings ...................................................................................................... 9
3. Maintenance ..................................................................................................................................... 11
3.1 Solar PV module maintenance .................................................................................................... 11
4. What to expect in terms of performance ......................................................................................... 12
4.1 Hot water production ................................................................................................................. 12
4.2 Impact of location and seasons .................................................................................................. 13
4.3 Payback period ............................................................................................................................ 14
5. Troubleshooting ................................................................................................................................ 15
5.1 Troubleshooting Guide for Users ................................................................................................ 15
5.2 Troubleshooting Guide for Electricians....................................................................................... 18
Appendix A. IEC/SANS and EMC Test Certificates: Elon® 100 .............................................................. 19
Appendix B. Warranty ........................................................................................................................... 22
Appendix C. Terminology ...................................................................................................................... 23
Notes ..................................................................................................................................................... 24

PowerOptimal Elon® 100 User Manual Version date: 2021/09/07
Page 4 of 24 Version number: 2.11
© PowerOptimal (Pty) Ltd 2021. The content of this document is confidential and all rights to the intellectual property and/or information contained herein remain vested in PowerOptimal, except if otherwise agreed in writing.
1. Introduction
Thank you for buying the PowerOptimal Elon® 100 solar PV water heating unit! You can look forward
to many years of savings and free energy from the sun.
1.1 System overview
The PowerOptimal Elon® 100 operates on a very simple principle: it enables you to connect solar PV
modules directly to a standard geyser with alternating current (AC) heating element and AC
thermostat, with no need for an inverter. It uses the water in your geyser as a battery to store solar
energy in the form of heat.
You can connect the system completely off-grid or connect it to your existing grid AC power supply.
Connecting the system to the existing grid supply allows for grid power backup in case of cloudy /
overcast days, or where you use more hot water than your solar PV array can generate.
Note: the system is designed in such a way that there is no possibility of solar array-produced
electricity feeding back into the grid. For municipal registration purposes it is classified as "off-grid".
Below is a simplified layout of the main components of the water heating system.
An array of solar modules (a string of 3 to 6 solar modules connected in series, or two parallel strings
of 4, 5 or 6 solar modules each) is connected to the Elon® 100. Grid electricity is also connected to the
Elon® 100.
The Elon® 100 is connected to the geyser element and thermostat.
When the solar modules are producing electricity, the Elon® 100 feeds this into the geyser element to
heat water, until the water reaches the temperature setting on the thermostat.
The Elon® 100 controller dial setting (see Section 2.3) will determine if or when the Elon® 100 will
boost the water heating with grid electricity.

PowerOptimal Elon® 100 User Manual Version date: 2021/09/07
Page 5 of 24 Version number: 2.11
© PowerOptimal (Pty) Ltd 2021. The content of this document is confidential and all rights to the intellectual property and/or information contained herein remain vested in PowerOptimal, except if otherwise agreed in writing.
1.2 Main system components
The main components of the system are as follows:
• Solar modules with struts, brackets and cabling
• PowerOptimal Elon® unit with controller
• Existing or new water heater or geyser (hot water tank with AC heating element and AC
thermostat)
• Isolators for grid and solar connections
1.3 Deciding on size of Elon® system (basic guide)
The table below provides a basic guide to selecting the size of your Elon® system based on number of
people in the household and/or hot water use. The Installation Manual (which you can download
from www.poweroptimal.com/manuals) contains a more detailed guide.
HOW MANY SOLAR PV MODULES DO I NEED?
Solar PV array size
(kWp)
Showers per day*
50%+ of daily hot water use provided
for how many people?
How many people off-grid for hot water?
Typical number of solar PV modules
1 – 1.2
2 - 3 modules
1.2 – 1.6
3 - 4 modules
1.5 – 2
4 - 5 modules
2.4 – 3.2
(two parallel PV strings)
6 - 8 modules
3 – 4
(two parallel PV strings)
8 - 10 modules
* 6-minute showers at 40 ºC with 8 litre/min (low-flow) showerheads
WHAT SIZE GEYSER ELEMENT IS THE BEST MATCH?
Solar PV array size (kWp)
Matching geyser element size (kW)
Geyser (water tank) size (litres)
1 – 1.2 4 or 3 100 - 200
1.2 – 1.6 3 or 2 100 - 200
1.5 – 2 2 150 – 300
2.4 – 3.2 (two parallel PV strings)
4 150 – 300
3 – 4 (two parallel PV strings)
4 200+
PowerOptimal Elon® 100 User Manual Version date: 2021/09/07
Page 6 of 24 Version number: 2.11
© PowerOptimal (Pty) Ltd 2021. The content of this document is confidential and all rights to the intellectual property and/or information contained herein remain vested in PowerOptimal, except if otherwise agreed in writing.
Instruction video: www.poweroptimal.com/elon100
Refer to our easy to understand instruction video on how to use the Elon 100.
2. Operation
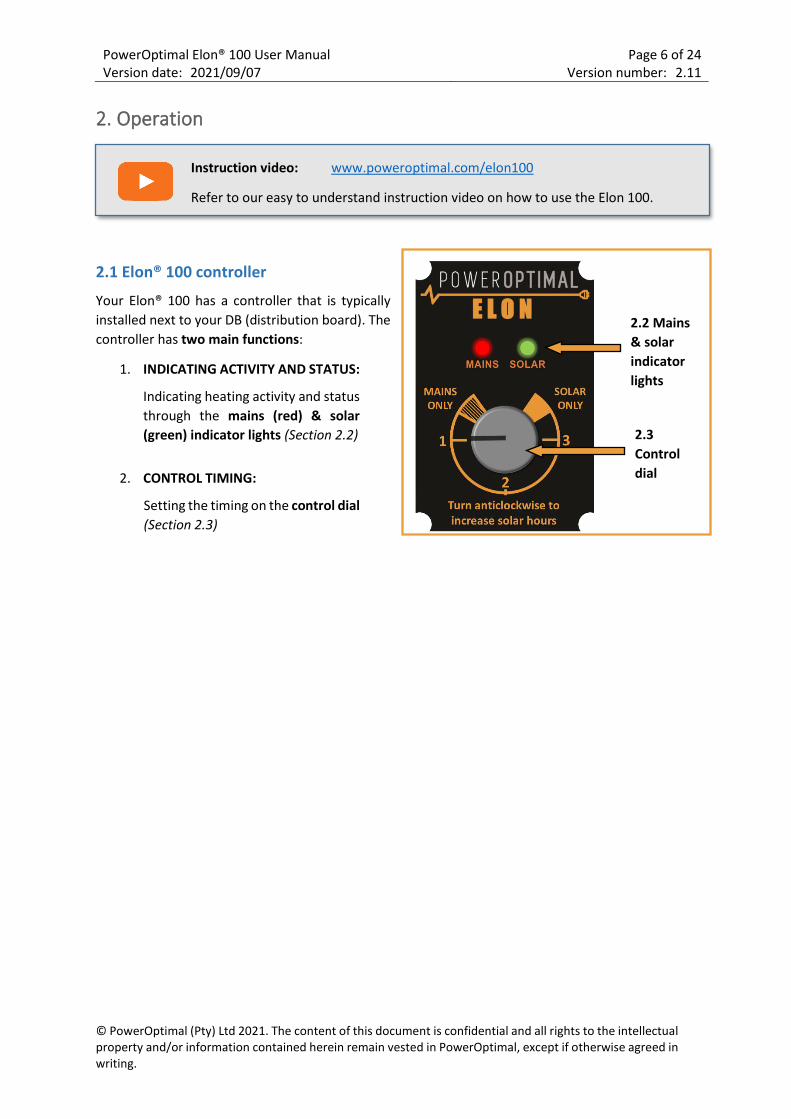
2.1 Elon® 100 controller
Your Elon® 100 has a controller that is typically
installed next to your DB (distribution board). The
controller has two main functions:
1. INDICATING ACTIVITY AND STATUS:
Indicating heating activity and status
through the mains (red) & solar
(green) indicator lights (Section 2.2)
2. CONTROL TIMING:
Setting the timing on the control dial
(Section 2.3)
2.3
Control
dial
2.2 Mains
& solar
indicator
lights

PowerOptimal Elon® 100 User Manual Version date: 2021/09/07
Page 7 of 24 Version number: 2.11
© PowerOptimal (Pty) Ltd 2021. The content of this document is confidential and all rights to the intellectual property and/or information contained herein remain vested in PowerOptimal, except if otherwise agreed in writing.
2.2 Mains and solar indicator lights
The Mains & solar indicator lights indicate the following conditions:
Lights Meaning
Green light ON Geyser on temperature
Green light
flashing Heating with solar
Red light ON Mains power available (power to Elon® unit on)
Red light flashing Heating with mains
Both lights ON Geyser is on temperature. Mains power available (mains
power to Elon® unit on)
Red light ON &
Green light flashing Heating with solar. Mains power available (mains power to
Elon® unit on)
Red & Green light
flashing fast Isolation fault (contact electrician)
Both lights OFF
No power to unit (for example: no sun plus a power
failure, or no sun plus geyser breaker at DB board is
switched off) OR supply voltage outside specifications
PowerOptimal Elon® 100 User Manual Version date: 2021/09/07
Page 8 of 24 Version number: 2.11
© PowerOptimal (Pty) Ltd 2021. The content of this document is confidential and all rights to the intellectual property and/or information contained herein remain vested in PowerOptimal, except if otherwise agreed in writing.
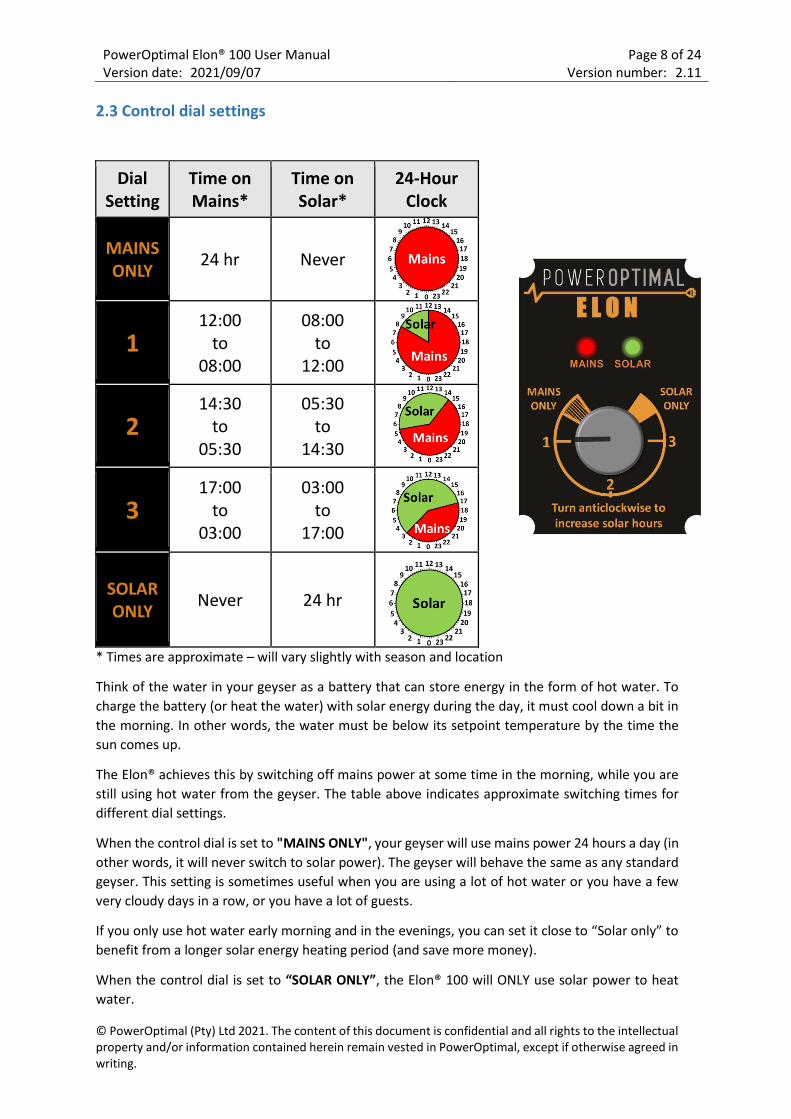
2.3 Control dial settings
Dial Setting
Time on Mains*
Time on Solar*
24-Hour Clock
MAINS ONLY
24 hr Never
1 12:00
to
08:00
08:00
to
12:00
2 14:30
to
05:30
05:30
to
14:30
3 17:00
to
03:00
03:00
to
17:00
SOLAR ONLY
Never 24 hr
* Times are approximate – will vary slightly with season and location
Think of the water in your geyser as a battery that can store energy in the form of hot water. To
charge the battery (or heat the water) with solar energy during the day, it must cool down a bit in
the morning. In other words, the water must be below its setpoint temperature by the time the
sun comes up.
The Elon® achieves this by switching off mains power at some time in the morning, while you are
still using hot water from the geyser. The table above indicates approximate switching times for
different dial settings.
When the control dial is set to "MAINS ONLY", your geyser will use mains power 24 hours a day (in
other words, it will never switch to solar power). The geyser will behave the same as any standard
geyser. This setting is sometimes useful when you are using a lot of hot water or you have a few
very cloudy days in a row, or you have a lot of guests.
If you only use hot water early morning and in the evenings, you can set it close to “Solar only” to
benefit from a longer solar energy heating period (and save more money).
When the control dial is set to “SOLAR ONLY”, the Elon® 100 will ONLY use solar power to heat
water.

PowerOptimal Elon® 100 User Manual Version date: 2021/09/07
Page 9 of 24 Version number: 2.11
© PowerOptimal (Pty) Ltd 2021. The content of this document is confidential and all rights to the intellectual property and/or information contained herein remain vested in PowerOptimal, except if otherwise agreed in writing.
If you set the control dial to “SOLAR ONLY”, you can increase the geyser thermostat temperature
to 60 ºC to get maximum benefit from your solar array installation. We do not recommend setting
the thermostat temperature above 60 °C. Remember to reduce the thermostat temperature again
if you reduce the efficiency setting.
Warning: Do not set thermostat temperature above 65 ºC due to increased scalding
risk. Be careful when opening hot water taps located close to your geyser. You can install
a thermostatic mixing valve to reduce the risk of scalding – ask your plumber.
Please note: DO NOT install a separate timer on the AC side to try and regulate mains power use.
Use only the Elon’s control dial to control mains power use. If you install a second timer, it will work
at cross-purposes with the Elon and you will reduce performance and hot water availability.
2.4 Holiday settings
What setting should I use when I go on holiday?
You can either switch off both solar and mains power OR you can switch off mains power.
Setting How to set it Benefits & comments
Mains power off
Turn dial to SOLAR ONLY You will have hot water on your return, and it will cost you nothing. It will also prevent Legionella growth in your geyser.
Both Mains & Solar power off
Turn dial to MAINS ONLY and switch off geyser at distribution board
Remember to switch system on when you return.
2.5 How to maximise your savings
Control dial
The best way to maximise your savings is to set the Elon® control dial to “SOLAR ONLY”. This will
ensure that the unit will never use grid (mains) power for heating water. You can still boost with
mains power (for example on a cloudy day) by turning the dial to "MAINS ONLY" if needed.
However, the "SOLAR ONLY" setting will only be feasible if you have enough solar PV modules
for your household (see the table in Section 1.3 above).
For most people, setting the dial at "3" will yield the most savings whilst maintaining hot water
availability mornings and evenings.

PowerOptimal Elon® 100 User Manual Version date: 2021/09/07
Page 10 of 24 Version number: 2.11
© PowerOptimal (Pty) Ltd 2021. The content of this document is confidential and all rights to the intellectual property and/or information contained herein remain vested in PowerOptimal, except if otherwise agreed in writing.
Please note: The water in your geyser should be heated to 60 °C at least once a week to
prevent Legionella bacterial growth1. If you have heavily overcast weather for more than
a week on the SOLAR ONLY setting, turn the dial clockwise outside of the SOLAR ONLY
zone for a day in order to supplement the solar water heating with grid electricity to reach
the thermostat temperature setting.
When is the best time to shower?
If the control dial is set to “SOLAR ONLY”, it is best for people in the household to shower either in
the morning or in the evening, but not both. (If you shower in the evening, cold water will mix with
the remaining warm water overnight, and you will have cold water the next morning. If you do not
shower again in the morning, the water will be heated during the day.)
If the control dial is set to any setting outside “SOLAR ONLY” or "MAINS ONLY", it is best to shower
in the morning for maximum savings.
General hot water energy saving tips
• Shower, don’t bath
• Install water-saving / low flow shower heads (these also save energy because of reduced
hot water use!)
• Reduce shower duration
• Check that your geyser is well insulated
South Africa is a water-scarce country – reducing hot water use saves both energy and water!
1 See for example: http://www.eskom.co.za/sites/idm/Documents/Legionaires_Fact_sheet_hot_water_bacteria_simple_facts.pdf and http://standards.nsf.org/apps/group_public/download.php/30413/How%20to%20Avoid%20LD%20at%20Home.pdf

PowerOptimal Elon® 100 User Manual Version date: 2021/09/07
Page 11 of 24 Version number: 2.11
© PowerOptimal (Pty) Ltd 2021. The content of this document is confidential and all rights to the intellectual property and/or information contained herein remain vested in PowerOptimal, except if otherwise agreed in writing.
3. Maintenance
The Elon® 100 has been designed to last for a very long time and has no moving parts aside from three
electrical relays. No maintenance is required on the Elon® 100.
3.1 Solar PV module maintenance
It is recommended that a qualified electrician inspect your solar PV installation at least once a year.
1. At least once a week, check whether the indicator lights are flashing rapidly. (This indicates an
isolation fault – call your electrician.)
2. Perform regular visual checks (at least once a year). Check for soiling or any visible damage to
any of the modules.
3. If the modules have been soiled by dirt, dust, debris, bird droppings or any other materials,
use water only and a sponge or soft cloth to clean them. Do the cleaning early in the morning
or late in the afternoon, as the modules are hot during the day. Avoid using a water jet that
may leave streaks on the modules.
4. Visually inspect cables for any degradation or loose fittings.
5. Look for any shading problems, such as trees that may have grown.
6. An electrician can check solar power production on a sunny day to ensure that the system is
still producing power at expected levels. A thermal imaging camera can be used to inspect
modules for hot spots.
7. Follow any specific maintenance instructions from the solar PV module manufacturer.
PowerOptimal Elon® 100 User Manual Version date: 2021/09/07
Page 12 of 24 Version number: 2.11
© PowerOptimal (Pty) Ltd 2021. The content of this document is confidential and all rights to the intellectual property and/or information contained herein remain vested in PowerOptimal, except if otherwise agreed in writing.
4. What to expect in terms of performance
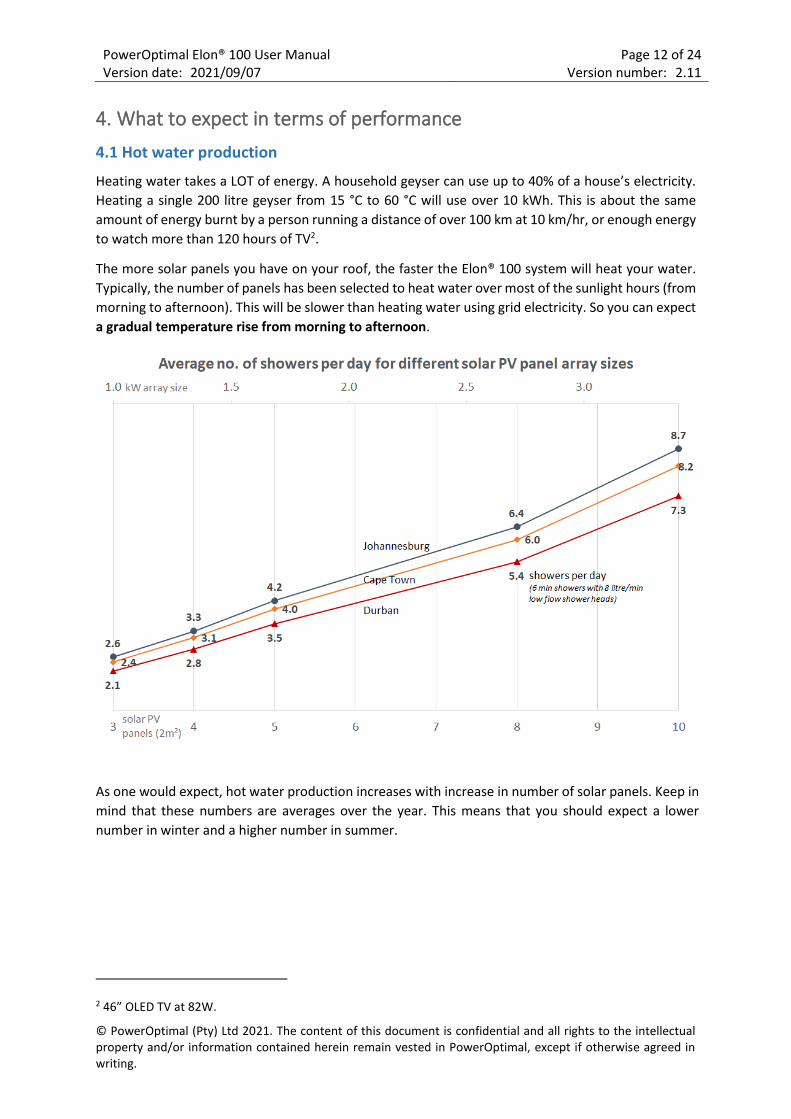
4.1 Hot water production
Heating water takes a LOT of energy. A household geyser can use up to 40% of a house’s electricity.
Heating a single 200 litre geyser from 15 °C to 60 °C will use over 10 kWh. This is about the same
amount of energy burnt by a person running a distance of over 100 km at 10 km/hr, or enough energy
to watch more than 120 hours of TV2.
The more solar panels you have on your roof, the faster the Elon® 100 system will heat your water.
Typically, the number of panels has been selected to heat water over most of the sunlight hours (from
morning to afternoon). This will be slower than heating water using grid electricity. So you can expect
a gradual temperature rise from morning to afternoon.
As one would expect, hot water production increases with increase in number of solar panels. Keep in
mind that these numbers are averages over the year. This means that you should expect a lower
number in winter and a higher number in summer.
2 46” OLED TV at 82W.

PowerOptimal Elon® 100 User Manual Version date: 2021/09/07
Page 13 of 24 Version number: 2.11
© PowerOptimal (Pty) Ltd 2021. The content of this document is confidential and all rights to the intellectual property and/or information contained herein remain vested in PowerOptimal, except if otherwise agreed in writing.
4.2 Impact of location and seasons
The amount of energy from the sun depends on your location, the time of year as well as the
orientation of your solar panels. The best direction for panels in South Africa is to face north, at an
angle of about 25 to 35° from horizontal.
Although Gauteng (Johannesburg / Pretoria) & Cape Town may seem quite similar in terms of total
solar energy per year, Cape Town has winter rainfall and Gauteng has summer rainfall. This leads to
Cape Town having much lower solar electricity production than Gauteng in winter.

PowerOptimal Elon® 100 User Manual Version date: 2021/09/07
Page 14 of 24 Version number: 2.11
© PowerOptimal (Pty) Ltd 2021. The content of this document is confidential and all rights to the intellectual property and/or information contained herein remain vested in PowerOptimal, except if otherwise agreed in writing.
4.3 Payback period
As can be seen from the graph above, payback period decreases as number of solar panels increases,
and is also different for Johannesburg, Cape Town and Durban3.
The reason that payback period improves (decreases) as number of solar panels increases, is because
there are some fixed costs (such as engineering design & safety components) and some costs that do
not scale linearly with array size (such as labour, wiring, mounting kit costs, etc.).
3 Calculations based on actual Elon performance, assuming a 20% reduction due to non-optimal user behaviour, an initial electricity tariff of R2/kWh and an annual electricity price increase of 8%.

PowerOptimal Elon® 100 User Manual Version date: 2021/09/07
Page 15 of 24 Version number: 2.11
© PowerOptimal (Pty) Ltd 2021. The content of this document is confidential and all rights to the intellectual property and/or information contained herein remain vested in PowerOptimal, except if otherwise agreed in writing.
5. Troubleshooting
5.1 Troubleshooting Guide for Users
PowerOptimal Elon® 100 User Manual Version date: 2021/09/07
Page 16 of 24 Version number: 2.11
© PowerOptimal (Pty) Ltd 2021. The content of this document is confidential and all rights to the intellectual property and/or information contained herein remain vested in PowerOptimal, except if otherwise agreed in writing.
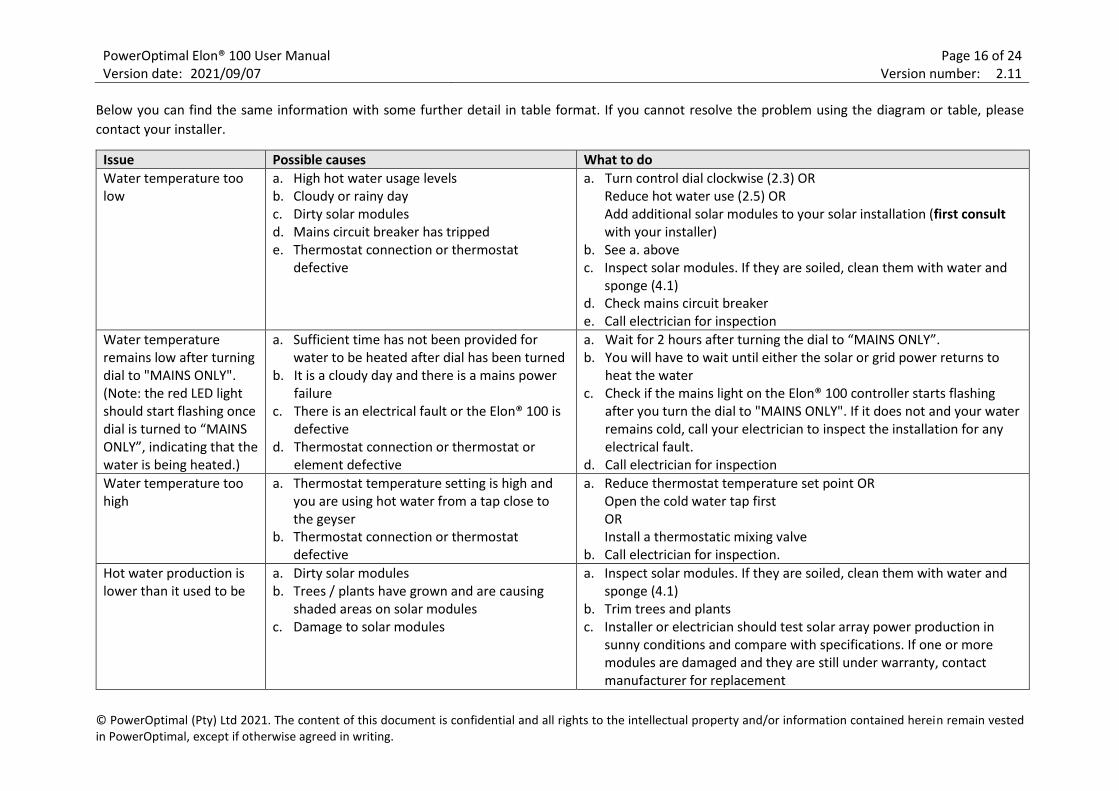
Below you can find the same information with some further detail in table format. If you cannot resolve the problem using the diagram or table, please
contact your installer.
Issue Possible causes What to do
Water temperature too low
a. High hot water usage levels b. Cloudy or rainy day c. Dirty solar modules d. Mains circuit breaker has tripped e. Thermostat connection or thermostat
defective
a. Turn control dial clockwise (2.3) OR Reduce hot water use (2.5) OR Add additional solar modules to your solar installation (first consult with your installer)
b. See a. above c. Inspect solar modules. If they are soiled, clean them with water and
sponge (4.1) d. Check mains circuit breaker e. Call electrician for inspection
Water temperature remains low after turning dial to "MAINS ONLY". (Note: the red LED light should start flashing once dial is turned to “MAINS ONLY”, indicating that the water is being heated.)
a. Sufficient time has not been provided for water to be heated after dial has been turned
b. It is a cloudy day and there is a mains power failure
c. There is an electrical fault or the Elon® 100 is defective
d. Thermostat connection or thermostat or element defective
a. Wait for 2 hours after turning the dial to “MAINS ONLY”. b. You will have to wait until either the solar or grid power returns to
heat the water c. Check if the mains light on the Elon® 100 controller starts flashing
after you turn the dial to "MAINS ONLY". If it does not and your water remains cold, call your electrician to inspect the installation for any electrical fault.
d. Call electrician for inspection
Water temperature too high
a. Thermostat temperature setting is high and you are using hot water from a tap close to the geyser
b. Thermostat connection or thermostat defective
a. Reduce thermostat temperature set point OR Open the cold water tap first OR Install a thermostatic mixing valve
b. Call electrician for inspection.
Hot water production is lower than it used to be
a. Dirty solar modules b. Trees / plants have grown and are causing
shaded areas on solar modules c. Damage to solar modules
a. Inspect solar modules. If they are soiled, clean them with water and sponge (4.1)
b. Trim trees and plants c. Installer or electrician should test solar array power production in
sunny conditions and compare with specifications. If one or more modules are damaged and they are still under warranty, contact manufacturer for replacement

PowerOptimal Elon® 100 User Manual Version date: 2021/09/07
Page 17 of 24 Version number: 2.11
© PowerOptimal (Pty) Ltd 2021. The content of this document is confidential and all rights to the intellectual property and/or information contained herein remain vested in PowerOptimal, except if otherwise agreed in writing.
Issue Possible causes What to do
Both indicator lights off a. There is a power failure and it is overcast or night-time
b. Geyser breaker at DB board switched off and it is overcast or night-time
c. Mains power is over- or under-voltage
a. Wait until power or sun returns and check if any indicator light comes on.
b. Switch on breaker at DB board. c. If actions in a. and b. above do not resolve the issue, call your
electrician.
Red or green indicator light flashing very fast
a. Isolation fault a. Please call your electrician.
PowerOptimal Elon® 100 User Manual Version date: 2021/09/07
Page 18 of 24 Version number: 2.11
© PowerOptimal (Pty) Ltd 2021. The content of this document is confidential and all rights to the intellectual property and/or information contained herein remain vested in PowerOptimal, except if otherwise agreed in writing.
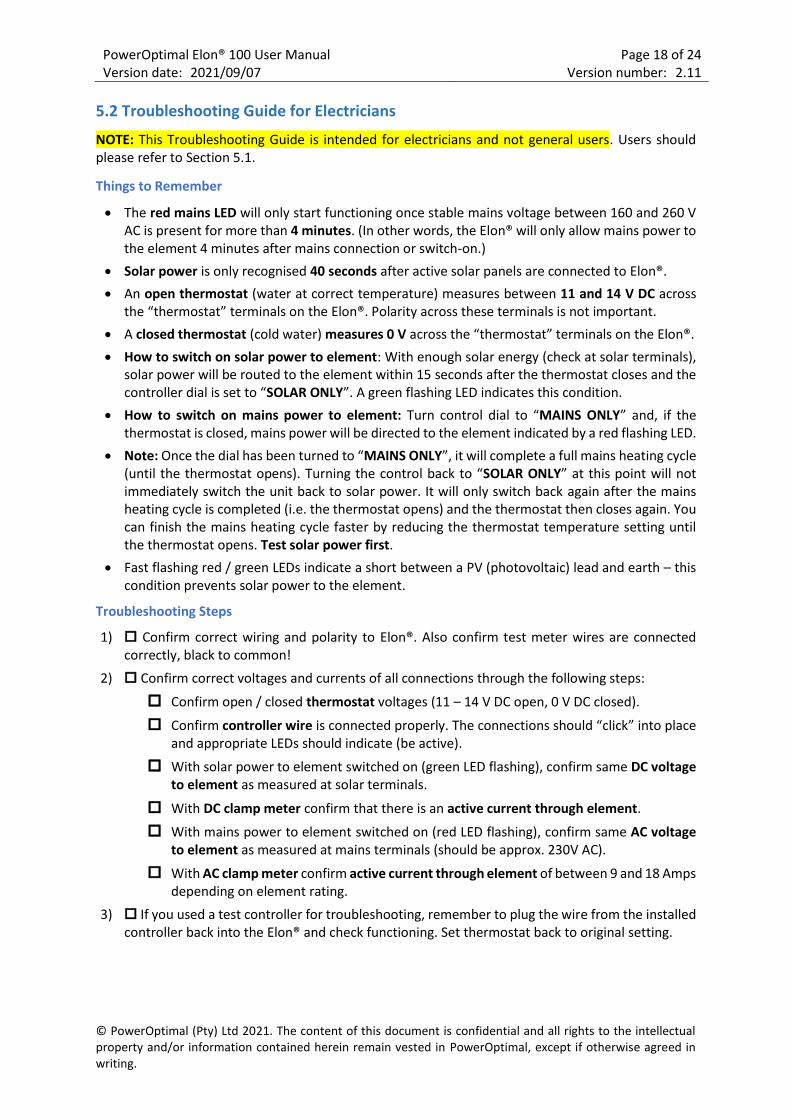
5.2 Troubleshooting Guide for Electricians
NOTE: This Troubleshooting Guide is intended for electricians and not general users. Users should please refer to Section 5.1.
Things to Remember
• The red mains LED will only start functioning once stable mains voltage between 160 and 260 V AC is present for more than 4 minutes. (In other words, the Elon® will only allow mains power to the element 4 minutes after mains connection or switch-on.)
• Solar power is only recognised 40 seconds after active solar panels are connected to Elon®.
• An open thermostat (water at correct temperature) measures between 11 and 14 V DC across the “thermostat” terminals on the Elon®. Polarity across these terminals is not important.
• A closed thermostat (cold water) measures 0 V across the “thermostat” terminals on the Elon®.
• How to switch on solar power to element: With enough solar energy (check at solar terminals), solar power will be routed to the element within 15 seconds after the thermostat closes and the controller dial is set to “SOLAR ONLY”. A green flashing LED indicates this condition.
• How to switch on mains power to element: Turn control dial to “MAINS ONLY” and, if the thermostat is closed, mains power will be directed to the element indicated by a red flashing LED.
• Note: Once the dial has been turned to “MAINS ONLY”, it will complete a full mains heating cycle (until the thermostat opens). Turning the control back to “SOLAR ONLY” at this point will not immediately switch the unit back to solar power. It will only switch back again after the mains heating cycle is completed (i.e. the thermostat opens) and the thermostat then closes again. You can finish the mains heating cycle faster by reducing the thermostat temperature setting until the thermostat opens. Test solar power first.
• Fast flashing red / green LEDs indicate a short between a PV (photovoltaic) lead and earth – this condition prevents solar power to the element.
Troubleshooting Steps
1) Confirm correct wiring and polarity to Elon®. Also confirm test meter wires are connected correctly, black to common!
2) Confirm correct voltages and currents of all connections through the following steps:
Confirm open / closed thermostat voltages (11 – 14 V DC open, 0 V DC closed).
Confirm controller wire is connected properly. The connections should “click” into place and appropriate LEDs should indicate (be active).
With solar power to element switched on (green LED flashing), confirm same DC voltage to element as measured at solar terminals.
With DC clamp meter confirm that there is an active current through element.
With mains power to element switched on (red LED flashing), confirm same AC voltage to element as measured at mains terminals (should be approx. 230V AC).
With AC clamp meter confirm active current through element of between 9 and 18 Amps depending on element rating.
3) If you used a test controller for troubleshooting, remember to plug the wire from the installed controller back into the Elon® and check functioning. Set thermostat back to original setting.

PowerOptimal Elon® 100 User Manual Version date: 2021/09/07
Page 19 of 24 Version number: 2.11
© PowerOptimal (Pty) Ltd 2021. The content of this document is confidential and all rights to the intellectual property and/or information contained herein remain vested in PowerOptimal, except if otherwise agreed in writing.
Appendix A. IEC/SANS and EMC Test Certificates: Elon® 100

PowerOptimal Elon® 100 User Manual Version date: 2021/09/07
Page 20 of 24 Version number: 2.11
© PowerOptimal (Pty) Ltd 2021. The content of this document is confidential and all rights to the intellectual property and/or information contained herein remain vested in PowerOptimal, except if otherwise agreed in writing.

PowerOptimal Elon® 100 User Manual Version date: 2021/09/07
Page 21 of 24 Version number: 2.11
© PowerOptimal (Pty) Ltd 2021. The content of this document is confidential and all rights to the intellectual property and/or information contained herein remain vested in PowerOptimal, except if otherwise agreed in writing.

PowerOptimal Elon® 100 User Manual Version date: 2021/09/07
Page 22 of 24 Version number: 2.11
© PowerOptimal (Pty) Ltd 2021. The content of this document is confidential and all rights to the intellectual property and/or information contained herein remain vested in PowerOptimal, except if otherwise agreed in writing.
Appendix B. Warranty
If the PowerOptimal Elon® 100 (“the Product”) is found to be defective, you will be entitled to a repair
or replacement within 1 (one) year of the date of delivery of the Product to you. Please keep your
receipt as proof of purchase. If you are a consumer as defined in the Consumer Protection Act No. 68
of 2008 (“the CPA”), you will be entitled to such remedies as are made available under the CPA in
relation to the return of goods.
PowerOptimal will not have any liability or obligation to you where the Product has been subjected to
abuse, misuse, improper use, improper testing, negligence, accident, alteration, tampering or repair
by a third party.
To the maximum extent permitted by applicable law, in no event shall PowerOptimal be liable for any
special, incidental, indirect, or consequential damages whatsoever, including, without limitation,
damages for loss of business profits or business interruption, arising out of the use or inability to use
this product.
Please note that this unit must be installed by an electrical contractor registered with the Department
of Labour. Failure to do so may invalidate this warranty.

PowerOptimal Elon® 100 User Manual Version date: 2021/09/07
Page 23 of 24 Version number: 2.11
© PowerOptimal (Pty) Ltd 2021. The content of this document is confidential and all rights to the intellectual property and/or information contained herein remain vested in PowerOptimal, except if otherwise agreed in writing.
Appendix C. Terminology
AC Alternating Current – an electric current that reverses its direction many times a
second at regular intervals, with voltage typically varying in the form of a sine wave.
CoC Certificate of Compliance – to be issued by the electrician installing your Elon® 100
system
CPA Consumer Protection Act No. 68 of 2008
DB Distribution board – the main electrical distribution board / panel in your home,
containing circuit breakers and switches.
DC Direct Current – an electric current flowing in one direction only. Solar PV modules
produce direct current electricity.
Geyser South African term for a water heater
IEC International Electrotechnical Commission
kWh A derived unit of energy equal to 3.6 MJ (megajoules). The amount of energy used by
a 1 kW electrical device over a period of 1 hour.
kWp or Wp The peak power rating in kilowatt (kW) or watt (W) of a solar module or array – i.e.
the output power achieved under full solar radiation. This is usually reported at STC
and NOCT.
PV Photovoltaic – referring to the production of electric current at the junction of two
materials exposed to light.
SANS South African National Standards

PowerOptimal Elon® 100 User Manual Version date: 2021/09/07
Page 24 of 24 Version number: 2.11
© PowerOptimal (Pty) Ltd 2021. The content of this document is confidential and all rights to the intellectual property and/or information contained herein remain vested in PowerOptimal, except if otherwise agreed in writing.
Notes
Related Documents