Polishing and Running a Presentation

Welcome message from author
This document is posted to help you gain knowledge. Please leave a comment to let me know what you think about it! Share it to your friends and learn new things together.
Transcript

Polishing and Running a Presentation

Objectives
• Add pictures
• Add sound
• Add video
• Set slide transitions and timing
• Animate slide objects
2 Microsoft Office 2013-Illustrated Fundamentals
Objectives
• Use speaker notes and slide show
commands
• Print handouts and notes pages
• Design effective presentations
3 Microsoft Office 2013-Illustrated Fundamentals
Adding Pictures
• In PowerPoint a picture might be a
photograph, a shape you draw, a piece of clip
art, or an illustration created using a graphics
app
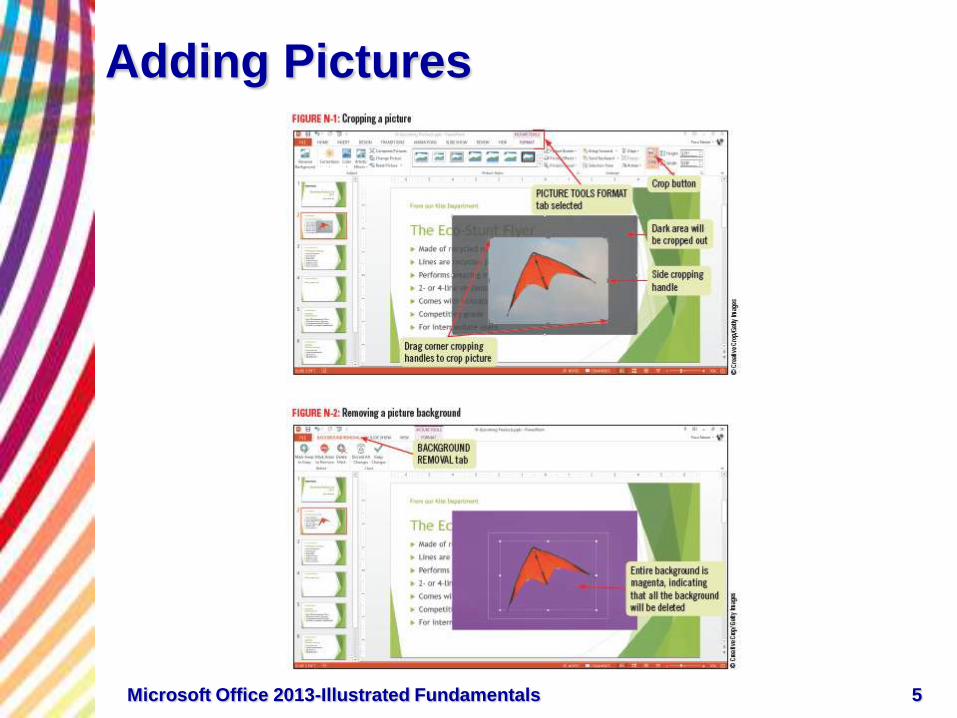
• You can use features on the PICTURE TOOLS
FORMAT tab to:
• Crop, or cut off, portions of a picture
• Remove the picture background
• Cropping handles on each corner and each
side let you reduce the size of a picture
4 Microsoft Office 2013-Illustrated Fundamentals
Adding Pictures
5 Microsoft Office 2013-Illustrated Fundamentals
Adding Sound
• Adding sound can enhance your
presentations
• You can add sound clips, also called audio
files, from online collections such as:
• Office.com
• Files you obtain from other sources
• Sounds you record yourself
•
Like pictures, sounds you add to your
presentation are objects and can be moved
and modified
6 Microsoft Office 2013-Illustrated Fundamentals
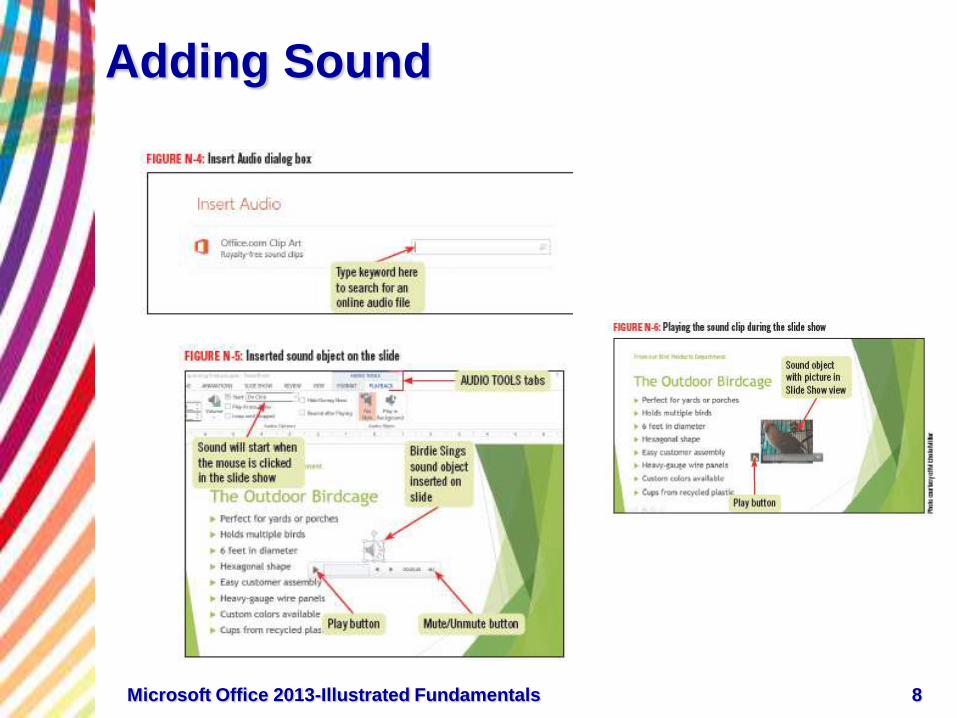
Adding Sound
• You can specify:
• Whether or not to show the sound
file icon on a slide
• How the icon will appear
• When you want the sound to play
7 Microsoft Office 2013-Illustrated Fundamentals
Adding Sound
8 Microsoft Office 2013-Illustrated Fundamentals
Adjusting Sound Playback during a
Slide Show
• You can change the way a sound
plays back during the slide show
by using commands on the AUDIO
TOOLS PLAYBACK tab
• You can use the tools in the
Editing group to trim the audio
clip, have the sound fade in and
out, and control when and how the
audio clip plays
9 Microsoft Office 2013-Illustrated Fundamentals
Adding Video
• Adding video to a presentation can
help your viewers remember your
message
• You can insert a video file from an
online resource or from a collection
you have saved on your computer
• You can use features on the VIDEO
TOOLS PLAYBACK tab to adjust how
and when the video plays during the
slide show
10 Microsoft Office 2013-Illustrated Fundamentals

Adding Video
11 Microsoft Office 2013-Illustrated Fundamentals

Formatting Sound and Video
Objects
• You can change the way a sound or video
object appears on a slide
• Adjust its color or brightness
• Apply a style such as a frame, shape, border, or
effect
• Crop and rotate the object
• To copy formatting from one object to
another, click the object whose formatting
you want to copy, click the Format Painter
button on the HOM tab, then click the second
object
12 Microsoft Office 2013-Illustrated Fundamentals

Setting Slide Timing and Transitions
• There are many times when you want to run a
presentation automatically, not manually
• You may also want to customize how slides
appear in a slide show
13 Microsoft Office 2013-Illustrated Fundamentals

Setting Slide Timing and Transitions
• You can set slide timings and transitions
• a transition is a special effect that determines how
a slide appears as it enters and leaves the screen
• a timing is the number of seconds a slide remains
on the screen before advancing to the next one
• you can adjust settings for individual slide or apply
one setting to multiple slides
14 Microsoft Office 2013-Illustrated Fundamentals

Setting Slide Timing and Transitions
15 Microsoft Office 2013-Illustrated Fundamentals
Using Slide Masters
• Used to make a design change to all the
slides in your presentation
• A slide master contains the layouts, design
elements, and other formatting for a
presentation
• Every slide is based on a master
• A slide master has a number of supporting
layouts
• To modify a slide master, click the VIEW tab,
then click the Slide Master button
16 Microsoft Office 2013-Illustrated Fundamentals

Animating Slide Objects
• You can add interest to text and graphics by
applying animations
• Animation effects are movements or changes in
appearance that you can apply to any text
placeholder or graphic
17 Microsoft Office 2013-Illustrated Fundamentals

Animating Slide Objects
• Use animations to control how any
object enters, exits, or becomes
emphasized on a slide during a slide
show
• Entrance animations
• Emphasis animations
• Exit animations
• You can use the Animation Painter to
apply settings to other objects
18 Microsoft Office 2013-Illustrated Fundamentals

Animating Slide Objects
19 Microsoft Office 2013-Illustrated Fundamentals

Animating Slide Objects
20 Microsoft Office 2013-Illustrated Fundamentals

Adding Animations using the
Animation Pane
• You can add more than one
animation to an object and control
when each animation occurs
using the Animation pane
• Select an object to which you’ve
applied one animation, click the
Add Animation button, and then
click the Animation Pane button
21 Microsoft Office 2013-Illustrated Fundamentals

Adding Animations using the
Animation Pane
22 Microsoft Office 2013-Illustrated Fundamentals

Using Speaker Notes and Slide Show
Commands
• You can add speaker notes to any slide using
the Notes pane
• You can view your slides and notes in Notes
Page view
• You can run your presentation in presenter
view
23 Microsoft Office 2013-Illustrated Fundamentals

Using Speaker Notes and Slide
Show Commands
24 Microsoft Office 2013-Illustrated Fundamentals

Using Speaker Notes and Slide
Show Commands
25 Microsoft Office 2013-Illustrated Fundamentals

Printing Handouts and Notes Pages
• When you give a presentation, you may also
want to give a printed copy to your audience
so they can use it to take notes
• You can print a handouts, which prints one or
more slides per page, and you can include
blank lines for audience members to use for
notes
• You can print Notes pages, which contain a
thumbnail of each slide plus any speaker
notes you added in the Notes pane
26 Microsoft Office 2010-Illustrated Fundamentals

Printing Handouts and Notes Pages
27 Microsoft Office 2010-Illustrated Fundamentals

Printing Handouts and Notes Pages
28 Microsoft Office 2013-Illustrated Fundamentals
Printing Presentation Slides
• You might want to print each of
your presentation slides on a
separate page, adding header and
footer information
• Click the FILE tab, click print, and
then set the desired options
• To add a header and footer, click
Edit Header & Footer
29 Microsoft Office 2013-Illustrated Fundamentals

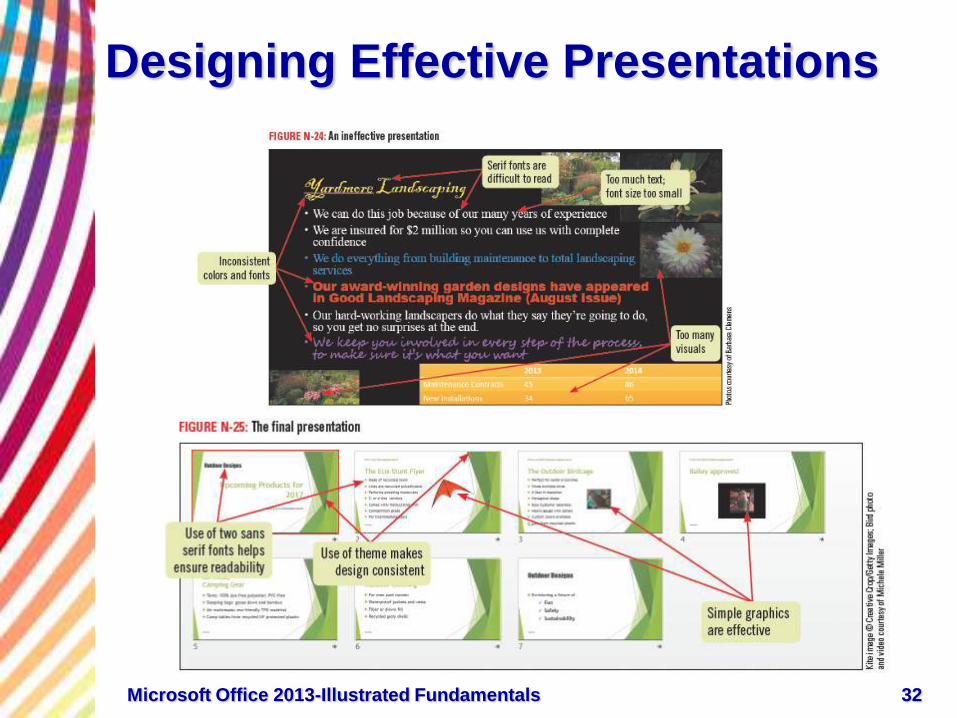
Designing Effective Presentations
• Make sure you communicate your
presentation goals to the audience
• Text and graphics should be
appropriate in both content and
appearance
30 Microsoft Office 2013-Illustrated Fundamentals

Designing Effective Presentations
• As you create a presentation,
consider the following:
• Content
• Design
• Text
• serif font
• sans serif font
• Graphics
• Transitions and animations
31 Microsoft Office 2013-Illustrated Fundamentals
Designing Effective Presentations
32 Microsoft Office 2013-Illustrated Fundamentals

Sharing a Presentation
• You can share your presentations with others
in several different ways
• Web or network location (SkyDrive)
• Sharing your presentation online creates a
link others can use to watch your slide show
using their web browsers
• Record a video of your presentation
33 Microsoft Office 2010-Illustrated Fundamentals
Related Documents