P/N 218972302 (0101)

Welcome message from author
This document is posted to help you gain knowledge. Please leave a comment to let me know what you think about it! Share it to your friends and learn new things together.
Transcript

P/N 218972302 (0101)

2
Contents
Product Registration
This Owner’s Guide provides specificoperating instructions for your model.Use the refrigerator only as instructed inthis Owner’s Guide.
© 2001 White Consolidated Industries, Inc.All rights reserved.
The information contained within this Owner's Guide will instruct you on how toproperly operate and care for your product. Please read through the informationcontained in your literature pack to learn more about your new appliance.
Record Your Model and Serial NumbersRecord the Model No. and Serial No. of this refrigerator in the space provided below.These numbers are found on the serial plate located on the top left wall of therefrigerator compartment.
Model No.
Serial No.
Register Your ProductThe self-addressed PRODUCT REGISTRATION CARD should be filled in completely,signed and returned to Electrolux Home Products.
2 Product Registration3 Important Safety Instructions3 For Your Safety3 Child Safety3 Electrical Information3 Other Precautions4 First Steps4 Location4 Installation4 Door Opening4 Leveling4 Cleaning5 Connecting Ice Maker to Water Supply6 Energy Saving Ideas6 Setting the Controls6 Temperatures6 Moisture Reduction Switch7 Fresh Food Storage8 Care and Cleaning8 Inside8 Outside8 Replacing the Light Bulb8 Vacation and Moving Tips9 Automatic Ice Maker9 Ice Maker Tips10-12 Door Reversal Instructions13 Refrigerator Toe Grille Assembly Instructions14-16 Avoid Service Checklist16 Normal Operating Sounds17 Warranty (United States)18 Service Information (Canada)19 Warranty (Canada)
Versión en españolSi desea obtener una copia en españolde este Manual del Usuario, sírvaseescribir la dirección que se incluye acontinuación. Solicite la P/N 218972301.
Spanish Owner's GuidesElectrolux Home ProductsP.O. Box 212378Augusta, GA 30917

3
Important SafetyInstructions
Proper Disposal ofYour Refrigerator/Freezer
DANGER Risk of child entrapment.Child entrapment and suffocation arenot problems of the past. Junked orabandoned refrigerators or freezers arestill dangerous — even if they will sit for"just a few days." If you are getting rid ofyour old refrigerator or freezer, pleasefollow the instructions below to helpprevent accidents.BEFORE YOU THROW AWAY YOUROLD REFRIGERATOR/FREEZER:
• Removedoors.
• Leaveshelves inplace, sochildrenmay noteasilyclimbinside.
Avoid fire hazard orelectric shock. Do not use an extensioncord or an adapter plug. Do not removeany prong from the power cord.
Read all instructions before using this refrigerator.
For Your SafetyDo not store or use gasoline or other flammable vapors and liquids in the vicinity ofthis or any other appliance. Read product labels for flammability and other warnings.
Child Safety• Destroy carton, plastic bags, and any exterior wrapping material immediately
after the refrigerator is unpacked. Children should never use these items for play.Cartons covered with rugs, bedspreads, plastic sheets or stretch wrap maybecome airtight chambers and can quickly cause suffocation.
• Remove all staples from the carton. Staples can cause severe cuts and destroyfinishes if they come in contact with other appliances or furniture.
• An empty, discarded ice box, refrigerator or freezer is a very dangerous attractionto children. Remove the door of any appliance that is not in use, even ifit is being discarded.
Electrical InformationThese guidelines must be followed to ensure that safety mechanisms in thedesign of this refrigerator will operate properly.• The refrigerator must be plugged into its own 115 Volt, 60 Hz, AC only
electrical outlet. The power cord of the appliance is equipped with a 3-pronggrounding plug for your protection against shock hazards. It must be pluggeddirectly into a properly grounded 3-prong receptacle. The receptacle must beinstalled in accordance with local codes and ordinances. Consult a qualifiedelectrician. Do not use an extension cord or an adapter plug.
• If voltage varies by 10 percent or more, performance of your refrigerator may beaffected. Operating the refrigerator with insufficient power can damage thecompressor. Such damage is not covered under your warranty. If you suspect yourvoltage is high or low, consult your power company for testing.
• To prevent the refrigerator from being turned off accidentally, do not plug the unitinto an outlet controlled by a wall switch or pull cord.
• Do not pinch, knot, or bend the power cord in any manner.
Other Precautions• Never unplug the refrigerator by pulling on the power cord. Always grip the plug
firmly and pull straight out from the receptacle.• To avoid electrical shock, unplug the refrigerator before cleaning and before
replacing a light bulb. NOTE: Turning the control to OFF turns off the compressor, butdoes not disconnect power to the light bulb or other electrical components.
• Do not operate the refrigerator in the presence of explosive fumes.• If the refrigerator has an automatic ice maker, avoid contact with any moving parts.

4
G05D
0010
First Steps Before starting the refrigerator, follow these important first steps:
Location• Choose a place that is near a grounded electrical outlet. DO NOT use an
extension cord or an adapter plug.• If possible, place the refrigerator out of direct sunlight and away from the range,
dishwasher or other heat sources.• The refrigerator must be installed on a floor that is level and strong enough
to support a fully loaded refrigerator.• Consider water supply availability for models equipped with an automatic ice
maker.
Installation• Do not install the refrigerator where the temperature will drop below 60°F
(15°C) or rise above 110°F (43°C). The compressor will not be able to maintainproper temperatures.
• Allow space around the unit for good air circulation. Leave a 1 inch (25 mm)space behind and a 3 inch (75 mm) space above the refrigerator for adequatecirculation.
• In a recessed installation, allow an extra 1/2 inch (10-15 mm) on each side forease of installation.
• For best circulation, elevate the unit 1 inch (25 mm) from the floor, especiallyif the floor is carpeted.
Door OpeningThe doors should open to allow easy access to a counter when removing food.• Do not position the refrigerator so you have to walk around the refrigerator doors.• Reverse the doors if necessary. See "Door Reversal Instructions."
LevelingAll four corners of refrigerator must rest firmly on a solid floor. Some models areequipped with adjustable screw-type levelers. Others are equipped with rollers. Ifyour refrigerator did not come with rollers, they can be purchased from your dealer.
Remove toe grille (some models). See Toe Grille Instructions on page 13.
• To adjust screw-type levelers (some models): Tip cabinet back slightly andraise adjusting bolts as needed.
• To adjust front rollers (some models): Use a screwdriver, 3/8" socketwrench, or nutdriver to adjust rollers as shown.
RAISE THE FRONT of cabinet enough so doors will close freely when openedhalfway. Level cabinet side to side.
Cleaning• Wash the inside, all removable parts and the outside with mild detergent and
warm water. Wipe dry. Do not use harsh cleaners on these surfaces.• Do not use razor blades or other sharp instruments that can scratch the appliance
surface, when removing adhesive labels. Any glue left from the tape or energylabel can be removed with a mixture of warm water and mild detergent, or, touchthe residue with the sticky side of tape already removed.
• Do not remove the serial plate.
1"
1"
1/2"
1/2"
3" AIR SPACE
Clearance
Proper air circulation and leveling willensure efficient operation.
Exposed bolt (some models)
Sunken bolt (some models)
5
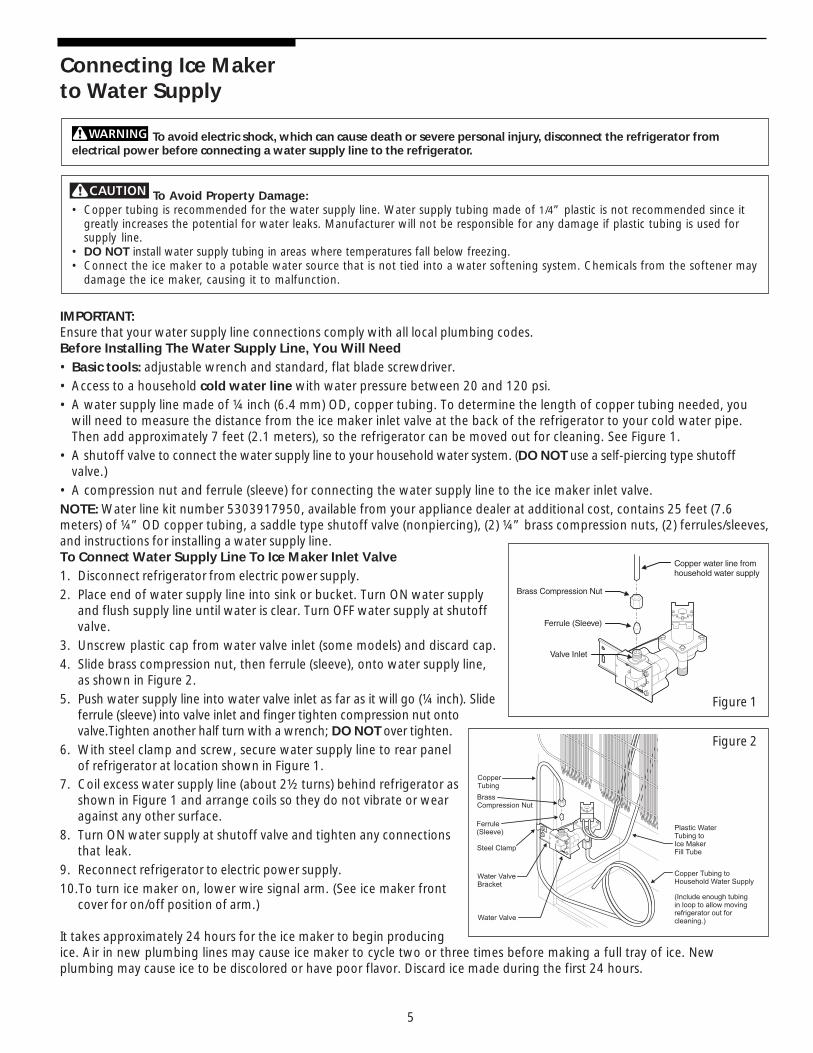
IMPORTANT:Ensure that your water supply line connections comply with all local plumbing codes.Before Installing The Water Supply Line, You Will Need• Basic tools: adjustable wrench and standard, flat blade screwdriver.• Access to a household cold water line with water pressure between 20 and 120 psi.• A water supply line made of ¼ inch (6.4 mm) OD, copper tubing. To determine the length of copper tubing needed, you
will need to measure the distance from the ice maker inlet valve at the back of the refrigerator to your cold water pipe.Then add approximately 7 feet (2.1 meters), so the refrigerator can be moved out for cleaning. See Figure 1.
• A shutoff valve to connect the water supply line to your household water system. (DO NOT use a self-piercing type shutoffvalve.)
• A compression nut and ferrule (sleeve) for connecting the water supply line to the ice maker inlet valve.NOTE: Water line kit number 5303917950, available from your appliance dealer at additional cost, contains 25 feet (7.6meters) of ¼” OD copper tubing, a saddle type shutoff valve (nonpiercing), (2) ¼” brass compression nuts, (2) ferrules/sleeves,and instructions for installing a water supply line.To Connect Water Supply Line To Ice Maker Inlet Valve1. Disconnect refrigerator from electric power supply.2. Place end of water supply line into sink or bucket. Turn ON water supply
and flush supply line until water is clear. Turn OFF water supply at shutoffvalve.
3. Unscrew plastic cap from water valve inlet (some models) and discard cap.4. Slide brass compression nut, then ferrule (sleeve), onto water supply line,
as shown in Figure 2.5. Push water supply line into water valve inlet as far as it will go (¼ inch). Slide
ferrule (sleeve) into valve inlet and finger tighten compression nut ontovalve.Tighten another half turn with a wrench; DO NOT over tighten.
6. With steel clamp and screw, secure water supply line to rear panelof refrigerator at location shown in Figure 1.
7. Coil excess water supply line (about 2½ turns) behind refrigerator asshown in Figure 1 and arrange coils so they do not vibrate or wearagainst any other surface.
8. Turn ON water supply at shutoff valve and tighten any connectionsthat leak.
9. Reconnect refrigerator to electric power supply.10.To turn ice maker on, lower wire signal arm. (See ice maker front
cover for on/off position of arm.)
It takes approximately 24 hours for the ice maker to begin producingice. Air in new plumbing lines may cause ice maker to cycle two or three times before making a full tray of ice. Newplumbing may cause ice to be discolored or have poor flavor. Discard ice made during the first 24 hours.
Connecting Ice Makerto Water Supply
Figure 1
Figure 2
To Avoid Property Damage:• Copper tubing is recommended for the water supply line. Water supply tubing made of 1/4” plastic is not recommended since it
greatly increases the potential for water leaks. Manufacturer will not be responsible for any damage if plastic tubing is used forsupply line.
• DO NOT install water supply tubing in areas where temperatures fall below freezing.• Connect the ice maker to a potable water source that is not tied into a water softening system. Chemicals from the softener may
damage the ice maker, causing it to malfunction.
To avoid electric shock, which can cause death or severe personal injury, disconnect the refrigerator fromelectrical power before connecting a water supply line to the refrigerator.

6
G05C0061
Energy Saving Ideas • Locate the refrigerator in the coolest part of the room, out of direct sunlight andaway from heating ducts or registers. Do not place the refrigerator next to heat-producing appliances such as a range, oven or dishwasher. If this is not possible,a section of cabinetry or an added layer of insulation between the twoappliances will help the refrigerator operate more efficiently.
• Level the refrigerator so the doors close tightly.• Refer to this Owner's Guide for the suggested refrigerator settings.• Periodic cleaning of the condenser will help the refrigerator run more
efficiently. See Outside in the "Care and Cleaning" section.• Do not overcrowd the refrigerator or block cold air vents. Doing so causes the
refrigerator to run longer and use more energy. Shelves should not be lined withaluminum foil, wax paper or paper toweling. Liners interfere with cold aircirculation, making the refrigerator less efficient, which could cause foodspoilage.
• Cover foods and wipe containers dry before placing them in the refrigerator.This cuts down on moisture build-up inside the unit.
• Organize the refrigerator to reduce door openings. Remove as many items asneeded at one time and close the door as soon as possible.
Setting the Controls
Freezer Control
Cool Down PeriodTo ensure safe food storage, allow the refrigerator to operate with the doors closedfor at least 8 to 12 hours before loading with food.
Refrigerator and Freezer Controls• To start out, set control dials to the midpoint for a trial period of 24 hours.
Temperatures• After 24 hours, adjust the controls as needed. Adjust temperatures one
number at a time. For colder temperatures, turn the dial toward COLDEST. Forwarmer temperatures, turn the dial toward COLD. The temperature willincrease or decrease, but not necessarily by 1, 2, or 3 degrees.
An adjustment made to one compartment may require an adjustment to the other.• Turning the refrigerator control will change the temperature in BOTH
compartments. If the refrigerator control is turned to OFF, coolingstops in both compartments.
• Turning the freezer control will change only the temperature in the freezercompartment.
To maintain temperatures, a fan circulates air in the refrigerator and freezercompartments. For good circulation, do not block cold air vents with food items.
Moisture Reduction Switch (some models)If moisture forms on the metal between the two doors, set the Moisture Reduc-tion Switch (located on the control box in the refrigerator compartment) to the“ON” position. A heater will warm the surface and allow moisture to evaporate.
Refrigerator Control
Moisture Reduction Switch

7
Sliding Shelf
Cantilever Shelf
Combination Cantilever/Sliding Shelf withPlastic Clip
Shelf AdjustmentRefrigerator shelves are easily adjustable to suit individual needs.Some models have sliding shelves, others have cantilever shelves,or both. Before adjusting shelves, remove all food. The shippingclips which stabilize the shelves for shipping may be removed anddiscarded.
To adjust sliding shelves, remove by pulling forward to the stopposition, then lift the front edge up and pull out. Replace on anypair of rails by reversing this procedure.
To adjust cantilever shelves (shelves supported at the rear of therefrigerator), lift the back of the shelf up and out. Replace shelf byinserting hooks at rear into wall bracket. Lower and lock intoposition.
To adjust combination cantilever/sliding shelves, remove shelf by lifting hooks up andout of rear wall bracket. Then flex plastic clip towards center of refrigerator and pullshelf straight out. Replace shelf by sliding plastic clip past side wall support. Then lockhooks at rear into wall bracket. NOTE: Plastic clip will automatically fit secure againstside wall.
Door StorageDoor bins and shelves are provided for convenient storage of jars, bottles, and cans.Items used often are available for quick selection.
Some models have adjustable door bins which can be moved to suit individual needs.To move the bins, remove by lifting straight up. Place the bin in the desired positionand lower over supports.
The Dairy compartment is warmer than the general food storage section and isintended for short term storage of cheese, spreads, or butter.
CrispersThe Crispers, located under the bottom refrigerator shelf, are designed for storingfruits, vegetables, and other fresh produce. Wash items in clear water and removeexcess water before placing in the Crispers. Items with strong odors or high moistureshould be wrapped before storing.
The Humidity Control (some models) allows you to adjust the humidity within theCrisper drawer. This can extend the life of fresh vegetables which keep best in highhumidity. Leafy vegetables, however, keep best when stored with the HumidityControl set on HIGHER, or in a drawer without a Humidity Control. This keepsincoming air to a minimum and maintains maximum moisture content.
Crisper Cover Support (some models)The Crisper Cover Support, located between the two Crisper drawers, is shippedraised from the liner floor. This prevents damage to the liner floor during shipping.Once your refrigerator has been installed in it’s final location, the Foot of the CrisperCover Support must be lowered to prevent bowing in the middle of the CrisperCover, when food is placed on it.
Adjusting the Foot of the Crisper Cover Support:1. To lower the Foot, rotate it the clockwise direction until it rests on the liner floor.2. To raise the Foot, rotate it in the counterclockwise direction.
Meat Keeper (some models)The temperature in the Meat Keeper drawer can be made colder than the rest of therefrigerator compartment by using the adjustable air flow control. Foods can bepartially frozen and kept fresh longer than if stored on a refrigerator shelf. Beforeplacing food in the Meat Keeper, follow these steps:1. Carefully handle food items with clean hands and always keep drawer clean.2. Store meat or fish in the original wrapper. If necessary, overwrap in plastic wrap
or foil to prevent drying.3. If food spoilage occurs, disinfect the drawer with liquid chlorine bleach following label
directions. Wash with a solution of baking soda and water. Rinse with water and dry.
Fresh Food Storage
Crisper Cover Support
FRESH FRUITS & VEGETABLES
LOWER
FRUITSHIGHER
HUMIDITY CONTROL
VEGETABLES
Adjustable Humidity Control

8
Care and Cleaning
Damp objects stick to coldmetal surfaces. Do not touch refrigeratedsurfaces with wet or damp hands.
G05D
0008
To avoid damage and helpthe refrigerator run as efficiently aspossible, clean the condenserperiodically.
Keep your refrigerator and freezer clean to prevent odor build-up. Wipe up any spillsimmediately and clean both sections at least twice a year. Never use metallicscouring pads, brushes, abrasive cleaners or strong alkaline solutions on any surface.Do not wash any removable parts in a dishwasher.
Always unplug the power cord from the wall outlet before cleaning. Turningthe control to OFF does not disconnect power to the controls, light bulb, or otherelectrical components.
InsideWash inside surfaces of the refrigerator and freezer with a solution of 2 tablespoonsbaking soda in 1 quart warm water. Rinse and dry thoroughly. Be sure to wringexcess water out of sponge or cloth when cleaning around the controls, lightbulb, or any electrical parts.
Wash removable parts such as shelves and drawers with baking soda solution or milddetergent and warm water. Do not use harsh cleaners on these surfaces. Rinseand dry thoroughly. Clean the door gaskets with mild suds, rinse with clear water andwipe dry. Do not use razor blades or other sharp instruments which can scratch theappliance surface when removing adhesive labels. Any glue left from the tape orenergy label can be removed with a mixture of warm water and mild detergent, or,touch the residue with the sticky side of tape already removed. Do not remove theserial plate.
OutsideWash the cabinet and handles with warm water and mild liquid detergent. Rinse welland wipe dry with a clean soft cloth.
When moving the refrigerator, pull straight out. Do not shift the refrigerator from side toside as this may tear or gouge the floor covering. If the refrigerator has an automatic icemaker, be careful not to move the refrigerator beyond plumbing connections.
Periodically clean the condenser (black tubes and wires on the back of therefrigerator). Using a vacuum with its dusting tool attachment, vacuum the coils toremove dust build-up. Do not allow lint or dust to accumulate on the coils. The defrostwater pan is located at the bottom rear of the refrigerator on top of the compressor(shown left). The pan should be cleaned periodically. Wipe clean with a damp cloth.
Replacing the Light BulbTo replace the light bulb:1. Unplug the refrigerator.2. Wear gloves as protection against possible broken glass.3. Replace old bulb with an appliance bulb of the same wattage.4. Remember to plug the refrigerator back in.
Vacation and Moving TipsShort vacations: Leave the refrigerator operating during vacations of 1 to 3 weeks.
Use up all perishable items from the refrigerator section. Wrap and store other itemsin the freezer. If the unit has an automatic ice maker, turn off the ice maker, evenif you will be gone just a few days.
Long vacations: Remove all food and ice if you will be gone 1 month or more. Turnthe control to OFF and disconnect the power. If the unit has an automatic ice maker,turn off the ice maker and turn the water supply valve to the closed position. Defrostand clean the interior thoroughly. Leave both doors open to prevent odor and moldbuildup. Block open if necessary.
Moving: When moving the refrigerator, follow these guidelines to prevent damage:• Remove all food and other items from both the refrigerator and freezer
compartments. Empty the ice storage bin. Defrost and clean the interiorthoroughly.
• If a hand truck is used in moving, load the refrigerator from the side.• Turn rollers as far up as possible. This will protect them during sliding or
moving.• The cabinet should be well padded and handled with care. Do not drop.

9
G05U
0016
Automatic Ice Maker If your refrigerator has an automatic ice maker, it will provide a continuous supplyof ice for normal use. The automatic ice maker is an optional accessory which maybe installed in most models at any time. Call your local dealer for installation.
After the plumbing connections have been completed, the water supply valve mustbe opened. Place the ice container under ice maker, pushing it as far back aspossible. Lower the wire signal arm to its "down" or ON position. Because of newplumbing connections, the first production of ice cubes may be discolored or havean odd flavor. Throw the ice away until the cubes made are free of discoloration andtaste. Remember, water quality determines your ice quality. It isbest to connect ice maker to water that is NOT soft. Softening chemicals can damageice maker. If ice maker is connected to soft water, ensure softener is maintained, andworking properly.
To stop the ice maker, lift the wire signal arm until it clicks and locks in the "up"or OFF position. The ice maker turns off automatically when the ice container is full.If your model has an adjustable freezer shelf, place the shelf so the wire signal armwill hit the ice when the ice container is full.
Ice Maker Tips1. Ice stored too long may develop an odd flavor. Empty container and be sure wire
signal arm is in its "down" or ON position. The ice maker will then produce moreice.
2. Occasionally shake the container to keep ice separated.3. Keep the wire signal arm in its "up" or OFF position until the refrigerator is
connected to the water supply or whenever water supply is turned off.4. Certain sounds are normal when the ice maker is operating. They are:
Motor operationIce being loosened from the trayIce being dropped into the containerRunning waterWater valve opening and closing
For more information on these operations, see "Normal Operating Sounds."5. Wash ice container in warm water with mild detergent. Rinse well and dry.6. Stop the ice maker when cleaning the freezer or for short vacations.7. If the ice maker will be turned off for a long period of time, turn the water supply
valve to the closed position.

10
Door ReversalInstructions
1. Refer to the ToeGrille Instructionson page 13 toremove the ToeGrille (somemodels). Snap offhinge cover at topof cabinet (somemodels). With thefreezer door closed,remove the twoscrews attachingupper hinge tocabinet. Lift thehinge up and off. Be sure to save screws and hinge forreassembly later.
2. Open the freezerdoor enough toallow it to be liftedoff the center hinge.
3. With the refrigera-tor door closed,remove center hingepin. (Note the ar-rangement of the up-per and lower wash-ers (some models) onthe hinge pin. Thewashers must be re-assembled later inthe same manner.)Open refrigeratordoor enough to al-low door to be liftedoff the lower hinge. Remove the two screws attaching the centerhinge. The third outermost screw under the center hinge shouldbe left in place. Save hinge, pin, and washers (somemodels) for reassembly later. Reinstall screws in originalholes.
Your refrigerator is equipped with reversible door hinges. Hinging of the door can bechanged to the opposite side any time you wish. An envelope containing extra plastichole plugs is included in some models. Turn the refrigerator control to OFF. Removeall food, bottles, and other items from the door. Begin with freezer door.Completely remove one door before beginning the other.
4. Remove hingepin, hinge, and thetwo screwsattaching the lowerhinge. Save thehinge, hinge pin,washer (somemodels) andscrews forreassembly later.
or
5. Carefullyremove the holeplugs from thehinge holes in thecenter mullion andtop of cabinet andreinstall in theopposite set ofholes.

11
7. To removerefrigeratorhandle: Remove thetwo screws attachingthe handle to the topof the refrigeratordoor. Swing the topof handle awayfrom the door andslide handle downand off of dovetailbutton. Removescrew and dovetailbutton and install onother side movinghole plugs fromcorresponding holesto the opposite side.Reverse instructionsfor reattachinghandle. Start withhandle offset awayfrom the door. Placebottom of handleover dovetail button,swing handle into an upright positionand push downward, locking it into place. Secure top ofhandle with screws.
Trim Removal (Full-Length Trim models only)In some models, the refrigerator door has a full lengthtrim piece which continues from the bottom of the handleto the bottom of the door. The top of the trim fits aroundthe base of the handle. An adhesive "trim lock" ispositioned about halfway down. The bottom of the trim isheld in place by either an adhesive trim lock, or a trim lockwith two prongs inserted into a hole on the face of the door.Remove the trim by gently pulling the trim lock areas outand away from the door. When the trim is free from thedoor, gently pull the trim down and away from the base ofthe handle.
6. To removefreezer handle:Reverse handleswhile doors are off.Remove the twoscrews attachingthe handle to thebottom of thefreezer door. Swingbottom of handleaway from the doorand slide handlestraight up and offof dovetail button.Remove screw anddovetail button and install on other side, using the sameholes as the nameplate. To move nameplate to other side,remove the magnetic nameplate from its frame, turn frameupside down and install in old handle holes. Insert magneticnameplate into frame. Reverse instructions for reattachinghandle. Start with handle offset away from the door. Placetop of handle over dovetail button, swing handle into anupright position and push upward, locking it into place.Secure bottom of handle with screws.
8. Remove doorstop from bottom offreezer andrefrigerator doorand reinstall onopposite side.
9. If yourrefrigerator doesnot have a ToeGrille, use a puttyknife to removethe plastic plug(not shown) fromfront of base andreinstall in theopposite set oflower hinge holes.Assemble lowerhinge to cabinet.Install hinge pin inopposite hingehole from which itwas removed.Install the washer(some models) onthe lower hingepin and inserthinge screws, butdo not tighten. Hinges will have to remain loose against
cabinet to align door.
or
10. Turn centerhinge upside downand secure tocabinet as shown,using the screwswhich are in thenew holes. Installrefrigerator door onlower hinge pin.Align door withedge of cabinet.Hold the door onfront of cabinet.
Refrigerator Door
Freezer Door
Freezer Door
Refrigerator Door
To reattach trim: Slide both trim locks out of trim. Insertthe new adhesive trim locks contained in your literaturepack. NOTE: Trim lock must be removed and installed bysliding OVER the two donut shaped areas. Install trim tohandle by sliding under base of handle. Carefully align trimand press down at trim lock locations. Replace hole plug onopposite side. Use rubbing alcohol to remove any adhesiveresidue from old trim lock location(s).
12
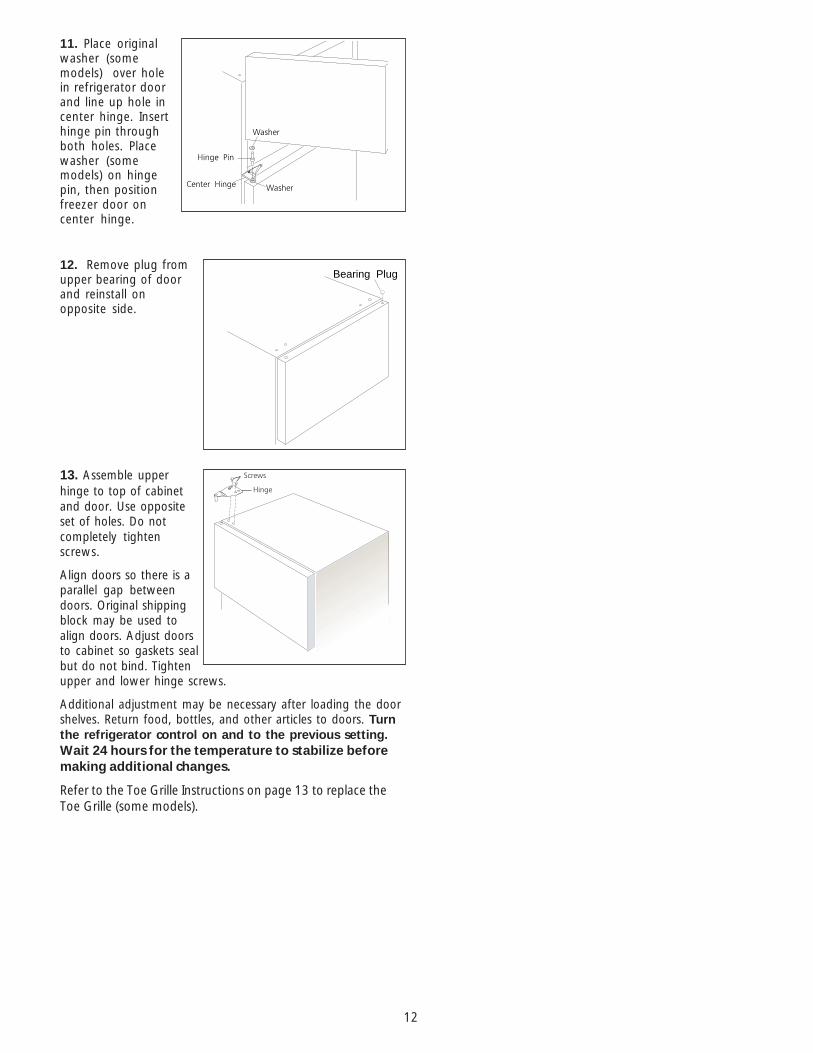
13. Assemble upperhinge to top of cabinetand door. Use oppositeset of holes. Do notcompletely tightenscrews.
Align doors so there is aparallel gap betweendoors. Original shippingblock may be used toalign doors. Adjust doorsto cabinet so gaskets sealbut do not bind. Tightenupper and lower hinge screws.
Additional adjustment may be necessary after loading the doorshelves. Return food, bottles, and other articles to doors. Turnthe refrigerator control on and to the previous setting.Wait 24 hours for the temperature to stabilize beforemaking additional changes.
Refer to the Toe Grille Instructions on page 13 to replace theToe Grille (some models).
11. Place originalwasher (somemodels) over holein refrigerator doorand line up hole incenter hinge. Inserthinge pin throughboth holes. Placewasher (somemodels) on hingepin, then positionfreezer door oncenter hinge.
12. Remove plug fromupper bearing of doorand reinstall onopposite side.
Bearing Plug

13
Tools Required: None
Refrigerator Toe GrilleAssembly Instructions
To Attach the Toe Grille to the Mounting Clips:
• With the end of the Toe Grille against the side of theLower Hinge, align the two (2) Assembly Slots with thetwo (2) Mounting Clips.
• Snap the Toe Grille onto the Mounting Clips. (SeeFigures 1A and 1B)
To Remove the Toe Grille:
• Carefully tilt the bottom edge of the Toe Grille away fromthe refrigerator base.
• Pull the Toe Grille toward you until it “unsnaps” from theMounting Clips. (See Figure 2)
For Cleaning:
Hand wash in Warm Soapy Water.
Figure 2
NOTE: If your refrigerator has the type of MountingClips shown in Figure 1B below, use this procedure.
The Toe Grille and Mounting Clips are NOTdishwasher safe. Placing them in the dishwasher willresult in a warped and unusable Grille.
NOTE: A properly mounted Toe Grille should have its edgeagainst the Lower Hinge, and the back of the Toe Grille tightagainst the refrigerator base.
NOTE: Both Toe Grille Buttons must be mounted on thesame side of the two keyhole slots.
To Attach the Toe Grille:
• Open the refrigerator door.
• Line up the Toe Grille Assembly over the two large holeson the front of the refrigerator base (See Figure 1).
• Push the Toe Grille Assembly into the holes until the grillesnaps in place (See Figure 1).
NOTE: The Toe Grille should be flush with the side of therefrigerator and not interfere with the Lower Hinge.
NOTE (some models): If your refrigerator has a left handdoor swing, the Toe Grille Buttons must be positioned onthe left side of the keyhole slots (See Figure 2).
To Remove the Toe Grille:
• Grasp the Toe Grille on each side and pull directlyoutward.
• The grille assembly will pop out of the holes for easycleaning.
For Cleaning:
Hand wash in Warm Soapy Water.
NOTE: If your refrigerator has the type of MountingClips shown in Figure 2 below, use this procedure.
Tools Required: None
Figure 2
Figure 1
Figure 1BFigure 1A

14
Refrigerator control is off. Set refrigerator control. See Setting the Controls.
Refrigerator is in defrost cycle. This is normal for a fully automatic defrosting refrigerator. The defrostcycle occurs periodically, lasting about 20 minutes.
Plug at wall outlet is disconnected. Make sure plug is tightly pushed into outlet.
House fuse has blown or circuit breaker has tripped. Check and/or replace fuse with a 15 amp time-delay fuse. Reset circuit breaker.
Power outage. Check house lights. Call local electric company.
Room or outside weather is hot. It is normal for the refrigerator to work longer under these conditions.
Refrigerator has recently been disconnected for a period of time. It takes about 8-12 hours for therefrigerator to cool down completely.
Automatic ice maker is operating (some models). Operation of the ice maker causes the refrigeratorto run slightly more.
Doors are opened too frequently or too long. Warm air entering the refrigerator causes it to run more.Open the doors less often.
Refrigerator or freezer door may be slightly open. Make sure refrigerator is level. Keep food andcontainers from blocking door. See Occurrence section OPENING/CLOSING OF DOORS/DRAWERS.
Refrigerator control (found in refrigerator section) is set too cold. Set the refrigerator control to awarmer setting until the refrigerator temperature is satisfactory. Allow 24 hours for the temperatureto stabilize. Then, if the freezer temperature is not right, set the freezer control to a colder setting.
Refrigerator or freezer gasket is dirty, worn, cracked, or poorly fitted. Clean or change gasket. Leaksin door seal will cause refrigerator to run longer in order to maintain desired temperatures.
Thermostat is keeping the refrigerator at a constant temperature. This is normal. Refrigerator goes onand off to keep temperature constant.
Freezer control is set too cold. Set the freezer control to a warmer setting until the freezer temperatureis satisfactory. Allow 24 hours for the temperature to stabilize.
Refrigerator control is set too cold. Set the refrigerator control to a warmer setting. Allow 24 hours fortemperatures to stabilize. Then, if the freezer temperature is not right, set the freezer control to a coldersetting.
Refrigerator control is set too cold. See above solution.
Meat should be stored at a temperature just below the freezing point of water (32°F, 0°C) for maximumfresh storage time. It is normal for ice crystals to form due to the moisture content of meat.
Adjustable air flow control set too cold. Adjust the adjustable air flow control to a lower setting.
Doors are opened too frequently or too long. Warm air enters the refrigerator whenever the door isopened. Open the door less often.
Door is open slightly. See Occurrence section OPENING/CLOSING OF DOORS/DRAWERS.
Condenser is dirty. Clean condenser. See "Outside" in Care and Cleaning.
Avoid Service Checklist
RUNNING OF REFRIGERATOR
OCCURRENCE
Refrigerator compressor does not run.
Refrigerator runs too much or toolong.
Refrigerator compressor goes on andoff frequently.
Temperature in the freezer is too coldand the refrigerator temperature issatisfactory.
Temperature in the refrigerator is toocold and the freezer temperature issatisfactory.
Food stored in drawers freezes.
Food stored in Meat Keeper (somemodels) freezes.
Temperature in the freezer orrefrigerator is too warm.
TEMPERATURES ARE TOO COLD
SOLUTION
TEMPERATURES ARE TOO WARM
Before calling for service, review this list. It may save you both time and expense.This list includes common occurrences that are not the result of defectiveworkmanship or materials in this appliance.

15
Freezer control is set too warm. Set the freezer control to a colder setting until the freezer temperatureis satisfactory. Allow 24 hours for the temperature to stabilize.
Refrigerator control is set too warm. Refrigerator control has some effect on freezer temperature.Set the refrigerator control to a colder setting. Allow 24 hours for the temperature to stabilize. Then,if the freezer temperature is not right, set the freezer control to a warmer setting. Refer to Setting theControls.
Adjustable air flow control is set too warm. Adjust the adjustable air flow control to a colder setting.
Weather is hot and humid which increases rate of frost buildup and internal sweating. This is normal.
Door is slightly open. See Occurrence section OPENING/CLOSING OF DOORS/DRAWERS.
Door is opened too often or too long. Open the door less often.
Vegetables contain and give off moisture. It is not unusual to have moisture on the bottom side of thecover.
Washed vegetables and fruits drain while in the drawer. Dry items before putting them into drawer.Water collecting in bottom of drawer is normal.
Weather is humid. This is normal in humid weather. When humidity is lower, the moisture shoulddisappear. Set the Moisture Reduction Switch to the “ON” position.
Door is slightly open, causing cold air from inside the refrigerator to meet warm air from outside. SeeOccurrence section OPENING/CLOSING OF DOORS/DRAWERS.
Ice maker wire signal arm is in "up" or OFF position. Move wire signal arm to "down" or ON position.
Household water line valve is not open. Turn on household water line valve.
Freezer is not cold enough. See Occurrence section TEMPERATURES ARE TOO WARM.
Saddle valve on cold water pipe is blocked or restricted by foreign material. Turn off household waterline valve. Remove, clean or replace valve.
Ice maker is producing less ice than you expect. Ice maker should produce approximately2 1/2 to 4 pounds of ice every 24 hours.
Freezer is not cold enough. See Occurrence section TEMPERATURES ARE TOO WARM.
Household water line valve is not completely open. Turn on household water line valve.
Water supply valve in refrigerator is being blocked by foreign material. See Occurrence, "Ice makeris not making any ice" above.
Ice maker wire arm is being held down by an item in the freezer. Remove item and release arm.Remove any ice cubes which are frozen together over arm.
Ice cubes are not being used frequently enough. Remove and shake ice bucket to separate cubes.
Ice has picked up odor or flavor from strong food stored in refrigerator or freezer. Cover foods tightly.Discard stale ice. Ice maker will produce fresh supply.
Water running to ice maker has poor taste or odor. Add filter to ice maker. Consult a waterpurifying company.
Interior needs to be cleaned. Clean interior with sponge, warm water and baking soda.
Food with strong odor is in refrigerator. Cover food tightly.
SOLUTIONTEMPERATURES ARE TOO WARM
Moisture collects on inside of refrigeratorwalls.
Water collects on bottom side of drawercover.
Water collects in bottom of drawer.
Moisture forms on outside of refrigerator orbetween doors.
Ice maker is not making any ice.
AUTOMATIC ICE MAKER (some models)
Ice maker is not making enough ice.
Ice maker will not stop making ice.
Ice maker is not separating the cubes.
Ice has bad odor and taste.
OCCURRENCE
Temperature in the freezer is too warm.
Temperature in the refrigerator is too warmand the freezer temperature is satisfactory.
Temperature in the Meat Keeper (somemodels) is too warm.
WATER/MOISTURE/FROST OUTSIDE REFRIGERATOR
WATER/MOISTURE/FROST INSIDE REFRIGERATOR

16
Door is not designed to swing shut automatically. Close door securely.
Door was closed too hard, causing other door to open slightly. Close both doors gently.
Refrigerator is not level. It rocks on the floor when it is moved slightly. Be sure floor is level and solidand can adequately support refrigerator. Adjust levelers or rollers (some models) as needed.
Floor is uneven or weak. Refrigerator rocks on the floor when it is moved slightly. Be sure floor is leveland can adequately support refrigerator. Contact carpenter to correct sagging or sloping floor.
Refrigerator is touching the wall or cabinets. Be sure floor is level and can adequately supportrefrigerator. Contact carpenter to correct sagging or sloping floor.
Food is touching shelf on top of drawer. Keep less food in drawer.
Track that drawers slides on is dirty. Clean drawer and track.
Light bulb is burned out. See "Replacing the Light Bulb" in Care and Cleaning.
Light switch is stuck. Light switch is located on the ceiling of the refrigerator compartment nearthe temperature control box. Push in light switch to release.
No electric current is reaching refrigerator. See Occurrence section RUNNING OF REFRIGERATOR.
SOLUTION
OPENING/CLOSING OF DOORS/DRAWERS
Door(s) will not close.
Drawers are difficult to move.
OCCURRENCE
Normal OperatingSounds
EVAPORATORThe flow of refrigerant through theevaporator may create a boilingor gurgling sound.
AUTOMATIC ICE MAKER *Occasionally you will hear icecubes dropping into the ice bin.
COLD CONTROL & DEFROST TIMERThese parts can produce a snappingsound when turning the refrigeratoron or off. The timer also producessounds similar to an electric clock.
INSULATIONRigid foam insulation has excellentinsulating capabilities. It is veryenergy efficient; however, it doeshave a tendency to amplify sound.
EVAPORATOR FANYou may hear air being forcedthrough the cabinet by the fan.
DEFROST HEATERDuring defrost cycles, water drippingonto the heater may cause a hissingor sizzling sound. After defrosting, apopping sound may occur.
WATER VALVE *When the ice maker fills withwater, you will hear a buzzingsound and water running.
COMPRESSORModern, high efficiency compressorsoperate much faster than older models.The compressor may have a high-pitched hum or pulsating sound.
* On models equipped with an Automatic Ice Maker.
LIGHT BULB IS NOT ON

17
GIBSON REFRIGERATOR PLATINUM ADVANTAGE WARRANTYYour Gibson product is protected by this warranty
FULL TWO-YEARWARRANTY
LIMITED 3RD- 5THYEAR WARRANTY(Sealed System)
LIMITED 6th - 10thYEAR WARRANTY(Compressor only)
LIMITEDWARRANTY(Applicable to theState of Alaska)
WARRANTYPERIOD
Two years from originalpurchase date.
Third through fifth yearsfrom original purchasedate.
Time periods listed above.
Time periods listed above.
THROUGH OUR AUTHORIZED SERVICERS,WE WILL:
Pay all costs for repairing or replacing any parts ofthis appliance which prove to be defective in materialsor workmanship.
Repair or replace any parts in the Sealed RefrigerationSystem (compressor, condenser, evaporator, drierand tubing) which prove to be defective in materialsor workmanship.
Provide a replacement for any compressor whichproves to be defective in workmanship or material.
All of the provisions of the full and limited warrantiesabove and the exclusions listed below apply.
THE CONSUMER WILL BERESPONSIBLE FOR:
Costs of service calls that are listed under NORMALRESPONSIBILITIES OF THE CONSUMER.*
Travel costs of the technician, diagnostic costs and anyremoval, transportation and reinstallation costs whichare required because of service. Costs for labor, partsand transportation other than with respect to theSealed Refrigeration System.
Diagnostic costs and any removal, transportation andreinstallation costs which are required because ofservice. Costs for labor, parts and transportationother than the cost of the replacement compressoritself.
Costs of the technician's travel to the home and anycosts for pick up and delivery of the appliance requiredbecause of service.
USA800•944•9044
Electrolux Home Products North AmericaP.O. Box 212378
Augusta, GA 30917
Your appliance is warranted by Electrolux Home Products North America, a division of White Consolidated Industries Inc. We authorize no personto change or add to any of our obligations under this warranty. Our obligations for service and parts under this warranty must be performed by usor an authorized Electrolux Home Products North America servicer.
This warranty applies only to products in ordinary household use, and the consumer is responsible for theitems listed below:1. Proper use of the appliance in accordance with instructions provided with the product.2. Proper installation by an authorized servicer in accordance with instructions provided with the appliance and in
accordance with all local plumbing, electrical and/or gas codes.3. Proper connection to a grounded power supply of sufficient voltage, replacement of blown fuses, repair of loose
connections or defects in house wiring.4. Expenses for making the appliance accessible for servicing, such as removal of trim, cupboards, shelves,etc.,
which are not a part of the appliance when it was shipped from the factory.5. Damages to finish after installation.6. Replacement of light bulbs and/or fluorescent tubes (on models with these features).
This warranty does not cover the following:1. CONSEQUENTIAL OR INCIDENTAL DAMAGES SUCH AS PROPERTY DAMAGE AND INCIDENTAL
EXPENSES RESULTING FROM ANY BREACH OF THIS WRITTEN OR ANY IMPLIED WARRANTY.NOTE: Some states do not allow the exclusion or limitation of incidental or consequential damages, so thislimitation or exclusion may not apply to you.
2. Service calls which do not involve malfunction or defects in workmanship or material, or for appliances not inordinary household use. The consumer shall pay for such service calls.
3. Damages caused by services performed by servicers other than Electrolux Home Products North America orits authorized servicers; use of parts other than genuine Electrolux Home Products parts; obtained from personsother than such servicers; or external causes such as abuse, misuse, inadequate power supply or acts of God.
4. Products with original serial numbers that have been removed or altered and cannot be readily determined.
Keep your bill of sale, delivery slip, or some other appropriate payment record. The date on the bill establishes thewarranty period should service be required. If service is performed, it is in your best interest to obtain and keep allreceipts. This written warranty gives you specific legal rights. You may also have other rights that vary from state tostate. Service under this warranty must be obtained by contacting Electrolux Home Products:
*NORMALRESPONSIBILITIESOF THE CONSUMER
EXCLUSIONS
IF YOU NEEDSERVICE
This warranty only applies in the 50 states of the U.S.A., and Puerto Rico. Product features or specifications as described or illustrated are subjectto change without notice. All warranties are made by Electrolux Home Products North America, a division of White Consolidated Industries Inc.
01-G-RE-02 (Rev. 01/2001)

18
Service Information(Canada)
To avoid unnecessary cost and inconvenience, make a few simple checks beforecalling for service. Common occurrences and their solutions can be found in theAvoid Service Checklist. Be sure you have followed the instructions in thismanual.
If you are unable to locate the cause of a problem, call for service. Insist onfactory service by an authorized ELECTROLUX PARTS AND SERVICE depot.
ELECTROLUX PARTS AND SERVICEAll Electrolux appliances are backed by ELECTROLUX PARTS AND SERVICE, oneof Canada's largest parts and service networks.
The Electrolux reputation means you can enjoy complete professional servicefrom one of our hundreds of trained technicians across the country.
ELECTROLUX PARTS AND SERVICE6150 McLaughlin RoadMississauga, OntarioL5R 4C2
Place the name, address and telephone number of your service depot in thespaces below.
Product and feature specifications as described or illustrated are subjectto change without notice.

19
REFRIGERATOR WARRANTY (CANADA)Your refrigerator is protected by this warranty
WARRANTYPERIOD
THROUGH OUR AUTHORIZED SERVICERS,WE WILL: THE CONSUMER WILL BE RESPONSIBLE FOR:
FULL ONE-YEARWARRANTY
One year from originalpurchase date
Pay all costs for repairing or replacing any parts of thisappliance which prove to be defective in materials orworkmanship. Excludes original and replacement Ice& Water filter cartridges (if equipped). Original andreplacement cartridges are warranted for 30 days(parts only).
Costs of service calls that are listed under NORMALRESPONSIBILITIES OF THE CONSUMER. *
LIMITED 2ND-5TH
YEAR WARRANTY(Cabinet Liner andSealed System)
Second through fifthyears from originalpurchase date
Repair or replace any parts in the cabinet liner orSealed Refrigeration System (compressor, condenser,evaporator, drier and tubing) which prove to bedefective in materials or workmanship.
Costs for pick up and delivery of the appliance required becauseof service. Costs for labor, parts and transportation other thanwith respect to the cabinet liner or Sealed Refrigeration System.
Canada866•213•9397
Electrolux Home Products North America6150 McLaughlin RoadMississauga, Ontario
L5R 4C2
Your appliance is warranted by Electrolux Home Products North America, a division of WCI Canada Inc. We authorize no person to change or addto any of our obligations under this warranty. Our obligations for service and parts under this warranty must be performed by us or an authorizedElectrolux Home Products North America servicer.
This warranty applies only to products in ordinary household use, and the consumer is responsible for theitems listed below:1. Proper use of the appliance in accordance with instructions provided with the product.2. Proper installation by an authorized servicer in accordance with instructions provided with the appliance and in
accordance with all local plumbing, electrical and/or gas codes.3. Proper connection to a grounded power supply of sufficient voltage, replacement of blown fuses, repair of loose
connections or defects in house wiring.4. Expenses for making the appliance accessible for servicing, such as removal of trim, cupboards, shelves,etc.,
which are not a part of the appliance when it was shipped from the factory.5. Damages to finish after installation.6. Replacement of light bulbs and/or fluorescent tubes (on models with these features).
This warranty does not cover the following:1. CONSEQUENTIAL OR INCIDENTAL DAMAGES SUCH AS PROPERTY DAMAGE AND INCIDENTAL
EXPENSES RESULTING FROM ANY BREACH OF THIS WRITTEN OR ANY IMPLIED WARRANTY.NOTE: Some states do not allow the exclusion or limitation of incidental or consequential damages, so thislimitation or exclusion may not apply to you.
2. Service calls which do not involve malfunction or defects in workmanship or material, or for appliances not inordinary household use. The consumer shall pay for such service calls.
3. Damages caused by services performed by servicers other than Electrolux Home Products North America orits authorized servicers; use of parts other than genuine Electrolux Home Products parts; obtained from personsother than such servicers; or external causes such as abuse, misuse, inadequate power supply or acts of God.
4. Products with original serial numbers that have been removed or altered and cannot be readily determined.
Keep your bill of sale, delivery slip, or some other appropriate payment record. The date on the bill establishes thewarranty period should service be required. If service is performed, it is in your best interest to obtain and keep allreceipts. This written warranty gives you specific legal rights. You may also have other rights that vary from state tostate. Service under this warranty must be obtained by contacting Electrolux Home Products:
*NORMALRESPONSIBILITIESOF THE CONSUMER
EXCLUSIONS
IF YOU NEEDSERVICE
Your appliance is warranted by Electrolux Home Products North America, a division of WCI Canada Inc. Product features or specifications asdescribed or illustrated are subject to change without notice.

[DO NOT PRINT
THIS PAGE TO BE LEFT
INTENTIONALLY BLANK.]
Related Documents