Pleasure Craft Operators Certificate (PCOC)

Pleasure Craft Operators Certificate (PCOC)
Jan 13, 2016
Pleasure Craft Operators Certificate (PCOC). Ch. 1 - Preface. This course is NOT a boat-handling course This course provides knowledge operators need to comply with legal requirements and standards of operating a pleasure craft You must read your manual to be successful on the examination. - PowerPoint PPT Presentation
Welcome message from author
This document is posted to help you gain knowledge. Please leave a comment to let me know what you think about it! Share it to your friends and learn new things together.
Transcript
Pleasure Craft Operators Certificate (PCOC)
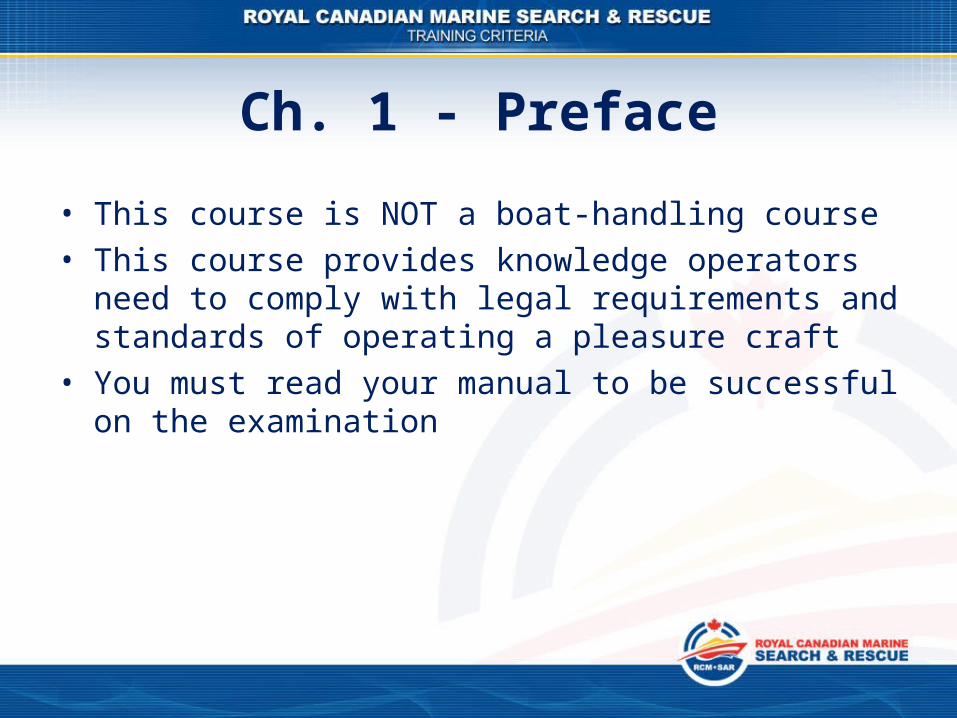
Ch. 1 - Preface
• This course is NOT a boat-handling course• This course provides knowledge operators need to
comply with legal requirements and standards of operating a pleasure craft
• You must read your manual to be successful on the examination
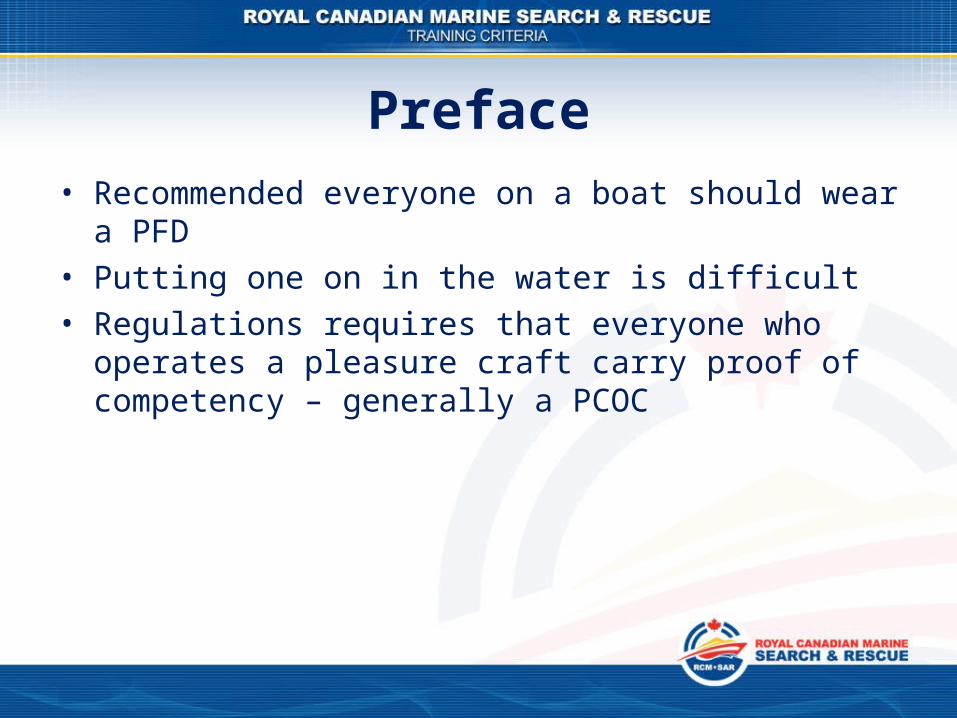
Preface• Recommended everyone on a boat should wear a PFD• Putting one on in the water is difficult• Regulations requires that everyone who operates a
pleasure craft carry proof of competency – generally a PCOC
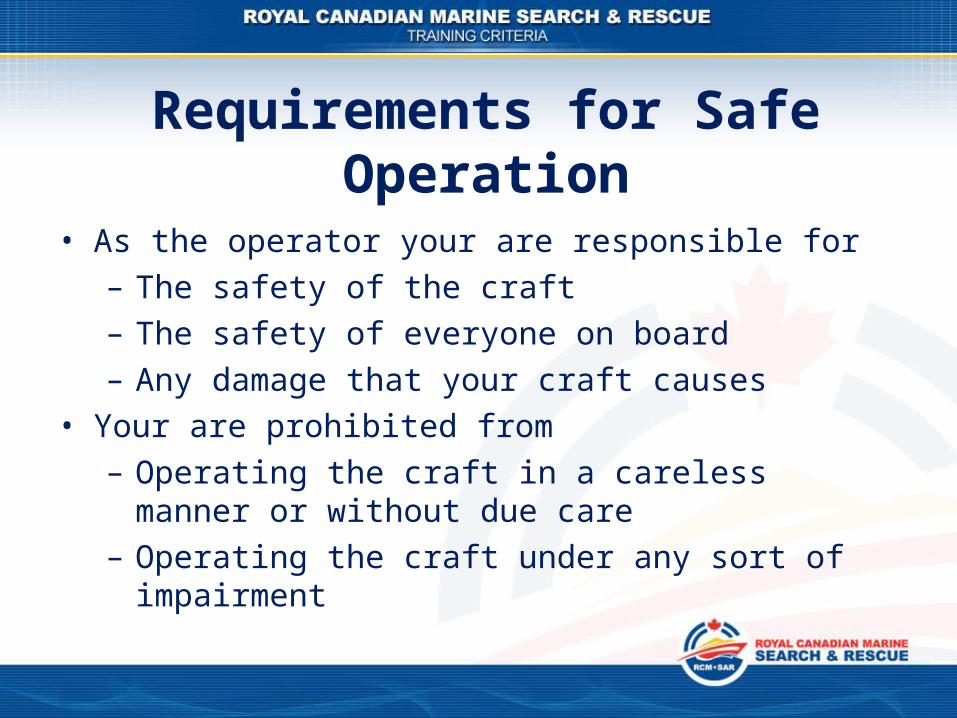
Requirements for Safe Operation
• As the operator your are responsible for– The safety of the craft– The safety of everyone on board– Any damage that your craft causes
• Your are prohibited from– Operating the craft in a careless manner or without
due care– Operating the craft under any sort of impairment
• Some of the laws include– Criminal Code of Canada– Contraventions Act and Regulations– Radio Communications Act and Regulations– Canada Shipping Act 2001– Small Vessel Regulations– Collision Regulations
Requirements for Safe Operation
• Some of the laws include– Vessel Operation Restriction Regulations– Competency of Operators of Pleasure Craft
Regulations– Charts and Nautical Publications Regulations– Navigation Safety Regulations– Regulations for the Prevention of Pollution from Ships
and from Dangerous Chemicals
Requirements for Safe Operation
• The most common causes are:– Not wearing a lifejacket or PFD– Person overboard– Capsizing and collision– Alcohol and drug related boat operation
• Section 1007 of the Small Vessel Regulations
“No person shall operate a vessel in a careless manner, without due care and attention or without reasonable consideration for other persons.”
Causes of incidents and fatalities
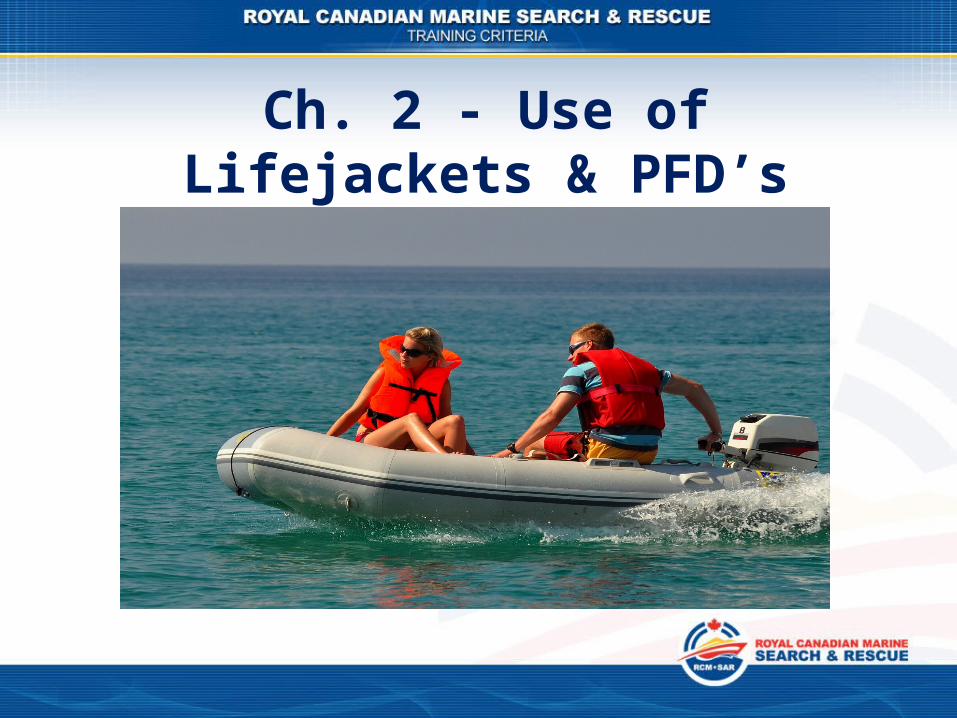
Ch. 2 - Use of Lifejackets & PFD’s
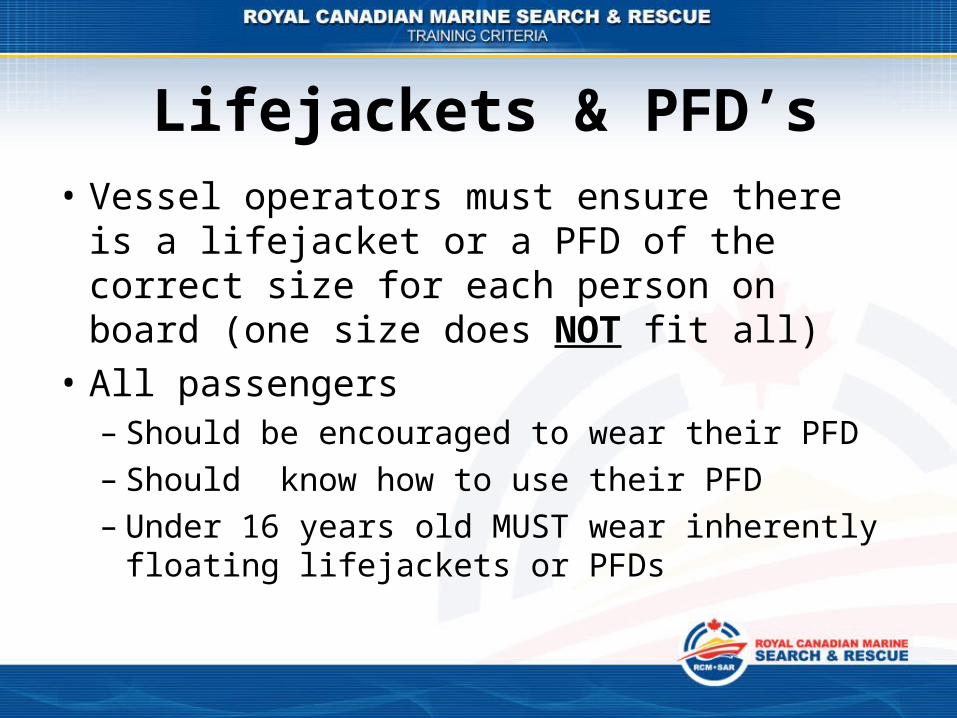
Lifejackets & PFD’s• Vessel operators must ensure there is a
lifejacket or a PFD of the correct size for each person on board (one size does NOT fit all)
• All passengers– Should be encouraged to wear their PFD– Should know how to use their PFD– Under 16 years old MUST wear inherently floating
lifejackets or PFDs

Lifejackets & PFD’s• All lifejackets and PFDs used on Canadian
pleasure craft must have the approval label sewn into the device
• US Coast Guard approved devices are not approved in Canada
• Devices may be approved by– Transport Canada (or Department of Transport)– Department of Fisheries and Oceans– Canadian Coast Guard

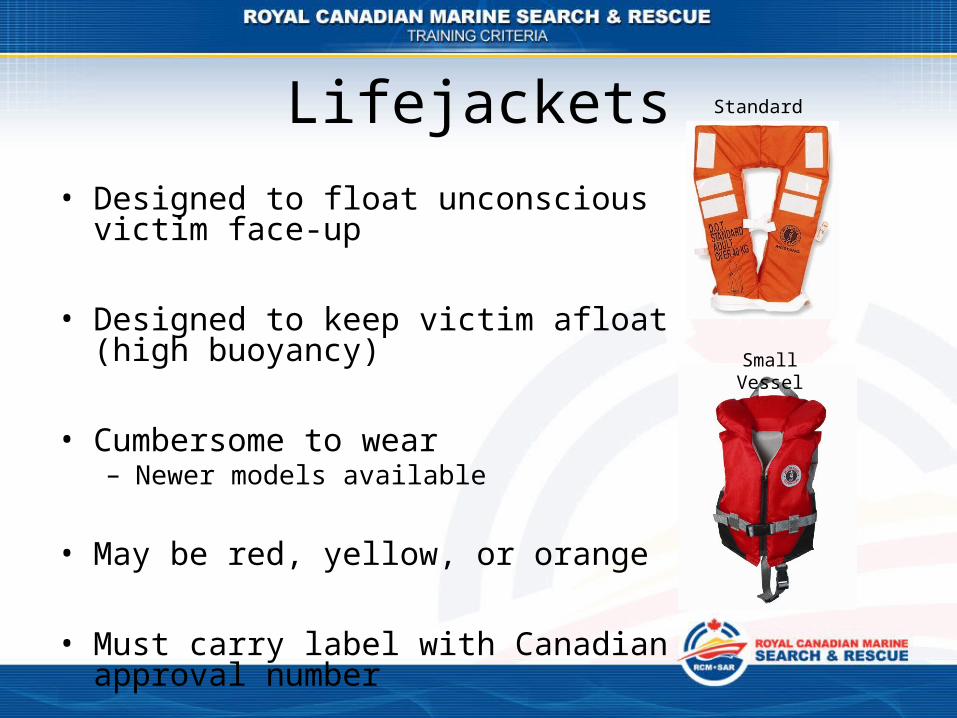
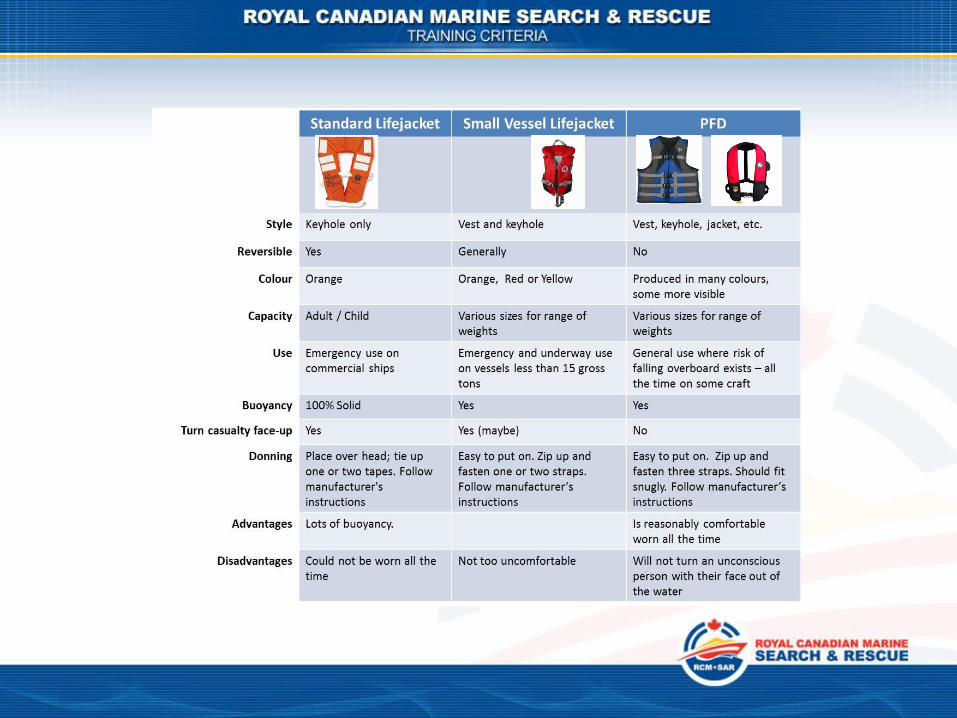
Lifejackets• Designed to float unconscious victim face-up
• Designed to keep victim afloat (high buoyancy)
• Cumbersome to wear– Newer models available
• May be red, yellow, or orange
• Must carry label with Canadian approval number
Standard
Small Vessel
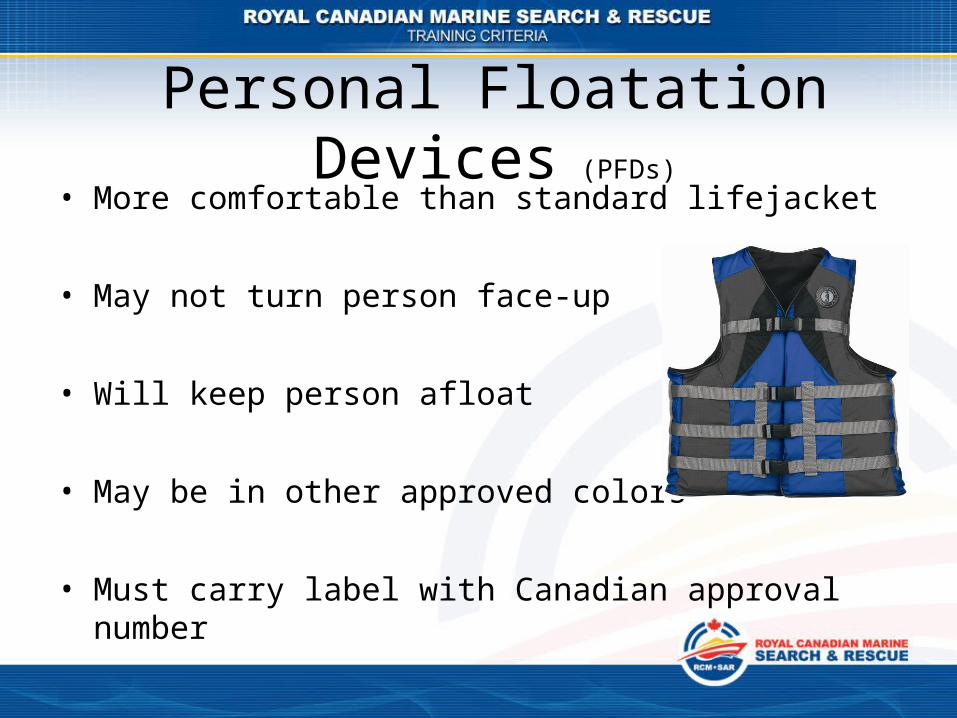
Personal Floatation Devices (PFDs)
• More comfortable than standard lifejacket
• May not turn person face-up
• Will keep person afloat
• May be in other approved colors
• Must carry label with Canadian approval number
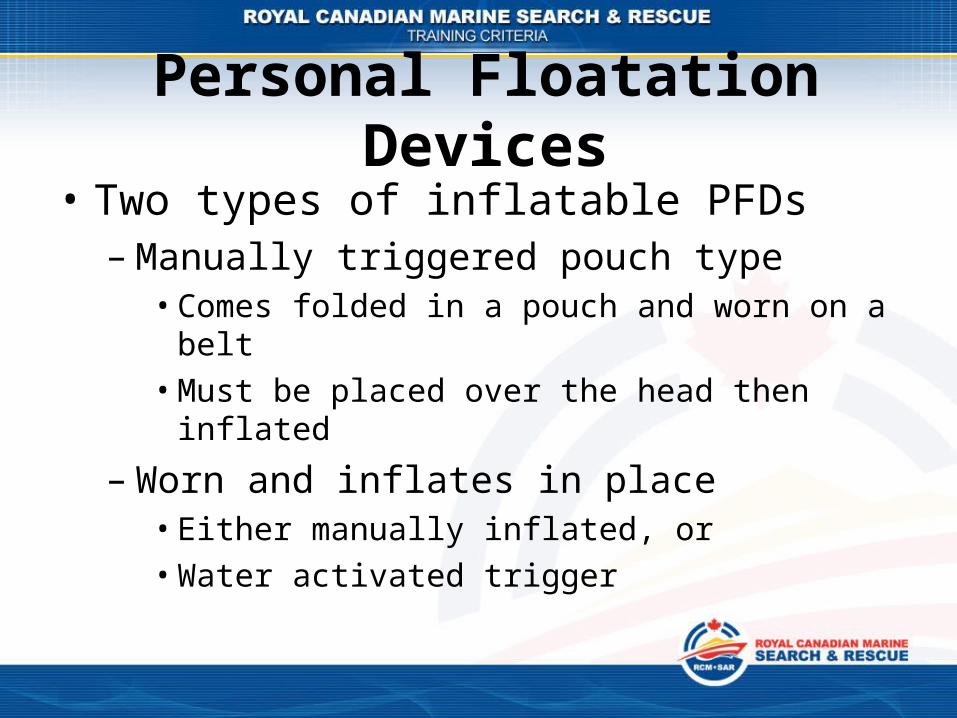
Personal Floatation Devices• Two types of inflatable PFDs
– Manually triggered pouch type• Comes folded in a pouch and worn on a belt• Must be placed over the head then inflated
– Worn and inflates in place• Either manually inflated, or• Water activated trigger
Person Overboard

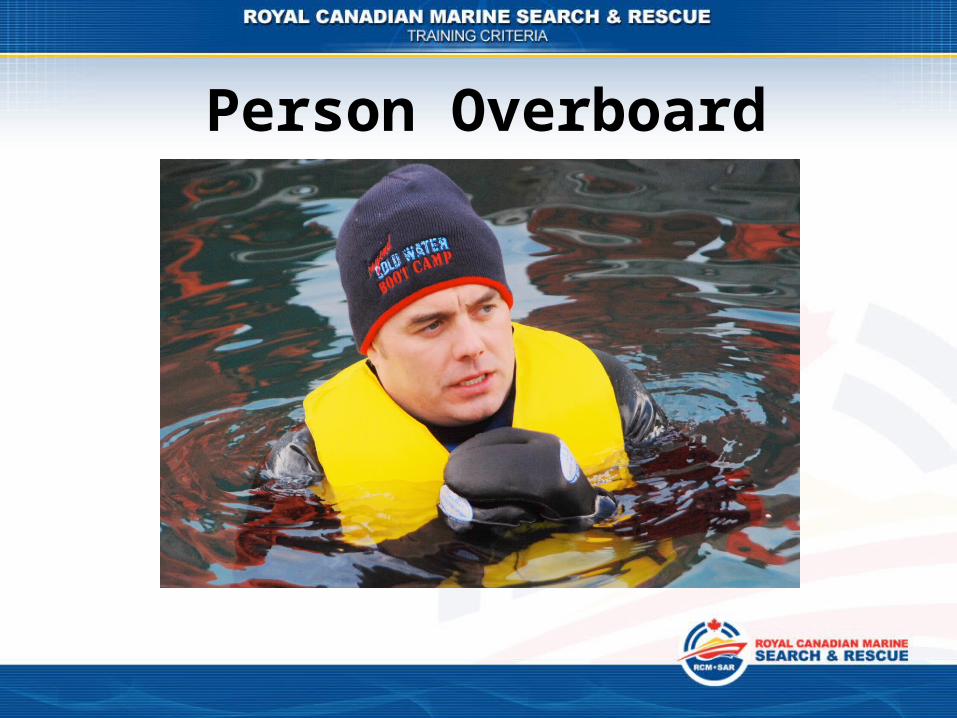
Person Overboard• If you end up in the water you have about 10
minutes of useful movement in Canada’s cold water
• If you have a PFD on your chances of survival are greatly increased
• Donning a PFD after entering the water is extremely difficult
Lifejackets & PFDs• Every device should have a whistle attached• They must be inspected regularly and tested
annually• They should be cleaned as necessary using
only mild detergents and air dried• They should not be used a seat cushions and if
not worn stowed in an immediately accessible location
Inflatable PFDs• Small Vessel Regulations restrict use:
– Must be worn by an adult (at least 16 years of age and weighing 36.3 kg or more), in the case of an open boat or on deck/cockpit in any other type of boat, or readily available to any other adult occupant while below deck.
– Are not approved for white water paddling or personal watercraft use.

Inflatable PFDs• Small Vessel Regulations restrict use:
– Must be fitted with an un-punctured, and fully functional inflation cartridge, or be worn fully inflated.
– Must be fitted with compatible inflation mechanism parts (refer to owner’s manual). The fitting of any other part could result in the device failing to inflate or inflating improperly.

Ch. 3 - Signalling Distress

Distress Signals
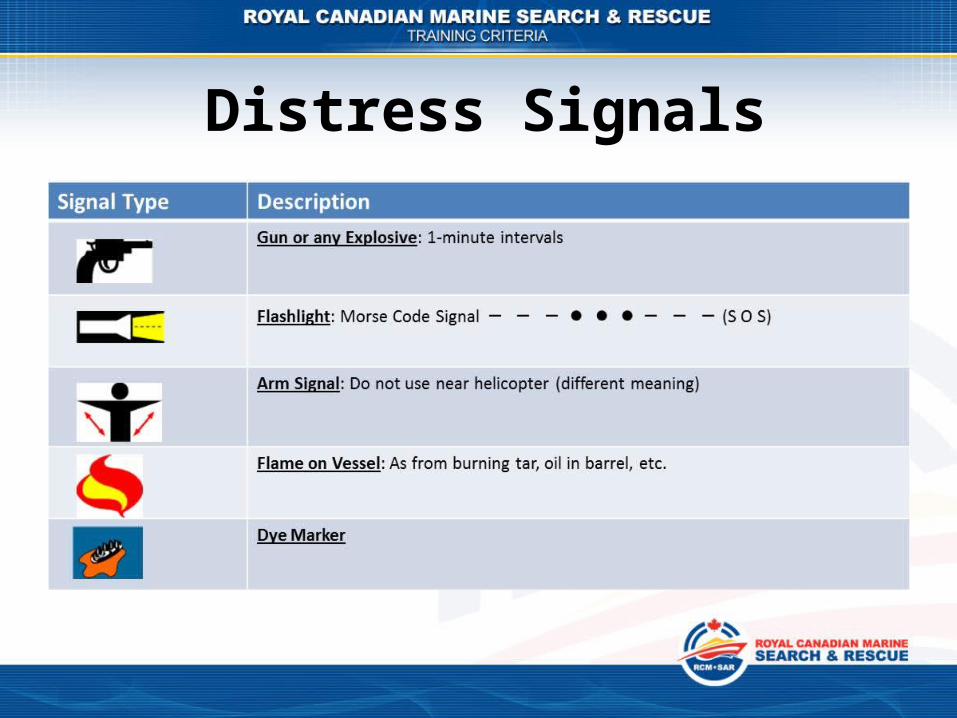
Distress Signals
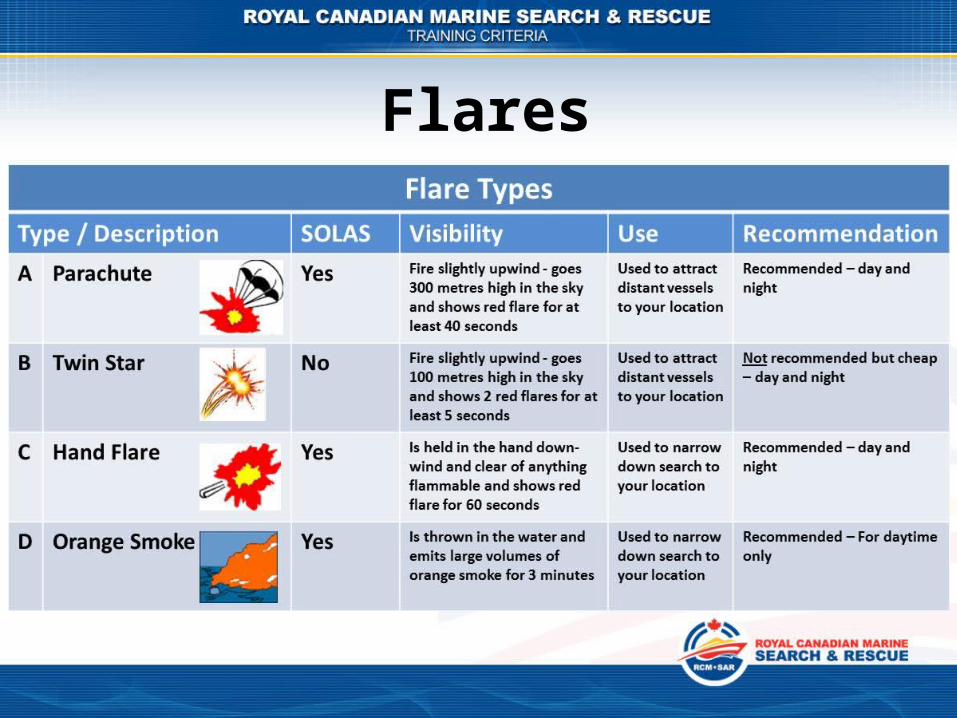
Flares

Flares• Minimum number of flares determined by
vessel size• All flares must be Transport Canada approved• Flares indicate the date of manufacture and
expires 4 years after that date• CCGA-P recommends the use of SOLAS flares
– Does not include Type B (twin star)
Ch. 4 - Licencing & Registration• Hull Identification Number (HIN)
– All new crafts built or imported to Canada must come marked with a HIN
– It provides a uniform method of identifying:• Any specific vessel• The construction standards that apply to that specific
vessel• Vessels subject to manufacturer’s defect recall• A lost or stolen vessel
Hull Identification Number• The HIN must be clearly visible when the
vessel is in the water– Typically on the upper starboard quarter on the
outside of the transom• The HIN must also be marked in a secondary
location on the hull– Beneath a fitting or an item of hardware; or– In an area that is on the interior of the vessel and
unexposed
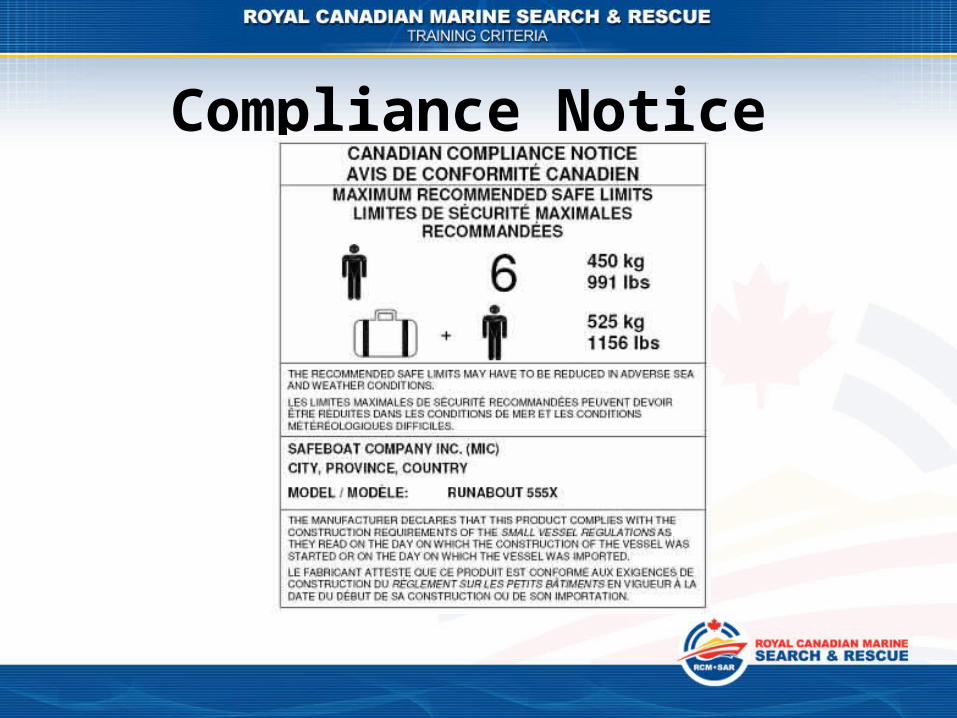
Compliance Notice • A Compliance Notice is defined as either:
– Capacity Label• pleasure craft not exceeding 6 m
– Conformity Label• pleasure craft greater than 6 m
– Single Vessel Label• home built boat• a boat manufactured or imported by a company no
longer able to supply a label
Compliance Notice
Capacity Label• For pleasure craft less than 6 m the Capacity
Label will include the following:– Name of manufacturer – Manufacturer's identification code, MIC – Model type or number, or both – Label number – Statement of compliance – Maximum recommended ratings for load, number
of occupants and power.
Capacity Label• On every outboard powered-driven vessel of
Capacity Label, the following ratings are specified:– Recommended maximum load capacity for that
vessel; – Recommended number of adult persons to be
carried on the vessel; – Recommended maximum safe limit of engine
power.
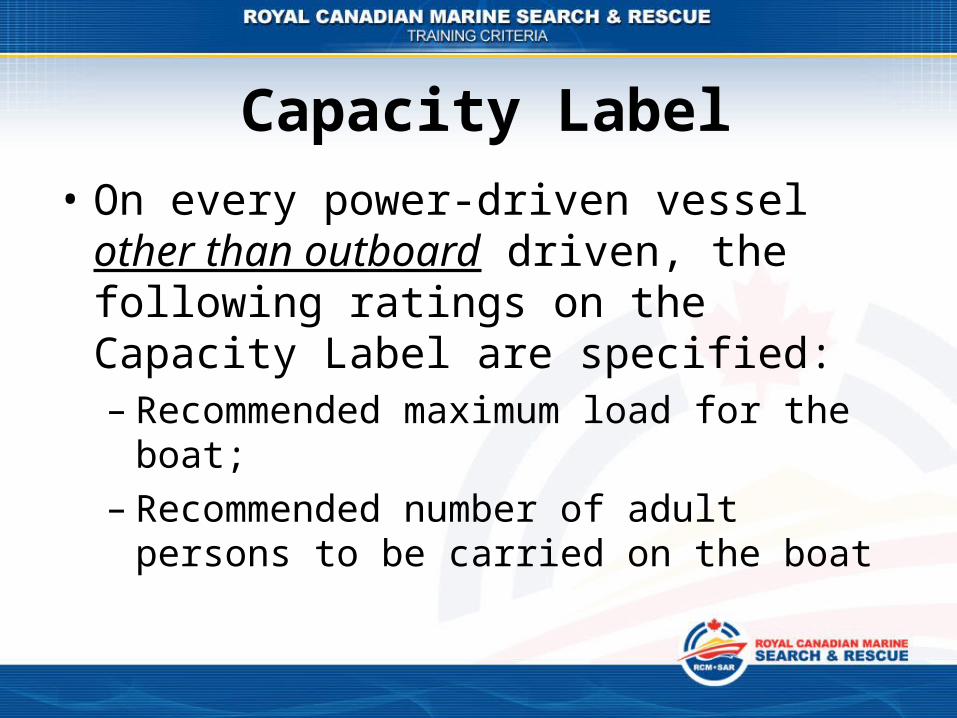
Capacity Label• On every power-driven vessel other than
outboard driven, the following ratings on the Capacity Label are specified:– Recommended maximum load for the boat; – Recommended number of adult persons to be
carried on the boat
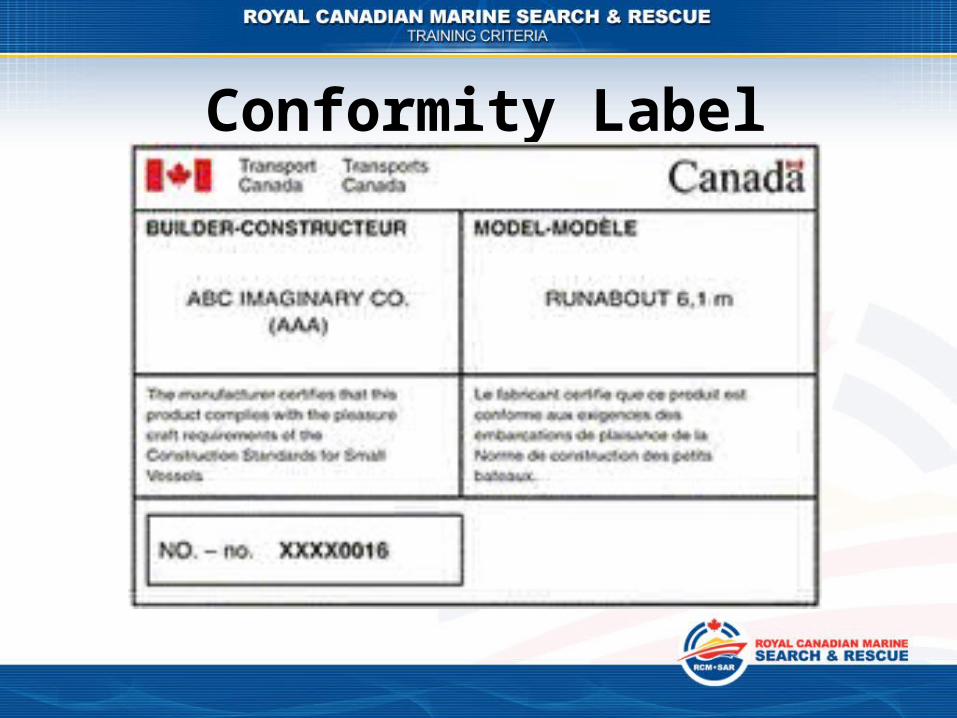
Conformity Label
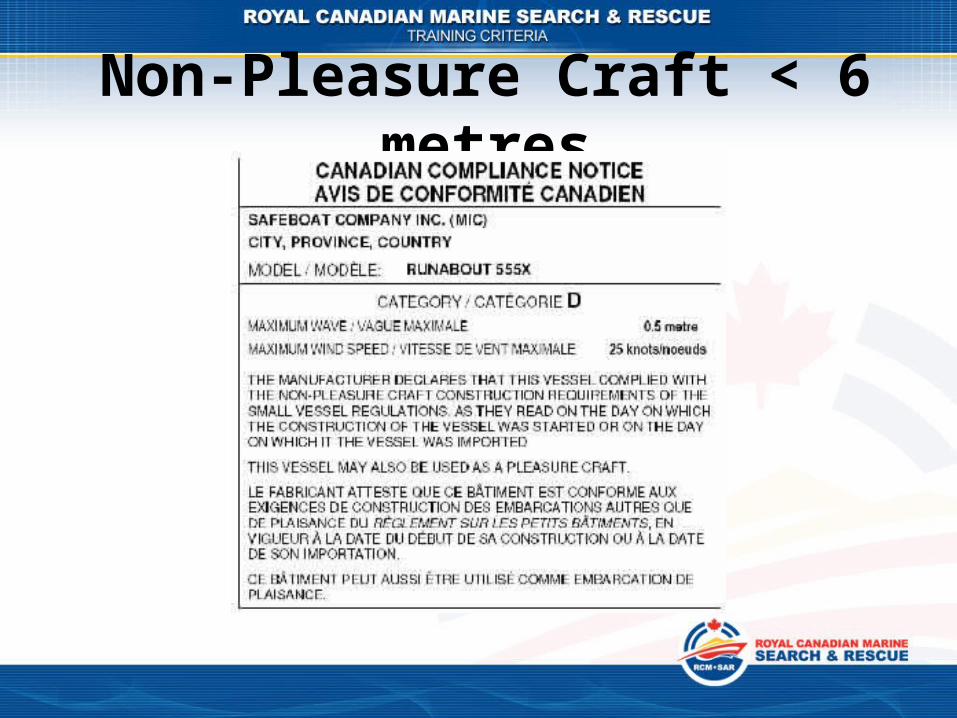
Non-Pleasure Craft < 6 metres
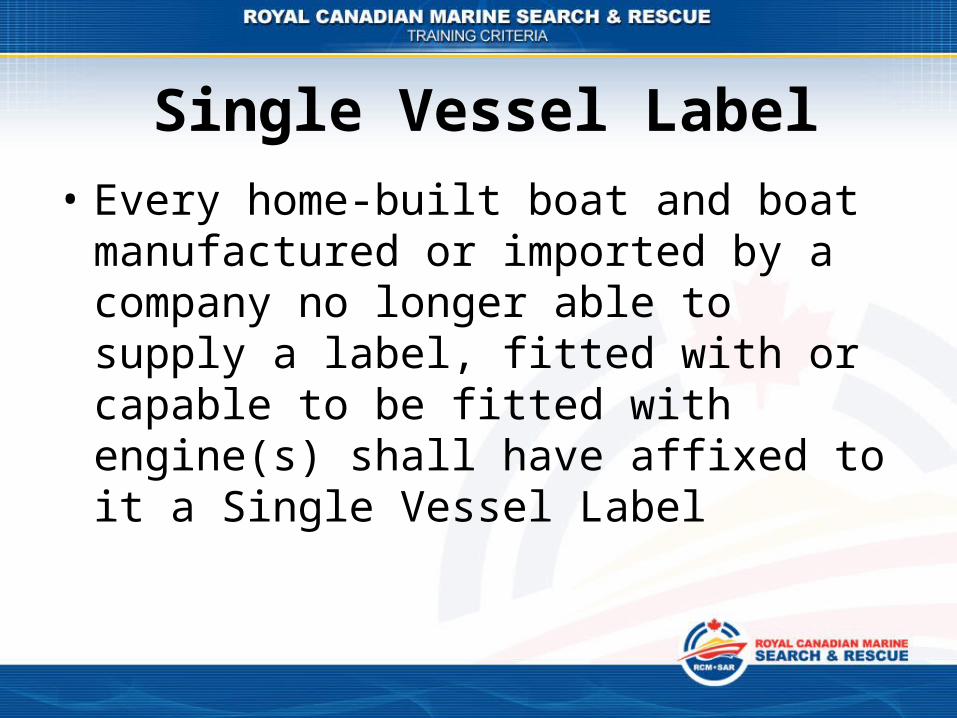
Single Vessel Label• Every home-built boat and boat manufactured
or imported by a company no longer able to supply a label, fitted with or capable to be fitted with engine(s) shall have affixed to it a Single Vessel Label
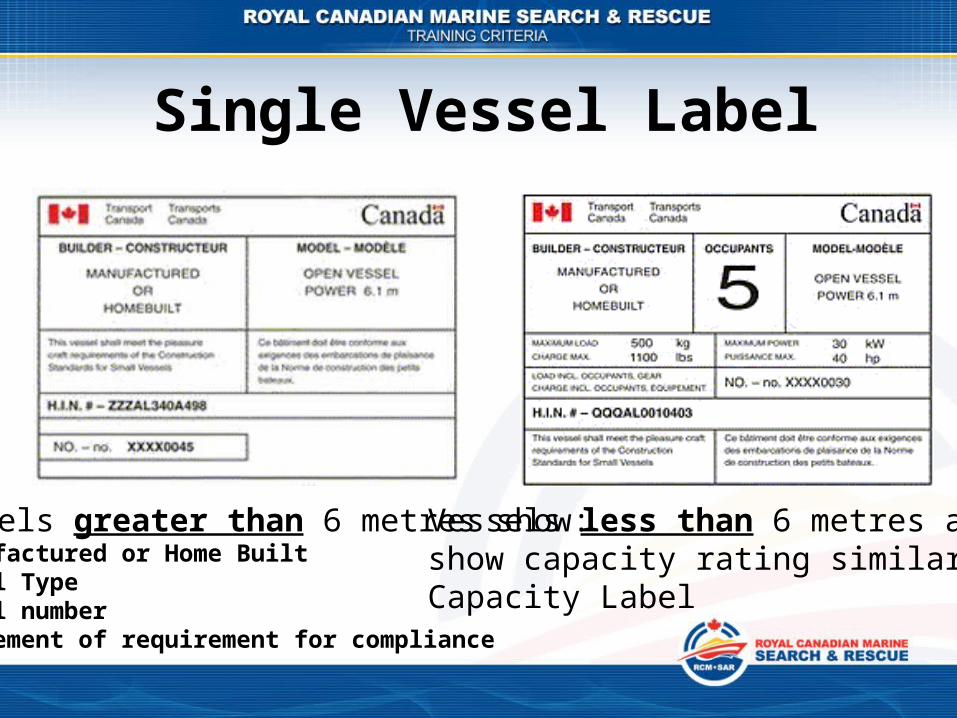
Single Vessel Label
Vessels less than 6 metres alsoshow capacity rating similar theCapacity Label
Vessels greater than 6 metres show:•Manufactured or Home Built•Model Type•Label number•Statement of requirement for compliance
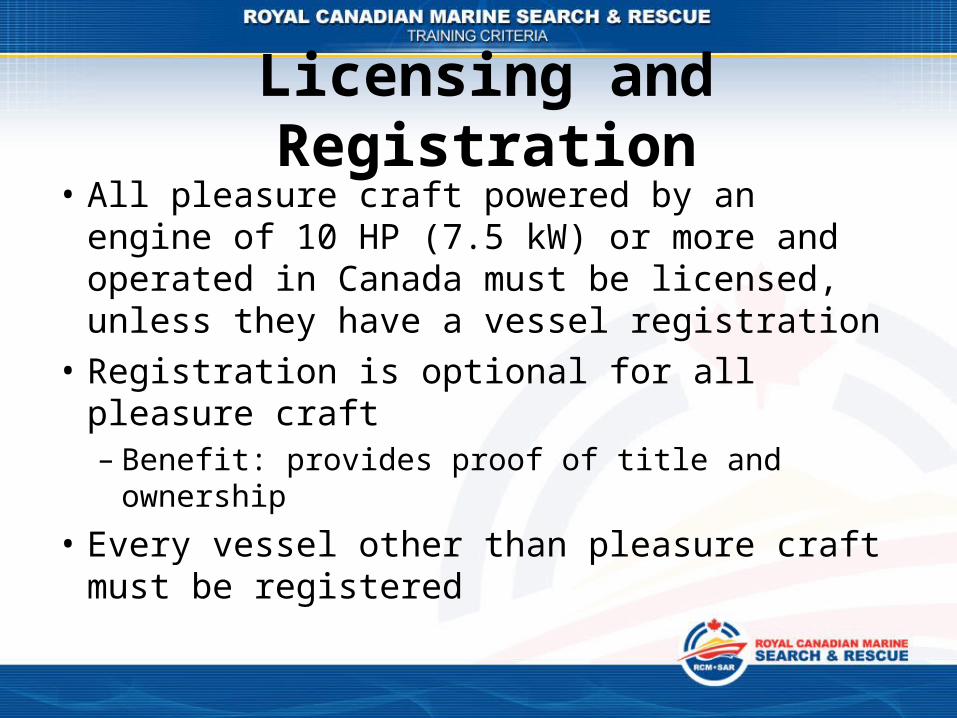
Licensing and Registration• All pleasure craft powered by an engine of 10
HP (7.5 kW) or more and operated in Canada must be licensed, unless they have a vessel registration
• Registration is optional for all pleasure craft– Benefit: provides proof of title and ownership
• Every vessel other than pleasure craft must be registered
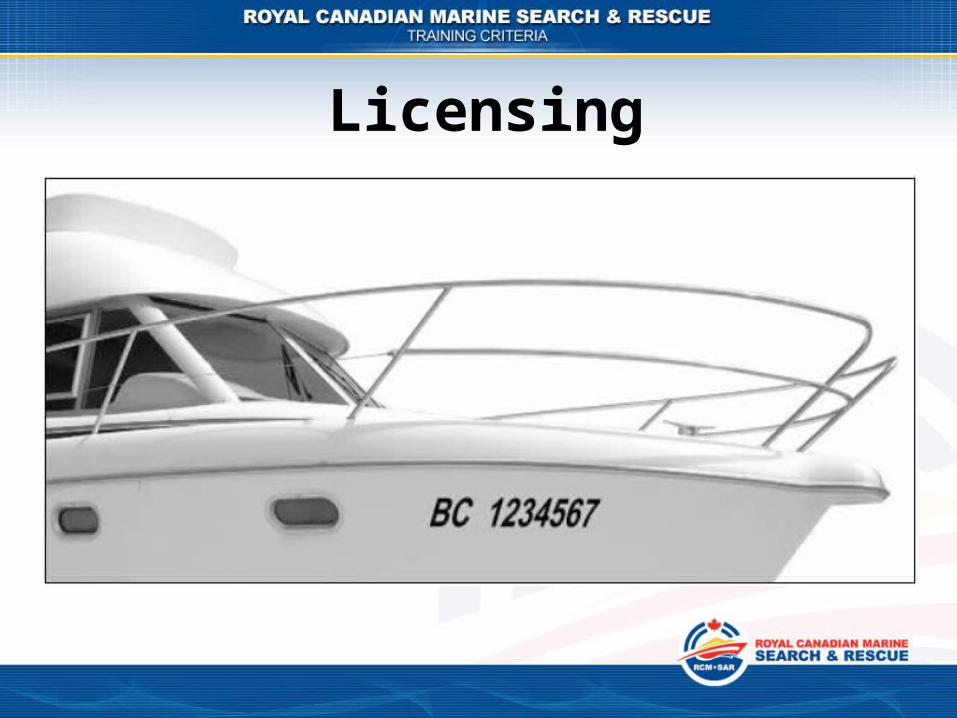
Licensing

Licensing• The license is valid for 10 years• The license must be carried on board• It must be updated to reflect changes in:
– owner name– owner address– particulars of the pleasure craft– ownership
Registration• Optional for pleasure craft• Mandatory for other than pleasure craft• Provides proof of title and ownership• A Certificate of Registry is good for 3 years• Fees vary

Registration• Vessels greater than 15 gross tons will have to
be measured by an approved measurer• The Name and the Port of Registry must be
clearly marked on the outside of the vessel– Minimum height of 10.4 cm– In a contrasting colour to the background

Registration• The registration number and net tonnage are
to be permanently etched, either on the main beam or, in the case of a fiberglass boat, on the forward bulkhead, inside and in a readily visible location, in such a manner that any alteration would be readily apparent
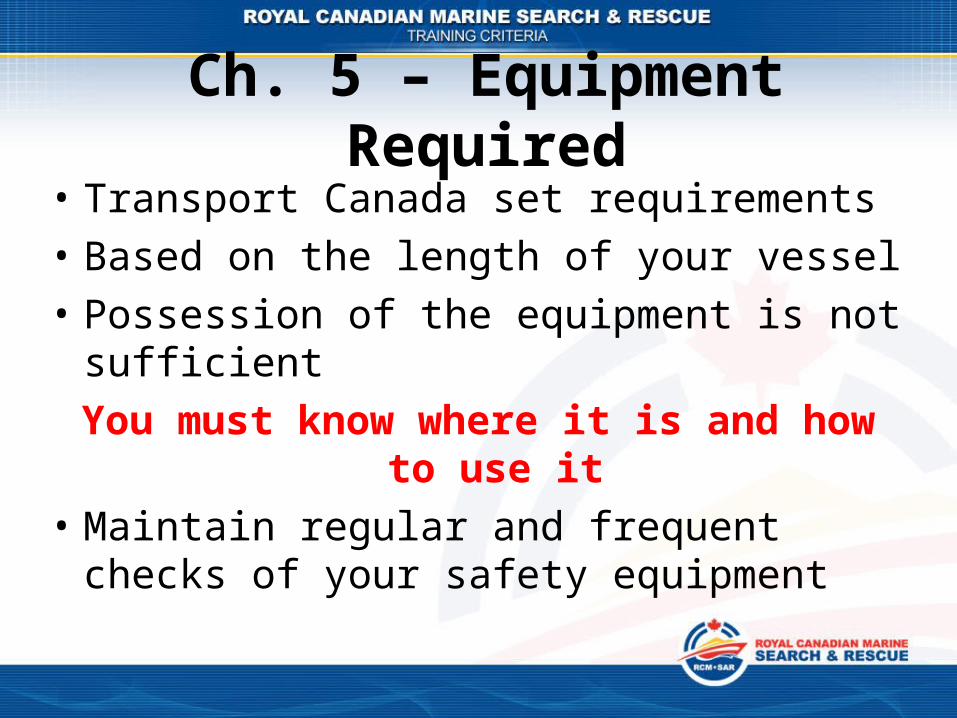
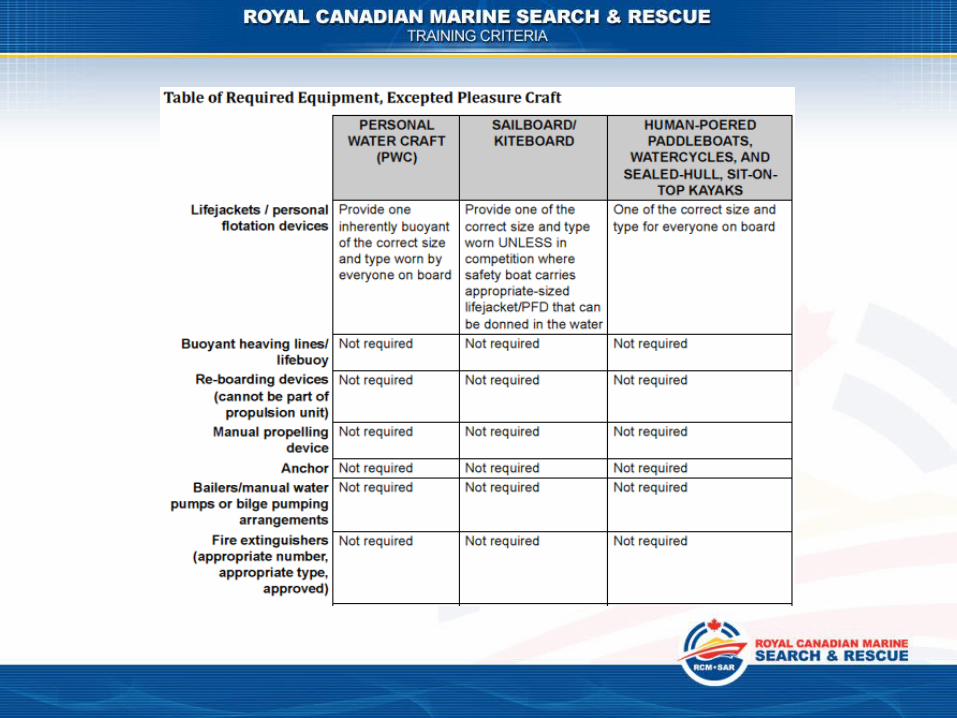
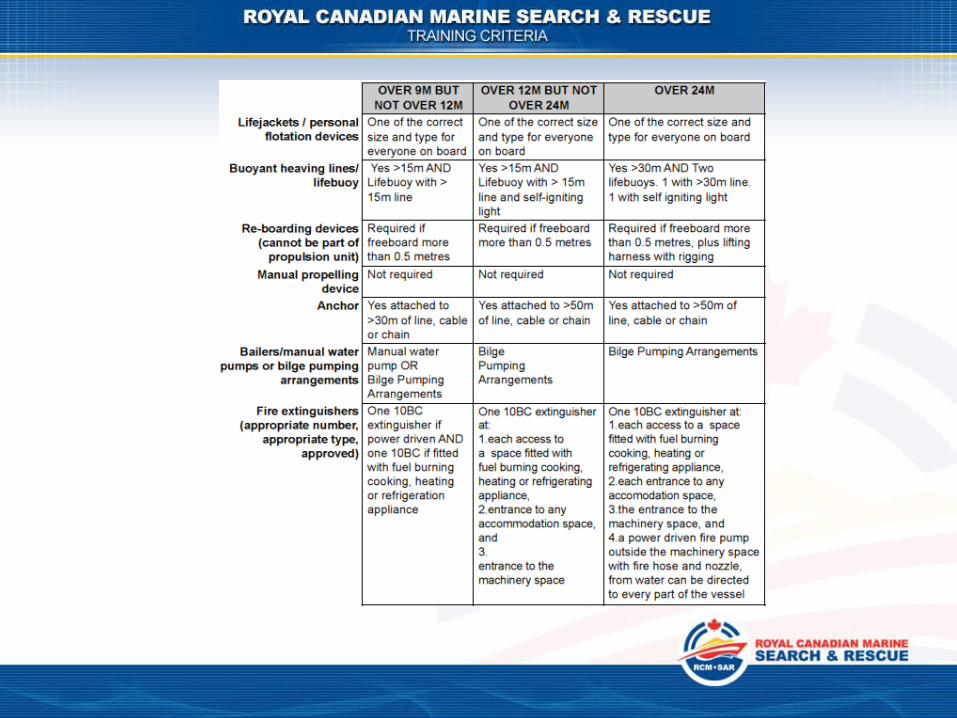
Ch. 5 – Equipment Required• Transport Canada set requirements• Based on the length of your vessel• Possession of the equipment is not sufficient
You must know where it is and how to use it• Maintain regular and frequent checks of your
safety equipment

Pre-Departure Check• Check to ensure that your equipment is:
– In place– Readily accessible and ready for immediate use– Properly maintained and in good working order
• Although some equipment is not mandatory, ensure your optional equipment is governed by the same procedure (e.g. first aid kit, tool kit, spare parts, fenders, lines, etc.)
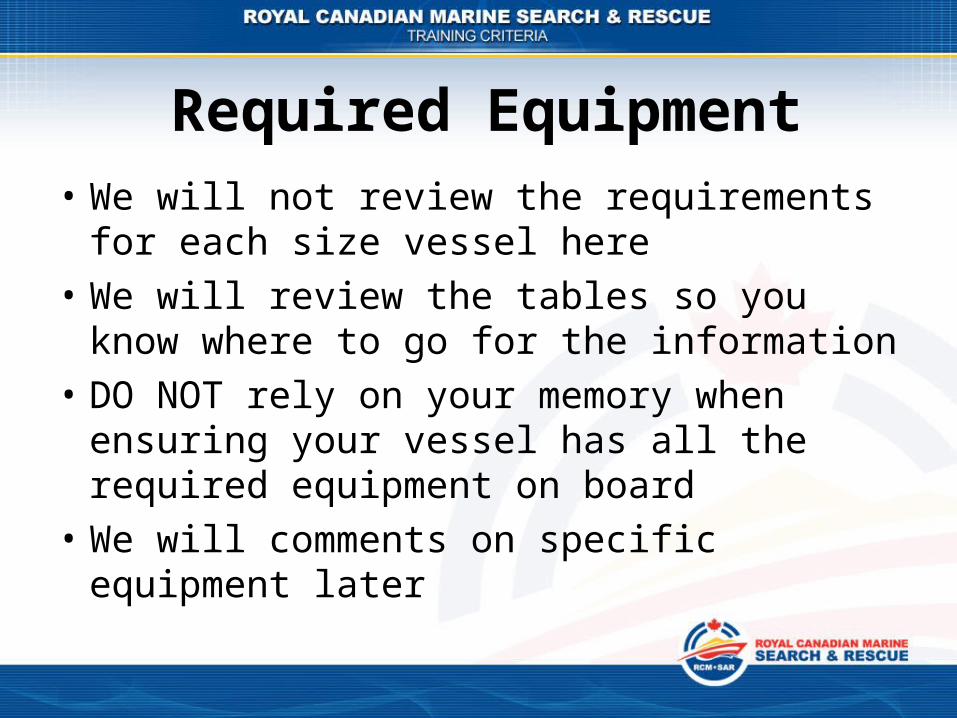
Required Equipment• We will not review the requirements for each
size vessel here• We will review the tables so you know where
to go for the information• DO NOT rely on your memory when ensuring
your vessel has all the required equipment on board
• We will comments on specific equipment later

Required Equipment• Magnetic Compass
– Shows the direction of Magnetic North– To correct reading to True North the variation
needs to be added or subtracted based on information on the Compass Rose
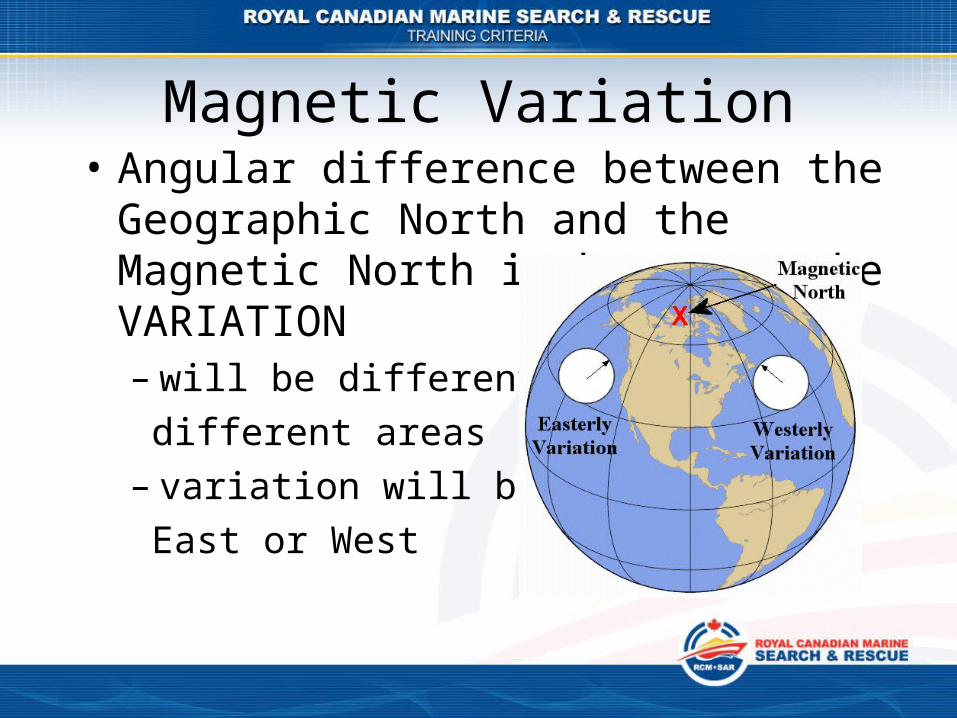
Magnetic Variation• Angular difference between the Geographic
North and the Magnetic North is known as the VARIATION– will be different for different areas– variation will be either East or West
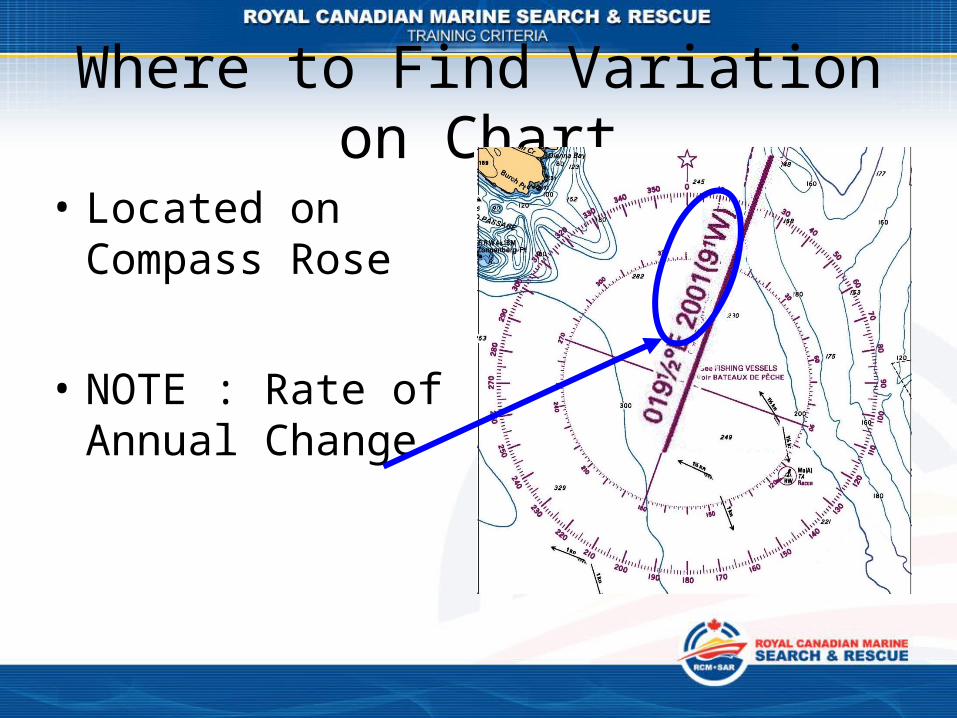
Where to Find Variation on Chart
• Located on Compass Rose
• NOTE : Rate of Annual Change

Required Equipment• Magnetic Compass
– Boats may have their own magnetic field• Causes: on board electronics, electric cables, ferrous
metals
– Compass should be positioned as far from these sources of influence as possible
– The error caused by these influences is call “Deviation”
Charts• It is required that you have on board the
largest scale charts available for the area in which you are boating– Unless you are boating in your own area and you
have intimate knowledge of those waters
• Remember, if you fall overboard the passengers on board will need to know or how determine your position
Charts• While operating on lakes where no marine
charts are available you should have a topographical map to assist you in determining your position
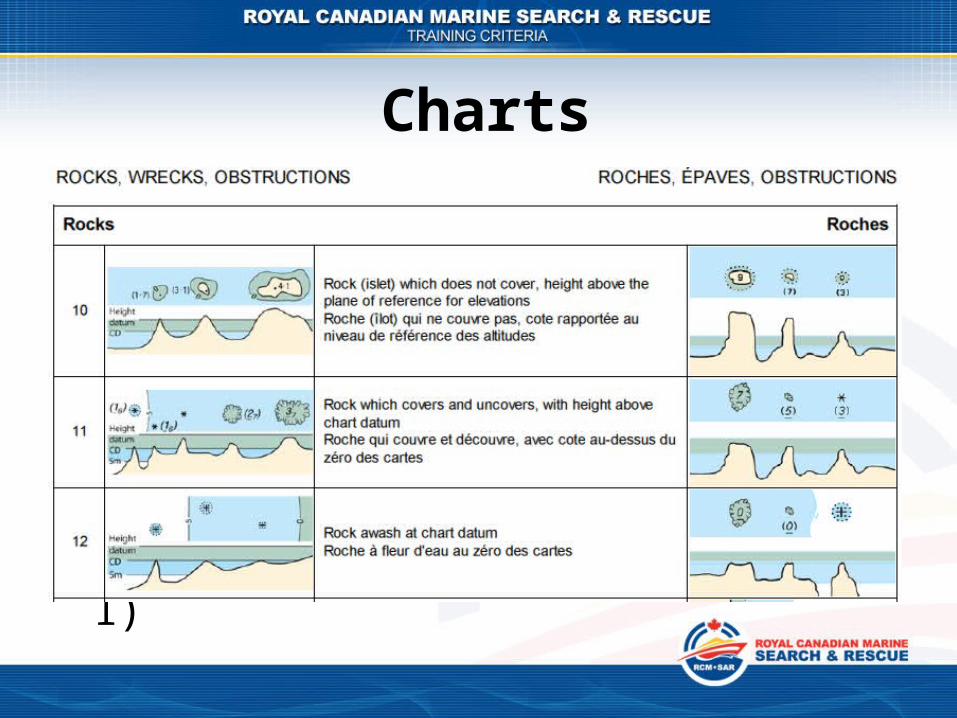
• You should be familiar with the symbols you will find on your charts or maps (refer to Chart 1)
Charts• Make sure you know how to:
– Plot a course– Find your position from the chart– Use a compass with the chart, and electronic
equipment– Use nautical publications such as tide tables– Read the buoyage system
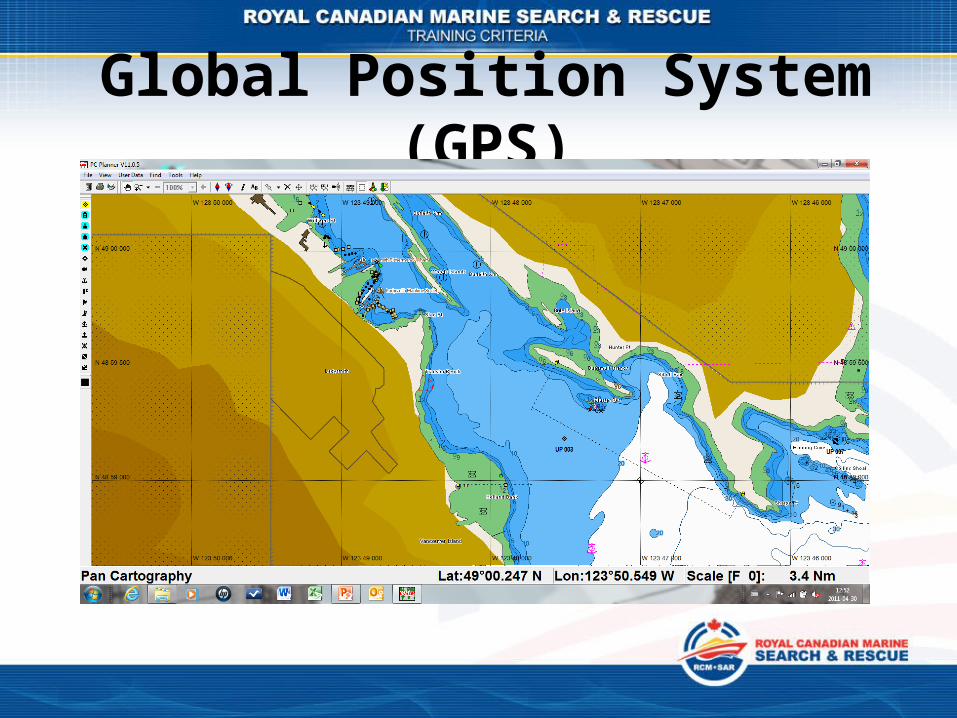
Global Position System (GPS)
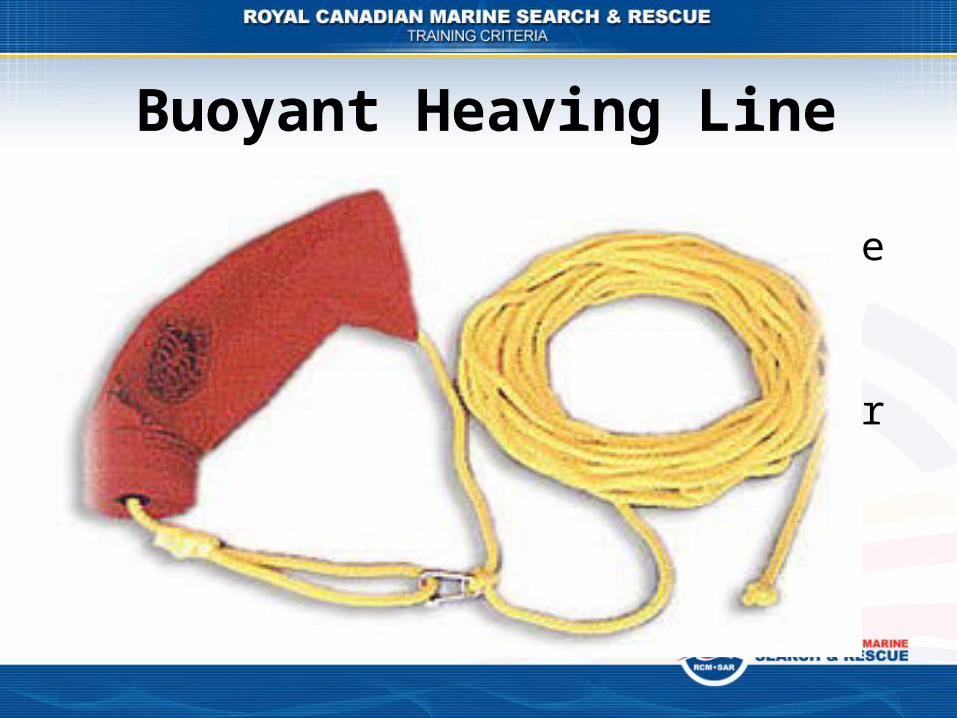
Buoyant Heaving Line• A buoyant heaving line is designed to get a
line to someone who is in the water• The line must float• It must be the correct length for the size of
boat• The line is a dedicated piece of safety
equipment and should not be used for other purposes
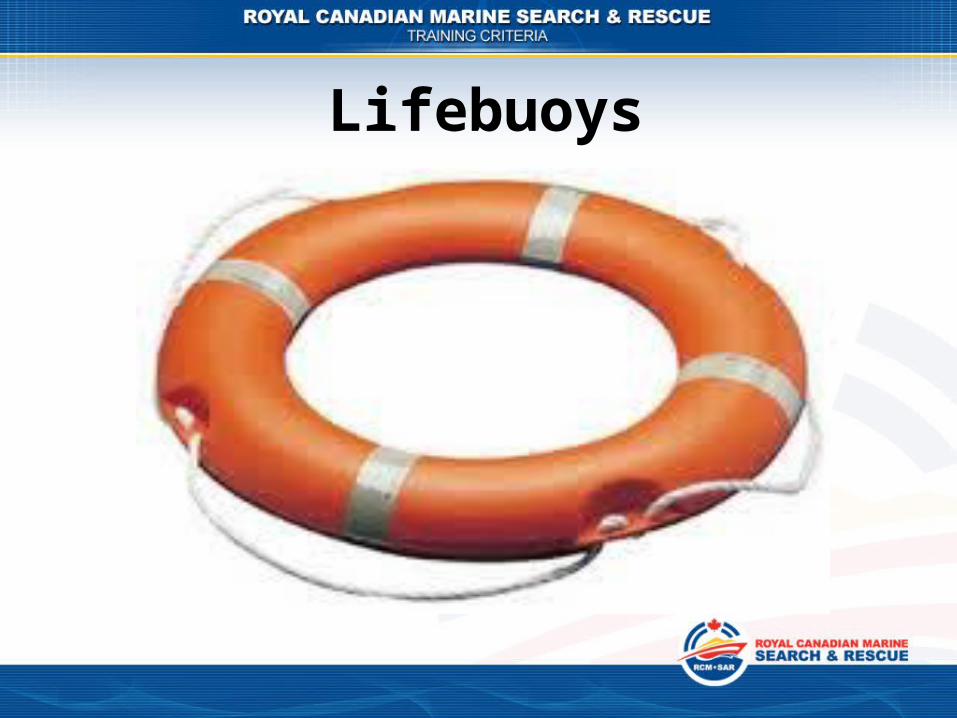
Lifebuoys
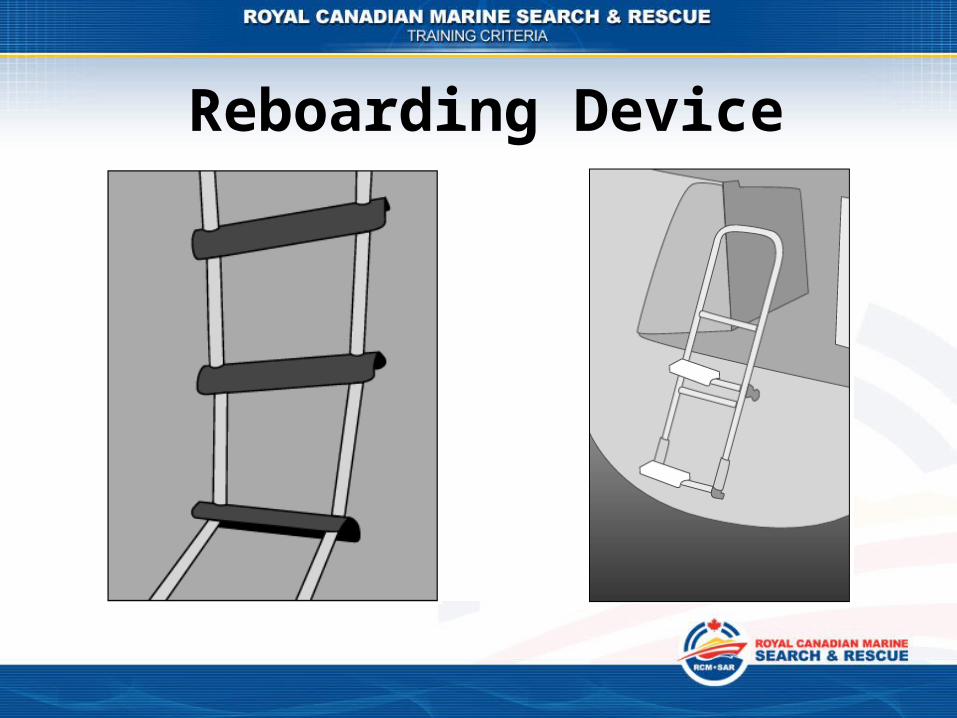
Reboarding Device
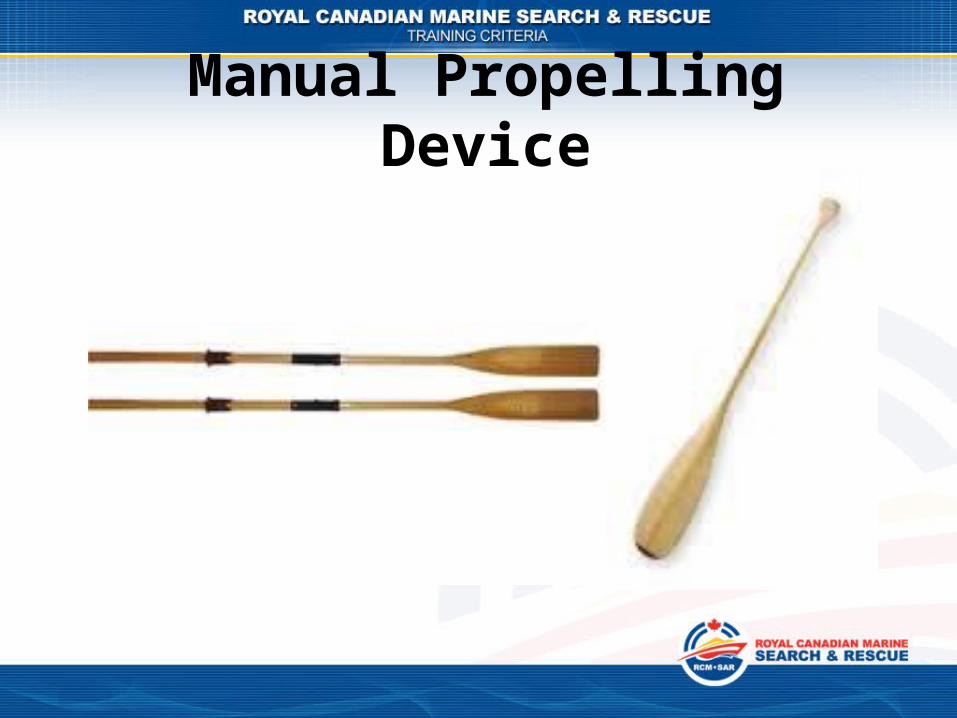
Manual Propelling Device
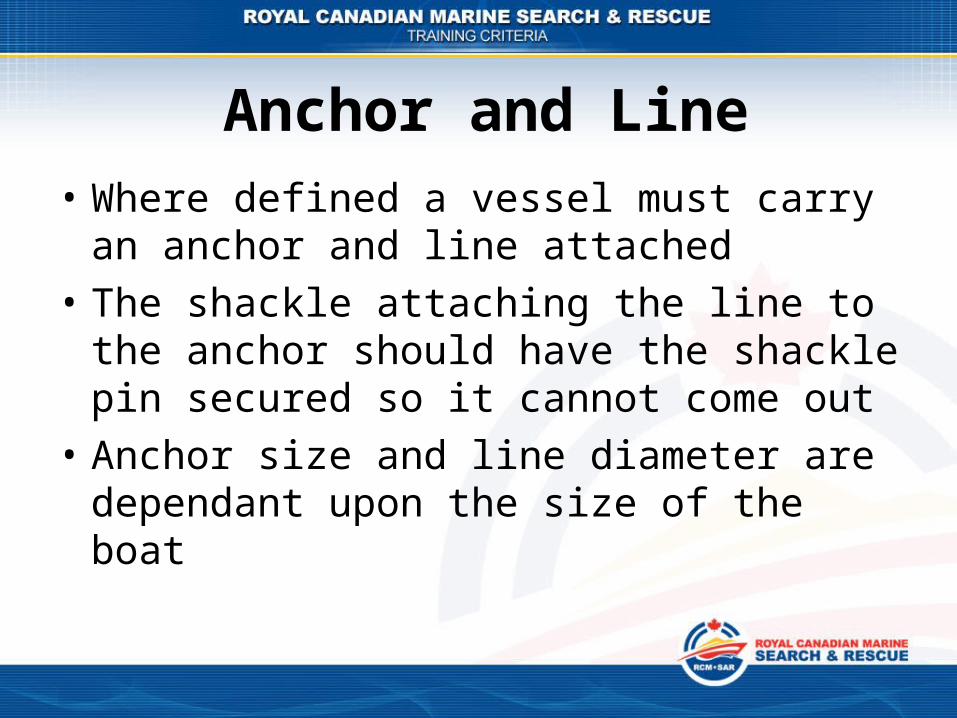
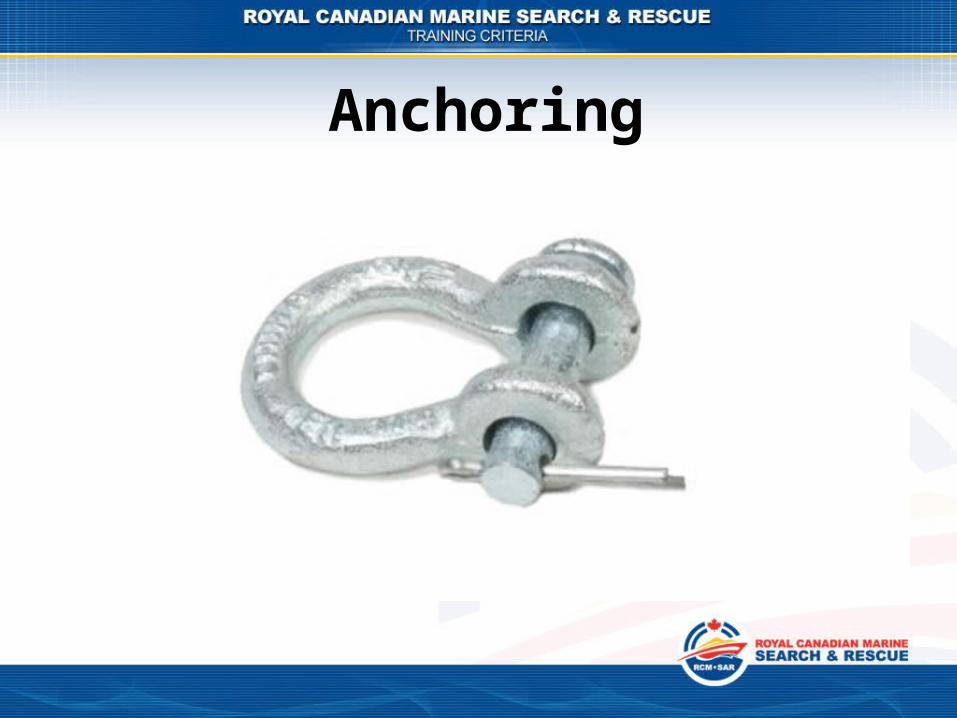
Anchor and Line• Where defined a vessel must carry an anchor
and line attached• The shackle attaching the line to the anchor
should have the shackle pin secured so it cannot come out
• Anchor size and line diameter are dependant upon the size of the boat
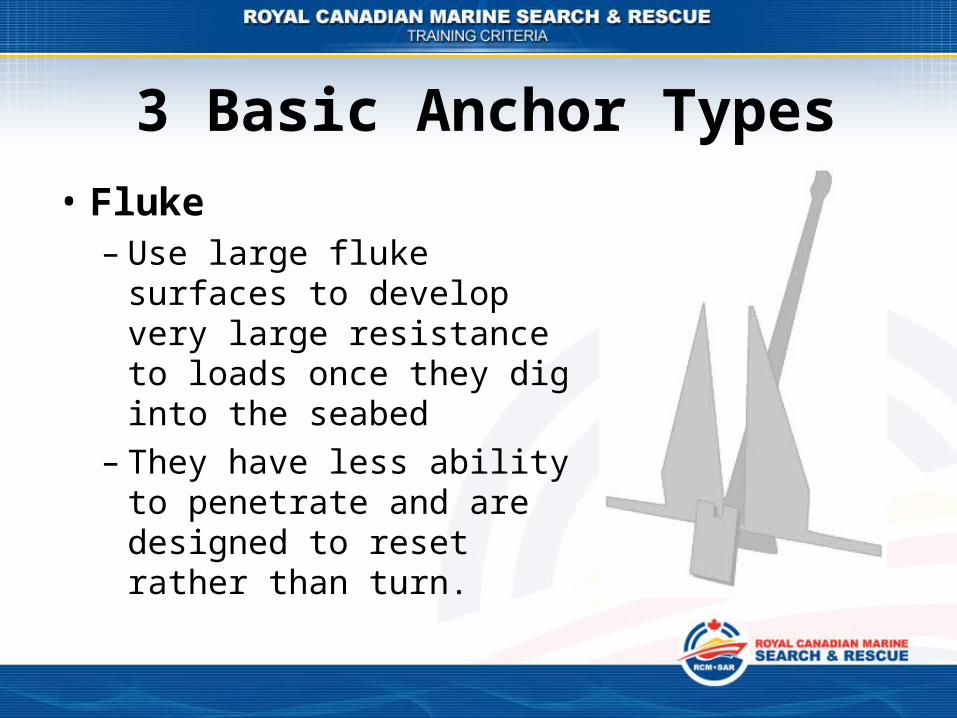
3 Basic Anchor Types• Fluke
– Use large fluke surfaces to develop very large resistance to loads once they dig into the seabed
– They have less ability to penetrate and are designed to reset rather than turn.
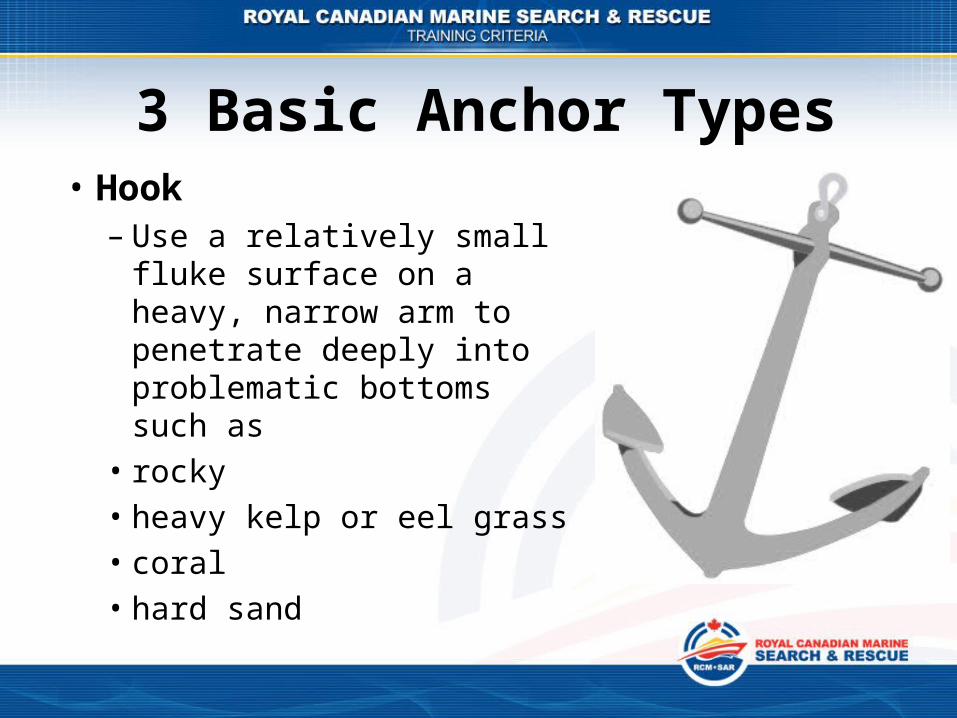
3 Basic Anchor Types• Hook
– Use a relatively small fluke surface on a heavy, narrow arm to penetrate deeply into problematic bottoms such as
• rocky• heavy kelp or eel grass• coral• hard sand
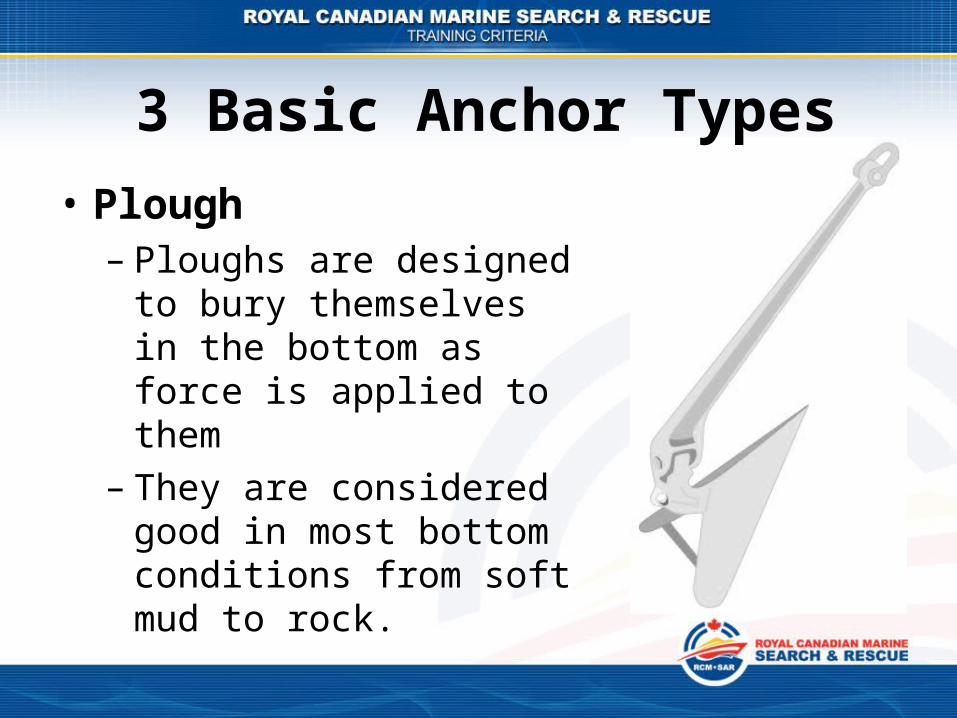
3 Basic Anchor Types• Plough
– Ploughs are designed to bury themselves in the bottom as force is applied to them
– They are considered good in most bottom conditions from soft mud to rock.

Bailers
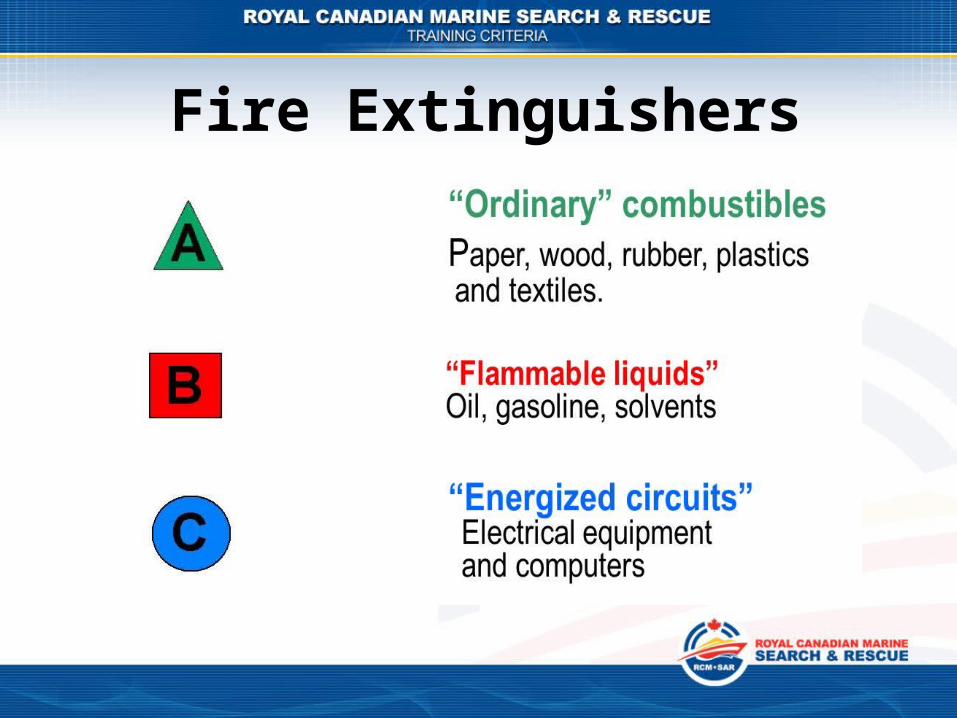
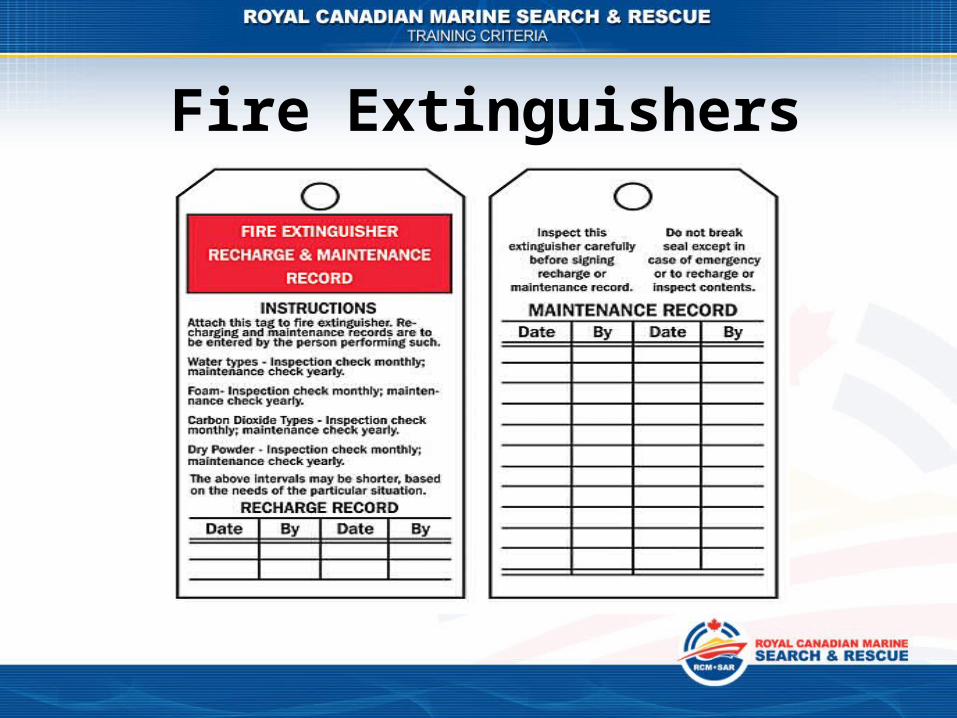
Fire Extinguishers
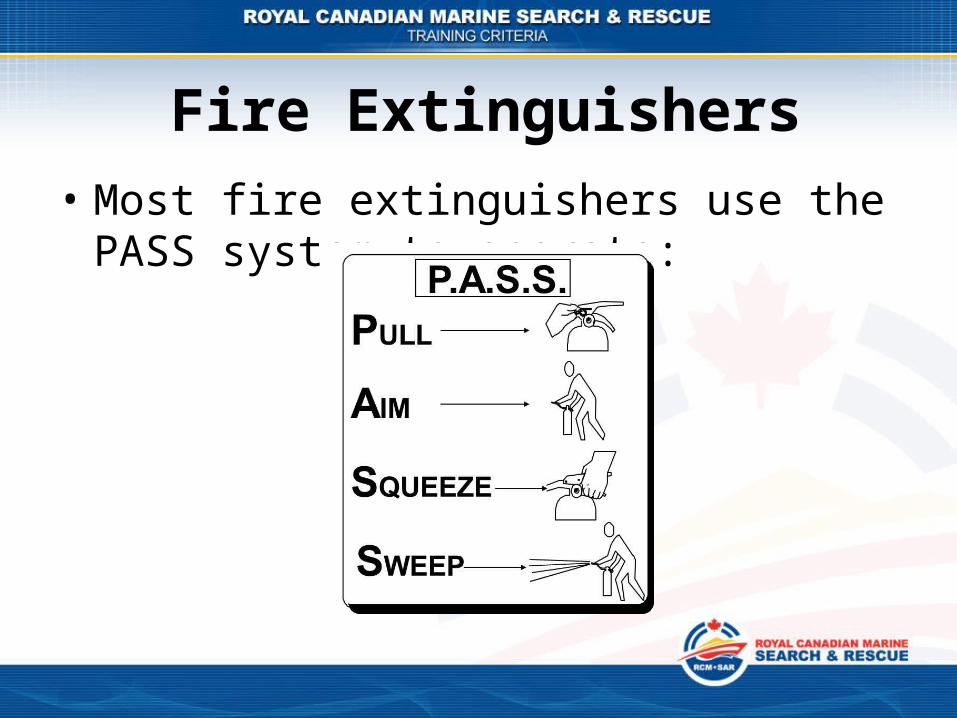
Fire Extinguishers• Most fire extinguishers use the PASS system
to operate:
Fire Extinguishers
Axe

Bucket

Flashlight
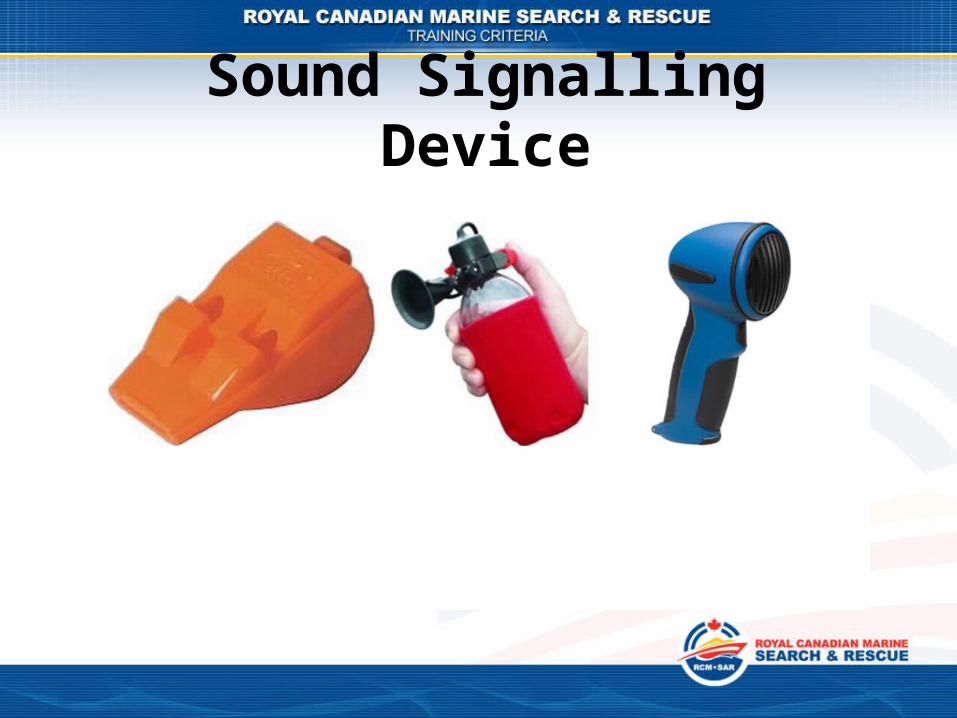
Sound Signalling Device

Sound Signalling Appliance• Sound signalling appliances are
– Whistles (not the same as the pealess whistle)– Gongs• Gongs are required to produce a tone and sound that are
separate and distinct from the bell
• Vessels over 12 m are required to have a sound signalling appliance
• Vessels over 20 m must also carry a bell
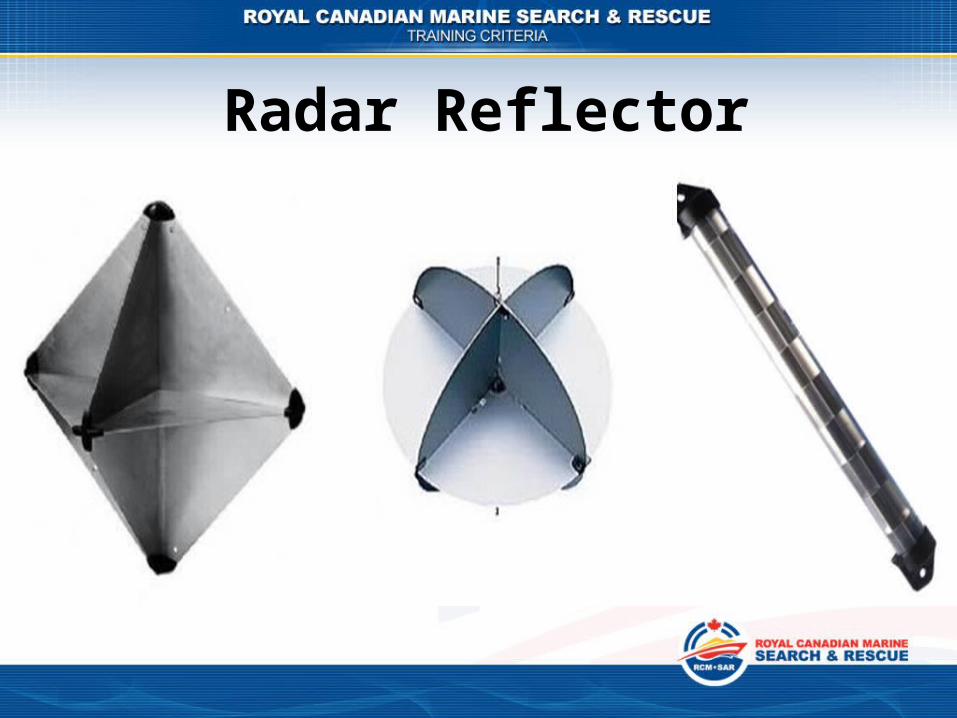
Radar Reflector• Make you more visible to other vessel’s radar• If your vessel is less than 20 m and not
constructed of steel or aluminum a radar reflector is recommended
• Radar reflectors should be as large as practicable for your vessel
• Should be mounted as high as possible– Preferably 4 m above water
VHF Radio• Fixed and portable radios are available
– Fixed can normally transmit at a higher wattage• An operator must have an ROC(M) to legally
operate the radio– Various radio procedures and operating
techniques are learned• Channel 16 is the International Distress and
calling channel– Leave your radio set to this standby channel
VHF Radio• *16 on your cell phone may be used to
contact Coast Guard Radio but cell coverage is spotty at best
• If you find yourself in a distress situation use VHF Channel 16 to broadcast a distress message

VHF Radio• Many newer radios have a feature built in
referred to as DSC– Digital Selective Calling– MMSI is required for functionality to operate
• Feature provides for automatic distress alerts at the push of a button– Includes your position if connected to a GPS
• Also provide the ability of selective calling to a specific vessel
Ch. 6 – Canadian Aids to Navigation
• There are no roads or street signs on the water• As a vessel operator you must become familiar
with the rules and signs on the water• This chapter is devoted to learning how to read
the various types of buoys on the water– Lateral buoys– Cardinal buoys– Special purpose buoys
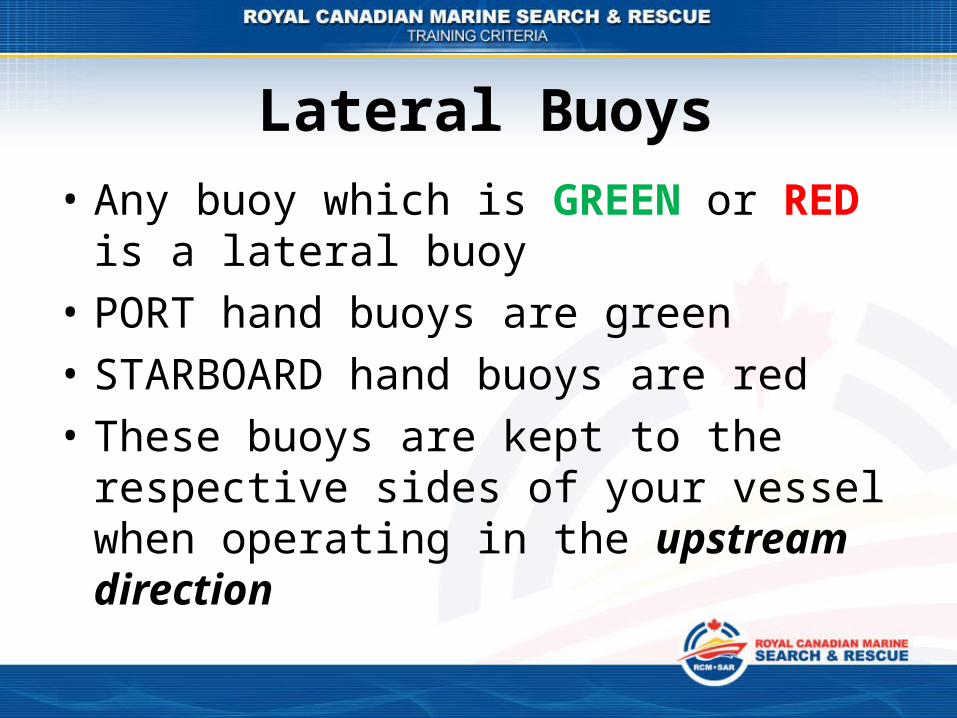
Lateral Buoys• Any buoy which is GREEN or RED is a lateral
buoy• PORT hand buoys are green• STARBOARD hand buoys are red• These buoys are kept to the respective sides of
your vessel when operating in the upstream direction
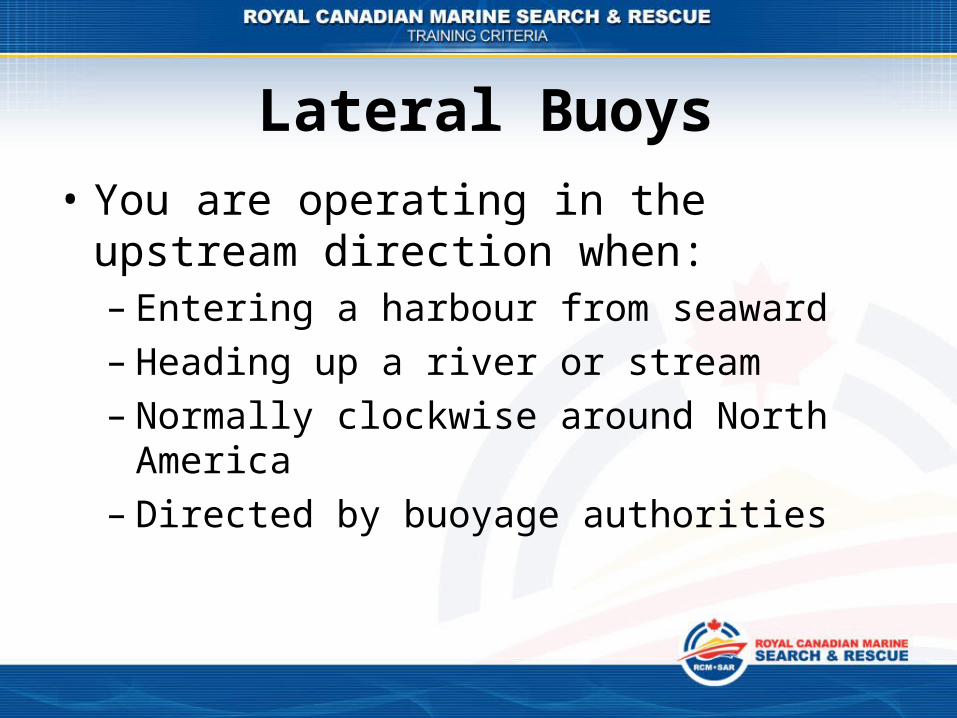
Lateral Buoys• You are operating in the upstream direction
when:– Entering a harbour from seaward– Heading up a river or stream– Normally clockwise around North America– Directed by buoyage authorities
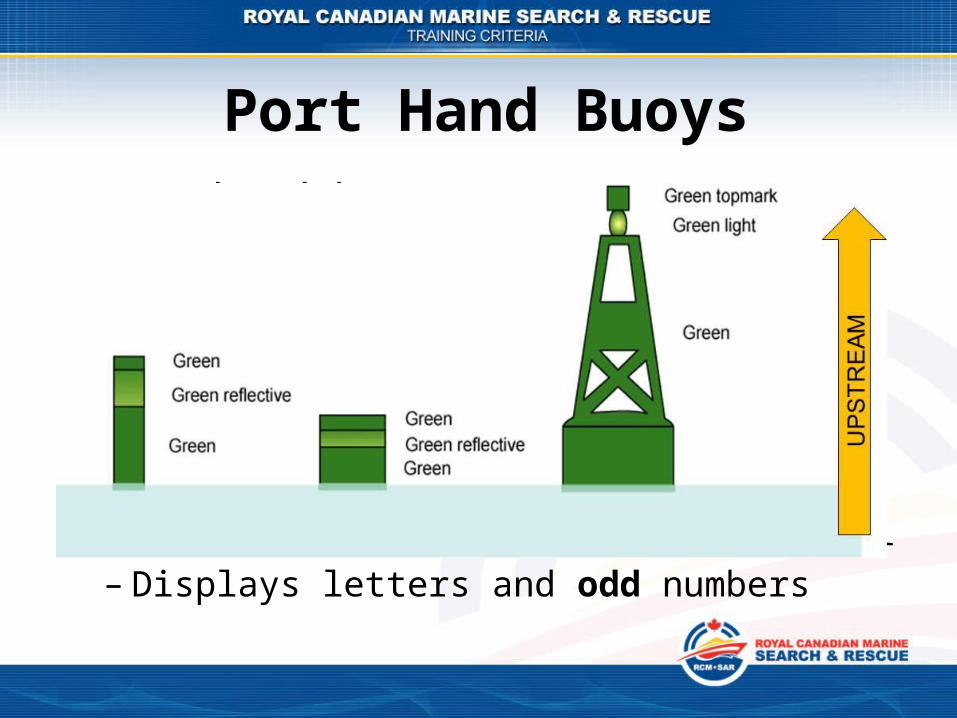
Port Hand Buoys• Port hand buoys:
– Are kept to the port side operating upstream– Are flat topped or carry a flat top mark– Have a green flashing light if so equipped– Have green retro reflective material– Displays letters and odd numbers
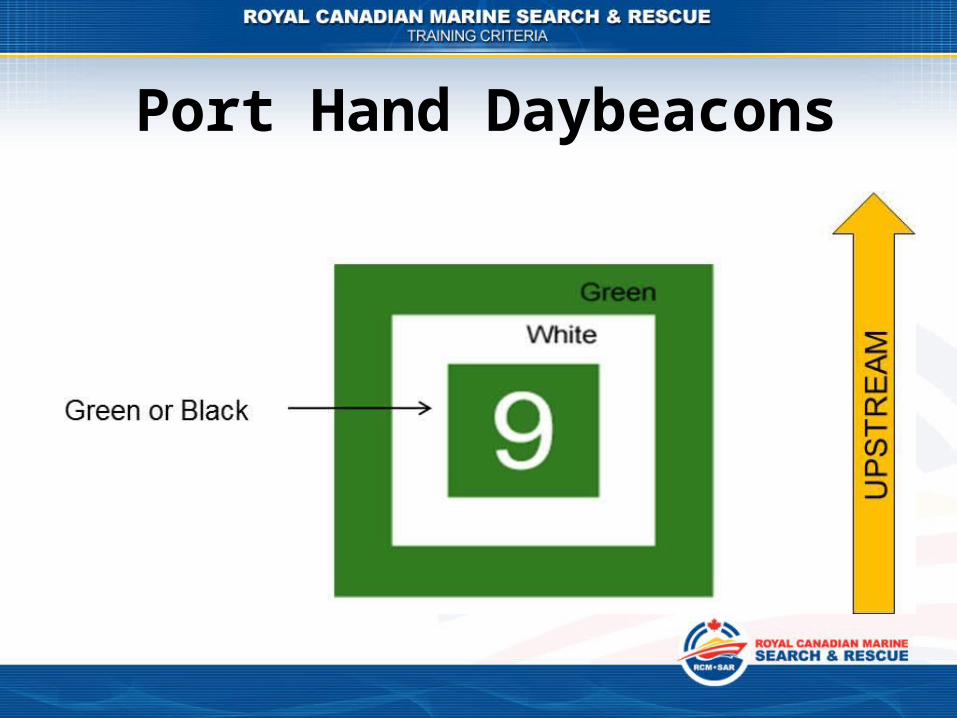
Port Hand Daybeacons

Port Hand Bifurcation Buoys
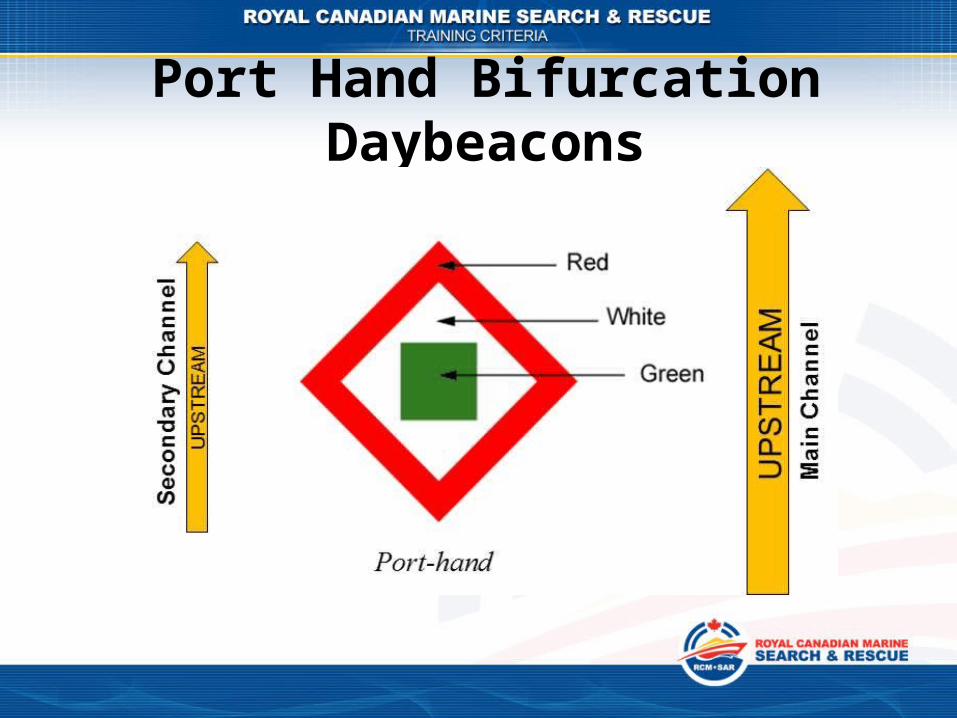
Port Hand Bifurcation Daybeacons
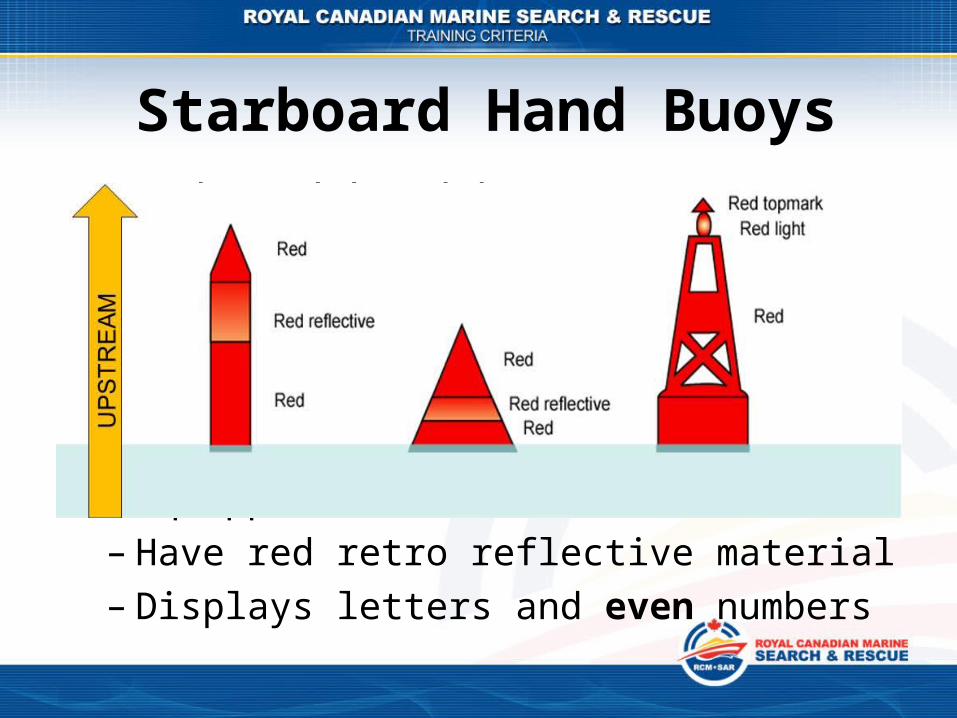
Starboard Hand Buoys• Starboard hand buoys:
– Are kept to the starboard side operating upstream– Have a pointed top or carry a pointed top mark– Have a red flashing light if so equipped– Have red retro reflective material– Displays letters and even numbers
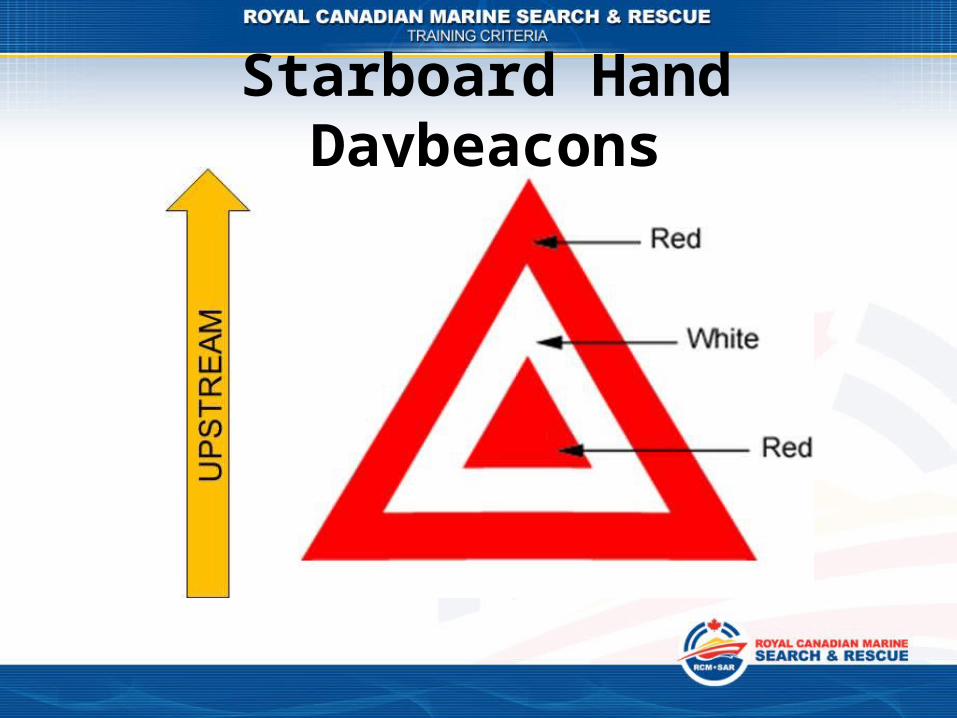
Starboard Hand Daybeacons

Starboard Hand Bifurcation Buoys
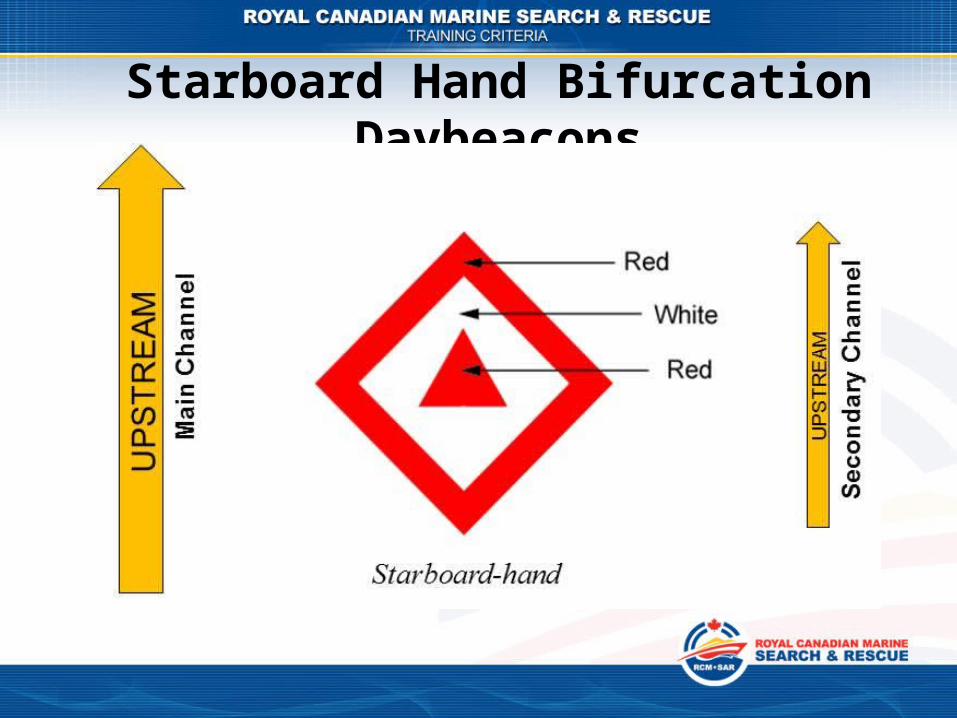
Starboard Hand Bifurcation Daybeacons
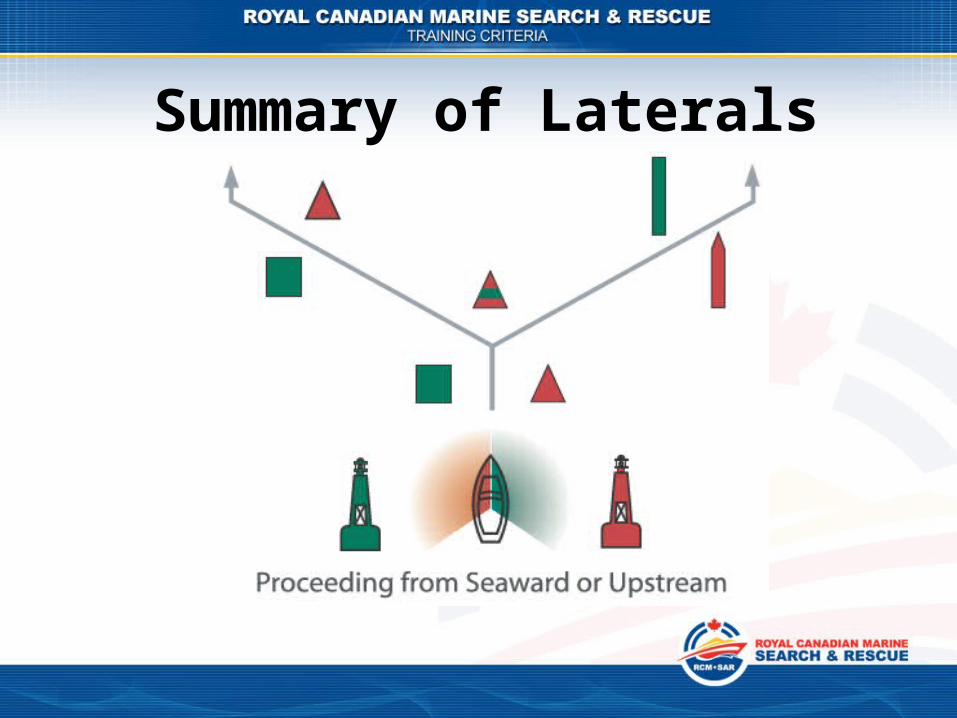
Summary of Laterals
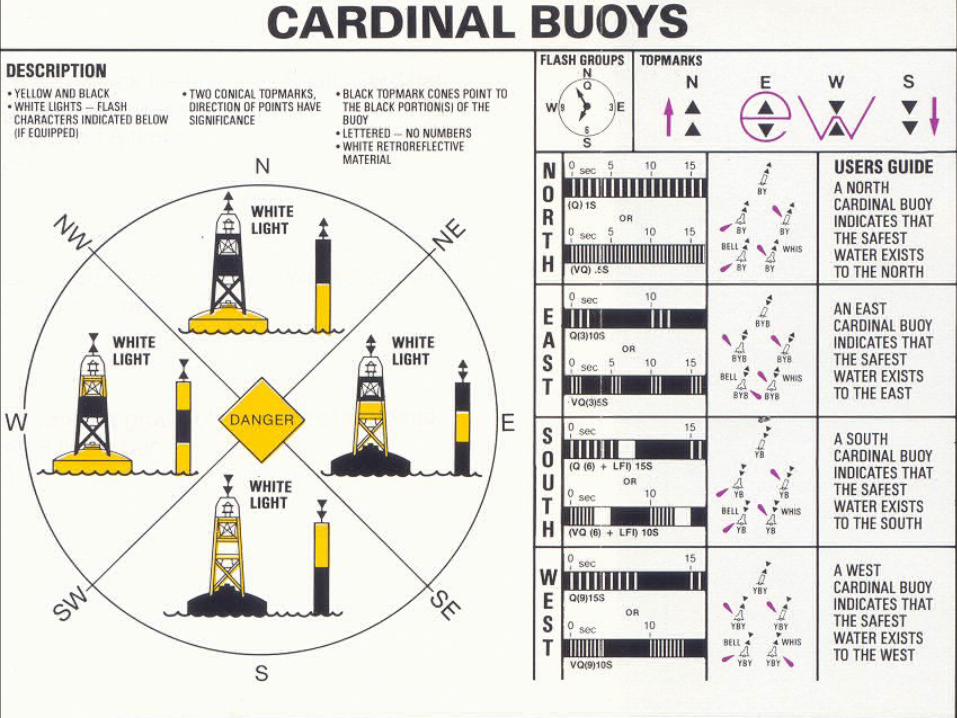
Cardinal Buoys
CANADIAN COAST GUARD AUXILIARY - PACIFIC
• Has basis in the 4 cardinal points of a compass– North, East, South and West
• Safe water exists in the direction indicated by the cardinal direction
• Cardinal buoys:– Are stripped Yellow and Black– Have top marks indicating cardinal direction– May have specific white flashing light combinations

Special Purpose Buoys• Special purpose buoys convey information not
primarily intended for navigation
Caution HazardAnchorage ControlMooring Keep OutInformation Swimming
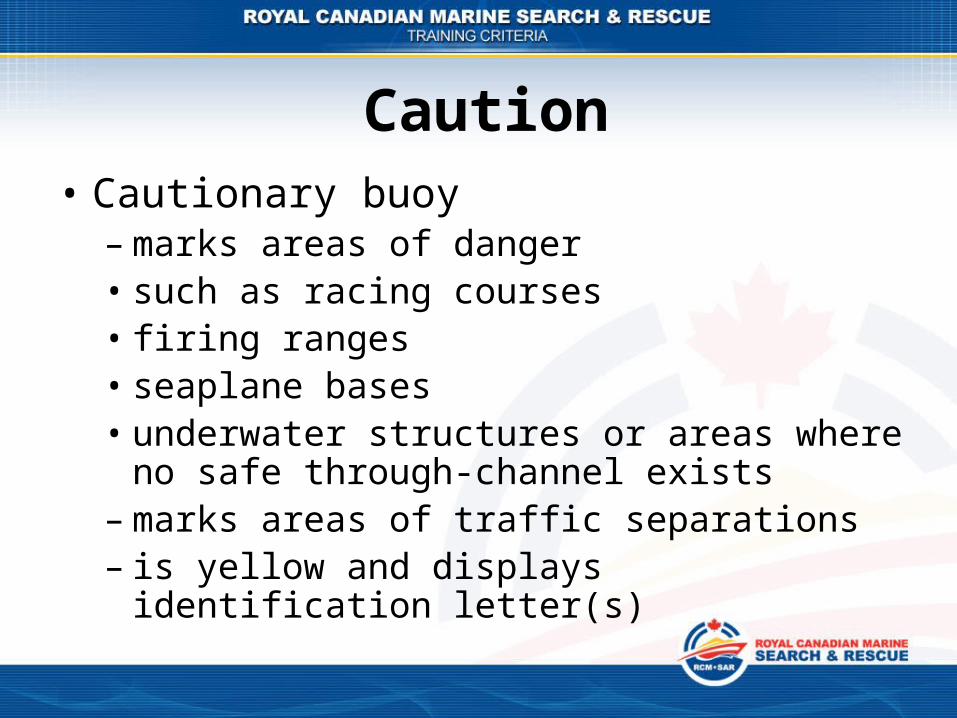
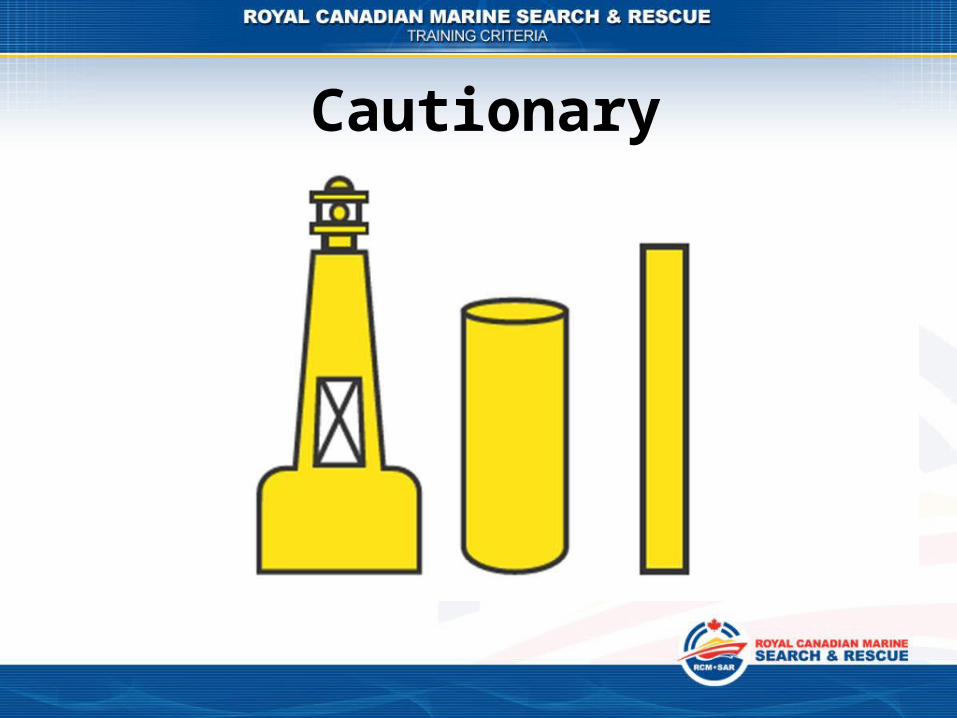
Caution• Cautionary buoy
– marks areas of danger• such as racing courses• firing ranges• seaplane bases• underwater structures or areas where no safe
through-channel exists– marks areas of traffic separations– is yellow and displays identification letter(s)
Cautionary• Cautionary buoy
– has a top mark that is a single yellow “X”– if it carries a light, the light is yellow and is a
flashing (Fl) four-second light.
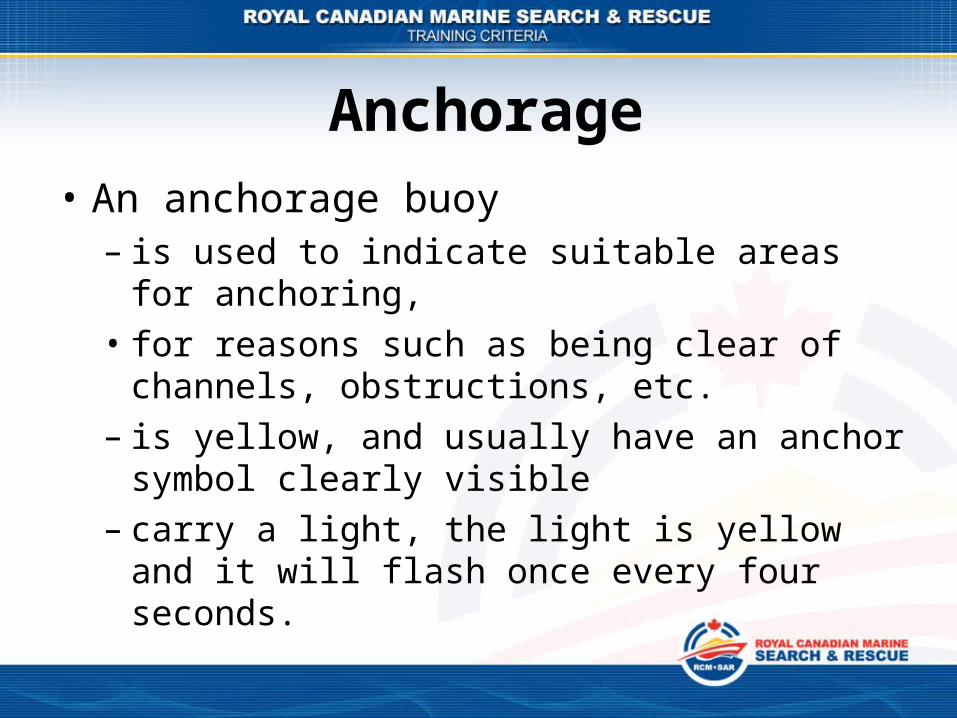
Anchorage• An anchorage buoy
– is used to indicate suitable areas for anchoring, • for reasons such as being clear of channels,
obstructions, etc. – is yellow, and usually have an anchor symbol
clearly visible– carry a light, the light is yellow and it will flash
once every four seconds.

Special Purpose Buoys
Mooring Keep Out
Used for mooring or securing vessels. Be aware that a
vessel may be secured to such a buoy.
Used to mark areas in which boats are prohibited. May carry
a yellow light flashing (Fl) 4s

Anchorage Cautionary Displays
Used to mark the perimeter ofDesignated anchorage areas.Consult your chart for water
depths.
May carry a single yellow “X” topmark. Yellow (Fl) 4s. Used to mark dangers such as
firing ranges, underwaterPipelines, race courses, seaplane bases.
Consult your local chart for details of dangers being marked.

Special Purpose Buoys
Information Hazard
Used to display information such as locality, name, marina,
campsite, etc. Be guided by information illustrated within
The orange square. May carry a yellow light flashing (Fl) 4s.
Marks random hazards such as rocks and shoals. May carry a yellow
light flashing (Fl) 4s.

Special Purpose Buoys
Swimming Control
Posted Command or
Warning
Marks the perimeter of
swimming areas. May carry a yellow light
flashing (Fl) 4s.Used to indicate speed limits,
wash restrictions, etc. Obey the restriction illustrated within the
orange circle. May carry a yellow light flashing (Fl) 4s.
These include: no wake zone, no anchorage area speedlimit zone, low head dam hazard, power line hazard or
pipe line hazard.

Range Markers• Consists of two or more
fixed markers• Top mark more distant• May or may not be
lighted• Provides a leading line to
steer on• When out of alignment
steer toward the bottom marker
In alignment

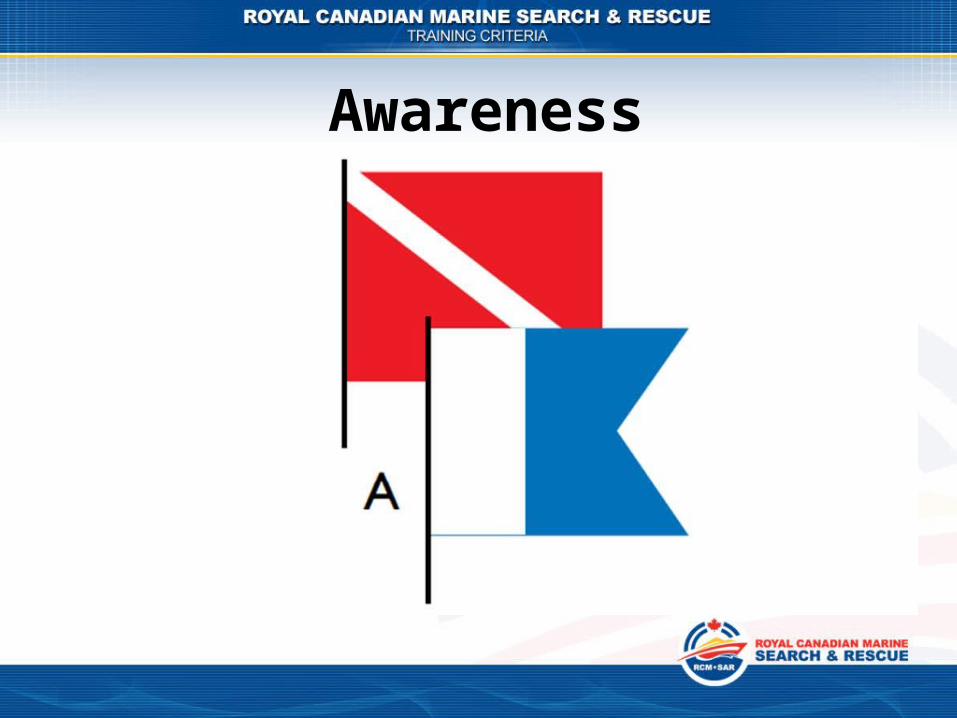
Diver’s Flags• Two flags should be displayed• Tender flies international flag “A”• Diver’s location identified by a white
buoy that flies a red flag with diagonal white stripe
• If it is equipped with a light it will flash Yellow (Fl) 4s
• Approach no closer than 35m from either flag
• Pass at slow speed

Fairway Buoys• Red and White vertically striped buoys mark the middle of the
channel• Can be passed on either side• Flashes Mo (A) 6s ● ▬

Isolated Danger Buoys• Black and Red horizontally striped buoy is moored on,
or above, an isolated danger• There is navigable water all around it• Light flashes in groups of two – Fl (2) 5s
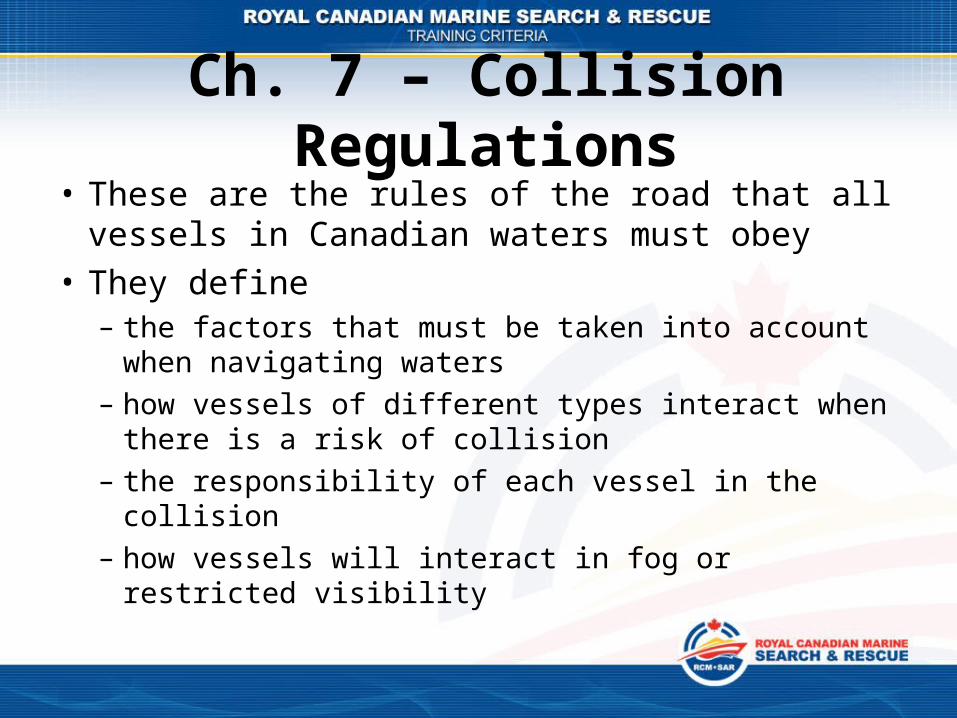
Ch. 7 – Collision Regulations• These are the rules of the road that all vessels in
Canadian waters must obey• They define
– the factors that must be taken into account when navigating waters
– how vessels of different types interact when there is a risk of collision
– the responsibility of each vessel in the collision– how vessels will interact in fog or restricted visibility

Collision Regulations• Collision Regulations
– define how vessels interact in fog or restricted visibility
– lay down the the different navigation light layouts– lay down the sound signals that should be used for
maneuvering or when in restricted visibility– list the distress signals which may be used
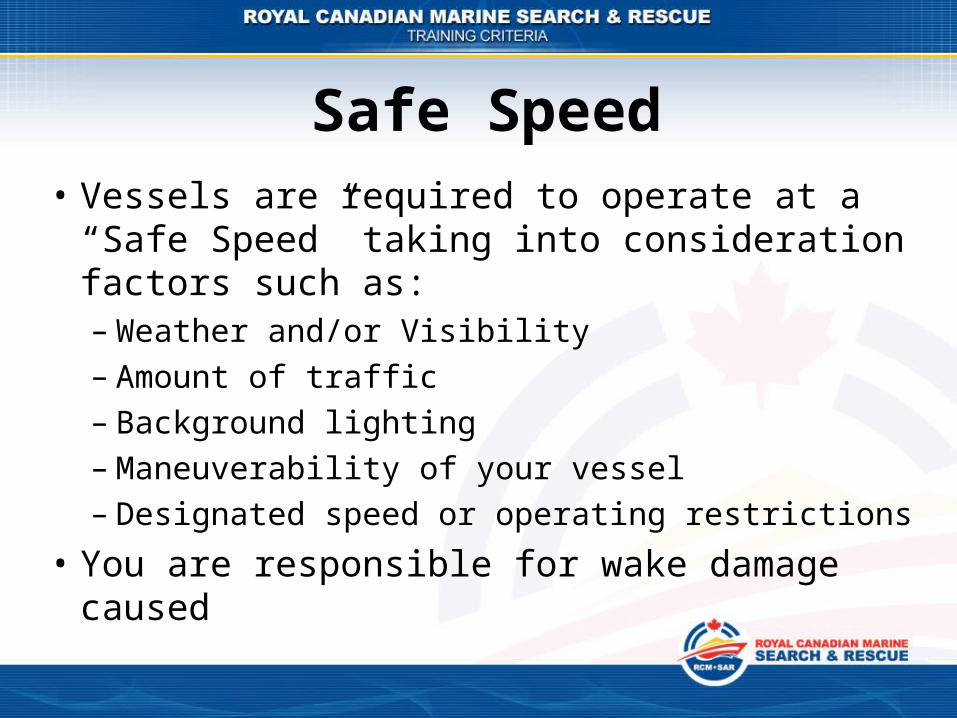
Safe Speed• Vessels are required to operate at a “Safe
Speed” taking into consideration factors such as:– Weather and/or Visibility– Amount of traffic– Background lighting– Maneuverability of your vessel– Designated speed or operating restrictions
• You are responsible for wake damage caused
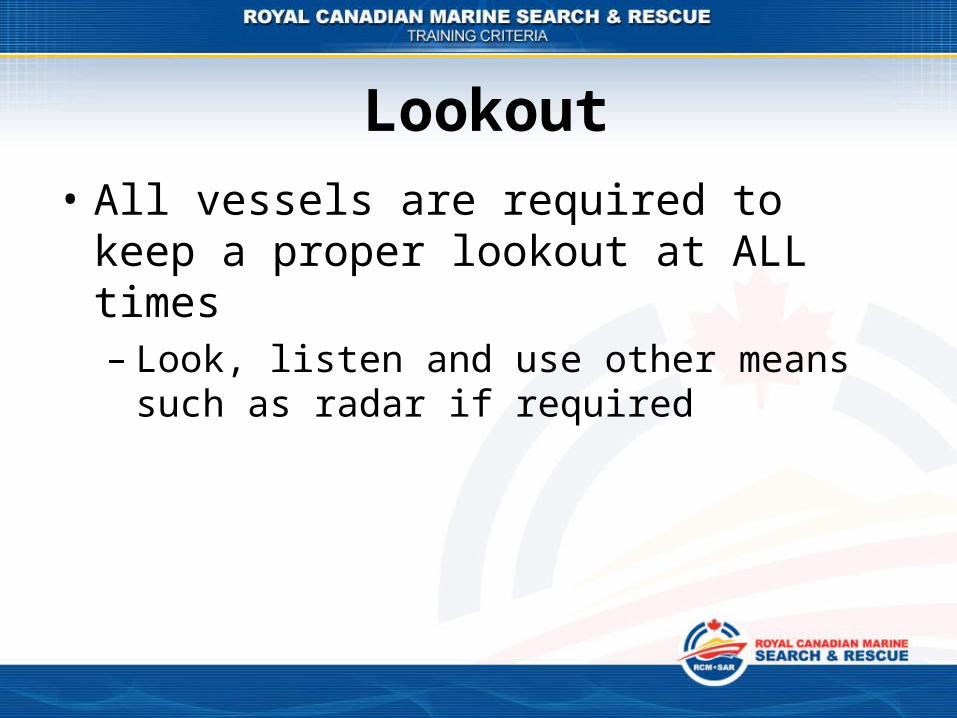
Lookout• All vessels are required to keep a proper
lookout at ALL times– Look, listen and use other means such as radar if
required

Definitions• Power Driven Vessel: any vessel propelled by
machinery– When a sailboat uses it's engine, even if it has it's
sails up, it is legally a power boat
• Under Way: Not tied to a dock, aground, or at anchor
• Making Way: Moving through the water
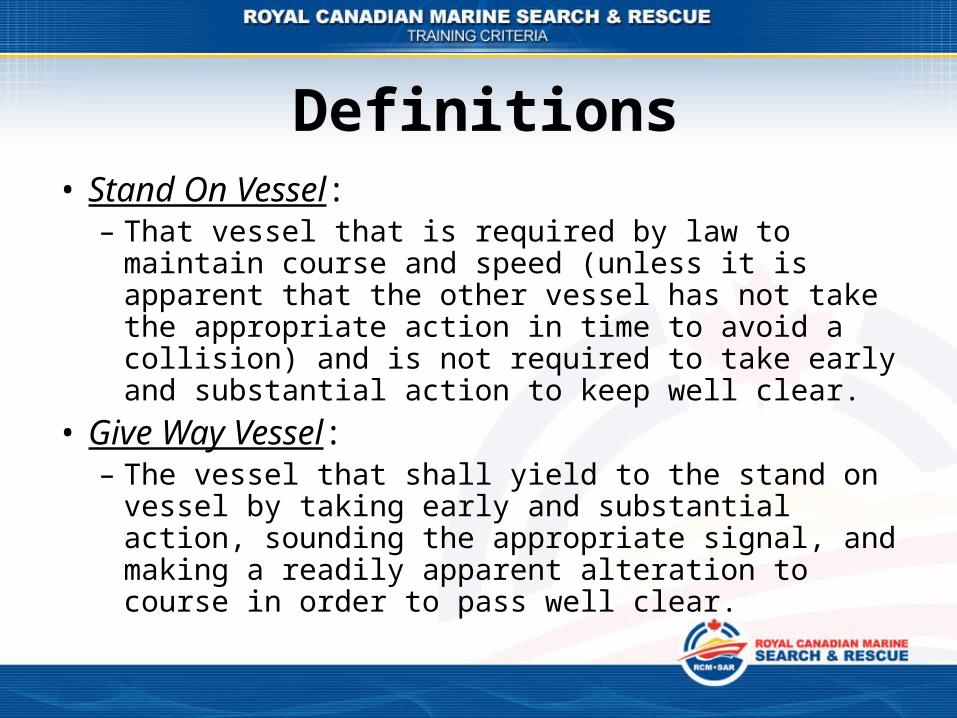
Definitions• Stand On Vessel:
– That vessel that is required by law to maintain course and speed (unless it is apparent that the other vessel has not take the appropriate action in time to avoid a collision) and is not required to take early and substantial action to keep well clear.
• Give Way Vessel:– The vessel that shall yield to the stand on vessel by
taking early and substantial action, sounding the appropriate signal, and making a readily apparent alteration to course in order to pass well clear.
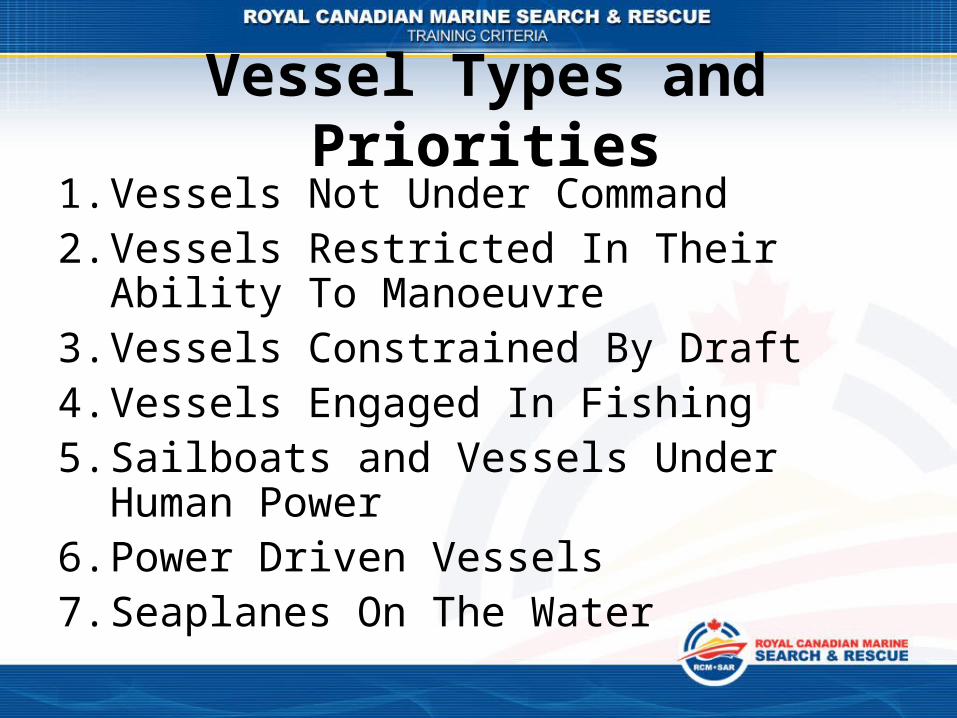
Vessel Types and Priorities1. Vessels Not Under Command2. Vessels Restricted In Their Ability To
Manoeuvre3. Vessels Constrained By Draft4. Vessels Engaged In Fishing5. Sailboats and Vessels Under Human Power6. Power Driven Vessels7. Seaplanes On The Water

Power Driven Vessels• Approaching head on

Power Driven Vessels• Crossing
Danger Zone
Stand-on VesselMaintains course
and speed
Give-way Vessel
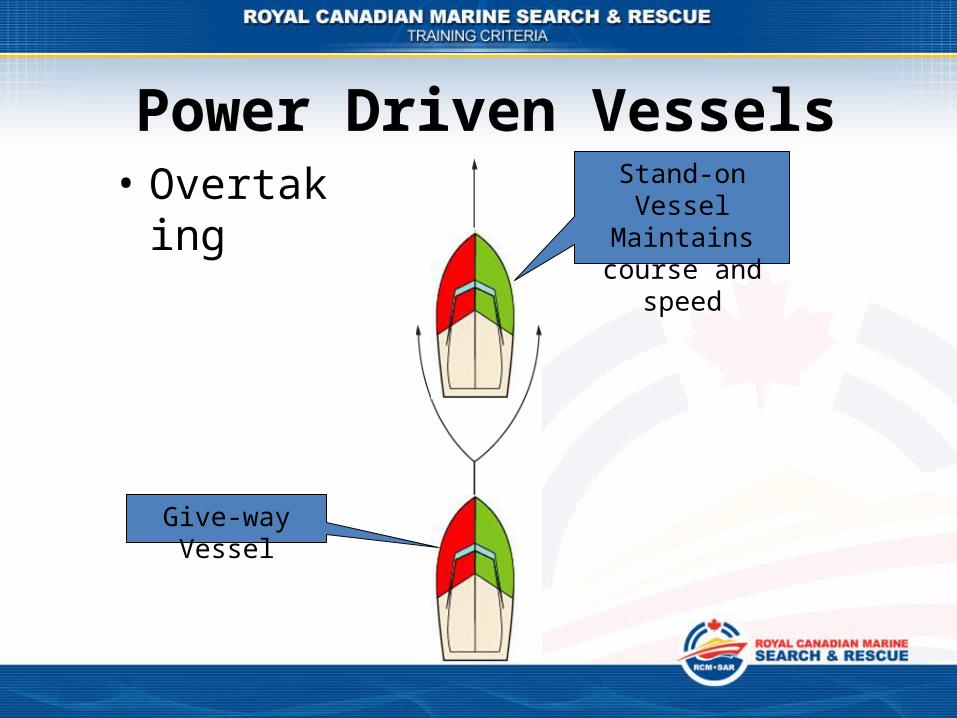
Power Driven Vessels• Overtaking Stand-on Vessel
Maintains course and speed
Give-way Vessel
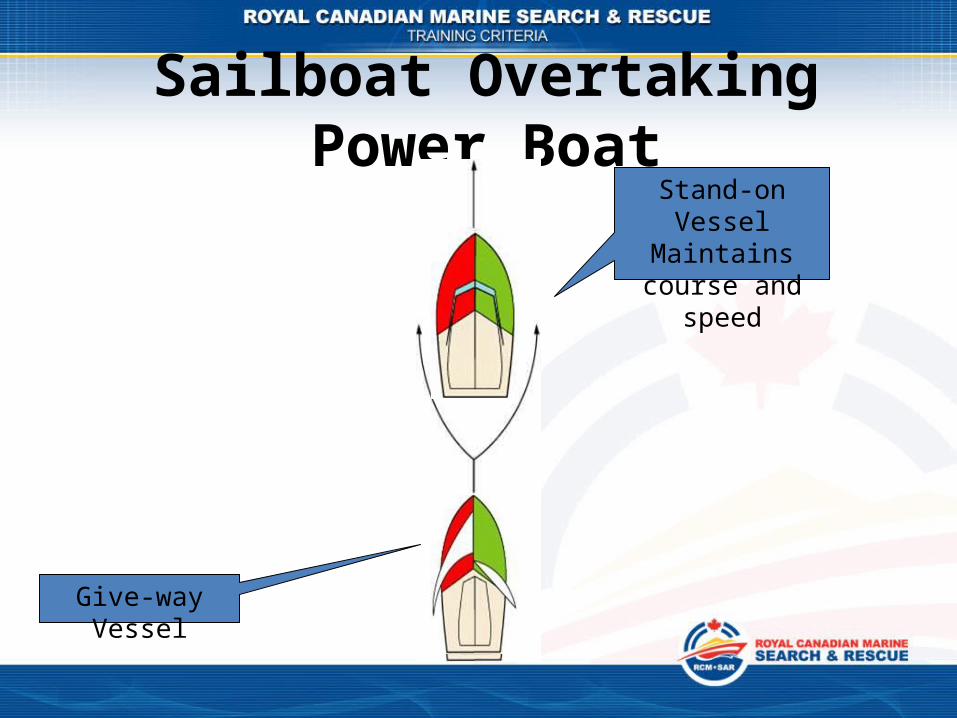
Sailboat Overtaking Power BoatStand-on VesselMaintains course
and speed
Give-way Vessel

Sailboats• As we learned earlier Sailboats in most
situations will be the Stand On vessel while the Power Driven Vessel is the Give Way Vessel– There is an exception we will talk about later
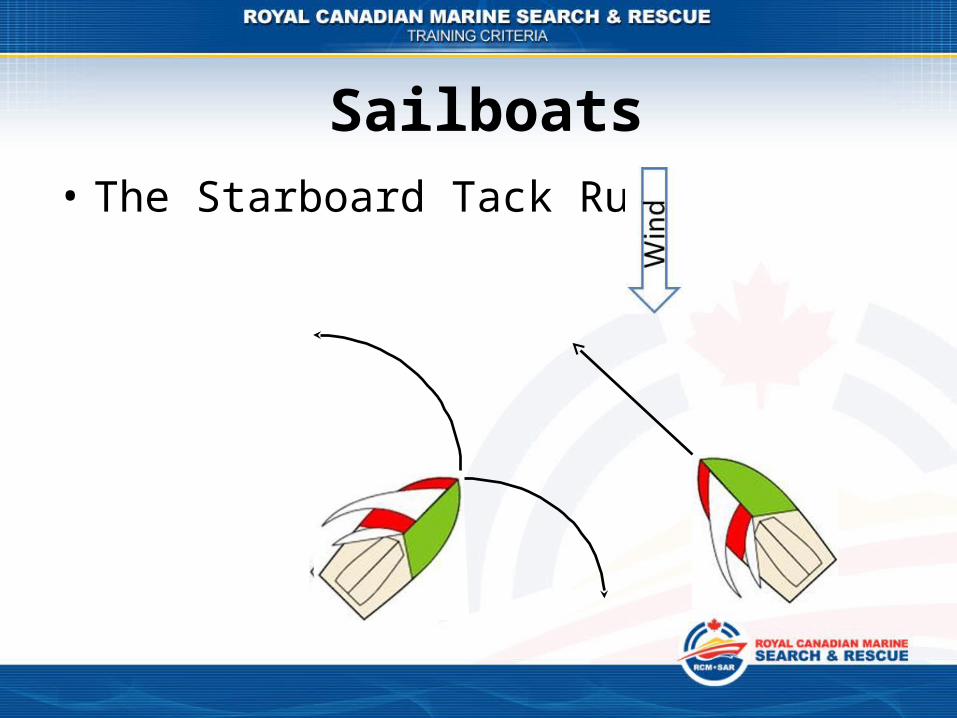
Sailboats• The Starboard Tack Rule
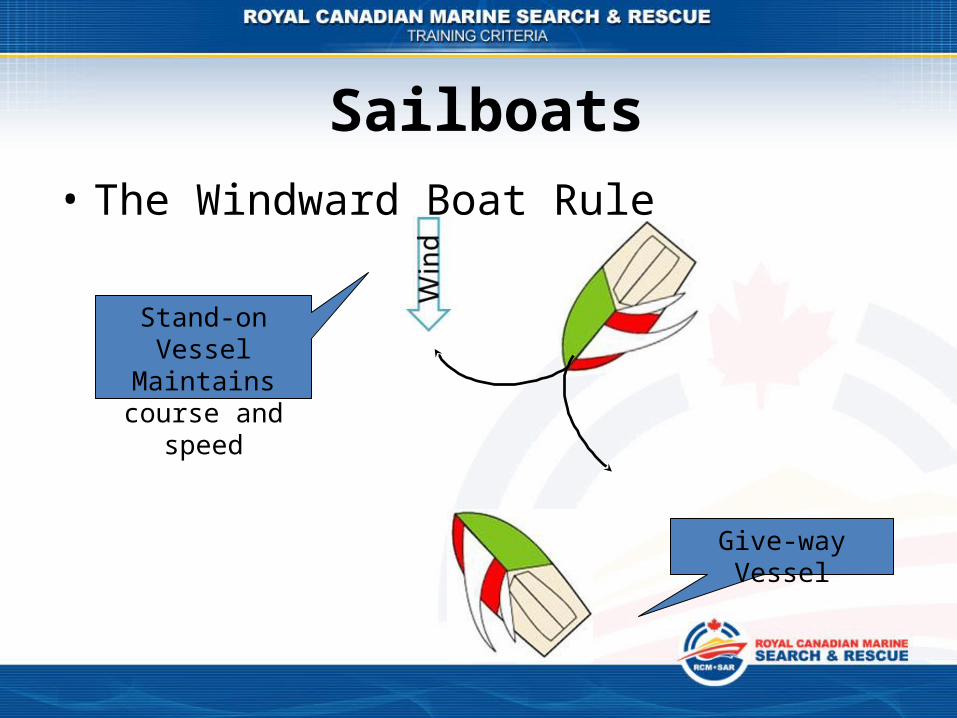
Sailboats• The Windward Boat Rule
Stand-on VesselMaintains course
and speed
Give-way Vessel
General• Shipping Lanes
– Stay clear, shipping lanes are designed for the convenience of ships and vessels of larger draft
– If you must cross do so at as close to 90° as possible
• Navigating in a narrow channel– Stay out of the way of larger vessels which can only
navigate in the middle– If possible stay over to the side of the channel on
your starboard side
General• Yield to larger vessels
– In a small vessel with a small draft, keep out of the way of large vessels or ships, whose maneuverability and ability to alter course and speed may be hampered by their size and draft
• Use of VHF Radio– Be mindful of using the radio to agree on a course
to steer between vessels– You may be talking with a vessel other than the
one you intend to
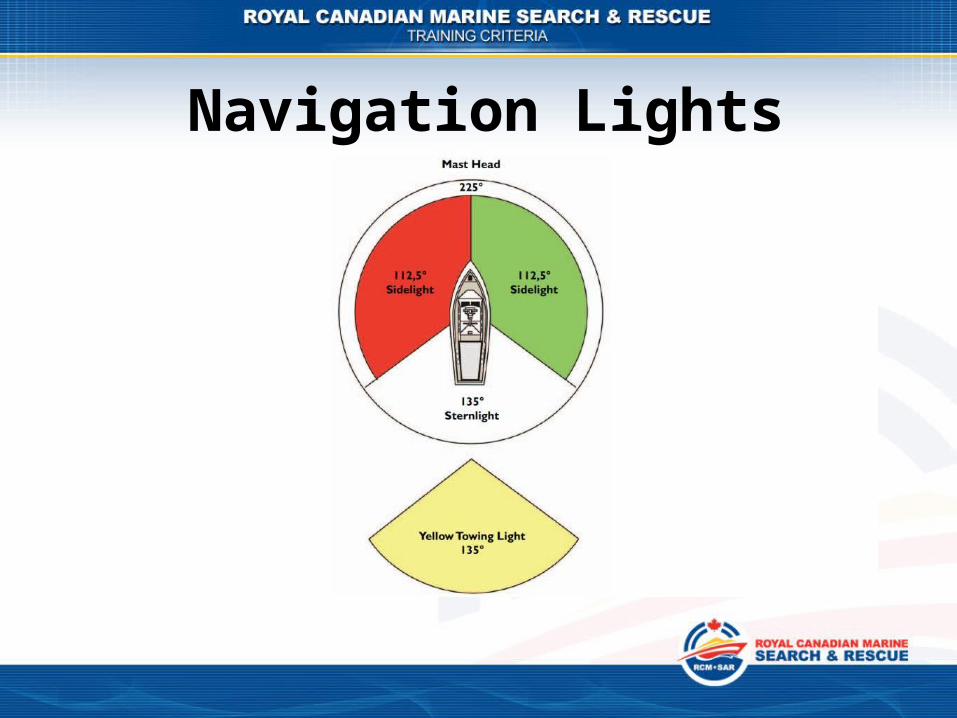
Navigation Lights

Navigation Lights• The most common lights your should be able
to recognize are:– Power driven vessel of all sizes (including ships)– Sailing vessels of all sizes– Hand-propelled vessels– Personal water craft (PWC)– Vessels at anchor– Tugs and tows, where they operate in local waters
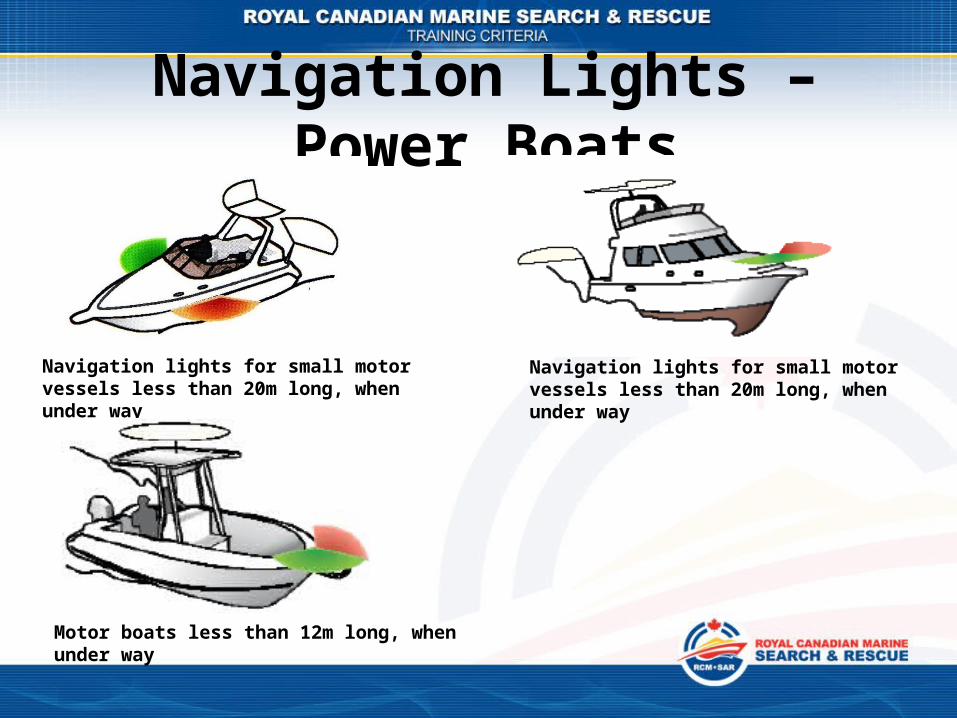
Navigation Lights – Power Boats
Navigation lights for small motor vessels less than 20m long, when under way
Navigation lights for small motor vessels less than 20m long, when under way
Motor boats less than 12m long, when under way

Navigation Lights – Sailboats
White
Standard Display•Red & Green sidelights•White stern light
Under 20 m•Red over Green at top of mast•Red & Green sidelights•White stern light
Under 20 m•Tri-light at top of mast with Red, Green & White
Under 7 m•360° White Light
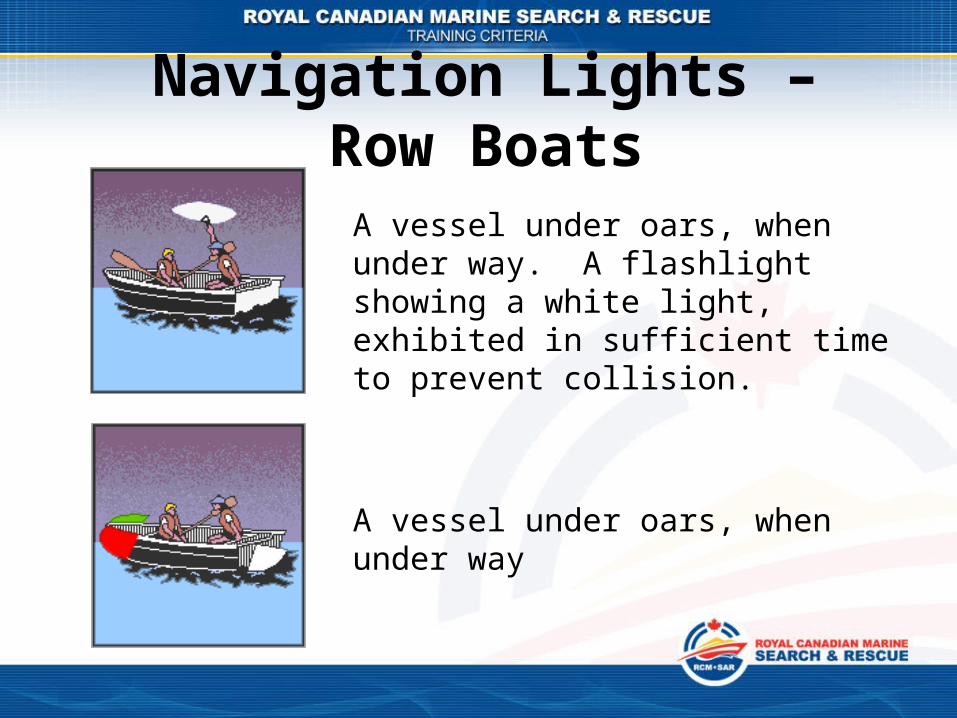
Navigation Lights – Row Boats
A vessel under oars, when under way. A flashlight showing a white light, exhibited in sufficient time to prevent collision.
A vessel under oars, when under way
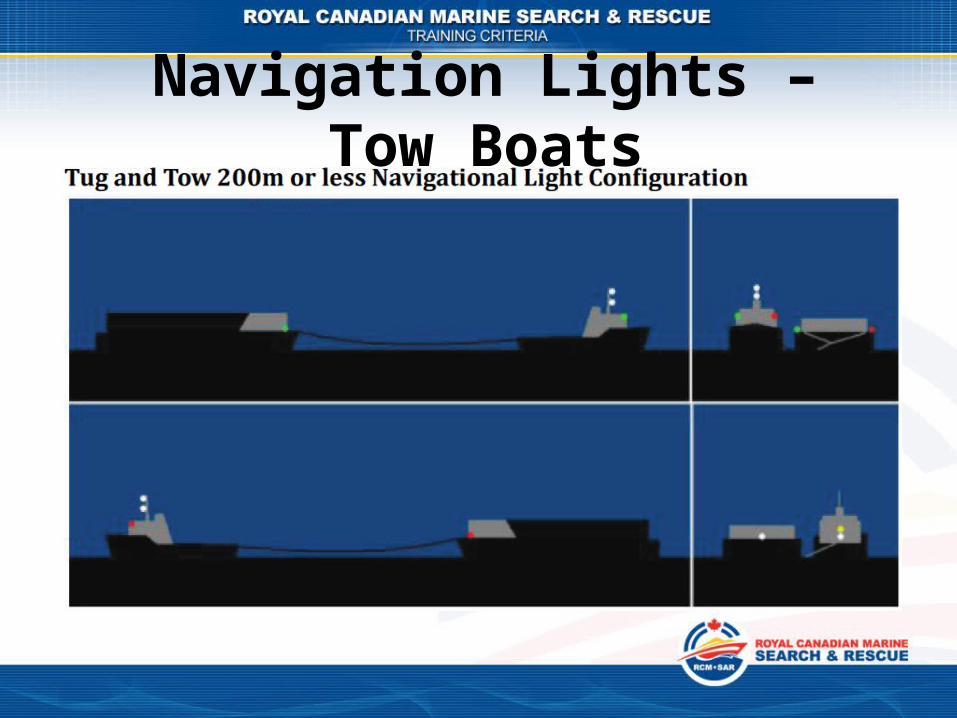
Navigation Lights – Tow Boats
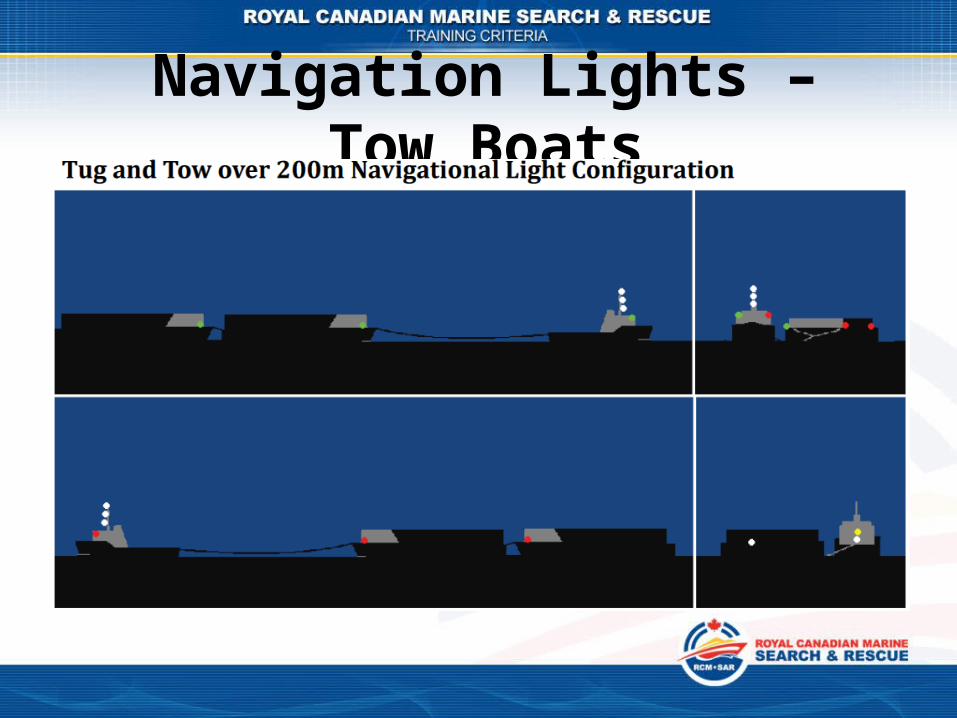
Navigation Lights – Tow Boats
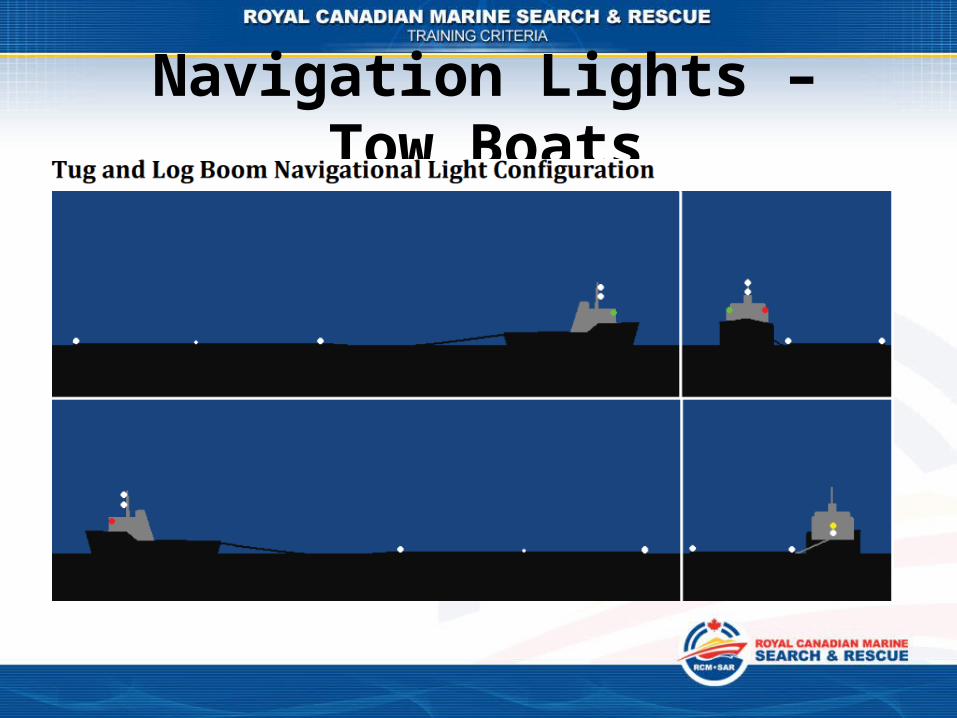
Navigation Lights – Tow Boats
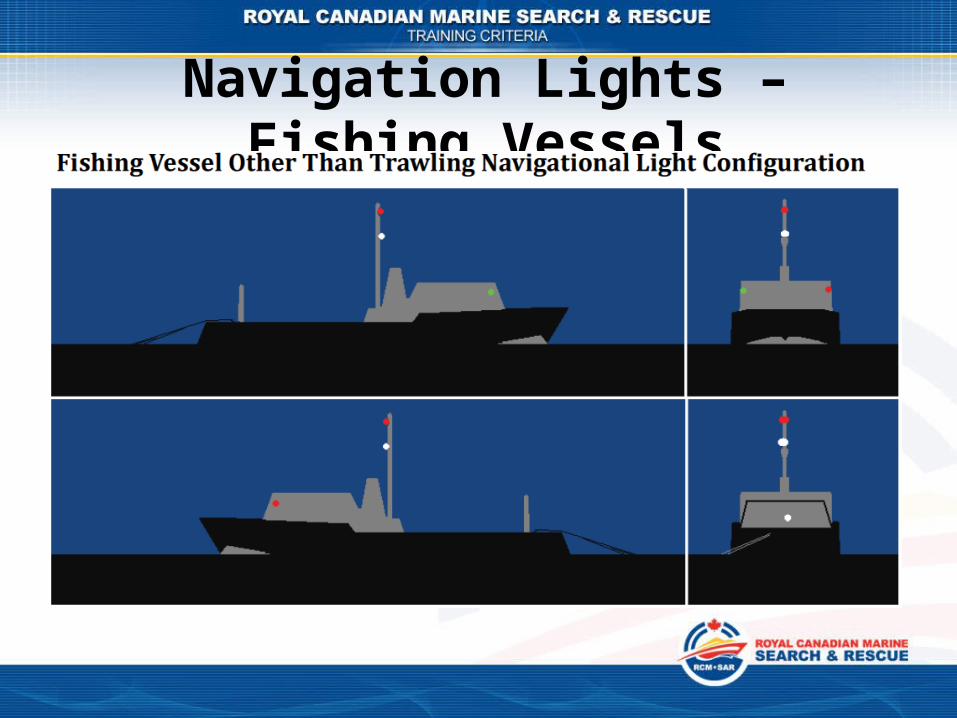
Navigation Lights – Fishing Vessels
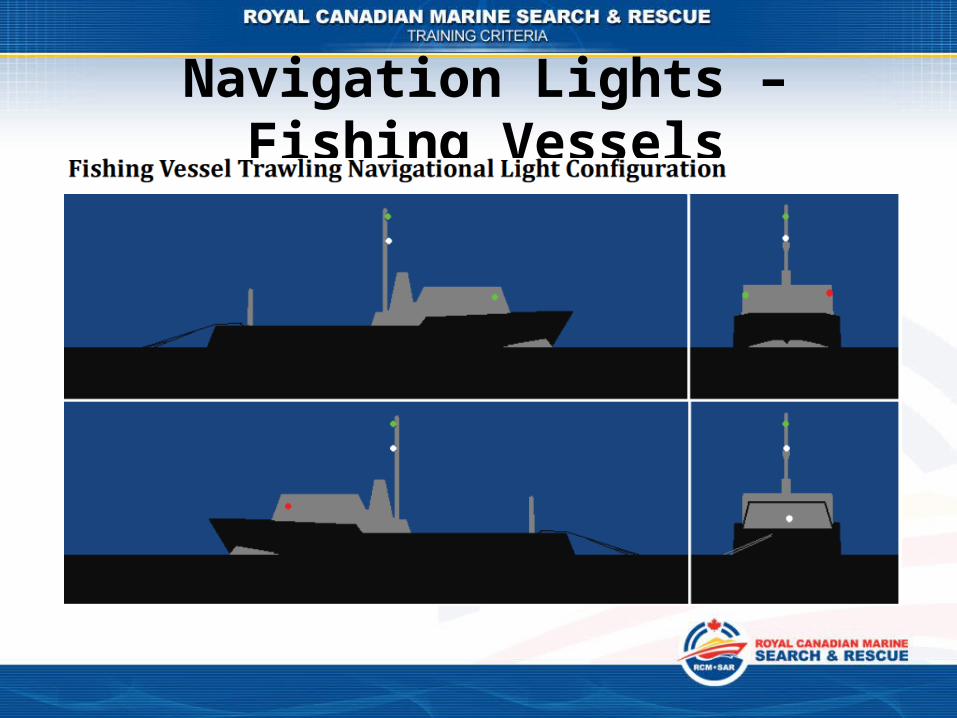
Navigation Lights – Fishing Vessels
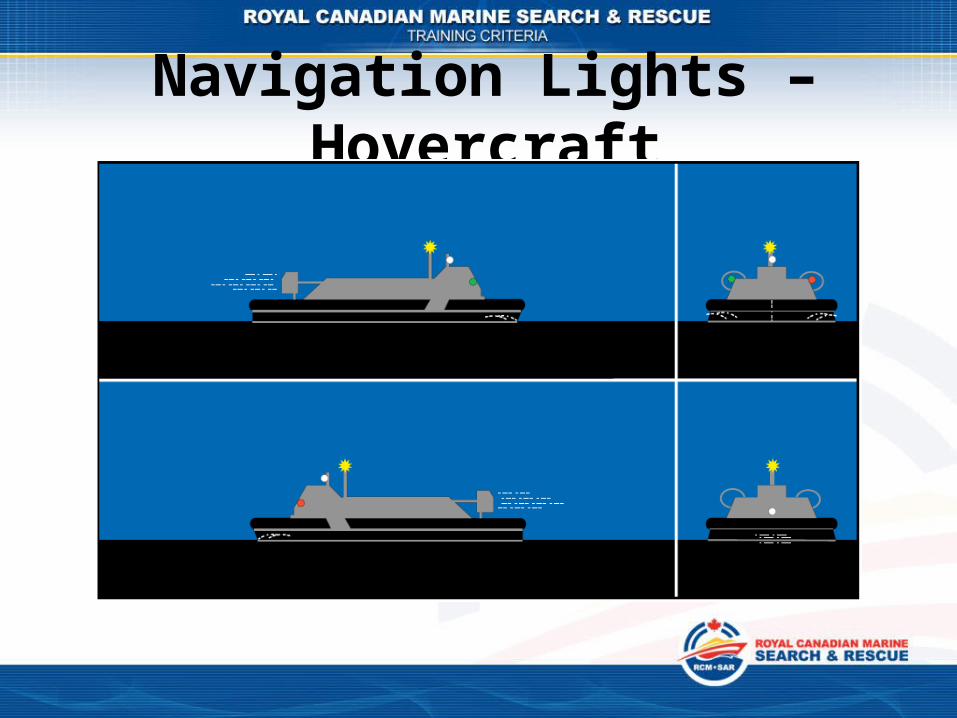
Navigation Lights – Hovercraft
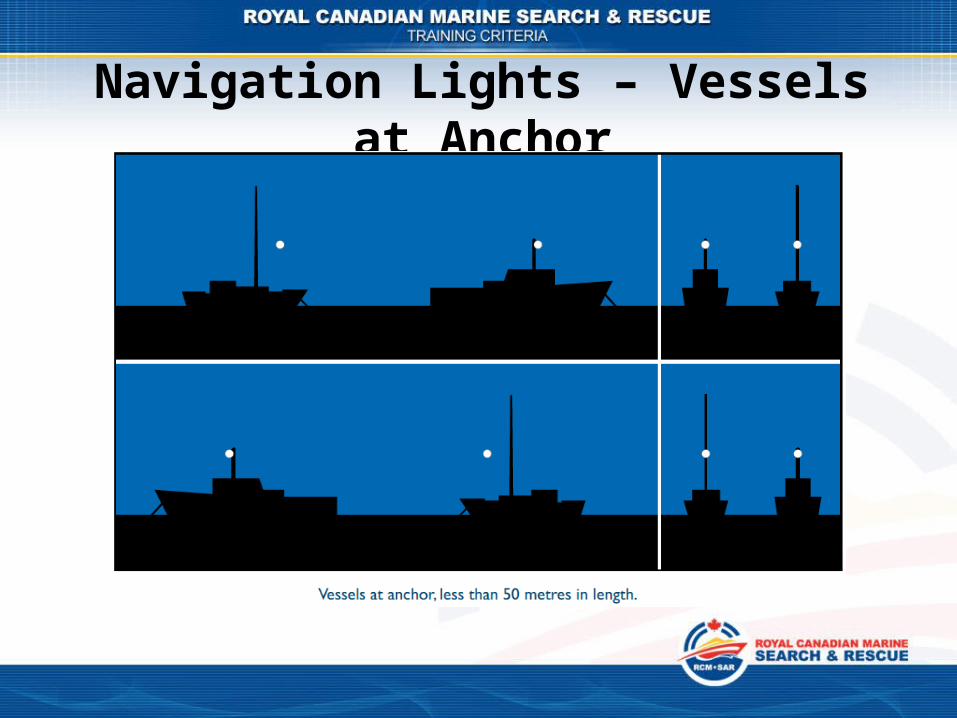
Navigation Lights – Vessels at Anchor

Navigation Lights – Government Vessels
• Government or police vessels may exhibit a blue flashing light when on an official operation
• This light DOES NOT provide any increased priority with respect to being either the Give Way Vessel or the Stand On Vessel
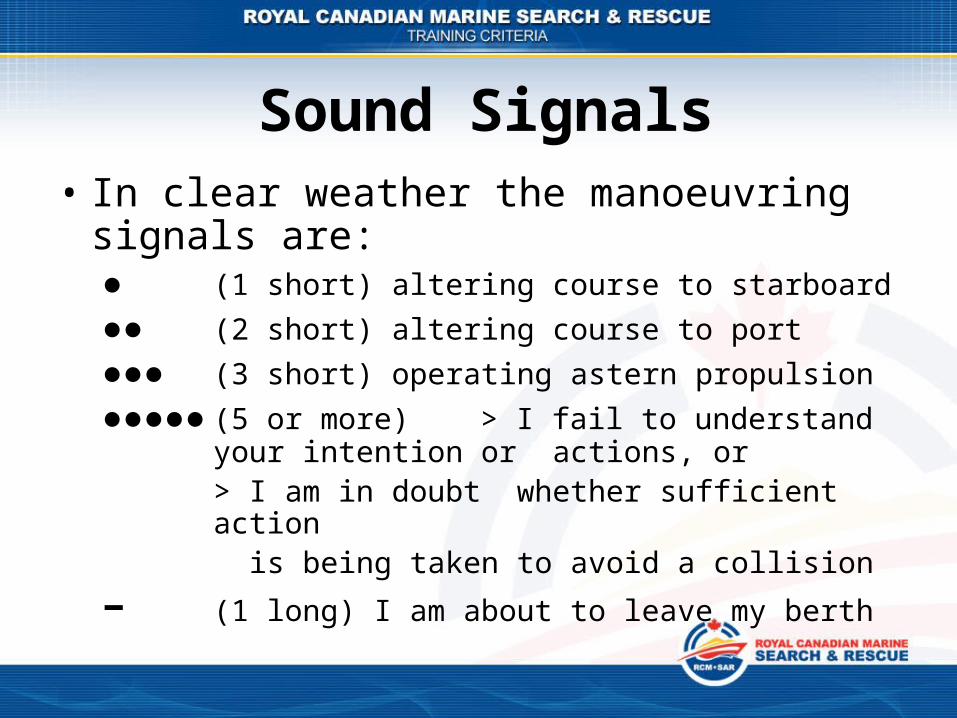
Sound Signals• In clear weather the manoeuvring signals are:
● (1 short) altering course to starboard●● (2 short) altering course to port●●● (3 short) operating astern propulsion●●●●● (5 or more) > I fail to understand your intention or
actions, or> I am in doubt whether sufficient
action is being taken to avoid a collision
− (1 long) I am about to leave my berth

Sound Signals• In clear weather in a narrow channel to warn
other ship out of sight and coming the other way of your presence:
− (1 long)
• As a distress signal:Continuous sounding of the equipment

Sound Signals• In restricted visibility, such as for, snow or heavy
rain, to warn other vessels of you presence:− Power driven vessel underway and making way
− − Power driven vessel underway and stopped
− ● ●A hampered vessel such as a sailing vessel, a fishing vessel, a hampered vessel, a vessel restricted in her ability to manoeuvre
Ch. 7 – Safety Awareness & Restrictions
• Manoeuverability of a vessel will depend upon:– Power; the greater the power for a given size boat– Underwater hull shape in comparison to topside
and whether current and wind will affect it more– Position of cabins and masts, including their
position along the length of the vessel, which will affect turning ability in the wind
Ch. 7 – Safety Awareness & Restrictions
• Manoeuverability of a vessel will depend upon:– Shape of the hull with regards to handling waves– One or two propellers– The skill of the helm
• Get to know your boat
Awareness
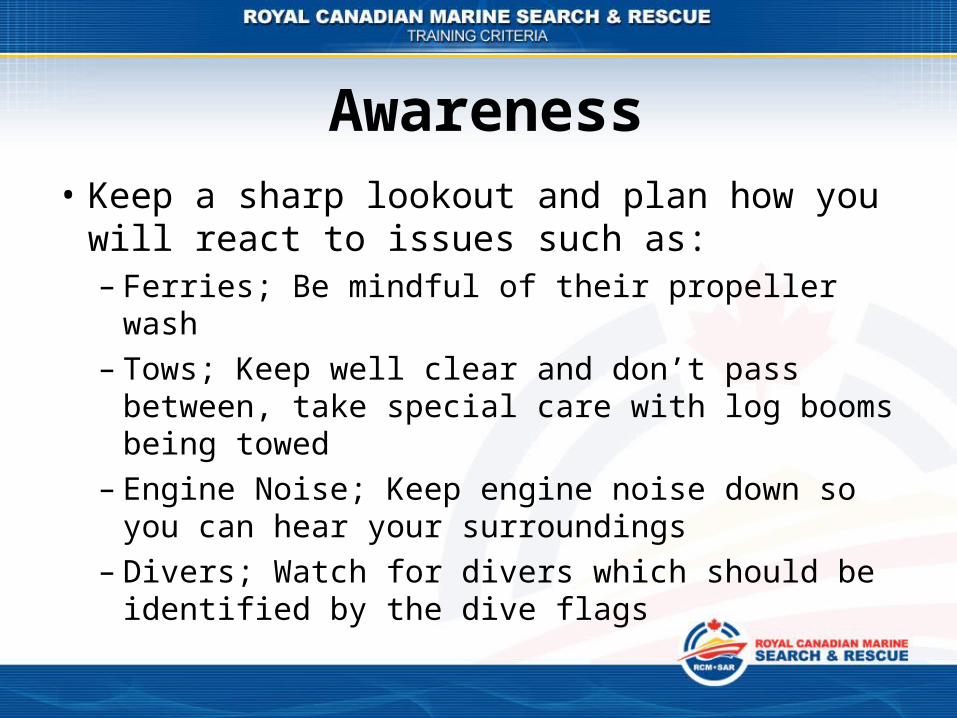
Awareness• Keep a sharp lookout and plan how you will
react to issues such as:– Ferries; Be mindful of their propeller wash– Tows; Keep well clear and don’t pass between,
take special care with log booms being towed– Engine Noise; Keep engine noise down so you can
hear your surroundings– Divers; Watch for divers which should be identified
by the dive flags
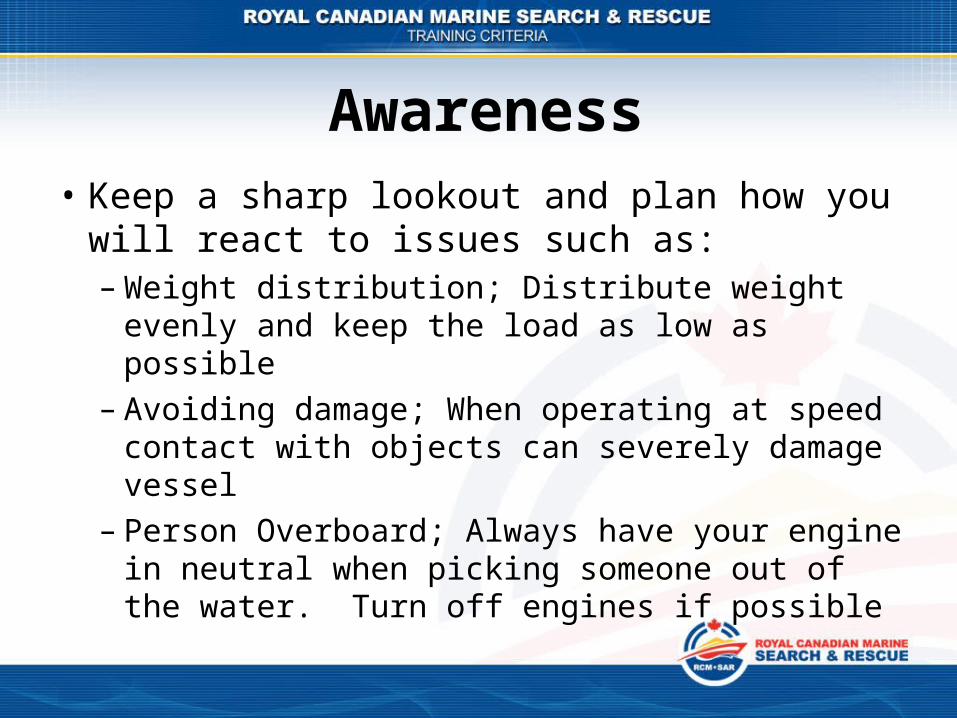
Awareness• Keep a sharp lookout and plan how you will
react to issues such as:– Weight distribution; Distribute weight evenly and
keep the load as low as possible– Avoiding damage; When operating at speed
contact with objects can severely damage vessel– Person Overboard; Always have your engine in
neutral when picking someone out of the water. Turn off engines if possible

Fuel Systems• To maximize safety follow these steps when
fueling your vessel– Portable fuel tanks must be filled ashore– Ensure vessel is safely tied– Only that person(s) involved with fueling on board– Turn off all onboard electronics, breakers and personal
electronic equipment– Close all doors and hatches– Do not overfill tanks– When fueling complete cap the filling lines– Operate blowers for at least 4 minutes

Age, HP and Speed Restrictions
Other Restrictions• There may be other restrictions in effect at
certain locations– Speed restrictions– No wake– Noise restrictions– Boating prohibited, some examples might be:• No power driven vessels, no internal combustion, power
restrictions, no skiing, operation only during specific hours, etc.
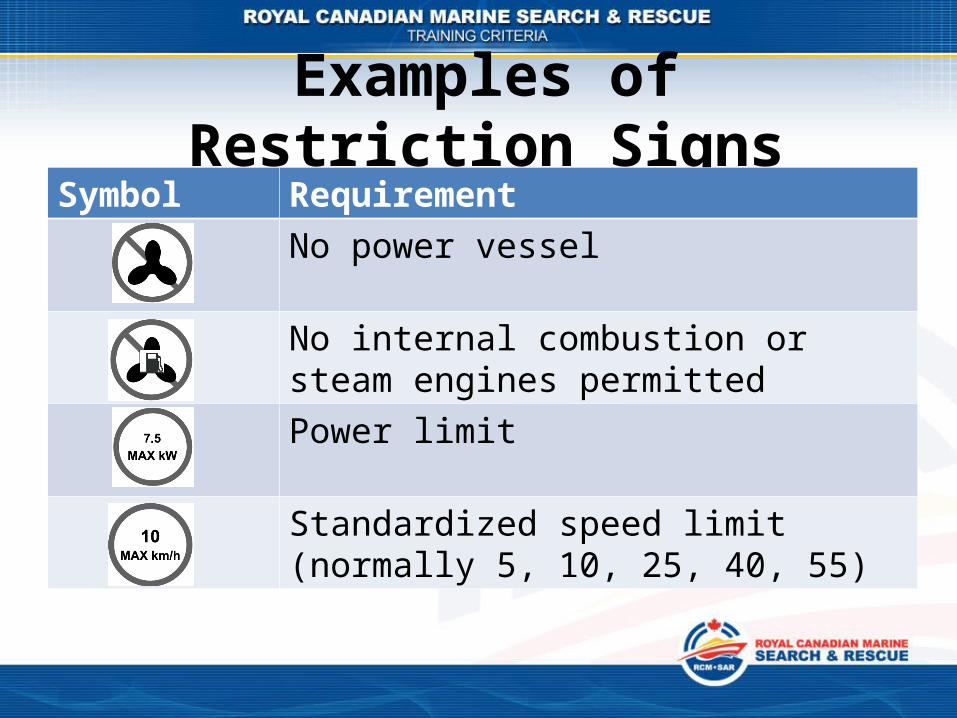
Examples of Restriction SignsSymbol Requirement
No power vessel
No internal combustion or steam engines permittedPower limit
Standardized speed limit(normally 5, 10, 25, 40, 55)

Examples of Restriction SignsSymbol Requirement
No skiing
No regatta
No boats
No power vessels in the direction indicated by the arrow

Examples of Restriction SignsSymbol Requirement
No skiing north of the sign
Combined sign (speed limit and no skiing)
No power vessels between the hours and days in red

Ch. 9 – Environmental Protection
• It is all our responsibility not to pollute– Take your garbage home– Install holding tanks– Vessel maintenance– Operate responsibly– Keep noise to a minimum– Be careful not to spill fuel
Environmental Protection• It is all our responsibility not to pollute
– Service engine regularly to minimize exhaust– Use eco-friendly products for cleaning– If you carry ballast flush your tanks on the outward
journey to different waters to avoid moving invasive marine species
– Sewage should be pumped out ashore• All boats with toilets require holding tanks effective May
3rd, 2012
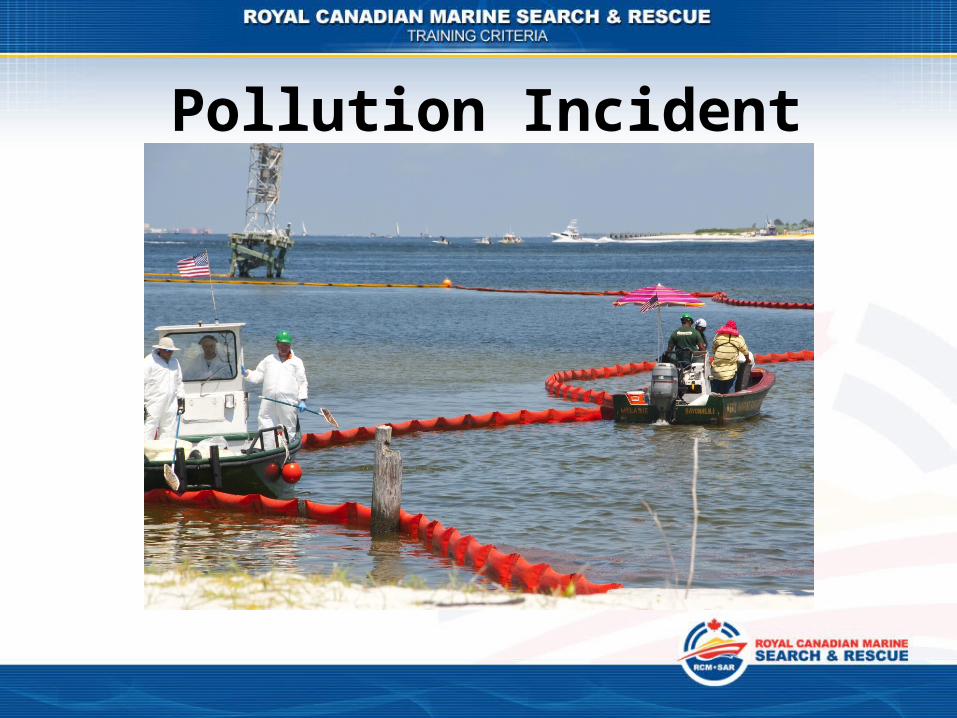
Pollution Incident
Pollution Incident• If you accidently pollute it is your
responsibility to clean it up– Most fuelling facilities have absorbent cloths
available– Do not use detergents on a fuel or oil spill
• To report a pollution incident call:– 1-800-889-8852 BC and Yukon– Refer to you student manual for other provinces
Ch. 10 – Trip Planning• It I a good idea to do pre-trip planning
– It may be the most important part of the trip
• It reduces the possibility of things going wrong• You and your guests should have the skills and
experience for the trip• Is your vessel up to the trip
– Engine, propellers, sails, rigging, hull, lights, etc.
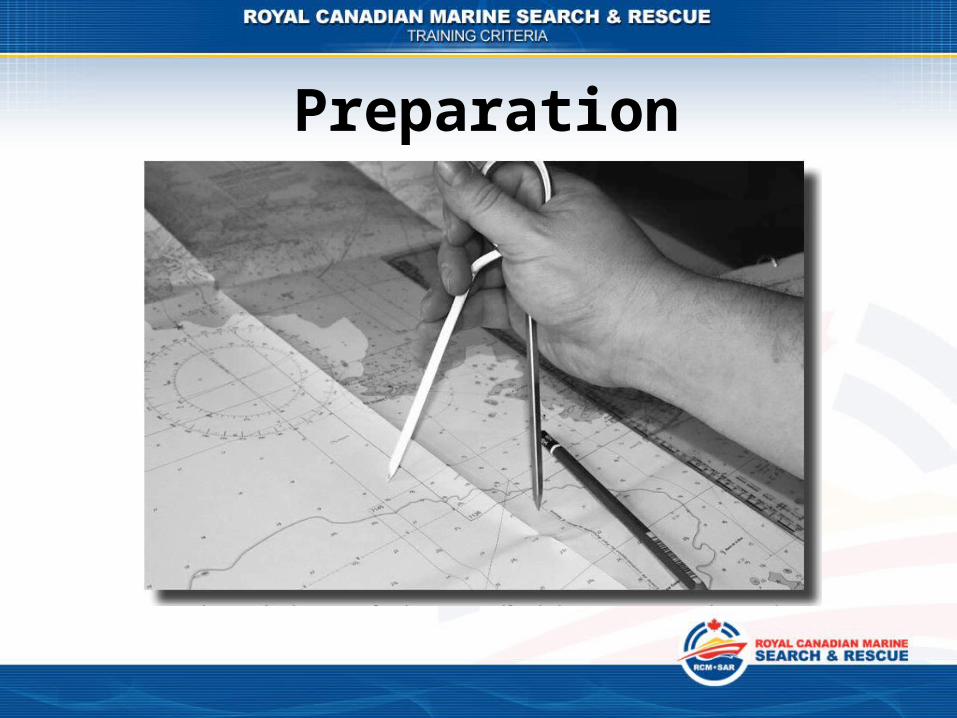
Preparation
Preparation• Paper charts and electronic plotters
– Do you have the correct charts for the area– Have they been updated (NOTMAR)– Familiarize yourself with the planned route• Know the hazards and aid you may encounter

Natural Conditions• Before you go out on the water make sure you
know the current and forecast conditions– Tides• Measured from LLW aka “0” Tide
– Currents• Remember current predictions are not in perfect synch
with the tides
– Sea conditions

Natural Conditions• Fuel and Oil
– Check both before heading out– Remember the rule of thirds for fuel: ⅓ out, ⅓ back
and ⅓ in reserve– You must know the amount of fuel you have on
board and the amount of fuel you consume– If you don’t use you boat year round ensure you
have fresh fuel when you start boating
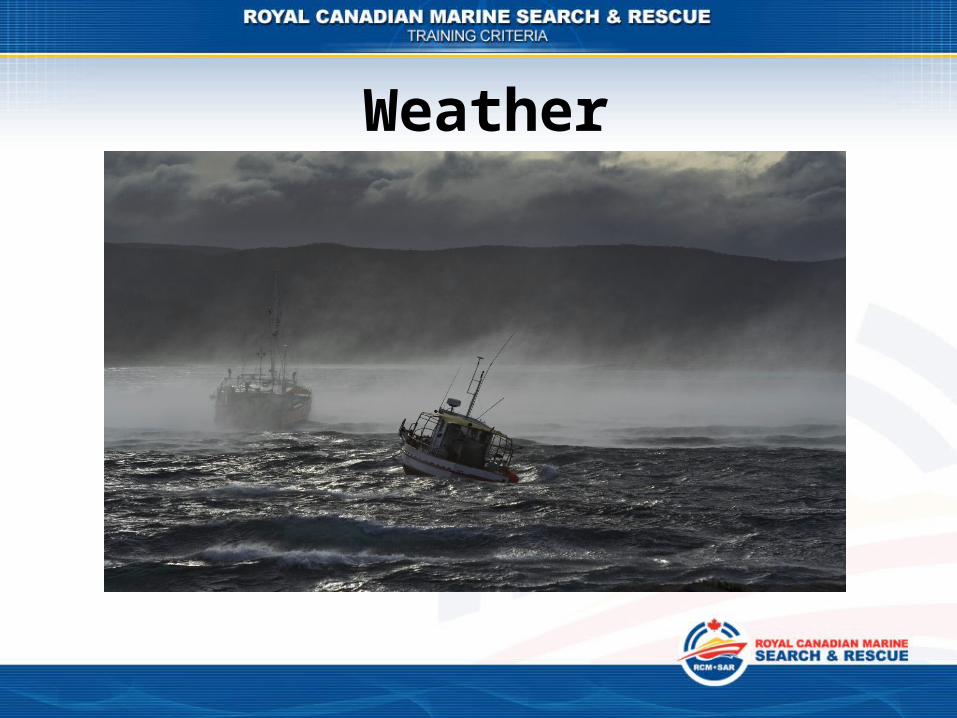
Weather

Weather• Knowing the current and forecast weather
prior to setting out is critical• Once you have started your trip continue to
watch the weather & check weather forecasts• Use your VHF weather channels• There will be added debris in the water after
high tides associated with high winds and rain• If caught in weather slow own and seek shelter
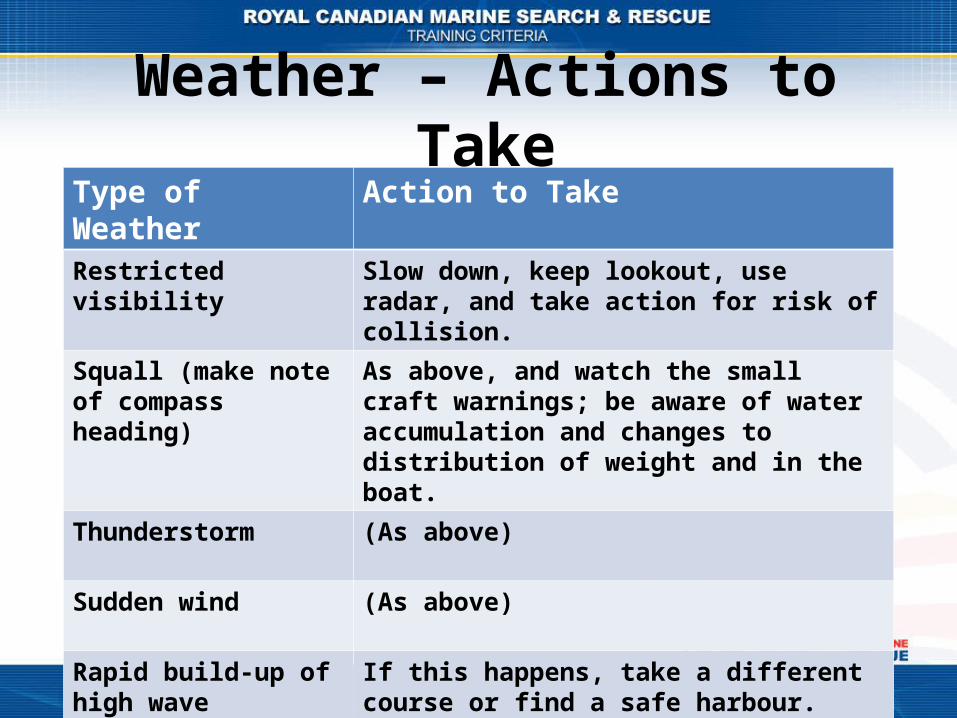
Weather – Actions to TakeType of Weather Action to TakeRestricted visibility Slow down, keep lookout, use radar, and take
action for risk of collision.
Squall (make note of compass heading)
As above, and watch the small craft warnings; be aware of water accumulation and changes to distribution of weight and in the boat.
Thunderstorm (As above)
Sudden wind (As above)
Rapid build-up of high wave conditions
If this happens, take a different course or find a safe harbour.
Prior to Departure• Prior to starting your engines, check
– Bilges– Fuel tanks or levels– For fuel odors– If outboard engines make sure they are trimmed
down– Visually check running engines (e.g. telltales)– Listen to running engines to ensure proper running
Trip Plan Forms• Also know as Sail Plans or Float Plans• Leave it with a reliable person on shore• If you cannot be contacted at the pre-specified
time he/she will contact the Rescue Centre• On longer trips file a daily report• If plans change warn them of the change

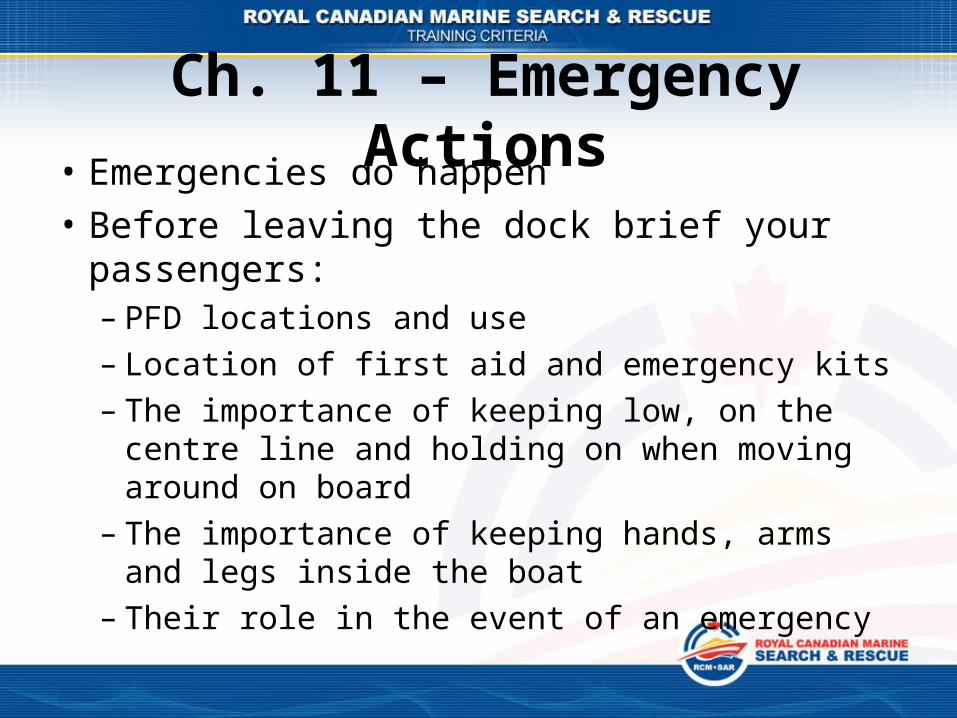
Ch. 11 – Emergency Actions• Emergencies do happen• Before leaving the dock brief your passengers:
– PFD locations and use– Location of first aid and emergency kits– The importance of keeping low, on the centre line
and holding on when moving around on board– The importance of keeping hands, arms and legs
inside the boat– Their role in the event of an emergency
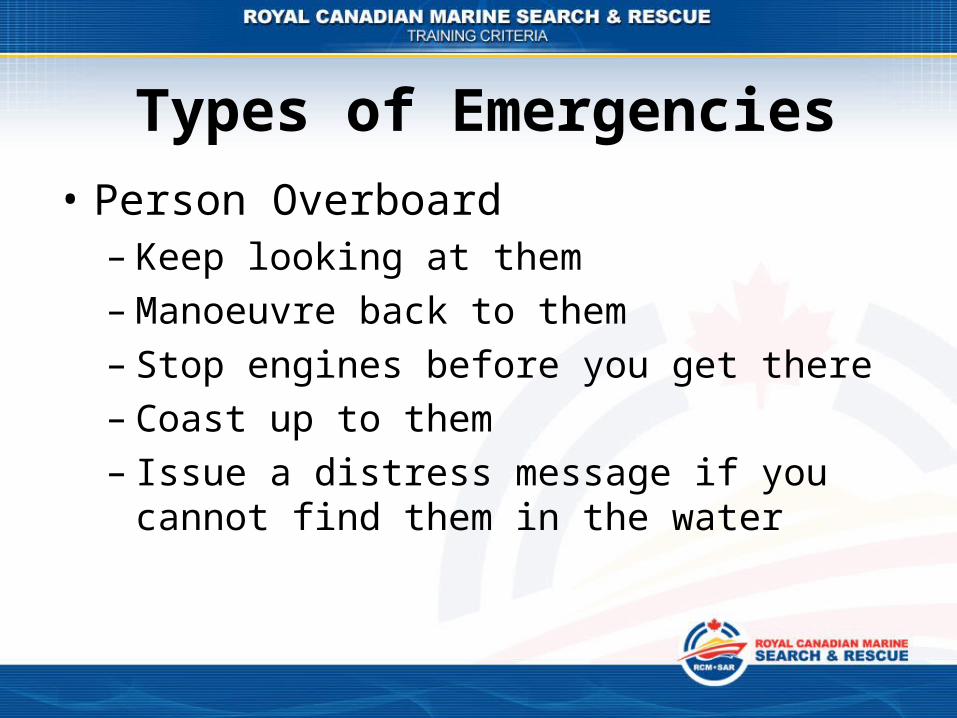
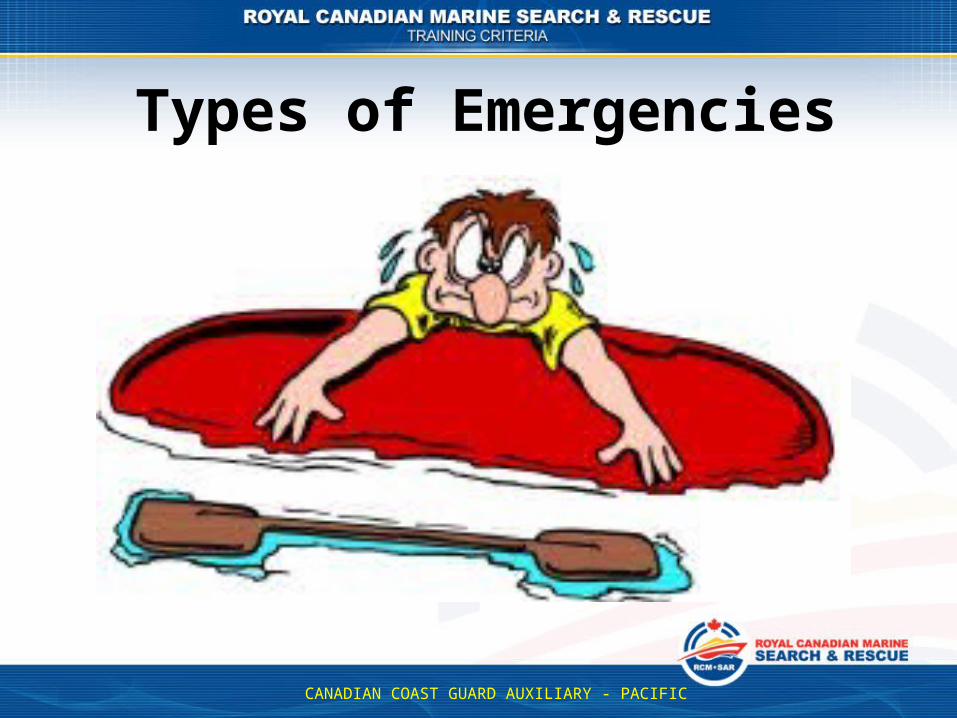
Types of Emergencies• Person Overboard
– Keep looking at them– Manoeuvre back to them– Stop engines before you get there– Coast up to them– Issue a distress message if you cannot find them in
the water

Types of Emergencies• Grounding
– Occurs when boat ends up in water too shallow– Grounding at low speed at a rising tide may not be
serious– Grounding on a falling tide can be serious if you
can’t re-float quickly– In bad seas and rough weather in can be
catastrophic– Do not back off until you know the vessel in not
holed
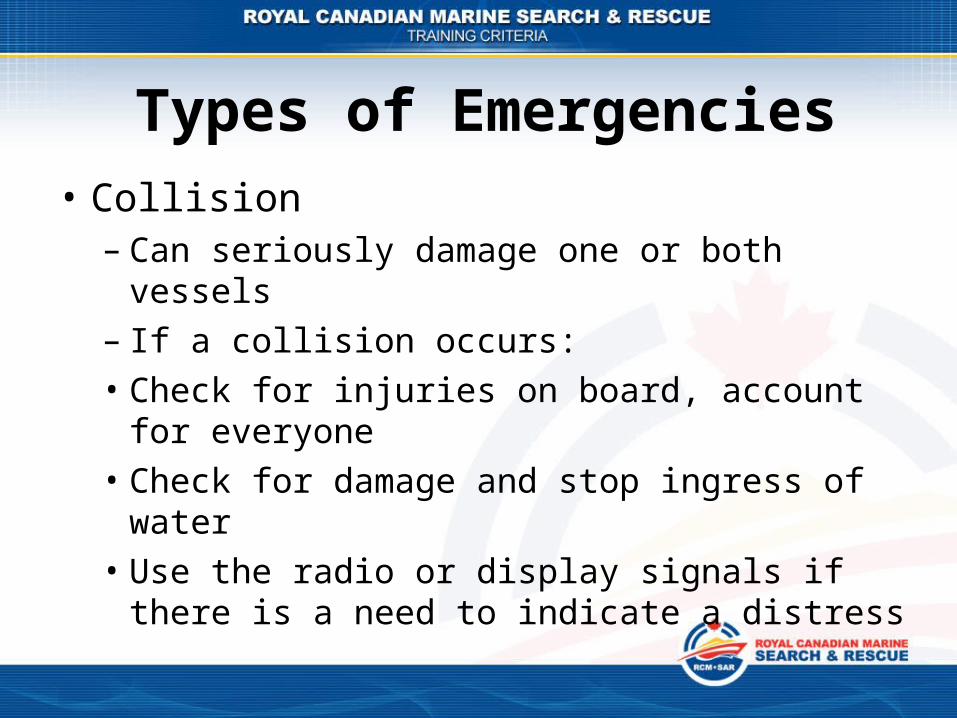
Types of Emergencies• Collision
– Can seriously damage one or both vessels– If a collision occurs:• Check for injuries on board, account for everyone• Check for damage and stop ingress of water• Use the radio or display signals if there is a need to
indicate a distress

Types of Emergencies• Hull Leaks or Flooding
– Any abnormal accumulation of water requires immediate attention
– You must, at all times, have the equipment and tools required to temporarily stop any leaks which may occur in the hull
– Hull leaks or flooding can prevented by good maintenance, proceeding at a safe speed, not overloading your vessel, and avoiding travel in conditions which may be taxing for your vessel
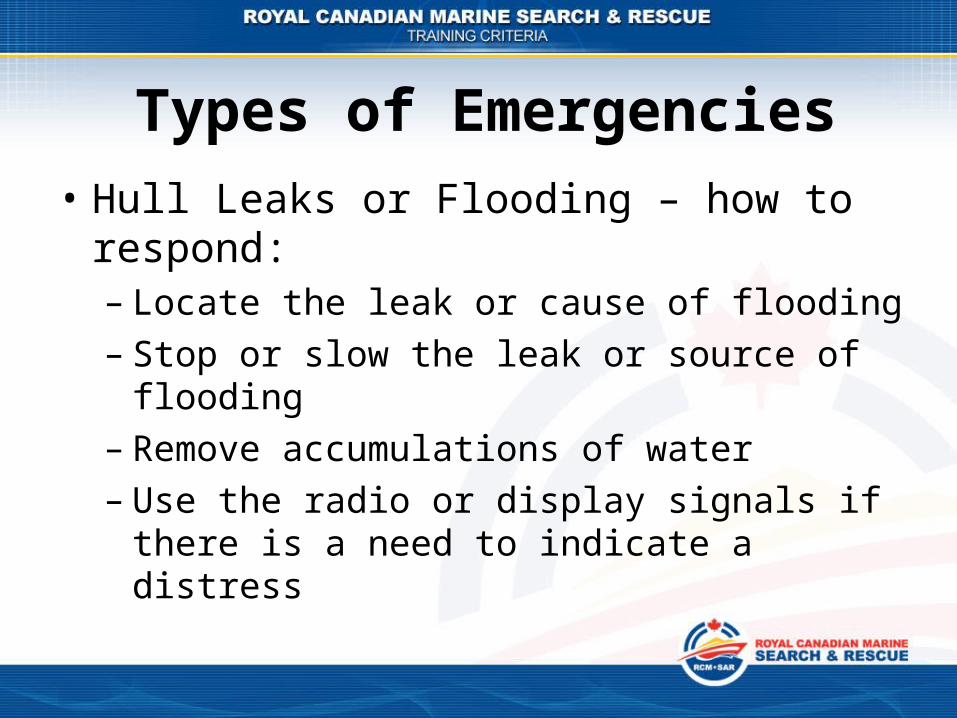
Types of Emergencies• Hull Leaks or Flooding – how to respond:
– Locate the leak or cause of flooding– Stop or slow the leak or source of flooding– Remove accumulations of water– Use the radio or display signals if there is a need to
indicate a distress
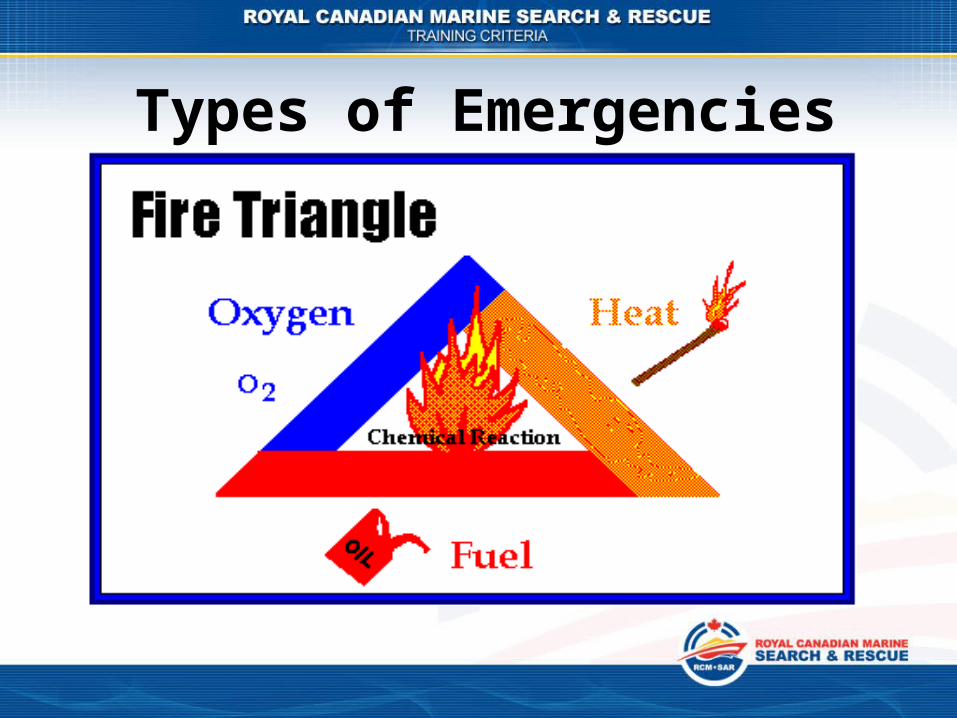
Types of Emergencies

Types of Emergencies• In the event of Mechanical Breakdowns:
– Altering the craft’s speed and direction away from danger, as appropriate to the circumstances
– Anchor– Investigate the problem– Correct the problem– Use the radio or display signals if there is a need to
indicate a distress
Types of Emergencies
CANADIAN COAST GUARD AUXILIARY - PACIFIC
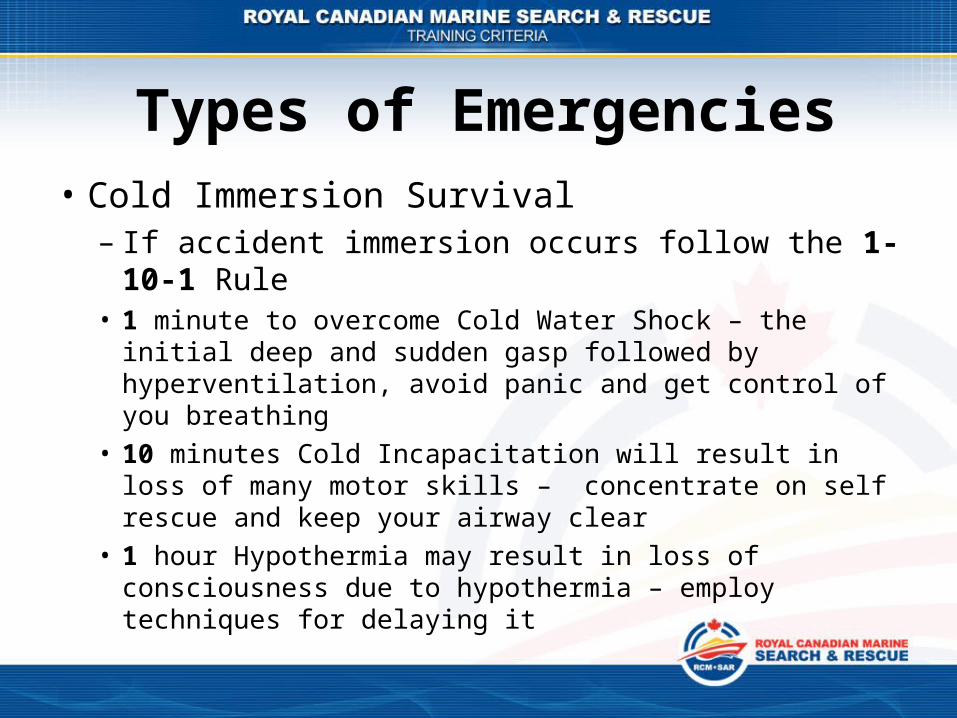
Types of Emergencies• Cold Immersion Survival
– If accident immersion occurs follow the 1-10-1 Rule• 1 minute to overcome Cold Water Shock – the initial deep
and sudden gasp followed by hyperventilation, avoid panic and get control of you breathing
• 10 minutes Cold Incapacitation will result in loss of many motor skills – concentrate on self rescue and keep your airway clear
• 1 hour Hypothermia may result in loss of consciousness due to hypothermia – employ techniques for delaying it
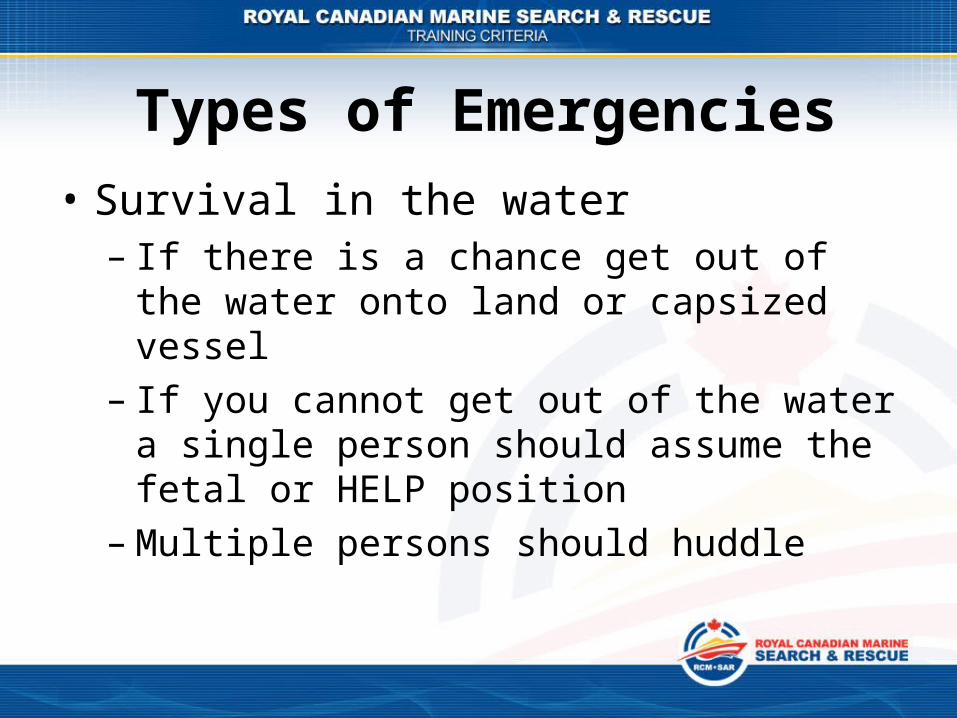
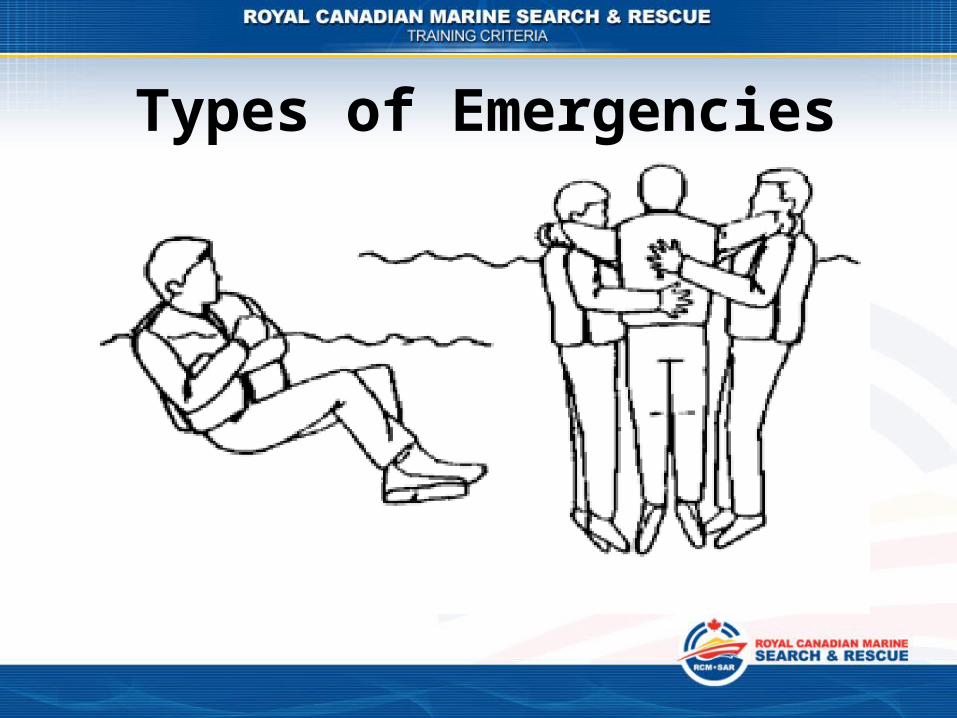
Types of Emergencies• Survival in the water
– If there is a chance get out of the water onto land or capsized vessel
– If you cannot get out of the water a single person should assume the fetal or HELP position
– Multiple persons should huddle
Types of Emergencies

Types of Emergencies• Hypothermia
– Develops with exposure to abnormally low temperatures
• Immersion in cold water, exposure to cold air in water-soaked clothing, prolonged exposure to low air temperatures
– Areas of the greatest heat loss are:• The head and neck• Both sides of the chest• Groin
Hypothermia• Hypothermia
– Early stages: shivering, slurred speech, withdrawn– Moderate: violet shivering, lack of muscle
coordination, mild confusion even though victim may appear alert, victim turns pale while lips, ears, fingers and toes appear blue
– Advanced: sluggish thinking and amnesia, inability to use hands, exposed skin may be blue and puffy, muscle coordination becomes poor and walking almost impossible, incoherent and irrational behaviour
Treating Hypothermia1. Take the patient to a warm, dry location.2. Remove wet clothing and replace it with dry
clothing and/or blankets, and cover the head. Never rub the patient's body or extremities in an effort to warm them up.
3. The introduction of another body with normal body temperatures can help.
4. Cover the patient with an insulating layer, and protect him from getting wet.

Treating Hypothermia5. Apply warm dry objects (40°to 45°C) onto the
patient. Professional treatment may include introducing warmed damp air into the lungs to warm the patient from the core.
6. Offer the patient warm but not hot liquids. Do not give alcohol or hot stimulants. Alcohol may assist in feeling warm, but actually increases bodily heat loss.
7. Call for help or exhibit signals to indicate distress and need of assistance, if necessary.
Carbon Monoxide Poisoning• CO is a toxic gas that is colourless, odorless,
tasteless and non-irritating• It is almost impossible to detect• It is heavier than air and accumulates in the
bottom of pockets• There is also a danger of the exhaust fumes
being drawn back into slow moving open boats
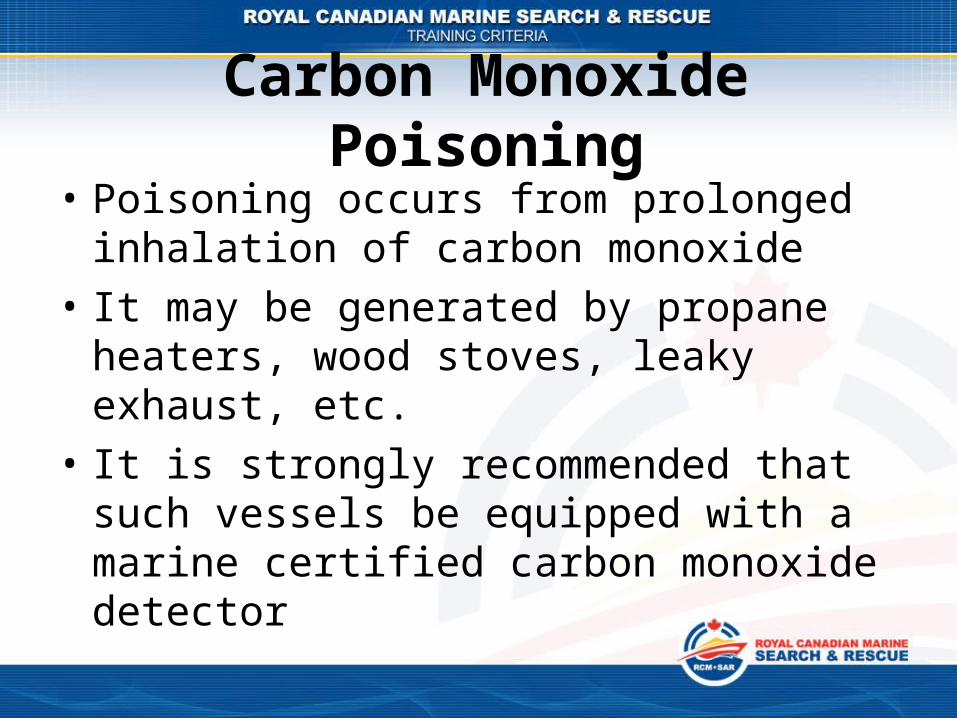
Carbon Monoxide Poisoning• Poisoning occurs from prolonged inhalation of
carbon monoxide• It may be generated by propane heaters, wood
stoves, leaky exhaust, etc.• It is strongly recommended that such vessels
be equipped with a marine certified carbon monoxide detector
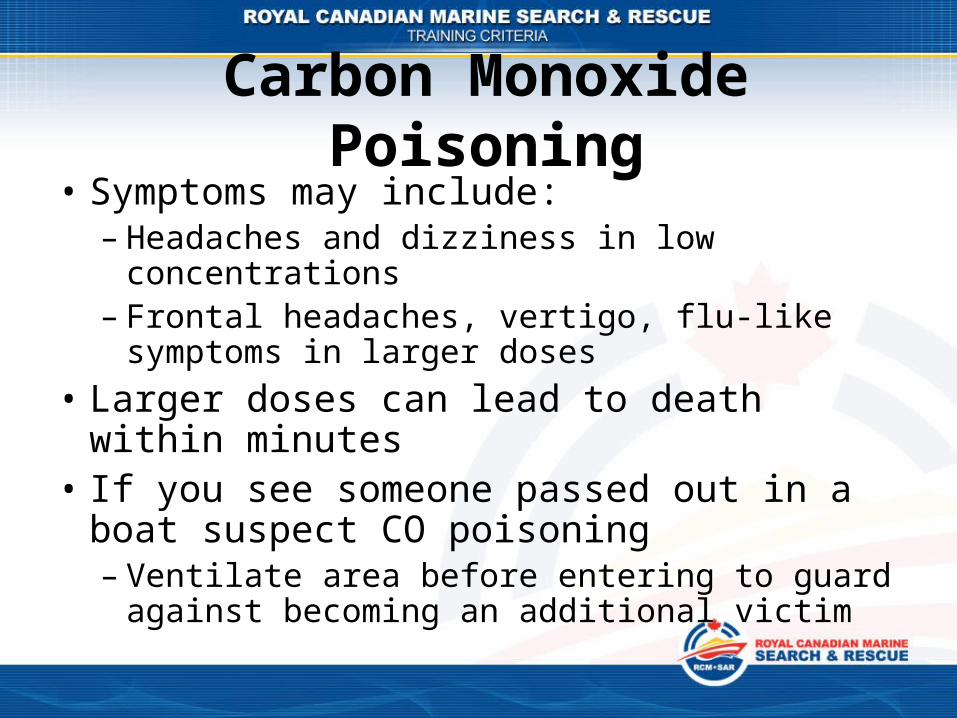
Carbon Monoxide Poisoning• Symptoms may include:
– Headaches and dizziness in low concentrations– Frontal headaches, vertigo, flu-like symptoms in
larger doses• Larger doses can lead to death within minutes• If you see someone passed out in a boat
suspect CO poisoning– Ventilate area before entering to guard against
becoming an additional victim
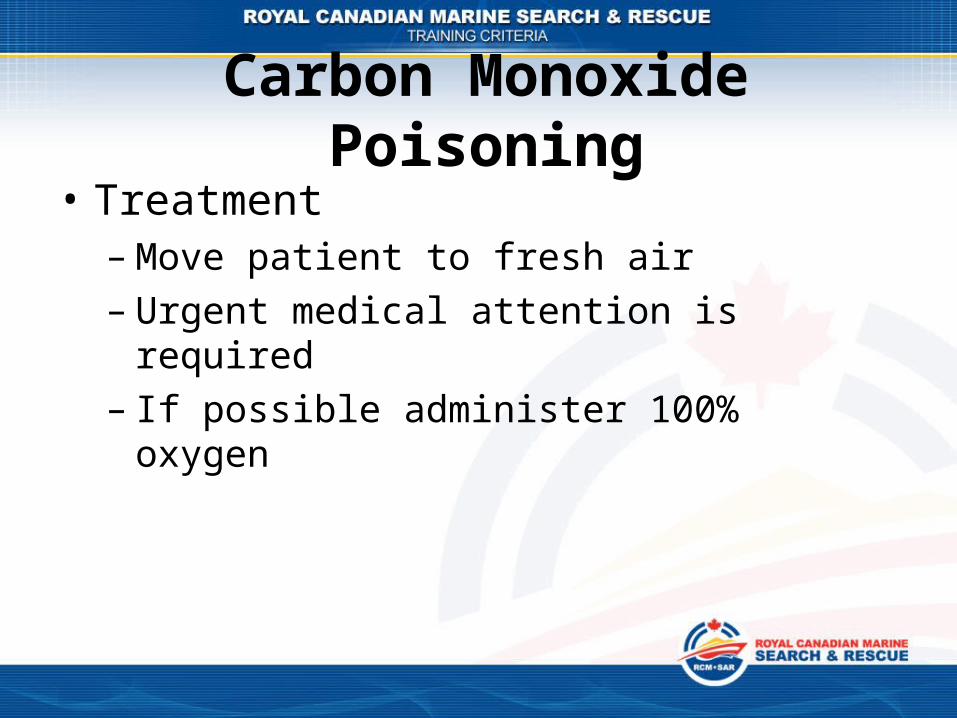
Carbon Monoxide Poisoning• Treatment
– Move patient to fresh air– Urgent medical attention is required– If possible administer 100% oxygen

Carbon Monoxide Poisoning

Ch. 12 – Anchoring• The factors to consider when anchoring are:
– Weather forecast– How long will you be anchoring– What type of bottom will you be anchoring in– Are there tidal considerations– Are there rivers, creeks or naturally occurring
currents– Do local regulations permit anchoring
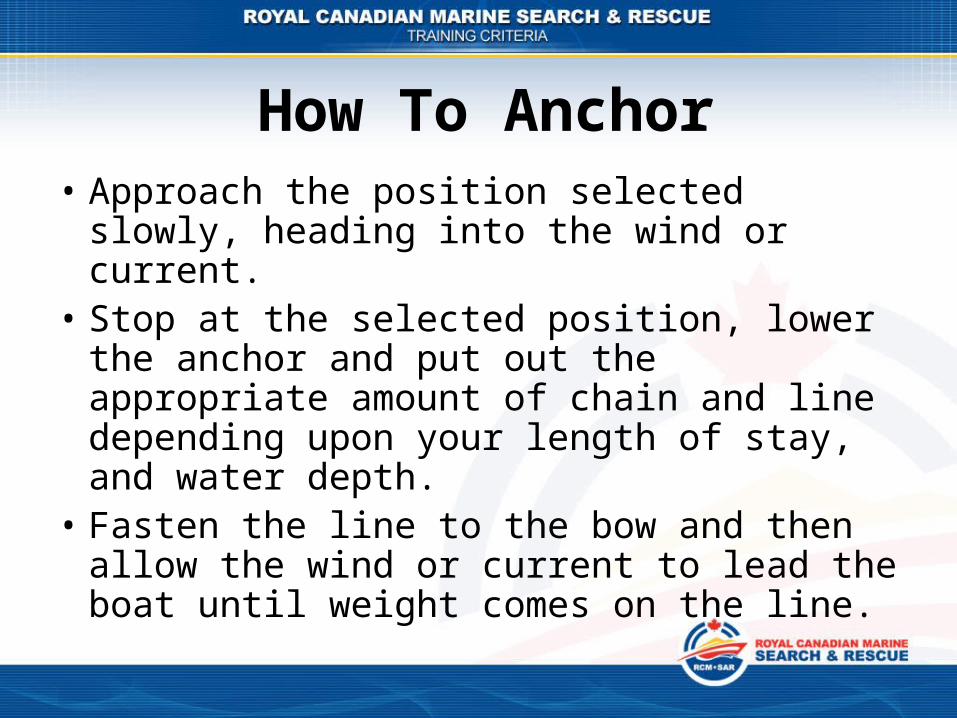
How To Anchor• Approach the position selected slowly, heading
into the wind or current.• Stop at the selected position, lower the anchor
and put out the appropriate amount of chain and line depending upon your length of stay, and water depth.
• Fasten the line to the bow and then allow the wind or current to lead the boat until weight comes on the line.
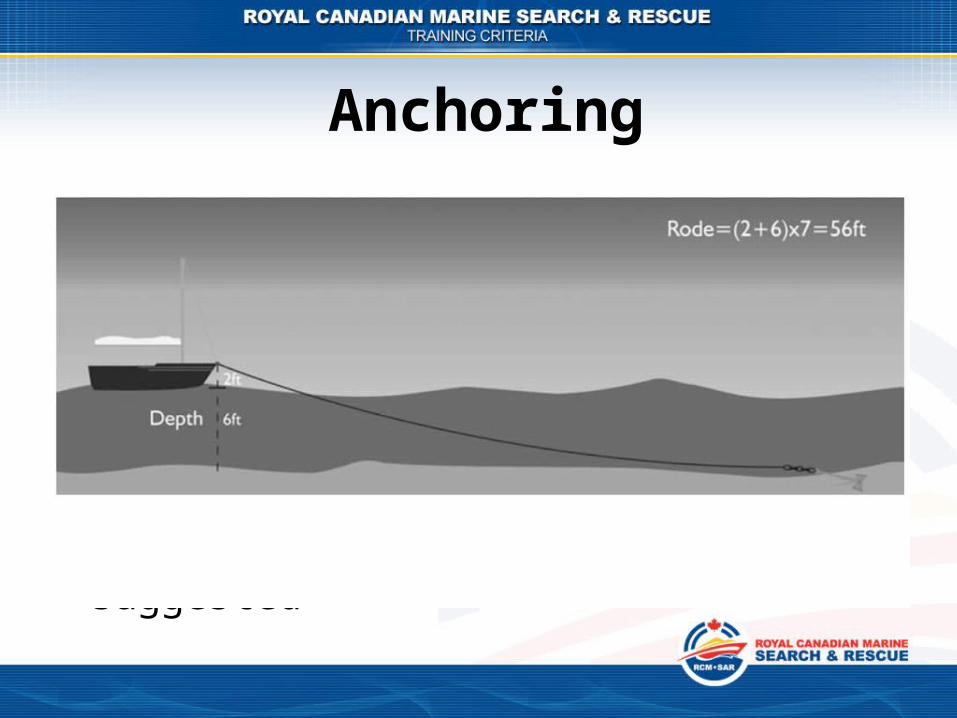
Anchoring• Scope is the ratio of
– Length of Anchor Rode : Depth of Water
• The depth is considered to be the maximum depth of water during the period of time you will be anchoring PLUS the distance from your gunwale to the water line
• For longer stays a Scope of 7:1 is suggested

Anchoring• Once anchored check your bearings so you can
determine if you start dragging anchor• You anchor can be used in situations of
mechanical breakdown or other emergencies to prevent drifting into shallow water– Ensure it is readily available
• At night remember you must display an all-around white light
Anchoring
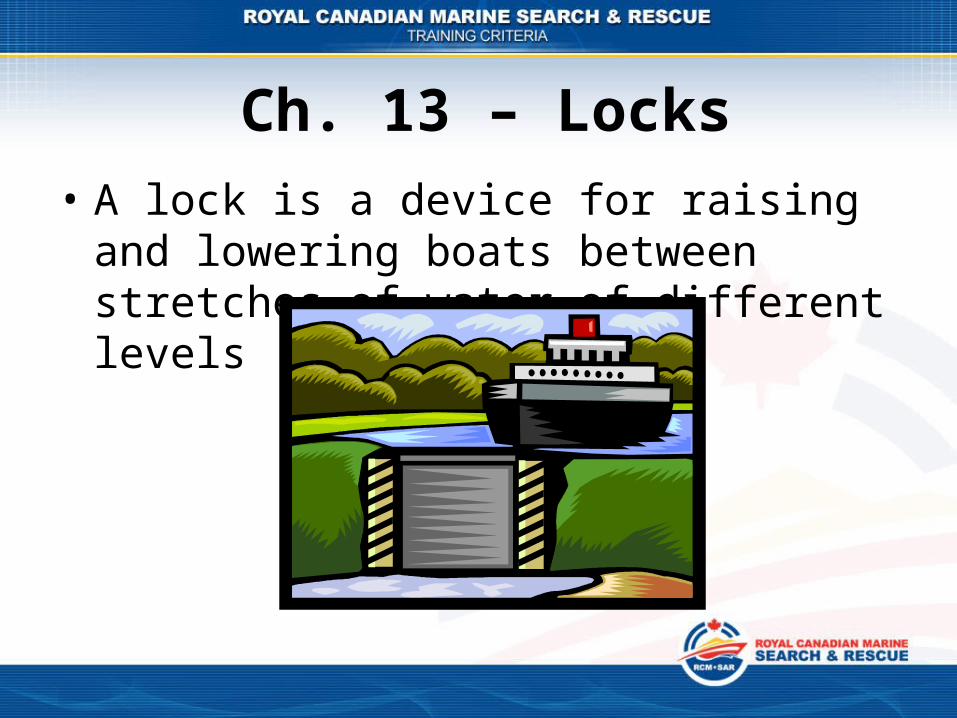
Ch. 13 – Locks• A lock is a device for raising and lowering boats
between stretches of water of different levels

How To Lock Up
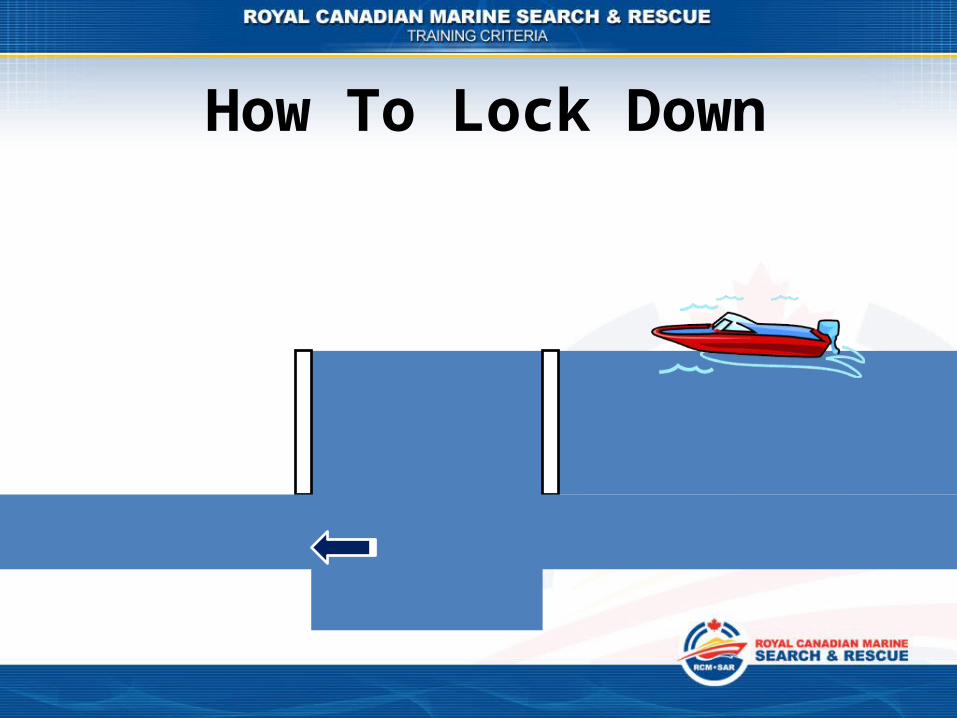
How To Lock Down
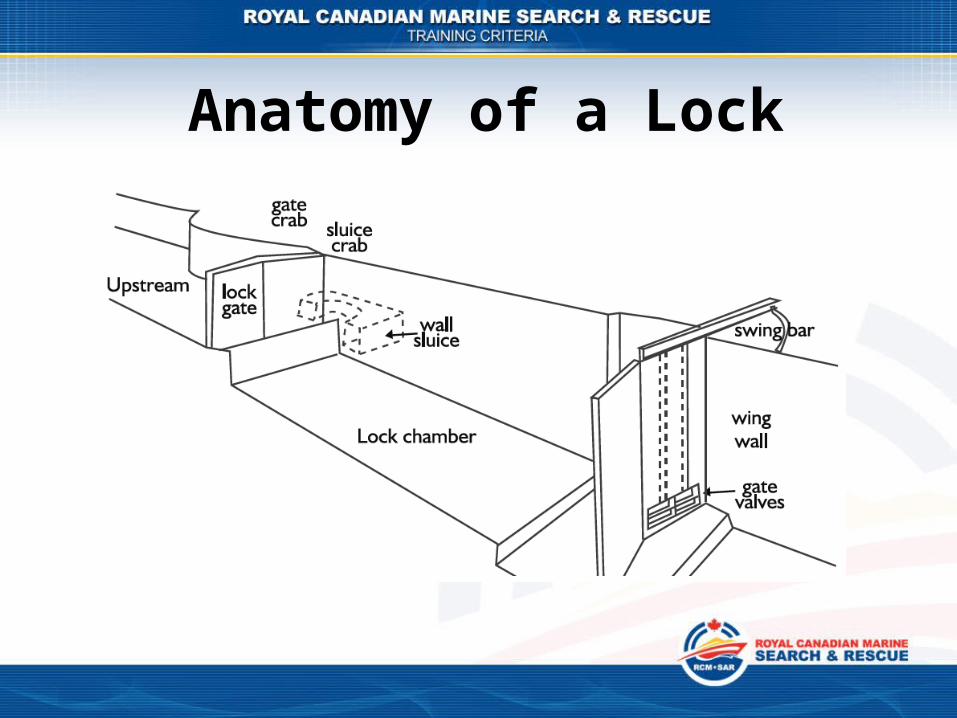
Anatomy of a Lock
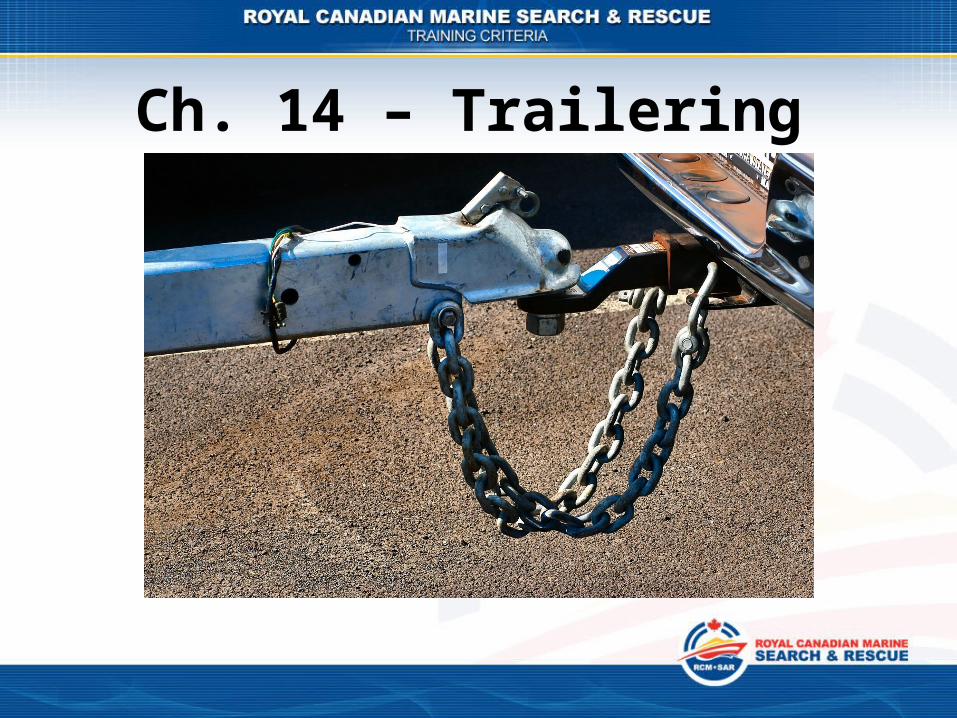
Ch. 14 – Trailering

Trailering

Trailering• Before towing practice manoeuvring a trailer
– Practice with your trailer empty then graduate to a loaded trailer
• The trailer must be of a suitable size for the boat– Don’t exceed 80% of the trailer’s capacity
• The boat should be balanced on the trailer– Approximately 10% is carried on the tongue
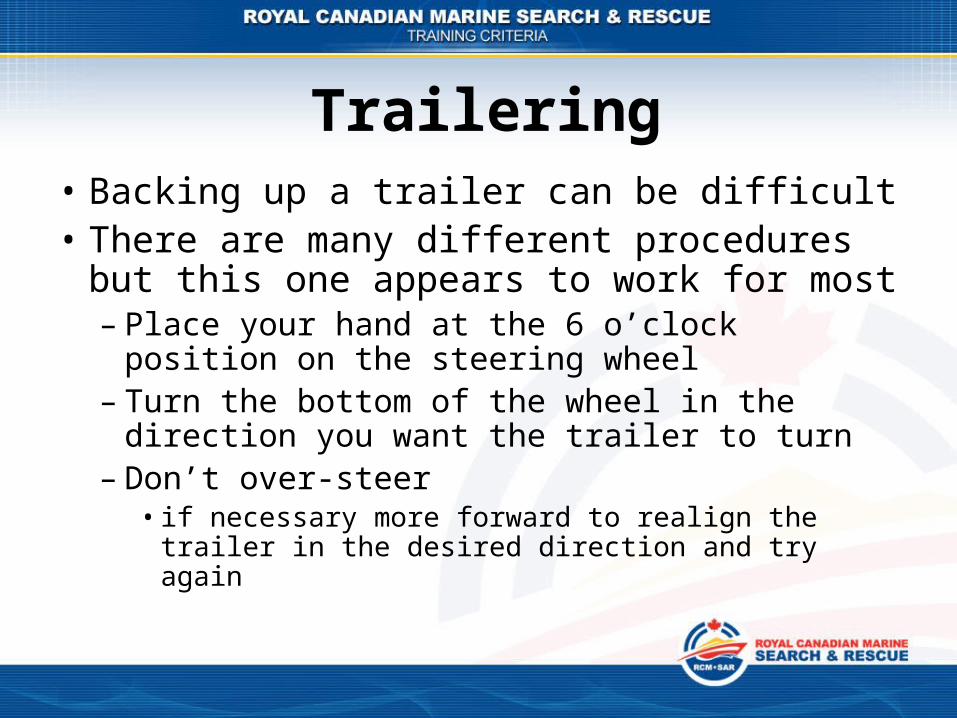
Trailering• Backing up a trailer can be difficult• There are many different procedures but this
one appears to work for most– Place your hand at the 6 o’clock position on the
steering wheel– Turn the bottom of the wheel in the direction you
want the trailer to turn– Don’t over-steer
• if necessary more forward to realign the trailer in the desired direction and try again

Pre-Departure Check• Check tire pressure• Inspect trailer for abnormalities• Ensure boat is properly secured to trailer
– Secured to bow eye plus tie-downs• Ensure electrical hook-up are properly
connected– Check for proper light and brake operation
• Connect cross hitch safety chains– Crossed chains may support the hitch if ball fails

Ch. 15 – Enforcement• Law enforcement agencies enforce the laws
under which all vessels operate– RCMP, provincial/municipal police, other
authorized government agencies
• You may be checked for items such as– PCOC, Radio Operator’s Certificate, mandatory
equipment– You may also be cited for careless operation or
operation under the influence of alcohol or drugs
Criminal Code of Canada• You may be prosecuted or fined for:
– Operating a vessel in a reckless manner compromising the safety of others
– Consumption of alcohol/drugs while operating a vessel
– Operating a vessel while impaired • Where impaired operation causes death the maximum
penalty can be 14 years imprisonment• Impaired operation causing injury carries a maximum
sentence of 10 years
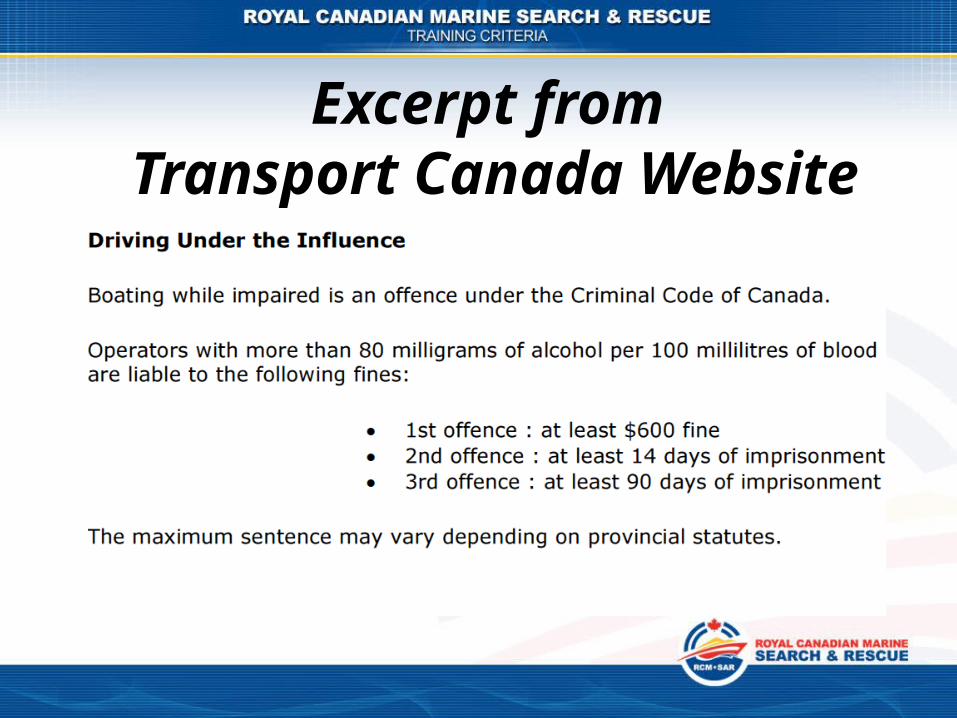
Excerpt from Transport Canada Website

Transport Canada Website (cont).
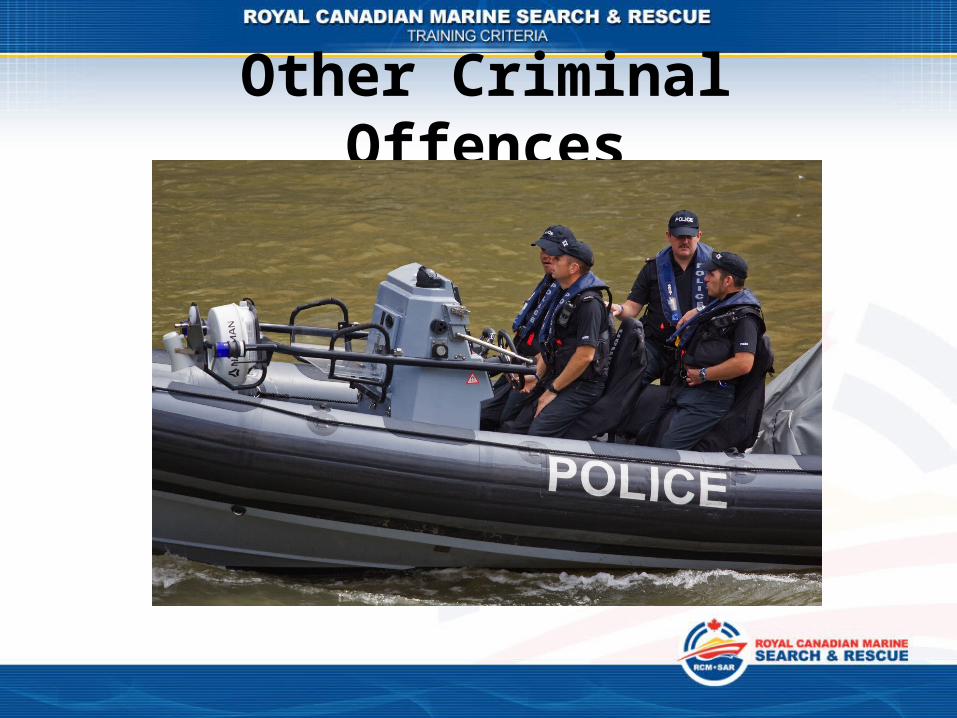
Other Criminal Offences

Other Criminal Offences• Towing water-skiers without a person on watch or
after dark (one hour after sunset to sunrise) or during restricted times.
• Sending false distress signals.• Operating an unseaworthy boat, and endangering
the lives of others.• Tying up to a navigational buoy.• Sailing an unseaworthy vessel.• Operating vessel while disqualified/ prohibited.

Actions to Avoid• Standing up or changing seats in a small boat,
especially if it is loaded.– If a person must absolutely change places, he or she
should stay low, on the centre line, and hold on to the boat's gunwales.
• Standing up to start an outboard motor.• Using a boat propelled by mechanical power
within five miles of the shoreline, unless it is equipped with a noise muffling mechanism.
• Needlessly setting off a sound signalling device or using a searchlight.

Actions to Avoid• Waiting until the last minute to comply with the Collision
Regulations.• Operating too close to beaches, as swimmers are difficult
to spot in the water.• Having only outdated charts and documents on board.• Overloading a boat.• Dropping anchor too close to boats already at anchor.• Proceeding at a high speed in or near an anchorage area.• Showing off in a reckless manner.
Ch. 16 – Glossary• This chapter outlines a table of valuable
terminology– Far too extensive for review here
• You are encouraged to review this material and reference it when new terms are presented
• We will, however, review some of the components of boats
Related Documents


![Cat C32 ACERT Spec Sheet - Pleasure Craft[1]](https://static.cupdf.com/doc/110x72/552276d04a7959455e8b492f/cat-c32-acert-spec-sheet-pleasure-craft1.jpg)


