PLEASE READ BEFORE STARTING INSTALLATION While MBRP Inc. has made every effort to ensure that all components of this system are of superior quality and properly packaged, it is the installer’s responsibility to ensure the following before removal of the factory exhaust: • that ALL components shown in the illustration on page 2 are present. • that ALL mating components fit together. • that there are no damaged components. • that the system you have purchased is appropriate for your vehicle year, model and configuration. • that the system will not interfere with any modifications previously installed. • that you have read and understand these instructions. If you have any questions or are uncertain about any aspect of the installation of this system to your vehicle please contact your dealer before commencing installation. Installation Instructions for Systems; S6220304, S6220409, S6220AL 01-06 Ford Excursion 6.0L Powerstroke Diesel S6220 © 01/06 Page 1 of 4

Welcome message from author
This document is posted to help you gain knowledge. Please leave a comment to let me know what you think about it! Share it to your friends and learn new things together.
Transcript

PLEASE READ BEFORE STARTING INSTALLATION
While MBRP Inc. has made every effort to ensure that all components of this system are of superior quality and properly packaged, it is the installer’s responsibility to ensure the following before removal of the factory exhaust:
• that ALL components shown in the illustration on page 2 are present.
• that ALL mating components fit together.
• that there are no damaged components.
• that the system you have purchased is appropriate for your vehicle year, model and configuration.
• that the system will not interfere with any modifications previously installed.
• that you have read and understand these instructions. If you have any questions or are uncertain about any aspect of the installation of this system to your vehicle please contact your dealer before commencing installation.
Installation Instructions for Systems; S6220304, S6220409, S6220AL
01-06 Ford Excursion
6.0L Powerstroke Diesel
S6220 © 01/06 Page 1 of 4

S6220304 “PRO SERIES” S6220AL “Installer Series” S6220409 “XP SERIES” 1 PC - Down Pipe 1 PC - Down Pipe 1 PC - Mid Pipe 1 PC - Mid Pipe 1 PC - Extension Pipe 1 PC - Extension Pipe 1 PC - High Flow Muffler 1 PC - High Flow Muffler 1 PC - Tail Pipe 1 PC - Tail Pipe 1 PC - 3.5" Clamps 1 PC - 3.5" Clamps 3 PCS - Hanger Clamps 3 PCS - Hanger Clamps 1 PC - 5" Stainless Steel Tip Tips Sold Separately
Removal of Stock System:
1. Apply a penetrating lubricant liberally to all exhaust fasteners, hangers and rubber insulators.
2. Loosen the nut on the band clamp located behind the catalytic converter using a 15mm wrench or socket. See Figure 1. 3. Remove the muffler and tail pipe from the OEM rubber hangers. To remove the system in one piece, on 03-04 models, the bottom shock bolt of the passenger side shock must be removed. This is not required on 05 or 06 models. Separate the stock exhaust at the slip joint located
Figure 1 behind the catalytic converter and remove the muffler and tail pipe from under the truck. Re-install the bottom shock bolt.
4. Remove the catalytic converter by removing the two nuts holding the inlet flange together using a 15mm wrench or socket. Retain the nuts for the re-installation of the catalytic converter. See Figure 2.
Figure 2
S6220 © 01/06 Page 2 of 4
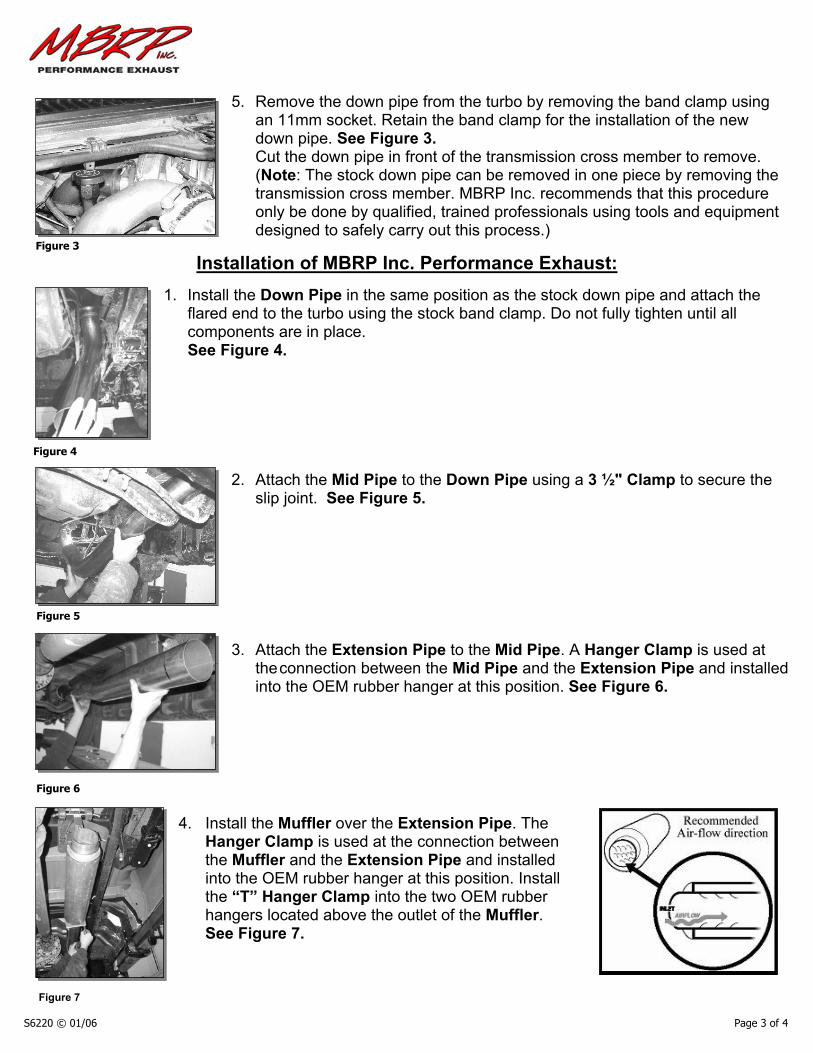
5. Remove the down pipe from the turbo by removing the band clamp using an 11mm socket. Retain the band clamp for the installation of the new down pipe. See Figure 3. Cut the down pipe in front of the transmission cross member to remove. (Note: The stock down pipe can be removed in one piece by removing the transmission cross member. MBRP Inc. recommends that this procedure only be done by qualified, trained professionals using tools and equipment designed to safely carry out this process.)
Figure 3
Installation of MBRP Inc. Performance Exhaust:
1. Install the Down Pipe in the same position as the stock down pipe and attach the flared end to the turbo using the stock band clamp. Do not fully tighten until all components are in place. See Figure 4.
Figure 4
2. Attach the Mid Pipe to the Down Pipe using a 3 ½" Clamp to secure the slip joint. See Figure 5.
Figure 5
3. Attach the Extension Pipe to the Mid Pipe. A Hanger Clamp is used at the connection between the Mid Pipe and the Extension Pipe and installed into the OEM rubber hanger at this position. See Figure 6.
Figure 6 4. Install the Muffler over the Extension Pipe. The Hanger Clamp is used at the connection between the Muffler and the Extension Pipe and installed into the OEM rubber hanger at this position. Install the “T” Hanger Clamp into the two OEM rubber hangers located above the outlet of the Muffler. See Figure 7.
Figure 7 S6220 © 01/06 Page 3 of 4

5. Install the Tail Pipe from the rear of the truck, over the axle and attach to the Muffler Outlet. Install the tail pipe hanger into the OEM hanger, and then adjust for best axle clearance and Tail Pipe exit location to complete. See Figure 8.
Figure 8
6. Install the provided clamps around the pipes where needed. Adjust the Tail Pipe and check along the
whole length of the exhaust system to ensure that there is adequate clearance around the fuel and brake lines or any wiring. If any interference is detected relocate or adjust.
7. Make sure the exhaust is in place before tightening the clamps. Start at the front of the exhaust system
and begin tightening all connections.
8. Install and adjust Tip to suit. Using a 17mm wrench tighten lock bolt located on Tip. A Tip is not included with “INSTALLER” or “XP SERIES” kits. A Tip may be purchased separately, check with your dealer.
Congratulations! You are ready to begin enjoying the improved performance and driving experience of your MBRP Inc. performance exhaust system. We hope you enjoy your purchase. S6220 © 01/06 Page 4 of 4
Related Documents
![IS 14961 (2001): Guidelines for Rain Water Harvesting in ... · reinforced cement concrete gutters. 4.2.3 Down Pipe Galvanized mild steel pipe [see IS 1239 (Part 1)] cast iron pipe](https://static.cupdf.com/doc/110x72/5e80e7c8f642be310c605b58/is-14961-2001-guidelines-for-rain-water-harvesting-in-reinforced-cement-concrete.jpg)