Introduction to Histology I. Introduction II. Methods I. Tissue preparation II. Observation III. Histochemistry

Welcome message from author
This document is posted to help you gain knowledge. Please leave a comment to let me know what you think about it! Share it to your friends and learn new things together.
Transcript
Introduction to Histology
I. Introduction II. Methods
I. Tissue preparation
II. Observation III. Histochemistry
Histology
The study of the organization of cells and extra-cellular material into tissues and organs.

Tissues
A group of similar cells that usually has a common embryonic origin and is specialized for a particular function.
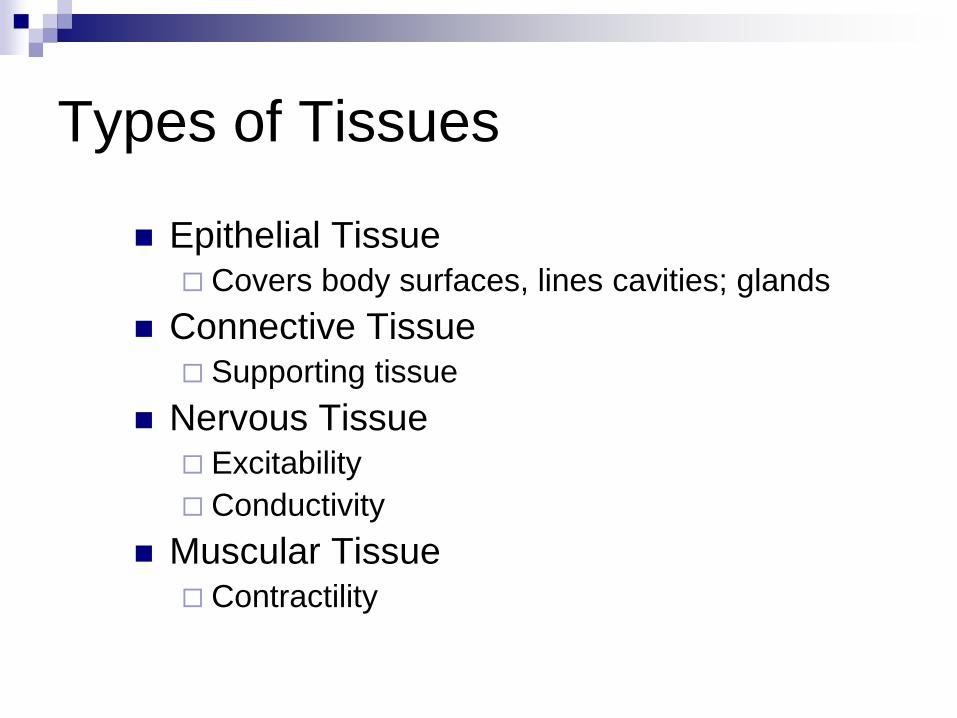
Types of Tissues
Epithelial Tissue Covers body surfaces, lines cavities; glands
Connective Tissue Supporting tissue
Nervous Tissue Excitability Conductivity
Muscular Tissue Contractility

Biopsy
Removal of a sample of living tissue for microscopic examination. Used to diagnose cancers, infections, etc

How to get tissues for study Steps in tissue preparation Fresh tissues from the body 1. fixation
Formalin ( 10% formaldehyde) Osmium tetroxide for EM Mechanism - Forms cross links with proteins (Lysine)
2. Embedding – gives support for tissue slicing Paraffin or plastic resin
3. Washing & dehydration (dehydration by graded alcohols in ascending order)
4. clearing – to remove paraffin & alcohol By xylol or tulol
5. block making
How to generate histology slides?

6. section cutting – 5-10μ thick sections with microtome 7. mounting – on glass slide ( adhesive – albumin) 8. clearing – xylol / tulol 9. rehydrate – alcohols in descending order Staining
nuclear stain – Hematoxylin ( basic stain & water soluble) counter stain – Eosin ( less water soluble but soluble in alcohol)
– dehydrate in ascending order 10. Clearing – xylol / tulol 11.Mounting medium – cover glass
How to generate histology slides?
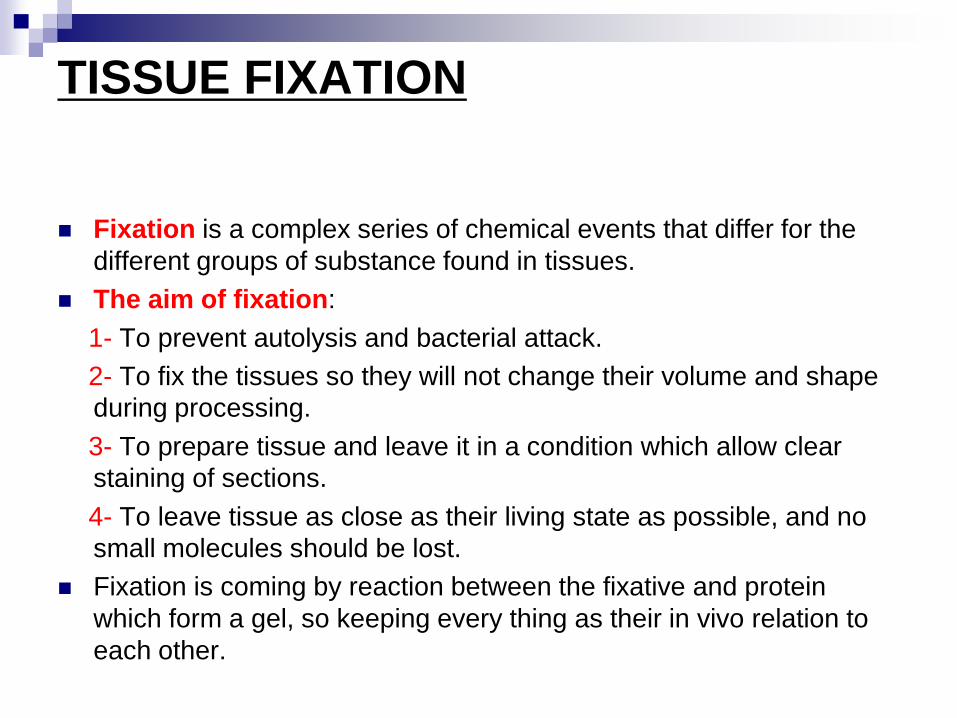
TISSUE FIXATION
Fixation is a complex series of chemical events that differ for the different groups of substance found in tissues.
The aim of fixation: 1- To prevent autolysis and bacterial attack. 2- To fix the tissues so they will not change their volume and shape
during processing. 3- To prepare tissue and leave it in a condition which allow clear
staining of sections. 4- To leave tissue as close as their living state as possible, and no
small molecules should be lost. Fixation is coming by reaction between the fixative and protein
which form a gel, so keeping every thing as their in vivo relation to each other.

Factors affect fixation:
- PH. - Temperature. - Penetration of fixative. - Volume of tissue. According to previous factors we can determine the concentration of
fixative and fixation time.
Types of fixative: Acetic acid, Formaldehyde, Ethanol, Glutaraldehyde, Methanol and
Picric acid.
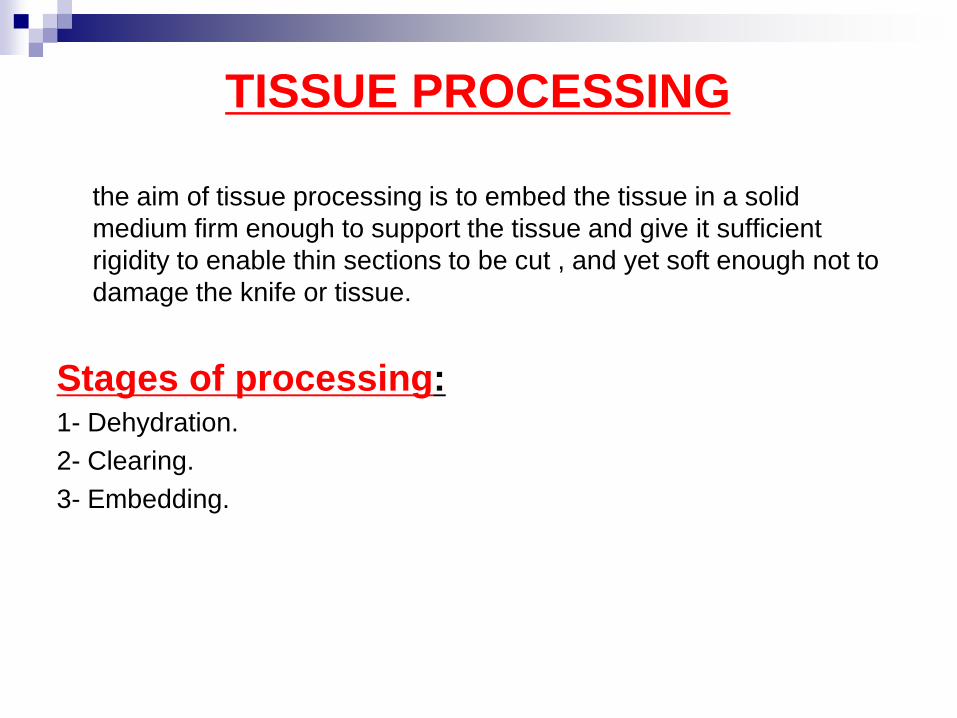
TISSUE PROCESSING
the aim of tissue processing is to embed the tissue in a solid medium firm enough to support the tissue and give it sufficient rigidity to enable thin sections to be cut , and yet soft enough not to damage the knife or tissue.
Stages of processing: 1- Dehydration. 2- Clearing. 3- Embedding.

Dehydration to remove fixative and water from the tissue and replace
them with dehydrating fluid. There are a variety of compounds many of which are
alcohols. several are hydrophilic so attract water from tissue.
To minimize tissue distortion from diffusion currents, delicate specimens are dehydrated in a graded ethanol series from water through 10%-20%-50%-95%-100% ethanol.
In the paraffin wax method, following any necessary post fixation treatment, dehydration from aqueous fixatives is usually initiated in 60%-70% ethanol, progressing through 90%-95% ethanol, then two or three changes of absolute ethanol before proceeding to the clearing stage.
Types of dehydrating agents:
Ethanol, Methanol, Acetone.
Duration of dehydration should be kept to the minimum consistent
with the tissues being processed. Tissue blocks 1 mm thick should receive up to 30 minutes in each alcohol, blocks 5 mm thick require up to 90 minutes or longer in each change. Tissues may be held and stored indefinitely in 70% ethanol without harm

Clearing replacing the dehydrating fluid with a fluid that is totally miscible with
both the dehydrating fluid and the embedding medium. Choice of a clearing agent depends upon the
following: - The type of tissues to be processed, and the type of processing to
be undertaken. - The processor system to be used. - Intended processing conditions such as temperature, vacuum and
pressure. - Safety factors. - Cost and convenience. - Speedy removal of dehydrating agent . - Ease of removal by molten paraffin wax . - Minimal tissue damage .

Some clearing agents: - Xylene. - Toluene. - Chloroform. - Benzene. - Petrol.

Embedding is the process by which tissues are surrounded by a medium such
as agar, gelatin, or wax which when solidified will provide sufficient external support during sectioning.
Paraffin wax properties :
Paraffin wax is a polycrystalline mixture of solid hydrocarbons produced during the refining of coal and mineral oils. It is about two thirds the density and slightly more elastic than dried protein. Paraffin wax is traditionally marketed by its melting points which range from 39°C to 68°C.
The properties of paraffin wax are improved for histological purposes by the inclusion of substances added alone or in combination to the wax:
- improve ribboning. - increase hardness. - decrease melting point - improve adhesion between specimen and wax

Precaution while embedding in wax The wax is clear of clearing agent. No dust particles must be present. Immediately after tissue embedding, the wax must be rapidly cooled
to reduce the wax crystal size.

Tissue processing Embedding moulds: (A) paper boat; (B) metal bot mould; (C) Dimmock embedding mould; (D) Peel-a-way disposable mould; (E) base mould used with embedding ring ( F) or cassette bases (G)

General Embedding Procedure 1- Open the tissue cassette, check against worksheet entry to ensure the correct number of tissue pieces are present.
2- Select the mould, there should be sufficient room for the tissue with allowance for at least a 2 mm surrounding margin of wax.
3- Fill the mould with paraffin wax.
4 Using warm forceps select the tissue, taking care that it does not cool in the air; at the same time.
5- Chill the mould on the cold plate, orienting the tissue and firming it into the wax with warmed forceps. This ensures that the correct orientation is maintained and the tissue surface to be sectioned is kept flat.
6- Insert the identifying label or place the labeled embedding ring or cassette base onto the mould.
7- Cool the block on the cold plate, or carefully submerge it under water when a thin skin has formed over the wax surface.
8- Remove the block from the mould.
9- Cross check block, label and worksheet.


ORIENTATION OF TISSUE IN THE BLOCK Correct orientation of tissue in a mould is the most important step in embedding. Incorrect placement of tissues may result in diagnostically important tissue elements being missed or damaged during microtomy.
elongate tissues are placed diagonally across the block
tubular and walled specimens such as vas deferens, cysts and gastrointestinal tissues are embedded so as to provide transverse sections showing all tissue layers
tissues with an epithelial surface such as skin, are embedded to provide sections in a plane at right angles to the surface (hairy or keratinised epithelia are oriented to face the knife diagonally)
multiple tissue pieces are aligned across the long axis of the mould, and not placed at random
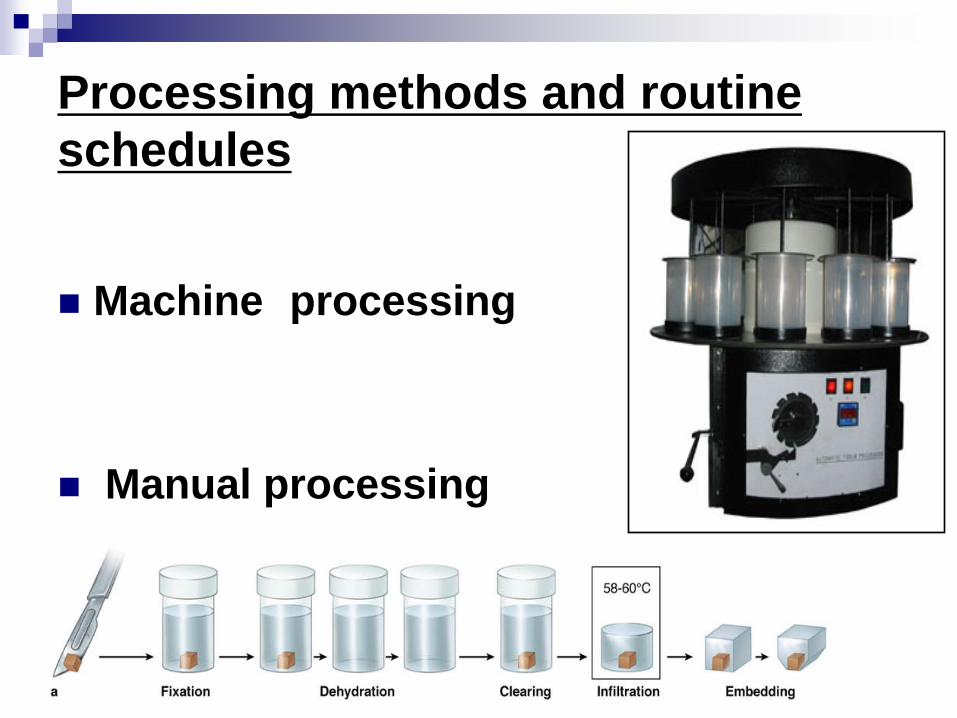
Processing methods and routine schedules
Machine processing
Manual processing
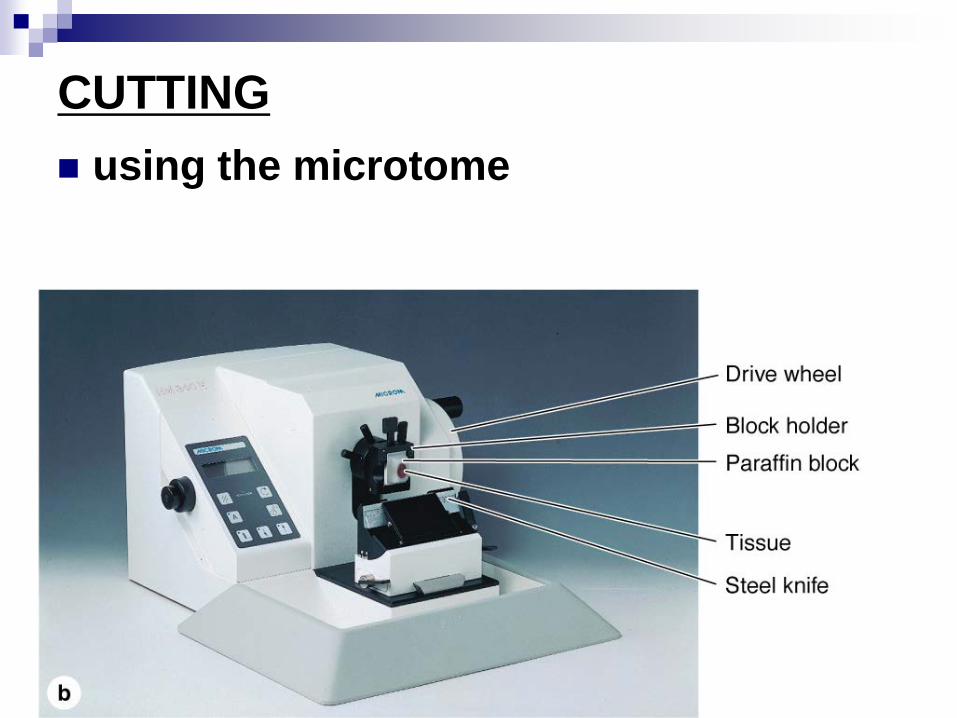
CUTTING using the microtome

A microtome is a mechanical instrument used to cut biological specimens into very thin segments for microscopic examination. Most microtomes use a steel blade and are used to prepare sections of animal or plant tissues for histology. The most common applications of microtomes are

Microtome knives STEEL KNIVES NON-CORROSIVE KNIVES FOR
CRYOSTATS DISPOSABLE BLADES GLASS KNIVES DIAMOND KNIVES
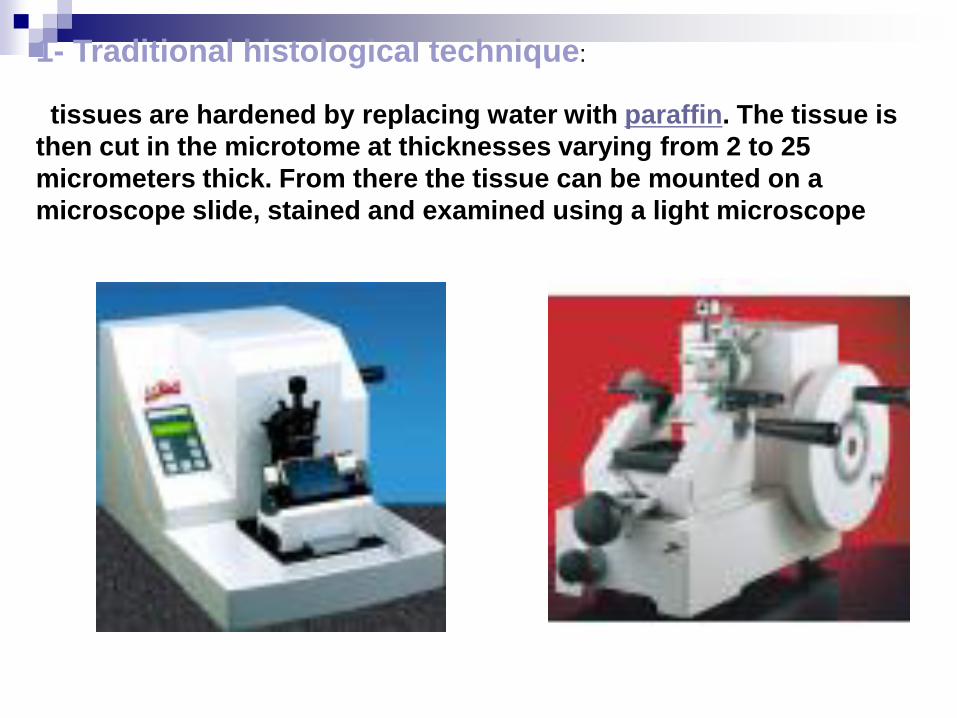
1- Traditional histological technique: tissues are hardened by replacing water with paraffin. The tissue is then cut in the microtome at thicknesses varying from 2 to 25 micrometers thick. From there the tissue can be mounted on a microscope slide, stained and examined using a light microscope

2- Cryosection: water-rich tissues are hardened by freezing and cut frozen;
sections are stained and examined with a light microscope. This technique is much faster than traditional histology (5 minutes vs. 16 hours) and are used in operations to achieve a quick diagnosis. Cryosections can also be used in immunohistochemistry as freezing tissue does not alter or mask its chemical composition as much as preserving it with a fixative.

STAIN and MAINTAIN Structural Integrity
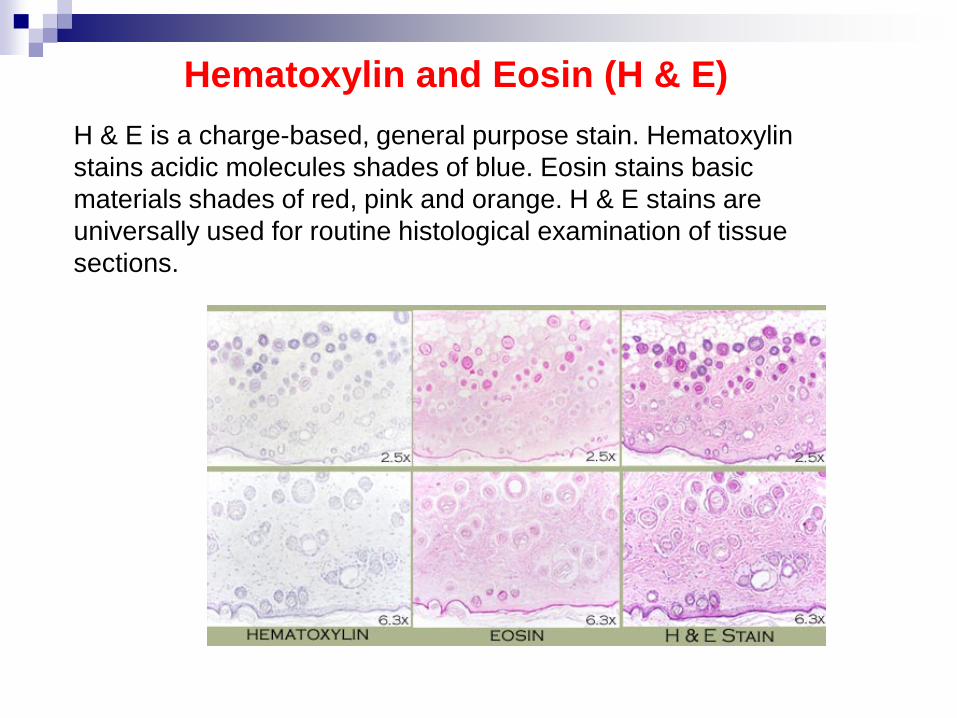
H & E is a charge-based, general purpose stain. Hematoxylin stains acidic molecules shades of blue. Eosin stains basic materials shades of red, pink and orange. H & E stains are universally used for routine histological examination of tissue sections.
Hematoxylin and Eosin (H & E)
Fixation
Any well fixed tissue. Staining Procedure
1- Deparaffinize and hydrate to water 2- If sections are Zenker-fixed, remove the mercuric chloride crystals with iodine and clear with sodium thiosulphate (hypo) 3- Mayer's hematoxylin for 15 minutes 4- Wash in running tap water for 20 minutes 5- Counterstain with eosin from 15 seconds to 2 minutes depending on the age of the eosin, and the depth of the counterstain desired. For even staining results dip slides several times before allowing them to set in the eosin for the desired time 6- Dehydrate in 95% and absolute alcohols, two changes of 2 minutes each or until excess eosin is removed. Check under microscope 7- Clear in xylene, two changes of 2 minutes each 8- Mount in Permount or Histoclad
Results Nuclei - blue - with some metachromasia Cytoplasm - various shades of pink-identifying different tissue components
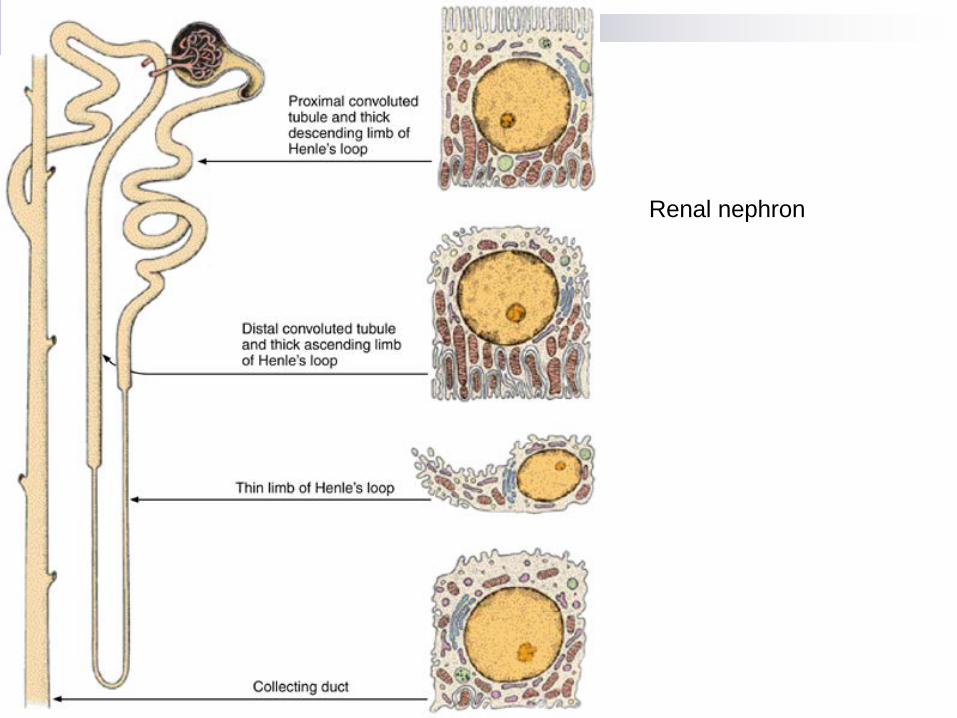
Renal nephron


http://www.meridianinstitute.com/eamt/files/burns2/54burns2.jpg

nephrotic range proteinuria-proximal tubule
http://www.gamewood.net/rnet/renalpath/ch1.htm Pathology

Staining – routine stain – H&E Some structures are seen/ preserved (large molecules like
nucleoproteins, cytoskeleton proteins, ECM proteins- collagen, membrane proteins)
some are not seen/lost (small molecules -t-RNA, large molecules like glycogen & Proteioglycans are dissolved, )during the fixation/staining process
Special fixatives to retain membrane ( phospholipids) Permanganate & osmium – for EM
For Elastic fibers – Orcein/ Resorcin – Fuscin For reticular fibers – Silver impregnation Histochemistry & Cytochemistry
Specific binding of dye with particular molecule Fluorescent dye labeled antibody to cell component
Enzyme activity Autoradiography – radio isotopes tagged with precursors of a
molecule molecule incorporated into cell/ tissue before fixation
Special situations

H&E, Hematoxylin and Eosin •Hematoxylin stains basophilic structures •Eosin stains acidophilic structures

Hematoxylin- nuclei; eosin- cytoplasm

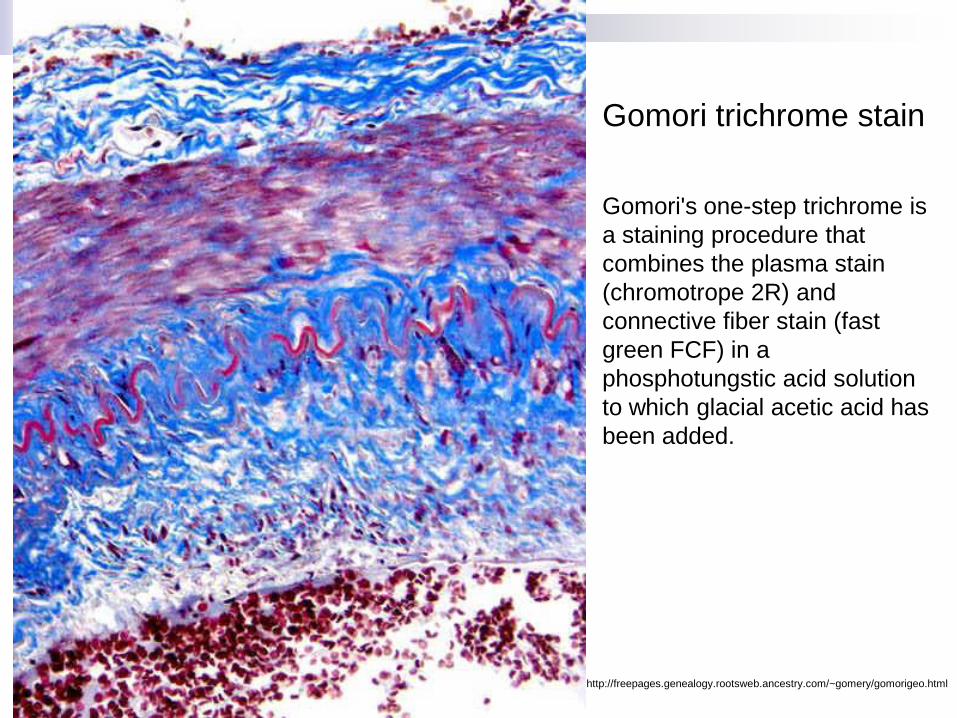
Gomori trichrome stain Gomori's one-step trichrome is a staining procedure that combines the plasma stain (chromotrope 2R) and connective fiber stain (fast green FCF) in a phosphotungstic acid solution to which glacial acetic acid has been added.
http://freepages.genealogy.rootsweb.ancestry.com/~gomery/gomorigeo.html

Trichrome stain (Generally Masson’s) – To delineate cells from surrounding connective Tissue
www-bioc.rice.edu/bios576/immuno/Trichrome.jpg
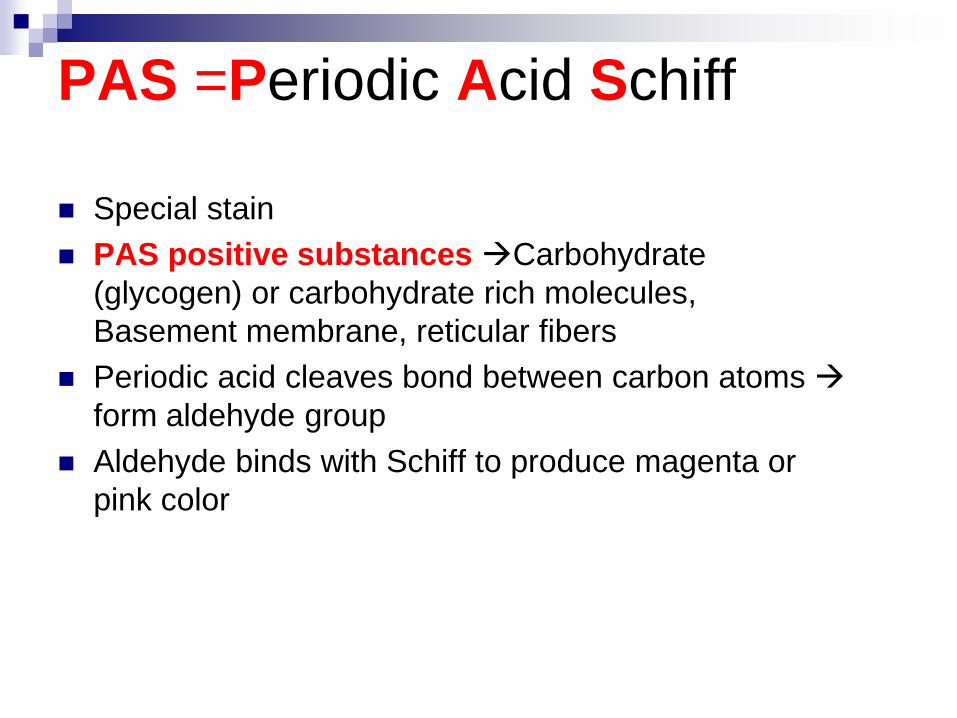
Special stain PAS positive substances Carbohydrate
(glycogen) or carbohydrate rich molecules, Basement membrane, reticular fibers
Periodic acid cleaves bond between carbon atoms form aldehyde group
Aldehyde binds with Schiff to produce magenta or pink color
PAS =Periodic Acid Schiff

Periodic Acid Schiff’s stain (PAS)- glycogen, mucopolysaccharides


Acid hydrolyses or cleaves proteins from deoxyribose of DNA leads to opening of sugar group & formation of aldehyde
Schiff binds and gives magenta color to aldehyde
Can be useful to quantify amount of DNA ( by using spectrophotmetry of Feulgen stained tissue)
Feulgen stain for Nuclear Proteins
Why RNA cannot be stained by Feulgen?

For the confirmation of specific substances Pretreatment of sections with specific
enzymes Diastase/amylase for glycogen DNA ase for DNA
Enzymatic digestion
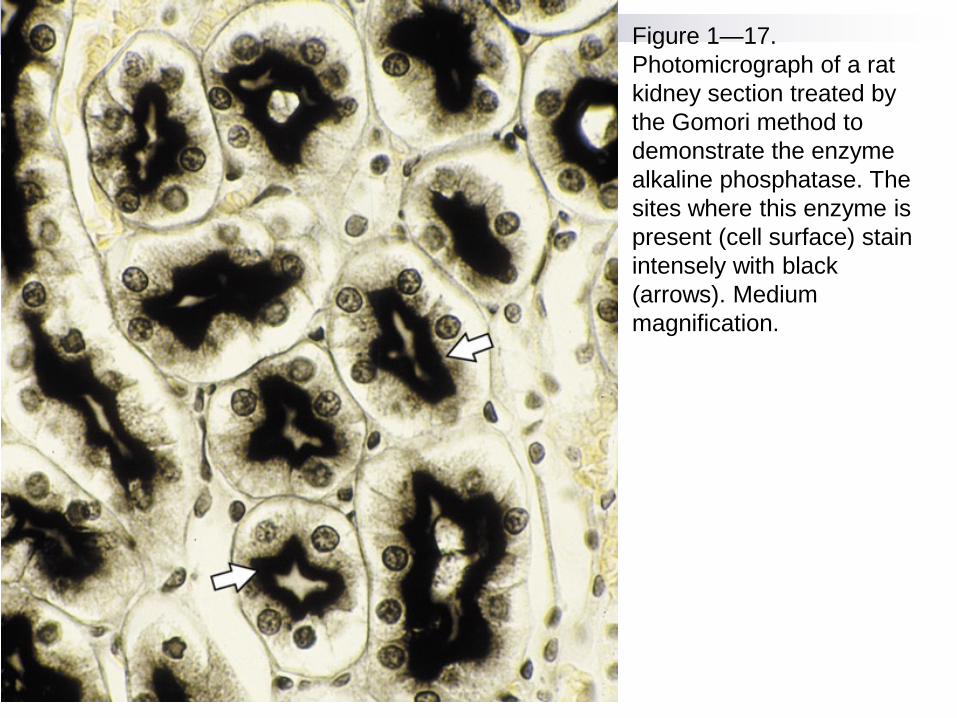
Figure 1—17. Photomicrograph of a rat kidney section treated by the Gomori method to demonstrate the enzyme alkaline phosphatase. The sites where this enzyme is present (cell surface) stain intensely with black (arrows). Medium magnification.

Three lenses- Compound microscope
1
3
2


Figure 1—16. Photomicrograph of a bone section treated with a histochemical technique to demonstrate calcium ions. The dark precipitate indicates the presence of calcium phosphate in calcified bone and cartilage. Noncalcified cartilage tissue (stained in pink) is in the upper portion of the figure. Medium magnification.

Antibody ( Immunoglobulin) conjugated with fluorescent dye( most common is Fluorescein) + Antigen ( foreign protein)
Fluorescein absorbs UV light and emits green fluorescence can be seen under Fluorescent microscope (IF- Immuno Fluorescence)
Example :- actin (Antigen) of Rat infected to Rabbit blood of Rabbit ( have poly - clonal antibodies for Rat’s actin/ anti rat actin antibodies) bind with Fluorescent dye
Immuno Histo Chemistry (IHC)

Specific antigen (actin of rat)
Monoclonal Antibodies
Multiple Myeloma pts.
Monoclonal B ells
Hybridoma cells ↓
Single specific type of antibodies (Monoclonal) ( against Actin)
B lymphocytes of Immunized rabbit
↓
Diagnosis of tumors(tumor markers) & Infections( HIV, Infectious Mononucleosis)
Classify sub – types (B -cell and T- cell lymphomas)
Treatment – Anti-TNF-α antibodies in inflammatory disorders
Clinical Significance of Monoclonal Antibodies


Direct Immunocytochemistry

Indirect Immunocytochemistry 2nd antibody employed

Figure 1—26. Photomicrograph of a section of small intestine in which an antibody against the enzyme lysozyme was applied to demonstrate lysosomes in macrophages and Paneth cells. The brown color results from the reaction done to show peroxidase, which was linked to the secondary antibody. Nuclei counterstained with hematoxylin. Medium magnification.
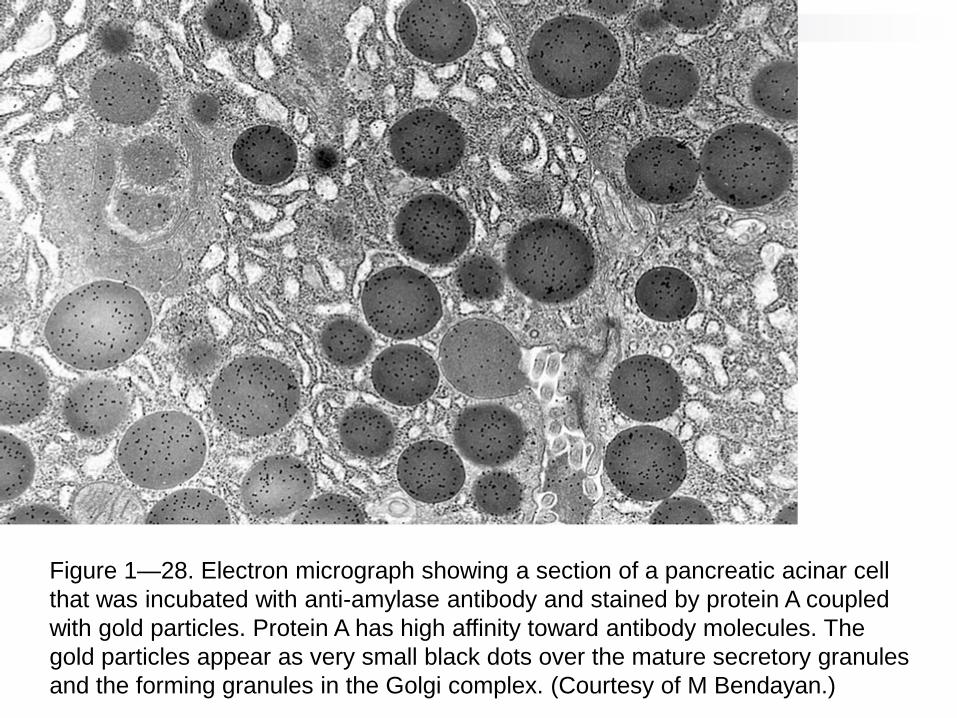
Figure 1—28. Electron micrograph showing a section of a pancreatic acinar cell that was incubated with anti-amylase antibody and stained by protein A coupled with gold particles. Protein A has high affinity toward antibody molecules. The gold particles appear as very small black dots over the mature secretory granules and the forming granules in the Golgi complex. (Courtesy of M Bendayan.)

Localization of enzymatic activity in tissues Best fixation – mild aldehyde ( formalin) Basis – localized reaction production of
enzyme activity Used for acid & alkaline phosphatase, ATP
ases AB (substrate) + T (trap) AT (
reaction product) + B (Hydrolyzed component of substrate)
Enzyme Histochemistry
enzyme

Other Methods
Hybridization: for localizing mRNA/DNA (NA)
In Situ Hybridization: Binding ( Probe + NA) in cell/tissue
FISH: If Fluorochrome is used in Hybridization technique
Autoradiography: by tagging the precursor molecules (Amino acids) followed by synthesis of large molecules (NA) localize the particular tagged molecule

Orientation of cut

Three dimensional picture
How you get it?
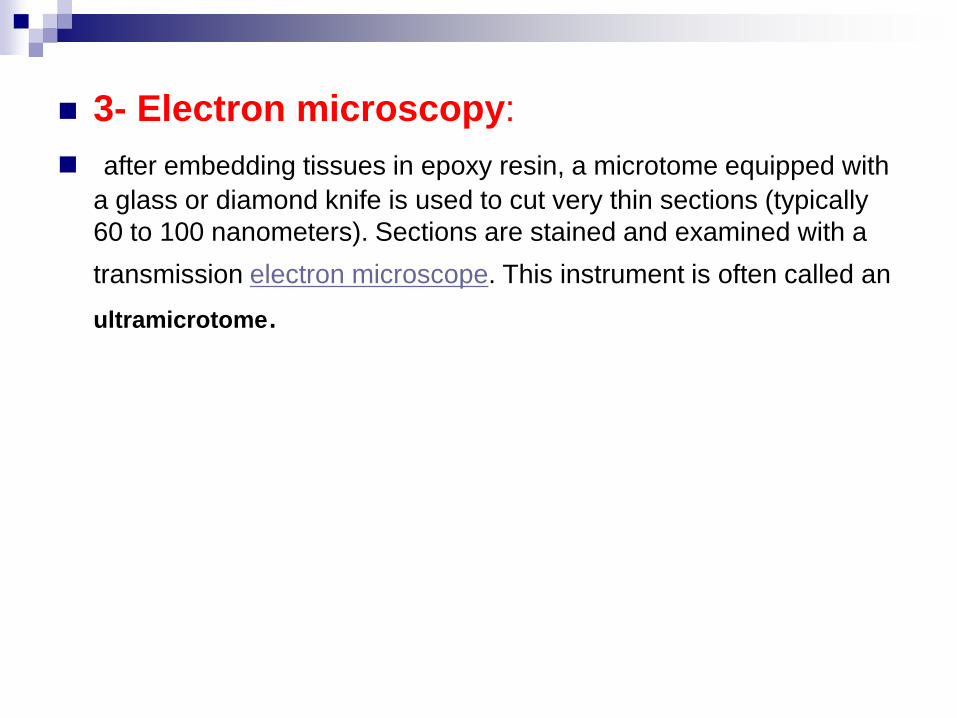
3- Electron microscopy: after embedding tissues in epoxy resin, a microtome equipped with
a glass or diamond knife is used to cut very thin sections (typically 60 to 100 nanometers). Sections are stained and examined with a transmission electron microscope. This instrument is often called an ultramicrotome.

Transmission Electron Microscope TEM

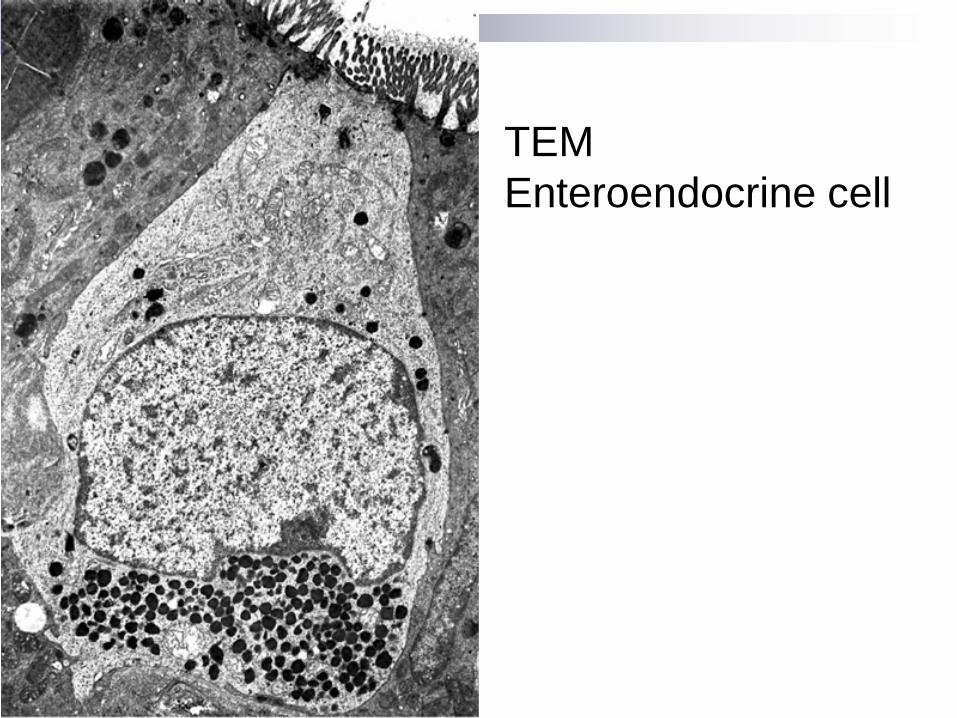
TEM Enteroendocrine cell

TEM-eosinophil

© 2002 by Bruce Alberts, Alexander Johnson, Julian Lewis, Martin Raff, Keith Roberts, and Peter Walter.

Scanning Electron Microscope

Scanning electron microscope
Related Documents