Want more Chief's Shop plans? Visit chiefsshop.com and look through the Plans section. Be sure to "Like" Chief's Shop on facebook by heading over to facebook.com/ChiefsShop. More Plans lumber hard are/supplies tools What ou'll Need p p i i r r a a t t e e ' ' s s c c h h e e s s t t t t o o y y b b o o chiefs‐shop .com NOTE Layout take care! About These Plans Parts

Welcome message from author
This document is posted to help you gain knowledge. Please leave a comment to let me know what you think about it! Share it to your friends and learn new things together.
Transcript

Want more Chief's Shop plans? Visitchiefsshop.com and look through thePlans section.Be sure to "Like" Chief's Shopon facebook by heading over tofacebook.com/ChiefsShop.
More Plans
lumber1 - 1x2x41 - 1x2x81 - 1x3x22 - 1x3x81 - 1x6x41 - 3/4 x 2 x 4 sheet ofplywood1 - 3/8 or 11 /32 x 4 x 8 sheet ofbeadboard paneling1 - 9/16 x 8 feet quarter roundmoulding1 - 1 /4-inch round dowel(availability will vary)
hardware/supplies1 1 /4" bradsKreg 1 1 /4" pocket hole screws1 /2-inch, 3/4-inch brads3, 2 1 /2-inch hinges2 safety lid hinges (left and
right)wood glue,
construction adhesivewood filler, choice of finish
toolstable saw, miter saw, j ig saw,sander/belt sander, drill/driver,Kreg Jig, clamps, strap clamp,square, flexible metal ruler orthin strip of scrap
WhatYou'll Need
ppiirraattee''ss cchheessttttooyy bbooxx
© Chris Hill/Chief's Shop 2013 Page 1chiefs‐shop.com
NOTELayout
take care!
About These PlansOn this first page you will see above the project complete. On one of the last two pages you'llfind the finished outer dimensions. Be sure to read ALL of the project steps before you start.
To the right is a list of the Lumber, Hardware/Supplies, and Tools you will need to completethis project. A measuring tape and pencil are not included because that should be prettystandard and self explanatory.
Below What You'll Need is the Parts list. This also is included on the Cutting Diagram page,which is the next to last page of this plan document. Also on the Cutting Diagram page is anestimate of the cost of the lumber. This estimate doesn't include any other supplies and doesnot factor in sales tax.
Throughout these plans you'll find the icons below:
This indicates a diagram detailing the dimensions of a project partand/or the placement for pocket holes, screws, nails, etc.
Notes are the instructions for aparticular step/section of the project.
This indicates when to payclose attention to the diagrams,take precautions for safety, etc.
Check out Chief's Shop Videos on YouTube. (cl ick here)
Partsbottom end rails (2) - 3/4 x 2 1 /2 x 12top end rails (2) - 3/4x 1 1 /2 x 12end stiles (4) - 3/4 x 1 3/4 x 11 3/4bottom side rails (2) - 3/4 x 2 1 /2 x 27top side rails (2) - 3/4 x 1 1 /2 x 27center side stiles (2) - 3/4 x 2 1 /2 x 7 3/4side stiles (4) - 3/4 x 2 1 /2 x 11 3/4bottom - 3/4 x 15 1 /2 x 30 1 /2corner blocks (4) - 3/4 x 2 1 /2 x 2 1 /2*end panels (2) - 3/8 x 9 1 /2 x 15 7/16side panels (2) - 3/8 x 9 1 /2 x 29 11 /16lid ends (2) - 3/4 x 5 3/8 x 17lid rails (3) - 3/4 x 1 5/8 x 30 1 /2starter lid slat - 3/8 x 2 1 /8 x 32lid slats (9) - 3/8 x 1 7/8 x 32lid trim (2) - 3/8 x 1 5/8 x 32hinge trim - 3/8 x 1 1 /2 x 32safety hinge blocks (2) - 3/4 x 1 1 /2 x 15 1 /2straps (9) - 1 /1 6 x 3/4 x CTF***mitered corners, **cut to fit
All parts are listed in actual dimensions. Refer tothe Cutting Diagram on the last page ofthis planas a guide for determining the specific boardfrom which to cut the parts.

© Chris Hill/Chief's Shop 2013 Page 2chiefs‐shop.com
ppiirraattee''ss CChheesstt TTooyy bbooxx
LayoutNOTE
Use the layout for creating
the Top End Rails and
Bottom End Rails. Set
your Kreg Jig and drill bit
for 3/4" stock.
NOTEApply glue to the ends of
the rails, position as
shown, and attach using
1 1/4" pocket hole screws.
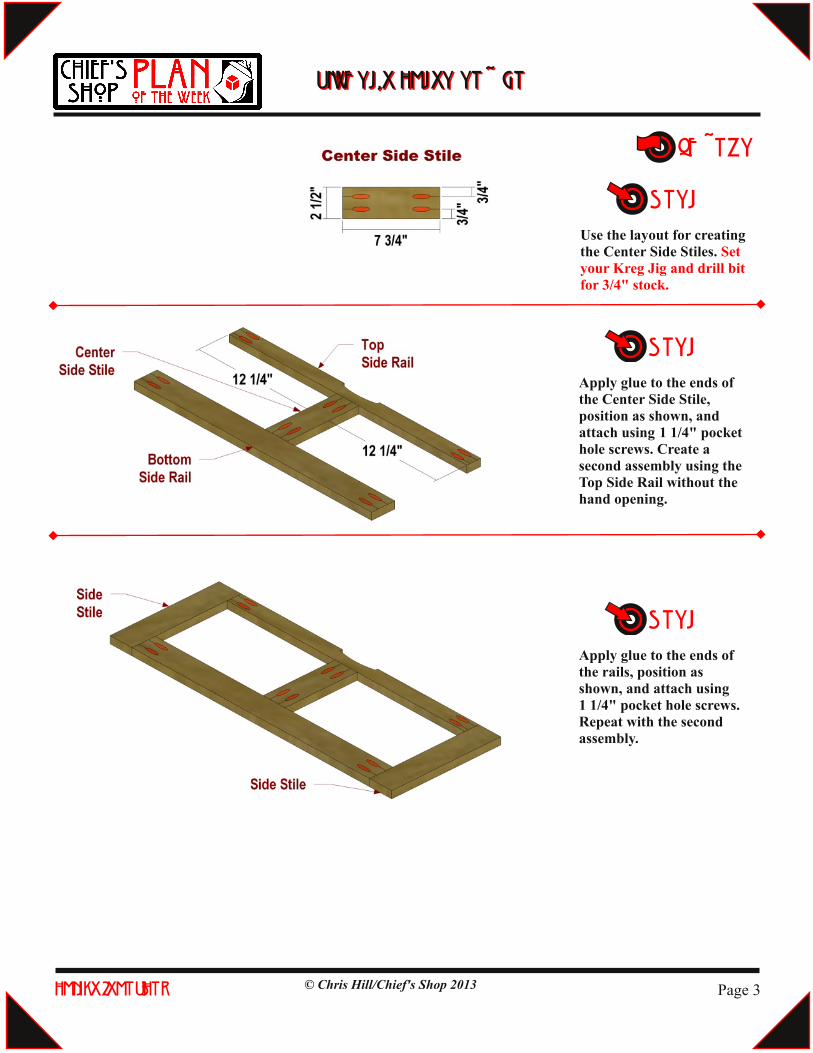
NOTEUse the layout for creating
the Top Side Rails and
Bottom Side Rails. Set
your Kreg Jig and drill bit
for 3/4" stock. Use the
layout below for creating
the hand opening on one
Top side Rail.
© Chris Hill/Chief's Shop 2013 Page 3chiefs‐shop.com
LayoutNOTE
Use the layout for creating
the Center Side Stiles. Set
your Kreg Jig and drill bit
for 3/4" stock.
NOTEApply glue to the ends of
the Center Side Stile,
position as shown, and
attach using 1 1/4" pocket
hole screws. Create a
second assembly using the
Top Side Rail without the
hand opening.
NOTEApply glue to the ends of
the rails, position as
shown, and attach using
1 1/4" pocket hole screws.
Repeat with the second
assembly.
ppiirraattee''ss cchheesstt ttooyy bbooxx
© Chris Hill/Chief's Shop 2013 Page 4chiefs‐shop.com
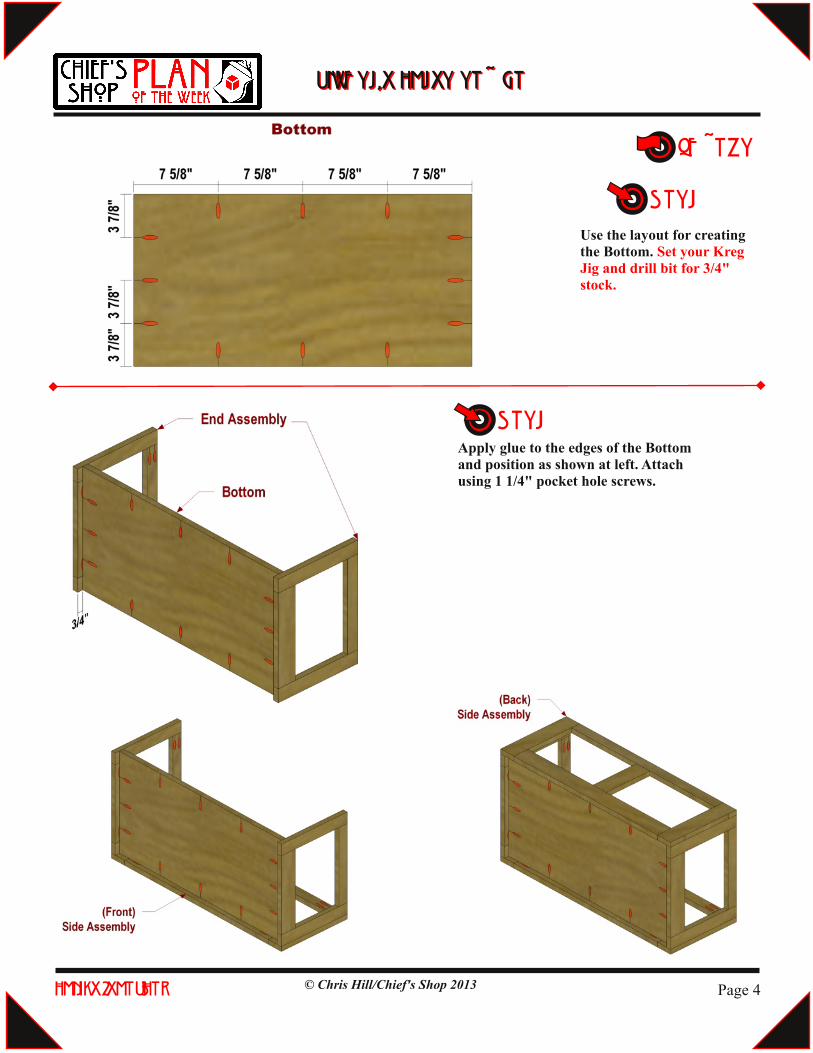
NOTEApply glue to the edges of the Bottom
and position as shown at left. Attach
using 1 1/4" pocket hole screws.
LayoutNOTE
Use the layout for creating
the Bottom. Set your Kreg
Jig and drill bit for 3/4"
stock.
ppiirraattee''ss cchheesstt ttooyy bbooxx

© Chris Hill/Chief's Shop 2013 Page 5chiefs‐shop.com
NOTEApply glue to the inside of the End
Assemblies and Side Assemblies, position
the End Panels and Side Panels as shown,
and attach using 3/4" brads.
LayoutNOTE
Use the layout for creating
the Corner Block. Cut a
45-degree miter to create
them.
NOTEApply glue to edges of the Corner Blocks
and position them as shown. Attach using
1 1/4" brads.
ppiirraattee''ss cchheesstt ttooyy bbooxx
© Chris Hill/Chief's Shop 2013 Page 6chiefs‐shop.com
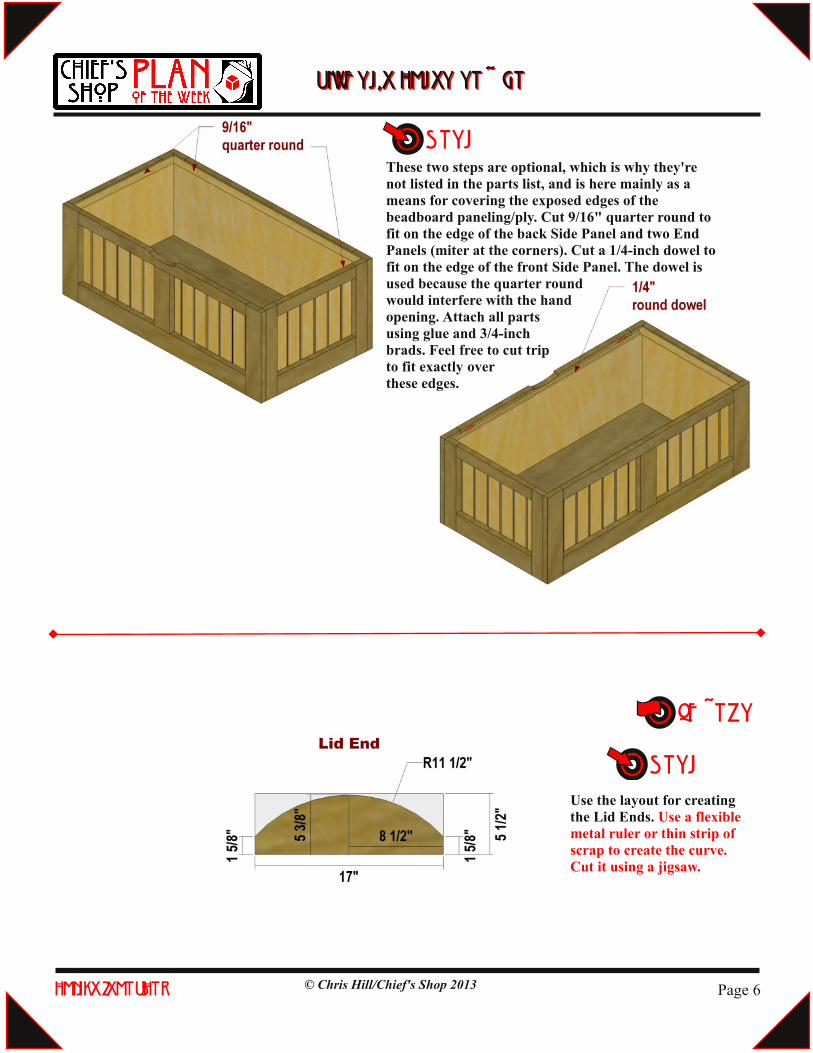
NOTEThese two steps are optional, which is why they're
not listed in the parts list, and is here mainly as a
means for covering the exposed edges of the
beadboard paneling/ply. Cut 9/16" quarter round to
fit on the edge of the back Side Panel and two End
Panels (miter at the corners). Cut a 1/4-inch dowel to
fit on the edge of the front Side Panel. The dowel is
used because the quarter round
would interfere with the hand
opening. Attach all parts
using glue and 3/4-inch
brads. Feel free to cut trip
to fit exactly over
these edges.
LayoutNOTE
Use the layout for creating
the Lid Ends. Use a flexible
metal ruler or thin strip of
scrap to create the curve.
Cut it using a jigsaw.
ppiirraattee''ss cchheesstt ttooyy bbooxx

© Chris Hill/Chief's Shop 2013 Page 7chiefs‐shop.com
Layout
NOTEApply glue to the ends of the Lid Rails,
position as shown, and attach using 1 1/4"
pocket hole screws.
NOTEUse the layout for creating
the Lid Rails. Set your
Kreg Jig and drill bit for
3/4" stock.
A note when ripping the Lid Rails: Go ahead and rip the strips needed for the Straps (see the Cutting
Diagram and Parts List). Rip to allow for three strips 1/16" thick. Then rip the Lid Rails. You can skip
ripping the Straps if desired, and simply use edge banding/veneer.
ppiirraattee''ss cchheesstt ttooyy bbooxx
© Chris Hill/Chief's Shop 2013 Page 8chiefs‐shop.com
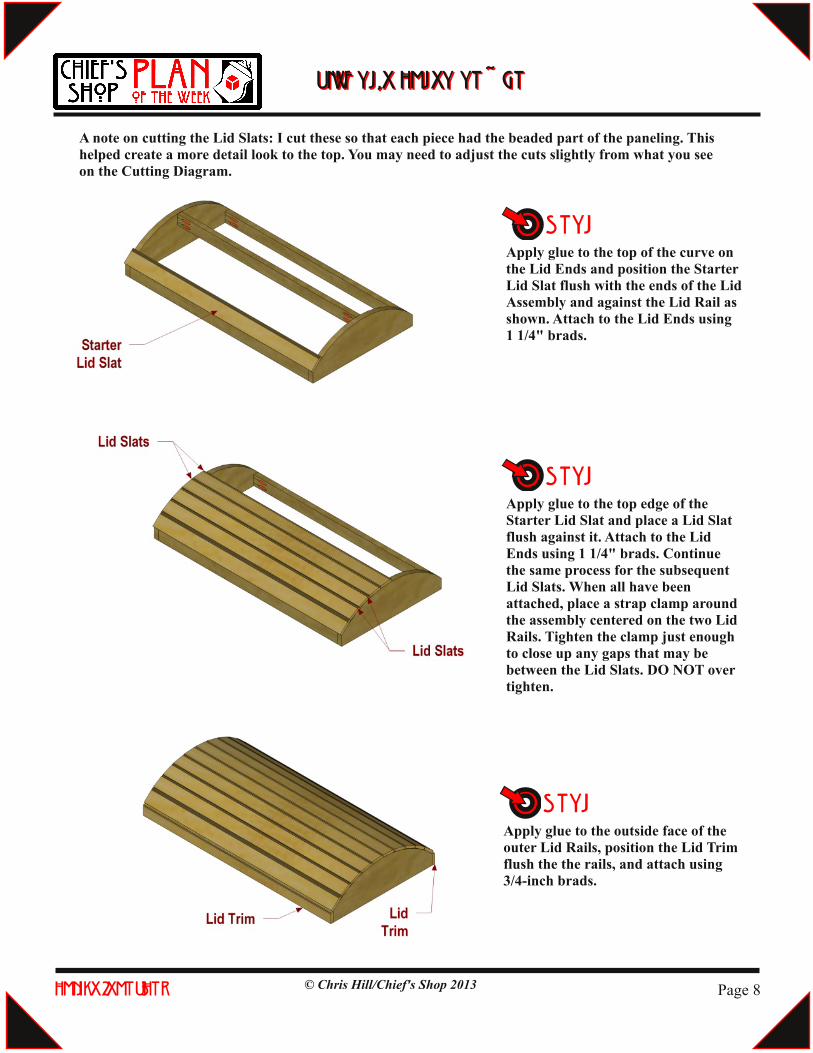
NOTEApply glue to the top of the curve on
the Lid Ends and position the Starter
Lid Slat flush with the ends of the Lid
Assembly and against the Lid Rail as
shown. Attach to the Lid Ends using
1 1/4" brads.
NOTEApply glue to the top edge of the
Starter Lid Slat and place a Lid Slat
flush against it. Attach to the Lid
Ends using 1 1/4" brads. Continue
the same process for the subsequent
Lid Slats. When all have been
attached, place a strap clamp around
the assembly centered on the two Lid
Rails. Tighten the clamp just enough
to close up any gaps that may be
between the Lid Slats. DO NOT over
tighten.
NOTEApply glue to the outside face of the
outer Lid Rails, position the Lid Trim
flush the the rails, and attach using
3/4-inch brads.
A note on cutting the Lid Slats: I cut these so that each piece had the beaded part of the paneling. This
helped create a more detail look to the top. You may need to adjust the cuts slightly from what you see
on the Cutting Diagram.
ppiirraattee''ss cchheesstt ttooyy bbooxx
© Chris Hill/Chief's Shop 2013 Page 9chiefs‐shop.com
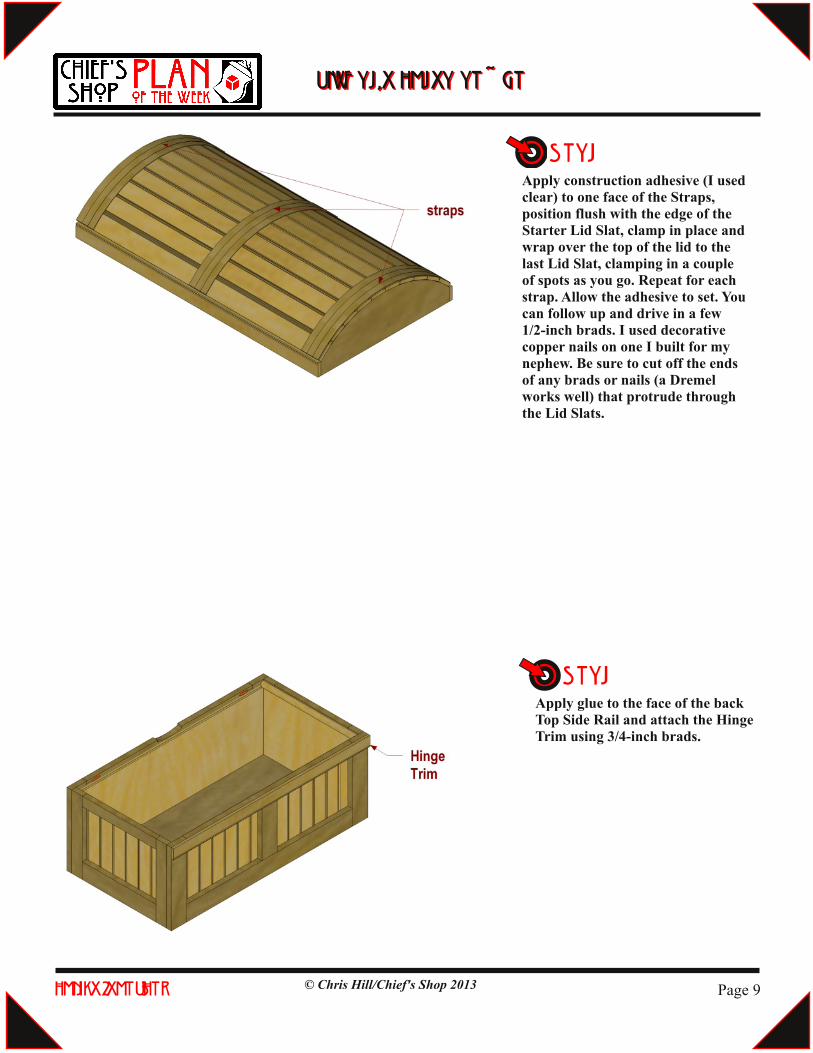
NOTEApply glue to the face of the back
Top Side Rail and attach the Hinge
Trim using 3/4-inch brads.
NOTEApply construction adhesive (I used
clear) to one face of the Straps,
position flush with the edge of the
Starter Lid Slat, clamp in place and
wrap over the top of the lid to the
last Lid Slat, clamping in a couple
of spots as you go. Repeat for each
strap. Allow the adhesive to set. You
can follow up and drive in a few
1/2-inch brads. I used decorative
copper nails on one I built for my
nephew. Be sure to cut off the ends
of any brads or nails (a Dremel
works well) that protrude through
the Lid Slats.
ppiirraattee''ss cchheesstt ttooyy bbooxx

© Chris Hill/Chief's Shop 2013 Page 10chiefs‐shop.com
NOTEI simply attached three hinges as
shown at left, using a 1/8" thick
piece of scrap (a paint stir stick is
roughly that size) as a spacer for
the barrel of the hinge. Feel free to
apply the hinges as you desire.
NOTEAttach two safety hinges to the End Panels
and Safety Hinge Blocks, following the
hinge manufacturer's directions. You will
need to get a left side version and a right
side version. The safety hinge will allow
the lid to stay upright and not slam down.
I also added felt furniture pads to the top
edge of the rails for an even softer close.
ppiirraattee''ss cchheesstt ttooyy bbooxx
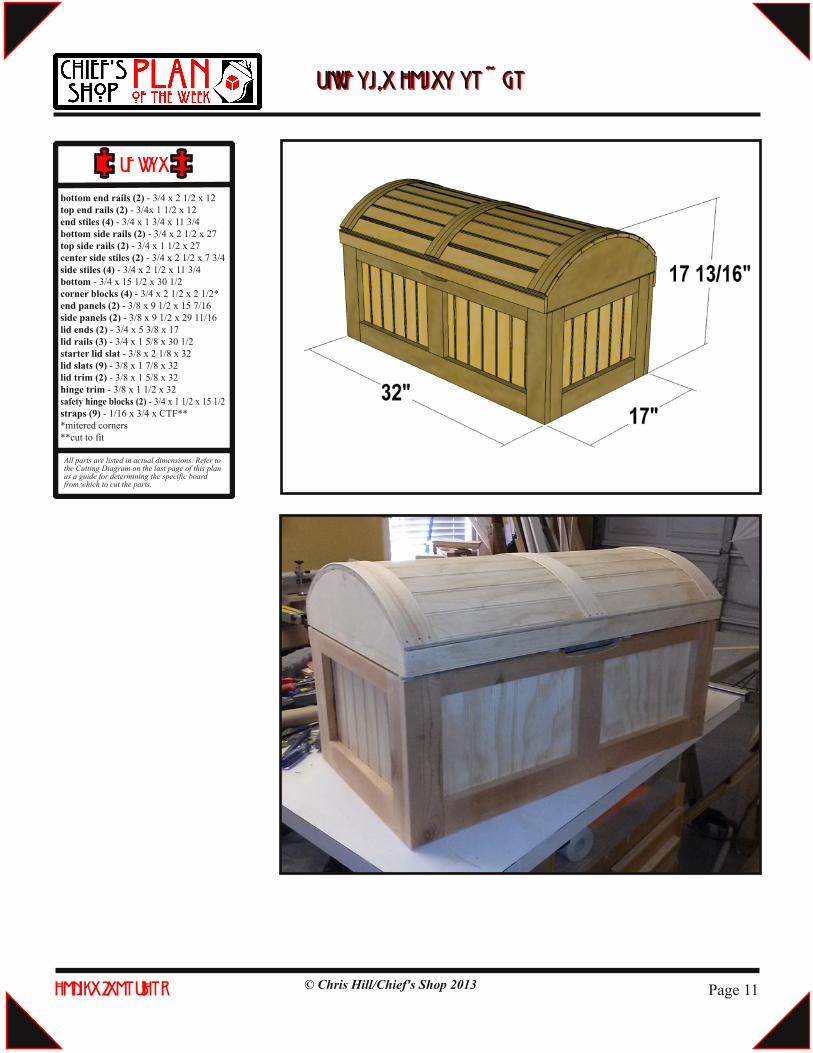
Partsbottom end rails (2) - 3/4 x 2 1 /2 x 12
top end rails (2) - 3/4x 1 1 /2 x 12
end stiles (4) - 3/4 x 1 3/4 x 11 3/4
bottom side rails (2) - 3/4 x 2 1 /2 x 27
top side rails (2) - 3/4 x 1 1 /2 x 27
center side stiles (2) - 3/4 x 2 1 /2 x 7 3/4
side stiles (4) - 3/4 x 2 1 /2 x 11 3/4
bottom - 3/4 x 15 1 /2 x 30 1 /2
corner blocks (4) - 3/4 x 2 1 /2 x 2 1 /2*
end panels (2) - 3/8 x 9 1 /2 x 15 7/16
side panels (2) - 3/8 x 9 1 /2 x 29 11 /16
lid ends (2) - 3/4 x 5 3/8 x 17
lid rails (3) - 3/4 x 1 5/8 x 30 1 /2
starter lid slat - 3/8 x 2 1 /8 x 32
lid slats (9) - 3/8 x 1 7/8 x 32
lid trim (2) - 3/8 x 1 5/8 x 32
hinge trim - 3/8 x 1 1 /2 x 32
safety hinge blocks (2) - 3/4 x 1 1 /2 x 15 1 /2
straps (9) - 1 /1 6 x 3/4 x CTF**
*mitered corners
**cut to fit
All parts are listed in actual dimensions. Refer tothe Cutting Diagram on the last page ofthis planas a guide for determining the specific boardfrom which to cut the parts.
© Chris Hill/Chief's Shop 2013 Page 11chiefs‐shop.com
ppiirraattee''ss cchheesstt ttooyy bbooxx

chiefs‐shop.com © Chris Hill/Chief's Shop 2013
cutting DIAGRAM
take care!Follow ALL SAFETYGUIDELINES AND RECOMMENDATIONS provided by the manufacturers ofyourtools, and any chemicals such as glue and finishes you use in this project. YOUare responsible for your safety,so use common sense when working in the shop!
Estimated lumber cost:starting at $11 0
Page 12
ppiirraattee''ss cchheesstt ttooyy bbooxx
Related Documents