Pine Cone Design and Diagram by Beth Johnson Recommended paper: Tissue Foil Recommended paper s ize: 1 1 inches Difficulty Level: High Intermediate 1. Fold and unfold. 2. Fold and unfold. 3. Fold and unfold. 4. Fold and unfold. 5. Fold and unfold. 6. Fold and unfold.

Welcome message from author
This document is posted to help you gain knowledge. Please leave a comment to let me know what you think about it! Share it to your friends and learn new things together.
Transcript
7/30/2019 PineCone Piña
http://slidepdf.com/reader/full/pinecone-pina 1/5
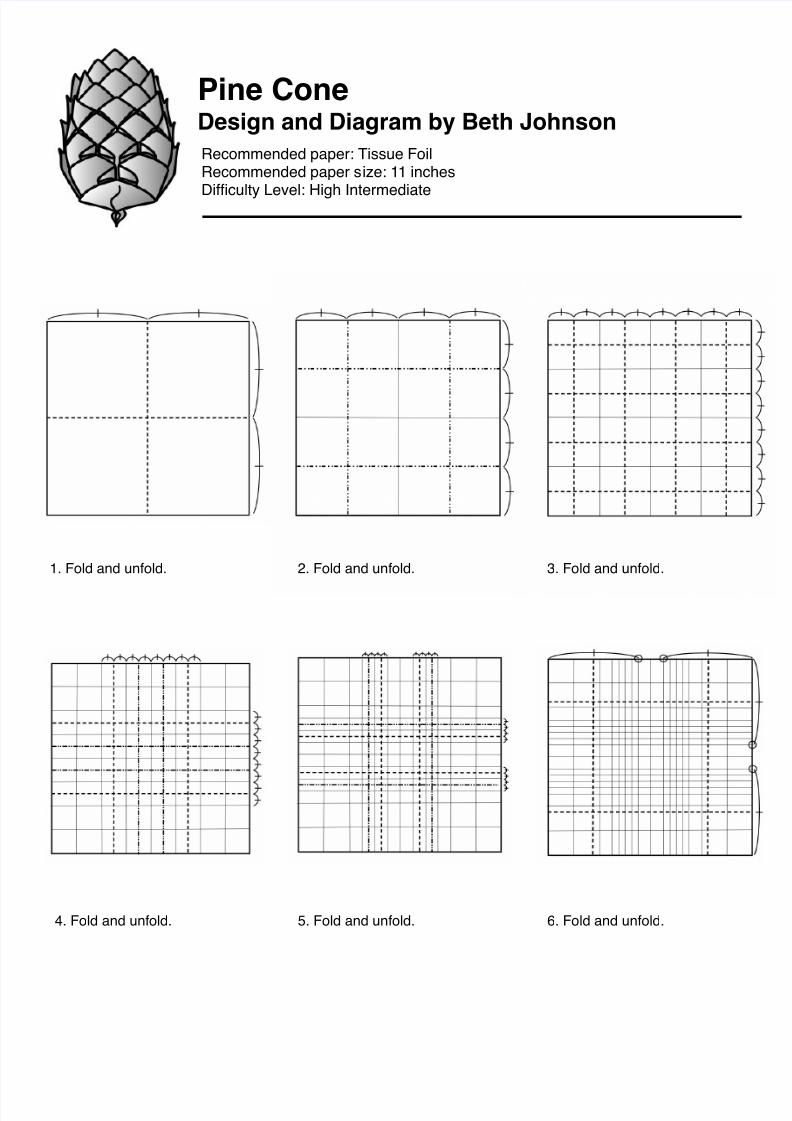
Pine ConeDesign and Diagram by Beth Johnson
Recommended paper: Tissue FoilRecommended paper size: 11 inches
Difficulty Level: High Intermediate
1. Fold and unfold. 2. Fold and unfold. 3. Fold and unfold.
4. Fold and unfold. 5. Fold and unfold. 6. Fold and unfold.

7/30/2019 PineCone Piña
http://slidepdf.com/reader/full/pinecone-pina 2/5
7. Fold and unfold. 8. Turn paper over. 9. Pleat.
10. Pleat. 11. Open up pleats from steps 9and 10.
12. The area highlighted aboveis blown up in steps 12a - 12dUsing the pleats made in theprevious steps, pinch the foldstogether, and squash the layerflat.12a. 12b.
12c. 12d.

7/30/2019 PineCone Piña
http://slidepdf.com/reader/full/pinecone-pina 3/5
13. Pleat. 14. Repeat step 12. 15. Pleat.
16. Repeat step 12. 17. Pleat. 18. Repeat step 12.
19. Pleat. 20. Repeat step 12. 21. Pleat.

7/30/2019 PineCone Piña
http://slidepdf.com/reader/full/pinecone-pina 4/5
22. Repeat step 12. 23. Pleat. 24. Repeat step 12.
25. Continue pattern. Pleat one
side, open up the intersectionsand squash them flat (step 12),then rotate to next side of paper.Work around the center of thepaper, as indicated by thenumbers above.
26. Result. 27. Continue pattern, as
described in step 25.
28. Result. 29. Collapse model. The modelwill not stay collapsed untillocked (later step).
30. Result.

7/30/2019 PineCone Piña
http://slidepdf.com/reader/full/pinecone-pina 5/5
31. Mountain folds. 32. Fully collapse along foldsmade in step 29. Mountainfold the creases at the tip tohelp give it shape.
33. Result. The paper thatwas folded inside in step 3will not fold flat and will fill inside of the pinecone.
34. Pinch the four flapstogether at the base.
35. Twist the four flapstogether to lock the model.
37. Pull out the scales toshape.
38. Finished!
36. Result (view from bottom).
Related Documents