Page 1 of 33 1 st Revision March, 2009 Pilot Operating Handbook And Flight Training Supplement For The Dova DV-1 Skylark 1 st Revision

Welcome message from author
This document is posted to help you gain knowledge. Please leave a comment to let me know what you think about it! Share it to your friends and learn new things together.
Transcript

Page 1 of 33 1st Revision March, 2009
Pilot Operating Handbook
And
Flight Training Supplement
For The
Dova DV-1 Skylark
1
st Revision

Page 2 of 33 1st Revision March, 2009
Manufacturer: DOVA a.s.
Kirilovova 115
739 21 Paskov
Telephone: 658/67 10 81
Fax: 658/67 11 39
Serial Number:
Registration Mark:

Page 3 of 33 1st Revision March, 2009
Amendment Status
No. Description Page Date Signature

Page 4 of 33 1st Revision March, 2009
Table of Contents
1. General 5
2. Airplane and Systems 6
3. Operating Limitations 14
4. Weight and Balance 17
5. Performance 20
6. Emergency Procedures 22
7. Normal Procedures 26
8. Aircraft Ground Handling and Servicing 34
9. Required Placards and Markings 38

Page 5 of 33 1st Revision March, 2009
1. General
1.1 Introduction
This handbook has been compiled to furnish pilots with the information necessary for safe
operation of this aircraft. It is the responsibility of the operator of the aircraft to read the handbook
and operating instructions and become familiar with the aircraft, its power plant and equipment,
and special flight characteristics.
1.2 Certification Basis
The DV-1 Skylark has been designed, manufactured, inspected and certified according to the
American Light Sport Aircraft category, and the Czech UL2 Ultra Light Airplane Category.
1.3 Abbreviations and Definitions
CAS Calibrated Airspeed
IAS Indicated Airspeed
TAS True Airspeed
VA Maneuver Speed
VSO Stall Speed in Landing Configuration
VS1 Stall Speed Flaps Up
VNE Never Exceed Speed
VFE Maximum Speed With Flaps
VRA Maximum Speed in Turbulence

Page 6 of 33 1st Revision March, 2009
2.0 Airplane and Systems
2.1 Three View

Page 7 of 33 1st Revision March, 2009
2.2 Basic Technical Data
2.2.1 Dimensions
Span ................................................................................ 26.60 ft.
Length ............................................................................ 21.75 ft.
Height ............................................................................ 7.50 ft.
Cabin Width ................................................................... 3.60 ft.
Wing Area ................................................................... 102 sq. ft.
Mean Aerodynamic Chord ............................................ 3.90 ft.
Dihedral ......................................................................... 5 Deg.
Tire Size ........................................................................ 500x5
Wheel Track ............................................................... 5.75 ft.
Wheel Base................................................................... 4.5 ft.
Maximum Take Off Weight .................................... 1320 lbs.
Fuel Capacity ...................................................... 24 Gallons
Empty Weight .......................................................... 650 lbs.
2.2.2 Control Deflections
Ailerons: Up 15o
Down 10o
Flaps: Position 1 -10o
Position 2 0o
Position 3 +10o
Position 4 + 20o
Position 5 +40o
Elevator: Up 30o
Down 20o
Rudder: Left 30o
Right 30o
2.2.3 Weights
Empty Weight ................................................... 650 lbs.
Maximum Take Off Weight .............................. 1320 lbs.
Baggage ............................................................. 45 lbs.

Page 8 of 33 1st Revision March, 2009
2.2.4 Engine
The Rotax 912ULS engine is a liquid/air cooled, four cylinder, four stroke opposed
cylinder engine which drives a Kaspar 3 blade fixed pitch propeller through a gear box.
Engine displacement ...................................................................... 1352 cm3
Gear Box ....................................................... Speed Reduction Ratio 2.43:1
Maximum take-off power ................. 100HP@ 5800 rpm (Max. 5 minutes)
Fuel grade: .......................................... Unleaded 91 Octane/100LL AVGAS
2.2.5 Propeller
Type....................................................................................... Kaspar KA 1/3
Manufacturer ............................................................................. Kaspar Aero
Diameter ................................................................................................... 64‖
Ground Adjustable Composite Blades
Turning to the right
2.2.6 Liquids
The recommendations of the engine manufacturer should be followed.
Fuel ........................... Premium Unleaded 91 Octane Mogas / 100LL Avgas
Maximum Volume of Fuel …………………………………….. 24 Gallons
Maximum Volume of Oil ............................................................. .2.5 Quarts
Cooling Fluid 50% Antifreeze with additives against corrosion
50% distilled water
Maximum Volume of Coolant ...................................................... 2.8 Quarts
2.2.7 Fuel Tanks
Fuel tanks are in the wing leading edges near the root
Maximum Volume ............................................................ 2 x12 US Gallons
Unused Volume ............................................................... 2 x 0.4 US Gallons
Usable Volume .................................................................... 23.2 Us Gallons

Page 9 of 33 1st Revision March, 2009
2.2.8 Instrument Panel (Typical)
1. Airspeed 10. Oil Pressure Gauge 21. Master Switch
2. Altimeter 11. Cylinder Head Temp. Gauge 22. Electrical Systems Switches
3. Vertical Speed Indicator 12. Oil Temperature Gauge 23. Circuit Breakers
4. Tachometer 13. Compass 24. Starter Switch
5. Sideslip Ball 14. Engine Hour Meter 25. Magneto Switches
6. Trim Control 15. Fuel Gauges 26. Choke
7. Trim Indicator 18. Radio 27. Throttle
8. Manifold Pressure Gauge 19. Transponder 28. Cabin Heat Control
9. Fuel Pressure Gauge 20. Fuel Selector Valve
Description

Page 10 of 33 1st Revision March, 2009
2.2.9 Fuel System
Fuel is supplied from 12 US gallon tanks in the leading edge of each wing near the root.
Each tank has a flush filler cap on the top of the wing, a vent line that goes to the winglet
with an outlet on the bottom and a drain valve at the lowest point. The fuel selector valve
provides positions left, right and off. Fuel goes to a gascolator located on the right side of
the firewall in the engine compartment. The gascolator is at the lowest point in the fuel
system and serves to catch water and sediment as well as providing a fine mesh screen to
filter the fuel. A drain on the bottom of the gascolator allows a check to be made for water
or sediment in the fuel on a preflight check. From the gascolator the fuel is drawn up by
the engine driven pump and supplied to the dual carburetors. Cables from the instrument
panel control the throttles and chokes. Content of each fuel tank is measured by float type
sensors in the tanks and indicated by electrical fuel gauges on the instrument panel. An
electrical fuel pump is located just below the fuel selector valve.
Fuel System Diagram
Page 11 of 33 1st Revision March, 2009
2.3 Electrical System
Electrical power is supplied from an alternator built into the Rotax engine. A 12-volt battery is
located on the firewall in the engine compartment. A master switch controls all electrical
power except for the ignition system which is built into the engine and controlled by the
ignition switches.(―mag switches‖) Some of the items shown on the following diagram are
optional and might not be included on a particular airplane.
Wiring Diagram

Page 12 of 33 1st Revision March, 2009
2.4 Pitot Static System
The pitot is located on the underside of the right wing. Static ports are located on either or both
side(s) of the aft fuselage. This location for the static ports was chosen to make the Indicated
Airspeed (IAS) agree closely with the Calibrated Airspeed (CAS).
2.5 Avionics
Radio and navigation equipment are not mandatory for the operation of a Light Sport Aircraft.
However, it is in the interest of safety to install a radio, intercom and GPS.
2.6 Landing gear
The main gear legs on the Skylark are composite (fiberglass) springs, bolted to a carry through
structure in the fuselage. The main wheels are bolted to the gear legs. Toe pedals on the left side
rudder pedals actuate hydraulic disc brakes. The main wheels are equipped with 500x5 aircraft
tires with recommended inflation pressure of 30 psi.
The nose wheel is steerable by push rods connected directly to the rudder pedals. Springing is by
means of 8 rubber discs located at the top of the nose wheel strut. Optional wheel fairings reduce
drag and protect the bottom of the aircraft from mud and water splashing from the wheels.
2.7 Seat Belts
Four point seat belts are provided. These are attached to solid structure. The seat backs are ground
adjustable to provide comfort for different sized pilots.
2.8 Baggage Compartment
The baggage area is behind the seats. It has a capacity for 45 lbs of baggage, which should be
distributed evenly and fastened securely to avoid movement in case of turbulence. The amount of
baggage carried may be limited by Center of Gravity limits, which should be determined for each
loading case. (See section for loading information)

Page 13 of 33 1st Revision March, 2009
3.0 Operating Limitations
3.1 Introduction
This chapter includes operating limitations for the safe operation of the Skylark aircraft, its engine and
standard equipment.
The structure is designed for a load limit of +4/-2 g.
LSA aircraft are prohibited from performing aerobatic maneuvers.
Turns with bank angles of more than 60 degrees are not allowed.
Full control movements may be made up to speed VA.
(Above this speed, no full or abrupt control movements should be made.)
VRA must not be exceeded except in smooth air.
VFE must not be exceeded with the flap down.
Flight in known icing conditions is prohibited
3.2 Airspeed Limitations
The airspeeds given in the table below are calibrated airspeeds (CAS) and are based on the full
gross weight of 1320 lbs.
Term CAS
(knots) Explanation VS Stall Speed Flaps up 44 Minimum Speed at 1320 lbs
VSo Stall Speed with flaps 20o 41 Landing Configuration
VFE Max. Speed with flaps down 82 Maximum Speed Flaps Down
VA Maneuvering Speed 88 No full control movements above
this speed
VRA Maximum rough air speed 118 Operations above this speed only
in smooth air
VNE Never Exceed Speed 150 Not to be exceeded ever

Page 14 of 33 1st Revision March, 2009
3.3 Airspeed Calibration
The calibration shown below was obtained with the rear fuselage static ports.
CAS Knots 41 45 52.9 58.3 64 70 75.1 80 86.4 92 95.6 103 108 119
IAS Knots 43 49 54 59.4 65 70 75.6 81 86.4 92 97.2 103 108 119
3.2 Best Climb Speeds
Best Rate of Climb VY = 70 knots
Best Angle of Climb VX = 60 knots
Page 15 of 33 1st Revision March, 2009
3.3 Engine
Refer to the engine manual for detailed information on engine limitations.
Maximum Take-off Power (5 minutes max): 100 Hp / 5800 rpm
Maximum Continuous Power: 95 Hp / 5500 rpm
Fuel Pressure: 2.2 to 5.8 psi
Cylinder Head Temperature: Maximum 266o F
Cylinder Head Normal Range: 100 to 266o F
Oil Pressure: Maximum 102 psi
Minimum 12 psi
Oil Temperature: Maximum 266o F
Normal Oil Temperature Range: 190 to 230 o F
4.0 Weight and Balance
Typical Empty Weight (with BRS parachute): 650 lbs.
Maximum Take Off Weight: 1320 lbs.
Baggage (Max.): 45 lbs.
Minimum Pilot Weight: 132 lbs.
Maximum Pilot Weight: 264 lbs.
Note: In every case the Center of Gravity must be within the specified limits for C of G travel.
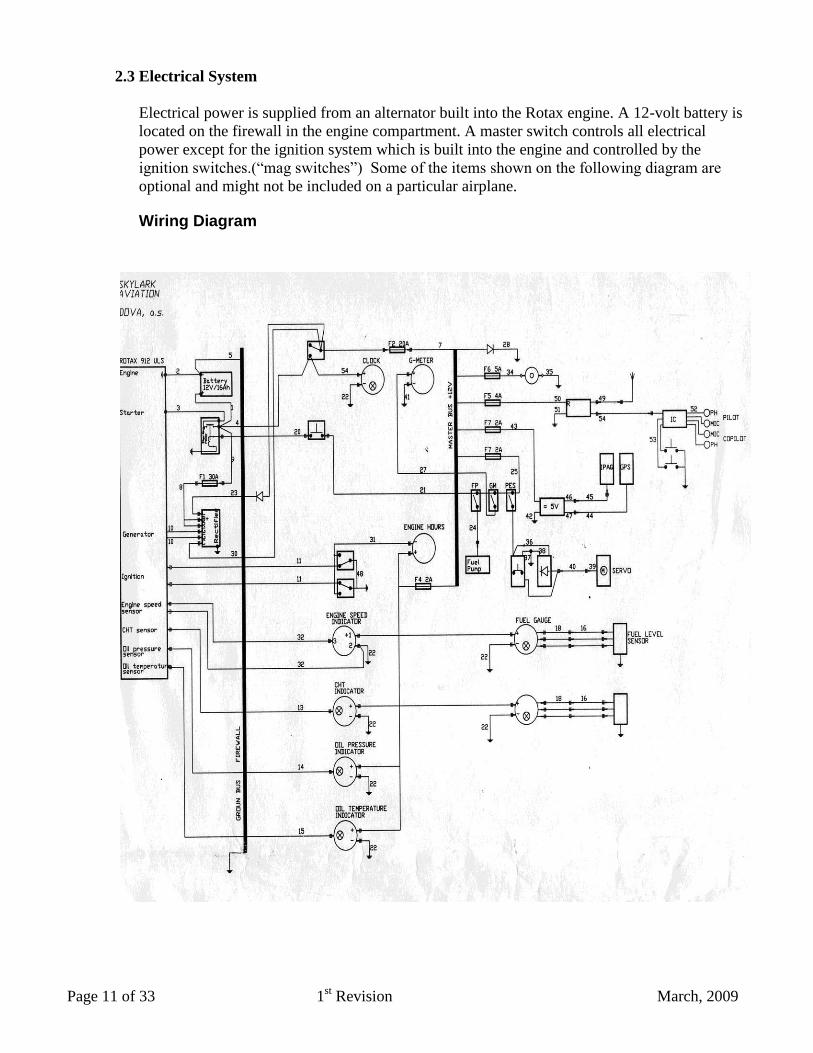
4.1 Weighing Procedure
The aircraft is to be placed on three scales in a horizontal position (top edge of the front fuselage
canopy rail is to be level).

Page 16 of 33 1st Revision March, 2009
LOADING CALCULATION EXAMPLE
DV-1 SKYLARK
Allowable C of G is from 20% to 45% mean chord
10 inches to 23 inches aft of the datum
Example Calculation
ITEM WEIGHT (lbs) LEVER ARM (inches) MOMENT (inch
lbs)
Empty Airplane 650 11.34 7371
Fuel 142 13 1846
Pilot 200 36 7200
Passenger 200 36 7200
Baggage 45 66 2970
TOTALS 1258 27,387
C of G position = moment/Weight = 27387/1258 = 21.8 inches
The values for the empty airplane are found from the weight and balance sheet for this particular airplane.

Page 17 of 33 1st Revision March, 2009
Graphical Calculation
The following graph will provide the moments needed to calculate the center of gravity position.
C of G = Moment/Weight (inches aft of the datum)
For example, a 200 lb pilot would add 7,200 inch lbs to the moment column.

Page 18 of 33 1st Revision March, 2009
5.0 Performance
Both take-off and climb performance are strongly affected by aircraft weight and by the pitch setting of
the propeller. A fine pitch will allow the engine to reach speeds that produce full power at relatively low
airspeed encountered during take-off and climb. However, the engine would have to be throttled back
during cruise flight to avoid over speeding the engine. The compromise that is made usually favors
cruising speed over take-off and climb performance.
The winglets on the Skylark have been shown by flight tests to increase the rate of climb by 10%
compared to conventional wing tips without winglets.
5.1 Take off performance
From a paved runway at sea level conditions of temperature and pressure.
Ground Roll
Minimum take-off weight: 300 ft.
Maximum take-off weight: 500 ft.
Distance over 50-foot obstacle
Minimum take-off weight: 550 ft.
Maximum take-off weight: 800 ft.
Minimum take-off weight: 850 lbs.
Maximum take-off weight: 1320 lbs.
5.2 Landing
Ground Roll:
At Minimum take-off weight: 400 feet.
At Maximum take-off weight: 500 feet.
Over a 50 foot obstacle:
At Minimum take-off weight: 1200 feet.
At Maximum take-off weight: 1400 feet.
5.3 Climb performance
At Minimum take-off weight: 1500 ft/min.
At Maximum take-off weight: 900 ft/min.
5.4 Wind Speeds
Maximum operating wind speeds:
Steady head wind in the take-off direction 25 kts.
Demonstrated cross-wind component 15 kts.

Page 19 of 33 1st Revision March, 2009
5.5 Range
Range is very dependent on cruising speed. In the table below range is calculated assuming full
tanks and allowing a 30-minute reserve fuel supply at destination. This also assumes still air.
Power at
sea level
conditions
Fuel Flow
Gallons/hour Speed in knots
Range
Nautical miles
100% (95HP) 7.44 120 326
75% 5.58 109 414
60% 4.46 101 492
50% 3.72 95 567
This table may be conservative because range will improve with altitude.
Fuel consumption assumes a Specific Fuel consumption of
SFC = 0.47 lb/bhp/hour given in the Rotax operators manual.

Page 20 of 33 1st Revision March, 2009
6.0 Emergency Procedures
The pilot is responsible for consequences of an engine failure. The aircraft should be operated at a height
and speed to provide the most safety in case of an engine failure.
6.1 Engine Failure
On the ground 1. Throttle to idle
2. Apply Brakes
3. Ignition switches both off
4. Fuel off
5. Master switch off
During Take-off 1. Increase speed to 55 knots
2. Land straight ahead. No steep turns. Do not attempt to return to runway.
3. Ignition switches both off
4. Fuel off
5. Master switch off
6. Tighten safety belts
7. Flaps as required
During Flight
If altitude above terrain is not sufficient to try to restart the engine:
1. Increase speed to 55 knots
2. Look for a safe place to land (direction, terrain, surface, wind, angle)
3. Ignition switches both off
4. Fuel off
5. Master switch off
6. Tighten safety belts
7. Flaps as required
If altitude above terrain is sufficient to try to restart the engine:
1. Increase speed to 55 knots
2. Look for a safe place to land
3. Check – ignition switches both on, fuel open on tank with fuel
Master Switch on, Fuel pump on
4. Throttle open – Choke if needed
5. Starter – If the engine starts, check that it is running properly while still in the
vicinity of a suitable forced landing site.
(continued)

Page 21 of 33 1st Revision March, 2009
6. If the engine runs properly, proceed to the nearest airfield and land to check the
engine.
7. If the engine does not start or does not run properly, proceed with an emergency
landing
8. Ignition switches both off
9. Fuel off
10. Master switch off
11. Tighten seat belts
12. Flaps as required.
Interrupted Landing (Go Around) 1. Speed to 55 knots
2. Set throttle for climb
3. When reaching a height of 100 feet, flaps to zero
4. Repeat landing attempt.
6.2 Fire
Engine fire on the ground
1. Fuel off
2. Throttle full open
3. Ignition switches off
4. Master switch off
5. Evacuate the aircraft and extinguish the fire if possible
Engine fire during take-off or in flight 1. Fuel off
2. Throttle full open
3. Ignition switches both off
4. Master switch off
5. Perform an emergency landing
6. Evacuate the aircraft and extinguish the fire if possible
Fire in the Cockpit 1. Fuel off
2. Ignition Switches both off
3. Master Switch off
4. Cabin Heat off
5. Perform an emergency landing
6. Evacuate the aircraft and extinguish the fire if possible

Page 22 of 33 1st Revision March, 2009
6.3 Forced Landings
Forced landings are not only emergency landings due to technical defects, but also include
precautionary landings undertaken when the aircraft or its passengers are in danger due to
operational irregularities (rough engine operation for example) or deteriorating weather
conditions.
6.4 Vibration of engine or propeller
If some unusual vibration occurs:
1. Set the engine rpm to minimize the vibration
2. Carry out an emergency landing at the nearest airfield
3. If the vibrations are increasing, carry out an emergency landing at the nearest safe
landing place.
6.6 Using the Ballistic Rescue System (if equipped)
The ballistic rescue system should only be used in true emergencies such as structural
failure or loss of control of the aircraft. The use of the ballistic rescue system can result in
damage to the aircraft and injuries to the crew.
1. Fuel off
2. Ignition switches both off
3. Master switch off
4. Tighten safety belts
5. Pull the release handle (requires about 20 lbs pull)
6. In an emergency at low altitude go at once to point 5.
The safety pin on the BRS handle must be removed before flight and replaced on landing
for safety on the ground.

Page 23 of 33 1st Revision March, 2009
7.0 Normal Procedures
7.1 Introduction
This chapter describes normal procedures for the operation of the DV-1 Skylark aircraft.
7.2 Pre-flight Inspection
A pre-flight inspection should be undertaken before each flight. For your own safety all points
should be carried out so that small defects can be discovered and removed in time.
Cabin Control
1. Aircraft papers: Check
2. Checklist: Available
3. Ignition key: Removed
4. Master switch: Off
5. Fuel Quantity: Visually check both tanks
6. Throttle: Idle
7. Movement of Controls: Free and Correct
8. Foreign Body Check: Complete
9. Baggage: Stowed and secured

Page 24 of 33 1st Revision March, 2009
7.3 Walk around inspection
Remove the upper engine cover, any canopy cover and pitot cover
Numbers in the above diagram indicate important
places on the aircraft.
Engine (2,3,4)
Visual check of engine and accessories
Check the status and fixation of units,
tightening of screws, condition of tubes (look
for cracks), condition and fixation of
electrical wires
Check volume of oil and cooling liquid
Replace the cowling and lock it (1/4 turn
fasteners)
Front Landing Gear (2,4)
Check tire pressure and condition of gear leg
Wings (5,18)
Visual check of the leading and trailing edges
Visual check of the fuel tank and content
Check the pitot tube (status, fixation,
direction)
Ailerons (6,17)
Visual check of condition
Check easy and free movements
Check the hinge line of the ailerons
Flaps (7,16)
Visual check of condition
Check free movement and locking of each
flap position
Check the hinge line of the flaps
Main landing gear (8,15)
Check tire pressure
Check security of wheel covers
General condition
Horizontal tail plane (11,12)
Visual check of condition
Check the security of mounting to the vertical
tail surfaces
Check the hinges of the elevator and trim tab
Check free movement
Vertical Tailplane (10,13)
Check rudder hinges
Check condition of the control cables (strain,
secure, free movement)
Visual check of condition

Page 25 of 33 1st Revision March, 2009
7.4 Procedures after entering the aircraft
Check the locking pin of the ballistic rescue system (if there is one)
Set the position of the seats
Canopy closed and locked
Safety belts – locked and tight
Controls – free and correct movement
Flaps – check function
Brakes – check function
Instruments – check setting of altimeter
Trim – check function then set to neutral
Fuel valve – open (left or right)
7.5 Start the Engine
Warning
Before starting you will have read the Manual for the Rotax engine!
Before warming up or testing the engine the airplane has to be:
In position facing the wind
Assistant with a fire extinguisher nearby
The engine must be started with the pilot in the aircraft
Getting in or out with the engine running is strictly prohibited!!
1. Fuel level – check the volume in the tanks
2. Radio off
3. Fuel valve open to the fullest tank
4. Throttle – (idle for cold engine with choke - one half turn for warm engine)
5. Choke depends on the temperature of the engine
(full for cold, not needed if the engine is warm)
6. Check the area around the propeller to make sure it is clear.
7. Ignition switches both on
8. Electric fuel pump – ON
9. Starter
10. Set rpm after start to 2500 rpm
11. Check oil and fuel pressure gauges
12. Electric fuel pump OFF
13. Switches on (radio, strobes,..…)
Warnings
Maximum time to engage starter is 10 seconds. Another start can be attempted
after cooling the starter for 2 minutes.
Oil pressure must rise within 10 seconds after the start. After reaching stable values
of oil pressure, rpm can be increased.

Page 26 of 33 1st Revision March, 2009
7.6 Warming up and pre-flight check of the engine
1. Brake the aircraft by applying full toe-brake pressure
2. All controls neutral position
3. Set rpm 2000 rpm and let it run for 2 minutes, then continue warming up at 3000
rpm until oil temperature reaches 120o F
4. Slowly increase rpm to at least 4000 rpm for 5 seconds, slow to idle, and repeat two
or three times.
5. Set to 3500 rpm, check ignition circuits by turning them off separately. They
should not drop the rpm by more than 300 rpm. The difference between the two
circuits (in rpm drop) should not be more than 100 rpm.
Warning:
After testing the engine, let it cool down at idle rpm
Do not carry out an engine test on dusty terrain or over gravel (damage to
the propeller or engine can occur)
7.7 Procedure before taxiing
1. Unlock the BRS (if installed)
2. Flaps neutral
3. Report to the tower/unicom (info, radio)
4. During taxi check brake function and free movement of the rudder/ front wheel
steering.
5. Taxi speed depends on terrain and weather conditions.
7.8 Procedures before take-off
1. Brake to stop
2. Idle rpm
3. Check controls for free movement and correct movement
4. Trim to neutral
5. Flaps to take-off position (zero flaps for normal takeoffs)
6. Check fuel – select fullest tank
7. Switches on – check instruments
8. Electric fuel pump ON
9. Check engine instruments
10. Set altimeter
11. Safety belts locked and tight
12. Canopy locked
13. Check pattern for traffic
14. Report to the tower/unicom

Page 27 of 33 1st Revision March, 2009
7.9 Take off
1. Runway free
2. Note the time
3. If short/soft field: 20o flaps
4. Throttle to maximum
5. Ease nose wheel off the ground
6. The aircraft will leave the ground at about 40-50 knots
7. Hold altitude until the speed reaches 55 knots
8. Start climbing at a speed of 60 knots and set rpm to 5500
9. Flaps to neutral at a safe height (if applied for short/soft field takeoff)
10. Check instruments
11. Trim if needed
12. After clearing the pattern and climbing to a safe height, turn OFF the electric fuel
pump.
7.10 Downwind position
1. Check the fuel volume, use the fullest tank
2. Fuel pump ON
3. Check instruments
4. Safety belts locked and tight
5. Look for traffic in the pattern
6. Report to the tower/unicom for landing instructions
7. Flaps to 10o when below max flap speed (white arc / 82 kts)
7.11 Base leg
1. Speed 65 knots, 3500 rpm
2. Flaps to 20o
3. Trim as needed
4. Check for traffic
7.12 Final
1. Speed 60 knots, throttle to idle
2. Check for traffic and clear runway
3. Report to the tower/unicom
4. Land on main gear first and maintain heading
5. Brake as needed
7.13 After landing
1. Leave the runway – note the time
2. Rpm to idle
3. Trim to neutral
4. Flaps to neutral
5. Electric fuel pump OFF

Page 28 of 33 1st Revision March, 2009
7.14 Turning off the engine
1. Cool the engine down with 2000 rpm
2. Throttle to idle
3. All switches off
4. Ignition switches off
5. Master switch off
7.15 After leaving the aircraft
1. Check all switches off
2. Lock BRS
3. Lock canopy
4. Tie down the aircraft
5. Cover canopy

Page 29 of 33 1st Revision March, 2009
8.0 Ground Handling and Servicing
8.1 Introduction
This chapter contains procedures for the proper ground handling and routine care and servicing of
the DV-1 Skylark airplane.
8.2 Maintenance intervals
The manual provided by the engine manufacturer provides all the information needed on engine
maintenance. The propeller manufacturer also provides the necessary information for propeller
maintenance. The procedures and maintenance schedules in the engine manuals are to be followed
in the maintenance of the Skylark. The manufacturer of the Rotax 912ULS has set a time between
overhauls (TBO) of 1500 hours or 15 years for this engine.
Daily inspection: As described in this manual, Chapter 7.3
25 hour inspection: According to the engine manual
100 hour/annual inspection: In accordance with the engine manual to be
repeated every 100 hours
Oil Change: In accordance with the engine manual
The oil change interval depends on the fuel used. More
frequent oil changes are needed if Avgas 100LL is used.
Propeller: Make a visual inspection for damage such as cracks, foreign
object damage, etc. All bolts must be torqued according to
the manufacturers specifications on installation.
Airframe: All inspections are based on an extended version of the pre-
flight inspection (Section 7.2).

Page 30 of 33 1st Revision March, 2009
8.3 25 hour inspection
1. Extended pre-flight inspection
2. Engine maintenance as per the engine manual
3. Check setting and secure attachment of the propeller
4. Check the fuel tank for contamination
5. Check exhaust attachment screws and springs
8.4 50 hour inspection
1. Detailed pre-flight inspection
2. Thorough cleaning of the airplane inside and out
3. Check secure attachment of the propeller
4. Check the engine hoses and lines for leakage or cracks
5. Check the air filter and clean if necessary
6. Check the exhaust attachment screws and springs and check for cracks
7. Check the nose wheel landing gear for damage or cracks and grease bearings.
8. Check the main landing gear for attachment and any damage
9. Check the control rods. Open inspection panels in the wing and fuselage to check
that connections are secure.
10. Check the rudder cables for abrasions and secure attachment.
11. Oil the hinges of the elevator, trim tab, rudder, flaps and ailerons.
12. Check the attachment of the horizontal tailplane to the top of the fin.
13. Check the battery for secure attachment
14. Check the brakes for leakage, amount of brake fluid and function
8.5 100 hour inspection
1. Repeat 50 hour inspection, plus:
2. Engine maintenance as per the engine manual
3. Careful check of welded joints of the engine mount, bolts and rubber bearings of
the engine suspension and engine mount.
4. Check the nose wheel landing gear rubber damper, and check the tire for wear.
5. Check the main landing gear for any damage, secure attachment of the bolts and
tires for wear.
6. Check the brake discs and the wheel bearings (play and lubrication)
7. Careful check of the battery and electrical system
8. Careful inspection of the skin and rivets for damage, secure attachment and cracks
9. Careful inspection of all instruments and avionics
10. Inspection of the interior for:
Foreign bodies
Flight controls for play
11. Carry out lubrication in accordance with the lubrication plan.

Page 31 of 33 1st Revision March, 2009
8.6 Lubrication Plan
Acid free grease and oil only should be used. Do not use too much grease because it will
attract dirt.
Grease:
1. Nose wheel axle
2. Upper nose wheel strut bearings
Oil:
1. Elevator, trim tab, aileron, flap and rudder hinges
2. Canopy guide rails
3. Canopy lock
4. Moveable parts of the flight controls
5. Brake pedals and rudder pedals
8.7 Changes/repairs
Changes, excepting the installation of additional instruments and/or avionics may only be carried
out with the permission of the manufacturer and the certification authority. The owner/operator
may carry out repair work but this work is limited to the replacement of defective parts with
original parts. Authorized persons following authorized repair procedures may carry out repair
work on the skin of the aircraft.
8.8 Ground Handling
The airplane may only be moved by hand by pulling at the propeller hub. It should not be pushed
at the wing tips or at the control surfaces. To move the aircraft backwards, push down the rear
fuselage at the intersection of the vertical tail.
8.9 Cleaning and Care
A dirty airplane does not perform as well as a clean airplane and dirt can hide damage. The aircraft
should be cleaned at the end of each day of flight. Insects and light dirt are best removed using
clear water, or for more persistent dirt a mild detergent may be added to the water.
Depending on the type of operation and weather conditions the painted surfaces should be waxed
and polished at least once a year.
8.10 Special operating conditions
If the aircraft is operated with wheel fairings from muddy runways, make sure that no
mud collects in the rear part of the fairing
During winter operations mud or snow could freeze in the air and the wheels could
become blocked.
During winter operations carefully remove all snow from the wings and make sure that
the control surfaces move smoothly
If the engine does not reach its minimum operating temperature of 100o C during
winter operation, partially cover the oil cooler.

Page 32 of 33 1st Revision March, 2009
9.0 Required Placards and Markings
9.1 Instrument Markings
Airspeed markings:
White Arc: 47 to 94 mph (41 to 82 kt) —full flap operating range.
Green Arc: 51 to 118 mph (44 to 118 kt) — normal operating range.
Yellow Arc: 136 to 173 mph (118 to 150 kt)
CAUTION, DO NOT USE IN TURBULENCE.
Red Line: 173 mph (150 kt) VNE VELOCITY NEVER EXCEED.
Yellow Triangle: 63 mph, 55 kt - Recommended Minimum Approach Speed
9.2 Cylinder Head Temperature:
Green Arc: 50o C to 150
o C
Red Arc: Over 150o C
9.3 Oil Temperature:
Yellow Arc: 50o C to 90
o C
Green Arc: 90o C to 110
o C
Yellow Arc: 110o C to 130
o C
Red Arc: 130o C to 150
o C
Oil Pressure:
Green Arc: 12 psi to 73 psi
Yellow Arc: 73 psi to 102 psi
Red Line: 102 psi
9.4 Tachometer:
Markings come with the tachometer recommended by Rotax.
9.5 Occupant Warning
Position: Within view of the occupant:
This aircraft was manufactured in accordance with
Light Sport Aircraft airworthiness standards and does
not conform to standard category airworthiness requirements.
To be flown Day VFR only

Page 33 of 33 1st Revision March, 2009
9.6 Prohibited maneuvers
Position: within the Pilots view
NO INTENTIONAL SPINS
9.7 Baggage
Position: Baggage compartment behind the left seat
MAXIMUM BAGGAGE WEIGHT 45 LBS
9.8 Registration (N numbers)
Position: Top center of the instrument panel
9.9 LSA sign
Position: on the sides of the fuselage, 2 inches minimum height.(3 Inches Maximum)
LIGHT SPORT
9.10 Fuel Requirements
Position: Next to fuel filler caps
Approved Fuels:
Unleaded Premium Auto Gas
Minimum Fuel Grade
MON 85, RON 95, AKI 91
AVGAS 100LL
Avoid Prolonged Use Of AVGAS
Fuel Capacity 12 gallons
Related Documents