PICKLEBALL LESSON PLAN - YOUTH AGES 7 TO 14 REV 2015 R Nibarger Pickleball Lesson Plan – Ages 7-14 By Robert Nibarger – USAPA Ambassador - North Carolina – 2015 Preliminary Preparation Instructor 1. Ensure site is ready a day before camp. Call volunteers and remind them of start time. Inventory equipment and load into vehicle. 2. Load equipment – Paddles, balls, nets, orange cones, cooler, snacks, ice , water, (cell phone in case first aid is needed) , pencils, paper, name badges, whistle. Portable shade, if available, during hot weather. Note: Have one of your instructors be time keeper and blow whistle to announce next module. Keeping on task and on time is very important. INTRODUCTION This lesson play requires 4 instructors and a maximum of 20 students per session. It is reommemed that two courts be utilized and that you divide the student into four groups of five with one instructor per group. SAFETY Ensure that all forms are completed properly and that liability release forms, if used, are signed and turned in to the office. I recommend that this clinic be offered through your local parks department. Background checks on all volunteers will normally be a part of a parks volunteer screening process. Take a few minutes to go over some basic safety rules. Encourage students to: Not leave the area of the courts without permission. Drink plenty of water and stay hydrated. Not enguage in horseplay or talk over instructors. Not back peddle to play lobs or shots over their head. Be respectful to other players at all times. Listen to instructions and obey instructors at all times.

Welcome message from author
This document is posted to help you gain knowledge. Please leave a comment to let me know what you think about it! Share it to your friends and learn new things together.
Transcript
PICKLEBALL LESSON PLAN - YOUTH AGES 7 TO 14 REV 2015 R Nibarger
Pickleball Lesson Plan – Ages 7-14
By Robert Nibarger – USAPA Ambassador - North Carolina – 2015
Preliminary Preparation Instructor
1. Ensure site is ready a day before camp. Call volunteers and remind them of
start time. Inventory equipment and load into vehicle.
2. Load equipment – Paddles, balls, nets, orange cones, cooler, snacks, ice,
water, (cell phone in case first aid is needed), pencils, paper, name badges,
whistle. Portable shade, if available, during hot weather.
Note: Have one of your instructors be time keeper and blow whistle to announce
next module. Keeping on task and on time is very important.
INTRODUCTION
This lesson play requires 4 instructors and a maximum of 20 students per session.
It is reommemed that two courts be utilized and that you divide the student into
four groups of five with one instructor per group.
SAFETY
Ensure that all forms are completed properly and that liability release forms, if
used, are signed and turned in to the office. I recommend that this clinic be
offered through your local parks department. Background checks on all
volunteers will normally be a part of a parks volunteer screening process.
Take a few minutes to go over some basic safety rules. Encourage students to:
Not leave the area of the courts without permission.
Drink plenty of water and stay hydrated.
Not enguage in horseplay or talk over instructors.
Not back peddle to play lobs or shots over their head.
Be respectful to other players at all times.
Listen to instructions and obey instructors at all times.
PICKLEBALL LESSON PLAN - YOUTH AGES 7 TO 14 REV 2015 R Nibarger
WARM UP
Begin the camp by introducing yourself and your volunteers. Divide the
students into 4 groups of 5 along with their instructor. (Note: Rotate
instructors each day. You may have them line up and count off by 5) so
that students are exposed to a variety of teaching techniques. Have the
students warm up and do the following streatches.
Jog 3 laps around courts
25 jumpingjacks
Forward and reverse arm circles
10 hampstring bend over and touch their toes
Ankle Rotations while lying on their backs
Select a few stretches from the chart on the next page.

PICKLEBALL LESSON PLAN - YOUTH AGES 7 TO 14 REV 2015 R Nibarger

PICKLEBALL LESSON PLAN - YOUTH AGES 7 TO 14 REV 2015 R Nibarger
WHY ARE WE HERE
GOALS: Students will demonstrate the proper technique in the
forehand, backhand, volley, ready position and serve.
OBJECTIVES: The students will be exposed to rules, scoring, strategies
and fitness.
FITNESS: Flexibility, muscular strength and Cardiovascular.
INSTRUCTION: Divide the students into two groups. Have group 1 sit
on the sidline facing group 2. Instructors will demonstrate and inform
students about the basic rules of pickleball. Note: Make this instruction
as “visual” as possible. As soon as finished, demonstrate skills.
BASIC RULES OF PICKLEBALL • PickleBall can be played in 1/2 court
singles, full court singles, doubles or mixed doubles. • The scoring
system is identical to badminton: only the side with the service can
score points. • Each match is decided over 3 games with each game
played to 11. • All services must be below the waist and must land in
the opposite square past the no volley zone. • The "Double Bounce
Rule" states that he receiving player must let the ball bounce once
before returning the serve and the serving side has to let the return of
the serve bounce once before returning the shot. • The ball can be
volleyed (hit before it bounces) during a rally only after the above two
bounces. • All lines are in bounds during play. • No player may hit a
ball while in the no volley zone unless the ball first bounces in the no
volley zone. • If another ball or player interferes with a rally replay that
point.
PICKLEBALL LESSON PLAN - YOUTH AGES 7 TO 14 REV 2015 R Nibarger
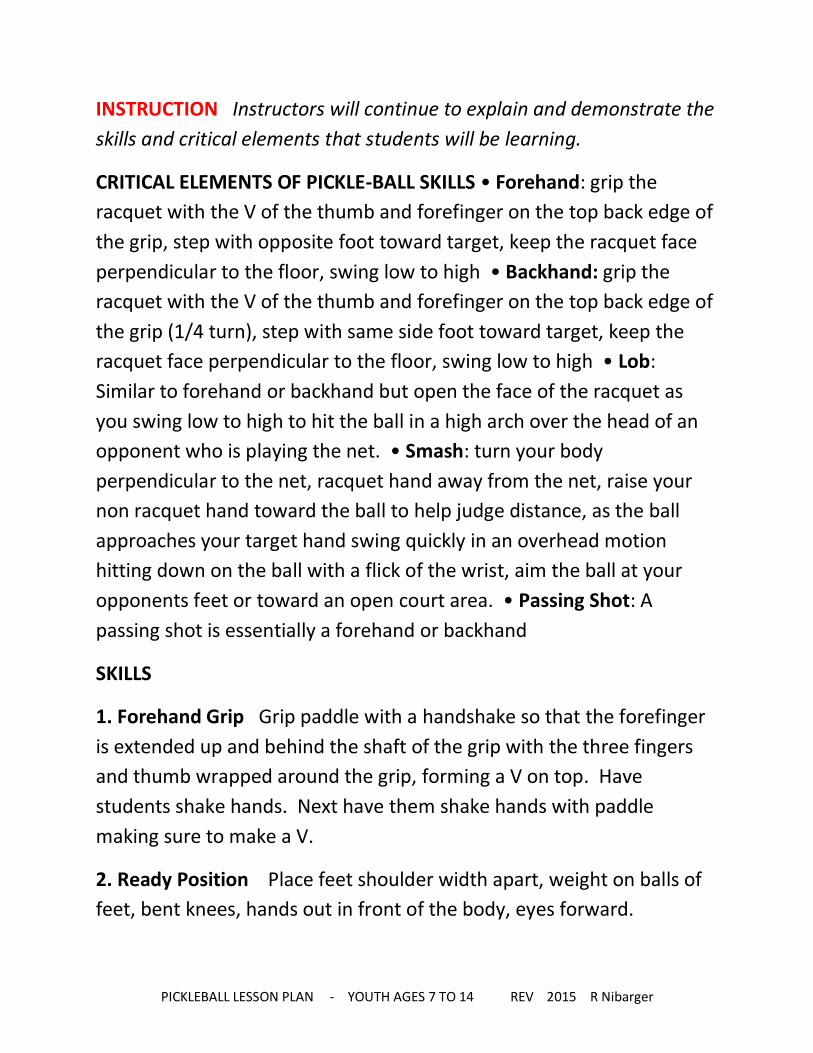
INSTRUCTION Instructors will continue to explain and demonstrate the
skills and critical elements that students will be learning.
CRITICAL ELEMENTS OF PICKLE-BALL SKILLS • Forehand: grip the
racquet with the V of the thumb and forefinger on the top back edge of
the grip, step with opposite foot toward target, keep the racquet face
perpendicular to the floor, swing low to high • Backhand: grip the
racquet with the V of the thumb and forefinger on the top back edge of
the grip (1/4 turn), step with same side foot toward target, keep the
racquet face perpendicular to the floor, swing low to high • Lob:
Similar to forehand or backhand but open the face of the racquet as
you swing low to high to hit the ball in a high arch over the head of an
opponent who is playing the net. • Smash: turn your body
perpendicular to the net, racquet hand away from the net, raise your
non racquet hand toward the ball to help judge distance, as the ball
approaches your target hand swing quickly in an overhead motion
hitting down on the ball with a flick of the wrist, aim the ball at your
opponents feet or toward an open court area. • Passing Shot: A
passing shot is essentially a forehand or backhand
SKILLS
1. Forehand Grip Grip paddle with a handshake so that the forefinger
is extended up and behind the shaft of the grip with the three fingers
and thumb wrapped around the grip, forming a V on top. Have
students shake hands. Next have them shake hands with paddle
making sure to make a V.
2. Ready Position Place feet shoulder width apart, weight on balls of
feet, bent knees, hands out in front of the body, eyes forward.

PICKLEBALL LESSON PLAN - YOUTH AGES 7 TO 14 REV 2015 R Nibarger
3. Hand Eye Coordination Have students use Eastern Grip. The paddle
face should face the ceiling, keep your eye on the ball, ball should go no
higher than one foot above the paddle, and arm is extended in front of
the body for ball control. Count how many volleys in a row for one
minute. Students will be timed two more times, attempting to improve
their score.
4. Combine Front and Backhand Drives when hitting the ball, students
need to make sure they hit the ball on the face (flat side) of the paddle
with extend arms.
6. Volleying Hitting the ball before it bounces, must be done with
player's feet behind the non-volley zone line. It is a fault if the player
steps over the line on the volley follow through.
7. Serve
Players must keep one foot behind the back line when serving. The
serve is an underhand serve that must be contacted in the air below
the waist. Server must contact the ball before it bounces. The serve is
made diagonally cross-court and must clear the non-volley zone. Serve
from right court, when your score is zero or even number. Serve from
the left court, when your score is odd number. ¾ Only one serve
attempt is allowed except if the ball touches the net on the serve and
lands in the proper service court. Then the serve may be taken over. ¾
At the start of each game, the first serving team is allowed only one
fault before giving up the ball to the opponents. Thereafter both
members of each team will serve and fault before the ball is turned
over the opposing team. The player in the right hand court will always
start first. Cannot serve until return person is in the ready position.
PICKLEBALL LESSON PLAN - YOUTH AGES 7 TO 14 REV 2015 R Nibarger
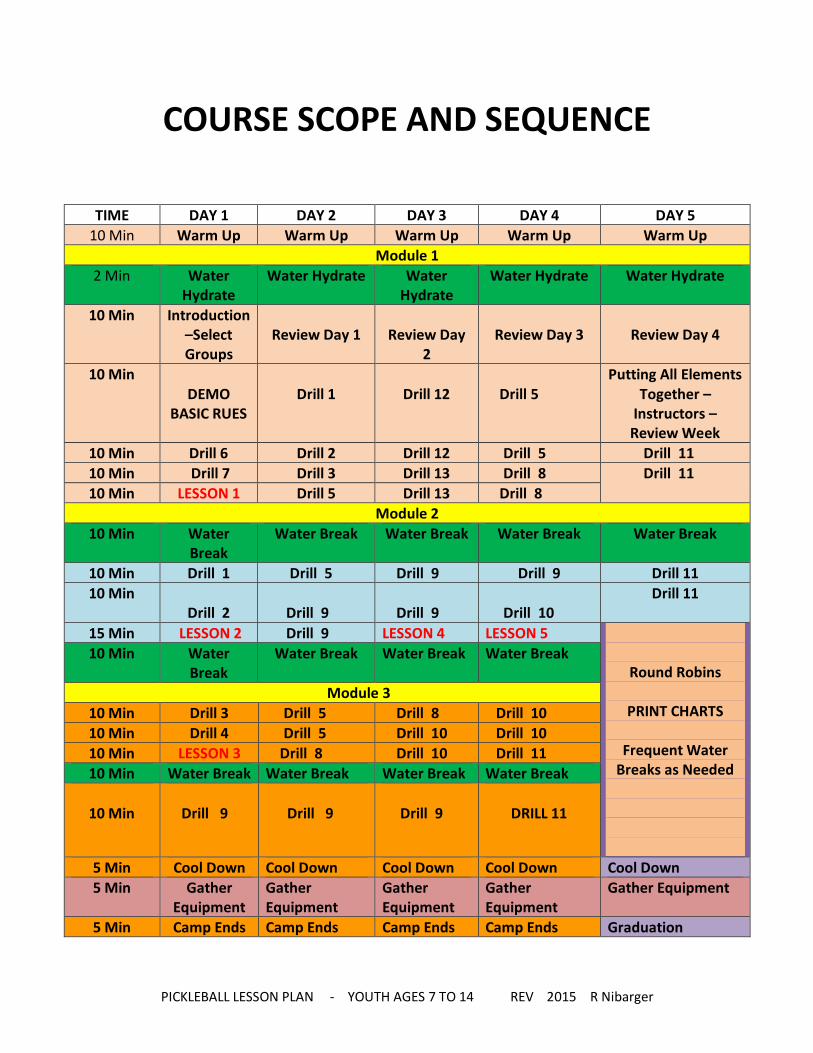
COURSE SCOPE AND SEQUENCE
TIME DAY 1 DAY 2 DAY 3 DAY 4 DAY 5
10 Min Warm Up Warm Up Warm Up Warm Up Warm Up
Module 1
2 Min Water Hydrate
Water Hydrate Water Hydrate
Water Hydrate Water Hydrate
10 Min Introduction –Select Groups
Review Day 1
Review Day
2
Review Day 3
Review Day 4
10 Min DEMO
BASIC RUES
Drill 1
Drill 12
Drill 5
Putting All Elements Together –
Instructors – Review Week
10 Min Drill 6 Drill 2 Drill 12 Drill 5 Drill 11
10 Min Drill 7 Drill 3 Drill 13 Drill 8 Drill 11 10 Min LESSON 1 Drill 5 Drill 13 Drill 8
Module 2
10 Min Water Break
Water Break Water Break Water Break Water Break
10 Min Drill 1 Drill 5 Drill 9 Drill 9 Drill 11
10 Min Drill 2
Drill 9
Drill 9
Drill 10
Drill 11
15 Min LESSON 2 Drill 9 LESSON 4 LESSON 5
Round Robins
PRINT CHARTS
Frequent Water Breaks as Needed
10 Min Water Break
Water Break Water Break Water Break
Module 3
10 Min Drill 3 Drill 5 Drill 8 Drill 10
10 Min Drill 4 Drill 5 Drill 10 Drill 10
10 Min LESSON 3 Drill 8 Drill 10 Drill 11
10 Min Water Break Water Break Water Break Water Break
10 Min
Drill 9
Drill 9
Drill 9
DRILL 11
5 Min Cool Down Cool Down Cool Down Cool Down Cool Down
5 Min Gather Equipment
Gather Equipment
Gather Equipment
Gather Equipment
Gather Equipment
5 Min Camp Ends Camp Ends Camp Ends Camp Ends Graduation

PICKLEBALL LESSON PLAN - YOUTH AGES 7 TO 14 REV 2015 R Nibarger
LESSON: 1 HITTING THE BALL BACK AND FORTH
FACILITY: One court or specified area for each group
EQUIPMENT: One pickleball for each group
One paddle for each student
PERFORMANCE GOAL: Students will learn to hold the paddle and
meet the ball on one bounce.
COGNITIVE GOAL: Students will learn to anticipate where the ball
goes after bouncing, safety concerns, and to improve their focus on the
ball.
LESSON SAFETY: Practice areas should be separated by a minimum
of 15 feet. Never back peddle to attempt a shot. Always warm up and do a cool down after matches.
LESSON SEQUENCE:
1. Teach the proper grip.
2. Line up students 15 feet away from each other along a court. 3. Demonstrate and have students practice hitting the ball to
each other from five feet away.
4. Have the students go to their respective court and, try to hit the ball over the net.
5. Have student pitch and catch across the net with their partner.
LESSON: 2 FORHAND AND BACKHAND
FACILITY: One court or specified area for each group

PICKLEBALL LESSON PLAN - YOUTH AGES 7 TO 14 REV 2015 R Nibarger
EQUIPMENT: One pickleball for each group
One paddle for each student
PERFORMANCE GOAL: Students will improve their ability to meet
the ball on their backhand, hit on a diagonal, and be able to serve.
COGNITIVE GOAL: Students will understand the difference between
a forehand and a backhand, and learn rules for serving.
LESSON SAFETY: Have students practice the same things at one time
so they do not get in each other’s way.
LESSON SEQUENCE:
1. Have students practice backhand to backhand. 2. Explain service rules.
3. Demonstrate how to make a ball go on the diagonal, and
show proper serve. 4. Have student practice serving.
LESSON: 3 SERVING
FACILITY: A specified practice area for each group if a court is not
available
EQUIPMENT: One pickleball for each group
One paddle for each student
PERFORMANCE GOAL: Students will continue to improve their
paddle skills and follow the rules of the game.
COGNITIVE GOAL: Students will review service rules and learn
receiver’s rules.
PICKLEBALL LESSON PLAN - YOUTH AGES 7 TO 14 REV 2015 R Nibarger
LESSON SAFETY: If there is not a court available for every four
students, have remaining students practice in an outside space that will not interfere with the game.
LESSON SEQUENCE: 1. Teach service rules.
2. Answer questions about service rules.
3. Have students play their first game. 4. Have students rotate courts after a set time.
LESSON: 4 VOLLEYS AND TWO BOUNCE RULE
FACILITY: A specified practice area for each group if a court is not
available
EQUIPMENT: One pickleball for each group
One paddle for each student
PERFORMANCE GOAL: Students will continue to improve their
paddle skills.
COGNITIVE GOAL: Students will learn that volleys have follow-
through, the no volley rule, and two-bounce rule.
LESSON SAFETY: If you do not have a safe place for practice, collect
all equipment and have the remaining students stand at the net and
officiate.
LESSON SEQUENCE:
1. Demonstrate the volley. 2. Teach the rules that involve the volley.
3. Review the receiving rules.

PICKLEBALL LESSON PLAN - YOUTH AGES 7 TO 14 REV 2015 R Nibarger
LESSON: 5 SCORE KEEPING AND BASIC RULES
FACILITY: Pickleball court or courts
EQUIPMENT: Pickleballs and Paddles
PERFORMANCE GOAL: Students will call correct score
COGNITIVE GOAL: Students will learn how to both play and keep an
accurate score
LESSON SAFETY: Instruct the students that when they are leaving the
court after completing a game, to walk behind the baselines so they do
not interfere with other games.
LESSON SEQUENCE:
1. Issue equipment 2. Review Proper Scoring 3. Practice Game 4. Students call score
THE SCORE CALLING PROCESS EXPLAINED Points are scored only on the serve. The receiving side can not score a point. At the start of the game, the player on the right side serves. If a point is scored, the server moves to the left side and serves to the opposite court. Each time that a point is scored, the players on the serving side alternate from the right to left or left to right. That player continues to serve until the serve is lost by losing a rally. Players on the
PICKLEBALL LESSON PLAN - YOUTH AGES 7 TO 14 REV 2015 R Nibarger
serving team do not alternate sides unless a point is scored. The receiving side never alternates sides.
When the receiving team wins a service turn, the player on the right serves first and continues to serve and alternates sides each time that a point is won. When the first server loses the serve, the serve goes to the second server on the side. When the second server loses the serve, the serve goes to the other team and the player on the right serves first. That pattern continues throughout the game.
Call the score in the order of server’s score, receiver’s score, then the server number. For example, if the score of the serving team is 3 and the score of the receiving team is 6, and the second server on the side is serving, the score would be announced as 3-6-2. Some players might say “first” or “second” for the server number, for example 3-6-second. Either way is correct. Note that the server number is for that service turn only. Whoever is on the right when the team gets the serve back is the first server for that service turn only. The next time that the team gets the serve back, it might be the other player that is on the right and is the first server for that service turn only. Beginning players often mistakenly assume that the player keeps the same server number throughout the game.
It is important to call the score including the server number prior to each serve. That helps the players to keep the server and the score straight. When you announce, as part of the score, that you are the first server, everyone on the court knows that when you lose the serve, the serve goes to your partner. When you announce that you are the second server, everyone knows that when you lose the serve, the serve goes to the other team. To minimize the advantage of being the first team to serve in the game, only one player gets a service turn on the first service turn of the game. To help everyone remember that the

PICKLEBALL LESSON PLAN - YOUTH AGES 7 TO 14 REV 2015 R Nibarger
serve goes to the other side when that player loses the serve, it is customary to say that the player is the last server or second server. Therefore, at the start of the game, it is customary to say that the score is 0-0-2. The “2” means that the serve goes to the other side when the serve is lost.
At the start of each game, make a mental note of the player that served first for each side. If the rotation is done correctly, a team’s score will always be even when that player is on the right and odd when that player is on the left. As you call the score, use the player position as a double check on whether you have the correct score.
Singles scoring is very similar except that there is no second server. The serve is always done from the right side when the server’s score is even and from the left side when the server’s score is odd. Note that it is the server’s score that matters, not the combined score of server and receiver.

PICKLEBALL LESSON PLAN - YOUTH AGES 7 TO 14 REV 2015 R Nibarger
PICKLEBALL DRILLS
DRILL 1 – Pitch and Catch With Pickleball
Divide the students into 4 groups. The drill is similar to a baseball drill
whereby the students face each other and toss the ball to each other
beginning at a distance of 5 feet. The instructor directs the students to
take one step back upon command. Student continue backwards until
the frequently drop the ball or 15 feet is reached.
DRILL 2 – Pitch and Catch With Pickleball & Paddle (No Net)
Divide the students into 4 groups. The drill is similar to a baseball drill
whereby the students face each other and toss the ball to each other
usng the pickleball paddle. The instructor directs the students to take
one step back upon command. Student continue backwards until they
frequently drop the ball or 15 feet is reached.
DRILL 3– Pitch and Catch With Pickleball & Paddle (NET)
Drill 3 is the same drill as drill 2 except the students volly the ball across
the net. The should continue to use the underhand technique and
continue to move further apart until they reach the baseline.
DRILL 4 – One Bounch Partner Drill
Position players about 30 feet apart, students drop hit the ball to their
partner, who let it bounce once before returning. When an error is
made begin with a drop hit once again. First use forehands only and
then backhands only. Change partners after 10 minutes.
PICKLEBALL LESSON PLAN - YOUTH AGES 7 TO 14 REV 2015 R Nibarger
DRILL 5 – Serve Drill
Have students practice serves beginning at the no volly line and
gradually move back toward the base line as their skill improve. Work
on keeping the ball in the correct court, deep and in the middle.
DRILL 6 - Eye Hand Coordination Drill
Have students try and keep the ball bouncing on the paddle like the old
paddle ball game. Note each student eye hand coordination for
possible group placement. It is helpful if the groups have similar ages
and skills. Upon completion, go directly to Day 1 lessons.
DRILL 7 - Eye Hand Coordination Drill – Dribble
This drill is the same as drill 6 except the studentsuse their paddles and
dribble the pickleball with their paddle like they would a basktball. See
who can keep the ball in motion the longest without an error.
DRILL 8 – Rally Tally
Partners count how many times a ball may be hit over the net with one
bounce. When a ball is hit out, in the net or two bounces switch places
with teammates after several repetitions.
DRILL 9 – Four Corners Drill
Send them to the four corners of the pickleball court. Each corner has a
coach.
Corner I – Serve accuracy drill – have students line up with their coach.
Have students serve the ball in between two orange cones. Switch
after 5 successful serves. Student proceeds to Corner II.

PICKLEBALL LESSON PLAN - YOUTH AGES 7 TO 14 REV 2015 R Nibarger
Corner II – Backhand drill. Coach toss. Student returns ball to coach
demonstrating the backhand. After 10 successful hits, student reports
to Corner III.
Corner III – Fore Hand – Coach toss. Student returns back hand volly to
coach. After 10 successful hits, student reports to Corner IV.
Corner IV – Ready Drill – Student pushes ball back to coach who tosses
underhand. Student repeats corner I when finished.
DRILL 10 – Rally
Divide student into 4 groups with similar skills., Object is to keep the
ball into play. You may use any boundary that you choose. Object is to
see how long student can maintain a rally.
DRILL 11 – Team Challenge (Two Player Each Team)
Begin with each team putting two players on the court against partners
from another team. Put ball in play with a drop-hit and play out the
point. Team who wins the point stays on the court and receives a point
for their team. Losing team from the point switch with two teammates.
Winning partners stay on until losing a point or winning 3 consecutive
points. Play to seven or time limit. Total the score for your team. Rotate
teams. Round Robin format
DRILL 12 – Back Hand
Students wil line up and face each other spaced appart. The drill is to
use the back hand and keep the ball in play while playing pitch n catch.
Drill 13 – Back Hand Across Net
PICKLEBALL LESSON PLAN - YOUTH AGES 7 TO 14 REV 2015 R Nibarger
This drill is the same as drill 11 except student use the net.
Drill 14 – Pickleball Tag (Note: Pull over camp shirts needed)
Instant Activity: Team challenge “Pickleball Tag” o Each team will assign
one tagger and one reliever. o Tagger will wear their color jersey and
the reliever will wear no jersey or non-used color. o The tagger, reliever
and the rest of the team must balance a pickleball on a paddle. o The
only way they may walk or run is if the ball is balanced on the paddle. o
If the ball falls off the tagger’s paddle; the tagger cannot tag until the
ball is balanced again and the players must remain still if they are
tagged or if the ball falls off until the reliever comes to tag them. Then
the players are back in the game. o Everyone must stay within cones
and boundaries. o Points are awarded based on how many of each
color are remaining active in the game when time is called. Bonus
points to each tagger who made the entire game without losing
possession of the ball.
.
Related Documents