PHOTOSHOP 101: A Crash Course

Welcome message from author
This document is posted to help you gain knowledge. Please leave a comment to let me know what you think about it! Share it to your friends and learn new things together.
Transcript

PHOTOSHOP 101: A Crash Course
moffj001
Typewritten Text
moffj001
Typewritten Text

Page | 2
INTRODUCTION As you go through this guide you will notice that I have included some tips to help you teach your students. These are things that I find very helpful when introducing Photoshop. I have also in-cluded many keyboard commands. If you will introduce key commands as you learn/teach Photoshop, your efficiency will increase. This guide will help you get started in Photoshop. When you open Photoshop for the first time you should familiarize yourself with the layout and the tools. By default, most versions of Photoshop will open with the Essentials Workspace. This is a very basic layout and has most of the panels that you will need for beginner lessons.
KNOWING YOUR ENVIRONMENT
Understanding the layout of Photoshop will help you to work efficiently. The Toolbar is located on the left side of the screen. It contains the tools that you will need to edit your document. The canvas is your work area where you will create your images. The right side of the screen contains your panels and palettes that will help you modify images.
LEARNING THE TOOLBAR
On the left side of the screen you will see the Toolbar. We will review what the tools do. As you click on a tool notice that there is an Options Bar at the top of the screen that changes based on the tool that you select. Also notice that some of the tools have a small triangle in the lower right corner of the tool. This means that other tools are hidden behind that tool. Right click on a tool to see the other tools available. There will be a capital letter next to the set of tools. This is the key command to quickly select that tool. If you are familiar with the tools you can skip this part.
Canvas
Tool Bar
Panels

Page | 3
Selection Tools— The first section of tools are used when you are se-
lecting items on the screen. Selections. Learning how to select areas is very important when working with Photoshop since you need to select what you want to edit. Making a selection allows you to isolate areas in your image and edit only that part. The rest of the image is not affected. There are four basic selection tools in the toolbox.
Marquee Tools are selection tools that allow you to make rectangular or elliptical selections. Once you make a selection you can edit the dimensions by going to Select>Transform Se-lection. Press Ok when you are satisfied with the selection that you have made.
Lasso Tools allow you to make freehand selections. You can se-lect straight with the Polygonal Lasso. If an object has a defined line of color variation, the Magnetic Lasso will make a selection on the line of differentiation.
The Quick Selection tool is a quick way to make a selection by dragging the mouse over the object to be selected. The Magic Wand Tool selects objects of similar color.
The Crop Tool allows you to select a portion of the object to keep and delete the rest. Perspective Crop can be used to select an object that is not directly flat on the screen. Slice Tools are a helpful way of cutting an image into multiple parts.
The Eyedropper Tool is used to sample colors on the screen. If you are using the Brush Tool you can hold down ALT and the Eyedropper will appear to quickly select colors. The Ruler Tool is used to straighten images. The Note Tool is a helpful way to leave notes about a project for you to refer back to later.
Page | 4
Editing Tools are below the selection tools. They are used to make changes to an image
once it has been selected. The Spot Healing Brush and Healing Brush removes blem-ishes and imperfections while keeping the color and texture. The Patch Tool works like Healing Brush, but you draw a lasso around the part you are changing. The Red Eye Tool removes red eye from photographs.
The Brush Tool and Pencil Tool works just like the name im-plies. The Color Replacement Tool allows you to change the color of an object by selecting a color and painting. The Mixer Brush Tool allows you to turn photographs into works of art. It mimics painting techniques that can be applied on canvas.
The Eraser Tools are used to remove parts of an image. Once the objects are erased they are gone. Sometimes it is better to use Masking techniques to preserve the original image. The Gradient Tool is used to blend col-ors. The two most common gradients are linear and radial. Those can be selected on the Options bar. The Paint Bucket Tool allows you to fill selections with a solid color. The Blur, Sharpen, and Smudge Tools do exactly what their name implies. Each is controlled by Strength (intensity) on the Options Bar. Start with a low Strength and gauge how much to use from there. The Dodge Tool can be used to bring out highlights and makes images lighter. The Burn Tool makes things darker. Both tools work by controlling exposure on the Options Bar. The Sponge Tool is used to saturate (make things brighter) or desaturate (takes out the color intensity until the object is grayscale). Set the exposure/flow to a low setting when you are starting out so that you do not overdo it. Type Tools work as each tool’s name implies. You will make changes to the font style, size, color, etc on the Options bar. If you make a selection box to type your text in (similar to word processing) this is called Paragraph Type. If you simply click your mouse on the canvas and begin typing, this is called Point Type. Both kinds of type have advantages.
Helpful key shortcuts will save
you time when filling in with solid
colors.
To fill with the foreground color
press Alt + Backspace.
To fill with the background color
press Ctrl + Backspace.
To fill with something else press
Shift F5
Page | 5
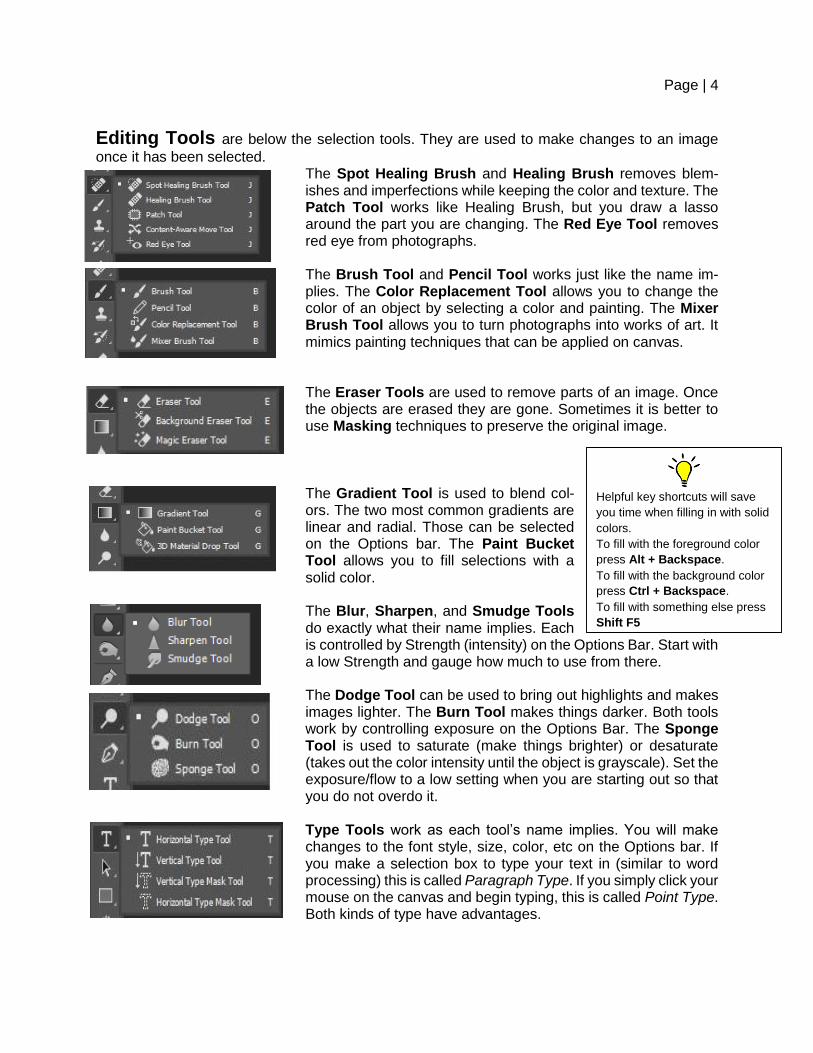
The Shape Tools are found behind the Rectangle Tool. Each tool does what its name implies. When creating a shape you can select whether you are creating a path, raster graphic, (pixels) or a shape layer. The Custom Shape Tool allows you to select from many preloaded shapes. Shapes can also be downloaded from the Internet.
Another tool worth noting is the Zoom Tool (magnifying glass). This allows you to change the size that you are view-ing the document. The large black and white squares represent the fore-ground and background of the image. By default, images start with black as the foreground color, meaning that any-
thing that you apply to the canvas will be black. By default, the background color is white. This is the color that will appear on an un-locked layer if the eraser is used. The small bent arrows will switch the foreground and background colors. The tiny black and white squares represent the default colors. To quickly change to black and white click on that icon.
Learning about Panels Panels are located on the right side of the screen. The default layout will include the Layers (F7) and Colors (F6) panels as well as some others. You can add or subtract panels to fit the needs of your project. Don’t worry about messing up your workspace. You can always reset it to Adobe settings later. To add additional panels, go to the Windows menu. I recommend adding the History panel to all of your workspaces. Common Panels are Layers, History, Colors/Swatches. You may not use Adjustments and Masks when you begin working in Photoshop. You will use those in more advanced projects. To close these panels click on the menu option and select either Close Tab or Close Tab Group. This will allow you to make room for panels that you will use more often. The History panel is useful because it is like a multiple “undo” option. By default, the History saves the 20 previous “states”. A state is any change that you make (including a single mouse click). State changes can add up very quickly. You can increase the number of states by going to Edit>Preferences>Performance. As you are starting out, you may find it really helpful to in-crease your states to at least 50. You can “dock” the History panel by clicking on the tab at the top of the panel and dragging it over to another panel.
Helpful Key Commands:
Ctrl + (plus) Zooms In
Ctrl – (minus) Zooms out
Ctrl 0 (zero) Fits the image on
the screen.
Ctrl 1 (one) Shows the image at
100%, aka Actual Pixels
Pressing D will change the col-
ors to the default colors
Pressing X switches fore-
ground and background colors

Page | 6
SETTING UP AN IMAGE When you first open Photoshop, you will be asked to put in size dimensions, resolution, color mode, etc. It’s recommended that you know what your document will be BEFORE you start the document. Size and resolution are the things you should really pay close attention to. Having the wrong settings can produce a headache later. Unless you know you need a transparent back-ground, it’s ok to use White as the background color. That can be changed in editing if you need a different color later. If you do not know the information, it’s best to leave the default settings.
Photoshop has many document presets for common sized documents. This is a good place to look before you enter in your settings. Also, you can save a document setting if you use it often. Resolution can be measured in pixels per inch, points, and picas. These are the common meas-urements, but you can also use millimeters, centimeters, and columns.
Tip: If you are planning to only view images on a computer screen, 72 ppi for resolution will work per-
fectly. If you plan to print your image, you should set your resolution to a minimum of 300 ppi .
The higher the resolution the larger the file size will be.
Page | 7
Photoshop 101: A Crash Course for Beginners Dawn Bradley, Granbury High School 2016
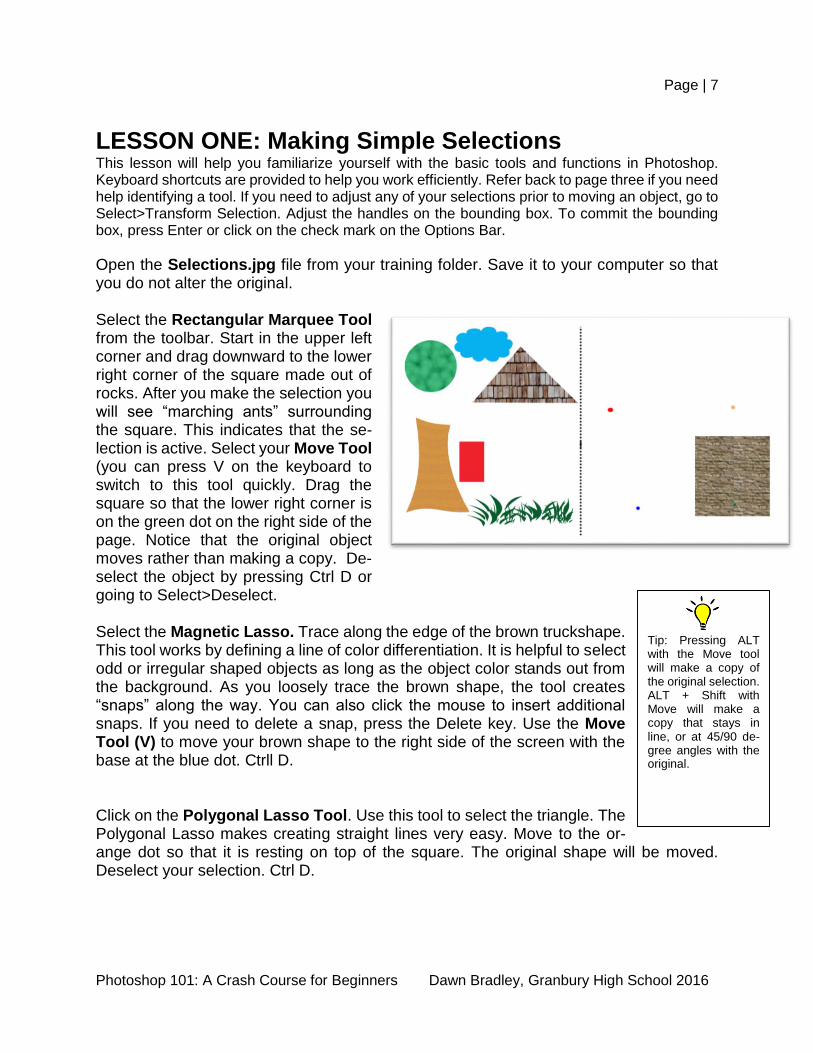
LESSON ONE: Making Simple Selections This lesson will help you familiarize yourself with the basic tools and functions in Photoshop. Keyboard shortcuts are provided to help you work efficiently. Refer back to page three if you need help identifying a tool. If you need to adjust any of your selections prior to moving an object, go to Select>Transform Selection. Adjust the handles on the bounding box. To commit the bounding box, press Enter or click on the check mark on the Options Bar.
Open the Selections.jpg file from your training folder. Save it to your computer so that you do not alter the original. Select the Rectangular Marquee Tool from the toolbar. Start in the upper left corner and drag downward to the lower right corner of the square made out of rocks. After you make the selection you will see “marching ants” surrounding the square. This indicates that the se-lection is active. Select your Move Tool (you can press V on the keyboard to switch to this tool quickly. Drag the square so that the lower right corner is on the green dot on the right side of the page. Notice that the original object moves rather than making a copy. De-select the object by pressing Ctrl D or going to Select>Deselect. Select the Magnetic Lasso. Trace along the edge of the brown truckshape. This tool works by defining a line of color differentiation. It is helpful to select odd or irregular shaped objects as long as the object color stands out from the background. As you loosely trace the brown shape, the tool creates “snaps” along the way. You can also click the mouse to insert additional snaps. If you need to delete a snap, press the Delete key. Use the Move Tool (V) to move your brown shape to the right side of the screen with the base at the blue dot. Ctrll D. Click on the Polygonal Lasso Tool. Use this tool to select the triangle. The Polygonal Lasso makes creating straight lines very easy. Move to the or-ange dot so that it is resting on top of the square. The original shape will be moved. Deselect your selection. Ctrl D.
Tip: Pressing ALT with the Move tool will make a copy of the original selection. ALT + Shift with Move will make a copy that stays in line, or at 45/90 de-gree angles with the original.

Page | 8
Choose the Elliptical Marquee Tool and select green circle. If you need to adjust your marquee, continue to hold the mouse and press the Space-bar on the keyboard. Holding the Spacebar while making a selection will allow you to adjust the placement of the marching ants. You can also adjust your marching ants by going to Select>Transform Selection. Switch to the Move Tool (V). Hold the ALT key and drag the circle to the right side of the screen. Place the circle on
top of the red dot. Release the mouse, but do not deselect. Hold Alt and move the circle over to the right. It should overlap the first circle. Repeat this step so that you have five circles on the right side of the screen as shown in the example below. Deselect.
Go to the Magic Wand Tool. The settings for this tool are very im-portant. Tolerance will determine how many colors will be selected. Turn Contiguous on. Set the tolerance to 25. Click on one piece of the green grass. This should select all of the grass on the screen. Move the grass to the right side of the image and place it at the base of the tree. Deselect. Ctrl D
Select the Lasso Tool (L). The lasso allows you to freehand trace your selections. The faster you make your selection, the smoother the lines will look. The slower you move your mouse, you will most likely have a shaky line, but it may be more accurate. Unfortunately, you will probably have a hard time making accurate selections when you start using Photoshop. That’s ok. Once you make your selection, Photoshop will allow you to Add to and Subtract from a selection. The
Magic Wand Tip: If your tolerance
is 20, the program will select 20
tints lighter and 20 shades darker
plus the one original pixel for a total
of 41 variations of a color.
Contiguous means that you are se-
lecting only objects of the same
color that are touching. If you want
to select everything on the page
that is one color you must remove
the check from Contiguous.
Page | 9
Photoshop 101: A Crash Course for Beginners Dawn Bradley, Granbury High School 2016
tricky part is remembering the key commands. Hold the ALT key and select portions of the selected area that you want to subtract. Then hold the SHIFT key and select portions of the object that need to be added to the selection.
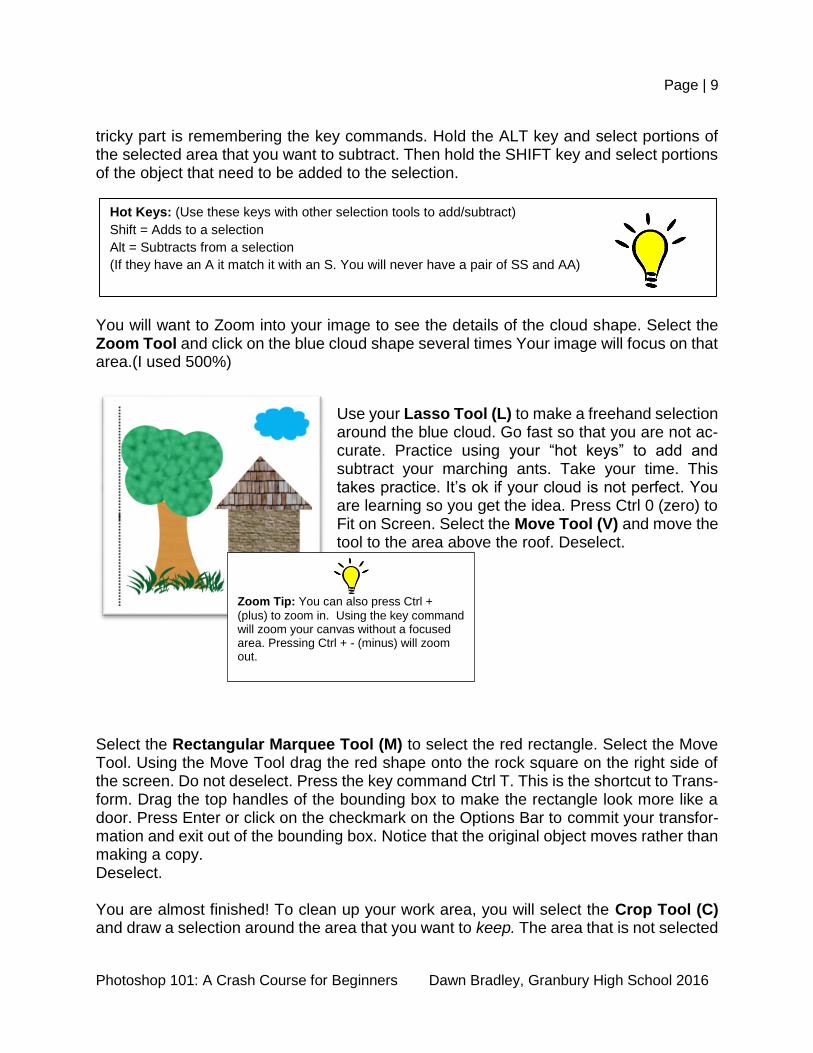
You will want to Zoom into your image to see the details of the cloud shape. Select the Zoom Tool and click on the blue cloud shape several times Your image will focus on that area.(I used 500%)
Use your Lasso Tool (L) to make a freehand selection around the blue cloud. Go fast so that you are not ac-curate. Practice using your “hot keys” to add and subtract your marching ants. Take your time. This takes practice. It’s ok if your cloud is not perfect. You are learning so you get the idea. Press Ctrl 0 (zero) to Fit on Screen. Select the Move Tool (V) and move the tool to the area above the roof. Deselect.
Select the Rectangular Marquee Tool (M) to select the red rectangle. Select the Move Tool. Using the Move Tool drag the red shape onto the rock square on the right side of the screen. Do not deselect. Press the key command Ctrl T. This is the shortcut to Trans-form. Drag the top handles of the bounding box to make the rectangle look more like a door. Press Enter or click on the checkmark on the Options Bar to commit your transfor-mation and exit out of the bounding box. Notice that the original object moves rather than making a copy. Deselect. You are almost finished! To clean up your work area, you will select the Crop Tool (C) and draw a selection around the area that you want to keep. The area that is not selected
Hot Keys: (Use these keys with other selection tools to add/subtract)
Shift = Adds to a selection
Alt = Subtracts from a selection
(If they have an A it match it with an S. You will never have a pair of SS and AA)
Zoom Tip: You can also press Ctrl +
(plus) to zoom in. Using the key command will zoom your canvas without a focused area. Pressing Ctrl + - (minus) will zoom out.
Page | 10
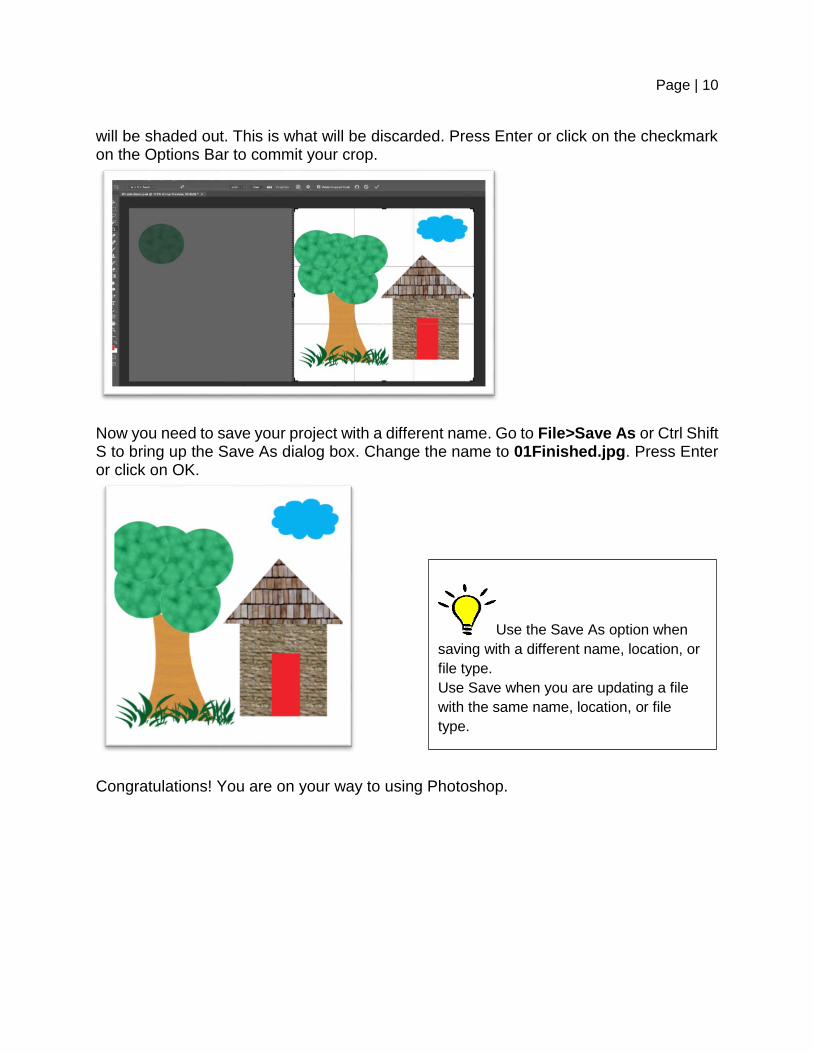
will be shaded out. This is what will be discarded. Press Enter or click on the checkmark on the Options Bar to commit your crop.
Now you need to save your project with a different name. Go to File>Save As or Ctrl Shift S to bring up the Save As dialog box. Change the name to 01Finished.jpg. Press Enter or click on OK.
Congratulations! You are on your way to using Photoshop.
Use the Save As option when
saving with a different name, location, or
file type.
Use Save when you are updating a file
with the same name, location, or file
type.

Page | 11
LESSON TWO: The Magic of Layers
One of the beautiful joys of Photoshop is being able to work with layers. Using layers allows you to edit parts of a document without it disturbing other parts. Open the file layers.psd. It’s very useful to rename your layers something relevant to the image. In this case, I have re-named the layers for you. To rename a layer, double-click on the layer name and replace it with the new name. Select the lock layer. Press Ctrl T to get into Transformation mode. You will see a bounding box with handles appear around the lock. Move your mouse to the outside edge of any of the corners. The icon will turn into a bended arrow. This means you are about to rotate the image. Turn the image so that the top right corner is pointing to 12:00. Press Enter or the checkmark on the Op-tions bar to commit the box. If you make a mistake you can press Esc and start over. With the lock layer still active, we will apply a blending mode. Blending modes are found in the Layers panel. They change the way a layer interacts with the layer beneath it. The default blending mode is Normal. Select several blending modes to see what each does. Then choose either Color Dodge or Screen. Activate the technology layer. Use the Move Tool (V) to move the rasterized type to the bottom right corner of the document. (Rasterized text means that you can no longer edit the text. The text is now considered pixels.) Change the Opacity of the layer to 50% (found at the top of the layers panel). Select the code layer. Press Ctrl T and click and drag the top left corner so that it is the same size as the background image. Press Enter or the checkmark to commit the transformation. When you work with layers you will want to save all of your working files as PSD files to retain the layers each time you save and reopen a file. Saving files as JPEG will flatten all of the layers and make editing much harder. Save your image.

Page | 12
CREATING PHOTOSHOP MAGIC
Once you learn a few basic Photoshop tools you will be ready to impress your friends with a little bit of Photoshop Magic. The lessons below are simple, yet impressive.
LESSON THREE: Make them Disappear Using the Clone Stamp Pt 1.
Open the photo Seawall.jpg. Notice the two people on the seawall. Removing the people from this image is very easy. Select the Clone Stamp. Choose a soft, round brush (80 px) so that your changes are subtle. Hold down the ALT key and click on an area below the couple. This is defining your source. Release the mouse and ALT. Hover your mouse over the couple. This will be your target. When you hover your mouse over another area, a preview will appear of

Page | 13
what will be “stamped” over the target. Click and drag your mouse over the couple. As you drag the mouse you will see a plus + that hovers over the source area. The target will be replaced with your source. In order to make the image look realistic you may need to repeat the process several times. It’s ok to define multiple sources to make the image look realistic. If your source and target are too close you may find that you create more errors. Be patient.
Make them Move Using Content Move Pt. 2 Open the 04 That Kid file from your source folder. This is a photo of some of my students. You can see that one student did not want to cooperate and stand with the group. Through Photoshop magic we are able to move him on our own. Find the Content Aware Move Tool (found behind the Spot Healing Brush). Make a loose selection around the boy on the left. You want some of the wall to appear in your selection so that Photoshop can work its magic. Next, click inside your selection and drag the boy over next to the group. Photoshop will try to guess what the image behind his should be. It’s not always perfect, but we can touch it up with other tools later.
Make them Disappear Using Content Fill Pt. 3 Press F12 on your keyboard to Revert back to your last saved file. This will probably get the file to its original state. Now use the Lasso Tool (L) to make a selection around the boy that you previously moved (currently in original location). Press Shift F5 on your key-board to bring up your Fill options. You can also go to Edit>Fill if you prefer to use menus. Select Content Aware and then press Ok. Photoshop will do the rest of the work for you.
Page | 14
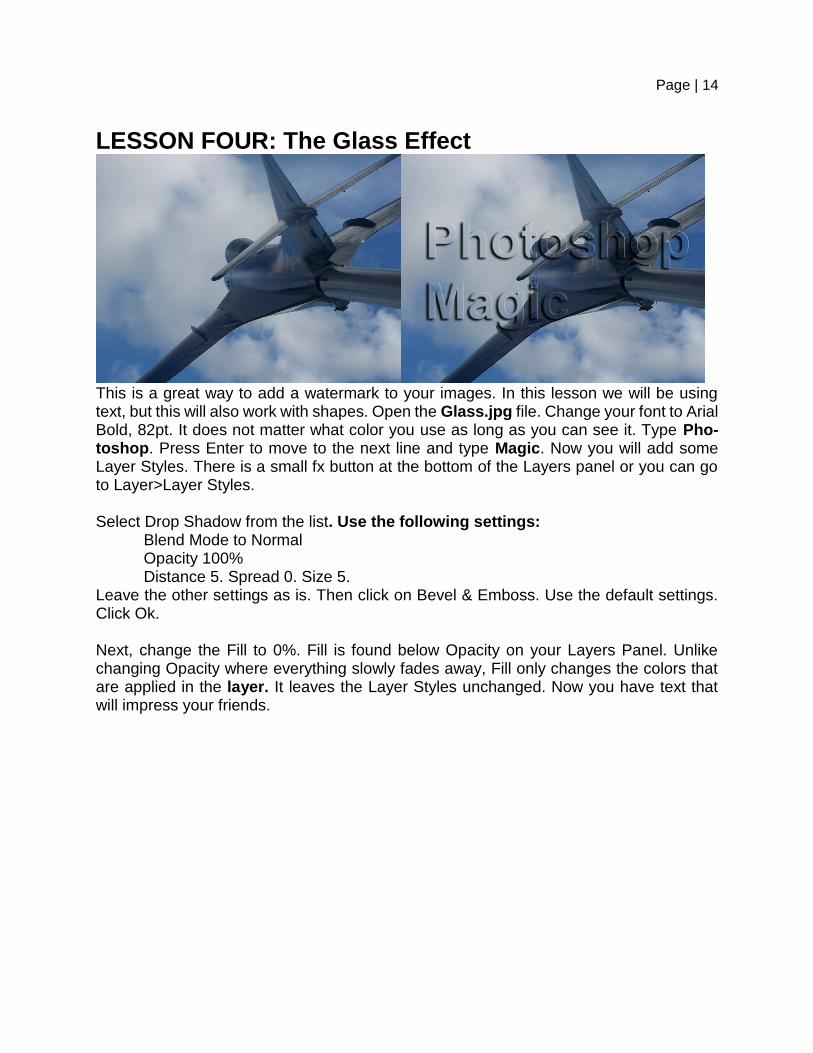
LESSON FOUR: The Glass Effect
This is a great way to add a watermark to your images. In this lesson we will be using text, but this will also work with shapes. Open the Glass.jpg file. Change your font to Arial Bold, 82pt. It does not matter what color you use as long as you can see it. Type Pho-toshop. Press Enter to move to the next line and type Magic. Now you will add some Layer Styles. There is a small fx button at the bottom of the Layers panel or you can go to Layer>Layer Styles. Select Drop Shadow from the list. Use the following settings:
Blend Mode to Normal Opacity 100% Distance 5. Spread 0. Size 5.
Leave the other settings as is. Then click on Bevel & Emboss. Use the default settings. Click Ok. Next, change the Fill to 0%. Fill is found below Opacity on your Layers Panel. Unlike changing Opacity where everything slowly fades away, Fill only changes the colors that are applied in the layer. It leaves the Layer Styles unchanged. Now you have text that will impress your friends.
Page | 15
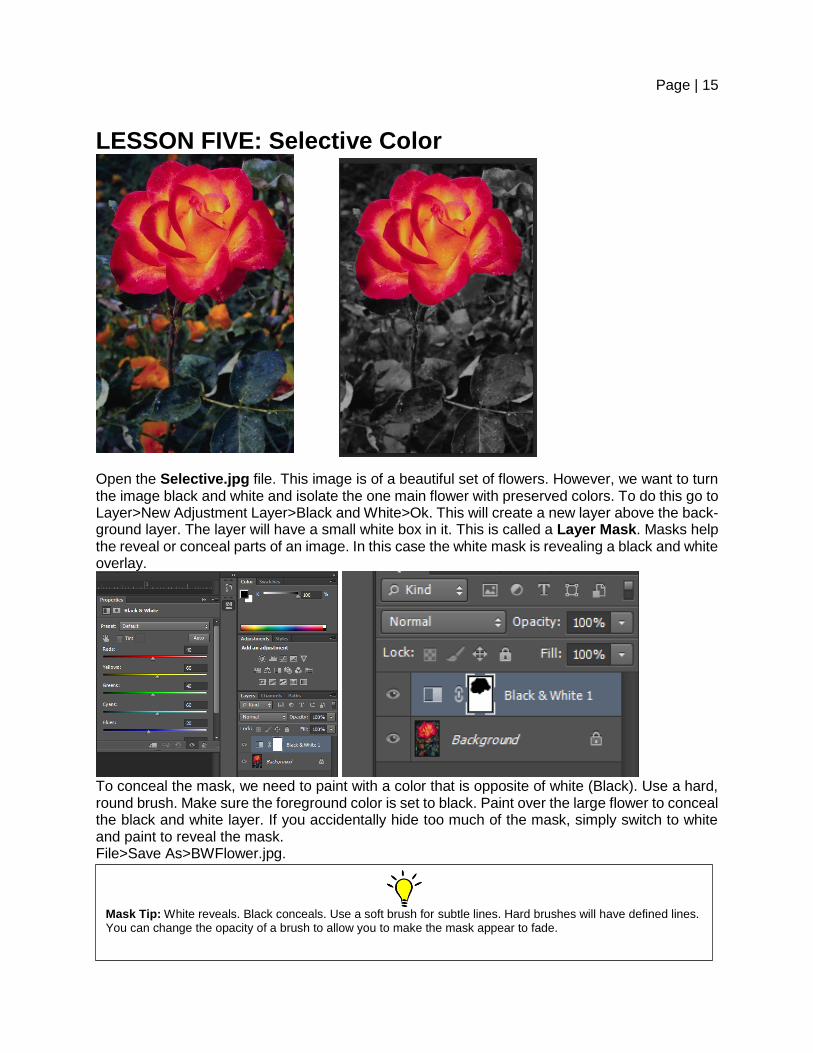
LESSON FIVE: Selective Color
Open the Selective.jpg file. This image is of a beautiful set of flowers. However, we want to turn the image black and white and isolate the one main flower with preserved colors. To do this go to Layer>New Adjustment Layer>Black and White>Ok. This will create a new layer above the back-ground layer. The layer will have a small white box in it. This is called a Layer Mask. Masks help the reveal or conceal parts of an image. In this case the white mask is revealing a black and white overlay.
To conceal the mask, we need to paint with a color that is opposite of white (Black). Use a hard, round brush. Make sure the foreground color is set to black. Paint over the large flower to conceal the black and white layer. If you accidentally hide too much of the mask, simply switch to white and paint to reveal the mask. File>Save As>BWFlower.jpg.
Mask Tip: White reveals. Black conceals. Use a soft brush for subtle lines. Hard brushes will have defined lines. You can change the opacity of a brush to allow you to make the mask appear to fade.

Page | 16
LESSON SIX: Become a Puppet Master
Open the file called Puppet Warp.psd in your source folder. In order to use the puppet warp feature (not found in PS CS4 or older), your object must be separate from the back-ground. In this case the animal is on its own layer. Select Layer 1. Go to Edit>Puppet Warp. Start at the base of the neck and click to place your starter “pin”. Continue to place pins where you want joints to occur. You can delete pins by right-clicking on them. You can also right-click and choose bring forward or send backward to make the image overlap in a different order. Once you place your pins, go back and click on each one and make slight movements to make the animal look downward. Be very cautious not to make moves that are too exag-gerated or your will warp your image. Patience is key in this method. When you are finished making your adjustments, press Enter or click on the checkmark on the options bar. If you do not like the adjustments that you made press the Esc key. Save your image as a PSD file if you think you might need to adjust the image again. Remember that saving files as JPG files will flatten the layers.

Page | 17
LESSON SEVEN: Zombify Yourself in 10 Steps Tools taught: Dodge, Burn, Sponge, Liquify, Loading Brushes
1. Open Photoshop and open a photo of yourself. Try finding a good photo with crisp quality, good lighting, and where the person is staring directly at the camera. Photos with your mouth slightly open work the best. Don’t squint your eyes. The wider your eyes are, the easier step three will be. I have provided a file for you to use. Open 08Zombie.jpg.
2. Make a copy of the background layer by pressing Ctrl + J (Layer via Copy). We do this in case you need to start over. You can delete the original layer once you have finished the as-signment.
3. Use the clone stamp tool to stamp out the iris (colored part of the eye). Spread the white of the eye across the whole eye. If you have difficulty using the white part of your eye as a source, try using a tooth to clone.
4. For steps 4-6 use a soft brush. Use the dodge tool to brighten the whites of the eye. Use the sponge tool to desaturate any color of the eye.
5. Use the burn tool at 25% to darken areas around the eyes (focusing on the underside and inner corners). You can go back over the area to create a darker color. Use a bigger brush for the burn tool to hallow out the cheeks and damage the neck. “Burn” the rest of the body with various degrees of exposure. Leave some skin as is (normal). Heavily burn any wrinkles or creases (joints). Go really heavy on the fingers. Use the burn tool to damage the clothes.
6. Use the sponge tool at 25% to desaturate your flesh. Do not desaturate your entire flash. Leave some in its natural state.
Page | 18
7. Go to Filter>Liquify to melt (warp) certain facial features. Be sparing with this tool. Too much can make your zombie look cartoonish. Use only the forward warp tool inside Liquify to slightly drag your bottom lip downward. You will want to use the mask tool under Ad-vanced options to protect the rest of your face when you are warping certain areas. Drag one of your eyes downward.
8. This step will require you to download custom brushes. Select your burn tool again. We use this tool because it will make your color slightly darker. Change the exposure to 100%. Open the brush settings and choose Load Brushes. Use a brushes shaped like cracks to damage your skin. You must reduce the brush size. This is a good time to review that the brackets on your keyboard control the size of a brush. Burn a few cracks into your body.
9. Create a new layer. Select the brush tool. Using a soft round brush, change the brush opac-ity to 20% (options bar). Go to your swatches panel and select a dark cool brown color. Paint “dirt” on areas of your clothing that should appear like you have been in the dirt (if you weren’t able to burn your clothes in step 5)
10. Change your foreground color to a dark red (RGB 99, 0, 0). Add a new layer and paint blood splatters using custom brushes. Working with multiple layers and masking will help you cre-ate realistic blood. Decorate the background. Refer to the end example for ideas.
Page | 19
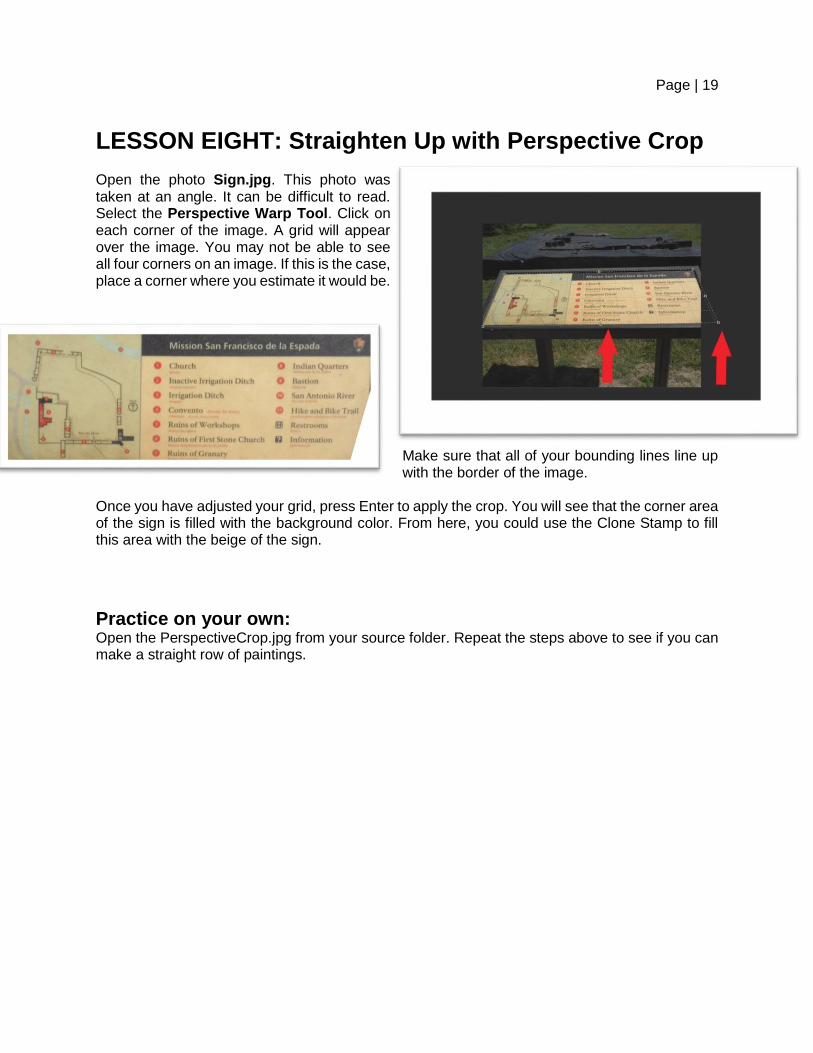
LESSON EIGHT: Straighten Up with Perspective Crop Open the photo Sign.jpg. This photo was taken at an angle. It can be difficult to read. Select the Perspective Warp Tool. Click on each corner of the image. A grid will appear over the image. You may not be able to see all four corners on an image. If this is the case, place a corner where you estimate it would be.
Make sure that all of your bounding lines line up with the border of the image.
Once you have adjusted your grid, press Enter to apply the crop. You will see that the corner area of the sign is filled with the background color. From here, you could use the Clone Stamp to fill this area with the beige of the sign.
Practice on your own: Open the PerspectiveCrop.jpg from your source folder. Repeat the steps above to see if you can make a straight row of paintings.
Page | 20
LESSON NINE: The Spot Healing Brush
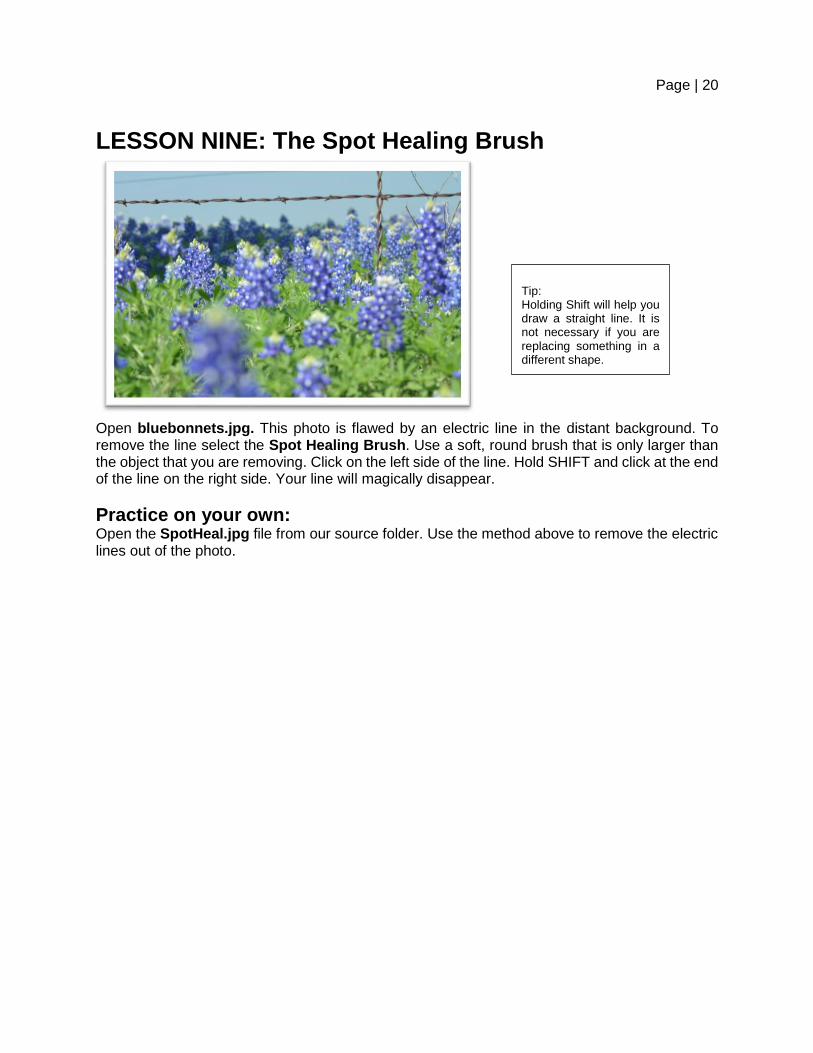
Open bluebonnets.jpg. This photo is flawed by an electric line in the distant background. To remove the line select the Spot Healing Brush. Use a soft, round brush that is only larger than the object that you are removing. Click on the left side of the line. Hold SHIFT and click at the end of the line on the right side. Your line will magically disappear.
Practice on your own: Open the SpotHeal.jpg file from our source folder. Use the method above to remove the electric lines out of the photo.
Tip: Holding Shift will help you draw a straight line. It is not necessary if you are replacing something in a different shape.
Page | 21
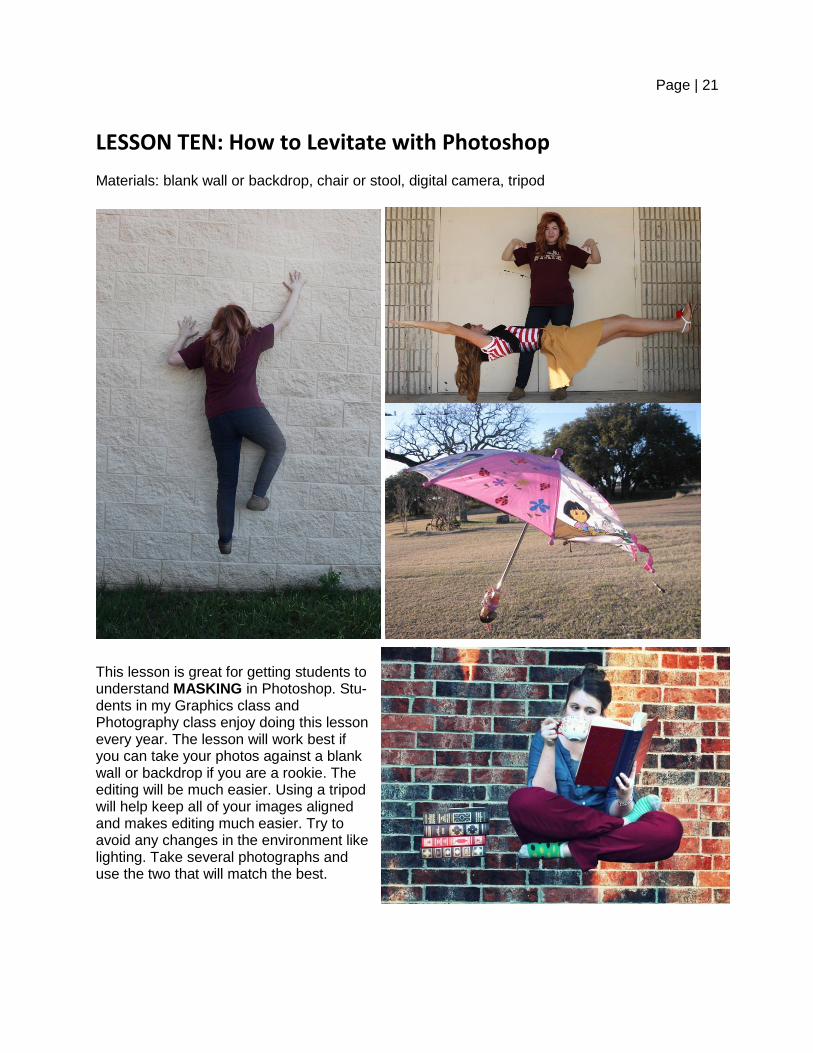
LESSON TEN: How to Levitate with Photoshop
Materials: blank wall or backdrop, chair or stool, digital camera, tripod
This lesson is great for getting students to understand MASKING in Photoshop. Stu-dents in my Graphics class and Photography class enjoy doing this lesson every year. The lesson will work best if you can take your photos against a blank wall or backdrop if you are a rookie. The editing will be much easier. Using a tripod will help keep all of your images aligned and makes editing much easier. Try to avoid any changes in the environment like lighting. Take several photographs and use the two that will match the best.

Page | 22
Step One: Setup
Take two photos for each project:
One photo of a person or object sitting on a stool or chair and another photo of the background without people or objects
Step Two: Combining Images
Open both images in Photoshop by selecting File>Open or Ctrl + O. Fit the images onto the screen by selecting View>Fit on Screen or Ctrl + 0
Select the Move tool.
Use the Move tool to drag the picture of the person or object onto the background image. There are numerous ways to do this. You can also select the first image and copy/paste
into the Background image. You’ll end up with this image of yourself copied as a new layer above the Background Layer. You must unlock the Background Layer. The easiest way to do this is by double clicking on the layer. You can rename it if you would like and then press OK.
Select both layers by holding shift and clicking on them. Go to Edit>Auto-Align Layers. Select Auto>OK.
Step Three: Removing Objects
Tip: Using a tripod is
very helpful during this
step so that your images
match up as close as
possible. If you do not
have a tripod, try to rest
your camera on an ob-
ject.
Page | 23
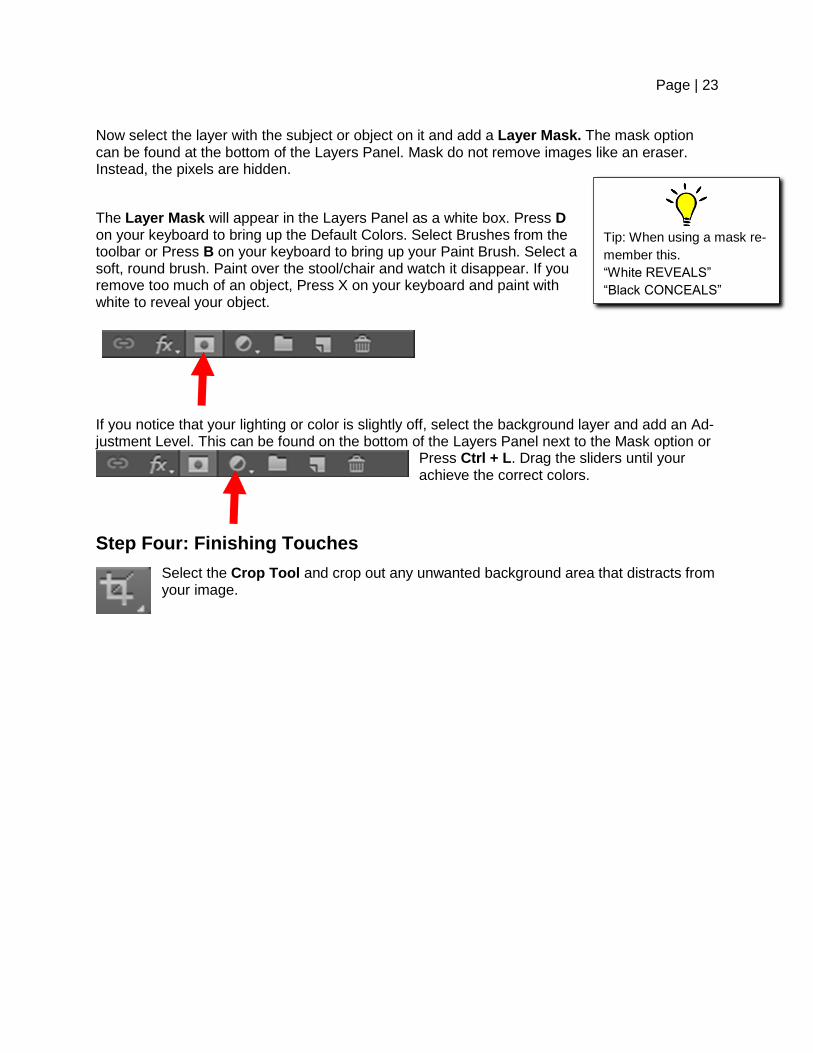
Now select the layer with the subject or object on it and add a Layer Mask. The mask option can be found at the bottom of the Layers Panel. Mask do not remove images like an eraser. Instead, the pixels are hidden.
The Layer Mask will appear in the Layers Panel as a white box. Press D on your keyboard to bring up the Default Colors. Select Brushes from the toolbar or Press B on your keyboard to bring up your Paint Brush. Select a soft, round brush. Paint over the stool/chair and watch it disappear. If you remove too much of an object, Press X on your keyboard and paint with white to reveal your object.
If you notice that your lighting or color is slightly off, select the background layer and add an Ad-justment Level. This can be found on the bottom of the Layers Panel next to the Mask option or
Press Ctrl + L. Drag the sliders until your achieve the correct colors.
Step Four: Finishing Touches
Select the Crop Tool and crop out any unwanted background area that distracts from your image.
Tip: When using a mask re-
member this.
“White REVEALS”
“Black CONCEALS”
Page | 24
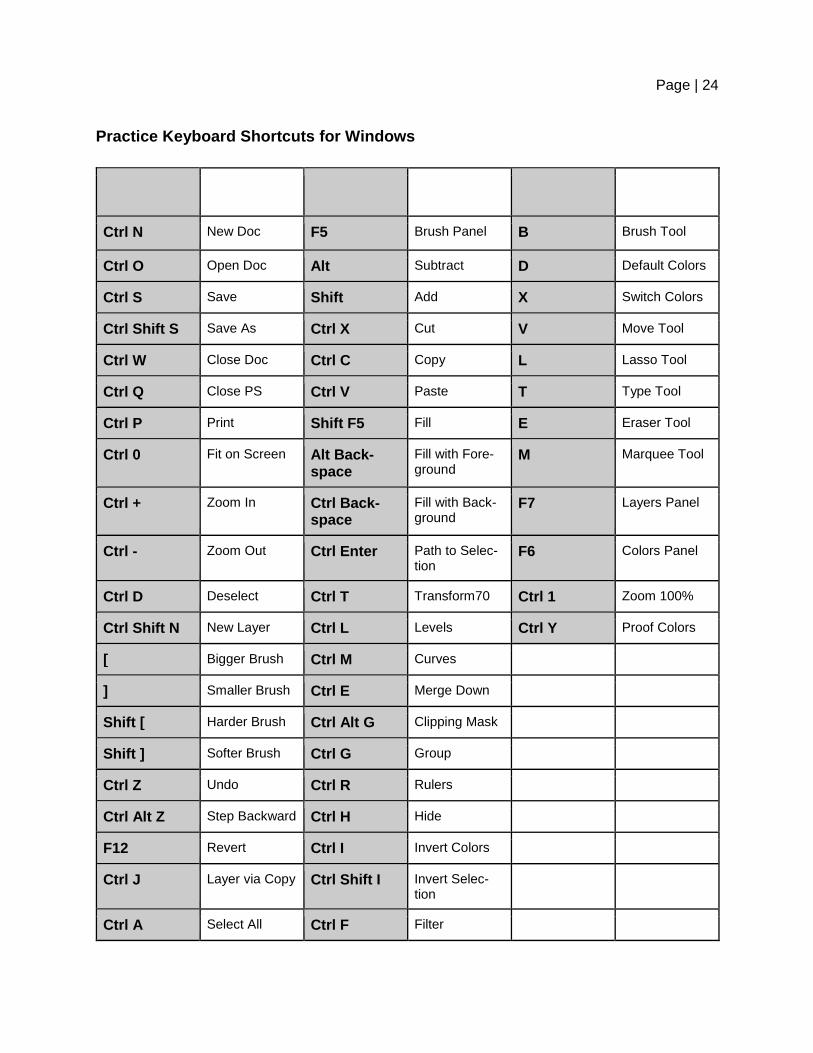
Practice Keyboard Shortcuts for Windows
Ctrl N New Doc F5 Brush Panel B Brush Tool
Ctrl O Open Doc Alt Subtract D Default Colors
Ctrl S Save Shift Add X Switch Colors
Ctrl Shift S Save As Ctrl X Cut V Move Tool
Ctrl W Close Doc Ctrl C Copy L Lasso Tool
Ctrl Q Close PS Ctrl V Paste T Type Tool
Ctrl P Print Shift F5 Fill E Eraser Tool
Ctrl 0 Fit on Screen Alt Back-space
Fill with Fore-ground
M Marquee Tool
Ctrl + Zoom In Ctrl Back-space
Fill with Back-ground
F7 Layers Panel
Ctrl - Zoom Out Ctrl Enter Path to Selec-tion
F6 Colors Panel
Ctrl D Deselect Ctrl T Transform70 Ctrl 1 Zoom 100%
Ctrl Shift N New Layer Ctrl L Levels Ctrl Y Proof Colors
[ Bigger Brush Ctrl M Curves
] Smaller Brush Ctrl E Merge Down
Shift [ Harder Brush Ctrl Alt G Clipping Mask
Shift ] Softer Brush Ctrl G Group
Ctrl Z Undo Ctrl R Rulers
Ctrl Alt Z Step Backward Ctrl H Hide
F12 Revert Ctrl I Invert Colors
Ctrl J Layer via Copy Ctrl Shift I Invert Selec-tion
Ctrl A Select All Ctrl F Filter

Page | 25
Understanding Basic File Types in Simple Terms
PSD This is the native file format for Photoshop. Once you have more than one layer, JPEG
files turn into PSD files. These files are NOT universal. You must save the file in another format
before using it outside of Adobe products. I suggest you save your work as a PSD until you are
ready to use it because it is *lossless.
JPEG This is a popular, universal file format. It is often used for photos because it supports a
large number of colors. JPEG files only have one layer. If you save your working file as a JPEG,
your image will automatically be flattened. JPEG files are *lossy. However, Photoshop allows
you to select how much compression you use. See examples below.
TIFF This file is used for the highest quality photos. It supports many colors. The files are very
large because they are *lossless. TIFF files are not used online very often due to the size of the
files. The file is universal.
GIF This is a simple file that will only support 256 colors. Do not save a photograph as a GIF
because it will limit the colors and detail that you expect to see. It is used for simple colored
logos and line art. This file supports transparency, but it will not support gradients. Simple ani-
mations are often created as GIF files. GIF files are universal.
PNG Think of a PNG file as a “new and improved” GIF. It holds more colors, supports transpar-
ency, AND it will work with gradients. A regular PNG will not support animation. However, there
is a newer version called a APNG that will support animation.
DNG A DNG file is a RAW file. Think of DNG files like a digital negative of a photograph. Cam-
eras have a RAW setting that allows the user to edit the photos.
COMPRESSION
When you save a file, the file compresses. I think of it like packing a suitcase. The compression
type that you select is important because it can affect the file when it is reopened.
Lossless files are often larger files. Everything is packed nice and neat when the file is closed
and is compressed. When it is reopened there is no degradation. All of the pixels are in good
quality.
Lossy files are smaller because each time the file is closed a part of the quality is lost. When
you reopen the file the file has some degradation. You may not notice the damage at first, but
after a while it is noticeable. I do not recommend saving your file as a lossy file type until you
are finished editing it.
Page | 26
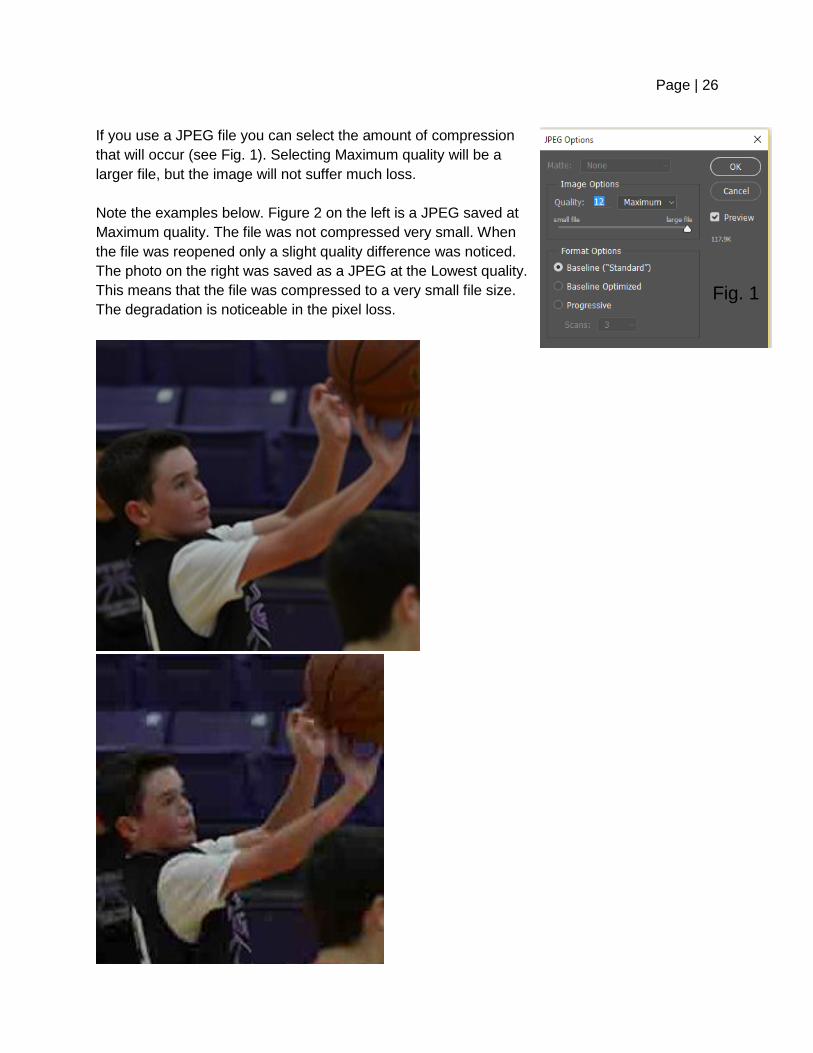
If you use a JPEG file you can select the amount of compression
that will occur (see Fig. 1). Selecting Maximum quality will be a
larger file, but the image will not suffer much loss.
Note the examples below. Figure 2 on the left is a JPEG saved at
Maximum quality. The file was not compressed very small. When
the file was reopened only a slight quality difference was noticed.
The photo on the right was saved as a JPEG at the Lowest quality.
This means that the file was compressed to a very small file size.
The degradation is noticeable in the pixel loss.
Fig. 1
Related Documents