P.G. Diploma in Yoga I - Semester 426 14 PRACTICAL LAB I: SIMPLE ASANASAND PRANAYAMA Directorate of Distance Education ALAGAPPAUNIVERSITY [Accredited with ‘A+’ Grade by NAAC (CGPA:3.64) in the Third Cycle and Graded as Category–I University by MHRD-UGC] (A State University Established by the Government of Tamil Nadu) KARAIKUDI – 630 003

Welcome message from author
This document is posted to help you gain knowledge. Please leave a comment to let me know what you think about it! Share it to your friends and learn new things together.
Transcript

P.G. Diploma in Yoga
I - Semester
426 14
PRACTICAL
LAB I: SIMPLE ASANAS AND PRANAYAMA
Directorate of Distance Education
ALAGAPPA UNIVERSITY[Accredited with ‘A+’ Grade by NAAC (CGPA:3.64) in the Third Cycle
and Graded as Category–I University by MHRD-UGC]
(A State University Established by the Government of Tamil Nadu)
KARAIKUDI – 630 003
All rights reserved. No part of this publication which is material protected by this copyright notice
may be reproduced or transmitted or utilized or stored in any form or by any means now known or
hereinafter invented, electronic, digital or mechanical, including photocopying, scanning, recording
or by any information storage or retrieval system, without prior written permission from the Alagappa
University, Karaikudi, Tamil Nadu.
Information contained in this book has been published by VIKAS® Publishing House Pvt. Ltd. and has
been obtained by its Authors from sources believed to be reliable and are correct to the best of their
knowledge. However, the Alagappa University, Publisher and its Authors shall in no event be liable for
any errors, omissions or damages arising out of use of this information and specifically disclaim any
implied warranties or merchantability or fitness for any particular use.
Vikas® is the registered trademark of Vikas® Publishing House Pvt. Ltd.
VIKAS® PUBLISHING HOUSE PVT. LTD.
Phone: 0120-4078900 Fax: 0120-4078999
Website: www.vikaspublishing.com Email: [email protected]
Work Order No. AU/DDE/DE1-238/Preparation and Printing of Course Materials/2018 Dated 30.08.2018 Copies - 500
"The copyright shall be vested with Alagappa University"
Author:
Vikas® Publishing House
Reviewer
Dr K. Balasubramanian Professor & Head,Department of Physical Education,Alagappa University, Karaikudi

SYLLABI-BOOK MAPPING TABLEPractical Lab I: Simple Asanas and Pranayama
Meditative Asanas
Sitting Types:
1. Ardha Padmasana or Veerasana, 2. Swasthikkasana, 3. Vajrasana, 4. Bhadrasana, 5. Gomukasana – I
Relaxative Asanas:
1. Makarasana, 2. Savasana Stage – I, 3. Savasana Stage – II, 4. Savasana Stage – III, Pranddharana, 5. Savasana Stage
– IV (Oceanic Feeling )
Cultural Asanas
Standing Types:
1. Trikonasana, 2. Parivrutha Trikonasana, 3. Parsva Konasana, 4. Tadasana, 5. Chakrasana (Side Bending), 6. Padahas
Tasana, 7. Ardha Chakrasana, 8. Utkattasana, 9. Vrikshasana, 10. Bakkasana
Sitting Postures:
1. Vakrasana, 2. Ardha Ustrasana, 3. Mandukasana, 4. Suptha Vajrasana, 5. Sasangasana, 6. Ardha Sirsasana, 7. Sirsasana,
8. Tolasana, 9. Hamsasana, 10. Parvatasana, 11. Bandha Konasana, 12. Dandasana, 13. Sithila Dandasana,
14. Pachimottasana
Cultural Asanas
Supine Type:
1. Ardha Pavanamukttanasana, 2. Pavana Mukttanasana, 3. Navasana, 4. Tolan Gulasana, 5. Viparitha Karani, 6. Matsyasana
(Simple), 7. Uttana Padasana
Prone Type Postures:
1. Bhujangasana, 2. Ardha Salabhasana, 3. Dhanurasana, 4. Naukasana, 5. Salabhasana
Preparatory For Pranayama
1. Kapalabhathi, 2. Sectional Breathing– i. Abdominal Breathing, ii. Thoracic, iii. Clavicular, iv. Full Yogic Breathing
Pranayamas
1. Suha Pranayama (Anuloma Viloma), 2. Surya Anuloma Viloma Pranayama (Ratio 1:0:2), 3. Candra Anuloma Viloma
Pranayama (1:0:2), 4. Surya Bhedhana (1:0:2), 5. Nadi Shodhana (1:0:2), 6. Sitali Pranayama, 7. Sitkari Pranayama,
8. Bhramari Pranayama
Syllabi Mapping in Book
INTRODUCTION
Yoga is essentially a spiritual discipline based on an extremely subtle science which
focuses on bringing harmony between mind and body. It is an art and science for
healthy living. The word ‘Yoga’ is derived from the Sanskrit root yuj meaning ‘to
join’, ‘to yoke’ or ‘to unite’. According to Yogic scriptures, the practice of Yoga
leads to the union of individual consciousness with universal consciousness.
According to modern scientists, everything in the universe is just a manifestation of
the same quantum firmament. Today, everybody has conviction about Yoga practices
towards the prevention of disease, maintenance and promotion of health. Millions
and millions of people across the globe have benefitted by the practice of Yoga
and the practice of Yoga is blossoming and growing more vibrant with each passing
day.
The widely practised Yoga sadhanas are Yama, Niyama, Āsana,Prānāyāma, Pratyāhara, Dhārana, Dhyāna, Samādhi, Bandhas and Mudras,Shatkarmas, Yuktāhāra, Mantra-japa, Yukta-karma, etc. Yamas are restraints
and Niyamas are observances. These are considered to be pre-requisites for
further Yogic practices. Āsanas, capable of bringing about stability of body and
mind, “kuryat-tadasanam- sthairyam”, involve adopting various psycho-physical
body patterns and giving one an ability to maintain a body position (a stable
awareness of one’s structural existence) for a considerable length of time.
Prānāyāma consists of developing awareness of one’s breathing followed by
regulation of respiration as the functional or vital basis of one’s existence. It helps
in developing awareness of one’s mind and helps to establish control over the
mind.
This practical lab book, Simple Asanas and Pranayam, describes the
methods and techniques of practising various Asanas and Pranayam.
Introduction
NOTES
Self-Instructional4 Material

Simple Asanas and
Pranayama
NOTES
Self-Instructional
Material 1
MEDITATIVE ASANAS
Sitting Types
1. Ardha Padmasana or Veerasana
Ardha Padmasana (Half Lotus Pose)
In Ardha Padmasana, the meaning of “Ardha” is one part or half, “Padma”
represents the Lotus and the Asana stands for the seat, pose or posture. Ardha
Padmasana is the variation of the authentic seated posture (Lotus Pose or
Padmasana in Sanskrit).
Ardha Padmasana is more suitable for those people who have less flexibility
in their lower body and also for those who are uncomfortable to perform the full
Padamasana (Traditional Lotus Pose). Half Lotus pose is also best for learners or
who are new to Yoga. Ardha Padmasana or Half Lotus pose is used as meditations
pose same like Padmasana.
Focusing Chakra: The Crown chakra
Position: Seated Pose
Level of Asana: Basic
Steps of Ardha Padmasana (Half Lotus Pose)
First, take a position of Dandasana (Staff Pose) with straight legs in front of
you and keep your spine erect.
Now, fold (bend) your right knee and place right heel in the direction of
your groin, by this number 4 – shape is formed with the combination of your
right and left legs.

Simple Asanas and
Pranayama
NOTES
Self-Instructional
2 Material
At that time, you have to keep your leg relaxed and not to push your knee
towards the ground for a deep stretch.
Now, you have to fold (bend) your left knee, at that time your both legs are
in the crossing position. Keep your left ankle on the top of your right butt
crease. Keep your left foot sole pointing towards the roof.
After that, you have to keep your hands on your both knees. Remember
one thing; during the pose keep your spine erect along with keeping your
head straight.
Note that, during the whole procedure keep your face muscles relax and
close your eyes or you can set your gaze to a particular point present in
front of you.
Remain in the pose about 1 minute or up to one minute or for the time
period of your Pranayama/Meditation practice (during this, breathe deeply).
Come back to the Staff Pose and repeat with the other leg.
For discharging, extend your both legs towards the ground and sit in the
staff pose.
Follow the same procedure with your other leg on top.
After performing the pose with your both legs, rest in the Savasana (Corpse
Pose) for 3 to 5 minutes.
Ardha Padmasana Tips for Beginner’s
If you are not able to keep your foot on your hip crease on its own, in this, you use
your hands and arms to assist your leg position.
You can also use a folded blanket if you are facing problems regarding
balancing.
Benefits of Ardha Padmasana (Half Lotus Pose)
Ardha Padmasana stretches & strengthens your ankles, knees and inner
thighs.
Best for those people who find difficulties (bend their leg) to perform
Padmasana.
It calms your mind and relaxes your body.
Good pose for meditation & Pranayama also.
Half lotus pose gives relieve in sciatica and menstrual pain.
NOTE
Keep in your mind, throughout the process you have to breathe deeply. Ardha
Padmasana is a variation of the Padmasana (Lotus Pose) mainly designed for
beginners. If you want to improve your Lotus pose then practice Ardha Padmasana
regularly for flexibility

Simple Asanas and
Pranayama
NOTES
Self-Instructional
Material 3
2. Swastikasana (The Auspicious Pose)-Steps and Benefits
Sanskrit Name: Swastikasana.
English Name: The Auspicious pose.
Position: sitting
Swastikasana is a Sanskrit word and which is made up from combinations of
Su+Asti+ka, in this ‘Su’ means good, meaning of ‘Asti’ is ‘existence’ and “ka”
stands for to make. Swastikasana is a simple meditation Pose. People who feel
difficulties to perform Asanas like Siddhasana or Padmasana, Swastikasana is
best for them. In India Swastika is a symbol of Happiness, good luck or
Auspiciousness. In this Asana the position of the legs resembles the symbol of the
Swastika, so that’s why this Asana is named as Swastikasana or Auspicious pose.
Swastikasana (The Auspicious Pose) is simple to attempt and this is one of best
Asana for meditative activity or for long sitting. This position may be described as
one that helps to understand the unity of existence.
Steps of Swastikasana (The Auspicious Pose)
First sit comfortably on the ground or floor and spread out your legs in front
of you.
Fold your left leg; keep the sole of your left leg against the inner thigh of
your right leg.
Now bend your right leg and keep your right foot in the space between left
thigh and calf muscles.
Catch your left foot by the toes and try to pull it up and place it between the
right calf and thigh.
Your knees have to firmly touch the floor.
Maintain the pose so that you feel relax.

Simple Asanas and
Pranayama
NOTES
Self-Instructional
4 Material
Your body and trunk should erect.
Place your hands on your knees in any mudra.
Control on your breath. Breathing slowly and normally.
You may also focus on the tip of your nose or center of eye brow it’s
depending on the type of meditation technique.
In the beginning try to sit for 10 to 15 minutes in this meditative pose, day
by day increase the time of sitting.
Benefits of Swastikasana (Auspicious Pose)
It is a best meditation Asana for those people who cannot sit comfortably
or find difficulties in classical poses like Padmasanaand Siddhasana.
Those people who are suffering from varicose veins and pain in the leg
muscles can perform this Asana.
Daily practice of this meditative pose increases the concentration level.
Give calmness to the mind.
Suitable for everybody in any age group.
Note
Avoid this Asana in case of sciatica and sacral infections, concern a doctor or well
educated yoga expert before doing this Asana in any medical problems.
3. Vajrasana
Steps to do Vajrasana
1. Kneel down with lower legs stretched straight backwards and toes crossing
each other.
2. Sit over the heels – your buttocks should sit on the heels and thighs on the
calf muscles.
3. Sit straight with head facing forward and hands on your knees.
4. Close your eyes (optional) and focus on breath observing inhalation and
exhalation.
5. Practice this position for 5 – 10 minutes in initial days and increase gradually
up to 20 – 30 minutes.

Simple Asanas and
Pranayama
NOTES
Self-Instructional
Material 5
Vajrasana - Points to remember
1. You may feel pain in the legs when you begin to practice this asana. If your
leg aches, undo the asana and stretch your legs. Now massage your ankles,
knees and calf muscles with hand. This soothes the muscles and pain
gradually fades.
2. If you have knee problem, have history of knee injury or had recent knee
surgery; don’t practice Vajrasana.
3. You can still practice this asana if you are pregnant. Be cautious to keep
your knees apart to not stress your abdomen.
Benefits of Vajrasana
1. Vajrasana helps better blood circulation in the body. It modifies the blood
flow by reducing the blood flow in lower portion, especially in the legs and
increasing blood flow to the digestive organs resulting to efficiency of the
digestive system. People with weak digestion are benefited. Better digestion
checks acidity and ulcers.
2. People with sciatica and severe lower back problems should regularly
practice vajrasana to be benefited.
3. Vajrasana is the answer to constipation, stomach disorder, digestive problems,
acidity. It makes lower body flexible, strengthens sexual organs, tones body
muscles (hips, thighs, calves), cures joint pains, urinary problems, etc.
4. Losing weight becomes possible with regular practice of Vajrasana. You
will see the difference in your belly fat after a few weeks of regular Vajrasana
practice.
5. Vajrasana calms mind and relaxes the nerves.
6. Slow and rhythmic breathing in this position can induce a meditative state.
Variations
Kurmasana (Tortoise Pose): After sitting on Vajrasana, firmly press the buttocks
with the soles. Your head, neck and trunk are already erect, you can keep your
hands on hips, knees or on the sides of the chest. Remain in this position for 3
minutes to as long as you can.
Ardha Kurmasana: While sitting in Vajrasana, stretch your both hands straight
to your face level; the palms should face each other. Slowly bend and lie down on
the ground on the support of your hands. Remain in this position for as long as you
are comfortable.
Utthana Kurmasana: Release your buttocks from the seated position over the
ankles. Put the ankles so close that they are one over the other; your spine, neck
and head erect. Keep your hands in between calves and thighs. Now slowly release
the hands and press the head with your hands looking downward. Sprains and
pains in the back will disappear.

Simple Asanas and
Pranayama
NOTES
Self-Instructional
6 Material
Mandukasana (Frog Pose): In Vajrasana, relax your knees keeping them at the
sides. Keep your hands on the knees. Stay in this position for as long as you can.
Padadirasana: Sitting on Vajrasana, stretch your hands to the chest level, palms
facing each other.
Parvatasana: Gradually raise your body and the hands above from your original
Vajrasana position.
Ananda Mandirasana: Release your hands from the knees in your Vajrasana
and hold the heels with your two hands.
Angushthasana: From your Vajrasana, slowly raise the knees trying to maintain
position in the toes alone.
Supta Vajrasana: From your Vajrasana, release hands from the knees. Gradually
bend backwards. Place your forearm and elbows on the floor and arch the spine
and neck back until the crown of the head touches the ground. Take normal breaths.
Remain in this position for as long as you are comfortable. Don’t try this asana
until you have gained command over Vajrasana. Beware, your knees are in more
pressure in this position than in Vajrasana.
4. Bhadrasana
Bhadhra means firm or auspicious.
Sthiti: Long sitting posture (Visramasana)
Technique
Sit erect with the legs stretched out s in the front.
Keep the hands beside the hips. Dandasana.
Now put the soles of your feet together.
Exhale and clasp your hands together over your toes. Pull your heels as
close as possible up to perineum region.
If your thighs are not touching or are not close to the floor, place a soft
cushion underneath the knees for support. This is the final position.
Stay here for some time.

Simple Asanas and
Pranayama
NOTES
Self-Instructional
Material 7
Benefits
Keeps the body firm and stabilize the mind.
Keeps the knees and hip joints healthy.
Helps to relieve knee pain.
Acts on the abdominal organs and releases any tension in the abdomen.
Benefits women by relieving abdominal pain often experienced
during menstruation.
A word of caution
Avoid this practice in case of severe arthritis and sciatica.
5. Gomukasana
Gomukhasana (The Cow-face Pose)
Gomukhasana (pronounced go-muKHA-suh-nuh) is an intermediate level seated
posture. The name is derived from the Sanskrit words go (meaning
cow) mukha (meaning face) and asana (meaning posture). This posture is called
“cow-face” pose due to the lower limbs that resemble the face of the cow. The
knees with a gap in between them look like the mouth. The shin looks like side of
a cow’s face. The feet look like the ears of a cow. This posture helps to open your
shoulder joints thus enabling a wider range of motion. Also, it is known for opening
the hips. Hips are the known storage depot for stress, anxiety and fear. Sitting in
this pose for several minutes while concentrating on your breath and release of
these deep muscles, your body will overcome the negative effects of the
aforementioned issues. It will also improve your posture because of the intense
focus on lifting the spine. Gomukhasana is a great pose for athletes to test their
ability to stay tough in a difficult situation. Working to open the shoulder joint, this
pose is an obvious choice for any athlete that depends on arm strength. It opens
and clears the rotator cuff while strengthening the supporting back muscles to add
power. Stretched and strengthened hips and thighs are important for power and
speed in sports that involve running. Opened glutes give more power to push for
speed. Improved posture for athletes translates into more space in the chest cavity,
leading to greater lung capacity and breath control.
Steps to perform Gomukhasana (pronounced go-muKHA-suh-nuh)
Begin by sitting in cross-leg seated posture
Bring your right foot on top of the left thigh and slide it as close to the left hip
as possible
Bring your left ankle by the side of the right hip. Try to make sure that one
knee is over the other
Slide both your feet far behind, but make sure you are comfortable
Try to keep the spine straight and vertical and the head facing forward

Simple Asanas and
Pranayama
NOTES
Self-Instructional
8 Material
Raise your right arm and bring your it over your shoulder
Wrap your left arm behind the back and reach to grasp your left hand with
the right hand behind the back, clasping the fingers together
Stay in the final pose for about 10-12 breaths.
Release the hands and stretch the legs straight, bounce the knees a few
times.
Repeat the asana using the opposite limbs
Finally release the post and relax in a comfortable cross-legged sitting posture
Gomukhasana – The Cow Face Pose
Fingers are locked at behind
Health Benefits of Gomukhasana (pronounced go-muKHA-suh-nuh)
It stretches your hips
It provides power to your ankles, thighs, shoulders, armpit, chest, deltoid
and triceps
Relieves chronic knee pain
Strengthens your spine and abdominal muscles
Helps decompress low spine (during folded variation)
Strengthens the hip joint
Adjustments of Gomukhasana (pronounced go-muKHA-suh-nuh)
In the beginning you may find it difficult to hold the two hands together; however,
with practice, you should gradually be able to do so. In case you are unable to
hold the hands, you may like to use a strap holding it with the two hands and trying
to close the gap between the two hands.

Simple Asanas and
Pranayama
NOTES
Self-Instructional
Material 9
Contraindications of Gomukhasana (pronounced go-muKHA-suh-nuh)
If you have sciatica, the use of a prop under the hips or folding forward
could aggravate the condition.
Avoid the pose if you have serious neck or shoulder problems
If pregnant, do not fold forward during first trimester
Do not practice if you have serious knee problems
Parivrtta Trikonasana also known as Revolved Triangle Pose is an
asana. Parivrtta – Revolved, Trikona – Triangle, Asana – Pose; Pronounced As –
par-ee-vrit-tah trik-cone-AHS-anna
This asana is basically a counter pose to the Utthita Trikonasana and is
definitely more complex. This asana is a combination of a forward bend and a
deep twist. It needs a good sense of balance and a sense of openness in order to
achieve stability in the pose. This is one of the first standing postures that you will
learn when you enroll yourself in a yoga course. It teaches you how to work every
part of your body in unison with one another.
RELAXATIVE ASANAS
1. Makrasana
Setubandha means formation of bridge. In this posture, the body is positioned like
a bridge, hence the name. This is also called as Catuspadasana.
Sthiti: Supine lying; Savasana.
Technique
Bend both the legs at the knees and bring the heels near the buttocks.
Hold both the ankles firmly; keep the knees and feet in one straight line.
Inhale; slowly raise your buttocks and trunk up as much as you can to form
bridge.
Remain in this position for 10-30 seconds, with normal breathing.
Exhale, slowly return to the original position and relax in Savasana.
Simple Asanas and
Pranayama
NOTES
Self-Instructional
10 Material
Note
In the final position, the shoulders and head remain in contact with the floor.
If required, in the final position, you can support your body at the waist with
your hands.
Benefits
Relieves depression and anxiety. Strengthens lower back muscles.
Stretches abdominal organs, improves digestion and helps to relieve
constipation.
A word of caution
People suffering from ulcers and hernia, and women in advanced stages of
pregnancy should not practice this asana.
2. Savasana and Its Various Stages
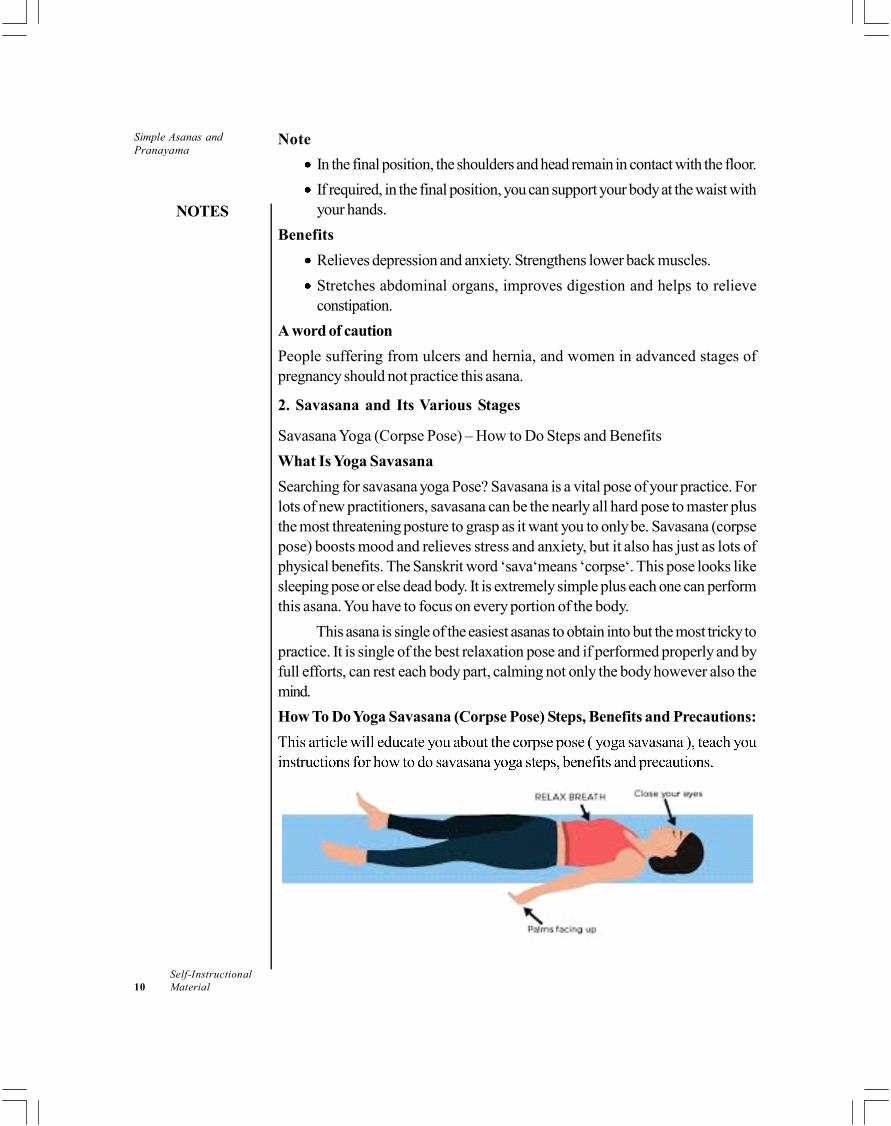
Savasana Yoga (Corpse Pose) – How to Do Steps and Benefits
What Is Yoga Savasana
Searching for savasana yoga Pose? Savasana is a vital pose of your practice. For
lots of new practitioners, savasana can be the nearly all hard pose to master plus
the most threatening posture to grasp as it want you to only be. Savasana (corpse
pose) boosts mood and relieves stress and anxiety, but it also has just as lots of
physical benefits. The Sanskrit word ‘sava‘means ‘corpse‘. This pose looks like
sleeping pose or else dead body. It is extremely simple plus each one can perform
this asana. You have to focus on every portion of the body.
This asana is single of the easiest asanas to obtain into but the most tricky to
practice. It is single of the best relaxation pose and if performed properly and by
full efforts, can rest each body part, calming not only the body however also the
mind.
How To Do Yoga Savasana (Corpse Pose) Steps, Benefits and Precautions:
Simple Asanas and
Pranayama
NOTES
Self-Instructional
Material 11
Performing Steps for Yoga Savasana or Corpse Pose:
1. Be positioned flat on your backside, like our sleeping pose. Legs are
supposed to be separated.
2. Maintain your arms at your side and your palms facing up. Now slow down.
3. Close your eyes moreover breathe deeply and bit by bit through the nostrils.
4. Start concentrating from your head to your feet. This way you are deliberately
calming your each portion of the body. Avoid moving ahead devoid of
relaxing each part of the body.
5. On every inhaling plus exhaling (breathing) feel that your body is entirely
relaxed. Allow your tension, depression, worry and stress run away on
every exhale.
6. Those having excellent concentration can perform for a long time and others
can perform for 3-5 minutes.
7. Relax the muscles which lead to a decrease in the demand for blood and
oxygen, giving the circulatory and respiratory systems a break.
Benefits of Savasana Yoga (Corpse Pose)
Lead to a relaxed mind that permit you to see moreover tell to the world in
a new realistic light, be extra well-organized in work moreover carry extra
happiness into life.
Savasana yoga remove worrying thoughts plus tensions.
Once the body is relaxed the consciousness of the mind boost and this lead
to the growth of pratyahara.
Savasana can be extremely helpful in menstruation because it propose a
deep rest to the muscles moreover also to the mind.
Corpse pose is helpful for emotional disturbances, anxiety, irritation,
depression plus frustration; redirect the energy moreover offering a sentiment
of calmness also freshness.
Irregularity in the menstrual cycle is frequently analytical of a superior problem.
Savasana assist to re- balance the body moreover rest each body system.
Get better the working of the brain. Decrease high blood pressure. Helpful
for preventing also improving heart complaint.
Savasana yoga will offer the peace plus calm needed by soothing the muscles,
focus the mind and getting rid of any anxieties or else doubts.
Integrate the mood of relaxation into the conscious moreover unaware
awareness.
All activities within the body require oxygen, supplied throughout blood
circulation. Once we need extra oxygen the circulation is improved that
leads to a boost in respiration.
Simple Asanas and
Pranayama
NOTES
Self-Instructional
12 Material
Makes Self acceptance. Later than working in class to develop form,
strength, poise, and suppleness. In savasana (corpse pose) there is no
ruthless, no fight. Let your mind to get a break from preparation the future
otherwise review the past. Surrender to the current moment.
Precautions for Savasana Yoga or Corpse Pose
Constantly create Savasana earlier than practicing other yogasana and
following ending yogasana.
That judgment hard to practice in the morning otherwise evening can do
whereas resting at night.
Focus is significant.
Whereas practicing Savasana, if you experience drowsy otherwise sleepy
you can respire a bit faster and deeper. Benefits of Savasana not only limit
you to relaxing your body and mind, but it also has a huge part to play in
your sleep. If you experience insomnia as such, you can easily try this yoga
before hitting the bed. However, one should never fall asleep whilst doing
the yoga which would hamper the gentle balance between relaxation and
controlling your breathing.
See More: Uttanasana Benefits
Immensely easy and maybe one of the best created hypes of the now trending
crazes, yoga once was a secluded practice only engaged into by the saints or the
sages who first came up with the concept. Even though the history to yoga is still
not definite, the future for this journey is definitely well lit and adorned. Yoga now
has become a commercial attraction, attracting people from all walks and ages.
They found how mind and body can both be sated just by using the enhanced
body movements and breathing techniques and within a few day the heated trend
of using yoga to capture the essence of mind and fitness of the body became a
huge hi
There are many different ways to practice exteriorization in Savasana. Here
are four approaches, each of which deals with successively more subtle points of
focus: the body, the senses, the breath and the mind itself. Any one of these practiced
alone would be sufficient, or you may combine two or more for longer holdings.
Muscle Relaxation
Starting with the feet and working your way to the head, use suggestion to soften
and release the different parts of the body.
Eventually, you learn how to voluntarily initiate relaxation, but initially it may
take the use of guided imagery to encourage the muscles to relax. Here are some
suggestions:
Silently name each body part and imagine the breath flowing directly into
that body part. Think of the body part as being darker or in shadow and
imagine that the breath brings light into the muscles.

Simple Asanas and
Pranayama
NOTES
Self-Instructional
Material 13
Alternatively, you can think of the breath as dissolving the tension like sugar
dissolving in water. With each exhalation the tension flows out of the body.
After naming the body part, imagine it getting heavier and heavier with each
exhalation and sinking into the floor.
After naming the body part, imagine it melting as if it were snow melting in
the winter sun.
Imagine the body were a sack of grain. For each body part, visualize rips
forming in the sack and the grain pouring out onto the floor.
Imagine the body as a suit of clothes falling through the air in slow motion
and touching the ground, body part by body part. As each part touches the
floor, all the wrinkles fall out of the fabric.
Sense Withdrawal
Sensory withdrawal begins with relaxation of the physical sense organs. This softens
their attachment to the outside world, preparing them to turn inwards. Sometimes
this can be a bit nebulous for the inexperienced practitioner to grasps. Releasing
specific parts of the face can assist in the release of the nearby sense organs.
The sense of touch resides in the skin. While softening the muscles of the
body, pay special attention to the skin, allowing it to soften and release as well.
This has the added benefit of calming the nervous system directly, as there is a
connection between the skin cells and the nerves: nerves, skin and brain all emerge
from the same embryonic cells in the womb.
The senses of taste and smell can be released by addressing the mouth and
nose:
Soften the tip of the tongue and allow it to detach itself from the roof of the
mouth.
Release the tongue from the tip to the root, near the back of the throat.
Release the roof of the mouth and the back of the throat.
Soften upwards from there behind the nose and into the nostrils.
Soften the bridge of the nose and the sinuses.
The sense of hearing can be released by softening the jaw and the ear canal:
Soften the chin and the jaw.
Soften the hinges of the jaw.
Soften the ear canal in and forward towards the eyes.
Soften the inner ear.
The sense of sight can be released by softening the temples, the muscles around
the eyes and the eyeballs themselves:
Soften the temples. Allow them to deflate and sink inwards.
Soften the eyebrows, the cheek bones and the bridge of the nose.

Simple Asanas and
Pranayama
NOTES
Self-Instructional
14 Material
Soften the muscles around the eyes.
Soften the eyeballs and allow them to sink down past the temples.
Soften the backs of the eyes and the optic nerve. moving back into the
skull.
According to yogic philosophy there is one more sense, the mind. The mind,
as opposed to consciousness or thoughts, is the part of you that organizes all the
senses and mediates between consciousness and the outside world. To release
the mind, we have to address the brain directly:
Soften the skull.
Soften the brain itself.
Allow the brain to detach itself from behind the forehead and let it sink
down to rest on the back of the skull.
Allow the front of the brain to settle on the back of the brain.
Soften the individual brain cells and allow them to deflate and sink towards
the floor.
Breath Awareness
With the body relaxed and the senses turned inwards, it is now possible to become
aware of the inner spaces of the body and the movement of the breath. There are
two ways to think of the breath, either as the mechanism of breathing or as the
flow of breath.
In the first, we can either observe the movement of the ribcage and belly or
the passage of air through the nostrils. Let us look at the ribcage first:
Bring the awareness into the inhalations and exhalations.
Observe what moves as you inhale, what moves as you exhale.
Observe the expansion of the ribcage as you inhale.
Observe the release of the belly as you exhale.
Observe the spreading of the diaphragm as you inhale.
Observe the release and resetting of the diaphragm as you exhale.
Allow each inhalation to emerge seamlessly out of the exhalation that
precedes it.
Allow each cycle of breath to flow seamlessly into the cycle that follows it.
Meditation
Even though the reclined position is not the ideal posture of meditation, it is still
possible to practice a detached attitude towards the thoughts that fill the mind:
Observe each individual thought as it arises.

Simple Asanas and
Pranayama
NOTES
Self-Instructional
Material 15
Do not categorize the thoughts. Simple acknowledge them for what they
are. Think of them as words or images projected on a screen.
As the mind wanders, gently acknowledge that it has done so and bring
your awareness back to the thoughts flowing across the mind.
As the mind becomes engaged in the thoughts, gently acknowledge that this
has happened, release the thought and allow it to proceed on its way.
As the mind begins to calm itself, you may find that the thoughts become a
little less frequent a little less insistent. Start to become aware of the moments
of silence between each thought.
The Effort of Effortlessness
Savasana is a very demanding pose to practice. It has the potential to take us right
up to the very limits of conscious awareness. It is as easy to think it unnecessary
and to avoid it as it is to allow it to become nothing more than a nap. It demands
of us both diligence and finesse. Too long in the pose and the mind may become
dull and even lose consciousness. Too little time, or time spent wrestling with our
thoughts, and the pose is almost useless. And yet, the benefits are many and
profound. I urge you to give the pose the attention it deserves. Experiment with
the different set-ups and become familiar with their effects. You will find different
variations appropriate for different practices, different times and different states of
mind. Experiment, too, with the different methods of turning inward to find what
works for you so that you may reap the benefits of this wonderful pose.
Savasana helps us learn how to completely surrender, stop fighting the clock,
and make space for peace and harmony to fill the soul. Savasana is like turning off
your computer when it’s acting up. Once you reboot it, the computer often has
greater functionality.
5 Steps to a Successful Savasana
1. Set yourself up for success: Stretch out on your mat and be sure you’re
completely comfortable. Use bolsters, pillows, blankets, and cover your
eyes with an eye pillow or towel. The more comfortable you are, the more
you can relax. The more relaxed you are, the more easily you can surrender.
The more open you are to surrendering, the more benefits you’ll receive.
2. Take one final cleansing breath: Your teacher will likely prompt you to
take one audible exhale, signaling to your body to release into the pose.
This cleansing breath also sends a message to your parasympathetic nervous
system that it is safe to relax and be just as you are.
3. Scan for tension: Mentally run through all the parts of your body and try
to make them heavier. Be on the lookout for tension hiding in the jaw, temples,
shoulders, and hips because stress likes to accumulate in these areas.

Simple Asanas and
Pranayama
NOTES
Self-Instructional
16 Material
4. Then, just notice: Some days will be easier than others, and that’s part of
the practice. See if you can be still, at ease, and simply trust that the breath
will carry you to the next moment. Watch for those peaceful moments of
quiet between the thoughts. Over time, they’ll get longer, and you’ll find
more inner quiet.
5. Set an intention: Before you come out of Savasana, take a mental snapshot
of how you feel on every level. Ask yourself what you’d like to take with
you from your practice, and what you might like to leave behind. Seal these
observations into your psyche with an inner smile, and then enjoy a deep
inhale to awaken and emerge into your day. Now take a moment to notice
that you feel more rested, awake, and alive than you did before.
Holding hands in Savasana floating on the Pacific Ocean in spontaneously
evokes a sense of trust, interconnectedness, play and peace. Yoga is a way to
remember our essential nature and the life energy bubbling up from within into
formations and creation.
CULTURAL ASANAS
Standing Types
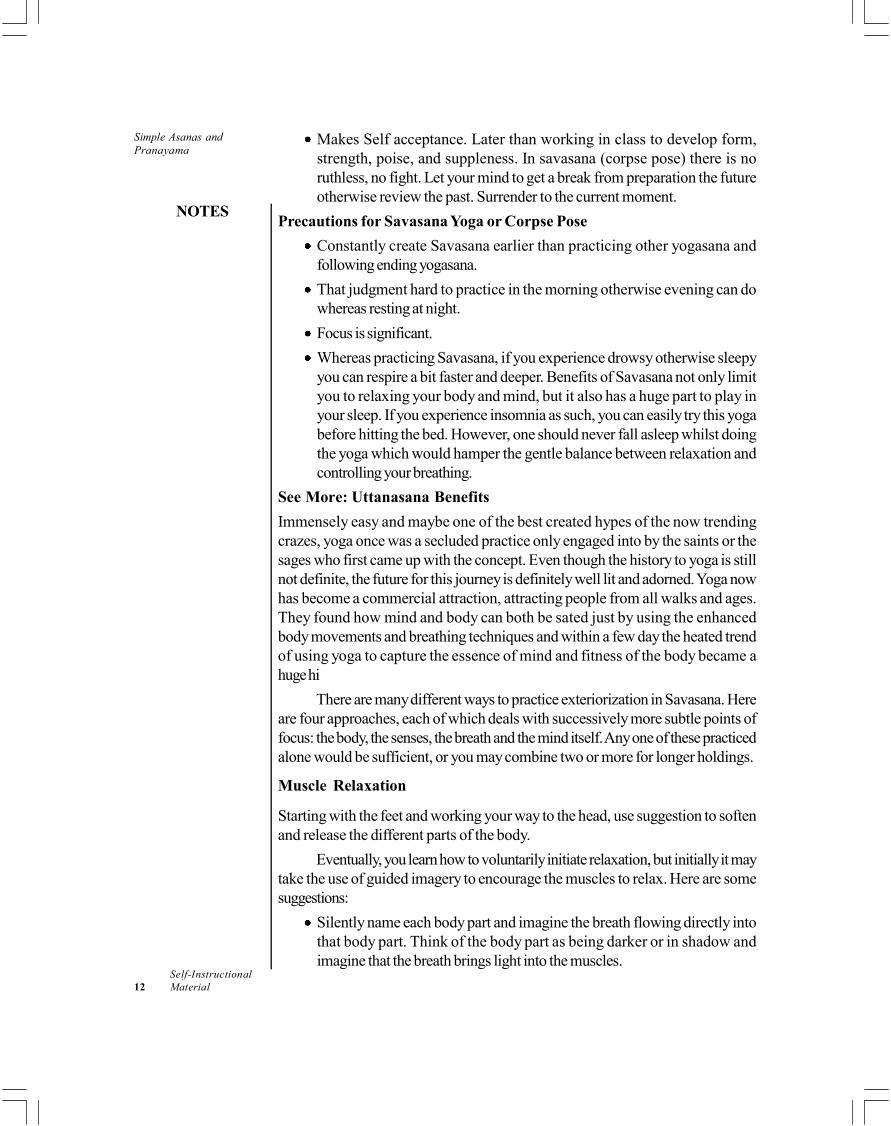
1. Trikonasana
Trikona means triangle. Tri means three and kona is an angle. As the asana resembles
three arms triangles made by the trunk and the limbs, it has been named Trikonasana.
Technique
Stand with your feet comfortably apart.
Slowly raise both the arms sideways till they are horizontal.
Exhale, slowly bend to the right side and place the right hand just behind the
right foot.
Simple Asanas and
Pranayama
NOTES
Self-Instructional
Material 17
The left arm is straight up, in line with the right arm.
Turn the left palm forward.
Turn your head and gaze at the tip of the left middle finger.
Remain in the posture for 10-30 seconds with normal breathing.
Benefits
Prevents flat foot.
Strengthens calf, thigh and waist muscles.
Makes the spine flexible, improves lungs capacity.
A word of caution
Avoid this posture in case of slipped disc, sciatica, and after undergoing
abdominal surgery.
Do not do beyond limits and overdo the lateral stretch.
If one cannot touch the feet, one can reach for the knees instead.
2. Parivrutha Trikonasana
What You Should Know Before You Do The Asana
As with all the asanas in yoga, it is important to keep your bowels and stomach
clean. Make sure you have your meals at least four to six hours before your workout
so that you give your system enough time to digest the food and give out the
required energy for the workout.
The best time to practice yoga is usually at dawn or dusk.
Level: Basic
Style: Hatha Yoga

Simple Asanas and
Pranayama
NOTES
Self-Instructional
18 Material
Duration: 30 Seconds
Repetition: Once on each side
Stretches: Knees, Hips, Shoulders, Thighs, Vertebral column, Thorax, Ankles,
Hamstrings, Calves, Groin
Strengthens: Knees, Thighs, Ankles
How To Do The Parivrtta Trikonasana (Revolved Triangle Pose)
1. Stand erect on your mat, preferably in Tadasana.
2. Then, take a three feet step backward with your right foot, and turn it out at
about 25-degrees to the side. Your left toes must point forward. At this
stage, your hip point must face the side of the mat. Also, quickly check the
alignment of your feet. They must be hip-width apart, with both the heels
aligned with each other. The heel and arch must also be aligned.
3. Place your left hand on the waist, and inhale and raise your right hand
overhead as you elongate your spine.
4. Firmly root the outside of the back foot, and pull in the lower part of your
belly so that your lower back is supported. Exhale and hinge forward at the
waist. Make sure your spine is stretched as you reach out with the right
arm.
5. Depending on your flexibility and range of motion, allow your right hand to
reach for your shin or on the floor outside of your foot. Inhale and continue
extending through the crown of the head, making sure your spine is long.
6. Quickly check if the outside of the right foot is firmly rooted in the ground.
Then, exhale and rotate to the left. Stretch the left arm towards the sky as
you gaze at it.
7. Breathe slowly and deeply as you hold the pose for a few seconds.
8. To exit the pose, look at your left foot, and pull your belly in. Then, inhale
and gently rise. Place your hands on your waist and bring your feet together.
Repeat the asana on the opposite side.

Simple Asanas and
Pranayama
NOTES
Self-Instructional
Material 19
Precautions and Contraindications
These are a few points of caution you must keep in mind before you do this asana:
1. If you have a back or spine injury, you must do this asana only under the
supervision of an expert. If not, it is best to avoid practicing this asana.
2. Also, avoid this asana if you have the following conditions:
a. Low blood pressure
b. Migraine
c. Diarrhea
d. Headache
e. Insomnia
The Benefits of the Revolved Triangle Pose
These are some amazing benefits of Parivrtta Trikonasana.
1. It gives the legs a good stretch and makes them strong.
2. The hips and the spine get a good stretch.
3. Practicing this asana opens up the chest, and therefore, breathing is improved.
4. Back pain is relieved.
5. The abdominal organs are stimulated and therefore, digestion is improved.
6. Balance, focus, and concentration are improved.
The Science Behind The Parivrtta Trikonasana
There are two different dynamic energies associated with the Revolved Triangle
Pose. The first is rooting the legs to the earth, and the second is sending energy
upward through the extended arms. This asana is a perfect union of sthira and
sukha, or effort and ease. Through this, other opposites like soft and hard,
contraction and expansion, descending and ascending, and solar and lunar are
also addressed in this asana.
Although this asana seems like a twist, when you reach the floor, you will
realize it is more about balancing. But you will feel steady and comfortable if you
know how to use your core and leg muscles to support yourself. When you get
your alignment right, you will attain flexibility and strength as you balance yourself
out energetically as well as physically. Practicing this asana not only makes your
mind steady but it also gives you a sense of being free. Then, as one arm reaches
the earth, and the other soars towards the sky, you will find stability that will allow
you to surrender to the present and the future.
3. Parsva Konasana
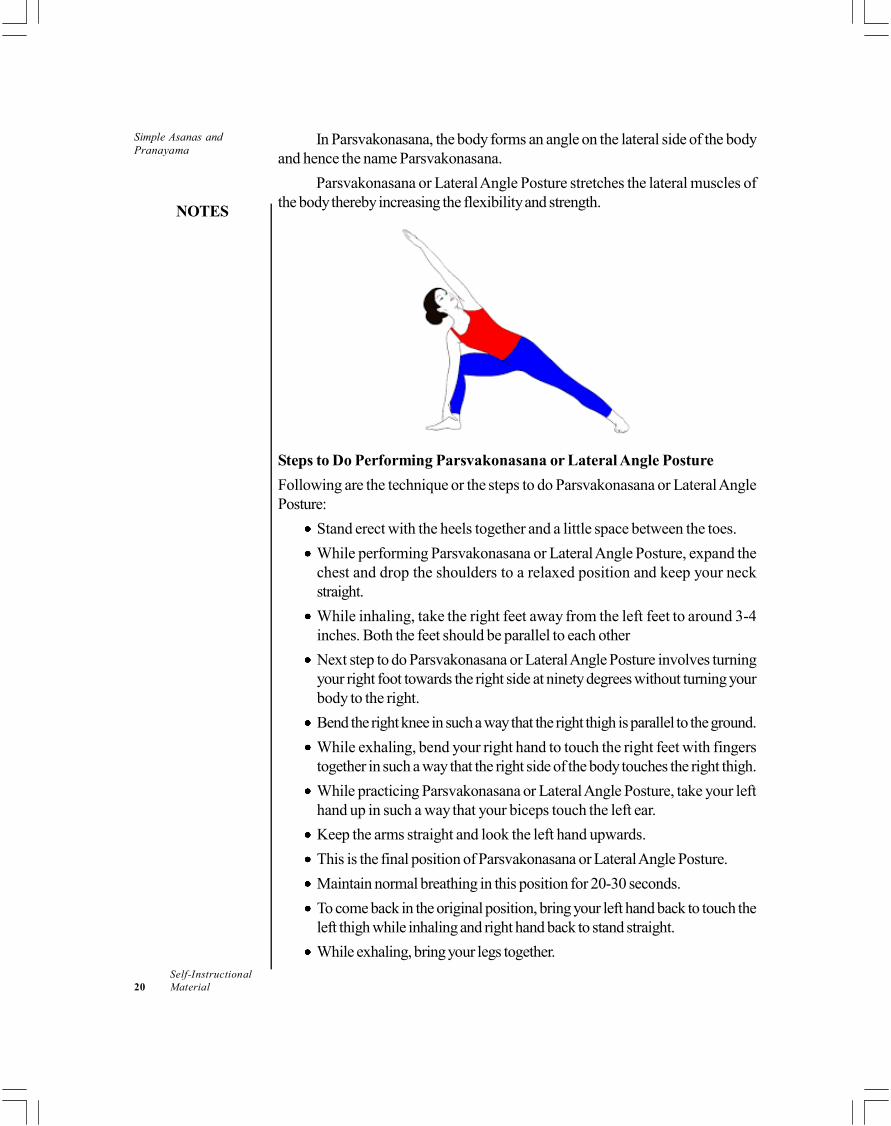
Parsvakonasana derives its name from Sanskrit where “Parsva” means “Lateral”,
“Kona” means “angle” and “Asana” means “Pose”.
Simple Asanas and
Pranayama
NOTES
Self-Instructional
20 Material
In Parsvakonasana, the body forms an angle on the lateral side of the body
and hence the name Parsvakonasana.
Parsvakonasana or Lateral Angle Posture stretches the lateral muscles of
the body thereby increasing the flexibility and strength.
Steps to Do Performing Parsvakonasana or Lateral Angle Posture
Following are the technique or the steps to do Parsvakonasana or Lateral Angle
Posture:
Stand erect with the heels together and a little space between the toes.
While performing Parsvakonasana or Lateral Angle Posture, expand the
chest and drop the shoulders to a relaxed position and keep your neck
straight.
While inhaling, take the right feet away from the left feet to around 3-4
inches. Both the feet should be parallel to each other
Next step to do Parsvakonasana or Lateral Angle Posture involves turning
your right foot towards the right side at ninety degrees without turning your
body to the right.
Bend the right knee in such a way that the right thigh is parallel to the ground.
While exhaling, bend your right hand to touch the right feet with fingers
together in such a way that the right side of the body touches the right thigh.
While practicing Parsvakonasana or Lateral Angle Posture, take your left
hand up in such a way that your biceps touch the left ear.
Keep the arms straight and look the left hand upwards.
This is the final position of Parsvakonasana or Lateral Angle Posture.
Maintain normal breathing in this position for 20-30 seconds.
To come back in the original position, bring your left hand back to touch the
left thigh while inhaling and right hand back to stand straight.
While exhaling, bring your legs together.

Simple Asanas and
Pranayama
NOTES
Self-Instructional
Material 21
Practice Parsvakonasana or Lateral Angle Posture 4-5 times by changing
sides i.e. - on both left and right sides.
Benefits of Parsvakonasana or Lateral Angle Posture
Parsvakonasana or Lateral Angle Posture is beneficial in relieving menstrual
discomfort.
It is said to cure Infertility.
Strengthening of Hip, knee, ankle, and shoulder is done with regular practice
of Parsvakonasana or Lateral Angle Posture.
Parsvakonasana creates traction in spine which helps in nourishing vertebral
discs.
It strengthens the abdominal orders thereby increasing the stamina of the
body.
It is said to cure Osteoporosis.
One of the benefits of Parsvakonasana or Lateral Angle Posture is that it
helps in getting rid of Sciatica.
Parsvakonasana is very beneficial for people with lower back pain.
Regular practice of Parsvakonasana or Lateral Angle Posture is said to be
beneficial in relieving Constipation.
Precautions While Performing Parsvakonasana or Lateral Angle Posture
Insomniac people should not perform Parsvakonasana or Lateral Angle
Posture
People with High and Low blood pressure should not perform
Parsvakonasana
Parsvakonasana or Lateral Angle Posture should not be practiced by people
with headache.
If you have severe neck problems like cervical etc. do not turn your head,
instead look straight and keep your neck long.
Tips While Performing Parsvakonasana or Lateral Angle Posture
While performing Parsvakonasana or Lateral Angle Posture it is very
important to do it in proper alignment.
Always try and start building the pose from ground by fixing you toe and
then knee and thigh and then move up to place your hands. You should
practice the asana from ground up.
Always align your knee in the direction of your toe otherwise the alignment
will be incorrect and the desired results won’t be achieved.
As you start practicing the advanced pose, the body tends to come forward
instead of being in line, thus unbalancing the pose.

Simple Asanas and
Pranayama
NOTES
Self-Instructional
22 Material
4. Tadasana
Instructions
1. From a standing position, bring the feet together or hip width apart, parallel.
Lift up the toes, spread them wide and place them back on the floor. Feel
your weight evenly balanced through the bottom of each foot, not leaning
forward or back.
2. Pull up the knee caps, squeeze the thighs and tuck the tailbone slightly
under. Feel the hips aligned directly over the ankles. The legs are straight,
but the knees are not locked back.
3. Inhale and lift out of the waist, pressing the crown of the head up towards
the ceiling, feeling the spine long and straight.
4. Exhale and drop the shoulders down and back as you reach the fingertips
towards the floor. Gently press the chest / sternum towards the front of the
room.
5. Continuing to reach out through the fingers, inhale the arms up, turning the
palms shoulder height, bringing the arms into a H position.
6. Exhale relax the shoulders down from the ears while still reaching the crown
and fingers up.
7. Breathe and hold for 4-8 breaths.
8. To release: exhale the arms down to your sides or bring the palms together
in front of your chest.
Benefits + Contraindications
Benefits: Mountain pose is the foundation for all of the standing postures and
improves posture, groundedness, stability and confidence.

Simple Asanas and
Pranayama
NOTES
Self-Instructional
Material 23
Contraindications: Recent or chronic injury to the shoulders.
Modifications + Variations
Variations: There are multiple variations on the placement of the hands: A) Fingers
interlaced with index finger pointing up, B) Arms down with the palms resting
against the outer thighs, C) Palms together in front of the heart in Anjali mudra
(Samasthiti / Equal Standing pose)
5. Chakrasana
Chakrasana (Wheel Pose)
Have you been practicing the mystical science of yoga for a long time now? If yes,
then advance your practice to next level and build your way to Chakrasana (Wheel
Pose ). Perform the strong-back bending wheel asana and benefit your whole
body, mind, and soul.
Alternatively known as Urdhva Dhanurasana (Upward-Facing Bow Pose),
this yoga asana has many reported benefits. It is believed that a consistent practice
of wheel pose greatly enhances the physical, mental, and emotional well-being of
a practitioner and unlocks the heart chakra. Slowly delve into the practice of
chakrasana and keep all the vital nerves and spine protected and healthy.
Learn the steps to perform Chakrasana (Wheel Pose)
1. Lie down on a yoga mat with bent knees and place your heels close to your
hips.
2. Raise your arms, fold your elbows, and rest your palms beside your ears
with fingers pointing towards the shoulders.
3. Actively press the feet into the floor and push your tailbone and posterior
away from the ground.
4. Now, press the hands down into a yoga mat and lift the crown of the head
from the floor.
5. Keep your arms and inner feet parallel to the earth.
6. Straighten the arms and come into a wheel pose.
7. Look down at the floor and hold this pose for 30 seconds.

Simple Asanas and
Pranayama
NOTES
Self-Instructional
24 Material
Have a look at the Top 10 health benefits of wheel pose
1. Opens the Heart Chakra: Unleash the power of love, kindness, and
happiness through the practice of chakrasana. The chakrasana opens up
the heart chakra, Anahata and makes the practitioners experience the spiritual
power and positive transformations. Heal your heart, balance your heart
energies and savor an increased sense of connectedness with the life.
2. Balances the Nervous system: Consistently perform wheel pose and
trigger your parasympathetic nervous system. The wheel pose is well-known
to reduce the signs and symptoms of depression, anxiety, and stress. It
slows, cools down the mind, balances the nervous system, and helps you
rest in a peaceful state.
3. Energizes the body: Chakrasana is a great and natural body-mind
energizer. Whenever you feel low on energy levels, perform a wheel pose
and vitalize all your stamina, energy, and strength. The pose also unlocks
the various energy centers and channels within the body and helps prana
travel through the entire body revitalizing the spirit of the practitioner.
4. Stimulates the Thyroid Glands: The performance of chakrasana highly
benefits the pituitary and thyroid glands. The wheel pose helps produce the
TSH releasing hormone (TRH) which signals the pituitary gland to stimulate
the thyroid gland and assist in keeping these glands in the best of the health.
5. Stretches the Back: Reverse the ill effects of a sedentary lifestyle by
performing a chakrasana. The chakrasana effectively stretches the upper
and lower back thus providing relief from a backache and associated health
problems.
6. Strengths the Vertebrae: A wheel posture powerfully strengthens and
lengthens the vertebrae that enhance the elasticity and flexibility of the spine.
It is an effectual yoga asana that creates space in the spine and keeps it healthy.
7. Heightens Lungs Health: Chakrasana is an instrumental yoga posture that
opens and strengthens the lungs. It intensifies the amount of oxygen to the
rib cage and improves respiration. The prolonged holding of this posture
with deep inhalations and exhalations therapeutically affects the asthmatic
patients.
8. Promotes Weight Loss: As you stretch your body in a wheel pose you
naturally lose fat-build up from your oblique areas. When practiced regularly,
you shall notice a toned and slim body. It also strengthens the abdominal
muscles granting you a robust physique.
9. Loosens Hips: Athletes acknowledge the importance of having flexible
hips. Wheel pose potently opens up the hips and increases mobility in the
posterior that enables them to perform their movements efficiently. The pose
also helps in keeping the hips and lower back strong thus benefiting the
overall wellness.
Simple Asanas and
Pranayama
NOTES
Self-Instructional
Material 25
10. Reduces Osteoporosis: As we age our bones become weak and brittle
and the risk of developing osteoporosis increases. Wheel pose effectively
reduces the onset of osteoporosis by strengthening the bones of the body.
Make this powerful and potential yoga pose a part of your daily routine and
exhibit a robust physique, peaceful mind, and compassionate soul
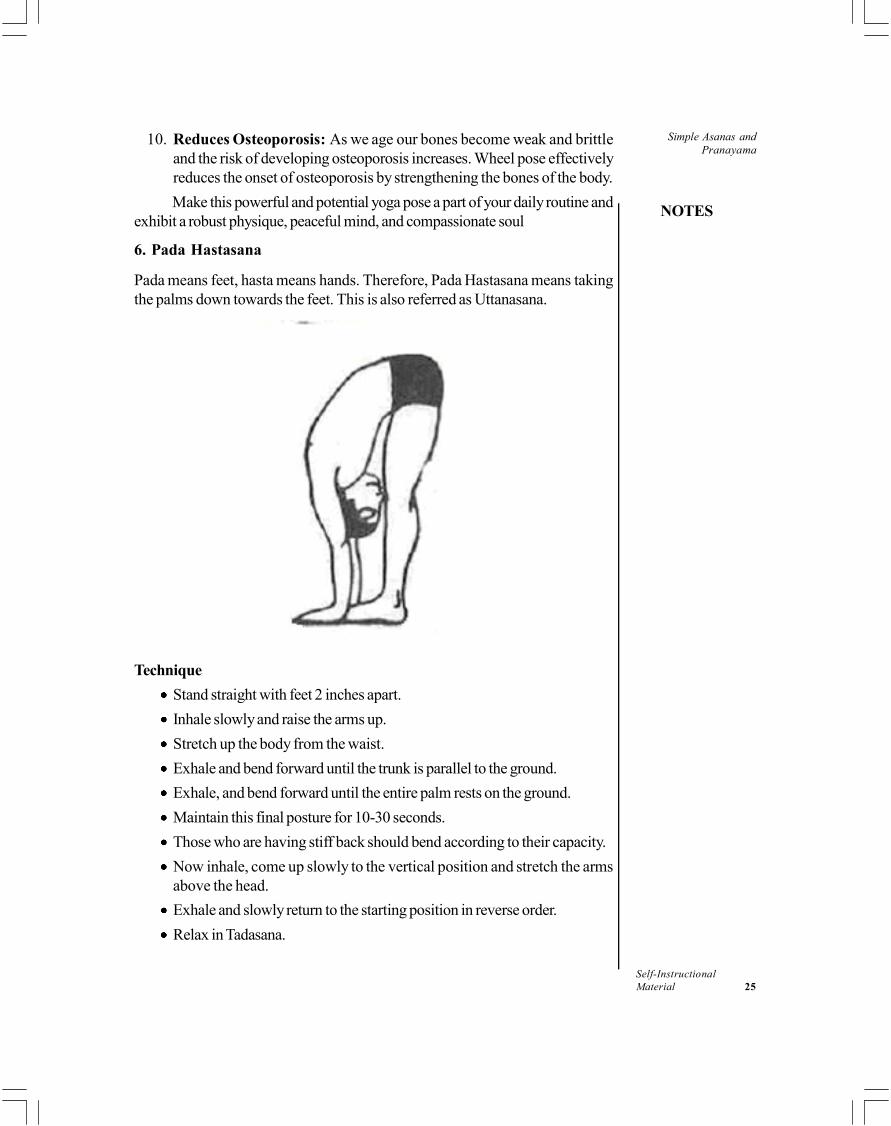
6. Pada Hastasana
Pada means feet, hasta means hands. Therefore, Pada Hastasana means taking
the palms down towards the feet. This is also referred as Uttanasana.
Technique
Stand straight with feet 2 inches apart.
Inhale slowly and raise the arms up.
Stretch up the body from the waist.
Exhale and bend forward until the trunk is parallel to the ground.
Exhale, and bend forward until the entire palm rests on the ground.
Maintain this final posture for 10-30 seconds.
Those who are having stiff back should bend according to their capacity.
Now inhale, come up slowly to the vertical position and stretch the arms
above the head.
Exhale and slowly return to the starting position in reverse order.
Relax in Tadasana.

Simple Asanas and
Pranayama
NOTES
Self-Instructional
26 Material
Benefits
Makes the spine flexible, improves digestions, and prevents constipation
and menstrual problems.
A word of caution
Please avoid this practice in case of cardiac or back problems, abdominal
inflammation, hernia and ulcers, high myopia, vertigo and during pregnancy.
Those with vertebral and disc disorders should also avoid this practice.
7. Ardha Chakrasana
Ardha means half. Cakra means wheel. In this posture, as the body takes the
shape of a half wheel, hence it is called Ardha Cakrasasna.
Technique
Support the back at the waist with all the fingers together pointing forward
or downward.
Drop the head backwards and stretching the neck muscles. As you inhale,
bend backwards from the lumbar region; exhale and relax.
Stay here for 10-30 seconds with normal breathing.
Inhale and slowly come up.
Benefits
Ardha Cakrasana makes the spine flexible and strengthens the spinal nerves.
Strengthens the neck muscles, and improves breathing capacity.
Helps in cervical spondylitis.
A word of caution
Avoid this posture in case of vertigo or a tendency to giddiness.
Hypertensive patients shall bend with care.
Simple Asanas and
Pranayama
NOTES
Self-Instructional
Material 27
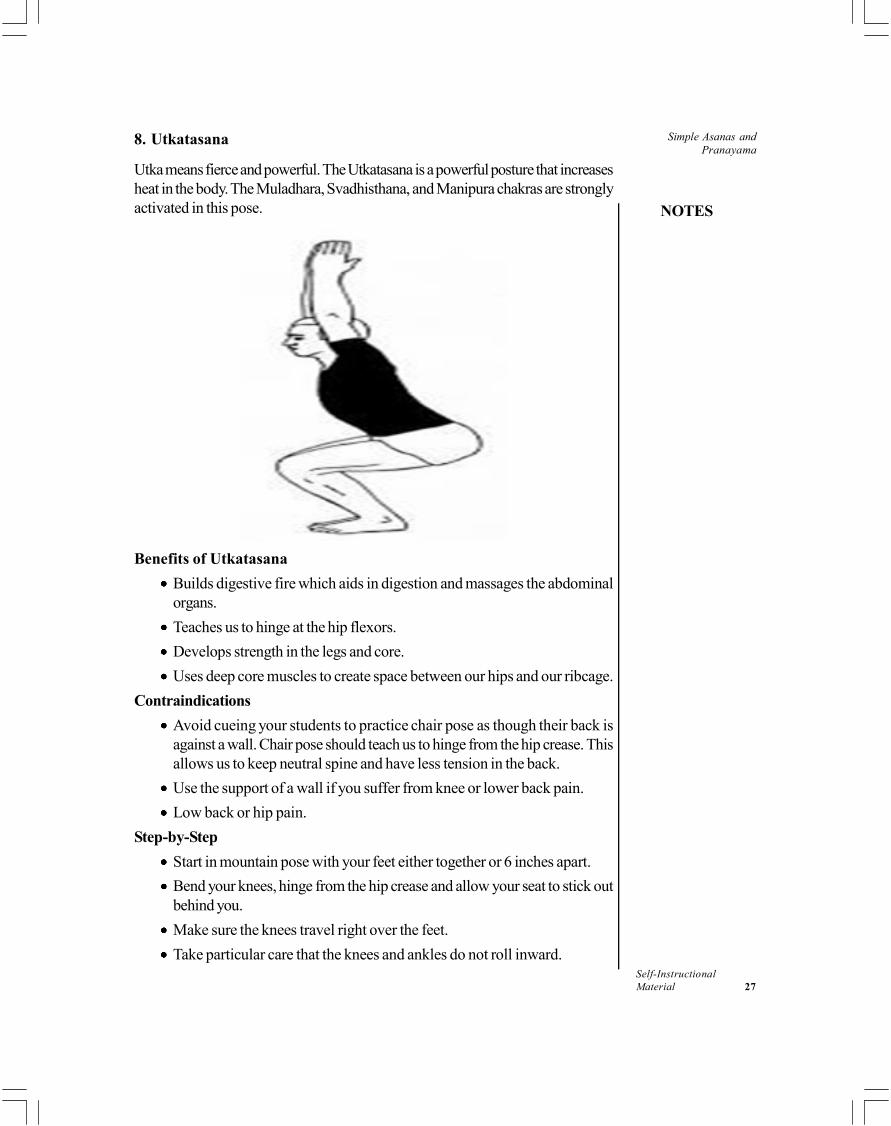
8. Utkatasana
Utka means fierce and powerful. The Utkatasana is a powerful posture that increases
heat in the body. The Muladhara, Svadhisthana, and Manipura chakras are strongly
activated in this pose.
Benefits of Utkatasana
Builds digestive fire which aids in digestion and massages the abdominal
organs.
Teaches us to hinge at the hip flexors.
Develops strength in the legs and core.
Uses deep core muscles to create space between our hips and our ribcage.
Contraindications
Avoid cueing your students to practice chair pose as though their back is
against a wall. Chair pose should teach us to hinge from the hip crease. This
allows us to keep neutral spine and have less tension in the back.
Use the support of a wall if you suffer from knee or lower back pain.
Low back or hip pain.
Step-by-Step
Start in mountain pose with your feet either together or 6 inches apart.
Bend your knees, hinge from the hip crease and allow your seat to stick out
behind you.
Make sure the knees travel right over the feet.
Take particular care that the knees and ankles do not roll inward.

Simple Asanas and
Pranayama
NOTES
Self-Instructional
28 Material
Feel your deep abdominal muscles engage further as you sit down into an
imaginary chair.
Keep a neutral spine – Avoid tucking the tailbone or trying to keep your
back straight as though against a wall.
Make sure the lower ribcage stays connected to the abdominals (the lower
ribs should not stick out).
Focus on lengthening in the waist.
Feel a natural curve in the back of the neck and that your shoulders relaxed.
For more of a challenge lift the arms so that the arms are in line with the
torso.
Find a perfect point of balance between the muscles on the front and the
back sides of your body. Rest into this point of balance.
Feel the muscles of your legs hugging the bones.
9. Vrikshasana
Tree Pose - Vrikshasana
Vriksha - Tree; Asana - Posture or Pose
The asana is pronounced as VRIK-shAH-sana
This posture replicates the graceful, steady stance of a tree. Unlike most
yoga poses, the Tree Pose requires keeping our eyes open in order to maintain
body balance.
Simple Asanas and
Pranayama
NOTES
Self-Instructional
Material 29
How to do the Tree Pose (Vrikshasana)
Stand tall and straight with arms by the side of your body.
Bend your right knee and place the right foot high up on your left thigh. The
sole of the foot should be placed flat and firmly near the root of the thigh.
Make sure that your left leg is straight. Find your balance.
Once you are well balanced, take a deep breath in, gracefully raise your
arms over your head from the side, and bring your palms together in
‘Namaste’ mudra (hands-folded position).
Look straight ahead in front of you, at a distant object. A steady gaze helps
maintain a steady balance.
Ensure that your spine is straight. Your entire body should be taut, like a
stretched elastic band. Keep taking in long deep breaths. With each
exhalation, relax the body more and more. Just be with the body and the
breath with a gentle smile on your face.
With slow exhalation, gently bring down your hands from the sides. You
may gently release the right leg.
Stand tall and straight as you did at the beginning of the posture. Repeat this
pose with the left leg off the ground on the right thigh.
Benefits of the Vrikshasana / Tree Pose
This pose leaves you in a state of rejuvenation. It stretches the legs, back
and arms, and invigorates you.
It brings balance and equilibrium to your mind.
It helps improve concentration.
This posture has been found to relieve some cases of sciatica.
It makes the legs strong, improves balance, and opens the hips.
Helps those who are suffering from sciatica.
Contraindications of the Tree Pose (Vrikshasana)
Avoid doing this posture if you are suffering from migraine, insomnia, low or high
blood pressure (those with high blood pressure may do this pose but without
raising their hands overhead, as this may further raise their blood pressure
10. Bakkasana
How to Do the Crow Pose (Yoga)
Crow or crane pose, which is called bakasana in Sanskrit, is one of the first arm
balances learned by yoga students. Crow pose strengthens the arms, wrists and
abdominal muscles. It also stretches the upper back and the groin. Bakasana can
be slightly tricky to learn, but with regular practice you can master crow pose and
then tackle more difficult variations of this asana, or position.

Simple Asanas and
Pranayama
NOTES
Self-Instructional
30 Material
(i) Start in garland pose: Garland pose, or malasana in Sanskrit, is a hip-opening
pose that resembles bakasana but in an upright position. This asana may make it
easier for you to enter crow pose if you are new to yoga or don’t have a lot of arm
or wrist strength.
Keep you head up and press your elbows and knees against one another.
It’s important to not press your elbows against your inner thighs so that you
can keep your chest area as open as possible.
Don’t collapse your shoulders. Pull your shoulder blades down your back
to lift your chest.
Keep your gaze straight ahead.
(ii) Place your hands on the floor: From either malasna or uttanasana, place
your palms flat on the floor. They should be about a shoulder width apart, or
slightly wider. This will help you support your weight while performing bakasana.
Spread your fingers wide. This will provide you with more stability once
you are in the pose. If it feels more comfortable, turn your fingertips slightly
towards each other.
Use a strap to keep your arms in line, if necessary. To use a strap properly
for bakasana, make a loop and measure it so that it is approximately the
width of your shoulders when flattened.
(iii) Shift your weight forward and pull up your sitting bones: The transition
from uttasana or malasana can be tricky. Slowly begin shifting your weight on to
your hand and lifting your sitting bones toward the sky to help you enter full bakasana
more easily.
If you are in malasana, you’ll want to bend your elbows and move your
chest forward while your shift your weight forward.
(iv) Place your knees on your triceps: To move into bakasana, bend your
elbows slightly, lift up onto your toes and try to position your knees onto your
triceps, as high above the elbows as possible. Imagine you are trying to get your
knees into your armpits!

Simple Asanas and
Pranayama
NOTES
Self-Instructional
Material 31
(v) Squeeze or snuggle your inner thighs against the sides of your torso,
burrow your shins into your upper arms.
Use your mula bandha, or root lock, to suck your abdominal muscles inwards
and keep you sitting bones lifting towards the sky.
To make the transition into crow pose easier, you can try standing on a
block. This will give you extra height and make it easier to get your knees
into position against your upper arms.
(vi) Gaze forward: One of the most important aspects of mastering bakasana is
keeping your gaze forward. If you try to look down at your hands or back at your
feet, you may lose your balance.
Try to focus your concentration, or drishti, in front of your hands.
If your fear of falling is holding you back, try placing a pillow or blanket on
the ground in front of you to soften a fall.
(vii) Lift one foot off the ground, then the other: Shift your weight onto your
hands by leaning your knees into your triceps and lifting your feet up off the floor.
Never hop into crow pose (or any yoga pose)! Gently and gradually shift
your weight forward until your feet come off the ground.
If you are nervous, begin by slowly lifting one foot off the ground, then
replace it and lift the other. When you feel strong and balanced, try lifting
both feet at the same time.
Once both feet are off the floor, try touching your big toes together and tuck
your heels as close to your buttocks as you can manage.
(viii) Straighten your arms and lift your sitting bones: Once your have
achieved crow and can hold it for more than a few seconds, straighten your arms
and lift your sitting bones. This will help you master the pose and cycle through a
vinyasa if you choose. you can make a few adjustments in order to master the
pose.
Straighten your arms as much as possible. They should not be splayed out
to the sides.
Round out your spine and draw your abdominal muscles inwards and
upwards using mula bandha.
Gradually work towards holding this pose for up to a minute. If your wrists
start to hurt, make sure that your palms are fully flat to the floor.
(ix) Finish the asana or cycle through a vinyasa. Once you’ve finished
practicing bakasana, you can either lower back to malasana or cycle through a
vinyasa if you are more experienced. Remember to only do what asanas you can
without losing proper form
Benefits of Crow Pose
Tones the abdominal wall

Simple Asanas and
Pranayama
NOTES
Self-Instructional
32 Material
Strengthens abdominal organs to aide in lower back pain and indigestion
Strengthens arms
Stretches and strengthens the back
Stretches and strengthens inner thighs
Opens the groin
Strengthens the wrists! TRUTH! Practice.
Builds endurance and focus – mental focus and calm!
Sitting Postures
1. Vakrasana
Vakra means twisted. In this asana, the spine is twisted which has a rejuvenating
effect on its functioning.
Sthiti: Dandasana
Technique
Bend the right leg, and place the right foot beside the left knee.
As you exhale, twist the body to the right.
Bring the left arm around the right knee and clasp the right big toe or place
the palm beside right foot.
Take the right arm back and keep the palm on the ground with the back
straight.
Remain in the posture for 10-30 seconds with normal breathing and relax.
Take out your hands with exhalation and relax.
Repeat the same on the other side.
Benefits
Increases flexibility of the spine.
Helps to overcome constipation, dyspepsia.
Stimulates pancreas and helps in the management of diabetes.

Simple Asanas and
Pranayama
NOTES
Self-Instructional
Material 33
A word of caution
Please avoid this posture in case of severe back pain, vertebral and disc disorders,
after abdominal surgery and during menstruation.
2. Ardha Ustrasana
Sthiti: Long sitting posture (Visramasana)
Ustra means camel. The final version of this asana resembles the hump of a camel.
In this version, only the first stage (half) of the asana is being practiced.
Technique
Sit in Visramasana.
Come to Dandasana.
Fold your legs and sit on your heels.
Keep the thighs close and big toes touching.
Place the hands on the knees.
The head and back should be straight.
This is Vajrasana.
Stand on your knees.
Place the hands on the waist with fingers pointing downward.
Keep the elbows and shoulders parallel.
Bend the head back and stretch the neck muscles; inhale and bend the
trunk backwards as much as possible. As you exhale, relax.
Keep the thighs perpendicular to the ground.

Simple Asanas and
Pranayama
NOTES
Self-Instructional
34 Material
Remain in the posture for 10-30 seconds with normal breathing.
Return with inhalation; sit in Vajrasana.
Relax in visramasna.
Note
If you can reach the heels, you can place your hands on them and bend backwards.
This is called Us.trasana.
Benefits
Relieves constipation and back pain.
Increases blood circulation to the head and cardiac region.
A word of caution
In case of hernia and abdominal injuries, arthritis, vertigo and pregnancy, please
avoid doing this asana.
3. Mandukasana
Mandukasana meaning
The word Mandukasana has been derived from Sanskrit word eaMwdklu.It isconsisted of two words manduk and asana. The meaning of manduk is Frog and
asana is showing a yoga posture. In the final stage, the asana seems to like frog,
hence the name. It is one of the important yoga poses to give appropriate massage
to the abdominal organs. It is helpful to make your stomach flat by burning the
extra fats from the belly.
How to do frog pose
The simple steps to do Mandukasna are given below. By following these technique,
one can perform Mandukasna even oneself.
Sit in Vajrasana.

Simple Asanas and
Pranayama
NOTES
Self-Instructional
Material 35
Now, make fists where thumbs should be inside.
Put the fists at the naval region.
Inhale deeply.
With exhale bend forward and put maximum pressure on the naval area.
While bending forward, your chest should touch your thigh and see ahead
with open eyes just like as frog.
Maintain the pose as long as you can do.
Inhale-exhale slowing while maintaining the pose.
Come to Vajrasana with deep inhale.
Perform it 3 to 5 times.
Health benefits of frog pose
It massages the entire abdominal organs. Thus, good for smooth functioning
of these organs.
It controls weight. Thus effective for those who are longing for weight loss
and making the stomach flat.
It is beneficial in case of constipation and indigestion.
It is helpful to release unwanted gases from the stomach thus make you feel
relaxed and calm.
It helps to control diabetes by stimulating the pancreas.
Dislocated naval can be corrected by performing this asana.
It should be practiced by those who have asthmatic condition.
It strengthens the back if practice technically right.
It is good for chest and shoulders.
Regular practicing the asana is helpful to minimize the impact of menstrual
cramps.
It can be practiced to relieve stress, anxiety and depression.
In traditional texts, it has also been said that the asana helps to awakening
of Kundalini.
Precautions of frog pose
Some of the contraindication, cautions and side effects of frog pose are given
below:
It shouldn’t be performed by those who has backache
It shouldn’t be practiced who has ulcer.
Knee pain patients should avoid it.
Don’t put maximum stretch on your stomach; try to maintain the pose for
longer period of time.
Simple Asanas and
Pranayama
NOTES
Self-Instructional
36 Material
Avoid if having ankle injuries.
High blood pressure
Insomnia
Migraine.
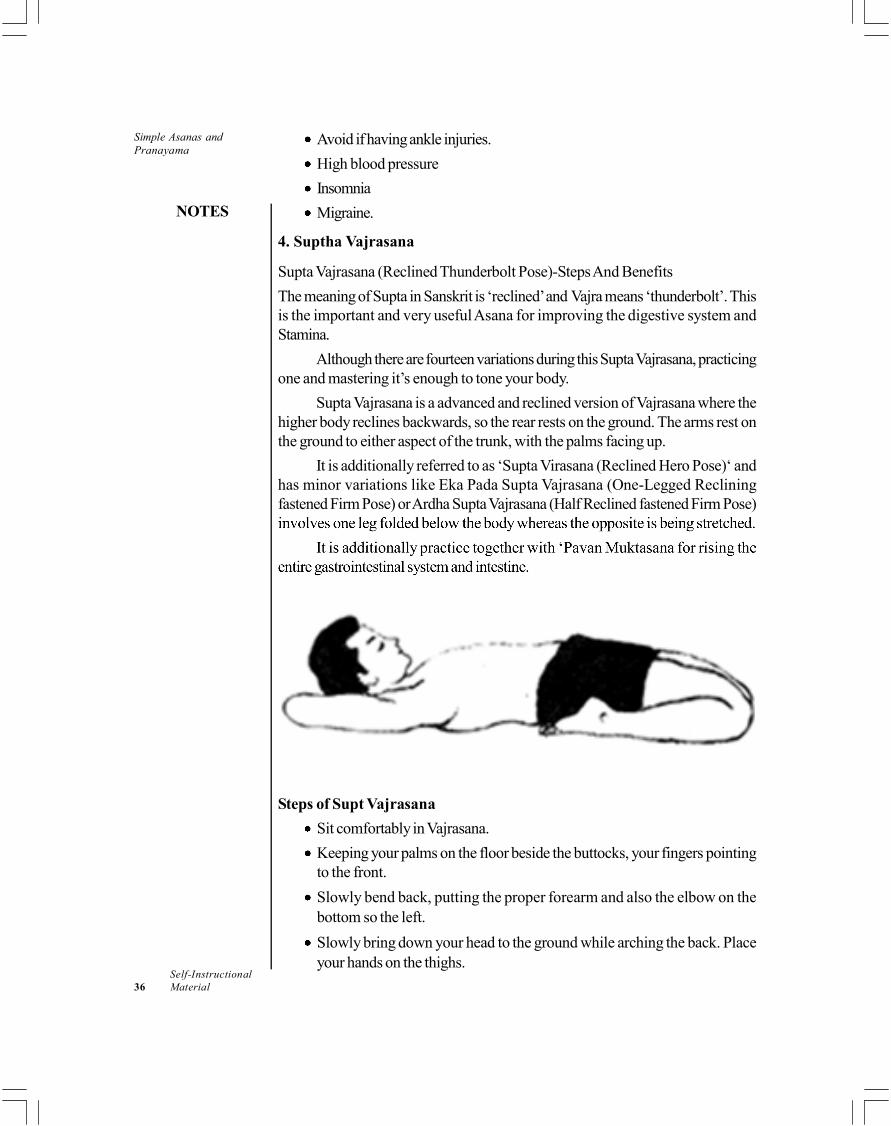
4. Suptha Vajrasana
Supta Vajrasana (Reclined Thunderbolt Pose)-Steps And Benefits
The meaning of Supta in Sanskrit is ‘reclined’ and Vajra means ‘thunderbolt’. This
is the important and very useful Asana for improving the digestive system and
Stamina.
Although there are fourteen variations during this Supta Vajrasana, practicing
one and mastering it’s enough to tone your body.
Supta Vajrasana is a advanced and reclined version of Vajrasana where the
higher body reclines backwards, so the rear rests on the ground. The arms rest on
the ground to either aspect of the trunk, with the palms facing up.
It is additionally referred to as ‘Supta Virasana (Reclined Hero Pose)‘ and
has minor variations like Eka Pada Supta Vajrasana (One-Legged Reclining
fastened Firm Pose) or Ardha Supta Vajrasana (Half Reclined fastened Firm Pose)
Steps of Supt Vajrasana
Sit comfortably in Vajrasana.
Keeping your palms on the floor beside the buttocks, your fingers pointing
to the front.
Slowly bend back, putting the proper forearm and also the elbow on the
bottom so the left.
Slowly bring down your head to the ground while arching the back. Place
your hands on the thighs.
Simple Asanas and
Pranayama
NOTES
Self-Instructional
Material 37
Try to stay the lower legs connected with the ground. If necessary, separate
the knees.
Make certain that you simply don’t seem to be overstraining the muscles
and ligaments of the legs.
Close the eyes and relax the body.
Breathe deeply and slowly within the final position.
Release within the reverse order, inhaling and taking the support of the
elbows and also the arms raise the top higher than the bottom.
Then shift the weight on the left arm and elbow by slippery the body, then
slowly returning to the beginning position.
Never leave the ultimate position by straightening the legs first; it’s going to
dislocate the knee joints.
Repeat this process for 3 to 5 times and once you master it increase the
time for 8 to 10 times.
Benefits of Supta Vajrasana
It tones the spinal nerves, makes the rear versatile and realigns rounded
shoulders. The nerves within the neck, the thyroid and parathyroid gland
glands square measure notably stirred.
It massages the abdominal organs assuaging digestive ailments and
constipation.
The ribcage is stretched and dilated totally, that helps to fill the lungs to its
piaximum capability and transportation additional element into the system.
It enhances courageousness and confidence level within the temperament.
It is useful for those stricken by respiratory disorder, and different respiratory
organ ailments.
5. Sasangasana
Shashankasana or the Rabbit pose is so called as the asana resembles a Rabbit in
the final position. There are many benefits of this asana including relaxation, relieving
of depression and much more. Age or flexibility is one of the barriers to perform or
practice asana but Shashankasana is one of those which is very easy to perform
and can be done by anyone regardless of age.
How (steps) to practice Shashankasana?
Sit down on the floor with a simple or yoga mat.
Stretch your leg in front and keep your spine erect.
Bend your right leg by your knee, bring it back and keep your right buttock
on your foot.

Simple Asanas and
Pranayama
NOTES
Self-Instructional
38 Material
Now bend your left leg by your knee, bring it back and keep your left
buttock on your foot.
Keep your right foot big toe on the left foot big toe.
This position is named as vajrasana.
Sit comfortably in Vajrasana and keep your palms on your thighs.
Inhale and raise your hand straight upwards and stretch.
Now exhale and bend forward.
Try to touch your nose or chin to the ground.
Keep your arms stretched and palms on the ground.
Stay in this position as long as possible.
Keep your breath out.
But if you want to stay for longer then start breathing normally.
Then slowly inhale and rise up with straight arms.
Exhale and bring back your hands down and keep your palms on your
thighs.
Simple Asanas and
Pranayama
NOTES
Self-Instructional
Material 39
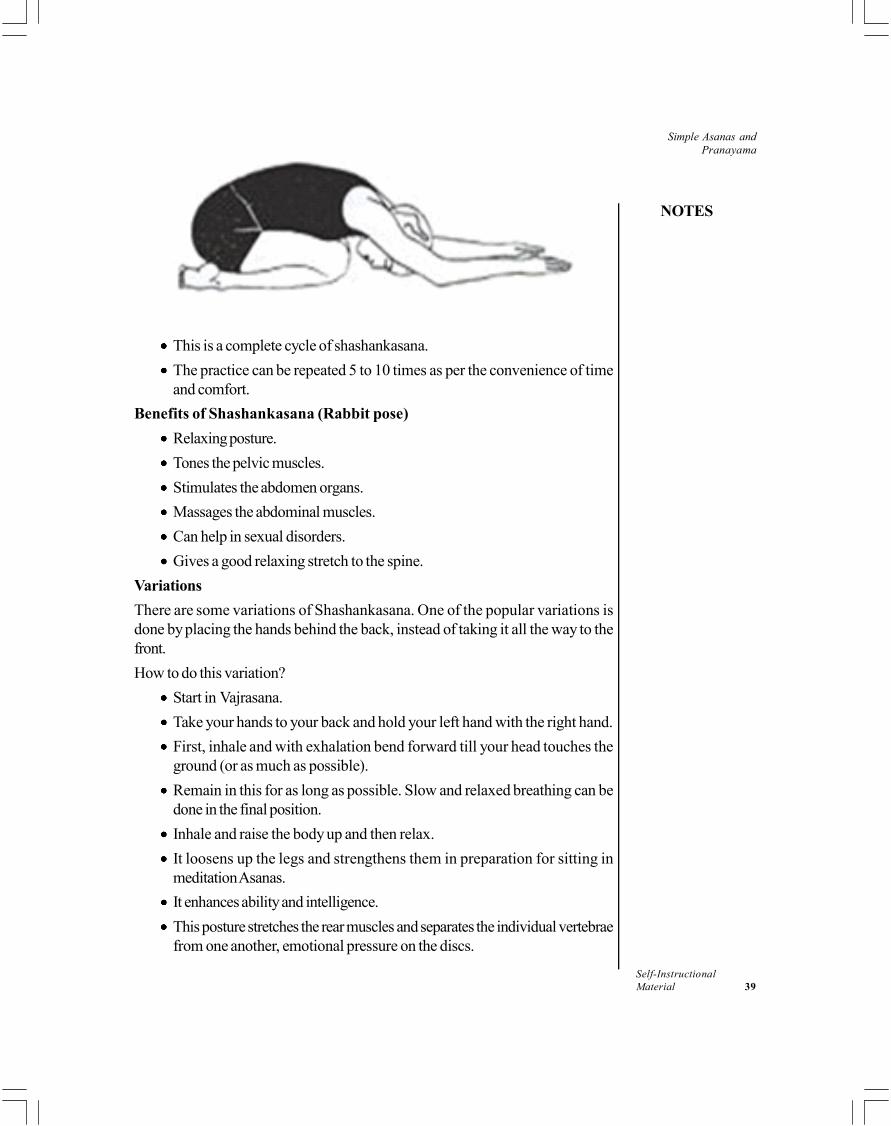
This is a complete cycle of shashankasana.
The practice can be repeated 5 to 10 times as per the convenience of time
and comfort.
Benefits of Shashankasana (Rabbit pose)
Relaxing posture.
Tones the pelvic muscles.
Stimulates the abdomen organs.
Massages the abdominal muscles.
Can help in sexual disorders.
Gives a good relaxing stretch to the spine.
Variations
There are some variations of Shashankasana. One of the popular variations is
done by placing the hands behind the back, instead of taking it all the way to the
front.
How to do this variation?
Start in Vajrasana.
Take your hands to your back and hold your left hand with the right hand.
First, inhale and with exhalation bend forward till your head touches the
ground (or as much as possible).
Remain in this for as long as possible. Slow and relaxed breathing can be
done in the final position.
Inhale and raise the body up and then relax.
It loosens up the legs and strengthens them in preparation for sitting in
meditation Asanas.
It enhances ability and intelligence.
This posture stretches the rear muscles and separates the individual vertebrae
from one another, emotional pressure on the discs.

Simple Asanas and
Pranayama
NOTES
Self-Instructional
40 Material
Often nerve connections emanating from the neural structure square measure
squeezed by these discs, giving rise to numerous styles of aching.
This posture helps to alleviate this downside and encourages the discs to
resume their correct position.
It regulates the functioning of the adrenal glands.
It tones the girdle muscles and also the sciatic nerves and it is useful for girls
who have an underdeveloped pelvis.
It helps to alleviate disorders of each the male and feminine procreative
organs.
Regular follow relieves constipation.
It helps to eliminate anger, aggression and relax the mind.
6. Ardha Sirsasana
Ardha Sirsasana is for you, if you are not able to do Sirsasana; however, can
enjoy its full benefit. Additionally, once you gain confidence can start doing
Sirsasana.
‘Ardha’ means ‘half’, ‘shirsha’ means ‘head’ and ‘asana’ means ‘posture’.
Ardha Sirsasana common name in English is half headstand.
Ardha Sirsasana supplies nutrient-rich pure blood to the brain, which connects
to our whole body and acts as a regulator. Thus, it kindles and regulates entire
body function by increasing blood supply to scalp and brain.
Half headstand stimulates the nervous system, boost mental alertness and
clarity. It is a centering, calming and soothing posture. People suffering from sleep
problems, memory loss and low vitality can recover by the regular practice of this
asana.
Ardha Sirsasana stimulates pineal and pituitary glands, and help normalizes
its function; thus entire nervous system starts recovering.
How do you do Ardha Sirsasana?
Take a blanket, which is needed to be placed under your head for some
cushion effect.
Position your forearms on the blanket in front of you with the fingers
interlocked and the elbows in front of the knees. The distance between
elbows to interlocked fingers in both sides should be same so that it forms
an equilateral triangle.

Simple Asanas and
Pranayama
NOTES
Self-Instructional
Material 41
Position your crown of the head on the blanket in between the interlocked
hands.
Slowly lift your buttocks and knees against the ground so that your legs are
straightened, keeping the toes on the floor.
Now you have formed an inverter “V” (or triangle) of the body.
Maintain this position as long as is possible without any strain, slowly bend
your knees, lower it, and grounded. Rest for a while, then lie down on your
back, and relax in Savasana.
Benefits of Ardha Sirsasana
It rejuvenates nervous system and brain, thus helps diabetics to stop nerve
damage.
Improve lung’s capacity by loading blood with enough oxygen as well as
heal cough, cold, sinusitis, and asthma.
Aids proper blood circulation and removes fluid buildup in the foot, thus
limits foot conditions.
Kindle digestion and normalize metabolism, thus helps maintain the blood-
glucose level. Psychological problems such as stress, depression and anxiety
are more common among diabetes, which has relieved by handstand.
It normalizes the functions of kidney, liver, intestine, stomach and reproductive
organ.
Finally, it provides a glow to your face and makes you more attractive
7. Sirsasana
Headstand Yoga Pose (Sirsasana)
A number of people are apprehensive and disinterested to do Sirsasana because
of its headstand position and requires some sort of balance. In fact, it is not difficult
to practice if it is performed under the guidance of an expert and providing the
basic rules are carefully followed. The brain needs well oxygenated blood for
performing its various functions smoothly. However, in case of sedentary as well
as general people, the brain didn’t receives sufficient enriched oxygenated blood
that leads to headache, pituitary malfunctioning, diabetes, sexual problems, improper
vision, hair fall, skin conditions, piles, varicose vein etc.
It also prevents blood stagnation in the lower parts of the body thus ensures
homogenous blood supply to the entire parts of the body. The scientific experiment
has verified that the amount of air breathed per minute during the performance of
headstand yoga was considerably reduced. Oxygen consumption by the tissues
increased and the amount of oxygen exhaled was less, indicating that the transfer
of oxygen to the blood is greatly increased. It has been also shown that the number
of WBC has increased thus prevents the body from infections and develop immunity.
The ideal time to practice it is early in the morning just before breakfast.

Simple Asanas and
Pranayama
NOTES
Self-Instructional
42 Material
How to do headstand yoga
Mastering Sirsasana is not a difficult task. Here are the 10 simple and easy steps
are being enumerated to raise the body into the final pose and how to become
mastered for headstand yoga. Once this is achieved then staying in the final pose
is little difficulty.
Interlock the fingers tightly, palms forming a cup.
Place the head on the formed cup so that the crown of the head touches the
palms.
Raise the knees from the floor by pulling the toes towards the head. Slowly
raise your legs upwards from the floor.
After the body gets properly balanced in this position, gradually and slowly
straighten the legs.
Take care that you maintain equilibrium and you don’t fall backwards
Make sure that the spine and thighs are in line, straight and vertical.
Relax the whole body as much as possible.
Close the eyes
Breathe slowly and deeply.
This is the final pose of sirsasana. Stay in the final pose for a comfortable
length of time. Come back by flexing the knees and sliding them down to
the floor in reverse order.

Simple Asanas and
Pranayama
NOTES
Self-Instructional
Material 43
Benefits of Headstand Yoga Pose (Sirsasana) for Hair, Skin and Health
Headstand Yoga pose is known as king of all asanas due to its multiple health
benefits. It speeds up the blood circulation and ensures that brain receives sufficient
well oxygenated blood. Sedentary lifestyle, lack of exercises and faulty modern
set up lead to varicose vein, hemorrhoids and general efficiency of the organs of
the body. So, Sirsasana is an unnatural method of combating an unnatural lifestyle,
helps to solve all endocrine related problems including many diseases and disorders.
Regular practice helps to develop the body, disciplines the mind and widens the
horizons of the spirit. One becomes balance and self-reliant in pain and pressure,
loss and gain, shame and fame, and defeat and victory.
(i) Good for healthy brain: Brain is the controlling centre of the body that
helps to function the physical and mental aspects of the body efficiently and
effectively. The headstand yoga pose allow to manifest the brain more vividly.
It can rejuvenate and revitalize the entire brain. Sirsasna directs an enriched
oxygenated supply of blood to the brain cells and the billions of cells receive
more nourishment.
(ii) Headache and Migraine: Sirsasana helps to relax and strengthen the
compression of certain blood vessels in the brain thereby prevent the
occurrence of these ailments. frgbtNote, however, sirsasana shouldn’t be
done during the actual time of headache or migraine. These ailments are
also associated with mental tension, so sirsasana helps to prevent these
ailments by inducing calmness.
(iii) Control pituitary functions: Practicing sirsasana increases blood flow to
the brain thereby revitalizes all the nervous system and the controller of the
endocrine system, the pituitary. Thus, it acts like as panacea to rectify various
types of glandular and nervous disorders.
(iv) Diabetes cure: The headstand yoga pose shows a significant positive
influence in relieving diabetes. The main cause of diabetes is the pituitary
gland whose symptoms itself manifest in the malfunctioning of pancreas.
The master gland secretes too much of diabetogenic hormone that leads to
type 2 diabetes. Modern medicine is not so effective in curing the condition
but Sirsasana acts directly on the pituitary gland by improving the blood
supply thus help in combating diabetes.
(v) Treat sexual disorders: Sirsasana helps in combating sexual disorders
such as prostrate problems hydrocele, leucorrhea, spermatorrhea, and all
general menopausal and menstrual ailments. The yoga pose drains blood
from the associated sexual endocrine glands and organs, thus improves the
functional efficiency.
(vi) Anxiety reliever: Anxiety is the greatest factor in causing sexual disorders
and other complicated problems. Sirsasana alone or with meditative
techniques of Yoga helps to calm the mind. The headstand yoga is an excellent
method of bringing about calmness and concentration.

Simple Asanas and
Pranayama
NOTES
Self-Instructional
44 Material
(vii) Treat thyroid: It acts directly on the thyroid gland by balancing the metabolic
functions. Malfunctioning of the thyroid can result in many ailments either
directly or indirectly. The headstand yoga pose helps to bring perfect health
to this vital organ.
(viii) Improves eye vision: It improves the overall functions of eyesight, sense
of smell and taste. The extra supply of blood during sirsasana helps to work
the sensory organs perfectly. Various types of ailments such as myopia,
astigmatism and catarrh and general bad hearing have been found to improve
by regular practice of sirsasana.
(ix) Skin complexion: The condition of the facial skin can also be improved
through regular practice of sirsasana. Pimples and wrinkles are often caused
by inadequate removal of waste materials and insufficient nourishment from
the blood. Sirsasana directs an oxygen rich flow of blood to the facial skin
thereby improving the facial complexion.
(x) Prevents hair fall: Hair loss, greying of hair and baldness are often caused
due to bad blood circulation in the scalp. Sirsasana doesn’t only direct
enriched blood to the brain, it also sends it to the scalp. The transforming of
grey hair into its original color and good growth of hair is possible through
the practice of this headstand pose.
(xi) Cures piles and varicose vein: The problems of varicose vein and piles
caused by accumulation of blood in the legs and anus respectively. Regular
practice of sirsasana relieves the pressure on the blood vessels help in
alleviating either of these ailments. All the organs of the pelvis and abdomen
are revitalized by sirsasana.
(xii) Memory power: Memory power, intelligence and all mental functions are
improved. Regular practice of sirsasana makes healthy pure blood flow
through the brain cells which rejuvenates them so that thinking power
increases and thoughts become easier.
(xiii) Removes lethargy: This asana is a tonic for those people who tire quickly.
It ensures a proper supply of blood to the pituitary and pineal glands in the
brain. Our growth, health and vitality depend on the proper functioning of
these two glands.
(xiv) Relives cold and cough: The lungs gain the power to resist any climate and
stand up to any work, thus helpful in relieving of colds, coughs and tonsillitis.
(xv) RBC formation: Regular practice of sirsasana show marked improvements
in the hemoglobin content of the blood
8. Tolasana
Definition - What does Tolasana mean?
Tolasana is an arm balancing variation of lotus pose, or padmasana. This asana is
part of the primary series of Ashtanga yoga, where it is used to engage and challenge

Simple Asanas and
Pranayama
NOTES
Self-Instructional
Material 45
the muscles one final time before the body is released and relaxed at the end of a
practice. It is also a powerful posture for learning the lower two bandhas.
To perform this asana, the yogi begins in lotus pose. The hands are placed
on either side of the body, and the arms are activated so the body and legs are
lifted off the ground. The body can then swing between the arms like a scale.
The name for this posture comes from the Sanskrit root word, tola, which
usually means “scale” or “balance,” but can also mean “poising oneself.” In English,
tolasana is called scale pose.
Yogapedia explains Tolasana
Tolasana is a challenging posture because of the way it requires the yogi to draw
their body weight and energy up. As such, it helps to activate the mula bandha (root
lock) and uddiyana bandha (upward abdominal lock). It is also said to be beneficial
for stimulating the muladhara (root) chakra, thus promoting a sense of stability
and groundedness.
Because it is a strong pose, it requires the mind to find the balance between
effort and ease in order to create a sense of calm in the pose. It may require a lot
of practice to attain this posture, which can teach patience and acceptance.
The balancing quality of this posture helps improve the student’s overall
balance in body and mind. It is also good for calming the mind and relieving stress
or anxiety.
This pose is not recommended for yogis who are not able to comfortably
perform Padmasana (Lotus Pose). If you have a shoulder, wrist, ankle, or knee
injury, be cautious before entering into this asana.
If you are a beginning yogi and find Tolasana difficult to perform, try starting
in Ardha Padmasana (Half Lotus Pose) before raising yourself. In this way, your
bottom foot will rest under the top thigh while the top leg is in regular Lotus.
To try this pose with a licensed yoga practitioner, check out our yoga class
schedules for each branch of CNY Healing Arts (Syracuse, Rochester, Albany).

Simple Asanas and
Pranayama
NOTES
Self-Instructional
46 Material
Getting Into Scale Pose
Begin in Padmasana (Lotus Pose). Place your palms on the floor beside your
hips. Press your hands against the floor, slowly activating your arms and abdomen
as you lift your legs and buttocks upward and off the floor.
Your legs should still be positioned in Padmasana. Your torso should be
vertical with your head and neck relaxed, softly gazing forward. If you want to
raise yourself higher, you can place each hand on a yoga block before lifting.
Hold yourself in suspension for 2-5 deep, slow breaths. Then, lower your
legs and buttocks back to the floor, uncross your legs, perform Padmasana with
the opposite leg on top, and repeat Tolasana for the same number of breaths.
Benefits of Scale Pose
Strengthens your arms and wrists
Tones your abdominal muscles
Stimulates your abdominal organs
Improves your sense of balance
Calms your mind.
This pose is not recommended for yogis who are not able to comfortably
perform Padmasana (Lotus Pose). If you have a shoulder, wrist, ankle, or knee
injury, be cautious before entering into this asana.
If you are a beginning yogi and find Tolasana difficult to perform, try starting
in Ardha Padmasana (Half Lotus Pose) before raising yourself. In this way, your
bottom foot will rest under the top thigh while the top leg is in regular Lotus.
To try this pose with a licensed yoga practitioner, check out our yoga class
schedules for each branch of CNY Healing Arts (Syracuse, Rochester, Albany).
Getting Into Scale Pose
Begin in Padmasana (Lotus Pose). Place your palms on the floor beside your
hips. Press your hands against the floor, slowly activating your arms and abdomen
as you lift your legs and buttocks upward and off the floor.
Your legs should still be positioned in Padmasana. Your torso should be
vertical with your head and neck relaxed, softly gazing forward. If you want to
raise yourself higher, you can place each hand on a yoga block before lifting.
Hold yourself in suspension for 2-5 deep, slow breaths. Then, lower your
legs and buttocks back to the floor, uncross your legs, perform Padmasana with
the opposite leg on top, and repeat Tolasana for the same number of breaths.
Benefits of Scale Pose
Strengthens your arms and wrists
Tones your abdominal muscles
Stimulates your abdominal organs
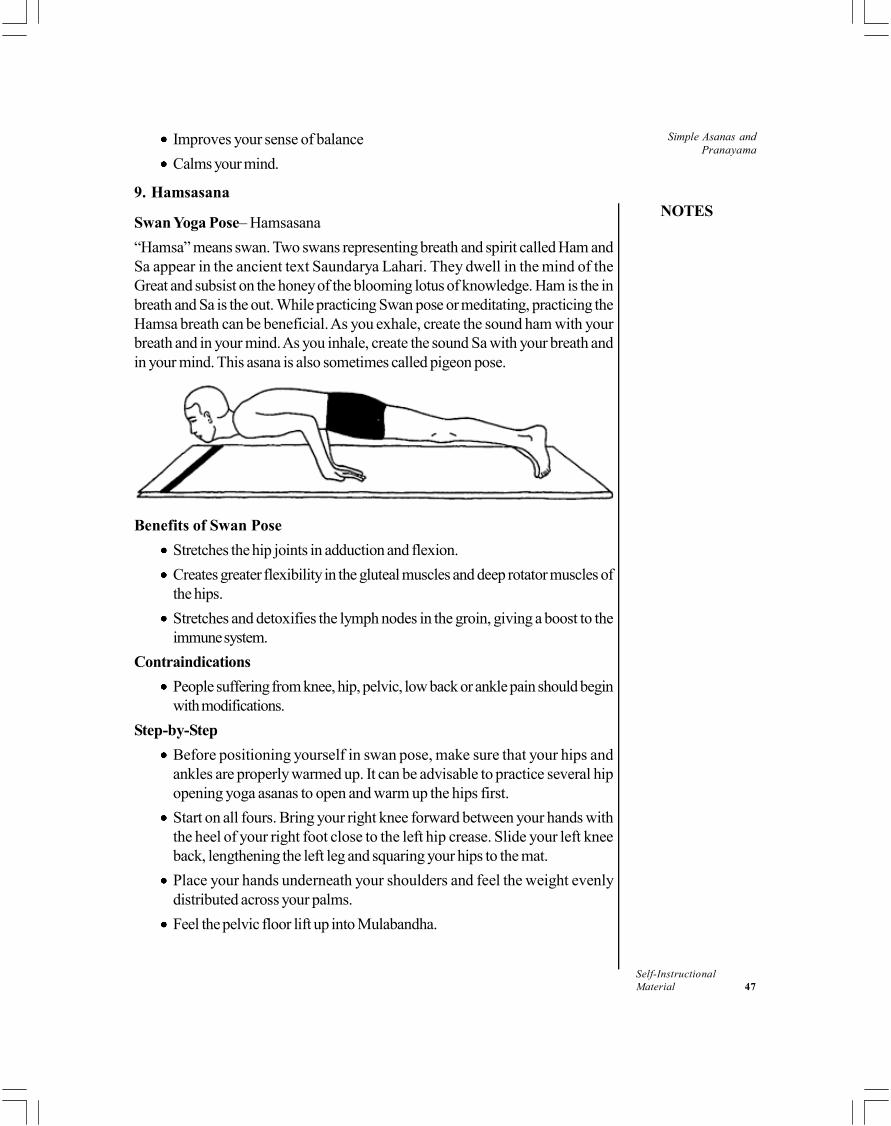
Simple Asanas and
Pranayama
NOTES
Self-Instructional
Material 47
Improves your sense of balance
Calms your mind.
9. Hamsasana
Swan Yoga Pose– Hamsasana
“Hamsa” means swan. Two swans representing breath and spirit called Ham and
Sa appear in the ancient text Saundarya Lahari. They dwell in the mind of the
Great and subsist on the honey of the blooming lotus of knowledge. Ham is the in
breath and Sa is the out. While practicing Swan pose or meditating, practicing the
Hamsa breath can be beneficial. As you exhale, create the sound ham with your
breath and in your mind. As you inhale, create the sound Sa with your breath and
in your mind. This asana is also sometimes called pigeon pose.
Benefits of Swan Pose
Stretches the hip joints in adduction and flexion.
Creates greater flexibility in the gluteal muscles and deep rotator muscles of
the hips.
Stretches and detoxifies the lymph nodes in the groin, giving a boost to the
immune system.
Contraindications
People suffering from knee, hip, pelvic, low back or ankle pain should begin
with modifications.
Step-by-Step
Before positioning yourself in swan pose, make sure that your hips and
ankles are properly warmed up. It can be advisable to practice several hip
opening yoga asanas to open and warm up the hips first.
Start on all fours. Bring your right knee forward between your hands with
the heel of your right foot close to the left hip crease. Slide your left knee
back, lengthening the left leg and squaring your hips to the mat.
Place your hands underneath your shoulders and feel the weight evenly
distributed across your palms.
Feel the pelvic floor lift up into Mulabandha.

Simple Asanas and
Pranayama
NOTES
Self-Instructional
48 Material
Use these Bandhas to protect your lower back as you press your left thigh
into the earth.
Inhale and reach your torso up into Swan lift, your heart lifting to the sky.
Feel your hips release, and feel energy floating down toward your knees.
Hinge forward from the hips and exhale into swan dive. Keep the spine
long and feel a deeper stretch in the gluteal muscles on the right side of the
body. Fold your hands on top of each other and rest your forehead on the
backs of your hands.
Feel the stretch all along your left thigh and deep in the psoas muscle.
Feel the release of tension in your forehead and facial muscles as your head
rests on the backs of your arms.
Press your hands under your shoulders. Lift knees off the mat. Draw your
right knee back under your hip and come onto all fours
10. Parvatasana
According to yoga, weakness of the body in any form can be removed through
the practise of asanas. Patanjali says in the Yoga Sutras: „Sthiram Sukham Aasanam”.
Today, we look at Parvatasana which is also known and translated as
Mountain Pose. To clarify this pose one needs to know that there are two types of
Mountain Poses.
One of them is the standing Mountain Pose called Tadasana. The other one
is Parvatasana, the grounded mountain, which we will discuss.
In Parvatasana our body resembles the shape of a mountain: Legs, back
and arms build the sides of the mountain and our buttocks the top.

Simple Asanas and
Pranayama
NOTES
Self-Instructional
Material 49
Parvatasana is often practised wrong or thought to be downward facing
dog.
In this section, you will find the step by step asana tutorial for Parvatasana:
We start in tabletop position or cat and cow pose. Do a few rounds of
curving your spine. Ideally, you should rotate your wrists and ankles prior to
attempting the pose to prevent strain.
Step 1:
Relax your spine. Close your feet and knees together. Now adjust your hands:
they should be right under your shoulders in one line.
Step 2:
On your next exhalation tuck your toes in and lift your knees off the mat. Push
your buttocks up and activate your kneecaps.
Step 3:
Straighten your legs, they should be in one line. Feet and legs remain together.
Now, try to reach your heels onto the mat. Keep your arms active.
Try to touch the crown of your head onto the mat.
If you cannot touch your heals onto the mat, walk on the spot and try to
increase the flexibility of your calves.
This is the final pose: hold the posture for 1 minute while breathing normally.
Benefits of Parvatasana
Strengthens to muscles of the shoulders, arms, and legs
Increases flexibility in the spine, hamstrings, and calves
Tones the spinal nerves and balances the nervous system
Improves the blood circulation to the brain
Contraindications of Parvatasana
This posture should be avoided in case of the wrist, hip or ankle injury.
It should not be practised by people who suffer from spinal disorders.
11. Baddha Konasana (Bound Angle Pose)
What is Baddha Konasana (Bound angle pose)
Sanskrit: c)dks.kklu (Baddha – Bound, Kona – Angle, Asana – Pose;Pronounced As BAH-dah cone-AHS-anna)
This pose is also known as cobbler pose because most cobblers sit in this
position to work. It is also known as butterfly pose since it opens the hip joints and
the up and down movement of knee make is look like a stance of a butterfly.
This Baddha Konasana (Bound angle pose) is one of the most effective and
best pose to reduce the stiffness in hip joints and helps in their better hip joint

Simple Asanas and
Pranayama
NOTES
Self-Instructional
50 Material
flexibility. Baddha Konasana is one of my favorite pose that I enjoy practicing on
a daily basis due to its enormous benefits on the lower body.
How It Works?
Hip joint is one of the most important joint of the body which helps in mobilizes
your lower body. Healthier and flexible hip joint helps in better synchronization of
lower and upper body. With poor hip mobility, you won’t be able to practice most
of the yoga postures and will make you prone to any injury.
Baddha Konasana (Bound angle pose) helps in better blood flow towards
your groin area which improves the male and female reproductive system and it
helps our body in many different ways. This pose can also be performed while
your meditation session to experience the improved benefits.
Benefits of Baddha Konasana (Bound angle pose)
Blood Flow: Baddha Konasana (Bound angle pose) is known to have its positive
effects on the blood flow towards the lower body part and abdominal area which
in turn helps in better functioning of internal organs, digestions and excretion.
Magical For Runners: Every runner needs to be flexible in their groin area and
hip joints, this asana does the same for them. Improved hip flexibility leads to
longer running and lower post running stiffness.
Better Digestion: Baddha Konasana (Bound angle pose) has a soothing effect
on intestinal walls and with the improved blood flow it enhances the body’s
capabilities of digesting food. Through better digestion, this pose aids your body
in different ways like relieving constipation, better elimination of body waste and
better nutrients absorption.
Lower Body Stretch: Improves flexibility of inner thigh, groins, and knees
Menstrual Cramps: This asana has proven effects on menstrual cramps due to
better blood circulation in groin areas.

Simple Asanas and
Pranayama
NOTES
Self-Instructional
Material 51
Stimulates Abdominal Organs: Kidneys, ovaries, prostate gland, bladder
Relives Sciatica Pain: This pose helps in relieving sciatica pain through mobilizing
hip joint and maintaining better blood flow in the abdominal area.
Energize: Baddha Konasana (Bound angle pose) helps you feel energized by
reducing the stress levels. Other reclined variation of Baddha Konasana helps in
reducing the blood pressure which results in lowering the anxiety.
Pregnant women: This yogic pose has shown positive effects on women while
the period of pregnancy. Practicing this asana said to easy childbirth.
Infertility: Baddha Konasana (Bound angle pose) has soothing effects on the
ovaries in women which lead to the cure of infertility and healthier reproductive
system.
Relieves stress: Baddha Konasana (Bound angle pose) helps in relieving stress
through two different ways:
This asana is a great asana to practice meditation, and meditation helps in
elimination of stress and anxiety.
This asana helps in regulating the blood flow in the body which results in
normal blood pressure and decreased anxiety.
Better Pasture: Baddha Konasana (Bound angle pose) reduces the stiffness
from hip joints and thigh which allows the body to stay in the natural pasture and
more flexible. It cures asthma and high blood pressure.
Perfect For Modern Lifestyle: Two most prominent diseases gifted by modern
lifestyle is bad posture and stress. This Baddha Konasana (Bound angle pose)
helps in relieving stress through better blood flow and relaxation to mind. This
asana also helps in improved pasture through flexing your hip joints and making
them with better mobility.
Relieve Fatigue and Insomnia: Bound angle pose is also known for its proven
effects on curing fatigue and insomnia through improving blood pressure.
Decreased Muscle Tension: A reclined version of Baddha Konasana (Bound
angle pose) helps in decreasing the all over muscle tension, relieving the stress
from the body and helps in regulating blood flow within the body.
Step By Step Guide
Sit in an erect position on a flat surface and stretch your legs out.
Exhale and bend you’re both knees to touch both soles together.
While pressing your heals close together try bringing your heals closer to
pelvis area.
Now grab your big toe of each foot with your thumb and index finger and
the middle finger.

Simple Asanas and
Pranayama
NOTES
Self-Instructional
52 Material
Never try to force your knee towards the floor, instead, let your head of
thigh bone move towards the floor. This will make your knees to move
towards floor naturally.
You can also move your knees up and down like the wings of a butterfly to
increase the range of your hip mobility without putting unnecessary constant
pressure on your hip joint.
Maintain the position for 1-5 minutes and then inhale and lift your knees
away from the floor and straighten your legs back in their original position.
12. Dandasana (Staff Pose)
Works as the starting position of several standing yoga poses. Similarly, Dandasana
is the foundation for all the seated yoga postures. A perfectly challenging yoga
asana for beginners to start with. Staff pose warms up the body and prepares you
mentally and physically to start your yoga practice. Dandasana tests the strength
of your spine. Practicing it for the first time will let you know how good are you at
your base.
Staff Pose Steps
Sit on your yoga mat with the legs outstretched in front of your body. Point
your big toes upwards.
Keep the spine and neck erect, legs together and feet gently touching each
other.
Place the palm on the floor by the side of your hips, point fingers towards
the toes.

Simple Asanas and
Pranayama
NOTES
Self-Instructional
Material 53
Keep the arms straight to provide a firm and gentle support to the spine.
Stretch your big toes towards yourself and firmly press your thighs and
heels into the floor.
Engage the muscles of your legs to root your legs down into the ground.
Gently press your palms against the floor to elongate your back.
Stretch the spine upwards right from the pelvis to the top of your head.
Lift your chest up and slightly draw your shoulders back to broaden your
collarbones.
Maintain a straight gaze and take slow breaths.
Hold Dandasana from 20 seconds to a minute depending on how long you
feel comfortable.
Practice Tips
(a) In staff pose, a lot of people find it very hard to keep the spine straight. To
cope with it, place your palms slightly behind the buttocks. Transfer a very
little of your body weight on the arms. This will support your back to sit
straight.
(b) If you have stiff hamstrings and you experience tension in your hips while
practicing the pose. Place a folded blanket below your buttocks to make
the pose more comfortable.
(c) Be careful not to round your back. Practice against a wall if necessary to
ensure your back is straight during the pose. As the muscles of your spine
gain strength, discontinue the support of the wall.
(d) You may keep the elbows slightly bent if you can’t place your palms firmly
on the ground.
Staff Pose Precautions
All us are accustomed to the lifestyles which may one day eventually lead to some
health problems unless we follow a healthy diet and an exercise regime regularly.
Now, bad standing and sitting postures make our back muscles weak resulting in
stiffness and pain which if ignored could lead to severe conditions. So pay attention
to your body and take a positive initiative towards a healthy living. That’s the
biggest precaution we all can take.
Coming back to Staff Pose:
Keep the knees slightly bent if you have knee pain.
Avoid practicing staff pose if you have wrist or spine injury.
Staff Pose Benefits
Strengthens the muscles of the spine and improves body posture.
Stretches chest, shoulders, upper back and abdomen.
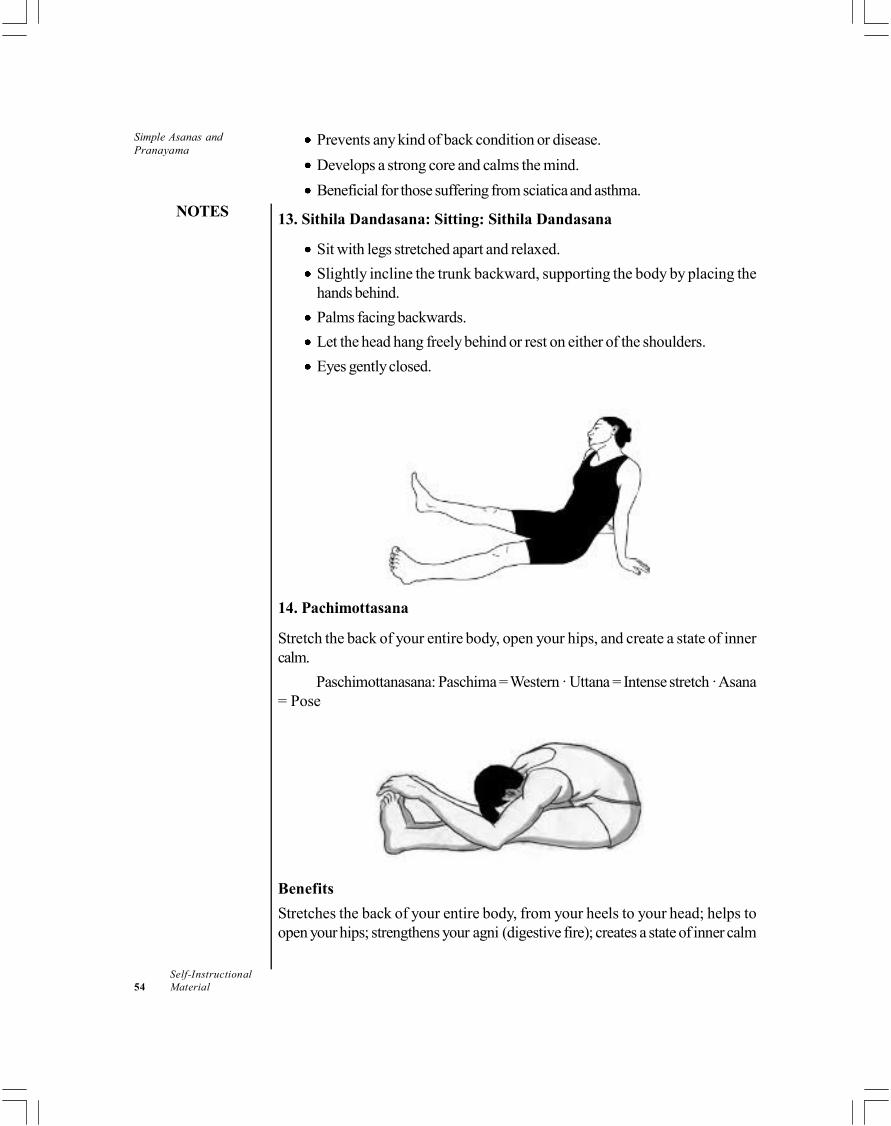
Simple Asanas and
Pranayama
NOTES
Self-Instructional
54 Material
Prevents any kind of back condition or disease.
Develops a strong core and calms the mind.
Beneficial for those suffering from sciatica and asthma.
13. Sithila Dandasana: Sitting: Sithila Dandasana
Sit with legs stretched apart and relaxed.
Slightly incline the trunk backward, supporting the body by placing the
hands behind.
Palms facing backwards.
Let the head hang freely behind or rest on either of the shoulders.
Eyes gently closed.
14. Pachimottasana
Stretch the back of your entire body, open your hips, and create a state of inner
calm.
Paschimottanasana: Paschima = Western · Uttana = Intense stretch · Asana
= Pose
Benefits
Stretches the back of your entire body, from your heels to your head; helps to
open your hips; strengthens your agni (digestive fire); creates a state of inner calm

Simple Asanas and
Pranayama
NOTES
Self-Instructional
Material 55
Instruction
Before exploring any particular asana, first complete at least three rounds of Surya
Namaskar A (Sun Salutation A).
1. For Paschimottanasana, begin in Adho Mukha Svanasana (Downward-
Facing Dog Pose). At the end of an exhalation, step (or jump) to a seated
position.
2. Straighten your legs and place your hands next to the flesh of your outer
hips. Bring your legs together with the insides of your feet touching. Flex
your feet by drawing your toes toward you, and simultaneously press out
through the balls of your feet. Activate your thigh muscles by drawing them
up, away from your kneecaps. Draw your low belly softly toward your
spine. Let your shoulders move back, and begin to breathe into your chest
and your entire rib cage.
3. Keeping the activation of your legs and low belly, reach forward to hold
your big toes, the sides of your feet, or a wrist beyond your flexed feet.
4. Maintaining the hold, inhale and lift your chest, lengthening your abdomen
and sides. Gently relax your shoulders away from your ears.
5. As you exhale, begin to move deeper into a forward fold. Try not to pull
with your arms. Instead, keep your shoulders relaxed. Bend your elbows
and bow your head, gazing toward your legs. Relax your neck and let your
breath move freely.
6. Keep gently drawing your low belly toward your spine, lifting your waist off
your thighs. On inhalations, feel a broadening of your chest and a lengthening
in the front of your torso. On exhalations, feel a widening in your upper
back as you continue to relax your shoulders. Hold for at least 5 breaths.
To exit the posture, inhale and lengthen your torso upward while straightening
your arms. Complete a full exhalation before releasing your feet.
Avoid These Common Mistakes
Don’t let your feet or knees turn out. This overstretches your inner knees and
brings the stretch out of the belly of your hamstrings, closer to your joints.
Don’t round and harden your back, pushing your torso away from your legs.
This will create tension and inhibit your breath, which can strain your back.
Supine Type
1. Ardha Pavanmukttanasana
Ardha Pawanmuktasana (Half Wind Relieving Pose)– Half wind relieving
pose or Ardha Pawanmuktasana is beginner’s pose. The pose is very good for
stomach disorders. Practice this pose for sure if you have acidity or gastric issues.
The preparatory poses for half wind relieving pose are such as bridge pose (setu
bandha sarvangasana) and fish pose (matsyasana).

Simple Asanas and
Pranayama
NOTES
Self-Instructional
56 Material
Ardha Pawanmuktasana Steps
Lie on your back on the mat. Keep your legs straight on the floor and hands
at your sides.
Bend your right leg.Exhale and draw your right leg to your chest. Inter-lock
your fingers with each other and hold your right knee with it. Keep your left
leg extended on the floor.
Hold the pose for 10-15 seconds or more. Inhale and extend your right leg
to the floor.
Now bend your left leg and draw your left leg to your chest and keep your
right leg extended on the floor.
Hold the pose for 10-15 seconds or more. Inhale and extend your left lef to
the floor.
Relax and repeat the same for 8-10 times with each leg.
To deepen the stretch, lift your head and touch your nose to the knee when
you are in the full pose. This is much beneficial, but practice it only if you are
comfortable.
Ardha Pawanmuktasana Benefits
Half wind relieving pose is most useful for helping to release the unwanted
and toxic gases from the digestive system.
It improves the quality and efficiency of digestive system.
It relieves indigestion, bloating, constipation, acidity and flatulence.
This pose is therapeutic in menstrual disorders, impotence and sterility.
Ardha Pawanmuktasana Contradiction/ precautions
If you have get done abdominal surgery or hernia problem, do not practice
this pose.
Pregnant women should not practice this pose.
Those who has spinal injury or sciatica should not practice this pose.
Do not deepen the stretch if you have injury in neck.

Simple Asanas and
Pranayama
NOTES
Self-Instructional
Material 57
2. Pavana Mukttanasana
Pavan means wind and mukta means to release or to make free. As the name
suggests, this asana is useful in removing wind or flatulence from the stomach and
intestines.
Sthiti: Savasana
Technique
Lie down flat on the back.
Bend both the knees and bring the thighs to the chest.
Interlock the fingers and clasp the shin below knees.
Exhale; rise the head till your chin touches the knees and relax.
This is Pavanamuktasana.
Bring the head back to the ground.
While exhaling, lower the legs to the floor.
Rest in Savasana
Note
Synchronise your breathing with the leg movement.
While touching the knee with the nose/ forehead, you should be able to feel
the lumbar region stretch; keep the eyes closed and focus your attention on
the lumbar region.
Benefits
Removes constipation; gives relief from flatulence, decreases the bloating
sensation in the abdomen and aids digestion.
Offers deep internal pressure, massage and stretching of the highly
complicated network of muscles, ligaments and tendons in the pelvis and
waist region.
It tones up the back muscles and spinal nerves.

Simple Asanas and
Pranayama
NOTES
Self-Instructional
58 Material
A word of caution
Please avoid this practice in case of abdominal injuries, hernia, sciatica or severe
back pain and during pregnancy.
3. Navasana
Many shall admit to the fact that we are busy juggling to create a work-life balance,
and at times it becomes really hard to keep a check on the health. The daily stress,
consumption of packaged food, lack of time to indulge in self-care, and so many
other factors contribute towards a poor physical-psychical health. While being
busy running around with our jobs and personal commitments, we tend to ignore
the early signs of warning that later develop into serious issues.
Therefore, it’s imperative that we spare a few minutes to our own health
and wellness. And, what better way to do it than practicing the natural system
of yoga? Even an everyday practice of 10 minutes shall benefit you holistically.
Moreover, the practice of Boat pose (Navasana) is the adornment of a healthy
being.
As you dig into the Navasana, your body mimics the shape of a boat with
sails and oars. The pose challenges, strengthens abdominal muscles, enhances
concentration, and builds stamina. Given below are the seven stages of performing
a Navasana (Boat Pose):
Sit on a yoga mat with bent knees and heels as close to the hips as possible.
Keep your hands 2-3 inches behind the posterior.
Lengthen your body from the top of the head to the hips
Slightly lean back and with an exhalation, lift the feet off the yoga mat.
Gently extend the legs in the front and keep the shins parallel to the floor.
Stretch the arms outward alongside the legs.
Here are some of the health benefits of boat pose:
(i) Strengthens the Abdominal Muscles: Who doesn’t like abs? Sure, they
look nice. But they are also equally important for keeping the body’s health.
Strong abdominal muscles positively support a person in daily function,
sports, and physical health. Strong abdominal muscles make a strong core

Simple Asanas and
Pranayama
NOTES
Self-Instructional
Material 59
and form a powerful axis for the whole body. The boat pose also bestows
various benefits such as reduced back pain, better posture, and greater
balance.
(ii) Improves the Functioning of Liver and Kidneys: The abdomen of a
human body constitutes liver, kidneys, pancreas, etc. The performance of
boat pose improves the health of all the abdominal organs, especially the
liver and kidneys. A proper functioning of these organs detoxifies the body
from toxins and regulates its fluids thus establishing a robust health.
(iii) De-stresses the Body and Mind: A Tranquilized mind is one of the
remarkable mental benefits of navasana. It acts as a de-stressor. It makes
the mind peaceful by warding off all the unwanted thoughts. Whenever in
stress, practice the boat pose and revive your state of mind naturally.
(iv) Rectifies the Back Problems: With constant slouching and excessive
forward movements, a backache and various back-related problems are
inevitable. The painless method of boat yoga posture is highly helpful in
reducing a backache and rectifying the associated problems. It effectively
stretches the spine and strengthens the weak back muscles.
(v) Promotes Healthy Weight Loss: If you wish to lose weight from your
stomach, hips, and waist without any side effects then Navasana is the best
choice to trust. The practice of boat pose helps shed extra pounds from the
stomach and waist in the most desirable manner.
(vi) Enhances Blood Circulation: An increase in the blood flow within the
body significantly benefits the heart and improves the lymphatic system.
Increased blood circulation leads to the flow of oxygen-rich blood to the
lower extremities as well thus providing relief from varicose veins.
(vii) Treats Navel Displacement: A problem which is still unrecognized by
other sciences. The science of yoga acknowledges the problem of navel
displacement that causes pain, affects the movement of prana, creates a
feeling of nausea, and constipation. The boat posture corrects the
misalignment of the navel-center and places it in its appropriate position.
(viii) Balances Hormonal System: An imbalanced hormonal system creates a
disharmony within the body too. The hormonal disparity can lead to fatigue,
depression, insomnia, and unhealthy cravings. Balance your hormonal system
by performing navasana. A balanced hormonal system secretes healthy
hormones within the body and keeps the organs in good health
4. Tolan Gulasama
Tolangulasana-1
Other Names: Weighing Scale Pose, Wighing Scale Lotus pose, Weigh Scale
Posture, Tolangula Asana, Tolangul Asan, Tolangula-padmasana

Simple Asanas and
Pranayama
NOTES
Self-Instructional
60 Material
Description
When this asana is performed, the body takes the shape of scales. So it is called
Tolangulasana. This has come through tradition. In its final position the whole
body is balanced on closed fists.
How to reach the stretch
(a) Sit in Padmasana.
(b) Take support of the elbows to lie down on the back.
(c) Lie down on the bank.
(d) Raise the foot-lock slightly towards the stomach so that your buttocks may
be raised. Place both the closed fists under the buttocks. Elbows should
touch the ground.
(e) Now raise foot-lock as well as head and back and balance your whole
body on the fists. (Elbows should be up from the around).
(f) While returning back to the original position takes your weight on both the
elbows first. Slowly bring back and head back to the ground.
How to release the stretch
Hold the position for a while and then remove the fists from under the buttock and
come to original position.
Benefits
(i) It stimulates blood circulation in the muscles and the nerves of the arms and
the hands which are incidentally toned up and strengthened.
(ii) It strengthens and enlarges the rib-box.
(iii) It increases the elasticity of the spine and tones up the nervous system.
(iv) It cures diseases such as constipation, dysentery, asthma, tuberculosis and
diabetes.
(v) The abdominal tension pushes down all fecal matter to the end of the passage
of the colon.
(vi) The constant practice of this asana improves the functioning of the sound
box and brings melody to the voice. It improves the eyesight.
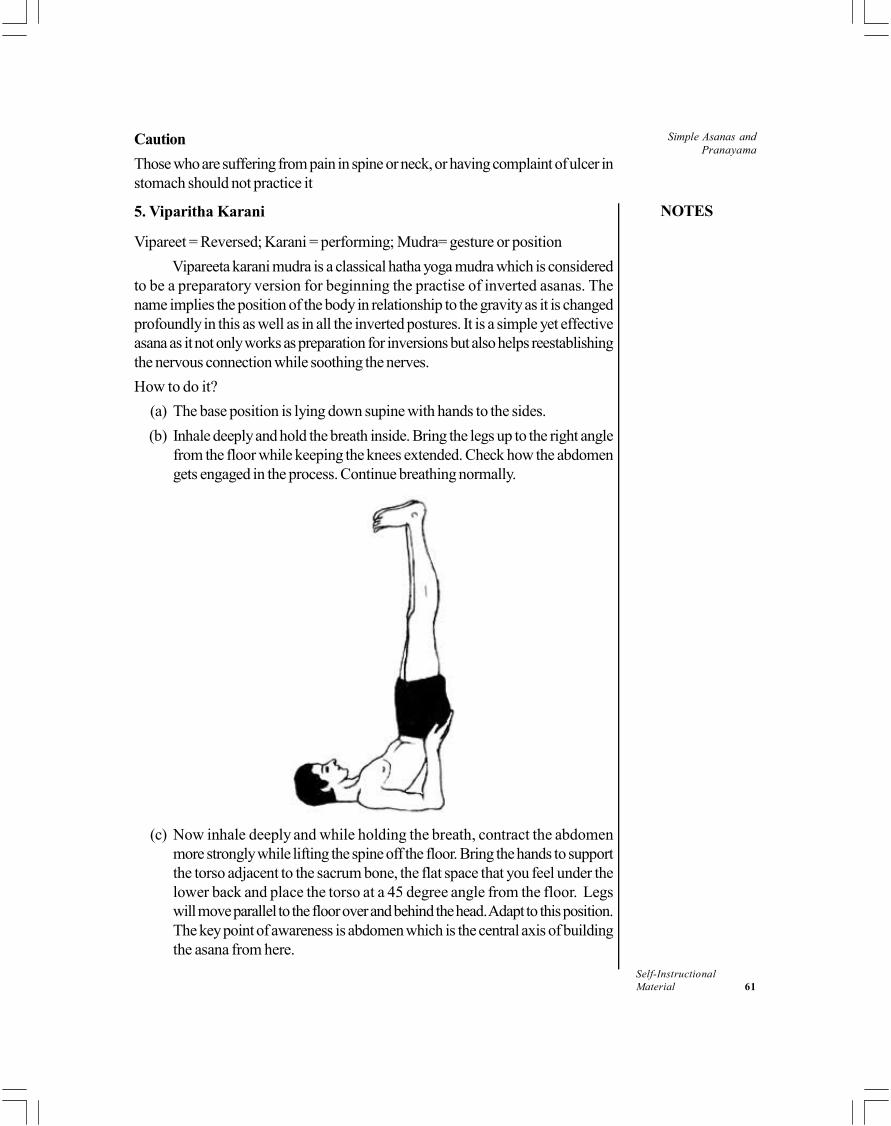
Simple Asanas and
Pranayama
NOTES
Self-Instructional
Material 61
Caution
Those who are suffering from pain in spine or neck, or having complaint of ulcer in
stomach should not practice it
5. Viparitha Karani
Vipareet = Reversed; Karani = performing; Mudra= gesture or position
Vipareeta karani mudra is a classical hatha yoga mudra which is considered
to be a preparatory version for beginning the practise of inverted asanas. The
name implies the position of the body in relationship to the gravity as it is changed
profoundly in this as well as in all the inverted postures. It is a simple yet effective
asana as it not only works as preparation for inversions but also helps reestablishing
the nervous connection while soothing the nerves.
How to do it?
(a) The base position is lying down supine with hands to the sides.
(b) Inhale deeply and hold the breath inside. Bring the legs up to the right angle
from the floor while keeping the knees extended. Check how the abdomen
gets engaged in the process. Continue breathing normally.
(c) Now inhale deeply and while holding the breath, contract the abdomen
more strongly while lifting the spine off the floor. Bring the hands to support
the torso adjacent to the sacrum bone, the flat space that you feel under the
lower back and place the torso at a 45 degree angle from the floor. Legs
will move parallel to the floor over and behind the head. Adapt to this position.
The key point of awareness is abdomen which is the central axis of building
the asana from here.

Simple Asanas and
Pranayama
NOTES
Self-Instructional
62 Material
(d) As you get comfortable, continue breathing andextend the hips and bring
the legs to a 45 degree elevation with pelvic being the base. Hands will be
bear weight of the body along with the abdomen so you might experience it
in your wrists and elbows.
(e) Stay in the posture for minimum 30 seconds while breathing deeply through
diaphragm. You will feel your diaphragm here.
(f) Coming out, flex the hips bringing the legs down and in a controlled manner
put the torso down on the floor with a coordinated effort of hands and
abdomen.
(g) Check your breath and relax the abdomen.
Benefits
Vipreeta karani mudra, as mentioned earlier, is a nice way to build your
inversion practise. It gives a stability of the core and strengthen the wrists
and lower arms.
This asans helps in balancing the agni in the stomach which is related with
assimilation, digestion and excretion.
Novice students can find it extremely helpful in understanding the
relationships with the gravity.
Help in relieving the strain from the heart.
It is used as a primary technique along with other mudras in Kundalini Yoga,
for channelising the Pran Shakti.
6. Matyasana : Matsya – Fish; Asana – Pose
This asana is pronounced as mut-see-ahs-ana.
The fish pose, if carried out in water, allows the body to float quite easily
like that of a fish; hence the name.
How to do Matsyasana / Fish Pose
Lie on your back. Your feet are together and hands relaxed alongside the
body.
Place the hands underneath the hips, palms facing down. Bring the elbows
closer toward each other.
Breathing in, lift the head and chest up.
Keeping the chest elevated, lower the head backward and touch the top of
the head to the floor.
With the head lightly touching the floor, press the elbows firmly into the
ground, placing the weight on the elbow and not on the head. Lift your
chest up from in-between the shoulder blades. Press the thighs and legs to
the floor.

Simple Asanas and
Pranayama
NOTES
Self-Instructional
Material 63
Hold the pose for as long as you comfortably can, taking gentle long breaths
in and out. Relax in the posture with every exhalation.
Now lift the head up, lowering the chest and head to the floor. Bring the
hands back along the sides of the body. Relax.
Benefits of the Matsyasana / Fish Pose
Stretches the chest and neck
Helps relieve tension in the neck and shoulders
Provides relief from respiratory disorders by encouraging deep breathing
Tones the parathyroid, pituitary and pineal glands
Contraindications of the Fish Pose (Matsyasana)
Avoid this posture if you have high or low blood pressure. Migraine and
insomnia patients should also refrain from doing the Fish Pose. Those who
have had serious lower-back or neck injuries are strongly recommended
not to practice this pose.
7. Uttana Padasana:
Uttana Padasana gets its name from Sanskrit where "Uttana" means "Intense
Stretch", "Pada" means "leg" or "foot", and "Asana" means "Pose" or "Posture".
Uttana Padasana is also named as raised leg pose because in the final position
the legs are raised above the ground thereby stretching the muscles of the body.
Uttana Padasana is a traditional yoga pose which stretches the muscles of
the abdomen, thighs, calves and lower back.
It also helps In case of a lot of digestive ailments thereby strengthening the
digestive system.
How to do Uttana Padasana or Raised Leg Pose?
The steps to do Uttana Padasana or Raised Leg Pose involve lying flat on
the ground or on yoga mat with your back on the floor.
Keep your knees together and your knees tight and keep breathing.
Raise your hands above your head while you start practicing Uttana
Padasana or Raised Leg Pose

Simple Asanas and
Pranayama
NOTES
Self-Instructional
64 Material
The toes and heels of both the feet should be kept together touching and
toes of both the feet should point upwards.
The next step to do Uttana Padasana or Raised Leg Pose requires you to
lift both your feet, while inhaling, from the floor almost at an angle of 45 to
60 degrees with the torso lying flat on the floor.
Hold your breath in this pose for 20- 30 breaths or for as long as you can.
While Exhaling, bring your legs back to touch the floor.
Now, raise your legs again at an angle of 60 degrees from the ground.
Retain the breath for a few seconds in this pose.
Start to arch your torso a little on the floor on such a way that the lower
back is arched slightly.
For beginners, the chin should be tucked to the neck while the torso is
raised.
For those practicing the advanced Uttana Padasana pose or Raised Leg
Pose, the upper torso should be raised as much as you can while the upper
body is supported by dropping the head slowly and gradually to touch the
floor.
For both beginners and those practicing advanced pose, the legs will be
raise at an angle of 60 degrees from the floor with the knees kept straight.
Note that you should not bend knees while practicing this pose.
This is the final Uttana Padasana or Raised Leg Pose. Stay in this position
for a few breaths or for as long as you feel comfortable.
This completes one round of Uttana Padasana or Raised Leg Pose. Practice
the same for 4-5 rounds for maximum benefits.
The pose where only the legs are raised at an angle of 60 degrees from the
ground while the torso touches the ground is called Ardha Uttana Padasana
or Half or Raised Leg Pose.
Ardha Uttana Padasana can be performed by people who have difficulty in
raising the upper body.
What are the Benefits of Practicing Uttana Padasana or Raised Leg Pose?
Uttana Padasana or Raised Leg Pose is very beneficial for people suffering
from Diabetes.
It is also said to relieve Constipation with regular practice.
Uttana Padasana or Raised Leg Pose strengthens the whole Digestive system
thereby relieving indigestion etc.
It also relieves ailments of the back especially lower back pains.
Uttana Padasana also relieves pain and problems associated with waist,
hip joint and buttocks.

Simple Asanas and
Pranayama
NOTES
Self-Instructional
Material 65
It massages the abdominal organs and also helps in reducing fat from waist
and thighs.
It also calms the nervous weakness and brings a sense of calmness in the
body.
Uttana Padasana also relieves tension in shoulders, neck and throat.
It relieves stress and anxiety.
Uttana Padasana or Raised Leg Pose is also said to improve posture.
It also improves blood circulation in whole body.
Uttana Padasana also improves the functioning of reproductive system.
Precautions While Practicing Uttana Padasana or Raised Leg Pose
People suffering with problems in Lumbar region should not practice Uttana
Padasna or Raised Leg Pose.
People who have had muscle pulls should not perform this Asana.
People who have high Blood pressure should practice Uttana Padasana
carefully or should practice under proper guidance.
Tips While Practicing Uttana Padasana or Raised Leg Pose
For beginners, who face difficulty while raising the legs should take the help
of hands to raise legs.
Knees should never bend while or during the time your legs are raised.
A maximum of 5 rounds of Uttana Padasana or Raised Leg Pose should be
practiced in one go.
Do not over stretch or over exert your body while practicing this asana. Go
as far as your body allows. If you can't raise legs at 60 degrees from the
floor, start raising legs at an angle of 45 degrees. It takes patience, persistence
and regular practice to reach the final position of advanced pose. Start slow
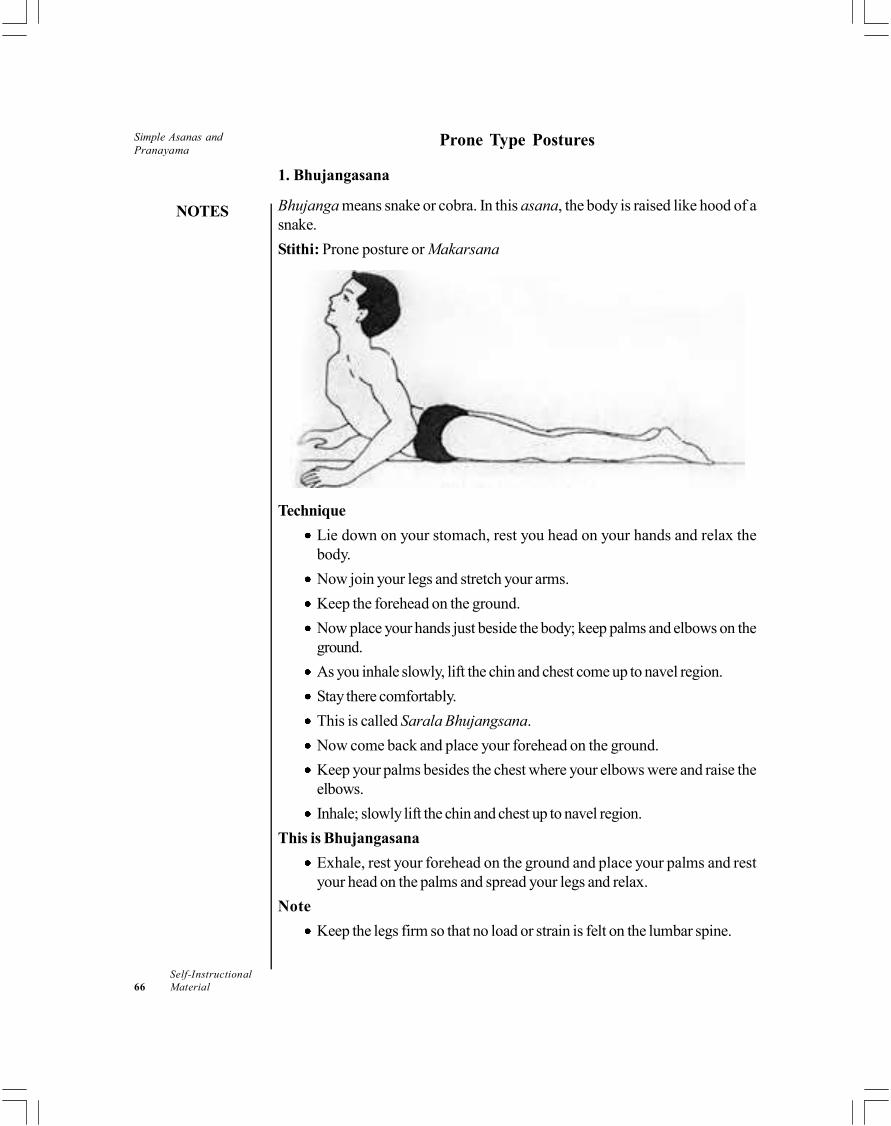
Simple Asanas and
Pranayama
NOTES
Self-Instructional
66 Material
Prone Type Postures
1. Bhujangasana
Bhujanga means snake or cobra. In this asana, the body is raised like hood of a
snake.
Stithi: Prone posture or Makarsana
Technique
Lie down on your stomach, rest you head on your hands and relax the
body.
Now join your legs and stretch your arms.
Keep the forehead on the ground.
Now place your hands just beside the body; keep palms and elbows on the
ground.
As you inhale slowly, lift the chin and chest come up to navel region.
Stay there comfortably.
This is called Sarala Bhujangsana.
Now come back and place your forehead on the ground.
Keep your palms besides the chest where your elbows were and raise the
elbows.
Inhale; slowly lift the chin and chest up to navel region.
This is Bhujangasana
Exhale, rest your forehead on the ground and place your palms and rest
your head on the palms and spread your legs and relax.
Note
Keep the legs firm so that no load or strain is felt on the lumbar spine.
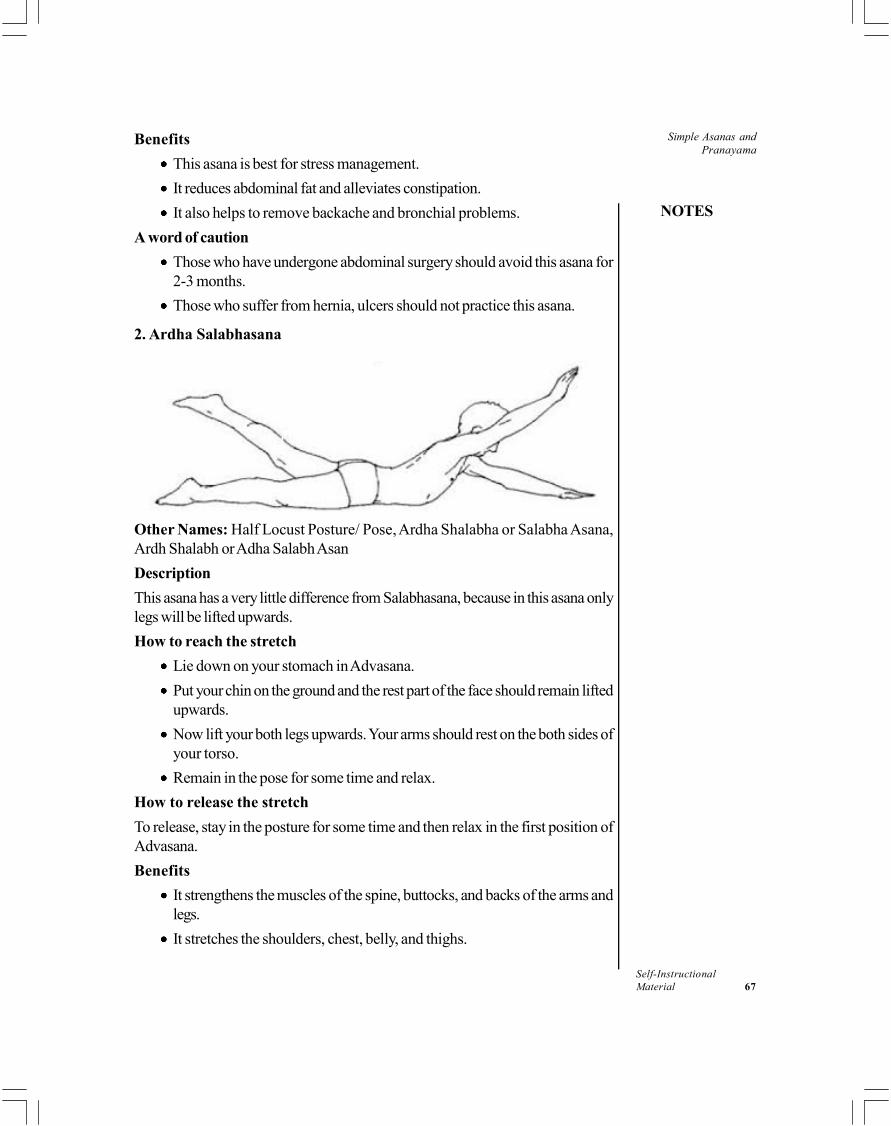
Simple Asanas and
Pranayama
NOTES
Self-Instructional
Material 67
Benefits
This asana is best for stress management.
It reduces abdominal fat and alleviates constipation.
It also helps to remove backache and bronchial problems.
A word of caution
Those who have undergone abdominal surgery should avoid this asana for
2-3 months.
Those who suffer from hernia, ulcers should not practice this asana.
2. Ardha Salabhasana
Other Names: Half Locust Posture/ Pose, Ardha Shalabha or Salabha Asana,
Ardh Shalabh or Adha Salabh Asan
Description
This asana has a very little difference from Salabhasana, because in this asana only
legs will be lifted upwards.
How to reach the stretch
Lie down on your stomach in Advasana.
Put your chin on the ground and the rest part of the face should remain lifted
upwards.
Now lift your both legs upwards. Your arms should rest on the both sides of
your torso.
Remain in the pose for some time and relax.
How to release the stretch
To release, stay in the posture for some time and then relax in the first position of
Advasana.
Benefits
It strengthens the muscles of the spine, buttocks, and backs of the arms and
legs.
It stretches the shoulders, chest, belly, and thighs.

Simple Asanas and
Pranayama
NOTES
Self-Instructional
68 Material
It improves posture.
It stimulates abdominal organs.
Caution
(i) People with neck injuries should keep their head in a neutral position by
looking down at the floor; they might also support the forehead on a thickly
folded blanket.
Dhanurasana has been named after the shape the body takes while performing it –
that of a bow. Dhanu means bow; Asana means posture or pose.
How to do Dhanurasana (Bow Pose)
Lie on your stomach with your feet hip-width apart and your arms by the
side of your body.
Fold your knees, take your hands backwards and hold your ankles.
Breathing in, lift your chest off the ground and pull your legs up and back.
Look straight ahead with a smile on your face.
Keep the pose stable while paying attention to your breath. Your body is
now curved and taut as a bow.
Continue to take long deep breaths as you relax in this pose. But bend only
as far as your body permits you to. Do not overdo the stretch.
After 15 -20 seconds, as you exhale, gently bring your legs and chest to the
ground. Release the ankles and relax.

Simple Asanas and
Pranayama
NOTES
Self-Instructional
Material 69
Benefits of Dhanurasana (Bow Pose)
Strengthens the back and abdominal muscles
Stimulates the reproductive organs
Opens up the chest, neck and shoulders
Tones the leg and arm muscles
Adds greater flexibility to the back
Good stress and fatigue buster
Relieves menstrual discomfort and constipation
Helps people with renal (kidney) disorders
Contraindications of Dhanurasana (Bow Pose)
Do not practice Dhanurasana (Bow Pose) if you have:
High or low blood pressure
Hernia
Neck injury
Pain in the lower back
Headache migraine
Recent abdominal surgery
Ladies should avoid practicing this yoga pose during pregnancy
4. Naukasana
Nauka = Boat, Asana = Posture or Pose
This yoga posture has been named after the shape it takes – that of a boat.
Naukasana is prounced as NAUK-AAHS-uh-nuh.
Naukasana - Boat Pose
How to do Naukasana / Boat Pose
Lie on your back with your feet together and arms beside your body.
Take a deep breath in and as you exhale, lift your chest and feet off the
ground, stretching your arms towards your feet.
Your eyes, fingers and toes should be in a line.

Simple Asanas and
Pranayama
NOTES
Self-Instructional
70 Material
Feel the tension in your navel area as the abdominal muscles contract.
Keep breathing deeply and easily while maintaining the pose.
As you exhale, come back to the ground slowly and relax.
It also forms a part of the Padma Sadhana sequence, where this yoga pose is
practiced after Dhanurasana (Bow Pose).
Benefits of the Boat Pose (Naukasana)
Strengthens the back and abdominal muscles
Tones the leg and arm muscles
Useful for people with hernia
Contraindications of the Naukasana - Boat Pose
Do not practice this yoga pose if you have low blood pressure, severe
headache, migraine, or if you have suffered from some chronic diseases or
spinal disorders in the recent past.
Asthma and heart patients are advised to avoid this pose.
Women should avoid doing Boat pose (Naukasana) during pregnancy and
during the first two days of the menstrual cycle
5. Salabhasana
Salaba means a locust.
Sthiti: Prone posture; Makarsana
Technique
Lie down on your stomach in Makarsana.
Rest the chin on the floor; keep both hands beside the body; palms facing
upwards
Inhale, raise the legs off the floor as much as you can without bending the
knees.
Extend the arms and legs well to ease the lift of the body off the floor.

Simple Asanas and
Pranayama
NOTES
Self-Instructional
Material 71
Stay in this position for 10-20 seconds breathing normally.
Exhale, bring the legs down towards the floor.
Rest for a few seconds in Makarasana.
Note
Pull up the knee caps and squeeze the buttocks to improve the posture.
This asana is more beneficial when performed after Bhujangasana
Benefits
Helps in sciatica and lower backache.
Tones the hip muscles and those in the kidney region.
Reduces fat on the thighs and buttocks; good in weight management
Helps the abdominal organs aiding digestion
A word of caution
Cardiac patients should avoid this posture. Please proceed cautiously in
case of sever lower back pain.
People with high blood pressure, peptic ulcers and hernia should also avoid
this posture.
PREPARATORY FOR PRANAYAMA
1. Kapalabathi
Sthiti: Any meditative posture eg Sukasana/Padmasana/Vajrasana

Simple Asanas and
Pranayama
NOTES
Self-Instructional
72 Material
Technique
Sit in any meditative posture.
Close the eyes and relax the whole body.
Inhale deeply through both nostrils, expand the chest.
Expel the breath with forceful contractions of the abdominal muscles and
relax.
Do not strain.
Continue active/forceful exhalation and passive inhalation.
Complete 30 rapid breaths, then take a deep breath and exhale slowly.
This is one round of Kapalabhati.
Each round shall be followed by deep breathing.
Repeat 2 more rounds.
Breathing: Forceful exhalation by contracting the abdominal muscles, without
any undue movements in the chest and shoulder region. Inhalation should be passive
throughout the practice.
Number of rounds: Beginners can practice up to 3 rounds of 20 breaths each.
The count and rounds can be increased gradually over a period of time.
Benefits
Kapalabhati purifies the frontal air sinuses; helps to overcome cough
disorders.
It is useful in treating cold, rhinitis, sinusitis, asthma and bronchial infections.
It rejuvenates whole body, and keeps the face young and vibrant.
It balances and strengthens the nervous system and tones up the digestive
system.
A word of caution
Please avoid this practice in case of cardiac conditions and giddiness, high
blood pressure, vertigo, chronic bleeding in the nose, epilepsy, migraine,
stroke, hernia and gastric ulcers.
2. Sectional Breathing
(i) Abdominal Breathing
Diaphragmatic Breathing and Types of Breathing in Yoga
Most people breathe incorrectly. Their breathing is shallow, using only a small part
of their lung capacity. This results in a large part of lungs remaining unutilized and
hence allowing germs to accumulate in those lower areas, resulting in ill health.

Simple Asanas and
Pranayama
NOTES
Self-Instructional
Material 73
Types of Breathing in Yoga
The three types of breathing techniques explained hereunder viz. diaphragmatic
breathing (also referred to as Abdominal breathing or Belly Breathing), Thoracic
breathing (also referred to as Chest Breathing), and Clavicular breathing introduce
the practitioner to the correct breathing habits with an increased awareness of the
breathing process, which is otherwise normally ignored. We start with Abdominal
breathing.
What is Diaphragmatic Breathing
The diaphragm is a domed sheet of muscle that separates the lungs from the
abdominal cavity. The diaphragmatic breathing or the abdominal breathing is
characterized by enhancing the movement of the diaphragm up and down while
minimizing the movement of the rib cage. This kind of breathing is the most efficient
way to breathe, but due to stress, an unbalanced lifestyle and many other factors
which are the result of modern day lifestyle, it is forgotten.
Place the right hand on the abdomen.
Develop the feeling that now onwards the breath has to be drawn in and out
directly through the navel.
Continue breathing slowly and deeply, without moving the shoulders or
expanding the chest.
Inhale while expanding the abdomen as much as is comfortable. The
diaphragm will compress the abdomen with the navel and right hand moving
up, reaching their highest point.
Exhale while contracting the abdomen again as much as is comfortable.
At the end of exhalation, the abdomen will be contracted with the navel
(and the palm) having moved towards the spine reaching its lowest point.
This abdominal breathing.
Continue it for a few minutes and keep on observing the movement of the
right hand.
In the end relax and become aware of the spontaneous breathing pattern.
Become aware of the body, the surroundings and then open the eyes gently.
Diaphragmatic Breathing Benefits
In Belly Breathing or the Diaphragmatic Breathing, movement of diaphragm
enables the utilization of lower lobes of the lungs.
This breathing results in the equal expansion of the alveoli.
The Diaphragmatic breathing improves lymphatic drainage from basal parts
of the lungs.

Simple Asanas and
Pranayama
NOTES
Self-Instructional
74 Material
It messages the abdominal organs that lie immediately below the diaphragm
including stomach, liver etc.
Belly breathing exerts a positive effect on cardiac functioning.
Once the technique of abdominal breathing becomes a part of daily life and the
correct breathing pattern is restored, there will be a great improvement in the state
of physical and mental well being and the practitioner learns to breathe properly.
(ii) Thoracic
Thoracic Breathing or Chest Breathing is inhalation done by expanding and
contracting the ribcage. The middle lobes of the lungs are utilized in this type of
breathing. The intercostal muscles are properly used to expand and contract the
chest cavity.
Diaphragmatic vs Chest Breathing
The Thoracic breathing utilizes the middle lobes of the lungs whereas, in
Diaphragmatic/Abdominal Breathing, movement of diaphragm enables the
utilization of lower lobes of the lungs.
Thoracic Breathing expends more energy than the abdominal breathing for
the same quantity of air exchange.
The man associates himself with Thoracic breathing when he is under physical
exertion or doing exercise.
This breathing is also experienced when a man is under stress.
Abdominal breathing is the most efficient way to breathe, whereas thoracic
breathing is not.
Thoracic (Chest) Breathing Technique
Lie in Savasana and relax the whole body.
Become aware of the natural and spontaneous breathing process.
Place the right hand on the abdomen and the left hand on the chest.
Start inhaling by slowly expanding the ribcage.
Develop the feeling that all the individual ribs are expanding outward and
upward creating more space for the air to be drawn into the lungs. The left
hand also moves up with a negligible movement of the right hand.
Expand the lungs as much as possible utilizing its full capacity.
Start exhaling by contracting the ribcage and forcing the air out of the lungs.
The left hand will come down too with the right hand moving the least. This
is Thoracic breathing.
Continue it for a few minutes, taking a small pause after each inhalation and
exhalation.
Simple Asanas and
Pranayama
NOTES
Self-Instructional
Material 75
Then relax and again become aware of the natural and spontaneous breathing
process.
Become aware of the physical body, the surroundings and then gently open
the eyes.
Chest Breathing Benefits
Thoracic breathing allows utilization of middle lobes of the lungs and helps
lungs to be fully inflated.
Thoracic breathing, when combined with abdominal breathing, helps the
body to obtain more oxygen.
(iii) Clavicular
Clavicular breathing occurs when the thoracic breathing has been completed and
in order to absorb a little more air into the lungs, the upper ribs and the collarbone
are pulled upwards. It can be said that the clavicular breathing is the final stage of
total ribcage expansion.
Clavicular Breathing Exercise
Lie on a yoga mat or a blanket in Savasana and relax the body.
Start inhaling and expand the ribcage fully, as in Thoracic breathing.
Inhale a little more and feel the expansion in the upper portion of the lungs
near collar bones.
The collar bones and shoulders will also move up slightly.
While exhaling, first release the collarbone area, the lower neck, and the
upper chest.
Then relax the remaining rib-cage portion and come back to the starting
position.
Continue the clavicular breathing for some time.
Then relax and come back to normal breathing.
Again become aware of the natural and spontaneous breathing process.
Become aware of the physical body and then the surroundings and then
gently open the eyes.
In daily life, the clavicular breathing is only experienced when under extreme physical
exertion or may be experiencing obstructive respiratory diseases such as asthma.
Although breathing is a spontaneous process, conscious control of it may
be taken to learn and develop correct and deep breathing techniques. Rhythmic,
deep and slow breathing exercises result in establishing the natural, relaxed rhythms
of the also, read.

Simple Asanas and
Pranayama
NOTES
Self-Instructional
76 Material
(iv) Full Yogic Breathing
Full Yogic Breath is a deeply balancing pranayama (breathing exercise) that
benefits vata, pitta, and kapha. It is sometimes known as three-part breath because
it works with three different sections of the torso and naturally engages all three
lobes of the lungs. Full Yogic Breath revitalizes the entire body with prana
(essential life force). In particular, it benefits the vital organs, which can easily
become stagnant, constricted, or fraught with emotional and physical tension when
we experience stress. Full Yogic Breath relieves stress, refreshes the mind, and
activates the parasympathetic nervous system, encouraging a calmer, more
balanced state of being overall. It also helps to correct unhealthy breathing
patterns. This pranayama can be engaged at any time, but it is especially beneficial
when practiced intently for five to fifteen minutes every day—preferably on an
empty stomach. The early morning is an ideal time to practice Full Yogic Breath.
Overview of the Practice
Full Yogic Breath begins with a deep and fluid inhalation that fills three sections
of the torso independently, but continuously. First, we breathe into the lower
abdomen. Then, we breathe into the mid-section of the torso, expanding the
diaphragm and the ribs as the inhalation continues. And finally, we draw the breath
into the upper chest and shoulders as the inhalation comes to a close. This slow
and purposeful inhalation is then followed by a long, slow, gentle exhale, expelling
the breath from these same three sections of the torso in reverse order, releasing
the upper chest, then the diaphragm and ribs, and finally the lower abdomen.
One round of Full Yogic Breath includes one complete inhalation and one
complete exhalation.
Simple Asanas and
Pranayama
NOTES
Self-Instructional
Material 77
Both the inhalation and the exhalation should feel fluid and continuous; at no
point should either one cause any strain whatsoever. Keep in mind that it may take
some time to develop a relaxed relationship with this type of breath work, especially
if it is new to you; it is no accident that pranayama is referred to as a practice.
What’s important is the intention to develop our capacity for moving the breath
intentionally, fluidly, and yet without tension or struggle.
Instructions for Practice
Choose a comfortable seated or lying position. If sitting, make sure that your
pelvic bones are rooted into the surface beneath you, and that your spine is erect.
If you prefer to lie down, lie on your back and relax your entire body, as in
savasana.
Gently close your eyes and take a few moments to settle in. Close your
mouth and breathe only through your nostrils. Quiet your mind, and attune to your
body. Begin by simply observing the natural flow your breath. Let go of any thoughts
and allow yourself to arrive completely in the present moment.
When you are ready, inhale slowly and with purpose, drawing your breath
deep into the lower abdomen, starting from the pelvic floor and slowly allowing
the breath to fill upward (toward the navel) and outward (away from the spine).
Initially, focus only on filling the lower abdomen.
As the breath fills this area, allow it to expand outward in all directions—to
the front (expanding the lower belly), to the sides (expanding the hips), and to the
back (expanding the lumbar spine and the sacrum)—as it moves upward toward
the navel.
Once the lower abdomen has filled completely, continue the inhalation by
filling the mid-torso in a similar manner. Continue to draw the breath upwards,
from the navel to the ribs, allowing the breath to gently expand the diaphragm, the
ribs, and the mid-back as the breath continues to rise.
Once the mid-torso feels full, complete the inhalation by drawing the breath
into the upper chest—allowing prana to rise up into the heart, the sternum,
and finally into the shoulders and the base of the neck. Feel the collarbones lift
slightly.
This completes the inhalation. For many, there is a brief, but natural pause at
the top of the inhalation. If this occurs, just allow it to be there for a moment before
surrendering to a long, slow exhalation. First, release the breath from the upper
chest as the heart, lungs, sternum and shoulders all relax—dropping down and
drawing in, toward the spine. Then, expel the breath from the mid-torso, feeling
the ribs contract and the navel draw in, closer to the spine. And lastly, release the
breath form the lower abdomen, feeling the belly contract and draw inward toward
the spine.

Simple Asanas and
Pranayama
NOTES
Self-Instructional
78 Material
This completes one round of Full Yogic Breath. If your exhalation is followed
by a natural pause, take a moment before beginning the next round. Then, draw a
fresh inhalation into the lower abdomen.
After several rounds of Full Yogic Breath (up to fifteen minutes), allow your
breathing to return to normal for a minute or two before gently opening your eyes
and bringing your practice to a close. Then, before you move on to your next
activity, pause briefly to notice how you feel. Are you more refreshed, awake, and
relaxed? How did your practice affect or benefit you today?
As you become more comfortable with the practice of Full Yogic Breath,
you can integrate this style of breathing more and more throughout your day-to-
day activitie
PRANAYAMAS
1. Suha Pranayama (Anuloma Viloma)
Anulom-Vilom Pranayama
Anulom Vilom Pranayama (vuqykse iz.kk;ke) is one of several Pranayama orbreathing exercise used in the practice of Hatha yoga. At first, you have to understand
the meaning of Anuloma and Viloma.In this, the first word Anu roughly translates
as with and word Loma means hair implying “with the grain” or “natural”. And the
meaning of Viloma is “against the grain.” Anuloma is opposite to Viloma. It is very
helpful in respiratory-related diseases like Asthma. Anulom Vilom Pranayama is
the best way of balancing the Tri dosas in our body. Our body gets ill when Tri
dosas are not in balancing position. Vaat, Pitta, Kaffa knows as Tri dosas, Tri
means “three” and the meaning of dosas is impurities. All these are present in the
body of every people. If one of them is an imbalance that we suffer from different
diseases. All three are the cause of all diseases. So it’s important to balance these
tri dosas. If you really want to balance these Tri dosas than do Anulom Vilom
pranayama regularly. It is the simplest and best way for this.
Steps of Anulom Vilom Pranayama
Anulom Vilom Pranayama is very easy to do, first of all, close your eyes
and sit in Padmasana and rest your hands on your knees.
Close the right nostril with the right thumb. Inhale slowly through the left
nostril, inhale the oxygen as much as you can, this will fill your lungs with air.
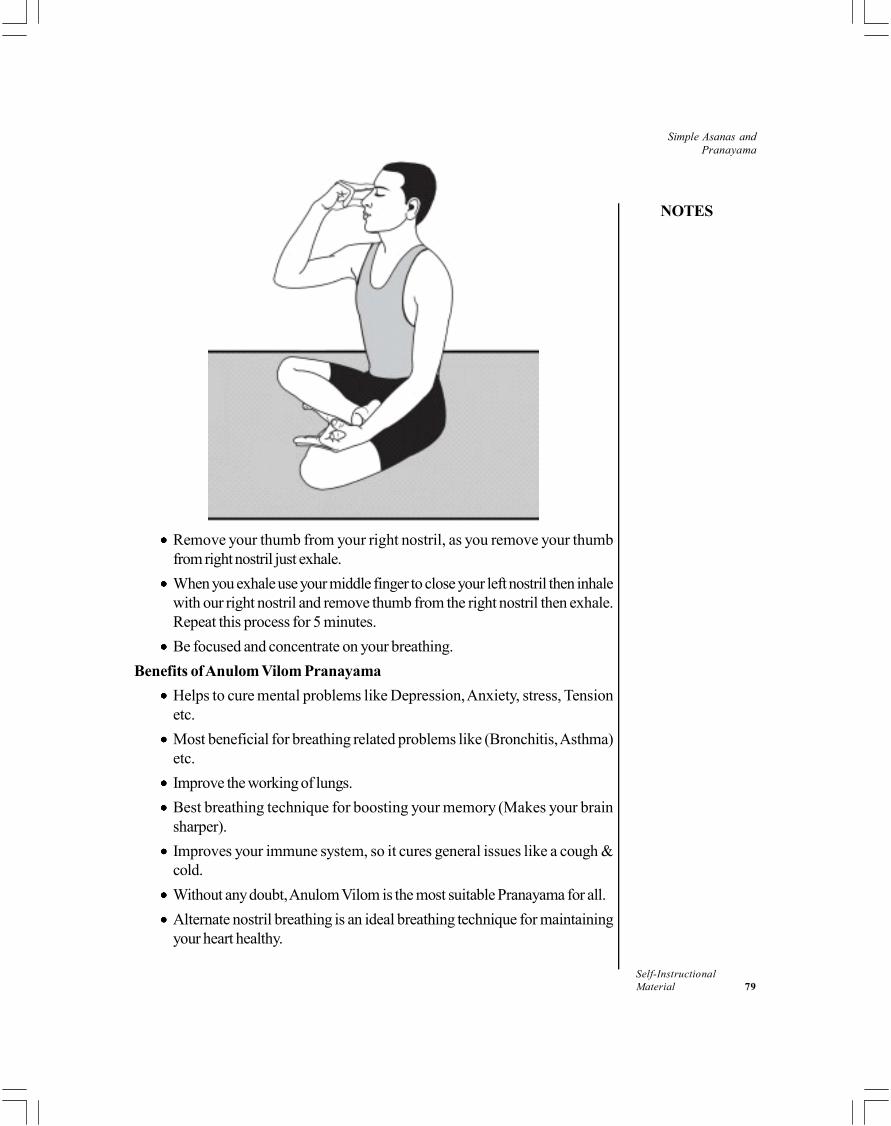
Simple Asanas and
Pranayama
NOTES
Self-Instructional
Material 79
Remove your thumb from your right nostril, as you remove your thumb
from right nostril just exhale.
When you exhale use your middle finger to close your left nostril then inhale
with our right nostril and remove thumb from the right nostril then exhale.
Repeat this process for 5 minutes.
Be focused and concentrate on your breathing.
Benefits of Anulom Vilom Pranayama
Helps to cure mental problems like Depression, Anxiety, stress, Tension
etc.
Most beneficial for breathing related problems like (Bronchitis, Asthma)
etc.
Improve the working of lungs.
Best breathing technique for boosting your memory (Makes your brain
sharper).
Improves your immune system, so it cures general issues like a cough &
cold.
Without any doubt, Anulom Vilom is the most suitable Pranayama for all.
Alternate nostril breathing is an ideal breathing technique for maintaining
your heart healthy.

Simple Asanas and
Pranayama
NOTES
Self-Instructional
80 Material
2. Surya Anuloma Viloma Pranayama
Position : Sit in any meditative posture or any comfortable sitting posture with the
head and spine straight. Close the eyes and relax the whole body.
Practice
When the body is comfortable and relaxed , focus on your breath for a few
minutes effortlessly.
Adopt Nasika Mudra with your right hand (folding index and middle fingers
towards palm).
Close the left nostril with the little and ring fingers of Nasika Mudra.
Inhale and exhale slowly through the right nostril (surya nadi) only.
During the practice, keep the left nostril closed all the time during the practice.
One cycle of inhalation and exhalation forms one round.
Exhalation should be longer than inhalation.
Repeat 9 rounds.
Depression patients should practice this pranayama 27 rounds before
breakfast, lunch, dinner and before sleep ( 4 times a day ).
Benefits
It increases the heat in the body.
Purifies the blood and improves digestion.
Cures the problem of gas in the abdominal region.
Beneficial for depression patients and weight reduction.

Simple Asanas and
Pranayama
NOTES
Self-Instructional
Material 81
Limitations
Avoid the practice during summer.
Not recommended for anxiety, high blood pressure patients.
3. Chandra Anuloma Viloma Pranayama
Nasika Mudra
Position : Sit in any meditative posture or any comfortable sitting posture with the
head and spine straight. Close the eyes and relax the whole body.
Practice
When the body is comfortable and relaxed , focus on your breath for a few
minutes effortlessly.
Adopt Nasika Mudra with your right hand (folding index and middle fingers
towards palm).
Close the right nostril with the tip of the thumb.
Inhale and exhale slowly through the left nostril (chandra nadi) only.
During the practice, keep the right nostril closed all the time.
One cycle of inhalation and exhalation forms one round.
Exhalation should be longer than inhalation.
Repeat 9 rounds.
Anxiety patients should practice this pranayama 27 rounds before breakfast,
lunch, dinner and before sleep ( 4 times a day ).
Benefits
It lowers the high blood pressure.
Beneficial for anxiety and mental tension.
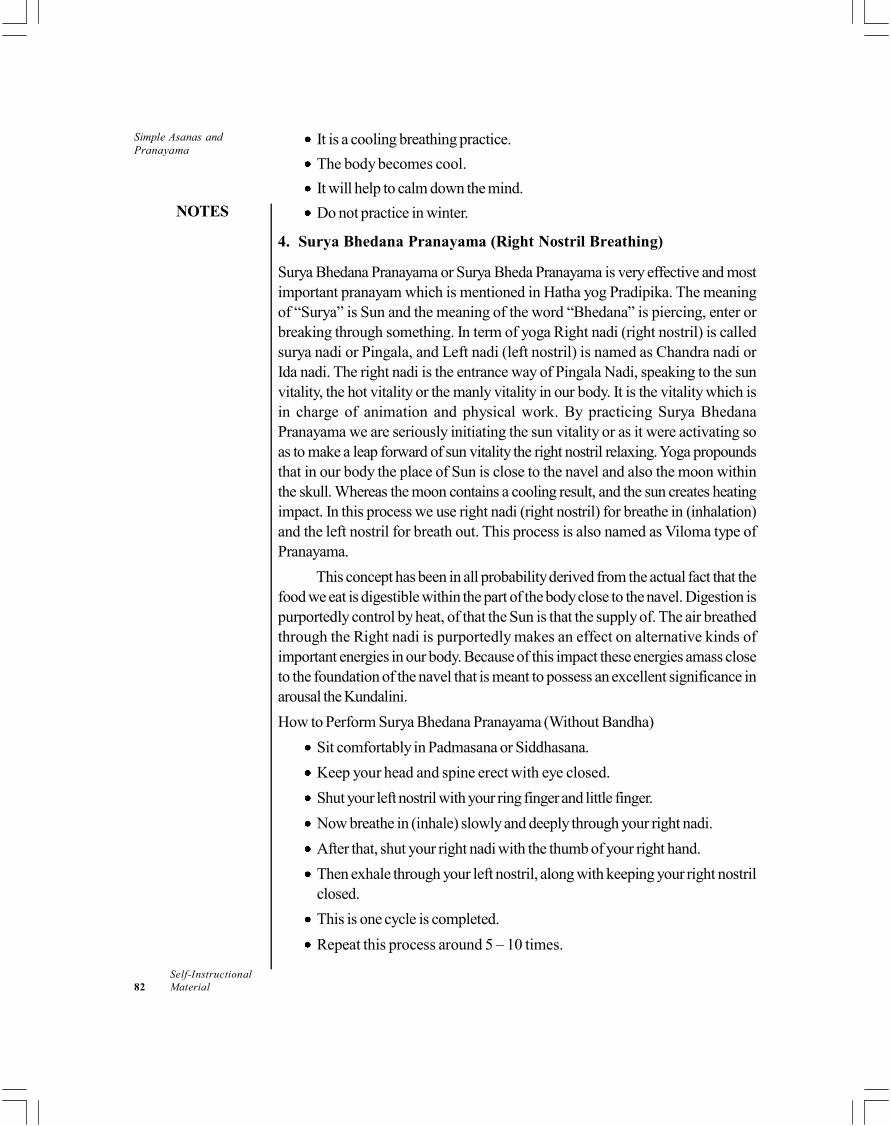
Simple Asanas and
Pranayama
NOTES
Self-Instructional
82 Material
It is a cooling breathing practice.
The body becomes cool.
It will help to calm down the mind.
Do not practice in winter.
4. Surya Bhedana Pranayama (Right Nostril Breathing)
Surya Bhedana Pranayama or Surya Bheda Pranayama is very effective and most
important pranayam which is mentioned in Hatha yog Pradipika. The meaning
of “Surya” is Sun and the meaning of the word “Bhedana” is piercing, enter or
breaking through something. In term of yoga Right nadi (right nostril) is called
surya nadi or Pingala, and Left nadi (left nostril) is named as Chandra nadi or
Ida nadi. The right nadi is the entrance way of Pingala Nadi, speaking to the sun
vitality, the hot vitality or the manly vitality in our body. It is the vitality which is
in charge of animation and physical work. By practicing Surya Bhedana
Pranayama we are seriously initiating the sun vitality or as it were activating so
as to make a leap forward of sun vitality the right nostril relaxing. Yoga propounds
that in our body the place of Sun is close to the navel and also the moon within
the skull. Whereas the moon contains a cooling result, and the sun creates heating
impact. In this process we use right nadi (right nostril) for breathe in (inhalation)
and the left nostril for breath out. This process is also named as Viloma type of
Pranayama.
This concept has been in all probability derived from the actual fact that the
food we eat is digestible within the part of the body close to the navel. Digestion is
purportedly control by heat, of that the Sun is that the supply of. The air breathed
through the Right nadi is purportedly makes an effect on alternative kinds of
important energies in our body. Because of this impact these energies amass close
to the foundation of the navel that is meant to possess an excellent significance in
arousal the Kundalini.
How to Perform Surya Bhedana Pranayama (Without Bandha)
Sit comfortably in Padmasana or Siddhasana.
Keep your head and spine erect with eye closed.
Shut your left nostril with your ring finger and little finger.
Now breathe in (inhale) slowly and deeply through your right nadi.
After that, shut your right nadi with the thumb of your right hand.
Then exhale through your left nostril, along with keeping your right nostril
closed.
This is one cycle is completed.
Repeat this process around 5 – 10 times.

Simple Asanas and
Pranayama
NOTES
Self-Instructional
Material 83
How to Perform Surya Bhedana Pranayama with Bandha
Sit comfortably in Padmasana, Siddhasana or Swastikasana.
Keep your head and spine erect with eye closed.
Shut your left nostril with your ring finger and little finger.
Now breathe in slowly, deeply and quietly (without making any noise while
inhalation).
When inhalation is completed, then shut your right nadi (right nostril) with
your right thumb, left nadi is closed also.
Hold your breath and make Jalandhar Bandha and Mula bandh also.
Now hold the position with bandha for 5 to 10seconds. (Hold your breath
with lock (bandha) as long as you can.
Release Jalandhar bandha and open your left nostril and exhale slowly.
Repeat this act for 5 to 10 times.
During this activity you ought to tally in the accompanying way:
Count to 2 amid inward breath, to 8 while holding the breath and to 4 amid
exhalation. Once you perfect in this Pranayama you can also increases the time
ratio like 4, 16, 8 or 8, 32, 16, depending on your capacity.
Jalandhar bandha
(While holding your breath bends your chin downward resting it on the throat pit).
Mula Bandha
(During the process of retention try to pull upward your anus).
Benefits of Surya Bhedana Pranayama
Surya Bheda Pranayama activates the body functions.
Very helpful for increasing the digestive fire.
Best for awakening the Kundalini Shakti.
Surya Bhedana Pranayama cures all diseases that are caused by insufficiency
of oxygen in the blood.

Simple Asanas and
Pranayama
NOTES
Self-Instructional
84 Material
It cleans the frontal sinuses.
Beneficial in Vata related problems.
It destroys intestinal worms.
Best for winter sessions.
If you feel cold in your feet or hands then try this.
It creates lots of energy.
Boost the Appetite.
It is the best breathing exercise for cold and cough, Asthama, or other
repiratory problems.
Best and simple method in Low blood pressure.
It cures gas problem.
Best for those Women who are suffering from a lack of sexual desire.
Useful in Leucoderma and other skin related problems.
Note
You can begin with the low checking and after that expand it. In the earliest reference
point of your practice you can even begin doing it without Kumbhaka (the holding)
and Jalandhar Bandha. That will make you feel greater with the relaxing. At that
point you gradually bring those components into the activity.
People, who are experienced high blood pressure problem, don’t try this.
Those people who have experienced brain surgery or heart surgery should take
advice from medal expert or yoga expert before doing Surya Bhedana Pranayama.
Always do Pranayama in systematic way and in under the supervision of an expert
person.
5. Nadi Shodhana
What is Nadi Shodhana?
Nadi = subtle energy channel; Shodhan = cleaning, purification; Pranayama =
breathing technique.
Nadis are subtle energy channels in the human body that can get blocked
due to various reasons. The Nadi Shodhan pranayama is a breathing technique
that helps clear these blocked energy channels, thus calming the mind. This
technique is also known as Anulom Vilom pranayama.
Cause of Obstruction in the Nadis
Nadis can get blocked on account of stress
Toxicity in the physical body also leads to blockage of nadis
Nadis can get blocked due to physical and mental trauma
Unhealthy lifestyle

Simple Asanas and
Pranayama
NOTES
Self-Instructional
Material 85
What Happens When these Nadis are Blocked?
Ida, Pingala and Sushumna are three of the most important nadis in the human
body.
When the Ida nadi is not functioning smoothly or is blocked, one experiences
cold, depression, low mental energy and sluggish digestion, blocked left nostril.
Whereas when the Pingala nadi is not smoothly functioning or is blocked, one will
experience heat, quick temper and irritation, itching body, dry skin and throat,
excessive appetite, excessive physical or sexual energy, and blocked right nostril.
Reason: Why You Should Practice Nadi Shodhan Pranayama
(i) Nadi Shodhan pranayama helps relax the mind and prepares it to enter a
meditative state.
(ii) Practicing it for just a few minutes every day helps keep the mind calm,
happy and peaceful.
(iii) It helps in releasing accumulated tension and fatigue.
How to Do Nadi Shodhan pranayama? - Alternate Nostril Breathing Technique)
Sit comfortably with your spine erect and shoulders relaxed. Keep a gentle
smile on your face.
Place your left hand on the left knee, palms open to the sky or in Chin
Mudra (thumb and index finger gently touching at the tips).
Place the tip of the index finger and middle finger of the right hand in between
the eyebrows, the ring finger and little finger on the left nostril, and the
thumb on the right nostril. We will use the ring finger and little finger to open
or close the left nostril and thumb for the right nostril.
Press your thumb down on the right nostril and breathe out gently through
the left nostril.
Now breathe in from the left nostril and then press the left nostril gently with
the ring finger and little finger. Removing the right thumb from the right nostril,
breathe out from the right.
Breathe in from the right nostril and exhale from the left. You have now
completed one round of Nadi Shodhan pranayama. Continue inhaling and
exhaling from alternate nostrils.
Complete 9 such rounds by alternately breathing through both the nostrils.
After every exhalation, remember to breathe in from the same nostril from
which you exhaled. Keep your eyes closed throughout and continue taking
long, deep, smooth breaths without any force or effort.
Cautions to be Taken While Practicing Nadi Shodhan Pranayama (Alternate Nostril
Breathing Technique)
Do not force the breathing, and keep the flow gentle and natural. Do not
breathe from the mouth or make any sound while breathing.

Simple Asanas and
Pranayama
NOTES
Self-Instructional
86 Material
Do not use the Ujjayi breath.
Place the fingers very lightly on the forehead and nose. There is no need to
apply any pressure.
In case you feel dull and are yawning after practicing Nadi Shodhan
pranayama, check the time you take to inhale and exhale. Your exhalation
should be longer than inhalation.
Tips While Doing Nadi Shodhan Pranayama
It is a good idea to do a short meditation after doing Nadi Shodhan
pranayama.
This breathing technique can also be practiced as part of the Padma Sadhana
sequence.
Benefits of Nadi Shodhan Pranayama (Alternate Nostril Breathing
Technique)
Excellent breathing technique to calm and center the mind.
Our mind has a tendency to keep regretting or glorifying the past and getting
anxious about the future. Nadi Shodhan pranayama helps to bring the mind
back to the present moment.
Works therapeutically for most circulatory and respiratory problems.
Releases accumulated stress in the mind and body effectively and helps
relax.
Helps harmonize the left and right hemispheres of the brain, which correlate
to the logical and emotional sides of our personality.
Helps purify and balance the nadis - the subtle energy channels, thereby
ensuring smooth flow of prana (life force) through the body.
Maintains body temperature.

Simple Asanas and
Pranayama
NOTES
Self-Instructional
Material 87
Contraindication
None. After you have learnt this breathing technique from an Sri Sri Yoga teacher,
you can practice this pranayama on an empty stomach, 2-3 times a day.
6. Sitali Pranayama (Cooling Breath)
The meaning of word “Sheetali” is cooling down, that process which can cool
down our body and gives feeling of coldness. The word Shitali is originally taken
from the word “Sheetal” which means cold or soothing. The daily practice of
Sheetali Pranayama can calm the mind along with body. In Ancient text Hatha
yoga Pradipika Sheetali pranayama and Sheetkari pranayama is mentioned. The
process of Sheetali Pranayama is very similar to Sheetkari pranayama. Sheetali
Pranayama and Sheetkari is also a breathing technique (Pranayama). The basic
purpose of the Shitali Pranayama is to decrease or cool down the body
temperature, this may have positive impact on our nervous system and endocrine
glands. Person becomes young and charming by practicing this process which is
mentioned in Hatha yoga Pradipika by Swami Swatmaram ji. Person is able to
control thirst and hunger with daily practice of sheetali Pranayama. This has been
mentioned in ancient books which are related to Yog.
How to perform Shitali Pranayama (sheetali Pranayama Steps)
Set comfortably in any meditative pose like Padmasana, Swastikasana e.t.c.
Keep your both hands on knees.
Now bring your tongue all the way out and fold both sides of tongue like a
tube or straw.
Take a long, deep inhalation through the tube in the tongue which is formed
by folding the both sides of tongue.

Simple Asanas and
Pranayama
NOTES
Self-Instructional
88 Material
After Inhalation close your mouth and exhale with both nostrils.
Repeat this about 8 to 10 times.
Steps of Sheetali Pranayama with Bandha
Set comfortably in any meditative pose like Padmasana, Swastikasana e.t.c.
Keep your both hands on knees.
Now bring your tongue all the way out and fold both sides of tongue like a
tube or straw.
Take a long, deep inhalation through the tube in the tongue which is formed
by folding the both sides of tongue.
After inhalation, lower your chin to the chest (Jalandhar bandha) and hold
the breath about 6 to 8 seconds. (During retention of breath lower and
bend the chin downward resting it on the throat pit.)
When you feel like breathe out release the Jalandhar bandha (lift your chin
to the normal position) and exhale slowly by the left nadi (nostril).
Repeat it about 5 to 6 time.
In the end, bring your breathing back to normal and feel relax.
Benefits of Sheetali Pranayama
Sheetali Pranayama is useful in diseases which related to tongue, mouth
and throat.
It is very beneficial in diseases of spleen.
Helpful in fever and indigestion.
Controls the High B.P.
Useful in Pitta related diseases.
It purifies the blood.
Best for cooling down the body temperature.
Best for fighting against the Insomnia problem.
It calms the mind, and it’s a effective stress buster.
If our mind is calm we can easily deal with anger and anxiety.
Effective in hyperacidity.
Caution
People who are low B.P. and those people who are suffering from Asthama, cold
and cough or other respiratory related problem should not try this.
If you are not able to fold your tongue like tube then try Sheetkari Pranayama
in that case. Sheetkari have the same effects like Sheetali Pranayama.

Simple Asanas and
Pranayama
NOTES
Self-Instructional
Material 89
7. Sitkari Pranayama
Sheetkari Pranayama (Hissing Breath)-Steps And Benefits
Yoga Asanas and Pranayama are the two distinctive gifts to people for maintaining
healthy life by natural manner. They enforce not solely physical well – being however
additionally mental well being. In Shitali pranayama and Sheetkari pranayama we
breathe through mouth. These are same like a Python’s breathing. Python, hens,
kids of deer takes a deep breath through opening the mouth and they all are simply
sucked in with the air and it’s the capability to digest it. Sheetkari pranayama and
Shitali process are also like this.
Both of two breathing activities are very useful in cooling down the body
and mind also. Performing 6 or 7 rounds of these processes can alleviate your
thirst when you are feeling vey thirsty and there is no water available. Shitali and
Sheetkari pranayama are mentioned in Hatha yoga Pradipika as a process of
pranayama. Shitali and Sheetkari pranayama are similar, but there is only one
difference between them, is way of breathing. In Shitali we breathe through folding
our tongue and in Sheetkari we inhale through teeth.
Steps of Sheetkari Pranayama
Sit in any meditative pose in which you are comfortable.
Keep your eyes close and try to touch the tongue upward.
Join the upper and lower row of teeth.
Now open your lips and start inhaling with making the sound See-See.
After inhaling close your lips and breathe out through nose.
Repeat this at least 8 to 10 rounds.
Benefits of Sheetkari Pranayama
The benefits or plus points of Sheetkari is same as Shitali Pranayama but there are
some following plus points of Sheetkari pranayam.
Cools down the body temperature so it is useful in Fever.
It is beneficial in mouth related diseases, throat and tongue.

Simple Asanas and
Pranayama
NOTES
Self-Instructional
90 Material
Helps in spleen and indigestion.
Best for High blood pressure and for summer session.
It is effective in dental problems like pyorrhea.
It controls the body temperature.
Calms the mind and it is best stress buster.
Reduces the emotional excitation and mental tension.
Best for depression.
People who are suffering from cold and cough, Asthama or other respiratory
problems, tonsillitis should not practice Sheetkari and Shitali pranayam. People
who have Low Blood pressure problems are strictly advised that not to perform
this pranayama.
Sheetkari pranayama is the variation of Shitali Pranayam. People who are
not able to fold their both sides of tongue in Shitali pranayam can perform this
pranayam. Perform Shitali pranayama and Sheetkari pranayama after doing Asana
and other Pranayama.
8. Bhramari Pranayama
Bhramari Pranayama, also known as Humming Bee Breath, is a calming breathing
practice that soothes the nervous system and helps to connect us with our truest
inner nature. Bhramari is the Sanskrit word for “bee,” and this pranayama is so
named because of the humming sound produced at the back of the throat during
the practice—like the gentle humming of a bee.

Simple Asanas and
Pranayama
NOTES
Self-Instructional
Material 91
Benefits
Bhramari Pranayama
Calms and quiets the mind
Releases cerebral tension
Stimulates the pineal and pituitary glands, supporting their proper functioning
Soothes the nerves
Relieves stress and anxiety
Dissipates anger
Lowers blood pressure
Bolsters the health of the throat
Strengthens and improves the voice
Supports the healing of bodily tissues
Induces sound sleep
Contraindications
Bhramari should not be practiced by pregnant or menstruating women. It is also
contraindicated for individuals with extremely high blood pressure, epilepsy, chest
pain, or an active ear infection. Bhramari should not be practiced in a supine
position (lying down).
When to Practice
Bhramari (as with most pranayamas) is best practiced on an empty stomach. While
it can be practiced at any time of day, bhramari is particularly potent in the early
morning and late at night—when there are fewer distracting noises and our inner
perception is most acute.
How to Practice
Choose a comfortable sitting position. If you are able, it is best to sit cross-legged
on the floor with a cushion or blanket to comfortably elevate the hips. Alternatively,
you may choose to sit toward the front of a chair, with your feet flat on the floor.
Allow the spine to lengthen so that the back, neck, and head are erect. Gently
close the lips, keeping the teeth slightly apart, and bring the tip of your tongue to
the space behind the upper front teeth. Maintain this position of the mouth throughout
the practice, frequently checking to ensure that the jaw remains relaxed. Then,
close each ear with the thumbs, place the index fingers at the midpoint of the
forehead—just above the eyebrows—and reach the middle, ring, and pinky fingers
across the eyes so that the tips of these fingers press very gently against the bridge
of the nose.
To begin, take a long, deep breath in through the nostrils, bringing the breath
all the way into the belly. Drop the chin to the chest and begin to exhale slowly,
making a steady, low-pitched ‘hmmm’ sound at the back of the throat—like the
Simple Asanas and
Pranayama
NOTES
Self-Instructional
92 Material
humming of a bee. Focus on making the sound soft, smooth, and steady. The
positioning of the tongue allows the vibration to better resonate throughout the
head, affecting the tissues of the brain. Keep the body completely still and bring
your awareness to the center of the head—to ajna chakra—letting the sound fill
the head and spread to the body. Merge with the sound and allow the vibration to
permeate your entire being. At the end of the exhalation, slowly straighten your
neck as you inhale again through the nostrils to repeat the process. Begin with
seven repetitions. You may either continue with seven repetitions, or you may add
one repetition per week, slowly building up to a total of seventeen repetitions.
After the final exhalation, allow your breath to return to normal and observe
any changes that have occurred. How do you feel physically, mentally, emotionally,
and spiritually? What energetic shifts do you notice as a result of this practice?
Where do you notice sensation in your body and how is it different from when you
started? When you are ready, gently open your eyes, continuing to direct some of
your awareness within. If it is morning, slowly stand and offer your full attention to
the rest of your day; if it is evening, notice the vibrational calm that this practice has
initiated in your body and try to maintain it as you prepare to retire for the night
Related Documents