Pexip Infinity Administrator Guide Software Version 12 Document Version 12.a May 2016

Welcome message from author
This document is posted to help you gain knowledge. Please leave a comment to let me know what you think about it! Share it to your friends and learn new things together.
Transcript

Pexip Infinity
Administrator Guide
Software Version 12
Document Version 12.a
May 2016
Pexip Infinity Administrator Guide
© 2016 Pexip AS Version 12.a May 2016 Page 2 of 369
Contents
The Pexip Infinity platform 18
Introduction to Pexip Infinity 19
Pexip Infinity version 12 features and specifications 20
Pexip Infinity platform 20Pexip Infinity Connect 22Audio and video specifications 23Host hardware requirements 24Capacity 25Hypervisor requirements 25
What's new in version 12? 26
New features 26Changes in functionality in this release 29
Pexip Infinity components 30
Management Node 30Conferencing Nodes 31Pexip Infinity Connect clients 31Pexip Infinity APIs and SDKs 31Virtual Meeting Rooms and Virtual Auditoriums 31Virtual Receptions 32Pexip Distributed Gateway 32Host servers 32Hypervisors 33
VM Managers 33Endpoints 33Call control 33
Supported call control solutions 33Gatekeeper registration 33Using a gatekeeper to route calls to Pexip Infinity conferences 33
Benefits and components of the Pexip Infinity distributed architecture 34
Distributed architecture components 34Scaling up 34Scaling out 34Application level resiliency 34
Conference distribution 34Locally distributed conferences 35Globally distributed conferences 35Locally and globally distributed conferences 36
Bandwidth management 36Bandwidth usage 36Downspeeding 38

Pexip Infinity Administrator Guide
© 2016 Pexip AS Version 12.a May 2016 Page 3 of 369
Bandwidth restrictions 38Load balancing, redundancy and scalability 38
Load balancing 38Redundancy 39Scalability 39
Handling of media and signaling 39Locally distributed conferences 40Globally distributed conferences 41Location capacity overflow 41Pexip Distributed Gateway calls 43
Customizing the Pexip Infinity user experience 45
Themes 45Infinity Connect customization 46
Installation and getting started with Pexip Infinity 48
Prerequisites before deploying Pexip Infinity 49
Hardware requirements 49Hypervisors 50
VMware vSphere ESXi 50Microsoft Hyper-V 50KVM 50Xen 50Other hypervisors and orchestration layers 50
Cloud service providers 50Network requirements 51
Call control 51Lync / Skype for Business server 51
Capacity planning 52
Server capacity 52Types of call 52Backplane reservation 52Service type 53Licenses 53
Hardware resource allocation rules 54
Implementing a dial plan 55
Service precedence 55Using a standard format for aliases 57Routing calls to the local Conferencing Node 57Further information 57
Network deployment options 58
Privately-addressed "on-premises" nodes 58Publicly-addressed DMZ nodes 59
Pexip Infinity Administrator Guide
© 2016 Pexip AS Version 12.a May 2016 Page 4 of 369
Combining public DMZ and privately-addressed nodes 60Deploying as a cloud service via Amazon Web Services or Microsoft Azure 60
Installation tasks overview 62
About the Pexip Infinity software files 63
Files used to upgrade an existing deployment 63Files used to deploy a new Management Node 63Files used to manually deploy new Conferencing Nodes 64Files used to automatically deploy new Conferencing Nodes 64
Hypervisor configuration 65
Configuring VMware 65Prerequisites 65Synchronizing time 65Using a static MAC address for the Management Node 66Enabling automatic startup 66Disabling EVC 67
Configuring Hyper-V 67Prerequisites 67Synchronizing time 67Using a static MAC address for the Management Node 67Creating an external virtual switch 67Enabling automatic startup 68Disabling processor compatibility mode 68
Configuring KVM 68Prerequisites 68Synchronizing time 68Enabling automatic startup 68
Configuring Xen 69Prerequisites 69Synchronizing time 69Enabling automatic startup 69
Management Node installation overview 70
Deploying the Management Node template 70Supported hypervisors 70Other hypervisors 70Cloud service providers 70
Installing the Management Node — VMware hypervisors 70Deploying the Management Node template 70
Installing the Management Node — Hyper-V hypervisors 73Deploying the Management Node template 73
Installing the Management Node — KVM hypervisors 74Deploying the Management Node template 74
Installing the Management Node — Xen hypervisors 77Deploying the Management Node template 77

Pexip Infinity Administrator Guide
© 2016 Pexip AS Version 12.a May 2016 Page 5 of 369
Running the installation wizard 80Opening a console window 80Running the installation wizard 81Re-running the installation wizard 82
Using the Pexip Infinity Administrator interface 83
Accessing the Pexip Infinity Administrator interface 83Setting the session timeout 83Changing the display language 83
Chrome 83Internet Explorer 84Firefox 84
Timezones 84Getting help 84
Field-level help 84Context-sensitive help 84Contacting support 84
Managing the Pexip Infinity platform 85
Enabling DNS 86
Enabling NTP on the Management Node 87
Using a syslog server 88
Enabling SNMP 89
SNMP support in Pexip Infinity 89Adding SNMP NMSs 90Enabling SNMP on the Management Node 91Enabling SNMP on Conferencing Nodes 92
Using a VM manager 93
Adding VM managers 94
Managing static routes 95
Configuring the set of available static routes 95Assigning a static route to an existing node 95Assigning a static route to a new Conferencing Node 95
About system locations 96
Intelligent routing 96Network deployment considerations 96Configuring external services 96
DNS and NTP servers 96H.323 gatekeepers, SIP proxies and Lync / Skype for Business servers 97TURN servers and STUN servers 97SNMP NMSs 97External policy servers 97
Pexip Infinity Administrator Guide
© 2016 Pexip AS Version 12.a May 2016 Page 6 of 369
Configuring system locations 98
Configuring the Management Node 100
Deploying new Conferencing Nodes 102
Prerequisites 102Deployment types 102Automatically deploying a new Conferencing Node on a VMware host 103
Enabling automatic startup 105Next steps 106
Manually deploying a Conferencing Node on an ESXi host 106Enabling automatic startup 108Next steps 108
Manually deploying a Conferencing Node on a Hyper-V host 108Enabling automatic startup 110Next steps 110
Manually deploying a Conferencing Node on a KVM host 110Generate and download the .ova image 110Convert the .ova image for use with KVM 112Create a new volume and upload the disk image 112Create the virtual machine 112Enabling automatic startup 114Next steps 114
Manually deploying a Conferencing Node on a Xen host 114Generate and download the .ova image 114Convert the .ova image for use with Xen 116Create a new volume and upload the disk image 116Create the virtual machine 116Enabling automatic startup 118Next steps 118
Deploying a Conferencing Node using a generic VM template and configuration file 118Enabling automatic startup 120Next steps 120
Assigning hostnames and FQDNs 121
Configuring existing Conferencing Nodes 122
SIP TLS FQDN 123Changing the node's IP address 123
Deleting Conferencing Nodes 125
Pexip Infinity license installation and usage 126
License allocation 126Insufficient licenses 126Invalid license 126
Viewing existing licenses and current usage 127Adding licenses 127

Pexip Infinity Administrator Guide
© 2016 Pexip AS Version 12.a May 2016 Page 7 of 369
Moving a license (e.g. when redeploying a Management Node) 127Manually activating a stored license request 128Repairing a license 128Content of the license request XML file 128
Managing TLS and trusted CA certificates 129
Certificate usage overview 129Alarms 130
Managing a node's TLS server certificate 130Uploading a TLS server certificate 130Viewing or modifying existing TLS certificates and changing node assignments 131Uploading multiple TLS certificate files 131
Verifying peer certificates for SIP TLS connections 132Using OCSP to check the status of certificates 132Mutual TLS authentication and client/server certificates 132
Managing trusted CA certificates 133Chain of trust 134Uploading and managing additional trusted CA certificates 134
About global settings 135
Integrating with external systems 138
Enabling and disabling SIP, H.323, WebRTC and RTMP 139
Enabling Full HD (1080p) 140
Managing users and roles via LDAP 141
Configuration summary for LDAP authentication 141Configuring how users are authenticated 142
Supporting nested security groups in Windows Active Directory 143Configuring account roles 144Configuring LDAP roles 144Example: configuring permissions for an AD group 145
Customizing the Infinity Connect Web App 148
Creating and uploading a branding package 148Creating a branding package via the Pexip branding portal 148Manually configuring the branding files 150
Editing an existing branding package 151Using the branding portal 151Manually changing your existing branding on the Management Node 151
Removing a branding package (revert to default branding) 151
Using external call control systems 152
About H.323 gatekeepers and SIP proxies 153
Managing SIP credentials 154
About Lync / Skype for Business servers 155
Pexip Infinity Administrator Guide
© 2016 Pexip AS Version 12.a May 2016 Page 8 of 369
Using TURN servers with Pexip Infinity 156
Nominating the TURN servers used by Pexip Infinity 156How Pexip Infinity decides which TURN server to offer 157
Using STUN servers with Pexip Infinity 158
How Conferencing Nodes decide which STUN server to use 158Nominating the STUN servers used by Pexip Infinity and Infinity Connect WebRTC clients 158
Configuring STUN server addresses 158Associating STUN server addresses with Conferencing Nodes 159Associating STUN server addresses with gateway calls 159Configuring the STUN server addresses provided to Infinity Connect WebRTC clients 159
When is a reverse proxy, TURN server or STUN server required? 160
Using an external policy server with Pexip Infinity 161
Configuring Pexip Infinity to use an external policy server 161
Managing conferences 163
About Pexip Infinity services 164
What's the difference between a Virtual Meeting Room and a Virtual Auditorium? 164Changing from a Virtual Meeting Room to a Virtual Auditorium and vice versa 164
About Virtual Meeting Rooms 165
Configuring Virtual Meeting Rooms 166
Provisioning VMRs from Active Directory via LDAP 169
Configuration summary 169Configuring an LDAP data source 169Configuring a VMR synchronization template 170
Allowing generated fields to be manually overridden 172LDAP search and filter examples 172
Filtering based on group membership 173Filtering by LDAP field names 173Filtering by organizational unit (e.g. region/country) 173
Using patterns to format the VMR properties (name, alias etc) 173Supported variables 174Supported filters 175Custom Pexip filters 176
Generating / syncing VMRs with LDAP 178Automatic synchronization 178Manual synchronization 178
Deleting all VMRs associated with a template 179Deleting a template 179
About Virtual Auditoriums 180
Configuring Virtual Auditoriums 181
Selecting the layout seen by participants 184

Pexip Infinity Administrator Guide
© 2016 Pexip AS Version 12.a May 2016 Page 9 of 369
Features common to all layouts 184Virtual Meeting Room layouts 184Virtual Auditorium layouts 185
Host view 185Guest view 185Lock presenter as main speaker 186
1 + 0 layout 1871 + 7 layout 1871+21 layout 188
About the Virtual Reception IVR service 189
Virtual Receptions and Lync / Skype for Business clients 189Including the numeric alias of the VMR in the Virtual Reception dial string 189Restricting or transforming the aliases entered into a Virtual Reception 189
Using the Virtual Reception with the Pexip Distributed Gateway 190Routing phone calls towards a Cisco VCS as E.164 numbers 190Joining scheduled and ad hoc Lync / Skype for Business AVMCU conferences 190
Configuring Virtual Reception IVRs 191
Example 192Step 1: Create a Virtual Reception 192Step 2: Add aliases to Virtual Meeting Rooms and Virtual Auditoriums 193
About aliases 194
Restrictions 194Case insensitivity 194Ignoring IP addresses 194Using IP addresses as aliases 195Ignoring protocol prefixes 195Search rules and alias transforms 195ENUM 195Domains 195Using multiple aliases to access the same service 196
Adding additional aliases 196Examples 196
Viewing all aliases 197
Creating and editing aliases 198
About PINs, Hosts and Guests 199
Using the same PIN for all participants 199Using PINs to differentiate between Hosts and Guests 199
Guest privileges 199Host privileges 200Host and Guest PINs 200Creating a Hosted Virtual Meeting Room or Virtual Auditorium 200
Using # at the end of a PIN 201

Pexip Infinity Administrator Guide
© 2016 Pexip AS Version 12.a May 2016 Page 10 of 369
Examples 201How to combine Host PINs and Guest PINs for differing levels of security 202Changing a participant's role from Guest to Host (and vice versa) 202Including the PIN in the dial string to bypass the PIN entry screen 202
Playing notification tones when participants join or leave a conference 204
Enabling notification tones 204Disabling notification tones 204
Automatically dialing out to a participant from a conference 205
When will the participant be called? 205Host and Guest PINs 205Choosing the calling location 205Incoming call alias 205Keeping a conference alive 206Configuration 206
Manually dialing out to a participant from a conference 209
Using the Administrator interface 209Using Infinity Connect 211Using the Infinity Connect Mobile client for iOS 211
Streaming a conference over YouTube 213
YouTube prerequisites 213Setting up streaming 213
Obtaining the YouTube streaming URL 214Adding the participant URL and enabling streaming 214Obtaining the YouTube streaming URL 216Adding the participant URL and enabling streaming 219
Locking a conference and allowing participants to join a locked conference 222
Locking using the Administrator interface 222Locking using Infinity Connect 222Locking using DTMF 222Allowing waiting participants to join a locked conference 223Rejecting a request to join a locked conference 223
Using DTMF to control a conference 224
Default DTMF controls 224Changing DTMF controls 224Disabling DTMF controls 224
Enabling and disabling chat 225
Providing chat to participants using unsupported clients 225
Restricting call bandwidth 226
Restricting video resolutions 226Applying restrictions to an entire deployment 226

Pexip Infinity Administrator Guide
© 2016 Pexip AS Version 12.a May 2016 Page 11 of 369
Applying restrictions to a service or Call Routing Rule 226Examples 227
Limiting the number of participants 228
Controlling media capability 229
Limiting media capability 229Adding a participant to a conference 229Conference-wide limitations 229Virtual Receptions 229Pexip Distributed Gateway calls 229
Automatically escalating Lync / Skype for Business audio calls 230
Automatically ending a conference 231
When only guests remain 231When there is only one participant remaining in the conference 231When the only participants remaining are ADPs and/or administrator-added 231
Keeping a conference alive 231
Muting a participant's audio 233
Using the Administrator interface 233Using Infinity Connect 233
Muting an individual participant 233Muting all Guest participants 234
Using the Infinity Connect Mobile client for iOS 234Using DTMF 234
Disconnecting participants from a conference 235
Using the Administrator interface 235Disconnecting a single participant 235Disconnecting all participants from a conference 235
Using Infinity Connect 235Disconnecting a single participant 235Disconnecting all participants 235
Using the Infinity Connect Mobile client for iOS 235Using DTMF 236
Registering devices to Pexip Infinity 237
Configuration summary for enabling registrations 237How it works 237
Registering devices 237Calling registered devices 237Avoiding call looping 238Call routing logic 239
Configuring the registrar service 240Specifying which aliases devices are allowed to register with 241Troubleshooting and logging 241
Pexip Infinity Administrator Guide
© 2016 Pexip AS Version 12.a May 2016 Page 12 of 369
Bulk import / export of basic Virtual Meeting Room or Virtual Auditorium configuration 242
Preparing the CSV file for import 242Format 242Header row 243Duplicates 243Restrictions 243Examples 243
Importing the CSV file 243Exporting Virtual Meeting Room or Virtual Auditorium configuration 244
Tracking usage with a service tag 245
Example 245
Customizing Pexip Infinity services with themes 246
Customizing images and voice prompts using themes 247
How do I know which files will be used? 247Example - replacing the logo in the PIN entry screen 247Example - using individual avatars for Lync / Skype for Business contacts 247Example - replacing the logo and using avatars together 247
Creating and editing themes 248
Creating a new theme 248Editing an existing theme 248Downloading an existing theme 249Automatically generating the PIN entry screen images 249Changing which themes are associated with which services 250
Setting the default theme 251
File requirements for themes 252
Sounds 252Audio files 252
Images 253Image files 254
Colors, background and text 256themeconfig.json 257
Base theme 259
Preconfigured themes 260
Using the Pexip Distributed Gateway service 261
About the Pexip Distributed Gateway service 262
How it works 262
Configuring Call Routing Rules 265
When are Call Routing Rules used? 265Call routing considerations 265

Pexip Infinity Administrator Guide
© 2016 Pexip AS Version 12.a May 2016 Page 13 of 369
Creating and modifying Call Routing Rules 267Example 269
Viewing status 271
Viewing current conference status 272
Participants 272Backplanes 273
Backplane media streams 273Graph 274
Viewing participant status 276
Participant details 276Media streams 277
Viewing registrations 279
Registration details 279
Viewing Conferencing Nodes 280
Viewing historical information about conferences 281
Viewing historical information about participants 282
Media streams 283
Viewing usage statistics 284
Viewing graphs 284Viewing source data 284
Viewing alarms 285
About the support log 287
Viewing the support log 287Searching the support log 288File size 288
About the administrator log 289
Viewing the administrator log 289Searching the administrator log 289File size 290
Viewing login history 291
Viewing VMR sync template results 292
Viewing all historical sync results via the Administrator log 292More information 293
Maintaining the Pexip Infinity platform 294
Setting and changing usernames and passwords 295
Pexip Infinity Administrator interface 295Local database authentication 295

Pexip Infinity Administrator Guide
© 2016 Pexip AS Version 12.a May 2016 Page 14 of 369
LDAP-accessible database authentication 295Changing the Management Node operating system password 295Conferencing Node operating system password 295Lost or forgotten passwords 296
Upgrading the Pexip Infinity platform 297
The upgrade process 297When to upgrade 297Upgrading from version 4 or later to version 12 297
Error messages during upgrade 298Upgrading from version 3 to version 12 298Upgrading configuration-only deployments 298Definition of upgrade statuses 299Downgrading or recovering from a failed upgrade 299Checking the installed version 299
Management Node 299Conferencing Nodes 299
Migrating Conferencing Nodes between host VMware servers 300
Prerequisites 300Manual migration via VMware's vMotion 300
Taking a Conferencing Node out of service 301
About maintenance mode 301
Rebooting a Conferencing Node 302
Backing up and restoring configuration 303
Backing up Conferencing Nodes 303Using your hypervisor's tools to take and restore snapshots 303Using backup and restore via the Pexip Infinity Administrator interface 303
Enabling daily automatic backups 303Manually creating a backup file 304Restoring data to the Management Node 304
Downloading a diagnostic snapshot 306
File contents 306File size 306
Automatically reporting errors 307
Content of incident reports 307Enabling and disabling automatic sending of incident reports 307
Automatically sending usage statistics 308
Enabling and disabling automatic sending of usage statistics 308Infinity Connect usage statistics 308
Appendices 309

Pexip Infinity Administrator Guide
© 2016 Pexip AS Version 12.a May 2016 Page 15 of 369
Glossary of Pexip Infinity terms 310
Pexip Infinity port usage 313
Management Node 313Inbound 313Outbound 313
Conferencing Nodes 314Inbound 314Outbound 315
Regular expression (regex) reference 317
Pattern matching examples 318Search and replace examples 318
Replacing an alias domain 318Strip leading 9 319
DNS record examples 320
Enabling endpoints to discover Conferencing Nodes 320Host DNS A-records 320DNS SRV records 320
Enabling direct federation with remote Lync / Skype for Business environments 321Example 321
Enabling access from the Infinity Connect Mobile client and the Infinity Connect desktop client 322Example 322
Encryption methodologies 323
Pexip nodes 323Endpoints 323
Supported RFCs 324
Changing aspect ratios 325
Presentations 325Pexip Infinity 325Endpoints 325
Main video 325Pexip Infinity 325Endpoints 325
Advanced VMware ESXi administration 326
Supported vSphere versions 326Supported vSphere editions 326Management Node network requirements 326Permissions in vCenter Server (or on ESXi hosts) 326Host server requirements 327General recommendations 327Impact on virtual environment 327
CPU 327

Pexip Infinity Administrator Guide
© 2016 Pexip AS Version 12.a May 2016 Page 16 of 369
Memory 327Storage 327Network 327
Traffic shaping 328NIC teaming 328vMotion 328Enhanced vMotion Compatibility (EVC) 328vSphere High Availability 328vSphere Fault Tolerance 329
PSTN gateways and toll fraud 330
Using Microsoft Lync / Skype for Business with Pexip Infinity 331
Architecture options 331Pexip Infinity as a Lync gateway 331
Using Multiway with Pexip Infinity 333
Example scenario 333Configuring endpoints using xConfiguration commands 333
E20 333MXP 333T150 333
Deployments without VCS Conference Factory 333Endpoint configuration 333Pexip Infinity configuration 333
Deployments using VCS Conference Factory 334Endpoint configuration 334VCS configuration 334Pexip Infinity configuration 334
Configuring Pexip Infinity for public DMZ deployments 336
Configuring Pexip Infinity nodes to work behind a static NAT device 336Enabling routing between local network nodes and DMZ nodes 336
Example 337Remote SIP endpoints behind a remote firewall/NAT 338
Information sent when usage reporting is enabled 339
Troubleshooting the Pexip Infinity platform 342
Pexip Infinity deployment and upgrading 342Joining a conference and viewing content 344Conference connectivity and TLS issues 346Pexip Infinity administration 347Infinity Connect clients 347
Troubleshooting LDAP server connections 349
Connecting to the LDAP server 349Connection process 349

Pexip Infinity Administrator Guide
© 2016 Pexip AS Version 12.a May 2016 Page 17 of 369
Connectivity error messages and using the support log 349Unable to contact the LDAP server 349Connection errors: TLS certificate issues 350Connection errors: binding to the server fails e.g. invalid credentials 350Connection errors when using insecure transport 350Connection errors: Error syncing with LDAP 350
Cannot log in to Pexip Infinity despite using correct credentials 351VMRs not created as expected by a sync template 351
User search or user filters not being applied 351Using ldapsearch or AD Explorer to view the LDAP database 351
Features added in previous releases 353
Features added in version 11 353Features added in version 10 356Features added in version 9 359Features added in version 8 363
Pexip Infinity platform features 363Microsoft Lync interoperability features 364Web and mobile client features 364
Features added in version 7 364Pexip Infinity platform features 365Microsoft Lync interoperability features 366Web and mobile client features 366Usability features 366
Features added in version 6 366Pexip Infinity platform features 366Security features 367Pexip Web App features 368Usability features 368
Software license information 369
Pexip Infinity license 369Third party licenses 369

Pexip Infinity Administrator Guide
© 2016 Pexip AS Version 12.a May 2016 Page 18 of 369
The Pexip Infinity platformPexip Infinity is a scalable meeting platform that connects virtually any communications tool, such as Microsoft Lync / Skype for Business, and traditional video and audio conferencing together for a seamless meeting experience.
In this section:
Introduction to Pexip Infinity 19
Pexip Infinity version 12 features and specifications 20
What's new in version 12? 26
Pexip Infinity components 30
Benefits and components of the Pexip Infinity distributed architecture 34
Customizing the Pexip Infinity user experience 45

Pexip Infinity Administrator GuideThe Pexip Infinity platform
Introduction to Pexip Infinity
© 2016 Pexip AS Version 12.a May 2016 Page 19 of 369
Introduction to Pexip InfinityPexip Infinity is a virtualized and distributed multipoint conferencing platform. It enables scaling of video, voice and data collaboration across organizations, enabling everyone to engage in high definition video, web, and audio conferencing.
It provides any number of users with their own personal Virtual Meeting Rooms, as well as Virtual Auditoriums, which they can use to hold conferences, share presentations, and chat. Participants can join over audio or video from any location using virtually any type of communications tool (such as Microsoft Lync / Skype for Business, a traditional conferencing endpoint, a mobile telephone, or a Pexip Infinity Connect client) for a seamless meeting experience.
Virtual Meeting Rooms and Virtual Auditoriums can also be accessed through a Virtual Reception IVR service, which allows all participants to dial a single number to access Pexip Infinity, and then use the DTMF tones on their endpoint to select the conference they want to join. The platform also includes the Pexip Distributed Gateway service, allowing end users to place point-to-point calls to other endpoints that use different protocols and media formats.
The complementary Pexip Infinity Connect suite of clients allow conference participants to access any Virtual Meeting Room or Virtual Auditorium within the Pexip Infinity deployment, either:
l directly from a web browser without any special downloads or plugins
l from an installable desktop client
l from an Infinity Connect Mobile client, available for iOS or Android.
Infinity Connect users can also control the conference, view presentations, share content and chat. Infinity Connect can also be used to make outbound point-to-point calls when used in conjunction with the Pexip Distributed Gateway.
For more information on using and administering Infinity Connect, see Introduction to Infinity Connect.
Pexip Infinity’s unique distributed architecture is purely software-based and virtualized, running on industry-standard servers, meaning it can be deployed quickly and simply with the flexibility to scale as required.
Pexip Infinity Administrator GuideThe Pexip Infinity platform
Pexip Infinity version 12 features and specifications
© 2016 Pexip AS Version 12.a May 2016 Page 20 of 369
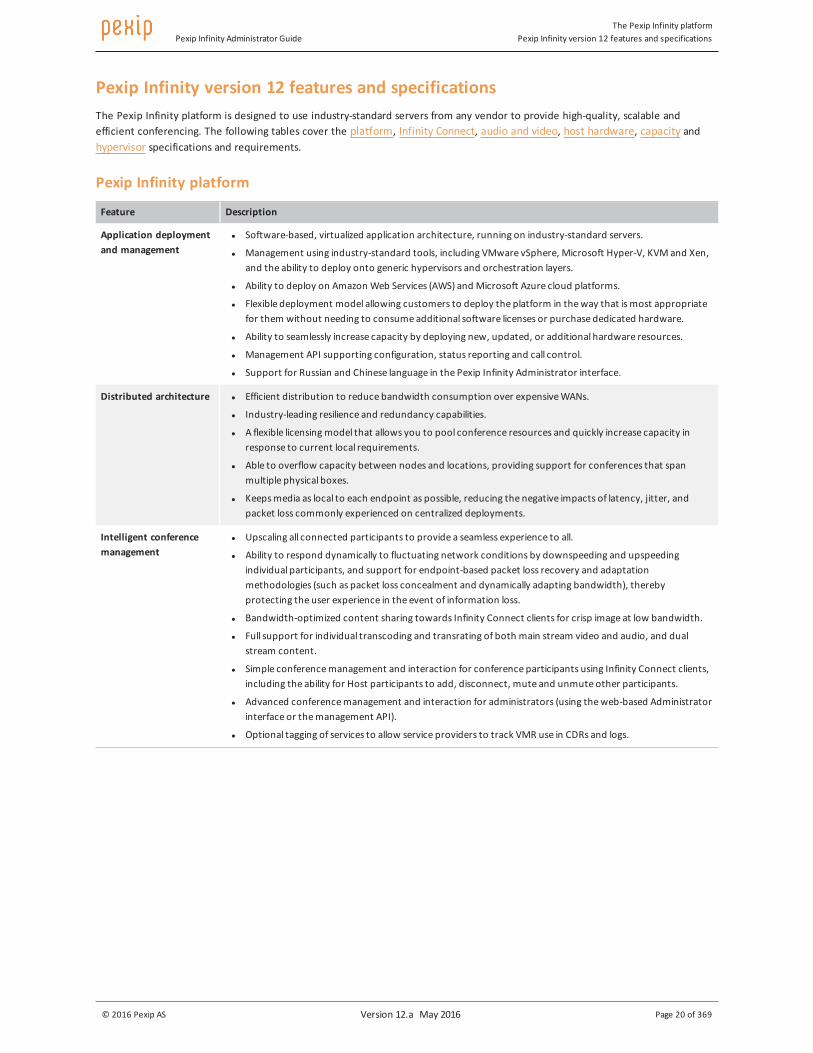
Pexip Infinity version 12 features and specificationsThe Pexip Infinity platform is designed to use industry-standard servers from any vendor to provide high-quality, scalable and efficient conferencing. The following tables cover the platform, Infinity Connect, audio and video, host hardware, capacity and hypervisor specifications and requirements.
Pexip Infinity platform
Feature Description
Application deployment and management
l Software-based, virtualized application architecture, running on industry-standard servers.
l Management using industry-standard tools, including VMware vSphere, Microsoft Hyper-V, KVM and Xen, and the ability to deploy onto generic hypervisors and orchestration layers.
l Ability to deploy on Amazon Web Services (AWS) and Microsoft Azure cloud platforms.
l Flexible deployment model allowing customers to deploy the platform in the way that is most appropriate for them without needing to consume additional software licenses or purchase dedicated hardware.
l Ability to seamlessly increase capacity by deploying new, updated, or additional hardware resources.
l Management API supporting configuration, status reporting and call control.
l Support for Russian and Chinese language in the Pexip Infinity Administrator interface.
Distributed architecture l Efficient distribution to reduce bandwidth consumption over expensive WANs.
l Industry-leading resilience and redundancy capabilities.
l A flexible licensing model that allows you to pool conference resources and quickly increase capacity in response to current local requirements.
l Able to overflow capacity between nodes and locations, providing support for conferences that span multiple physical boxes.
l Keeps media as local to each endpoint as possible, reducing the negative impacts of latency, jitter, and packet loss commonly experienced on centralized deployments.
Intelligent conference management
l Upscaling all connected participants to provide a seamless experience to all.
l Ability to respond dynamically to fluctuating network conditions by downspeeding and upspeeding individual participants, and support for endpoint-based packet loss recovery and adaptation methodologies (such as packet loss concealment and dynamically adapting bandwidth), thereby protecting the user experience in the event of information loss.
l Bandwidth-optimized content sharing towards Infinity Connect clients for crisp image at low bandwidth.
l Full support for individual transcoding and transrating of both main stream video and audio, and dual stream content.
l Simple conference management and interaction for conference participants using Infinity Connect clients, including the ability for Host participants to add, disconnect, mute and unmute other participants.
l Advanced conference management and interaction for administrators (using the web-based Administrator interface or the management API).
l Optional tagging of services to allow service providers to track VMR use in CDRs and logs.

Pexip Infinity Administrator GuideThe Pexip Infinity platform
Pexip Infinity version 12 features and specifications
© 2016 Pexip AS Version 12.a May 2016 Page 21 of 369
Feature Description
Conferencing services l Virtual Meeting Rooms providing personal meeting spaces for everyone within the organization. VMRs can be bulk-provisioned from directory information contained in a Windows Active Directory LDAP server, or any other LDAP-accessible database.
l Virtual Auditoriums designed to hold larger lecture-style conferences.
l Virtual Reception IVR (Interactive Voice Response) service.
l Pexip Distributed Gateway enables endpoints to make point-to-point calls to other endpoints that use different protocols and media formats (e.g. from Lync / Skype for Business or WebRTC to H.323). Includes DTMF support.
l Choice of layouts: main speaker only; main speaker + 7 PIPs; main speaker + 21 PIPs (see Selecting the layout seen by participants for more information).
l Conference participants can chat and share messaging content.
l Can output a dedicated multimedia stream to enterprise CDN (Content Delivery Network) streaming and recording services such as Wowza, Adobe, VBrick, Abiliteam, Qumu and Azure Media Services, and to public streaming services such as YouTube.
l Ability to manage conferences and participants:
o PIN-protect conferences and differentiate between Hosts and Guests.
o Lock a conference to prevent any further participants from joining.
o Transfer a participant to another conference (via management and client APIs only).
o Limit the number of participants in a conference, on a per-conference basis.
o Limit the bandwidth used by each participant, on a per-conference and/or global basis.
l Ability to re-brand with your own images and voice prompts, on a per-conference basis.
l Ability to re-brand the Infinity Connect experience.
l Ability to integrate Infinity Connect (WebRTC/RTMP) functionality with third-party applications and websites via a front-end SDK.
l Call policy decisions can be taken by an external system.
Broad interoperability and protocol support
l Full support for existing industry-standard protocols (SIP, H.323), as well as other technologies (HTML5, Microsoft Lync, Skype for Business, RTMP, WebRTC, Skype).
l Easy integration with existing SIP and H.323 call control solutions including Cisco UCM, Cisco VCS, Polycom CMA, Polycom DMA, Avaya Aura, Microsoft Lync 2010 and 2013, Skype for Business and others.
l Conferencing Nodes can act as SIP registrars and as H.323 gatekeepers.
l Support for automatic call escalation using Multiway (Cisco VCS), call transfer capability (Cisco UCM), and CCCP to a Microsoft AVMCU.
l Support for presence and customizable avatar published to a Microsoft Lync / Skype for Business client.
l Support for automatic dial-out to audio bridges, including automatically issuing conference aliases and pass codes via DTMF tone generation.
l IPv4 and IPv6 support.
l Ability to tag management, call signaling, and media packets independently with DSCP QoS support.
l Support for Forward Error Correction (FEC), downspeeding, bandwidth throttling, and other packet loss concealment technologies.
Firewall traversal l Support for static NAT.
l Support for static routes.
l Support for far-end NAT traversal (media latching).
l Support for media over a TCP connection to assist with firewall traversal.
Pexip Infinity Administrator GuideThe Pexip Infinity platform
Pexip Infinity version 12 features and specifications
© 2016 Pexip AS Version 12.a May 2016 Page 22 of 369
Feature Description
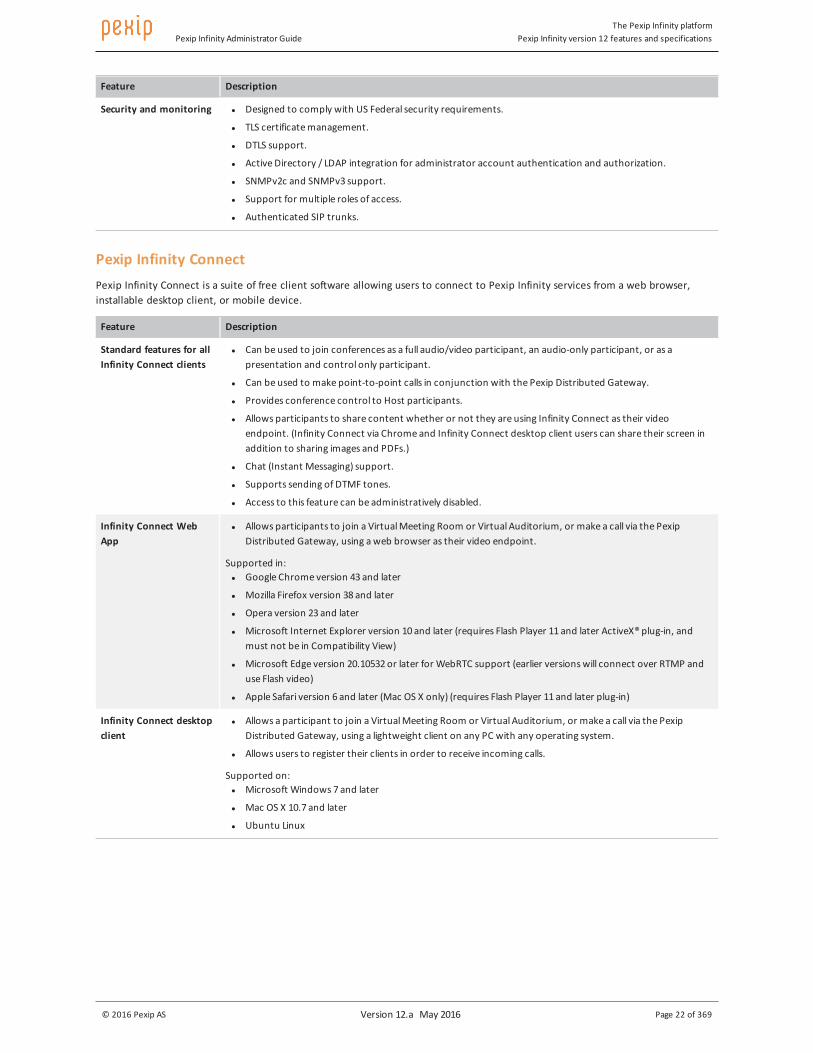
Security and monitoring l Designed to comply with US Federal security requirements.
l TLS certificate management.
l DTLS support.
l Active Directory / LDAP integration for administrator account authentication and authorization.
l SNMPv2c and SNMPv3 support.
l Support for multiple roles of access.
l Authenticated SIP trunks.
Pexip Infinity Connect Pexip Infinity Connect is a suite of free client software allowing users to connect to Pexip Infinity services from a web browser, installable desktop client, or mobile device.
Feature Description
Standard features for all Infinity Connect clients
l Can be used to join conferences as a full audio/video participant, an audio-only participant, or as a presentation and control only participant.
l Can be used to make point-to-point calls in conjunction with the Pexip Distributed Gateway.
l Provides conference control to Host participants.
l Allows participants to share content whether or not they are using Infinity Connect as their video endpoint. (Infinity Connect via Chrome and Infinity Connect desktop client users can share their screen in addition to sharing images and PDFs.)
l Chat (Instant Messaging) support.
l Supports sending of DTMF tones.
l Access to this feature can be administratively disabled.
Infinity Connect Web App
l Allows participants to join a Virtual Meeting Room or Virtual Auditorium, or make a call via the Pexip Distributed Gateway, using a web browser as their video endpoint.
Supported in: l Google Chrome version 43 and later
l Mozilla Firefox version 38 and later
l Opera version 23 and later
l Microsoft Internet Explorer version 10 and later (requires Flash Player 11 and later ActiveX® plug-in, and must not be in Compatibility View)
l Microsoft Edge version 20.10532 or later for WebRTC support (earlier versions will connect over RTMP and use Flash video)
l Apple Safari version 6 and later (Mac OS X only) (requires Flash Player 11 and later plug-in)
Infinity Connect desktop client
l Allows a participant to join a Virtual Meeting Room or Virtual Auditorium, or make a call via the Pexip Distributed Gateway, using a lightweight client on any PC with any operating system.
l Allows users to register their clients in order to receive incoming calls.
Supported on: l Microsoft Windows 7 and later
l Mac OS X 10.7 and later
l Ubuntu Linux

Pexip Infinity Administrator GuideThe Pexip Infinity platform
Pexip Infinity version 12 features and specifications
© 2016 Pexip AS Version 12.a May 2016 Page 23 of 369
Feature Description
Infinity Connect Mobile client
l Allows a participant to join a Virtual Meeting Room or Virtual Auditorium, or make a call via the Pexip Distributed Gateway, using a client downloaded onto their mobile device.
l Enables participants to view presentations on their mobile device, regardless of whether they are a video, audio-only, or control-only participant.
l Android users can register their device in order to receive incoming calls.
Available versions:
l Infinity Connect Mobile client for iOS
l Infinity Connect Mobile client for Android
Audio and video specifications
Feature Description
Supported protocols l H.323
l SIP
l WebRTC
l RTMP
l Microsoft Lync / Skype for Business
l Individual protocols can be administratively enabled and disabled.
Audio codecs l G.711(a/µ)
l G.719 (this product is covered by patent rights licensed from Telefonaktiebolaget LM Ericsson)
l G.722
l G.722.1, G.722.1 Annex C (licensed from Polycom®)
l Siren7™, Siren14™ (licensed from Polycom®)
l G.729, G.729A, G.729B
l Opus
l SILK
l MPEG-4 AAC-LD (MPEG-4 video technology licensed by Fraunhofer IIS)
l Speex
l AAC-LC
Video codecs l H.261
l H.263, H.263++
l H.264 (Constrained Baseline Profile and Baseline Profile), H.264 SVC (UCIF Profiles 0, 1)
l VP8
l Flash video (for Internet Explorer and Safari browser support)
l RTVideo (licensed from Microsoft®).
Content sharing l H.239 (for H.323)
l BFCP (for SIP)
l RDP (for Microsoft Lync / Skype for Business)
l VP8 (for WebRTC high framerate)
l JPEG (for apps and web).
Bandwidth l Connections from 8 kbps per participant (G.729, audio-only), up to 6 Mbps per participant (will vary depending on the deployment environment, video resolutions, etc.).

Pexip Infinity Administrator GuideThe Pexip Infinity platform
Pexip Infinity version 12 features and specifications
© 2016 Pexip AS Version 12.a May 2016 Page 24 of 369
Feature Description
Other audio and video features
l Resolutions from QCIF to Full HD 1080p (1920 x 1080); 4:3 and 16:9 aspect ratios.
l Frame rates up to 30 fps.
l Pexip StudioSound™ for recording-studio audio quality.
l Wideband audio mixing.
l Automatic gain control.
l Control individual audio via Infinity Connect clients.
l Support for AES (128-bit key size) and DTLS SRTP encryption.
Host hardware requirements
Feature Description
CPU Conferencing Nodes
l We recommend Intel Xeon E5-2600 series (Haswell architecture) or similar Xeon processors from 2012 or later, 2.3 GHz or faster.
l We recommend 10-12 physical cores per socket.
Management Node
l Any processor, 2.0 GHz or faster.
l 2 cores.
RAM Conferencing Nodes
Dependent on the number of CPUs, but generally:
l Minimum 2 GB of RAM per Conferencing Node, plus 2 GB per host.
l We recommend 1 GB (or more) RAM per physical core.
Management Node
l Minimum 4 GB RAM for the Management Node.
Storage Conferencing Nodes l 50 GB minimum per Conferencing Node
l 500 GB total per server (to allow for snapshots etc.)
Management Node
l 100 GB SSD
GPU l Host servers do not require any specific hardware cards or GPUs.
OS l The Pexip Infinity VMs are delivered as VM images (.ova etc) to be run directly on the hypervisor. No OS should be installed.
Network l Gigabit Ethernet connectivity is strongly recommended.
l In general, you can expect 0.5-3 Mbps per call, depending on call control setup.
Multiple VMs sharing the same hardware
l Pexip Infinity Conferencing Nodes and Management Nodes may share the same physical host.
l Pexip nodes may also share the same physical host with other virtual machines.
l Pexip virtual machines must be configured with dedicated CPU and memory resources, i.e. Pexip virtual machines do not support oversubscription.

Pexip Infinity Administrator GuideThe Pexip Infinity platform
Pexip Infinity version 12 features and specifications
© 2016 Pexip AS Version 12.a May 2016 Page 25 of 369
Feature Description
Service provider considerations
A Pexip deployment can manage multiple customers in various ways:
l Single Management Node, multiple domains, shared Conferencing Nodes
A single installation with one Management Node and one or more Conferencing Nodes is used by all customers. Call control or DNS sends calls for all domains to the shared Conferencing Nodes. Does not provide dedicated capacity per customer.
l Single Management Node, multiple domains, dedicated Conferencing Nodes
One or more Conferencing Nodes per customer. Allows for dedicated capacity per customer.
l Dedicated Management Node and dedicated Conferencing Nodes per customer instance
Allows for close customer network integration, using VLANs, hosted on a shared server farm with multiple VLANs. The dedicated Management Node allows for customer self-management.
Capacity
Feature Description
Call capacity Capacity is dependent on server specifications. As a general indication, using our recommended hardware (Intel Haswell, 10 cores, 2.3 GHz) Pexip Infinity can connect:
l up to two High Definition 720p30 calls per CPU core (based on 1.1 GHz per call plus 20% headroom)
l up to 20 audio-only AAC-LD calls at 64 kbps.
Servers that are older, have slower processors, or have fewer CPUs, will have a lower overall capacity.
Hypervisor requirements
Feature Description
VMware l Version 12 of the Pexip Infinity platform supports VMware vSphere ESXi 5.x and 6.0, although we recommend ESXi 5.5 or 6.0. Support for ESXi 4.1 is being deprecated - if you have upgraded from a version prior to v12, you can still deploy Conferencing Nodes to servers running ESXi 4.1; however if you have a new deployment using v12 and attempt to deploy a Conferencing Node to a server running ESXi 4.1, that node will go straight into maintenance mode.
l We recommend at least the Standard edition.
l The Enterprise and Enterprise Plus editions have additional features that can be taken advantage of by Pexip Infinity in larger deployments.
l The Pexip Infinity platform will run on the free edition of vSphere Hypervisor. However, this edition has a number of limitations that mean we do not recommend its use except in smaller deployments, or test or demo environments. Notably, automatic deployment of Conferencing Nodes is not supported.
Microsoft Hyper-V l The Pexip Infinity platform supports Microsoft Hyper-V in the form of Microsoft Hyper-V Server 2012 and later, and Windows Server 2012 and later.
KVM l Pexip Infinity requires your KVM environment to include Linux kernel 3.10.0 or later, and QEMU 1.5.0 or later. This means the following distributions: Debian 8, RHEL 7, SLES 12, or Ubuntu 14.04 (or later, where appropriate).
Xen l Pexip Infinity requires Xen 4.2 and later.
Other hypervisors and orchestration layers
l Conferencing Nodes can be provisioned with a configuration document generated independently of a generic VM image. This permits deployment of Pexip Infinity onto unsupported hypervisors as well as onto supported hypervisors that are managed by an orchestration layer.
l Pexip Infinity can be deployed on Amazon Web Services (AWS).
l Pexip Infinity can be deployed on Microsoft Azure.
l Pexip Infinity can be deployed on the HPE Helion Openstack® Cloud platform.
Pexip Infinity Administrator GuideThe Pexip Infinity platformWhat's new in version 12?
© 2016 Pexip AS Version 12.a May 2016 Page 26 of 369
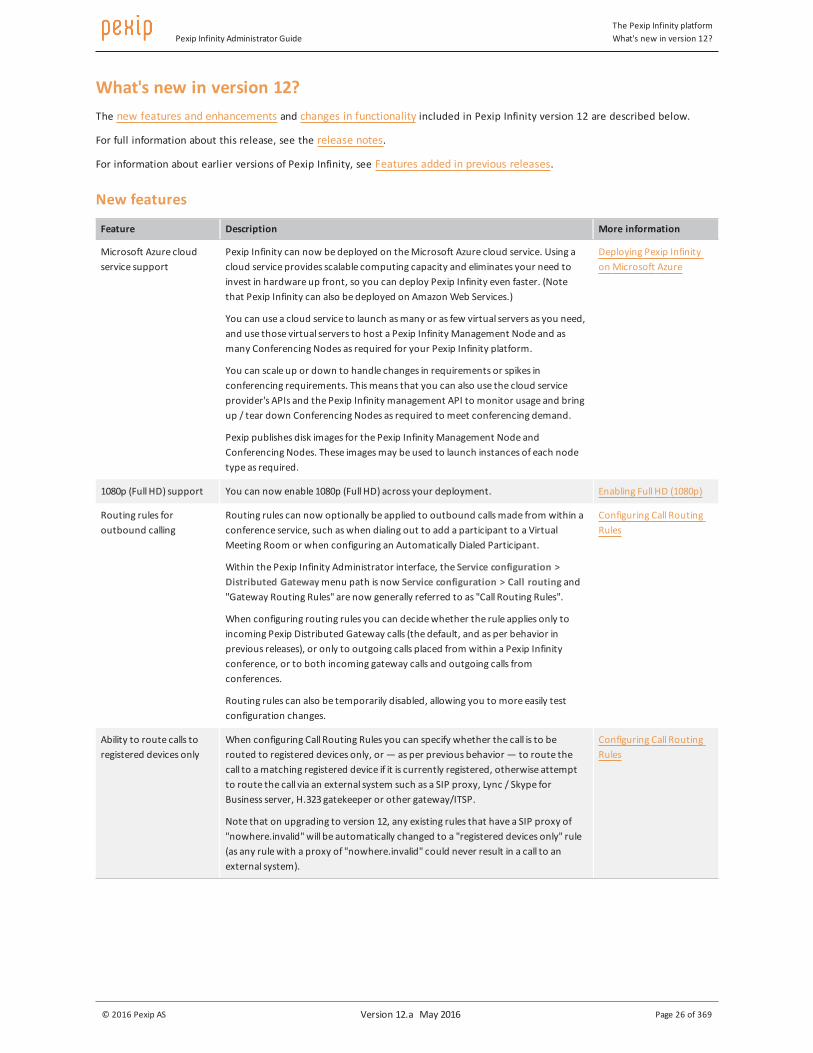
What's new in version 12?The new features and enhancements and changes in functionality included in Pexip Infinity version 12 are described below.
For full information about this release, see the release notes.
For information about earlier versions of Pexip Infinity, see Features added in previous releases.
New features
Feature Description More information
Microsoft Azure cloud service support
Pexip Infinity can now be deployed on the Microsoft Azure cloud service. Using a cloud service provides scalable computing capacity and eliminates your need to invest in hardware up front, so you can deploy Pexip Infinity even faster. (Note that Pexip Infinity can also be deployed on Amazon Web Services.)
You can use a cloud service to launch as many or as few virtual servers as you need, and use those virtual servers to host a Pexip Infinity Management Node and as many Conferencing Nodes as required for your Pexip Infinity platform.
You can scale up or down to handle changes in requirements or spikes in conferencing requirements. This means that you can also use the cloud service provider's APIs and the Pexip Infinity management API to monitor usage and bring up / tear down Conferencing Nodes as required to meet conferencing demand.
Pexip publishes disk images for the Pexip Infinity Management Node and Conferencing Nodes. These images may be used to launch instances of each node type as required.
Deploying Pexip Infinity on Microsoft Azure
1080p (Full HD) support You can now enable 1080p (Full HD) across your deployment. Enabling Full HD (1080p)
Routing rules for outbound calling
Routing rules can now optionally be applied to outbound calls made from within a conference service, such as when dialing out to add a participant to a Virtual Meeting Room or when configuring an Automatically Dialed Participant.
Within the Pexip Infinity Administrator interface, the Service configuration > Distributed Gateway menu path is now Service configuration > Call routing and "Gateway Routing Rules" are now generally referred to as "Call Routing Rules".
When configuring routing rules you can decide whether the rule applies only to incoming Pexip Distributed Gateway calls (the default, and as per behavior in previous releases), or only to outgoing calls placed from within a Pexip Infinity conference, or to both incoming gateway calls and outgoing calls from conferences.
Routing rules can also be temporarily disabled, allowing you to more easily test configuration changes.
Configuring Call Routing Rules
Ability to route calls to registered devices only
When configuring Call Routing Rules you can specify whether the call is to be routed to registered devices only, or — as per previous behavior — to route the call to a matching registered device if it is currently registered, otherwise attempt to route the call via an external system such as a SIP proxy, Lync / Skype for Business server, H.323 gatekeeper or other gateway/ITSP.
Note that on upgrading to version 12, any existing rules that have a SIP proxy of "nowhere.invalid" will be automatically changed to a "registered devices only" rule (as any rule with a proxy of "nowhere.invalid" could never result in a call to an external system).
Configuring Call Routing Rules
Pexip Infinity Administrator GuideThe Pexip Infinity platformWhat's new in version 12?
© 2016 Pexip AS Version 12.a May 2016 Page 27 of 369
Feature Description More information
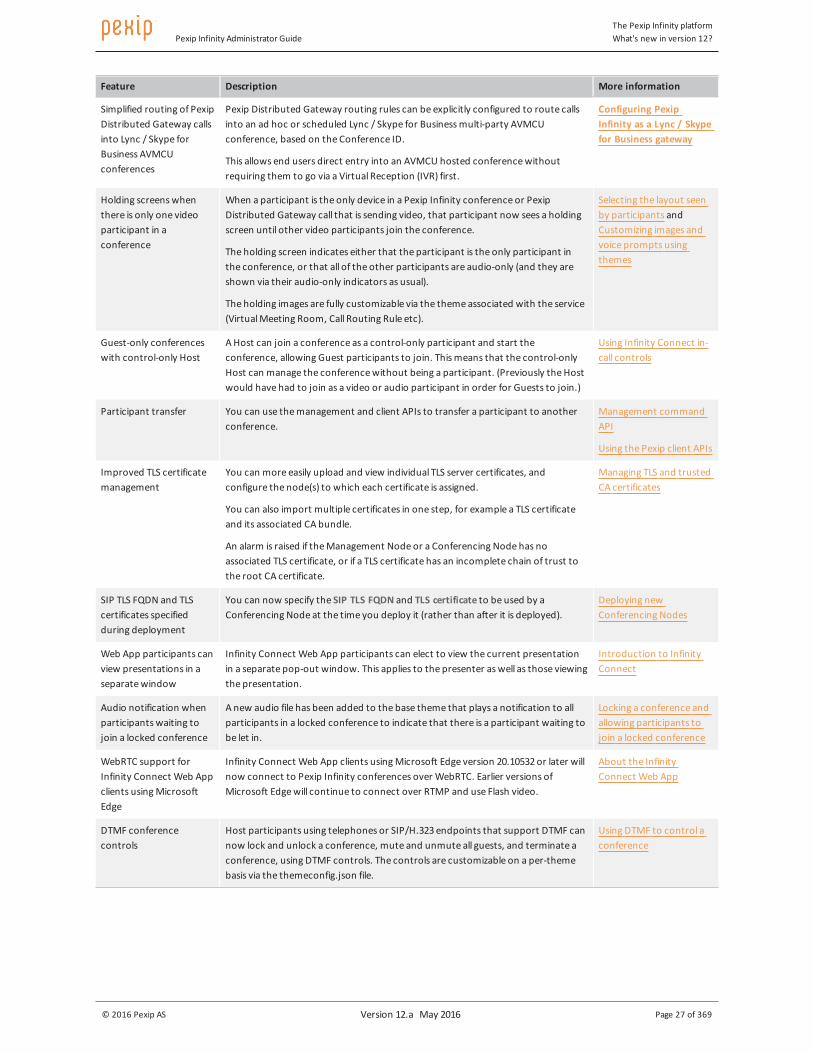
Simplified routing of Pexip Distributed Gateway calls into Lync / Skype for Business AVMCU conferences
Pexip Distributed Gateway routing rules can be explicitly configured to route calls into an ad hoc or scheduled Lync / Skype for Business multi-party AVMCU conference, based on the Conference ID.
This allows end users direct entry into an AVMCU hosted conference without requiring them to go via a Virtual Reception (IVR) first.
Configuring Pexip Infinity as a Lync / Skype for Business gateway
Holding screens when there is only one video participant in a conference
When a participant is the only device in a Pexip Infinity conference or Pexip Distributed Gateway call that is sending video, that participant now sees a holding screen until other video participants join the conference.
The holding screen indicates either that the participant is the only participant in the conference, or that all of the other participants are audio-only (and they are shown via their audio-only indicators as usual).
The holding images are fully customizable via the theme associated with the service (Virtual Meeting Room, Call Routing Rule etc).
Selecting the layout seen by participants and Customizing images and voice prompts using themes
Guest-only conferences with control-only Host
A Host can join a conference as a control-only participant and start the conference, allowing Guest participants to join. This means that the control-only Host can manage the conference without being a participant. (Previously the Host would have had to join as a video or audio participant in order for Guests to join.)
Using Infinity Connect in-call controls
Participant transfer You can use the management and client APIs to transfer a participant to another conference.
Management command API
Using the Pexip client APIs
Improved TLS certificate management
You can more easily upload and view individual TLS server certificates, and configure the node(s) to which each certificate is assigned.
You can also import multiple certificates in one step, for example a TLS certificate and its associated CA bundle.
An alarm is raised if the Management Node or a Conferencing Node has no associated TLS certificate, or if a TLS certificate has an incomplete chain of trust to the root CA certificate.
Managing TLS and trusted CA certificates
SIP TLS FQDN and TLS certificates specified during deployment
You can now specify the SIP TLS FQDN and TLS certificate to be used by a Conferencing Node at the time you deploy it (rather than after it is deployed).
Deploying new Conferencing Nodes
Web App participants can view presentations in a separate window
Infinity Connect Web App participants can elect to view the current presentation in a separate pop-out window. This applies to the presenter as well as those viewing the presentation.
Introduction to Infinity Connect
Audio notification when participants waiting to join a locked conference
A new audio file has been added to the base theme that plays a notification to all participants in a locked conference to indicate that there is a participant waiting to be let in.
Locking a conference and allowing participants to join a locked conference
WebRTC support for Infinity Connect Web App clients using Microsoft Edge
Infinity Connect Web App clients using Microsoft Edge version 20.10532 or later will now connect to Pexip Infinity conferences over WebRTC. Earlier versions of Microsoft Edge will continue to connect over RTMP and use Flash video.
About the Infinity Connect Web App
DTMF conference controls
Host participants using telephones or SIP/H.323 endpoints that support DTMF can now lock and unlock a conference, mute and unmute all guests, and terminate a conference, using DTMF controls. The controls are customizable on a per-theme basis via the themeconfig.json file.
Using DTMF to control a conference

Pexip Infinity Administrator GuideThe Pexip Infinity platformWhat's new in version 12?
© 2016 Pexip AS Version 12.a May 2016 Page 28 of 369
Feature Description More information
Including the PIN in VMR dial strings
SIP and H.323 endpoints and Lync / Skype for Business clients that dial into PIN-protected conferences can bypass the PIN entry screen by including the PIN in the dialed alias.
Including the PIN in the dial string to bypass the PIN entry screen
Virtual Reception support for Lync / Skype for Business clients
Lync/Skype for Business clients can now use the Virtual Reception service to either join a VMR or to route calls via the Pexip Distributed Gateway.
Virtual Receptions and Lync / Skype for Business clients
Ability to restrict or transform the aliases entered into a Virtual Reception
New Virtual Reception configuration options allow you to restrict the aliases or alias patterns that can be entered into a Virtual Reception and optionally transform the entered alias before the Virtual Reception attempts to route the call to that new destination.
Restricting or transforming the aliases entered into a Virtual Reception
Including the VMR alias / Conference ID in Virtual Reception dial strings
SIP and H.323 endpoints can optionally bypass having to enter the VMR destination alias or a Lync / Skype for Business Conference ID via DTMF tones.
Instead they can include the numeric alias of the VMR or the Lync / Skype for Business Conference ID in the Virtual Reception dial string.
About the Virtual Reception IVR service and Using the Lync IVR gateway service
Automatic daily backups You can choose to automatically backup the Management Node configuration data on a daily basis.
Also, when restoring a backup there is a new confirmation step where you can see the Management Node IP address that will be restored.
Backing up and restoring configuration
Global bandwidth limits You can now set the maximum inbound and outbound call bandwidth on a system-wide basis, as well as per service.
Restricting call bandwidth
Additional Conferencing Node status information
Information regarding a Conferencing Node's current media load and total estimated capacity in terms of HD connections is now available via the main Conferencing Node status page of the Administrator interface.
Viewing Conferencing Nodes
Adaptive strategy for registration refresh intervals
When calculating the registration refresh interval for registered SIP and H.323 devices, Pexip Infinity now uses an adaptive strategy by default. It will automatically adjust the refresh interval depending on the number of current registrations on the Conferencing Node handling the registration request, in order to spread the load of registration refreshes.
You can also configure separate registration refresh intervals for SIP endpoints that are registering from behind a NAT.
Registering devices to Pexip Infinity
Improved theme management
When adding or modifying a theme you can now assign the Call Routing Rules that will use that theme.
Creating and editing themes
Dual streaming RTMP participants can be added via the Pexip Infinity Administrator interface
When using the Pexip Infinity Administrator interface to add an RTMP streaming participant to a conference you can now optionally enter the RTMP URL for a second (presentation) stream.
Manually dialing out to a participant from a conference
"Keep conference alive" option for manually dialed participants
You can now determine whether participants who have been added to a conference by an administrator (either from the Administrator interface or using the Management API) have the ability to keep a conference alive.
Automatically ending a conference
Display name for dialed participants
You can specify a display name for participants that are added to a conference either manually via the Pexip Infinity Administrator interface, as an automatically dialed participant, or via the management API.
Manually dialing out to a participant from a conference
Audio output device selection
From Chrome 50, Infinity Connect clients will offer the option to select the device used for audio output.
About Infinity Connect client settings

Pexip Infinity Administrator GuideThe Pexip Infinity platformWhat's new in version 12?
© 2016 Pexip AS Version 12.a May 2016 Page 29 of 369
Changes in functionality in this release
Feature Description More information
Maximum PIN length of 20 digits
The maximum PIN length for Host and Guest PINs has been extended from 10 to 20 digits.
If you use customized themes you should regenerate your PIN entry screen images to ensure that you have customized versions of the new screens (for the entry of 11–20 digits). This is particularly important if you use PINs with a trailing #.
Automatically generating the PIN entry screen images
Support for VMware vSphere ESXi 4.1 has been deprecated
ESXi 4.1 support has been deprecated in Pexip Infinity v12 because ESXi 4.1 does not support AVX or AVX2, and these are required in Pexip Infinity v12 (see below).
If you have upgraded to Pexip Infinity from a version prior to v12, you can still deploy Conferencing Nodes to servers running ESXi 4.1; however if you have a new deployment using v12 and attempt to deploy a Conferencing Node to a server running ESXi 4.1, that node will go straight into maintenance mode.
AVX or AVX2 required From version 12, new deployments of Pexip Infinity require AVX or AVX2 processor instruction sets. Conferencing Nodes deployed onto a server with older instruction sets will go straight into maintenance mode.
Upgrades from previous versions to version 12 are not affected. Your existing Conferencing Nodes, and any newly deployed Conferencing Nodes, will run on SSE4.1.
Management configuration API now always allocates new resource object IDs.
The management configuration API now always allocates a new object ID when creating a new resource. Previously, if a resource was deleted, its ID would have been reused when creating a new resource of the same type.
Management configuration API

Pexip Infinity Administrator GuideThe Pexip Infinity platformPexip Infinity components
© 2016 Pexip AS Version 12.a May 2016 Page 30 of 369
Pexip Infinity componentsThe Pexip Infinity conferencing platform is a virtual entity that consists of a Management Node and one or more securely interconnected Conferencing Nodes. Both are software applications that you deploy as Virtual Machines (VMs) on host servers distributed around the globe. You can add, remove or move Conferencing Nodes according to your conferencing requirements.
Conferences take place in Virtual Meeting Rooms and Virtual Auditoriums, which each having one or more associated aliases. Conference participants access a Virtual Meeting Room or Virtual Auditorium by dialing any one of its aliases directly, or via the Virtual Reception IVR service. This connects them to the Virtual Meeting Room or Virtual Auditorium on their nearest Conferencing Node. A single such conference can take place across one, two, or more Conferencing Nodes with no difference in conference experience from the participants' perspective.
Conference participants can access Virtual Meeting Rooms and Virtual Auditoriums from virtually any endpoint, including the Pexip Infinity Connect suite of clients (which includes the Infinity Connect desktop client, the Infinity Connect Mobile client and the Infinity Connect Web App). Infinity Connect clients can also be used to control the conference, view presentations, share content, and chat with other conference participants.
The Pexip Distributed Gateway service interworks calls between protocols, allowing users to make calls from virtually any type of endpoint (including SIP, H.323, Lync / Skype for Business) and Infinity Connect clients (WebRTC and RTMP).
Pexip Infinity deployment showing Management Node and four Conferencing Nodes with participants connected locally
Management NodeThe Management Node is the administrative interface of the Pexip Infinity platform. It hosts the Pexip Infinity Administrator interface, from which administrators can:
l Create and manage Conferencing Nodes.
l Create and configure Pexip Infinity services (Virtual Meeting Rooms, Virtual Auditoriums, Virtual Receptions and the Pexip Distributed Gateway).
l View conference status across all Conferencing Nodes.
l Perform active conference management functions such as dialing out to new participants, adding streaming participants, locking a conference, muting a participant’s audio and disconnecting participants.
The Management Node does not handle any media or signaling. It is deployed using a virtual machine management application such as VMware's vCenter Server, or Microsoft Hyper-V, or on a cloud service such as Amazon Web Services or Microsoft Azure.

Pexip Infinity Administrator GuideThe Pexip Infinity platformPexip Infinity components
© 2016 Pexip AS Version 12.a May 2016 Page 31 of 369
Conferencing NodesThe Conferencing Nodes provide the capacity for conferences.
l They handle all conference media and signaling.
l There is no limit on the number of Conferencing Nodes that you can add to the Pexip Infinity platform.
l All Conferencing Nodes get the same service configuration from the Management Node. This means that participants throughout your organization can access the same Virtual Meeting Rooms, Virtual Auditoriums, Virtual Receptions and the Pexip Distributed Gateway even though they might be connected to different Conferencing Nodes.
l Conferencing Nodes are deployed via the Management Node. The Conferencing Node can be deployed fully automatically on host servers running VMware. On host servers running on other hypervisors or when running in a cloud service, you use the Management Node to configure the new Conferencing Node and then complete the deployment manually using the appropriate hypervisor or cloud-provider tools.
l The Pexip Infinity platform can have Conferencing Nodes that are deployed on one or more host servers, across one or more system locations and managed by one or more types of hypervisor, or it can be a hybrid deployment with nodes running on a combination of on-premises and cloud-hosted servers. A Conferencing Node can co-exist on the same host server as a Management Node.
Pexip Infinity Connect clientsConference participants do not need to have a traditional video endpoint in order to access Pexip Infinity services.
The complementary Pexip Infinity Connect suite of clients allow conference participants to access any Virtual Meeting Room or Virtual Auditorium within the Pexip Infinity deployment, either:
l directly from a web browser without any special downloads or plugins
l from an installable desktop client
l from an Infinity Connect Mobile client, available for iOS or Android.
Infinity Connect users can also control the conference, view presentations, share content and chat. Infinity Connect can also be used to make outbound point-to-point calls when used in conjunction with the Pexip Distributed Gateway.
For more information on using and administering Infinity Connect, see Introduction to Infinity Connect.
Pexip Infinity APIs and SDKs
Pexip Infinity incorporates several powerful and comprehensive APIs:
l Management API: a REST API used for configuring the entire Pexip Infinity deployment, viewing history and status, and issuing commands. See Introduction to the management API for more information.
l Client API: a REST API used for managing calls and participants, such as connect, disconnect, mute and unmute, presentation controls, DTMF, etc. See Pexip client REST API for more information.
l Policy API: a REST API used to defer decision-making to external policy servers instead of using the built-in call policies within Pexip Infinity. See Pexip Infinity External Policy Deployment Guide for more information.
In addition to these REST APIs, a Javascript API and mobile SDK are also available for building custom web-based or mobile clients. See PexRTC JavaScript client API and Creating your own mobile clients with the PexKit SDK for more information.
Virtual Meeting Rooms and Virtual AuditoriumsConferences take place in Virtual Meeting Rooms (VMRs) and Virtual Auditoriums (a type of VMR that is optimized for use by a small number of hosts and a large number of guests). Virtual Meeting Rooms and Virtual Auditoriums can host any number of people from any type of device, subject to any participant limits that have been applied by administrator.
Pexip Infinity Administrator GuideThe Pexip Infinity platformPexip Infinity components
© 2016 Pexip AS Version 12.a May 2016 Page 32 of 369
When creating Virtual Meeting Rooms and Virtual Auditoriums, you define the aliases that are used to access the Virtual Meeting Room, and any PINs that are required.
All Virtual Meeting Rooms and Virtual Auditoriums exist on all Conferencing Nodes. When a Conferencing Node receives a call to a particular Virtual Meeting Room or Virtual Auditorium alias, it creates a conference instance based on that service's settings. In this way, resources are not used until the first caller actually places a call into the conference.
When a second endpoint places a call to an alias that belongs to the same Virtual Meeting Room or Virtual Auditorium, the call is placed into the existing conference instance.
There is no limit on the number of Virtual Meeting Rooms that can be configured on your Pexip Infinity platform. Virtual Meeting Rooms do not consume resources on your deployment unless they are actually being used to host a conference. Unless you manually restrict access, the number of participants who can access a particular Virtual Meeting Room, and the number of Virtual Meeting Rooms that can be in use at the same time, are limited only by the size of your Pexip Infinity deployment.
Virtual Meeting Rooms can be bulk-provisioned from directory information contained in a Windows Active Directory LDAP server, or any other LDAP-accessible database.
For more information, see About Virtual Meeting Rooms and About Virtual Auditoriums.
Virtual ReceptionsA Virtual Reception allows you to set up one or more direct dial telephone numbers or IP addresses that participants can dial to access a single, central IVR service. From here, participants can use DTMF tones to select the Virtual Meeting Room or Virtual Auditorium they wish to join. It provides an alternative means to access Pexip Infinity services for participants who cannot dial aliases directly.
For more information, see About the Virtual Reception IVR service.
Pexip Distributed GatewayThe Pexip Distributed Gateway service interworks calls between protocols, allowing users to make calls from virtually any type of endpoint (including SIP, H.323, Lync / Skype for Business) and Infinity Connect clients (WebRTC and RTMP) and interworking these to SIP, H.323 or Lync / Skype for Business.
For more information, see About the Pexip Distributed Gateway service.
Host serversThe Management Node and Conferencing Nodes are virtual machines (VMs) that run on industry-standard host servers. A Management Node can run on the same host server as a Conferencing Node. Other Conferencing Nodes can run on host servers in the same or different locations, allowing you to create a globally distributed system.
You can have two Conferencing Nodes running on the same host server, for example to ensure service continuity during upgrade of one of the Conferencing Nodes. However, you must ensure that your hardware is not overcommitted - see Hardware requirements for more information.
The Pexip Infinity platform can also be deployed as a cloud service via Amazon Web Services (AWS) or Microsoft Azure, with private, public or hybrid deployment options.

Pexip Infinity Administrator GuideThe Pexip Infinity platformPexip Infinity components
© 2016 Pexip AS Version 12.a May 2016 Page 33 of 369
HypervisorsEach host server runs a hypervisor, an application which manages virtual machines and the physical hardware on which they are hosted. Pexip Infinity version 12 includes specific support for the following hypervisors:
l VMware vSphere ESXi (4.1, 5.x and 6.0).
l Microsoft Hyper-V (Microsoft Hyper-V Server 2012 and later, or Windows Server 2012 and later)
l KVM
l Xen (4.2 and later)
Other hypervisors and orchestration layers may be used but are not officially supported. If you wish to deploy Pexip Infinity using a non-supported hypervisor, we recommend that you contact your Pexip authorized support representative for assistance.
VM Managers
A VM manager is an application that allows you to connect to one or more VMware vSphere ESXi hypervisors when Automatically deploying a new Conferencing Node on a VMware host. VM managers supported by version 12 of Pexip Infinity are vCenter Server and vSphere.
l vCenter Server is an application used to manage groups of host servers (and therefore ESXi hypervisors) through a single interface.
l vSphere on the host server is used when managing a single host server (and therefore ESXi hypervisor).
For more information, see Using a VM manager.
EndpointsYou can register SIP and H.323 endpoints to Pexip Infinity, alternatively your endpoints could register with a call management system.
For more information, see Registering devices to Pexip Infinity and DNS record examples.
Call control
Supported call control solutions
Pexip Infinity can be easily integrated with virtually any existing SIP, H.323 and Lync / Skype for Business call control solutions including Cisco UCM, Cisco VCS, Polycom CMA, Polycom DMA, Avaya Aura, Microsoft Lync 2010 and 2013, Skype for Business and others.
Gatekeeper registration
Pexip Infinity does not register with a gatekeeper as an MCU.
Using a gatekeeper to route calls to Pexip Infinity conferences
To ensure that calls can be routed to Pexip Infinity, your gatekeeper or call control system must be configured with appropriate neighbor/zone relationships towards the Pexip Infinity Conferencing Nodes. These zones must be set up so that when an endpoint places a call to a Pexip Infinity alias, the call is routed to the endpoint's local Conferencing Node(s) as a first preference. Other non-local Conferencing Nodes can be used as secondary choices to provide redundancy.
For further information about how to configure your specific call management system to work with Pexip Infinity, see the following documentation:
l Pexip Infinity and Microsoft Lync / Skype for Business Deployment Guide l Pexip Infinity and Cisco VCS Deployment Guide l Pexip Infinity and Cisco Unified Communications Manager Deployment Guide l Pexip Infinity and Polycom DMA Deployment Guide
Pexip Infinity Administrator GuideThe Pexip Infinity platform
Benefits and components of the Pexip Infinity distributed architecture
© 2016 Pexip AS Version 12.a May 2016 Page 34 of 369
Benefits and components of the Pexip Infinity distributed architecturePexip Infinity is built on top of a distributed architecture which provides:
l centralized management of any number of Conferencing Nodes in any number of locations
l ability to deploy conferencing resources where and when required, without service outage
l significant WAN bandwidth savings in conferences that span locations
l consistent user experience, independent of the number of Conferencing Nodes
l increased resilience to temporary network outages
l ability to use Conferencing Nodes as gateways for point-to-point calls, thus avoiding hairpinning of media back to a centralized data center
l allocation of licenses from a central pool.
Distributed architecture componentsPexip Infinity distributed architecture is purely software-based and virtualized, running on industry-standard servers. It consists of:
l a single Management Node. A Pexip Infinity deployment, regardless of size, has just one Management Node. The purpose of the Management Node is to create and manage Conferencing Nodes. The Management Node is in neither the signaling nor the media path of a conference.
l one or more Conferencing Nodes. A minimal Pexip Infinity deployment will have one Management Node and one Conferencing Node. However, most Pexip Infinity deployments will have multiple Conferencing Nodes.
Configuration and provisioning data is pushed out from the Management Node to all the Conferencing Nodes; diagnostics data and event information is sent from the Conferencing Nodes back to the Management Node. There is never a need for the administrator to manage a Conferencing Node directly. This centralized management ensures that the entire deployment is configured with a consistent data set – the entire deployment acts as a single application.
A Management Node can run on the same host server as a Conferencing Node. Other Conferencing Nodes can run on host servers in the same or different locations, allowing you to create a globally distributed system. You can have two Conferencing Nodes running on the same host server, for example to ensure service continuity during upgrade of one of the Conferencing Nodes, and for maximum performance.
Scaling up
An administrator can easily scale a deployment up by creating several Conferencing Nodes in the same location (i.e. the same data center). Capacity can even be added “on the fly” – Conferencing Nodes can be added in a couple of minutes if more capacity is needed.
Scaling out
A typical Pexip Infinity deployment consists of two or more locations. If a customer has three main offices such as New York, London and Tokyo, and a concentration of users in those locations, it would make sense to deploy Conferencing Nodes in all three locations. There is no limit on the number of locations in a Pexip Infinity deployment. When additional locations need to be added, this can be done “on the fly” while the system is operating, with no impact on service availability.
Application level resiliency
Application level resiliency greatly improves on a conference experience during for instance temporary network outages, as Pexip Infinity will automatically re-establish the conference when the network connection is re-established.
Conference distributionAll Pexip Infinity services (Virtual Meeting Rooms, Virtual Auditoriums, Virtual Receptions and the Pexip Distributed Gateway) exist on all Conferencing Nodes. When a user dials in to a Virtual Meeting Room, or Virtual Auditorium a conference instance is created. This conference can exist across one or more Conferencing Nodes. Where two or more Conferencing Nodes are involved, they send the call media between each other over a secure IPsec backplane.

Pexip Infinity Administrator GuideThe Pexip Infinity platform
Benefits and components of the Pexip Infinity distributed architecture
© 2016 Pexip AS Version 12.a May 2016 Page 35 of 369
When you first deploy a Conferencing Node, you select its system location, which is a user-defined parameter that tells Pexip Infinity where the Conferencing Node is physically located. Conferences that involve more than one Conferencing Node can be locally distributed, globally distributed, or both, depending on the system location of each of the Conferencing Nodes involved. Each of these distribution scenarios are described in more detail below.
Locally distributed conferences
Locally distributed conference with two Conferencing Nodes across two host servers in the same location
Locally distributed conferences exist across two or more Conferencing Nodes in the same physical location (i.e. nodes with the same System location selected) as shown in the diagram above.
Having more than one Conferencing Node in a single location allows you to increase capacity and provide redundancy.
To maintain efficiency, no more than three Conferencing Nodes in a single location will handle the media for a particular conference instance. However, you can configure "overflow" locations that will handle the media when the original location reaches its capacity for a conference instance. For more information, see Handling of media and signaling and Location capacity overflow.
Globally distributed conferences
Globally distributed conferences exist across two or more Conferencing Nodes in different physical locations (i.e. nodes with a different System location selected). This allows participants in different regions to access the conference from their local Conferencing Node. Call media is sent between the Conferencing Nodes on behalf of all the endpoints connected to them, thus minimizing WAN bandwidth usage between locations.
This helps to provide a superior meeting experience as it reduces the distance that the media has to travel between the endpoint / client and the Conferencing Nodes.

Pexip Infinity Administrator GuideThe Pexip Infinity platform
Benefits and components of the Pexip Infinity distributed architecture
© 2016 Pexip AS Version 12.a May 2016 Page 36 of 369
Locally and globally distributed conferences
Locally and globally distributed conference with four Conferencing Nodes across four host servers in three locations
Conferences can also be locally and globally distributed at the same time, if two or more Conferencing Nodes in one location and at least one other Conferencing Node in a different location are involved. In such cases, one Conferencing Node in each location will act as the proxy for any other Conferencing Nodes in the same location that are handling the media for that conference. Call media for each location is sent between the proxies only, thus minimizing WAN bandwidth usage between locations.
Bandwidth management
Bandwidth usage
The Conferencing Node to which the current speaker is connected sends an HD video stream of the current speaker, plus a lower-resolution thumbnail (a smaller image at the bottom of the screen which shows the participant's video) of each of the other participants connected to it.
The Conferencing Node to which the previous speaker is connected sends an HD video stream of the previous speaker, plus lower-resolution thumbnails of each of the other participants connected to it.
All other Conferencing Nodes send lower-resolution thumbnails of each of the participants connected to it.

Pexip Infinity Administrator GuideThe Pexip Infinity platform
Benefits and components of the Pexip Infinity distributed architecture
© 2016 Pexip AS Version 12.a May 2016 Page 37 of 369
Bandwidth usage when current and previous speakers are connected to different Conferencing Nodes
As shown in the diagram above, if the current and previous speakers are connected to different Conferencing Nodes, there is one HD stream in each direction between the two nodes, plus one smaller stream for every participant being shown in a thumbnail.
Bandwidth usage when current and previous speakers are connected to the same Conferencing Node
As shown in the diagram above, if the current and previous speakers are connected to the same Conferencing Node, that Conferencing Node sends an HD video stream of the current speaker plus lower-resolution thumbnails of each of the other participants, to all other Conferencing Nodes. The other Conferencing Nodes send lower-resolution thumbnails of the other participants.
This architecture means that there are major bandwidth savings when compared with traditional MCU deployments where all conference participants regardless of location connect to the same MCU and individual HD and thumbnail video streams are sent between the MCU and every endpoint.

Pexip Infinity Administrator GuideThe Pexip Infinity platform
Benefits and components of the Pexip Infinity distributed architecture
© 2016 Pexip AS Version 12.a May 2016 Page 38 of 369
Significant bandwidth savings are achieved due to fewer and smaller video streams being sent between locations.
Note that:
l One HD stream uses about 1.6 Mbps.
l One thumbnail stream uses about 64-192 kbps.
l A presentation stream (not shown in the diagrams above) uses an additional 1.6 Mbps from the presenter.
l Pexip Infinity supports up to 6 Mbps per participant (this will vary depending on the deployment environment, video resolutions, etc.).
Downspeeding
Pexip Infinity will automatically downspeed and upspeed individual calls in response to fluctuating network conditions.
Bandwidth restrictions
Administrators can individually restrict the bandwidth available to participants accessing each Virtual Reception, Virtual Meeting Room and Virtual Auditorium, and per Call Routing Rule. Restrictions can also be applied across an entire deployment. For more information, see Restricting call bandwidth.
Load balancing, redundancy and scalabilityThis topic describes the load balancing, redundancy and scalability aspects of Pexip Infinity.
Load balancing
Pexip Infinity load-balances intelligently across all Conferencing Nodes that are grouped within a location (Platform configuration > Locations), according to the following logic:
l Signaling is always handled by the node that originally receives the call. Signaling cannot be moved, and always remains routed to the original node in the local location.
l If a node in that location is already handling media for this conference, and it has spare capacity, then that node will also handle the media on the new call.

Pexip Infinity Administrator GuideThe Pexip Infinity platform
Benefits and components of the Pexip Infinity distributed architecture
© 2016 Pexip AS Version 12.a May 2016 Page 39 of 369
l If no nodes are handling media for this conference, or all nodes currently handling media for this conference have no spare capacity, then media processing will occur on the least loaded node in the location. (Note that no more than three nodes in a single location can handle the media for a particular conference instance.)
l If more than one node is now involved in media processing, a backplane is created between the nodes.
l If a location has no spare capacity for this conference, the least loaded node in the overflow location is used, if configured.
For more information see Handling of media and signaling.
Load balancing of signaling between Conferencing Nodes in a single location is achieved via your call management system. You should configure it so that calls from each configured set of endpoints are routed to a configured set of Conferencing Nodes. You should configure DNS SRV records to identify all Conferencing Nodes in a location.
For further information about how to configure your specific call management system to work with Pexip Infinity, see the following documentation:
l Pexip Infinity and Microsoft Lync / Skype for Business Deployment Guide l Pexip Infinity and Cisco VCS Deployment Guide l Pexip Infinity and Cisco Unified Communications Manager Deployment Guide l Pexip Infinity and Polycom DMA Deployment Guide
Redundancy
Management Node
The Management Node is used to create Conferencing Nodes, configure conference settings, manage licenses and collate system logs. It does not handle any call processing, so if it were to become unavailable the Pexip Infinity service would be unaffected. However:
l you would not be able to make changes to services (Virtual Meeting Rooms, Virtual Auditoriums, Virtual Receptions and the Pexip Distributed Gateway)
l logging would be affected: the Management Node would not receive and collate logs from the Conferencing Nodes. This can be mitigated by Using a syslog server to collate logs
l after 14 days licenses would cease to be allocated and the Pexip Infinity service would no longer allow calls.
Conferencing Node
You should ensure that your call control system is set up so that, in the event of a Conferencing Node failing, new calls to the conference will be routed to another available Conferencing Node.
If multiple Conferencing Nodes are configured in a single location, new calls to a conference can be routed by the call control to only those nodes that are currently available. To achieve this, you must configure the call control system with all possible Conferencing Nodes (either explicitly or through DNS records), and for liveness checks to be carried out.
Note that there is no live fail-over; calls in progress on a Conferencing Node that fails will be lost, and participants will need to redial the Virtual Meeting Room or Virtual Auditorium alias in order to reconnect to the conference.
Scalability
To increase the capacity of the Pexip Infinity platform, simply deploy one or more new Conferencing Nodes from the Management Node.
You may also need to increase the number of licenses.
Handling of media and signalingMedia and signaling for each call to a Pexip Infinity service (VMR, gateway call etc.) may take different paths, depending on the location of the caller, the available capacity of Conferencing Nodes, and whether any overflow locations have been configured.
In all cases, when a call is placed to a Pexip Infinity service, the call will be received by whichever Conferencing Node was selected by your call control system or routed via DNS. This Conferencing Node will always continue to handle the signaling for that call. The following sections describe how the media is routed in different situations:

Pexip Infinity Administrator GuideThe Pexip Infinity platform
Benefits and components of the Pexip Infinity distributed architecture
© 2016 Pexip AS Version 12.a May 2016 Page 40 of 369
l Locally distributed conferences l Globally distributed conferences l Location capacity overflow l Pexip Distributed Gateway calls
Locally distributed conferences
A conference is locally distributed when all participants are connected to Conferencing Nodes in a single location.
Media and signaling for a single call may take different paths within a single location, as follows:
l When an alias that belongs to a Pexip Infinity service is dialed from an endpoint, the call will be placed to whichever Conferencing Node your call control system directs the call to. This Conferencing Node will always continue to handle the signaling for that call, regardless of where the media is routed.
l If the conference does not already exist in this Conferencing Node's location, Pexip Infinity will check the loading of all Conferencing Nodes in the location and will allocate the conference to the Conferencing Node that currently has the most available capacity. The media for the call will go directly to that Conferencing Node, but the signaling will continue to be handled on the Conferencing Node to which the endpoint connected.
l If this is a call to a conference already running on another Conferencing Node within the same location, the media will be set up on the node where the conference is running, but the signaling will be handled on the node to which the endpoint connected.
l If the Conferencing Node on which the conference is running reaches capacity, Pexip Infinity will allocate a secondary (and a then a tertiary) node within that location to handle media for that conference, and automatically create a local backplane between these Conferencing Nodes so all participants are part of the same conference, with the same layout.
l Up to three Conferencing Nodes within one location can be involved in media handling for one conference instance.
l Within one location, when all of the local Conferencing Nodes that can handle the media for a conference instance have reached their capacity, "overflow" locations may be utilized, thus escalating it to a globally distributed conference. In such cases, one Conferencing Node in each location will act as the proxy for any other Conferencing Nodes in the same location that are handling the media for that conference. Call media for each location is sent between the proxies only, thus minimizing WAN bandwidth usage between locations.
l When all of the local Conferencing Nodes and all of the nodes in the overflow locations that can handle the media for a conference instance have reached their capacity, no further calls can be placed to that conference from endpoints connected to nodes within that local location. Other endpoints connected to Conferencing Nodes in other locations may still connect to the conference, assuming that there is sufficient capacity in those locations.
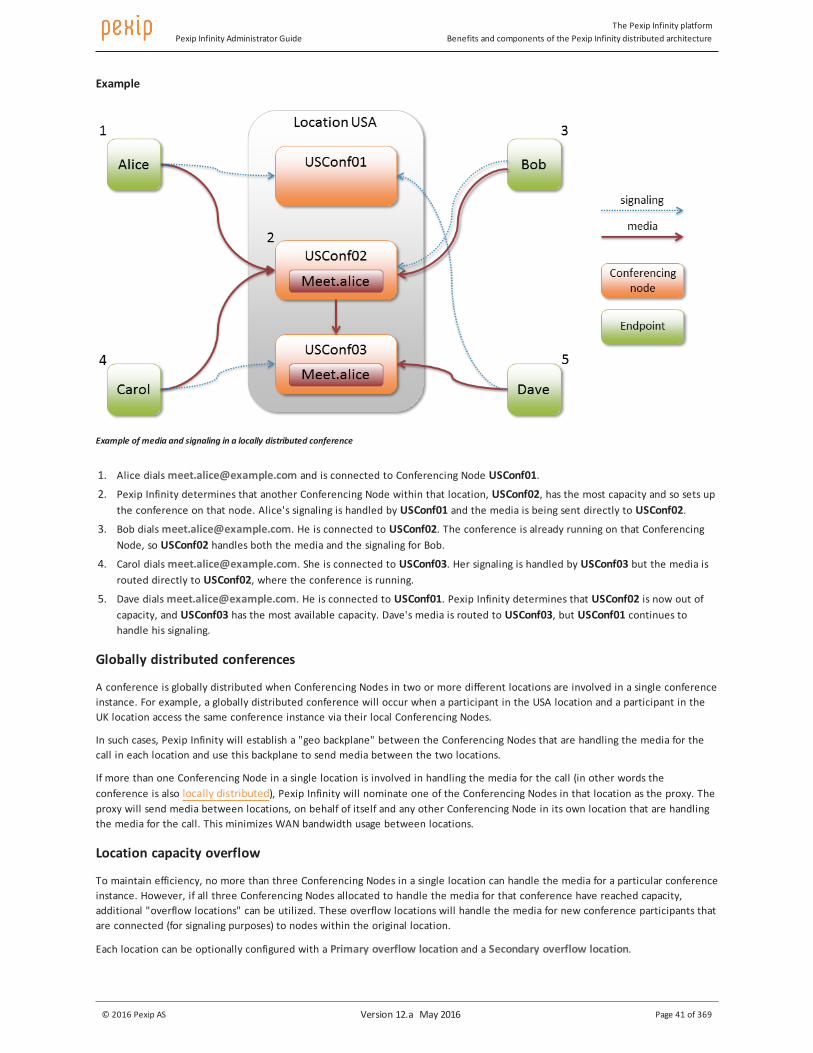
Pexip Infinity Administrator GuideThe Pexip Infinity platform
Benefits and components of the Pexip Infinity distributed architecture
© 2016 Pexip AS Version 12.a May 2016 Page 41 of 369
Example
Example of media and signaling in a locally distributed conference
1. Alice dials [email protected] and is connected to Conferencing Node USConf01.
2. Pexip Infinity determines that another Conferencing Node within that location, USConf02, has the most capacity and so sets up the conference on that node. Alice's signaling is handled by USConf01 and the media is being sent directly to USConf02.
3. Bob dials [email protected]. He is connected to USConf02. The conference is already running on that Conferencing Node, so USConf02 handles both the media and the signaling for Bob.
4. Carol dials [email protected]. She is connected to USConf03. Her signaling is handled by USConf03 but the media is routed directly to USConf02, where the conference is running.
5. Dave dials [email protected]. He is connected to USConf01. Pexip Infinity determines that USConf02 is now out of capacity, and USConf03 has the most available capacity. Dave's media is routed to USConf03, but USConf01 continues to handle his signaling.
Globally distributed conferences
A conference is globally distributed when Conferencing Nodes in two or more different locations are involved in a single conference instance. For example, a globally distributed conference will occur when a participant in the USA location and a participant in the UK location access the same conference instance via their local Conferencing Nodes.
In such cases, Pexip Infinity will establish a "geo backplane" between the Conferencing Nodes that are handling the media for the call in each location and use this backplane to send media between the two locations.
If more than one Conferencing Node in a single location is involved in handling the media for the call (in other words the conference is also locally distributed), Pexip Infinity will nominate one of the Conferencing Nodes in that location as the proxy. The proxy will send media between locations, on behalf of itself and any other Conferencing Node in its own location that are handling the media for the call. This minimizes WAN bandwidth usage between locations.
Location capacity overflow
To maintain efficiency, no more than three Conferencing Nodes in a single location can handle the media for a particular conference instance. However, if all three Conferencing Nodes allocated to handle the media for that conference have reached capacity, additional "overflow locations" can be utilized. These overflow locations will handle the media for new conference participants that are connected (for signaling purposes) to nodes within the original location.
Each location can be optionally configured with a Primary overflow location and a Secondary overflow location.

Pexip Infinity Administrator GuideThe Pexip Infinity platform
Benefits and components of the Pexip Infinity distributed architecture
© 2016 Pexip AS Version 12.a May 2016 Page 42 of 369
l When a location reaches its capacity for a conference instance, new participants joining that conference at that location will have their media routed directly to a Conferencing Node in the Primary overflow location. Their signaling will remain routed to the original node in the local location.
l If the conference instance running at the Primary overflow location is at that location's capacity, the new participants joining the conference at the original location will have their media routed directly to a Conferencing Node in the Secondary overflow location instead.
l If the conference instance is at full capacity at the original location, and its primary and secondary locations, then no further calls can be placed to that conference from endpoints connected to nodes within that original location.Note that endpoints connected to nodes at other locations may still be able to join the conference. This includes endpoints connected to the primary and secondary overflow locations that are associated with a location that can no longer accept calls for that conference (this is because each location has its own set of overflow locations that it can use for its local endpoints).
l If participants leave a conference and capacity becomes available again at some locations, existing participants' media connections are not rebalanced to their local location. However, any new participants will be able to take advantage of that freed-up capacity and join the conference at those locations.
l Location overflow is triggered whenever a location reaches its capacity for a conference instance — in other words, whenever all the Conferencing Node in that location that can take the media for that conference instance have reached capacity. You do not have to deploy three Conferencing Nodes at a location before it can overflow to a different location. Examples of when overflow could happen are:
o if there is only one node at that location and it has reached capacity
o if there are four nodes at that location, but the three that have been allocated the media are at capacity.
l Whenever an overflow location is utilized, a "Capacity reached in the location. Allocating the media node in the overflow location." entry is written to the administrator log. The log message indicates the conference name, the original location and the overflow location.
l When each new location is brought into the conference, Pexip Infinity nominates a single Conferencing Node in that location as the proxy node for that conference instance, and a geo backplane is established between each of the proxy nodes.
l You must ensure that endpoints in their local locations are able to route their media to the Conferencing Nodes in the overflow locations.
l Note that in very rare scenarios, depending on existing media allocation and timing, a conference could span four media nodes in the same location. For example, assume that two new participants connect at the same time to an existing conference spanning two media nodes, and that those two existing media nodes are at capacity. If the two new participants' signaling is being handled by different nodes, it is possible that each signaling node could expand the conference onto a different media node in that location, resulting in four nodes handling the conference media.
Example
This example builds on the previous example described above in Locally distributed conferences. It assumes that the conference [email protected] is in progress and currently has all of its media and signaling in a locally distributed conference in location USA.
In addition, the Pexip Infinity deployment has locations configured for USA, Mexico, Canada and Brazil, and that the USA and Mexico locations are configured with primary and secondary overflow locations as follows:
Location Primary overflow location Secondary overflow location
USA Mexico Canada
Mexico Brazil -

Pexip Infinity Administrator GuideThe Pexip Infinity platform
Benefits and components of the Pexip Infinity distributed architecture
© 2016 Pexip AS Version 12.a May 2016 Page 43 of 369
This example now shows what could happen when three new participants, two from the USA and one from Mexico, join the conference.
Example of escalating a locally distributed conference to a globally distributed conference via location overflow
1. Emma, who lives in USA, dials [email protected] and is connected to USConf01 in location USA.Assume that all three Conferencing Nodes currently handling the media for this conference in location USA have reached their capacity, so Emma's media is routed directly to MexConf01 in location Mexico (because Mexico is the primary overflow location for the USA location). USConf01 continues to handle her signaling.
2. Frank, who lives in Mexico, dials [email protected] and is connected to MexConf01 in location Mexico.Assume that all of the Conferencing Nodes currently handling the media for this conference in location Mexico have reached their capacity, so Frank's media is routed directly to BraConf01 in location Brazil (because Brazil is the primary overflow location for the Mexico location to which Frank is connected). MexConf01 continues to handle his signaling.
3. Greta, who lives in USA, dials [email protected] and is connected to USConf03 in location USA.Assume that all of the Conferencing Nodes currently handling the media for this conference in location USA have reached their capacity, as have all of the nodes handling the media for this conference in the USA location's primary failover location of Mexico, so Greta's media is routed directly to CanConf01 in location Canada (because Canada is the secondary overflow location for the USA location to which Greta is connected; it is irrelevant if location Brazil has spare capacity as Brazil is not an overflow location for endpoints connected to the USA location). USConf03 continues to handle her signaling.
Note that this example deliberately describes an extreme scenario as its purpose is to demonstrate the location overflow logic applied by Pexip Infinity.
Pexip Distributed Gateway calls
The same principles described above also apply to calls placed via the Pexip Distributed Gateway:

Pexip Infinity Administrator GuideThe Pexip Infinity platform
Benefits and components of the Pexip Infinity distributed architecture
© 2016 Pexip AS Version 12.a May 2016 Page 44 of 369
l The call signaling will always be handled by the Conferencing Nodes that receive and place the call (you can configure Call Routing Rules to call out from a Conferencing Node in a different location to that which received the call).
l The call media will be handled by the Conferencing Node that has the most available capacity in that location.
l If there is no available capacity in that location and one or more overflow locations have been configured that do have available capacity, the media will be handled by one of the Conferencing Nodes in an overflow location.

Pexip Infinity Administrator GuideThe Pexip Infinity platform
Customizing the Pexip Infinity user experience
© 2016 Pexip AS Version 12.a May 2016 Page 45 of 369
Customizing the Pexip Infinity user experienceYou can easily apply your own corporate branding to the Pexip Infinity platform, and produce a personalized user experience for all of your Pexip Infinity services.
This topic gives some examples of how themes (which are applied to one or more services, and affect all participants using those services) can be used to customize the voice prompts and images used in your Pexip Infinity services, and how branding customizations can be applied to change the look and feel of the Infinity Connect clients (Pexip's free video clients, which can optionally be used to access those services).
ThemesThemes are applied to the service itself (VMR, Virtual Auditorium or Virtual Reception) or Pexip Distributed Gateway call (via Call Routing Rules), and affect all participants using that service, regardless of the device or video client that the participant is using to make the call. A different theme can be applied to each service or rule if required.
Themes are used to control:
l all of the voice prompts used when accessing or participating in a conference
l the appearance of PIN entry screens (on devices other than the Infinity Connect clients )
l in-conference indicators such as audio-only participants, streaming, no incoming video etc.
l the appearance of information screens such as waiting for host, capacity exceeded, insufficient licenses etc.
The following images show some examples of which elements of the user experience can be customized via themes. All of the examples show a video client that is accessing a service that uses the base (default) Pexip theme.

Pexip Infinity Administrator GuideThe Pexip Infinity platform
Customizing the Pexip Infinity user experience
© 2016 Pexip AS Version 12.a May 2016 Page 46 of 369
Themes are uploaded and managed via the Pexip Infinity Administrator interface (Service configuration > Themes).
For more information, including the full set of theme elements that can be customized, see Customizing images and voice prompts using themes.
Infinity Connect customizationThe branding and styling of the Infinity Connect Web App and the Infinity Connect desktop client can also be customized.
The participant has the same branding experience when using the application, regardless of which service is being accessed. (However, the theme-based elements of each service may also have been customized as described above.)
Infinity Connect customization can be used to control:
l the logos and background image displayed on the application's home page
l the foreground and background colors used for:
o headings, input fields and buttons on the home page and other dialogs (such as PIN entry or adding a participant)
o the participants list and chat window
o in-call control buttons and the conference control menu options

Pexip Infinity Administrator GuideThe Pexip Infinity platform
Customizing the Pexip Infinity user experience
© 2016 Pexip AS Version 12.a May 2016 Page 47 of 369
The following images show examples of the Infinity Connect Web App using the default Pexip branding, and identifies the elements of the application that can be customized:
You can customize the Infinity Connect Web App by creating and then uploading a branding package to the Management Node (Service configuration > Web App customization).
There are two main ways to create a branding package for the Infinity Connect Web App:
l via the Pexip branding portal (https://branding.pexip.com)
l manual configuration of the default branding files after downloading them from the Management Node
For more information, see Customizing the Infinity Connect Web App.
If you also use the Infinity Connect desktop client, you can use the same set of customized files in both the Infinity Connect Web App and the Infinity Connect desktop client. See the Infinity Connect Desktop Client Customization Guide for more information.
Pexip Infinity Administrator Guide
© 2016 Pexip AS Version 12.a May 2016 Page 48 of 369
Installation and getting started with Pexip InfinityPexip Infinity is installed as a Management Node and one or more Conferencing Nodes. All are virtual machines (VMs) that are deployed onto host hardware using hypervisors or are hosted on a cloud platform service. The Management Node is deployed first, and is then used to configure the Pexip Infinity platform and deploy Conferencing Nodes.
In this section:
Prerequisites before deploying Pexip Infinity 49
Capacity planning 52
Hardware resource allocation rules 54
Implementing a dial plan 55
Network deployment options 58
Installation tasks overview 62
About the Pexip Infinity software files 63
Hypervisor configuration 65
Management Node installation overview 70
Using the Pexip Infinity Administrator interface 83

Pexip Infinity Administrator GuideInstallation and getting started with Pexip Infinity
Prerequisites before deploying Pexip Infinity
© 2016 Pexip AS Version 12.a May 2016 Page 49 of 369
Prerequisites before deploying Pexip InfinityPexip Infinity is installed as a Management Node and one or more Conferencing Nodes. All are virtual machines (VMs) that are deployed onto host hardware using hypervisors or are hosted on a cloud platform service. The Management Node is deployed first, and is then used to configure the Pexip Infinity platform and deploy Conferencing Nodes.
This section outlines the systems and configuration required before you can begin to deploy Pexip Infinity in your network.
Hardware requirementsThe following table lists the recommended hardware requirements for the Management Node and Conferencing Node host servers.
Management Node Conferencing Node
Server manufacturer Any Any
Processor make Any Intel Xeon E5-2600 series (Haswell architecture) or similar Xeon processors from 2012 or later
Processor instruction set Any AVX2‡
Processor architecture 64-bit 64-bit
Processor speed 2.0 GHz 2.3 GHz or faster
No. of physical cores* 2† 10-12 cores per socket
Processor cache no minimum 20 MB or greater(2.5 MB L3 cache per core)
Total RAM* 4 GB† 1 GB per core
RAM makeup Any All channels must be populated with a DIMM.
Hardware allocation The host server must not be over-committed in terms of either RAM or CPU. In other words, the Management Node and Conferencing Nodes each must have dedicated access to their own RAM and CPU cores.
Storage space required 100 GB SSD l 50 GB minimum per Conferencing Node
l 500 GB total per server (to allow for snapshots etc.)
GPU No specific hardware cards or GPUs are required.
Network Gigabit Ethernet connectivity from the host server.
Operating System The Pexip Infinity VMs are delivered as VM images (.ova etc) to be run directly on the hypervisor. No OS should be installed.
Hypervisor l VMware ESXi 4.1**, 5.x or 6.0
l Microsoft Hyper-V 2012 or later
l Xen 4.2 or later
l KVM (Linux kernel 3.10.0 or later, and QEMU 1.5.0 or later)
* This does not include the processor and RAM requirements of the Hypervisor.
** Support for ESXi 4.1 is being deprecated.
† Sufficient for deployments of up to 30 Conferencing Nodes. For larger deployments, you will need to increase the amount of RAM and number of cores. For more information about our server design guidelines, consult your Pexip authorized support representative.
‡ For VMware platforms, ESXi 6 is required to make full use of the AVX2 instruction set. Note that AVX or AVX2 is required; older instruction sets are not supported.

Pexip Infinity Administrator GuideInstallation and getting started with Pexip Infinity
Prerequisites before deploying Pexip Infinity
© 2016 Pexip AS Version 12.a May 2016 Page 50 of 369
For further information, see the Pexip Infinity Server Design Guide.
HypervisorsPexip Infinity currently offers specific support for VMware ESXi, Microsoft Hyper-V, KVM and Xen hypervisors. Other hypervisors and orchestration layers may be used but are not officially supported. If you wish to deploy Pexip Infinity using a non-supported hypervisor, we recommend that you contact your Pexip authorized support representative for assistance.
VMware vSphere ESXi
VMware versions
Version 12 of the Pexip Infinity platform supports VMware vSphere ESXi 5.x and 6.0, although we recommend ESXi 5.5 or 6.0. Support for ESXi 4.1 is being deprecated - if you have upgraded from a version prior to v12, you can still deploy Conferencing Nodes to servers running ESXi 4.1; however if you have a new deployment using v12 and attempt to deploy a Conferencing Node to a server running ESXi 4.1, that node will go straight into maintenance mode.
You must have a suitable VMware environment already installed. For information on configuring a VMware environment specifically for use with Pexip Infinity, see Configuring VMware and Advanced VMware ESXi administration.
VMware editions
The Pexip Infinity platform will run on the free edition of vSphere Hypervisor. However, this edition has a number of limitations (limited support from VMware, no access to vCenter or vMotion, no access to VMware API). In particular, the lack of access to the VMware API means that all Conferencing Nodes will have to be deployed manually (see Deployment types). For this reason we do not recommend its use except in smaller deployments, or test or demo environments.
The minimum edition of VMware that we recommend is the vSphere Standard edition. This does not have the limitations of the free edition. If you do not already use VMware in your enterprise, the vSphere Essentials Kit is a simple way to get started and will provide you with Standard edition licenses for 3 servers (with 2 CPUs each) plus a vCenter license.
The Enterprise Plus edition includes further additional features relevant to the Pexip Infinity platform that could be of benefit to larger deployments. These include Storage DRS and Distributed Switch.
For a comparison of the VMware editions, see http://www.vmware.com/products/datacenter-virtualization/vsphere/compare-editions.html.
Microsoft Hyper-V
Version 12 of Pexip Infinity supports Microsoft Hyper-V in the form of Microsoft Hyper-V Server 2012 and later, or Windows Server 2012 and later. You must have a suitable Hyper-V environment already installed. For information on configuring a Hyper-V environment specifically for use with Pexip Infinity, see Configuring Hyper-V.
KVM
For information on configuring a KVM environment specifically for use with Pexip Infinity, see Configuring KVM.
Xen
Pexip Infinity requires Xen 4.2 and later. For information on configuring a Xen environment specifically for use with Pexip Infinity, see Configuring Xen.
Other hypervisors and orchestration layers
Pexip Infinity Management Nodes and Conferencing Nodes support static IP addressing only. Therefore the hypervisor or orchestration layer must also support static IP addressing.
Cloud service providersThe Pexip Infinity platform can be deployed on Amazon Web Services (AWS) and Microsoft Azure cloud platforms.
Pexip Infinity Administrator GuideInstallation and getting started with Pexip Infinity
Prerequisites before deploying Pexip Infinity
© 2016 Pexip AS Version 12.a May 2016 Page 51 of 369
See Deploying Pexip Infinity on Amazon Web Services and Deploying Pexip Infinity on Microsoft Azure for installation guidelines and prerequisites.
Network requirementsDepending on your network deployment scenario, you may have to configure your system to operate behind a static NAT and to ensure that traffic can be routed between nodes. See Network deployment options and Configuring Pexip Infinity for public DMZ deployments for more information about the requirements and implications of your deployment scenario.
Note that in all Pexip Infinity deployment scenarios:
l All Pexip nodes must be fully routable to each other (full mesh) in both directions. This means that the Management Node must be able to reach every Conferencing Node, and each Conferencing Node must be able to reach every other Conferencing Node.
l Any internal firewalls must be configured to allow UDP port 500 and traffic using IP protocol 50 (ESP) in both directions between all Pexip nodes.
l There cannot be a NAT between any Pexip nodes.
Call control
If your deployment includes a call control system, it must be configured to route calls to Pexip Infinity appropriately. The exact configuration will depend on your deployment and dial plan, but in general calls placed from an endpoint to a Virtual Meeting Room alias should be routed to the endpoint's local Conferencing Nodes. For more information, see Implementing a dial plan.
Lync / Skype for Business server
If your deployment includes Lync / Skype for Business, you must set up static routes to domains used by Pexip Infinity aliases. For more information, see Pexip Infinity and Microsoft Lync / Skype for Business Deployment Guide.

Pexip Infinity Administrator GuideInstallation and getting started with Pexip Infinity
Capacity planning
© 2016 Pexip AS Version 12.a May 2016 Page 52 of 369
Capacity planningThe capacity of each Conferencing Node in your Pexip Infinity deployment - in terms of the number of connections* that can be handled simultaneously - depends on a variety of factors including:
l server capacity and hardware configuration l types of calls - Full HD, HD, SD, or audio-only, and whether there is a presentation stream included
l the number of unique VMRs being used (and thus the number of backplanes being reserved)
l the type of services being used - whether the calls are to a Virtual Meeting Room/Virtual Auditorium, or point to point (i.e. a gateway call)
l the number of licenses that are available.
* A connection can be a call or presentation from an endpoint to a Virtual Meeting Room or Virtual Auditorium, a backplane between Conferencing Nodes, or a call into or out of the Pexip Distributed Gateway. In this context, a connection is analogous to a port.
The following sections explain each of these factors. For some comprehensive examples showing how these different factors can combine to influence capacity, see Resource allocation examples.
Server capacityThe capacity and configuration of the server on which the Conferencing Node is running will impact the number of calls that can be handled. This is influenced by a number of factors, including:
l processor generation
l no. of cores
l processor speed
l hypervisor
l BIOS settings
For more information, see Server design recommendations and Example Conferencing Node server configurations.
Types of callA single HD call requires roughly:
l half the resources of a Full HD call
l twice the resources of an SD call, or
l 12 times the resources of an audio-only call.
On startup, each Conferencing Node runs an internal capacity check. This capacity is translated into an estimated maximum number of HD, SD or audio-only calls, and can be viewed on the status page (Status > Conferencing Nodes) for each Conferencing Node. The status will also show the current media load on each Conferencing Node as a percentage of its total capacity.
When a Conferencing Node receives a call, it will select the node with the most available capacity in its location to handle the media for that conference. For more information, see Handling of media and signaling.
Backplane reservationEach conference instance on each node will reserve 1 HD connection for a backplane, to allow the conference to become geographically distributed if required. The exceptions to this are:
l Deployments with a single Conferencing Node. In such cases, no backplanes will ever be required, so capacity is not reserved.
l Conferences that are audio-only (in other words, where the Virtual Meeting Room or Virtual Auditorium being used has its Conference capabilities set to Audio-only. In such cases, capacity equivalent to one audio connection will be reserved for the backplane.
l Deployments with 1080p enabled. In such cases, backplanes will reserve 1 Full HD connection of capacity, approximately double that of an HD connection.
Pexip Infinity Administrator GuideInstallation and getting started with Pexip Infinity
Capacity planning
© 2016 Pexip AS Version 12.a May 2016 Page 53 of 369
This means that a Conferencing Node with a single VMR running on it will be able to handle more calls into it than the same Conferencing Node running multiple VMRs. For some examples, see Resource allocation examples.
Service typeGateway calls (point-to-point calls) require sufficient capacity for both the inbound leg and the outbound leg. This means that each point-to-point call consumes resources equivalent to two connections.
Calls to Virtual Meeting Rooms and Virtual Auditoriums, and calls placed via Virtual Receptions, consume the resource of a single connection.
LicensesThe total number of concurrent calls that can be made in your deployment (regardless of whether those calls are HD, SD or audio-only) is limited by your license. For more information, see Pexip Infinity license installation and usage.

Pexip Infinity Administrator GuideInstallation and getting started with Pexip Infinity
Hardware resource allocation rules
© 2016 Pexip AS Version 12.a May 2016 Page 54 of 369
Hardware resource allocation rulesA number of different types of connections are required in order for a conference to take place, or for a gateway call to be made. A connection can be a call or presentation from an endpoint to a Virtual Meeting Room or Virtual Auditorium, a backplane between Conferencing Nodes, or a call into or out of the Pexip Distributed Gateway. In this context, a connection is analogous to a port.
Each of these connections requires a certain amount of resource, or capacity. In general, the amount of resource required for each connection can be categorized as:
l audio-only
l standard definition (SD)
l high definition (HD - 720p), or
l Full HD (1080p).
Following are the rules that determine how hardware resources are allocated and consumed by conference and gateway calls in a Pexip Infinity deployment.
l Each HD participant uses one HD connection.
l If these are Lync/Skype for Business participants, they each require one additional HD connection when sending or receiving presentation.
l If these are WebRTC participants, the presenter requires one additional HD connection for sending presentation.
l Standards-based endpoints (SIP or H.323) do not require an additional connection when sending or receiving presentation.
l Each conference instance on each node will reserve 1 HD connection for a backplane, to allow the conference to become geographically distributed if required. The exceptions to this are:
o Deployments with a single Conferencing Node. In such cases, no backplanes will ever be required, so capacity is not reserved.
o Conferences that are audio-only (in other words, where the Virtual Meeting Room or Virtual Auditorium being used has its Conference capabilities set to Audio-only. In such cases, capacity equivalent to one audio connection will be reserved for the backplane.
o Deployments with 1080p enabled. In such cases, backplanes will reserve 1 Full HD connection of capacity, approximately double that of an HD connection.
l Each conference instance on each Conferencing Node will reserve one HD connection for a backplane, even if the conference is not currently distributed. There are three exceptions:
o If there is only a single Conferencing Node in the deployment, no extra capacity is reserved for a backplane.
o If the service has been configured with a capability of audio-only, the backplane only takes an audio connection (rather than an HD connection).
l Only one backplane connection will be used for each Virtual Meeting Room and Virtual Auditorium on each Conferencing Node, regardless of the number of other Conferencing Nodes the backplane is connecting to.
l A gateway call will not reserve resource for a backplane, but will use one if required (for example, if the participants are connected to different Conferencing Nodes).
l SD quality can be enforced by reducing the bandwidth of a service (VMRs, VAs, VRs) and on point-to-point calls (via the Pexip Distributed Gateway) to 960 kbps or less. Pexip Infinity will consume less resource per-call, however, it will still reserve an HD connection for the backplane.
Concurrent call licenses are consumed slightly differently. For more information see Pexip Infinity license installation and usage.
We have provided some Resource allocation examples and a deployment Case study to help illustrate these rules in practice.
For further discussions on this topic, go to the Pexip Technical Community forums at https://forums.pexip.com/pexcommunity/topic/hardware-port-resource-consumption/.

Pexip Infinity Administrator GuideInstallation and getting started with Pexip Infinity
Implementing a dial plan
© 2016 Pexip AS Version 12.a May 2016 Page 55 of 369
Implementing a dial planBefore you deploy the Pexip Infinity platform in your network, you must consider your dial plan and ensure that calls to Virtual Meeting Room, Virtual Auditorium and Virtual Reception aliases, and that point-to-point calls handled by the Pexip Distributed Gateway, will be routed appropriately.
If your environment includes a PSTN gateway or uses an ITSP (Internet telephony service provider), consider the potential for toll fraud if you have Call Routing Rules that can route calls to the PSTN gateway or ITSP, or if you allow conference participants to dial out to other participants via the PSTN gateway or ITSP. See PSTN gateways and toll fraud for more information.
Service precedenceIncoming calls received by Pexip Infinity are routed as follows:
1. Pexip Infinity receives an incoming call via one of its Conferencing Nodes.
2. It checks whether the destination alias belongs to any Pexip Infinity Virtual Meeting Rooms, Virtual Auditoriums or Virtual Receptions; if so, it directs the call to that service.
3. If the alias does not belong to any of the above services, Pexip Infinity checks the Call Routing Rules to see if the alias matches any rules specified there for incoming calls. If so, it places an outgoing call to the destination alias according to the rule's call target settings (which protocol and call control system to use, whether to route to registered devices only etc).
This means that if an alias matches both a Virtual Meeting Room and a Call Routing Rule, the former will always take precedence and the call will be routed to the Virtual Meeting Room. You must therefore ensure that any regular expressions used in a Call Routing Rule do not unintentionally overlap with any aliases used by Virtual Meeting Rooms, Virtual Auditoriums or Virtual Receptions.

Pexip Infinity Administrator GuideInstallation and getting started with Pexip Infinity
Implementing a dial plan
© 2016 Pexip AS Version 12.a May 2016 Page 56 of 369
Pexip Infinity's call routing logic is shown in the following diagram:

Pexip Infinity Administrator GuideInstallation and getting started with Pexip Infinity
Implementing a dial plan
© 2016 Pexip AS Version 12.a May 2016 Page 57 of 369
For more information about incoming and outgoing Call Routing Rules and how to specify where calls are routed, see Configuring Call Routing Rules.
Using a standard format for aliasesWe recommend that you use a standard format for all Virtual Meeting Room and Virtual Auditorium aliases within your Pexip Infinity deployment. A simple way to do this would be to have a set prefix such as meet., followed by a user name, followed by your domain. For example:
l [email protected] (for Alice's VMR)
l [email protected] (for Bob's VMR)
l [email protected] (for the sales team's Virtual Auditorium)
l [email protected] (for the Virtual Reception)
Using this standard format will then make it simple to configure your call management system to route calls matching the format to the appropriate Conferencing Nodes.
Routing calls to the local Conferencing NodeWhen your call management system receives a call to a Virtual Meeting Room, Virtual Auditorium or Virtual Reception alias, it must then decide where to route the call.
A single conference can take place across one, two or more Conferencing Nodes with no difference in conference experience from the users' perspective. We recommend that in the first instance, calls are routed to the Conferencing Node that is geographically nearest to the endpoint that placed the call. This reduces the WAN bandwidth used for the conference in two ways: firstly, endpoints are only making local calls; and secondly, if more than one Conferencing Node is involved, only one set of media has to be sent between the two locations.
We recommend that you set up rules on your call management system so that calls originating from a particular location (defined by zone, subzone or IP address range) and placed to a Pexip Infinity alias are routed to a specific Conferencing Node. To build on the previous example, we have configured subzones on our call management system which group together endpoints in a particular physical location, and we have then set up the following call routing rules:
Source Alias Destination zone
Oslo subzone meet.*@example.com.* Norway Conferencing Node
New York subzone meet.*@example.com.* Americas Conferencing Node
Boston subzone meet.*@example.com.* Americas Conferencing Node
In this case, users in Oslo, New York and Boston could all call [email protected] and be routed to the same conference.
See Regular expression (regex) reference for information about writing regular expressions.
Further informationFor further information about how to configure your specific call management system to work with Pexip Infinity, see the following documentation:
l Pexip Infinity and Microsoft Lync / Skype for Business Deployment Guide l Pexip Infinity and Cisco VCS Deployment Guide l Pexip Infinity and Cisco Unified Communications Manager Deployment Guide l Pexip Infinity and Polycom DMA Deployment Guide

Pexip Infinity Administrator GuideInstallation and getting started with Pexip Infinity
Network deployment options
© 2016 Pexip AS Version 12.a May 2016 Page 58 of 369
Network deployment optionsIf you need to support business-to-business video calls and provide access to Pexip Infinity resources from external systems and endpoints such as remote or federated Lync / Skype for Business clients, remote SIP and H.323 endpoints, and Infinity Connect clients, you need to consider how to deploy your Pexip Infinity Conferencing Nodes.
This section explains how the Pexip Infinity platform fits into typical network deployment scenarios:
l a private "on-premises" deployment of privately-addressed Pexip Infinity nodes
l a public DMZ deployment with publicly-addressable Pexip Infinity nodes (with optional static NAT)
l a combination of public DMZ and "on-premises" nodes.
The Pexip Infinity platform can also be deployed as a cloud service via Amazon Web Services (AWS) or Microsoft Azure, with private, public or hybrid deployment options.
Note that in all Pexip Infinity deployment scenarios:
l All Pexip nodes must be fully routable to each other (full mesh) in both directions. This means that the Management Node must be able to reach every Conferencing Node, and each Conferencing Node must be able to reach every other Conferencing Node.
l Any internal firewalls must be configured to allow UDP port 500 and traffic using IP protocol 50 (ESP) in both directions between all Pexip nodes.
l There cannot be a NAT between any Pexip nodes.
For information about using the Pexip Reverse Proxy and TURN Server and how to configure your specific call management system to work with Pexip Infinity, see Integrating Pexip Infinity with other systems.
Privately-addressed "on-premises" nodesA typical "on-premises" deployment of privately-addressed Pexip Infinity nodes is shown below:
Privately-addressed Pexip Infinity nodes
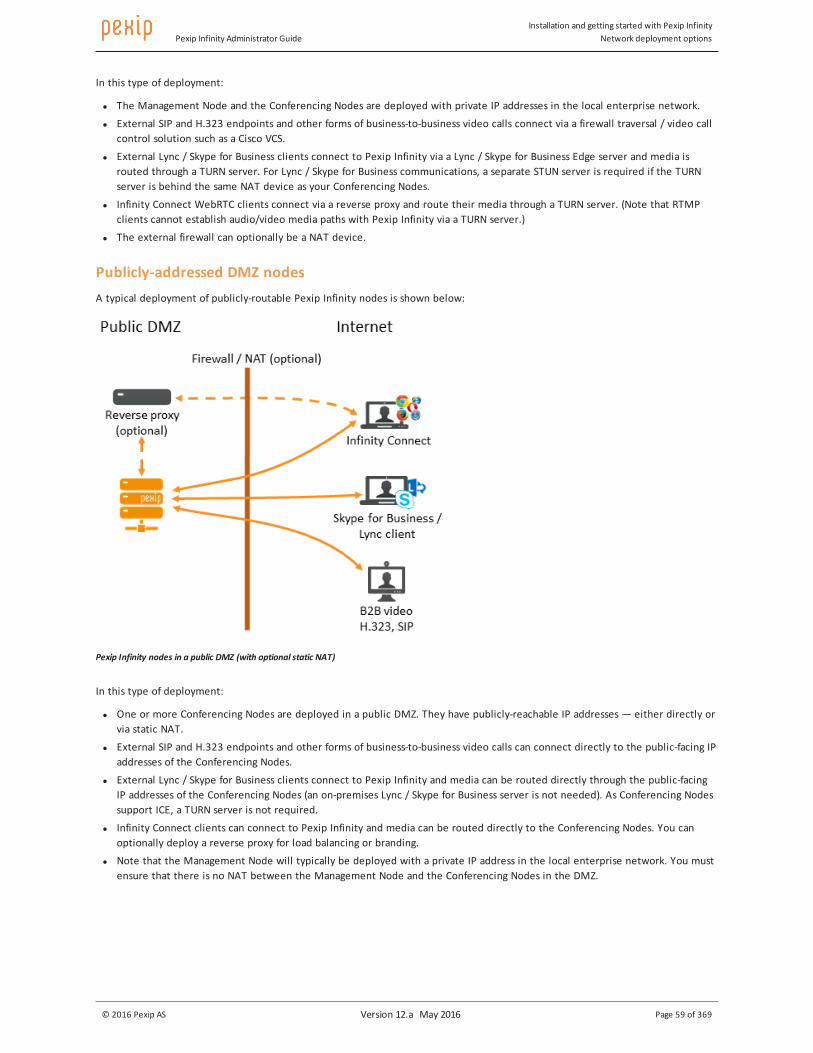
Pexip Infinity Administrator GuideInstallation and getting started with Pexip Infinity
Network deployment options
© 2016 Pexip AS Version 12.a May 2016 Page 59 of 369
In this type of deployment:
l The Management Node and the Conferencing Nodes are deployed with private IP addresses in the local enterprise network.
l External SIP and H.323 endpoints and other forms of business-to-business video calls connect via a firewall traversal / video call control solution such as a Cisco VCS.
l External Lync / Skype for Business clients connect to Pexip Infinity via a Lync / Skype for Business Edge server and media is routed through a TURN server. For Lync / Skype for Business communications, a separate STUN server is required if the TURN server is behind the same NAT device as your Conferencing Nodes.
l Infinity Connect WebRTC clients connect via a reverse proxy and route their media through a TURN server. (Note that RTMP clients cannot establish audio/video media paths with Pexip Infinity via a TURN server.)
l The external firewall can optionally be a NAT device.
Publicly-addressed DMZ nodesA typical deployment of publicly-routable Pexip Infinity nodes is shown below:
Pexip Infinity nodes in a public DMZ (with optional static NAT)
In this type of deployment:
l One or more Conferencing Nodes are deployed in a public DMZ. They have publicly-reachable IP addresses — either directly or via static NAT.
l External SIP and H.323 endpoints and other forms of business-to-business video calls can connect directly to the public-facing IP addresses of the Conferencing Nodes.
l External Lync / Skype for Business clients connect to Pexip Infinity and media can be routed directly through the public-facing IP addresses of the Conferencing Nodes (an on-premises Lync / Skype for Business server is not needed). As Conferencing Nodes support ICE, a TURN server is not required.
l Infinity Connect clients can connect to Pexip Infinity and media can be routed directly to the Conferencing Nodes. You can optionally deploy a reverse proxy for load balancing or branding.
l Note that the Management Node will typically be deployed with a private IP address in the local enterprise network. You must ensure that there is no NAT between the Management Node and the Conferencing Nodes in the DMZ.

Pexip Infinity Administrator GuideInstallation and getting started with Pexip Infinity
Network deployment options
© 2016 Pexip AS Version 12.a May 2016 Page 60 of 369
Combining public DMZ and privately-addressed nodesDepending on your requirements, aspects of the privately-addressed and public DMZ scenarios can be combined. For example, as shown below, you may want to:
l deploy some publicly-accessible Pexip Infinity nodes for external Lync / Skype for Business and Infinity Connect client access
l deploy some privately-accessible nodes and route external SIP and H.323 endpoints and other forms of business-to-business video calls to them via a video call control solution.
Public and privately-addressed Conferencing Nodes
In this example deployment:
l One or more Conferencing Nodes are deployed in a public DMZ. They have publicly-reachable IP addresses — either directly or via static NAT.
l Additional Conferencing Nodes are deployed with private IP addresses in the local enterprise network. They must be assigned to a different system location than the publicly-addressable nodes.
l External SIP and H.323 endpoints and other forms of business-to-business video calls are routed via a video call control solution such as a Cisco VCS. Alternatively, SIP and H.323 endpoints can register to Conferencing Nodes in the DMZ and route their calls through those nodes.
l External Lync / Skype for Business clients connect to Pexip Infinity and media can be routed directly through the public-facing IP addresses of the Conferencing Nodes (an on-premises Lync / Skype for Business server is not needed). As Conferencing Nodes support ICE, a TURN server is also not required.
l Infinity Connect clients can connect to Pexip Infinity and media can be routed directly to the Conferencing Nodes. You can optionally still deploy a reverse proxy for load balancing or branding.
l Geo backplanes are established between the privately-addressed nodes and the publicly-addressed nodes as and when required. Note that there cannot be a NAT between Pexip Infinity nodes (any nodes in the local enterprise network and the nodes in the DMZ).
l Static routing configuration may be required to allow those nodes in the public DMZ to communicate with Pexip Infinity nodes or other systems in the local enterprise network.
Deploying as a cloud service via Amazon Web Services or Microsoft AzureThe Pexip Infinity platform can be deployed in the Amazon Web Services (AWS) or Microsoft Azure cloud.
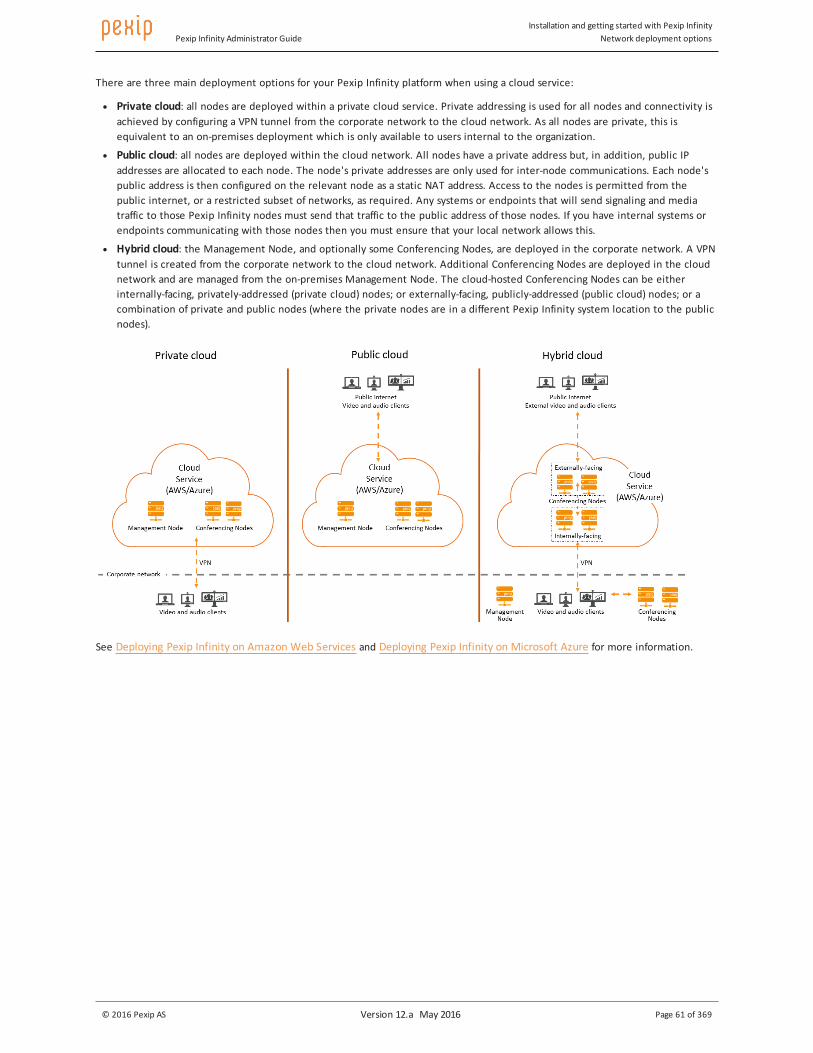
Pexip Infinity Administrator GuideInstallation and getting started with Pexip Infinity
Network deployment options
© 2016 Pexip AS Version 12.a May 2016 Page 61 of 369
There are three main deployment options for your Pexip Infinity platform when using a cloud service:
l Private cloud: all nodes are deployed within a private cloud service. Private addressing is used for all nodes and connectivity is achieved by configuring a VPN tunnel from the corporate network to the cloud network. As all nodes are private, this is equivalent to an on-premises deployment which is only available to users internal to the organization.
l Public cloud: all nodes are deployed within the cloud network. All nodes have a private address but, in addition, public IP addresses are allocated to each node. The node's private addresses are only used for inter-node communications. Each node's public address is then configured on the relevant node as a static NAT address. Access to the nodes is permitted from the public internet, or a restricted subset of networks, as required. Any systems or endpoints that will send signaling and media traffic to those Pexip Infinity nodes must send that traffic to the public address of those nodes. If you have internal systems or endpoints communicating with those nodes then you must ensure that your local network allows this.
l Hybrid cloud: the Management Node, and optionally some Conferencing Nodes, are deployed in the corporate network. A VPN tunnel is created from the corporate network to the cloud network. Additional Conferencing Nodes are deployed in the cloud network and are managed from the on-premises Management Node. The cloud-hosted Conferencing Nodes can be either internally-facing, privately-addressed (private cloud) nodes; or externally-facing, publicly-addressed (public cloud) nodes; or a combination of private and public nodes (where the private nodes are in a different Pexip Infinity system location to the public nodes).
See Deploying Pexip Infinity on Amazon Web Services and Deploying Pexip Infinity on Microsoft Azure for more information.

Pexip Infinity Administrator GuideInstallation and getting started with Pexip Infinity
Installation tasks overview
© 2016 Pexip AS Version 12.a May 2016 Page 62 of 369
Installation tasks overviewPexip Infinity is installed as a Management Node and one or more Conferencing Nodes. All are virtual machines (VMs) that are deployed onto host hardware using hypervisors or are hosted on a cloud platform service. The Management Node is deployed first, and is then used to configure the Pexip Infinity platform and deploy Conferencing Nodes.
This section lists the individual tasks that you must complete in order to deploy the Pexip Infinity platform.
Each step provides a link to the section of this guide that provides full information about how to complete that task.
Task Notes
Download the appropriate Pexip Infinity software files
The files you need depend on the hypervisor you are using and whether your Conferencing Nodes will be deployed manually or automatically.
If you are deploying Pexip Infinity on a cloud platform then you do not need to download these software files.
Configure VMware
Configure Hyper-V
Configure KVM
Configure Xen
For server-based deployments, this guide assumes that you have a suitable VMware, Hyper-V, KVM or Xen environment already up and running. These sections outline the specific configuration of each application that is required to support a Pexip Infinity deployment.
If you are deploying Pexip Infinity on a cloud platform then you need to prepare your environment as appropriate for your cloud service. See Deploying Pexip Infinity on Amazon Web Services and Deploying Pexip Infinity on Microsoft Azure for more information.
Deploy the Management Node During this step you install and configure an instance of a Pexip Infinity Management Node using the tools available for your hypervisor.
Configure DNS
Configure NTP
This will ensure that your system will function correctly within your network.
Add VM managers This will provide you with a quick way of selecting VM managers, used if you intend to deploy new Conferencing Nodes automatically onto vSphere ESXi hosts.
Add locations Locations allow you to group your Conferencing Nodes together according to their physical location to allow more efficient routing of media streams.
Add licenses You must install a system license and sufficient concurrent licenses before you can place calls to Pexip Infinity Virtual Meeting Rooms.
Add Conferencing Nodes During this step you use the Pexip Infinity Administrator interface, which resides on the Management Node, to create Conferencing Nodes on host servers.
Configure Virtual Meeting Rooms
Configure Virtual Auditoriums
During these steps you set up details of the Virtual Meeting Rooms and Virtual Auditoriums on the Pexip Infinity platform, including the aliases that will be dialed to access them.
Configure a Virtual Reception This is an optional step where you set up details of a Virtual Reception. This is used to provide access to Virtual Meeting Rooms and Virtual Auditoriums for participants who are unable to dial their aliases directly, and/or to provide local telephone numbers that audio-only participants can dial to access conferences.
Configure Pexip Distributed Gateway service
This is an optional step where you set up the Call Routing Rules that configure how the Pexip Distributed Gateway service enables endpoints to make calls to other devices or systems that use different protocols and media formats.

Pexip Infinity Administrator GuideInstallation and getting started with Pexip Infinity
About the Pexip Infinity software files
© 2016 Pexip AS Version 12.a May 2016 Page 63 of 369
About the Pexip Infinity software filesThe Pexip Infinity platform is entirely software-based, and is deployed by installing the files provided by Pexip onto your hypervisor to create Virtual Machines (VMs), which you then configure appropriately for your environment.
The Pexip Infinity version 12 release includes the files described below. Which set of files you require depends on:
l the hypervisor you are deploying on
l whether you are deploying a new instance of Pexip Infinity or upgrading an existing deployment
l if you are deploying new Conferencing Nodes via a generic VM template and configuration file
Note that If you are deploying Pexip Infinity on a cloud platform then you do not need to download these software files. See Deploying Pexip Infinity on Amazon Web Services and Deploying Pexip Infinity on Microsoft Azure for more information.
Files used to upgrade an existing deployment
Description File name Location Hypervisor Notes
Pexip Infinity upgrade package
Pexip_Infinity_v12_UPGRADE_<release>.tar
www.pexip.com/software-download
Any Used when upgrading the Pexip Infinity platform from version 4 or later to version 12. For more information, see Upgrading the Pexip Infinity platform.
Files used to deploy a new Management Node
Description File name Location Hypervisor Notes
Pexip Infinity OVA
Pexip_Infinity_v12_generic_pxMgr_<release>.ova
www.pexip.com/software-download
Any except Microsoft Hyper-V
Used to deploy a new generic Management Node VM using VMware, KVM, Xen or other hypervisors except Microsoft Hyper-V. For more information, see Management Node installation overview.
Pexip Infinity ZIP
Pexip_Infinity_v12_HyperV_pxMgr_<release>.zip
www.pexip.com/software-download
Microsoft Hyper-V
Used to deploy a generic Management Node VM using Hyper-V. For more information, see Management Node installation overview.

Pexip Infinity Administrator GuideInstallation and getting started with Pexip Infinity
About the Pexip Infinity software files
© 2016 Pexip AS Version 12.a May 2016 Page 64 of 369
Files used to manually deploy new Conferencing Nodes
Description File name Location Hypervisor Notes
Generic Pexip Infinity Conferencing Node OVA
Pexip_Infinity_v12_generic_ConfNode_<release>.ova
www.pexip.com/software-download
Any hypervisor in a cloud-based deployment except Hyper-V.
Used to manually deploy a generic Conferencing Node VM using hypervisors other than Hyper-V. For more information, see Deploying a Conferencing Node using a generic VM template and configuration file.
Generic Pexip Infinity Conferencing Node ZIP
Pexip_Infinity_v12_HyperV_ConfNode_<release>.zip
www.pexip.com/software-download
Hyper-V in a cloud-based deployment
Used to manually deploy a generic Conferencing Node VM using Hyper-V in certain cloud-based environments. For more information, see Deploying a Conferencing Node using a generic VM template and configuration file.
Generated Pexip Infinity Conferencing Node OVA
pexip-<hostname>.<domain>.ova
Generated on request by the Management Node
VMware / KVM / Xen
See Deploying new Conferencing Nodes
Generated Pexip Infinity Conferencing Node ZIP
pexip-<hostname>.<domain>.zip
Generated on request by the Management Node
Hyper-V See Manually deploying a Conferencing Node on a Hyper-V host.
Files used to automatically deploy new Conferencing NodesYou can automatically deploy a new Conferencing Node on to a VMware ESXi host.
When deploying a Conferencing Node automatically, the Pexip Infinity Management Node generates a file that contains a template for a generic VM along with Conferencing Node-specific configuration details, and uploads it automatically onto the hypervisor. The new Conferencing Node VM is then created without any further intervention by the administrator.
There is no requirement to download any files from the Pexip website when automatically deploying new Conferencing Nodes.
For more information, see Automatically deploying a new Conferencing Node on a VMware host.
Pexip Infinity Administrator GuideInstallation and getting started with Pexip Infinity
Hypervisor configuration
© 2016 Pexip AS Version 12.a May 2016 Page 65 of 369
Hypervisor configurationFor information about how to configure your hypervisor to support deployments of the Pexip Infinity platform before you install the Management Node or a Conferencing Node, see:
Configuring VMwareThis section describes the VMware configuration required in order to support deployments of the Pexip Infinity platform before you install the Management Node or automatically deploy / manually install a Conferencing Node.
Prerequisites
It is assumed that you have a VMware environment already installed.
For details on the versions and editions of VMware that are supported by Pexip Infinity, see VMware vSphere ESXi.
For more details on VMware and information on advanced VMware ESXi administration, see Advanced VMware ESXi administration.
If an ESXi host is being managed by vCenter Server, all administration must be performed via vCenter Server. Do not log in directly to the ESXi host; configuration changes made in this way may be lost. To ensure that ESXi hosts being managed by vCenter Server are accessible via vCenter Server only and are not directly accessible, you should put them in Lockdown mode. Lockdown mode forces all operations to be performed through vCenter Server.
Synchronizing time
All host servers must be synchronized with accurate time before you install the Pexip Infinity Management Node or Conferencing Nodes on them.
l NTP must be enabled on the Management Node before you deploy any Conferencing Nodes. l We strongly recommend that you configure at least three distinct NTP servers or NTP server pools on all your host servers and
the Management Node itself. This will ensure that log entries from all nodes are properly synchronized.
Using the desktop client
To synchronize time on the host server using the vSphere desktop client:
1. Log in to the VM manager (vCenter Server or the ESXi host).
2. From the left-hand panel, select the host server on which the software image is to be installed.
3. Select the Configuration tab.
4. From the Software pane on the left-hand side, select Time Configuration.
5. On the top right of the page, select Properties. The Time Configuration dialog box appears.
6. In the NTP Configuration section, select NTP Client Enabled.
7. Select Options. The NTP Daemon (ntpd) Options dialog box appears.
8. From the left-hand panel, select General. Under Startup Policy, select Start and stop with host.
9. Select OK.
10. Select Options again. The NTP Daemon (ntpd) Options dialog box appears.
11. From the left-hand panel, select NTP Settings. Under NTP Servers, we strongly recommend that you configure at least 3 distinct NTP servers or NTP server pools to ensure that log entries from all nodes are properly synchronized.
12. Select Restart NTP service to apply changes, and then select OK.
Using the web client
To synchronize time on the host server using the vSphere web client:

Pexip Infinity Administrator GuideInstallation and getting started with Pexip Infinity
Hypervisor configuration
© 2016 Pexip AS Version 12.a May 2016 Page 66 of 369
1. Log in to the VM manager (vCenter Server).
2. From the left-hand panel, select vCenter > Hosts and Clusters and go to the host server on which the software image is to be installed.
3. Select the Manage tab.
4. From the pane on the left-hand side, select Time Configuration.
5. On the top right of the page, select Edit. The Edit Time Configuration dialog box appears.
6. Select Use Network Time Protocol (Enable NTP client).
7. From the NTP Service Startup Policy drop-down menu, select Start and stop with host.
8. In the NTP Servers field, we strongly recommend that you enter at least 3 distinct NTP servers or NTP server pools to ensure that log entries from all nodes are properly synchronized.
9. Select OK.
To verify that NTP has been enabled correctly:
1. Select the Configuration tab.
2. From the Software pane on the left-hand side, select Time Configuration.
3. Ensure that value in the Date & Time field is correct.
Using a static MAC address for the Management Node
We recommend using a static MAC address for the virtual machine hosting your Management Node. This will ensure that the licenses on your Management Node do not become invalid if, for example, the node reboots and comes up on a different physical blade.
Enabling automatic startup
After deploying a new Management Node or Conferencing Node from VMware, you must enable automatic startup of that virtual machine (VM). In VMware, automatic startup is disabled by default for every new VM. This means that if the host server is powered down for any reason, when it restarts the VM will not restart and must be started manually.
You can only enable automatic startup after the Management Node or Conferencing Node has been deployed.
Using the web client
To enable automatic startup using the vSphere web client:
1. Log in to the VM manager (vCenter Server).
2. From the left-hand panel, select vCenter > Hosts and Clusters and go to the host server on which the node's VM is installed.
3. Select the Manage tab.
4. From the pane on the left-hand side, select VM Startup/Shutdown.
5. At the top right of the page, select Edit.
6. Select the relevant node's VM and use the up arrow to move it to the Automatic Startup section.
7. Select OK.
Using the desktop client
To enable automatic startup using the vSphere desktop client:
1. Log in to the VM manager (vCenter Server or the ESXi host).
2. From the left-hand panel, select the host server on which the node's VM is installed.
3. Select the Configuration tab.
4. From the Software pane on the left-hand side, select Virtual Machine Startup/Shutdown.
5. At the top right of the page, select Properties.
6. Select the relevant VM and use the Move Up button to move it to the Automatic Startup section.
7. Select OK.

Pexip Infinity Administrator GuideInstallation and getting started with Pexip Infinity
Hypervisor configuration
© 2016 Pexip AS Version 12.a May 2016 Page 67 of 369
Disabling EVC
We strongly recommend that you disable EVC (Enhanced vMotion Compatibility) for any ESXi clusters hosting Conferencing Nodes that include a mix of old and new CPUs. If EVC is enabled on such clusters, the Pexip Infinity platform will run more slowly because the Conferencing Nodes will assume they are running on older hardware.
For more information, see Enhanced vMotion Compatibility (EVC).
To disable EVC:
1. Log in to vCenter Server using either the vSphere desktop or web client.
2. Display the cluster in the inventory.
3. Right-click the cluster and select Edit Settings.
4. In the left panel, select VMware EVC.The dialog box displays the current EVC settings.
5. Select Change EVC Settings.
6. Select Disable EVC.
Configuring Hyper-VThis section describes the Hyper-V configuration required in order to support deployments of the Pexip Infinity platform before you install the Management Node or install a Conferencing Node.
Prerequisites
It is assumed that you have a Hyper-V environment already installed.
Synchronizing time
All host servers must be synchronized with accurate time before you install the Pexip Infinity Management Node or Conferencing Nodes on them.
l NTP must be enabled on the Management Node before you deploy any Conferencing Nodes. l We strongly recommend that you configure at least three distinct NTP servers or NTP server pools on all your host servers and
the Management Node itself. This will ensure that log entries from all nodes are properly synchronized.
In Hyper-V, all time synchronization is configured using the Active Domain Controller. You must ensure that all VMs and host servers are using the same time. Consult your Hyper-V documentation for information on how to do this in your environment.
Using a static MAC address for the Management Node
We recommend using a static MAC address for the virtual machine hosting your Management Node. This will ensure that the licenses on your Management Node do not become invalid if, for example, the node reboots and comes up on a different physical blade.
Creating an external virtual switch
You must create an external virtual switch on the host server to allow VMs on that host to access external network resources. To do this:
1. Log in to Hyper-V.
2. Right-click on the host server and select Virtual Switch Manager....The Virtual Switch Manager window opens.
3. Select External and then Create Virtual Switch.
4. Enter a Name for the switch. 5. Either accept the default options, or select the options appropriate for your environment.
6. Select Apply.

Pexip Infinity Administrator GuideInstallation and getting started with Pexip Infinity
Hypervisor configuration
© 2016 Pexip AS Version 12.a May 2016 Page 68 of 369
Enabling automatic startup
By default, virtual machines deployed using Hyper-V are configured to restart automatically if they were running when the host server was shut down or powered off. We recommend that you leave this setting as is for the Management Node and all Conferencing Nodes.
Disabling processor compatibility mode
We strongly recommend that you disable processor compatibility mode on all Hyper-V Conferencing Node virtual machines. If processor compatibility mode is enabled, the Conferencing Node may assume it is running on older hardware, and may stop working, with the message CPU instruction set is not supported; system will be placed in maintenance mode.
For more information, see https://technet.microsoft.com/en-us/library/dn859550.aspx.
Configuring KVMThis section describes the KVM configuration required in order to support deployments of the Pexip Infinity platform before you install the Management Node or install a Conferencing Node.
Prerequisites
This guide assumes that you have a KVM environment already installed.
Pexip Infinity requires your KVM environment to include Linux kernel 3.10.0 or later, and QEMU 1.5.0 or later. This means the following distributions: Debian 8, RHEL 7, SLES 12, or Ubuntu 14.04 (or later, where appropriate).
You must ensure that:
l the KVM environment may be managed through libvirt l the virt-manager, virsh and virt-install applications are available for use on the client system that is managing the KVM
environment; to do this, run the command:sudo apt-get install virt-manager libvirt-bin
The libvirt command line tools are used to import the disk image and create the VM. Note that we use the libvirt command line tools to perform the import as they provide greater control than Virtual Machine Manager. For more information, see http://libvirt.org/drvqemu.html.
Synchronizing time
All host servers must be synchronized with accurate time before you install the Pexip Infinity Management Node or Conferencing Nodes on them.
l NTP must be enabled on the Management Node before you deploy any Conferencing Nodes. l We strongly recommend that you configure at least three distinct NTP servers or NTP server pools on all your host servers and
the Management Node itself. This will ensure that log entries from all nodes are properly synchronized.
Install the NTP package on your host server using the appropriate package management tool for your Linux distribution.
Enabling automatic startup
After deploying a new Management Node or Conferencing Node in KVM, you should enable automatic startup of that virtual machine (VM). In KVM, automatic startup is disabled by default for every new VM. This means that if the host server is powered down for any reason, when it restarts the VM will not restart and must be started manually.
You can only enable automatic startup after the Management Node or Conferencing Node has been deployed.
To enable automatic startup using Virtual Machine Manager:
1. Connect to the Virtual Machine Manager (virt-manager) that is managing the node's VM.
2. Select the node's VM and then, from the toolbar, select the Show the virtual machine console and details icon .A new window for that VM is opened.

Pexip Infinity Administrator GuideInstallation and getting started with Pexip Infinity
Hypervisor configuration
© 2016 Pexip AS Version 12.a May 2016 Page 69 of 369
3. If necessary, select View > Details to display the VM information.
4. From the sidebar menu, select Boot Options.
5. Select the Start virtual machine on host boot up check box.
6. Select Apply.
Configuring XenThis section describes the Xen configuration required in order to support deployments of the Pexip Infinity platform before you install the Management Node or install a Conferencing Node.
Prerequisites
This guide assumes that you have a Xen environment already installed. Pexip Infinity requires Xen 4.2 and later.
You must ensure that:
l the Xen environment may be managed through libvirt l the virt-manager, virsh and virt-install applications are available for use on the client system that is managing the Xen
environment; to do this, run the command:sudo apt-get install virt-manager libvirt-bin
The libvirt command line tools are used to import the disk image and create the VM. Note that we use the libvirt command line tools to perform the import as they provide greater control than Virtual Machine Manager. For more information, see http://libvirt.org/drvxen.html.
Synchronizing time
All host servers must be synchronized with accurate time before you install the Pexip Infinity Management Node or Conferencing Nodes on them.
l NTP must be enabled on the Management Node before you deploy any Conferencing Nodes. l We strongly recommend that you configure at least three distinct NTP servers or NTP server pools on all your host servers and
the Management Node itself. This will ensure that log entries from all nodes are properly synchronized.
Install the NTP package on your host server using the appropriate package management tool for your Linux distribution.
Enabling automatic startup
After deploying a new Management Node or Conferencing Node in Xen, you should enable automatic startup of that virtual machine (VM). In Xen, automatic startup is disabled by default for every new VM. This means that if the host server is powered down for any reason, when it restarts the VM will not restart and must be started manually.
You can only enable automatic startup after the Management Node or Conferencing Node has been deployed.
To enable automatic startup using Virtual Machine Manager:
1. Connect to the Virtual Machine Manager (virt-manager) that is managing the node's VM.
2. Select the node's VM and then, from the toolbar, select the Show the virtual machine console and details icon .A new window for that VM is opened.
3. If necessary, select View > Details to display the VM information.
4. From the sidebar menu, select Boot Options.
5. Select the Start virtual machine on host boot up check box.
6. Select Apply.
Pexip Infinity Administrator GuideInstallation and getting started with Pexip Infinity
Management Node installation overview
© 2016 Pexip AS Version 12.a May 2016 Page 70 of 369
Management Node installation overviewInstallation of the Management Node is a two-step process:
1. Deploying the VM template: this creates a new unconfigured instance of a generic Management Node VM.
2. Running the installation wizard: after deploying the Management Node template, the installation wizard allows you to enter the basic configuration details for your Management Node VM.
Deploying the Management Node templateThe process for obtaining and deploying the Management Node VM template varies according to your hypervisor or cloud service provider.
Supported hypervisors
Two template files are available for download from the Pexip website for use when creating your Management Node VM. Select the appropriate template file for your hypervisor:
l an .ova file for VMware, KVM or Xen deployments, and other hypervisors except Hyper-V
l a .zip file for Microsoft Hyper-V deployments
Review the hypervisor configuration guidelines and then select your hypervisor from the list below for instructions on how to create a new instance of a Pexip Infinity Management Node virtual machine:
l VMware l Microsoft Hyper-V l KVM l Xen
Other hypervisors
Pexip Infinity currently supports deployments using ESXi, Hyper-V, KVM or Xen hypervisors only. If you wish to use any other type of hypervisor or orchestration layer, you can use the Pexip Infinity OVA file to create a generic instance of the Management Node and then configure it by Running the installation wizard. However, we recommend that you first contact your Pexip authorized support representative for advice.
Cloud service providers
The Pexip Infinity platform can be deployed on Amazon Web Services (AWS) and Microsoft Azure cloud platforms.
See Deploying Pexip Infinity on Amazon Web Services and Deploying Pexip Infinity on Microsoft Azure for installation guidelines and prerequisites.
Installing the Management Node — VMware hypervisorsBefore installing the Management Node we recommend that you review the VMware configuration prerequisites.
Installation of the Management Node is a two-step process:
1. Deploying the VM template: this creates a new unconfigured instance of a generic Management Node VM.The process for deploying the template in a VMware hypervisor environment is described below.Instructions are provided for using either the vSphere desktop client or the vSphere web client.
2. Running the installation wizard: after deploying the Management Node template, the installation wizard allows you to enter the basic configuration details for your Management Node VM.
Deploying the Management Node template
If an ESXi host is being managed by vCenter Server, all administration must be performed via vCenter Server. Do not log in directly to the ESXi host; configuration changes made in this way may be lost. To ensure that ESXi hosts being managed by

Pexip Infinity Administrator GuideInstallation and getting started with Pexip Infinity
Management Node installation overview
© 2016 Pexip AS Version 12.a May 2016 Page 71 of 369
vCenter Server are accessible via vCenter Server only and are not directly accessible, you should put them in Lockdown mode. Lockdown mode forces all operations to be performed through vCenter Server.
Using the vSphere desktop clientTo install a new instance of a Pexip Infinity Management Node using the vSphere desktop client:
1. Download the Pexip Infinity OVA file (Pexip_Infinity_v12_generic_pxMgr_<release>.ova) from www.pexip.com/software-download.
2. Log in to the VM Manager (vCenter Server or the ESXi host).
3. Select File > Deploy OVF Template.... You will be taken to the Source page.
4. Browse to the location of the Pexip Infinity OVA file and select Next >.You will be taken to the OVF Template Details page.
5. Select Next >.You will be taken to the End User License Agreement page.
6. Read the license agreement, and if you agree to the terms select Accept and then Next >.You will be taken to the Name and Location page.
7. Enter an appropriate name for the Management Node. This name will be used in the VMware interface to identify this Management Node virtual machine (VM).
8. Select Next >.You will be taken to the Resource Pool page.
9. Select the resource pool for the Pexip Infinity Management Node.
10. Select Next >.You will be taken to the Disk Format page.
11. Select Thick Provision Lazy Zeroed.
12. Select Next >. You will be taken to the Network Mapping page.
13. Select the appropriate mappings and select Next >. You will be taken to the Ready to Complete page.
14. Review the information and select Power on after deployment.
15. Select Finish.
A window will appear showing the deployment progress. When deployment is complete this will say Completed Successfully. You can then Close the window.
Enabling automatic startup
After deploying a new Management Node from VMware, you must enable automatic startup of that virtual machine (VM). In VMware, automatic startup is disabled by default for every new VM. This means that if the host server is powered down for any reason, when it restarts the VM will not restart and must be started manually.
You can only enable automatic startup after the Management Node has been deployed.
To enable automatic startup using the vSphere desktop client:
1. Log in to the VM manager (vCenter Server or the ESXi host).
2. From the left-hand panel, select the host server on which the node's VM is installed.
3. Select the Configuration tab.
4. From the Software pane on the left-hand side, select Virtual Machine Startup/Shutdown.
5. At the top right of the page, select Properties.
6. Select the relevant VM and use the Move Up button to move it to the Automatic Startup section.
7. Select OK.

Pexip Infinity Administrator GuideInstallation and getting started with Pexip Infinity
Management Node installation overview
© 2016 Pexip AS Version 12.a May 2016 Page 72 of 369
Opening a console window to run the installation wizard
To run the installation wizard, which configures the Management Node, you must open a console window on the Management Node VM.
For step-by-step instructions, see Running the installation wizard.
Using the vSphere web clientTo install a new instance of a Pexip Infinity Management Node using the vSphere web client:
1. Download the Pexip Infinity OVA file from www.pexip.com/software-download. 2. Log in to the VM Manager (vCenter Server).
3. Select vCenter > VMs and Templates.
4. Click on the Actions menu and select Deploy OVF Template....You will be taken to the Select source page.
5. Browse to the location of the Pexip Infinity OVA file and select Next >.You will be taken to the Review details page.
6. You may see the following warning:
Select the Accept extra configuration options checkbox and select Next.You will be taken to the Accept EULAs page.
7. Read the license agreement, and if you agree to the terms select Accept and then Next >.You will be taken to the Select name and folder page.
8. Enter an appropriate Name for the Management Node. This name will be used in the VMware interface to identify this Management Node virtual machine (VM).
9. Select the folder or datacenter within which the Management Node will be located.
10. Select Next. 11. Select the resource pool in which to run the template.
12. Select Next.You will be taken to the Select storage page.

Pexip Infinity Administrator GuideInstallation and getting started with Pexip Infinity
Management Node installation overview
© 2016 Pexip AS Version 12.a May 2016 Page 73 of 369
13. Select the virtual disk format and datastore to be used.
14. Select Next.You will be taken to the Setup networks page.
15. Select the VM Network and configuration, and select Next.You will be taken to the Ready to complete page.
16. Review the settings and select Power on after deployment.
17. Select Finish.
Progress is shown in the Recent Tasks tab to the right of the screen. When the template has been deployed successfully, a green tick will appear.
Enabling automatic startup
After deploying a new Management Node from VMware, you must enable automatic startup of that virtual machine (VM). In VMware, automatic startup is disabled by default for every new VM. This means that if the host server is powered down for any reason, when it restarts the VM will not restart and must be started manually.
You can only enable automatic startup after the Management Node has been deployed.
To enable automatic startup using the vSphere web client:
1. Log in to the VM manager (vCenter Server).
2. From the left-hand panel, select vCenter > Hosts and Clusters and go to the host server on which the node's VM is installed.
3. Select the Manage tab.
4. From the pane on the left-hand side, select VM Startup/Shutdown.
5. At the top right of the page, select Edit.
6. Select the relevant node's VM and use the up arrow to move it to the Automatic Startup section.
7. Select OK.
Opening a console window to run the installation wizard
To run the installation wizard, which configures the Management Node, you must open a console window on the Management Node VM.
For step-by-step instructions, see Running the installation wizard.
Installing the Management Node — Hyper-V hypervisorsBefore installing the Management Node we recommend that you review the Hyper-V configuration prerequisites.
Installation of the Management Node is a two-step process:
1. Deploying the VM template: this creates a new unconfigured instance of a generic Management Node VM.The process for deploying the template in a Microsoft Hyper-V hypervisor environment is described below.
2. Running the installation wizard: after deploying the Management Node template, the installation wizard allows you to enter the basic configuration details for your Management Node VM.
Deploying the Management Node template
To deploy a new instance of a Pexip Infinity Management Node using Hyper-V:
1. Download the Pexip Infinity ZIP file (Pexip_Infinity_v12_HyperV_pxMgr_<release>.zip) from www.pexip.com/software-download, and extract the files.
2. Log in to Hyper-V.
3. Right-click on the host server and select Import Virtual Machine....This will start the Import Virtual Machine wizard.
4. On the Locate Folder page, Browse to the folder containing the extracted files and select Next.You will be taken to the Select Virtual Machine page.

Pexip Infinity Administrator GuideInstallation and getting started with Pexip Infinity
Management Node installation overview
© 2016 Pexip AS Version 12.a May 2016 Page 74 of 369
5. The wizard will automatically detect the folder and file containing the Management Node VM. Confirm that this is correct and select Next.You will be taken to the Choose Import Type page.
6. Select the type of import most appropriate for your environment (if you are unsure, select Restore the virtual machine). Select Next.
7. Depending on the import type you have chosen, you may be asked for further information. Follow the prompts as required.When the setup is complete, you will be taken to the Completing Import Wizard page.
8. Review the summary and select Finish.
When the Management Node VM has been created successfully, it will appear in the list of Virtual Machines.
Enabling automatic startup
By default, virtual machines deployed using Hyper-V are configured to restart automatically if they were running when the host server was shut down or powered off. We recommend that you leave this setting as is for the Management Node and all Conferencing Nodes.
Opening a console window to run the installation wizard
To run the installation wizard, which configures the Management Node, you must open a console window on the Management Node VM.
For step-by-step instructions, see Running the installation wizard.
Installing the Management Node — KVM hypervisorsBefore installing the Management Node we recommend that you review the KVM configuration prerequisites.
Installation of the Management Node is a two-step process:
1. Deploying the VM template: this creates a new unconfigured instance of a generic Management Node VM.The process for deploying the template in a KVM hypervisor environment is described below.
2. Running the installation wizard: after deploying the Management Node template, the installation wizard allows you to enter the basic configuration details for your Management Node VM.
Deploying the Management Node template
To deploy a new instance of a Pexip Infinity Management Node on to a KVM host, you must:
1. Download the Management Node OVA image file and convert it for use with KVM.
2. Create a new volume on your KVM server and upload the disk image.
3. Create the Management Node virtual machine.Note that we use the libvirt command line tools to perform the import as they provide greater control than Virtual Machine Manager.
4. Enable the virtual machine for automatic startup.
These steps are described in detail below.
Download the Pexip .ova image and convert it for use with KVM
You must download the Management Node OVA image file and then, to use it with KVM, you must convert it from VMDK to raw format.
From within your KVM environment:
1. Download the Pexip Infinity OVA file (Pexip_Infinity_v12_generic_pxMgr_<release>.ova) from www.pexip.com/software-download.
2. Unpack the .ova image, using the command:tar xf Pexip_Infinity_v12_generic_pxMgr_<release>.ova

Pexip Infinity Administrator GuideInstallation and getting started with Pexip Infinity
Management Node installation overview
© 2016 Pexip AS Version 12.a May 2016 Page 75 of 369
This unpacks a set of files including pexipmcumgr-disk01.vmdk.
3. If required, you can verify the pexipmcumgr.mf manifest file, using the command:sha1sum -c pexipmcumgr.mf
4. Convert the disk image from VMDK to raw, using the command:qemu-img convert -O raw pexipmcumgr-disk01.vmdk pexipmcumgr-disk01.raw
(This conversion process can take several seconds.)
Create a new volume and upload the disk image
Next, you create a new volume on your KVM server and upload the converted disk image. From within your KVM environment:
1. Use virsh to create a new volume on your KVM server:virsh --connect qemu://<hostname>/system vol-create-as <poolname> <volume_name> 99G --format raw
where:<hostname> is the hostname of your KVM server. Note that you can omit the <hostname> if you are running virsh commands on the local server i.e. you can use virsh --connect qemu:///system .<poolname> is the name of the storage pool in which to create the volume; typically you would use default. (To determine the storage pools available on the target system, use virsh --connect qemu://<hostname>/system pool-list.)<volume_name> is the name of your new volume.99G is the virtual size of the volume; always use 99G for a Management Node.For example:virsh --connect qemu://host1.example.com/system vol-create-as default pexip-manager 99G --format raw
This example creates a volume named pexip-manager of size 99 GB and format raw in the storage pool named default. 2. Upload the converted disk image to the newly created volume:
virsh --connect qemu://<hostname>/system vol-upload <volume_name> pexipmcumgr-disk01.raw --pool <poolname>
For example:virsh --connect qemu://host1.example.com/system vol-upload pexip-manager pexipmcumgr-disk01.raw --pool default
This example uploads the pexipmcumgr-disk01.raw image to the newly created volume, pexip-manager, in the storage pool named default.
Create the virtual machine
After the disk image has been uploaded, you can create the virtual machine to use it.
Note that we use the libvirt command line tools to perform the import as they provide greater control than Virtual Machine Manager.
1. Identify the filesystem path of the newly uploaded disk image:virsh --connect qemu://<hostname>/system vol-path <volume_name> --pool <poolname>
For example:virsh --connect qemu://host1.example.com/system vol-path pexip-manager --pool default
This prints out the absolute path to the disk image file, for example:/var/lib/libvirt/images/pexip-manager
This path is used in the disk path parameter in the next step.
2. Use the virt-install command line tool to create the virtual machine:
virt-install \ --import \ --hvm \ --name=<vm_name> \ --arch=x86_64 \ --vcpus=2 \ --ram=4096 \

Pexip Infinity Administrator GuideInstallation and getting started with Pexip Infinity
Management Node installation overview
© 2016 Pexip AS Version 12.a May 2016 Page 76 of 369
--cpu host \ --os-type=linux \ --connect=qemu://<hostname>/system \ --virt-type kvm \ --disk path=<image_file_path>,bus=virtio,format=raw,cache=none,io=native \ --network bridge=br0,model=virtio \ --memballoon virtio \ --graphics vnc,listen=0.0.0.0,password=<password>
This creates a new VM (KVM domain) from the converted disk image.The meaning of the various options are as follows (items in bold may be changed as necessary):
Option Description
--import Build guest domain around pre-installed disk image; do not attempt to install a new OS.
--hvm Create a fully virtualized (i.e. not paravirtualized) VM.
--name=<vm_name> Name of the new VM, where <vm_name> is, for example, pexip-management-vm.
--arch=x86_64 CPU architecture of new VM (must be x84_64).
--vcpus=2 Number of CPUs allocated to new VM. Typically, this is 2 for the Management Node.
--ram=4096 Memory allocated to new VM (in megabytes).
--cpu host Expose all host CPU capabilities to new VM (CPUID).
--os-type=linux The guest OS is Linux.
--connect=qemu://<hostname>/system
Connect to KVM on the target system, where <hostname> is the hostname of your KVM server.
--virt-type kvm Use KVM to host the new VM.
--disk path=<image_file_path>,bus=virtio,format=raw,cache=none,io=native
o Define the location of the disk image file, where <image_file_path> is as determined in the previous step, for example /var/lib/libvirt/images/pexip-manager.
o Expose it to the guest on the virtio paravirtualized bus (as opposed to IDE/SCSI).
o Define the image file as being in raw format.
o Instruct the host system not to cache the disk contents in memory.
o Use the native IO backend to access the disk device.
--network bridge=br0,model=virtio
o Create a network interface connected to the br0 bridge interface on the host.
o Expose it to the guest as a virtio paravirtualized NIC.
--memballoon virtio Expose the virtio memory balloon to the guest.
--graphics vnc,listen=0.0.0.0,password=<password>
Expose the graphical console over VNC, listening on 0.0.0.0 (i.e. all addresses on the target system) and with an access password of <password>.
You may receive a warning "Unable to connect to graphical console: virt-viewer not installed"; if so, this message can be safely ignored.After the VM has been created, it may be managed using the Virtual Machine Manager desktop interface (virt-manager application) or via the command line interface (virsh).The new node should start automatically. If it does not you can use the Virtual Machine Manager to start the node, or the CLI command:virsh --connect qemu://<hostname>/system start <vm_name>
Note that you can list existing VMs by using virsh --connect qemu://<hostname>/system list

Pexip Infinity Administrator GuideInstallation and getting started with Pexip Infinity
Management Node installation overview
© 2016 Pexip AS Version 12.a May 2016 Page 77 of 369
Enabling automatic startup
After deploying a new Management Node in KVM, you should enable automatic startup of that virtual machine (VM). In KVM, automatic startup is disabled by default for every new VM. This means that if the host server is powered down for any reason, when it restarts the VM will not restart and must be started manually.
You can only enable automatic startup after the Management Node has been deployed.
To enable automatic startup using Virtual Machine Manager:
1. Connect to the Virtual Machine Manager (virt-manager) that is managing the node's VM.
2. Select the node's VM and then, from the toolbar, select the Show the virtual machine console and details icon .A new window for that VM is opened.
3. If necessary, select View > Details to display the VM information.
4. From the sidebar menu, select Boot Options.
5. Select the Start virtual machine on host boot up check box.
6. Select Apply.
Opening a console window to run the installation wizard
To run the installation wizard, which configures the Management Node, you must open a console window on the Management Node VM.
For step-by-step instructions, see Running the installation wizard.
Installing the Management Node — Xen hypervisorsBefore installing the Management Node we recommend that you review the Xen configuration prerequisites.
Installation of the Management Node is a two-step process:
1. Deploying the VM template: this creates a new unconfigured instance of a generic Management Node VM.The process for deploying the template in a Xen hypervisor environment is described below.
2. Running the installation wizard: after deploying the Management Node template, the installation wizard allows you to enter the basic configuration details for your Management Node VM.
Deploying the Management Node template
To deploy a new instance of a Pexip Infinity Management Node on to a Xen host, you must:
1. Download the Management Node OVA image file and convert it for use with Xen.
2. Create a new volume on your Xen server and upload the disk image.
3. Create the Management Node virtual machine.Note that we use the libvirt command line tools to perform the import as they provide greater control than Virtual Machine Manager.
4. Enable the virtual machine for automatic startup.
These steps are described in detail below.
Download the Pexip .ova image and convert it for use with Xen
You must download the Management Node OVA image file and then, to use it with Xen, you must convert it from VMDK to raw format.
From within your Xen environment:
1. Download the Pexip Infinity OVA file (Pexip_Infinity_v12_generic_pxMgr_<release>.ova) from www.pexip.com/software-download.
2. Unpack the .ova image, using the command:

Pexip Infinity Administrator GuideInstallation and getting started with Pexip Infinity
Management Node installation overview
© 2016 Pexip AS Version 12.a May 2016 Page 78 of 369
tar xf Pexip_Infinity_v12_generic_pxMgr_<release>.ova
This unpacks a set of files including pexipmcumgr-disk01.vmdk.
3. If required, you can verify the pexipmcumgr.mf manifest file, using the command:sha1sum -c pexipmcumgr.mf
4. Convert the disk image from VMDK to raw, using the command:qemu-img convert -O raw pexipmcumgr-disk01.vmdk pexipmcumgr-disk01.raw
(This conversion process can take several seconds.)
Create a new volume and upload the disk image
Next, you create a new volume on your Xen server and upload the converted disk image. From within your Xen environment:
1. Use virsh to create a new volume on your Xen server:virsh --connect xen://<hostname>/ vol-create-as <poolname> <volume_name> 99G --format raw
where:<hostname> is the hostname of your Xen server. Note that you can omit the <hostname> if you are running virsh commands on the local server i.e. you can use virsh --connect xen:/// .<poolname> is the name of the storage pool in which to create the volume; typically you would use default. (To determine the storage pools available on the target system, use virsh --connect xen://<hostname>/ pool-list.)<volume_name> is the name of your new volume.99G is the virtual size of the volume; always use 99G for a Management Node.For example:virsh --connect xen://host1.example.com/ vol-create-as default pexip-manager 99G --format raw
This example creates a volume named pexip-manager of size 99 GB and format raw in the storage pool named default. 2. Upload the converted disk image to the newly created volume:
virsh --connect xen://<hostname>/ vol-upload <volume_name> pexipmcumgr-disk01.raw --pool <poolname>
For example:virsh --connect xen://host1.example.com/ vol-upload pexip-manager pexipmcumgr-disk01.raw --pool default
This example uploads the pexipmcumgr-disk01.raw image to the newly created volume, pexip-manager, in the storage pool named default.
Create the virtual machine
After the disk image has been uploaded, you can create the virtual machine to use it.
Note that we use the libvirt command line tools to perform the import as they provide greater control than Virtual Machine Manager.
1. Identify the filesystem path of the newly uploaded disk image:virsh --connect xen://<hostname>/ vol-path <volume_name> --pool <poolname>
For example:virsh --connect xen://host1.example.com/ vol-path pexip-manager --pool default
This prints out the absolute path to the disk image file, for example:/var/lib/libvirt/images/pexip-manager
This path is used in the disk path parameter in the next step.
2. Use the virt-install command line tool to create the virtual machine:
virt-install \ --import \ --hvm \ --name=<vm_name> \ --arch=x86_64 \ --vcpus=2 \ --ram=4096 \

Pexip Infinity Administrator GuideInstallation and getting started with Pexip Infinity
Management Node installation overview
© 2016 Pexip AS Version 12.a May 2016 Page 79 of 369
--os-type=linux \ --connect=xen://<hostname>/ \ --virt-type xen \ --disk path=<image_file_path>,bus=xen,format=raw,driver_name=qemu,cache=none,io=native \ --network bridge=xenbr0,model=e1000 \ --memballoon xen \ --graphics vnc,listen=0.0.0.0,password=<password>
This creates a new VM (Xen domain) from the converted disk image.The meaning of the various options are as follows (items in bold may be changed as necessary):
Option Description
--import Build guest domain around pre-installed disk image; do not attempt to install a new OS.
--hvm Create a fully virtualized (i.e. not paravirtualized) VM.
--name=<vm_name> Name of the new VM, where <vm_name> is, for example, pexip-management-vm.
--arch=x86_64 CPU architecture of new VM (must be x84_64).
--vcpus=2 Number of CPUs allocated to new VM. Typically, this is 2 for the Management Node.
--ram=4096 Memory allocated to new VM (in megabytes).
--os-type=linux The guest OS is Linux.
--connect=xen://<hostname>/
Connect to Xen on the target system, where <hostname> is the hostname of your Xen server.
--virt-type xen Use Xen to host the new VM.
--disk path=<image_file_path>,bus=xen,format=raw,driver_name=qemu,cache=none,io=native
o Define the location of the disk image file, where <image_file_path> is as determined in the previous step, for example /var/lib/libvirt/images/pexip-manager.
o Expose it to the guest on the xen paravirtualized bus (as opposed to IDE/SCSI).
o Define the image file as being in raw format and the driver as qemu.
o Instruct the host system not to cache the disk contents in memory.
o Use the native IO backend to access the disk device.
--network bridge=xenbr0,model=e1000
o Create a network interface connected to the xenbr0 bridge interface on the host.
o Expose it to the guest as an e1000 NIC.
--memballoon xen Expose the xen memory balloon to the guest.
--graphics vnc,listen=0.0.0.0,password=<password>
Expose the graphical console over VNC, listening on 0.0.0.0 (i.e. all addresses on the target system) and with an access password of <password>.
You may receive a warning "Unable to connect to graphical console: virt-viewer not installed"; if so, this message can be safely ignored.After the VM has been created, it may be managed using the Virtual Machine Manager desktop interface (virt-manager application) or via the command line interface (virsh).The new node should start automatically. If it does not you can use the Virtual Machine Manager to start the node, or the CLI command:virsh --connect xen://<hostname>/ start <vm_name>
Note that you can list existing VMs by using virsh --connect xen://<hostname>/ list
Enabling automatic startup
After deploying a new Management Node in Xen, you should enable automatic startup of that virtual machine (VM). In Xen, automatic startup is disabled by default for every new VM. This means that if the host server is powered down for any reason, when

Pexip Infinity Administrator GuideInstallation and getting started with Pexip Infinity
Management Node installation overview
© 2016 Pexip AS Version 12.a May 2016 Page 80 of 369
it restarts the VM will not restart and must be started manually.
You can only enable automatic startup after the Management Node has been deployed.
To enable automatic startup using Virtual Machine Manager:
1. Connect to the Virtual Machine Manager (virt-manager) that is managing the node's VM.
2. Select the node's VM and then, from the toolbar, select the Show the virtual machine console and details icon .A new window for that VM is opened.
3. If necessary, select View > Details to display the VM information.
4. From the sidebar menu, select Boot Options.
5. Select the Start virtual machine on host boot up check box.
6. Select Apply.
Opening a console window to run the installation wizard
To run the installation wizard, which configures the Management Node, you must open a console window on the Management Node VM.
For step-by-step instructions, see Running the installation wizard.
Running the installation wizardTo run the installation wizard, which configures the Management Node, you must open a console window on the Management Node VM.
Opening a console window
Open the console window using the appropriate method for your hypervisor.
Opening a console window in vSphere
1. Using either the vSphere desktop or web client, log in to the Management Node's VM Manager (vCenter Server or, for stand-alone deployments, the ESXi host).
2. Power on the new Management Node VM (if it is not already powered on).
3. Right-click on the new Management Node VM and select Open Console.
Opening a console window in Hyper-V
1. Log in to Hyper-V.
2. Start the new Management Node VM (if it is not already running).
3. Right-click on the new Management Node VM and select Connect....
Opening a console window in KVM or Xen
1. Connect to Virtual Machine Manager (virt-manager) that is managing the Management Node's VM.
2. Ensure that the Management Node VM is Running.
3. Select the new Management Node VM and then, from the toolbar, select the Show the virtual machine console and details
icon .A new window for that VM is opened.
4. If necessary, select View > Console to display the console.
Cloud-based deployments (AWS or Azure)
See Deploying a Management Node in Amazon Web Services and Deploying a Management Node in Microsoft Azure for instructions about how to run the installation wizard as part of the Management Node deployment process.

Pexip Infinity Administrator GuideInstallation and getting started with Pexip Infinity
Management Node installation overview
© 2016 Pexip AS Version 12.a May 2016 Page 81 of 369
Running the installation wizard
When you have opened a console window on the Management Node VM, the following prompt will appear:pexipmcumgr login:
To run the installation wizard:
1. At the prompt, enter the username admin.The display will read:You are required to change your password immediately (root enforced)Enter new UNIX password:
2. Create a password for the Management Node operating system by typing the password, pressing enter, retyping the password, and pressing enter again.
3. Ensure you record the password in a secure location. After you have finished running the installation wizard you will not need the password again unless you need to access the Management Node using SSH.You are presented with another login prompt:Running Pexip installation wizard...[sudo] password for admin:
4. Log in again with the password you just created.The Pexip installation wizard will begin.
5. Follow the prompts to set the following configuration for the Management Node. If you press enter, the default value will be applied:
Setting Default value Multiple entries allowed? Can be changed via Pexip Infinity Administrator interface?
IP address 192.168.0.100 * No No ‡
Network mask 255.255.255.0 * No No ‡
Gateway 192.168.0.1 * No No ‡
Hostname <no default> No No ‡
Domain suffix <no default> No No ‡
DNS servers 8.8.8.8 Yes, if separated by a space Yes
NTP servers † Two of the following:
o 0.pexip.pool.ntp.org
o 1.pexip.pool.ntp.org
o 2.pexip.pool.ntp.org
o 3.pexip.pool.ntp.org
Yes, if separated by a space Yes
Web administration username admin No No ‡
Web administration password <no default> No Yes
Enable incident reporting (yes/no)
<no default> Yes
Pexip Infinity Administrator GuideInstallation and getting started with Pexip Infinity
Management Node installation overview
© 2016 Pexip AS Version 12.a May 2016 Page 82 of 369
Setting Default value Multiple entries allowed? Can be changed via Pexip Infinity Administrator interface?
Send deployment and usage statistics to Pexip (yes/no)
<no default> Yes
* These defaults apply only if your network does not have DHCP enabled. If DHCP is enabled, the defaults will be those allocated by the DHCP server. The addresses you enter using this wizard will be assigned as static IP addresses.
† The NTP server must be accessible by the Management Node at the time the startup wizard is run. Installation will fail if the Management Node is unable to synchronize its time with an NTP server.
‡ After they have been configured, do not attempt to change these settings by any other means. To change these settings on server-based deployments, you must re-run the installation wizard. To change these settings on cloud-based deployments (AWS or Azure), you must terminate the existing instance and deploy a new Management Node instance.
The installation will begin and the Management Node will restart using the values you have configured.When the Management Node has restarted the console will display a login prompt:<hostname> login:At this point you can close the console. All further configuration should now be done Using the Pexip Infinity Administrator interface (if you encounter SSL connection errors when using the Administrator interface, wait a few seconds to allow the relevant services to start before trying again).
Re-running the installation wizard
You can re-run the installation wizard if you previously exited the wizard before completing all the steps, or (for server-based deployments) you entered the wrong hostname/addressing information during the initial configuration.
Re-running the installation wizard will overwrite any existing Management Node configuration and lose all connections to existing Conferencing Nodes. Therefore, if you re-run the installation wizard after deploying any Conferencing Nodes, you must delete any existing Conferencing Nodes and then redeploy them from the updated Management Node.
If you want to change the IP address of the Management Node you must first return your licenses from your current Management Node. If you do not return your licenses before re-running the installation wizard you will lose your licenses from your new Management Node (with the new IP address) and you will not be able to add them back to that new Management Node. See Moving a license (e.g. when redeploying a Management Node) for instructions on how to do this.
Do not re-run the installation wizard on cloud-based deployments (AWS or Azure) in order to change Management Node configuration data such as its IP address or hostname. To change such data you must terminate the existing instance and deploy a new Management Node instance. You should only re-run the installation wizard on cloud-based deployments if you need to reset the web administration password (and then you should not change any of the other configuration data).
If you re-run the installation wizard to only reset the web administration password then you will not lose your configuration data and you will not need to delete and redeploy your Conferencing Nodes, providing you re-enter exactly the same hostname/addressing information as before. However, after completing the wizard you must then edit every system location (Platform configuration > Locations) and reselect the DNS and NTP servers for that location.
To re-run the installation wizard:
1. Open a console window on the Management Node VM.If your Management Node is deployed on AWS or Azure, use an SSH client to access the Management Node, supplying your private key file if appropriate.
2. At the login prompt, log in as admin.
3. If requested, enter the operating system password created in step 2 of Running the installation wizard. If you did not get as far as creating a new password, you will be asked to create one now.
4. Type installwizard.If your Management Node is deployed on AWS or Azure, you will be prompted again for the admin password.The Pexip installation wizard will begin.
(Note that the steps described above can vary slightly depending on whether it is a cloud or server-based deployment, and whether you previously completed all of the installation wizard steps.)

Pexip Infinity Administrator GuideInstallation and getting started with Pexip InfinityUsing the Pexip Infinity Administrator interface
© 2016 Pexip AS Version 12.a May 2016 Page 83 of 369
Using the Pexip Infinity Administrator interfaceAfter you have run the installation wizard, all further configuration should be done using the Pexip Infinity Administrator interface.
This topic covers:
l Accessing the Pexip Infinity Administrator interface l Setting the session timeout l Changing the display language l Timezones l Getting help
Accessing the Pexip Infinity Administrator interfaceThe Pexip Infinity Administrator interface is hosted on the Management Node. To access this:
1. Open a web browser and type in the IP address or DNS name that you assigned to the Management Node using the installation wizard (you may need to wait a minute or so after installation is complete before you can access the Administrator interface).
2. Until you have uploaded appropriate TLS certificates to the Management Node, your browser may present you with a warning that the website's security certificate is not trusted. You should proceed, but upload appropriate TLS certificates to the Management Node (and Conferencing Nodes, when they have been created) as soon as possible.The Pexip Infinity Conferencing Platform login page will appear.
3. Log in using the web administration username and password you set using the installation wizard.
You are now ready to begin configuring the Pexip Infinity service and deploying Conferencing Nodes.
As a first step, we strongly recommend that you configure at least 2 additional NTP servers or NTP server pools to ensure that log entries from all nodes are properly synchronized. For details, see Enabling NTP on the Management Node.
For further information on the next steps, see Managing the Pexip Infinity platform.
Setting the session timeoutBy default, Pexip Infinity Administrator interface sessions will time out after 30 minutes of inactivity. You can modify the Management web interface session timeout setting via the Global settings page (Platform configuration > Global settings).
Changing the display languageThe Pexip Infinity Administrator interface supports localization, meaning it can be displayed in different languages. The v12 release includes the following languages:
l English (default)
l Simplified Chinese
l Russian
Future releases will include other languages.
To select the language used for the Pexip Infinity Administrator interface, you must edit the language preferences within your browser settings. You must then refresh your browser for the changes to take effect.
You can edit your browser's language preferences as follows:
Chrome
1. Select the control button at the top right of the screen.
2. Select Settings.
3. Select Show advanced settings.
4. In the Languages section, select Language and input settings....
Pexip Infinity Administrator GuideInstallation and getting started with Pexip InfinityUsing the Pexip Infinity Administrator interface
© 2016 Pexip AS Version 12.a May 2016 Page 84 of 369
Internet Explorer
1. Select the Tools button at the top right of the screen.
2. Select Internet options.
3. At the bottom of the window, select Languages.
Firefox
1. Select the Firefox button at the top left of the screen.
2. Select Options > Options.
3. Select the Content tab and in the Languages section, select Choose....
TimezonesThe Pexip Infinity Administrator interface displays all times (except for those in the Administrator log and Support log, and usage graphs) in your local time. This is obtained from the timezone configured on the computer you are using to access the Administrator interface. So for example, if you are sitting in an office in London and you log in to a Management Node that is located in New York, call start and end times will be shown in London time.
The timezone being used will always be shown in brackets after the time, in the format 2015-02-25 22:00:12 (GMT).
Logs (and usage graphs, which are based on the information in the logs) are always shown in UTC because of the distributed nature of the Pexip Infinity platform. Logs use the format 2015-02-24T23:16:33.019+00:00.
Getting helpThere are two types of help integrated into the Pexip Infinity Administrator interface:
Field-level help
By default, most configuration fields will show an explanation of the field underneath the input area. You can turn these
explanations on or off by clicking on the icon on the bottom right of the page.
Context-sensitive help
From any page, clicking on the Help link at the top right of the page will open a new browser window showing the online Pexip Infinity Administrator Guide, which will be opened to the section that relates to the page you are on. From there you can use the table of contents on the left-hand side of the help window to navigate and view the entire guide. There is also a search box at the top right of the browser window which you can use to search for individual words or phrases.
More deployment information and PDF downloads of all documentation are available on the Pexip Infinity technical documentation website.
Contacting support
If you cannot find the information you require, contact your Pexip authorized support representative.

Pexip Infinity Administrator Guide
© 2016 Pexip AS Version 12.a May 2016 Page 85 of 369
Managing the Pexip Infinity platformAfter the Management Node has been deployed, you can configure your Pexip Infinity platform. This includes adding licenses and TLS certificates, and configuring a VM manager, configuring your system locations, and deploying Conferencing Nodes.
In this section:
Enabling DNS 86
Enabling NTP on the Management Node 87
Using a syslog server 88
Enabling SNMP 89
Using a VM manager 93
Managing static routes 95
About system locations 96
Configuring the Management Node 100
Deploying new Conferencing Nodes 102
Assigning hostnames and FQDNs 121
Configuring existing Conferencing Nodes 122
Deleting Conferencing Nodes 125
Pexip Infinity license installation and usage 126
Managing TLS and trusted CA certificates 129
About global settings 135
Integrating with external systems 138
Enabling and disabling SIP, H.323, WebRTC and RTMP 139
Enabling Full HD (1080p) 140
Managing users and roles via LDAP 141
Customizing the Infinity Connect Web App 148

Pexip Infinity Administrator GuideManaging the Pexip Infinity platform
Enabling DNS
© 2016 Pexip AS Version 12.a May 2016 Page 86 of 369
Enabling DNSAt least one DNS server must be added to your system.
DNS is required when using hostnames instead of IP addresses when setting up NTP servers, syslog servers and VM managers to be used by Pexip Infinity. It is also used for call routing that depends on FQDNs.
To add, edit or delete the set of available DNS servers, go to System configuration > DNS servers.
The available options are:
Option Description
Address The IP address of the DNS server.
After configuring the DNS servers available to your system, you should assign appropriate DNS servers to each location (Platform configuration > Locations). Each Conferencing Node in that location will then use those DNS servers.
You can also select the specific DNS servers to be used by the Management Node (Platform configuration > Management Node).

Pexip Infinity Administrator GuideManaging the Pexip Infinity platform
Enabling NTP on the Management Node
© 2016 Pexip AS Version 12.a May 2016 Page 87 of 369
Enabling NTP on the Management NodeAll host servers must be synchronized with accurate time before you install the Pexip Infinity Management Node or Conferencing Nodes on them.
You must enable NTP on your Management Node before deploying any Conferencing Nodes.
Pexip Infinity uses NTP servers to obtain accurate system time. This is necessary to ensure correct operation, including configuration replication and log timestamps.
Pexip Infinity Management Node and Conferencing Nodes use the UTC timezone, and all logs are in UTC. Note however that the administrator web interface uses your local time. For more information, see Timezones.
We strongly recommend that you configure at least 3 distinct NTP servers or NTP server pools to ensure that log entries from all nodes are properly synchronized.
To add, edit or delete the set of available NTP servers, go to System configuration > NTP servers.
The available options are:
Option Description
Address The IP address or hostname of the NTP server.
Secure NTP key ID This optional field allows you to configure a key ID which is used in conjunction with the Secure NTP key for authenticating access to a secure NTP server.
Secure NTP key This optional field, used in conjunction with the Secure NTP key ID, allows configuration of a SHA1 key for authenticating access to a secure NTP server. Enter the plaintext key; this will be stored as a SHA1 hash.
After configuring the NTP servers available to your system, you should assign appropriate NTP servers to each location (Platform configuration > Locations). Each Conferencing Node in that location will then use those NTP servers.
You can also select the specific NTP servers to be used by the Management Node (Platform configuration > Management Node).

Pexip Infinity Administrator GuideManaging the Pexip Infinity platform
Using a syslog server
© 2016 Pexip AS Version 12.a May 2016 Page 88 of 369
Using a syslog serverThe Management Node acts as a syslog server, collating the logs from itself and each Conferencing Node to produce the Pexip Infinity support log. The support log includes the administrator log.
However, you can also use a remote syslog server to collect copies of each system's logs. The advantage of this is that, should the Management Node become unavailable, logging would still continue on the syslog server.
When a remote syslog server is used, the Management Node and each of the Conferencing Nodes sends its logs directly to the syslog server using the syslog protocol. The Management Node will still continue to collate logs from all the nodes, and it is these logs that will be shown from the Pexip Infinity Administrator interface.
To add, edit or delete the remote syslog servers used by Pexip Infinity, go to System configuration > Syslog servers.
The available options are:
Option Description
Address The IP address or hostname of the remote syslog server.
Port The port on the remote syslog server.
Default: 514.
Transport The IP transport protocol used to communicate with the remote syslog server.
Default: UDP.
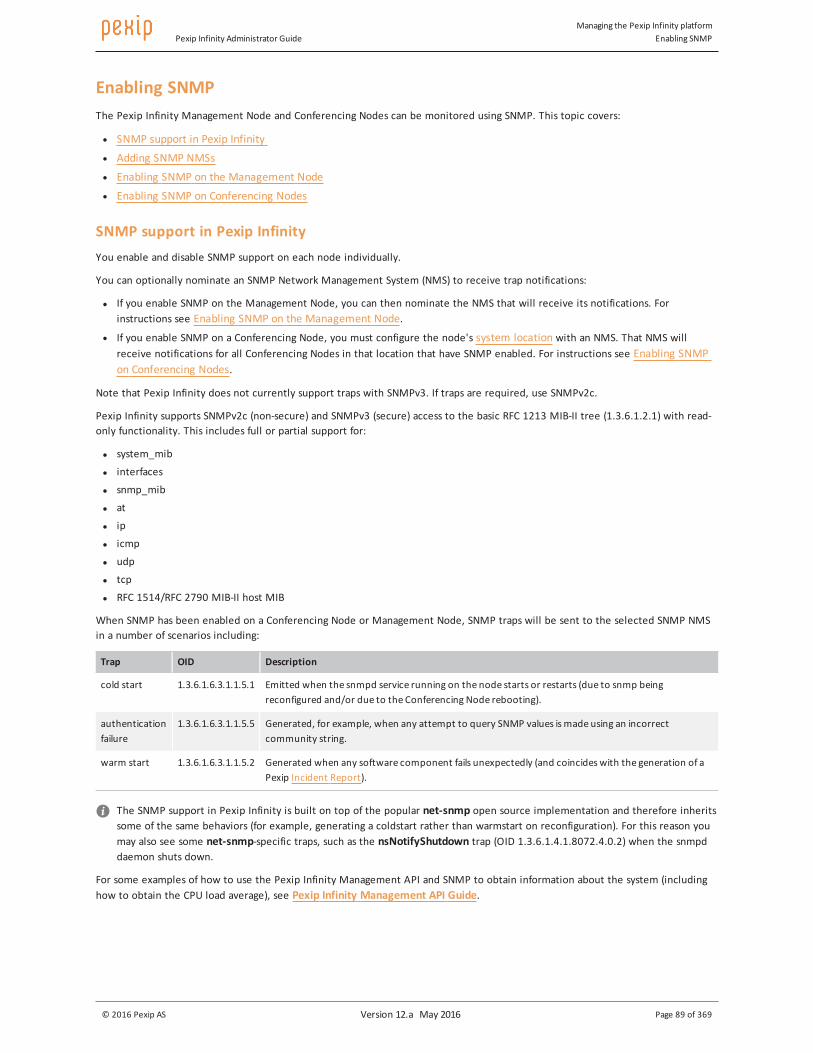
Pexip Infinity Administrator GuideManaging the Pexip Infinity platform
Enabling SNMP
© 2016 Pexip AS Version 12.a May 2016 Page 89 of 369
Enabling SNMPThe Pexip Infinity Management Node and Conferencing Nodes can be monitored using SNMP. This topic covers:
l SNMP support in Pexip Infinity l Adding SNMP NMSs l Enabling SNMP on the Management Node l Enabling SNMP on Conferencing Nodes
SNMP support in Pexip Infinity You enable and disable SNMP support on each node individually.
You can optionally nominate an SNMP Network Management System (NMS) to receive trap notifications:
l If you enable SNMP on the Management Node, you can then nominate the NMS that will receive its notifications. For instructions see Enabling SNMP on the Management Node.
l If you enable SNMP on a Conferencing Node, you must configure the node's system location with an NMS. That NMS will receive notifications for all Conferencing Nodes in that location that have SNMP enabled. For instructions see Enabling SNMP on Conferencing Nodes.
Note that Pexip Infinity does not currently support traps with SNMPv3. If traps are required, use SNMPv2c.
Pexip Infinity supports SNMPv2c (non-secure) and SNMPv3 (secure) access to the basic RFC 1213 MIB-II tree (1.3.6.1.2.1) with read-only functionality. This includes full or partial support for:
l system_mib
l interfaces
l snmp_mib
l at
l ip
l icmp
l udp
l tcp
l RFC 1514/RFC 2790 MIB-II host MIB
When SNMP has been enabled on a Conferencing Node or Management Node, SNMP traps will be sent to the selected SNMP NMS in a number of scenarios including:
Trap OID Description
cold start 1.3.6.1.6.3.1.1.5.1 Emitted when the snmpd service running on the node starts or restarts (due to snmp being reconfigured and/or due to the Conferencing Node rebooting).
authentication failure
1.3.6.1.6.3.1.1.5.5 Generated, for example, when any attempt to query SNMP values is made using an incorrect community string.
warm start 1.3.6.1.6.3.1.1.5.2 Generated when any software component fails unexpectedly (and coincides with the generation of a Pexip Incident Report).
The SNMP support in Pexip Infinity is built on top of the popular net-snmp open source implementation and therefore inherits some of the same behaviors (for example, generating a coldstart rather than warmstart on reconfiguration). For this reason you may also see some net-snmp-specific traps, such as the nsNotifyShutdown trap (OID 1.3.6.1.4.1.8072.4.0.2) when the snmpd daemon shuts down.
For some examples of how to use the Pexip Infinity Management API and SNMP to obtain information about the system (including how to obtain the CPU load average), see Pexip Infinity Management API Guide.

Pexip Infinity Administrator GuideManaging the Pexip Infinity platform
Enabling SNMP
© 2016 Pexip AS Version 12.a May 2016 Page 90 of 369
Adding SNMP NMSsIf you want SNMP notifications to be sent to a SNMP Network Management System (NMS) from a Management Node or Conferencing Node, you should add the details of the NMS to Pexip Infinity before you enable SNMP on the node.
To do this:
1. Go to System configuration > SNMP NMSs and select Add SNMP Network Management System.
2. Complete the required fields:
Option Description
Name The name used to refer to this SNMP Network Management System
Description An optional description of the SNMP Network Management System.
Address The IP address or hostname of the SNMP Network Management System.
Port The SNMP port of the Network Management System.
Default: 161.
SNMP trap community The SNMP trap community name.
Default: public
3. Select Save.
The NMS will now be available for selection on the Edit Management Node page when Enabling SNMP on the Management Node, and the Edit System Location page when Enabling SNMP on Conferencing Nodes.

Pexip Infinity Administrator GuideManaging the Pexip Infinity platform
Enabling SNMP
© 2016 Pexip AS Version 12.a May 2016 Page 91 of 369
Enabling SNMP on the Management NodeTo enable SNMP on the Management Node:
1. Go to Platform configuration > Management Node and select the Management Node.
You will be taken to the Edit Management Node page. 2. Configure the SNMP settings for the Management Node. The options are:
Option Description
SNMP mode Configures the SNMP mode for the selected node:
Off: SNMP is disabled. You will not be able to use SNMP to query the node for its status.
SNMPv2c read-only: enables insecure, read-only access.
SNMPv3 read-only: enables secure, read-only access, using the authPriv security level with SHA1 authentication and AES 128-bit encryption.
When enabled, access is provided to the basic RFC 1213 MIB-II tree (1.3.6.1.2.1).
Default: Off.
SNMP community The SNMP group to which this node belongs. This setting applies to SNMPv2c only.
Default: public
SNMPv3 username The node's SNMPv3 username, used to authenticate SNMPv3 requests.
SNMPv3 privacy password
The node's SNMPv3 privacy password used for encrypting messages between the node and the management station.
AES encryption must be used; DES is not supported.
SNMPv3 authentication password
The node's SNMPv3 authentication password, used to authenticate the associated username.
The SHA authentication protocol must be used; MD5 is not supported.
SNMP system contact The contact details (for example, email address) of the person responsible for this particular node.
SNMP system location A description of the node's location.
3. If you want SNMP traps to be sent from the Management Node to an SNMP Network Management System (NMS), select the NMS from the SNMP NMS drop-down menu.
If you have not already added the SNMP NMS, you can do so now by clicking .
4. Select Save.
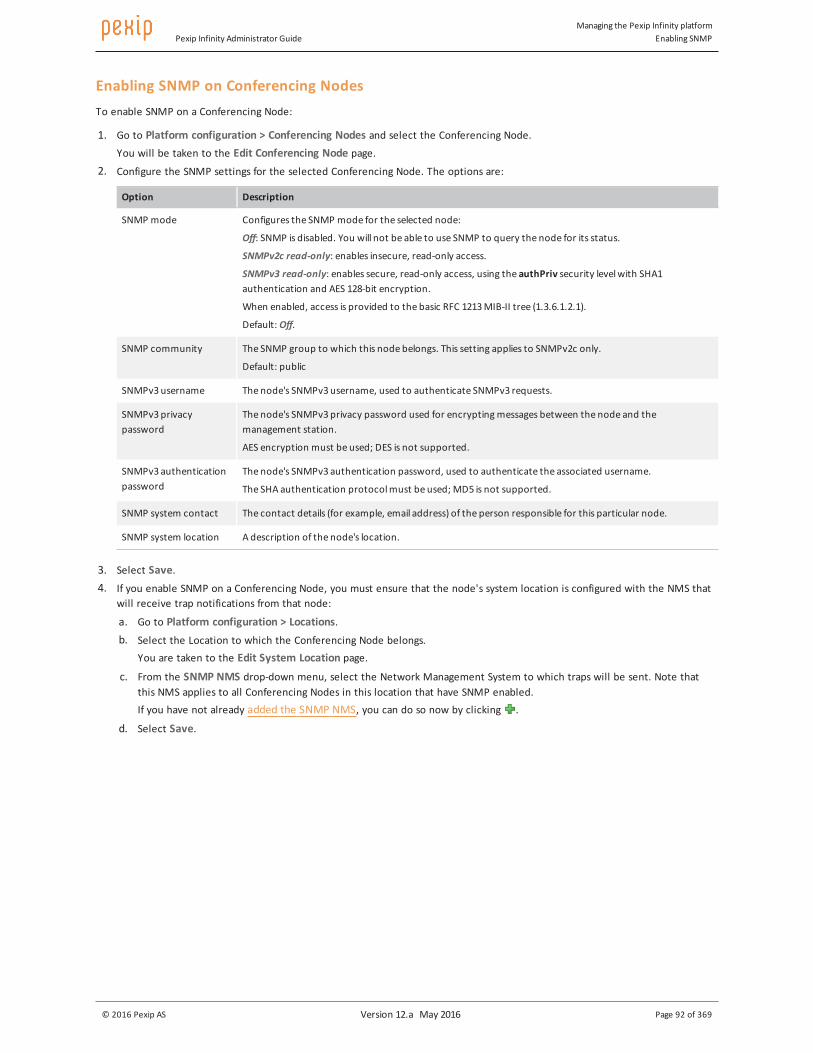
Pexip Infinity Administrator GuideManaging the Pexip Infinity platform
Enabling SNMP
© 2016 Pexip AS Version 12.a May 2016 Page 92 of 369
Enabling SNMP on Conferencing NodesTo enable SNMP on a Conferencing Node:
1. Go to Platform configuration > Conferencing Nodes and select the Conferencing Node.You will be taken to the Edit Conferencing Node page.
2. Configure the SNMP settings for the selected Conferencing Node. The options are:
Option Description
SNMP mode Configures the SNMP mode for the selected node:
Off: SNMP is disabled. You will not be able to use SNMP to query the node for its status.
SNMPv2c read-only: enables insecure, read-only access.
SNMPv3 read-only: enables secure, read-only access, using the authPriv security level with SHA1 authentication and AES 128-bit encryption.
When enabled, access is provided to the basic RFC 1213 MIB-II tree (1.3.6.1.2.1).
Default: Off.
SNMP community The SNMP group to which this node belongs. This setting applies to SNMPv2c only.
Default: public
SNMPv3 username The node's SNMPv3 username, used to authenticate SNMPv3 requests.
SNMPv3 privacy password
The node's SNMPv3 privacy password used for encrypting messages between the node and the management station.
AES encryption must be used; DES is not supported.
SNMPv3 authentication password
The node's SNMPv3 authentication password, used to authenticate the associated username.
The SHA authentication protocol must be used; MD5 is not supported.
SNMP system contact The contact details (for example, email address) of the person responsible for this particular node.
SNMP system location A description of the node's location.
3. Select Save. 4. If you enable SNMP on a Conferencing Node, you must ensure that the node's system location is configured with the NMS that
will receive trap notifications from that node:
a. Go to Platform configuration > Locations. b. Select the Location to which the Conferencing Node belongs.
You are taken to the Edit System Location page.
c. From the SNMP NMS drop-down menu, select the Network Management System to which traps will be sent. Note that this NMS applies to all Conferencing Nodes in this location that have SNMP enabled.If you have not already added the SNMP NMS, you can do so now by clicking .
d. Select Save.

Pexip Infinity Administrator GuideManaging the Pexip Infinity platform
Using a VMmanager
© 2016 Pexip AS Version 12.a May 2016 Page 93 of 369
Using a VM managerA VM manager is an application that allows you to connect to one or more VMware vSphere ESXi hypervisors. Pexip Infinity logs in to the selected VM manager when Automatically deploying a new Conferencing Node on a VMware host. It does not log in at any other time, and the credentials used to log in to the VM manager are not stored by Pexip Infinity.
Version 12 of the Pexip Infinity platform supports VMware vSphere ESXi 5.x and 6.0, although we recommend ESXi 5.5 or 6.0. Support for ESXi 4.1 is being deprecated - if you have upgraded from a version prior to v12, you can still deploy Conferencing Nodes to servers running ESXi 4.1; however if you have a new deployment using v12 and attempt to deploy a Conferencing Node to a server running ESXi 4.1, that node will go straight into maintenance mode. The VM managers used to connect to these hypervisors are either:
l vCenter Server, an application that allows you to use a single interface to manage one or more host servers running ESXi.
l ESXi directly on the host, used when managing a single host server running ESXi.
You can also log in to a VM manager directly yourself. To connect to vCenter Server, use either the vSphere desktop or web client; to connect directly to an ESXi host you can only use the vSphere desktop client.
Overview of Pexip Infinity, vSphere clients, VM Manager and ESXi host connectivity
When creating a Conferencing Node for automatic deployment on an ESXi host, you are asked to select the VM manager to be used. If the ESXi host on which you wish to deploy the Conferencing Node is managed by vCenter Server, you must select that vCenter Server as the VM Manager. Do not attempt to deploy the conferencing node directly onto the ESXi host (by selecting the ESXi host as the VM manager).
The Add VM Manager page allows you to create a list of VM managers in advance of creating your Conferencing Nodes. You can also add a VM manager during the process of creating a Conferencing Node.

Pexip Infinity Administrator GuideManaging the Pexip Infinity platform
Using a VMmanager
© 2016 Pexip AS Version 12.a May 2016 Page 94 of 369
Adding VM managersTo add, edit or delete VM managers, go to System configuration > VM Managers.
The available options are:
Option Description
Name The name that you will use to refer to this VM manager.
Description An optional field where you can provide more information about the VM manager.
Address The IP address or hostname of the VM manager.
If you are using vCenter Server, this will be the IP address or hostname of the vCenter Server.
If you are not using vCenter Server, this will be the IP address or hostname of ESXi on the host server.
If an ESXi host is being managed by vCenter Server, all administration must be performed via vCenter Server. Do not log in directly to the ESXi host; configuration changes made in this way may be lost. To ensure that ESXi hosts being managed by vCenter Server are accessible via vCenter Server only and are not directly accessible, you should put them in Lockdown mode. Lockdown mode forces all operations to be performed through vCenter Server.

Pexip Infinity Administrator GuideManaging the Pexip Infinity platform
Managing static routes
© 2016 Pexip AS Version 12.a May 2016 Page 95 of 369
Managing static routesStatic routes are additional configuration settings that permit routing of traffic to networks that are not accessible through the default gateway.
Typically, static routes are configured on Conferencing Nodes that are deployed in a DMZ, and where the default gateway on those nodes routes traffic out to the internet. The static routes would allow those nodes to communicate with Pexip Infinity nodes or other systems in the local, internal network. (See Configuring Pexip Infinity for public DMZ deployments for more information.)
l You must configure the static routes you want to use (via System configuration > Static routes) before you can apply them to a Conferencing Node or a Management Node.
l Static routes can be assigned to Conferencing Nodes during the automatic or manual deployment process, as well as after it has been deployed.
l Static routes can only be assigned to a Management Node after it has been deployed.
The static routes take immediate effect after they have been assigned to a node. You do not have to restart the VM.
Configuring the set of available static routesTo configure the set of static routes that can be applied to a Conferencing Node or Management Node:
1. Go to System configuration > Static routes.
2. Select Add Static route and then configure the relevant destination and gateway addresses:
Option Description
Name A unique short name or description of the static route.
Destination network address
The IP address to be used in conjunction with the Network prefix to determine the network addresses to which this route applies.
Network prefix The prefix length used in conjunction with the Destination network address to determine the network addresses to which this route applies.
The prefix length can be in the range 0–32 for IPv4 addresses and 0–128 for IPv6 addresses.
For example, use a Destination network address of 10.0.0.0 and a Network prefix of 8 to route addresses in the range 10.0.0.0 to 10.255.255.255.
Gateway IP address The IP address of the gateway to the network for this route.
3. Select Save.
Assigning a static route to an existing nodeTo assign a static route to an existing Conferencing Node or Management Node:
1. Ensure that the static route that you want to apply has already been configured (System configuration > Static routes).
2. Go to Platform configuration > Conferencing Node or Platform configuration > Management Node as appropriate: 3. Select the node to which you want to assign the static route.
4. In the Static routes section, select from the list of Available Static routes the routes to assign to the node, and then use the right arrow to move the selected routes into the Chosen Static routes list.
5. Select Save.
Assigning a static route to a new Conferencing NodeBefore you start the deployment process as described in Deploying new Conferencing Nodes, ensure that the static routes that you want to apply have already been configured (System configuration > Static routes).
Then, while specifying the network configuration parameters to be applied to the new Conferencing Node, you will be able to include the static routes that you want to assign to that node.

Pexip Infinity Administrator GuideManaging the Pexip Infinity platform
About system locations
© 2016 Pexip AS Version 12.a May 2016 Page 96 of 369
About system locationsSystem locations are labels that allow you to group Conferencing Nodes together, typically according to where they are physically located. System locations serve two purposes:
l They enable Pexip Infinity to make intelligent decisions about routing of media and signaling, including overflowing to another location when a particular location reaches capacity.
l External services such as DNS, NTP, H.323 gatekeepers, SIP proxies, Lync / Skype for Business Servers, TURN servers, STUN servers, SNMP NMSs and external policy servers are configured on a per-location basis, and are used by all Conferencing Nodes in that location.
The Conferencing Node's system location is assigned when the node is deployed, however you can subsequently change its location.
If you change the system location of an existing Conferencing Node, all existing calls will be disconnected and the Conferencing Node will be restarted.
Intelligent routingGrouping Conferencing Nodes by location allows Pexip Infinity to make intelligent decisions about routing. For example, if a single conference is taking place across groups of Conferencing Nodes in two different locations, then Pexip Infinity will nominate one Conferencing Node in each location to act as the proxy for that location. Media streams will be sent between each proxy only, rather than multiple streams being sent between each of the Conferencing Nodes at each of the locations. For more information, see Handling of media and signaling.
If a location reaches its capacity for a conference instance, additional "overflow" locations can be utilized to handle the media for new conference participants that are connected (for signaling purposes) to nodes within that location. For more information, see Location capacity overflow.
When grouping Conferencing Nodes into different locations, you should consider the amount of packet loss within your network. If there is a chance of packet loss due to network congestion between different groups of Conferencing Nodes by design, then they should be assigned separate system locations even if they are in the same physical location.
Network deployment considerationsNodes within a location actively synchronize with each other and may require a relatively high amount of network bandwidth for their communication. Pexip's backplane topology for distributed conferences assumes that there is a high availability, low latency, high-bandwidth network link between nodes within a location.
Therefore, while physical proximity is not a requirement, nodes in the same system location should typically be in the same physical datacenter or in physically proximate datacenters with an excellent link between them.
If (as is often the case) you do not have such a network between your datacenters, we recommend that you consider assigning your nodes to different system locations. There should be no more than 150 ms latency between Conferencing Nodes.
In addition:
l Conferencing Nodes in a DMZ must not be configured with the same System location as nodes in a local network. This is to ensure that load balancing is not performed across nodes in the DMZ and nodes in the local network.
l Any Conferencing Nodes that are configured with a static NAT address must not be configured with the same System location as nodes that do not have static NAT enabled. This is to ensure that load balancing is not performed across nodes servicing external clients and nodes that can only service private IP addresses.
See Network deployment options for more information about the various deployment scenarios.
Configuring external services
DNS and NTP servers
When setting up a system location you must select at least one DNS server and at least one NTP server to be used by all of the Conferencing Nodes in that location. This allows you to, for example, assign nodes in a DMZ to a location that uses different DNS and NTP servers to a location containing nodes in a local, internal network.

Pexip Infinity Administrator GuideManaging the Pexip Infinity platform
About system locations
© 2016 Pexip AS Version 12.a May 2016 Page 97 of 369
H.323 gatekeepers, SIP proxies and Lync / Skype for Business servers
When setting up a system location you can optionally specify the H.323 gatekeeper, the SIP proxy, and the Lync / Skype for Business server / MSSIP domain to be used for outbound calls from that location. These are the call control systems that will be used when:
l a conference participant uses an Infinity Connect client to add another participant to the call l the administrator manually dials out to a participant from a Virtual Meeting Room l a participant is automatically dialed out to from a Virtual Meeting Room l a third party uses the API to place a call to a participant
For more information, see About H.323 gatekeepers and SIP proxies and About Lync / Skype for Business servers.
TURN servers and STUN servers
Pexip Conferencing Nodes can utilize a TURN server and negotiate TURN relays with the following ICE capable clients:
l Lync / Skype for Business clients
l Infinity Connect WebRTC clients (Web App on Chrome, Firefox and Opera, and the mobile and desktop clients)
If these endpoints will be connecting to privately-addressed "on-premises" Conferencing Nodes, you must configure Pexip Infinity with the address of at least one TURN server that it can offer to ICE clients.
In some deployment scenarios where the TURN server is not located outside of the enterprise firewall, you may need to configure a separate STUN server so that each Conferencing Node can discover its public NAT address.
You can also configure the STUN servers to be used by Infinity Connect WebRTC clients when they connect to a Conferencing Node in this location.
For more information, see Using TURN servers with Pexip Infinity and Using STUN servers with Pexip Infinity.
SNMP NMSs
If you have enabled SNMP support on one or more Conferencing Nodes in a particular location, you must also select the SNMP Network Management System (NMS) to which SNMP traps will be sent. The selected NMS will be used for all Conferencing Nodes in this location that have SNMP support enabled.
Note that Pexip Infinity does not currently support traps with SNMPv3. If traps are required, use SNMPv2c.
For more information, see Enabling SNMP.
External policy servers
Pexip Infinity's external policy API allows call policy decisions to be taken by an external system, based on the data sources that are available to that system. This allows Pexip Infinity administrators to implement routing decisions based on their specific requirements.
When external policy is enabled, rather than using its own database and systems to retrieve service and participant data, Pexip Infinity Conferencing Nodes send the external policy server a service request (a GET request over HTTP or HTTPS) and the server should respond by returning the requested data to the Conferencing Node.
You can configure Pexip Infinity to use a different policy server per system location.
For more information, see Using an external policy server with Pexip Infinity.

Pexip Infinity Administrator GuideManaging the Pexip Infinity platform
About system locations
© 2016 Pexip AS Version 12.a May 2016 Page 98 of 369
Configuring system locationsTo add, edit or delete system locations, go to Platform configuration > Locations.
The available options are:
Option Description
Name The name you want to give to this physical location.
Description An optional field where you can provide more information about the location.
DNS servers From the list of configured DNS servers, select one or more DNS servers to be used by all the Conferencing Nodes in this location.
NTP servers From the list of configured NTP servers, select one or more NTP servers to be used by all the Conferencing Nodes in this location.
H.323 gatekeeper
The H.323 gatekeeper to use for outbound H.323 calls from this location. For more information, see About H.323 gatekeepers and SIP proxies.
SNMP NMS The Network Management System to which SNMP traps for all Conferencing Nodes in this location will be sent. For more information, see Enabling SNMP.
SIP proxy The SIP proxy to use for outbound SIP calls from this location. For more information, see About H.323 gatekeepers and SIP proxies.
Lync server The Lync / Skype for Business server to use for outbound MS-SIP calls from this location. For more information, see About Lync / Skype for Business servers.
TURN server The TURN server to use when ICE clients (such as Lync / Skype for Business clients and Infinity Connect WebRTC clients) located outside the firewall connect to a Conferencing Node in this location. For more information, see Using TURN servers with Pexip Infinity.
STUN server The STUN server to use when ICE clients (such as Lync / Skype for Business clients and Infinity Connect WebRTC clients) located outside the firewall connect to a Conferencing Node in this location. For more information, see Using STUN servers with Pexip Infinity.
Client STUN servers
The STUN servers to be used by Infinity Connect WebRTC clients when they connect to a Conferencing Node in this location. Note that stun.l.google.com is added by default to every location. For more information, see Using STUN servers with Pexip Infinity.
MTU (Maximum Transmission Unit) - the size of the largest packet that can be transmitted via the network interface for this system location. Whether you need to specify a value here will depend on the settings of your firewall rules.
DSCP value for media
This is an optional setting used to prioritize different types of traffic in large, complex networks.
This DSCP value tags the media traffic from Conferencing Nodes in this system location that is sent line side to endpoints and over the IPsec backplanes to other Pexip Conferencing Nodes.
DSCP value for signaling
This is an optional setting used to prioritize different types of traffic in large, complex networks.
This DSCP value tags the signaling traffic from Conferencing Nodes in this system location that is sent line side to endpoints and over the IPsec backplanes to other Pexip Conferencing Nodes.
Note that some IPsec traffic between nodes — configuration synchronization and other non-realtime traffic — remains untagged.
Also see DSCP value for management traffic in Global settings.
Primary overflow location
An optional field where you can select the system location to handle media when capacity is reached in the current location. For more information, see Location capacity overflow.

Pexip Infinity Administrator GuideManaging the Pexip Infinity platform
About system locations
© 2016 Pexip AS Version 12.a May 2016 Page 99 of 369
Secondary overflow location
An optional field where you can select the system location to handle media when capacity is reached in both the current location and the Primary overflow location.
Lync MSSIP domain
The name of the SIP domain that is routed from Microsoft Lync / Skype for Business to this Pexip Infinity location, either as a static route or via federation.
This is an optional field. If configured, it is used instead of the global Lync MSSIP domain in outbound calls to Lync / Skype for Business from Conferencing Nodes in this location.
Policy server The external policy server to be used by Conferencing Nodes in this system location. For more information see Using an external policy server with Pexip Infinity.

Pexip Infinity Administrator GuideManaging the Pexip Infinity platformConfiguring the Management Node
© 2016 Pexip AS Version 12.a May 2016 Page 100 of 369
Configuring the Management NodeThe Management Node is a virtual machine which controls the Pexip Infinity service. It is used to deploy and manage one or more Conferencing Nodes, and configure the Pexip Infinity services (Virtual Meeting Rooms, Virtual Auditoriums, Virtual Receptions, and the Pexip Distributed Gateway) that exist on those Conferencing Nodes. It also collates status and logging information about conferences across all Conferencing Nodes.
Initial configuration of the Management Node was provided at the time the software image was initially installed using the installation wizard, but if necessary you can edit some of this information afterwards.
All changes to the configuration of the Management Node should be done using the Pexip Infinity Administrator interface. Do not make any changes by any other means such as VMware or SSH; doing so may cause the Pexip Infinity service to fail. In particular you must not change the IP address of the Management Node.
To change configuration of the Management Node, go to Platform configuration > Management Node.
The available options are:
Option Description
Name The name used to refer to this Management Node. It is made up of the DNS Hostname and Domain suffix that were assigned to the Management Node when the Pexip Infinity software image was initially installed using the installation wizard.
Description An optional field where you can provide more information about the Management Node.
This will default to the Name but you can change it here.
DNS servers From the list of configured DNS servers, select one or more DNS servers to be used by this Management Node.
NTP servers From the list of configured NTP servers, select one or more NTP servers to be used by this Management Node.
IPv6 address The IPv6 address for this Management Node.
Gateway IPv6 address The IPv6 address of the default gateway.
Static routes From the list of Available Static routes, select the routes to assign to the node, and then use the right arrow to move the selected routes into the Chosen Static routes list. For more information, see Managing static routes.
You can also change the Management Node's SNMP settings (see Enabling SNMP for more information):
Option Description
SNMP mode Configures the SNMP mode for the selected node:
Off: SNMP is disabled. You will not be able to use SNMP to query the node for its status.
SNMPv2c read-only: enables insecure, read-only access.
SNMPv3 read-only: enables secure, read-only access, using the authPriv security level with SHA1 authentication and AES 128-bit encryption.
When enabled, access is provided to the basic RFC 1213 MIB-II tree (1.3.6.1.2.1).
Default: Off.
SNMP community The SNMP group to which this node belongs. This setting applies to SNMPv2c only.
Default: public
SNMPv3 username The node's SNMPv3 username, used to authenticate SNMPv3 requests.

Pexip Infinity Administrator GuideManaging the Pexip Infinity platformConfiguring the Management Node
© 2016 Pexip AS Version 12.a May 2016 Page 101 of 369
Option Description
SNMPv3 privacy password
The node's SNMPv3 privacy password used for encrypting messages between the node and the management station.
AES encryption must be used; DES is not supported.
SNMPv3 authentication password
The node's SNMPv3 authentication password, used to authenticate the associated username.
The SHA authentication protocol must be used; MD5 is not supported.
SNMP system contact The contact details (for example, email address) of the person responsible for this particular node.
SNMP system location A description of the node's location.
If you want SNMP traps to be sent from the Management Node to a particular SNMP Network Management System (NMS), select the NMS from the SNMP NMS drop-down menu:
Option Description
SNMP NMS The Network Management System to which SNMP traps will be sent from the Management Node. If you have not already added the SNMP NMS, you can do so now by clicking .
Note that Pexip Infinity does not currently support traps with SNMPv3. If traps are required, use SNMPv2c.
Other details of the Management Node that cannot be changed are also shown on this page for your information, as follows:
Option Description
IP address The IPv4 address of the Management Node.
Network mask The IPv4 network mask of the Management Node.
Gateway IP address The IPv4 address of the default gateway.
Hostname The DNS hostname of this Management Node.
Domain The DNS domain of this Management Node.
If you have to change any of the settings in the table above, you must do so by Re-running the installation wizard.

Pexip Infinity Administrator GuideManaging the Pexip Infinity platformDeploying new Conferencing Nodes
© 2016 Pexip AS Version 12.a May 2016 Page 102 of 369
Deploying new Conferencing NodesConferencing Nodes are virtual machines that provide the capacity for conferences. They handle all conference media and signaling.
There is no limit on the number of Conferencing Nodes that you can add to the Pexip Infinity platform. However, each Conferencing Node must have a unique:
l name
l IP address
l hostname
l DNS name (hostname and domain)
For secure deployments, you should also:
l specify a SIP TLS FQDN l replace the self-signed TLS certificates with your own TLS certificates
After deploying a new Conferencing Node, it takes approximately 5 minutes before the node is available for conference hosting and for its status to be updated on the Management Node. (Until it is available, the Management Node will report the status of the Conferencing Node as having a last contacted and last updated date of "Never".)
All Conferencing Nodes have identical service configuration, which is obtained automatically from the Management Node.
Do not use VMware, Hyper-V or any other tools to clone instances of existing Conferencing Node virtual machines (VMs). Conferencing Nodes must always be created using the Pexip Infinity Administrator interface or management API.
Prerequisites l All host servers must be synchronized with accurate time before you install the Pexip Infinity Management Node or
Conferencing Nodes on them.
l You must enable NTP on the Pexip Infinity Management Node before you deploy any Conferencing Nodes.
Deployment typesTo create a new Conferencing Node, first a generic instance of a Conferencing Node VM is created, and then it is configured with the details of the specific Conferencing Node being deployed.
This process has been automated (or partly automated) for environments using VMware ESXi, Microsoft Hyper-V, KVM or Xen hypervisors, which are supported in Pexip Infinity. However, Pexip also provide the Conferencing Node VM template and the ability to generate a Conferencing Node-specific configuration file for deployment in other environments using non-supported hypervisors or orchestration layers.
The different deployment options are described in the table below. A Pexip Infinity deployment can contain Conferencing Nodes created using any combination of these methods.
Deployment type Description
Automatic (ESXi 4.1, 5.x and 6.0)
Pexip Infinity deploys the Conferencing Node VM on a host server running VMware vSphere ESXi 4.1 or higher.
Choose this option if you want to deploy the Conferencing Node immediately, and there is network connectivity to the host server on which the Conferencing Node is to be deployed.
For more information, see Automatically deploying a new Conferencing Node on a VMware host.
Manual (ESXi 6.0)
Manual (ESXi 5.x)
Manual (ESXi 4.1)
Pexip Infinity generates an .ova file that you must then manually deploy from within VMware on to an ESXi host in order to create the Conferencing Node VM.
Choose one of these options (selecting the appropriate ESXi host version for your environment) if the Management Node does not have existing connectivity to the host server on which the Conferencing Node is to be deployed, or you do not want to deploy the Conferencing Node immediately.
For more information, see Manually deploying a Conferencing Node on an ESXi host.

Pexip Infinity Administrator GuideManaging the Pexip Infinity platformDeploying new Conferencing Nodes
© 2016 Pexip AS Version 12.a May 2016 Page 103 of 369
Deployment type Description
Manual (Hyper-V 2012) Pexip Infinity generates a file that you must then manually deploy on a host server running either Microsoft Hyper-V Server 2012 and higher, or Windows Server 2012 and higher, in order to create the Conferencing Node VM.
Choose this option for all deployments that use Hyper-V.
For more information, see Manually deploying a Conferencing Node on a Hyper-V host.
Manual (KVM) Choose this option to generate an .ova file that is suitable for deploying on a KVM host in order to create the Conferencing Node VM.
For more information, see Manually deploying a Conferencing Node on a KVM host.
Manual (Xen) Choose this option to generate an .ova file that is suitable for deploying on a Xen host in order to create the Conferencing Node VM.
For more information, see Manually deploying a Conferencing Node on a Xen host.
Generic (configuration-only)
Pexip Infinity generates a file containing the configuration of the Conferencing Node. You then upload this file to a generic Conferencing Node that has been created from the Pexip-supplied VM template, in order to configure it with the appropriate settings.
Choose this option for any deployments that do not use ESXi, Hyper-V, KVM or Xen hypervisors, or for Hyper-V in a cloud-based environment.
For more information, see Deploying a Conferencing Node using a generic VM template and configuration file.
Automatically deploying a new Conferencing Node on a VMware hostTo automatically deploy a new Conferencing Node on to a VMware ESXi host:
1. Ensure that the Management Node can connect directly to the ESXi host server over HTTPS (port 443/TCP), even if you are using vCenter server.
2. Go to Platform configuration > Conferencing Nodes and select Add Conferencing Node.
3. From the Deployment type field, select Automatic (ESXi 4.1, 5.x and 6.0).
4. Select Next.
5. You are now asked to log in to the VM manager via which the Conferencing Node virtual machine is to be created, by completing the following fields:
Option Description
VM manager Select the VM manager via which this Conferencing Node VM will be created.
If the VM manager does not appear in the drop-down list, you can add it by clicking to the right of the field.
UsernamePassword
Enter a valid username and password to log in to the selected VM manager.
Verify TLS certificates Determines whether the certificate presented by the VM manager is verified before the connection is allowed.
6. Select Next.There may be a slight delay while Pexip Infinity locates and logs in to the VM manager, and obtains information from it.
7. You are now asked to select the datacenter on the VM manager where the Conferencing Node VM will be created, by completing the following field:
Option Description
Datacenter Select the path of the datacenter in which the Conferencing Node will be created.
The options available in the drop-down menu reflect what is currently configured in the VM manager.

Pexip Infinity Administrator GuideManaging the Pexip Infinity platformDeploying new Conferencing Nodes
© 2016 Pexip AS Version 12.a May 2016 Page 104 of 369
Note that this step is skipped if there is only one datacenter configured in the VM manager.
8. Select Next. 9. You are now asked to nominate the resource pool on the VM manager where the Conferencing Node VM will be created, by
completing the following field:
Option Description
Resource path Select the path of the resource pool in which the Conferencing Node will be created.
The options available in the drop-down menu are filtered by the datacenter selected in the previous step and reflect what is currently configured in the VM manager. To add a new path, you must do so using vCenter Server (or the ESXi host if you are not using vCenter Server) prior to creating the Conferencing Node.
10. Select Next. 11. You are now asked to provide the VM manager with parameters relating to the Conferencing Node, by completing the following
fields:
Option Description
Host network Select the host network on which this Conferencing Node will be deployed.
The options shown here are the vSphere switches that have been configured on the VM manager on which this Conferencing Node is being deployed.
Host datastore Select the datastore on the host server to be used by this Conferencing Node.
The options shown here are the datastores that have been configured on the VM manager via which this Conferencing Node is being deployed.
12. Select Next. 13. You are now asked to provide the VM manager with information regarding the CPUs and memory of the Conferencing Node, by
completing the following fields:
Option Description
Number of virtual CPUs to assign
Enter the number of virtual CPUs to assign to the Conferencing Node. We do not recommend that you assign more virtual CPUs than there are physical cores on a single processor on the host server. For example, if the host server has 2 processors each with 8 physical cores, we recommend that you assign no more than 8 virtual CPUs.
System memory (in megabytes)
Enter the amount of RAM (in megabytes) to assign to the Conferencing Node. The number entered must be a multiple of 4.
We recommend 1024 MB (1 GB) RAM for each CPU.
14. Select Next. 15. You are now asked to provide the network configuration to be applied to the Conferencing Node, by completing the following
fields:
Option Description
Name Enter the name that will be used to refer to this Conferencing Node in the Pexip Infinity Administrator interface.
Description An optional field where you can provide more information about the Conferencing Node.
IPv4 address Enter the IP address to be assigned to this Conferencing Node when it is created.
Network mask Enter the IP network mask to be assigned to this Conferencing Node.
Gateway IPv4 address Enter the IP address of the default gateway to be assigned to this Conferencing Node.

Pexip Infinity Administrator GuideManaging the Pexip Infinity platformDeploying new Conferencing Nodes
© 2016 Pexip AS Version 12.a May 2016 Page 105 of 369
Option Description
Hostname Domain
Enter the hostname and domain to be assigned to this Conferencing Node. Each Conferencing Node and Management Node must have a unique hostname.
The Hostname and Domain together make up the Conferencing Node's DNS name or FQDN. We recommend you assign valid DNS names to all your Conferencing Nodes. For more information, see Assigning hostnames and FQDNs.
System location Select the physical location of this Conferencing Node.
If the system location does not already exist, you can create a new one here by clicking to the right of the field. This will open up a new window showing the Add system location page. For further information see About system locations.
SIP TLS FQDN A unique identity for this Conferencing Node, used in signaling SIP TLS Contact addresses. For more information, see SIP TLS FQDN.
TLS certificate The TLS certificate to use on this node. This must be a certificate that contains the above SIP TLS FQDN.
IPv6 address The IPv6 address for this Conferencing Node. Each Conferencing Node must have a unique IPv6 address.
Gateway IPv6 address The IPv6 address of the default gateway.
IPv4 static NAT address The public IPv4 address used by this Conferencing Node when it is located behind a NAT device. Note that if you are using NAT, you must also configure your NAT device to route the Conferencing Node's IPv4 static NAT address to its IPv4 address.
For more information, see Configuring Pexip Infinity nodes to work behind a static NAT device.
Static routes From the list of Available Static routes, select the routes to assign to the node, and then use the right arrow to move the selected routes into the Chosen Static routes list. For more information, see Managing static routes.
SSH password Enter the password to be used when logging in to this Conferencing Node's Linux operating system over SSH. The username will always be admin.
Logging in to the operating system is required when changing passwords or for diagnostic purposes only, and should generally be done under the guidance of your Pexip authorized support representative. In particular, do not change any configuration using SSH — all changes should be made using the Pexip Infinity Administrator interface.
16. Select Finish.
You will be taken to the Deploying Conferencing Node page. The deployment will take several minutes. When complete, the progress bar will show that the Conferencing Node VM has been deployed successfully and the Status will say Deployment succeeded.
Go to Platform configuration > Conferencing Nodes to return to the list of Conferencing Nodes.
After deploying a new Conferencing Node, it takes approximately 5 minutes before the node is available for conference hosting and for its status to be updated on the Management Node. (Until it is available, the Management Node will report the status of the Conferencing Node as having a last contacted and last updated date of "Never".)
Enabling automatic startup
After deploying a new Conferencing Node from VMware, you must enable automatic startup of that virtual machine (VM). In VMware, automatic startup is disabled by default for every new VM. This means that if the host server is powered down for any reason, when it restarts the VM will not restart and must be started manually.
You can only enable automatic startup after the Conferencing Node has been deployed.
Using the web client

Pexip Infinity Administrator GuideManaging the Pexip Infinity platformDeploying new Conferencing Nodes
© 2016 Pexip AS Version 12.a May 2016 Page 106 of 369
To enable automatic startup using the vSphere web client:
1. Log in to the VM manager (vCenter Server).
2. From the left-hand panel, select vCenter > Hosts and Clusters and go to the host server on which the node's VM is installed.
3. Select the Manage tab.
4. From the pane on the left-hand side, select VM Startup/Shutdown.
5. At the top right of the page, select Edit.
6. Select the relevant node's VM and use the up arrow to move it to the Automatic Startup section.
7. Select OK.
Using the desktop client
To enable automatic startup using the vSphere desktop client:
1. Log in to the VM manager (vCenter Server or the ESXi host).
2. From the left-hand panel, select the host server on which the node's VM is installed.
3. Select the Configuration tab.
4. From the Software pane on the left-hand side, select Virtual Machine Startup/Shutdown.
5. At the top right of the page, select Properties.
6. Select the relevant VM and use the Move Up button to move it to the Automatic Startup section.
7. Select OK.
Next steps
Assigning hostnames and FQDNs
Enabling SNMP on Conferencing Nodes
Manually deploying a Conferencing Node on an ESXi hostThe manual deployment process generates an .ova file that must then be manually deployed from within VMware on to an ESXi host. Note that:
l This file is specific to the Conferencing Node being deployed. It cannot be used to deploy multiple Conferencing Nodes.
l The file is single-use. It cannot be used to re-deploy the same Conferencing Node at a later date. To re-deploy the Conferencing Node, you must first delete it from the Pexip Infinity Management Node and from VMware, and then deploy a new Conferencing Node with the same configuration as the deleted node.
To manually deploy a new Conferencing Node on to a VMware ESXi host:
1. Go to Platform configuration > Conferencing Nodes and select Add Conferencing Node.
2. From the Deployment type field, select either Manual (ESXi 6.0), Manual (ESXi 5.x) or Manual (ESXi 4.1) as appropriate.
3. Select Next. 4. You are now asked to provide information regarding the CPUs and memory of the Conferencing Node, by completing the
following fields:
Option Description
Number of virtual CPUs to assign
Enter the number of CPUs to assign to the Conferencing Node. We do not recommend that you assign more virtual CPUs than there are physical cores on a single processor on the host server. For example, if the host server has 2 processors each with 8 physical cores, we recommend that you assign no more than 8 virtual CPUs.
System memory (in megabytes) to assign
Enter the amount of RAM (in megabytes) to assign to the Conferencing Node. The number entered must be a multiple of 4.
We recommend 1024 MB (1 GB) RAM for each CPU.
5. Select Next.

Pexip Infinity Administrator GuideManaging the Pexip Infinity platformDeploying new Conferencing Nodes
© 2016 Pexip AS Version 12.a May 2016 Page 107 of 369
6. You are now asked to provide the network configuration to be applied to the Conferencing Node, by completing the following fields:
Option Description
Name Enter the name that will be used to refer to this Conferencing Node in the Pexip Infinity Administrator interface.
Description An optional field where you can provide more information about the Conferencing Node.
IPv4 address Enter the IP address to be assigned to this Conferencing Node when it is created.
Network mask Enter the IP network mask to be assigned to this Conferencing Node.
Gateway IPv4 address Enter the IP address of the default gateway to be assigned to this Conferencing Node.
Hostname Domain
Enter the hostname and domain to be assigned to this Conferencing Node. Each Conferencing Node and Management Node must have a unique hostname.
The Hostname and Domain together make up the Conferencing Node's DNS name or FQDN. We recommend you assign valid DNS names to all your Conferencing Nodes. For more information, see Assigning hostnames and FQDNs.
System location Select the physical location of this Conferencing Node.
If the system location does not already exist, you can create a new one here by clicking to the right of the field. This will open up a new window showing the Add system location page. For further information see About system locations.
SIP TLS FQDN A unique identity for this Conferencing Node, used in signaling SIP TLS Contact addresses. For more information, see SIP TLS FQDN.
TLS certificate The TLS certificate to use on this node. This must be a certificate that contains the above SIP TLS FQDN.
IPv6 address The IPv6 address for this Conferencing Node. Each Conferencing Node must have a unique IPv6 address.
Gateway IPv6 address The IPv6 address of the default gateway.
IPv4 static NAT address The public IPv4 address used by this Conferencing Node when it is located behind a NAT device. Note that if you are using NAT, you must also configure your NAT device to route the Conferencing Node's IPv4 static NAT address to its IPv4 address.
For more information, see Configuring Pexip Infinity nodes to work behind a static NAT device.
Static routes From the list of Available Static routes, select the routes to assign to the node, and then use the right arrow to move the selected routes into the Chosen Static routes list. For more information, see Managing static routes.
SSH password Enter the password to be used when logging in to this Conferencing Node's Linux operating system over SSH. The username will always be admin.
Logging in to the operating system is required when changing passwords or for diagnostic purposes only, and should generally be done under the guidance of your Pexip authorized support representative. In particular, do not change any configuration using SSH — all changes should be made using the Pexip Infinity Administrator interface.
7. Select Finish. You will be taken to the Manually Deploy Conferencing Node page.
8. Select Download Conferencing Node. A file with the name pexip-<hostname>.<domain>.ova will be downloaded.
9. When you wish to deploy the Conferencing Node VM, use a vSphere client to log in to vCenter Server (or the ESXi host directly, if it is not managed in vCenter Server) and select File > Deploy OVF template.... Follow the on-screen prompts to deploy the .ova file.

Pexip Infinity Administrator GuideManaging the Pexip Infinity platformDeploying new Conferencing Nodes
© 2016 Pexip AS Version 12.a May 2016 Page 108 of 369
After deploying a new Conferencing Node, it takes approximately 5 minutes before the node is available for conference hosting and for its status to be updated on the Management Node. (Until it is available, the Management Node will report the status of the Conferencing Node as having a last contacted and last updated date of "Never".)
Enabling automatic startup
After deploying a new Conferencing Node from VMware, you must enable automatic startup of that virtual machine (VM). In VMware, automatic startup is disabled by default for every new VM. This means that if the host server is powered down for any reason, when it restarts the VM will not restart and must be started manually.You can only enable automatic startup after the Conferencing Node has been deployed.
Using the web clientTo enable automatic startup using the vSphere web client: a. Log in to the VM manager (vCenter Server).
b. From the left-hand panel, select vCenter > Hosts and Clusters and go to the host server on which the node's VM is installed.
c. Select the Manage tab.
d. From the pane on the left-hand side, select VM Startup/Shutdown.
e. At the top right of the page, select Edit.
f. Select the relevant node's VM and use the up arrow to move it to the Automatic Startup section.
g. Select OK.
Using the desktop clientTo enable automatic startup using the vSphere desktop client: a. Log in to the VM manager (vCenter Server or the ESXi host).
b. From the left-hand panel, select the host server on which the node's VM is installed.
c. Select the Configuration tab.
d. From the Software pane on the left-hand side, select Virtual Machine Startup/Shutdown.
e. At the top right of the page, select Properties.
f. Select the relevant VM and use the Move Up button to move it to the Automatic Startup section.
g. Select OK.
Next steps
Enabling SNMP on Conferencing Nodes
Manually deploying a Conferencing Node on a Hyper-V hostTo manually deploy a new Conferencing Node on to a Hyper-V host:
1. Go to Platform configuration > Conferencing Nodes and select Add Conferencing Node.
2. From the Deployment type field, select Manual (Hyper-V 2012).
3. Select Next. 4. You are now asked to provide information regarding the CPUs and memory of the Conferencing Node VM, by completing the
following fields:
Option Description
Number of virtual CPUs to assign
Enter the number of CPUs to assign to the Conferencing Node. We do not recommend that you assign more virtual CPUs than there are physical cores on a single processor on the host server. For example, if the host server has 2 processors each with 8 physical cores, we recommend that you assign no more than 8 virtual CPUs.
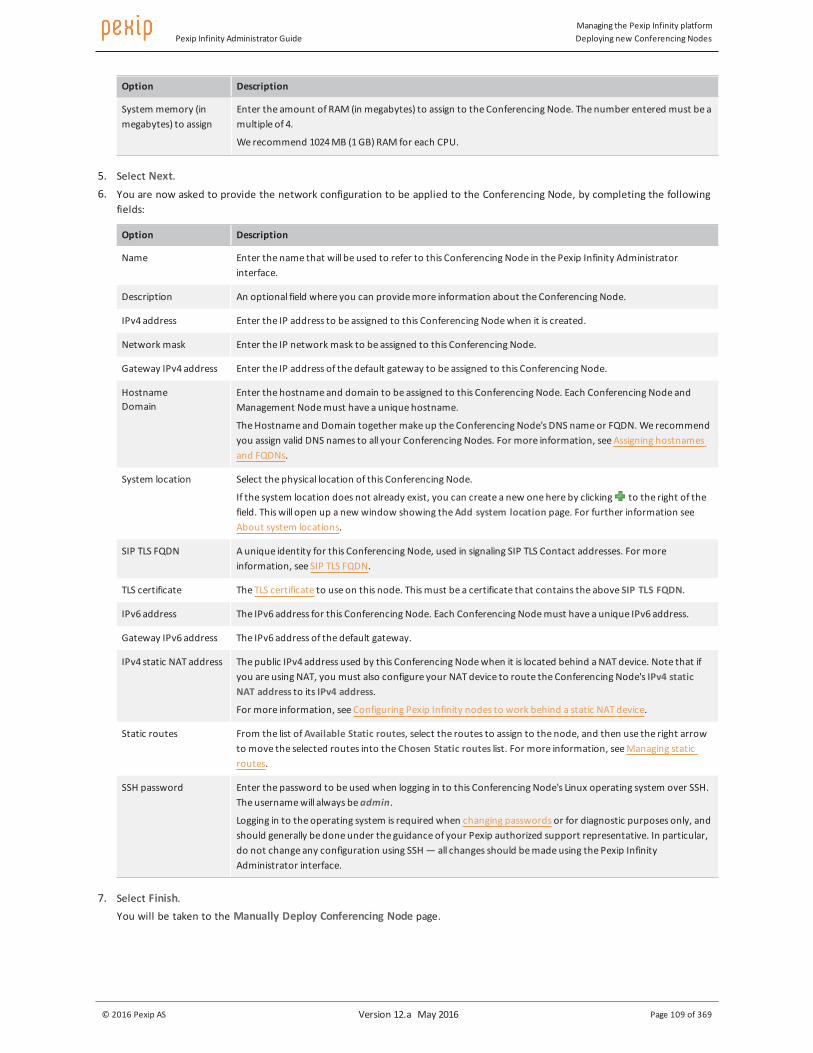
Pexip Infinity Administrator GuideManaging the Pexip Infinity platformDeploying new Conferencing Nodes
© 2016 Pexip AS Version 12.a May 2016 Page 109 of 369
Option Description
System memory (in megabytes) to assign
Enter the amount of RAM (in megabytes) to assign to the Conferencing Node. The number entered must be a multiple of 4.
We recommend 1024 MB (1 GB) RAM for each CPU.
5. Select Next. 6. You are now asked to provide the network configuration to be applied to the Conferencing Node, by completing the following
fields:
Option Description
Name Enter the name that will be used to refer to this Conferencing Node in the Pexip Infinity Administrator interface.
Description An optional field where you can provide more information about the Conferencing Node.
IPv4 address Enter the IP address to be assigned to this Conferencing Node when it is created.
Network mask Enter the IP network mask to be assigned to this Conferencing Node.
Gateway IPv4 address Enter the IP address of the default gateway to be assigned to this Conferencing Node.
Hostname Domain
Enter the hostname and domain to be assigned to this Conferencing Node. Each Conferencing Node and Management Node must have a unique hostname.
The Hostname and Domain together make up the Conferencing Node's DNS name or FQDN. We recommend you assign valid DNS names to all your Conferencing Nodes. For more information, see Assigning hostnames and FQDNs.
System location Select the physical location of this Conferencing Node.
If the system location does not already exist, you can create a new one here by clicking to the right of the field. This will open up a new window showing the Add system location page. For further information see About system locations.
SIP TLS FQDN A unique identity for this Conferencing Node, used in signaling SIP TLS Contact addresses. For more information, see SIP TLS FQDN.
TLS certificate The TLS certificate to use on this node. This must be a certificate that contains the above SIP TLS FQDN.
IPv6 address The IPv6 address for this Conferencing Node. Each Conferencing Node must have a unique IPv6 address.
Gateway IPv6 address The IPv6 address of the default gateway.
IPv4 static NAT address The public IPv4 address used by this Conferencing Node when it is located behind a NAT device. Note that if you are using NAT, you must also configure your NAT device to route the Conferencing Node's IPv4 static NAT address to its IPv4 address.
For more information, see Configuring Pexip Infinity nodes to work behind a static NAT device.
Static routes From the list of Available Static routes, select the routes to assign to the node, and then use the right arrow to move the selected routes into the Chosen Static routes list. For more information, see Managing static routes.
SSH password Enter the password to be used when logging in to this Conferencing Node's Linux operating system over SSH. The username will always be admin.
Logging in to the operating system is required when changing passwords or for diagnostic purposes only, and should generally be done under the guidance of your Pexip authorized support representative. In particular, do not change any configuration using SSH — all changes should be made using the Pexip Infinity Administrator interface.
7. Select Finish.You will be taken to the Manually Deploy Conferencing Node page.

Pexip Infinity Administrator GuideManaging the Pexip Infinity platformDeploying new Conferencing Nodes
© 2016 Pexip AS Version 12.a May 2016 Page 110 of 369
8. Select Download Conferencing Node.A zip file with the name pexip-<hostname>.<domain>.zip will be downloaded.
9. When you wish to deploy the Conferencing Nodes: a. Copy the zip file to the server running Hyper-V and unzip it.
You will see a subfolder called Virtual Machines, containing an XML file which contains the configuration for the Conferencing Node VM.
b. Open the Hyper-V Manager and select Import Virtual Machine.... c. Follow the on-screen prompts to deploy the Conferencing Node VM.
When prompted, select the Virtual Machines folder and the Hyper-V manager will automatically discover the XML file.
Select the type of import most appropriate for your environment (if you are unsure, select Restore the virtual machine).
After deploying a new Conferencing Node, it takes approximately 5 minutes before the node is available for conference hosting and for its status to be updated on the Management Node. (Until it is available, the Management Node will report the status of the Conferencing Node as having a last contacted and last updated date of "Never".)
Enabling automatic startup
By default, virtual machines deployed using Hyper-V are configured to restart automatically if they were running when the host server was shut down or powered off. We recommend that you leave this setting as is for the Management Node and all Conferencing Nodes.
Next steps
Enabling SNMP on Conferencing Nodes
Manually deploying a Conferencing Node on a KVM hostTo manually deploy a new Conferencing Node onto a KVM host, you must:
1. Use the Pexip Infinity Administrator interface to generate and download the .ova image.
2. Convert the .ova image for use with KVM.
3. Create a new volume on your KVM server and upload the disk image.
4. Create the Conferencing Node virtual machine.Note that we use the libvirt command line tools to perform the import as they provide greater control than Virtual Machine Manager.
5. Enable the virtual machine for automatic startup.
These steps are described in detail below.
Generate and download the .ova image
Use the Pexip Infinity Administrator interface to generate and download the .ova image:
1. Go to Platform configuration > Conferencing Nodes and select Add Conferencing Node.
2. From the Deployment type field, select Manual (KVM).
3. Select Next. 4. You are now asked to provide information regarding the CPUs and memory of the Conferencing Node VM, by completing the
following fields:
Option Description
Number of virtual CPUs to assign
Enter the number of CPUs to assign to the Conferencing Node. We do not recommend that you assign more virtual CPUs than there are physical cores on a single processor on the host server. For example, if the host server has 2 processors each with 8 physical cores, we recommend that you assign no more than 8 virtual CPUs.

Pexip Infinity Administrator GuideManaging the Pexip Infinity platformDeploying new Conferencing Nodes
© 2016 Pexip AS Version 12.a May 2016 Page 111 of 369
Option Description
System memory (in megabytes) to assign
Enter the amount of RAM (in megabytes) to assign to the Conferencing Node. The number entered must be a multiple of 4.
We recommend 1024 MB (1 GB) RAM for each CPU.
5. Select Next. 6. You are now asked to provide the network configuration to be applied to the Conferencing Node, by completing the following
fields:
Option Description
Name Enter the name that will be used to refer to this Conferencing Node in the Pexip Infinity Administrator interface.
Description An optional field where you can provide more information about the Conferencing Node.
IPv4 address Enter the IP address to be assigned to this Conferencing Node when it is created.
Network mask Enter the IP network mask to be assigned to this Conferencing Node.
Gateway IPv4 address Enter the IP address of the default gateway to be assigned to this Conferencing Node.
Hostname Domain
Enter the hostname and domain to be assigned to this Conferencing Node. Each Conferencing Node and Management Node must have a unique hostname.
The Hostname and Domain together make up the Conferencing Node's DNS name or FQDN. We recommend you assign valid DNS names to all your Conferencing Nodes. For more information, see Assigning hostnames and FQDNs.
System location Select the physical location of this Conferencing Node.
If the system location does not already exist, you can create a new one here by clicking to the right of the field. This will open up a new window showing the Add system location page. For further information see About system locations.
SIP TLS FQDN A unique identity for this Conferencing Node, used in signaling SIP TLS Contact addresses. For more information, see SIP TLS FQDN.
TLS certificate The TLS certificate to use on this node. This must be a certificate that contains the above SIP TLS FQDN.
IPv6 address The IPv6 address for this Conferencing Node. Each Conferencing Node must have a unique IPv6 address.
Gateway IPv6 address The IPv6 address of the default gateway.
IPv4 static NAT address The public IPv4 address used by this Conferencing Node when it is located behind a NAT device. Note that if you are using NAT, you must also configure your NAT device to route the Conferencing Node's IPv4 static NAT address to its IPv4 address.
For more information, see Configuring Pexip Infinity nodes to work behind a static NAT device.
Static routes From the list of Available Static routes, select the routes to assign to the node, and then use the right arrow to move the selected routes into the Chosen Static routes list. For more information, see Managing static routes.
SSH password Enter the password to be used when logging in to this Conferencing Node's Linux operating system over SSH. The username will always be admin.
Logging in to the operating system is required when changing passwords or for diagnostic purposes only, and should generally be done under the guidance of your Pexip authorized support representative. In particular, do not change any configuration using SSH — all changes should be made using the Pexip Infinity Administrator interface.
7. Select Finish.You are taken to the Manually Deploy Conferencing Node page.

Pexip Infinity Administrator GuideManaging the Pexip Infinity platformDeploying new Conferencing Nodes
© 2016 Pexip AS Version 12.a May 2016 Page 112 of 369
8. Select Download Conferencing Node.This downloads a zip file with the name pexip-<hostname>.<domain>.ova.
Convert the .ova image for use with KVM
To use the Conferencing Node OVA image file with KVM, you must convert it from VMDK to raw format:
1. Copy the downloaded OVA file (named pexip-<hostname>.<domain>.ova) to the server running KVM.
2. Unpack the .ova image, using the command:tar xf pexip-<hostname>.<domain>.ova
This unpacks a set of files including pexip-disk01.vmdk. 3. Convert the disk image from VMDK to raw, using the command:
qemu-img convert -O raw pexip-disk01.vmdk pexip-disk01.raw
(This conversion process can take several seconds.)
Create a new volume and upload the disk image
Next, you create a new volume on your KVM server and upload the converted disk image. From within your KVM environment:
1. Use virsh to create a new volume on your KVM server:virsh --connect qemu://<hostname>/system vol-create-as <poolname> <volume_name> 49G --format raw
where:<hostname> is the hostname of your KVM server. Note that you can omit the <hostname> if you are running virsh commands on the local server i.e. you can use virsh --connect qemu:///system .<poolname> is the name of the storage pool in which to create the volume; typically you would use default. (To determine the storage pools available on the target system, use virsh --connect qemu://<hostname>/system pool-list.)<volume_name> is the name of your new volume.49G is the virtual size of the volume; always use 49G for a Conferencing Node.For example:virsh --connect qemu://host1.example.com/system vol-create-as default pexip-conf-01 49G --format raw
This example creates a volume named pexip-conf-01 of size 49 GB and format raw in the storage pool named default. 2. Upload the converted disk image to the newly created volume:
virsh --connect qemu://<hostname>/system vol-upload <volume_name> pexip-disk01.raw --pool <poolname>
For example:virsh --connect qemu://host1.example.com/system vol-upload pexip-conf-01 pexip-disk01.raw --pool default
This example uploads the pexip-disk01.raw image to the newly created volume, pexip-conf-01, in the storage pool named default.
Create the virtual machine
After the disk image has been uploaded, you can create the virtual machine to use it.
Note that we use the libvirt command line tools to perform the import as they provide greater control than Virtual Machine Manager.
1. Identify the filesystem path of the newly uploaded disk image:virsh --connect qemu://<hostname>/system vol-path <volume_name> --pool <poolname>
For example:virsh --connect qemu://host1.example.com/system vol-path pexip-conf-01 --pool default
This prints out the absolute path to the disk image file, for example:/var/lib/libvirt/images/pexip-conf-01
This path is used in the disk path parameter in the next step.
2. Use the virt-install command line tool to create the virtual machine:

Pexip Infinity Administrator GuideManaging the Pexip Infinity platformDeploying new Conferencing Nodes
© 2016 Pexip AS Version 12.a May 2016 Page 113 of 369
virt-install \ --import \ --hvm \ --name=<vm_name> \ --arch=x86_64 \ --vcpus=4 \ --ram=4096 \ --cpu host \ --os-type=linux \ --connect=qemu://<hostname>/system \ --virt-type kvm \ --disk path=<image_file_path>,bus=virtio,format=raw,cache=none,io=native \ --network bridge=br0,model=virtio \ --memballoon virtio \ --graphics vnc,listen=0.0.0.0,password=<password>
This creates a new VM (KVM domain) from the converted disk image.The meaning of the various options are as follows (items in bold may be changed as necessary):
Option Description
--import Build guest domain around pre-installed disk image; do not attempt to install a new OS.
--hvm Create a fully virtualized (i.e. not paravirtualized) VM.
--name=<vm_name> Name of the new VM, where <vm_name> is, for example, pexip-conf01-vm.
--arch=x86_64 CPU architecture of new VM (must be x84_64).
--vcpus=4 Number of CPUs allocated to new VM. By default, this is 4 for the Conferencing Node.
--ram=4096 Memory allocated to new VM (in megabytes).
--cpu host Expose all host CPU capabilities to new VM (CPUID).
--os-type=linux The guest OS is Linux.
--connect=qemu://<hostname>/system
Connect to KVM on the target system, where <hostname> is the hostname of your KVM server.
--virt-type kvm Use KVM to host the new VM.
--disk path=<image_file_path>,bus=virtio,format=raw,cache=none,io=native
o Define the location of the disk image file, where <image_file_path> is as determined in the previous step, for example /var/lib/libvirt/images/pexip-conf-01.
o Expose it to the guest on the virtio paravirtualized bus (as opposed to IDE/SCSI).
o Define the image file as being in raw format.
o Instruct the host system not to cache the disk contents in memory.
o Use the native IO backend to access the disk device.
--network bridge=br0,model=virtio
o Create a network interface connected to the br0 bridge interface on the host.
o Expose it to the guest as a virtio paravirtualized NIC.
--memballoon virtio Expose the virtio memory balloon to the guest.
--graphics vnc,listen=0.0.0.0,password=<password>
Expose the graphical console over VNC, listening on 0.0.0.0 (i.e. all addresses on the target system) and with an access password of <password>.
You may receive a warning "Unable to connect to graphical console: virt-viewer not installed"; if so, this message can be safely ignored.After the VM has been created, it may be managed using the Virtual Machine Manager desktop interface (virt-manager application) or via the command line interface (virsh).The new node should start automatically. If it does not you can use the Virtual Machine Manager to start the node, or the CLI command:
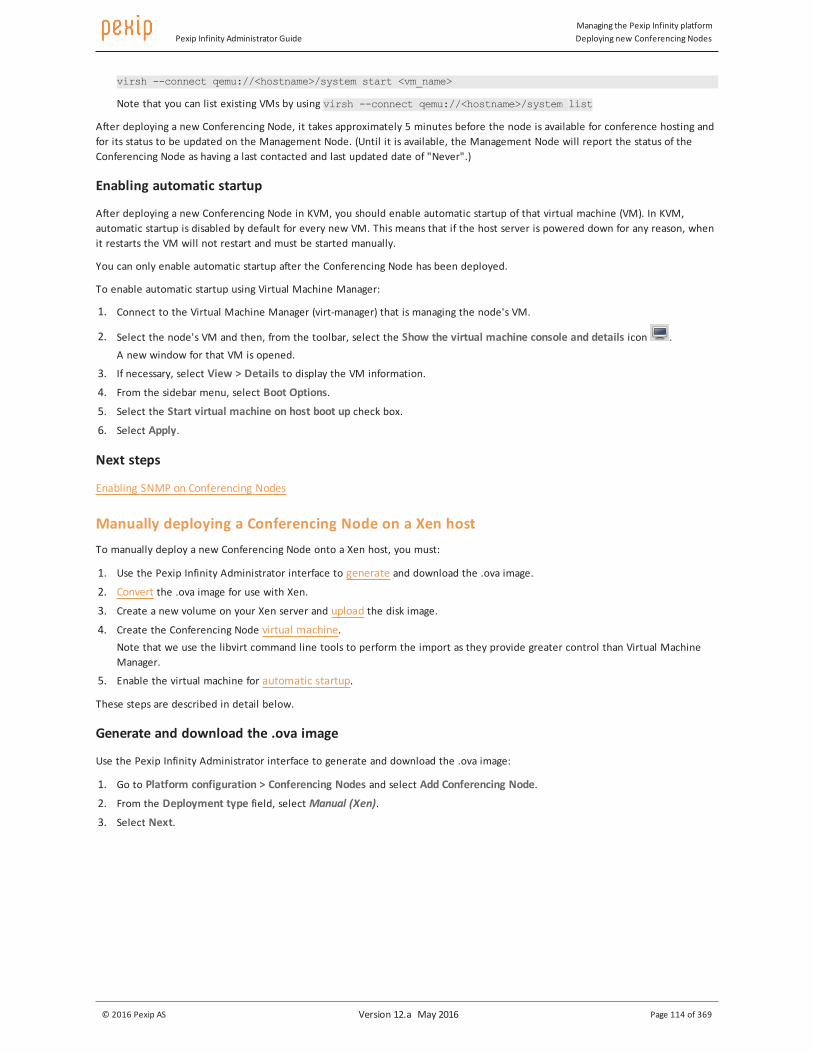
Pexip Infinity Administrator GuideManaging the Pexip Infinity platformDeploying new Conferencing Nodes
© 2016 Pexip AS Version 12.a May 2016 Page 114 of 369
virsh --connect qemu://<hostname>/system start <vm_name>
Note that you can list existing VMs by using virsh --connect qemu://<hostname>/system list
After deploying a new Conferencing Node, it takes approximately 5 minutes before the node is available for conference hosting and for its status to be updated on the Management Node. (Until it is available, the Management Node will report the status of the Conferencing Node as having a last contacted and last updated date of "Never".)
Enabling automatic startup
After deploying a new Conferencing Node in KVM, you should enable automatic startup of that virtual machine (VM). In KVM, automatic startup is disabled by default for every new VM. This means that if the host server is powered down for any reason, when it restarts the VM will not restart and must be started manually.
You can only enable automatic startup after the Conferencing Node has been deployed.
To enable automatic startup using Virtual Machine Manager:
1. Connect to the Virtual Machine Manager (virt-manager) that is managing the node's VM.
2. Select the node's VM and then, from the toolbar, select the Show the virtual machine console and details icon .A new window for that VM is opened.
3. If necessary, select View > Details to display the VM information.
4. From the sidebar menu, select Boot Options.
5. Select the Start virtual machine on host boot up check box.
6. Select Apply.
Next steps
Enabling SNMP on Conferencing Nodes
Manually deploying a Conferencing Node on a Xen hostTo manually deploy a new Conferencing Node onto a Xen host, you must:
1. Use the Pexip Infinity Administrator interface to generate and download the .ova image.
2. Convert the .ova image for use with Xen.
3. Create a new volume on your Xen server and upload the disk image.
4. Create the Conferencing Node virtual machine.Note that we use the libvirt command line tools to perform the import as they provide greater control than Virtual Machine Manager.
5. Enable the virtual machine for automatic startup.
These steps are described in detail below.
Generate and download the .ova image
Use the Pexip Infinity Administrator interface to generate and download the .ova image:
1. Go to Platform configuration > Conferencing Nodes and select Add Conferencing Node.
2. From the Deployment type field, select Manual (Xen).
3. Select Next.

Pexip Infinity Administrator GuideManaging the Pexip Infinity platformDeploying new Conferencing Nodes
© 2016 Pexip AS Version 12.a May 2016 Page 115 of 369
4. You are now asked to provide information regarding the CPUs and memory of the Conferencing Node VM, by completing the following fields:
Option Description
Number of virtual CPUs to assign
Enter the number of CPUs to assign to the Conferencing Node. We do not recommend that you assign more virtual CPUs than there are physical cores on a single processor on the host server. For example, if the host server has 2 processors each with 8 physical cores, we recommend that you assign no more than 8 virtual CPUs.
System memory (in megabytes) to assign
Enter the amount of RAM (in megabytes) to assign to the Conferencing Node. The number entered must be a multiple of 4.
We recommend 1024 MB (1 GB) RAM for each CPU.
5. Select Next. 6. You are now asked to provide the network configuration to be applied to the Conferencing Node, by completing the following
fields:
Option Description
Name Enter the name that will be used to refer to this Conferencing Node in the Pexip Infinity Administrator interface.
Description An optional field where you can provide more information about the Conferencing Node.
IPv4 address Enter the IP address to be assigned to this Conferencing Node when it is created.
Network mask Enter the IP network mask to be assigned to this Conferencing Node.
Gateway IPv4 address Enter the IP address of the default gateway to be assigned to this Conferencing Node.
Hostname Domain
Enter the hostname and domain to be assigned to this Conferencing Node. Each Conferencing Node and Management Node must have a unique hostname.
The Hostname and Domain together make up the Conferencing Node's DNS name or FQDN. We recommend you assign valid DNS names to all your Conferencing Nodes. For more information, see Assigning hostnames and FQDNs.
System location Select the physical location of this Conferencing Node.
If the system location does not already exist, you can create a new one here by clicking to the right of the field. This will open up a new window showing the Add system location page. For further information see About system locations.
SIP TLS FQDN A unique identity for this Conferencing Node, used in signaling SIP TLS Contact addresses. For more information, see SIP TLS FQDN.
TLS certificate The TLS certificate to use on this node. This must be a certificate that contains the above SIP TLS FQDN.
IPv6 address The IPv6 address for this Conferencing Node. Each Conferencing Node must have a unique IPv6 address.
Gateway IPv6 address The IPv6 address of the default gateway.
IPv4 static NAT address The public IPv4 address used by this Conferencing Node when it is located behind a NAT device. Note that if you are using NAT, you must also configure your NAT device to route the Conferencing Node's IPv4 static NAT address to its IPv4 address.
For more information, see Configuring Pexip Infinity nodes to work behind a static NAT device.
Static routes From the list of Available Static routes, select the routes to assign to the node, and then use the right arrow to move the selected routes into the Chosen Static routes list. For more information, see Managing static routes.
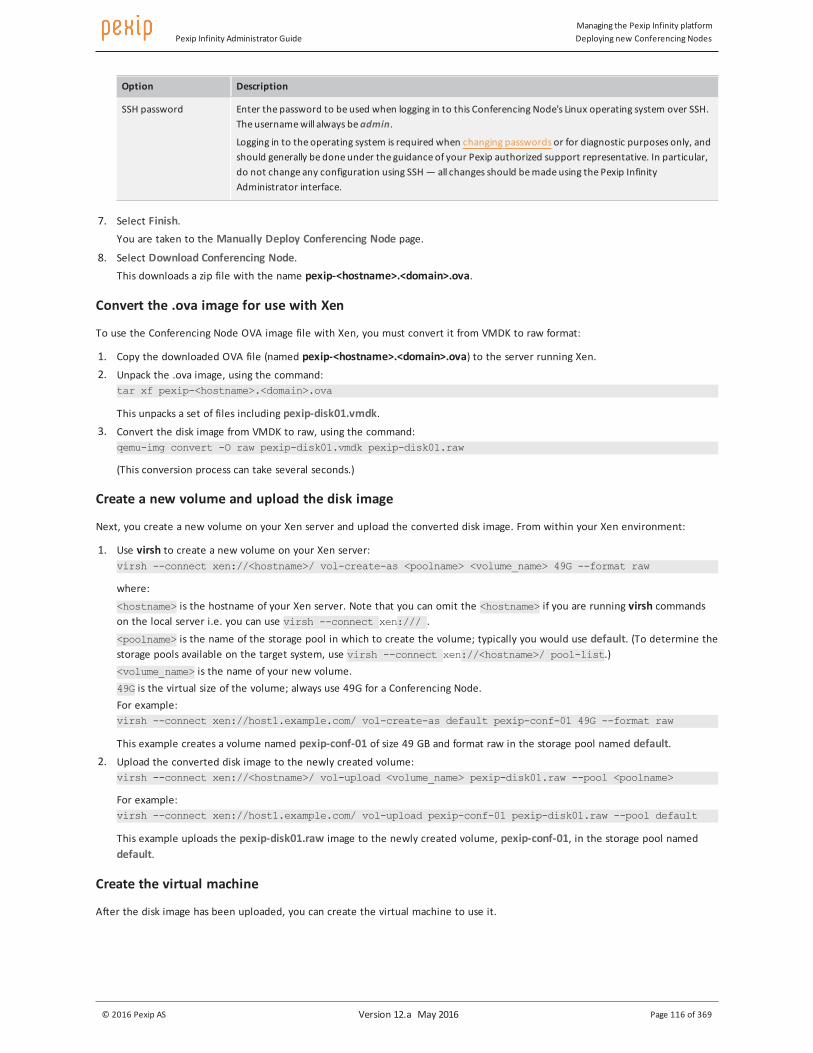
Pexip Infinity Administrator GuideManaging the Pexip Infinity platformDeploying new Conferencing Nodes
© 2016 Pexip AS Version 12.a May 2016 Page 116 of 369
Option Description
SSH password Enter the password to be used when logging in to this Conferencing Node's Linux operating system over SSH. The username will always be admin.
Logging in to the operating system is required when changing passwords or for diagnostic purposes only, and should generally be done under the guidance of your Pexip authorized support representative. In particular, do not change any configuration using SSH — all changes should be made using the Pexip Infinity Administrator interface.
7. Select Finish.You are taken to the Manually Deploy Conferencing Node page.
8. Select Download Conferencing Node.This downloads a zip file with the name pexip-<hostname>.<domain>.ova.
Convert the .ova image for use with Xen
To use the Conferencing Node OVA image file with Xen, you must convert it from VMDK to raw format:
1. Copy the downloaded OVA file (named pexip-<hostname>.<domain>.ova) to the server running Xen. 2. Unpack the .ova image, using the command:
tar xf pexip-<hostname>.<domain>.ova
This unpacks a set of files including pexip-disk01.vmdk. 3. Convert the disk image from VMDK to raw, using the command:
qemu-img convert -O raw pexip-disk01.vmdk pexip-disk01.raw
(This conversion process can take several seconds.)
Create a new volume and upload the disk image
Next, you create a new volume on your Xen server and upload the converted disk image. From within your Xen environment:
1. Use virsh to create a new volume on your Xen server:virsh --connect xen://<hostname>/ vol-create-as <poolname> <volume_name> 49G --format raw
where:<hostname> is the hostname of your Xen server. Note that you can omit the <hostname> if you are running virsh commands on the local server i.e. you can use virsh --connect xen:/// .<poolname> is the name of the storage pool in which to create the volume; typically you would use default. (To determine the storage pools available on the target system, use virsh --connect xen://<hostname>/ pool-list.)<volume_name> is the name of your new volume.49G is the virtual size of the volume; always use 49G for a Conferencing Node.For example:virsh --connect xen://host1.example.com/ vol-create-as default pexip-conf-01 49G --format raw
This example creates a volume named pexip-conf-01 of size 49 GB and format raw in the storage pool named default. 2. Upload the converted disk image to the newly created volume:
virsh --connect xen://<hostname>/ vol-upload <volume_name> pexip-disk01.raw --pool <poolname>
For example:virsh --connect xen://host1.example.com/ vol-upload pexip-conf-01 pexip-disk01.raw --pool default
This example uploads the pexip-disk01.raw image to the newly created volume, pexip-conf-01, in the storage pool named default.
Create the virtual machine
After the disk image has been uploaded, you can create the virtual machine to use it.

Pexip Infinity Administrator GuideManaging the Pexip Infinity platformDeploying new Conferencing Nodes
© 2016 Pexip AS Version 12.a May 2016 Page 117 of 369
Note that we use the libvirt command line tools to perform the import as they provide greater control than Virtual Machine Manager.
1. Identify the filesystem path of the newly uploaded disk image:virsh --connect xen://<hostname>/ vol-path <volume_name> --pool <poolname>
For example:virsh --connect xen://host1.example.com/ vol-path pexip-conf-01 --pool default
This prints out the absolute path to the disk image file, for example:/var/lib/libvirt/images/pexip-conf-01
This path is used in the disk path parameter in the next step.
2. Use the virt-install command line tool to create the virtual machine:
virt-install \ --import \ --hvm \ --name=<vm_name> \ --arch=x86_64 \ --vcpus=4 \ --ram=4096 \ --os-type=linux \ --connect=xen://<hostname>/ \ --virt-type xen \ --disk path=<image_file_path>,bus=xen,format=raw,driver_name=qemu,cache=none,io=native \ --network bridge=xenbr0,model=e1000 \ --memballoon xen \ --graphics vnc,listen=0.0.0.0,password=<password>
This creates a new VM (Xen domain) from the converted disk image.The meaning of the various options are as follows (items in bold may be changed as necessary):
Option Description
--import Build guest domain around pre-installed disk image; do not attempt to install a new OS.
--hvm Create a fully virtualized (i.e. not paravirtualized) VM.
--name=<vm_name> Name of the new VM, where <vm_name> is, for example, pexip-conf01-vm.
--arch=x86_64 CPU architecture of new VM (must be x84_64).
--vcpus=4 Number of CPUs allocated to new VM. By default, this is 4 for the Conferencing Node.
--ram=4096 Memory allocated to new VM (in megabytes).
--os-type=linux The guest OS is Linux.
--connect=xen://<hostname>/
Connect to Xen on the target system, where <hostname> is the hostname of your Xen server.
--virt-type xen Use Xen to host the new VM.
--disk path=<image_file_path>,bus=xen,format=raw,driver_name=qemu,cache=none,io=native
o Define the location of the disk image file, where <image_file_path> is as determined in the previous step, for example /var/lib/libvirt/images/pexip-conf-01.
o Expose it to the guest on the xen paravirtualized bus (as opposed to IDE/SCSI).
o Define the image file as being in raw format and the driver as qemu.
o Instruct the host system not to cache the disk contents in memory.
o Use the native IO backend to access the disk device.

Pexip Infinity Administrator GuideManaging the Pexip Infinity platformDeploying new Conferencing Nodes
© 2016 Pexip AS Version 12.a May 2016 Page 118 of 369
Option Description
--network bridge=xenbr0,model=e1000
o Create a network interface connected to the xenbr0 bridge interface on the host.
o Expose it to the guest as an e1000 NIC.
--memballoon xen Expose the xen memory balloon to the guest.
--graphics vnc,listen=0.0.0.0,password=<password>
Expose the graphical console over VNC, listening on 0.0.0.0 (i.e. all addresses on the target system) and with an access password of <password>.
You may receive a warning "Unable to connect to graphical console: virt-viewer not installed"; if so, this message can be safely ignored.After the VM has been created, it may be managed using the Virtual Machine Manager desktop interface (virt-manager application) or via the command line interface (virsh).The new node should start automatically. If it does not you can use the Virtual Machine Manager to start the node, or the CLI command:virsh --connect xen://<hostname>/ start <vm_name>
Note that you can list existing VMs by using virsh --connect xen://<hostname>/ list
After deploying a new Conferencing Node, it takes approximately 5 minutes before the node is available for conference hosting and for its status to be updated on the Management Node. (Until it is available, the Management Node will report the status of the Conferencing Node as having a last contacted and last updated date of "Never".)
Enabling automatic startup
After deploying a new Conferencing Node in Xen, you should enable automatic startup of that virtual machine (VM). In Xen, automatic startup is disabled by default for every new VM. This means that if the host server is powered down for any reason, when it restarts the VM will not restart and must be started manually.
You can only enable automatic startup after the Conferencing Node has been deployed.
To enable automatic startup using Virtual Machine Manager:
1. Connect to the Virtual Machine Manager (virt-manager) that is managing the node's VM.
2. Select the node's VM and then, from the toolbar, select the Show the virtual machine console and details icon .A new window for that VM is opened.
3. If necessary, select View > Details to display the VM information.
4. From the sidebar menu, select Boot Options.
5. Select the Start virtual machine on host boot up check box.
6. Select Apply.
Next steps
Enabling SNMP on Conferencing Nodes
Deploying a Conferencing Node using a generic VM template and configuration fileCreating a new Conferencing Node is a two-step process:
1. A generic instance of a Conferencing Node VM is created using a template provided by Pexip.
2. The VM is configured with the details of the specific Conferencing Node being deployed.
This process has been automated (or partly automated) for environments using VMware ESXi, Microsoft Hyper-V, KVM or Xen hypervisors, which are supported in Pexip Infinity. However, Pexip also provide the Conferencing Node VM template and the ability to generate a Conferencing Node-specific configuration file for you to deploy yourself using non-supported hypervisors or orchestration layers.
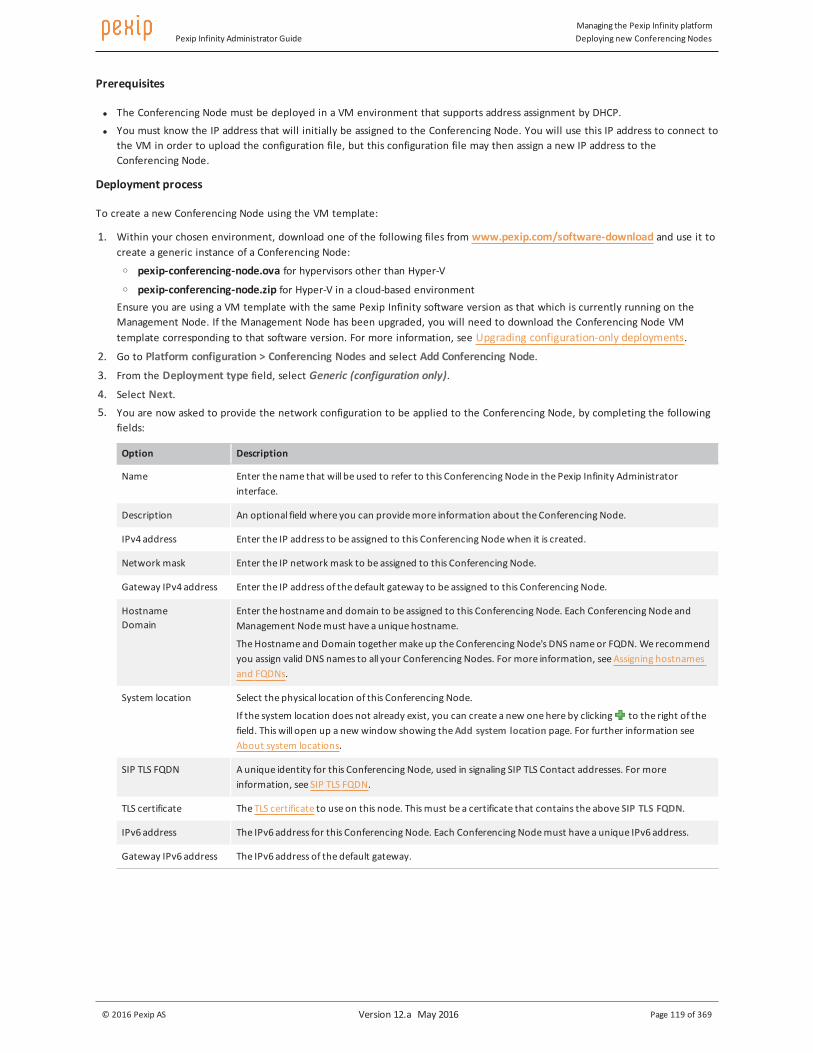
Pexip Infinity Administrator GuideManaging the Pexip Infinity platformDeploying new Conferencing Nodes
© 2016 Pexip AS Version 12.a May 2016 Page 119 of 369
Prerequisites
l The Conferencing Node must be deployed in a VM environment that supports address assignment by DHCP.
l You must know the IP address that will initially be assigned to the Conferencing Node. You will use this IP address to connect to the VM in order to upload the configuration file, but this configuration file may then assign a new IP address to the Conferencing Node.
Deployment process
To create a new Conferencing Node using the VM template:
1. Within your chosen environment, download one of the following files from www.pexip.com/software-download and use it to create a generic instance of a Conferencing Node:
o pexip-conferencing-node.ova for hypervisors other than Hyper-V o pexip-conferencing-node.zip for Hyper-V in a cloud-based environmentEnsure you are using a VM template with the same Pexip Infinity software version as that which is currently running on the Management Node. If the Management Node has been upgraded, you will need to download the Conferencing Node VM template corresponding to that software version. For more information, see Upgrading configuration-only deployments.
2. Go to Platform configuration > Conferencing Nodes and select Add Conferencing Node.
3. From the Deployment type field, select Generic (configuration only).
4. Select Next. 5. You are now asked to provide the network configuration to be applied to the Conferencing Node, by completing the following
fields:
Option Description
Name Enter the name that will be used to refer to this Conferencing Node in the Pexip Infinity Administrator interface.
Description An optional field where you can provide more information about the Conferencing Node.
IPv4 address Enter the IP address to be assigned to this Conferencing Node when it is created.
Network mask Enter the IP network mask to be assigned to this Conferencing Node.
Gateway IPv4 address Enter the IP address of the default gateway to be assigned to this Conferencing Node.
Hostname Domain
Enter the hostname and domain to be assigned to this Conferencing Node. Each Conferencing Node and Management Node must have a unique hostname.
The Hostname and Domain together make up the Conferencing Node's DNS name or FQDN. We recommend you assign valid DNS names to all your Conferencing Nodes. For more information, see Assigning hostnames and FQDNs.
System location Select the physical location of this Conferencing Node.
If the system location does not already exist, you can create a new one here by clicking to the right of the field. This will open up a new window showing the Add system location page. For further information see About system locations.
SIP TLS FQDN A unique identity for this Conferencing Node, used in signaling SIP TLS Contact addresses. For more information, see SIP TLS FQDN.
TLS certificate The TLS certificate to use on this node. This must be a certificate that contains the above SIP TLS FQDN.
IPv6 address The IPv6 address for this Conferencing Node. Each Conferencing Node must have a unique IPv6 address.
Gateway IPv6 address The IPv6 address of the default gateway.

Pexip Infinity Administrator GuideManaging the Pexip Infinity platformDeploying new Conferencing Nodes
© 2016 Pexip AS Version 12.a May 2016 Page 120 of 369
Option Description
IPv4 static NAT address The public IPv4 address used by this Conferencing Node when it is located behind a NAT device. Note that if you are using NAT, you must also configure your NAT device to route the Conferencing Node's IPv4 static NAT address to its IPv4 address.
For more information, see Configuring Pexip Infinity nodes to work behind a static NAT device.
Static routes From the list of Available Static routes, select the routes to assign to the node, and then use the right arrow to move the selected routes into the Chosen Static routes list. For more information, see Managing static routes.
SSH password Enter the password to be used when logging in to this Conferencing Node's Linux operating system over SSH. The username will always be admin.
Logging in to the operating system is required when changing passwords or for diagnostic purposes only, and should generally be done under the guidance of your Pexip authorized support representative. In particular, do not change any configuration using SSH — all changes should be made using the Pexip Infinity Administrator interface.
6. Select Finish.You will be taken to the Manually Deploy Conferencing Node page.
7. Select Download Conferencing Node Configuration.A zip file with the name pexip-<hostname>.<domain>.xml will be downloaded.
8. Browse to https://<conferencing-node-ip>:8443/ and use the form provided to upload the configuration file to the Conferencing Node VM.The Conferencing Node will apply the configuration and then reboot. When it has rebooted, it will connect to the Management Node in the usual way.
9. Within your hypervisor, configure the Conferencing Node VM with information regarding the CPUs and memory to be assigned to it, as follows:
Option Description
Number of virtual CPUs to assign
Enter the number of CPUs to assign to the Conferencing Node. We do not recommend that you assign more virtual CPUs than there are physical cores on a single processor on the host server. For example, if the host server has 2 processors each with 8 physical cores, we recommend that you assign no more than 8 virtual CPUs.
System memory (in megabytes) to assign
Enter the amount of RAM (in megabytes) to assign to the Conferencing Node. The number entered must be a multiple of 4.
We recommend 1024 MB (1 GB) RAM for each CPU.
After deploying a new Conferencing Node, it takes approximately 5 minutes before the node is available for conference hosting and for its status to be updated on the Management Node. (Until it is available, the Management Node will report the status of the Conferencing Node as having a last contacted and last updated date of "Never".)
Enabling automatic startup
We recommend that all virtual machines are configured to restart automatically if they were running when the host server was shut down or powered off.
Next steps
Enabling SNMP on Conferencing Nodes

Pexip Infinity Administrator GuideManaging the Pexip Infinity platform
Assigning hostnames and FQDNs
© 2016 Pexip AS Version 12.a May 2016 Page 121 of 369
Assigning hostnames and FQDNsThe Management Node and each Conferencing Node within your deployment must have a unique hostname.
Hostnames can be made of a combination of numbers, letters, and the hyphen (-) character, and are case-insensitive. Hostnames cannot be entirely numeric.
The hostname and the domain together make up the system's DNS name or FQDN.
We recommend that you assign valid DNS names or FQDNs to all of your Conferencing Nodes. Doing so will make managing your deployment easier, for example by:
l allowing you to route calls more easily
l allowing you to use more manageable TLS certificates l allowing you to in effect change the IP address of a Conferencing Node (by re-deploying a new system using the same DNS name
but a different IP address)
l making the system easier to access for the purposes of troubleshooting.
To assign a DNS name to a Conferencing Node, enter a valid Hostname and Domain combination when first deploying the Conferencing Node.

Pexip Infinity Administrator GuideManaging the Pexip Infinity platform
Configuring existing Conferencing Nodes
© 2016 Pexip AS Version 12.a May 2016 Page 122 of 369
Configuring existing Conferencing NodesTo reconfigure or delete an existing Conferencing Node, go to Platform configuration > Conferencing Nodes and click on the name of the Conferencing Node.
Any changes to the configuration of the Conferencing Node should be made using the Pexip Infinity Administrator interface. Do not make any changes using other tools (such as VMware or Hyper-V); doing so may cause the Conferencing Node to fail. The only exception is any change to the CPU and RAM allocated to the Conferencing Node — these changes should be made using the hypervisor and should only be done while the Conferencing Node is powered off.
When reconfiguring existing Conferencing Nodes, the following information can be changed:
Option Description
Name The name used to refer to this Conferencing Node in the Pexip Infinity Administrator interface. Each Conferencing Node must have a unique name.
Description An optional field where you can provide more information about the Conferencing Node.
System location The physical location of this Conferencing Node.
If you change the system location of an existing Conferencing Node, all existing calls will be disconnected and the Conferencing Node will be restarted.
Enable maintenance mode
While maintenance mode is enabled, this Conferencing Node will not accept any new conference instances. For more information, see About maintenance mode.
The maintenance mode setting will persist after a reboot.
SIP TLS FQDN A unique identity for this Conferencing Node, used in signaling SIP TLS Contact addresses. For more information, see SIP TLS FQDN.
TLS certificate The TLS certificate to use on this node. This must be a certificate that contains the above SIP TLS FQDN.
IPv6 address The IPv6 address for this Conferencing Node.
Gateway IPv6 address The IPv6 address of the default gateway.
IPv4 static NAT address The public IPv4 address used by this Conferencing Node when it is located behind a NAT device.
Static routes From the list of Available Static routes, select the routes to assign to the node, and then use the right arrow to move the selected routes into the Chosen Static routes list. For more information, see Managing static routes.
You can also change the node's SNMP settings (see Enabling SNMP for more information):
Option Description
SNMP mode Configures the SNMP mode for the selected node:
Off: SNMP is disabled. You will not be able to use SNMP to query the node for its status.
SNMPv2c read-only: enables insecure, read-only access.
SNMPv3 read-only: enables secure, read-only access, using the authPriv security level with SHA1 authentication and AES 128-bit encryption.
When enabled, access is provided to the basic RFC 1213 MIB-II tree (1.3.6.1.2.1).
Default: Off.
SNMP community The SNMP group to which this node belongs. This setting applies to SNMPv2c only.
Default: public
SNMPv3 username The node's SNMPv3 username, used to authenticate SNMPv3 requests.

Pexip Infinity Administrator GuideManaging the Pexip Infinity platform
Configuring existing Conferencing Nodes
© 2016 Pexip AS Version 12.a May 2016 Page 123 of 369
Option Description
SNMPv3 privacy password
The node's SNMPv3 privacy password used for encrypting messages between the node and the management station.
AES encryption must be used; DES is not supported.
SNMPv3 authentication password
The node's SNMPv3 authentication password, used to authenticate the associated username.
The SHA authentication protocol must be used; MD5 is not supported.
SNMP system contact The contact details (for example, email address) of the person responsible for this particular node.
SNMP system location A description of the node's location.
Other details of the Conferencing Node that cannot be directly changed (however, see Changing the node's IP address below) are also shown on this page for your information, as follows:
Option Description
IPv4 address The IPv4 address of this Conferencing Node.
Network mask The IP network mask for this Conferencing Node.
Gateway IPv4 address The IPv4 address of the default gateway.
Hostname
Domain
The DNS hostname and domain of this Conferencing Node. Together these make up the machine's FQDN, or DNS Name in VMware.
For more information, see Assigning hostnames and FQDNs.
SIP TLS FQDNIf your deployment includes Microsoft Lync / Skype for Business, you must configure each Conferencing Node with a SIP TLS FQDN. However, for security purposes we recommend that all deployments use SIP TLS FQDNs.
To configure the SIP TLS FQDN, go to Platform configuration > Conferencing Nodes and select each Conferencing Node in turn.
The FQDN in the SIP TLS FQDN field is used in SIP signaling over TLS, and specifies the identity that the Conferencing Node service will use when identifying itself to the systems connecting to it. Each Conferencing Node must have a unique SIP TLS FQDN.
The SIP TLS FQDN:
l must match one of the identities returned in the certificate for the Conferencing Node, and
l must have an entry in DNS
so that the identity of the Conferencing Node can be verified by the systems connecting to it.
The SIP TLS FQDN can be the same as the Conferencing Node's FQDN (made up of its Hostname and Domain).
If the SIP TLS FQDN field is left blank, the IP address of the Conferencing Node will be used in SIP TLS signaling, and, depending on your call control configuration, this may result in calls failing.
For more details on the use of domain certificates in SIP, see section 4 of RFC 5922.
Changing the node's IP addressYou can change the IPv4 address of a Conferencing Node by adding a new node with the new address, and deleting the node with the old address.
If you want to preserve the Conferencing Node's existing FQDN, you should:
1. Put the Conferencing Node whose IP address you want to change into maintenance mode.
2. When all calls on that Conferencing Node have terminated, delete the Conferencing Node. 3. Wait at least 60 seconds to allow the deletion to be synchronized across the platform.

Pexip Infinity Administrator GuideManaging the Pexip Infinity platform
Configuring existing Conferencing Nodes
© 2016 Pexip AS Version 12.a May 2016 Page 124 of 369
4. Add a new Conferencing Node with the new IP address (but using the same Name, Hostname and Domain etc. as used before, if required).
5. If necessary, make any changes to your call control system so that calls are routed to the Conferencing Node's new IP address.
If you want to maintain full service capacity, and do not need to preserve the node's FQDN, then you can add the new node with the new IP address before deleting the old node with the old IP address. There is no limit on the number of Conferencing Nodes that you can add to the Pexip Infinity platform.
Do not attempt to change the IP address of a Conferencing Node using utilities available in external tools (such as VMware or Hyper-V) because this will cause Pexip Infinity services to fail.

Pexip Infinity Administrator GuideManaging the Pexip Infinity platform
Deleting Conferencing Nodes
© 2016 Pexip AS Version 12.a May 2016 Page 125 of 369
Deleting Conferencing NodesWhen deleting a Conferencing Node, you must first remove its details from the Pexip Infinity platform using the Pexip Infinity Administrator interface, and then delete it from the hypervisor.
To delete a Conferencing Node:
1. Put the Conferencing Node into maintenance mode and wait until all calls on it have terminated.
2. From the Pexip Infinity Administrator interface, go to Platform configuration > Conferencing Nodes.
3. Select the Conferencing Node(s) to be deleted, and from the Action drop-down menu select Delete selected Conferencing Nodes.
4. Select Go and on the following page confirm that you want to delete the selected Conferencing Nodes by selecting Yes, I'm sure.
5. Log in to the VM manager, shut down the deleted Conferencing Node and then power it off.
6. Right-click on the Conferencing Node and select Delete from Disk (VMware) or Delete (Hyper-V / KVM / Xen).
Pexip Infinity Administrator GuideManaging the Pexip Infinity platform
Pexip Infinity license installation and usage
© 2016 Pexip AS Version 12.a May 2016 Page 126 of 369
Pexip Infinity license installation and usageBefore you can place calls to Pexip Infinity services (Virtual Meeting Rooms, Virtual Auditoriums, Virtual Receptions and the Pexip Distributed Gateway), you must install a license.
Pexip Infinity can be licensed in a number of different ways. However, regardless of the type of license you have purchased, it will ultimately permit use of the Pexip Infinity software, and specify the total number of concurrent calls that can be made to any Pexip Infinity service (Virtual Meeting Rooms, Virtual Auditoriums, Virtual Receptions or the Pexip Distributed Gateway) across the entire Pexip Infinity deployment.
Note that in addition to having sufficient licenses, your deployment must also have sufficient capacity to support the number of calls being placed. For more information, see Capacity planning.
License allocationWhen a Conferencing Node receives a request from a participant to join a Virtual Meeting Room, Virtual Auditorium or Virtual Reception, or to interwork a call using the Pexip Distributed Gateway, it contacts the Management Node to see whether there is a license available. If so, the call will be allowed and one concurrent call license will be allocated to that participant for the duration of the call. When the call is terminated, the license is returned to the pool. In general, each participant will consume a single concurrent license, and no participant will consume more than one license at a time. Specifically:
l Infinity Connect clients and all other endpoints consume one call license per connection when sending or receiving media (video, audio, screen share, and/or full motion HD presentation). This is regardless of whether the call is Full HD, HD, SD or audio-only - each will consume a single license.
l Infinity Connect control-only participants who are only sending slides (images or PDF) or receiving non-HD presentations do not consume a license. Control-only participants who are sharing their screen or receiving full motion HD presentations will consume a license.
l Lync / Skype for Business participants (connected directly to a VMR) who are only sending or receiving presentations will consume a license.
l Gateway calls consume two licenses: one for the inbound leg of the call and one for the outbound leg.
l a Fusion connection to a Lync / Skype for Business AVMCU conference consumes a single license (regardless of the number of participants connected to the AVMCU).
If the Conferencing Node is unable to contact the Management Node, the call will be permitted on the assumption that a license is available. After the Management Node has been out of contact for a grace period of 14 days, all calls will be rejected.
If there are no licenses available, or the existing license is not valid, the participant will be advised that they are not permitted to join the conference along with the reason why, and a corresponding message will appear in the support log.
For more information about license usage, contact your Pexip authorized support representative.
Insufficient licenses
If your Pexip Infinity reports insufficient licenses, this means that there are valid licenses installed on the system, but at the point at which a participant tried to join a conference, all of the existing call licenses were in use. To remedy this, either wait until one or more existing conferences have completed, thus freeing up some call licenses, or add more call licenses to your system.
In some cases your licenses may include an overdraft. This is intended to cover instances where the number of concurrent calls temporarily exceeds the number of available licenses.
Invalid license
If your Pexip Infinity reports an invalid license, this could mean that:
l the license has not been activated
l the existing license has expired
l the existing license has become corrupt (this could occur, for example, if the Management Node reboots after an upgrade and comes back up on a different physical blade with a new MAC address).
Licenses become valid at 00:00:00 PST on the day they start and expire at 23:59:59 UTC on the day they expire.

Pexip Infinity Administrator GuideManaging the Pexip Infinity platform
Pexip Infinity license installation and usage
© 2016 Pexip AS Version 12.a May 2016 Page 127 of 369
Viewing existing licenses and current usageTo see the licenses that are installed on your system, and the number of licenses currently being consumed, go to Platform configuration > Licenses.
The Licensing section states how many concurrent licenses are currently being consumed out of the total available, and then lists the licenses that have been activated successfully. You can select a license to see further information, including the maximum number of Concurrent calls that can be made.
The Stored license request section lists any licenses that were not activated automatically, and are awaiting manual activation.
Adding licensesTo add a new license:
1. On the Pexip Infinity Administrator interface, go to Platform configuration > Licenses.
2. Select Add License.
3. In the License entitlement key field, enter the activation key provided by your authorized Pexip representative.
4. Leave the Manually activate checkbox clear (unless you have been instructed to select this option by your Pexip authorized support representative).
5. Select Save.
Pexip Infinity will automatically generate an XML file containing the license request (for more information, see Content of the license request XML file). It will then attempt to contact the Pexip licensing server and send it this file in order to activate the license. To enable this, you must have an active internet connection from the Management Node, and your firewall must be configured to allow a connection from the Management Node to pexip.flexnetoperations.com (64.14.29.85) on HTTPS (port 443).
l If the license is activated successfully, you will be returned to the Licensing page and will see the new license under the Licensing section.
l If the activation attempt is unsuccessful (for example, if the Management Node was unable to establish a connection to the Pexip licensing server), or you selected Manually activate, the license will be saved as a Stored license request. You must then activate it manually.
Moving a license (e.g. when redeploying a Management Node)You may need to move a license from one Management Node to another. You would typically need to do this if you are redeploying a Management Node, such as when setting up a new test or demonstration environment, or changing the Management Node's IP address.
To move a license between Management Nodes, you must deactivate the existing license on your 'old' Management Node before reactivating it on the 'new' Management Node.
On the old Management Node:
1. Go to Platform configuration > Licenses. 2. Select the license you want to deactivate.
3. Make a note of the License entitlement key.
4. Select Return license.
The system will attempt to contact the Pexip licensing server to automatically deactivate the license:
l If successful, the license will no longer appear in the list of licenses.
l If unsuccessful, you must manually deactivate the license by following the same steps as described in Manually activating a stored license request.
On the new Management Node:
1. Go to Platform configuration > Licenses.
2. Select Add License.
Pexip Infinity Administrator GuideManaging the Pexip Infinity platform
Pexip Infinity license installation and usage
© 2016 Pexip AS Version 12.a May 2016 Page 128 of 369
3. In the License entitlement key field, enter the entitlement key from the 'old' Management Node that you noted previously.
4. Select Save.
The system will attempt to activate the license on the 'new' Management Node:
l If the license is activated successfully, you will be returned to the Licensing page and will see the new license under the Licensing section.
l If the activation attempt is unsuccessful (for example, if the Management Node was unable to establish a connection to the Pexip licensing server), or you selected Manually activate, the license will be saved as a Stored license request. You must then activate it manually.
Manually activating a stored license requestTo manually activate a stored license request:
1. Go to Platform configuration > Licenses.The Stored license request section lists the licenses that were not able to be activated automatically, and are awaiting manual activation.
2. Select the license you wish to activate.
3. Select Export stored license request. This generates an XML file containing the request (for more information, see Content of the license request XML file).
4. Download the XML file and send it to your authorized Pexip representative for activation. They will respond with an XML activation file.
5. When you receive the XML file, go back to Platform configuration > Licenses, select the stored license request, and select Complete stored license request.
6. Browse to the location of the XML activation file you have received.
7. Select Save.
The license should now be activated and appear in the Licensing section.
Repairing a licenseIf a license becomes corrupt (for example if the Management Node MAC address has changed), a Repair button will appear under the license information. To reactivate the license, select Repair. This will normally resolve the issue automatically; in some circumstances the repair operation will result in a stored license request, in which case follow the procedure above for Manually activating a stored license request.
Content of the license request XML fileDuring both automatic and manual license activation, the same license request XML file is sent to the Pexip licensing server. The content of this file includes:
l the license request information (i.e. the detail of what is being requested)
l opaque machine identifiers (computed from various information sources, but not exposing the actual values).
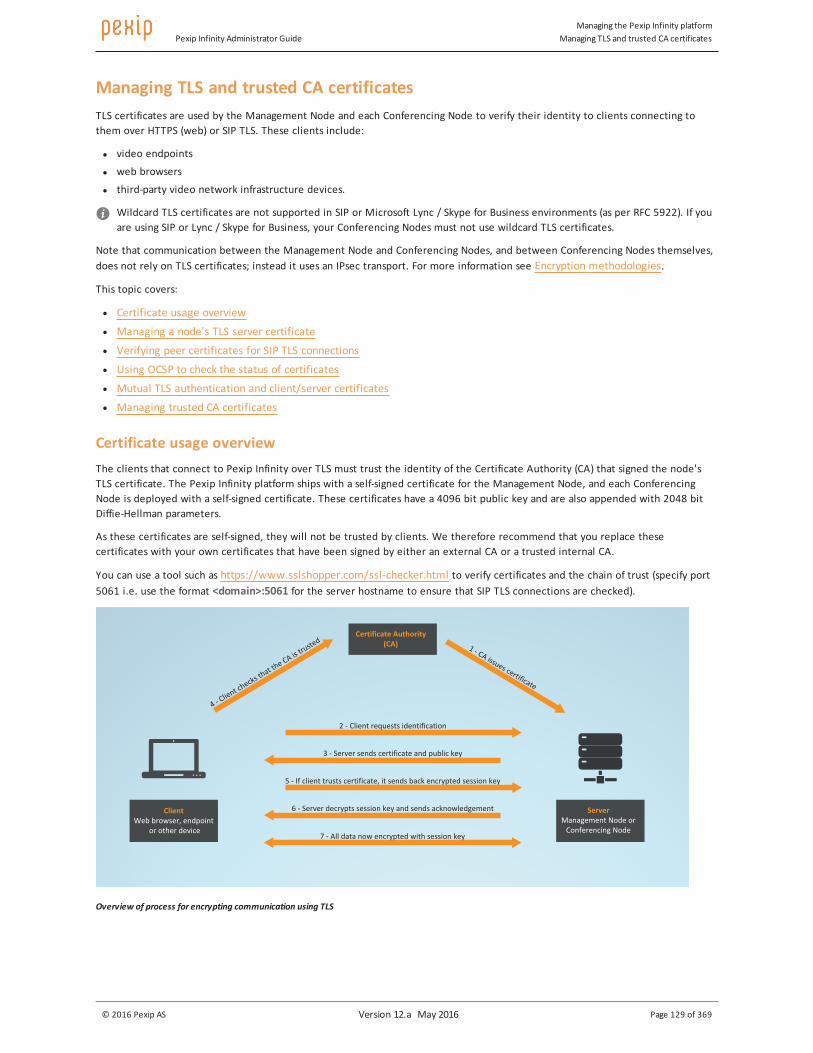
Pexip Infinity Administrator GuideManaging the Pexip Infinity platform
Managing TLS and trusted CA certificates
© 2016 Pexip AS Version 12.a May 2016 Page 129 of 369
Managing TLS and trusted CA certificatesTLS certificates are used by the Management Node and each Conferencing Node to verify their identity to clients connecting to them over HTTPS (web) or SIP TLS. These clients include:
l video endpoints
l web browsers
l third-party video network infrastructure devices.
Wildcard TLS certificates are not supported in SIP or Microsoft Lync / Skype for Business environments (as per RFC 5922). If you are using SIP or Lync / Skype for Business, your Conferencing Nodes must not use wildcard TLS certificates.
Note that communication between the Management Node and Conferencing Nodes, and between Conferencing Nodes themselves, does not rely on TLS certificates; instead it uses an IPsec transport. For more information see Encryption methodologies.
This topic covers:
l Certificate usage overview l Managing a node's TLS server certificate l Verifying peer certificates for SIP TLS connections l Using OCSP to check the status of certificates l Mutual TLS authentication and client/server certificates l Managing trusted CA certificates
Certificate usage overviewThe clients that connect to Pexip Infinity over TLS must trust the identity of the Certificate Authority (CA) that signed the node's TLS certificate. The Pexip Infinity platform ships with a self-signed certificate for the Management Node, and each Conferencing Node is deployed with a self-signed certificate. These certificates have a 4096 bit public key and are also appended with 2048 bit Diffie-Hellman parameters.
As these certificates are self-signed, they will not be trusted by clients. We therefore recommend that you replace these certificates with your own certificates that have been signed by either an external CA or a trusted internal CA.
You can use a tool such as https://www.sslshopper.com/ssl-checker.html to verify certificates and the chain of trust (specify port 5061 i.e. use the format <domain>:5061 for the server hostname to ensure that SIP TLS connections are checked).
Overview of process for encrypting communication using TLS

Pexip Infinity Administrator GuideManaging the Pexip Infinity platform
Managing TLS and trusted CA certificates
© 2016 Pexip AS Version 12.a May 2016 Page 130 of 369
In general, to achieve encrypted communication using TLS the following must happen:
1. The CA issues a signed certificate which is uploaded to the server. 2. When a client needs to communicate with the server, it sends a request to the server asking it to provide identification.
3. The server sends back a copy of its TLS certificate and its public key.
4. The client checks whether the CA that issued the certificate is one that it trusts.
5. If the CA is trusted, and if the certificate is otherwise valid, the client creates a session key encrypted with the server's public key and sends it to the server.
6. The server decrypts the session key. It then uses the session key to encrypt an acknowledgment which it sends to the client in order to initiate the encrypted communication.
7. The server and the client now encrypt all communication using the session key.
Alarms
An alarm is raised on the Management Node if:
l the Management Node or a Conferencing Node has no associated TLS certificate
l a TLS certificate has an incomplete chain of trust to the root CA certificate
l one or more of your trusted CA certificates is due to expire within the next 30 days.
Managing a node's TLS server certificateYou can upload and view the TLS server certificates that are used by the Management Node and by each Conferencing Node.
Note that after making any changes to certificates, there will be a delay of up to 1 minute while the files are synchronized to the relevant Management Node or Conferencing Node.
Uploading a TLS server certificate
To upload a new TLS server certificate for the Management Node or a Conferencing Node:
1. From the Pexip Infinity Administrator interface, go to Platform configuration > TLS certificates.
2. Select Add TLS certificate.

Pexip Infinity Administrator GuideManaging the Pexip Infinity platform
Managing TLS and trusted CA certificates
© 2016 Pexip AS Version 12.a May 2016 Page 131 of 369
3. Complete the following fields:
TLS certificate Paste the PEM-formatted certificate into the text area or alternatively select the file containing the new TLS certificate. Certificate files typically have a .CRT or .PEM extension.
The certificate must be valid for the hostname or FQDN of the Management Node or Conferencing Node to which it will be assigned.
You can paste multiple certificates into the text area, but one of those certificates must pair with the associated private key.
Private key Paste the PEM-formatted private key into the text area or alternatively select the file containing the private key that is associated with the new TLS certificate.
Private key files typically have a .KEY or .PEM extension. Pexip Infinity supports RSA and ECDSA keys.
TLS parameters Optionally, paste any additional PEM-formatted parameters into the text area or alternatively select the file containing the parameters that are to be associated with the new TLS certificate.
Custom DH parameters and an EC curve name for ephemeral keys can be added. Such parameters can be generated through the OpenSSL toolkit using the commands openssl dhparam and openssl ecparam. For example, the command openssl dhparam -2 -outform PEM 2048 generates 2048 bit DH parameters.
Note that these parameters can alternatively be added 'as is' to the end of the TLS certificate.
Nodes Select one or more nodes to which the new TLS certificate is to be applied.
If required, you can upload a certificate and then apply it to a node later.
4. Select Save.
Viewing or modifying existing TLS certificates and changing node assignments
To view information about an existing TLS certificate, change a certificate's contents, or change the nodes to which a certificate is applied:
1. Go to Platform configuration > TLS certificates.By default you are shown a list and the current status of All certificates that have been uploaded. You can alternatively select to view Certificates by Node to see which certificate has been assigned to the Management Node or to a particular Conferencing Node.
2. Select the subject name of the certificate you want to view or modify.The decoded certificate data is shown, including any chain of trust information.
3. If required, you can modify the:
o Nodes to which the certificate is assigned o TLS certificate data o TLS parameters associated with the certificate.You cannot modify the private key.
4. Select Save.
Uploading multiple TLS certificate files
To upload a batch of TLS certificates:
1. Go to Platform configuration > TLS certificates.
2. Select Import files.
3. Select Choose Files to pick one or more PEM-formatted text files that you want to import.
o The files should contain server TLS certificates with matching private keys.
o Private keys can be uploaded as separate files or appended to the server TLS certificate file(s).
o DH or EC parameters may be appended to each server TLS certificate.Note that trusted CA certificate files can also be imported via this method if required.

Pexip Infinity Administrator GuideManaging the Pexip Infinity platform
Managing TLS and trusted CA certificates
© 2016 Pexip AS Version 12.a May 2016 Page 132 of 369
4. Select Import.This adds the certificates in the selected files to the existing list of TLS certificates (or to the list of trusted CA certificates, if appropriate). If a certificate with the same subject name already exists (e.g. when replacing an expired certificate), that certificate will be updated with the new contents from the file. Any duplicate certificates are ignored.
5. You can then select each imported TLS certificate in turn and assign it to a Management Node or one or more Conferencing Nodes as appropriate.
Verifying peer certificates for SIP TLS connectionsFor connections over SIP TLS, you can use the SIP TLS verification mode setting to control whether the certificate presented by the peer is verified before the connection is allowed. When this setting is enabled:
l The peer certificate is verified (in date, issued by a trusted authority etc).
l OCSP, if enabled, is used to check that the certificate has not been revoked (see Using OCSP to check the status of certificates below for more information).
l The identity of the peer as presented in the certificate is checked against the identity expected by Pexip Infinity.
l The peer certificate must be a client certificate (see Mutual TLS authentication and client/server certificates below for more information) — otherwise you will get "unsupported certificate" errors in the support log.
When this setting is enabled, all peers (including endpoints connecting directly with Pexip Infinity) must have their own certificate.
To enable or disable this setting, go to Platform configuration > Global settings. The options available are:
Field Description
SIP TLS verification mode
Determines whether to verify the peer certificate for connections over SIP TLS.
Off: the peer certificate is not verified; all connections are allowed.
On: the peer certificate is verified, and the peer's remote identities (according to RFC5922) are compared against the Application Unique String (AUS) identified by Pexip Infinity before the connection is allowed.
Using OCSP to check the status of certificates
Pexip Infinity allows you to use Online Certificate Status Protocol (OCSP) to check whether a certificate has been revoked. TLS certificates that support OCSP are encoded with the URL of an OCSP responder — a server that will check and respond with the status of the certificate.
OCSP checking only applies when SIP TLS verification mode is On. To enable or disable the use of OCSP, and to configure the URL of the OCSP responder, go to Platform configuration > Global settings. The options available are:
Field Description
OCSP state Determines whether OCSP is used to check the status of TLS certificates.
Off: OCSP is not used.
On: OCSP is used, and the request is sent to the URL specified in the TLS certificate. If no URL is specified in the TLS certificate, the OCSP responder URL configured below is used.
Override: OCSP is used, and the request is sent to the OCSP responder URL configured below, regardless of any URL encoded in the TLS certificate.
OCSP responder URL
The URL to which OCSP requests are sent if either:
l the OCSP state is set to On but no URL is present in the TLS certificate, or
l the OCSP state is set to Override (in which case any URL present in the certificate is ignored).
Mutual TLS authentication and client/server certificates
If a Conferencing Node makes an outbound connection to, or receives an incoming connection from, a video network infrastructure device (such as a Cisco VCS) that is configured to perform TLS verification checking, then that external system will verify that the certificate on the Conferencing Node is valid. In these cases, both the Conferencing Node and the external system can adopt the
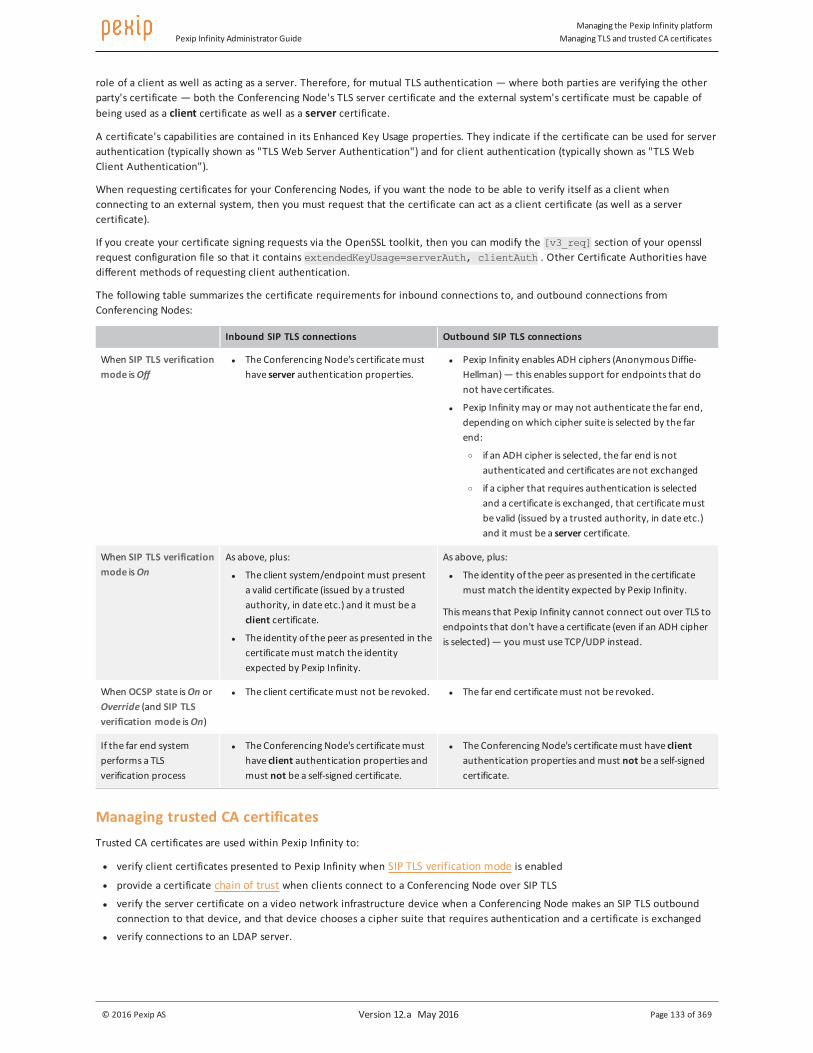
Pexip Infinity Administrator GuideManaging the Pexip Infinity platform
Managing TLS and trusted CA certificates
© 2016 Pexip AS Version 12.a May 2016 Page 133 of 369
role of a client as well as acting as a server. Therefore, for mutual TLS authentication — where both parties are verifying the other party's certificate — both the Conferencing Node's TLS server certificate and the external system's certificate must be capable of being used as a client certificate as well as a server certificate.
A certificate's capabilities are contained in its Enhanced Key Usage properties. They indicate if the certificate can be used for server authentication (typically shown as "TLS Web Server Authentication") and for client authentication (typically shown as "TLS Web Client Authentication").
When requesting certificates for your Conferencing Nodes, if you want the node to be able to verify itself as a client when connecting to an external system, then you must request that the certificate can act as a client certificate (as well as a server certificate).
If you create your certificate signing requests via the OpenSSL toolkit, then you can modify the [v3_req] section of your openssl request configuration file so that it contains extendedKeyUsage=serverAuth, clientAuth . Other Certificate Authorities have different methods of requesting client authentication.
The following table summarizes the certificate requirements for inbound connections to, and outbound connections from Conferencing Nodes:
Inbound SIP TLS connections Outbound SIP TLS connections
When SIP TLS verification mode is Off
l The Conferencing Node's certificate must have server authentication properties.
l Pexip Infinity enables ADH ciphers (Anonymous Diffie-Hellman) — this enables support for endpoints that do not have certificates.
l Pexip Infinity may or may not authenticate the far end, depending on which cipher suite is selected by the far end:
o if an ADH cipher is selected, the far end is not authenticated and certificates are not exchanged
o if a cipher that requires authentication is selected and a certificate is exchanged, that certificate must be valid (issued by a trusted authority, in date etc.) and it must be a server certificate.
When SIP TLS verification mode is On
As above, plus:
l The client system/endpoint must present a valid certificate (issued by a trusted authority, in date etc.) and it must be a client certificate.
l The identity of the peer as presented in the certificate must match the identity expected by Pexip Infinity.
As above, plus:
l The identity of the peer as presented in the certificate must match the identity expected by Pexip Infinity.
This means that Pexip Infinity cannot connect out over TLS to endpoints that don't have a certificate (even if an ADH cipher is selected) — you must use TCP/UDP instead.
When OCSP state is On or Override (and SIP TLS verification mode is On)
l The client certificate must not be revoked. l The far end certificate must not be revoked.
If the far end system performs a TLS verification process
l The Conferencing Node's certificate must have client authentication properties and must not be a self-signed certificate.
l The Conferencing Node's certificate must have client authentication properties and must not be a self-signed certificate.
Managing trusted CA certificatesTrusted CA certificates are used within Pexip Infinity to:
l verify client certificates presented to Pexip Infinity when SIP TLS verification mode is enabled l provide a certificate chain of trust when clients connect to a Conferencing Node over SIP TLS l verify the server certificate on a video network infrastructure device when a Conferencing Node makes an SIP TLS outbound
connection to that device, and that device chooses a cipher suite that requires authentication and a certificate is exchanged
l verify connections to an LDAP server.

Pexip Infinity Administrator GuideManaging the Pexip Infinity platform
Managing TLS and trusted CA certificates
© 2016 Pexip AS Version 12.a May 2016 Page 134 of 369
Pexip Infinity ships with an inbuilt list of trusted CA certificates. This list is based on the Mozilla CA Certificate Store and cannot be modified.
In addition, you can upload a customized set of trusted CA certificates to the Pexip Infinity platform.
Chain of trust
For a server's TLS certificate to be trusted by a client, the client must be configured to trust the Certificate Authority (CA) that signed the server certificate. Many CAs do not sign with their root certificate, but instead with an intermediate certificate. Clients, however, may only trust the root CA. Therefore the server (in this case the Management Node or Conferencing Node) is often required to present a full certificate chain along with their TLS server certificate.
When this is the case, the chain of intermediate CA certificates must be installed on the Management Node to ensure that the certificate chain of trust is properly established when clients connect to a Conferencing Node over SIP TLS.
To do this you must upload a custom Trusted CA certificates file that contains all the required CA certificates, one after each other, in PEM format.
Uploading and managing additional trusted CA certificates
You can upload a customized set of trusted CA certificates to the Pexip Infinity platform. Any trusted CA certificates uploaded here are used in addition to the default set of trusted CA certificates that ships with Pexip Infinity.
To manage the set of custom trusted CA certificates, go to Platform configuration > Trusted CA certificates. This shows a list and the current status of all the trusted CA certificates that have been uploaded. From here you can:
l Upload a file of Trusted CA certificates: select Import files, select Choose Files to pick one or more PEM files that you want to import, and then select Import.This adds the certificates in the selected files to the existing list of trusted CA certificates (or to the list of TLS certificates, depending on the certificate types contained in the file). If a certificate with the same subject name already exists (e.g. when replacing an expired certificate), that certificate will be updated with the new contents from the file. Any duplicate certificates are ignored.
l View or modify an existing certificate: select the Subject name of the certificate you want to view. The decoded certificate data is shown.If required, you can modify the PEM-formatted certificate data and select Save.
l Download all certificates: select Export. A ca-certificates.pem file containing all of the custom-added certificates in PEM format is created and automatically saved to your local file system.
l Delete one or more certificates: select the boxes next to the certificates to be deleted, and from the Action drop-down menu select Delete selected Trusted CA certificates and select Go.
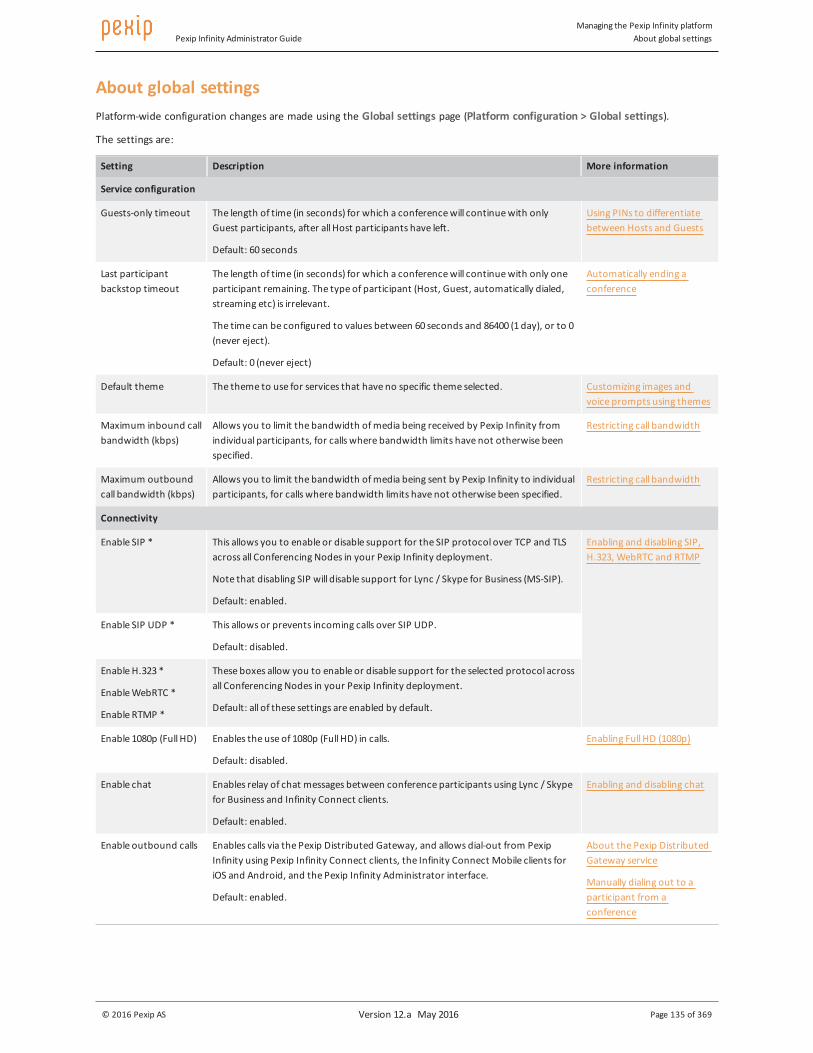
Pexip Infinity Administrator GuideManaging the Pexip Infinity platform
About global settings
© 2016 Pexip AS Version 12.a May 2016 Page 135 of 369
About global settingsPlatform-wide configuration changes are made using the Global settings page (Platform configuration > Global settings).
The settings are:
Setting Description More information
Service configuration
Guests-only timeout The length of time (in seconds) for which a conference will continue with only Guest participants, after all Host participants have left.
Default: 60 seconds
Using PINs to differentiate between Hosts and Guests
Last participant backstop timeout
The length of time (in seconds) for which a conference will continue with only one participant remaining. The type of participant (Host, Guest, automatically dialed, streaming etc) is irrelevant.
The time can be configured to values between 60 seconds and 86400 (1 day), or to 0 (never eject).
Default: 0 (never eject)
Automatically ending a conference
Default theme The theme to use for services that have no specific theme selected. Customizing images and voice prompts using themes
Maximum inbound call bandwidth (kbps)
Allows you to limit the bandwidth of media being received by Pexip Infinity from individual participants, for calls where bandwidth limits have not otherwise been specified.
Restricting call bandwidth
Maximum outbound call bandwidth (kbps)
Allows you to limit the bandwidth of media being sent by Pexip Infinity to individual participants, for calls where bandwidth limits have not otherwise been specified.
Restricting call bandwidth
Connectivity
Enable SIP * This allows you to enable or disable support for the SIP protocol over TCP and TLS across all Conferencing Nodes in your Pexip Infinity deployment.
Note that disabling SIP will disable support for Lync / Skype for Business (MS-SIP).
Default: enabled.
Enabling and disabling SIP, H.323, WebRTC and RTMP
Enable SIP UDP * This allows or prevents incoming calls over SIP UDP.
Default: disabled.
Enable H.323 *
Enable WebRTC *
Enable RTMP *
These boxes allow you to enable or disable support for the selected protocol across all Conferencing Nodes in your Pexip Infinity deployment.
Default: all of these settings are enabled by default.
Enable 1080p (Full HD) Enables the use of 1080p (Full HD) in calls.
Default: disabled.
Enabling Full HD (1080p)
Enable chat Enables relay of chat messages between conference participants using Lync / Skype for Business and Infinity Connect clients.
Default: enabled.
Enabling and disabling chat
Enable outbound calls Enables calls via the Pexip Distributed Gateway, and allows dial-out from Pexip Infinity using Pexip Infinity Connect clients, the Infinity Connect Mobile clients for iOS and Android, and the Pexip Infinity Administrator interface.
Default: enabled.
About the Pexip Distributed Gateway service
Manually dialing out to a participant from a conference

Pexip Infinity Administrator GuideManaging the Pexip Infinity platform
About global settings
© 2016 Pexip AS Version 12.a May 2016 Page 136 of 369
Setting Description More information
Enable support for Pexip Infinity Connect and Mobile App
Enable or disable support for Pexip Infinity clients. These include the Infinity Connect Web App, Infinity Connect desktop client, the Infinity Connect Mobile client for iOS or Android, and any other third-party applications that use the client API.
Default: enabled.
Introduction to Infinity Connect
Enabling and disabling Infinity Connect clients
Lync MSSIP domain The name of the SIP domain that is routed from Lync / Skype for Business to Pexip Infinity, either as a static route or via federation.
You can also configure the Lync MSSIP domain on a per-location basis, which would override this global setting for Conferencing Nodes in that location.
Pexip Infinity and Microsoft Lync / Skype for Business Deployment Guide
Enable Lync auto-escalation
When selected, this automatically escalates a Lync / Skype for Business audio call so that it receives video from a conference.
Default: disabled.
Automatically escalating Lync / Skype for Business audio calls
DSCP value for management traffic
The DSCP value for SSH, HTTPS and SNMP management traffic sent from the Management Node and from Conferencing Nodes. This is an optional setting used to prioritize different types of traffic in large, complex networks. Also see Configuring system locations.
Enable SSH Allows an administrator to log in to the Management Node and Conferencing Nodes over SSH.
Default: enabled.
Port ranges
Signaling port range start and end *
The start and end values for the range of ports (UDP and TCP) that all Conferencing Nodes use to send signaling (for H.323, H.245 and SIP).
Default: 33000–39999.
Media port range start and end *
The start and end values for the range of ports (UDP and TCP) that all Conferencing Nodes use to send media for H.323, SIP, Lync / Skype for Business, WebRTC and RTMP (note that RTMP uses TCP only).
Default: 40000–49999.
Security
OCSP state Whether to use OCSP when checking the validity of TLS certificates.
Off: OCSP checking is disabled.
On: An OCSP request will be sent to the URL specified in the TLS certificate.
Override: An OCSP request will be sent to the URL specified in the OCSP responder URL field.
Default: Off.
Using OCSP to check the status of certificates
OCSP responder URL The URL to which OCSP requests will be sent either:
l if the OCSP state is set to Override, or
l if the OCSP state is set to On but there is no URL specified in the TLS certificate.
Using OCSP to check the status of certificates
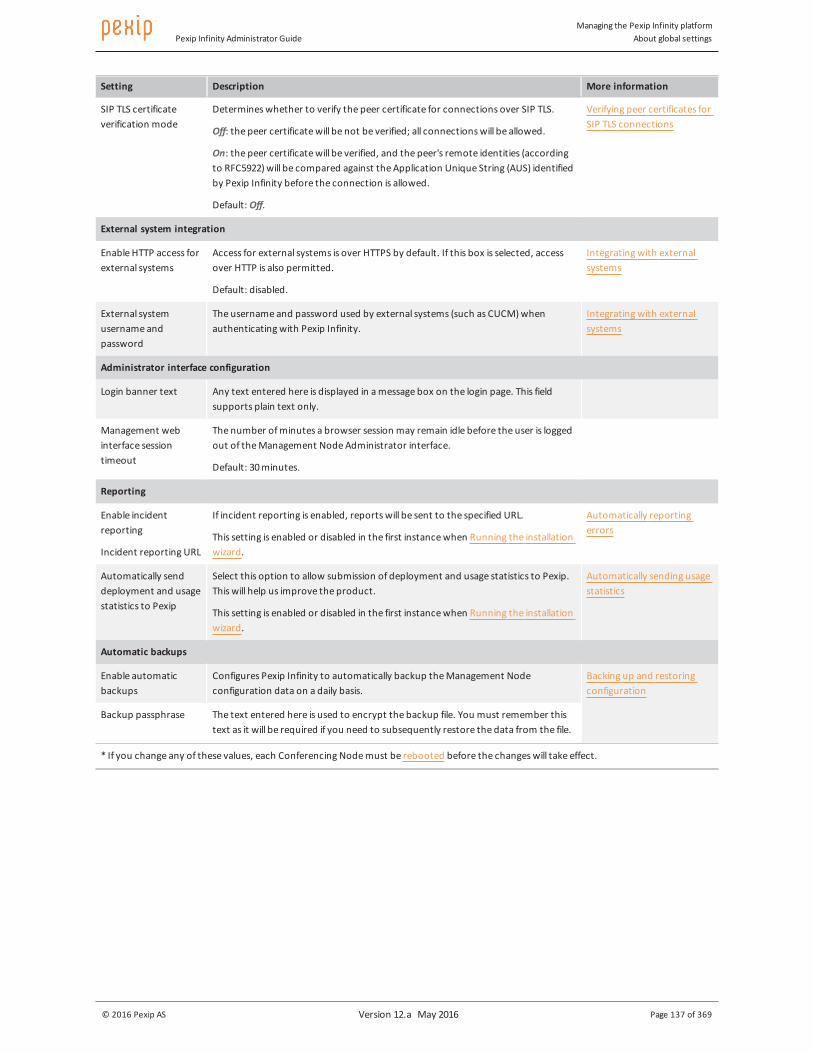
Pexip Infinity Administrator GuideManaging the Pexip Infinity platform
About global settings
© 2016 Pexip AS Version 12.a May 2016 Page 137 of 369
Setting Description More information
SIP TLS certificate verification mode
Determines whether to verify the peer certificate for connections over SIP TLS.
Off: the peer certificate will be not be verified; all connections will be allowed.
On: the peer certificate will be verified, and the peer's remote identities (according to RFC5922) will be compared against the Application Unique String (AUS) identified by Pexip Infinity before the connection is allowed.
Default: Off.
Verifying peer certificates for SIP TLS connections
External system integration
Enable HTTP access for external systems
Access for external systems is over HTTPS by default. If this box is selected, access over HTTP is also permitted.
Default: disabled.
Integrating with external systems
External system username and password
The username and password used by external systems (such as CUCM) when authenticating with Pexip Infinity.
Integrating with external systems
Administrator interface configuration
Login banner text Any text entered here is displayed in a message box on the login page. This field supports plain text only.
Management web interface session timeout
The number of minutes a browser session may remain idle before the user is logged out of the Management Node Administrator interface.
Default: 30 minutes.
Reporting
Enable incident reporting
Incident reporting URL
If incident reporting is enabled, reports will be sent to the specified URL.
This setting is enabled or disabled in the first instance when Running the installation wizard.
Automatically reporting errors
Automatically send deployment and usage statistics to Pexip
Select this option to allow submission of deployment and usage statistics to Pexip. This will help us improve the product.
This setting is enabled or disabled in the first instance when Running the installation wizard.
Automatically sending usage statistics
Automatic backups
Enable automatic backups
Configures Pexip Infinity to automatically backup the Management Node configuration data on a daily basis.
Backing up and restoring configuration
Backup passphrase The text entered here is used to encrypt the backup file. You must remember this text as it will be required if you need to subsequently restore the data from the file.
* If you change any of these values, each Conferencing Node must be rebooted before the changes will take effect.

Pexip Infinity Administrator GuideManaging the Pexip Infinity platform
Integrating with external systems
© 2016 Pexip AS Version 12.a May 2016 Page 138 of 369
Integrating with external systemsIn many video conferencing deployments, Pexip Infinity will be integrated with other third-party systems and products. An example is Cisco Unified Communications Manager (CUCM), which can be integrated with Pexip Infinity so that when users initiate the Ad Hoc Conferencing feature on supported endpoints, the resulting conference will be hosted on Pexip Infinity.
This type of integration requires that communications from the external system are authenticated by Pexip Infinity. (Note that the credentials for this authentication are distinct from those used to access the Pexip Infinity management API.)
Some external systems (such as CUCM 8.6.2) only support access over HTTP rather than the secure HTTPS protocol, so you have the option to enable this if required.
To configure Pexip Infinity with the authentication credentials and protocol to be used by systems which do not use the management API, go to Platform configuration > Global settings. The options available are:
Field Description
Enable HTTP access for external systems
Access for external systems is over HTTPS by default. If this box is selected, access over HTTP is also permitted.
External system username The username presented to Pexip Infinity by external systems attempting to authenticate with it.
External system password The password presented to Pexip Infinity by external systems attempting to authenticate with it.

Pexip Infinity Administrator GuideManaging the Pexip Infinity platform
Enabling and disabling SIP, H.323,WebRTC and RTMP
© 2016 Pexip AS Version 12.a May 2016 Page 139 of 369
Enabling and disabling SIP, H.323, WebRTC and RTMPAll call protocols, except for SIP over UDP, are enabled by default in your Pexip Infinity deployment.
If your deployment does not include any endpoints that support a particular protocol, for security reasons you may want to disable support for those protocols across your entire Pexip Infinity deployment.
SIP over UDP is disabled by default so as to reduce the impact of SIP spam which typically uses UDP.
The configurable protocols are:
l SIP over TCP and TLS, including MS-SIP (Lync / Skype for Business)
l SIP over UDP (for incoming calls)
l H.323
l WebRTC
l RTMP
WebRTC calls can originate from the Infinity Connect desktop client, the Infinity Connect Web App via Google Chrome, Microsoft Edge, Firefox and Opera browsers, and the Infinity Connect Mobile client.
RTMP calls can originate from the Infinity Connect Web App via Internet Explorer and Safari browsers. The Web App will attempt an encrypted RTMPS connection first. For a secure RTMP connection to be established, the SIP TLS FQDN must be configured on the Conferencing Node (via Platform configuration > Conferencing Nodes) and it must match the Common Name of its TLS server certificate. If RTMPS fails, it will use an unencrypted connection for media.
RTMP is also used when sending conference content to streaming and recording services.
To enable or disable a particular call protocol across your Pexip Infinity deployment:
1. Go to Platform configuration > Global settings. 2. Select or clear the following checkboxes, as appropriate:
o Enable SIP — this affects both SIP and MS-SIP (Lync / Skype for Business) over TCP and TLS
o Enable SIP UDP — this affects incoming calls only over SIP UDP
o Enable H.323 o Enable WebRTC o Enable RTMP
3. After modifying any of these values, each Conferencing Node must be rebooted before the changes will take effect. (It will, however, have an immediate effect on outbound calls placed via the modified protocols.)

Pexip Infinity Administrator GuideManaging the Pexip Infinity platform
Enabling Full HD (1080p)
© 2016 Pexip AS Version 12.a May 2016 Page 140 of 369
Enabling Full HD (1080p)By default, Pexip Infinity deployments have Full HD (1080p) disabled, with the result that endpoints capable of sending Full HD will only be permitted to use HD (720p) resolution.
You have the option to enable Full HD in your deployment, which allows any endpoint capable of it to send video and presentations at 1080p. However, be aware that enabling Full HD will have implications on bandwidth and capacity across your deployment, specifically:
l Full HD calls will require approximately double the Conferencing Node resources and double the bandwidth of an HD call. l With Full HD enabled, all backplane reservations in the deployment will consume resources equivalent to a Full HD call,
approximately twice that of an HD call. For more information, see Backplane reservation.
Note that a Full HD call still only requires a single concurrent call license, as does any other type of call.
When you enable or disable Full HD, the change will take effect for any new conferences initiated after the change has been made.
If you do enable Full HD in your deployment, you may wish to consider applying bandwidth limitations to individual services if appropriate, to enable you to manage your bandwidth usage and server capacity.
To enable or disable Full HD:
1. Go to Platform configuration > Global settings.
2. From within the Connectivity section, deselect or select Enable 1080p (Full HD).

Pexip Infinity Administrator GuideManaging the Pexip Infinity platformManaging users and roles via LDAP
© 2016 Pexip AS Version 12.a May 2016 Page 141 of 369
Managing users and roles via LDAPYou can configure the Pexip Infinity platform to authenticate and authorize login accounts via a centrally managed LDAP-accessible server. This provides increased security and more flexibility than using the single administrator account that is installed by default.
Instead of authenticating the supplied username and password credentials against its own internal database, Pexip Infinity contacts the LDAP server to authenticate the user. It then uses the user's LDAP group attributes in combination with role mappings defined in Pexip Infinity to determine which Pexip Infinity features the user is authorized to access.
You can also configure the Pexip Infinity platform for client certificate authentication. This means that instead of logging in to the Pexip Infinity Administrator interface via the standard login page, users present (via their browser) a client certificate containing their user identification details. The validation of the presented certificate acts as the authentication phase and the username attributes in the certificate are used to determine which features the user is authorized to access.
The configuration described here applies to all user accounts connecting to the Pexip Infinity Administrator interface or the Pexip Infinity API. It does not apply to SSH connections. When using LDAP authentication, Pexip Infinity is configured by default to work with a Windows Active Directory LDAP server, but it can also be configured to work with other LDAP-accessible databases.
All usernames and passwords are case sensitive.
The following sections describe:
l Configuration summary for LDAP authentication l Configuring how users are authenticated l Configuring account roles l Configuring LDAP roles l Example: configuring permissions for an AD group
Configuration summary for LDAP authenticationTo enable authentication and authorization via LDAP, you will need to configure both the LDAP database (if it is not already configured with user details) and the Pexip Infinity platform.
The LDAP database must be configured with:
l users' credentials
l groups that define the capabilities of the users.
The Pexip Infinity platform must be configured with:
l an authentication source setting that uses an LDAP database
l connection details for the LDAP server; if the server address is an FQDN, ensure that it is resolvable over the DNS server configured for the Management Node
l account roles to control the actions that users can perform
l LDAP role mappings that map LDAP groups to account roles.
If a secure TLS connection between the LDAP server and the Management Node is required, ensure that:
l The LDAP server address is specified as an FQDN (so that it matches the name on the certificate presented by the LDAP server, which is typically created for the host name rather than the IP address).
l The Management Node trusts the certificate presented by the LDAP server; typically this means that the LDAP server certificate has to be uploaded to the Management Node as a trusted CA certificate (as the LDAP server's certificate is often generated by an internal authority which would not be included in Pexip's inbuilt list of trusted CA certificates).Note that the Management Node's server certificate does not have to be trusted by the LDAP server (unless the LDAP server has been explicitly configured to demand a client certificate).

Pexip Infinity Administrator GuideManaging the Pexip Infinity platformManaging users and roles via LDAP
© 2016 Pexip AS Version 12.a May 2016 Page 142 of 369
The Pexip Infinity platform configuration steps for specifying an LDAP authentication source, and configuring account and LDAP role mappings are described in more detail in the following sections, and there is an example that shows how to configure permissions for an AD group. For information about installing server and trusted CA certificates, see Managing TLS and trusted CA certificates.
Configuring how users are authenticatedTo configure how users are authenticated when they log in to the Pexip Infinity Administrator interface or API, go to Users > User authentication. The options are:
Option Description
Authentication source The database to query for user authentication and authorization.
Local database: uses the Pexip Infinity local on-box database. Users can only log in via the default account (typically admin) and will have full administrator privileges.
LDAP database: users log in using an account configured on the LDAP database and obtain privileges according to the groups and roles associated with that account. Note that if this option is selected and the LDAP server is inaccessible for any reason, users will not be able to log in to the Pexip Infinity web-based Administrator interface or API.
LDAP database and local database: users can log in using either the default local admin account or via an account configured on the LDAP database.
When using an LDAP database, you must configure the items in the LDAP configuration section.
Default: Local database.
Require client certificate
Controls whether all users log in to the Pexip Infinity Administrator interface via the standard login page or if they instead present (via their browser) a client certificate containing their user identification details.
Not required: users log in via the standard login page and provide a password which is authenticated against the selected Authentication source.
Required (user identity in subject CN): users identify themselves via the identity contained in the subject CN (common name) of the client certificate presented by their browser.
Required (user identity in subjectAltName userPrincipalName): users identify themselves via the identity contained in the subjectAltName userPrincipalName attribute of the client certificate presented by their browser.
Default: Not required.
When a client certificate is required, the standard login page is no longer presented. Administrators will not be able to access the Pexip Infinity Administrator interface if their browser does not present a valid certificate that contains a user identity which exists in the selected Authentication source.
LDAP configuration
LDAP server address The domain name (for DNS SRV lookup), FQDN (for DNS A/AAAA lookup) or IP address of the LDAP server. If using a domain or an FQDN, ensure that it is resolvable over DNS.
You must also ensure that Pexip Infinity has trusted CA certificates for the authority that signed the LDAP server’s certificate (if a TLS connection is required).
We strongly recommend that you do not use an IP address. If an IP address is used, and a TLS connection is required, this will only work if the IP address is specified as the common name in the LDAP server's certificate.
See Troubleshooting LDAP server connections for more information about how the system establishes a connection to the LDAP server and how to troubleshoot connection issues.
Allow insecure transport
By default the system will attempt to establish a secure TLS connection with the LDAP server. Select this option if you want to allow the system to fall back to a TCP connection (using SASL DIGEST-MD5). You cannot specify the LDAP server by IP address if this option is selected.
LDAP bind username and password
The username and password of the bind account on the LDAP server. This should be a domain user service account, not the Administrator account.

Pexip Infinity Administrator GuideManaging the Pexip Infinity platformManaging users and roles via LDAP
© 2016 Pexip AS Version 12.a May 2016 Page 143 of 369
Option Description
LDAP base DN The base DN (distinguished name) of the LDAP forest to query (e.g. dc=example,dc=com).
Advanced LDAP configurationBy default the advanced LDAP configuration settings are preconfigured for Windows Active Directory, and may also be appropriate for other LDAP databases such as OpenLDAP.
Search global catalog Select this option to expand the scope of the search to the entire Active Directory Global Catalog instead of traditional LDAP.
LDAP user search DN The DN relative to the LDAP base DN to query for user records (e.g. ou=people). If blank, the LDAP base DN is used. In deployments with large user bases, you may want to configure this to optimize the LDAP user queries.
LDAP user filter The LDAP filter used to match user records in the directory.
Default: (&(objectclass=person)(!(objectclass=computer)))
LDAP user search filter The LDAP filter used to find user records when given the user name. The filter may contain {username} to indicate locations into which the username is substituted. This filter is applied in conjunction with the LDAP user filter and must contain at least one substitution.
If client certificate-based authentication is used, this filter usually must include 'userPrincipalName={username})' either in addition to, or instead of, the default value; for example '(|(uid={username})(sAMAccountName={username})(userPrincipalName={username}))'.
Default: (|(uid={username})(sAMAccountName={username}))
LDAP group attributes A comma-separated list of attributes in the LDAP user record to examine for group membership information. The attribute value must contain the DN of each group the user is a member of. If no attributes are specified, or none of the specified attributes are present in the LDAP user record, an LDAP group search (using the remaining advanced configuration options below) will be performed instead.
Default: memberOf
LDAP group search DN The DN relative to the LDAP base DN to query for group records (e.g. ou=groups) when no group attributes are present in the LDAP user record. If blank, the LDAP base DN is used. In deployments with large user bases, you may want to configure this to optimize the LDAP group queries.
LDAP group filter The LDAP filter used to match group records in the directory.
Default: (|(objectclass=group)(objectclass=groupOfNames)(objectclass=groupOfUniqueNames)(objectclass=posixGroup))
LDAP group membership filter
The LDAP filter used to search for group membership of a user. The filter may contain {userdn} to indicate locations into which the user DN is substituted. The filter may contain {useruid} to indicate locations into which the user UID is substituted. This filter is applied in conjunction with the LDAP group filter and must contain at least one substitution.
Default: (|(member={userdn})(uniquemember={userdn})(memberuid={useruid}))
If authentication against an LDAP database is configured, you can save the settings only if Pexip Infinity can successfully contact the specified LDAP server.
Note that all LDAP distinguished names must be entered as per the LDAP standard (RFC 4514). LDAP configuration is case insensitive.
Supporting nested security groups in Windows Active Directory
The default LDAP configuration does not support nested security groups in Windows Active Directory. For example, if group A is allowed to log in via LDAP, and if group B is a member of group A, then any user who is only a member of group B will not be allowed to log in.
To allow members of a nested Active Directory security group to log in over LDAP:

Pexip Infinity Administrator GuideManaging the Pexip Infinity platformManaging users and roles via LDAP
© 2016 Pexip AS Version 12.a May 2016 Page 144 of 369
1. Go to Users > User authentication and expand the Advanced LDAP configuration section.
2. Ensure that LDAP group attributes is empty (i.e. remove the default "memberOf" content).
3. Change LDAP group membership filter to "(member:1.2.840.113556.1.4.1941:={userdn})"
4. Select Save.
(This configuration uses the LDAP_MATCHING_RULE_IN_CHAIN OID. More information on this can be found at https://msdn.microsoft.com/en-us/library/aa746475%28VS.85%29.aspx.)
Configuring account rolesAccount roles are used to control the actions that users can perform in the web-based Administrator interface or API after they have been authenticated. For example, you can configure a role that allows a user to only view (and not modify) specific items of configuration data or status information via the Administrator interface.
When a user has restricted permissions, all navigation menu options are still displayed to that user, but they are given an Access denied message if they try to select a menu option that they are not authorized to use. For read-only restrictions, the relevant Add <item> options are not displayed.
Two roles are present by default:
l Read-only: allows read-only access to all configuration settings and status information when accessing the system via the web-based Administrator interface or the API.
l Read-write: allows full administrative access when accessing the system via the web-based Administrator interface or the API.
To add, edit or delete account roles, go to Users > Account roles. When configuring account roles, the options are:
Option Description
Name A descriptive name of the role, e.g. "auditor" or "management system".
Permissions Select from the list of Available permissions the set of permitted actions for the role and then use the right arrow to move the selected actions into the Chosen permissions list.
All roles must include the Is an administrator permission for access to the system. In addition, the May use web interface and May use API permissions must be included for access via the web-based Administrator interface and API respectively. You must then also add all of the other permissions, such as May modify system configuration and so on, that you want to apply to the role — if a role has, for example, only the Is an administrator and May use web interface permissions, a user with that role will be able to log in via the web-based Administrator interface but will not be able to perform any actions.
Configuring LDAP rolesLDAP roles are used to map the LDAP groups associated with LDAP user records to the Pexip Infinity account roles. You must configure a separate LDAP role for each LDAP group for which you want to map one or more Pexip Infinity account roles.
To add, edit or delete LDAP roles, go to Users > LDAP roles. When configuring LDAP roles, the options are:
Option Description
Name A descriptive name of the role, e.g. "domain administrator with full privileges".
LDAP group DN Select the LDAP group against which you want to map one or more account roles.
The list of LDAP groups is only populated when there is an active connection to an LDAP server (Users > User authentication).

Pexip Infinity Administrator GuideManaging the Pexip Infinity platformManaging users and roles via LDAP
© 2016 Pexip AS Version 12.a May 2016 Page 145 of 369
Option Description
Roles Select from the list of Available roles the account roles to associate with the LDAP group and then use the right arrow to move the selected roles into the Chosen Roles list.
All of the underlying permissions within a role are "positive" permissions, i.e. they allow the user to do something. If more than one role is selected, all of the permissions associated with each role are combined and granted to the relevant user.
Note that you can select which will open a new window from where you can configure a new account role. When you save the role it is automatically added to the set of Chosen Roles.
Example: configuring permissions for an AD groupThis example shows how you can configure the specific actions (permissions) that all members of an AD group are allowed to perform when administering Pexip Infinity.
Let's assume that you have the following set of groups already configured in Windows Active Directory:
This example shows how to configure all AD users who are members of the "itadmins" group to be able to add, modify and delete VMR/conference related settings, but only be able to view other configuration aspects of Pexip Infinity (system settings, logs etc).
1. Ensure that you have configured an LDAP authentication source (Users > User authentication) that can access your AD server, for example:
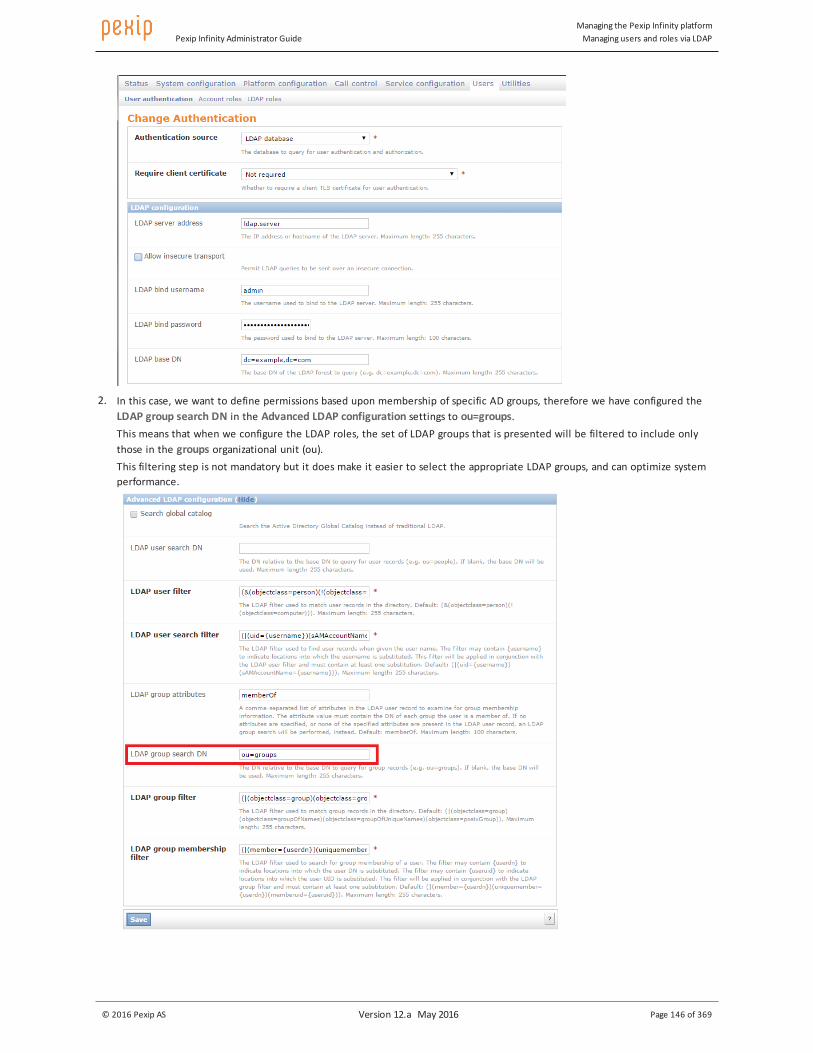
Pexip Infinity Administrator GuideManaging the Pexip Infinity platformManaging users and roles via LDAP
© 2016 Pexip AS Version 12.a May 2016 Page 146 of 369
2. In this case, we want to define permissions based upon membership of specific AD groups, therefore we have configured the LDAP group search DN in the Advanced LDAP configuration settings to ou=groups.This means that when we configure the LDAP roles, the set of LDAP groups that is presented will be filtered to include only those in the groups organizational unit (ou).This filtering step is not mandatory but it does make it easier to select the appropriate LDAP groups, and can optimize system performance.

Pexip Infinity Administrator GuideManaging the Pexip Infinity platformManaging users and roles via LDAP
© 2016 Pexip AS Version 12.a May 2016 Page 147 of 369
3. We now need to configure an account role (Users > Account roles) that defines the set of actions that can be performed by users who have been assigned that role.Here, a "Manage Conferences" role has been created. The Chosen permissions allow a user to use the web interface to configure all service-related items such as VMRs, themes, gateway rules, but to only be able to view (and not modify) all other configuration.
4. The final step is to associate this account role with an LDAP role/group (Users > LDAP roles).Here, we have configured an "IT admins - manage conferences" role. The LDAP group DN dropdown presents a list of LDAP groups from AD. In our case this list is filtered to only show those groups in the ou=groups organizational unit (due to the LDAP group search DN configuration in step 2).We have selected the itadmins group and associated it with the Manage Conferences role we created in step 3. (Note that you can associate the LDAP role with more than one account role if required.)
This means that AD users who are in the itadmins group will now be able to sign in to the Pexip Infinity Administrator interface, using their AD credentials, and configure service-related settings only.
To set up different permissions for members of other AD groups, repeat steps 3 and 4 to create different account role and LDAP role associations.
Pexip Infinity Administrator GuideManaging the Pexip Infinity platform
Customizing the Infinity Connect Web App
© 2016 Pexip AS Version 12.a May 2016 Page 148 of 369
Customizing the Infinity Connect Web AppThe Infinity Connect Web App is available as part of all Pexip Infinity deployments. It provides a WebRTC or Flash-based interface to Pexip Infinity services.
The standard Infinity Connect Web App uses Pexip logos and icons and has an orange color scheme. However, you can customize all text, color, and image elements to provide a branded experience. To do this you must create and then upload a branding package to the Management Node.
Branding customizations that are applied via the Management Node will persist over upgrades to subsequent versions of Pexip Infinity software (although you may need to adapt the customization to cater for any new features when upgrading to a new major release).
The procedures described here apply a generic customization for all Web App users. If you have specific customization requirements, such as hosting multiple different branding customizations under different URLs on external web servers or reverse proxies, see Advanced Infinity Connect Web App customization.
The following instructions describe how to create and upload, edit and remove a branding package.
Creating and uploading a branding packageYou must first create a branding package before you can upload it to the Management Node.
There are two main ways to create a branding package for the Infinity Connect Web App:
l via the Pexip branding portal (https://branding.pexip.com)
l manual configuration of the default branding files after downloading them from the Management Node
Note that both methods use the same set of configuration files — you can use the branding portal to easily apply your basic customization requirements and then make further manual amendments to the configuration files if necessary.
If you also use the Infinity Connect desktop client, you can use the same set of customized files in both the Infinity Connect Web App and the Infinity Connect desktop client. See the Infinity Connect Desktop Client Customization Guide for more information.
Creating a branding package via the Pexip branding portal
You can use the Pexip branding portal to customize your Web App. This web-based tool guides you through the selection of your image files and colors without having to edit individual css files etc, and then generates the customized branding package for you. The portal also lets you go back and modify existing branding packages and share your branding with colleagues from your organization.
To use the Pexip branding portal to generate your branding package:
1. Go to the Pexip branding portal (https://branding.pexip.com/) and sign in.First time users need to register before they can use the portal.
2. From here you can choose to add a new customization (branding package), or edit an existing customization that you or somebody else in your organization has previously created.
3. Configure your customization as required, selecting the relevant image files, colors and languages.Note that you can use the Preview option to see how the Web App home page would look with your branding applied.
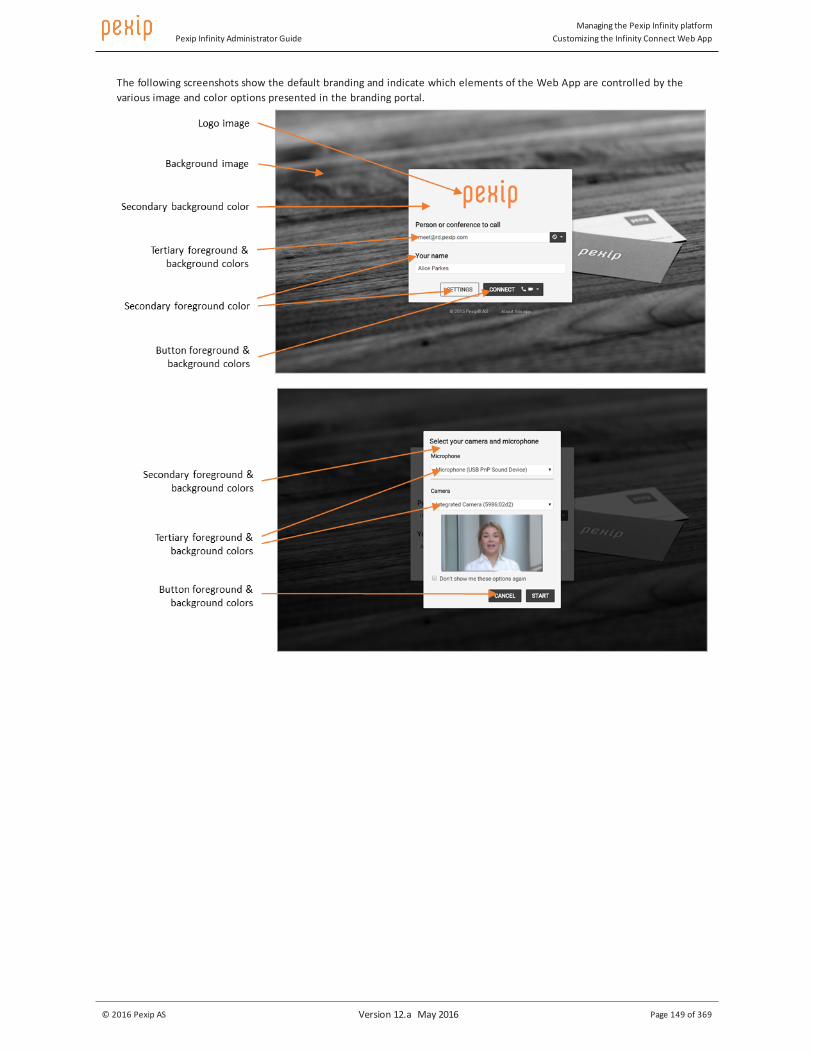
Pexip Infinity Administrator GuideManaging the Pexip Infinity platform
Customizing the Infinity Connect Web App
© 2016 Pexip AS Version 12.a May 2016 Page 149 of 369
The following screenshots show the default branding and indicate which elements of the Web App are controlled by the various image and color options presented in the branding portal.
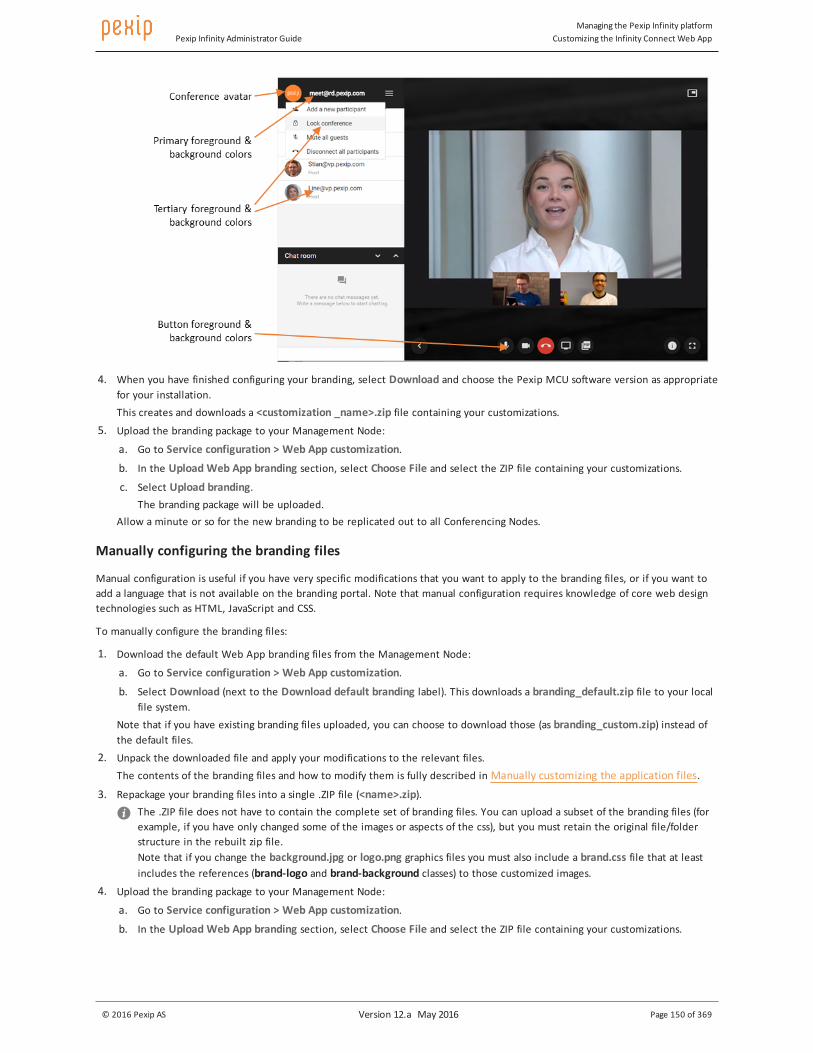
Pexip Infinity Administrator GuideManaging the Pexip Infinity platform
Customizing the Infinity Connect Web App
© 2016 Pexip AS Version 12.a May 2016 Page 150 of 369
4. When you have finished configuring your branding, select Download and choose the Pexip MCU software version as appropriate for your installation. This creates and downloads a <customization _name>.zip file containing your customizations.
5. Upload the branding package to your Management Node:
a. Go to Service configuration > Web App customization.
b. In the Upload Web App branding section, select Choose File and select the ZIP file containing your customizations.
c. Select Upload branding.The branding package will be uploaded.
Allow a minute or so for the new branding to be replicated out to all Conferencing Nodes.
Manually configuring the branding files
Manual configuration is useful if you have very specific modifications that you want to apply to the branding files, or if you want to add a language that is not available on the branding portal. Note that manual configuration requires knowledge of core web design technologies such as HTML, JavaScript and CSS.
To manually configure the branding files:
1. Download the default Web App branding files from the Management Node:
a. Go to Service configuration > Web App customization.
b. Select Download (next to the Download default branding label). This downloads a branding_default.zip file to your local file system.
Note that if you have existing branding files uploaded, you can choose to download those (as branding_custom.zip) instead of the default files.
2. Unpack the downloaded file and apply your modifications to the relevant files.The contents of the branding files and how to modify them is fully described in Manually customizing the application files.
3. Repackage your branding files into a single .ZIP file (<name>.zip).The .ZIP file does not have to contain the complete set of branding files. You can upload a subset of the branding files (for example, if you have only changed some of the images or aspects of the css), but you must retain the original file/folder structure in the rebuilt zip file.Note that if you change the background.jpg or logo.png graphics files you must also include a brand.css file that at least includes the references (brand-logo and brand-background classes) to those customized images.
4. Upload the branding package to your Management Node:
a. Go to Service configuration > Web App customization.
b. In the Upload Web App branding section, select Choose File and select the ZIP file containing your customizations.

Pexip Infinity Administrator GuideManaging the Pexip Infinity platform
Customizing the Infinity Connect Web App
© 2016 Pexip AS Version 12.a May 2016 Page 151 of 369
c. Select Upload branding.The branding package will be uploaded.
Allow a minute or so for the new branding to be replicated out to all Conferencing Nodes.
You can now test the branding by dialing in to one of your Pexip Infinity services via the Infinity Connect Web App.
Editing an existing branding packageYou can modify an existing branding package by either returning to Pexip branding portal or manually editing the branding files that were uploaded previously to the Management Node.
Note that when you upload a new branding package to the Management Node, all of the previously uploaded branding files are deleted and replaced with the new set of files.
Using the branding portal
If you initially created your branding package via the Pexip branding portal, you can return to the portal and change those files:
1. Go to the Pexip branding portal (https://branding.pexip.com/) and sign in. 2. Select the customization (branding package) you want to change.
3. Make your changes, previewing them if necessary, and then download a new ZIP file.
4. On the Management Node, go to Service configuration > Web App customization and upload your new ZIP file.
Allow a minute or so for the new branding to be replicated out to all Conferencing Nodes.
Manually changing your existing branding on the Management Node
You can manually edit the existing branding files that have been uploaded to the Management Node (even if those files were originally created via the Pexip branding portal):
1. On the Management Node, go to Service configuration > Web App customization.
2. Download the existing branding files (select the Download option next to the Download current branding label). 3. Unpack the downloaded file and apply your modifications to the relevant files.
The contents of the branding files and how to modify them is fully described in Manually customizing the application files. 4. Repackage your modified branding files into a single .ZIP file.
5. Upload the new ZIP file back onto the Management Node (Service configuration > Web App customization then Choose File followed by Upload branding).
Allow a minute or so for the new branding to be replicated out to all Conferencing Nodes.
Removing a branding package (revert to default branding)If you want to revert to the default Infinity Connect Web App branding, you need to remove your customized branding from the Management Node. To do this:
1. On the Management Node, go to Service configuration > Web App customization.
2. From the bottom-right corner of the page, select Remove branding and confirm.
Allow a minute or so for the customized branding to be removed from all Conferencing Nodes and for them to revert to the default branding.

Pexip Infinity Administrator GuideUsing external call control systems
Customizing the Infinity Connect Web App
© 2016 Pexip AS Version 12.a May 2016 Page 152 of 369
Using external call control systemsThe Call control menu allows you to manage the external call control systems used by Pexip Infinity when routing calls. These systems include H.323 gatekeepers, SIP proxies, Lync servers, TURN server and STUN servers.
In this section:
About H.323 gatekeepers and SIP proxies 153
Managing SIP credentials 154
About Lync / Skype for Business servers 155
Using TURN servers with Pexip Infinity 156
Using STUN servers with Pexip Infinity 158
When is a reverse proxy, TURN server or STUN server required? 160
Using an external policy server with Pexip Infinity 161

Pexip Infinity Administrator GuideUsing external call control systems
About H.323 gatekeepers and SIP proxies
© 2016 Pexip AS Version 12.a May 2016 Page 153 of 369
About H.323 gatekeepers and SIP proxiesYou can configure the Pexip Infinity platform with the addresses of one or more H.323 gatekeepers and SIP proxies. These are the call control systems that can be used to route outbound H.323 and SIP calls on behalf of Pexip Infinity.
Each System location can have a nominated H.323 gatekeeper and/or a SIP proxy — these are used to route outbound H.323 and SIP calls from that location.
Each Call Routing Rule can also have a nominated H.323 gatekeeper and/or a SIP proxy — these are used to route outbound calls for rules that are targeted at external H.323 and SIP systems.
The H.323 gatekeepers and SIP proxies configured here are used for outbound calls from Pexip Infinity. They do not determine the systems used to route inbound calls to Pexip Infinity. Pexip Infinity will not automatically register with any systems configured here. To route inbound calls from a gatekeeper or SIP proxy, you must configure these systems with neighbor zones that direct calls to Pexip Infinity. For more information see Call control.
Outbound calls are made from Pexip Infinity when:
l a conference participant uses an Infinity Connect client to add another participant to the call l the administrator manually dials out to a participant from a Virtual Meeting Room l a participant is automatically dialed out to from a Virtual Meeting Room l a third party uses the API to place a call to a participant
l the Pexip Distributed Gateway is used to interwork a call.
When a Pexip Infinity Connect user who is connected to a particular Conferencing Node adds another participant, the call will be routed to the H.323 gatekeeper or SIP proxy associated with the system location to which that Conferencing Node belongs. If you do not specify an H.323 gatekeeper or SIP proxy for a system location, Pexip Infinity Connect users connected to Conferencing Nodes in that location may still be able to dial in other participants. To enable this, the user must enter an IP address or FQDN (and for the latter, DNS must be configured properly), thus allowing Pexip Infinity to dial the participant directly.
To add, edit or delete an H.323 gatekeeper, go to Call control > H.323 gatekeepers.
To add, edit or delete a SIP proxy, go to Call control > SIP proxies.
After adding the details of the H.323 gatekeeper or SIP proxy, you must then add it to the relevant location (Platform configuration > Locations) or Call Routing Rule (Service configuration > Call routing).
Pexip Infinity Administrator GuideUsing external call control systems
Managing SIP credentials
© 2016 Pexip AS Version 12.a May 2016 Page 154 of 369
Managing SIP credentialsWhen sending a SIP request, Pexip Infinity may be challenged for authentication credentials by the host system or proxy.
The authentication challenge will include a realm that identifies the credentials that Pexip Infinity should use to respond to the challenge. The credentials to use will be provided separately by the administrator of the host system or proxy.
All realms, usernames and passwords are case sensitive.
To configure the SIP credentials used by Pexip Infinity for each realm, go to Call control > SIP credentials. The options are:
Option Description
Realm The realm defines the protection space of the host or proxy (such as its name or domain, e.g. sipproxy.example.com) that is challenging Pexip Infinity for authentication.
Username and Password
The username and password presented by Pexip Infinity when responding to the authentication challenge for the given realm.

Pexip Infinity Administrator GuideUsing external call control systems
About Lync / Skype for Business servers
© 2016 Pexip AS Version 12.a May 2016 Page 155 of 369
About Lync / Skype for Business serversPexip Infinity uses Lync / Skype for Business* servers to route outbound MS-SIP calls.
Outbound calls are made from Pexip Infinity when:
l a conference participant uses an Infinity Connect client to add another participant to the call l the administrator manually dials out to a participant from a Virtual Meeting Room l a participant is automatically dialed out to from a Virtual Meeting Room l a third party uses the API to place a call to a participant
l the Pexip Distributed Gateway is used to interwork a call.
You can configure the addresses of one or more Lync servers within Pexip Infinity. These can be Front End Servers or a Directors; they cannot be Edge Servers.
Within an on-prem Lync / Skype for Business environment, you must then associate a specific Lync server with a System location or Call Routing Rule to instruct Pexip Infinity to use that Lync server when it places an outbound MS-SIP call from a Conferencing Node in that location, or when it matches that routing rule.
Within a public DMZ Lync / Skype for Business deployment, you must ensure that a Pexip Infinity location is not configured to route calls to a specific Lync server. This is to ensure that each Conferencing Node uses DNS to locate an appropriate Lync system via which to route outbound calls.
To add, edit or delete Lync servers, go to Call control > Lync Servers.
The available options are:
Option Description
Name The name used to refer to this Lync server in the Pexip Infinity Administrator interface.
Description An optional description of the Lync server.
Address The IP address or hostname of the Lync server.
Port The IP port on the Lync server to which the Conferencing Node will connect.
Default: 5061.
Transport The IP transport used to connect to the Lync server.
Default: TLS.
To associate a Lync server with a System location, go to Platform configuration > Locations, and to associate it with a Call Routing Rule, go to Service configuration > Call routing.
For more information on integrating Pexip Infinity with Microsoft Lync, see Using Microsoft Lync / Skype for Business with Pexip Infinity.
* Note that where this documentation refers to "Lync", it represents both Microsoft Lync and Skype for Business unless explicitly stated otherwise.

Pexip Infinity Administrator GuideUsing external call control systems
Using TURN servers with Pexip Infinity
© 2016 Pexip AS Version 12.a May 2016 Page 156 of 369
Using TURN servers with Pexip InfinityTURN servers provide a mechanism for relaying media between devices. ICE (Interactive Connectivity Establishment) is a framework that allows endpoints to discover paths through which they can exchange media — such as via a TURN server — where direct routing between those devices may not be possible, e.g. when a device is on a private network or is behind a NAT.
Pexip Conferencing Nodes can utilize a TURN server and negotiate TURN relays with the following ICE capable clients:
l Lync / Skype for Business clients
l Infinity Connect WebRTC clients (Web App on Chrome, Firefox and Opera, and the mobile and desktop clients)
If these endpoints will be connecting to privately-addressed "on-premises" Conferencing Nodes, you must configure Pexip Infinity with the address of at least one TURN server that it can offer to ICE clients.
A TURN server is not required if your Conferencing Nodes are publicly-addressable, either directly or via static NAT. For more information, see When is a reverse proxy, TURN server or STUN server required?.
Note that the H.323 specification has no concept of ICE.
The TURN servers that you use with Pexip Infinity:
l must have a public IP address (located either on the public internet or in a DMZ)
l unless a separate STUN server has also been configured, they must be deployed in such a way that traffic from the Conferencing Node towards the TURN server appears as coming from the Conferencing Node's public NAT address (its server reflexive address), otherwise this will prohibit some Lync / Skype for Business communication scenarios
l must be routable from your Conferencing Nodes
l must be standards-based (supporting RFC 5766), for example a VCS Expressway or a Pexip TURN server (see Pexip Reverse Proxy and TURN Server Deployment Guide).
When using a TURN server with a Conferencing Node:
l Conferencing Nodes only use TURN over UDP (not TCP). However, Conferencing Nodes will perform ICE TCP negotiation.
l Conferencing Nodes always communicate with a TURN server over a single UDP port (default UDP/3478).
Note that Microsoft A/V Edge Server does not support RFC 5766 and therefore cannot be used as a TURN server with Pexip Infinity.
Nominating the TURN servers used by Pexip InfinityWithin Pexip Infinity you specify one or more TURN servers, and then associate one of those TURN servers with each System location and Call Routing Rule. The same TURN server can be used by more than one location or rule.
l To add, edit or delete TURN server connection details, go to Call control > TURN servers. The options are:
Option Description
Name The name used to refer to this TURN server in the Pexip Infinity Administrator interface.
Description An optional description of the TURN server.
Address The IP address of the TURN server.
Port The IP port on the TURN server to which the Conferencing Node will connect.
Default: 3478.
UsernamePassword
The credentials of an account on the TURN server that can be used to create bindings.
l To associate a TURN server with a location, go to Platform configuration > Locations and configure the relevant location. l To associate a TURN server with a Call Routing Rule, go to Service configuration > Call routing and configure the relevant rule.
After adding the details of the TURN server, you must add it to the relevant locations and Call Routing Rules.

Pexip Infinity Administrator GuideUsing external call control systems
Using TURN servers with Pexip Infinity
© 2016 Pexip AS Version 12.a May 2016 Page 157 of 369
How Pexip Infinity decides which TURN server to offerThe TURN server offered by Pexip Infinity to ICE clients is determined as follows:
l Conferences: uses the TURN server associated with the location of the Conferencing Node that is handling the call signaling. l Point-to-point calls via the Pexip Distributed Gateway: uses the TURN server associated with the Call Routing Rule that
matched the call request. If there is no TURN server associated with the rule, then the TURN server associated with the location of the Conferencing Node that is handling the call is used instead. Note that rules can optionally be configured on a per-location basis.
If a TURN server is not configured for the location or rule, a TURN server relay candidate will not be offered.
When a Conferencing Node receives a call from an ICE client, it sends a request to the TURN server to allocate bindings to be used by that client. The client uses these bindings to route its call media through the firewall to the Conferencing Node. The Conferencing Node allocates up to four TURN bindings per call (made up of two TURN bindings per media stream for both audio and video).

Pexip Infinity Administrator GuideUsing external call control systems
Using STUN servers with Pexip Infinity
© 2016 Pexip AS Version 12.a May 2016 Page 158 of 369
Using STUN servers with Pexip InfinityA STUN server allows clients, such as Conferencing Nodes or Infinity Connect WebRTC clients, to find out their public NAT address.
When a client is deployed behind a NAT, it can send a STUN request to the STUN server, which responds back to the client and tells it from which IP address it received the STUN request. Using this method, the client can discover its public NAT address, which is important in order for ICE to work between Conferencing Nodes and other ICE-enabled clients (for example, WebRTC and Lync / Skype for Business clients). In relation to ICE, this public NAT address is also known as the server reflexive address.
In Microsoft Lync and Skype for Business deployments it is essential that a Conferencing Node can discover its public NAT address.
Conferencing Nodes
If a Conferencing Node is deployed on a private network behind a NAT, its system location may already be configured with the details of a TURN server (such as the Pexip TURN server). Often, that TURN server can act as a STUN server and a separate STUN server is not normally required.
By default, Conferencing Nodes send their STUN requests to the TURN server, but if the TURN server is not located outside of the enterprise firewall then the Conferencing Node will not be able to discover its public NAT address. If this is the case in your deployment scenario, you must configure a separate STUN server — the Conferencing Node's STUN requests will then be sent to the STUN server, instead of the TURN server.
A STUN server is not required if:
l your Conferencing Nodes are publicly-addressable, either directly or via static NAT, or
l the STUN requests sent from the Conferencing Nodes to the TURN server will return the public NAT address of the Conferencing Node.
The STUN servers that you use with Pexip Infinity must be located outside of the enterprise firewall and must be routable from your Conferencing Nodes.
Infinity Connect WebRTC clients
When connecting to a privately-addressed Conferencing Node, Infinity Connect WebRTC clients that are behind a NAT may also use a STUN server to find out their public NAT address.
When an Infinity Connect WebRTC client connects to a Conferencing Node, the node will provision it with a set of STUN server addresses that it should use to discover its public NAT address.
For more information, see When is a reverse proxy, TURN server or STUN server required?.
How Conferencing Nodes decide which STUN server to useThe STUN server used by a Pexip Infinity Conferencing Node handling a call is determined as follows:
l Conferences: uses the STUN server associated with the location of the Conferencing Node that is handling the call signaling. l Point-to-point calls via the Pexip Distributed Gateway: uses the STUN server associated with the Call Routing Rule that
matched the call request. If there is no STUN server associated with the rule, then the STUN server associated with the location of the Conferencing Node that is handling the call signaling is used instead. Note that rules can optionally be configured on a per-location basis.
If a STUN server is not configured for a location or rule, but a TURN server is configured, the Conferencing Node will send STUN requests to that TURN server.
Nominating the STUN servers used by Pexip Infinity and Infinity Connect WebRTC clientsWithin Pexip Infinity you can configure the addresses of one or more STUN servers. You then associate those STUN servers with each System location (with separate configuration for the STUN server used by Conferencing Nodes in that location, and the STUN servers to offer to Infinity Connect clients connected to that Conferencing Node), and with each Call Routing Rule.
Configuring STUN server addresses
To add, edit or delete STUN server connection details, go to Call control > STUN servers. The options are:
Pexip Infinity Administrator GuideUsing external call control systems
Using STUN servers with Pexip Infinity
© 2016 Pexip AS Version 12.a May 2016 Page 159 of 369
Option Description
Name The name used to refer to this STUN server in the Pexip Infinity Administrator interface.
Description An optional description of the STUN server.
Address The IP address or hostname of the STUN server. This should not be the same address as any of your configured TURN servers.
Port The IP port on the STUN server to which the Conferencing Node will connect.
Default: 3478.
Note that Pexip Infinity ships with one STUN server address already configured by default: stun.l.google.com. This STUN server is typically used by Infinity Connect WebRTC clients and uses port 19302 (rather than the common 3478).
Associating STUN server addresses with Conferencing Nodes
To associate a STUN server address with a Conferencing Node, you must configure the node's system location:
1. Go to Platform configuration > Locations. 2. Select the Conferencing Node's location.
3. Select a STUN server and select Save.
All Conferencing Nodes in that location will use the nominated STUN server for conference calls.
Associating STUN server addresses with gateway calls
If a gateway call is being placed to an ICE-enabled client (such as Lync / Skype for Business clients and Infinity Connect WebRTC clients), the Conferencing Node placing the call will use the STUN server associated with the matching rule. (For gateway calls, the Conferencing Node does not use the STUN sever associated with its system location.)
To associate a STUN server address with a Call Routing Rule:
1. Go to Service configuration > Call routing. 2. Select the relevant rule.
3. Select a STUN server and select Save.
Configuring the STUN server addresses provided to Infinity Connect WebRTC clients
To configure the specific STUN server addresses that are provisioned to Infinity Connect WebRTC clients, you must configure the system locations used by the Conferencing Nodes that the clients connect to:
1. Go to Platform configuration > Locations. 2. Select the Conferencing Node's location.
3. Select one or more Client STUN servers and select Save.Note that stun.l.google.com is added by default to every location.
When an Infinity Connect WebRTC client connects to a Conferencing Node in that location, the Conferencing Node will provide it with the addresses of the nominated STUN servers. These STUN servers are used by the client to discover its public NAT address.
If no Client STUN servers are configured for that node/location, the Infinity Connect client may still be able to communicate by using a TURN relay, if a TURN server is configured on the Conferencing Node, but this may cause delays in setting up media.
For clients on the same network as the Conferencing Nodes, where no NAT is present, users may find that WebRTC call setup time is improved by removing all Client STUN servers.

Pexip Infinity Administrator GuideUsing external call control systems
When is a reverse proxy, TURN server or STUN server required?
© 2016 Pexip AS Version 12.a May 2016 Page 160 of 369
When is a reverse proxy, TURN server or STUN server required?When your Conferencing Nodes are privately addressed, you will need to use a reverse proxy and a TURN server to allow external endpoints such as Infinity Connect and Lync / Skype for Business clients to access your Pexip Infinity services. Normally a TURN server can act as a STUN server, but a separate STUN server may also be required if the TURN server is deployed inside your firewall.
When connecting to a privately-addressed Conferencing Node, Infinity Connect WebRTC clients that are behind a NAT may also use a STUN server to find out their public NAT address.
The following table shows when each of these devices needs to be deployed. When used, they must be publicly accessible, and routable from your Conferencing Nodes.
External endpoint / client
Conferencing Node addresses
Reverse proxy
TURN server
STUN server(for Conferencing Nodes)
STUN server(for WebRTC clients behind NAT)
Infinity Connect WebRTC clients
Private (on-premises)
(if the TURN server is inside the firewall)
Lync / Skype for Business clients*
Private (on-premises) -
(if the TURN server is inside the firewall)
Any endpoint / client Publicly reachable — either directly or via static NAT
- - - -
* Also requires a Lync / Skype for Business Edge server when Conferencing Nodes are privately addressed
Note that you may also need to deploy a reverse proxy if you want to host multiple Infinity Connect Web App customizations.

Pexip Infinity Administrator GuideUsing external call control systems
Using an external policy server with Pexip Infinity
© 2016 Pexip AS Version 12.a May 2016 Page 161 of 369
Using an external policy server with Pexip InfinityPexip Infinity's external policy API allows call policy decisions to be taken by an external system, based on the data sources that are available to that system. This allows Pexip Infinity administrators to implement routing decisions based on their specific requirements.
When external policy is enabled, rather than using its own database and systems to retrieve service and participant data, Pexip Infinity Conferencing Nodes send the external policy server a service request (a GET request over HTTP or HTTPS) and the server should respond by returning the requested data to the Conferencing Node.
Currently, Pexip Infinity makes requests to an external policy server to obtain service configuration data, media location requirements, and to retrieve JPEG avatars to represent participants in a conference. In the future, we expect Pexip Infinity to make use of external policy servers for other aspects of call processing decision-making.
You can configure Pexip Infinity to use a different policy server per system location. The requests can be subject to basic username and password authentication.
The policy requests supported in Pexip Infinity version 12 are:
l Service configuration: to obtain details of a service, typically when Pexip Infinity is receiving or placing a call, or showing the status of a conference alias.
l Media location: to obtain the system location to use for media allocation for a conference participant.
l Participant avatar: to obtain the image to display to represent a conference participant, for example in the participant list in the Infinity Connect client.
When a policy server has been configured, a Conferencing Node that needs to obtain service information will in the first instance always attempt to request information from the policy server associated with the location hosting that node. If the policy server does not return the expected service information e.g. the policy server cannot be reached, times out or returns invalid or incomplete data, Pexip Infinity will then attempt to obtain the relevant information from its own internal database.
Configuring Pexip Infinity to use an external policy serverYou must configure Pexip Infinity with the details of one or more external policy servers to which it can send policy requests. You do this by configuring the addresses of one or more external policy server URLs and then associating each system location with a single policy server URL. This means that different locations can use different policy servers for scalability and routing efficiency, if required. For redundancy, you may also use a http load balancer in front of a pool of policy servers.
We recommend that each policy server uses the same underlying decision-making logic or database, so that consistent responses are returned. However, the policy servers can apply different rules on a per-location basis, if required, as the requesting location is one of the parameters passed to the policy server in policy requests.
To configure Pexip Infinity to use an external policy server:
1. Go to Call control > Policy servers. 2. Configure one or more policy servers, as appropriate. The options are:
Option Description
Name The name used to refer to this policy server in the Pexip Infinity Administrator interface.
Description An optional description of the policy server.
URL The URL of the policy server, for example https://policy.example.com/path.
You can only configure one address URL per policy server.
If the request is over HTTPS, Pexip Infinity must trust the certificate presented by the policy server.
Username
Password
Optional fields where you can specify the credentials required to access the external policy server.
3. Go to Platform configuration > Locations.

Pexip Infinity Administrator GuideUsing external call control systems
Using an external policy server with Pexip Infinity
© 2016 Pexip AS Version 12.a May 2016 Page 162 of 369
4. Select each location in turn and specify the Policy server that the location should use when making policy decisions.You must ensure that each Conferencing Node in that location is able to reach the nominated policy server.
Note that you can also use the management API to configure external policy servers and locations.
Full details about the requests sent by Pexip Infinity to an external policy server and the responses that Pexip Infinity expects to receive in return are contained on the Pexip Infinity technical documentation website.

Pexip Infinity Administrator Guide
© 2016 Pexip AS Version 12.a May 2016 Page 163 of 369
Managing conferencesThe Service configuration menu allows you to manage the conference services offered by Pexip Infinity. These services include Virtual Meeting Rooms, Virtual Auditoriums and Virtual Receptions.
In this section:
About Pexip Infinity services 164
About Virtual Meeting Rooms 165
Configuring Virtual Meeting Rooms 166
Provisioning VMRs from Active Directory via LDAP 169
About Virtual Auditoriums 180
Configuring Virtual Auditoriums 181
Selecting the layout seen by participants 184
About the Virtual Reception IVR service 189
Configuring Virtual Reception IVRs 191
About aliases 194
Viewing all aliases 197
Creating and editing aliases 198
About PINs, Hosts and Guests 199
Playing notification tones when participants join or leave a conference 204
Automatically dialing out to a participant from a conference 205
Manually dialing out to a participant from a conference 209
Streaming a conference over YouTube 213
Locking a conference and allowing participants to join a locked conference 222
Using DTMF to control a conference 224
Enabling and disabling chat 225
Restricting call bandwidth 226
Limiting the number of participants 228
Controlling media capability 229
Automatically ending a conference 231
Muting a participant's audio 233
Disconnecting participants from a conference 235
Registering devices to Pexip Infinity 237
Bulk import / export of basic Virtual Meeting Room or Virtual Auditorium configuration 242
Tracking usage with a service tag 245

Pexip Infinity Administrator GuideManaging conferences
About Pexip Infinity services
© 2016 Pexip AS Version 12.a May 2016 Page 164 of 369
About Pexip Infinity servicesThe Service configuration menu allows you to manage the conference services offered by Pexip Infinity. These services include:
l Virtual Meeting Rooms: personal meeting spaces in which you can hold conferences.
l Virtual Auditoriums: larger meeting spaces optimized for use by a small number of Hosts and a large number of Guests. For more information, see What's the difference between a Virtual Meeting Room and a Virtual Auditorium?.
l Virtual Receptions: these provide a way for conference participants who cannot dial Virtual Meeting Room and Virtual Auditorium aliases directly, to access these services from a central point using DTMF tones.
Conference participants access these services by dialing one of the service's aliases. You can change the audio and video prompts presented to participants when they are accessing these services by applying themes.
In addition, the Pexip Infinity platform offers:
l Pexip Distributed Gateway: a service that interworks calls between different protocols. This allows endpoints within your deployment to make conference calls and point-to-point calls to other endpoints that do not use the same protocol.
What's the difference between a Virtual Meeting Room and a Virtual Auditorium?Virtual Auditoriums differ from Virtual Meeting Rooms in that:
l Administrators can configure a Virtual Auditorium so that Hosts and Guests see different layouts. In a Virtual Meeting Room, all participants see the same layout.
l In a Virtual Auditorium, Guest participants cannot see other Guests - they will only see the Host(s). In a Virtual Meeting Room all participants can see both Hosts and Guests, in order of who spoke most recently.
l In a Virtual Auditorium, Host participants will see all other Hosts first in the PIPs (in order of which Host spoke most recently), followed by Guests (again, in order of who spoke most recently). In a Virtual Meeting Room, all participants can see all other participants, in order of who spoke most recently and regardless of whether they are Hosts or Guests.
l Administrators can configure a Virtual Auditorium so that when a presentation is being shown, the person showing the presentation is fixed in the main speaker position. In a Virtual Meeting Room, this option is not available; the main speaker position will always be voice-switched, showing the current speaker.
Changing from a Virtual Meeting Room to a Virtual Auditorium and vice versaWhile it is not possible to change an existing Virtual Meeting Room to a Virtual Auditorium (and vice versa), you can change the service to which an alias is routed. For example, if your sales team already have a Virtual Meeting Room with an alias [email protected] and you want these conferences to take advantage of the features available to a Virtual Auditorium instead, then:
1. Set up a new Virtual Auditorium (Service configuration > Virtual Auditoriums > Add Virtual Auditorium) with the appropriate configuration, but do not configure any aliases.
2. Save the new Virtual Auditorium.
3. Go to the Aliases page (Service configuration > Aliases) and select the alias of the existing Virtual Meeting Room.
4. From the Service name drop-down list, select the name of the new Virtual Auditorium.
5. Repeat for all aliases belonging to the existing Virtual Meeting Room.
All calls made to any of the aliases that previously belonged to the Virtual Meeting Room will now be routed to the Virtual Auditorium. The Virtual Meeting Room will still exist, but will not have any aliases, so no calls can be made to it.

Pexip Infinity Administrator GuideManaging conferences
About Virtual Meeting Rooms
© 2016 Pexip AS Version 12.a May 2016 Page 165 of 369
About Virtual Meeting RoomsA Virtual Meeting Room (VMR) is a personal virtual meeting space that is always available for use. It can host any number of people from any type of device.
Each Virtual Meeting Room has one or more aliases associated with it. Participants access the Virtual Meeting Room by dialing any one of its aliases - this will route them all to the same conference. For more information, see About aliases and Configuring Virtual Meeting Rooms.
Participants can access Virtual Meeting Rooms from any video endpoint, or by using one of Pexip's Infinity Connect clients — for more information see Introduction to Infinity Connect.
Virtual Meeting Rooms can be PIN-protected, and you can also assign Host and Guest privileges to conference participants. For more information, see About PINs, Hosts and Guests.
You can also place a limit on the number of participants that can access a Virtual Meeting Room at any one time.
Administrators manage Virtual Meeting Rooms from the Pexip Infinity Administrator interface. For more information, see Configuring Virtual Meeting Rooms.
There is no limit on the number of Virtual Meeting Rooms that can be configured on your Pexip Infinity platform. Virtual Meeting Rooms do not consume resources on your deployment unless they are actually being used to host a conference. Unless you manually restrict access, the number of participants who can access a particular Virtual Meeting Room, and the number of Virtual Meeting Rooms that can be in use at the same time, are limited only by the size of your Pexip Infinity deployment.
Virtual Meeting Rooms can be bulk-provisioned from directory information contained in a Windows Active Directory LDAP server, or any other LDAP-accessible database.
Pexip Infinity Administrator GuideManaging conferences
Configuring Virtual Meeting Rooms
© 2016 Pexip AS Version 12.a May 2016 Page 166 of 369
Configuring Virtual Meeting RoomsVirtual Meeting Rooms are used to hold Pexip Infinity conferences. Each Virtual Meeting Room has one or more aliases associated with it, and participants access the conference by dialing one of these aliases.
When creating a new Virtual Meeting Room, you must provide at least one alias that will be used to access it. You can also optionally configure PINs for the conference.
To create a new Virtual Meeting Room, go to Service configuration > Virtual Meeting Rooms and click Add Virtual Meeting Room.
To edit an existing Virtual Meeting Room, or to view its details (including all the aliases associated with it), go to Service configuration > Virtual Meeting Rooms and select the name of the Virtual Meeting Room.
As an alternative to manually configuring your Virtual Meeting Rooms:
l You can import Virtual Meeting Rooms from directory information contained in a Windows Active Directory LDAP server, or any other LDAP-accessible database. For more information, see Provisioning VMRs from Active Directory via LDAP.
l You can bulk import basic Virtual Meeting Rooms configuration from a CSV file. See Bulk import / export of basic Virtual Meeting Room or Virtual Auditorium configuration.
l You can also manage Virtual Meeting Rooms using the Pexip Infinity API. For more information, see the Pexip Infinity Management API documentation.
Any configuration changes made to Virtual Meeting Rooms are replicated to all Conferencing Nodes within 60 seconds and applied to any subsequent conferences in that Virtual Meeting Room. If there are any conferences already in place that use the Virtual Meeting Room, any attempts to join it after the configuration has been replicated may be affected by the new configuration settings. For this reason, we do not recommend changing Virtual Meeting Room configuration while a conference is in progress as this may lead to an inconsistent user experience.
When adding or editing Virtual Meeting Rooms, the options are:
Option Description
Name The name used to refer to this Virtual Meeting Room.
Description A description of the Virtual Meeting Room.
Host PIN This optional field allows you to set a secure access code that must be entered by Virtual Meeting Room participants before they can join the conference.
If Allow Guests is set to Yes, then the Host PIN will apply to the conference Host(s) only.
For more information, see About PINs, Hosts and Guests.
l PINs must use the digits 0-9 only.
l PINs may optionally end with #.
l PINs must be between 4–20 digits long, including any #.
Allow Guests Yes: the conference will have two types of participants, Hosts and Guests. You must configure a Host PIN to be used by the Hosts. You can optionally configure a Guest PIN; if you do not configure a Guest PIN, Guests can join without a PIN, but the meeting will not start until the first Host has joined.
No: all participants will have Host privileges.
Default: No.

Pexip Infinity Administrator GuideManaging conferences
Configuring Virtual Meeting Rooms
© 2016 Pexip AS Version 12.a May 2016 Page 167 of 369
Option Description
Guest PIN This optional field allows you to set a secure access code that must be entered by Virtual Meeting Room Guests before they can join the conference.
For more information, see About PINs, Hosts and Guests.
l Host PINs and Guest PINs must be different.
l PINs must use the digits 0-9 only.
l PINs may optionally end with #.
l PINs must be between 4–20 digits long, including any #.
l If the Host PIN ends in # and a Guest PIN is used, the Guest PIN must also end with #.
l If # is not used, Host PINs and Guest PINs must have the same number of digits.
l You cannot configure a Guest PIN unless you have already configured a Host PIN.
View The maximum number of other participants that each participant will see, and the layout used to show them. For more information, see Selecting the layout seen by participants.
Default: Large main speaker and up to 7 other participants (1+7 layout).
Theme The theme for use with this Virtual Meeting Room. For more information, see Customizing images and voice prompts using themes.
Default: <use Default theme> (the global default theme will be used).
Advanced options
Automatically Dialed Participants
When a conference begins in this Virtual Meeting Room, a call will be placed automatically to any participants selected here. To add an Automatically Dialed Participant that is not already on the list, select the icon to the right of the selection fields.
For more information, see Automatically dialing out to a participant from a conference.
Maximum inbound call bandwidth (kbps)
Enter a value in this field to limit the bandwidth of media being received by Pexip Infinity from each individual participant dialed in to this Virtual Meeting Room. For more information see Restricting call bandwidth.
Maximum outbound call bandwidth (kbps)
Enter a value in this field to limit the bandwidth of media being sent from Pexip Infinity to each individual participant dialed in to this Virtual Meeting Room. For more information see Restricting call bandwidth.
Conference capabilities Allows you to limit the media content of the conference. For more information, see Controlling media capability.
Default: Main video + presentation.
Participant limit This optional field allows you to limit the number of participants allowed to join this Virtual Meeting Room. For more information see Limiting the number of participants.
Service tag This optional field allows you to assign a unique identifier to this service, which you can then use to track use of the service. For more information, see Tracking usage with a service tag.
VMR origin The name of the VMR Sync Template used to create this VMR; if the VMR was created by manual input, CSV import, or via the API this will be blank. This field is read-only.
Aliases
Alias: #1
Alias The alias that, when received by Pexip Infinity, will cause it to route the call to this service (Virtual Meeting Room, Virtual Auditorium or Virtual Reception).The alias entered here must match exactly the alias as it is received by Pexip Infinity. Wildcards and regular expressions are not supported.In most cases, the alias received by Pexip Infinity will be the same as the alias that the conference participant dialed from their endpoint, but there are some exceptions, described in About aliases.
Description An optional description of the alias. This is useful if you have more than one alias for a service.

Pexip Infinity Administrator GuideManaging conferences
Configuring Virtual Meeting Rooms
© 2016 Pexip AS Version 12.a May 2016 Page 168 of 369
Option Description
Add another Alias Select this option if you want the Virtual Meeting Room to be accessible by more than one alias. For more information, see Using multiple aliases to access the same service.

Pexip Infinity Administrator GuideManaging conferences
Provisioning VMRs fromActive Directory via LDAP
© 2016 Pexip AS Version 12.a May 2016 Page 169 of 369
Provisioning VMRs from Active Directory via LDAPPexip Infinity Virtual Meeting Rooms can be bulk-provisioned from directory information contained in a Windows Active Directory LDAP server, or any other LDAP-accessible database.
This means, for example, that you can automatically provide a personal VMR for every employee in an organization. Data such as employee names can be imported from the directory and used to generate a unique name and alias for each VMR, following a pattern such as meet.<username>@example.com. Other VMR settings such as PIN numbers, the layout and theme can also be assigned, depending upon your VMR template configuration.
Each VMR template can be configured to automatically synchronize against its LDAP sync source once per day. This ensures that the Pexip Infinity VMR configuration stays in step with all additions and removals that have occurred in the source directory. Many of the VMR settings can be tagged as "overridable" which means that if that setting (the PIN number for example) is manually overridden after the VMR has been created, a subsequent resynchronization will not reset it back to another value.
Configuration summaryTo provision your Virtual Meeting Rooms from an LDAP database you must:
1. Configure the connection details of an LDAP data source. You must also ensure that Pexip Infinity has trusted CA certificates for the authority that signed the LDAP server’s certificate (if a TLS connection is required).
2. Configure a VMR synchronization template that controls how the VMR settings such as its name, dialable alias and PIN numbers are generated, which of those values can be manually overridden, and whether to synchronize automatically against the LDAP data source.If required, you can configure multiple synchronization templates that use the same LDAP data source (or different templates that use different LDAP sources).
3. Generate the VMRs using your template and LDAP data source. Set the template to sync automatically when you are happy that the template is configured correctly.
These configuration steps are described in more detail in the following sections.
In addition, you can also:
l View the status of ongoing or completed VMR template synchronization processes via Status > VMR sync status. l Delete all of the VMRs that have been created from a specific template.
Configuring an LDAP data sourceTo configure Pexip Infinity with the connection details of an LDAP data source, such as a Windows Active Directory LDAP server:
1. Go to Utilities > LDAP sync sources.
2. Select Add LDAP sync source, and then complete the following fields:
Option Description
Name The name used to identify this LDAP sync source.
Description An optional description of the sync source.
LDAP server address The domain name (for DNS SRV lookup), FQDN (for DNS A/AAAA lookup) or IP address of the LDAP server. If using a domain or an FQDN, ensure that it is resolvable over DNS.
You must also ensure that Pexip Infinity has trusted CA certificates for the authority that signed the LDAP server’s certificate (if a TLS connection is required).
We strongly recommend that you do not use an IP address. If an IP address is used, and a TLS connection is required, this will only work if the IP address is specified as the common name in the LDAP server's certificate.
See Troubleshooting LDAP server connections for more information about how the system establishes a connection to the LDAP server and how to troubleshoot connection issues.

Pexip Infinity Administrator GuideManaging conferences
Provisioning VMRs fromActive Directory via LDAP
© 2016 Pexip AS Version 12.a May 2016 Page 170 of 369
Option Description
Search global catalog Select this option to expand the scope of the search to the entire Active Directory Global Catalog instead of traditional LDAP.
Allow insecure transport
By default the system will attempt to establish a secure TLS connection with the LDAP server. Select this option if you want to allow the system to fall back to a TCP connection (using SASL DIGEST-MD5). You cannot specify the LDAP server by IP address if this option is selected.
LDAP bind username and password
The username and password of the bind account on the LDAP server. This should be a domain user service account, not the Administrator account.
LDAP base DN The base DN (distinguished name) of the LDAP forest to query (e.g. dc=example,dc=com).
3. Select Save.You can save the sync source details only if Pexip Infinity can successfully contact the specified LDAP server.
Note that all LDAP distinguished names must be entered as per the LDAP standard (RFC 4514). LDAP configuration is case insensitive.
Configuring a VMR synchronization templateVMR synchronization templates control how the VMR settings such as its name, dialable alias and PIN numbers are generated. You must also tell the template which LDAP data source to use.
To configure Pexip Infinity with a VMR synchronization template:
1. Go to Utilities > VMR sync templates.
2. Select Add VMR sync template, and then complete the following fields:
Option Description
Name The name used to identify this synchronization template.
Description An optional description of the synchronization template.
LDAP user search DN The DN relative to the LDAP base DN of the sync source to query for user records (e.g. ou=people). If blank, the LDAP base DN is used. In deployments with large user bases, you may want to configure this to optimize the LDAP user queries.
LDAP user filter The LDAP filter used to match user records in the directory.
Default: (&(objectclass=person)(!(objectclass=computer)))
For more information, see LDAP search and filter examples.
LDAP sync source Select the LDAP data source to use when syncing records.
Note that you can select which will open a new window from where you can configure a new sync source.
Enable automatic daily sync
Select this option to instruct Pexip Infinity to automatically synchronize this template against its LDAP sync source once per day. This ensures that VMRs are regularly updated, deleted or created as appropriate based on the latest data in the sync source. Therefore, for example, if a user is removed from Active Directory or their account is disabled, their corresponding VMR will be deleted via the next daily sync.
All automatic synchronizations are initiated at 01:00 UTC (this start time cannot be configured).
As template synchronization can result in the automatic creation, modification or deletion of large numbers of VMRs, we recommend that you only enable automatic syncing after you have manually synced at least once and have verified that you are satisfied with your sync template configuration.

Pexip Infinity Administrator GuideManaging conferences
Provisioning VMRs fromActive Directory via LDAP
© 2016 Pexip AS Version 12.a May 2016 Page 171 of 369
Option Description
VMR settings
VMR name pattern The pattern to use to generate the name of the VMR. You should structure this pattern to generate a unique VMR name.
For more information, see Using patterns to format the VMR properties (name, alias etc).
Example: {{givenName}} {{sn}} VMR
If a VMR with the generated name already exists, that existing VMR configuration will be overwritten with the data generated from this template.
VMR description pattern
The pattern to use to generate the VMR description. This field is optional.
Example: {{givenName}} {{sn}}'s meeting room
Allow VMR description to be manually overridden
Allows the auto-generated VMR description to be manually overridden for each VMR.
Host PIN pattern The pattern to use to generate the Host PIN (if required).
Example: {{ [9,pex_random_pin(5)]|join }} (sets the PIN to a random 6 digit number starting with a 9)
In this example you would probably also select Allow PIN settings to be manually overridden to stop the PIN being changed to another random value after every template resync.
Allow Guests Yes: the conference will have two types of participants, Hosts and Guests. You must configure a Host PIN to be used by the Hosts. You can optionally configure a Guest PIN; if you do not configure a Guest PIN, Guests can join without a PIN, but the meeting will not start until the first Host has joined.
No: all participants will have Host privileges.
Default: No.
Guest PIN pattern The pattern to use to generate the Guest PIN (if required).
Example: {{ [2,pex_random_pin(5)]|join }} (sets the PIN to a random 6 digit number starting with a 2)
Note that if you set a Host PIN and a Guest PIN for a VMR, those two PINs must be different. Therefore we recommend that you generate Host and Guest PINs of different lengths, or ensure that some aspect of each PIN will be different (as shown in the examples).
Allow PIN settings to be manually overridden
Allows the auto-generated Host and Guest PIN settings to be manually overridden for each VMR.
Note that this would also preserve the generated PIN value, even if it does not actually get manually overridden.
View (layout) The maximum number of other participants that each participant will see, and the layout used to show them. For more information, see Selecting the layout seen by participants.
Default: Large main speaker and up to 7 other participants (1+7 layout).
Allow host layout to be manually overridden
Allows the host layout to be manually overridden for each VMR.
Theme The theme for use with this Virtual Meeting Room. For more information, see Customizing images and voice prompts using themes.
Default: <use Default theme> (the global default theme will be used).
Allow theme to be manually overridden
Allows the auto-generated theme to be manually overridden for each VMR.
VMR alias 1 pattern The pattern to use to generate the alias (string) that participants can dial to join this VMR. You should structure this pattern to generate a unique alias for the VMR.
Example: meet.{{givenName|lower}}.{{sn|lower}}@example.com or meet.{{mail}}
If the generated alias is already assigned to another VMR, that alias will be reassigned to the VMR currently being created/updated from this template.

Pexip Infinity Administrator GuideManaging conferences
Provisioning VMRs fromActive Directory via LDAP
© 2016 Pexip AS Version 12.a May 2016 Page 172 of 369
Option Description
Alias 1 description pattern
The pattern to use to generate a description of the alias. This field is optional.
Example: {{givenName|lower}}'s full URI
VMR alias 2...4 pattern and descriptions
You can enter optionally enter patterns for a further 3 alternative aliases, such as an E.164 alias, to associate with this VMR.
Note: do not use the pex_random_pin() filter to generate numeric aliases as this is likely to generate duplicate aliases. Where possible, it is best to use a phone number, employee ID or other typically unique value as the basis of a numeric alias. If a unique value does not exist, a good fallback is to use a pex_hash() expression such as the following to generate a consistent 6-digit random E164-type alias from a hash of each user's email address:{{ ("my alias passphrase"+(mail|pex_reverse))|pex_hash|pex_tail(6) }}
Advanced options
Maximum inbound call bandwidth (kbps)
Enter a value in this field to limit the bandwidth of media being received by Pexip Infinity from each individual participant dialed in to this Virtual Meeting Room. For more information see Restricting call bandwidth.
Maximum outbound call bandwidth (kbps)
Enter a value in this field to limit the bandwidth of media being sent from Pexip Infinity to each individual participant dialed in to this Virtual Meeting Room. For more information see Restricting call bandwidth.
Allow maximum bandwidth settings to be manually overridden
Allows the auto-generated maximum inbound call bandwidth and outbound call bandwidth to be manually overridden for each VMR.
Participant limit This optional field allows you to limit the number of participants allowed to join this Virtual Meeting Room. For more information see Limiting the number of participants.
Allow participant limit to be manually overridden
Allows the auto-generated participant limit to be manually overridden for each VMR.
Service tag pattern This optional field allows you to assign a unique identifier to this service, which you can then use to track use of the service. For more information, see Tracking usage with a service tag.
Allow service tag to be manually overridden
Allows the auto-generated service tag to be manually overridden for each VMR.
3. Select Save.You must save the template before you can use it to generate VMRs.
Allowing generated fields to be manually overridden
Many of the VMR settings can be tagged as "overridable" which means that if that setting is manually overridden after the VMR has been created, a subsequent resynchronization of that template will not reset it back to another value.
For example, you could configure the template with Allow PIN settings to be manually overridden selected. Then, after generating a VMR with a random Host PIN, the administrator could manually change the PIN to another specific value. This "overridable" setting ensures that the new value is protected and is not reset to another random value when that template is next used to synchronize the VMRs.
To make a field modifiable via the template again, you must clear the relevant Allow <field> to be manually overridden template setting and then re-sync with that template. Note that a VMR setting tagged as overridable via one template could still be modified by a different template.
LDAP search and filter examplesYou can configure multiple synchronization templates that all use the same LDAP data source (or different LDAP sources, if required), but that apply different filters to that LDAP source. This means that you could apply different VMR configuration patterns based on different LDAP organizational groups. For example, you could configure the VMRs for all members of the European sales team to have a Guest PIN and a different theme to those VMRs generated for the American accounting department.

Pexip Infinity Administrator GuideManaging conferences
Provisioning VMRs fromActive Directory via LDAP
© 2016 Pexip AS Version 12.a May 2016 Page 173 of 369
If you want to apply different VMR patterns to different types of users, you can use the LDAP user search DN and LDAP user filter template fields to filter the records from the LDAP sync source that are used to generate VMRs via that template.
This section contains some examples that you could use in a Windows Active Directory environment. Note that all LDAP user search and user filter contents are not case sensitive.
Filtering based on group membership
To import users that belong to a specific group, you can filter on the memberOf AD attribute. For example, to only import users who are members of the cn=sales,ou=groups,dc=example,dc=com group, you would set the LDAP user filter on your template to:(&(objectCategory=person)(objectClass=user) (memberOf=cn=sales,ou=groups,dc=example,dc=com))
You could then configure a second template for the accounting department that uses the same LDAP sync source but with the LDAP user filter set to:(&(objectCategory=person)(objectClass=user) (memberOf=cn=accounting,ou=groups,dc=example,dc=com))
To only import users who are not a member of the sales group, you would set the LDAP user filter to:(&(objectCategory=person)(objectClass=user) (!(memberOf=cn=sales,ou=groups,dc=example,dc=com)))
Filtering by LDAP field names
To import only those users who have an email address, you can set the LDAP user filter to:mail=*
To import all users except for some named individuals, you could use the following LDAP user filter model:(&(objectCategory=person)(objectClass=user) (!(cn=Alice Parkes))(!(cn=Bob Lee))(!(cn=Carol Jones)))
Filtering by organizational unit (e.g. region/country)
To import users that are located in a specific organizational unit such as a region or country, you can restrict the user search to the appropriate 'ou' objects. For example, to only import users who are based in 'Europe', you would set the LDAP user search DN to:ou=europe,ou=people(this is the DN relative to the base DN defined in the LDAP sync source)
More information on Active Directory LDAP filtering can be found at http://social.technet.microsoft.com/wiki/contents/articles/5392.active-directory-ldap-syntax-filters.aspx.
Using patterns to format the VMR properties (name, alias etc)When you configure a VMR synchronization template, you define patterns for how some of the VMR properties — such as its name and the aliases — are generated from the data in the LDAP sync source.
Pexip Infinity's pattern formats are based on a subset of the jinja2 templating language (http://jinja.pocoo.org/docs/dev/).
These patterns are made up of the following elements:
l literal text, such as prefixing every name with meet. l variables that are substituted with values from the LDAP sync source, such as givenName l filters that can manipulate text or modify the content of variables or text strings, such as join or lower l delimiters such as {{...}} and pipes | which are used to enclose variables and define filter expressions l jinja statements and control structures (see http://jinja.pocoo.org/docs/dev/templates/#list-of-control-structures)
An example pattern would be meet.{{givenName|lower}}.{{sn|lower}}. This concatenates the literal text meet. with the content of the givenName variable that has been converted to lower case by the lower filter. This is then concatenated with a period . and then the sn (surname) variable, also piped through the lower filter.
Therefore if Alice Parkes had an entry in the LDAP directory with givenName=Alice and sn=Parkes, the example pattern above would produce meet.alice.parkes.
The following sections provide more information about the supported variables and filters, and how to format expressions.

Pexip Infinity Administrator GuideManaging conferences
Provisioning VMRs fromActive Directory via LDAP
© 2016 Pexip AS Version 12.a May 2016 Page 174 of 369
Supported variables
When syncing each VMR, Pexip Infinity extracts LDAP fields from each user entry in the LDAP data source and makes them available as variables (with the same name) for use in the template. Pexip Infinity offers several standard fields, and administrators can also add their own custom set of fields.
When using variables:
l You must enclose the variable name within {{...}} delimiters, for example {{givenName}}. l Any combination of the variables can be used in any VMR synchronization template pattern field.
l Fields that are not present in the LDAP source will appear as "None".
l Capitalization of the variable name is important. The variable must be spelled exactly as shown below.
Standard LDAP fields
Pexip Infinity automatically extracts and makes available the following standard LDAP fields:
Variable name Description
company Company/organization name
department Department name
displayName User's preferred display name
dn Distinguished name
employeeID * Employee reference number
givenName First name
mail Email address
mailNickname * Typically used to store an alternative email address (e.g. based on a maiden name); see Change of name below
mobile Mobile phone number
objectGUID Globally unique identifier for the directory object (user entry)
sAMAccountName Logon name (domainname\username format)
sn Last name or surname
telephoneNumber Telephone number
title Job title
userPrincipalName Logon name (username@domainname format)
* not present in all AD schemas
Custom LDAP fields
In addition to the standard set of fields made available automatically by Pexip Infinity, administrators can configure their own custom set of fields to support additional attributes in their LDAP/AD schemas.
To add a custom LDAP field:
1. Go to Utilities > LDAP sync fields.
2. Select Add LDAP sync field, and then complete the following fields:

Pexip Infinity Administrator GuideManaging conferences
Provisioning VMRs fromActive Directory via LDAP
© 2016 Pexip AS Version 12.a May 2016 Page 175 of 369
LDAP field name The name of LDAP field to be read from the LDAP server.
The name is case sensitive. If the name does not match exactly against a field in the LDAP data source its value will appear (when used in a template) as "None".
Template variable name
The name of the variable to use in VMR sync templates that will contain the value of the LDAP field.
We recommend that you set this name to something similar to the LDAP field name, but note that this name cannot contain hyphens.
Description An optional description of the LDAP attribute.
Is binary (advanced options)
In advanced scenarios, some binary LDAP fields such as GUIDs require special encoding. In such cases, expand the advanced options and select Is binary.
Do not select this option for ordinary textual or numeric LDAP fields.
3. Select Save.The Template variable name that represents the custom LDAP field can now be used in a template along with the standard LDAP fields.
Change of name
A typical scenario encountered by IT administrators is when someone changes their name (e.g. after getting married) and wants to preserve their original contact address alongside their new contact details.
One way in which you could support this in Pexip Infinity is by defining multiple VMR alias patterns in your template. This example approach assumes that the LDAP mail field holds the user's contact address, and a mailNickname field is used to hold an alternative address. Thus, you could define the following patterns:
VMR alias 1 pattern: meet.{{mail}}
VMR alias 2 pattern: {%if mailNickname %}{#Add alias based on user's maiden name mailNickname#}meet.{{mailNickname}}{% else %}{#intentionally leave the alias blank#}{% endif %}
For most users, this will generate a single VMR alias in the format meet.<email address>, and the VMR's second alias will remain blank as the LDAP mailNickname field for those users will be empty.
For example, user Ann Jones has her LDAP mail field set to [email protected] and her LDAP mailNickname field is blank. Her VMR will have a single alias of [email protected].
When a user changes their name, the administrator would update the user's LDAP mail field to match their new name and populate the mailNickname field with the previous value of the mail field.
Now, the next time the administrator performs a template synchronization, the user's VMR aliases will be updated. The first alias will be changed to a new string based on the user's new email address, and a second alias will also be generated based upon the mailNickname field. This means that the user can be contacted via either their previous VMR alias or the new alias.
In our example, let's assume that Ann Jones changes her name to Ann Smith. The administrator changes her LDAP mail field to [email protected] and sets her LDAP mailNickname field to [email protected]. Her VMR will now have two aliases: [email protected] and [email protected].
Supported filters
Pexip Infinity supports a subset of filters from the jinja2 templating language. Any jinja filters that are not listed below have been disabled in Pexip Infinity. See http://jinja.pocoo.org/docs/dev/templates/#filters for more information about these filters.
abs float last striptags
capitalize format lower trim
default int replace truncate
first join round upper

Pexip Infinity Administrator GuideManaging conferences
Provisioning VMRs fromActive Directory via LDAP
© 2016 Pexip AS Version 12.a May 2016 Page 176 of 369
To use a filter you would typically follow the syntax {{<source_value>|<filter_name>}}.
In most cases the <source_value> is likely to be a variable, for example {{givenName|upper}}, although it could be one or more literal values, for example {{ [1, 2, 3, 4]|join }}.
Some filters take parameters, for example {{sn|truncate(5)}}. You can also use multiple filters in the same expression, for example {{sn|truncate(5)|upper}}.
The replace filter is often used. This replaces one string with another string. The first argument of the filter is the substring that should be replaced, the second is the replacement string. If the optional third argument count is given, only the first count occurrences are replaced.
Example usage: {{ department|replace("Personnel", "HR") }}
If the department field contained "Personnel Department Personnel", this would be converted to "HR Department HR".
Example usage: {{ department|replace("Personnel", "HR", 1) }}
In this case a count of 1 is specified, thus if the department field contained "Personnel Department Personnel", it would be converted to "HR Department Personnel".
For more complicated search and replace patterns, use the custom Pexip pex_regex_replace filter described below.
Custom Pexip filters
In addition to the jinja filters, Pexip also provides the following custom filters:
pex_regex_replace('find_regex', 'replace_string')
This performs a regex find and replace.
Example usage: {{ givenName|pex_regex_replace('(e|o)', 'i') }}
This example replaces occurrences of 'e' or 'o' with 'i' in the givenName variable.
See Regular expression (regex) reference for information about writing regular expressions.
pex_reverse
This reverses the characters in the input field.
Example usage: {{ givenName|pex_reverse|lower }}
In this example, if givenName is 'Alice', this expression would return 'ecila'.
pex_clean_phone_number
This extracts only +0123456789 characters (and removes ()&%#@|"':;, A-Z,a-z etc).
Example usage: {{ telephoneNumber|pex_clean_phone_number }}
In this example, if telephoneNumber is '+44 (20) 12345678', this expression would return '+442012345678'.
pex_strlen
This returns the length of string.
Example usage: {%set a = telephoneNumber|pex_clean_phone_number|pex_head(8)%}{%set b = mobile|pex_clean_phone_number|pex_head(8)%}{%if a|pex_strlen== 8%}{{a}}{%else%}{{b}}{%endif%}
In this example, the expression returns the value of the telephoneNumber field if it is present and at least 8 characters long after cleaning and truncation, otherwise it returns the value of the mobile field that has been cleaned and truncated to at most 8 characters.
Example usage: {%if telephoneNumber|pex_strlen == 5 %}{#return user's phone number#}{{telephoneNumber|pex_clean_phone_number}}{% else %}{#intentionally leave blank#}{% endif %}

Pexip Infinity Administrator GuideManaging conferences
Provisioning VMRs fromActive Directory via LDAP
© 2016 Pexip AS Version 12.a May 2016 Page 177 of 369
In this example, the expression returns a cleaned value of the telephoneNumber field if it is 5 characters long, otherwise it returns an empty string.
pex_require_min_length(length)
You can use this filter to control if VMRs are created or not, based on the length of a string or variable.
For example, you could set the VMR description pattern as {{ mail|pex_require_min_length(1) }}. This means that the VMR will not be created if the mail variable is empty. (When subsequently syncing, the VMR would be deleted if the condition is not met.)
Example usage: {{ telephoneNumber|pex_require_min_length(4) }}
This example ensures that a VMR is created only if telephoneNumber is at least 4 characters long.
pex_random_pin(length)
Generates a random PIN of the given length. Note that this filter does not take any input.
Example usage: {{ [9,pex_random_pin(5)]|join }} for the host PIN, and {{ [2,pex_random_pin(5)]|join }} for the guest PIN.
A usage pattern such as this (where the host PIN starts with a 9, and the guest PIN starts with a 2) ensures that a VMR can never be configured with a host PIN that is the same as the guest PIN.
You would typically use this filter in conjunction with the Allow PIN settings to be manually overridden option to ensure that the PIN is not reset every time a template resync is performed.
Do not use pex_random_pin() to generate aliases. This filter generates a truly random number, with each number generated independently of any previous output. Therefore, with many thousands of users, a 5 digit numeric alias (e.g. pex_random_pin(5) ) is statistically quite likely to clash with a random alias generated using pex_random_pin(5) for another user. With 10,001 or more users and a 4 digit random alias, a clash is guaranteed (with multiple clashes being likely).
pex_uuid4()
This generates a uuid (universally unique identifier). Note that this filter does not take any input.
Example usage: {{ pex_uuid4() }}
In a similar manner to the pex_random_pin filter, you would typically use this in conjunction with the appropriate Allow <field> to be manually overridden template setting, to ensure that after a uuid has been assigned to a field, another different uuid is not assigned every time a template resync is performed.
pex_hash
Performs a hash of a field. You could use this, for example, to generate random-looking PINs based on a hash of one or more fields from the directory (you would also need to apply another filter such as pex_tail to set the PIN to an appropriate valid length).
Example usage: {{ sAMAccountName|pex_hash|pex_tail(6) }}
pex_head(maxlength):
Returns, at most, the first maxlength characters from the input field.
Example usage: {{ givenName|pex_head(4) }}
In this example, for a givenName of 'Alice' this expression would return 'Alic', and a givenName of 'Bob' would return 'Bob'.
pex_tail(maxlength):
Returns, at most, the last maxlength characters from the input field.
Example usage: {{ telephoneNumber|pex_tail(4) }}
In this example, if telephoneNumber is '+44 (20) 12345678', this expression would return '5678'.

Pexip Infinity Administrator GuideManaging conferences
Provisioning VMRs fromActive Directory via LDAP
© 2016 Pexip AS Version 12.a May 2016 Page 178 of 369
Generating / syncing VMRs with LDAPAfter you have configured a sync source and a template you can generate your VMRs for the first time, or you can synchronize them to any changes that have occurred in the LDAP database since the last time the VMRs were updated.
When synchronizing a template:
l Pexip Infinity checks all of the VMRs previously created by that template and it updates, deletes or creates new VMRs as appropriate based on the current data in the sync source. Therefore, for example, if a user is removed from Active Directory or their account is disabled, then their corresponding VMR will be deleted.
l If a generated VMR name already exists (either created manually or via a different template), that existing VMR will be updated with the new settings generated from the template.
l If a generated alias for a VMR is already assigned to another VMR, that alias will be reassigned to the VMR currently being created/updated.
Any configuration changes made to Virtual Meeting Rooms are replicated to all Conferencing Nodes within 60 seconds and applied to any subsequent conferences in that Virtual Meeting Room. If there are any conferences already in place that use the Virtual Meeting Room, any attempts to join it after the configuration has been replicated may be affected by the new configuration settings.
The template synchronization process can take several minutes if you have a large number of VMRs. Therefore you must wait for 60 seconds after the entire synchronization process has completed to ensure that all synced data has been replicated to all Conferencing Nodes.
For these reasons, we do not recommend changing Virtual Meeting Room configuration while a conference is in progress as this may lead to an inconsistent user experience.
Automatic synchronization
To automatically synchronize a template on a daily basis:
1. Go to Utilities > VMR sync templates.
2. Select the template you want to use (to open the Change VMR sync template page).
3. Select Enable automatic daily sync.
4. Select Save.
All automatic synchronizations are initiated at 01:00 UTC (this start time cannot be configured).
As template synchronization can result in the automatic creation, modification or deletion of large numbers of VMRs, we recommend that you only enable automatic syncing after you have manually synced at least once and have verified that you are satisfied with your sync template configuration.
Manual synchronization
To manually generate (for the first time) or synchronize the VMRs in Pexip Infinity with the LDAP data source:
1. Go to Utilities > VMR sync templates.
2. Select the template you want to use (to open the Change VMR sync template page).
3. Scroll down to the bottom of the page and select Sync VMRs now.
4. A status page is displayed which shows the progress of the synchronization.You can safely navigate away from this page without affecting the synchronization.
5. For large imports that take a long time to complete, you can monitor the ongoing status of the import at any time via Status > VMR sync status.
Alternatively, you can sync one or more templates by going to Utilities > VMR sync templates, selecting the check box next to the templates that you want to use, and then from the Action drop-down menu, select Sync selected VMR sync templates and then select Go.
Pexip Infinity Administrator GuideManaging conferences
Provisioning VMRs fromActive Directory via LDAP
© 2016 Pexip AS Version 12.a May 2016 Page 179 of 369
Deleting all VMRs associated with a templateYou can easily delete all of the VMRs that have been created from a specific template, for example if you have incorrectly specified the template's LDAP user filter.
To delete all VMRS associated with a synchronization template:
1. Go to Utilities > VMR sync templates.
2. Select the template whose associated VMRs you want to delete (to open the Change VMR sync template page).
3. Scroll down to the bottom of the page and select Delete all VMRs created from this template. 4. Confirm that you want to proceed.
5. The VMRs will be deleted and a status message is displayed confirming the number of VMRs that were deleted.
Deleting a templateIf you delete a synchronization template, all of the VMRs associated with that template will also be deleted.

Pexip Infinity Administrator GuideManaging conferences
About Virtual Auditoriums
© 2016 Pexip AS Version 12.a May 2016 Page 180 of 369
About Virtual AuditoriumsA Virtual Auditorium is a meeting space that is optimized for use by a small number of Hosts and a large number of Guests, for example:
l a lecture, where the lecturer joins as the Host and all the students join as Guests
l an internal team meeting, where the department heads join as Hosts and all the managers join as Guests.
Virtual Auditoriums differ from Virtual Meeting Rooms in that:
l Administrators can configure a Virtual Auditorium so that Hosts and Guests see different layouts. In a Virtual Meeting Room, all participants see the same layout.
l In a Virtual Auditorium, Guest participants cannot see other Guests - they will only see the Host(s). In a Virtual Meeting Room all participants can see both Hosts and Guests, in order of who spoke most recently.
l In a Virtual Auditorium, Host participants will see all other Hosts first in the PIPs (in order of which Host spoke most recently), followed by Guests (again, in order of who spoke most recently). In a Virtual Meeting Room, all participants can see all other participants, in order of who spoke most recently and regardless of whether they are Hosts or Guests.
l Administrators can configure a Virtual Auditorium so that when a presentation is being shown, the person showing the presentation is fixed in the main speaker position. In a Virtual Meeting Room, this option is not available; the main speaker position will always be voice-switched, showing the current speaker.
Virtual Auditoriums use PINs to protect access, and to differentiate between Host and Guest participants. For more information, see About PINs, Hosts and Guests.
You can also place a limit on the number of participants that can access a Virtual Auditorium at any one time.
To add, edit or delete a Virtual Auditorium, go to Service configuration > Virtual Auditoriums. For more information, see Configuring Virtual Auditoriums.
Each Virtual Auditorium has one or more aliases associated with it. Participants access the Virtual Auditorium by dialing any one of its aliases - this will route them all to the same conference. For more information, see About aliases.
Participants can access Virtual Auditoriums from any video endpoint, or by using one of Pexip's Infinity Connect clients - for more information see Introduction to Infinity Connect.
Administrators manage Virtual Auditoriums from the Pexip Infinity Administrator interface. For more information, see Configuring Virtual Auditoriums.
There is no limit on the number of Virtual Auditoriums that can be configured on your Pexip Infinity platform. Virtual Auditoriums do not consume resources on your deployment unless they are actually being used to host a conference. Unless you manually restrict access, the number of participants who can access a particular Virtual Auditorium, and the number of Virtual Auditoriums that can be in use at the same time, are limited only by the size of your Pexip Infinity deployment.

Pexip Infinity Administrator GuideManaging conferences
Configuring Virtual Auditoriums
© 2016 Pexip AS Version 12.a May 2016 Page 181 of 369
Configuring Virtual AuditoriumsLarge Pexip Infinity conferences can take place in Virtual Auditoriums. Each Virtual Auditorium has one or more aliases associated with it, and participants access the conference by dialing one of these aliases.
When creating a new Virtual Auditorium, you must provide at least one alias that will be used to access it. You have the option of configuring Host and Guest PINs for the conference.
To create a new Virtual Auditorium, go to Service configuration > Virtual Auditoriums and click Add Virtual Auditorium.
You cannot convert an existing Virtual Meeting Room into a Virtual Auditorium. Instead, you must create a new Virtual Auditorium and reassign the existing aliases to it. For more information, see Changing from a Virtual Meeting Room to a Virtual Auditorium and vice versa.
You can manage Virtual Auditoriums using the Pexip Infinity API. For more information, see the Pexip Infinity Management API documentation.
To edit an existing Virtual Auditorium, or to view its details (including all the aliases associated with it), go to Service configuration > Virtual Auditoriums and click on the name of the Virtual Auditorium.
Any changes you make to Virtual Auditorium configuration will be replicated to all Conferencing Nodes within 60 seconds and will be applied to any subsequent conferences in that Virtual Auditorium. If there are any conferences already in place that use the Virtual Auditorium, any attempts to join it after the configuration has been replicated may be affected by the new configuration settings. For this reason, we do not recommend changing Virtual Auditorium configuration while a conference is in progress because this will lead to an inconsistent user experience.
When adding or editing Virtual Auditoriums, the options are:
Option Description
Name The name used to refer to this Virtual Auditorium.
Description A description of the Virtual Auditorium.
Host PIN This optional field allows you to set a secure access code that must be entered by participants before they can join the conference.
If Allow Guests is set to Yes, then the Host PIN will apply to the conference Host(s) only.
For more information, see About PINs, Hosts and Guests.
l PINs must use the digits 0-9 only.
l PINs may optionally end with #.
l PINs must be between 4–20 digits long, including any #.
Allow Guests Yes: the conference will have two types of participants, Hosts and Guests. You must configure a Host PIN to be used by the Hosts. You can optionally configure a Guest PIN; if you do not configure a Guest PIN, Guests can join without a PIN, but the meeting will not start until the first Host has joined.
No: all participants will have Host privileges.
Default: No.

Pexip Infinity Administrator GuideManaging conferences
Configuring Virtual Auditoriums
© 2016 Pexip AS Version 12.a May 2016 Page 182 of 369
Option Description
Guest PIN This optional field allows you to set a secure access code that must be entered by Guests before they can join the conference.
For more information, see About PINs, Hosts and Guests.
l Host PINs and Guest PINs must be different.
l PINs must use the digits 0-9 only.
l PINs may optionally end with #.
l PINs must be between 4–20 digits long, including any #.
l If the Host PIN ends in # and a Guest PIN is used, the Guest PIN must also end with #.
l If # is not used, Host PINs and Guest PINs must have the same number of digits.
l You cannot configure a Guest PIN unless you have already configured a Host PIN.
Host view The maximum number of other participants that Hosts will see, and the layout used to show them. For more information, see Selecting the layout seen by participants.
Default: Large main speaker and up to 7 other participants (1+7 layout).
Guest view The maximum number of Host participants that each Guest will see, and the layout used to show them. For more information, see Selecting the layout seen by participants.
Default: Large host speaker and up to 7 other hosts (1+7 layout).
Mute all guests When enabled, Guest participants will be muted when they first join the conference. After the conference has started, Hosts can use the Infinity Connect client to unmute Guests, either individually or as a group.
Lock presenter as main speaker
When a presentation is being shown, whether the main speaker position shows the presenter or the current speaker. For more information, see Selecting the layout seen by participants.
Yes: When a presentation is being shown, the main speaker position will always show the video image from the endpoint that is showing the presentation, even if others are speaking.
No: When a presentation is being shown the main speaker position will be voice-switched as usual.
Default: No.
Theme The theme for use with this Virtual Auditorium. For more information, see Customizing images and voice prompts using themes.
Default: <use Default theme> (the global default theme will be used).
Advanced options
Automatically dialed participants
When a conference begins in this Virtual Auditorium, a call will be placed automatically to any participants selected here. To add an Automatically Dialed Participant that is not already on the list, select the icon to the right of the selection fields.
For more information, see Automatically dialing out to a participant from a conference.
Maximum inbound call bandwidth (kbps)
Enter a value in this field to limit the bandwidth of media being received by Pexip Infinity from each individual participant dialed in to this Virtual Auditorium. For more information see Restricting call bandwidth.
Maximum outbound call bandwidth (kbps)
Enter a value in this field to limit the bandwidth of media being sent from Pexip Infinity to each individual participant dialed in to this Virtual Auditorium. For more information see Restricting call bandwidth.
Conference capabilities Allows you to limit the media content of the conference. For more information, see Controlling media capability.
Default: Main video + presentation.
Participant limit This optional field allows you to limit the number of participants allowed to join this Virtual Auditorium. For more information see Limiting the number of participants.
Service tag This optional field allows you to assign a unique identifier to this service, which you can then use to track use of the service. For more information, see Tracking usage with a service tag.

Pexip Infinity Administrator GuideManaging conferences
Configuring Virtual Auditoriums
© 2016 Pexip AS Version 12.a May 2016 Page 183 of 369
Option Description
Aliases
Alias: #1
Alias The alias that, when received by Pexip Infinity, will cause it to route the call to this service (Virtual Meeting Room, Virtual Auditorium or Virtual Reception).The alias entered here must match exactly the alias as it is received by Pexip Infinity. Wildcards and regular expressions are not supported.In most cases, the alias received by Pexip Infinity will be the same as the alias that the conference participant dialed from their endpoint, but there are some exceptions, described in About aliases.
Description An optional description of the alias. This is useful if you have more than one alias for a service.
Add another Alias Select this option if you want the Virtual Auditorium to be accessible by more than one alias. For more information, see Using multiple aliases to access the same service.
Pexip Infinity Administrator GuideManaging conferences
Selecting the layout seen by participants
© 2016 Pexip AS Version 12.a May 2016 Page 184 of 369
Selecting the layout seen by participantsA layout is the view that each participant has of all the other participants in the conference. Layouts are chosen in advance by the administrator, and some of the options available will depend on whether the conference is being held in a Virtual Meeting Room or Virtual Auditorium.
You cannot convert an existing Virtual Meeting Room into a Virtual Auditorium. Instead, you must create a new Virtual Auditorium and reassign the existing aliases to it. For more information, see Changing from a Virtual Meeting Room to a Virtual Auditorium and vice versa.
Features common to all layoutsRegardless of whether the conference is being held in a Virtual Meeting Room or Virtual Auditorium,
l Audio-only participants are represented by an avatar on the left side of the video window. The avatar will be either the
participant's image (if available via an external policy server) or a telephone icon: l If there are more than 4 audio-only participants, they are represented by a single icon on the left side of the video window.
This icon indicates the total number of audio-only participants:
l When an audio-only participant speaks, their avatar will slide out to show their name.
l Participants who are receiving video but not sending video (for example, if they have disabled their camera) are represented by
an icon of a camera with a line through it .
l Video participants who are on hold, or who are experiencing connectivity issues, are represented by a frozen grayscale image.
l If there are more video participants than there are live thumbnail views available, the last thumbnail is replaced by an icon indicating the number of additional participants not currently visible.
l When a participant is the only device that is sending video, that participant sees a holding screen until other video participants join the conference. The holding screen indicates either that the participant is the only participant in the conference, or that all of the other participants are audio-only (and they are shown via their audio-only indicators as usual). The holding images are fully customizable via the theme associated with the service (Virtual Meeting Room, Call Routing Rule etc).
l A full list of participants is available using Infinity Connect clients.
l If the conference includes a streaming participant (e.g. it is being streamed to YouTube), a streaming icon is displayed to the right of the video window.
l When sending presentation content to a single-stream endpoint such as Skype or broadcasting via an RTMP stream (when not dialed out with dual streaming), Pexip Infinity sends the video stream of the active speaker in a small window in the upper right corner of the presentation.
Virtual Meeting Room layoutsAll video-enabled participants in a Pexip Infinity Virtual Meeting Room will see the same layout, regardless of whether they are Hosts or Guests. Administrators can select between one of the following three options (go to Service configuration > Virtual Meeting Rooms and select the Virtual Meeting Room you wish to change):

Pexip Infinity Administrator GuideManaging conferences
Selecting the layout seen by participants
© 2016 Pexip AS Version 12.a May 2016 Page 185 of 369
Option Description
Full-screen main speaker only (1 + 0 layout)
Participants see a single speaker, with no thumbnails.
l The current speaker is shown full-screen. (The current speaker sees the previous speaker.)
l The number of other participants (Hosts plus Guests) is indicated in a small icon at the bottom right of the screen.
Large main speaker and up to 7 other participants (1 + 7 layout)
Participants see each other in the standard 1+7 layout.
l The main video shows the current speaker (or previous speaker, for those currently speaking).
l Up to 7 other participants are shown in a single row of live thumbnails at the bottom of the screen.
o Participants are shown in the thumbnails in order of who spoke most recently, from left to right, regardless of whether they are a Host or Guest.
o If there are more participants than there are thumbnails available, the number of additional participants is indicated in the far right thumbnail.
Small main speaker and up to 21 other participants (1 + 21 layout)
This is the same as the 1 + 7 layout option, except the main speaker is shown slightly smaller in order to accommodate up to 21 other participants in 3 rows of live thumbnails at the bottom of the screen.
Virtual Auditorium layoutsWith Pexip Infinity Virtual Auditoriums, Guest participants only ever see the Host participants; however, Hosts will see Hosts and Guests. Administrators choose from separate options for the layout shown to Guests and the layout shown to Hosts. Additionally, administrators can configure the Virtual Auditorium so that when a presentation is being shown, the presenter is kept in the main view.
To select which layouts are shown to Hosts and Guests, go to Service configuration > Virtual Auditoriums and select the Virtual Auditorium you wish to change. The options available are described below.
Host view
Option Description
Full-screen main speaker only (1 + 0 layout)
Hosts see a single speaker, with no thumbnails.
l The current Host speaker is shown full-screen. (The currently speaking Host sees the previous Host speaker, or if there are no other Hosts, they see the most recent Guest speaker.)
l The number of other participants (Hosts plus Guests) is indicated in a small icon at the bottom right of the screen.
Large main speaker and up to 7 other participants (1 + 7 layout)
Hosts see other Host and Guest participants in the standard 1+7 layout.
l If there is only one Host, they see the most recent Guest speaker in the main video.
l If there is more than one Host, they see the currently speaking Host in the main video. (The currently speaking Host sees the previous Host speaker.)
l Up to 7 other participants are shown in a single row of live thumbnails at the bottom of the screen.
o Host participants are shown first in the thumbnails, in order of who spoke most recently, from left to right.
o Any remaining thumbnails are used to show Guests (again, in order of who spoke most recently).
o If there are more participants than there are thumbnails available, the number of additional participants is indicated in the far right thumbnail.
Small main speaker and up to 21 other participants (1 + 21 layout)
This is the same as the 1 + 7 layout option, except the main speaker is shown slightly smaller in order to accommodate up to 21 other participants in 3 rows of live thumbnails at the bottom of the screen.
Guest view
Guests in a Virtual Auditorium are able to:

Pexip Infinity Administrator GuideManaging conferences
Selecting the layout seen by participants
© 2016 Pexip AS Version 12.a May 2016 Page 186 of 369
l hear and see the Host participant(s)
l hear but not see any of the other Guests, even if a Guest is speaking.
However, if all Hosts have left the conference, Guests will be able to see and hear other Guests in the selected layout until the conference is automatically disconnected (after about a minute), or until a Host rejoins.
Option Description
Full-screen Host speaker only (1 + 0 layout)
Guests see a single Host speaker, with no thumbnails.
l The Host who spoke most recently is shown full-screen.
l If there are two or more Hosts, the number of other Host participants is indicated in a small icon at the bottom right of the screen.
Large Host speaker and up to 7 other Hosts (1 + 7 layout)
Guests see Host participants in the standard 1+7 layout.
l If there is only one Host participant, the Host is shown full-screen.
l If there is more than one Host participant, the standard 1+7 layout is used, with the main video showing the currently speaking Host and all other Host participants shown in the thumbnails.
l Hosts are shown in the thumbnails in order of who spoke most recently, from left to right.
l If there are more Host participants than there are thumbnails available, the number of additional Hosts is indicated in the bottom right thumbnail.
Small Host speaker and up to 21 other Hosts (1 + 21 layout)
This is the same as the 1 + 7 layout option, except the main Host speaker is shown slightly smaller in order to accommodate up to 21 other Hosts in 3 rows of live thumbnails at the bottom of the screen.
Lock presenter as main speaker
You can configure a Virtual Auditorium so that when a presentation is being shown, the main speaker position always shows the presenter instead of the current speaker.
Option Description
Yes When a presentation is being shown, the selected layout rules are overridden so that:
l The main speaker position always shows the video image from the endpoint that is showing the presentation, even if others are speaking.
l The image that would have been shown in the main view is instead shown in the first available thumbnail (for 1 + 7 and 1 + 21 layouts).
No When a presentation is being shown, the main speaker position will be voice-switched as usual.

Pexip Infinity Administrator GuideManaging conferences
Selecting the layout seen by participants
© 2016 Pexip AS Version 12.a May 2016 Page 187 of 369
1 + 0 layout
1 + 0 layout: full-screen main video plus an icon indicating the number of additional participants
1 + 7 layout
standard 1+7 layout: main video plus a single row of thumbnails, an indicator showing the number of additional video participants, and two icons representing the audio-only participants (one with a personal avatar).
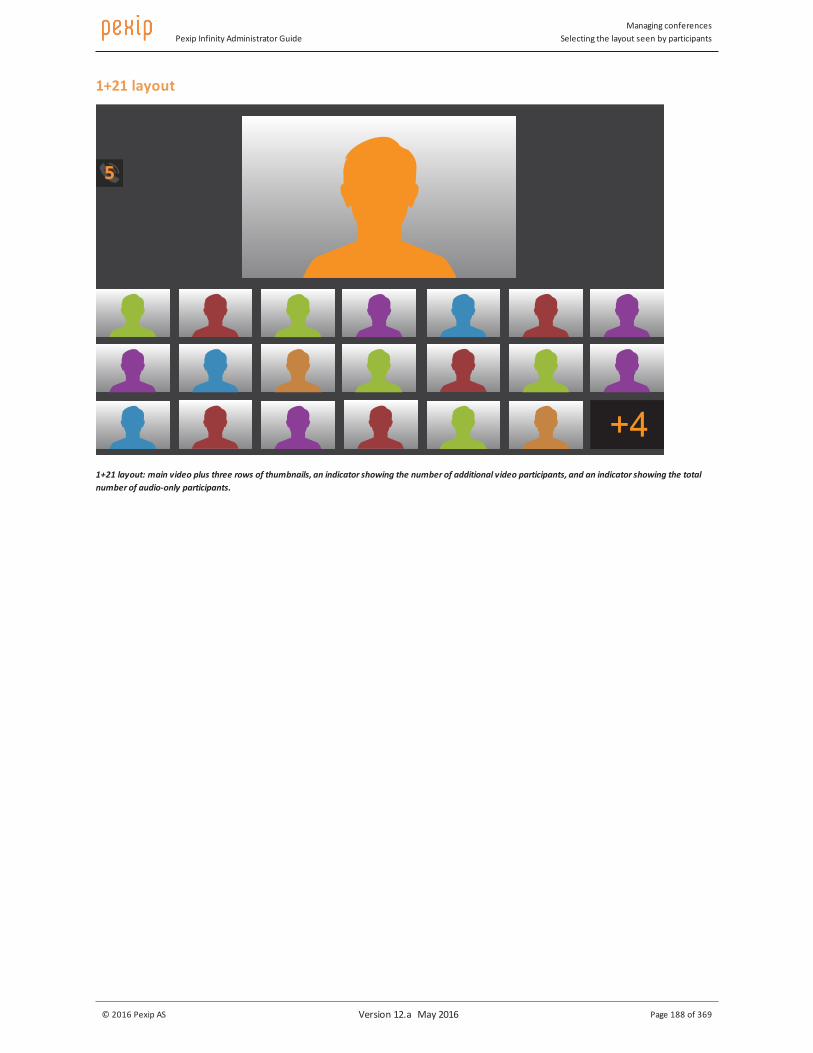
Pexip Infinity Administrator GuideManaging conferences
Selecting the layout seen by participants
© 2016 Pexip AS Version 12.a May 2016 Page 188 of 369
1+21 layout
1+21 layout: main video plus three rows of thumbnails, an indicator showing the number of additional video participants, and an indicator showing the total number of audio-only participants.

Pexip Infinity Administrator GuideManaging conferences
About the Virtual Reception IVR service
© 2016 Pexip AS Version 12.a May 2016 Page 189 of 369
About the Virtual Reception IVR serviceThe Virtual Reception IVR service allows participants to use DTMF tones to select the Virtual Meeting Room they wish to join. It provides an alternative means to access Virtual Meeting Rooms for participants who cannot dial VMR aliases directly.
Generally, in order to access a Virtual Meeting Room, participants dial one of the Virtual Meeting Room's aliases directly from their endpoint. However, some conference participants may not be able to do this. Reasons might include:
l The participant's endpoint might not support dialing by URI - they can only dial by IP address.
l The participant might be using an audio-only PSTN telephone and can only make calls to direct dial numbers.
l Your enterprise might have a limited number of direct dial numbers that can be used for audio participants, and you do not want to allocate one per VMR.
l Your enterprise uses local, toll-free telephone numbers that audio-only users can dial to access your VMRs and you don't want to have one of these for every VMR in your enterprise.
To allow for such cases, Pexip Infinity enables you to set up a single direct dial number or IP address that participants can dial to access a single, central Virtual Reception. From here they can use the DTMF tones on their endpoint to enter the number of the specific VMR they want to join.
To implement this you must:
1. Create and configure your Virtual Reception. 2. Ensure that every Virtual Meeting Room that you want to be accessible from the Virtual Reception has at least one alias that
consists of digits only. For more information, see Using multiple aliases to access the same service. 3. Provide conference participants with the combination of Virtual Reception alias followed by the Virtual Auditorium or Virtual
Meeting Room number that they must dial to access the conference.
Virtual Receptions and Lync / Skype for Business clients
To allow Lync / Skype for Business clients to use Virtual Receptions, you must ensure that the target VMR is configured with at least one alias in the form of a SIP URI that is routable by the Lync / Skype for Business client. (This is in addition to the digits-only VMR alias used by the Virtual Reception.)
Note that the Lync / Skype for Business client will be transferred into the destination VMR or gateway call as an audio-only participant, although they can subsequently escalate to two-way video if required (providing the Call capability configuration of the VMR or Call Routing Rule allows it).
Including the numeric alias of the VMR in the Virtual Reception dial string
SIP and H.323 endpoints and Lync / Skype for Business clients can optionally bypass having to enter the destination alias via DTMF tones.
They can do this by including the numeric alias of the VMR in their dial string when dialing the Virtual Reception. The dial string should be in the format: <reception_alias>**<destination_alias>@<domain>.
For example, if the alias of the Virtual Reception is [email protected] and the numeric alias of the target Virtual Meeting Room is 1234, then the endpoint can dial ivr**[email protected] to be transferred directly into the VMR.
Note that H.323 devices can also use the dial format <reception_alias>#<destination_alias>@<domain>.
Restricting or transforming the aliases entered into a Virtual Reception
To increase the security of your Virtual Reception services you may want to:
l restrict the aliases or alias patterns that can be entered into a Virtual Reception
l optionally transform the entered alias before the Virtual Reception attempts to route the call to that new destination.
You can do this when configuring your Virtual Reception by expanding the Advanced options and specifying the Destination alias regex match and Destination alias regex replace string fields.
For example, you could:

Pexip Infinity Administrator GuideManaging conferences
About the Virtual Reception IVR service
© 2016 Pexip AS Version 12.a May 2016 Page 190 of 369
l lock down the number ranges that can be reached via the Virtual Reception, e.g. by specifying a regex match of 8(.*) to only allow calls to numbers starting with "8"
l restrict and then transform the aliases that are entered, e.g. by specifying a regex match of (\d{4}) to only allow 4 digit extensions to be entered and then to prepend the entered alias with a prefix of "88" by entering a replace string of 88\1
l append a domain onto any numbers entered (so that you don't need to configure so many alternative VMR aliases), e.g. by specifying a regex match of (\d{4}) and then appending a domain by using a replace string of \[email protected]
l only allow access to a specified shortlist of aliases, e.g. by configuring a match string of (1111|1112|1113) to reject any other alias than 1111, 1112 or 1113.
Using the Virtual Reception with the Pexip Distributed GatewayYou can also use the Virtual Reception to route calls via the Pexip Distributed Gateway. This would allow you, for example, to route phone calls towards a Cisco VCS as E.164 numbers, or to join scheduled and ad hoc Lync / Skype for Business AVMCU conferences.
If your environment includes a PSTN gateway or uses an ITSP (Internet telephony service provider), consider the potential for toll fraud if you have Call Routing Rules that can route calls to the PSTN gateway or ITSP, or if you allow conference participants to dial out to other participants via the PSTN gateway or ITSP. See PSTN gateways and toll fraud for more information.
Routing phone calls towards a Cisco VCS as E.164 numbers
To implement this you must:
1. Create and configure your Virtual Reception in the normal way.
2. Configure a Call Routing Rule that matches the desired E.164 pattern and then routes the call via the specified Cisco VCS (where the Cisco VCS is the SIP proxy or H.323 gatekeeper as specified in the rule).Ensure that the E.164 pattern does not match a Virtual Meeting Room alias (as Virtual Meeting Room routing takes precedence).
Now, if someone dials in to the Virtual Reception and then enters the E.164 number that matches the Call Routing Rule, their call will be routed via the Cisco VCS.
Joining scheduled and ad hoc Lync / Skype for Business AVMCU conferences
See Configuring Pexip Infinity as a Lync / Skype for Business gateway for instructions on how to do this.

Pexip Infinity Administrator GuideManaging conferences
Configuring Virtual Reception IVRs
© 2016 Pexip AS Version 12.a May 2016 Page 191 of 369
Configuring Virtual Reception IVRsTo create or edit a Virtual Reception IVR service:
1. Go to Service configuration > Virtual Receptions.
2. To create a new Virtual Reception, select Add Virtual Reception, or to edit an existing Virtual Reception, click on its name.The following options are available:
Option Description
Name Enter the name you will use to refer to this Virtual Reception.
Description An optional field where you can add details about the Virtual Reception.
Theme Select the theme to apply to this Virtual Reception. For more information, see Customizing images and voice prompts using themes.
If you leave this blank, the default Pexip theme will be used.
Advanced options
Destination alias regex match
An optional regular expression used to match against the alias entered by the caller into the Virtual Reception. If the entered alias does not match the expression, the Virtual Reception will not route the call.
If this field is left blank, any entered alias is permitted. For more information, see Restricting or transforming the aliases entered into a Virtual Reception.
Destination alias regex replace string
An optional regular expression used to transform the alias entered by the caller into the Virtual Reception. (Only applies if a regex match string is also configured and the entered alias matches that regex.)
Leave this field blank if you do not want to change the alias entered by the caller.
Maximum inbound call bandwidth (kbps)
Enter a value in this field to limit the bandwidth of media being received by Pexip Infinity from each individual participant dialed in to this Virtual Reception. For more information see Restricting call bandwidth.
Maximum outbound call bandwidth (kbps)
Enter a value in this field to limit the bandwidth of media being sent from Pexip Infinity to each individual participant dialed in to this Virtual Reception. For more information see Restricting call bandwidth.
Conference capabilities
Allows you to limit the media content of calls while they are connected to the Virtual Reception service. For more information, see Controlling media capability.
Default: Main video + presentation.
Service tag This optional field allows you to assign a unique identifier to this service, which you can then use to track use of the service. For more information, see Tracking usage with a service tag.
Lync server Select a Lync / Skype for Business server only if this Virtual Reception is to act as an IVR gateway to scheduled and ad hoc Lync / Skype for Business AVMCU conferences. You must then ensure that your Call Routing Rule that routes calls to your Lync / Skype for Business environment has Match against full alias URI selected and a Destination alias regex match in the style [email protected].*
For more information, see Configuring Pexip Infinity as a Lync / Skype for Business gateway.
Lync conference lookup location
This is an optional field used in conjunction with the Lync server setting. If selected, a Conferencing Node in this system location will perform the Lync / Skype for Business Conference ID lookup on the Lync / Skype for Business server. If a location is not selected, the IVR ingress node will perform the lookup.

Pexip Infinity Administrator GuideManaging conferences
Configuring Virtual Reception IVRs
© 2016 Pexip AS Version 12.a May 2016 Page 192 of 369
Option Description
Aliases
Alias: #1
Alias Enter the alias that participants will dial to access the Virtual Reception.
Description An optional description of the alias. This is useful if the Virtual Reception has more than one alias.
Add another alias
Select this option if you want the Virtual Reception to be accessible by more than one alias. For more information, see Using multiple aliases to access the same service.
3. Ensure that every Virtual Meeting Room and Virtual Auditorium that you want to be accessible from this Virtual Reception has an alias in the form of a number. To do this:
a. Go to either Service configuration > Virtual Meeting Rooms or Service configuration > Virtual Auditoriums. b. Select the name of the Virtual Meeting Room or Virtual Auditorium.
c. In the Aliases section at the bottom of the page, enter the number to be used to access this Virtual Meeting Room or Virtual Auditorium from the Virtual Reception.To allow Lync / Skype for Business clients to use Virtual Receptions, you must ensure that the target VMR is configured with at least one alias in the form of a SIP URI that is routable by the Lync / Skype for Business client. (This is in addition to the digits-only VMR alias used by the Virtual Reception.)
d. Select Save.
ExampleIn this example we want to allow participants to access any of our Virtual Meeting Rooms or Virtual Auditoriums as audio-only participants using a telephone (to allow for situations where they do not have access to a video endpoint), by making a local, toll-free telephone call to one of the numbers we have provisioned.
Step 1: Create a Virtual Reception
In order to support this, we create the following Virtual Reception:
Option Input Notes
Name Toll-free Virtual Reception access This single Virtual Reception will be accessible globally by local toll-free numbers.
Description Allow users to dial a local telephone number and then select a VMR.
Aliases
Alias: #1
Alias
Description
15556789
US toll-free number
The first alias is the telephone number that participants in the US will dial to access the Virtual Reception.
Alias: #2
Alias
Description
441116789
UK toll-free number
The second alias is the telephone number that participants in the UK will dial to access the Virtual Reception.
Alias: #3
Alias
Description
612226789
Australia toll-free number
We continue to add as many aliases as we need, one for each local telephone number that can be used.
Now whenever participants dial any of the numbers shown above they will be taken to the same central Virtual Reception.
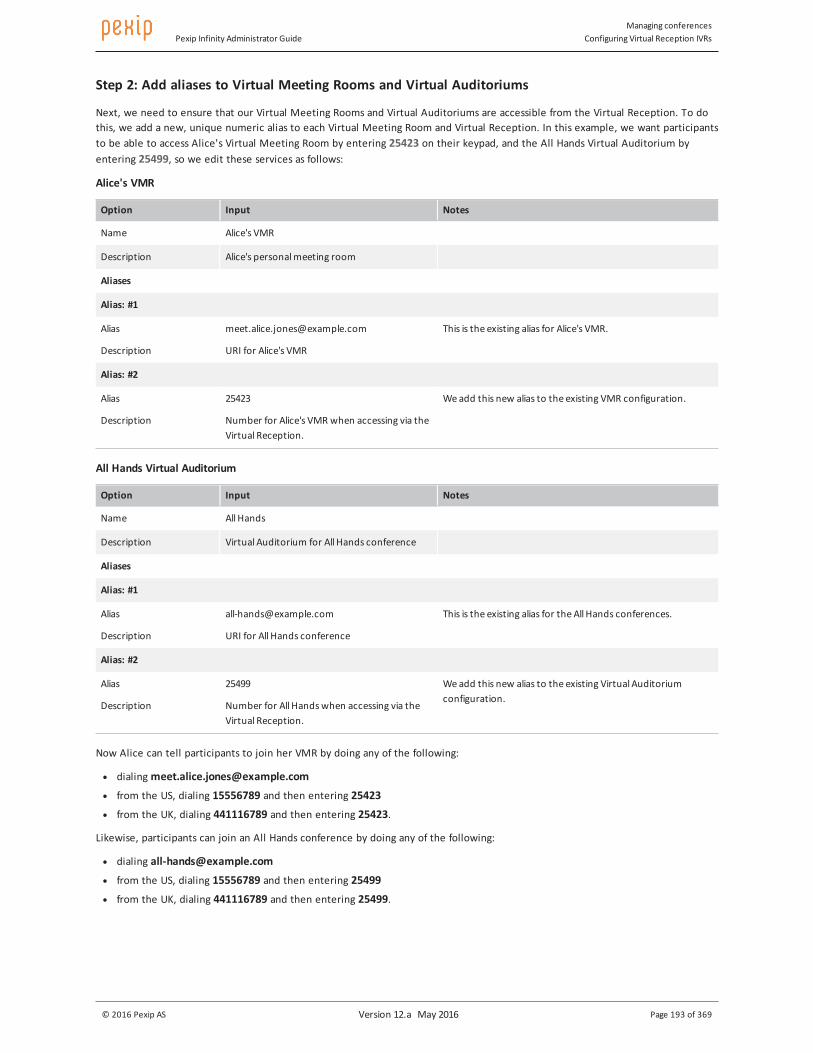
Pexip Infinity Administrator GuideManaging conferences
Configuring Virtual Reception IVRs
© 2016 Pexip AS Version 12.a May 2016 Page 193 of 369
Step 2: Add aliases to Virtual Meeting Rooms and Virtual Auditoriums
Next, we need to ensure that our Virtual Meeting Rooms and Virtual Auditoriums are accessible from the Virtual Reception. To do this, we add a new, unique numeric alias to each Virtual Meeting Room and Virtual Reception. In this example, we want participants to be able to access Alice's Virtual Meeting Room by entering 25423 on their keypad, and the All Hands Virtual Auditorium by entering 25499, so we edit these services as follows:
Alice's VMR
Option Input Notes
Name Alice's VMR
Description Alice's personal meeting room
Aliases
Alias: #1
Alias
Description
URI for Alice's VMR
This is the existing alias for Alice's VMR.
Alias: #2
Alias
Description
25423
Number for Alice's VMR when accessing via the Virtual Reception.
We add this new alias to the existing VMR configuration.
All Hands Virtual Auditorium
Option Input Notes
Name All Hands
Description Virtual Auditorium for All Hands conference
Aliases
Alias: #1
Alias
Description
URI for All Hands conference
This is the existing alias for the All Hands conferences.
Alias: #2
Alias
Description
25499
Number for All Hands when accessing via the Virtual Reception.
We add this new alias to the existing Virtual Auditorium configuration.
Now Alice can tell participants to join her VMR by doing any of the following:
l dialing [email protected] l from the US, dialing 15556789 and then entering 25423 l from the UK, dialing 441116789 and then entering 25423.
Likewise, participants can join an All Hands conference by doing any of the following:
l dialing [email protected] l from the US, dialing 15556789 and then entering 25499 l from the UK, dialing 441116789 and then entering 25499.
Pexip Infinity Administrator GuideManaging conferences
About aliases
© 2016 Pexip AS Version 12.a May 2016 Page 194 of 369
About aliasesEvery Virtual Meeting Room (VMR), Virtual Auditorium and Virtual Reception has one or more aliases associated with it.
When Pexip Infinity receives an incoming call via one of its Conferencing Nodes, it checks whether the destination alias belongs to a Virtual Meeting Room, Virtual Auditorium, or Virtual Receptions; if so, it will direct the call to that service. If the alias does not belong to any of the above services, Pexip Infinity will then check through the Call Routing Rules used by the Pexip Distributed Gateway to see if the alias matches any rules specified there - for more information, see Service precedence.
When Pexip Infinity receives a call to a Virtual Meeting Room or Virtual Auditorium alias, it creates a conference instance and routes the call to that conference. Any further calls received to any of the aliases belonging to the same Virtual Meeting Room or Virtual Auditorium are routed to the same conference instance, for the duration of that particular conference. If the service has more than one alias, participants can dial any one of the aliases and be routed to the same conference instance. For more information, see Using multiple aliases to access the same service.
Virtual Receptions also have one or more aliases associated with them. In these cases, when the participant dials a Virtual Reception alias they will be taken to the Virtual Reception IVR service, from which they can use a DTMF keypad to enter the number of the Virtual Meeting Room or Virtual Auditorium they wish to join. This number must correspond to a numeric-only alias of the Virtual Meeting Room or Virtual Auditorium in question. For more information, see About the Virtual Reception IVR service.
In most cases, the alias received by Pexip Infinity will be the same as the alias that the conference participant dialed from their endpoint, but there are some exceptions, described in Search rules and alias transforms and ENUM.
For the sake of clarity, the following discussion assumes that the alias dialed by the endpoint user is the same as the alias received by Pexip Infinity.
RestrictionsAn alias can include a domain but this is optional (see Domains). Aliases can be made up of:
l numbers
l letters
l dashes
l dots
l a combination of the above.
In certain circumstances an alias can also be in the form of an IP address - for more information see Using IP addresses as aliases.
Aliases do not support wildcards or regular expressions.
Case insensitivityThe aliases that you configure on Pexip Infinity are not case-sensitive, and Pexip Infinity treats all incoming aliases as not case-sensitive.
For example, this means that:
l a user who dials meet.alice will match against a Virtual Meeting Room with an alias of Meet.Alice
l a user who dials Meet.Alice will match against a Virtual Meeting Room with an alias of meet.alice
Ignoring IP addressesPexip Infinity ignores any IP address or IP address and port combination appended to an alias. This is because some SIP endpoints will automatically add the IP address of their proxy to the URI that is dialed by the user.
For example, a Virtual Meeting Room with a single alias of meet.alice will be matched when an endpoint dials any of:
l meet.alice
l meet.alice@<IPaddress>
l meet.alice@<IPaddress>:<port>

Pexip Infinity Administrator GuideManaging conferences
About aliases
© 2016 Pexip AS Version 12.a May 2016 Page 195 of 369
Using IP addresses as aliasesTo support users who can only dial by IP address, you can give a Virtual Reception, Virtual Meeting Room or Virtual Auditorium an alias that is the same as the IP address of one of your Conferencing Nodes.
In this case, when a user dials the IP address, they will be routed directly to the Conferencing Node in question. Pexip Infinity will then check to see if the IP address matches any of the aliases configured on it; if so, the call will be routed to the associated Virtual Reception, Virtual Meeting Room or Virtual Auditorium.
In most cases you would use this feature to assign a Conferencing Node IP address as an alias for a Virtual Reception, so that users could then select which Virtual Meeting Room or Virtual Auditorium they wish to join. For more information, see About the Virtual Reception IVR service.
Ignoring protocol prefixesPexip Infinity ignores relevant URI schemes included in an alias, as in the case where a SIP endpoint automatically prefixes the URI dialed by the user with sip:. The ignored prefixes are:
l sip:
l sips:
l h323:
This is because the protocol used for the call does not matter to Pexip Infinity.
For example, a Virtual Meeting Room with a single alias of meet.alice will be matched when an endpoint dials any of
l sip:meet.alice@IPaddress
l sips:meet.alice@IPaddress
l h323:meet.alice
Search rules and alias transformsSome call control systems (for example the Cisco VCS) support the use of search rules and alias transforms. In these cases, the alias that was dialed by the endpoint user and received by the call control system may be changed by the call control system in some way before it is passed on to Pexip Infinity. Often this is done in larger deployments to support complex dial plans.
For example, the call control system might have a rule that replaces the domain example.com with example.net. This means that when a user dials [email protected], the call is routed to [email protected]. Therefore it is this latter alias that must be configured on Pexip Infinity in order to match it with a Virtual Meeting Room.
ENUMThe ENUM system allows users to dial an E.164 number (for example a telephone number) which is then mapped using DNS to a SIP URI. For more information, see RFC 3761.
For example, your dial plan could be set up so that when a user dials 555 0123, the call is routed via ENUM to meet.alice.
If your dial plan uses ENUM, the resulting SIP URIs must be included as aliases on Pexip Infinity in order to match them with a Virtual Meeting Room.
DomainsDomains are optional in aliases. However, when a call is received to an alias in the form of a URI that includes a domain, the domain is not ignored.
For example, if a Virtual Meeting Room is configured with an alias of meet.alice, users can dial meet.alice or meet.alice@<IPaddress> to access the meeting room. However, if they dial [email protected] they will not be able to access the Virtual Meeting Room because the Virtual Meeting Room alias does not include the domain.
When a SIP endpoint user dials an alias that does not include a domain (for example meet.alice), the SIP endpoint will automatically add its own domain to the alias (making it for example [email protected]). So even if the Virtual

Pexip Infinity Administrator GuideManaging conferences
About aliases
© 2016 Pexip AS Version 12.a May 2016 Page 196 of 369
Meeting Room is configured with an alias of meet.alice and this alias is dialed by a participant from a SIP endpoint, the participant will not be able to join the conference. (H.323 endpoints do not add domains.)
In the absence of a call control system to strip the domain part of the alias, you could instead add to the Virtual Meeting Room a second alias of [email protected] so that participants can dial meet.alice from either a SIP or H.323 endpoint and access the same conference.
Using multiple aliases to access the same serviceIt is likely that you will want to enable conference participants to dial different numbers to access the same Virtual Reception. There may also be cases where you want different conference participants to be able to dial different aliases but still end up in the same Virtual Meeting Room or Virtual Auditorium. Some example deployments where this might be the case are given below.
To achieve this, you can add any number of aliases to a single Virtual Meeting Room, Virtual Auditorium or Virtual Reception.
The order in which aliases appear in the list of aliases is relevant when Automatically dialing out to a participant from a conference.
Adding additional aliases
To add an additional alias to a Virtual Meeting Room, Virtual Auditorium or Virtual Reception while you are creating it, select Add another Alias.
To add another alias to an existing Virtual Meeting Room, Virtual Auditorium or Virtual Reception:
1. Go to:
o Service configuration > Virtual Meeting Rooms, o Service configuration > Virtual Auditoriums, or o Service configuration > Virtual Receptions.
2. Select the name of the service you wish to add the alias to.
3. In the Aliases section at the bottom of the page, enter the new alias in the empty Alias field.
4. Select Save.
Examples
l If some of your endpoints do not support URI dialing, you could set up a Virtual Meeting Room for Alice with one alias of meet.alice.jones and another alias of 555 25423. This would give conference participants two different methods of accessing the same conference.
l If your deployment includes a Virtual Reception, every Virtual Meeting Room and Virtual Auditorium that you want to be accessible from the Virtual Reception will need to have a numeric-only alias (so that participants can enter the number using DTMF), in addition to any aliases in the form of a URI. So to continue with our example, you could add a third alias to Alice's VMR of 25423, which is the number that participants would enter from the Virtual Reception. For more information, see About the Virtual Reception IVR service.
l If you use an ISDN gateway to support telephone participants, you could set up Alice's Virtual Meeting Room with aliases of meet.alice.jones and an appropriate E.164 number.
l If you do not have or do not wish to use a call control system to transform aliases, you could set up Alice's Virtual Meeting Room with aliases of meet.alice.jones and [email protected] to support internal and external dialing, and dialing from both SIP and H.323 endpoints.

Pexip Infinity Administrator GuideManaging conferences
Viewing all aliases
© 2016 Pexip AS Version 12.a May 2016 Page 197 of 369
Viewing all aliasesTo view a list of all existing aliases for all services (Virtual Meeting Rooms, Virtual Auditoriums and Virtual Receptions), go to Service configuration > Aliases.
From here you can:
l Sort the list of aliases alphabetically by Alias or by Service name.
l Search for a particular alias. l Edit an alias. To do this, click on the alias. This takes you to the Change Alias page. From here you can edit details of the alias,
including changing the service with which it is associated.
l Add a new alias. To do this, click Add Alias. You will be asked to select the service with which this alias is to be associated.

Pexip Infinity Administrator GuideManaging conferences
Creating and editing aliases
© 2016 Pexip AS Version 12.a May 2016 Page 198 of 369
Creating and editing aliasesAliases are the strings that users dial to access Pexip Infinity services - Virtual Meeting Rooms, Virtual Auditoriums and Virtual Receptions. Each alias is associated with a single service, but a service can have more than one alias - for more information, see Using multiple aliases to access the same service.
To add a single alias to an existing service, go to Service configuration > Aliases and click Add Alias. This will take you to the Add Alias page.
You can also add a new alias while creating or editing a service. For further information, see Configuring Virtual Meeting Rooms, Configuring Virtual Auditoriums, and Configuring Virtual Reception IVRs.
When adding or editing aliases from the Add Alias page, the options are:
Option Description
Service Select the name of the Virtual Meeting Room, Virtual Auditorium or Virtual Reception that will be accessed when participants dial this alias.
Alias The alias that, when received by Pexip Infinity, will cause it to route the call to this service (Virtual Meeting Room, Virtual Auditorium or Virtual Reception).The alias entered here must match exactly the alias as it is received by Pexip Infinity. Wildcards and regular expressions are not supported.In most cases, the alias received by Pexip Infinity will be the same as the alias that the conference participant dialed from their endpoint, but there are some exceptions, described in About aliases.
Description An optional description of the alias. This is useful if you have more than one alias for a service.

Pexip Infinity Administrator GuideManaging conferences
About PINs, Hosts and Guests
© 2016 Pexip AS Version 12.a May 2016 Page 199 of 369
About PINs, Hosts and GuestsFor added security, you can set up your Pexip Infinity Virtual Meeting Rooms and Virtual Auditoriums with PIN numbers. You can use the same PIN for all participants, or you can use PINs to differentiate between Hosts and Guests. When a participant dials the alias of a Virtual Meeting Room or Virtual Auditorium that has a PIN, they are presented with an Interactive Voice Response (IVR) screen where they are asked to enter the PIN number. They must enter the correct PIN before they can join the conference.
This topic covers:
l Using the same PIN for all participants l Using PINs to differentiate between Hosts and Guests l Using # at the end of a PIN l Changing a participant's role from Guest to Host (and vice versa) l How to combine Host PINs and Guest PINs for differing levels of security
Using the same PIN for all participantsAll participants in a conference that uses a single PIN will have the same Host privileges. (To create a PIN-protected conference where participants have different levels of privileges, see Using PINs to differentiate between Hosts and Guests.)
Participants have 3 attempts to enter a correct PIN. After the third unsuccessful attempt, they will hear a message advising them that the PIN is invalid, and their call will be disconnected.
All PIN entry attempts, successful and unsuccessful, are logged in the administrator log.
To set a PIN number on a Virtual Meeting Room:
1. Go to Service configuration > Virtual Meeting Rooms. 2. Select the Virtual Meeting Room.
3. In the Host PIN field, enter the PIN number to be used.
4. In the Allow Guests drop-down list, select No.
Note that:
l PINs must use the digits 0-9 only. l PINs may optionally end with #. l PINs must be between 4–20 digits long, including any #.
Using PINs to differentiate between Hosts and GuestsYou can set up your Pexip Infinity Virtual Meeting Rooms and Virtual Auditoriums so that they are "Hosted". Hosted Virtual Meeting Rooms and Virtual Auditoriums have two different types of participants: Hosts and Guests. Hosts and Guests both dial the same alias in order to join the conference, however:
l Only those participants who enter the Host PIN will have privileges to control the conference; everyone else is a Guest and can only view the conference.
l If a conference is locked, Hosts will still be able to join but Guests will be held at a waiting screen. l For conferences that use Virtual Auditoriums, the administrator can select different layouts for the Host view and Guest view.
For more information, see Selecting the layout seen by participants.
Guest privileges
l If any Guests join the conference before a Host has arrived, they will be shown a holding image and hear a message advising them that they are waiting for the conference Host.
l A minute or so after the last Host has left, any remaining Guests will be automatically disconnected. During this time, Virtual Auditorium Guests will be able to see other Guests in the selected layout. (Note that administrators can change the length of time before Guests will be disconnected by going to Platform configuration > Global settings > Guests-only timeout.)
In addition, if the conference is held in a Virtual Auditorium:
Pexip Infinity Administrator GuideManaging conferences
About PINs, Hosts and Guests
© 2016 Pexip AS Version 12.a May 2016 Page 200 of 369
l Guest will only be able to see the Hosts; they will not be able to see other Guests. For more information, see Selecting the layout seen by participants.
Host privileges
l Normally, Guests cannot join a conference until the first Host has joined. This does not apply if the Host is control-only, so control-only Hosts can elect to start the conference manually, thus allowing Guests to join.
l If the first participant to join the conference is a Host, they will be shown a holding image until another Host or Guest joins the conference.
l If the conference has a Host PIN, participants who enter the Host PIN will be able to join a conference even if it is locked. l The presence of a Host in a conference may prevent that conference from being automatically terminated. l A minute or so after the last Host has left, any remaining Guests will be automatically disconnected. (Note that administrators
can change the length of time before Guests will be disconnected by going to Platform configuration > Global settings > Guests-only timeout.)
l Hosts can use Infinity Connect clients to disconnect participants from the conference.
l Hosts can use Infinity Connect clients to add participants to the conference.
l Hosts can use Infinity Connect clients to mute and unmute an individual participant, or all Guest participants simultaneously.
l Hosts can use Infinity Connect clients to lock and unlock a conference, and to allow individual participants in to a locked conference.
l Hosts can use Infinity Connect clients to change the role of other participants in the conference.
If the conference is taking place in a Virtual Auditorium:
l The Pexip Infinity administrator may configure the Virtual Auditorium so that Hosts see other participants in a different layout to that seen by Guests. For more information, see Selecting the layout seen by participants.
Host and Guest PINs
You can create two types of Hosted conference:
l the Host must enter a PIN but Guests do not, or
l both Hosts and Guests must enter a PIN.
Participants have 3 attempts to enter a correct PIN. After the third unsuccessful attempt, they will hear a message advising them that the PIN is invalid, and their call will be disconnected.
All PIN entry attempts, successful and unsuccessful, are logged in the administrator log.
Creating a Hosted Virtual Meeting Room or Virtual Auditorium
To create a Hosted Virtual Meeting Room or Virtual Auditorium:
1. Go to either:
o Service configuration > Virtual Meeting Rooms o Service configuration > Virtual Auditoriums.
2. Select the Virtual Meeting Room or Virtual Auditorium.
3. In the Host PIN field, enter the PIN number to be used by the Hosts.
4. In the Allow Guests drop-down list, select Yes.
5. If you want to require Guests to enter a PIN, in the Guest PIN field, enter the PIN number to be used. If you leave this field blank, anyone who dials the alias of the Virtual Meeting Room or Virtual Auditorium will be able to access the conference as a Guest. However, the conference will not start until the first Host has joined and in the meantime all Guests will continue to be shown the holding screen.
Note that:
l Host PINs and Guest PINs must be different.
l PINs must use the digits 0-9 only.
Pexip Infinity Administrator GuideManaging conferences
About PINs, Hosts and Guests
© 2016 Pexip AS Version 12.a May 2016 Page 201 of 369
l PINs may optionally end with #. l PINs must be between 4–20 digits long, including any #. l If the Host PIN ends in # and a Guest PIN is used, the Guest PIN must also end with #. l If # is not used, Host PINs and Guest PINs must have the same number of digits.
l You cannot configure a Guest PIN unless you have already configured a Host PIN.
Using # at the end of a PINPINs can optionally end with a # (known either as the pound or hash character). Using a terminal #:
l Allows administrators to set different length PINs for Hosts and Guests.
l Allows users who have accidentally entered too many or too few digits (particularly those using audio-only, who have no on-screen indication of the number of digits required) to return to the start of the PIN entry process by entering #.
The Administrator interface will prevent you from entering a Host PIN that ends with # and a Guest PIN that does not (or vice versa).
For conferences where a terminal # is used, Pexip Infinity will automatically use the appropriate audio file, asking participants to "please enter the conference PIN number followed by the pound key". Preconfigured themes allow you to change the use of "pound key" to "hash key".
For Infinity Connect clients, the terminal # is optional when entering a PIN.
Examples
l If you want to use a terminal # on a VMR with a Host PIN of 1234 and a Guest PIN of 567890:
o in the Host PIN field enter 1234# o in the Guest PIN field enter 567890#.Now when anyone calls the VMR they will hear the message "please enter the conference PIN number followed by the pound key".
l If you do not want to use a terminal # on a VMR with a Host PIN of 1234 and no Guest PIN:
o in the Host PIN field enter 1234 o leave the Guest PIN field blank.Now when anyone calls the VMR they will hear the message "please enter the conference PIN number".

Pexip Infinity Administrator GuideManaging conferences
About PINs, Hosts and Guests
© 2016 Pexip AS Version 12.a May 2016 Page 202 of 369
How to combine Host PINs and Guest PINs for differing levels of securityThe table below shows how to use Host PINs and Guest PINs to achieve various levels of security for your Virtual Meeting Rooms and Virtual Auditoriums:
Access Roles Host PIN Allow Guests Guest PIN
Anyone - no PIN required
All participants have the same Host privileges. Leave blank Select No Leave blank
All participants must enter the same PIN
All participants have the same Host privileges. Enter the PIN Select No Leave blank
Hosts must enter a PIN but Guest do not
Participants who enter the PIN have Host privileges. The conference will not begin until they have joined, and will finish a minute or so after the last Host leaves.
All other participants have Guest privileges and do not need to enter a PIN. They will see a holding screen until the first Host joins.
Enter the PIN Select Yes Leave blank
Hosts and Guests must enter different PINs
Participants who enter the Host PIN have Host privileges. The conference will not begin until they have joined, and will finish a minute or so after the last Host leaves.
Participants who enter the Guest PIN have Guest privileges and will see a holding screen until the first Host joins.
Enter the PIN(must be different from the Guest PIN)
Select Yes Enter the PIN*(must be different from the Host PIN)
* If you configure a Guest PIN, you must also configure a Host PIN.
Changing a participant's role from Guest to Host (and vice versa)Infinity Connect users who have a role of Host can change the role of other participants in the conference. This is useful, for example, if a Host needs to leave the conference; they can promote one of the Guests to a role of Host so that the conference will continue after they disconnect.
You can also use this feature to allow a participant who is waiting at the PIN entry screen to join the conference as Host or Guest without entering a PIN. Such users will appear in the roster with a role of Unknown. (Note that this does not apply to participants using Infinity Connect clients, as they use a different PIN entry process.)
To change a participant's role, select the participant and then select the role you wish to assign them:
You cannot change your own role to Guest.
Including the PIN in the dial string to bypass the PIN entry screenSIP and H.323 endpoints and Lync / Skype for Business clients that dial into PIN-protected conferences can bypass the PIN entry screen by including the PIN in the dialed alias.
This makes it more convenient, for example, when bookmarking PIN-protected conferences.
They can do this by including the relevant PIN (either the Host PIN or the Guest PIN as appropriate) in their dial string when dialing the Virtual Meeting Room or Virtual Auditorium. The dial string should be in the format: <vmr_alias>**<PIN>@<domain>.
For example, if the alias of the Virtual Meeting Room is [email protected] and the PIN is 1234, then the endpoint can dial meet.alice**[email protected] to go straight into the VMR.

Pexip Infinity Administrator GuideManaging conferences
About PINs, Hosts and Guests
© 2016 Pexip AS Version 12.a May 2016 Page 203 of 369
Note that H.323 devices can also use the dial format <vmr_alias>#<PIN>@<domain>.
If there is a # configured at the end of the PIN e.g. 1234#, then that # is not required in the dial string.

Pexip Infinity Administrator GuideManaging conferences
Playing notification tones when participants join or leave a conference
© 2016 Pexip AS Version 12.a May 2016 Page 204 of 369
Playing notification tones when participants join or leave a conferencePexip Infinity can automatically play a sound when a participant joins or leaves a conference. These entry and exit tones are disabled by default, but you can enable them on selected services using themes.
Enabling notification tonesEntry and exit tones are applied using themes. To enable entry or exit tones for a particular Virtual Meeting Room or Virtual Auditorium, you must ensure that the theme used for that service includes the following files:
l conf-participant_entry_tone_48kHz_mono.wav, containing the sound to play when a participant joins the conference. l conf-participant_exit_tone_48kHz_mono.wav, containing the sound to play when a participant leaves the conference.
By default, entry and exit tones are not played, as the Base theme contains "empty" entry and exit tone files. However, Pexip Infinity also ships with a selection of preconfigured themes, some of which contain entry and exit tones in the .wav files listed above.
This means that to enable notification tones you can do any of the following:
l select one of the preconfigured themes containing tones
l use the .wav files from those preconfigured themes in your own themes
l produce your own .wav files and include those files in your own themes.
Disabling notification tonesThe Base theme contains empty entry and exit tone files, and is shipped as the default theme. This means that by default entry and exit tones will not be played. You can download and copy the empty entry and exit tone files from the Base theme and use them in any custom themes you create for which you don't want to include entry and exit tones. Some of the preconfigured themes also contain empty entry and exit tone files.
If you apply a theme that does not include these files (rather than including empty files), Pexip Infinity will instead use the entry and exit tone files from the theme that has been selected as the default theme.
Therefore, if you want to ensure that entry or exit tones are not played, you must still include the entry tone and exit tone files in the theme, but leave them empty.

Pexip Infinity Administrator GuideManaging conferences
Automatically dialing out to a participant from a conference
© 2016 Pexip AS Version 12.a May 2016 Page 205 of 369
Automatically dialing out to a participant from a conferenceYou can configure a Virtual Meeting Room or Virtual Auditorium to automatically dial out to one or more participants whenever a conference using that service starts.
You can also manually dial out to participants from a Virtual Meeting Room or Virtual Auditorium, on an ad-hoc basis. For more information, see Manually dialing out to a participant from a conference.
The Pexip API can also be used by third-party applications to dial out to a participant. For more information, see the Pexip Infinity Management API documentation.
When will the participant be called?When an Automatically Dialed Participant (ADP) has been added to a Virtual Meeting Room or Virtual Auditorium's configuration, a call is placed from the conference to the ADP's endpoint as follows:
Meeting type Participant automatically dialed...
No PIN when the first participant joins the conference
Guests not allowed; participants must enter a PIN when the first participant has entered a valid PIN
Guests allowed; Hosts must enter a PIN but Guests do not when the first participant joins the conference
Guests allowed; Hosts and Guests must enter a PIN when the first participant has entered a valid PIN
The role of the first participant does not matter - both Hosts and Guests can trigger a call to an ADP.
A call is not placed to an ADP if that participant has already joined the conference.
Host and Guest PINsWhen the call is answered, the Automatically Dialed Participant will join the conference as either a Host or Guest, depending on which role you selected when configuring them as an ADP. They will not be required to enter a PIN even if one is required for that role.
Choosing the calling locationUsually, the call to the ADP is placed from the same Conferencing Node that is being used by the participant who initiated the conference.
However, you can optionally configure the call to be placed from a Conferencing Node in a specific location. The behavior varies according to whether it is a manually routed ADP (where Route this call is set to Manually) or the ADP is called according to Call Routing Rules (where Route this call is set to Automatically).
l Manually routed ADPs: the nominated location is the location of the node that will dial the ADP.
l Automatically routed ADPs: the nominated location is the notional source location used when considering if a Call Routing Rule applies or not — but the rules themselves will determine the location of the node that dials the ADP. In this case, the configured Outgoing location for the ADP is deemed to be the location handling the call (when matched against the Calls being handled in location setting for the Call Routing Rule) and the rule's Outgoing location setting is used to determine the actual location of the node that dials the ADP.This behavior is useful if, for example, you have configured lowest-cost-routing rules that only allow calls to be placed from "internal" Conferencing Nodes but you have a conference that is triggered by a call to an "external" Conferencing Node. In this case you still want the call to the ADP to be initiated, but you don't want, in general, to allow calls to arbitrary ISDN destinations to be placed from Conferencing Nodes in the external location.
Incoming call aliasWhen the endpoint is called, the Automatically Dialed Participant will see the call as coming from one of the Virtual Meeting Room or Virtual Auditorium's aliases. This means that if the participant misses the call, they can easily return it by dialing the alias that appears on their endpoint. When deciding which of the Virtual Meeting Room or Virtual Auditorium's aliases will be used to

Pexip Infinity Administrator GuideManaging conferences
Automatically dialing out to a participant from a conference
© 2016 Pexip AS Version 12.a May 2016 Page 206 of 369
identify the call, Pexip Infinity will select the first in the list that is valid for the selected call protocol. So if your Virtual Meeting Room has two aliases, the first meet.sales and the second [email protected], when you place a call to an ADP over SIP it will show as coming from meet.sales because that is the first valid SIP address in the list. However, endpoints may not always be able to return a call to this alias because it is missing the domain. For this reason, if you want ADPs to be able to return calls to Virtual Meeting Rooms and Virtual Auditoriums, we recommend that you list the most routable aliases first when assigning them to these services. Note that you can also use external policy to specify the source alias for calls to ADPs.
Keeping a conference aliveAutomatically Dialed Participants with a role of Host may or may not prevent a conference from being automatically terminated, depending on their Keep conference alive setting and whether any other ADPs remain in the conference. For more information, see Automatically ending a conference.
ConfigurationTo configure a Virtual Meeting Room or Virtual Auditorium to automatically dial out to a participant when a conference starts:
1. Go to Service configuration > Automatically dialed participants.
2. Select Add Automatically Dialed Participant.You will be taken to the Add Automatically Dialed Participant page.
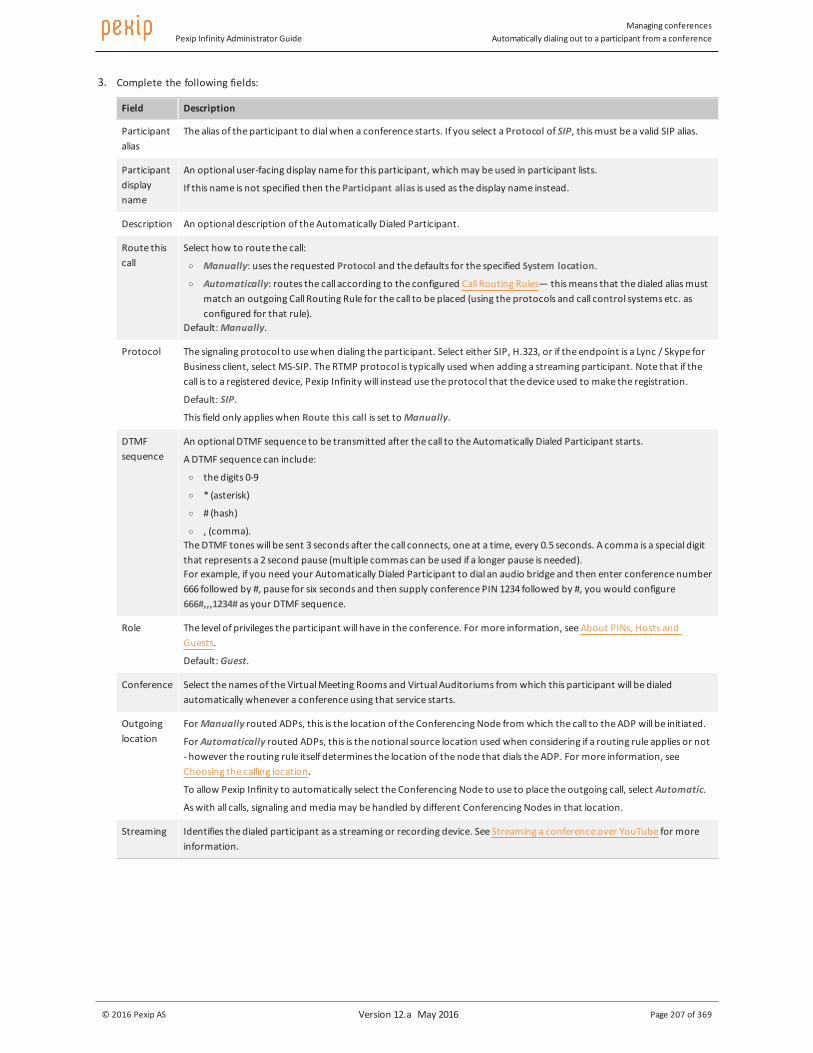
Pexip Infinity Administrator GuideManaging conferences
Automatically dialing out to a participant from a conference
© 2016 Pexip AS Version 12.a May 2016 Page 207 of 369
3. Complete the following fields:
Field Description
Participant alias
The alias of the participant to dial when a conference starts. If you select a Protocol of SIP, this must be a valid SIP alias.
Participant display name
An optional user-facing display name for this participant, which may be used in participant lists.
If this name is not specified then the Participant alias is used as the display name instead.
Description An optional description of the Automatically Dialed Participant.
Route this call
Select how to route the call:
o Manually: uses the requested Protocol and the defaults for the specified System location.
o Automatically: routes the call according to the configured Call Routing Rules— this means that the dialed alias must match an outgoing Call Routing Rule for the call to be placed (using the protocols and call control systems etc. as configured for that rule).
Default: Manually.
Protocol The signaling protocol to use when dialing the participant. Select either SIP, H.323, or if the endpoint is a Lync / Skype for Business client, select MS-SIP. The RTMP protocol is typically used when adding a streaming participant. Note that if the call is to a registered device, Pexip Infinity will instead use the protocol that the device used to make the registration.
Default: SIP.
This field only applies when Route this call is set to Manually.
DTMF sequence
An optional DTMF sequence to be transmitted after the call to the Automatically Dialed Participant starts.
A DTMF sequence can include:
o the digits 0-9
o * (asterisk)
o # (hash)
o , (comma). The DTMF tones will be sent 3 seconds after the call connects, one at a time, every 0.5 seconds. A comma is a special digit that represents a 2 second pause (multiple commas can be used if a longer pause is needed).For example, if you need your Automatically Dialed Participant to dial an audio bridge and then enter conference number 666 followed by #, pause for six seconds and then supply conference PIN 1234 followed by #, you would configure 666#,,,1234# as your DTMF sequence.
Role The level of privileges the participant will have in the conference. For more information, see About PINs, Hosts and Guests.
Default: Guest.
Conference Select the names of the Virtual Meeting Rooms and Virtual Auditoriums from which this participant will be dialed automatically whenever a conference using that service starts.
Outgoing location
For Manually routed ADPs, this is the location of the Conferencing Node from which the call to the ADP will be initiated.
For Automatically routed ADPs, this is the notional source location used when considering if a routing rule applies or not - however the routing rule itself determines the location of the node that dials the ADP. For more information, see Choosing the calling location.
To allow Pexip Infinity to automatically select the Conferencing Node to use to place the outgoing call, select Automatic.
As with all calls, signaling and media may be handled by different Conferencing Nodes in that location.
Streaming Identifies the dialed participant as a streaming or recording device. See Streaming a conference over YouTube for more information.

Pexip Infinity Administrator GuideManaging conferences
Automatically dialing out to a participant from a conference
© 2016 Pexip AS Version 12.a May 2016 Page 208 of 369
Field Description
Keep conference alive
Determines whether the conference will continue when all other non-ADP participants have disconnected.
Yes: the conference will continue to run until this participant has disconnected (applies to Hosts only).
If multiple: the conference will continue to run as long as there are two or more If multiple participants and at least one of them is a Host.
No: the conference will be terminated automatically if this is the only remaining participant.
Default: If multiple.
For streaming participants, we recommend that this option is set to No.
For more information, see Automatically ending a conference.
Call capability
Allows you to limit the media content of the call. The participant being called will not be able to escalate beyond the selected capability. For more information, see Controlling media capability.
Default: Main video + presentation.
This field only applies when Route this call is set to Manually.
4. Select Save.

Pexip Infinity Administrator GuideManaging conferences
Manually dialing out to a participant from a conference
© 2016 Pexip AS Version 12.a May 2016 Page 209 of 369
Manually dialing out to a participant from a conferenceThe Pexip Infinity platform allows you to manually dial out to participants from a conference, on an ad-hoc basis. When you dial out to a participant in this way, a call is placed to their endpoint from the Virtual Meeting Room or Virtual Auditorium. If and when they answer the call, they will join the conference as either a Host or Guest, depending on the option that you selected. Participants joining the conference in this way will not go through the IVR screen and will not have to enter a PIN.
The participant could also take the form of a dedicated multimedia stream to enterprise CDN (Content Delivery Network) streaming and recording services such as Wowza, Adobe, VBrick, Abiliteam, Qumu and Azure Media Services, and to public streaming services such as YouTube. Any Pexip conference can be streamed as a live event to an unlimited number of viewers, and can automatically be recorded and stored for later consumption. For more information, see Streaming a conference over YouTube.
Call Routing Rules may be applied when dialing out from a conference to a new participant:
l Call Routing Rules are applied if automatic routing is selected when placing the call — this means that the dialed alias must match an outgoing Call Routing Rule for the call to be placed (using the protocols and call control systems etc. as configured for that rule).
l For manual routing, Pexip Infinity always attempts to route the call according to the requested protocol and media capabilities.
The ability to manually dial out to a participant is enabled by default. You can disable this setting by going to the Global settings page (Platform configuration > Global settings) and clearing the Enable outbound calls checkbox (note that this will also disable calls made via the Pexip Distributed Gateway).
Both Administrators and conference hosts can manually add a participant to a conference. Administrators can do so Using the Administrator interface, and hosts can do so Using Infinity Connect. These options are described below. The Pexip Infinity API can also be implemented by third party applications to dial a participant into a conference - for more information, see the Pexip Infinity Management API documentation.
You can also configure a Virtual Meeting Room or Virtual Auditorium so that one or more participants are dialed out to automatically whenever a conference starts. For more information, see Automatically dialing out to a participant from a conference.
If your environment includes a PSTN gateway or uses an ITSP (Internet telephony service provider), consider the potential for toll fraud if you have Call Routing Rules that can route calls to the PSTN gateway or ITSP, or if you allow conference participants to dial out to other participants via the PSTN gateway or ITSP. See PSTN gateways and toll fraud for more information.
Using the Administrator interfaceYou can use the Pexip Infinity Administrator interface to dial out to a participant from a Virtual Meeting Room or Virtual Auditorium. If and when the call is answered, that endpoint will join the conference.
To dial out to a participant using the Administrator interface:
1. Select the Virtual Meeting Room or Virtual Auditorium to dial the participant from. You can do this in any of the following ways:
o Go to Service configuration > Virtual Meeting Rooms and select the name of the Virtual Meeting Room.
o Go to Service configuration > Virtual Auditoriums and select the name of the Virtual Auditorium.
o If the conference that you wish to dial out from is already in progress, go to Status > Conferences and select the name of the Virtual Meeting Room or Virtual Auditorium being used.
2. At the bottom left of the screen, select Dial out to participant. 3. Complete the following fields:
Field Description
System location
Select the system location from which the call will be placed. If there is more than one Conferencing Node in that location, Pexip Infinity will choose the most appropriate.
The system location determines which H.323 gatekeeper or SIP proxy to use to route the call.
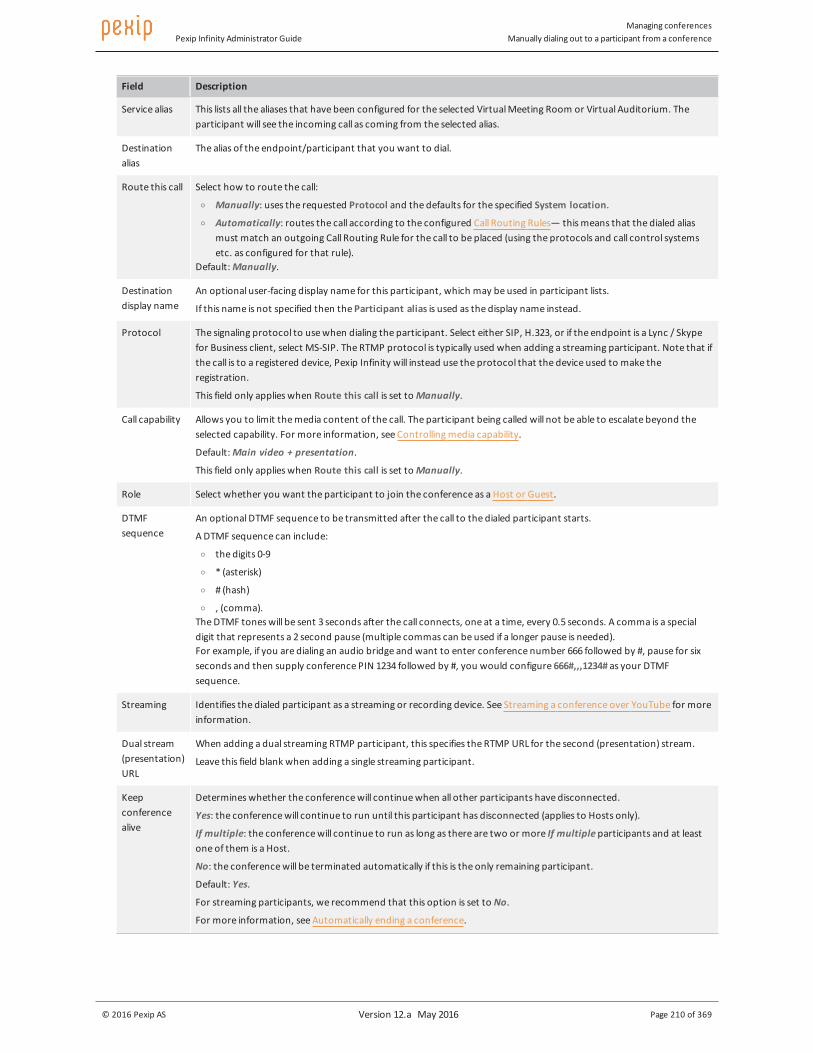
Pexip Infinity Administrator GuideManaging conferences
Manually dialing out to a participant from a conference
© 2016 Pexip AS Version 12.a May 2016 Page 210 of 369
Field Description
Service alias This lists all the aliases that have been configured for the selected Virtual Meeting Room or Virtual Auditorium. The participant will see the incoming call as coming from the selected alias.
Destination alias
The alias of the endpoint/participant that you want to dial.
Route this call Select how to route the call:
o Manually: uses the requested Protocol and the defaults for the specified System location.
o Automatically: routes the call according to the configured Call Routing Rules— this means that the dialed alias must match an outgoing Call Routing Rule for the call to be placed (using the protocols and call control systems etc. as configured for that rule).
Default: Manually.
Destination display name
An optional user-facing display name for this participant, which may be used in participant lists.
If this name is not specified then the Participant alias is used as the display name instead.
Protocol The signaling protocol to use when dialing the participant. Select either SIP, H.323, or if the endpoint is a Lync / Skype for Business client, select MS-SIP. The RTMP protocol is typically used when adding a streaming participant. Note that if the call is to a registered device, Pexip Infinity will instead use the protocol that the device used to make the registration.
This field only applies when Route this call is set to Manually.
Call capability Allows you to limit the media content of the call. The participant being called will not be able to escalate beyond the selected capability. For more information, see Controlling media capability.
Default: Main video + presentation.
This field only applies when Route this call is set to Manually.
Role Select whether you want the participant to join the conference as a Host or Guest.
DTMF sequence
An optional DTMF sequence to be transmitted after the call to the dialed participant starts.
A DTMF sequence can include:
o the digits 0-9
o * (asterisk)
o # (hash)
o , (comma). The DTMF tones will be sent 3 seconds after the call connects, one at a time, every 0.5 seconds. A comma is a special digit that represents a 2 second pause (multiple commas can be used if a longer pause is needed).For example, if you are dialing an audio bridge and want to enter conference number 666 followed by #, pause for six seconds and then supply conference PIN 1234 followed by #, you would configure 666#,,,1234# as your DTMF sequence.
Streaming Identifies the dialed participant as a streaming or recording device. See Streaming a conference over YouTube for more information.
Dual stream (presentation) URL
When adding a dual streaming RTMP participant, this specifies the RTMP URL for the second (presentation) stream.
Leave this field blank when adding a single streaming participant.
Keep conference alive
Determines whether the conference will continue when all other participants have disconnected.
Yes: the conference will continue to run until this participant has disconnected (applies to Hosts only).
If multiple: the conference will continue to run as long as there are two or more If multiple participants and at least one of them is a Host.
No: the conference will be terminated automatically if this is the only remaining participant.
Default: Yes.
For streaming participants, we recommend that this option is set to No.
For more information, see Automatically ending a conference.

Pexip Infinity Administrator GuideManaging conferences
Manually dialing out to a participant from a conference
© 2016 Pexip AS Version 12.a May 2016 Page 211 of 369
4. Select Dial out to participant.
A message Initiated dial out to participant will appear at the top of the screen.
To confirm whether the participant has joined the conference:
1. Go to Status > Conferences. 2. Select the name of the Virtual Meeting Room or Virtual Auditorium.
3. Select the Participants tab.
The participant will appear in the list.
Using Infinity ConnectIf you have Host privileges, you can use the Infinity Connect desktop client, the Infinity Connect Web App, or the Infinity Connect Mobile client for Android to dial out to participants from the Virtual Meeting Room or Virtual Auditorium you are in. When you use this feature, a call is placed to the participant and if and when they answer the call, they will join the conference directly (they will not go through the IVR screen and will not have to enter a PIN).
To dial out to a participant using Infinity Connect, from within a Virtual Meeting Room or Virtual Auditorium:
1. At the top left of the screen, select the menu icon and then select Add a new participant. 2. At the prompt, enter the address of the person you want to dial.
3. If you want to use a protocol other than SIP (the default) select either H.323 or Lync/Skype. RTMP is typically used when connecting to a streaming or recording service.
4. If you want to use a protocol other than SIP (the default) select either Automatic, H.323, Lync/Skype or RTMP.Automatic means that the protocol will be selected according to how your administrator or service provider has configured the system.RTMP is typically used when connecting to a streaming or recording service.
Note that the Automatic option currently only applies to Infinity Connect Web App clients. To support the use of Automatic you must configure some appropriate Call Routing Rules that apply to Outgoing calls from a conference. If required, you can then also change the default protocol presented to users of the Infinity Connect Web App clients by configuring the defaultDialOutProtocol setting in the settings.js file (see Application and default user settings (settings.js) for more information).
5. Select whether you want the participant to have Host or Guest privileges.
6. Select OK.
A call will be placed from the Virtual Meeting Room or Virtual Auditorium to the participant and they will appear in the participant
list with the "calling" icon next to their avatar while their endpoint is ringing. If and when the participant answers the call they will join the conference; if they do not answer, or do not accept the call, they will disappear from the participant list.
Using the Infinity Connect Mobile client for iOSIn order to use this feature:
l You must have Host privileges.
l In some cases, your administrator must have enabled this functionality. See Enabling and disabling SIP, H.323, WebRTC and RTMP for more information.
l You must have agreed to allow the Infinity Connect Mobile client to access your contacts.
You can use the Infinity Connect Mobile client to dial out to participants from the Virtual Meeting Room or Virtual Auditorium you are in. When you use this feature, a call is placed to the participant and if and when they answer the call, they will join the conference as a Guest participant (or as a normal participant, if the conference has no PIN). Participants joining the conference in this way will not go through the IVR screen and will not have to enter a PIN.
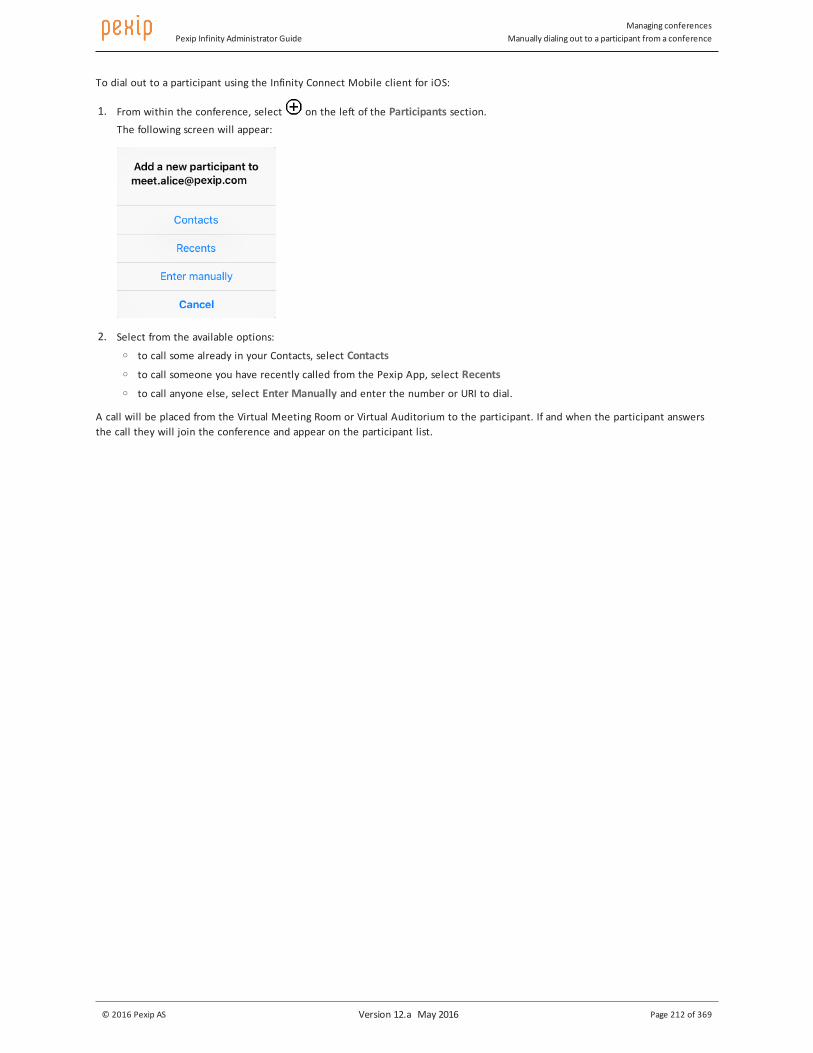
Pexip Infinity Administrator GuideManaging conferences
Manually dialing out to a participant from a conference
© 2016 Pexip AS Version 12.a May 2016 Page 212 of 369
To dial out to a participant using the Infinity Connect Mobile client for iOS:
1. From within the conference, select on the left of the Participants section.The following screen will appear:
2. Select from the available options:
o to call some already in your Contacts, select Contacts o to call someone you have recently called from the Pexip App, select Recents o to call anyone else, select Enter Manually and enter the number or URI to dial.
A call will be placed from the Virtual Meeting Room or Virtual Auditorium to the participant. If and when the participant answers the call they will join the conference and appear on the participant list.

Pexip Infinity Administrator GuideManaging conferences
Streaming a conference over YouTube
© 2016 Pexip AS Version 12.a May 2016 Page 213 of 369
Streaming a conference over YouTube
Pexip Infinity can output a dedicated RTMP multimedia stream to enterprise CDN (Content Delivery Network) streaming and recording services such as Wowza, Adobe, VBrick, Abiliteam, Qumu and Azure Media Services, and to public streaming services such as YouTube. Any Pexip conference can be streamed as a live event to an unlimited number of viewers, and can automatically be recorded and stored for later consumption.
If your conference contains presentation content, you have the option of setting up dual streams so that you can output the main video and presentation content channels separately. This means that viewers can simultaneously access the main video stream of the participants and a separate presentation content stream.
The administrator or meeting Host has to decide whether to set up the conference with a single RTMP stream or with dual RTMP streams.
When a conference is single streamed:
l Viewers are automatically switched between the main video stream and the presentation stream whenever someone is presenting.
l When someone is presenting, the video stream of the active speaker is shown in a small window in the upper right corner of the presentation.
l The same single stream (with automatic switching between main video and presentation streams) can be made available later as a recording.
When a conference is dual streamed:
l Viewers have to manually switch between the main video stream and the presentation stream, according to their preference. (However, viewers could optionally view the streams in two separate windows — one window showing the main video stream and the other window showing the presentation stream.)
l The main video stream is not embedded as a small window within the presentation stream.
l If nobody is currently presenting, Pexip Infinity sends a placeholder image on the presentation stream.
l If the event is made available later as a recording, it can only be played back as two completely separate streams. There is no synchronization between the streams.
Note that your firewall needs to allow outbound traffic from the Conferencing Node to TCP port 1935 on the RTMP streaming server.
This guide explains how an administrator or meeting Host can stream a Pexip conference over YouTube.
YouTube prerequisitesBefore the administrator or meeting Host can obtain an RTMP streaming URL from YouTube, they must ensure that they have a verified YouTube account, and that the account is enabled for live events.
1. From your YouTube account settings page, select View additional features (www.youtube.com/features).
2. If your Account status is not verified, select Verify and follow the YouTube instructions.
3. If Live events is not enabled, click Enable.
Setting up streamingTo stream a conference you must assign a live streaming URL via YouTube, and then add it as a participant in your Pexip conference. There are two ways in which you can obtain an RTMP streaming URL from YouTube:
l Use Pexip's own service at http://youtube.pexip.com. This method simplifies the generation process and automatically uses the appropriate settings. However, it is only suitable if you want to set up a single stream.

Pexip Infinity Administrator GuideManaging conferences
Streaming a conference over YouTube
© 2016 Pexip AS Version 12.a May 2016 Page 214 of 369
l Generate your URL directly from within your YouTube account at www.youtube.com/my_live_events. You must use this method if you want to set up dual streams within the same broadcast (i.e. a "second camera" in YouTube terms).
When generating a URL directly from within YouTube, the Privacy setting is Public by default, so we recommend that you change this to Unlisted.
Note that the live stream will have a 20-30 second delay. This is because YouTube buffers the stream so that it can tolerate brief connection losses and to ensure a good consistent experience. This is standard streaming behavior.
The appropriate procedures for adding single or dual-streamed participants to your conference are described below.
Setting up and adding a single streaming participantThis procedure explains how to use Pexip's own service to request a URL for a single YouTube RTMP stream on your behalf, and how to add that stream as a participant to your Pexip conference.
Obtaining the YouTube streaming URL
1. Go to http://youtube.pexip.com.
2. Enter a Video Name — this is the name that will appear in YouTube.
3. Select a Privacy level: o Unlisted: viewers must know the streaming URL to see the stream.
o Public: anybody can find the stream on YouTube. This is not recommended unless you are streaming very public content.
o Private: restricts access to only people that you have explicitly allowed to view the stream.
Default: Unlisted.
4. Select Get url.
5. If you are not already signed in to a Google Account, you must either sign in or select an account.
6. The streaming URL will be generated and displayed.
If you receive a "The user is not enabled for live streaming" error message, this means that you either do not have a verified YouTube account, or that the account is not enabled for live events.
7. Select Copy to put the rtmp:// address onto your clipboard. Leave this browser window open.
Adding the participant URL and enabling streaming
Now that you have the YouTube streaming URL, you can add it as a participant in your Pexip conference and start streaming.
1. Add the YouTube streaming URL as a new RTMP participant in the Virtual Meeting Room you want to stream. a. Join the conference via Infinity Connect.
(Note that administrators can also use the Pexip Infinity Administrator interface to add RTMP streaming participants.)
b. Select Add a new participant.
c. Select a protocol of RTMP.

Pexip Infinity Administrator GuideManaging conferences
Streaming a conference over YouTube
© 2016 Pexip AS Version 12.a May 2016 Page 215 of 369
d. Paste the streaming URL as the address to dial.
e. Select a role. We recommend selecting Guest (so that the streaming participant is not shown to other Guests in a Virtual Auditorium layout, and so that it does not keep a conference alive when all other Hosts have left).
f. Select OK.
Pexip Infinity will dial out to YouTube. The streaming participant will appear in the participant list with a streaming badge
and a name that is typically in the format a.rtmp.youtube.com, and a streaming icon is displayed to the right of the layout.Note that administrators can also add a streaming participant via the Administrator interface (go to Status > Conference, select the conference and then select Dial out to participant).
2. Wait for a few seconds, then from within your YouTube account, go to your Live Control Room. (You can select the green link below the rtmp:// address that you copied when using Pexip's URL generator.)
3. Select Preview and confirm.
After a few seconds you will be able to Play the Preview stream.Note that this is your preview only — at this stage the stream is not being broadcast. The stream has a 20-30 second delay.
4. Click Start streaming and confirm, to start broadcasting.
5. You are now streaming to anyone who is allowed to access or find your streams (according to your Privacy settings). You can optionally Play the Public View of the stream.
6. You can select View on Watch Page (top right of your Live Control Room page) to see the normal YouTube view. This is how it appears to users who are watching the live stream and is the URL that you should share.
Setting up and adding a dual streaming participantThis procedure explains how to use YouTube to generate a YouTube streaming URL with dual streams, and how to add that stream as a participant to your Pexip conference.
Note that the YouTube Privacy setting is Public by default, so we recommend that you change this to Unlisted.

Pexip Infinity Administrator GuideManaging conferences
Streaming a conference over YouTube
© 2016 Pexip AS Version 12.a May 2016 Page 216 of 369
Obtaining the YouTube streaming URL
To generate your URL directly from within YouTube:
1. In your YouTube account go to Video Manager > Live Events (www.youtube.com/my_live_events).
2. Select New live event (at the top right of the page).
3. Enter the Basic info:
Title The title of the video.
Start time Set the start time to 30 minutes in the past (so that it is available instantly).
Privacy Select a privacy level. We recommend Unlisted, which means that viewers must know the streaming URL to see the stream.
Type Select Custom.
4. Select Create event. You are taken to the Ingestion Settings tab. 5. Configure the main video stream:
a. Select Basic ingestion and select a bit rate of 1500 Kbps - 4000 Kbps (720p).
b. From the Select your encoder drop-down list, select Other encoders.
c. Optionally, you can upload a Thumbnail for this stream.

Pexip Infinity Administrator GuideManaging conferences
Streaming a conference over YouTube
© 2016 Pexip AS Version 12.a May 2016 Page 217 of 369
6. Configure the second stream:
a. Select Add a Camera (next to the Main Camera tab).
b. Enter the Camera Name e.g. "Training presentation".
c. Select Basic ingestion and select a bit rate of 1500 Kbps - 4000 Kbps (720p).
d. From the Select your encoder drop-down list, select Other encoders.
e. Optionally, you can upload a Thumbnail for this stream.

Pexip Infinity Administrator GuideManaging conferences
Streaming a conference over YouTube
© 2016 Pexip AS Version 12.a May 2016 Page 218 of 369
7. Select Save changes.
8. Produce the RTMP URL for your primary video stream as Primary Server URL/Stream Name of the Main Camera:
a. Go to the Main Camera tab.
b. Take the Primary Server URL, for example rtmp://a.rtmp.youtube.com/live2.
c. Append a / (slash).
d. Then append the Stream Name, for example alice.b3s7-qz6v-ud09-958y.In this example, the RTMP URL is rtmp://a.rtmp.youtube.com/live2/alice.b3s7-qz6v-ud09-958y.You will use this RTMP URL as the first address of the new participant in your Pexip conference.
9. Produce the RTMP URL for your presentation stream as Primary Server URL/Stream Name of Camera 2:
a. Go to the Camera 2 tab.
b. Take the Primary Server URL, for example rtmp://a.rtmp.youtube.com/live2.
c. Append a / (slash).
d. Then append the Stream Name, for example alice.gtxc-uxy1-babd-4cqz.In this example, the RTMP URL is rtmp://a.rtmp.youtube.com/live2/alice.gtxc-uxy1-babd-4cqz.You will use this RTMP URL as the second stream address of the new participant in your Pexip conference.

Pexip Infinity Administrator GuideManaging conferences
Streaming a conference over YouTube
© 2016 Pexip AS Version 12.a May 2016 Page 219 of 369
Adding the participant URL and enabling streaming
Now that you have the dual YouTube streaming URLs, you can add them as a participant in your Pexip conference and start streaming.
1. Using Infinity Connect, add the YouTube streaming URL as a new RTMP participant in the Virtual Meeting Room you want to stream. a. Join the conference via Infinity Connect.
(Note that administrators can also use the Pexip Infinity Administrator interface to add RTMP streaming participants.)
b. Select Add a new participant.
c. Select a protocol of RTMP.
d. Paste the streaming URL of the primary video stream (from the Main Camera tab in the YouTube Ingestion settings) as the address to dial.
e. Select Dual Stream and paste the second presentation streaming URL (from the Camera 2 tab) into the address field that appears.
f. Select a role. We recommend selecting Guest (so that the streaming participant is not shown to other Guests in a Virtual Auditorium layout, and so that it does not keep a conference alive when all other Hosts have left).
g. Select OK.
Pexip Infinity will dial out to YouTube. The streaming participant will appear in the participant list with a streaming badge
and a name that is typically in the format a.rtmp.youtube.com, and a streaming icon is displayed to the right of the layout. (Only one streaming participant is shown, even if you have selected Dual Stream.)
2. Wait for a few seconds, then from within your YouTube account, go to your Live Control Room.
3. Select Preview and confirm.
After a few seconds you will be able to Play the Preview stream (of the primary video stream).Note that this is your preview only — at this stage the stream is not being broadcast. The stream has a 20-30 second delay.
4. Click Start streaming and confirm, to start broadcasting.

Pexip Infinity Administrator GuideManaging conferences
Streaming a conference over YouTube
© 2016 Pexip AS Version 12.a May 2016 Page 220 of 369
You do not have to preview/start the "Camera 2" presentation stream.
5. You are now streaming to anyone who is allowed to access or find your streams (according to your Privacy settings). You can optionally Play the Public View of the stream.
6. You can select View on Watch Page (top right of your Live Control Room page) to see the normal YouTube view. This is how it appears to users who are watching the live stream and is the URL that you should share.When you have dual streams, YouTube viewers can switch views between the main camera and the second presentation stream by selecting the thumbnails above the main window.
If nobody is currently presenting, Pexip Infinity sends a placeholder image on the presentation stream.
Stopping streamingThis procedure explains how to stop streaming your conference (for either single streamed or dual streamed conferences).
To stop streaming your Pexip conference:
1. Disconnect the streaming participant from the Virtual Meeting Room.
o When using Infinity Connect: the streaming participant appears in the participant list with a streaming badge and a name that is typically in the format a.rtmp.youtube.com.
o When using the Administrator interface (Status > Conference, and then select the conference): the participant alias is the streaming URL with an alias typically in the format rtmp://a.rtmp.youtube.com.<etc.>.
2. The Live Control Room will report that the stream status has No Data. and the YouTube public stream will now display:
Note that while the stream is still open in your YouTube Live Control Room, you can restart streaming by adding the RTMP URL to the conference again as a new participant.
3. In your YouTube Live Control Room, select Stop Streaming and confirm.
4. A few minutes after your stream has ended, it will appear under Video Manager > Videos.From here you can delete the video if you do not want it to be available for later use, or you can change its privacy settings. You can also use the YouTube video editor to combine multiple recordings, or remove parts of a recording before you publish it etc. (If the video is slow to appear in the Videos list, you can also check its content by going to Video Manager > Live Events and viewing all Completed events.)Note that if you have produced two recordings (because you selected Dual Stream), you must manage each recording separately. When playing back the recordings, YouTube does not provide any mechanism to synchronize them to each other.
Adding a presentation stream when single streaming is already in progressThis procedure explains how to change an existing single streamed RTMP participant into a dual streamed participant.

Pexip Infinity Administrator GuideManaging conferences
Streaming a conference over YouTube
© 2016 Pexip AS Version 12.a May 2016 Page 221 of 369
YouTube ingestion settings cannot be changed after streaming has started. Therefore the only way to add a separate presentation stream after streaming has already started is set up a new, second stream (rather than a second camera on the existing stream) for the presentation channel.
Unlike setting up dual streams from the outset, this time the two streams are completely separate YouTube events and must be viewed in separate browser windows/tabs.
If you have already added a single stream participant to an in-progress conference but want to change this to a dual stream:
1. Go to http://youtube.pexip.com and obtain a second streaming URL. Enter a Video Name (e.g. "Alice's training video presentation content" and select GET url.
2. From within Infinity Connect, ensure that you have a copy of the existing streaming URL for the video channel:
o The streaming participant appears in the participant list with a streaming badge and a name that is typically in the format a.rtmp.youtube.com.
o You can select the participant from the participant list and copy the rtmp URL/alias. 3. Disconnect the existing streaming participant from the Virtual Meeting Room.
Note: do not stop streaming in the YouTube Live Control Room.
4. Add the streaming participant back in to the conference again, but this time include the second streaming URL:
a. Select Add a new participant.
b. Select a protocol of RTMP and a role (we recommend Guest). c. Enter the original, existing streaming URL (from step 2).
d. Select Dual Stream and enter the second streaming URL (from step 1).
e. Select OK.(Note that administrators can also use the Pexip Infinity Administrator interface to add RTMP streaming participants.)
5. Start broadcasting the second stream in YouTube:
a. Go to the Live Control Room for the second stream.(You can select the green link below the rtmp:// address on the Pexip URL generator screen from step 1.)
b. Select Preview and confirm.
c. Play the Preview stream.
d. Click Start streaming and confirm, to start broadcasting the presentation stream.
6. You are now streaming the presentation channel in addition to the original video channel to anyone who is allowed to access or find your streams (according to your Privacy settings). You can optionally Play the Public View of the presentation stream.
7. You can select View on Watch Page (top right of your Live Control Room page) to see the normal YouTube view and to obtain the URL of the presentation stream that you should share with the conference viewers, alongside the existing video stream URL.
Note that the original conference stream will experience a break in content for the period of time between disconnecting the existing streaming participant from the Virtual Meeting Room and adding it back in again as one of the dual streamed participants. The YouTube Live Control Room for the original stream will report that no data is being received, but this will be resolved automatically when the streaming participant is added back into the conference (providing the original streaming URL is used).

Pexip Infinity Administrator GuideManaging conferences
Locking a conference and allowing participants to join a locked conference
© 2016 Pexip AS Version 12.a May 2016 Page 222 of 369
Locking a conference and allowing participants to join a locked conferenceIf you want to prevent any further participants from joining a conference after it has started, you can lock it by using the Administrator interface, using Infinity Connect, or using DTMF. After a conference has been locked, participants who are attempting to join the conference can be allowed in individually by participants already in the conference.
The impact of locking depends on whether or not the Virtual Meeting Room or Virtual Auditorium being used has a Host PIN.
If the service does not have a Host PIN:
l Participants will be able to join the conference until it is locked.
l After the conference has been locked, any further participants who attempt to join the conference (including any Automatically Dialed Participants and manually-invited participants) will be held at the Waiting for conference host screen.
l All participants who are already in the conference will be notified of any participants who are attempting to join the locked conference, and will be able to allow the waiting participants to join. Notifications will take the form of an on-screen message (visible to Infinity Connect clients only) and a customizable audio message (audible to all participants already in the conference) for each participant attempting to join.
l When the conference is unlocked, any participants who are still waiting will automatically join the conference.
If the service has a Host PIN:
l Host and Guest participants will be able to join the conference until it is locked.
l After the conference has been locked, participants who enter the Host PIN will be able to join the conference immediately - locking does not apply to them.
l After the conference has been locked, Guest participants (including any Automatically Dialed Participants and manually-invited participants who have been given a role of Guest) will be held at the Waiting for conference host screen.
l All Host participants who are already in the conference will be notified of any Guest participants who are attempting to join the locked conference, and will be able to allow the waiting Guest participants to join. Notifications will take the form of an on-screen message (visible to Infinity Connect clients only) and a customizable audio message (audible to all participants already in the conference) for each participant attempting to join.
l When the conference is unlocked, any Guest participants who are still waiting will automatically join the conference.
Locking using the Administrator interfaceTo lock or unlock a conference from the Administrator interface:
1. Log into the Pexip Infinity Administrator interface.
2. Go to Status > Conferences.
3. From the Service name column, select the conference you want to lock or unlock.
4. At the bottom left of the page, select Lock conference or Unlock conference as appropriate.
Locking using Infinity ConnectHost participants using Infinity Connect can lock and unlock the conference they are in by clicking on the conference control menu
and selecting Lock conference or Unlock conference as appropriate:
A "locked" icon will appear next to the conference avatar to indicate that the conference is currently locked.
Locking using DTMFIf DTMF controls have been enabled, Host participants can lock and unlock the conference using DTMF. The default DTMF entry to do this is *7 but this may have been customized. For more information, see Using DTMF to control a conference.

Pexip Infinity Administrator GuideManaging conferences
Locking a conference and allowing participants to join a locked conference
© 2016 Pexip AS Version 12.a May 2016 Page 223 of 369
Allowing waiting participants to join a locked conferenceWhen a new participant attempts to join a locked conference, Host participants in the conference who are using Infinity Connect
are notified that the participant is waiting to join, and see a red "waiting" icon next to the participant's avatar. To allow the
participant to join the locked conference they can click on the green telephone icon next to the participant's name:
In the above example, Bob is waiting to join Alice's locked VMR. Alice is a Host, so can let him join at any time by clicking on the green telephone icon next to Bob's name.
Rejecting a request to join a locked conferenceIf a Host (who is using Infinity Connect) does not want a waiting participant to join the conference immediately, they have two options:
l To reject the request completely, the Host participant must click on the red telephone icon next to the waiting participant's name. The waiting participant's call will be disconnected.
l To leave the participant at the waiting for Host screen, the Host participant should do nothing. The waiting participant will remain at the waiting screen until:
o a Host participant chooses to let the waiting participant join the conference, or
o the conference is unlocked (after which the waiting participant will automatically join the conference), or
o the conference finishes (after which the waiting participant's call will be disconnected).

Pexip Infinity Administrator GuideManaging conferences
Using DTMF to control a conference
© 2016 Pexip AS Version 12.a May 2016 Page 224 of 369
Using DTMF to control a conferenceHost participants using telephones or SIP/H.323 endpoints that support DTMF can control aspects of the conference by using their keypad.
Default DTMF controlsThe default DTMF controls are:
DTMF digits Control
*7 Toggle conference lock and unlock
*5 Toggle mute and unmute all guests
## Terminate the conference
Changing DTMF controlsThe DTMF digits for each control can be changed on a per-theme basis by editing the themeconfig.json file.
When deciding the digits to be used for each control, you should ensure there is no risk of overlap in situations where one of the digits is not successfully received.
For example, if you used:
l 57 to lock the conference l 75 to mute all guests
l 77 to end the conference
there is a risk that a user could enter 5775 to lock and mute the conference, but due to packet loss the initial digit was not received. In this case the string that is received would be 775, which would be interpreted as 77 and thus a command to terminate the conference.
Disabling DTMF controlsDTMF controls are enabled by default. They can be disabled and enabled on a per-theme basis by editing the themeconfig.json file.

Pexip Infinity Administrator GuideManaging conferences
Enabling and disabling chat
© 2016 Pexip AS Version 12.a May 2016 Page 225 of 369
Enabling and disabling chatConference participants using a variety of clients can chat and share links with other participants who are in the same Virtual Meeting Room or Virtual Auditorium. Supported clients include Microsoft Lync, Skype, and Skype for Business. Chat is also natively supported in Pexip's own Infinity Connect suite. Microsoft Lync / Skype for Business and Infinity Connect clients can also chat when calling each other directly via the Pexip Distributed Gateway.
You enable or disable chat on a platform-wide basis, and it is enabled by default. To disable or re-enable this feature:
1. Go to Platform configuration > Global settings.
2. From within the Connectivity section, deselect or select Enable chat.
When chat is disabled, Infinity Connect clients will not show the chat window.
Providing chat to participants using unsupported clientsConference participants who are not using one of the supported clients will not be able to read or send chat messages. However, if they have access to a web browser they can use the Infinity Connect Web App to join the conference without video or audio. This will give them access to the chat room, as well as the ability to view and share presentations, view the participant list, and (if they are Host participants) control aspects of the conference. For more information on using and administering the Infinity Connect suite of clients, see Introduction to Infinity Connect.

Pexip Infinity Administrator GuideManaging conferences
Restricting call bandwidth
© 2016 Pexip AS Version 12.a May 2016 Page 226 of 369
Restricting call bandwidthThe Pexip Infinity platform allows you to restrict the amount of bandwidth used by each participant when dialed in to a Pexip Infinity service (Virtual Meeting Room, Virtual Auditorium, Virtual Reception) or for Pexip Distributed Gateway calls or other outbound calls that are managed by Call Routing Rules. You can place restrictions on the bandwidth received by participants, sent by participants, or both. The restriction will apply to the total bandwidth of all media (video, audio and presentation) per participant.
Bandwidth restrictions can be configured on a global basis, or on each individual service or routing rule. Settings applied to an individual service will override any global limits that have been applied.
If a Virtual Reception has bandwidth limits, these only apply to participants while they are in the Virtual Reception. When their call is successfully transferred to their selected Virtual Meeting Room or Virtual Auditorium, any bandwidth restrictions for that service will then apply.
Restricting video resolutionsIf you wish to limit video calls to specific resolutions, you should do this using the maximum bandwidth settings, as follows:
To allow resolutions up to... Set the maximum bandwidth to...
Full HD (1080p)* no limit
HD (720p) 1800
SD 960
* You must have also enabled Full HD (1080p).
Applying restrictions to an entire deploymentTo restrict the bandwidth of calls across your entire deployment:
1. Go to Platform configuration > Global settings.
2. In the Service configuration section, enter the desired values in the following fields:
Option Description
Maximum inbound call bandwidth (kbps)
Limits the bitrate of media received by Pexip Infinity from a participant.
Leave blank if you do not want to apply any restrictions.
Note that this restriction will not apply to services or rules that have a Maximum inbound call bandwidth configured.
Maximum outbound call bandwidth (kbps)
Limits the bitrate of media sent from Pexip Infinity to a participant.
Leave blank if you do not want to apply any restrictions.
Note that this restriction will not apply for services or rules that have a Maximum outbound call bandwidth configured.
Applying restrictions to a service or Call Routing RuleTo restrict the bandwidth of calls to a particular service or Call Routing Rule:
1. Go to the relevant service or rule:
o Service configuration > Virtual Meeting Rooms o Service configuration > Virtual Auditoriums o Service configuration > Virtual Receptions o Service configuration > Call routing
2. Either select the name of the service or rule you wish to edit, or click Add.
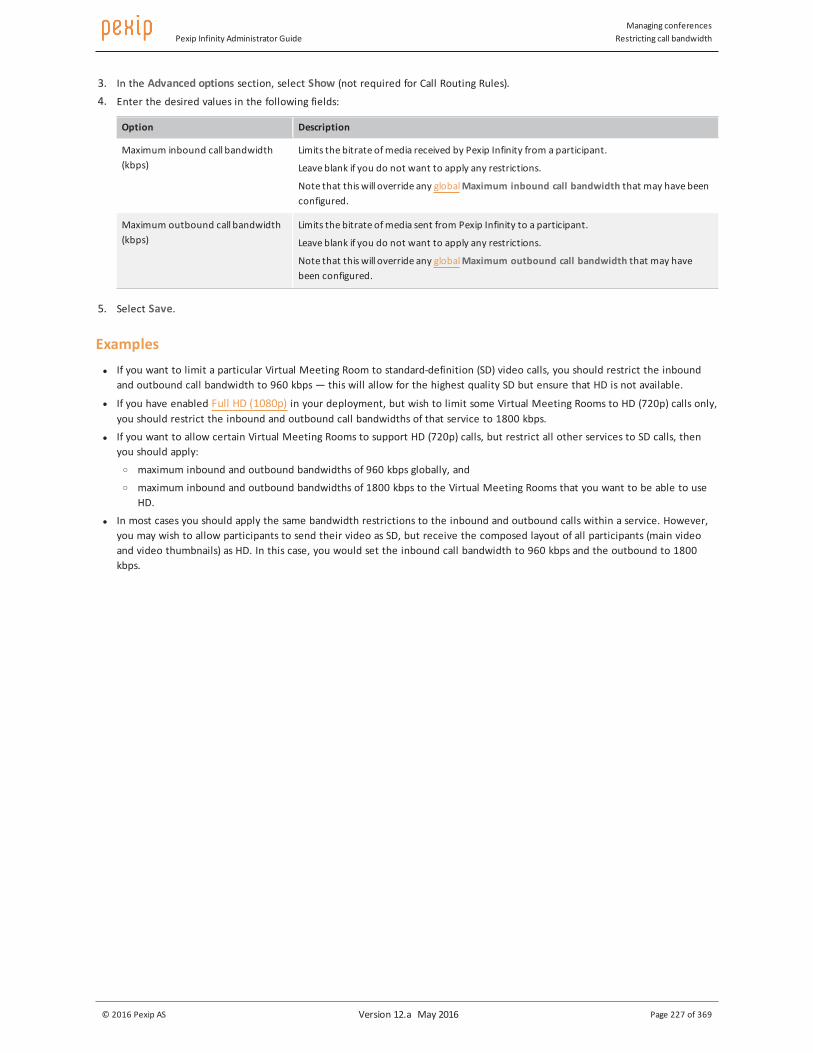
Pexip Infinity Administrator GuideManaging conferences
Restricting call bandwidth
© 2016 Pexip AS Version 12.a May 2016 Page 227 of 369
3. In the Advanced options section, select Show (not required for Call Routing Rules).
4. Enter the desired values in the following fields:
Option Description
Maximum inbound call bandwidth (kbps)
Limits the bitrate of media received by Pexip Infinity from a participant.
Leave blank if you do not want to apply any restrictions.
Note that this will override any global Maximum inbound call bandwidth that may have been configured.
Maximum outbound call bandwidth (kbps)
Limits the bitrate of media sent from Pexip Infinity to a participant.
Leave blank if you do not want to apply any restrictions.
Note that this will override any global Maximum outbound call bandwidth that may have been configured.
5. Select Save.
Examples l If you want to limit a particular Virtual Meeting Room to standard-definition (SD) video calls, you should restrict the inbound
and outbound call bandwidth to 960 kbps — this will allow for the highest quality SD but ensure that HD is not available.
l If you have enabled Full HD (1080p) in your deployment, but wish to limit some Virtual Meeting Rooms to HD (720p) calls only, you should restrict the inbound and outbound call bandwidths of that service to 1800 kbps.
l If you want to allow certain Virtual Meeting Rooms to support HD (720p) calls, but restrict all other services to SD calls, then you should apply:
o maximum inbound and outbound bandwidths of 960 kbps globally, and
o maximum inbound and outbound bandwidths of 1800 kbps to the Virtual Meeting Rooms that you want to be able to use HD.
l In most cases you should apply the same bandwidth restrictions to the inbound and outbound calls within a service. However, you may wish to allow participants to send their video as SD, but receive the composed layout of all participants (main video and video thumbnails) as HD. In this case, you would set the inbound call bandwidth to 960 kbps and the outbound to 1800 kbps.

Pexip Infinity Administrator GuideManaging conferences
Limiting the number of participants
© 2016 Pexip AS Version 12.a May 2016 Page 228 of 369
Limiting the number of participantsYou can place a limit on the number of participants that can access a particular Virtual Meeting Room or Virtual Auditorium at any one time. When such a restriction is in place, after the limit has been reached any new participants will be presented with a capacity exceeded message.
If you change this setting while a conference is in place, participants who have already joined the conference will not be affected, even if the conference is already over capacity. However, after a minute or so (when the change has been replicated to all Conferencing Nodes) any new participants attempting to join the conference will be rejected.
Only participants who are consuming a license are included in the limits. Therefore there are some participants to which the limit does not apply:
l Infinity Connect users who have joined as presentation and control only participants (i.e. they are not sending and receiving audio or video) are not counted when calculating the number of current participants. However:
o If such a participant has elected to receive presentations as full motion, they will be counted as a participant as soon as the presentation starts.
o If the conference has already reached capacity and then an Infinity Connect user attempts to join as a presentation and control only participant, they will be rejected.
Note that presentation streams from standards-based endpoints and Lync / Skype for Business clients are not counted separately; such participants are only counted once regardless of whether or not there is a presentation stream in addition to the main video.
If you do not restrict the number of participants, any number of participants will be able to join the service, subject to the available capacity of your Pexip Infinity deployment.
To limit the number of participants in a particular Virtual Meeting Room or Virtual Auditorium:
1. Go to Service configuration > Virtual Meeting Rooms or Service configuration > Virtual Auditoriums. 2. Select the Virtual Meeting Room or Virtual Auditorium to change.
3. In the Advanced options section, select Show.
4. In the Participant limit field, enter the maximum number of participants you wish to be able to use the service at any one time.
5. Select Save.
Pexip Infinity Administrator GuideManaging conferences
Controllingmedia capability
© 2016 Pexip AS Version 12.a May 2016 Page 229 of 369
Controlling media capabilityCalls consist of three types of media - audio, video, and presentation - each in their own stream. Pexip Infinity allows you to control which types of media can be used for certain calls. This feature allows better resource management and smaller SDPs when calling out to known audio-only devices.
Limiting media capabilityYou can restrict the media capability either on a per-call basis (the call capability) or a per-conference basis (the conference capability), as follows:
Adding a participant to a conference
When dialing out to a participant from within a conference, either manually or automatically, you can choose whether the call will be audio-only, main video only, or main video plus presentation. In such cases, the called participant will not be able to escalate the call (for example, from an audio-only call to video).
Conference-wide limitations
You can apply limits to individual Virtual Meeting Rooms or Virtual Auditoriums, restricting them to be audio-only, main video only, or main video plus presentation. In such cases, participants calling in to the conference with a higher media capability will have their media limited. For example, when a participant dials in over video to an audio-only VMR, their call will be placed as audio-only and they will not subsequently be able to escalate the call.
Using the audio-only setting where appropriate also has the advantage of increasing the overall capacity of your distributed deployment. Each Conferencing Node will reserve an extra connection for each Virtual Meeting Rooms and Virtual Auditoriums it is hosting, to be used for a backplane should that service become distributed (i.e. hosted on more than one Conferencing Node). By default this connection will be equivalent in capacity to an HD call, but if the service has been configured as audio-only it will instead be equivalent to that of an audio-only call. For further information on capacity and how calls consume resources, see Hardware resource allocation rules.
Virtual Receptions
You can limit the conference capability of a Virtual Reception. Any restrictions will be applied to a call while it is accessing the Virtual Reception service. When the call is placed to the destination Virtual Meeting Room or Virtual Auditorium, the capability of that service will be applied instead. For example, if you limit your Virtual Reception to audio-only, when Alice calls it she will not receive any video and will only hear the audio prompts. However, when her call is then placed to the destination VMR which has a capability of main video, she will then be able to send and receive video as well as audio.
Note that SIP calls placed via a Virtual Reception with a capability limit will not be able to escalate beyond that capability, even when they are transferred to their final destination. So if Bob uses his SIP endpoint to make the same call as Alice, he too will only be able to hear the audio prompts while accessing the Virtual Reception, but he will not be able to send or receive video when he reaches the destination VMR.
Pexip Distributed Gateway calls
For calls made using the Distributed Gateway, you can configure the relevant Call Routing Rule to limit the media by selecting an appropriate Call capability setting:
l You can limit the media capability of the outbound call to audio-only, main video only, or main video plus presentation. For example, if the media capability is set to audio-only and Alice makes a video call to Bob, Bob will not be able to answer with video.
l You can match the capability of the outbound call to that of the inbound call by using the Same as incoming call option. This means that if, for example, Alice makes an audio-only call to Bob, Bob will not be able to answer with video.Note that, when using Same as incoming call: o an audio-only call cannot later be escalated to video
o auto-escalation of Lync calls (if enabled) will not work

Pexip Infinity Administrator GuideManaging conferences
Controllingmedia capability
© 2016 Pexip AS Version 12.a May 2016 Page 230 of 369
Automatically escalating Lync / Skype for Business audio callsYou can control how Pexip Infinity handles incoming audio-only calls from Lync / Skype for Business* clients.
By default, Pexip Infinity treats the call as audio-only and does not send video back to the Lync participant.
This behavior can be changed on a platform-wide basis by selecting the Enable Lync auto-escalation setting on the Platform settings > Global configuration page.
When Lync auto-escalation is enabled, Pexip Infinity automatically escalates a Lync audio-only call so that it receives video from a conference (the Lync participant still only sends audio).
The following table shows the differences in conference experience based on the auto-escalation setting when a Lync client makes an audio call to a Pexip conference:
Lync auto-escalation configuration
Disabled (default) Enabled
The Lync participant...
sees the conference avatar image ( by
default) receives a video stream from the conference
Other conference participants see the Lync participant as...
an audio-only participant indicator on the left side of the video window ( by default)
a "no incoming video" indicator when the participant is shown as the main speaker or as a thumbnail ( by
default)
In all cases, the Lync participant can still subsequently escalate to send (and receive) video.
* Note that where this documentation refers to "Lync", it represents both Microsoft Lync and Skype for Business unless explicitly stated otherwise.

Pexip Infinity Administrator GuideManaging conferences
Automatically ending a conference
© 2016 Pexip AS Version 12.a May 2016 Page 231 of 369
Automatically ending a conferenceYou may want to ensure that conferences are automatically terminated in certain situations, in order to preserve resources and to ensure that certain types of participants can't keep the conference alive by remaining in a call indefinitely. For this reason, there are settings that allow you to end a conference in any of the following situations:
l when only Guests remain l when there is only one participant remaining in the conference l when the only participants remaining are ADPs or participants that have been added by an administrator.
These settings are all independent; a conference needs to meet only one of the above criteria in order for it to be terminated automatically on that basis. For example, you may have configured your system to terminate conferences 120 seconds after the last Host leaves, and 60 seconds after there is only one participant remaining. In that case:
l if all but one Guest remains in a conference 30 seconds after the last Hosts has left, the conference will be terminated 60 seconds later (i.e. based on the one participant remaining setting)
l if all but two guests remain 30 seconds after the last Host has left, the conference will be terminated in another 90 seconds (i.e. based on the last Host setting).
When only guests remainPexip Infinity will always terminate a conference a certain period after the last Host disconnects and only Guests remain in the call. By default this period is set to one minute, but it can be set to between 0 seconds (i.e. all Guests are disconnected immediately upon the last Host disconnecting), and one day.
The default is 60 seconds. This should be sufficient time for a Host who has been unintentionally disconnected from a conference to reconnect before the conference is terminated.
To change this setting, go to Platform configuration > Global settings > Guests-only timeout.
When there is only one participant remaining in the conferenceYou can configure the length of time (in seconds) for which a conference will continue with only one participant remaining. This can be set to between 60 seconds and one day, or alternatively you can set it to 0 which means that a conference will never be terminated on the basis that there is a single participant remaining. The default is 0.
When this setting is used to terminate a conference, the type of participant (Host, Guest, ADP, administrator-added, streaming, etc.) is irrelevant; if they are the only participant remaining, the conference will be terminated after the specified time.
To change this setting, go to Platform configuration > Global settings > Last participant backstop timeout.
When the only participants remaining are ADPs and/or administrator-addedIn most cases a conference won't be terminated if a Host participant is present. However, if the only remaining Host participants are:
l Automatically Dialed Participants (ADPs), and/or
l participants who have been added to a conference by an administrator (either from the Administrator interface or using the Management API),
then the conference may or may not be terminated, depending on the participants' Keep conference alive settings and whether any other ADPs or administrator-added participants remain in the conference.
Keeping a conference alive
There are three options for the Keep conference alive setting:
l Yes: if the participant is a Host, the conference will continue to run even when this is the only participant remaining - in other words, they are just like any other Host participant. This is the default used when adding a participant to a conference using the Administrator interface or the using the Management API.

Pexip Infinity Administrator GuideManaging conferences
Automatically ending a conference
© 2016 Pexip AS Version 12.a May 2016 Page 232 of 369
l No: the conference will be automatically terminated if this is the only participant remaining. This is the option we recommend for automated systems that are unable to terminate a call themselves, such as streaming participants.
l If multiple: if two or more ADP or administrator-added participants with the If multiple setting remain in the call and at least one of them is a Host, the conference will not be terminated by Pexip Infinity. However, if all other participants have disconnected and only one ADP or administrator-added participant with the If multiple setting remains, the conference will be terminated by Pexip Infinity. This is to prevent automated systems (such as recording devices) that are unable to terminate a call themselves from keeping the conference alive indefinitely. For this reason, if you are using this option we recommend that each Virtual Meeting Room or Virtual Auditorium has no more than one such automated system as an ADP. A better alternative is to give automated systems a Keep conference alive setting of No (see above). If multiple is the default option when adding an ADP.
If the only remaining participants in a conference are ADPs and/or administrator-dialed participants with a mix of Yes, If multiple and No options, the conference will be terminated unless:
l at least one participant has a Keep conference alive setting of Yes, or l there are two or more participants with a setting of If multiple and at least one of them is a Host.

Pexip Infinity Administrator GuideManaging conferences
Muting a participant's audio
© 2016 Pexip AS Version 12.a May 2016 Page 233 of 369
Muting a participant's audioThere are several ways the audio being sent from a participant can be muted:
l Using the Administrator interface l Using Infinity Connect l Using the Infinity Connect Mobile client for iOS l Using DTMF l The Pexip API can also be implemented by third party applications to mute a participant. For more information, see
Introduction to the management API.
When a participant's audio has been muted, Pexip Infinity will still receive their audio stream but will not add it to the mix being sent to all other participants.
Using the Administrator interfaceTo use the Pexip Infinity Administrator interface to mute a participant's audio:
1. Select the participant. You can do this in two ways:
o Go to Status > Participants and select the participant to mute.
o Go to Status > Conferences and select the Virtual Meeting Room or Virtual Auditorium that the participant is in. From the Participants tab, select the participant to mute.
2. At the bottom right of the screen, select Mute.
Using Infinity ConnectYou must have Host privileges to use this feature.
It is possible to mute a participant's audio using Infinity Connect. Note that this will not mute the participant's speakers, so they will still hear all other unmuted participants, but what they say will not be heard. Host participants can mute an individual participant, or mute all Guests simultaneously.
When Infinity Connect has been used to mute a participant, the Audio administratively muted? column of the Conference status page of the Pexip Infinity Administrator interface will show YES.
Participants will not be aware that they have been muted or unmuted.
Participants can mute and unmute themselves using Infinity Connect, but only if they have Host privileges.
An Infinity Connect user can unmute a participant previously muted by another Infinity Connect user.
Muting an individual participant
To use Infinity Connect to mute an individual participant's audio:
1. From the participant list, select the Mute icon to the right of the participant's name.
A "muted" icon will appear next to the participant's avatar, and the icon will appear next to their name.
2. To unmute the participant, select the Unmute icon .

Pexip Infinity Administrator GuideManaging conferences
Muting a participant's audio
© 2016 Pexip AS Version 12.a May 2016 Page 234 of 369
Muting all Guest participants
To use Infinity Connect to mute the audio coming from all Guests participants:
l From the top left of the screen, select the menu icon and then select Mute all guests:
A "muted" icon will appear next to the conference avatar. All Guest participants currently in the conference, and any Guest
participants who subsequently join the conference, will be muted (indicated by a "muted" icon next to their avatar).
Using the Infinity Connect Mobile client for iOSTo mute or unmute a conference participant's audio:
1. Select the participant.
2. Toggle the Enable audio from participant setting:
Using DTMFIf DTMF controls have been enabled, Host participants can mute and unmute all Guest participants. The default DTMF entry to do this is *5 but this may have been customized. For more information, see Using DTMF to control a conference.

Pexip Infinity Administrator GuideManaging conferences
Disconnecting participants from a conference
© 2016 Pexip AS Version 12.a May 2016 Page 235 of 369
Disconnecting participants from a conferenceThere are several ways to disconnect a participant from a conference: Using the Administrator interface, Using Infinity Connect, Using the Infinity Connect Mobile client for iOS and Using DTMF. Each of these options is described below.
Third-party applications can also use the management API to disconnect participants from a conference. For more information, see Introduction to the management API.
Using the Administrator interface
Disconnecting a single participant
To use the Pexip Infinity Administrator interface to disconnect a single participant from a conference:
1. Select the participant. You can do this in two ways:
o Go to Status > Participants and select the participant to disconnect. o Go to Status > Conferences and select the Virtual Meeting Room or Virtual Auditorium that the participant is in. From the
Participants tab, select the participant to disconnect.
2. At the bottom right of the screen, select Disconnect.
Disconnecting all participants from a conference
To use the Pexip Infinity Administrator interface to disconnect all of the participants from a conference:
1. Go to Status > Conferences and select the Virtual Meeting Room or Virtual Auditorium that the participants are in.
2. At the bottom right of the screen, select Disconnect all.
3. Select Yes, I'm sure to confirm.
All participants will be disconnected and the conference will no longer be active.
Using Infinity ConnectYou must be a Host participant in the conference to use this feature.
Disconnecting a single participant
To use an Infinity Connect client to disconnect a participant:
l From the participant list, select the Disconnect icon to the right of the participant's name.
Disconnecting all participants
To use an Infinity Connect client to disconnect all participants, including yourself:
l From the top left of the screen, select the menu icon and then select Disconnect all participants:
Using the Infinity Connect Mobile client for iOSYou must have Host privileges to use this feature.
To remove a participant from the conference:
1. Select the participant, or left-swipe the participant.
2. Select Disconnect participant.

Pexip Infinity Administrator GuideManaging conferences
Disconnecting participants from a conference
© 2016 Pexip AS Version 12.a May 2016 Page 236 of 369
Using DTMFIf DTMF controls have been enabled, Host participants can terminate the conference by disconnecting all participants, including themselves. The default DTMF entry to do this is ## but this may have been customized. For more information, see Using DTMF to control a conference.

Pexip Infinity Administrator GuideManaging conferences
Registering devices to Pexip Infinity
© 2016 Pexip AS Version 12.a May 2016 Page 237 of 369
Registering devices to Pexip InfinityPexip Infinity acts as a SIP registrar and H.323 gatekeeper.
In addition to SIP and H.323 endpoints, Infinity Connect desktop clients and Infinity Connect Mobile clients for Android can also register to Pexip Infinity Conferencing Nodes. This allows Pexip Infinity to route outbound calls to those registered devices without having to go via a SIP proxy or H.323 gatekeeper, or rely on DNS.
Note that devices do not need to be registered in order to make inbound calls to Pexip Infinity.
For end-user instructions on how to register a device, see Registering your device to receive calls.
Configuration summary for enabling registrationsTo configure Pexip Infinity to accept registrations and route calls to registered devices you must:
1. Ensure that the Pexip Infinity's registrar service is enabled (Service configuration > Registrar).
2. Configure the aliases that devices are allowed to register to Pexip Infinity (Service configuration > Device aliases).
3. Configure appropriate Call Routing Rules (Service configuration > Call routing). Rules are required in all cases except for when using Manual routing to add a participant to a conference.
Each step is described in more detail below, after the explanation of how Pexip Infinity manages registered devices.
How it works
Registering devices
The registrar service on Pexip Infinity is enabled by default. However, a device can only register to Pexip Infinity if the alias it wants to register has been added to Pexip Infinity's list of allowed device aliases (Service configuration > Device aliases).
Device registrations can optionally also be subject to authentication. To enforce authentication, username and password credentials must be included when the alias is added to Pexip Infinity's list of allowed device aliases. When credentials have been included, the device's registration request will be challenged and the device will only be allowed to register with that alias if it provides matching credentials. Pexip Infinity supports Digest authentication only.
A device can register to any Conferencing Node. Pexip Infinity does not apply any form of registration load balancing or failover. Multiple devices can register with the same alias.
l To register a SIP device, enter the IP address or FQDN of a local Conferencing Node as the SIP proxy. l To register an H.323 device, enter the IP address or FQDN of a local Conferencing Node as the H.323 gatekeeper.
All of the device aliases presented in the H.323 registration request must be in the list of allowed device aliases. If any alias is not present, none of the aliases will be allowed to register. Additionally, if device authentication is being used, all of the aliases presented in the request must use the same credentials.
l If your endpoint supports SIP and H.323, you should register it to Pexip Infinity over just one protocol, either SIP or H.323, but not both.
l To register an Infinity Connect client, enter either the IP address or FQDN of a local Conferencing Node, or the IP address or FQDN of the reverse proxy, as the registration server address. Infinity Connect clients register over the WebRTC protocol. For more information about how to register an Infinity Connect client, see Registering your device to receive calls.
After the device has registered it must periodically refresh that registration.
Calling registered devices
Whenever Pexip Infinity needs to place an outbound call (such as when adding a participant to a conference, or when making a call via the Pexip Distributed Gateway), it will first look through the set of devices currently registered to any of the Conferencing Nodes on the Pexip Infinity platform. If the alias it is trying to call is currently registered, then Pexip Infinity will place the call to that registered device.

Pexip Infinity Administrator GuideManaging conferences
Registering devices to Pexip Infinity
© 2016 Pexip AS Version 12.a May 2016 Page 238 of 369
When calling a registered device:
l the Conferencing Node to which the device is registered will place the call to the device (media may flow through other nodes, as per the platform's standard distributed conferencing behavior)
l the outbound call is always placed to the registered device over the same protocol that it used to make the registration
l if multiple devices are registered with the same alias, Pexip Infinity will place a call to each device, i.e. it will fork the call.
Requirement for Call Routing Rules
Note that, in most cases, you must also configure a suitable Call Routing Rule that instructs Pexip Infinity to place the outbound call (either to the registered device or to any other non-registered device or system). A Call Routing Rule is required when:
l making a call to another device or system via the Pexip Distributed Gateway
l using Automatic routing when adding a participant to a conference.
A Call Routing Rule is not required when:
l using Manual routing when adding a participant to a conference.
When configuring rules you must define:
l whether the rule applies only to incoming Pexip Distributed Gateway calls, or only to outgoing calls placed from within a Pexip Infinity conference (where Automatic routing has been selected), or to both incoming gateway calls and outgoing calls from conferences
l the destination aliases to be matched — this needs to match the pattern of the registered device aliases
l whether to route the call to Registered devices only (in which case the call will fail if the device is not currently registered), or to Registered device or external system which will route the call to a matching registered device if it is currently registered, otherwise it will attempt to route the call via an external system.
Avoiding call looping
Call Routing Rules that are intended to route calls to devices registered to Pexip Infinity (e.g. Infinity Connect clients) could, depending upon DNS configuration, result in call looping if the destination device alias is not currently registered.
This can occur if the Call Routing Rule handling those calls has its Call target set to Registered device or external system. In this case, if the alias is not currently registered, Pexip Infinity will attempt to place the call via DNS or a call control system. This could result in the call being routed back to Pexip Infinity which would then match the same Call Routing Rule and result in a loop.
To avoid this, we recommend that you configure your Call Routing Rules that match the pattern of registered device aliases to use a Call target of Registered devices only. This ensures that the call will fail cleanly without looping if the device is not currently registered.
To avoid this, we recommend that you configure a Call target of Registered devices only for your Call Routing Rules that match registered device aliases. This ensures that the call will fail cleanly without looping if the device is not currently registered.
Note that in earlier versions of Pexip Infinity before the availability of the Registered devices only option, we previously recommended configuring a SIP proxy with an address of nowhere.invalid. This workaround will still avoid the call looping issue, but if you have any existing rules that use this method, we recommend modifying them to use a Call target of Registered devices only instead.

Pexip Infinity Administrator GuideManaging conferences
Registering devices to Pexip Infinity
© 2016 Pexip AS Version 12.a May 2016 Page 239 of 369
Call routing logic
The stage in Pexip Infinity's call routing logic where it checks if a device is registered is highlighted in the following diagram:

Pexip Infinity Administrator GuideManaging conferences
Registering devices to Pexip Infinity
© 2016 Pexip AS Version 12.a May 2016 Page 240 of 369
Configuring the registrar serviceDevices can only register to Pexip Infinity if the registrar service is enabled.
To configure Pexip Infinity's registrar service, go to Service configuration > Registrar. The options are:
Option Description
Enable registrar Controls whether devices can register to Pexip Infinity. Devices must register with a permitted alias (configured via Service configuration > Device aliases).
The registrar service is enabled by default.
Registration refresh (general)
Registration refresh strategy
Defines which strategy to use when calculating the expiry time of a SIP or H.323 registration:
l Adaptive: Pexip Infinity automatically adjusts the refresh interval depending on the number of current registrations on the Conferencing Node handling the registration request, in order to spread the load of registration refreshes. As the number of devices registered to a Conferencing Node increases, the refresh interval calculated by Pexip Infinity will also typically increase, although it will always be within the bounds of the configured minimum and maximum refresh intervals.
l Basic: Pexip Infinity simply uses the configured minimum and maximum settings, along with the requested value, to determine the refresh interval.
Default: Adaptive.
Minimum refresh interval (Adaptive strategy)
The minimum interval in seconds before a device's registration must be refreshed, when using the Adaptive strategy.
Default: 60 seconds.
Maximum refresh interval (Adaptive strategy)
The maximum interval in seconds before a device's registration must be refreshed, when using the Adaptive strategy.
Default: 3600 seconds.
Minimum refresh interval (Basic strategy)
The minimum interval in seconds before a device's registration must be refreshed, when using the Basic strategy.
Default: 60 seconds.
Maximum refresh interval (Basic strategy)
The maximum interval in seconds before a device's registration must be refreshed, when using the Basic strategy.
Default: 300 seconds.
Registration refresh intervals for SIP endpoints behind NATs
Minimum refresh interval (when behind NAT)
The minimum interval in seconds before a device's registration must be refreshed, for a SIP endpoint behind a NAT.
Default: 60 seconds.
Maximum refresh interval (when behind NAT)
The maximum interval in seconds before a device's registration must be refreshed, for a SIP endpoint behind a NAT.
The refresh interval for SIP endpoints behind a NAT typically has to be shorter than the interval for other endpoints. This is to help keep the NAT pinhole alive.
Default: 90 seconds.
Note that:
l In all circumstances, requests for a value lower than the relevant Minimum refresh delay will result in the registration being rejected.
l The registration refresh strategies apply only to SIP and H.323 endpoints. Infinity Connect clients have a fixed refresh interval of 120 seconds.

Pexip Infinity Administrator GuideManaging conferences
Registering devices to Pexip Infinity
© 2016 Pexip AS Version 12.a May 2016 Page 241 of 369
Specifying which aliases devices are allowed to register withDevices can only register to Pexip Infinity with a permitted alias.
To configure the aliases that devices are allowed to register to Pexip Infinity, go to Service configuration > Device aliases. The options are:
Option Description
Device alias The alias URI with which the device must register to Pexip Infinity. The alias must be an exact match; regular expressions are not supported.
Service tag This optional field allows you to assign a unique identifier to this service, which you can then use to track use of the service. For more information, see Tracking usage with a service tag.
Description An optional description of the device.
Username and Password
The username and password credentials with which to authenticate the device. The credentials are optional and the device is not challenged if no credentials are entered.
The username and password are case-sensitive.
Troubleshooting and loggingTo see a list of all device aliases that are currently registered to the Pexip Infinity platform, go to Status > Registrations.
Successful registration requests and expired registrations are recorded in the administrator log.
Failed registration requests (due to, for example, an unknown device alias or authorization failure) and refreshed registrations are recorded in the support log only.
If a call fails to be placed to a registered device, check that an appropriate Call Routing Rule has been configured that has suitable destination alias matching strings for the registered alias (and ensure that call looping cannot occur).

Pexip Infinity Administrator GuideManaging conferences
Bulk import / export of basic Virtual Meeting Roomor Virtual Auditorium configuration
© 2016 Pexip AS Version 12.a May 2016 Page 242 of 369
Bulk import / export of basic Virtual Meeting Room or Virtual Auditorium configurationIf you want to configure your Pexip Infinity platform with a large number of Virtual Meeting Rooms and Virtual Auditoriums, you can import the configuration for those services from a CSV file.
This feature allows you to import basic configuration only. It does not allow you to import the configuration for the themes, Automatically Dialed Participants or bandwidth limitations that are associated with each service. When importing Virtual Auditoriums, the default Host view and Guest view are used.
You can import Virtual Meeting Rooms from directory information contained in a Windows Active Directory LDAP server, or any other LDAP-accessible database. For more information, see Provisioning VMRs from Active Directory via LDAP.
You can also export all of your existing Virtual Meeting Room or Virtual Auditorium configuration data to a CSV file. You may want to do this for backup purposes or to transfer configuration between, for example, a test system and a production system.
Preparing the CSV file for import
Format
The data in the CSV file must use the following format:
name,description,pin,allow_guests,guest_pin,alias_alias,alias_description
where:
name The name used to refer to this Virtual Meeting Room or Virtual Auditorium.
description An optional description of the Virtual Meeting Room or Virtual Auditorium.
pin This optional field allows you to set a secure access code that must be entered by participants before they can join the conference.
If a Guest PIN has also been set, then the PIN will apply to the conference Host(s) only.
For more information, see About PINs, Hosts and Guests.
l PINs must use the digits 0-9 only.
l PINs may optionally end with #.
l PINs must be between 4–20 digits long, including any #.
allow_guests
Determines whether the conference will allow participants with Guest privileges.
True: the conference will have two types of participants: Hosts and Guests. You must also include a pin to be used by the Hosts. You can optionally enter a guest_pin; if you do not enter a guest_pin, Guests can join without a PIN, but the meeting will not start until the first Host has joined.
False: all participants will have the same Host privileges.
If this field is left blank it will default to False.
guest_pin This optional field allows you to set a secure access code that must be entered by Guests before they can join the conference.
For more information, see About PINs, Hosts and Guests.
l Host PINs and Guest PINs must be different.
l PINs must use the digits 0-9 only.
l PINs may optionally end with #.
l PINs must be between 4–20 digits long, including any #.
l If the Host PIN ends in # and a Guest PIN is used, the Guest PIN must also end with #.
l If # is not used, Host PINs and Guest PINs must have the same number of digits.
l You cannot configure a Guest PIN unless you have already configured a Host PIN.
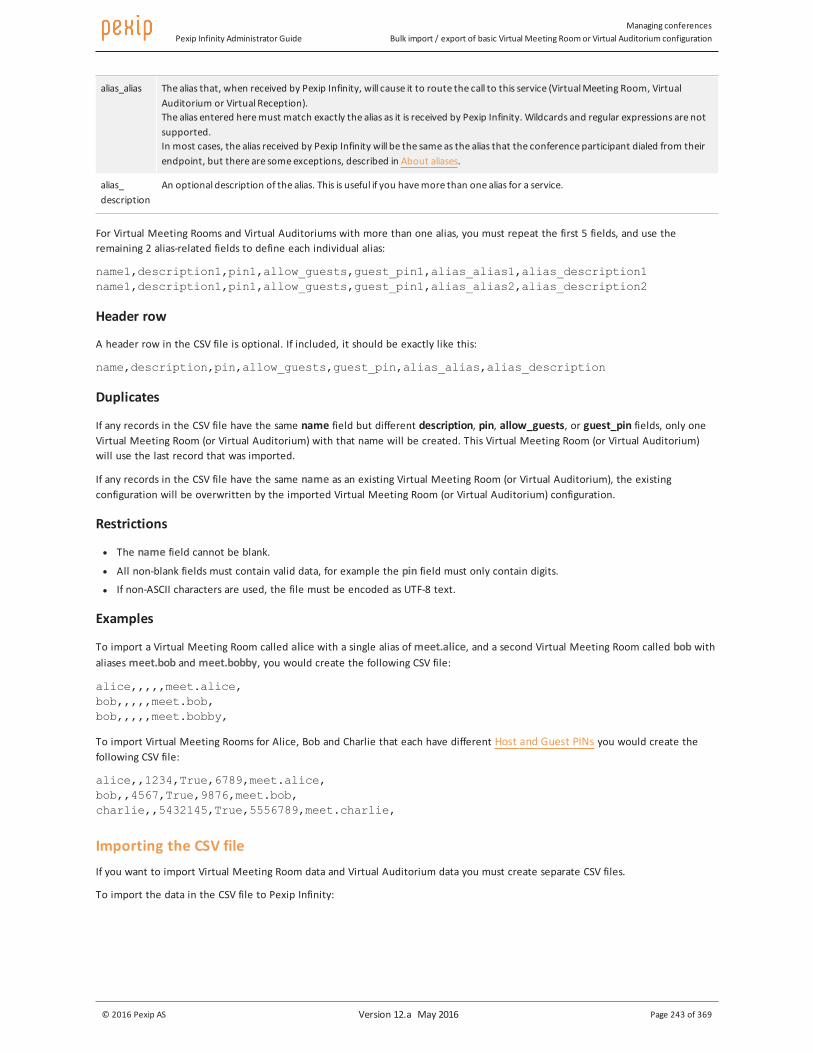
Pexip Infinity Administrator GuideManaging conferences
Bulk import / export of basic Virtual Meeting Roomor Virtual Auditorium configuration
© 2016 Pexip AS Version 12.a May 2016 Page 243 of 369
alias_alias The alias that, when received by Pexip Infinity, will cause it to route the call to this service (Virtual Meeting Room, Virtual Auditorium or Virtual Reception).The alias entered here must match exactly the alias as it is received by Pexip Infinity. Wildcards and regular expressions are not supported.In most cases, the alias received by Pexip Infinity will be the same as the alias that the conference participant dialed from their endpoint, but there are some exceptions, described in About aliases.
alias_description
An optional description of the alias. This is useful if you have more than one alias for a service.
For Virtual Meeting Rooms and Virtual Auditoriums with more than one alias, you must repeat the first 5 fields, and use the remaining 2 alias-related fields to define each individual alias:
name1,description1,pin1,allow_guests,guest_pin1,alias_alias1,alias_description1name1,description1,pin1,allow_guests,guest_pin1,alias_alias2,alias_description2
Header row
A header row in the CSV file is optional. If included, it should be exactly like this:
name,description,pin,allow_guests,guest_pin,alias_alias,alias_description
Duplicates
If any records in the CSV file have the same name field but different description, pin, allow_guests, or guest_pin fields, only one Virtual Meeting Room (or Virtual Auditorium) with that name will be created. This Virtual Meeting Room (or Virtual Auditorium) will use the last record that was imported.
If any records in the CSV file have the same name as an existing Virtual Meeting Room (or Virtual Auditorium), the existing configuration will be overwritten by the imported Virtual Meeting Room (or Virtual Auditorium) configuration.
Restrictions
l The name field cannot be blank. l All non-blank fields must contain valid data, for example the pin field must only contain digits.
l If non-ASCII characters are used, the file must be encoded as UTF-8 text.
Examples
To import a Virtual Meeting Room called alice with a single alias of meet.alice, and a second Virtual Meeting Room called bob with aliases meet.bob and meet.bobby, you would create the following CSV file:
alice,,,,,meet.alice,bob,,,,,meet.bob,bob,,,,,meet.bobby,
To import Virtual Meeting Rooms for Alice, Bob and Charlie that each have different Host and Guest PINs you would create the following CSV file:
alice,,1234,True,6789,meet.alice,bob,,4567,True,9876,meet.bob,charlie,,5432145,True,5556789,meet.charlie,
Importing the CSV fileIf you want to import Virtual Meeting Room data and Virtual Auditorium data you must create separate CSV files.
To import the data in the CSV file to Pexip Infinity:
Pexip Infinity Administrator GuideManaging conferences
Bulk import / export of basic Virtual Meeting Roomor Virtual Auditorium configuration
© 2016 Pexip AS Version 12.a May 2016 Page 244 of 369
1. On the Pexip Infinity Administrator interface, go to either:
o Service configuration > Virtual Meeting Rooms or o Service configuration > Virtual Auditoriums.
2. Select Import.
3. Choose the CSV file to import and select Save.
Exporting Virtual Meeting Room or Virtual Auditorium configurationYou can export all of your Virtual Meeting Room or Virtual Auditorium configuration data to a CSV file. This produces a CSV file in the same format as described above for importing configuration data. The file includes a header row.
This feature exports basic configuration only. It does not export the configuration for the themes, Automatically Dialed Participants, bandwidth limitations associated with each service, or (for Virtual Auditoriums) Host view and Guest view selections.
To export the data:
1. On the Pexip Infinity Administrator interface, go to either:
o Service configuration > Virtual Meeting Rooms or o Service configuration > Virtual Auditoriums.
2. Select Export. This takes you to the Export configuration page.
3. Select Download. 4. Follow your browser's prompts to save or open the file.

Pexip Infinity Administrator GuideManaging conferences
Tracking usage with a service tag
© 2016 Pexip AS Version 12.a May 2016 Page 245 of 369
Tracking usage with a service tagEach Virtual Meeting Room, Virtual Auditorium, Virtual Reception, Call Routing Rule and registered device can be assigned a unique identifier, known as a service tag. You can then use this tag to track usage of the service, for example for billing purposes.
In most cases, if you are using service tags in your deployment you would use the Pexip Infinity Management API to obtain the information you require from the logs (for more information, see Log output). However, you can also search the Administrator log directly from the web-based Administrator interface (Status > Administrator log) using the service tag to track usage of the service.
ExampleA service provider is using the Pexip Infinity Management API to create Virtual Meeting Rooms automatically on behalf of customers. They assign each new VMR a user-friendly Service name - this is the name that will be presented to participants accessing the conference and will appear in Lync / Skype for Business users' contact lists. They also assign each VMR a randomly generated UUID as the Service tag. The service provider then uses the Service tag UUID to track usage of each VMR in order to bill each customer appropriately for using their services.

Pexip Infinity Administrator GuideCustomizing Pexip Infinity services with themes
Tracking usage with a service tag
© 2016 Pexip AS Version 12.a May 2016 Page 246 of 369
Customizing Pexip Infinity services with themesThemes allow you to change the voice prompts and images provided to participants when they are accessing a Virtual Meeting Room, Virtual Auditorium or Virtual Reception.
In this section:
Customizing images and voice prompts using themes 247
Creating and editing themes 248
Setting the default theme 251
File requirements for themes 252
Base theme 259
Preconfigured themes 260
Pexip Infinity Administrator GuideCustomizing Pexip Infinity services with themes
Customizing images and voice prompts using themes
© 2016 Pexip AS Version 12.a May 2016 Page 247 of 369
Customizing images and voice prompts using themesThemes allow you to change the voice prompts and images provided to participants when they are accessing a Virtual Meeting Room, Virtual Auditorium or Virtual Reception, or making a point-to-point call using the Distributed Gateway. You might change the theme if, for example, you want to use your company's own logo or color scheme on the PIN entry screens, or you want to change the language used in the voice prompts.
Each conference theme is made up of a customized set of audio and image files. You can replace any or all of these files with your own customized sounds and images in order to create a new theme. Alternatively you can automatically generate the images used for the PIN entry screens based on a background image and color of your choosing.
You apply themes to individual Virtual Meeting Rooms, Virtual Auditoriums, Virtual Receptions, and Call Routing Rules, but the same theme can be used for multiple services. You can also nominate a global default theme to be used for any services that have not had a specific theme applied to them.
Pexip Infinity ships with its own Base theme, which cannot be edited. Files from the Base theme are used when no other theme has been selected, or when the selected theme does not contain a specific file. Pexip Infinity also ships with a number of preconfigured themes — these include alternative themes that contain entry and exit tones and localized audio files — making it easier for you to select and create themes suitable for your deployment.
Note that if you use the Infinity Connect clients to access your services, you can also customize the look and feel of those clients. For more information, see Customizing the Infinity Connect Web App.
How do I know which files will be used?When you create a new customized theme, you don't have to upload a complete set of files — you can just upload the ones you want to be used specifically for that theme. When a user accesses a service that has that theme applied, Pexip Infinity presents them with the sounds and images from the files included in that theme. If the customized theme does not include a specific file, or the service does not have a theme applied, then Pexip Infinity uses the relevant file from the theme that has been selected as the default theme. If the default theme does not include the specific file either, then the file from the Base theme is used.
Example - replacing the logo in the PIN entry screen
Imagine you want to replace the Pexip logo that appears in all the PIN entry screens with your own company's logo, and have this apply to every Virtual Meeting Room and Virtual Auditorium in your deployment. To do this:
1. Create a new customized "Logo" theme containing only the new PIN entry screens. 2. Select this new theme as your default theme.
Now, users will see your own company's logo when entering their PIN, but all other image files, and all the audio prompts, would come from the Base theme.
Example - using individual avatars for Lync / Skype for Business contacts
Imagine you want to change the avatar that is displayed in Lync / Skype for Business users' contact lists to represent Alice's and Bob's personal Virtual Meeting Rooms, so that they show Alice's and Bob's images respectively. To do this, you create a new customized "Alice" theme that contains only Alice's image (saved as presence_avatar_image.jpg) and a new customized "Bob" theme that contains only Bob's image (also saved as presence_avatar_image.jpg). You then select the "Alice" theme for Alice's personal VMR, and the "Bob" theme for Bob's personal VMR. Now, Lync / Skype for Business users will see Alice's and Bob's images as the avatars representing their respective VMRs.
Example - replacing the logo and using avatars together
Imagine you want to use individual avatars for each VMR and also replace the Pexip logo with your corporate logo. To do this, you would combine the steps in the above two examples - apply a theme containing just the avatar image file to each VMR, and then select the theme that uses the corporate logo as your default theme. Now, Lync / Skype for Business users will see Alice's and Bob's images as the avatars representing their personal VMRs, and when they connect to the VMR they will see your company's logo in the PIN entry screens. All other image files, and all the audio prompts, will come from the Base theme.

Pexip Infinity Administrator GuideCustomizing Pexip Infinity services with themes
Creating and editing themes
© 2016 Pexip AS Version 12.a May 2016 Page 248 of 369
Creating and editing themesThis section describes how to create and edit your own themes, including how to automatically generate the PIN entry screen images, and how to change which themes are associated with which services.
Creating a new themeYou can create a new theme by uploading a .ZIP file containing the files you want to use instead of the default theme.
The .ZIP file does not need to contain the complete set of files, just any files that you want to use in place of those from the default theme.
To create a new theme:
1. Ensure that all new sound and image files meet the specified file requirements for themes. 2. Save all new sound and image files together in a new folder. You can name the folder whatever you like, but within the folder,
each new file must be saved with the same file name and extension as the default file being replaced. 3. Create a .ZIP file of the new folder.
4. Go to Service configuration > Themes and select Add theme.
5. In the Name field, enter the name of the new theme.
6. In the Theme field, select Choose file and go to the .ZIP file you have just created.
7. In the Services and Call Routing Rule sections, select the Virtual Meeting Rooms, Virtual Auditoriums, Virtual Receptions and Call Routing Rules that will use this new theme.Note that if you have more than 10,000 services configured, you cannot select the associated services via this page. Instead you must use another method to assign the theme to a service, such as editing the individual service, using the configuration API, or by using the bulk VMR provisioning facility.
8. Select Save. 9. Allow a minute or so for the new theme to be replicated out to all Conferencing Nodes.
You can now test the theme by dialing one of the services (Virtual Meeting Room, Virtual Auditorium, Virtual Reception or Call Routing Rule) to which it has been applied.
Editing an existing themeYou can edit an existing theme by uploading a new .ZIP file containing the new set of files.
The .ZIP file does not need to contain the complete set of files, just any files that you want to use in place of those from the default theme.
Note that when you edit a theme, all existing files in that theme will be deleted and replaced with files from the new theme. This means that if you have an existing theme containing File A and you want to add File B to the theme, you need to upload a .ZIP file containing both File A and File B.
To edit an existing theme:
1. If you want to retain files from the existing theme, first download the theme.
2. Ensure that all new sound and image files meet the specified file requirements for themes. 3. Save all new sound and image files, along with any existing files, together in a new folder. Each file must be saved with the
same file name and extension as the default file being replaced. 4. Create a .ZIP file of the new folder.
5. Go to Service configuration > Themes and select the theme you wish to edit.
6. In the Theme field, select Choose file and go to the .ZIP file you have just created.
7. Select Save. 8. Allow a minute or so for the updated theme to be replicated out to all Conferencing Nodes.
You can now test the theme by dialing one of the services (Virtual Meeting Room, Virtual Auditorium, Virtual Reception or Call Routing Rule) to which it has been applied.

Pexip Infinity Administrator GuideCustomizing Pexip Infinity services with themes
Creating and editing themes
© 2016 Pexip AS Version 12.a May 2016 Page 249 of 369
Downloading an existing themeYou can download a theme to view the files it contains, or to edit it.
To download a theme:
1. Go to Service configuration > Themes. 2. Either:
o to download a copy of the default set of files that are shipped with Pexip Infinity, select Download Base theme o to download a copy of the files that make up a customized theme, select the theme and from the Change Theme page
select Download theme.
A file with a .ZIP extension will be downloaded.
Automatically generating the PIN entry screen imagesTo save you from having to create 23 separate images for each of the PIN entry screens (i.e. all Image files with a file name beginning with pin_entry_), Pexip Infinity's themes feature allows you to select a background image and foreground color, and then automatically generates the required images for you.
You could use this option if you want to use the new images as part of an entirely new theme, or if you want to edit the PIN entry screens only.
The background image must be:
l JPEG format
l 1920x1080 pixels.
The PIN entry indicators will:
l begin 634 pixels from the top of the background image
l be 70 pixels in diameter
l have 14 pixels of space between each indicator.
You must ensure that the PIN entry indicators use a color that makes them clearly visible when overlaid on the background image.
To change the PIN entry screen images:
1. Go to Service configuration > Themes.
2. Select Generate theme.
3. In the Background image field, select Choose file and select the image you want to appear behind the PIN entry indicators.
4. In the Foreground color field, enter the hexadecimal value of the color you want to use for the PIN entry indicators.
5. Select Generate. 6. A <image name>.ZIP file will be downloaded. This file will contain the 23 new PIN entry images.
7. If you want to add any other new files to this theme: a. Unzip the downloaded .ZIP file to a new folder.
b. Add the new files to the new folder.
c. Create a .ZIP file of the new folder.
8. Go back to Service configuration > Themes and select Add Theme.
9. In the Name field, enter the name you want to give to this new theme.
10. In the Theme field, select Choose file and go to the .ZIP file you have just created.
11. In the Services and Call Routing Rule sections, select the service(s) that will use this new theme.
12. Select Save. 13. Allow a minute or so for the new theme to be replicated out to all Conferencing Nodes.
You can now test the theme by dialing in to one of the VMRs to which it has been applied.

Pexip Infinity Administrator GuideCustomizing Pexip Infinity services with themes
Creating and editing themes
© 2016 Pexip AS Version 12.a May 2016 Page 250 of 369
Changing which themes are associated with which servicesThere are many ways in which you can change the theme that is associated with a service (Virtual Meeting Room, Virtual Auditorium, Virtual Reception or Call Routing Rule). You can do this:
l via the Themes page (go to Service configuration > Themes, select the new theme you want to use, then select the service(s) you want to apply it to). Note that you cannot use this method if you have more than 10,000 services configured
l by editing the individual service (go to Service configuration, select the service, then select the new theme from the Theme drop-down menu) or Call Routing Rule (Service configuration > Call routing)
l via the configuration API l by using the bulk VMR provisioning facility

Pexip Infinity Administrator GuideCustomizing Pexip Infinity services with themes
Setting the default theme
© 2016 Pexip AS Version 12.a May 2016 Page 251 of 369
Setting the default themeYou can specify a theme to be used by default for all services that have not had a specific theme applied.
The default theme does not need to contain a complete set of files, just those that you want to be used in place of files from the Base theme.
If you do not select a default theme, the entire Base theme will be used as the default.
To change the default theme:
1. Go to Platform configuration > Global settings.
2. From the Default theme drop-down, select the theme to be used for services where no specific theme has been selected.
3. Select Save.

Pexip Infinity Administrator GuideCustomizing Pexip Infinity services with themes
File requirements for themes
© 2016 Pexip AS Version 12.a May 2016 Page 252 of 369
File requirements for themesThe following three sections list the complete set of audio, image and configuration files that make up a full theme. This is also the same set of files that comprise the Base theme. When creating or editing a theme, you upload your own customized version of one or more of these files, ensuring each new file name is identical to that of the file being replaced.
All files must meet the requirements specified at the start of each section.
SoundsAll sounds must be:
l .WAV format
l RIFF (little-endian) data, WAVE audio, Microsoft PCM, 16 bit, mono 48000 Hz
Points to note:
l mono and 48000Hz are essential - audio files that do not meet these requirements will fail to upload.
l The volume level of the audio recording is important - use the default Pexip Infinity prompts as a guide.
l Some endpoints may take a few seconds after a call connects before they are able to receive audio. For this reason, we have included a 2-second pause at the start of any audio files that may be played when a user first connects to Pexip Infinity. We recommend that you include a similar pause; use the default Pexip Infinity files as a guide.
Audio files
File name Content in Base theme
2sd-invalid-number-three-times-disconnect_48kHz_mono.wav
"You have entered an invalid number three times. I will now disconnect the call."
2sd-not-entered-valid-number-disconnect-call_48kHz_mono.wav
"You have not entered a valid number. I will now disconnect the call."
2sd-number-not-valid-try-again_48kHz_mono.wav "That number is not valid. Please try again."
2sd-number-pound-key_48kHz_mono.wav "Please enter the number you wish to connect to, followed by the pound key." †
2sd-please-hold-connect-you_48kHz_mono.wav "Please hold while I try to connect you."
conf-call-will-be-disconnected_48kHz_mono.wav "Your call will be disconnected."
conf-capacity_exceeded_48kHz_mono.wav "The conferencing system capacity has been exceeded."
conf-getpin_48kHz_mono.wav "Please enter the conference PIN number."
conf-getpin_pound-key_48kHz_mono.wav "Please enter the conference PIN number, followed by the pound key." †
conf-insufficient_licenses_48kHz_mono.wav "There are insufficient conferencing system licenses available."
conf-invalid_license_48kHz_mono.wav "The conferencing system license is invalid."
conf-invalidpin_48kHz_mono.wav "The PIN is invalid for this conference."
conf-leaderhasleft_48kHz_mono.wav "The Host has left the conference. The conference is about to end."
conf-participant_entry_tone_48kHz_mono.wav <empty file> (For more information, see Playing notification tones when participants join or leave a conference.)
conf-participant_exit_tone_48kHz_mono.wav <empty file> (For more information, see Playing notification tones when participants join or leave a conference.)
conf-participant_locked_out_48Khz_mono.wav * Three knocks. (For more information, see Locking a conference and allowing participants to join a locked conference.)

Pexip Infinity Administrator GuideCustomizing Pexip Infinity services with themes
File requirements for themes
© 2016 Pexip AS Version 12.a May 2016 Page 253 of 369
File name Content in Base theme
conf-placeintoconf_48kHz_mono.wav "Welcome to the conference."
conf-waitforleader_48kHz_mono.wav "Waiting for the conference Host to join."
conf-waithostpin_48kHz_mono.wav "Waiting for the conference Host to join. If you are the conference Host, please enter the conference PIN number now."
conf-waithostpin_pound-key_48kHz_mono.wav "Waiting for the conference Host to join. If you are the conference Host, please enter the conference PIN number followed by the pound key." †
conf-you_are_the_only_participant_48kHz_mono.wav
"You are the only participant in the conference."
* Added in v12.
† Alternative recordings using the term "hash key" are also available - see Preconfigured themes.
ImagesEach image must be a specific size and file format (PNG or JPEG), as specified in Image files. PNG images support transparency; JPEG images do not.
Points to note:
l Ensure that the images display acceptably on both 16:9 endpoints and 4:3 endpoints (if applicable). For example, the original 1920 x 1080 pixel (16:9) images may have approximately 240 pixels cropped from both the left and right sides when displayed as 4:3. You should therefore check that any details on the far left or far right of the image are visible in both formats; for this reason we recommend keeping the image fairly central.
l Depending on the endpoint capabilities and network conditions, images may be scaled down to CIF (352 x 288) or even QCIF (176 x 144), so ensure that images are not overly detailed, and any text uses a clear, large font to ensure that it is legible at low resolutions.
l The transfer and two_stage_dialing images will be overlaid with system-generated text. By default this text is white, but it can be changed via the themeconfig.json file. When creating customized themes, you must therefore ensure these images include sufficient empty space starting from 755 pixels from the top of the image, in a contrasting color to the text, to allow the text to be visible.
l Pexip provides some resources for constructing your own themes at http://download.pexip.com/resources/themes/. This includes white and black colored versions of the "no other participants" and "no other video participants" graphics. They are provided as transparent PNG files and can be used as overlays on top of your own background JPEG images.

Pexip Infinity Administrator GuideCustomizing Pexip Infinity services with themes
File requirements for themes
© 2016 Pexip AS Version 12.a May 2016 Page 254 of 369
Image files
File name Image size (width, height)
File format Content in Base theme
Notes
audio_indicator.png 100 x 100 pixels
.PNG Used to represent an audio-only participant.
capacity_exceeded_image.jpg 1920 x 1080 pixels
.JPG (RGB mode only)
Shown to participants (other than those using Infinity Connect) when they attempt to join a conference that has reached its maximum number of participants. For more information, see Limiting the number of participants.
insufficient_license_image.jpg 1920 x 1080 pixels
.JPG (RGB mode only)
Shown to participants (other than those using Infinity Connect) when they are unable to join a conference because all call licenses are currently in use. For more information, see Insufficient licenses.
invalid_license_image.jpg 1920 x 1080 pixels
.JPG (RGB mode only)
Shown to participants (other than those using Infinity Connect) when they are unable to join a conference because the Pexip Infinity license is not valid. For more information, see Invalid license.
no_incoming_video_icon.png 400 x 400 pixels
.PNG Shown when a participant's video stream is not available.
no_main_video_icon.png 400 x 400 pixels
.PNG Used when streaming a conference to indicate that there is currently no main video.
no_other_participants.jpg * 1920 x 1080 pixels
.JPG (RGB mode only)
Shown when there are no other participants in the conference.
no_other_video_participants.jpg * 1920 x 1080 pixels
.JPG (RGB mode only)
Shown when all other participants are audio-only or control-only.
no_presentation_video_icon.png 400 x 400 pixels
.PNG Used when dual streaming a conference to indicate that there is currently no presentation.

Pexip Infinity Administrator GuideCustomizing Pexip Infinity services with themes
File requirements for themes
© 2016 Pexip AS Version 12.a May 2016 Page 255 of 369
File name Image size (width, height)
File format Content in Base theme
Notes
pin_entry_0_digits_image.jpg ‡ 1920 x 1080 pixels
.JPG (RGB mode only)
Shown to participants (other than those using Infinity Connect) when entering PINs.
pin_entry_1_digits_image.jpg ‡ 1920 x 1080 pixels
.JPG (RGB mode only)
pin_entry_2_digits_image.jpg ‡ 1920 x 1080 pixels
.JPG (RGB mode only)
pin_entry_3_digits_image.jpg ‡
... and so on, up to...
1920 x 1080 pixels
.JPG (RGB mode only)
↓
pin_entry_20_digits_image.jpg ‡ * 1920 x 1080 pixels
.JPG (RGB mode only)
pin_entry_correct_image.jpg ‡ 1920 x 1080 pixels
.JPG (RGB mode only)
pin_entry_incorrect_image.jpg ‡ 1920 x 1080 pixels
.JPG (RGB mode only)
plus_n_indicator.jpg 1920 x 1080 pixels
.JPG (RGB mode only)
Background of the thumbnail on which the text showing the number of participants is overlaid.
Note: the color of the text is specified in the themeconfig.json file.
presence_avatar_image.jpg 128 x 128 pixels
(Note that when the image is used, the corners will be cropped in order to be displayed as a round image.)
.JPG (RGB mode only)
Shown next to the conference alias when using Infinity Connect clients, and as the contact avatar when using Lync / Skype for Business.

Pexip Infinity Administrator GuideCustomizing Pexip Infinity services with themes
File requirements for themes
© 2016 Pexip AS Version 12.a May 2016 Page 256 of 369
File name Image size (width, height)
File format Content in Base theme
Notes
streaming_indicator.png 100 x 100 pixels
.PNG Used to indicate that the conference is being streamed or recorded.
timed_out.jpg 1920 x 1080 pixels
.JPG (RGB mode only)
Shown briefly prior to disconnecting participants (other than those using Infinity Connect) who have connected to a Virtual Reception but did not enter a valid conference number.
transfer.jpg † 1920 x 1080 pixels
.JPG (RGB mode only)
Shown briefly to participants (other than those using Infinity Connect) while being transferred from a Virtual Reception to a Virtual Meeting Room or Virtual Auditorium.
two_stage_dialing.jpg † 1920 x 1080 pixels
.JPG (RGB mode only)
Shown to participants (other than those using Infinity Connect) who have connected to a Virtual Reception.
two_stage_dialing_conf_number_invalid_image.jpg
1920 x 1080 pixels
.JPG (RGB mode only)
Shown to participants (other than those using Infinity Connect) who have connected to a Virtual Reception and have entered an invalid conference number.
waiting_for_conference_leader_image.jpg
1920 x 1080 pixels
.JPG (RGB mode only)
Shown to Guests while waiting for a Host to join.
‡ When creating customized themes, these files can be automatically generated using a background image and foreground color of your choice.
† These images will be overlaid with system-generated text. By default this text is white, but it can be changed via the themeconfig.json file. When creating customized themes, you must therefore ensure these images include sufficient empty space starting from 755 pixels from the top of the image, in a contrasting color to the text, to allow the text to be visible.
* Added in v12 (includes 10 new pin_entry_<number>_digits_image.jpg images — from pin_entry_11_digits_image.jpg to pin_entry_20_digits_image.jpg — as the maximum PIN length has been extended from 10 digits to 20 digits).
Colors, background and textThe wording and color of certain text and image backgrounds can be customized via the optional themeconfig.json file.
All colors in this file are specified using RGB hexadecimal notation (in the format 0xnnnnnn), apart from the following:
l indicator_num_bg_color
This color uses ARGB hexadecimal notation (0xnnnnnnnn), where the first two (optional) digits after the 0x represent the Alpha channel, indicating the level of opacity applied. Example values include:
l 00 - fully transparent
l 80 - 50% opaque
l 99 - 60% opaque
l BE - 75% opaque
l E6 - 90% opaque
l FF - fully opaque

Pexip Infinity Administrator GuideCustomizing Pexip Infinity services with themes
File requirements for themes
© 2016 Pexip AS Version 12.a May 2016 Page 257 of 369
themeconfig.json
The themeconfig.json contains the following. If any values within this file are not specified, Pexip Infinity will simply use the values from the Base theme.
{ "enable_dtmf_conference_control" : true, "dtmf_conference_control_commands" : { "*7" : "toggle_lock", "*5" : "toggle_guest_mute", "##" : "end_conference" }, "no_main_video_bg" : "0x000000", "no_presentation_video_bg" : "0x000000", "disable_streaming_indicator" : false, "streaming_indicator_text" : "Streaming enabled", "virtual_reception_text_color" : "0xFFFFFF", "plus_n_indicator_text_color" : "0xF38B3C", "indicator_num_color" : "0xF38B3C", "indicator_num_bg_color" : "0xBE222222" }
Item Description Value in Base theme
enable_dtmf_conference_control *
Determines whether Host participants can use DTMF to control the conference (true) or not (false).
true
dtmf_conference_control_commands *
If DTMF controls are enabled, this section specifies the DTMF digits used for each control. Current controls are:
l conference lock and unlock (toggle_lock)
l mute and unmute all guests (toggle_guest_mute)
l terminate the conference (end_conference)
When changing the DTMF controls, you must only edit the digits inside the first pair of quotes on each line (i.e. *7, *5 and ##). Editing anything else will disable DTMF commands. Each control must be two DTMF digits long, and all the commands must be different. See Changing DTMF controls for guidance on best practice.
"*7" : "toggle_
lock""*5" : "toggle_
guest_mute""##" : "end_conference"
no_main_video_bg The color of the background to the no_main_video_icon.png image. 0x000000(black)
no_presentation_video_bg
The color of the background to the no_presentation_video_icon.png image. 0x000000(black)
disable_streaming_indicator
Determines whether the streaming indicator is disabled (true) or enabled (false). false
streaming_indicator_text
The text that appears to the right of the streaming indicator when it slides out over the main video image.
Streaming enabled
virtual_reception_text_color
The color of the text that is overlaid at the bottom of the transfer.jpg and two_stage_dialing.jpg images.
0xFFFFFF(white)
plus_n_indicator_text_color
The color of the text that is overlaid on the plus_n_indicator.jpg image, which shows how many additional participants are in the conference.
0xF38B3C(orange)

Pexip Infinity Administrator GuideCustomizing Pexip Infinity services with themes
File requirements for themes
© 2016 Pexip AS Version 12.a May 2016 Page 258 of 369
Item Description Value in Base theme
indicator_num_color The color of the text that is overlaid on the indicator_num_bg_color background, which slides out to show how many additional audio participants are in the conference.
0xF38B3C(orange)
indicator_num_bg_color †
The color of the background to the indicator_num_color text, which slides out to show how many additional audio participants are in the conference.
0xBE222222(75% opaque dark gray)
* Added in v12.
† This value can optionally include a level of transparency using ARGB notation, where the first two digits represent the level of opacity applied.

Pexip Infinity Administrator GuideCustomizing Pexip Infinity services with themes
Base theme
© 2016 Pexip AS Version 12.a May 2016 Page 259 of 369
Base themePexip Infinity ships with its own Base theme. Files from the Base theme are used when no other theme has been selected, or the selected theme does not contain the required file.
You cannot change the contents of the Base theme, but you can create your own themes by uploading customized versions of one or more of the Base files.
When a user accesses a service that has a customized theme applied, Pexip Infinity presents them with the sounds and images from the files included in that theme. If the customized theme does not include a specific file, or the service does not have a theme applied, then Pexip Infinity uses the relevant file from the default theme. If the default theme does not include the specific file either, then the file from the Base theme is used.
The same rules apply when deciding which Base theme file will be used. However, if any values within this file are not specified, Pexip Infinity will use the values from the Base theme's themeconfig.json file.
The files used in the Base theme are as described in File requirements for themes

Pexip Infinity Administrator GuideCustomizing Pexip Infinity services with themes
Preconfigured themes
© 2016 Pexip AS Version 12.a May 2016 Page 260 of 369
Preconfigured themesPexip Infinity ships with a number of preconfigured themes. These themes can be copied and edited, making it easier for you to select and create themes suitable for your deployment.
The preconfigured themes are identical to the Base theme with the following exceptions:
l some include entry and exit tones (the Base theme contains "empty" tones files)
l some refer to the "#" key as "the hash key" (the Base theme refers to this as "the pound key").
The files that may differ from those in the Base theme are:
l Entry tone: conf-participant_entry_tone_48kHz_mono.wav
l Exit tone: conf-participant_exit_tone_48kHz_mono.wav
l "#" key reference: 2sd-number-pound-key_48kHz_mono.wav, conf-getpin_pound-key_48kHz_mono.wav, conf-waithostpin_pound-key_48kHz_mono.wav
The content of the above files for each of the preconfigured themes is as follows:
Theme Entry tone Exit tone "#" key references
Pexip theme (English_US) * <empty file> <empty file> "...the pound key"
Pexip theme (English_UK) <empty file> <empty file> "...the hash key"
Pexip theme (English_US) with entry tones A high tone followed by a low tone A low tone followed by a high tone "...the pound key"
Pexip theme (English_UK) with entry tones A high tone followed by a low tone A low tone followed by a high tone "...the hash key"
* This theme is identical to the Base theme, although unlike the Base theme it can be edited.

Pexip Infinity Administrator Guide
© 2016 Pexip AS Version 12.a May 2016 Page 261 of 369
Using the Pexip Distributed Gateway serviceThe Pexip Distributed Gateway service enables endpoints to make point-to-point calls to other endpoints that use different protocols and media formats.
In this section:
About the Pexip Distributed Gateway service 262
Configuring Call Routing Rules 265

Pexip Infinity Administrator GuideUsing the Pexip Distributed Gateway serviceAbout the Pexip Distributed Gateway service
© 2016 Pexip AS Version 12.a May 2016 Page 262 of 369
About the Pexip Distributed Gateway serviceThe Pexip Distributed Gateway service enables endpoints to make calls to other devices or systems that use different protocols and media formats.
Traditional hardware gateways are often expensive and are typically centralized in a single location. This means that remote endpoints making gateway calls have to route media over a WAN or over the internet which is costly and uses a lot of bandwidth.
The software-based Pexip Distributed Gateway service allows for a very cost-efficient deployment of local gateway/transcoding resources in every location. This can result in an improved user experience because of reduced latency as there is no longer a need to hairpin media back to a centralized datacenter. The other benefit is reduced WAN bandwidth usage — again due to not having to hairpin media. Reduced bandwidth usage allows an enterprise to deploy more video systems without having to upgrade the WAN infrastructure.
The Pexip Distributed Gateway service supports industry-standard protocols and emerging technologies, including H.323, SIP, Microsoft Lync / Skype for Business (MS-SIP), WebRTC and RTMP.
For example, you can use the Pexip Distributed Gateway to enable:
l users of Infinity Connect clients to place a point-to-point call to a SIP endpoint
l Lync / Skype for Business users in your enterprise to make calls to, and receive calls from, virtually any other type of endpoint
It can also as a gateway between Lync / Skype for Business AVMCU multi-party conferences and standards-based endpoints, allowing:
l incoming calls to be routed directly into a Lync / Skype for Business AVMCU multi-party conference
l participants in a Lync / Skype for Business AVMCU multi-party conference to dial out to (i.e. invite) other non-Lync / Skype for Business participants.
How it worksEach Conferencing Node can act as a gateway service for placing calls between devices, in addition to the multi-party conferencing services offered by Pexip Infinity.
To enable devices to call other devices or systems via the Pexip Distributed Gateway, you must configure Call Routing Rules. These rules specify which calls should be interworked, for which protocols, and to where they should be routed.
Incoming calls received by Pexip Infinity are routed as follows:
1. Pexip Infinity receives an incoming call via one of its Conferencing Nodes.
2. It checks whether the destination alias belongs to any Pexip Infinity Virtual Meeting Rooms, Virtual Auditoriums or Virtual Receptions; if so, it directs the call to that service.
3. If the alias does not belong to any of the above services, Pexip Infinity checks the Call Routing Rules to see if the alias matches any rules specified there for incoming calls. If so, it places an outgoing call to the destination alias according to the rule's call target settings (which protocol and call control system to use, whether to route to registered devices only etc).
This means that if an alias matches both a Virtual Meeting Room and a Call Routing Rule, the former will always take precedence and the call will be routed to the Virtual Meeting Room. You must therefore ensure that any regular expressions used in a Call Routing Rule do not unintentionally overlap with any aliases used by Virtual Meeting Rooms, Virtual Auditoriums or Virtual Receptions.
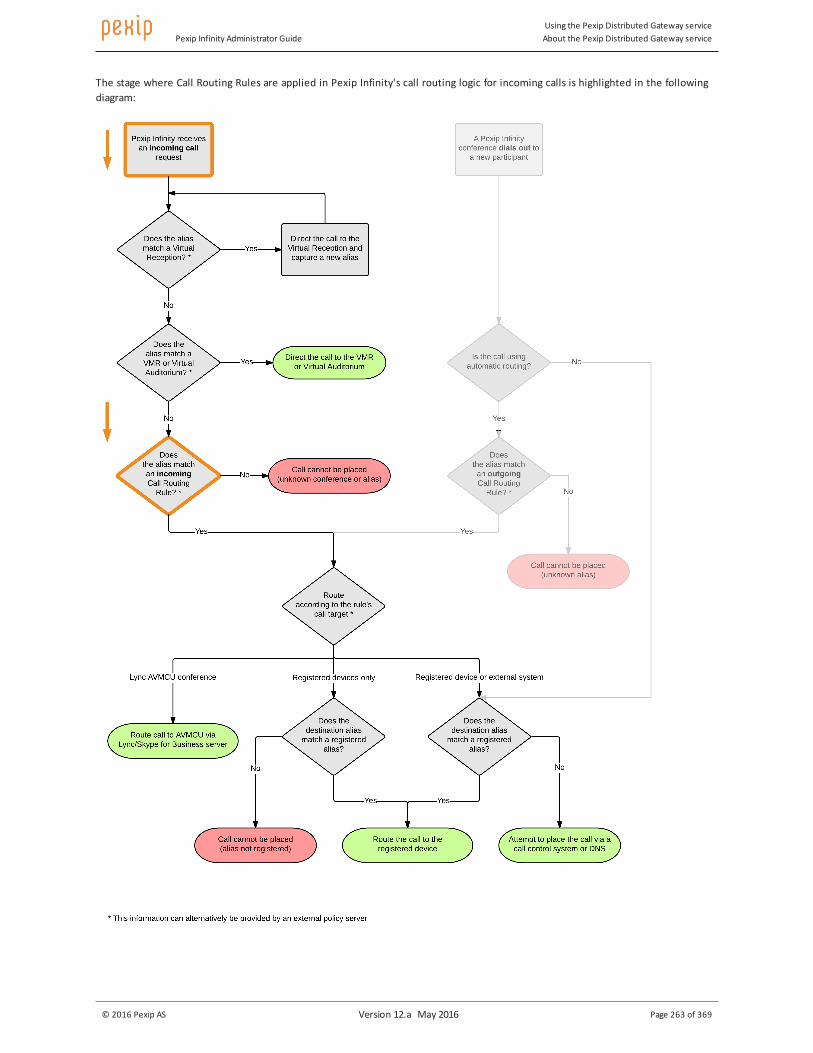
Pexip Infinity Administrator GuideUsing the Pexip Distributed Gateway serviceAbout the Pexip Distributed Gateway service
© 2016 Pexip AS Version 12.a May 2016 Page 263 of 369
The stage where Call Routing Rules are applied in Pexip Infinity's call routing logic for incoming calls is highlighted in the following diagram:

Pexip Infinity Administrator GuideUsing the Pexip Distributed Gateway serviceAbout the Pexip Distributed Gateway service
© 2016 Pexip AS Version 12.a May 2016 Page 264 of 369
If your environment includes a PSTN gateway or uses an ITSP (Internet telephony service provider), consider the potential for toll fraud if you have Call Routing Rules that can route calls to the PSTN gateway or ITSP, or if you allow conference participants to dial out to other participants via the PSTN gateway or ITSP. See PSTN gateways and toll fraud for more information.
Note that:
l By default, the same Conferencing Node that received the incoming call is used to place the outgoing call. However, you can configure the matching rule to place the call from a Conferencing Node in a specific location. As with all calls, signaling and media may be handled by different Conferencing Nodes in that location.
l Bandwidth restrictions can be applied to gateway calls; you do this by applying the restriction to the relevant Call Routing Rule.
l If the Pexip Distributed Gateway receives DTMF signaling from an inbound call, it will generate similar DTMF on the outbound call.
l Call Routing Rules may also be applied when dialing out from a conference to a new participant (where Automatic routing has been selected). When configuring your rules, consider whether the rule is to apply to incoming calls, outgoing calls or to both incoming and outgoing calls.

Pexip Infinity Administrator GuideUsing the Pexip Distributed Gateway service
Configuring Call Routing Rules
© 2016 Pexip AS Version 12.a May 2016 Page 265 of 369
Configuring Call Routing RulesCall Routing Rules determine how calls are routed within Pexip Infinity. This includes calls received by Pexip Infinity that are to be routed via the Pexip Distributed Gateway service to their ultimate destination, and outgoing calls made from within a Pexip Infinity conference (such as when manually adding a participant to a Virtual Meeting Room).
This topic explains when Call Routing Rules are used, the main considerations when configuring your rules, how to add or modify rules, and provides an example rule.
When are Call Routing Rules used?Call Routing Rules are always used for matching incoming calls, and may be used for matching outbound calls made from a Pexip Infinity conference.
Incoming calls
If an incoming call does not match an alias associated with a conference service (Virtual Meeting Room, Virtual Auditorium or Virtual Reception), it is deemed a Pexip Distributed Gateway call and it must match a Call Routing Rule for the call to be placed to the destination alias / target system.
Outgoing calls from a conference
Outgoing calls made from within a Pexip Infinity conference are only checked against Call Routing Rules when:
l Automatically Dialed Participants or participants added manually via the Pexip Infinity Administrator interface have their Route this call option set to Automatically
l participants added via the Infinity Connect Web App have selected a Protocol of Automatic
and then it must match a suitable rule for the call to be placed to the destination alias / target system.
Call routing considerationsWhen configuring a Call Routing Rule, the main points to consider are:
l Rule priority: this is the order in which the rules are considered to see if the conditions specified in the rule match the characteristics of the call that Pexip Infinity is trying to route. Rule checking stops when a match is found, even if the call that is placed as a result of that match fails for any reason.
l Applicability to incoming or outgoing calls: you must decide whether the rule applies only to incoming Pexip Distributed Gateway calls, or only to outgoing calls placed from within a Pexip Infinity conference (where Automatic routing has been selected), or to both incoming gateway calls and outgoing calls from conferences.
l Incoming call protocols: for incoming calls via the Pexip Distributed Gateway, whether to limit the rule's applicability to certain incoming protocols e.g. SIP only.
l Alias matching and transforms: the dialed alias or alias patterns that apply to this rule. A rule can be configured to apply to a specific alias e.g. [email protected], or to an alias pattern defined by a regex (regular expression) such as [email protected] (any destination alias with the domain example.com). The destination alias can also, optionally, be transformed before the outgoing call is placed.
l Call media settings: whether to limit the media capabilities of the call, or whether to apply a theme.
l Outgoing call placement: every rule must define to where and how the call is routed to the destination alias. This includes defining the types of devices or systems to which the call is routed, such as limiting it to registered devices only or by specifying the SIP proxy, H.323 gatekeeper or Lync / Skype for Business server to use.
Note that any incoming call that has a destination alias that matches the alias of any Pexip Infinity Virtual Meeting Room, Virtual Auditorium or Virtual Reception is always directed automatically to that conferencing service; the call will not be routed via the Pexip Distributed Gateway and the Call Routing Rules are not applied.

Pexip Infinity Administrator GuideUsing the Pexip Distributed Gateway service
Configuring Call Routing Rules
© 2016 Pexip AS Version 12.a May 2016 Page 266 of 369
The following diagram shows the call routing logic within Pexip Infinity when handling incoming call requests and when dialing out from within a conference.

Pexip Infinity Administrator GuideUsing the Pexip Distributed Gateway service
Configuring Call Routing Rules
© 2016 Pexip AS Version 12.a May 2016 Page 267 of 369
Note that as an alternative to using Pexip Infinity's own routing logic, you can configure Pexip Infinity to instead defer its decision making to an external policy service. This allows Pexip Infinity administrators to implement routing decisions based on their specific requirements.
Creating and modifying Call Routing RulesTo add, edit or delete a Call Routing Rule, go to Service configuration > Call routing.
When specifying a Call Routing Rule, the options are:
Option Description
Name The name used to refer to this rule.
Service tag This optional field allows you to assign a unique identifier to this service, which you can then use to track use of the service. For more information, see Tracking usage with a service tag.
Description An optional description of the rule.
Priority Assign a relative priority to this rule, from 1 to 200. Rules are checked in order of priority, starting with 1 and working down the list until a match is found.
Rule checking stops when a match is found, even if the call that is placed as a result of that match fails for any reason.
Use this rule for...
Incoming gateway calls Applies this rule to incoming calls that have not been routed to a Virtual Meeting Room or Virtual Reception, and should be routed via the Pexip Distributed Gateway service.
Default: selected.
Outgoing calls from a conference
Applies this rule to outgoing calls placed from a conference service (e.g. when a participant is added to a Virtual Meeting Room) where Automatic routing has been selected.
Default: not selected.
Note that the same rule can be applied to both incoming and outgoing calls if required.
Calls being handled in location
Applies the rule only if the incoming call is being handled by a Conferencing Node in the selected location or the outgoing call is being initiated from the selected location.
To apply the rule regardless of the location, select Any Location.
Default: Any Location.
When matching incoming Gateway calls...
Match Infinity Connect (WebRTC/RTMP)
Match SIP
Match Lync (MS-SIP)
Match H.323
Select the source / protocols of the incoming call to which the rule should apply.
Default: these options are all enabled by default.

Pexip Infinity Administrator GuideUsing the Pexip Distributed Gateway service
Configuring Call Routing Rules
© 2016 Pexip AS Version 12.a May 2016 Page 268 of 369
Option Description
Alias match and transform
Match against full alias URI
This setting is for advanced use cases and will not normally be required.
By default, Pexip Infinity matches against a parsed version of the destination alias, i.e. it ignores the URI scheme, any other parameters, and any host IP addresses. So, if the original alias received by Pexip Infinity is sip:[email protected];transport=tls for example, then by default the rule will match against [email protected].
Select this option to match against the full, unparsed alias instead.
You must select this option if you are using this rule to support your Lync / Skype for Business IVR gateway (where this rule is routing calls handled by a Virtual Reception into the relevant Lync / Skype for Business AVMCU multi-party conference). See Configuring Pexip Infinity as a Lync / Skype for Business gateway for instructions on how to do this.
Destination alias regex match
The regular expression that the destination alias (the alias that was dialed) is checked against to see if this rule applies to this call.
Pexip Distributed Gateway supports case-insensitive Perl-style regular expression patterns. See Regular expression (regex) reference for information about writing regular expressions.
Destination alias regex replace string
The regular expression string used to transform the originally dialed alias (if a match was found).
If you do not want to change the alias, leave this field blank.
Call media settings
Maximum inbound call bandwidth (kbps)
Enter a value in this field to limit the bandwidth of media being received by Pexip Infinity from each individual participant dialed in via this rule. For more information see Restricting call bandwidth.
Maximum outbound call bandwidth (kbps)
Enter a value in this field to limit the bandwidth of media being sent from Pexip Infinity to each individual participant dialed out from this rule. For more information see Restricting call bandwidth.
Call capability Allows you to limit the media content of the call. The participant being called will not be able to escalate beyond the selected capability. For more information, see Controlling media capability.
Default: Main video + presentation.
Theme The theme to use for calls placed using this rule. For more information, see Customizing images and voice prompts using themes.
Default: <use Default theme> (the global default theme will be used).
Outgoing call placement (individual fields are only displayed when appropriate)
Call target The device or system to which the call is routed. The options are:
l Registered device or external system: route the call to a matching registered device if it is currently registered, otherwise attempt to route the call via an external system such as a SIP proxy, Lync / Skype for Business server, H.323 gatekeeper or other gateway/ITSP.
l Registered devices only: route the call to a matching registered device only (providing it is currently registered).
l Lync AVMCU conference direct (not via Virtual Reception): route the call via a Lync / Skype for Business server to an AVMCU conference. Note that the destination alias must be transformed into a Lync / Skype for Business Conference ID.
l Lync clients or Lync AVMCU conferences via a Virtual Reception: route the call via a Lync / Skype for Business server either to a Lync client, or — for calls that have come via a Virtual Reception — to an AVMCU conference. For AVMCU via Virtual Reception routing, ensure that Match against full alias URI is selected and that the Destination alias regex match ends with .*

Pexip Infinity Administrator GuideUsing the Pexip Distributed Gateway service
Configuring Call Routing Rules
© 2016 Pexip AS Version 12.a May 2016 Page 269 of 369
Option Description
Outgoing location When calling an external system, this forces the outgoing call to be handled by a Conferencing Node in a specific location.
When calling an AVMCU conference, a Conferencing Node in this location will handle the outgoing call, and — for Lync AVMCU conference direct targets — perform the Conference ID lookup on the Lync / Skype for Business server.
Select Automatic to allow Pexip Infinity to automatically select the Conferencing Node to use to place the outgoing call (which will usually be the node that received the call).
Protocol The protocol used to place the outgoing call. Note that if the call is to a registered device, Pexip Infinity will instead use the protocol that the device used to make the registration.
Default: SIP.
SIP Proxy* You can optionally specify the SIP Proxy to use to place an outgoing SIP call.
Default: Use DNS.
H.323 Gatekeeper* You can optionally specify the H.323 Gatekeeper to use to place an outgoing H.323 call.
Default: Use DNS.
Lync server* When calling an external system, this is the Lync / Skype for Business server to use for outbound Lync (MS-SIP) calls.
When calling an AVMCU conference, this is the Lync / Skype for Business server to use for the Conference ID lookup and to place the call.
Default: Use DNS (note that a server must be selected when calling an AVMCU conference).
TURN server** You can optionally specify the TURN server to use when placing calls to ICE-enabled clients (such as Lync / Skype for Business clients and Infinity Connect WebRTC clients).
STUN server** You can optionally specify the STUN server to use when placing calls to ICE-enabled clients (such as Lync / Skype for Business clients and Infinity Connect WebRTC clients).
Rule state
Enable this rule Determines if the rule is enabled or not. Any disabled rules still appear in the rules list but are ignored. Use this setting to test configuration changes, or to temporarily disable specific rules.
* If you do not select a specific H.323 Gatekeeper, SIP Proxy or Lync server, the Conferencing Node will attempt to use DNS to locate an appropriate system via which to route the call (rather than fall back to using the gatekeeper / proxy / server associated with the node's system location).
** If you do not select a specific TURN server or STUN server, the call will use the TURN / STUN server associated with the node's system location.
ExampleIn our example organization, every employee has their own video endpoint with an alias in the format [email protected], and their own Virtual Meeting Room with an alias in the format [email protected].
In most cases, employees will use their standalone SIP or H.323 endpoints to call others within the organization, but sometimes they want to use Infinity Connect to make a point-to-point call.
In order to support this, we set up the following Call Routing Rule (unspecified settings can be left as their default values):
Option Input Notes
Name Infinity Connect to SIP

Pexip Infinity Administrator GuideUsing the Pexip Distributed Gateway service
Configuring Call Routing Rules
© 2016 Pexip AS Version 12.a May 2016 Page 270 of 369
Option Input Notes
Description Allow Infinity Connect (WebRTC / RTMP) users to call SIP endpoints directly
Incoming gateway calls
Outgoing calls from a conference
We want this rule to match incoming gateway calls only.
Calls being handled in location Any location We want this rule to apply throughout our deployment.
Match Infinity Connect (WebRTC /
RTMP) Match SIP
Match Lync (MS-SIP)
Match H.323
In this example, we only want the rule to apply to calls from Infinity Connect clients.
Destination alias regex match [email protected] This regular expression will match any destination alias with the domain example.com.
Destination alias regex replace string <blank> We have left this blank because we do not want to amend the alias.
Call target Registered device or external system We want to call either a matching registered device (if it is currently registered), otherwise route the call via an external SIP system.
Outgoing location Automatic We want to place the outgoing call from the same node that received the call.
Protocol SIP The call will be interworked to SIP.
SIP Proxy Use DNS We want to use DNS to locate an appropriate SIP proxy to place the call.
This rule means that if an Infinity Connect user dials any alias with the domain @example.com (e.g. [email protected]), the call will be routed over SIP. We do not need to worry about this rule applying to VMR aliases with the same domain (e.g. [email protected]) because Call Routing Rules are only applied to incoming calls after checking whether there are any VMRs with that alias.

Pexip Infinity Administrator Guide
© 2016 Pexip AS Version 12.a May 2016 Page 271 of 369
Viewing statusYou can view the status of all current and historical conferences, and the status of participants in those conferences. You can also view usage statistics, alarms, the support log and the administrator log.
In this section:
Viewing current conference status 272
Viewing participant status 276
Viewing registrations 279
Viewing Conferencing Nodes 280
Viewing historical information about conferences 281
Viewing historical information about participants 282
Viewing usage statistics 284
Viewing alarms 285
About the support log 287
About the administrator log 289
Viewing login history 291
Viewing VMR sync template results 292
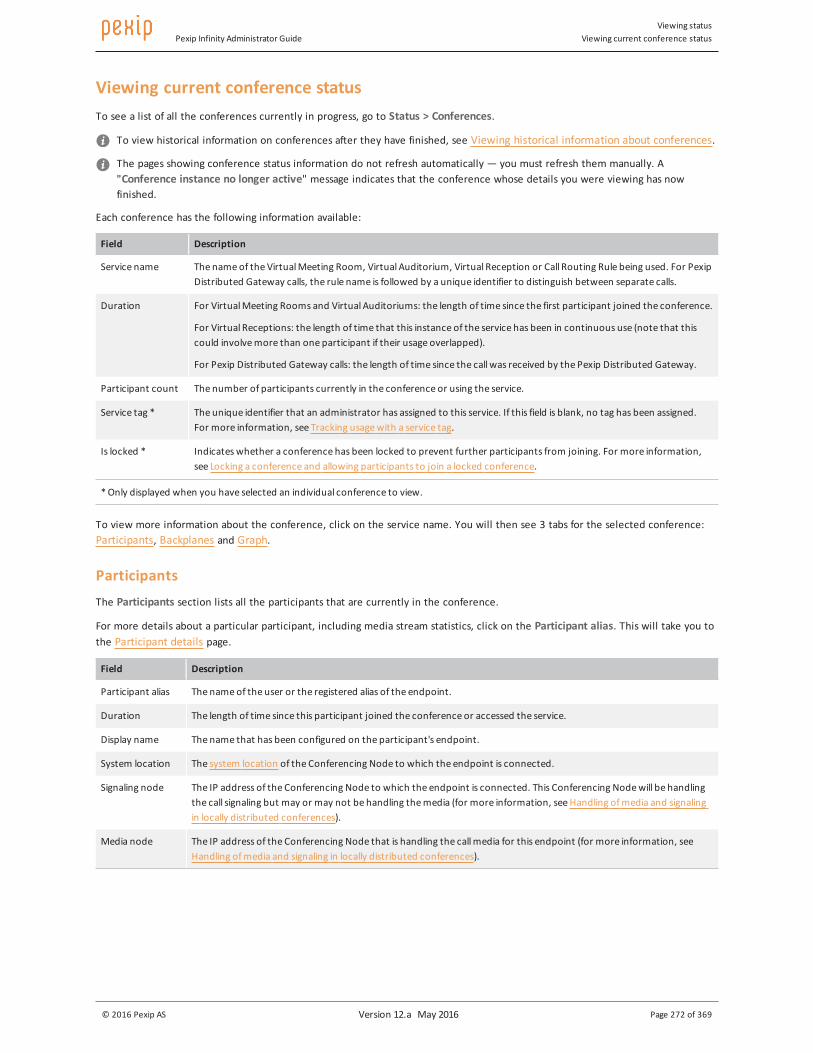
Pexip Infinity Administrator GuideViewing status
Viewing current conference status
© 2016 Pexip AS Version 12.a May 2016 Page 272 of 369
Viewing current conference statusTo see a list of all the conferences currently in progress, go to Status > Conferences.
To view historical information on conferences after they have finished, see Viewing historical information about conferences.
The pages showing conference status information do not refresh automatically — you must refresh them manually. A "Conference instance no longer active" message indicates that the conference whose details you were viewing has now finished.
Each conference has the following information available:
Field Description
Service name The name of the Virtual Meeting Room, Virtual Auditorium, Virtual Reception or Call Routing Rule being used. For Pexip Distributed Gateway calls, the rule name is followed by a unique identifier to distinguish between separate calls.
Duration For Virtual Meeting Rooms and Virtual Auditoriums: the length of time since the first participant joined the conference.
For Virtual Receptions: the length of time that this instance of the service has been in continuous use (note that this could involve more than one participant if their usage overlapped).
For Pexip Distributed Gateway calls: the length of time since the call was received by the Pexip Distributed Gateway.
Participant count The number of participants currently in the conference or using the service.
Service tag * The unique identifier that an administrator has assigned to this service. If this field is blank, no tag has been assigned. For more information, see Tracking usage with a service tag.
Is locked * Indicates whether a conference has been locked to prevent further participants from joining. For more information, see Locking a conference and allowing participants to join a locked conference.
* Only displayed when you have selected an individual conference to view.
To view more information about the conference, click on the service name. You will then see 3 tabs for the selected conference: Participants, Backplanes and Graph.
ParticipantsThe Participants section lists all the participants that are currently in the conference.
For more details about a particular participant, including media stream statistics, click on the Participant alias. This will take you to the Participant details page.
Field Description
Participant alias The name of the user or the registered alias of the endpoint.
Duration The length of time since this participant joined the conference or accessed the service.
Display name The name that has been configured on the participant's endpoint.
System location The system location of the Conferencing Node to which the endpoint is connected.
Signaling node The IP address of the Conferencing Node to which the endpoint is connected. This Conferencing Node will be handling the call signaling but may or may not be handling the media (for more information, see Handling of media and signaling in locally distributed conferences).
Media node The IP address of the Conferencing Node that is handling the call media for this endpoint (for more information, see Handling of media and signaling in locally distributed conferences).

Pexip Infinity Administrator GuideViewing status
Viewing current conference status
© 2016 Pexip AS Version 12.a May 2016 Page 273 of 369
Field Description
Role Host indicates that either:
l the conference has no PINs configured (in which case all participants will have a role of Host)
l the participant accessed the conference using the Host PIN.
Guest indicates that the participant accessed the conference using the Guest PIN.Unknown indicates that either:
l the participant is at the PIN entry screen and has not yet successfully entered a PIN
l the participant is connected via an AVMCU conference (these participants will appear in the Infinity Connect participant list with a role of External).
For more information, see About PINs, Hosts and Guests.
Is presenting Indicates whether the endpoint is currently sending a presentation stream.
Is muted Indicates whether the endpoint's audio has been muted (using an Infinity Connect client, the Administrator interface, or by a third party using the Pexip API).
On hold Indicates whether the endpoint has been put on hold (usually by the endpoint user).
Streaming or recording device
Indicates if the participant is a streaming or recording device.
BackplanesThe Backplanes section provides information about the media streams being transmitted between Conferencing Nodes for the selected conference. Backplane links are unidirectional, so for a conference involving two Conferencing Nodes there will be two backplane links: one from node A to node B, and another from node B to node A.
Field Description
Media node The IP address of the Conferencing Node that is transmitting media.
For details about the media streams being sent over a particular backplane link, click on the Media node's IP address.
Remote media node The IP address of the Conferencing Node that is receiving media.
Note that the remote media node of a merged AVMCU conference is identified by the address of the Lync client that initiated the AVMCU conference.
System location * The system location of the Conferencing Node that is transmitting media.
Duration The length of time since the connection was established.
Type Geographic indicates that the two Conferencing Nodes are in different system locations.
Local indicates that the two Conferencing Nodes are in the same system location.
* Only displayed when you have selected an individual media node to view.
Backplane media streams
Media stream details are displayed when you have selected an individual node to view.
Field Description
Type Indicates whether the information is for an Audio, Video, or Presentation stream.
Tx codec The format used by the transmitting Conferencing Node to encode and decode the media stream being transmitted.

Pexip Infinity Administrator GuideViewing status
Viewing current conference status
© 2016 Pexip AS Version 12.a May 2016 Page 274 of 369
Field Description
Tx bitrate (kbps) The quantity of data currently being sent from the transmitting Conferencing Node to the recipient Conferencing Node for this particular media stream.
Tx resolution The display resolution of the image being sent from the transmitting Conferencing Node.
Tx packets sent The total quantity of packets sent from the transmitting Conferencing Node to the recipient Conferencing Node since the start of the conference.
Tx packets lost The total quantity of packets sent from the transmitting Conferencing Node but not received by the recipient Conferencing Node.
Tx jitter (ms) The variation in the expected periodic arrival of packets being sent from the transmitting Conferencing Node to the recipient Conferencing Node, in milliseconds.
Rx jitter (ms) The variation in the expected periodic arrival of packets being received by the recipient Conferencing Node, in milliseconds.
GraphThis section displays a graphical view of the media connections for this conference, as follows:
l blue dots: all endpoints (note that Infinity Connect control-only participants will not appear on this graph because they have not established a media connection)
l large orange dots: the Conferencing Nodes to which the endpoints are connected l small orange dots: an external node (e.g. an AVMCU conference)
l green lines: backplane links between Conferencing Nodes. These will become dashed green lines if packet loss is greater than 1%
l gray lines: connections between an endpoint and a Conferencing Node. These will become dashed gray lines if packet loss is greater than 1%
l red dashed lines: any connections with packet loss greater than 2%.
Note that a Conferencing Node with (seemingly) no participants connected to it may appear in the graph. In such cases, the Conferencing Node will have one or more control-only participants connected but no media connections.
To view details of a particular participant, double-click on the participant node.

Pexip Infinity Administrator GuideViewing status
Viewing current conference status
© 2016 Pexip AS Version 12.a May 2016 Page 275 of 369
Example graph showing two Conferencing Nodes and nine participant endpoints, with packet loss between one endpoint and a node, and between the two nodes

Pexip Infinity Administrator GuideViewing status
Viewing participant status
© 2016 Pexip AS Version 12.a May 2016 Page 276 of 369
Viewing participant statusTo see a list of all the current conference participants across all services (Virtual Meeting Rooms, Virtual Auditoriums, Virtual Receptions and the Pexip Distributed Gateway), go to Status > Participants. This shows a list of all participants; to view a particular participant's details, click on the Participant alias.
To view historical information on participants after a conference has finished, see Viewing historical information about participants.
Participant detailsThe following information about each participant is available:
Field Description
Participant alias The name of the user or the registered alias of the endpoint.
Service name The name of the Virtual Meeting Room, Virtual Auditorium, Virtual Reception or Pexip Distributed Gateway that the participant is accessing. For Pexip Distributed Gateway calls, the name is followed by a unique identifier to distinguish between separate calls.
Connect time * The date and time that signaling was established between the participant's endpoint and Pexip Infinity.
Duration The length of time since this participant joined the conference or accessed the service.
Display name The name that has been configured on the participant's endpoint.
Destination alias * For participants that have dialed in to the conference or service themselves, this is the alias that they dialed.
For participants that have been dialed out to manually or automatically from a Virtual Meeting Room or Virtual Auditorium, this is the alias of the endpoint that was dialed.
System location The system location of the Conferencing Node to which the endpoint is connected.
Signaling node The IP address of the Conferencing Node to which the endpoint is connected. This Conferencing Node will be handling the call signaling but may or may not be handling the media (for more information, see Handling of media and signaling in locally distributed conferences).
Media node The IP address of the Conferencing Node that is handling the call media for this endpoint (for more information, see Handling of media and signaling in locally distributed conferences).
Service type * Virtual Meeting Room, Virtual Auditorium, Virtual Reception, or Gateway: the participant has successfully accessed the service indicated.
PIN collection IVR: the participant is currently accessing the Interactive Voice Response screens (where they are asked to enter a valid PIN).
Waiting for Host: the participant is being shown a holding screen while they wait for a conference Host to join.
Insufficient Capacity Screen: the participant is being shown a holding screen indicating that they cannot join the conference due to a lack of capacity on Pexip Infinity, or because the service's participant limit has been reached.
Insufficient Licenses Screen: the participant is being shown a holding screen indicating that they cannot join the conference due to a lack of available licenses on Pexip Infinity. For more information, see Insufficient licenses.
Invalid License Screen: the participant is being shown a holding screen indicating that they cannot join the conference because there are no valid licenses available on Pexip Infinity. For more information, see Invalid license.

Pexip Infinity Administrator GuideViewing status
Viewing participant status
© 2016 Pexip AS Version 12.a May 2016 Page 277 of 369
Field Description
Role Host indicates that either:
l the conference has no PINs configured (in which case all participants will have a role of Host)
l the participant accessed the conference using the Host PIN.
Guest indicates that the participant accessed the conference using the Guest PIN.Unknown indicates that either:
l the participant is at the PIN entry screen and has not yet successfully entered a PIN
l the participant is connected via an AVMCU conference (these participants will appear in the Infinity Connect participant list with a role of External).
For more information, see About PINs, Hosts and Guests.
License count * The number of licenses consumed by this participant. Media participants consume 1 license but API-only participants (e.g. Infinity Connect users who are not sending media) do not consume a license.
Is presentation stream supported *
Indicates whether the endpoint is able to support a separate media stream for presentations negotiated by H.239 or BFCP.
Is presenting Indicates whether the endpoint is currently sending a presentation stream.
Is muted Indicates whether the endpoint's audio has been muted (using an Infinity Connect client, the Administrator interface, or by a third party using the Pexip API).
On hold * Indicates whether the endpoint has been put on hold (usually by the endpoint user).
Streaming or recording device *
Indicates if the participant is a streaming or recording device.
Protocol * The communication protocol being used by the endpoint.
Call direction * In: the call was placed by an external endpoint and received by Pexip Infinity.
Out: the call was placed by Pexip Infinity to an endpoint or other device.
Bandwidth (kbps) *
The maximum bandwidth, in kbps, negotiated for use between the Conferencing Node and the endpoint. Actual bandwidth used is shown in the Media streams section (Tx bitrate and Rx bitrate).
Encryption * Indicates whether the media stream being sent to and from the Conferencing Node towards the endpoint is encrypted.
Vendor * Information about the endpoint's manufacturer and software.
Remote IP address *
The IP address of the system from which signaling from this endpoint is being sent and received. This may be the endpoint itself, or it may be a call control system if one is in use in your network.
Remote port * The port on the system from which signaling from this endpoint is being sent and received.
Call ID * A unique identifier that can be used to trace the call in the administrator log and support log.
Select View call logs to see a filtered view of the support log showing only events containing this Call ID.
Calls made via the Virtual Reception generate two separate participant calls but these both have the same Call ID.Calls made via the Pexip Distributed Gateway generate separate participant calls with different Call IDs.
* Only displayed when you have selected an individual participant to view.
Media streams
Media stream details are displayed when you view the details of an individual participant. (Note that media streams are not displayed for any participants that are connected to the Lync / Skype for Business AVMCU in a Fusion call.)

Pexip Infinity Administrator GuideViewing status
Viewing participant status
© 2016 Pexip AS Version 12.a May 2016 Page 278 of 369
Type Indicates whether the information is for the Audio, Video, or Presentation stream.
When viewing the stream details of a completed call you may see multiple instances of each stream type (for example, if the participant had started presenting, stopped and then started presenting again). For in-progress calls you can only see a maximum of one instance of each stream type (reflecting what the participant is currently doing).
Note that a presentation stream is not shown for Infinity Connect clients that are sending or receiving still images or PDF pages (as opposed to screen sharing, or receiving full motion presentation).
Start time The date and time that the media stream started.
End time The date and time that the media stream ended (displayed for historic calls only).
Node The address of the Conferencing Node handling the media.
Tx codec The format used by the Conferencing Node to encode the media stream being sent to the endpoint.
Off indicates that no decodable media for this stream has been received in the last 10 seconds or so from the codec. For example, for an Infinity Connect client being used for presentation only, there will be no video transmitted.
Off stage indicates that the participant is currently not being shown in the main video or thumbnails, so Pexip Infinity is not attempting to decode the media stream.
If this field is blank, this may mean that Pexip Infinity has negotiated which codec to use but it is yet to receive any media from the endpoint to determine which codec it is actually sending.
Tx bitrate (kbps) The quantity of data currently being sent from the Conferencing Node to the endpoint, in kilobits per second.
Tx resolution The display resolution of the image being sent from the Conferencing Node to the endpoint.
Tx packets sent The total quantity of packets sent from the Conferencing Node to the endpoint since the start of the conference.
Tx packets lost The total quantity of packets sent from the Conferencing Node but not received by the endpoint.
This value is reported to the Conferencing Node by the endpoint. Endpoints that do not support RTCP are not able to supply this information, so the value will always be 0.
Tx jitter (ms) * The variation in the expected periodic arrival of packets being sent from the Conferencing Node to the endpoint, in milliseconds.This value is reported to the Conferencing Node by the endpoint. Endpoints that do not support RTCP are not able to supply this information, so the value will always be 0.
Rx codec The format used by the Conferencing Node decode the media stream being sent from the endpoint.
Off indicates that no decodable media for this stream has been received in the last 10 seconds or so from the codec. For example, for an Infinity Connect client being used for presentation only, there will be no video transmitted.
Off stage indicates that the participant is currently not being shown in the main video or thumbnails, so Pexip Infinity is not attempting to decode the media stream.
If this field is blank, this may mean that Pexip Infinity has negotiated which codec to use but it is yet to receive any media from the endpoint to determine which codec it is actually sending.
Rx bitrate (kbps) The quantity of data currently being received by the Conferencing Node from the endpoint, in kilobits per second.
Rx resolution The display resolution of the image being received by the Conferencing Node from the endpoint.
Rx packets received
The total quantity of packets received by the Conferencing Node from the endpoint since the start of the conference.
Rx packets lost The total quantity of packets sent from the endpoint but not received by the Conferencing Node.
Rx jitter (ms) * The variation in the expected periodic arrival of packets being received by the Conferencing Node from the endpoint, in milliseconds.
* Displayed for in-progress calls only.

Pexip Infinity Administrator GuideViewing status
Viewing registrations
© 2016 Pexip AS Version 12.a May 2016 Page 279 of 369
Viewing registrationsTo see a list of all device aliases that are currently registered to the Pexip Infinity platform, go to Status > Registrations.
Devices can only register to Pexip Infinity if the alias it wants to register has been added to Pexip Infinity's list of allowed device aliases (Service configuration > Device aliases). For more information, see Registering devices to Pexip Infinity.
Registration detailsThe following information about each registration is available:
Field Description
Alias The alias that has been registered, including its URI scheme (e.g. sip:).
Click on the alias to view detailed status information.
Username The username associated with the alias that was used to authenticate the registration.
Node The address of the node to which the device is registered.
Start time The date and time the registration started.
Protocol The protocol over which the device alias is registered, such as SIP, H.323 or WebRTC.
Is natted * Indicates if the registered device is probably behind a NAT (its contact address is different from its source IP address).
* Only displayed when you have selected an individual alias to view.

Pexip Infinity Administrator GuideViewing status
Viewing Conferencing Nodes
© 2016 Pexip AS Version 12.a May 2016 Page 280 of 369
Viewing Conferencing NodesTo see a list of all Conferencing Nodes currently configured on this Pexip Infinity, go to Status > Conferencing Nodes.
Each Conferencing Node has the following information available:
Field Description
Name The name of the Conferencing Node. Click on the name to view detailed status information.
IPv4 Address The IP address of the Conferencing Node.
System location The physical location of the Conferencing Node.
Deployment status Deployment succeeded indicates that the Conferencing Node has been automatically deployed.
Deployment failed indicates that an automatic deployment has not been successful.
Manual indicates that the Manual option was selected when the Conferencing Node was deployed (for more information see Deployment types. Even if the manual deployment was successful, this field will still say Manual; however you can see from the Last contacted and Last updated fields whether the Conferencing Node is now up and running and receiving configuration updates.
Other statuses indicate that an automatic deployment is currently in progress.
Version The version number of the Pexip Infinity software that is currently installed on this Conferencing Node.
Last contacted The date and time that the Conferencing Node last contacted the Management Node. In general, Conferencing Nodes should contact the Management Node every minute or so.
l Green text indicates that the contact was within the last 2 minutes.
l Orange text indicates that the contact was between 2 and 5 minutes ago.
l Red text indicates that the contact was more than 5 minutes ago.
Last updated The last time that the Conferencing Node's configuration was updated.
Max HD connections/Maximum capacity - HD connections*
An estimate of the total number of simultaneous high-definition (HD) 720p video calls this Conferencing Node can handle the media for (assuming it is not being used for any other types of call at that time.)†
Maximum capacity - audio connections*
An estimate of the total number of simultaneous audio-only calls this Conferencing Node can handle the media for (assuming it is not being used for any other types of call at that time.)†
Maximum capacity - SD connections*
An estimate of the total number of simultaneous standard-definition (SD) video calls this Conferencing Node can handle the media for (assuming it is not being used for any other types of call at that time.)†
Maximum capacity - Full HD connections*
An estimate of the total number of simultaneous full high-definition (Full HD) 1080p video calls this Conferencing Node can handle the media for (assuming it is not being used for any other types of call at that time.)†
Media load An estimate of how much of its total capacity the Conferencing Node is currently using.†
* Only displayed when you have selected an individual Conferencing Node to view.
† For more information on server capacity, see Capacity planning.

Pexip Infinity Administrator GuideViewing status
Viewing historical information about conferences
© 2016 Pexip AS Version 12.a May 2016 Page 281 of 369
Viewing historical information about conferencesTo see a list of all the completed conferences on the Pexip Infinity platform, go to Status > Conference history. This shows a list of the most recent completed conferences (up to a limit of 5,000). To view details of a particular conference, click on the Service name.
To view information on conferences currently running on Pexip Infinity, see Viewing current conference status.
The following information is available for each completed conference:
Field Description
Service name The name of the Virtual Meeting Room, Virtual Auditorium, Virtual Reception or Pexip Distributed Gateway that was used. For Pexip Distributed Gateway calls, the name is followed by a unique identifier to distinguish between separate calls.
Click on the service name to view more information.
Service tag* The unique identifier that an administrator has assigned to this service. If this field is blank, no tag has been assigned. For more information, see Tracking usage with a service tag.
Start time The date and time that the first participant connected to the service.
End time The date and time that the last participant's call ended.
Duration The length of time that the conference or service was in use.
Participant count The total number of participant calls made to this conference. Note that if a single participant disconnects from the conference and then reconnects to it, this will be counted as two participant calls.
Instant message count* The total number of instant messages sent during the conference.
Participants*
Participant alias* The name of the user or the registered alias of the endpoint.
Click on the Participant alias to view information about the participant. This will take you to the Participant history page.
Start time* The date and time that the participant's call reached Pexip Infinity.
End time* The date and time that the participant's call ended.
Duration* The length of time that the participant was connected to Pexip Infinity. This includes time connected to the Virtual Meeting Room or Virtual Auditorium, and any time spent at the Virtual Reception or PIN entry screens.
Display name* The name that was configured on the participant's endpoint.
System location* The system location of the Conferencing Node to which the participant was connected.
Role* Host indicates that either:
l the conference had no PINs configured (in which case all participants had a role of Host)
l the participant accessed the conference using the Host PIN.
Guest indicates that the participant accessed the conference using the Guest PIN.Unknown indicates one of the following:
l the participant reached the Virtual Reception but did not proceed to a Virtual Meeting Room or Virtual Auditorium
l the participant reached the PIN entry screen but did not successfully enter a PIN
l the call was via the Pexip Distributed Gateway.
For more information, see About PINs, Hosts and Guests.
* Only displayed when you have selected an individual conference to view.

Pexip Infinity Administrator GuideViewing status
Viewing historical information about participants
© 2016 Pexip AS Version 12.a May 2016 Page 282 of 369
Viewing historical information about participantsTo see a list of all the calls made to the Pexip Infinity platform (including calls to Virtual Meeting Rooms, Virtual Auditoriums, Virtual Reception and the Pexip Distributed Gateway), go to Status > Participant history. This shows a list of all calls made to the 5,000 most recent completed conferences. To view details of a particular call, click on the Participant alias.
To view information on participants currently connected to Pexip Infinity, see Viewing participant status.
The following information is available:
Field Description
Participant alias The name of the user or the registered alias of the endpoint.
Click on the participant alias to view detailed information about the call.
Service name The name of the Virtual Meeting Room, Virtual Auditorium, Virtual Reception or Pexip Distributed Gateway that the participant was connected to. For Pexip Distributed Gateway calls, the name is followed by a unique identifier to distinguish between separate calls.
Start time The date and time that the participant's call reached Pexip Infinity.
End time The date and time that the participant's call ended.
Duration The length of time that the participant was connected to Pexip Infinity. This includes time connected to the Virtual Meeting Room or Virtual Auditorium and any time spent at the Virtual Reception or PIN entry screens.
Display name The name that was configured on the participant's endpoint.
Conference alias * The alias that the participant dialed to access the service. If the participant included a PIN number in the dial string, this would also be included in the alias shown here.
System location The system location of the Conferencing Node to which the participant was connected.
Signaling node * The IP address of the Conferencing Node to which the endpoint was connected. This Conferencing Node was handling the call signaling but may or may not have been handling the media (for more information, see Handling of media and signaling).
Media node * The IP address of the Conferencing Node that was handling the call media for this endpoint (for more information, see Handling of media and signaling).
Service type * Indicates whether the participant was connected to a Virtual Meeting Room, Virtual Auditorium, Virtual Reception or the Pexip Distributed Gateway.
Role Host indicates that either:
l the conference had no PINs configured (in which case all participants had a role of Host)
l the participant accessed the conference using the Host PIN.
Guest indicates that the participant accessed the conference using the Guest PIN.Unknown indicates one of the following:
l the participant reached the Virtual Reception but did not proceed to a Virtual Meeting Room or Virtual Auditorium
l the participant reached the PIN entry screen but did not successfully enter a PIN
l the call was via the Pexip Distributed Gateway.
For more information, see About PINs, Hosts and Guests.
License count * The number of licenses consumed by this participant. Media participants consume 1 license but API-only participants (e.g. Infinity Connect users who are not sending media) do not consume a license.
Protocol * The communication protocol used by the endpoint.
Call direction * In: the call was placed by an external endpoint and received by Pexip Infinity.
Out: the call was placed by Pexip Infinity to an endpoint or other device.

Pexip Infinity Administrator GuideViewing status
Viewing historical information about participants
© 2016 Pexip AS Version 12.a May 2016 Page 283 of 369
Field Description
Bandwidth (kbps) * The maximum bandwidth, in kbps, negotiated for use between the Conferencing Node and the endpoint. Actual bandwidth used is shown in the Viewing historical information about participants section (Tx bitrate and Rx bitrate).
Streaming or recording device *
Indicates if the participant is a streaming or recording device.
Encryption * Indicates whether the media stream being sent to and from the Conferencing Node towards the endpoint was encrypted.
Vendor * Information about the endpoint's manufacturer and software.
Remote IP address * The IP address of the system from which signaling from this endpoint was being sent and received. This may be the endpoint itself, or it may be a call control system if one is in use in your network.
Remote port * The port on the system from which signaling from this endpoint was being sent and received.
Call ID * A unique identifier that can be used to trace the call in the administrator log and support log.
Select View call logs to see a filtered view of the support log showing only events containing this Call ID.
Calls made via the Virtual Reception generate two separate participant calls but these both have the same Call ID.Calls made via the Pexip Distributed Gateway generate separate participant calls with different Call IDs.
Disconnect reason * The reason that the call was disconnected. This is provided by either the endpoint or Pexip Infinity, depending on how the call was terminated.
* Only displayed when you have selected an individual participant to view.
Media streams
Historical media stream details are displayed when you view the details of an individual participant.
Pexip Infinity Administrator GuideViewing status
Viewing usage statistics
© 2016 Pexip AS Version 12.a May 2016 Page 284 of 369
Viewing usage statistics
Viewing graphsTo view the daily usage statistics per system location on:
l the total number of minutes used, and
l the highest number of concurrent ports used,
go to Status > Usage statistics.
These graphs show statistics for up to the past 100 days, even if you have rebooted or upgraded your system during that time. Each day represents usage for the 24-hour period from midnight UTC.
If there is no information available, for example if your system has been deployed in the last 24 hours, you will see the following message:
Information not yet available. This can take up to 1 hour.
Viewing source dataTo view the source data used to create each graph, click on the View source data link below the graph. This takes you to a page showing the source data in CSV format.
The source data goes back for the same amount of time as the administrator log, from which they are extracted. For more information, see About the administrator log.

Pexip Infinity Administrator GuideViewing statusViewing alarms
© 2016 Pexip AS Version 12.a May 2016 Page 285 of 369
Viewing alarmsWhen there are active alarms on your Pexip Infinity deployment, a flashing yellow icon appears at the top right of each page of the Administrator interface. To view details of the alarms, click on this icon or go to the Alarms page (Status > Alarms).
Alarms remain in place for as long as the issue exists. After the issue has been resolved (for example, when an existing conference ends, therefore freeing up licenses) the associated alarm will automatically disappear from the Alarms page.
You can view alarms that have since been resolved by searching the Administrator log for administrator.alarm. This will show a list of all Alarm raised and Alarm lowered events.
An alarm is raised in each of the following situations:
Alarm Level Cause Suggested resolutions
The Management Node or a Conferencing Node does not have a TLS certificate
Critical The Management Node or a Conferencing Node has no associated TLS certificate.
Upload a TLS certificate and associate it with the Management Node or Conferencing Node.
Alternatively, and if appropriate for your deployment, associate an existing certificate with your Conferencing Node. When doing this, the existing certificate should already contain a SAN (Subject Alternate Name) that matches your Conferencing Node's FQDN.
See Managing a node's TLS server certificate for more information.
CPU instruction set not supported
Critical A Conferencing Node has gone into maintenance mode because it was deployed on a server with an unsupported processor instruction set (e.g. SSE4.1).
Deploy the Conferencing Node on a server with AVX or AVX2.
License limit reached*
Warning A Conferencing Node is unable to accept a call because there are not enough concurrent licenses available on the system at this time. For more information, see Pexip Infinity license installation and usage.
l Wait until one or more of the existing conferences have finished and the licenses have been returned to the pool.
l Contact your Pexip authorized support representative to purchase more licenses.
Licenses expiring Warning One or more of your licenses is due to expire within the next 60 days.
Contact your Pexip authorized support representative to renew your licenses.
Call capacity limit reached*
Warning A call has not been accepted because all Conferencing Nodes that are able to take the media for this call are at capacity.
Note: to understand how often this issue is occurring in your deployment, search the Administrator log for "insufficient capacity".
l Deploy more Conferencing Nodes in this location.
l Move existing Conferencing Nodes onto more powerful servers.
l Allocate more virtual CPUs for Conferencing Nodes on existing servers (if there are sufficient CPU cores). Note that the Conferencing Node will have to be rebooted for this to take effect.
l Configure each location with a primary and secondary overflow location.
For further information on capacity and how calls consume resources, see Hardware resource allocation rules.
Management Node limit reached
Warning The Management Node does not have sufficient resources for the current deployment size (number of Conferencing Nodes).
Increase the amount of RAM and the number of virtual CPUs assigned to the Management Node.
See the recommended hardware requirements in Prerequisites before deploying Pexip Infinity.
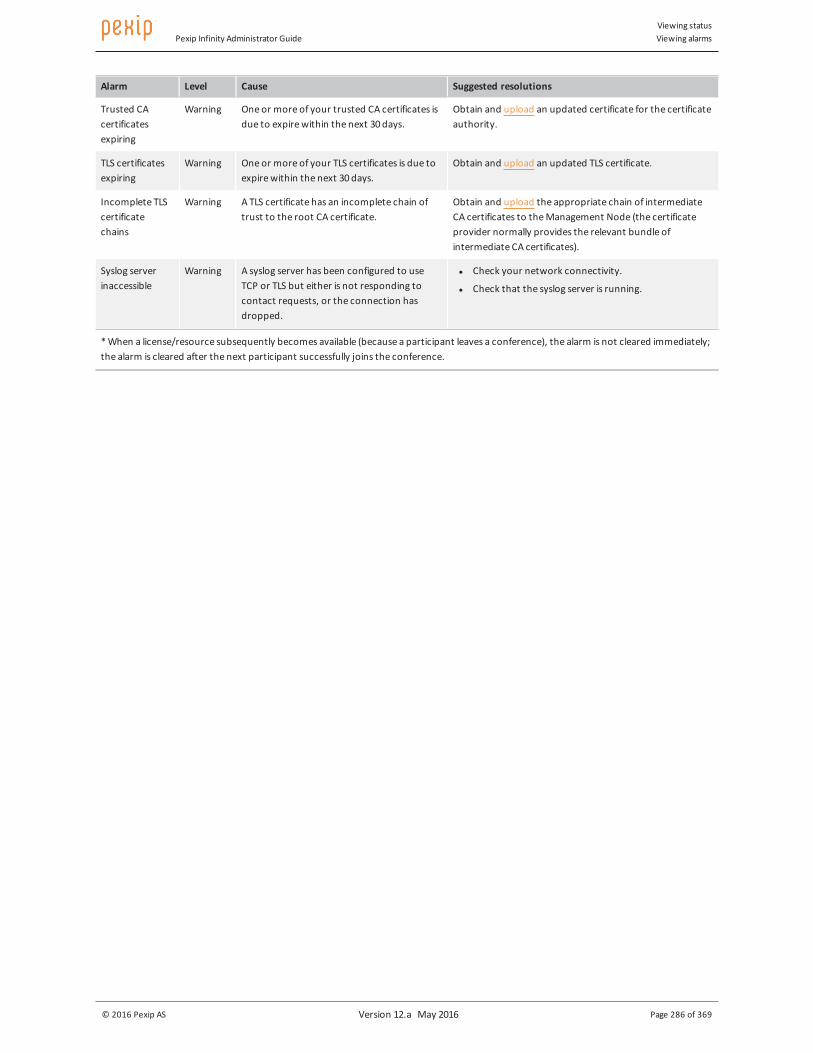
Pexip Infinity Administrator GuideViewing statusViewing alarms
© 2016 Pexip AS Version 12.a May 2016 Page 286 of 369
Alarm Level Cause Suggested resolutions
Trusted CA certificates expiring
Warning One or more of your trusted CA certificates is due to expire within the next 30 days.
Obtain and upload an updated certificate for the certificate authority.
TLS certificates expiring
Warning One or more of your TLS certificates is due to expire within the next 30 days.
Obtain and upload an updated TLS certificate.
Incomplete TLS certificate chains
Warning A TLS certificate has an incomplete chain of trust to the root CA certificate.
Obtain and upload the appropriate chain of intermediate CA certificates to the Management Node (the certificate provider normally provides the relevant bundle of intermediate CA certificates).
Syslog server inaccessible
Warning A syslog server has been configured to use TCP or TLS but either is not responding to contact requests, or the connection has dropped.
l Check your network connectivity.
l Check that the syslog server is running.
* When a license/resource subsequently becomes available (because a participant leaves a conference), the alarm is not cleared immediately; the alarm is cleared after the next participant successfully joins the conference.

Pexip Infinity Administrator GuideViewing status
About the support log
© 2016 Pexip AS Version 12.a May 2016 Page 287 of 369
About the support logThe Management Node collates the logs from itself and all Conferencing Nodes and compiles these into the support log.
The support log records all events occurring across the Pexip Infinity deployment, including:
l configuration changes on the system
l conferences starting and ending
l participants joining and leaving conferences
l participants presenting in conferences
l SIP, H.323 and BFCP signaling
l device registration requests
l DNS lookups.
Sensitive information, such as the content of chat messages, is not logged.
Log timestamps always use UTC.
The information in the support log is retained during reboot and upgrade.
You can also configure Pexip Infinity to use an external syslog server. This allows you to use the syslog server's associated tools to collate and process the log entries to obtain specific information about real-time events, tailored to your requirements.
For more information on the content of the support log, see Log output.
Viewing the support logTo view the support log, go to Status > Support log. If required, you can export the support log to a text file by selecting Download.
The log appears in the format:
syslog_time system originating_time level name details
where:
Field Description
syslog_time In the format:
year-month-dayThour:minute:second.millisecondUTC_offset
The time that the event was logged by syslog on the originating system.
system The IP address or host name of the system that sent the log message.
originating_time In the format:
year-month-day hour:minute:second,millisecond
The time at which the event occurred on the originating system.
level The severity of the event. The levels, in order of increasing severity, are:
l DEBUG
l INFO
l WARNING
l ERROR
name The system module producing the log output.
details Information about the event, as a series of name=value pairs.

Pexip Infinity Administrator GuideViewing status
About the support log
© 2016 Pexip AS Version 12.a May 2016 Page 288 of 369
Searching the support logYou can filter the entire support log to only show messages that contain a particular string (for example, an IP address or alias) using the search box at the top left of the web page.
The search box also supports regular expressions (regex), so for example, you could search for:
l ^2015-10-07T09:[34][[:digit:]]: to limit the displayed log messages to those emitted between 09:30:00 and 09:49:59 UTC on 7 October 2015
l .*"Registration added".*"sip:[email protected]" to find all instances of "Registration added" messages for the SIP alias [email protected]
Note that the results are not paginated.
File sizeThe support log has a maximum size of 2 GB, after which it will be overwritten, starting with the oldest entries. Up to 10 MB is available in a single page view on the Pexip Infinity Administrator interface; you can navigate through additional log pages using the buttons at the bottom left of the page. (Note that each page is a separate file, so the first page, which is the end of the file, may not be full.)

Pexip Infinity Administrator GuideViewing status
About the administrator log
© 2016 Pexip AS Version 12.a May 2016 Page 289 of 369
About the administrator logThe administrator log is a subset of the support log. It contains information about events occurring during the normal use of the system which may be of interest to a system administrator, notably:
l Conferencing Node deployment and communication status
l configuration changes on the system
l conferences starting and ending
l participants joining and leaving conferences
l participants presenting in conferences
l device registrations
l VMR imports
l system backups.
Sensitive information, such as the content of chat messages, is not logged.
Log timestamps always use UTC.
The information in the administrator log is retained during reboot and upgrade.
Viewing the administrator logTo view the administrator log, go to Status > Administrator log. If required, you can export the administrator log to a text file by selecting Download.
The log appears in the format:
syslog_time system originating_time level name details
where:
Field Description
syslog_time In the format:
year-month-dayThour:minute:second.millisecondUTC_offset
The time that the event was logged by syslog on the originating system.
system The IP address or host name of the system that sent the log message.
originating_time In the format:
year-month-day hour:minute:second,millisecond
The time at which the event occurred on the originating system.
level The severity of the event. The levels, in order of increasing severity, are:
l DEBUG
l INFO
l WARNING
l ERROR
name The system module producing the log output.
details Information about the event, as a series of name=value pairs.
Searching the administrator logYou can filter the entire administrator log to only show messages that contain a particular string (for example, an IP address, alias or service tag) using the search box at the top left of the web page.
The search box also supports regular expressions (regex), so for example, you could search for:

Pexip Infinity Administrator GuideViewing status
About the administrator log
© 2016 Pexip AS Version 12.a May 2016 Page 290 of 369
l ^2015-10-07T09:[34][[:digit:]]: to limit the displayed log messages to those emitted between 09:30:00 and 09:49:59 UTC on 7 October 2015
l .*"Registration added".*"sip:[email protected]" to find all instances of "Registration added" messages for the SIP alias [email protected]
Note that the results are not paginated.
File sizeThe administrator log has a maximum size of 1 GB, after which it will be overwritten, starting with the oldest entries. Up to 10 MB is available in a single page view on the Pexip Infinity Administrator interface; you can navigate through additional log pages using the buttons at the bottom left of the page. (Note that each page is a separate file, so the first page, which is the end of the file, may not be full.)

Pexip Infinity Administrator GuideViewing status
Viewing login history
© 2016 Pexip AS Version 12.a May 2016 Page 291 of 369
Viewing login historyTo see a record of attempts to log in to the Pexip Infinity Administrator interface, go to Status > Login history.
The system displays the 100 most recent login attempts. It displays successful and failed attempts, and for each attempt shows the time of the attempt, the username that was submitted, and the address and port of the remote client.
Note that you are taken directly to the Login history page after logging in to the Pexip Infinity Administrator interface if the system has been configured with a login banner and certificate-based authentication has been enabled.

Pexip Infinity Administrator GuideViewing status
Viewing VMR sync template results
© 2016 Pexip AS Version 12.a May 2016 Page 292 of 369
Viewing VMR sync template resultsTo view the status of ongoing or completed VMR template synchronization processes, go to Status > VMR sync status.
You are shown the details of the most recent or in-progress run of each VMR synchronization template. Information shown includes:
l run status e.g. Initializing sync: connecting to LDAP, Syncing, Sync succeeded
l number of VMRs created, deleted, updated and unchanged
l number of warnings
l last updated date and time.
If necessary, you can select a template to view the details of the last warning message it generated. Typical warnings include:
Warning Comment
Error syncing with LDAP This can occur if Pexip Infinity fails to connect to, or authenticate with, the LDAP server. In which case the Pexip Infinity support log will provide more information. Alternatively, this can be caused by invalid syntax in the template's LDAP user filter or LDAP user search DN fields.
Alias clash: alias held by an existing conference has been reassigned to the newly synced conference
This occurs when a template generates an alias that is identical to an existing alias that is already assigned to another VMR (either created manually or via a different template).
In this case, the alias will be reassigned to the VMR currently being created/updated.
Duplicate alias: attempting to create the same alias more than once for the same conference
This occurs when the template attempts to create the same alias more than once for the same conference. Check the alias patterns for your template.
Conference clash: overwriting manually created conference
This occurs when a template generates a VMR name that already exists, and that VMR was created manually.
In this case, the existing VMR with that name will be updated with the new settings generated from the template.
Sync template clash: overwriting conference created by another template
This occurs when a template generates a VMR name that already exists, and that VMR was created via a different template.
In this case, the existing VMR with that name will be updated with the new settings generated from the template.
Validation error when creating conference
This occurs if the synchronization tries to set a field to an invalid value (e.g. a PIN containing letters rather than numbers, or an empty VMR name).
The error message will include some addition parameters such as vmr_name, error and vmr_data which will help to identify the VMR, the field and source LDAP data that is causing the problem.
All of the warning messages generated from a sync run can be viewed in the Administrator log (Status > Administrator log) as described below.
Viewing all historical sync results via the Administrator logTo view all historic details of completed VMR template synchronization processes:
1. Go to the Administrator log (Status > Administrator log).
2. Search for Beginning VMR Sync or Completed VMR Sync to see details of the start end and events corresponding to every VMR template synchronization process that has occurred.Alternatively you can search for vmrsync to see details of all log entries relating to VMR synchronization processes.

Pexip Infinity Administrator GuideViewing status
Viewing VMR sync template results
© 2016 Pexip AS Version 12.a May 2016 Page 293 of 369
More informationFor more information about bulk-provisioning VMRs from an LDAP-accessible database, see:
l Provisioning VMRs from Active Directory via LDAP l Troubleshooting LDAP server connections
Pexip Infinity Administrator Guide
© 2016 Pexip AS Version 12.a May 2016 Page 294 of 369
Maintaining the Pexip Infinity platformTypical maintenance tasks include upgrading the Pexip Infinity software, creating and restoring backups of configuration data, and managing administrator account passwords.
In this section:
Setting and changing usernames and passwords 295
Upgrading the Pexip Infinity platform 297
Migrating Conferencing Nodes between host VMware servers 300
Taking a Conferencing Node out of service 301
Rebooting a Conferencing Node 302
Backing up and restoring configuration 303
Downloading a diagnostic snapshot 306
Automatically reporting errors 307
Automatically sending usage statistics 308

Pexip Infinity Administrator GuideMaintaining the Pexip Infinity platform
Setting and changing usernames and passwords
© 2016 Pexip AS Version 12.a May 2016 Page 295 of 369
Setting and changing usernames and passwordsThere are a number of different components of the Pexip Infinity platform that require a username and password:
l Pexip Infinity Administrator interface
l Management Node operating system
l Conferencing Node operating system
Information on how to set and change these is given below.
Some external systems such as CUCM also use usernames and passwords to authenticate with Pexip Infinity. For more information on these, see Integrating with external systems.
Pexip Infinity Administrator interfaceA username and password are required for logging in to the Pexip Infinity Administrator interface. By default these credentials are verified against the local database and are the web administration username and web administration password that were set during installation using the installation wizard. You can also configure the system to authenticate users against an LDAP-accessible database.
Local database authentication
The username (typically admin) cannot be changed after being set, but the password can.
To change the password used to log in to the Pexip Infinity Administrator interface:
1. Log in to the Pexip Infinity Administrator interface.
2. At the top right of the screen, select Change password. 3. Enter the existing password, and then enter the new password twice.
4. Select Change my password.
You will see a message:
Password change successful
Your password was changed.
Note that the Change password option is not available if the system has its Authentication source configured as LDAP database.
LDAP-accessible database authentication
Usernames and passwords for the LDAP-accessible database cannot be managed via the Pexip Infinity Administrator interface.
Changing the Management Node operating system passwordThe Management Node virtual machine (VM) runs on a Linux operating system. The username is admin and cannot be changed.
The password for the Management Node operating system was set during installation using the installation wizard.
The password can be changed by logging in to the Management Node operating system over SSH (providing SSH access has not been disabled) and running the standard UNIX command passwd.
Conferencing Node operating system passwordConferencing Nodes run on a Linux operating system. The username for each Conferencing Node operating system is admin and cannot be changed.
The password was set during Deploying new Conferencing Nodes when configuring the SSH password field.

Pexip Infinity Administrator GuideMaintaining the Pexip Infinity platform
Setting and changing usernames and passwords
© 2016 Pexip AS Version 12.a May 2016 Page 296 of 369
The password can be changed by logging in to the Conferencing Node operating system over SSH (providing SSH access has not been disabled) and running the standard UNIX command passwd.
Lost or forgotten passwordsIf you forget the password for the Pexip Infinity Administrator interface, you can re-run the installation wizard, being sure to change only the Web administration password setting.
If you re-run the installation wizard to only reset the web administration password then you will not lose your configuration data and you will not need to delete and redeploy your Conferencing Nodes, providing you re-enter exactly the same hostname/addressing information as before. However, after completing the wizard you must then edit every system location (Platform configuration > Locations) and reselect the DNS and NTP servers for that location.
If you forget the password used to log in to a Conferencing Node or Management Node operating system, contact your authorized Pexip representative for assistance.
Pexip Infinity Administrator GuideMaintaining the Pexip Infinity platformUpgrading the Pexip Infinity platform
© 2016 Pexip AS Version 12.a May 2016 Page 297 of 369
Upgrading the Pexip Infinity platform
The upgrade processWhen you initiate an upgrade of the Pexip Infinity software, the following steps occur automatically, in order.
1. The Management Node software is upgraded, after which the Management Node will automatically reboot.
2. The first Conferencing Node is put into maintenance mode, meaning all further incoming calls to it will be rejected.
3. When all calls have cleared from the first Conferencing Node, its software is upgraded and the system is rebooted. This process should take around 2 minutes to complete, but may take longer depending on the speed of the connection between the Management Node and Conferencing Node over which the files are transferred.
If all calls have not cleared after 1 hour, the first Conferencing Node will be taken out of maintenance mode and put at the back of the queue of systems to be upgraded. A further attempt to upgrade the first Conferencing Node will be made after all other systems have been upgraded (or had upgrade attempts made).
4. After the first Conferencing Node has been upgraded successfully (or has been put back in the queue for a later upgrade attempt) and is again available, the second Conferencing Node is put into maintenance mode.
5. The process continues with each subsequent Conferencing Node being put into maintenance mode, and, after all calls have cleared, being upgraded and then rebooted.
6. If the upgrade of the Management Node and all Conferencing Nodes has not completed successfully after 24 hours, the process will stop and all systems will be left in their existing upgrade state. This is designed to prevent situations where one Conferencing Node cannot be upgraded, which would otherwise leave the system in a permanent state of upgrading.
If the upgrade process does not complete successfully and stops after 24 hours, you may have a mix of upgraded and non-upgraded systems. You will then need to repeat the upgrade process. During a repeat upgrade, only those systems that have not already been upgraded will be included in the upgrade process.
During the 24-hour period from when an upgrade has been initiated, you cannot re-initiate an upgrade using the Administrator interface. If you must re-initiate an upgrade during this time, you must reboot the Management Node and then start the process again.
When to upgradeWhile the upgrade is in progress, some Conferencing Nodes will be running the newer version of the software and some will be running the older version. These Conferencing Nodes will be incompatible until they are all again running the same version. This means that there may be instances where two endpoints dial the same Virtual Meeting Room alias but if they are routed to different Conferencing Nodes that are running different versions of the software, the two endpoints will be in different conferences. For this reason, we recommend upgrading at a time of minimal usage.
Upgrading from version 4 or later to version 12To upgrade Pexip Infinity software from v4 or later to v12:
1. Before upgrading, we recommend that you use your hypervisor's snapshot functionality to take a full VMware/Hyper-V snapshot of the Management Node. If upgrading from v8, due to incompatibilities resolved in v8.1, ensure that you take a non-quiescing snapshot. This snapshot will be required should you later need to downgrade, or if the upgrade fails. You may also want to take a snapshot of each Conferencing Node, although depending on the size and complexity of your deployment it may be easier to simply redeploy these from the Management Node in the unlikely event that this is required.
2. Download the Pexip Infinity upgrade package for v12 from www.pexip.com/software-download.
3. From the Pexip Infinity Administrator interface, go to Utilities > Upgrade.
4. Select Choose File and browse to the location of the upgrade package.

Pexip Infinity Administrator GuideMaintaining the Pexip Infinity platformUpgrading the Pexip Infinity platform
© 2016 Pexip AS Version 12.a May 2016 Page 298 of 369
5. Select Upgrade. There will be a short delay while the upgrade package is uploaded.After the upgrade package has been uploaded, you are presented with a confirmation page showing details of the existing software version and the upgrade version.
6. To proceed, select Upgrade.You are taken to the Upgrade status page, showing the current upgrade status of the Management Node and all Conferencing Nodes (for a definition of each status, see Definition of upgrade statuses). This page automatically refreshes every 5 seconds.
7. When the upgrade completes, all systems will show a status of No upgrade in progress and have the new Installed version.If a Conferencing Node fails to upgrade, for example if it remains on a Waiting for calls to clear status, it should be rebooted. The upgrade process will then continue as expected.
No additional actions are required to upgrade the Management Node or Conferencing Nodes individually.
We recommend that you take a fresh backup of your system after upgrading.
Error messages during upgrade
The following Error-level messages are expected during an upgrade and do not require any action:
2014-03-03T12:12:01.924+00:00 <manager_hostname> 2014-03-03 12:12:01,924 Level="ERROR" Name="administrator.system.configuration" Message="Node configuration failed." Node="<worker_hostname>" Resource="File[/etc/certs/privatekey.pem]"
2014-03-03T12:12:01.924+00:00 <manager_hostname> 2014-03-03 12:12:01,924 Level="ERROR" Name="administrator.system.configuration" Message="Node configuration failed." Node=""<worker_hostname>" Resource="File[/etc/certs/server.pem]"
2014-03-03T12:12:02.400+00:00 <manager_hostname> 2014-03-03 12:12:02,399 Level="ERROR" Name="administrator.system.connectivity" Message="Unable to contact node." Node="<node_ip_fqdn>"
Upgrading from version 3 to version 12To upgrade Pexip Infinity version 3 software to the latest version, you must first upgrade to version 6. To do this:
1. Download the Pexip Infinity v6 upgrade file (contact your Pexip authorized support representative for the link to this file).
2. Follow the steps outlined in Upgrading from version 4 or later to version 12, but when asked to Choose File browse to the location of the v6 upgrade file.
3. Verify that the upgrade has completed successfully.
4. Download the Pexip Infinity v12 upgrade file.
5. Follow the steps outlined in Upgrading from version 4 or later to version 12, and when asked to Choose File browse to the location of the v12 upgrade file.
Upgrading configuration-only deploymentsThe automatic upgrade process described above will update the Management Node and all Conferencing Nodes, including Conferencing Nodes that have been created using the configuration only deployment type.
However, if after the upgrade you wish to deploy new configuration-only Conferencing Nodes, you must download and use a version of the Conferencing Node VM template that matches the version of the Management Node that you have upgraded to. Creating a new Conferencing Node from a VM template containing a different version of the Pexip Infinity software than that which is running
Pexip Infinity Administrator GuideMaintaining the Pexip Infinity platformUpgrading the Pexip Infinity platform
© 2016 Pexip AS Version 12.a May 2016 Page 299 of 369
on the Management Node is not supported and will not work. For more information, see Deploying a Conferencing Node using a generic VM template and configuration file
Definition of upgrade statusesDuring an upgrade, the Upgrade status page will report the status of each Conferencing Node as follows:
Status Description
No upgrade in progress During a platform upgrade, this is the default state that occurs before a Conferencing Node is upgraded, or after the node has rebooted .
Upgrade pending An upgrade of the platform is in progress and this Conferencing Node is in the queue to be upgraded.
Preparing to upgrade The Conferencing Node is preparing to upgrade. During this time the node will be put into maintenance mode, and other services will be stopped.
Waiting for calls to clear The Conferencing Node is in maintenance mode and is waiting for existing conferences to complete.
Timeout waiting for calls to clear
Not all conferences had cleared after 1 hour. This Conferencing Node has been removed from maintenance mode and the upgrade will be attempted again later.
Upgrade in progress The new software is being unpackaged and installed on the Conferencing Node. During this time the Conferencing Node will not synchronize configuration with the Management Node.
Rebooting The upgrade has completed and the Conferencing Node is rebooting.
Could not communicate with conferencing node
This error will be reported if the Conferencing Node cannot be contacted.
Downgrading or recovering from a failed upgradeTo downgrade your system to the previous version, or to recover your system after a failed upgrade:
1. Restore the Management Node from the VMware snapshot that you took using your hypervisor at the start of the upgrade process.
2. Restore the individual Conferencing Nodes by either:
o redeploying each Conferencing Node manually from the Management Node - see Deploying new Conferencing Nodes, or o restoring the hypervisor snapshot of each Conferencing Node that was taken at the start of the upgrade process.
Checking the installed version
Management Node
To view which software version is running on the Management Node, click on the About link at the top right corner of the Pexip Infinity Administrator interface.
Conferencing Nodes
To view which software version is running on individual Conferencing Nodes, go to Status > Conferencing Nodes. The software version number will be shown in the Installed version column.

Pexip Infinity Administrator GuideMaintaining the Pexip Infinity platform
Migrating Conferencing Nodes between host VMware servers
© 2016 Pexip AS Version 12.a May 2016 Page 300 of 369
Migrating Conferencing Nodes between host VMware serversUsing the tools available in VMware, you can move Conferencing Nodes from one host server to another.
You may want to do this if the existing host server is running low on capacity or is experiencing performance issues.
Pexip Infinity supports VMware's vMotion for the live migration of Conferencing Nodes.
You must put the Conferencing Node into maintenance mode and wait until all conferences on that node have finished before migrating it to another host server. See Taking a Conferencing Node out of service for more information.
PrerequisitesThe source and target servers must be enabled for vMotion and use the same shared storage.
Manual migration via VMware's vMotion 1. Ensure that the Conferencing Node is in maintenance mode and that all conferences on that node have finished.
2. In the VMware inventory view, right-click on the Conferencing Node and select Migrate. The Migrate Virtual Machine window will appear.
3. Select Change host then select Next.
4. Select the destination host server or cluster and then select Next.
5. Select the destination resource pool and then select Next.
6. Select the priority and then select Next.
7. Check the details of the migration, and if they are all correct, select Finish.
Pexip Infinity Administrator GuideMaintaining the Pexip Infinity platform
Taking a Conferencing Node out of service
© 2016 Pexip AS Version 12.a May 2016 Page 301 of 369
Taking a Conferencing Node out of serviceIf you need to take a Conferencing Node out of service, you must first put it into maintenance mode to ensure that it is not hosting any conferences.
To do this:
1. Go to Platform configuration > Conferencing Nodes. 2. Select the Conferencing Node.
3. Select the Enable maintenance mode check box and select Save.While maintenance mode is enabled, this Conferencing Node will not accept any new conference instances.
4. Wait until any existing conferences on that Conferencing Node have finished. To check, go to Status > Conferences.
When all conferences on the Conferencing Node have finished you can take it out of service.
About maintenance modeWhen a Conferencing Node goes into maintenance mode, it will not accept any new calls. Any existing calls on that Conferencing Node will not be affected. After all existing calls have terminated, the Conferencing Node will still be live and contactable but will not be handling any calls.
A Conferencing Node will go into maintenance mode for one of three reasons:
1. The system administrator has elected to put the Conferencing Node into maintenance mode. This is done from the Pexip Infinity Administrator interface by going to Platform configuration > Conferencing Nodes, selecting the relevant Conferencing Node, and selecting the Enable maintenance mode checkbox.
This setting will persist after a reboot. 2. The Pexip Infinity platform is being upgraded, during which time each Conferencing Node in turn is automatically put into
maintenance mode and upgraded. For more information, see Upgrading the Pexip Infinity platform.
3. The Conferencing Node has been installed on a system that does not meet the CPU instruction set requirements. In such a case:
o after initial deployment, the following message will appear in the admin log:
CPU instruction set is not supported; system will be placed in maintenance mode
o each time the Conferencing Node rejects a call, the following message will appear in the admin log:
Message="Participant failed to join conference." Reason="System in maintenance mode"
o any manual changes to the Enable maintenance mode setting will have no impact - the Conferencing Node will remain in maintenance mode regardless of this setting.
For more information on how to resolve this, see Troubleshooting the Pexip Infinity platform.

Pexip Infinity Administrator GuideMaintaining the Pexip Infinity platform
Rebooting a Conferencing Node
© 2016 Pexip AS Version 12.a May 2016 Page 302 of 369
Rebooting a Conferencing NodeOccasionally, it may be necessary to reboot a Conferencing Node. A reboot is typically required if:
l You have changed some specific Global settings such as the media and signaling port ranges, or you have enabled or disabled call protocols.
l A Conferencing Node fails to upgrade, for example if it remains on a Waiting for calls to clear status.
There are two main ways to reboot a Conferencing Node:
l Log in to the hypervisor or your cloud service that is managing the host server and reboot the virtual machine using the relevant processes according to the management system.
l Connect to the Conferencing Node via SSH, log in as admin, and issue the command sudo reboot.

Pexip Infinity Administrator GuideMaintaining the Pexip Infinity platformBacking up and restoring configuration
© 2016 Pexip AS Version 12.a May 2016 Page 303 of 369
Backing up and restoring configurationYou should take regular backups of the configuration data on your Management Node, particularly before and after Upgrading the Pexip Infinity platform. This allows you to restore your configuration to a specific point in time, or to restore your configuration if you have to deploy a new Management Node.
There are 2 ways to maintain copies of your Management Node configuration data:
l use your hypervisor's tools to create a full snapshot of the Management Node VM
l use the backup and restore mechanism built into the Pexip Infinity Administrator interface (automatic and manual backup options are available)
We recommend that you use both methods to preserve your configuration data. The VM snapshot should be your primary mechanism, as this allows you to easily restore your configuration back to its state at the time the snapshot was taken. The Pexip Infinity backup and restore mechanism is your fallback mechanism, as this allows you to preserve a copy of your data in an alternative location, in case you lose your VM environment.
You can also separately backup and restore just your Virtual Meeting Room and Virtual Auditorium configuration, see Bulk import / export of basic Virtual Meeting Room or Virtual Auditorium configuration.
Backing up Conferencing NodesConferencing Nodes do not need to be backed up. They receive all their configuration information from the Management Node and can simply be redeployed if necessary. However, if your Conferencing Nodes are geographically spread out and redeploying them would consume significant bandwidth or take a significant length of time, they can also be backed up with your hypervisor's backup tools.
Using your hypervisor's tools to take and restore snapshotsYou can use your hypervisor's own backup tools, or any other third-party tool that supports VM backups, to create a full snapshot of the Management Node. This snapshot can then be re-deployed at a later date if required.
Note that snapshots can take a significant amount of storage space. For this reason, we recommend taking snapshots only when necessary (such as prior to an upgrade) and deleting the snapshot as soon as possible.
Consult your hypervisor documentation for more information about taking and restoring snapshots.
Using backup and restore via the Pexip Infinity Administrator interfaceYou can use Pexip Infinity's inbuilt backup and restore mechanism to backup and restore the configuration data on the Management Node.
You can enable daily automatic backups, and you can also take a manual backup whenever it is appropriate, for example, before and after you make any configuration changes or perform a software upgrade.
l All backup files are encrypted — the administrator supplies a passphrase and must remember this for any subsequent restoration.
l Restoration must occur on exactly the same version that the backup was taken from.
l The data contained in the backup contains all configuration data, including IP addresses, custom themes, certificates and call history.
l The backup data does not contain licenses, the administrator log, the support log, usage statistics or the operating system password.
Note that this function can only be used to replicate the configuration of a previous Management Node onto a new node. It cannot be used to redeploy Conferencing Nodes.
Enabling daily automatic backups
You can enable Pexip Infinity to automatically backup the Management Node configuration data on a daily basis.
When automatic backups are enabled:

Pexip Infinity Administrator GuideMaintaining the Pexip Infinity platformBacking up and restoring configuration
© 2016 Pexip AS Version 12.a May 2016 Page 304 of 369
l Each backup is taken at 01:02 UTC every day.
l Successful backup operations are recorded in the administrator log (with a "Created automatic system backup" message).
l Automatic backup filenames take the format:pexip_auto_backup_<hostname>_<version>_<build>_<date>_<time>.tar.gpg
l You can see the set of backup files that are currently stored on the host VM by going to Utilities > Backup/Restore and looking at the list of Existing backup files.
l If you want to download a backup file from the host VM to another machine, you have to do this manually (by selecting the Download backup option from the Backup/Restore page).
l The system keeps on the host VM only the 5 most recent manually-taken backups and the 5 most recent automatic backups. Older backup files are deleted.
To enable automatic backups:
1. Go to Platform configuration > Global settings.
2. Select the Enable automatic backups checkbox.
3. Enter a Backup passphrase.The text entered here is used to encrypt the backup file. You must remember this text as it will be required if you need to subsequently restore the data from the file.
4. Select Save.
Manually creating a backup file
To manually create and download a backup file:
1. Go to Utilities > Backup/Restore.
2. In the Create backup section, enter a Passphrase and then enter it again in the Re-enter passphrase field.The text entered here is used to encrypt the backup file. You must remember this text as it will be required if you need to subsequently restore the data from the file.
3. Select Create backup.After a few seconds you will see a message: "Successfully created the backup file: <file_name>" where <file_name> takes the format:pexip_backup_<hostname>_<version>_<build>_<date>_<time>.tar.gpg
4. Download the file from the host VM:
a. From the Existing backup files section at the bottom of the page, select Download backup for the file you have just created.
b. Follow your browser's prompts to save or download the file to your local file system.
c. If required, you can delete unwanted backup files from your host VM by selecting Delete backup.The system keeps on the host VM only the 5 most recent manually-taken backups and the 5 most recent automatic backups. Older backup files are deleted.
Restoring data to the Management Node
You can restore configuration data to the Management Node. This could be restored to the original Management Node from which the backup was taken, or it could be restored to a newly deployed Management Node (if the original node was lost due to, for example, issues with its VM environment).
Any in-progress calls will not be affected while data is being restored to the Management Node.
To restore configuration data:
1. If required, deploy a new Management Node as described in Management Node installation overview.
o Complete the installation wizard as normal.
o The IP address you enter at this stage is temporary (it can be the same as the previous Management Node).
o All the configuration data you enter, including the IP address, will be subsequently replaced.

Pexip Infinity Administrator GuideMaintaining the Pexip Infinity platformBacking up and restoring configuration
© 2016 Pexip AS Version 12.a May 2016 Page 305 of 369
2. If any new Conferencing Nodes have been deployed since the backup was taken:
o Power these Conferencing Nodes off and delete them before restoring the Management Node data.
o These additional Conferencing Nodes will not be recognized by the restored Management Node. You will have to create them again after the restore has completed.
3. If previously configured Conferencing Nodes have been deleted since the backup was taken:
o There is no need to do anything at this stage; the restore will complete successfully.
o Simply delete the Conferencing Nodes from the restored configuration, after the restore has completed. 4. Restore your previous backup file:
a. Go to Utilities > Backup/Restore.
b. In the Restore backup section, enter the Passphrase.The text entered here must be identical to the text that was used to create the backup file.
c. Select Choose File and then choose the backup file that you want to restore.The file must be chosen from your local file system (you cannot select a file from the list of Existing backup files).
d. Select Restore backup.You are taken to the Restore backup confirmation page.If instead, you see "Failed to restore the system from the backup file" with a "Decryption Error: decryption failed" message, the most likely reason for this is that you have entered an incorrect passphrase.
e. The confirmation page shows the date that the backup was taken, and the Management Node IP address that will be restored to this system.Select Restore backup to confirm the restoration.
5. If the restore is successful, after a few seconds you will see a "Successfully restored the backup file" message and the Management Node will reboot.You will need to wait for the node to return from rebooting before you can access it again.If you have restored a file where the IP address of the Management Node in the backup file is different from the node's current address (prior to the restore), you will need to manually enter this IP address into the web browser to access the restored Management Node's web interface login page.
6. If you have restored your configuration onto a new VM (and were unable to return the licenses from your previous VM), you must contact your Pexip authorized support representative to get your licenses reapplied on your new VM.

Pexip Infinity Administrator GuideMaintaining the Pexip Infinity platform
Downloading a diagnostic snapshot
© 2016 Pexip AS Version 12.a May 2016 Page 306 of 369
Downloading a diagnostic snapshotIf you are experiencing issues with your Pexip Infinity service, you may be asked by your Pexip authorized support representative to provide them with a snapshot of your system to assist them in diagnosis of the issue.
To download the diagnostic snapshot:
1. On the Pexip Infinity Administrator interface, go to Utilities > Diagnostic snapshot.
2. To download all available data, select Download full snapshot.orTo download up to 24 hours of data: a. Type in, or adjust the slider to the number of hours of diagnostic data to be downloaded.
b. Select Download limited duration snapshot. 3. Follow your browser's prompts to save the file.
File contentsThe diagnostic snapshot is a collection of logs and incident reports and contains information such as IP addresses, conference names, aliases, Pexip Infinity configuration and system logs. Some of this information may be sensitive to your company, so the snapshot should be saved and handled securely.
File sizeWhen each log reaches its maximum size, the oldest data is overwritten.
The maximum file size of each log in the snapshot is as follows:
l Administrator: 0.5 GB
l Support: 0.5 GB
l Internal developer-specific logs: 2 GB
The diagnostic snapshot also includes all available incident reports:
l the full snapshot contains up to 28 days of incident reports, with a cap at 5 GB
l the limited duration snapshot contains incident reports from the selected number of hours.
Pexip Infinity Administrator GuideMaintaining the Pexip Infinity platform
Automatically reporting errors
© 2016 Pexip AS Version 12.a May 2016 Page 307 of 369
Automatically reporting errorsIn order to allow continual monitoring and improvement of the Pexip Infinity platform, we encourage customers to send us details of any incidents that occur in their products. When this feature is enabled, incident reports are sent automatically to a specified URL. By default this is the address of a secure web server owned and managed by Pexip, but you have the option to change the URL.
We collate and analyze this information in order to identify issues with the software that can be resolved in future product releases. The information we receive will not be used for any other purpose.
The feature is enabled and disabled on a Pexip Infinity platform-wide basis, but when enabled each Management Node and Conferencing Node will send their individual incident reports directly to the incident reporting server.
You must therefore ensure that your IP routing and firewall configuration allows outbound communications from each of these systems to the nominated URL. By default, reports are sent to https://acr.pexip.com over TLS to port 443.
Content of incident reportsThe exact content of each incident report will vary depending on the nature of the problem, but all reports always include:
l the date and time that the incident occurred
l the FQDN of the system on which the incident occurred
l the IP address of the system on which the incident occurred
l information about the Pexip Infinity software version
l details of the internal software processes running at the time the incident occurred.
The incident reporting server will also annotate each report with the IP address from which it was received (generally this will be the public IP address of the sender's network). This information is not contained in the original incident report.
The incident reports may also include:
l system configuration information
l stack traces.
The incident reports never include:
l system logs.
Enabling and disabling automatic sending of incident reportsAutomatic sending of incident reports is enabled or disabled in the first instance when Running the installation wizard.
To enable or disable the automatic submission of incident reports, or to change the URL to which they are sent:
1. On the Pexip Infinity Administrator interface, go to Platform configuration > Global settings.
2. Select or deselect the Enable incident reporting box as required.
3. If appropriate, in the Incident reporting URL field enter the URL to which reports will be sent.
4. Select Save.

Pexip Infinity Administrator GuideMaintaining the Pexip Infinity platformAutomatically sending usage statistics
© 2016 Pexip AS Version 12.a May 2016 Page 308 of 369
Automatically sending usage statisticsAs part of our desire to continuously improve operation of the Pexip Infinity platform based on real-life customer usage data, we have enabled the ability for customers, at their own discretion, to automatically provide us with statistics relating to the usage and configuration of their deployment.
When enabled, relevant conference information (such as conference duration and number of participants, call duration and protocol) and selected configuration settings (such as version, license information, location and number of conferencing nodes) is sent automatically every 30 minutes to a third party service provider on behalf of Pexip. If you wish, we are happy to provide you with regular reports containing an analysis of your information, giving you insight into the usage patterns within your organization and helping you in your long-term capacity and growth planning.
We will also anonymize, aggregate, and analyze the information from all customers who have enabled this option, in order to better understand the ways our products are being used in production deployments. This in turn helps us determine the features and requirements of future software releases, which will ultimately provide a product that is of maximum benefit to you.
The analytics information we receive will not be used for any other purpose, will not contain any identifying information (such as user names or passwords), and will not be shared with any other organizations in an identifiable manner. A full list of the data that will be sent to us is given in Information sent when usage reporting is enabled. For more information, please contact your Pexip authorized support representative.
When this option is enabled, your firewall must be configured to allow the Management Node to send outbound traffic over HTTPS.
Enabling and disabling automatic sending of usage statisticsFor new deployments, automatic sending of usage statistics is enabled or disabled in the first instance when Running the installation wizard.
For upgrades from existing deployments running Pexip Infinity v7 or earlier, this feature will be disabled by default.
To enable or disable the automatic submission of usage statistics after initial installation or upgrade:
1. On the Pexip Infinity Administrator interface, go to Platform configuration > Global settings.
2. Select or deselect the Automatically send deployment and usage statistics to Pexip box as required.
3. Select Save.
Infinity Connect usage statistics
Individual Infinity Connect users can also control via their Infinity Connect application's Settings page whether to send usage statistics.
Note that the Automatically send deployment and usage statistics to Pexip global setting on the Management Node must also be enabled in order to allow the Infinity Connect application to send usage statistics.

Pexip Infinity Administrator Guide
© 2016 Pexip AS Version 12.a May 2016 Page 309 of 369
AppendicesIn this section:
Glossary of Pexip Infinity terms 310
Pexip Infinity port usage 313
Regular expression (regex) reference 317
DNS record examples 320
Encryption methodologies 323
Supported RFCs 324
Changing aspect ratios 325
Advanced VMware ESXi administration 326
PSTN gateways and toll fraud 330
Using Microsoft Lync / Skype for Business with Pexip Infinity 331
Using Multiway with Pexip Infinity 333
Configuring Pexip Infinity for public DMZ deployments 336
Information sent when usage reporting is enabled 339
Troubleshooting the Pexip Infinity platform 342
Troubleshooting LDAP server connections 349
Features added in previous releases 353
Software license information 369

Pexip Infinity Administrator GuideAppendices
Glossary of Pexip Infinity terms
© 2016 Pexip AS Version 12.a May 2016 Page 310 of 369
Glossary of Pexip Infinity termsThe following table contains a list of many of the terms used in Pexip Infinity documentation.
Term Definition
Alias The string that, when received by a Conferencing Node, will trigger the creation of a conference instance (or if one already exists, will cause the call to be routed to the appropriate conference).
Each alias is associated with a service (Virtual Meeting Room, Virtual Auditorium or Virtual Reception), which defines the type and settings (such as PIN) for the conference that is created.
In most cases, the alias received by the Conferencing Node will be the same as the alias that the conference participant dialed from their endpoint, but there are some exceptions (for more information see About aliases).
Depending on the dial plan, multiple aliases can be used throughout a network to access the same service.
Automatically dialed participant
A participant who will have a call placed to them from a Virtual Meeting Room or Virtual Auditorium whenever a conference using that service starts.
For more information, see Automatically dialing out to a participant from a conference.
Backplane A link between the Management Node and a Conferencing Node, or between two Conferencing Nodes, used to transmit Pexip control messages. Backplanes between Conferencing Nodes also transmit conference audio, video, and data packets.
All packets are secured through authentication and encryption designed to protect the privacy of the data. For more information, see Encryption methodologies.
Local backplanes exist between Conferencing Nodes in a single location.
Geo backplanes exist between Conferencing Nodes in different locations.
Conference instance A conference with active participants that exists on one or more Conferencing Nodes. A unique conference instance is created when the first participant dials a Virtual Meeting Room or Virtual Auditorium alias and lasts until the last participant disconnects.
Conferencing Node A virtual machine (VM) that provides the capacity for conferences, handling the media processing and call signaling. For more information, see Conferencing Nodes.
Core One single physical processing unit.
Intel Xeon E5 typically has 8 cores (10, 12 or more in newer versions)
Distributed conference A conference instance that exists across two or more Conferencing Nodes. It can be locally distributed, globally distributed, or both:
Locally distributed conferences exist across two or more Conferencing Nodes in the same location.
Globally distributed conferences exist across two or more Conferencing Nodes in physically different locations.
Locally and globally distributed conferences exist across two or more Conferencing Nodes in one location and at least one other Conferencing Node in a different location.
Endpoint A device capable of participating in a conference. The endpoint's capabilities can vary from audio-only to full audio, video, and data sharing support.
Host A conference participant who has privileges to control aspects of the conference. For more information, see About PINs, Hosts and Guests.
Host server The physical hardware on which the virtual Management Node and Conferencing Nodes reside. For more information, see Host servers.
Hypervisor An application that is used to create and manage virtual machines. For more information on the hypervisors supported by Pexip Infinity, see Hypervisors.

Pexip Infinity Administrator GuideAppendices
Glossary of Pexip Infinity terms
© 2016 Pexip AS Version 12.a May 2016 Page 311 of 369
Term Definition
Infinity Connect A suite of software clients that allows end users to connect to Pexip Infinity services from a web browser, an installable desktop client, or a mobile client. For more information, see Introduction to Infinity Connect.
IVR(Interactive Voice Response)
IVR technology allows participants to use a DTMF keypad to interact with Pexip Infinity services to:
l select which Virtual Meeting Room or Virtual Auditorium they wish to join. For more information, see About the Virtual Reception IVR service.
l enter a PIN, for those Virtual Meeting Rooms that have restricted access. For more information, see About PINs, Hosts and Guests.
Management Node A virtual machine (VM) on which the Pexip Infinity software is installed. This machine hosts the Pexip Infinity Administrator interface. It is used to create one or more Conferencing Nodes and configure information about the conferences that can exist on those Conferencing Nodes.
NUMA node The combination of a processor (consisting of one or more cores) and its associated memory.
Pexip Infinity A virtual conferencing platform that encompasses a single Management Node and its associated Conferencing Node(s). Together they provide a coherent conferencing service to a single organization.
Pexip Infinity software The files that are used to deploy the Management Node on to the physical virtual machine (VM) infrastructure.
Port A connection can be a call or presentation from an endpoint to a Virtual Meeting Room or Virtual Auditorium, a backplane between Conferencing Nodes, or a call into or out of the Pexip Distributed Gateway. In this context, a connection is analogous to a port. For more information, see Pexip Infinity license installation and usage.
Port can also refer to the virtual data connections used for network traffic between devices. For more information on the ports used by the Management Node and Conferencing Nodes to connect to other devices, see Pexip Infinity port usage.
Processor The hardware within a computer that carries out the basic computing functions. Can consist of multiple cores.
Proxy In a globally distributed conference, one Conferencing Node in each location will act as the proxy for any other Conferencing Nodes in the same location. Each proxy will funnel traffic between physical locations. This will prevent full mesh bandwidth occupation, minimizing bandwidth consumption and ensuring optimal WAN utilization.
RAM Also referred to as "memory". The hardware that stores data which is accessed by the processor core while executing programs.
Service tag An optional identifier that an administrator can assign to a service, allowing them to track usage of the service via the administrator log. For more information, see Tracking usage with a service tag.
Socket The socket on the host server's motherboard where one processor is installed.
System location A label that allows you to group Management Nodes and Conferencing Nodes together according to where they are physically located. For more information, see About system locations.
Thumbnail A smaller window at the bottom of the main picture which displays the live video stream from a conference participant. Sometimes referred to as a PiP (Picture in Picture).
Virtual Machine(VM)
A software implementation of a computer, which runs on a host server and is implemented and managed using a hypervisor. The Management Node and Conferencing Nodes are virtual machines.
Virtual Auditorium A meeting space that is optimized for use by a small number of Host participants and a large number of Guests. For more information, see About Virtual Auditoriums.
Virtual Meeting Room A personal virtual meeting space. For more information, see About Virtual Meeting Rooms.
Virtual Reception A central IVR service from which participants can select the Virtual Meeting Room or Virtual Auditorium they wish to join. For more information, see About the Virtual Reception IVR service.

Pexip Infinity Administrator GuideAppendices
Glossary of Pexip Infinity terms
© 2016 Pexip AS Version 12.a May 2016 Page 312 of 369
Term Definition
VM manager An application that allows you to connect to one or more VMware vSphere ESXi Hypervisors (which manage host servers and their virtual machines). VM managers supported by version 12 of Pexip Infinity are vCenter Server and vSphere.
l vCenter Server is an application that is used to manage one or more host servers running ESXi, through a single interface.
l vSphere on the host is used when managing a single host server running ESXi.
For more information see Using a VM manager.

Pexip Infinity Administrator GuideAppendices
Pexip Infinity port usage
© 2016 Pexip AS Version 12.a May 2016 Page 313 of 369
Pexip Infinity port usageThe diagrams and tables below show the ports used when the Management Node and Conferencing Node connect to other devices.
Note that in all Pexip Infinity deployment scenarios:
l All Pexip nodes must be fully routable to each other (full mesh) in both directions. This means that the Management Node must be able to reach every Conferencing Node, and each Conferencing Node must be able to reach every other Conferencing Node.
l Any internal firewalls must be configured to allow UDP port 500 and traffic using IP protocol 50 (ESP) in both directions between all Pexip nodes.
l There cannot be a NAT between any Pexip nodes.
Management Node
Inbound
Protocol Source-Port Dest-Port Description Device
TCP <any> 22 SSH * SSH client
TCP <any> 80 HTTP * Web browser / API interface
TCP <any> 443 HTTPS Web browser / API interface
UDP <any> 161 SNMP ‡ SNMP server
UDP 500 500 ISAKMP (IPsec) Conferencing Node
ESP n/a n/a IPsec / IP Protocol 50 Conferencing Node
Outbound
Protocol Source-Port Dest-Port Description Device
TCP/UDP 55000–65535 53 DNS DNS server
TCP 55000–65535 389 / 636 LDAP ‡ LDAP server
TCP 55000–65535 443 HTTPS vCenter Server and any ESXi host on which workers may be deployed *
TCP 55000–65535 443 HTTPS Pexip Licensing server (pexip.flexnetoperations.com, 64.14.29.85) *
TCP 55000–65535 443 HTTPS ‡ Incident reporting server (acr.pexip.com)
TCP 55000–65535 443 HTTPS ‡ Usage statistics (api.keen.io) *
UDP 123, 55000–65535 123 NTP NTP server
UDP <any> 161 † SNMP ‡ SNMP NMS
UDP 500 500 ISAKMP (IPsec) Conferencing Node
UDP † 55000–65535 514 † Syslog ‡ Syslog server
ESP n/a n/a IPsec / IP Protocol 50 Conferencing Node
* Only required if you want to allow administrative access via this port.
† Configurable by the administrator.
‡ Only applies if the relevant feature is configured.
Note also that the ephemeral port range (55000–65535) is subject to change.

Pexip Infinity Administrator GuideAppendices
Pexip Infinity port usage
© 2016 Pexip AS Version 12.a May 2016 Page 314 of 369
Management Node port usage
Conferencing Nodes
Inbound
Protocol Source-Port Dest-Port Description Device
TCP <any> 22 SSH * SSH client
TCP <any> 80 HTTP * Web browser / API interface / Lync / Skype for Business system (for conference avatar)
TCP <any> 443 HTTPS Web browser/ API interface / Infinity Connect Mobile client
TCP <any> 1720 H.323 (H.225 signaling) Endpoint / call control system
TCP <any> 5060 SIP Endpoint / call control system
UDP ‡ <any> 5060 SIP Endpoint / call control system
TCP <any> 5061 SIP/TLS Endpoint / call control system
TCP <any> 33000–39999 ** H.323 (Q.931/H.245 signaling) Endpoint / call control system
TCP/UDP <any> 40000–49999 ** RTP / RTCP / RDP / DTLS / RTMP / STUN / TURN
Endpoint / call control system / Lync / Skype for Business system
UDP <any> 161 SNMP ‡ SNMP server
UDP 500 500 ISAKMP (IPsec) Management Node / Conferencing Node
UDP <any> 1719 H.323 (RAS signaling) Endpoint / call control system
ESP n/a n/a IPsec / IP Protocol 50 Management Node / Conferencing Node

Pexip Infinity Administrator GuideAppendices
Pexip Infinity port usage
© 2016 Pexip AS Version 12.a May 2016 Page 315 of 369
Outbound
Protocol Source-Port Dest-Port Description Device
TCP/UDP 55000–65535 53 DNS DNS server
TCP 55000–65535 443 HTTPS ‡ Incident reporting server (acr.pexip.com)
TCP 33000–39999 ** 1720 H.323 (H.225 signaling) Endpoint / call control system
TCP/UDP 33000–39999 ** 5060 SIP Endpoint / call control system
TCP 33000–39999 ** 5061 SIP/TLS Endpoint / call control system
TCP 33000–39999 ** <any> H.323 (Q.931/H.245 signaling) Endpoint / call control system
TCP/UDP 40000–49999 ** <any> RTP / RTCP / RDP / DTLS / RTMP / STUN / TURN
Endpoint / call control system / Lync / Skype for Business system
TCP 40000–49999 ** 1935 RTMP RTMP streaming server
UDP 123, 55000–65535 123 NTP NTP server
UDP <any> 161 † SNMP ‡ SNMP NMS
UDP 500 500 ISAKMP (IPsec) Management Node / Conferencing Node
UDP † 55000–65535 514 † Syslog ‡ Syslog server
UDP 33000–39999 ** 1719 H.323 (RAS signaling) Endpoint / Call control system
UDP 40000–49999 ** 3478 † STUN / TURN STUN / TURN server
ESP n/a n/a IPsec / IP Protocol 50 Management Node / Conferencing Node
* Only required if you want to allow administrative access via this port.
† Configurable by the administrator.
** Configurable via the Media port range start/end and Signaling port range start/end options (see About global settings).
‡ Only applies if the relevant feature is configured.
Note also that:
l ICE calls allocate 4 ports per media line/stream.
l The ephemeral port range (55000–65535) is subject to change.

Pexip Infinity Administrator GuideAppendices
Pexip Infinity port usage
© 2016 Pexip AS Version 12.a May 2016 Page 316 of 369
Conferencing Node port usage

Pexip Infinity Administrator GuideAppendices
Regular expression (regex) reference
© 2016 Pexip AS Version 12.a May 2016 Page 317 of 369
Regular expression (regex) referenceRegular expressions can be used in conjunction with Pexip Infinity features including Call Routing Rules, Provisioning VMRs from Active Directory via LDAP and searching the support and admin logs.
Pexip Infinity supports case-insensitive Perl-style regular expression patterns. The table below describes some of the special characters that are commonly used in regular expressions, and provides examples of how they can be used.
Character Description Example
Basic syntax
non-special character
Matches the specified characters literally (providing they are not any of the regex special characters).
abc matches abc, ABC, aBC etc
(...) Groups a set of matching characters together. Multiple groups can be specified. Each group can then be referenced in order (from left to right) using the characters \1, \2, etc as part of a replace string.
See Search and replace examples below
\ Escapes a regular expression special character: {}[]()^ $.|*+?\
Also used to reference a group in a replace expression.
ab\+ matches ab+
| Matches either one expression or an alternative expression. .*@example\.(net|com) matches against any URI for the domain example.com or the domain example.net
Wildcard and character matching
. Matches any single character. a.c matches aac, abc, azc, a2c, a$c etc
\d Matches a decimal digit character (i.e. 0-9). a\d matches a1, a2, a3 etc but not aa, ab etc
\D Matches a non-digit character. a\D matches ab but not a1, a2, a3 etc
\s Matches any whitespace character (space, tab, newline). ab\sd matches ab d but not abcd, abxd etc
\S Matches any non-whitespace character. ab\Sd matches abcd, abxd etc but not ab d
[...] Matches the characters specified in the brackets.
You can specify a range of characters by specifying the first and last characters in the range, separated by a hyphen.
You cannot use other special characters within the [] — they will be taken literally.
9[aeiou] matches 9a, 9e, 9i etc and 9A, 9E, 9I etc, but not 9b, 9c, 9B, 9C etc
9[a-z] matches 9a, 9b, 9z etc and 9A, 9B, 9Z etc but not strings such as 91, 99 or 9(
[0-9#*] matches any single E.164 character (digits 0-9, hash key or asterisk)
[^...] Matches anything except the set of specified characters. [^a-z] matches any non-alphabetical character
[^0-9#*] matches anything other than an E.164 character
Repetition factors
* Matches 0 or more repetitions of the previous character or expression.
ab*c matches ac, abc, abbc, but not ab or abd
+ Matches 1 or more repetitions of the previous character or expression.
ab+c matches abc and abbc, but not ab, ac or abd
[a-z.]+ matches any string containing the letters a to z, A to Z, or dots (periods)
? Matches 0 or 1 repetitions of the previous character or expression. ab?c matches ac and abc, but not ab, abbc or abd
.* Matches against any sequence of characters. a.* matches everything beginning with a

Pexip Infinity Administrator GuideAppendices
Regular expression (regex) reference
© 2016 Pexip AS Version 12.a May 2016 Page 318 of 369
Character Description Example
{n} Matches n repetitions of the previous character or expression. ab{2}c matches abbc, but not abc or abbbc
a\d{3} matches a123and a789, but not a12 or 456
{n,m} Matches n to m repetitions of the previous character or expression. ab{2,4}c matches abbc, abbbc and abbbbc, but not abc or abbbbbc
{n,} Matches at least n repetitions of the previous character or expression.
ab{2,}c matches abbc, abbbc, abbbbc etc, but not abc
Position matching
$ Matches the end of the line. .*\.com$ matches any string that ends in .com
(?!...) Negative lookahead. Defines a subexpression that must not be present immediately after the current match position, for example regex1 (?! regex2 ) where a match is found if regex1 matches and regex2 does not match.
(?!.*@example\.com$).* matches any string that does not end with @example.com
(?!meet).* matches any string that does not start with meet
meet(?!\.).* matches any string that starts with meet providing it is not followed by a period
(?<!...) Negative lookbehind. Defines a subexpression that must not be present immediately before the current match position, for example (?<!regex1)regex2 where a match is found if regex1 does not match and regex2 matches.
.*(?<!@)example\.com.* matches any string containing example.com providing it is not preceded by @
Note that this is only a subset of the full range of expressions. For a full description of regular expression syntax see http://perldoc.perl.org/perlre.html. You can test regex expressions at sites such as https://regex101.com/.
Pattern matching examplesIf your videoconferencing rooms have an alias naming convention in the form [email protected], [email protected], [email protected] etc, this could be matched with an expression such as:
[a-z]+\d@example\.com
Or, if the rooms are named 555 followed by exactly three digits, e.g. [email protected] and [email protected], you could use the expression:
555\d{3}@example\.com
If your room aliases could follow either pattern, you could merge the two expressions like this:
([a-z]+\d|555\d{3})@example\.com
Search and replace examples
Replacing an alias domain
This example transforms any alias that ends in example.net into an alias that ends in example.com:
Match string: (.+)(@example\.net$)
Replace string: \[email protected]
This example builds on the previous example by transforming any alias that ends in example.com, example.net or example.co.uk into a common alias that ends in example.com:
Match string: (.+)(@example\.(com|net|co\.uk)$)
Replace string: \[email protected]

Pexip Infinity Administrator GuideAppendices
Regular expression (regex) reference
© 2016 Pexip AS Version 12.a May 2016 Page 319 of 369
Strip leading 9
This example strips a leading 9 from any all-numeric (0-9) alias (e.g. for integrating with an ITSP phone gateway service):
Match string: 9([0-9]+$)
Replace string: \1
If your environment includes a PSTN gateway or uses an ITSP (Internet telephony service provider), consider the potential for toll fraud if you have Call Routing Rules that can route calls to the PSTN gateway or ITSP, or if you allow conference participants to dial out to other participants via the PSTN gateway or ITSP. See PSTN gateways and toll fraud for more information.

Pexip Infinity Administrator GuideAppendices
DNS record examples
© 2016 Pexip AS Version 12.a May 2016 Page 320 of 369
DNS record examplesThis section describes the DNS records required for endpoints, federated Lync / Skype for Business environments and Infinity Connect clients to access Pexip Infinity services.
You can use the tool at http://dns.pexip.com to lookup and check SRV records for a domain.
Enabling endpoints to discover Conferencing NodesThe following examples show the records that are required in DNS for endpoints to discover Pexip Infinity Conferencing Nodes.
It shows example DNS A and SRV records for the domain example.com to allow:
l SIP and H.323 endpoint registration messages to be routed to Pexip Infinity
l calls from non-registered SIP and H.323 endpoints to be routed to Pexip Infinity
If you have multiple Conferencing Nodes, you must set up DNS A and SRV records for each node.
Host DNS A-records
This example assumes there are 2 Conferencing Nodes, thus 2 DNS A-records are required.
Hostname Host IP address
conf01.example.com. 198.51.100.40
conf02.example.com. 198.51.100.41
In your actual deployment, both the Hostname and Host IP address should be changed to use the real names and addresses of your Conferencing Nodes.
DNS SRV records
The following DNS SRV records are required for H.323 and SIP services. For each service there should be one record per host (Conferencing Node). Therefore, in this example, there are 2 records per service — one for each target host — conf01.example.com and conf02.example.com.
Name Service Protocol Priority Weight Port Target host
example.com.example.com.
h323csh323cs
tcptcp
1010
1010
17201720
conf01.example.com.conf02.example.com.
example.com.example.com.
h323lsh323ls
udpudp
1010
1010
17191719
conf01.example.com.conf02.example.com.
example.com.example.com.
h323rsh323rs
udpudp
1010
1010
17191719
conf01.example.com.conf02.example.com.
example.com.example.com.
sipsip
tcptcp
1010
1010
50605060
conf01.example.com.conf02.example.com.
example.com.example.com.
sipsip
udp *udp *
1010
1010
50605060
conf01.example.com.conf02.example.com.
example.com.example.com.
sipssips
tcptcp
1010
1010
50615061
conf01.example.com.conf02.example.com.
* SIP UDP is disabled on Pexip Infinity by default.
In your actual deployment, both the Name and the Target host should be changed to use the real domain name and host names of your Conferencing Nodes.

Pexip Infinity Administrator GuideAppendices
DNS record examples
© 2016 Pexip AS Version 12.a May 2016 Page 321 of 369
In these examples, the DNS records would be:
_h323cs._tcp.example.com. 86400 IN SRV 10 10 1720 conf01.example.com. _h323cs._tcp.example.com. 86400 IN SRV 10 10 1720 conf02.example.com. _h323ls._udp.example.com. 86400 IN SRV 10 10 1719 conf01.example.com. _h323ls._udp.example.com. 86400 IN SRV 10 10 1719 conf02.example.com. _h323rs._udp.example.com. 86400 IN SRV 10 10 1719 conf01.example.com. _h323rs._udp.example.com. 86400 IN SRV 10 10 1719 conf02.example.com. _sip._tcp.example.com. 86400 IN SRV 10 10 5060 conf01.example.com. _sip._tcp.example.com. 86400 IN SRV 10 10 5060 conf02.example.com. _sip._udp.example.com. 86400 IN SRV 10 10 5060 conf01.example.com. _sip._udp.example.com. 86400 IN SRV 10 10 5060 conf02.example.com. _sips._tcp.example.com. 86400 IN SRV 10 10 5061 conf01.example.com. _sips._tcp.example.com. 86400 IN SRV 10 10 5061 conf02.example.com. conf01.example.com. 86400 IN A 198.51.100.40 conf02.example.com. 86400 IN A 198.51.100.41
If the ability to implement geographically-aware DNS exists, then different weights and priorities could be set on the SRV records for different locations. For example, if there is both a European and a North American site, each with separate DNS servers, the European one could return European Pexip nodes at a higher priority than the North American nodes, and vice versa.
Enabling direct federation with remote Lync / Skype for Business environmentsTo ensure that calls from remote Lync / Skype for Business environments are routed to your Conferencing Node, a DNS SRV record in the format _sipfederationtls._tcp.<domain> must be created.
Example
Assume that the following _sipfederationtls._tcp.example.com DNS SRV and associated A-record have been created:
_sipfederationtls._tcp.example.com. 86400 IN SRV 1 100 5061 sip.example.com. sip.example.com. 86400 IN A 198.51.100.40
The SRV record points to the DNS A-record sip.example.com (this is a typical convention in Lync / Skype for Business environments), port 5061, with a priority of 1 and a weight of 100. In other words, it tells Lync / Skype for Business to send its TLS requests to sip.example.com on TCP port 5061. The A-record then resolves sip.example.com to the node's IP address (198.51.100.40).
In your actual deployment, the domain and host IP address should be changed to use the real name and address of your Conferencing Node.
Note that the domain name used in the SRV record has to match the domain in the corresponding A-record. This is required due to the trust model for Lync federation. Using our example:
l _sipfederationtls._tcp.example.com must use the same domain as sip.example.com l you cannot, for example, configure the _sipfederationtls._tcp.example.com SRV record to point to sip.video.example.com or
conf01.otherdomain.com).
For more information, see Pexip Infinity configuration for public DMZ deployments with remote Lync environments.

Pexip Infinity Administrator GuideAppendices
DNS record examples
© 2016 Pexip AS Version 12.a May 2016 Page 322 of 369
Enabling access from the Infinity Connect Mobile client and the Infinity Connect desktop clientTo enable participants to connect to conferences within your deployment using the Infinity Connect desktop client or Infinity Connect Mobile client, you must provide a DNS lookup so that these clients know which host to contact. The host will typically be a reverse proxy (for deployments where Conferencing Nodes are located within a private network), but it can also be a public-facing Conferencing Node.
To enable access from these desktop and mobile clients, each domain used in aliases in your deployment must either have an SRV record for _pexapp._tcp.<domain>, or resolve directly to the IP address of a reverse proxy or a public-facing Conferencing Node.
Example
Assume that the following _pexapp._tcp.example.com DNS SRV records have been created:
_pexapp._tcp.example.com. 86400 IN SRV 10 100 443 proxy1.example.com. _pexapp._tcp.example.com. 86400 IN SRV 20 100 443 proxy2.example.com.
These point to the DNS A-records proxy1.example.com, port 443 (HTTPS), with a priority of 10 and a weight of 100, and proxy2.example.com, port 443, with a relatively lower priority of 20 and a weight of 100.
l This tells the Infinity Connect desktop client to initially send its HTTP requests to host proxy1.example.com (our primary reverse proxy server) on TCP port 443. The desktop client will also try to use host proxy2.example.com (our fallback server) if it cannot contact proxy1.
l The Infinity Connect Mobile client will send its HTTP requests either to proxy1.example.com or to proxy2.example.com, depending on the order of the returned SRV records. If it fails to contact the first host, it will not attempt to contact the second host address.
For more information, see Setting up DNS records for Infinity Connect Mobile client and Infinity Connect desktop client use.

Pexip Infinity Administrator GuideAppendices
Encryption methodologies
© 2016 Pexip AS Version 12.a May 2016 Page 323 of 369
Encryption methodologies
Pexip nodesThe backplane (the link between the Management Node and a Conferencing Node, or between two Conferencing Nodes) uses an IPsec transport with the following settings:
l 256-bit AES-CBC for encryption
l SHA 512 hashing for integrity checking
l a 4096 bit Diffie-Hellman modulus for key exchange.
No other ciphers, hashes or moduli are permitted.
These settings apply to both the initial channel set up for key exchange (ISAKMP) and the secondary channel over which application data is transported (ESP).
EndpointsEncrypted connections between Pexip Infinity and endpoints use:
l AES 128-bit encryption for media
l TLS for SIP call control (for more information, see Managing TLS and trusted CA certificates) l SRTP for SIP media
l H.235 for H.323 media
Infinity Connect (web/desktop/mobile) clients use:
l HTTPS TLS for signaling
l DTLS and SRTMP (encrypted RTMP) for media
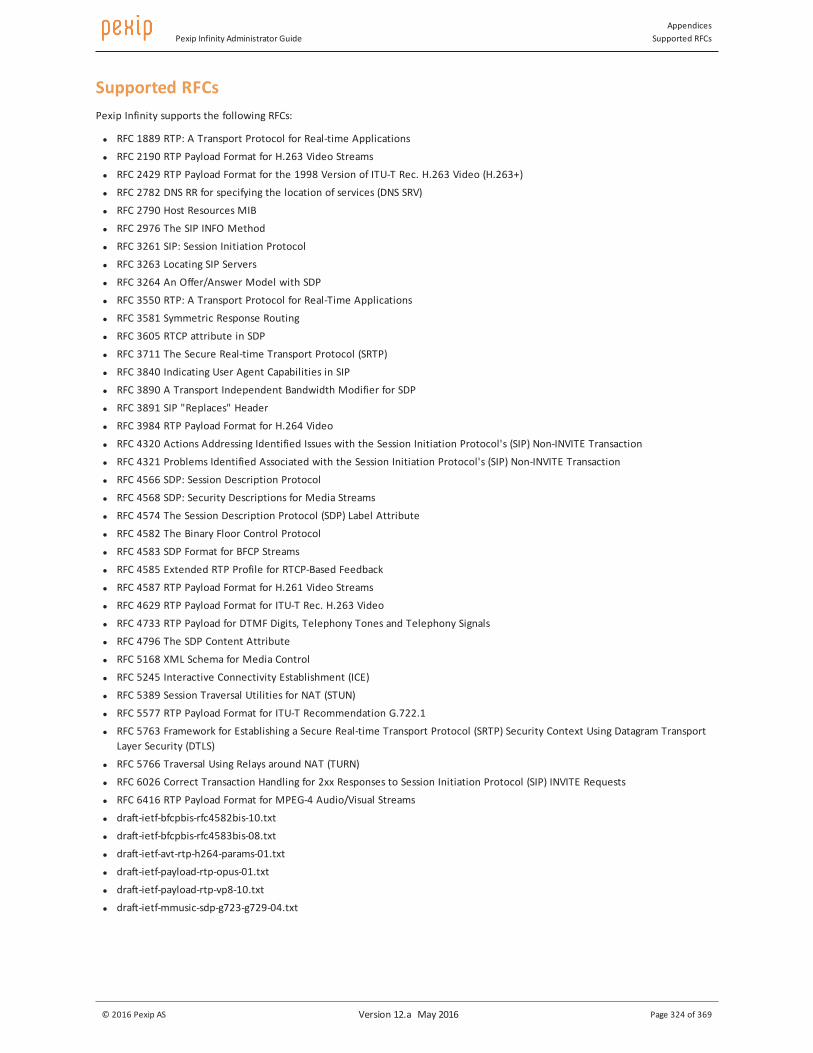
Pexip Infinity Administrator GuideAppendices
Supported RFCs
© 2016 Pexip AS Version 12.a May 2016 Page 324 of 369
Supported RFCsPexip Infinity supports the following RFCs:
l RFC 1889 RTP: A Transport Protocol for Real-time Applications
l RFC 2190 RTP Payload Format for H.263 Video Streams
l RFC 2429 RTP Payload Format for the 1998 Version of ITU-T Rec. H.263 Video (H.263+)
l RFC 2782 DNS RR for specifying the location of services (DNS SRV)
l RFC 2790 Host Resources MIB
l RFC 2976 The SIP INFO Method
l RFC 3261 SIP: Session Initiation Protocol
l RFC 3263 Locating SIP Servers
l RFC 3264 An Offer/Answer Model with SDP
l RFC 3550 RTP: A Transport Protocol for Real-Time Applications
l RFC 3581 Symmetric Response Routing
l RFC 3605 RTCP attribute in SDP
l RFC 3711 The Secure Real-time Transport Protocol (SRTP)
l RFC 3840 Indicating User Agent Capabilities in SIP
l RFC 3890 A Transport Independent Bandwidth Modifier for SDP
l RFC 3891 SIP "Replaces" Header
l RFC 3984 RTP Payload Format for H.264 Video
l RFC 4320 Actions Addressing Identified Issues with the Session Initiation Protocol's (SIP) Non-INVITE Transaction
l RFC 4321 Problems Identified Associated with the Session Initiation Protocol's (SIP) Non-INVITE Transaction
l RFC 4566 SDP: Session Description Protocol
l RFC 4568 SDP: Security Descriptions for Media Streams
l RFC 4574 The Session Description Protocol (SDP) Label Attribute
l RFC 4582 The Binary Floor Control Protocol
l RFC 4583 SDP Format for BFCP Streams
l RFC 4585 Extended RTP Profile for RTCP-Based Feedback
l RFC 4587 RTP Payload Format for H.261 Video Streams
l RFC 4629 RTP Payload Format for ITU-T Rec. H.263 Video
l RFC 4733 RTP Payload for DTMF Digits, Telephony Tones and Telephony Signals
l RFC 4796 The SDP Content Attribute
l RFC 5168 XML Schema for Media Control
l RFC 5245 Interactive Connectivity Establishment (ICE)
l RFC 5389 Session Traversal Utilities for NAT (STUN)
l RFC 5577 RTP Payload Format for ITU-T Recommendation G.722.1
l RFC 5763 Framework for Establishing a Secure Real-time Transport Protocol (SRTP) Security Context Using Datagram Transport Layer Security (DTLS)
l RFC 5766 Traversal Using Relays around NAT (TURN)
l RFC 6026 Correct Transaction Handling for 2xx Responses to Session Initiation Protocol (SIP) INVITE Requests
l RFC 6416 RTP Payload Format for MPEG-4 Audio/Visual Streams
l draft-ietf-bfcpbis-rfc4582bis-10.txt
l draft-ietf-bfcpbis-rfc4583bis-08.txt
l draft-ietf-avt-rtp-h264-params-01.txt
l draft-ietf-payload-rtp-opus-01.txt
l draft-ietf-payload-rtp-vp8-10.txt
l draft-ietf-mmusic-sdp-g723-g729-04.txt

Pexip Infinity Administrator GuideAppendices
Changing aspect ratios
© 2016 Pexip AS Version 12.a May 2016 Page 325 of 369
Changing aspect ratiosEndpoints send and display video images and presentations in various aspect ratios, most commonly 16:9 and 4:3. If there is a difference between the aspect ratios of the sending and receiving endpoints, then the endpoint and/or Pexip Infinity may crop the image or add black vertical or horizontal borders (also known as letterboxing and pillarboxing). How and when aspect ratios are changed depends on a number of factors, but the general principles are described below.
Presentations
Pexip Infinity
In general, Pexip Infinity prefers to send presentations as a 16:9 video stream (typically 720p, or 1080p if it is enabled) for calls where the bandwidth is sufficient and the endpoint supports it. But if this is not feasible, all lower bandwidth resolutions have an aspect ratio of 4:3.
If a change of aspect ratio is required, Pexip Infinity will add black borders (in order to not remove anything important from the presentation). It will never crop presentations.
Endpoints
If the aspect ratio of the presentation image being sent from Pexip Infinity does not match the aspect ratio of the endpoint, the endpoint will typically add another border to make it fit. Generally endpoints will not crop the image.
Main video
Pexip Infinity
If required, Pexip Infinity will change the aspect ratio of main video by cropping the image (to avoid black bars in the thumbnail images).
Endpoints
If the aspect ratio of the main video image being sent from Pexip Infinity does not match the aspect ratio of the endpoint, the endpoint will typically add a border to make it fit. Generally endpoints will not crop the image.

Pexip Infinity Administrator GuideAppendices
Advanced VMware ESXi administration
© 2016 Pexip AS Version 12.a May 2016 Page 326 of 369
Advanced VMware ESXi administrationSimple deployments of the Pexip Infinity platform should not require any special VMware knowledge or configuration beyond that described in Configuring VMware.
This section describes some important requirements for advanced VMware ESXi administration when used with Pexip Infinity. It assumes that you are already familiar with VMware. For more information on VMware ESXi in general, see http://www.vmware.com/products/vsphere/esxi-and-esx/overview.html.
If an ESXi host is being managed by vCenter Server, all administration must be performed via vCenter Server. Do not log in directly to the ESXi host; configuration changes made in this way may be lost. To ensure that ESXi hosts being managed by vCenter Server are accessible via vCenter Server only and are not directly accessible, you should put them in Lockdown mode. Lockdown mode forces all operations to be performed through vCenter Server.
Supported vSphere versionsVersion 12 of the Pexip Infinity platform supports VMware vSphere ESXi 5.x and 6.0, although we recommend ESXi 5.5 or 6.0. Support for ESXi 4.1 is being deprecated - if you have upgraded from a version prior to v12, you can still deploy Conferencing Nodes to servers running ESXi 4.1; however if you have a new deployment using v12 and attempt to deploy a Conferencing Node to a server running ESXi 4.1, that node will go straight into maintenance mode.
Supported vSphere editionsThe Pexip Infinity platform will run on the free edition of vSphere Hypervisor. However, this edition has a number of limitations (limited support from VMware, no access to vCenter or vMotion, no access to VMware API). In particular, the lack of access to the VMware API means that all Conferencing Nodes will have to be deployed manually (see Deployment types). For this reason we do not recommend its use except in smaller deployments, or test or demo environments.
The minimum edition of VMware that we recommend is the vSphere Standard edition. This does not have the limitations of the free edition. If you do not already use VMware in your enterprise, the vSphere Essentials Kit is a simple way to get started and will provide you with Standard edition licenses for 3 servers (with 2 CPUs each) plus a vCenter license.
The Enterprise Plus edition includes further additional features relevant to the Pexip Infinity platform that could be of benefit to larger deployments. These include Storage DRS and Distributed Switch.
For a comparison of the VMware editions, see http://www.vmware.com/products/datacenter-virtualization/vsphere/compare-editions.html.
Management Node network requirementsWhen deploying Conferencing Nodes, the Management Node connects to the vCenter Server (or the ESXi host directly) on port 443 (https).
This communication port must be open when creating new Conferencing Nodes.
Permissions in vCenter Server (or on ESXi hosts)A valid username and password for the vCenter Server or ESXi host must be entered every time a new Conferencing Node is created. For security and tracking reasons, these credentials will not be stored by the Management Node.
The account used to log in to vCenter Server or the ESXi host from the Management Node must have sufficient permissions to create virtual machines (VMs) on the folder or resource group where the Conferencing Node will be deployed. The permissions listed below are required as a minimum (in vCenter Server, these permissions should be set on Datacenter level or higher):
l Datastore > Allocate space
l Datastore > Browse datastore
l Network > Assign network
l Resource > Assign virtual machine to resource pool
l vApp > Import

Pexip Infinity Administrator GuideAppendices
Advanced VMware ESXi administration
© 2016 Pexip AS Version 12.a May 2016 Page 327 of 369
l Virtual Machine > Configuration > Add new disk
l Virtual Machine > Interaction > Configure CD media
l Virtual Machine > Interaction > Power On
The Administrator role includes all the above permissions (in addition to many others).
Host server requirementsThe recommended hardware requirements for the Management Node and Conferencing Node host servers are described in Hardware requirements. In addition to this:
l GPU: host servers do not require any specific hardware cards or GPUs. l Disk: either direct attached storage or shared storage can be used. The primary disk activity will be logging.
l Multitenancy: this version of Pexip Infinity requires a dedicated VMware host for supported deployments. Multitenancy with other applications may be supported in the future, and is possible in a test environment as long as other applications on the same host server are not consuming significant CPU and Pexip Infinity can be given reserved memory.
General recommendationsPexip Infinity can take advantage of advanced CPU features, so for optimal performance we recommend that you run Conferencing Nodes on your newer host servers.
CPUs with a large cache (15–30 MB+) are recommended over CPUs with a smaller cache (4–10 MB), especially when running 10 or more participants per conference.
To protect the overall quality of the conference, we highly recommend that any hardware resources allocated to a Conferencing Node are reserved specifically for its own use.
Impact on virtual environment
CPU
The CPU is the most critical component in a successful deployment of the Pexip Infinity platform.
Newer Intel (or AMD) CPUs typically provide more features which Pexip Infinity will utilize to give better performance. We therefore recommend that you deploy Pexip Infinity on newer hardware, and move applications that are not so time-critical (for example, mail servers, web servers, file servers) to your older hardware.
Memory
The memory specified for the Pexip Infinity deployment should not be shared with other processes, because Pexip Infinity accesses memory at a high speed when active. However, the amount of memory needed is quite small compared to the workload, and increasing the memory beyond the recommended scope will not significantly increase performance.
Storage
Apart from storing the Pexip Infinity application, the disk activity during operation will mainly be used for logging. There is therefore no need to deploy your fastest or newest SSD drives for this application, as most of the real-time activity happens in memory. Standard disk access as required for most servers should be used to get good logging performance.
Network
Gigabit Ethernet connectivity from the host server is strongly recommended, because Conferencing Nodes are sending and receiving real-time audio and video data, and any network bottlenecks should be avoided. The amount of traffic to be expected can be calculated based on the capacity of the servers, but typically 100 Mbps network links can easily be saturated if there is a large number of calls going through a given Conferencing Node. In general, you can expect 1–3 Mbps per call connection, depending on call control setup.

Pexip Infinity Administrator GuideAppendices
Advanced VMware ESXi administration
© 2016 Pexip AS Version 12.a May 2016 Page 328 of 369
Traffic shapingAny shaping of the Conferencing Node traffic that can potentially limit its flow should not be used without considerable planning. If bandwidth usage to or from a Conferencing Node is too high, this should be addressed in the call control, as shaping it on the Conferencing Node level will most likely reduce the experience for the participants.
NIC teamingVMware NIC teaming is a way to group several network interface cards (NICs) to behave as one logical NIC. When using NIC teaming in ESXi, we recommend you load balance using originating Virtual Port ID due to its low complexity (it does not steal CPU cycles from the host). Source MAC hash is also usable; we do not recommend IP hash because of the CPU overhead for a lot of media packets.
vMotionConferencing Nodes (and the Management Node) can be moved across host servers using vMotion.
You must put the Conferencing Node into maintenance mode and wait until all conferences on that node have finished before migrating it to another host server. See Taking a Conferencing Node out of service for more information.
For more information on vMotion in general, see http://www.vmware.com/products/datacenter-virtualization/vsphere/vmotion.html.
Enhanced vMotion Compatibility (EVC)When EVC (Enhanced vMotion Compatibility) is enabled across a cluster of host servers, all servers in that cluster will emulate the lowest common denominator CPU. This allows you to move VMs between any servers in the cluster without any problems, but it means that if any servers in that cluster have newer-generation CPUs, their advanced features cannot be used.
Because Conferencing Nodes use the advanced features of newer-generation CPUs, (for example AVX on newer Intel CPUs), we recommend that you disable EVC (Enhanced vMotion Compatibility) for any clusters hosting Conferencing Nodes where the cluster includes a mix of new and old CPUs.
If you enable EVC on mixed-CPU clusters, the Pexip Infinity platform will run more slowly because it will cause the Conferencing Nodes to assume they are running on older hardware.
If you enable EVC, you must select the Sandy Bridge-compatible EVC mode as a minimum. This is the lowest EVC mode that supports the AVX instruction set, which is required to run the Pexip Infinity platform.
When enabling EVC or lowering the EVC mode, you should first power off any currently running VMs with a higher EVC mode than the one you intend to enable.
When disabling EVC or raising the EVC mode, any currently running VMs will not have access to the new level until they have been powered off and on again.
For instructions on disabling EVC, see Disabling EVC.
For more information on EVC in general, see http://pubs.vmware.com/vsphere-51/index.jsp?topic=%2Fcom.vmware.vsphere.vcenterhost.doc%2FGUID-9F444D9B-44A0-4967-8C07-693C6B40278A.html.
vSphere High AvailabilityvSphere High Availability (HA) can be configured so that, in the case of an ESXi host failure, it will automatically start the VM on another host in the cluster. This is supported for both Management Node and Conferencing Nodes and will provide protection against hosts failing.
Loss of a Conferencing Node in such circumstances will result in any participants connected to that node being disconnected. They will have to redial the Virtual Meeting Room alias to rejoin the conference.
Momentary loss of the Management Node will not affect running conferences.
For more information on HA, see http://www.vmware.com/products/datacenter-virtualization/vsphere/high-availability.html.

Pexip Infinity Administrator GuideAppendices
Advanced VMware ESXi administration
© 2016 Pexip AS Version 12.a May 2016 Page 329 of 369
vSphere Fault ToleranceFor zero downtime, the Management Node can be protected with vSphere Fault Tolerance (FT), because it is only using a single virtual CPU.
For more information on FT, see http://www.vmware.com/products/datacenter-virtualization/vsphere/fault-tolerance.html.

Pexip Infinity Administrator GuideAppendices
PSTN gateways and toll fraud
© 2016 Pexip AS Version 12.a May 2016 Page 330 of 369
PSTN gateways and toll fraudIf your environment includes a PSTN gateway or uses an ITSP (Internet telephony service provider), consider the potential for toll fraud if you have Call Routing Rules that can route calls to the PSTN gateway or ITSP, or if you allow conference participants to dial out to other participants via the PSTN gateway or ITSP.
As you might intentionally want to allow users to route calls via the PSTN gateway or ITSP (and thus incur toll charges), we recommend that you use a suitable call control solution such as a Cisco VCS to configure an appropriate dial plan and authentication mechanism for your network.
The ways in which Pexip Infinity calls may be routed via a PSTN gateway or ITSP are described below.
Pexip Distributed Gateway calls
If your dial plan allows Pexip Distributed Gateway calls and has a Call Routing Rule which, for example, matched 9.* and routed the call via the PSTN gateway or ITSP, this would allow anyone who could route a call to the Pexip Infinity platform to then send a call via the PSTN gateway or ITSP.
Virtual Receptions
If you have configured Virtual Receptions and also have Call Routing Rules that match numeric aliases (such as 9.*), then anyone that can reach the Virtual Reception could match the Call Routing Rule and potentially route their call via the PSTN gateway or ITSP.
Thus, if any call control rules are in place to restrict who may dial numbers which correspond with numeric Call Routing Rules, then the same restrictions should also be placed on who may call any Virtual Receptions.
Manually dialing out to a participant from a conference
Pexip Infinity allows you to manually dial out to participants from a conference, on an ad-hoc basis.
This means that conference participants using Infinity Connect clients could place outbound calls via the PSTN gateway or ITSP. Note that these types of calls may dial out directly to the destination alias or they may use Call Routing Rules.
In these circumstances, to reduce (but not eliminate) the risk of toll fraud, we recommend that you use:
l PIN-protected conferences
l an appropriately configured reverse proxy that only allows authenticated connections from Infinity Connect clients.
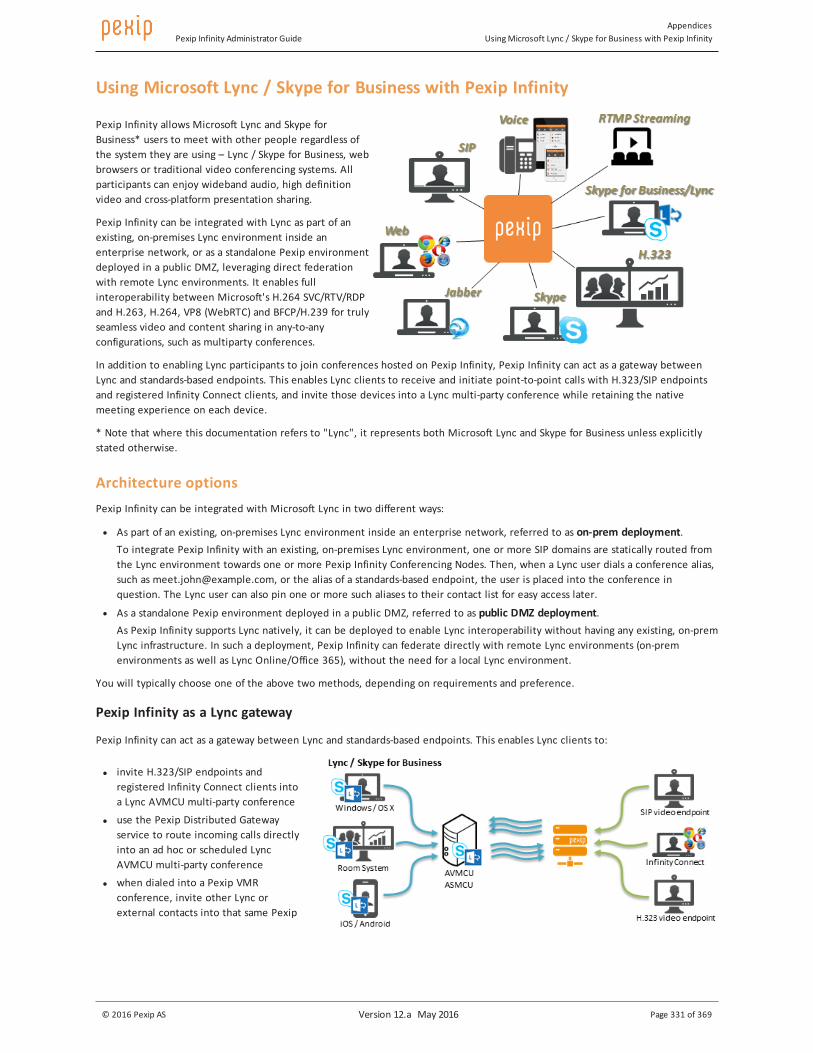
Pexip Infinity Administrator GuideAppendices
UsingMicrosoft Lync / Skype for Business with Pexip Infinity
© 2016 Pexip AS Version 12.a May 2016 Page 331 of 369
Using Microsoft Lync / Skype for Business with Pexip Infinity
Pexip Infinity allows Microsoft Lync and Skype for Business* users to meet with other people regardless of the system they are using – Lync / Skype for Business, web browsers or traditional video conferencing systems. All participants can enjoy wideband audio, high definition video and cross-platform presentation sharing.
Pexip Infinity can be integrated with Lync as part of an existing, on-premises Lync environment inside an enterprise network, or as a standalone Pexip environment deployed in a public DMZ, leveraging direct federation with remote Lync environments. It enables full interoperability between Microsoft's H.264 SVC/RTV/RDP and H.263, H.264, VP8 (WebRTC) and BFCP/H.239 for truly seamless video and content sharing in any-to-any configurations, such as multiparty conferences.
In addition to enabling Lync participants to join conferences hosted on Pexip Infinity, Pexip Infinity can act as a gateway between Lync and standards-based endpoints. This enables Lync clients to receive and initiate point-to-point calls with H.323/SIP endpoints and registered Infinity Connect clients, and invite those devices into a Lync multi-party conference while retaining the native meeting experience on each device.
* Note that where this documentation refers to "Lync", it represents both Microsoft Lync and Skype for Business unless explicitly stated otherwise.
Architecture optionsPexip Infinity can be integrated with Microsoft Lync in two different ways:
l As part of an existing, on-premises Lync environment inside an enterprise network, referred to as on-prem deployment.To integrate Pexip Infinity with an existing, on-premises Lync environment, one or more SIP domains are statically routed from the Lync environment towards one or more Pexip Infinity Conferencing Nodes. Then, when a Lync user dials a conference alias, such as [email protected], or the alias of a standards-based endpoint, the user is placed into the conference in question. The Lync user can also pin one or more such aliases to their contact list for easy access later.
l As a standalone Pexip environment deployed in a public DMZ, referred to as public DMZ deployment.As Pexip Infinity supports Lync natively, it can be deployed to enable Lync interoperability without having any existing, on-prem Lync infrastructure. In such a deployment, Pexip Infinity can federate directly with remote Lync environments (on-prem environments as well as Lync Online/Office 365), without the need for a local Lync environment.
You will typically choose one of the above two methods, depending on requirements and preference.
Pexip Infinity as a Lync gateway
Pexip Infinity can act as a gateway between Lync and standards-based endpoints. This enables Lync clients to:
l invite H.323/SIP endpoints and registered Infinity Connect clients into a Lync AVMCU multi-party conference
l use the Pexip Distributed Gateway service to route incoming calls directly into an ad hoc or scheduled Lync AVMCU multi-party conference
l when dialed into a Pexip VMR conference, invite other Lync or external contacts into that same Pexip

Pexip Infinity Administrator GuideAppendices
UsingMicrosoft Lync / Skype for Business with Pexip Infinity
© 2016 Pexip AS Version 12.a May 2016 Page 332 of 369
VMR (this creates a new Lync AVMCU conference which is merged with the existing Pexip VMR)
l receive and initiate point-to-point calls with standards-based devices.
More information
For full information on using Microsoft Lync with Pexip Infinity, see Pexip Infinity and Microsoft Lync Deployment Guide.

Pexip Infinity Administrator GuideAppendices
UsingMultiway with Pexip Infinity
© 2016 Pexip AS Version 12.a May 2016 Page 333 of 369
Using Multiway with Pexip InfinityMultiway™ is a Cisco TelePresence feature that allows an endpoint user to transfer an established point-to-point call to an MCU, so that more participants can join the conference.
If your deployment includes endpoints that support Cisco TelePresence Multiway, you can configure these endpoints to use Pexip Infinity Virtual Meeting Rooms for Multiway conferences.
The exact configuration required to support Multiway will depend on whether or not you use the VCS Conference Factory application (an application on the VCS which dynamically generates a unique conference alias for each Multiway conference).
For full information on Multiway, see the Cisco TelePresence Multiway Deployment Guide (http://www.cisco.com/c/en/us/support/unified-communications/telepresence-video-communication-server-vcs/products-installation-and-configuration-guides-list.html).
Example scenarioThe sections below describe how to enable the following example scenario:
l Alice makes a point-to-point call to Bob.
l They want to include Charlie in the conversation, so Alice puts Bob on hold, calls Charlie, and then Joins the calls together. l All 3 participants are dialed in to a Virtual Meeting Room on Pexip Infinity.
Configuring endpoints using xConfiguration commandsThe xConfiguration commands used to enable Multiway vary depending on the endpoint. Below are example commands for some more common endpoints, showing how to configure them with the alias [email protected].
E20
xConfiguration SystemUnit MultiwayURI: "[email protected]"
MXP
xConfiguration Multipoint Mode: Multiway xConfiguration Multipoint MultiwayURI: "[email protected]"
T150
xConfiguration Multipoint MultiwayURI: "[email protected]"
Deployments without VCS Conference FactoryIn a non-Conference Factory deployment, each endpoint must be configured with its own Multiway alias, which must match a Virtual Meeting Room alias. When point-to-point calls are escalated to a Multiway conference, all endpoints call this alias and are routed to the same Virtual Meeting Room.
Endpoint configuration
The endpoint that initiates the join must support Multiway and be configured with a Multiway alias that matches a Virtual Meeting Room alias in Pexip Infinity. In this example, we have configured Alice's endpoint to use her personal Virtual Meeting Room alias of [email protected] as her Multiway alias.
Pexip Infinity configuration
No additional configuration is required on Pexip Infinity, beyond ensuring that at least one appropriate Virtual Meeting Room exists that can be used for Multiway conferences.
A Virtual Meeting Room used for Multiway does not need to be reserved specifically for Multiway. It can be a user's personal Virtual Meeting Room, as in this example.

Pexip Infinity Administrator GuideAppendices
UsingMultiway with Pexip Infinity
© 2016 Pexip AS Version 12.a May 2016 Page 334 of 369
If a Virtual Meeting Room that is being used for Multiway has a PIN configured, all participants must know the PIN and be able to enter it from their endpoint in order to access the conference.
In this example scenario we had already created a personal Virtual Meeting Room for Alice which uses the alias [email protected], and we will use this Virtual Meeting Room for her Multiway calls. If you want to create a new Virtual Meeting Room:
On the Pexip Infinity Administrator interface, go to Service configuration > Virtual Meeting Rooms.
1. Select Add Virtual Meeting Room.
2. In the Name field, enter Alice.
3. Enter a PIN, if required.
4. In the Alias field, enter [email protected].
5. Select Save.
The Virtual Meeting Room is now configured and available for use whenever [email protected] is dialed, including when it is dialed as part of a Multiway escalation.
Deployments using VCS Conference FactoryThe VCS Conference Factory application dynamically generates a unique conference alias for the Multiway conference. When the VCS Conference Factory application is used for Multiway, all endpoints must be configured with the same Multiway alias. When this alias is dialed by the initiating endpoint, it creates a query to the VCS for the alias that will be used for the conference. The VCS generates an alias based on its Conference Factory configuration, and all endpoints then dial this alias to access the Virtual Meeting Room. This means that all possible aliases that could be generated by the VCS must be configured on Pexip Infinity and each must be associated with a unique Virtual Meeting Room.
Endpoint configuration
All endpoints must be configured with the same Multiway alias. In this example, they are all configured to use the alias pexip.multiway.
VCS configuration
In this example, we will configure the VCS to generate aliases in the range [email protected] to [email protected] whenever a Multiway call is initiated. Note that a range of 9 is for example purposes only and is too small for most deployments.
On the VCS, go to Applications > Conference Factory and configure it as follows:
Field Setting
Mode On
Alias pexip.multiway
Template multiway%%@example.com
Number range start 1
Number range end 9
Pexip Infinity configuration
On Pexip Infinity, we create 9 Virtual Meeting Rooms specifically for use by Multiway, and to each we assign one of the 9 aliases.
We could do this manually for each alias by going to Service configuration > Virtual Meeting Rooms and selecting Add Virtual Meeting Room. However, we can also use Pexip Infinity's importing configuration feature, so instead we select Import, and import the following CSV file:
multiway1,,,,,[email protected], multiway2,,,,,[email protected],

Pexip Infinity Administrator GuideAppendices
UsingMultiway with Pexip Infinity
© 2016 Pexip AS Version 12.a May 2016 Page 335 of 369
multiway3,,,,,[email protected], multiway4,,,,,[email protected], multiway5,,,,,[email protected], multiway6,,,,,[email protected], multiway7,,,,,[email protected], multiway8,,,,,[email protected], multiway9,,,,,[email protected],
This creates a Virtual Meeting Room with the name multiway1 and an alias of [email protected]; another with the name multiway2 and an alias of [email protected]; and so on for all 9 aliases.

Pexip Infinity Administrator GuideAppendices
Configuring Pexip Infinity for public DMZ deployments
© 2016 Pexip AS Version 12.a May 2016 Page 336 of 369
Configuring Pexip Infinity for public DMZ deploymentsThis section describes the configuration requirements for deploying Pexip Infinity Conferencing Nodes in a public DMZ. It covers the following scenarios:
l Configuring Pexip Infinity to work when Conferencing Nodes are behind a static NAT device (from the perspective of clients located on the Internet)
l Enabling routing between nodes deployed in a local network and publicly-facing nodes deployed in a DMZ l Communicating with remote SIP endpoints behind a remote firewall/NAT
Note that in all Pexip Infinity deployment scenarios:
l All Pexip nodes must be fully routable to each other (full mesh) in both directions. This means that the Management Node must be able to reach every Conferencing Node, and each Conferencing Node must be able to reach every other Conferencing Node.
l Any internal firewalls must be configured to allow UDP port 500 and traffic using IP protocol 50 (ESP) in both directions between all Pexip nodes.
l There cannot be a NAT between any Pexip nodes.
In addition, you must ensure that all appropriate firewall ports have been opened as described in Pexip Infinity port usage.
Configuring Pexip Infinity nodes to work behind a static NAT deviceTo configure your Pexip Infinity deployment to work behind a static NAT device (from the perspective of clients located on the Internet) you must:
1. Configure the NAT device / firewall with the static, publicly-reachable IP address of each Conferencing Node that you want to be accessible from devices in the internet, and then map the public address to the node's corresponding internal IP address. Note that it must be a 1:1 NAT.
2. Configure each publicly-reachable Conferencing Node with its IPv4 static NAT address (Platform configuration > Conferencing Nodes) i.e. the public address of the node that you have configured on the NAT device.
Note that:
l Any Conferencing Nodes that are configured with a static NAT address must not be configured with the same System location as nodes that do not have static NAT enabled. This is to ensure that load balancing is not performed across nodes servicing external clients and nodes that can only service private IP addresses.
l Any internal systems such as Cisco VCSs or endpoints that will send signaling and media traffic to Pexip Infinity nodes that are enabled for static NAT should send that traffic to the public address of those nodes. You must ensure that your local network allows this.
l We do not recommend that you allow the Management Node to be accessible from devices in the public internet. However, if you want to do this, you must assign and configure the Management Node with its static NAT address. You should also configure your firewall to only allow access to the Management Node from the specific IP addresses from where you want to allow management tasks to be performed.
l There cannot be a NAT device between any Pexip Infinity nodes.
Enabling routing between local network nodes and DMZ nodesIn public DMZ deployments you will typically have the Management Node and some Conferencing Nodes deployed in the local enterprise network, and some Conferencing Nodes deployed in the DMZ.
In this case, you will also need to configure static routes on any Conferencing Nodes that are deployed in the DMZ, if the default gateway on those nodes is configured to route traffic out to the internet. The static routes will allow those nodes to communicate with Pexip Infinity nodes or other systems in the local, internal network. See Managing static routes for information about to how to configure and assign static routes to Pexip Infinity nodes.
Note that:
l Conferencing Nodes in a DMZ must not be configured with the same System location as nodes in a local network. This is to ensure that load balancing is not performed across nodes in the DMZ and nodes in the local network.

Pexip Infinity Administrator GuideAppendices
Configuring Pexip Infinity for public DMZ deployments
© 2016 Pexip AS Version 12.a May 2016 Page 337 of 369
l You must configure any internal firewall to allow UDP port 500 and traffic using IP protocol 50 (ESP) in both directions between the Pexip Infinity nodes in the DMZ and the nodes in the local network.
l The firewall between the Pexip Infinity nodes in the DMZ and the nodes in the local network cannot be a NAT device.
l The external firewall between Conferencing Nodes in the DMZ and the internet can be configured with static NAT. In this case you would also need to configure each Conferencing Node in the DMZ with its relevant static NAT address.
l If you deploy the Management Node in the DMZ (although we do not recommend this for security reasons), it must also be assigned with the relevant static route (Platform configuration > Management Node).
Example
For example, consider a Pexip Infinity system which is deployed as shown below:
Example network with Pexip Infinity nodes in LAN and DMZ
This deployment has:
l Pexip Infinity nodes on the enterprise LAN with addresses in the 10.40.0.0/24 subnet
l an internal firewall (without NAT) with LAN address 10.40.0.1 and DMZ address 198.51.100.10
l an external firewall with DMZ address 198.51.100.150 and public address 198.51.99.200
l a Conferencing Node in the DMZ with public address 198.51.100.40 and which is configured with a default gateway address of 198.51.100.150 (the external firewall).
In this situation the Conferencing Node in the DMZ will, by default, send all of its traffic out through its default gateway — the external firewall at 198.51.100.150. To ensure that traffic from the Conferencing Node in the DMZ that is destined for Pexip Infinity nodes on the enterprise LAN can be routed to those nodes, you must:
1. Configure a static route (System configuration > Static routes). In this example:
o the Destination network address would be 10.40.0.0 with a Network prefix of 24 to route addresses in the range 10.40.0.0 to 10.40.0.255
o the Gateway IP address would be 198.51.100.10 (the DMZ address of the internal firewall).
2. Assign that static route to the Conferencing Node that is located in the DMZ (Platform configuration > Conferencing Node).

Pexip Infinity Administrator GuideAppendices
Configuring Pexip Infinity for public DMZ deployments
© 2016 Pexip AS Version 12.a May 2016 Page 338 of 369
Remote SIP endpoints behind a remote firewall/NATRemote SIP endpoints that are behind remote firewalls/NATs can join Pexip Infinity conferences.
Media latching with remote endpoints behind a remote firewall/NAT
You do not have to apply any explicit configuration to the Pexip Infinity nodes in order to allow remote SIP endpoints behind remote firewalls/NATs to join a conference. Pexip Infinity automatically uses signaling and media port latching to establish routable paths.
(Port latching involves Pexip Infinity waiting until it receives signaling and media traffic from the remote endpoint, and then it uses — or "latches" on to — the source address and port of that traffic as a destination for all traffic bound in the opposite direction. Typically these source addresses/ports will belong to the public interface of the NAT in front of the remote endpoint, and thus anything sent by Pexip Infinity to that address/port should ultimately reach the endpoint.)

Pexip Infinity Administrator GuideAppendices
Information sent when usage reporting is enabled
© 2016 Pexip AS Version 12.a May 2016 Page 339 of 369
Information sent when usage reporting is enabledThe Pexip Infinity platform includes a feature that allows you to send anonymized statistical information to Pexip for analysis. For more information on this feature and how to enable or disable it, see Automatically sending usage statistics.
When this feature is enabled, the following usage statistics are sent:
Information sent
Common
The version of Pexip Infinity software running on the Management Node.
The Pexip Infinity software license ID.
Public IP address of the Management Node from which the report has been sent.
Call
Reason the call was disconnected.
Whether the call was to a Virtual Meeting Room, Virtual Auditorium, Virtual Reception, or Pexip Distributed Gateway.
Number of seconds this call leg was alive.
Vendor of the endpoint that placed the call.
Protocol used by the endpoint (SIP, H.323, WebRTC, etc).
Maximum bandwidth signaled.
Whether the participant was a Guest or Host.
IP address of the Conferencing Node that handled the media for the call.
IP address of Conferencing Node that handled the signaling for the call.
Whether the media stream was encrypted.
Unique identifier of this call (UUID).
Unique identifier of the conference instance (UUID).
The time at which the call was connected.
The time at which the call was disconnected.
Identifier of the system location of the Conferencing Node to which the call was connected.
Whether the call was incoming or outgoing.
Audio/Video/Presentation (statistics for each type of stream, where present)
The format used by the Conferencing Node to encode the media stream being sent to the endpoint.
The quantity of data sent to the endpoint.
The display resolution of the image sent to the endpoint.
The total quantity of packets sent to the endpoint
The total quantity of packets sent from the Conferencing Node but not received by the endpoint.
The format used by the Conferencing Node to decode the media stream being sent from the endpoint.
The quantity of data received from the endpoint.
The display resolution of the image received from the endpoint.
The total quantity of packets received by the Conferencing Node from the endpoint.

Pexip Infinity Administrator GuideAppendices
Information sent when usage reporting is enabled
© 2016 Pexip AS Version 12.a May 2016 Page 340 of 369
Information sent
The total quantity of packets sent from the endpoint but not received by the Conferencing Node.
Conference
Cryptographic hash of the name of the Virtual Meeting Room, Virtual Auditorium, Virtual Reception or Pexip Distributed Gateway that was used.
The date and time that the first participant connected to the service.
The date and time that the last participant's call ended.
Number of seconds conference was active.
Whether the call was to a Virtual Meeting Room, Virtual Auditorium, Virtual Reception, or Pexip Distributed Gateway.
Total number of participants who connected to this conference instance.
The number of chat messages exchanged on this conference.
Platform (sent once a day for each system location)
Numeric identifier of the system location.
Number of nodes in that system location.
Configuration
Whether RTMP is enabled.
Whether SIP (TCP and TLS) is enabled.
Whether SIP TLS certificate verification mode is set to On or Off.
Whether WebRTC is enabled.
The URL to which OCSP requests will be sent.
The start value for the range of ports that all Conferencing Nodes use to send media.
The end value for the range of ports that all Conferencing Nodes use to send media.
The start value for the range of ports that all Conferencing Nodes use to send signaling.
The end value for the range of ports that all Conferencing Nodes use to send signaling.
Whether outbound calls are enabled.
Whether SSH is enabled.
Whether OCSP will be used when checking the validity of TLS certificates.
The DSCP value for management traffic sent from the Management Node and Conferencing Nodes.
The number of minutes a browser session may remain idle before the user is logged out of the Pexip Infinity Administrator interface.
The URL to which incident reports will be sent (if enabled).
Whether HTTP access for external systems is enabled.
Whether H.323 is enabled.
Whether incident reporting is enabled.
Whether support for Pexip Infinity Connect and Mobile App is enabled.
The number of configured devices, regardless of whether or not they are registered.
The number of configured services (Virtual Meeting Rooms + Virtual Auditoriums + Virtual Receptions).

Pexip Infinity Administrator GuideAppendices
Information sent when usage reporting is enabled
© 2016 Pexip AS Version 12.a May 2016 Page 341 of 369
Information sent
Whether chat messages are enabled.
Whether SIP UDP is enabled.
Infinity Connect (when usage reporting is enabled on the client)
Indicates an attempt to place a call.
Indicates the call was connected.
Unique call identifier.
Properties of the type of client running Infinity Connect.
IP address of the client.
Width of the application window.
Height of the application window.
Screen width (maximum size available).
Screen height (maximum size available).
The bit depth of the color palette for displaying images.
The color resolution (in bits per pixel) of the screen.
Client/user language.
Whether the participant had audio-only media enabled.
Whether the participant had video (and audio) media enabled.
The requested connection bandwidth.
Indicates the participant initiated screen sharing / presenting.
Number of slides uploaded (when presenting).
Dial out participant role.
Dial out participant protocol.

Pexip Infinity Administrator GuideAppendices
Troubleshooting the Pexip Infinity platform
© 2016 Pexip AS Version 12.a May 2016 Page 342 of 369
Troubleshooting the Pexip Infinity platformThis section contains a list of symptoms, possible causes and suggested resolutions for some issues you may experience when using the Pexip Infinity platform.
It includes the following sections:
l Pexip Infinity deployment and upgrading l Joining a conference and viewing content l Conference connectivity and TLS issues l Pexip Infinity administration l Infinity Connect clients
Help in resolving LDAP-specific issues is contained in a separate topic: Troubleshooting LDAP server connections.
Help in resolving Lync/Skype for Business issues is contained in a separate topic: Troubleshooting and limitations with Lync / Skype for Business and Pexip Infinity integrations.
Pexip Infinity deployment and upgrading
Symptom Possible cause Resolution
During upgrade, one or more Conferencing Nodes are stuck with a status of "waiting for calls to clear", but there are no active calls reported on the Management Node.
In some circumstances a call will not clear properly from the Conferencing Node.
Reboot the Conferencing Node.
During automatic deployment of a Conferencing Node using VMware, the following message is given:
"Server raised fault: 'Current license or ESXi version prohibits execution of the requested operation.'"
You are using a version of VMware that does not support use of the VMware API, which is required for automatic deployment of Conferencing Nodes.
Either:
l Upgrade your VMware deployment to one that supports the VMware API. For more information, see VMware editions.
l Deploy the Conferencing Node manually. For more information, see Manually deploying a Conferencing Node on an ESXi host.
An automatic deployment of a Conferencing Node using vCenter as the VM manager fails at 22%.
During automatic deployment, the Management Node uploads the VM image directly to the ESXi host using HTTPS on port 443/TCP. If this port is not accessible, the upload will fail.
Ensure that all ESXi hosts on which Conferencing Nodes are being deployed are accessible from the Management Node using HTTPS on port 443/TCP.

Pexip Infinity Administrator GuideAppendices
Troubleshooting the Pexip Infinity platform
© 2016 Pexip AS Version 12.a May 2016 Page 343 of 369
Symptom Possible cause Resolution
A Conferencing Node does not accept calls even though it is powered on and is contactable on the network.
If time is not properly synchronized between the Management Node and the host server, certificates issued by the Management Node may be invalidated by Conferencing Nodes within the same Pexip Infinity deployment. As a result, the Conferencing Nodes will not communicate properly with the Management Node, causing calls to fail.
Ensure all virtual machines (VMs) (i.e. the Management Node and all Conferencing Nodes) within the Pexip Infinity platform, and the host servers on which they are running, are using accurate times according to the public or private standard NTP clock.
We strongly recommend that you configure at least 3 distinct NTP servers or NTP server pools in each instance to ensure proper synchronization.
To synchronize time on Pexip Infinity: 1. Synchronize time on host servers (for
instructions see Hypervisor configuration).
2. Enable NTP on Management Node.
3. Reboot all VMs.
A newly deployed Conferencing Node does not accept calls and its last contacted status on the Management Node shows "Never", even though it is powered on and is contactable on the network.
After deploying a new Conferencing Node, it takes approximately 5 minutes before the node is available for conference hosting and for its status to be updated on the Management Node. (Until it is available, the Management Node will report the status of the Conferencing Node as having a last contacted and last updated date of "Never".)
Wait for the Conferencing Node to finish initializing.
I entered the wrong information while running the installation wizard.
On server-based deployments you can re-run the installation wizard by following the instructions in Re-running the installation wizard.
Do not re-run the installation wizard on cloud-based deployments (AWS or Azure) in order to change Management Node configuration data such as its IP address or hostname. To change such data you must terminate the existing instance and deploy a new Management Node instance. You should only re-run the installation wizard on cloud-based deployments if you need to reset the web administration password (and then you should not change any of the other configuration data).
A new Management Node or Conferencing Node does not work. It was created by cloning it through VMware.
You cannot use cloning to create Management Nodes and Conferencing Nodes.
Create all Management Nodes according to the instructions in Management Node installation overview.
Create all Conferencing Nodes by following the instructions in Deploying new Conferencing Nodes.

Pexip Infinity Administrator GuideAppendices
Troubleshooting the Pexip Infinity platform
© 2016 Pexip AS Version 12.a May 2016 Page 344 of 369
Symptom Possible cause Resolution
Your system experiences random node crashes and a wedged VM. A kernel backtrace on the system console reports the instruction pointer (RIP) as being within "move_freepages".
Crashes can occur if the amount of main system RAM allocated to the Management Node or a Conferencing Node is not a multiple of 2 MB.
Ensure that the amount of main system RAM allocated to the Management Node or a Conferencing Node is a multiple of 2 MB.
One way to achieve this is by configuring your VM with 8 MB of video RAM (VRAM). Refer to your specific hypervisor documentation for how to do this.
A newly-deployed Conferencing Node has gone into maintenance mode with the message "CPU instruction set is not supported; system will be placed in maintenance mode".
The Conferencing Node has been installed on a system that does not meet the CPU instruction set requirements.
Do one of the following:
l Migrate the Conferencing Node to another server.
l Re-install the Conferencing Node on another server.
l If the instruction set is limited because you are using EVC mode (or equivalent), increase the minimum EVC level to L4 (Sandy Bridge).
Joining a conference and viewing content
Symptom Possible cause Resolution
Participants cannot join a conference due to insufficient capacity.
l When users attempt to join a conference they get a message saying "Participants cannot join a conference due to insufficient capacity."
l There is an alarm "Call capacity limit reached".
l The admin log is reporting "Participant failed to join conference" and "resource unavailable".
All Conferencing Nodes that are able to take the media for this call are at capacity.
l Deploy more Conferencing Nodes in this location.
l Move existing Conferencing Nodes onto more powerful servers.
l Allocate more virtual CPUs for Conferencing Nodes on existing servers (if there are sufficient CPU cores). Note that the Conferencing Node will have to be rebooted for this to take effect.
l Configure each location with a primary and secondary overflow location.
For further information on capacity and how calls consume resources, see Hardware resource allocation rules.
The participant has dialed in to the Conferencing Node while it is still starting up and an internal capacity-checking tool is running.
The Administrator should place the Conferencing Node into maintenance mode if it is expected to be powered off and on.
If the Conferencing Node is not in maintenance mode while the capacity-checking tool is running the participant should wait a few moments and then attempt to join the conference.
The Virtual Meeting Room or Virtual Auditorium has a participant limit applied, and this limit has been reached.
Increase the participant limit, if appropriate.

Pexip Infinity Administrator GuideAppendices
Troubleshooting the Pexip Infinity platform
© 2016 Pexip AS Version 12.a May 2016 Page 345 of 369
Symptom Possible cause Resolution
Participants cannot join a conference due to an invalid license.
l When users attempt to join a conference they get a message saying "Participants cannot join a conference due to an invalid license."
l The admin log is reporting "Participant failed to join conference" and "no valid license available".
If your Pexip Infinity reports an invalid license, this could mean that:
l the license has not been activated
l the existing license has expired
l the existing license has become corrupt (this could occur, for example, if the Management Node reboots after an upgrade and comes back up on a different physical blade with a new MAC address).
l Check the status of your licenses from the Licensing page (Platform configuration > Licenses).
l Contact your Pexip authorized support representative for assistance.
For more information, see Pexip Infinity license installation and usage.
Participants cannot join a conference due to insufficient licenses.
l When users attempt to join a conference they get a message saying "Participants cannot join a conference due to insufficient licenses."
l There is an alarm saying "License limit reached".
l The admin log is reporting "Participant failed to join conference" and "license limit reached".
There are not enough port licenses available on the system at this time. For more information, see Pexip Infinity license installation and usage.
l Wait until one or more of the existing conferences have finished and the licenses have been returned to the pool.
l Contact your Pexip authorized support representative to purchase more licenses.
An H.323 endpoint has its bandwidth restricted when joining a conference via a Virtual Reception, or when placing a call using the Distributed Gateway after first connecting to a Virtual Reception.
If there has been a bandwidth restriction placed on the Virtual Reception, any H.323 endpoints using that service will not be able to subsequently increase their bandwidth, even after being transferred to a Virtual Meeting Room or using a Call Routing Rule that has a higher (or no) limit.
l Make the call using a SIP endpoint or Infinity Connect client.
l Do not place a bandwidth restriction on the Virtual Reception.
Presentations do not display full screen If the presentation being shared is either:
l an application that is not in full-screen mode
l a full screen image that is being sent from a non-standard aspect ratio screen
then the image being sent may have a non-standard aspect ratio. In order to send the image inside a standard resolution window (for example 640x480 [4:3]) or 1280x720 [16:9]), the endpoint may add horizontal or vertical mattes (also known as letterboxing or pillarboxing respectively).
Ensure that presenters always either:
l share their entire screen, or
l share individual applications when they are in full-screen mode only.
Images are not displaying as expected:
l they are being cropped
l they have black bars at the top or sides
Endpoints send and display video images and presentations in various aspect ratios, most commonly 16:9 and 4:3. If there is a difference between the aspect ratios of the sending and receiving endpoints, then the endpoint and/or Pexip Infinity may crop the image or add vertical or horizontal mattes.
For more information, see Changing aspect ratios.

Pexip Infinity Administrator GuideAppendices
Troubleshooting the Pexip Infinity platform
© 2016 Pexip AS Version 12.a May 2016 Page 346 of 369
Symptom Possible cause Resolution
Participants keep hearing themselves repeated back after a short delay. This happens in a conference with one or more other participants connected using Infinity Connect via Internet Explorer, Edge, Safari or Firefox, and who are using their computer's microphone and speakers.
Internet Explorer, Edge, Safari and Firefox do not have adequate echo cancellation, and in certain circumstances may experience a delay in playing audio. When this happens, sounds played through the computer's speakers are picked up by the computer's microphone and replayed back to other participants.
Participants using Internet Explorer, Edge, Safari or Firefox should:
l use a headset
l mute themselves when not speaking
l consider using Chrome or the Infinity Connect desktop client instead.
Participants using Flash-based browsers should also ensure echo cancellation is enabled:
Users can't enter a conference PIN from a T150 running L5.1.
There was a bug in the L5.1 software which meant that DTMF tones weren't being sent properly over SIP.
Do one of the following:
l upgrade the T150 to L6.1
l use H.323 (not SIP)
l interwork to SIP via a VCS.
In-band DTMF tones may not be detected if they are input too quickly.
False detections can be caused, for example, by poor line quality, line noise and echo.
This is best resolved through using out-of-band DTMF tones.
Conference connectivity and TLS issues
Symptom Possible cause Resolution
Calls fail when dialing out to, or receiving calls from, video network infrastructure devices, such as a Cisco VCS or CUCM. Calls may fail immediately, or after a period of time, and SSL alerts are raised in the support log with an "unsupported certificate" description.
Either the external system or the Conferencing Node is verifying the other party's certificate and it is rejecting the connection because the certificate does not have client authentication properties.
Ensure that the certificates on your external systems and on your Conferencing Nodes contain "TLS Web Client Authentication" Enhanced Key Usage properties (see Mutual TLS authentication and client/server certificates).
A Cisco MXP intermittently puts a call on hold immediately after resuming it.
This is due to a bug in the MXP where a race condition exists between the resume message and the session refresh re-INVITE message.
Set the session refresh configuration on your call control system to a value that avoids this race occurring.
After upgrading to version 10 or later, some Cisco MXPs may no longer be able to connect over TLS to Pexip Infinity.
This can occur if the endpoint connects directly to a Conferencing Node (e.g. because it is registered to Pexip Infinity, or it is using IP dialing).
Add to your Conferencing Node server certificates some custom DH parameters that define a DH group of size <=2048 bits. See Managing a node's TLS server certificate for information about how to do this.

Pexip Infinity Administrator GuideAppendices
Troubleshooting the Pexip Infinity platform
© 2016 Pexip AS Version 12.a May 2016 Page 347 of 369
Pexip Infinity administration
Symptom Possible cause Resolution
Log timestamps appear to be inaccurate or log entries appear to be out of sequence.
Time is not properly synchronized between the Management Node, Conferencing Nodes and their host servers, causing different systems to use different timestamps. This could be because:
l Insufficient NTP servers or NTP pools have been configured on a host server or the Management Node (we recommend a minimum of 3).
l One or more NTP servers are unreachable or have inaccurate time themselves.
l NTP is otherwise not configured according to our recommendations.
Ensure all virtual machines (VMs) (i.e. the Management Node and all Conferencing Nodes) within the Pexip Infinity platform, and the host servers on which they are running, are using accurate times according to the public or private standard NTP clock.
We strongly recommend that you configure at least 3 distinct NTP servers or NTP server pools in each instance to ensure proper synchronization.
To synchronize time on Pexip Infinity: 1. Synchronize time on host servers (for
instructions see Hypervisor configuration).
2. Enable NTP on Management Node.
3. Reboot all VMs.
How do I register Pexip Infinity to a gatekeeper?
You don't. Instead, you configure your call control system to route calls to Pexip Infinity. See Call control.
Oracle Acme Packet SBC has the error "Message Too Large".
Increase the following configuration parameters on the Acme Packet SBC: l sip-message-len 16000
l option +max-udp-length=0
VMware datastore is showing disk I/O alarms.
Enabling SIOC on your datastores might help. For more information, see this VMware knowledge base article.
Infinity Connect clients
Symptom Possible cause Resolution
Participants are unable to use Infinity Connect clients. Infinity Connect Web App and Infinity Connect desktop client users are presented with a message"Server error! Please try again".
Support for these applications has been disabled.
Enable support as follows:
1. Go to Platform configuration > Global settings.
2. Select the Enable support for Pexip Infinity Connect and Mobile App checkbox.
Participants using an Infinity Connect client cannot see the chat window.
Chat has been globally disabled. Enable chat.
Guest participants using an Infinity Connect client cannot see the chat window, participant list, or presentation.
Guest participants are not allowed in to the conference if the conference is locked, or until the first Host participant has joined. There must be at least one Host participant sending media (i.e. connected using video or audio) in order for Guests to join the conference.
l Allow an individual guest to join the conference.
l Unlock the conference, allowing all guests to join.
l Connect at least one endpoint to the conference as a Host participant, with video or audio.

Pexip Infinity Administrator GuideAppendices
Troubleshooting the Pexip Infinity platform
© 2016 Pexip AS Version 12.a May 2016 Page 348 of 369
Symptom Possible cause Resolution
Users cannot access the Infinity Connect Web App home page when using Internet Explorer.
Internet Explorer may be accessing the site in Compatibility View.
Ensure that the target domain is not in Internet Explorer's list of websites added to Compatibility View.
Users of the Infinity Connect Web App via Edge, Internet Explorer or Safari get no main video when connecting to a conference via a reverse proxy. Other conference participants see a muted camera icon in place of the
participant's video.
To send and receive audio/video media, Internet Explorer, Edge, and Safari browsers need a direct TCP connection to a Conferencing Node (as they use the RTMP protocol and thus cannot use ICE/TURN).
For more information, see Using Infinity Connect from outside your network.
l Connect over VPN.
l Use a different browser.

Pexip Infinity Administrator GuideAppendices
Troubleshooting LDAP server connections
© 2016 Pexip AS Version 12.a May 2016 Page 349 of 369
Troubleshooting LDAP server connectionsPexip Infinity can be configured to connect to a Windows Active Directory LDAP server, or any other LDAP-accessible database, in order to:
l bulk-provision individual Virtual Meeting Rooms for every member of the directory
l authenticate and authorize the login accounts that are allowed to connect to the Pexip Infinity Administrator interface or the Pexip Infinity API.
This section explains how Pexip Infinity connects to the LDAP server, and provides guidance on how to troubleshoot connection problems.
Connecting to the LDAP serverWhen resolving the LDAP server address, the system supports DNS SRV and DNS A/AAAA lookups. The system always tries in the first instance to set up a TLS connection with the LDAP server. If that fails it may fall back to a TCP connection if allowed.
To establish a TLS connection, the Pexip Infinity platform must trust the certificate presented by the LDAP server i.e. the LDAP server’s certificate must be signed by an authority within the Pexip Infinity trusted CA certificates store. In addition, the resolved LDAP server address must match the CN (common name) contained within the certificate presented by the LDAP server. Note that the Pexip Infinity platform does not support mutual authentication — it will not supply its server certificate to the LDAP server.
The system will connect to the port returned by an SRV lookup, otherwise it will connect to 389 (TCP) or 636 (TLS).
Connection process
If the LDAP server address is configured as an IP address, the system will connect directly to the given address, otherwise it treats it as a domain or FQDN and attempts to resolve the address via DNS lookups in the following sequence:
1. Perform a DNS SRV lookup against _ldaps._tcp.<LDAP server address>.
2. Perform a DNS SRV lookup against _ldap._tcp.<LDAP server address>.
3. Perform a DNS A/AAAA lookup against <LDAP server address>.
When a DNS lookup is successful, the system will first attempt to establish a TLS connection with the server at the returned address. If the TLS connection attempt fails, the system will then attempt a TCP connection, but only if Allow insecure transport is enabled. Only TLS connections are attempted as a result of _ldaps lookups.
If multiple addresses are returned by SRV lookups, the system will attempt to connect to each address in priority order.
Connectivity error messages and using the support logDiagnostic information is also recorded in the support log (Status > Support log).
When Pexip Infinity connects successfully to the LDAP server, the support log will contain an entry similar to this:
2015-06-05T11:15:00.550+00:00 mgmt 2015-06-05 11:15:00,550 Level="INFO" Name="support.ldap" Message="Successfully connected to LDAP server" Address="server.example.com" Uri="ldaps://server.example.com"
Unable to contact the LDAP server
If Pexip Infinity cannot contact the configured LDAP server, the support log will contain an entry similar to this:
2015-06-05T08:40:29.707+00:00 mgmt 2015-06-05 08:40:29,704 Level="INFO" Name="support.ldap" Message="Failed connecting to LDAP server" Address="server.example.com" Reasons="ldaps://server.example.com : Can't contact LDAP serverldap://server.example.com : Can't contact LDAP server"
Ensure that the server is available at the configured address and, if the server address is specified by domain name or FQDN, ensure that DNS records exist and resolve to the correct address.

Pexip Infinity Administrator GuideAppendices
Troubleshooting LDAP server connections
© 2016 Pexip AS Version 12.a May 2016 Page 350 of 369
Connection errors: TLS certificate issues
If Pexip Infinity can reach the configured LDAP server, but cannot connect to it due to TLS certificate issues, the support log will contain an entry similar to this:
2015-06-05T08:55:49.042+00:00 mgmt 2015-06-05 08:55:49,042 Level="INFO" Name="support.ldap" Message="Failed connecting to LDAP server" Address="server.example.com" Reasons="ldaps://server.example.com : Can't contact LDAP serverldap://server.example.com : Connect error"
The reason "Connect error" means that Pexip Infinity cannot verify the LDAP server's certificate.
Ensure that the LDAP server's TLS certificate (or the CA certificate that signed it, if it is not self-signed) is in the Pexip Infinity trust store (Platform configuration > Trusted CA certificates).
Connection errors: binding to the server fails e.g. invalid credentials
If Pexip Infinity can reach the configured LDAP server, but cannot connect to it due to binding errors, such as invalid credentials, the support log will contain an entry similar to this:
2015-06-05T09:11:03.765+00:00 mgmt 2015-06-05 09:11:03,765 Level="INFO" Name="support.ldap" Message="Failed connecting to LDAP server" Address="server.example.com" Reasons="ldaps://server.example.com : Invalid credentialsldap://server.example.com : Invalid credentials"
Ensure that you have entered the correct credentials. They should be for an enabled, non-expired, domain user service account (not the Administrator account), which has a password set to never expire. All usernames and passwords are case sensitive.
If you are certain that the account you are trying to bind with is configured correctly, try to bind using the:
l bare username of the service account (e.g. ldapuser) l full DN of the service account (e.g. CN=ldapuser,CN=Users,DC=example,DC=com)
l Windows logon of the service account (e.g. EXAMPLE\ldapuser).
Connection errors when using insecure transport
You cannot specify the LDAP server address as an IP address if you have also selected the Allow insecure transport option. If the server address is not specified as an FQDN you will receive "Invalid credentials" error messages.
You cannot use an IP address because the authentication handshake is encrypted using SASL technology. To achieve this, various shared keys are used — things both sides know and use as part of the handshake but are not exchanged on the wire. In this case, it is the FQDN of the LDAP server that is used.
Therefore, if you need to use insecure transport, you must ensure that you refer to the LDAP server by its FQDN (and this is the hostname the server uses to identify itself, not just something that points to the IP address), so that the authentication will work. See Using ldapsearch or AD Explorer to view the LDAP database below for an example of how to discover an AD server's hostname.
Alternatively, you could use secure transport, referring to the LDAP server by any name that appears in its TLS certificate, and by loading all necessary trusted CA certificates onto Pexip Infinity.
Connection errors: Error syncing with LDAP
You can receive an "Error syncing with LDAP" error message when attempting to perform a VMR template synchronization.
This can be caused by invalid syntax in the template's LDAP user filter or LDAP user search DN fields. Check that all parentheses are balanced and are in the correct places, and that all operators are correctly positioned.
This message can also be received if you have not selected an LDAP sync source when configuring your VMR sync template.

Pexip Infinity Administrator GuideAppendices
Troubleshooting LDAP server connections
© 2016 Pexip AS Version 12.a May 2016 Page 351 of 369
Cannot log in to Pexip Infinity despite using correct credentialsIf users receive a "Please enter the correct username and password for a staff account" message when trying to log in to Pexip Infinity, but they are using the correct username and password, this typically means that either:
l The LDAP server cannot be contacted:
o These errors will be recorded in the Support log; see the connectivity troubleshooting guidelines above for more information.
l The LDAP server can be contacted but the correct user records are not being searched:
o Check the Pexip Infinity LDAP configuration settings (Users > User authentication) to ensure that all objectClass and LDAP field names have been spelled correctly, and that the base DN and user search DN fields contain the correct domain and organizational unit settings.
o If you are using nested AD security groups, see Supporting nested security groups in Windows Active Directory. l The LDAP server can be contacted and the user records can be found and authenticated, but the user is not authorized to
access Pexip Infinity:
o Check that LDAP roles have been configured on Pexip Infinity (Users > LDAP roles). o Ensure that the user's LDAP account is associated with the LDAP group DNs / role combinations that are configured on
Pexip Infinity.
VMRs not created as expected by a sync template
User search or user filters not being applied
If more or fewer VMRs than expected (or no VMRs at all) were created after performing a template synchronization, it is likely that the LDAP base DN, LDAP user search DN and LDAP user filter fields have been misconfigured.
Check that all objectCategory, objectClass and LDAP field names have been spelled correctly. Note that all LDAP user search and user filter contents are not case sensitive.
More information on Active Directory LDAP filtering can be found at http://social.technet.microsoft.com/wiki/contents/articles/5392.active-directory-ldap-syntax-filters.aspx.
Using ldapsearch or AD Explorer to view the LDAP database
Mac and Linux systems
You can use a command line tool such as ldapsearch, which is available for Mac and Linux systems, to help test and diagnose connectivity issues with the LDAP server. Note that ldapsearch is not installed on any Pexip Infinity nodes.
Here are some example ldapsearch queries you could use (after adapting the parameters as appropriate for your environment).
$ ldapsearch -v -h 10.0.0.8 -D "example\\admin123" -w password123 -b OU=people,DC=example,DC=com
This fetches the contents of OU (org unit) people from the LDAP server at 10.0.0.8 over TCP, binding as user (sAMAccountName) admin123 in NetBIOS domain example with password password123 using simple (insecure) authentication.
$ ldapsearch -v -h dc01.example.com -Y DIGEST-MD5 -U admin123 -w password123 -b OU=people,DC=example,DC=com
This extends the previous example by addressing the LDAP server by its FQDN dc01.example.com and uses SASL/DIGEST-MD5 authentication.
Windows
Windows users can use Active Directory Explorer (AdExplorer) to navigate around and view AD structures and entries. See https://technet.microsoft.com/en-us/sysinternals/adexplorer for more information and links to download the software.

Pexip Infinity Administrator GuideAppendices
Troubleshooting LDAP server connections
© 2016 Pexip AS Version 12.a May 2016 Page 352 of 369
The example below shows how you can discover your AD server's actual hostname (AD-LON.example.local in this case) if you use AdExplorer to connect to your server via its IP address (10.44.10.10 in this case):

Pexip Infinity Administrator GuideAppendices
Features added in previous releases
© 2016 Pexip AS Version 12.a May 2016 Page 353 of 369
Features added in previous releasesThis section summarizes the features and enhancements that were added in previous releases of Pexip Infinity software.
l Version 11 l Version 10 l Version 9 l Version 8 l Version 7 l Version 6
Features added in version 11Pexip Infinity version 11 added the following features and enhancements:
Feature Description More information
Multistreaming support from Lync / Skype for Business AVMCU to Pexip Infinity
Pexip Infinity can receive multiple video streams from an AVMCU multi-party conference.
This means, for example, that all endpoints connected to an AVMCU conference via the Pexip Distributed Gateway now see a full combined set of both AVMCU and any other Pexip gateway participants in the conference. Previously Lync / Skype for Business participants would see all AVMCU participants, but gateway participants would only see the currently active AVMCU participant.
Pexip Infinity and Lync integration features
Merge a Lync / Skype for Business AVMCU conference with a Pexip Infinity VMR conference
A Lync / Skype for Business AVMCU hosted multi-party conference can be merged with a conference being hosted on the Pexip Infinity platform. This means that, for example:
l a Lync / Skype for Business user dialed into a Pexip VMR can use drag-and-drop to add a contact (such as a Microsoft Surface Hub system, or an external SIP/H.323 device) into the meeting. This will create an adhoc AVMCU conference and merge it with the Pexip VMR.
l a Lync / Skype for Business user in an AVMCU conference can drag and drop a Pexip VMR contact into the AVMCU conference to manually merge the conferences together.
When a conference is merged, participants in the Pexip VMR see a combined set of Pexip VMR and Lync / Skype for Business AVMCU participants, and the Lync / Skype for Business AVMCU participants see the Pexip VMR stage alongside the other AVMCU participants.
Pexip Infinity and Lync integration features
H.264 simulcast from Pexip Infinity to Lync / Skype for Business AVMCU
Pexip Infinity can now send the video streams of gateway participants at multiple resolutions to an AVMCU multi-party conference.
This means that if Lync / Skype for Business clients request different video resolutions from the AVMCU, Pexip Infinity can now support the equivalent request from the AVMCU. This optimizes the user experience for all conference participants, and for all device sizes from a mobile client to the Microsoft Surface Hub.
Pexip Infinity and Lync integration features
Optimized Lync / Skype for Business gateway functionality
Pexip's Lync / Skype for Business gateway functionality has been improved to reduce the bandwidth and quantity of streams sent to the AVMCU based on what is requested. (This improvement has no detrimental impact to the user experience.)
Pexip Infinity and Lync integration features
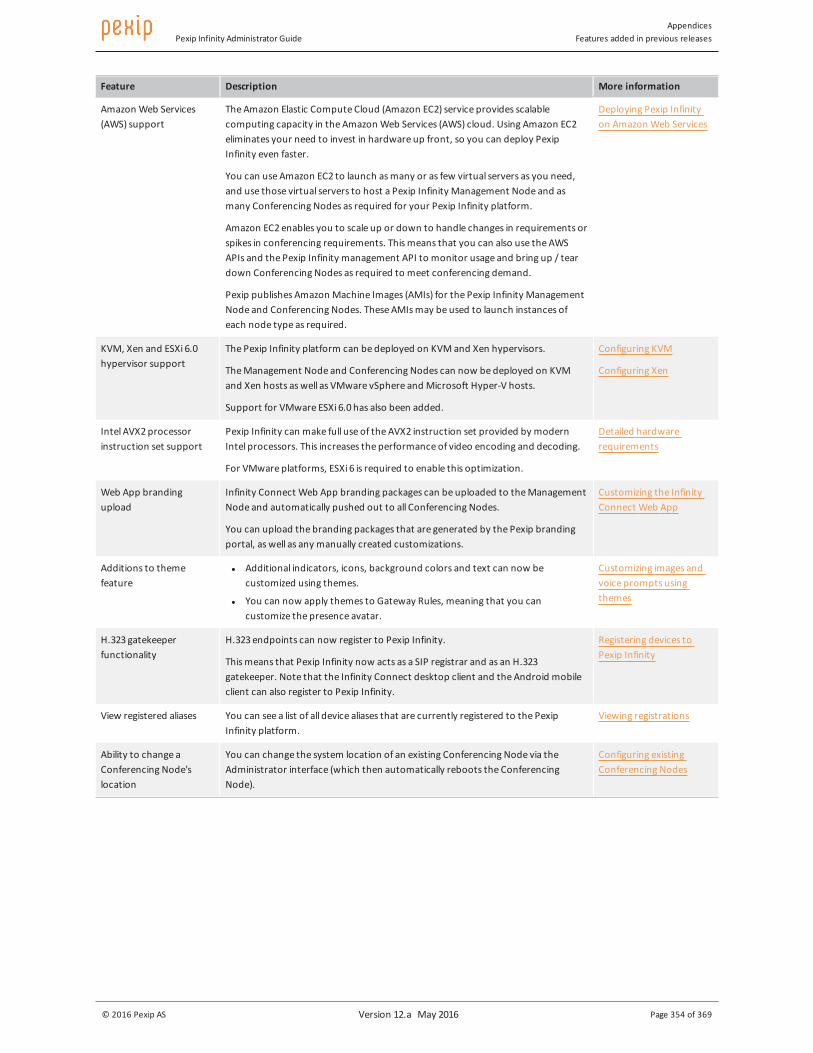
Pexip Infinity Administrator GuideAppendices
Features added in previous releases
© 2016 Pexip AS Version 12.a May 2016 Page 354 of 369
Feature Description More information
Amazon Web Services (AWS) support
The Amazon Elastic Compute Cloud (Amazon EC2) service provides scalable computing capacity in the Amazon Web Services (AWS) cloud. Using Amazon EC2 eliminates your need to invest in hardware up front, so you can deploy Pexip Infinity even faster.
You can use Amazon EC2 to launch as many or as few virtual servers as you need, and use those virtual servers to host a Pexip Infinity Management Node and as many Conferencing Nodes as required for your Pexip Infinity platform.
Amazon EC2 enables you to scale up or down to handle changes in requirements or spikes in conferencing requirements. This means that you can also use the AWS APIs and the Pexip Infinity management API to monitor usage and bring up / tear down Conferencing Nodes as required to meet conferencing demand.
Pexip publishes Amazon Machine Images (AMIs) for the Pexip Infinity Management Node and Conferencing Nodes. These AMIs may be used to launch instances of each node type as required.
Deploying Pexip Infinity on Amazon Web Services
KVM, Xen and ESXi 6.0 hypervisor support
The Pexip Infinity platform can be deployed on KVM and Xen hypervisors.
The Management Node and Conferencing Nodes can now be deployed on KVM and Xen hosts as well as VMware vSphere and Microsoft Hyper-V hosts.
Support for VMware ESXi 6.0 has also been added.
Configuring KVM
Configuring Xen
Intel AVX2 processor instruction set support
Pexip Infinity can make full use of the AVX2 instruction set provided by modern Intel processors. This increases the performance of video encoding and decoding.
For VMware platforms, ESXi 6 is required to enable this optimization.
Detailed hardware requirements
Web App branding upload
Infinity Connect Web App branding packages can be uploaded to the Management Node and automatically pushed out to all Conferencing Nodes.
You can upload the branding packages that are generated by the Pexip branding portal, as well as any manually created customizations.
Customizing the Infinity Connect Web App
Additions to theme feature
l Additional indicators, icons, background colors and text can now be customized using themes.
l You can now apply themes to Gateway Rules, meaning that you can customize the presence avatar.
Customizing images and voice prompts using themes
H.323 gatekeeper functionality
H.323 endpoints can now register to Pexip Infinity.
This means that Pexip Infinity now acts as a SIP registrar and as an H.323 gatekeeper. Note that the Infinity Connect desktop client and the Android mobile client can also register to Pexip Infinity.
Registering devices to Pexip Infinity
View registered aliases You can see a list of all device aliases that are currently registered to the Pexip Infinity platform.
Viewing registrations
Ability to change a Conferencing Node's location
You can change the system location of an existing Conferencing Node via the Administrator interface (which then automatically reboots the Conferencing Node).
Configuring existing Conferencing Nodes

Pexip Infinity Administrator GuideAppendices
Features added in previous releases
© 2016 Pexip AS Version 12.a May 2016 Page 355 of 369
Feature Description More information
VMR provisioning via LDAP enhanced with daily sync, customizable fields and string length filter
The facility to bulk-provision VMRs from directory information contained in an AD/LDAP server has been enhanced:
l Automatic daily sync: each VMR sync template can be configured to run automatically on a daily basis. Note that on upgrade, your existing templates will not be set to run automatically.
l Customizable LDAP fields: to complement the standard LDAP fields that can be used as variables, administrators can add their own fields to support additional attributes in their LDAP/AD schemas.
l New pex_strlen filter which returns the length of string.
Provisioning VMRs from Active Directory via LDAP
Improved trusted CA certificate management
You can now upload, view and delete individual trusted CA certificates, in addition to being able to import a file of one or more certificates.
An alarm is raised when a certificate is due to expire within the next 30 days.
Managing TLS and trusted CA certificates
Ability to limit the media capability
You can now specify the maximum media capability of certain calls. Options are audio-only, main video only, or main video plus presentation. This feature allows better resource management and smaller SDPs when calling out to known audio-only devices.
You can place restrictions on a per-conference basis (for Virtual Meeting Rooms and Virtual Auditoriums) or a per-call basis (for outbound and Distributed Gateway calls). You can also limit the capability of a Virtual Reception.
Controlling media capability
Configurable auto-escalation of Lync / Skype for Business audio calls
You can configure whether a Lync / Skype for Business audio call is automatically escalated so that it receives video from a conference.
Previously, such audio calls were always escalated to receive video. From v11 this behavior is configurable and is disabled by default.
Automatically escalating Lync / Skype for Business audio calls
Changes to Host and Guest PIN behavior
Conference PINs can now optionally end with #. This means that:
l Host PINs and Guest PINs for the same conference can now be different lengths.
l Users who have accidentally entered too many or too few digits can enter # to return to the start of the PIN entry process.
Using # at the end of a PIN
Lync / Skype for Business Response Group support
SIP Replaces support (RFC 3891 - "Replaces" Header) has been implemented.
This enables support within Pexip Infinity for Lync / Skype for Business Response Group call management.
Lync / Skype for Business IVR gateway conference lookup location
When configuring the Lync / Skype for Business IVR gateway functionality, you can specify the system location that will perform the Lync / Skype for Business Conference ID lookup on the Lync / Skype for Business server.
This can assist in scenarios where an external device connects to a Virtual Reception via a Conferencing Node in the DMZ and that node is not trusted by the Lync / Skype for Business FEP.
Configuring Pexip Infinity as a Lync / Skype for Business gateway
Option to mute all guests in a Virtual Auditorium
Virtual Auditoriums have a new option to automatically mute all Guests when they first join a conference. After the conference has started, Hosts can use the Infinity Connect client to unmute Guests, either individually or as a group.
Configuring Virtual Auditoriums
Send DTMF to manually dialed participants
DTMF sequences can be configured when manually dialing out to participants from a conference via the Administrator interface. The DTMF is transmitted 3 seconds after the call connects to the participant.
Manually dialing out to a participant from a conference

Pexip Infinity Administrator GuideAppendices
Features added in previous releases
© 2016 Pexip AS Version 12.a May 2016 Page 356 of 369
Feature Description More information
Last conference participant timeout
You can configure at the platform level the length of time (in seconds) for which a conference will continue with only one participant remaining. The type of participant (Host, Guest, automatically dialed, streaming etc.) is irrelevant.
By default the Last participant backstop timeout setting is configured to never eject the last participant.
About global settings
Additional options to determine whether an ADP can keep a conference alive
In addition to the existing behavior (where a conference would be terminated if the only remaining participant was an Automatically Dialed Participant, unless there were two or more ADPs and at least one was a Host), there are now two other options:
l a Host ADP can be configured to always keep a conference alive even if they are the only remaining participant
l an ADP can be configured to never keep a conference alive.
Keeping a conference alive
Infinity Connect one-click join
The process of joining conferences via Infinity Connect has been streamlined. Users now elect, prior to joining the conference, whether they will join a conference with full video and audio, with audio only, or as presentation and control only.
Infinity Connect supported in Microsoft Edge
The Infinity Connect Web App is now supported in Microsoft Edge. Using Infinity Connect via Microsoft Edge
Infinity Connect users can change the role of other participants
Infinity Connect users who have a role of Host can change the role of other users in the conference. This is useful, for example, if a Host needs to leave the conference; they can promote one of the Guests to a role of Host so that the conference will continue after they disconnect.
Changing a participant's role from Guest to Host (and vice versa)
Infinity Connect users can automatically mute microphone on joining
Many videoconference users mute their microphones unless they are actually speaking, to reduce the level of background noise. This option allows users to join with their microphone muted by default.
New parameters supported in preconfigured URLs
Additional parameters are now supported in URLs that can be provided to Infinity Connect Web App users to preconfigure conference joining information:
l <escalate> offers users the camera and microphone selection options immediately upon joining
l <extension> provides the Virtual Reception extension, or the Lync / Skype for Business Conference ID.
Creating preconfigured links to conferences via Infinity Connect
Alarm raised when Management Node limit is reached
An alarm is raised if the Management Node does not have sufficient resources for the current deployment size (number of Conferencing Nodes).
Viewing alarms
Features added in version 10Pexip Infinity version 10 added the following features and enhancements:

Pexip Infinity Administrator GuideAppendices
Features added in previous releases
© 2016 Pexip AS Version 12.a May 2016 Page 357 of 369
Feature Description More information
VMR provisioning from Active Directory / LDAP
Pexip Infinity Virtual Meeting Rooms can be bulk-provisioned from directory information contained in a Windows Active Directory LDAP server, or any other LDAP-accessible database.
This means, for example, that you can automatically provide a personal VMR for every employee in an organization. Data such as employee names can be imported from the directory and used to generate a unique name and alias for each VMR, following a pattern such as meet.<username>@example.com. Other VMR attributes such as PIN numbers can also be generated, depending upon how you configure your VMR template.
After the VMRs have been generated you can periodically re-run the provisioning process to resynchronize your VMRs to cater for additions and removals to the directory.
Provisioning VMRs from Active Directory via LDAP
Lync IVR gateway Within on-prem Lync deployments a Virtual Reception can act as a "Lync IVR lobby" to route calls based on the Lync Conference ID into any ad hoc or scheduled Lync multi-party conference.
This means that Lync users can schedule and use Lync conferences in the normal way. A Lync conference ID is generated when an on-prem Lync deployment is configured with a dial-in access number. Non-Lync users (H.323, SIP, Infinity Connect endpoints etc) can then dial a URI or IP address of the "Lync IVR lobby" and enter that Lync conference ID to join the Lync conference from the video endpoint. Lync users and video endpoint users can then see each other and present to each other.
Configuring Pexip Infinity as a Lync gateway
Pexip StudioSound™ Pexip’s new StudioSound™ audio feature brings recording studio technology and quality to video, audio, and web conferencing. It greatly improves the overall experience by making conferences and meetings sound better, with improved intelligibility.
StudioSound™ is part of the standard Pexip Infinity feature set and is utilized automatically in all conferences.
How meticulous studio quality sound engineering improves meeting efficiencies (article on www.pexip.com)
Infinity Connect clients can register and receive calls
Infinity Connect desktop clients for Windows, Mac OS X and Linux, and Infinity Connect Mobile clients for Android can register to Pexip Infinity Conferencing Nodes.
This means that users who have registered their Infinity Connect client can be dialed in to a Pexip conference, and can receiving incoming calls placed via the Pexip Distributed Gateway.
Registering devices to Pexip Infinity

Pexip Infinity Administrator GuideAppendices
Features added in previous releases
© 2016 Pexip AS Version 12.a May 2016 Page 358 of 369
Feature Description More information
Infinity Connect enhancements
Further enhancements have been made to Infinity Connect clients. These include:
l Ability to preview your own video (self view) and check camera and microphone settings before joining a call.
l New toolbar icons to start video, or to start audio-only when joining a call.
l Ability to send DTMF tones (via the keypad) to another participant.
l Host or Guest indication in the participant list.
l "Currently speaking" badge in the participant list.
l Each participant is shown as a single entry in the participant list, even if they are sending multiple media streams.
l Information about each participant is now available by clicking on their name in the participant list.
l Ability to stop sending a presentation to a participant is now available in all clients.
l Ability to send anonymous usage statistics to Pexip. (This helps us improve the operation of the Pexip Infinity platform based on real-life customer usage data.)
Introduction to Infinity Connect
New audio-only indicator Audio-only participants are now represented by an avatar on the left side of the video window. Whenever an audio-only participant is speaking, their avatar slides out to show their name; the most recent video participant to speak will remain in the main video window. You can use an external policy server to personalize the avatar for individual participants, otherwise the avatar will be an icon of a telephone handset.
Note: As a consequence of this change, the audio_avatar.jpg theme file was deprecated in v10 and has been removed completely in v11.
Selecting the layout seen by participants
Separate RTMP streams for video and presentation content
Pexip Infinity can stream the main video and presentation content channels separately over RTMP.
This means that when streaming a conference over RTMP — to streaming and recording services such as YouTube — viewers can simultaneously access the main video stream of the participants and a separate presentation content stream.
Streaming a conference over YouTube
Active speaker shown when receiving single-stream presentation
When sending presentation content to a single-stream endpoint such as Skype or broadcasting via an RTMP stream (when not dialed out with dual streaming), Pexip Infinity sends the video stream of the active speaker in a small window in the upper right corner of the presentation.
Selecting the layout seen by participants
Send content with a video thumbnail to Lync Room Systems
Pexip Infinity can now send presentation content to Lync Room Systems (SMART and Crestron) in main video with the active speaker as a thumbnail. This allows both content and main video to be seen whenever an LRS system connects directly to a Pexip VMR.
Improved status reporting for Infinity Connect and Lync clients
When viewing the status of conference participants, Infinity Connect and Microsoft Lync clients are now shown as a single participant instance, regardless of whether they have active media streams or if they are presenting content.
Each participant's status shows the individual media streams, and for completed conferences it may show multiple instances of each stream type (for example if the participant had started presenting, stopped and then started presenting again).
Viewing participant status

Pexip Infinity Administrator GuideAppendices
Features added in previous releases
© 2016 Pexip AS Version 12.a May 2016 Page 359 of 369
Feature Description More information
Reject calls via external policy
When responding to a service configuration request, an external policy server can instruct Pexip Infinity to reject the call associated with that service request.
If the policy server does not return the service configuration data and it does not instruct Pexip Infinity to reject the call, then Pexip Infinity will continue with its standard processing behavior (it will attempt to obtain the relevant information from its own internal database).
Policy server responses
Improved scalability for WebRTC calls
Scalability improvements for WebRTC video handling in distributed conferences.
Login history You can view the 100 most recent attempts to log in to the Pexip Infinity Administrator interface.
Viewing login history
Limited duration snapshot
As an alternative to generating a full diagnostic snapshot, you can specify the number of hours to include in a limited duration snapshot.
Downloading a diagnostic snapshot
Customizable Lync contact list avatar for gateway contacts
The Lync contact list avatar that is displayed for contacts reached via the Pexip Distributed Gateway can be customized. You can do this by modifying the presence_avatar_image.jpg file contained in the default theme.
Presence and contact lists in Lync environments
Features added in version 9Pexip Infinity version 9 added the following features and enhancements:

Pexip Infinity Administrator GuideAppendices
Features added in previous releases
© 2016 Pexip AS Version 12.a May 2016 Page 360 of 369
Feature Description More information
Infinity Connect Web App and desktop client enhancements
Instant Messaging and chat
Conference participants using a variety of clients can chat and share links with other participants. Supported clients include Microsoft Lync, Skype, and Skype for Business. Chat is also natively supported in Pexip's own Infinity Connect suite (Web App and desktop client). Microsoft Lync and Infinity Connect clients can also chat when calling each other directly via the Pexip Distributed Gateway.
Content sharing
All users can now share images and PDF content from any browser.
Notifications and selective unlocking for a locked conference
When a new participant attempts to connect to a locked conference using a guest PIN (or without a PIN if it is an open conference), the Hosts are notified that the participant is waiting to join. Hosts can then selectively either allow the participant to join the conference, or reject the request and disconnect the participant. While waiting, the participant is held in the conference lobby, where they will see and hear the waiting for conference host message (these items are customizable via themes).
Conference control
Host participants now have the options to mute all Guest participants simultaneously, and to disconnect all participants simultaneously.
Role selection when adding participants
You can select the role (Host or Guest) when adding a participant to a conference.
New and improved design
The Infinity Connect Web App and desktop clients have been redesigned with a new look and workflow to support the chat, content sharing and conference control features. This allows, for example, conference participants who are using a video conferencing endpoint, or a Microsoft Lync client, to use Infinity Connect to connect to the conference without audio and video, but have access to all of the advanced features.
Simplified rebranding
It is now easier to rebrand the styles and images used in the Infinity Connect clients. You can add a logo, a background image and set the colors to match your own corporate branding. Existing customers who have rebranded the Infinity Connect Web App have to reapply their branding in version 9. Any textual changes to labels and messages also has to be reapplied. As any existing branding on the Conferencing Nodes will be removed when upgrading, customers may want to prepare their updated branding prior to upgrading.
Enabling and disabling chat
Locking a conference and allowing participants to join a locked conference
Introduction to Infinity Connect
Outbound video streaming to Content Delivery Networks and public services
Pexip Infinity can output a dedicated multimedia stream to enterprise CDN (Content Delivery Network) streaming and recording services such as Wowza, Adobe, VBrick, and Microsoft Azure, and to public streaming services such as YouTube. Any Pexip conference can be streamed as a live event to an unlimited number of viewers, and can be recorded and stored for later consumption.
Streaming a conference over YouTube
Device registration Endpoint devices can register to Pexip Infinity Conferencing Nodes. This allows Pexip Infinity to route outbound calls to those registered devices without having to go via a SIP proxy or rely on DNS.
Registering devices to Pexip Infinity

Pexip Infinity Administrator GuideAppendices
Features added in previous releases
© 2016 Pexip AS Version 12.a May 2016 Page 361 of 369
Feature Description More information
External policy Pexip Infinity's external policy feature allows call policy decisions to be taken by an external system, based on the data sources that are available to that system. This allows Pexip Infinity administrators to implement routing decisions based on their specific requirements. The external system can, for example, return VMR configuration data and JPEG avatars to represent participants in a conference, and decide the location for the placement of media on a per call basis.
Using an external policy server with Pexip Infinity
Backup and restore Administrators can backup and restore configuration data via the Pexip Infinity Administrator interface.
Backing up and restoring configuration
Location-based call control enhancements
Pexip Distributed Gateway
You can optionally configure Call Routing Rules to place the outgoing call from a Conferencing Node in a specific location (rather than from the node that received the call). This means that internal LAN-facing nodes and NATted DMZ-facing nodes can act as a gateway between internal and external traffic.
Automatically dialed participants
You can optionally configure an Automatically Dialed Participant to be called from a Conferencing Node in a specific location (rather than from the node being used by the participant who initiated the conference).
About the Pexip Distributed Gateway serviceandAutomatically dialing out to a participant from a conference
Microsoft Lync integration enhancements
Per-location Lync MSSIP domain
You can specify the Lync MSSIP domain per location. If configured, it is used instead of the global Lync MSSIP domain in outbound calls to Lync from Conferencing Nodes in that location. This makes it easier for service providers, for example, to support multiple Lync domains.
Direct gateway calls into the AVMCU
Calls received via the Pexip Distributed Gateway can now be configured to call directly into an AVMCU multi-party conference (both ad-hoc and scheduled calls hosted on AVMCU).
Audio-only calls
When making audio-only calls from Lync to a Pexip Virtual Meeting Room, the participants in the VMR will only receive your audio. However, the Lync user will receive video and audio from the VMR. The Lync call can be escalated to video in the normal way by starting video, if required.
Resizing shared application content
When a Lync user shares an application (rather than their screen), additional black borders are now removed and the shared content is resized to cover the full dual video stream for receiving endpoints/clients.
Using Microsoft Lync / Skype for Business with Pexip Infinity
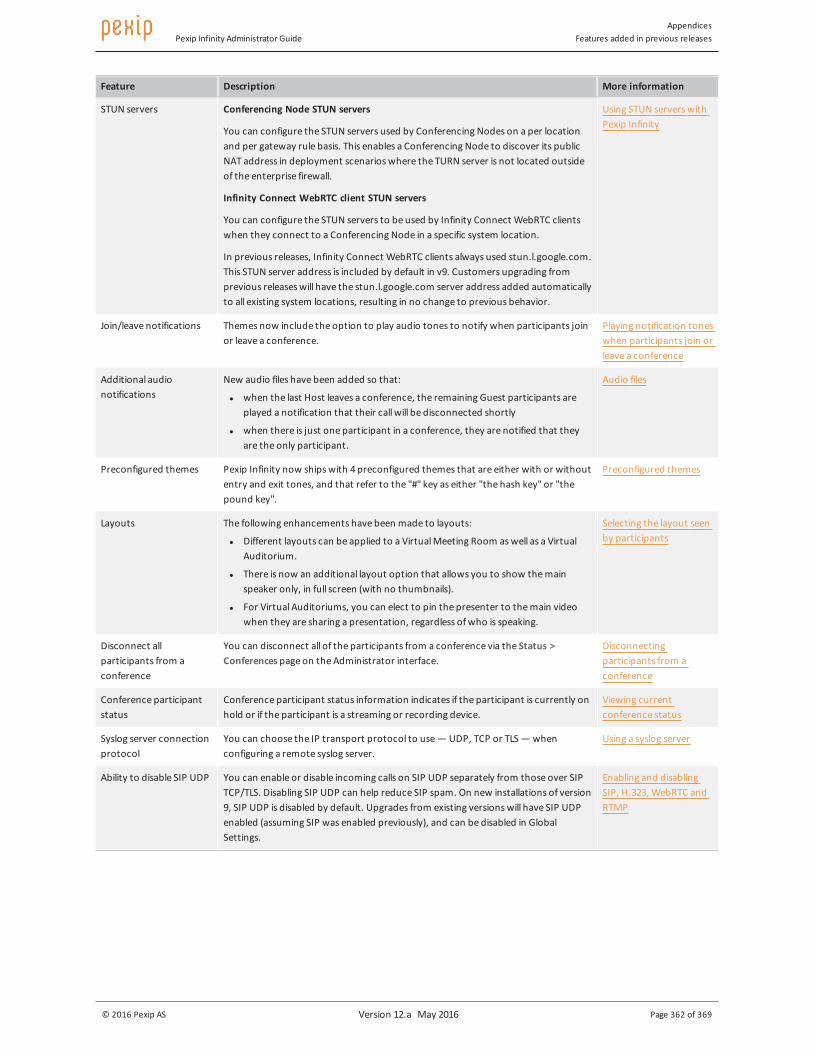
Pexip Infinity Administrator GuideAppendices
Features added in previous releases
© 2016 Pexip AS Version 12.a May 2016 Page 362 of 369
Feature Description More information
STUN servers Conferencing Node STUN servers
You can configure the STUN servers used by Conferencing Nodes on a per location and per gateway rule basis. This enables a Conferencing Node to discover its public NAT address in deployment scenarios where the TURN server is not located outside of the enterprise firewall.
Infinity Connect WebRTC client STUN servers
You can configure the STUN servers to be used by Infinity Connect WebRTC clients when they connect to a Conferencing Node in a specific system location.
In previous releases, Infinity Connect WebRTC clients always used stun.l.google.com. This STUN server address is included by default in v9. Customers upgrading from previous releases will have the stun.l.google.com server address added automatically to all existing system locations, resulting in no change to previous behavior.
Using STUN servers with Pexip Infinity
Join/leave notifications Themes now include the option to play audio tones to notify when participants join or leave a conference.
Playing notification tones when participants join or leave a conference
Additional audio notifications
New audio files have been added so that:
l when the last Host leaves a conference, the remaining Guest participants are played a notification that their call will be disconnected shortly
l when there is just one participant in a conference, they are notified that they are the only participant.
Audio files
Preconfigured themes Pexip Infinity now ships with 4 preconfigured themes that are either with or without entry and exit tones, and that refer to the "#" key as either "the hash key" or "the pound key".
Preconfigured themes
Layouts The following enhancements have been made to layouts:
l Different layouts can be applied to a Virtual Meeting Room as well as a Virtual Auditorium.
l There is now an additional layout option that allows you to show the main speaker only, in full screen (with no thumbnails).
l For Virtual Auditoriums, you can elect to pin the presenter to the main video when they are sharing a presentation, regardless of who is speaking.
Selecting the layout seen by participants
Disconnect all participants from a conference
You can disconnect all of the participants from a conference via the Status > Conferences page on the Administrator interface.
Disconnecting participants from a conference
Conference participant status
Conference participant status information indicates if the participant is currently on hold or if the participant is a streaming or recording device.
Viewing current conference status
Syslog server connection protocol
You can choose the IP transport protocol to use — UDP, TCP or TLS — when configuring a remote syslog server.
Using a syslog server
Ability to disable SIP UDP You can enable or disable incoming calls on SIP UDP separately from those over SIP TCP/TLS. Disabling SIP UDP can help reduce SIP spam. On new installations of version 9, SIP UDP is disabled by default. Upgrades from existing versions will have SIP UDP enabled (assuming SIP was enabled previously), and can be disabled in Global Settings.
Enabling and disabling SIP, H.323, WebRTC and RTMP

Pexip Infinity Administrator GuideAppendices
Features added in previous releases
© 2016 Pexip AS Version 12.a May 2016 Page 363 of 369
Feature Description More information
Pexip Infinity Administrator interface improvements
Local timezone
The Pexip Infinity Administrator interface now displays times using the administrator's local timezone. (Log timestamps continue to use UTC.)
New Call control and Users navigation menu options
There are now separate menu options for Call control configuration (H.323 gatekeepers, SIP credentials, SIP proxies, Lync servers, TURN servers, STUN servers and Policy servers) and for User configuration (User authentication, Account roles and LDAP roles).
Timezones
Alarm enhancements You will now receive a warning when:
l your license is due to expire within the next 60 days
l the syslog server is inaccessible
Also, you can view all alarm activity by searching the Administrator log for administrator.alarm. This will show a list of all Alarm raised and Alarm lowered events.
Viewing alarms
Alarm raised and lowered events
You can view alarms that have since been resolved by searching the Administrator log for administrator.alarm. This will show a list of all Alarm raised and Alarm lowered events.
Viewing alarms
Automatic Conferencing Node deployment improvements
Verify VM manager certificate
When automatically deploying a new Conferencing Node on a VMware host, you can control whether the certificate presented by the VM manager is verified before the connection is allowed.
Faster resource path selection
There is an extra step in the automatic deployment wizard to select a datacenter. The resource path selection is then filtered by the selected datacenter.
Deploying new Conferencing Nodes
Support for G.719 Support has been added for the G.719 audio codec. Audio and video specifications
Features added in version 8Pexip Infinity version 8 added the following features and enhancements:
Pexip Infinity platform features
Feature Description More information
Additional codecs Support has been added for the following codecs:
Audio
l Siren7™ (licensed from Polycom®)
l SILK
l Speex
l AAC-LC
Video
l H.261
Audio and video specifications
Guest-only timeout You can now specify the length of time a conference will continue with only Guest participants, after all Host participants have left.
Using PINs to differentiate between Hosts and Guests
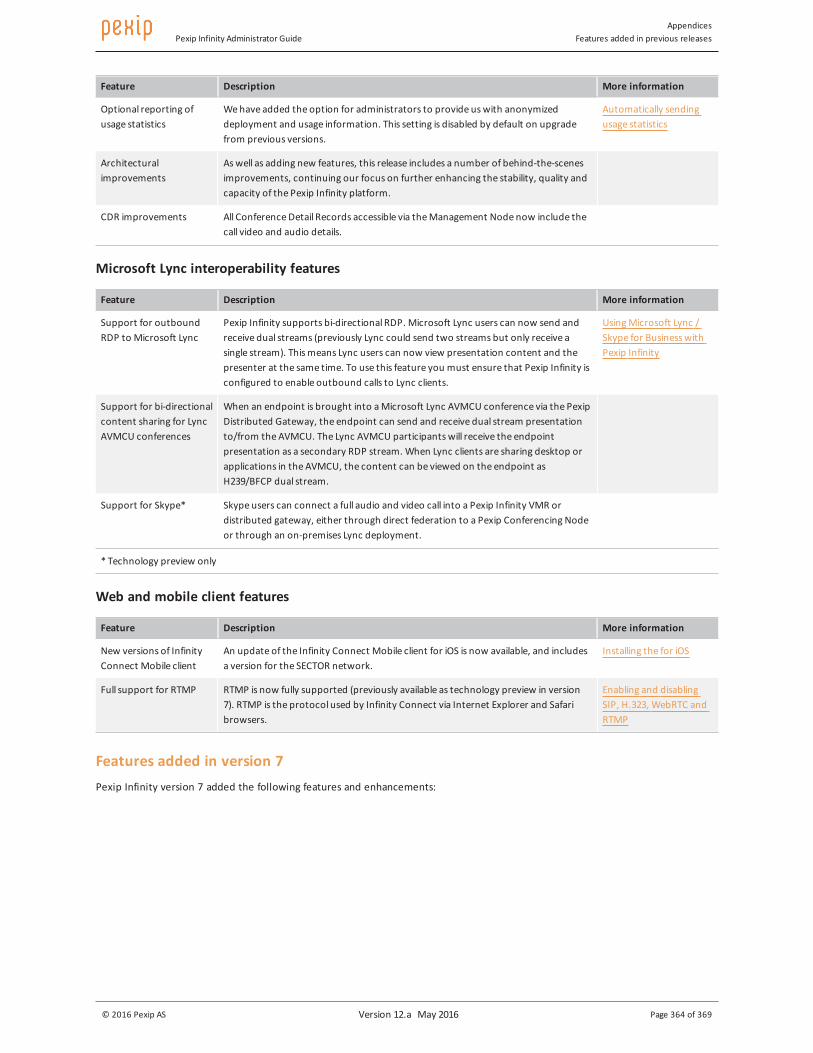
Pexip Infinity Administrator GuideAppendices
Features added in previous releases
© 2016 Pexip AS Version 12.a May 2016 Page 364 of 369
Feature Description More information
Optional reporting of usage statistics
We have added the option for administrators to provide us with anonymized deployment and usage information. This setting is disabled by default on upgrade from previous versions.
Automatically sending usage statistics
Architectural improvements
As well as adding new features, this release includes a number of behind-the-scenes improvements, continuing our focus on further enhancing the stability, quality and capacity of the Pexip Infinity platform.
CDR improvements All Conference Detail Records accessible via the Management Node now include the call video and audio details.
Microsoft Lync interoperability features
Feature Description More information
Support for outbound RDP to Microsoft Lync
Pexip Infinity supports bi-directional RDP. Microsoft Lync users can now send and receive dual streams (previously Lync could send two streams but only receive a single stream). This means Lync users can now view presentation content and the presenter at the same time. To use this feature you must ensure that Pexip Infinity is configured to enable outbound calls to Lync clients.
Using Microsoft Lync / Skype for Business with Pexip Infinity
Support for bi-directional content sharing for Lync AVMCU conferences
When an endpoint is brought into a Microsoft Lync AVMCU conference via the Pexip Distributed Gateway, the endpoint can send and receive dual stream presentation to/from the AVMCU. The Lync AVMCU participants will receive the endpoint presentation as a secondary RDP stream. When Lync clients are sharing desktop or applications in the AVMCU, the content can be viewed on the endpoint as H239/BFCP dual stream.
Support for Skype* Skype users can connect a full audio and video call into a Pexip Infinity VMR or distributed gateway, either through direct federation to a Pexip Conferencing Node or through an on-premises Lync deployment.
* Technology preview only
Web and mobile client features
Feature Description More information
New versions of Infinity Connect Mobile client
An update of the Infinity Connect Mobile client for iOS is now available, and includes a version for the SECTOR network.
Installing the for iOS
Full support for RTMP RTMP is now fully supported (previously available as technology preview in version 7). RTMP is the protocol used by Infinity Connect via Internet Explorer and Safari browsers.
Enabling and disabling SIP, H.323, WebRTC and RTMP
Features added in version 7Pexip Infinity version 7 added the following features and enhancements:
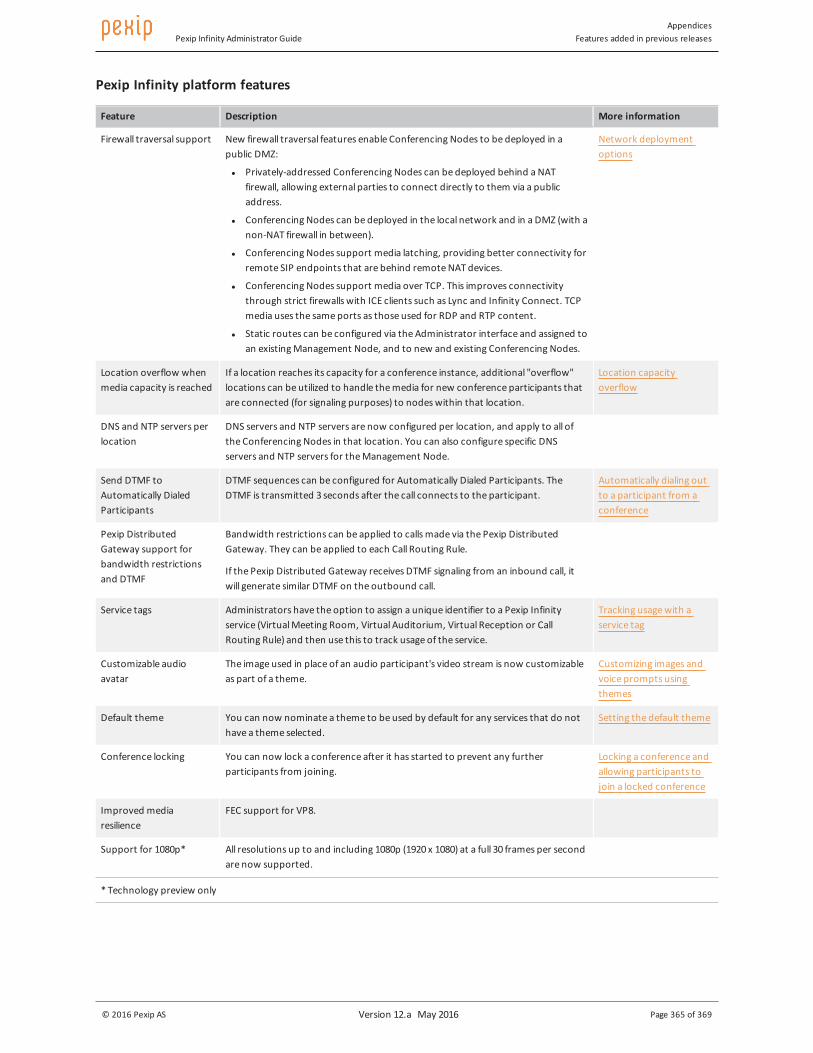
Pexip Infinity Administrator GuideAppendices
Features added in previous releases
© 2016 Pexip AS Version 12.a May 2016 Page 365 of 369
Pexip Infinity platform features
Feature Description More information
Firewall traversal support New firewall traversal features enable Conferencing Nodes to be deployed in a public DMZ:
l Privately-addressed Conferencing Nodes can be deployed behind a NAT firewall, allowing external parties to connect directly to them via a public address.
l Conferencing Nodes can be deployed in the local network and in a DMZ (with a non-NAT firewall in between).
l Conferencing Nodes support media latching, providing better connectivity for remote SIP endpoints that are behind remote NAT devices.
l Conferencing Nodes support media over TCP. This improves connectivity through strict firewalls with ICE clients such as Lync and Infinity Connect. TCP media uses the same ports as those used for RDP and RTP content.
l Static routes can be configured via the Administrator interface and assigned to an existing Management Node, and to new and existing Conferencing Nodes.
Network deployment options
Location overflow when media capacity is reached
If a location reaches its capacity for a conference instance, additional "overflow" locations can be utilized to handle the media for new conference participants that are connected (for signaling purposes) to nodes within that location.
Location capacity overflow
DNS and NTP servers per location
DNS servers and NTP servers are now configured per location, and apply to all of the Conferencing Nodes in that location. You can also configure specific DNS servers and NTP servers for the Management Node.
Send DTMF to Automatically Dialed Participants
DTMF sequences can be configured for Automatically Dialed Participants. The DTMF is transmitted 3 seconds after the call connects to the participant.
Automatically dialing out to a participant from a conference
Pexip Distributed Gateway support for bandwidth restrictions and DTMF
Bandwidth restrictions can be applied to calls made via the Pexip Distributed Gateway. They can be applied to each Call Routing Rule.
If the Pexip Distributed Gateway receives DTMF signaling from an inbound call, it will generate similar DTMF on the outbound call.
Service tags Administrators have the option to assign a unique identifier to a Pexip Infinity service (Virtual Meeting Room, Virtual Auditorium, Virtual Reception or Call Routing Rule) and then use this to track usage of the service.
Tracking usage with a service tag
Customizable audio avatar
The image used in place of an audio participant's video stream is now customizable as part of a theme.
Customizing images and voice prompts using themes
Default theme You can now nominate a theme to be used by default for any services that do not have a theme selected.
Setting the default theme
Conference locking You can now lock a conference after it has started to prevent any further participants from joining.
Locking a conference and allowing participants to join a locked conference
Improved media resilience
FEC support for VP8.
Support for 1080p* All resolutions up to and including 1080p (1920 x 1080) at a full 30 frames per second are now supported.
* Technology preview only

Pexip Infinity Administrator GuideAppendices
Features added in previous releases
© 2016 Pexip AS Version 12.a May 2016 Page 366 of 369
Microsoft Lync interoperability features
Feature Description More information
Improved Microsoft Lync interoperability
l Pexip Infinity acts as a gateway between Lync and standards-based endpoints.
l Pexip Infinity supports bi-directional RDP*. Lync users can now send and receive dual streams (previously Lync could send two streams but only receive a single stream). This means Lync users can now view presentation content and the presenter at the same time.
l CCCP support providing improved features and usability:
o Initiation of point-to-point calls from Lync to standards-based devices.
o Drag-and-drop to add H.323/SIP endpoints into a Lync conference.
Using Microsoft Lync / Skype for Business with Pexip Infinity
* Technology preview only
Web and mobile client features
Feature Description More information
Infinity Connect suite This release includes Infinity Connect, a suite of software clients that allows end users to connect to Pexip Infinity services from a web browser, an installable desktop client, or a mobile client (supported on Windows, OS X and Linux). This incorporates design and usability updates to what was previously the Pexip Web App.
Introduction to Infinity Connect
Browser-based client support extended
Access to the browser-based video client has been extended to Opera, IE* and Safari* (in addition to Chrome and Firefox).
Infinity Connect Mobile client for SECTOR Network
An additional Android version of the Infinity Connect Mobile client is available for use in enterprises that require mobile apps to work with management solutions based on OpenPeak's ADAM platform.
Pexip for SECTOR Network
* Technology preview only
Usability features
Feature Description More information
Support for Russian language
The Pexip Infinity Administrator interface can now be displayed in Russian, in addition to Simplified Chinese and English.
Changing the display language
Features added in version 6Pexip Infinity version 6 added the following features and enhancements:
Pexip Infinity platform features
Feature Description More information
Alarms Notifications will appear on the new Alarms page (Status > Alarms) whenever a participant cannot join a conference because of lack of resources or lack of licenses.
Viewing alarms
Global settings page Configuration of settings that apply to all Conferencing Nodes, or to the entire platform, have been incorporated on a new Global settings page (Platform configuration > Global settings).
About global settings

Pexip Infinity Administrator GuideAppendices
Features added in previous releases
© 2016 Pexip AS Version 12.a May 2016 Page 367 of 369
Feature Description More information
Limiting participant numbers
You can now specify the maximum number of participants that will be allowed to use a Virtual Meeting Room or Virtual Auditorium at any one time.
Limiting the number of participants
Enabling or disabling SIP, H.323 and WebRTC
You now have the option to select which call protocols (SIP, H.323 or WebRTC) your deployment will support.
Enabling and disabling SIP, H.323, WebRTC and RTMP
Lync MSSIP domain You can now specify the name of the Lync domain to which this Pexip deployment belongs.
Using Microsoft Lync / Skype for Business with Pexip Infinity
Lync presence In a Lync environment, Pexip Infinity will publish presence information for Virtual Meeting Rooms and Virtual Auditoriums.
Pexip Infinity and Microsoft Lync Deployment Guide
Customizable avatars for Lync
You can customize the avatar that is displayed in Lync users' contact lists to represent a Virtual Meeting Room or a Virtual Auditorium.
Customizing images and voice prompts using themes
Security features
Feature Description More information
Integration with external systems
You can now configure a username and password to be used by external systems (for example, CUCM) that are integrating with Pexip Infinity.
Integrating with external systems
SIP authentication credentials
You can now configure the SIP credentials that Pexip Infinity will use if it is challenged for authentication credentials after making a SIP request.
Managing SIP credentials
AD/LDAP integration You can now enable administrators to use their Active Directory or other LDAP server credentials to log in to the Pexip Infinity web-based Administrator interface or management API.
Managing users and roles via LDAP
Role-based authorization If you are using AD/LDAP integration, you can create roles with different access rights for administrators accessing the Pexip Infinity web-based Administrator interface or management API.
Managing users and roles via LDAP
OCSP support You now have the option to use OCSP when checking the validity of TLS certificates.
Using OCSP to check the status of certificates
SIP TLS verification For SIP connections over TLS, you now have the option to require that peer certificates are verified.
Verifying peer certificates for SIP TLS connections
SNMPv3 support Pexip Infinity now supports SNMPv3, in addition to SNMPv2c. Enabling SNMP
Secure NTP Pexip Infinity now supports synchronization of time over an encrypted channel. Enabling NTP on the Management Node
AS-SIP Pexip Infinity now supports interoperability with Assured Services SIP (AS-SIP) compliant devices.
Configurable SSH access You can now disable access over SSH to the Management Node and Conferencing Nodes.
About global settings
Management web interface session timeout
You can now configure the number of minutes a browser session may remain idle before the user is logged out of the Pexip Infinity Administrator interface.
About global settings
Login banner text You can now specify informational text to display in a message box on the Administrator interface login page.
About global settings

Pexip Infinity Administrator GuideAppendices
Features added in previous releases
© 2016 Pexip AS Version 12.a May 2016 Page 368 of 369
Pexip Web App features
Feature Description More information
Improved screen sharing for Pexip Web App users
Screen sharing from within the Pexip Web App is now enabled via a Chrome extension, and users now have the option to select whether they share their entire screen or a single application.
Introduction to Infinity Connect
Usability features
Feature Description More information
Logs have paginated view and support searching
The entire contents of the administrator log and the support log can now be displayed in the Administrator interface via a paginated view.
You can also search the logs using the new search box at the top left of the page.
About the support logAbout the administrator log
Localization The Pexip Infinity Administrator interface can now be displayed in Simplified Chinese, in addition to English.
Changing the display language

Pexip Infinity Administrator GuideAppendices
Software license information
© 2016 Pexip AS Version 12.a May 2016 Page 369 of 369
Software license information
Pexip Infinity licenseThe full text of the Pexip Infinity license is available from the Pexip website under www.pexip.com/Infinity-License.
Third party licensesThe full text of all licenses for third-party software used in the Pexip Infinity platform is available from the Pexip Infinity Administrator interface by selecting the About link at the top right of the page and then selecting Third Party Software. It is also available from the Pexip website under www.pexip.com/3rd-Party-Licenses.
Related Documents