C O N T E N T S 1 Permit Module Group 3 – AGR, MORA, MOH & RCED Development Guide for Brunei Darussalam National Single Window

Welcome message from author
This document is posted to help you gain knowledge. Please leave a comment to let me know what you think about it! Share it to your friends and learn new things together.
Transcript

C O N T E N T S
1
Permit Module
Group 3 – AGR, MORA, MOH & RCED
Development Guide for
Brunei Darussalam National Single Window

C O N T E N T S
2
PREPARED BY
ROLE NAME SIGNATURE DATE (DD.MM.YYYY)
Project Coordinator cum Trainer
Dk Siti Noor Izzah Nadzirah Bte Pg Hj Ibrahim
REVIEWED BY
ROLE NAME SIGNATURE DATE (DD.MM.YYYY)
Alif Technologies Project Manager
Pg Mohd Sufian bin DP Hj Maidin
MIPR, MORA, MOH
ICT Deputy SuperIntendant of RCED
Noralizah Bte Tarip
APPROVALS BY
DESIGNATION NAME SIGNATURE DATE (DD.MM.YYYY)
RCED Project Manager
DISTRIBUTION LIST (APPLICABLE ONLY IF HARDCOPIES ARE DISTRIBUTED)
DOCUMENT CONTROL NUMBER
VERSION NUMBER RECIPIENT NAME DATE (DD.MM.YYYY)
RELEASE HISTORY
RELEASE NUMBER
ASSOCIATED CHANGE REQUEST NUMBER
DATE (MM,YYYY) SUMMARY OF CHANGES
AUTHOR
2.0 First copy Initial Version Dk Siti Noor Izzah Nadzirah Pg Hj Ibrahim

C O N T E N T S
3
CONTENTS
Chapter 1: Introduction 5
Overview………………………………………………………………………………………………………………………………………………………………..5
Features…………………………………………………………………………………………………………………………………………………………………6
User Roles……………………………………………………………………………………………………………………………………………………………..6
Permit Application Process Flow……………………………………………………………………………………………………………………………7
Minimum System Requirements………………………………………………………………………………………………………......................8
General Information………………………………………………………………………………………………………………………………………………9
Support………………………………………………………………………………………………………………………………………………………………….9
Chapter 2: Getting Started 10
Log In……………………………………………………………………………………………………………………………………………………………………11
Log Out…………………………………………………………………………………………………………………………………………………………………12
Link to Homepage………………………………………………………………………………………………………………………………………………...13
Chapter 3: Permit Application 14
Create Permit…………………………………………………………………………………………………………………………………………………..14
Log in………………………………………………………………………………………………………………………………………………………...14
Application Type…………………………………………………………………………………………………………………………………….15
Trader Information……………………………………………………………………………………………………………….......................16
Application Items……………………………………………………………………………………………………………………………………….17
Add New Record…………………………………………………………………………………………………………………………….22
Duplicate Record……………………………………………………………………………………………………………………………22
Display Record……………………………………………………………………………………………………………………………….26
Edit Record……………………….……………………………………………………………………………………………………………29
Delete Record………………………………………………………………………………………………………………………………..30
Draft…………………………………………………………………………………………………………………………………………………………31
Save As Draft………………………………………………………………………………………………………………………………….31
Search Draft Application………………………………………………………………………………………………………………..32
Submission………………………………………………………………………………………………………………………………………………33
Upload Document………………………………………………………………………………………………………………………….34
Search Permit………………………………………………………………………………………………………………………………………….39
View Permit Details and Status……………………………………………………………………………………………………..39
Cancel……………………………………………………………………………………………………………………………………………………..45
Cancel Application………………………………………………………………………………………………………………………..45
Replicate………………………………………………………………………………………………………………………………………………..48
Replicate Application…………………………………………………………………………………………………………………48
Messages……………………………………………………………………………………………………………………………………………..50
Inbox………………………………………………………………………………………………………………………………………..50
Outbox……………………………………………………………………………………………………………………………………..61
Print……………………………………………………………………………………………………………………………………..................64
Print Permit Application………………………………………………………………………………………………………….64

C O N T E N T S
4
Chapter 4: Permit Endorsement 71
Permit Endorsement…………………………………………………………………………………………………………………………………………71
Search Permit Application…………………………………………………………………………………………………………………………71
Review Items………………………………………..………………………………………………………………………………………………….73
Review Supporting Documents………………………………………………………………………………………………………………….74
Query to Trader or Agent……………..……….………………………………………………………………………………………………….76
Set Item Action………………………………………………………………………………………………………………………………………….82
Finalize Processing…………………………………………………………………………………………………………………………………….83
Search Permit……………………………………………………………………………………………………………………………………………84
Print Permit Application……………………………………………………………………………………………………………………………84
Chapter 5: Permit Payment 86
Permit Payment………………………………………………………………………………………………………………………………………………86
View Payment Charges…………………………………………………………………………………………………………………………….86
Payment to Other Government Agencies…………………………………………………………………………………………………89
View Paid Permits…………………………………………………………………………………………………………………………………….92
View Payment Status………………………………………………………………………………………………………………………………..94
Chapter 6: Permit Verification 95
Permit Verification……………………………………………………………………………………………………………………………………………95
Search Permit Application……………………………………………………………………………………….………………………………..96
Review Items…………………………………………..……………………………………………………………………………………………….97
Review Supporting Documents………………………………………………………………………………………………………………….99
Query to Trader or Agent……………..……….…………………………………………………………………………………………………101
Approval Settings……………………………………………………………………………………………………………………………………107
Set Item Action………………………………………………………………………………………………………………………………………..109
Finalize Processing……………………………………………………………………………………………………………………………………111
Search Permit…………………………………………………………………………………………………………………………………………..112
Print Permit Application…………………………………………………………………………………………………………………………..113
Chapter 7: Permit Approval 114
Permit Approval……………………………………………………………………………………………………………………………………………..114
Search Permit Application……………………………………………………………………………………….……………………………….115
Review Items…………………………………………..……………………………………………………………………………………………….117
Review Supporting Documents………………………………………………………………………………………………………………..120
Query to Trader or Agent ……………..……….…………………………………………………………………………………………….122
Approval settings…………………………………………………………………………………………………………………………………..122
Set Item Action………………………………………………………………………………………………………………………………………125
Display History……………………………………………………………………………………………………………………………………….126
Finalize Processing………………………………………………………………………………………………………………………………….127
Search Permit………………………………………………………………………………………………………………………………………….128
Print Permit Application…………………………………………………………………………………………………………………………..130

C O N T E N T S
5
CHAPTER 1 Introduction
Overview
Permit Module Batch 2 – Part 1 covers import permits that are handled and owned by four government agency.
Importing controlled goods requires permission from the relevant government agencies before coming into Brunei
Darussalam. Previously, this process is still paper-based and traders and agents have to make frequent travel visits
to submit and collect the permits. However, with the introduction of Brunei Darussalam National Single Window
(BDNSW) the process is now made easy by digitizing it and making it accessible online.
Traders or agents will be able to submit their permit applications to one or more government agencies
electronically within BDNSW. Government authorities will be able to receive, endorse, verify, record payments and
make approval process to the permit applications. Once permit is processed, trader and agents will be able to view
the status of their permit application whether it is accepted or rejected. An Import Permit (IP) reference number
will be generated for each goods applied that is going to be useful as an input to Declaration process of controlled
goods.
Permit module covers:
Getting Started Permit Application Permit Payment Permit Endorsement Permit Verification Permit Approval
This User Guide will help the user to get a quick reference on usage of the system. It will also act as an immediate
reference for any clarifications on the system.
This chapter covers the following topics:
Purpose
Document Conventions

C O N T E N T S
6
Features
Workflow Implementation for Traders, Agents and Government Agencies
The proposed system facilitates the implementation of Import Permit application for traders and agents,
verification, endorsement, payment and approval for Government agencies. The workflow also includes integration
with Declaration module where verification of permit application existence can be made.
Import Permit Form Printing
The proposed system enables printing of Import Permit to accommodate the various needs of the users of the
system. The import permit is available for print in many states of the permit such as draft state, submission state,
processing state, endorsed state, verified state, approved and even rejected state. One of the main useful purposes
is for traders and agents to print it as a proof of approval during RCED clearance.
Permit Application Status Search
Users are able to view the latest processing as well as approval status of an import permit. Traders and agents will
find this useful to track the latest progress of their permit application. Government officers will find this useful for
reference, archive and tracking purposes as well.
Payment Statement
This system incorporates extra feature for the tracking of payment as well as to generate payment bill of
statement. This ensures payment have been legitimately made in order for OGA to proceed processing the permit
application.
User Roles
The following parties (organizations) are involved in various phases of the entire certification process:
Traders
Agents
Other Government Agencies Officer
The OGAs involved are:
1. Department of Agriculture and Agrifood (AGR), Ministry of Industry and Primary Resources.
2. Halal Food Control Division (MORA), Ministry of Religious Affairs.
3. Food Safety and Quality Control Division (MOH), Ministry of Health.
4. Royal Customs and Excises Department (RCED), Ministry of Finance.

C O N T E N T S
7

C O N T E N T S
8
Minimum System Requirements
Hardware
PC or laptop computer
Internet access
Printer (if the user requires printing of Permit Application)
Scanner if requires to attach the supporting document images.
Browser
Latest Google Chrome with JRE 1.5.04 and above (Java Runtime Environment)
Internet Explorer version 11 or above with JRE 1.5.04 and above (Java Runtime Environment)
o Set BDNSW website to be in the compatibility view.
o Install Adobe PDF Reader at http://get.adobe.com/reader/
Supports JavaScript.
Pop up is allowed for BDNSW website.
Steps to Install Adobe PDF Reader
Adobe PDF Reader is required for printing Permit Applications.
1. Go to the URL http://get.adobe.com/reader/ to get a free Adobe PDF Reader.
2. Follow the Instruction given to install the Adobe PDF Reader.
Steps to Install Java Run-Time Environment.
For the signed applets to be downloaded successfully, the user needs to install the Java Run-Time
Environment (JRE) on their PC. The software can be downloaded from the Internet.
1. The users can go to this website
http://java.sun.com/javase/downloads/index.jsp to download the JRE software.
2. Follow the Instruction given to install the JRE software.

C O N T E N T S
9
General Information
If first click does not work, click the button or link again. It might be due to internet connectivity
problem.
If the animation of the browser icon is in motion, this indicates that the application is still
processing, please wait until the animation stops before selecting or clicking any other options
on the screen.
Support
For any inquiry, problems with the application or feedback on the system, please contact ICT
Department, Royal Customs and Excise Department at:
Tel: +6732 382361
Fax: +6732 382666
E-mail: [email protected]

C O N T E N T S
10
CHAPTER 2 Getting Started Refer to this chapter to familiarise yourself with the BDNSW System; how to log in and log off from the system.
This chapter covers the following topics:
Log In
Log Out
Log In
To log in into BDNSW.
1. Enter the BDNSW URL in your browser. The Login page will be displayed
@ Preferred browser is Google Chrome

C O N T E N T S
11
Home Page
1. Enter your Username and Password. 2. Click Login and the system will validate your details and upon successful login, system will
display the Main Menu page.
3. Click Permit > Permit to proceed to Permit page.

C O N T E N T S
12
Log Out
To log out after using the system.
1. On right top corner of the page, click Log Out.
2. User will be redirected to the Login page.
@ If system remains idle for more than 30 minutes after login, session will expire and user will be logged out automatically.
! It is always recommended to Logout from the system rather than simply closing the browser

C O N T E N T S
13
Link to Homepage
To go to the main homepage and access other menu. Users can access other parts of the
system based on the role they are assigned.
4. Go to Home.
5. The page will redirect to BDNSW Homepage.

C O N T E N T S
14
CHAPTER 3 Permit Application
This section allows traders or agents to apply, save, search or print Permit application online.
This chapter covers the following areas:
Create Permit
o Permit Type
o Permit Items
o Draft
o Submission
Search Permit
Cancel Permit
Replicate Permit
Print Permit
Messages
o Inbox
o Outbox
Permit Payment
Create Permit
Log in
Step by step to create permit application.
6. Log in as Trader or Agent and click to Permit > Permit 7. Go to Permit Application > Create

C O N T E N T S
15
Application Type
To select the permit type: IMPORT
8. Click on the Permit Type drop down list and select IMPORT.
9. Click Create New Application button to proceed to the next section.
Trader Information
For traders, this tab is just for viewing their information. For agents, this tab requires them to select
the specific trader they want to apply permit for.
10. The Traders Tab will be shown.

C O N T E N T S
16
@ Only authorised Agents will be able to select trader.
1. Click on -- select a trader—option and select any trader.

C O N T E N T S
17
Application Items
To add item(s) into the permit application.
1. Click Search by HS Code and enter the 10 digits HS Code that you require.
@ A minimum of 2 digits can be entered when searching for item using HS Code.
OR
Click Search by HS Code Description and enter any keyword(s) from the item description.

C O N T E N T S
18
2. Click Lookup button
3. The Search Result will be displayed. Select any of the listed items.

C O N T E N T S
19
4. The Item Basic Information and OGA form will be shown.

C O N T E N T S
20
@ Different OGAs will have different form.
! Field marked with * is a required field. The form will not submit if the required fields are left blanked.
ITEM BASIC INFORMATION
Field Name Mandatory Remarks
HS Code The Harmonized System Code.
HS Code Description The Harmonized System code description.
Quantity M The quantity of the product.
Country of Origin M The country of manufacture.
Country of Last Shipment
M The product’s last shipment country.
Product Name M The name of the product.
Item Description The description of the product.
Number of packages The total packages of the item.
Type of Package The item type of package.
Value in B$ M The total amount of the item in Brunei Dollars (BND).
Item Remark The remarks of the item.
Invoice No M The Invoice number of the item.
Transport Mode The mean of transport for the item.
Vessel/Flight/Vehicle No The transport registration number.
Vessel/Aircraft/ Vehicle Name
The transport name.
Arrival Date The arrival date of the product
Entry Point/Exit Point The place of entry of the item if it is imported. The place of the exit if the item is exported.
Transport Information Remark
The transport remarks.

C O N T E N T S
21
OGA Form for LMH (MORA) – Lembaga Makanan Halal
Field Name Mandatory Remarks
Duty
Supplier Name
Supplier Country
Total Quota
Using Quota
Expiry Date
Import From M
Exchange Rate M
5. Once form is completely filled, click Save to continue (or Cancel to cancel the application).
6. The item will be added and displayed in the ‘Added Items in Application’ list.

C O N T E N T S
22
Add New Record
To add new item into the Permit Application.
1. Click on Add New Record.
2. The Search Item panel will be shown.
3. Repeat steps from Application Items.
Duplicate Record
To copy an item and add into the Permit Application.
1. Select the item to duplicate and click Duplicate Record.

C O N T E N T S
23
2. A validation message will be pop up. Click OK to continue.
3. The selected item will be duplicated and added above it.

C O N T E N T S
24
4. The Item Basic Information and OGA form will also be displayed on editable mode.

C O N T E N T S
25
Once done making necessary information changes, click Update else click Cancel.
The item information will be updated.

C O N T E N T S
26
Display Record
To view the added item basic information and OGA specific information.
1. Select the desired item and click Display Record.
2. Application Item Details, Other information and OGA form will be shown.

C O N T E N T S
27

C O N T E N T S
28
1. Click Close to close the information.

C O N T E N T S
29
Edit Record
To update item information.
1. Select the item and click on Edit Record.
2. A validation message will pop out and click OK.
3. The OGA specific information form and basic form will be shown. Update any fields as necessary. Once done click on Update.
Else, click Cancel to cancel update.

C O N T E N T S
30
Delete
To delete an item from the item list.
1. Select the item to delete and click Delete Record.
2. A pop up message will be shown. Click OK.
3. The item will be deleted from the list.

C O N T E N T S
31
Draft
Save As Draft
To save the permit application as draft mode and continue the drafted application when
required.
1. Click on Save As Draft.
2. The draft Reference ID will be shown.
! It is very important to remember the reference ID for future use.
c

C O N T E N T S
32
Search Draft Application
To search and continue the drafted Permit Application.
1. Go to Permit Application > Draft
2. Type in the draft reference number and click the Search.
3. The search result will be displayed. Click on the permit draft reference ID link.
@ Saving as draft is optional. Trader or Agent can also submit the application without saving as draft first.

C O N T E N T S
33
Submission
Submitting the permit application for verification and approval.
1. The draft application will be opened and is available for trader and agent to continue.
2. Once done adding all the items, click Continue Process to continue.

C O N T E N T S
34
Upload Document
@ Uploading document(s) is only optional for OGAs that require it.
1. The Document page will be shown. This page will allow trader/agent to upload the required supporting document(s).
2. Click on ‘Help’ will show the step by step on how to upload supporting documents.

C O N T E N T S
35
3. Click on Required Documents to view the list of supporting documents required to be upload by OGA
Click Close to close the checklist.
4. To upload supporting document, click Browse and select the supporting document to be uploaded.

C O N T E N T S
36
5. Click Upload.
6. Edit the description and click Save Document.

C O N T E N T S
37
7. The uploaded document will be shown in a list below, the status of the upload and the total files successfully uploaded will also be shown.
8. Click Complete Process once all the required documents have been uploaded.
9. The Summary page will be shown to mark the completion of the import permit application creation.

C O N T E N T S
38
10. Click Close to close the application.
11. View Payment Details will be covered in Permit Payment section .

C O N T E N T S
39
Search Permit
To search for Permit Applications that has been submitted or approved for reference purposes.
View Permit Details and Status
1. Go to Permit Application > Search
2. There are 4 options to search the Permit Application :
i. Permit Reference ID – PTN-999999-999999
ii. Start Date and End Date

C O N T E N T S
40
iii. Permit Application Status
iv. Mix criteria from i, ii and iii.
3. Click Search to search (Reset to clear all search criteria).
4. The result of the searched permit will be shown. Search by Permit Reference ID will return one result

C O N T E N T S
41
Search by Start Date and End Date will return one or more result
Search by Permit Status will return one or more result

C O N T E N T S
42
5. Click Open on the selected Permit Application and Click Display. The item information will be shown.

C O N T E N T S
43
To view the uploaded supporting documents, click View Docs

C O N T E N T S
44
6. To view the approved Import Permit number and permit credentials, click the OGA Reference Code

C O N T E N T S
45
Cancel
To search for Permit Applications that has been submitted or approved for reference purposes.
Cancel Application
1. Click on Permit Application > Cancel
2. The permit cancellation page will be shown. Enter the Permit Reference ID and click Search.
3. Click Cancel to cancel the permit application.

C O N T E N T S
46
@
Only applications with ‘SUBMITTED’ status are allowed to be cancelled.
i. To cancel on Application level, click Cancel.
ii.To cancel on OGA level, click the Permit Ref link and click Cancel on the specific OGA application to cancel.

C O N T E N T S
47
4. A cancel success notification message will be shown on top of the page.

C O N T E N T S
48
Replicate
To copy and reuse previous application for a new submission. This can save time for traders or
agents who apply same permit information every now and then.
Replicate Application
1. Click on Permit Processing > Replicate
2. The permit replication page will be shown. Enter the Permit Reference ID and click Search.
3. The searched permit application will be shown. Click the link to open.

C O N T E N T S
49
4. The permit page containing the exact copy of the items from the previous application will be open. This allows you to continue this application.

C O N T E N T S
50
Messages
To view and reply query messages from OGA officer.
Inbox
To view messages coming from OGA Verifier or OGA Approver officer.
1. Click on Messages > Inbox
2. The inbox page will be displayed.
C O N T E N T S
51
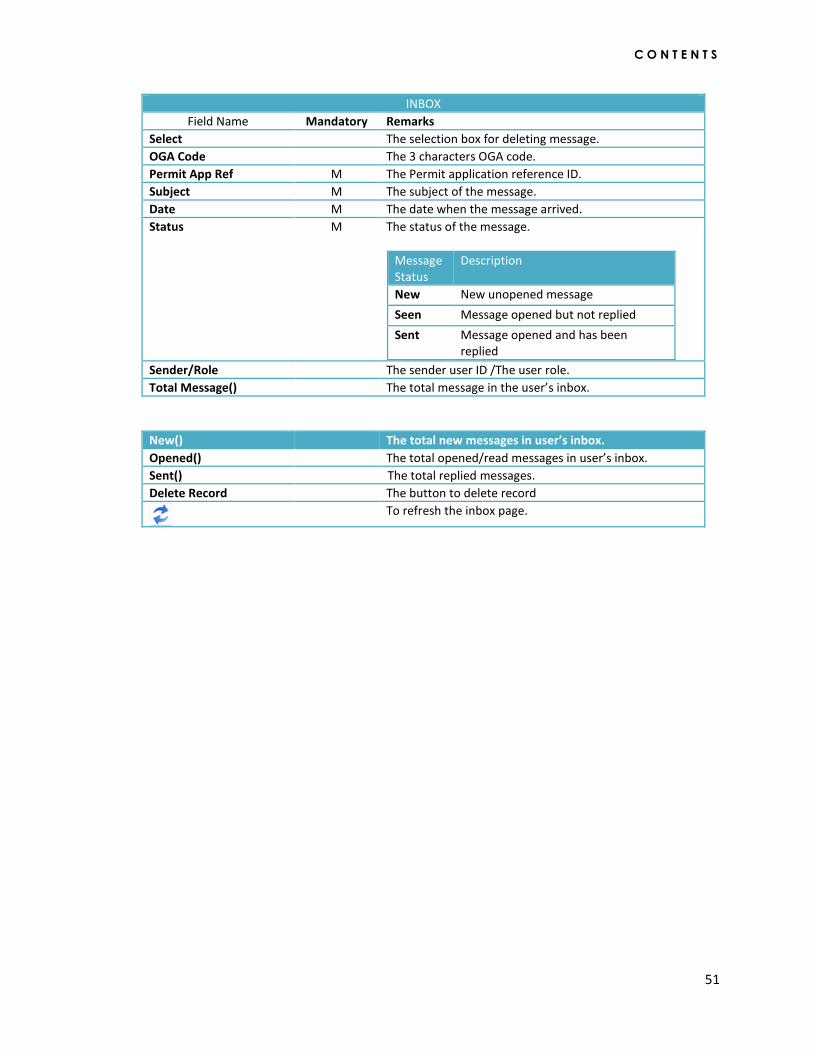
INBOX
Field Name Mandatory Remarks
Select The selection box for deleting message.
OGA Code The 3 characters OGA code.
Permit App Ref M The Permit application reference ID.
Subject M The subject of the message.
Date M The date when the message arrived.
Status M The status of the message.
Message Status
Description
New New unopened message
Seen Message opened but not replied
Sent Message opened and has been replied
Sender/Role The sender user ID /The user role.
Total Message() The total message in the user’s inbox.
New() The total new messages in user’s inbox.
Opened() The total opened/read messages in user’s inbox.
Sent() The total replied messages.
Delete Record The button to delete record
To refresh the inbox page.

C O N T E N T S
52
3. Click on the subject of the selected message and the message content will be displayed.

C O N T E N T S
53
4. If the message asks for uploading missing documents, click on the Upload document(s) here link to open the upload document page.

C O N T E N T S
54
5. Click Browse and select the file to upload.

C O N T E N T S
55
6. Click Upload.

C O N T E N T S
56
7. Add Remarks and click Save Remark. The document information will be shown.

C O N T E N T S
57
8. Click Close Application once done uploading the file(s). The page will be redirected back to the message content.

C O N T E N T S
58
9. Click on Reply and the Reply page will be shown. Click on Subject to change the title and click Tick to confirm the
change.

C O N T E N T S
59
10. Double click on the message subject to change the message subject. Click tick to confirm the changes.
11. Enter respond text in the textbox and click Send.
Message sent status should be shown

C O N T E N T S
60
Click Close to go back to Inbox. The previous replied message status should be changed to “Sent”
12. To delete a message in the inbox, tick the Select box and click Delete.

C O N T E N T S
61
Outbox
To view previous sent messages.
1. Click on Messages > Outbox
2. The Message outbox page will be shown. Click the message subject to view the sent message content.
INBOX
Field Name Mandatory Remarks
Select The selection box for deleting message.
OGA Code The 3 characters OGA code.
Permit App Ref The Permit application reference ID.
Subject The subject of the message.
Date The date when the message arrived.
Receiver The sender user ID /The user role.
Total Message() The total message in the user’s inbox.
Delete Record The button to delete record
To refresh the outbox page.

C O N T E N T S
62
3. Click the message Subject to view the sent message content.

C O N T E N T S
63
4. Click close to close the message and return to outbox page.
5. To delete a message in the outbox, tick the message in the Select box and click Delete Record.

C O N T E N T S
64
To print drafted, submitted, processing, queried, verified approved or rejected permit
applications for trader/agent own copy or reference.
Print Permit Applications
1. Click on Permit Application > Print
2. Select your search options and click Search.

C O N T E N T S
65
3. The search result will be displayed. There are 2 different views: a. Non-Draft Permit Application (Status: Other than draft) b. Draft Permit Application (Status: Draft)
Non-Draft Permit Application
i. Click Print

C O N T E N T S
66
ii. The print preview of the Permit Application will be shown.

C O N T E N T S
67
iii. Click the OGA Ref to view the items in the OGA-specific Permit Application
To further view the item information, click display

C O N T E N T S
68

C O N T E N T S
69
Draft Permit Application
i. Click on the Permit Ref and the breakdown of OGAs in the permit application will be shown.

C O N T E N T S
70
ii. Click Print to view the print preview of the draft permit application.

C O N T E N T S
71
CHAPTER 4 Permit Endorsement
Permit Endorsement
OGA Endorser endorses permit application received from traders and agents by either accept it
and forwards to OGA Verifier and Approver or to reject it. OGA Endorser can also query
incomplete or erroneous permit application as well as search permit applications.
This chapter covers the following areas:
Search Permit Application
Review Items
Review Supporting Documents
Query to Trader or Agent
Set Item Action
Finalize Processing
Search Permit
1. Login as OGA Endorser 2. Go to Permit Processing > Endorse
Search Permit Application
OGA Endorser can search the permit applications received to be processed.
3. Review the permit applications and view the company information.

C O N T E N T S
72
4. Select the permit application to be endorsed
5. Item(s) in the application will be shown.

C O N T E N T S
73
Review Items
To review each item basic information, other information and OGA specific information.
1. To view the further detail of the item, click display

C O N T E N T S
74
Review Supporting Documents
To review the supporting documents uploaded by traders/agents
1. To review supporting documents, click View Docs.
2. The supporting document(s) page will be shown. Click on the document name to preview.

C O N T E N T S
75
3. A pop up window will be shown to save the document. Click the Save button and once saved, open the file for preview.
4. Click X to go back to the previous page.

C O N T E N T S
76
Query to Trader or Agent
To send query message to trader or agent regarding inaccurate or incomplete supporting
document or regarding erroneous permit details or other matters.
1. In case of a need for clarification or notice, click Query to send message to trader/agent.
2. Fill in the subject and message and click Send.
3. Notification message will be displayed.

C O N T E N T S
77
4. Go to Messages > Outbox
5. Click on the message Subject to view the content of the message.

C O N T E N T S
78
6. Go to Messages>Inbox to view the reply from Trader/Agent
7. Click the message subject to view the received message.

C O N T E N T S
79
8. OGA can interact with Trader/Agent through exchanging messages in this query function unlimitedly. Click
Reply to respond to Trader/Agent message.
Click subject to edit the title.
Enter the new subject title and click tick to apply or x to cancel.
The subject will be updated.
c

C O N T E N T S
80
Fill in the query box and click Send. A notification message will be displayed.
@
Query can only be sent by OGA to Trader/Agent. Trader/Agent cannot initiate a query message to OGA.
The steps for trader/agent to reply a received message is the same as explained above. Trader/Agent have to go to Messages >Inbox to view incoming message and Message>Outbox to view outgoing message.

C O N T E N T S
81
9. As long as the application is still queried, it will be temporarily located under Permit Processing > Queried
10. Click Revert to put the application back to Verify category for further processing.
c

C O N T E N T S
82
Set Item Action
To decide and set decision status for each item whether it is passed or rejected.
1. Select any of the application to be endorsed.
2. Choose the Action taken for the item whether to reject by selecting Rejected or passed by selecting Endorsed

C O N T E N T S
83
Finalize Processing
To set the final decision for the permit application whether to endorse and pass it to OGA verifier
or to reject it.
1. Click Finalize Processing to set the final decision for the application.
2. Select the Action or decision taken for the permit
3. Enter any remarks for the approver to refer and click OK.

C O N T E N T S
84
Search Permit
To search for newly received, in process, endorsed or rejected permit applications relevant to
them.
1. Go to Permit Processing > Search
2. The Permit search will be shown.
Please refer to Permit Application > Search Permit to view the steps.
Print Permit Application
To print drafted, submitted, processing, queried, endorsed, verified, approved or rejected permit
applications for Endorser own copy or reference.
1. Go to Permit Processing > Print

C O N T E N T S
85
2. Enter your search options and click Search.
Please refer to Permit Application > Create Permit > Print to view the steps.

C O N T E N T S
86
CHAPTER 5 Permit Payment
Permit Payment
Some OGAs impose payment charges on applying or on approval of Permit applications. Traders
and agents are required to make payments to OGA and OGA payment officer will record the
payment in the system and issue it through the bill of statement.
This chapter covers the following areas:
View Payment Charges
Payment to Other Government Agencies
View Paid Permits
View Payment Status
View Payment Charges
Traders and agents can view the payment charges imposed for application and approval
stages.
1. There are 2 options to view the Permit tab: i. Directly after Permit submission
ii. Go to Payment menu
2. Option 1: Directly after Permit Submission

C O N T E N T S
87
3. Option 2: Go to Payment menu
Note down the Permit Application Reference number
Go to Payment > View
4. Type in the Permit Reference ID and click Display.
00

C O N T E N T S
88
5. The Permit payment details will be listed. To view further payment breakdown for each government agency, click details.

C O N T E N T S
89
Payment to Other Government Agencies
OGA payment officers can record the payment received from Traders or Agents and issue bill of
statement copy to them.
@ There are 2 stage of payment:
1. Submit – After permit application submission.
2. Approve – After permit application approved.
1. Log in as OGA Payment officer
2. Go to Fee Payment > Permit
3. Permit Payment Search page will be shown.

C O N T E N T S
90
There are 2 ways to search for the permit to pay:
i. By OGA Reference ID ii. By Manual browsing
4. By OGA Reference ID
1. Enter OGA Reference ID and click Search.
2. The searched permit will be shown. Click on Pay Info to proceed on confirming payments.

C O N T E N T S
91
5. By Manual Browsing
1. Click on the forward or backward arrows or the page number to browse for specific permit to confirm the
payment for.
ii. Once done, click on Pay Info of the selected Permit.
6. The statement billing page will be shown. Click on Pay to proceed confirming the payment.

C O N T E N T S
92
1. The date of payment will be recorded.
7. Click Print Receipt Here to view the print preview of the bill of statement.
View Paid Permits
OGA Payment officer can view permits that have been paid.
1. Log in as OGA Payment officer 2. Go to Fee Payment > Paid Permits

C O N T E N T S
93
3. Paid Permits listings page will be shown. Click on Pay Info on the selected permit.

C O N T E N T S
94
View Payment Status
Traders and agents can view their payment status for specific permit application.
1. Log in as Trader/Agent.
2. Please refer the steps in Permit Application section under Search Permit.
3. The payment status will be displayed.
@ Non Halal Meat will skip the process of :
1. Payment to LMH - Lembaga Makanan Halal
2. Endorsement by LMH

C O N T E N T S
95
CHAPTER 6 Permit Verifier
Permit Verifier
OGA Verifier verifies permit application received from traders and agents by either accept it and
forwards to OGA Approver or to reject it. OGA Verifier can also query incomplete or erroneous
permit application as well as search permit applications.
This chapter covers the following areas:
Search Permit Application
Review Items
Review Supporting Documents
Query to Trader or Agent
Set Item Action
Finalize Processing
Search Permit
1. Login as OGA Verifier
2. Go to Permit Processing > Verify

C O N T E N T S
96
Search Permit Application
OGA Verifier can search the permit applications received to be processed.
3. Review the permit applications and view the company information.
4. Select the permit application to be verified.

C O N T E N T S
97
5. Item(s) in the application will be shown
Review Items
To review each item basic information, other information and OGA specific information.
1. To view the further detail of the item, click display

C O N T E N T S
98

C O N T E N T S
99
Review Supporting Documents
To review the supporting documents uploaded by traders/agents.
1. To review supporting documents, click View Docs.
2. The supporting document(s) page will be shown. Click on the document name to preview.

C O N T E N T S
100
3. A pop up window will be shown to save the document. Click the Save button and once saved, open the file
for preview.
4. Click X to go back to the previous page.

C O N T E N T S
101
Query to Trader or Agent
To send query message to trader or agent regarding inaccurate or incomplete supporting
document or regarding erroneous permit details or other matters.
1. In case of a need for clarification or notice, click Query to send message to trader/agent.
2. Fill in the subject and message and click Send.
3. Notification message will be displayed.

C O N T E N T S
102
4. Go to Messages > Outbox
5. Click on the message Subject to view the content of the message.
6. Go to Messages>Inbox to view the reply from Trader/Agent

C O N T E N T S
103
7. Click the message subject to view the received message.
8. OGA can interact with Trader/Agent through exchanging messages in this query function unlimitedly. Click Reply to respond to Trader/Agent message.

C O N T E N T S
104
Click subject to edit the title.
Enter the new subject title and click tick to apply or x to cancel.
The subject will be updated.
Fill in the query box and click Send. A notification message will be displayed.

C O N T E N T S
105
@
Query can only be sent by OGA to Trader/Agent. Trader/Agent cannot initiate a query message to OGA.
The steps for trader/agent to reply a received message is the same as explained above. Trader/Agent have to go to Messages >Inbox to view incoming message and Message>Outbox to view outgoing message.
1. As long as the application is still queried, it will be temporarily located under Permit Processing > Queried

C O N T E N T S
106
10. Click Revert to put the application back to Verify category for further processing.

C O N T E N T S
107
Approval Settings
To set the permit approval type, usage mode, next action or procedure after approval and
duration of permit validity.
1. Click on Approval Settings to set the permit credentials.
2. The Permit Settings page will be shown. Fill in all the fields as necessary and click Ok.

C O N T E N T S
108
Field Name Description
Approval Type The type of the permit.
Permit Usage Mode The manner which this permit can be use.
Require Endorsement/Inspection
Option if this permit requires endorsement or inspection after this approval.
Procedure Name Procedure option to be applied after this approval.
Expiry Date The expiry date of the permit application.
Remark Comments from approver for trader/agent.
1. Click Close.
2. The Approval Setting’s status will change to ‘Done’.

C O N T E N T S
109
Set Item Action
To decide and set decision status for each item whether it is passed or rejected.
1. Select any of the application to be verified
2. Choose the Action taken for the item whether to reject by selecting Rejected or passed by selecting
Verified.

C O N T E N T S
110
3. Double click Import Permit No text “Double click for manual permit No”, enter the reference number and once done, click enter or click elsewhere. A pop up notification message will be shown and click OK.
@ Import Permit No generated internally within your organization for each of the items. However, this is optional and can be left blank. This will be used for cross-referencing purposes in the Search section.

C O N T E N T S
111
Finalize Processing
To set the final decision for the permit application whether to approve and pass it to OGA
approver or to reject it.
1. Click Finalize Processing to set the final decision for the application.
Select the Action or decision taken for the permit
2. Enter any remarks for the approver to refer and click OK.

C O N T E N T S
112
Search Permit
To search for newly received, in process, approved or rejected permit applications relevant to
them.
1. Go to Permit Processing > Search
2. The Permit search will be shown.
Please refer to Permit Application > Search Permit to view the steps.

C O N T E N T S
113
Print Permit Application
To print drafted, submitted, processing, queried, endorsed, verified approved or rejected permit
applications for Verifier own copy or reference.
1. Go to Permit Processing > Print
2. Enter your search options and click Search.
Please refer to Permit Application > Create Permit > Print to view the steps.

C O N T E N T S
114
CHAPTER 7 Permit Approval
Permit Approval
OGA Approver process permit application received from traders and agents by either approve it
or reject it. OGA Approver plays an important role to set the permit validity and next necessary
actions after approval. OGA Approver can also query incomplete or erroneous permit
application as well as search permit applications.
This chapter covers the following areas:
Search Permit Application
Review Items
Review Supporting Documents
Query to Trader or Agent
Set Item Action
Display History
Finalize Processing
Search Permit
3. Login as OGA Approver 4. Go to Permit Processing > Approve

C O N T E N T S
115
Search Permit Application
OGA Approver can search the permit applications received to be processed.
1. Review the permit applications and view the company information.

C O N T E N T S
116
2. Select the permit application to be approved. The items in the application will be shown.

C O N T E N T S
117
Review Items
To review each item basic information, other information and OGA specific information.
1. Click on display link to view item complete details.

C O N T E N T S
118

C O N T E N T S
119
4. Click Close to proceed with view documents.

C O N T E N T S
120
Review Supporting Documents
To review the supporting documents uploaded by traders/agents.
1. To view supporting documents, click View Docs link
2. The supporting document(s) page will be shown. Click on the document name to preview.
3. A pop up window will be shown to save the document. Click the Save button and once saved, open the file for preview.

C O N T E N T S
121
4. Click X to go back to the previous page.

C O N T E N T S
122
Query to Trader or Agent
To send query message to trader or agent regarding inaccurate or incomplete supporting
document or regarding erroneous permit details or other matters.
1. In case of a need for clarification or notice from trader/agent, click Query. Please refer to Permit Verification > Query to Trader or Agent section in this user guide.
Approval Settings
To set the permit approval type, usage mode, next action or procedure after approval and
duration of permit validity.
5. Click on Approval Settings to set the permit credentials.

C O N T E N T S
123
6. RCED officer can edit application setting that has been set by the previous officer.
6. The Permit Settings page will be shown. Fill in all the fields as necessary and click Ok.

C O N T E N T S
124
Field Name Description
Approval Type The type of the permit.
Permit Usage Mode The manner which this permit can be use.
Require Endorsement/Inspection
Option if this permit requires endorsement or inspection after this approval.
Procedure Name Procedure option to be applied after this approval.
Expiry Date The expiry date of the permit application.
Remark Comments from approver for trader/agent.
7. Click Close.
8. The Approval Setting’s status will change to ‘Done’.

C O N T E N T S
125
Set Item Action
To decide and set decision status for each item whether it is passed or rejected.
9. Choose the Action taken for the item whether to reject by selecting Rejected or passed by selecting Approved.
10. To make changes to the Import Permit No set by the Verifier, click twice on the “Double click for manual
permit No” and enter the reference number and once done, click enter or click elsewhere. A pop up notification message will be shown and click OK.

C O N T E N T S
126
Display History
To view the previous action or decision set by the verifier.
1. Before setting the final decision, a previous processing history by Verifier can be viewed for additional reference.

C O N T E N T S
127
Finalize Processing
To set the final decision for the permit application whether to approve or to reject it.
1. Click Finalize Processing to set the final decision for the application.
Select the Action for this permit. To approve, choose Issue Approval.
2. Fill in any remarks for trader/agent reference and click OK.
A pop up will be displayed, click OK to proceed.

C O N T E N T S
128
11. Permit issuing status will be shown
@ The Import Permit (IP) Approval Number (IP-999999-999999) will be generated for each item. Agents will need to enter the number in the Permit Section of Declaration Module.
Search Permit
To search for newly received, in process, approved or rejected permit applications relevant to
them.
1. Go to Permit Processing > Search

C O N T E N T S
129
2. The Permit search will be shown.
Please refer to Permit Application > Search Permit to view the steps.

C O N T E N T S
130
Print Permit Application
To print drafted, submitted, processing, queried, verified approved or rejected permit
applications for Approver own copy or reference.
1. Go to Permit Processing > Print
2. Enter your search options and click Search.
Please refer to Permit Application > Create Permit > Print to view the steps.
Related Documents