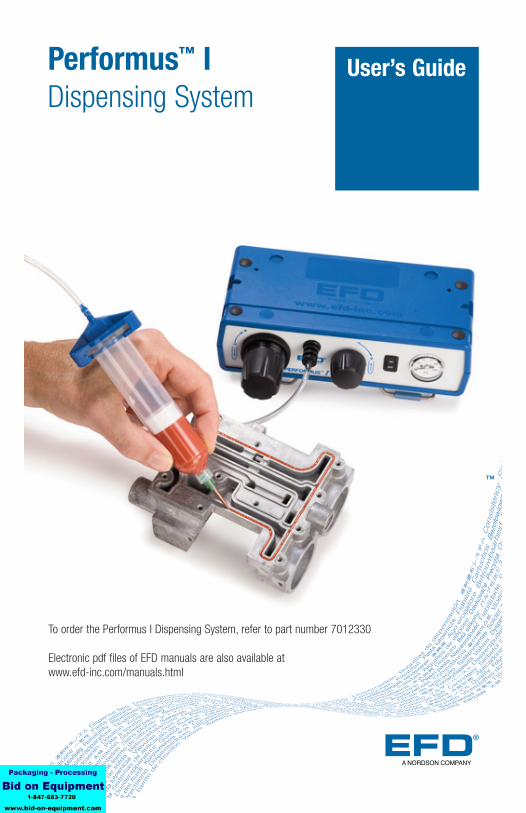
Performus ™ I Dispensing System ™ A NORDSON COMPANY User’s Guide To order the Performus I Dispensing System, refer to part number 7012330 Electronic pdf files of EFD manuals are also available at www.efd-inc.com/manuals.html

Welcome message from author
This document is posted to help you gain knowledge. Please leave a comment to let me know what you think about it! Share it to your friends and learn new things together.
Transcript
Performus™ IDispensing System
™
A NORDSON COMPANY
User’s Guide
To order the Performus I Dispensing System, refer to part number 7012330
Electronic pdf files of EFD manuals are also available at www.efd-inc.com/manuals.html
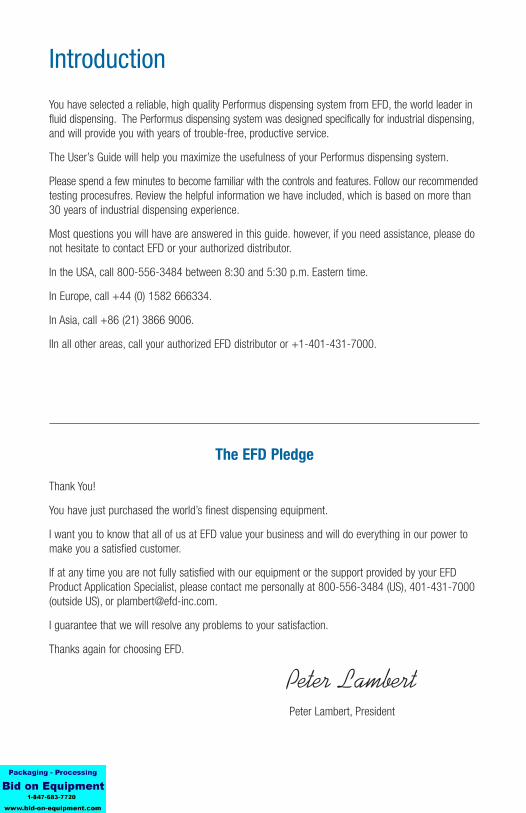
Introduction
You have selected a reliable, high quality Performus dispensing system from EFD, the world leader influid dispensing. The Performus dispensing system was designed specifically for industrial dispensing,and will provide you with years of trouble-free, productive service.
The User’s Guide will help you maximize the usefulness of your Performus dispensing system.
Please spend a few minutes to become familiar with the controls and features. Follow our recommendedtesting procesufres. Review the helpful information we have included, which is based on more than30 years of industrial dispensing experience.
Most questions you will have are answered in this guide. however, if you need assistance, please donot hesitate to contact EFD or your authorized distributor.
In the USA, call 800-556-3484 between 8:30 and 5:30 p.m. Eastern time.
In Europe, call +44 (0) 1582 666334.
In Asia, call +86 (21) 3866 9006.
IIn all other areas, call your authorized EFD distributor or +1-401-431-7000.
The EFD Pledge
Thank You!
You have just purchased the world’s finest dispensing equipment.
I want you to know that all of us at EFD value your business and will do everything in our power tomake you a satisfied customer.
If at any time you are not fully satisfied with our equipment or the support provided by your EFDProduct Application Specialist, please contact me personally at 800-556-3484 (US), 401-431-7000(outside US), or [email protected].
I guarantee that we will resolve any problems to your satisfaction.
Thanks again for choosing EFD.
Peter Lambert, President
2
Peter Lambert
3
ContentsEFD Product Safety Information ....................................4-7
Specifications..................................................................8
Features and Controls......................................................9
Getting Started ........................................................10-12
Dispensing System Setup ........................................13-14
Filling the Syringe Barrel ..........................................15-16
Barrel Loaders ..............................................................17
Replacement Parts ........................................................18
Accessories ..................................................................19
Troubleshooting Guide ..................................................20
Helpful Hints/Suggestions on Settings ............................21
Warranty ......................................................................23
IMPORTANT SAFETY INFORMATION
All EFD disposable components, including syringe barrels, cartridges,pistons, tip caps, end caps, and dispense tips, are precision engineeredfor one-time use. Attempting to clean and re-use components will compromisedispensing accuracy and may increase the risk of personal injury.
Always wear appropriate protective equipment and clothing suitable foryour dispensing application.
Do not exceed maximum operating pressure of 100 psi (7.0kg/cm2).
Do not heat syringe barrels or cartridges to a temperature greater than 100°F (38°C).
Dispose of components according to local regulations after one-time use.
Do not clean components with strong solvents (e.g. MEK, Acetone, THF).
Cartridge retainer systems and barrel loaders should be cleaned with milddetergents only.
To prevent fluid waste, use EFD SmoothFlowTM pistons.

4
EFD Product Safety Statement
This statement provides personal and equipment safety notices for EFD dispensing products excludingthe TT dispensing robot. For the safety statement on the TT dispensing robot, please see the TTuser’s guide.
The safety message that follows has a WARNING level hazard. Failure to comply could result in death or serious injury.
ELECTRIC SHOCKRisk of electric shock. Disconnect power before removing cover and/or disconnect,lock out, and tag switches before servicing electrical equipment. If you receiveeven a slight electrical shock, shut down all equipment immediately. Do notrestart the equipment until the problem has been identified and corrected.
The safety messages that follow have CAUTION level hazards.Failure to comply may result in minor or moderate injury.
READ MANUALRead manual for proper use of this equipment. Follow all safety instructions. Task-and equipment-specific warnings, cautions and instructions are included in equipmentdocumentation where appropriate. Make sure these instructions and all otherequipment documents are accessible to persons operating or servicing equipment.
MAXIMUM AIR PRESSUREMaximum air input pressure 6.9 bar (100 psi). Excessive air input pressuremay damage the equipment.
BURST PRESSUREMaximum air input pressure 6.9 bar (100 psi). Burst pressure 20.7 bar(300 psi). Excessive air input pressure may damage the equipment.
RELEASE PRESSURERelease pressure before opening. Maximum pressure 2.0 bar (30 psi). Release hydraulic and pneumatic pressure before adjusting or servicingpressurized systems or components. .
CAUTION
WARNING
5
Halogenated Hydrocarbon Solvent HazardsDo not use halogenated hydrocarbon solvents in a pressurized system that contains aluminumcomponents. Under pressure, these solvents can react with aluminum and explode, causing injury, death,or property damage. Halogenated hydrocarbon solvents contain one or more of the following elements:
Element Symbol Prefix Fluorine F “Fluoro-”Chlorine Cl “Chloro-”Bromine Br “Bromo-”Iodine I “Iodo-”
Check your material MSDS or contact your material supplier for more information. If you must usehalogenated hydrocarbon solvents, contact your EFD representative for compatible EFD components.
High Pressure FluidsHigh pressure fluids, unless they are safety contained, are extremely hazardous. Always release fluidpressure before adjusting or servicing high pressure equipment. A jet of high pressure fluid can cutlike a knife and cause serious bodily injury, amputation, or death. Fluids penetrating the skin canalso cause toxic poisoning.
Warning: Any injury caused by high pressure liquid can be serious. If you are injured or evensuspect an injury:
• Go to an emergency room immediately.
• Tell the doctor that you suspect an injection injury.
• Show the doctor this note.
• Tell the doctor what kind of material you were dispensing.
Medical Alert–Airless Spray Wounds: Note to PhysicianInjection in the skin is a serious traumatic injury. It is important to treat the injury surgically as soonas possible. Do not delay treatment to research toxicity. Toxicity is a concern with some exoticcoatings injected directly into the bloodstream.
Qualified PersonnelEquipment owners are responsible for making sure that EFD equipment is installed, operated andserviced by qualified personnel. Qualified personnel are those employees or contractors who aretrained to safely perform their assigned tasks. They are familiar with all relevant safety rules andregulations and are physically capable of performing their assigned tasks.

6
EFD Product Safety Statement
Intended UseUse of EFD equipment in ways other than those described in the documentation supplied with theequipment may result in injury to persons or damage to property. Some examples of unintended useof equipment include:
• Using incompatible materials
• Making unauthorized modifications
• Removing or bypassing safety guards or interlocks
• Using incompatible or damaged parts
• Using unapproved auxiliary equipment
• Operating equipment in excess of maximum ratings
• Operating equipment in an explosive atmosphere
Regulations and ApprovalsMake sure all equipment is rated and approved for the environment in which it is used. Anyapprovals obtained for EFD equipment will be voided if instructions for installation, operation andservice are not followed.
Personal SafetyTo prevent injury, follow these instructions:
• This equipment is for indoor use only.
• Do not operate or service equipment unless you are qualified.
• Do not operate equipment unless safety guards, doors or covers are intact and automaticinterlocks are operating properly. Do not bypass or disarm any safety devices.
• Keep clear of moving equipment. Before adjusting or servicing moving equipment, shut off thepower supply and wait until the equipment comes to a complete stop. Lock out power and securethe equipment to prevent unexpected movement.
• Make sure spray areas and other work areas are adequately ventilated.
• Know where emergency stop buttons, shutoff valves and fire extinguishers are located.
• Clean – Remove all electrical and mechanical connections to unit. Apply a small amount of lightdetergent onto a moist cloth and wipe surface of unit lightly, cleaning any stains or spilled adhesive.
• Maintain – Only use clean dry air and regulated power supply to unit. Equipment does not requireany other regular maintenance.

7
• Test – Verify operation of features and performance of equipment using the ‘Features andControls’ and ‘Getting Started’ sections within this user guide. If necessary, refer to the‘Troubleshooting Guide’ elsewhere in this user guide. A faulty or defective unit should be returnedto EFD or representative for refurbishment.
• Use only replacement parts that are designed for use with original equipment. Contact your EFD representative for information and advice.
• Caution: Use or wear adequate ear protection when operating the vacuum in close proximity for aprolonged period of time.
Action in the Event of a MalfunctionIf a system or any equipment in a system malfunctions, shut off the system immediately and performthe following steps:
• Disconnect and lock out system electrical power. If using hydraulic and pneumatic shutoff valves,close and relieve pressure.
• Identify the reason for the malfunction and correct it before restarting the system.
• For EFD-powered dispensers, remove the syringe barrel from the adapter assembly. For EFDelectro-mechanical dispensers, slowly unscrew the barrel retainer and remove the barrel from theactuator.
DisposalDispose of equipment and materials used in operation and servicing according to local codes.
RoHS标准相关声明 (China RoHS Hazardous Material Declaration)
产品名称 有害物质及元素Part Name Toxic or Hazardous Substances and Elements
铅 汞 镉 六价铬 多溴联苯 多溴联苯醚Lead Mercury Cadmium Hexavalent Polybrominated Polybrominated
Chromium Biphenyls Diphenyl Ethers(Pb) (Hg) (Cd) (Cr6) (PBB) (PBDE)
金属转接头 X O O O O OAll Brass Fittings
O: 表示该产品所含有的危险成分或有害物质含量依照EIP-A, EIP-B, EIP-C 的标准低于SJ/T11363-2006 限定要求。Indicates that this toxic or hazardous substance contained in all the homogeneous materials forthis part, according to EIP-A, EIP-B, EIP-C is below the limit requirement in SJ/T11363-2006.
X: 表示该产品所含有的危险成分或有害物质含量依照EIP-A, EIP-B, EIP-C 的标准高于SJ/T11363-2006 限定要求.Indicates that this toxic or hazardous substance contained in all the homogeneous materials forthis part, according to EIP-A, EIP-B, EIP-C is above the limit requirement in SJ/T11363-2006.
8
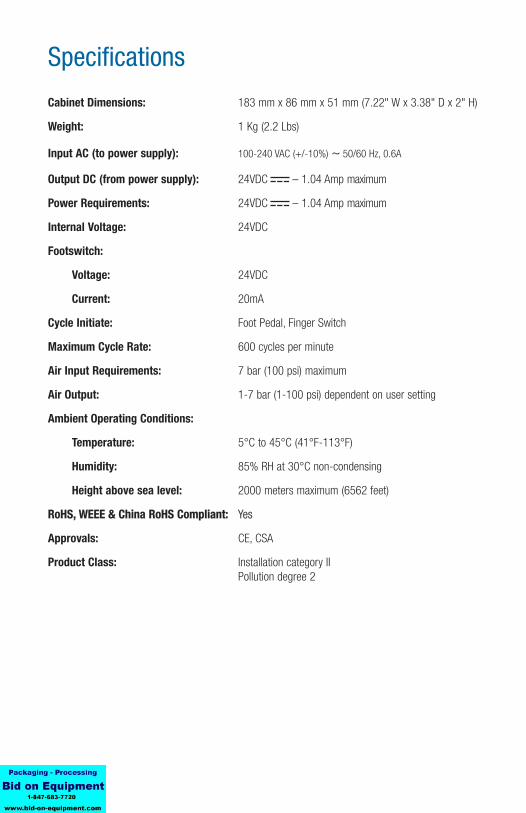
Specifications
Cabinet Dimensions: 183 mm x 86 mm x 51 mm (7.22" W x 3.38" D x 2" H)
Weight: 1 Kg (2.2 Lbs)
Input AC (to power supply): 100-240 VAC (+/-10%) ~ 50/60 Hz, 0.6A
Output DC (from power supply): 24VDC – 1.04 Amp maximum
Power Requirements: 24VDC – 1.04 Amp maximum
Internal Voltage: 24VDC
Footswitch:
Voltage: 24VDC
Current: 20mA
Cycle Initiate: Foot Pedal, Finger Switch
Maximum Cycle Rate: 600 cycles per minute
Air Input Requirements: 7 bar (100 psi) maximum
Air Output: 1-7 bar (1-100 psi) dependent on user setting
Ambient Operating Conditions:
Temperature: 5°C to 45°C (41°F-113°F)
Humidity: 85% RH at 30°C non-condensing
Height above sea level: 2000 meters maximum (6562 feet)
RoHS, WEEE & China RoHS Compliant: Yes
Approvals: CE, CSA
Product Class: Installation category II Pollution degree 2
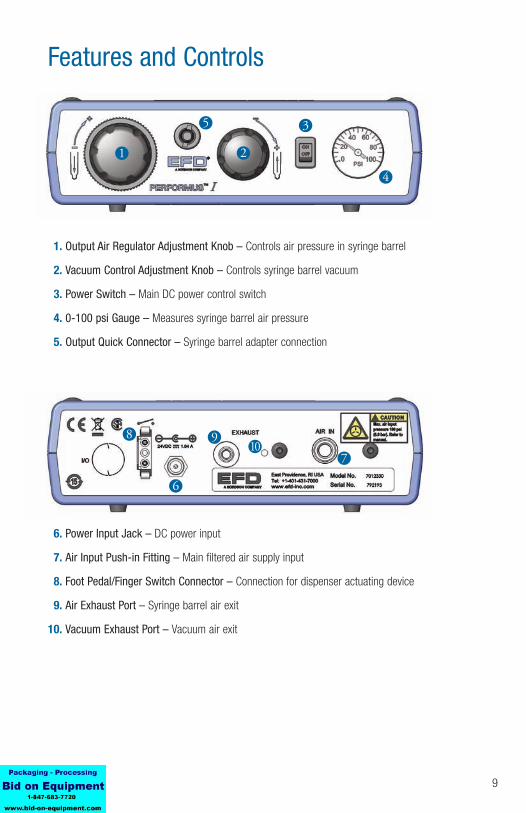
Features and Controls
1. Output Air Regulator Adjustment Knob – Controls air pressure in syringe barrel
2. Vacuum Control Adjustment Knob – Controls syringe barrel vacuum
3. Power Switch – Main DC power control switch
4. 0-100 psi Gauge – Measures syringe barrel air pressure
5. Output Quick Connector – Syringe barrel adapter connection
6. Power Input Jack – DC power input
7. Air Input Push-in Fitting – Main filtered air supply input
8. Foot Pedal/Finger Switch Connector – Connection for dispenser actuating device
9. Air Exhaust Port – Syringe barrel air exit
10. Vacuum Exhaust Port – Vacuum air exit
9
4
3
2
5
1
8
6
97
10
10
Getting Started
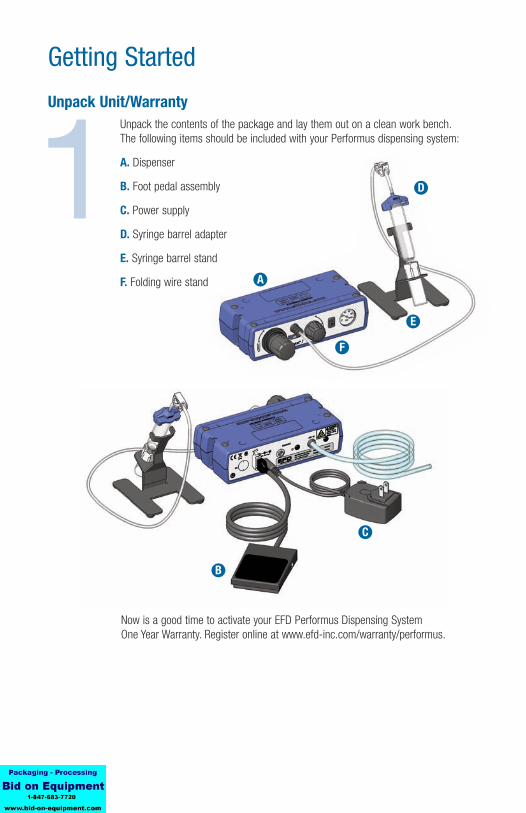
Unpack Unit/WarrantyUnpack the contents of the package and lay them out on a clean work bench.The following items should be included with your Performus dispensing system:
A. Dispenser
B. Foot pedal assembly
C. Power supply
D. Syringe barrel adapter
E. Syringe barrel stand
F. Folding wire stand A
B
C
D
E
F
1
Now is a good time to activate your EFD Performus Dispensing SystemOne Year Warranty. Register online at www.efd-inc.com/warranty/performus.

11
Connect Air Supply
Note: Clean, dry filtered factory air isrequired to meet warranty. If your air supplyis not filtered, order the EFD five micron filterregulator (EFD part 7016547).
Turn the air regulator adjustment knob tozero before connecting the main air inputto the Performus.
• Push one end of the 6mm air input hose intothe input fitting on the back of thePerformus.
• Connect the other end of the hose to yourplant air supply.
• Set plant air supply at minimum 5.5 to 6.9bar (80 to 100 psi).
• Keep the vacuum feature turned off byturning the vacuum control knob all theway counter-clockwise. If the fluid you aredispensing is a thin, watery, or low viscosityconsistency, proceed to “Using the VacuumControl Feature for Low Viscosity Fluids.”
Connect Power
• Locate the DC input connection on the back of your Performus dispensing system.
• Insert the DC Plug securely into the input connection.
• Select the proper adapter from the powersupply plug kit and then connect the powersupply to a grounded power source.
Note: The power supply is multi-voltage,therefore no external adjustments are required.
2
3
12
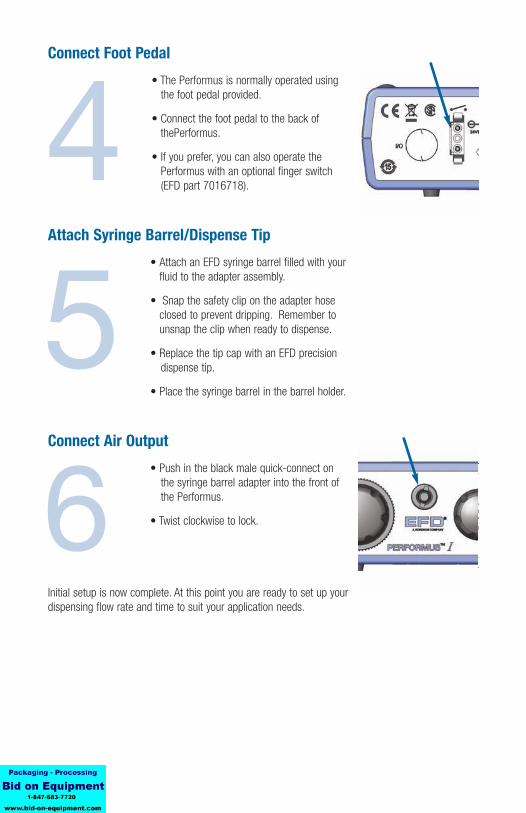
Connect Foot Pedal
• The Performus is normally operated using the foot pedal provided.
• Connect the foot pedal to the back ofthePerformus.
• If you prefer, you can also operate the Performus with an optional finger switch (EFD part 7016718).
Attach Syringe Barrel/Dispense Tip
• Attach an EFD syringe barrel filled with yourfluid to the adapter assembly.
• Snap the safety clip on the adapter hoseclosed to prevent dripping. Remember tounsnap the clip when ready to dispense.
• Replace the tip cap with an EFD precision dispense tip.
• Place the syringe barrel in the barrel holder.
Connect Air Output
• Push in the black male quick-connect on the syringe barrel adapter into the front of the Performus.
• Twist clockwise to lock.
Initial setup is now complete. At this point you are ready to set up yourdispensing flow rate and time to suit your application needs.
456

13
Dispensing System Setup
1. Pull the air regulator adjustment knob out until it clicks into the unlocked position. Start with pressure set to zero.
2. Place the syringe barrel over a piece of paper or test surface.
3. Unsnap the safety clip. Depress and hold the foot pedal for the remainder of this setup.
4. While resting the tip on the paper (test surface), SLOWLY turn the air pressure regulator clockwiseuntil fluid starts to exit from the tip.
5. Keep increasing the air pressure until you have reached the desired fluid dispensing flow rate.
Note: Always use the lowest possible pressure and the largest possible tip size. The combination ofthe lowest possible output pressure + largest possible tip size + longest possible dispense duration= most consistent and accurate deposits.
6. Release the foot pedal.
7. Retest the dispensing rate a few more times. Fine tune as required by making small changes inpressure.
8. Push the air regulator adjustment knob in to lock the setting.
Correct anglefor consistentdeposits.
Remember - alwaysbring the tip in contactwith the work surface atthe illustrated angle. Afterthe tip is in position, pressthe foot pedal. Releasepedal and remove tip bylifting straight up.
14
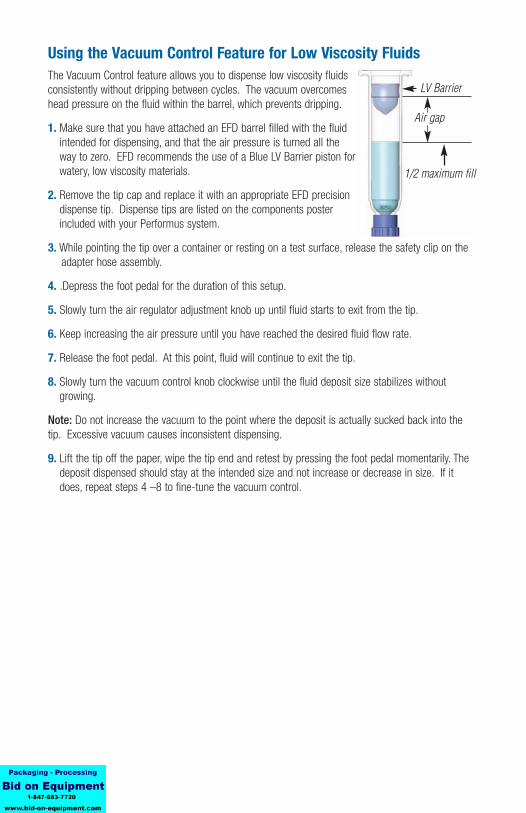
Using the Vacuum Control Feature for Low Viscosity FluidsThe Vacuum Control feature allows you to dispense low viscosity fluidsconsistently without dripping between cycles. The vacuum overcomeshead pressure on the fluid within the barrel, which prevents dripping.
1. Make sure that you have attached an EFD barrel filled with the fluidintended for dispensing, and that the air pressure is turned all theway to zero. EFD recommends the use of a Blue LV Barrier piston forwatery, low viscosity materials.
2. Remove the tip cap and replace it with an appropriate EFD precisiondispense tip. Dispense tips are listed on the components posterincluded with your Performus system.
3. While pointing the tip over a container or resting on a test surface, release the safety clip on the adapter hose assembly.
4. .Depress the foot pedal for the duration of this setup.
5. Slowly turn the air regulator adjustment knob up until fluid starts to exit from the tip.
6. Keep increasing the air pressure until you have reached the desired fluid flow rate.
7. Release the foot pedal. At this point, fluid will continue to exit the tip.
8. Slowly turn the vacuum control knob clockwise until the fluid deposit size stabilizes withoutgrowing.
Note: Do not increase the vacuum to the point where the deposit is actually sucked back into thetip. Excessive vacuum causes inconsistent dispensing.
9. Lift the tip off the paper, wipe the tip end and retest by pressing the foot pedal momentarily. Thedeposit dispensed should stay at the intended size and not increase or decrease in size. If itdoes, repeat steps 4 –8 to fine-tune the vacuum control.
1/2 maximum fill
LV Barrier
Air gap

15
Filling the Syringe Barrel
Barrel Filling Techniques:Caution: Do not completely fill syringe barrels. The optimum fill is a maximum 2/3 of the barrelcapacity and 1/2 of the barrel capacity when using the EFD blue LV Barrier piston.
For best results, we strongly recommend that you use a piston as part of your dispensing system.The white EFD SmoothFlow piston is appropriate for most fluids and has several advantages:
• Vacuum adjustment is less sensitive.
• The piston prevents fumes from the fluid being exhausted into the work environment.
• The piston prevents fluid from flowing back into the dispenser if the syringe barrel is inadvertently turned upside down.
• The piston makes it easy and safe to change tips without dripping. For watery solvents andcyanoacrylates, request the blue EFD LV Barrier piston, available in 3cc, 10cc and 30/55cc sizes.Contact EFD for assistance in selecting a suitable piston.
RememberFor best results, EFD strongly recommends the use of a piston as part of your dispensing system.
When changing tips orattaching a tip cap, snapthe safety clip completelyclosed to prevent anydripping or bubbling.
Open
Closed
If you choose to not use a piston when dispensing thin fluids, remember these important points.
Fumes cannot escape.
No air gap when usingthe SmoothFlow piston.
SmoothFlow pistonprevents fluid
backflow.
Do not tip the barrelupside down or lay flat.This will cause theliquid to run into thedispenser.

16
Filling Procedure for Pourable Low and Medium Viscosity Fluids If the fluid you are dispensing is pourable, take the syringe barrel, twist on tip cap and pour yourfluid in. Insert a white SmoothFlow piston and carefully press down until it contacts the fluid. Thesyringe barrel is now ready for use.
Filling Procedure for Thick Fluids If your fluid is thick or non-leveling, you can spoon it into the syringe barrel with a spatula. Or, if thefluid comes packed in a 1/10 gallon (300 ml) cartridge, try loading the barrel with a caulking gun.Then, press the SmoothFlow piston to move the fluid to the bottom of the syringe barrel and removetrapped air.
Trapped air in thick fluids can lead to drooling and oozing. Also, repetitive air cycles can boretunnels through non-leveling fluids, causing spitting and inconsistent deposits. The SmoothFlowpiston eliminates these problems. It prevents tunneling by providing a barrier to the pulsed-aircycles. And it prevents oozing by responding to the pressure of trapped air with a slight suck-backmovement after the dispense cycle.

17
Barrel LoadersBarrel Loading AlternativesEFD offers productive alternatives to traditional syringe barrelloading methods. Here are a few suggestions that can helpkeep your work area clean, save time and reduce the chanceof entrapped air in the fluid.
1. For fast, accurate volumetric filling, the Atlas Filling System#7022068 can be used with any pressure reservoir orcartridge. Recommended for high production barrel filling.
2. You could use the #7022445 Atlas™ Filling System. Packthe fluid into the 12 ounce cartridge as shown. Then placethe pre-filled cartridge into the barrel loader. Using airpressure, the barrel loader fills the syringe barrel (with apiston installed) from the bottom up.
1. If the fluid comes packed in a 1/10 gallon (300 ml) caulkingtype cartridge, use the EFD #7022452 filling system.
3. If you receive frozen epoxies or other fluids in medical typesyringes with a manual plunger, request the EFD luer-to-luer fitting #7016862 to transfer the material.
Please contact an EFD Fluid Application Specialist foradditional assistance.
#7022445 Atlas Filling System. Specify #7022452 forpre-filled 1/10 gal (300 ml) caulking tubes.
#7022068 Atlas FillingSystem
Barrel Rack#7022411 for 3cc & 5cc barrels#7022429 for 10cc, 30cc and 55cc barrels
#7016862 Luer-to-luer fitting
18
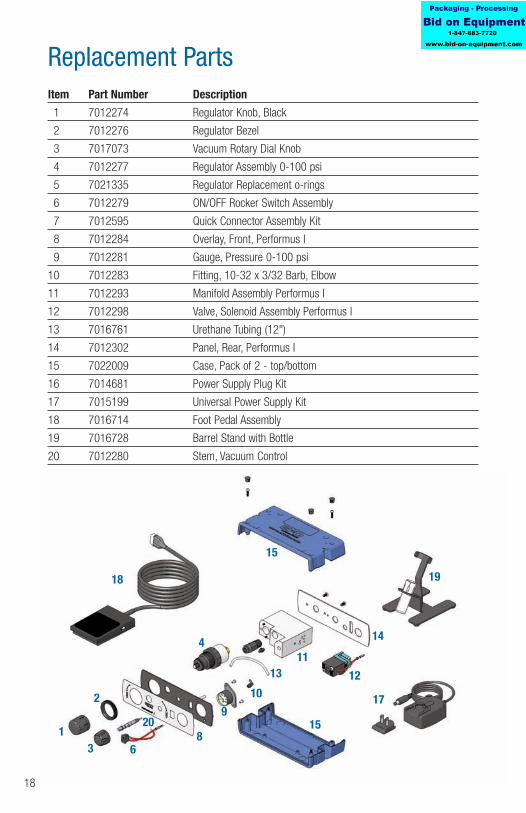
Replacement PartsItem Part Number Description
11 7012274 Regulator Knob, Black
12 7012276 Regulator Bezel
13 7017073 Vacuum Rotary Dial Knob
14 7012277 Regulator Assembly 0-100 psi
15 7021335 Regulator Replacement o-rings
16 7012279 ON/OFF Rocker Switch Assembly
17 7012595 Quick Connector Assembly Kit
18 7012284 Overlay, Front, Performus I
19 7012281 Gauge, Pressure 0-100 psi
10 7012283 Fitting, 10-32 x 3/32 Barb, Elbow
11 7012293 Manifold Assembly Performus I
12 7012298 Valve, Solenoid Assembly Performus I
13 7016761 Urethane Tubing (12")
14 7012302 Panel, Rear, Performus I
15 7022009 Case, Pack of 2 - top/bottom
16 7014681 Power Supply Plug Kit
17 7015199 Universal Power Supply Kit
18 7016714 Foot Pedal Assembly
19 7016728 Barrel Stand with Bottle
20 7012280 Stem, Vacuum Control
3 68
20
4
18
10
9
11
15
12
17
14
19
2
1
13
15
19
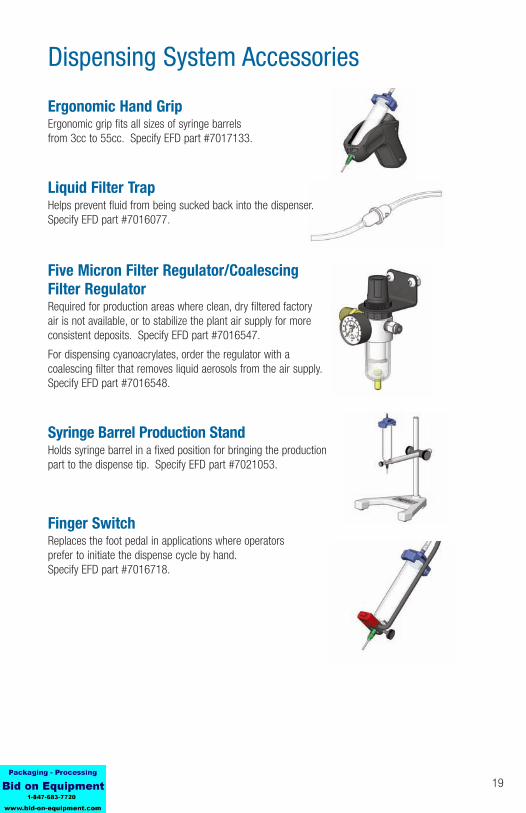
Dispensing System Accessories
Ergonomic Hand GripErgonomic grip fits all sizes of syringe barrelsfrom 3cc to 55cc. Specify EFD part #7017133.
Liquid Filter TrapHelps prevent fluid from being sucked back into the dispenser. Specify EFD part #7016077.
Five Micron Filter Regulator/CoalescingFilter RegulatorRequired for production areas where clean, dry filtered factoryair is not available, or to stabilize the plant air supply for moreconsistent deposits. Specify EFD part #7016547.
For dispensing cyanoacrylates, order the regulator with acoalescing filter that removes liquid aerosols from the air supply.Specify EFD part #7016548.
Syringe Barrel Production StandHolds syringe barrel in a fixed position for bringing the productionpart to the dispense tip. Specify EFD part #7021053.
Finger SwitchReplaces the foot pedal in applications where operatorsprefer to initiate the dispense cycle by hand. Specify EFD part #7016718.

20
Troubleshooting Guide
An EFD Customer Service or Technical Services representative is always available to assist you withany question you may have about your Performus Dispensing System. Please feel free to call oremail us at the addresses on the back cover of this User’s Guide.
Trouble Solution
No power Check the power supply connection and DC power supply to the unit.
No fluid beingdispensed
Check the main air supply and primary regulator.
Check to make sure that the main air supply is connected to theback of the unit and has not come loose.
Check to make sure that the regulator is not turned off (fullycounterclockwise).
If dispensing thicker materials, try increasing output air pressureslightly.
Inconsistentdispense output
Check the dispensing tip, barrel and material for possiblecontamination or clogs.
Note: Dispensing System Components are disposable. Do notattempt to reuse.
Check for air supply pressure fluctuation.
Air bubbles in the fluid path and entrapped air within the fluid maycause inconsistency. For best dispensing results, remove allentrapped air before dispensing.
Material suck-back
Always use an appropriate piston to prevent material from beingdrawn back into the dispenser. For thick to medium viscosity fluidsuse EFD SmoothFlow pistons. For thin, low viscosity fluids, useEFD LV Barrier pistons.
Another option is to order optional barrel adapters with filter traps.Part numbers for all adapters are listed on the components posterincluded with your Performus system.
21
Helpful Hints/Suggestions on Settings
Helpful Hints 1. There are three core variables to the Performus dispenser: dispense time, pressure and vacuum.
Adjust just one of these at a time, in small increments, to achieve the correct deposit.
2. Another variable is tip size. Choose the right tip for the deposit type. Remember, smaller tipsrequire more pressure and more time pressing the foot pedal. Try different tips without changingthe time or pressure settings and observe the results.
3. Tapered tips reduce the amount of air pressure needed to dispense thick materials. They alsohelp prevent drooling at the end of a dispense cycle.
4. .To ensure smooth fluid flow and to make consistent deposits, keep the dispense tip at a 45°angle to the work surface.
5. Use EFD SmoothFlow pistons to make barrel loading, dispensing and handling cleaner, safer andmore accurate. Caution: If you dispense watery fluids and choose not to use EFD pistons, do notincrease vacuum pressure rapidly and do not tip the barrel. Vacuum may pull fluid into theadapter hose, or if the syringe barrel is tipped, fluid may flow back into the dispenser.
6. Always use new EFD syringe barrels and tips. Carefully dispose of after use. This procedureensures maximum cleanliness, prevents contamination and provides proper safety.
7. Do not completely fill the syringe barrel. For most fluids, optimum fill is a maximum 2/3 of thebarrel capacity. For cyanoacrylates or watery fluids, optimum fill is 1/2 of the barrel capacity.
Suggestions on Settings:1. To reduce air pressure, turn the knob counterclockwise until the display reads at a
lower-than-needed pressure setting. Then turn clockwise to increase pressure until you reachthe correct setting.
2. Avoid high pressure settings with very small deposit settings. The ideal setup matches airpressure and tip size to create a “workable” flow rate – no splashing, but not too slow either.
3. With any fluid, always give the air pressure time to do its job. Moderate time and pressureprovides the best results since dispensing pressure remains at its peak for a longer period of time.
Related Documents


![Manual Codazzi[1][1]](https://static.cupdf.com/doc/110x72/5571fb70497959916994e1e2/manual-codazzi11.jpg)