This document is subject to further edits, corrections and/or modifications Updated 6/18/18 PeopleSoft Campus Solutions Processing Readmit Applications

Welcome message from author
This document is posted to help you gain knowledge. Please leave a comment to let me know what you think about it! Share it to your friends and learn new things together.
Transcript
This document is subject to further edits, corrections and/or modifications
Updated 6/18/18
PeopleSoft Campus Solutions
Processing Readmit
Applications

1
Step 1-Verifying Academic Plan Status
Navigation: Main Menu>Campus Solutions>Records and Enrollment>Career and Program Information>Student Program/Plan
Note: Be sure to click the Include History button.
I. Review the program action for each program/plan stack. This can be done by selecting the Next in List button at the bottom of this page.
II. Validate the Program Action does not = Completion of Program for the program/plan listed on the Readmission Application
Step 2-Review Current Applications on File Navigation: Main Menu>Campus Solutions>Student Admissions>Application Maintenance>Maintain
Applications.
* Note: Be sure to click the Include History button.
This page will display any application currently on file for the student. Verify that the student does not already
have an application on file for the term and the plan listed on the Readmission Application. If so, the
Readmission Application does not need to be processed, otherwise proceed to step 3.
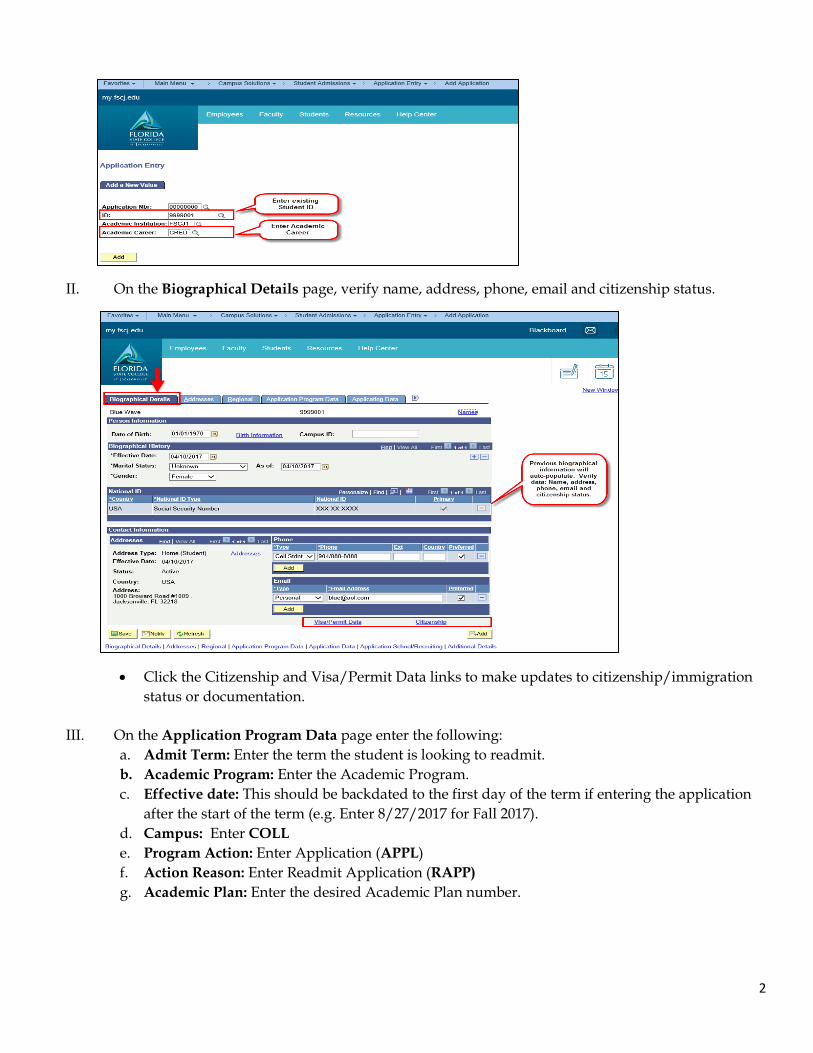
Step 3-Adding an Application Navigation: Main Menu>Campus Solutions>Student Admissions>Application Entry>Add Application.
I. Enter the Existing Student ID and Academic Career and click Add
2
II. On the Biographical Details page, verify name, address, phone, email and citizenship status.
Click the Citizenship and Visa/Permit Data links to make updates to citizenship/immigration
status or documentation.
III. On the Application Program Data page enter the following:
a. Admit Term: Enter the term the student is looking to readmit.
b. Academic Program: Enter the Academic Program.
c. Effective date: This should be backdated to the first day of the term if entering the application
after the start of the term (e.g. Enter 8/27/2017 for Fall 2017).
d. Campus: Enter COLL
e. Program Action: Enter Application (APPL)
f. Action Reason: Enter Readmit Application (RAPP)
g. Academic Plan: Enter the desired Academic Plan number.
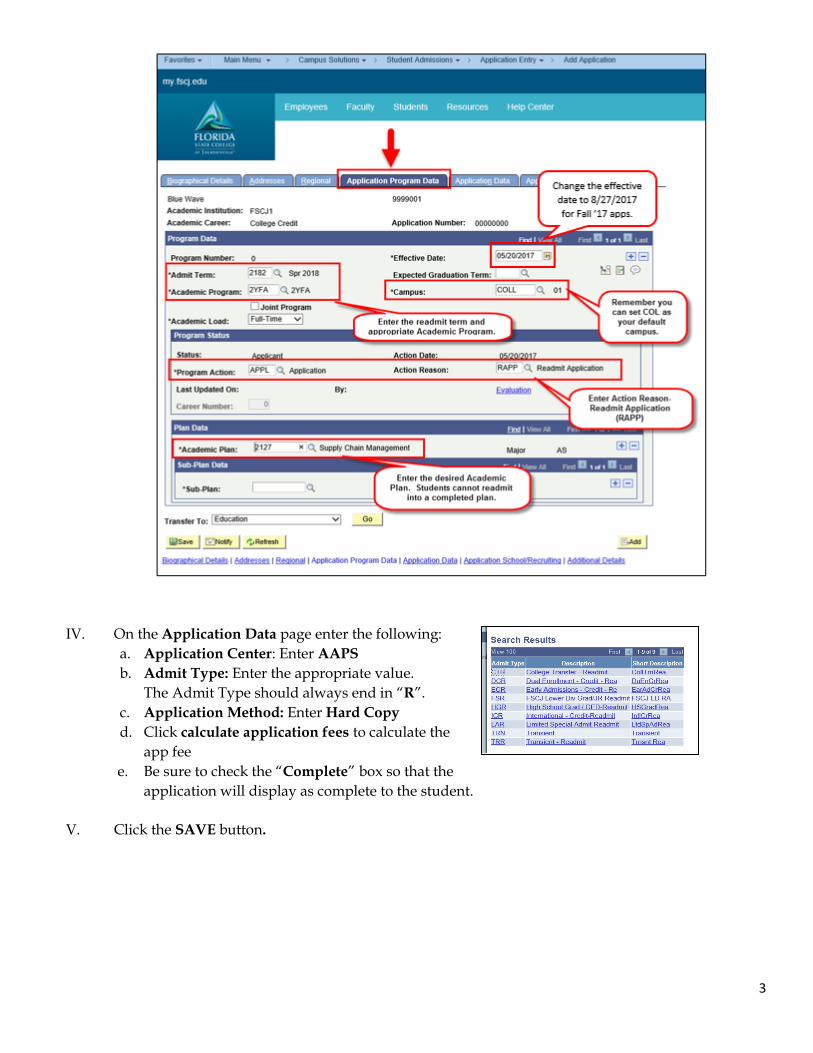
3
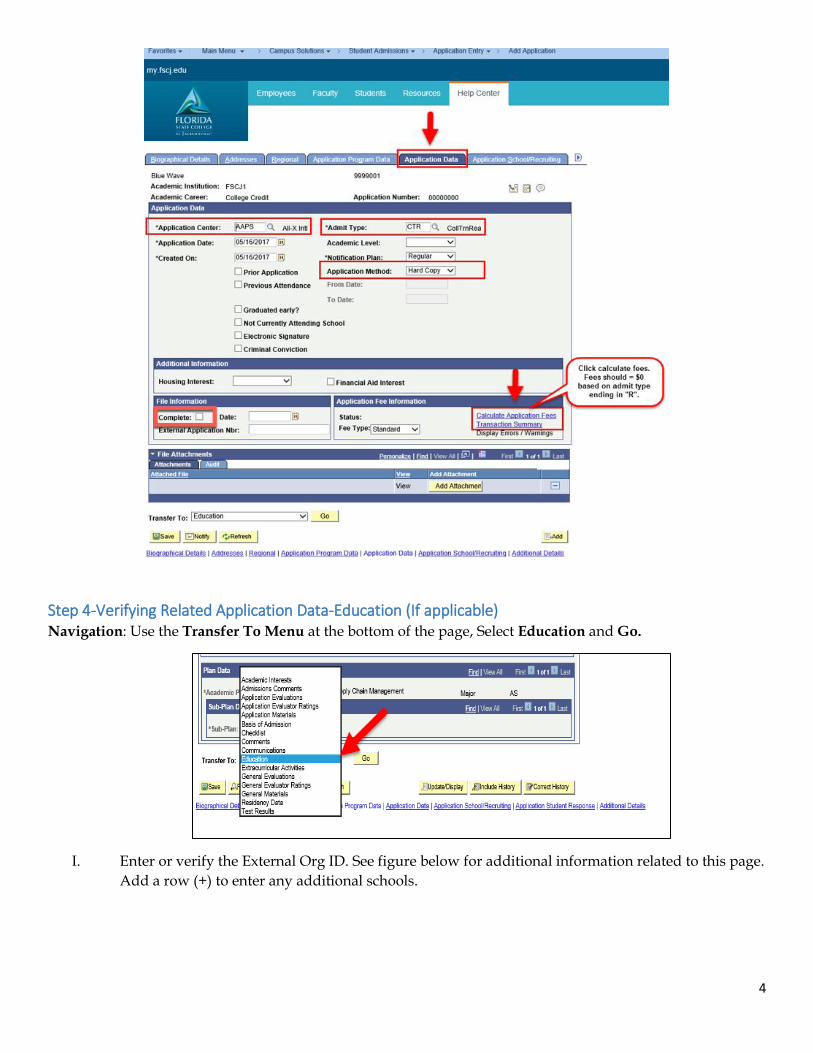
IV. On the Application Data page enter the following:
a. Application Center: Enter AAPS
b. Admit Type: Enter the appropriate value.
The Admit Type should always end in “R”.
c. Application Method: Enter Hard Copy
d. Click calculate application fees to calculate the
app fee
e. Be sure to check the “Complete” box so that the
application will display as complete to the student.
V. Click the SAVE button.
4
Step 4-Verifying Related Application Data-Education (If applicable) Navigation: Use the Transfer To Menu at the bottom of the page, Select Education and Go.
I. Enter or verify the External Org ID. See figure below for additional information related to this page.
Add a row (+) to enter any additional schools.
5
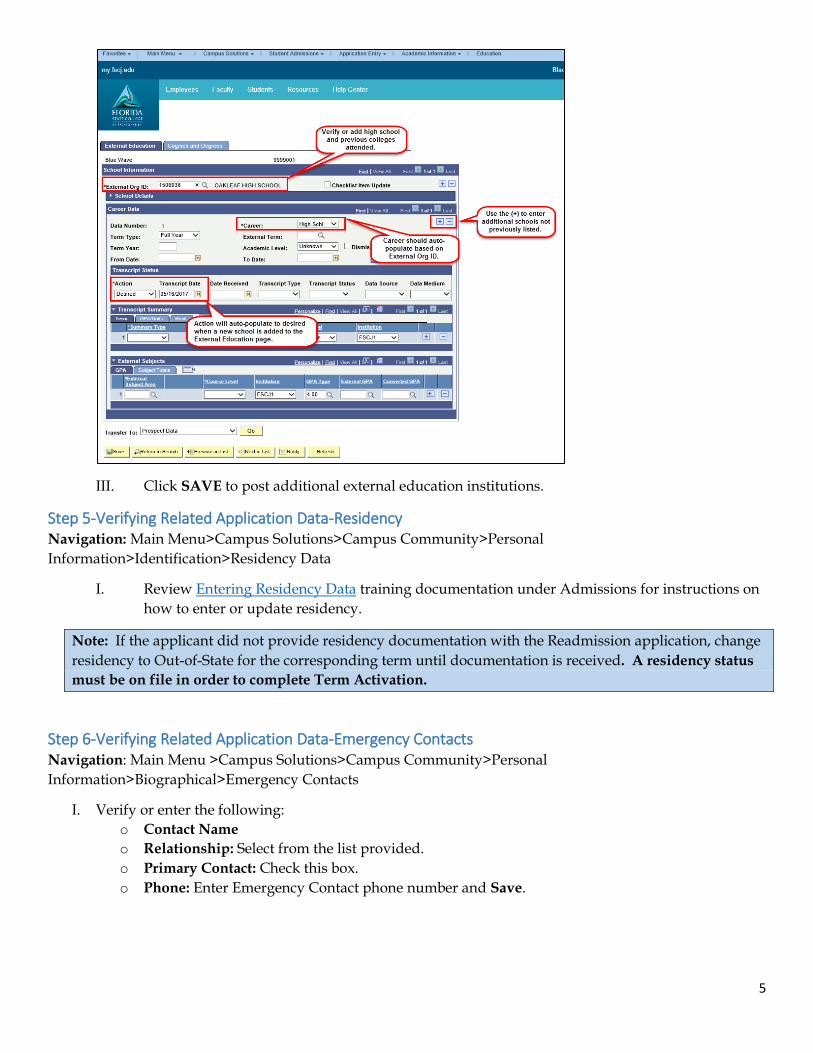
III. Click SAVE to post additional external education institutions.
Step 5-Verifying Related Application Data-Residency Navigation: Main Menu>Campus Solutions>Campus Community>Personal
Information>Identification>Residency Data
I. Review Entering Residency Data training documentation under Admissions for instructions on
how to enter or update residency.
Note: If the applicant did not provide residency documentation with the Readmission application, change
residency to Out-of-State for the corresponding term until documentation is received. A residency status
must be on file in order to complete Term Activation.
Step 6-Verifying Related Application Data-Emergency Contacts Navigation: Main Menu >Campus Solutions>Campus Community>Personal
Information>Biographical>Emergency Contacts
I. Verify or enter the following:
o Contact Name
o Relationship: Select from the list provided.
o Primary Contact: Check this box.
o Phone: Enter Emergency Contact phone number and Save.
6
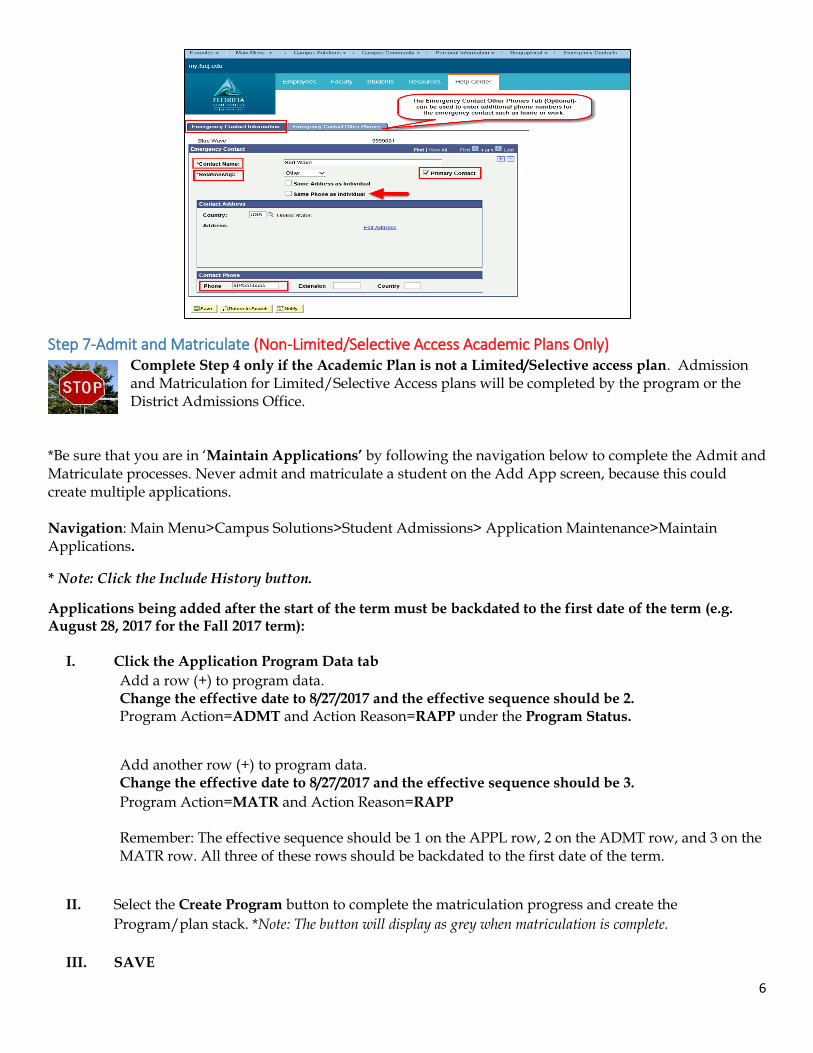
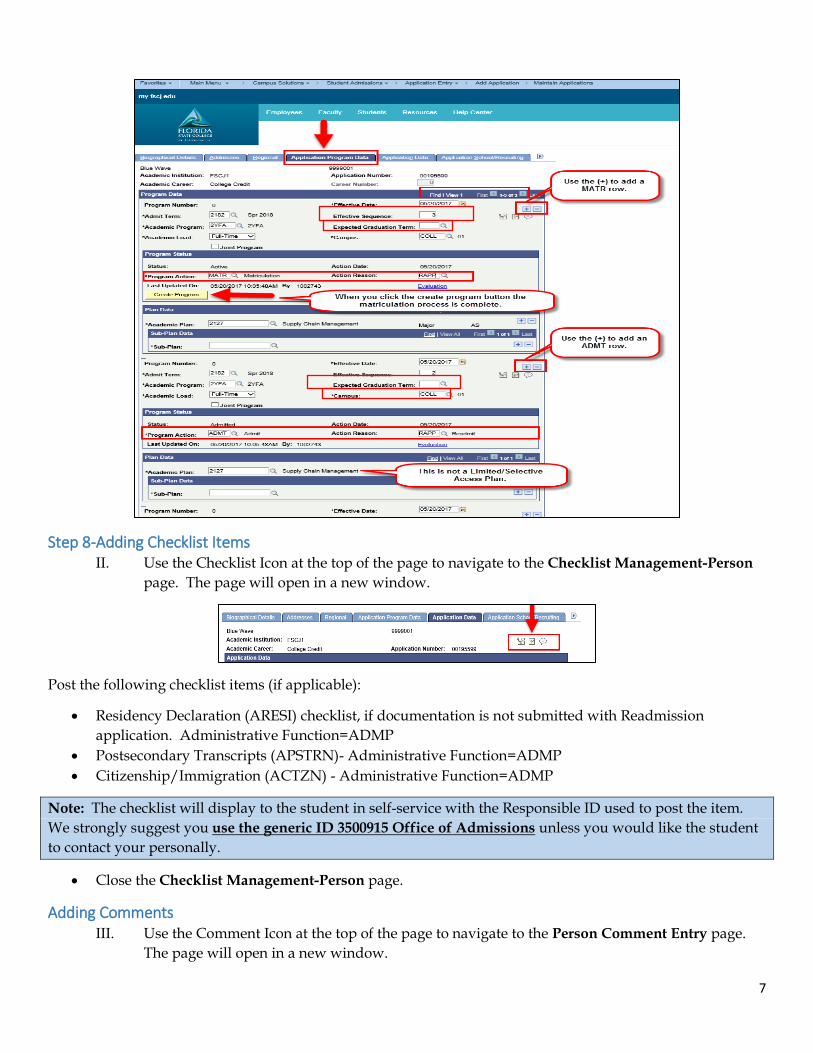
Step 7-Admit and Matriculate (Non-Limited/Selective Access Academic Plans Only) Complete Step 4 only if the Academic Plan is not a Limited/Selective access plan. Admission and Matriculation for Limited/Selective Access plans will be completed by the program or the District Admissions Office.
*Be sure that you are in ‘Maintain Applications’ by following the navigation below to complete the Admit and Matriculate processes. Never admit and matriculate a student on the Add App screen, because this could create multiple applications. Navigation: Main Menu>Campus Solutions>Student Admissions> Application Maintenance>Maintain Applications.
* Note: Click the Include History button.
Applications being added after the start of the term must be backdated to the first date of the term (e.g. August 28, 2017 for the Fall 2017 term):
I. Click the Application Program Data tab
Add a row (+) to program data. Change the effective date to 8/27/2017 and the effective sequence should be 2. Program Action=ADMT and Action Reason=RAPP under the Program Status.
Add another row (+) to program data. Change the effective date to 8/27/2017 and the effective sequence should be 3.
Program Action=MATR and Action Reason=RAPP Remember: The effective sequence should be 1 on the APPL row, 2 on the ADMT row, and 3 on the MATR row. All three of these rows should be backdated to the first date of the term.
II. Select the Create Program button to complete the matriculation progress and create the
Program/plan stack. *Note: The button will display as grey when matriculation is complete.
III. SAVE
7
Step 8-Adding Checklist Items II. Use the Checklist Icon at the top of the page to navigate to the Checklist Management-Person
page. The page will open in a new window.
Post the following checklist items (if applicable):
Residency Declaration (ARESI) checklist, if documentation is not submitted with Readmission
application. Administrative Function=ADMP
Postsecondary Transcripts (APSTRN)- Administrative Function=ADMP
Citizenship/Immigration (ACTZN) - Administrative Function=ADMP
Note: The checklist will display to the student in self-service with the Responsible ID used to post the item.
We strongly suggest you use the generic ID 3500915 Office of Admissions unless you would like the student
to contact your personally.
Close the Checklist Management-Person page.
Adding Comments III. Use the Comment Icon at the top of the page to navigate to the Person Comment Entry page.
The page will open in a new window.
8
Enter the following comments (if applicable):
IV. Florida Residency Declaration (RESID) -Administrative Function=ADMP. This requires posting
a comment before updating the residency data.
V. Citizenship/Immigration (CTZNP)- Administrative Function=ADMP
IMPORTANT: If a student answered Yes to the Safety and Security question. Enter a comment using:
ASAFINN, ASAFNR, ASAFSO, ASAFSP. This student application will need to be forwarded to our Dean of
Students.
Close the Person Comment Entry page.
*Note: The following steps are for Matriculated Students only.
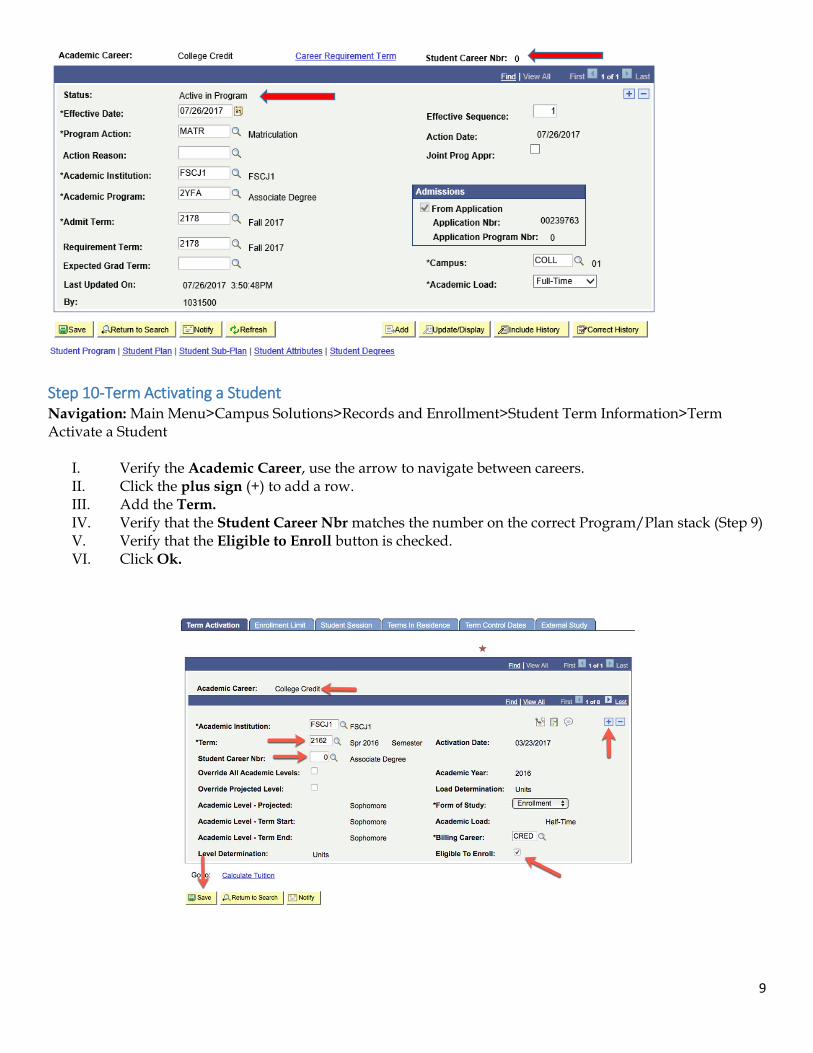
Step 9-Reviewing the Program/Plan Stack
Navigation: Main Menu>Campus Solutions>Records and Enrollment>Career and Program Information>Student Program/Plan. *Note: this page is similar to the AD AP AS in Orion.
Students may have been given an Active in Program status for a program/plan that was primary in Orion, but still needed to submit a Readmission Application. Once matriculated the student may be Active in more than one program. When term activating the student we will need to verify that we are using the correct Academic
Career and Student Career Nbr.
I. Review each program/plan stack to verify if the student already has a program/plan that is in an Active in Program status. This can be done by selecting the Next in List button at the bottom of this page.
II. If the student is active in more than one program/plan take note of the Student Career Nbr associated with that program/plan stack. This number will be used in Term Activation.
9
Step 10-Term Activating a Student Navigation: Main Menu>Campus Solutions>Records and Enrollment>Student Term Information>Term Activate a Student
I. Verify the Academic Career, use the arrow to navigate between careers. II. Click the plus sign (+) to add a row. III. Add the Term. IV. Verify that the Student Career Nbr matches the number on the correct Program/Plan stack (Step 9) V. Verify that the Eligible to Enroll button is checked. VI. Click Ok.
10
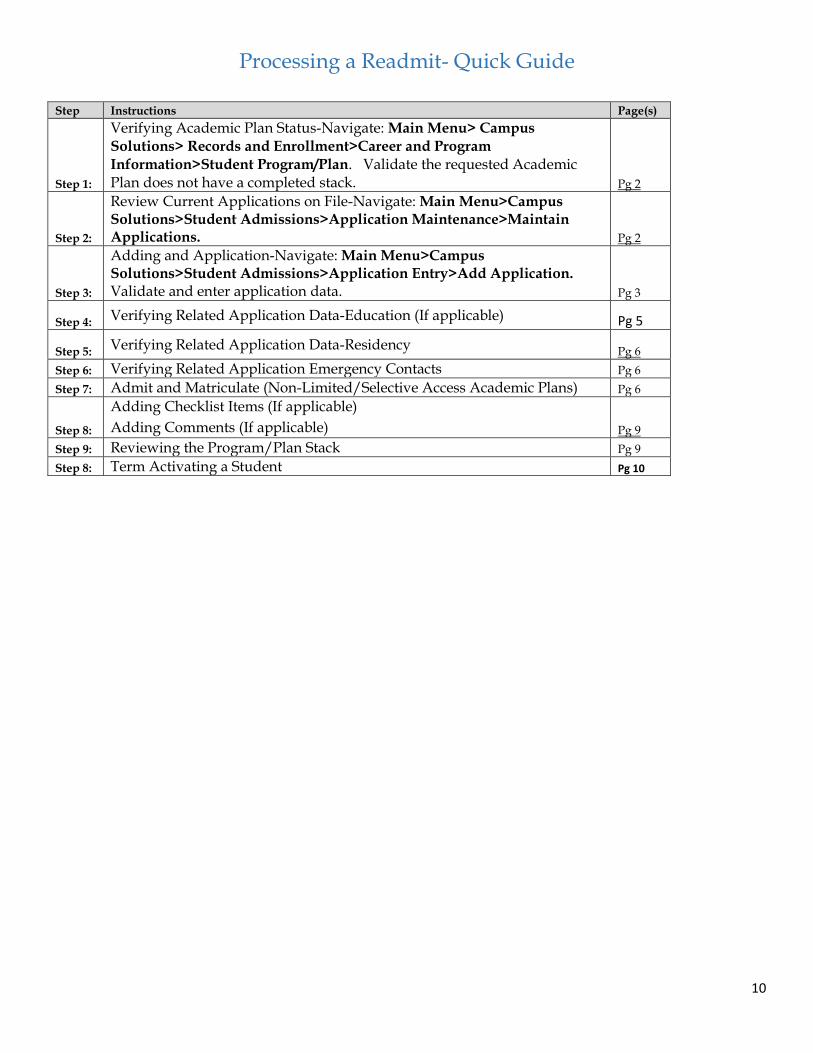
Processing a Readmit- Quick Guide
Step Instructions Page(s)
Step 1:
Verifying Academic Plan Status-Navigate: Main Menu> Campus
Solutions> Records and Enrollment>Career and Program
Information>Student Program/Plan. Validate the requested Academic Plan does not have a completed stack. Pg 2
Step 2:
Review Current Applications on File-Navigate: Main Menu>Campus Solutions>Student Admissions>Application Maintenance>Maintain Applications. Pg 2
Step 3:
Adding and Application-Navigate: Main Menu>Campus Solutions>Student Admissions>Application Entry>Add Application. Validate and enter application data. Pg 3
Step 4: Verifying Related Application Data-Education (If applicable) Pg 5
Step 5: Verifying Related Application Data-Residency Pg 6
Step 6: Verifying Related Application Emergency Contacts Pg 6
Step 7: Admit and Matriculate (Non-Limited/Selective Access Academic Plans) Pg 6
Step 8:
Adding Checklist Items (If applicable)
Adding Comments (If applicable) Pg 9
Step 9: Reviewing the Program/Plan Stack Pg 9
Step 8: Term Activating a Student Pg 10
Related Documents