Introduction to Workcenters in PeopleSoft Finance 9.2 PEOPLESOFT 9.2 JOURNAL ENTRY CONTENTS JOURNAL ENTRY NAVIGATION .......................................................................................................................... 2 JOURNAL HEADER.............................................................................................................................................. 2 STEP 1: ADD A NEW VALUE ............................................................................................................................ 3 STEP 2: JOURNAL HEADER.............................................................................................................................. 4 STEP 3: JOURNAL ATTACHMENTS ............................................................................................................... 5 STEP 4: BUSINESS PROCESS FOR JE ATTACHMENTS ............................................................................. 6 JOURNAL LINE ENTRY........................................................................................................................................... 7 STEP 5: ENTER LINE INFORMATION ........................................................................................................... 7 STEP 6: EDIT JOURNAL..................................................................................................................................... 8 SUBMIT FOR APPROVAL ...................................................................................................................................... 9 STEP 7: SUBMIT JOURNAL ENTRY ................................................................................................................ 9 STEP 8: JOURNAL APPROVAL INFORMATION ........................................................................................ 10 STEP 9: NOTIFY OTHER CAMPUS DEPARTMENTS................................................................................ 11 JOURNAL ENTRY FEATURES ............................................................................................................................. 12 STEP 10: FIND AN EXISTING VALUE .......................................................................................................... 12 STEP 11: JOURNAL ENTRY COPY ................................................................................................................ 13 STEP 12: JOURNAL ENTRY REVERSAL ...................................................................................................... 14 APPENDIX A: JE HELPFUL HINTS 9.2 ............................................................................................................. 15 APPENDIX B: COMMON CHART STRING ERRORS ...................................................................................... 16 APPENDIX C “COST TRANSFER PROCEDURES ON SPONSORED PROJECTS ...................................... 17

Welcome message from author
This document is posted to help you gain knowledge. Please leave a comment to let me know what you think about it! Share it to your friends and learn new things together.
Transcript

Introduction to Workcenters in PeopleSoft Finance 9.2
P E O P L E S O F T 9 . 2 J O U R N A L E NT R Y
CONTENTS
JOURNAL ENTRY NAVIGATION .......................................................................................................................... 2
JOURNAL HEADER .............................................................................................................................................. 2
STEP 1: ADD A NEW VALUE ............................................................................................................................ 3
STEP 2: JOURNAL HEADER .............................................................................................................................. 4
STEP 3: JOURNAL ATTACHMENTS ............................................................................................................... 5
STEP 4: BUSINESS PROCESS FOR JE ATTACHMENTS ............................................................................. 6
JOURNAL LINE ENTRY ........................................................................................................................................... 7
STEP 5: ENTER LINE INFORMATION ........................................................................................................... 7
STEP 6: EDIT JOURNAL ..................................................................................................................................... 8
SUBMIT FOR APPROVAL ...................................................................................................................................... 9
STEP 7: SUBMIT JOURNAL ENTRY ................................................................................................................ 9
STEP 8: JOURNAL APPROVAL INFORMATION ........................................................................................ 10
STEP 9: NOTIFY OTHER CAMPUS DEPARTMENTS ................................................................................ 11
JOURNAL ENTRY FEATURES ............................................................................................................................. 12
STEP 10: FIND AN EXISTING VALUE .......................................................................................................... 12
STEP 11: JOURNAL ENTRY COPY ................................................................................................................ 13
STEP 12: JOURNAL ENTRY REVERSAL ...................................................................................................... 14
APPENDIX A: JE HELPFUL HINTS 9.2 ............................................................................................................. 15
APPENDIX B: COMMON CHART STRING ERRORS ...................................................................................... 16
APPENDIX C “COST TRANSFER PROCEDURES ON SPONSORED PROJECTS ...................................... 17

PeopleSoft 9.2 Journal Entry 3.1
JOURNAL ENTRY NAVIGATION
JOURNAL HEADER
After logging in, access the Campus WorkCenter.
On the left hand side, under Links, select the dropdown arrow next to Journal Entry. Select GL Journal Entry.
PeopleSoft 9.2 Journal Entry 3.1
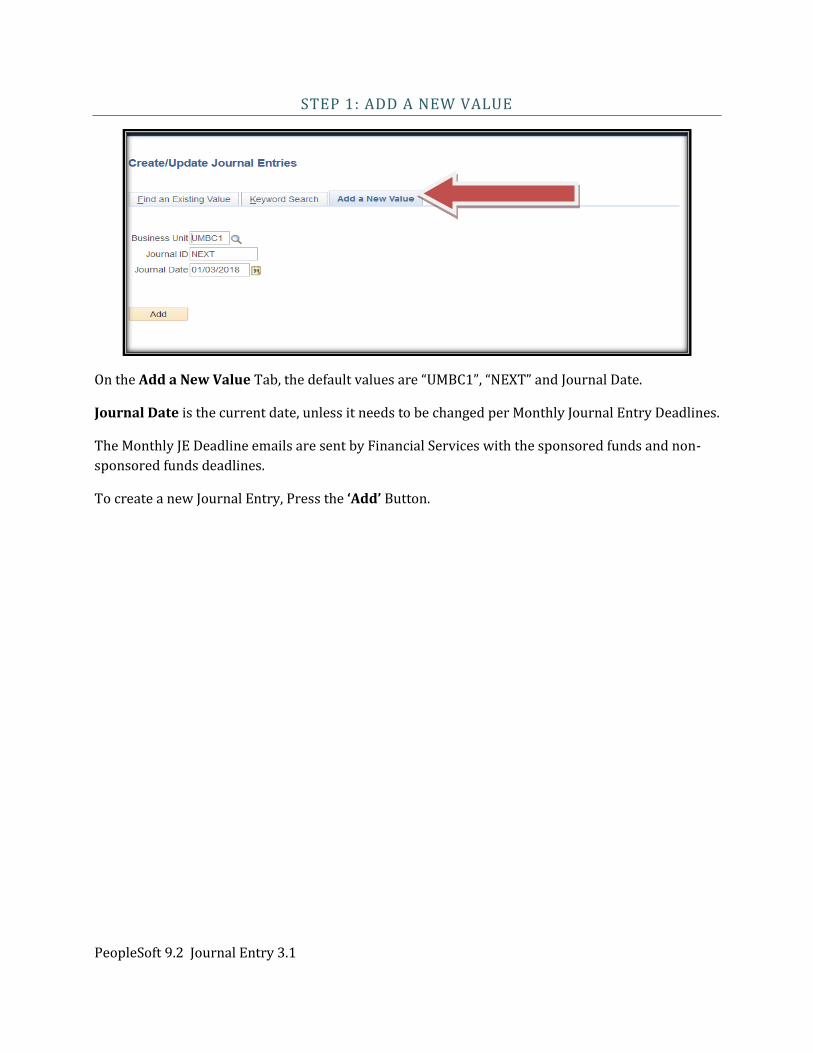
STEP 1: ADD A NEW VALUE
On the Add a New Value Tab, the default values are “UMBC1”, “NEXT” and Journal Date.
Journal Date is the current date, unless it needs to be changed per Monthly Journal Entry Deadlines.
The Monthly JE Deadline emails are sent by Financial Services with the sponsored funds and non-
sponsored funds deadlines.
To create a new Journal Entry, Press the ‘Add’ Button.

PeopleSoft 9.2 Journal Entry 3.1
STEP 2: JOURNAL HEADER
This screen is the Journal Header. The Long Description, next to the arrow, holds 254 characters. This is where you type the purpose of the Journal.
A new 9.2 Feature in the Journal Entry process is Attachments, which will save the backup
supporting the journal in PeopleSoft Finance. This can be viewed by anyone on campus, so please
avoid sensitive data, such as social security numbers.
Long Description is the *ONLY* field in this upper section to modify.
‘Attachments’ is the only link to modify here

PeopleSoft 9.2 Journal Entry 3.1
STEP 3: JOURNAL ATTACHMENTS
After clicking the Attachments Link, it will bring you to this screen.
Please leave the box next to “Show to Approver?” checked.
Please click Add Attachment.
1.1 Browse button to select File, select the file, Click Open button to select.
1.2 Click Upload button to attach.
1.3 For 1 file, click OK button. For 2 or more files, click Add Attachment again.
1.4 For each file, please enter a Description that will assist the Approver in understanding
the purpose of the attachment.

PeopleSoft 9.2 Journal Entry 3.1
STEP 4: BUSINESS PROCESS FOR JE ATTACHMENTS
Business Process for Attachments:
Attachments should be supporting information for the Approver to better understand the purpose of the transaction.
Examples of attachments:
Detail report from REX Finance
Pcard report
Grant Detail Report
Scanned Emails indicating that Department A is supporting Department B
Scanned Formal agreements indicating ongoing financial support to/from departments on journal lines.
Sponsored funding requires backup for Cost Transfers. For details and deadlines on Cost Transfers, please visit:https://cga.umbc.edu/cost-transfer-procedures-on-sponsored-projects-2
The attachment follows the Journal Entry and can be viewed by anyone on campus. Please avoid attachments with sensitive information.

PeopleSoft 9.2 Journal Entry 3.1
JOURNAL LINE ENTRY
STEP 5: ENTER LINE INFORMATION
Now that an appropriate Attachment has been included, please click on the ‘Lines’ Tab.
The next steps are to enter the Journal Line chartstring information. See “Journal Entry Helpful
Hints” at the end of this document for help with some of the chartfield data entry, including Debit or
Credit information.
Enter chartfield information by typing the information into the fields or selecting the magnifying
glass. Start with your department chartstring on line 1, because those approvers will have
the worklist items.
Now that the journal has been entered, please click ‘Save’ in the lower left hand corner. This will
change Journal ID from NEXT to a 10 digit number.

PeopleSoft 9.2 Journal Entry 3.1
STEP 6: EDIT JOURNAL
Next, Press ‘Process’ button while the ‘Edit Journal’ option is selected.
After the Edit Journal Process runs, it creates internal account numbers to auto balance by fund shown below.
To review the lines without the new 1701000 account numbers, the lines can be downloaded form the red box.
Please ignore these line with 1701000, they auto balance by fund.

PeopleSoft 9.2 Journal Entry 3.1
SUBMIT FOR APPROVAL
STEP 7: SUBMIT JOURNAL ENTRY
Since PeopleSoft Finance will house the journal and backup in the attachments, printing the
journal is NOT REQUIRED. When the Journal is free of Errors, please continue to Submitting for
Approval.
Please click the Approval Tab.
Next Click Submit button.
When the Journal is submitted for approval, it enters a “Worklist Item” to the Departmental
Approvers for the department listed on the Journal Line 1.

PeopleSoft 9.2 Journal Entry 3.1
STEP 8: JOURNAL APPROVAL INFORMATION
When the Journal is submitted for approval, it enters a “Worklist Item” to the Departmental
Approvers for the department listed on the Journal Line 1.
To see who will be approving the journals, please click on the link in the “Pending” box. This
example has one Fund Approval box, but other journals may have multiple.

PeopleSoft 9.2 Journal Entry 3.1
STEP 9: NOTIFY OTHER CAMPUS DEPARTMENTS
Business Process for “Notify”: Colleges or Units may have business processes to include more than one approver to notify. This Notify Button may be used to accommodate this business process. It can be used in conjunction with the “Attachments” feature.
There is also a step that an Approver can take, which is in the Approver’s Instructions.
Update the Workflow Notification Email:
1. To:
2. Subject
3. Message

PeopleSoft 9.2 Journal Entry 3.1
JOURNAL ENTRY FEATURES
STEP 10: FIND AN EXISTING VALUE
Check the status of your keyed journals via “Find an Existing Value” menu. This also has a new
feature to search by your USER NAME or Campus ID.
Search criteria can be saved

PeopleSoft 9.2 Journal Entry 3.1
STEP 11: JOURNAL ENTRY COPY
On occasion, it is necessary to COPY or REVERSE a journal
To COPY a Journal,
1. While in the Lines tab of a journal:
2. Select the Process drop down box to be ‘Copy Journal’.
3. Click Process
To COPY the original Journal, please check two boxes.
A. Recalculate Budget Data
B. Save Journal in Incomplete Status
C. Then click OK button.
PLEASE REMEMBER TO ATTACH BACKUP TO THE “NEW COPY” of the JOURNAL.

PeopleSoft 9.2 Journal Entry 3.1
STEP 12: JOURNAL ENTRY REVERSAL
To COPY with the objective of making a REVERSAL of a previous JE:
1. While in the Lines tab of a journal:
2. Select the Process drop down box to be ‘Copy Journal’.
3. Click Process
Check the boxes below for:
A. Reversal Signs Button
B. Recalculate Budget Data
C. Save Journal in Incomplete Status
Once the original journal has been Reversed and recopied, please update the
1. Journal Header: Long Description to explain why it is being reversed
2. Journal Lines: Line Description shown on these instructions (if needed).
3. Journal Lines: Reference shown on these instructions (optional).
4. These appear on the General Ledger Detail reports so if you indicate that a journal is a
REVERSAL and REDO of a previous journal, it will make research easier.
PLEASE REMEMBER TO ATTACH BACKUP TO THE “NEW COPY” of the JOURNAL.

PeopleSoft 9.2 Journal Entry 3.1
APPENDIX A: JE HELPFUL HINTS 9.2
Field Description Values
Base Amount
Balance Sheet Accounts (Usually Central Use) 1,2,3 CR (-) DR (+)
Revenue Accounts (Campus Wide) 4, 5 CR (-) increase revenue DR (+) decrease revenue
Expense Accounts (Campus Wide) 6,7,8 CR (-) decrease expense DR (+) increase expense
Fund
1111 State Fund
* Journals with 1114,1253,1263 will be
reviewed by OCGA.
1112 Auxiliary Fund
1113 DRIF or Revolving Fund
1114* Cost Share fund for Grant
1253* Grant Fund
1263* Financial Aid
Prog FIN
Revenue Accounts / Balance Sheet Must be 000
Expense Accounts Never be 000
Expense Accounts – Fund 1112 special rule
Must be 081 for expenses
Dept
Use Magnifying class to search. e.g Enter 10% in the field then press ‘Look Up’
Be careful typing Dept ID.
Account
Use Magnifying class to search. e.g Enter 4, 5, 6, or 7 in the field Account field then press ‘Look Up’
PC BUS Unit
Needed for Projects
Blank if there is NO project
UMBC1 for UMBC projects
CAPPJ* for Facilities Mgmt
Project Use Magnifying class to search. FYI: List will only appear if UMBC1 is in PC BUS Unit.
Activity Use Magnifying class to search. Needed if Project field is populated
Journal Line Description
Enter information that will be helpful on Detail Reports – 30 characters long. See Appendix A
References
Enter information that will be helpful on Detail Reports – 10 characters long.

PeopleSoft 9.2 Journal Entry 3.1
APPENDIX B: COMMON CHART STRING ERRORS
Error Description What to do?
COMMON
ERRORS
FIX_STRING Project ID does not match either Fund or Department or Prog Fin
1) Please run this query to determine correct fund:
UM_GL_VALID_FIX_STRING_COMBO
Error Description What to do?
COMMON
ERRORS
NO1111FUND or NO1112FUND
Department has no State Funds (1111) or
Auxiliary Funds (1112)
Ensure there is no typo, then contact department. If Dept has budgeted Fund 1111 or 1112, open RT ticket in Financial Services & Accounting Queue.
FUND_PROJE E.g. Fund 1113 has been used without a PC BUS Unit or Project ID.
Confirm the chartstring.
UM_PROGFIN The Prog FIN selected is intended for a different account type.
Change the Prog FIN based on the Helpful Hints.
Error Description What to do?
UN-COMMON
ERRORS
ACCT_FUND A Fund is required for this transaction.
Enter the fund.
FS_DBT_SRV
Debt Service requires specific chartstring and departments.
Please review Ledger Inquiry for the previously accepted chartstrings.
FS_PAYROLL The account selected is a system generated payroll department and is not available for manual journal entries.
Please check Tree Viewer for the Tree CC_ACCOUNTS. Look under the “6015099 Fringes – Manual Calc” for correct manual account.
UM_DPT_REQ Department required. Enter a Department ID.
UM_INVL_DP The department or account selected is a roll up value, which means it cannot have transactions directly charged to it.
Please check Tree Viewer to review CC_ACCOUNTS or CC_DEPT
UM_INVL_FD Invalid Field.
UM_ROLLUP
The department or account selected is a roll up value, which means it cannot have transactions directly charged to it.
Please check Tree Viewer to review CC_ACCOUNTS or CC_DEPT
UM_SOF_X Field Source of Funds (SOF) is no longer used.
Remove value from SOF. Customize JE screen to exclude SOF.

PeopleSoft 9.2 Journal Entry 3.1
APPENDIX C “COST TRANSFER PROCEDURES ON SPONSORED PROJECTS
Printed for class, but also available on OCGA Website: https://cga.umbc.edu/cost-transfer-procedures-on-sponso fred-projects-2/
Related Documents