Sri Adichunchanagiri Shikshana Trust(R) SJB INSTITUTE OF TECHNOLOGY BGS HEALTH AND EDUCATION CITY Kengeri, Bengaluru-560060 7 th SEMESTER POWER ELECTRONICS LAB MANUAL (10ECL78) DEPARTMENT OF ELECTRONICS AND COMMUNICATION SJB INSTITUTE OF TECHNOLOGY BENGALURU -560060 NAME : ________________________ USN : ________________________ SECTiON : ________________________

PE Manual 10ECL78
Oct 28, 2015
Lab manual.
Welcome message from author
This document is posted to help you gain knowledge. Please leave a comment to let me know what you think about it! Share it to your friends and learn new things together.
Transcript

Sri Adichunchanagiri Shikshana Trust(R)
SJB INSTITUTE OF TECHNOLOGY BGS HEALTH AND EDUCATION CITY
Kengeri, Bengaluru-560060
7th SEMESTER
POWER ELECTRONICS LAB MANUAL
(10ECL78)
DEPARTMENT OF ELECTRONICS AND COMMUNICATION
SJB INSTITUTE OF TECHNOLOGY BENGALURU -560060
NAME : ________________________
USN : ________________________
SECTiON : ________________________

Power Electronics Lab Manual-10ECL78 2013-14
CONTENTS
Sl.
No. Topics Page No.
1 List of Experiments 1
2 Examination Questions 2
3 Component and devices 4
4 Static characteristics of SCR 7
4 Static characteristics of DIAC 9
5 Static characteristics of Power MOSFET 11
6 Static characteristics of Power IGBT 13
7 RC triggering circuit 15
8 AC voltage controller 18
9 UJT firing circuit 20
10 Controlled rectifier with R & RL load 22
11 Commutation circuits 24
12 Inverters 26
13 DC Chopper (Jones chopper) 28
14 Speed control of DC motor 30
15
16
17
18
Digital Firing circuit
Speed Control of Stepper Motor
Introduction of ORCAD 16.5 Use, circuit design
& Simulation
Converter Circuits Using ORCAD Pspice
32
33
36
41
19 Theory & Working operations 53
20 Viva Questions 58

Power Electronics Lab Manual-10ECL78 2013-14
1 Dept. of ECE, SJBIT, Bangalore.
POWER ELECTRONICS LAB (10ECL78)
List of VTU Experiments:
1. Static characteristics of SCR & DIAC.
2. Static characteristics of MOSFET & IGBT.
3. Controlled HWR & FWR using RC triggering
4. SCR turn off circuits using (i) LC circuits (ii) Auxiliary Commutation.
5. Synchronized UJT firing circuit for HWR & FWR circuits.
6. Generation of firing signals for thyristors /TRIACs using digital circuits /
Microprocessors.
7. AC voltage controller using TRIAC-DIAC combination.
8. Single phase Fully Controlled Bridge Converter with R & RL loads.
9. Voltage (Impulse) commutated chopper-both frequency & variable frequency
operations.
10. Speed control of a separately excited DC motor.
11. Speed control of Universal motor & single-phase induction motor.
12. Parallel/Series Inverters.
13. Speed control of a stepper motor.

Power Electronics Lab Manual-10ECL78 2013-14
2 Dept. of ECE, SJBIT, Bangalore.
EXAMINATION QUESTIONS
1. Obtain the VI characteristics of a given SCR by conducting a suitable experiment & find
the holding current, latching current & forward resistance.
2. Conduct a suitable experiment to obtain the VI characteristics of a unidirectional four-
layer device for two gate currents. Determine breakdown voltage & holding current, for
both the cases.
3. Conduct a suitable experiment to obtain the VI characteristics of the Bi-directional switch
experimentally. Determine the holding current & break down voltage in 1st & 3
rd
coordinate.
4. Conduct the suitable experiment to draw VI characteristics of the given IGBT. Using that
find the threshold voltage & Trans- resistance of the IGBT.
5. Conduct a suitable experiment to draw VI characteristics of the given MOSFET. Using
that find the threshold voltage & drain resistance of the MOSFET.
6. Design and conduct to obtain triggering input voltage by using RC triggering circuit for
HWR.
7. Design and conduct to obtain triggering input voltage by using RC triggering circuit for
FWR
8. Design and conduct an experiment to obtain synchronized triggering pulse to turn- on
SCR in Half wave with resistive load. Show the load voltage and trigger pulse
waveforms.
9. Design and conduct an experiment to obtain synchronized triggering pulse to turn- on
SCR in Full wave with resistive load. Show the load voltage and trigger pulse
waveform.
10. Conduct a suitable experiment on Half controlled bridge rectifier with resistive
load/RL load. Plot the output DC voltage V/S delay angle graph.
11. Conduct a suitable experiment to obtain output voltage waveform of full controlled
bridge using R-L load. Plot the output DC voltage V/S delay angle graph. i) Without
freewheeling diode, ii) With freewheeling diode.
12. Conduct the suitable experiment to obtain output voltage waveform using jones chopper.

Power Electronics Lab Manual-10ECL78 2013-14
3 Dept. of ECE, SJBIT, Bangalore.
13. Conduct the suitable experiment to turn off SCR using LC circuit and Auxiliary
Commutation.
14. Rig up and test the chopper circuit to produce variable DC output. Draw the output
voltage V/S duty cycle graph.
15. Conduct a suitable experiment on a chopper to convert constant DC voltage to variable
DC voltage with a duty cycle of ------ Check the result with theoretical value.
16. Conduct a suitable experiment to obtain AC output using Series Inverter.
17. Conduct a suitable experiment to verify the operating principle of a Parallel Inverter.
18. Setup the circuit to control RMS voltage across incandescent lamp using Triac- Diac
combination, plot the graph of load voltage V/S delay angle
19. Conduct a suitable experiment to determining the speed control of DC motor using semi
converter and plot delay angle V/S speed.
20. Conduct a suitable experiment to determine the speed control of a universal motor using
AC voltage controller.
21. Rig up test a chopper circuit to variable DC output using Digital firing circuit, draw the
output voltage V/S duty cycle graph.
Power Electronics Lab Manual-10ECL78 2013-14
4 Dept. of ECE, SJBIT, Bangalore.
G (Gate)
A K
(Anode) (Cathode)
G (Gate)
MT2 MT1 (Main (Main terminal-2) terminal-1)
K A G
MT1 MT2 G
D (Drain)
G
Gate S (Source) G D S
C (Collector)
G
Gate
E (Emitter) G C E
MT2 MT1 MT2 MT1
(Main (Main OR
terminal-2) terminal-1)
B2 (Base-2)
E
(Emitter)
B1 (Base-1)
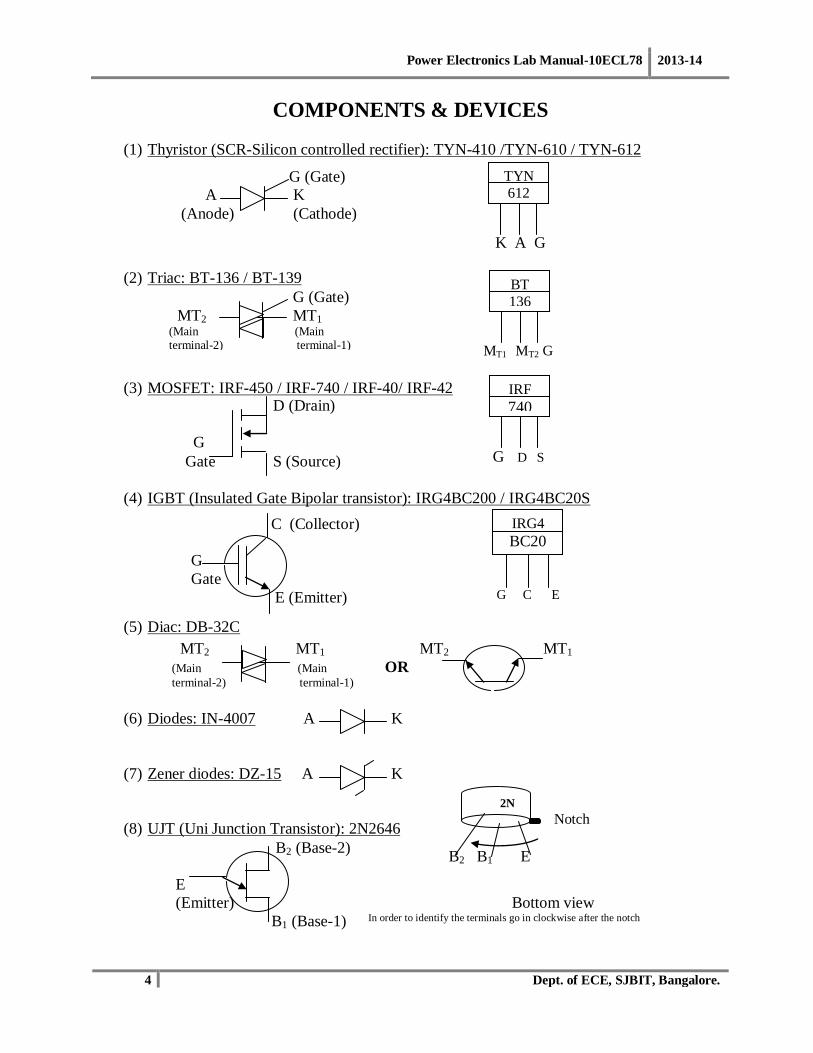
COMPONENTS & DEVICES
(1) Thyristor (SCR-Silicon controlled rectifier): TYN-410 /TYN-610 / TYN-612
(2) Triac: BT-136 / BT-139
(3) MOSFET: IRF-450 / IRF-740 / IRF-40/ IRF-42
(4) IGBT (Insulated Gate Bipolar transistor): IRG4BC200 / IRG4BC20S
(5) Diac: DB-32C
(6) Diodes: IN-4007 A K
(7) Zener diodes: DZ-15 A K
(8) UJT (Uni Junction Transistor): 2N2646
TYN
612
BT
136
IRF
740
IRG4
BC20
Bottom view In order to identify the terminals go in clockwise after the notch
B2 B1 E
2N
26
46 Notch

Power Electronics Lab Manual-10ECL78 2013-14
5 Dept. of ECE, SJBIT, Bangalore.
Primary
winding
230V
1:1:1 pulse
Transformer
- +
12V
0
12V
10mH - 5mH - 0 - 5mH - 10mH
115V
60V
30V
0
30V
60v
115V
(9) Isolation Transformer: 230V/115V-60V-30V-0-30V-60V-115V with 2A
(10) Pulse Transformer-1:1 and 1:1:1
In order to identify the primary & secondary windings, check the continuity.
(11) Power (Wattage) resistors: 100/5W, 500/5W, 1K/5W
(12) Potentiometers (POTS): 4.7K, 10K, 100K, 1M
(13) Rheostats: 50/25W, 100/25W, 200/25W.
(14) Capacitors: Disc type:0.1F, 0.01F,
Electrolytic type:1F, 10F,47F, 6.8F/100V & 100F/100V
High voltage handling capacitor: 100nF/200V, 100nF/600V
(15) Step down Transformers:
230V / 12V-0-12V (500mA),
230V / 24V-0-24V
(16) Inductors: 10mH, 100mH, 250H, 500H:
Mutual inductor coil:
Secondary windings
with different tapings
1:1 pulse
Transformer
Green coloured
(Thick) Resistors 500
Polarity will
be there
Primary
winding 230V
Secondary
winding

Power Electronics Lab Manual-10ECL78 2013-14
6 Dept. of ECE, SJBIT, Bangalore.
Symbol Physical appearance
(17) Fuses: 1A, 2A, 5A & 6A
(18) Single phase converter Triggering unit:
(19) DC Chopper Triggering unit:
(20) DC Motor: Separately Excited Dc Motor:
(21) Induction Motor:
1 Converter Triggering
unit: 900
ON / OFF 1200 600
Trigger O/Ps 1500
300
G K T1
1800 00
T1’ Test Points
T2 Gnd 1 2 3
T2’ 4 5 6 7
POWER DC Chopper Triggering unit:
10% 90% Min Max DUTY CYCLE FREQUENCY
ON / OFF
Trigger O/Ps
G K
Test Points
TMAIN Gnd 1 2 3
TAUX 4 5 6 7
POWER
M Armature
side
Field side
M

Power Electronics Lab Manual-10ECL78 2013-14
7 Dept. of ECE, SJBIT, Bangalore.
EXPERIMENT-1
Static characteristics of SCR
AIM :- a) To Plot the VI characteristics of SCR.
b) To obtain the device parameters.
COMPONENTS REQUIRED: SCR (TYN-612), Resistors, Milli-ammeters (0-50mA,0-100mA),
Voltmeter, Power supplies & connecting board.
CIRCUIT DIAGRAM:-
PROCEDURE:
(1) Make the connections as shown in the figure. (2) Keep the gate current (IG) at a constant value (say 5mA).
(3) Now vary the anode supply voltage (VAA) in steps.
(4) Correspondingly note down the ammeter (IA) & Voltmeter (VAK) readings, till the SCR turns on, which can be observed by sudden increase in anode current & drop in anode to cathode voltage.
Readings are tabulated.
(5) Repeat the above procedure for different values of gate currents & plot the graph.
(6) From the graph find out Forward Break-over voltage (VFBO) & the forward resistance of the SCR.
1k (0-50mA)
A
IG VGG
0-30V
(0-100mA) 500 / 5W
A
V
IA
VAK (0-60V )
A
K G VAA 0-30V
TYN- 612
TYN
612
K A G
SCR IA
IL
IH
V-I (Static) Characteristics of SCR:
VFBO VAK
VKA VRBO
-IA
Forward Blocking
Region
Reverse Blocking
Region
Breakdown
Region
Forward
Conduction
Region
IG3 > IG2 > IG1
IG2 > IG1
IG1 = 0
Power Electronics Lab Manual-10ECL78 2013-14
8 Dept. of ECE, SJBIT, Bangalore.
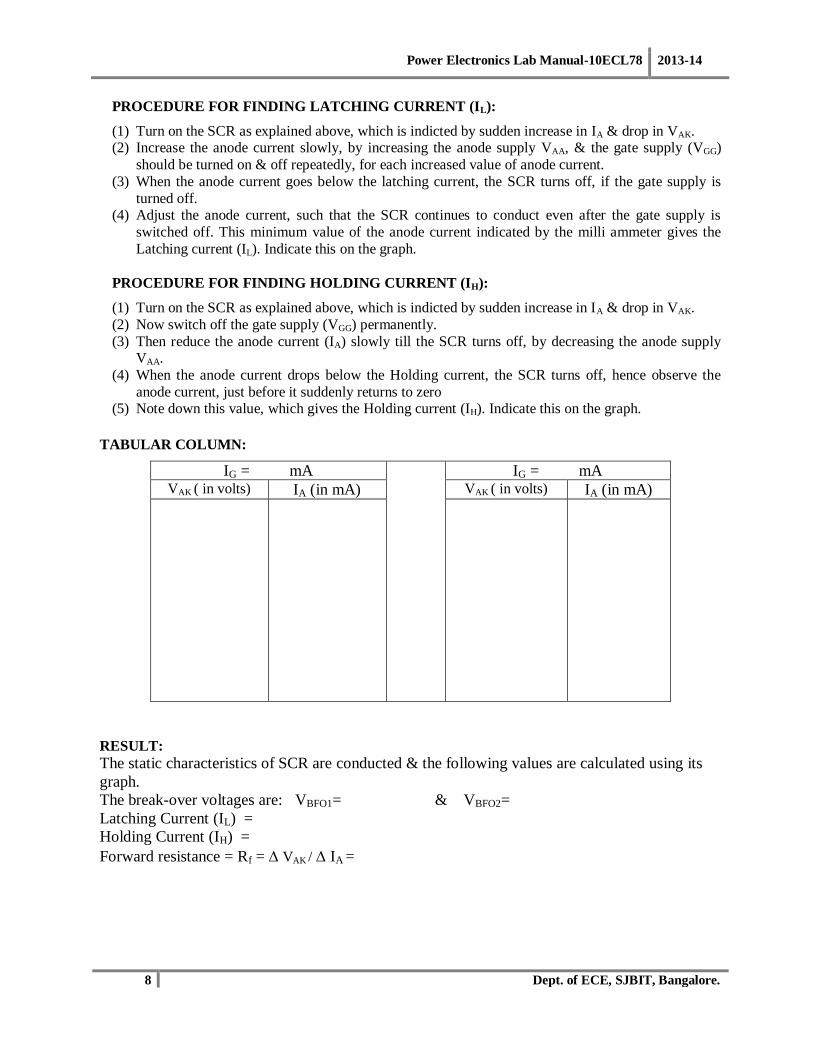
PROCEDURE FOR FINDING LATCHING CURRENT (IL):
(1) Turn on the SCR as explained above, which is indicted by sudden increase in IA & drop in VAK. (2) Increase the anode current slowly, by increasing the anode supply VAA, & the gate supply (VGG)
should be turned on & off repeatedly, for each increased value of anode current.
(3) When the anode current goes below the latching current, the SCR turns off, if the gate supply is
turned off. (4) Adjust the anode current, such that the SCR continues to conduct even after the gate supply is
switched off. This minimum value of the anode current indicated by the milli ammeter gives the
Latching current (IL). Indicate this on the graph.
PROCEDURE FOR FINDING HOLDING CURRENT (IH):
(1) Turn on the SCR as explained above, which is indicted by sudden increase in IA & drop in VAK.
(2) Now switch off the gate supply (VGG) permanently.
(3) Then reduce the anode current (IA) slowly till the SCR turns off, by decreasing the anode supply VAA.
(4) When the anode current drops below the Holding current, the SCR turns off, hence observe the
anode current, just before it suddenly returns to zero (5) Note down this value, which gives the Holding current (IH). Indicate this on the graph.
TABULAR COLUMN:
IG = mA IG = mA VAK ( in volts) IA (in mA) VAK ( in volts) IA (in mA)
RESULT: The static characteristics of SCR are conducted & the following values are calculated using its
graph.
The break-over voltages are: VBFO1= & VBFO2=
Latching Current (IL) =
Holding Current (IH) =
Forward resistance = Rf = VAK / IA =

Power Electronics Lab Manual-10ECL78 2013-14
9 Dept. of ECE, SJBIT, Bangalore.
EXPERIMENT-2
Static characteristics of DIAC
AIM:- To Plot the VI characteristics of DIAC.
COMPONENTS REQUIRED: DIAC (BT-136), Milli-ammeters (0-100mA), Power supplies &
connecting board.
CIRCUIT DIAGRAM:-
MT2 MT1 (Main (Main
terminal-2) terminal-1)
V-I Characteristics of DIAC:-

Power Electronics Lab Manual-10ECL78 2013-14
10 Dept. of ECE, SJBIT, Bangalore.
Procedure:
1. Connect the circuit as per the circuit diagram.
2. Change the voltage Vs in steps till 30V and observe VB01, the start of break over voltage.
3. Change the voltage Vs in steps in the negative direction till -30V and observe VB02, the start
of break over voltage.
4. Note down the voltage Vo and Current I and plot the graph.
Tabular Column:
Mode-I : Mode-III : Vo ( in volts) I (in mA) V0( in volts) I (in mA)
RESULT:-
The static characteristic of DIAC is conducted & the following values are calculated using its
graph.
The break-over voltages are : VBO1=
VBO2=
Power Electronics Lab Manual-10ECL78 2013-14
11 Dept. of ECE, SJBIT, Bangalore.
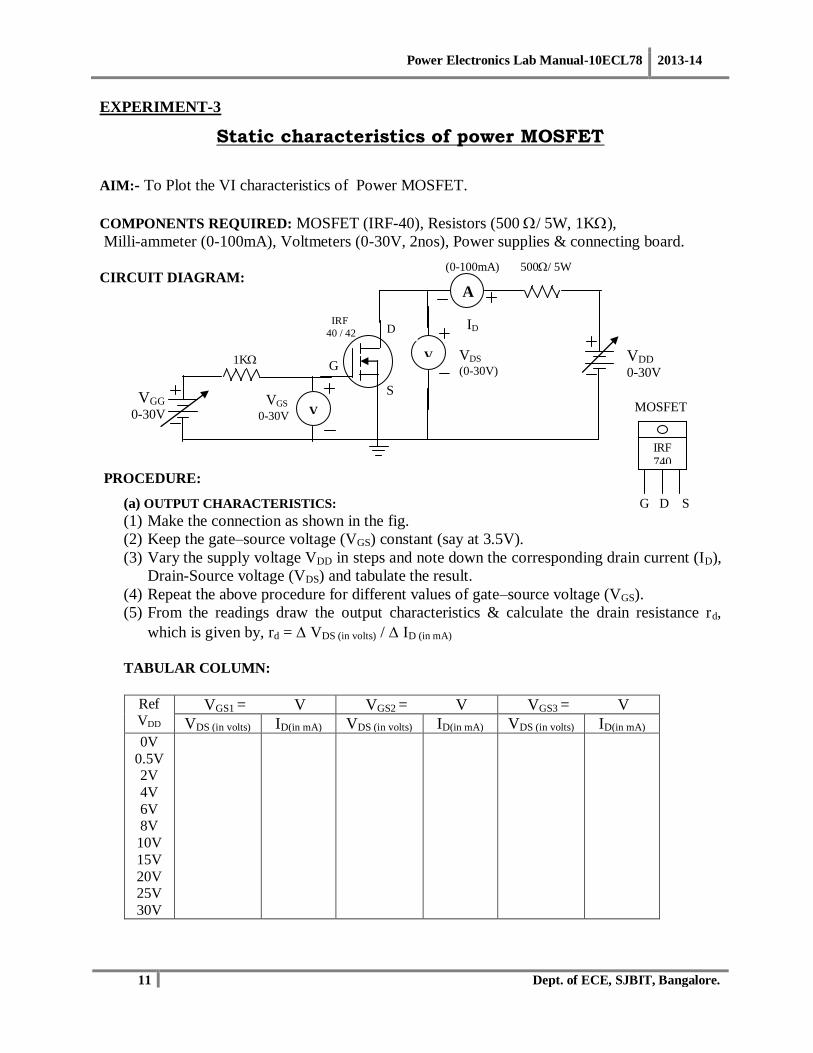
EXPERIMENT-3
Static characteristics of power MOSFET
AIM:- To Plot the VI characteristics of Power MOSFET.
COMPONENTS REQUIRED: MOSFET (IRF-40), Resistors (500 / 5W, 1K),
Milli-ammeter (0-100mA), Voltmeters (0-30V, 2nos), Power supplies & connecting board.
CIRCUIT DIAGRAM:
PROCEDURE:
(a) OUTPUT CHARACTERISTICS:
(1) Make the connection as shown in the fig.
(2) Keep the gate–source voltage (VGS) constant (say at 3.5V).
(3) Vary the supply voltage VDD in steps and note down the corresponding drain current (ID),
Drain-Source voltage (VDS) and tabulate the result.
(4) Repeat the above procedure for different values of gate–source voltage (VGS).
(5) From the readings draw the output characteristics & calculate the drain resistance rd,
which is given by, rd = VDS (in volts) / ID (in mA)
TABULAR COLUMN:
Ref VDD
VGS1 = V VGS2 = V VGS3 = V
VDS (in volts) ID(in mA) VDS (in volts) ID(in mA) VDS (in volts) ID(in mA) 0V
0.5V 2V
4V
6V 8V
10V
15V
20V 25V
30V
G D S
IRF
740
MOSFET VGG
0-30V
1K
VGS
0-30V
(0-100mA) 500/ 5W
A
V
ID
VDS (0-30V)
D
S
G
IRF
40 / 42
V
VDD 0-30V

Power Electronics Lab Manual-10ECL78 2013-14
12 Dept. of ECE, SJBIT, Bangalore.
b) TRANSFER CHARACTERISTICS:
(1) Make the connection as shown in the fig.
(2) Keep the Drain–source voltage (VDS) constant (say at 10V). (3) Vary the gate supply voltage VGG in steps and note down the corresponding drain current (ID),
Gate-Source voltage (VGS) and tabulate the result.
(4) Repeat the above procedure for different values of Drain–source voltage (VDS).
(6) From the readings draw the transfer characteristics & calculate the trans-conductance gm, which is
given by gm = ID (in mA) /VGS (in volts)
TABULAR COLUMN:
Ref
VGG VDS1 = 5 V VDS2 = 8 V
VGS (in volts) ID(in mA) VGS (in volts) ID(in mA)
RESULT:- The static characteristics of MOSFET is conducted & the following values are calculated using its graph.
(a) Drain resistance = rd = VDS (in volts) / ID(in mA) =
(b) Trans-conductance = gm = ID(in mA) /VGS (in volts) = mhos
(c) Amplification factor = = rd * gm =
(d) VGS(th)=Threshold voltage = V
ID
(in mA)
VT VDS (in volts)
VGS4
VGS3
VGS2
VGS1
Active region
Cut-off region
VGS(th) VGS (in volts)
ID (in mA)
Transfer Characteristics
of MOSFET

Power Electronics Lab Manual-10ECL78 2013-14
13 Dept. of ECE, SJBIT, Bangalore.
EXPERIMENT-4
Static characteristics of power IGBT
AIM:- To Plot the VI characteristics of Power IGBT.
COMPONENTS REQUIRED: IGBT (IRG4BC200), Resistors (500 / 5W, 1K),
Milli-ammeter (0-100mA), Voltmeters (0-30V, 2nos), Power supplies & connecting board.
CIRCUIT DIAGRAM:
PROCEDURE:
(a) OUTPUT CHARACTERSTICS.
(1) Make the connection as shown in the fig.
(2) Keep the Gate–Emitter voltage (VGE) constant ( say at 5V).
(3) Vary the supply voltage VCC in steps and note down the corresponding collector current
(IC) & the Collector-Emitter voltage (VCE) and tabulate the result.
(4) Repeat the above procedure for different values of Gate–Emitter voltage (VGE).
(5) From the readings draw the output characteristics & calculate the Collector resistance rC,
which is given by, rC = VCE (in volts) / IC (in mA)
TABULAR COLUMN:
Ref
VGG VGE1 = V VGE2 = V
VCE (in volts) IC (in mA) VCE (in volts) IC (in Ma) 0V
0.5V
2V
4V
6V
8V 10V
15V
20V
25V
30V
VGG 0-30V
IC
(in mA)
VT VCE (in volts)
VGE4 = 5.2V
VGE3 = 5.15V
VGE2 = 5.1V
VGE1 = 5.05V
G C E
IRG4
BC200
0
IGBT
1K
VGE
0-10V
(0-100mA) 500/ 5W
A
V
IC
VCE (0-30V)
C
E
G
IRG4
BC-200
V
VCC 0-30V
IGBT

Power Electronics Lab Manual-10ECL78 2013-14
14 Dept. of ECE, SJBIT, Bangalore.
(b) TRANSFER CHARACTERISTICS:
(1) Make the connection as shown in the fig.
(2) Keep the Collector–Emitter voltage (VCE) constant (say at 10V).
(3) Vary the gate supply voltage VGG in steps and note down the corresponding collector
current (IC), Gate-Emitter voltage (VGE) and tabulate the result.
(4) Repeat the above procedure for different values of Collector–Emitter voltage
(VCE).
(5) From the readings draw the transfer characteristics & calculate the trans-resistance
rm, which is given by rm = VGE (in volts) / IC (in mA)
TABULAR COLUMN:
Ref
Vcc VCE1 = V VCE1 = V
VGE (involts) IC (in mA) VGE (involts) IC (in mA)
RESULT:- The static characteristics of IGBT is conducted & the following values are calculated using its
graph.
(a) Collector resistance = rc = VCE (involts) / IC (in mA) =
(b) Trans-resistance = rm = VGE (involts) / IC (in mA) =
(c) VGS(th)=Threshold voltage = V
VGE(th) VGE (in volts)
IC (in mA)
Transfer Characteristics
of IGBT

Power Electronics Lab Manual-10ECL78 2013-14
15 Dept. of ECE, SJBIT, Bangalore.
EXPERIMENT-5
RC Triggering Circuit
AIM:- a) To study the working of Half wave and Full wave controller rectification using
RC triggering.
b) To plot the response curve Vdc v/s α
c) To draw the waveforms at different points.
COMPONENTS REQUIRED: SCR (TYN-612), Diodes (IN-4007), Resistors (500 / 5W, 1K),
Pot (4.7K), CRO with probes, Transformer & connecting board.
CIRCUIT DIAGRAM OF
RC TRIGGERING FOR HWR:
D1: Prevents the breakdown of the gate to cathode junction during the negative half cycle of the I/P D2: It allows the capacitor to charge in the in the negative direction (there by it introduces the phase shift
between capacitor voltage & the supply voltage)
DESIGN: Let us assume that Vs = 24V, Vg (min) = 0.5V, Ig (min) =4mA, VD1 = 0.7V, Ig (max) = 500mA.
The thyristor turns on when the capacitor voltage reaches to the minimum triggering voltage (Vgt), which
is given by: VC = Vg (min) + VD1
Therefore the maximum value of Rv is obtained from the equation given by:
Vs > Ig(min) * RV + Vc. Where Vs is the instantaneous supply voltage. But Vc = Vg (min) + VD1
Rv < Vs – V g (min) – V D1 = 24V – 0.5V – 0.7V = 5.7K Choose RV = 4.7K. (POT)
I g (min) 4mA
Also Rmin > Vs = 24V = 48 Choose Rmin = 100. I g (max) 500mA
RC > 1.3 T = 4 C > 1.3 T ( Since f =50Hz, T = 20mS)
2 w 2R
C = 1.3* 20m > 2.76 F Choose C = 4.7 F
2*4.7K
C
4.7F D1
230V
AC I/P
12V
0V
D2
V
o
R
L
Vo
RL=500
Rmin
100 Rv
4.7K
A
VSCR G
K

Power Electronics Lab Manual-10ECL78 2013-14
16 Dept. of ECE, SJBIT, Bangalore.
D1
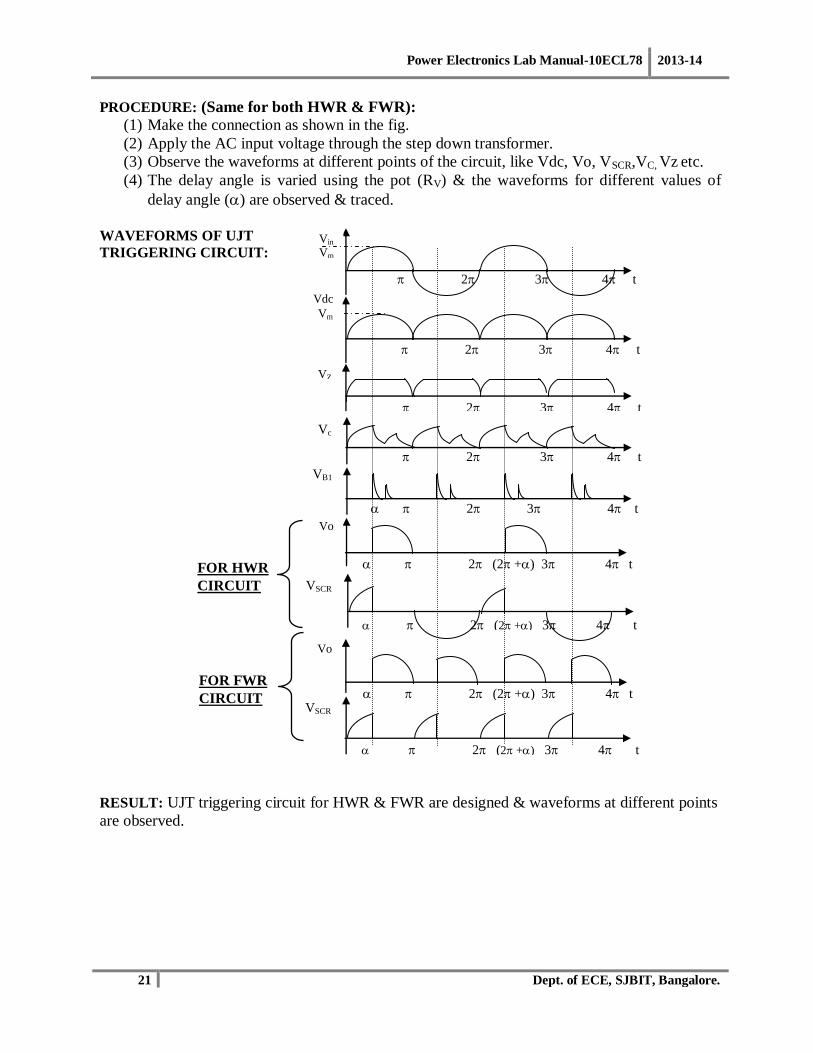
PROCEDURE: (Same for both HWR & FWR circuits)
(1) Make the connection as shown in the fig.
(2) Apply the AC input voltage through the step down transformer.
(3) Observe the waveforms at different points of the circuit, like Vo, VSCR, VC etc.
(4) The delay angle is varied using the pot (RV) & the waveforms for different values of
delay angle () are observed & traced.
RC TRIGGERING FOR FWR:
DESIGN:
Let Vs = 48V, then Vdc = 2 Vm/ = 30V.
Designing of Rmin is same as HWR, Rmin = 100
Rv < Vs – V g t = 30V – 0.5V 10K Choose RV = 10K. (POT)
I g (min) 3mA
To find C use the relation given by: RC > 50 T C > 50 T 50*20m 50F
2 2R 2*10K
Hence choose C = 47 F
TABULAR COLUMN:
α in degrees VL (volts)
A TYN-410
SCR
K G
IN-4007
IN-4007
D2
230V AC I/P
C
47F
12V
12V
Rmin
100
Rv
10K VSCR
Vo RL=500/
5W
VL
Vm /
0 900 1800 in degrees

Power Electronics Lab Manual-10ECL78 2013-14
17 Dept. of ECE, SJBIT, Bangalore.
Vs
Vm
2 3 4 t
( +)
2 (2 +)
3 (3 +)
4 t
( +)
2 (2 +)
3 (3 +)
4 t
WAVE FORMS:
RESULT: RC triggering circuit for HWR & FWR are designed & waveforms at different points
are observed.
Vs
Vm
2 3 4 t
2
(2 +) 3 4 t
Output for RC-triggering for HWR:
can be varied from 0 to 1800
VSCR
2
(2 +) 3 4 t
Vo
VSCR
Output for RC-triggering for FWR:
can be varied from 0 to 1800
Vo

Power Electronics Lab Manual-10ECL78 2013-14
18 Dept. of ECE, SJBIT, Bangalore.
AC
Mains
150V/ 230V
0V
Rmin=100/5W
1M
DB32C
C=100nF/200V
MT2
BT-136
MT1 G
EXPERIMENT-6
AC Voltage Controller AIM: a] To study the speed control of universal motor using Triac-Diac combination.
b] To study the working principle phase control of Triac (light dimmer)
APPARATUS REQUIRED: Triac (BT-136), Diac (DB32C), Rheostat-200, Resistors-
100/5W, Capacitor-100nF/200V, Pot-1M, Isolation Transformer,
Power Scope, Multi meter, Patch chords & Connecting board.
CIRCUIT DIAGRAM:
PROCEDURE:
(1) Rig up the circuit as shown in the figure.
(2) Apply 230V from the secondary of the transformer, observe the waveforms across the
load, Capacitor & Triac.
(3) Now vary the pot & measure the O/P RMS voltage across the load using a multi meter
(in AC range) & correspondingly measure the delay angle using Power Scope.
(4) Calculate the theoretical O/P RMS voltage, for every delay angle measured using the
formula:
(5) Compare the theoretical O/P voltage with the practical values.
(6) Draw a graph of Vo(rms) versus delay angle ()
Vo
Lamp/motor
VT2T1
1
V0(rms) = Vs - + Sin (2)
2

Power Electronics Lab Manual-10ECL78 2013-14
19 Dept. of ECE, SJBIT, Bangalore.
Vo(rms)
Delay angle ()
2 3 t
( +) (2 +) t
VC
Vo
( +)
2 (2 +) t
VT1T2
TABULAR COLUMN:
Delay angle () measured from the CRO
Delay angle
() in degrees Vo(rms) Theoretical =
VS1/ ( - + ½ sin [2]}1/2
Vo(rms) practical
Measured using multimeter
EXPECTED WAVEFORMS:
IDEAL GRAPH:
RESULT: An AC voltage controller is studied & its O/P rms voltage is calculated & verified
for different values of delay angle.
Vo(rms) V/S Delay angle()
( +) 2
(2 +) 3 t
VS
Vm

Power Electronics Lab Manual-10ECL78 2013-14
20 Dept. of ECE, SJBIT, Bangalore.
A
VSCR
G K
IZ-15V
B2
2N2646
B1
RL=500
/ 5W
R2
1K
A
VSCR
G K
IZ-15V
B2
2N2646
B1
RL=500
/ 5W
R2
1K
Pulse Transformer
Pulse Transformer
EXPERIMENT-7
UJT Firing Circuit
AIM:- To study the UJT triggering circuit for HWR & FWR circuits
COMPONENTS REQUIRED: SCR (TYN-612), UJT (2N2646), Resistors (500/5W, 1K,
330, 100, Pot (10K), CRO with probes, Transformer & connecting board.
CIRCUIT DIAGRAM:
UJT TRIGGERING CIRCUIT
FOR HWR CIRCUIT:
Designing: (Same for both HWR & FWR): Let Secondary voltage of the transformer
Vs = 48V, Is = 50mA, Vz = 15V, = 0.66, tg = 50S & T = 5mS
Hence Vdc = 2 Vm/ = 30V.
Then Rs = Vs –Vz = 30 – 15 = 300 Choose Rs = 330. Is 50m
Let C = 0.47F, then R1 = tg / C = 50*10-6
/ 0.47* 10-6
= 106. Choose R1 = 100.
We know that for an UJT relaxation Oscillator T = RC ln(1/1-)
R = T /{ C ln(1/1-)} = 5*10-3 /{0.47*10
-6 ln (1/1-0.66)} 10K.
Hence Choose RV = 10K (pot) in series with a 100 resistor.
R2 = 104 / Vz = 10
4 / (0.66 * 15) 1K. Hence choose R2 = 1K. Choose RL = 500 /5W
CIRCUIT DIAGRAM:
UJT triggering circuit
for FWR circuit:
D1
IN-4007
IN-4007
D2
230V AC I/P
12V
12V C
0.47F
Rmin
100
Rv
10K
E
Vo Rs = 330
D1
IN-4007
D2
IN-4007
230V AC I/P
12V
12V C
0.47F
Rmin
100
Rv
10K
E
Vo
Rs = 330
Power Electronics Lab Manual-10ECL78 2013-14
21 Dept. of ECE, SJBIT, Bangalore.
PROCEDURE: (Same for both HWR & FWR):
(1) Make the connection as shown in the fig.
(2) Apply the AC input voltage through the step down transformer.
(3) Observe the waveforms at different points of the circuit, like Vdc, Vo, VSCR,VC, Vz etc.
(4) The delay angle is varied using the pot (RV) & the waveforms for different values of
delay angle () are observed & traced.
WAVEFORMS OF UJT
TRIGGERING CIRCUIT:
RESULT: UJT triggering circuit for HWR & FWR are designed & waveforms at different points
are observed.
2 (2 +) 3 4 t
Vo
VSCR
2 (2 +) 3 4 t
2 (2 +) 3 4 t
Vo
VSCR
2 (2 +) 3 4 t
FOR HWR
CIRCUIT
FOR FWR
CIRCUIT
Vin Vm
2 3 4 t Vdc
Vm
2 3 4 t
VZ
2 3 4 t
Vc
2 3 4 t VB1
2 3 4 t

Power Electronics Lab Manual-10ECL78 2013-14
22 Dept. of ECE, SJBIT, Bangalore.
K K
EXPERIMENT-8
CONTROLLED RECTIFIER WITH R& RL LOAD
AIM:- To study the Half Controlled & Full Controlled Rectifier circuits for R & RL loads
COMPONENTS REQUIRED: SCR (4 Nos-TYN-612), Diodes (2 Nos- IN5402), Converter Firing
circuits, Resistor (500/ 10W), Inductor 10mH, CRO with probes, Voltmeter & patch cords.
CIRCUIT DIAGRAM: HALF CONTROLLED RECTIFIER (SEMI CONVERTER) FOR R AND
RL LOAD:
PROCEDURE: (Common for both Semi & Full Converters):
(1) Rig up the circuit as shown in the figure.
(2) Apply some input voltage (say 30V) through the isolation transformer. Then switch on the triggering circuit
(3) Display the output on the CRO & observe the rectified voltage.
(4) Now vary the firing angle () in steps & note down the corresponding output voltage using a voltmeter.
(5) The theoretical output voltage is calculated using the formula given by: Vo(avg)= [Vm /](1+Cos ).
(6) Compare the practical readings with the theoretical values.
(7) Repeat the above procedure for RL load & observe the effect of the Free Wheeling Diode.
TABULAR COLUMN:
in degrees Vo(Practical) Vo(Theoretical)=[Vm / ] (1+ Cos ).
Isolation
Transformer
230V
AC I/P
30V
0V
RL
500
/5W
K
G T2 A
D1 A
K
G
T1 A
D2 A
Vo CRO &
Voltmeter
R
FWD
L

Power Electronics Lab Manual-10ECL78 2013-14
23 Dept. of ECE, SJBIT, Bangalore.
Vo O/P for R load & RL load with FWD
2 3 t
Vg1
(2 +) t
Vg2
( +) t
Vo O/P for RL load without FWD
CIRCUIT DIAGRAM OF FULL CONTROLLED RECTIFIER :( FULL CONVERTER) FOR
R & RL LOADS:
TABULAR COLUMN:
in degrees Vo(Practical) Vo(Theoretical) = [Vm / ] (1+ Cos ).
RESULT: The Half controlled (Semi converter) & Full controlled (Full converter) rectifiers are studied for both R & RL load.
Isolation Transformer
230V
AC I/P
30V
0V
RL
500
K
G T2 A
K
G T1
1 A
K
G
T1 A
K
G
T12
A
( +) 2 (2 +) 3
t
( +) 2 (2 +) 3 t
VS Vm
Vo(avg)
2Vm /
0 900 1800 in degrees
Ideal graph of delay angle ()&
the output average voltage Vo(avg):
EXPECTED WAVEFORMS OF A
CONVERTER:
FWD

Power Electronics Lab Manual-10ECL78 2013-14
24 Dept. of ECE, SJBIT, Bangalore.
RL
1K
L 10mH
C
10F Vs
10V
toff
EXPERIMENT-9
Commutation Circuits
AIM:- To study the different commutation circuits.
COMPONENTS REQUIRED: SCR (2 Nos-TYN-612), Diodes (2 Nos- IN5402), Firing circuits,
Rheostat (1K/ 5W), CRO with probes & patch cords.
Self Commutation with LC in shunt with thyristors (CLASS-B Commutation):
L-C or C switched by an auxiliary SCR (Class D):
A
TYN-612 G K
Ig
VT
VL
t
t
t

Power Electronics Lab Manual-10ECL78 2013-14
25 Dept. of ECE, SJBIT, Bangalore.
Turn off times of different commutation circuits:
Class-B Class-D
Theoretical
Turnoff time
toff = (πLC)/2 toff = 0.693 R1C
Practical
Turnoff time
Result: Class B and Class D Commutation circuits are constructed & their turn off times is
verified.
Procedure:
(1) Make the circuit as shown in the figure.
(2) Apply a DC voltage using Vs (say 10V).
(3) Switch on the triggering circuit unit & observe
the voltage across the load, thyristors &
capacitors in CRO & then trace them.
(4) Measure the turn off time & verify it using
appropriate formulae.
(5) Repeat the above procedure for all the
Commutation circuits.

Power Electronics Lab Manual-10ECL78 2013-14
26 Dept. of ECE, SJBIT, Bangalore.
Vs
10V
C1
RL=50
Vo
C2
O/P Voltage across load (For low frequency):
O/P Voltage across load (For High frequency):
G
D1
L
Vs
10V
C RL
50
D2
EXPERIMENT-10
INVERTERS
AIM:- To study the performance of Series & Parallel inverter circuits.
COMPONENTS REQUIRED: SCR (2 Nos-TYN-410), Diodes (2 Nos- IN5402), Firing circuits,
Rheostat (50/ 25W), CRO with probes & patch cords.
CIRCUIT DIAGRAM:
Series Inverter:
PROCEDURE: (Same for both series & parallel Inverters):
(1) Rig up the circuit as shown in the fig.
(2) Switch on the DC supply & apply some voltage (say 10V) to the circuit.
(3) Now switch on the triggering circuit & observe the O/P voltage across the load.
(4) Measure the frequency of the O/P voltage, if this frequency increases above the resonant
frequency of the circuit, commutation failure occurs.
(5) Then switch off the DC supply, change the triggering angle & Load resistance & again
switch on the circuit to get the inverter O/P.
(6) Measure the minimum & maximum range of the O/P frequency.
CIRCUIT DIAGRAM: Parallel Inverter:
K A
G T1
A
T1 D1
G K
A
T2 D2
G K
t
t
T2 K A
Vo
O/P Voltage waveform:
t

Power Electronics Lab Manual-10ECL78 2013-14
27 Dept. of ECE, SJBIT, Bangalore.
TABULAR COLUMN:
𝐹𝑟 =1
2𝜋 1
𝐿𝐶−𝑅2
4𝐿2
Type of the Inverter Theoretical Frequency Practical Frequency
Series Inverter:
Fmin=
Fmax=
Parallel Inverter:
Fmin=
Fmax=
RESULT:
The Series & Parallel Inverters are constructed & their performance is studied.

Power Electronics Lab Manual-10ECL78 2013-14
28 Dept. of ECE, SJBIT, Bangalore.
Vs
10V
RL
500
T1
C 1F T2
L D
10mH
Vo
EXPERIMENT-11
Voltage (Impulse) Commutated Chopper
AIM: To study the performance of a Chopper using Jones chopper circuit.
Apparatus required: SCR (2 Nos-TYN - 612), Diodes (1No - IN5402), Chopper Triggering
unit, VRPS, Resistor-500/5W, CRO with Probes & patch chords.
Circuit Diagram:
Procedure:
(1) Rig up the circuit as shown in the figure
(2) Apply a DC voltage using VRPS (say 10V)
(3) Switch on the Chopper Triggering circuit & observe the voltage across the load on CRO.
(4) Measure the on & off periods of the output voltage & calculate the duty cycle (D), using
it, the output average voltage can be calculated, which is given by: Vo(avg) = Vs * D.
(5) Measure the output average voltage using a multi-meter (keeping it in DC range),
compare that with the theoretical value.
(6) Repeat the above procedure for different values of firing angle () & frequency.
Tabular Column: For Duty cycle variation: Vs=10V
Firing
Angle ()
Ton Toff D = Ton. .
Ton + Toff
Vo(avg) (Theoretical)
= D * Vs
Vo(avg) (Practical)
(Multi-meter reading)
Vo t Ton Toff

Power Electronics Lab Manual-10ECL78 2013-14
29 Dept. of ECE, SJBIT, Bangalore.
Vo(avg)
Duty
Cycle (D)
For Frequency variation: Vs=10V
Frequency Ton Toff D = Ton. .
Ton + Toff
Vo(avg) (Theoretical)
= D * Vs
Vo(avg) (Practical)
(Multi-meter reading)
Expected Graph:
Result: A DC Chopper is constructed & its performance is studied.

Power Electronics Lab Manual-10ECL78 2013-14
30 Dept. of ECE, SJBIT, Bangalore.
A RL Armature
500/5W side
AA
F
Field side
FF
AC
Mains
60V 0V
K G K G
T1 T2
A A
D2 D1
EXPERIMENT-12
SPEED CONTROL OF DC MOTOR
Aim: To study the speed control of a separately excited DC motor using a Semi converter
Apparatus required: SCRs –2 Nos (TYN-410), Diodes –2 Nos (IN 5402), A Separately excited
DC motor, Rheostat-50, Power Scope, Tachometer, Isolation Transformer, Multi meter,
Connecting board & Patch chords.
Circuit Diagram:
Procedure:
(1) Switch on the triggering circuit & observe the triggering pulses generation from it.
(2) Rig up the circuit as shown in the fig. With R-load only. Connect the triggering circuit to
the SCRs.
(3) Apply 30V from the secondary of the transformer & observe the O/P voltage waveform
across the load resistor (RL), on the CRO.
(4) Now switch off the Mains & then Triggering circuit & replace the load resistor (RL) by
the motor as shown in the fig.
(5) Switch on the Field supply & mains, then switch on the Triggering circuit
(6) Now observe the running of the motor.
(7) Vary the firing angle () in steps & note down the corresponding speed of the motor
using a Tacho-meter.
(8) Tabulate the readings & plot the graph of delay angle () versus speed.
NOTE: While Switching on, the AC mains is switched on first & then the firing circuit. While
switching off the circuit, switch off the mains first, then the firing circuit should be switched off.
Tabular Column: Delay angle ()
in degrees Vo(avg)
(Measured using multi meter )
Speed (in rpm) Measured using Tacho-meter
M Vo

Power Electronics Lab Manual-10ECL78 2013-14
31 Dept. of ECE, SJBIT, Bangalore.
Vo(avg)
& Speed
0o 90
o 180
o Delay angle ()
2 3 t
Vg1
(2 +) t Vg2
( +) t
Expected waveforms:
Ideal Graph:
Result: The Speed control of a DC motor is studied & the graph of O/P average voltage & its
speed are plotted for different values of delay angle.
Vo(avg) & Speed V/S Delay angle()
( +) 2 (2 +) 3 t
VS
Vm
Power Electronics Lab Manual-10ECL78 2013-14
32 Dept. of ECE, SJBIT, Bangalore.
Preset
CLK
Reset
Reset
Ō
A Ā
Load
B
B
A Ā
En
Sync Signal (~8V) DC 5V Supply
TP
TN
TM TA
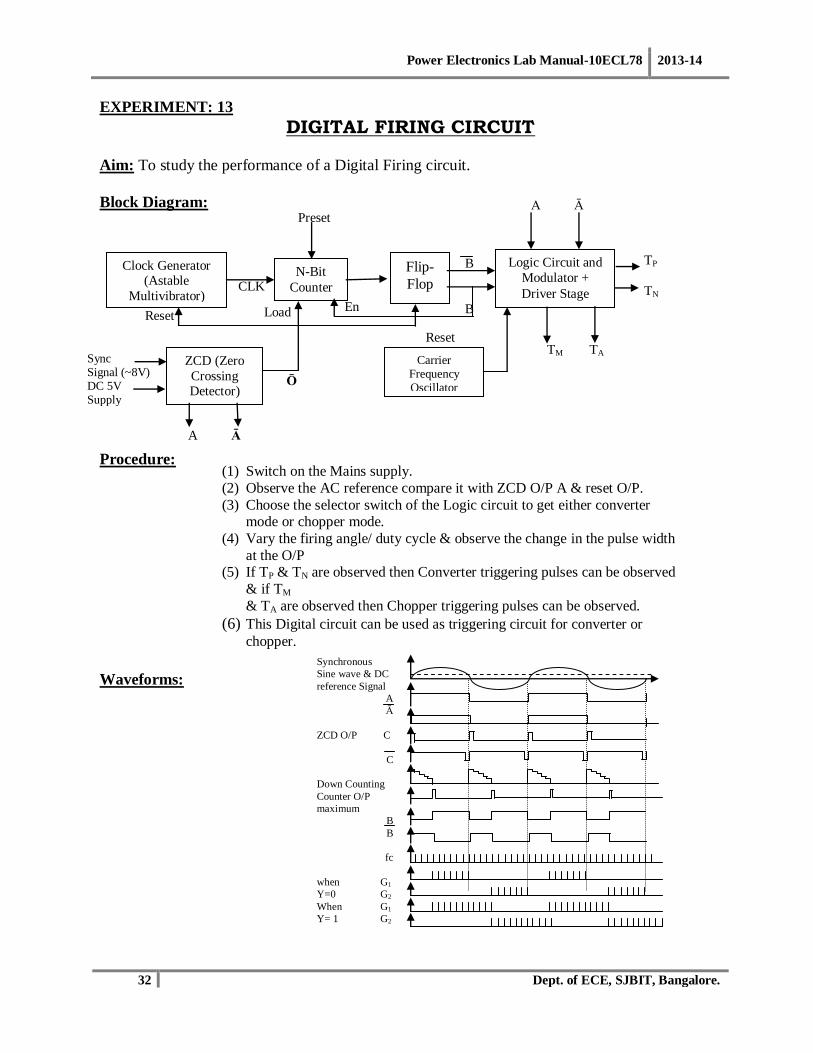
EXPERIMENT: 13
DIGITAL FIRING CIRCUIT
Aim: To study the performance of a Digital Firing circuit.
Block Diagram:
Procedure:
Waveforms:
Flip-
Flop
Clock Generator (Astable
Multivibrator)
N-Bit
Counter
Logic Circuit and
Modulator +
Driver Stage
Carrier Frequency Oscillator
ZCD (Zero
Crossing Detector)
(1) Switch on the Mains supply.
(2) Observe the AC reference compare it with ZCD O/P A & reset O/P.
(3) Choose the selector switch of the Logic circuit to get either converter mode or chopper mode.
(4) Vary the firing angle/ duty cycle & observe the change in the pulse width
at the O/P (5) If TP & TN are observed then Converter triggering pulses can be observed
& if TM
& TA are observed then Chopper triggering pulses can be observed.
(6) This Digital circuit can be used as triggering circuit for converter or chopper.
Synchronous
Sine wave & DC
reference Signal
A
Ā
ZCD O/P C
C
Down Counting
Counter O/P
maximum
B
B
fc
when G1
Y=0 G2
When G1
Y= 1 G2

Power Electronics Lab Manual-10ECL78 2013-14
33 Dept. of ECE, SJBIT, Bangalore.
EXPERIMENT-14
SPEED CONTROL OF STEPPER MOTOR
AIM: To rig up and verify operation of Stepper Motor.
COMPONENTS REQUIRED: Stepper Motor Controller (SMC), Stepper Motor Module.
CIRCUIT DIAGRAM:
PROCEDURE:
1. Connect the controller o/p A1, A2, B1, B2 to A1 A2 B1 B2 i/ps (respectively) of the
Stepper Motor Module.
2. Connect +ve common terminal to +ve supply.
3. Switch on the power supply to the unit. It displays S-00.
4. Press SET on SMC.
5. Display shows “rpm”(Rev Per Sec).
6. Press ENT for “Speed MODE”.
7. Display “00”.
8. Press INC key to set rpm.
9. Press ENT
10. Displays DR FR (Direction of rotation).
11. Press INC/DEC to change direction of rotation.
12. Press ENT.
13. Displays HF ST or FL STEP.(Step size Half or Full)
14. Use INC/DEC to select step size.
15. Press ENT.
16. Then it displays n…….. Rpm set for speed mode.
17. Press Run/Stop for running or stopping the motor.

Power Electronics Lab Manual-10ECL78 2013-14
34 Dept. of ECE, SJBIT, Bangalore.
STEP MODE:
1. Switch on the power supply.
2. Display shows S 00
3. Press SET.
4. Display shows rpm.
5. Press INC/DEC to change to step mode
6. Follow similar steps as above from step 7 for setting the parameters for step mode.
7. In the last display shows S……. Steps set.
8. Run/Stop will make the motor to run by respective steps.
TABULAR COLUMN: Speed Mode.
Sl. No RPM set Time for full
Rotation
No of Rotations Practical RPM
TABULAR C OLUMN: Step Mode [Step angle =1.8 ± 0.1] (Non cumulative)
Sl. No No of Steps Type of Step Half or
Full
Theoretical
Degrees
NOTE: Step Lle =1.8 + 0.1 (Non cumulative)
Steps/ revolution =200

Power Electronics Lab Manual-10ECL78 2013-14
35 Dept. of ECE, SJBIT, Bangalore.
SWITCHING LOGIC SEQUENCE:
Full step
A1
(RED)
A2
(GREEN)
B1
(BLUE)
B2
(BLACK)
0
0
1
1
1
1
0
0
0
1
0
1
1
0
0
1
Half step
A1
(RED)
A2
(GREEN)
B1
(BLUE)
B2
(BLACK)
0
0
1
1
1
0
0
0
1
0
0
0
0
0
1
1
0
0
0
0
1
1
1
0
1
1
1
0
0
0
0
0
RESULT: The operation of a Stepper motor is studied and the speed control is verified.

Power Electronics Lab Manual-10ECL78 2013-14
36 Dept. of ECE, SJBIT, Bangalore.
INTRODUCTION OF ORCAD 16.5, USE, CIRCUIT DESIGN & SIMULATION
Step 1: Software opens by clicking an option “CAPTURE LITE” in the start menu.
Step 2: To start with a PSpice project:
Go to “File” menu. Select “New Project” option.
Choose “analog or mixed A/D” option and specify the project name and its location and
click Ok

Power Electronics Lab Manual-10ECL78 2013-14
37 Dept. of ECE, SJBIT, Bangalore.
Step 3: Once the step (2) is completed the following window appears. Choose “Create a blank
project” option.
Step 4: Create the circuit by placing all its parts using “Part” option from “Place” menu. In this
way a complete electrical circuit can be formed.

Power Electronics Lab Manual-10ECL78 2013-14
38 Dept. of ECE, SJBIT, Bangalore.
Step 5: After completing the circuit, make the simulation profile using “New Simulation Profile”
command from “PSpice” menu.
Step 6: Go to “Edit Simulation Profile” in “PSpice” menu, simulation settings window will
open. Go to “Analysis” and set the simulation parameters as shown below.

Power Electronics Lab Manual-10ECL78 2013-14
39 Dept. of ECE, SJBIT, Bangalore.
Step 7: Place the markers (voltage or current) near the required component on the circuit by
using command “MARKERS” from “PSpice” menu.
Step 8: Run the simulation by using command “RUN” from “PSpice” menu.

Power Electronics Lab Manual-10ECL78 2013-14
40 Dept. of ECE, SJBIT, Bangalore.
Step 9: And the results will be plotted.

Power Electronics Lab Manual-10ECL78 2013-14
41 Dept. of ECE, SJBIT, Bangalore.
CONVERTER CIRCUITS USING ORCAD PSPICE
1. AC voltage controller using triac – diac combination.
Output Waveforms:
12k
0
Vs
FREQ = 50VAMPL = 230v
VOFF = 0
R4
50
C
48uf
Triac
V+ V-

Power Electronics Lab Manual-10ECL78 2013-14
42 Dept. of ECE, SJBIT, Bangalore.
2. Controlled Rectifiers with R & RL Loads. 2. a. Half bridge controlled rectifier (semi converter) for R load
Output Waveforms:
D1N914
Vpulse1
TD = {talpha+1/(2*f )}
TF = 0.1uPW = {0.5/f }PER = {1/f }
V1 = 0
TR = 0.1u
V2 = 5
V
D1N914
Vpulse
TD = {talpha}
TF = 0.1uPW = {0.5/f }PER = {1/f }
V1 = 0
TR = 0.1u
V2 = 5
1k
V
2N1595
PARAMETERS:talpha = {alpha/(360*f )}alpha = 90f = 60v rms = 120
Vs
FREQ = {f }VAMPL = 30v
VOFF = 0
2N1595

Power Electronics Lab Manual-10ECL78 2013-14
43 Dept. of ECE, SJBIT, Bangalore.
2. b. Half bridge controlled rectifier (semi converter) for RL load without freewheeling diode
Output Waveforms:
500Vs
FREQ = {f }VAMPL = 30v
VOFF = 0
L1
0.5H
1
2
D1N914
Vpulse
TD = {talpha}
TF = 0.1uPW = {0.5/f }PER = {1/f }
V1 = 0
TR = 0.1u
V2 = 52N1595 Vpulse1
TD = {talpha+1/(2*f )}
TF = 0.1uPW = {0.5/f }PER = {1/f }
V1 = 0
TR = 0.1u
V2 = 5
2N1595
D1N914
V
PARAMETERS:talpha = {alpha/(360*f )}alpha = 90f = 60v rms = 120

Power Electronics Lab Manual-10ECL78 2013-14
44 Dept. of ECE, SJBIT, Bangalore.
2. c. Half bridge controlled rectifier (semi converter) for RL load with
freewheeling diode
Output Waveforms:
V
Vpulse1
TD = {talpha+1/(2*f )}
TF = 0.1uPW = {0.5/f }PER = {1/f }
V1 = 0
TR = 0.1u
V2 = 5Vpulse
TD = {talpha}
TF = 0.1uPW = {0.5/f }PER = {1/f }
V1 = 0
TR = 0.1u
V2 = 5
500Vs
FREQ = {f }VAMPL = 30v
VOFF = 0
2N1595
L1
0.5H
1
2
PARAMETERS:talpha = {alpha/(360*f )}alpha = 90f = 60v rms = 120
2N1595

Power Electronics Lab Manual-10ECL78 2013-14
45 Dept. of ECE, SJBIT, Bangalore.
2. d. Full controlled rectifier for R load
Output Waveforms:
Vs
FREQ = {f }VAMPL = 30v
VOFF = 0
PARAMETERS:talpha = {alpha/(360*f )}alpha = 90f = 60
R1
500
Vpulse
TD = {talpha}
TF = 0.1uPW = {0.5/f }PER = {1/f }
V1 = 0
TR = 0.1u
V2 = 5Vpulse1
TD = {talpha+1/(2*f )}
TF = 0.1uPW = {0.5/f }PER = {1/f }
V1 = 0
TR = 0.1u
V2 = 5
0
Vpulse2
TD = {talpha}
TF = 0.1uPW = {0.5/f }PER = {1/f }
V1 = 0
TR = 0.1u
V2 = 5Vpulse3
TD = {talpha+1/(2*f )}
TF = 0.1uPW = {0.5/f }PER = {1/f }
V1 = 0
TR = 0.1u
V2 = 5
0
V
V

Power Electronics Lab Manual-10ECL78 2013-14
46 Dept. of ECE, SJBIT, Bangalore.
2. e. Full controlled rectifier for RL load
Output Waveforms:
Vs
FREQ = {f }VAMPL = 30v
VOFF = 0
PARAMETERS:talpha = {alpha/(360*f )}alpha = 90f = 60
R1
500
Vpulse
TD = {talpha}
TF = 0.1uPW = {0.5/f }PER = {1/f }
V1 = 0
TR = 0.1u
V2 = 5Vpulse1
TD = {talpha+1/(2*f )}
TF = 0.1uPW = {0.5/f }PER = {1/f }
V1 = 0
TR = 0.1u
V2 = 5
0
Vpulse2
TD = {talpha}
TF = 0.1uPW = {0.5/f }PER = {1/f }
V1 = 0
TR = 0.1u
V2 = 5Vpulse3
TD = {talpha+1/(2*f )}
TF = 0.1uPW = {0.5/f }PER = {1/f }
V1 = 0
TR = 0.1u
V2 = 5
0
L1
0.5H
V

Power Electronics Lab Manual-10ECL78 2013-14
47 Dept. of ECE, SJBIT, Bangalore.
2. f. Full controlled rectifier for RL load with freewheeling diode
Output Waveforms:
Vs
FREQ = {f }VAMPL = 30v
VOFF = 0
PARAMETERS:talpha = {alpha/(360*f )}alpha = 90f = 60
R1
500
Vpulse
TD = {talpha}
TF = 0.1uPW = {0.5/f }PER = {1/f }
V1 = 0
TR = 0.1u
V2 = 5Vpulse1
TD = {talpha+1/(2*f )}
TF = 0.1uPW = {0.5/f }PER = {1/f }
V1 = 0
TR = 0.1u
V2 = 5
0
Vpulse2
TD = {talpha}
TF = 0.1uPW = {0.5/f }PER = {1/f }
V1 = 0
TR = 0.1u
V2 = 5Vpulse3
TD = {talpha+1/(2*f )}
TF = 0.1uPW = {0.5/f }PER = {1/f }
V1 = 0
TR = 0.1u
V2 = 5
0
L1
0.5H
D
V

Power Electronics Lab Manual-10ECL78 2013-14
48 Dept. of ECE, SJBIT, Bangalore.
3. COMMUTATION CIRCUITS
3. a. Self Commutation with LC in shunt with thyristor (CLASS-B
Commutation)
Output Waveforms:
V3
5Vdc
R
1k
C1
5uF
L1
0.5H
1
2PARAMETERS:talpha = {alpha/(360*f )}alpha = 60f = 60
V
2N1595
V2
TD = {talpha}
TF = 0.1uPW = {0.5/f }PER = {1/f }
V1 = 0
TR = 0.1u
V2 = 5
V-
V+

Power Electronics Lab Manual-10ECL78 2013-14
49 Dept. of ECE, SJBIT, Bangalore.
3. b. L-C or C switched by an auxiliary SCR (Class D Commutation)
Output Waveforms:
R
1k
X2
2N1595
VC1
1uF
D2
D1N914
PARAMETERS:talpha = {alpha/(360*f )}alpha = 60f = 60
V-
L2
10uH
1
2
V+
D1
D1N914
V2
TD = {talpha}
TF = 0.1uPW = {0.5/f }PER = {1/f }
V1 = 0
TR = 0.1u
V2 = 5
2N1595
Vpulse1
TD = {talpha+1/(2*f )}
TF = 0.1uPW = {0.5/f }PER = {1/f }
V1 = 0
TR = 0.1u
V2 = 5
L1
0.5H
1 2
V3
5Vdc
Power Electronics Lab Manual-10ECL78 2013-14
50 Dept. of ECE, SJBIT, Bangalore.
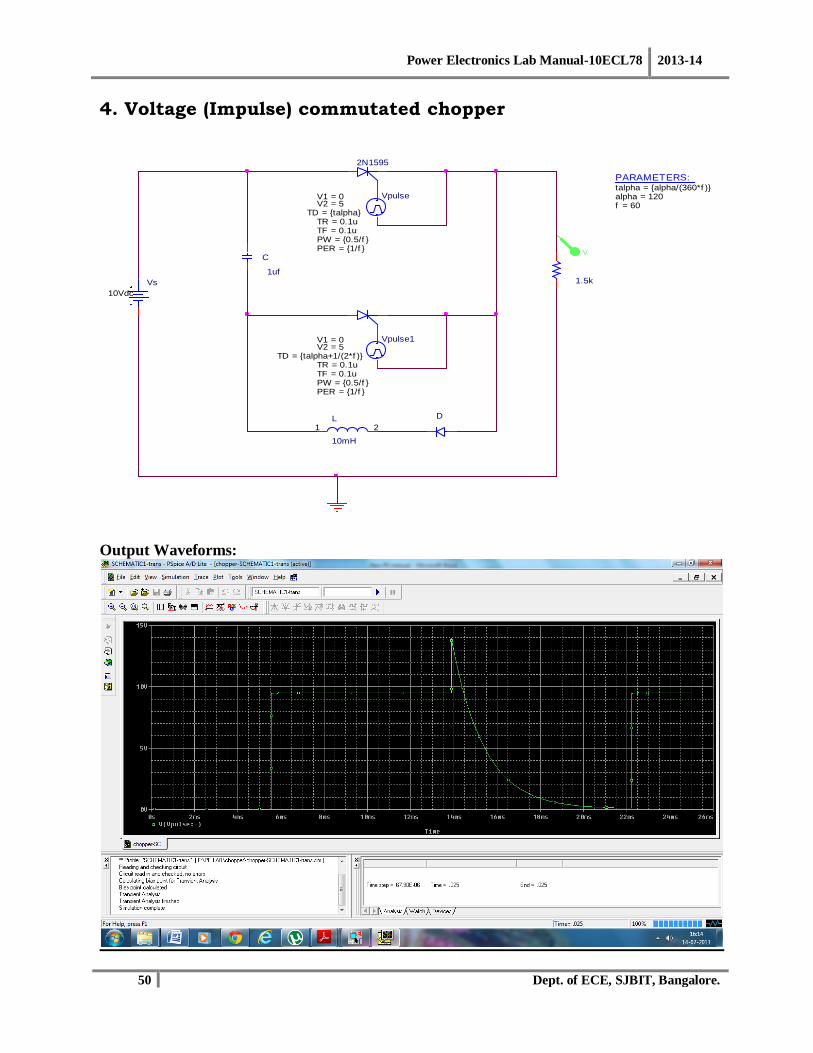
4. Voltage (Impulse) commutated chopper
Output Waveforms:
2N1595
Vpulse
TD = {talpha}
TF = 0.1uPW = {0.5/f }PER = {1/f }
V1 = 0
TR = 0.1u
V2 = 5
D
VC
1uf1.5kVs
10Vdc
PARAMETERS:talpha = {alpha/(360*f )}alpha = 120f = 60
Vpulse1
TD = {talpha+1/(2*f )}
TF = 0.1uPW = {0.5/f }PER = {1/f }
V1 = 0
TR = 0.1u
V2 = 5
L
10mH
1 2

Power Electronics Lab Manual-10ECL78 2013-14
51 Dept. of ECE, SJBIT, Bangalore.
5. Inverters 5. a. Series Inverter
Output Waveforms:
PARAMETERS:talpha = {alpha/(360*f )}alpha = 90f = 60
2N1595
Vs
10Vdc
Vpulse
TD = {talpha}
TF = 0.1uPW = {0.5/f }PER = {1/f }
V1 = 0
TR = 0.1u
V2 = 5C
10uf
D
Vpulse1
TD = {talpha+1/(2*f )}
TF = 0.1uPW = {0.5/f }PER = {1/f }
V1 = 0
TR = 0.1u
V2 = 5
V+
C1
10uf
R2
100
D1
V-
L2
10mH
1
2
L1
10mH
1
2

Power Electronics Lab Manual-10ECL78 2013-14
52 Dept. of ECE, SJBIT, Bangalore.
5. b. Parallel Inverter
Output Waveforms:
2N1595
R3
500
Vpulse2
TD = {talpha}
TF = 0.1uPW = {0.5/f }PER = {1/f }
V1 = 0
TR = 0.1u
V2 = 5
PARAMETERS:talpha = {alpha/(360*f )}alpha = 60f = 60
Vpulse3
TD = {talpha+1/(2*f )}
TF = 0.1uPW = {0.5/f }PER = {1/f }
V1 = 0
TR = 0.1u
V2 = 5
TX2
L4
300uH
1 2VC
6.8uf
Vs
10v

Power Electronics Lab Manual-10ECL78 2013-14
53 Dept. of ECE, SJBIT, Bangalore.
Theory & working operations about the experiments:
Thyristor (Silicon Controlled Rectifier-SCR):
It is a four layer (PNPN), three junction & three terminal semiconductor device which
can be used as a controlled uni-directional switch. It has three terminals called Anode (A),
Cathode (K) & Gate (G). Due to its uni-direction property it can be used as controlled rectifier.
Due to the gate terminal its conduction can be controlled. Hence it is mainly used in controlled
rectifiers (converters), Inverters, AC voltage controllers, cyclo-converters etc.
TRIAC:
It is a four layer, three junction & three terminal semiconductor device which can be used
as a controlled bi-directional switch. It has three terminals called Main terminal-1 (MT1), Main
terminal-2 (MT2) & Gate (G). It can be considered as equivalent to two thyristors connected in
anti-parallel combination. The TRIAC can be operated in four modes depending upon the
voltage applied to its main terminals & gate terminal. The mode which requires minimum gate
current to turn is considered as most sensitive mode of TIAC. Due to its bi-directional property,
it can be used to control the AC power, hence it is used as AC voltage controllers.
MOSFET (Metal Oxide Semiconductor Field Effect Transistor):
It is a type of uni-polar transistor, which can be used as a fast acting switch. It is a
voltage controlled device, whose conduction can be controlled using gate voltage. It has three
terminals called Drain (D), Source (S) & Gate (G). Due to the semiconductor layer at its gate
terminal, it offers very high input impedance & low output impedance. The conduction loss of
the MOSFET is less compared to BJT, but power handling capacity of it is less.
IGBT (Insulated Gate Bipolar Transistror):
It is a latest power electronic device, which is obtained by combining the advantages of
BJT & MOSFET. It has three terminals called Emitter (E), Collector (C) & Gate (G).It is a bi-
polar switch, having low on state drop & high switching speed. It’s a voltage controlled device
having almost flat temperature coefficient & it does not have second break down problem. But it
is a costly device. It is used in UPS systems, AC motor drives, Choppers etc.
RC Triggering:
The process of turning on of the thyristor is called as Triggering. The best way of
triggering the thyristor is by applying gate current, which is called as Gate triggering. R
triggering can be used to control the thyristor triggering from 0 to 900 only. But in RC triggering
AC voltage is used to trigger the thyristor with the help of Resistance & Capacitance, hence it
can be used to control the thyristor triggering from 0 to 1800. This possible due to the charging
of the capacitor, which introduces a phase shift between voltage & current. The triggering angle
can be controlled by varying the R value.
Working operation:
During the negative half cycle of the supply voltage, the capacitor charges through diode
D2 (to –Vs) & during this the output voltage will be zero. During the next positive half cycle, the
capacitor discharges through resistor & starts charging in the positive direction. As this positive
voltage reaches the minimum gate voltage required to trigger the thyristor, the diode D1 gets
forward biased & allows the capacitor to discharge through it, hence the thristor gets sufficient

Power Electronics Lab Manual-10ECL78 2013-14
54 Dept. of ECE, SJBIT, Bangalore.
gate current & it gets triggered. The triggering of the Thyristor can be controlled from 0 to 1800,
by raring the resistance value.
UJT Triggering:
UJT is a Uni-junction Transistor, which exhibits negative resistance region (Increase in
the voltage decreases the current). Hence it can be used as Relaxation Oscillator to generator saw
tooth waves & short durational spikes (pulses). Due to this property it is used as a triggering
circuit for thyristors. When the UJT & SCR both are triggered using the same AC vaoltage, it is
called as Synchronous UJT Triggering circuit. In Asynchronous UJT Triggering they are
triggered using two different voltages.
Working operation: AC input voltage is stepped down using transformer, then it is rectified
using a rectifier. This rectified (DC) voltage is regulated using a zener diode. This regulated
voltage is applied as DC supply voltage for UJT circuit. Here UJT is used as a Relaxation
Oscillator, hence it behaves like a open switch until its emitter voltage reaches peak voltage of it
& as its emitter voltage reaches peak voltage level UJT turns on & it behaves like a closed
switch. This is achieved by charging the capacitor through the resistor. For this the regulated
zener voltage is used. As the capacitor discharges reaches peak voltage of UJT, it turns on &
provides a path for discharging. This discharging of the capacitor takes place very fast, hence a
short duration spike gets developed across its base terminal. This short duration spike (pulse) is
applied to the gate terminal of the thyristor, through 1:1 pulse transformer (which is used for
isolation) to trigger the thyristor. The charging of the capacitor can be controlled by varying the
resistance value & there by the conduction of the thyristor can be controlled.
Single Phase Half controlled & Fully controlled converters:
Converter is basically a controlled rectifier, which gives variable DC voltage. Depending
upon the polarity of the output voltage & current (Quadrants) obtained they are classified as 1
Quadrant, 2 Quadrant & 4 Quadrant converters. Single phase half controlled converter is a single
Quadrant converter & single phase fully controlled converter is a 2 Quadrant converter.
Both of them work in the similar fashion. But half controlled converter uses 2 diodes & 2
thyristors, on the other hand Fully controlled converter uses 4 thyristors. Output voltage is same
in both the cases for R load. But for RL load, the output voltage will have small negative voltage
in case of Fully controlled converters. This negative voltage occurs due to the inductive load &
this can be eliminated using Free wheeling Diode (FWD). These converters are mainly used in
DC drives, power supplies, HVDC systems stc.
Working operation of Half controlled converter: During the positive half cycle, T1-D1 gets
forward biased, by controlling the firing angle of T1, this half cycle can be controlled. Similarly
during the negative half cycle of the I/P, T2-D2 gets forward biased, now T2 can be controlled by
varying the firing angle. Thus the negative half cycle can be controlled. Due to the bridge
configuration the output voltage will be always positive. This positive voltage can be controlled
using the delay angle.
Working operation of Fully controlled converter:
Same as Half controlled converter, but the firing of T1 &T’1 should be done simultaneously.
And the firing of T2 &T’2 should be done simultaneously.

Power Electronics Lab Manual-10ECL78 2013-14
55 Dept. of ECE, SJBIT, Bangalore.
SCR Commutation Circuits:
Commutation is the process of turning off of the thyristor. A conducting thyristor can be
turned off by making the current through it to fall below Holding current (which is called as
Current Commutation) or by applying a large negative voltage across it (which is called as
Voltage Commutation). Mainly there are 2 types of Commutation methods called Natural
Commutation & Forced Commutation. In Natural Commutation the conducting thyristor gets
turned off due to the AC supply applied to it. But in Forced Commutation the Input voltage will
be DC, hence some external components are used to turn off the thyristor.
CLASS-B Commutation: (Self Commutation by parallel L & C)
It is also a type of current Commutation circuit, in which the L & C are connected in
parallel to the thyristor. The main advantage of this circuit is that it is very simple, but the main
disadvantage of this circuit is that its turn off time is fixed. Here R, L & C are selected such that
the circuit is always under damped. This circuit is mainly used in parallel inverters.
In this case the thyristor is connected across the series combination of L & C, hence
when the thyristor was off, the capacitor gets charged to the supply voltage, & as the thyristor is
turned on it discharges through L & SCR. As the capacitor discharges, it gets charged in the
opposite direction, and as the capacitor gets fully charged in the opposite direction it again
discharges, through the thyristor but in the opposite direction. Hence after some time the current
through the thyristor drops to zero (due to opposing currents), thus causes current commutation
& turns off the thyristor.
CLASS-C Commutation: (Complimentary Commutation) In this method an extra thyristor is used to turn off the conducting thyristor, hence one
thyristor will be on at a time & the other being off, thus it is called as Complimentary
Commutation circuit. It is a type of voltage commutation circuit.
In this case when one of the thyristor is conducting, the other will be off. Hence the
capacitor gets charged & this stored energy can be used to turn off the conducting thyristor,
whenever it is required. The main advantage of this circuit is that, its simple construction, but its
major disadvantage is that the load current will be discontinuous.
AC Voltage Controller using TRIAC-DIAC combination
AC Voltage Controller is a circuit, which controls the AC voltage without change in the
frequency. As it controls AC voltage it is mainly used in Light control, fan regulator, AC motor
speed control etc. It uses a TRIAC-DIAC combination, in which DIAC helps in trigger the
TRIAC. DIAC can be triggered using R-C combination.
Working operation: Initially the TRIAC will be off, hence the I/P current flows towards the
capacitor through resistor & charges it. As the capacitor gets charged to the minimum voltage
required to turn on DIAC, the DIAC turns on. Now the capacitor discharges through DIAC
towards gate of the TRIAC & helps in triggering it. Then the output voltage is obtained & it can
be controlled using the pot. Since DIAC & TRIAC both are bi-directional, output can be
controlled in both the directions.
DC Chopper:
It is a circuit, which converts fixed DC to variable DC. It is DC equivalent to
transformer. It uses thyristors with forced commutation. The circuit & working of a Jones

Power Electronics Lab Manual-10ECL78 2013-14
56 Dept. of ECE, SJBIT, Bangalore.
chopper is similar to a Class-D commutation circuit. It produces square wave form, whose on &
off periods can be controlled to control the output DC voltage. We control the output DC voltage
in two ways, namely-fixed frequency & variable frequency operations. In fixed frequency
operations, the duty cycle of the output is varied to control it. In variable frequency operations,
the duty cycle is kept constant & frequency of the output wave is varied.
Inverters:
It converts DC signal into AC signal of desired amplitude & frequency. It uses thyristors
with forced commutation. They are mainly used in UPS, Stand by power supplies etc.
Depending upon the commutating elements, they are classified as series & parallel inverters.
Series Inverter: In this case the commutating elements are placed in series with the thyristors. It
uses two Thyristors with two sets of commutating elements. It uses current commutation for the
thyristors. When one thyristor is fired, the other turns off due to the energy stored in the
commutating elements & vice versa. Thus it produces a wave which looks like spike of longer
duration, but if it is properly filtered, then almost sine wave can be obtained.
Parallel Inverter: In this case the commutating elements are placed in parallel with the
thyristors. It uses voltage commutation for the thyristors.
Working operation: When one thyristor is on (say T1), the current flows through half of the
transformer, T1 & inductor and causes the capacitor to charge to 2Vs. This voltage gets applied
across the conducting thyrisor T2 & turns it off due to voltage commutation. Now the capacitor
discharges through L & T2, and gets charged in the opposite direction. Now the capacitor
becomes ready for the commutation of T2 & it can be done whenever T1 is fired again. This
continues producing a slightly tilted square wave across the output.
Note: In case of inverters, the thyristors are connected with anti parallel diodes to provide
alternative path for reverse current, which can occur due to inductive loads.
Speed Control of DC motor:
DC motor is a device, which uses DC voltage to convert electrical energy into
mechanical energy. Mainly there are two types of DC motors, namely: Separately excited DC
motors & Self-excited DC motors. In case of Separately excited DC motor, the field winding
will be excited using a separate supply, but in case of Self excited DC motors the field winding
will not be there separately.
A Separately excited DC motor can be controlled in two ways, namely: Armature
control, Field control. Incase of Armature control, the armature current is varied to control its
Torque & speed. But in field control, the field current is varied to control its speed. A semi
converter can be used to control the armature voltage & there by its current can be controlled,
this in turn controls the speed of the motor.
Speed Control of Universal motor:
Universal motor is basically a series wound motor, capable of working under both AC &
DC inputs. When it works on DC, it is controlled by armature control & it can be done using a
converter and when it works on AC, it is controlled by stator voltage, which can be done using a
AC voltage controller (using two thyristors connected back to back or using a TRIAC). The
speed of the motor can be controlled by varying the firing angles of thyristors.
Power Electronics Lab Manual-10ECL78 2013-14
57 Dept. of ECE, SJBIT, Bangalore.
Speed Control of Induction motor:
It a type of AC motor, which works with AC input. It has two parts, called Stator
(primary winding) & rotor (secondary winding). These stator & rotors are electrically isolated &
the current through stator induces current into the rotor, hence the name Induction motor. The
speed of the motor is controlled by stator voltage control & this can be achieved by using an AC
voltage controller, having two thyristors connected back to back or using a TRIAC. The speed of
the motor is controlled by varying the firing angles of the thyristors, which in turn varies output
rms voltage.
Speed Control of Stepper motor:
A Stepper motor changes its speed in steps. It basically converters an electronic pulse
into appropriate mechanical movement. Thus it provides precision positioning & speed control
without the use of feedback sensor. Each revolution of the stepper motor’s shaft made up of a
series of discrete individual steps. A step is the angular rotation produced by the output shaft
when the motor receives a step pulse. The number of pulses can control positioning & speed of
the motor precisely. The rotor of the motor produces a torque due to the interaction between the
magnetic fields in the stator & rotor. The stepper motors are mainly used in Robotics, machine
tools, disk drives & programmable controllers.

Power Electronics Lab Manual-10ECL78 2013-14
58 Dept. of ECE, SJBIT, Bangalore.
POWER ELECTRONICS LAB - VIVA QUESTIONS
(01) What is an SCR?
(02) Why Silicon is used in SCR?
(03) What are Latching & Holding currents? Distinguish them.
(04) What is Break over voltage (VBO)?
(05) Explain the procedure used for finding Latching & Holding currents?
(06) What is the significance of wattage resistors?
(07) Give the applications of SCR.
(08) What are the current & voltage ratings of SCR?
(09) What is the difference between Converter grade & Inverter grade SCRs?
(10) Explain the regions in which SCR can be operated.
(11) What is TRIAC? How it differs from SCR?
(12) In how many modes TRIAC can be operated?
(13) In which of the modes the TRIAC is most sensitive? What is the basis?
(14) How many layers are there in TRIAC?
(15) Give the applications of TRIAC.
(16) What is MOSFET?
(17) What are the types of MOSFETs we have?
(18) What are Drain resistance, trans-conductance & amplification factors of MOSFET.
(19) What is the meaning of Negative temperature coefficient of resistance?
(20) Give the applications of MOSFET.
(21) What is an IGBT?
(22) Compare its features with MOSFET & BJT.
(23) Give the advantages & applications of IGBT.
(24) How many types of IGBT’s are available?
(25) Why we call IGBT as majority carrier device?
(26) What is Triggering?
(27) What are the methods of triggering an SCR?
(28) What is the limitation of R triggering?
(29) How RC triggering is better than R triggering?
(30) What is the range of R triggering & RC triggering?
(31) What is meant by synchronized triggering?
(32) What is relaxation oscillator?
(33) What is UJT? How it differs from BJT?
(34) Why UJT is used in relaxation oscillator?
(35) In what region of its characteristics, the UJT is operated for relaxation oscillator
(36) What is the range of in case of UJT triggering?
(37) What is the advantage of UJT triggering over other triggering circuits?
(38) What is the role of Zener diode in this circuit?
(39) What is a pulse transformer? Why it is used in UJT triggering circuit?
(40) What is the role of resistor connected in series with the POT?
(41) What is Commutation?
(42) What is Natural Commutation & Forced Commutation.
(43) How the commutation can be achieved practically?
(44) What are the circuit elements required for Commutation?
(45) What is the difference between current & voltage Commutation?

Power Electronics Lab Manual-10ECL78 2013-14
59 Dept. of ECE, SJBIT, Bangalore.
(46) Give the types of Forced Commutation circuits.
(47) What is the advantage of Class-B Commutation over Class-A Commutation?
(48) What is the advantage of Class-C Commutation over Class-B Commutation?
(49) What is the advantage of Class-D Commutation over Class-C Commutation?
(50) What is Auxiliary voltage commutation?
(51) What is an AC voltage controller? Give its application.
(52) What is the role of Diac in AC voltage controller?
(53) What are the factors on which the charging of the capacitor depends?
(54) What are the different types of AC voltage controllers we have?
(55) What is the difference between on off controller & phase controller?
(56) What is a Converter? What is the difference between converter & rectifier?
(57) What is the difference between Fully controlled & Half controlled converters?
(58) What is the effect of inductance on the load circuit?
(59) What is freewheeling/ Fly wheeling diode?
(60) What is the effect of Freewheeling diodes on the load?
(61) What is a Dual Converter? Give its applications.
(62) What is a Series Converter? Give its applications.
(63) In what way the Free wheeling diodes are different from ordinary diode?
(64) Give the classification of converters based on the quadrant operation
(65) Give the applications of controlled rectifiers?
(66) What is a DC Chopper? Give its applications.
(67) What is the principle of a Chopper?
(68) Give the classification of choppers.
(69) Give the classification of choppers based on quadrant operation.
(70) What are the types of controlling we have for choppers?
(71) What is meant by separately excited DC motor?
(72) What are methods of speed control of DC motor?
(73) What method is implemented in this experiment?
(74) What are the applications of DC motor?
(75) What are the different types of DC motors?
(76) What is an Universal motor?
(77) What are the methods of speed control of universal motor?
(78) What are the applications of Universal motor?
(79) What is a stepper motor?
(80) Give the applications a stepper motor.
(81) What is an Inverter?
(82) What is the principle of an Inverter?
(83) What is the difference between series & parallel inverters?
(84) What is the use of Fly back diodes used in the Inverters?
(85) Give the applications of inverters.
(86) Which inverter circuit gives a square wave output?
(87) How to get sine wave from the square wave obtained from the Parallel Inverter?
(88) Which inverter gives an approximate sine wave output?
(89) Compare a series inverter with parallel inverter?
(90) How the Inverters are classified?
(91) What is meant by dv/dt & di/dt ratings?
(92) What is a Snubber circuit? How it eliminates voltage & current transients?

Power Electronics Lab Manual-10ECL78 2013-14
60 Dept. of ECE, SJBIT, Bangalore.
(93) How do you protect SCR against high voltage & currents?
(94) What is the purpose of a Fuse? How does it protects a circuit?
(95) What is PIV rating of a Thyristor?
(96) What is GTO? How it differs from SCR?
(97) Give the advantage & disadvantages of GTO.
(98) What are Harmonics? Why they will get introduced in power electronic circuits
(99) What is a Cyclo-converter? Give its applications.
(100) What is the difference between Un-controlled, Controlled & Fully controlled
devices. Give examples for them.
(101) What is stepper motor?
(102) Why is stepper motor also called digital motor?
(103) How many steps are covered in one revolution?
(104) What is step angle?
(105) What are the applications of stepper motor?
Related Documents