HP ProCurve Network Management Installation and Getting Started Guide

Welcome message from author
This document is posted to help you gain knowledge. Please leave a comment to let me know what you think about it! Share it to your friends and learn new things together.
Transcript

HP ProCurve Network Management Installation and Getting Started Guide

© Copyright 2004, 2005, 2007, 2009 Hewlett-Packard Development Company, L.P.All Rights Reserved
Publication Number
5991-8636b
Version v3, February 2010
Applicable Products
ProCurve Manager v3.0ProCurve Manager Plus v3.0ProCurve Mobility Manager v3.0ProCurve Network Immunity Manager v2.0ProCurve Identity Driven Management v3.0
Trademark Credits
Microsoft, Windows, Windows XP, and Windows Vista are registered trademarks of Microsoft Corporation.
Disclaimer
The information contained in this document is subject to change without notice.
The only warranties for HP products and services are set forth in the express warranty statements accompanying such products and services. Nothing herein should be construed as constituting an additional warranty. HP shall not be liable for technical or editorial errors or omis-sions contained herein.
Warranty
See the Customer Support/Warranty booklet included with the product.
A copy of the specific warranty terms applicable to your Hewlett-Packard products and replacement parts can be obtained from your HP Sales and Service Office or authorized dealer.

Contents
Introduction . . . . . . . . . . . . . . . . . . . . . . . . . . . . . . . . . . . . . . . . . . . . . . . . . . . . . . . . . . . . . . . . . . . . . . . . . . 1
Other Documentation . . . . . . . . . . . . . . . . . . . . . . . . . . . . . . . . . . . . . . . . . . . . . . . . . . . . . . . . . . . . . . 2
Purchasing ProCurve Manager Software . . . . . . . . . . . . . . . . . . . . . . . . . . . . . . . . . . . . . . . . . . . . . . 3
Installation Prerequisites . . . . . . . . . . . . . . . . . . . . . . . . . . . . . . . . . . . . . . . . . . . . . . . . . . . . . . . . . . . . . . . 4
Supported Software for Dedicated PCM Systems . . . . . . . . . . . . . . . . . . . . . . . . . . . . . . . . . . . . . . . 4
Supported Hardware for Dedicated PCM Systems . . . . . . . . . . . . . . . . . . . . . . . . . . . . . . . . . . . . . . 4
Supported Configurations . . . . . . . . . . . . . . . . . . . . . . . . . . . . . . . . . . . . . . . . . . . . . . . . . . . . . . . . . . . 6
VMWare Supported Software . . . . . . . . . . . . . . . . . . . . . . . . . . . . . . . . . . . . . . . . . . . . . . . . . . . . . . . . 6
VMWare Supported Hardware . . . . . . . . . . . . . . . . . . . . . . . . . . . . . . . . . . . . . . . . . . . . . . . . . . . . . . . 6
Additional Requirements . . . . . . . . . . . . . . . . . . . . . . . . . . . . . . . . . . . . . . . . . . . . . . . . . . . . . . . . . . . . 7
ProCurve Manager for Network Node Manager . . . . . . . . . . . . . . . . . . . . . . . . . . . . . . . . . . . . . . . . . 7
ProCurve Identity Driven Manager (IDM) . . . . . . . . . . . . . . . . . . . . . . . . . . . . . . . . . . . . . . . . . . . . . . 8
Upgrading from Previous Versions . . . . . . . . . . . . . . . . . . . . . . . . . . . . . . . . . . . . . . . . . . . . . . . . . . . 8
ProCurve Manager Installation Instructions . . . . . . . . . . . . . . . . . . . . . . . . . . . . . . . . . . . . . . . . . . . . . . . 9
Before You Begin . . . . . . . . . . . . . . . . . . . . . . . . . . . . . . . . . . . . . . . . . . . . . . . . . . . . . . . . . . . . . . . . . . 9
Installing the PCM Server, Local Agent, and Modules . . . . . . . . . . . . . . . . . . . . . . . . . . . . . . . . . . . 10
Configure User Settings . . . . . . . . . . . . . . . . . . . . . . . . . . . . . . . . . . . . . . . . . . . . . . . . . . . . . . . . . . . . 15
Installing Remote Clients . . . . . . . . . . . . . . . . . . . . . . . . . . . . . . . . . . . . . . . . . . . . . . . . . . . . . . . . . . 24
Installing Remote Agents . . . . . . . . . . . . . . . . . . . . . . . . . . . . . . . . . . . . . . . . . . . . . . . . . . . . . . . . . . . 27
PCM Installation Notes . . . . . . . . . . . . . . . . . . . . . . . . . . . . . . . . . . . . . . . . . . . . . . . . . . . . . . . . . . . . . . . . 31
One Network Management Program per Computer . . . . . . . . . . . . . . . . . . . . . . . . . . . . . . . . . . . . 31
Screen Resolution . . . . . . . . . . . . . . . . . . . . . . . . . . . . . . . . . . . . . . . . . . . . . . . . . . . . . . . . . . . . . . . . . 31
Using PCM on multi-homed computers . . . . . . . . . . . . . . . . . . . . . . . . . . . . . . . . . . . . . . . . . . . . . . . 31
Microsoft Vista’s User Account Control . . . . . . . . . . . . . . . . . . . . . . . . . . . . . . . . . . . . . . . . . . . . . . 32
IDM Installation Notes . . . . . . . . . . . . . . . . . . . . . . . . . . . . . . . . . . . . . . . . . . . . . . . . . . . . . . . . . . . . . . . . 33
Configuring IDM Agent Access . . . . . . . . . . . . . . . . . . . . . . . . . . . . . . . . . . . . . . . . . . . . . . . . . . . . . . 33
Licensing ProCurve Manager Plus Software . . . . . . . . . . . . . . . . . . . . . . . . . . . . . . . . . . . . . . . . . . . . . . 34
Getting Started with ProCurve Manager . . . . . . . . . . . . . . . . . . . . . . . . . . . . . . . . . . . . . . . . . . . . . . . . . 42
PCM Interface . . . . . . . . . . . . . . . . . . . . . . . . . . . . . . . . . . . . . . . . . . . . . . . . . . . . . . . . . . . . . . . . . . . 42
Start-Up Tips . . . . . . . . . . . . . . . . . . . . . . . . . . . . . . . . . . . . . . . . . . . . . . . . . . . . . . . . . . . . . . . . . . . . . 45
i

ii
1
Introduction
HP ProCurve Manager (PCM) v3 is a network management application which provides an effective solution for basic monitoring and managing of network devices. PCM is focused for small to medium-sized networks that need to monitor basic device health, capture and browse SNMP and Syslog events, and map network devices. PCM provides the core features of network management systems: auto discovery, network mapping, device status monitoring, and network event management. It also provides easy access to configure devices via the Web management page or telnet access.
PCM includes an auto-update feature which will keep management systems up to date with new device support. Also, PCM can be used to automatically register all discovered HP ProCurve devices, reducing support time from the start and can also be used to easily update HP ProCurve devices with new device software. HP ProCurve Manager is a Microsoft Windows-based network management solution that is a downloadable software package from http://www.procurve.com/pcm. The download provides all the basic tools needed to handle a network effectively, along with a 60-day trial version of HP ProCurve Manager Plus v3.
HP ProCurve Manager Plus (PCM Plus) v3 is an advanced network management system. PCM Plus enables mapping, configuration, and monitoring of network devices from a central location. The new PCM Plus v3 provides security and extensibility for small to large networks with one to many remote sites. Network-wide management control allows network administrators to securely add, customize, and restrict network management access. PCM Plus also builds on the discovery and network mapping, providing on-demand or scheduled reporting about network inventory, security, and performance of PCM Plus policy and event-based management capabilities allow administrators to define policies that can automate notifications and changes as desired. In addition, PCM Plus configuration management logs all changes to network devices, including who made the change and when. The application includes detailed traffic monitoring capabilities to identify network congestion issues and identify dangerous network usage. PCM Plus provides network administrators a powerful toolset to effectively configure, monitor, document and troubleshoot the network. HP PCM Plus v3 is available for a 60-day trial and thereafter requires a separately purchased license key.
With ProCurve’s security and wireless solutions, as well as extended third-party support, HP ProCurve Manager Plus v3 offers a single pane management solution. For instance, PCM plus integrates with HP OpenView Network Node Manager (ver.7.5) to provide a robust solution for managing ProCurve network products in a multi-vendor environment.
As well as integration with HP Network Node Manager, HP ProCurve Mobility Manager (PMM) extends the PCM plus monitoring and configuration tools for use with HP ProCurve Wireless Access Points (APs) and Wireless Services Modules (WESM) including their Radio Ports (RPs). The PMM module can be used to monitor all Radios within range of the managed ProCurve APs and RPs, define Trusted Radios, plan RF coverage, and monitor and configure WLANs and SSIDs for Radios on managed APs and RPs.
HP PMM v3 requires HP PCM Plus v3 and can be directly installed after downloading the HP PCM software package from Procurve.com. HP PMM v3 is available for a 60-day trial and thereafter requires a separately purchased license key.
1

Introduction
Another plug in for HP PCM Plus is HP ProCurve Identity Driven Manager (IDM) which provides network security at the “edge” of the network. HP ProCurve IDM extends the capabilities of 802.1x authentication, Web authentication, and MAC authentication with features for dynamically configuring access rights at the point where users access the network.
HP IDM 3.0 requires HP PCM Plus v3 and can be directly installed after downloading the HP PCM software package from Procurve.com. The HP ProCurve Identity Driven Manager is available for a 60-day trial and thereafter requires a separately purchased license key.
Finally, HP ProCurve Network Immunity Manager (NIM) provides an affordable, scalable, and easily manageable solution that delivers per-port intrusion detection and response to stop malicious network traffic on both the wired and wireless network as a plug-in to HP PCM Plus. HP ProCurve NIM allows users to define policies, collect security events, monitor threats, and automate threat mitigation.
HP ProCurve NIM detects suspicious network activity using Network Behavior Anomaly Detection (NBAD) on sampled traffic, and it accepts virus detection alerts from switches running Virus Throttle software and from select IDS, IPS, and UTM security appliances. The HP ProCurve NIM can detect zero day attacks (first attacks by a new threat) and protects against threats from inside the network such as an employee bringing an infected laptop to work. NIM also provides centralized management of ProCurve TMS zl Modules, including firewall and IPS configuration.
HP ProCurve NIM requires HP PCM Plus 3.0 or greater and can be directly installed after downloading the HP PCM software package from Procurve.com. HP ProCurve NIM is available for a 60-day trial and thereafter requires a separately purchased license key.
This book provides information on the following topics:
■ Prerequisites for installing ProCurve Management software - page 4
■ Installing ProCurve Management software modules – page 9
■ Licensing your ProCurve Management software – page 34
■ Getting started with the ProCurve Management software – page 42
Other Documentation
Other documentation available for ProCurve Manager, Identity Driven Management, Mobility Manager, and Network Immunity Manager includes:
Online Help: Context specific and topical help is available everywhere from within the user interface for PCM, PCM Plus, and its modules. The help also includes a table of contents, glossary, and search capabilities.
HP ProCurve Manager Network Administrator’s Guide: Detailed information about all PCM and Mobility Manager features and uses. This guide is accessible from the Help menu in the program and can be downloaded from www.ProCurve.com. It is also included as a PDF file on the ProCurve Manager installation disk.
HP ProCurve Identity Driven Manager User’s Guide: Detailed information for configuring net-work access groups and policies. This guide is included as a PDF file on the ProCurve Manager installation disk.
HP ProCurve Network Immunity Manager Security Administrator’s Guide: Detailed informa-tion for configuring NBAD (threat detection) sensitivity, monitoring suspicious network activity, and configuring automated threat response and mitigation using Security Alerts and Actions with the Policy
2
Introduction
Manager feature available in PCM Plus. Detailed information for configuring ProCurve TMS zl Modules is also included in this guide, which can be downloaded from www.ProCurve.com and is included as a PDF file on the ProCurve Manager installation disk.
HP ProCurve Network Management 3.0 Migration Guide: How to plan and migrate your net-work management solution to PCM 3.0. Also includes information about upgrading from PCM 2.x with installed plug-ins to PCM 3.0 with installed plug-ins, along with licensing requirements.
Purchasing ProCurve Manager Software
A 60-day trial version of ProCurve Manager Plus (PCM Plus), Mobility Manager (PMM), Identity Driven Management (IDM), and Network Immunity Manager (NIM) software is included with new ProCurve switches. Contact your HP sales representative or HP reseller to purchase PCM Plus, PMM, NIM, or IDM software. You can also go to the ProCurve Web site at http://www.procurve.com for more information.
HP ProCurve Manager Plus 3.0 Licensing
All PCM 3.0 installations, new or upgrade, require an initial license, called an entry level or base license. A new customer can either purchase a 50-device base license (J9174A) and add incremental, 100-device licenses (J9175A) or they can purchase the unlimited license, which includes a base license (J9177A). An upgrade customer can either purchase a 50-device base license upgrade (J9173A) and add incre-mental, 100-device licenses (J9175A) or they can purchase the unlimited license upgrade, which includes a base license (J9176A).
SKU Description Supported Devices Agents
J9173A Upgrade with 50-device licence plus one Agent license from previous HP PCM+ 2.x
50 1
J9174A Entry level software with 50-device license plus 1 Agent license 50 1
J9175A Incremental + 100-device license plus 1 Agent license +100 +1
J9176A Upgrade to unlimited device license with all support Agents from HP PCM+ 2.x unrestricted license
Up to 3500 10
J9177A Software with unlimited device license and all supported Agents
Up to 3500 10
3
Installation Prerequisites
2
Installation Prerequisites
Before installing the ProCurve Network Management products, ensure your system meets the following prerequisites. The following specifications are for the PCM/PCM Plus Server, remote Client, and Agent programs only. For PMM, IDM, or NIM Plug-in hardware operational requirements refer to the plug-in’s datasheet on the Web.
Supported Software for Dedicated PCM Systems
ProCurve Management software is supported on these Operating Systems:
■ PCM Server
• MS Windows 2003 Server Enterprise Edition SP2 (32-bit)
• MS Windows XP Pro SP2 or SP3 (32-bit) *
* MS Windows XP Pro supports a maximum of 4Gb memory and 4 CPUs. Therefore, XP Pro cannot be used in some setups.
MS Windows 2003 provides better performance than MS Windows XP.
■ Remote Client
• MS Windows XP Pro SP2 or SP3 (32-bit)
• MS Windows Vista Business/Ultimate SP1 (32-bit)
■ Remote Agent
• MS Windows XP Pro SP2 or SP3 (32-bit)
• MS Windows 2003 Server (32-bit)
MS Windows 2003 provides better performance than MS Windows XP.
■ IDM Agent
• MS Internet Authentication Service (IAS) on MS Windows 2003 (32-bit)
• MS Network Policy Server on Windows Server 2008 (32-bit)
• RADIUS on the ProCurve Network Access Controller 800
• FreeRADIUS supplied with Red Hat Enterprise Linux (4.7, 5.2)
• FreeRADIUS supplied with SuSE Enterprise Linux (9.3, 10.2)
Supported Hardware for Dedicated PCM Systems
The hardware requirements listed in the tables below assume:
■ System hardware is used for PCM purposes only.
■ 1 PCM Server can support a maximum of 10 Agents, including local and remote Agents. Better performance can be achieved if a local Agent is not running on the PCM Server.
■ 1 PCM Server can support a maximum of 10 PCM Clients, including local and remote Clients. Better performance can be achieved if a local Client is not running on the PCM Server.
4

Installation Prerequisites
■ 1 Agent can manage a maximum of 350 devices.
Minimum Hardware Requirements
* For Remote Clients installed on Microsoft Windows Vista: minimum 4 GB RAM required
Recommended Hardware Requirements
* For Remote Clients installed on Microsoft Windows Vista: minimum 4 GB RAM required
<50 50-350 350-1200 1200-2400 2400-3500 Free Disk Space
NIC
Server 2 GB1 CPU
2 GB1 CPU
4 GB2 CPU
4 GB4 CPU
5 GB4 CPU
60 GB 100/1000 Mbps
PCM Remote Agent
n/a n/a 2 GB2 CPU
2 GB2 CPU
2 GB2 CPU
20 GB 100 Mbps
PCM Remote Client
2/4* GB1 CPU
2/4* GB1 CPU
2/4* GB1 CPU
2/4* GB1 CPU
2/4* GB1 CPU
20 GB 100 Mbps
Recommended Number of Agents
Agents 1 local 1 local 1 local3 remote
0 local7 remote
0 local10 remote
<50 50-350 350-1200 1200-2400 2400-3500 Free Disk Space
NIC
Server 2 GB2 CPU
3 GB2 CPU
4 GB4 CPU
6 GB4 CPU
6 GB4 CPU
60 GB 100/1000 Mbps
PCM Remote Agent
n/a n/a 3 GB2 CPU
3 GB2 CPU
3 GB2 CPU
20 GB 100 Mbps
PCM Remote Client
2/4* GB2 CPU
2/4* GB2 CPU
2/4* GB2 CPU
2/4* GB2 CPU
2/4* GB2 CPU
20 GB 100 Mbps
Recommended Number of Agents
Agents 1 local 1 local 1 local3 remote
0 local7 remote
0 local10 remote
5

Installation Prerequisites
Supported Configurations
* This configuration includes 2-3 Agents with 200-500 devices per Agent and 22-23 Agents with 10-50 devices per Agent.
VMWare Supported Software
• VMWare system is running ESX V3.5.• PCM Server
– MS Windows 2003 Server Enterprise Edition (Service Pack 2) running as guest operating system
MS Windows 2003 provides better performance than MS Windows XP.
• Remote Client– MS Windows XP Pro (Service Pack 2 or 3) – MS Windows Vista Business/Ultimate SP1
• Remote Agent– MS Windows XP Pro (Service Pack 2 or 3) – MS Windows 2003 Server
MS Windows 2003 provides better performance than MS Windows XP.
VMWare Supported Hardware
When using VMWare, the requirements listed in the tables below assume:
■ System hardware is used for PCM purposes only.
■ 1 PCM Server can support a maximum of 4 Agents, including local and remote Agents. Better performance can be achieved if a local Agent is not running on the PCM Server.
■ 1 PCM Server can support a maximum of 10 PCM Clients, including local and remote Clients.
■ 1 Agent can manage a maximum of 350 devices.
■ VMWare supports 1200 devices.
VMWare Minimum Hardware Requirements
up to 2000 Devices1 Agent
(local or remote)
up to 3000 Devices2 remote Agents
up to 2650 Devicesup to 25 remote Agents*
Operating System MS Windows 2003 Server MS Windows 2003 Server or MS Windows XP Pro
MS Windows 2003 Server or MS Windows XP Pro
sFlow Interfaces 500 3,000 per Agent 2-3 Agents: 3,00022-23 Agents: 525
Polled Interfaces 10,000 6,000 per Agent 2-3 Agents: 7,00022-23 Agents: 1250
Events per Second 10 10 per Agent 2 per Agent
<50 50-350 350-1200 Free Disk Space NIC
Server 2 GB1 CPU
2 GB2 CPU
3 GB4 CPU
60 GB 100/1000 Mbps
6

Installation Prerequisites
* For Remote Clients installed on Microsoft Windows Vista: minimum 4 GB RAM required
VMWare Recommended Hardware Requirements
* For Remote Clients installed on Microsoft Windows Vista: minimum 4 GB RAM required
Additional Requirements
Note: Installing PCM on a Server with full terminal services is not supported.
If the device views do not appear correctly in the PCM display, it may be that you do not have the necessary JRE plug-in software. You need "J2SE Runtime Environment 5.0 (JRE)" or newer installed on your system to display the switch "live view" correctly. This software is available from Sun Microsystems Web site (java.sun.com)
ProCurve Manager for Network Node Manager
ProCurve Management software is supported on HP Network Node Manager for Windows, versions 7.5. When determining hardware requirements for a computer running both NNM and PCM, add the NNM hardware requirements to the PCM hardware requirements to determine the combined hardware requirements.
PCM Remote Agent
n/a n/a 2 GB2 CPU
20 GB 100 Mbps
PCM Remote Client
2/4* GB2 CPU
2/4* GB2 CPU
2/4* GB2 CPU
20 GB 100 Mbps
Recommended Number of Agents
Agents 1 local 1 local 0 local4 remote
<50 50-350 350-1200 Free Disk Space
NIC
Server 2 GB1 CPU
4 GB2 CPU
3 GB4 CPU
60 GB 100/1000 Mbps
PCM Remote Agent
n/a n/a 2 GB2 CPU
20 GB 100 Mbps
PCM Remote Client
2/4* GB2 CPU
2/4* GB2 CPU
2/4* GB2 CPU
20 GB 100 Mbps
Recommended Number of Agents
Agents 1 local 1 local 0 local4 remote
<50 50-350 350-1200 Free Disk Space NIC
7

Installation Prerequisites
ProCurve Identity Driven Manager (IDM)
■ The IDM Agent is supported on the operating systems listed in “Supported Software for Dedicated PCM Systems” on page 1-4, which also identifies the Linux version supported.
■ Use of the IDM software requires configuration of one of the following RADIUS-based access control methods: MAC-auth, Web-auth, or 802.1x.
■ Distributed applications require synchronized clocks. Thus, clocks on the PCM Server and IDM Agents must be synchronized to within 10 minutes.
■ For assistance with implementation of RADIUS and access control on your network, contact the ProCurve Elite Partner nearest you that can provide ProCurve Access Control Security solutions. You can find ProCurve Direct Elite partners on the Find a Partner link at http://www.procurve.com.
Upgrading from Previous Versions
Because of the variety of upgrade scenarios, see the HP ProCurve Network Management 3.0 Migration
Guide, which includes special considerations and how upgrading affects PCM and its modules. Do NOT use the instructions in this guide to upgrade from a previous version of PCM. Once you upgrade to PCM 3.0 you cannot revert to a previous version, so you should back up data prior to upgrade or load PCM 3.0 on different hardware.
8
ProCurve Manager Installation Instructions
3
ProCurve Manager Installation Instructions
All components (PCM Server, PCM Agent, PCM Client, and IDM Agents) of ProCurve Manager, Identity Driven Manager, Mobility Manager, and Network Immunity Manager are installed from the downloaded software or the CD by the installation process described in this document.
Before You Begin
During installation, the PCM Install Wizard will prompt you to configure PCM startup defaults and user settings. Use the following list to determine these settings BEFORE starting the installation process. Specific settings are shown in “Configure User Settings” on page 1-15.
■ IDM realm & alias
■ Server to Agent connection
■ PCM Admin password
■ discovery
■ SNMP
■ CLI
■ HTTP
■ AUTO update
To accept the default User settings provided with PCM, simply click the Next button to continue to the next window. You can change the settings at a later time using the Preferences options in PCM. See the HP ProCurve Manager Network Administrator’s Guide for details.
Note: ■ ProCurve Management software is not localized for non-English versions of Windows.
9

ProCurve Manager Installation Instructions
Installing the PCM Server, Local Agent, and Modules
Start the installation at the computer that will be the network management station. Installation will install the PCM Server, a local Agent, and any selected modules on this computer. To install PCM Clients or remote Agents, you will use a browser (e.g., Internet Explorer) at remote computers to download the PCM software from this network management station.
Note When installing PCM and Network Node Manager (NNM) on the same computer, the NNM environment should be set up and network nodes initially discovered before installing PCM for NNM.
If installing PCM from software downloaded from www.procurve.com, open the install.exe program file to start the installation. If installing PCM from a CD, insert the product CD into the CD ROM drive in the computer that you are using as the network management station. The program will auto install using the PCM Install Wizard. If the auto install doesn’t open the wizard automatically, double-click the Install.exe program.
Figure 1. PCM Installation, Introduction
In each window:
• Click Next to continue to the next step in the install process. If the step includes settings, clicking Next accepts the displayed default settings.
You can change the settings at a later time using the Preferences options in PCM. See the HP
ProCurve Manager Network Administrator’s Guide for details.
• Click Previous to return to the previous step in the process.
• Click Cancel to exit the install process.
10
ProCurve Manager Installation Instructions
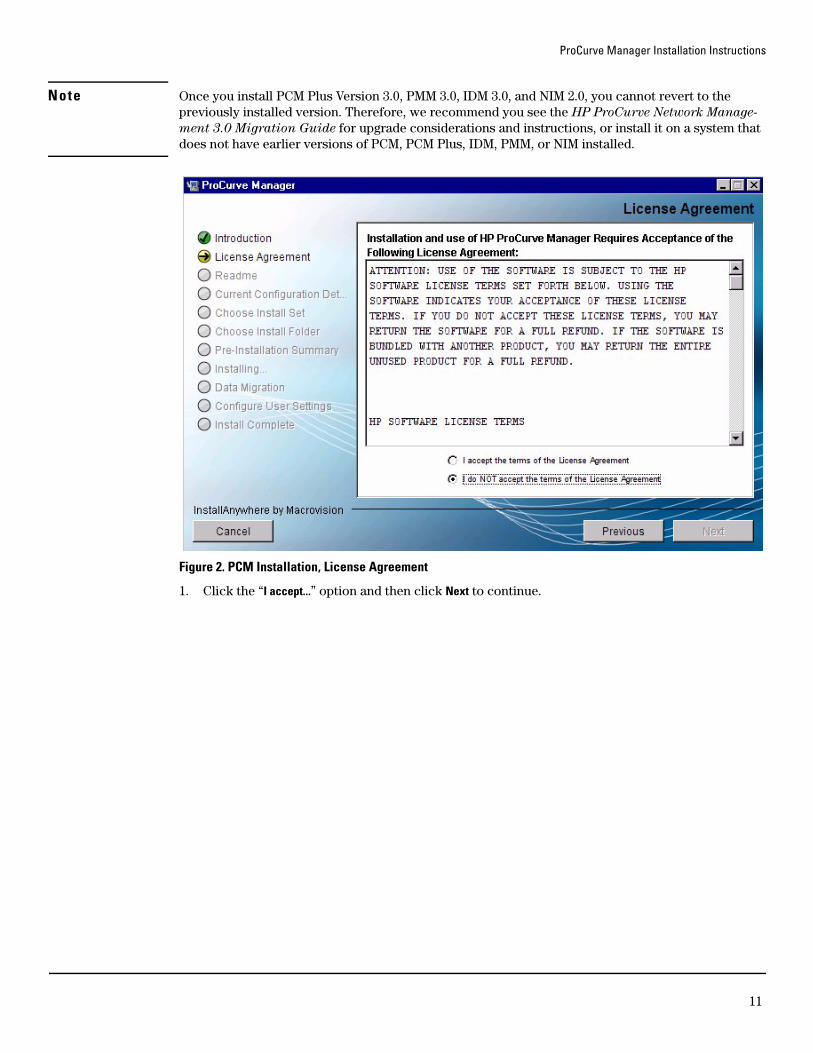
Note Once you install PCM Plus Version 3.0, PMM 3.0, IDM 3.0, and NIM 2.0, you cannot revert to the previously installed version. Therefore, we recommend you see the HP ProCurve Network Manage-
ment 3.0 Migration Guide for upgrade considerations and instructions, or install it on a system that does not have earlier versions of PCM, PCM Plus, IDM, PMM, or NIM installed.
Figure 2. PCM Installation, License Agreement
1. Click the “I accept...” option and then click Next to continue.
11

ProCurve Manager Installation Instructions
Figure 3. PCM Installation, Read Me First
2. Use the scroll bar to review all of the “readme” notes and click Next.
Figure 4. PCM Installation, Current Configuration Detection
The PCM install script will auto-detect the system configuration and determine the appropriate PCM software option (PCM 3.0 standalone version or PCM-NNM).
12

ProCurve Manager Installation Instructions
Note To install PCM-NNM, you must already have NNM installed on your system. Otherwise, the standalone PCM version will be installed.
3. Click Next to choose the modules to install.
Figure 5. PCM Installation, Choose Install Set
When the configuration detection process completes, the recommended PCM features for instal-lation on your network management system is displayed.
4. Check the check box next to each module you want to install, or uncheck the check box if you do not want to install a module. A brief description of each module is displayed in the bottom pane. After 60 days the trial versions of ProCurve Manager Plus, Mobility Manager, Network Immunity Manager, and Identity Driven Manager are deactivated.
Note To install IDM, you must already be using RADIUS for authentication, because the IDM Agent can only be installed on a RADIUS server. If no RADIUS server is detected, the IDM Agent will not install, and IDM will not work.
5. Click Next. If you chose to install IDM, important information about IDM and PCM installation is displayed.
13

ProCurve Manager Installation Instructions
Figure 6. PCM Installation, IDM and PCM Important Information
6. Review the steps required to install IDM once you complete PCM installation, and click Next to continue to the Choose Install Folder window.
Figure 7. PCM Installation, Choose Install Folder
14

ProCurve Manager Installation Instructions
7. To install PCM in an alternate location, use the Choose button to select a different install path, or type the installation directory path.
8. Click Next to continue to the Pre-Installation Summary window.
Figure 8. PCM Installation, Pre-Installation Summary
9. Review the pre- installation summary, then click Install to continue with the installation process.
10. When the confirmation prompt appears, click Continue to confirm that you want to proceed with installation.
The Installing HP ProCurve Manager window displays and provides progress indicators for the installation process.
Note Once the Installation Wizard begins installing the PCM files on your system, you cannot safely cancel the installation. You must wait until the installation process is complete, then uninstall PCM using the “Add/Remove Programs” function via the Windows Control Panel.
If you cancel the installation while files are being copied to your system, PCM may not be able to uninstall the files or properly reinstall over the existing files.
Configure User Settings
Use the information you collected in “Before You Begin” on page 1-9 to review the User Settings to configure during installation.
To accept the defaults provided with PCM, simply click the Next button to continue to the next window. You can change the settings later from within PCM. See the HP ProCurve Manager
Network Administrator’s Guide for details.
15
ProCurve Manager Installation Instructions
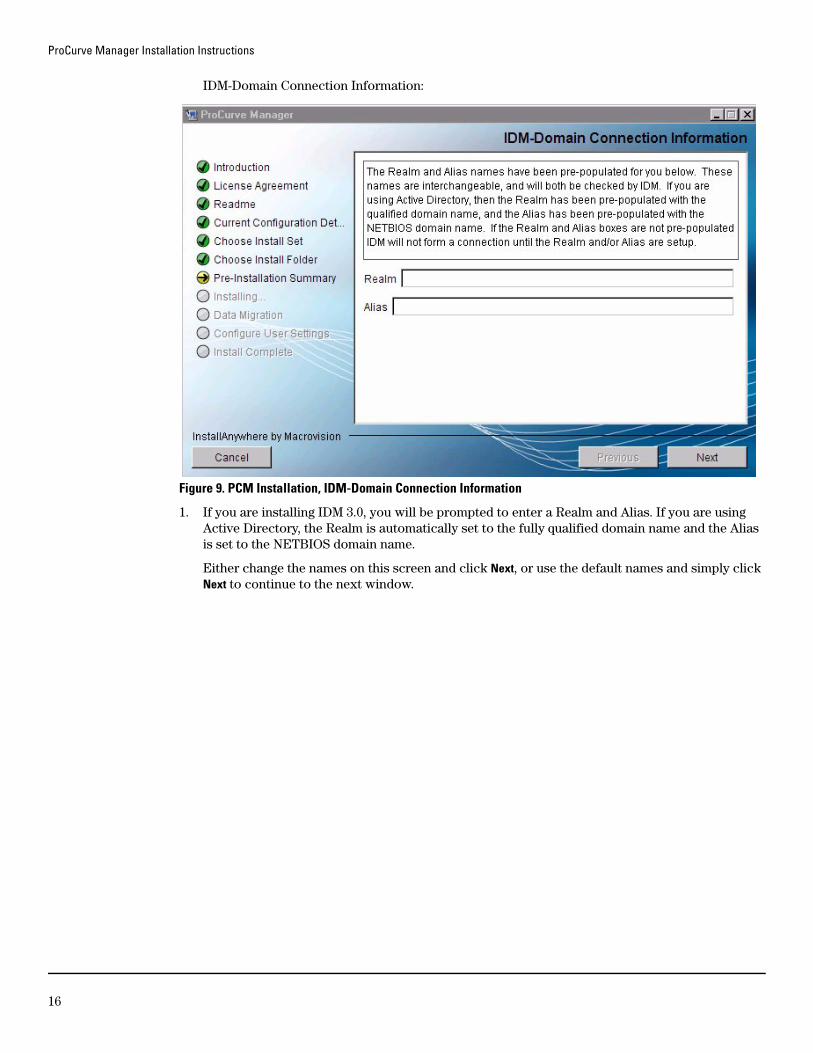
IDM-Domain Connection Information:
Figure 9. PCM Installation, IDM-Domain Connection Information
1. If you are installing IDM 3.0, you will be prompted to enter a Realm and Alias. If you are using Active Directory, the Realm is automatically set to the fully qualified domain name and the Alias is set to the NETBIOS domain name.
Either change the names on this screen and click Next, or use the default names and simply click Next to continue to the next window.
16
ProCurve Manager Installation Instructions
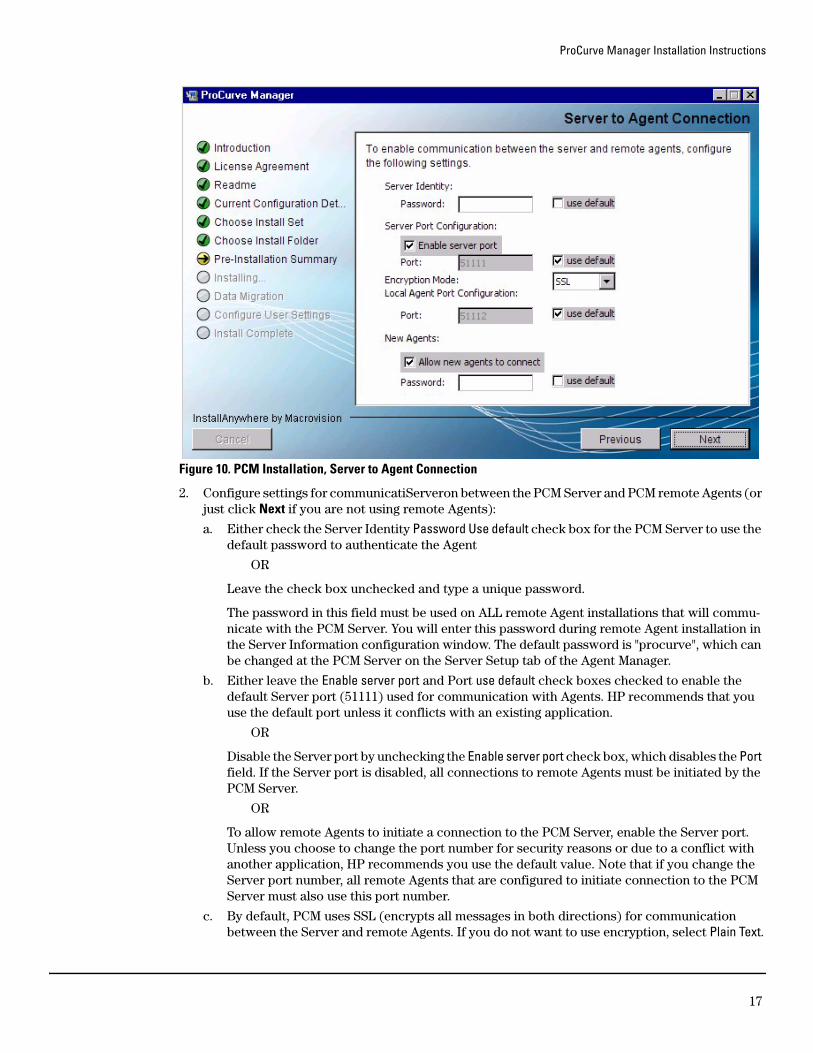
Figure 10. PCM Installation, Server to Agent Connection
2. Configure settings for communicatiServeron between the PCM Server and PCM remote Agents (or just click Next if you are not using remote Agents):
a. Either check the Server Identity Password Use default check box for the PCM Server to use the default password to authenticate the Agent
OR
Leave the check box unchecked and type a unique password.
The password in this field must be used on ALL remote Agent installations that will commu-nicate with the PCM Server. You will enter this password during remote Agent installation in the Server Information configuration window. The default password is "procurve", which can be changed at the PCM Server on the Server Setup tab of the Agent Manager.
b. Either leave the Enable server port and Port use default check boxes checked to enable the default Server port (51111) used for communication with Agents. HP recommends that you use the default port unless it conflicts with an existing application.
OR
Disable the Server port by unchecking the Enable server port check box, which disables the Port field. If the Server port is disabled, all connections to remote Agents must be initiated by the PCM Server.
OR
To allow remote Agents to initiate a connection to the PCM Server, enable the Server port. Unless you choose to change the port number for security reasons or due to a conflict with another application, HP recommends you use the default value. Note that if you change the Server port number, all remote Agents that are configured to initiate connection to the PCM Server must also use this port number.
c. By default, PCM uses SSL (encrypts all messages in both directions) for communication between the Server and remote Agents. If you do not want to use encryption, select Plain Text.
17
ProCurve Manager Installation Instructions
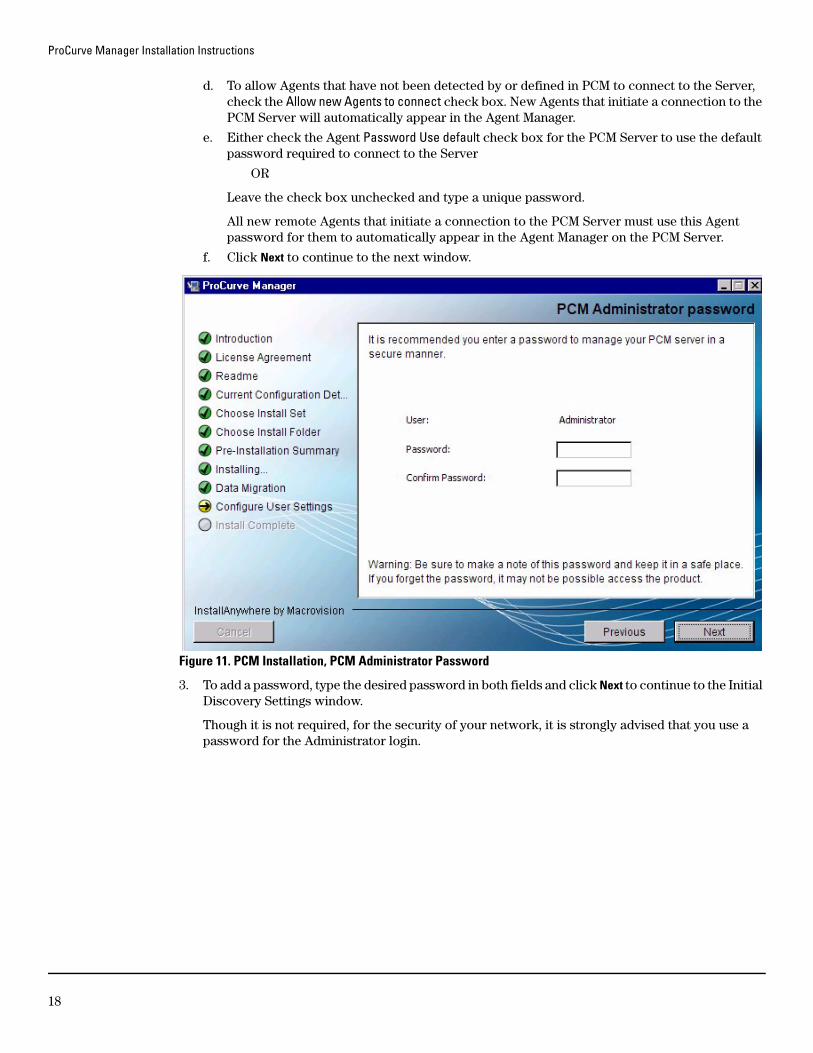
d. To allow Agents that have not been detected by or defined in PCM to connect to the Server, check the Allow new Agents to connect check box. New Agents that initiate a connection to the PCM Server will automatically appear in the Agent Manager.
e. Either check the Agent Password Use default check box for the PCM Server to use the default password required to connect to the Server
OR
Leave the check box unchecked and type a unique password.
All new remote Agents that initiate a connection to the PCM Server must use this Agent password for them to automatically appear in the Agent Manager on the PCM Server.
f. Click Next to continue to the next window.
Figure 11. PCM Installation, PCM Administrator Password
3. To add a password, type the desired password in both fields and click Next to continue to the Initial Discovery Settings window.
Though it is not required, for the security of your network, it is strongly advised that you use a password for the Administrator login.
18
ProCurve Manager Installation Instructions
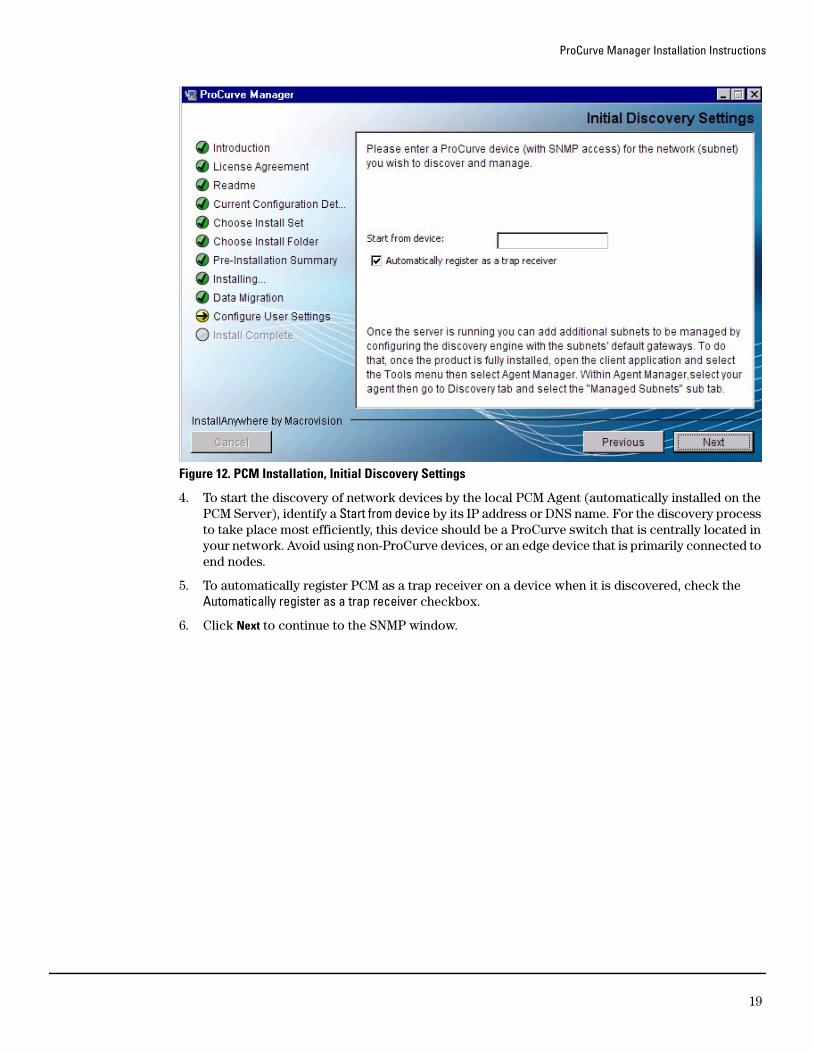
Figure 12. PCM Installation, Initial Discovery Settings
4. To start the discovery of network devices by the local PCM Agent (automatically installed on the PCM Server), identify a Start from device by its IP address or DNS name. For the discovery process to take place most efficiently, this device should be a ProCurve switch that is centrally located in your network. Avoid using non-ProCurve devices, or an edge device that is primarily connected to end nodes.
5. To automatically register PCM as a trap receiver on a device when it is discovered, check the Automatically register as a trap receiver checkbox.
6. Click Next to continue to the SNMP window.
19

ProCurve Manager Installation Instructions
Figure 13. PCM Installation, Set default SNMP parameters
The PCM default uses SNMP V2 with Read and Write Community names of “public” to communicate with devices. The following table explains the options for setting SNMP versions that PCM uses to access devices. You can select both versions using the Primary and Secondary configurations to support devices that use SNMPV2 and SNMPV3.
To change SNMP settings:
1. Select the SNMP Discovery version to use. To use both V2 and V3, set the Primary SNMP version and Secondary SNMP version you will use to communicate with devices on the network.
2. For SNMP V2 Credentials, enter the Read Community name, using up to 16 alphanumeric characters, except >, <, and spaces. (Default is “public”). Repeat to set the Write Community name.
3. For SNMP V3 Credentials:– In the Username field, type the USM user name. The name must be unique and cannot
contain the > or < character.– Select the Authentication Protocol to use.– Enter the Authentication Password.– Select the Privacy Protocol.– Enter the Privacy Password.
4. Set the SNMP Timeout in seconds parameter (maximum 60 seconds).
SNMPV2 Discovery uses only SNMPV2 to discover devices. Devices that do not support SNMPV2 will not be discovered.
SNMPV3 Discovery uses only SNMPV3 to discover devices. Devices that do not support SNMPV3 will not be discovered.
SNMPV2 and SNMPV3 Discovery initially uses the primary SNMP version to discover devices. If communications fail, discovery attempts to communicate with devices using the secondary SNMP version.
None Network uses only one SNMP version, no alternate needed.
20

ProCurve Manager Installation Instructions
5. Set the SNMP Retry Counts parameter. The maximum is 5.
6. Click Next to continue to the next window.
Figure 14. PCM Installation, Set default CLI parameters
If different from the defaults shown, type the communications parameters for Command Line Interface (CLI) access from PCM to ProCurve devices. The default configuration uses Telnet, SSH1 with Password Authentication.
To customize the CLI settings:
1. Use Telnet for CLI communication and disable SSH.
OR
Use SSH for CLI communication and disable Telnet.
2. Set the Timeout parameter to the number of seconds PCM should wait for a connection to be established. Maximum is 60 seconds.
3. Set the Retries parameter to the number of times PCM should retry a failed connection. Maximum is 5 retries.
4. For SSH Credentials:
a. Select the SSH version: SSH1 or SSH2.
b. Select the Password Authentication or Key Authentication option. Key Authentication is available only with SSH2.
c. For Password authentication, define the User Credentials that SSH will use to authorize communication with the device.
d. For Key authentication, enter the Port number to be used for CLI communication.
5. For Telnet credentials:
a. Type the Manager login in the Mgr Username field and the associated password in the Mgr Password field.
21
ProCurve Manager Installation Instructions
b. To set an operator login, type the new operator user name in the Opr Username field and the associated password in the Opr Password field.
6. Click Next to continue to the next window.
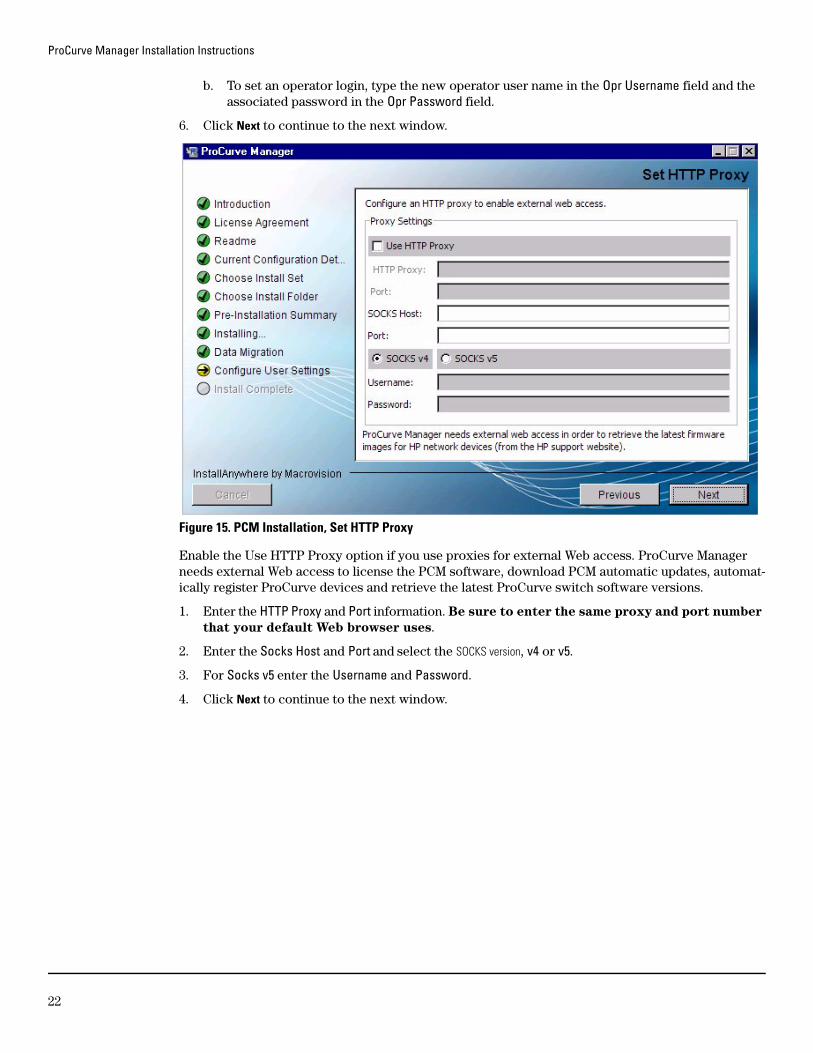
Figure 15. PCM Installation, Set HTTP Proxy
Enable the Use HTTP Proxy option if you use proxies for external Web access. ProCurve Manager needs external Web access to license the PCM software, download PCM automatic updates, automat-ically register ProCurve devices and retrieve the latest ProCurve switch software versions.
1. Enter the HTTP Proxy and Port information. Be sure to enter the same proxy and port number
that your default Web browser uses.
2. Enter the Socks Host and Port and select the SOCKS version, v4 or v5.
3. For Socks v5 enter the Username and Password.
4. Click Next to continue to the next window.
22
ProCurve Manager Installation Instructions
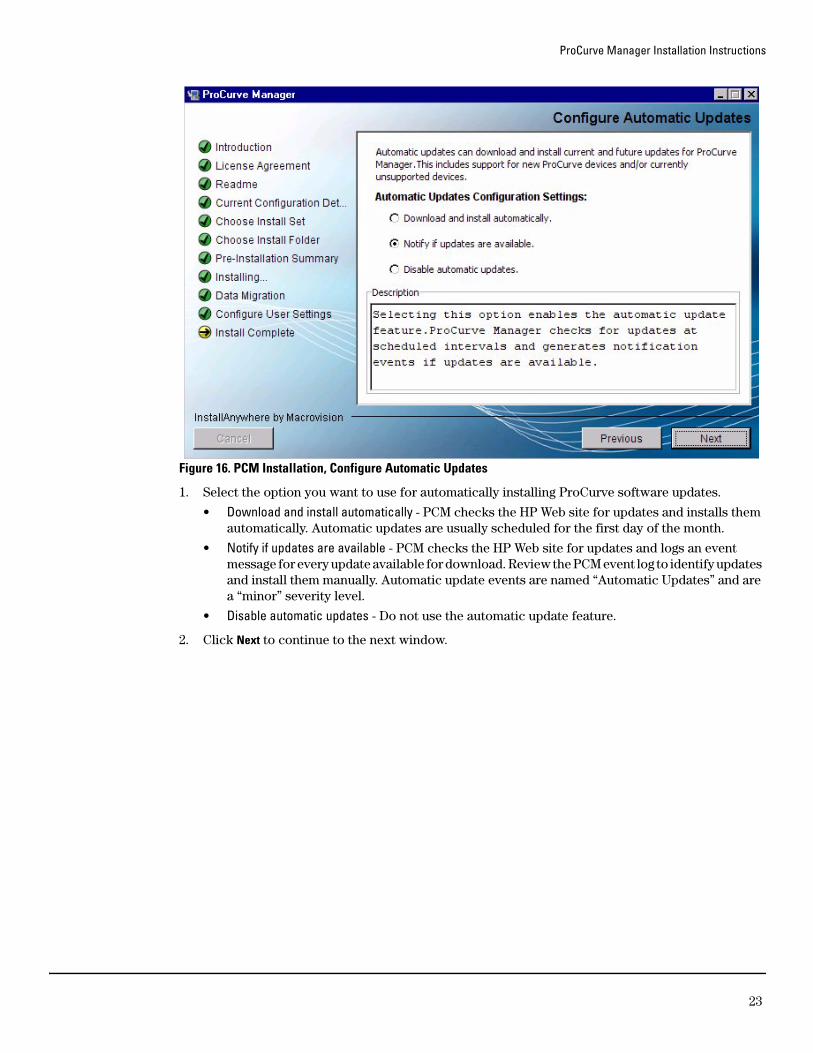
Figure 16. PCM Installation, Configure Automatic Updates
1. Select the option you want to use for automatically installing ProCurve software updates.
• Download and install automatically - PCM checks the HP Web site for updates and installs them automatically. Automatic updates are usually scheduled for the first day of the month.
• Notify if updates are available - PCM checks the HP Web site for updates and logs an event message for every update available for download. Review the PCM event log to identify updates and install them manually. Automatic update events are named “Automatic Updates” and are a “minor” severity level.
• Disable automatic updates - Do not use the automatic update feature.
2. Click Next to continue to the next window.
23
ProCurve Manager Installation Instructions
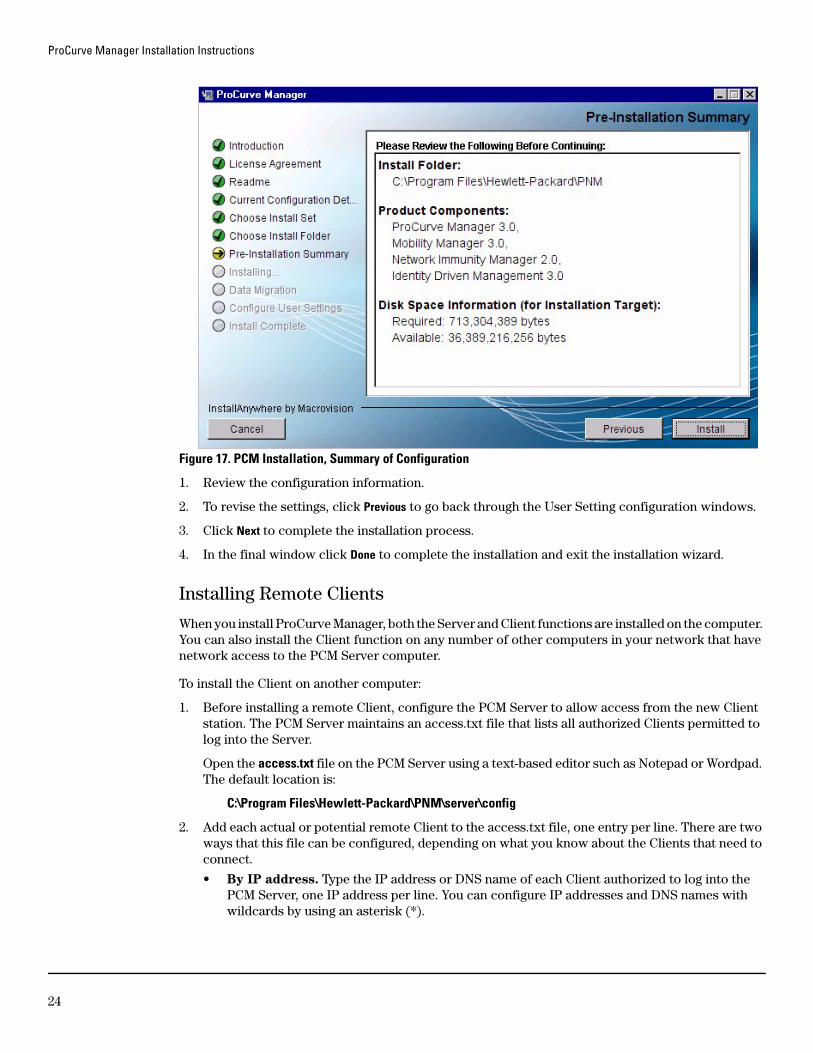
Figure 17. PCM Installation, Summary of Configuration
1. Review the configuration information.
2. To revise the settings, click Previous to go back through the User Setting configuration windows.
3. Click Next to complete the installation process.
4. In the final window click Done to complete the installation and exit the installation wizard.
Installing Remote Clients
When you install ProCurve Manager, both the Server and Client functions are installed on the computer. You can also install the Client function on any number of other computers in your network that have network access to the PCM Server computer.
To install the Client on another computer:
1. Before installing a remote Client, configure the PCM Server to allow access from the new Client station. The PCM Server maintains an access.txt file that lists all authorized Clients permitted to log into the Server.
Open the access.txt file on the PCM Server using a text-based editor such as Notepad or Wordpad. The default location is:
C:\Program Files\Hewlett-Packard\PNM\server\config
2. Add each actual or potential remote Client to the access.txt file, one entry per line. There are two ways that this file can be configured, depending on what you know about the Clients that need to connect.
• By IP address. Type the IP address or DNS name of each Client authorized to log into the PCM Server, one IP address per line. You can configure IP addresses and DNS names with wildcards by using an asterisk (*).
24

ProCurve Manager Installation Instructions
• By Password. If you do not know the IP address or an actual or potential Client, type the selected password (on a line by itself). Wildcards cannot be used in passwords. For example, you might use a password when the Client comes in through a VPN and the IP address of the Client is assigned externally.
The access.txt file can contain any combination of IP addresses, DNS names, and passwords. Following is an example of a valid access.txt file using IP addresses, DNS Names, wildcards, and a password of “procurve”:
15.255.124.84 15.29.37.* 10.*.*.* *.rose.hp.com system1.hp.com procurve
3. If a firewall will prevent the Server and Client from communicating, configure the firewall to allow communication.
4. Start a Web browser such as Microsoft Internet Explorer on the computer where the Client will be installed, and type the IP address of the PCM Server computer followed by a colon and the port ID 8040. For example, if the IP address of the Server computer is 10.15.20.25, enter the following URL:
http://10.15.20.25:8040
Figure 18. Download PCM Remote Client
5. Click the Download the PCM remote client link, on the next window click Download Installer for Windows, and then click Save to download the file.
25

ProCurve Manager Installation Instructions
6. Once the download completes, close the Download window and the Web browser.
7. Open the downloaded install.exe file by double-clicking on it. The Client installation wizard will then guide you through the Client installation.
8. If the remote Client will use a password to access the PCM Server, change the TyphoonServer.cfg file on the Client computer:
a. Open the TyphoonServer.cfg file using a text-based editor such as Notepad or Wordpad. The default location is:
C:\Program Files\Hewlett-Packard\PNM\server\configb. Change the following entry in this file to:
Change from: AUTHENTICATION=10Change to: AUTHENTICATION=100
c. Save and close the file.
9. If the remote Client will use a password to access the PCM Server, add the following line to the riptide.cfg file on the Client computer and then save and close the file:
PASSWORD = your password
Do not change any other entries in the file, because all entries are necessary for the correct operation of the Client.
A sample Riptide.cfg file, once edited with the password “procurve”, would look like this:
LEASE_LENGTH = 40000TRACING_PROPERTY_KEY = CoreServices.MainMANUFACTURER = Hewlett-PackardSERVICE_NAME = TyphoonCOMPONENT_DB = config/Components.prpTRACING_DBFILE = config/Loggers.prpNETWORK_DELAY = 25000VERBOSE = truePASSWORD=procurve
10. Start the Client and enter the IP address of the Server in the “Direct address” field of the Server search dialog. The Client should now connect successfully to the Server.
If you have multiple ProCurve Manager Servers in the network, the first time you start the Client you will be prompted to select the Server to which you want the Client to attach. The Server you select will be used each time the Client program is launched thereafter.
You can change the Server that is being accessed by selecting the “ProCurve Manager Server Discovery” option accessible from the PCM Client computer’s Windows Start button by selecting Programs, ProCurve Manager, and then ProCurve Manager Server Discovery.
11. If a firewall lies between the PCM remote Client and the PCM Server, either configure the firewall to allow the Client to connect to the PCM Server or disable the firewall on the Server.
The firewall prevents the PCM remote Client from getting the necessary connection and data files from the PCM Server. In most cases, a PCM remote Client will display the message no contexts defined and a grey (empty) display.
26

ProCurve Manager Installation Instructions
Installing Remote Agents
PCM 3.0’s architecture lets you logically divide the network and manage devices on remote segments of large networks connected by LAN or WAN links that might or might not be behind a NAT firewall. The 3.0 architecture relies on Agents (installed as a Windows service) deployed across the network to perform management operations on behalf of the PCM Server. Up to 10 Agents (including local and remote Agents) can be installed.
Note The PCM Plus software base products (J9173A and J9174A) provide one license for the PCM Server and one license for only one PCM Agent. If you wish to use multiple PCM Agents, you must purchase an add-on incremental PCM license (J9175A) or an unlimited PCM license (J9176A or J9177A). Without a license for the additional PCM Agent, the PCM Server will not connect to the additional Agent(s).
To install a remote Agent:
1. If a firewall will prevent the Server and Agent from communicating, configure the firewall to allow communication.
2. Start a Web browser such as Microsoft Internet Explorer on the computer where the Agent will be installed, and type the IP address of the PCM Server computer followed by a colon and the port ID 8040. For example, if the IP address of the Server computer is 10.15.20.25, enter the following URL:
http://10.15.20.25:8040
3. Click the Download the Windows PCM/IDM agent link, and click Save to download the file.
4. Once the download completes, close the Download window and the Web browser.
5. Open the downloaded procurve-agent-setup.exe file by double-clicking on it. The Agent Installation Wizard will then guide you through the installation. Use the guidelines provided in the next steps and the same methods for this wizard that you did for installing the PCM Server.
6. On the Agent Information window of the Agent Installation Wizard:
27
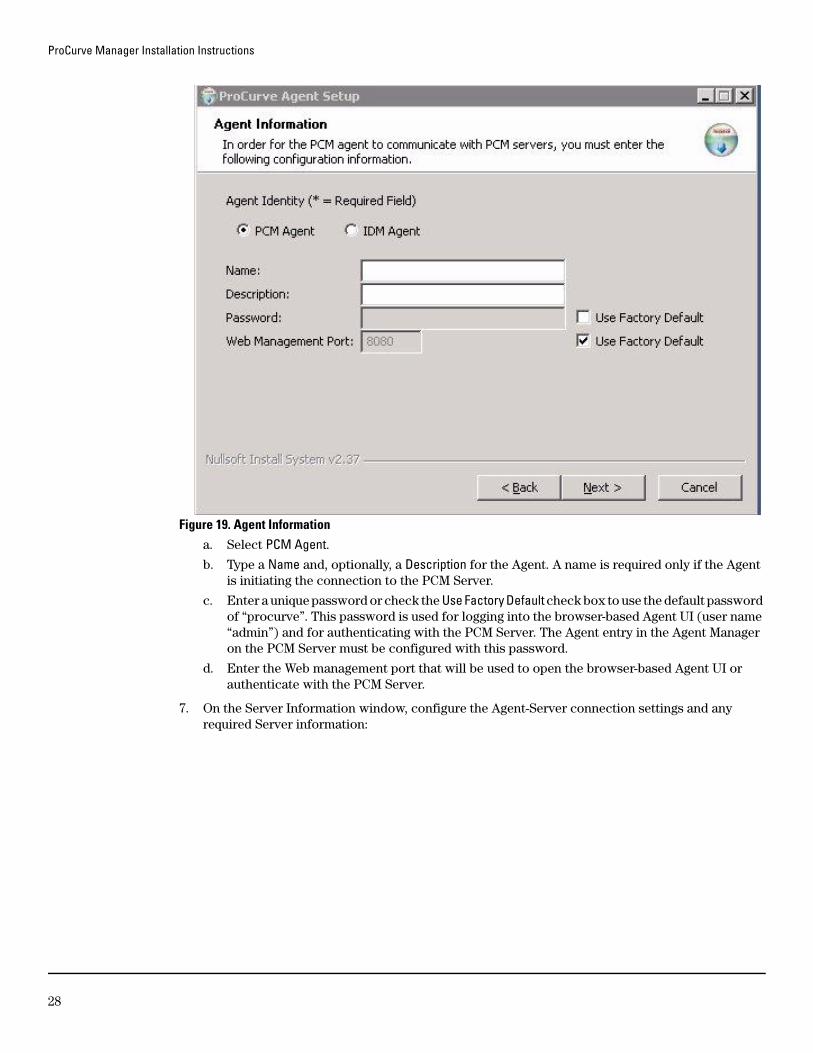
ProCurve Manager Installation Instructions
Figure 19. Agent Informationa. Select PCM Agent.b. Type a Name and, optionally, a Description for the Agent. A name is required only if the Agent
is initiating the connection to the PCM Server.
c. Enter a unique password or check the Use Factory Default check box to use the default password of “procurve”. This password is used for logging into the browser-based Agent UI (user name “admin”) and for authenticating with the PCM Server. The Agent entry in the Agent Manager on the PCM Server must be configured with this password.
d. Enter the Web management port that will be used to open the browser-based Agent UI or authenticate with the PCM Server.
7. On the Server Information window, configure the Agent-Server connection settings and any required Server information:
28

ProCurve Manager Installation Instructions
Figure 20. Server Information
For the Agent to communicate with the PCM Server, these values MUST MATCH the values set on the PCM Server for this Agent.
a. If the Agent will initiate connection to the PCM Server, check the Agent Initiates Connection check box. If the PCM Server will initiate a connection to the Agent, ensure this check box is unchecked.
All Agents that initiate a connection to the PCM Server must use the same port number and encryption type as configured in the Agent Manager Server Setup tab.
b. To change the default Port that the Agent will use to communicate with the PCM Server, uncheck the related Use Default check box and type the desired port. The default PCM Server port is 51111, which can be changed to any unused port during PCM Server installation or at the PCM Server.
c. If you do not want to encrypt data sent to the PCM Server, uncheck the related Use Default check box and select Plain Text from the Encryption drop-down list. The default encryption method is SSL. If the PCM Server is behind a firewall, we recommend using SSL encryption.
d. In the IP Address field, type the IP address of the PCM Server if the Agent is initiating the connection to the PCM Server.
e. Enter a unique password or check the Use Default check box to use the default password of “procurve”. This must match the password set on the Agent Manager Server Setup tab.
8. Once the Agent Installation Wizard completes, configure the remote Agent to initiate connections with the PCM Server or configure the PCM Server to initiate connections with the remote Agent. If a firewall or NAC appliance is between the PCM Server and a remote Agent, we recommend
29

ProCurve Manager Installation Instructions
initiating the connection from the location with the firewall. Instructions for configuring, and activating a remote Agent are provided in the HP ProCurve Manager Network Administrator’s
Guide.
Any firewalls must be configured to allow TCP/IP traffic on the configured connection port number.
30

PCM Installation Notes
4
PCM Installation Notes
When installing the “PCM for NNM” module, you will be prompted only for Traffic Management and Proxy settings. The remaining installation parameters are configured based on existing NNM settings.
One Network Management Program per Computer
The PCM installation process will determine if you are running OpenView Network Node Manager and configure PCM appropriately to install the PCM for HP OV-NT Network Node Manager application.
Because of resource conflicts that will occur if you have any other network management tools running on the same computer, for example during discovery of the network devices, make sure you uninstall any other network management programs (except HP OV-NT Network Node Manager) from your computer before installing ProCurve Manager or ProCurve Manager Plus.
Screen Resolution
PCM requires a minimum screen resolution on a PC containing a PCM Client of 1024 x 768. Otherwise, some PCM screens may not display properly.
Using PCM on multi-homed computers
A multi-homed system is a Server or PC that has more than one IP address. Generally this occurs when more than one network card is installed in the computer, but there are other ways that a computer can be multi-homed. Here are a few of the situations that meet this definition:
1. A computer with two or more network adaptors.
2. A computer with a traditional Ethernet network adaptor, plus a wireless adaptor.
3. A computer with only one network adaptor, that is also running some network tunneling software such as a VPN client. In this situation the computer appears to have two network interfaces (each with its own IP address). However, the system only has one physical adaptor, and the VPN client software emulates a second adaptor (while using the original adaptor under the covers).
An example of a multi-homed system is shown below:
Figure 21. Example Multi-homed Computer
Network A Network B
Interface A(166.3.4.5)
Interface B(15.255.120.25)
31

PCM Installation Notes
The Situation: When ProCurve Manager (either Client, Agent, or Server) starts up, it attaches itself to the primary network interface. All network traffic between the Client or PCM Agent and Server will be directed to the selected network interface.
In the diagram above, if the ProCurve Manager Client application attaches itself to the 166.3.4.5 interface, and the ProCurve Manager Server is running on the Server on the right (somewhere on the 15.255.120.* network), the Client cannot connect successfully to the Server.
The Solution: Edit the ProCurve Manager configuration file to correct this situation using the following procedure:
1. For a multi-homed Server, open the commIpAddr.txt file with a text-based editor (such as Notepad or WordPad). By default, the file is located in: C:\Program Files\Hewlett-Packard\PNM\server\ config. Enter the IP address of the interface you want the application to attach to and save your changes. For example for the network illustrated above, you would add the entry "10.255.120.25" (without quotes) in the first line of the file.
2. For a multi-homed Client, perform the same steps as for the Server. By default, the file is located in: C:\Program Files\Hewlett-Packard\PNM\server\ config.
3. For a multi-homed PCM Agent, you must create the file in the C:\Program Files\Hewlett-Pack-ard\PNM\pcm-agent directory, and then enter the IP address you want the application to attach to.
4. Restart the application. If this is the ProCurve Manager Client or Agent, just restart the application. If this is the ProCurve Manager Server, you must restart the PCM services (Network Manager Server) from the Services control panel.
5. Find the commIpAddr.txt file. On the Client, the default file path is: C:\Program Files\Hewlett-Packard\PNM\client\config. On the Server, the default file path is: C:\Program Files\Hewlett-Packard\PNM\server\config.
6. Using a text-based editor (such as Notepad), on the first line enter the IP address of the interface you want PCM to attach to. For the network illustrated above, you would enter 15.255.120.25 as the first line of the file.
7. Save your changes.
8. Restart the PCM Client and Server. For the Server, you must restart the PCM (PNM) service from the MS Services control panel.
Microsoft Vista’s User Account Control
Due to Microsoft Vista’s User Account Control (UAC) controlling what system resources an application can access, PCM 3.0 requires that the customer configure it to run as an administrator in order to function properly. This can be done by right-clicking the ProCurve Manager icon on the desktop or in the start menu and selecting Run as Administrator.
32
IDM Installation Notes
5
IDM Installation Notes
You can install the IDM application at the same time you install the PCM application, or install it at a later time.
If you are upgrading from PCM 2.x with IDM v2.x to v3, all policies, alerts, device data, and user data are migrated.
Configuring IDM Agent Access
When you select the IDM option during the PCM installation, the IDM module is installed on the target system. To complete the installation process you need to install the IDM Agent on your RADIUS server(s). This is similar to the process for adding PCM remote Agents.
To install the IDM Agent on a supported Windows system, follow the instructions for installing a remote PCM Agent in “Installing Remote Agents” on page 1-27. However, be sure to select IDM Agent on the first wizard screen (shown in step 5).
The Install Wizard guides you through the installation process. During the installation process, you will be prompted to enter the IP address of the PCM Server. This is needed to establish communication between the IDM Agent on the RADIUS server, and the IDM application on the PCM Server.
The IDM Agent can only be installed on a system with the RADIUS server configured. If the RADIUS server is not found on the system, the IDM Agent installation displays an error message, and the installation process is aborted.
To install the IDM Agent on a supported Linux or ProCurve Network Access Controller system:
1. Start a Web browser, and type the IP address of the PCM Server computer followed by a colon and the port ID 8040. For example, if the IP address of the Server computer is 10.15.20.25, enter the following URL:
http://10.15.20.25:8040
2. Click the Download the IDM FreeRADIUS Agent link, and click Save to download the file.
3. Once the download completes, move the file to a location accessible by the target Agent system, if necessary.
4. Extract the downloaded HpIdmLinuxAgentInstaller-<version>.tar.gz file to a temporary location on the RADIUS server.
5. Change to the HpIdmLinuxAgentInstaller-<version> directory, run install.sh as root, and then follow the prompts.
33
Licensing ProCurve Manager Plus Software
6
Licensing ProCurve Manager Plus Software
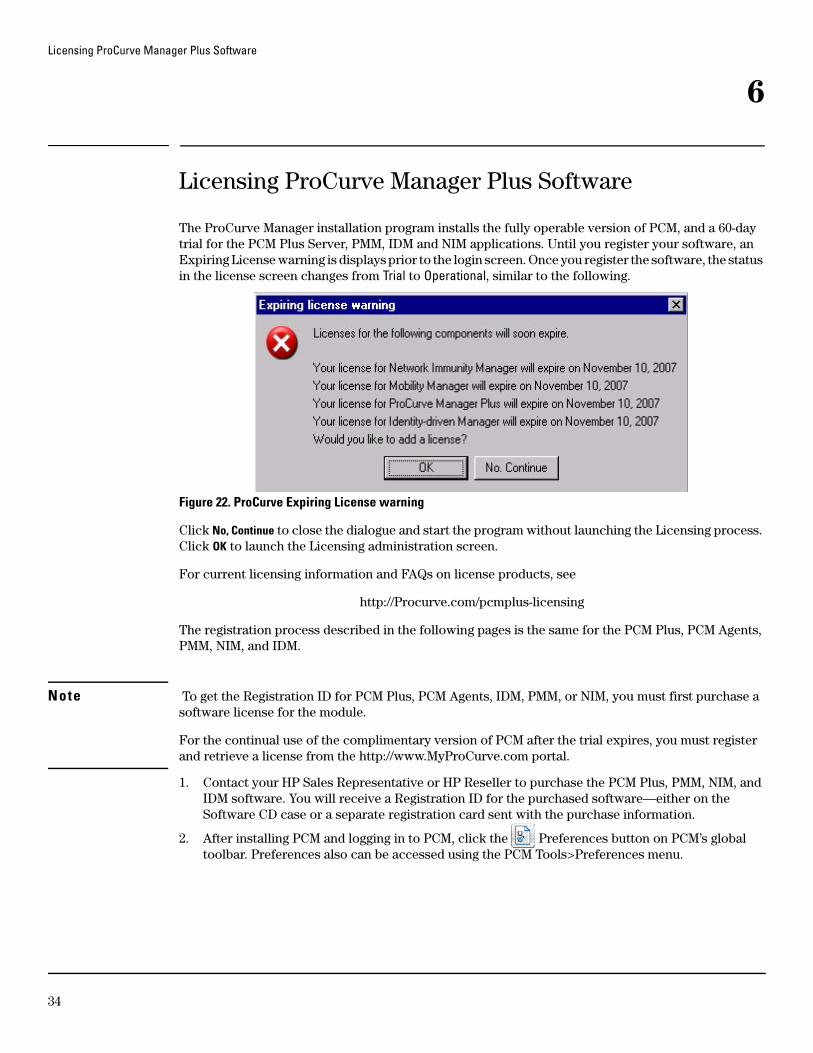
The ProCurve Manager installation program installs the fully operable version of PCM, and a 60-day trial for the PCM Plus Server, PMM, IDM and NIM applications. Until you register your software, an Expiring License warning is displays prior to the login screen. Once you register the software, the status in the license screen changes from Trial to Operational, similar to the following.
Figure 22. ProCurve Expiring License warning
Click No, Continue to close the dialogue and start the program without launching the Licensing process. Click OK to launch the Licensing administration screen.
For current licensing information and FAQs on license products, see
http://Procurve.com/pcmplus-licensing
The registration process described in the following pages is the same for the PCM Plus, PCM Agents, PMM, NIM, and IDM.
Note To get the Registration ID for PCM Plus, PCM Agents, IDM, PMM, or NIM, you must first purchase a software license for the module.
For the continual use of the complimentary version of PCM after the trial expires, you must register and retrieve a license from the http://www.MyProCurve.com portal.
1. Contact your HP Sales Representative or HP Reseller to purchase the PCM Plus, PMM, NIM, and IDM software. You will receive a Registration ID for the purchased software—either on the Software CD case or a separate registration card sent with the purchase information.
2. After installing PCM and logging in to PCM, click the Preferences button on PCM’s global toolbar. Preferences also can be accessed using the PCM Tools>Preferences menu.
34
Licensing ProCurve Manager Plus Software
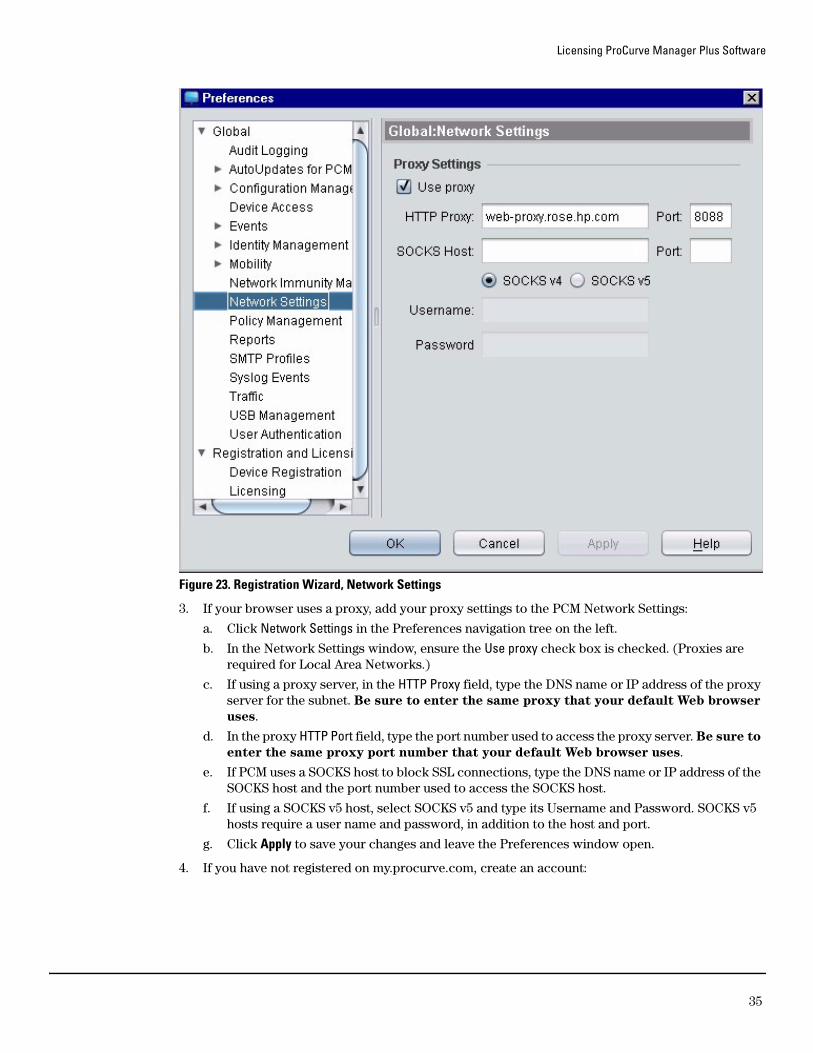
Figure 23. Registration Wizard, Network Settings
3. If your browser uses a proxy, add your proxy settings to the PCM Network Settings:
a. Click Network Settings in the Preferences navigation tree on the left.
b. In the Network Settings window, ensure the Use proxy check box is checked. (Proxies are required for Local Area Networks.)
c. If using a proxy server, in the HTTP Proxy field, type the DNS name or IP address of the proxy server for the subnet. Be sure to enter the same proxy that your default Web browser
uses.
d. In the proxy HTTP Port field, type the port number used to access the proxy server. Be sure to
enter the same proxy port number that your default Web browser uses.
e. If PCM uses a SOCKS host to block SSL connections, type the DNS name or IP address of the SOCKS host and the port number used to access the SOCKS host.
f. If using a SOCKS v5 host, select SOCKS v5 and type its Username and Password. SOCKS v5 hosts require a user name and password, in addition to the host and port.
g. Click Apply to save your changes and leave the Preferences window open.
4. If you have not registered on my.procurve.com, create an account:
35

Licensing ProCurve Manager Plus Software
Figure 24. Registration Wizard, Device Registrationa. Expand the Registration and Licensing node in the Preferences navigation tree and select
Device Registration, which displays the Device Registration window on the right.
b. Click the my.procurve.com link and create a member ID and password.
c. In the My ProCurve Member ID and MyProCurve password fields of the Device Registration window, type the email address used to register at My.ProCurve.com and the password emailed to you when you registered.
d. Click Apply to save your changes and leave the Preferences window open.
5. To register the PCM Plus, PCM multiple Agents, IDM, PMM, or NIM software:
a. Select Licensing in the Preferences navigation tree, which displays the Licensing window on the right.
36
Licensing ProCurve Manager Plus Software
Figure 25. Licensing Preferences
The Licensing window provides the following information for each installed product:
The Deactivated Licenses tab lists licenses that are uninstalled and no longer operational. It contains applicable information for each deactivated license similar to the information displayed on the Active Licenses tab, with the following columns of information:
b. Register your licenses, using one of the following options:
•Use the PCM License Registration Wizard
•Use the My.ProCurve.com portal (see page 40).
Product Name of the product family being licensed
Expires Expiration date when the product stops functioning
Valid for Number of devices, Agents, or users supported by this license
Base Yes means this product is a base license, which is required before adding an Incremental license for additional devices or users. No means the license is an incremental license, which requires the base to be installed for the incremental license to be operational.
Serial No Unique serial number assigned to the software product, which is used for ProCurve tracking purposes and does not affect licensing functions.
Type Type of license in use: Trial or Operational.
Uninstall Key Unique key that guarantees your license has been uninstalled. This key is required to transfer a license to another Server.
Status Status can be Transferable, Non-Transferable (Trial licenses are not transferable), and Transferred. Transferred means a license was transferred from the source PCM Server to the MyProCurve portal, but does not indicate whether the license was transferred (added) to another PCM Server.
37

Licensing ProCurve Manager Plus Software
To use the PCM License Registration Wizard:
1. Click Register, which opens the Registration Wizard.
2. Click Next and enter the Registration ID:
Figure 26. Registration Wizard, Register IDsa. In the Registration ID field, type the registration ID that you received when you purchased the
license.
b. If you purchased more than one license, click the Add another Registration ID button and enter the next registration ID. Repeat this step until all registration IDs have been entered.
c. Click Next.
3. On the License Request window, request a license:
38

Licensing ProCurve Manager Plus Software
Figure 27. Registration Wizard, License Requesta. Ensure that PCM could obtain information about each license successfully.
b. To view a log of actions taken, click View Log.
c. Upon completion, click Next.
4. Preview the requested license:
Figure 28. Registration Wizard, Preview License Informationa. Ensure the requested license information is correct.
b. Optionally, add a description to help identify the license.
39
Licensing ProCurve Manager Plus Software
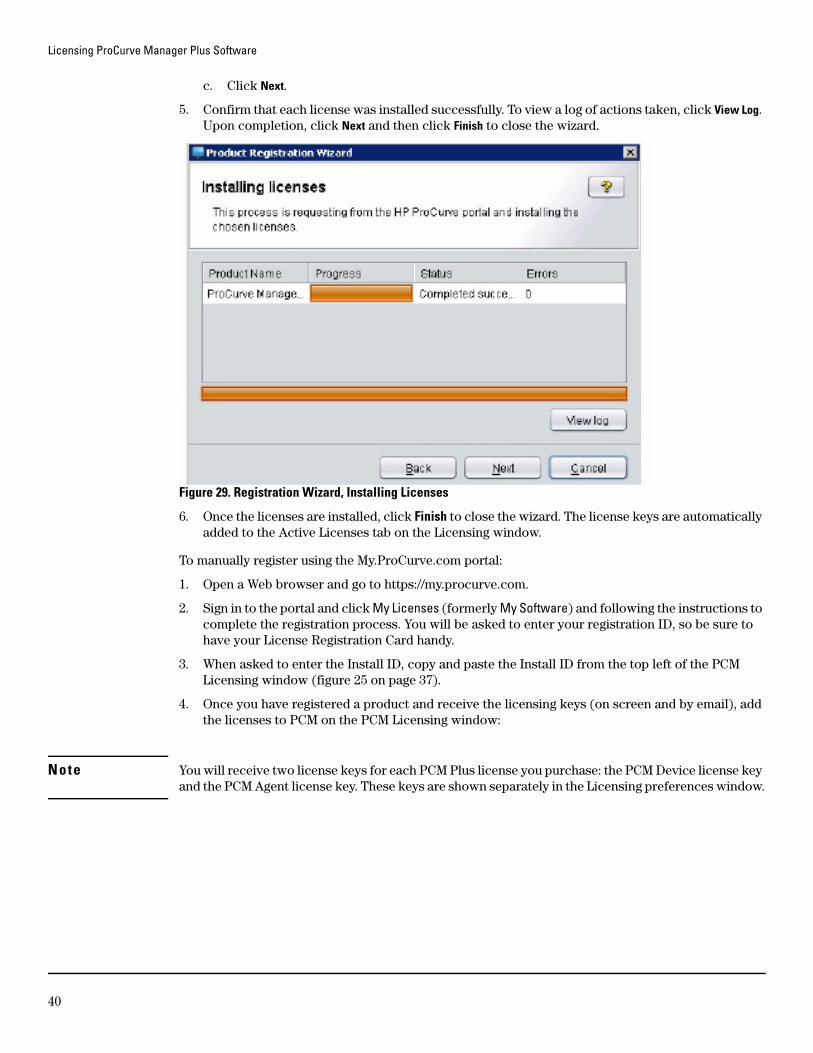
c. Click Next.
5. Confirm that each license was installed successfully. To view a log of actions taken, click View Log. Upon completion, click Next and then click Finish to close the wizard.
Figure 29. Registration Wizard, Installing Licenses
6. Once the licenses are installed, click Finish to close the wizard. The license keys are automatically added to the Active Licenses tab on the Licensing window.
To manually register using the My.ProCurve.com portal:
1. Open a Web browser and go to https://my.procurve.com.
2. Sign in to the portal and click My Licenses (formerly My Software) and following the instructions to complete the registration process. You will be asked to enter your registration ID, so be sure to have your License Registration Card handy.
3. When asked to enter the Install ID, copy and paste the Install ID from the top left of the PCM Licensing window (figure 25 on page 37).
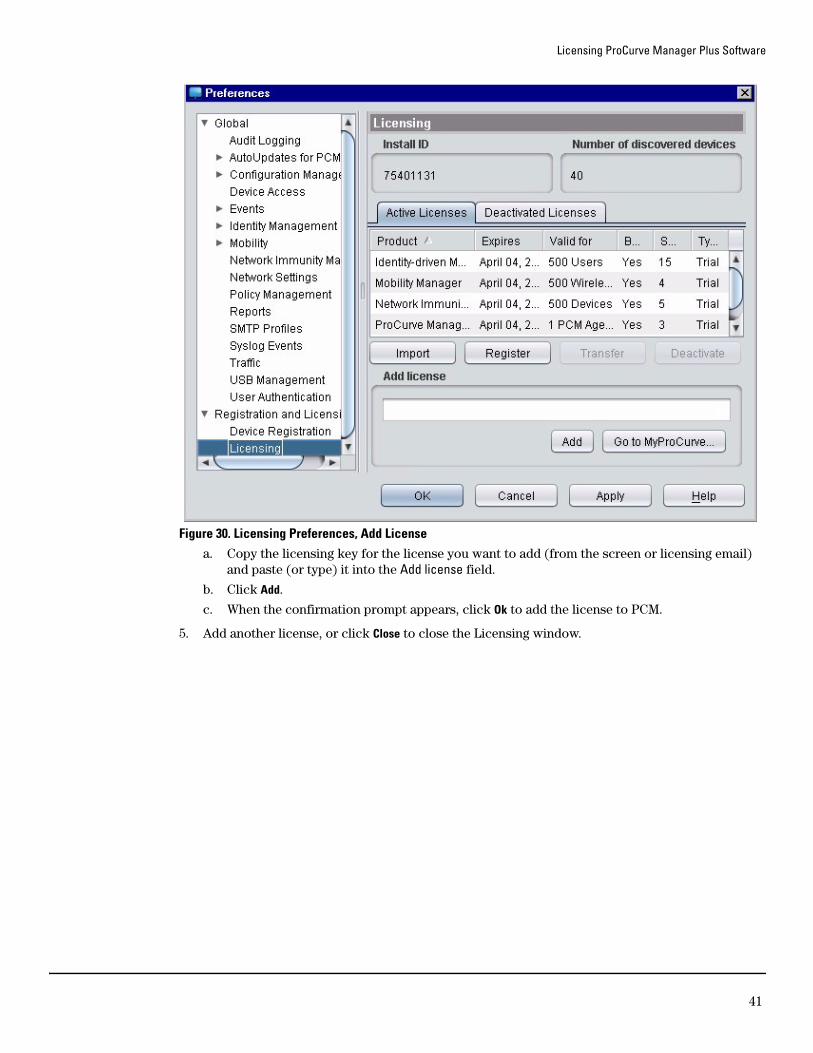
4. Once you have registered a product and receive the licensing keys (on screen and by email), add the licenses to PCM on the PCM Licensing window:
Note You will receive two license keys for each PCM Plus license you purchase: the PCM Device license key and the PCM Agent license key. These keys are shown separately in the Licensing preferences window.
40
Licensing ProCurve Manager Plus Software
Figure 30. Licensing Preferences, Add Licensea. Copy the licensing key for the license you want to add (from the screen or licensing email)
and paste (or type) it into the Add license field.
b. Click Add.
c. When the confirmation prompt appears, click Ok to add the license to PCM.
5. Add another license, or click Close to close the Licensing window.
41

Getting Started with ProCurve Manager
7
Getting Started with ProCurve Manager
Several default settings are established during installation of your ProCurve Management applications. You may want to customize these settings and take advantage of some additional options.
For more information on these topics, please see the HP ProCurve Network Administrator’s Guide available at www.procurve.com/pcm-manuals.
You can also refer to the PCM online help system.
PCM Interface
Clicking the PCM icon on your desktop displays the PCM interface, which consists of a menu bar and global toolbar across the top, a navigation tree on the left, and the main PCM window on the right.
Navigation Tree
Figure 31. PCM Navigation Tree
42
Getting Started with ProCurve Manager
The navigation tree is a navigational tool that provides a hierarchical view of the structure of your network and all devices discovered by PCM. It contains icons that show the status of devices at the device level and Agent group level. For example, the figure above shows devices in warning and unreachable states.
PCM Right Pane
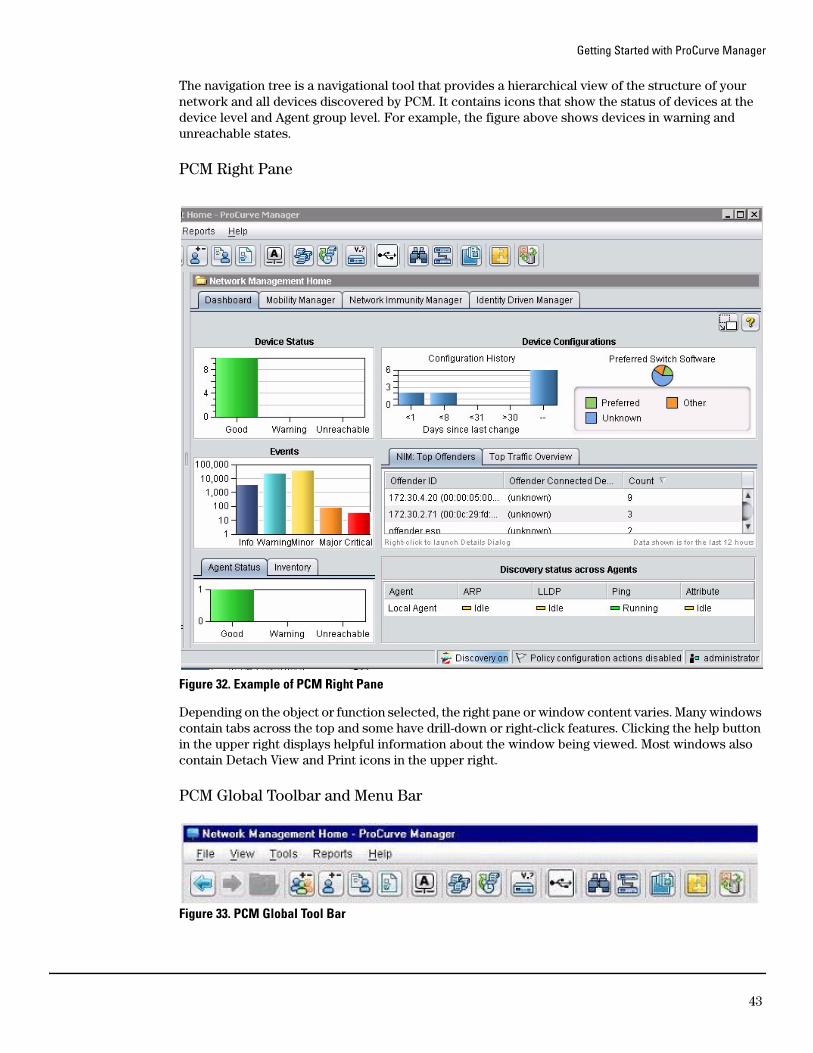
Figure 32. Example of PCM Right Pane
Depending on the object or function selected, the right pane or window content varies. Many windows contain tabs across the top and some have drill-down or right-click features. Clicking the help button in the upper right displays helpful information about the window being viewed. Most windows also contain Detach View and Print icons in the upper right.
PCM Global Toolbar and Menu Bar
Figure 33. PCM Global Tool Bar
43
Getting Started with ProCurve Manager
Use the PCM global toolbar functions to access commonly used features. Simply click the button (icon) to launch a feature. Hover the mouse over a button (icon) in the toolbar to display its tool tip. Disabled functions will be grayed out.
The standard Windows-type menu bar at the top of the PCM window also provides access to commonly used features.
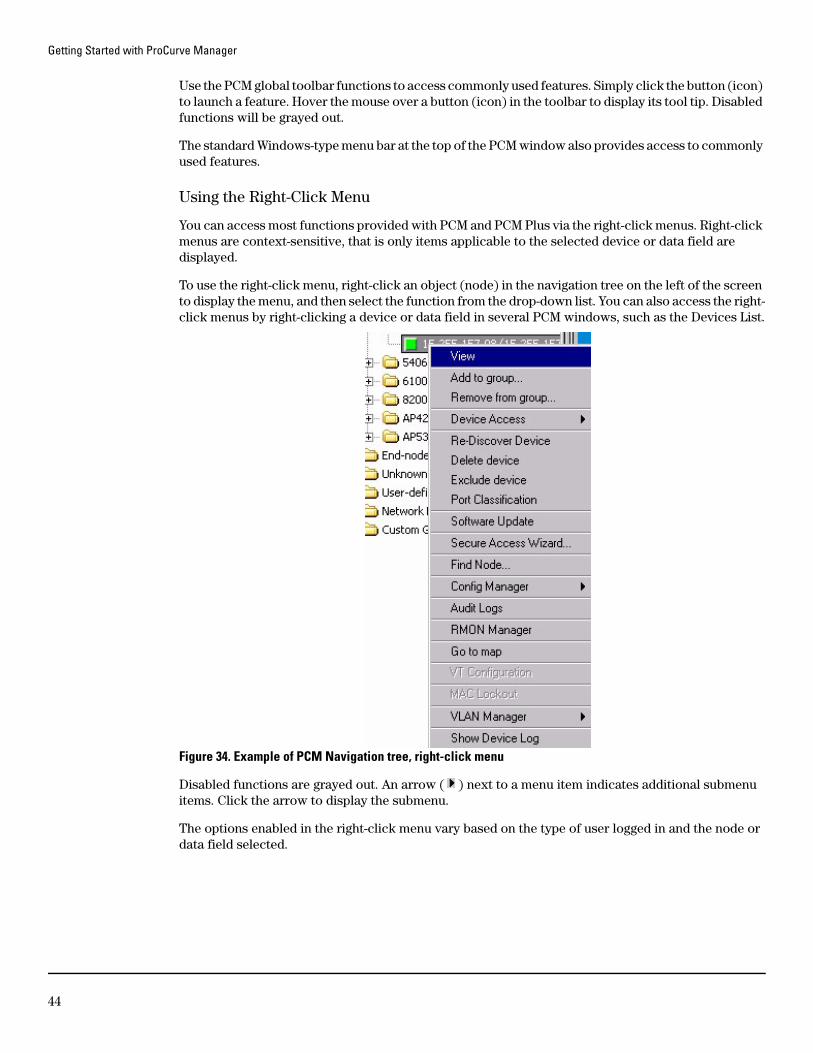
Using the Right-Click Menu
You can access most functions provided with PCM and PCM Plus via the right-click menus. Right-click menus are context-sensitive, that is only items applicable to the selected device or data field are displayed.
To use the right-click menu, right-click an object (node) in the navigation tree on the left of the screen to display the menu, and then select the function from the drop-down list. You can also access the right-click menus by right-clicking a device or data field in several PCM windows, such as the Devices List.
Figure 34. Example of PCM Navigation tree, right-click menu
Disabled functions are grayed out. An arrow ( ) next to a menu item indicates additional submenu items. Click the arrow to display the submenu.
The options enabled in the right-click menu vary based on the type of user logged in and the node or data field selected.
44

Getting Started with ProCurve Manager
Start-Up Tips
■ If Discovery is having trouble finding devices, try manually discovering a few devices.
■ If you use network devices from several vendors, enter the IP address of a ProCurve device as the Seed Device in Discovery tab of the Agent Manager for each Agent.
■ If you have a large number of Subnets within your network, you may want to use the Tools>Imports>Import Subnets function to improve PCM discovery performance.
■ If Discovery has run (Discovery Status in the Network Management Home-Dashboard indicates 'Idle') and some subnets were not discovered, check Agent Manager>Discovery>Managed Subnet to see whether there are unmanaged subnets that should be moved to Managed Subnets, similar to the figure below.
Figure 35. Agent Manager, Discovery, Managed SubnetsIf the subnet is not listed, you can add it to the Unmanaged subnets list, then move it to the Managed subnets list.
■ If unable to access a specific device via PCM, try testing the communication parameters in PCM. To access this test, right-click the unreachable device in the navigation tree and select Device Access>Test Communications in PCM.
45

Getting Started with ProCurve Manager
46


Technology for better business outcomes
To learn more, visit www.hp.com/go/procurve/
© Copyright 2004, 2005, 2007, 2009 Hewlett-Packard Development Company, L.P. The information contained herein is subject to change without notice. The only warranties for HP products and services are set forth in the express warranty statements accompanying such prod-ucts and services. Nothing herein should be construed as constituting an additional warranty. HP will not be liable for technical or editorial errors or omissions contained herein.
February 2010
Manual Part Number 5991-8636
Related Documents


