Serena ® Prototype Composer ™ Getting Started Guide SERENA PROPRIETARY AND CONFIDENTIAL INFORMATION

Welcome message from author
This document is posted to help you gain knowledge. Please leave a comment to let me know what you think about it! Share it to your friends and learn new things together.
Transcript
Serena® Prototype Composer™Getting Started Guide
SERENA PROPRIETARY AND CONFIDENTIAL INFORMATION
Copyright © 2001–2007 Serena Software, Inc. All rights reserved.This document, as well as the software described in it, is furnished under license and may be used or copied only in accordance with the terms of such license. Except as permitted by such license, no part of this publication may be reproduced, photocopied, stored in a retrieval system, or transmitted, in any form or by any means, electronic, mechanical, recording, or otherwise, without the prior written permission of Serena. Any reproduction of such software product user documentation, regardless of whether the documentation is reproduced in whole or in part, must be accompanied by this copyright statement in its entirety, without modification.This document contains proprietary and confidential information, and no reproduction or dissemination of any information contained herein is allowed without the express permission of Serena Software.The content of this document is furnished for informational use only, is subject to change without notice, and should not be construed as a commitment by Serena. Serena assumes no responsibility or liability for any errors or inaccuracies that may appear in this document.
TrademarksSerena, TeamTrack, StarTool, PVCS, Collage, and ChangeMan are registered trademarks of Serena Software, Inc. The Serena logo, Dimensions, Professional, Tracker, Version Manager, Builder, Meritage, and Mover are trademarks of Serena Software, Inc.All other products or company names are used for identification purposes only, and may be trademarks of their respective owners.Microsoft, Visual Studio and the Visual Studio logo are trademarks or registered trademarks of Microsoft Corporation in the United States and/or other countries.
U.S. Government RightsAny Software product acquired by Licensee under this Agreement for or on behalf of the U.S. Government, its agencies and instrumentalities is "commercial software" as defined by the FAR. Use, duplication, and disclosure by the U.S. Government is subject to the restrictions set forth in the license under which the Software was acquired. The manufacturer is Serena Software, Inc., 2755 Campus Drive, San Mateo, CA 94403.
Part number: MA-COMGTS-004
Publication date: December 2007
Table of Contents
Welcome to Serena Prototype Composer. . . . . . . . . . . . . 7What is Serena Prototype Composer?. . . . . . . . . . . . . . . . . . . . . . . . . . 7Benefits of Using Prototype Composer . . . . . . . . . . . . . . . . . . . . . . . . . 7What’s New in Serena Prototype Composer. . . . . . . . . . . . . . . . . . . . . . 7About this Document . . . . . . . . . . . . . . . . . . . . . . . . . . . . . . . . . . . . . 8
Audience . . . . . . . . . . . . . . . . . . . . . . . . . . . . . . . . . . . . . . . . . . 8Scope . . . . . . . . . . . . . . . . . . . . . . . . . . . . . . . . . . . . . . . . . . . . 8Document Organization . . . . . . . . . . . . . . . . . . . . . . . . . . . . . . . . 8
Related Documents . . . . . . . . . . . . . . . . . . . . . . . . . . . . . . . . . . . . . . 9Using the Manuals . . . . . . . . . . . . . . . . . . . . . . . . . . . . . . . . . . . . 9Accessing Online Help . . . . . . . . . . . . . . . . . . . . . . . . . . . . . . . . . 10
Typographical Conventions . . . . . . . . . . . . . . . . . . . . . . . . . . . . . . . . . 10
Chapter 1 Where to Begin . . . . . . . . . . . . . . . . . . . . . . . . . . . . . 13Installation . . . . . . . . . . . . . . . . . . . . . . . . . . . . . . . . . . . . . . . . . . . . 14Getting Started with Prototype Composer . . . . . . . . . . . . . . . . . . . . . . . 14User Interface Overview . . . . . . . . . . . . . . . . . . . . . . . . . . . . . . . . . . . 14
Navigation Pane . . . . . . . . . . . . . . . . . . . . . . . . . . . . . . . . . . . . . 15Prototype Composer Editors . . . . . . . . . . . . . . . . . . . . . . . . . . . . . 16Task Panes . . . . . . . . . . . . . . . . . . . . . . . . . . . . . . . . . . . . . . . . . 16Properties Dialogs . . . . . . . . . . . . . . . . . . . . . . . . . . . . . . . . . . . . 17Information Pane . . . . . . . . . . . . . . . . . . . . . . . . . . . . . . . . . . . . 17
Some Things to Consider . . . . . . . . . . . . . . . . . . . . . . . . . . . . . . . . . . 18
Chapter 2 Starting a Project . . . . . . . . . . . . . . . . . . . . . . . . . . . . 19Overview . . . . . . . . . . . . . . . . . . . . . . . . . . . . . . . . . . . . . . . . . . . . . 20Creating a Project . . . . . . . . . . . . . . . . . . . . . . . . . . . . . . . . . . . . . . . 20
Further Defining Your Project . . . . . . . . . . . . . . . . . . . . . . . . . . . . 20Adding Requirements . . . . . . . . . . . . . . . . . . . . . . . . . . . . . . . . . . . . . 22
Creating Sub-requirements . . . . . . . . . . . . . . . . . . . . . . . . . . . . . 23Further Defining Requirements . . . . . . . . . . . . . . . . . . . . . . . . . . . 23Mapping Requirements. . . . . . . . . . . . . . . . . . . . . . . . . . . . . . . . . 24
Publishing Documents . . . . . . . . . . . . . . . . . . . . . . . . . . . . . . . . . . . . 24Publishing a New Document . . . . . . . . . . . . . . . . . . . . . . . . . . . . . 24Updating an Existing Document . . . . . . . . . . . . . . . . . . . . . . . . . . 24Saving a Document in Microsoft Word Format. . . . . . . . . . . . . . . . . 25Document Templates . . . . . . . . . . . . . . . . . . . . . . . . . . . . . . . . . . 25
Using IT Services . . . . . . . . . . . . . . . . . . . . . . . . . . . . . . . . . . . . . . . . 26Adding New Services . . . . . . . . . . . . . . . . . . . . . . . . . . . . . . . . . . 26Editing and Viewing Services . . . . . . . . . . . . . . . . . . . . . . . . . . . . 26Deleting Services . . . . . . . . . . . . . . . . . . . . . . . . . . . . . . . . . . . . 26
Versioning Projects in Prototype Composer . . . . . . . . . . . . . . . . . . . . . . 26
Getting Started Guide 3
Table of Contents
Using Shared Locations . . . . . . . . . . . . . . . . . . . . . . . . . . . . . . . . . . . 27Saving a Project to a Shared Location . . . . . . . . . . . . . . . . . . . . . . 27Opening a Project from a Shared Location . . . . . . . . . . . . . . . . . . . 28Managing Shared Locations . . . . . . . . . . . . . . . . . . . . . . . . . . . . . 29
More Information on Project Editor . . . . . . . . . . . . . . . . . . . . . . . . . . . 31
Chapter 3 Defining the Process Flow . . . . . . . . . . . . . . . . . . . . . . 33Overview . . . . . . . . . . . . . . . . . . . . . . . . . . . . . . . . . . . . . . . . . . . . . 34
What is a Process? . . . . . . . . . . . . . . . . . . . . . . . . . . . . . . . . . . . 34Creating a Process . . . . . . . . . . . . . . . . . . . . . . . . . . . . . . . . . . . . . . . 35
Adding Steps to the Process Flow . . . . . . . . . . . . . . . . . . . . . . . . . 35Connecting Process Steps. . . . . . . . . . . . . . . . . . . . . . . . . . . . . . . 36
Working with Swimlanes and Audiences . . . . . . . . . . . . . . . . . . . . . . . . 36More Information on Process Editor . . . . . . . . . . . . . . . . . . . . . . . . . . . 37
Chapter 4 Defining Activities . . . . . . . . . . . . . . . . . . . . . . . . . . . 39Overview . . . . . . . . . . . . . . . . . . . . . . . . . . . . . . . . . . . . . . . . . . . . . 40
Activity Types . . . . . . . . . . . . . . . . . . . . . . . . . . . . . . . . . . . . . . . 40About Activity Flow Maps . . . . . . . . . . . . . . . . . . . . . . . . . . . . . . . 40Activity Simulation and Prototypes . . . . . . . . . . . . . . . . . . . . . . . . 40
Creating Activities . . . . . . . . . . . . . . . . . . . . . . . . . . . . . . . . . . . . . . . 41Creating an Activity Step . . . . . . . . . . . . . . . . . . . . . . . . . . . . . . . 41Adding Steps to the Activity Flow . . . . . . . . . . . . . . . . . . . . . . . . . 41
More Information on Activity Editor . . . . . . . . . . . . . . . . . . . . . . . . . . . 41
Chapter 5 Designing Interfaces. . . . . . . . . . . . . . . . . . . . . . . . . . 43Overview . . . . . . . . . . . . . . . . . . . . . . . . . . . . . . . . . . . . . . . . . . . . . 44
Building an Interface Page . . . . . . . . . . . . . . . . . . . . . . . . . . . . . . 44Creating Interface Steps. . . . . . . . . . . . . . . . . . . . . . . . . . . . . . . . . . . 44
Adding Interface Elements . . . . . . . . . . . . . . . . . . . . . . . . . . . . . . 44More Information On Interface Editor . . . . . . . . . . . . . . . . . . . . . . . . . . 45
Chapter 6 Creating Actions . . . . . . . . . . . . . . . . . . . . . . . . . . . . 47Overview . . . . . . . . . . . . . . . . . . . . . . . . . . . . . . . . . . . . . . . . . . . . . 48Creating Actions . . . . . . . . . . . . . . . . . . . . . . . . . . . . . . . . . . . . . . . . 48Action Step Types . . . . . . . . . . . . . . . . . . . . . . . . . . . . . . . . . . . . . . . 48
Calculate Action Step. . . . . . . . . . . . . . . . . . . . . . . . . . . . . . . . . . 49Communicate Action Step . . . . . . . . . . . . . . . . . . . . . . . . . . . . . . 49Connect Action Step . . . . . . . . . . . . . . . . . . . . . . . . . . . . . . . . . . 49Manual Action Step . . . . . . . . . . . . . . . . . . . . . . . . . . . . . . . . . . . 49
Editing Actions . . . . . . . . . . . . . . . . . . . . . . . . . . . . . . . . . . . . . . . . . 50More Information on Action Editor . . . . . . . . . . . . . . . . . . . . . . . . . . . . 50
Chapter 7 Defining Decisions . . . . . . . . . . . . . . . . . . . . . . . . . . . 51Overview . . . . . . . . . . . . . . . . . . . . . . . . . . . . . . . . . . . . . . . . . . . . . 52Creating Decisions . . . . . . . . . . . . . . . . . . . . . . . . . . . . . . . . . . . . . . . 52
Decision Branches . . . . . . . . . . . . . . . . . . . . . . . . . . . . . . . . . . . . 52More Information on Decision Editor . . . . . . . . . . . . . . . . . . . . . . . . . . 53
4 Serena® Prototype Composer™ 2.4

Table of Contents
Chapter 8 Working with Data . . . . . . . . . . . . . . . . . . . . . . . . . . . 55Overview . . . . . . . . . . . . . . . . . . . . . . . . . . . . . . . . . . . . . . . . . . . . . 56Creating Activity Data . . . . . . . . . . . . . . . . . . . . . . . . . . . . . . . . . . . . 56
Chapter 9 Working with Reviews. . . . . . . . . . . . . . . . . . . . . . . . . 59Overview . . . . . . . . . . . . . . . . . . . . . . . . . . . . . . . . . . . . . . . . . . . . . 60About E-Mail Reviews . . . . . . . . . . . . . . . . . . . . . . . . . . . . . . . . . . . . . 60E-mail Review Configuration . . . . . . . . . . . . . . . . . . . . . . . . . . . . . . . . 61About Business Mashups Reviews . . . . . . . . . . . . . . . . . . . . . . . . . . . . 61Business Mashups Review Configuration . . . . . . . . . . . . . . . . . . . . . . . . 61Creating a Review . . . . . . . . . . . . . . . . . . . . . . . . . . . . . . . . . . . . . . . 62
Creating a Prototype Only Scenario Review . . . . . . . . . . . . . . . . . . 63Sending a Review . . . . . . . . . . . . . . . . . . . . . . . . . . . . . . . . . . . . . . . 63Cancelling a Review . . . . . . . . . . . . . . . . . . . . . . . . . . . . . . . . . . . . . . 63Receiving a Review Request . . . . . . . . . . . . . . . . . . . . . . . . . . . . . . . . 64Navigating to a Review Artifact . . . . . . . . . . . . . . . . . . . . . . . . . . . . . . 65
Reviewing a Prototype Only Scenario. . . . . . . . . . . . . . . . . . . . . . . 65Submitting Review Feedback. . . . . . . . . . . . . . . . . . . . . . . . . . . . . . . . 65Receiving Reviewer Feedback . . . . . . . . . . . . . . . . . . . . . . . . . . . . . . . 66
Chapter 10 Publishing to Serena Dimensions RM . . . . . . . . . . . . . . . 69Overview . . . . . . . . . . . . . . . . . . . . . . . . . . . . . . . . . . . . . . . . . . . . . 70Using the Dimensions RM Publishing Interface. . . . . . . . . . . . . . . . . . . . 70
Chapter 11 Publishing to Microsoft VSTS . . . . . . . . . . . . . . . . . . . . 73Overview . . . . . . . . . . . . . . . . . . . . . . . . . . . . . . . . . . . . . . . . . . . . . 74Using the VSTS Publishing Interface. . . . . . . . . . . . . . . . . . . . . . . . . . . 74
Index. . . . . . . . . . . . . . . . . . . . . . . . . . . . . . . . . . . . 77
Getting Started Guide 5

Table of Contents
6 Serena® Prototype Composer™ 2.4

Welcome to Serena Prototype Composer
What is Serena Prototype Composer?
Serena® Prototype Composer™ is a powerful application planning, modeling and prototyping environment that non-technical business users can use to visually define their application needs, including business processes, activities, user interfaces, requirements, and data. Designed for use by business experts such as business analysts, application consultants and solution architects, Prototype Composer provides a fully integrated environment that makes it easy to plan, model and rationalize business applications before beginning their development. The models can be derived from existing resources such as Web applications and can be published as running prototypes as well as Microsoft® Word specifications.
Benefits of Using Prototype Composer
Traditionally, business analysts and similar professionals define application needs by writing requirements documents and specifications using standard office tools like Microsoft® Word® and Microsoft® Visio®. As a result, the IT professionals responsible for application development have to read voluminous and potentially incomplete documents telling them what to implement. The situation is more complicated if development is outsourced, where communication can be further hampered by language and geographic boundaries.
With Prototype Composer, the business experts create working models that describe the application in visual terms that both business and IT can understand. These models are then passed to IT for implementation, greatly reducing the possibility of miscommunication and dramatically reducing the rework and wasted development that occurs in most application projects. When written specifications are required, Prototype Composer provides a library of customizable Microsoft Word specification templates that can be automatically populated with data from the model to create any needed requirements, functional and technical specifications at the touch of a button.
What’s New in Serena Prototype Composer
Serena Prototype Composer 2.4 features the following updates:
Rebranding Serena Composer is now called Serena Prototype Composer.
Free of Charge Serena Prototype Composer is now free of charge.
Getting Started Guide 7
About this Document
The purpose of this document is to help users become familiar with the functionality and capabilities of Prototype Composer.
Audience
This document is intended for business users wanting to use Prototype Composer to define their application needs. It presumes that you have knowledge of the operating systems to which you are installing.
Scope
This document provides an overview to Prototype Composer to familiarize you with the product and its functionality.
Document Organization
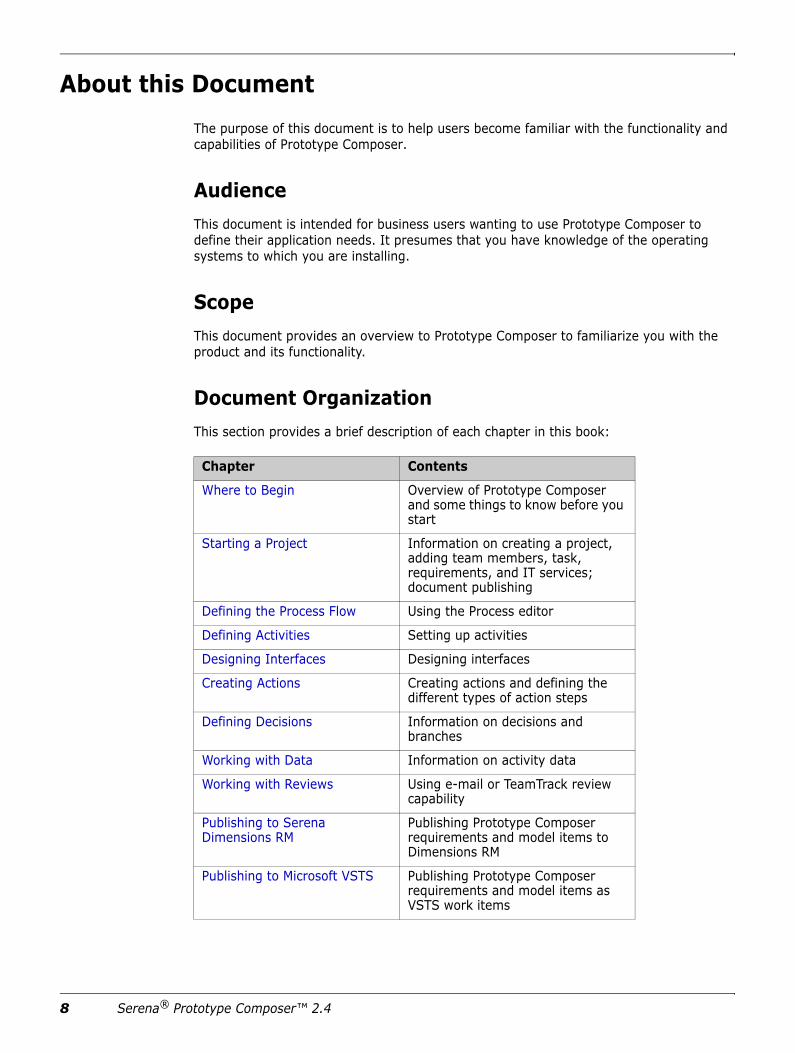
This section provides a brief description of each chapter in this book:
Chapter Contents
Where to Begin Overview of Prototype Composer and some things to know before you start
Starting a Project Information on creating a project, adding team members, task, requirements, and IT services; document publishing
Defining the Process Flow Using the Process editor
Defining Activities Setting up activities
Designing Interfaces Designing interfaces
Creating Actions Creating actions and defining the different types of action steps
Defining Decisions Information on decisions and branches
Working with Data Information on activity data
Working with Reviews Using e-mail or TeamTrack review capability
Publishing to Serena Dimensions RM
Publishing Prototype Composer requirements and model items to Dimensions RM
Publishing to Microsoft VSTS Publishing Prototype Composer requirements and model items as VSTS work items
8 Serena® Prototype Composer™ 2.4

Related Documents
Related Documents
For related information, see the following documentation:
Serena® Prototype Composer™ Integration Guide for Serena® Dimensions® RM
Serena® Prototype Composer™ Integration Guide for Serena® Business Mashups
Serena® Prototype Composer™ Integration Guide for Microsoft® Visual Studio® Team System
Serena® TeamTrack® Administrator’s Guide
Serena® TeamTrack® Installation and Setup Guide
Serena® TeamTrack® User’s Guide
Serena® Dimensions® RM Administrator’s Guide
Serena® Dimensions® RM Installation Guide
Serena® Dimensions® RM User’s Guide
Using the Manuals
The Serena manuals use the Adobe Portable Document Format (PDF). To view PDF files, use Adobe® Reader®, which is freely available from www.adobe.com.
This section highlights some of the main Reader features. For more detailed information, see the Adobe Reader online help system.
The PDF manuals include the following features:
Bookmarks. All of the manuals contain predefined bookmarks that make it easy for you to quickly jump to a specific topic. By default, the bookmarks appear to the left of each online manual.
Links. Cross-reference links within an manual enable you to jump to other sections within the manual and to other manuals with a single mouse click. These links appear in blue.
Printing. While viewing a manual, you can print the current page, a range of pages, or the entire manual.
Advanced search. Starting with version 6, Adobe Reader includes an advanced search feature that enables you to search across multiple PDF files in a specified directory. (This is in addition to using any search index created by Adobe Catalog—see step 3 below.)
To search within multiple PDF documents at once, perform the following steps (requires Adobe Reader version 6 or higher):
1 In Adobe Reader, select Edit | Search (or press CTRL+F).
2 In the text box, enter the word or phrase for which you want to search.
TIP Be sure to download the full version of Reader. The more basic version does not include the search feature.
Getting Started Guide 9
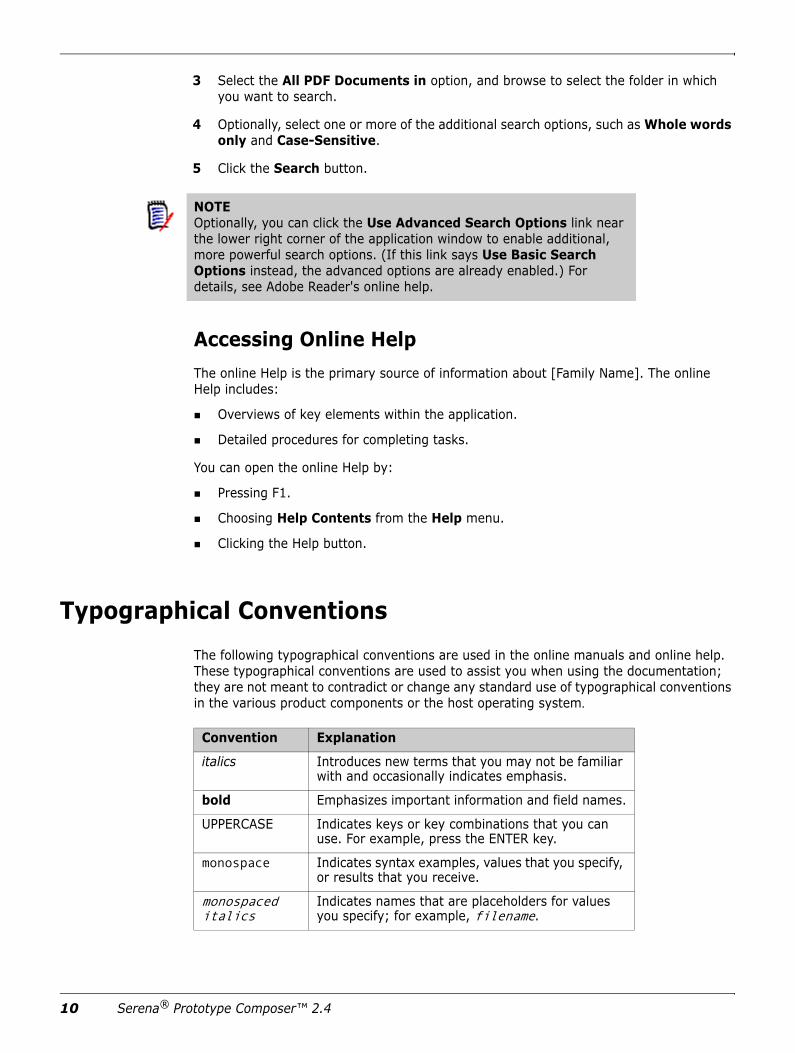
3 Select the All PDF Documents in option, and browse to select the folder in which you want to search.
4 Optionally, select one or more of the additional search options, such as Whole words only and Case-Sensitive.
5 Click the Search button.
Accessing Online Help
The online Help is the primary source of information about [Family Name]. The online Help includes:
Overviews of key elements within the application.
Detailed procedures for completing tasks.
You can open the online Help by:
Pressing F1.
Choosing Help Contents from the Help menu.
Clicking the Help button.
Typographical Conventions
The following typographical conventions are used in the online manuals and online help. These typographical conventions are used to assist you when using the documentation; they are not meant to contradict or change any standard use of typographical conventions in the various product components or the host operating system.
NOTE Optionally, you can click the Use Advanced Search Options link near the lower right corner of the application window to enable additional, more powerful search options. (If this link says Use Basic Search Options instead, the advanced options are already enabled.) For details, see Adobe Reader's online help.
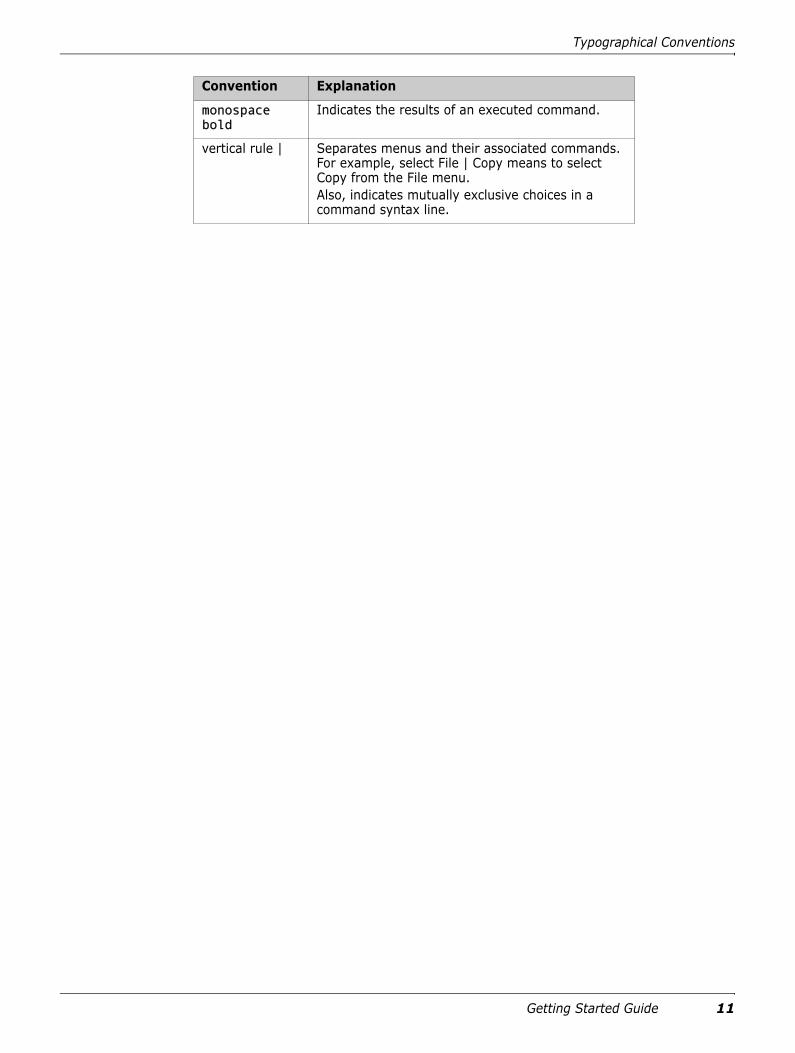
Convention Explanation
italics Introduces new terms that you may not be familiar with and occasionally indicates emphasis.
bold Emphasizes important information and field names.
UPPERCASE Indicates keys or key combinations that you can use. For example, press the ENTER key.
monospace Indicates syntax examples, values that you specify, or results that you receive.
monospaced italics
Indicates names that are placeholders for values you specify; for example, filename.
10 Serena® Prototype Composer™ 2.4
Typographical Conventions
monospace bold
Indicates the results of an executed command.
vertical rule | Separates menus and their associated commands. For example, select File | Copy means to select Copy from the File menu.Also, indicates mutually exclusive choices in a command syntax line.
Convention Explanation
Getting Started Guide 11

12 Serena® Prototype Composer™ 2.4
Chapter 1Where to Begin
This section provides an overview as to how to begin using Serena® Prototype Composer™.
Installation 14
Getting Started with Prototype Composer 14
User Interface Overview 14
Some Things to Consider 18
Getting Started Guide 13
Chapter 1 Where to Begin
Installation
For information pertaining to system requirements for and installation of Prototype Composer, see the readme file.
Getting Started with Prototype Composer
Prototype Composer helps you define business processes and prototype applications to supply clear requirements to developers. This document guides you through the process of using Prototype Composer to design your application project and its processes.
To begin using Prototype Composer for modeling, start by creating a project to contain your model items. From there, you can:
add team members and tasks to create your application
gather requirements and generate product requirement documents and functional specifications
Once your project structure is defined, you can define your application needs by:
designing and modeling the user interfaces and experiences of your application
defining the business rules that are used in processes and activities to select between options on the flow map
User Interface Overview
The Prototype Composer user interface consists of the following main regions:
the editor window that you use to view and edit models of processes, activities, interfaces, actions, decisions and activity data
the navigation pane to select model items to edit
menus and toolbars to provide access to modeling commands and options
task panes to provide tools and palettes to support your modeling activities
information pane to view properties, requirements and reviews for selected model items
14 Serena® Prototype Composer™ 2.4
User Interface Overview
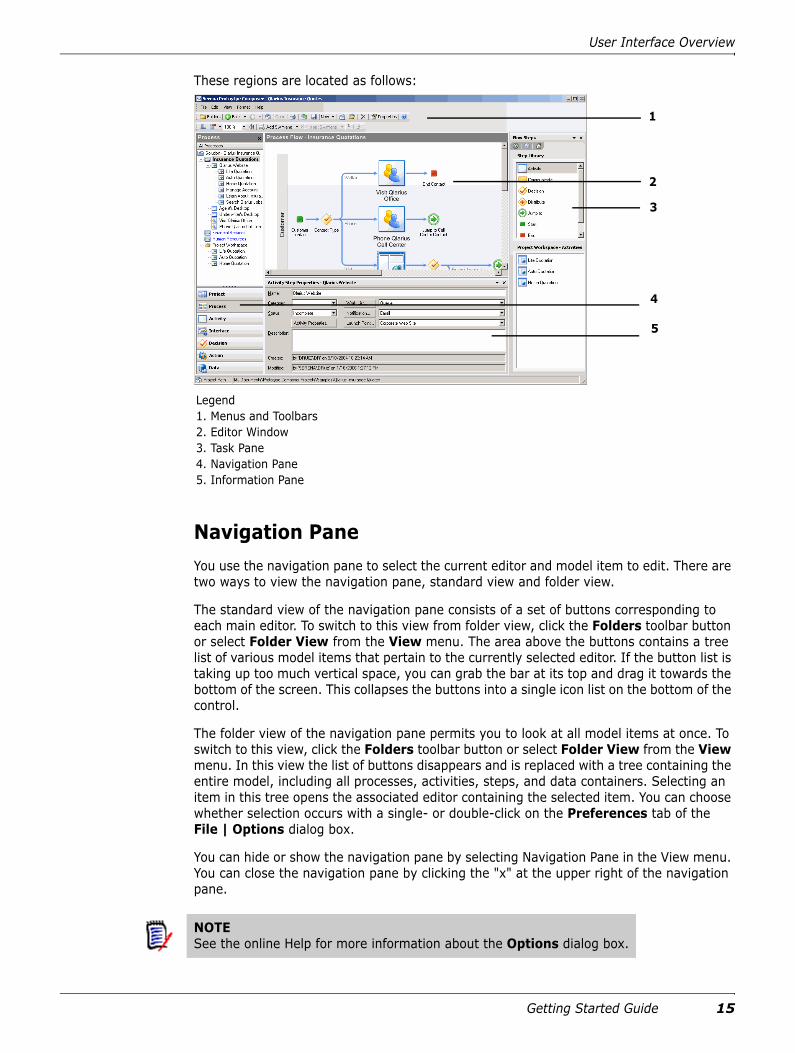
These regions are located as follows:
Navigation Pane
You use the navigation pane to select the current editor and model item to edit. There are two ways to view the navigation pane, standard view and folder view.
The standard view of the navigation pane consists of a set of buttons corresponding to each main editor. To switch to this view from folder view, click the Folders toolbar button or select Folder View from the View menu. The area above the buttons contains a tree list of various model items that pertain to the currently selected editor. If the button list is taking up too much vertical space, you can grab the bar at its top and drag it towards the bottom of the screen. This collapses the buttons into a single icon list on the bottom of the control.
The folder view of the navigation pane permits you to look at all model items at once. To switch to this view, click the Folders toolbar button or select Folder View from the View menu. In this view the list of buttons disappears and is replaced with a tree containing the entire model, including all processes, activities, steps, and data containers. Selecting an item in this tree opens the associated editor containing the selected item. You can choose whether selection occurs with a single- or double-click on the Preferences tab of the File | Options dialog box.
You can hide or show the navigation pane by selecting Navigation Pane in the View menu. You can close the navigation pane by clicking the "x" at the upper right of the navigation pane.
1
2
3
4
Legend1. Menus and Toolbars2. Editor Window3. Task Pane4. Navigation Pane5. Information Pane
5
NOTE See the online Help for more information about the Options dialog box.
Getting Started Guide 15
Chapter 1 Where to Begin
Using the Navigation Tree
Both views of the navigation pane display a tree containing model items. The model item currently being edited appears in bold type. You can edit another item in the tree by single- or double-clicking on it. In standard view, a single-click will navigate you to any item editable by the current editor. Double-click a parent item to navigate to the editor for that item.
The context menu provides additional commands while working in the navigation tree. See the online Help for more information.
Prototype Composer Editors
Prototype Composer breaks the job of modeling application projects into a number of different tasks, each of which requires a different editor. To accommodate this, Prototype Composer contains several high level editors that are accessible through the navigation pane for editing the various aspects of a project:
Project: Use the Project editor to collect general project information, to manage requirements, initiate reviews, and to create and publish documentation related to the project.
Process: Use the Process editor to graphically define the process flows that make up the project. A process defines the relationship between business activities performed by different audiences to accomplish a business goal.
Activity: Use the Activity editor to graphically define the interactive, system or manual activity flows that comprise the business processes. An activity consists of a flow diagram that combines interface, decision, and action steps to describe the logic and functional behavior of an individual interaction or system task.
Interface: Use the Interface editor to graphically define user interface pages. An interface consists of a page containing a variety of visual elements such as images, buttons, text editors, and other controls.
Decision: Use the Decision editor to create steps that embody business rules. The Process and Activity editors use decision steps to make branching decisions that determine which steps are executed next in a flow.
Action: Use the Action editors to define steps that perform calculate, communicate, and connect actions. For example, action steps in an activity may represent sending e-mail, performing calculations, or connecting to systems-of-record.
Data: Use the Data editor to view and edit the inputs, outputs and data underlying a selected activity.
Task Panes
The task pane appears in the vertical window on the right edge of Prototype Composer. You can show and hide this area by selecting Task Pane from the View menu or using the Ctrl+F1 keyboard combination. You can also close a task pane by clicking the Close button.
16 Serena® Prototype Composer™ 2.4
User Interface Overview
Selecting a Task Pane
The set of available task panes changes depending on the current editor you are using. You can view a different task pane by selecting it from the View menu or the menu at the top of the current task pane.
You can navigate the task panes you have been using by clicking the Back or Forward buttons at the top of the task pane. Clicking the Home button switches to the Getting Started task pane.
Properties Dialogs
Most items you create within Prototype Composer have a properties dialog associated with them. Though the content of the dialog differs based on the type of item selected, the properties dialog allows you to view information about the item and modify some of it.
To access the properties dialog for an item:
Select the item and either:
• choose Edit | Properties
• click the Properties toolbar button
• right-click on the item and select Properties
• press Alt+Enter
Information Pane
To open the information pane, select Information View from the View menu. The information pane appears below the editor window. This capability is available in most Prototype Composer editors. The information visible depends on the item selected in the navigation pane or the editor.
Depending on the item selected, the information pane displays three different views:
Properties: This view displays properties information for the project item selected. This pane allows you to edit the properties of the item while viewing the item itself. You can update an item by changing field information in either the properties view pane or the properties dialog for the item.
Reviews: This view displays a list of reviews associated with the open project item. The options available in this view change depending on whether Prototype Composer is running in normal Prototype Composer operation, reviewer mode or disposition mode.
Requirements: This view displays a list of requirements associated with the open project item.
You can toggle between the three views by clicking the arrow in the upper right of the Information Pane.
Getting Started Guide 17
Chapter 1 Where to Begin
Some Things to Consider
The following topics describe other items to be aware of as you use Prototype Composer.
Field Limits
Prototype Composer contains various fields to collect data for project planning. Unless otherwise noted within the description of the field, the following standards are applied to fields:
Single line text boxes do not support newlines.
All fields are unlimited unless otherwise specified.
Numeric fields are limited to numeric characters.
E-mail fields must match an e-mail pattern.
Document Publishing
Document Publisher is designed to work with Microsoft Word 2003 and will not function with earlier versions of Word.
Check to make sure you have the correct version of Microsoft Word 2003. The XML tag feature used by Prototype Composer is available only in the standalone version of Microsoft Word 2003 and the version that ships with Microsoft Office Professional Edition 2003. If you are using the version of Word that ships with Microsoft Office Standard Edition 2003 you will not be able to view the XML tags in the document template.
CAUTION! Modifying the templates that ship with Prototype Composer using the standard edition of Word will eliminate the XML tags that Prototype Composer relies upon and the template will be no longer be valid.
18 Serena® Prototype Composer™ 2.4
Chapter 2Starting a Project
This section guides you through setting up your project.
Overview 20
Creating a Project 20
Adding Requirements 22
Publishing Documents 24
Using IT Services 26
Versioning Projects in Prototype Composer 26
Using Shared Locations 27
More Information on Project Editor 31
Getting Started Guide 19
Chapter 2 Starting a Project
Overview
After launching Serena® Prototype Composer™, the first thing you need to do is create a project. After the project is created, you can configure it within the Project editor. You can use the Project editor to:
describe and manage information about your project
define requirements related to the project
publish documents describing the application modeled in the project, and
create reviews of project items
You also use the Project editor to access IT-sponsored business functions and services that allow you to more easily model connections to existing systems-of-record.
Creating a Project
To create a project:
1 Click New on the standard toolbar, or choose New > Project from the File menu to open the new project dialog box.
2 Type the name of your project in the Project Name field and click OK.
Further Defining Your Project
When your project is created, the Project Information screen opens. It contains the following tabs:
Project Summary: contains summary information about the project.
Team Members: contains a list of the members of the project team. Also contains a list of team positions with which you can associate team members.
Project Tasks: contains a list of tasks that you have defined for the project.
Project Integrations: contains settings required to enable the Serena® Dimensions® RM, Serena® Business Mashups, and Microsoft® Visual Studio® 2005 Team System (VSTS) integration with Prototype Composer™.
20 Serena® Prototype Composer™ 2.4
Creating a Project
Project Summary
To provide summary information:
Fill in the appropriate fields on the Project Summary tab for your project. Refer to the online Help for specific field information.
Team Members
To add team members to your project:
1 Select the Team Members tab.
2 Define a new team member by selecting New | Team Member or clicking New Team Member above the list of team members.
The Team Member Properties dialog box opens.
3 Enter a name and an e-mail address.
4 Select the appropriate team position for this person.
5 Click Save and Close to save this team member and return to the Team Members tab.
If you want to create a series of team members, click Save and New to save your current team member and leave the properties dialog open to create a new one. When finished creating team members, click Save and Close.
Team Positions
To define team positions for the your project:
1 In the Team Members tab, click New Team Position.
The Team Position Properties dialog box opens.
NOTES The following fields on the Project Summary tab are read-only:
Project Name. This can only be set during creation.
Version
Created
Last Modified
The following fields cannot be set until team members are created and given the corresponding role:
Lead Manager
Lead Sponsor
IT Manager
Lead Approver
The Reviewers field is automatically populated by every team member with a Reviewer role.
Getting Started Guide 21

Chapter 2 Starting a Project
2 Enter a name and a description of the team position.
3 Click Save and Close to save and add this item to the list of team positions.
If you want to create a series of team positions, click Save and New to save your current team position and leave the properties dialog open to create a new one. When finished creating team positions, click Save and Close.
To associate a team position with a team member:
1 Double-click an item in the list of team members to open the Team Member Properties dialog box for that team member.
2 Click the button next to the team position you want to assign to the team member and click Save and Close.
Project Tasks
To add tasks to your projects:
1 Select the Project Tasks tab.
2 Define a new task by selecting File | New | Team Member.
The Task properties dialog box opens.
3 Type the name of your task in the Subject field and supply any other appropriate information about that task.
4 Click Save and Close to save this task and return to the Project Task tab.
If you want to create a series of tasks, click Save and New to save your current task and leave the properties dialog box open to create a new one. When finished creating tasks, click Save and Close.
Adding Requirements
The requirements editor lets you define the business, user, functional and system requirements of your application project.
To add a requirement to your project:
1 Select Requirements in the project navigation pane.
2 Choose File | New | Requirement.
The Requirement Properties dialog box opens.
3 On the General tab, type the name of the requirement.
4 Select the type of the requirement from the Type drop-down list.
TIP If none of the team positions listed are appropriate for the team member, create a new one by clicking Define New Position and completing the fields in the Team Position Properties dialog box. After saving the position, select it from the position list to assign it to the team member.
22 Serena® Prototype Composer™ 2.4
Adding Requirements
If the types available do not apply to the requirement, click the Type button to define a new type. After it is created, click Done and select the new type from the drop-down list.
5 Provide any further information about the requirement.
6 Click Save and Close to save this task and return to the Project Task tab.
If you want to create a series of requirements, click Save and New to save your current requirement and leave the properties dialog box open to create a new one. When finished creating requirements, click Save and Close.
Creating Sub-requirements
To add a sub-requirement to an existing requirement:
1 In the Requirements editor, select the requirement you want to be the parent object.
2 Choose File | New | Sub-Requirement.
The Requirement Properties dialog box opens.
3 Complete the sub-requirement the same way you complete a regular requirement.
4 Click Save and Close when finished.
Further Defining Requirements
1 Select the Applies To tab.
This tab lets you associate the requirement with model items such as processes, activities, steps, data or all items. When a requirement applies to a model item, the requirement will appear on the Requirements pane for that item.
See the online help for information about the Requirements pane.
2 Select any model items to which this requirement pertains.
The requirement can be associated with any defined model items.
3 Select the Associated Requirements tab.
The associated requirements tab contains a list of requirements to associate with the requirement being edited. For example, you may have a business requirement that an activity must be accessible from branch offices. An associated functional or system requirement pertaining to the use of a Web platform could refer to the business requirement as the motivation for the lower-level requirement. Because these requirements have a different type, they cannot be sub-requirements of the business requirement.
4 Provide any further information about the requirement and click Save and Close.
NOTE The ID of the requirement is based on what type is chosen. If you change the type at a later time, the ID will also be changed. Any references to the old ID in external documents will no longer be valid.
Getting Started Guide 23
Chapter 2 Starting a Project
Mapping Requirements
If Prototype Composer is enabled to work with Dimensions RM or Microsoft Visual Studio 2005 Team System (VSTS), you can map Prototype Composer requirement types to classes in Dimensions RM and to work item types in VSTS, respectively. Mapping enables you to publish requirements to these systems. See Chapter 10, "Publishing to Serena Dimensions RM" and Chapter 11, "Publishing to Microsoft VSTS" for information about mapping requirement types.
Publishing Documents
The Document Publisher automatically generates documents from the application models you create in Prototype Composer™. Using the document publisher, information from the model is merged with XML-based document templates authored with Microsoft® Word 2003 to generate requirements documents and specifications that can include everything from high level graphic images of process and activity maps and user interface pages to detailed lists of the data fields underlying the modeled activities. The resulting document is generated in a standard XML file format (WordProcessingML) that can be viewed and edited using Microsoft Word 2003.
Publishing a New DocumentTo generate a new document:
1 Select a template from the available document templates list.
A proposed name for the generated specification appears in the Name field. You may change this to whatever you want the output document named.
2 To restrict the data that is used for creating the document you can clear the check boxes for corresponding items in the Items to Publish tree. For example, if you have two processes defined, but would like to report on only one of them, you can clear the check box for the process you want to exclude.
3 Click Publish or right-click on the item and select Publish. If the document contains interface page graphic images, a window appears briefly displaying the interface pages. In a few seconds, the newly generated document appears in the Published Documents list under the name you provided. The revision of the newly generated document will be 1.
If you have already published a document of the same name, you are warned before that document is overwritten. If you have made significant edits to that document, you may want to consider updating it instead of creating new one, because republishing it will cause the loss of any updates.
Updating an Existing Document
To update an existing document:
1 Select the document in the Published Documents list, then clicking the Update button. If you want to restrict the data that is used for updating the document you can clear the check boxes for corresponding items in the Items to Publish tree. Updating an existing document causes its revision number to be increased by 1.
24 Serena® Prototype Composer™ 2.4
Publishing Documents
When you update an existing document, document publisher will attempt to preserve any edits that you have made in the previously published document. This enables you to customize the output of document publisher without losing the ability to update the document as your model changes.
Saving a Document in Microsoft Word Format
You may want to convert the XML format of generated documents to standard .doc formats so that it can be read by earlier versions of Microsoft Word.
To save a generated document in .doc format:
1 View the document by clicking Open Document.
2 Select Save As from the File menu.
3 Select a directory to save it.
4 Select Word Document (*.doc) in the Save as type: drop-down list box.
5 Click Save.
Document Templates
Prototype Composer includes a variety of pre-configured templates corresponding to common document and specification types. You can modify these templates to meet your specific documentation requirements. After doing so, any documents created using the document publisher will reflect your castigations. In addition, you can author additional templates with the Microsoft Word 2003 standalone version and the version that ships with Microsoft Office Professional Edition 2003. You can use the Prototype Composer schema file ComposerModel.xsd with Microsoft Word 2003 to define custom document templates that access information and images from your projects. Refer to the online help for information on creating document templates.
Viewing a Document Template
To view a document template:
Click Open Template or right-click and select Open to launch Microsoft Word 2003 to preview the template. By default, this opens Word in a mode that displays the
NOTE To use this feature, the changes in the previously published document must have been made with the standalone version of Microsoft Word 2003 or the version that ships with Microsoft Office Professional Edition 2003. Editing the document with the version of Word that ships with Microsoft Office Standard Edition 2003 will eliminate the XML tags that Prototype Composer relies upon and prevent the update feature from functioning.
NOTE After converting an XML document into .doc format, it will no longer be possible to update it automatically because the internal XML tags are removed by this process.
Getting Started Guide 25
Chapter 2 Starting a Project
internal XML tags that Prototype Composer uses to merge model data with the template.
Using IT Services
An IT service, also referred to as a Web service, is a software component that is used to enable programmed interactions and data exchange between computer systems. These services will typically be developed by your IT department to enable execution of discrete business functions in a standard reusable way. For example, your IT department might have defined a Web service that contains functions for retrieving customer records from your existing CRM system or employment information from your HR system. With Prototype Composer, you can use these same services to model connections to existing systems or applications. Using the IT Services view in Prototype Composer, you can import services for use in your project, and optionally create new service requests for implementation by your IT department.
Once an IT service has been imported, you can use its functions to automatically define the inputs and outputs of any connect (execute, lookup, or update) step in an activity flow. Use a test set for the connect step to obtain sample data during simulation and prototype.
Adding New ServicesTo add to the list of available IT services:
Click New Service from the context menu.
The Service Properties dialog opens where you can either import a service already defined by your IT department or create an entirely new service.
Editing and Viewing Services
To edit or view an existing service:
Double-click on it in the IT Services list, or select it and click Properties.
Deleting Services
To delete a service while in the service manager:
Select the service, then click Delete or select Delete from the context menu.
Versioning Projects in Prototype Composer
Prototype Composer supports the versioning of projects similar to the way Microsoft Word handles versioning. In addition to working with the current version of the project, you can now store numbered versions of it. These versions are often referred to as snapshots or checkpoints.
26 Serena® Prototype Composer™ 2.4
Using Shared Locations
The project list on the Prototype Composer Home page contains a Version column that displays the version number for that project. This column can either show the latest version or list all versions available for a project. Right-click on the column and select or clear Show all Versions to switch between the two views.
The latest stored version is also displayed on the Project Summary tab of the Project Information screen.
To save a version of your Prototype Composer project:
1 Open a Prototype Composer project.
2 From the File menu, select Versions.
The Versions dialog box appears.
3 In the Versions dialog box, click Save Now and enter comments on the version being saved.
4 Click OK.
The version appears in the Existing versions list.
Within the Versions dialog box, the following other buttons are available once a version has been saved:
• Open: opens the selected version of the project in read-only mode in another instance of Prototype Composer.
• Revert: reverts the project to the state of the selected version. This operation prompts for confirmation because any work done after the latest version was saved will be lost.
• Delete: deletes the selected version of the project.
• View Comments: displays the information entered about the selected version.
Using Shared Locations
Prototype Composer supports the sharing of project files between multiple users by storing them in a network location and providing a simple check-in/check-out synchronization feature.
Saving a Project to a Shared Location
If you have a local project that you want to make available to other users, you can save the project to a shared location.
NOTE If a project has not been versioned, this column is empty.
NOTE Only one user can work on a shared project at any one time.
Getting Started Guide 27
Chapter 2 Starting a Project
To save a project to a shared location:
1 Open an existing local project.
2 From the File menu, select Save Project to Shared Location.
The Save Project to Shared Location dialog box opens.
3 Click Add Share to set shared locations.
4 Browse to or create an appropriate location in which to place the shared project and click OK.
For information on the color and icon coding of projects in the list, see "Understanding Project Icons and Color Encoding" on page 29.
5 If you want to keep the file checked out to yourself, select Keep the project checked out. If not selected, the local copy of the file will be read-only when the project is saved.
6 Click Save Project.
If the current local project happens to have the same name as an existing project in a shared location, it cannot be saved to the shared location under the current name. In such a situation, the project name in the list is displayed in red and the Save Project button is disabled.
If you still want to share your local project, save the project under a different name. Alternately, the shared project could be deleted if it is no longer needed. See "Managing Shared Locations" on page 29.
Opening a Project from a Shared Location
If a Prototype Composer project was placed in a shared location, you can open it from the shared location.
To open a project from a shared location:
1 From the File menu, select Open Project from Shared Location.
The Open Project from Shared Location dialog box opens.
2 Verify that the project you want to check out is not already checked out by another user.
For information on the color and icon coding of projects in the list, see "Understanding Project Icons and Color Encoding" on page 29.
3 Select the project from the list and click Open Project.
If another project is already open, you may be prompted to save changes to that project before it is closed and the other one is opened.
IMPORTANT! Verify that all users who need access to this project have access to the location where you want to place the shared project.
28 Serena® Prototype Composer™ 2.4

Using Shared Locations
Managing Shared Locations
The Managed Shared Locations dialog box, accessed by selecting Manage Shared Locations from the File menu, lets you manage projects in shared locations.
Within this dialog, you can perform the following functions by right-clicking on a project:
Open a shared project.
Get the latest version of the selected shared project to the local machine. This is often used when someone else has updated a shared project and you want to update your local copy without checking it out.
Check out the project for editing on the local machine.
Undo a check out to remove the lock and discard all changes made to the project since the check out operation.
Delete the project in shared location.
For information on the color and icon coding of projects in the list, see "Understanding Project Icons and Color Encoding" on page 29.
Understanding Project Icons and Color Encoding
Projects listed in the Save Project to Shared Location, Open Project from Shared Location, and Managed Shared Locations dialog boxes are color-coded as follows:
Black text: the project is not present on the local machine.
Bold black text: the project is present on the local machine.
Gray text: shows that a project on the local machine has the same name as a shared project, but the two projects are not linked.
The icon next to the project name represents the state of the project in shared location:
Normal: the project is not checked out by anyone.
Lock: the project is checked out by someone.
Check: the project is checked out by a current user.
The description of the project state in a shared location is also displayed in the status bar.
Managing Shared Projects from the Project List
For projects that are linked to a project in a shared location (shown by an icon with a lock or check mark), you can perform the following operations from the project list:
Get Latest: gets latest version of the project from the shared location.
Check Out: checks out the project from the shared location for editing.
Check In: checks in a local version of the project to the shared location and creates a new version of the project. To perform this operation, the project must be currently open.
Getting Started Guide 29
Chapter 2 Starting a Project
Undo Check Out: discards local changes and returns to the state of the project before the check out
Repairing Shared Projects and Shared Project Directories
A shared project displayed in red text means that the shared project linked to the local project cannot be found. If a shared project is deleted in the Manage Shared Locations dialog box or the entire shared project directory becomes permanently disabled, for example, through deletion, you can use the Repair command available from the context menu in Prototype Composer Home. Choosing the Repair command opens a message describing your repair options.
Working with Prototype Composer While Disconnected from a Shared Location
If you are working with Prototype Composer and a shared location is not available, all shared location related commands are disabled.
You can work on a project while disconnected from a shared location, but the project must be checked out in advance. Any changes can be checked in when the shared location is available again.
Unavailability of the shared location is shown by:
The shared location in the project list is gray and appended with [Not available].
Instead of a project list, the shared location dialog boxes displays "Shared location <locationpath> is not accessible at this time."
Use Case
Sharing Prototype Composer projects can be useful in environments where multiple people are working on defining a product. Following is an example of how this functionality could be useful.
1 A team of product managers, Victor, Allen, and Leslie, are responsible for planning the next major release of their company’s flagship product.
2 After an initial meeting, Victor creates a project and enters the basic details about it.
3 Victor then saves it to a shared location and lets the other team members know where it is.
4 Leslie launches Prototype Composer and opens the shared project. Leslie then checks out the project and adds requirements. When she is finished, she checks the project back in and lets the team know about the changes.
5 Allen then checks out the shared project to work on the process.
6 Victor, knowing Allen has the file checked out but wanting to get Leslie’s changes, selects Get Latest from the File menu.
NOTE These operations are also available in the main File menu when the shared project is opened.
30 Serena® Prototype Composer™ 2.4
More Information on Project Editor
More Information on Project Editor
Refer to the online Help for information on:
project files
managing the project list
field descriptions
organizing and sorting requirements
creating and editing document templates
importing Web services
Getting Started Guide 31
Chapter 2 Starting a Project
32 Serena® Prototype Composer™ 2.4
Chapter 3Defining the Process Flow
This section guides you through setting up the process flow.
Overview 34
Creating a Process 35
Working with Swimlanes and Audiences 36
More Information on Process Editor 37
Getting Started Guide 33
Chapter 3 Defining the Process Flow
Overview
You can use the Process editor to graphically model the business processes that are being defined or modified by your current application project. Open the Process editor by clicking the Process button in the navigation pane standard view or by selecting a process in the navigation pane folder view.
What is a Process?
A process is a series of business-related activities that are carried out in a specific sequence to achieve a business goal. It describes how work flows between those activities as well the audiences who participate in the process. Unlike activity flows, which involve a single audience and typically occur in a single session, a process usually involves multiple audiences and may take days or weeks for a work item in a process to reach the end.
About Process Flow Maps
A process flow map is a graphical representation of a logical business process. The Process editor displays a process map as a collection of activities placed in horizontal audience bands called swimlanes with flow lines, decision steps and action steps used to define the logical flow sequence between activities.
Swimlanes and Audiences
Each activity step in a process flow is associated with an audience that performs the activity. For example, a CRM automated activity could be associated with a system audience while a loan request activity might be associated with a customer audience.
In the Serena® Prototype Composer™ Process editor, the audience associated with an activity is defined by the swimlane in which it is placed. This standard method of representing a process makes it easy to visualize the flow of work between the various audiences. Before you can start adding steps to the process, you should decide which audiences you will be using then add swimlanes corresponding to those audiences to the process flow.
Process Flow Steps and Connectors
Each process step is represented on the process map by an icon corresponding to its type and function. Process steps are connected to each other by drawing lines or connectors from step to step.
Step Properties and Editors
To see the properties of any step in the process flow, right-click on the step and select the Properties context menu item.
For activity steps, this opens the Activity Step Properties dialog box.
For action steps (lookup, perform, update, communicate, and calculate), it opens the Action Step Properties dialog box.
NOTE You cannot simulate or prototype processes.
34 Serena® Prototype Composer™ 2.4
Creating a Process
For all other steps, it opens the Step Properties dialog box.
In addition to the properties dialog box, most steps have dedicated editors, depending on their type. You can navigate to the editor for a step by double-clicking on it, or by right-clicking on it and selecting the Edit step name item from the context menu.
Creating a Process
To create a process:
1 Open the Process editor by clicking on the Process button in the navigation pane standard view or by selecting a process in the navigation pane folder view.
2 Define a new process flow by selecting the File | New | Process menu item, by using the New toolbar button, or by right-clicking on the solution item in the navigation pane tree and selecting the New Process context menu item.
Adding Steps to the Process FlowTo add a step to a process flow:
Drag it from the Flow Steps task pane onto a swimlane on the map.
Step Types
The following types of steps are available in the Process editor:
Activity: The activity step represents a link to a corresponding activity flow.
Decision: The decision step represents the evaluation of data to determine which of several process options (branches) should be taken.
Distribute: The distribute step represents the simultaneous parallel processing of the same work item by two branches of the process.
Jump To: The jump to step represents a continuation of the process flow at the associated target location. You can configure the Jump To step to transfer control to any Start step in the current process or any other process in your solution.
Start: The Start step represents the entry point for a process. It is also used within processes as a target for the Jump To step. You can define multiple entry points for a process by using more than one start step.
End: The End step represents the termination of a process. You can use multiple end steps to represent more than one outcome for a process.
NOTE When first placed on the map, all process steps except the Start step are shown as disabled to indicate they are not yet logically connected into the process flow. Once they have been connected to an upstream step, they are shown as enabled to signify that the connection is complete.
Getting Started Guide 35

Chapter 3 Defining the Process Flow
Connecting Process Steps
To connect one step to another:
Click on the arrow leaving the first step with the left mouse button and drag the arrow to the target step.
Steps that do not have a Start Step predecessor are shown in gray, indicating that they cannot be reached in the process flow.
To disconnect a connector from a step:
Click on the arrow and drag the arrow away from the step. You can also right-click on the connector and select Disconnect, or you can select the connector and press Backspace.
Working with Swimlanes and Audiences
To add swimlanes for existing audiences:
Right-click anywhere on the process flow map and select the audience from the cascading Add Swimlane context menu. The new swimlane will appear at the bottom of the process flow.
To insert a swimlane above an existing swimlane:
Right-click on the existing swimlane title and select the audience from the cascading Insert Swimlane context menu.
To add swimlanes for new audiences:
1 Right-click on the process flow map and select Add Swimlane | New.
This opens the Audiences Properties dialog box which you can use to define a new audience.
2 Create a new audience.
When you save the new audience you defined, a corresponding swimlane appears at the bottom of the process flow.
To insert a swimlane based on a new audience above an existing swimlane, right-click on the existing swimlane title and select Insert Swimlane | New.
You can also use the audiences tab of the Solution Lists dialog box to add, delete, or modify audiences.
36 Serena® Prototype Composer™ 2.4

More Information on Process Editor
More Information on Process Editor
Refer to the online Help for information on:
field descriptions
renaming processes
modifying process maps
modifying audiences and swimlanes
Getting Started Guide 37

Chapter 3 Defining the Process Flow
38 Serena® Prototype Composer™ 2.4
Chapter 4Defining Activities
This section guides you through setting up the activities.
Overview 40
Creating Activities 41
More Information on Activity Editor 41
Getting Started Guide 39
Chapter 4 Defining Activities
Overview
Activities are work flows that involve a single audience and are typically concluded in a single session. The steps that can comprise an activity flow are restricted according to the activity type. For example, a system activity cannot contain an interface step because, by definition, a system activity occurs without human involvement.
You build your activity by adding steps to the activity map to create an end-to-end flow. Steps are connected by lines that determine the sequence in which the steps are performed.
Activity Types
The activity type is specified when activities are first created and can be either system, manual, or interactive activities.
System activities represent work that is performed automatically without human involvement.
Manual activities represent those portions of a business process that are performed by humans outside the control of a computer system.
Interactive activities represent work by a human directly interacting with the computer system. Interactive activities always have one or more interface steps in the activity flow.
You can change the activity type by right-clicking on an activity step in a process flow or the project workspace and selecting a new type from the Activity Type context menu. You can also access this menu from in the Activity editor by right-clicking on the activity flow. In addition, you can change the activity type using the Activity Properties dialog box.
Any steps in the activity flow that are not permitted for the new activity type display an error icon and will be grayed out.
About Activity Flow Maps
Within the Activity editor, activities are displayed as a directed flow map of steps that comprise that activity. The activity flow map begins with a start step, followed by other steps available in the flow steps task pane such as interface, action and decision steps. It is always terminated by an end step. Most actions that you can perform on an activity flow map are available through the Activity editor context menus.
Activity Simulation and Prototypes
After you have defined an activity, you can use Serena® Prototype Composer™ to simulate running the activity flow. The simulation feature lets you view each interface step, enter data and make decisions as you traverse the activity. Links in the underlying activity map are highlighted to show your progress. You can step forward and backward through the activity, set breakpoints, and watch decisions being made.
Unlike simulation, which is designed to interact with the underlying activity map, Prototype runs the Activity independently without tracking it on the map. The outputs of all Action steps are predefined by a selected Scenario. Assuming all data has been
40 Serena® Prototype Composer™ 2.4
Creating Activities
mapped correctly and depending on how much detail you've put into the model, running the prototype of an Activity can accurately reflect the experience of a user running the end application as it is ultimately deployed.
Refer to the online Help for information on setting up and running simulations and prototypes.
Creating Activities
Each activity flow is associated with one or more Activity steps. When you create a new Activity step, a new activity flow is automatically created with it.
Creating an Activity Step
Usually, you will create a new Activity step by dragging it from the Flow Steps task pane onto a Process flow.
To create a new activity step in the Project Workspace:
Choose File | New or click the New toolbar button in the Activity editor. You can also right-click on the Project Workspace in the navigation pane tree and select New | Activity.
New Activity from Web
You can also create an activity by capturing a sequence of Web pages by using the Web Importer.
To create an activity from Web pages:
Open the Web capture dialog box by selecting File | New | Activity from Web menu item, clicking the New | Activity from Web toolbar button, or right-clicking on the Project Workspace item in the navigation pane tree and selecting New | Activity from Web. This opens the Web Capture dialog box that you can use for capturing Web pages.
Adding Steps to the Activity Flow
To add steps to the activity flow, either:
Drag them from the Flow Steps task pane, or
Capture a sequence of Web pages by using the Web Importer. Open the Web capture dialog box by choosing File | New | Activity from Web. This opens the web capture dialog box that you can use for capturing Web pages.
Refer to the online Help for information on the available steps for each activity type.
More Information on Activity Editor
Refer to the online Help for information on:
Getting Started Guide 41
Chapter 4 Defining Activities
field descriptions
context menus
creating nested activities
creating activity prototypes and prototype annotations
renaming activities
the steps available for each activity type
importing activities from the Web
editing activity maps
step properties and editors
activity simulation and prototypes
42 Serena® Prototype Composer™ 2.4

Chapter 5Designing Interfaces
This section guides you through designing interfaces.
Overview 44
Creating Interface Steps 44
More Information On Interface Editor 45
Getting Started Guide 43
Chapter 5 Designing Interfaces
Overview
The Serena® Prototype Composer™ Interface editor is a powerful but easy-to-use tool for designing and modeling user interfaces and experiences. You can create interfaces from scratch or, with Prototype Composer's Web transformer capability, you can capture existing interface pages from the Web.
Building an Interface Page
The following outlines the tasks involved in creating an interface from scratch.
Add an interface step in an activity flow map.
Adjust the size of the page and set interface page options.
Add layout panels to organize your page
Add controls to the page
Change the label of the control
Change control properties
Set resizing behavior
Creating Interface Steps
Usually, you create a new interface step in the Activity editor by dragging an interface step from the Flow Steps task pane onto the activity map or by duplicating an existing one on the map. You can also create new interface steps in the project workspace by right-clicking on the project workspace icon in the navigation pane tree and selecting New | Interface.
Using the Web transformer capability of Prototype Composer, you can create interface pages by capturing existing Web pages. You can also create interface pages automatically from previously defined connect action steps by right-clicking on the action step and selecting the Create Interface for > Inputs, Outputs or Inputs and Outputs menu item. See generating controls from activity data for more information.
Adding Interface Elements
After an interface step is defined, you can add the elements to design your interface.
To design an interface:
1 Open an existing interface step by double-clicking on it in the activity flow, or by selecting it in the Interface pane of the Interface editor.
2 Select and drag layout panels and controls from the Controls and Layouts task pane to define your interface.
Layout panels are control containers you use to organize the controls on the interface page. Each cell in the layout contains a panel control that you can use for setting backgrounds and default control values.
44 Serena® Prototype Composer™ 2.4
More Information On Interface Editor
Refer to the online Help for information on the different types of controls.
3 Preview your interface at anytime by pressing F5.
More Information On Interface Editor
Refer to the online Help for information on:
capturing interface pages from the Web
changing interface page options
control types and their properties
Getting Started Guide 45

Chapter 5 Designing Interfaces
46 Serena® Prototype Composer™ 2.4
Chapter 6Creating Actions
This section guides you through creating actions.
Overview 48
Creating Actions 48
Action Step Types 48
Editing Actions 50
More Information on Action Editor 50
Getting Started Guide 47

Chapter 6 Creating Actions
Overview
You can use the Action editors to create and edit action steps for use in activity flows. Action steps in a flow represent non-user automatic behaviors that typically involve connection and communication with external systems. For example:
define an action to simulate a connection to a credit scoring system in order to perform a credit check.
model an action that simulates sending a confirmation e-mail message to an online applicant.
Action steps will typically have both inputs and outputs. In certain cases, action steps may not have outputs because the purpose of the action may be to notify or update the external system.
Creating Actions
To create a new action step:
Either:
• Add an action step to a process or activity flow map, then double-click on it to launch the corresponding Action editor.
• If you are currently in the Action editor, click New | ActionType | ActionSubtype or right-click on Project Workspace in the navigation pane tree and select New | Action | ActionType | ActionSubtype for the action type you would like to create.
Serena® Prototype Composer™ includes a general editor for defining action inputs and outputs as well as specialized editors for defining e-mail, numeric calculation, and string calculation steps.
Web servicesexecution
You can optionally associate a service or function with a Connect step in an activity flow and (optionally) run that function when running the prototype. In this case, inputs and outputs are defined by association with IT-sponsored Web services to simulate integration with existing systems-of-record. When a Connect step is associated with a service or function, a function icon appears on the Connect step on the activity flow map.
Action Step Types
Prototype Composer supports the following basic types of actions:
Calculate
Communicate
Connect
Manual
Each of these types has subtypes that further refine the action to be taken by the action step.
48 Serena® Prototype Composer™ 2.4

Action Step Types
Calculate Action Step
The Numeric Calculate subtype represents a step that evaluates a formula based on its inputs and produces a single output containing the result of the calculation. Use the numeric calculate Action editor to configure and test the step behavior.
The String Calculate subtype represents a step that you can use to combine inputs to build a single string output. Use the string calculate Action editor to configure and test the step behavior.
Communicate Action Step
The General Communicate subtype represents a communication step with a generic set of inputs and outputs defined in Composer. You can use this subtype to describe any mechanism of communication you need to model in your activity. Use the communicate Action editor to define the inputs and outputs for the step.
The Email Communicate subtype represents a step that generates and sends an e-mail message to the specified e-mail addresses. Use the E-mail communicate Action editor to define inputs and the e-mail subject and body. When the activity is simulated or prototyped, the e-mail is constructed and displayed in a form, but is not actually sent to the identified recipients.
Connect Action Step
The Connect Execute subtype represents a step used for executing some function on an external system, for example, executing a purchase order transaction in an existing enterprise resource planning (ERP) system. Use the connect Action editor to define inputs and outputs for the step.
The Connect Lookup subtype represents a step used for looking up information from an external database or other system, for example, looking up an employee record in an existing human resources (HR) system. Use the connect Action editor to define inputs and outputs for the step.
The Connect Update subtype represents a step used for updating information in an external database or other system, for example, updating a customer profile in an existing customer relationship management (CRM) system. Use the standard Action editor to define inputs and outputs for the step..
Manual Action Step
Manual action steps represent traditional work done by a person without direct interaction with a computer system. The only currently supported subtype for manual action steps is the Task subtype. You can specify a checklist of work that must be performed before the manual action is considered complete using the manual Action editor.
NOTE The differences between the Connect action step types are conceptual only. All types can have the same number of inputs and outputs.
Getting Started Guide 49
Chapter 6 Creating Actions
Editing Actions
In the activity editor you can open the Action editor for an existing action step by double clicking on the step. You can also edit an action step by selecting it from the navigation tree in either standard view or folder view.
General Action Editor
The general Action editor is used for the communicate/general, connect/lookup, connect/execute and connect/update Action steps. The only difference you see when editing these actions is the action type or subtype name that appears in the title bar of the editor.
For all these steps, you only need to define the inputs that the action takes and the outputs it produces.
More Information on Action Editor
Refer to the online Help for information on:
action step properties
defining action steps
50 Serena® Prototype Composer™ 2.4
Chapter 7Defining Decisions
This section guides you through defining decisions.
Overview 52
Creating Decisions 52
More Information on Decision Editor 53
Getting Started Guide 51
Chapter 7 Defining Decisions
Overview
You can use the Decision editor to define the business rules that are used in processes and activities to select between options on the flow map. The Decision editor contains a list of branches that you have defined. For each branch in the list, there is a rule that evaluates it to either be true or false. The last branch represents "otherwise" (although you can rename it) and always evaluates as true. When a decision is made on an activity flow map during a simulation or prototype, the rules for each branch are evaluated in sequence from top to bottom. The first branch rule that evaluates to true will be taken in the flow.
The Decision editor provides a number of shortcuts to make defining decisions easier. For example, to use a field from an earlier step in the current activity as data in a formula or as one side of a simple rule, you can drag that field from the Flow Outline task pane onto the formula editor or the rule tree. When data fields have a limited set of possible values (because the control they come from supports a limited set of possible values), you can use the context menu to select from that set of values to compare against.
Creating Decisions
You can configure an existing decision step by selecting it from the navigation pane tree.
To create a new Decision step:
In the Process editor, drag and drop a Decision step onto the process flow map.
In the Decision editor, you can also add an unbounded decision step to the Project Workspace by clicking the New Decision toolbar button or right-clicking on Project Workspace in the navigation pane tree and selecting New | Decision.
Decision Branches
The Branches list contains all defined branches for the selected decision step. You can add new branches, delete branches, rename branches, and re-order branches by clicking on the corresponding toolbar buttons. You can also right-click on the branches list and select an action from the menu.
At run time, rules associated with branches are evaluated from top to bottom. The branch corresponding with the first rule that evaluates to true is taken. You use the rule tree control that appears to the right of the branches list to configure simple or compound branch rules. You can configure decision branches to:
Branch a flow based on a button click
Branch a flow based on a selected option
Make a decision based on information from separate branches
Re-map step outputs
52 Serena® Prototype Composer™ 2.4
More Information on Decision Editor
More Information on Decision Editor
Refer to the online Help for information on:
the rule tree
branch rules
automatic generation of decision steps and branches
working with flow data
formulas in decisions
lists in decisions
Getting Started Guide 53

Chapter 7 Defining Decisions
54 Serena® Prototype Composer™ 2.4
Chapter 8Working with Data
This section guides you through the Data editor.
Overview 56
Creating Activity Data 56
Getting Started Guide 55
Chapter 8 Working with Data
Overview
The Data editor gives you access to the data groups and data fields associated with activities. In the navigation pane folder view, click the Activity Data tree node to open the Data editor. In standard view, click the Data button to open the Data editor.
The Data editor consists of three data tree controls corresponding to the activity's data, inputs, and outputs. The activity working data control (in the center) contains data automatically created from the outputs of the steps in the activity flow.
The activity inputs and outputs are initially empty. You can create inputs and outputs manually by selecting New Group or New Field from the context menu in these controls. You can also drag and drop groups and fields from the activity data to these controls.
After you have defined activity inputs, the fields are available for mapping to the inputs of the steps in the activity. See the online Help for more information on mapping step inputs.
If you created activity outputs by dragging and dropping from activity data, a mapping is automatically created between the activity data and the activity outputs. If you individually created data groups and data fields in the activity outputs, you will need to manually map these fields to the activity data to identify where they get their values.
Creating Activity Data
Most activity data is automatically created from the activity steps. Any time you place a step on the activity map that has outputs defined for it or define a new output for an existing step, corresponding data groups and data fields are automatically created in the activity data. You can then map these data fields to the inputs of downstream steps using the step mapping pane in the activity editor.
Show SuggestedMappings
You can quickly map activity data to a user interface control by right-clicking the control to open a context menu showing suggested mappings for that control. For example, if you have a field on the first page of an activity flow that collects customer addresses and you want an address from that field to appear in a field on a downstream page, right-click the control (for example, address textbox) in the downstream page to open the Suggested Mappings context menu. Select the appropriate field from the choices presented. Selecting a field auto-maps the control to that field.
Show InputMappings
To conveniently review the data mapping for the controls, you can click Show Input Mappings in the Interface editor. The mapping information appears when you hold the mouse pointer over the green check icon next to each control.
Data groups andfields for multiple
branches
There are some circumstances when you need to create additional data groups and data fields in the activity data. Suppose you have an activity flow containing a decision with two branches where data is collected through alternative means on each of the branches. For example, you might collect information for an existing customer using an action step on one branch while prompting a new customer for information using an interface step on another branch. In this case, downstream steps (after the branches re-combine) will need to be able to get the information collected without knowing which step collected the data. You cannot use the auto-generated data nodes for this purpose.
56 Serena® Prototype Composer™ 2.4
Creating Activity Data
The solution is to create data groups and fields in the activity data that represent the data you would like to collect, and then map the outputs of the steps on each branch to that data. Downstream steps can then map their inputs to the data fields you have created.
Creating Activity Inputs
You can define activity inputs using the Inputs data tree control in the Data editor. The activity inputs represent the information passed into the activity when it is executed. Activity inputs are visible both from the outside of the activity as activity step inputs and from the inside of the activity as sources of data.
Creating Activity Outputs
You can define activity outputs using the Outputs data tree control in the Data editor. The step outputs represent the data produced by the activity when it is executed.
Activity output fields must be mapped to the activity data to define where they get their values in simulation and prototype. If you created the outputs by dragging and dropping from activity data, this mapping is created for you automatically. However, if you defined the outputs manually, the outputs will be unmapped. Refer to the online Help for information on manually mapping outputs
NOTE Refer to the online Help for information on creating activity data.
Getting Started Guide 57

Chapter 8 Working with Data
58 Serena® Prototype Composer™ 2.4

Chapter 9Working with Reviews
This section explains how to create and participate in reviews of Serena® Prototype Composer™ artifacts.
Overview 60
About E-Mail Reviews 60
E-mail Review Configuration 61
About Business Mashups Reviews 61
Business Mashups Review Configuration 61
Creating a Review 62
Sending a Review 63
Cancelling a Review 63
Receiving a Review Request 64
Navigating to a Review Artifact 65
Submitting Review Feedback 65
Receiving Reviewer Feedback 66
Getting Started Guide 59
Chapter 9 Working with Reviews
Overview
Prototype Composer gives you the option of creating e-mail based reviews and Serena® Business Mashups managed reviews. Both review types require the review requester and the reviewer to have Prototype Composer locally installed in order to participate in the review.
In an e-mail review you can send items in your Prototype Composer project through e-mail to defined reviewers. The reviewer receives a review request as an e-mail attachment.
In a Business Mashups review, Business Mashups is used to manage the transfer of review files between the review requester and the reviewer. This type of review requires the integration of Prototype Composer with Business Mashups.
In either case, opening the review request opens Prototype Composer and displays the items for review.
About E-Mail Reviews
An e-mail review is a review method in which you define individual reviewers who will receive a project review file (.bar) as an e-mail attachment. Prototype Composer lets you initiate and participate in two kinds of e-mail reviews, shared directory reviews and self-contained reviews. When the reviewer selects the project review file e-mail attachment, Prototype Composer opens and displays the first item for review. After entering review responses, the reviewer sends them back to the reviewer in a response file (.rsp) through e-mail. When the requester opens the response file, Prototype Composer opens in a special mode that allows the requester to read and disposition review responses.
Shared DirectoryReviews
For this type of review, the review requester first creates a shared directory. Both the review requester and all recipients of the e-mail review must have access to the shared directory. When the requester creates the review, a new directory is created in the specified shared directory as in the following example.
\Shared Dir\Project\Prototype Composer Reviews where Shared Dir is the name of the shared directory, Project is the Prototype Composer project, and Review is the name of the review.
Within the \Prototype Composer Reviews directory is copied a read-only version of the project .bap file. Any document files are copied to the Documentation Output subdirectory.
When the review recipient opens the project review file, Prototype Composer displays reviews items in the project file that is stored in the shared directory. A response file is copied to the \Prototype Composer Reviews directory.
Self-ContainedE-Mail Reviews
A "self-contained" review is a type of e-mail based review in which all files necessary for the review are packaged in the project review file and sent through e-mail. This type of e-mail review is useful when the reviewer has no access to a shared directory and therefore, no access to the project files. When the review recipient receives the review request through e-mail and selects the project review file attachment, the project files are copied to the \Prototype Composer Reviews folder on the reviewer’s local machine. A read-only version of Prototype Composer opens and navigates to the review items referenced by the project review file.
60 Serena® Prototype Composer™ 2.4

E-mail Review Configuration
For details on creating and sending e-mail reviews, see "Creating a Review" on page 62 and "Sending a Review" on page 63, respectively.
E-mail Review Configuration
To use Email communication, set the following options in the E-mail tab of the Options menu available under File | Options in the Prototype Composer menu bar.
SMTP Server: Host name of the SMTP server through which e-mail may be sent
Login: Login name to be used when connecting to the SMTP server
Password: Password to be used when connecting to the SMTP server
Email Address: E-mail address from which e-mail will be sent
A first name and last name may be optionally supplied and, if present, will be used to construct an e-mail alias that will appear in the From address field.
About Business Mashups Reviews
A Business Mashups review is a review method that requires integration with a Business Mashups server. This method maintains a workflow for the progress of the review cycle. The list of participating reviewers is defined by the Business Mashups workflow which creates a new task for each reviewer. Each task has a project review file attachment. The Business Mashups server is the central repository for all shared files such as the Prototype Composer project file, document files, and the review response files.
You can start a Business Mashups review if you have integrated Prototype Composer with Business Mashups, an issues management software solution. For information on installing the integration and initiating reviews using the Prototype Composer with Business Mashups integration, see Serena Prototype Composer Integration Guide for Serena Business Mashups.
Business Mashups Review Configuration
To use Business Mashups integration, you must set the following options in the Project Integrations tab in the Project editor.
Server URL: Web address of the Business Mashups Web service
Username: User name to be used when connecting to the Business Mashups server
Password: Password to be used when connecting to the Business Mashups server
Solution: Business Mashups solution under which to start the Review workflow
NOTE The Company and Use local email client for feedback options do not pertain to the review functionality.
Getting Started Guide 61
Chapter 9 Working with Reviews
Project: Business Mashups project under which to start the Review workflow
Click Test Connection to test the connection between Prototype Composer and the Business Mashups server and confirm that you are able to connect to the given Solution and Project.
After valid Business Mashups integration settings are supplied, the Business Mashups review communication method becomes available in the review properties dialog.
To properly integrate with Prototype Composer, you must configure the Business Mashups server with one or more review capable workflows. These workflows will then become available for selection in the Solution field of the Product Integrations tab. See Serena Prototype Composer Integration Guide for Serena Business Mashups for complete information on installing the Prototype Composer with Business Mashups integration.
Creating a Review
As the reviewer requester, you can create a review. Before creating the review, find or create at least one project item in Prototype Composer that you would like to include in a review.
To create a review:
1 Open the Reviews view in the Project editor.
2 Click New in the Defined Reviews tab.
3 In the Review Properties dialog box, enter the review name, review type and description.
4 If you want reviewers to see comments from previous reviews, select the check box next to Allow Reviewers to see comments from previous reviews.
5 Select the communication method (Email or Business Mashups) from the Communications drop-down list.
• For e-mail communication select either Use Shared Directory for Review Content to send a shared directory review or Send All Review Content to Reviewers to send a self-contained review. See "About E-Mail Reviews" on page 60 for more information on selecting an e-mail communication method.
• For Business Mashups reviews, select Business Mashups from the Communications drop-down list.
6 If you selected Email, click the Reviewers tab and add reviewers to the e-mail review.
Skip this step for Business Mashups reviews, because the reviewers are predefined in the Business Mashups workflow and appear as read-only in the Reviewers tab.
7 Click the Review Scope tab and define the scope for the review by checking the boxes beside the items to include in the review.
8 Save and close the dialog box.
A new review item is created and listed in the defined reviews list. Until you send the review, the review will have a status of Pending with no date specified in Sent On.
62 Serena® Prototype Composer™ 2.4
Sending a Review
Creating a Prototype Only Scenario Review
A prototype only scenario review includes only a review of a scenario. Before creating a prototype only scenario review, you must first have created a scenario in the Activity editor. See Chapter 4, "Defining Activities" for information on creating scenarios.
To create a prototype only scenario review:
Create the review as in "Creating a Review" on page 62. Note the following exceptions:
Include only a scenario in the review.
Click Send Prototype Only to include the scenario as the only review item.
Sending a Review
As the review requester, you can send the review to designated reviewers. The selected review must have the status Pending, have at least one review request defined, and at least one item included in the scope.
To send a review:
1 Select the review in the defined reviews list.
2 Click Send located below the defined reviews list.
If the project has not been saved, you may be asked if you want to save the current project before sending.
After the review is sent, it has the status Open and the Sent On date reflects the date it was sent. The review is now read-only and all properties for the review are read-only in the Review Properties dialog box.
Each reviewer defined in the review receives an e-mail message with the project review (.bar) file attachment.
Business Mashups
A new Business Mashups Review workflow is started within the solution and project specified in the Business Mashups integration settings.
Cancelling a Review
As the review requester, you can cancel an e-mail or Business Mashups based review.
E-mail Reviews To cancel an e-mail review, in the Reviews view, select the review to be cancelled from the Defined Review list and click Cancel. You will be asked to confirm whether you want to cancel the review. If you answer Yes, you will be asked whether you want to send e-mail to the reviewers notifying them of the cancellation. Answering Yes will send e-mail to the individual reviewers with a notification similar to the following:
Getting Started Guide 63

Chapter 9 Working with Reviews
The review <Review Name> was cancelled on <date> <time>. You may delete any files that you have received pertaining to this review.
Business MashupReviews
To cancel a Business Mashups review, click Cancel. This automatically cancels the Business Mashups workflow associated with the review. If the reviewer subsequently opens the review, a message appears stating that the review was cancelled and that the project will open as read-only.
Receiving a Review Request
To receive and open the review request, find the e-mail notification and open the attached project review file (.bar).
If you received a shared directory review, clicking the project review file copies the project review file and the Documentation Output folder from the shared directory, opens Prototype Composer, and displays the first referenced review item in read-only mode.
If you received a self-contained review, clicking the project review file copies the project review file (.bap), and the Documentation Output folder into the \Prototype Composer Reviews directory and automatically opens Prototype Composer and displays the first referenced review item in read-only mode.
Responses to all e-mail reviews are returned to the requester in the review response file (.rsp) through e-mail. For more information, see "Submitting Review Feedback" on page 65.
Business Mashups
As a Business Mashups user participating in a Business Mashups review, depending on the notification settings set in Business Mashups, you can receive an e-mail message containing a link to the user assigned task in Business Mashups that contains the review request. Clicking the link opens the Business Mashups task that contains the link to the review request. Clicking the review request link prompts the message asking whether you want to run the review request or download it. If you choose to download it, the attachment associated with the specific Business Mashups sub-task assigned to you is copied to your local machine and you run it from there.
Prototype Composer loads the associated project file and opens it in Prototype Composer in reviewer mode. Prototype Composer opens the first review artifact in the project file and selects it in the Reviews Task Pane.
After completing a review, the reviewer submits a response back to Business Mashups through the Prototype Composer interface. For more information on how Prototype Composer and Business Mashups interact during a review, see the Serena Prototype Composer Integration Guide for Serena Business Mashups.
NOTE See the product readme for information on a limitation to opening Prototype Composer reviews from TeamTrack 6.3. (Business Mashups was formerly called TeamTrack.)
64 Serena® Prototype Composer™ 2.4
Navigating to a Review Artifact
Navigating to a Review Artifact
When Prototype Composer opens in response to selecting a project review file, Prototype Composer navigates to the first referenced review item. After that, you can navigate manually between the items scoped for review.
To navigate through review items:
1 With the review open, open the Reviews Task Pane if it is not already displayed.
2 Select an item category from the Reviews Task Pane.
3 Select a review artifact from the category tree. Prototype Composer automatically navigates to the selected review artifact.
• If the artifact is a scenario, the associated activity is displayed in the activity editor.
• If the artifact is a business model item, the item is displayed in the appropriate editor.
• If the artifact is a requirement, the project requirements view is displayed, highlighting the requirement.
• If the artifact is a published document, a simplified version of the project documents view is displayed, highlighting the document. This simplified version only allows you to open the selected document.
4 Enter comments in the Reviews pane for the selected artifact.
You can also select a model item directly in the Prototype Composer user interface that is available for review.
The information fields in the Reviews Information Pane change to reflect the currently selected review artifact.
Reviewing a Prototype Only Scenario
To review a prototype only review:
1 Open the review link in the e-mail notification (e-mail) or Business Mashups task (Business Mashups reviewers).
2 Navigate to the scenario prototype to be reviewed.
3 Click Run Prototype.
4 Enter comments in the scenario review window and submit feedback as in "Submitting Review Feedback" on page 65.
Submitting Review Feedback
You can submit review feedback to the review requester.
To submit review feedback:
1 Open the review in reviewer mode and display the Reviewer Task Pane.
Getting Started Guide 65
Chapter 9 Working with Reviews
2 Click Submit Feedback to open the Submit Review Feedback dialog box.
3 Enter a value in the Rating and Approval fields and provide comments as appropriate.
4 Click Submit to send the review responses back to the review requester or Cancel to cancel the submit operation.
• For e-mail reviews, the review response file is sent through e-mail and a confirmation of successful submission appears.
• If the review response file was not sent successfully, you are alerted that an error occurred attempting to submit the review response and you are asked whether you want to attempt resubmitting the response using your Microsoft Outlook client. Clicking the Outlook button will cause a new mail item to be created in the Microsoft Outlook outgoing mail queue. Upon successful creation of an Outlook mail item, a confirmation message appears.
• For Business Mashups reviews, the review response file is attached to the associated Business Mashups sub-task for the user. A confirmation that the sub-task was transitioned to the Completed state appears.
5 To save the responses, choose Save Project from the File menu. This only saves the review comments, not the project itself. Review responses are saved in a response file to the \Prototype Composer Reviews directory.
Receiving Reviewer Feedback
As the review requester, after sending a review request, you can check for review responses and disposition them in Prototype Composer. For all e-mail reviews, the responses are submitted to the review requester through e-mail.
To receive responses:
1 Open Prototype Composer and navigate to the Reviews view in the Project editor.
2 Select a review in the defined reviews list.
3 In the list of associated reviewers:
• For e-mail reviews, click Load Responses to open and import the response for the selected review. Any review requests in the Associated Review Requests list that now contain new responses will have the status Received.
• For Business Mashups reviews, click Retrieve Responses. The system checks for any new or updated review response files attached to the associated Business Mashups workflow automatically. Any review requests in the Associated Review Requests list that now contain new responses will have the status Received.
Feedback contained in updated review response files is merged with the existing feedback such that the most currently saved comments take precedence.
NOTE You can save the responses at any point in your review. If you have successfully submitted your responses and have not modified the review feedback before exiting the application, the contents of the \Prototype Composer Reviews directory are deleted.
66 Serena® Prototype Composer™ 2.4
Receiving Reviewer Feedback
4 Select the review request in the associated review requests list that has status Received.
5 Click Check Response, located below the Associated Review Requests list. Prototype Composer is now in a special mode of operation that allows you to disposition the review responses.
The Review Feedback task pane is displayed on the right and the first review artifact for which feedback has been included is selected. Prototype Composer automatically opens the review artifact as described in "Navigating to a Review Artifact" on page 65. You can also navigate manually through the review artifacts in the Review Feedback task pane and in the window appearing in the left side of the Reviews pane.
If you have selected Information Pane from the Views menu, you can see the updates to the currently selected review artifact in the Reviews Information Pane.
6 Read the reviewer’s comments in the Current Review tab. These comments are read-only. You can also view all previous comments submitted for the item in the Review Summary tab.
7 Select a disposition from the Disposition list and enter an explanation for the disposition choice.
8 Use the left and right arrow controls to advance through all the review items.
9 If you are finished entering a disposition for all review items, click Feedback Checking Complete.
After clicking Feedback Checking Complete the status of the review request you were checking changes to Reviewed.
If the reviewer sends further responses for that review request, repeat all steps in this this procedure to check responses and complete the feedback checking.
NOTE If the Review is currently past the due date and all review requests have been received and reviewed (have status Reviewed) you will be prompted to confirm whether you would like to close the review. Doing so marks the review and all associated review requests with status Closed.
Getting Started Guide 67

Chapter 9 Working with Reviews
68 Serena® Prototype Composer™ 2.4
Chapter 10Publishing to Serena Dimensions RM
This section provides a high level explanation of publishing requirements and project artifacts from Serena® Prototype Composer™ to Serena® Dimensions® RM.
Overview 70
Using the Dimensions RM Publishing Interface 70
Getting Started Guide 69

Chapter 10 Publishing to Serena Dimensions RM
Overview
Prototype Composer features the ability to publish requirements, model items, scenarios, and documents to Dimensions RM (formerly known as RTM). You can also import requirements from Dimensions RM and synchronize Prototype Composer requirements with requirements in Dimensions RM. To participate in the exchange of requirements Prototype Composer must be integrated with Dimensions RM.
Before using the integration, you must establish relationships between Dimensions RM requirement classes and model items or scenarios on the Dimensions RM database. Using the Prototype Composer interface you map requirement types, scenarios, documents, and model items created in Prototype Composer to Dimensions RM classes as appropriate. When mapping is complete, you can publish these items to Dimensions RM.
When a scenario or model item with an attached requirement or a requirement with an attached requirement is published to Dimensions RM, a link is created between the corresponding Dimensions RM requirements and Dimensions RM scenarios or model items. The result is that all associations in Prototype Composer between requirements and corresponding scenarios or model items are tracked and maintained through links in Dimensions RM.
Prototype Composer model items and prototype scenarios are published along with an embedded link to a .bapl file that references a particular artifact within the Prototype Composer project. Selecting the link opens a read-only version of the local installation of Prototype Composer. Prototype Composer automatically navigates to, and displays, the item referenced by the .bapl file..
Using the Dimensions RM Publishing Interface
This section summarizes the steps required to configure Prototype Composer to publish requirements and model items, scenarios, and documents to Dimensions RM. This section assumes you have installed the Prototype Composer with Dimensions RM integration and have configured the Dimensions RM database and project to include at least one requirement class that contains at least one attribute with the type File Attachment.
To use the Prototype Composer Dimensions RM interface:
SettingDimensions RM
Options
1 Establish a connection between Prototype Composer and Dimensions RM by setting the required options in the Dimensions RM Integrations section of the Project Integrations tab in the Project editor.
• Test the connection to the Dimensions RM database by clicking Test Connection. The Dimensions RM publishing interface only appears in Prototype Composer after you have made a successful connection to the Dimensions RM database.
Creating aDimensions RM
Mapping
2 Navigate to Requirements view in the Project editor, and select a:
a Dimensions RM class to which to map the Prototype Composer requirement.
NOTE For more information on how the Prototype Composer with Dimensions RM integration works and on installing the Prototype Composer with Dimensions RM integration, see Serena Prototype Composer Integration Guide for Serena Dimensions RM.
70 Serena® Prototype Composer™ 2.4
Using the Dimensions RM Publishing Interface
b Dimensions RM attribute for each Prototype Composer requirement field.
c Dimensions RM attribute value for the Prototype Composer requirement subtype.
PublishingRequirements
3 Click Publish to RM.
• If you are publishing only an existing Prototype Composer requirement that has no associated model item, use Publish to RM located in the Project Requirements view.
• If you are publishing model items, scenarios, and documents (with or without associated requirements), use Publish to RM located in the RM Publisher Task Pane.
You can also perform the following tasks:
Import requirements from RM: Imports existing Dimensions RM requirements that belong to a Dimensions RM class that is mapped to a Prototype Composer requirement.
Sychronize published requirements: Synchronizes Dimensions RM requirements with their Prototype Composer counterparts. Changes made to the Dimensions RM requirement attributes that are mapped to the Prototype Composer requirement fields become reflected in the associated Prototype Composer requirements.
Getting Started Guide 71

Chapter 10 Publishing to Serena Dimensions RM
72 Serena® Prototype Composer™ 2.4
Chapter 11Publishing to Microsoft VSTS
This section provides a high level explanation of publishing requirements and project artifacts from Serena® Prototype Composer™ to Microsoft® Visual Studio® Team System.
Overview 74
Using the VSTS Publishing Interface 74
Getting Started Guide 73

Chapter 11 Publishing to Microsoft VSTS
Overview
Prototype Composer features the ability to publish requirements and project artifacts created in Prototype Composer to Microsoft® Visual Studio® 2005 Team System (VSTS) as VSTS work items. These items can be assigned to project team members and tracked through the development lifecycle. This capability is enabled by integrating Prototype Composer with VSTS.
Before using the integration, a project must be set up on VSTS that functions under a process template whose work item types correspond with requirement types, model items and prototype scenarios in Prototype Composer.
Requirement types, model items, and prototype scenarios are mapped to VSTS work item types and published to Team Foundation Server as VSTS work items. Team Foundation Server is the back-end infrastructure of VSTS that enables the assignment and tracking of work items.
Prototype Composer model items and prototype scenarios are published along with an embedded link to a .bapl file that references a particular artifact within the Prototype Composer project. Selecting the link opens a read-only version of the local installation of Prototype Composer. Prototype Composer automatically navigates to, and displays, the item referenced by the .bapl file.
Upon publication, the association between a requirement and a Prototype Composer artifact (a prototype scenario or model item) is maintained in VSTS as a link created between the work items for the artifact and the requirement.
Published Microsoft Word documents are added to the WSS-based project portal of VSTS, also known as SharePoint. To open a Word document click the associated link. Documents can be updated by republishing to the same SharePoint location.
Any work items on VSTS for which there are currently no corresponding Prototype Composer requirements can be imported from VSTS to Prototype Composer. As in publishing, prior to importing, VSTS work item types must be mapped to Prototype Composer requirement types. Also, any changes made to a work item can be synchronized with the corresponding requirement in Prototype Composer, thereby maintaining consistent baselines between the requirements in Prototype Composer projects and the work items in VSTS projects.
Using the VSTS Publishing Interface
This section summarizes the steps required to configure Prototype Composer to publish requirements, model items, prototype scenarios and documents to VSTS. This section assumes that you have created a process template that has work item types that are compatible with Prototype Composer requirement types, model items and prototype scenarios and that you have installed the integration files on Team Foundation Server.
NOTE For more information about the Prototype Composer with VSTS integration, see the Serena Prototype Composer Integration Guide for Microsoft Visual Studio 2005 Team System, the online help and the readme.
74 Serena® Prototype Composer™ 2.4
Using the VSTS Publishing Interface
To use the Prototype Composer VSTS interface:
Entering VSTSConnection
Settings
1 Establish a connection between Prototype Composer and Team Foundation Server by setting the required options in the VSTS Integrations section of the Project Integrations tab in the Project editor.
• Test the connection to Team Foundation Server by clicking Test Connection.
The VSTS publishing interface appears in Prototype Composer only after you have made a successful connection to Team Foundation Server.
Creating a VSTSMapping
2 In the Requirements view of the Project editor, open the Requirement Type Properties dialog box for the requirement type you wish to map to a VSTS Work Item type. Select a:
a VSTS work item type to which to map the Prototype Composer requirement type.
b VSTS work item attribute for each Prototype Composer requirement field.
c VSTS work item attribute value for the Prototype Composer requirement subtype.
PublishingRequirements and
Artifacts
3 Click Publish to VSTS.
• You can publish existing Prototype Composer requirements, model items and scenarios by clicking Publish to VSTS located in the Project Requirements view.
• You an publish documents, model items, scenarios and any attached requirements by clicking Publish to VSTS located in the VSTS Publisher Task Pane.
Importing andSynchronizing
You can also perform the following tasks:
Import requirements from VSTS: Imports VSTS work items as requirements that are mapped to a work item type.
Sychronize published requirements: Synchronizes VSTS work items with the corresponding Prototype Composer requirements. Changes made to the VSTS work item attributes which are mapped to the Prototype Composer requirement fields are reflected in the associated Prototype Composer requirements.
Getting Started Guide 75

Chapter 11 Publishing to Microsoft VSTS
76 Serena® Prototype Composer™ 2.4

Index
Symbols
.bap 60
.bar 60
.rsp 60
A
actionscalculate steps 49
numeric 49string 49
communicate steps 49email 49general 49
connect steps 49execute 49lookup 49update 49
creating 48editing 50manual steps 49step types 48
actitity datacreating 62
activitiesadding steps 41creating 41creating from Web page 41flow maps 40prototype 40simulation 40types 40
activity datacreating 56creating inputs 57creating outputs 57
Adobe Acrobat 9
B
Business Mashupsintegration 60
Business Mashups reviews 61configuration 61
D
decisionsbranches 52creating 52
document publishing 24Microsoft Word version required 18saving as a Word file 25templates 25updating 24
E
editorsAction 16Activity 16Data 16Decision 16Interface 16Process 16Project 16
e-mail reviews 60configuration 61
F
field limits 18
I
information pane 17installation 14integrations
Business Mashups 60Microsoft Visual Studio Team System 74Serena Dimensions RM 70
interfacescreating 44
overview 44IT services 26
adding 26deleting 26editing 26
Getting Started Guide 77

Index
M
Microsoft Visual Studio Team Systemintegrating with Prototype Composer 74publishing requirements to 73
O
online documentation 9online help 10
P
process stepsconnecting 36types 35
processesadding audiences 36adding steps 35adding swimlanes 36audiences 34connecting process steps 36connecting steps 36connectors 34creating 35definition 34disconnecting steps 36flow map 34step types 35steps 34swimlanes 34
projectsadding requirements 22adding tasks 22adding team members 21creating 20Project Summary 21Project Tasks 22requirements 22Team Members 21
properties dialogs 17properties pane 17prototype only scenarios
reviewing 65publishing requirements
to Microsoft Visual Studio Team System 73
R
requirements 22adding sub-requirements 23creating 22publishing to Microsoft VSTS 74
publishing to Serena Dimensions RM 70requirements pane 17reviews
Business Mashups based 59cancelling 63creating 62e-mail based 59overview 60prototype only scenarios 63, 65receiving 64receiving feedback 66reviewing Prototype Composer items 65sending 63submitting feedback 65
reviews pane 17
S
Serena Dimensions RMintegration 70publishing requirements 70
stepsdisconnecting 36
swimlanesadding 36adding for new audiences 36inserting above existing 36
T
task panes 16
U
user interface 14
78 Serena® Prototype Composer™ 2.4