PC SOFTWARE MANUAL MODEL #44316

Welcome message from author
This document is posted to help you gain knowledge. Please leave a comment to let me know what you think about it! Share it to your friends and learn new things together.
Transcript

PC SOFTWARE MANUALMODEL #44316
2 | ENGLISH
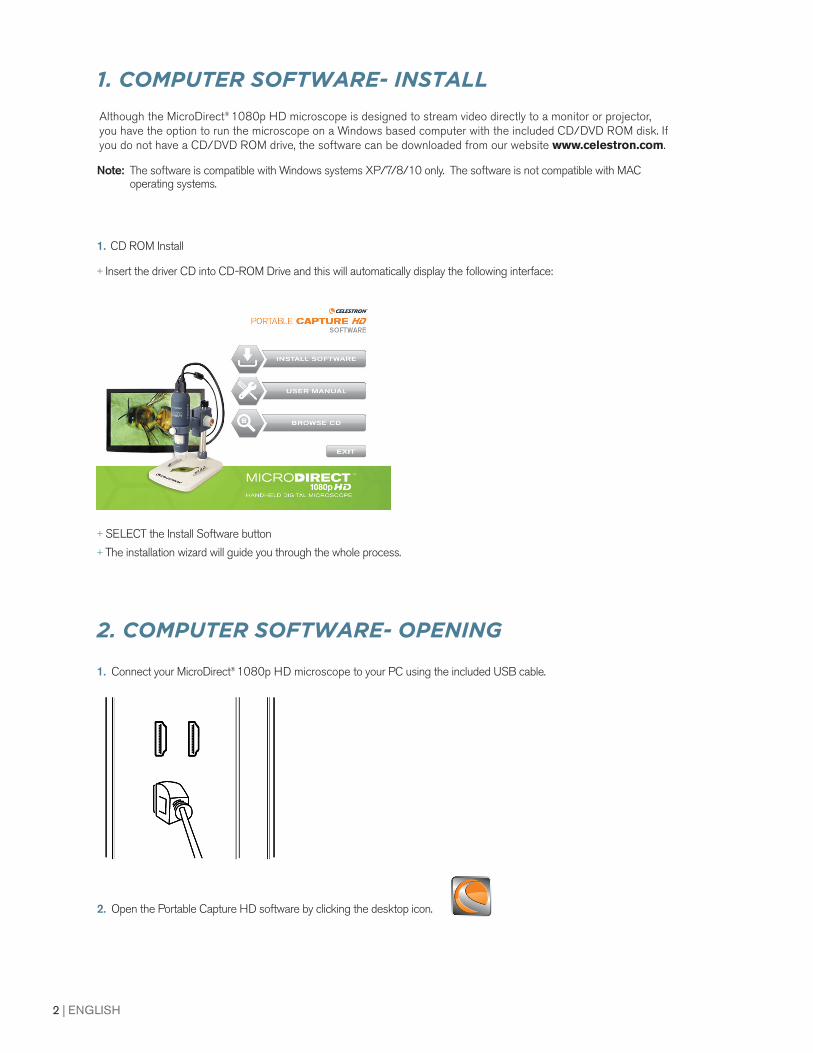
1. COMPUTER SOFTWARE- INSTALL
Although the MicroDirect® 1080p HD microscope is designed to stream video directly to a monitor or projector, you have the option to run the microscope on a Windows based computer with the included CD/DVD ROM disk. If you do not have a CD/DVD ROM drive, the software can be downloaded from our website www.celestron.com.
Note: The software is compatible with Windows systems XP/7/8/10 only. The software is not compatible with MAC operating systems.
1. CD ROM Install
+ Insert the driver CD into CD-ROM Drive and this will automatically display the following interface:
+ SELECT the Install Software button+ The installation wizard will guide you through the whole process.
2. COMPUTER SOFTWARE- OPENING
1. Connect your MicroDirect® 1080p HD microscope to your PC using the included USB cable.
2. Open the Portable Capture HD software by clicking the desktop icon.
ENGLISH | 3
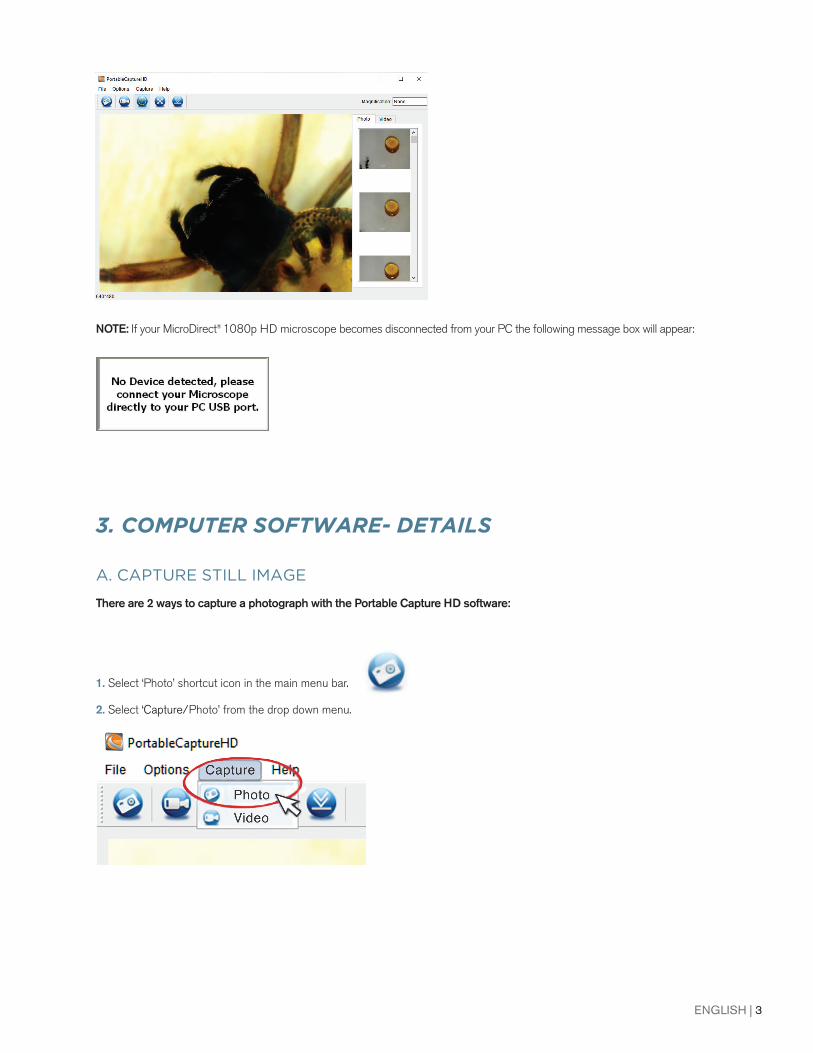
NOTE: If your MicroDirect® 1080p HD microscope becomes disconnected from your PC the following message box will appear:
3. COMPUTER SOFTWARE- DETAILS
A. CAPTURE STILL IMAGE
There are 2 ways to capture a photograph with the Portable Capture HD software:
1. Select ‘Photo’ shortcut icon in the main menu bar.
2. Select ‘Capture/Photo’ from the drop down menu.
4 | ENGLISH
B. CAPTURE VIDEO
There are 2 ways to capture video with the Portable Capture HD software:
1. Select ‘Video’ shortcut icon in the main menu bar.
2. Select ‘Video’ from the drop down menu.
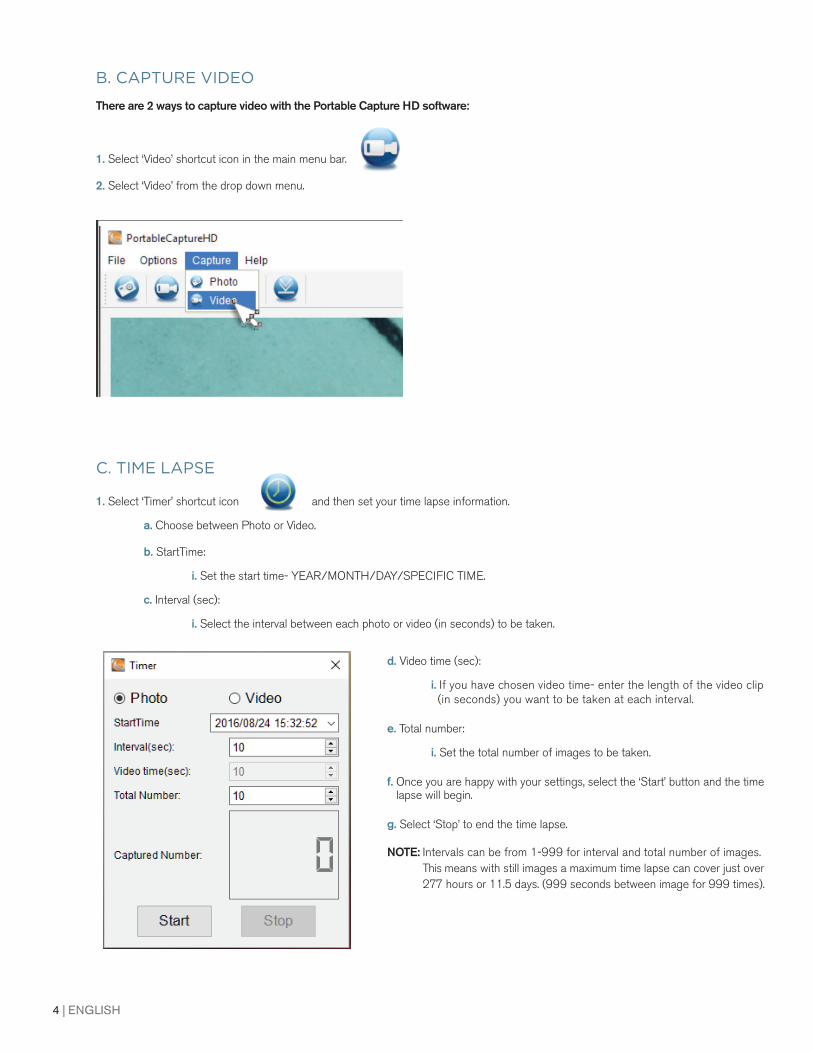
C. TIME LAPSE
1. Select ‘Timer’ shortcut icon and then set your time lapse information.
a. Choose between Photo or Video.
b. StartTime:
i. Set the start time- YEAR/MONTH/DAY/SPECIFIC TIME.
c. Interval (sec):
i. Select the interval between each photo or video (in seconds) to be taken.
d. Video time (sec):
i. If you have chosen video time- enter the length of the video clip (in seconds) you want to be taken at each interval.
e. Total number:
i. Set the total number of images to be taken.
f. Once you are happy with your settings, select the ‘Start’ button and the time lapse will begin.
g. Select ‘Stop’ to end the time lapse.
NOTE: Intervals can be from 1-999 for interval and total number of images. This means with still images a maximum time lapse can cover just over 277 hours or 11.5 days. (999 seconds between image for 999 times).

ENGLISH | 5
+ Make sure the X,Y Guide is ON (Options/XY Guide).
+ Place the included Calibration ruler on the stage under the microscope lens and focus.
+ Take a still image making sure the X,Y Guide and the lines on the calibration ruler are parallel.
+ Double-click on the image to enter into measurement interface window.
A. CALIBRATION
4. CALIBRATION AND MEASUREMENT
+ A dimension line will appear and a dimension will be displayed above the line and a dialogue box will appear.
+ Enter the “known” distance that you measured, based on the calibration ruler.
+ The software will automatically calibrate the magnification rate.
+ Click ‘OK’ and the adjusted magnification rate will show in the upper right corner.
NOTE: Save this magnification rate, so that you may use it for future settings.
+ Now you can take measurements on the saved image.
+ Select the Calibration icon and using your cursor, click on a start line on the calibration ruler, hold the mouse button down and drag a dimension line across to the next black line on the calibration ruler.
NOTE: The idea here is to measure a “known” distance on the calibration ruler. For example 1mm or .5 mm.
6 | ENGLISH
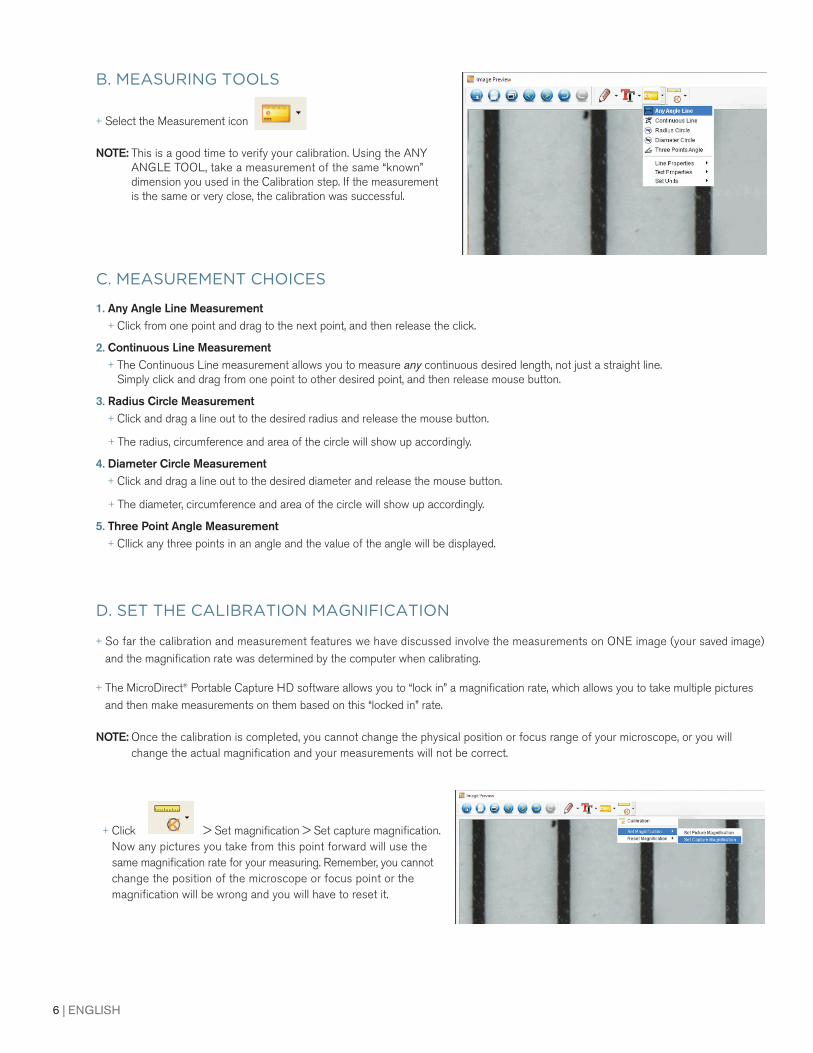
B. MEASURING TOOLS
+ Select the Measurement icon
NOTE: This is a good time to verify your calibration. Using the ANY ANGLE TOOL, take a measurement of the same “known”dimension you used in the Calibration step. If the measurement is the same or very close, the calibration was successful.
C. MEASUREMENT CHOICES
1. Any Angle Line Measurement+ Click from one point and drag to the next point, and then release the click.
2. Continuous Line Measurement+ The Continuous Line measurement allows you to measure any continuous desired length, not just a straight line.
Simply click and drag from one point to other desired point, and then release mouse button.
3. Radius Circle Measurement+ Click and drag a line out to the desired radius and release the mouse button.
+ The radius, circumference and area of the circle will show up accordingly.
4. Diameter Circle Measurement+ Click and drag a line out to the desired diameter and release the mouse button.
+ The diameter, circumference and area of the circle will show up accordingly.
5. Three Point Angle Measurement+ Cllick any three points in an angle and the value of the angle will be displayed.
D. SET THE CALIBRATION MAGNIFICATION
+ So far the calibration and measurement features we have discussed involve the measurements on ONE image (your saved image) and the magnifi cation rate was determined by the computer when calibrating.
+ The MicroDirect® Portable Capture HD software allows you to “lock in” a magnifi cation rate, which allows you to take multiple pictures and then make measurements on them based on this “locked in” rate.
NOTE: Once the calibration is completed, you cannot change the physical position or focus range of your microscope, or you will change the actual magnifi cation and your measurements will not be correct.
+ Click > Set magnifi cation > Set capture magnifi cation.Now any pictures you take from this point forward will use the same magnifi cation rate for your measuring. Remember, you cannot change the position of the microscope or focus point or the magnifi cation will be wrong and you will have to reset it.
ENGLISH | 7
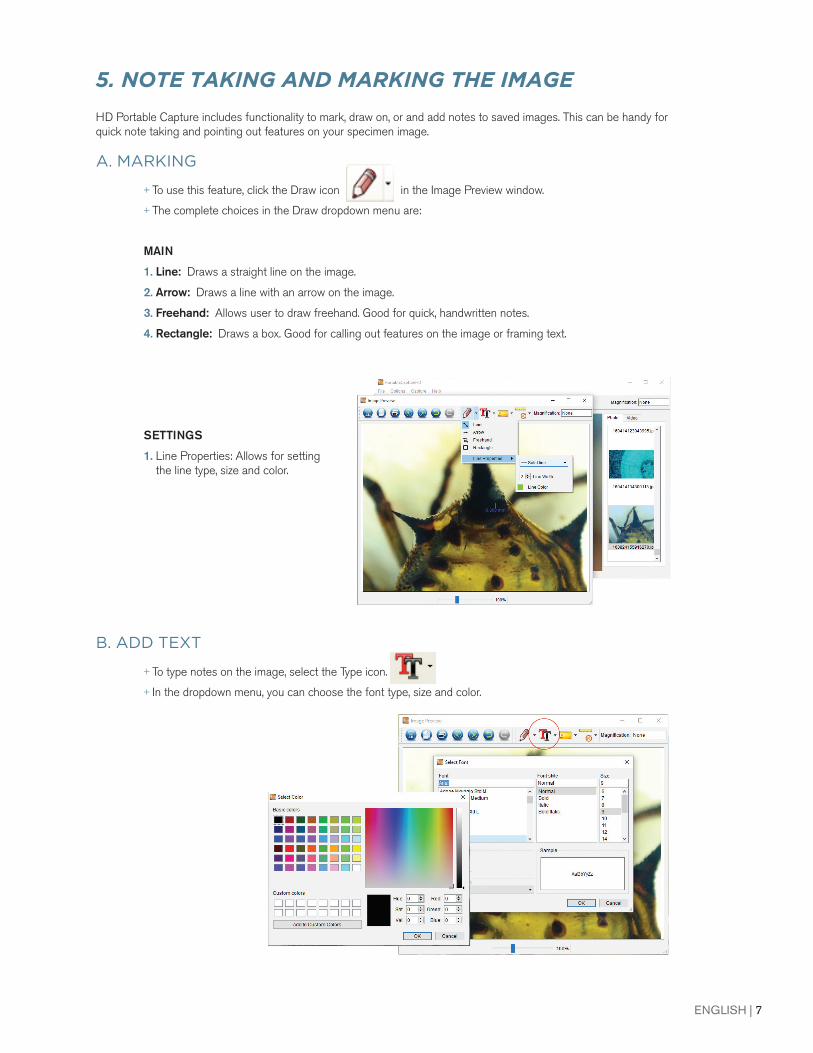
HD Portable Capture includes functionality to mark, draw on, or and add notes to saved images. This can be handy for quick note taking and pointing out features on your specimen image.
+ To use this feature, click the Draw icon in the Image Preview window.
+ The complete choices in the Draw dropdown menu are:
MAIN
1. Line: Draws a straight line on the image.
2. Arrow: Draws a line with an arrow on the image.
3. Freehand: Allows user to draw freehand. Good for quick, handwritten notes.
4. Rectangle: Draws a box. Good for calling out features on the image or framing text.
SETTINGS
1. Line Properties: Allows for settingthe line type, size and color.
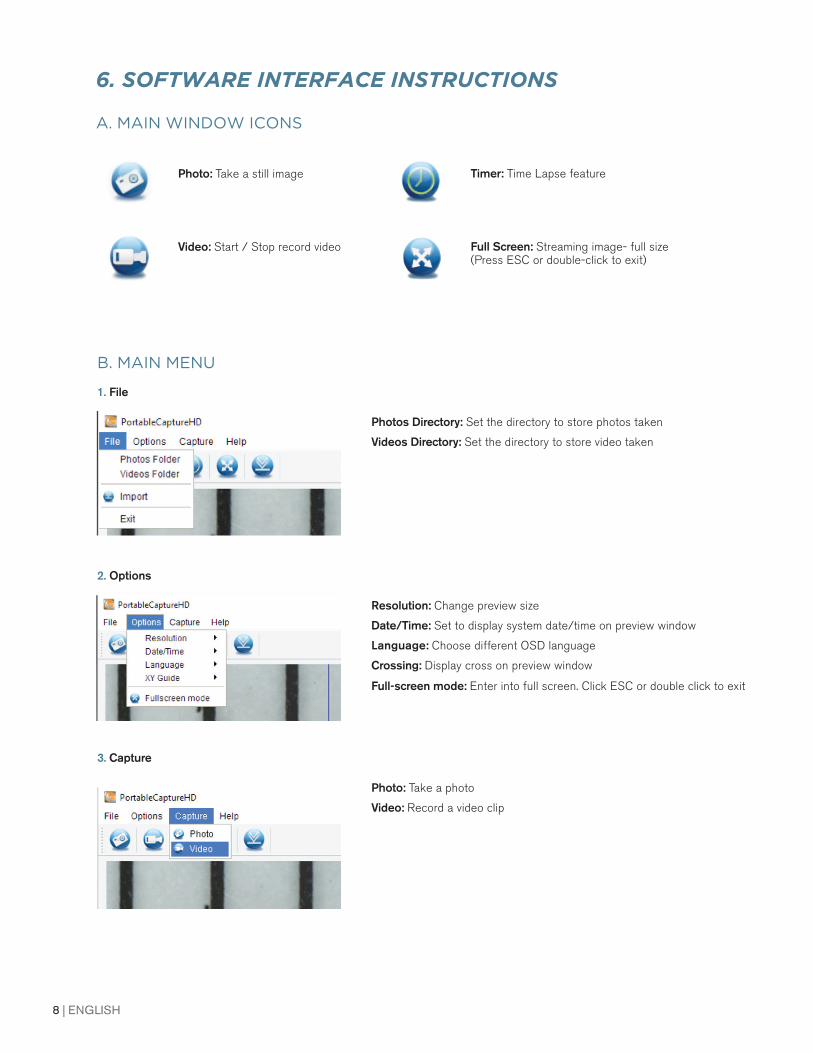
+ To type notes on the image, select the Type icon.
+ In the dropdown menu, you can choose the font type, size and color.
A. MARKING
5. NOTE TAKING AND MARKING THE IMAGE
B. ADD TEXT
8 | ENGLISH
A. MAIN WINDOW ICONS
Photo: Take a still image
Video: Start / Stop record video
Timer: Time Lapse feature
Full Screen: Streaming image- full size (Press ESC or double-click to exit)
B. MAIN MENU
1. File
Photos Directory: Set the directory to store photos taken
Videos Directory: Set the directory to store video taken
2. Options
Resolution: Change preview size
Date/Time: Set to display system date/time on preview window
Language: Choose different OSD language
Crossing: Display cross on preview window
Full-screen mode: Enter into full screen. Click ESC or double click to exit
3. Capture
Photo: Take a photo
Video: Record a video clip
6. SOFTWARE INTERFACE INSTRUCTIONS
ENGLISH | 9
7. CARE AND MAINTENANCE Your Celestron MicroDirect® 1080p HD microscope is a precision optical instrument and should be treated with care at all times. Follow these suggestions and your microscope will need very little maintenance throughout its lifetime.
+ Store your microscope in a clean, dry place.
+ Never use your microscope where operation of such devices is restricted. Improper use creates the risk of serious accident.
+ Only use your microscope within the 23° to 120°F (-5° to 50° C) temperature range. Try to limit sudden temperature changes as this may create moisture inthe microscope housing.
+ Do not try to access the internal components of your microscope or attempt to modify it in any way. Only authorized technicians should perform maintenanceor repairs.
+ Keep your microscope away from water and other liquids. Never use it in rain or snow. Moisture creates the danger of fi re and electric shock.
+ If the exterior of your microscope needs cleaning, wipe it with a moist cloth.
8. WARRANTY Your Celestron MicroDirect® 1080p HD microscope has a two year limited warranty. Please visit the Celestron website for detailed information on all Celestron microscopes: www.celestron.com.
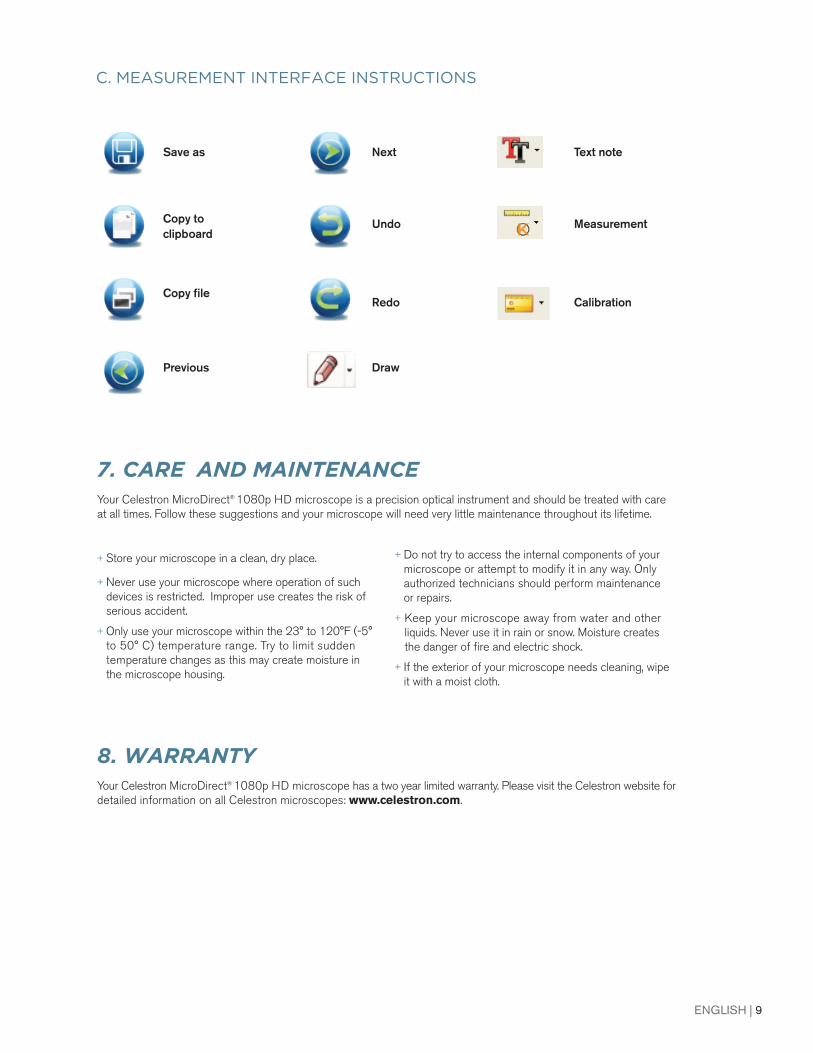
C. MEASUREMENT INTERFACE INSTRUCTIONS
Save as
Copy toclipboard
Copy fi le
Previous
Next
Undo
Redo
Draw
Text note
Measurement
Calibration

© 2016 Celestron • All rights reserved. • www.celestron.com 2835 Columbia Street • Torrance, CA 90503 U.S.A. Telephone: 1(800) 421-9649 • Printed in China 2016
FCC Note: This equipment has been tested and found to comply with the limits for a Class B digital device, pursuant to part 15 of the FCC Rules. These limits are designed to provide reasonable protection against harmful interference in a residential installation. This equipment generates, uses, and can radiate radio frequency energy and, if not installed and used in accordance with the instructions, may cause harmful interference to radio communications. However, there is no guarantee that interference will not occur in a particular installation. If this equipment does cause harmful interference to radio or television reception, which can be determined by turning the equipment off and on, the user is encouraged to try to correct the interference by one or more of the following measures:+ Reorient or relocate the receiving antenna.+ Increase the separation between the equipment and receiver.
+ Connect the equipment into an outlet on a circuit different from that to which the receiver is connected.
+ Consult the dealer or an experienced radio/TV technician for help.
This product is designed and intended for use by those 14 years of age and older. Product design and specifications are subject to change without prior notification.
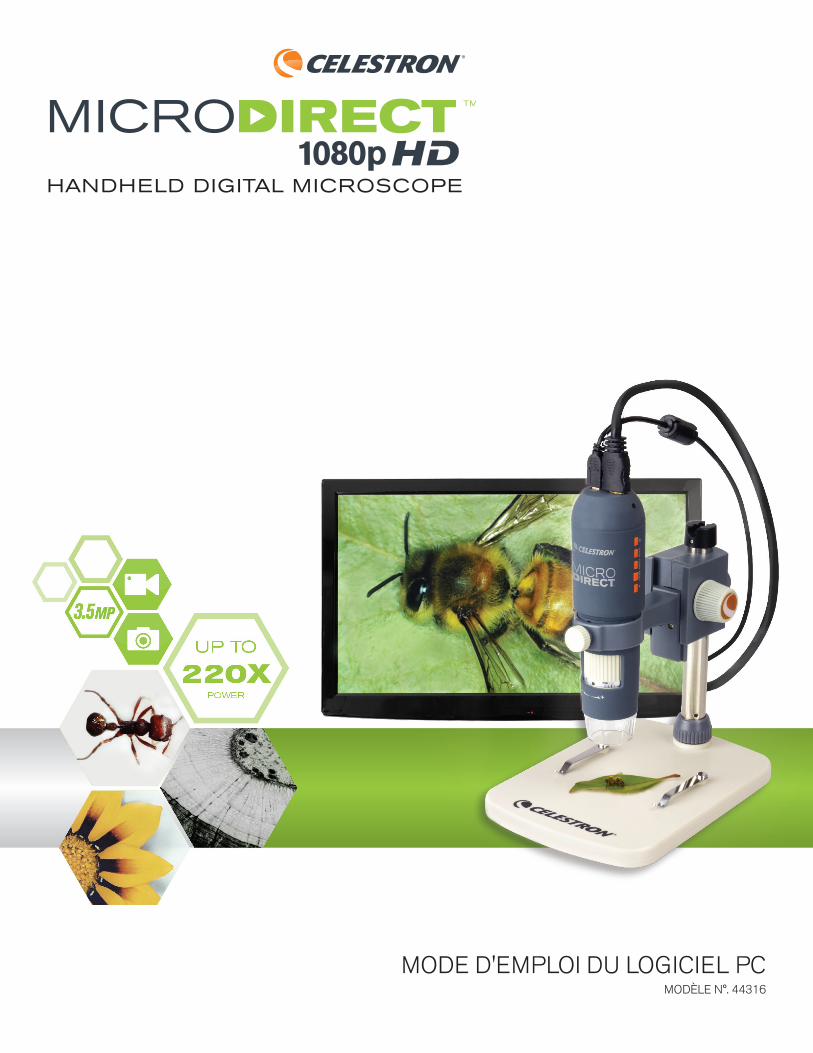
MODE D'EMPLOI DU LOGICIEL PCMODÈLE N°. 44316
2 | FRANÇAIS
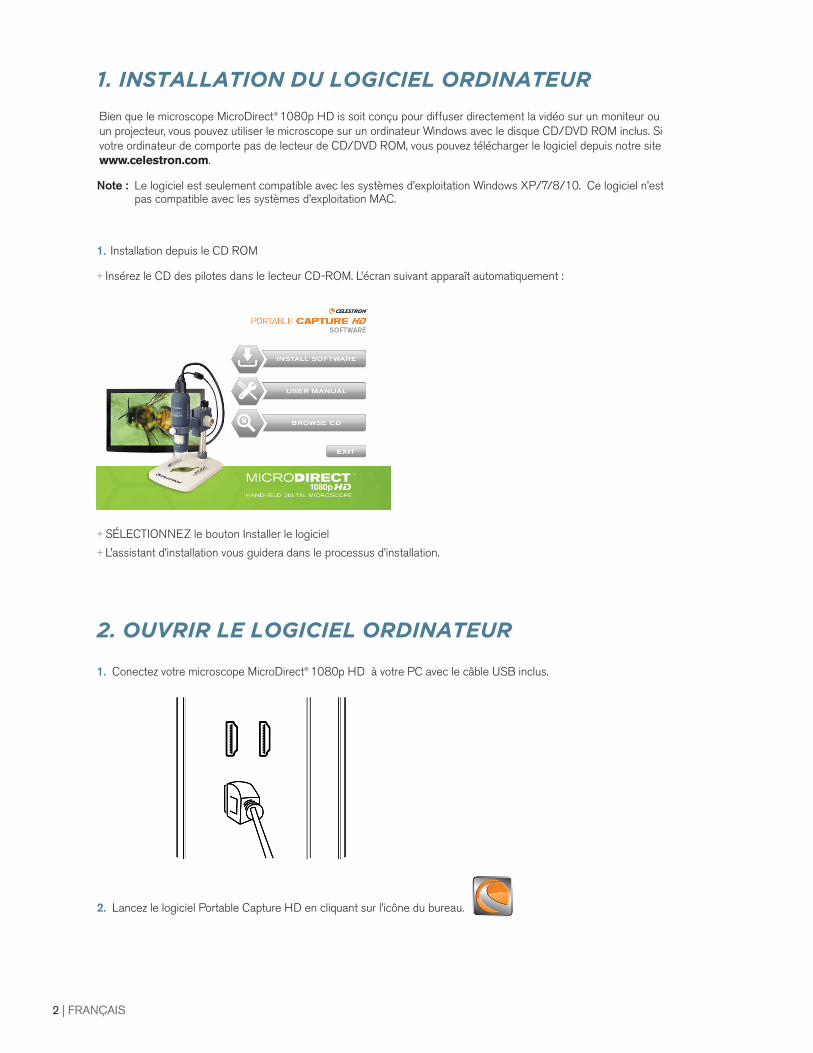
1. INSTALLATION DU LOGICIEL ORDINATEUR
Bien que le microscope MicroDirect® 1080p HD is soit conçu pour diffuser directement la vidéo sur un moniteur ou un projecteur, vous pouvez utiliser le microscope sur un ordinateur Windows avec le disque CD/DVD ROM inclus. Si votre ordinateur de comporte pas de lecteur de CD/DVD ROM, vous pouvez télécharger le logiciel depuis notre site www.celestron.com.
Note : Le logiciel est seulement compatible avec les systèmes d’exploitation Windows XP/7/8/10. Ce logiciel n’est pas compatible avec les systèmes d’exploitation MAC.
1. Installation depuis le CD ROM
+ Insérez le CD des pilotes dans le lecteur CD-ROM. L’écran suivant apparaît automatiquement :
+ SÉLECTIONNEZ le bouton Installer le logiciel+ L’assistant d’installation vous guidera dans le processus d’installation.
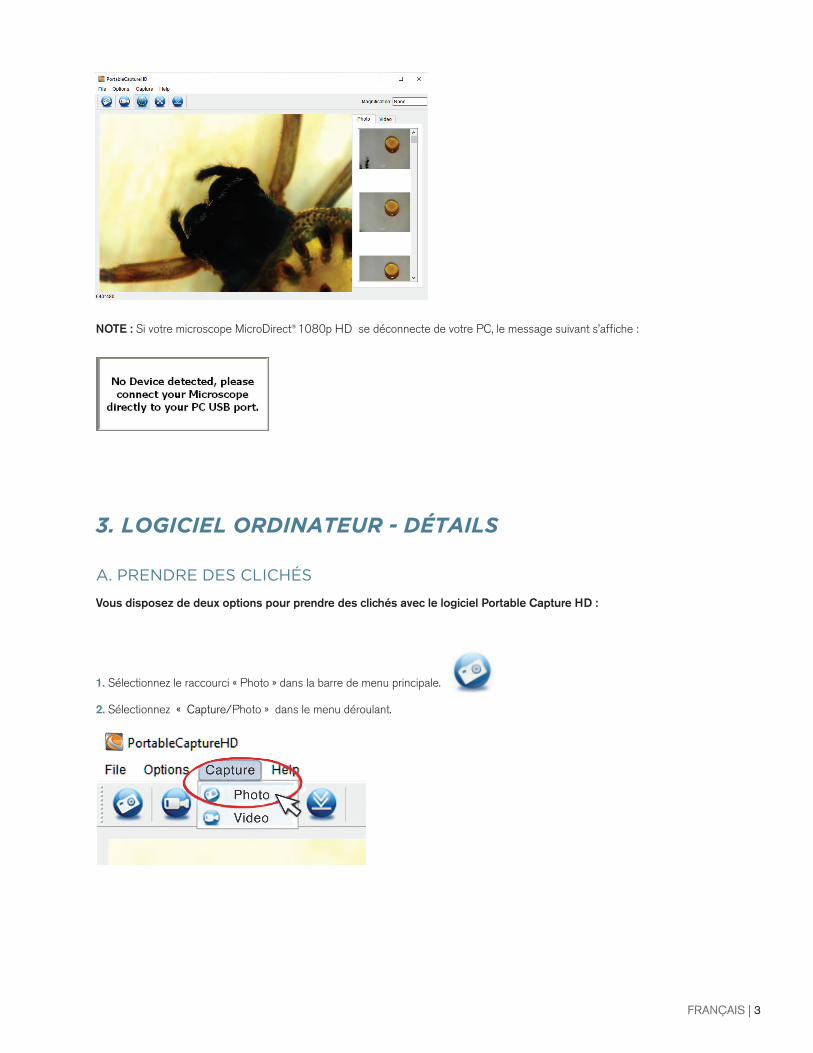
2. OUVRIR LE LOGICIEL ORDINATEUR
1. Conectez votre microscope MicroDirect® 1080p HD à votre PC avec le câble USB inclus.
2. Lancez le logiciel Portable Capture HD en cliquant sur l’icône du bureau.
FRANÇAIS | 3
NOTE : Si votre microscope MicroDirect® 1080p HD se déconnecte de votre PC, le message suivant s’affiche :
3. LOGICIEL ORDINATEUR - DÉTAILS
A. PRENDRE DES CLICHÉS
Vous disposez de deux options pour prendre des clichés avec le logiciel Portable Capture HD :
1. Sélectionnez le raccourci « Photo » dans la barre de menu principale.
2. Sélectionnez « Capture/Photo » dans le menu déroulant.
4 | FRANÇAIS
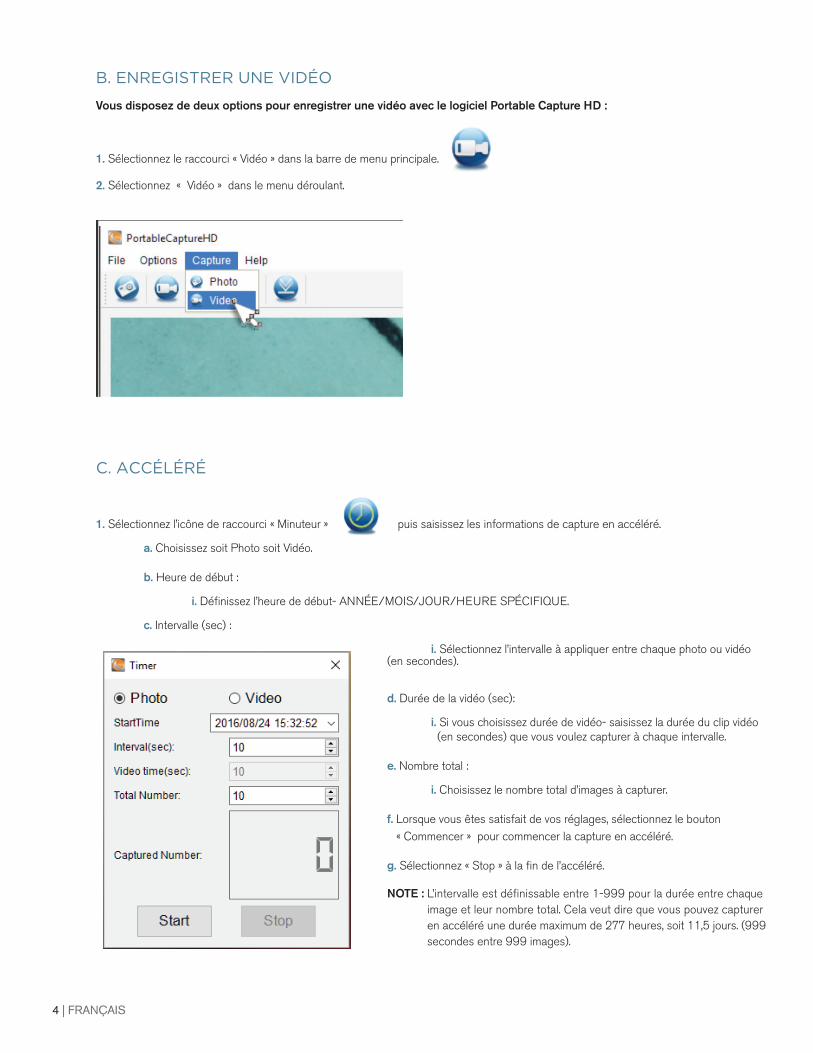
B. ENREGISTRER UNE VIDÉO
Vous disposez de deux options pour enregistrer une vidéo avec le logiciel Portable Capture HD :
1. Sélectionnez le raccourci « Vidéo » dans la barre de menu principale.
2. Sélectionnez « Vidéo » dans le menu déroulant.
C. ACCÉLÉRÉ
1. Sélectionnez l’icône de raccourci « Minuteur » puis saisissez les informations de capture en accéléré.
a. Choisissez soit Photo soit Vidéo.
b. Heure de début :
i. Définissez l’heure de début- ANNÉE/MOIS/JOUR/HEURE SPÉCIFIQUE.
c. Intervalle (sec) :
i. Sélectionnez l’intervalle à appliquer entre chaque photo ou vidéo (en secondes).
d. Durée de la vidéo (sec):
i. Si vous choisissez durée de vidéo- saisissez la durée du clip vidéo (en secondes) que vous voulez capturer à chaque intervalle.
e. Nombre total :
i. Choisissez le nombre total d’images à capturer.
f. Lorsque vous êtes satisfait de vos réglages, sélectionnez le bouton « Commencer » pour commencer la capture en accéléré.
g. Sélectionnez « Stop » à la fin de l’accéléré.
NOTE : L’intervalle est définissable entre 1-999 pour la durée entre chaque image et leur nombre total. Cela veut dire que vous pouvez capturer en accéléré une durée maximum de 277 heures, soit 11,5 jours. (999 secondes entre 999 images).
FRANÇAIS | 5
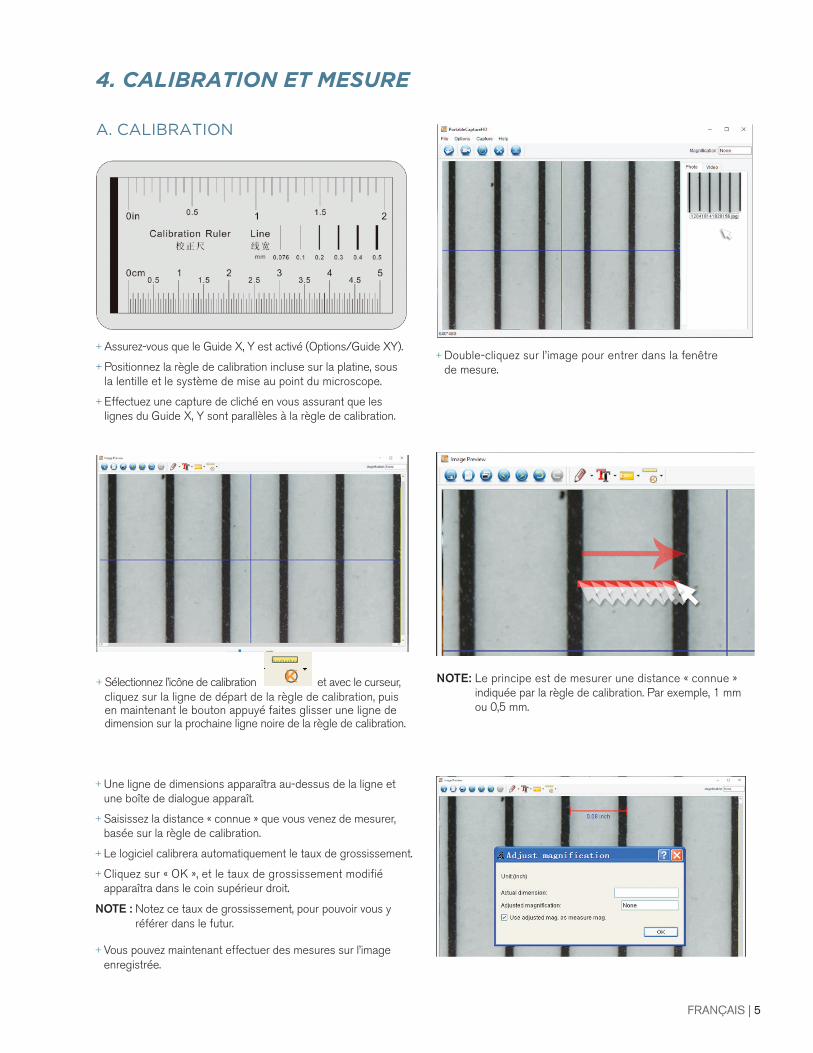
+ Assurez-vous que le Guide X, Y est activé (Options/Guide XY).
+ Positionnez la règle de calibration incluse sur la platine, sous la lentille et le système de mise au point du microscope.
+ Effectuez une capture de cliché en vous assurant que les lignes du Guide X, Y sont parallèles à la règle de calibration.
+ Double-cliquez sur l’image pour entrer dans la fenêtre de mesure.
A. CALIBRATION
4. CALIBRATION ET MESURE
+ Une ligne de dimensions apparaîtra au-dessus de la ligne et une boîte de dialogue apparaît.
+ Saisissez la distance « connue » que vous venez de mesurer, basée sur la règle de calibration.
+ Le logiciel calibrera automatiquement le taux de grossissement.
+ Cliquez sur « OK », et le taux de grossissement modifié apparaîtra dans le coin supérieur droit.
NOTE : Notez ce taux de grossissement, pour pouvoir vous y référer dans le futur.
+ Vous pouvez maintenant effectuer des mesures sur l’image enregistrée.
+ Sélectionnez l’icône de calibration et avec le curseur, cliquez sur la ligne de départ de la règle de calibration, puis en maintenant le bouton appuyé faites glisser une ligne de dimension sur la prochaine ligne noire de la règle de calibration.
NOTE: Le principe est de mesurer une distance « connue » indiquée par la règle de calibration. Par exemple, 1 mm ou 0,5 mm.

6 | FRANÇAIS
B. OUTILS DE MESURE
+ Sélectionnez l’icône Mesure
NOTE : Il est recommandé d’effectuer une calibration avant de continuer. En utilisant l’OUTIL TOUT ANGLE, effectuez une mesure de la même dimension « connue » prise lors de la calibration. Si la mesure est la même ou très proche, alors la calibration a été effectuée avec succès.
C. OPTIONS DE MESURE
1. Mesure Tout angle+ Cliquez sur un point puis faites glisser vers le prochain point et relâchez.
2. Mesure Ligne continue+ La Mesure Ligne continue vous permet de mesurer n’importe quelle longueur continue, pas seulement les lignes droites.
Cliquez et faites glisser d’un point à un autre puis relâchez.
3. Mesure Rayon de cercle+ Cliquez et faites glisser sur le rayon désiré puis relâchez.
+ Le rayon, la circonférence et la surface du cercle seront également calculés.
4. Mesure Diamètre de cercle+ Cliquez et faites glisser sur le diamètre désiré puis relâchez.
+ Le diamètre, la circonférence et la surface du cercle seront également calculés.
5. Mesure Angle trois points+ Cliquez sur trois points d’un triangle pour que la valeur de l’angle soit calculée.
D. DÉFINIR LA CALIBRATION DE GROSSISSEMENT
+ Jusqu’à maintenant, les fonctions de calibration et de mesures exposées ont été appliquées à la mesure d’UNE image (l’image capturée) et le taux de grossissement a été déterminé par l’ordinateur lors de la calibration.
+ Le logiciel Portable Capture HD MicroDirect® vous permet de « verrouiller » un taux de grossissement, ce qui vous permet de capturer plusieurs images et d’effectuer plusieurs mesures fondées sur le taux « verrouillé ».
NOTE : Une fois la calibration effectuée, vous ne pouvez pas modifi er la position physique ni la distance de focale de votre microscope, car cela modifi era le grossissement réel et vos mesures seront faussées.
+ Cliquez sur > Défi nir le grossissement > Défi nir le grossissement de capture.Maintenant, toutes mes captures effectuée par la suite utiliseront le même taux de grossissement pour effectuer les mesures. Souvenez-vous de ne pas déplacer le microscope ni changer la distance de focale, ou le grossissement sera modifi é et vous devrez le réinitialiser.
FRANÇAIS | 7
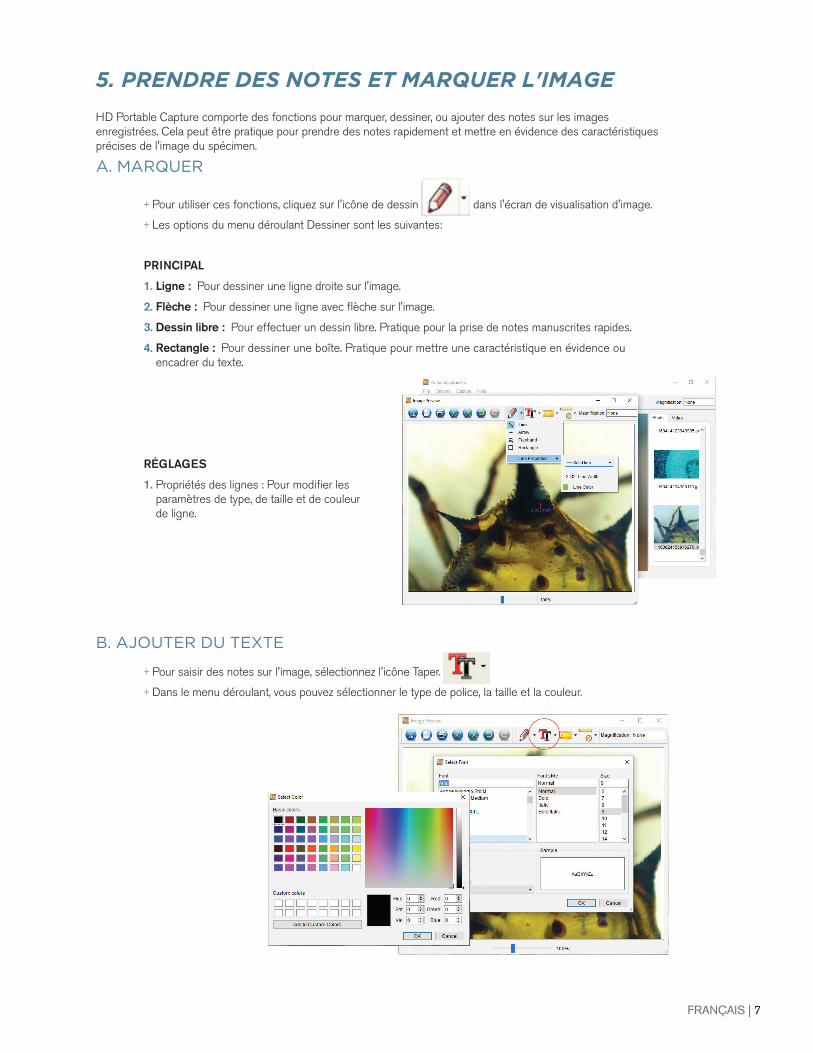
HD Portable Capture comporte des fonctions pour marquer, dessiner, ou ajouter des notes sur les images enregistrées. Cela peut être pratique pour prendre des notes rapidement et mettre en évidence des caractéristiques précises de l'image du spécimen.
+ Pour utiliser ces fonctions, cliquez sur l'icône de dessin dans l'écran de visualisation d'image.
+ Les options du menu déroulant Dessiner sont les suivantes:
PRINCIPAL
1. Ligne : Pour dessiner une ligne droite sur l'image.
2. Flèche : Pour dessiner une ligne avec fl èche sur l'image.
3. Dessin libre : Pour effectuer un dessin libre. Pratique pour la prise de notes manuscrites rapides.
4. Rectangle : Pour dessiner une boîte. Pratique pour mettre une caractéristique en évidence ouencadrer du texte.
RÉGLAGES
1. Propriétés des lignes : Pour modifi er les paramètres de type, de taille et de couleurde ligne.
+ Pour saisir des notes sur l'image, sélectionnez l'icône Taper.
+ Dans le menu déroulant, vous pouvez sélectionner le type de police, la taille et la couleur.
A. MARQUER
5. PRENDRE DES NOTES ET MARQUER L'IMAGE
B. AJOUTER DU TEXTE
8 | FRANÇAIS
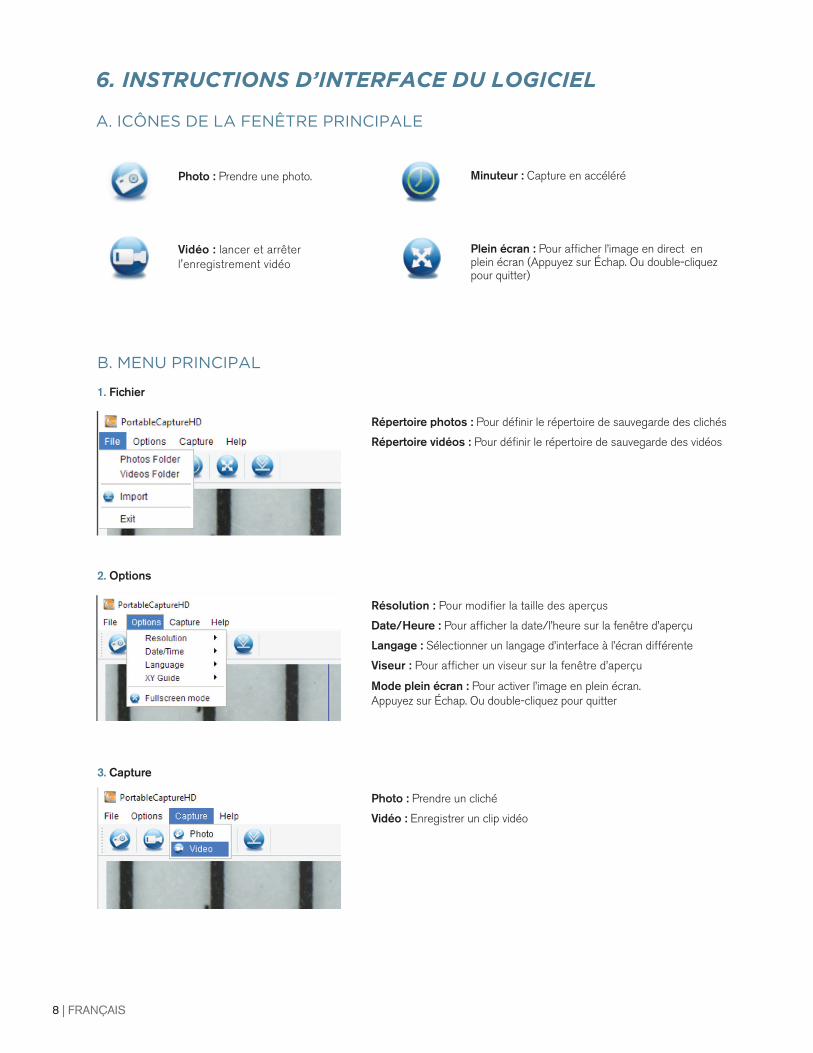
Photo : Prendre une photo.
Vidéo : lancer et arrêter l'enregistrement vidéo
Minuteur : Capture en accéléré
Plein écran : Pour afficher l’image en direct en plein écran (Appuyez sur Échap. Ou double-cliquez pour quitter)
B. MENU PRINCIPAL
1. Fichier
Répertoire photos : Pour définir le répertoire de sauvegarde des clichés
Répertoire vidéos : Pour définir le répertoire de sauvegarde des vidéos
2. Options
Résolution : Pour modifier la taille des aperçus
Date/Heure : Pour afficher la date/l’heure sur la fenêtre d’aperçu
Langage : Sélectionner un langage d’interface à l’écran différente
Viseur : Pour afficher un viseur sur la fenêtre d’aperçu
Mode plein écran : Pour activer l’image en plein écran. Appuyez sur Échap. Ou double-cliquez pour quitter
3. Capture
Photo : Prendre un cliché
Vidéo : Enregistrer un clip vidéo
6. INSTRUCTIONS D’INTERFACE DU LOGICIEL
A. ICÔNES DE LA FENÊTRE PRINCIPALE
FRANÇAIS | 9
7. NETTOYAGE ET ENTRETIEN Votre microscope MicroDirect® 1080p HD Celestron est un instrument optique de précision et doit être manipulé avec soin. Suivez ces soins et suggestions d'entretien et votre microscope n'aura besoin que de très peu d'entretien tout au long de sa vie.
+ Entreposez votre microscope dans un endroit frais et sec.
+ Ne jamais utiliser votre microscope dans les lieux ou de tels dispositifs sont interdits. Une utilisation incorrecte peut entraîner des accidents sérieux.
+ N'utilisez votre microscope que dans des environ-nements de température compris entre -5° et 50° C (23° et 120°F). Essayez d'éviter les changements de température brusques, car cela pourrait entraîner la formation d'humidité dans le boîtier du microscope.
+ Ne pas essayer d'atteindre les composants internes de votre microscope ou essayer de les modifi er de quelque manière que ce soit. Seuls les techniciens qualifi és sont habilités à effectuer la maintenance ou des réparations.
+ Conservez le microscope à distance de l'eau ou autres liquides. Ne jamais utiliser sous la pluie ou la neige. L'humidité entraîne des risques d'incendie ou dechoc électrique.
+ Si la surface extérieure du microscope doit êtrenettoyée, essuyez-la à l'aide d'un tissu humide.
8. GARANTIE Votre microscope MicroDirect® 1080p HD Celestron est couvert par une garantie limitée d'un an. Veuillez consultez le site Web de Celestron pour obtenir des informations détaillées sur tous les microscopes Celestron : www.celestron.com.
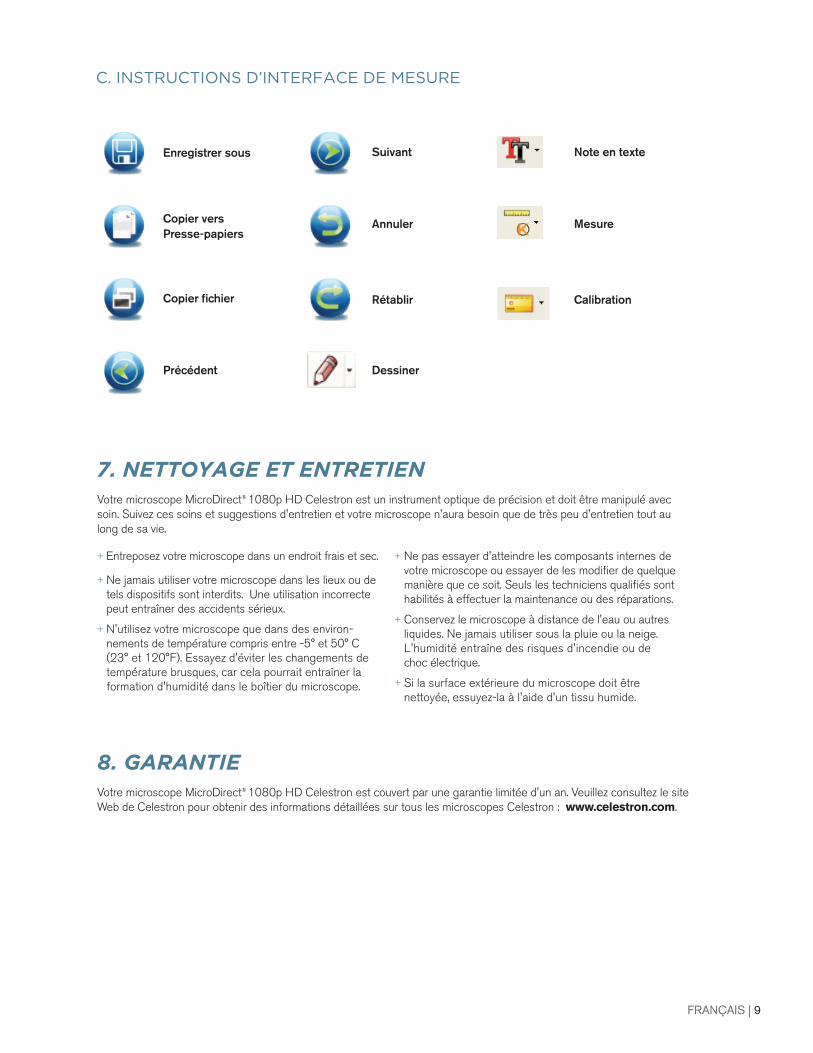
C. INSTRUCTIONS D’INTERFACE DE MESURE
Enregistrer sous
Copier versPresse-papiers
Copier fi chier
Précédent
Suivant
Annuler
Rétablir
Dessiner
Note en texte
Mesure
Calibration
© 2016 Celestron • Tous droits réservés. • www.celestron.com 2835 Columbia Street • Torrance, CA 90503 U.S.A. Téléphone : 1 (800) 421-9649 • Imprimé en Chine 2016
Remarque relative à la FCC : Cet équipement a été testé et jugé conforme aux limites établies pour un dispositif numérique de classe B, conformément à la partie 15 de la réglementation de la FCC. Ces limites ont étés mises en place pour offrir une protection raisonnable contre les interférences dans un complexe résidentiel. Cet équipement génère et peut émettre des fréquences radio et, s'il n'est pas installé et utilisé conformément aux instructions du manuel, peut causer des interférences nuisibles aux communications radio. Mais il n'existe aucune garantie que des interférences ne seront pas produites dans une installation particulière. Si cet équipement crée des interférences pour la réception radio ou télévisuelle, ce qui peut être constaté en l'allumant et en l'éteignant, alors il vous est conseillé d'y remédier d'une des manières suivantes :
+ Réorientez ou déplacez l'antenne de réception.+ Augmentez la distance séparant l'équipement et le récepteur.
+ Connectez l'équipement à une prise ou à un circuit différent de celui du récepteur.
+ Consultez le distributeur ou un technicien radio ou TV d'expérience pour obtenir de l'assistance.
Ce produit a été conçu pour être utilisé par les personnes de 14 ans et plus. La conception et les caractéristiques du produit sont indiquées sous réserve de modifications sans préavis.

PC-SOFTWAREHANDBUCHMODELL-NR. 44316

2 | DEUTSCH
1. Verbinden Sie Ihr MicroDirect® 1080p HD Mikroskop mithilfe eines USB-Kabels mit Ihrem PC.
2. Klicken Sie zum Öffnen der Portable Capture HD Software auf das Desktopsymbol.
1- DIE COMPUTERSOFTWARE INSTALLIEREN
Obwohl das MicroDirect® 1080p HD Mikroskop für das direkte Streaming eines Videos an einen Bildschirm oder Projektor entworfen wurde, können Sie das Mikroskop mithilfe der CD/DVD ROM auch mit einem Windows-PC verwenden. Sollten Sie kein CD/DVD ROM-Laufwerk haben, können Sie die Software von unserer Website www.celestron.com heruntergeladen.
Hinweis: Die Software ist nur kompatibel mit Windows XP/7/8/10. Die Software ist mit dem Mac-Betriebssystem nicht kompatibel.
1. CD ROM-Installation
+ Legen Sie die Treiber-CD in das CD-ROM-Laufwerk ein. Folgende Oberfläche wird nun automatisch angezeigt:
+ WÄHLEN Sie die Schaltfläche Software installieren+ Der Installationsassistenz leitet Sie durch den gesamten Prozess.
2. DIE COMPUTERSOFTWARE - ÖFFNEN
DEUTSCH | 3
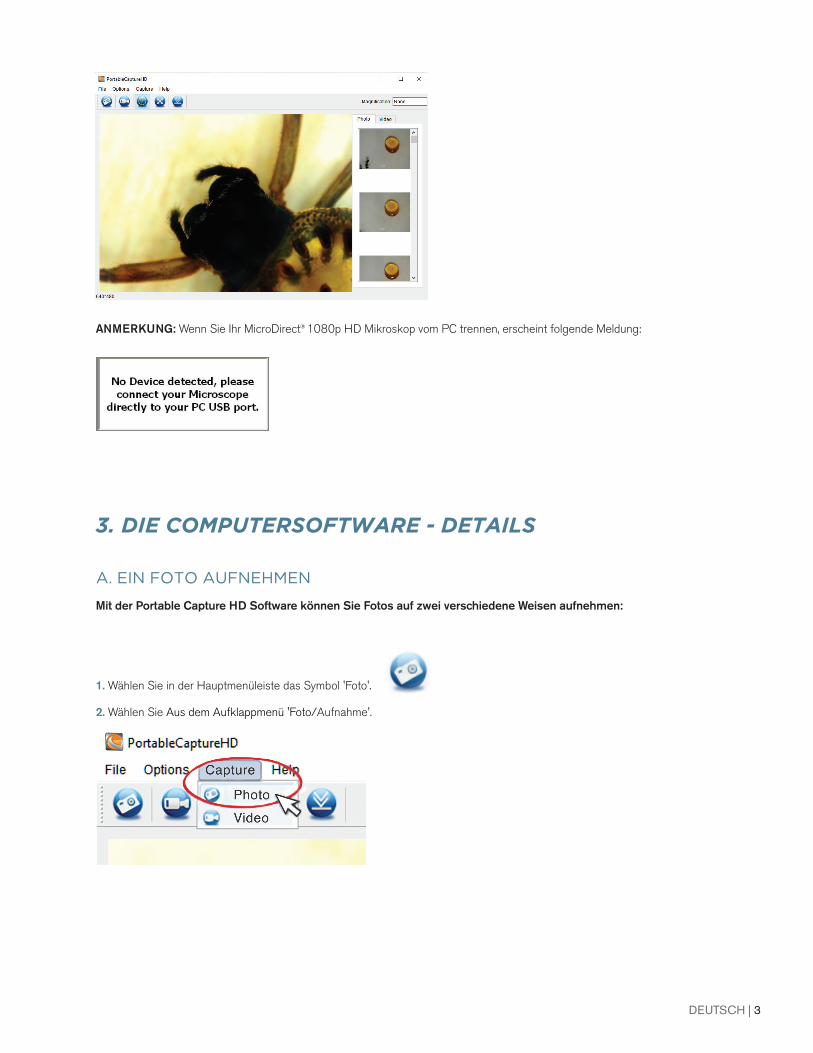
ANMERKUNG: Wenn Sie Ihr MicroDirect® 1080p HD Mikroskop vom PC trennen, erscheint folgende Meldung:
3. DIE COMPUTERSOFTWARE - DETAILS
A. EIN FOTO AUFNEHMEN
Mit der Portable Capture HD Software können Sie Fotos auf zwei verschiedene Weisen aufnehmen:
1. Wählen Sie in der Hauptmenüleiste das Symbol 'Foto'.
2. Wählen Sie Aus dem Aufklappmenü 'Foto/Aufnahme'.

4 | DEUTSCH
B. EIN VIDEO AUFNEHMEN
Mit der Portable Capture HD Software können Sie Videos auf zwei verschiedene Weisen aufnehmen:
1. Wählen Sie in der Hauptmenüleiste das Symbol 'Video'.
2. Wählen Sie Aus dem Aufklappmenü 'Video'.
C. ZEITRAFFER
1. Wählen Sie das 'Timer'-Symbol und geben Sie die Daten für Ihren Zeitraffer ein.
a. Wählen Sie zwischen Foto und Video.
b. Startzeit:
i. Startzeit einstellen - JAHR/MONAT/TAG/ZEIT.
c. Intervall (Sek.):
i. Wählen Sie das Intervall zwischen jedem Foto oder Video (in Sekunden).
d. Videozeit (Sek.):
i. Wenn Sie Videozeit ausgewählt haben, wird nun die Länge des Videoclips (in Sekunden) jedes Intervalls eingeben.
e. Gesamtanzahl:
i. Stellen Sie die Gesamtzahl der aufzunehmenden Bilder ein.
f. Haben Sie alle Einstellungen zufriedenstellend eingegeben, auf 'Start' klicken, um die Zeitrafferaufnahme zu beginnen.
g. Zum Beenden der Zeitrafferaufnahme 'Stopp' wählen.
ANMERKUNG: Sowohl die Intervalle als auch die Gesamtzahl an Bildern kann auf einen Wert zwischen 1 und 999 eingestellt werden. Mit Fotos ergibt sich daraus ein maximaler Zeitraffer von über 277 Stunden oder 11,5 Tagen. (999 Sekunden zwischen jedem der 999 Bilder).

DEUTSCH | 5
+ Vergewissern Sie sich, dass die X-Y-Führung auf AN gestellt ist (Optionen/X-Y-Führung).
+ Legen Sie das enthaltene Kalibrierungslineal auf den Tisch unter das Mikroskopobjektiv und stellen Sie es scharf.
+ Richten Sie die X-Y-Führung und die Linien des Kalibrierungslineals parallel aus und nehmen Sie ein Bild auf.
+ Doppelklicken Sie auf das Bild, um das Fenster mit der Messoberfläche zu öffnen.
A. KALIBRIERUNG
4. KALIBRIERUNG UND MESSUNGEN
+ Es erscheint eine Maßlinie und eine zweite wird über dieser Linie angezeigt. Außerdem wird ein Dialogfeld eingeblendet.
+ Geben Sie den gemessenen "bekannten" Abstand aufgrund der Messung mit dem Kalibrierungslineal ein.
+ Die Software kalibriert automatisch die Vergrößerungsrate.
+ Klicken Sie auf 'OK'. Die angepasste Vergrößerungsrate erscheint in der oberen rechten Ecke.
ANMERKUNG: Speichern Sie diese Vergrößerungsrate für künftige Einstellungen.
+ Jetzt können Sie auf der Grundlage des gespeicherten Bildes Messungen vornehmen.
+ Wählen Sie das Kalibrierungssymbol und klicken Sie mit dem Cursor auf eine Startlinie des Kalibrierungslineals. Halten Sie die Maustaste gedrückt und ziehen Sie eine Maßli-nie auf die nächste schwarze Linie des Kalibrierungslineals.
ANMERKUNG: Hiermit soll ein “bekannter” Abstand auf dem Kali-brierungslineal gemessen werden. Beispielsweise 1 oder 5 mm.
6 | DEUTSCH
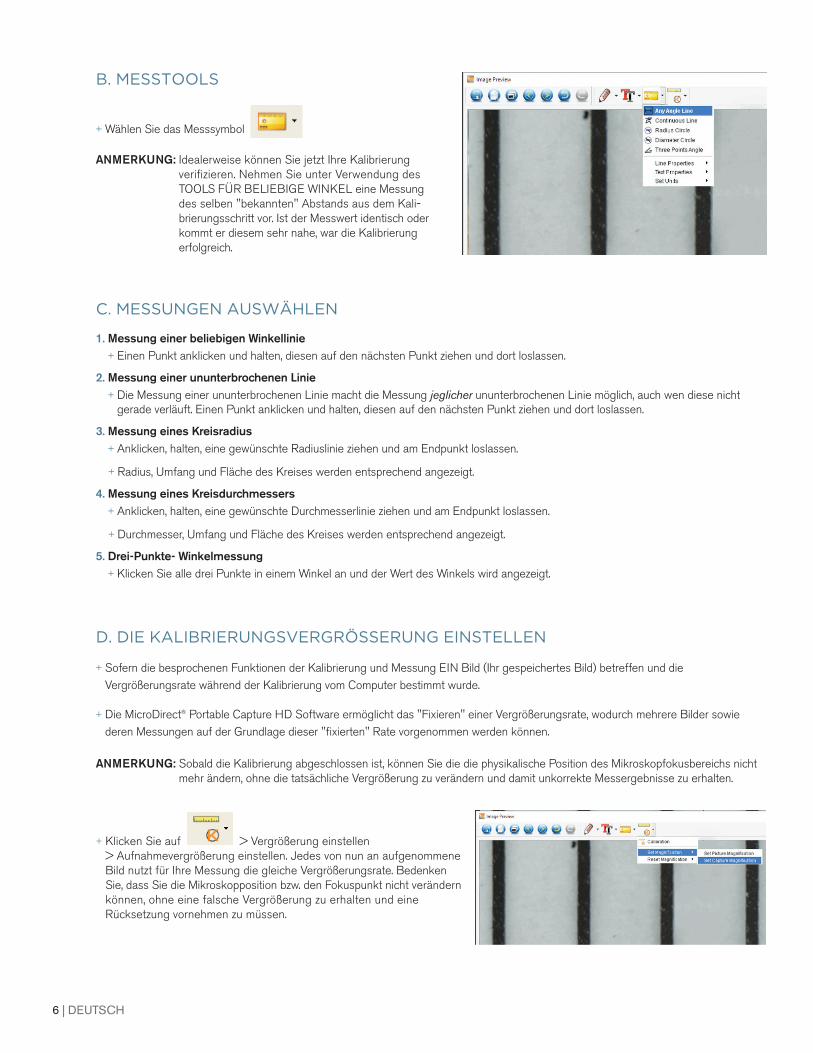
B. MESSTOOLS
+ Wählen Sie das Messsymbol
ANMERKUNG: Idealerweise können Sie jetzt Ihre Kalibrierungverifi zieren. Nehmen Sie unter Verwendung des TOOLS FÜR BELIEBIGE WINKEL eine Messung des selben "bekannten" Abstands aus dem Kali-brierungsschritt vor. Ist der Messwert identisch oder kommt er diesem sehr nahe, war die Kalibrierung erfolgreich.
C. MESSUNGEN AUSWÄHLEN
1. Messung einer beliebigen Winkellinie+ Einen Punkt anklicken und halten, diesen auf den nächsten Punkt ziehen und dort loslassen.
2. Messung einer ununterbrochenen Linie+ Die Messung einer ununterbrochenen Linie macht die Messung jeglicher ununterbrochenen Linie möglich, auch wen diese nicht
gerade verläuft. Einen Punkt anklicken und halten, diesen auf den nächsten Punkt ziehen und dort loslassen.
3. Messung eines Kreisradius+ Anklicken, halten, eine gewünschte Radiuslinie ziehen und am Endpunkt loslassen.
+ Radius, Umfang und Fläche des Kreises werden entsprechend angezeigt.
4. Messung eines Kreisdurchmessers+ Anklicken, halten, eine gewünschte Durchmesserlinie ziehen und am Endpunkt loslassen.
+ Durchmesser, Umfang und Fläche des Kreises werden entsprechend angezeigt.
5. Drei-Punkte- Winkelmessung+ Klicken Sie alle drei Punkte in einem Winkel an und der Wert des Winkels wird angezeigt.
D. DIE KALIBRIERUNGSVERGRÖSSERUNG EINSTELLEN
+ Sofern die besprochenen Funktionen der Kalibrierung und Messung EIN Bild (Ihr gespeichertes Bild) betreffen und die Vergrößerungsrate während der Kalibrierung vom Computer bestimmt wurde.
+ Die MicroDirect® Portable Capture HD Software ermöglicht das "Fixieren" einer Vergrößerungsrate, wodurch mehrere Bilder sowie deren Messungen auf der Grundlage dieser "fi xierten" Rate vorgenommen werden können.
ANMERKUNG: Sobald die Kalibrierung abgeschlossen ist, können Sie die die physikalische Position des Mikroskopfokusbereichs nicht mehr ändern, ohne die tatsächliche Vergrößerung zu verändern und damit unkorrekte Messergebnisse zu erhalten.
+ Klicken Sie auf > Vergrößerung einstellen> Aufnahmevergrößerung einstellen. Jedes von nun an aufgenommene Bild nutzt für Ihre Messung die gleiche Vergrößerungsrate. Bedenken Sie, dass Sie die Mikroskopposition bzw. den Fokuspunkt nicht verändern können, ohne eine falsche Vergrößerung zu erhalten und eine Rücksetzung vornehmen zu müssen.
DEUTSCH | 7
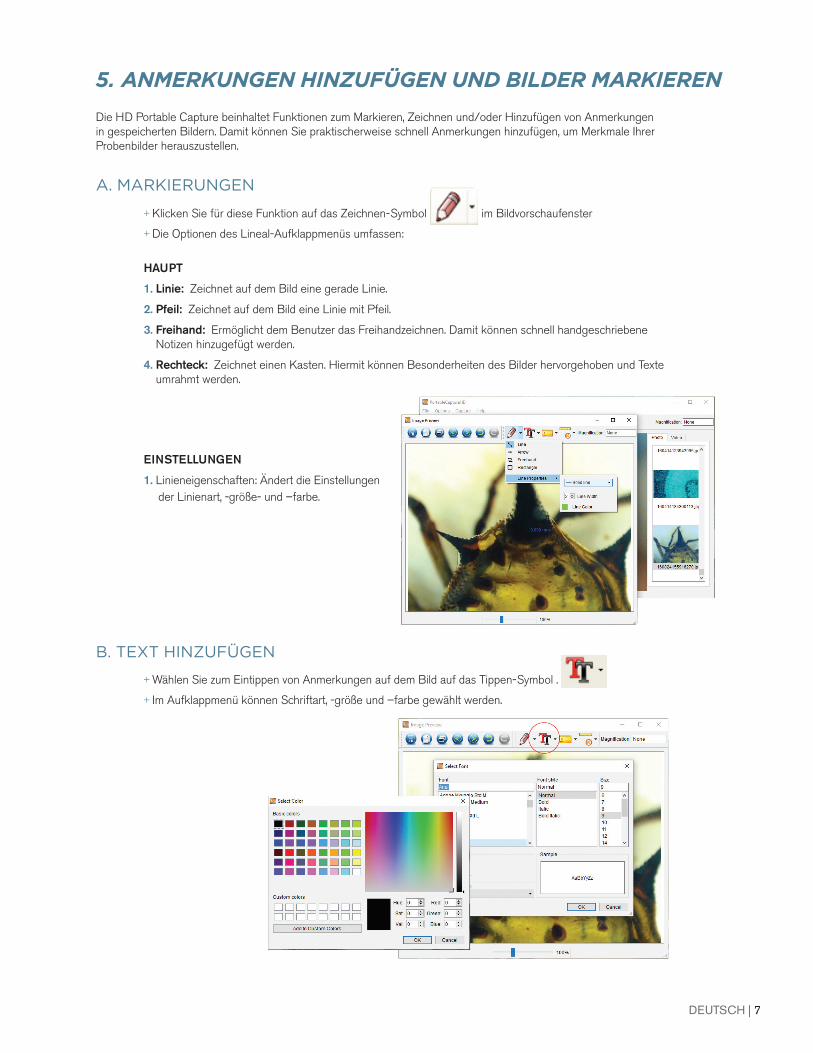
Die HD Portable Capture beinhaltet Funktionen zum Markieren, Zeichnen und/oder Hinzufügen von Anmerkungen in gespeicherten Bildern. Damit können Sie praktischerweise schnell Anmerkungen hinzufügen, um Merkmale Ihrer Probenbilder herauszustellen.
+ Klicken Sie für diese Funktion auf das Zeichnen-Symbol im Bildvorschaufenster
+ Die Optionen des Lineal-Aufklappmenüs umfassen:
HAUPT
1. Linie: Zeichnet auf dem Bild eine gerade Linie.
2. Pfeil: Zeichnet auf dem Bild eine Linie mit Pfeil.
3. Freihand: Ermöglicht dem Benutzer das Freihandzeichnen. Damit können schnell handgeschriebene Notizen hinzugefügt werden.
4. Rechteck: Zeichnet einen Kasten. Hiermit können Besonderheiten des Bilder hervorgehoben und Texte umrahmt werden.
EINSTELLUNGEN
1. Linieneigenschaften: Ändert die Einstellungen der Linienart, -größe- und –farbe.
+ Wählen Sie zum Eintippen von Anmerkungen auf dem Bild auf das Tippen-Symbol .
+ Im Aufklappmenü können Schriftart, -größe und –farbe gewählt werden.
A. MARKIERUNGEN
5. ANMERKUNGEN HINZUFÜGEN UND BILDER MARKIEREN
B. TEXT HINZUFÜGEN
8 | DEUTSCH
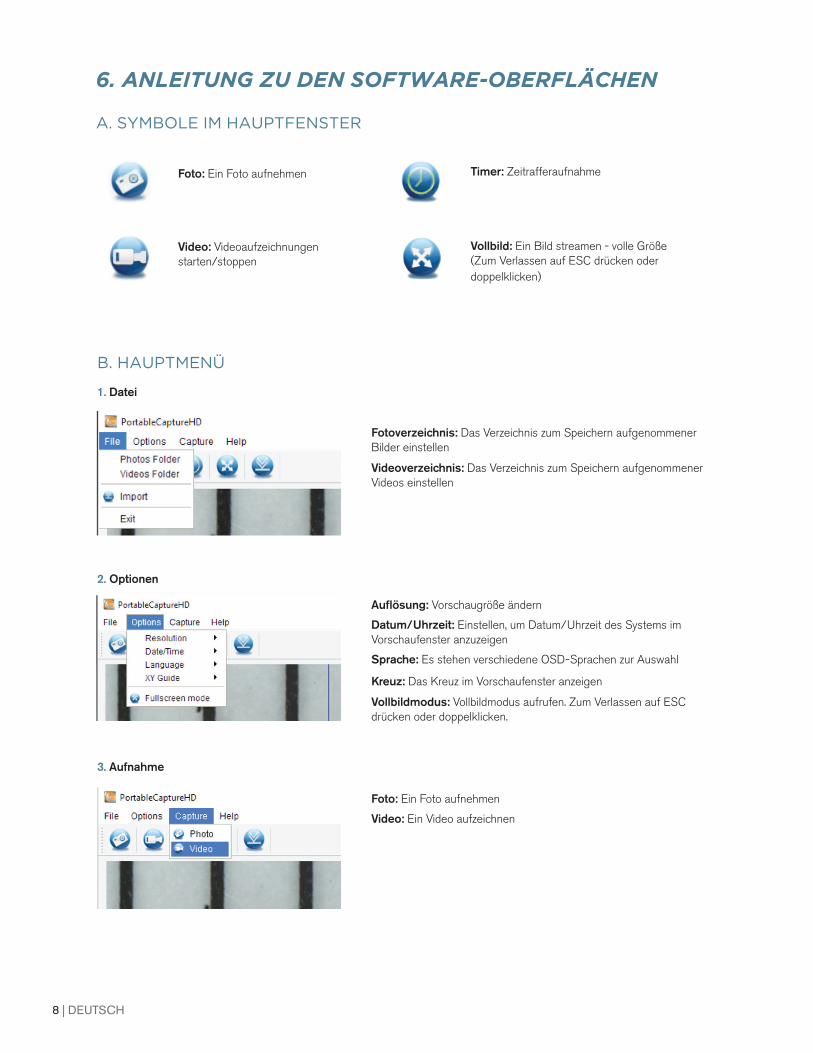
A. SYMBOLE IM HAUPTFENSTER
Foto: Ein Foto aufnehmen
Video: Videoaufzeichnungen starten/stoppen
Timer: Zeitrafferaufnahme
Vollbild: Ein Bild streamen - volle Größe (Zum Verlassen auf ESC drücken oder doppelklicken)
B. HAUPTMENÜ
1. Datei
Fotoverzeichnis: Das Verzeichnis zum Speichern aufgenommener Bilder einstellen
Videoverzeichnis: Das Verzeichnis zum Speichern aufgenommener Videos einstellen
2. Optionen
Auflösung: Vorschaugröße ändern
Datum/Uhrzeit: Einstellen, um Datum/Uhrzeit des Systems im Vorschaufenster anzuzeigen
Sprache: Es stehen verschiedene OSD-Sprachen zur Auswahl
Kreuz: Das Kreuz im Vorschaufenster anzeigen
Vollbildmodus: Vollbildmodus aufrufen. Zum Verlassen auf ESC drücken oder doppelklicken.
3. Aufnahme
Foto: Ein Foto aufnehmen
Video: Ein Video aufzeichnen
6. ANLEITUNG ZU DEN SOFTWARE-OBERFLÄCHEN
DEUTSCH | 9
7. PFLEGE UND INSTANDHALTUNG Bei Ihrem Celestron MicroDirect® 1080p HD-Mikroskop handelt es sich um ein präzises optisches Instrument, das immer mit äußerster Vorsicht behandelt werden sollte. Befolgen Sie diese Vorschläge, und ihr Mikroskop wird während seiner Lebensdauer nur sehr wenig Wartung benötigen.
+ Lagern Sie Ihr Mikroskop an einem trockenen und sauberen Ort.
+ Verwenden Sie Ihr Mikroskop keinesfalls an Orten, an denen die Bedienung solcher Geräte beschränkt ist. Unsachgemäße Nutzung führt zur Gefahr von schweren Unfällen.
+ Nutzen Sie Ihr Mikroskop lediglich in einem Temperatur-bereich von 23 ° bis 120 °F (-5 ° bis 50 °C). Vermeiden Sie plötzliche Temperaturveränderungen, da diese Feuchtigkeit im Mikroskopgehäuse hervorrufen können.
+ Versuchen Sie nicht, an die internen Komponenten Ihres Mikroskops zu gelangen oder es in irgendeiner Weise zu modifi zieren. Nur autorisierte Techniker sollten Wartungs- oder Reparaturarbeiten vornehmen.
+ Halten Sie Ihr Mikroskop von Wasser und anderen Flüssigkeiten fern. Verwenden Sie es keinesfalls im Regen oder Schnee. Feuchtigkeit führt zur Brand- oder Stromschlaggefahr.
+ Wenn die Außenfl ächen Ihres Mikroskops gereinigt werden müssen, können Sie diese mit einem feuchten Tuch abwischen.
8. GARANTIE Ihr Celestron MicroDirect® 1080p HD-Mikroskop hat eine auf zwei Jahre beschränkte Gewährleistung. Besuchen Siebitte für weitere Informationen bezüglich Celestron-Mikroskopen die Celestron-Website: www.celestron.com.
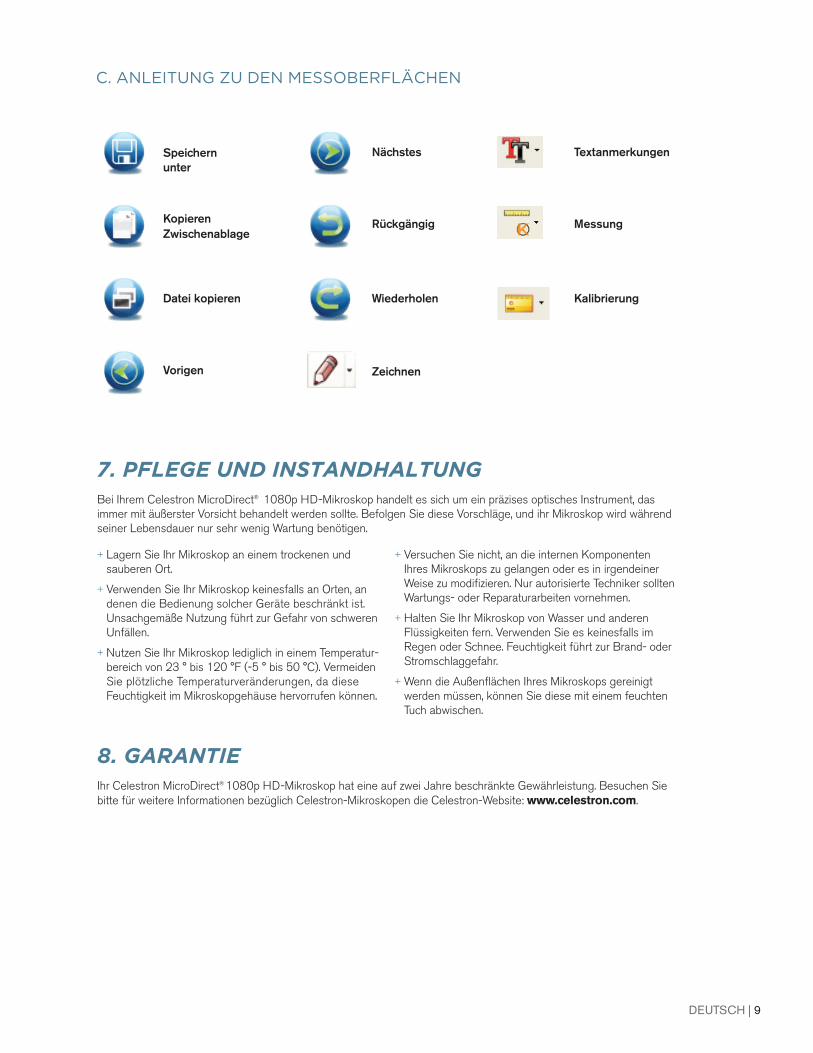
C. ANLEITUNG ZU DEN MESSOBERFLÄCHEN
Speichern unter
KopierenZwischenablage
Datei kopieren
Vorigen
Nächstes
Rückgängig
Wiederholen
Zeichnen
Textanmerkungen
Messung
Kalibrierung

© 2016 Celestron • Alle Rechte vorbehalten. • www.celestron.com 2835 Columbia Street • Torrance, CA 90503 U.S.A. Telefon: 1(800) 421-9649 • Gedruckt in China 2016
FCC-Erklärung: Dieses Gerät wurde getestet und entspricht den Grenzwerten für digitale Geräte der Klasse B in Übereinstimmung mit Artikel 15 der FCC-Bestimmungen. Diese Grenzwerte sollen einen angemessenen Schutz vor Störungen in Wohngegenden bieten. Dieses Gerät erzeugt, verwendet und strahlt Hochfrequenzenergie aus und kann den Funkverkehr stören, wenn es nicht gemäß den Anweisungen installiert und verwendet wird. Es kann jedoch nicht garantiert werden, dass in einer bestimmten Einrichtung keine Störungen auftreten. Falls dieses Gerät Störungen des Radio- oder Fernsehempfangs verursacht, was durch ein vorübergehendes Ausschalten des Geräts festgestellt werden kann, wird der Benutzer dazu angehalten, die Störung durch eine oder mehrere der nachstehenden Maßnahmen zu beheben:
+ Neuausrichtung oder Positionsveränderung der Empfangsantenne.+ Den Abstand zwischen dem Gerät und dem Empfänger vergrößern.
+ Anschluss des Geräts an eine Steckdose, die nicht am selben Stromkreis angeschlossen ist, wie die des Empfängers.
+ Den Händler oder einen erfahrenen Radio- und Fernsehtechniker um Hilfe bitten.
Dieses Produkt wurde für die Verwendung durch Personen von 14 Jahren und darüber entworfen und vorgesehen. Produktdesign und technische Daten können ohne Vorankündigung geändert werden.

MANUAL DEL SOFTWARE DE PCMODELO #44316
2 | ESPAÑOL
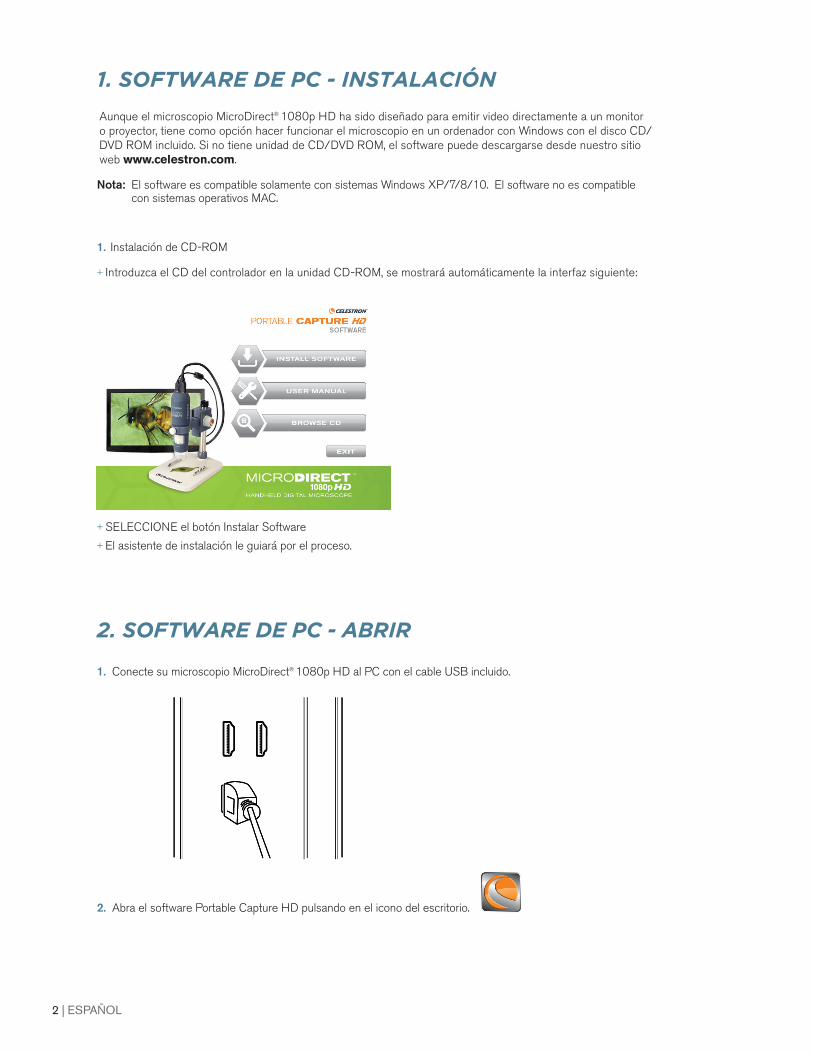
1. SOFTWARE DE PC - INSTALACIÓN
Aunque el microscopio MicroDirect® 1080p HD ha sido diseñado para emitir video directamente a un monitor o proyector, tiene como opción hacer funcionar el microscopio en un ordenador con Windows con el disco CD/DVD ROM incluido. Si no tiene unidad de CD/DVD ROM, el software puede descargarse desde nuestro sitio web www.celestron.com.
Nota: El software es compatible solamente con sistemas Windows XP/7/8/10. El software no es compatible con sistemas operativos MAC.
1. Instalación de CD-ROM
+ Introduzca el CD del controlador en la unidad CD-ROM, se mostrará automáticamente la interfaz siguiente:
+ SELECCIONE el botón Instalar Software+ El asistente de instalación le guiará por el proceso.
2. SOFTWARE DE PC - ABRIR
1. Conecte su microscopio MicroDirect® 1080p HD al PC con el cable USB incluido.
2. Abra el software Portable Capture HD pulsando en el icono del escritorio.
ESPAÑOL | 3
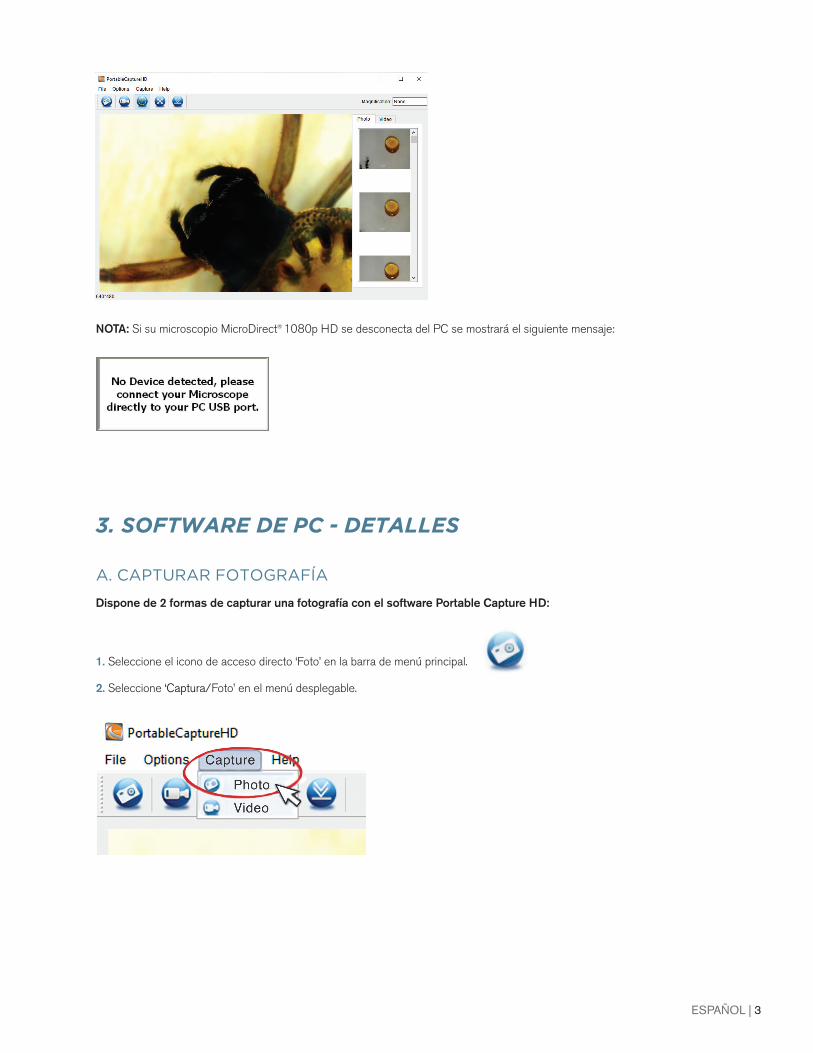
NOTA: Si su microscopio MicroDirect® 1080p HD se desconecta del PC se mostrará el siguiente mensaje:
3. SOFTWARE DE PC - DETALLES
A. CAPTURAR FOTOGRAFÍA
Dispone de 2 formas de capturar una fotografía con el software Portable Capture HD:
1. Seleccione el icono de acceso directo ‘Foto’ en la barra de menú principal.
2. Seleccione ‘Captura/Foto’ en el menú desplegable.
4 | ESPAÑOL
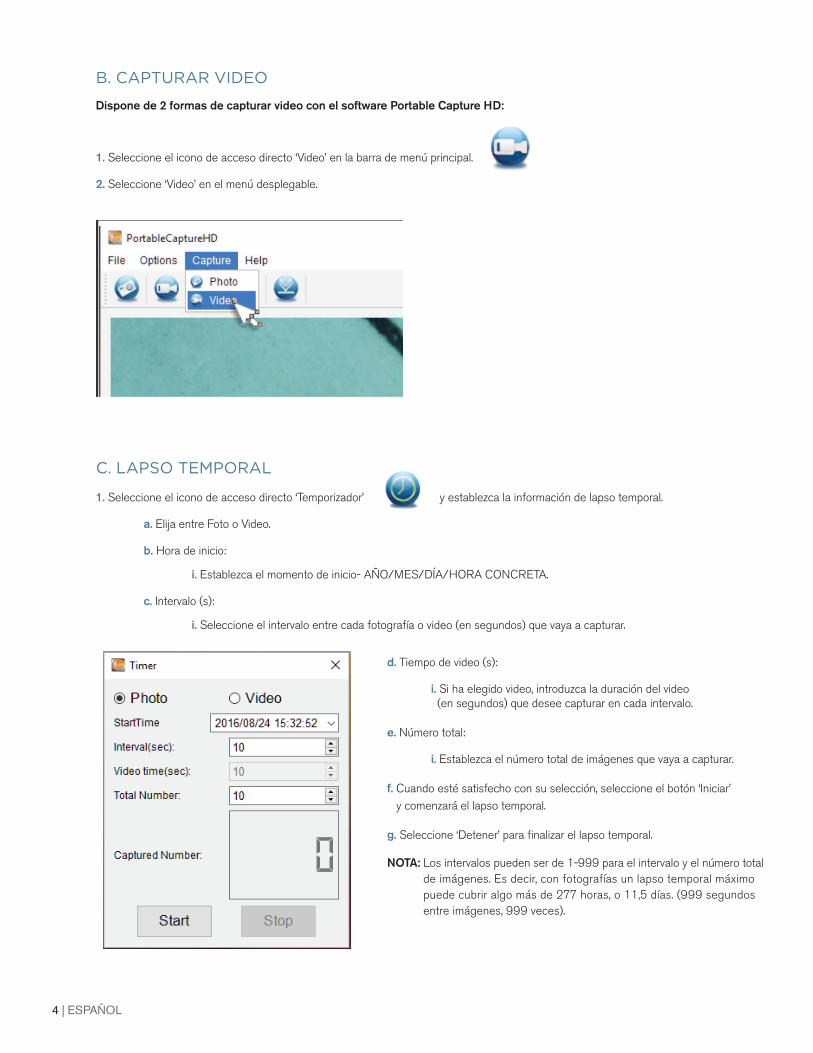
B. CAPTURAR VIDEO
Dispone de 2 formas de capturar video con el software Portable Capture HD:
1. Seleccione el icono de acceso directo ‘Video’ en la barra de menú principal.
2. Seleccione ‘Video’ en el menú desplegable.
C. LAPSO TEMPORAL
1. Seleccione el icono de acceso directo ‘Temporizador’ y establezca la información de lapso temporal.
a. Elija entre Foto o Video.
b. Hora de inicio:
i. Establezca el momento de inicio- AÑO/MES/DÍA/HORA CONCRETA.
c. Intervalo (s):
i. Seleccione el intervalo entre cada fotografía o video (en segundos) que vaya a capturar.
d. Tiempo de video (s):
i. Si ha elegido video, introduzca la duración del video (en segundos) que desee capturar en cada intervalo.
e. Número total:
i. Establezca el número total de imágenes que vaya a capturar.
f. Cuando esté satisfecho con su selección, seleccione el botón ‘Iniciar’ y comenzará el lapso temporal.
g. Seleccione ‘Detener’ para finalizar el lapso temporal.
NOTA: Los intervalos pueden ser de 1-999 para el intervalo y el número total de imágenes. Es decir, con fotografías un lapso temporal máximo puede cubrir algo más de 277 horas, o 11,5 días. (999 segundos entre imágenes, 999 veces).
ESPAÑOL | 5
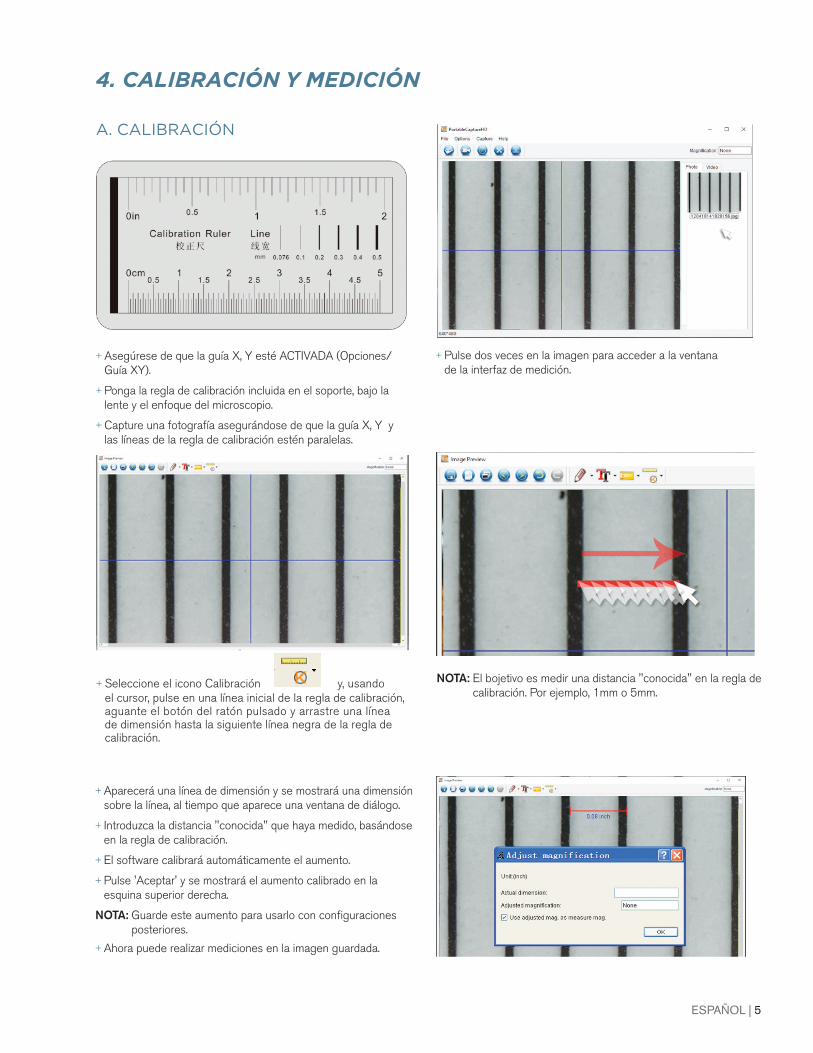
+ Asegúrese de que la guía X, Y esté ACTIVADA (Opciones/Guía XY).
+ Ponga la regla de calibración incluida en el soporte, bajo la lente y el enfoque del microscopio.
+ Capture una fotografía asegurándose de que la guía X, Y y las líneas de la regla de calibración estén paralelas.
+ Pulse dos veces en la imagen para acceder a la ventana de la interfaz de medición.
A. CALIBRACIÓN
4. CALIBRACIÓN Y MEDICIÓN
+ Aparecerá una línea de dimensión y se mostrará una dimensión sobre la línea, al tiempo que aparece una ventana de diálogo.
+ Introduzca la distancia "conocida" que haya medido, basándose en la regla de calibración.
+ El software calibrará automáticamente el aumento.
+ Pulse 'Aceptar' y se mostrará el aumento calibrado en la esquina superior derecha.
NOTA: Guarde este aumento para usarlo con configuraciones posteriores.
+ Ahora puede realizar mediciones en la imagen guardada.
+ Seleccione el icono Calibración y, usando el cursor, pulse en una línea inicial de la regla de calibración, aguante el botón del ratón pulsado y arrastre una línea de dimensión hasta la siguiente línea negra de la regla de calibración.
NOTA: El bojetivo es medir una distancia "conocida" en la regla de calibración. Por ejemplo, 1mm o 5mm.
6 | ESPAÑOL
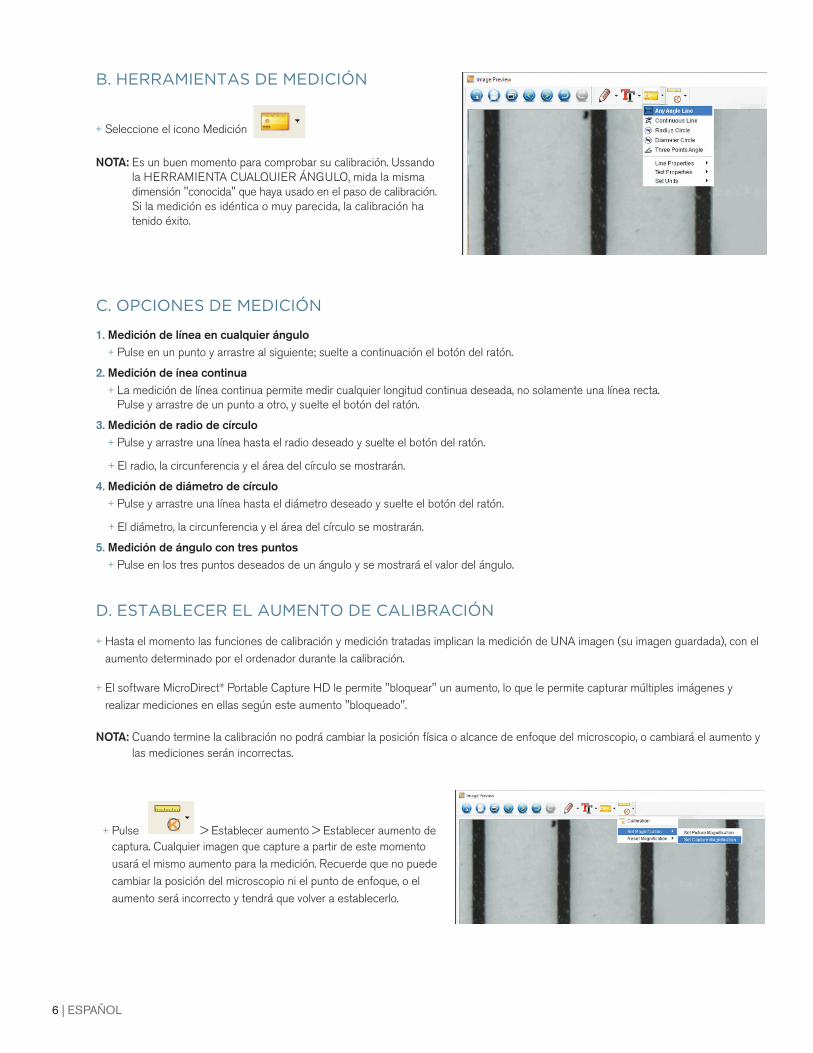
B. HERRAMIENTAS DE MEDICIÓN
+ Seleccione el icono Medición
NOTA: Es un buen momento para comprobar su calibración. Ussando la HERRAMIENTA CUALQUIER ÁNGULO, mida la misma dimensión "conocida" que haya usado en el paso de calibración. Si la medición es idéntica o muy parecida, la calibración ha tenido éxito.
C. OPCIONES DE MEDICIÓN
1. Medición de línea en cualquier ángulo+ Pulse en un punto y arrastre al siguiente; suelte a continuación el botón del ratón.
2. Medición de ínea continua + La medición de línea continua permite medir cualquier longitud continua deseada, no solamente una línea recta.
Pulse y arrastre de un punto a otro, y suelte el botón del ratón.
3. Medición de radio de círculo + Pulse y arrastre una línea hasta el radio deseado y suelte el botón del ratón.
+ El radio, la circunferencia y el área del círculo se mostrarán.
4. Medición de diámetro de círculo + Pulse y arrastre una línea hasta el diámetro deseado y suelte el botón del ratón.
+ El diámetro, la circunferencia y el área del círculo se mostrarán.
5. Medición de ángulo con tres puntos + Pulse en los tres puntos deseados de un ángulo y se mostrará el valor del ángulo.
D. ESTABLECER EL AUMENTO DE CALIBRACIÓN
+ Hasta el momento las funciones de calibración y medición tratadas implican la medición de UNA imagen (su imagen guardada), con el aumento determinado por el ordenador durante la calibración.
+ El software MicroDirect® Portable Capture HD le permite "bloquear" un aumento, lo que le permite capturar múltiples imágenes y realizar mediciones en ellas según este aumento "bloqueado".
NOTA: Cuando termine la calibración no podrá cambiar la posición física o alcance de enfoque del microscopio, o cambiará el aumento y las mediciones serán incorrectas.
+ Pulse > Establecer aumento > Establecer aumento de captura. Cualquier imagen que capture a partir de este momento usará el mismo aumento para la medición. Recuerde que no puede cambiar la posición del microscopio ni el punto de enfoque, o el aumento será incorrecto y tendrá que volver a establecerlo.
ESPAÑOL | 7
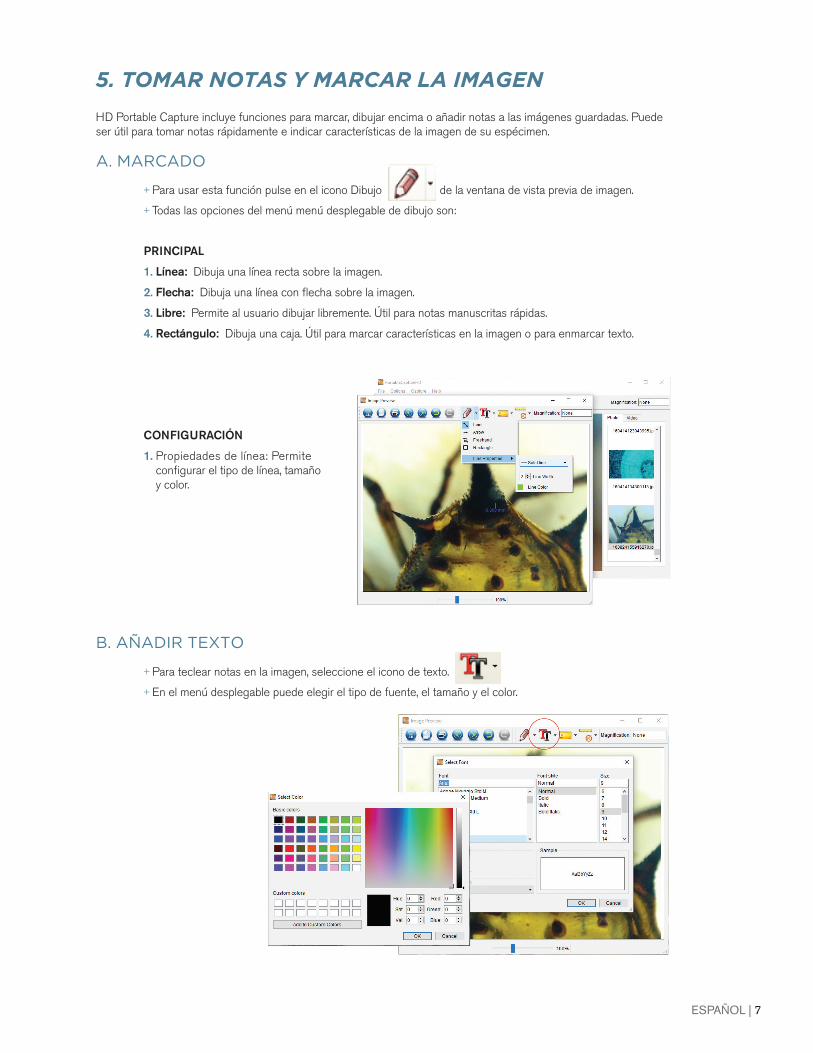
HD Portable Capture incluye funciones para marcar, dibujar encima o añadir notas a las imágenes guardadas. Puede ser útil para tomar notas rápidamente e indicar características de la imagen de su espécimen.
+ Para usar esta función pulse en el icono Dibujo de la ventana de vista previa de imagen.
+ Todas las opciones del menú menú desplegable de dibujo son:
PRINCIPAL
1. Línea: Dibuja una línea recta sobre la imagen.
2. Flecha: Dibuja una línea con fl echa sobre la imagen.
3. Libre: Permite al usuario dibujar libremente. Útil para notas manuscritas rápidas.
4. Rectángulo: Dibuja una caja. Útil para marcar características en la imagen o para enmarcar texto.
CONFIGURACIÓN
1. Propiedades de línea: Permite confi gurar el tipo de línea, tamañoy color.
+ Para teclear notas en la imagen, seleccione el icono de texto.
+ En el menú desplegable puede elegir el tipo de fuente, el tamaño y el color.
A. MARCADO
5. TOMAR NOTAS Y MARCAR LA IMAGEN
B. AÑADIR TEXTO
8 | ESPAÑOL
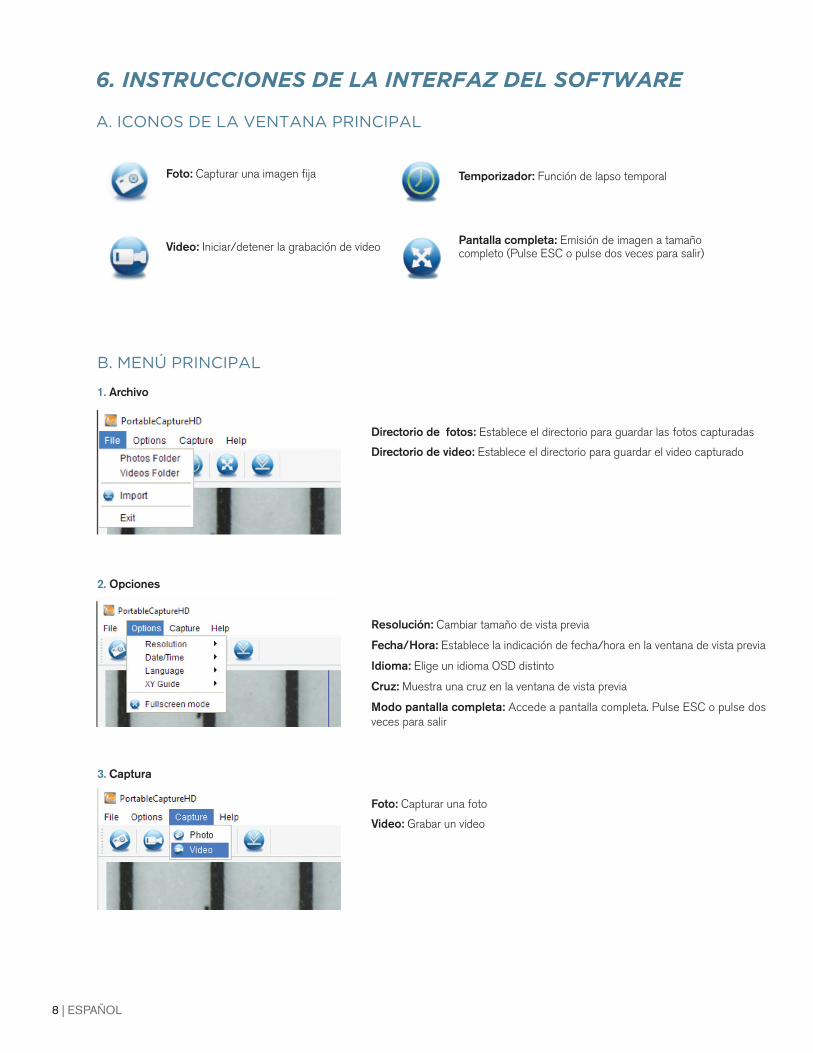
Foto: Capturar una imagen fija
Video: Iniciar/detener la grabación de video
Temporizador: Función de lapso temporal
Pantalla completa: Emisión de imagen a tamaño completo (Pulse ESC o pulse dos veces para salir)
B. MENÚ PRINCIPAL
1. Archivo
Directorio de fotos: Establece el directorio para guardar las fotos capturadas
Directorio de video: Establece el directorio para guardar el video capturado
2. Opciones
Resolución: Cambiar tamaño de vista previa
Fecha/Hora: Establece la indicación de fecha/hora en la ventana de vista previa
Idioma: Elige un idioma OSD distinto
Cruz: Muestra una cruz en la ventana de vista previa
Modo pantalla completa: Accede a pantalla completa. Pulse ESC o pulse dos veces para salir
3. Captura
Foto: Capturar una foto
Video: Grabar un video
6. INSTRUCCIONES DE LA INTERFAZ DEL SOFTWARE
A. ICONOS DE LA VENTANA PRINCIPAL
ESPAÑOL | 9
7. CUIDADOS Y MANTENIMIENTO Su microscopio Celestron MicroDirect® 1080p HD es un instrumento óptico de precisión y debe tratarse con cuidado en todo momento. Siga estas recomendaciones de cuidados y mantenimiento y su microscopio necesitará de muy poco mantenimiento durante su vida útil.
+ Guarde el microscopio en un lugar seco y limpio.
+ No use nunca el microscopio donde esté restringido el uso de este tipo de dispositivos. Un uso inadecuado crea riesgos de accidentes graves.
+ Use el microscopio exclusivamente en una gama de temperatura de 23° a 120°F (-5° a 50° C). Intentelimitar los cambios súbitos de temperatura, podríagenerar humedad en el chasis del microscopio..
+ No intente acceder a los componentes internos de su microscopio ni intente modifi carlo en modo alguno. El mantenimiento y las reparaciones deben ser realizados exclusivamente por técnicos autorizados.
+ Mantenga su microscopio alejado de agua y otroslíquidos. No lo use nunca en la lluvia o la nieve. Lahumedad crea riesgos de incendio y electrocución.
+ Si la superfi cie exterior del microscopio necesitalimpieza, límpiela con una gamuza humedecida.
8. GARANTÍA Su microscopio Celestron MicroDirect® 1080p HD tiene una garantía limitada de dos años. Visite el sitio web deCelestron para obtener información detallada de todos los microscopios Celestron: www.celestron.com.
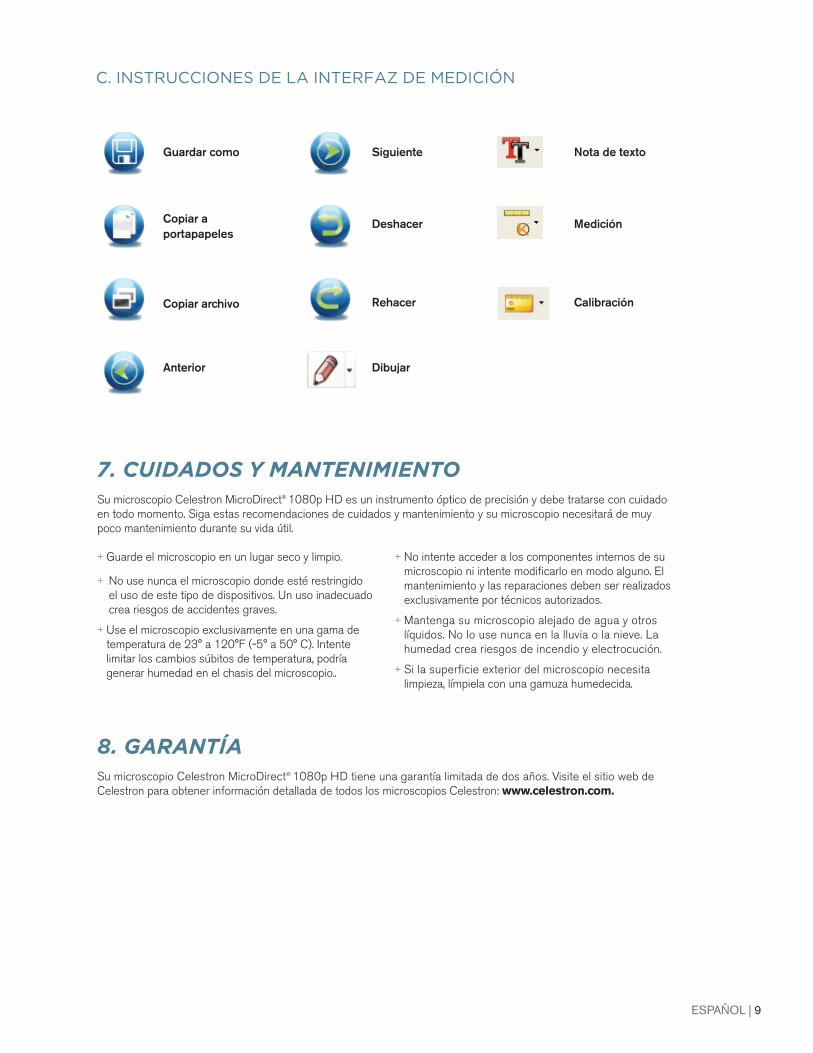
C. INSTRUCCIONES DE LA INTERFAZ DE MEDICIÓN
Guardar como
Copiar aportapapeles
Copiar archivo
Anterior
Siguiente
Deshacer
Rehacer
Dibujar
Nota de texto
Medición
Calibración
© 2016 Celestron + Todos los derechos reservados. • www.celestron.com 2835 Columbia Street • Torrance, CA 90503 EE.UU. Teléfono: 1 (800) 421-9649 • Impreso en China 2016
Nota FCC: Este equipo ha sido probado y cumple con los límites de un dispositivo digital de Clase B, según el apartado 15 de las normas FCC. Estos límites están diseñados para proporcionar una protección razonable contra interferencias dañinas en una instalación doméstica. Este equipo genera, usa e irradia energía de radiofrecuencia y, si no se instala y utiliza de acuerdo con las instrucciones, puede provocar interferencias dañinas en comunicaciones por radio. Sin embargo, no existe ninguna garantía de que no se produzcan interferencias en una instalación concreta. Si este equipo causa interferencias dañinas en la recepción de radio o televisión, lo que puede determinarse apagando y encendiendo el equipo, se recomienda al usuario intentar corregir las interferencias con una o varias de las medidas siguientes:
+ Reorientar o recolocar la antena receptora.+ Aumentar la separación entre el equipo y el receptor.
+ Conecte el equipo a una toma de corriente o circuito distinto de aquél al que esté conectado el receptor.
+ Consultar al vendedor o a un técnico experimentado de radio/TV para obtener ayuda.
Este producto ha sido diseñado y está pensado para ser usado por personas de 14 años o más de edad. El diseño y las especificaciones del producto están sujetos a cambios sin notificación previa.
MANUALE SOFTWARE PCMODELLO N. 44316
2 | ITALIANO
1. SOFTWARE COMPUTER - INSTALLAZIONE
Nonostante il microscopio HD MicroDirect® 1080p sia ideato per mostrare video direttamente su un monitor o un proiettore, è possibile operare il microscopio su un computer con Windows installato mediante il CD/DVD in dotazione. Se non si possiede un lettore per CD/DVD, è possibile scaricare il software dal nostro sito web www.celestron.com.
Nota: Il software è compatibile esclusivamente con i sistemi Windows XP/7/8/10. Il software non è compatibile con i sistemi operativi MAC.
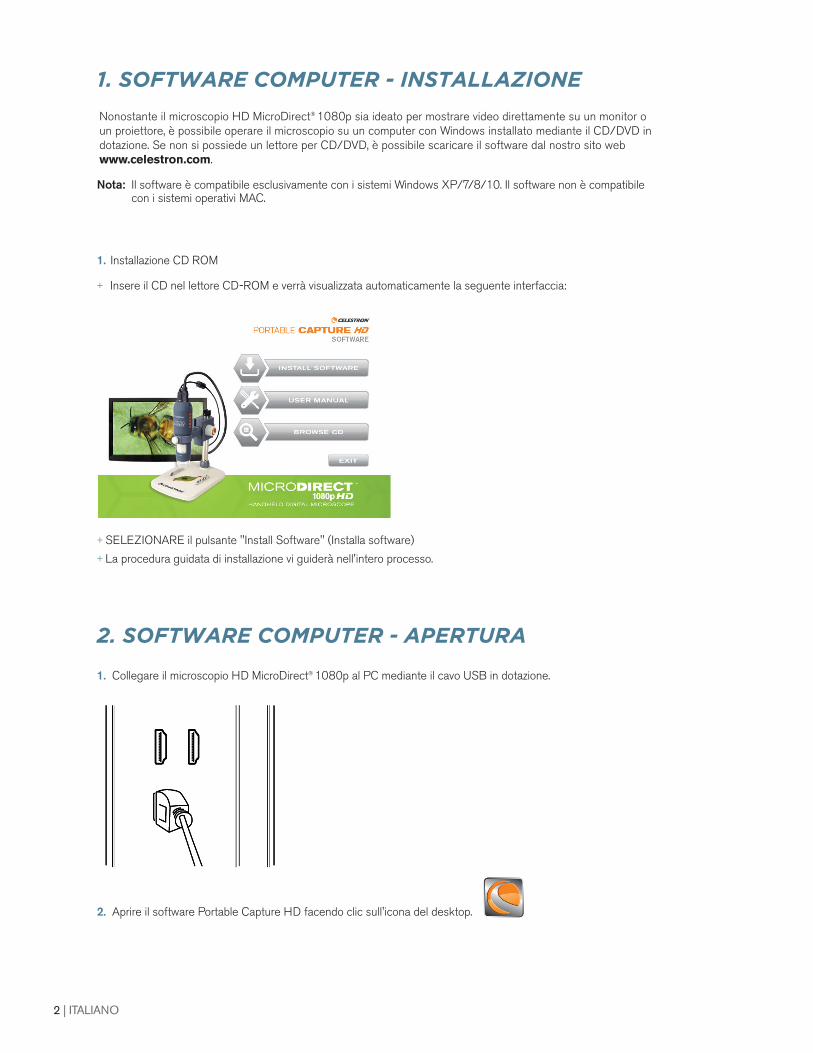
1. Installazione CD ROM
+ Insere il CD nel lettore CD-ROM e verrà visualizzata automaticamente la seguente interfaccia:
+ SELEZIONARE il pulsante "Install Software" (Installa software)+ La procedura guidata di installazione vi guiderà nell'intero processo.
2. SOFTWARE COMPUTER - APERTURA
1. Collegare il microscopio HD MicroDirect® 1080p al PC mediante il cavo USB in dotazione.
2. Aprire il software Portable Capture HD facendo clic sull'icona del desktop.
ITALIANO | 3
NOTA: Se il microscopio HD MicroDirect® 1080p si scollega dal PC, appare un riquadro con il seguente messaggio:
3. SOFTWARE COMPUTER - DETTAGLI
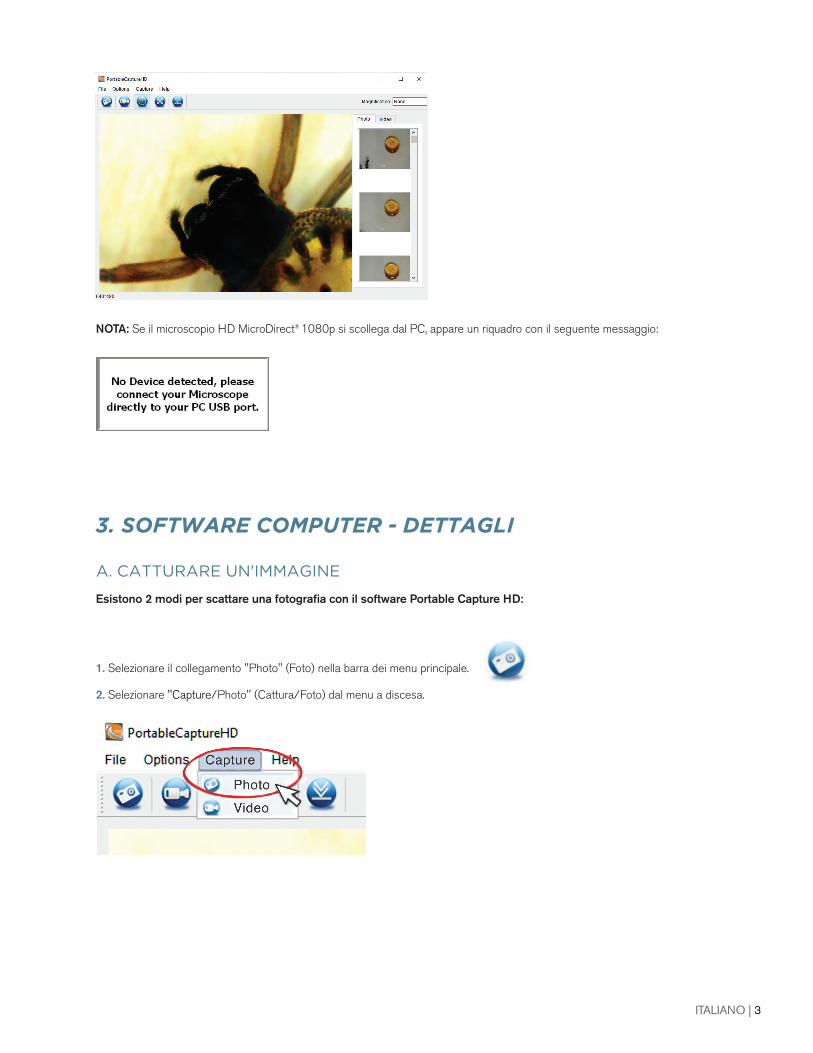
A. CATTURARE UN'IMMAGINE
Esistono 2 modi per scattare una fotografia con il software Portable Capture HD:
1. Selezionare il collegamento "Photo" (Foto) nella barra dei menu principale.
2. Selezionare "Capture/Photo" (Cattura/Foto) dal menu a discesa.
4 | ITALIANO
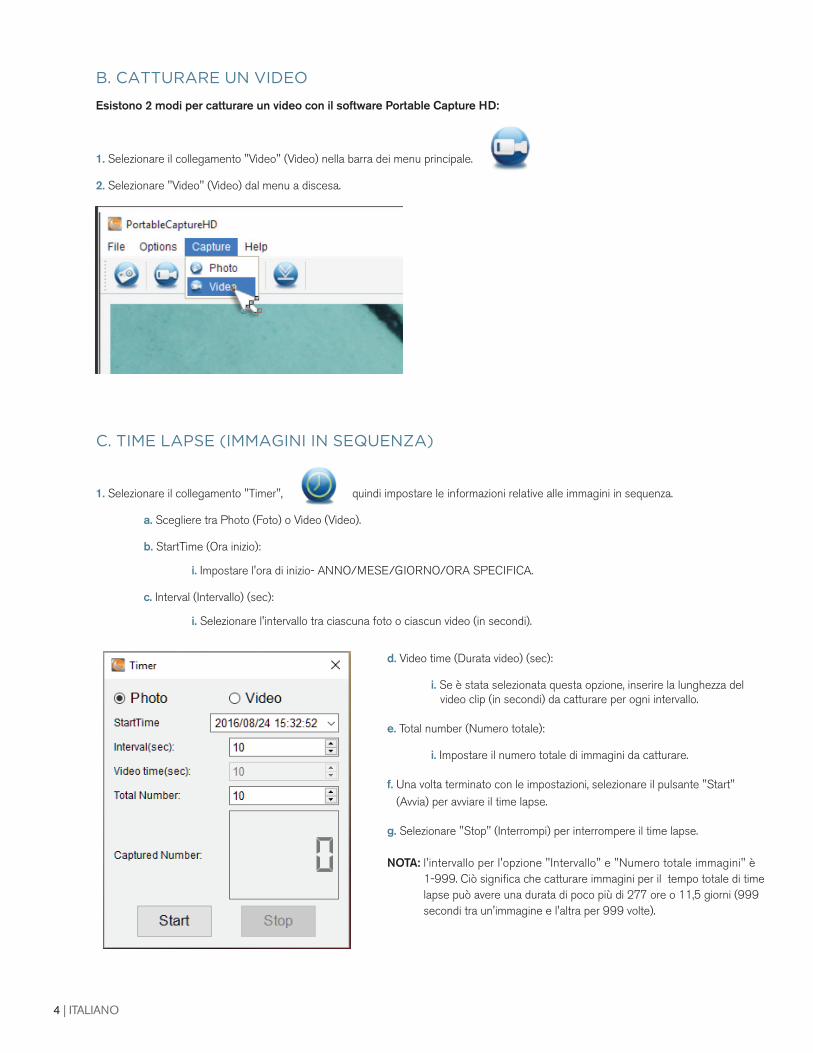
B. CATTURARE UN VIDEO
Esistono 2 modi per catturare un video con il software Portable Capture HD:
1. Selezionare il collegamento "Video" (Video) nella barra dei menu principale.
2. Selezionare "Video" (Video) dal menu a discesa.
C. TIME LAPSE (IMMAGINI IN SEQUENZA)
1. Selezionare il collegamento "Timer", quindi impostare le informazioni relative alle immagini in sequenza.
a. Scegliere tra Photo (Foto) o Video (Video).
b. StartTime (Ora inizio):
i. Impostare l'ora di inizio- ANNO/MESE/GIORNO/ORA SPECIFICA.
c. Interval (Intervallo) (sec):
i. Selezionare l'intervallo tra ciascuna foto o ciascun video (in secondi).
d. Video time (Durata video) (sec):
i. Se è stata selezionata questa opzione, inserire la lunghezza del video clip (in secondi) da catturare per ogni intervallo.
e. Total number (Numero totale):
i. Impostare il numero totale di immagini da catturare.
f. Una volta terminato con le impostazioni, selezionare il pulsante "Start" (Avvia) per avviare il time lapse.
g. Selezionare "Stop" (Interrompi) per interrompere il time lapse.
NOTA: l'intervallo per l'opzione "Intervallo" e "Numero totale immagini" è 1-999. Ciò significa che catturare immagini per il tempo totale di time lapse può avere una durata di poco più di 277 ore o 11,5 giorni (999 secondi tra un'immagine e l'altra per 999 volte).
ITALIANO | 5
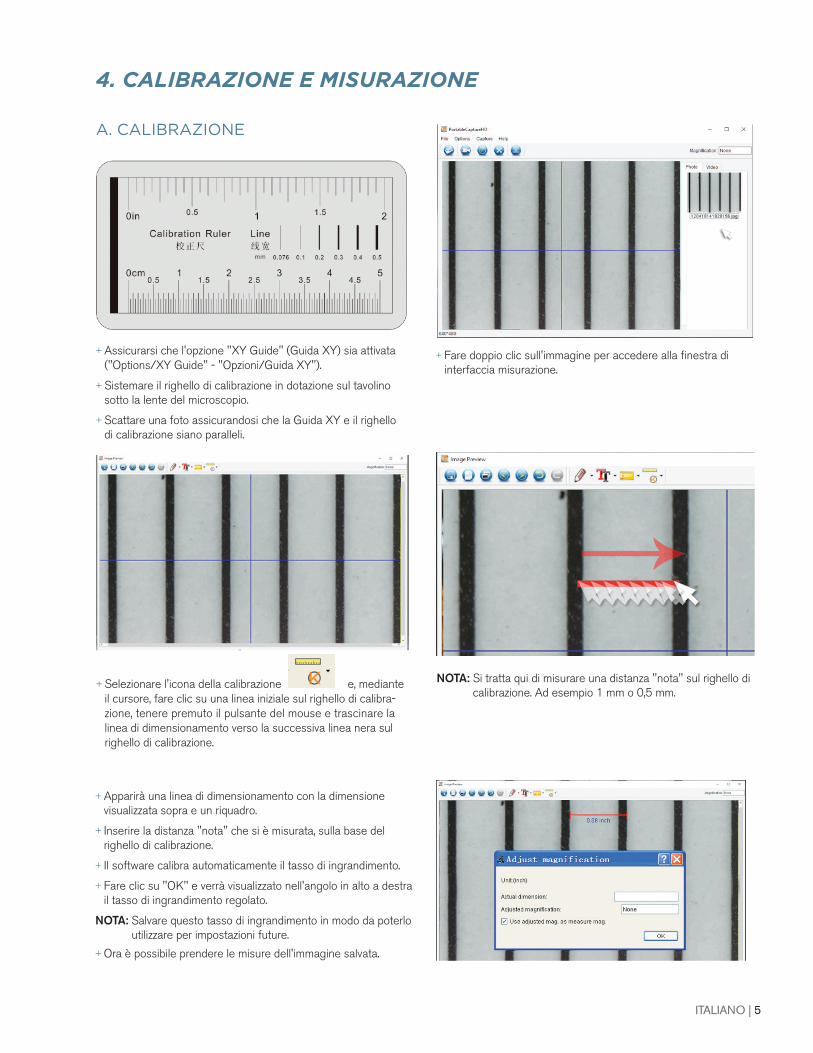
+ Assicurarsi che l'opzione "XY Guide" (Guida XY) sia attivata ("Options/XY Guide" - "Opzioni/Guida XY").
+ Sistemare il righello di calibrazione in dotazione sul tavolino sotto la lente del microscopio.
+ Scattare una foto assicurandosi che la Guida XY e il righello di calibrazione siano paralleli.
+ Fare doppio clic sull'immagine per accedere alla finestra di interfaccia misurazione.
A. CALIBRAZIONE
4. CALIBRAZIONE E MISURAZIONE
+ Apparirà una linea di dimensionamento con la dimensione visualizzata sopra e un riquadro.
+ Inserire la distanza "nota" che si è misurata, sulla base del righello di calibrazione.
+ Il software calibra automaticamente il tasso di ingrandimento.
+ Fare clic su "OK" e verrà visualizzato nell'angolo in alto a destra il tasso di ingrandimento regolato.
NOTA: Salvare questo tasso di ingrandimento in modo da poterlo utilizzare per impostazioni future.
+ Ora è possibile prendere le misure dell'immagine salvata.
+ Selezionare l'icona della calibrazione e, mediante il cursore, fare clic su una linea iniziale sul righello di calibra-zione, tenere premuto il pulsante del mouse e trascinare la linea di dimensionamento verso la successiva linea nera sul righello di calibrazione.
NOTA: Si tratta qui di misurare una distanza "nota" sul righello di calibrazione. Ad esempio 1 mm o 0,5 mm.
6 | ITALIANO
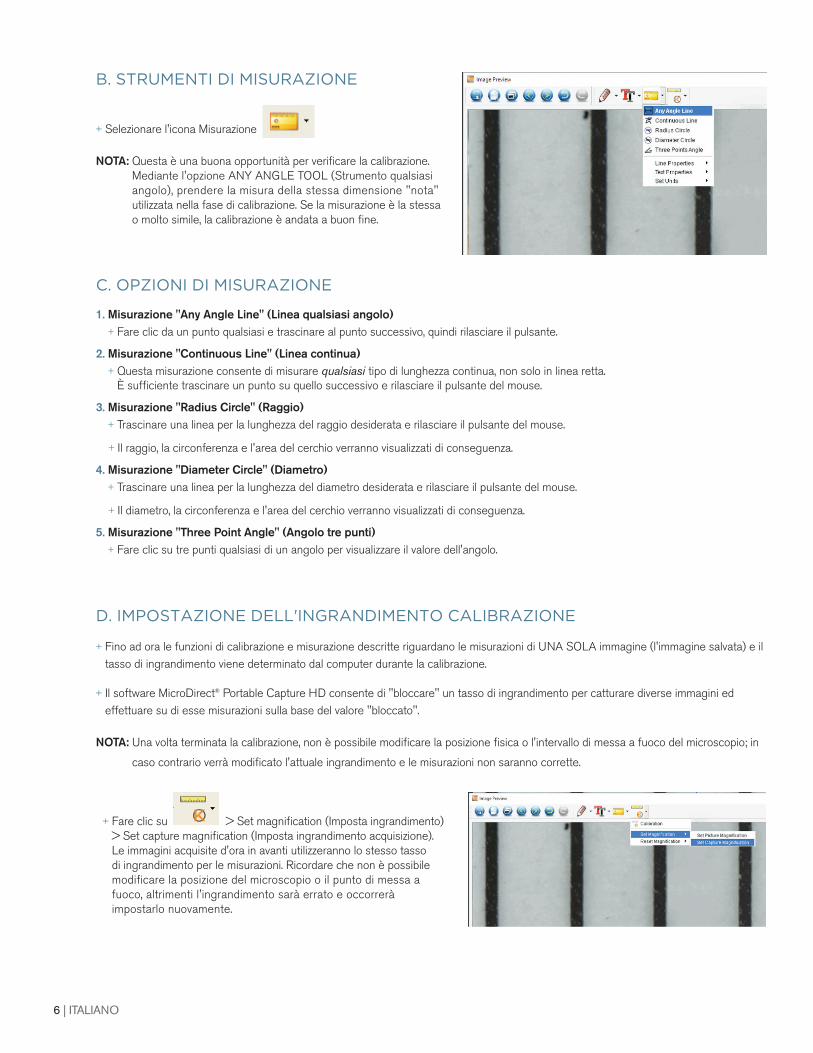
B. STRUMENTI DI MISURAZIONE
+ Selezionare l'icona Misurazione
NOTA: Questa è una buona opportunità per verifi care la calibrazione. Mediante l'opzione ANY ANGLE TOOL (Strumento qualsiasi angolo), prendere la misura della stessa dimensione "nota" utilizzata nella fase di calibrazione. Se la misurazione è la stessa o molto simile, la calibrazione è andata a buon fi ne.
C. OPZIONI DI MISURAZIONE
1. Misurazione "Any Angle Line" (Linea qualsiasi angolo)+ Fare clic da un punto qualsiasi e trascinare al punto successivo, quindi rilasciare il pulsante.
2. Misurazione "Continuous Line" (Linea continua)+ Questa misurazione consente di misurare qualsiasi tipo di lunghezza continua, non solo in linea retta.
È suffi ciente trascinare un punto su quello successivo e rilasciare il pulsante del mouse.
3. Misurazione "Radius Circle" (Raggio)+ Trascinare una linea per la lunghezza del raggio desiderata e rilasciare il pulsante del mouse.
+ Il raggio, la circonferenza e l'area del cerchio verranno visualizzati di conseguenza.
4. Misurazione "Diameter Circle" (Diametro)+ Trascinare una linea per la lunghezza del diametro desiderata e rilasciare il pulsante del mouse.
+ Il diametro, la circonferenza e l'area del cerchio verranno visualizzati di conseguenza.
5. Misurazione "Three Point Angle" (Angolo tre punti)+ Fare clic su tre punti qualsiasi di un angolo per visualizzare il valore dell'angolo.
D. IMPOSTAZIONE DELL'INGRANDIMENTO CALIBRAZIONE
+ Fino ad ora le funzioni di calibrazione e misurazione descritte riguardano le misurazioni di UNA SOLA immagine (l'immagine salvata) e il tasso di ingrandimento viene determinato dal computer durante la calibrazione.
+ Il software MicroDirect® Portable Capture HD consente di "bloccare" un tasso di ingrandimento per catturare diverse immagini ed effettuare su di esse misurazioni sulla base del valore "bloccato".
NOTA: Una volta terminata la calibrazione, non è possibile modifi care la posizione fi sica o l'intervallo di messa a fuoco del microscopio; in
caso contrario verrà modifi cato l'attuale ingrandimento e le misurazioni non saranno corrette.
+ Fare clic su > Set magnifi cation (Imposta ingrandimento) > Set capture magnifi cation (Imposta ingrandimento acquisizione).Le immagini acquisite d'ora in avanti utilizzeranno lo stesso tasso di ingrandimento per le misurazioni. Ricordare che non è possibile modifi care la posizione del microscopio o il punto di messa afuoco, altrimenti l'ingrandimento sarà errato e occorreràimpostarlo nuovamente.
ITALIANO | 7
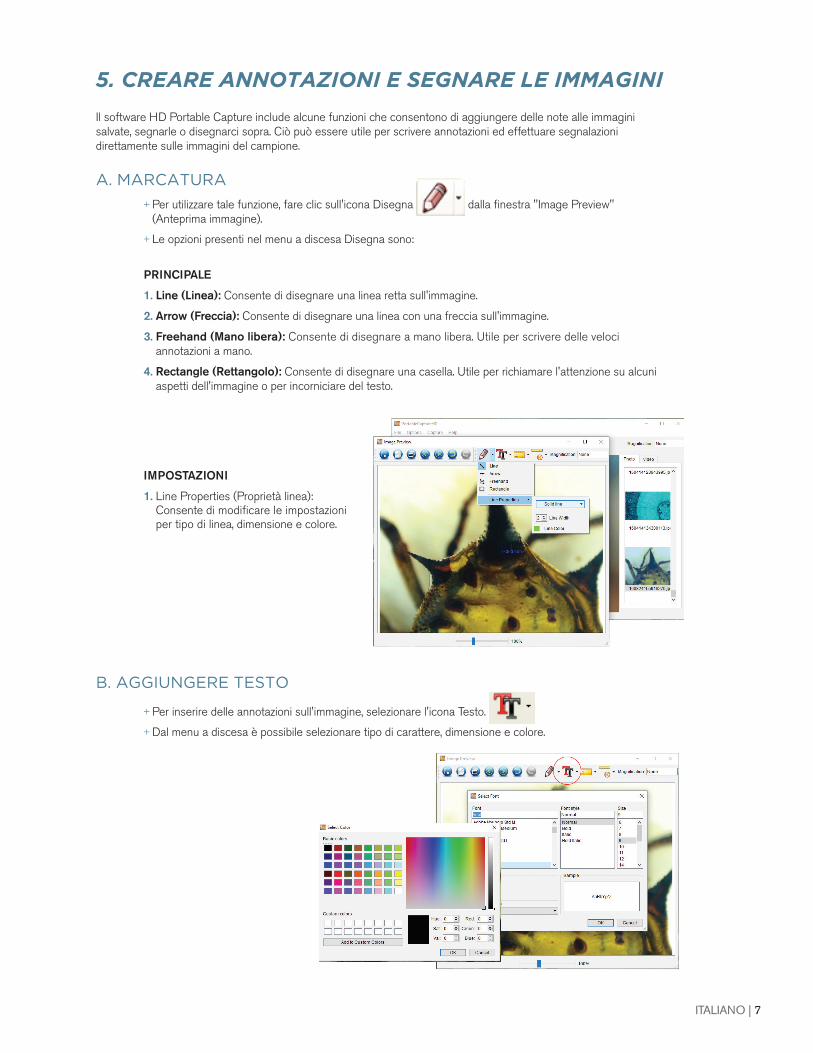
Il software HD Portable Capture include alcune funzioni che consentono di aggiungere delle note alle immagini salvate, segnarle o disegnarci sopra. Ciò può essere utile per scrivere annotazioni ed effettuare segnalazioni direttamente sulle immagini del campione.
+ Per utilizzare tale funzione, fare clic sull'icona Disegna dalla fi nestra "Image Preview" (Anteprima immagine).
+ Le opzioni presenti nel menu a discesa Disegna sono:
PRINCIPALE
1. Line (Linea): Consente di disegnare una linea retta sull'immagine.
2. Arrow (Freccia): Consente di disegnare una linea con una freccia sull'immagine.
3. Freehand (Mano libera): Consente di disegnare a mano libera. Utile per scrivere delle velociannotazioni a mano.
4. Rectangle (Rettangolo): Consente di disegnare una casella. Utile per richiamare l'attenzione su alcuni aspetti dell'immagine o per incorniciare del testo.
IMPOSTAZIONI
1. Line Properties (Proprietà linea):Consente di modifi care le impostazioniper tipo di linea, dimensione e colore.
+ Per inserire delle annotazioni sull'immagine, selezionare l'icona Testo.
+ Dal menu a discesa è possibile selezionare tipo di carattere, dimensione e colore.
A. MARCATURA
5. CREARE ANNOTAZIONI E SEGNARE LE IMMAGINI
B. AGGIUNGERE TESTO
8 | ITALIANO
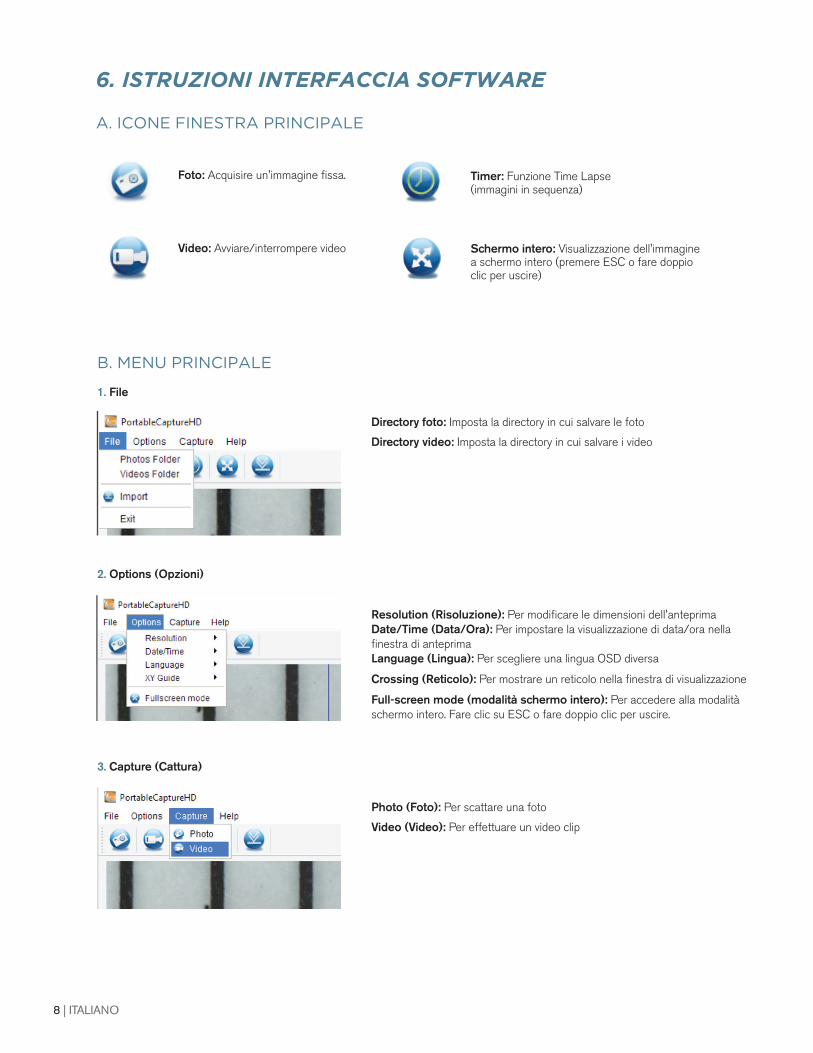
A. ICONE FINESTRA PRINCIPALE
Foto: Acquisire un'immagine fissa.
Video: Avviare/interrompere video
Timer: Funzione Time Lapse (immagini in sequenza)
Schermo intero: Visualizzazione dell'immagine a schermo intero (premere ESC o fare doppio clic per uscire)
B. MENU PRINCIPALE
1. File
Directory foto: Imposta la directory in cui salvare le foto
Directory video: Imposta la directory in cui salvare i video
2. Options (Opzioni)
Resolution (Risoluzione): Per modificare le dimensioni dell'anteprima Date/Time (Data/Ora): Per impostare la visualizzazione di data/ora nella finestra di anteprima Language (Lingua): Per scegliere una lingua OSD diversa
Crossing (Reticolo): Per mostrare un reticolo nella finestra di visualizzazione
Full-screen mode (modalità schermo intero): Per accedere alla modalità schermo intero. Fare clic su ESC o fare doppio clic per uscire.
3. Capture (Cattura)
Photo (Foto): Per scattare una foto
Video (Video): Per effettuare un video clip
6. ISTRUZIONI INTERFACCIA SOFTWARE
ITALIANO | 9
7. CURA E MANUTENZIONE Il microscopio HD Celestron MicroDirect® 1080p è uno strumento ottico di precisione e deve essere sempre trattato con cura. Seguendo i consigli di seguito elencati il microscopio richiederà una manutenzione minima lungo il suociclo di vita.
+ Riporre sempre il microscopio in un luogo pulito e asciutto.
+ Non utilizzare mai il microscopio in luoghi in cui l'uso ne è limitato. Un uso non corretto può creare potenziali rischi di incidenti.
+ Utilizzare il microscopio solo entro l'intervallo ditemperatura compreso tra -5 e 50 °C (tra 23 e 120 °F). Cercare di proteggere il microscopio da sbalzi ditemperatura in quanto si può creare della condensa all'interno del microscopio.
+ Non cercare di accedere ai componenti interni delmicroscopio né di modifi carlo in alcun modo. Solotecnici autorizzati possono eseguire interventi dimanutenzione o riparazione.
+ Tenere il microscopio al riparo da acqua o altri liquidi. Non utilizzare il microscopio in presenza di pioggia o neve. L'umidità crea pericoli di incendio e scosse elettriche.
+ Se la superfi cie del microscopio necessita di pulizia, utilizzare un panno umido.
8. GARANZIA Il microscopio HD Celestron MicroDirect® 1080p è coperto da due anni di garanzia limitata. Visitare il sito Web Celestron per informazioni dettagliate su tutti i microscopi Celestron: www.celestron.com.
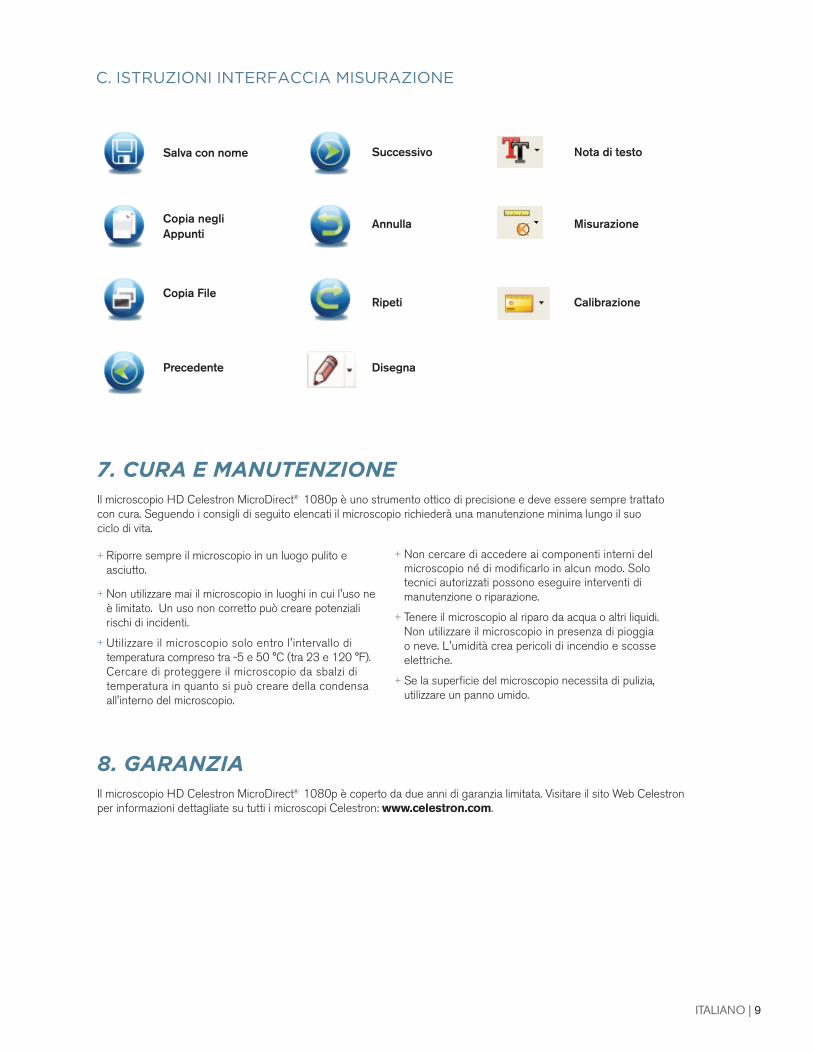
C. ISTRUZIONI INTERFACCIA MISURAZIONE
Salva con nome
Copia negliAppunti
Copia File
Precedente
Successivo
Annulla
Ripeti
Disegna
Nota di testo
Misurazione
Calibrazione

© 2016 Celestron • Tutti i diritti riservati. • www.celestron.com 2835 Columbia Street • Torrance, CA 90503 U.S.A. Telefono: 1(800) 421-9649 • Stampato in Cina 2016
Nota FCC: La presente apparecchiatura è stata testata ed è risultata conforme ai limiti imposti per i dispositivi digitali di Classe B, ai sensi della Parte 15 delle Norme FCC. Tali limiti sono stati ideati per fornire un’adeguata protezione nei confronti di interferenze dannose in installazioni residenziali. La presente apparecchiatura genera, utilizza e può irradiare energia in radio frequenza e, se non installata e utilizzata conformemente alle istruzioni, può causare interferenze dannose alle radiocomunicazioni. Tuttavia, non esiste alcuna garanzia che l’interferenza non si verifichi in una particolare installazione. Nel caso in cui la presente apparecchiatura causi interferenze dannose alla ricezione radio o televisiva, il che potrebbe essere determinato dall'accensione e dallo spegnimento dell'apparecchiatura, l'utente è incoraggiato a tentare di correggere l'interferenza mediante una o più delle misure seguenti:
+ Orientare o posizionare nuovamente l’antenna di ricezione.+ Aumentare la distanza tra l'apparecchiatura e il ricevitore.
+ Collegare l’apparecchiatura a una presa su un circuito diverso da quello a cui è collegato il ricevitore.
+ Consultare il rivenditore o un tecnico radio/TV esperto per richiedere assistenza.
Questo prodotto è progettato per essere utilizzato da persone di età uguale o superiore ai 14 anni. Il design del prodotto e le specifiche sono soggetti a modifiche senza previa notifica.
Related Documents