677 Optimizing Windows • About Windows utilities and tools you can use to solve problems with Windows • How to optimize Windows to improve performance In this chapter, you will learn: CHAPTER 14 I n the last chapter, you learned about the tools and strategies to maintain Windows and its hardware resources and about the importance of keeping good backups of data and system files. This chapter takes you one step further as a PC support technician so that you can get the best performance out of Windows. We begin the chapter learning about the Windows tools you’ll need to optimize Windows. As a support technician, because you might be called on to edit the Windows registry, you’ll also learn about the registry and how to safely edit it manually. Then we turn our attention to the steps you can follow to cause a sluggish Windows system to perform at its best. As you read, you might consider following the steps in the chapter first using a Windows Vista system and then going through the chapter again using a Windows XP system.

Welcome message from author
This document is posted to help you gain knowledge. Please leave a comment to let me know what you think about it! Share it to your friends and learn new things together.
Transcript

677
Optimizing Windows
• About Windowsutilities and toolsyou can use tosolve problemswith Windows
• How to optimizeWindows toimprove performance
In this chapter,you will learn:
CHAPTER
14
In the last chapter, you learned about the tools and strategies tomaintain Windows and its hardware resources and about the
importance of keeping good backups of data and system files. Thischapter takes you one step further as a PC support technician so thatyou can get the best performance out of Windows. We begin thechapter learning about the Windows tools you’ll need to optimizeWindows. As a support technician, because you might be called on toedit the Windows registry, you’ll also learn about the registry andhow to safely edit it manually. Then we turn our attention to thesteps you can follow to cause a sluggish Windows system to performat its best. As you read, you might consider following the steps in thechapter first using a Windows Vista system and then going throughthe chapter again using a Windows XP system.

WINDOWS UTILITIES AND TOOLS TO SUPPORT THE OS
Windows offers some powerful tools to help you understand what is happening behind thescenes with processes that are launched during and after startup, with events that mightindicate a problem with software, hardware, or security, and with performance. By knowinghow and when to use these tools, you can quickly zero in on a Windows problem or a performance block. In this part of the chapter, you will learn how to use the tools and thenlater in the chapter, you will see how these tools can help you when following the step-by-step strategy to optimize Windows.
Tools covered in this part of the chapter include Task Manager, System ConfigurationUtility (commonly called MSconfig), Services console, Computer Management console,Microsoft Management Console (MMC), Event Viewer, Reliability and PerformanceMonitor, and the Registry Editor. So, let’s get started.
TASK MANAGERTask Manager (Taskmgr.exe) lets you view the applications and processes running on yourcomputer as well as information about process and memory performance, network activity,and user activity. There are several ways you can access Task Manager:
Press Ctrl+Alt+Delete. Depending on your system, Task Manager appears or theWindows Security screen appears. If the security screen appears, click Start TaskManager.Right-click a blank area on the taskbar, and then select Task Manager on the shortcut menu.Press Ctrl+Shift+Esc.Enter taskmgr.exe in the Vista Start Search box or the XP Run dialog box and press Enter.
Windows Vista Task Manager has six tabs: Applications, Processes, Services, Performance,Networking, and Users (see Figure 14-1). Windows XP Task Manager does not have theServices tab (see Figure 14-2). The Windows XP Users tab shows only when a system is setfor Fast User Switching and lets you monitor other users logged onto the system.
Let’s see how each tab of the Task Manager window works.
APPLICATIONS TABOn the Applications tab shown in Figure 14-1, each application loaded can have one of twostates: Running or Not Responding. If an application is listed as Not Responding, you canend it by selecting it and clicking the End Task button at the bottom of the window. Theapplication will attempt a normal shutdown; if data has not been saved, you are given theopportunity to save it.
PROCESSES TABThe Processes tab of Task Manager lists system services and other processes associated withapplications, together with how much CPU time and memory the process uses. This
CHAPTER 14678 Optimizing Windows
A+220-7013.2
A+ Exam Tip The A+ 220-701 Essentials exam expects you to know how to use Task Manager,MSconfig, the Services console, Computer Management console, MMC, Event Viewer, and PerformanceMonitor (also called the System Monitor).

679Windows Utilities and Tools to Support the OS
14Figure 14-1 The Applications tab in Task Manager shows the status of active applicationsCourtesy: Course Technology/Cengage Learning
A+ 220-701
Figure 14-2 This Processes tab of Windows XP Task Manager shows Windowsprocesses before any applications are installedCourtesy: Course Technology/Cengage Learning
A+220-7013.2

information can help you determine which applications are slowing down your system. TheProcesses tab for Windows Vista Task Manager (see Figure 14-3) shows the processes running under the current user. This screen shot was taken immediately after a Vista installation before any applications were installed. To see all processes running, click Showprocesses from all users and respond to the UAC box (see Figure 14-4). Task Manager nowshows processes running under the current user, System, Local Service, and Network Serviceaccounts. Services running under these last three accounts cannot display a dialog box on-screenor interact with the user. To do that, the service must be running under a user account. Also,a service running under the System account has more core privileges than does a service run-ning under another account. Figure 14-2 shows the list of processes for a Windows XPsystem immediately after the installation was completed with no applications installed.
CHAPTER 14680 Optimizing Windows
Figure 14-3 Processes running under the current user for a new Vista installationCourtesy: Course Technology/Cengage Learning
A+220-7013.2
When you have a sluggish Windows system, close all open applications and open TaskManager. Check the Applications tab to make sure no applications are running. Then clickthe Processes tab. Compare the list in Figure 14-2 (for Windows XP) or Figure 14-3 (forWindows Vista) with the list of processes running on the sluggish system. Any extra processesyou see might be caused by unwanted applications running in the background or malicioussoftware running. If you see a process running that you are not familiar with, search theMicrosoft Web site (support.microsoft.com) to verify the process is legitimate. If you don’tfind it there, do a general Google search on the process. If you find that the process is notlegitimate, stop the process and immediately run antivirus software. Chapter 20 gives moreinformation about ridding your system of malicious software and about the processes you seelisted in the Task Manager window.

681Windows Utilities and Tools to Support the OS
14
A+220-7013.2
Figure 14-4 Vista processes for all usersCourtesy: Course Technology/Cengage Learning
A word of caution is important here: Many Web sites will tell you a legitimateprocess is malicious so that you will download and use their software to get rid of the process. However,their software is likely to be adware or spyware that you don’t want. Make sure you can trust a sitebefore you download from it or take its advice.
To stop a process using Task Manager, select the process and click End Process. Theprocess is ended abruptly. If the process belongs to an application, you will lose any unsavedinformation in the application. Therefore, if an application is hung, try using the Applicationstab to end the task before turning to the Processes tab to end its underlying process.
When an application is listed on the Applications tab, you can right-click it and select GoTo Process on the shortcut menu (see Figure 14-5). Task Manager will take you to theProcesses tab and the running process for this application.
If you want to end the process and all related processes, right-click the process and selectEnd Process Tree from the shortcut menu. Be careful to not end critical Windows processes;ending these might crash your system.
Each application running on your computer is assigned a priority level, which determinesits position in the queue for CPU resources. You can use Task Manager to change the prior-ity level for an application that is already loaded. If an application performs slowly, increase
A+ 220-701Caution

CHAPTER 14682 Optimizing Windows
Figure 14-5 Find the running process for this running applicationCourtesy: Course Technology/Cengage Learning
Notes If your desktop locks up, you can use Task Manager to refresh it. To do so, press Ctrl+Alt+Deland then click Task Manager. Click the Processes tab. Select Explorer.exe (the process that provides thedesktop) and then click End Process. Click End process in the warning box. Then click the Applicationstab. Click New Task. Enter Explorer.exe in the Create New Task dialog box and click OK. Your desktop willbe refreshed and any running programs will still be open.
its priority. You should only do this with very important applications, because giving anapplication higher priority than certain background system processes can sometimes inter-fere with the operating system.
A+220-7013.2
Notes Remember: any changes you make to an application’s priority level affect only the current session.
To use Task Manger to change the priority level of an open application, do the following:
1. In Task Manager, click the Applications tab. Right-click the application and select GoTo Process from the shortcut menu. The Processes tab is selected and the process thatruns the application is selected.
2. Right-click the selected process. From the shortcut menu that appears, set the new priority to AboveNormal (see Figure 14-6). If that doesn’t give satisfactory performance,then try High.
SERVICES TABThe third Vista tab, the Services tab, is shown in Figure 14-7. This tab lists the servicescurrently installed along with the status of each service. Recall that a service is a program thatruns in the background and is called on by other programs to perform a background task.

14
Figure 14-6 Change the priority level of a running applicationCourtesy: Course Technology/Cengage Learning
A+220-7013.2
Figure 14-7 This Services tab of Windows Vista Task Manager gives the current status of all installed services Courtesy: Course Technology/Cengage Learning
683
A+ 220-701

CHAPTER 14684 Optimizing Windows
Running services are sometimes listed in the notification area of the taskbar. To manage aservice, click the Services button at the bottom of the window to go to the Services console.How to use this console is discussed later in the chapter.
PERFORMANCE TABThe fourth Vista tab, the Performance tab, is shown in Figure 14-8. It provides details abouthow a program uses system resources. You can use these views to identify which applica-tions and processes use the most CPU time.
Figure 14-8 The Performance tab window shows details about how system resources are being usedCourtesy: Course Technology/Cengage Learning
A+220-7013.2
On the Performance tab, you’ll find five graphs near the top of the window and three frames near the bottom of the window. Here is an explanation of how they are used:
The CPU Usage graph indicates the percentage of time the CPU is currently being used.The CPU Usage History graphs show this same percentage of use over recent time.The left Memory graph shows the amount of memory currently used.The right Physical Memory Usage History shows how much memory has recentlybeen used. If this blue bar is a flat line near the top of the graph, you need to addmore RAM to the system.The Physical Memory (MB) frame lists Total (amount of RAM), Cached (RAM thathas recently been cached), and Free (RAM that recently has not been used).

685Windows Utilities and Tools to Support the OS
14
Figure 14-9 Use the Networking tab of Task Manager to monitor network activityCourtesy: Course Technology/Cengage Learning
The Kernel Memory frame indicates how much RAM and virtual memory the corekernel components of Windows are using. This frame lists Total (sum of RAM andvirtual memory), Paged (how much of the paging file the kernel uses), and Nonpaged(how much RAM the kernel uses).The System frame gives information about the overall system status. This frame listsHandles (number of running objects used by all processes), Threads (number of subprocesses), Processes (number of running processes), Up Time (time since thecomputer was last restarted), and Page File (the first number is the amount of RAMand virtual memory currently in use, and the second number is total RAM andvirtual memory).
To get even more detailed information about how Windows is performing, click theResource Monitor button. You will be taken to the Resource Monitor window, discussedlater in the chapter.
NETWORKING TABThe Networking tab lets you monitor network activity and bandwidth used. You can use itto see how heavily the network is being used by this computer. For example, in Figure 14-9,
A+ 220-701
A+220-7013.2

CHAPTER 14686 Optimizing Windows
Suppose a friend asks you to help her solve a problemwith her Windows XP system that is moving very slowly.
You open Task Manager, select the Processes tab, and see a window similar to that in Figure 14-11.Notice that the Ccapp.exe process is using 99 percent of CPU time. When you click the Performancetab, you see why the system is running so slowly (see Figure 14-12). This one process is consis-tently using most of the CPU resources.
When you try to lower the priority of this process, you discover the process will not relinquishpriority (see Figure 14-13). The next step is to investigate the process. Is it legitimate? Is it a virus?Can it be better managed or not used? If you do a Google search on Ccapp.exe, you’ll discover theprocess belongs to Norton AntiVirus software. The solution is to disable scanning of outgoing e-mailso the process will not lock up the CPU.
APPLYING CONCEPTS
you can see that the wireless connection is running at 54 Mbps, while the local (wired) connection is running at 100 Mbps. You can also see moderate network activity.
USERS TABThe Users tab shows all users currently logged on the system. To improve Windows performanceor just before you shut down the system, you can log off a user. To log off a user, first select theProcesses tab and click Show processes from all users and respond to the UAC box. Then returnto the Users tab, select the user, and click Logoff. The dialog box shown in Figure 14-10 appears,warning that unsaved data might be lost. Click Log off user to complete the operation.
Figure 14-10 Use Task Manager to log off a userCourtesy: Course Technology/Cengage Learning
A+220-7013.2

687Windows Utilities and Tools to Support the OS
14
A+220-7013.2
Process using 99 percentof CPU time
Figure 14-11 The Processes tab of Task Manager shows a process hogging CPU resourcesCourtesy: Course Technology/Cengage Learning
Figure 14-12 The Performance tab shows a heavily used CPUCourtesy: Course Technology/Cengage Learning
A+ 220-701

SYSTEM CONFIGURATION UTILITY (MSCONFIG)You can use the System Configuration Utility (Msconfig.exe), which is commonly pronounced “M-S-config,” to find out what processes are launched at startup and to temporarily disable a process from loading. This utility is included with Windows Vista andWindows XP, but it is not included with Windows 2000.
MSconfig is a temporary fix to disable a program or service at startup, but it should notbe considered a permanent fix. Once you’ve decided you want to make the change perma-nent, use other tools to permanently remove that process from Windows startup. Followthese steps to learn to use MSconfig:
1. To start MSconfig, enter msconfig.exe in the Vista Start Search box or the XP Runbox and press Enter. For Vista, respond to the UAC box. The System Configurationbox opens.
2. Click the Services tab to see a list of all services launched at startup (see Figure 14-14).Notice that this tab has a Disable all button. If you use that button, you’ll disable allnonessential Windows services as well as third-party services such as virus scan programs. Use it only for the most difficult Windows problems, because you’ll disablesome services that you might really want, such as Windows Task Scheduler, PrintSpooler, Automatic Updates, and the System Restore service.
3. To view only those services put there by third-party software, check Hide allMicrosoft services. If you have antivirus software running in the background (and youshould), you’ll see that listed as well as any service launched at startup and put thereby installed software. Uncheck all services that you don’t want. If you don’t recognizea service, try entering its name in a search string at www.google.com for informationabout the program. If the program is a service, you can permanently stop it by usingthe Services console, discussed next.
4. Click the Startup tab to see a list of programs that launch at startup (see Figure 14-15).To disable all nonessential startup tasks, click Disable all. Or you can check and
CHAPTER 14688 Optimizing Windows
Figure 14-13 The priority level of this process cannot be changedCourtesy: Course Technology/Cengage Learning
Notes Lowering the CPU processing time allowed for an application is calledthrottling the process.
A+220-7013.2
Task Manager gives good information, but doesn’t always give the full picture ofrunning processes. One tool that gives better information than Task Manager is Process Explorer byMicrosoft Technet (technet.microsoft.com). The utility is free, and you will learn to use it in Chapter 20.
A+ Exam Tip

689Windows Utilities and Tools to Support the OS
14
Figure 14-14 Use MSconfig to view and control services launched at startupCourtesy: Course Technology/Cengage Learning
Figure 14-15 Select startup processes to enable or disableCourtesy: Course Technology/Cengage Learning
uncheck an individual startup program to enable or disable it. The Startup tab can beuseful when trying to understand how a program is launched at startup because itoffers the Location column. This column shows the registry key or startup folder where the startup entry is made. How to find and change registry keys is covered laterin the chapter.
A+220-7013.2
A+ 220-701

CHAPTER 14690 Optimizing Windows
Figure 14-16 MSconfig is set to control the Windows startup programsCourtesy: Course Technology/Cengage Learning
Figure 14-17 The System Configuration utility has blocked some startup programsCourtesy: Course Technology/Cengage Learning
5. Click Apply to apply your changes. Now click the General tab and you should seeSelective startup selected, as shown in Figure 14-16. MSconfig is now set to controlthe startup process. Click OK to close the MSconfig box.
6. After you make a change in the MSconfig box, reboot so that you can see what happens. When Windows starts up, you’ll see the bubble in Figure 14-17 that saysWindows has blocked some startup programs. Remember, using MSconfig is recom-mended only as a temporary fix, and this bubble reminds us of that.
7. Watch for error messages during the boot that indicate you’ve created a problemwith your changes. For instance, after the boot, you find out you can no longer usethat nifty little utility that came with your digital camera. To fix the problem, youneed to find out which service or program you stopped that you need for that util-ity. Go back to the MSconfig tool and enable that one service and reboot.MSconfig should only be used to temporarily disable a program. Use other tools,such as the Services console or startup folders, to permanently remove it from the
A+220-7013.2

691Windows Utilities and Tools to Support the OS
14
startup process. Once the program is removed from the startup process, you willno longer need MSconfig and can return it to normal startup mode.
Recall from Chapter 13 that Software Explorer in Windows Vista can also be used to moni-tor startup programs and to enable and disable a startup program. Software Explorer ismore convenient to use than MSconfig.
SERVICES CONSOLEThe Services console is used to control the Windows and third-party services installed on asystem. To launch the Services console, type Services.msc in the Vista Start Search box orthe XP Run box and press Enter. For Vista, respond to the UAC box. If the Extended tab atthe bottom of the window is not selected, click it (see Figure 14-18).
Notes MSconfig reports only what it is programmed to look for when listing startup programs andservices. It looks only in certain registry keys and startup folders, and sometimes MSconfig does notreport a startup process. Therefore, don’t consider its list of startup processes to be complete.
Gives descriptionsabout a service
Figure 14-18 The Services window is used to manage Windows servicesCourtesy: Course Technology/Cengage Learning
As you select each service, the area on the left describes the service. If the descriptionis missing, most likely the service is a third-party service put there by an installedapplication. To get more information about a service or to stop or start a service, right-click its name and select Properties from the shortcut menu. In the Properties box(see Figure 14-19), the startup types for a service are:
Automatic (Delayed Start). Starts shortly after startup, after the user logs on, so as notto slow down the startup processAutomatic. Starts when Windows loadsManual. Starts as neededDisabled. Cannot be started
A+220-7013.2
A+ 220-701

CHAPTER 14692 Optimizing Windows
Figure 14-19 Use a service properties box to manage a serviceCourtesy: Course Technology/Cengage Learning
When cleaning up a Windows system, one step is to disable or uninstall unwanted ser-vices. Research each third-party service whose Startup type is set to Automatic, and decide ifyou need to disable the service or uninstall the software responsible for the service. For mostWindows services, you can use the Control Panel or other Windows utilities to control aparticular service. For example, you can stop and start Automatic Updates from the XPSystem Properties box or uninstall software using the Vista Programs and Features window.Third-party services can often be stopped by using the utility that installed the service. Youcan access the utility from the Start menu. However, you can also use the Services console todisable a service. In the console, use its Properties box (see Figure 14-19). In the Startuptype drop-down list, select Disabled and then click Apply.
COMPUTER MANAGEMENTComputer Management (Compmgmt.msc) is a window that consolidates several Windowsadministrative tools that you can use to manage the local PC or other computers on the network. To use most of these tools, you must be logged on as an administrator, althoughyou can view certain settings and configurations in Computer Management if you are loggedon with lesser privileges.
Notes If you suspect a Windows system service is causing a problem, you can use MSconfig to disable the service. If this works, then try replacing the service file with a fresh copy from the Windowssetup CD or DVD.
A+220-7013.2

693Windows Utilities and Tools to Support the OS
14
As with most Windows tools, there are several ways to access ComputerManagement:
Enter compmgmt.msc in the Vista Start Search box or the XP Run box and pressEnter. For Vista, respond to the UAC box.Click Start, right-click Computer (My Computer for XP) and select Manage from theshortcut menu. For Vista, respond to the UAC box.In Control Panel, click System and Maintenance (for XP, click Performance andMaintenance), click Administrative Tools, and double-click Computer Management.For Vista, respond to the UAC box.
The Computer Management window opens (see Figure 14-20). Using this window, you canaccess Task Scheduler (Vista only), Event Viewer, Shared Folders, Reliability andPerformance, Device Manager, Disk Management, Services console, Indexing Service, andmanage user groups (covered in Chapter 20). You can also monitor problems with hardware, software, and security. Several tools available from the Computer Managementwindow are covered in this chapter.
Figure 14-20 Windows Computer Management combines several administrative tools into a single easy-to-access windowCourtesy: Course Technology/Cengage Learning
Notes By default, the Administrative Tools group is found in Control Panel, but you can add the group to the All Programs menu. To do that, right-click the taskbar and select Properties fromthe shortcut menu. The Taskbar and Start Menu Properties box opens. Select the Start Menu tab and then click Customize (as shown on the left side of Figure 14-21). The Customize Start Menu box opens. Scroll down through the list, select Display on the All Programs menu, and click OK. Click Apply and OK to close the Taskbar and Start Menu Properties box. Now, to use theAdministrative Tools group, click Start, All Programs, and Administrative Tools. (To add the tool to the All Programs menu in Windows XP, in the Customize Start Menu box, click the Advanced tab.)
A+220-7013.2
A+ 220-701

CHAPTER 14694 Optimizing Windows
MICROSOFT MANAGEMENT CONSOLE (MMC)Microsoft Management Console (MMC; the program file is mmc.exe) is a Windows utilitythat can be used to build your own customized console windows. A console is a single window that contains one or more administrative tools such as Device Manager or DiskManagement. In a console, these individual tools are called snap-ins. An example of a console is Computer Management, which has a filename of Compmgmt.msc. (Event Viewer,Device Manager, Disk Management, and Task Scheduler are examples of snap-ins thatappear in that console.) A console is saved in a file with an .msc file extension, and a snap-inin a console can itself be a console. To use all the functions of MMC, you must be loggedon with administrator privileges.
You can use MMC to create a console that contains some popular utility tools. Followthese steps for Windows to create a console:
1. Enter mmc.exe in the Vista Start Search box or the XP Run box and press Enter. ForVista, respond to the UAC box. An empty console window appears, as shown inFigure 14-22.
2. Click File on the menu bar and then click Add/Remove Snap-in. The Add or RemoveSnap-ins box opens, as shown at the top of Figure 14-23.
3. Select a snap-in from the list on the left. Notice a description of the snap-in appears atthe bottom of the window. The snap-ins that appear in this list depend on the editionof Vista you have installed and what other components are installed on the system.Click Add to add the snap-in to the console. (For Windows XP, in the Add/RemoveSnap-In box, click Add. A list of snap-ins appears. Select one and click Add.)
Figure 14-21 Use the Taskbar and Start Menu Properties window to change items on the Start menuCourtesy: Course Technology/Cengage Learning
A+220-7013.2

695Windows Utilities and Tools to Support the OS
14
Figure 14-22 An empty consoleCourtesy: Course Technology/Cengage Learning
Figure 14-23 Add a snap-in to the new consoleCourtesy: Course Technology/Cengage Learning
A+220-7013.2
A+ 220-701

CHAPTER 14696 Optimizing Windows
Figure 14-24 Saving a console with two snap-insCourtesy: Course Technology/Cengage Learning
Notes After you create a console, you can copy the .msc file to any computer or place a shortcut toit on the desktop.
4. If parameters for the snap-in need defining, a dialog box opens that allows you to setup these parameters. The dialog box offers different selections, depending on the snap-in being added. For example, when Event Viewer is selected, the Select Computerbox appears, asking you to select the computer that Event Viewer will monitor (seethe bottom of Figure 14-23). Select Local computer (the computer this console is running on) and click OK. (For XP, click Finish.) The snap-in now appears in the listof snap-ins for this console.
5. Repeat Steps 3 and 4 to add all the snap-ins that you want to the console. When youfinish, click OK in the Add or Remove Snap-ins box shown in Figure 14-23.
6. The left side of Figure 14-24 shows a console with two snap-ins added. To save theconsole, click File on the menu bar and then click Save As. The Save As dialog boxopens, as shown on the right side of the figure.
7. The default location for the console file is C:\Users\username\AppData\Roaming\Microsoft\Windows\Start Menu\Programs\Administrative Tools. However, you cansave the console to any location, such as the Windows desktop. However, if you save the file to its default location, the console will appear as an option underAdministrative Tools on the Start menu. Select the location for the file, name the file,and click Save.
8. Close the console window.
A+220-7013.2

697Windows Utilities and Tools to Support the OS
14
EVENT VIEWEREvent Viewer (Eventvwr.msc) is a Windows tool useful for troubleshooting problems withWindows, applications, and hardware. Of all these types of problems, it is most useful whentroubleshooting problems with hardware. Event Viewer displays logs of significant eventssuch as a hardware or network failure, OS error messages, a device or service that has failedto start, or General Protection Faults.
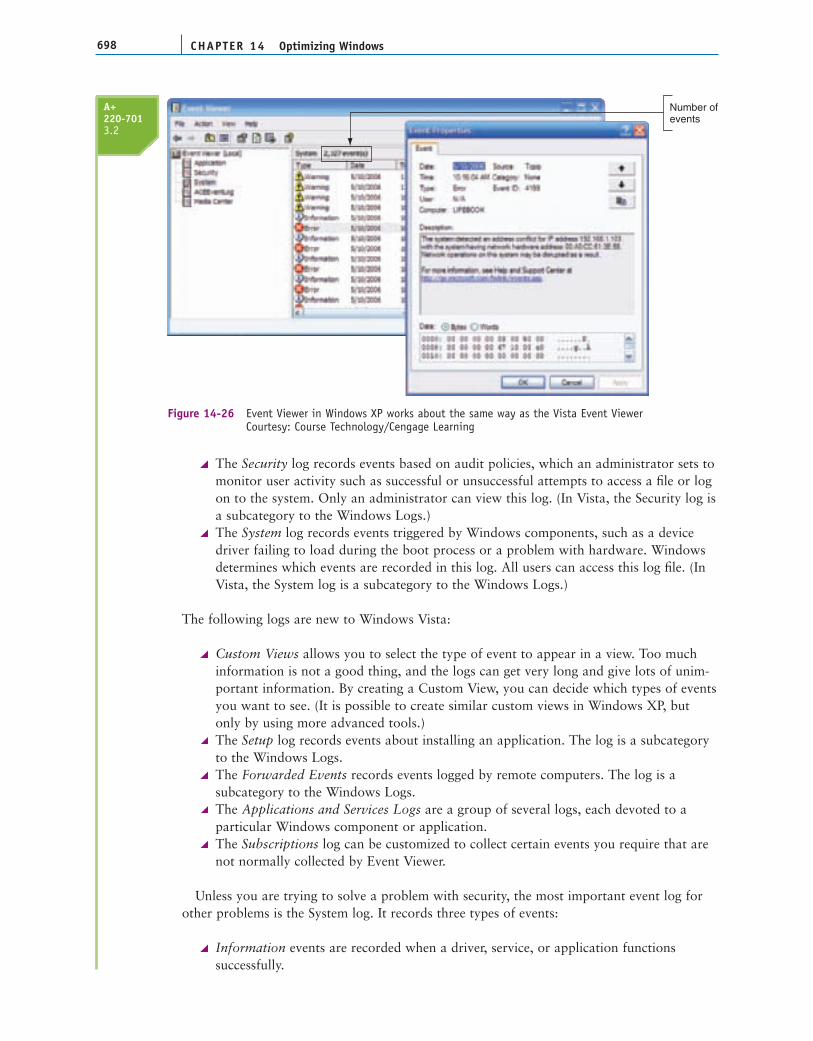
Note that Event Viewer is also a Computer Management console snap-in. You can open itby using the Computer Management window, by entering Eventvwr.msc in the Vista StartSearch box or the XP Run box, using the Administrative Tools applet in Control Panel, orby clicking Start, All Programs, Administrative Tools, Event Viewer. (This last optionassumes Administrative Tools has been added to the All Programs menu.) All of thesemethods open the window in Figure 14-25 (for Windows Vista after you respond to theUAC box) and the window in Figure 14-26 (for Windows XP).
Event Viewer manages logs of events. The logs that Event Viewer keeps partly dependon the edition of Windows you are using. For example, in Figure 14-26, the Media Centerlog is kept by Windows XP Media Center Edition. Event Viewer logs can be filtered andsorted in several ways. The different views of logs are listed in the left pane. You can clicka triangle beside a view to see subcategories of logs within that view. Depending on theOS version and original equipment manufacturer (OEM) features, Event Viewer showsthree or more views of logs. The three most important views of logs are described next:
The Application log records events about applications and Windows utilities such aswhen an application was unable to open a file or when Windows created a restorepoint. The application events recorded depend on what the developer of theapplication set to trigger a log entry. All users can view this log. (In Vista, theApplication log is a subcategory to the Windows Logs.)
Figure 14-25 Use Event Viewer to see information about events with hardware, Windows,security, and applicationsCourtesy: Course Technology/Cengage Learning
A+220-7013.2
A+ 220-701
CHAPTER 14698 Optimizing Windows
The Security log records events based on audit policies, which an administrator sets tomonitor user activity such as successful or unsuccessful attempts to access a file or logon to the system. Only an administrator can view this log. (In Vista, the Security log isa subcategory to the Windows Logs.)The System log records events triggered by Windows components, such as a devicedriver failing to load during the boot process or a problem with hardware. Windowsdetermines which events are recorded in this log. All users can access this log file. (InVista, the System log is a subcategory to the Windows Logs.)
The following logs are new to Windows Vista:
Custom Views allows you to select the type of event to appear in a view. Too muchinformation is not a good thing, and the logs can get very long and give lots of unim-portant information. By creating a Custom View, you can decide which types of eventsyou want to see. (It is possible to create similar custom views in Windows XP, butonly by using more advanced tools.)The Setup log records events about installing an application. The log is a subcategoryto the Windows Logs.The Forwarded Events records events logged by remote computers. The log is a subcategory to the Windows Logs.The Applications and Services Logs are a group of several logs, each devoted to a particular Windows component or application.The Subscriptions log can be customized to collect certain events you require that arenot normally collected by Event Viewer.
Unless you are trying to solve a problem with security, the most important event log forother problems is the System log. It records three types of events:
Information events are recorded when a driver, service, or application functions successfully.
Number ofevents
Figure 14-26 Event Viewer in Windows XP works about the same way as the Vista Event ViewerCourtesy: Course Technology/Cengage Learning
A+220-7013.2

699Windows Utilities and Tools to Support the OS
14
Warning events are recorded when something happens that may indicate a futureproblem but does not necessarily indicate that something is presently wrong with thesystem. For example, low disk space might trigger a warning event.Error events are recorded when something goes wrong with the system, such as a nec-essary component failing to load, data getting lost or becoming corrupted, or a systemor application function ceasing to operate.
To view a log within Event Viewer, click the log that you want to view in the leftpane. This generates a summary of events that appears on the right. For WindowsVista, select an event to see information about it in the lower pane of Event Viewer.Figure 14-27 shows an event in the System log about a conflict in IP addresses withanother computer on the network, and gives a suggestion as to how to handle theproblem. For Windows XP, double-click an event to see details about it (refer back to Figure 14-26).
Figure 14-27 A conflicting IP address triggers an error eventCourtesy: Course Technology/Cengage Learning
When you are trying to solve a Windows, hardware, application, or security problem,Event Viewer can be your first source of information about the nature of the problem. Youcan find out if the problem is recent or has been going on for some time. Sometimes, youcan even see what just occurred to the system when the problem started and see what otherproblems started at the same time. All this can be useful information to track the source of aproblem.
To save time, you might want to view only certain events and not the entire list to makeyour search easier. Fortunately, you can filter events so only certain ones are listed. To dothat, right-click a log in the left pane and select Filter Current Log from the shortcut menu.
A+220-7013.2
A+ 220-701

CHAPTER 14700 Optimizing Windows
Figure 14-28 Criteria to filter events in Event ViewerCourtesy: Course Technology/Cengage Learning
(For Windows XP, select Properties from the shortcut menu and then click the Filter tab.)The Filter Current Log box appears. See Figure 14-28 for Vista; the XP box looks andworks about the same way.
You can filter events on the time logged, the event level (critical, error, warning, informa-tion, or verbose), event source (for example, application, driver, service, or Windowscomponent), event ID (identifies the type of event, such as a service has failed to load),keyword, user, and computer. To view the most significant events to troubleshoot a problem,check Critical and Error under the Event level. Critical events are those errors that Windowsbelieves are affecting critical Windows processes.
Another way you can avoid a ballooning log file is to set a size limit, and specify whathappens when the log reaches this limit. To control the size of a log file and see generalinformation about the log, right-click the log, select Properties on the shortcut menu, andclick the General tab (see Figure 14-29). You can set the maximum size of the log file. Youcan also set the log to overwrite events as needed, archive the log when full, and clear thelog manually. To clear the log manually, click Clear Log. Before clearing the log, EventViewer gives you a chance to save it.
Event Viewer can be useful when you suspect someone is attempting to illegally log onto asystem and you want to view login attempts, or the network is giving intermittent problems.But Event Viewer is most useful in solving intermittent hardware problems. For example, onour network we have a file server and several people in the office update Microsoft Worddocuments stored on the server. For weeks, people complained about these Word documents
A+220-7013.2

701Windows Utilities and Tools to Support the OS
14getting corrupted. We downloaded the latest patches for Windows and Microsoft Office andscanned for viruses, thinking that the problem might be with Windows or the application.Then we suspected a corrupted template file for building the Word documents. But nothingwe did solved our problem of corrupted Word documents. Then one day someone thought tocheck Event Viewer on the file server. The Event Viewer had faithfully been recording errorswhen writing to the hard drive. What we had suspected to be a software problem was, infact, a failing hard drive, which was full of bad sectors. We replaced the drive and the prob-lem went away.
RELIABILITY AND PERFORMANCE MONITORWindows Reliability and Performance Monitor is another MMC snap-in (Perfmon.msc) that collects, records, and displays events. In Windows XP, this monitor is called thePerformance Monitor or the System Monitor. These events, called Data Collector Sets, helpyou track the performance and reliability of Windows. To start the monitor, you can use theAdministrative Tool applet in Control Panel, open the Computer Management Console, orenter perfmon.msc in the Vista Start Search box or the XP Run box. If Administrative Toolsis added to the All Programs menu, you also can click Start, All Programs, AdministrativeTools, Reliability and Performance Monitor (for XP, click Performance). The monitor window is shown in Figure 14-30 for Windows Vista after you respond to the UAC box.The XP Performance monitor is set up differently, but provides similar information, and isshown in Figure 14-31.
Figure 14-29 View information about a log, including maximum size of the log file inthe Log Properties boxCourtesy: Course Technology/Cengage Learning
A+220-7013.2
A+ 220-701

CHAPTER 14702 Optimizing Windows
Figure 14-30 Reliability and Performance Monitor window shows the Resource Overview screenCourtesy: Course Technology/Cengage Learning
Figure 14-31 Windows XP Performance Monitor (also called the System Monitor)Courtesy: Course Technology/Cengage Learning
The Reliability and Performance Monitor for Vista contains three monitoring tools:
In the window shown in Figure 14-30, click Performance Monitor to see a real-timeview of Windows performance counters (see Figure 14-32). You can add your ownperformance counters to this view by clicking the green plus sign, called the Add button, at the top of the Performance Monitor pane.
A+220-7013.2

703Windows Utilities and Tools to Support the OS
14
Figure 14-32 Performance monitor view shows real-time tracking of Windows performance countersCourtesy: Course Technology/Cengage Learning
A+220-7013.2
A+ 220-701
Click Reliability Monitor to see a view of historical data that shows how stable theWindows system is. To get detailed information about a problem, click a day thatshows an error and then click the plus sign beside the error’s category. For example, in Figure 14-33, there was a Windows failure on May 1, 2009. When you click thatdate and then click the plus sign beside Windows Failures in the lower part of thepane, you can see what happened to Windows that day.The Data Collector Sets utility can be used to collect your own data about the system.Click Data Collector Sets and drill down to a subcategory that appears in the rightpane (see Figure 14-34). Right-click a category and select Start from the shortcut menushown in the figure. Wait while data is collected and then fills the middle pane. In ourexample, we’re using System Diagnostics.
To view the system diagnostics data as a report, right-click System Diagnostics and select LatestReport from the shortcut menu. The report for one system is shown in Figure 14-35, which reportsthe system is experiencing excessive paging and needs more memory. (In this situation, note thatthe Reliability and Performance Monitor was started in the Computer Management console.)
THE REGISTRY EDITORMany actions, such as installing application software or hardware, can result in changes tothe registry. These changes can create new keys, add new values to existing keys, and changeexisting values. For a few difficult problems, you might need to edit or remove a registrykey. This part of the chapter looks at how the registry is organized, which keys might holdentries causing problems, and how to back up and edit the registry using the Registry Editor(regedit.exe). Let’s first look at how the registry is organized, and then you’ll learn how toback up and edit the registry.

CHAPTER 14704 Optimizing Windows
Figure 14-33 Reliability Monitor shows a history of the system that can help identify problems withthe stability of WindowsCourtesy: Course Technology/Cengage Learning
Figure 14-34 Collect data from a Data Collector Set to analyzeCourtesy: Course Technology/Cengage Learning
A+220-7013.2

705Windows Utilities and Tools to Support the OS
14
HOW THE REGISTRY IS ORGANIZEDThe most important Windows component that holds information for Windows is theregistry. The registry is a database designed with a treelike structure (called a hierarchicaldatabase) that contains configuration information for Windows, users, software applica-tions, and installed hardware devices. During startup, Windows builds the registry in memory and keeps it there until Windows shuts down. During startup, afterthe registry is built, Windows reads from it to obtain information to complete thestartup process. After Windows is loaded, it continually reads from many of the subkeysin the registry.
Windows builds the registry from the current hardware configuration and from informa-tion it takes from these files:
Five files stored in the C:\Windows\System32\config folder; these files are called hives,and they are named the SAM (Security Accounts Manager), Security, Software,System, and Default hives. (Each hive is backed up with a log file and a backup file,which are also stored in the C:\Windows\System32\config folder.)For Windows Vista, the C:\Users\username\Ntuser.dat file, which holds the preferencesand settings of the currently logged on user.Windows XP uses information about the current user stored in two files:
• C:\Documents and Settings\username\Ntuser.dat
• C:\Documents and Settings\username\Local Settings\ApplicationData\Microsoft\Windows\Usrclass.dat
After the registry is built in memory, it is organized into five treelike structures (see Figure 14-36). Each of the five segments is called a key. Each key can have subkeys, andsubkeys can have more subkeys and can be assigned one or more values. The way data isorganized in the hive files is different from the way it is organized in registry keys. Figure 14-37 shows the relationship between registry keys and hives.
Figure 14-35 Reported results of collecting data about System DiagnosticsCourtesy: Course Technology/Cengage Learning
A+220-7013.2
A+ 220-701

CHAPTER 14706 Optimizing Windows
HKEY_CURRENT_USER
HKEY_CURRENT_CONFIG
HKEY_CLASSES_ROOT
HKEY_LOCAL_MACHINE
HKEY_USERS
Windows Registry
Subkey Subkey
Subkey
Subkey
Value
Value Value Value
Value
Tree
Key or subtree
Figure 14-36 The Windows registry is logically organized in an upside-down tree structure of keys, subkeys,and valuesCourtesy: Course Technology/Cengage Learning
HKEY_LOCAL_MACHINE
HKEY_USERS
SAM hive Security hive
Software hive System hive
HKEY_CURRENT_CONFIG
HKEY_CLASSES_ROOT
HKEY_CLASSES_ROOT
Default hive
HKEY_CURRENT_USER
Figure 14-37 The relationship between registry subtrees (keys) and hivesCourtesy: Course Technology/Cengage Learning
Here are the five keys, including where they get their data and their purposes:
HKEY_LOCAL_MACHINE (HKLM) is the most important key and contains hard-ware, software, and security data. The data is taken from four hives: the SAM hive,the Security hive, the Software hive, and the System hive. In addition, the HARD-WARE subkey of HKLM is built when the registry is first loaded, based on data collected about the current hardware configuration.HKEY_CURRENT_CONFIG (HKCC) contains Plug and Play information about thehardware configuration that is used by the computer at startup. Information that identifies each hardware device installed on a PC is kept in this area. Some of the data
A+220-7013.2

707Windows Utilities and Tools to Support the OS
14
is gathered from the current hardware configuration when the registry is first loadedinto memory. Other data is taken from the HKLM key, which got its data primarilyfrom the System hive.HKEY_CLASSES_ROOT (HKCR) stores information that determines which applica-tion is opened when the user double-clicks a file. This process relies on the file’s exten-sion to determine which program to load. For example, this registry key might holdthe information to cause Microsoft Word to open when a user double-clicks a file with a .doc file extension. Data for this key is gathered from HKLM key and theHKCU key.HKEY_USERS (HKU) contains data about all users and is taken from the Default hive.HKEY_CURRENT_USER (HKCU) contains data about the current user. The key isbuilt when a user logs on using data kept in the HKEY_USERS key and data kept inthe Ntuser.dat file of the current user.
A+220-7013.2
Notes Device Manager reads data from the HKLM\HARDWARE key to build the information it displaysabout hardware configurations. You can consider Device Manager to be an easy-to-view presentation ofthis HARDWARE key data.
BEFORE YOU EDIT THE REGISTRY, BACK IT UP!As you investigate startup problems and see a registry entry that needs changing, rememberthat it is important to use caution when editing the registry. If possible, make the changefrom the Windows tool that is responsible for the key—for example, by using the VistaPrograms and Features window in Control Panel. If that doesn’t work and you must edit theregistry, always back up the registry before attempting to edit it. Changes made to the registry are implemented immediately. There is no undo feature in the Registry Editor, andno opportunity to change your mind once the edit is made.
Here are the ways to back up the registry:
Use System Protection to create a restore point. A restore point keeps informationabout the registry. You can restore the system to a restore point to undo registrychanges, as long as the registry is basically intact and not too corrupted. Also knowthat, if System Protection is turned on, Windows Vista automatically makes a dailybackup of the registry hive files to the C:\Windows\System32\Config\RegBackfolder.Back up a single registry key just before you edit the key. This method, called export-ing a key, should always be used before you edit the registry. How to export a key iscoming up in this chapter.Make an extra copy of the C:\Windows\System32\config folder. This is what I call theold-fashioned shotgun approach to backing up the registry. This backup will help ifthe registry gets totally trashed. You can boot from the Windows setup CD or DVDand use the Vista Recovery Environment or the XP Recovery Console to restore thefolder from your extra copy. This method is drastic and not recommended except insevere cases. But, still, just to be on the safe side, I make an extra copy of this folderjust before I start any serious digging into the registry.For Windows XP, back up the system state. Use Ntbackup in Windows XP or 2000 toback up the system state, which also makes an extra copy of the registry hives.Windows XP stores the backup of the registry hives in the C:\Windows\repair folder.Windows 2000 stores the backup in the C:\Windows\repair\RegBack folder.
A+ 220-701

CHAPTER 14708 Optimizing Windows
Notes Although you can edit the registry while in Safe Mode, you cannot create a restore point inSafe Mode.
In some situations, such as when you’re going to make some drastic changes to the registry, you’ll want to play it safe and use more than one backup method. Extra registrybackups are always a good thing! You learned how to create a restore point and back upthe system state in Chapter 13. Now let’s look at how to back up an individual key in theregistry, and then you’ll learn how to edit the registry.
Backing Up and Restoring Individual Keys in the RegistryA less time-consuming method of backing up the registry is to back up a particular key thatyou plan to edit. However, know that if the registry gets corrupted, having a backup of onlya particular key most likely will not help you much when trying a recovery. Also, althoughyou could use this technique to back up the entire registry or an entire tree within the registry, it is not recommended.
To back up a key along with its subkeys in the registry, follow these steps:
1. Open the Registry Editor. To do that, click Start and type regedit in the Start Searchdialog box, press Enter, and respond to the UAC box. Figure 14-38 shows theRegistry Editor with the five main keys and several subkeys listed. Click the triangleson the left to see subkeys. When you select a subkey, such as KeyboardClass in the figure, the names of the values in that subkey are displayed in the right pane alongwith the data assigned to each value.
Dataassignedto values
Values forselectedkey
Selectedkey
Figure 14-38 The Registry Editor showing the five main keys, subkeys, values, and dataCourtesy: Course Technology/Cengage Learning
A+220-7013.2
2. Suppose we want to back up the registry key that contains a list of installed software,which is HKLM\Software\Microsoft\Windows\CurrentVersion\Uninstall. (HKLMstands for HKEY_LOCAL_MACHINE.) First click the appropriate triangles to navi-gate to the key. Next, right-click the key and select Export on the shortcut menu, asshown in Figure 14-39. The Export Registry File dialog box appears.

709Windows Utilities and Tools to Support the OS
143. Select the location to save the export file and name the file. A convenient place to store
an export file while you edit the registry is the desktop. Click Save when done. The filesaved will have a .reg file extension.
4. You can now edit the key. Later, if you need to undo your changes, exit the RegistryEditor and double-click the saved export file. The key and its subkeys saved in theexport file will be restored. After you’re done with an export file, delete it.
Editing the RegistryWhen you make a change in Control Panel, Device Manager, or many other places inWindows, the registry is modified automatically. This is the only way most users will everchange the registry. However, on rare occasions, you might need to edit the registry manually.
Before you edit the registry, you should use one or more of the four backup methods justdiscussed so that you can restore it if something goes wrong. To edit the registry, open theRegistry Editor (regedit.exe), and locate and select the key in the left pane of the RegistryEditor, which will display the values stored in this key in the right pane. To edit, rename, ordelete a value, right-click it and select the appropriate option from the shortcut menu. Forexample, in Figure 14-40, I’m ready to delete the value NapsterShell and its data. Changesare immediately applied to the registry and there is no undo feature. (However, Windows orapplications might need to read the changed value before it affects their operations.) Noticein Figure 14-40 that the selected key is displayed in the status bar at the bottom of the editor window. If the status bar is missing, click View on the menu bar and make sureStatus Bar is checked. To search the registry for keys, values, and data, click Edit on themenu bar and then click Find.
A+220-7013.2
A+ 220-701
Figure 14-39 Using the Windows Registry Editor, you can back up a key and its subkeys with the ExportcommandCourtesy: Course Technology/Cengage Learning

CHAPTER 14710 Optimizing Windows
IMPROVING WINDOWS PERFORMANCE
Sluggish Windows systems are so frustrating, and as a PC support technician, you need toknow how to configure the Windows environment for optimum performance using the toolsthat were introduced in the first part of this chapter and in the last chapter.
In this part of the chapter, you’ll learn step-by-step procedures to search for problemsaffecting performance and how to clean up the Windows startup process that goes beyondthe routine maintenance tasks you learned about in Chapter 13. We’re assuming you canstart Windows with no errors. If you are having trouble loading Windows, it’s best toaddress the error first rather than to use the tools described here to improve performance.How to handle errors that keep Windows from starting is covered in Chapters 15 and 16.
Now let’s look at 11 steps you can take to improve Windows performance. After that,you’ll learn how to manually remove software and how to use a monitor to alert you ofchanges that might affect performance.
STEP 1: PERFORM ROUTINE MAINTENANCEIt might seem pretty mundane, but the first things you need to do to improve performanceare the obvious routine maintenance tasks that you learned in Chapter 13. These tasks aresummarized here:
Verify critical Windows settings. Make sure Windows updates are current and servicepacks are installed. Verify that antivirus software is updated and set to routinely scanfor viruses. If a recent scan has not been performed or you suspect a virus is present,
Figure 14-40 Right-click a value to modify, delete, or rename itCourtesy: Course Technology/Cengage Learning
Changes made to the registry take effect immediately. Therefore, take extra carewhen editing the registry. If you make a mistake and don’t know how to correct a problem you create,then double-click the exported key to recover. When you double-click an exported key, the registry isupdated with the values stored in this key.
A+ Exam Tip Content on the A+ 220-701 Essentials exam ends here and content on the A+ 220-702Practical Application exam begins.
A+220-7013.2
A+220-7022.32.4
Caution

711Improving Windows Performance
14
download the latest updates to the antivirus software and scan the system. Make sureWindows Firewall is turned on. How to use antivirus software and Windows Firewallis covered in later chapters.Clean up the hard drive. Make sure at least 15 percent of drive C is free.Defrag the hard drive. Vista automatically does that weekly, but XP does not. A seri-ously fragmented hard drive can significantly affect performance.Check the hard drive for errors. Run Chkdsk to check the hard drive for errors andrecover data.Disable or remove unwanted startup programs. For Vista, use Software Explorer toview and disable startup programs. For XP, check the startup folders for programsthat you can remove from these folders to speed up the startup process. If you findprograms that are no longer needed, use the Vista Programs and Features window orthe XP Add or Remove Programs window to uninstall them.Back up data. As always, if valuable data is not backed up, back it up before you doanything else. Recall from Chapter 13 that you can use the Vista Backup and RestoreCenter or the Windows XP Ntbackup utility to back up data. Don’t risk the datawithout the user’s permission.
A+220-7022.32.4
Notes Viruses, adware, worms, and other malicious software can use Windows resources and pull asystem down. Keep antivirus software running in the background. If you see a marked decrease inWindows performance, scan the hard drive for viruses, worms, and adware.
STEP 2: CHECK IF THE HARDWARE CAN SUPPORT THE OSThe system might be slow because the OS does not have the hardware resources it needs.Use the Vista Windows Experience Index, upgrade advisors, and System Information to findout if the system can support the OS. If you find that the system does not meet the mini-mum requirements or hardware is not compatible, discuss the situation with the user. Youmight be able to upgrade the hardware or install another OS that is compatible with thehardware that is present.
WINDOWS VISTA EXPERIENCE INDEXWindows Experience Index, under Windows Vista, is a summary index designed to measurethe overall performance of a system. You can use it to compare systems and identify performance bottlenecks in a particular system. To use it, click Start, right-click Computer,and select Properties from the shortcut menu. In the System window, click WindowsExperience Index. The Performance Information and Tools window appears. Figure 14-41shows the window for a system with performance issues, and Figure 14-42 shows the windowfor a high-end system. Currently, index scores range from 1.0 to 5.9 for Windows Vista.
The base score is the lowest score of all components and identifies the bottleneck for thesystem. In the case of the computer in Figure 14-41, this bottleneck is memory. Therefore, toimprove performance on this system, a memory upgrade should be considered. However,don’t always assume a hardware upgrade is necessary. If the bottleneck appears to be graph-ics, the problem might be solved by updating the graphics drivers or by updating Windows.Try updating the graphics drivers before you consider upgrading the video card.
CHECK FOR HARDWARE OR SOFTWARE COMPATIBILITYTo make sure that all hardware or software installed on the system is compatible withWindows Vista, use the Vista Upgrade Advisor. Download the program from the Microsoft
A+ 220-702

712
Figure 14-41 Use the Windows Experience Index to get a snapshot of a computer’s performance and identifypotential bottlenecksCourtesy: Course Technology/Cengage Learning
Figure 14-42 The Windows Experience Index for this system reports no potential bottlenecksCourtesy: Course Technology/Cengage Learning
A+220-7022.32.4

713Improving Windows Performance
14
Web site at www.microsoft.com/windows/windows-vista/get/upgrade-advisor.aspx. Be sureto connect your printer and USB devices before you use the program to scan the system. Ifthe scan finds software or hardware that has compatibility issues with Vista, it might reportan update that you can use. Follow any guidelines it gives to solve the problem.
For Windows XP, the upgrade advisor is no longer available on the Microsoft Web site,but you can find it on the XP setup CD. Run this program from a command promptwindow: D:\I386\Winnt32 /checkupgradeonly. You might need to substitute a differentdrive letter for your optical drive.
You can also use the System Information Utility (msinfo32.exe) to find information aboutthe installed processor and its speed, how much RAM is installed, and free space on thehard drive. Compare all these values to the minimum and recommended requirements forWindows listed in Chapter 12.
If you suspect the processor is not fast enough for the system, you can use PerformanceMonitor to see how well it’s performing. Following instructions given earlier in the chapter, openthe Reliability and Performance Monitor. To get more detailed information, click PerformanceMonitor, which is tracking CPU activity (see Figure 14-43). Leave the window open on thescreen as you perform various operations and watch the percentage activity of the CPU.
Figure 14-43 The Performance monitor tracking CPU performanceCourtesy: Course Technology/Cengage Learning
A+ 220-702
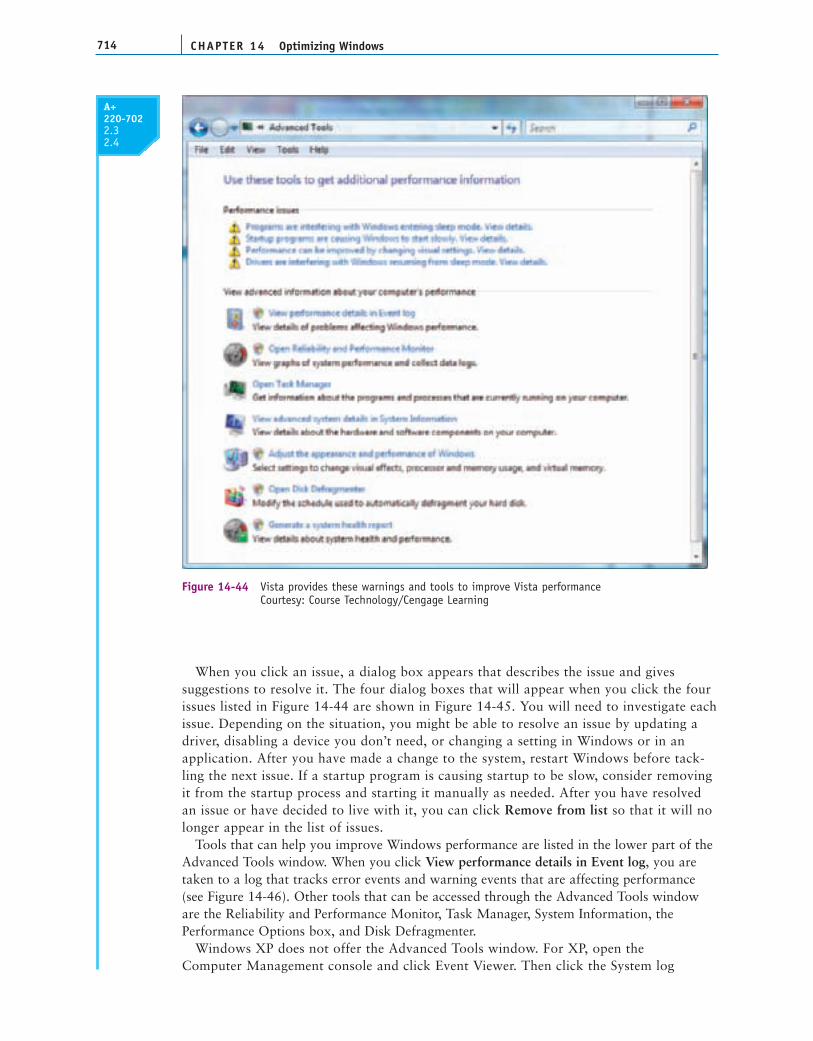
STEP 3: CHECK FOR PERFORMANCE WARNINGSWindows Vista tracks issues that are interfering with performance. To see these warnings,click Advanced tools in the Windows Experience Index window shown in Figures 14-41 and14-42. The Advanced Tools window appears, as shown in Figure 14-44. If Windows knowsof performance issues, they are listed at the top of this window. For the computer in Figure 14-44, four issues are reported.
A+220-7022.32.4
CHAPTER 14714 Optimizing Windows
When you click an issue, a dialog box appears that describes the issue and givessuggestions to resolve it. The four dialog boxes that will appear when you click the fourissues listed in Figure 14-44 are shown in Figure 14-45. You will need to investigate eachissue. Depending on the situation, you might be able to resolve an issue by updating adriver, disabling a device you don’t need, or changing a setting in Windows or in anapplication. After you have made a change to the system, restart Windows before tack-ling the next issue. If a startup program is causing startup to be slow, consider removingit from the startup process and starting it manually as needed. After you have resolvedan issue or have decided to live with it, you can click Remove from list so that it will nolonger appear in the list of issues.
Tools that can help you improve Windows performance are listed in the lower part of theAdvanced Tools window. When you click View performance details in Event log, you aretaken to a log that tracks error events and warning events that are affecting performance(see Figure 14-46). Other tools that can be accessed through the Advanced Tools windoware the Reliability and Performance Monitor, Task Manager, System Information, thePerformance Options box, and Disk Defragmenter.
Windows XP does not offer the Advanced Tools window. For XP, open the Computer Management console and click Event Viewer. Then click the System log
Figure 14-44 Vista provides these warnings and tools to improve Vista performanceCourtesy: Course Technology/Cengage Learning
A+220-7022.32.4

715
14
A+ 220-702
Figure 14-45 Windows reports four issues that are affecting performanceCourtesy: Course Technology/Cengage Learning
A+220-7022.32.4
Figure 14-46 Event Viewer log reporting warning and error events affecting performanceCourtesy: Course Technology/Cengage Learning

CHAPTER 14716 Optimizing Windows
Figure 14-47 Windows XP Event Viewer shows events sorted by typeCourtesy: Course Technology/Cengage Learning
(see Figure 14-47). To sort the events by type, click the Type column. Look for eventsthat might indicate a performance problem. To see details about an event, double-clickit. The Event Properties box opens, shown on the right side of Figure 14-47. You canthen scroll through the details of events by clicking the up and down arrows in the top-right side of this box.
A+220-7022.32.4
STEP 4: CHECK THE RELIABILITY MONITORThe next step to improve performance is to try to determine if a problem with a hard-ware or software installation is affecting performance. You need to know if Windowsperformance has always been slow, or if poor performance began sometime afterWindows was installed. If the problem began after Windows was installed, it mightbe caused by a hardware or software installation that has a problem or is notcompatible with Windows. Try to determine about the time the problem started.Then do the following:
1. Open the Reliability and Performance Monitor and click the Reliability Monitor (seeFigure 14-48). This monitor has faithfully been recording events since Windows wasinstalled.
2. Scroll through the graph to find the day that the problem began. Look for failuresrelated to software installations, applications, hardware, Windows, and other fail-ures that happened about the time the problem occurred. To see details about

717Improving Windows Performance
14
Figure 14-48 Use Reliability Monitor to search for when a problem beganCourtesy: Course Technology/Cengage Learning
A+220-7022.32.4
A+ 220-702
the failure, click it. Also look for a dip in the line graph at the top of theReliability Monitor graph. You can see such a dip in Figure 14-48 when driverswere installed. These drivers were installed for a Maxtor external hard drive thatautomatically makes backups of user data on this computer. Looking back atFigure 14-45, you can see that the Maxtor backup service is slowing downWindows startup. Options to fix the problem are to update the drivers or stop theservice from launching at startup.
STEP 5: DISABLE THE INDEXER FOR WINDOWS SEARCHThe Windows indexer is responsible for maintaining an index of files and folders on a harddrive to speed up Windows searches. The indexing service has a low priority and onlyworks when it senses that the hard drive is not being accessed by a service with a higher priority. However, it might still slow down performance. Do the following to find out if thisservice is causing a performance problem:
1. Find out if the indexing service is currently indexing the system. To do that, enterIndex in the Vista Start Search box and select Indexing Options from the programslist. The Indexing Options box opens. If you see the indexing status is Indexingspeed is reduced due to user activity (see Figure 14-49), know that indexing is inprogress. Wait until the status changes to Indexing complete. You can now stop theindexing service.
2. To stop the indexing service, click Start and enter services in the Start Search box andpress Enter. Respond to the UAC box. The Services console opens (see the left side ofFigure 14-50).

718
Figure 14-49 Indexing is in progressCourtesy: Course Technology/Cengage Learning
Figure 14-50 Windows Search service Startup type is Automatic (Delayed Start)Courtesy: Course Technology/Cengage Learning
A+220-7022.32.4

719Improving Windows Performance
14
3. Scroll down to and right-click the Windows Search service. Select Properties from theshortcut menu. The properties box opens. Change the Startup type to Disabled (seethe right side of Figure 14-50). Click Stop to stop the service.
4. Click Apply and OK to close the properties box. Close the Services console window.Restart the computer.
5. Run the system for a while and see if performance improves.
6. If performance does not improve, restart the indexing service. To do that, use theServices console to set the status of the Windows Search service to Automatic (DelayedStart) and start the service. Then move on to the next section, Step 6: Disable theVista Aero Interface.
7. If performance does improve, it is possible that the problem was caused by a corrupted index database. To rebuild the database, first use the Services console to setthe Windows Search service status back to Automatic (Delayed Start) and to start theservice.
8. Open the Indexing Options box, click Advanced, and respond to the UAC box. TheAdvanced Options box opens (see Figure 14-51).
9. To rebuild the indexing database, click Rebuild. A dialog box appears warning youthat this can take some time. Click OK. Close the Indexing Options box.
10. After running the system for a while, if the performance problem returns, you can disable the Windows Search service and leave it disabled. However, know that searching will not be as fast without indexing.
A+220-7022.32.4
A+ 220-702
Figure 14-51 Rebuild the indexing databaseCourtesy: Course Technology/Cengage Learning

CHAPTER 14720 Optimizing Windows
STEP 6: DISABLE THE VISTA AERO INTERFACEThe Vista Aero interface (also called the Aero Glass) might be slowing down the systembecause it uses memory and computing power. Try disabling it. If performance improves,you can conclude that the hardware is not able to support the Aero interface. At that point,you might want to upgrade memory, upgrade the video card, or leave the Aero interface disabled. To disable the Aero interface, do the following:
1. Right-click the desktop and select Personalize from the shortcut menu. ThePersonalization window opens. Click Window Color and Appearance. Then clickOpen classic appearance properties for more color options. The Appearance Settingsbox opens, shown on the right of Figure 14-52.
2. Under Color scheme, select Windows Vista Basic and click Apply. Close the dialogbox and window.
Figure 14-52 Disable Aero Glass to conserve system resourcesCourtesy: Course Technology/Cengage Learning
A+220-7022.32.4
STEP 7: DISABLE THE VISTA SIDEBARRecall that the Vista sidebar appears on the Windows desktop to hold miniapplicationscalled gadgets. You might see a slight improvement in performance if you disable the side-bar. To do that, right-click the sidebar and select Properties from the shortcut menu. The

721Improving Windows Performance
14Figure 14-53 Disable the Vista sidebar to improve performance
Courtesy: Course Technology/Cengage Learning
A+220-7022.32.4
A+ 220-702
STEP 8: PLUG UP ANY MEMORY LEAKSIf you notice that performance slows after a system has been up and running withouta restart for some time, suspect a memory leak. A memory leak is caused when anapplication does not properly release memory allocated to it that it no longer needsand continually requests more memory than it needs. To see how much memory anapplication has allocated to it that is not available to other programs, open theReliability and Performance Monitor. Click the down arrow on the Memory bar.For example, in Figure 14-54, you can see that the sidebar.exe program (Vistasidebar) is using a significant amount of memory compared to other runningapplications.
Another way to search for a memory leak is to use Task Manager. Open TaskManager and click the Processes tab. On the menu bar, click View, Select Columns.Verify that the Memory Private Working Set, Handles, and Threads columns arechecked and click OK. If you observe that the values in these three columns increaseover time for a particular program, suspect the program has a memory leak. To sort thedata by one column, click the column label. For example, the Task Manager windowshown in Figure 14-55 is sorted by Memory. To solve the problem of a program thathas a memory leak, try to get an update or patch from the program manufacturer’sWeb site.
Windows Sidebar Properties box appears (see Figure 14-53). Uncheck Start Sidebar whenWindows starts. Then click Apply and OK to close the box.

CHAPTER 14722 Optimizing Windows
Figure 14-54 Memory allocated to the Vista sidebar programCourtesy: Course Technology/Cengage Learning
Figure 14-55 Task Manager shows how memory is allocated for an applicationCourtesy: Course Technology/Cengage Learning
A+220-7022.32.4

723Improving Windows Performance
14
A+220-7022.32.4
Figure 14-56 Control the User Account Control boxCourtesy: Course Technology/Cengage Learning
A+ 220-702
STEP 9: CONSIDER DISABLING THE VISTA UAC BOXOne task that might slightly improve performance on a Vista system is to disablethe UAC box. Even though you might see a slight performance gain, disabling it isnot recommended. The UAC box can protect your system against users makingunauthorized changes and against malware installing itself without your knowledge.It’s best to keep it up and running. However, if you do decide to disable it, here’s how:
1. Open Control Panel and click User Accounts and Family Safety. In thewindow that opens, click User Accounts. In the User Accounts window (seeFigure 14-56), click Turn User Account Control on or off. Respond to theUAC box.
2. Uncheck Use User Account Control (UAC) to help protect your computer. Click OK.Close the User Accounts window.
STEP 10: CONSIDER USING VISTA READYBOOSTWindows Vista ReadyBoost uses a flash drive or secure digital (SD) memory card to boosthard drive performance. The faster flash memory is used as a buffer to speed up hard driveaccess time. You see the greatest performance increase using ReadyBoost when you have aslow hard drive (running at less than 7200 RPM). To find out what speed your hard drive isusing, use System Information (Msinfo32.exe) and drill down to the Storage Disks (seeFigure 14-57). The model of the hard drive appears in the right pane. Use Google to searchon this brand and model; a quick search shows this drive runs at 5400 RPM. It’s, therefore,a good candidate to benefit from ReadyBoost.
When you first connect a flash device, Windows will automatically test it to see if it qualifiesfor ReadyBoost. To qualify, it must have a capacity of 256 MB to 4 GB with at least 256 MBof free space, and run at about 2 MB/sec of throughput. If the device qualifies, Windows will ask you permission to use the device for ReadyBoost, which will tie up at least 256 MB

CHAPTER 14724 Optimizing Windows
of free space. You can manually have Windows test a memory card or flash drive forReadyBoost by right-clicking the device and selecting Properties from the shortcut menu. On the device properties window, click the ReadyBoost tab, as shown in Figure 14-58.
The best flash devices to use for ReadyBoost are the ones that use the faster buses. Forexample, an onboard memory card reader in a laptop will be faster than a USB 1.1 external
Figure 14-57 Use the System Information window to find out the brand and model of your hard driveCourtesy: Course Technology/Cengage Learning
A+220-7022.32.4
Figure 14-58 Offer a device for Windows to use for ReadyBoostCourtesy: Course Technology/Cengage Learning

725Improving Windows Performance
14
Figure 14-59 Windows Advanced Boot Options menu allows you to launch Safe ModeCourtesy: Course Technology/Cengage Learning
A+ 220-702
memory card reader. When you remove the device, no data is lost because the device onlyholds a copy of the data.
STEP 11: CLEAN WINDOWS STARTUPAs a part of routine maintenance, you need to verify that startup programs are kept to a minimum so as to not slow down Windows startup or Windows performance. These routinechores include checking startup folders in Windows XP and Software Explorer in WindowsVista. If you still need to improve Windows performance, you can dig deeper into startupprocesses to make sure that unnecessary programs are not using up resources. To cleanWindows startup, you can use Safe Mode and MSconfig to find out more about the problem,and then you can disable or uninstall programs causing the problem. So let’s get started.
OBSERVE PERFORMANCE IN SAFE MODETo find out if programs and services are slowing down Windows startup, boot the system in SafeMode and watch to see if performance improves. Recall that Safe Mode loads a minimum configuration of hardware and software. If performance improves when you start the system inSafe Mode, you can assume that nonessential startup programs are slowing down the systemwhen Windows boots normally. If you have a stopwatch or a watch with a second hand, youcan time a normal Windows startup from the moment you press the power button until the waiticon on the Windows desktop disappears. Then time the system when it boots into Safe Mode. Ifthe difference is significant, follow the steps in this part of the chapter to reduce Windowsstartup to essentials. To boot the system in Safe Mode, press F8 while Windows is loading andthen select Safe Mode with Networking from the boot options menu (see Figure 14-59).
A+220-7022.32.4

CHAPTER 14726 Optimizing Windows
If the performance problem still exists in Safe Mode, then you can assume that the problemis with a hardware device, a critical driver, or a Windows component. How to solve problemswith these components is covered in Chapters 15 and 16. If the problem does not occur whenbooting into Safe Mode, then use the tools discussed next to find the nonessential service orprogram causing the problem.
USE MSCONFIG TO FIND A STARTUP PROGRAM AFFECTINGPERFORMANCEYou can use the MSconfig utility to zero in on the service or other program that is slowing downstartup. The process of using MSconfig to find the programs causing the problem is described inFigure 14-60. The recommended strategy uses a search technique called a half-again search.
Start
Disable all programs in the group ofsuspected programs
Is performancegood?
No
The problem is notamong this group of
programs
Enable all programs inthe group
Stop
Yes
The problem is amongthose most recently
disabled
Enable half of thosemost recently disabled
Is performancegood?
The problem is amongthose most recently
enabled
Disable half of thosemost recently enabled
Have you identifiedthe problemprogram?
You are nowready to fix the
problemStop
YesNo
No Yes
Figure 14-60 Strategy to identify the program(s) causing the problemCourtesy: Course Technology/Cengage Learning
A+220-7022.32.4
A+220-7022.32.42.1

727Improving Windows Performance
14
You can demonstrate the effectiveness of the half-again search technique (also called a binary search) by
playing the number guessing game with a friend. Tell your friend to pick a number between oneand 1,000,000. Tell him you can guess the number if he will answer no more than 21 questions.The first question is “Is the number between one and 500,000?” If the answer is “No,” then you know the number is between 500,000 and 1,000,000. The next half-again question is, “Is the number between 500,000 and 750,000?” Using this technique, you can zero in on the answer in fewer than 21 questions.
APPLYING CONCEPTS
Follow these steps using MSconfig to identify one or more programs as the source of theproblem:
1. To launch the utility, enter msconfig.exe in the Vista Start Search box or the XP Runbox and press Enter. For Vista, respond to the UAC box.
2. To look for the problem among the non-Microsoft services, click the Services tab (seeFigure 14-61). Check Hide all Microsoft services, and then click Disable all. ClickApply. Close the System Configuration window and restart the computer.
A+ 220-702
Figure 14-61 Use the System Configuration Utility (MSconfig) to temporarily disable servicesCourtesy: Course Technology/Cengage Learning
3. Has performance improved? If so, you can assume that one or more services you disabled are the source of the problem. You can find out which service is causing theproblem by enabling them one at a time, restarting the system each time, until theproblem returns. This process can take a lot of time! A faster approach is to use thehalf-again technique. With this technique, use MSconfig to enable half the services youdisabled and then restart the system. Did the problem return? If so, disable half ofthose you just enabled and restart again. If not, enable half of the disabled services.Restart the system and look for a performance improvement.
A+220-7022.32.42.1

CHAPTER 14728 Optimizing Windows
4. Keep repeating Step 3 until you have identified the service that is causing the problem. Next, try to update the service, or, if it is nonessential, consider unin-stalling or permanently disabling it. To permanently disable a service, use theServices console.
5. If performance does not improve by disabling all services, you can assume the problemis not with the services. In that case, enable them all and select the Startup tab.
6. Disable all the programs listed on the Startup tab and restart the system. If perform-ance improves, begin the process diagramed in Figure 14-60 to enable half the programs that are disabled until you zero in on the problem.
7. If no non-Microsoft service or startup program caused the problem, then you canassume the problem is caused by a Microsoft service. Disable all services, including theMicrosoft services and test performance. If performance improves, use MSconfig tokeep enabling services until you find the Microsoft service causing the problem. Youcan then update the service or replace it using tools described in Chapters 15 and 16.
8. Remember that you don’t want to permanently leave MSconfig in control of startup.After you have used MSconfig to identify the problem, use other tools such as theServices console or startup folders to permanently remove them from startup. Afterthe problem is fixed, return MSconfig to a normal startup.
DISABLE OR UNINSTALL BACKGROUND PROCESSES AND STARTUP PROGRAMSRecall that you can stop a service or other program using Task Manager, and you can useMSconfig to stop it from starting at startup. You can also use Task Manager to viewresources a program is using and change the priority level of a running program. However,all these solutions should be considered temporary fixes. To permanently manage a service,use the services console or the Windows component responsible for the service, such as anapplet in Control Panel. For third-party services, such as software to update an applicationor software to download digital photos, the application is likely to have a management util-ity to control the service or background process.
When investigating a service, try using a good search engine on the Web to search for thename of the service or the name of the program file that launches the service. Either can giveyou information you need to snoop out unwanted services. If you’re not sure you want tokeep a certain service, use MSconfig to temporarily disable it at the next boot so that youcan see what happens.
Be aware that when you disable all Microsoft services, you are disablingNetworking, Event Logging, Error Reporting, Windows Firewall, Windows Installer, Windows Backup, PrintSpooler, Windows Update, System Protection, and other important services. These services should onlybe disabled when testing for performance problems and then immediately enabled when the test is finished. Also, know that if you disable the Volume Shadow Copy service, all restore points kept on thesystem will be lost. If you intend to use System Restore to fix a problem with the system, don’t disablethis service. If you are not sure what a service does, read its description in the Services console beforeyou change its status.
Notes One service you might want to disable in the Services console is the Windows Installer servicethat is responsible for uninstalling and installing software. You can then manually start the service if youneed to install or uninstall software.
A+220-7022.32.4
A+220-7022.32.42.1
Caution

729Improving Windows Performance
14
When you permanently disable a service using the Services console or some other tool,don’t forget to reboot to make sure everything works before moving on to the next tool touse in cleaning up startup: Task Scheduler.
CHECK FOR UNWANTED SCHEDULED TASKSHome and business editions of Windows Vista and Windows XP Professional offer a Task Scheduler that can be set to launch a task or program at a future time, including atstartup. Task Scheduler stores tasks in a file stored in the C:\Windows\System32\Tasksfolder. For example, in Figure 14-62, there are four scheduled tasks showing and other tasks are stored in three folders.
To view a list of scheduled tasks, click Start, All Programs, Accessories, System Tools,and Task Scheduler. The Task Scheduler window opens as shown in Figure 14-63 forVista after you have responded to the UAC box. For a bare-bones Vista system, theMicrosoft folder will be the only item listed in the Task Scheduler Library on the left.But for this system, other folders and tasks are present. To see details about a task,
A+ 220-702
Figure 14-62 The Tasks folder can contain tasks that launch at startupCourtesy: Course Technology/Cengage Learning
Figure 14-63 View and manage tasks from the Task Scheduler windowCourtesy: Course Technology/Cengage Learning
A+220-7022.32.4

CHAPTER 14730 Optimizing Windows
Notes Windows Vista automatically runs Disk Defragmenter weekly, but Windows XP does not offerthis feature. For XP, you can use Task Scheduler to schedule Disk Defragmenter to run weekly.
including what triggers it, what actions it performs, the conditions and settings related tothe task, and the history of past actions, select the task and then click the tabs in thelower-middle pane. For example, in Figure 14-63 you can see that the HP WEP task isscheduled to run at 5:48 PM daily.
All this information is helpful when researching scheduled tasks to unravel the mystery ofprocesses or activities that fail or bog down a system. In cleaning up startup, be sure tocheck the Task Scheduler window after you have run antivirus software and disabled oruninstalled all startup programs you don’t want. If you still find scheduled tasks present inthe Task Scheduler window, research each task by searching for information about it on theInternet. (Be sure you use reliable Web sites to get your information.) If you decide youdon’t want a task, rather than deleting it, select the task and click Disable in the Actionspane so that you can undo your change if necessary. The exception to this rule is if youknow the task is malware; in this case, definitely delete it!
Notes Tasks can be hidden in the Task Scheduler window. To be certain you’re viewing all scheduledtasks, unhide them. In the menu bar, click View, and then Show Hidden Tasks.
Notes When searching the Internet for information about a process, be sure to use reliable Web sitesto get your information. Some sites will tell you a good process is a bad one just so you’ll purchase theirsoftware to scan the system for errors.
Tasks can be scheduled to run when users log on, when Windows launches, or at a partic-ular time of day, week, or month. Tasks can be scheduled to run one time or many times.Tasks can be applications, services, or other background processes. Tasks can be scheduledto download e-mail or open Internet Explorer and download a Web page. Tasks can alsoconsist of batch programs or Windows scripting. Using the Task Scheduler window, you canadd, delete, or change a task, and these actions can also be performed at a commandprompt.
In the process of cleaning up startup, you might run into software that you’ll want touninstall. In the next part of the chapter, you’ll learn how to manually remove softwarewhen normal uninstall methods fail.
HOW TO MANUALLY REMOVE SOFTWAREIn this part of the chapter, we focus on getting rid of programs that refuse to uninstall orgive errors when uninstalling. In these cases, you can manually uninstall a program. Doingso often causes problems later, so use the methods discussed in this section only as a lastresort after normal uninstall methods have failed.
A+220-7022.32.4

731Improving Windows Performance
14
FIRST TRY THE UNINSTALL ROUTINEMost programs written for Windows have an uninstall routine which can be accessed from theVista Programs and Features applet in the Control Panel, the XP Add Remove Programs appletin the Control Panel, or a utility in the All Programs menu. For example, in Figure 14-64 youcan see in the All Programs menu that Uninstall is an option for the RegCure software installa-tion. Click this option and follow the directions on-screen to uninstall the software. Alternately,you can use the applet in Control Panel to remove the software.
MANUALLY DELETE THE PROGRAM FILESIf the uninstall routine does not work or is missing, as a last resort, you can manually deletethe program files and registry entries used by the software you want to uninstall. In ourexample, we’ll use the RegCure software by ParetoLogic, Inc. as the software to be deleted.Follow these steps:
1. Most likely, the program files are stored in the C:\Program Files folder on the harddrive (see Figure 14-65). For 64-bit editions of Vista, also look for program files in theC:\Program Files (x86) folder. Using Windows Explorer, look for a folder in these fold-ers that contains the software. In Figure 14-65, you can see the RegCure folder underthe Program Files folder. Keep in mind, however, that you might not find the programfiles you’re looking for in the C:\Program Files or C:\Program Files (x86) folderbecause when you install software, the software installation program normally asksyou where to install the software. Therefore, the program files might be anywhere, andyou might need to search a bit to find them.
2. Delete the RegCure folder and all its contents. You’ll need to confirm the deletion several times as Windows really doesn’t like your doing such things.
Notes Before uninstalling software, make sure it’s not running in the background. Antivirus softwarecannot be uninstalled if it’s still running. You can use Task Manager to end all processes related to thesoftware, and you can use the Services console to stop services related to the software. Then remove thesoftware.
Figure 14-64 Most applications have an uninstall utility included with the softwareCourtesy: Course Technology/Cengage Learning
A+ 220-702
A+220-7022.32.4

CHAPTER 14732 Optimizing Windows
DELETE REGISTRY ENTRIESEditing the registry can be dangerous, so do this with caution and be sure to back up first!Do the following to delete the registry entries for a program, which cause it to be listed asinstalled software in the Vista Programs and Features window or the XP Add or RemovePrograms window of Control Panel:
1. Using one or more of the following methods, back up the registry: Use Windows XPNTbackup to back up the system state, back up the C:\Windows\System32\configfolder, or create a restore point.
2. Click Start, type regedit in the Vista Start Search box or the XP Run box and pressEnter. For Vista, respond to the UAC box.
3. Locate this key, which contains the entries that comprise the list of installed software inControl Panel: HKEY_LOCAL_MACHINE\Software\Microsoft\Windows\CurrentVersion\Uninstall.
4. Back up the Uninstall key to the Windows desktop so that you can backtrack if neces-sary. To do that, right-click the Uninstall key and select Export from the shortcutmenu (see Figure 14-39 earlier in the chapter).
5. In the Export Registry File dialog box, select the Desktop. Enter the filename as SaveUninstall Key, and click Save. You should see a new icon on your desktop named SaveUninstall Key.reg.
6. The Uninstall key can be a daunting list of all the programs installed on your PC.When you expand the key, you might see a long list of subkeys in the left pane, which
Figure 14-65 Program files are usually stored in the C:\Program Files folderCourtesy: Course Technology/Cengage Learning
A+220-7022.32.4

733Improving Windows Performance
14
have meaningless names that won’t help you find the program you’re looking for.Select the first subkey in the Uninstall key and watch as its values and data aredisplayed in the right pane (see Figure 14-66). Step down through each key, watchingfor a meaningful name of the subkey in the left pane or meaningful details in the rightpane until you find the program you want to delete.
7. To delete the key, right-click the key and select Delete from the shortcut menu (seeFigure 14-67). When the Confirm Key Delete dialog box appears asking you to confirmthe deletion, click Yes. Be sure to search through all the keys in this list because the software might have more than one key. Delete them all and exit the Registry Editor.
Figure 14-66 Select a subkey under the Uninstall key to display its values and data in the right paneCourtesy: Course Technology/Cengage Learning
Figure 14-67 Delete the registry key that lists the software as installed softwareCourtesy: Course Technology/Cengage Learning
A+ 220-702
A+220-7022.32.4

CHAPTER 14734 Optimizing Windows
8. Open the Vista Programs and Features window or the XP Add or Remove Programswindow and verify that the list of installed software is correct and the software youare uninstalling is no longer listed.
9. If the list of installed software is not correct, to restore the Uninstall registry key,double-click the Save Uninstall Key.reg icon on your desktop.
10. As a last step when editing the registry, clean up after yourself by deleting the SaveUninstall Key.reg icon and file on your desktop. Right-click the icon and select Deletefrom the shortcut menu.
REMOVE THE PROGRAM FROM THE ALL PROGRAMS MENUTo remove the program from the All Programs menu, right-click it and select Delete fromthe shortcut menu (see Figure 14-68). Click Yes and then Continue to confirm the deletionand respond to the UAC box.
Figure 14-68 Delete the program from the All Programs menuCourtesy: Course Technology/Cengage Learning
Restart the PC and watch for any startup errors about a missing program file. The soft-ware might have stored startup entries in the registry, in startup folders, or as a service thatis no longer present and causing an error. If you see an error, use MSconfig to find out howthe program is set to start. This entry point is called an orphaned entry. You’ll then need todelete this startup entry by editing the registry, deleting a shortcut in a startup folder, or disabling a service using the Services console.
An example of an orphaned entry that resulted in a startup error after software wasremoved is shown in Figure 14-69. Somewhere in the system, the command to launchOsisOijw.dll is still working even though this DLL file has been deleted.
A+220-7022.32.4

735Improving Windows Performance
14
One way to find this orphaned entry point is to use MSconfig. Figure 14-70 shows theMSconfig window, showing us that the DLL is launched from a registry key.
Figure 14-69 Startup error indicates an entry to launch a program has not been removedCourtesy: Course Technology/Cengage Learning
Figure 14-70 MSconfig shows how the DLL is launched during startupCourtesy: Course Technology/Cengage Learning
Figure 14-71 Delete the registry key left there by uninstalled softwareCourtesy: Course Technology/Cengage Learning
A+ 220-702
A+220-7022.32.4
The next step is to back up the registry and then use the Registry Editor to find and deletethe key (see Figure 14-71).

CHAPTER 14736 Optimizing Windows
REGISTRY KEYS THAT AFFECT STARTUP AND LOGON EVENTSYou have just seen how you can edit the registry to remove the entries left there by softwarethat you have manually removed. Listed in this section are some registry keys where startupprocesses can be located. If a system is giving repeated startup errors or you have just removedseveral programs, you might want to search through these registry keys for processes left thereby uninstalled or corrupted software that might be giving startup problems.
As you read through this list of registry keys to search, know that the list is not exhaustive.With experience, you’ll learn that the registry is an everchanging landscape of keys and values.
Registry keys that affect the startup and logon events are listed in the bulleted list below.Your registry might or might not have all these keys. As you search the registry for entries inthese keys, don’t forget to first back up the registry. Because you’ll be searching all over theregistry and not just in one particular place, it’s a good idea to create a restore point as well asback up the C:\Windows\System32\config folder so that the entire registry will be backed up.
These keys cause an entry to run once and only once at startup:
HKLM\Software\Microsoft\Windows\CurrentVersion\RunOnceHKLM\Software\Microsoft\Windows\CurrentVersion\RunServiceOnceHKLM\Software\Microsoft\Windows\CurrentVersion\RunServicesOnceHKCU\Software\Microsoft\Windows\CurrentVersion\RunOnce
Check each key in the list above and move on to the next list.Group Policy (an administrator’s tool to control what a user can do on a system) places
entries in the following keys to affect startup:
HKCU\Software\Microsoft\Windows\CurrentVersion\Policies\Explorer\RunHKLM\Software\Microsoft\Windows\CurrentVersion\Policies\Explorer\Run
Windows loads many DLL programs from the following key, which is sometimes used bymalicious software. Entries in this key are normal, so don’t delete one unless you know it’scausing a problem:
HKLM\Software\Microsoft\Windows\CurrentVersion\ShellServiceObjectDelayLoad
Entries in the keys listed next apply to all users and hold legitimate startup entries. Don’tdelete an entry unless you suspect it to be bad:
HKLM\Software\Microsoft\Windows\CurrentVersion\RunHKCU\Software\Microsoft\Windows NT\CurrentVersion\WindowsHKCU\Software\Microsoft\Windows NT\CurrentVersion\Windows\RunHKCU\Software\Microsoft\Windows\CurrentVersion\Run
These keys and their subkeys contain entries that pertain to background services that aresometimes launched at startup:
HKLM\Software\Microsoft\Windows\CurrentVersion\RunServiceHKLM\Software\Microsoft\Windows\CurrentVersion\RunServices
The following key contains a value named BootExecute, which is normally set to autochk.It causes the system to run a type of Chkdsk program to check for hard drive integrity whenit was previously shut down improperly. Sometimes another program adds itself to this
A+220-7022.4

737Improving Windows Performance
14
value, causing a problem. For more information about this situation, see the MicrosoftKnowledge Base article 151376, “How to Disable Autochk If It Stops Responding DuringReboot” at support.microsoft.com.
HKLM\System\CurrentControlSet\Control\Session Manager
Here is an assorted list of registry keys that have all been known to cause various problemsat startup. Remember, before you delete a program entry from one of these keys, research theprogram filename so that you won’t accidentally delete something you want to keep:
HKCU\Software\Microsoft\CommandHKCU\Software\Microsoft\Command Processor\AutoRunHKCU\Software\Microsoft\Windows\CurrentVersion\RunOnce\SetupHKCU\Software\Microsoft\Windows NT\CurrentVersion\Windows\loadHKLM\Software\Microsoft\Windows NT\CurrentVersion\Windows\AppInit_DLLsHKLM\Software\Microsoft\Windows NT\CurrentVersion\Winlogon\SystemHKLM\Software\Microsoft\Windows NT\CurrentVersion\Winlogon\UsHKCR\batfile\shell\open\commandHKCR\comfile\shell\open\commandHKCR\exefile\shell\open\commandHKCR\htafile\shell\open\commandHKCR\piffile\shell\open\commandHKCR\scrfile\shell\open\command
MONITOR THE STARTUP PROCESSIf you keep the startup process clean, you are more likely to keep Windows performing well. Youcan use several third-party tools to monitor any changes to startup. A good one is WinPatrol byBillP Studios (www.winpatrol.com). Download and install the free program to run in the back-ground to monitor all sorts of things, including changes to the registry, startup processes, InternetExplorer settings, and system files. In Figure 14-72, you can see how WinPatrol gave an alertwhen it detected that Adobe Update Manager was placing an entry in the registry to launch atstartup to update the Adobe software. WinPatrol displays a little black Scotty dog in the notifica-tion area of the taskbar to indicate it’s running in the background and guarding your system. Also,many antivirus programs monitor the startup process and inform you when changes are made.
A+ 220-702
Figure 14-72 WinPatrol by BillP Studios alerts you when the startup process is about to be alteredCourtesy: Course Technology/Cengage Learning
A+220-7022.4

CHAPTER 14738 Optimizing Windows
>> CHAPTER SUMMARY
Task Manager (Taskmgr.exe) lets you view services and other running programs, CPU andmemory performance, network activity, and user activity. It is useful to stop a process thatis hung.
The MSconfig (Msconfig.exe) tool can be used to temporarily disable startupprocesses to test for performance improvement and find a startup program causing a problem.
The Services console (Services.msc) is used to manage services. When and if a servicestarts can be controlled from this console.
The Computer Management console (Compmgmt.msc) contains a group of Windowsadministrative tools useful for managing a system.
The Microsoft Management Console (MMC) can be used to build your own custom consoles from available snap-ins.
Event Viewer (Eventvwr.msc) is a console that displays a group of logs kept by Windowsuseful for troubleshooting problems with software and hardware and also auditsWindows security.
The Vista Reliability and Performance Monitor (Perfmon.msc) and the XP PerformanceMonitor (also called the System Monitor) can be useful when trying to find out the sourceof a performance drain on the system.
The Registry Editor (Regedit.exe) is used to edit the register in real time. There is no wayto undo changes you make to the registry. Therefore, you should always make a backupbefore editing it.
The 11 high-level steps to improve Windows performance are (1) routine maintenance,(2) check if hardware can support the OS, (3) check for performance warnings, (4)check the Reliability Monitor, (5) disable indexing for Windows search, (6) disable theVista Aero glass, (7) disable the Vista sidebar, (8) plug up memory leaks, (9) disable the Vista UAC box, although this is not a recommended best practice, and(10) use ReadyBoost to improve a slow hard drive’s performance, and (11) clean upWindows startup.
The Windows Vista Experience Index gives a high-level measurement of the overall performance of a system and lists any performance alerts.
Disabling the Vista Aero glass and the Vista sidebar can save on system resources andimprove performance, especially if memory is low.
Memory leaks are caused by poorly written applications that request memory they don’t need.
Disabling the Vista UAC box is not a recommended best practice because it improves thesecurity of a system.
Tools that can be used to investigate and clean up the Windows start process include SafeMode, MSconfig, Task Manager, Services console, and Task Scheduler.
If software does not uninstall using the Vista Programs and Features window or the XP Add or Remove Programs window, you can manually uninstall the software.

739Reviewing the Basics
14
>> REVIEWING THE BASICS
1. List four ways to start Task Manager.
2. If a program is not responding, how can you stop it?
3. If a program is using too much of system resources and bogging down other applications,what can you do to fix the problem?
4. How can you get a list of users currently logged onto the computer?
5. What is the program filename and extension of the System Configuration utility?
6. What tool in Windows Vista, used to temporarily disable a startup program, is not avail-able in Windows XP?
7. If a nonessential service is slowing down startup, how can you permanently disable it?
8. What should be the startup type of a service that should not load at startup but might beused later after startup? What tool can you use to set the startup type of a service?
9. List three snap-ins that can be found in both the Windows Vista and Windows XPComputer Management windows that are used to manage hardware and track problemswith hardware.
10. What is the file extension of a console that is managed by Microsoft Management Console?
11. What are the program filename and extensions of the Microsoft Management Console?
12. Which log in Event Viewer would you use to find out about attempted logins to a computer?
13. Which log in Event Viewer would you use if you suspect a problem with the hard drive?
14. What is the program filename and extension of the Reliability and Performance Monitor?
15. What is the path to the Ntuser.dat file in Windows Vista?
16. How is the Ntuser.dat file used?
17. Which registry key contains information that Device Manager uses to display informationabout hardware?
18. What tool in Windows XP do you use to back up the system state?
Computer Management(Compmgmt.msc)
consoleData Collector SetsEvent Viewer (Eventvwr.msc)HKEY_CLASSES_ROOT
(HKCR)HKEY_CURRENT_CONFIG
(HKCC)HKEY_CURRENT_USER
(HKCU)
HKEY_LOCAL_MACHINE(HKLM)
HKEY_USERS (HKU)Microsoft Management
Console (MMC)Perfmon.mscReadyBoostregistryRegistry Editor (Regedit.exe)Reliability and Performance
Monitor
snap-insSystem Configuration Utility
(Msconfig.exe)Task Manager (Taskmgr.exe)Task SchedulerVista Upgrade AdvisorWindows Experience Index
>> KEY TERMS
For explanations of key terms, see the Glossary near the end of the book.

CHAPTER 14740 Optimizing Windows
19. What is the Vista tool that can give you a quick report of the overall performance of thesystem?
20. To improve Windows performance, you decide to disable the indexer used for Windowssearch. Will Windows search still work?
21. What three indicators in Task Manager can be used to find which program has a memory leak?
22. Why is it best to not disable the UAC box?
23. What key do you press at startup to load the system in Safe Mode?
24. If performance improves when Windows is loaded in Safe Mode, what can you conclude?
25. If performance does not improve when Windows is loaded in Safe Mode, what can youconclude?
26. When using MSconfig to stop startup services, including Microsoft services, which serviceshould you not stop so that restore points will not be lost?
27. What is the purpose of the Windows Installer service?
28. In what folder does Task Scheduler keep scheduled tasks?
29. In what folder is most installed software likely to be found?
30. What is the name of the Control Panel applet used to uninstall software in Vista?
>> THINKING CRITICALLY
1. You need to install a customized console on 10 computers. What is the best way to do that?
a. When installing the console on the first computer, write down each step to make it easier to do the same chore on the other nine.
b. Create the console on one computer and copy the .mmc file to the other nine.
c. Create the console on one computer and copy the .msc file to the other nine.
2. What is the name of the program that you can enter in the Vista Start Search box toexecute Event Viewer? What is the process that is running when Event Viewer is displayedon the screen? Why do you think the running process is different from the program name?
3. When cleaning up the startup process, which of these should you do first?
a. Run MSconfig to see what processes are started.
b. If an error message is displayed when you start Windows, investigate the message.
c. After you have launched several applications, use Task Manager to view a list of run-ning tasks.
d. Run the Defrag utility to optimize the hard drive.
4. Using the Internet, investigate each of the following startup processes. Identify the processand write a one-sentence description.
a. Acrotray.exe
b. Ieuser.exe

741Hands-On Projects
14
5. Using Task Manager, you discover an unwanted program that is launched at startup. Ofthe items listed below, which ones might lead you to the solution to the problem? Whichones would not be an appropriate solution to the problem? Explain why they are notappropriate.
a. Look at the registry key that launched the program to help determine where inWindows the program was initiated.
b. Use Task Manager to disable the program.
c. Search Task Scheduler for the source of the program being launched.
d. Use MSconfig to disable the program.
e. Search the startup folders for the source of the program.
>> HANDS-ON PROJECTS
PROJECT 14-1: Researching Running Processes
Boot to the Windows desktop and then use Task Manager to get a list of all the runningprocesses on your machine. Use the Vista Snipping Tool to save and print the Task Managerscreens showing the list of processes. Next, boot the system into Safe Mode and use TaskManager to list running processes. Which processes that were loaded normally are notloaded when the system is running in Safe Mode?
PROJECT 14-2: Monitoring Startup Items with WinPatrol
1. Using the System Configuration Utility (MSconfig), disable all the non-Windows startupitems. Restart your computer.
2. Download and install WinPatrol from www.winpatrol.com.
3. Using the System Configuration Utility (MSconfig), enable all of the disabled startupitems and restart the computer.
4. Are the startup programs able to start? What messages are displayed on the screen?
PROJECT 14-3: Practicing Launching Programs at Startup
Do the following to practice launching programs at startup, listing the steps you took foreach activity:
1. Configure Scheduled Tasks to launch Notepad each time the computer starts and anyuser logs on. List the steps you took.
2. Put a shortcut in a startup folder so that any user launches a command prompt windowat startup.
3. Restart the system and verify that both programs are launched. Did you receive any errors?
4. Remove the two programs from the startup process.

CHAPTER 14742 Optimizing Windows
PROJECT 14-4: Practicing Manually Removing Software
To practice your skills of manually removing software, install WinPatrol fromwww.winpatrol.com. (If you did Project 14-2, the software is already installed.) Then,following directions in the chapter, manually remove the software, listing the steps youused. After you have manually removed the software, reboot the system. Did you get anyerror messages?
PROJECT 14-5: Editing and Restoring the Registry
Practice editing and restoring the registry by doing the following to change the name of theRecycle Bin on the Windows desktop:
1. Using the Registry Editor, export the registry key HKEY_CURRENT_USER\Software\Microsoft\Windows\CurrentVersion\Explorer to an export file stored on the desktop.The data entry for this key is set to “Value not set,” which means the default name,Recycle Bin, is used.
2. To change the name of the Recycle Bin on the Windows Vista desktop for the currentlylogged-on user, click the following subkey, which holds the name of the Recycle Bin:HKEY_CURRENT_USER\Software\Microsoft\Windows\CurrentVersion\Explorer\CLSID\645FF040-5081-101B-9F08-00AA002F954E.
3. To enter a new name for the Recycle Bin, in the right pane, double-click Default.The Edit String box appears. The Value data text box in the dialog box should beempty. If a value is present, you selected the wrong value. Check your work and try again.
4. Enter a new name for the Recycle Bin, for example, “Trash Can.” Click OK.
5. Move the Registry Editor window so that you can see the Recycle Bin on the desktop.Don’t close the window.
6. Right-click the desktop and select Refresh on the shortcut menu. The name of theRecycle Bin changes.
7. To restore the name to its default value, in the Registry Editor window, again double-click the name of the value, delete your entry, and click OK.
8. To verify the change is made, refresh the Windows desktop. The Recycle Bin nameshould return to its default value.
9. Exit the Registry Editor and then delete the exported registry key stored on the desktop.
10. From these directions, you can see that changes made to the registry take effectimmediately. Therefore, take extra care when editing the registry. If you make a mistake and don’t know how to correct a problem you create, then you can restorethe key that you exported by exiting the Registry Editor and double-clicking theexported key.
PROJECT 14-6: Using the Microsoft Management Console
Using the Microsoft Management Console, follow the step-by-step directions in the chapterto create a customized console. Put two snap-ins in the console: Device Manager and EventViewer. Store a shortcut to your console on the Windows desktop.

743Real Problems, Real Solutions
14
PROJECT 14-7: Finding Windows Utilities
The following table lists some important Windows utilities covered in this chapter. Fill in theright side of the table with the filename and path of each utility. (Hint: You can useWindows Explorer or Search to locate files.)
Task Manager
System Configuration Utility
Services Console
Computer Management
Microsoft Management Console
Event Viewer
Reliability and Performance Monitor
Registry Editor
Filename and Path in Filename and Path in Utility Windows Vista Windows XP
>> REAL PROBLEMS, REAL SOLUTIONS
REAL PROBLEM 14-1: Problems Starting Windows XP
Tim, a coworker who uses many different applications on his Windows XP system, complains to you that his system is very slow starting up and responding when he loads andunloads applications. You suspect the system is loading too many services and programsduring startup that are sucking up system resources. What do you do to check for startupprocesses and eliminate the unnecessary ones? If you have access to a Windows XP systemthat needs this type of service, test your answers on this system. Write down at least 10 things you should do or try that were discussed in the chapter to speed up a sluggishWindows XP installation.
REAL PROBLEM 14-2: Cleaning Up Startup
Using a computer that has a problem with a sluggish startup, apply the tools and proce-dures you learned in this chapter to clean up the startup process. Take detailed notes ofeach step you take and the results. (If you are having a problem finding a computer with asluggish startup, consider offering your help to a friend, a family member, or a nonprofitorganization.)

This page intentionally left blank
Related Documents