PowerBroker Identity Services Administration Guide

PBIS Administration Guide 8.2
Dec 22, 2015
bla
Welcome message from author
This document is posted to help you gain knowledge. Please leave a comment to let me know what you think about it! Share it to your friends and learn new things together.
Transcript
PowerBroker Identity Services
Administration Guide
Revision/Update Information: September 2014
Corporate Headquarters5090 N. 40th StreetPhoenix, AZ 85018Phone: 1 818-575-4000
COPYRIGHT NOTICECopyright © 2014 BeyondTrust Software, Inc. All rights reserved. Use of this software and/or document, as and when applicable,is also subject to the terms and conditions of the license between the licensee and BeyondTrust Software, Inc. (“BeyondTrust”)or BeyondTrust’s authorized remarketer, if and when applicable.
TRADE SECRET NOTICEThis software and/or documentation, as and when applicable, and the information and know-how they contain constitute theproprietary, confidential and valuable trade secret information of BeyondTrust and/or of the respective manufacturer or author,and may not be disclosed to others without the prior written permission of BeyondTrust. This software and/or documentation,as and when applicable, have been provided pursuant to an agreement that contains prohibitions against and/or restrictions oncopying, modification and use.
DISCLAIMERBeyondTrust makes no representations or warranties with respect to the contents hereof. Other than, any limited warrantiesexpressly provided pursuant to a license agreement, NO OTHER WARRANTY IS EXPRESSED AND NONE SHALL BE IMPLIED,INCLUDING WITHOUT LIMITATION THE WARRANTIES OF MERCHANTABILITY AND FITNESS FOR USE OR FOR A PARTICULARPURPOSE.
LIMITED RIGHTS FARS NOTICE (If Applicable)If provided pursuant to FARS, this software and/or documentation, as and when applicable, are submitted with limited rights.This software and/or documentation, as and when applicable, may be reproduced and used by the Government with the expresslimitation that it will not, without the permission of BeyondTrust, be used outside the Government for the following purposes:manufacture, duplication, distribution or disclosure. (FAR 52.227.14(g)(2)(Alternate II))
LIMITED RIGHTS DFARS NOTICE (If Applicable)If provided pursuant to DFARS, use, duplication, or disclosure of this software and/or documentation by the Government issubject to limited rights and other restrictions, as set forth in the Rights in Technical Data – Noncommercial Items clause atDFARS 252.227-7013.
TRADEMARK NOTICESPowerBroker, PowerPassword, and PowerKeeper are registered trademarks of BeyondTrust. PowerSeries, PowerADvantage,PowerBroker Password Safe, PowerBroker Directory Integrator, PowerBroker Management Console, PowerBroker Desktops,PowerBroker Virtualization, PowerBroker Express, PowerBroker Databases, PowerBroker Windows Servers, PowerBrokerWindows Desktops, and PowerBroker Identity Services are trademarks of BeyondTrust.ssh® is a registered trademark of SSH Communications Security Corp in the United States and in certain other jurisdictions. TheSSH logo, Tectia and tectia logo are trademarks of SSH Communications Security Corp and may be registered in certainjurisdictions.This application contains software powered by PKAIP®, the leading solution for enabling efficient and secure data storage andtransmission. PKAIP® is provided by PKWARE, the inventor and continuing innovator of the ZIP file format. Used withpermission.
OTHER NOTICESIf and when applicable the following additional provisions are so noted:The PowerBroker Identity Services Open software is free to download and use according to the terms of the Limited GPL 2.1 forclient libraries and the GPL 2 for daemons. The licenses for PowerBroker Identity Services Enterprise and for PowerBrokerIdentity Services UID-GID Module are different. For complete information on the software licenses and terms of use forBeyondTrust products, see www.beyondtrust.com.
Contents
Introduction 7
Conventions Used in This Guide 7Documentation Set for PBIS Enterprise 7
Contact Technical Support 9Before Contacting Technical Support 9Contacting Support 10
Using the Management Console 12
Start the BeyondTrust Management Console 12Connect to a Domain 14
Changes Made by the Directory Integrated Mode Configuration 14Replication in a Large Forest or in Multiple Domains 14Add a Plug-In 14
Working with Cells 15
Understanding PowerBroker Cells 15Types of Cells 15How Cells Are Processed 16Cell Design 17Using Multiple Cells 18
Assigning Users to Manage Cells 18Create a Cell and Associate it with an OU or a Domain 19Create a Default Cell 19Associate a User with Cells 20Linking Cells 20Moving a Computer to Another Cell 23Managing Cells with Cell Manager 23
Start Cell Manager 23Assigning Users to Manage a Cell 24Change Permissions of a Cell, Group, or User 24Add a Cell 24Adding a User or Group to a Cell 25Filter Cells 25Connect to a Different Domain 26
Managing Users and Groups 27
Configuring Cell Settings for Users 27Configuring Cell Settings for a Group 29Disable a User 31Finding Users and Groups in ADUC 31Finding Orphaned Objects 33Configure Entries in Your sudoers Files 33
Check a User's Canonical Name on Linux 34
PBIS Enterprise Administration Guide Contents
BeyondTrust® September 2014 3
Set a sudoers Search Path 34Add Domain Accounts to Local Groups 34Extend File Mode Permissions with POSIX ACLs 35
Prerequisites 35Example 36Using POSIX ACLs to Grant AD Accounts Access to Subversion 37
Migrating Users to Active Directory 38
Migrate Users to Active Directory 38Before Running theMigration Tool 38Run theMigration Tool 39
Migrate a User Profile on a Mac 40Migrate a User Profile from the GUI 41Migrate a User Profile from the Command Line 42Customize theMigration Script 42Migrating NIS Domains 42
Managing Computers 43
Use PBIS with a Single Organizational Unit 43Join a Linux Computer to an Organizational Unit 43
Rename a Joined Computer 43Rename a Computer Using the Command-Line Tool 44Rename a Computer Using the Domain Join Tool UI 44
Removing a Computer from a Domain 45NetworkManager: Use a Wired Connection to Join a Domain 46AIX: Create Audit Classes to Monitor Events 46
Configuring PBIS with the Registry 48
The Structure of the Registry 48Data Types 49Access the Registry 50Change a Registry Value Using the Shell 50
Set Common Options with the Registry Shell 51Change a Registry Value from the Command Line 52Find a Registry Setting 52lsass Settings 53
Log Level Value Entries 53Turn on Event Logging 53Turn off Network Event Logging 54Restrict Logon Rights 54Display an Error to Users Without Access Rights 55Display a Message of the Day 55Change the Domain Separator Character 56Change Replacement Character for Spaces 56Turn Off System Time Synchronization 57Set the Default Domain 57
PBIS Enterprise Administration Guide Contents
BeyondTrust® September 2014 4
Set the Home Directory and Shell for Domain Users 58Set the Umask for Home Directories 60Set the Skeleton Directory 60Force PBIS Enterprise to WorkWithout Cell Information 61Refresh User Credentials 62Turn Off K5Logon File Creation 62Change the Duration of the Computer Password 62Sign and Seal LDAP Traffic 63NTLM Settings 64Additional Subkeys 65Add Domain Groups to Local Groups 66Control Trust Enumeration 66Modify Smart Card Settings 68Set the Interval for Checking the Status of a Domain 68Set the Interval for Caching an Unknown Domain 68
lsass Cache Settings 68Set the Cache Type 69Cap the Size of theMemory Cache 69Change the Duration of Cached Credentials 69Change NSS Membership and NSS Cache Settings 70
eventlog Settings 71Allow Users and Groups to Delete Events 71Allow Users and Groups to Read Events 72Allow Users and Groups to Write Events 72Set theMaximum Disk Size 73Set theMaximum Number of Events 73Set theMaximum Event Timespan 73Change the Purge Interval 74
netlogon Settings 74Set the Negative Cache Timeout 75Set the Ping Again Timeout 75Set theWritable Rediscovery Timeout 75Set theWritable Timestamp Minimum Change 76Set CLdap Options 76
lwio Settings 76Sign Messages If Supported 77Enable Security Signatures 77Require Security Signatures 77Set Support for SMB2 78
autoenroll Settings 79Lwedsplugin Settings for Mac Computers 80
Managing PBIS Licenses 82
Create a License Container 84Turn on Automatic Licensing 86
Import a License File 86
PBIS Enterprise Administration Guide Contents
BeyondTrust® September 2014 5
Assign a License to a Computer in AD 86Manage a License Key from the Command Line 87
Check the License Key 87Set a License Key 88Release a License Key 88Change the Type of License 89
Delete a License 89
Manage PBIS Enterprise from the Windows Command Line (btopt.exe) 90
PBIS Enterprise Administration Guide Contents
BeyondTrust® September 2014 6
Introduction
This guide shows system administrators and security administrators how to use BeyondTrustPowerBroker Identity Services Enterprise Edition (PBIS).
PBIS ships with a number of documents that help you to use the various features of the product. See thefollowing section for a list of the guides.
Conventions Used in This Guide
Specific font and linespacing conventions are used in this book to ensure readability and to highlightimportant information such as commands, syntax, and examples.
Font Conventions
The font conventions used for this document are:
• Courier New Font is used for program names, commands, command arguments, directorypaths, variable names, text input, text output, configuration file listings, and source code. Forexample:
C:\Documents and Settings\All Users
• Courier New Bold Font is used for information that should be entered into the system exactly asshown. For example:
pbdeploy.exe
• Courier New Italics Font is used for input variables that need to be replaced by actual values.In the following example, the variable MyServer, must be replaced by an actual environment servername and the variable MyFolder must be replaced by an actual folder name:
\\MyServer\MyFolder\pbdcl32.msi
• Bold is used for Windows buttons. For example:
Click OK.
Documentation Set for PBIS Enterprise
The complete PowerBroker Identity Services Enterprise Edition documentation set includes the following:
• PBIS Enterprise Installation Guide
• PBIS Enterprise Administration Guide
• PBIS Enterprise Linux Administration Guide
• PBIS Enterprise Auditing & Reporting Guide
• PBIS Enterprise Group Policy Administration Guide
• PBIS Release Notes
• Report Book
• Best Practices (go to the BeyondTrust web site)
PBIS Enterprise Administration Guide Introduction
BeyondTrust® September 2014 7

Contact Technical Support
BeyondTrust Software, Inc. provides an online knowledge base, as well as telephone and web-basedsupport.
Before Contacting Technical Support
To expedite support, collect the following information to provide to Technical Support:
• PBIS Enterprise version (Available in the PBIS Console by clicking Help, About on themenu bar.)
• PBIS Agent version and build number
• Linux or Unix version
• Windows or Windows Server version
If you are contacting Technical Support about one of the following problems, also provide the diagnosticinformation specified.
Segmentation Faults
Provide the following information when contacting Technical Support:
• Core dump of the PowerBroker Identity Services application:ulimit - c unlimited
• Exact patch level or exact versions of all installed packages.
Program Freezes
Provide the following information when contacting Technical Support:
• Debug logs
• tcpdump
• An strace of the program
Domain-Join Errors
Provide the following information when contacting Technical Support:
• Debug logs (Copy the log file from /var/log/pbis-join.log.)
• tcpdump
All Active Directory Users AreMissing
Provide the following information when contacting Technical Support:
• Run /opt/pbis/bin/get-status
• Contents of nsswitch.conf
All Active Directory Users Cannot Log On
Provide the following information when contacting Technical Support:
PBIS Enterprise Administration Guide
BeyondTrust® September 2014 9
• Output of id <user>
• Output of su -c 'su <user>' <user>
• Lsass debug logs (See Generate an Authentication Agent Debug Log, in the PBIS Troubleshootingwebhelp.)
• Contents of pam.d/pam.conf
• The sshd and ssh debug logs and syslog
AD Users or Groups areMissing
Provide the following information when contacting Technical Support:
• The debug logs for lsass
• Output for getent passwd or getent group for themissing object
• Output for id <user> if user
• tcpdump
• Copy of lsass cache file.
Poor PerformanceWhen Logging On or Looking UpUsers
Provide the following information when contacting Technical Support:
• Output of id <user>
• The lsass debug log
• Copy of lsass cache file. (For more about the file name and location of the cache files, refer to theLinux Administration Guide.)
• tcpdump
Contacting Support
If you encounter problems that are not covered in the documentation, contact BeyondTrust TechnicalSupport.
When contacting Technical Support, provide the following information:
l Your company namel Telephone and email address where you can be contactedl Description of the problem and the steps you have taken to resolve itl Diagnostic information requested in Before Contacting Technical Support
You can contact BeyondTrust Technical Support by email or through the BeyondTrust website. If you arelocated in the United States, you can also contact Technical Support by telephone. Support is staffed 24hours per day, seven days per week.
Telephone: +1 800-234-9072 or +1 818-575-4040
Email: [email protected]
Web: To submit a support request online:
PBIS Enterprise Administration Guide
BeyondTrust® September 2014 10
1. Browse to http://www.beyondtrust.com.2. Click Support at the top of any page.3. On the BeyondTrust Technical Support page, scroll to the Customer Support Portals section and
click the PowerBroker Identity Services tab.4. If you do not have a PBIS Support password, click [email protected] to request that a PBIS
Support password be sent to your email address.Note: This is a different password than the one provided for use with the BeyondTrust
Customer/Partner Portal.
5. For Username, enter your email address.6. For Password, enter the password provided to you by PBIS Support and click Submit.
PBIS Enterprise Administration Guide
BeyondTrust® September 2014 11
Using the Management Console
You can use the console to do the following tasks:
• Run multiple instances of the console and point them at different domains.
• Run the console with a different user account.
• Upgrade your Active Directory schema.
• Obtain status information about your Active Directory forests and domains.
• Migrate Unix and Linux users and groups by importing passwd and group files and mapping theinformation to users and groups in Active Directory.
• Remove orphaned objects.
• Generate reports about users, groups, and computers.
• Start Active Directory Users and Computers (ADUC), Cell Manager, and theMigration tool.
Start the BeyondTrust Management Console
Depending on the options chosen during installation, the console can be started in the following ways:
• Double-click the BeyondTrust Management Console shortcut.
• Click Start > All Programs > BeyondTrust PBIS > BeyondTrust Enterprise Console.
• At the command prompt, execute the following commands:
cd %ProgramFiles%\BeyondTrust\PBIS\Enterprise\
iConsole.bmc
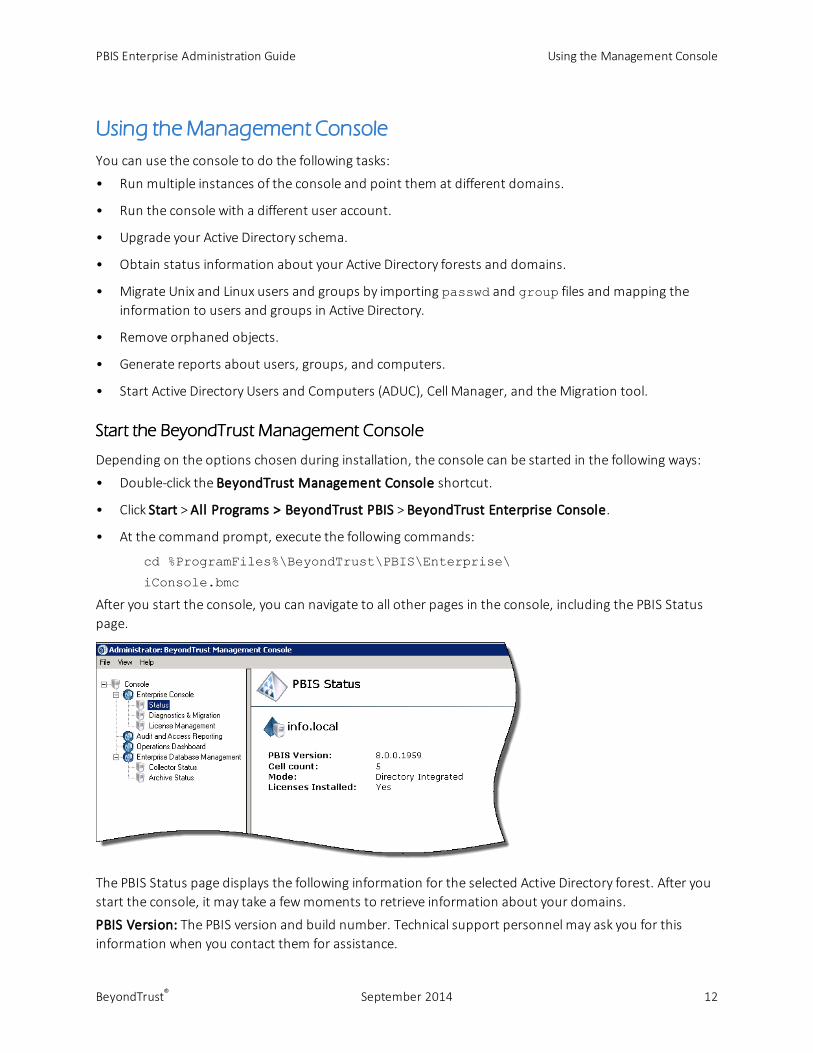
After you start the console, you can navigate to all other pages in the console, including the PBIS Statuspage.
The PBIS Status page displays the following information for the selected Active Directory forest. After youstart the console, it may take a fewmoments to retrieve information about your domains.
PBIS Version: The PBIS version and build number. Technical support personnel may ask you for thisinformation when you contact them for assistance.
PBIS Enterprise Administration Guide Using the Management Console
BeyondTrust® September 2014 12

Consistency check: Indicates whether Active Directory has been properly prepared for the currentoperating mode. Typically this status indicator is Good.
Cell count: Displays the number of cells that are associated with organizational units in the selecteddomain, including the default cell.
Mode: Either Directory Integrated or Schemaless. Directory Integrated indicates that the selected forestis using the RFC 2307-compliant schema. Schemaless indicates that it is not.
Licenses Installed: Indicates if valid product licenses are deployed.
PBIS Enterprise Administration Guide Using the Management Console
BeyondTrust® September 2014 13
Connect to a Domain
If PBIS detects more than one Active Directory forest, it displays them on the PBIS Status page. You canconnect to a forest by double-clicking the forest name.
You can connect to another domain as follows:
1. In the BeyondTrust Management Console tree, right-click the Enterprise Console node, and thenclick Connect to Domain.
2. Enter the FQDN of the domain that you want to connect to.3. Enter the credentials of an Active Directory administrator.
It is recommended that you use the AD Enterprise Administrators security group account.
Changes Made by the Directory IntegratedMode Configuration
The Active Directory schema changes are applied from a set of LDAP Data Interchange Format (LDIF) files.The standard installation places these files in the following directory:\Program Files\BeyondTrust\PBIS\Enterprise\Resources\LDF
After you raise the domain and forest to 2003 functional levels, the PBIS domain configuration wizardchanges the following attributes, which are required for PBIS to run in Directory Integrated mode.
Promotes and indexes the following attributes to the global catalog:
• uidNumber
• uid
• displayName
• gecos
• loginShell
• unixHomeDirectory
Replication in a Large Forest or in Multiple Domains
When you set up PBIS in an environment with a large forest or multiple domains, it may take some timefor the PBIS objects and the schema update to replicate to the rest of the domain.
Replication must complete before the domain and its child domains are fully enabled for PBIS. You will beunable to connect to a child domain until replication finishes.
Add a Plug-In
The console includes several plug-ins: Access and Audit Reporting, Enterprise DatabaseManagement,and the Operations Dashboard.
1. In the console, on the File menu, click Add/Remove Plug-in.2. Click Add.3. Click the plug-in that you want, and then click Add.4. Click Close, and then click OK.
PBIS Enterprise Administration Guide Using the Management Console
BeyondTrust® September 2014 14
Working with Cells
You can use the following tools to manage your PowerBroker cells:
• Active Directory Users and Computers – A PowerBroker Cell Settings tab is added to the dialog box ofthe following objects in the Active Directory Users and Computers MMC snap-in:
– Domain
– Users
– Groups
– Organizational Units
• Cell Manager – Cell Manager is a PBIS MMC snap-in for managing your PowerBroker cells. CellManager is installed when you install the BeyondTrust Management Console.
Checkpoint
– Ensure the account you are using to manage PowerBroker cell properties is a member of theDomain Admins group or Enterprise Admins group. The account needs privileges to create andchange objects and child objects in Active Directory.
Understanding PowerBroker Cells
A PowerBroker cell is a container of Unix settings for Active Directory users and groups so they can log onto Linux, Unix, and Mac OS X computers.
For each user, the settings include a Unix user identifier (UID), the group identifier (GID) of the primarygroup, a home directory, and a login shell.
You can use cells to map a user to different UIDs and GIDs for different computers.
Review the details in this section to learn more about how cells work.
Types of Cells
There are two types of PowerBroker cells:
• Default cell – A cell associated with a domain or an entire enterprise. In a multi-domain topology, youcreate a default cell in each domain, and these domain-specific default cells merge into an enterprise-wide default cell.
• Named cell – A cell associated with an organizational unit (OU). Associating cells with OUs is a naturalway to organize computers and users.
PBIS lets you define a default cell that handles mapping for computers that are not in an OUwith anassociated named cell. The default cell for the domain can contain themapping information for all yourLinux and Unix computers. If you are using Directory Integrated mode, various attributes are indexed inthe global catalog by using the default cell.
PBIS Enterprise Administration Guide Working with Cells
BeyondTrust® September 2014 15

In a multi-domain or multi-forest enterprise, the default cells of the domains merge into a singleenterprise-wide default cell where users from each domain can authenticate with their credentials. Users'UID, GID, and other settings are defined separately in each domain, but nothing additional is needed atthe domain-level to enable the user to authenticate.
Each forest that has a two-way transitive forest trust with the computer's forest is listed in the defaultcell. Each domain in each forest can opt in to this enterprise-wide default cell by creating a default cell inthat domain. Any user who is listed in the default cell in a domain can be seen by the PBIS-enabledoperating system of any computer joined to the default cell.
HowCells Are Processed
• PBIS searches Active Directory for cell information
When an Active Directory user logs on to a PBIS client computer, the PBIS agent searches ActiveDirectory for the user's PowerBroker cell information.
The search typically begins at the node where the computer is joined to Active Directory and canextend to all forests that have a two-way transitive trust with the client computer's forest.
• PBIS agent checks the cell type
The PBIS agent determines the OUwhere the computer is a member and checks whether a namedcell is associated with it.
• PBIS agent continues search if no cell found for the OU
If a cell is not associated with the OU, the PBIS agent on the Unix or Linux computer moves up thedirectory structure, searching the parent and grandparent OUs until it finds an OU that has aPowerBroker cell associated with it.
• Named cell found
If a named cell is found, PBIS searches for a user or group's attributes in the cell associated with thecomputer.
If an OUwith an associated cell is not found, the PBIS agent uses the default cell for the domain to mapthe username to UID and GID information.
Default Cell Processing
A default cell is processed differently than a named cell. When processing a default cell, PBIS searches fora user or group's attributes in the default cell of the domain where the user or group resides. Forexample, a two-domain topology configured with one domain for users and another domain forcomputers would require two default cells—one default cell in the domain where user and group objectsreside, and another default cell in the domain where computer objects are joined.
A Linux or Unix computer can be a member of an OU that does not have a cell associated with it. In such acase, the Group Policy Objects (GPOs) associated with the OU apply to the Linux or Unix computer, butuser UID and GID mappings follow the policy of the nearest parent cell or the default cell.
PBIS Enterprise Administration Guide Working with Cells
BeyondTrust® September 2014 16
PBIS does not require you to have a default cell, but for PBIS to operate properly you must ensure thatthe PBIS agent can always find a cell. For more information, see Best Practices for Modes, Cells, and UserRights.
Cell Design
PowerBroker cell technology allows managing overlapping Unix identities in a single Active Directoryorganization for PBIS Enterprise. Cells work in Directory Integrated or Schemaless mode.
Storing Unix Identities
Cells store Unix identity information separate from other cells. This allows a single user or group to havedifferent names or different numerical ID values (UID or GID) in different environments, all associatedwith the same AD identity.
This also allows multiple users or groups to have overlapping names or numerical ID values (UID or GID) inseparate environments. Each cell requires additional overhead for the standard procedure for accountmanagement and for troubleshooting end-user logon issues, because both cases require the additionalstep of determining which cell the operation must be performed against.
To minimize complexity while allowing the flexibility of cells, it is recommended that you use no morethan four cells.
Named Cells
Named Cells store Unix identity information (uid, uidNumber, gidNumber, gecos, unixHomeDirectory,logonShell) in a subcontainer of the organizational unit (OU) which is associated with the cell.
Whether a user exists in the local domain or a trusted domain, the Unix identity information exists in anobject in the cell. In other words, a Named Cell can reference users or groups from outside the current ADdomain.
Default Cells
Default Cell mode refers to how an AD domain is set up. There is one Default Cell, and it is enterprise-wide. All trusted Microsoft Active Directory Global Catalogs are part of the Default Cell. However,individual AD domains participate in the Default Cell by creating the Default Cell object in the root ofthose domains.
In Default Cell mode, the Unix identity information is stored in the same OU as the user object that theUnix Identity information is related to. This enforces a single Unix identity for a single AD user across theentire enterprise. Therefore, the Default Cell should be viewed as the ultimate authority for Unixinformation within an enterprise.
Directory IntegratedMode - Default Cell Configurations
In Directory Integrated mode, the Default Cell stores the Unix identity information directly to the user orgroup object in the samemanner as “First Name” (givenName), “Address” (address, city, state), and“Email” (emailAddress) attributes.
PBIS Enterprise Administration Guide Working with Cells
BeyondTrust® September 2014 17
Because the Directory Integrated Mode - Default Cell stores the information to the user or group object,existing IdentityManagement (IDM) products do not need to bemodified to provision users for theDefault Cell in Directory Integrated Mode. This also allows non-PBIS computers that use the RFC 2307attributes (such as Network Appliances ONTAPP Filers and EMC Celerra storage devices) to use the sameidentity information as PBIS Enterprise.
Directory Integrated Mode - Default Cell is the preferred method for all PBIS Enterprise installations. In allcases where Unix identity information can bemade to be non-overlapping, the Directory IntegratedMode - Default Cell should be used.
Directory IntegratedMode - Named Cell Configurations
In Directory Integrated mode, Named Cells create objects of class PosixAccount andserviceConnectionPoint, which are linked back to the user or group object associated with the PBISobject.
Directory Integrated Mode - Named Cells are recommended wherever multiple cells beyond the DefaultCell are required.
Schemaless Mode Cells
Schemaless mode is deprecated but fully supported.
The PBIS clients determine cell and Schema configuration at startup and re-check this configurationperiodically. Because of how the data is stored, migration from a Schemaless Default Cell to a DirectoryIntegrated Mode - Default Cell configuration requires more work, more steps, and more potential risksthan any other cell migration.
For migration and long-term support purposes, Schemaless Mode Cells should only be created as NamedCells.
Note: Directory Integrated mode is preferred for the performance benefits and becauseMicrosoftActive Directory is moving towards Directory Integrated Mode by default.
Using Multiple Cells
If you havemultiple Unix and Linux computers but are not using a centralized scheme to manage UIDsand GIDs, it is likely that each computer has unique UID-GID mappings. You may also havemore than onecentralized IMS, such as multiple NIS domains. You can usemultiple cells to represent the UID-GIDassociations that the NIS domain provided, allowing those Unix and Linux users to continue to use theirexisting UID-GID information while using Active Directory credentials.
When using multiple cells, it can be helpful to identify what Unix and Linux objects each cell represents.For example:
• Individual Unix, Linux, or Mac OS X computers
• A single NIS domain
• Multiple NIS domains (which require multiple cells)
Assigning Users to Manage Cells
PBIS Enterprise Administration Guide Working with Cells
BeyondTrust® September 2014 18
If you want to assign users to help manage PowerBroker cells, ensure the users have the permissions tocreate container objects in an OU.
For more information about delegating control, see Delegating Administration in Active Directory Usersand Computers Help.
1. In Active Directory Users and Computers, right-click an OU, and then select Delegate Control.2. Go through the Delegation of Control wizard, and ensure the following permissions are selected:
– Read, Write, Create All Child Objects, Delete All Child Objects, Read All Properties, Write AllProperties
3. Click Finish.
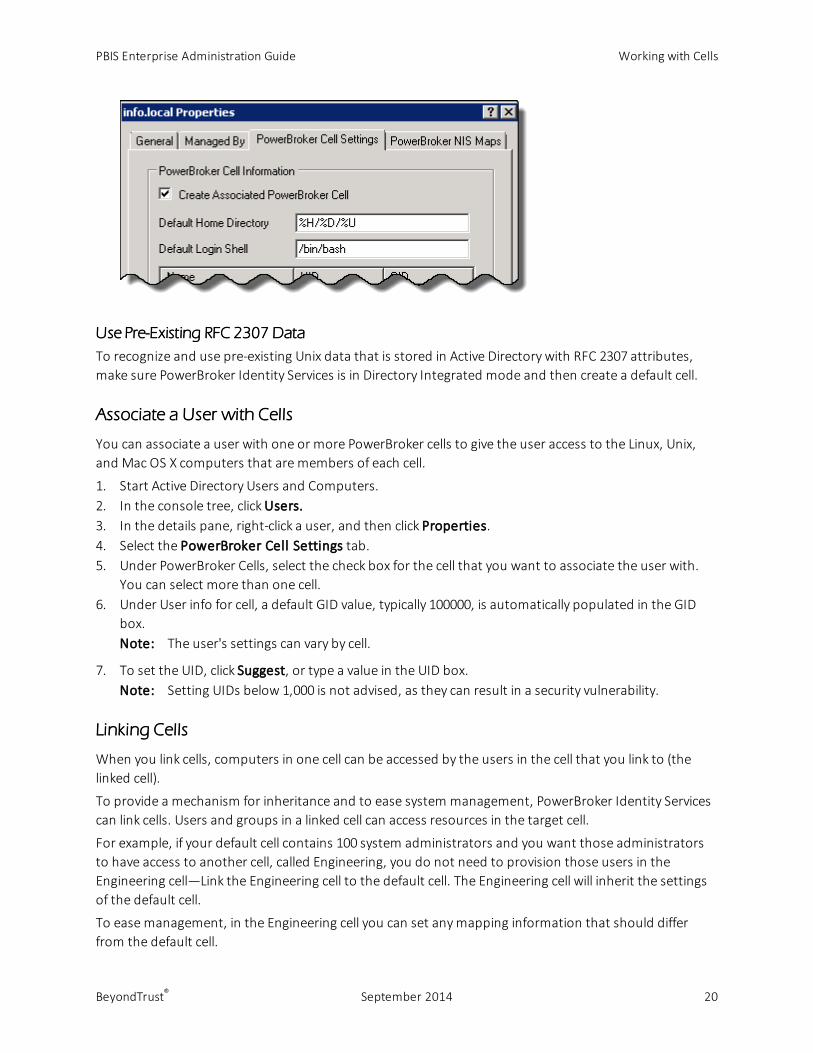
Create a Cell and Associate it with an OU or a Domain
To associate a cell with an OU, for example, you must be a member of the Domain Administratorssecurity group, or you must be assigned permissions to manage container objects in an OU.
Important: Do not create a cell in the Domain Controllers built-in OU.
Important: Before you associate a cell with an OU, make sure you chose the schema mode. You cannoteasily change the schema mode after you create a cell, including a default cell.
1. Start Active Directory Users and Computers.2. In the console tree, right-click the OU or the domain for which you want to create a cell, click
Properties, and then click the PowerBroker Cell Settings tab.3. Under PowerBroker Cell Information, select the Create Associated PowerBroker Cell check box,
and then click OK.You can now associate users with the cell.
Create a Default Cell
You can create a default cell that maps computers that are not in an OUwith an associated cell. Thedefault cell can contain themapping information for all your Linux and Unix computers. PBIS Enterprisedoes not require a default cell.
A Linux or Unix computer can be a member of an OU that does not have a cell associated with it. In suchcases, the group policies associated with the OU apply to the Linux and Unix computer, but user UID-GIDmappings follow the policy of the nearest parent cell, or the default cell.
To create a default cell:
1. Start Active Directory Users and Computers.2. Right-click the name of your domain, and then select Properties.3. Select the PowerBroker Cell Settings tab, and then select Create Associated PowerBroker Cell
check box.
PBIS Enterprise Administration Guide Working with Cells
BeyondTrust® September 2014 19
Use Pre-Existing RFC 2307 Data
To recognize and use pre-existing Unix data that is stored in Active Directory with RFC 2307 attributes,make sure PowerBroker Identity Services is in Directory Integrated mode and then create a default cell.
Associate a User with Cells
You can associate a user with one or more PowerBroker cells to give the user access to the Linux, Unix,and Mac OS X computers that are members of each cell.
1. Start Active Directory Users and Computers.2. In the console tree, click Users.3. In the details pane, right-click a user, and then click Properties.4. Select the PowerBroker Cell Settings tab.5. Under PowerBroker Cells, select the check box for the cell that you want to associate the user with.
You can select more than one cell.6. Under User info for cell, a default GID value, typically 100000, is automatically populated in the GID
box.Note: The user's settings can vary by cell.
7. To set the UID, click Suggest, or type a value in the UID box.Note: Setting UIDs below 1,000 is not advised, as they can result in a security vulnerability.
Linking Cells
When you link cells, computers in one cell can be accessed by the users in the cell that you link to (thelinked cell).
To provide a mechanism for inheritance and to ease system management, PowerBroker Identity Servicescan link cells. Users and groups in a linked cell can access resources in the target cell.
For example, if your default cell contains 100 system administrators and you want those administratorsto have access to another cell, called Engineering, you do not need to provision those users in theEngineering cell—Link the Engineering cell to the default cell. The Engineering cell will inherit the settingsof the default cell.
To easemanagement, in the Engineering cell you can set anymapping information that should differfrom the default cell.
PBIS Enterprise Administration Guide Working with Cells
BeyondTrust® September 2014 20
Although you can use linking to create a hierarchy of cells, linking is not transitive.
For example, consider the following linked cells:
- Civil cell linked to Engineering cell
- Engineering cell linked to Default cell
In this scenario, the Civil cell will not inherit the settings of the default cell.
Linking toMultiple Cells
The order of the UIDs controls the search order.
Consider the following scenario:
Kathy, a system administrator, has UIDs set in the default cell (100,000) and in the Engineering cell(150,000). In the Civil cell, however, the UID from the Engineering cell must be used to log on to Civilcomputers.
If the Civil cell is linked to the default cell and the Engineering cell, the order is important. If Engineeringdoes not precede the default cell in the search order, Kathy will be assigned the wrong UID and will beunable to log on computers in the Civil cell.
In the following scenario, a link is created to the Engineering cell. With this link, users in the Engineeringcell can access the computers in the Accounting cell:
PBIS Enterprise Administration Guide Working with Cells
BeyondTrust® September 2014 21
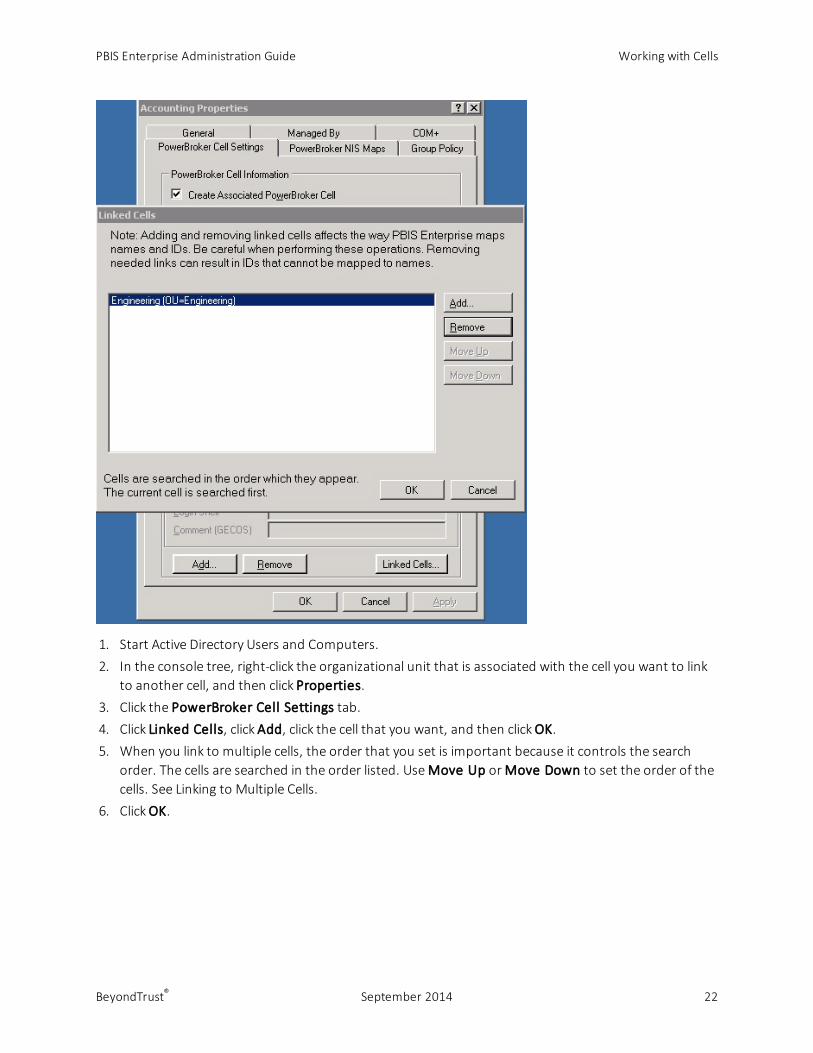
1. Start Active Directory Users and Computers.2. In the console tree, right-click the organizational unit that is associated with the cell you want to link
to another cell, and then click Properties.3. Click the PowerBroker Cell Settings tab.4. Click Linked Cells, click Add, click the cell that you want, and then click OK.5. When you link to multiple cells, the order that you set is important because it controls the search
order. The cells are searched in the order listed. UseMove Up or Move Down to set the order of thecells. See Linking to Multiple Cells.
6. Click OK.
PBIS Enterprise Administration Guide Working with Cells
BeyondTrust® September 2014 22
Moving a Computer to Another Cell
When you move a computer from one cell to another, you must do the following if you want the cellinformation to be updated immediately on the client:
• Clear the authentication cache for user and group membership: lsass-adcache.db. SeeManagethe AD Cache (ad-cache).
• Restart the PBIS authentication service by running this command as root: /opt/pbis/bin/lwsmrestart lsass
• Force the computer to refresh its Group Policy settings by running this command as root:/opt/pbis/bin/gporefresh
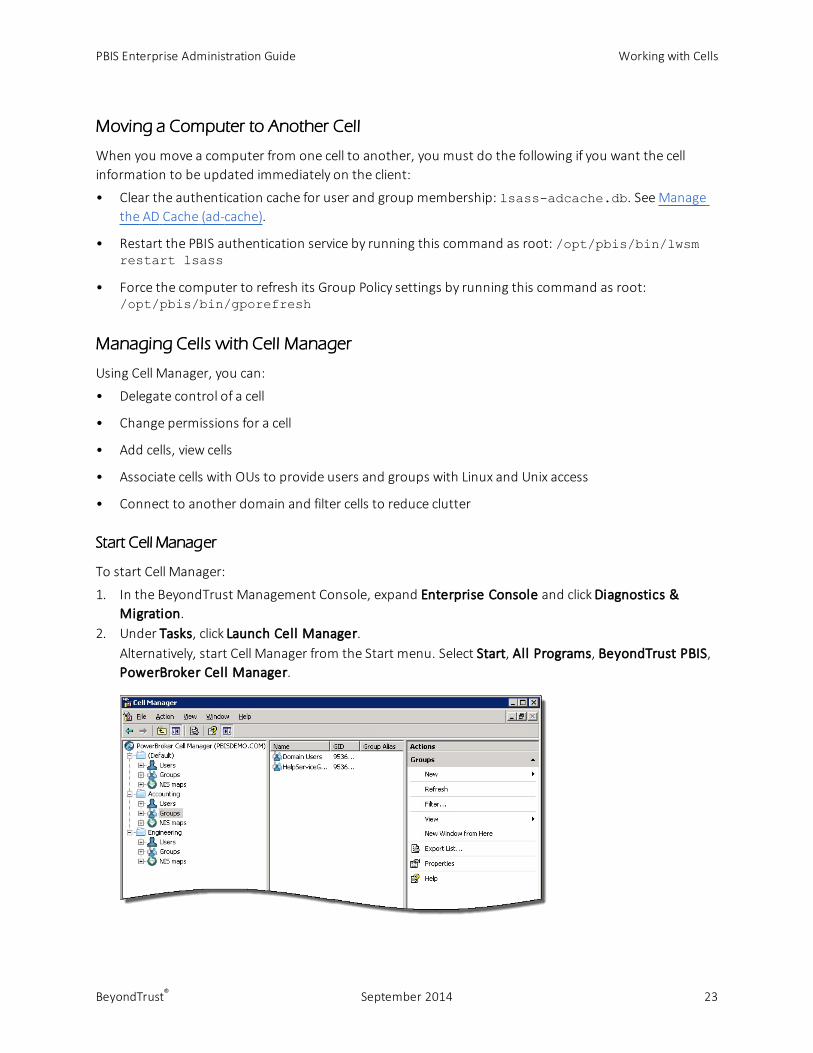
Managing Cells with Cell Manager
Using Cell Manager, you can:
• Delegate control of a cell
• Change permissions for a cell
• Add cells, view cells
• Associate cells with OUs to provide users and groups with Linux and Unix access
• Connect to another domain and filter cells to reduce clutter
Start Cell Manager
To start Cell Manager:
1. In the BeyondTrust Management Console, expand Enterprise Console and click Diagnostics &Migration.
2. Under Tasks, click Launch Cell Manager.Alternatively, start Cell Manager from the Start menu. Select Start, All Programs, BeyondTrust PBIS,PowerBroker Cell Manager.
PBIS Enterprise Administration Guide Working with Cells
BeyondTrust® September 2014 23
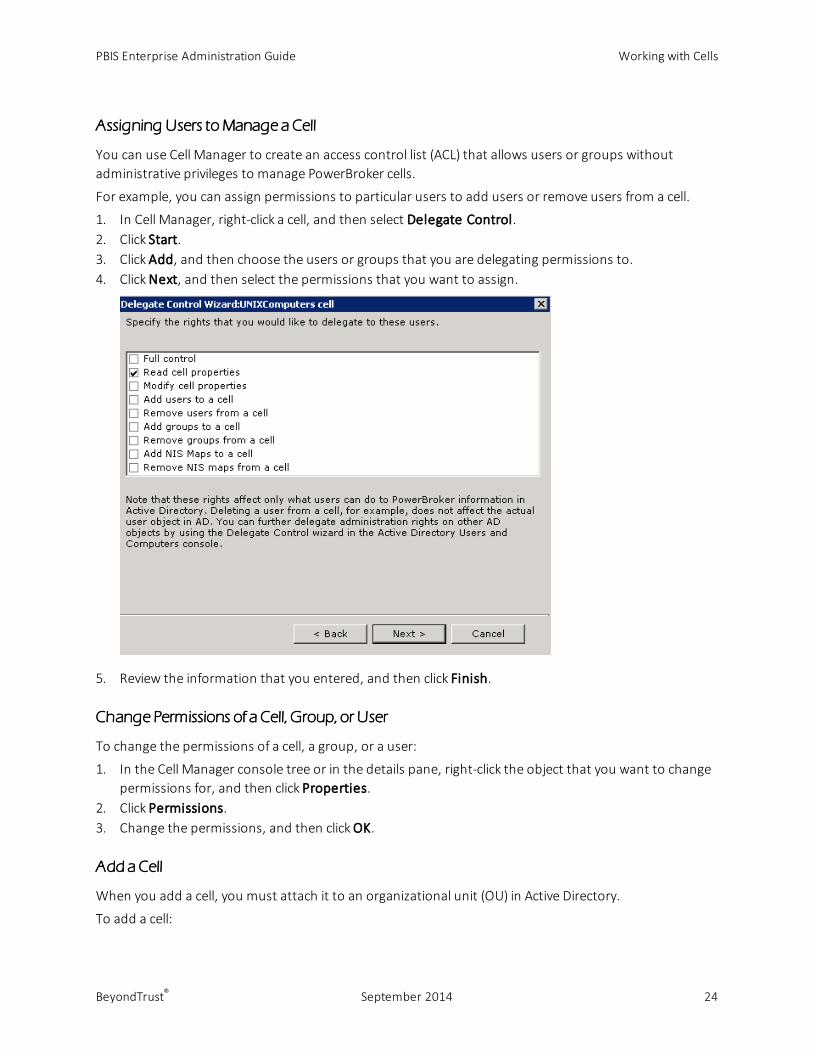
Assigning Users toManage a Cell
You can use Cell Manager to create an access control list (ACL) that allows users or groups withoutadministrative privileges to manage PowerBroker cells.
For example, you can assign permissions to particular users to add users or remove users from a cell.
1. In Cell Manager, right-click a cell, and then select Delegate Control.2. Click Start.3. Click Add, and then choose the users or groups that you are delegating permissions to.4. Click Next, and then select the permissions that you want to assign.
5. Review the information that you entered, and then click Finish.
Change Permissions of a Cell, Group, or User
To change the permissions of a cell, a group, or a user:
1. In the Cell Manager console tree or in the details pane, right-click the object that you want to changepermissions for, and then click Properties.
2. Click Permissions.3. Change the permissions, and then click OK.
Add a Cell
When you add a cell, you must attach it to an organizational unit (OU) in Active Directory.
To add a cell:
PBIS Enterprise Administration Guide Working with Cells
BeyondTrust® September 2014 24
1. In Cell Manager, right-click the top-level Cell Manager domain node, select New, and then click Cell.2. Select the OU to which you want to attach the cell.
Note: You cannot attach a cell to the top-level node (the domain).
3. On the Cell Defaults page, select the following:– Default Home directory – type the path for the home directory that you want to set for users in
the cell—for example, /home/%D/%U.
Important: When you set the home directory, you must use the default user name variable (%U).You can set the default domain name using the domain name variable (%D) but it is not required.
– Default login shell – type the path to the default shell that you want to use—for example,/bin/ sh.
– Enable your user account in the cell – select to add your account to the cell.
4. Select the Create Group Policy Object check box to create a GPO for the OU.– Forward audit event to
– Prepend default domain name to AD users and groups
– Set group policy refresh interval
5. Click Start.
Adding a User or Group to a Cell
Default attributes are used when you add a user or group to a cell using Cell Manager.
You can change the properties later using Active Directory Users and Computers. See Configuring CellSettings for Users.
1. In Cell Manager, right-click a cell, select New.2. Select User or Group.3. Click OK.4. Enter Search for the user or group that you want to add, and then click OK.
Filter Cells
You can use filtering to set themaximum number of cells to display and show only the cells that match apattern.
1. In Cell Manager, right-click the top-level Cell Manager domain node, and then click Filter.2. Set the filtering values that you want to use:
– Maximum number of cells to display – Enter the number of cells to display. The default is 300.
– Only show cells that match pattern
– Interpret pattern as regular expression
3. Click OK.
PBIS Enterprise Administration Guide Working with Cells
BeyondTrust® September 2014 25
Connect to a Different Domain
Even though users and groups imported from a different domain appear in Cell Manager, you cannotmodify their settings from outside their original domain.
To modify the settings of a user or group imported from another domain, use Cell Manager to connect tothat domain and then make the changes that you want.
1. In Cell Manager, right-click the top-level Cell Manager domain node, and then click Connect ToDomain.
2. In the Domain box, type the domain. Alternatively, click Browse, and then locate the domain.
PBIS Enterprise Administration Guide Working with Cells
BeyondTrust® September 2014 26
Managing Users andGroups
Using PBIS Enterprise, you can manage the PowerBroker cell settings for Unix, Linux, and Mac OS X usersand groups in Active Directory Users and Computers.
Configuring Cell Settings for Users
In Active Directory Users and Computers, you can configure PowerBroker cell settings for your users.
Note: Administrative privileges are required to manage PowerBroker cell settings. Ensure you are loggedon as a Domain Administrator, Enterprise Administrators, or you are assigned permissions. Formore information, see Assigning Users to Manage Cells.
The following cell settings can be configured to establish connection between Active Directory and yourclients:
• UID – The Unix user ID.
The user's settings can vary by cell.
• GID – The Unix group ID.
• Login Name – Provide an alias for an Active Directory user so that the user can log on to a bridgedclient using the alias. An alias only applies to the selected cell.
• Home Directory –When you set the default home directory, you must use the default user namevariable (%U). Using the default domain name using the domain name variable (%D) but it is optional.
Important: On Solaris, you cannot create a local home directory in /home, because /home is used byautofs, Sun's automatic mounting service. The standard on Solaris is to create local home directoriesin /export/home.
• Login Shell –When assigning a login shell, you can select a user or more than one user.
You can assign the login shell at the OU level or user level.
• Comment (GECOS)
Tip: Generate a report to view existing values
The Cell Access Report can show you existing values for UID, GID, home directory, and loginshells for users. For more information, see Generate a Sample Report.
You can configure cell settings at the OU level, user level, or select a range of users in a selected OU.
To configure cell settings for your users:
1. Start Active Directory Users and Computers.2. Navigate to the OUwhere your users reside.3. Right-click the user and then select Properties.4. Select the cells where you want the settings to apply.
When editing the properties for a particular cell, if the check box is already selected, then select thecell to activate the settings in the user info section.
PBIS Enterprise Administration Guide Managing Users and Groups
BeyondTrust® September 2014 27
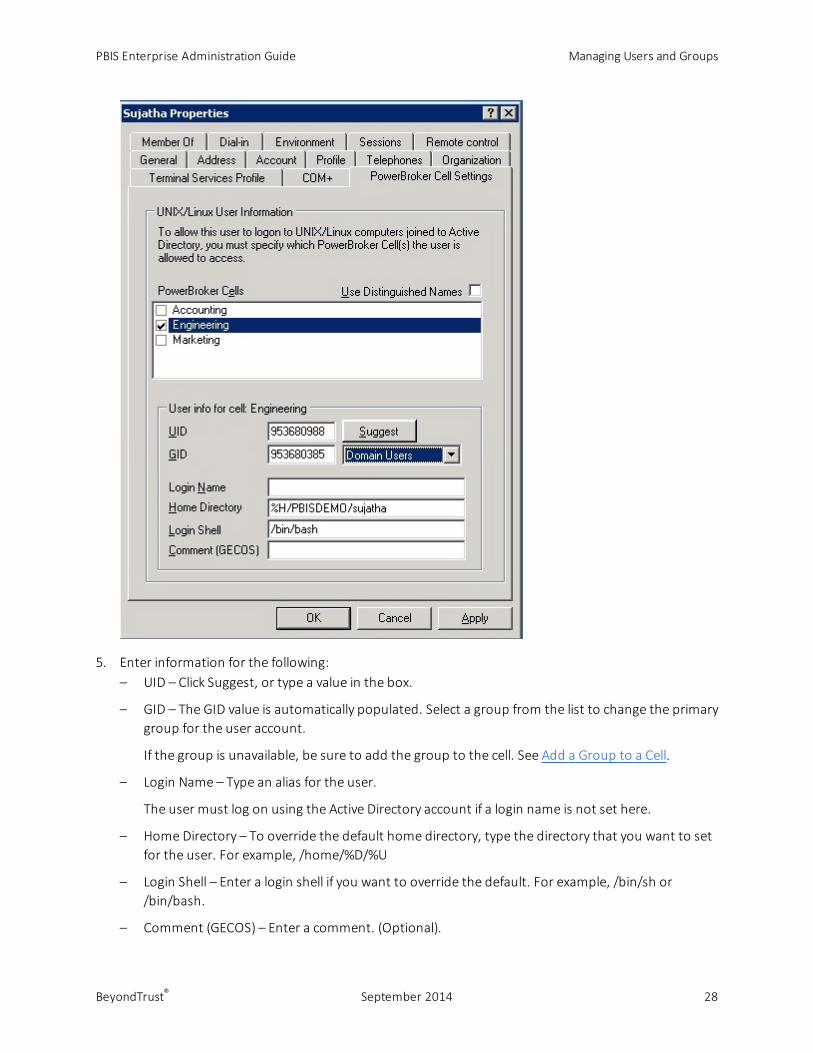
5. Enter information for the following:– UID – Click Suggest, or type a value in the box.
– GID – The GID value is automatically populated. Select a group from the list to change the primarygroup for the user account.
If the group is unavailable, be sure to add the group to the cell. See Add a Group to a Cell.
– Login Name – Type an alias for the user.
The user must log on using the Active Directory account if a login name is not set here.
– Home Directory – To override the default home directory, type the directory that you want to setfor the user. For example, /home/%D/%U
– Login Shell – Enter a login shell if you want to override the default. For example, /bin/sh or/bin/bash.
– Comment (GECOS) – Enter a comment. (Optional).
PBIS Enterprise Administration Guide Managing Users and Groups
BeyondTrust® September 2014 28
6. Click OK.
Assigning Settings toMore ThanOneUser
You can assign settings to more than one user at the same time. For example, you can assign users to acell and then set the home directory.
The users must bemembers of a group already associated to a cell and each user must have a UID-GIDmapping.
Configuring Cell Settings for a Group
In Active Directory Users and Computers, you can configure PowerBroker cell settings for a group.
You can configure a GID and group alias.
Note: Administrative privileges are required to manage PowerBroker cell settings. Ensure you are loggedon as a Domain Administrator, Enterprise Administrators, or you are assigned permissions. Formore information, see Assigning Users to Manage Cells.
A cell must already be created. See Create a Cell or Create a Default Cell.
1. Start Active Directory Users and Computers.2. In the console tree, right-click a group, and then click Properties.3. Click the PowerBroker Cell Settings tab.4. In the PowerBroker Cells section, select the check box for the cell that you want to provide the group
access to.
PBIS Enterprise Administration Guide Managing Users and Groups
BeyondTrust® September 2014 29
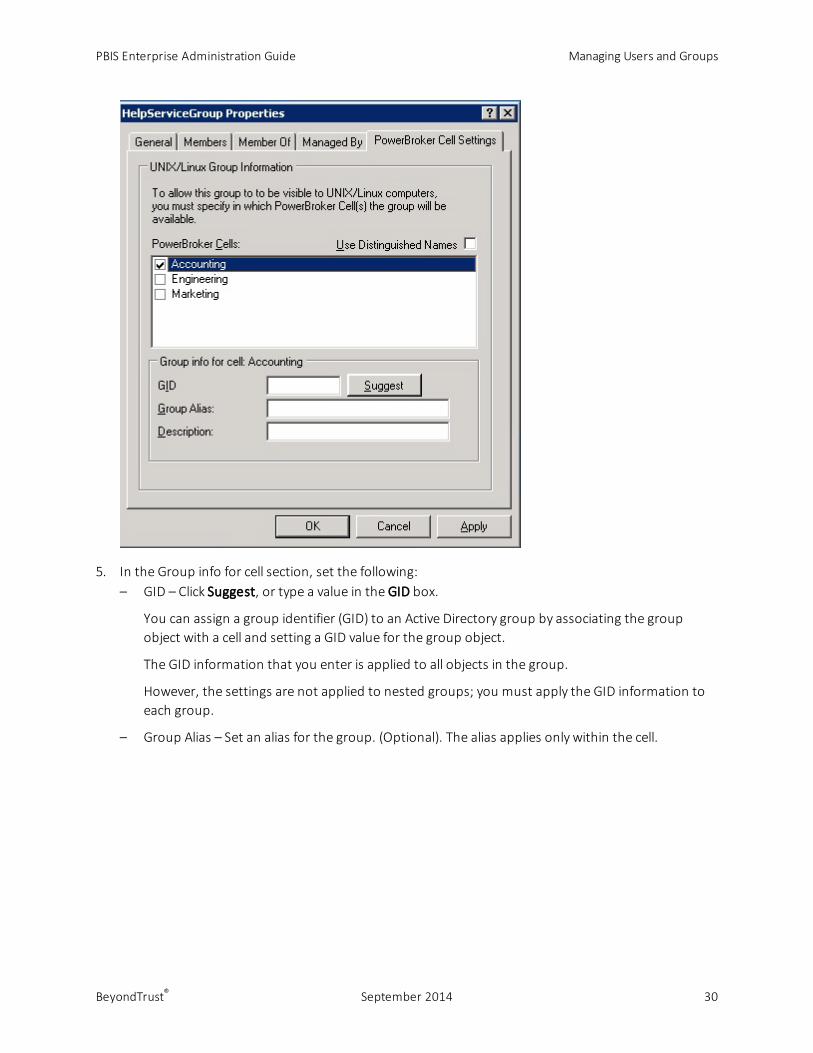
5. In the Group info for cell section, set the following:– GID – Click Suggest, or type a value in the GID box.
You can assign a group identifier (GID) to an Active Directory group by associating the groupobject with a cell and setting a GID value for the group object.
The GID information that you enter is applied to all objects in the group.
However, the settings are not applied to nested groups; you must apply the GID information toeach group.
– Group Alias – Set an alias for the group. (Optional). The alias applies only within the cell.
PBIS Enterprise Administration Guide Managing Users and Groups
BeyondTrust® September 2014 30
Disable a User
Note: When a computer cannot communicate with a domain controller, a user whose account wasdisabled on the domain controller, but who logged on to the computer prior to their accountbeing disabled, can continue to log on until you clear the cache or until the computer regainscommunication with the domain controller.
By default, the cache expires after 4 hours. You can configure the interval using a PBIS GroupPolicy setting or, if the policy setting has not been configured, bymodifying the registry using thePBIS config tool.
1. Start Active Directory Users and Computers.2. Find the user.3. Right-click the user that you want to disable, and then click Properties.4. Click the PowerBroker Cell Settings tab.5. In the PowerBroker Cells section, clear the check boxes for the cells where you want to disable the
user.To disable the user's access to all Linux, Unix, and Mac OS X computers, clear all the check boxes.
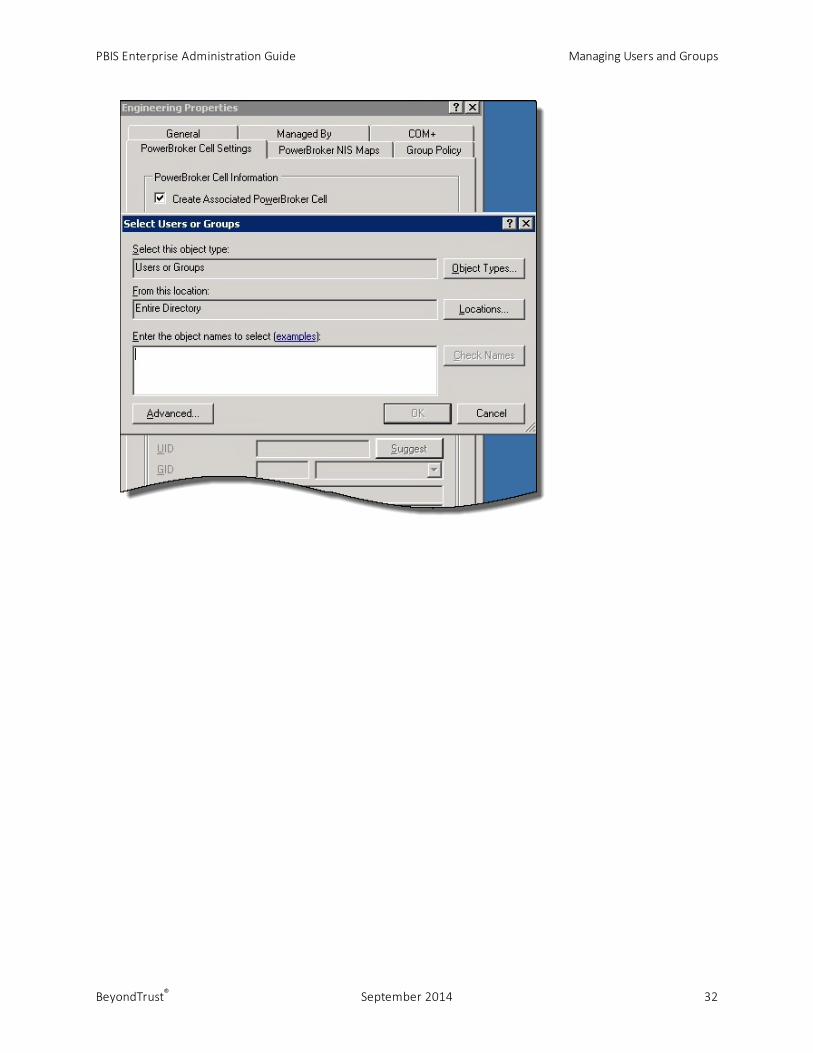
Finding Users and Groups in ADUC
Because of a limitation with the Active Directory Users and Computers snap-in, when you try to find aPBIS user or group by right-clicking an OU and then clicking Find, the user or group will not appear in theresults even when the user or group is in the OU. The Find command does, however, work at the domainlevel.
As an alternative, you can find PBIS users and groups in an OU using the following procedure:
1. Right-click the OUwith an associated cell, select Properties, and then click the PowerBroker CellSettings tab.
2. Click Add, and then search the user or group.
PBIS Enterprise Administration Guide Managing Users and Groups
BeyondTrust® September 2014 31
PBIS Enterprise Administration Guide Managing Users and Groups
BeyondTrust® September 2014 32
Finding Orphaned Objects
You can use the BeyondTrust Management Console to find and remove orphaned objects. An orphanedobject is a linked object, such as a Unix or Linux user ID or group ID, that remains in a cell after you deletea group or user's security identifier, or SID, from an Active Directory domain.
Removing orphaned objects from Active Directory can clean up manually assigned user IDs and improvesearch speed. It is recommended that you remove orphaned objects before you use themigration toolwith a domain that operates in Schemaless mode.
1. In the BeyondTrust Management Console tree, expand Enterprise Console, and then clickDiagnostics & Migration.
2. From the Tasks list, click Find Orphaned Objects.3. Click Select Domains, select the domains that you want to scan, and then click OK.4. Click Begin Scan.5. To remove the objects that appear in the Orphaned objects to delete box, click Delete Objects.
Configure Entries in Your sudoers Files
When you add Active Directory entries to your sudoers file—typically, /etc/sudoers—you must adhereto at least the following rules:
• ALLmust be in uppercase letters.
• Use a slash character to escape the slash that separates the Active Directory domain from the user orgroup name.
• Use the correct case; entries are case sensitive.
• Use a user or group's alias if the user or group has one in Active Directory.
• If the user or group does not have an alias, you must set the user or group in the PBIS canonicalname format of NetBIOSdomainName\SAMaccountName (and escape the slash character).
Note: For users or groups with an alias, the PBIS canonical name format is the alias, which youmust use; you cannot use the format of NetBIOS domain name\SAM account name.
For users and groups without an alias, the form of an entry in the sudoers file is as follows:DOMAIN\\username
DOMAIN\\groupname
Example entry of a group:% EXAMPLE\\LinuxFullAdmins ALL=(ALL) ALL
Example entry of a user with an alias:kyle ALL=(ALL) ALL
For more information about how to format your sudoers file, see your computer's man page for sudo.
PBIS Enterprise Administration Guide Managing Users and Groups
BeyondTrust® September 2014 33
Check a User's Canonical Name on Linux
To determine the canonical name of a PBIS user on Linux, execute the following command, replacing thedomain and user in the example with your domain and user:getent passwd example.com\\hab
EXAMPLE\hab:x:593495196:593494529: Jurgen Habermas:/home/local/ EXAMPLE/hab:/bin/ sh
In the results, the user's PBIS canonical name is the first field.
Set a sudoers Search Path
Although PowerBroker Identity Services searches a number of common locations for your sudoers file, onsome platforms PBIS might not find it.
You can set the location of your sudoers file by adding the following line to the Sudo GP Extension sectionof /etc/pbis/grouppolicy.conf:SudoersSearchPath = /your/search/path
Example: SudoersSearchPath = "/opt/sfw/etc";
Here is an example in the context of the /etc/pbis/grouppolicy.conf file:
[{20D139DE-D892-419f-96E5-0C3A997CB9C4}]Name = "PBIS Enterprise Sudo GP Extension";DllName = "liblwisudo.so";EnableAsynchronousProcessing = 0;NoBackgroundPolicy = 0;NoGPOListChanges = 1;NoMachinePolicy = 0;NoSlowLink = 1;NoUserPolicy = 1;PerUserLocalSettings = 0;ProcessGroupPolicy = "ProcessSudoGroupPolicy";ResetGroupPolicy = "ResetSudoGroupPolicy";RequireSuccessfulRegistry = 1;SudoersSearchPath = "/opt/sfw/etc";
Add Domain Accounts to Local Groups
You can add domain users to your local groups on a Linux, Unix, and Mac OS X computer by placing anentry for the user or group in the /etc/group file. Adding an entry for an Active Directory user to yourlocal groups can give the user local administrative rights. The entries must adhere to the following rules:
• Use the correct case; entries are case sensitive.
• Use a user or group's alias if the user or group has one in Active Directory.
• If the user or group does not have an alias, you must set the user or group in the PBIS canonicalname format of NetBIOSdomainName\SAMaccountName.
Note: For users or groups with an alias, the PBIS canonical name format is the alias, which youmust use; you cannot use the format of NetBIOS domain name\SAM account name.
PBIS Enterprise Administration Guide Managing Users and Groups
BeyondTrust® September 2014 34

For users and groups without an alias, the form of an entry is as follows:root:x:0:EXAMPLE\kristeva
For users and groups with an alias, the form of an entry is as follows:root:x:0:kris
In /etc/group, the slash character separating the domain name from the account name does nottypically need to be escaped.
Tip: On Ubuntu, you can give a domain user administrative privileges by adding the user to the admingroup as follows:admin:x:119:EXAMPLE\bakhtin
On a Mac OS X computer, you can add users to a local group with Apple's directory service command-lineutility: dscl. In dscl, go to the /Local/Default/Groups directory and then add users to a group byusing the append command.
Extend File Mode Permissions with POSIX ACLs
When you have to grant multiple users or groups access to a file, directory, or Samba share on a Linuxserver, you can use POSIX access control lists to extend the standard file mode permissions.
Because Linux and Unix file mode permissions control access only for a single user, a single group, andthen everyone else, the onlymeans of granting access to more than one group with the standard filemodes is to either nest the groups together or to give everyone access—approaches that are oftenunacceptable. Nested groups can be a maintenance burden, and granting access to everyone canundermine security. As for Samba shares, it is insufficient to add multiple users and groups to the validusers parameter in smb.conf if the underlying file system does not allow them access.
Prerequisites
You must have the acl package installed. You can determine this as follows:
# rpm – qa | grep acllibacl-2.2.23-5acl-2.2.23-5
The file system must bemounted with acl in the option list. You can determine this using the mountcommand:
# mount/dev/sda1 on / type ext3 (rw,acl)
As shown above, the root file system has been mounted with read-write (rw) and acl options. If you donot see acl in the options for the file system you are working with, modify /etc/fstab to include thisoption, and then remount the file system. In the case of the root file system, you may need to restart thesystem.
All users and groups must be created before adding them to the ACL. In the case of Active Directoryusers, theymust be preceded by the domain unless user aliases have to be configured (for example,DOMAIN\username).
PBIS Enterprise Administration Guide Managing Users and Groups
BeyondTrust® September 2014 35
Example
This example uses a directory called testdir. The process is the same for files.
Here are the standard file mode permissions of the testdir directory.
[aciarochi@rhel4-devel tmp]$ ls -ld testdirdrwxrwx--- 2 root root 4096 Dec 14 13:28 testdir
You can view the extended ACL using the getfacl utility. In this case, it shows the same information, ina different format:
[aciarochi@rhel4-devel tmp]$ getfacl testdir# file: testdir# owner: root# group: rootuser::rwxgroup::rwxother::---
With these permissions, only the root user and members of the root group are allowed to open thedirectory. Since the aciarochi user is not in the root group, he is denied access:
[aciarochi@rhel4-devel tmp]$ cd testdir-bash: cd: testdir: Permission denied
However, we can grant access to aciarochi by using the setfacl utility to add him to the ACL. Wemust switch to the root user, since that is the directory owner. Once the ACL is set, aciarochi can openthe directory:
[root@rhel4-devel ~]# setfacl -m u:aciarochi:rwx /tmp/testdir/[root@rhel4-devel ~]# exitlogout[aciarochi@rhel4-devel tmp]$ cd testdir[aciarochi@rhel4-devel testdir]$ pwd/tmp/testdir
Notice that the standard file mode permissions have not changed, except for the addition of a + at theend, indicating that extended file permissions are in effect:
[aciarochi@rhel4-devel tmp]$ ls -ld /tmp/testdir/drwxrwx---+ 2 root root 4096 Dec 14 13:28 /tmp/testdir/
Additional groups can be added in the samemanner—using a g: instead of a u:—to indicate a group. Inthe following example, we grant read and execute (open) access to the ftp group:
[root@rhel4-devel ~]# setfacl -m g:ftp:r-x /tmp/testdir[root@rhel4-devel ~]# getfacl testdir
PBIS Enterprise Administration Guide Managing Users and Groups
BeyondTrust® September 2014 36
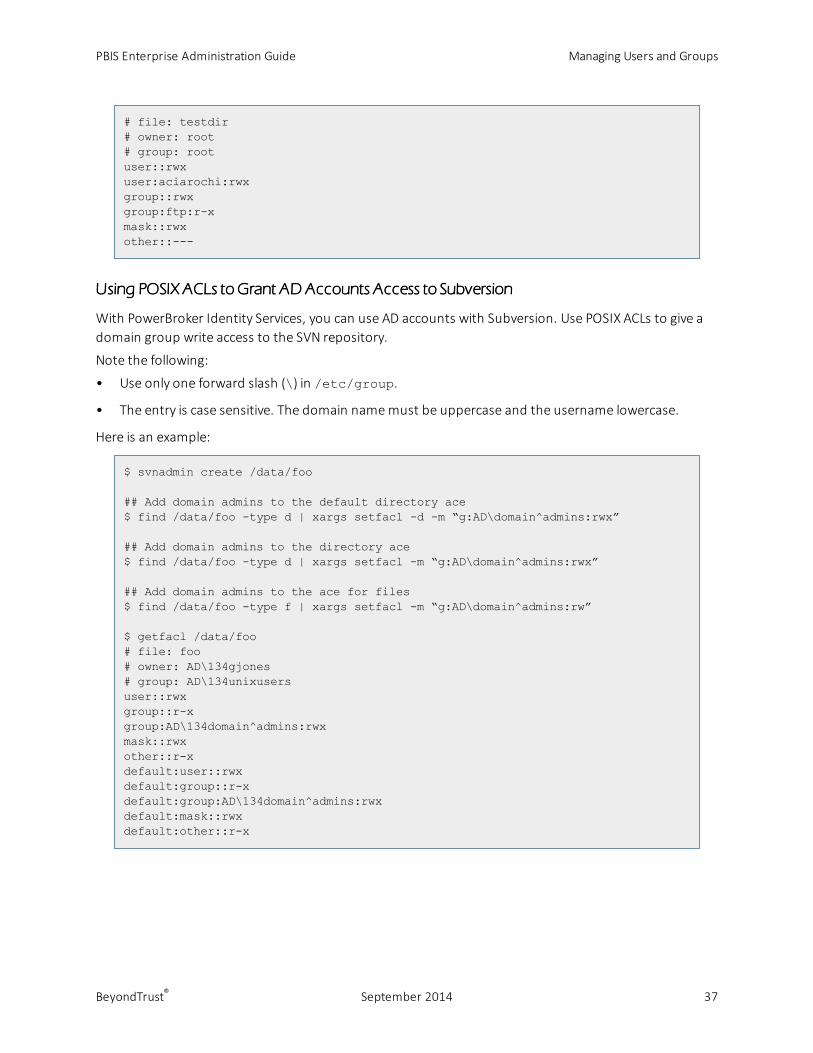
# file: testdir# owner: root# group: rootuser::rwxuser:aciarochi:rwxgroup::rwxgroup:ftp:r-xmask::rwxother::---
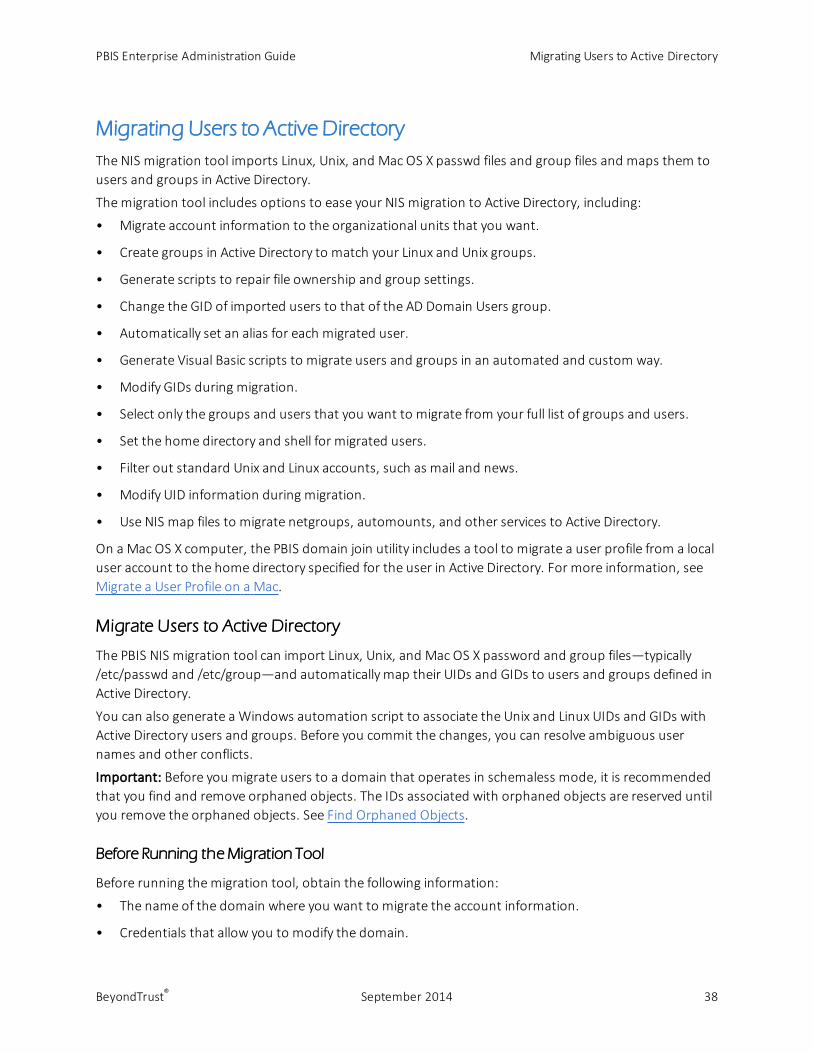
Using POSIX ACLs to Grant AD Accounts Access to Subversion
With PowerBroker Identity Services, you can use AD accounts with Subversion. Use POSIX ACLs to give adomain group write access to the SVN repository.
Note the following:
• Use only one forward slash (\) in /etc/group.
• The entry is case sensitive. The domain namemust be uppercase and the username lowercase.
Here is an example:
$ svnadmin create /data/foo
## Add domain admins to the default directory ace$ find /data/foo -type d | xargs setfacl -d -m “g:AD\domain^admins:rwx”
## Add domain admins to the directory ace$ find /data/foo -type d | xargs setfacl -m “g:AD\domain^admins:rwx”
## Add domain admins to the ace for files$ find /data/foo -type f | xargs setfacl -m “g:AD\domain^admins:rw”
$ getfacl /data/foo# file: foo# owner: AD\134gjones# group: AD\134unixusersuser::rwxgroup::r-xgroup:AD\134domain^admins:rwxmask::rwxother::r-xdefault:user::rwxdefault:group::r-xdefault:group:AD\134domain^admins:rwxdefault:mask::rwxdefault:other::r-x
PBIS Enterprise Administration Guide Managing Users and Groups
BeyondTrust® September 2014 37
Migrating Users to Active Directory
The NIS migration tool imports Linux, Unix, and Mac OS X passwd files and group files and maps them tousers and groups in Active Directory.
Themigration tool includes options to ease your NIS migration to Active Directory, including:
• Migrate account information to the organizational units that you want.
• Create groups in Active Directory to match your Linux and Unix groups.
• Generate scripts to repair file ownership and group settings.
• Change the GID of imported users to that of the AD Domain Users group.
• Automatically set an alias for each migrated user.
• Generate Visual Basic scripts to migrate users and groups in an automated and custom way.
• Modify GIDs during migration.
• Select only the groups and users that you want to migrate from your full list of groups and users.
• Set the home directory and shell for migrated users.
• Filter out standard Unix and Linux accounts, such as mail and news.
• Modify UID information during migration.
• Use NIS map files to migrate netgroups, automounts, and other services to Active Directory.
On a Mac OS X computer, the PBIS domain join utility includes a tool to migrate a user profile from a localuser account to the home directory specified for the user in Active Directory. For more information, seeMigrate a User Profile on a Mac.
Migrate Users to Active Directory
The PBIS NIS migration tool can import Linux, Unix, and Mac OS X password and group files—typically/etc/passwd and /etc/group—and automatically map their UIDs and GIDs to users and groups defined inActive Directory.
You can also generate a Windows automation script to associate the Unix and Linux UIDs and GIDs withActive Directory users and groups. Before you commit the changes, you can resolve ambiguous usernames and other conflicts.
Important: Before you migrate users to a domain that operates in schemaless mode, it is recommendedthat you find and remove orphaned objects. The IDs associated with orphaned objects are reserved untilyou remove the orphaned objects. See Find Orphaned Objects.
Before Running theMigration Tool
Before running themigration tool, obtain the following information:
• The name of the domain where you want to migrate the account information.
• Credentials that allow you to modify the domain.
PBIS Enterprise Administration Guide Migrating Users to Active Directory
BeyondTrust® September 2014 38
• The Unix or Linux passwd file and corresponding group file that you want to add to Active Directory.The password and group files can be from a computer or an NIS server.
Run theMigration Tool
To import Linux, Unix, and Mac OS X password and group files and automatically map UIDs and GIDs tousers and groups in Active Directory:
1. In the BeyondTrust Management Console tree, expand Enterprise Console, and then click theDiagnostics & Migration.
2. From the Tasks list, click Run Migration Tool.3. Click Next.4. In the Domain box, type the domain name that you want to migrate the account information to.5. Select credentials:
– Use logon credentials – Select if your logon credentials allow you to modify the domain.
– Use alternate credentials – Select if your logon credentials are not allowed to modify thedomain, and then enter credentials that have the appropriate privileges.
6. Click Next.7. Select your mapping files:
– Click Import to import a Linux/Unix password and group file, and then provide the followinginformation.
– Map name – Themigration tool imports the passwd file and group file into themap file,which is then matched to existing Active Directory user and group names.
– Passwd file – Type the path and name of the file that you want to import, or click Browse tofind the file.
– Group file – Type the path and name of the passwd file's corresponding group file, or clickBrowse and then find the file.
– To import default Unix or Linux user accounts such as root and public, clear the Omitstandard Linux/UNIX user accounts check box.
– In the list under Users, clear the Import check box for any user that you do not want toimport, and then click Next.
– Click Import NIS Map to import an NIS Map File:
You can run the ypcat command on the NIS server to create themap file.
– NIS Map file – Click Rowse to find themap file.
– Map type – Select themap file type: Netgroups, Automounts, or Services.
8. Select the OUwhere you want to migrate the Linux or Unix account information.If you select the top of your domain, the information is migrated to the default PowerBroker cell ofyour Active Directory forest and UID numbers are automatically assigned within the domain's range.
PBIS Enterprise Administration Guide Migrating Users to Active Directory
BeyondTrust® September 2014 39
If you select an OU, PBIS creates a cell for the OU and migrates the account information to it. UIDsand GIDs are maintained if the passwd and group files agree, and if the UIDs and GIDs do not conflictwith existing users or groups.
Themigrated account information applies only to computers that are members of the OU.
9. Click Next.10. Select from the following list of migration options:
– Create groups in Active Directory to match Linux/Unix groups – Create groups in Active Directorythat match your Linux or Unix groups
– Create all groups in AD – Create all groups in Active Directory—not just the references ones. Toselect this option, you must first select the Create groups in Active Directory to matchLinux/UNIX groups check box.
– Generate scripts to repair file ownership and group settings – Run scripts that can repairownership issues and group settings issues.
– Change GID of imported users to Domain Users
– Always set Login Name (alias), even when same as sAMAcountName
– Generate VBScript to perform migration – Enter the name of the script in the Script name box.Enter the directory where the script is located.
11. Click Next.12. Click the Users tab and verify that the information is correct.13. Click the Groups tab and verify that the information is correct.14. To import the passwd and group files after you verify that the information is correct, click Next.
Migrate a User Profile on a Mac
On a Mac OS X computer, the PBIS domain join utility includes a tool to migrate a user's profile from alocal user account to the home directory specified for the user in Active Directory.
When you migrate the user's profile, you can either copy or move it from the local account to the user'sActive Directory account. Copying the profile leaves a copy of the user's files in their original location, butdoubles the space on the hard disk required to keep the user's files.
You can migrate a user by using the GUI or by using the command line. In addition, you can customizethemigration shell script to suit your requirements.
Important: To migrate a user's profile, you must have a local or AD account with administrative privileges.The account that you usemust not be the account that you are migrating.
PBIS Enterprise Administration Guide Migrating Users to Active Directory
BeyondTrust® September 2014 40
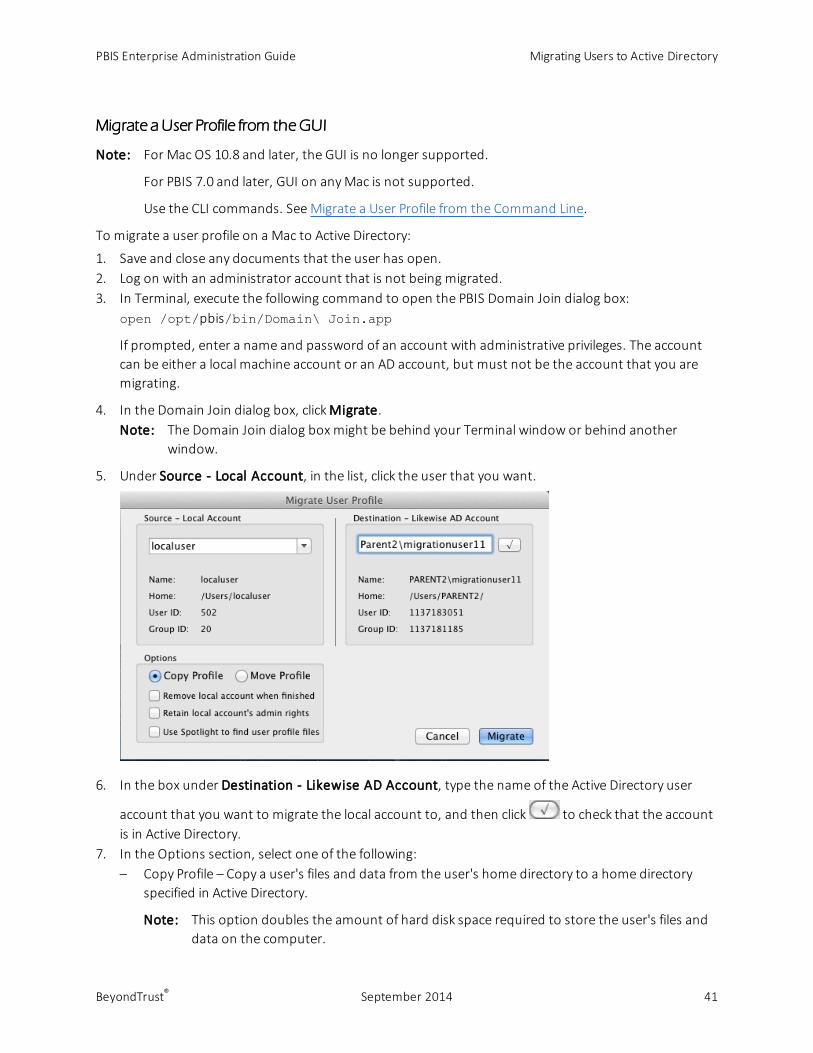
Migrate a User Profile from theGUI
Note: For Mac OS 10.8 and later, the GUI is no longer supported.
For PBIS 7.0 and later, GUI on anyMac is not supported.
Use the CLI commands. SeeMigrate a User Profile from the Command Line.
To migrate a user profile on a Mac to Active Directory:
1. Save and close any documents that the user has open.2. Log on with an administrator account that is not being migrated.3. In Terminal, execute the following command to open the PBIS Domain Join dialog box:
open /opt/pbis/bin/Domain\ Join.app
If prompted, enter a name and password of an account with administrative privileges. The accountcan be either a local machine account or an AD account, but must not be the account that you aremigrating.
4. In the Domain Join dialog box, clickMigrate.Note: The Domain Join dialog box might be behind your Terminal window or behind another
window.
5. Under Source - Local Account, in the list, click the user that you want.
6. In the box under Destination - Likewise AD Account, type the name of the Active Directory user
account that you want to migrate the local account to, and then click to check that the accountis in Active Directory.
7. In the Options section, select one of the following:– Copy Profile – Copy a user's files and data from the user's home directory to a home directory
specified in Active Directory.
Note: This option doubles the amount of hard disk space required to store the user's files anddata on the computer.
PBIS Enterprise Administration Guide Migrating Users to Active Directory
BeyondTrust® September 2014 41

– Move Profile –Move the user's files and data from the user's home directory to a home directoryspecified in Active Directory.
Select any of the check boxes, as needed:
– Remove local account when finished: Deletes the account after the account is migrated toAD.
– Retain local account's admin rights: Maintains the permissions of the account aftermigration.
– Use Spotlight to find user profile files.
8. ClickMigrate.
Migrate a User Profile from the Command Line
You can migrate a user's profile using the command line. On a Mac OS X computer, the location of themigration shell script is as follows:/opt/pbis/bin/lw-local-user-migrate.sh
You can run the script locally or remotely. Connect to a Mac using SSH and then run themigration scriptto remotelymigrate users from another computer.
For information about the command's syntax and arguments, execute the following command inTerminal:/opt/pbis/bin/lw-local-user-migrate.sh --help
Customize theMigration Script
You can customize themigration script to suit your needs by opening the script and editing it. The scriptis written in Bash shell.
Important: There is no PBIS support for customizing the script or for modified scripts. Changes to thescript preclude PBIS support.
Migrating NIS Domains
If you use PBIS to migrate all your Unix and Linux users to Active Directory, in most cases you will assignthese users a UID and GID that is consistent across all the Unix and Linux computers that are joined toActive Directory—a simple approach that reduces administrative overhead.
In cases when multiple NIS domains are in use and you want to eliminate these domains over time andmigrate all users and computers to Active Directory, mapping an Active Directory user to a single UID andGID might be too difficult. When multiple NIS domains are in place, a user typically has different UID-GIDmaps in each NIS domain. With PBIS, you can eliminate these NIS domains but retain the different NISmapping information in Active Directory because PBIS lets you use a cell to map a user to different UIDsand GIDs depending on the Unix or Linux computer that they are accessing.
To move to Active Directory when you havemultiple NIS servers, you can create an OU (or choose anexisting OU) and join to the OU all the Unix computers that are connected to the NIS server. You can thenuse cells to represent users' UID-GID mapping from the previous identitymanagement system.
PBIS Enterprise Administration Guide Migrating Users to Active Directory
BeyondTrust® September 2014 42
Managing Computers
Use PBIS with a Single Organizational Unit
You can use PBIS if you have write privileges for only one OU. Your AD rights to create objects in the OUallow you to join Linux and Unix computers to the OU even though you do not have Active DirectoryDomain Administrator or Enterprise Administrator privileges. (See Assigning Users to Manage Cells.)
There are additional limitations to this approach:
• You must join the computer to a specific OU, and you must know the path to that OU.
• You cannot use PBIS Enterprise in Directory Integrated mode unless you have EnterpriseAdministrator privileges, which are required to upgrade the schema.
Join a Linux Computer to anOrganizational Unit
To join a computer to a domain, you need:
• The user name and password of an account that has privileges to join computers to the OU
• The full name of the domain that you want to join. The OU path is from the top OU down to the OUthat you want.
As root, execute the following command, replacing organizationalUnitNamewith the path andname of the OU that you want to join, domainNamewith the FQDN of the domain, and joinAccountwith the user name of an account that has privileges to join computers to the domain:
/opt/pbis/bin/domainjoin-cli join --ou organizationalUnitName domainName joinAc-count
Example: /opt/pbis/bin/domainjoin-cli join --ou Engineering example.comAdministrator
Example of how to join a nested OU:domainjoin-cli join --ou topLevelOU/middleLevelOU/LowerLevelOU/TargetOUexample.com Administrator
After you join a domain for the first time, you must restart the computer before you can log on.
Rename a Joined Computer
To rename a joined computer, you must:
• Leave the domain.
• Rename the computer using the domain join command-line interface.
• Rejoin the computer to the domain.
Important: Do not change the name of a Linux, Unix, or Mac computer using the hostname commandbecause some distributions do not permanently apply the changes.
PBIS Enterprise Administration Guide Managing Computers
BeyondTrust® September 2014 43
Rename a Computer Using the Command-Line Tool
The following procedure removes a Unix or Linux computer from the domain, renames the computer,and then rejoins it to the domain.
Note: Renaming a joined computer requires the user name and password of a user with privileges tojoin a computer to a domain.
1. With root privileges, at the shell prompt of a Unix computer, execute the following command:/opt/pbis/bin/domainjoin-cli leave
2. To rename the computer in /etc/hosts, execute the following command, replacingcomputerNamewith the new name of the computer:/opt/pbis/bin/domainjoin-cli setname computerName
Example: /opt/pbis/bin/domainjoin-cli setname RHEL44ID
3. To rejoin the renamed computer to the domain, execute the following command at the shell prompt,replacing DomainNamewith the name of the domain that you want to join and UserNamewith theuser name of a user who has privileges to join a domain:/opt/pbis/bin/domainjoin-cli join DomainName UserName
Example: /opt/pbis/bin/domainjoin-cli join example.com Administrator
It may take a fewmoments before the computer is joined to the domain.
4. After you change the hostname of a computer, you must also change the name in the PBIS localprovider database so that the local PBIS accounts use the correct prefix. Execute the followingcommand as root, replacing hostNamewith the name that you want:/opt/pbis/bin/set-machine-name hostName
Rename a Computer Using the Domain Join Tool UI
1. From the desktop with root privileges, double-click the PBIS Domain Join Tool, or at the shell promptof a Linux computer, type the following command:/opt/pbis/bin/domainjoin-gui
2. Click Leave, and then click OK.3. Start the domain join tool again by double-clicking the PBIS Domain Join Tool on the desktop, or by
typing the following command at the shell prompt of a Linux computer:/opt/pbis/bin/domainjoin-gui
4. Click Next.5. In the Computer name box, rename the computer by typing a new name.
PBIS Enterprise Administration Guide Managing Computers
BeyondTrust® September 2014 44
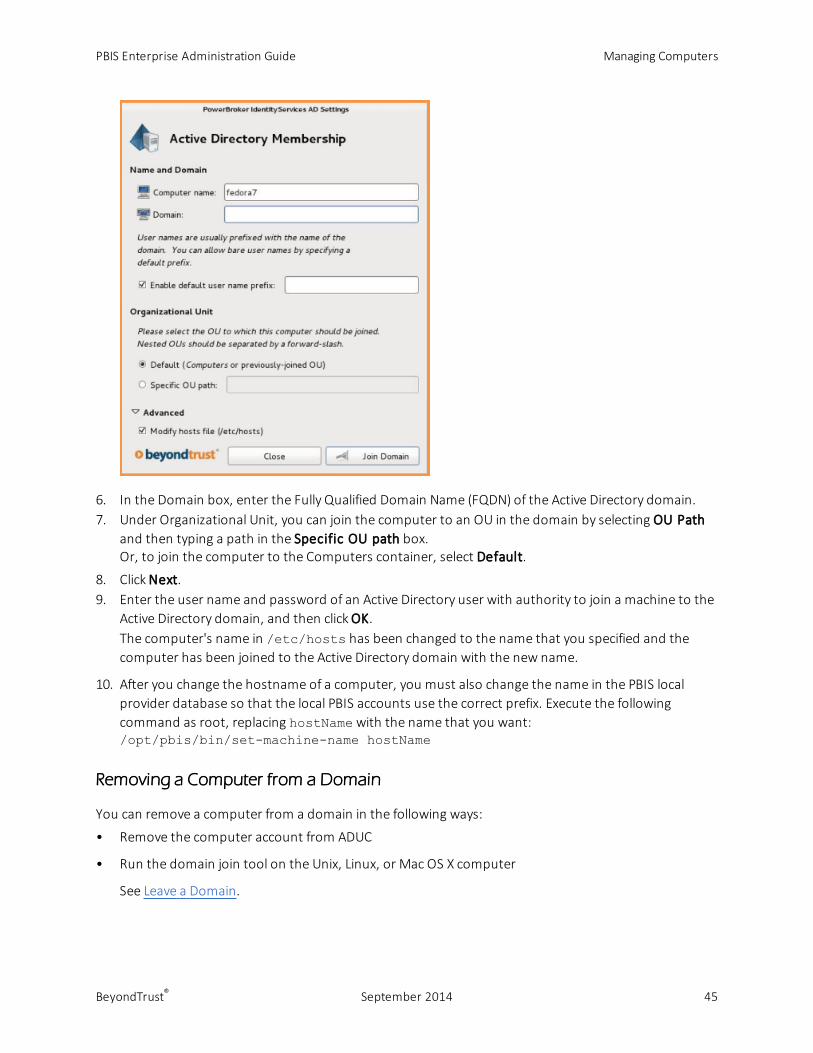
6. In the Domain box, enter the Fully Qualified Domain Name (FQDN) of the Active Directory domain.7. Under Organizational Unit, you can join the computer to an OU in the domain by selecting OU Path
and then typing a path in the Specific OU path box.Or, to join the computer to the Computers container, select Default.
8. Click Next.9. Enter the user name and password of an Active Directory user with authority to join a machine to the
Active Directory domain, and then click OK.The computer's name in /etc/hosts has been changed to the name that you specified and thecomputer has been joined to the Active Directory domain with the new name.
10. After you change the hostname of a computer, you must also change the name in the PBIS localprovider database so that the local PBIS accounts use the correct prefix. Execute the followingcommand as root, replacing hostNamewith the name that you want:/opt/pbis/bin/set-machine-name hostName
Removing a Computer from a Domain
You can remove a computer from a domain in the following ways:
• Remove the computer account from ADUC
• Run the domain join tool on the Unix, Linux, or Mac OS X computer
See Leave a Domain.
PBIS Enterprise Administration Guide Managing Computers
BeyondTrust® September 2014 45
NetworkManager: Use a Wired Connection to Join a Domain
On Linux computers running NetworkManager—which is often used for wireless connections—you mustmake sure before you join a domain that the computer has a non-wireless network connection and thatthe non-wireless connection is configured to start when the networking cable is plugged in. You mustcontinue to use the non-wireless network connection during the post-join process of restarting yourcomputer and logging on with your Active Directory domain credentials.
After you join the domain and log on for the first time with your AD domain credentials using a non-wireless connection, you can then revert to using your wireless connection because your AD logoncredentials are cached. (You will not, however, be notified when your AD password is set to expire untilyou either run a sudo command or log on using a non-wireless connection.)
If, instead, you attempt to use a wireless connection when you join the domain, you cannot log on toyour computer with AD domain credentials after your computer restarts.
Here is why: NetworkManager is composed of a daemon that runs at startup and a user-modeapplication that runs only after you log on. NetworkManager is typically configured to auto-start wirednetwork connections when they are plugged in and wireless connections when they are detected. Theproblem is that the wireless network is not detected until the user-mode application starts—whichoccurs only after you log on.
Information about NetworkManager is available at http://projects.gnome.org/NetworkManager/.
AIX: Create Audit Classes to Monitor Events
On AIX computers, after you install the PBIS agent, you can create audit classes to monitor the activitiesof users who log on with their Active Directory credentials.
You can use the following file as a template to create audit classes for AD users:/etc/pbis/auditclasses.sample
To create and configure an audit class, copy the file and name it /etc/pbis/auditclasses. Edit thefile to set the audit classes.
After you configure audit classes, the auditing occurs the next time the user logs on.
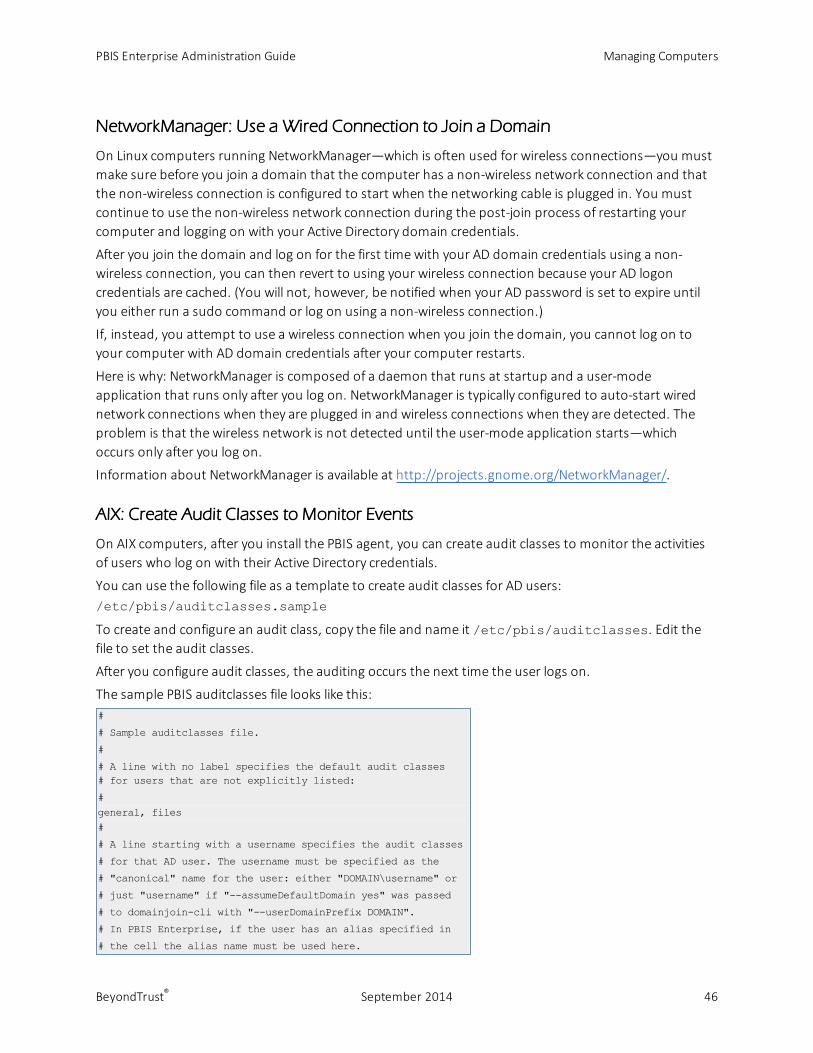
The sample PBIS auditclasses file looks like this:#
# Sample auditclasses file.
#
# A line with no label specifies the default audit classes# for users that are not explicitly listed:
#general, files#
# A line starting with a username specifies the audit classes
# for that AD user. The username must be specified as the
# "canonical" name for the user: either "DOMAIN\username" or
# just "username" if "--assumeDefaultDomain yes" was passed
# to domainjoin-cli with "--userDomainPrefix DOMAIN".
# In PBIS Enterprise, if the user has an alias specified in
# the cell the alias name must be used here.
PBIS Enterprise Administration Guide Managing Computers
BeyondTrust® September 2014 46
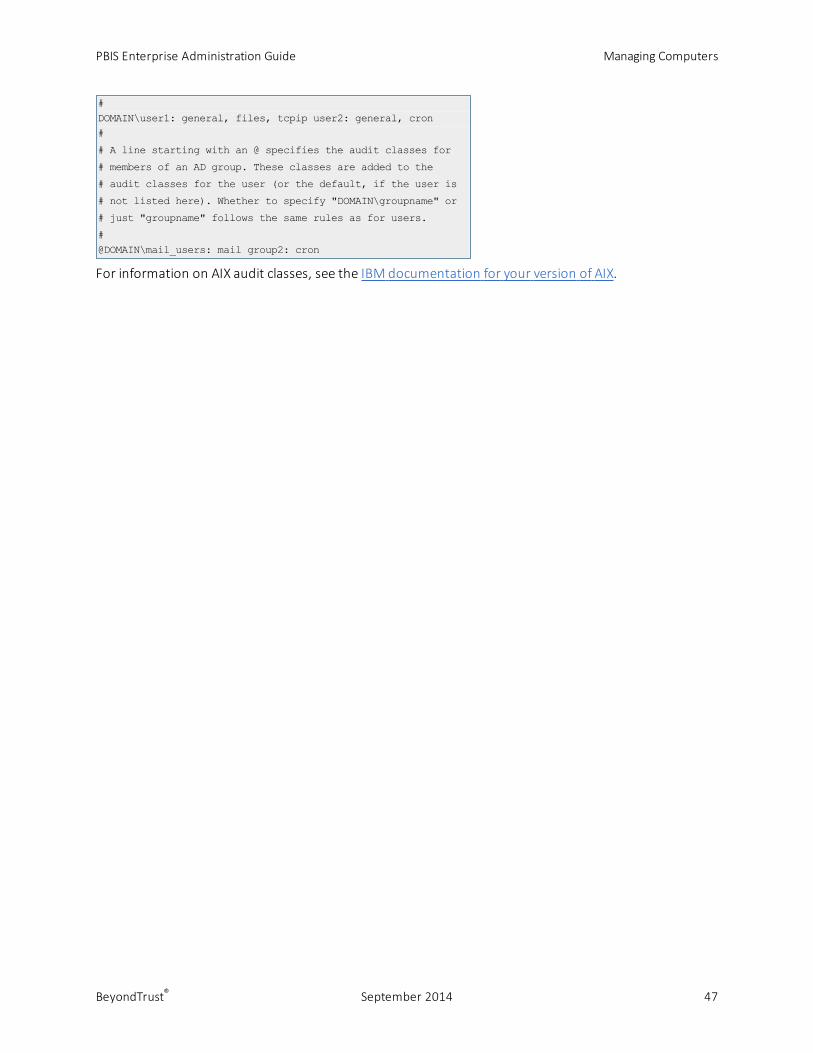
#DOMAIN\user1: general, files, tcpip user2: general, cron#
# A line starting with an @ specifies the audit classes for
# members of an AD group. These classes are added to the
# audit classes for the user (or the default, if the user is
# not listed here). Whether to specify "DOMAIN\groupname" or
# just "groupname" follows the same rules as for users.
#@DOMAIN\mail_users: mail group2: cron
For information on AIX audit classes, see the IBM documentation for your version of AIX.
PBIS Enterprise Administration Guide Managing Computers
BeyondTrust® September 2014 47

Configuring PBIS with the Registry
The PBIS registry is a hierarchical database that stores configuration information for PBIS services,authentication providers, drivers, and other services.
On Linux, Unix, and Mac computers, the PBIS services continually access the registry to obtain settings fortheir parameters. The PBIS authentication service, for example, queries the registry to determine whichlog level to use or which home directory template to apply to a user. In version 5.4 or later, the registryreplaces the text-based configuration files like lsassd.conf that were used in version 5.3 or earlier.
When you install the PBIS agent on a Linux, Unix, or Mac computer but do not install PBIS Enterprise on aWindows administrative workstation connected to Active Directory, you cannot configure local PBISsettings with Group Policy settings. Instead, you must edit the local PBIS registry. You can access theregistry and modify its settings by using the PBIS registry shell—regshell—in /opt/pbis/bin/.
This chapter describes the structure of the registry, demonstrates how to change a value in it, and liststhe local PBIS configuration options.
Note: Most of the registry settings can be centrally managed with Group Policy settings when you usePBIS Enterprise; see the PowerBroker Identity Services Group Policy Administration Guide. If youmodify a setting in the registry that is managed by a Group Policy setting, the change will notpersist: It will be overwritten by the setting in the Group Policy Object (GPO) as soon as the GPO isupdated, which typically takes place once every 30minutes. PBIS Open does not apply GroupPolicy settings.
The Structure of the Registry
The PBIS registry contains one predefined top-level, or root, key: HKEY_THIS_MACHINE. Within the rootkey, the structure of the registry is delineated by service into branches of keys, subkeys, and values.
• A key is similar to a folder; it can contain additional keys and one or more value entries.
• A value entry is an ordered pair with a name and a value.
• A subkey, similar to a subfolder, is simply a child key that appears under another key, the parent.
• A branch describes a key and all of its contents, including subkeys and value entries.
The upper level of the PBIS registry's hierarchical structure looks like the following:
[root@bvt-cen62-64 testuser]# /opt/pbis/bin/regshell\> cd H\> cd [HKEY_THIS_MACHINE]
HKEY_THIS_MACHINE\> ls
[HKEY_THIS_MACHINE][HKEY_THIS_MACHINE\Services]
HKEY_THIS_MACHINE\> cd Ser\HKEY_THIS_MACHINE\> cd Services\
PBIS Enterprise Administration Guide Configuring PBIS with the Registry
BeyondTrust® September 2014 48
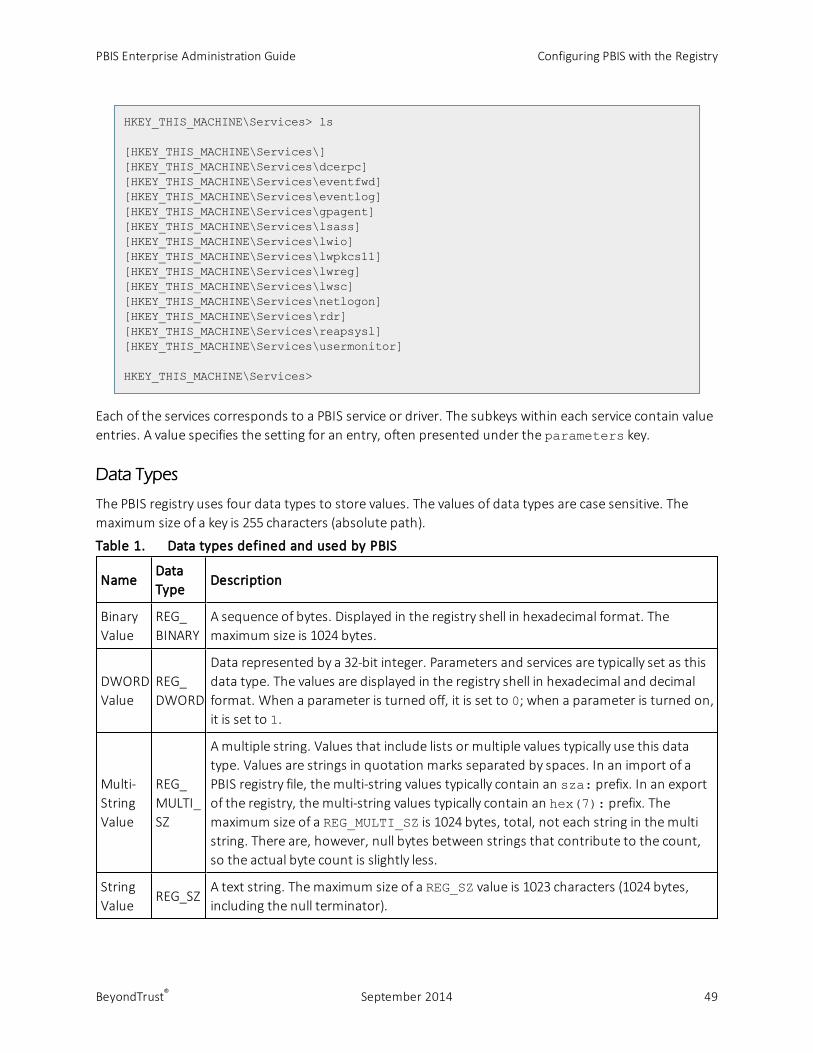
HKEY_THIS_MACHINE\Services> ls
[HKEY_THIS_MACHINE\Services\][HKEY_THIS_MACHINE\Services\dcerpc][HKEY_THIS_MACHINE\Services\eventfwd][HKEY_THIS_MACHINE\Services\eventlog][HKEY_THIS_MACHINE\Services\gpagent][HKEY_THIS_MACHINE\Services\lsass][HKEY_THIS_MACHINE\Services\lwio][HKEY_THIS_MACHINE\Services\lwpkcs11][HKEY_THIS_MACHINE\Services\lwreg][HKEY_THIS_MACHINE\Services\lwsc][HKEY_THIS_MACHINE\Services\netlogon][HKEY_THIS_MACHINE\Services\rdr][HKEY_THIS_MACHINE\Services\reapsysl][HKEY_THIS_MACHINE\Services\usermonitor]
HKEY_THIS_MACHINE\Services>
Each of the services corresponds to a PBIS service or driver. The subkeys within each service contain valueentries. A value specifies the setting for an entry, often presented under the parameters key.
Data Types
The PBIS registry uses four data types to store values. The values of data types are case sensitive. Themaximum size of a key is 255 characters (absolute path).
Table 1. Data types defined and used by PBIS
NameDataType
Description
BinaryValue
REG_BINARY
A sequence of bytes. Displayed in the registry shell in hexadecimal format. Themaximum size is 1024 bytes.
DWORDValue
REG_DWORD
Data represented by a 32-bit integer. Parameters and services are typically set as thisdata type. The values are displayed in the registry shell in hexadecimal and decimalformat. When a parameter is turned off, it is set to 0; when a parameter is turned on,it is set to 1.
Multi-StringValue
REG_MULTI_SZ
Amultiple string. Values that include lists or multiple values typically use this datatype. Values are strings in quotation marks separated by spaces. In an import of aPBIS registry file, the multi-string values typically contain an sza: prefix. In an exportof the registry, the multi-string values typically contain an hex(7): prefix. Themaximum size of a REG_MULTI_SZ is 1024 bytes, total, not each string in themultistring. There are, however, null bytes between strings that contribute to the count,so the actual byte count is slightly less.
StringValue
REG_SZA text string. Themaximum size of a REG_SZ value is 1023 characters (1024 bytes,including the null terminator).
PBIS Enterprise Administration Guide Configuring PBIS with the Registry
BeyondTrust® September 2014 49
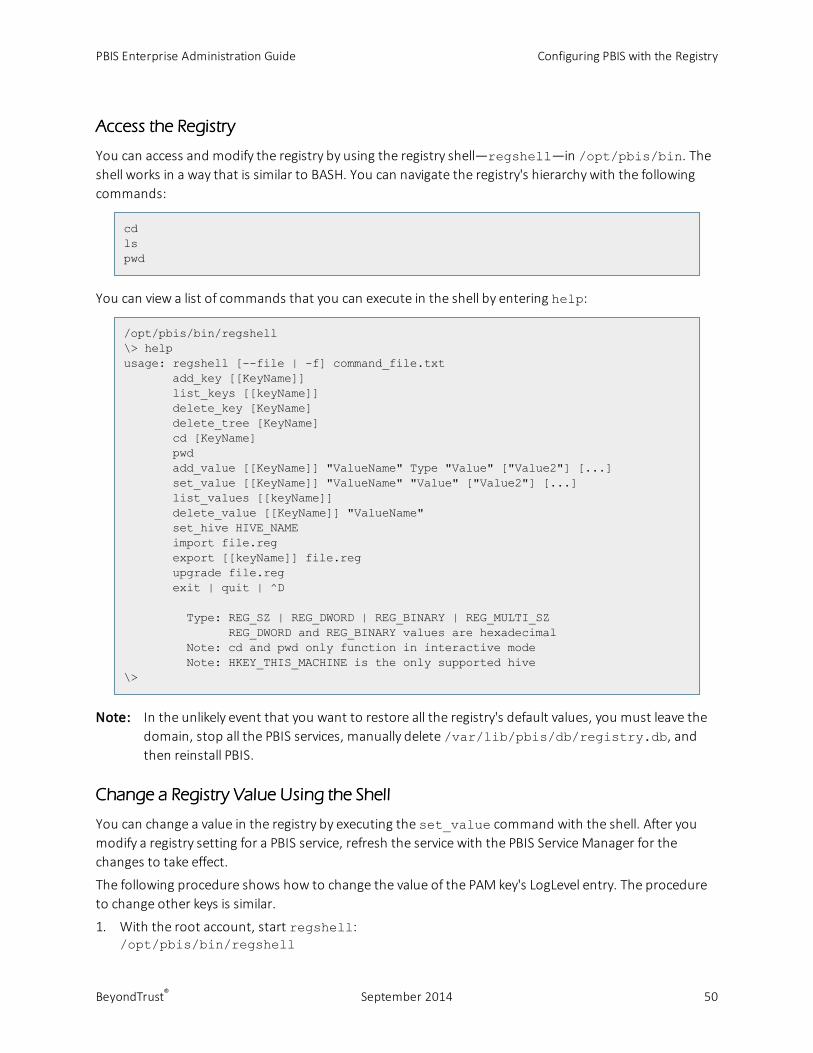
Access the Registry
You can access and modify the registry by using the registry shell—regshell—in /opt/pbis/bin. Theshell works in a way that is similar to BASH. You can navigate the registry's hierarchy with the followingcommands:
cdlspwd
You can view a list of commands that you can execute in the shell by entering help:
/opt/pbis/bin/regshell\> helpusage: regshell [--file | -f] command_file.txt
add_key [[KeyName]]list_keys [[keyName]]delete_key [KeyName]delete_tree [KeyName]cd [KeyName]pwdadd_value [[KeyName]] "ValueName" Type "Value" ["Value2"] [...]set_value [[KeyName]] "ValueName" "Value" ["Value2"] [...]list_values [[keyName]]delete_value [[KeyName]] "ValueName"set_hive HIVE_NAMEimport file.regexport [[keyName]] file.regupgrade file.regexit | quit | ^D
Type: REG_SZ | REG_DWORD | REG_BINARY | REG_MULTI_SZREG_DWORD and REG_BINARY values are hexadecimal
Note: cd and pwd only function in interactive modeNote: HKEY_THIS_MACHINE is the only supported hive
\>
Note: In the unlikely event that you want to restore all the registry's default values, you must leave thedomain, stop all the PBIS services, manually delete /var/lib/pbis/db/registry.db, andthen reinstall PBIS.
Change a Registry Value Using the Shell
You can change a value in the registry by executing the set_value command with the shell. After youmodify a registry setting for a PBIS service, refresh the service with the PBIS ServiceManager for thechanges to take effect.
The following procedure shows how to change the value of the PAM key's LogLevel entry. The procedureto change other keys is similar.
1. With the root account, start regshell:/opt/pbis/bin/regshell
PBIS Enterprise Administration Guide Configuring PBIS with the Registry
BeyondTrust® September 2014 50
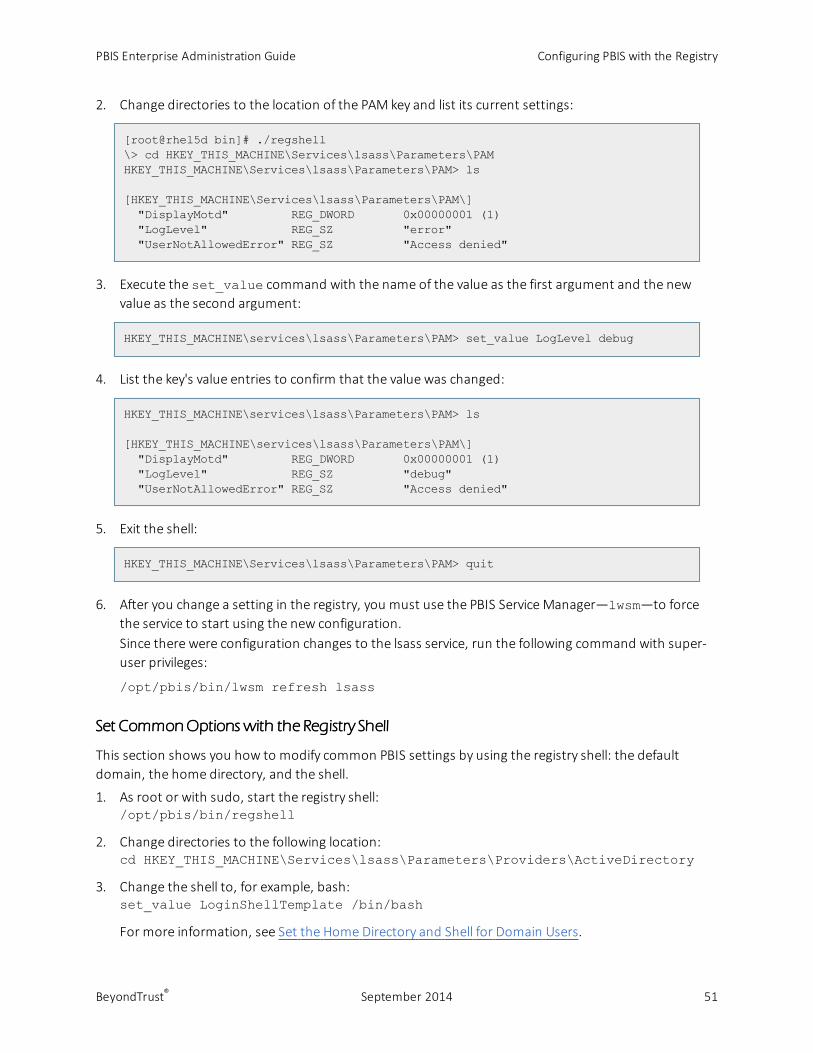
2. Change directories to the location of the PAM key and list its current settings:
[root@rhel5d bin]# ./regshell\> cd HKEY_THIS_MACHINE\Services\lsass\Parameters\PAMHKEY_THIS_MACHINE\Services\lsass\Parameters\PAM> ls
[HKEY_THIS_MACHINE\Services\lsass\Parameters\PAM\]"DisplayMotd" REG_DWORD 0x00000001 (1)"LogLevel" REG_SZ "error""UserNotAllowedError" REG_SZ "Access denied"
3. Execute the set_value command with the name of the value as the first argument and the newvalue as the second argument:
HKEY_THIS_MACHINE\services\lsass\Parameters\PAM> set_value LogLevel debug
4. List the key's value entries to confirm that the value was changed:
HKEY_THIS_MACHINE\services\lsass\Parameters\PAM> ls
[HKEY_THIS_MACHINE\services\lsass\Parameters\PAM\]"DisplayMotd" REG_DWORD 0x00000001 (1)"LogLevel" REG_SZ "debug""UserNotAllowedError" REG_SZ "Access denied"
5. Exit the shell:
HKEY_THIS_MACHINE\Services\lsass\Parameters\PAM> quit
6. After you change a setting in the registry, you must use the PBIS ServiceManager—lwsm—to forcethe service to start using the new configuration.Since there were configuration changes to the lsass service, run the following command with super-user privileges:
/opt/pbis/bin/lwsm refresh lsass
Set CommonOptions with the Registry Shell
This section shows you how to modify common PBIS settings by using the registry shell: the defaultdomain, the home directory, and the shell.
1. As root or with sudo, start the registry shell:/opt/pbis/bin/regshell
2. Change directories to the following location:cd HKEY_THIS_MACHINE\Services\lsass\Parameters\Providers\ActiveDirectory
3. Change the shell to, for example, bash:set_value LoginShellTemplate /bin/bash
For more information, see Set the Home Directory and Shell for Domain Users.
PBIS Enterprise Administration Guide Configuring PBIS with the Registry
BeyondTrust® September 2014 51
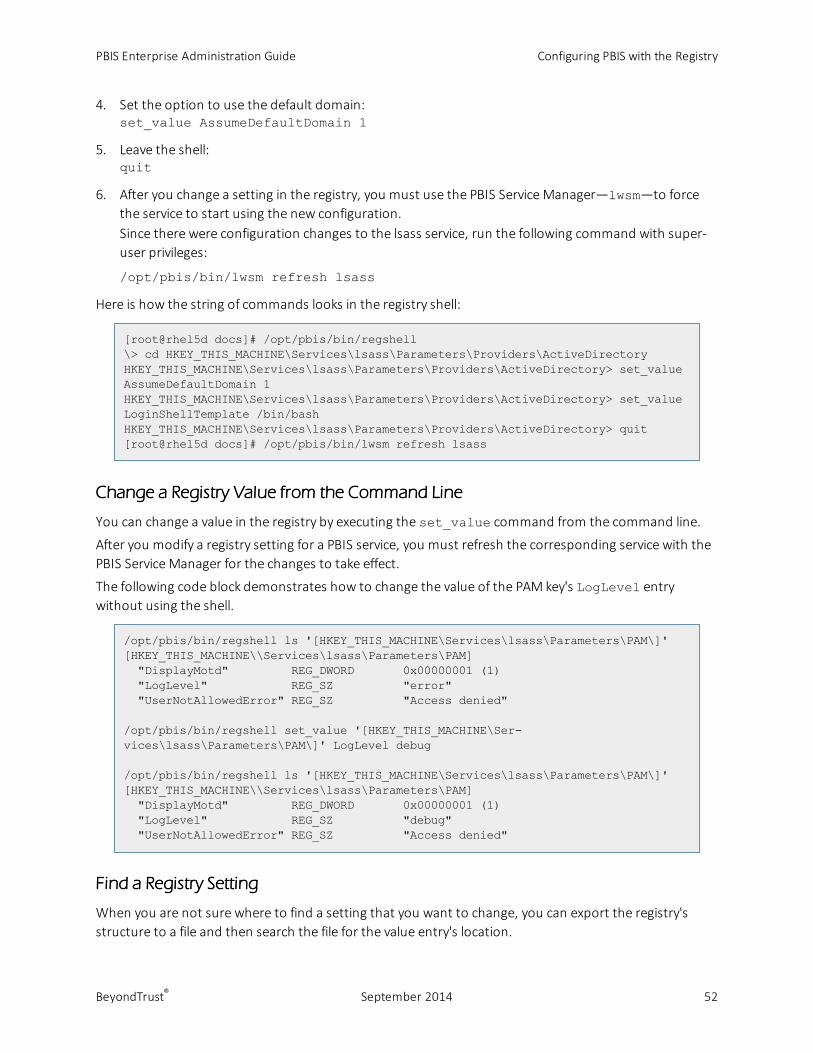
4. Set the option to use the default domain:set_value AssumeDefaultDomain 1
5. Leave the shell:quit
6. After you change a setting in the registry, you must use the PBIS ServiceManager—lwsm—to forcethe service to start using the new configuration.Since there were configuration changes to the lsass service, run the following command with super-user privileges:
/opt/pbis/bin/lwsm refresh lsass
Here is how the string of commands looks in the registry shell:
[root@rhel5d docs]# /opt/pbis/bin/regshell\> cd HKEY_THIS_MACHINE\Services\lsass\Parameters\Providers\ActiveDirectoryHKEY_THIS_MACHINE\Services\lsass\Parameters\Providers\ActiveDirectory> set_valueAssumeDefaultDomain 1HKEY_THIS_MACHINE\Services\lsass\Parameters\Providers\ActiveDirectory> set_valueLoginShellTemplate /bin/bashHKEY_THIS_MACHINE\Services\lsass\Parameters\Providers\ActiveDirectory> quit[root@rhel5d docs]# /opt/pbis/bin/lwsm refresh lsass
Change a Registry Value from the Command Line
You can change a value in the registry by executing the set_value command from the command line.
After you modify a registry setting for a PBIS service, you must refresh the corresponding service with thePBIS ServiceManager for the changes to take effect.
The following code block demonstrates how to change the value of the PAM key's LogLevel entrywithout using the shell.
/opt/pbis/bin/regshell ls '[HKEY_THIS_MACHINE\Services\lsass\Parameters\PAM\]'[HKEY_THIS_MACHINE\\Services\lsass\Parameters\PAM]"DisplayMotd" REG_DWORD 0x00000001 (1)"LogLevel" REG_SZ "error""UserNotAllowedError" REG_SZ "Access denied"
/opt/pbis/bin/regshell set_value '[HKEY_THIS_MACHINE\Ser-vices\lsass\Parameters\PAM\]' LogLevel debug
/opt/pbis/bin/regshell ls '[HKEY_THIS_MACHINE\Services\lsass\Parameters\PAM\]'[HKEY_THIS_MACHINE\\Services\lsass\Parameters\PAM]"DisplayMotd" REG_DWORD 0x00000001 (1)"LogLevel" REG_SZ "debug""UserNotAllowedError" REG_SZ "Access denied"
Find a Registry Setting
When you are not sure where to find a setting that you want to change, you can export the registry'sstructure to a file and then search the file for the value entry's location.
PBIS Enterprise Administration Guide Configuring PBIS with the Registry
BeyondTrust® September 2014 52
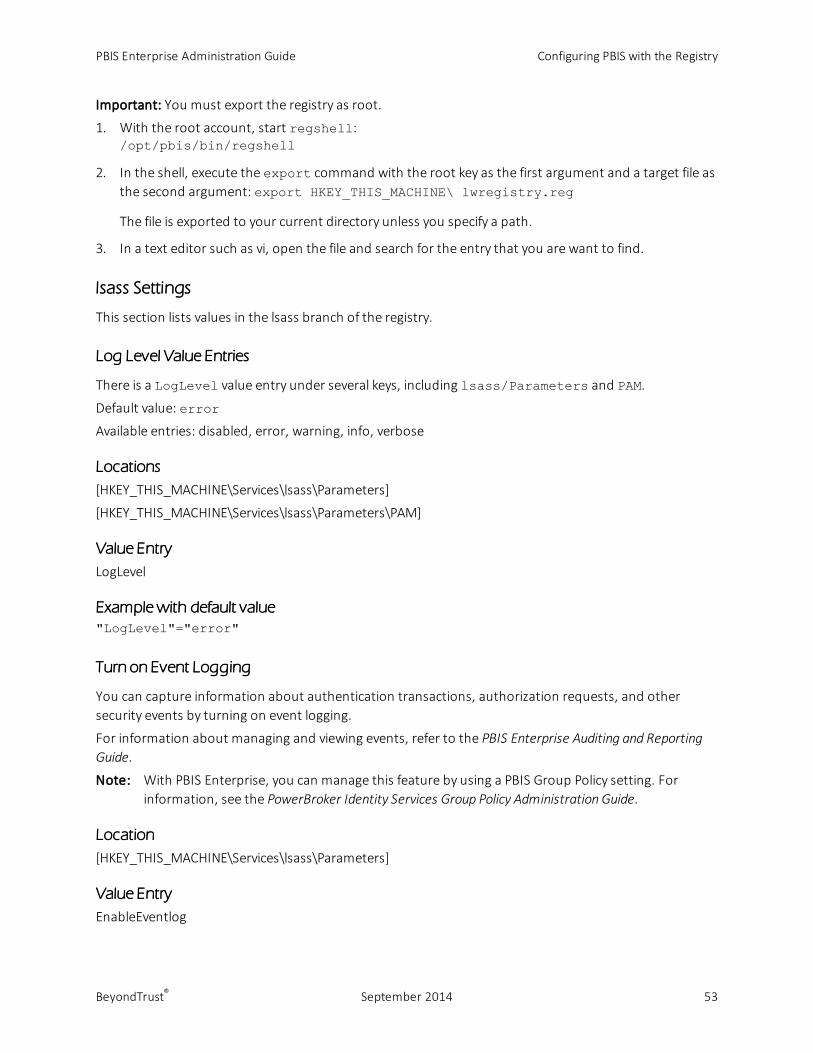
Important: You must export the registry as root.
1. With the root account, start regshell:/opt/pbis/bin/regshell
2. In the shell, execute the export command with the root key as the first argument and a target file asthe second argument: export HKEY_THIS_MACHINE\ lwregistry.reg
The file is exported to your current directory unless you specify a path.
3. In a text editor such as vi, open the file and search for the entry that you are want to find.
lsass Settings
This section lists values in the lsass branch of the registry.
Log Level Value Entries
There is a LogLevel value entry under several keys, including lsass/Parameters and PAM.
Default value: error
Available entries: disabled, error, warning, info, verbose
Locations
[HKEY_THIS_MACHINE\Services\lsass\Parameters]
[HKEY_THIS_MACHINE\Services\lsass\Parameters\PAM]
Value Entry
LogLevel
Examplewith default value
"LogLevel"="error"
Turn on Event Logging
You can capture information about authentication transactions, authorization requests, and othersecurity events by turning on event logging.
For information about managing and viewing events, refer to the PBIS Enterprise Auditing and ReportingGuide.
Note: With PBIS Enterprise, you can manage this feature by using a PBIS Group Policy setting. Forinformation, see the PowerBroker Identity Services Group Policy Administration Guide.
Location
[HKEY_THIS_MACHINE\Services\lsass\Parameters]
Value Entry
EnableEventlog
PBIS Enterprise Administration Guide Configuring PBIS with the Registry
BeyondTrust® September 2014 53
Examplewith default value
"EnableEventlog"=dword:00000000
Turn off Network Event Logging
After you turn on event logging, network connection events are logged by default.
On laptop computers, computers with a wireless connection, or other computers whose network statusmight be in flux, you can turn off event logging so that the event log is not inundated with connectivityevents.
Note: With PBIS Enterprise, you can manage this feature by using a PBIS Group Policy setting. Forinformation, see the PowerBroker Identity Services Group Policy Administration Guide.
Location
[HKEY_THIS_MACHINE\Services\lsass\Parameters\Providers\ActiveDirectory]
Value Entry
LogNetworkConnectionEvents
Examplewith default value
"LogNetworkConnectionEvents"=dword:00000001
Restrict Logon Rights
You can require that a user be a member of a group to log on a computer, or you can limit logon to onlythe users that you specify. PBIS checks requiremembershipof information in both the authenticationphase and the account phase.
Note: With PBIS Enterprise, you can manage this feature by using a PBIS Group Policy setting. Forinformation, see the PowerBroker Identity Services Group Policy Administration Guide.
Location
[HKEY_THIS_MACHINE\Services\lsass\Parameters\Providers\ActiveDirectory]
Value Entry
RequireMembershipOf
Notes
• Add each user or group to the value entry by using an NT4-style name (the short domain namewiththe group name) or an Active Directory security identifier (SID). Aliases are not supported.
• Each entrymust be enclosed in quotation marks.
• Only the users that you specify and the users who are members of the groups that you specify areallowed to log on the computer.
• Use a slash character to escape a slash (\\).
PBIS Enterprise Administration Guide Configuring PBIS with the Registry
BeyondTrust® September 2014 54
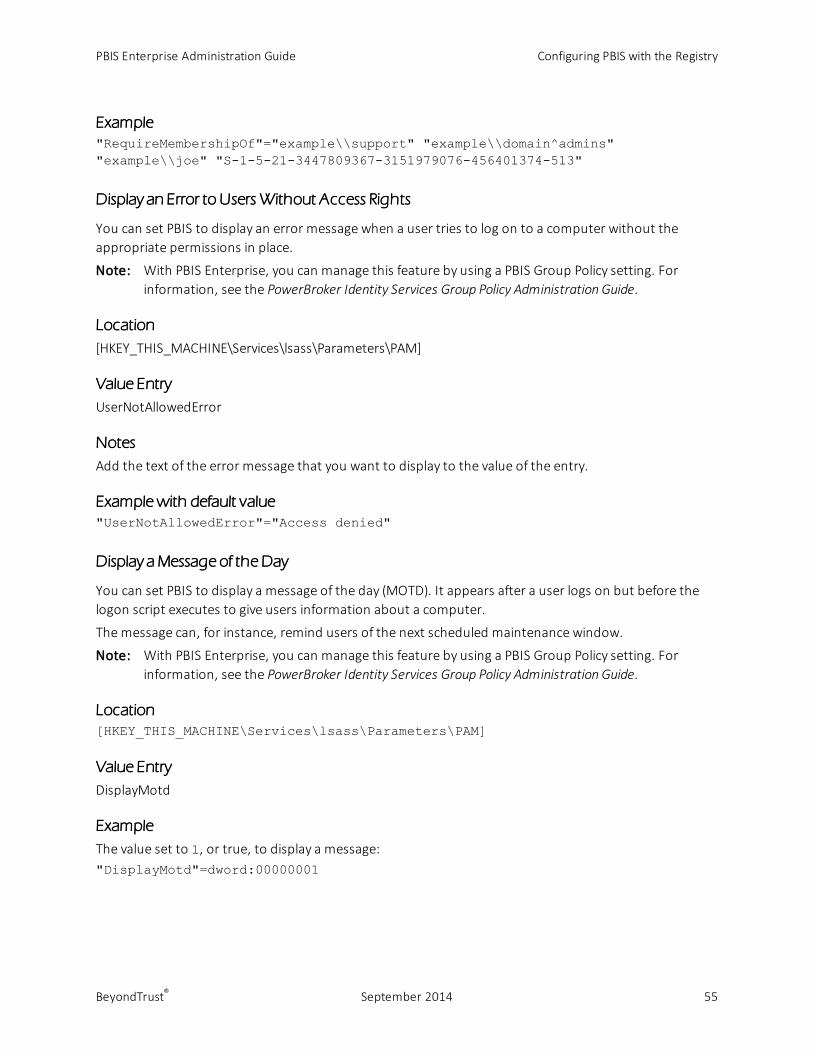
Example
"RequireMembershipOf"="example\\support" "example\\domain^admins""example\\joe" "S-1-5-21-3447809367-3151979076-456401374-513"
Display an Error to UsersWithout Access Rights
You can set PBIS to display an error message when a user tries to log on to a computer without theappropriate permissions in place.
Note: With PBIS Enterprise, you can manage this feature by using a PBIS Group Policy setting. Forinformation, see the PowerBroker Identity Services Group Policy Administration Guide.
Location
[HKEY_THIS_MACHINE\Services\lsass\Parameters\PAM]
Value Entry
UserNotAllowedError
Notes
Add the text of the error message that you want to display to the value of the entry.
Examplewith default value
"UserNotAllowedError"="Access denied"
Display aMessage of the Day
You can set PBIS to display a message of the day (MOTD). It appears after a user logs on but before thelogon script executes to give users information about a computer.
Themessage can, for instance, remind users of the next scheduled maintenance window.
Note: With PBIS Enterprise, you can manage this feature by using a PBIS Group Policy setting. Forinformation, see the PowerBroker Identity Services Group Policy Administration Guide.
Location
[HKEY_THIS_MACHINE\Services\lsass\Parameters\PAM]
Value Entry
DisplayMotd
Example
The value set to 1, or true, to display a message:"DisplayMotd"=dword:00000001
PBIS Enterprise Administration Guide Configuring PBIS with the Registry
BeyondTrust® September 2014 55
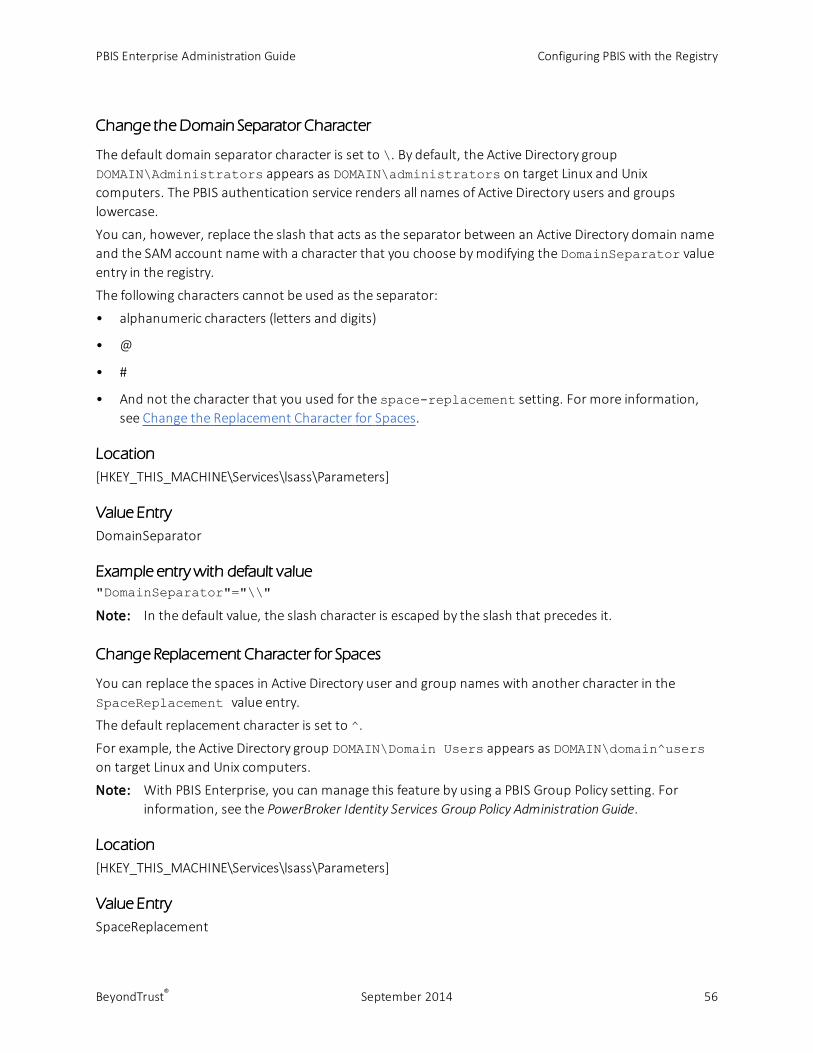
Change the Domain Separator Character
The default domain separator character is set to \. By default, the Active Directory groupDOMAIN\Administrators appears as DOMAIN\administrators on target Linux and Unixcomputers. The PBIS authentication service renders all names of Active Directory users and groupslowercase.
You can, however, replace the slash that acts as the separator between an Active Directory domain nameand the SAM account namewith a character that you choose bymodifying the DomainSeparator valueentry in the registry.
The following characters cannot be used as the separator:
• alphanumeric characters (letters and digits)
• @
• #
• And not the character that you used for the space-replacement setting. For more information,see Change the Replacement Character for Spaces.
Location
[HKEY_THIS_MACHINE\Services\lsass\Parameters]
Value Entry
DomainSeparator
Example entrywith default value
"DomainSeparator"="\\"
Note: In the default value, the slash character is escaped by the slash that precedes it.
Change Replacement Character for Spaces
You can replace the spaces in Active Directory user and group names with another character in theSpaceReplacement value entry.
The default replacement character is set to ^.
For example, the Active Directory group DOMAIN\Domain Users appears as DOMAIN\domain^userson target Linux and Unix computers.
Note: With PBIS Enterprise, you can manage this feature by using a PBIS Group Policy setting. Forinformation, see the PowerBroker Identity Services Group Policy Administration Guide.
Location
[HKEY_THIS_MACHINE\Services\lsass\Parameters]
Value Entry
SpaceReplacement
PBIS Enterprise Administration Guide Configuring PBIS with the Registry
BeyondTrust® September 2014 56
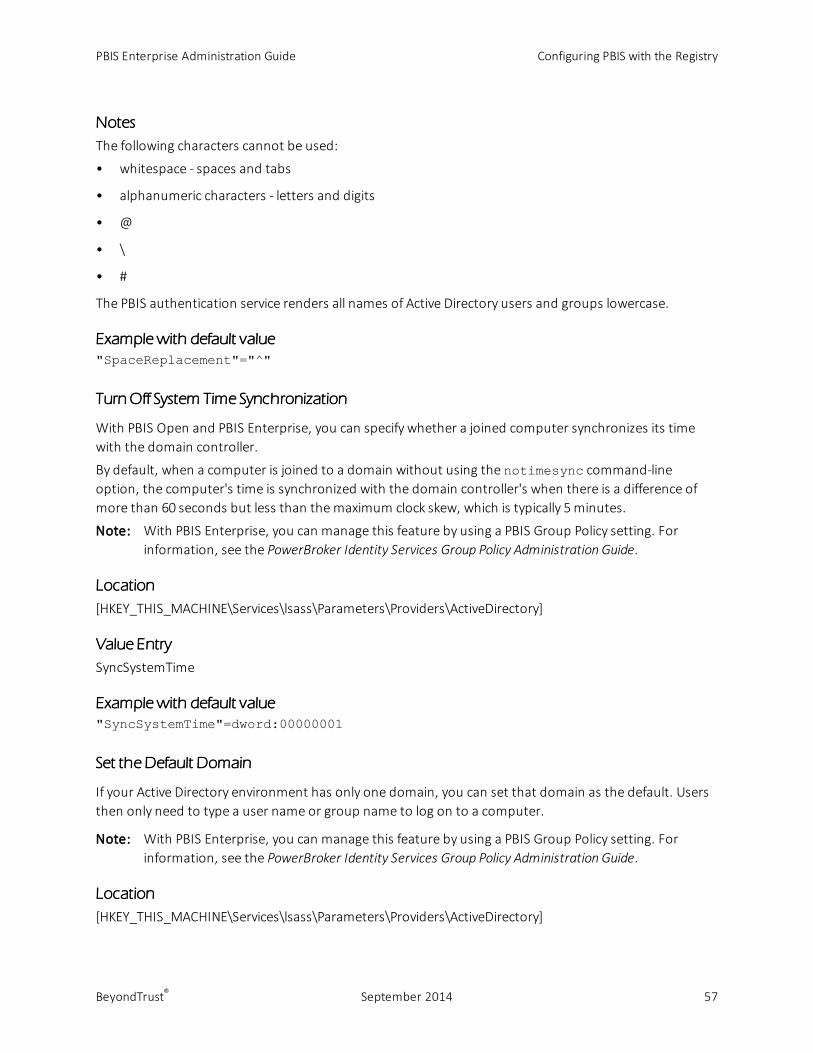
Notes
The following characters cannot be used:
• whitespace - spaces and tabs
• alphanumeric characters - letters and digits
• @
• \
• #
The PBIS authentication service renders all names of Active Directory users and groups lowercase.
Examplewith default value
"SpaceReplacement"="^"
TurnOff System Time Synchronization
With PBIS Open and PBIS Enterprise, you can specify whether a joined computer synchronizes its timewith the domain controller.
By default, when a computer is joined to a domain without using the notimesync command-lineoption, the computer's time is synchronized with the domain controller's when there is a difference ofmore than 60 seconds but less than themaximum clock skew, which is typically 5minutes.
Note: With PBIS Enterprise, you can manage this feature by using a PBIS Group Policy setting. Forinformation, see the PowerBroker Identity Services Group Policy Administration Guide.
Location
[HKEY_THIS_MACHINE\Services\lsass\Parameters\Providers\ActiveDirectory]
Value Entry
SyncSystemTime
Examplewith default value
"SyncSystemTime"=dword:00000001
Set the Default Domain
If your Active Directory environment has only one domain, you can set that domain as the default. Usersthen only need to type a user name or group name to log on to a computer.
Note: With PBIS Enterprise, you can manage this feature by using a PBIS Group Policy setting. Forinformation, see the PowerBroker Identity Services Group Policy Administration Guide.
Location
[HKEY_THIS_MACHINE\Services\lsass\Parameters\Providers\ActiveDirectory]
PBIS Enterprise Administration Guide Configuring PBIS with the Registry
BeyondTrust® September 2014 57
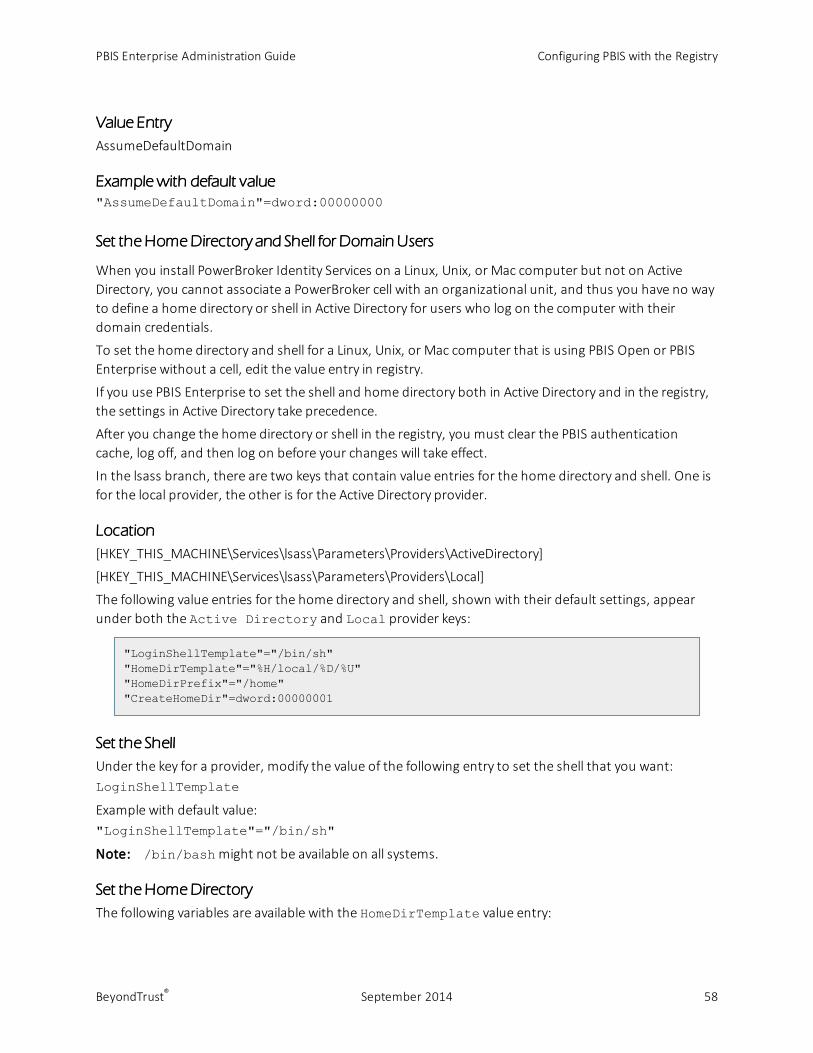
Value Entry
AssumeDefaultDomain
Examplewith default value
"AssumeDefaultDomain"=dword:00000000
Set the HomeDirectory and Shell for Domain Users
When you install PowerBroker Identity Services on a Linux, Unix, or Mac computer but not on ActiveDirectory, you cannot associate a PowerBroker cell with an organizational unit, and thus you have no wayto define a home directory or shell in Active Directory for users who log on the computer with theirdomain credentials.
To set the home directory and shell for a Linux, Unix, or Mac computer that is using PBIS Open or PBISEnterprise without a cell, edit the value entry in registry.
If you use PBIS Enterprise to set the shell and home directory both in Active Directory and in the registry,the settings in Active Directory take precedence.
After you change the home directory or shell in the registry, you must clear the PBIS authenticationcache, log off, and then log on before your changes will take effect.
In the lsass branch, there are two keys that contain value entries for the home directory and shell. One isfor the local provider, the other is for the Active Directory provider.
Location
[HKEY_THIS_MACHINE\Services\lsass\Parameters\Providers\ActiveDirectory]
[HKEY_THIS_MACHINE\Services\lsass\Parameters\Providers\Local]
The following value entries for the home directory and shell, shown with their default settings, appearunder both the Active Directory and Local provider keys:
"LoginShellTemplate"="/bin/sh""HomeDirTemplate"="%H/local/%D/%U""HomeDirPrefix"="/home""CreateHomeDir"=dword:00000001
Set the Shell
Under the key for a provider, modify the value of the following entry to set the shell that you want:LoginShellTemplate
Example with default value:"LoginShellTemplate"="/bin/sh"
Note: /bin/bashmight not be available on all systems.
Set the HomeDirectory
The following variables are available with the HomeDirTemplate value entry:
PBIS Enterprise Administration Guide Configuring PBIS with the Registry
BeyondTrust® September 2014 58

Variable Description
%U The default user name. Required.
%D The default domain name. Optional.
%H The default home directory. Optional.It must be set as an absolute path. This value, if used, is typically the first variable in thesequence.
%L The hostname of the computer. Optional.
Here is an example with all four variables set: %H/%L/%D/%U
In the following example, the HomeDirTemplate is using the %H variable for the HomeDirPrefix to setthe user's home directory:"HomeDirTemplate"="%H/local/%D/%U"
In the example, the HomeDirPrefix is not preceded by a slash because the slash is included in thedefault HomeDirPrefix to ensure that the path is absolute.
By default, the %H variable automatically changes to be compatible with the operating system togenerate a home directory path:
– On Solaris, the %H variable maps to /export/home.
– On Mac OS X, %Hmaps to /Users
– On Linux, %Hmaps to /home
Optionally, you can set the HomeDirPrefix by changing the prefix to the path that you want. However,the HomeDirPrefixmust be an absolute path—so you must precede it with a slash. Example withdefault value:"HomeDirPrefix"="/home"
All the users who log on to the computer using their Active Directory domain credentials will have theshell and home directory that you set under the Providers\ActiveDirectory key. All the users wholog on to the computer using their local PBIS provider credentials will have the shell and home directorythat you set under the Providers\Local key.
Important: On Solaris, you cannot create a local home directory in /home, because /home is used byautofs, Sun's automatic mounting service. The standard on Solaris is to create local home directories in/export/home.
On Mac OS X, to mount a remote home directory, you must first create the directory on the remoteserver as well as the folders for music, movies, and so forth. See Use the createhomedir Command toCreate Home Directories and other information on Apple's website.
TurnOff HomeDirectories
By default, a user's home directory is created upon logon. To turn off the creation of home directories,change value of the following entry to 0, for false:CreateHomeDir
Example with default setting of 1, which creates a home directory:"CreateHomeDir"=dword:00000001
PBIS Enterprise Administration Guide Configuring PBIS with the Registry
BeyondTrust® September 2014 59
Set the Umask for HomeDirectories
PBIS presets the umask for the home directory and all the files in it to 022. With a umask value of 022,the default file permissions for your AD user account are as follows:
• Read-write access for files
• Read-write-search for directories you own.
All others have read access only to your files and read-search access to your directories. You can,however, set the umask for home directories bymodifying its value entry in the registry.
Note: With PBIS Enterprise, you can manage this feature by using a PBIS Group Policy setting. Forinformation, see the PowerBroker Identity Services Group Policy Administration Guide.
Location
[HKEY_THIS_MACHINE\Services\lsass\Parameters\Providers\ActiveDirectory]
[HKEY_THIS_MACHINE\Services\lsass\Parameters\Providers\Local]
Value Entry
HomeDirUmask
Examplewith default value
"HomeDirUmask"="022"
Set the SkeletonDirectory
By default, PBIS adds the contents of /etc/skel to the home directory created for a new user accounton Linux and Unix computers. Using /etc/skel or a directory that you designate ensures that all usersbegin with the same settings or environment.
On Mac OS X computers, the default skeleton directory is as follows:
System/Library/User Template/Non_localized,/System/Library/User Template/English.lproj
Note: With PBIS Enterprise, you can manage this feature by using a PBIS Group Policy setting. Forinformation, see the PowerBroker Identity Services Group Policy Administration Guide.
Locations
[HKEY_THIS_MACHINE\Services\lsass\Parameters\Providers\ActiveDirectory]
[HKEY_THIS_MACHINE\Services\lsass\Parameters\Providers\Local]
Value Entry
SkeletonDirs
PBIS Enterprise Administration Guide Configuring PBIS with the Registry
BeyondTrust® September 2014 60
Notes
• Add the skeleton directory that you want to set to the entry.
• You can add multiple entries, but each entrymust be enclosed in quotation marks and separated bya space.
Examplewith default value
"SkeletonDirs"="/etc/skel"
Force PBIS Enterprise toWorkWithout Cell Information
To use the PBIS Enterprise agent to join a Linux, Unix, or Mac OS X computer to a domain that has notbeen configured with cell information, you must change the value of CellSupport to unprovisioned.
This setting, which applies only to PBIS Enterprise, forces the authentication service to ignore thefollowing Unix information even though it is set in Active Directory:
• Home directory
• UID
• GID
• Unix shell
Instead of using the information from Active Directory, the unprovisioned value sets theauthentication service to hash the user's security identifier and use local settings for the Unix shell andthe home directory.
Location
[HKEY_THIS_MACHINE\Services\lsass\Parameters\Providers\ActiveDirectory]
Value Entry
CellSupport
Notes
The valuemust be set as one of the following: no-unprovisioned, full or unprovisioned.
The default is no-unprovisioned, a setting that requires you to create a cell in Active Directory beforeyou join a PBIS client to it. If you are using PBIS Enterprise with cells and you want to use the Unix settingsin AD, it is recommended that you leave cell-support set to its default value of no-unprovisioned:
"CellSupport"="no-unprovisioned"
Examples
Here is an example with the value set to unprovisioned to force PBIS Enterprise to ignore Unix settingsand other cell information in AD:
"CellSupport"="unprovisioned"
PBIS Enterprise Administration Guide Configuring PBIS with the Registry
BeyondTrust® September 2014 61
Setting the value to full configures the PBIS Enterprise agent to use cell information when it appears inAD and local settings when no cells are in AD:
"CellSupport"="full"
Refresh User Credentials
By default, PBIS automatically refreshes user credentials, but you can turn off automatic refreshes bymodifying the configuration of the PBIS authentication service.
Location
[HKEY_THIS_MACHINE\Services\lsass\Parameters\Providers\ActiveDirectory]
Value Entry
RefreshUserCredentials
Examplewith default setting
"RefreshUserCredentials"=dword:00000001
TurnOff K5Logon File Creation
By default, PBIS creates a .k5login file in the home directory of an Active Directory user who isauthenticated by Kerberos when logging on a Linux, Unix, or Mac OS X computer. You can, however, stopthe creation of a .k5login file.
The .k5login file contains the user's Kerberos principal, which uniquely identifies the user within theKerberos authentication protocol. Kerberos can use the .k5login file to check whether a principal isallowed to log on as a user. A .k5login file is useful when your computers and your users are in differentKerberos realms or different Active Directory domains, which can occur when you use Active Directorytrusts.
Note: With PBIS Enterprise, you can manage this feature by using a PBIS Group Policy setting. Forinformation, see the PowerBroker Identity Services Group Policy Administration Guide.
Location
[HKEY_THIS_MACHINE\Services\lsass\Parameters\Providers\ActiveDirectory]
Value Entry
CreateK5Login
Examplewith default value
"CreateK5Login"=dword:00000001
Change the Duration of the Computer Password
You can set the computer account password's expiration time. The expiration time specifies when acomputer account password is reset in Active Directory if the account is not used. The default is 30 days.
PBIS Enterprise Administration Guide Configuring PBIS with the Registry
BeyondTrust® September 2014 62
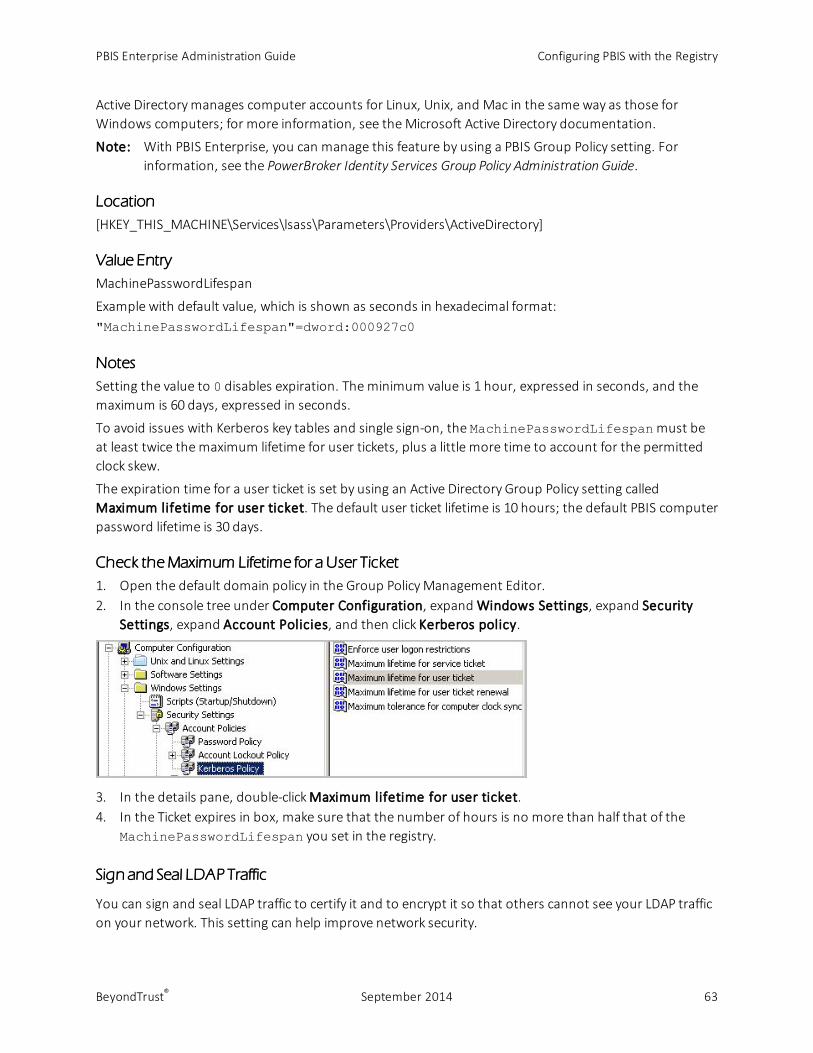
Active Directorymanages computer accounts for Linux, Unix, and Mac in the sameway as those forWindows computers; for more information, see theMicrosoft Active Directory documentation.
Note: With PBIS Enterprise, you can manage this feature by using a PBIS Group Policy setting. Forinformation, see the PowerBroker Identity Services Group Policy Administration Guide.
Location
[HKEY_THIS_MACHINE\Services\lsass\Parameters\Providers\ActiveDirectory]
Value Entry
MachinePasswordLifespan
Example with default value, which is shown as seconds in hexadecimal format:"MachinePasswordLifespan"=dword:000927c0
Notes
Setting the value to 0 disables expiration. Theminimum value is 1 hour, expressed in seconds, and themaximum is 60 days, expressed in seconds.
To avoid issues with Kerberos key tables and single sign-on, the MachinePasswordLifespanmust beat least twice themaximum lifetime for user tickets, plus a little more time to account for the permittedclock skew.
The expiration time for a user ticket is set by using an Active Directory Group Policy setting calledMaximum lifetime for user ticket. The default user ticket lifetime is 10 hours; the default PBIS computerpassword lifetime is 30 days.
Check theMaximum Lifetime for a User Ticket
1. Open the default domain policy in the Group PolicyManagement Editor.2. In the console tree under Computer Configuration, expand Windows Settings, expand Security
Settings, expand Account Policies, and then click Kerberos policy.
3. In the details pane, double-clickMaximum lifetime for user ticket.4. In the Ticket expires in box, make sure that the number of hours is no more than half that of the
MachinePasswordLifespan you set in the registry.
Sign and Seal LDAP Traffic
You can sign and seal LDAP traffic to certify it and to encrypt it so that others cannot see your LDAP trafficon your network. This setting can help improve network security.
PBIS Enterprise Administration Guide Configuring PBIS with the Registry
BeyondTrust® September 2014 63
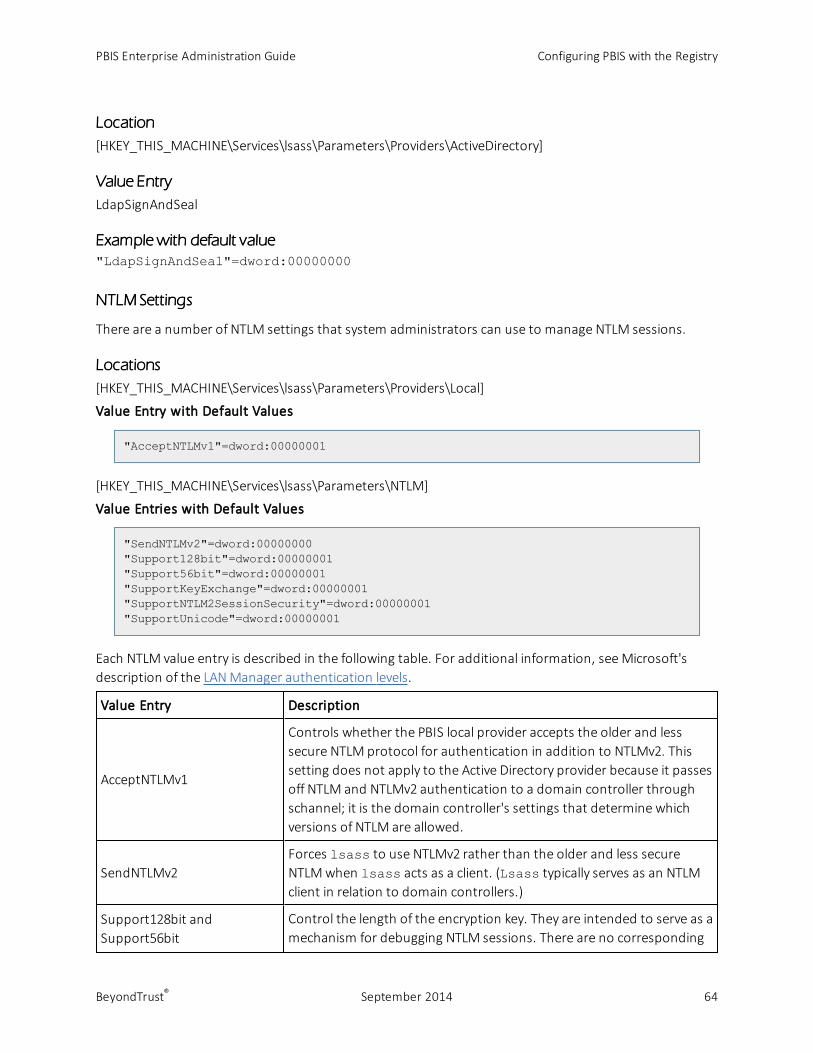
Location
[HKEY_THIS_MACHINE\Services\lsass\Parameters\Providers\ActiveDirectory]
Value Entry
LdapSignAndSeal
Examplewith default value
"LdapSignAndSeal"=dword:00000000
NTLM Settings
There are a number of NTLM settings that system administrators can use to manage NTLM sessions.
Locations
[HKEY_THIS_MACHINE\Services\lsass\Parameters\Providers\Local]
Value Entry with Default Values
"AcceptNTLMv1"=dword:00000001
[HKEY_THIS_MACHINE\Services\lsass\Parameters\NTLM]
Value Entries with Default Values
"SendNTLMv2"=dword:00000000"Support128bit"=dword:00000001"Support56bit"=dword:00000001"SupportKeyExchange"=dword:00000001"SupportNTLM2SessionSecurity"=dword:00000001"SupportUnicode"=dword:00000001
Each NTLM value entry is described in the following table. For additional information, seeMicrosoft'sdescription of the LANManager authentication levels.
Value Entry Description
AcceptNTLMv1
Controls whether the PBIS local provider accepts the older and lesssecure NTLM protocol for authentication in addition to NTLMv2. Thissetting does not apply to the Active Directory provider because it passesoff NTLM and NTLMv2 authentication to a domain controller throughschannel; it is the domain controller's settings that determine whichversions of NTLM are allowed.
SendNTLMv2Forces lsass to use NTLMv2 rather than the older and less secureNTLMwhen lsass acts as a client. (Lsass typically serves as an NTLMclient in relation to domain controllers.)
Support128bit andSupport56bit
Control the length of the encryption key. They are intended to serve as amechanism for debugging NTLM sessions. There are no corresponding
PBIS Enterprise Administration Guide Configuring PBIS with the Registry
BeyondTrust® September 2014 64
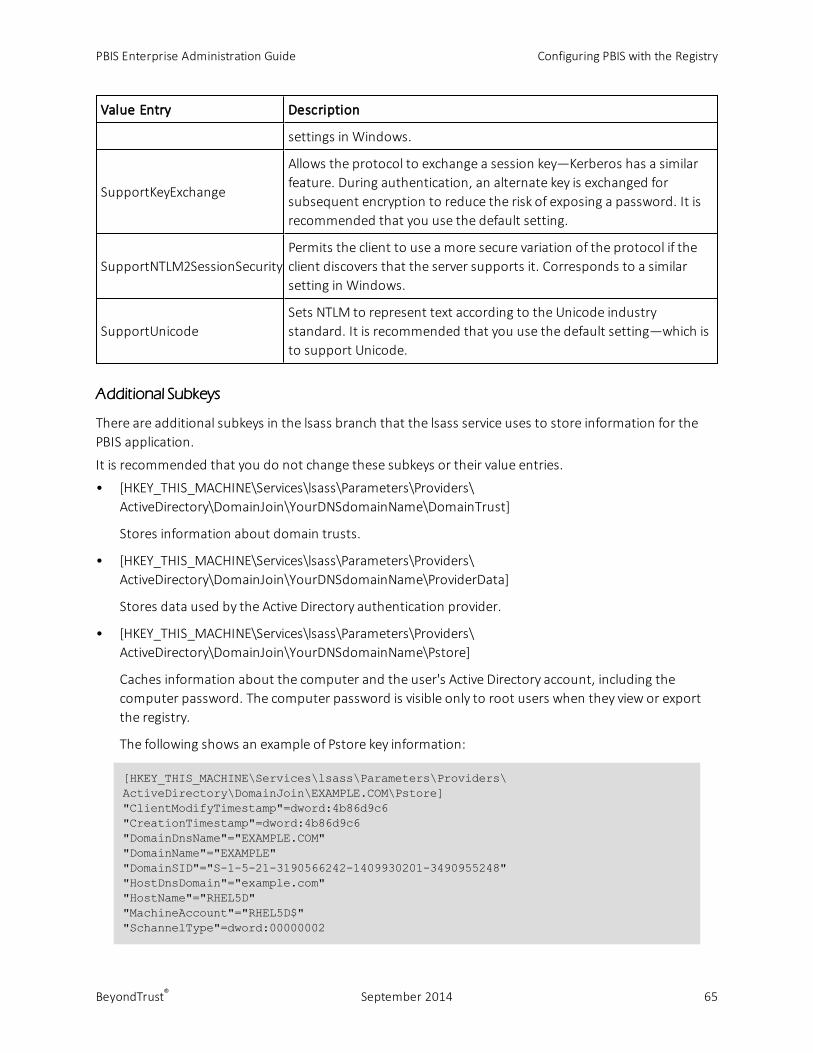
Value Entry Description
settings in Windows.
SupportKeyExchange
Allows the protocol to exchange a session key—Kerberos has a similarfeature. During authentication, an alternate key is exchanged forsubsequent encryption to reduce the risk of exposing a password. It isrecommended that you use the default setting.
SupportNTLM2SessionSecurityPermits the client to use a more secure variation of the protocol if theclient discovers that the server supports it. Corresponds to a similarsetting in Windows.
SupportUnicodeSets NTLM to represent text according to the Unicode industrystandard. It is recommended that you use the default setting—which isto support Unicode.
Additional Subkeys
There are additional subkeys in the lsass branch that the lsass service uses to store information for thePBIS application.
It is recommended that you do not change these subkeys or their value entries.
• [HKEY_THIS_MACHINE\Services\lsass\Parameters\Providers\ActiveDirectory\DomainJoin\YourDNSdomainName\DomainTrust]
Stores information about domain trusts.
• [HKEY_THIS_MACHINE\Services\lsass\Parameters\Providers\ActiveDirectory\DomainJoin\YourDNSdomainName\ProviderData]
Stores data used by the Active Directory authentication provider.
• [HKEY_THIS_MACHINE\Services\lsass\Parameters\Providers\ActiveDirectory\DomainJoin\YourDNSdomainName\Pstore]
Caches information about the computer and the user's Active Directory account, including thecomputer password. The computer password is visible only to root users when they view or exportthe registry.
The following shows an example of Pstore key information:
[HKEY_THIS_MACHINE\Services\lsass\Parameters\Providers\ActiveDirectory\DomainJoin\EXAMPLE.COM\Pstore]"ClientModifyTimestamp"=dword:4b86d9c6"CreationTimestamp"=dword:4b86d9c6"DomainDnsName"="EXAMPLE.COM""DomainName"="EXAMPLE""DomainSID"="S-1-5-21-3190566242-1409930201-3490955248""HostDnsDomain"="example.com""HostName"="RHEL5D""MachineAccount"="RHEL5D$""SchannelType"=dword:00000002
PBIS Enterprise Administration Guide Configuring PBIS with the Registry
BeyondTrust® September 2014 65
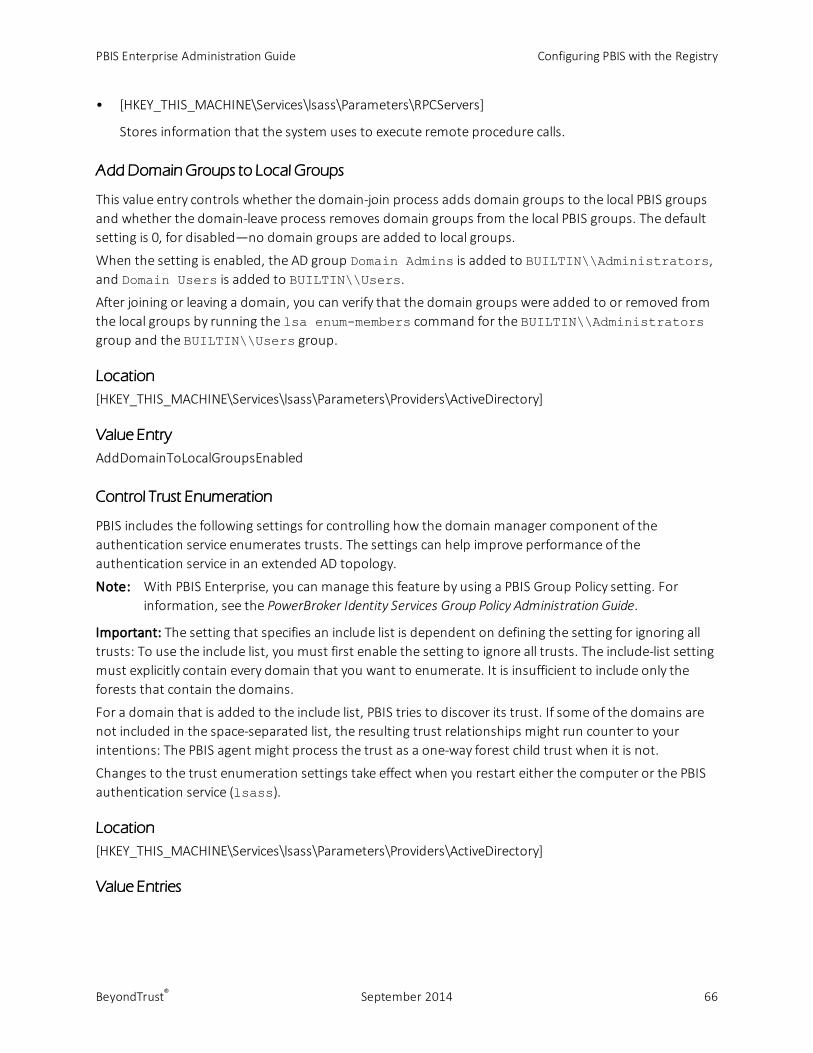
• [HKEY_THIS_MACHINE\Services\lsass\Parameters\RPCServers]
Stores information that the system uses to execute remote procedure calls.
AddDomainGroups to Local Groups
This value entry controls whether the domain-join process adds domain groups to the local PBIS groupsand whether the domain-leave process removes domain groups from the local PBIS groups. The defaultsetting is 0, for disabled—no domain groups are added to local groups.
When the setting is enabled, the AD group Domain Admins is added to BUILTIN\\Administrators,and Domain Users is added to BUILTIN\\Users.
After joining or leaving a domain, you can verify that the domain groups were added to or removed fromthe local groups by running the lsa enum-members command for the BUILTIN\\Administratorsgroup and the BUILTIN\\Users group.
Location
[HKEY_THIS_MACHINE\Services\lsass\Parameters\Providers\ActiveDirectory]
Value Entry
AddDomainToLocalGroupsEnabled
Control Trust Enumeration
PBIS includes the following settings for controlling how the domain manager component of theauthentication service enumerates trusts. The settings can help improve performance of theauthentication service in an extended AD topology.
Note: With PBIS Enterprise, you can manage this feature by using a PBIS Group Policy setting. Forinformation, see the PowerBroker Identity Services Group Policy Administration Guide.
Important: The setting that specifies an include list is dependent on defining the setting for ignoring alltrusts: To use the include list, you must first enable the setting to ignore all trusts. The include-list settingmust explicitly contain every domain that you want to enumerate. It is insufficient to include only theforests that contain the domains.
For a domain that is added to the include list, PBIS tries to discover its trust. If some of the domains arenot included in the space-separated list, the resulting trust relationships might run counter to yourintentions: The PBIS agent might process the trust as a one-way forest child trust when it is not.
Changes to the trust enumeration settings take effect when you restart either the computer or the PBISauthentication service (lsass).
Location
[HKEY_THIS_MACHINE\Services\lsass\Parameters\Providers\ActiveDirectory]
Value Entries
PBIS Enterprise Administration Guide Configuring PBIS with the Registry
BeyondTrust® September 2014 66
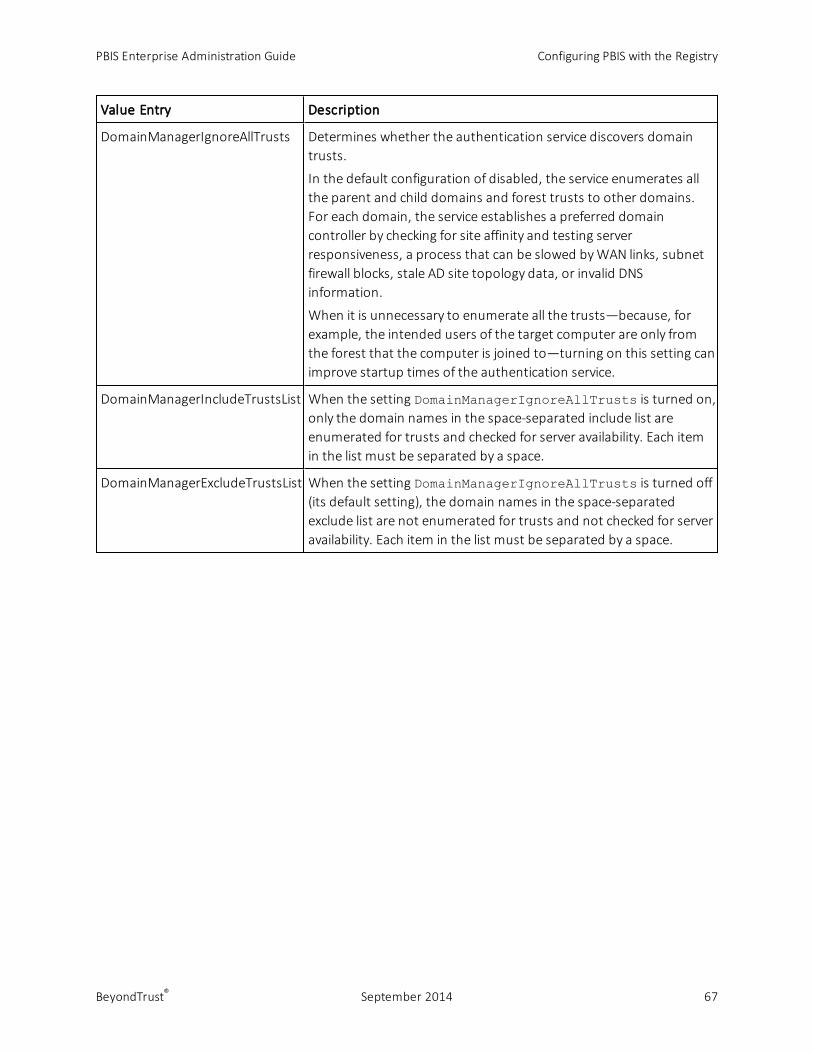
Value Entry Description
DomainManagerIgnoreAllTrusts Determines whether the authentication service discovers domaintrusts.
In the default configuration of disabled, the service enumerates allthe parent and child domains and forest trusts to other domains.For each domain, the service establishes a preferred domaincontroller by checking for site affinity and testing serverresponsiveness, a process that can be slowed byWAN links, subnetfirewall blocks, stale AD site topology data, or invalid DNSinformation.
When it is unnecessary to enumerate all the trusts—because, forexample, the intended users of the target computer are only fromthe forest that the computer is joined to—turning on this setting canimprove startup times of the authentication service.
DomainManagerIncludeTrustsList When the setting DomainManagerIgnoreAllTrusts is turned on,only the domain names in the space-separated include list areenumerated for trusts and checked for server availability. Each itemin the list must be separated by a space.
DomainManagerExcludeTrustsList When the setting DomainManagerIgnoreAllTrusts is turned off(its default setting), the domain names in the space-separatedexclude list are not enumerated for trusts and not checked for serveravailability. Each item in the list must be separated by a space.
PBIS Enterprise Administration Guide Configuring PBIS with the Registry
BeyondTrust® September 2014 67

Modify Smart Card Settings
The following settings are available only with PBIS Enterprise.
Location
[HKEY_THIS_MACHINE\Services\lsass\Parameters\PAM]
Value Entries
SmartCardPromptGecos
SmartCardServices
Set the Interval for Checking the Status of a Domain
This value entry determines how frequently the PBIS domain manager checks whether a domain is online.The default is 5minutes.
Location
[HKEY_THIS_MACHINE\Services\lsass\Parameters\Providers\ActiveDirectory]
Value Entry
DomainManagerCheckDomainOnlineInterval
Examplewith default value
"DomainManagerCheckDomainOnlineInterval"=dword:0000012c
Set the Interval for Caching anUnknownDomain
This value entry determines how long the PBIS domain manager caches an unknown domain asunknown. The default is 1 hour.
Location
[HKEY_THIS_MACHINE\Services\lsass\Parameters\Providers\ActiveDirectory]
Value Entry
DomainManagerUnknownDomainCacheTimeout
Examplewith default value
"DomainManagerUnknownDomainCacheTimeout"=dword:00000e10
lsass Cache Settings
Many of the following cache settings can bemanaged by the Group Policy settings of PBIS Enterprise. Formore information, see the PowerBroker Identity Services Group Policy Administration Guide.
PBIS Enterprise Administration Guide Configuring PBIS with the Registry
BeyondTrust® September 2014 68
Set the Cache Type
By default, the lsass service uses memory to cache information about users, groups, and the state of thecomputer. You can, however, change the cache to store the information in SQLite, which might improvethe performance of your system.
Location
[HKEY_THIS_MACHINE\Services\lsass\Parameters\Providers\ActiveDirectory]
Value Entry
CacheType
Example with default value:"CacheType"="memory"
Notes
To use the SQLite cache, change the value to sqlite.
Example
"CacheType"="sqlite"
Cap the Size of theMemory Cache
You can set the size of the cache to prevent it from consuming too much memory.
The recommended cache size is between 1MB and 10MB. The size limit depends on your environment.
Groups with manymembers require a larger memory cache to enumerate all the users.
Location
[HKEY_THIS_MACHINE\Services\lsass\Parameters\Providers\ActiveDirectory]
Value Entry
MemoryCacheSizeCap
Notes
To limit thememory cache to a maximum value, change the value to the byte count that you want. Whenthe total cache size exceeds the limit, old data is purged. The default value is 0: no limit is set.
Examplewith default value
"MemoryCacheSizeCap"=dword:00000000
Change the Duration of Cached Credentials
You can specify how long the PBIS agent caches information about an Active Directory user's homedirectory, logon shell, and themapping between the user or group and its security identifier (SID). Thissetting can improve the performance of your system by increasing the expiration time of the cache.
PBIS Enterprise Administration Guide Configuring PBIS with the Registry
BeyondTrust® September 2014 69

Note: With PBIS Enterprise, you can manage this feature by using a PBIS Group Policy setting. Forinformation, see the PowerBroker Identity Services Group Policy Administration Guide.
Location
[HKEY_THIS_MACHINE\Services\lsass\Parameters\Providers\ActiveDirectory]
Value Entry
CacheEntryExpiry
Notes
Set the value to an interval, in seconds. Theminimum entry is 0 seconds and themaximum is 1 day,expressed in seconds.
Examplewith default value
"CacheEntryExpiry"=dword:00003840
ChangeNSSMembership andNSS Cache Settings
To customize PBIS to meet the performance needs of your network, you can specify how the PBIS agentparses and caches group and user membership information with the following value entries in theregistry:
Location
[HKEY_THIS_MACHINE\Services\lsass\Parameters\Providers\ActiveDirectory]
Value Entries
Here are the value entries with their default values:
"TrimUserMembership"=dword:00000001"NssGroupMembersQueryCacheOnly"=dword:00000001"NssUserMembershipQueryCacheOnly"=dword:00000000"NssEnumerationEnabled"=dword:00000000
Each setting is described in the table.
Setting Description
TrimUserMembership Specifies whether to discard cached information from aPrivilege Attribute Certificate (PAC) entry when it conflictswith new information retrieved through LDAP. Otherwise,PAC information, which does not expire, is updated the nexttime the user logs on.
The default setting is 1: It is turned on.
PBIS Enterprise Administration Guide Configuring PBIS with the Registry
BeyondTrust® September 2014 70

Setting Description
NssGroupMembersQueryCacheOnly Specifies whether to return only cached information for themembers of a group when queried through nsswitch. Morespecifically, the setting determines whether nsswitch-basedgroup APIs obtain group membership information exclusivelyfrom the cache, or whether they search for additional groupmembership data through LDAP.
This setting is made available because, with large amounts ofdata, the LDAP enumeration can be slow and can affectperformance. To improve performance for groups with morethan 10,000 users, set this option to yes. Without the LDAPenumeration, only when a user logs on can that user'scomplete group membership be retrieved based on the PAC.
The default setting is 1: It is turned on.
NssUserMembershipQueryCacheOnly When set to yes, enumerates the groups to which a userbelongs using information based solely on the cache. Whenset to no, it checks the cache and searches for moreinformation over LDAP.
The default setting is 0: It is turned off.
NssEnumerationEnabled Controls whether all users or all groups can be incrementallylisted through NSS. On Linux computers and Unix computersother than Mac, the default setting is 0, or turned off. OnMac OS X computers, the default setting is 1, or turned on.
To allow third-party software show Active Directory users andgroups in lists, you can change this setting to 1, butperformancemight be affected.
Note: When you run the id command for an ActiveDirectory user other than the current user on someLinux systems, such as SLES 10 and SLED 10, thecommand returns only that user's primary group.The command enumerates all the groups andsearches for the user in the groups' membership. Toproperly find another user's membership with the idcommand on SLES 10 and SLED 10, you must turn onNSS enumeration.
eventlog Settings
This section lists values in the eventlog branch of the registry.
Allow Users andGroups to Delete Events
This entry specifies the Active Directory users and groups who can delete events from the PBIS event log.
PBIS Enterprise Administration Guide Configuring PBIS with the Registry
BeyondTrust® September 2014 71
Location
[HKEY_THIS_MACHINE\Services\eventlog\Parameters]
Value Entry
AllowDeleteTo
Notes
Add the users and groups, separated by commas, to the value entry by using NT4-style names (the shortdomain namewith the group name), the user's or group's alias, or an Active Directory security identifier(SID). The comma-separated list must be enclosed in quotation marks.
Example
AllowDeleteTo="example\support, example\domain^admins, example\joe, jane, S-1-5-21-3447809367-3151979076-456401374-513, sales^admins"
Allow Users andGroups to Read Events
This value entry specifies the Active Directory users and groups who can read events in the PBIS event log.
Location
[HKEY_THIS_MACHINE\Services\eventlog\Parameters]
Value Entry
AllowReadTo
Notes
Add the users and groups, separated by commas, to the value entry by using NT4-style names (the shortdomain namewith the group name), the user's or group's alias, or an Active Directory security identifier(SID). The comma-separated list must be enclosed in quotation marks.
Example
AllowReadTo="example\support, example\domain^admins, example\joe, jane, S-1-5-21-3447809367-3151979076-456401374-513, sales^admins"
Allow Users andGroups toWrite Events
This value entry specifies the Active Directory users and groups who can write events in the PBIS event log.
Location
[HKEY_THIS_MACHINE\Services\eventlog\Parameters]
Value Entry
AllowWriteTo
PBIS Enterprise Administration Guide Configuring PBIS with the Registry
BeyondTrust® September 2014 72

Notes
Add the users and groups, separated by commas, to the value entry by using NT4-style names (the shortdomain namewith the group name), the user's or group's alias, or an Active Directory security identifier(SID). The comma-separated list must be enclosed in quotation marks.
Example
AllowWriteTo="example\support, example\domain^admins, example\joe, jane, S-1-5-21-3447809367-3151979076-456401374-513, sales^admins"
Set theMaximum Disk Size
This value entry specifies themaximum size of the event log. The default is 102400 KB. Theminimum sizeis 100 KB. Themaximum is 2097152 KB.
Location
[HKEY_THIS_MACHINE\Services\eventlog\Parameters]
Value Entry
MaxDiskUsage
Examplewith default value
"MaxDiskUsage"=dword:06400000
Set theMaximum Number of Events
This value entry defines themaximum number of events that can reside in the event log. The default is100,000. Theminimum number is 100. Themaximum is 2,000,000.
Location
[HKEY_THIS_MACHINE\Services\eventlog\Parameters]
Value Entry
MaxNumEvents
Examplewith default value
"MaxNumEvents"=dword:000186a0
Set theMaximum Event Timespan
This value entry defines maximum length of time, in days, that events can remain in the event log. Eventsolder than the specified time span are removed. The default is 90 days. Themaximum is 365 days.
Location
[HKEY_THIS_MACHINE\Services\eventlog\Parameters]
PBIS Enterprise Administration Guide Configuring PBIS with the Registry
BeyondTrust® September 2014 73
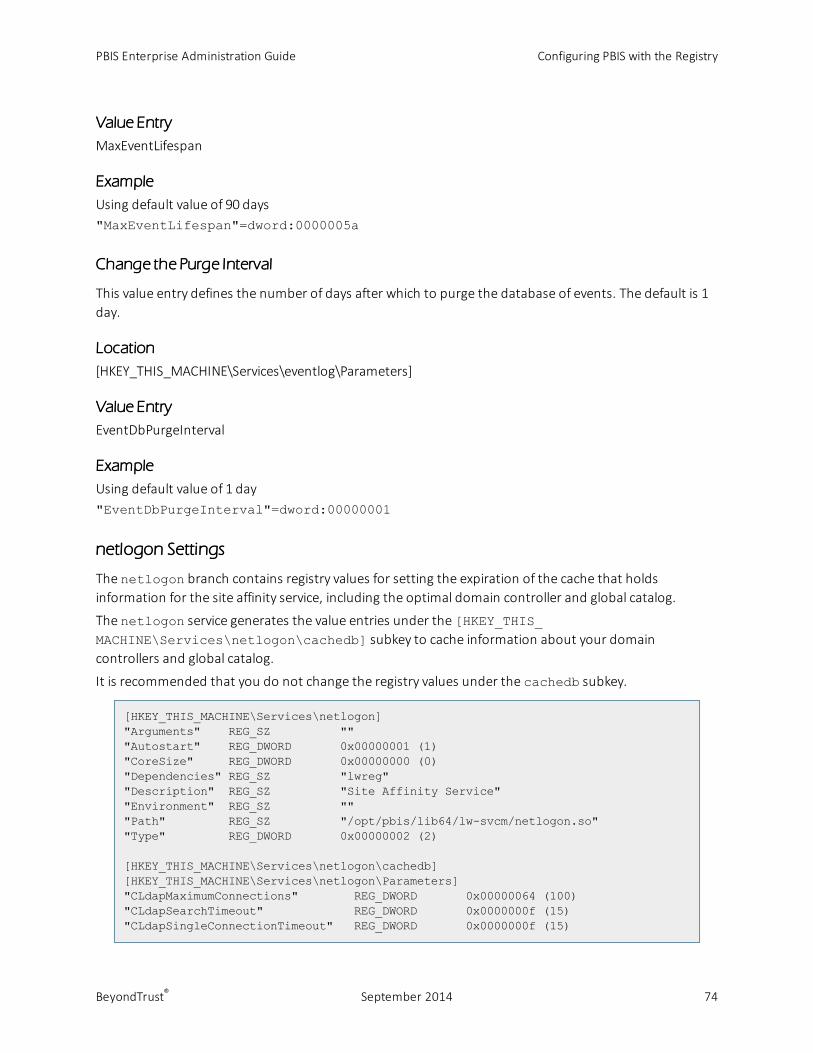
Value Entry
MaxEventLifespan
Example
Using default value of 90 days"MaxEventLifespan"=dword:0000005a
Change the Purge Interval
This value entry defines the number of days after which to purge the database of events. The default is 1day.
Location
[HKEY_THIS_MACHINE\Services\eventlog\Parameters]
Value Entry
EventDbPurgeInterval
Example
Using default value of 1 day"EventDbPurgeInterval"=dword:00000001
netlogon Settings
The netlogon branch contains registry values for setting the expiration of the cache that holdsinformation for the site affinity service, including the optimal domain controller and global catalog.
The netlogon service generates the value entries under the [HKEY_THIS_MACHINE\Services\netlogon\cachedb] subkey to cache information about your domaincontrollers and global catalog.
It is recommended that you do not change the registry values under the cachedb subkey.
[HKEY_THIS_MACHINE\Services\netlogon]"Arguments" REG_SZ """Autostart" REG_DWORD 0x00000001 (1)"CoreSize" REG_DWORD 0x00000000 (0)"Dependencies" REG_SZ "lwreg""Description" REG_SZ "Site Affinity Service""Environment" REG_SZ """Path" REG_SZ "/opt/pbis/lib64/lw-svcm/netlogon.so""Type" REG_DWORD 0x00000002 (2)
[HKEY_THIS_MACHINE\Services\netlogon\cachedb][HKEY_THIS_MACHINE\Services\netlogon\Parameters]"CLdapMaximumConnections" REG_DWORD 0x00000064 (100)"CLdapSearchTimeout" REG_DWORD 0x0000000f (15)"CLdapSingleConnectionTimeout" REG_DWORD 0x0000000f (15)
PBIS Enterprise Administration Guide Configuring PBIS with the Registry
BeyondTrust® September 2014 74
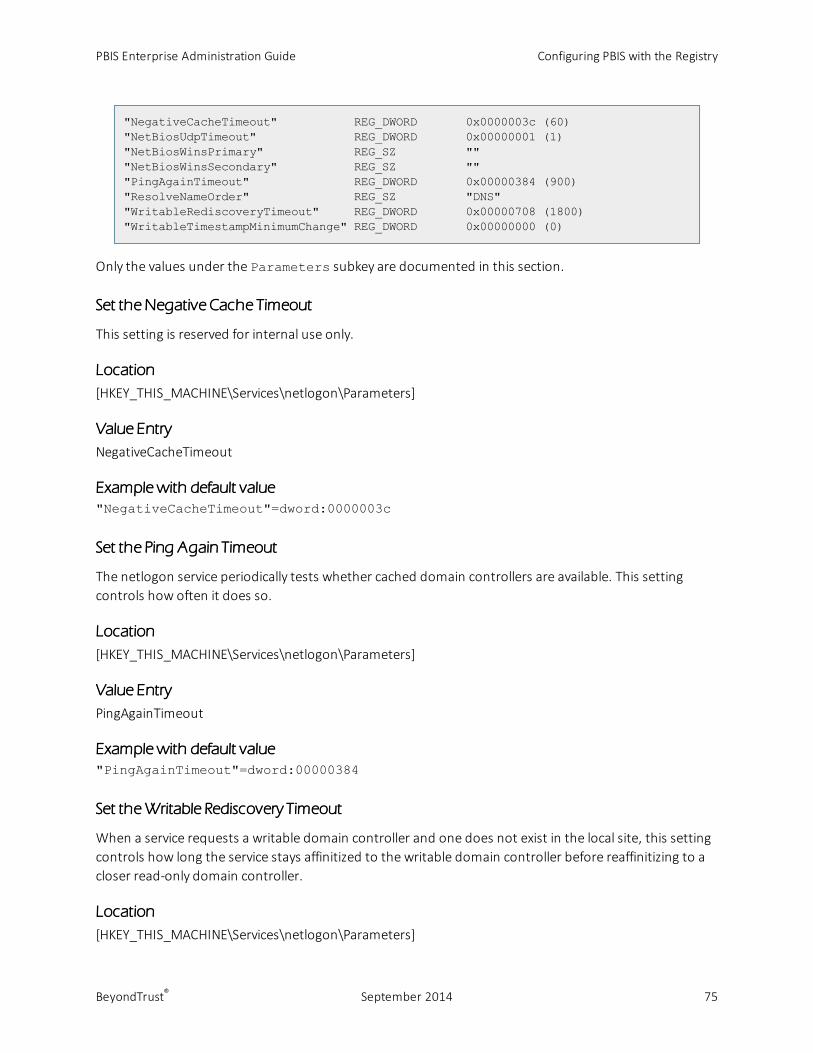
"NegativeCacheTimeout" REG_DWORD 0x0000003c (60)"NetBiosUdpTimeout" REG_DWORD 0x00000001 (1)"NetBiosWinsPrimary" REG_SZ """NetBiosWinsSecondary" REG_SZ """PingAgainTimeout" REG_DWORD 0x00000384 (900)"ResolveNameOrder" REG_SZ "DNS""WritableRediscoveryTimeout" REG_DWORD 0x00000708 (1800)"WritableTimestampMinimumChange" REG_DWORD 0x00000000 (0)
Only the values under the Parameters subkey are documented in this section.
Set the Negative Cache Timeout
This setting is reserved for internal use only.
Location
[HKEY_THIS_MACHINE\Services\netlogon\Parameters]
Value Entry
NegativeCacheTimeout
Examplewith default value
"NegativeCacheTimeout"=dword:0000003c
Set the Ping Again Timeout
The netlogon service periodically tests whether cached domain controllers are available. This settingcontrols how often it does so.
Location
[HKEY_THIS_MACHINE\Services\netlogon\Parameters]
Value Entry
PingAgainTimeout
Examplewith default value
"PingAgainTimeout"=dword:00000384
Set theWritable Rediscovery Timeout
When a service requests a writable domain controller and one does not exist in the local site, this settingcontrols how long the service stays affinitized to the writable domain controller before reaffinitizing to acloser read-only domain controller.
Location
[HKEY_THIS_MACHINE\Services\netlogon\Parameters]
PBIS Enterprise Administration Guide Configuring PBIS with the Registry
BeyondTrust® September 2014 75
Value Entry
WritableRediscoveryTimeout
Examplewith default value
"WritableRediscoveryTimeout"=dword:00000708
Set theWritable TimestampMinimum Change
Netlogon keeps track of when a writable domain controller was last requested. Related toWritableDiscoveryTimeout, this setting controls how often that timestamp is changed.
Location
[HKEY_THIS_MACHINE\Services\netlogon\Parameters]
Value Entry
WritableTimestampMinimumChange
Examplewith default value
"WritableTimestampMinimumChange"=dword:00000000
Set CLdapOptions
The netlogon service uses multiple asynchronous CLDAP searches in a single thread to find servers thatact as domain controllers and global catalogs.
To improve performance in the context of your unique network, you can adjust the following settings forthe Connection-less Lightweight Directory Access Protocol.
Location
[HKEY_THIS_MACHINE\Services\netlogon\Parameters]
Value Entries
CLdapMaximumConnections is the maximum number of servers that will be pinged simultaneously.The default is 100.
CLdapSearchTimeout is the timeout for the entire search (in seconds). The default is 15 seconds.
CLdapSingleConnectionTimeout is the timeout for pinging a single server (in seconds). The default is15 seconds.
lwio Settings
The lwio branch contains registry settings for the input-output service, lwio.
The settings under the shares subkey define shared folders and the security descriptors that controlaccess to them. It is recommended that you do not directly change the values under the shares subkeywhile the lwio service is running.
PBIS Enterprise Administration Guide Configuring PBIS with the Registry
BeyondTrust® September 2014 76

SignMessages If Supported
Although signing messages is turned off by default, you can set the input-output service to signmessages. Doing so, however, can degrade performance. When signing is turned off, the input-outputservice will reject clients that require signing.
Location
[HKEY_THIS_MACHINE\Services\lwio\Parameters]
Value Entry
SignMessagesIfSupported
Examplewith default value
"SignMessagesIfSupported"=dword:00000000
Enable Security Signatures
This registry setting, which is turned on by default, sets the CIFS file server to sign responses when itreceives signed messages from a client.
Location
[HKEY_THIS_MACHINE\Services\lwio\Parameters\Drivers\srv]
Value Entry
EnableSecuritySignatures
Examplewith default value
"EnableSecuritySignatures"=dword:00000001
Require Security Signatures
This registry setting determines whether the CIFS file server will reject clients that do not support signing.
Location
[HKEY_THIS_MACHINE\Services\lwio\Parameters\Drivers\srv]
Value Entry
RequireSecuritySignatures
Examplewith default value
"RequireSecuritySignatures"=dword:00000001
PBIS Enterprise Administration Guide Configuring PBIS with the Registry
BeyondTrust® September 2014 77
Set Support for SMB2
This registry setting determines whether the CIFS file server will engage the SMB2 protocol module. Whenthe setting is turned off, the server will not negotiate with SMB2.
Location
[HKEY_THIS_MACHINE\Services\lwio\Parameters\Drivers\srv]
Value Entry
SupportSmb2
Examplewith default value
"SupportSmb2"=dword:00000000
PBIS Enterprise Administration Guide Configuring PBIS with the Registry
BeyondTrust® September 2014 78
autoenroll Settings
The autoenroll settings provide registry values to configure auto enrollment for certificates.
You can also manage auto enrollment using GPOs. For more information, refer to the PBIS Group PolicyGuide.
[HKEY_THIS_MACHINE\Services\autoenroll]+ "Autostart" REG_DWORD 0x00000000 (0)"Arguments" REG_SZ """Dependencies" REG_SZ """Description" REG_SZ "PBIS Auto Enroll Service""Environment" REG_SZ """Path" REG_SZ "/opt/pbis/lib/lw-svcm/autoenroll.so""Type" REG_DWORD 0x00000002 (2)
[HKEY_THIS_MACHINE\Services\autoenroll\Parameters]+ "Authentication" REG_SZ "none"+ "AutoEnrollPollInterval" REG_DWORD 0x00007080 (28800)+ "EnableAutoEnroll" REG_DWORD 0x00000000 (0)+ "EnableWireless" REG_DWORD 0x00000000 (0)+ "ManagedCertificateLifecycle" REG_DWORD 0x00000000 (0)+ "SecurityType" REG_DWORD 0x00000000 (0)+ "SSID" REG_SZ "none"
[HKEY_THIS_MACHINE\Policy\Services\autoenroll\Parameters]+ "Authentication" REG_SZ "WirelessAuthentication"+ "AutoEnrollPollInterval" REG_DWORD 0x0000012c (300)+ "EnableAutoEnroll" REG_DWORD 0x00000001 (1)+ "EnableWireless" REG_DWORD 0x00000001 (1)+ "ManagedCertificateLifecycle" REG_DWORD 0x00000001 (1)+ "PrivateKeyPassword" REG_SZ "OkEp0OihVlG6yuk"+ "SecurityType" REG_DWORD 0x00000001 (1)+ "SSID" REG_SZ "SSID"
PBIS Enterprise Administration Guide Configuring PBIS with the Registry
BeyondTrust® September 2014 79

Lwedsplugin Settings for Mac Computers
The PBIS registry includes the following settings to manage the directory services plugin on a Mac OS Xcomputer.
Note: With PBIS Enterprise, you can manage this feature by using a PBIS Group Policy setting. Forinformation, see the PowerBroker Identity Services Group Policy Administration Guide.
Here is an example configuration in the registry:
[HKEY_THIS_MACHINE\Services\lwedsplugin\Parameters\]"AllowAdministrationBy" REG_SZ """EnableForceHomedirOnStartupDisk" REG_DWORD 0x00000000 (0)"EnableMergeAdmins" REG_DWORD 0x00000000 (0)"EnableMergeModeMCX" REG_DWORD 0x00000000 (0)"UncProtocolForHomeLocation" REG_SZ "smb""UseADUncForHomeLocation" REG_DWORD 0x00000000 (0)
Each setting is described in the table.
DS Plugin Settingin the Registry
Description
Allowadministration by
Specifies the administrators included the local admin group (GID: 80) on thecomputer. The setting can specify Active Directory users or groups. Local entries areoverwritten unless you also set the parameter to merge administrators who aredefined locally.
Force homedirectory onstartup disk
Sets a computer to use a local home directory path. When a user with a homefolder connection defined in Active Directory logs on, the connection is created inthe dock under /Network/Servers/homeFolderName.
MergeAdministrators
Preserves members of the admin group who are defined locally but are not specifiedin the allow administration by policy.
Set the UNCProtocol for theHome Location
Sets the protocol for the home location.
Use UNC path fromActive Directory tocreate homelocation
Sets the computer to connect to the network share defined in the Active Directoryuser account. The UNC path is converted to SMB when the target share is runningWindows or AFPwhen the target is running Mac OS X.
If the setting for forcing the home directory on the startup disk is enabled, the UNCpath is used to create a folder in the user's dock and the home directory is set to theuser's local home directory path.
To set the path for the home directory, go to the Profile tab of the user's propertiesin ADUC and under Home folder select Connect, choose a drive letter (which isignored by a Mac OS X computer), and then in the To box type the UNC path thatyou want.
Here is the form the path takes: \\server\share\folder
PBIS Enterprise Administration Guide Configuring PBIS with the Registry
BeyondTrust® September 2014 80

DS Plugin Settingin the Registry
Description
Here is an example of a path: \\example\homes\fanthony
PBIS Enterprise Administration Guide Configuring PBIS with the Registry
BeyondTrust® September 2014 81
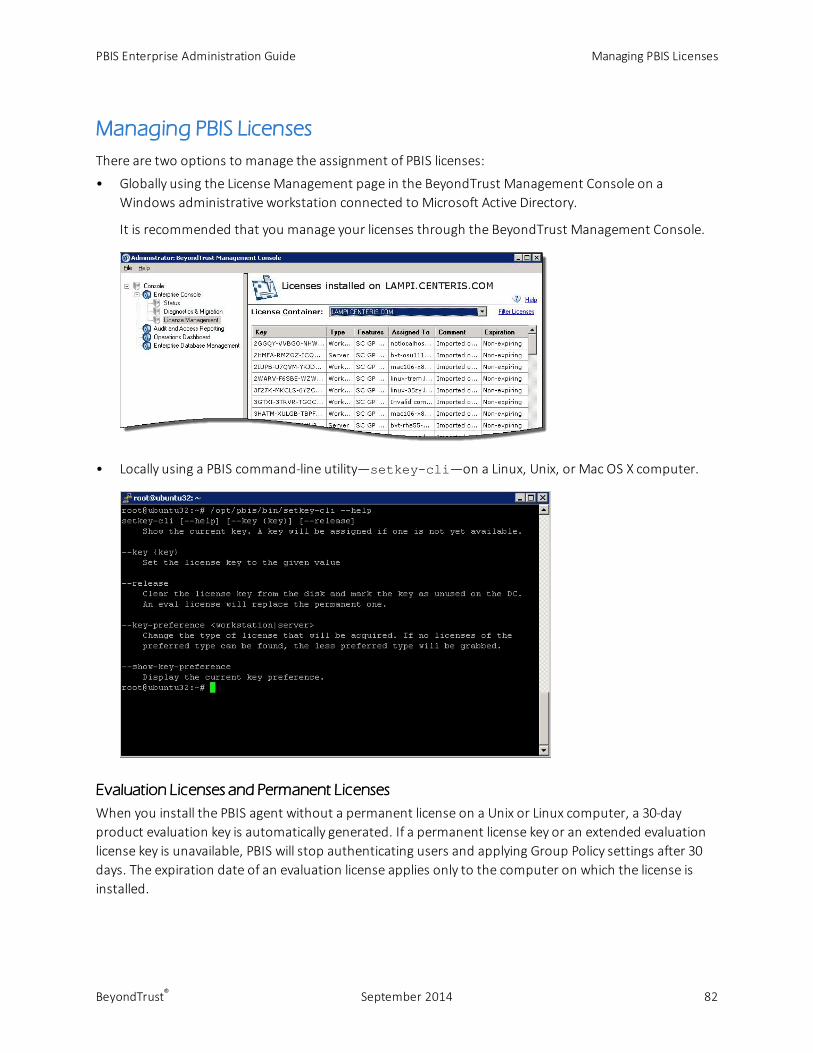
Managing PBIS Licenses
There are two options to manage the assignment of PBIS licenses:
• Globally using the LicenseManagement page in the BeyondTrust Management Console on aWindows administrative workstation connected to Microsoft Active Directory.
It is recommended that you manage your licenses through the BeyondTrust Management Console.
• Locally using a PBIS command-line utility—setkey-cli—on a Linux, Unix, or Mac OS X computer.
Evaluation Licenses and Permanent Licenses
When you install the PBIS agent without a permanent license on a Unix or Linux computer, a 30-dayproduct evaluation key is automatically generated. If a permanent license key or an extended evaluationlicense key is unavailable, PBIS will stop authenticating users and applying Group Policy settings after 30days. The expiration date of an evaluation license applies only to the computer on which the license isinstalled.
PBIS Enterprise Administration Guide Managing PBIS Licenses
BeyondTrust® September 2014 82
To obtain a permanent license or to convert a trial license to a full license, contact a BeyondTrust salesrepresentative by sending an email to [email protected] or by calling 1-800-234-9072 in theUnited States. From outside the United States, call +1-818-575-4040.
You can upgrade an evaluation license to a permanent license by importing the permanent license keyinto the BeyondTrust Management Console, and applying it to a client computer. If the automaticassignment feature is in use, the PBIS agent will automatically apply a permanent license when you log ona client with an AD account, restart the PBIS authentication service, or run the command-line utility formanaging licenses.
Site Licenses and Single-Computer Licenses
BeyondTrust offers site licenses and single-computer licenses.
• A site license covers all the computers in a domain and its child domains. To determine whether acomputer falls under a site license, PBIS checks the last two components of the domain name.
For example, example.com is the domain governed by a site license and one of the child domains isnamed child.example.com. The child domain is covered by the site license because the last twocomponents of the domain namematch.
• If there are multiple domains, a different license file is required for each domain, regardless ofwhether you are using a site license or a set of single-computer licenses. To spread a set of single-computer licenses across two or more domains, you can request BeyondTrust sales to distribute thelicenses in two or more license files.
Workstation and Server Licenses
BeyondTrust offers two kinds of licenses: workstation and server. Both single-computer licenses and sitelicenses distinguish between servers and workstations. When a computer joins a domain, PBIS looks atthe version of the operating system to determine whether to assign a workstation or a server license. If aserver license is unavailable, a workstation license is automatically used.
A workstation license limits the number of concurrent logins to five discrete user accounts. With a serverlicense, the number of concurrent logins is unlimited. If the computer is a server but is using aworkstation license because no server licenses were available, please contact BeyondTrust sales at [email protected] to obtain more server licenses. You can adjust the license type that you wantthe agent to obtain by using the command-line utility for managing licenses.
The PBIS agent verifies a license when you run the setkey-cli utility, when you start the PBISauthentication service, and when you log on. To verify a license, the setkey-cli utility uses thecomputer's Active Directory account to search for licenses in the computer's OU hierarchy up to the topof the domain. Other domains in the forest are not searched. If the utility cannot find a license in the OUhierarchy, as a last resort it checks the legacy PBIS container in the Program Data container. When thecomputers's domain controller is down, the utility loads the license from the disk without verifying itsassignment in Active Directory.
The PBIS Group Policy service also checks for a license when it refreshes the computer's Group PolicyObjects (GPOs). If the license is invalid, the service ignores the GPOs. Once the license becomespermanent and valid, the service applies the GPOs when it restarts.
PBIS Enterprise Administration Guide Managing PBIS Licenses
BeyondTrust® September 2014 83
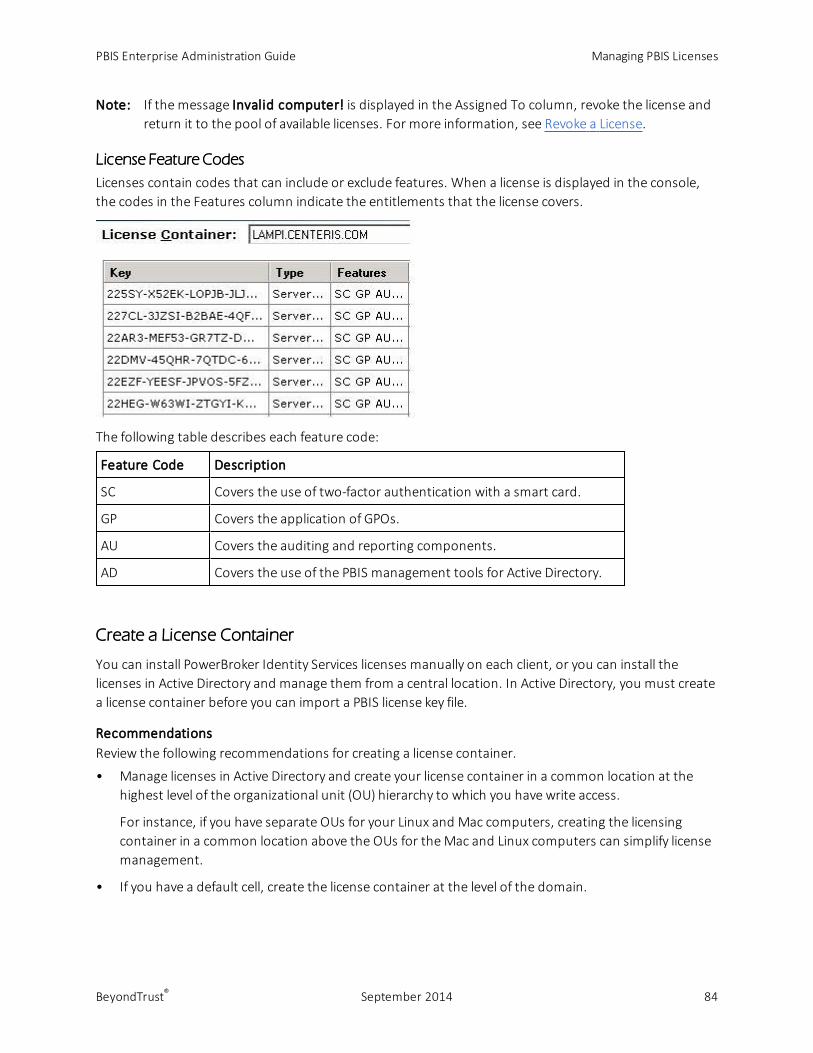
Note: If the message Invalid computer! is displayed in the Assigned To column, revoke the license andreturn it to the pool of available licenses. For more information, see Revoke a License.
License Feature Codes
Licenses contain codes that can include or exclude features. When a license is displayed in the console,the codes in the Features column indicate the entitlements that the license covers.
The following table describes each feature code:
Feature Code Description
SC Covers the use of two-factor authentication with a smart card.
GP Covers the application of GPOs.
AU Covers the auditing and reporting components.
AD Covers the use of the PBIS management tools for Active Directory.
Create a License Container
You can install PowerBroker Identity Services licenses manually on each client, or you can install thelicenses in Active Directory and manage them from a central location. In Active Directory, you must createa license container before you can import a PBIS license key file.
RecommendationsReview the following recommendations for creating a license container.
• Manage licenses in Active Directory and create your license container in a common location at thehighest level of the organizational unit (OU) hierarchy to which you have write access.
For instance, if you have separate OUs for your Linux and Mac computers, creating the licensingcontainer in a common location above the OUs for theMac and Linux computers can simplify licensemanagement.
• If you have a default cell, create the license container at the level of the domain.
PBIS Enterprise Administration Guide Managing PBIS Licenses
BeyondTrust® September 2014 84
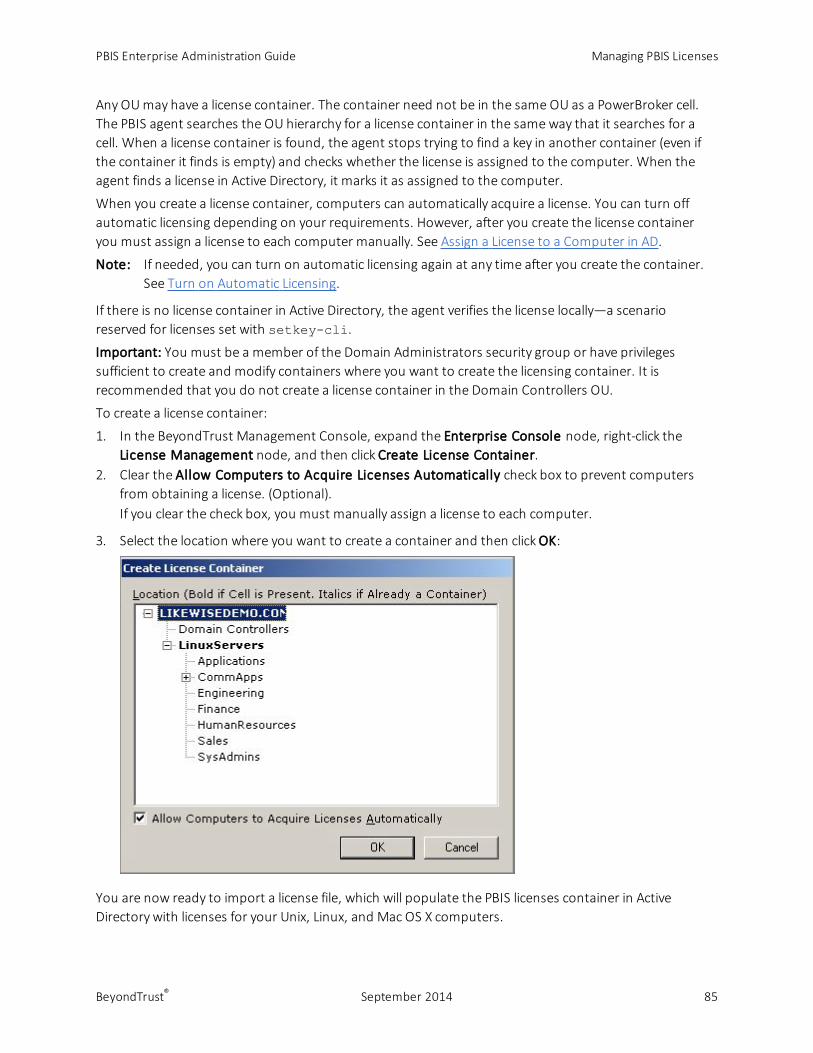
Any OUmay have a license container. The container need not be in the same OU as a PowerBroker cell.The PBIS agent searches the OU hierarchy for a license container in the sameway that it searches for acell. When a license container is found, the agent stops trying to find a key in another container (even ifthe container it finds is empty) and checks whether the license is assigned to the computer. When theagent finds a license in Active Directory, it marks it as assigned to the computer.
When you create a license container, computers can automatically acquire a license. You can turn offautomatic licensing depending on your requirements. However, after you create the license containeryou must assign a license to each computer manually. See Assign a License to a Computer in AD.
Note: If needed, you can turn on automatic licensing again at any time after you create the container.See Turn on Automatic Licensing.
If there is no license container in Active Directory, the agent verifies the license locally—a scenarioreserved for licenses set with setkey-cli.
Important: You must be a member of the Domain Administrators security group or have privilegessufficient to create and modify containers where you want to create the licensing container. It isrecommended that you do not create a license container in the Domain Controllers OU.
To create a license container:
1. In the BeyondTrust Management Console, expand the Enterprise Console node, right-click theLicense Management node, and then click Create License Container.
2. Clear the Allow Computers to Acquire Licenses Automatically check box to prevent computersfrom obtaining a license. (Optional).If you clear the check box, you must manually assign a license to each computer.
3. Select the location where you want to create a container and then click OK:
You are now ready to import a license file, which will populate the PBIS licenses container in ActiveDirectory with licenses for your Unix, Linux, and Mac OS X computers.
PBIS Enterprise Administration Guide Managing PBIS Licenses
BeyondTrust® September 2014 85
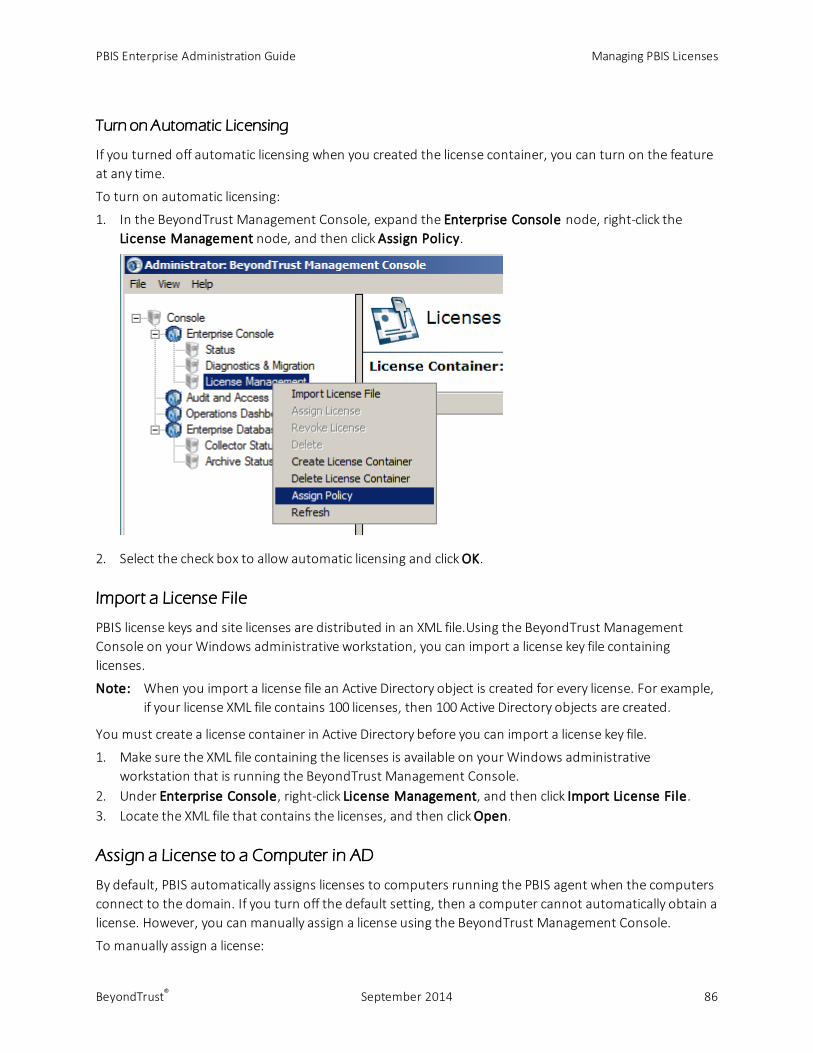
Turn on Automatic Licensing
If you turned off automatic licensing when you created the license container, you can turn on the featureat any time.
To turn on automatic licensing:
1. In the BeyondTrust Management Console, expand the Enterprise Console node, right-click theLicense Management node, and then click Assign Policy.
2. Select the check box to allow automatic licensing and click OK.
Import a License File
PBIS license keys and site licenses are distributed in an XML file.Using the BeyondTrust ManagementConsole on your Windows administrative workstation, you can import a license key file containinglicenses.
Note: When you import a license file an Active Directory object is created for every license. For example,if your license XML file contains 100 licenses, then 100 Active Directory objects are created.
You must create a license container in Active Directory before you can import a license key file.
1. Make sure the XML file containing the licenses is available on your Windows administrativeworkstation that is running the BeyondTrust Management Console.
2. Under Enterprise Console, right-click License Management, and then click Import License File.3. Locate the XML file that contains the licenses, and then click Open.
Assign a License to a Computer in AD
By default, PBIS automatically assigns licenses to computers running the PBIS agent when the computersconnect to the domain. If you turn off the default setting, then a computer cannot automatically obtain alicense. However, you can manually assign a license using the BeyondTrust Management Console.
To manually assign a license:
PBIS Enterprise Administration Guide Managing PBIS Licenses
BeyondTrust® September 2014 86
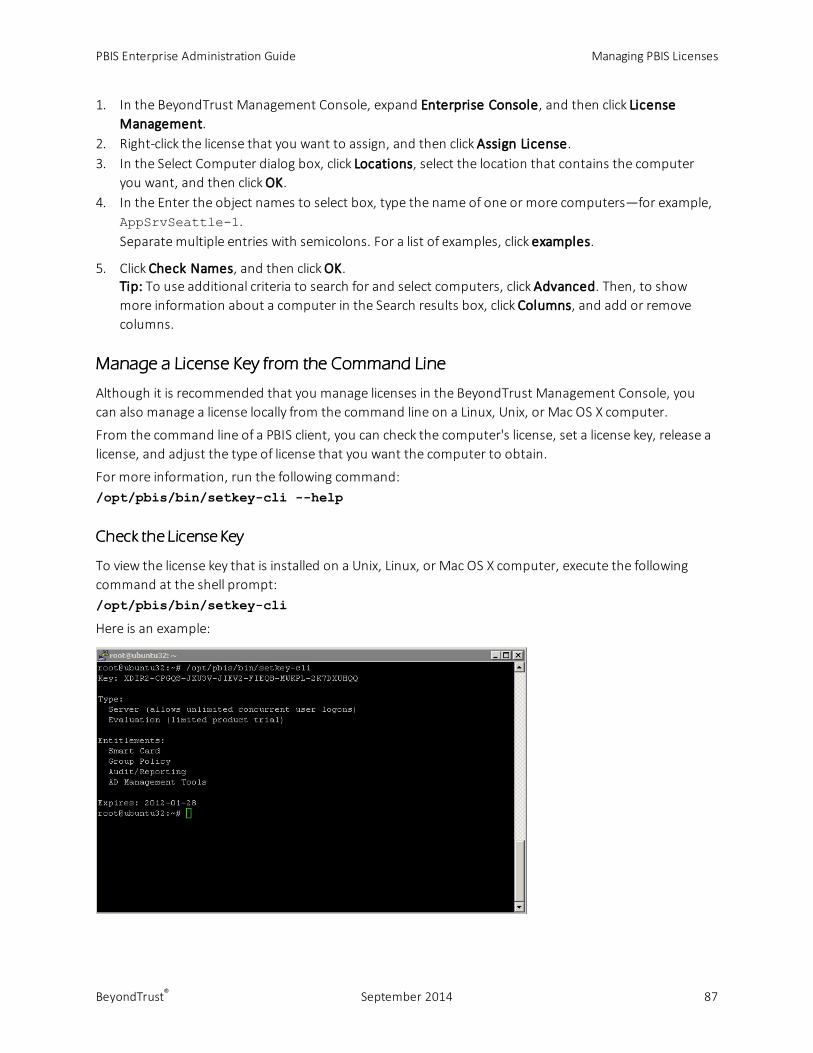
1. In the BeyondTrust Management Console, expand Enterprise Console, and then click LicenseManagement.
2. Right-click the license that you want to assign, and then click Assign License.3. In the Select Computer dialog box, click Locations, select the location that contains the computer
you want, and then click OK.4. In the Enter the object names to select box, type the name of one or more computers—for example,
AppSrvSeattle-1.Separate multiple entries with semicolons. For a list of examples, click examples.
5. Click Check Names, and then click OK.Tip: To use additional criteria to search for and select computers, click Advanced. Then, to showmore information about a computer in the Search results box, click Columns, and add or removecolumns.
Manage a License Key from the Command Line
Although it is recommended that you manage licenses in the BeyondTrust Management Console, youcan also manage a license locally from the command line on a Linux, Unix, or Mac OS X computer.
From the command line of a PBIS client, you can check the computer's license, set a license key, release alicense, and adjust the type of license that you want the computer to obtain.
For more information, run the following command:/opt/pbis/bin/setkey-cli --help
Check the License Key
To view the license key that is installed on a Unix, Linux, or Mac OS X computer, execute the followingcommand at the shell prompt:/opt/pbis/bin/setkey-cli
Here is an example:
PBIS Enterprise Administration Guide Managing PBIS Licenses
BeyondTrust® September 2014 87
Set a License Key
You can set a license key for the PBIS agent by using the command line. You should, however, use thismethod of setting a key only when there is no licensing container in Active Directory and you want theagent to verify the license locally.
To set a license key, run the following command as root, replacing LicenseKeyNumberwith a validlicense key number:/opt/pbis/bin/setkey-cli --key LicenseKeyNumber
Note: If there is a license container in Active Directory, you cannot use the command to apply anadditional license or to select a license from the license container; instead, assign the license fromActive Directory.
Release a License Key
When you decommision a computer, you can release a computer's license so it can be used by anothercomputer. When you release a permanent license key, it is replaced by a temporary evaluation license.
You can also release a license to apply a different permanent license to the computer./opt/pbis/bin/setkey-cli --release
PBIS Enterprise Administration Guide Managing PBIS Licenses
BeyondTrust® September 2014 88
Change the Type of License
You can change the type of license that the computer obtains when it connects to Active Directory byexecuting the following command as root, replacing typeOfLicensewith either workstation orserver./opt/pbis/bin/setkey-cli --key-preference typeOfLicense
If the license type you set is unavailable the non-preferred type is obtained.
Delete a License
When you rename or remove a domain from Active Directory, you might also need to delete PBIS licensekeys from Active Directory. If you rename an Active Directory domain, you must obtain new license keysfrom BeyondTrust.
Licenses are provided on a per-domain basis; domain licenses apply only to the fully qualified domainname or child domain to which theywere issued.
1. In the BeyondTrust Management Console, expand Enterprise Console, and then click LicenseManagement.
2. In the list of licenses, under Key, right-click the license that you want to delete and then click Delete.
Tip: If you inadvertently delete a license, you can restore it by importing the license file that contains it.
PBIS Enterprise Administration Guide Managing PBIS Licenses
BeyondTrust® September 2014 89
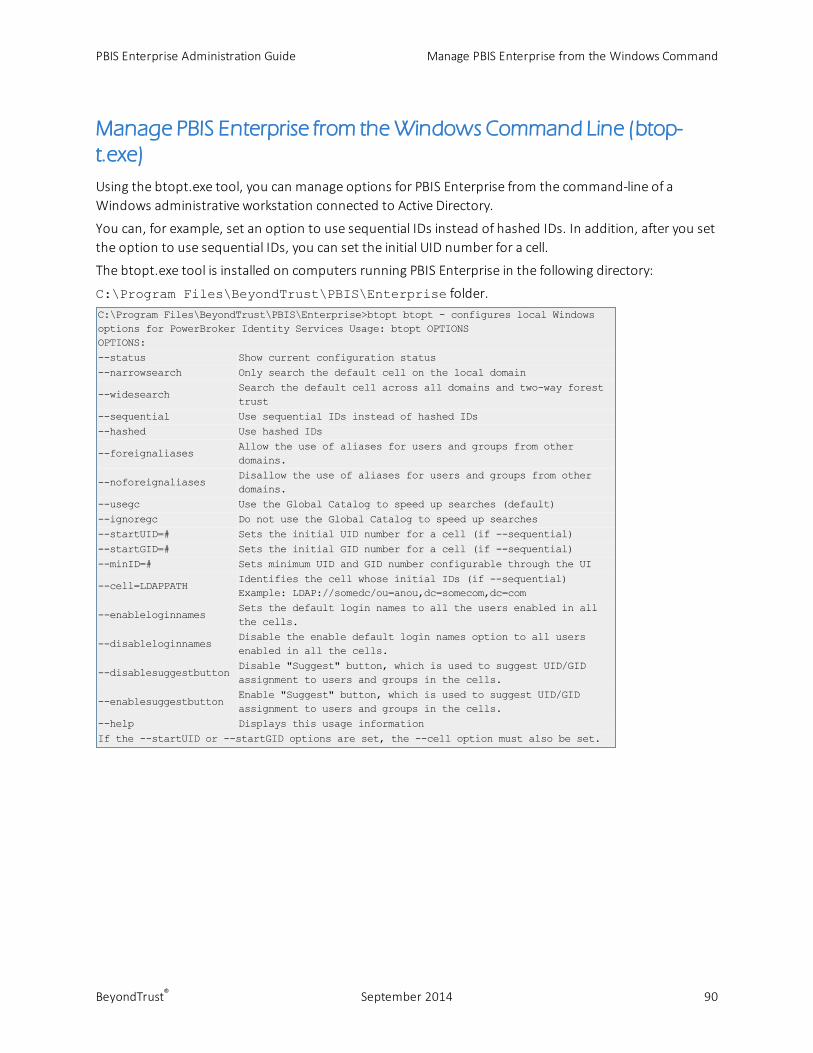
Manage PBIS Enterprise from theWindows Command Line (btop-
t.exe)
Using the btopt.exe tool, you can manage options for PBIS Enterprise from the command-line of aWindows administrative workstation connected to Active Directory.
You can, for example, set an option to use sequential IDs instead of hashed IDs. In addition, after you setthe option to use sequential IDs, you can set the initial UID number for a cell.
The btopt.exe tool is installed on computers running PBIS Enterprise in the following directory:
C:\Program Files\BeyondTrust\PBIS\Enterprise folder.C:\Program Files\BeyondTrust\PBIS\Enterprise>btopt btopt - configures local Windowsoptions for PowerBroker Identity Services Usage: btopt OPTIONSOPTIONS:--status Show current configuration status--narrowsearch Only search the default cell on the local domain
--widesearchSearch the default cell across all domains and two-way foresttrust
--sequential Use sequential IDs instead of hashed IDs--hashed Use hashed IDs
--foreignaliasesAllow the use of aliases for users and groups from otherdomains.
--noforeignaliasesDisallow the use of aliases for users and groups from otherdomains.
--usegc Use the Global Catalog to speed up searches (default)--ignoregc Do not use the Global Catalog to speed up searches--startUID=# Sets the initial UID number for a cell (if --sequential)--startGID=# Sets the initial GID number for a cell (if --sequential)--minID=# Sets minimum UID and GID number configurable through the UI
--cell=LDAPPATHIdentifies the cell whose initial IDs (if --sequential)Example: LDAP://somedc/ou=anou,dc=somecom,dc=com
--enableloginnamesSets the default login names to all the users enabled in allthe cells.
--disableloginnamesDisable the enable default login names option to all usersenabled in all the cells.
--disablesuggestbuttonDisable "Suggest" button, which is used to suggest UID/GIDassignment to users and groups in the cells.
--enablesuggestbuttonEnable "Suggest" button, which is used to suggest UID/GIDassignment to users and groups in the cells.
--help Displays this usage informationIf the --startUID or --startGID options are set, the --cell option must also be set.
PBIS Enterprise Administration Guide Manage PBIS Enterprise from the Windows Command
BeyondTrust® September 2014 90
Related Documents

![Golden Code PBIS Program Golden Ring Middle School Syretta James [PBIS Coach] Gina Peller [PBIS Team Member] Linda Salihi [PBIS Team Leader] Kevin Roberts.](https://static.cupdf.com/doc/110x72/56649f305503460f94c4b850/golden-code-pbis-program-golden-ring-middle-school-syretta-james-pbis-coach.jpg)