Pavement Quality Indicator Operator’s Handbook

Welcome message from author
This document is posted to help you gain knowledge. Please leave a comment to let me know what you think about it! Share it to your friends and learn new things together.
Transcript

Pavement Quality Indicator
Operator’s Handbook

Introduction 3Measurement Technology 3Application Summary 4Safety 4Operating Requirements 4
Controls & Components 5 Contents 5
Gauge Features 6External/Internal Controls 7
Setting Up the PQI380 7Installing/Charging the Batteries 8Starting the Software 9Main Menu 10Local Time and Change Date Format 10Setup the GPS 11Control Menu 12Select Measurement Units 13Data Logging 13Mix Details 14Editing Mix Details 14Project Details 19Editing Project Details 20
Reading Modes-Selection and Definition 21Select Reading Modes 21Reading Mode Definition 22Single Reading Mode 22Average Reading Mode 24Continuous Reading Mode 26Segregation Reading Mode 26
Calibration 28Core Calibration Method 28
Calculating the Offset 29 PQI380 Offset Setup 29Data Management 31Downloading Data 32Power Save/Auto Shut Down 33Maintenance & Troubleshooting 33Diagnostics 35Factory Parameters 35Calibration Reset 36Standardization 37 Warranty 38Measurement Table 39 Core Comparison Calibration Worksheet 39
Table of Contents
2

TransTech’s Pavement Quality Indicator Model 380 (PQI 380) utilizes state of the art technology to get accurate asphalt pavement density readings. It’s primary features are:
• No special license or radioactive materials required.• Lightweight and easy to use.• 12 hours of portable operation.• Measures density in common units (pcf or kg/m³).• Relative moisture detection and correction when necessary.• Stores infinite records.• Data download via USB flash drive (semicolon delimited text file format).
Introduction
Measurement Technology
The PQI 380 uses Impedance Spectroscopy to measure the electrical response of asphalt from which the density is calculated. As shown in the Comsol simulation below, the electrical field transmits through the material from the sensor plate of the PQI. The impedance is then measured and used in the calculation of the density for that specific aggregate.
3

Application Summary
The PQI 380 is intended primarily for use on newly-laid asphalt pavements with lift thickness ranging from 0.75 inches to 6 inches. The calibration of the PQI 380 to a density standard (core) is very important for the reliability and consistency of the density measurements for each material.
Safety
Every effort has been made to make the Pavement Quality Indicator convenient to use and inherently safe. The PQI uses non-nuclear, low-voltage direct current to obtain measurements, therefore, there are no badges, licensing, storage or transport concerns. Like any instrument, however, the user should exercise care and common sense in its use to prevent mishaps.
WarningDo not use the unit on or near electrical wiring.
A potential shock hazard exists if contact is made with the exposed wiring.
WarningUse care in handling the unit. Personal injury can occur through improper handling.
Take proper care to avoid accidentally dropping the unit.
WarningUnauthorized disassembly of the unit will void the warranty.
WarningShipping the gauge with the batteries inside is not recommended.
CautionCharging the gauge overnight or unattended is not recommended
CautionTurn the unit off when not in use and during transport.
CautionBe sure not to switch standardization plates with other gauges. Check the
Serial Numbers located on the gauge and on the plate to be sure they match.
Temperature: -4° to 104° F (-20° to 40° C)Relative Humidity: 10% to 90% noncondensing
Note: Exposing the equipment to high altitude OR extreme temperature may reduce life of the equipment.
Disclaimer: TransTech reserves the right to change or modify product design, construction, specifications, or materials without prior notice and without incurring any obligation to make such changes and modifications on TransTech products previously or subsequently sold.
Operating Requirements
4

Controls and ComponentsContentsThe PQI 380 is packaged and shipped with the following components. Contact TransTech Systems Inc. Customer Service if any of the parts are missing.
• PQI380 unit• Storage/shipping case• Operators Quickstart Guide• PQI handle• 120/220V AC to 12V DC battery charger• 12V DC Car Charger• 3 battery packs
5

Gauge Features
USB PortUsed to allow communication between a flash drive and the gauge
Charger Portused to connect the ac or dc charger to gauge
Infrared Temperature SensorUsed to measure the surface temperature of the asphalt
Shroud with10” Sensor Plate
Location where sensor plate is located
Battery
Gauge ShellBody of the gauge
HandleUsed to carry the gauge
TouchScreenUsed to input and interact with the gauge
FaceplateProtective bezel for touchscreen
GPS ModuleLocation of GPSunit on the gauge
(Accurate to5+- Meters)
On\Off ButtonTurns gauge
on and off
Handle ExtensionUsed to connect handleextension
ReflectiveVinyl
safety feature foroperation in dark
areas
6
Battery Plate

External/Internal Controls
External controls on the PQI 380 consist of an ON/OFF switch and 480x640 VGA touch screen display for navigating through the user interface and entering alpha/numeric data.
Be sure not to drag your finger from one button to the next. A firm yet light touch is all that is needed to navigate from screen to screen.
Unique yet consistent icons are located on most screens for easy one touch navigation. When data input is required of the operator the screen will display the above keyboard. Toggle from upper to lower case letters using the Shift button The upper case keyboard gives the option of a minus sign while the lower case keyboard gives the plus sign Once editing is completed simply Press Enter to store and return to the previous screen.
7
The numeric keypad as shown in this example allows for only numbers and a decimal point. Press Accept to store your entry and in most cases return to the previous screen.
The Status Bar is located at the bottom of the screen (excluding the keyboard screens) and will continuously update the remaining voltage of the batteries while displaying the date, time and status of the GPS and Data Logging features.
Prior to using the PQI 380 for the first time the gauge will need to be configured to make measurements and record data correctly.
The following steps must be completed before operating the PQI 380:
1. Installing and Charging the Batteries2. Starting the Software3. Set the Local Time/Set Date4. Set up the GPS5. Select Units of Measurement6. Select Data Logging7. Define the material being tested (Mix Details)8. Project Details (for the Data Logging Feature)9. Select Measurement Mode
Setting up the PQI 380
External/Internal Controls
8

Installing/Charging the Batteries
9
You will find a plate on the back of the PQI 380 with 4 spring loaded bolts.
• Turn each bolt approx. 2 full turns until the spring releases • Remove the plate from the gauge • Next you will find a wire with a connector, disconnect the battery from the gauge • Then pull the nylon strap to slide the battery out of the compartment. (Do Not pull the battery by the connector wire, doing so could cause damage to the battery)
Plug the gauge in and allow the LED to go from red to green for a full charge. Approximate charge time is 4 hours.
To charge the unit, proceed as follows:
1) Turn the PQI380 unit OFF. 2) Connect the charger to the charger connector located on the back of the PQI380. 3) Plug the charger into a standard AC outlet. 4) The red indicator lamp will turn green to indicate that the batteries are charged.
5) Unplug the charger from the power source before disconnecting the charger from the PQI380.

Battery voltage can be viewed on the Status Bar located at the bottom of all screens. A fully charged battery will display over 8 volts. The battery voltage will decrease as the PQI 380 is used. A low battery icon will be displayed at approximately 6.5 volts.
The gauge will continue to operate until the battery can not supply enough voltage to complete a measurement. Once this happens, the gauge will automatically shut down and will not restart until charged. Depending on the condition of the batteries, once the voltage drops below 6 volts, the gauge may be able to take about 12 to 15 additional readings. It is important to re-charge the battery after each use.
Starting the Software
Turn the PQI 380 on by pressing the ON button. After a few seconds the TransTech splash screen will appear followed by the Main Menu Screen. The Main Menu screen will display six options. Start PQI380, Internet (Coming Soon), Calculator, Contact TransTech, GPS Control and Update Software.
Installing/Charging the Batteries
10

Main Menu
Start button when pressed will open the Control Menu Screen.
The Internet button when pressed will open a new screen. The new screen indicates that this will be an option in the future. It is not active at this time.
The Calculator button when pressed will open a screen which functions as a calculator.
The Contact button when pressed displays TransTech and distributor contact information.
The GPS Control button when pressed will open a screen which will allow you to enableor disable the GPS.
The Update Software button will be used in the event that TransTech releases an update to the software
Local Time and Change Date Format
You may set the date and time in two locations. From the Main Menu, Press Set Time & Date located on the status bar or from the Control Menu press Date & Time.
11

To set the time, Press Set Time. Press the appropriate numbers for the time in military format. Once you are satisfied with your entry, Press Accept to store and return to the previous screen.
To set the date, Press Set Date. The date will display in either the DD/MM/YY or MM/DD/YY format which may be toggled from the button located on both screens. As you did with the time, press the appropriate numbers for the date in the format chosen. Press Accept to store and return to the previous screen. (Note: Date will be preset by the factory)
12
Local Time and Change Date Format

When the GPS is ON the satellite dish on the status bar turns from red to green.
GPS formatting can also be toggled from the Universal Transverse Mercator (UTM) grid to Latitude/Longitude (LAT-LON). Initially the display will read Sats 0 for both formats until connections have been made. The above examples show a connection to five satellites (Sats 5) in both formats. GPS locations will appear on the bottom left corner of all Reading Mode screens and will store with each reading when Data Logging is ON.
Setup the GPS
Setting up the GPS is nothing more than turning it on and waiting to connect to satellites. It takes approximately 15 minutes to connect to satellites depending on your location.From the Main Menu, Press GPS CONTROL. GPS status can be toggled ON or OFF.
13

Opens the project details screen
Starts the standardization process
Opens the mix details screen
Opens the diagnostics screen
Opens the datalogging settings screen, toggle dataloggingon\off
Opens the modes screen. Here you can select, Single, Average, Continuous orSegregation modes
Opens the units screen. Here you can toggle, kg/m3-lbs/ft3, F°-C°, in-mm,%voids-%compaction
Opens the date and time screen
Opens the datamanagement screen. Hereyou can delete, download and print job files
Starts the measurement process
Control Menu
From the Main Menu Press Start PQI 380 to obtain the Control Menu. From this menu, you will findthe icons listed below.
14

Select Measurement Units
From the Control Menu, Press Units. Density, Temperature, Depth, Stone Size and Voids can be toggled independently between System International (SI “metric”) and U.S. Customary Units. For example, you can set your Density, Temperature and Depth in lb/ft3, °F and inches respectively while the stone size is set for millimeters. Press Control Menu on the taskbar to return to the Control Menu.
Data Logging
From the Control Menu, Press Data Logging. If you wish to save your data, you must activate the Data Logging feature by toggling the button to ON. The floppy disk on the status bar will turn from red to green when data save is ON.
Data will not save for Continuous or Segregation Reading Modes. Data stored includes all Project and Mix details, as well as the Compaction, Density, Temperature, Date and Time of each reading. If the GPS is on and it is connected to satellites, the location in the format chosen as well as GPS date and GPS time for each reading will also be recorded.
15
Mix Details
The density determined by the PQI 380 is highly material dependent so it is extremely important that the mix information for each mix design are input accurately into the gauge.
Note: Readings taken prior to accurately setting up the Mix Details section of the gauge will result in incorrect density and compaction results.
The PQI 380 is configured to store 20 unique mixes that are identified by user entered descriptions. If 20 mixes have been defined in the PQI 380 and a 21st mix is required, one of the original 20 will need to be modified to reflect the mix details of the new mix design. The details of the new mix will need to be input by editing the details of a previously defined mix. Once the old mix details are overwritten with new information, the old information is gone and the new information is saved in the gauge. Previously stored data files with the old mix information, however, will not be overwritten.
The default mixes stored in a new PQI 380 will have generic mix names (i.e. Mix1, Mix2, etc), the stone sizes will all be set to 9.5mm (0.375in.) at a depth of 5 inches with a Maximum Theoretical Density (MTD) of 125 lb/ft3. Readings taken prior to editing the default information on a mix that does not resemble the default information will result in incorrect density and compaction.
Editing Mix Details
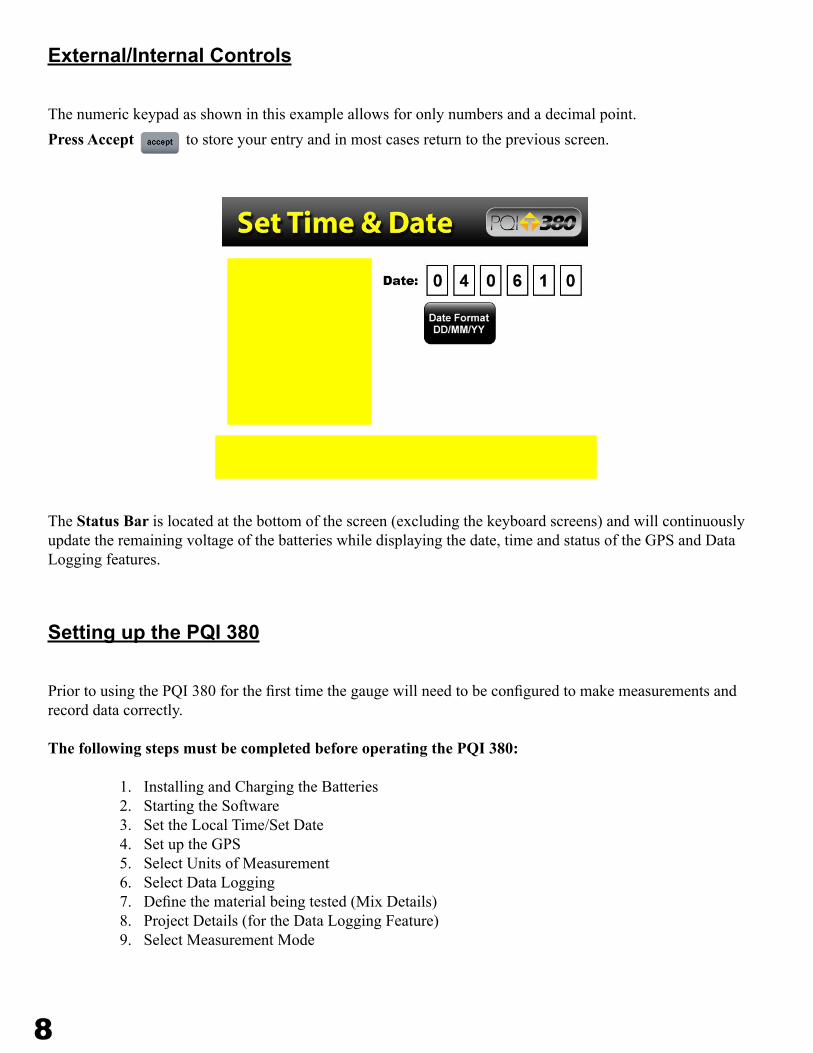
From the Control Menu, Press Mix for the Mix Details screen. The mix highlighted in green on the left is displayed in detail on the right. To edit the details of this mix, Press Edit Mix.
16

There are six black buttons labeled
Mix Stone Size Depth MTD
Offset Operator.
By pressing one of these black labeled buttons, you will enter the screen that allows you to store the information described by that button. For example Press Mix, a keyboard allowing you to change the default name will appear. Press Clear if you would like to start over with a new name. Press Shift to toggle from lower to upper case letters. Once completed, Press Enter to save and return to the Edit Mix screen.
Next, Press Stone Size. There are five options of aggregate sizes listed in millimeters (inches). If, however, you do not see your specific stone size listed choose the closest stone size available. For example, if your mix has an aggregate size of 20mm (0.79in), select the 19mm (0.75in). Press Accept after you made your selection.
17
Editing Mix Details

Next, Press Depth. Type in the depth of the asphalt mat from the numeric keypad in the units you previously selected for the depth. Once the correct value has been entered, Press Accept. An Out Of Range Warning will display for depths entered outside of the following range: 0.75in. 6.0in.(19.05mm-152.4mm).
Next, Press MTD. Type in the Maximum Theoretical Density (MTD) of the material from the numeric keypad in the units you previously selected. The MTD is provided from the asphalt mix designer and is a key value in determining the percent compaction. Once the correct value has been entered,Press Accept. An Out Of Range Warning will display for depths entered outside of the following range: 100lb/ft3.-200lb/ft3 (1601.8kb/m3-3203.7kg/m3).
18
Editing Mix Details

The offset for this material can be adjusted at a later time. Measurements taken prior to adjusting the offset will not include the offset. You will need to take a measurement to determine the offset. Continue on to Operator. The Offset feature will be revisited later in the Calibration section of this document.
Press Operator. Enter your name as the operator of the gauge, Press Enter. The gauge will return to the Edit Mix screen. Verify and change any information from this screen. Once verified, Press Exit.
19
Editing Mix Details

After pressing Exit, the gauge will display the Mix Detail screen. Here you may use the green up or down arrows to select a new mix for editing or change an existing mix. The green highlighted mix is the CURRENT MIX that the gauge will use when taking readings. Prior to exiting this screen, be sure this is the mix you want and the information to the right has been verified. Press Control Menu on the Status Bar to return to the Control Menu. If the gauge is shutdown, the current mix prior to shutdown will remain the current mix when started back up.
Project Details
The PQI 380 is configured to store 10 unique projects that are identified by user entered descriptions. If 10 projects have been defined in the PQI 380 and an 11th project is required, one of the original 10 will need to be modified to reflect the new project. The details of the new project will need to be input by editing the details of a previously stored project. Once the old projects are overwritten with new information, the old information is gone and the new information is saved in the gauge. Previously store data files with the old mix information, however, will not be overwritten.
You may revisit each Project at any given time to continue taking readings. Data from readings taken within each project will store in the order of which they were taken. If mix details change within a project (i.e. offset, stone size, etc) or project details are added, data for readings taken after the changes will continue to store on the same dat file in the order of which they were taken. Only by changing the Project Name itself will the data be stored on a separate dat file.
The default Projects stored in a new PQI 380 will have generic Project names (i.e. Project1, Project2, etc) along with generic Project details (i.e. My Street, My Road, Contact). Project Detail screens will resemble the Mix Detail screens such that you are able to select your Project using the up and down arrows. The green highlighted project is the CURRENT PROJECT. Readings taken will store on a dat file using the CURRENT PROJECT NAME. If the gauge is shutdown, the current project prior to shutdown will remain the current project when started back up.
20
Editing Mix Details

Editing Project Details
From the Control Menu, Press Project for the Project Details screen. The project highlighted in green on the left is displayed in detail on the right. To edit the details of this project, Press Edit Project.
There are four black buttons labeled Project Location Location Contact.
By pressing one of these labeled buttons, you will enter the screen that allows you to store informationfor that Project.
For example Press Project, a keyboard allowing you to change the default name will appear. Press Clear if you would like to start over with a new name. Press Shift to toggle from lowerto upper case letters. Once editing has been completed, Press Enter.
21

The screen returns to Edit Project. After verifying your information, Press Exit to return to the Project Details screen. Verify and Press Control Menu on the Status Bar to return to the Control Menu. If you took readings with Data Storage On but did not set up a Project, data will store on the default Project Name (ex. Project1). Always take note of the Project and Mix names displayed on your reading mode screens.
Reading Modes – Selection and DefinitionThe PQI 380 has four reading modes – Single, Average, Continuous and Segregation. Continuous Mode and Segregation Mode will not save data. Single and Average Mode will only save data when Data Logging is ON.
Select Reading Modes
To select or change a Reading Mode from the Control Menu Press Modes. Press the button of the mode you desire. The active mode button will appear larger than the rest. For example, the Single mode has been selected here. Once your selection has been made, press Control Menu on the Status Bar to return to the Control Menu.
22
Editing Project Details

Reading Mode Definition
For all Reading Modes, take note and verify the Mix and Project names displayed in the bottom right corner. Do not touch or hover over the gauge when it is taking a reading. Place the gauge on a flat and dry surface whenever possible.
From the Control Menu, Press Measure to begin taking readings. The heading of the screen will display the active mode (Single, Average, Continuous, Segregation).
Single Reading Mode
To begin taking readings, Press Measure. If Data Logging is OFF, the gauge will display the results of the first reading and await another.
23

If Data Logging is ON, the gauge will display Accept and Reject buttons for that reading. Once accepted, the Enter Location screen will appear to allow specific information to be stored for that location. Press Accept immediately to bypass this screen or when editing is complete.
Average Reading Mode
The five Average Readings are taken in a clover leaf format. The gauge will highlight the reading number as well as the position the gauge should be in.
Once the gauge is positioned on a flat surface, Press 1. When reading one is complete, the density summary will list the individual density reading and the green number 2 button will be highlighted. Move the gauge to this location and Press 2. Repeat for the five readings.
24
Single Reading Mode

After the fifth reading the gauge will display the five individual readings under Density Summary on the left and the average of the Compaction, Density and Temperature for the five readings will display in the center of the screen. The gauge does not store individual readings, only the average readings will be stored. If individual readings are needed, this will be the last time the screen will display them. If data logging is ON the gauge gives the option whether to Accept or Decline the current average reading. If declined, the average reading will not store on the dat file and the gauge awaits another set of readings. If data logging is OFF the gauge simply displays the averages and awaits the Next Reading set.
DataLogging OFF DataLogging ON
If data logging is ON and you wish to save the displayed average reading, Press Accept. As with the Single Mode, the Enter Location screen appears to allow specific information to be stored for that location. Press Accept immediately to bypass this screen or when editing is complete.
25
Average Reading Mode

Continuous Reading Mode
Data will NOT store for this mode. To begin taking readings, Press Measure.
Once the Measure button has been pressed, the Continuous mode will continuously display and update the Compaction, Density and Temperature until the STOP button is pressed.
Segregation Reading Mode
Data will NOT store for this mode. Be sure to write down the individual readings, if you must make note of them. This mode mimics the PQI 300’s where two readings (‘A’ and ‘B’) are taken for each location. Segregation is the separation of the course and fine aggregate particles in the asphalt mix. A segregated mix will usually result in density fluctuations in the finished mat. The PQI 380’s Segregation Mode can be used to conveniently measure the density variations that result from mix segregation. The operation of Segregation Mode is patterned after test procedures used by a number of testing organizations. The PQI 380 is used to take a number of readings at pre-determined locations on the mat and the variations in the readings are calculated after all readings have been taken.
26

Position the PQI 380 on the first pre-determined location on the mat and Press Measure to obtain reading 1A for location 1. If needed, write down the results of the reading at this time. For every reading taken, the option to Accept or Reject will be given as shown in the example. Two readings (‘A’ and ‘B’) are taken at each location and the average value is used. Taking the average of two readings is required for nuclear gauges, which exhibit poor repeatability. The PQI 380 has excellent repeatability so two readings should not be required, but two readings are taken for compatibility with existing nuclear test procedures. If satisfied with the first reading, Press Accept.
The PQI 380 will prompt you to take the next reading in the same location, 1B.
Press Measure. Results of reading 1B for location 1 will display and wait to be accepted
or declined.
If satisfied with the second reading write down the results (if needed), Press Accept. The PQI 380 will then show a “Calculate” button and prompt for reading 1 at location two (2A). After the last pair of readings has been accepted, Press Calculate. The gauge will display %Compaction, Density and Temperature for the lowest, highest and mean readings.
27
Segregation Reading Mode

Calibration
The calibration of the PQI 380 to each new mix is necessary for accurate and consistent readings. This is due to the various HMA mixtures being used in the field today. Changes in the aggregate type and size as well as changes in the binders produce a wide variety of electrical properties. Once calibrated to a standard (core) the PQI 380 will maintain optimal precision and accuracy.
Core Calibration MethodFor optimal results, the core calibration method is the most accurate method when calibrating the PQI 380. The level of quality control from the plant to the mat will determine the number of test locations an operator should identify (one to five). The standard method for establishing a control strip as specified in AASHTO TP 68-04 would be a total of five core locations. Remember the calibration will only be as good as the cores they are calibrated to. Therefore, the more test locations you have the more accurate the results.
Place the PQI 380 in the first location on the asphalt mat. Using the sensor plate as a guide, draw a circle around the PQI with a crayon marker. Using the Average Mode on the PQI, Press 1 for the first reading. (DO NOT TOUCH OR HOVER OVER THE PQI WHILE IT IS TAKING A READING) The PQI 380 does NOT store individual readings, only the average reading will be stored when Data Logging is ON.
Move the PQI approximately 2 inches up and to the right on the outside of the circle. The Average Reading Mode screen will also guide you to the proper location and reading number. Press 2 to take the second reading. Continue through the clover leaf pattern until you have completed five individual readings. After the fifth reading, the PQI 380 will display all five individual readings for verification under the Density Summary portion of the screen. If individual readings are needed write them down, this will be the last time the screen will display them. The average of these five individual readings will display in the center of the display waiting for an Accept or Reject button to be pressed. Write down the average PQI 380 reading on the “Core Comparison Calibration Work Sheet” located at the back of this manual. Press Accept to store the average reading on the data file. If the option to Accept or Reject does not display then Data Logging is OFF and the average reading will not store.
28
Calculating the Offset
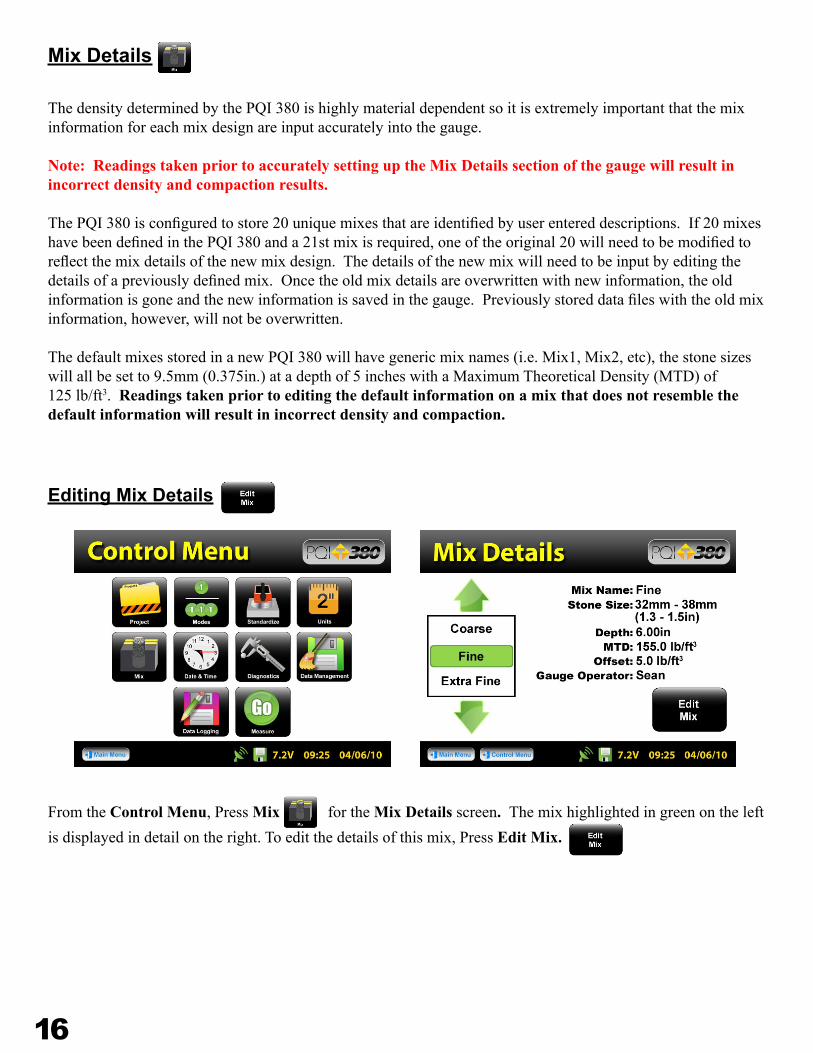
Direct percent compaction of the test mat is achieved by pulling physical samples (cores) from the locations previously tested. Once the core density lab reports are received enter the value for each core on the “Core Comparison Work Sheet”. Calculate the difference between the average PQI readings and the core density values. The five calculated differences (Core Density – PQI Average Density) will then be averaged to obtain one difference. This difference will be the Offset for that specific mix that will be stored in the gauge for that mix. Therefore, you will be Adjusting the Value of the PQI readings by that amount in order for the gauge to read the same as the core(s).
If you do not have a calculator handy, Press Main Menu on the taskbar. From the Main Menu, Press Calculator. Once the numeric difference is calculated, determine whether the PQI 380 is reading too high or too low. For example, if the PQI reads 155lb/ft3, and you would like it to read 150lb/ft3, the PQI reads too high and the Adjusted Value for the Offset is 5.
PQI380 Offset Setup
From the Main Menu Press Start PQI380, then from the Control Menu Press Mix.
29

Be sure that the green highlighted mix is the mix you wish to add the offset to. Press Edit Mix, then Press Offset. By using the density you previously measured and comparing the value to the density desired, determine whether the PQI 380 reading is too low or too high.
Press PQI is reading too High or Low depending on your situation. For the example, we are going to use “PQI is reading too HIGH”. A numeric keypad will appear as well as the Mix Name and Current Offset for that mix. Type in the Adjusted Value for the offset which we previously determined would be 5. Type 5, then Press Enter.
30
PQI380 Offset Setup

The Adjusted Value and New Offset will be the same if the Current Offset was originally zero. If the Current Offset had been 1 and the Adjusted Value 5, then the New Offset would be -4 for a PQI reading that had read too high. Press Accept. The screen returns to the Edit Mix screen where you can verify the information for that mix. Once verified, Press Exit and then press Control Menu on the taskbar to return to the Control Menu.
The Offset for each mix can be adjusted at any time. Readings taken prior to a specific adjustment will not reflect that adjustment. Data files will record each offset used to calculate density for each reading.
31
PQI380 Offset Setup
Data ManagementThe Data Management screen is where you can download and delete project files. From the Control Menu, Press Data Management. In the Data Management screen you will see six buttons...
Scroll Up
Scroll Down
Print Data File (Not Available at this time)
Download Data File
Delete Data File
Displays details of the Data File(Not Available at this time)

Download the data onto your computerOpen an Excel spreadsheet and import the data by clicking Import External Data from the Data menu then click Import Data. Change the Look In folder to the location you stored your data as well as changing the Files of Types to All Files. Highlight and open your data file (ex. Project1.pqidat). Check Delimited, Click Next, Check Tab, Check Semicolon, Click Finish. Highlight the beginning cell and Click OK.
Column headings and data for each individual reading include the following: from Project Details: Project Name, Location 1, Location 2, Contact; from Mix Details: Mix Name, Stone Size, Depth, MTD, Offset, Gauge Op; Station Information: Station Name, Station Offset, Description, Operator; Density, Compaction, Surface Temperature, GPS location, GPS time, GPS date, PQI380 Date/Time.
32
Downloading Data
From the Control Menu, Press Data Management. Scroll down to the Project you would like to download using the arrows located at the top left corner of the screen. Insert the USB flash drive into the USB port located on the back of the gauge. Press Download and Download again. Downloading is complete when the gauge displays “Ready” in the top right hand corner. When and if you wish to delete a Project, be sure to highlight the correct project and Press Delete. Printing options are not yet available.
Ready

Maintenance and Troubleshooting
The PQI has been designed to require a minimum of maintenance or service. Normal care in use should insure long and trouble free operation.
Keep the PQI bottom surface clean and dry:For accurate readings, the PQI should have a clean, dry, smooth interface with the mat. Therefore, you should wipe the PQI sensor plate surface dry and clean after each reading. Also, before placing the PQI on the mat, you should check the surface of the mat to make sure there is no loose material on the surface, which would prevent the PQI from seating properly. If a buildup of asphalt begins to form on the sensor plate surface, clean the surface with WD-40.
Touchscreen:Do not clean the touchscreen with abrasive products. Apply window cleaner to a soft rag and wipe the surface clean.
Factory Calibration:Yearly recalibration of the gauge is needed to maintain consistency and accuracy for the electronic components.
The Diagnostic button on the Control Menu will turn red as a reminder. Only authorized distributors or the factory are able to perform this type of calibration.
33
Power Save/Auto Shut Down
The PQI Model 380 has a built in power saving mode. If there are no buttons pressed after approximately 20 minutes the unit will go into a power saving mode. Pressing any key will “Wake” the PQI up for continued use. If the PQI is left “On” for an hour without any buttons being pressed, it will shut itself down, to conserve battery run time.

34
Battery Problems Check orientation of batteries – be sure the plus side button is sticking out of the gauge (cap side)Check battery cap- be sure they are screwed on evenly and fullyCall Factory
Data is not recording Check Data Logging-the floppy disk on the status bar should be green, Data Logging should be On.Check Current Project Name-data readings will store on the Current Project only, be sure you have the correct Project name set on the gauge (Verify the name of the Project and Mix on each reading screen)
GPS Communication Errors Call Factory
Buttons Sticking/Frozen Software Repress the frozen button firmly for three seconds. Be sure not to drag your finger from one button to the next. If this does not work, reset the gauge by turning it off and then back on.
Incorrect Density Reading Clean off sensor plateCheck Current Mix Details -be sure you have selected the proper aggregate size and entered all details correctlyCheck Calibration-check your calculations for the Adjusted Value of the offset and that it was entered correctlyCall Factory
TroubleshootingThe chart below provides guidance to a few suspect conditions.

Diagnostics
In the event that the PQI continues to malfunction an internal diagnostics mode can be activated to provide necessary technical information to the factory. In the event that a repair is required, it is strongly recommended that authorized factory service be obtained. Unauthorized repair or maintenance by the user during the warranty period will void the unit’s warranty.
From the Control Menu Press Diagnostics. Place the gauge on the asphalt mat and Press Take Reading. Parameters from this display should be written down and relayed back to TransTech or the Distributor as a diagnostics tool.
35
Factory Parameters
The Factory Parameters button is located in the diagnostics screen. This button is used for TransTech
inhouse diagnostics. If this button is pressed the keyboard will display and you will be prompted for a password.
In certain circumstances TransTech may provide you with the password to aide them in diagnosing your gauge.
36
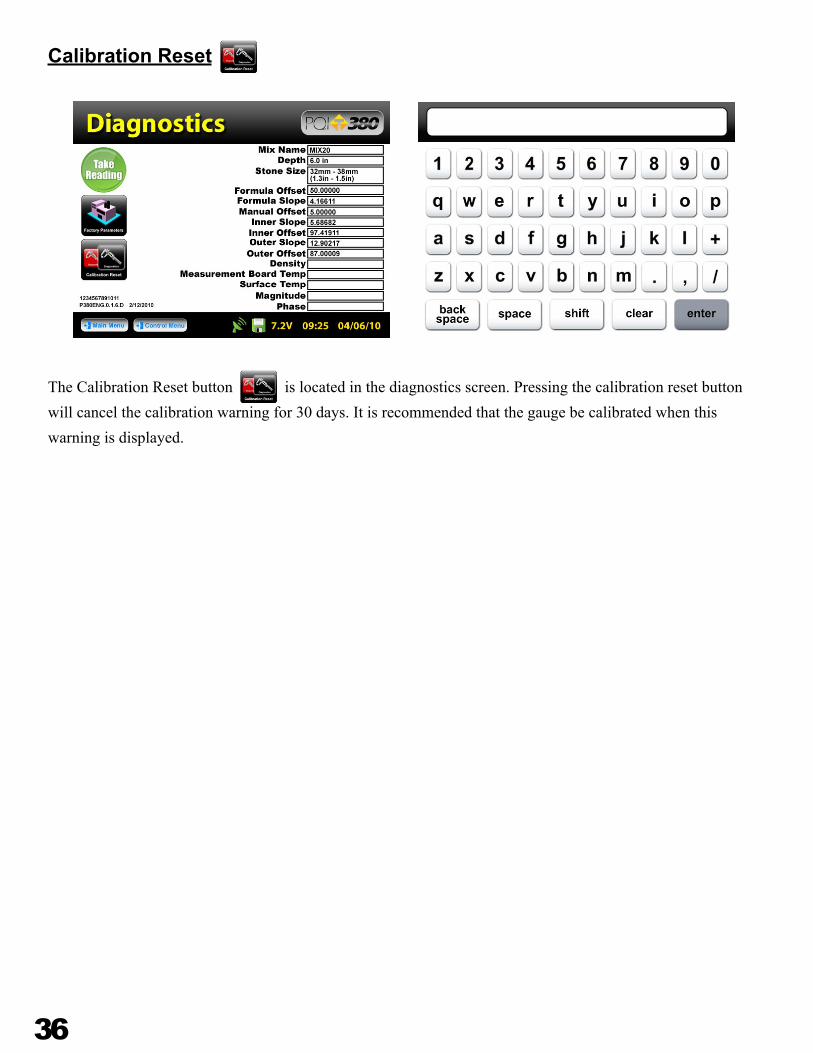
Calibration Reset
The Calibration Reset button is located in the diagnostics screen. Pressing the calibration reset button will cancel the calibration warning for 30 days. It is recommended that the gauge be calibrated when this warning is displayed.
37
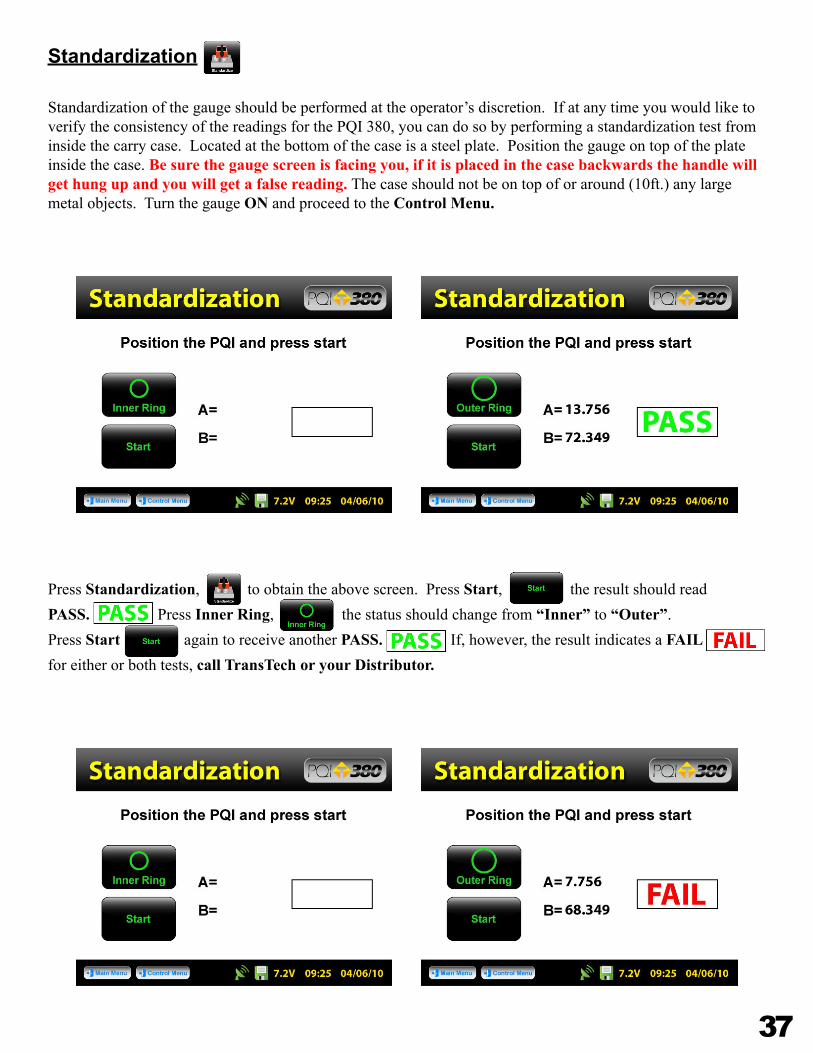
Standardization
Press Standardization, to obtain the above screen. Press Start, the result should read PASS. Press Inner Ring, the status should change from “Inner” to “Outer”. Press Start again to receive another PASS. If, however, the result indicates a FAIL for either or both tests, call TransTech or your Distributor.
Standardization of the gauge should be performed at the operator’s discretion. If at any time you would like to verify the consistency of the readings for the PQI 380, you can do so by performing a standardization test from inside the carry case. Located at the bottom of the case is a steel plate. Position the gauge on top of the plate inside the case. Be sure the gauge screen is facing you, if it is placed in the case backwards the handle will get hung up and you will get a false reading. The case should not be on top of or around (10ft.) any large metal objects. Turn the gauge ON and proceed to the Control Menu.

38
WARNING: THE STANDARDIZATION OF THE PQI 380 WILL ONLY WORK WITH THE PLATE IT HAS BEEN ISSUED TO. IF YOU RECEIVE A FAIL RESULT, CHECK TO BE SURE THE SERIAL NUMBERS LOCATED ON THE GAUGE AND THE STANDARDIZATION PLATE ARE THE SAME.
WARNING: THE STANDARDIZATION OF THE PQI380 MAY GIVE A FALSE “FAIL” IF TEST IS TAKEN TOO CLOSE TO METAL OBJECTS, POWER LINES OR OTHER ELECTRICAL DEVICES THAT MAY BE TOO CLOSE TO THE GAUGE. TURN THE GAUGE OFF AND MOVE THE GAUGE ATLEAST 10 FEET FROM THESE OBJECTS. IF AFTER THESE PRECAUTIONS ARE TAKEN THE GAUGE STILL DISPLAYS A “FAIL” CONTACT YOUR DISTRIBUTOR.
Warranty
The Company warrants to the Purchaser that the product delivered hereunder will be free from defects in material or workmanship and be the kind and quality designated or specified in the contract or purchase order. This warranty shall apply only to defects appearing within one (1) year from the date of shipment by the Company.
If the product delivered hereunder does not meet the above warranty and if the Purchaser promptly notifies the Company, the Company shall thereupon correct any defect, including nonconformance with the specifications, either (at the Company’s option) by repairing any defective or damaged parts of the product, replacing the product, or by making available the necessary repaired or replacement parts. The liability of the Company under this warranty, for any loss, whether the claim is based on contract or negligence, shall not in any case exceed the cost of correcting defects in the product as herein provided, and upon the expiration of the warranty period, all such liability shall terminate. The foregoing shall constitute the exclusive remedy of the Purchaser and the exclusive liability of the Company. The foregoing warranty is exclusive and in lieu of all other warranties, whether written, oral, implied or statutory.
No warranty of merchantability or of fitness for purpose shall apply. Unauthorized service shall void this warranty.
Factory authorized service and replacement items may be obtained directly from TransTech’s factory or through an authorized representative (see TransTech’s website for a complete list of distributors www.transtechsys.com).
For further information contact
TransTech Customer Service:
Standardization
Telephone (518) 370-5558 or Toll Free in the US 1 (800) 724-6306 FAX (518) 370-5538 E-mail [email protected] Web www.transtechsys.comAddress TransTech Systems Inc. 1594 State St. Schenectady, NY 12304

39
Measurement Table
Company Name Job Site
Asphalt Mix
Date
MTD
Measurement Table
Company Name Job Site
Asphalt Mix
Date
MTD
Measurement Table
Company Name Job Site
Asphalt Mix
Date
MTD
Core Comparison Calibration Work Sheet
1) Enter the Core Density readings and the Average PQI 380 readings for each location.2) Subtract the PQI readings from the Core Density for each location.3) Add the differences for each location = Total Difference.4) Calculate the Average Difference (Total Difference ÷ 5). This is the Adjusted Value for the Offset.
LocationCore DensityPQI ReadingsDifference
1 2 3 4 5
Total Difference
Average Difference(Adj. Value-Offset)

1594 State StreetSchenectady, NY 12304Phone: 518-370-5558
Toll Free: 1-800-724-6306Fax: 518-370-5538
Email: [email protected]: www.transtechsys.com
Toll Free: TransTech.Systems.Inc01
Follow us on
Related Documents