Building a Home vSphere Lab – Part 2 September 29, 2015 Page 1 ©John Borhek 2015, All Rights Reserved www.johnborhek.com Part 2 – Install the vCenter Server Appliance and dependencies In Part two, we will install the vSphere Client for Windows, create forward and reverse DNS (which is a prerequisite for installing vCenter in any form) and then we will install the VMware vCenter Server Appliance Installing the vSphere Client for Windows VMware would have you believe that the VMware vSphere® Client for Windows is best used only for managing standalone ESXi installations. Any administrator that has worked with the VMware vSphere® Web Client (even in vSphere 6.X) knows that the vSphere Web Client sucks! Not only is the web-client not capable of managing standalone ESXi installations, it is basically unsuitable for use in any production environments, largely due to its heavy dependence on Flash. We already acquired the binary for the vSphere client for Windows from VMware (if you did not, go get it now), so we are ready to begin installing the client. 1. Install the vSphere Client for windows on your local PC a. Locate the binary you downloaded from VMware and right-click to: Run as administrator b. Files extrace c. You may see this

Welcome message from author
This document is posted to help you gain knowledge. Please leave a comment to let me know what you think about it! Share it to your friends and learn new things together.
Transcript

Building a Home vSphere Lab – Part 2
September 29, 2015
Page 1 ©John Borhek 2015, All Rights Reserved www.johnborhek.com
Part 2 – Install the vCenter Server Appliance and dependencies In Part two, we will install the vSphere Client for Windows, create forward and reverse DNS (which is a
prerequisite for installing vCenter in any form) and then we will install the VMware vCenter Server Appliance
Installing the vSphere Client for Windows VMware would have you believe that the VMware vSphere® Client for Windows is best used only for managing
standalone ESXi installations. Any administrator that has worked with the VMware vSphere® Web Client (even in
vSphere 6.X) knows that the vSphere Web Client sucks! Not only is the web-client not capable of managing standalone
ESXi installations, it is basically unsuitable for use in any production environments, largely due to its heavy dependence
on Flash.
We already acquired the binary for the vSphere client for Windows from VMware (if you did not, go get it now), so we
are ready to begin installing the client.
1. Install the vSphere Client for windows on your local PC
a. Locate the binary you downloaded from VMware and right-click to: Run as administrator
b. Files extrace
c. You may see this

Building a Home vSphere Lab – Part 2
September 29, 2015
Page 2 ©John Borhek 2015, All Rights Reserved www.johnborhek.com
d. Click: Next
e. Click: Next

Building a Home vSphere Lab – Part 2
September 29, 2015
Page 3 ©John Borhek 2015, All Rights Reserved www.johnborhek.com
f. Click: Install
g. Wait
Building a Home vSphere Lab – Part 2
September 29, 2015
Page 4 ©John Borhek 2015, All Rights Reserved www.johnborhek.com
h. Click: Finish
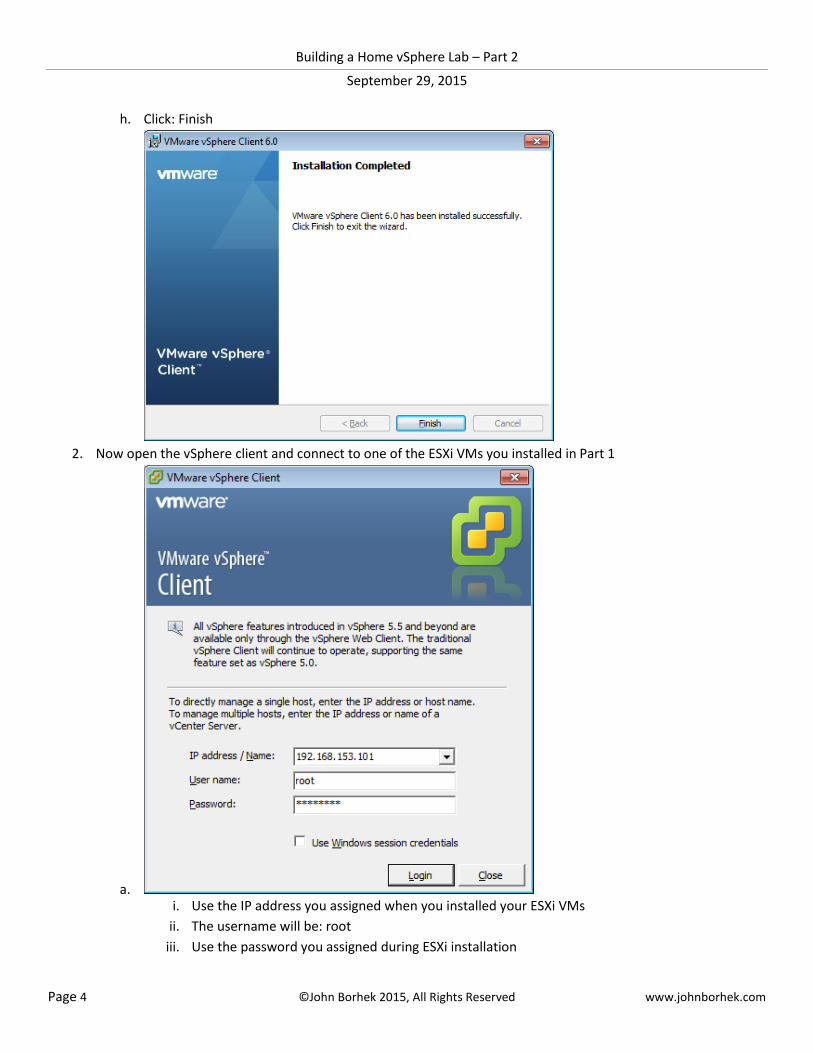
2. Now open the vSphere client and connect to one of the ESXi VMs you installed in Part 1
a. i. Use the IP address you assigned when you installed your ESXi VMs
ii. The username will be: root
iii. Use the password you assigned during ESXi installation

Building a Home vSphere Lab – Part 2
September 29, 2015
Page 5 ©John Borhek 2015, All Rights Reserved www.johnborhek.com
b. Install the certificate and then ignore the warning (we trust this host)
Creating DNS for vCenter Forward and reverse DNS are a prerequisite for installing vCenter, no matter if you choose vCenter for Windows or the
VCSA. There are many ways to create DNS in the home lab including building a Windows Server VM and adding the DNS
Role. I wanted something simpler, free and lighter weight.
Regardless of your choice for DNS Server (Windows or Linux), you will need to create the A-records manually, as the
VCSA will not create them on your behalf.
Linux DNS ServerAppliance
Ubuntu server 14.04 LTS provides a convenient platform on which to install DNS. Ubuntu Server is thin and light, and will
easily fit on the DAS of the ESXi VMs we have created, until such time as we have created SAN storage!
You can build your own VM, or download the actual VM that I built for this article, and then re-configure the IB, Bind
daemon and Forward/Reverse zones to suit your needs. If you choose to use our OVA, then you are just a few easy
steps from having a functional DNS Server in your home lab!
The goal of this lab is to re-configure a pre-built Linux DNS Server specific to your needs. I have done this in simplest way
I could imagine, with the fewest possible number of steps! I will not be showing you how to build a Linux DNS Server
from scratch, rather just re-configure the DNS Server I built for my lab. The net result should be a minimal DNS server
suitable configured for your lab environment.
NOTE: My lab is on 192.168.153.0/24 and configured to be: jb-lab.local.
In the example screenshots, I will be showing you how to re-configure my Ubuntu DNS Server for your lab using: your-
lab.local as an example of your domain and 192.168.174.0 as an example of your “subnet” (VMware misuses the term
‘Subnet” in the Workstation product, technically this is a Broadcast Domain).
Download the ubuntu-server VM as an OVA from here:
1. Import the OVA into one of your newly-created ESXi VMs.

Building a Home vSphere Lab – Part 2
September 29, 2015
Page 6 ©John Borhek 2015, All Rights Reserved www.johnborhek.com
1.1. Choose: Deploy OVF Template
1.2. Locate the downloaded file: ubuntu-server.ova Click: Next
1.3. Next

Building a Home vSphere Lab – Part 2
September 29, 2015
Page 7 ©John Borhek 2015, All Rights Reserved www.johnborhek.com
1.4. Name your Ubuntu-server. Per Best Practices, the VM name and its hostname should be the same. You may
name your DNS something different, but if you choose a name other than “Ubuntu-server,” you may be better
off building DNS on a fresh build of Ubuntu, as opposed to re-configuring my Build. Click: Next
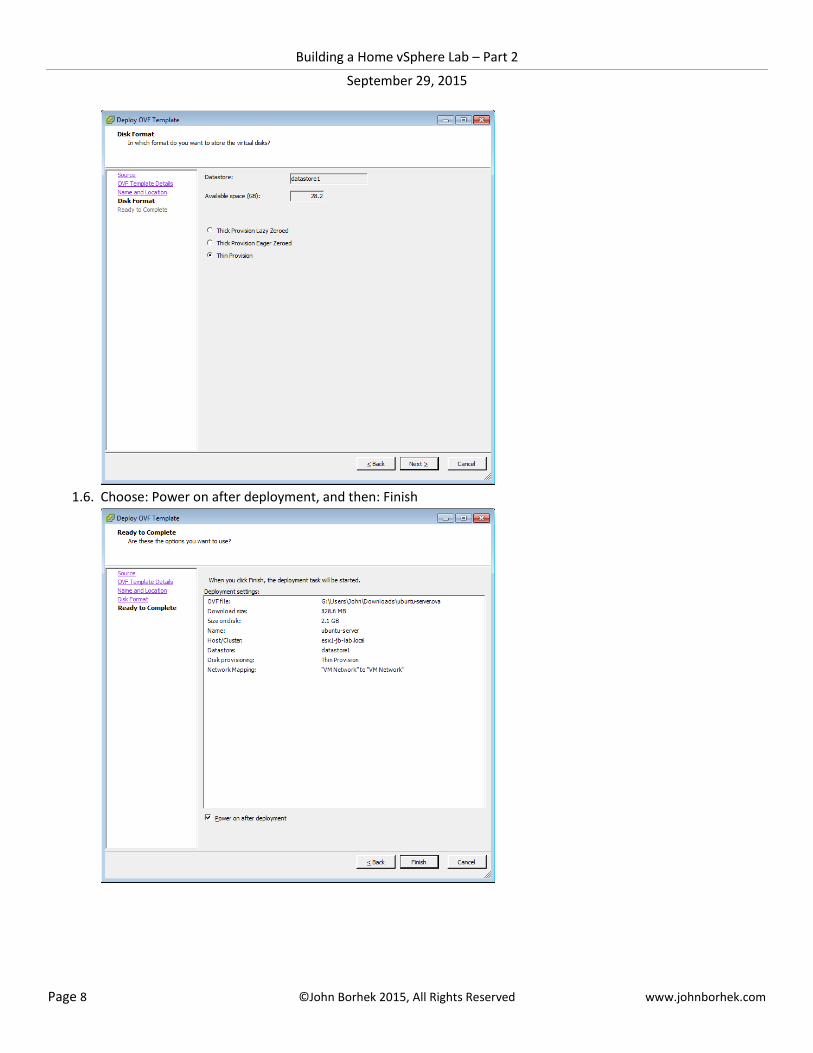
1.5. Choose: Thin Provision Click: Next
Building a Home vSphere Lab – Part 2
September 29, 2015
Page 8 ©John Borhek 2015, All Rights Reserved www.johnborhek.com
1.6. Choose: Power on after deployment, and then: Finish

Building a Home vSphere Lab – Part 2
September 29, 2015
Page 9 ©John Borhek 2015, All Rights Reserved www.johnborhek.com
1.7. Wait. This process should take 2-5 minutes on decent hardware.
1.8. Close
2. Open the VMRC (be sure to right-click the VM, then go to: Open Console – NEVER use the Console tab, it’s so
annoying!)

Building a Home vSphere Lab – Part 2
September 29, 2015
Page 10 ©John Borhek 2015, All Rights Reserved www.johnborhek.com
3. Log on to the VMRC with the username: administrator and the password: P@ssw0rd (That’s a zero in P@ssw0rd)
4. Open the eth0 configuration by running: sudo vi /etc/network/interfaces
4.1. You will be asked for your password, which is: P@ssw0rd
4.2. There are many good VI cheat sheets like this one: http://www.lagmonster.org/docs/vi.html
4.3. The text editor Nano is also available, run: sudo nano /etc/network/interfaces

Building a Home vSphere Lab – Part 2
September 29, 2015
Page 11 ©John Borhek 2015, All Rights Reserved www.johnborhek.com
4.4. Customize the values in this file to suit your needs snd save (:wq). In this example, we have changed the
address, network, broadcast, and gateway suitable for our example network.
4.4.1. I replaced every occurance of 153 in the third-octed of the IP address with 174

Building a Home vSphere Lab – Part 2
September 29, 2015
Page 12 ©John Borhek 2015, All Rights Reserved www.johnborhek.com
5. Define the forward and reverse zone files for Bind
5.1. Open the named.conf.local file to edit with vi: sudo vi /etc/bind/named.conf.local
5.1.1. NOTE: sudo will not prompt for a password if used again within its default session timeout of 5 minutes.
5.2. Customize the values in this file to suit your needs
5.2.1. In the example, we changed the text: “jb-lab.local” to “your-lab.local” in each occurrence.
5.2.2. In the example we changed: “153.168.192.in-addr.arpa” to “174.168.192.in-addr.arpa” (NOTE:
174.168.192 represents the reverse of the Network portion of the IP. If this were a class B /16 network
with a Subnet Mask of 255.255.0.0, then the zone would be “16.172.in-addr.arpa” and the file would be
“/etc/bind/db.172”
6. Create your forward lookup zone by copying my forward lookup zone (/etc/bind/jb-lab.local) toand then editing it.

Building a Home vSphere Lab – Part 2
September 29, 2015
Page 13 ©John Borhek 2015, All Rights Reserved www.johnborhek.com
6.1. Run the command: sudo cp /etc/bind/db.jb-lab.local /etc/bind/db.your-lab.local
6.2. Edit the forward lookup zone for your-lab.local by running: sudo vi /etc/bind/db.your-lab.local
6.3. Customize the values in this file to suit your needs.
Building a Home vSphere Lab – Part 2
September 29, 2015
Page 14 ©John Borhek 2015, All Rights Reserved www.johnborhek.com
6.3.1. I replaced every occurance of “jb-lab.local” with “your-lab.local”
6.3.2. I replaced “john” with “your”
6.3.3. I changed the 153 portion of every IP/A-record to 174
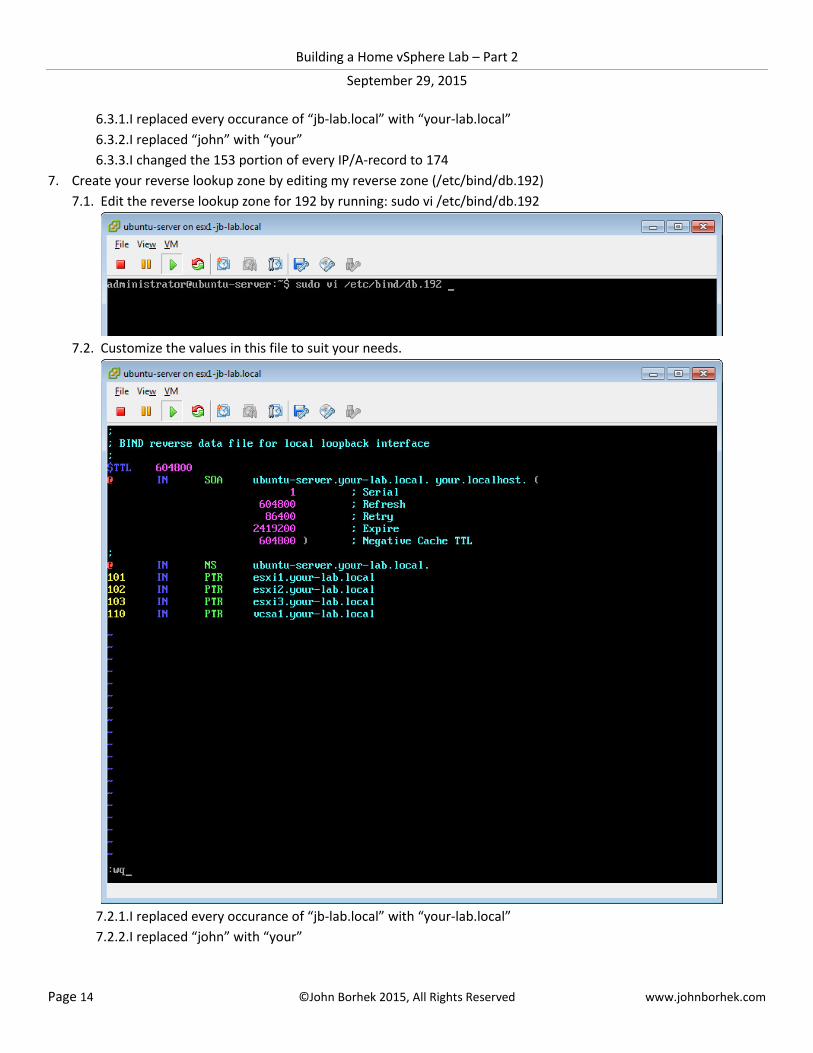
7. Create your reverse lookup zone by editing my reverse zone (/etc/bind/db.192)
7.1. Edit the reverse lookup zone for 192 by running: sudo vi /etc/bind/db.192
7.2. Customize the values in this file to suit your needs.
7.2.1. I replaced every occurance of “jb-lab.local” with “your-lab.local”
7.2.2. I replaced “john” with “your”

Building a Home vSphere Lab – Part 2
September 29, 2015
Page 15 ©John Borhek 2015, All Rights Reserved www.johnborhek.com
7.2.3. NOTE: The numeric portion of pointer (PRT) record is the host portion of the IP address. In a Class C
network with a subnet mask of 255.255.255.0 (or /24), the host portion of the IP is the last octet of the IP.
In this case, 101 represents 192.168.174.101
8. Reboot your server to apply all the changes at once.
8.1. Run the command: sudo reboot
8.2. Check your work
8.2.1. Login with the username: administrator and password: P@ssw0rd
8.2.2. Run the command: ifconfig
8.2.3. Run the command: service bind9 status
You should be in business with DNS!

Building a Home vSphere Lab – Part 2
September 29, 2015
Page 16 ©John Borhek 2015, All Rights Reserved www.johnborhek.com
Installing VMware vCenter Server Now we need to install vCenter in whatever form you choose. I choose the VMware VCSA! We will begin by creating the
VCSA on the DAS of the first ESXi VM, which will be possible if we Thinly Provision the disks.
1. Locate the VCSA ISO you downloaded from VMware and extract it with a tool like 7-ZIP . If you are running
Windows 8 and beyond, simply Mount the ISO on your desktop to browse the files.
2. Browse the ISO (or the Extracted files) to: \VMware-VCSA-all-6.0.0-3040890\vcsa and run the Client Integration
Plugin as Administrator
a. b. You may need to close all your open browsers to continue.

Building a Home vSphere Lab – Part 2
September 29, 2015
Page 17 ©John Borhek 2015, All Rights Reserved www.johnborhek.com
c. If google Chrome refuses to close, you need to force-close ti with the task manager or at the command-
line
d. 3. Now locate the vcsa-setup.html file and open it with Google Chrome

Building a Home vSphere Lab – Part 2
September 29, 2015
Page 18 ©John Borhek 2015, All Rights Reserved www.johnborhek.com
a. Click: Install
b. Specify the FQDN or IP of your ESXi VM where the VCSA will be installed
i. I chose to enter the IP because the actual .HTML installer is on my PC, not inside the jb-lab.local
network. For this reason, the DNS we configured will not work.
ii. The username is: root
iii. The password is what you set when you installed ESXi

Building a Home vSphere Lab – Part 2
September 29, 2015
Page 19 ©John Borhek 2015, All Rights Reserved www.johnborhek.com
c. Click: Yes
d. Name the VCSA and assign a password for the OS. This will be the VM name in inventory.

Building a Home vSphere Lab – Part 2
September 29, 2015
Page 20 ©John Borhek 2015, All Rights Reserved www.johnborhek.com
i. The password you set there has nothing to do with vCenter Services, rather is just the OS
password for updates, the shell, etc.
e. Choose: Embedded Platform Services Controller
f. Now set the SSO Domain and password.
i. This is the password that makes you king of the world.

Building a Home vSphere Lab – Part 2
September 29, 2015
Page 21 ©John Borhek 2015, All Rights Reserved www.johnborhek.com
ii. Be sure to note your SSO Domain name. The SSO Domain name must be unique and not the
same as other domains.
g. Set: Tiny

Building a Home vSphere Lab – Part 2
September 29, 2015
Page 22 ©John Borhek 2015, All Rights Reserved www.johnborhek.com
h. Choose the DAS on the ESXi VM we created earlier and Enable Thin Disk Mode
i. We will move the VCSA to a SAN later.
i. Choose: Use an embedded database
Building a Home vSphere Lab – Part 2
September 29, 2015
Page 23 ©John Borhek 2015, All Rights Reserved www.johnborhek.com
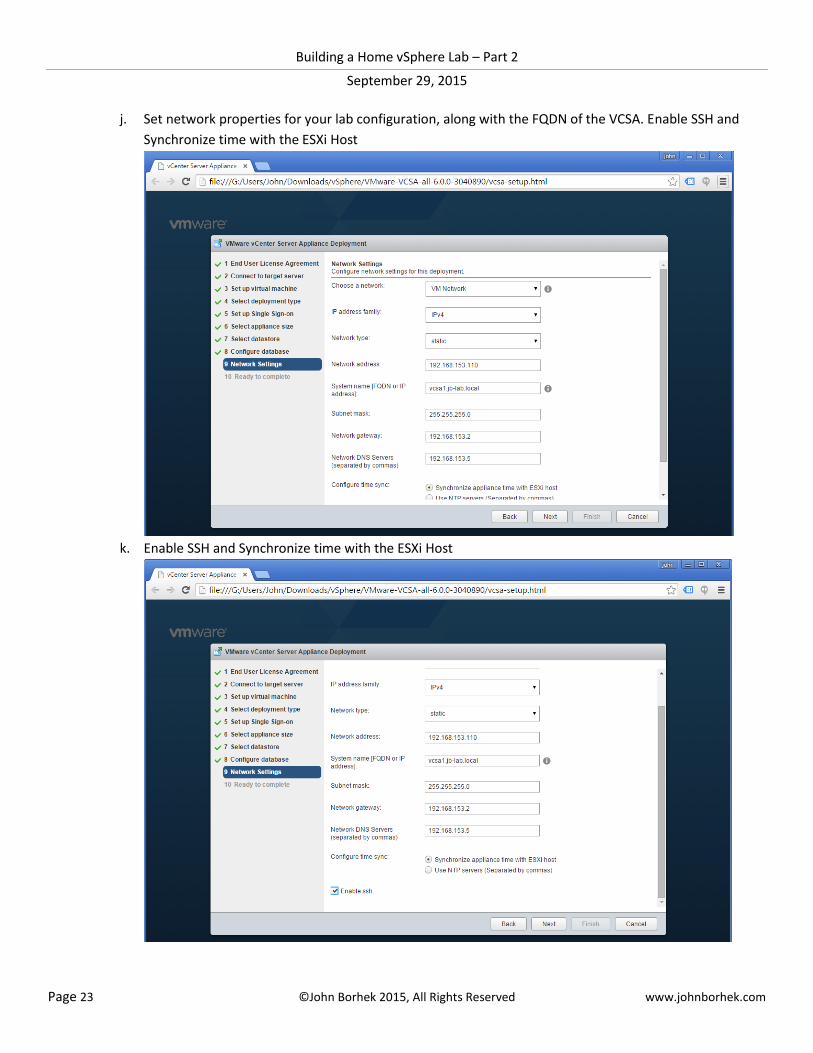
j. Set network properties for your lab configuration, along with the FQDN of the VCSA. Enable SSH and
Synchronize time with the ESXi Host
k. Enable SSH and Synchronize time with the ESXi Host

Building a Home vSphere Lab – Part 2
September 29, 2015
Page 24 ©John Borhek 2015, All Rights Reserved www.johnborhek.com
l. Review your settings and click: Finish
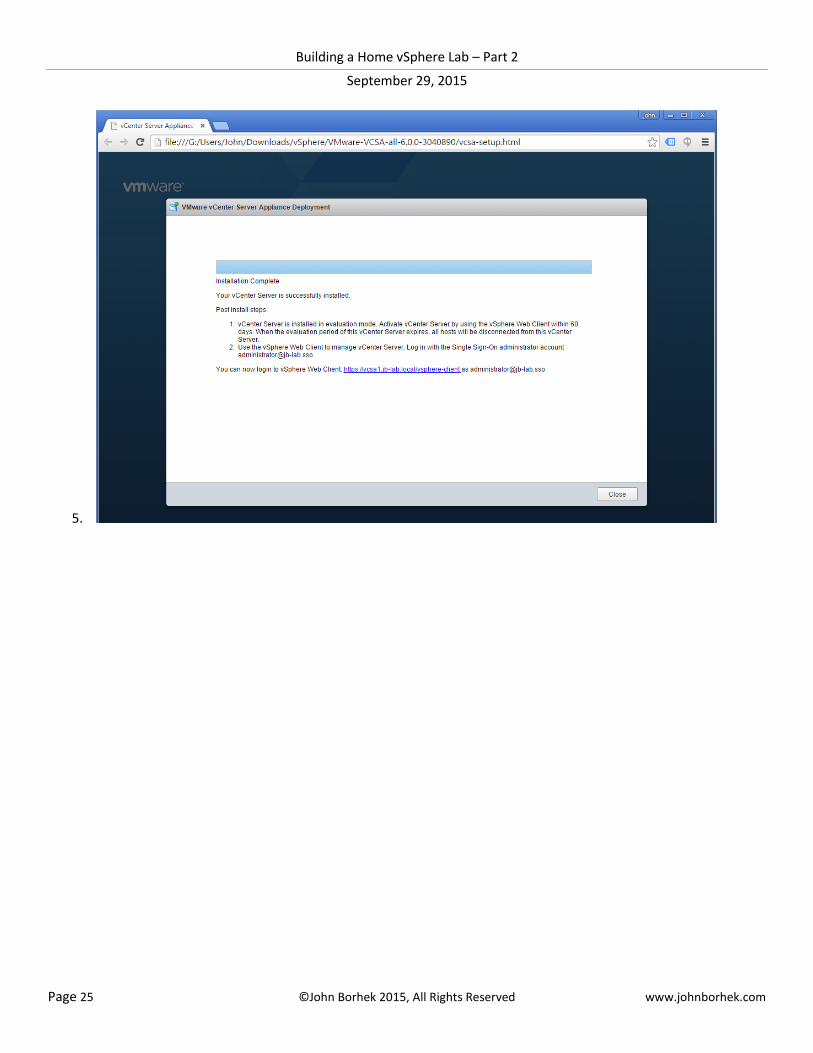
m. This can take a long time!
4.
Building a Home vSphere Lab – Part 2
September 29, 2015
Page 25 ©John Borhek 2015, All Rights Reserved www.johnborhek.com
5.
Building a Home vSphere Lab – Part 2
September 29, 2015
Page 26 ©John Borhek 2015, All Rights Reserved www.johnborhek.com
Troubleshooting VCSA installations I have had tremendous success installing VCSA 6! In fact, my installations have only failed for one of two reasons:
1. The vSphere Client Integration Plugin became incompatible when Google Chrome is updated (most recently to
Version 45). In this case, detecting the Sphere Web Client Integration Plugin 6.x simply times out and no amount of
re-configuring the browser or re-loading the installer page will make it work.
The fix is fairly simple, just download the latest version of the Sphere Web Client Integration Plugin 6.x, or (at the time of
this writing) download from this VMware KB:
http://kb.vmware.com/selfservice/microsites/search.do?language=en_US&cmd=displayKC&externalId=2130672
2. Forward and Reverse DNS were not correctly configured for the Broadcast Domain (network) on which VCSA will be
installed. If this is the case, you will see the installer fail with this message:
The fix is very simple: Configure DNS correctly with forward and reverse zones and A-records for the VCSA, and all ESXi
Hosts/VMs
Connecting to your new vCenter and adding ESXi VMs This is where VMware would really like you to start using the VMware vSphere Web Client. At this point, however, there
is no need, as all of the operations we are going to perform are still fully supported by the VMware vSphere Client for
Windows as well!
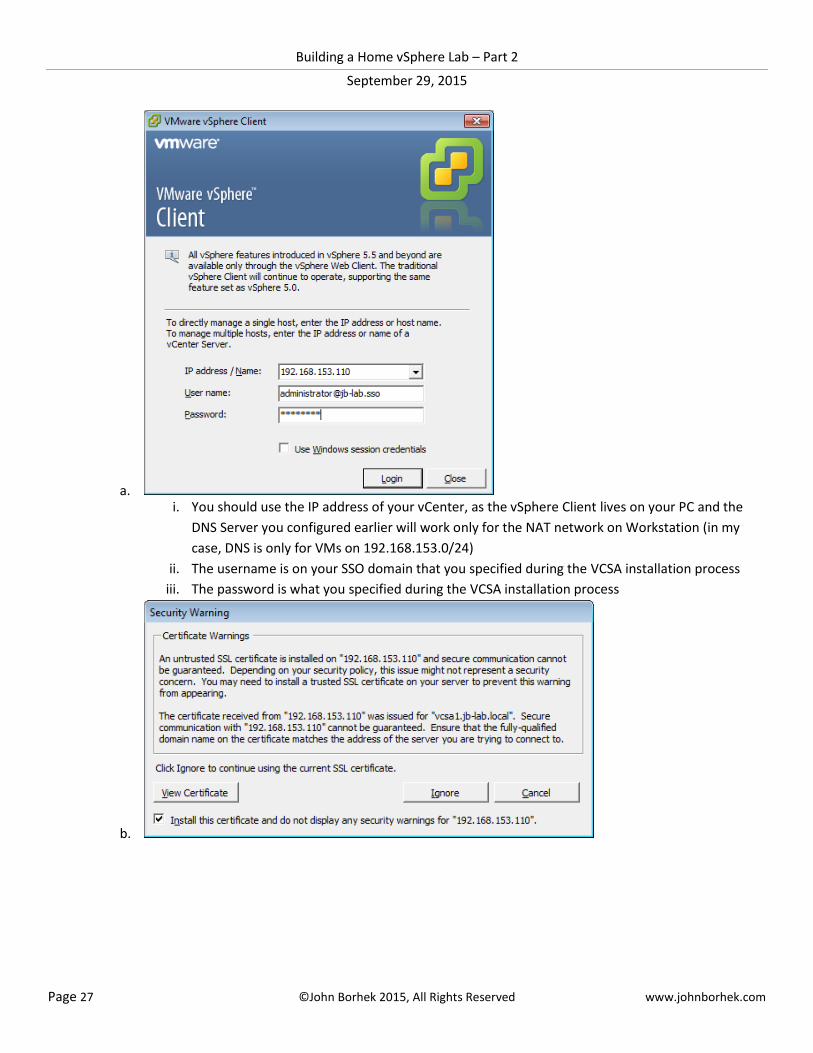
1. Open the vSphere Client for Windows and connect to your vCenter
Building a Home vSphere Lab – Part 2
September 29, 2015
Page 27 ©John Borhek 2015, All Rights Reserved www.johnborhek.com
a. i. You should use the IP address of your vCenter, as the vSphere Client lives on your PC and the
DNS Server you configured earlier will work only for the NAT network on Workstation (in my
case, DNS is only for VMs on 192.168.153.0/24)
ii. The username is on your SSO domain that you specified during the VCSA installation process
iii. The password is what you specified during the VCSA installation process
b.

Building a Home vSphere Lab – Part 2
September 29, 2015
Page 28 ©John Borhek 2015, All Rights Reserved www.johnborhek.com
2. Create a Datacenter object
a.
b. 3. Add your ESXi VMs. If DNS is working, they should add by hostname!
a. Choose: Add Host

Building a Home vSphere Lab – Part 2
September 29, 2015
Page 29 ©John Borhek 2015, All Rights Reserved www.johnborhek.com
b. Input your hostname or IP. I recommend using the hostname because it proves that DNS is working,
whereas using the IP proves nothing. The username for this operation is always: root
c. The SHA1 Thumbprint is visible in the Troubleshooting Options screen of the DCUI. Choose Yes

Building a Home vSphere Lab – Part 2
September 29, 2015
Page 30 ©John Borhek 2015, All Rights Reserved www.johnborhek.com
d. Click: Next
e. Click: Next
Building a Home vSphere Lab – Part 2
September 29, 2015
Page 31 ©John Borhek 2015, All Rights Reserved www.johnborhek.com
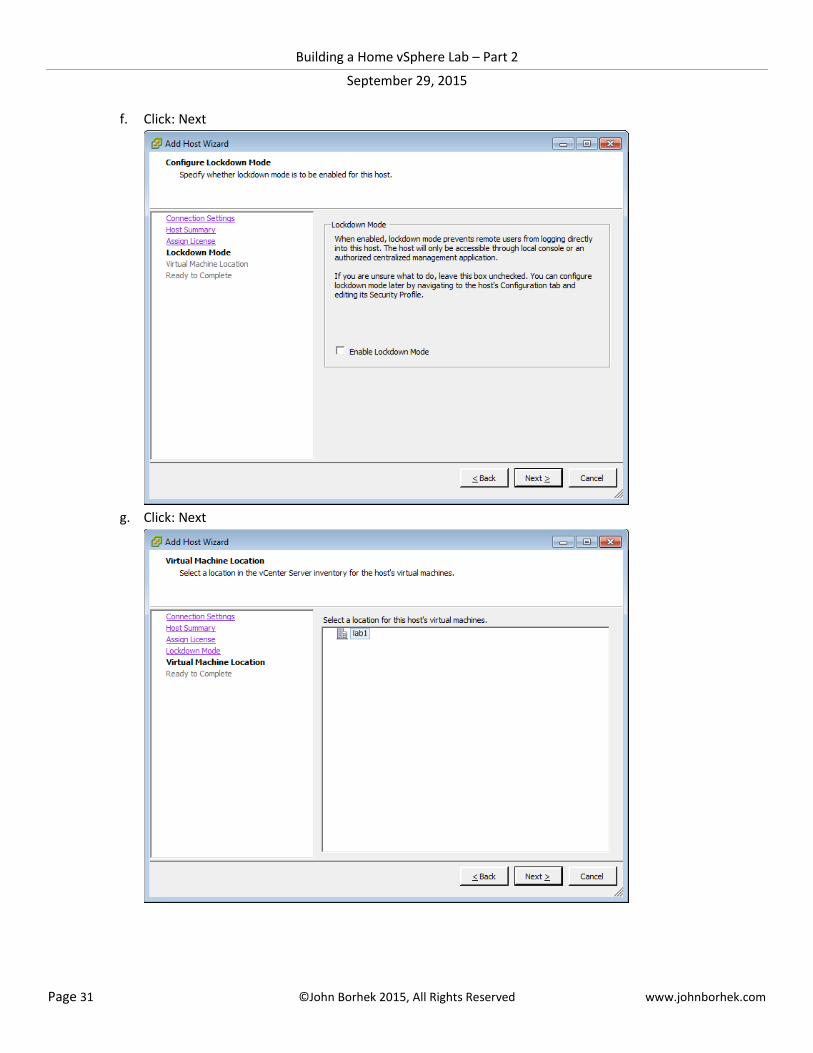
f. Click: Next
g. Click: Next

Building a Home vSphere Lab – Part 2
September 29, 2015
Page 32 ©John Borhek 2015, All Rights Reserved www.johnborhek.com
h. Click: Finish
4. Now do the same for esxi2 and esxi3!
5. This is what your completed home vSphere lab on VMware Workstation Pro looks like!
Coming soon….. In Part three, we will create shared storage using Openfiler as an iSCSI SAN
In Part four, we will configure vSphere Storage, Jumbo Frames, Port Binding and All, and then migrate our VMs
to the SAN
In Part five, we will configure a vSphere Cluster for DRS and HA, then test those services

Building a Home vSphere Lab – Part 2
September 29, 2015
Page 33 ©John Borhek 2015, All Rights Reserved www.johnborhek.com
Related Documents


![[VMWARE][ENG]How-To Simple install and configure an Ubuntu Virtual Server](https://static.cupdf.com/doc/110x72/5467ef3ab4af9f55598b4651/vmwareenghow-to-simple-install-and-configure-an-ubuntu-virtual-server.jpg)
![[VMWARE][ENG]How-To Simple install GateIn on an Ubuntu Virtual Server](https://static.cupdf.com/doc/110x72/54696a6eaf79592a298b4a5b/vmwareenghow-to-simple-install-gatein-on-an-ubuntu-virtual-server.jpg)