http://www.instructables.com/id/Paracord/ Introduction "Easy Paracord Projects" gives you the complete step-by-step instructions for 20 different paracord projects. Learn to make survival bracelets, watchbands, a dog collar and much more. All projects come from Instructables.com , are written by our creative community, and contain pictures for each step so you can easily make these yourself. Instructables is the most popular project-sharing community on the Internet. We provide easy publishing tools to enable passionate, creative people like you to share their most innovative projects, recipes, skills, and ideas. Instructables has over 40,000 projects covering all subjects: crafts, art, electronics, kids, home improvement, pets, outdoors, reuse, bikes, cars, robotics, food, decorating, woodworking, costuming, games, and more. Check it out today! Laura Khalil Editor, Instructables.com

Welcome message from author
This document is posted to help you gain knowledge. Please leave a comment to let me know what you think about it! Share it to your friends and learn new things together.
Transcript

http://www.instructables.com/id/Paracord/
Introduction"Easy Paracord Projects" gives you the complete step-by-step instructions for 20 different paracord projects. Learn to make survival bracelets, watchbands, a dog collarand much more. All projects come from Instructables.com , are written by our creative community, and contain pictures for each step so you can easily make theseyourself.
Instructables is the most popular project-sharing community on the Internet. We provide easy publishing tools to enable passionate, creative people like you to sharetheir most innovative projects, recipes, skills, and ideas. Instructables has over 40,000 projects covering all subjects: crafts, art, electronics, kids, home improvement,pets, outdoors, reuse, bikes, cars, robotics, food, decorating, woodworking, costuming, games, and more. Check it out today!
Laura KhalilEditor, Instructables.com
http://www.instructables.com/id/Paracord/
Table of Contents
Introduction . . . . . . . . . . . . . . . . . . . . . . . . . . . . . . . . . . . . . . . . . . . . . . . . . . . . . . . . . . . . . . . . . . . . . . . . . . . . . . . . . . . . . . . . . . . . . . . . . . . . . . . . . . . . . . . . . . 1
Author and Copyright Notices . . . . . . . . . . . . . . . . . . . . . . . . . . . . . . . . . . . . . . . . . . . . . . . . . . . . . . . . . . . . . . . . . . . . . . . . . . . . . . . . . . . . . . . . . . . . . . . . . . 13
Disclaimer . . . . . . . . . . . . . . . . . . . . . . . . . . . . . . . . . . . . . . . . . . . . . . . . . . . . . . . . . . . . . . . . . . . . . . . . . . . . . . . . . . . . . . . . . . . . . . . . . . . . . . . . . . . . . . . . . 15
Paracord bracelet with a side release buckle . . . . . . . . . . . . . . . . . . . . . . . . . . . . . . . . . . . . . . . . . . . . . . . . . . . . . . . . . . . . . . . . . . . . . . . . . . . . . . . . . . . . . . . . . 16
Intro: Paracord bracelet with a side release buckle . . . . . . . . . . . . . . . . . . . . . . . . . . . . . . . . . . . . . . . . . . . . . . . . . . . . . . . . . . . . . . . . . . . . . . . . . . . . . . . . . . 16
Step 1: Materials . . . . . . . . . . . . . . . . . . . . . . . . . . . . . . . . . . . . . . . . . . . . . . . . . . . . . . . . . . . . . . . . . . . . . . . . . . . . . . . . . . . . . . . . . . . . . . . . . . . . . . . . . . . 19
Step 2: Measure wrist . . . . . . . . . . . . . . . . . . . . . . . . . . . . . . . . . . . . . . . . . . . . . . . . . . . . . . . . . . . . . . . . . . . . . . . . . . . . . . . . . . . . . . . . . . . . . . . . . . . . . . . 20
Step 3: Find the center of the cord . . . . . . . . . . . . . . . . . . . . . . . . . . . . . . . . . . . . . . . . . . . . . . . . . . . . . . . . . . . . . . . . . . . . . . . . . . . . . . . . . . . . . . . . . . . . . . 20
Step 4: Finding the bracelet length . . . . . . . . . . . . . . . . . . . . . . . . . . . . . . . . . . . . . . . . . . . . . . . . . . . . . . . . . . . . . . . . . . . . . . . . . . . . . . . . . . . . . . . . . . . . . . 20
Step 5: Start making the knots . . . . . . . . . . . . . . . . . . . . . . . . . . . . . . . . . . . . . . . . . . . . . . . . . . . . . . . . . . . . . . . . . . . . . . . . . . . . . . . . . . . . . . . . . . . . . . . . . 21
Step 6: Continue knotting . . . . . . . . . . . . . . . . . . . . . . . . . . . . . . . . . . . . . . . . . . . . . . . . . . . . . . . . . . . . . . . . . . . . . . . . . . . . . . . . . . . . . . . . . . . . . . . . . . . . 22
Step 7: Trim the excess cord and melt the ends . . . . . . . . . . . . . . . . . . . . . . . . . . . . . . . . . . . . . . . . . . . . . . . . . . . . . . . . . . . . . . . . . . . . . . . . . . . . . . . . . . . . 22
Step 8: You're finished . . . . . . . . . . . . . . . . . . . . . . . . . . . . . . . . . . . . . . . . . . . . . . . . . . . . . . . . . . . . . . . . . . . . . . . . . . . . . . . . . . . . . . . . . . . . . . . . . . . . . . 23
Step 9: Other variations. . . . . . . . . . . . . . . . . . . . . . . . . . . . . . . . . . . . . . . . . . . . . . . . . . . . . . . . . . . . . . . . . . . . . . . . . . . . . . . . . . . . . . . . . . . . . . . . . . . . . . 24
Related Instructables . . . . . . . . . . . . . . . . . . . . . . . . . . . . . . . . . . . . . . . . . . . . . . . . . . . . . . . . . . . . . . . . . . . . . . . . . . . . . . . . . . . . . . . . . . . . . . . . . . . . . . . . 26
Paracord wrist lanyard made with the snake knot . . . . . . . . . . . . . . . . . . . . . . . . . . . . . . . . . . . . . . . . . . . . . . . . . . . . . . . . . . . . . . . . . . . . . . . . . . . . . . . . . . . . . . 27
Intro: Paracord wrist lanyard made with the snake knot . . . . . . . . . . . . . . . . . . . . . . . . . . . . . . . . . . . . . . . . . . . . . . . . . . . . . . . . . . . . . . . . . . . . . . . . . . . . . . 27
Step 1: Supplies . . . . . . . . . . . . . . . . . . . . . . . . . . . . . . . . . . . . . . . . . . . . . . . . . . . . . . . . . . . . . . . . . . . . . . . . . . . . . . . . . . . . . . . . . . . . . . . . . . . . . . . . . . . 27
Step 2: Attaching two colors of paracord . . . . . . . . . . . . . . . . . . . . . . . . . . . . . . . . . . . . . . . . . . . . . . . . . . . . . . . . . . . . . . . . . . . . . . . . . . . . . . . . . . . . . . . . . 28
Step 3: Find the center of the length of paracord . . . . . . . . . . . . . . . . . . . . . . . . . . . . . . . . . . . . . . . . . . . . . . . . . . . . . . . . . . . . . . . . . . . . . . . . . . . . . . . . . . . 28
Step 4: Making the snake knot . . . . . . . . . . . . . . . . . . . . . . . . . . . . . . . . . . . . . . . . . . . . . . . . . . . . . . . . . . . . . . . . . . . . . . . . . . . . . . . . . . . . . . . . . . . . . . . . . 28
Step 5: Count your knots . . . . . . . . . . . . . . . . . . . . . . . . . . . . . . . . . . . . . . . . . . . . . . . . . . . . . . . . . . . . . . . . . . . . . . . . . . . . . . . . . . . . . . . . . . . . . . . . . . . . . 32
Step 6: Trim and melt the excess paracord . . . . . . . . . . . . . . . . . . . . . . . . . . . . . . . . . . . . . . . . . . . . . . . . . . . . . . . . . . . . . . . . . . . . . . . . . . . . . . . . . . . . . . . 32
Step 7: You're done! . . . . . . . . . . . . . . . . . . . . . . . . . . . . . . . . . . . . . . . . . . . . . . . . . . . . . . . . . . . . . . . . . . . . . . . . . . . . . . . . . . . . . . . . . . . . . . . . . . . . . . . . 32
Related Instructables . . . . . . . . . . . . . . . . . . . . . . . . . . . . . . . . . . . . . . . . . . . . . . . . . . . . . . . . . . . . . . . . . . . . . . . . . . . . . . . . . . . . . . . . . . . . . . . . . . . . . . . . 34
Paracord Bracelet with Monkey Fist Button . . . . . . . . . . . . . . . . . . . . . . . . . . . . . . . . . . . . . . . . . . . . . . . . . . . . . . . . . . . . . . . . . . . . . . . . . . . . . . . . . . . . . . . . . . 35
Intro: Paracord Bracelet with Monkey Fist Button . . . . . . . . . . . . . . . . . . . . . . . . . . . . . . . . . . . . . . . . . . . . . . . . . . . . . . . . . . . . . . . . . . . . . . . . . . . . . . . . . . . 35
Step 1: Ingredients . . . . . . . . . . . . . . . . . . . . . . . . . . . . . . . . . . . . . . . . . . . . . . . . . . . . . . . . . . . . . . . . . . . . . . . . . . . . . . . . . . . . . . . . . . . . . . . . . . . . . . . . . 35
Step 2: The Skully Button . . . . . . . . . . . . . . . . . . . . . . . . . . . . . . . . . . . . . . . . . . . . . . . . . . . . . . . . . . . . . . . . . . . . . . . . . . . . . . . . . . . . . . . . . . . . . . . . . . . . 36
Step 3: Wraps and fraps . . . . . . . . . . . . . . . . . . . . . . . . . . . . . . . . . . . . . . . . . . . . . . . . . . . . . . . . . . . . . . . . . . . . . . . . . . . . . . . . . . . . . . . . . . . . . . . . . . . . . 36
Step 4: Fraps . . . . . . . . . . . . . . . . . . . . . . . . . . . . . . . . . . . . . . . . . . . . . . . . . . . . . . . . . . . . . . . . . . . . . . . . . . . . . . . . . . . . . . . . . . . . . . . . . . . . . . . . . . . . . 37
Step 5: Fraps continued... . . . . . . . . . . . . . . . . . . . . . . . . . . . . . . . . . . . . . . . . . . . . . . . . . . . . . . . . . . . . . . . . . . . . . . . . . . . . . . . . . . . . . . . . . . . . . . . . . . . . 37
Step 6: Wraps, 2nd time. . . . . . . . . . . . . . . . . . . . . . . . . . . . . . . . . . . . . . . . . . . . . . . . . . . . . . . . . . . . . . . . . . . . . . . . . . . . . . . . . . . . . . . . . . . . . . . . . . . . . . 38
Step 7: Dressing the knot . . . . . . . . . . . . . . . . . . . . . . . . . . . . . . . . . . . . . . . . . . . . . . . . . . . . . . . . . . . . . . . . . . . . . . . . . . . . . . . . . . . . . . . . . . . . . . . . . . . . 39
Step 8: Sizing the bracelet. . . . . . . . . . . . . . . . . . . . . . . . . . . . . . . . . . . . . . . . . . . . . . . . . . . . . . . . . . . . . . . . . . . . . . . . . . . . . . . . . . . . . . . . . . . . . . . . . . . . 40
Step 9: Sizing the closure loop. . . . . . . . . . . . . . . . . . . . . . . . . . . . . . . . . . . . . . . . . . . . . . . . . . . . . . . . . . . . . . . . . . . . . . . . . . . . . . . . . . . . . . . . . . . . . . . . . 40
Step 10: Ladder weaving . . . . . . . . . . . . . . . . . . . . . . . . . . . . . . . . . . . . . . . . . . . . . . . . . . . . . . . . . . . . . . . . . . . . . . . . . . . . . . . . . . . . . . . . . . . . . . . . . . . . . 41
Step 11: Ladder weaving . . . . . . . . . . . . . . . . . . . . . . . . . . . . . . . . . . . . . . . . . . . . . . . . . . . . . . . . . . . . . . . . . . . . . . . . . . . . . . . . . . . . . . . . . . . . . . . . . . . . . 41
Step 12: Alternating hitches . . . . . . . . . . . . . . . . . . . . . . . . . . . . . . . . . . . . . . . . . . . . . . . . . . . . . . . . . . . . . . . . . . . . . . . . . . . . . . . . . . . . . . . . . . . . . . . . . . . 41
Step 13: Weaving the bracelet . . . . . . . . . . . . . . . . . . . . . . . . . . . . . . . . . . . . . . . . . . . . . . . . . . . . . . . . . . . . . . . . . . . . . . . . . . . . . . . . . . . . . . . . . . . . . . . . . 42
Step 14: Finishing up. . . . . . . . . . . . . . . . . . . . . . . . . . . . . . . . . . . . . . . . . . . . . . . . . . . . . . . . . . . . . . . . . . . . . . . . . . . . . . . . . . . . . . . . . . . . . . . . . . . . . . . . 42

http://www.instructables.com/id/Paracord/
Step 15: Add the skully bead. . . . . . . . . . . . . . . . . . . . . . . . . . . . . . . . . . . . . . . . . . . . . . . . . . . . . . . . . . . . . . . . . . . . . . . . . . . . . . . . . . . . . . . . . . . . . . . . . . 43
Step 16: Final Product Photos . . . . . . . . . . . . . . . . . . . . . . . . . . . . . . . . . . . . . . . . . . . . . . . . . . . . . . . . . . . . . . . . . . . . . . . . . . . . . . . . . . . . . . . . . . . . . . . . . 43
Step 17: Skully . . . . . . . . . . . . . . . . . . . . . . . . . . . . . . . . . . . . . . . . . . . . . . . . . . . . . . . . . . . . . . . . . . . . . . . . . . . . . . . . . . . . . . . . . . . . . . . . . . . . . . . . . . . . 44
Step 18: Herd of Bracelets. . . . . . . . . . . . . . . . . . . . . . . . . . . . . . . . . . . . . . . . . . . . . . . . . . . . . . . . . . . . . . . . . . . . . . . . . . . . . . . . . . . . . . . . . . . . . . . . . . . . 44
Related Instructables . . . . . . . . . . . . . . . . . . . . . . . . . . . . . . . . . . . . . . . . . . . . . . . . . . . . . . . . . . . . . . . . . . . . . . . . . . . . . . . . . . . . . . . . . . . . . . . . . . . . . . . . 44
Woven paracord bracelet/watchband . . . . . . . . . . . . . . . . . . . . . . . . . . . . . . . . . . . . . . . . . . . . . . . . . . . . . . . . . . . . . . . . . . . . . . . . . . . . . . . . . . . . . . . . . . . . . . . 45
Intro: Woven paracord bracelet/watchband . . . . . . . . . . . . . . . . . . . . . . . . . . . . . . . . . . . . . . . . . . . . . . . . . . . . . . . . . . . . . . . . . . . . . . . . . . . . . . . . . . . . . . . 45
Step 1: Supplies . . . . . . . . . . . . . . . . . . . . . . . . . . . . . . . . . . . . . . . . . . . . . . . . . . . . . . . . . . . . . . . . . . . . . . . . . . . . . . . . . . . . . . . . . . . . . . . . . . . . . . . . . . . 45
Step 2: To begin . . . . . . . . . . . . . . . . . . . . . . . . . . . . . . . . . . . . . . . . . . . . . . . . . . . . . . . . . . . . . . . . . . . . . . . . . . . . . . . . . . . . . . . . . . . . . . . . . . . . . . . . . . . 46
Step 3: Add the watch and adjust for wrist size . . . . . . . . . . . . . . . . . . . . . . . . . . . . . . . . . . . . . . . . . . . . . . . . . . . . . . . . . . . . . . . . . . . . . . . . . . . . . . . . . . . . 46
Step 4: Begin weaving . . . . . . . . . . . . . . . . . . . . . . . . . . . . . . . . . . . . . . . . . . . . . . . . . . . . . . . . . . . . . . . . . . . . . . . . . . . . . . . . . . . . . . . . . . . . . . . . . . . . . . . 47
Step 5: Threading the watch . . . . . . . . . . . . . . . . . . . . . . . . . . . . . . . . . . . . . . . . . . . . . . . . . . . . . . . . . . . . . . . . . . . . . . . . . . . . . . . . . . . . . . . . . . . . . . . . . . 48
Step 6: Continue on the other side of the watch . . . . . . . . . . . . . . . . . . . . . . . . . . . . . . . . . . . . . . . . . . . . . . . . . . . . . . . . . . . . . . . . . . . . . . . . . . . . . . . . . . . . 50
Step 7: Finishing up . . . . . . . . . . . . . . . . . . . . . . . . . . . . . . . . . . . . . . . . . . . . . . . . . . . . . . . . . . . . . . . . . . . . . . . . . . . . . . . . . . . . . . . . . . . . . . . . . . . . . . . . 50
Related Instructables . . . . . . . . . . . . . . . . . . . . . . . . . . . . . . . . . . . . . . . . . . . . . . . . . . . . . . . . . . . . . . . . . . . . . . . . . . . . . . . . . . . . . . . . . . . . . . . . . . . . . . . . 52
Survival Bracelet (Updated!) . . . . . . . . . . . . . . . . . . . . . . . . . . . . . . . . . . . . . . . . . . . . . . . . . . . . . . . . . . . . . . . . . . . . . . . . . . . . . . . . . . . . . . . . . . . . . . . . . . . . . 53
Intro: Survival Bracelet (Updated!) . . . . . . . . . . . . . . . . . . . . . . . . . . . . . . . . . . . . . . . . . . . . . . . . . . . . . . . . . . . . . . . . . . . . . . . . . . . . . . . . . . . . . . . . . . . . . . 53
Step 1: Supplies . . . . . . . . . . . . . . . . . . . . . . . . . . . . . . . . . . . . . . . . . . . . . . . . . . . . . . . . . . . . . . . . . . . . . . . . . . . . . . . . . . . . . . . . . . . . . . . . . . . . . . . . . . . 53
Step 2: Measurements . . . . . . . . . . . . . . . . . . . . . . . . . . . . . . . . . . . . . . . . . . . . . . . . . . . . . . . . . . . . . . . . . . . . . . . . . . . . . . . . . . . . . . . . . . . . . . . . . . . . . . 54
Step 3: The Cobra Weave . . . . . . . . . . . . . . . . . . . . . . . . . . . . . . . . . . . . . . . . . . . . . . . . . . . . . . . . . . . . . . . . . . . . . . . . . . . . . . . . . . . . . . . . . . . . . . . . . . . . 55
Step 4: Conclusion . . . . . . . . . . . . . . . . . . . . . . . . . . . . . . . . . . . . . . . . . . . . . . . . . . . . . . . . . . . . . . . . . . . . . . . . . . . . . . . . . . . . . . . . . . . . . . . . . . . . . . . . . 56
Step 5: Multi-Colored . . . . . . . . . . . . . . . . . . . . . . . . . . . . . . . . . . . . . . . . . . . . . . . . . . . . . . . . . . . . . . . . . . . . . . . . . . . . . . . . . . . . . . . . . . . . . . . . . . . . . . . . 57
Step 6: Multi-Colored Bracelet (with clip) . . . . . . . . . . . . . . . . . . . . . . . . . . . . . . . . . . . . . . . . . . . . . . . . . . . . . . . . . . . . . . . . . . . . . . . . . . . . . . . . . . . . . . . . . 58
Step 7: Quick Release Survival Bracelet (Prototype) . . . . . . . . . . . . . . . . . . . . . . . . . . . . . . . . . . . . . . . . . . . . . . . . . . . . . . . . . . . . . . . . . . . . . . . . . . . . . . . . 60
Step 8: Other Variations . . . . . . . . . . . . . . . . . . . . . . . . . . . . . . . . . . . . . . . . . . . . . . . . . . . . . . . . . . . . . . . . . . . . . . . . . . . . . . . . . . . . . . . . . . . . . . . . . . . . . 61
Related Instructables . . . . . . . . . . . . . . . . . . . . . . . . . . . . . . . . . . . . . . . . . . . . . . . . . . . . . . . . . . . . . . . . . . . . . . . . . . . . . . . . . . . . . . . . . . . . . . . . . . . . . . . . 63
Parachute Cord Belt . . . . . . . . . . . . . . . . . . . . . . . . . . . . . . . . . . . . . . . . . . . . . . . . . . . . . . . . . . . . . . . . . . . . . . . . . . . . . . . . . . . . . . . . . . . . . . . . . . . . . . . . . . . 64
Intro: Parachute Cord Belt . . . . . . . . . . . . . . . . . . . . . . . . . . . . . . . . . . . . . . . . . . . . . . . . . . . . . . . . . . . . . . . . . . . . . . . . . . . . . . . . . . . . . . . . . . . . . . . . . . . . 64
Step 1: Materials . . . . . . . . . . . . . . . . . . . . . . . . . . . . . . . . . . . . . . . . . . . . . . . . . . . . . . . . . . . . . . . . . . . . . . . . . . . . . . . . . . . . . . . . . . . . . . . . . . . . . . . . . . . 64
Step 2: Measure! . . . . . . . . . . . . . . . . . . . . . . . . . . . . . . . . . . . . . . . . . . . . . . . . . . . . . . . . . . . . . . . . . . . . . . . . . . . . . . . . . . . . . . . . . . . . . . . . . . . . . . . . . . . 66
Step 3: Set up . . . . . . . . . . . . . . . . . . . . . . . . . . . . . . . . . . . . . . . . . . . . . . . . . . . . . . . . . . . . . . . . . . . . . . . . . . . . . . . . . . . . . . . . . . . . . . . . . . . . . . . . . . . . . 66
Step 4: Wind the warp . . . . . . . . . . . . . . . . . . . . . . . . . . . . . . . . . . . . . . . . . . . . . . . . . . . . . . . . . . . . . . . . . . . . . . . . . . . . . . . . . . . . . . . . . . . . . . . . . . . . . . . 67
Step 5: Weave the rest . . . . . . . . . . . . . . . . . . . . . . . . . . . . . . . . . . . . . . . . . . . . . . . . . . . . . . . . . . . . . . . . . . . . . . . . . . . . . . . . . . . . . . . . . . . . . . . . . . . . . . 68
Step 6: Finish up . . . . . . . . . . . . . . . . . . . . . . . . . . . . . . . . . . . . . . . . . . . . . . . . . . . . . . . . . . . . . . . . . . . . . . . . . . . . . . . . . . . . . . . . . . . . . . . . . . . . . . . . . . . 68
Related Instructables . . . . . . . . . . . . . . . . . . . . . . . . . . . . . . . . . . . . . . . . . . . . . . . . . . . . . . . . . . . . . . . . . . . . . . . . . . . . . . . . . . . . . . . . . . . . . . . . . . . . . . . . 69
Wide Paracord Bracelet . . . . . . . . . . . . . . . . . . . . . . . . . . . . . . . . . . . . . . . . . . . . . . . . . . . . . . . . . . . . . . . . . . . . . . . . . . . . . . . . . . . . . . . . . . . . . . . . . . . . . . . . . 70
Intro: Wide Paracord Bracelet . . . . . . . . . . . . . . . . . . . . . . . . . . . . . . . . . . . . . . . . . . . . . . . . . . . . . . . . . . . . . . . . . . . . . . . . . . . . . . . . . . . . . . . . . . . . . . . . . 70
Step 1: Pick your colors . . . . . . . . . . . . . . . . . . . . . . . . . . . . . . . . . . . . . . . . . . . . . . . . . . . . . . . . . . . . . . . . . . . . . . . . . . . . . . . . . . . . . . . . . . . . . . . . . . . . . . 70
Step 2: Step 1 . . . . . . . . . . . . . . . . . . . . . . . . . . . . . . . . . . . . . . . . . . . . . . . . . . . . . . . . . . . . . . . . . . . . . . . . . . . . . . . . . . . . . . . . . . . . . . . . . . . . . . . . . . . . . 70
Step 3: Step 2 . . . . . . . . . . . . . . . . . . . . . . . . . . . . . . . . . . . . . . . . . . . . . . . . . . . . . . . . . . . . . . . . . . . . . . . . . . . . . . . . . . . . . . . . . . . . . . . . . . . . . . . . . . . . . 71
Step 4: Step 3 . . . . . . . . . . . . . . . . . . . . . . . . . . . . . . . . . . . . . . . . . . . . . . . . . . . . . . . . . . . . . . . . . . . . . . . . . . . . . . . . . . . . . . . . . . . . . . . . . . . . . . . . . . . . . 71

http://www.instructables.com/id/Paracord/
Step 5: Step 4 . . . . . . . . . . . . . . . . . . . . . . . . . . . . . . . . . . . . . . . . . . . . . . . . . . . . . . . . . . . . . . . . . . . . . . . . . . . . . . . . . . . . . . . . . . . . . . . . . . . . . . . . . . . . . 72
Step 6: Step 5 . . . . . . . . . . . . . . . . . . . . . . . . . . . . . . . . . . . . . . . . . . . . . . . . . . . . . . . . . . . . . . . . . . . . . . . . . . . . . . . . . . . . . . . . . . . . . . . . . . . . . . . . . . . . . 72
Step 7: Step 6 . . . . . . . . . . . . . . . . . . . . . . . . . . . . . . . . . . . . . . . . . . . . . . . . . . . . . . . . . . . . . . . . . . . . . . . . . . . . . . . . . . . . . . . . . . . . . . . . . . . . . . . . . . . . . 73
Step 8: Step 7 . . . . . . . . . . . . . . . . . . . . . . . . . . . . . . . . . . . . . . . . . . . . . . . . . . . . . . . . . . . . . . . . . . . . . . . . . . . . . . . . . . . . . . . . . . . . . . . . . . . . . . . . . . . . . 73
Step 9: Step 8 . . . . . . . . . . . . . . . . . . . . . . . . . . . . . . . . . . . . . . . . . . . . . . . . . . . . . . . . . . . . . . . . . . . . . . . . . . . . . . . . . . . . . . . . . . . . . . . . . . . . . . . . . . . . . 74
Step 10: Step 9 . . . . . . . . . . . . . . . . . . . . . . . . . . . . . . . . . . . . . . . . . . . . . . . . . . . . . . . . . . . . . . . . . . . . . . . . . . . . . . . . . . . . . . . . . . . . . . . . . . . . . . . . . . . . 74
Step 11: Repeat until you get the desired length. . . . . . . . . . . . . . . . . . . . . . . . . . . . . . . . . . . . . . . . . . . . . . . . . . . . . . . . . . . . . . . . . . . . . . . . . . . . . . . . . . . . 75
Step 12: Attaching the other side of the buckle. . . . . . . . . . . . . . . . . . . . . . . . . . . . . . . . . . . . . . . . . . . . . . . . . . . . . . . . . . . . . . . . . . . . . . . . . . . . . . . . . . . . . 76
Step 13: Finished . . . . . . . . . . . . . . . . . . . . . . . . . . . . . . . . . . . . . . . . . . . . . . . . . . . . . . . . . . . . . . . . . . . . . . . . . . . . . . . . . . . . . . . . . . . . . . . . . . . . . . . . . . 76
Step 14: Animated steps . . . . . . . . . . . . . . . . . . . . . . . . . . . . . . . . . . . . . . . . . . . . . . . . . . . . . . . . . . . . . . . . . . . . . . . . . . . . . . . . . . . . . . . . . . . . . . . . . . . . . 76
Related Instructables . . . . . . . . . . . . . . . . . . . . . . . . . . . . . . . . . . . . . . . . . . . . . . . . . . . . . . . . . . . . . . . . . . . . . . . . . . . . . . . . . . . . . . . . . . . . . . . . . . . . . . . . 77
Make a Wide Sturdy Handle With The Portuguese Sinnet . . . . . . . . . . . . . . . . . . . . . . . . . . . . . . . . . . . . . . . . . . . . . . . . . . . . . . . . . . . . . . . . . . . . . . . . . . . . . . . . 78
Intro: Make a Wide Sturdy Handle With The Portuguese Sinnet . . . . . . . . . . . . . . . . . . . . . . . . . . . . . . . . . . . . . . . . . . . . . . . . . . . . . . . . . . . . . . . . . . . . . . . . 78
Step 1: The Setup: . . . . . . . . . . . . . . . . . . . . . . . . . . . . . . . . . . . . . . . . . . . . . . . . . . . . . . . . . . . . . . . . . . . . . . . . . . . . . . . . . . . . . . . . . . . . . . . . . . . . . . . . . 78
Step 2: Begin: . . . . . . . . . . . . . . . . . . . . . . . . . . . . . . . . . . . . . . . . . . . . . . . . . . . . . . . . . . . . . . . . . . . . . . . . . . . . . . . . . . . . . . . . . . . . . . . . . . . . . . . . . . . . . 79
Step 3: The First Knot: . . . . . . . . . . . . . . . . . . . . . . . . . . . . . . . . . . . . . . . . . . . . . . . . . . . . . . . . . . . . . . . . . . . . . . . . . . . . . . . . . . . . . . . . . . . . . . . . . . . . . . 79
Step 4: The Second Knot and Beyond: . . . . . . . . . . . . . . . . . . . . . . . . . . . . . . . . . . . . . . . . . . . . . . . . . . . . . . . . . . . . . . . . . . . . . . . . . . . . . . . . . . . . . . . . . . 80
Step 5: Prepare to Finnish Off: . . . . . . . . . . . . . . . . . . . . . . . . . . . . . . . . . . . . . . . . . . . . . . . . . . . . . . . . . . . . . . . . . . . . . . . . . . . . . . . . . . . . . . . . . . . . . . . . 80
Step 6: Finishing Off: . . . . . . . . . . . . . . . . . . . . . . . . . . . . . . . . . . . . . . . . . . . . . . . . . . . . . . . . . . . . . . . . . . . . . . . . . . . . . . . . . . . . . . . . . . . . . . . . . . . . . . . . 80
Step 7: Dressing Up: . . . . . . . . . . . . . . . . . . . . . . . . . . . . . . . . . . . . . . . . . . . . . . . . . . . . . . . . . . . . . . . . . . . . . . . . . . . . . . . . . . . . . . . . . . . . . . . . . . . . . . . . 82
Step 8: All Done: . . . . . . . . . . . . . . . . . . . . . . . . . . . . . . . . . . . . . . . . . . . . . . . . . . . . . . . . . . . . . . . . . . . . . . . . . . . . . . . . . . . . . . . . . . . . . . . . . . . . . . . . . . . 82
Related Instructables . . . . . . . . . . . . . . . . . . . . . . . . . . . . . . . . . . . . . . . . . . . . . . . . . . . . . . . . . . . . . . . . . . . . . . . . . . . . . . . . . . . . . . . . . . . . . . . . . . . . . . . . 83
How to make a harpoon on the cheap . . . . . . . . . . . . . . . . . . . . . . . . . . . . . . . . . . . . . . . . . . . . . . . . . . . . . . . . . . . . . . . . . . . . . . . . . . . . . . . . . . . . . . . . . . . . . . 84
Intro: How to make a harpoon on the cheap . . . . . . . . . . . . . . . . . . . . . . . . . . . . . . . . . . . . . . . . . . . . . . . . . . . . . . . . . . . . . . . . . . . . . . . . . . . . . . . . . . . . . . . 84
Step 1: Gather materials and tools . . . . . . . . . . . . . . . . . . . . . . . . . . . . . . . . . . . . . . . . . . . . . . . . . . . . . . . . . . . . . . . . . . . . . . . . . . . . . . . . . . . . . . . . . . . . . . 84
Step 2: Find a helper . . . . . . . . . . . . . . . . . . . . . . . . . . . . . . . . . . . . . . . . . . . . . . . . . . . . . . . . . . . . . . . . . . . . . . . . . . . . . . . . . . . . . . . . . . . . . . . . . . . . . . . . 85
Step 3: Make a template . . . . . . . . . . . . . . . . . . . . . . . . . . . . . . . . . . . . . . . . . . . . . . . . . . . . . . . . . . . . . . . . . . . . . . . . . . . . . . . . . . . . . . . . . . . . . . . . . . . . . 85
Step 4: Cut out the blank . . . . . . . . . . . . . . . . . . . . . . . . . . . . . . . . . . . . . . . . . . . . . . . . . . . . . . . . . . . . . . . . . . . . . . . . . . . . . . . . . . . . . . . . . . . . . . . . . . . . . 85
Step 5: File and sand . . . . . . . . . . . . . . . . . . . . . . . . . . . . . . . . . . . . . . . . . . . . . . . . . . . . . . . . . . . . . . . . . . . . . . . . . . . . . . . . . . . . . . . . . . . . . . . . . . . . . . . 87
Step 6: Hone the blade to a knife-edge and wrap handle . . . . . . . . . . . . . . . . . . . . . . . . . . . . . . . . . . . . . . . . . . . . . . . . . . . . . . . . . . . . . . . . . . . . . . . . . . . . . 88
Step 7: Use your new tool . . . . . . . . . . . . . . . . . . . . . . . . . . . . . . . . . . . . . . . . . . . . . . . . . . . . . . . . . . . . . . . . . . . . . . . . . . . . . . . . . . . . . . . . . . . . . . . . . . . . 89
Related Instructables . . . . . . . . . . . . . . . . . . . . . . . . . . . . . . . . . . . . . . . . . . . . . . . . . . . . . . . . . . . . . . . . . . . . . . . . . . . . . . . . . . . . . . . . . . . . . . . . . . . . . . . . 90
Paracord watchband/bracelet with a side release buckle . . . . . . . . . . . . . . . . . . . . . . . . . . . . . . . . . . . . . . . . . . . . . . . . . . . . . . . . . . . . . . . . . . . . . . . . . . . . . . . . 91
Intro: Paracord watchband/bracelet with a side release buckle . . . . . . . . . . . . . . . . . . . . . . . . . . . . . . . . . . . . . . . . . . . . . . . . . . . . . . . . . . . . . . . . . . . . . . . . . 91
Step 1: Supplies . . . . . . . . . . . . . . . . . . . . . . . . . . . . . . . . . . . . . . . . . . . . . . . . . . . . . . . . . . . . . . . . . . . . . . . . . . . . . . . . . . . . . . . . . . . . . . . . . . . . . . . . . . . 96
Step 2: Measure your wrist size . . . . . . . . . . . . . . . . . . . . . . . . . . . . . . . . . . . . . . . . . . . . . . . . . . . . . . . . . . . . . . . . . . . . . . . . . . . . . . . . . . . . . . . . . . . . . . . . 97
Step 3: Attach the paracord to one end of the side release buckle . . . . . . . . . . . . . . . . . . . . . . . . . . . . . . . . . . . . . . . . . . . . . . . . . . . . . . . . . . . . . . . . . . . . . . 97
Step 4: Attach the watch . . . . . . . . . . . . . . . . . . . . . . . . . . . . . . . . . . . . . . . . . . . . . . . . . . . . . . . . . . . . . . . . . . . . . . . . . . . . . . . . . . . . . . . . . . . . . . . . . . . . . 97
Step 5: Loop onto the other part of the side release buckle . . . . . . . . . . . . . . . . . . . . . . . . . . . . . . . . . . . . . . . . . . . . . . . . . . . . . . . . . . . . . . . . . . . . . . . . . . . 98
Step 6: Now you'll start tying the alternate half-hitches . . . . . . . . . . . . . . . . . . . . . . . . . . . . . . . . . . . . . . . . . . . . . . . . . . . . . . . . . . . . . . . . . . . . . . . . . . . . . . . 98
Step 7: When you get about halfway, run the working ends of cord along side the center cords under the watch . . . . . . . . . . . . . . . . . . . . . . . . . . . . . . . . . . . . 100
Step 8: Keep tying until you reach the other buckle . . . . . . . . . . . . . . . . . . . . . . . . . . . . . . . . . . . . . . . . . . . . . . . . . . . . . . . . . . . . . . . . . . . . . . . . . . . . . . . . . 100

http://www.instructables.com/id/Paracord/
Step 9: You can make the alternate half-hitch without the watch . . . . . . . . . . . . . . . . . . . . . . . . . . . . . . . . . . . . . . . . . . . . . . . . . . . . . . . . . . . . . . . . . . . . . . . . 101
Related Instructables . . . . . . . . . . . . . . . . . . . . . . . . . . . . . . . . . . . . . . . . . . . . . . . . . . . . . . . . . . . . . . . . . . . . . . . . . . . . . . . . . . . . . . . . . . . . . . . . . . . . . . . . 101
Multi-Color Monkey Fist . . . . . . . . . . . . . . . . . . . . . . . . . . . . . . . . . . . . . . . . . . . . . . . . . . . . . . . . . . . . . . . . . . . . . . . . . . . . . . . . . . . . . . . . . . . . . . . . . . . . . . . . . 102
Intro: Multi-Color Monkey Fist . . . . . . . . . . . . . . . . . . . . . . . . . . . . . . . . . . . . . . . . . . . . . . . . . . . . . . . . . . . . . . . . . . . . . . . . . . . . . . . . . . . . . . . . . . . . . . . . . 102
Step 1: The original monkey's fist . . . . . . . . . . . . . . . . . . . . . . . . . . . . . . . . . . . . . . . . . . . . . . . . . . . . . . . . . . . . . . . . . . . . . . . . . . . . . . . . . . . . . . . . . . . . . . 102
Step 2: Things you need . . . . . . . . . . . . . . . . . . . . . . . . . . . . . . . . . . . . . . . . . . . . . . . . . . . . . . . . . . . . . . . . . . . . . . . . . . . . . . . . . . . . . . . . . . . . . . . . . . . . . 103
Step 3: Creating your monkey's fist tool . . . . . . . . . . . . . . . . . . . . . . . . . . . . . . . . . . . . . . . . . . . . . . . . . . . . . . . . . . . . . . . . . . . . . . . . . . . . . . . . . . . . . . . . . . 103
Step 4: Begin wrapping cord . . . . . . . . . . . . . . . . . . . . . . . . . . . . . . . . . . . . . . . . . . . . . . . . . . . . . . . . . . . . . . . . . . . . . . . . . . . . . . . . . . . . . . . . . . . . . . . . . . 103
Step 5: 1st wrap . . . . . . . . . . . . . . . . . . . . . . . . . . . . . . . . . . . . . . . . . . . . . . . . . . . . . . . . . . . . . . . . . . . . . . . . . . . . . . . . . . . . . . . . . . . . . . . . . . . . . . . . . . . 104
Step 6: Starting the second wrap . . . . . . . . . . . . . . . . . . . . . . . . . . . . . . . . . . . . . . . . . . . . . . . . . . . . . . . . . . . . . . . . . . . . . . . . . . . . . . . . . . . . . . . . . . . . . . . 104
Step 7: Second wrap completed . . . . . . . . . . . . . . . . . . . . . . . . . . . . . . . . . . . . . . . . . . . . . . . . . . . . . . . . . . . . . . . . . . . . . . . . . . . . . . . . . . . . . . . . . . . . . . . 104
Step 8: Final wrap and core placement . . . . . . . . . . . . . . . . . . . . . . . . . . . . . . . . . . . . . . . . . . . . . . . . . . . . . . . . . . . . . . . . . . . . . . . . . . . . . . . . . . . . . . . . . . 105
Step 9: Begin to tighten . . . . . . . . . . . . . . . . . . . . . . . . . . . . . . . . . . . . . . . . . . . . . . . . . . . . . . . . . . . . . . . . . . . . . . . . . . . . . . . . . . . . . . . . . . . . . . . . . . . . . . 105
Step 10: Snug as a Bug . . . . . . . . . . . . . . . . . . . . . . . . . . . . . . . . . . . . . . . . . . . . . . . . . . . . . . . . . . . . . . . . . . . . . . . . . . . . . . . . . . . . . . . . . . . . . . . . . . . . . . 106
Step 11: Cut and tuck . . . . . . . . . . . . . . . . . . . . . . . . . . . . . . . . . . . . . . . . . . . . . . . . . . . . . . . . . . . . . . . . . . . . . . . . . . . . . . . . . . . . . . . . . . . . . . . . . . . . . . . 106
Related Instructables . . . . . . . . . . . . . . . . . . . . . . . . . . . . . . . . . . . . . . . . . . . . . . . . . . . . . . . . . . . . . . . . . . . . . . . . . . . . . . . . . . . . . . . . . . . . . . . . . . . . . . . . 107
How To Make a Four Strand Round Braid Dog Leash From Paracord . . . . . . . . . . . . . . . . . . . . . . . . . . . . . . . . . . . . . . . . . . . . . . . . . . . . . . . . . . . . . . . . . . . . . . . 108
Intro: How To Make a Four Strand Round Braid Dog Leash From Paracord . . . . . . . . . . . . . . . . . . . . . . . . . . . . . . . . . . . . . . . . . . . . . . . . . . . . . . . . . . . . . . . 108
Step 1: Tools That You Will Need . . . . . . . . . . . . . . . . . . . . . . . . . . . . . . . . . . . . . . . . . . . . . . . . . . . . . . . . . . . . . . . . . . . . . . . . . . . . . . . . . . . . . . . . . . . . . . 108
Step 2: Arranging The Paracord Strands . . . . . . . . . . . . . . . . . . . . . . . . . . . . . . . . . . . . . . . . . . . . . . . . . . . . . . . . . . . . . . . . . . . . . . . . . . . . . . . . . . . . . . . . . 109
Step 3: Braiding Move One . . . . . . . . . . . . . . . . . . . . . . . . . . . . . . . . . . . . . . . . . . . . . . . . . . . . . . . . . . . . . . . . . . . . . . . . . . . . . . . . . . . . . . . . . . . . . . . . . . . 109
Step 4: Braiding Move Two . . . . . . . . . . . . . . . . . . . . . . . . . . . . . . . . . . . . . . . . . . . . . . . . . . . . . . . . . . . . . . . . . . . . . . . . . . . . . . . . . . . . . . . . . . . . . . . . . . . 110
Step 5: Braiding Move Three . . . . . . . . . . . . . . . . . . . . . . . . . . . . . . . . . . . . . . . . . . . . . . . . . . . . . . . . . . . . . . . . . . . . . . . . . . . . . . . . . . . . . . . . . . . . . . . . . . 110
Step 6: Clamping Off the Cord With the Hemostat Clamp . . . . . . . . . . . . . . . . . . . . . . . . . . . . . . . . . . . . . . . . . . . . . . . . . . . . . . . . . . . . . . . . . . . . . . . . . . . . . 111
Step 7: Measuring the Braid For the Handle Loop . . . . . . . . . . . . . . . . . . . . . . . . . . . . . . . . . . . . . . . . . . . . . . . . . . . . . . . . . . . . . . . . . . . . . . . . . . . . . . . . . . 111
Step 8: Back Braiding Move Two . . . . . . . . . . . . . . . . . . . . . . . . . . . . . . . . . . . . . . . . . . . . . . . . . . . . . . . . . . . . . . . . . . . . . . . . . . . . . . . . . . . . . . . . . . . . . . . 112
Step 9: Back Braid Move Three . . . . . . . . . . . . . . . . . . . . . . . . . . . . . . . . . . . . . . . . . . . . . . . . . . . . . . . . . . . . . . . . . . . . . . . . . . . . . . . . . . . . . . . . . . . . . . . . 112
Step 10: Back Braid Move Four . . . . . . . . . . . . . . . . . . . . . . . . . . . . . . . . . . . . . . . . . . . . . . . . . . . . . . . . . . . . . . . . . . . . . . . . . . . . . . . . . . . . . . . . . . . . . . . . 113
Step 11: Finishing The Back Braiding Process . . . . . . . . . . . . . . . . . . . . . . . . . . . . . . . . . . . . . . . . . . . . . . . . . . . . . . . . . . . . . . . . . . . . . . . . . . . . . . . . . . . . . 113
Step 12: Trimming The Loose Ends Of The Paracord . . . . . . . . . . . . . . . . . . . . . . . . . . . . . . . . . . . . . . . . . . . . . . . . . . . . . . . . . . . . . . . . . . . . . . . . . . . . . . . . 114
Step 13: Melting The Ends Of The Paracord . . . . . . . . . . . . . . . . . . . . . . . . . . . . . . . . . . . . . . . . . . . . . . . . . . . . . . . . . . . . . . . . . . . . . . . . . . . . . . . . . . . . . . 114
Step 14: Close Up Of The Melted Cords . . . . . . . . . . . . . . . . . . . . . . . . . . . . . . . . . . . . . . . . . . . . . . . . . . . . . . . . . . . . . . . . . . . . . . . . . . . . . . . . . . . . . . . . . 115
Step 15: Admire Your Finished Leash! . . . . . . . . . . . . . . . . . . . . . . . . . . . . . . . . . . . . . . . . . . . . . . . . . . . . . . . . . . . . . . . . . . . . . . . . . . . . . . . . . . . . . . . . . . . 115
Related Instructables . . . . . . . . . . . . . . . . . . . . . . . . . . . . . . . . . . . . . . . . . . . . . . . . . . . . . . . . . . . . . . . . . . . . . . . . . . . . . . . . . . . . . . . . . . . . . . . . . . . . . . . . 116
How to make a great looking bracelet . . . . . . . . . . . . . . . . . . . . . . . . . . . . . . . . . . . . . . . . . . . . . . . . . . . . . . . . . . . . . . . . . . . . . . . . . . . . . . . . . . . . . . . . . . . . . . . 117
Intro: How to make a great looking bracelet . . . . . . . . . . . . . . . . . . . . . . . . . . . . . . . . . . . . . . . . . . . . . . . . . . . . . . . . . . . . . . . . . . . . . . . . . . . . . . . . . . . . . . . 117
Step 1: Materials . . . . . . . . . . . . . . . . . . . . . . . . . . . . . . . . . . . . . . . . . . . . . . . . . . . . . . . . . . . . . . . . . . . . . . . . . . . . . . . . . . . . . . . . . . . . . . . . . . . . . . . . . . . 119
Step 2: Attaching the buckle . . . . . . . . . . . . . . . . . . . . . . . . . . . . . . . . . . . . . . . . . . . . . . . . . . . . . . . . . . . . . . . . . . . . . . . . . . . . . . . . . . . . . . . . . . . . . . . . . . 120
Step 3: Beginning the weave . . . . . . . . . . . . . . . . . . . . . . . . . . . . . . . . . . . . . . . . . . . . . . . . . . . . . . . . . . . . . . . . . . . . . . . . . . . . . . . . . . . . . . . . . . . . . . . . . . 120
Step 4: Keep going! . . . . . . . . . . . . . . . . . . . . . . . . . . . . . . . . . . . . . . . . . . . . . . . . . . . . . . . . . . . . . . . . . . . . . . . . . . . . . . . . . . . . . . . . . . . . . . . . . . . . . . . . . 122
Step 5: As you go... . . . . . . . . . . . . . . . . . . . . . . . . . . . . . . . . . . . . . . . . . . . . . . . . . . . . . . . . . . . . . . . . . . . . . . . . . . . . . . . . . . . . . . . . . . . . . . . . . . . . . . . . . 124
Step 6: Attaching the other end of the buckle . . . . . . . . . . . . . . . . . . . . . . . . . . . . . . . . . . . . . . . . . . . . . . . . . . . . . . . . . . . . . . . . . . . . . . . . . . . . . . . . . . . . . . 124
http://www.instructables.com/id/Paracord/
Step 7: Secure the buckle . . . . . . . . . . . . . . . . . . . . . . . . . . . . . . . . . . . . . . . . . . . . . . . . . . . . . . . . . . . . . . . . . . . . . . . . . . . . . . . . . . . . . . . . . . . . . . . . . . . . 124
Step 8: Securing the ends . . . . . . . . . . . . . . . . . . . . . . . . . . . . . . . . . . . . . . . . . . . . . . . . . . . . . . . . . . . . . . . . . . . . . . . . . . . . . . . . . . . . . . . . . . . . . . . . . . . . 125
Step 9: You're done! . . . . . . . . . . . . . . . . . . . . . . . . . . . . . . . . . . . . . . . . . . . . . . . . . . . . . . . . . . . . . . . . . . . . . . . . . . . . . . . . . . . . . . . . . . . . . . . . . . . . . . . . 126
Related Instructables . . . . . . . . . . . . . . . . . . . . . . . . . . . . . . . . . . . . . . . . . . . . . . . . . . . . . . . . . . . . . . . . . . . . . . . . . . . . . . . . . . . . . . . . . . . . . . . . . . . . . . . . 126
Paracord Lighter Wrap . . . . . . . . . . . . . . . . . . . . . . . . . . . . . . . . . . . . . . . . . . . . . . . . . . . . . . . . . . . . . . . . . . . . . . . . . . . . . . . . . . . . . . . . . . . . . . . . . . . . . . . . . . 127
Intro: Paracord Lighter Wrap . . . . . . . . . . . . . . . . . . . . . . . . . . . . . . . . . . . . . . . . . . . . . . . . . . . . . . . . . . . . . . . . . . . . . . . . . . . . . . . . . . . . . . . . . . . . . . . . . . 127
Step 1: Supplies . . . . . . . . . . . . . . . . . . . . . . . . . . . . . . . . . . . . . . . . . . . . . . . . . . . . . . . . . . . . . . . . . . . . . . . . . . . . . . . . . . . . . . . . . . . . . . . . . . . . . . . . . . . 127
Step 2: Start the wrap . . . . . . . . . . . . . . . . . . . . . . . . . . . . . . . . . . . . . . . . . . . . . . . . . . . . . . . . . . . . . . . . . . . . . . . . . . . . . . . . . . . . . . . . . . . . . . . . . . . . . . . 128
Step 3: Finishing . . . . . . . . . . . . . . . . . . . . . . . . . . . . . . . . . . . . . . . . . . . . . . . . . . . . . . . . . . . . . . . . . . . . . . . . . . . . . . . . . . . . . . . . . . . . . . . . . . . . . . . . . . . 128
Related Instructables . . . . . . . . . . . . . . . . . . . . . . . . . . . . . . . . . . . . . . . . . . . . . . . . . . . . . . . . . . . . . . . . . . . . . . . . . . . . . . . . . . . . . . . . . . . . . . . . . . . . . . . . 129
How To Make A Paracord Dog Collar Using The Seesaw Knot . . . . . . . . . . . . . . . . . . . . . . . . . . . . . . . . . . . . . . . . . . . . . . . . . . . . . . . . . . . . . . . . . . . . . . . . . . . . 130
Intro: How To Make A Paracord Dog Collar Using The Seesaw Knot . . . . . . . . . . . . . . . . . . . . . . . . . . . . . . . . . . . . . . . . . . . . . . . . . . . . . . . . . . . . . . . . . . . . 130
Step 1: Tools & Supplies . . . . . . . . . . . . . . . . . . . . . . . . . . . . . . . . . . . . . . . . . . . . . . . . . . . . . . . . . . . . . . . . . . . . . . . . . . . . . . . . . . . . . . . . . . . . . . . . . . . . . 130
Step 2: Putting The Cords and D-ring on the Snap . . . . . . . . . . . . . . . . . . . . . . . . . . . . . . . . . . . . . . . . . . . . . . . . . . . . . . . . . . . . . . . . . . . . . . . . . . . . . . . . . . 131
Step 3: Clamping the Snap . . . . . . . . . . . . . . . . . . . . . . . . . . . . . . . . . . . . . . . . . . . . . . . . . . . . . . . . . . . . . . . . . . . . . . . . . . . . . . . . . . . . . . . . . . . . . . . . . . . 131
Step 4: The First Knot . . . . . . . . . . . . . . . . . . . . . . . . . . . . . . . . . . . . . . . . . . . . . . . . . . . . . . . . . . . . . . . . . . . . . . . . . . . . . . . . . . . . . . . . . . . . . . . . . . . . . . . 132
Step 5: The Second Knot . . . . . . . . . . . . . . . . . . . . . . . . . . . . . . . . . . . . . . . . . . . . . . . . . . . . . . . . . . . . . . . . . . . . . . . . . . . . . . . . . . . . . . . . . . . . . . . . . . . . 132
Step 6: The Third Knot . . . . . . . . . . . . . . . . . . . . . . . . . . . . . . . . . . . . . . . . . . . . . . . . . . . . . . . . . . . . . . . . . . . . . . . . . . . . . . . . . . . . . . . . . . . . . . . . . . . . . . 133
Step 7: Attaching The Loose Cords To The Snap . . . . . . . . . . . . . . . . . . . . . . . . . . . . . . . . . . . . . . . . . . . . . . . . . . . . . . . . . . . . . . . . . . . . . . . . . . . . . . . . . . . 134
Step 8: Finishing The Cord Ends Part One . . . . . . . . . . . . . . . . . . . . . . . . . . . . . . . . . . . . . . . . . . . . . . . . . . . . . . . . . . . . . . . . . . . . . . . . . . . . . . . . . . . . . . . . 135
Step 9: Finishing The Cord Ends Part Two . . . . . . . . . . . . . . . . . . . . . . . . . . . . . . . . . . . . . . . . . . . . . . . . . . . . . . . . . . . . . . . . . . . . . . . . . . . . . . . . . . . . . . . . 135
Step 10: Melting the Cord Ends . . . . . . . . . . . . . . . . . . . . . . . . . . . . . . . . . . . . . . . . . . . . . . . . . . . . . . . . . . . . . . . . . . . . . . . . . . . . . . . . . . . . . . . . . . . . . . . . 135
Step 11: Put It On Your Dog! . . . . . . . . . . . . . . . . . . . . . . . . . . . . . . . . . . . . . . . . . . . . . . . . . . . . . . . . . . . . . . . . . . . . . . . . . . . . . . . . . . . . . . . . . . . . . . . . . . 136
Related Instructables . . . . . . . . . . . . . . . . . . . . . . . . . . . . . . . . . . . . . . . . . . . . . . . . . . . . . . . . . . . . . . . . . . . . . . . . . . . . . . . . . . . . . . . . . . . . . . . . . . . . . . . . 136
How To Make A Paracord Dog Leash Using The Seesaw Knot . . . . . . . . . . . . . . . . . . . . . . . . . . . . . . . . . . . . . . . . . . . . . . . . . . . . . . . . . . . . . . . . . . . . . . . . . . . . 137
Intro: How To Make A Paracord Dog Leash Using The Seesaw Knot . . . . . . . . . . . . . . . . . . . . . . . . . . . . . . . . . . . . . . . . . . . . . . . . . . . . . . . . . . . . . . . . . . . . 137
Step 1: Tools And Supplies . . . . . . . . . . . . . . . . . . . . . . . . . . . . . . . . . . . . . . . . . . . . . . . . . . . . . . . . . . . . . . . . . . . . . . . . . . . . . . . . . . . . . . . . . . . . . . . . . . . 137
Step 2: Arranging The Cords On The Snap . . . . . . . . . . . . . . . . . . . . . . . . . . . . . . . . . . . . . . . . . . . . . . . . . . . . . . . . . . . . . . . . . . . . . . . . . . . . . . . . . . . . . . . 138
Step 3: Clamping Down The Snap . . . . . . . . . . . . . . . . . . . . . . . . . . . . . . . . . . . . . . . . . . . . . . . . . . . . . . . . . . . . . . . . . . . . . . . . . . . . . . . . . . . . . . . . . . . . . . 138
Step 4: Knot One . . . . . . . . . . . . . . . . . . . . . . . . . . . . . . . . . . . . . . . . . . . . . . . . . . . . . . . . . . . . . . . . . . . . . . . . . . . . . . . . . . . . . . . . . . . . . . . . . . . . . . . . . . 139
Step 5: Knot Two . . . . . . . . . . . . . . . . . . . . . . . . . . . . . . . . . . . . . . . . . . . . . . . . . . . . . . . . . . . . . . . . . . . . . . . . . . . . . . . . . . . . . . . . . . . . . . . . . . . . . . . . . . 139
Step 6: Knot Three . . . . . . . . . . . . . . . . . . . . . . . . . . . . . . . . . . . . . . . . . . . . . . . . . . . . . . . . . . . . . . . . . . . . . . . . . . . . . . . . . . . . . . . . . . . . . . . . . . . . . . . . . 140
Step 7: Starting The Handle Loop . . . . . . . . . . . . . . . . . . . . . . . . . . . . . . . . . . . . . . . . . . . . . . . . . . . . . . . . . . . . . . . . . . . . . . . . . . . . . . . . . . . . . . . . . . . . . . 141
Step 8: Finishing The Cord Ends Part One . . . . . . . . . . . . . . . . . . . . . . . . . . . . . . . . . . . . . . . . . . . . . . . . . . . . . . . . . . . . . . . . . . . . . . . . . . . . . . . . . . . . . . . . 142
Step 9: Finishing The Cord Ends Part Two . . . . . . . . . . . . . . . . . . . . . . . . . . . . . . . . . . . . . . . . . . . . . . . . . . . . . . . . . . . . . . . . . . . . . . . . . . . . . . . . . . . . . . . . 142
Related Instructables . . . . . . . . . . . . . . . . . . . . . . . . . . . . . . . . . . . . . . . . . . . . . . . . . . . . . . . . . . . . . . . . . . . . . . . . . . . . . . . . . . . . . . . . . . . . . . . . . . . . . . . . 142
Cutting cord without a knife . . . . . . . . . . . . . . . . . . . . . . . . . . . . . . . . . . . . . . . . . . . . . . . . . . . . . . . . . . . . . . . . . . . . . . . . . . . . . . . . . . . . . . . . . . . . . . . . . . . . . . 143
Intro: Cutting cord without a knife . . . . . . . . . . . . . . . . . . . . . . . . . . . . . . . . . . . . . . . . . . . . . . . . . . . . . . . . . . . . . . . . . . . . . . . . . . . . . . . . . . . . . . . . . . . . . . . 143
Step 1: Materials . . . . . . . . . . . . . . . . . . . . . . . . . . . . . . . . . . . . . . . . . . . . . . . . . . . . . . . . . . . . . . . . . . . . . . . . . . . . . . . . . . . . . . . . . . . . . . . . . . . . . . . . . . . 143
Step 2: Setup . . . . . . . . . . . . . . . . . . . . . . . . . . . . . . . . . . . . . . . . . . . . . . . . . . . . . . . . . . . . . . . . . . . . . . . . . . . . . . . . . . . . . . . . . . . . . . . . . . . . . . . . . . . . . 143
Step 3: Cutting the 550 cord . . . . . . . . . . . . . . . . . . . . . . . . . . . . . . . . . . . . . . . . . . . . . . . . . . . . . . . . . . . . . . . . . . . . . . . . . . . . . . . . . . . . . . . . . . . . . . . . . . 144

http://www.instructables.com/id/Paracord/
Related Instructables . . . . . . . . . . . . . . . . . . . . . . . . . . . . . . . . . . . . . . . . . . . . . . . . . . . . . . . . . . . . . . . . . . . . . . . . . . . . . . . . . . . . . . . . . . . . . . . . . . . . . . . . 145
Knife Making Without Tools . . . . . . . . . . . . . . . . . . . . . . . . . . . . . . . . . . . . . . . . . . . . . . . . . . . . . . . . . . . . . . . . . . . . . . . . . . . . . . . . . . . . . . . . . . . . . . . . . . . . . . 146
Intro: Knife Making Without Tools . . . . . . . . . . . . . . . . . . . . . . . . . . . . . . . . . . . . . . . . . . . . . . . . . . . . . . . . . . . . . . . . . . . . . . . . . . . . . . . . . . . . . . . . . . . . . . 146
Step 1: Optional: Drill Holes in Each End of the Handle . . . . . . . . . . . . . . . . . . . . . . . . . . . . . . . . . . . . . . . . . . . . . . . . . . . . . . . . . . . . . . . . . . . . . . . . . . . . . . 146
Step 2: Optional: Countersink and Smooth the Holes . . . . . . . . . . . . . . . . . . . . . . . . . . . . . . . . . . . . . . . . . . . . . . . . . . . . . . . . . . . . . . . . . . . . . . . . . . . . . . . . 147
Step 3: Optional: Melt and Taper the Cord End . . . . . . . . . . . . . . . . . . . . . . . . . . . . . . . . . . . . . . . . . . . . . . . . . . . . . . . . . . . . . . . . . . . . . . . . . . . . . . . . . . . . 148
Step 4: Start Wrapping . . . . . . . . . . . . . . . . . . . . . . . . . . . . . . . . . . . . . . . . . . . . . . . . . . . . . . . . . . . . . . . . . . . . . . . . . . . . . . . . . . . . . . . . . . . . . . . . . . . . . . 148
Step 5: Lay Down a Loop . . . . . . . . . . . . . . . . . . . . . . . . . . . . . . . . . . . . . . . . . . . . . . . . . . . . . . . . . . . . . . . . . . . . . . . . . . . . . . . . . . . . . . . . . . . . . . . . . . . . 148
Step 6: Put the Tail in the Loop . . . . . . . . . . . . . . . . . . . . . . . . . . . . . . . . . . . . . . . . . . . . . . . . . . . . . . . . . . . . . . . . . . . . . . . . . . . . . . . . . . . . . . . . . . . . . . . . 149
Step 7: Pull! . . . . . . . . . . . . . . . . . . . . . . . . . . . . . . . . . . . . . . . . . . . . . . . . . . . . . . . . . . . . . . . . . . . . . . . . . . . . . . . . . . . . . . . . . . . . . . . . . . . . . . . . . . . . . . 149
Step 8: Pull the Tails Tight . . . . . . . . . . . . . . . . . . . . . . . . . . . . . . . . . . . . . . . . . . . . . . . . . . . . . . . . . . . . . . . . . . . . . . . . . . . . . . . . . . . . . . . . . . . . . . . . . . . . 150
Step 9: Handle is Finished . . . . . . . . . . . . . . . . . . . . . . . . . . . . . . . . . . . . . . . . . . . . . . . . . . . . . . . . . . . . . . . . . . . . . . . . . . . . . . . . . . . . . . . . . . . . . . . . . . . . 150
Step 10: Design Your Blade . . . . . . . . . . . . . . . . . . . . . . . . . . . . . . . . . . . . . . . . . . . . . . . . . . . . . . . . . . . . . . . . . . . . . . . . . . . . . . . . . . . . . . . . . . . . . . . . . . 151
Step 11: Shape and Rough Sharpen the Blade . . . . . . . . . . . . . . . . . . . . . . . . . . . . . . . . . . . . . . . . . . . . . . . . . . . . . . . . . . . . . . . . . . . . . . . . . . . . . . . . . . . . 151
Step 12: You Have a Knife! . . . . . . . . . . . . . . . . . . . . . . . . . . . . . . . . . . . . . . . . . . . . . . . . . . . . . . . . . . . . . . . . . . . . . . . . . . . . . . . . . . . . . . . . . . . . . . . . . . . 152
Related Instructables . . . . . . . . . . . . . . . . . . . . . . . . . . . . . . . . . . . . . . . . . . . . . . . . . . . . . . . . . . . . . . . . . . . . . . . . . . . . . . . . . . . . . . . . . . . . . . . . . . . . . . . . 152
Army Ranger Beads . . . . . . . . . . . . . . . . . . . . . . . . . . . . . . . . . . . . . . . . . . . . . . . . . . . . . . . . . . . . . . . . . . . . . . . . . . . . . . . . . . . . . . . . . . . . . . . . . . . . . . . . . . . 153
Intro: Army Ranger Beads . . . . . . . . . . . . . . . . . . . . . . . . . . . . . . . . . . . . . . . . . . . . . . . . . . . . . . . . . . . . . . . . . . . . . . . . . . . . . . . . . . . . . . . . . . . . . . . . . . . . 153
Step 1: What You Need . . . . . . . . . . . . . . . . . . . . . . . . . . . . . . . . . . . . . . . . . . . . . . . . . . . . . . . . . . . . . . . . . . . . . . . . . . . . . . . . . . . . . . . . . . . . . . . . . . . . . . 153
Step 2: Preparation . . . . . . . . . . . . . . . . . . . . . . . . . . . . . . . . . . . . . . . . . . . . . . . . . . . . . . . . . . . . . . . . . . . . . . . . . . . . . . . . . . . . . . . . . . . . . . . . . . . . . . . . . 154
Step 3: Adding beads (Top Rung) . . . . . . . . . . . . . . . . . . . . . . . . . . . . . . . . . . . . . . . . . . . . . . . . . . . . . . . . . . . . . . . . . . . . . . . . . . . . . . . . . . . . . . . . . . . . . . 155
Step 4: Adding beads (Second Rung) . . . . . . . . . . . . . . . . . . . . . . . . . . . . . . . . . . . . . . . . . . . . . . . . . . . . . . . . . . . . . . . . . . . . . . . . . . . . . . . . . . . . . . . . . . . 155
Step 5: Using Ranger Beads . . . . . . . . . . . . . . . . . . . . . . . . . . . . . . . . . . . . . . . . . . . . . . . . . . . . . . . . . . . . . . . . . . . . . . . . . . . . . . . . . . . . . . . . . . . . . . . . . . 156
Related Instructables . . . . . . . . . . . . . . . . . . . . . . . . . . . . . . . . . . . . . . . . . . . . . . . . . . . . . . . . . . . . . . . . . . . . . . . . . . . . . . . . . . . . . . . . . . . . . . . . . . . . . . . . 156
Simple Paracord Ring . . . . . . . . . . . . . . . . . . . . . . . . . . . . . . . . . . . . . . . . . . . . . . . . . . . . . . . . . . . . . . . . . . . . . . . . . . . . . . . . . . . . . . . . . . . . . . . . . . . . . . . . . . 157
Intro: Simple Paracord Ring . . . . . . . . . . . . . . . . . . . . . . . . . . . . . . . . . . . . . . . . . . . . . . . . . . . . . . . . . . . . . . . . . . . . . . . . . . . . . . . . . . . . . . . . . . . . . . . . . . . 157
Step 1: Materials . . . . . . . . . . . . . . . . . . . . . . . . . . . . . . . . . . . . . . . . . . . . . . . . . . . . . . . . . . . . . . . . . . . . . . . . . . . . . . . . . . . . . . . . . . . . . . . . . . . . . . . . . . . 157
Step 2: Size and Meassure your cord . . . . . . . . . . . . . . . . . . . . . . . . . . . . . . . . . . . . . . . . . . . . . . . . . . . . . . . . . . . . . . . . . . . . . . . . . . . . . . . . . . . . . . . . . . . 158
Step 3: Cutting and Gutting . . . . . . . . . . . . . . . . . . . . . . . . . . . . . . . . . . . . . . . . . . . . . . . . . . . . . . . . . . . . . . . . . . . . . . . . . . . . . . . . . . . . . . . . . . . . . . . . . . . 159
Step 4: Shaping and Sealing the ends. . . . . . . . . . . . . . . . . . . . . . . . . . . . . . . . . . . . . . . . . . . . . . . . . . . . . . . . . . . . . . . . . . . . . . . . . . . . . . . . . . . . . . . . . . . 159
Step 5: Closing the ring . . . . . . . . . . . . . . . . . . . . . . . . . . . . . . . . . . . . . . . . . . . . . . . . . . . . . . . . . . . . . . . . . . . . . . . . . . . . . . . . . . . . . . . . . . . . . . . . . . . . . . 162
Step 6: Sealing the bond . . . . . . . . . . . . . . . . . . . . . . . . . . . . . . . . . . . . . . . . . . . . . . . . . . . . . . . . . . . . . . . . . . . . . . . . . . . . . . . . . . . . . . . . . . . . . . . . . . . . . 162
Step 7: All Done . . . . . . . . . . . . . . . . . . . . . . . . . . . . . . . . . . . . . . . . . . . . . . . . . . . . . . . . . . . . . . . . . . . . . . . . . . . . . . . . . . . . . . . . . . . . . . . . . . . . . . . . . . . 163
Related Instructables . . . . . . . . . . . . . . . . . . . . . . . . . . . . . . . . . . . . . . . . . . . . . . . . . . . . . . . . . . . . . . . . . . . . . . . . . . . . . . . . . . . . . . . . . . . . . . . . . . . . . . . . 166
Multi-Color Paracord Can Koozie . . . . . . . . . . . . . . . . . . . . . . . . . . . . . . . . . . . . . . . . . . . . . . . . . . . . . . . . . . . . . . . . . . . . . . . . . . . . . . . . . . . . . . . . . . . . . . . . . . 167
Intro: Multi-Color Paracord Can Koozie . . . . . . . . . . . . . . . . . . . . . . . . . . . . . . . . . . . . . . . . . . . . . . . . . . . . . . . . . . . . . . . . . . . . . . . . . . . . . . . . . . . . . . . . . . 167
Step 1: Supplies . . . . . . . . . . . . . . . . . . . . . . . . . . . . . . . . . . . . . . . . . . . . . . . . . . . . . . . . . . . . . . . . . . . . . . . . . . . . . . . . . . . . . . . . . . . . . . . . . . . . . . . . . . . 168
Step 2: Prep . . . . . . . . . . . . . . . . . . . . . . . . . . . . . . . . . . . . . . . . . . . . . . . . . . . . . . . . . . . . . . . . . . . . . . . . . . . . . . . . . . . . . . . . . . . . . . . . . . . . . . . . . . . . . . 169
Step 3: The first knot . . . . . . . . . . . . . . . . . . . . . . . . . . . . . . . . . . . . . . . . . . . . . . . . . . . . . . . . . . . . . . . . . . . . . . . . . . . . . . . . . . . . . . . . . . . . . . . . . . . . . . . . 171
Step 4: The first row . . . . . . . . . . . . . . . . . . . . . . . . . . . . . . . . . . . . . . . . . . . . . . . . . . . . . . . . . . . . . . . . . . . . . . . . . . . . . . . . . . . . . . . . . . . . . . . . . . . . . . . . 174
Step 5: Dress for success . . . . . . . . . . . . . . . . . . . . . . . . . . . . . . . . . . . . . . . . . . . . . . . . . . . . . . . . . . . . . . . . . . . . . . . . . . . . . . . . . . . . . . . . . . . . . . . . . . . . 179
Step 6: Coming to an End . . . . . . . . . . . . . . . . . . . . . . . . . . . . . . . . . . . . . . . . . . . . . . . . . . . . . . . . . . . . . . . . . . . . . . . . . . . . . . . . . . . . . . . . . . . . . . . . . . . . 182

http://www.instructables.com/id/Paracord/
Step 7: All done -- What's next? . . . . . . . . . . . . . . . . . . . . . . . . . . . . . . . . . . . . . . . . . . . . . . . . . . . . . . . . . . . . . . . . . . . . . . . . . . . . . . . . . . . . . . . . . . . . . . . . 186
Related Instructables . . . . . . . . . . . . . . . . . . . . . . . . . . . . . . . . . . . . . . . . . . . . . . . . . . . . . . . . . . . . . . . . . . . . . . . . . . . . . . . . . . . . . . . . . . . . . . . . . . . . . . . . 187
How to Make a Paracord Fender Keychain . . . . . . . . . . . . . . . . . . . . . . . . . . . . . . . . . . . . . . . . . . . . . . . . . . . . . . . . . . . . . . . . . . . . . . . . . . . . . . . . . . . . . . . . . . . 188
Intro: How to Make a Paracord Fender Keychain . . . . . . . . . . . . . . . . . . . . . . . . . . . . . . . . . . . . . . . . . . . . . . . . . . . . . . . . . . . . . . . . . . . . . . . . . . . . . . . . . . . 188
Step 1: SUPPLIES . . . . . . . . . . . . . . . . . . . . . . . . . . . . . . . . . . . . . . . . . . . . . . . . . . . . . . . . . . . . . . . . . . . . . . . . . . . . . . . . . . . . . . . . . . . . . . . . . . . . . . . . . 188
Step 2: BEGINNING THE LOOP . . . . . . . . . . . . . . . . . . . . . . . . . . . . . . . . . . . . . . . . . . . . . . . . . . . . . . . . . . . . . . . . . . . . . . . . . . . . . . . . . . . . . . . . . . . . . . . 190
Step 3: BRAIDING THE LOOP . . . . . . . . . . . . . . . . . . . . . . . . . . . . . . . . . . . . . . . . . . . . . . . . . . . . . . . . . . . . . . . . . . . . . . . . . . . . . . . . . . . . . . . . . . . . . . . . 190
Step 4: FINISHING THE LOOP . . . . . . . . . . . . . . . . . . . . . . . . . . . . . . . . . . . . . . . . . . . . . . . . . . . . . . . . . . . . . . . . . . . . . . . . . . . . . . . . . . . . . . . . . . . . . . . . 192
Step 5: TYING THE CROWN SINNET . . . . . . . . . . . . . . . . . . . . . . . . . . . . . . . . . . . . . . . . . . . . . . . . . . . . . . . . . . . . . . . . . . . . . . . . . . . . . . . . . . . . . . . . . . . 192
Step 6: TYING THE FOOTROPE KNOT . . . . . . . . . . . . . . . . . . . . . . . . . . . . . . . . . . . . . . . . . . . . . . . . . . . . . . . . . . . . . . . . . . . . . . . . . . . . . . . . . . . . . . . . . 194
Step 7: FINISHING THE FENDER . . . . . . . . . . . . . . . . . . . . . . . . . . . . . . . . . . . . . . . . . . . . . . . . . . . . . . . . . . . . . . . . . . . . . . . . . . . . . . . . . . . . . . . . . . . . . . 195
Related Instructables . . . . . . . . . . . . . . . . . . . . . . . . . . . . . . . . . . . . . . . . . . . . . . . . . . . . . . . . . . . . . . . . . . . . . . . . . . . . . . . . . . . . . . . . . . . . . . . . . . . . . . . . 196
How I singe my Paracord ends . . . . . . . . . . . . . . . . . . . . . . . . . . . . . . . . . . . . . . . . . . . . . . . . . . . . . . . . . . . . . . . . . . . . . . . . . . . . . . . . . . . . . . . . . . . . . . . . . . . . 197
Intro: How I singe my Paracord ends . . . . . . . . . . . . . . . . . . . . . . . . . . . . . . . . . . . . . . . . . . . . . . . . . . . . . . . . . . . . . . . . . . . . . . . . . . . . . . . . . . . . . . . . . . . . 197
Step 1: Materials needed . . . . . . . . . . . . . . . . . . . . . . . . . . . . . . . . . . . . . . . . . . . . . . . . . . . . . . . . . . . . . . . . . . . . . . . . . . . . . . . . . . . . . . . . . . . . . . . . . . . . . 198
Step 2: Trimming the cord . . . . . . . . . . . . . . . . . . . . . . . . . . . . . . . . . . . . . . . . . . . . . . . . . . . . . . . . . . . . . . . . . . . . . . . . . . . . . . . . . . . . . . . . . . . . . . . . . . . . 198
Step 3: Burning the ends . . . . . . . . . . . . . . . . . . . . . . . . . . . . . . . . . . . . . . . . . . . . . . . . . . . . . . . . . . . . . . . . . . . . . . . . . . . . . . . . . . . . . . . . . . . . . . . . . . . . . 199
Related Instructables . . . . . . . . . . . . . . . . . . . . . . . . . . . . . . . . . . . . . . . . . . . . . . . . . . . . . . . . . . . . . . . . . . . . . . . . . . . . . . . . . . . . . . . . . . . . . . . . . . . . . . . . 199
Paracord Laced Pallet, Hanging Chair . . . . . . . . . . . . . . . . . . . . . . . . . . . . . . . . . . . . . . . . . . . . . . . . . . . . . . . . . . . . . . . . . . . . . . . . . . . . . . . . . . . . . . . . . . . . . . 200
Intro: Paracord Laced Pallet, Hanging Chair . . . . . . . . . . . . . . . . . . . . . . . . . . . . . . . . . . . . . . . . . . . . . . . . . . . . . . . . . . . . . . . . . . . . . . . . . . . . . . . . . . . . . . 200
Step 1: . . . . . . . . . . . . . . . . . . . . . . . . . . . . . . . . . . . . . . . . . . . . . . . . . . . . . . . . . . . . . . . . . . . . . . . . . . . . . . . . . . . . . . . . . . . . . . . . . . . . . . . . . . . . . . . . . . 200
Step 2: Tools and Materials . . . . . . . . . . . . . . . . . . . . . . . . . . . . . . . . . . . . . . . . . . . . . . . . . . . . . . . . . . . . . . . . . . . . . . . . . . . . . . . . . . . . . . . . . . . . . . . . . . . 200
Step 3: Take Pallet Apart . . . . . . . . . . . . . . . . . . . . . . . . . . . . . . . . . . . . . . . . . . . . . . . . . . . . . . . . . . . . . . . . . . . . . . . . . . . . . . . . . . . . . . . . . . . . . . . . . . . . . 201
Step 4: Cutting the Wood to Size . . . . . . . . . . . . . . . . . . . . . . . . . . . . . . . . . . . . . . . . . . . . . . . . . . . . . . . . . . . . . . . . . . . . . . . . . . . . . . . . . . . . . . . . . . . . . . . 202
Step 5: Marking Wood for Lace Holes . . . . . . . . . . . . . . . . . . . . . . . . . . . . . . . . . . . . . . . . . . . . . . . . . . . . . . . . . . . . . . . . . . . . . . . . . . . . . . . . . . . . . . . . . . . 202
Step 6: Drill the Holes . . . . . . . . . . . . . . . . . . . . . . . . . . . . . . . . . . . . . . . . . . . . . . . . . . . . . . . . . . . . . . . . . . . . . . . . . . . . . . . . . . . . . . . . . . . . . . . . . . . . . . . 203
Step 7: Start Lacing . . . . . . . . . . . . . . . . . . . . . . . . . . . . . . . . . . . . . . . . . . . . . . . . . . . . . . . . . . . . . . . . . . . . . . . . . . . . . . . . . . . . . . . . . . . . . . . . . . . . . . . . . 204
Step 8: Hang and Enjoy . . . . . . . . . . . . . . . . . . . . . . . . . . . . . . . . . . . . . . . . . . . . . . . . . . . . . . . . . . . . . . . . . . . . . . . . . . . . . . . . . . . . . . . . . . . . . . . . . . . . . . 206
Related Instructables . . . . . . . . . . . . . . . . . . . . . . . . . . . . . . . . . . . . . . . . . . . . . . . . . . . . . . . . . . . . . . . . . . . . . . . . . . . . . . . . . . . . . . . . . . . . . . . . . . . . . . . . 208
How to make a survival paracord belt using only two cords! . . . . . . . . . . . . . . . . . . . . . . . . . . . . . . . . . . . . . . . . . . . . . . . . . . . . . . . . . . . . . . . . . . . . . . . . . . . . . . 209
Intro: How to make a survival paracord belt using only two cords! . . . . . . . . . . . . . . . . . . . . . . . . . . . . . . . . . . . . . . . . . . . . . . . . . . . . . . . . . . . . . . . . . . . . . . . 209
Step 1: . . . . . . . . . . . . . . . . . . . . . . . . . . . . . . . . . . . . . . . . . . . . . . . . . . . . . . . . . . . . . . . . . . . . . . . . . . . . . . . . . . . . . . . . . . . . . . . . . . . . . . . . . . . . . . . . . . 209
Step 2: Starting up . . . . . . . . . . . . . . . . . . . . . . . . . . . . . . . . . . . . . . . . . . . . . . . . . . . . . . . . . . . . . . . . . . . . . . . . . . . . . . . . . . . . . . . . . . . . . . . . . . . . . . . . . 210
Step 3: Begining the braid . . . . . . . . . . . . . . . . . . . . . . . . . . . . . . . . . . . . . . . . . . . . . . . . . . . . . . . . . . . . . . . . . . . . . . . . . . . . . . . . . . . . . . . . . . . . . . . . . . . . 210
Step 4: Finishing up . . . . . . . . . . . . . . . . . . . . . . . . . . . . . . . . . . . . . . . . . . . . . . . . . . . . . . . . . . . . . . . . . . . . . . . . . . . . . . . . . . . . . . . . . . . . . . . . . . . . . . . . 212
Related Instructables . . . . . . . . . . . . . . . . . . . . . . . . . . . . . . . . . . . . . . . . . . . . . . . . . . . . . . . . . . . . . . . . . . . . . . . . . . . . . . . . . . . . . . . . . . . . . . . . . . . . . . . . 214
Paracord Rifle Sling . . . . . . . . . . . . . . . . . . . . . . . . . . . . . . . . . . . . . . . . . . . . . . . . . . . . . . . . . . . . . . . . . . . . . . . . . . . . . . . . . . . . . . . . . . . . . . . . . . . . . . . . . . . . 215
Intro: Paracord Rifle Sling . . . . . . . . . . . . . . . . . . . . . . . . . . . . . . . . . . . . . . . . . . . . . . . . . . . . . . . . . . . . . . . . . . . . . . . . . . . . . . . . . . . . . . . . . . . . . . . . . . . . 215
Step 1: . . . . . . . . . . . . . . . . . . . . . . . . . . . . . . . . . . . . . . . . . . . . . . . . . . . . . . . . . . . . . . . . . . . . . . . . . . . . . . . . . . . . . . . . . . . . . . . . . . . . . . . . . . . . . . . . . . 215
Step 2: Para Wrap . . . . . . . . . . . . . . . . . . . . . . . . . . . . . . . . . . . . . . . . . . . . . . . . . . . . . . . . . . . . . . . . . . . . . . . . . . . . . . . . . . . . . . . . . . . . . . . . . . . . . . . . . . 216
Step 3: . . . . . . . . . . . . . . . . . . . . . . . . . . . . . . . . . . . . . . . . . . . . . . . . . . . . . . . . . . . . . . . . . . . . . . . . . . . . . . . . . . . . . . . . . . . . . . . . . . . . . . . . . . . . . . . . . . 217
Step 4: . . . . . . . . . . . . . . . . . . . . . . . . . . . . . . . . . . . . . . . . . . . . . . . . . . . . . . . . . . . . . . . . . . . . . . . . . . . . . . . . . . . . . . . . . . . . . . . . . . . . . . . . . . . . . . . . . . 217

http://www.instructables.com/id/Paracord/
Step 5: . . . . . . . . . . . . . . . . . . . . . . . . . . . . . . . . . . . . . . . . . . . . . . . . . . . . . . . . . . . . . . . . . . . . . . . . . . . . . . . . . . . . . . . . . . . . . . . . . . . . . . . . . . . . . . . . . . 218
Step 6: . . . . . . . . . . . . . . . . . . . . . . . . . . . . . . . . . . . . . . . . . . . . . . . . . . . . . . . . . . . . . . . . . . . . . . . . . . . . . . . . . . . . . . . . . . . . . . . . . . . . . . . . . . . . . . . . . . 220
Related Instructables . . . . . . . . . . . . . . . . . . . . . . . . . . . . . . . . . . . . . . . . . . . . . . . . . . . . . . . . . . . . . . . . . . . . . . . . . . . . . . . . . . . . . . . . . . . . . . . . . . . . . . . . 222
Paracord Bullwhip . . . . . . . . . . . . . . . . . . . . . . . . . . . . . . . . . . . . . . . . . . . . . . . . . . . . . . . . . . . . . . . . . . . . . . . . . . . . . . . . . . . . . . . . . . . . . . . . . . . . . . . . . . . . . 223
Intro: Paracord Bullwhip . . . . . . . . . . . . . . . . . . . . . . . . . . . . . . . . . . . . . . . . . . . . . . . . . . . . . . . . . . . . . . . . . . . . . . . . . . . . . . . . . . . . . . . . . . . . . . . . . . . . . 223
Step 1: You will need... . . . . . . . . . . . . . . . . . . . . . . . . . . . . . . . . . . . . . . . . . . . . . . . . . . . . . . . . . . . . . . . . . . . . . . . . . . . . . . . . . . . . . . . . . . . . . . . . . . . . . . 224
Step 2: Some usefull knotting ressources . . . . . . . . . . . . . . . . . . . . . . . . . . . . . . . . . . . . . . . . . . . . . . . . . . . . . . . . . . . . . . . . . . . . . . . . . . . . . . . . . . . . . . . . 225
Step 3: Cutting things to length . . . . . . . . . . . . . . . . . . . . . . . . . . . . . . . . . . . . . . . . . . . . . . . . . . . . . . . . . . . . . . . . . . . . . . . . . . . . . . . . . . . . . . . . . . . . . . . . 228
Step 4: Preparing the core . . . . . . . . . . . . . . . . . . . . . . . . . . . . . . . . . . . . . . . . . . . . . . . . . . . . . . . . . . . . . . . . . . . . . . . . . . . . . . . . . . . . . . . . . . . . . . . . . . . . 229
Step 5: Beginning the core . . . . . . . . . . . . . . . . . . . . . . . . . . . . . . . . . . . . . . . . . . . . . . . . . . . . . . . . . . . . . . . . . . . . . . . . . . . . . . . . . . . . . . . . . . . . . . . . . . . 230
Step 6: Properly twisting strands . . . . . . . . . . . . . . . . . . . . . . . . . . . . . . . . . . . . . . . . . . . . . . . . . . . . . . . . . . . . . . . . . . . . . . . . . . . . . . . . . . . . . . . . . . . . . . . 232
Step 7: Wrapping the guts . . . . . . . . . . . . . . . . . . . . . . . . . . . . . . . . . . . . . . . . . . . . . . . . . . . . . . . . . . . . . . . . . . . . . . . . . . . . . . . . . . . . . . . . . . . . . . . . . . . . 232
Step 8: Begining the first layer . . . . . . . . . . . . . . . . . . . . . . . . . . . . . . . . . . . . . . . . . . . . . . . . . . . . . . . . . . . . . . . . . . . . . . . . . . . . . . . . . . . . . . . . . . . . . . . . . 233
Step 9: Plaiting the 8 strand layer . . . . . . . . . . . . . . . . . . . . . . . . . . . . . . . . . . . . . . . . . . . . . . . . . . . . . . . . . . . . . . . . . . . . . . . . . . . . . . . . . . . . . . . . . . . . . . 234
Step 10: Keeping things neat . . . . . . . . . . . . . . . . . . . . . . . . . . . . . . . . . . . . . . . . . . . . . . . . . . . . . . . . . . . . . . . . . . . . . . . . . . . . . . . . . . . . . . . . . . . . . . . . . . 236
Step 11: Dropping strands . . . . . . . . . . . . . . . . . . . . . . . . . . . . . . . . . . . . . . . . . . . . . . . . . . . . . . . . . . . . . . . . . . . . . . . . . . . . . . . . . . . . . . . . . . . . . . . . . . . . 237
Step 12: Finishing the first layer . . . . . . . . . . . . . . . . . . . . . . . . . . . . . . . . . . . . . . . . . . . . . . . . . . . . . . . . . . . . . . . . . . . . . . . . . . . . . . . . . . . . . . . . . . . . . . . . 239
Step 13: Making the handle transition stiff . . . . . . . . . . . . . . . . . . . . . . . . . . . . . . . . . . . . . . . . . . . . . . . . . . . . . . . . . . . . . . . . . . . . . . . . . . . . . . . . . . . . . . . . 240
Step 14: Plaiting the 12 strands outer layer . . . . . . . . . . . . . . . . . . . . . . . . . . . . . . . . . . . . . . . . . . . . . . . . . . . . . . . . . . . . . . . . . . . . . . . . . . . . . . . . . . . . . . . 241
Step 15: Finishing off . . . . . . . . . . . . . . . . . . . . . . . . . . . . . . . . . . . . . . . . . . . . . . . . . . . . . . . . . . . . . . . . . . . . . . . . . . . . . . . . . . . . . . . . . . . . . . . . . . . . . . . . 242
Step 16: Making the cracker . . . . . . . . . . . . . . . . . . . . . . . . . . . . . . . . . . . . . . . . . . . . . . . . . . . . . . . . . . . . . . . . . . . . . . . . . . . . . . . . . . . . . . . . . . . . . . . . . . 246
Step 17: Making it yours ! . . . . . . . . . . . . . . . . . . . . . . . . . . . . . . . . . . . . . . . . . . . . . . . . . . . . . . . . . . . . . . . . . . . . . . . . . . . . . . . . . . . . . . . . . . . . . . . . . . . . 248
Step 18: Trying things out . . . . . . . . . . . . . . . . . . . . . . . . . . . . . . . . . . . . . . . . . . . . . . . . . . . . . . . . . . . . . . . . . . . . . . . . . . . . . . . . . . . . . . . . . . . . . . . . . . . . 250
Step 19: FInal reference sheet . . . . . . . . . . . . . . . . . . . . . . . . . . . . . . . . . . . . . . . . . . . . . . . . . . . . . . . . . . . . . . . . . . . . . . . . . . . . . . . . . . . . . . . . . . . . . . . . . 250
Related Instructables . . . . . . . . . . . . . . . . . . . . . . . . . . . . . . . . . . . . . . . . . . . . . . . . . . . . . . . . . . . . . . . . . . . . . . . . . . . . . . . . . . . . . . . . . . . . . . . . . . . . . . . . 251
Super-easy Paracord Camp Chair . . . . . . . . . . . . . . . . . . . . . . . . . . . . . . . . . . . . . . . . . . . . . . . . . . . . . . . . . . . . . . . . . . . . . . . . . . . . . . . . . . . . . . . . . . . . . . . . . 252
Intro: Super-easy Paracord Camp Chair . . . . . . . . . . . . . . . . . . . . . . . . . . . . . . . . . . . . . . . . . . . . . . . . . . . . . . . . . . . . . . . . . . . . . . . . . . . . . . . . . . . . . . . . . 252
Step 1: You Will Need . . . . . . . . . . . . . . . . . . . . . . . . . . . . . . . . . . . . . . . . . . . . . . . . . . . . . . . . . . . . . . . . . . . . . . . . . . . . . . . . . . . . . . . . . . . . . . . . . . . . . . . 252
Step 2: Hang Your Cord . . . . . . . . . . . . . . . . . . . . . . . . . . . . . . . . . . . . . . . . . . . . . . . . . . . . . . . . . . . . . . . . . . . . . . . . . . . . . . . . . . . . . . . . . . . . . . . . . . . . . 253
Step 3: Attaching the Towel . . . . . . . . . . . . . . . . . . . . . . . . . . . . . . . . . . . . . . . . . . . . . . . . . . . . . . . . . . . . . . . . . . . . . . . . . . . . . . . . . . . . . . . . . . . . . . . . . . . 254
Step 4: The Magic Loop (optional) . . . . . . . . . . . . . . . . . . . . . . . . . . . . . . . . . . . . . . . . . . . . . . . . . . . . . . . . . . . . . . . . . . . . . . . . . . . . . . . . . . . . . . . . . . . . . . 256
Step 5: Test the Chair, and Make Adjustments . . . . . . . . . . . . . . . . . . . . . . . . . . . . . . . . . . . . . . . . . . . . . . . . . . . . . . . . . . . . . . . . . . . . . . . . . . . . . . . . . . . . . 256
Step 6: Enjoy Your Comfy Chair . . . . . . . . . . . . . . . . . . . . . . . . . . . . . . . . . . . . . . . . . . . . . . . . . . . . . . . . . . . . . . . . . . . . . . . . . . . . . . . . . . . . . . . . . . . . . . . 256
Step 7: Appendix: How to tie a Sheet Bend . . . . . . . . . . . . . . . . . . . . . . . . . . . . . . . . . . . . . . . . . . . . . . . . . . . . . . . . . . . . . . . . . . . . . . . . . . . . . . . . . . . . . . . 257
Related Instructables . . . . . . . . . . . . . . . . . . . . . . . . . . . . . . . . . . . . . . . . . . . . . . . . . . . . . . . . . . . . . . . . . . . . . . . . . . . . . . . . . . . . . . . . . . . . . . . . . . . . . . . . 258
How to make a weaved paracord lighter holder . . . . . . . . . . . . . . . . . . . . . . . . . . . . . . . . . . . . . . . . . . . . . . . . . . . . . . . . . . . . . . . . . . . . . . . . . . . . . . . . . . . . . . . 259
Intro: How to make a weaved paracord lighter holder . . . . . . . . . . . . . . . . . . . . . . . . . . . . . . . . . . . . . . . . . . . . . . . . . . . . . . . . . . . . . . . . . . . . . . . . . . . . . . . . 259
Step 1: Materials . . . . . . . . . . . . . . . . . . . . . . . . . . . . . . . . . . . . . . . . . . . . . . . . . . . . . . . . . . . . . . . . . . . . . . . . . . . . . . . . . . . . . . . . . . . . . . . . . . . . . . . . . . . 261
Step 2: Starting to wrap . . . . . . . . . . . . . . . . . . . . . . . . . . . . . . . . . . . . . . . . . . . . . . . . . . . . . . . . . . . . . . . . . . . . . . . . . . . . . . . . . . . . . . . . . . . . . . . . . . . . . . 261
Step 3: Starting to weave . . . . . . . . . . . . . . . . . . . . . . . . . . . . . . . . . . . . . . . . . . . . . . . . . . . . . . . . . . . . . . . . . . . . . . . . . . . . . . . . . . . . . . . . . . . . . . . . . . . . 262
Step 4: Finishing up . . . . . . . . . . . . . . . . . . . . . . . . . . . . . . . . . . . . . . . . . . . . . . . . . . . . . . . . . . . . . . . . . . . . . . . . . . . . . . . . . . . . . . . . . . . . . . . . . . . . . . . . 262

http://www.instructables.com/id/Paracord/
Related Instructables . . . . . . . . . . . . . . . . . . . . . . . . . . . . . . . . . . . . . . . . . . . . . . . . . . . . . . . . . . . . . . . . . . . . . . . . . . . . . . . . . . . . . . . . . . . . . . . . . . . . . . . . 263
How to make a Paracord Leatherman Pouch . . . . . . . . . . . . . . . . . . . . . . . . . . . . . . . . . . . . . . . . . . . . . . . . . . . . . . . . . . . . . . . . . . . . . . . . . . . . . . . . . . . . . . . . . 264
Intro: How to make a Paracord Leatherman Pouch . . . . . . . . . . . . . . . . . . . . . . . . . . . . . . . . . . . . . . . . . . . . . . . . . . . . . . . . . . . . . . . . . . . . . . . . . . . . . . . . . 264
Step 1: Materials . . . . . . . . . . . . . . . . . . . . . . . . . . . . . . . . . . . . . . . . . . . . . . . . . . . . . . . . . . . . . . . . . . . . . . . . . . . . . . . . . . . . . . . . . . . . . . . . . . . . . . . . . . . 264
Step 2: Preparing your weave . . . . . . . . . . . . . . . . . . . . . . . . . . . . . . . . . . . . . . . . . . . . . . . . . . . . . . . . . . . . . . . . . . . . . . . . . . . . . . . . . . . . . . . . . . . . . . . . . 265
Step 3: Weaving your pouch . . . . . . . . . . . . . . . . . . . . . . . . . . . . . . . . . . . . . . . . . . . . . . . . . . . . . . . . . . . . . . . . . . . . . . . . . . . . . . . . . . . . . . . . . . . . . . . . . . 266
Step 4: Shaping the pouch round your Leatherman . . . . . . . . . . . . . . . . . . . . . . . . . . . . . . . . . . . . . . . . . . . . . . . . . . . . . . . . . . . . . . . . . . . . . . . . . . . . . . . . . 269
Step 5: Adding a belt loop . . . . . . . . . . . . . . . . . . . . . . . . . . . . . . . . . . . . . . . . . . . . . . . . . . . . . . . . . . . . . . . . . . . . . . . . . . . . . . . . . . . . . . . . . . . . . . . . . . . . 270
Step 6: Completed Pouch . . . . . . . . . . . . . . . . . . . . . . . . . . . . . . . . . . . . . . . . . . . . . . . . . . . . . . . . . . . . . . . . . . . . . . . . . . . . . . . . . . . . . . . . . . . . . . . . . . . . 271
Related Instructables . . . . . . . . . . . . . . . . . . . . . . . . . . . . . . . . . . . . . . . . . . . . . . . . . . . . . . . . . . . . . . . . . . . . . . . . . . . . . . . . . . . . . . . . . . . . . . . . . . . . . . . . 271
DIY Paracord Fids (Permalok-like Needles) . . . . . . . . . . . . . . . . . . . . . . . . . . . . . . . . . . . . . . . . . . . . . . . . . . . . . . . . . . . . . . . . . . . . . . . . . . . . . . . . . . . . . . . . . . 272
Intro: DIY Paracord Fids (Permalok-like Needles) . . . . . . . . . . . . . . . . . . . . . . . . . . . . . . . . . . . . . . . . . . . . . . . . . . . . . . . . . . . . . . . . . . . . . . . . . . . . . . . . . . 272
Step 1: Tools and Materials . . . . . . . . . . . . . . . . . . . . . . . . . . . . . . . . . . . . . . . . . . . . . . . . . . . . . . . . . . . . . . . . . . . . . . . . . . . . . . . . . . . . . . . . . . . . . . . . . . . 273
Step 2: Remove the head of the screw post . . . . . . . . . . . . . . . . . . . . . . . . . . . . . . . . . . . . . . . . . . . . . . . . . . . . . . . . . . . . . . . . . . . . . . . . . . . . . . . . . . . . . . . 273
Step 3: Round over the end just cut off . . . . . . . . . . . . . . . . . . . . . . . . . . . . . . . . . . . . . . . . . . . . . . . . . . . . . . . . . . . . . . . . . . . . . . . . . . . . . . . . . . . . . . . . . . 273
Step 4: Finished . . . . . . . . . . . . . . . . . . . . . . . . . . . . . . . . . . . . . . . . . . . . . . . . . . . . . . . . . . . . . . . . . . . . . . . . . . . . . . . . . . . . . . . . . . . . . . . . . . . . . . . . . . . 274
Related Instructables . . . . . . . . . . . . . . . . . . . . . . . . . . . . . . . . . . . . . . . . . . . . . . . . . . . . . . . . . . . . . . . . . . . . . . . . . . . . . . . . . . . . . . . . . . . . . . . . . . . . . . . . 274
Easy Paracord Survival Key Fob . . . . . . . . . . . . . . . . . . . . . . . . . . . . . . . . . . . . . . . . . . . . . . . . . . . . . . . . . . . . . . . . . . . . . . . . . . . . . . . . . . . . . . . . . . . . . . . . . . 275
Intro: Easy Paracord Survival Key Fob . . . . . . . . . . . . . . . . . . . . . . . . . . . . . . . . . . . . . . . . . . . . . . . . . . . . . . . . . . . . . . . . . . . . . . . . . . . . . . . . . . . . . . . . . . . 275
Step 1: Stuff . . . . . . . . . . . . . . . . . . . . . . . . . . . . . . . . . . . . . . . . . . . . . . . . . . . . . . . . . . . . . . . . . . . . . . . . . . . . . . . . . . . . . . . . . . . . . . . . . . . . . . . . . . . . . . 275
Step 2: Attaching to the keyring . . . . . . . . . . . . . . . . . . . . . . . . . . . . . . . . . . . . . . . . . . . . . . . . . . . . . . . . . . . . . . . . . . . . . . . . . . . . . . . . . . . . . . . . . . . . . . . . 276
Step 3: Weaving the fob . . . . . . . . . . . . . . . . . . . . . . . . . . . . . . . . . . . . . . . . . . . . . . . . . . . . . . . . . . . . . . . . . . . . . . . . . . . . . . . . . . . . . . . . . . . . . . . . . . . . . 276
Step 4: Finishing . . . . . . . . . . . . . . . . . . . . . . . . . . . . . . . . . . . . . . . . . . . . . . . . . . . . . . . . . . . . . . . . . . . . . . . . . . . . . . . . . . . . . . . . . . . . . . . . . . . . . . . . . . . 279
Step 5: Go use it! . . . . . . . . . . . . . . . . . . . . . . . . . . . . . . . . . . . . . . . . . . . . . . . . . . . . . . . . . . . . . . . . . . . . . . . . . . . . . . . . . . . . . . . . . . . . . . . . . . . . . . . . . . 279
Related Instructables . . . . . . . . . . . . . . . . . . . . . . . . . . . . . . . . . . . . . . . . . . . . . . . . . . . . . . . . . . . . . . . . . . . . . . . . . . . . . . . . . . . . . . . . . . . . . . . . . . . . . . . . 279
Easy woven paracord belt . . . . . . . . . . . . . . . . . . . . . . . . . . . . . . . . . . . . . . . . . . . . . . . . . . . . . . . . . . . . . . . . . . . . . . . . . . . . . . . . . . . . . . . . . . . . . . . . . . . . . . . 280
Intro: Easy woven paracord belt . . . . . . . . . . . . . . . . . . . . . . . . . . . . . . . . . . . . . . . . . . . . . . . . . . . . . . . . . . . . . . . . . . . . . . . . . . . . . . . . . . . . . . . . . . . . . . . . 280
Step 1: Supplies . . . . . . . . . . . . . . . . . . . . . . . . . . . . . . . . . . . . . . . . . . . . . . . . . . . . . . . . . . . . . . . . . . . . . . . . . . . . . . . . . . . . . . . . . . . . . . . . . . . . . . . . . . . 280
Step 2: Measuring. . . . . . . . . . . . . . . . . . . . . . . . . . . . . . . . . . . . . . . . . . . . . . . . . . . . . . . . . . . . . . . . . . . . . . . . . . . . . . . . . . . . . . . . . . . . . . . . . . . . . . . . . . 281
Step 3: Getting it set up to weave . . . . . . . . . . . . . . . . . . . . . . . . . . . . . . . . . . . . . . . . . . . . . . . . . . . . . . . . . . . . . . . . . . . . . . . . . . . . . . . . . . . . . . . . . . . . . . 281
Step 4: Get your weave on! . . . . . . . . . . . . . . . . . . . . . . . . . . . . . . . . . . . . . . . . . . . . . . . . . . . . . . . . . . . . . . . . . . . . . . . . . . . . . . . . . . . . . . . . . . . . . . . . . . . 282
Step 5: Just keep weaving, weaving, weaving. . . . . . . . . . . . . . . . . . . . . . . . . . . . . . . . . . . . . . . . . . . . . . . . . . . . . . . . . . . . . . . . . . . . . . . . . . . . . . . . . . . . . . 284
Step 6: Finishing up . . . . . . . . . . . . . . . . . . . . . . . . . . . . . . . . . . . . . . . . . . . . . . . . . . . . . . . . . . . . . . . . . . . . . . . . . . . . . . . . . . . . . . . . . . . . . . . . . . . . . . . . 284
Related Instructables . . . . . . . . . . . . . . . . . . . . . . . . . . . . . . . . . . . . . . . . . . . . . . . . . . . . . . . . . . . . . . . . . . . . . . . . . . . . . . . . . . . . . . . . . . . . . . . . . . . . . . . . 284
The easiest paracord bracelet you'll ever make. . . . . . . . . . . . . . . . . . . . . . . . . . . . . . . . . . . . . . . . . . . . . . . . . . . . . . . . . . . . . . . . . . . . . . . . . . . . . . . . . . . . . . . . 285
Intro: The easiest paracord bracelet you'll ever make. . . . . . . . . . . . . . . . . . . . . . . . . . . . . . . . . . . . . . . . . . . . . . . . . . . . . . . . . . . . . . . . . . . . . . . . . . . . . . . . 286
Step 1: Materials . . . . . . . . . . . . . . . . . . . . . . . . . . . . . . . . . . . . . . . . . . . . . . . . . . . . . . . . . . . . . . . . . . . . . . . . . . . . . . . . . . . . . . . . . . . . . . . . . . . . . . . . . . . 286
Step 2: The first knot . . . . . . . . . . . . . . . . . . . . . . . . . . . . . . . . . . . . . . . . . . . . . . . . . . . . . . . . . . . . . . . . . . . . . . . . . . . . . . . . . . . . . . . . . . . . . . . . . . . . . . . . 287
Step 3: . . . . . . . . . . . . . . . . . . . . . . . . . . . . . . . . . . . . . . . . . . . . . . . . . . . . . . . . . . . . . . . . . . . . . . . . . . . . . . . . . . . . . . . . . . . . . . . . . . . . . . . . . . . . . . . . . . 287
Step 4: . . . . . . . . . . . . . . . . . . . . . . . . . . . . . . . . . . . . . . . . . . . . . . . . . . . . . . . . . . . . . . . . . . . . . . . . . . . . . . . . . . . . . . . . . . . . . . . . . . . . . . . . . . . . . . . . . . 287
Step 5: . . . . . . . . . . . . . . . . . . . . . . . . . . . . . . . . . . . . . . . . . . . . . . . . . . . . . . . . . . . . . . . . . . . . . . . . . . . . . . . . . . . . . . . . . . . . . . . . . . . . . . . . . . . . . . . . . . 288
Step 6: . . . . . . . . . . . . . . . . . . . . . . . . . . . . . . . . . . . . . . . . . . . . . . . . . . . . . . . . . . . . . . . . . . . . . . . . . . . . . . . . . . . . . . . . . . . . . . . . . . . . . . . . . . . . . . . . . . 289

http://www.instructables.com/id/Paracord/
Step 7: The second knot . . . . . . . . . . . . . . . . . . . . . . . . . . . . . . . . . . . . . . . . . . . . . . . . . . . . . . . . . . . . . . . . . . . . . . . . . . . . . . . . . . . . . . . . . . . . . . . . . . . . . 290
Step 8: . . . . . . . . . . . . . . . . . . . . . . . . . . . . . . . . . . . . . . . . . . . . . . . . . . . . . . . . . . . . . . . . . . . . . . . . . . . . . . . . . . . . . . . . . . . . . . . . . . . . . . . . . . . . . . . . . . 290
Step 9: . . . . . . . . . . . . . . . . . . . . . . . . . . . . . . . . . . . . . . . . . . . . . . . . . . . . . . . . . . . . . . . . . . . . . . . . . . . . . . . . . . . . . . . . . . . . . . . . . . . . . . . . . . . . . . . . . . 291
Related Instructables . . . . . . . . . . . . . . . . . . . . . . . . . . . . . . . . . . . . . . . . . . . . . . . . . . . . . . . . . . . . . . . . . . . . . . . . . . . . . . . . . . . . . . . . . . . . . . . . . . . . . . . . 292
Easy Paracord Drawstring Pouch! . . . . . . . . . . . . . . . . . . . . . . . . . . . . . . . . . . . . . . . . . . . . . . . . . . . . . . . . . . . . . . . . . . . . . . . . . . . . . . . . . . . . . . . . . . . . . . . . . 293
Intro: Easy Paracord Drawstring Pouch! . . . . . . . . . . . . . . . . . . . . . . . . . . . . . . . . . . . . . . . . . . . . . . . . . . . . . . . . . . . . . . . . . . . . . . . . . . . . . . . . . . . . . . . . . . 293
Step 1: Stuff You'll Need . . . . . . . . . . . . . . . . . . . . . . . . . . . . . . . . . . . . . . . . . . . . . . . . . . . . . . . . . . . . . . . . . . . . . . . . . . . . . . . . . . . . . . . . . . . . . . . . . . . . . 293
Step 2: Drawstring . . . . . . . . . . . . . . . . . . . . . . . . . . . . . . . . . . . . . . . . . . . . . . . . . . . . . . . . . . . . . . . . . . . . . . . . . . . . . . . . . . . . . . . . . . . . . . . . . . . . . . . . . . 294
Step 3: Off we go! . . . . . . . . . . . . . . . . . . . . . . . . . . . . . . . . . . . . . . . . . . . . . . . . . . . . . . . . . . . . . . . . . . . . . . . . . . . . . . . . . . . . . . . . . . . . . . . . . . . . . . . . . . 295
Step 4: Keep on dancing! . . . . . . . . . . . . . . . . . . . . . . . . . . . . . . . . . . . . . . . . . . . . . . . . . . . . . . . . . . . . . . . . . . . . . . . . . . . . . . . . . . . . . . . . . . . . . . . . . . . . 298
Step 5: Finishing it of . . . . . . . . . . . . . . . . . . . . . . . . . . . . . . . . . . . . . . . . . . . . . . . . . . . . . . . . . . . . . . . . . . . . . . . . . . . . . . . . . . . . . . . . . . . . . . . . . . . . . . . . 299
Step 6: Admiring your work! . . . . . . . . . . . . . . . . . . . . . . . . . . . . . . . . . . . . . . . . . . . . . . . . . . . . . . . . . . . . . . . . . . . . . . . . . . . . . . . . . . . . . . . . . . . . . . . . . . . 301
Related Instructables . . . . . . . . . . . . . . . . . . . . . . . . . . . . . . . . . . . . . . . . . . . . . . . . . . . . . . . . . . . . . . . . . . . . . . . . . . . . . . . . . . . . . . . . . . . . . . . . . . . . . . . . 302
How to make a single color survival bracelet/paracord bracelet with buckle . . . . . . . . . . . . . . . . . . . . . . . . . . . . . . . . . . . . . . . . . . . . . . . . . . . . . . . . . . . . . . . . . . . 303
Intro: How to make a single color survival bracelet/paracord bracelet with buckle . . . . . . . . . . . . . . . . . . . . . . . . . . . . . . . . . . . . . . . . . . . . . . . . . . . . . . . . . . . 303
Step 1: What You'll Need . . . . . . . . . . . . . . . . . . . . . . . . . . . . . . . . . . . . . . . . . . . . . . . . . . . . . . . . . . . . . . . . . . . . . . . . . . . . . . . . . . . . . . . . . . . . . . . . . . . . 303
Step 2: Measuring Your Wrist. . . . . . . . . . . . . . . . . . . . . . . . . . . . . . . . . . . . . . . . . . . . . . . . . . . . . . . . . . . . . . . . . . . . . . . . . . . . . . . . . . . . . . . . . . . . . . . . . . 304
Step 3: Cutting and Melting Ends . . . . . . . . . . . . . . . . . . . . . . . . . . . . . . . . . . . . . . . . . . . . . . . . . . . . . . . . . . . . . . . . . . . . . . . . . . . . . . . . . . . . . . . . . . . . . . . 304
Step 4: Sliding Buckles Onto Cord . . . . . . . . . . . . . . . . . . . . . . . . . . . . . . . . . . . . . . . . . . . . . . . . . . . . . . . . . . . . . . . . . . . . . . . . . . . . . . . . . . . . . . . . . . . . . . 305
Step 5: Measuring Cord To Match Wrist Size . . . . . . . . . . . . . . . . . . . . . . . . . . . . . . . . . . . . . . . . . . . . . . . . . . . . . . . . . . . . . . . . . . . . . . . . . . . . . . . . . . . . . . 305
Step 6: Completing Your First Braid . . . . . . . . . . . . . . . . . . . . . . . . . . . . . . . . . . . . . . . . . . . . . . . . . . . . . . . . . . . . . . . . . . . . . . . . . . . . . . . . . . . . . . . . . . . . . 305
Step 7: Completing Second Braid . . . . . . . . . . . . . . . . . . . . . . . . . . . . . . . . . . . . . . . . . . . . . . . . . . . . . . . . . . . . . . . . . . . . . . . . . . . . . . . . . . . . . . . . . . . . . . 306
Step 8: Finish All Braids and Pull For More Slack . . . . . . . . . . . . . . . . . . . . . . . . . . . . . . . . . . . . . . . . . . . . . . . . . . . . . . . . . . . . . . . . . . . . . . . . . . . . . . . . . . . 307
Step 9: Finishing It Off . . . . . . . . . . . . . . . . . . . . . . . . . . . . . . . . . . . . . . . . . . . . . . . . . . . . . . . . . . . . . . . . . . . . . . . . . . . . . . . . . . . . . . . . . . . . . . . . . . . . . . . 307
Step 10: Tightening Up The End . . . . . . . . . . . . . . . . . . . . . . . . . . . . . . . . . . . . . . . . . . . . . . . . . . . . . . . . . . . . . . . . . . . . . . . . . . . . . . . . . . . . . . . . . . . . . . . 308
Step 11: Final Cut and Melt . . . . . . . . . . . . . . . . . . . . . . . . . . . . . . . . . . . . . . . . . . . . . . . . . . . . . . . . . . . . . . . . . . . . . . . . . . . . . . . . . . . . . . . . . . . . . . . . . . . 308
Step 12: DONE! . . . . . . . . . . . . . . . . . . . . . . . . . . . . . . . . . . . . . . . . . . . . . . . . . . . . . . . . . . . . . . . . . . . . . . . . . . . . . . . . . . . . . . . . . . . . . . . . . . . . . . . . . . . 308
Related Instructables . . . . . . . . . . . . . . . . . . . . . . . . . . . . . . . . . . . . . . . . . . . . . . . . . . . . . . . . . . . . . . . . . . . . . . . . . . . . . . . . . . . . . . . . . . . . . . . . . . . . . . . . 309
How To Make a Two Color Survival Bracelet. . . . . . . . . . . . . . . . . . . . . . . . . . . . . . . . . . . . . . . . . . . . . . . . . . . . . . . . . . . . . . . . . . . . . . . . . . . . . . . . . . . . . . . . . . 310
Intro: How To Make a Two Color Survival Bracelet. . . . . . . . . . . . . . . . . . . . . . . . . . . . . . . . . . . . . . . . . . . . . . . . . . . . . . . . . . . . . . . . . . . . . . . . . . . . . . . . . . 310
Step 1: What you’ll need. . . . . . . . . . . . . . . . . . . . . . . . . . . . . . . . . . . . . . . . . . . . . . . . . . . . . . . . . . . . . . . . . . . . . . . . . . . . . . . . . . . . . . . . . . . . . . . . . . . . . 310
Step 2: Measuring your wrist . . . . . . . . . . . . . . . . . . . . . . . . . . . . . . . . . . . . . . . . . . . . . . . . . . . . . . . . . . . . . . . . . . . . . . . . . . . . . . . . . . . . . . . . . . . . . . . . . . 311
Step 3: Cutting your cord, and melting ends. . . . . . . . . . . . . . . . . . . . . . . . . . . . . . . . . . . . . . . . . . . . . . . . . . . . . . . . . . . . . . . . . . . . . . . . . . . . . . . . . . . . . . . 311
Step 4: Sliding both buckle halves onto the cord. . . . . . . . . . . . . . . . . . . . . . . . . . . . . . . . . . . . . . . . . . . . . . . . . . . . . . . . . . . . . . . . . . . . . . . . . . . . . . . . . . . . 311
Step 5: Temporary step: taping the excess cord. . . . . . . . . . . . . . . . . . . . . . . . . . . . . . . . . . . . . . . . . . . . . . . . . . . . . . . . . . . . . . . . . . . . . . . . . . . . . . . . . . . . 312
Step 6: Measuring to insure your bracelet ends up being the right size . . . . . . . . . . . . . . . . . . . . . . . . . . . . . . . . . . . . . . . . . . . . . . . . . . . . . . . . . . . . . . . . . . . 312
Step 7: Starting your first Cobra braid . . . . . . . . . . . . . . . . . . . . . . . . . . . . . . . . . . . . . . . . . . . . . . . . . . . . . . . . . . . . . . . . . . . . . . . . . . . . . . . . . . . . . . . . . . . 312
Step 8: Weaving your second Cobra braid . . . . . . . . . . . . . . . . . . . . . . . . . . . . . . . . . . . . . . . . . . . . . . . . . . . . . . . . . . . . . . . . . . . . . . . . . . . . . . . . . . . . . . . . 313
Step 9: Optional step. Pulling bracelet for slack. . . . . . . . . . . . . . . . . . . . . . . . . . . . . . . . . . . . . . . . . . . . . . . . . . . . . . . . . . . . . . . . . . . . . . . . . . . . . . . . . . . . . 313
Step 10: Braiding the cord over the 1âۥ excess cord. . . . . . . . . . . . . . . . . . . . . . . . . . . . . . . . . . . . . . . . . . . . . . . . . . . . . . . . . . . . . . . . . . . . . . . . . . . . . . . . . 314
Step 11: Finishing touches . . . . . . . . . . . . . . . . . . . . . . . . . . . . . . . . . . . . . . . . . . . . . . . . . . . . . . . . . . . . . . . . . . . . . . . . . . . . . . . . . . . . . . . . . . . . . . . . . . . 314
Step 12: Tightening the end . . . . . . . . . . . . . . . . . . . . . . . . . . . . . . . . . . . . . . . . . . . . . . . . . . . . . . . . . . . . . . . . . . . . . . . . . . . . . . . . . . . . . . . . . . . . . . . . . . . 315

http://www.instructables.com/id/Paracord/
Step 13: Cut/Melt remaining cord . . . . . . . . . . . . . . . . . . . . . . . . . . . . . . . . . . . . . . . . . . . . . . . . . . . . . . . . . . . . . . . . . . . . . . . . . . . . . . . . . . . . . . . . . . . . . . . 315
Step 14: Your done! . . . . . . . . . . . . . . . . . . . . . . . . . . . . . . . . . . . . . . . . . . . . . . . . . . . . . . . . . . . . . . . . . . . . . . . . . . . . . . . . . . . . . . . . . . . . . . . . . . . . . . . . 315
Related Instructables . . . . . . . . . . . . . . . . . . . . . . . . . . . . . . . . . . . . . . . . . . . . . . . . . . . . . . . . . . . . . . . . . . . . . . . . . . . . . . . . . . . . . . . . . . . . . . . . . . . . . . . . 316

http://www.instructables.com/id/Paracord/
Author and Copyright NoticesInstructable: Paracord bracelet with a side release buckleAuthor: StormdraneLicense: Attribution-NonCommercial-ShareAlike (by-nc-sa)
Instructable: Paracord wrist lanyard made with the snake knotAuthor: StormdraneLicense: Attribution-NonCommercial-ShareAlike (by-nc-sa)
Instructable: Paracord Bracelet with Monkey Fist ButtonAuthor: Tommi PotxLicense: Attribution-NonCommercial-ShareAlike (by-nc-sa)
Instructable: Woven paracord bracelet/watchbandAuthor: StormdraneLicense: Attribution-NonCommercial-ShareAlike (by-nc-sa)
Instructable: Survival Bracelet (Updated!)Author: tevers94License: Attribution-NonCommercial (by-nc)
Instructable: Parachute Cord BeltAuthor: greatpandaLicense: Attribution-NonCommercial-ShareAlike (by-nc-sa)
Instructable: Wide Paracord BraceletAuthor: Falcon_WOGLicense: Attribution-NonCommercial-ShareAlike (by-nc-sa)
Instructable: Make a Wide Sturdy Handle With The Portuguese SinnetAuthor: kengLicense: Attribution-NonCommercial-ShareAlike (by-nc-sa)
Instructable: How to make a harpoon on the cheapAuthor: notjustsomeoneLicense: Attribution-NonCommercial-ShareAlike (by-nc-sa)
Instructable: Paracord watchband/bracelet with a side release buckleAuthor: StormdraneLicense: Attribution-NonCommercial-ShareAlike (by-nc-sa)
Instructable: Multi-Color Monkey FistAuthor: TripWir3License: Attribution-NonCommercial-ShareAlike (by-nc-sa)
Instructable: How To Make a Four Strand Round Braid Dog Leash From ParacordAuthor: Doggie StylishLicense: Attribution-NonCommercial-NoDerivs (by-nc-nd)
Instructable: How to make a great looking braceletAuthor: MetafireLicense: Attribution-NonCommercial-ShareAlike (by-nc-sa)
Instructable: Paracord Lighter WrapAuthor: METALBLADELicense: Attribution-NonCommercial-ShareAlike (by-nc-sa)
Instructable: How To Make A Paracord Dog Collar Using The Seesaw KnotAuthor: Doggie StylishLicense: None (All Rights Reserved) (c)
Instructable: How To Make A Paracord Dog Leash Using The Seesaw KnotAuthor: Doggie StylishLicense: None (All Rights Reserved) (c)
Instructable: Cutting cord without a knifeAuthor: qon duixoteLicense: Attribution-NonCommercial-ShareAlike (by-nc-sa)
Instructable: Knife Making Without ToolsAuthor: TimAndersonLicense: Attribution-NonCommercial-ShareAlike (by-nc-sa)
Instructable: Army Ranger BeadsAuthor: NikcdcLicense: Attribution-NonCommercial-ShareAlike (by-nc-sa)
Instructable: Simple Paracord RingAuthor: clintonmcLicense: Attribution-NonCommercial-ShareAlike (by-nc-sa)
Instructable: Multi-Color Paracord Can KoozieAuthor: craftydanLicense: Attribution-NonCommercial-ShareAlike (by-nc-sa)
Instructable: How to Make a Paracord Fender Keychain

http://www.instructables.com/id/Paracord/
Author: SyberProdigyLicense: Attribution-NonCommercial-ShareAlike (by-nc-sa)
Instructable: How I singe my Paracord endsAuthor: evil ernieLicense: Attribution-NonCommercial-ShareAlike (by-nc-sa)
Instructable: Paracord Laced Pallet, Hanging ChairAuthor: Twotim221License: Attribution-NonCommercial (by-nc)
Instructable: How to make a survival paracord belt using only two cords!Author: building kingLicense: Attribution-NonCommercial-NoDerivs (by-nc-nd)
Instructable: Paracord Rifle SlingAuthor: biker_trash_1340License: Attribution-NonCommercial-ShareAlike (by-nc-sa)
Instructable: Paracord BullwhipAuthor: ch5License: Attribution-NonCommercial-NoDerivs (by-nc-nd)
Instructable: Super-easy Paracord Camp ChairAuthor: RavingMadStudiosLicense: Attribution-NonCommercial-ShareAlike (by-nc-sa)
Instructable: How to make a weaved paracord lighter holderAuthor: evil ernieLicense: Attribution-NonCommercial-ShareAlike (by-nc-sa)
Instructable: How to make a Paracord Leatherman PouchAuthor: stuwegieLicense: Attribution-NonCommercial-ShareAlike (by-nc-sa)
Instructable: DIY Paracord Fids (Permalok-like Needles)Author: MacGyver9License: Attribution-NonCommercial-ShareAlike (by-nc-sa)
Instructable: Easy Paracord Survival Key FobAuthor: Adambowker98License: Attribution-NonCommercial-ShareAlike (by-nc-sa)
Instructable: Easy woven paracord beltAuthor: amandaggogoLicense: Attribution-NonCommercial-ShareAlike (by-nc-sa)
Instructable: The easiest paracord bracelet you'll ever make.Author: KuribosbootsLicense: Attribution-NonCommercial-ShareAlike (by-nc-sa)
Instructable: Easy Paracord Drawstring Pouch!Author: snipirLicense: Attribution-NonCommercial-ShareAlike (by-nc-sa)
Instructable: How to make a single color survival bracelet/paracord bracelet with buckleAuthor: ParavivalLicense: Attribution-NonCommercial-ShareAlike (by-nc-sa)
Instructable: How To Make a Two Color Survival Bracelet.Author: ParavivalLicense: Attribution (by)

http://www.instructables.com/id/Paracord/
DisclaimerAll do-it-yourself activities involve risk, and your safety is your own responsibility, including proper use of equipment and safety gear, and determining whether you haveadequate skill and experience. Some of the resources used for these projects are dangerous unless used properly and with adequate precautions, including safety gear.Some illustrative photos do not depict safety precautions or equipment, in order to show the project steps more clearly. The projects are not intended for use by children.
Many projects on Instructables are user-submitted, and appearance of a project in this format does not indicate it has been checked for safety or functionality. Use of theinstructions and suggestions is at your own risk. Instructables, Inc. disclaims all responsibility for any resulting damage, injury, or expense. It is your responsibility to makesure that your activities comply with all applicable laws.
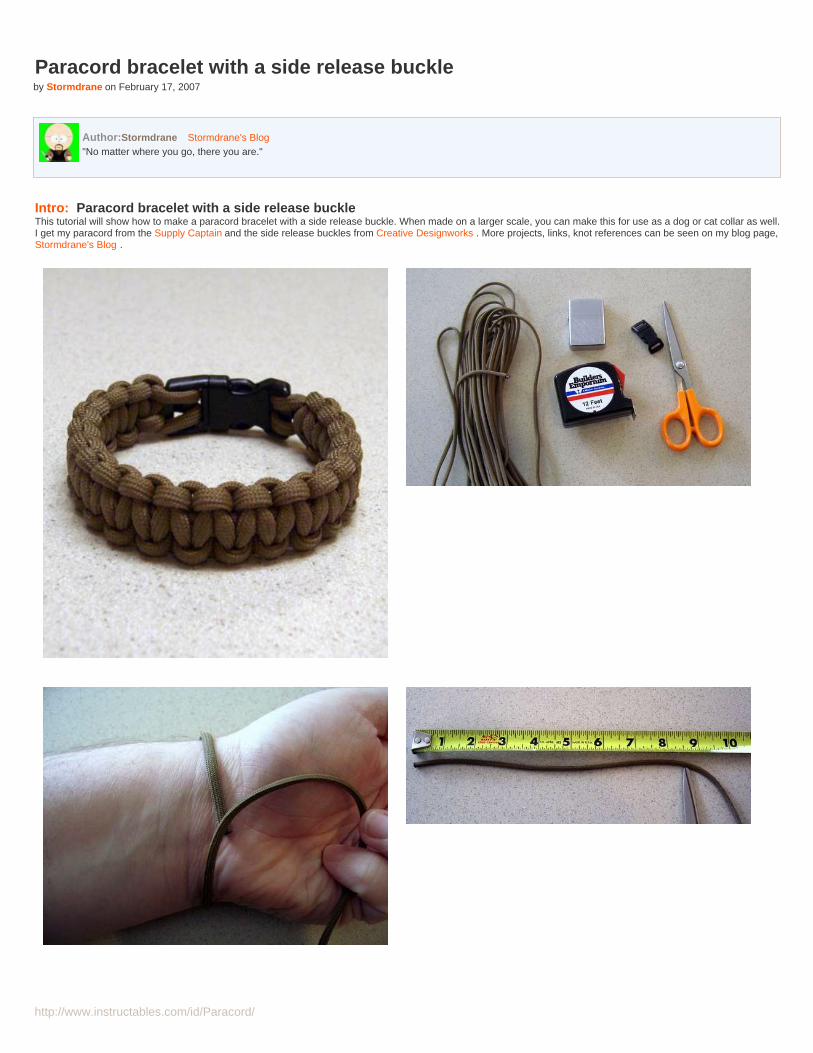
http://www.instructables.com/id/Paracord/
Paracord bracelet with a side release buckleby Stormdrane on February 17, 2007
Author:Stormdrane Stormdrane's Blog"No matter where you go, there you are."
Intro: Paracord bracelet with a side release buckleThis tutorial will show how to make a paracord bracelet with a side release buckle. When made on a larger scale, you can make this for use as a dog or cat collar as well.I get my paracord from the Supply Captain and the side release buckles from Creative Designworks . More projects, links, knot references can be seen on my blog page,Stormdrane's Blog .
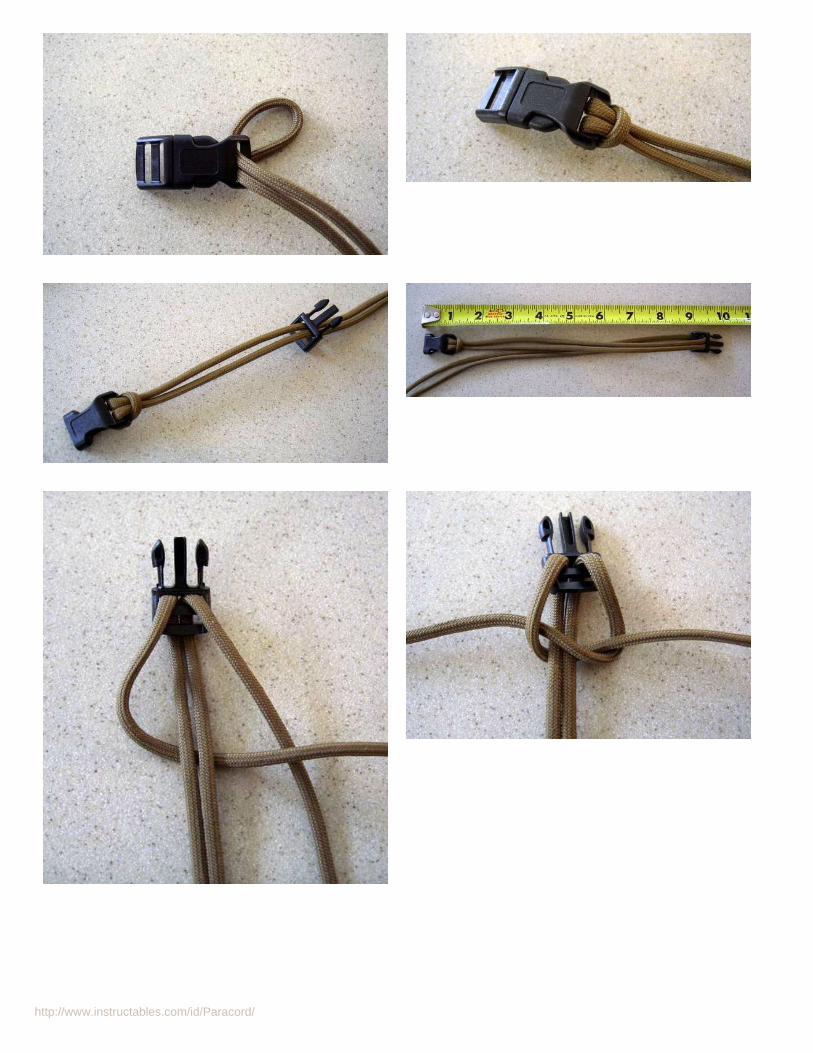
http://www.instructables.com/id/Paracord/
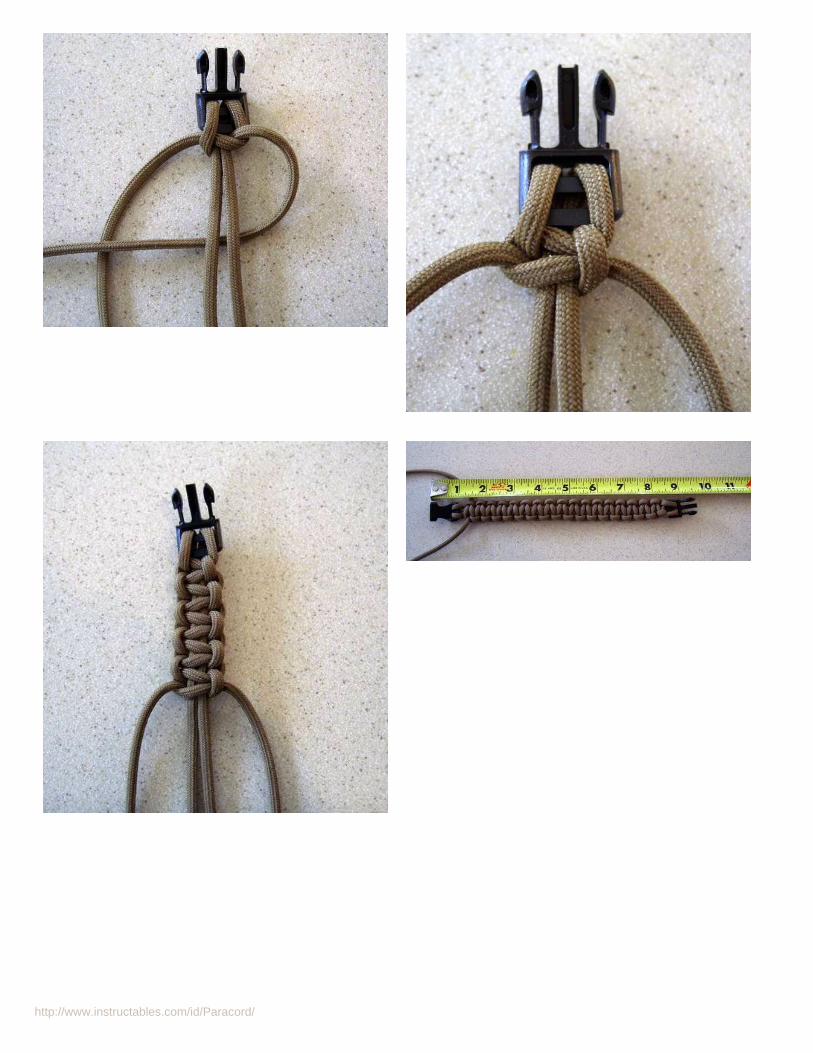
http://www.instructables.com/id/Paracord/
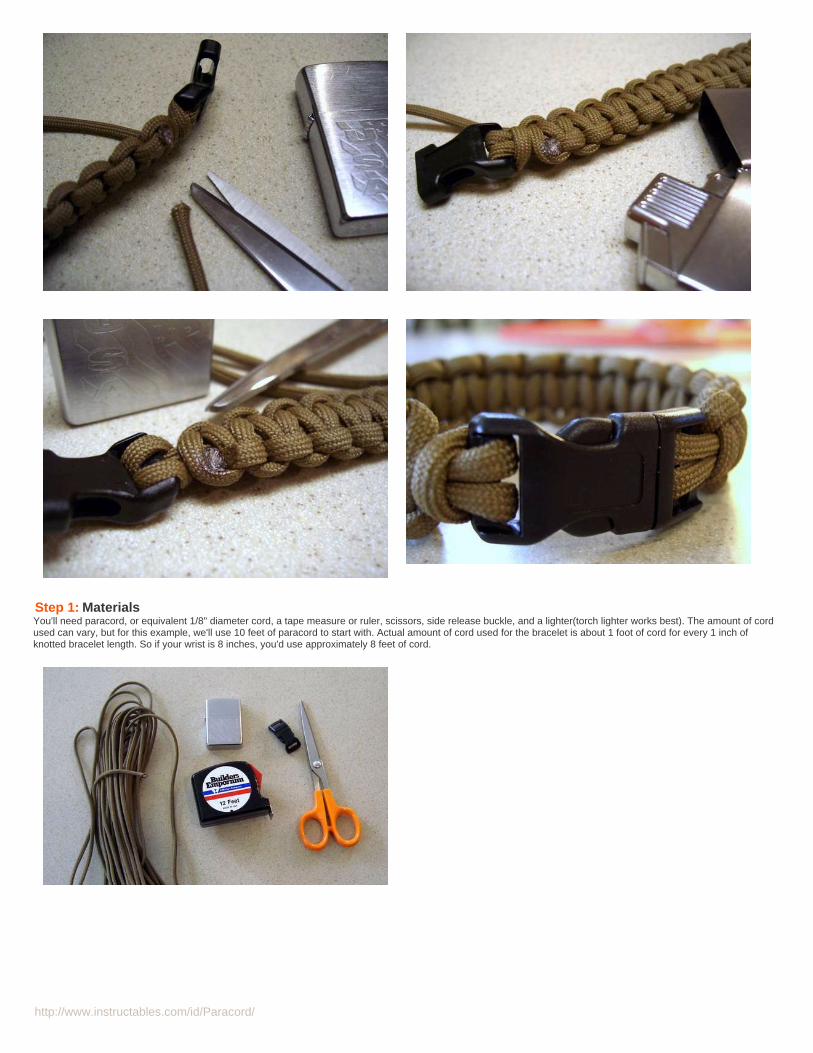
http://www.instructables.com/id/Paracord/
Step 1: MaterialsYou'll need paracord, or equivalent 1/8" diameter cord, a tape measure or ruler, scissors, side release buckle, and a lighter(torch lighter works best). The amount of cordused can vary, but for this example, we'll use 10 feet of paracord to start with. Actual amount of cord used for the bracelet is about 1 foot of cord for every 1 inch ofknotted bracelet length. So if your wrist is 8 inches, you'd use approximately 8 feet of cord.

http://www.instructables.com/id/Paracord/
Step 2: Measure wristWrap the paracord around you wrist and make a note of where the cord meets. Hold this point next to your ruler or tape measure and that's your wrist size.
Step 3: Find the center of the cordHold the ends of the cord together and find the center of the loop. Take the center of the cord and pull it thru one end of the buckle(either side of the buckle, it doesn'tmatter). Now pull the cord ends thru the loop until it's tightened up and attached to the buckle.
Step 4: Finding the bracelet lengthTake buckle apart and and pull the free ends of the cord thru the other part of the buckle, sliding it up towards the attached part. You're going to measure the distancebetween the two buckle ends for the bracelet size for your wrist. Add about 1 inch to your measured wrist length, this will make the finished bracelet a comfortable fit.You're measuring from the end of the female part of the buckle to the flat part of the male end of the buckle(the part with the prongs, they don't count for themeasurement because the fit inside the female part of the buckle when the bracelet is closed.).

http://www.instructables.com/id/Paracord/
Step 5: Start making the knotsThe knot used for the bracelet has a few different names, cobra stitch, Solomon bar, and Portuguese sinnet. Take the cord on the left side and place it under the centerstrands running between the buckle ends. Now take the cord on the right side under the left side cord, over the center strands, and thru the loop of the left side cord.Tighten up the cords so the half knot you just formed is next to the buckle. Now take the right side cord under the center strands. The left side cord goes under the rightside cord, over the center strands and thru the loop of the right side cord. Tighten up the cords(not too tight, just until they meet the resistance of the knot) and now youhave a completed knot. You will continue doing the alternating the left and right sides as you go. If you don't alternate, you'll quickly see a twisting of the knots, just undothe last knot and alternate it to correct.
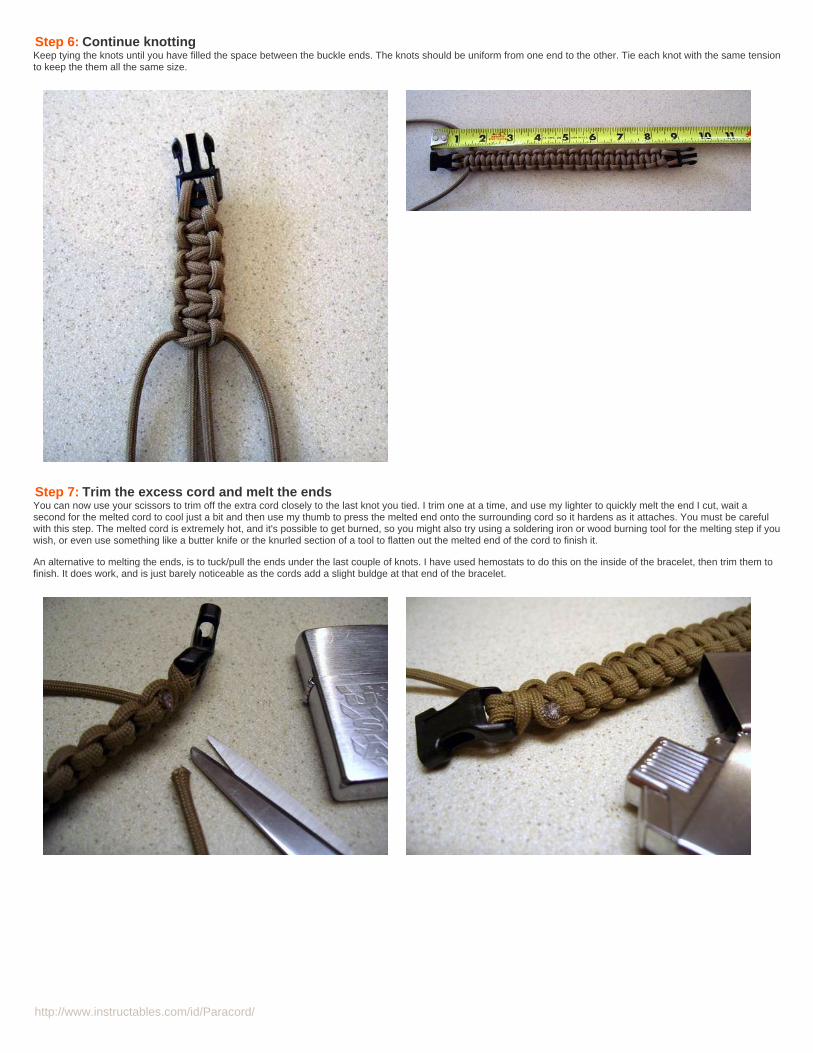
http://www.instructables.com/id/Paracord/
Step 6: Continue knottingKeep tying the knots until you have filled the space between the buckle ends. The knots should be uniform from one end to the other. Tie each knot with the same tensionto keep the them all the same size.
Step 7: Trim the excess cord and melt the endsYou can now use your scissors to trim off the extra cord closely to the last knot you tied. I trim one at a time, and use my lighter to quickly melt the end I cut, wait asecond for the melted cord to cool just a bit and then use my thumb to press the melted end onto the surrounding cord so it hardens as it attaches. You must be carefulwith this step. The melted cord is extremely hot, and it's possible to get burned, so you might also try using a soldering iron or wood burning tool for the melting step if youwish, or even use something like a butter knife or the knurled section of a tool to flatten out the melted end of the cord to finish it.
An alternative to melting the ends, is to tuck/pull the ends under the last couple of knots. I have used hemostats to do this on the inside of the bracelet, then trim them tofinish. It does work, and is just barely noticeable as the cords add a slight buldge at that end of the bracelet.
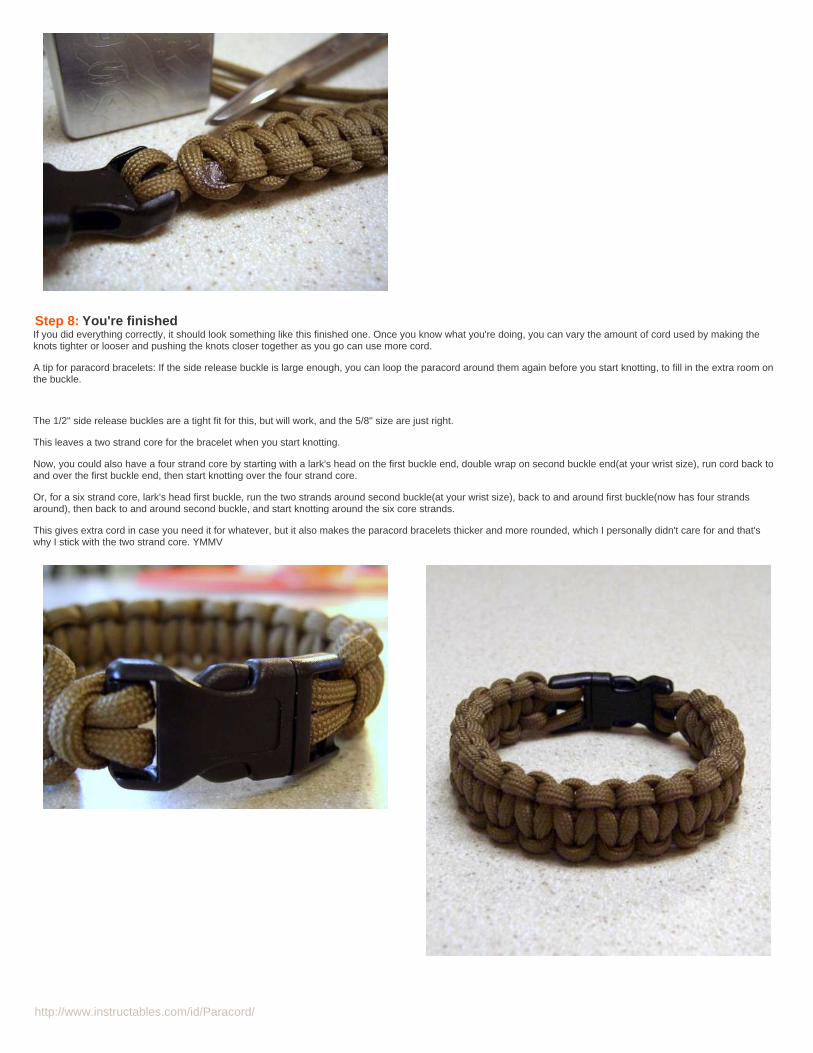
http://www.instructables.com/id/Paracord/
Step 8: You're finishedIf you did everything correctly, it should look something like this finished one. Once you know what you're doing, you can vary the amount of cord used by making theknots tighter or looser and pushing the knots closer together as you go can use more cord.
A tip for paracord bracelets: If the side release buckle is large enough, you can loop the paracord around them again before you start knotting, to fill in the extra room onthe buckle.
The 1/2" side release buckles are a tight fit for this, but will work, and the 5/8" size are just right.
This leaves a two strand core for the bracelet when you start knotting.
Now, you could also have a four strand core by starting with a lark's head on the first buckle end, double wrap on second buckle end(at your wrist size), run cord back toand over the first buckle end, then start knotting over the four strand core.
Or, for a six strand core, lark's head first buckle, run the two strands around second buckle(at your wrist size), back to and around first buckle(now has four strandsaround), then back to and around second buckle, and start knotting around the six core strands.
This gives extra cord in case you need it for whatever, but it also makes the paracord bracelets thicker and more rounded, which I personally didn't care for and that'swhy I stick with the two strand core. YMMV
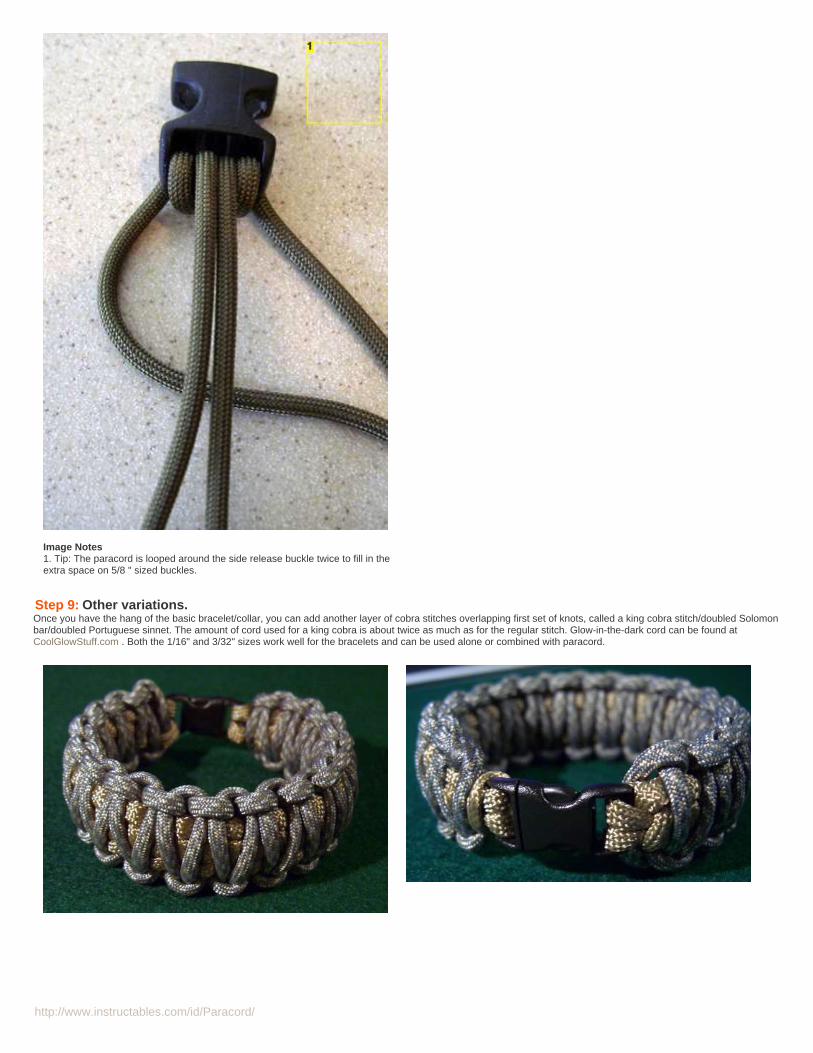
http://www.instructables.com/id/Paracord/
Image Notes1. Tip: The paracord is looped around the side release buckle twice to fill in theextra space on 5/8 " sized buckles.
Step 9: Other variations.Once you have the hang of the basic bracelet/collar, you can add another layer of cobra stitches overlapping first set of knots, called a king cobra stitch/doubled Solomonbar/doubled Portuguese sinnet. The amount of cord used for a king cobra is about twice as much as for the regular stitch. Glow-in-the-dark cord can be found atCoolGlowStuff.com . Both the 1/16" and 3/32" sizes work well for the bracelets and can be used alone or combined with paracord.
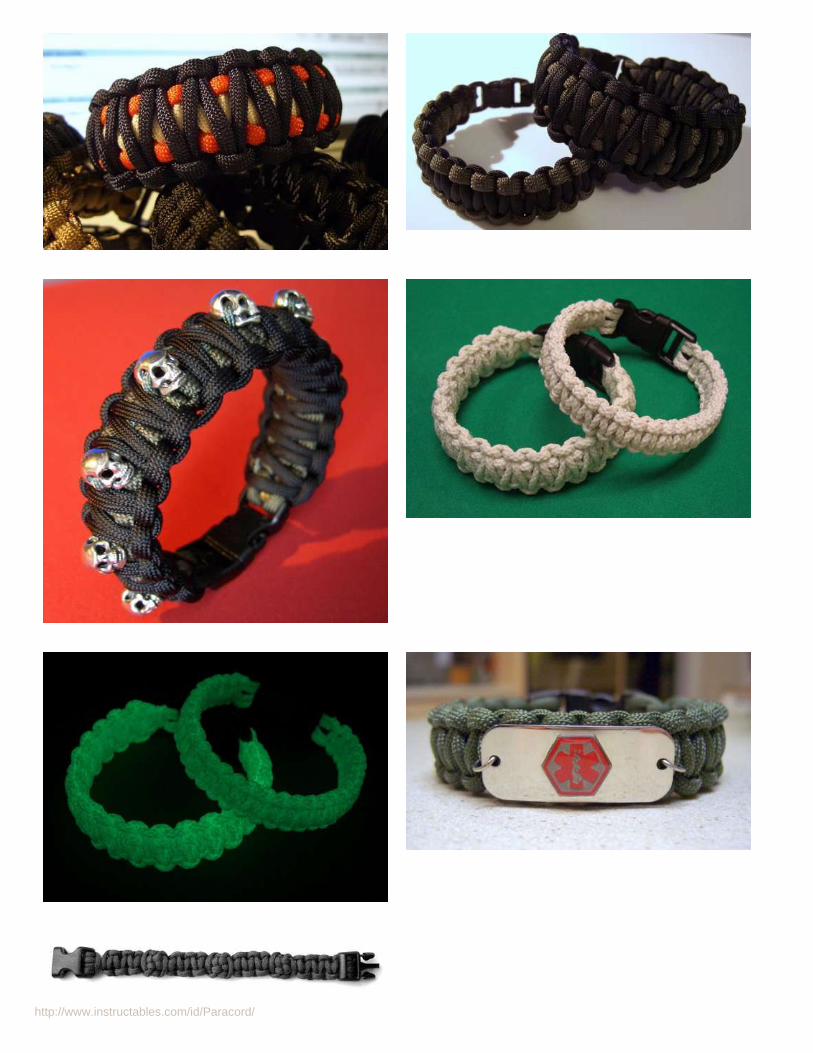
http://www.instructables.com/id/Paracord/
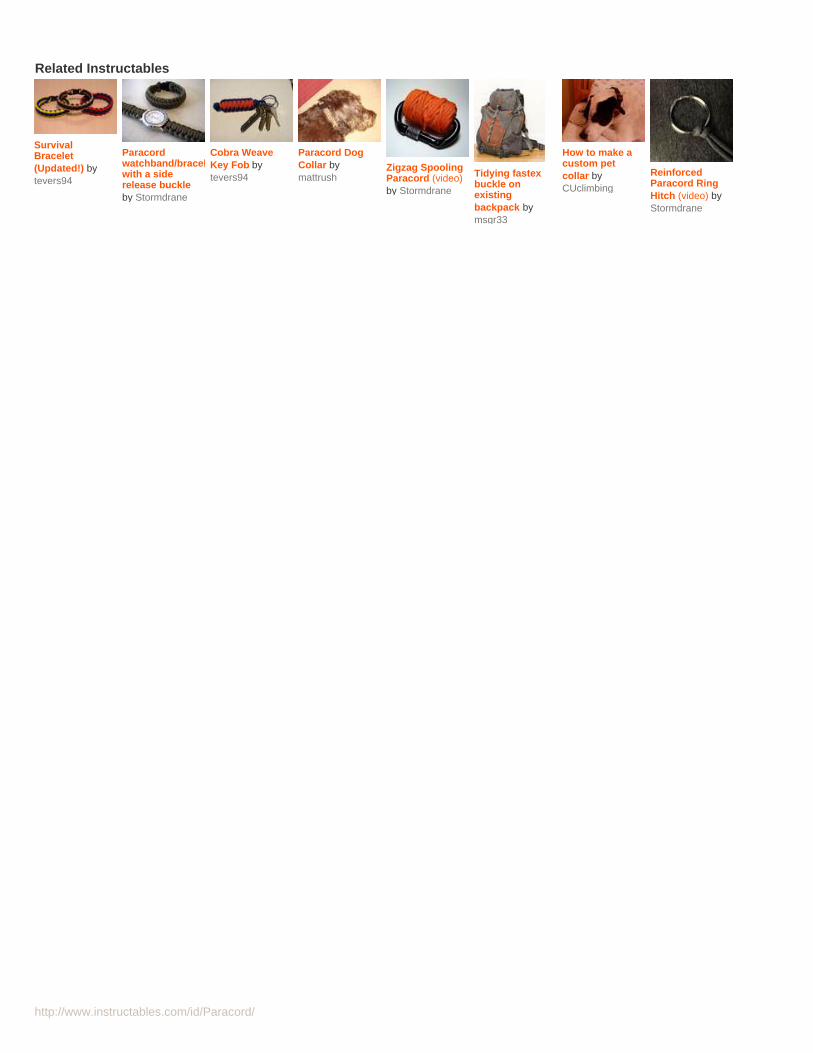
http://www.instructables.com/id/Paracord/
Related Instructables
SurvivalBracelet(Updated!) bytevers94
Paracordwatchband/braceletwith a siderelease buckleby Stormdrane
Cobra WeaveKey Fob bytevers94
Paracord DogCollar bymattrush
Zigzag SpoolingParacord (video)by Stormdrane
Tidying fastexbuckle onexistingbackpack bymsgr33
How to make acustom petcollar byCUclimbing
ReinforcedParacord RingHitch (video) byStormdrane
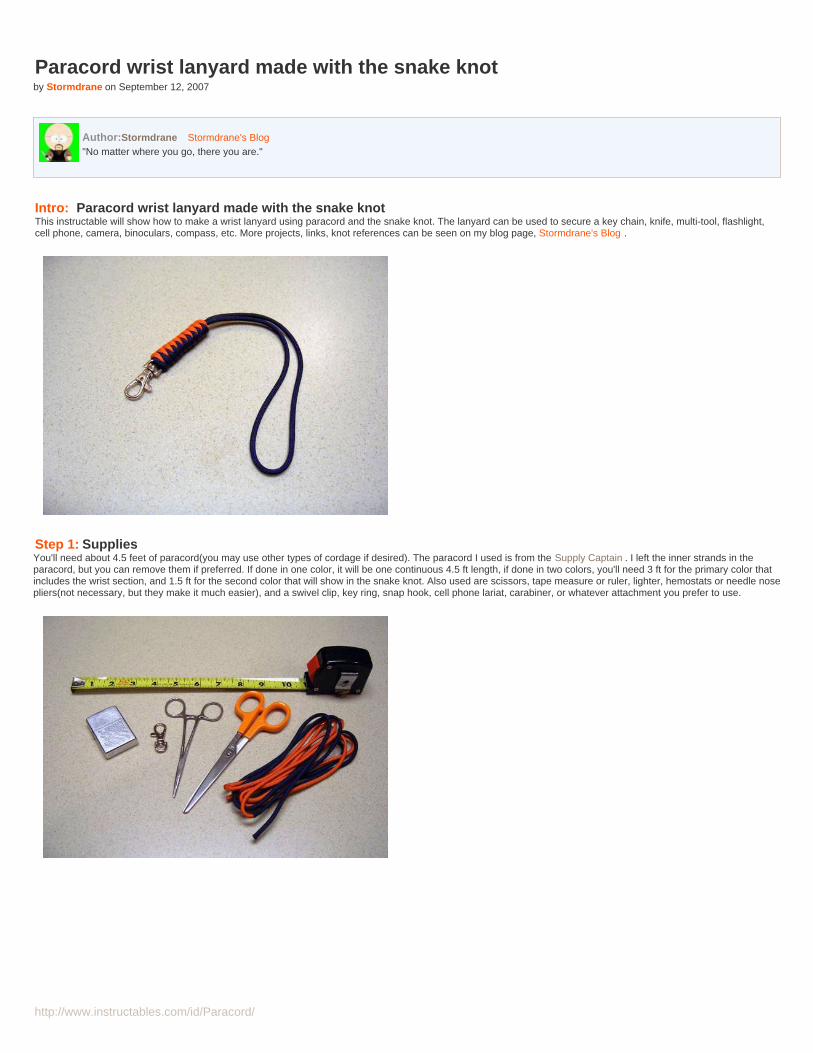
http://www.instructables.com/id/Paracord/
Paracord wrist lanyard made with the snake knotby Stormdrane on September 12, 2007
Author:Stormdrane Stormdrane's Blog"No matter where you go, there you are."
Intro: Paracord wrist lanyard made with the snake knotThis instructable will show how to make a wrist lanyard using paracord and the snake knot. The lanyard can be used to secure a key chain, knife, multi-tool, flashlight,cell phone, camera, binoculars, compass, etc. More projects, links, knot references can be seen on my blog page, Stormdrane's Blog .
Step 1: SuppliesYou'll need about 4.5 feet of paracord(you may use other types of cordage if desired). The paracord I used is from the Supply Captain . I left the inner strands in theparacord, but you can remove them if preferred. If done in one color, it will be one continuous 4.5 ft length, if done in two colors, you'll need 3 ft for the primary color thatincludes the wrist section, and 1.5 ft for the second color that will show in the snake knot. Also used are scissors, tape measure or ruler, lighter, hemostats or needle nosepliers(not necessary, but they make it much easier), and a swivel clip, key ring, snap hook, cell phone lariat, carabiner, or whatever attachment you prefer to use.
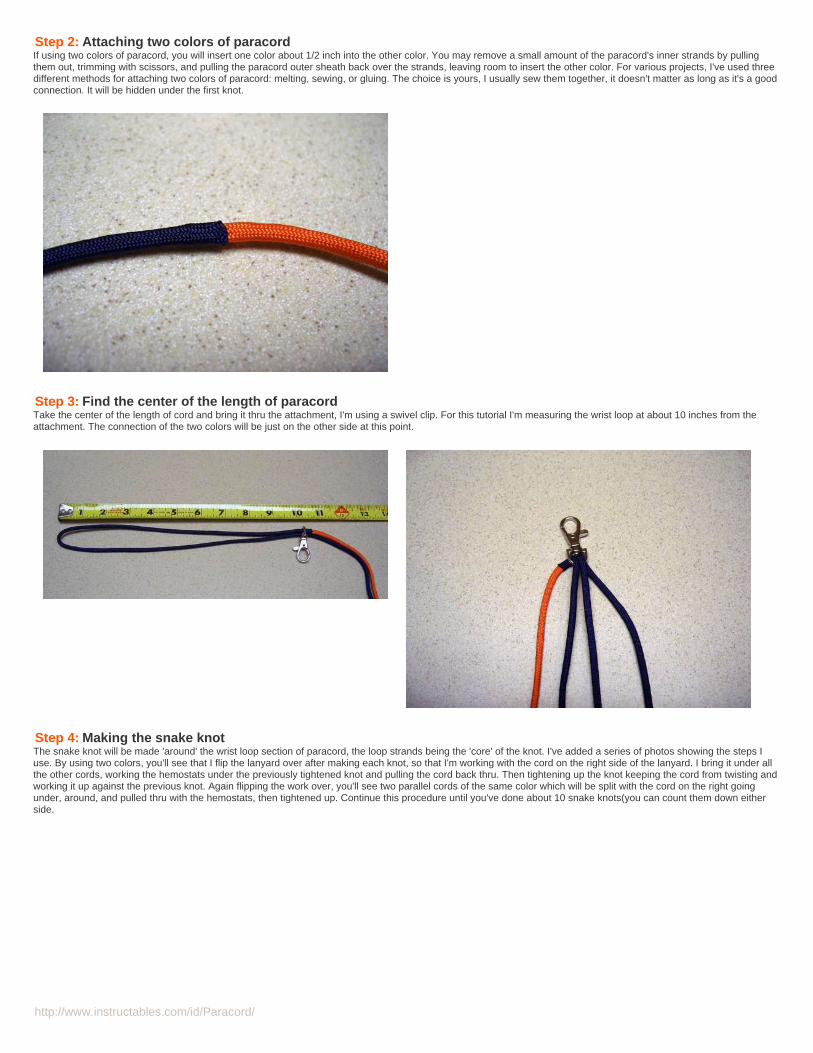
http://www.instructables.com/id/Paracord/
Step 2: Attaching two colors of paracordIf using two colors of paracord, you will insert one color about 1/2 inch into the other color. You may remove a small amount of the paracord's inner strands by pullingthem out, trimming with scissors, and pulling the paracord outer sheath back over the strands, leaving room to insert the other color. For various projects, I've used threedifferent methods for attaching two colors of paracord: melting, sewing, or gluing. The choice is yours, I usually sew them together, it doesn't matter as long as it's a goodconnection. It will be hidden under the first knot.
Step 3: Find the center of the length of paracordTake the center of the length of cord and bring it thru the attachment, I'm using a swivel clip. For this tutorial I'm measuring the wrist loop at about 10 inches from theattachment. The connection of the two colors will be just on the other side at this point.
Step 4: Making the snake knotThe snake knot will be made 'around' the wrist loop section of paracord, the loop strands being the 'core' of the knot. I've added a series of photos showing the steps Iuse. By using two colors, you'll see that I flip the lanyard over after making each knot, so that I'm working with the cord on the right side of the lanyard. I bring it under allthe other cords, working the hemostats under the previously tightened knot and pulling the cord back thru. Then tightening up the knot keeping the cord from twisting andworking it up against the previous knot. Again flipping the work over, you'll see two parallel cords of the same color which will be split with the cord on the right goingunder, around, and pulled thru with the hemostats, then tightened up. Continue this procedure until you've done about 10 snake knots(you can count them down eitherside.
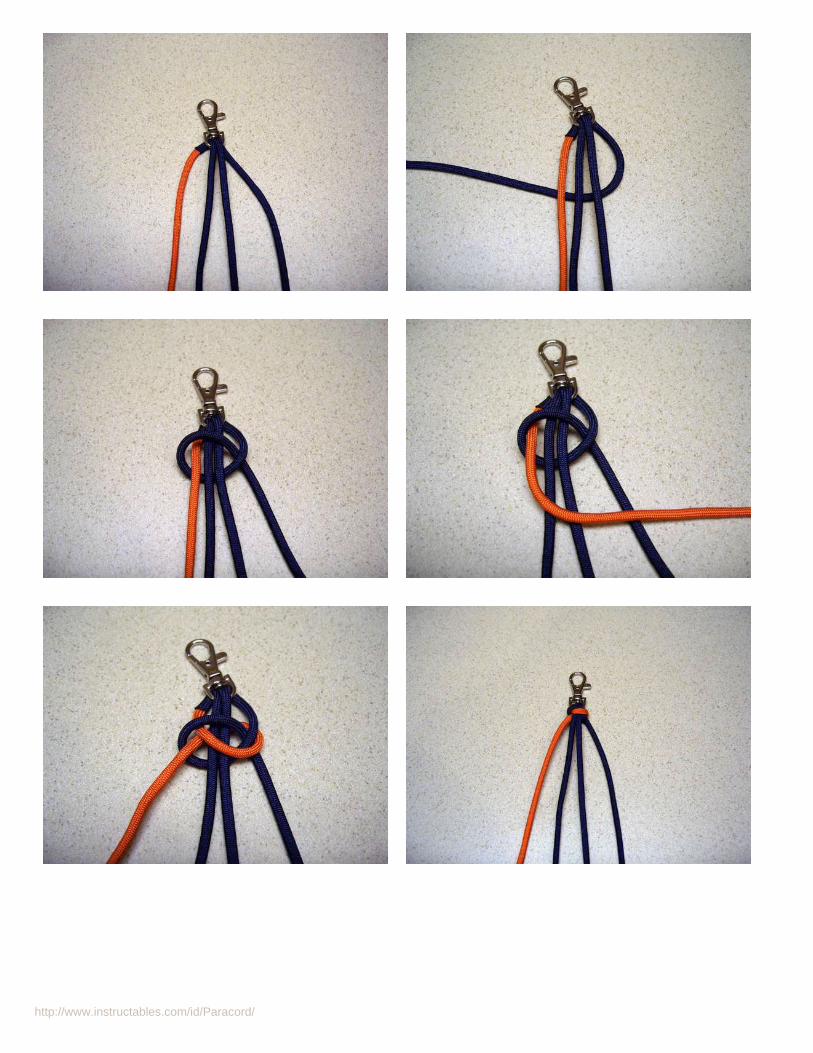
http://www.instructables.com/id/Paracord/
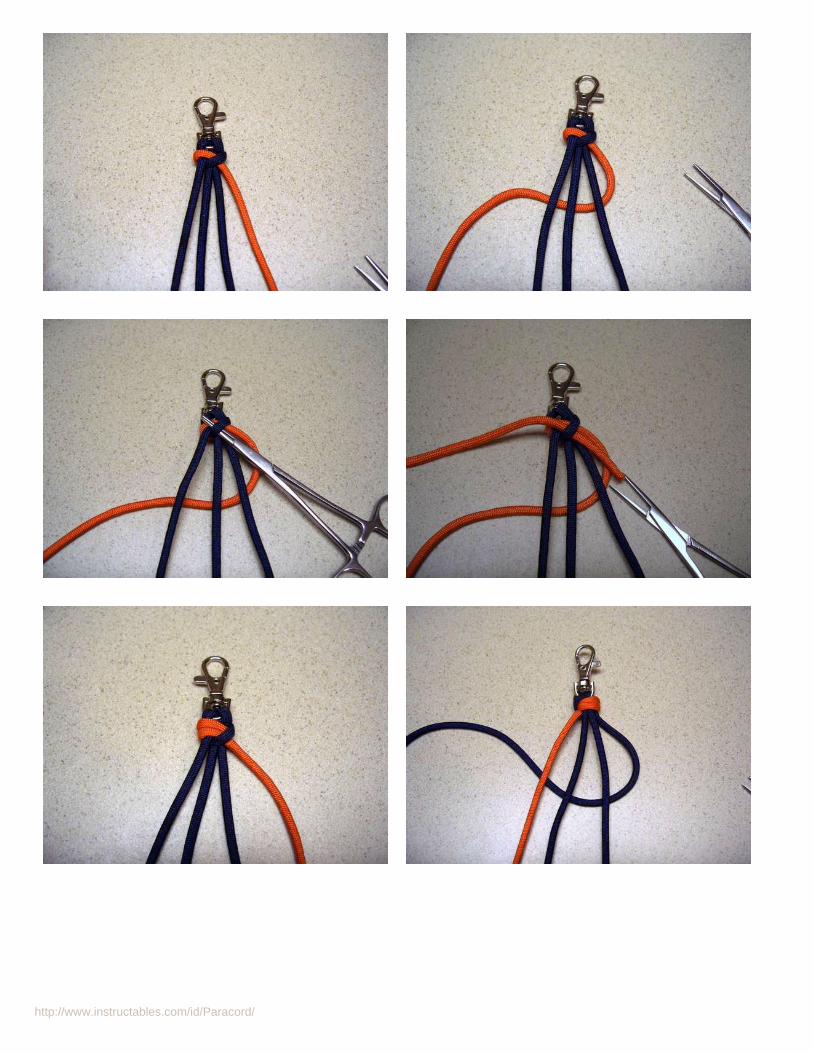
http://www.instructables.com/id/Paracord/
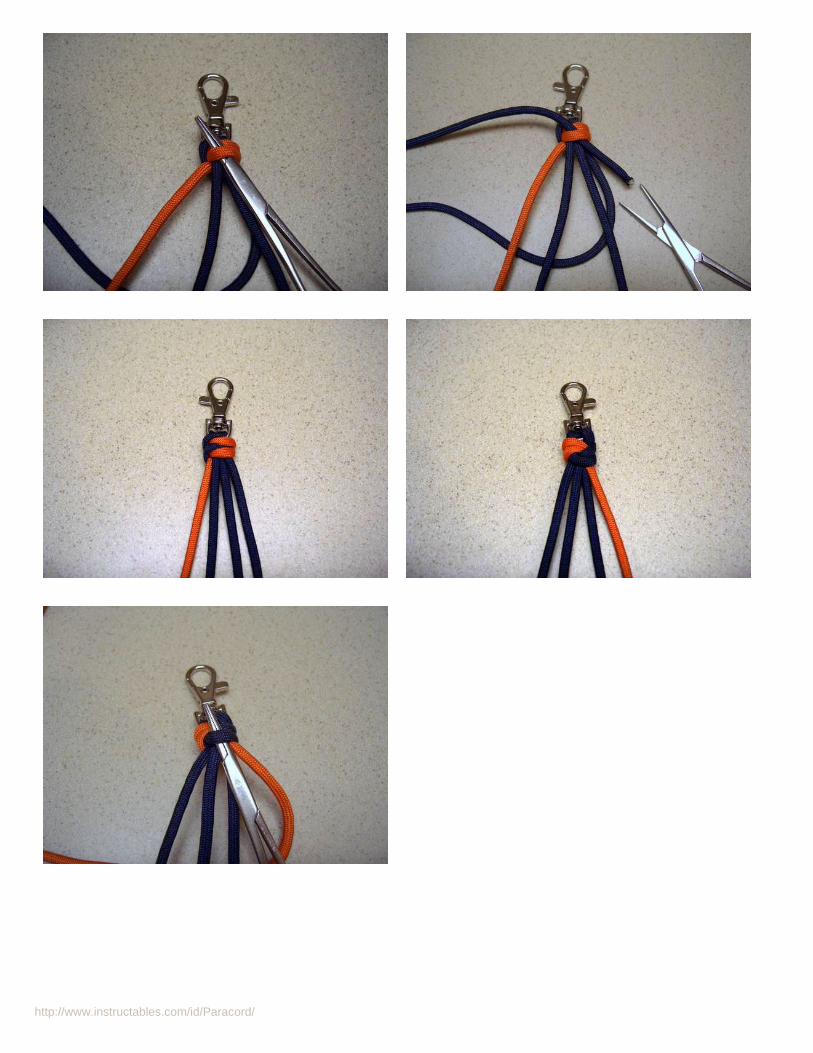
http://www.instructables.com/id/Paracord/
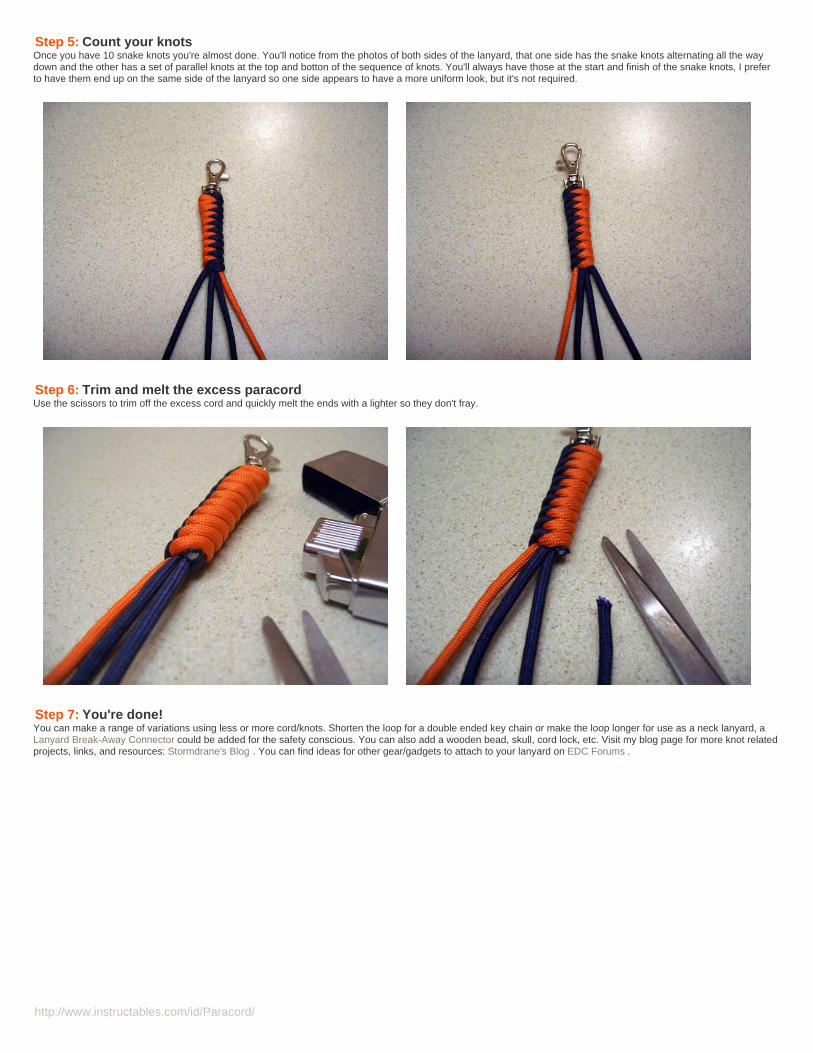
http://www.instructables.com/id/Paracord/
Step 5: Count your knotsOnce you have 10 snake knots you're almost done. You'll notice from the photos of both sides of the lanyard, that one side has the snake knots alternating all the waydown and the other has a set of parallel knots at the top and botton of the sequence of knots. You'll always have those at the start and finish of the snake knots, I preferto have them end up on the same side of the lanyard so one side appears to have a more uniform look, but it's not required.
Step 6: Trim and melt the excess paracordUse the scissors to trim off the excess cord and quickly melt the ends with a lighter so they don't fray.
Step 7: You're done!You can make a range of variations using less or more cord/knots. Shorten the loop for a double ended key chain or make the loop longer for use as a neck lanyard, aLanyard Break-Away Connector could be added for the safety conscious. You can also add a wooden bead, skull, cord lock, etc. Visit my blog page for more knot relatedprojects, links, and resources: Stormdrane's Blog . You can find ideas for other gear/gadgets to attach to your lanyard on EDC Forums .
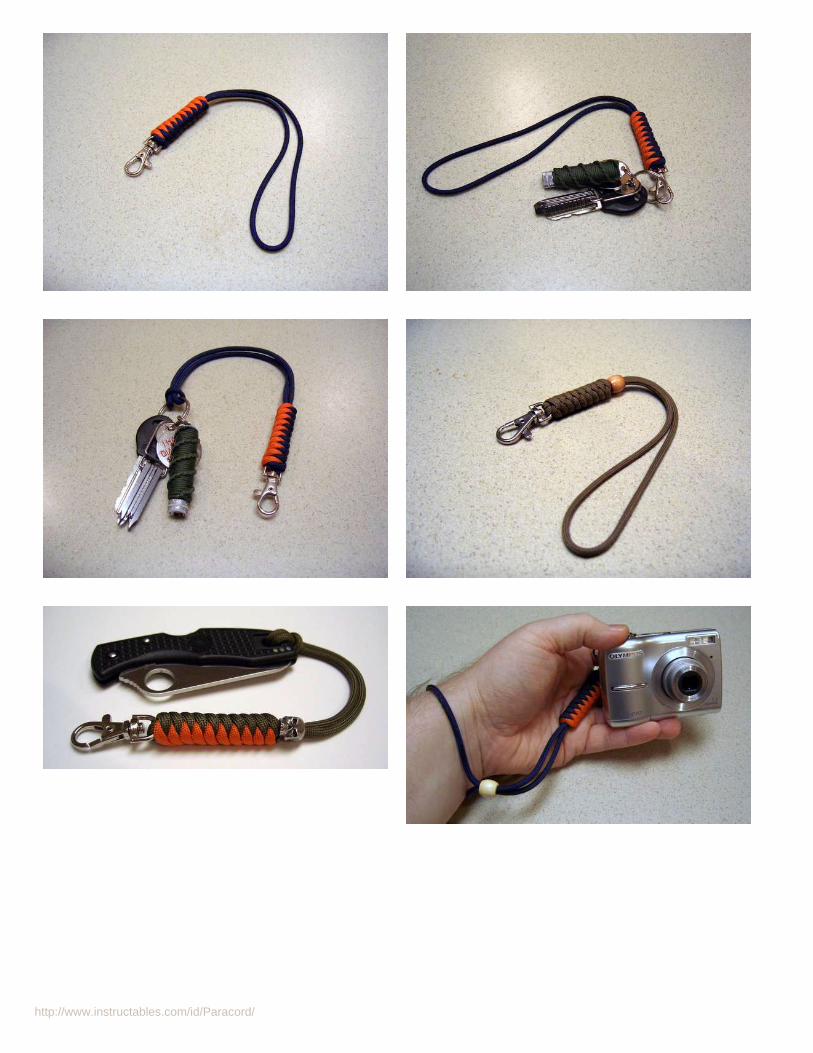
http://www.instructables.com/id/Paracord/

http://www.instructables.com/id/Paracord/
Related Instructables
Paracord ChainSinnet FastDeploy BoonieHatband (video)by Stormdrane
How to Tie aSingle StrandStar Knot (video)by Stormdrane
ReinforcedParacord RingHitch (video) byStormdrane
Cross KnotParacordLanyard byStormdrane
Zigzag SpoolingParacord (video)by Stormdrane
SurvivalBracelet II bytevers94
SurvivalBracelet(Updated!) bytevers94
Paracord CobraStitch Pattern:make bracelets,keychains,lanyards andmore (video) byboonokian

http://www.instructables.com/id/Paracord/
Paracord Bracelet with Monkey Fist Buttonby Tommi Potx on February 5, 2008
Intro: Paracord Bracelet with Monkey Fist ButtonI saw the paracord bracelet by Stormdrane a couple of months ago, and had to make some; one night, while insomniacking, I was inspired, and had an epiphany: whynot make a paracord bracelet, using a Monkey fist and loop as a closure, instead of a buckle or button?So, here we go: a paracord bracelet with a Monkey Fist knot acting as the button.
Step 1: Ingredients-Approximately 7 to 8 feet of gutted paracord; more depending on your wrist size. I measured the ratio of cord to weave once, and promptly forgot it.-A pair of scissors or sharp Swiss Army knife.-A lighter to melt fraying ends.-A marlin spike or similar pokey object, used when dressing the monkey fist knot; it should be as tight as possible.-A skully bead, available at craft stores near you; all kinds are available online, too.-Time: 2 hours for first attempt

http://www.instructables.com/id/Paracord/
Step 2: The Skully ButtonThe hardest part of the project, after procuring the skull beads, will be the monkey fist. It was intended for use as a weight on a heaving line, in order to get larger, non-throwable hawsers from ship to jetty. I think it is a nice looking knot, and also resembles a head with a turban on it.Take the inner strands out of the paracord, as this reduces the bulky look
Step 3: Wraps and frapsHopefully these pics and diagrams will help; if not, there are lots of good knot-tying sites online.Begin with your single, long piece of paracord; while tying the Fist, try and get it as close to the center of the piece of cord as possible; this will save a lot of cursing andswearing later on when dressing / tightening the knot.
Using the fingers, make 3 turns around the hand; as part of Mountain Ops training, we called these verticals 'wraps'
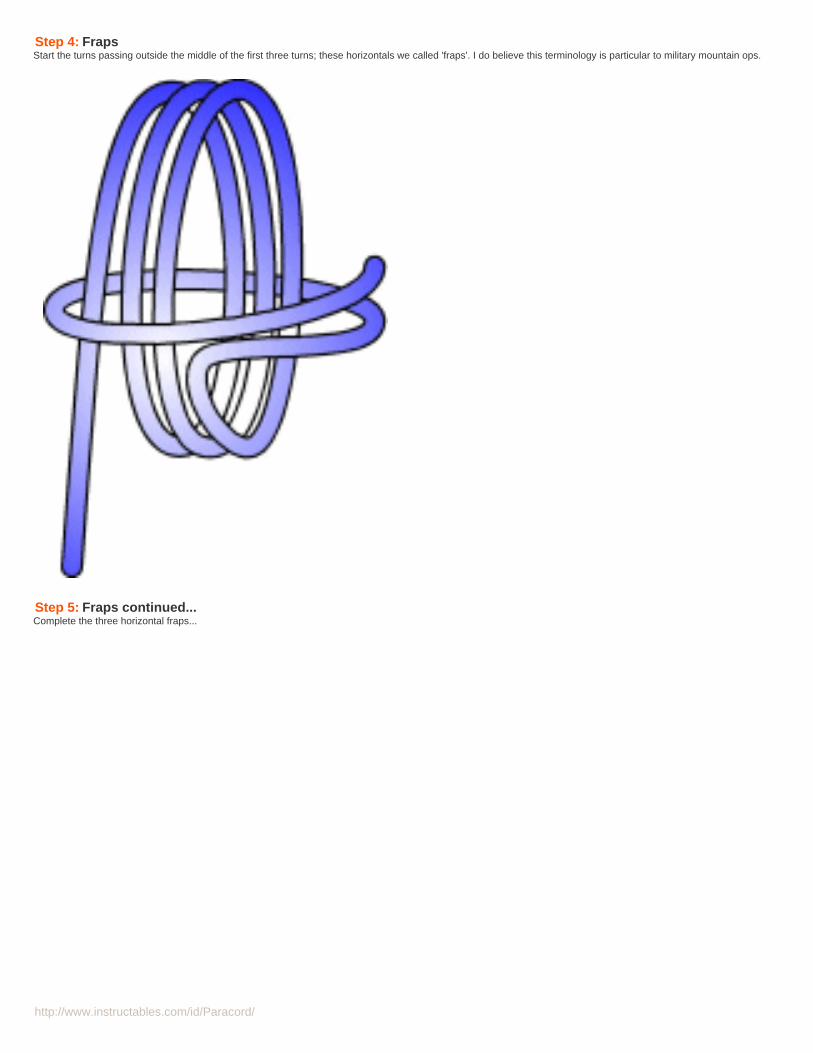
http://www.instructables.com/id/Paracord/
Step 4: FrapsStart the turns passing outside the middle of the first three turns; these horizontals we called 'fraps'. I do believe this terminology is particular to military mountain ops.
Step 5: Fraps continued...Complete the three horizontal fraps...
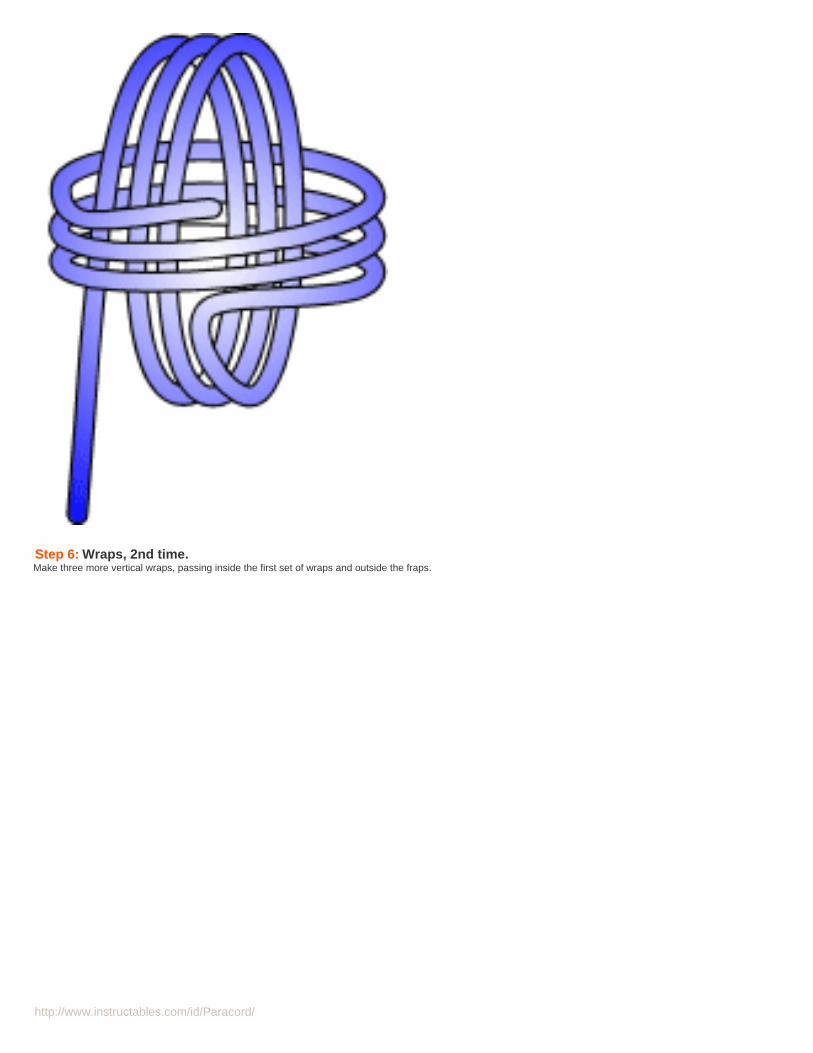
http://www.instructables.com/id/Paracord/
Step 6: Wraps, 2nd time.Make three more vertical wraps, passing inside the first set of wraps and outside the fraps.
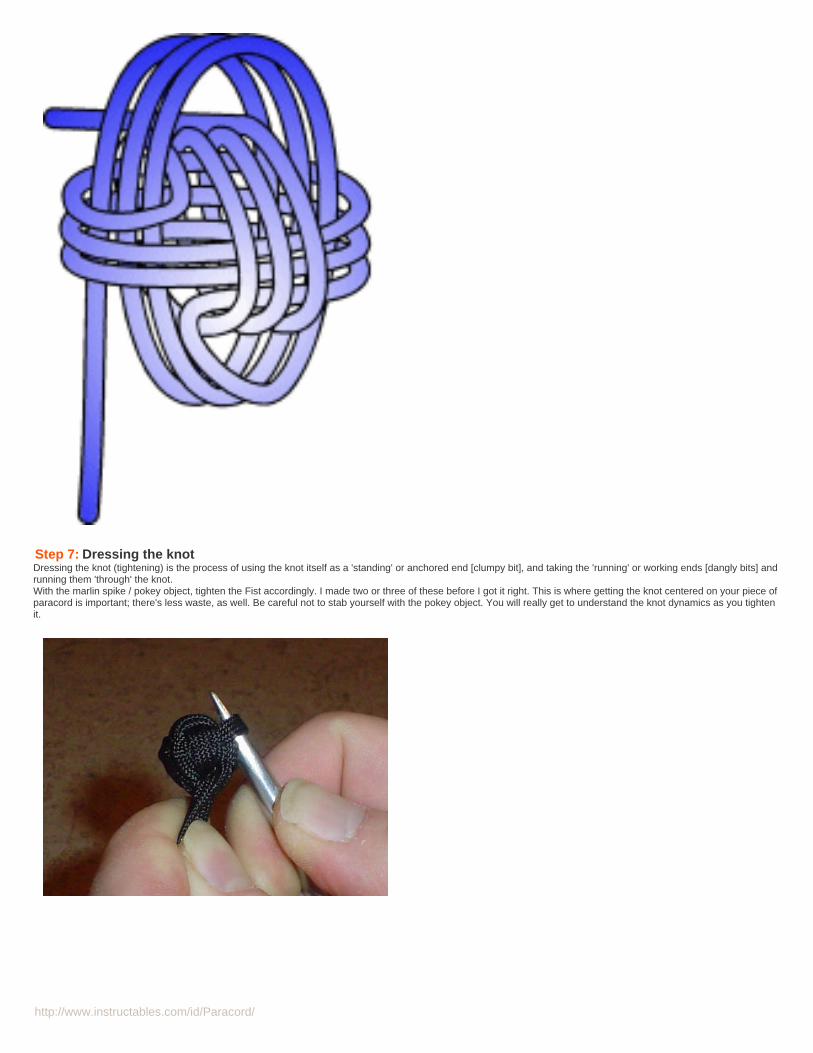
http://www.instructables.com/id/Paracord/
Step 7: Dressing the knotDressing the knot (tightening) is the process of using the knot itself as a 'standing' or anchored end [clumpy bit], and taking the 'running' or working ends [dangly bits] andrunning them 'through' the knot.With the marlin spike / pokey object, tighten the Fist accordingly. I made two or three of these before I got it right. This is where getting the knot centered on your piece ofparacord is important; there's less waste, as well. Be careful not to stab yourself with the pokey object. You will really get to understand the knot dynamics as you tightenit.
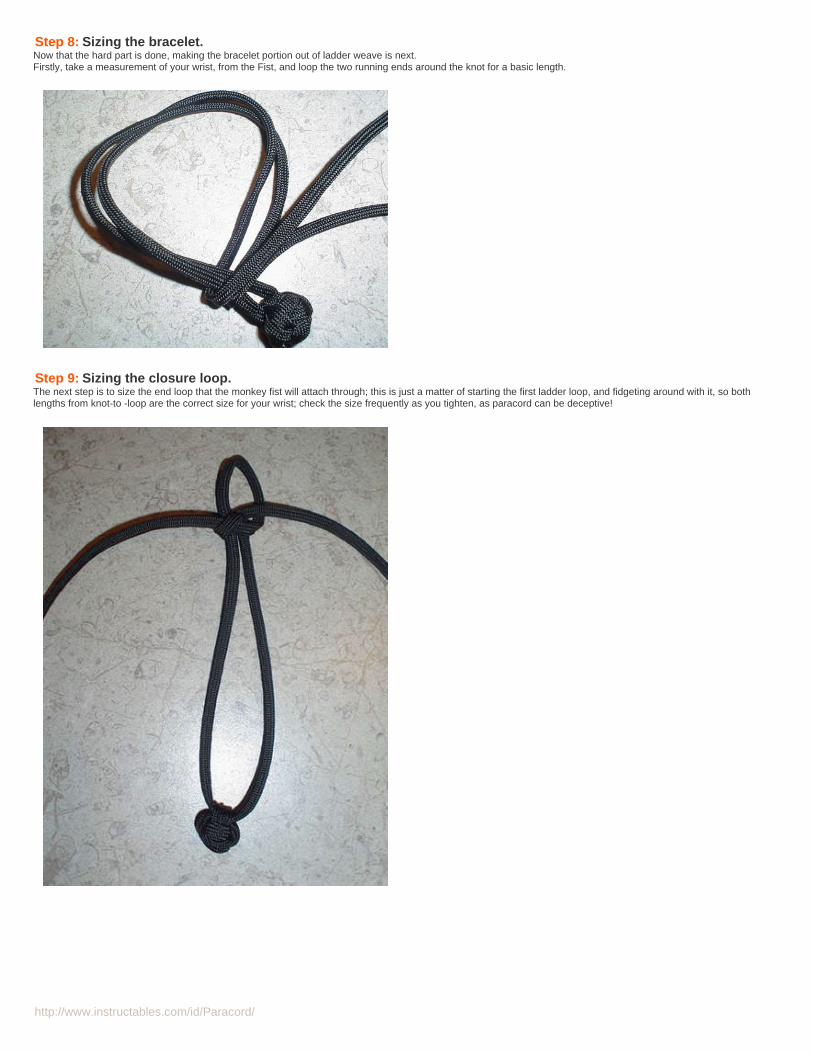
http://www.instructables.com/id/Paracord/
Step 8: Sizing the bracelet.Now that the hard part is done, making the bracelet portion out of ladder weave is next.Firstly, take a measurement of your wrist, from the Fist, and loop the two running ends around the knot for a basic length.
Step 9: Sizing the closure loop.The next step is to size the end loop that the monkey fist will attach through; this is just a matter of starting the first ladder loop, and fidgeting around with it, so bothlengths from knot-to -loop are the correct size for your wrist; check the size frequently as you tighten, as paracord can be deceptive!
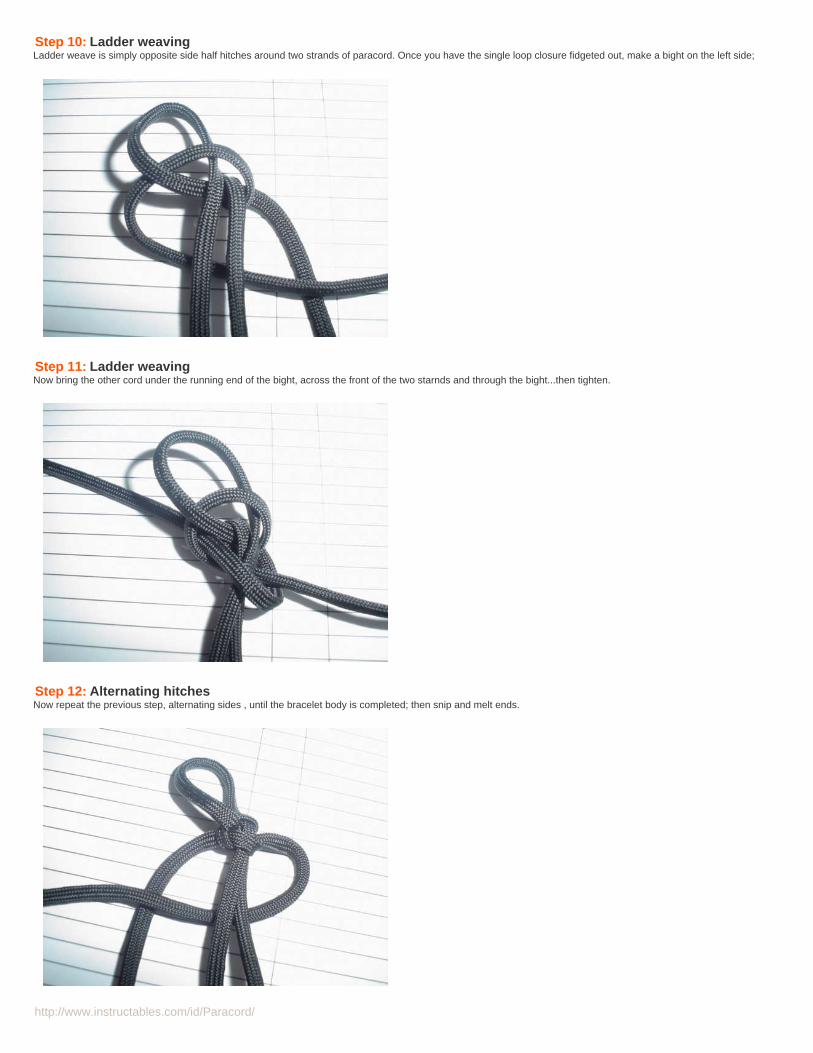
http://www.instructables.com/id/Paracord/
Step 10: Ladder weavingLadder weave is simply opposite side half hitches around two strands of paracord. Once you have the single loop closure fidgeted out, make a bight on the left side;
Step 11: Ladder weavingNow bring the other cord under the running end of the bight, across the front of the two starnds and through the bight...then tighten.
Step 12: Alternating hitchesNow repeat the previous step, alternating sides , until the bracelet body is completed; then snip and melt ends.
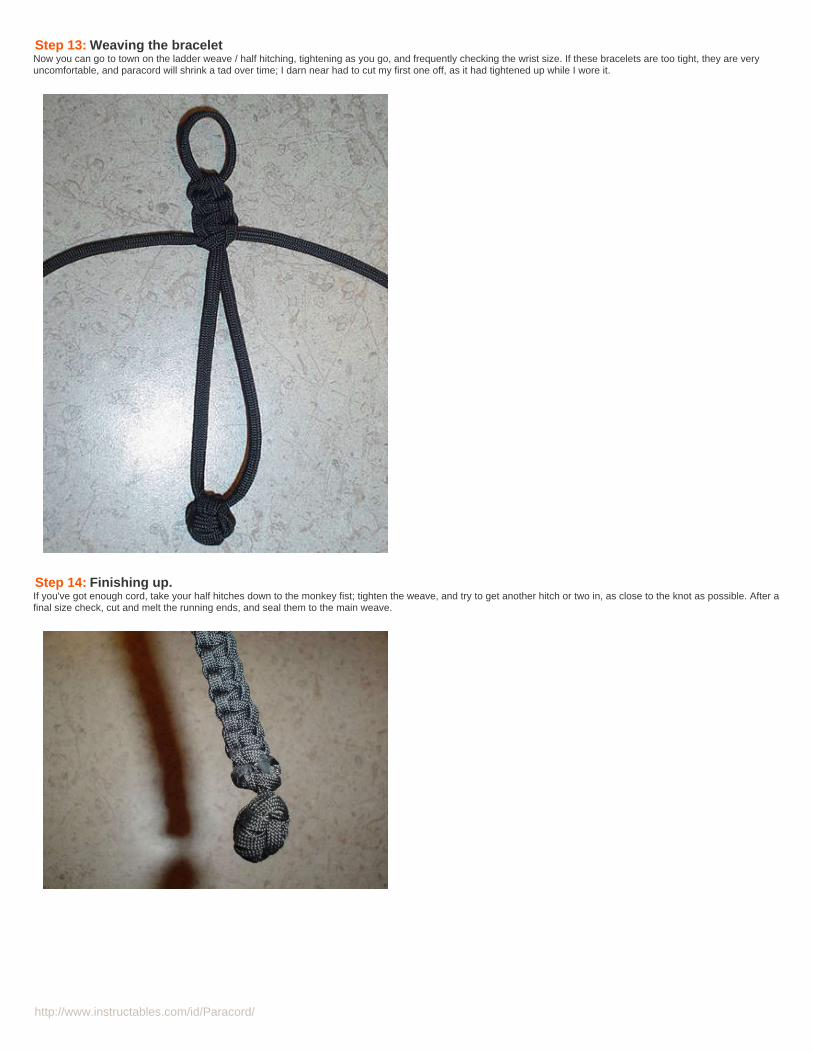
http://www.instructables.com/id/Paracord/
Step 13: Weaving the braceletNow you can go to town on the ladder weave / half hitching, tightening as you go, and frequently checking the wrist size. If these bracelets are too tight, they are veryuncomfortable, and paracord will shrink a tad over time; I darn near had to cut my first one off, as it had tightened up while I wore it.
Step 14: Finishing up.If you've got enough cord, take your half hitches down to the monkey fist; tighten the weave, and try to get another hitch or two in, as close to the knot as possible. After afinal size check, cut and melt the running ends, and seal them to the main weave.
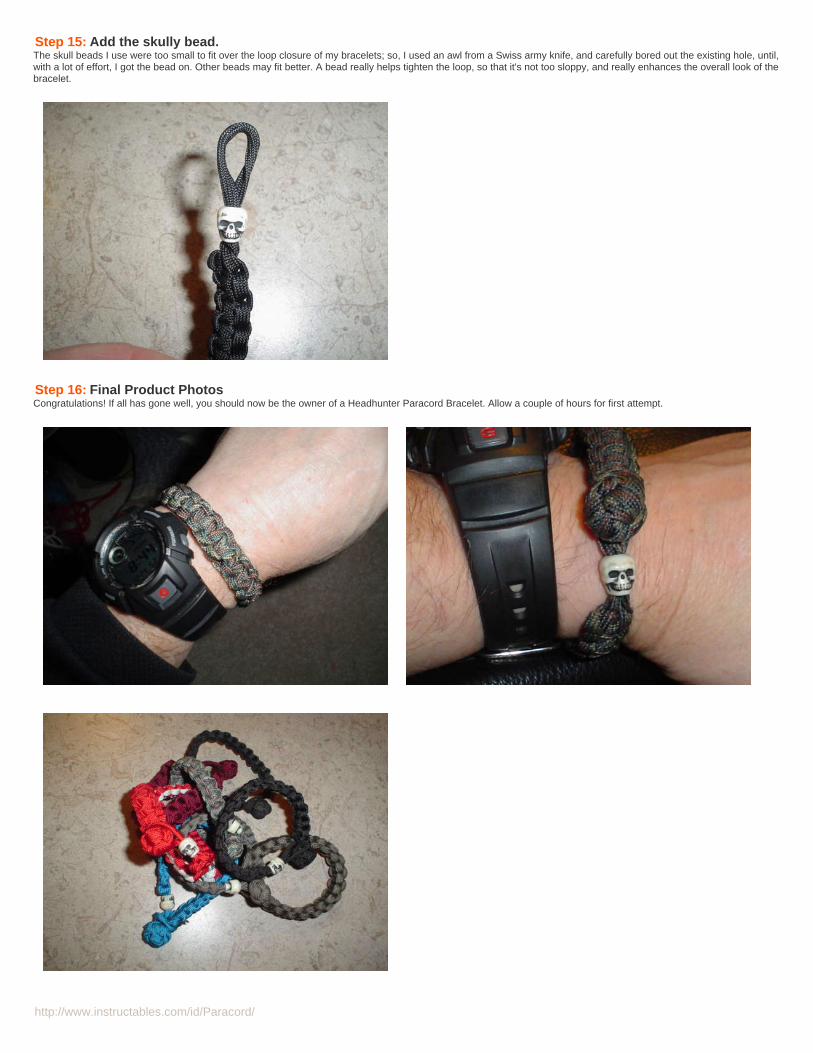
http://www.instructables.com/id/Paracord/
Step 15: Add the skully bead.The skull beads I use were too small to fit over the loop closure of my bracelets; so, I used an awl from a Swiss army knife, and carefully bored out the existing hole, until,with a lot of effort, I got the bead on. Other beads may fit better. A bead really helps tighten the loop, so that it's not too sloppy, and really enhances the overall look of thebracelet.
Step 16: Final Product PhotosCongratulations! If all has gone well, you should now be the owner of a Headhunter Paracord Bracelet. Allow a couple of hours for first attempt.
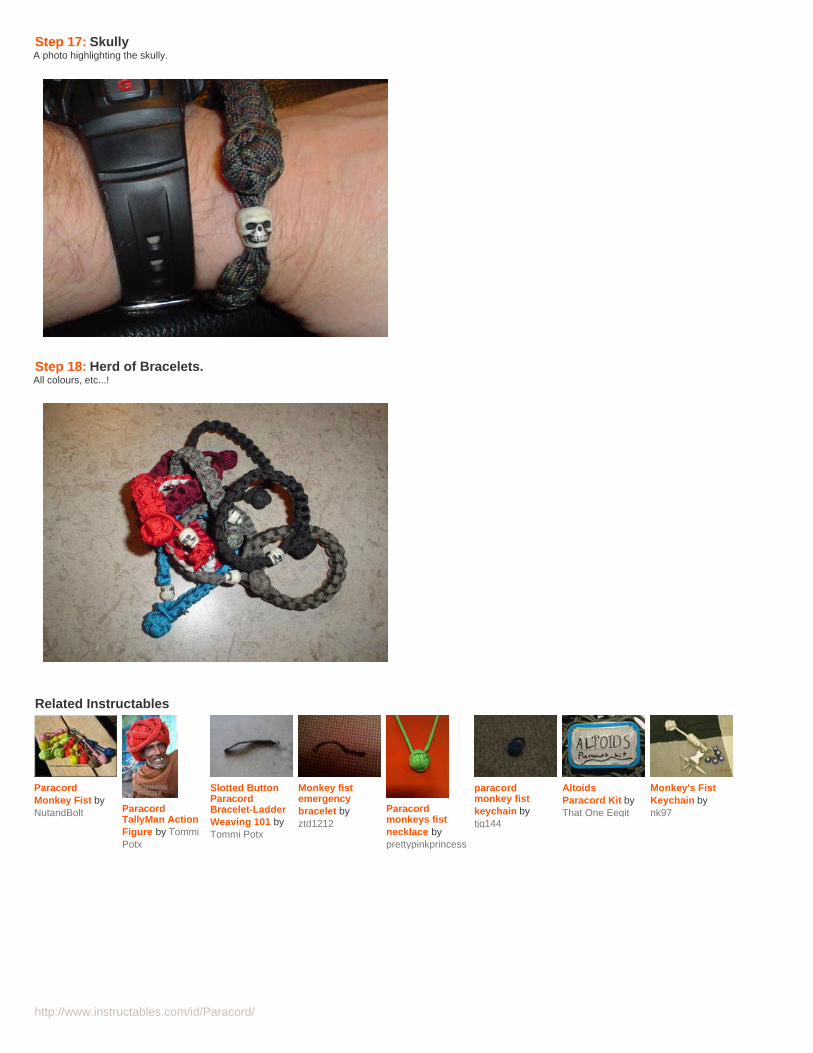
http://www.instructables.com/id/Paracord/
Step 17: SkullyA photo highlighting the skully.
Step 18: Herd of Bracelets.All colours, etc...!
Related Instructables
ParacordMonkey Fist byNutandBolt Paracord
TallyMan ActionFigure by TommiPotx
Slotted ButtonParacordBracelet-LadderWeaving 101 byTommi Potx
Monkey fistemergencybracelet byztd1212
Paracordmonkeys fistnecklace byprettypinkprincess
paracordmonkey fistkeychain bytjg144
AltoidsParacord Kit byThat One Eegit
Monkey's FistKeychain bynk97
http://www.instructables.com/id/Paracord-TallyMan-Action-Figure/?utm_source=pdf&utm_campaign=related
http://www.instructables.com/id/Paracord-TallyMan-Action-Figure/?utm_source=pdf&utm_campaign=related
http://www.instructables.com/id/Paracord-TallyMan-Action-Figure/?utm_source=pdf&utm_campaign=related
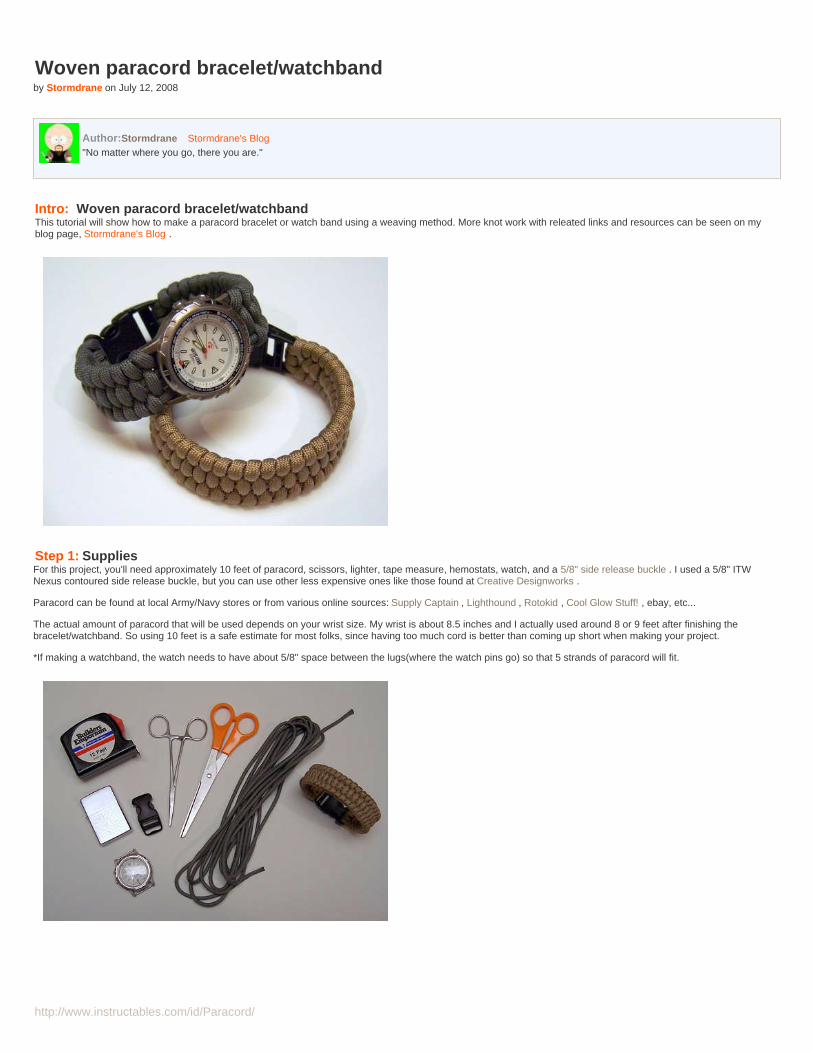
http://www.instructables.com/id/Paracord/
Woven paracord bracelet/watchbandby Stormdrane on July 12, 2008
Author:Stormdrane Stormdrane's Blog"No matter where you go, there you are."
Intro: Woven paracord bracelet/watchbandThis tutorial will show how to make a paracord bracelet or watch band using a weaving method. More knot work with releated links and resources can be seen on myblog page, Stormdrane's Blog .
Step 1: SuppliesFor this project, you'll need approximately 10 feet of paracord, scissors, lighter, tape measure, hemostats, watch, and a 5/8" side release buckle . I used a 5/8" ITWNexus contoured side release buckle, but you can use other less expensive ones like those found at Creative Designworks .
Paracord can be found at local Army/Navy stores or from various online sources: Supply Captain , Lighthound , Rotokid , Cool Glow Stuff! , ebay, etc...
The actual amount of paracord that will be used depends on your wrist size. My wrist is about 8.5 inches and I actually used around 8 or 9 feet after finishing thebracelet/watchband. So using 10 feet is a safe estimate for most folks, since having too much cord is better than coming up short when making your project.
*If making a watchband, the watch needs to have about 5/8" space between the lugs(where the watch pins go) so that 5 strands of paracord will fit.
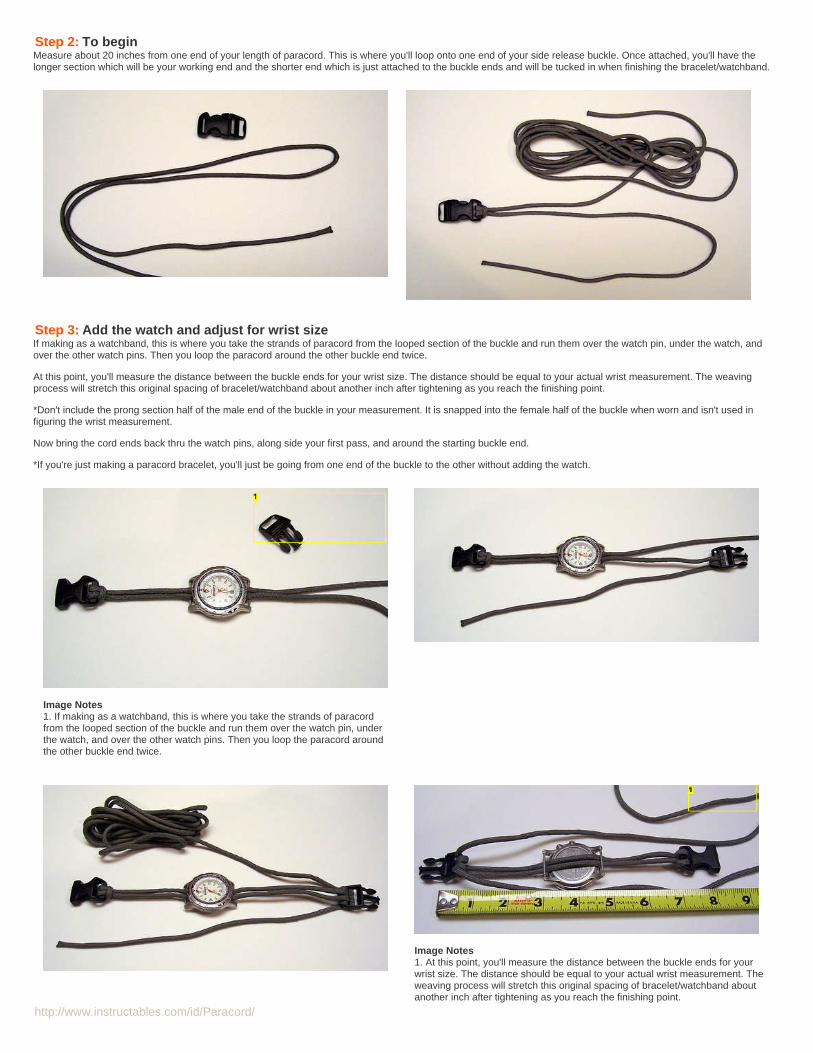
http://www.instructables.com/id/Paracord/
Step 2: To beginMeasure about 20 inches from one end of your length of paracord. This is where you'll loop onto one end of your side release buckle. Once attached, you'll have thelonger section which will be your working end and the shorter end which is just attached to the buckle ends and will be tucked in when finishing the bracelet/watchband.
Step 3: Add the watch and adjust for wrist sizeIf making as a watchband, this is where you take the strands of paracord from the looped section of the buckle and run them over the watch pin, under the watch, andover the other watch pins. Then you loop the paracord around the other buckle end twice.
At this point, you'll measure the distance between the buckle ends for your wrist size. The distance should be equal to your actual wrist measurement. The weavingprocess will stretch this original spacing of bracelet/watchband about another inch after tightening as you reach the finishing point.
*Don't include the prong section half of the male end of the buckle in your measurement. It is snapped into the female half of the buckle when worn and isn't used infiguring the wrist measurement.
Now bring the cord ends back thru the watch pins, along side your first pass, and around the starting buckle end.
*If you're just making a paracord bracelet, you'll just be going from one end of the buckle to the other without adding the watch.
Image Notes1. If making as a watchband, this is where you take the strands of paracordfrom the looped section of the buckle and run them over the watch pin, underthe watch, and over the other watch pins. Then you loop the paracord aroundthe other buckle end twice.
Image Notes1. At this point, you'll measure the distance between the buckle ends for yourwrist size. The distance should be equal to your actual wrist measurement. Theweaving process will stretch this original spacing of bracelet/watchband aboutanother inch after tightening as you reach the finishing point.
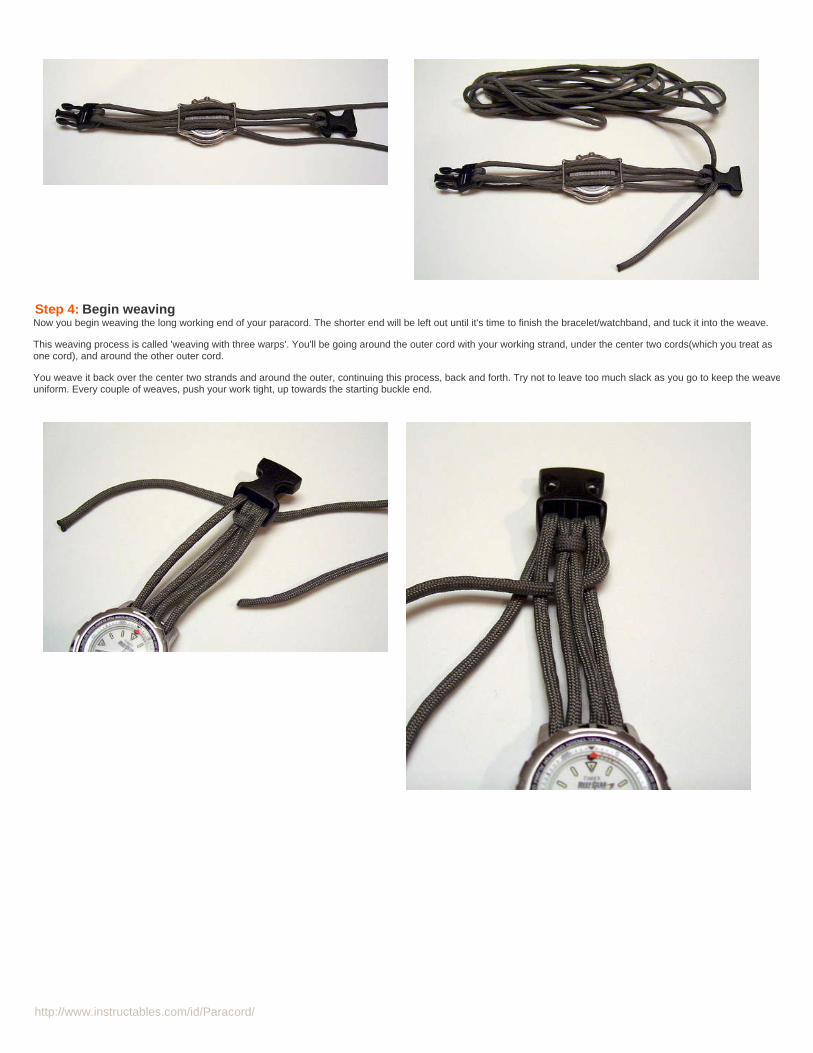
http://www.instructables.com/id/Paracord/
Step 4: Begin weavingNow you begin weaving the long working end of your paracord. The shorter end will be left out until it's time to finish the bracelet/watchband, and tuck it into the weave.
This weaving process is called 'weaving with three warps'. You'll be going around the outer cord with your working strand, under the center two cords(which you treat asone cord), and around the other outer cord.
You weave it back over the center two strands and around the outer, continuing this process, back and forth. Try not to leave too much slack as you go to keep the weaveuniform. Every couple of weaves, push your work tight, up towards the starting buckle end.
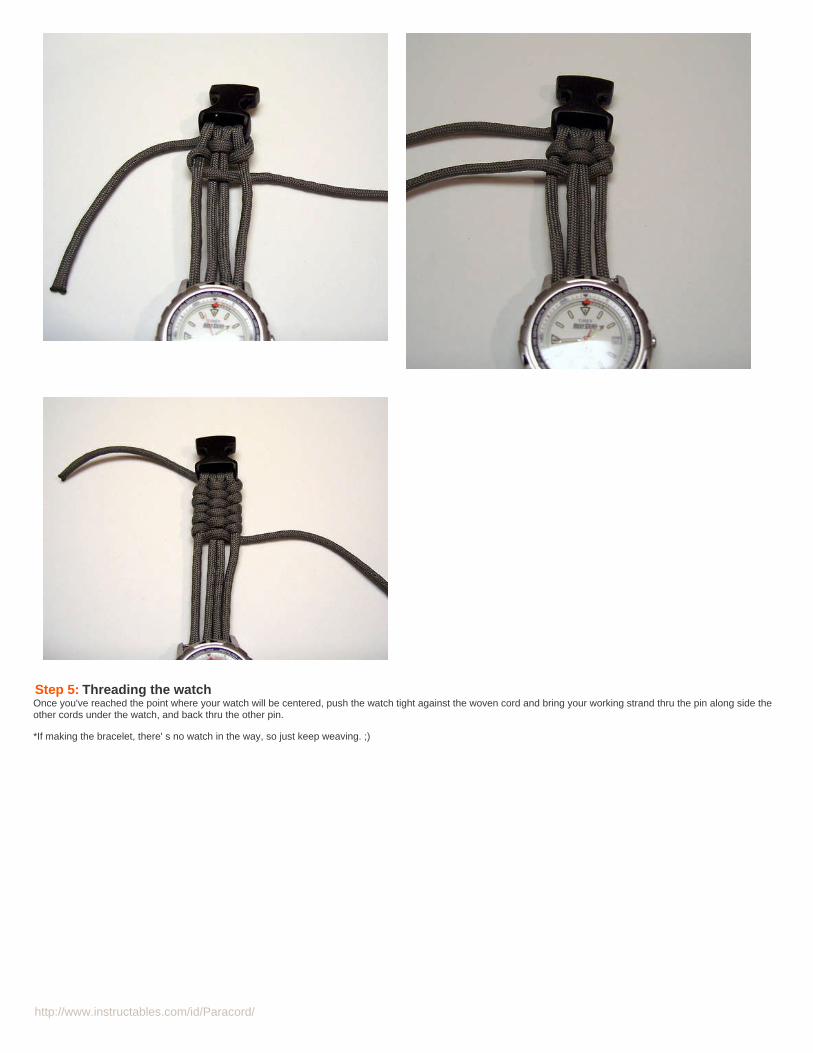
http://www.instructables.com/id/Paracord/
Step 5: Threading the watchOnce you've reached the point where your watch will be centered, push the watch tight against the woven cord and bring your working strand thru the pin along side theother cords under the watch, and back thru the other pin.
*If making the bracelet, there' s no watch in the way, so just keep weaving. ;)
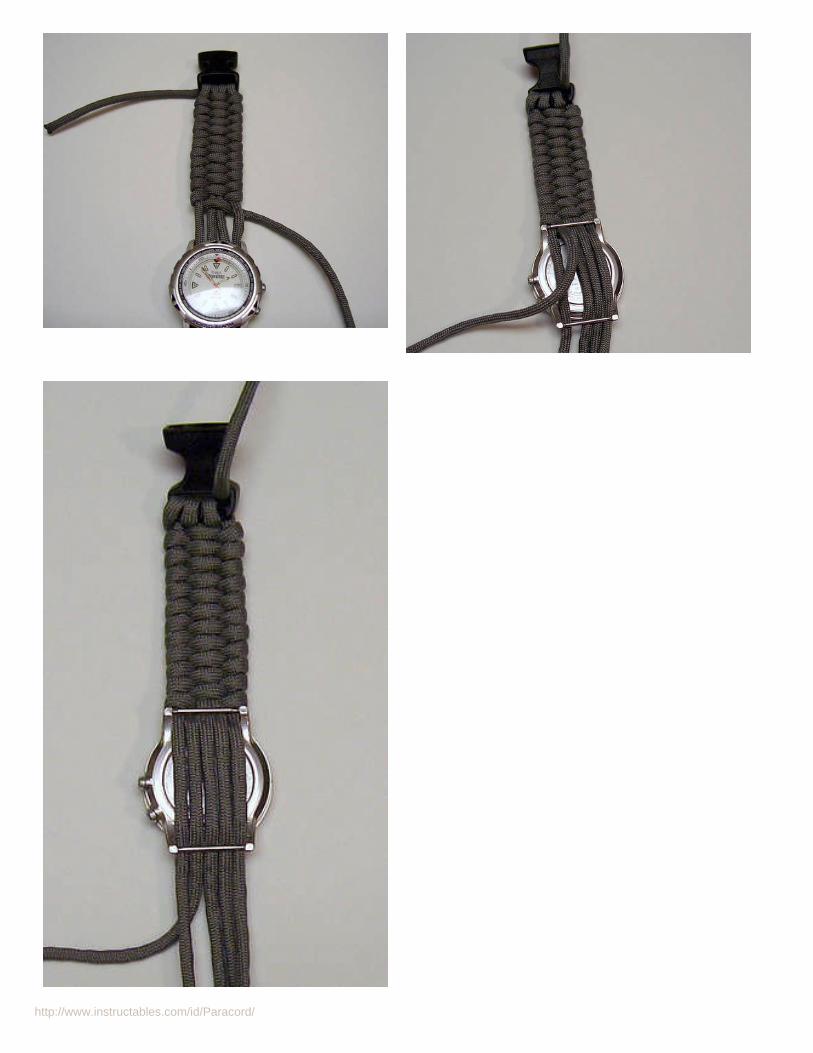
http://www.instructables.com/id/Paracord/
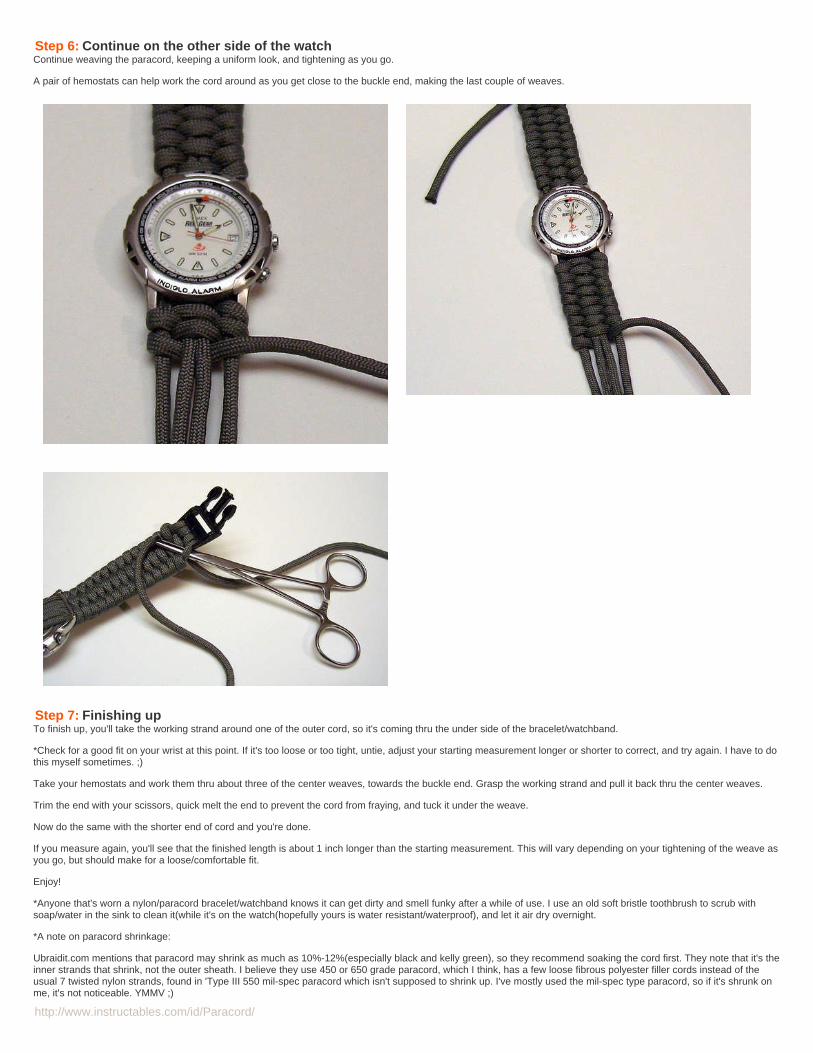
http://www.instructables.com/id/Paracord/
Step 6: Continue on the other side of the watchContinue weaving the paracord, keeping a uniform look, and tightening as you go.
A pair of hemostats can help work the cord around as you get close to the buckle end, making the last couple of weaves.
Step 7: Finishing upTo finish up, you'll take the working strand around one of the outer cord, so it's coming thru the under side of the bracelet/watchband.
*Check for a good fit on your wrist at this point. If it's too loose or too tight, untie, adjust your starting measurement longer or shorter to correct, and try again. I have to dothis myself sometimes. ;)
Take your hemostats and work them thru about three of the center weaves, towards the buckle end. Grasp the working strand and pull it back thru the center weaves.
Trim the end with your scissors, quick melt the end to prevent the cord from fraying, and tuck it under the weave.
Now do the same with the shorter end of cord and you're done.
If you measure again, you'll see that the finished length is about 1 inch longer than the starting measurement. This will vary depending on your tightening of the weave asyou go, but should make for a loose/comfortable fit.
Enjoy!
*Anyone that's worn a nylon/paracord bracelet/watchband knows it can get dirty and smell funky after a while of use. I use an old soft bristle toothbrush to scrub withsoap/water in the sink to clean it(while it's on the watch(hopefully yours is water resistant/waterproof), and let it air dry overnight.
*A note on paracord shrinkage:
Ubraidit.com mentions that paracord may shrink as much as 10%-12%(especially black and kelly green), so they recommend soaking the cord first. They note that it's theinner strands that shrink, not the outer sheath. I believe they use 450 or 650 grade paracord, which I think, has a few loose fibrous polyester filler cords instead of theusual 7 twisted nylon strands, found in 'Type III 550 mil-spec paracord which isn't supposed to shrink up. I've mostly used the mil-spec type paracord, so if it's shrunk onme, it's not noticeable. YMMV ;)
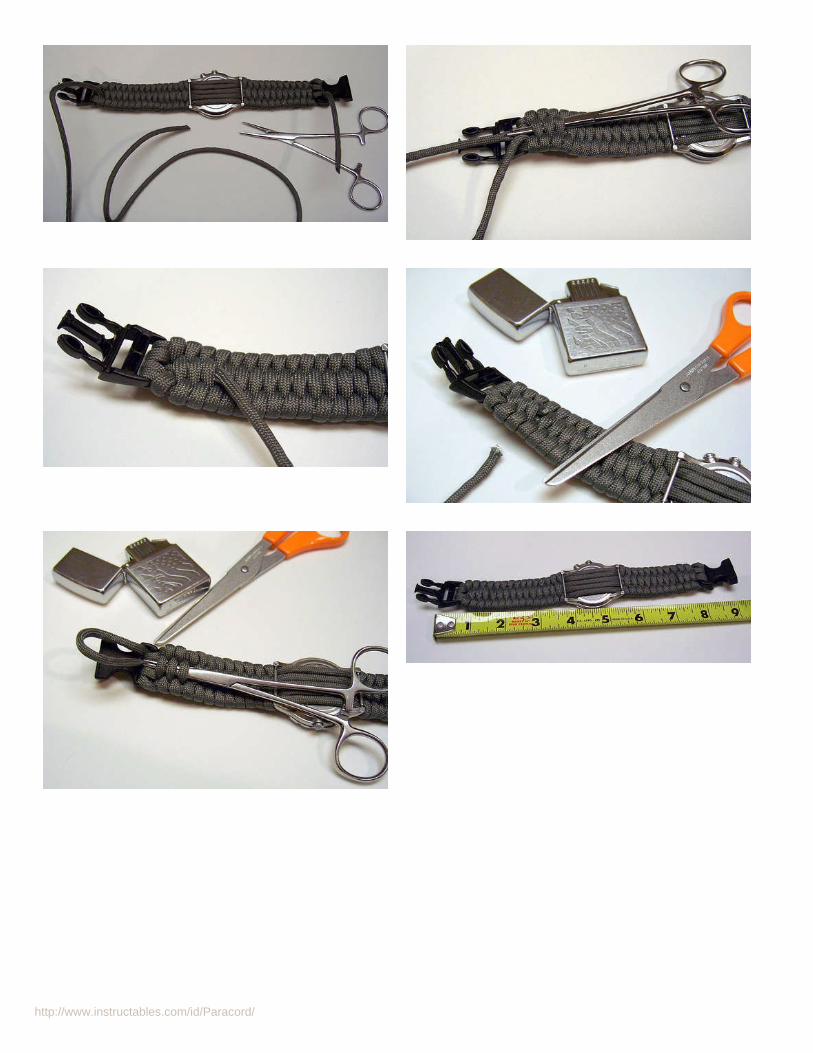
http://www.instructables.com/id/Paracord/
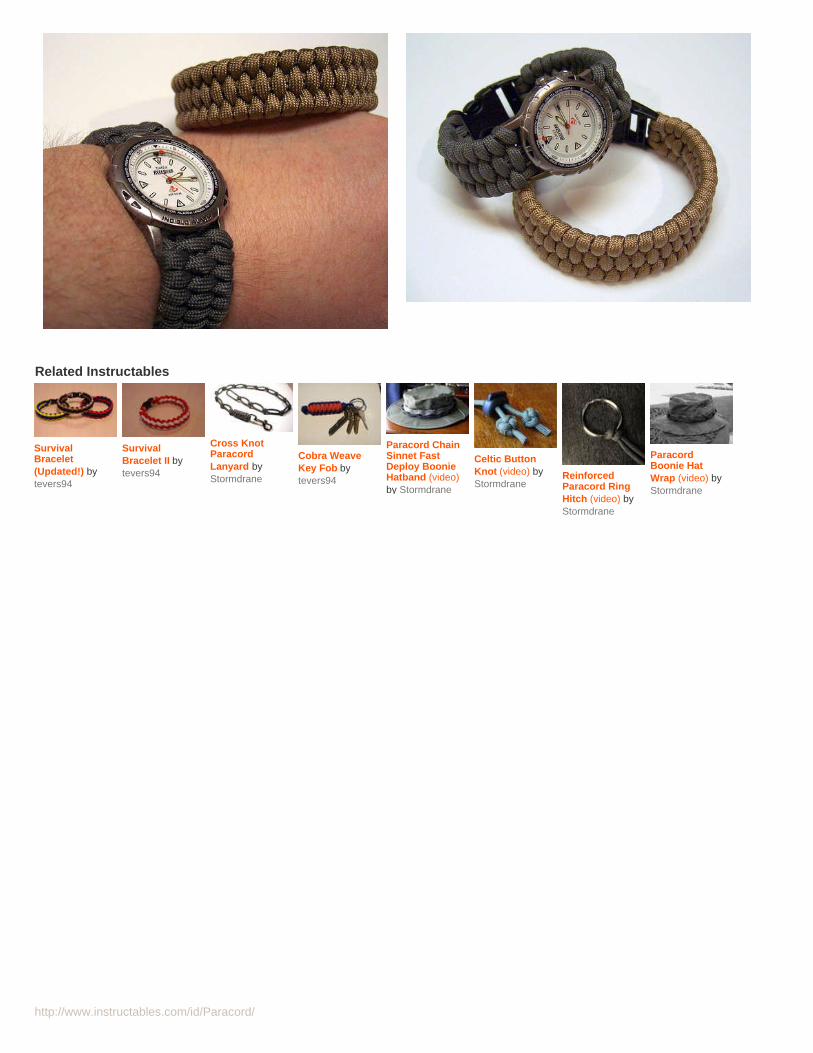
http://www.instructables.com/id/Paracord/
Related Instructables
SurvivalBracelet(Updated!) bytevers94
SurvivalBracelet II bytevers94
Cross KnotParacordLanyard byStormdrane
Cobra WeaveKey Fob bytevers94
Paracord ChainSinnet FastDeploy BoonieHatband (video)by Stormdrane
Celtic ButtonKnot (video) byStormdrane
ReinforcedParacord RingHitch (video) byStormdrane
ParacordBoonie HatWrap (video) byStormdrane
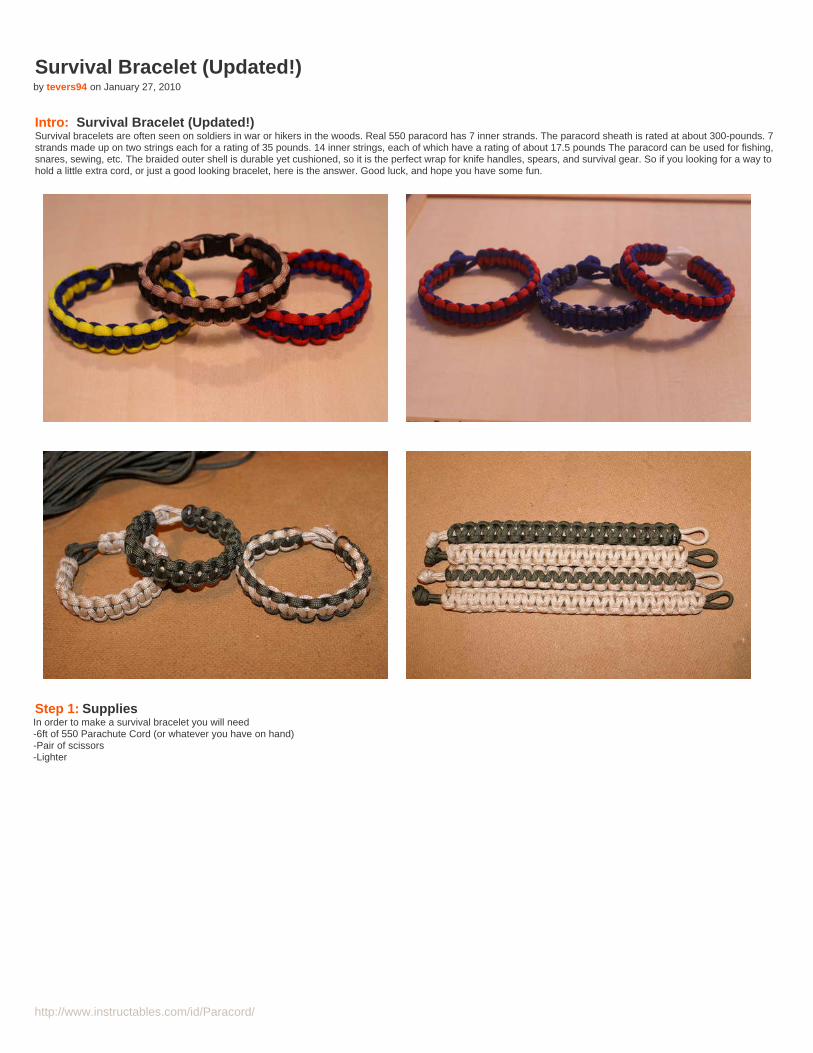
http://www.instructables.com/id/Paracord/
Survival Bracelet (Updated!)by tevers94 on January 27, 2010
Intro: Survival Bracelet (Updated!)Survival bracelets are often seen on soldiers in war or hikers in the woods. Real 550 paracord has 7 inner strands. The paracord sheath is rated at about 300-pounds. 7strands made up on two strings each for a rating of 35 pounds. 14 inner strings, each of which have a rating of about 17.5 pounds The paracord can be used for fishing,snares, sewing, etc. The braided outer shell is durable yet cushioned, so it is the perfect wrap for knife handles, spears, and survival gear. So if you looking for a way tohold a little extra cord, or just a good looking bracelet, here is the answer. Good luck, and hope you have some fun.
Step 1: SuppliesIn order to make a survival bracelet you will need-6ft of 550 Parachute Cord (or whatever you have on hand)-Pair of scissors-Lighter
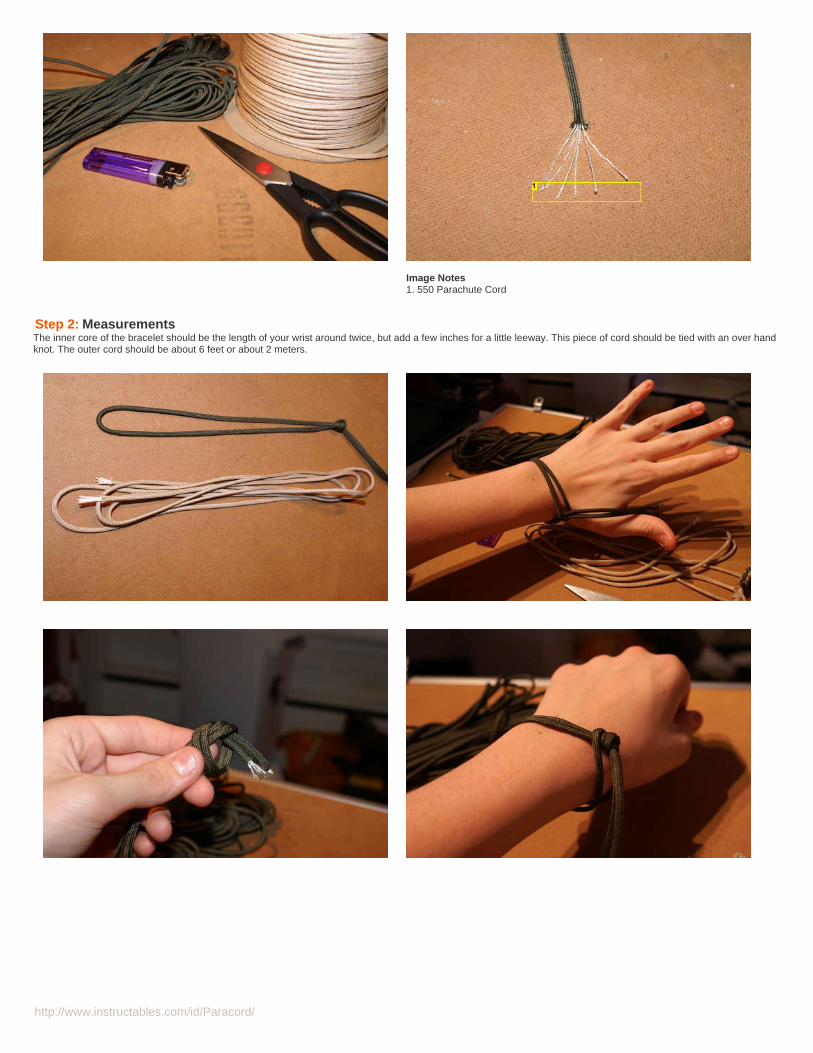
http://www.instructables.com/id/Paracord/
Image Notes1. 550 Parachute Cord
Step 2: MeasurementsThe inner core of the bracelet should be the length of your wrist around twice, but add a few inches for a little leeway. This piece of cord should be tied with an over handknot. The outer cord should be about 6 feet or about 2 meters.
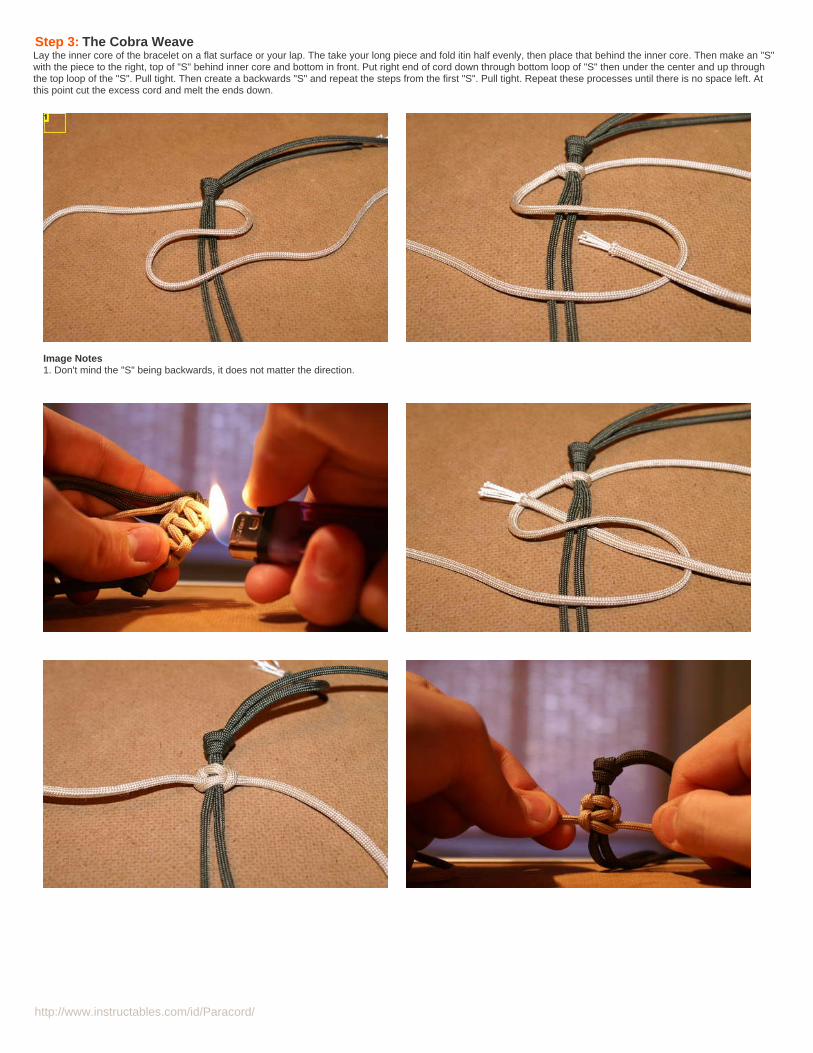
http://www.instructables.com/id/Paracord/
Step 3: The Cobra WeaveLay the inner core of the bracelet on a flat surface or your lap. The take your long piece and fold itin half evenly, then place that behind the inner core. Then make an "S"with the piece to the right, top of "S" behind inner core and bottom in front. Put right end of cord down through bottom loop of "S" then under the center and up throughthe top loop of the "S". Pull tight. Then create a backwards "S" and repeat the steps from the first "S". Pull tight. Repeat these processes until there is no space left. Atthis point cut the excess cord and melt the ends down.
Image Notes1. Don't mind the "S" being backwards, it does not matter the direction.
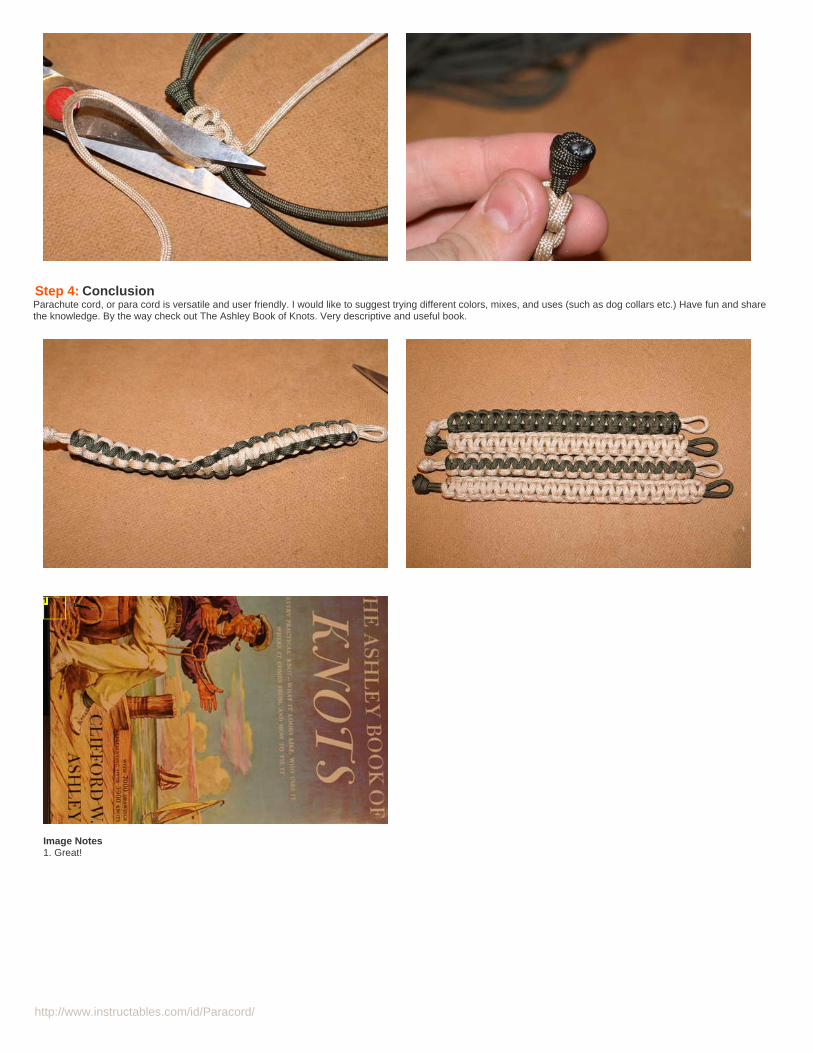
http://www.instructables.com/id/Paracord/
Step 4: ConclusionParachute cord, or para cord is versatile and user friendly. I would like to suggest trying different colors, mixes, and uses (such as dog collars etc.) Have fun and sharethe knowledge. By the way check out The Ashley Book of Knots. Very descriptive and useful book.
Image Notes1. Great!
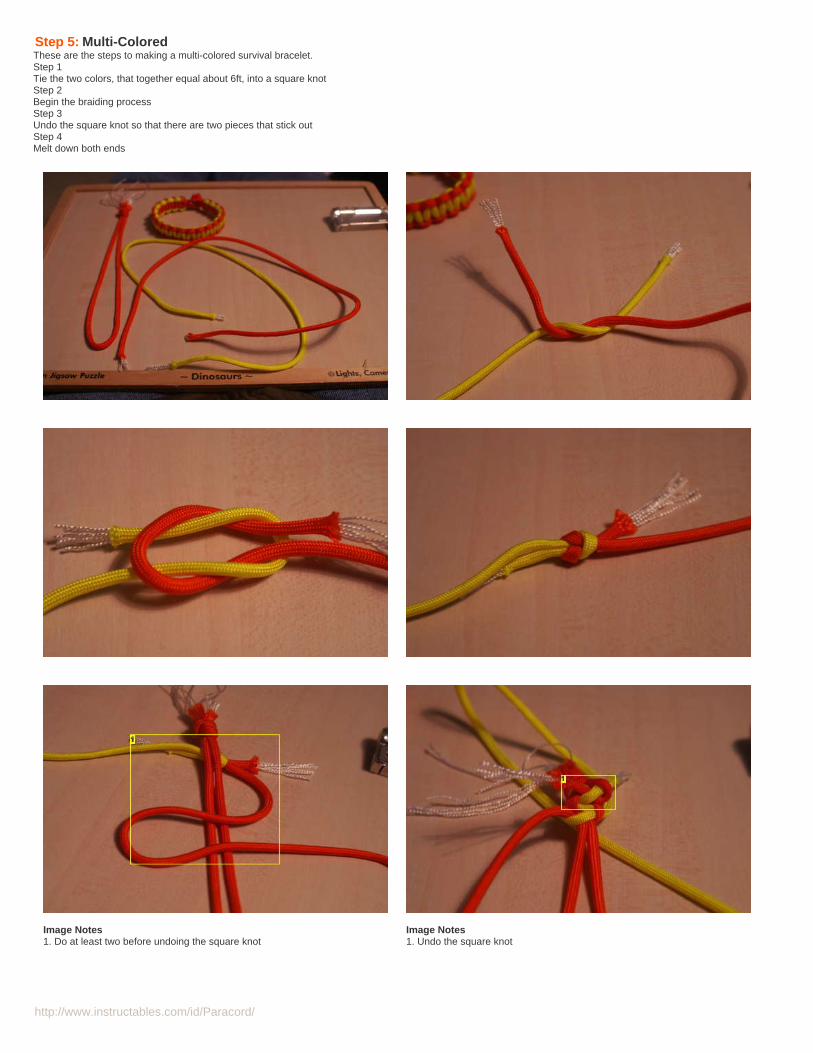
http://www.instructables.com/id/Paracord/
Step 5: Multi-ColoredThese are the steps to making a multi-colored survival bracelet.Step 1Tie the two colors, that together equal about 6ft, into a square knotStep 2Begin the braiding processStep 3Undo the square knot so that there are two pieces that stick outStep 4Melt down both ends
Image Notes1. Do at least two before undoing the square knot
Image Notes1. Undo the square knot
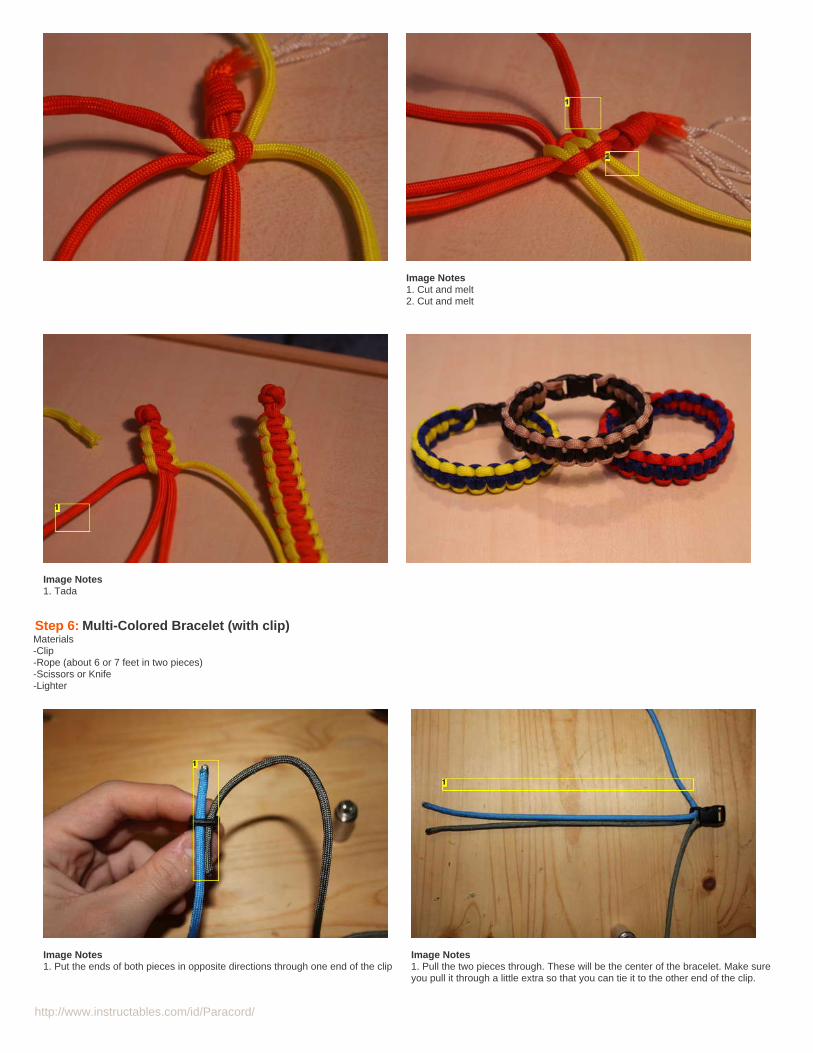
http://www.instructables.com/id/Paracord/
Image Notes1. Cut and melt2. Cut and melt
Image Notes1. Tada
Step 6: Multi-Colored Bracelet (with clip)Materials-Clip-Rope (about 6 or 7 feet in two pieces)-Scissors or Knife-Lighter
Image Notes1. Put the ends of both pieces in opposite directions through one end of the clip
Image Notes1. Pull the two pieces through. These will be the center of the bracelet. Make sureyou pull it through a little extra so that you can tie it to the other end of the clip.
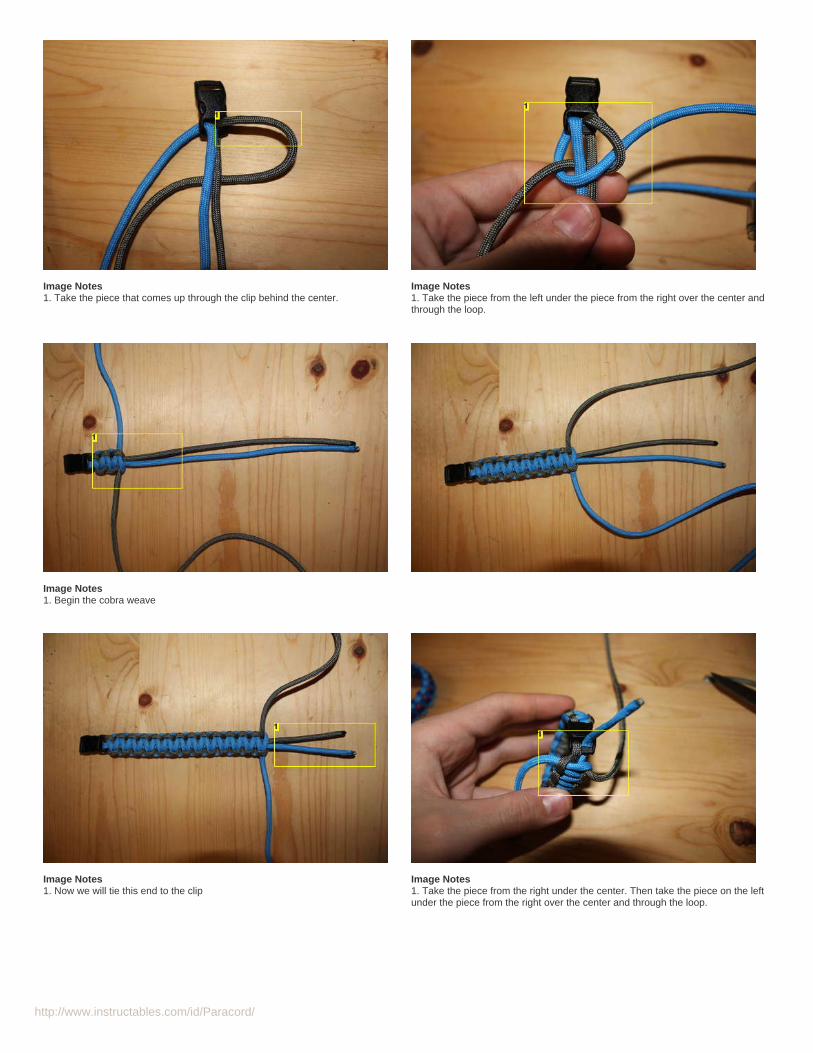
http://www.instructables.com/id/Paracord/
Image Notes1. Take the piece that comes up through the clip behind the center.
Image Notes1. Take the piece from the left under the piece from the right over the center andthrough the loop.
Image Notes1. Begin the cobra weave
Image Notes1. Now we will tie this end to the clip
Image Notes1. Take the piece from the right under the center. Then take the piece on the leftunder the piece from the right over the center and through the loop.
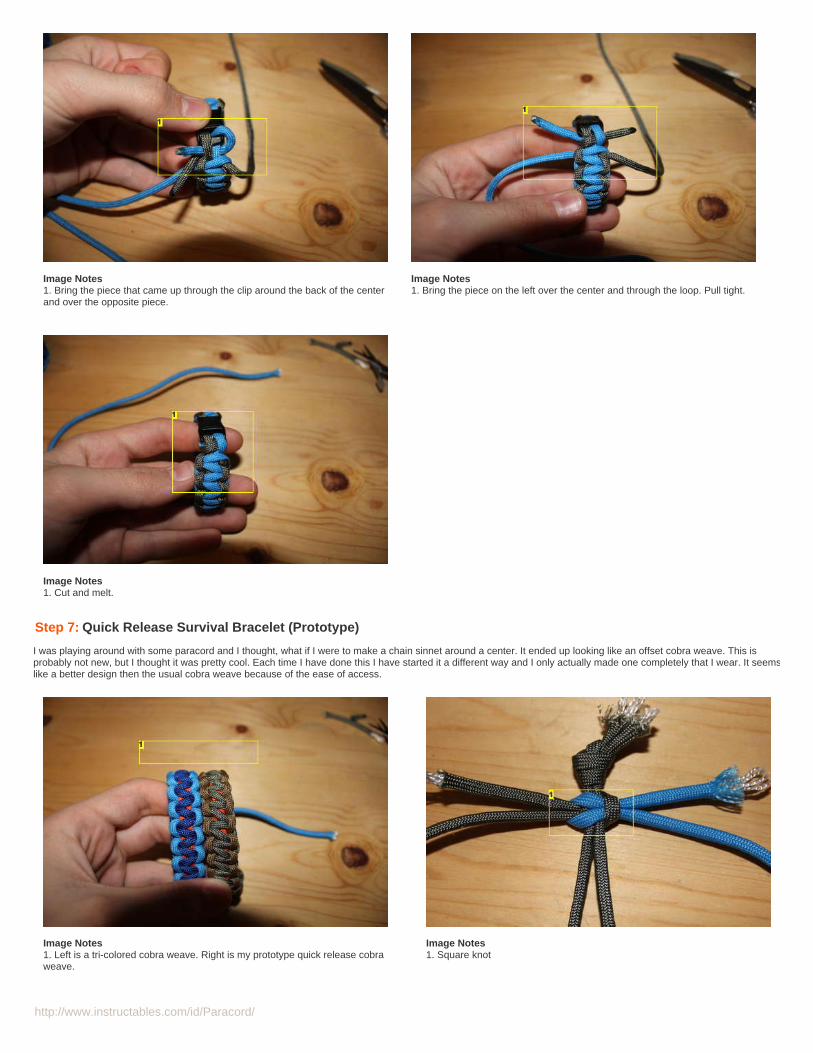
http://www.instructables.com/id/Paracord/
Image Notes1. Bring the piece that came up through the clip around the back of the centerand over the opposite piece.
Image Notes1. Bring the piece on the left over the center and through the loop. Pull tight.
Image Notes1. Cut and melt.
Step 7: Quick Release Survival Bracelet (Prototype)
I was playing around with some paracord and I thought, what if I were to make a chain sinnet around a center. It ended up looking like an offset cobra weave. This isprobably not new, but I thought it was pretty cool. Each time I have done this I have started it a different way and I only actually made one completely that I wear. It seemslike a better design then the usual cobra weave because of the ease of access.
Image Notes1. Left is a tri-colored cobra weave. Right is my prototype quick release cobraweave.
Image Notes1. Square knot
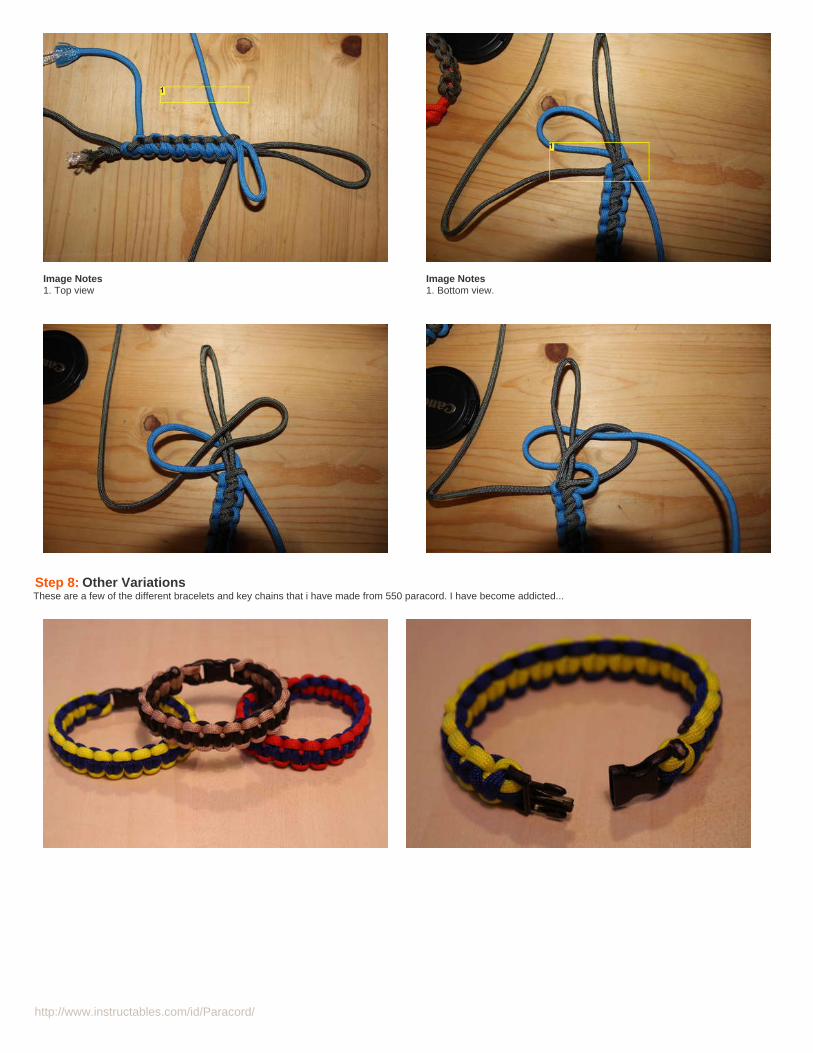
http://www.instructables.com/id/Paracord/
Image Notes1. Top view
Image Notes1. Bottom view.
Step 8: Other VariationsThese are a few of the different bracelets and key chains that i have made from 550 paracord. I have become addicted...
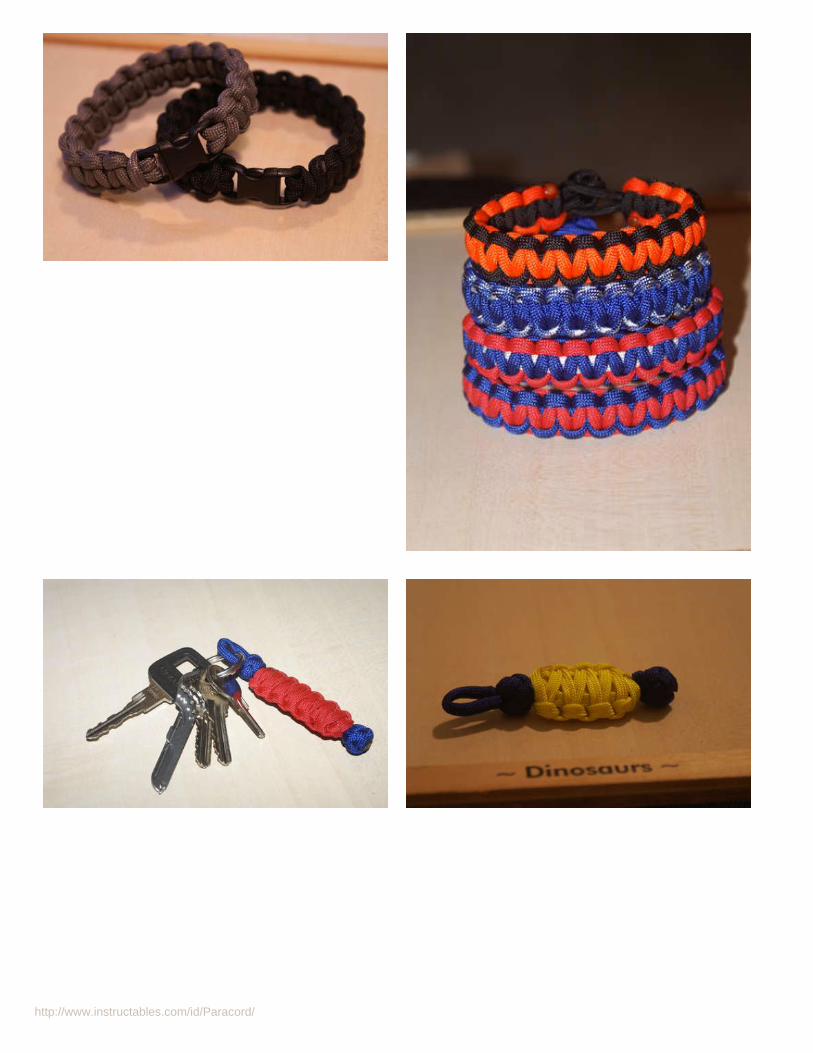
http://www.instructables.com/id/Paracord/
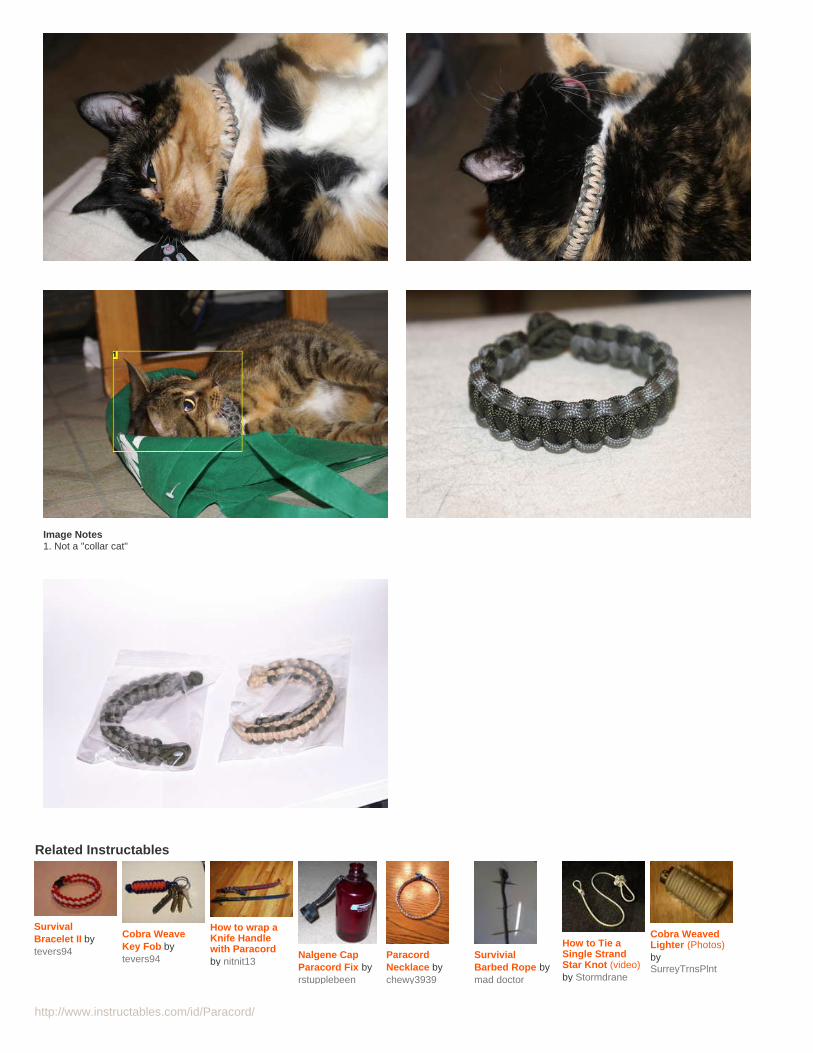
http://www.instructables.com/id/Paracord/
Image Notes1. Not a "collar cat"
Related Instructables
SurvivalBracelet II bytevers94
Cobra WeaveKey Fob bytevers94
How to wrap aKnife Handlewith Paracordby nitnit13
Nalgene CapParacord Fix byrstupplebeen
ParacordNecklace bychewy3939
SurvivialBarbed Rope bymad doctor
How to Tie aSingle StrandStar Knot (video)by Stormdrane
Cobra WeavedLighter (Photos)bySurreyTrnsPlnt

http://www.instructables.com/id/Paracord/
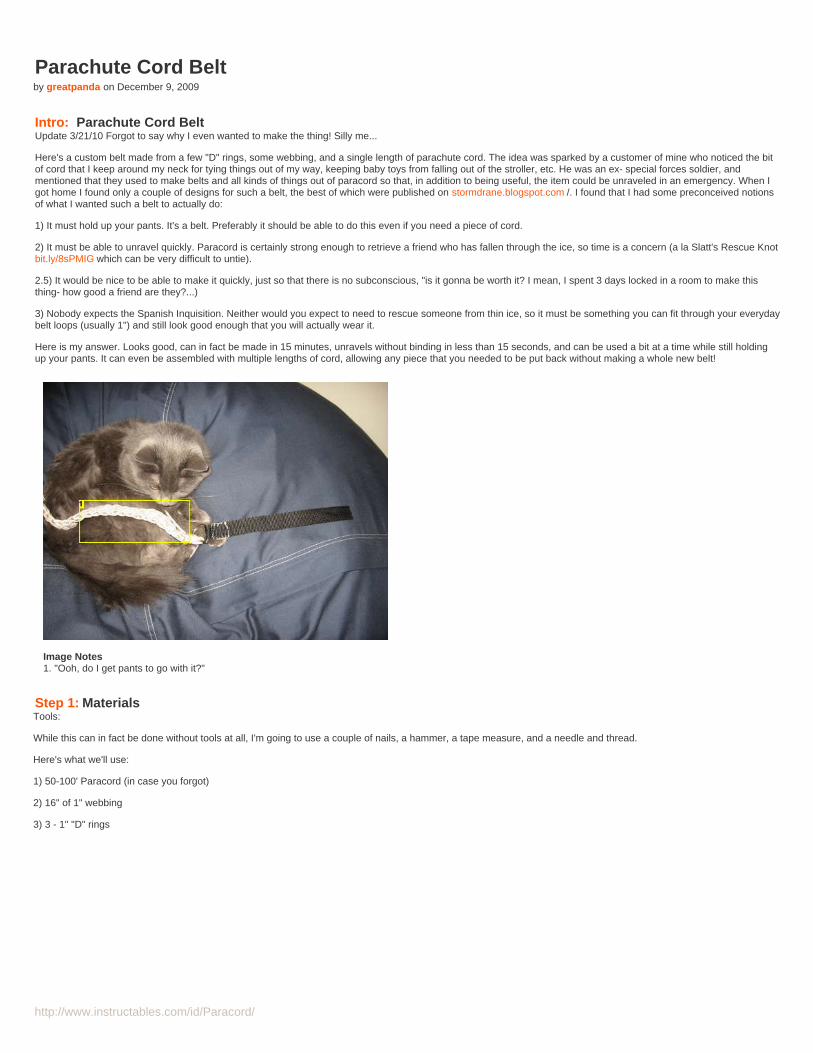
http://www.instructables.com/id/Paracord/
Parachute Cord Beltby greatpanda on December 9, 2009
Intro: Parachute Cord BeltUpdate 3/21/10 Forgot to say why I even wanted to make the thing! Silly me...
Here's a custom belt made from a few "D" rings, some webbing, and a single length of parachute cord. The idea was sparked by a customer of mine who noticed the bitof cord that I keep around my neck for tying things out of my way, keeping baby toys from falling out of the stroller, etc. He was an ex- special forces soldier, andmentioned that they used to make belts and all kinds of things out of paracord so that, in addition to being useful, the item could be unraveled in an emergency. When Igot home I found only a couple of designs for such a belt, the best of which were published on stormdrane.blogspot.com /. I found that I had some preconceived notionsof what I wanted such a belt to actually do:
1) It must hold up your pants. It's a belt. Preferably it should be able to do this even if you need a piece of cord.
2) It must be able to unravel quickly. Paracord is certainly strong enough to retrieve a friend who has fallen through the ice, so time is a concern (a la Slatt's Rescue Knotbit.ly/8sPMIG which can be very difficult to untie).
2.5) It would be nice to be able to make it quickly, just so that there is no subconscious, "is it gonna be worth it? I mean, I spent 3 days locked in a room to make thisthing- how good a friend are they?...)
3) Nobody expects the Spanish Inquisition. Neither would you expect to need to rescue someone from thin ice, so it must be something you can fit through your everydaybelt loops (usually 1") and still look good enough that you will actually wear it.
Here is my answer. Looks good, can in fact be made in 15 minutes, unravels without binding in less than 15 seconds, and can be used a bit at a time while still holdingup your pants. It can even be assembled with multiple lengths of cord, allowing any piece that you needed to be put back without making a whole new belt!
Image Notes1. "Ooh, do I get pants to go with it?"
Step 1: MaterialsTools:
While this can in fact be done without tools at all, I'm going to use a couple of nails, a hammer, a tape measure, and a needle and thread.
Here's what we'll use:
1) 50-100' Paracord (in case you forgot)
2) 16" of 1" webbing
3) 3 - 1" "D" rings
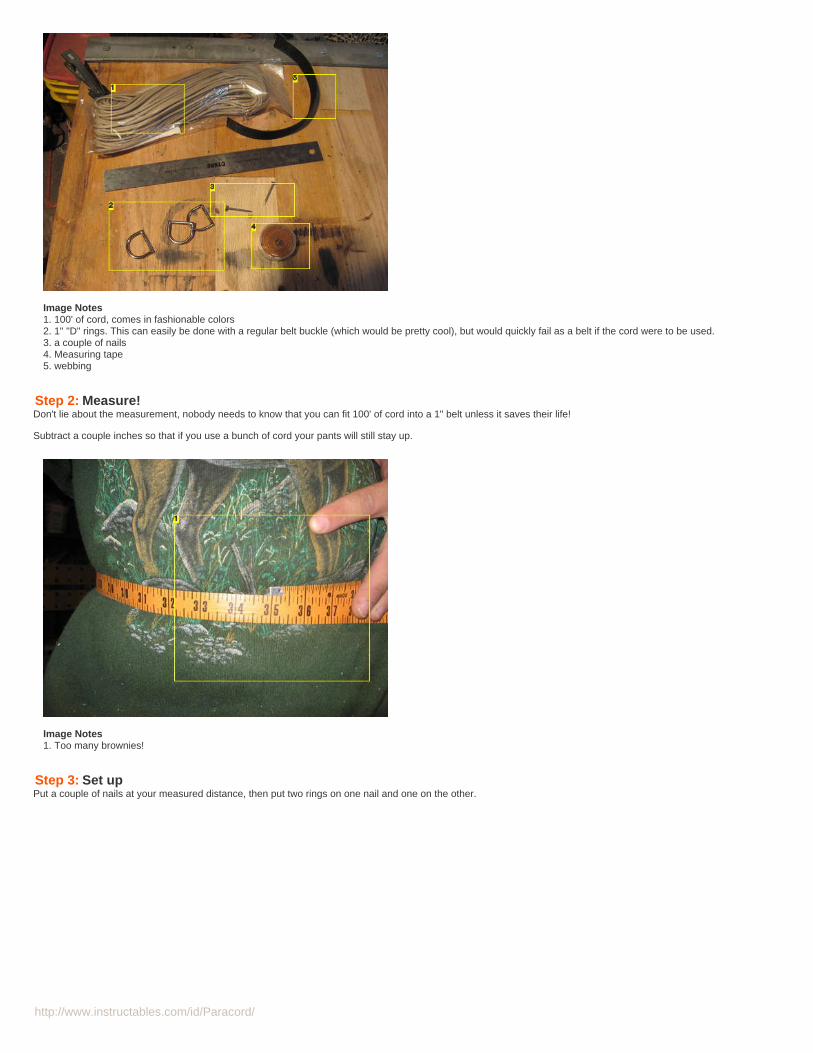
http://www.instructables.com/id/Paracord/
Image Notes1. 100' of cord, comes in fashionable colors2. 1" "D" rings. This can easily be done with a regular belt buckle (which would be pretty cool), but would quickly fail as a belt if the cord were to be used.3. a couple of nails4. Measuring tape5. webbing
Step 2: Measure!Don't lie about the measurement, nobody needs to know that you can fit 100' of cord into a 1" belt unless it saves their life!
Subtract a couple inches so that if you use a bunch of cord your pants will still stay up.
Image Notes1. Too many brownies!
Step 3: Set upPut a couple of nails at your measured distance, then put two rings on one nail and one on the other.
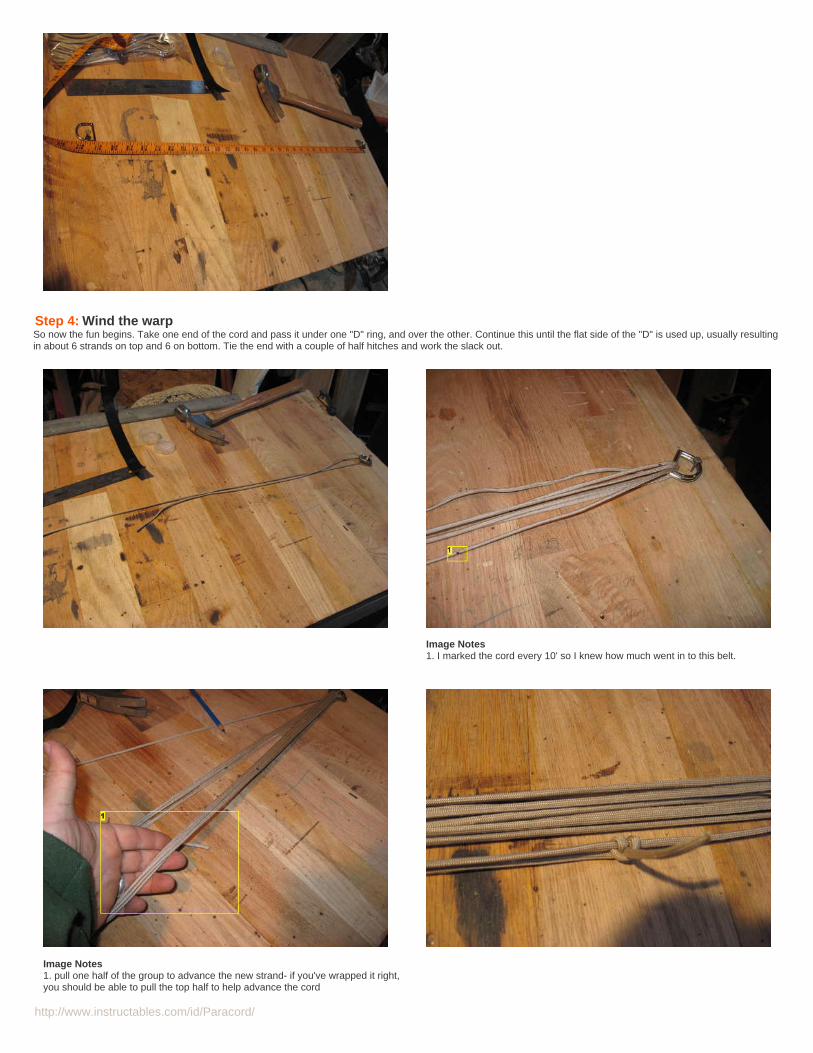
http://www.instructables.com/id/Paracord/
Step 4: Wind the warpSo now the fun begins. Take one end of the cord and pass it under one "D" ring, and over the other. Continue this until the flat side of the "D" is used up, usually resultingin about 6 strands on top and 6 on bottom. Tie the end with a couple of half hitches and work the slack out.
Image Notes1. I marked the cord every 10' so I knew how much went in to this belt.
Image Notes1. pull one half of the group to advance the new strand- if you've wrapped it right,you should be able to pull the top half to help advance the cord
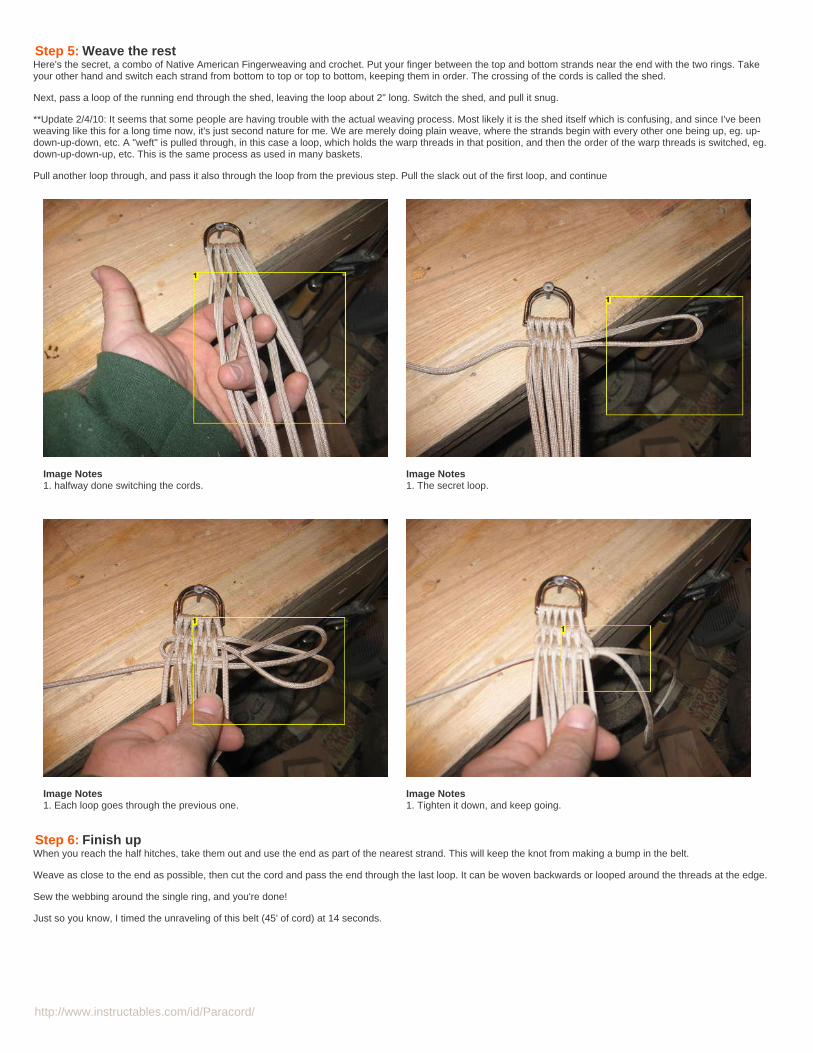
http://www.instructables.com/id/Paracord/
Step 5: Weave the restHere's the secret, a combo of Native American Fingerweaving and crochet. Put your finger between the top and bottom strands near the end with the two rings. Takeyour other hand and switch each strand from bottom to top or top to bottom, keeping them in order. The crossing of the cords is called the shed.
Next, pass a loop of the running end through the shed, leaving the loop about 2" long. Switch the shed, and pull it snug.
**Update 2/4/10: It seems that some people are having trouble with the actual weaving process. Most likely it is the shed itself which is confusing, and since I've beenweaving like this for a long time now, it's just second nature for me. We are merely doing plain weave, where the strands begin with every other one being up, eg. up-down-up-down, etc. A "weft" is pulled through, in this case a loop, which holds the warp threads in that position, and then the order of the warp threads is switched, eg.down-up-down-up, etc. This is the same process as used in many baskets.
Pull another loop through, and pass it also through the loop from the previous step. Pull the slack out of the first loop, and continue
Image Notes1. halfway done switching the cords.
Image Notes1. The secret loop.
Image Notes1. Each loop goes through the previous one.
Image Notes1. Tighten it down, and keep going.
Step 6: Finish upWhen you reach the half hitches, take them out and use the end as part of the nearest strand. This will keep the knot from making a bump in the belt.
Weave as close to the end as possible, then cut the cord and pass the end through the last loop. It can be woven backwards or looped around the threads at the edge.
Sew the webbing around the single ring, and you're done!
Just so you know, I timed the unraveling of this belt (45' of cord) at 14 seconds.
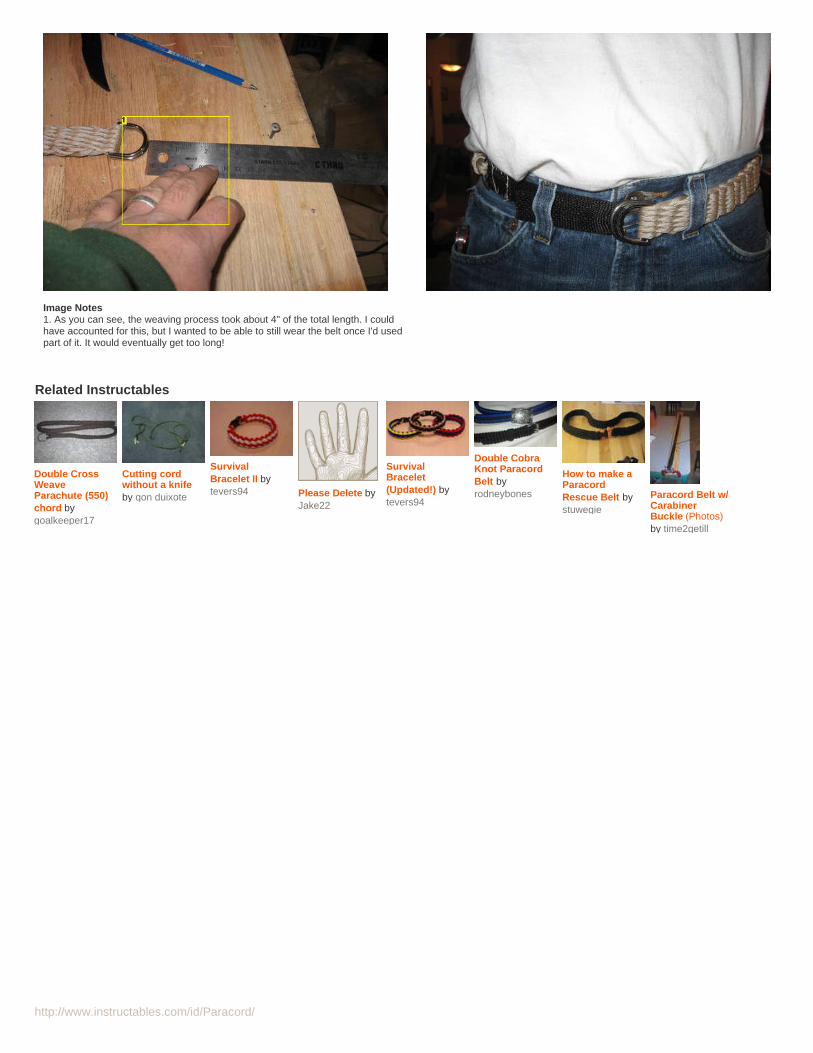
http://www.instructables.com/id/Paracord/
Image Notes1. As you can see, the weaving process took about 4" of the total length. I couldhave accounted for this, but I wanted to be able to still wear the belt once I'd usedpart of it. It would eventually get too long!
Related Instructables
Double CrossWeaveParachute (550)chord bygoalkeeper17
Cutting cordwithout a knifeby qon duixote
SurvivalBracelet II bytevers94 Please Delete by
Jake22
SurvivalBracelet(Updated!) bytevers94
Double CobraKnot ParacordBelt byrodneybones
How to make aParacordRescue Belt bystuwegie
Paracord Belt w/CarabinerBuckle (Photos)by time2getill
http://www.instructables.com/id/Double-Cobra-Knot-Paracord-Belt/?utm_source=pdf&utm_campaign=related
http://www.instructables.com/id/Double-Cobra-Knot-Paracord-Belt/?utm_source=pdf&utm_campaign=related
http://www.instructables.com/id/Double-Cobra-Knot-Paracord-Belt/?utm_source=pdf&utm_campaign=related
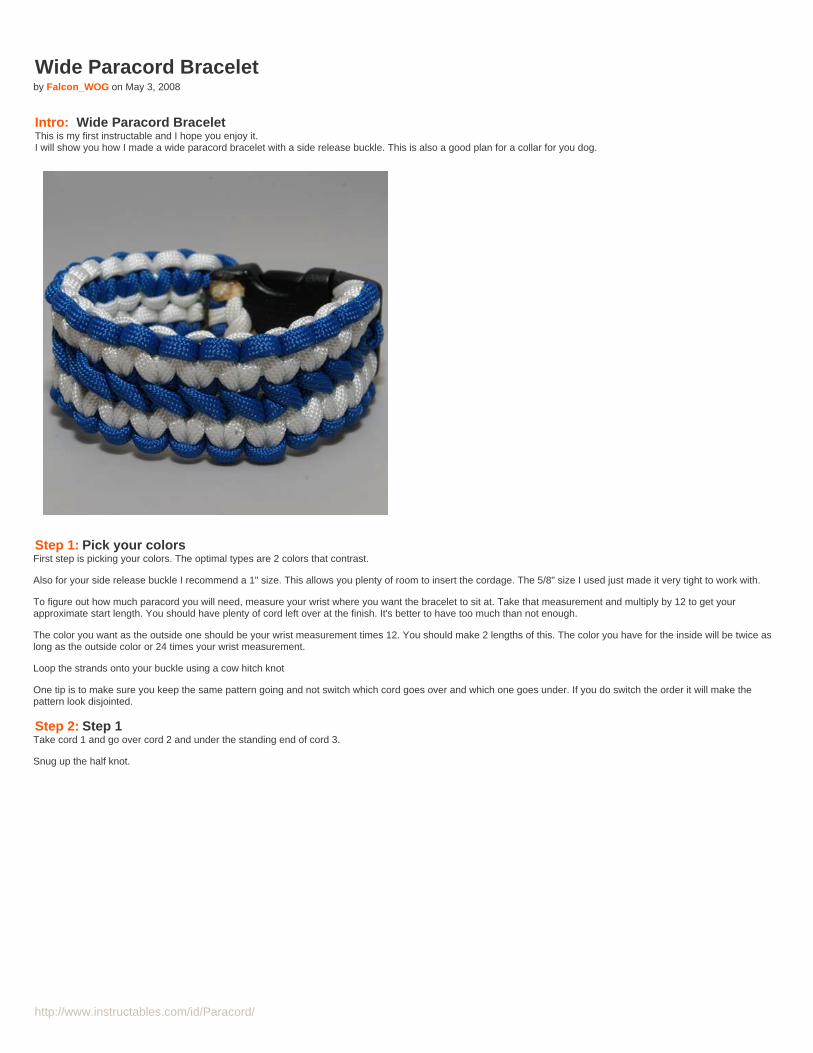
http://www.instructables.com/id/Paracord/
Wide Paracord Braceletby Falcon_WOG on May 3, 2008
Intro: Wide Paracord BraceletThis is my first instructable and I hope you enjoy it.I will show you how I made a wide paracord bracelet with a side release buckle. This is also a good plan for a collar for you dog.
Step 1: Pick your colorsFirst step is picking your colors. The optimal types are 2 colors that contrast.
Also for your side release buckle I recommend a 1" size. This allows you plenty of room to insert the cordage. The 5/8" size I used just made it very tight to work with.
To figure out how much paracord you will need, measure your wrist where you want the bracelet to sit at. Take that measurement and multiply by 12 to get yourapproximate start length. You should have plenty of cord left over at the finish. It's better to have too much than not enough.
The color you want as the outside one should be your wrist measurement times 12. You should make 2 lengths of this. The color you have for the inside will be twice aslong as the outside color or 24 times your wrist measurement.
Loop the strands onto your buckle using a cow hitch knot
One tip is to make sure you keep the same pattern going and not switch which cord goes over and which one goes under. If you do switch the order it will make thepattern look disjointed.
Step 2: Step 1Take cord 1 and go over cord 2 and under the standing end of cord 3.
Snug up the half knot.
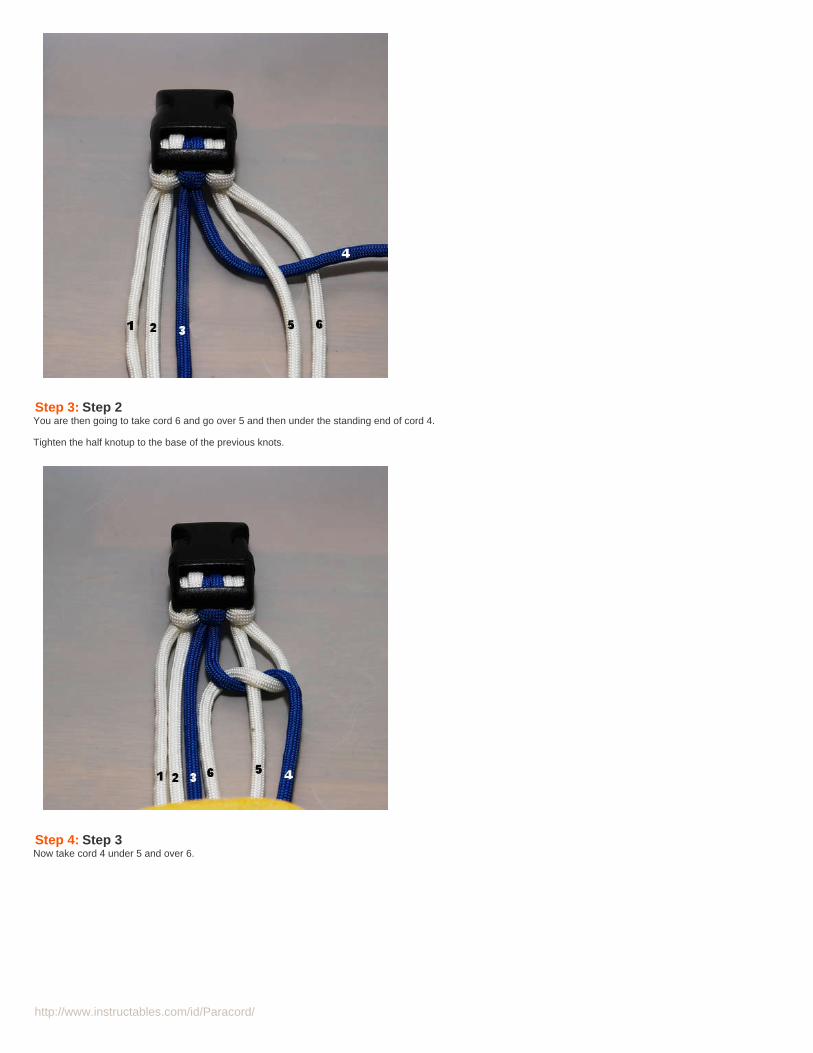
http://www.instructables.com/id/Paracord/
Step 3: Step 2You are then going to take cord 6 and go over 5 and then under the standing end of cord 4.
Tighten the half knotup to the base of the previous knots.
Step 4: Step 3Now take cord 4 under 5 and over 6.
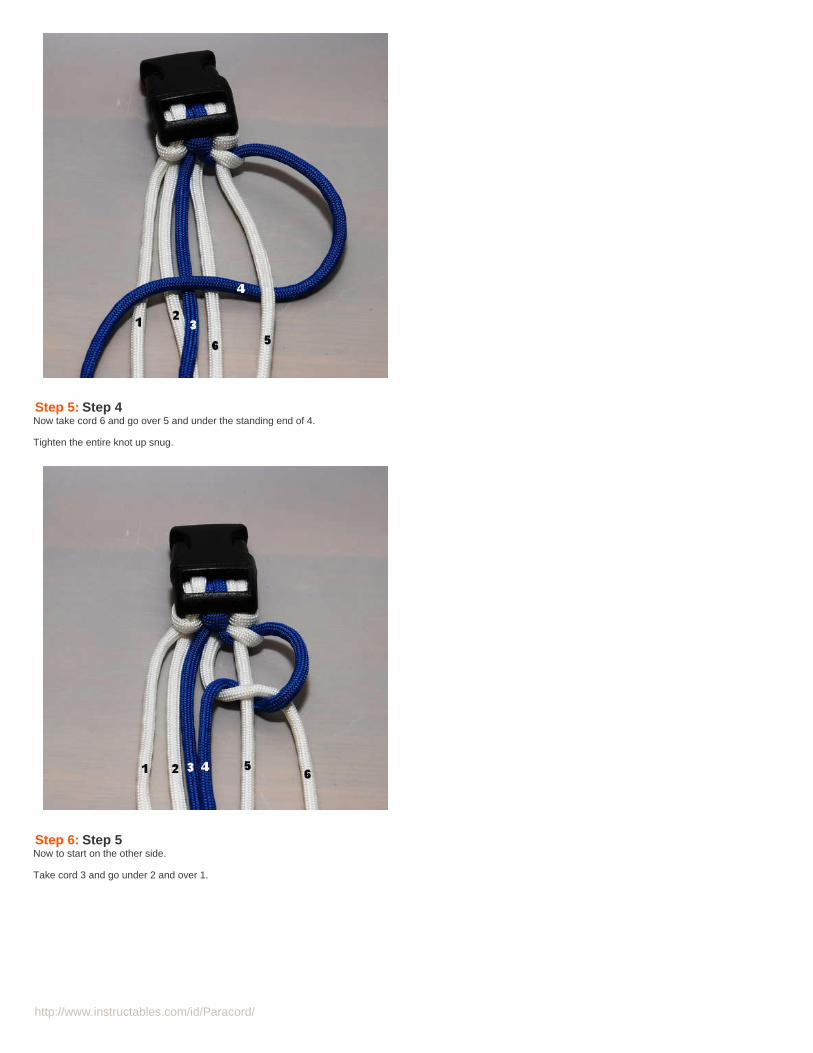
http://www.instructables.com/id/Paracord/
Step 5: Step 4Now take cord 6 and go over 5 and under the standing end of 4.
Tighten the entire knot up snug.
Step 6: Step 5Now to start on the other side.
Take cord 3 and go under 2 and over 1.
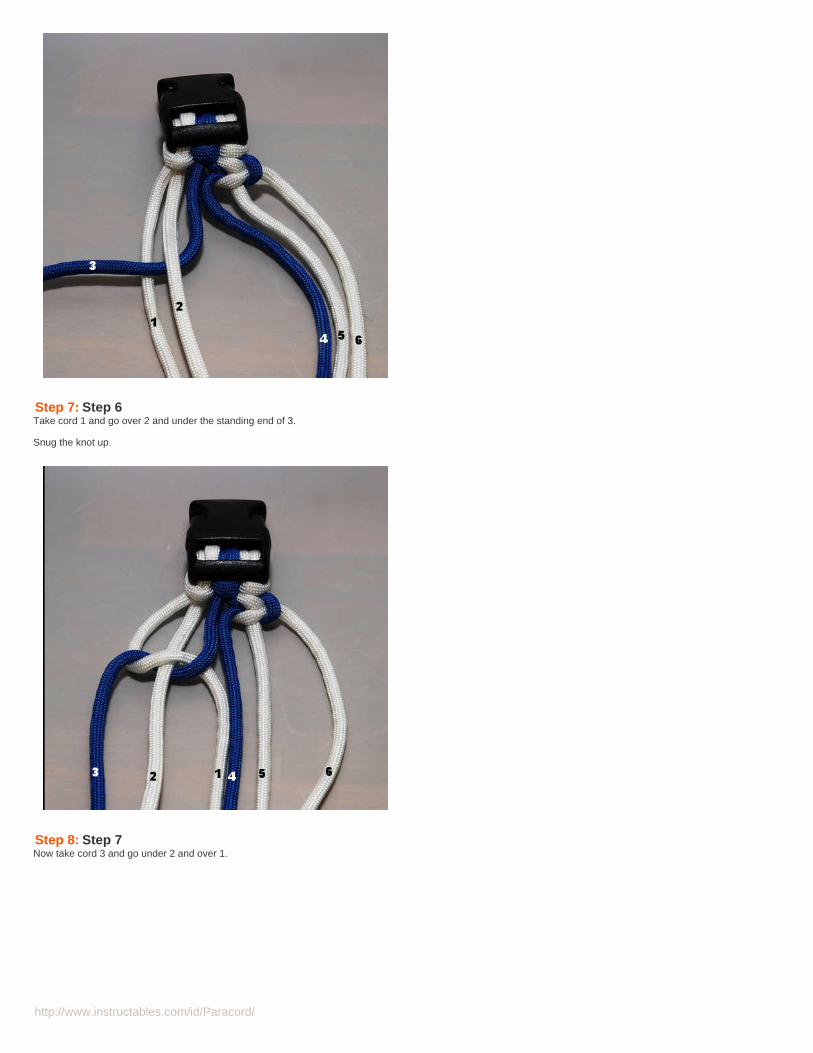
http://www.instructables.com/id/Paracord/
Step 7: Step 6Take cord 1 and go over 2 and under the standing end of 3.
Snug the knot up.
Step 8: Step 7Now take cord 3 and go under 2 and over 1.
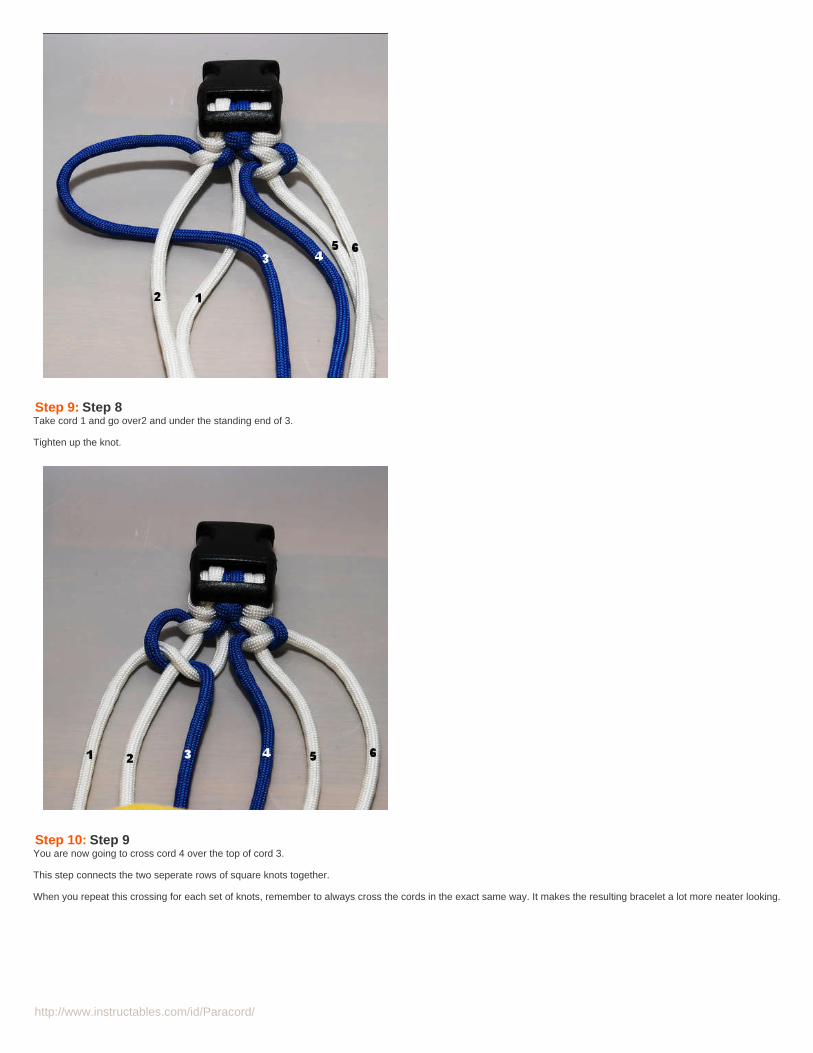
http://www.instructables.com/id/Paracord/
Step 9: Step 8Take cord 1 and go over2 and under the standing end of 3.
Tighten up the knot.
Step 10: Step 9You are now going to cross cord 4 over the top of cord 3.
This step connects the two seperate rows of square knots together.
When you repeat this crossing for each set of knots, remember to always cross the cords in the exact same way. It makes the resulting bracelet a lot more neater looking.
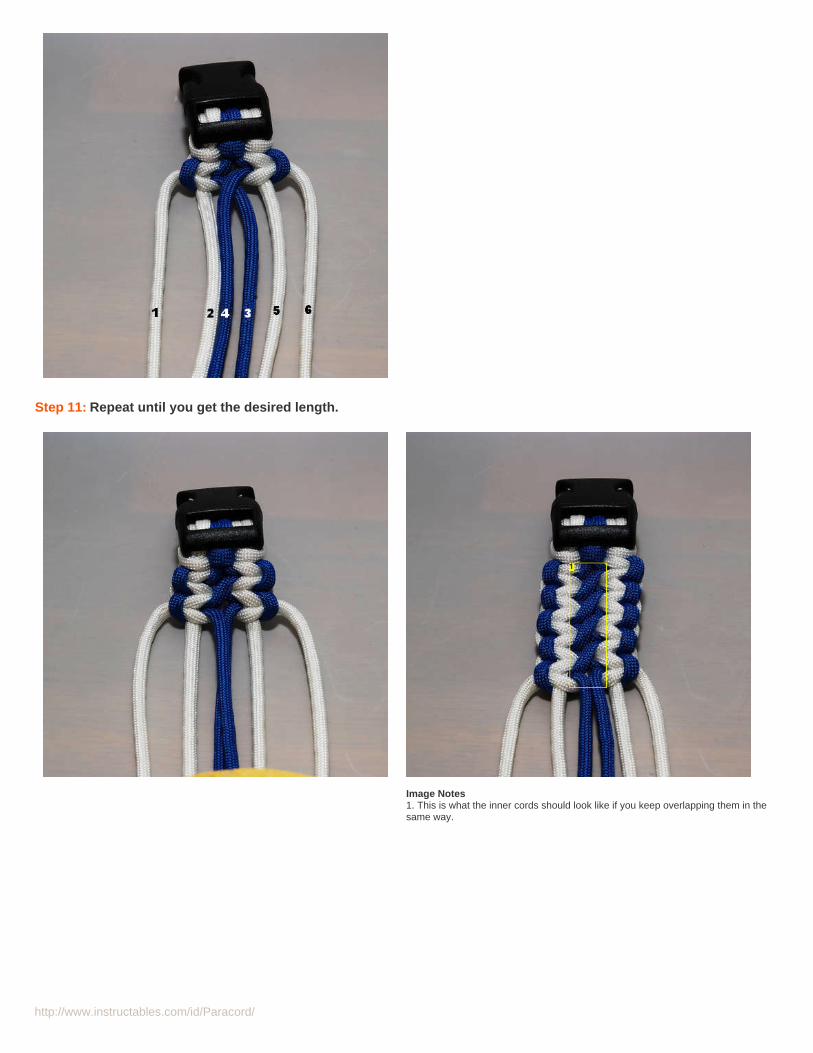
http://www.instructables.com/id/Paracord/
Step 11: Repeat until you get the desired length.
Image Notes1. This is what the inner cords should look like if you keep overlapping them in thesame way.
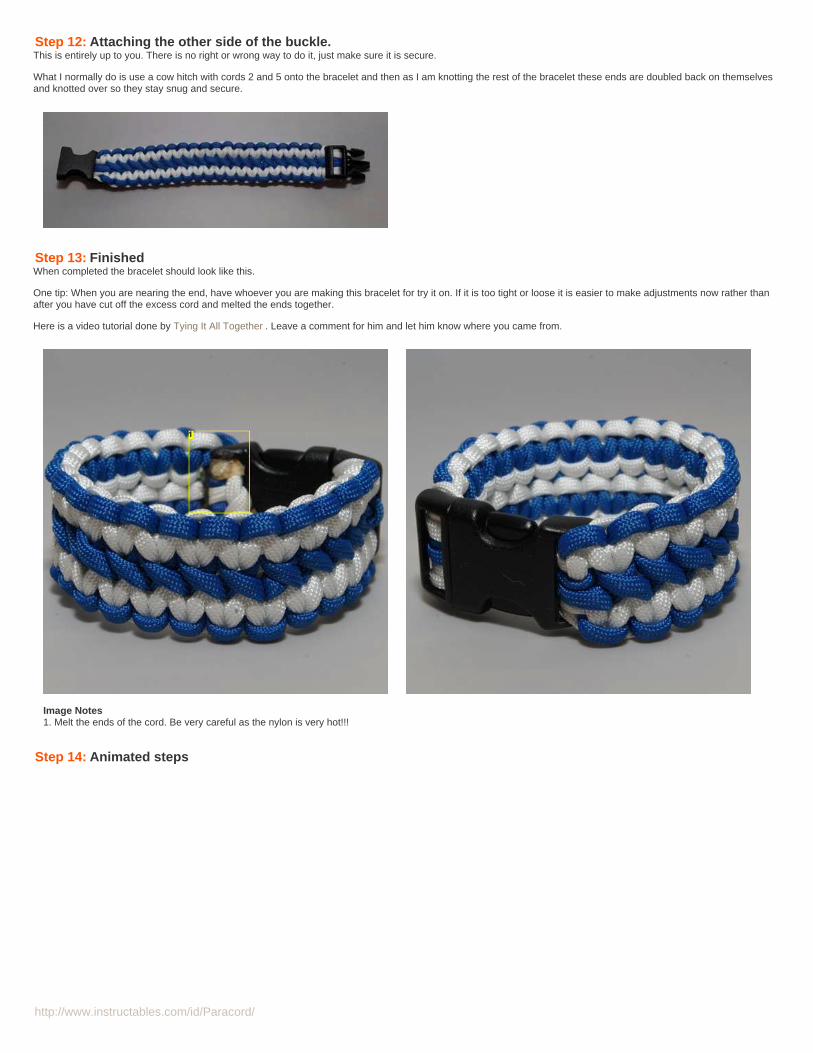
http://www.instructables.com/id/Paracord/
Step 12: Attaching the other side of the buckle.This is entirely up to you. There is no right or wrong way to do it, just make sure it is secure.
What I normally do is use a cow hitch with cords 2 and 5 onto the bracelet and then as I am knotting the rest of the bracelet these ends are doubled back on themselvesand knotted over so they stay snug and secure.
Step 13: FinishedWhen completed the bracelet should look like this.
One tip: When you are nearing the end, have whoever you are making this bracelet for try it on. If it is too tight or loose it is easier to make adjustments now rather thanafter you have cut off the excess cord and melted the ends together.
Here is a video tutorial done by Tying It All Together . Leave a comment for him and let him know where you came from.
Image Notes1. Melt the ends of the cord. Be very careful as the nylon is very hot!!!
Step 14: Animated steps
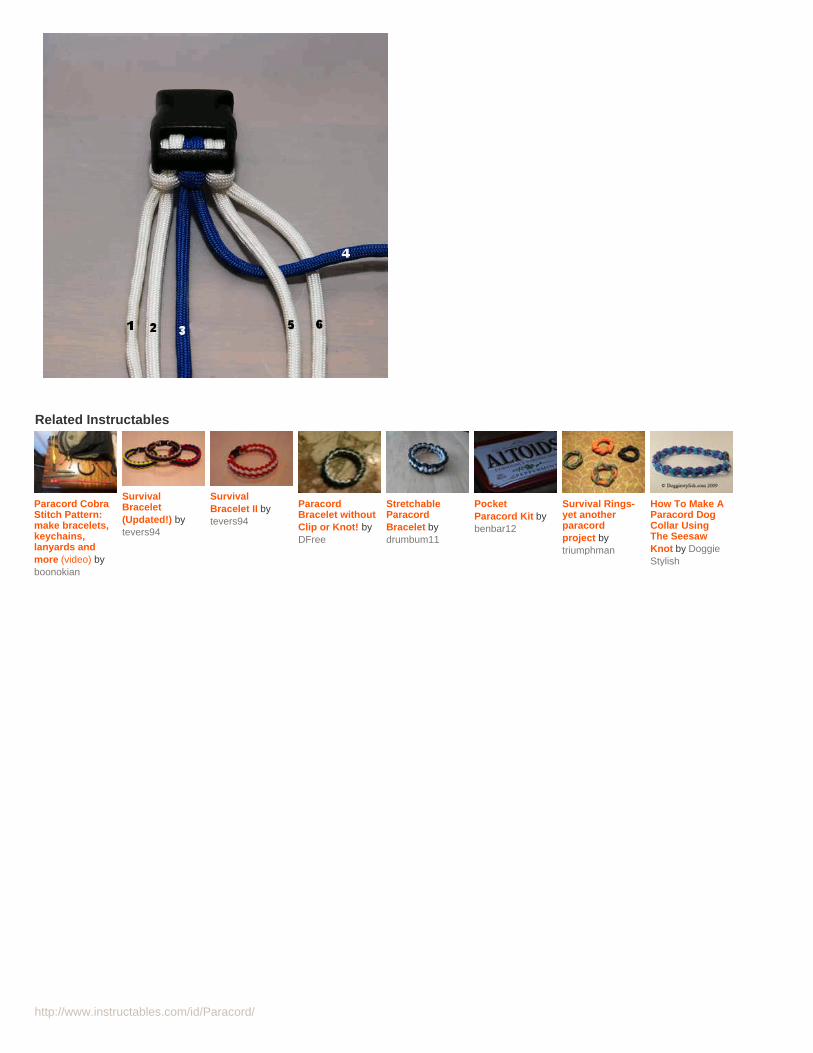
http://www.instructables.com/id/Paracord/
Related Instructables
Paracord CobraStitch Pattern:make bracelets,keychains,lanyards andmore (video) byboonokian
SurvivalBracelet(Updated!) bytevers94
SurvivalBracelet II bytevers94
ParacordBracelet withoutClip or Knot! byDFree
StretchableParacordBracelet bydrumbum11
PocketParacord Kit bybenbar12
Survival Rings-yet anotherparacordproject bytriumphman
How To Make AParacord DogCollar UsingThe SeesawKnot by DoggieStylish
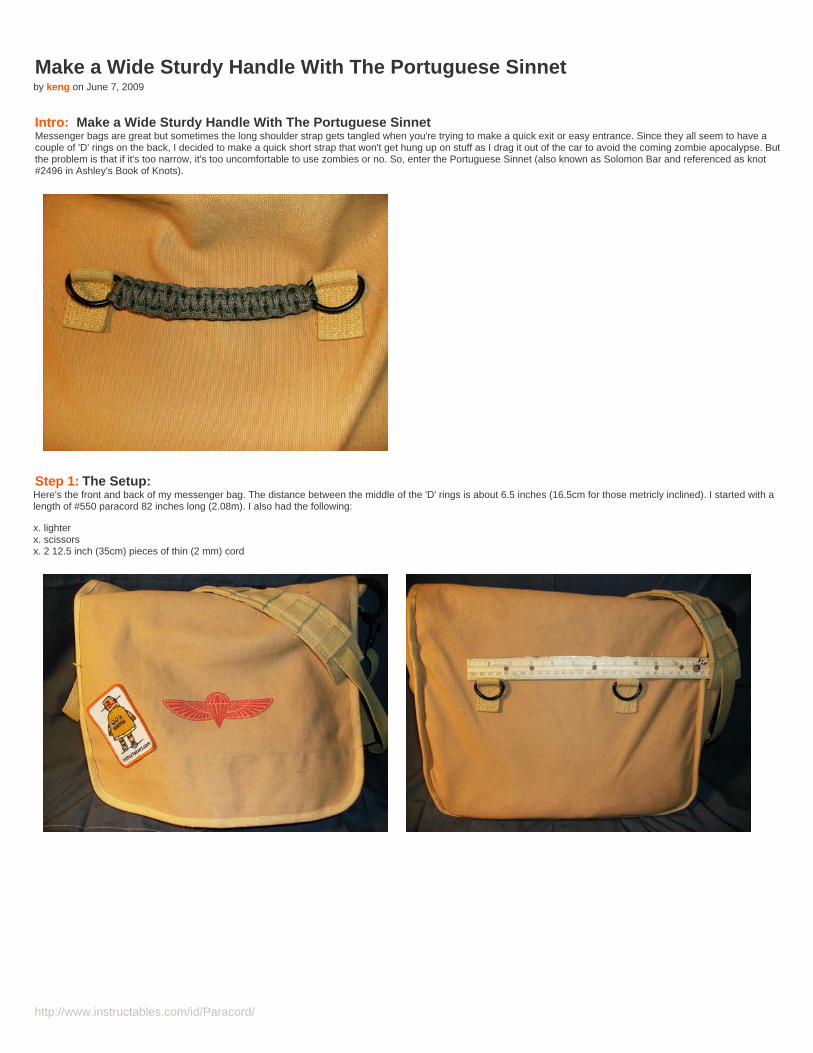
http://www.instructables.com/id/Paracord/
Make a Wide Sturdy Handle With The Portuguese Sinnetby keng on June 7, 2009
Intro: Make a Wide Sturdy Handle With The Portuguese SinnetMessenger bags are great but sometimes the long shoulder strap gets tangled when you're trying to make a quick exit or easy entrance. Since they all seem to have acouple of 'D' rings on the back, I decided to make a quick short strap that won't get hung up on stuff as I drag it out of the car to avoid the coming zombie apocalypse. Butthe problem is that if it's too narrow, it's too uncomfortable to use zombies or no. So, enter the Portuguese Sinnet (also known as Solomon Bar and referenced as knot#2496 in Ashley's Book of Knots).
Step 1: The Setup:Here's the front and back of my messenger bag. The distance between the middle of the 'D' rings is about 6.5 inches (16.5cm for those metricly inclined). I started with alength of #550 paracord 82 inches long (2.08m). I also had the following:
x. lighterx. scissorsx. 2 12.5 inch (35cm) pieces of thin (2 mm) cord
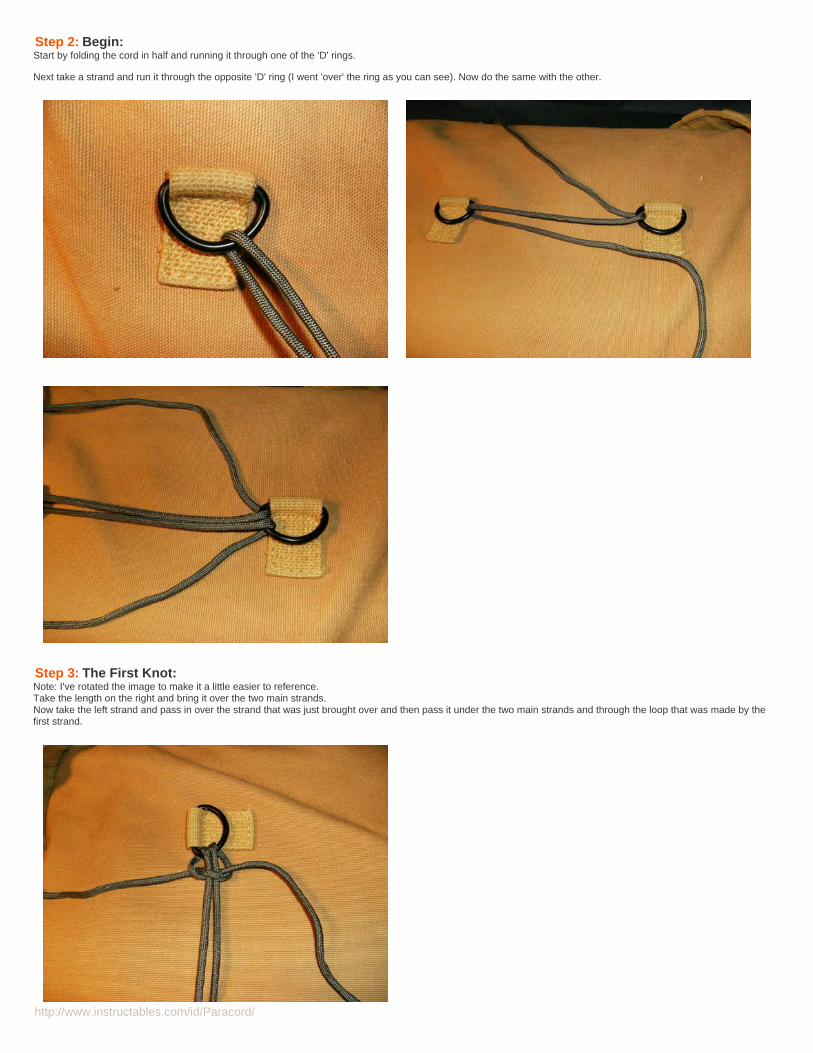
http://www.instructables.com/id/Paracord/
Step 2: Begin:Start by folding the cord in half and running it through one of the 'D' rings.
Next take a strand and run it through the opposite 'D' ring (I went 'over' the ring as you can see). Now do the same with the other.
Step 3: The First Knot:Note: I've rotated the image to make it a little easier to reference.Take the length on the right and bring it over the two main strands.Now take the left strand and pass in over the strand that was just brought over and then pass it under the two main strands and through the loop that was made by thefirst strand.
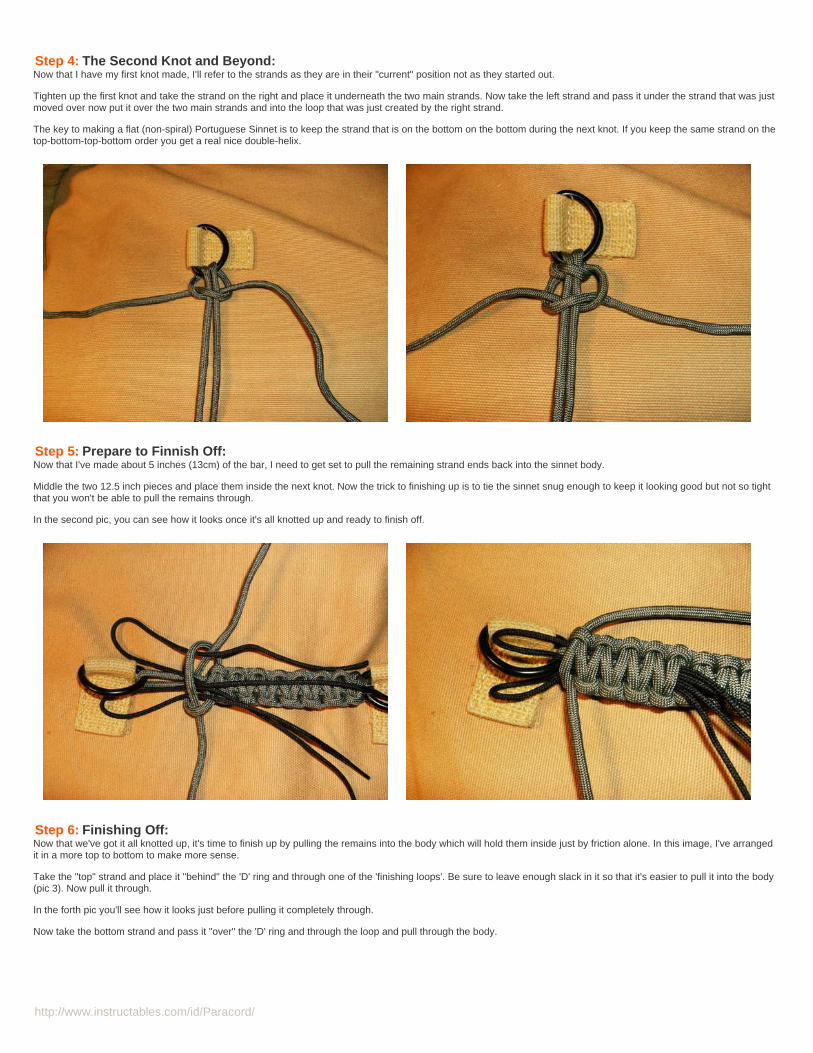
http://www.instructables.com/id/Paracord/
Step 4: The Second Knot and Beyond:Now that I have my first knot made, I'll refer to the strands as they are in their "current" position not as they started out.
Tighten up the first knot and take the strand on the right and place it underneath the two main strands. Now take the left strand and pass it under the strand that was justmoved over now put it over the two main strands and into the loop that was just created by the right strand.
The key to making a flat (non-spiral) Portuguese Sinnet is to keep the strand that is on the bottom on the bottom during the next knot. If you keep the same strand on thetop-bottom-top-bottom order you get a real nice double-helix.
Step 5: Prepare to Finnish Off:Now that I've made about 5 inches (13cm) of the bar, I need to get set to pull the remaining strand ends back into the sinnet body.
Middle the two 12.5 inch pieces and place them inside the next knot. Now the trick to finishing up is to tie the sinnet snug enough to keep it looking good but not so tightthat you won't be able to pull the remains through.
In the second pic, you can see how it looks once it's all knotted up and ready to finish off.
Step 6: Finishing Off:Now that we've got it all knotted up, it's time to finish up by pulling the remains into the body which will hold them inside just by friction alone. In this image, I've arrangedit in a more top to bottom to make more sense.
Take the "top" strand and place it "behind" the 'D' ring and through one of the 'finishing loops'. Be sure to leave enough slack in it so that it's easier to pull it into the body(pic 3). Now pull it through.
In the forth pic you'll see how it looks just before pulling it completely through.
Now take the bottom strand and pass it "over" the 'D' ring and through the loop and pull through the body.
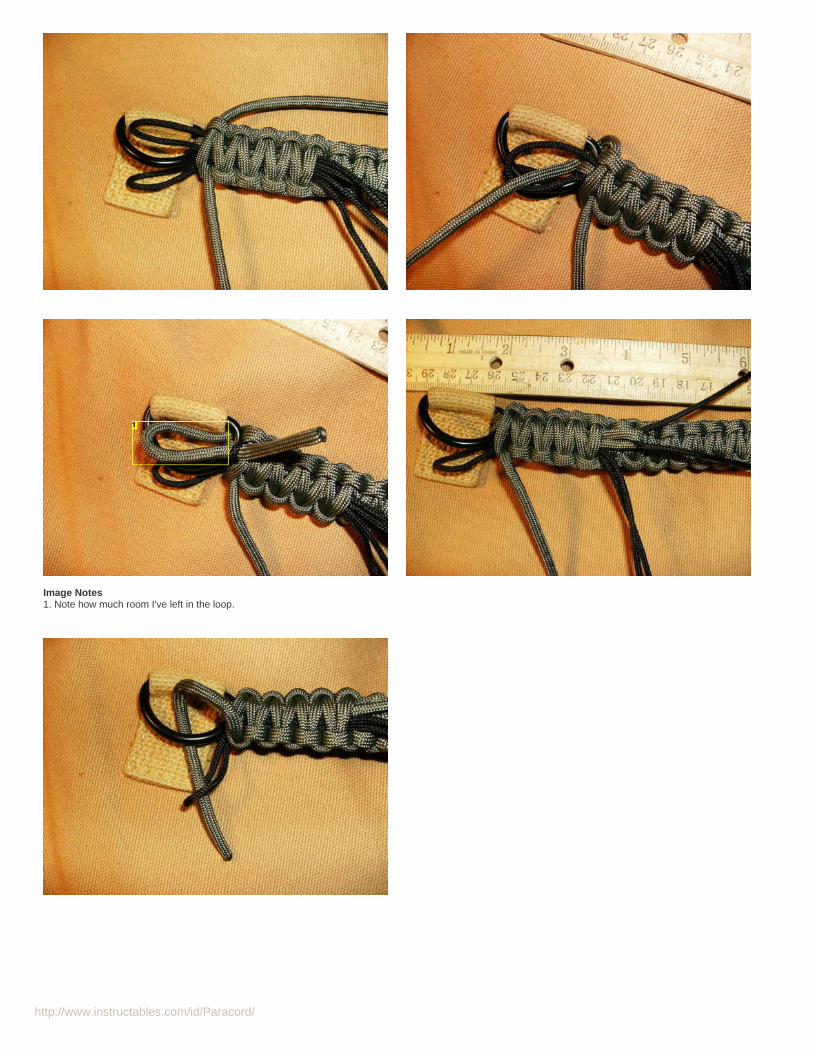
http://www.instructables.com/id/Paracord/
Image Notes1. Note how much room I've left in the loop.
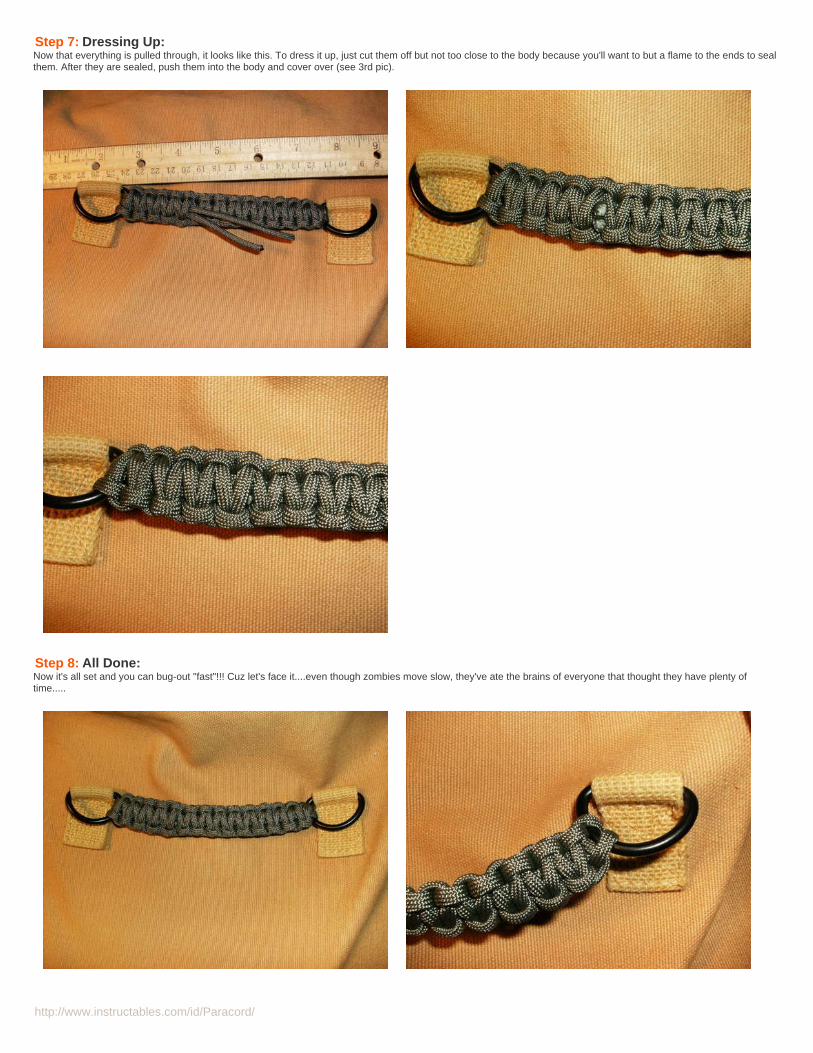
http://www.instructables.com/id/Paracord/
Step 7: Dressing Up:Now that everything is pulled through, it looks like this. To dress it up, just cut them off but not too close to the body because you'll want to but a flame to the ends to sealthem. After they are sealed, push them into the body and cover over (see 3rd pic).
Step 8: All Done:Now it's all set and you can bug-out "fast"!!! Cuz let's face it....even though zombies move slow, they've ate the brains of everyone that thought they have plenty oftime.....
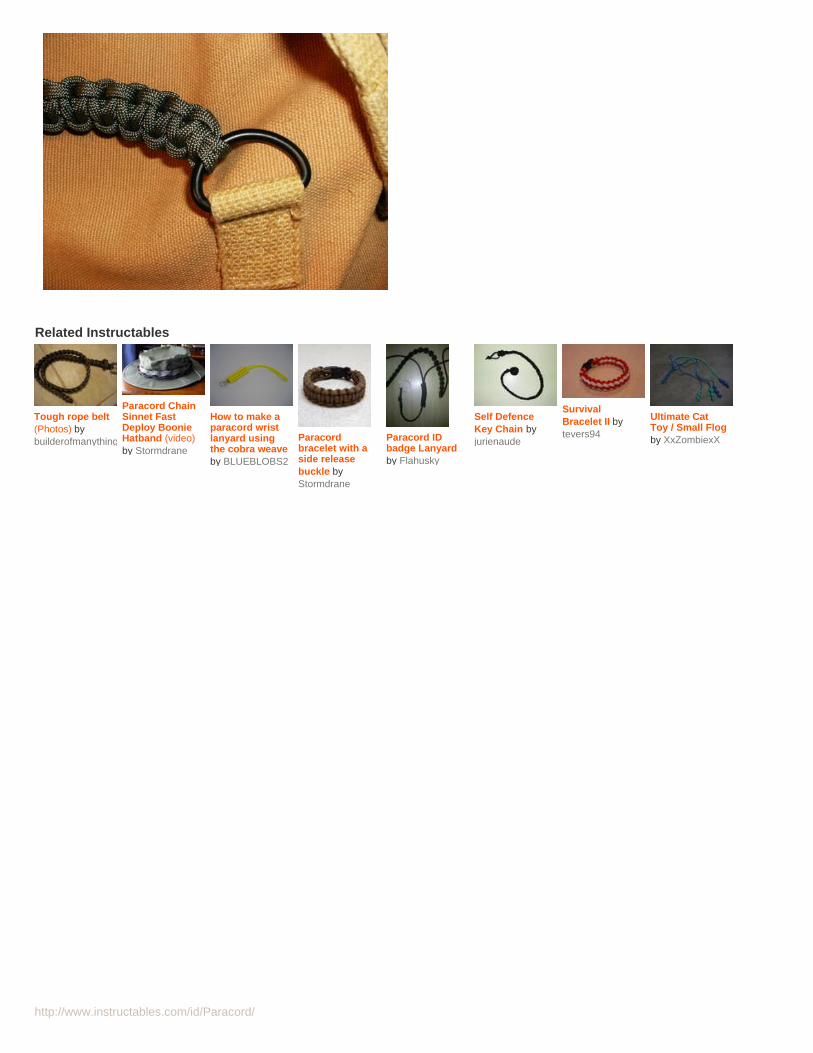
http://www.instructables.com/id/Paracord/
Related Instructables
Tough rope belt(Photos) bybuilderofmanythings
Paracord ChainSinnet FastDeploy BoonieHatband (video)by Stormdrane
How to make aparacord wristlanyard usingthe cobra weaveby BLUEBLOBS2
Paracordbracelet with aside releasebuckle byStormdrane
Paracord IDbadge Lanyardby Flahusky
Self DefenceKey Chain byjurienaude
SurvivalBracelet II bytevers94
Ultimate CatToy / Small Flogby XxZombiexX

http://www.instructables.com/id/Paracord/
How to make a harpoon on the cheapby notjustsomeone on May 7, 2008
Intro: How to make a harpoon on the cheapDemonstrates how to make a harpoon, similar to the Hoffman Harpoon, intended as a sort of minimalist survival tool. It's 8 inches long, with a 2 and one half inch blade,the handle is wrapped in paracord.
I haven't made a sheath for it yet, but will post it when I do.
Step 1: Gather materials and toolsFor this project you will need the following:
- paper.- pencil.- 8"x2" peice of metal.(I used an old machete from walmart)- saw to cut metal aka hacksaw.- a couple metal files; flat, rounded, and 1/4" round file.- sandpaper, grits 60 and up.- glue.- paracord, or whatever 1/8" cordage you've got lying around.- vise (optional but helps a lot)- drill (optional if you make a lanyard hole)- honing stone (optional, but not if you want a sharp blade)
Image Notes1. hacksaw2. file3. superglue4. machete from walmart5. 60, 150, and 220 grit sandpaper
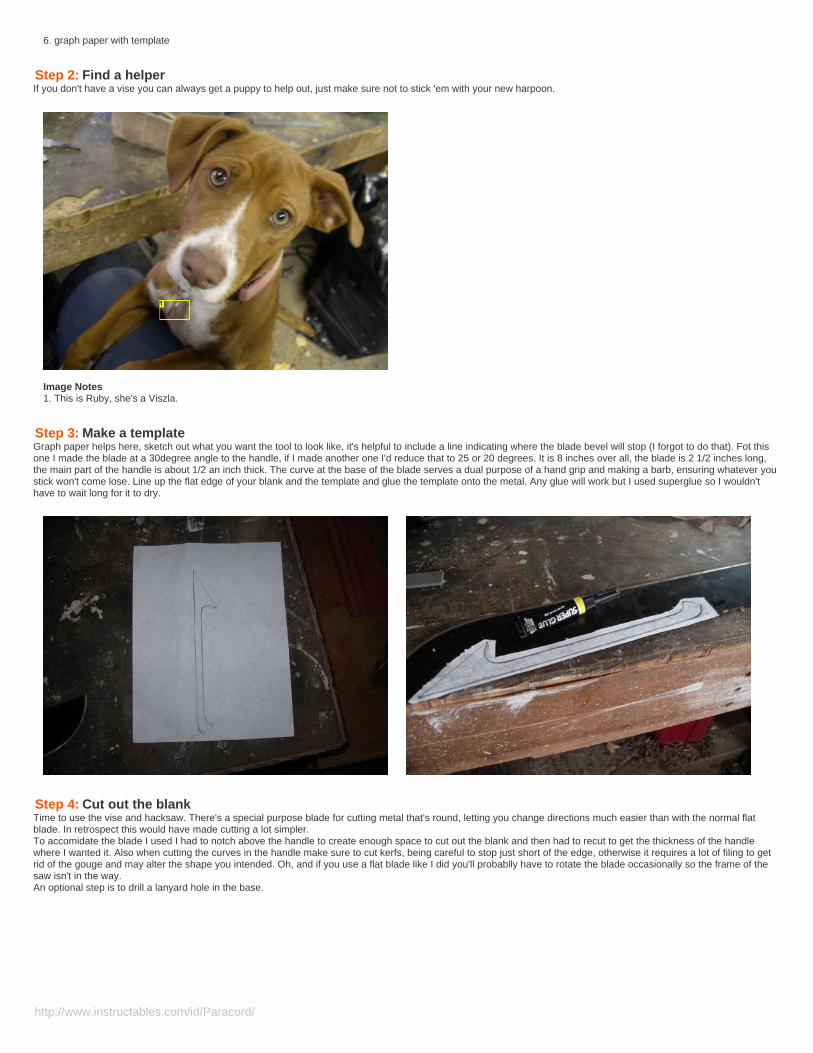
http://www.instructables.com/id/Paracord/
6. graph paper with template
Step 2: Find a helperIf you don't have a vise you can always get a puppy to help out, just make sure not to stick 'em with your new harpoon.
Image Notes1. This is Ruby, she's a Viszla.
Step 3: Make a templateGraph paper helps here, sketch out what you want the tool to look like, it's helpful to include a line indicating where the blade bevel will stop (I forgot to do that). Fot thisone I made the blade at a 30degree angle to the handle, if I made another one I'd reduce that to 25 or 20 degrees. It is 8 inches over all, the blade is 2 1/2 inches long,the main part of the handle is about 1/2 an inch thick. The curve at the base of the blade serves a dual purpose of a hand grip and making a barb, ensuring whatever youstick won't come lose. Line up the flat edge of your blank and the template and glue the template onto the metal. Any glue will work but I used superglue so I wouldn'thave to wait long for it to dry.
Step 4: Cut out the blankTime to use the vise and hacksaw. There's a special purpose blade for cutting metal that's round, letting you change directions much easier than with the normal flatblade. In retrospect this would have made cutting a lot simpler.To accomidate the blade I used I had to notch above the handle to create enough space to cut out the blank and then had to recut to get the thickness of the handlewhere I wanted it. Also when cutting the curves in the handle make sure to cut kerfs, being careful to stop just short of the edge, otherwise it requires a lot of filing to getrid of the gouge and may alter the shape you intended. Oh, and if you use a flat blade like I did you'll probablly have to rotate the blade occasionally so the frame of thesaw isn't in the way.An optional step is to drill a lanyard hole in the base.
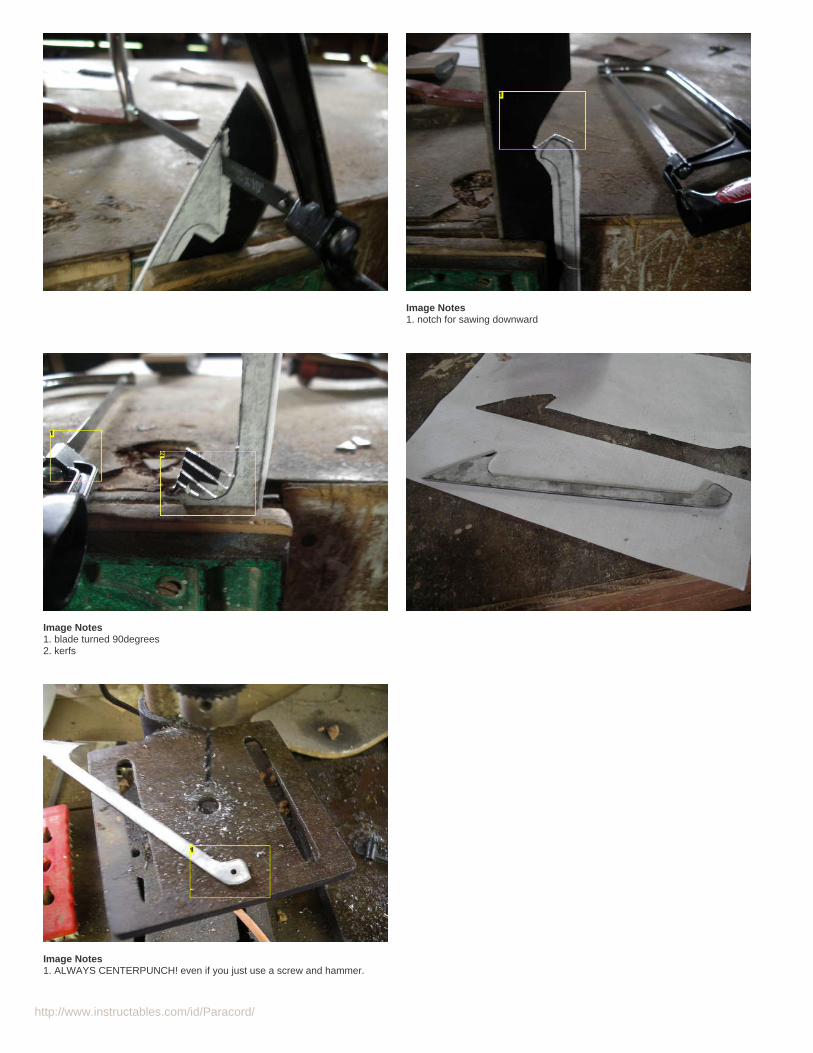
http://www.instructables.com/id/Paracord/
Image Notes1. notch for sawing downward
Image Notes1. blade turned 90degrees2. kerfs
Image Notes1. ALWAYS CENTERPUNCH! even if you just use a screw and hammer.
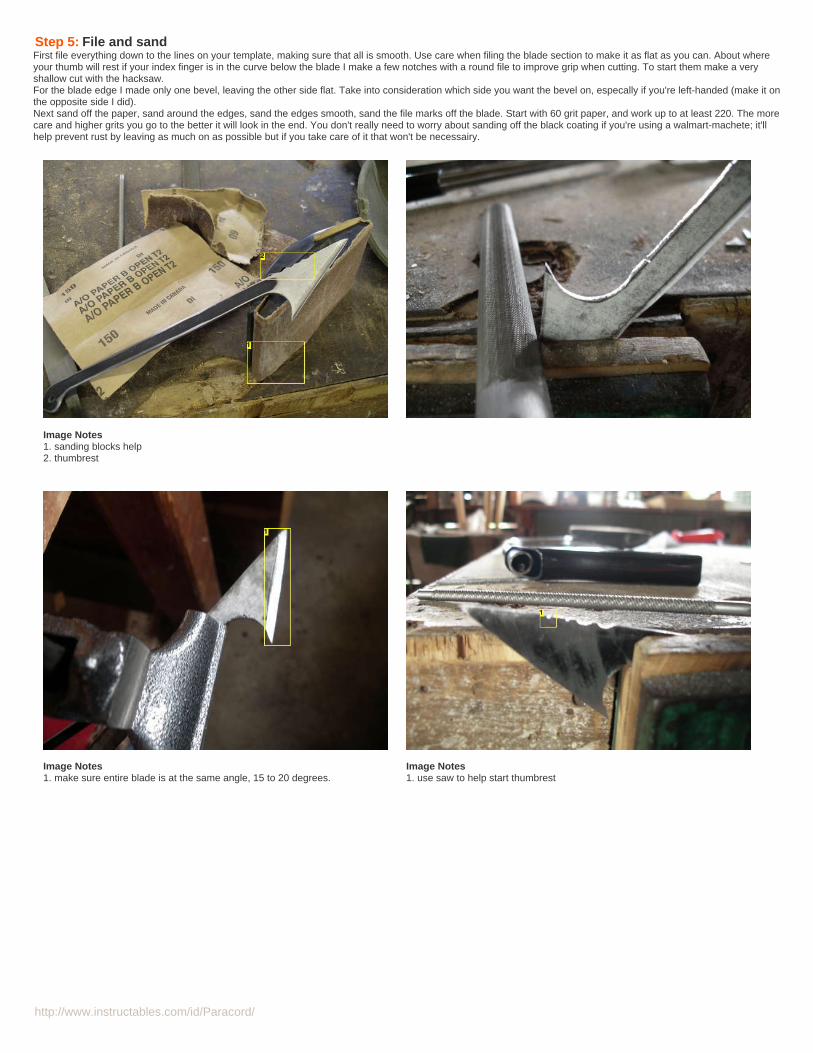
http://www.instructables.com/id/Paracord/
Step 5: File and sandFirst file everything down to the lines on your template, making sure that all is smooth. Use care when filing the blade section to make it as flat as you can. About whereyour thumb will rest if your index finger is in the curve below the blade I make a few notches with a round file to improve grip when cutting. To start them make a veryshallow cut with the hacksaw.For the blade edge I made only one bevel, leaving the other side flat. Take into consideration which side you want the bevel on, especally if you're left-handed (make it onthe opposite side I did).Next sand off the paper, sand around the edges, sand the edges smooth, sand the file marks off the blade. Start with 60 grit paper, and work up to at least 220. The morecare and higher grits you go to the better it will look in the end. You don't really need to worry about sanding off the black coating if you're using a walmart-machete; it'llhelp prevent rust by leaving as much on as possible but if you take care of it that won't be necessairy.
Image Notes1. sanding blocks help2. thumbrest
Image Notes1. make sure entire blade is at the same angle, 15 to 20 degrees.
Image Notes1. use saw to help start thumbrest
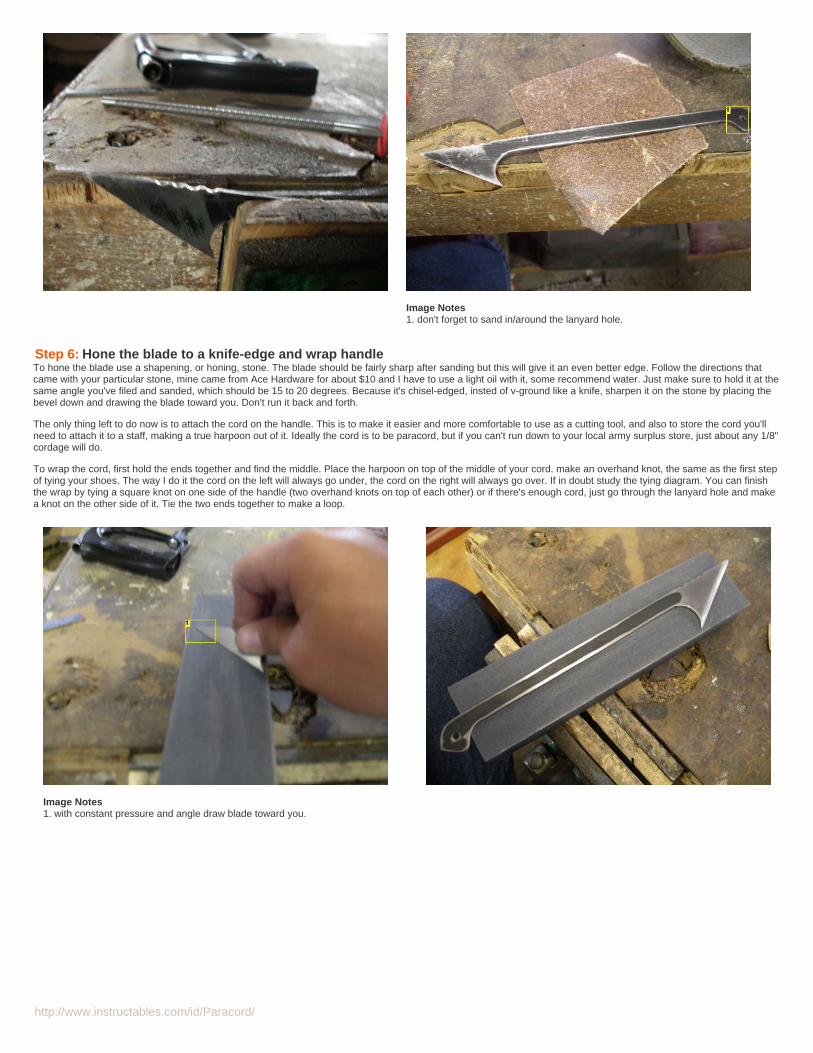
http://www.instructables.com/id/Paracord/
Image Notes1. don't forget to sand in/around the lanyard hole.
Step 6: Hone the blade to a knife-edge and wrap handleTo hone the blade use a shapening, or honing, stone. The blade should be fairly sharp after sanding but this will give it an even better edge. Follow the directions thatcame with your particular stone, mine came from Ace Hardware for about $10 and I have to use a light oil with it, some recommend water. Just make sure to hold it at thesame angle you've filed and sanded, which should be 15 to 20 degrees. Because it's chisel-edged, insted of v-ground like a knife, sharpen it on the stone by placing thebevel down and drawing the blade toward you. Don't run it back and forth.
The only thing left to do now is to attach the cord on the handle. This is to make it easier and more comfortable to use as a cutting tool, and also to store the cord you'llneed to attach it to a staff, making a true harpoon out of it. Ideally the cord is to be paracord, but if you can't run down to your local army surplus store, just about any 1/8"cordage will do.
To wrap the cord, first hold the ends together and find the middle. Place the harpoon on top of the middle of your cord. make an overhand knot, the same as the first stepof tying your shoes. The way I do it the cord on the left will always go under, the cord on the right will always go over. If in doubt study the tying diagram. You can finishthe wrap by tying a square knot on one side of the handle (two overhand knots on top of each other) or if there's enough cord, just go through the lanyard hole and makea knot on the other side of it. Tie the two ends together to make a loop.
Image Notes1. with constant pressure and angle draw blade toward you.
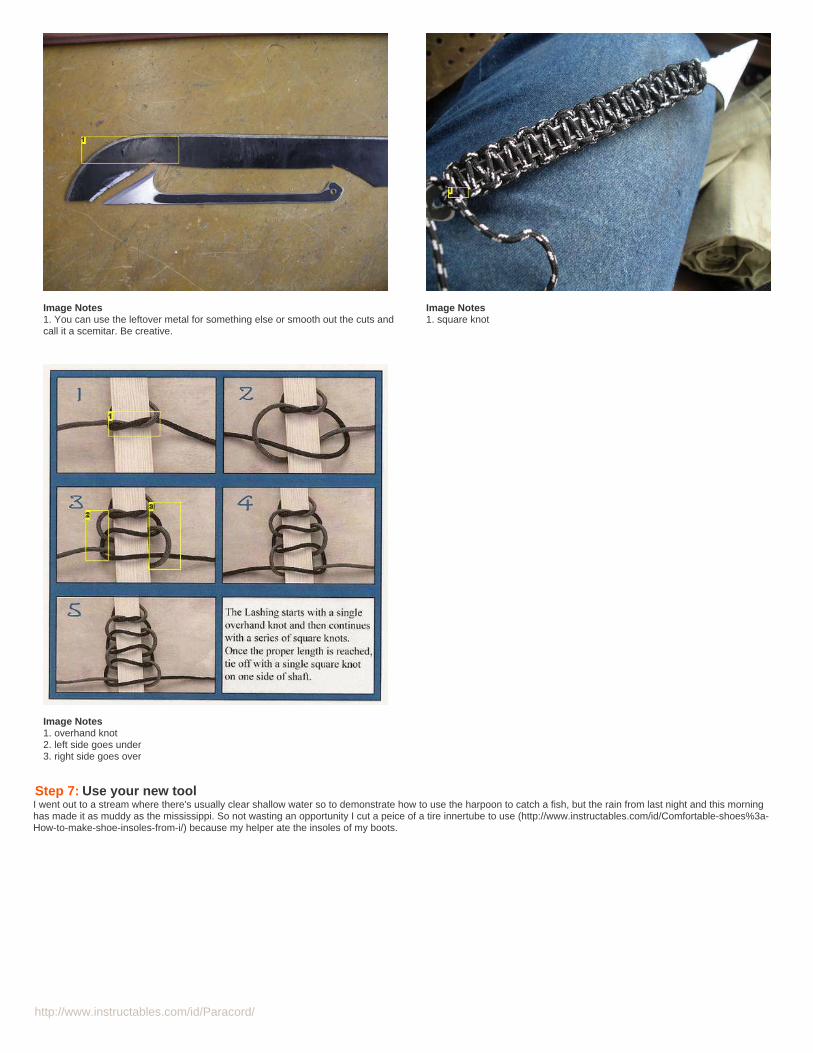
http://www.instructables.com/id/Paracord/
Image Notes1. You can use the leftover metal for something else or smooth out the cuts andcall it a scemitar. Be creative.
Image Notes1. square knot
Image Notes1. overhand knot2. left side goes under3. right side goes over
Step 7: Use your new toolI went out to a stream where there's usually clear shallow water so to demonstrate how to use the harpoon to catch a fish, but the rain from last night and this morninghas made it as muddy as the mississippi. So not wasting an opportunity I cut a peice of a tire innertube to use (http://www.instructables.com/id/Comfortable-shoes%3a-How-to-make-shoe-insoles-from-i/) because my helper ate the insoles of my boots.
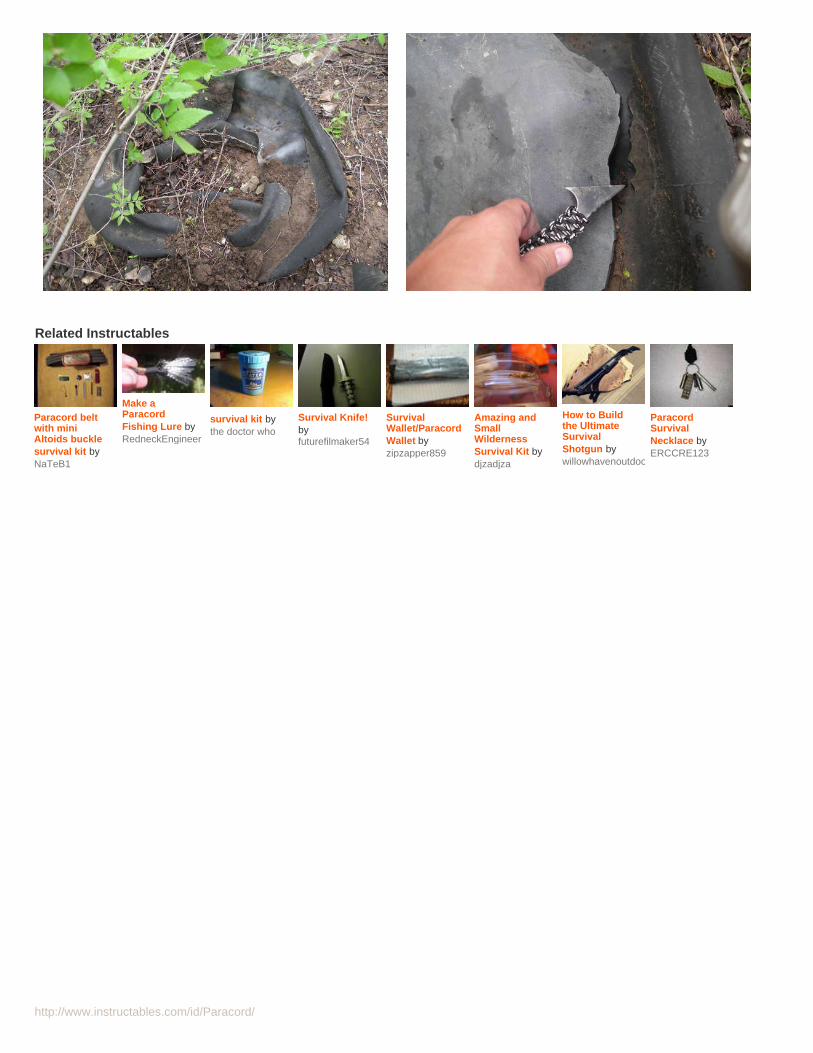
http://www.instructables.com/id/Paracord/
Related Instructables
Paracord beltwith miniAltoids bucklesurvival kit byNaTeB1
Make aParacordFishing Lure byRedneckEngineer
survival kit bythe doctor who
Survival Knife!byfuturefilmaker54
SurvivalWallet/ParacordWallet byzipzapper859
Amazing andSmallWildernessSurvival Kit bydjzadjza
How to Buildthe UltimateSurvivalShotgun bywillowhavenoutdoor
ParacordSurvivalNecklace byERCCRE123
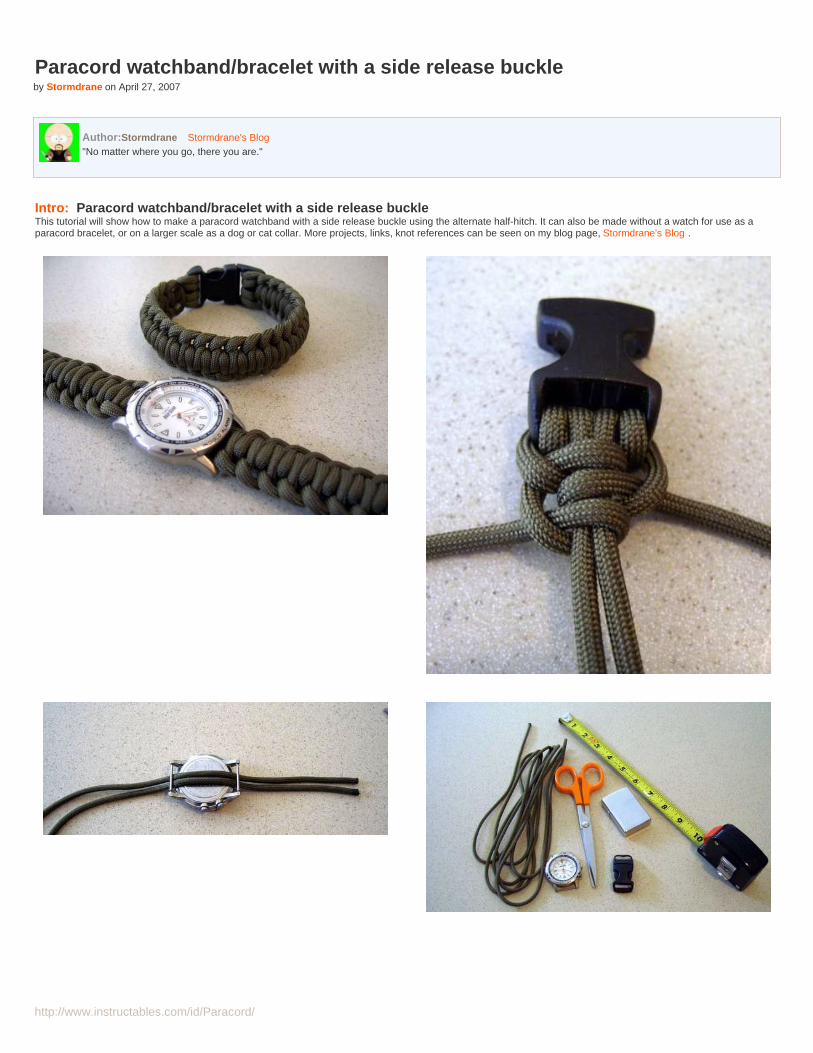
http://www.instructables.com/id/Paracord/
Paracord watchband/bracelet with a side release buckleby Stormdrane on April 27, 2007
Author:Stormdrane Stormdrane's Blog"No matter where you go, there you are."
Intro: Paracord watchband/bracelet with a side release buckleThis tutorial will show how to make a paracord watchband with a side release buckle using the alternate half-hitch. It can also be made without a watch for use as aparacord bracelet, or on a larger scale as a dog or cat collar. More projects, links, knot references can be seen on my blog page, Stormdrane's Blog .
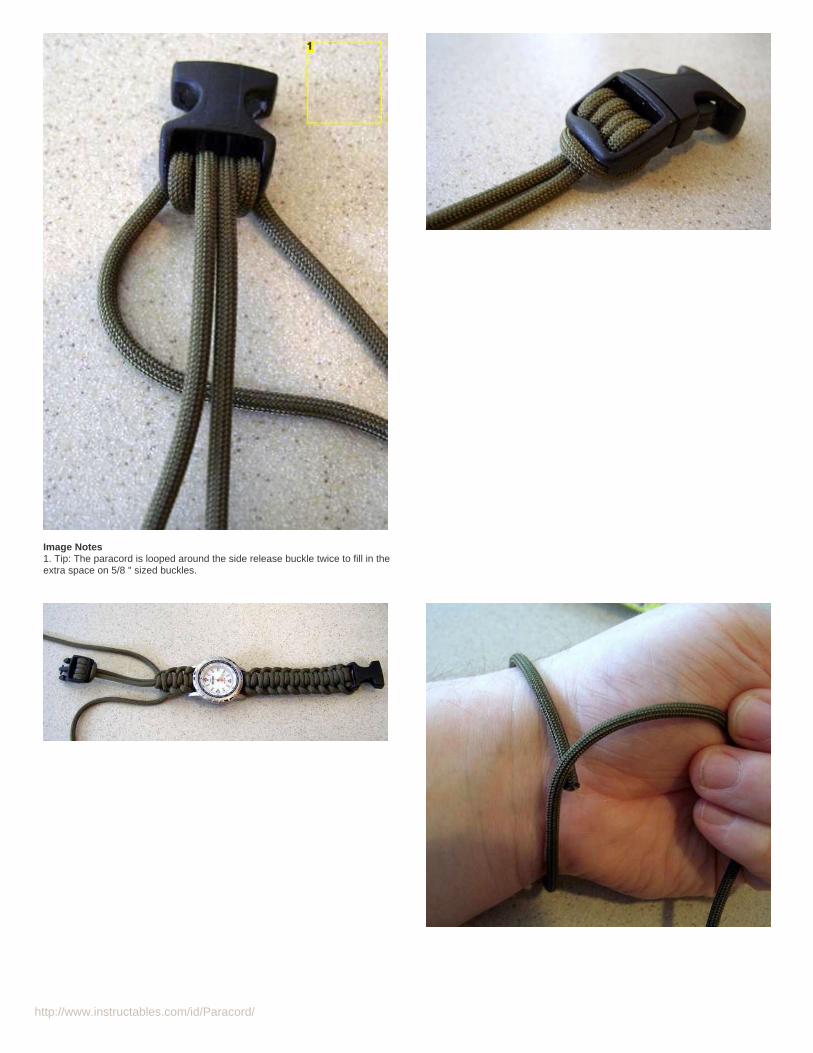
http://www.instructables.com/id/Paracord/
Image Notes1. Tip: The paracord is looped around the side release buckle twice to fill in theextra space on 5/8 " sized buckles.

http://www.instructables.com/id/Paracord/
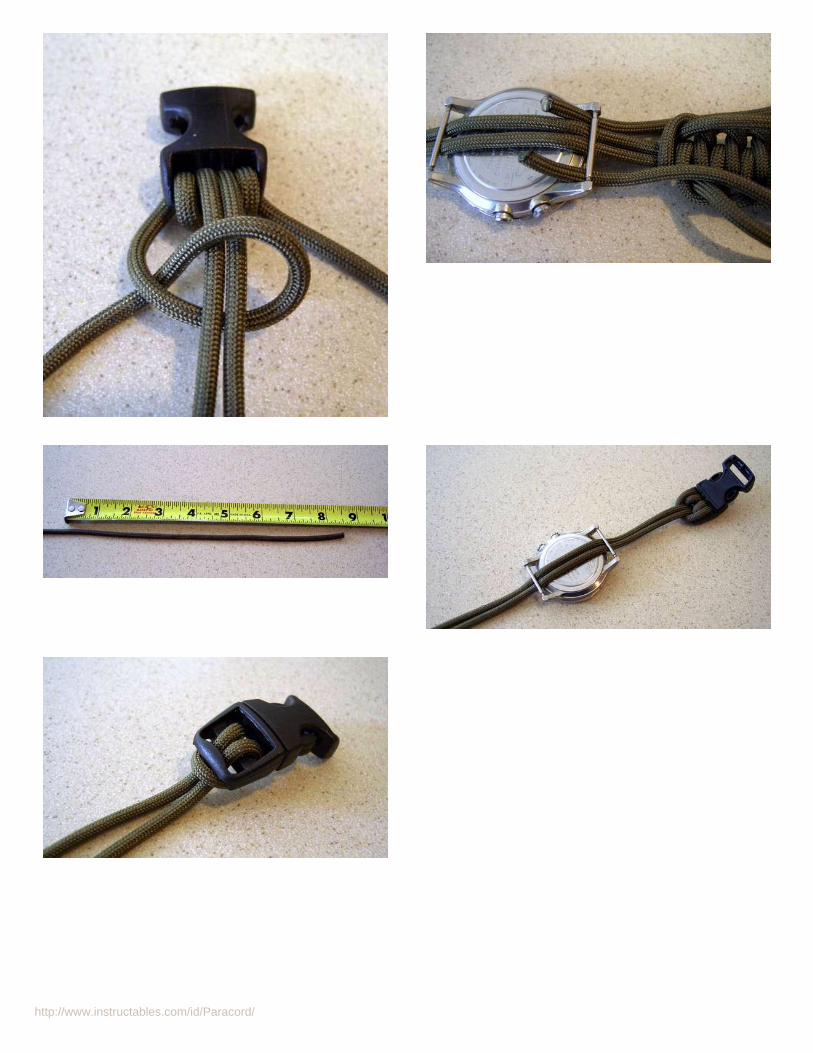
http://www.instructables.com/id/Paracord/
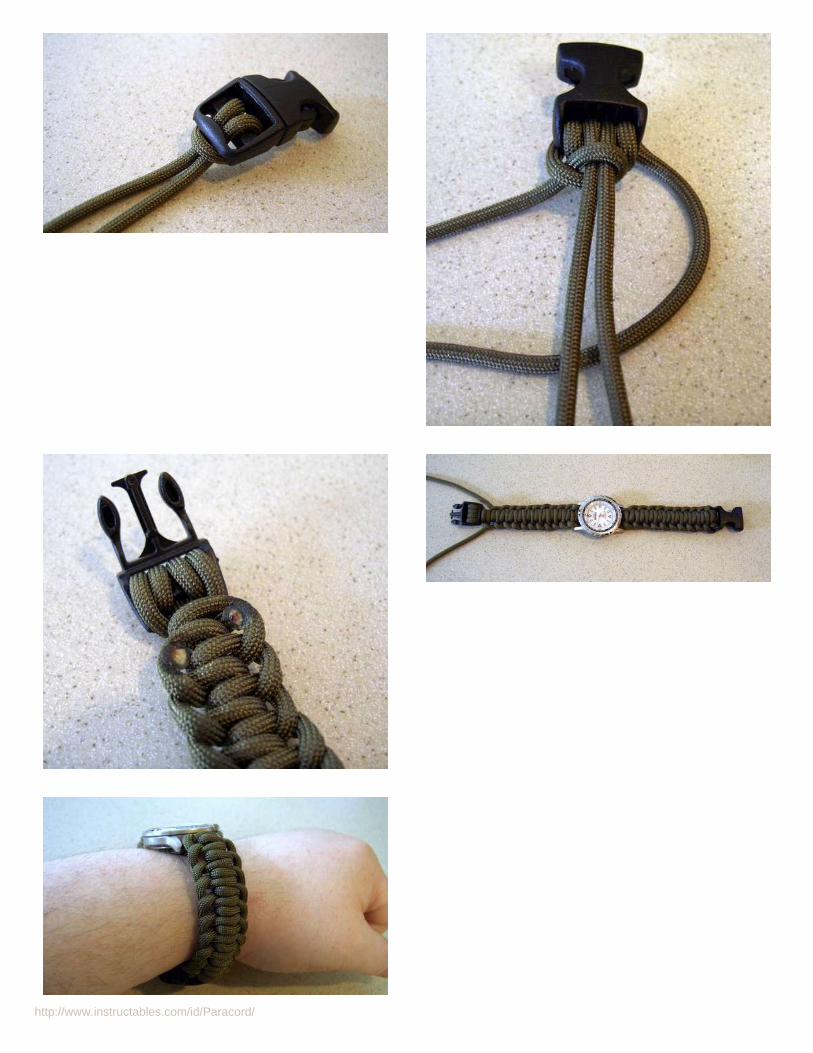
http://www.instructables.com/id/Paracord/

http://www.instructables.com/id/Paracord/
Step 1: SuppliesSupplies needed: 10 feet of paracord, scissors, torch lighter, tape measure, a watch with the watchand pins, and a 5/8 inch side release buckle. The 5/8 inch curvedbuckles can be found at Creative Designworks or ITW Nexus brand ones on ebay, either will work fine. I use paracord with the 7 inner strands from the Supply Captain ,but other similar types/diameter of cord will work as well.
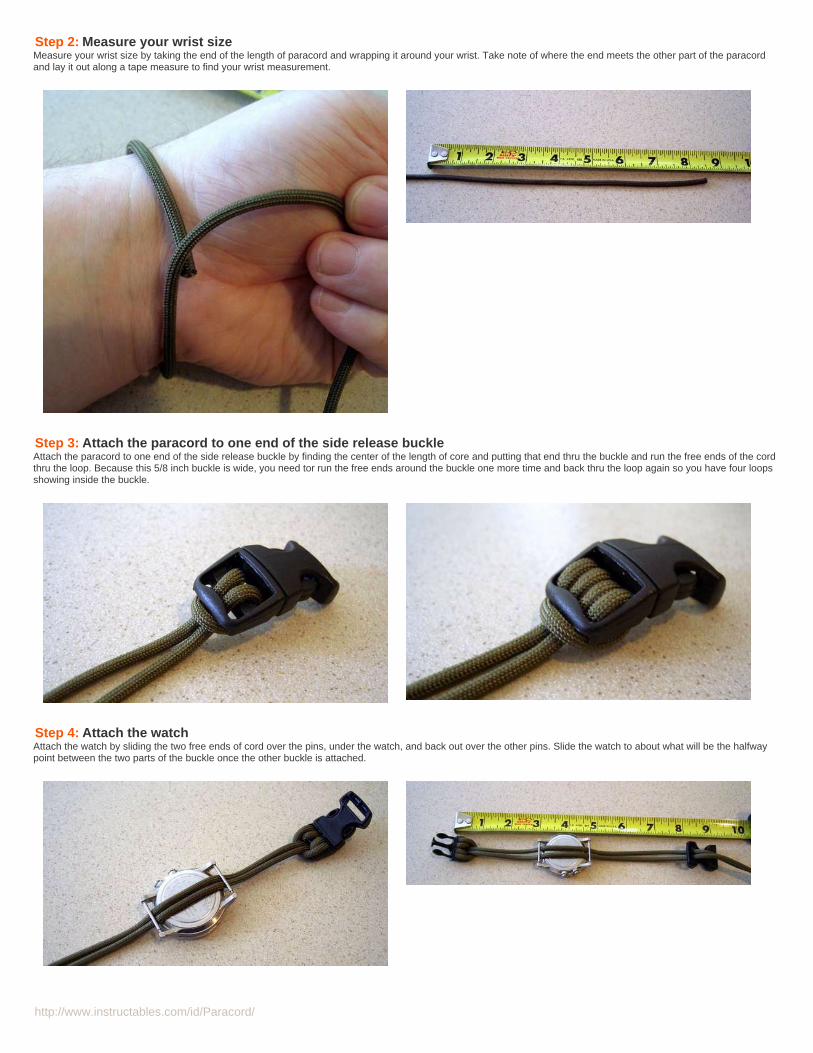
http://www.instructables.com/id/Paracord/
Step 2: Measure your wrist sizeMeasure your wrist size by taking the end of the length of paracord and wrapping it around your wrist. Take note of where the end meets the other part of the paracordand lay it out along a tape measure to find your wrist measurement.
Step 3: Attach the paracord to one end of the side release buckleAttach the paracord to one end of the side release buckle by finding the center of the length of core and putting that end thru the buckle and run the free ends of the cordthru the loop. Because this 5/8 inch buckle is wide, you need tor run the free ends around the buckle one more time and back thru the loop again so you have four loopsshowing inside the buckle.
Step 4: Attach the watchAttach the watch by sliding the two free ends of cord over the pins, under the watch, and back out over the other pins. Slide the watch to about what will be the halfwaypoint between the two parts of the buckle once the other buckle is attached.
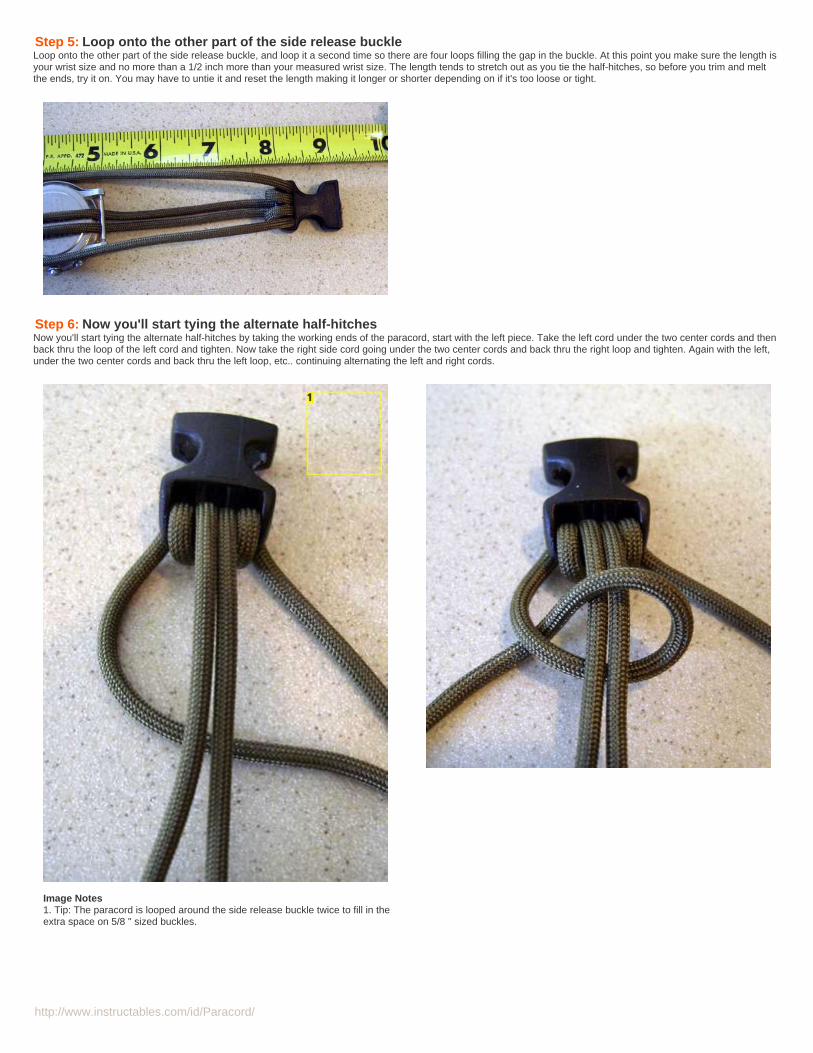
http://www.instructables.com/id/Paracord/
Step 5: Loop onto the other part of the side release buckleLoop onto the other part of the side release buckle, and loop it a second time so there are four loops filling the gap in the buckle. At this point you make sure the length isyour wrist size and no more than a 1/2 inch more than your measured wrist size. The length tends to stretch out as you tie the half-hitches, so before you trim and meltthe ends, try it on. You may have to untie it and reset the length making it longer or shorter depending on if it's too loose or tight.
Step 6: Now you'll start tying the alternate half-hitchesNow you'll start tying the alternate half-hitches by taking the working ends of the paracord, start with the left piece. Take the left cord under the two center cords and thenback thru the loop of the left cord and tighten. Now take the right side cord going under the two center cords and back thru the right loop and tighten. Again with the left,under the two center cords and back thru the left loop, etc.. continuing alternating the left and right cords.
Image Notes1. Tip: The paracord is looped around the side release buckle twice to fill in theextra space on 5/8 " sized buckles.
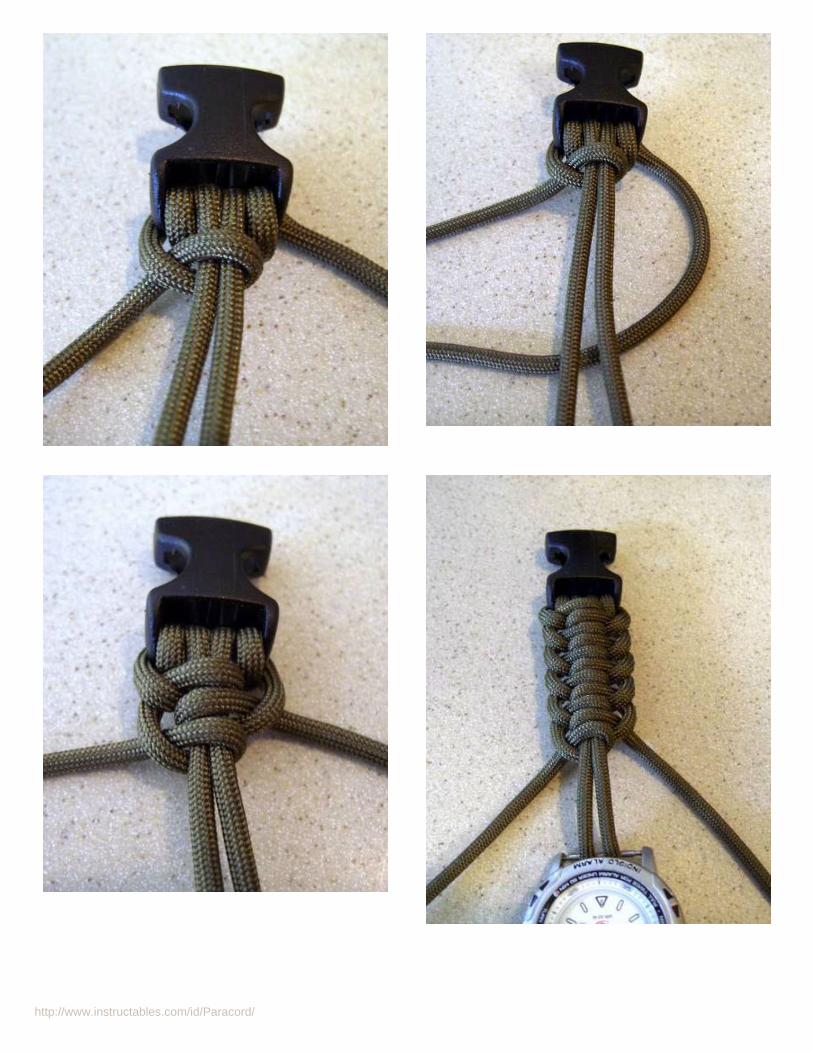
http://www.instructables.com/id/Paracord/
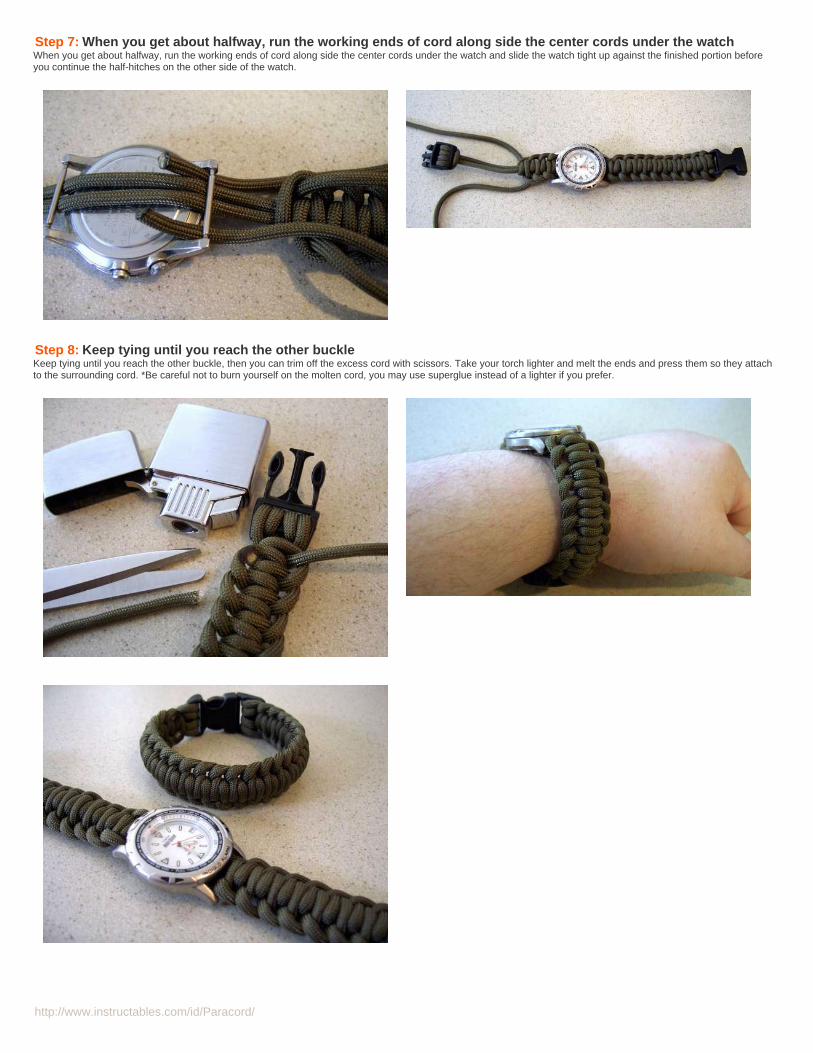
http://www.instructables.com/id/Paracord/
Step 7: When you get about halfway, run the working ends of cord along side the center cords under the watchWhen you get about halfway, run the working ends of cord along side the center cords under the watch and slide the watch tight up against the finished portion beforeyou continue the half-hitches on the other side of the watch.
Step 8: Keep tying until you reach the other buckleKeep tying until you reach the other buckle, then you can trim off the excess cord with scissors. Take your torch lighter and melt the ends and press them so they attachto the surrounding cord. *Be careful not to burn yourself on the molten cord, you may use superglue instead of a lighter if you prefer.
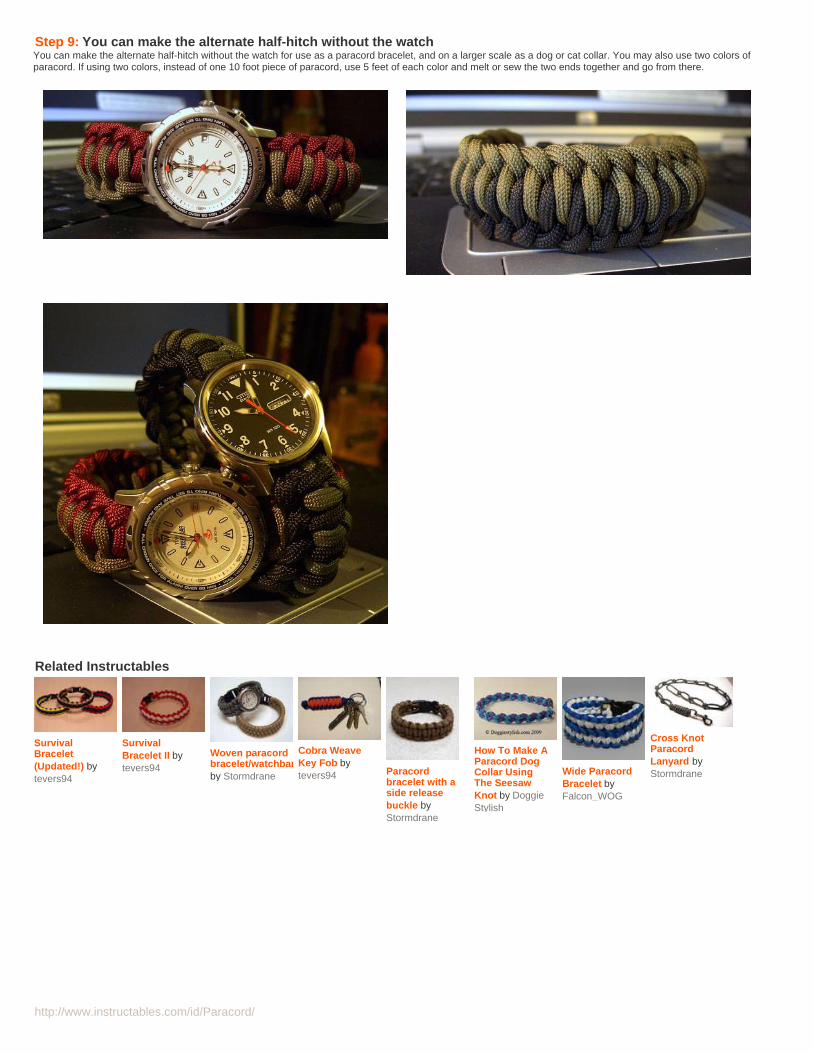
http://www.instructables.com/id/Paracord/
Step 9: You can make the alternate half-hitch without the watchYou can make the alternate half-hitch without the watch for use as a paracord bracelet, and on a larger scale as a dog or cat collar. You may also use two colors ofparacord. If using two colors, instead of one 10 foot piece of paracord, use 5 feet of each color and melt or sew the two ends together and go from there.
Related Instructables
SurvivalBracelet(Updated!) bytevers94
SurvivalBracelet II bytevers94
Woven paracordbracelet/watchbandby Stormdrane
Cobra WeaveKey Fob bytevers94 Paracord
bracelet with aside releasebuckle byStormdrane
How To Make AParacord DogCollar UsingThe SeesawKnot by DoggieStylish
Wide ParacordBracelet byFalcon_WOG
Cross KnotParacordLanyard byStormdrane
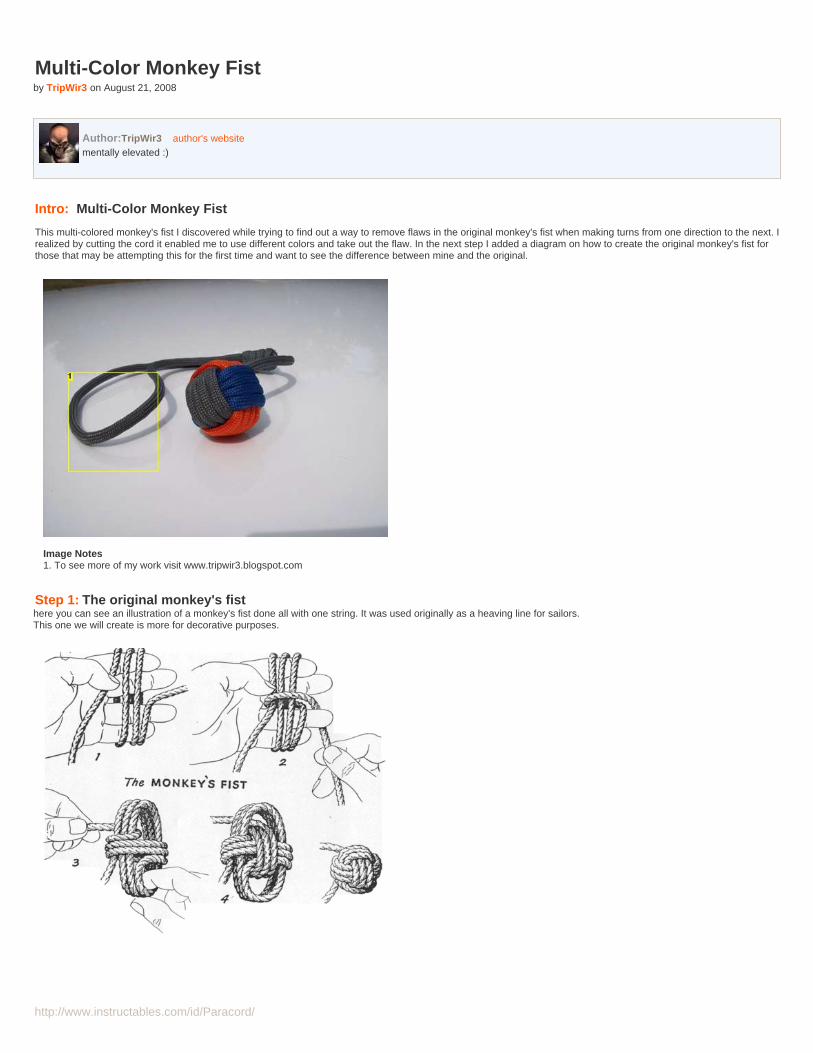
http://www.instructables.com/id/Paracord/
Multi-Color Monkey Fistby TripWir3 on August 21, 2008
Author:TripWir3 author's websitementally elevated :)
Intro: Multi-Color Monkey Fist
This multi-colored monkey's fist I discovered while trying to find out a way to remove flaws in the original monkey's fist when making turns from one direction to the next. Irealized by cutting the cord it enabled me to use different colors and take out the flaw. In the next step I added a diagram on how to create the original monkey's fist forthose that may be attempting this for the first time and want to see the difference between mine and the original.
Image Notes1. To see more of my work visit www.tripwir3.blogspot.com
Step 1: The original monkey's fisthere you can see an illustration of a monkey's fist done all with one string. It was used originally as a heaving line for sailors.This one we will create is more for decorative purposes.
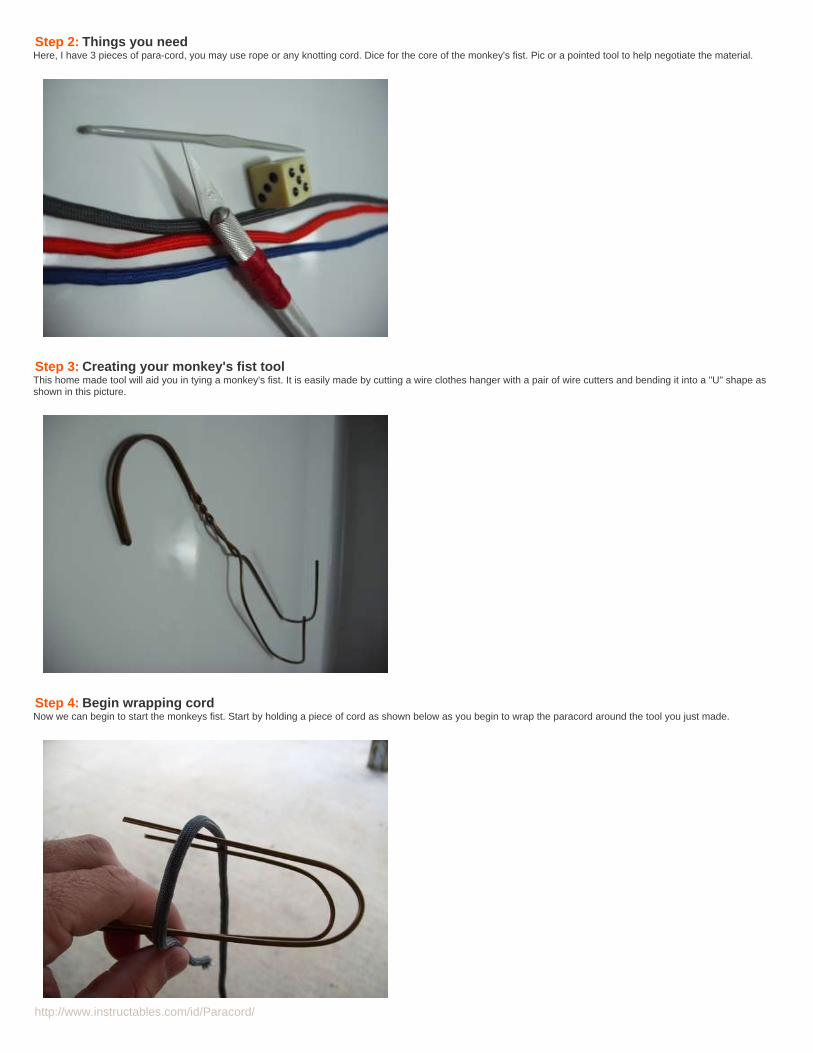
http://www.instructables.com/id/Paracord/
Step 2: Things you needHere, I have 3 pieces of para-cord, you may use rope or any knotting cord. Dice for the core of the monkey's fist. Pic or a pointed tool to help negotiate the material.
Step 3: Creating your monkey's fist toolThis home made tool will aid you in tying a monkey's fist. It is easily made by cutting a wire clothes hanger with a pair of wire cutters and bending it into a "U" shape asshown in this picture.
Step 4: Begin wrapping cordNow we can begin to start the monkeys fist. Start by holding a piece of cord as shown below as you begin to wrap the paracord around the tool you just made.
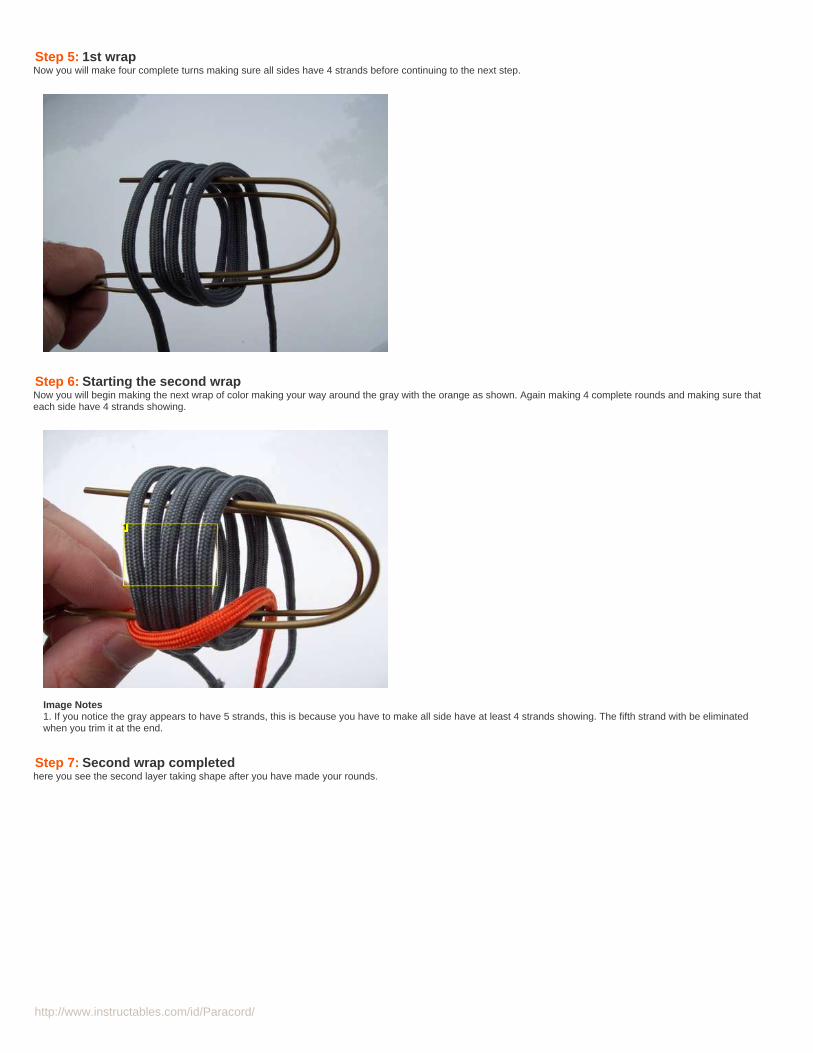
http://www.instructables.com/id/Paracord/
Step 5: 1st wrapNow you will make four complete turns making sure all sides have 4 strands before continuing to the next step.
Step 6: Starting the second wrapNow you will begin making the next wrap of color making your way around the gray with the orange as shown. Again making 4 complete rounds and making sure thateach side have 4 strands showing.
Image Notes1. If you notice the gray appears to have 5 strands, this is because you have to make all side have at least 4 strands showing. The fifth strand with be eliminatedwhen you trim it at the end.
Step 7: Second wrap completedhere you see the second layer taking shape after you have made your rounds.
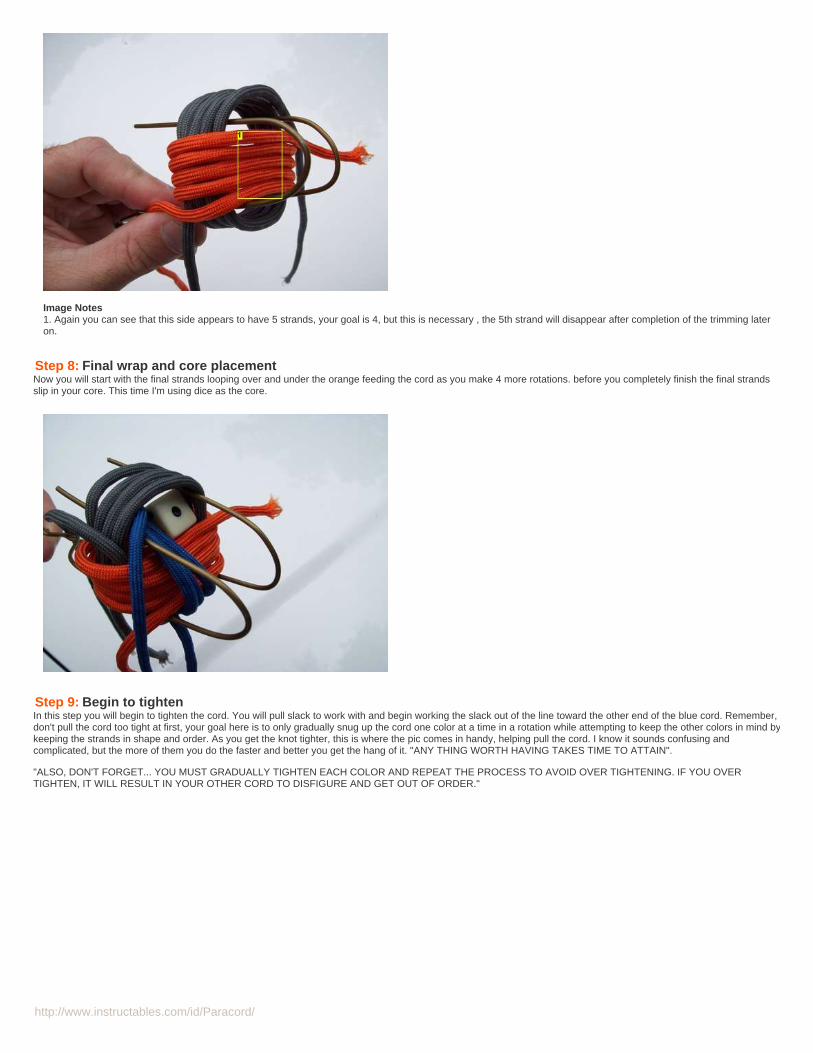
http://www.instructables.com/id/Paracord/
Image Notes1. Again you can see that this side appears to have 5 strands, your goal is 4, but this is necessary , the 5th strand will disappear after completion of the trimming lateron.
Step 8: Final wrap and core placementNow you will start with the final strands looping over and under the orange feeding the cord as you make 4 more rotations. before you completely finish the final strandsslip in your core. This time I'm using dice as the core.
Step 9: Begin to tightenIn this step you will begin to tighten the cord. You will pull slack to work with and begin working the slack out of the line toward the other end of the blue cord. Remember,don't pull the cord too tight at first, your goal here is to only gradually snug up the cord one color at a time in a rotation while attempting to keep the other colors in mind bykeeping the strands in shape and order. As you get the knot tighter, this is where the pic comes in handy, helping pull the cord. I know it sounds confusing andcomplicated, but the more of them you do the faster and better you get the hang of it. "ANY THING WORTH HAVING TAKES TIME TO ATTAIN".
"ALSO, DON'T FORGET... YOU MUST GRADUALLY TIGHTEN EACH COLOR AND REPEAT THE PROCESS TO AVOID OVER TIGHTENING. IF YOU OVERTIGHTEN, IT WILL RESULT IN YOUR OTHER CORD TO DISFIGURE AND GET OUT OF ORDER."
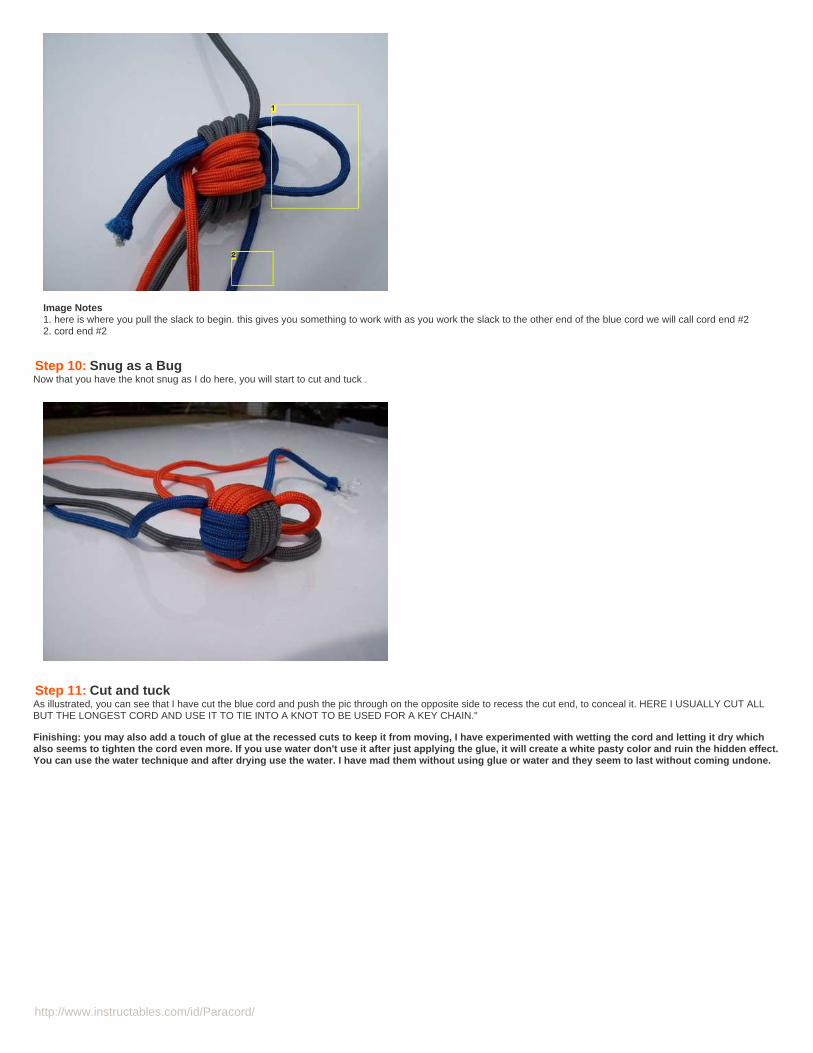
http://www.instructables.com/id/Paracord/
Image Notes1. here is where you pull the slack to begin. this gives you something to work with as you work the slack to the other end of the blue cord we will call cord end #22. cord end #2
Step 10: Snug as a BugNow that you have the knot snug as I do here, you will start to cut and tuck .
Step 11: Cut and tuckAs illustrated, you can see that I have cut the blue cord and push the pic through on the opposite side to recess the cut end, to conceal it. HERE I USUALLY CUT ALLBUT THE LONGEST CORD AND USE IT TO TIE INTO A KNOT TO BE USED FOR A KEY CHAIN."
Finishing: you may also add a touch of glue at the recessed cuts to keep it from moving, I have experimented with wetting the cord and letting it dry whichalso seems to tighten the cord even more. If you use water don't use it after just applying the glue, it will create a white pasty color and ruin the hidden effect.You can use the water technique and after drying use the water. I have mad them without using glue or water and they seem to last without coming undone.
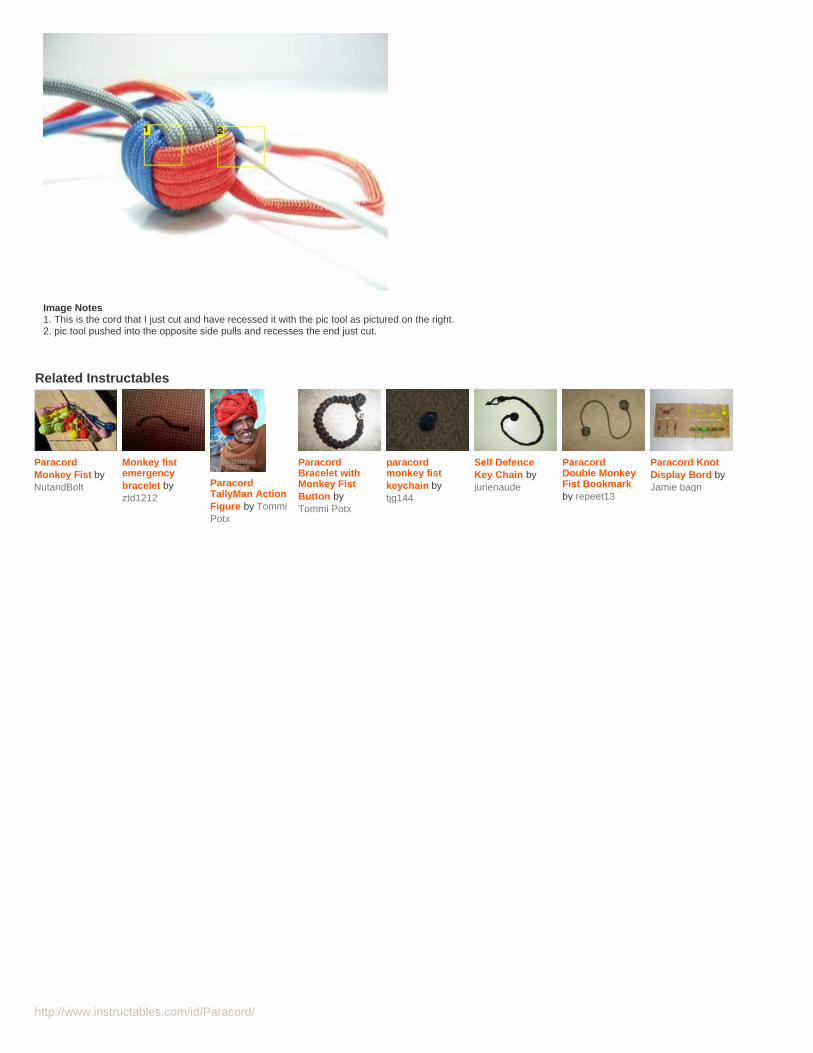
http://www.instructables.com/id/Paracord/
Image Notes1. This is the cord that I just cut and have recessed it with the pic tool as pictured on the right.2. pic tool pushed into the opposite side pulls and recesses the end just cut.
Related Instructables
ParacordMonkey Fist byNutandBolt
Monkey fistemergencybracelet byztd1212
ParacordTallyMan ActionFigure by TommiPotx
ParacordBracelet withMonkey FistButton byTommi Potx
paracordmonkey fistkeychain bytjg144
Self DefenceKey Chain byjurienaude
ParacordDouble MonkeyFist Bookmarkby repeet13
Paracord KnotDisplay Bord byJamie bagn
http://www.instructables.com/id/Paracord-TallyMan-Action-Figure/?utm_source=pdf&utm_campaign=related
http://www.instructables.com/id/Paracord-TallyMan-Action-Figure/?utm_source=pdf&utm_campaign=related
http://www.instructables.com/id/Paracord-TallyMan-Action-Figure/?utm_source=pdf&utm_campaign=related
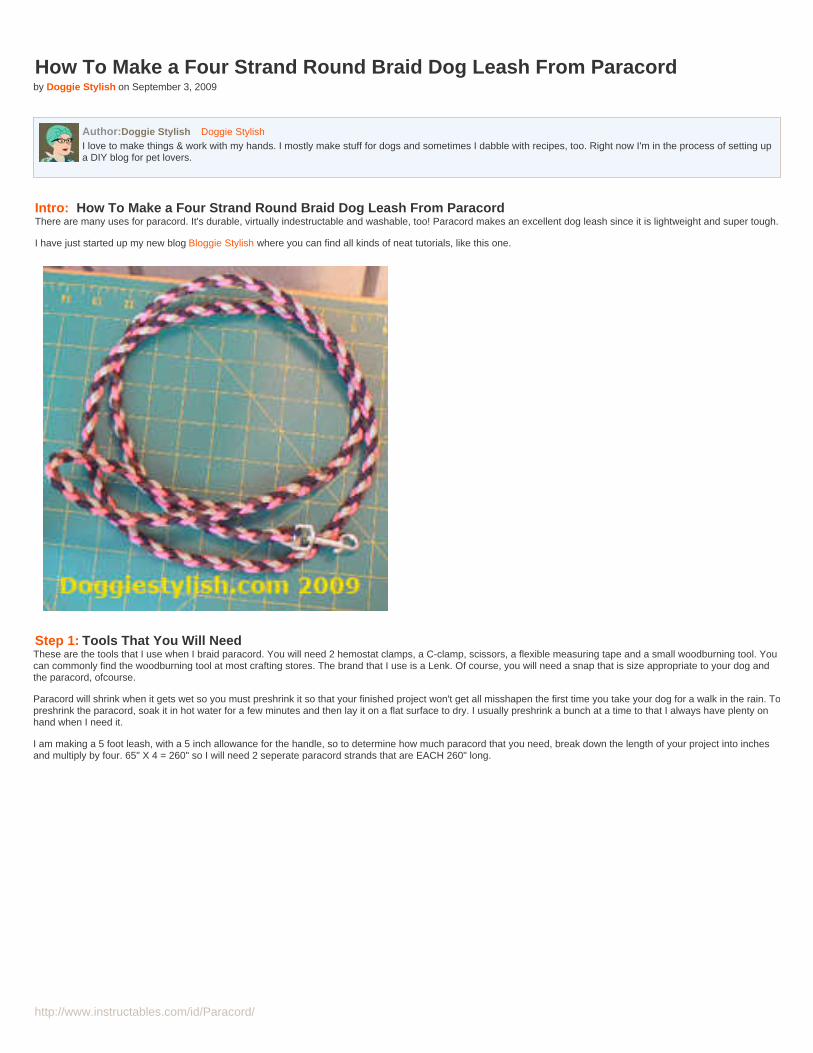
http://www.instructables.com/id/Paracord/
How To Make a Four Strand Round Braid Dog Leash From Paracordby Doggie Stylish on September 3, 2009
Author:Doggie Stylish Doggie StylishI love to make things & work with my hands. I mostly make stuff for dogs and sometimes I dabble with recipes, too. Right now I'm in the process of setting upa DIY blog for pet lovers.
Intro: How To Make a Four Strand Round Braid Dog Leash From ParacordThere are many uses for paracord. It's durable, virtually indestructable and washable, too! Paracord makes an excellent dog leash since it is lightweight and super tough.
I have just started up my new blog Bloggie Stylish where you can find all kinds of neat tutorials, like this one.
Step 1: Tools That You Will NeedThese are the tools that I use when I braid paracord. You will need 2 hemostat clamps, a C-clamp, scissors, a flexible measuring tape and a small woodburning tool. Youcan commonly find the woodburning tool at most crafting stores. The brand that I use is a Lenk. Of course, you will need a snap that is size appropriate to your dog andthe paracord, ofcourse.
Paracord will shrink when it gets wet so you must preshrink it so that your finished project won't get all misshapen the first time you take your dog for a walk in the rain. Topreshrink the paracord, soak it in hot water for a few minutes and then lay it on a flat surface to dry. I usually preshrink a bunch at a time to that I always have plenty onhand when I need it.
I am making a 5 foot leash, with a 5 inch allowance for the handle, so to determine how much paracord that you need, break down the length of your project into inchesand multiply by four. 65" X 4 = 260" so I will need 2 seperate paracord strands that are EACH 260" long.
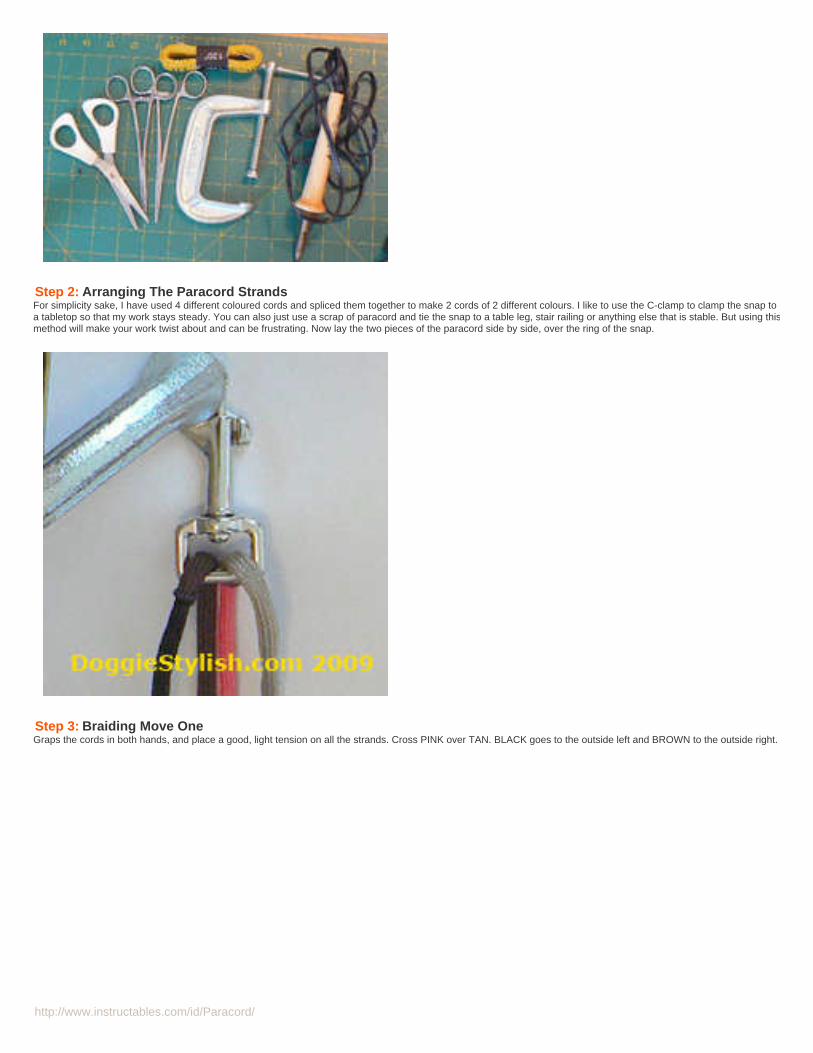
http://www.instructables.com/id/Paracord/
Step 2: Arranging The Paracord StrandsFor simplicity sake, I have used 4 different coloured cords and spliced them together to make 2 cords of 2 different colours. I like to use the C-clamp to clamp the snap toa tabletop so that my work stays steady. You can also just use a scrap of paracord and tie the snap to a table leg, stair railing or anything else that is stable. But using thismethod will make your work twist about and can be frustrating. Now lay the two pieces of the paracord side by side, over the ring of the snap.
Step 3: Braiding Move OneGraps the cords in both hands, and place a good, light tension on all the strands. Cross PINK over TAN. BLACK goes to the outside left and BROWN to the outside right.
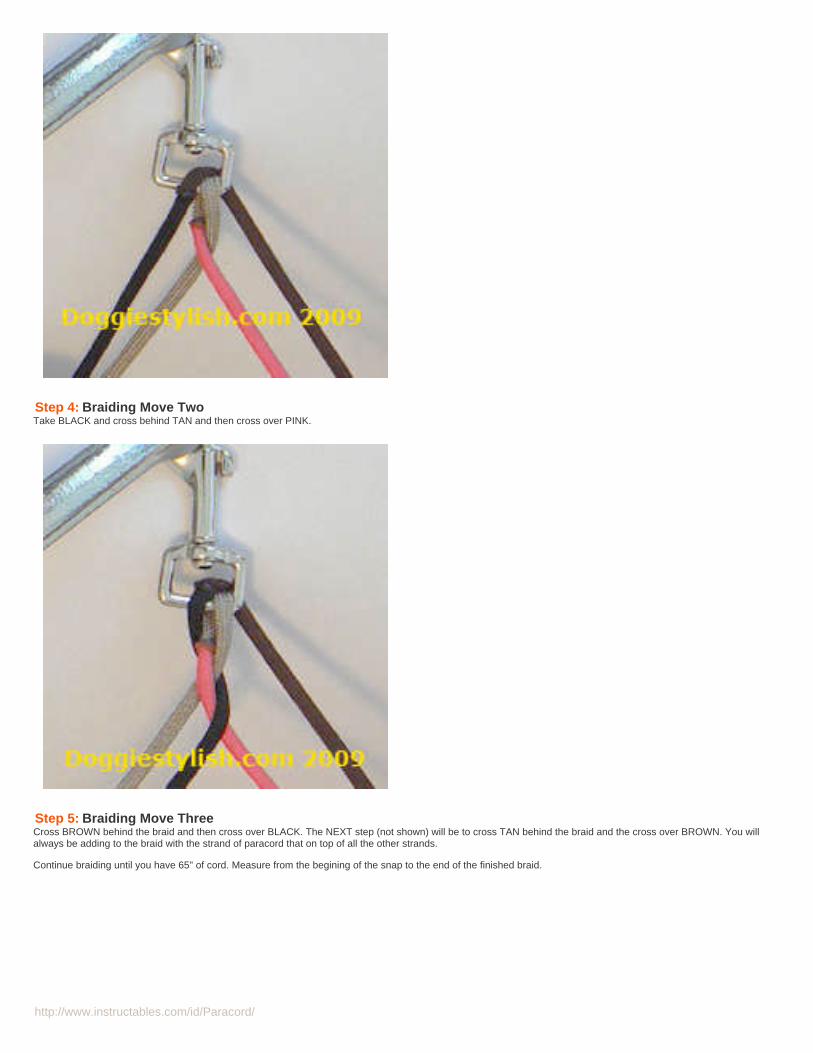
http://www.instructables.com/id/Paracord/
Step 4: Braiding Move TwoTake BLACK and cross behind TAN and then cross over PINK.
Step 5: Braiding Move ThreeCross BROWN behind the braid and then cross over BLACK. The NEXT step (not shown) will be to cross TAN behind the braid and the cross over BROWN. You willalways be adding to the braid with the strand of paracord that on top of all the other strands.
Continue braiding until you have 65" of cord. Measure from the begining of the snap to the end of the finished braid.
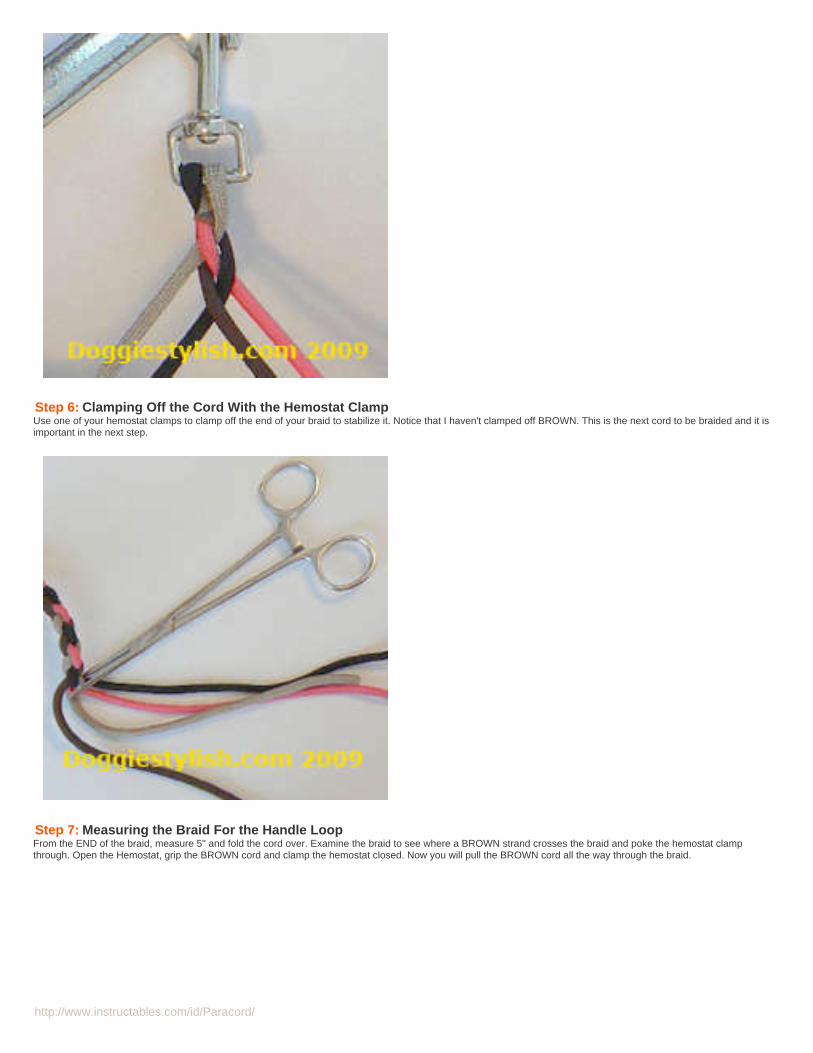
http://www.instructables.com/id/Paracord/
Step 6: Clamping Off the Cord With the Hemostat ClampUse one of your hemostat clamps to clamp off the end of your braid to stabilize it. Notice that I haven't clamped off BROWN. This is the next cord to be braided and it isimportant in the next step.
Step 7: Measuring the Braid For the Handle LoopFrom the END of the braid, measure 5" and fold the cord over. Examine the braid to see where a BROWN strand crosses the braid and poke the hemostat clampthrough. Open the Hemostat, grip the BROWN cord and clamp the hemostat closed. Now you will pull the BROWN cord all the way through the braid.
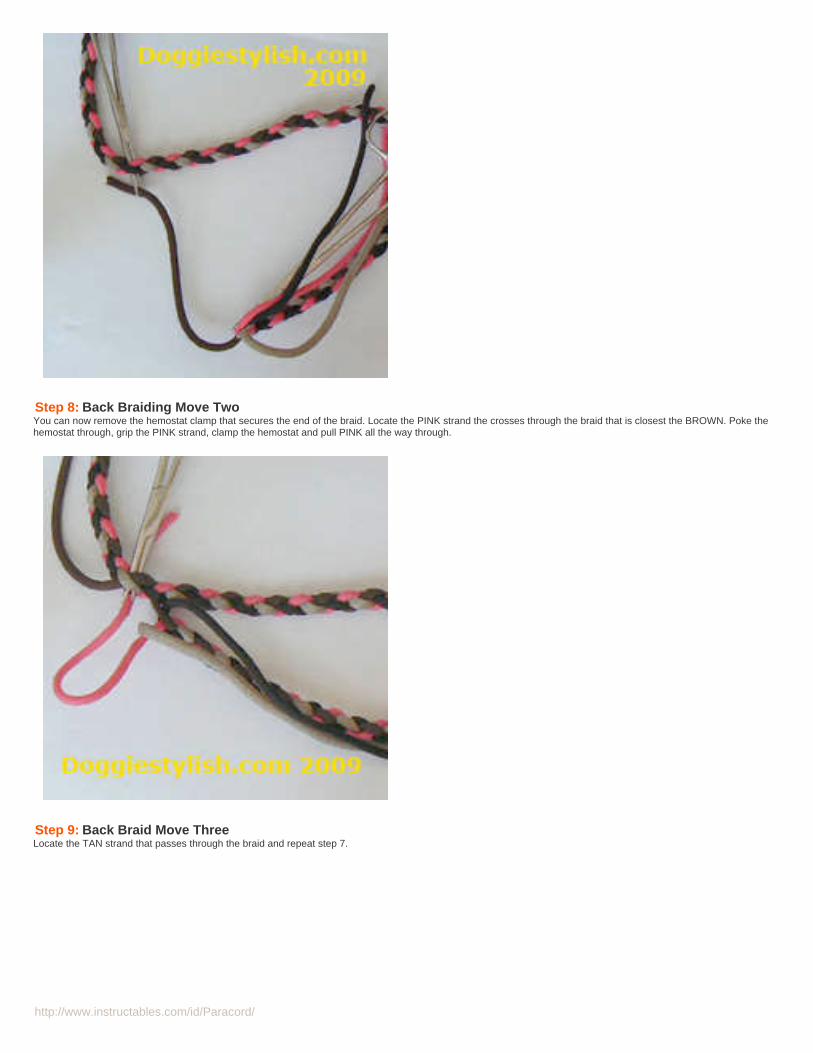
http://www.instructables.com/id/Paracord/
Step 8: Back Braiding Move TwoYou can now remove the hemostat clamp that secures the end of the braid. Locate the PINK strand the crosses through the braid that is closest the BROWN. Poke thehemostat through, grip the PINK strand, clamp the hemostat and pull PINK all the way through.
Step 9: Back Braid Move ThreeLocate the TAN strand that passes through the braid and repeat step 7.

http://www.instructables.com/id/Paracord/
Step 10: Back Braid Move FourThe final step is to locate where the BLACK strand passes through the braid and repeat step 7.
Step 11: Finishing The Back Braiding ProcessNow that you have made the handle, it has to be stabilized by further back braiding. Keep repeating steps seven to ten, three or four times to create a sturdy back braid.

http://www.instructables.com/id/Paracord/
Step 12: Trimming The Loose Ends Of The ParacordNow that you have completed the back braid, you need to properly finish the ends. Take your scissors and cut the cords close the braid. Now is the time to plug in thewoodburner and allow a few minutes for it to heat up.
Step 13: Melting The Ends Of The ParacordThe woodburner usually takes three to five minutes to get hot enough to melt the paracord. To properly melt the cord, gently run the woodburner over the cut cord in asweeping motion. To make you leash look good, melt the cord against the same colour cord that is directly below it. Before you switch colours, quickly swipe the tip of thewoodburner over a damp scrap of cloth to clean it. Do this carefully since the woodburner gets very hot!
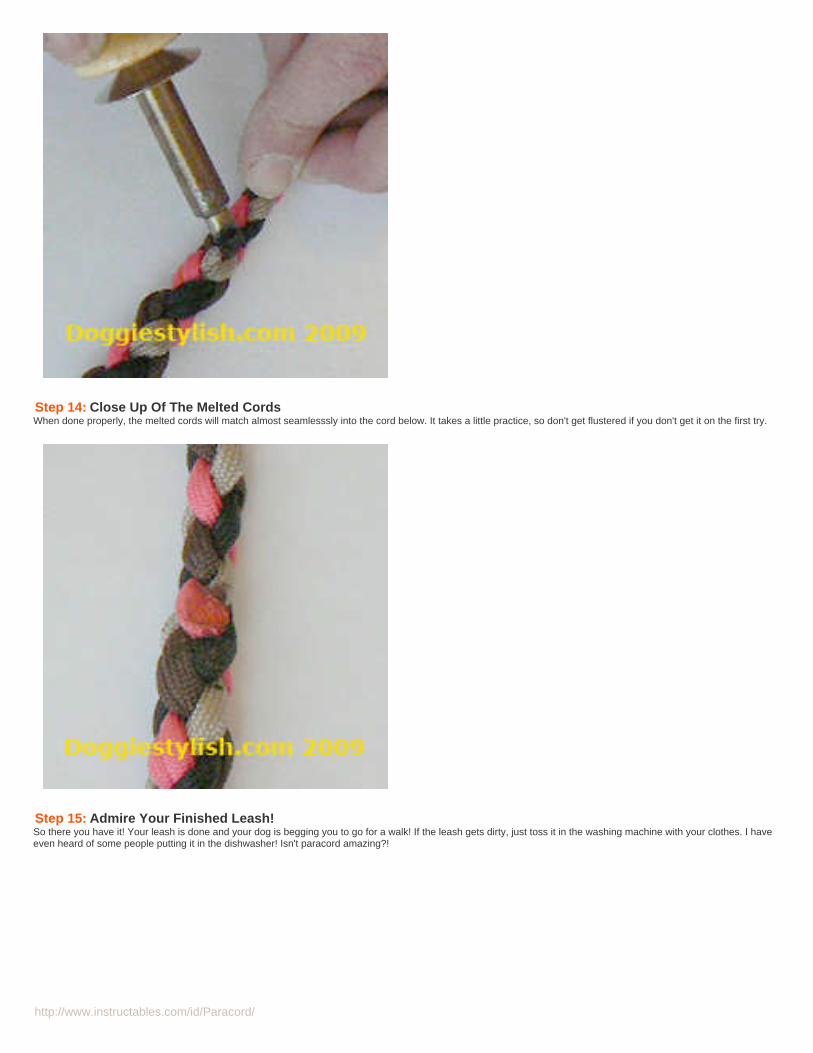
http://www.instructables.com/id/Paracord/
Step 14: Close Up Of The Melted CordsWhen done properly, the melted cords will match almost seamlesssly into the cord below. It takes a little practice, so don't get flustered if you don't get it on the first try.
Step 15: Admire Your Finished Leash!So there you have it! Your leash is done and your dog is begging you to go for a walk! If the leash gets dirty, just toss it in the washing machine with your clothes. I haveeven heard of some people putting it in the dishwasher! Isn't paracord amazing?!
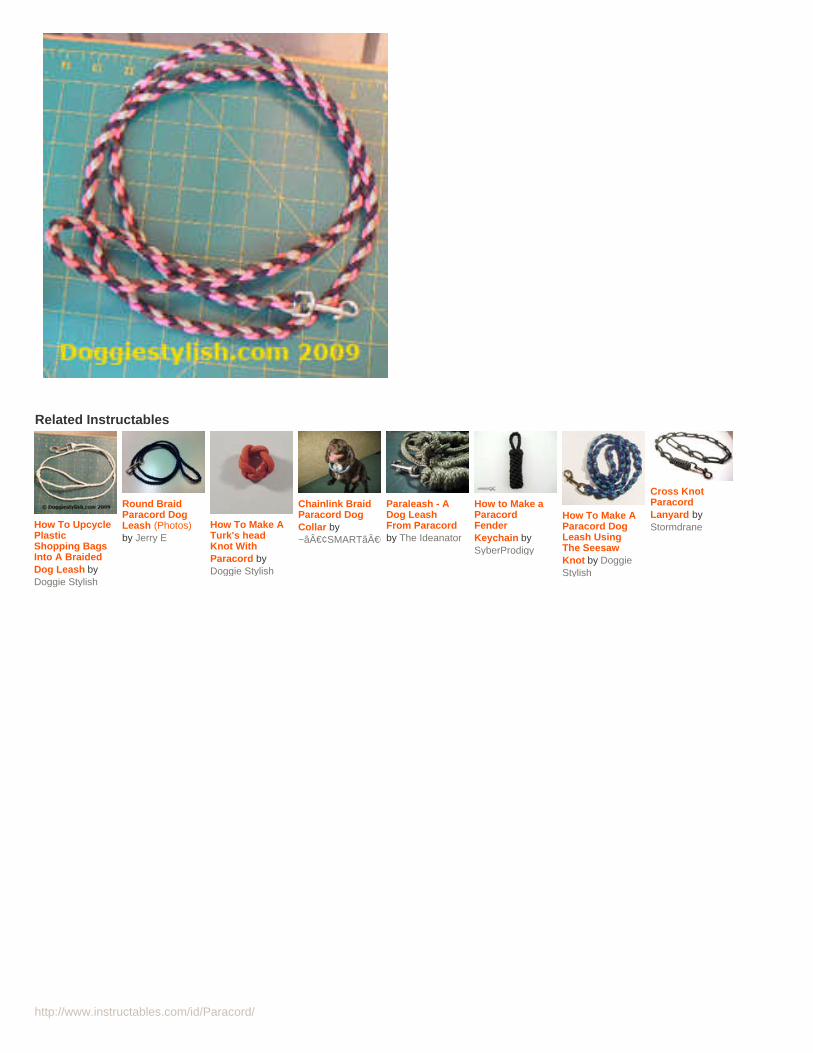
http://www.instructables.com/id/Paracord/
Related Instructables
How To UpcyclePlasticShopping BagsInto A BraidedDog Leash byDoggie Stylish
Round BraidParacord DogLeash (Photos)by Jerry E
How To Make ATurk's headKnot WithParacord byDoggie Stylish
Chainlink BraidParacord DogCollar by~•SMART•~
Paraleash - ADog LeashFrom Paracordby The Ideanator
How to Make aParacordFenderKeychain bySyberProdigy
How To Make AParacord DogLeash UsingThe SeesawKnot by DoggieStylish
Cross KnotParacordLanyard byStormdrane
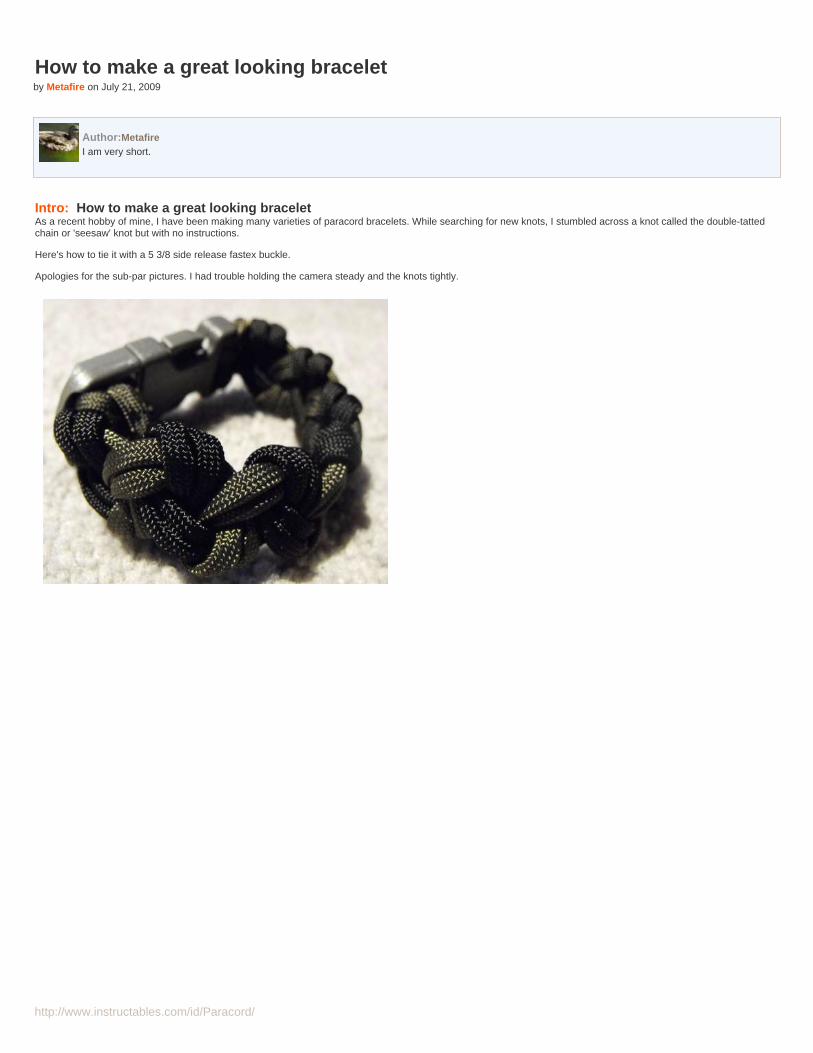
http://www.instructables.com/id/Paracord/
How to make a great looking braceletby Metafire on July 21, 2009
Author:MetafireI am very short.
Intro: How to make a great looking braceletAs a recent hobby of mine, I have been making many varieties of paracord bracelets. While searching for new knots, I stumbled across a knot called the double-tattedchain or 'seesaw' knot but with no instructions.
Here's how to tie it with a 5 3/8 side release fastex buckle.
Apologies for the sub-par pictures. I had trouble holding the camera steady and the knots tightly.
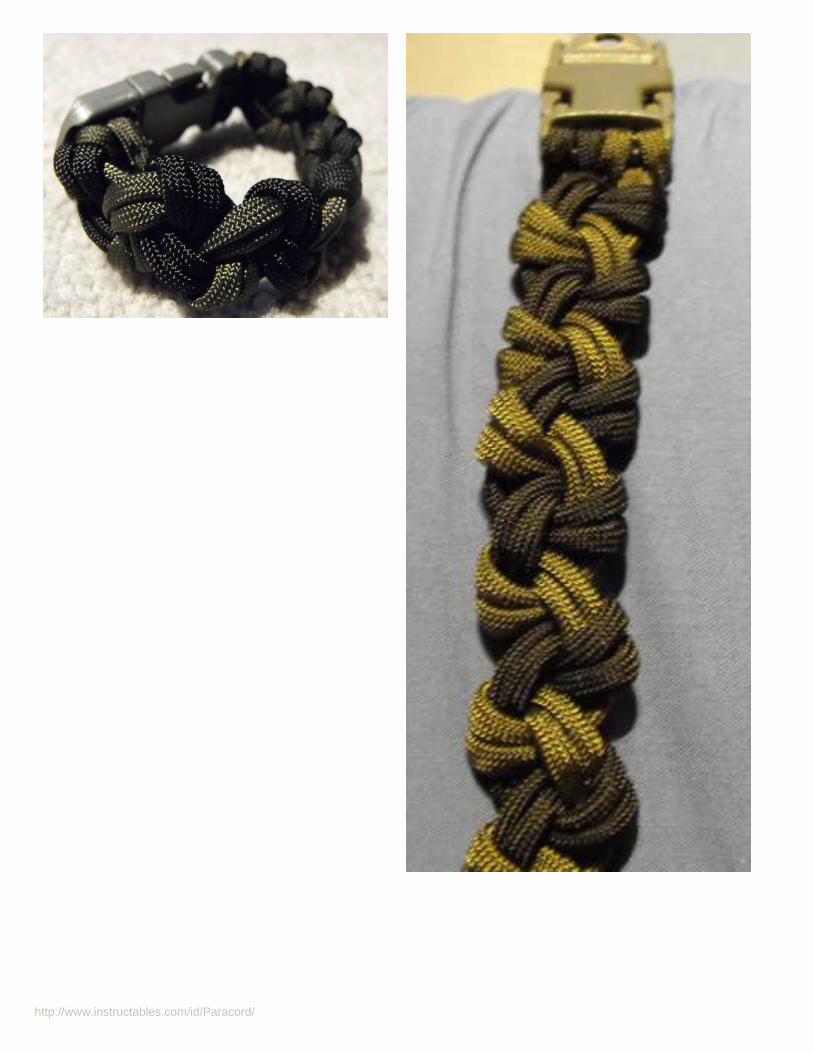
http://www.instructables.com/id/Paracord/
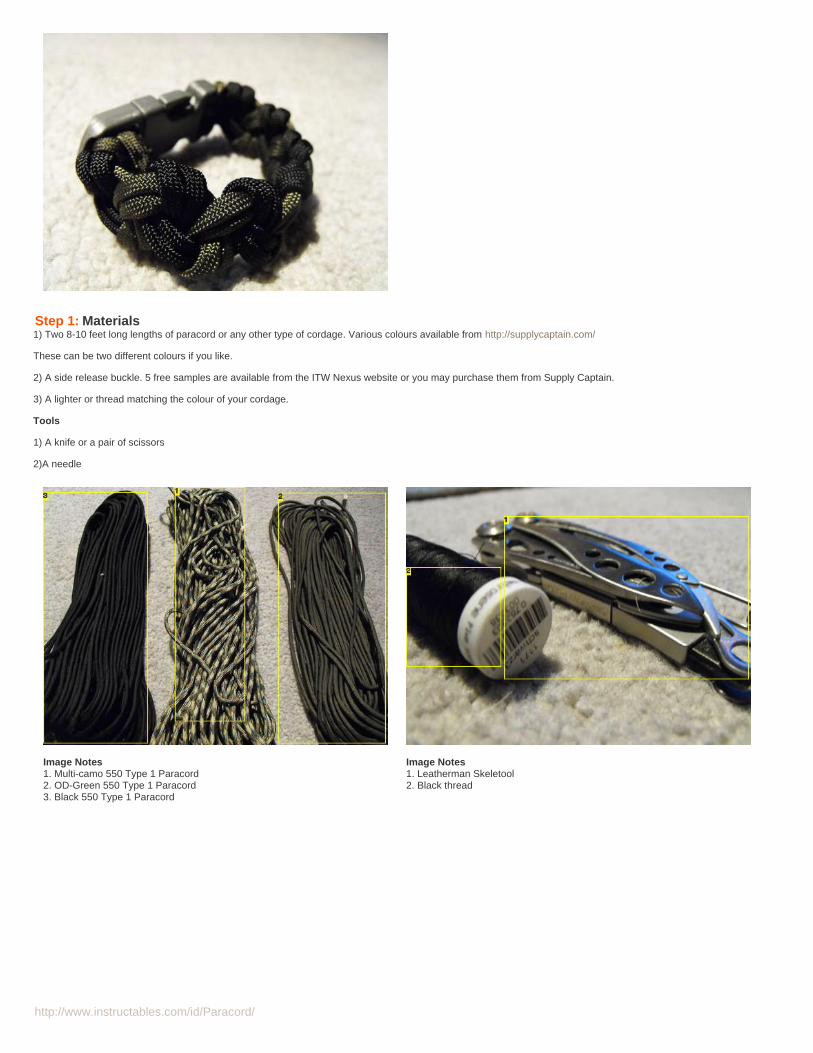
http://www.instructables.com/id/Paracord/
Step 1: Materials1) Two 8-10 feet long lengths of paracord or any other type of cordage. Various colours available from http://supplycaptain.com/
These can be two different colours if you like.
2) A side release buckle. 5 free samples are available from the ITW Nexus website or you may purchase them from Supply Captain.
3) A lighter or thread matching the colour of your cordage.
Tools
1) A knife or a pair of scissors
2)A needle
Image Notes1. Multi-camo 550 Type 1 Paracord2. OD-Green 550 Type 1 Paracord3. Black 550 Type 1 Paracord
Image Notes1. Leatherman Skeletool2. Black thread
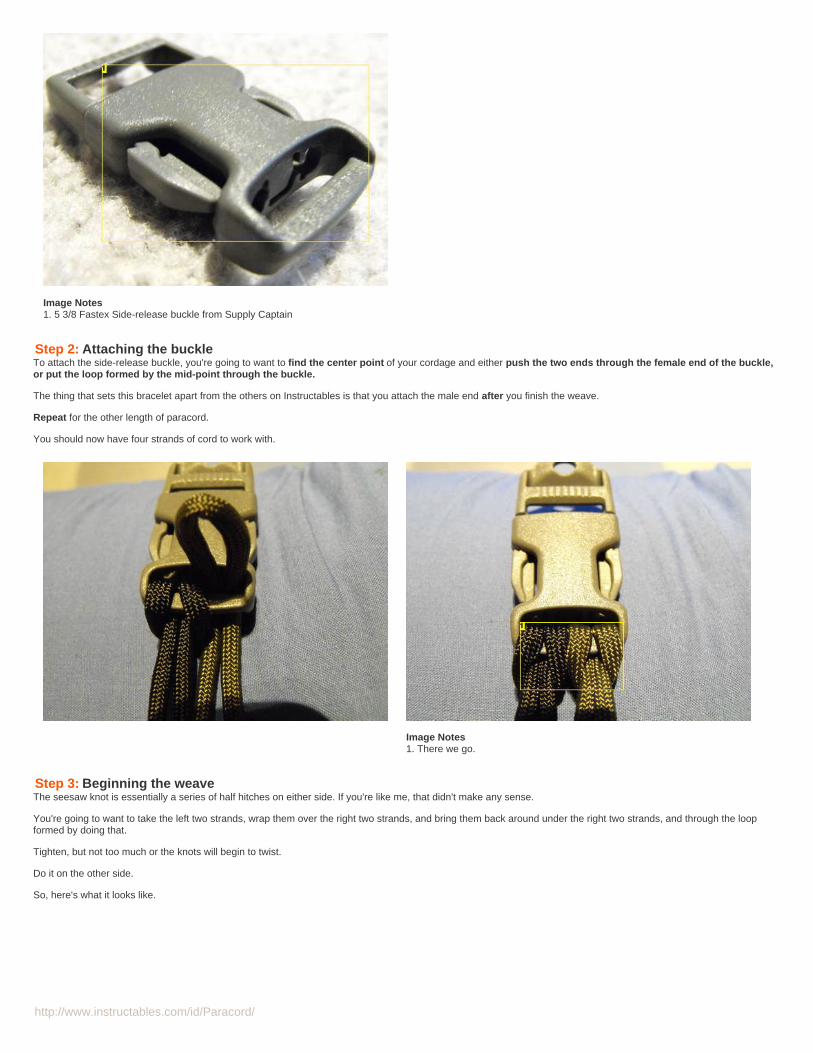
http://www.instructables.com/id/Paracord/
Image Notes1. 5 3/8 Fastex Side-release buckle from Supply Captain
Step 2: Attaching the buckleTo attach the side-release buckle, you're going to want to find the center point of your cordage and either push the two ends through the female end of the buckle,or put the loop formed by the mid-point through the buckle.
The thing that sets this bracelet apart from the others on Instructables is that you attach the male end after you finish the weave.
Repeat for the other length of paracord.
You should now have four strands of cord to work with.
Image Notes1. There we go.
Step 3: Beginning the weaveThe seesaw knot is essentially a series of half hitches on either side. If you're like me, that didn't make any sense.
You're going to want to take the left two strands, wrap them over the right two strands, and bring them back around under the right two strands, and through the loopformed by doing that.
Tighten, but not too much or the knots will begin to twist.
Do it on the other side.
So, here's what it looks like.
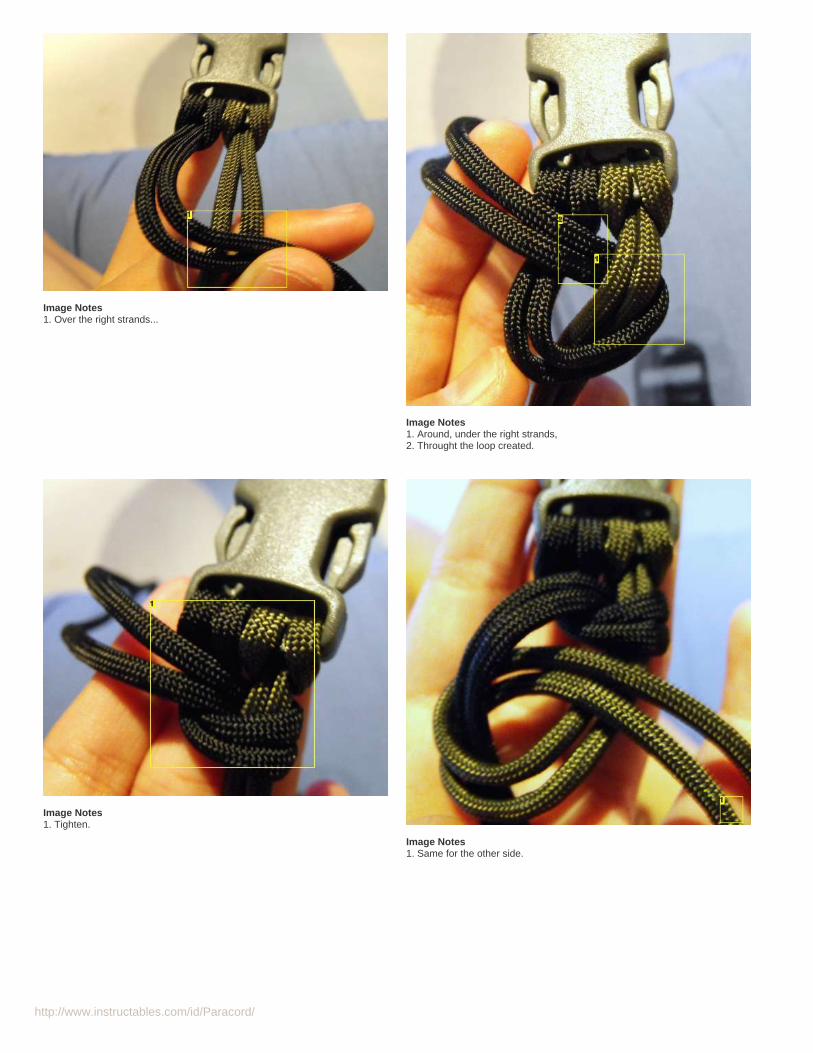
http://www.instructables.com/id/Paracord/
Image Notes1. Over the right strands...
Image Notes1. Around, under the right strands,2. Throught the loop created.
Image Notes1. Tighten.
Image Notes1. Same for the other side.
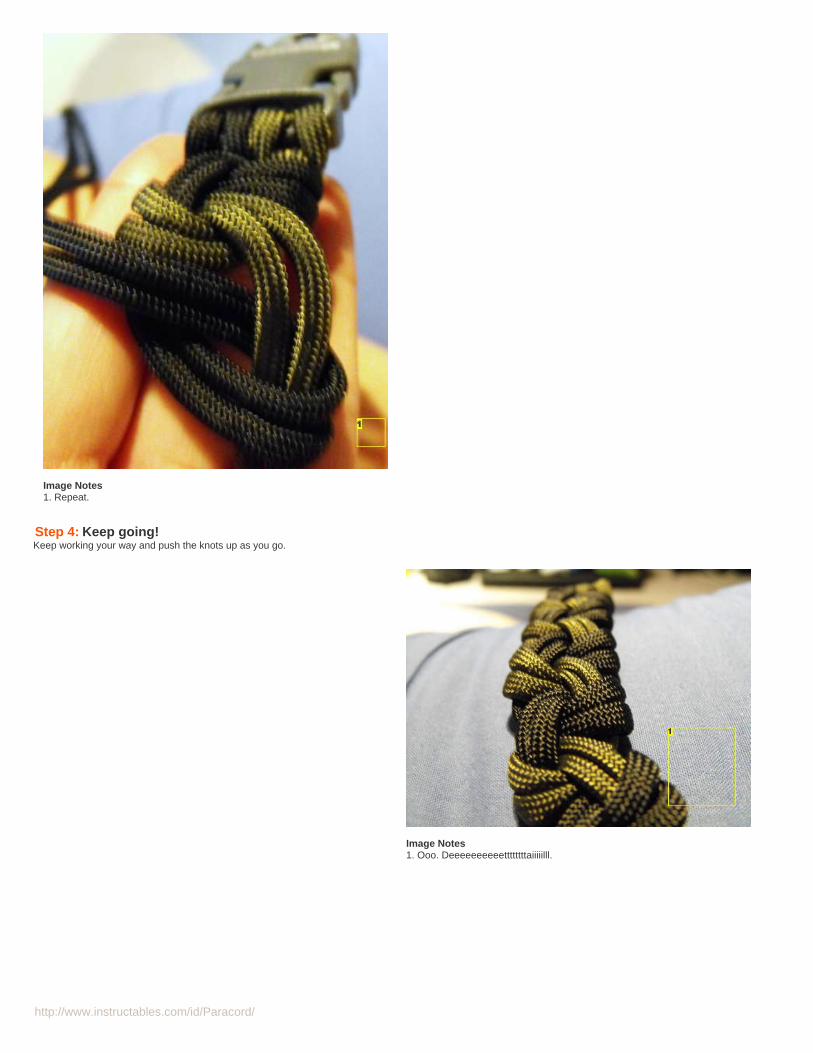
http://www.instructables.com/id/Paracord/
Image Notes1. Repeat.
Step 4: Keep going!Keep working your way and push the knots up as you go.
Image Notes1. Ooo. Deeeeeeeeeettttttttaiiiiilll.
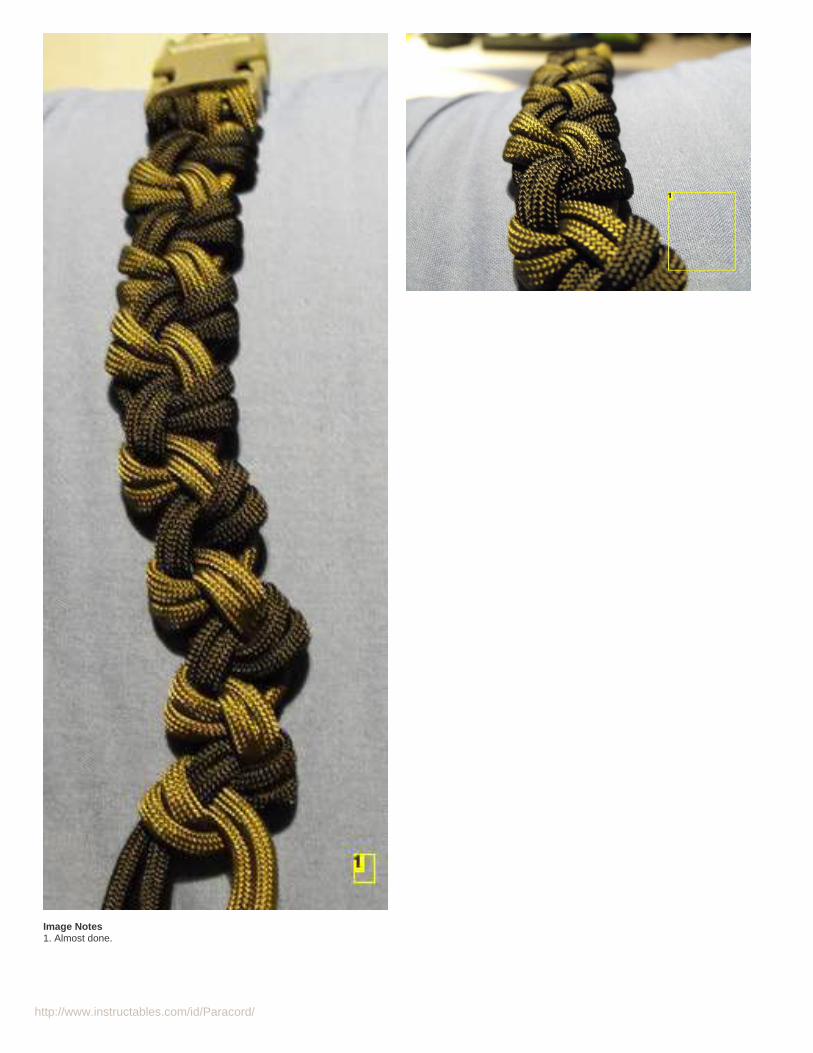
http://www.instructables.com/id/Paracord/
Image Notes1. Almost done.
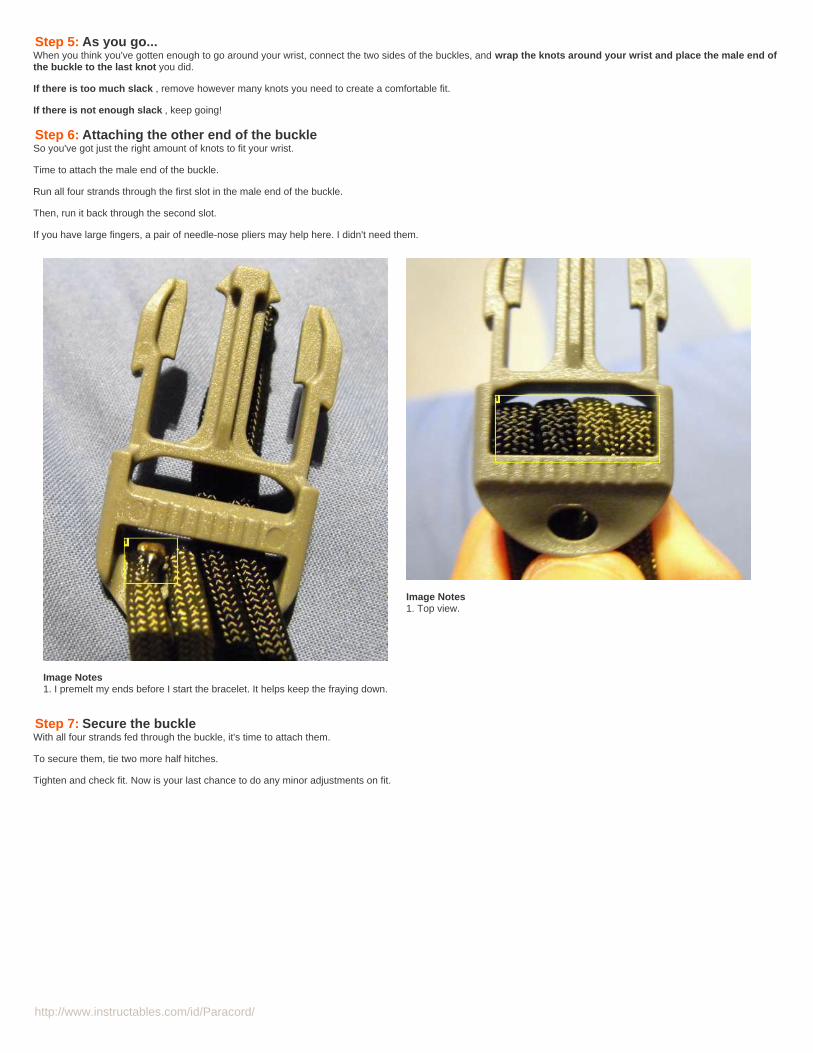
http://www.instructables.com/id/Paracord/
Step 5: As you go...When you think you've gotten enough to go around your wrist, connect the two sides of the buckles, and wrap the knots around your wrist and place the male end ofthe buckle to the last knot you did.
If there is too much slack , remove however many knots you need to create a comfortable fit.
If there is not enough slack , keep going!
Step 6: Attaching the other end of the buckleSo you've got just the right amount of knots to fit your wrist.
Time to attach the male end of the buckle.
Run all four strands through the first slot in the male end of the buckle.
Then, run it back through the second slot.
If you have large fingers, a pair of needle-nose pliers may help here. I didn't need them.
Image Notes1. I premelt my ends before I start the bracelet. It helps keep the fraying down.
Image Notes1. Top view.
Step 7: Secure the buckleWith all four strands fed through the buckle, it's time to attach them.
To secure them, tie two more half hitches.
Tighten and check fit. Now is your last chance to do any minor adjustments on fit.
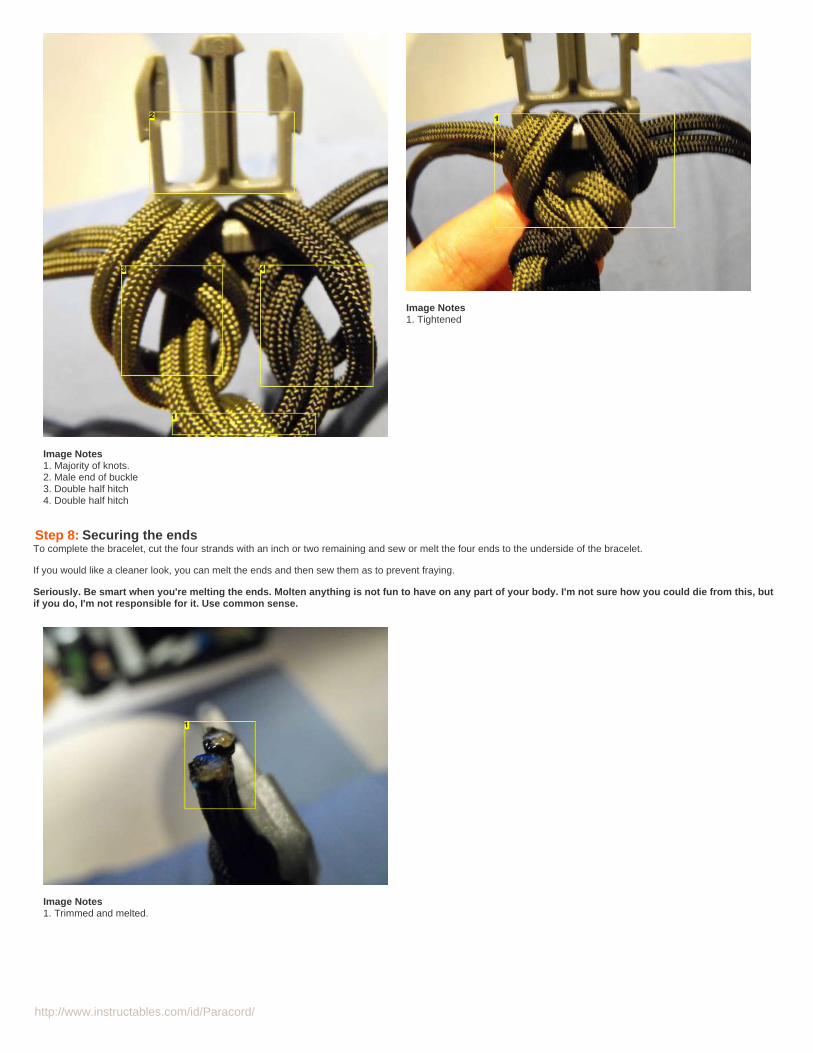
http://www.instructables.com/id/Paracord/
Image Notes1. Majority of knots.2. Male end of buckle3. Double half hitch4. Double half hitch
Image Notes1. Tightened
Step 8: Securing the endsTo complete the bracelet, cut the four strands with an inch or two remaining and sew or melt the four ends to the underside of the bracelet.
If you would like a cleaner look, you can melt the ends and then sew them as to prevent fraying.
Seriously. Be smart when you're melting the ends. Molten anything is not fun to have on any part of your body. I'm not sure how you could die from this, butif you do, I'm not responsible for it. Use common sense.
Image Notes1. Trimmed and melted.
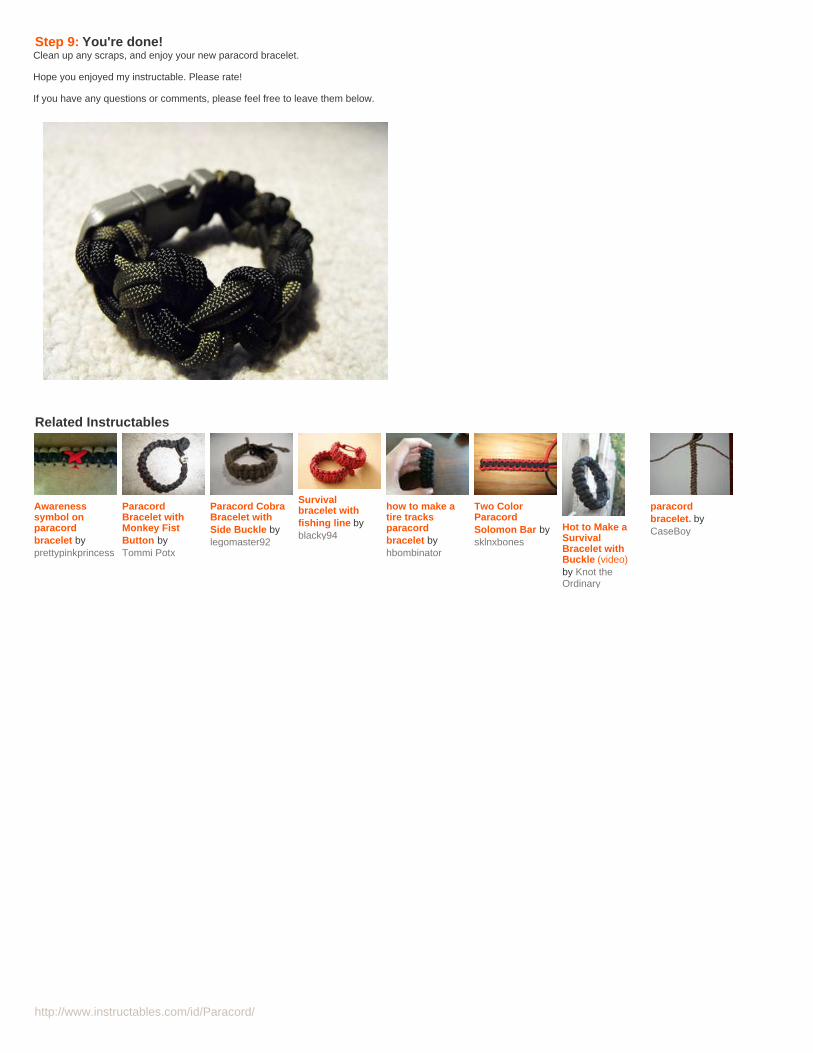
http://www.instructables.com/id/Paracord/
Step 9: You're done!Clean up any scraps, and enjoy your new paracord bracelet.
Hope you enjoyed my instructable. Please rate!
If you have any questions or comments, please feel free to leave them below.
Related Instructables
Awarenesssymbol onparacordbracelet byprettypinkprincess
ParacordBracelet withMonkey FistButton byTommi Potx
Paracord CobraBracelet withSide Buckle bylegomaster92
Survivalbracelet withfishing line byblacky94
how to make atire tracksparacordbracelet byhbombinator
Two ColorParacordSolomon Bar bysklnxbones
Hot to Make aSurvivalBracelet withBuckle (video)by Knot theOrdinary
paracordbracelet. byCaseBoy
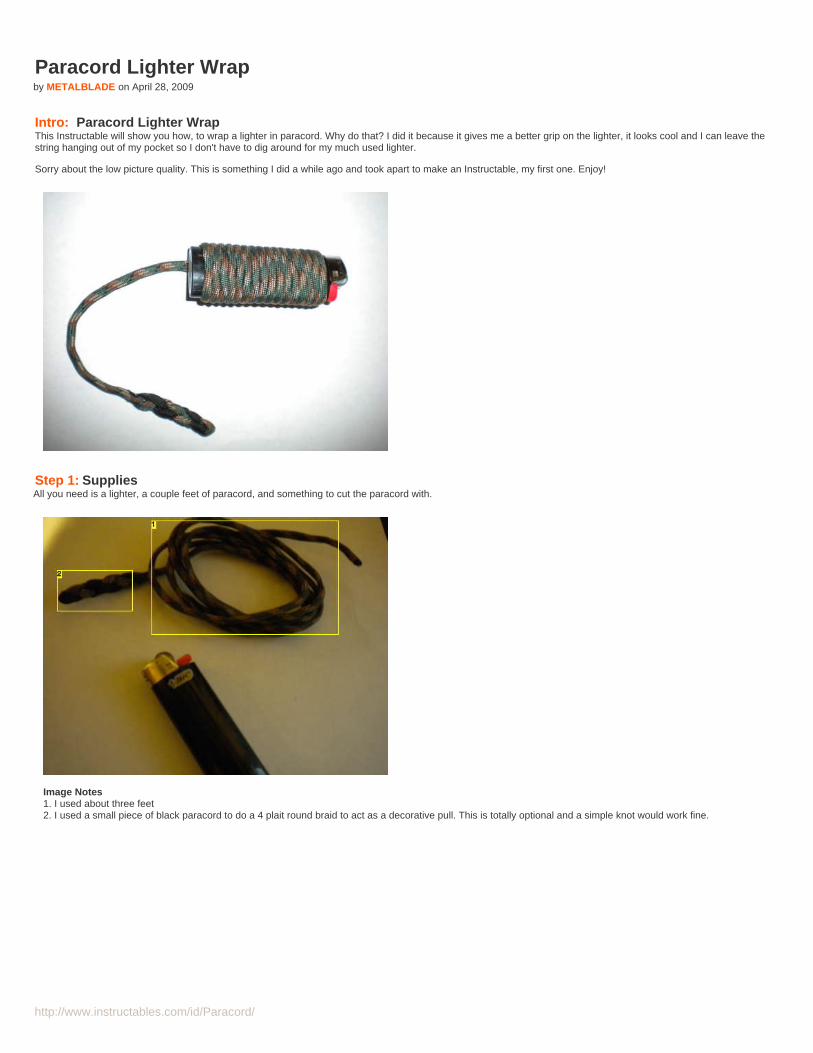
http://www.instructables.com/id/Paracord/
Paracord Lighter Wrapby METALBLADE on April 28, 2009
Intro: Paracord Lighter WrapThis Instructable will show you how, to wrap a lighter in paracord. Why do that? I did it because it gives me a better grip on the lighter, it looks cool and I can leave thestring hanging out of my pocket so I don't have to dig around for my much used lighter.
Sorry about the low picture quality. This is something I did a while ago and took apart to make an Instructable, my first one. Enjoy!
Step 1: SuppliesAll you need is a lighter, a couple feet of paracord, and something to cut the paracord with.
Image Notes1. I used about three feet2. I used a small piece of black paracord to do a 4 plait round braid to act as a decorative pull. This is totally optional and a simple knot would work fine.
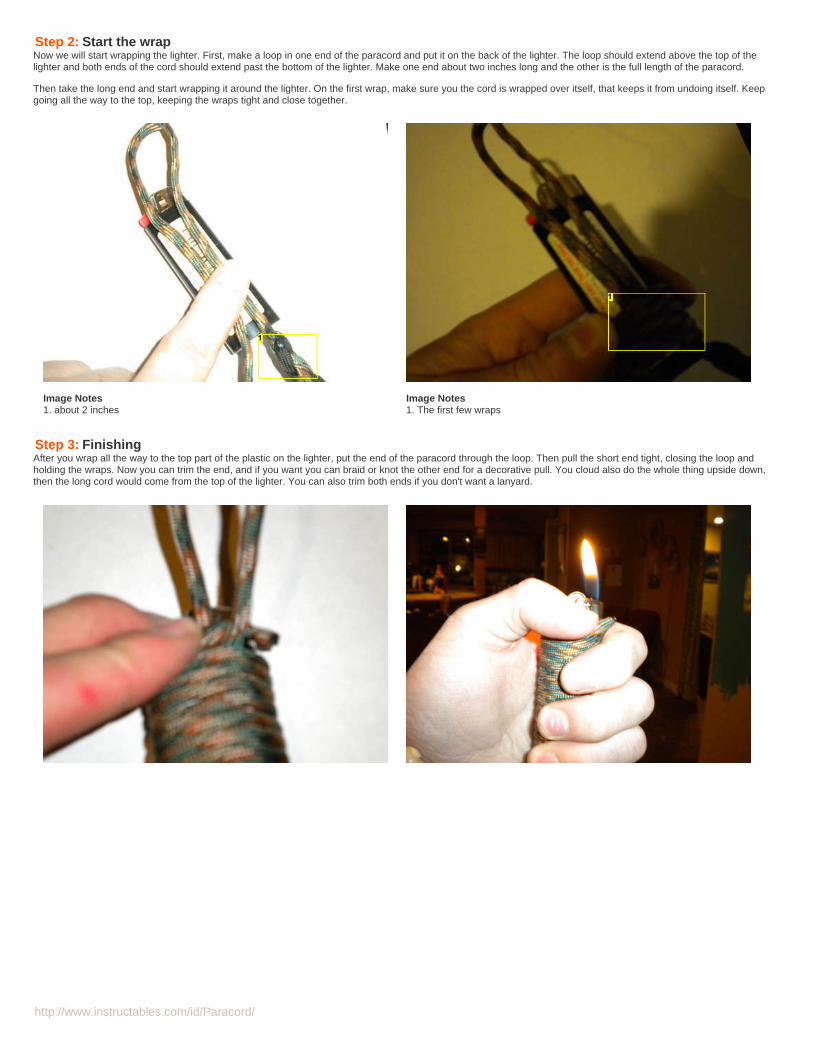
http://www.instructables.com/id/Paracord/
Step 2: Start the wrapNow we will start wrapping the lighter. First, make a loop in one end of the paracord and put it on the back of the lighter. The loop should extend above the top of thelighter and both ends of the cord should extend past the bottom of the lighter. Make one end about two inches long and the other is the full length of the paracord.
Then take the long end and start wrapping it around the lighter. On the first wrap, make sure you the cord is wrapped over itself, that keeps it from undoing itself. Keepgoing all the way to the top, keeping the wraps tight and close together.
Image Notes1. about 2 inches
Image Notes1. The first few wraps
Step 3: FinishingAfter you wrap all the way to the top part of the plastic on the lighter, put the end of the paracord through the loop. Then pull the short end tight, closing the loop andholding the wraps. Now you can trim the end, and if you want you can braid or knot the other end for a decorative pull. You cloud also do the whole thing upside down,then the long cord would come from the top of the lighter. You can also trim both ends if you don't want a lanyard.
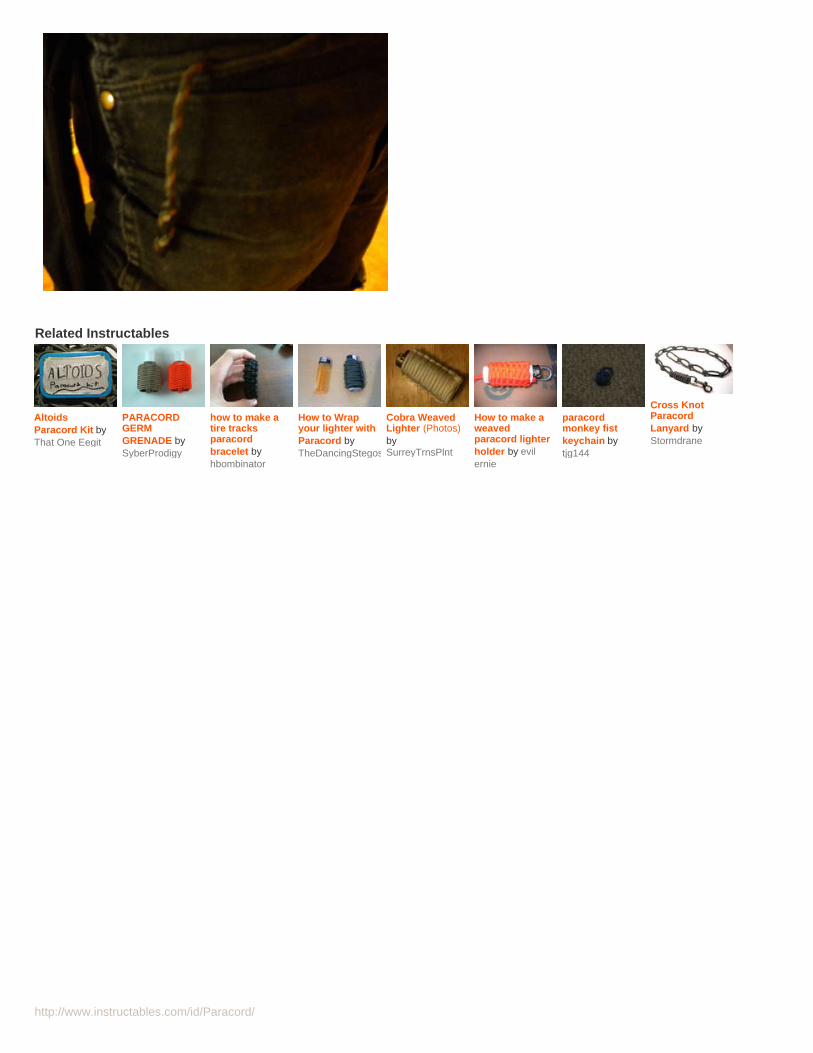
http://www.instructables.com/id/Paracord/
Related Instructables
AltoidsParacord Kit byThat One Eegit
PARACORDGERMGRENADE bySyberProdigy
how to make atire tracksparacordbracelet byhbombinator
How to Wrapyour lighter withParacord byTheDancingStegosaurus
Cobra WeavedLighter (Photos)bySurreyTrnsPlnt
How to make aweavedparacord lighterholder by evilernie
paracordmonkey fistkeychain bytjg144
Cross KnotParacordLanyard byStormdrane
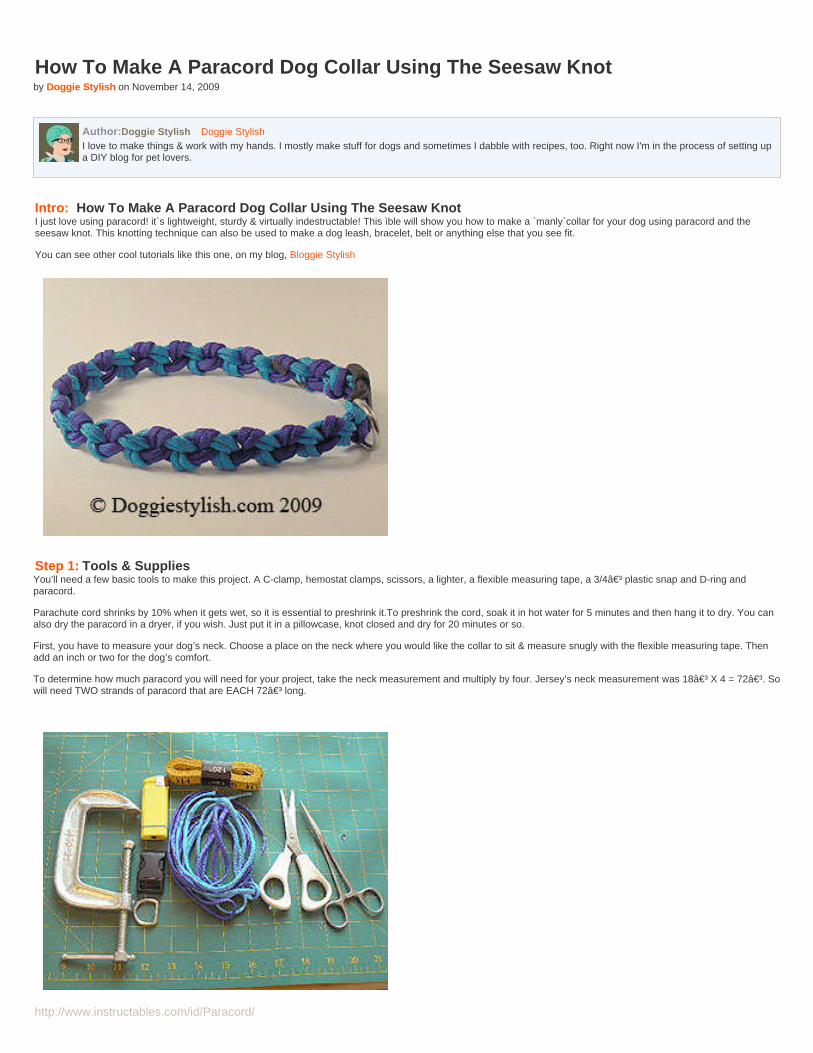
http://www.instructables.com/id/Paracord/
How To Make A Paracord Dog Collar Using The Seesaw Knotby Doggie Stylish on November 14, 2009
Author:Doggie Stylish Doggie StylishI love to make things & work with my hands. I mostly make stuff for dogs and sometimes I dabble with recipes, too. Right now I'm in the process of setting upa DIY blog for pet lovers.
Intro: How To Make A Paracord Dog Collar Using The Seesaw KnotI just love using paracord! it`s lightweight, sturdy & virtually indestructable! This ìble will show you how to make a `manly`collar for your dog using paracord and theseesaw knot. This knotting technique can also be used to make a dog leash, bracelet, belt or anything else that you see fit.
You can see other cool tutorials like this one, on my blog, Bloggie Stylish
Step 1: Tools & SuppliesYou’ll need a few basic tools to make this project. A C-clamp, hemostat clamps, scissors, a lighter, a flexible measuring tape, a 3/4″ plastic snap and D-ring andparacord.
Parachute cord shrinks by 10% when it gets wet, so it is essential to preshrink it.To preshrink the cord, soak it in hot water for 5 minutes and then hang it to dry. You canalso dry the paracord in a dryer, if you wish. Just put it in a pillowcase, knot closed and dry for 20 minutes or so.
First, you have to measure your dog’s neck. Choose a place on the neck where you would like the collar to sit & measure snugly with the flexible measuring tape. Thenadd an inch or two for the dog’s comfort.
To determine how much paracord you will need for your project, take the neck measurement and multiply by four. Jersey’s neck measurement was 18″ X 4 = 72″. So Iwill need TWO strands of paracord that are EACH 72″ long.
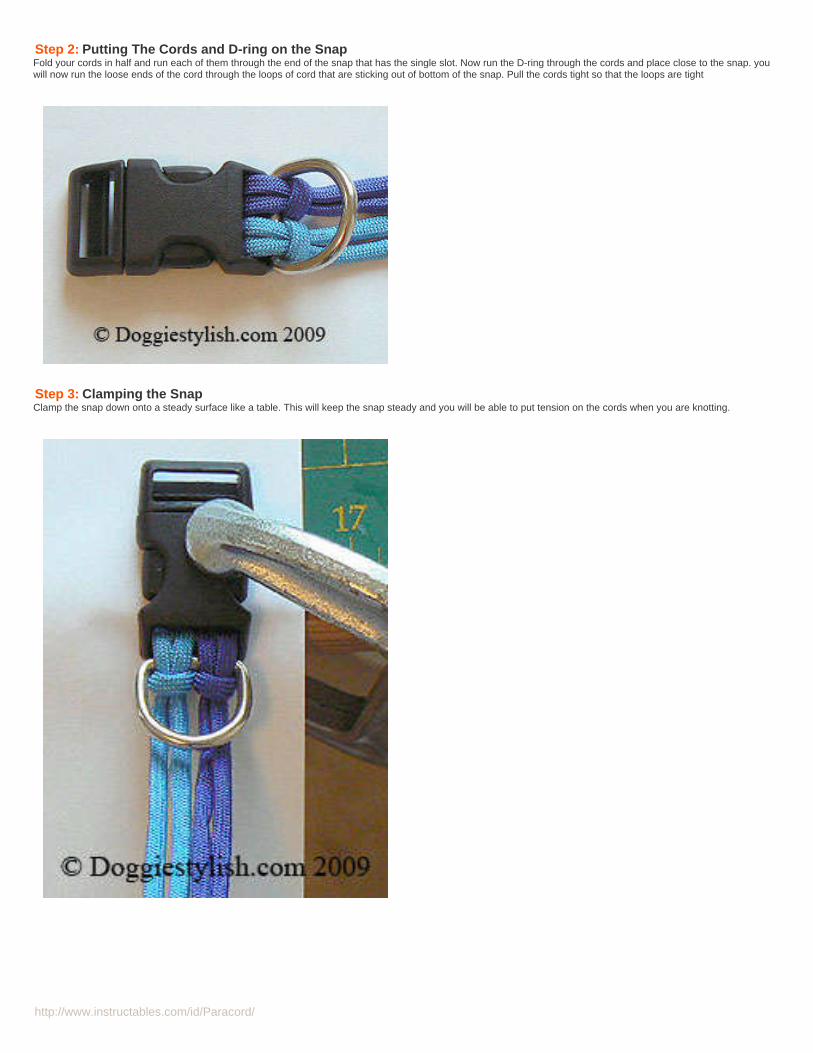
http://www.instructables.com/id/Paracord/
Step 2: Putting The Cords and D-ring on the SnapFold your cords in half and run each of them through the end of the snap that has the single slot. Now run the D-ring through the cords and place close to the snap. youwill now run the loose ends of the cord through the loops of cord that are sticking out of bottom of the snap. Pull the cords tight so that the loops are tight
Step 3: Clamping the SnapClamp the snap down onto a steady surface like a table. This will keep the snap steady and you will be able to put tension on the cords when you are knotting.
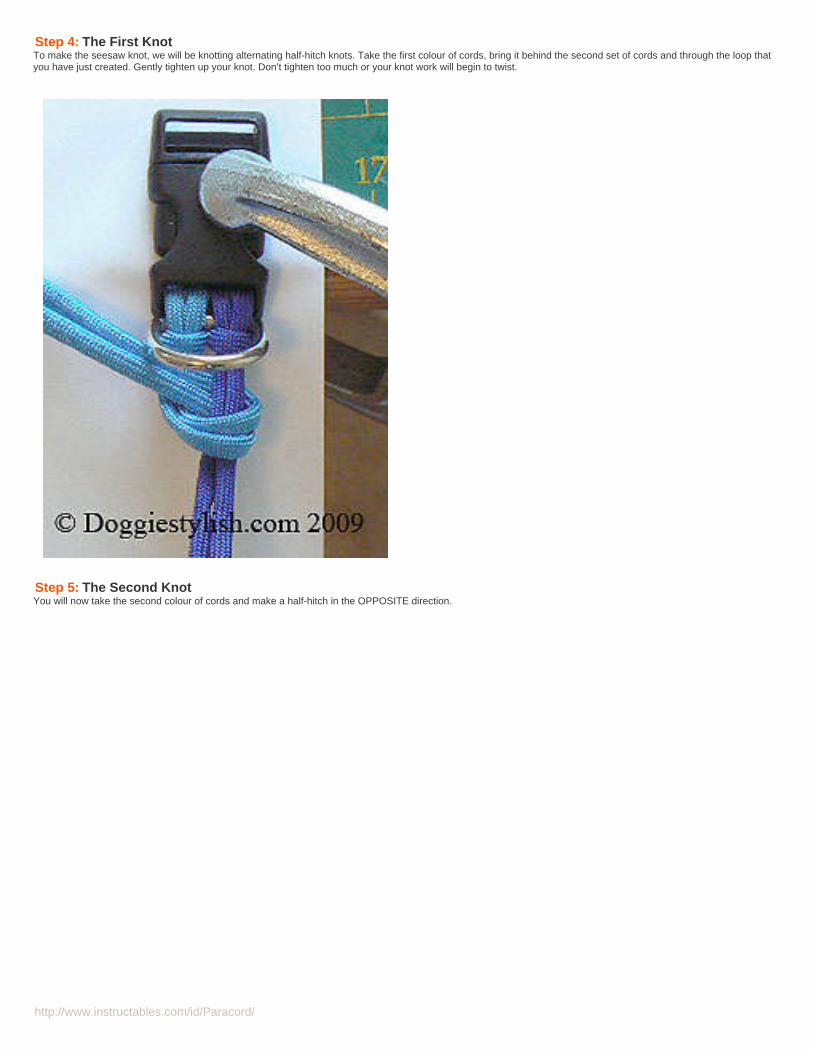
http://www.instructables.com/id/Paracord/
Step 4: The First KnotTo make the seesaw knot, we will be knotting alternating half-hitch knots. Take the first colour of cords, bring it behind the second set of cords and through the loop thatyou have just created. Gently tighten up your knot. Don’t tighten too much or your knot work will begin to twist.
Step 5: The Second KnotYou will now take the second colour of cords and make a half-hitch in the OPPOSITE direction.
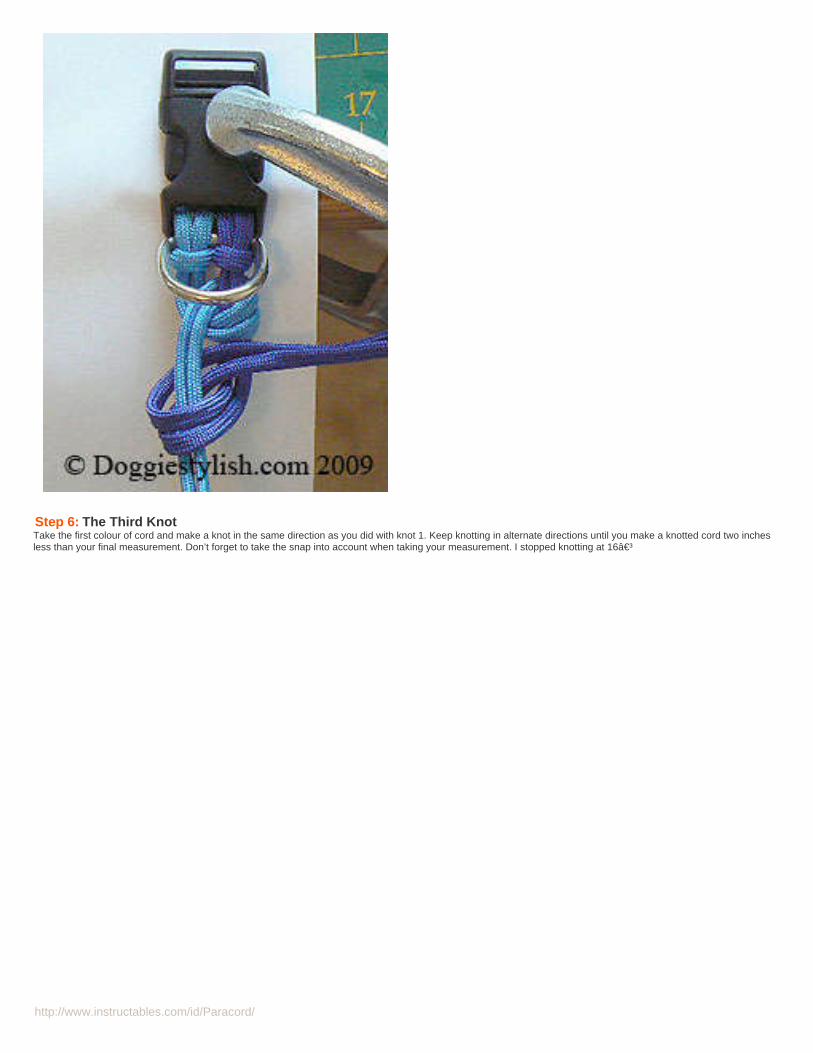
http://www.instructables.com/id/Paracord/
Step 6: The Third KnotTake the first colour of cord and make a knot in the same direction as you did with knot 1. Keep knotting in alternate directions until you make a knotted cord two inchesless than your final measurement. Don’t forget to take the snap into account when taking your measurement. I stopped knotting at 16″
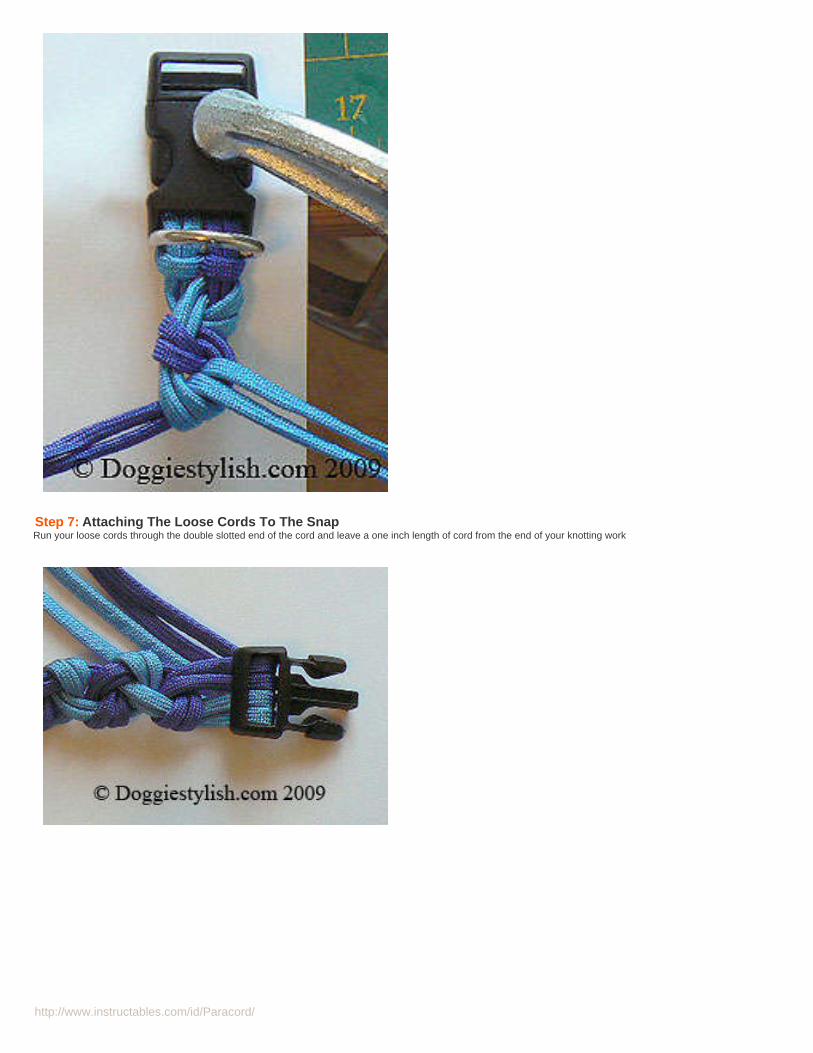
http://www.instructables.com/id/Paracord/
Step 7: Attaching The Loose Cords To The SnapRun your loose cords through the double slotted end of the cord and leave a one inch length of cord from the end of your knotting work
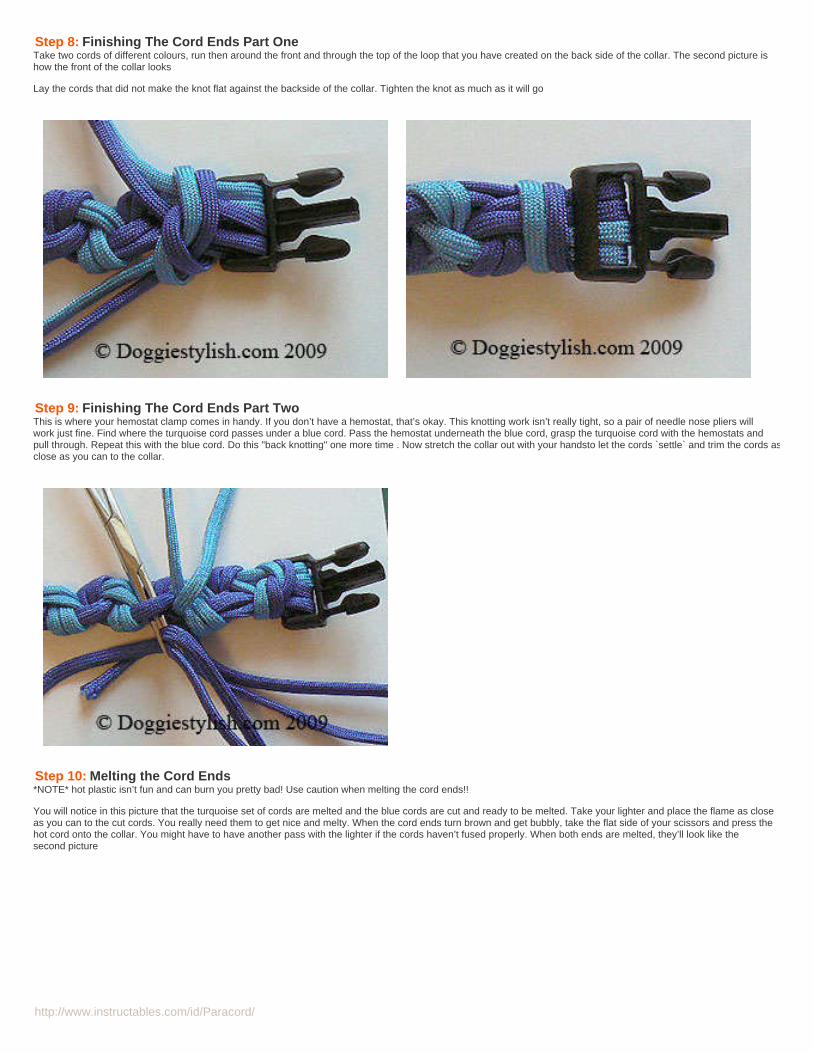
http://www.instructables.com/id/Paracord/
Step 8: Finishing The Cord Ends Part OneTake two cords of different colours, run then around the front and through the top of the loop that you have created on the back side of the collar. The second picture ishow the front of the collar looks
Lay the cords that did not make the knot flat against the backside of the collar. Tighten the knot as much as it will go
Step 9: Finishing The Cord Ends Part TwoThis is where your hemostat clamp comes in handy. If you don’t have a hemostat, that’s okay. This knotting work isn’t really tight, so a pair of needle nose pliers willwork just fine. Find where the turquoise cord passes under a blue cord. Pass the hemostat underneath the blue cord, grasp the turquoise cord with the hemostats andpull through. Repeat this with the blue cord. Do this "back knotting" one more time . Now stretch the collar out with your handsto let the cords `settle` and trim the cords asclose as you can to the collar.
Step 10: Melting the Cord Ends*NOTE* hot plastic isn’t fun and can burn you pretty bad! Use caution when melting the cord ends!!
You will notice in this picture that the turquoise set of cords are melted and the blue cords are cut and ready to be melted. Take your lighter and place the flame as closeas you can to the cut cords. You really need them to get nice and melty. When the cord ends turn brown and get bubbly, take the flat side of your scissors and press thehot cord onto the collar. You might have to have another pass with the lighter if the cords haven’t fused properly. When both ends are melted, they’ll look like thesecond picture
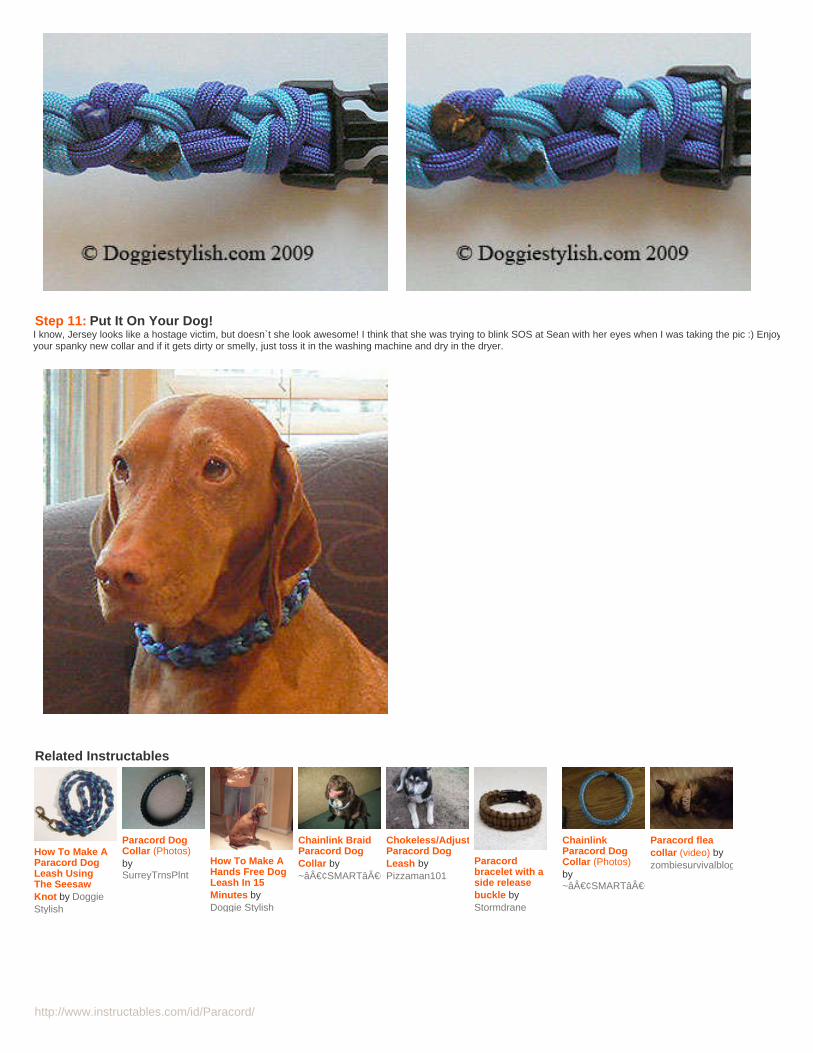
http://www.instructables.com/id/Paracord/
Step 11: Put It On Your Dog!I know, Jersey looks like a hostage victim, but doesn`t she look awesome! I think that she was trying to blink SOS at Sean with her eyes when I was taking the pic :) Enjoyyour spanky new collar and if it gets dirty or smelly, just toss it in the washing machine and dry in the dryer.
Related Instructables
How To Make AParacord DogLeash UsingThe SeesawKnot by DoggieStylish
Paracord DogCollar (Photos)bySurreyTrnsPlnt
How To Make AHands Free DogLeash In 15Minutes byDoggie Stylish
Chainlink BraidParacord DogCollar by~•SMART•~
Chokeless/AdjustableParacord DogLeash byPizzaman101
Paracordbracelet with aside releasebuckle byStormdrane
ChainlinkParacord DogCollar (Photos)by~•SMART•~
Paracord fleacollar (video) byzombiesurvivalblog

http://www.instructables.com/id/Paracord/
How To Make A Paracord Dog Leash Using The Seesaw Knotby Doggie Stylish on November 15, 2009
Author:Doggie Stylish Doggie StylishI love to make things & work with my hands. I mostly make stuff for dogs and sometimes I dabble with recipes, too. Right now I'm in the process of setting upa DIY blog for pet lovers.
Intro: How To Make A Paracord Dog Leash Using The Seesaw KnotSince I've shown you how to make the dog collar , let's make the matching dog leash! It's actually easier to make than the collar, you'll just need a little more paracord.
If you liked this tutorial, you'll *love* my blog, Bloggie Stylish. There are lots more cool tutorials to see there!
Step 1: Tools And SuppliesYou’ll need a few basic tools to make this project. A C-clamp, hemostat clamps, scissors, a lighter, a flexible measuring tape, a dog leash snap and paracord.
Parachute cord shrinks by 10% when it gets wet. To preshrink the paracord, soak it in hot water for 5 minutes and then hang it to dry. You can also use the washingmachine & dryer, it's up to you.
To determine how much paracord you will need, the project length must be broken down into inches and multiplied by five. So, I’m making a four foot leash with a fiveinch allowance to make a handle loop. Therefore 53″ X 5 = 265″. For making this leash I will need TWO cords that EACH measure 265″ long
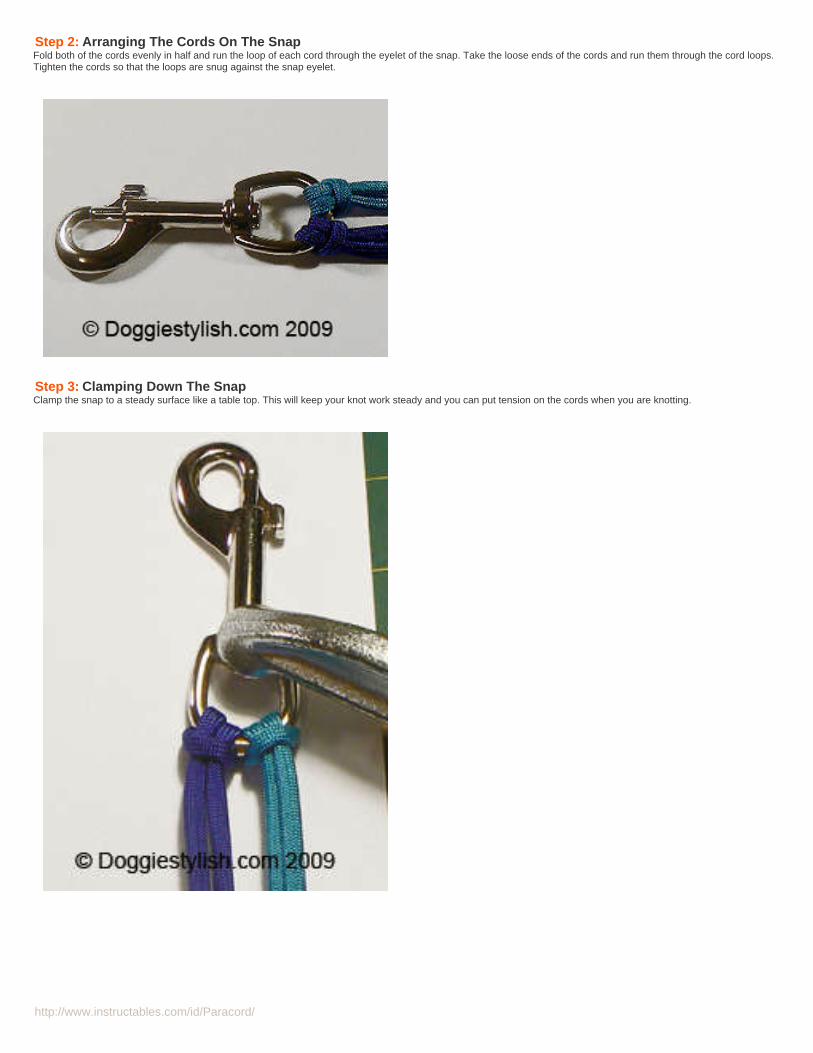
http://www.instructables.com/id/Paracord/
Step 2: Arranging The Cords On The SnapFold both of the cords evenly in half and run the loop of each cord through the eyelet of the snap. Take the loose ends of the cords and run them through the cord loops.Tighten the cords so that the loops are snug against the snap eyelet.
Step 3: Clamping Down The SnapClamp the snap to a steady surface like a table top. This will keep your knot work steady and you can put tension on the cords when you are knotting.
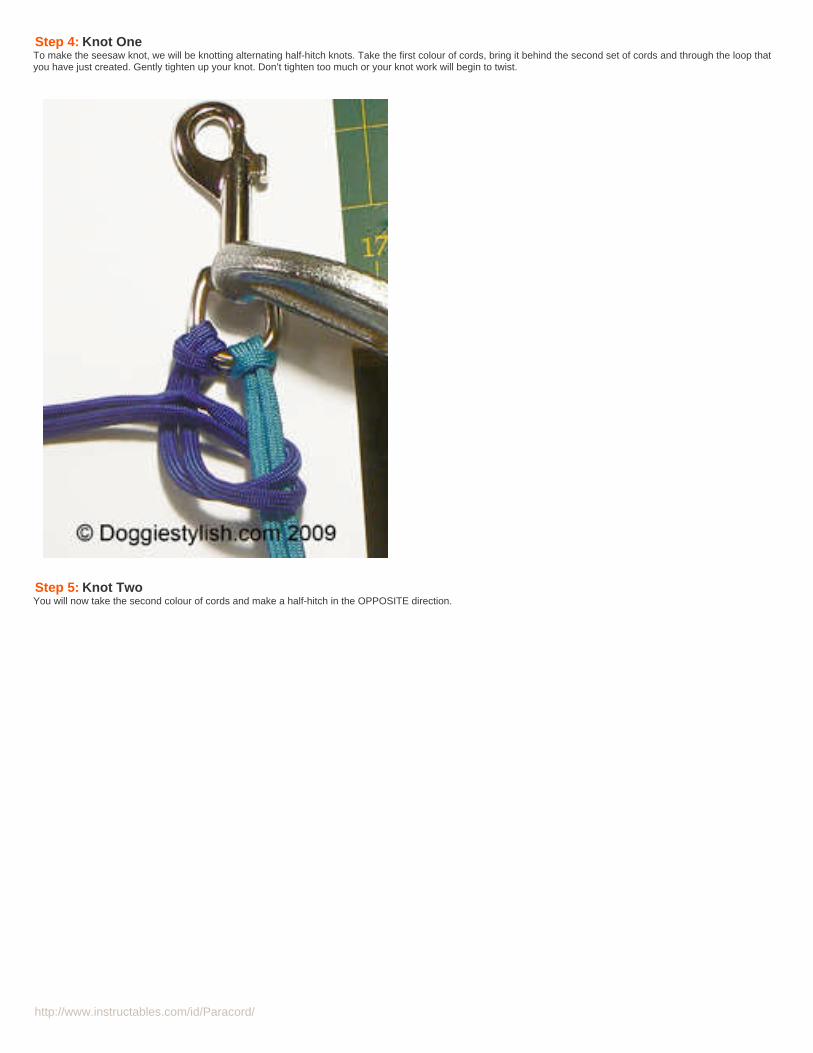
http://www.instructables.com/id/Paracord/
Step 4: Knot OneTo make the seesaw knot, we will be knotting alternating half-hitch knots. Take the first colour of cords, bring it behind the second set of cords and through the loop thatyou have just created. Gently tighten up your knot. Don’t tighten too much or your knot work will begin to twist.
Step 5: Knot TwoYou will now take the second colour of cords and make a half-hitch in the OPPOSITE direction.
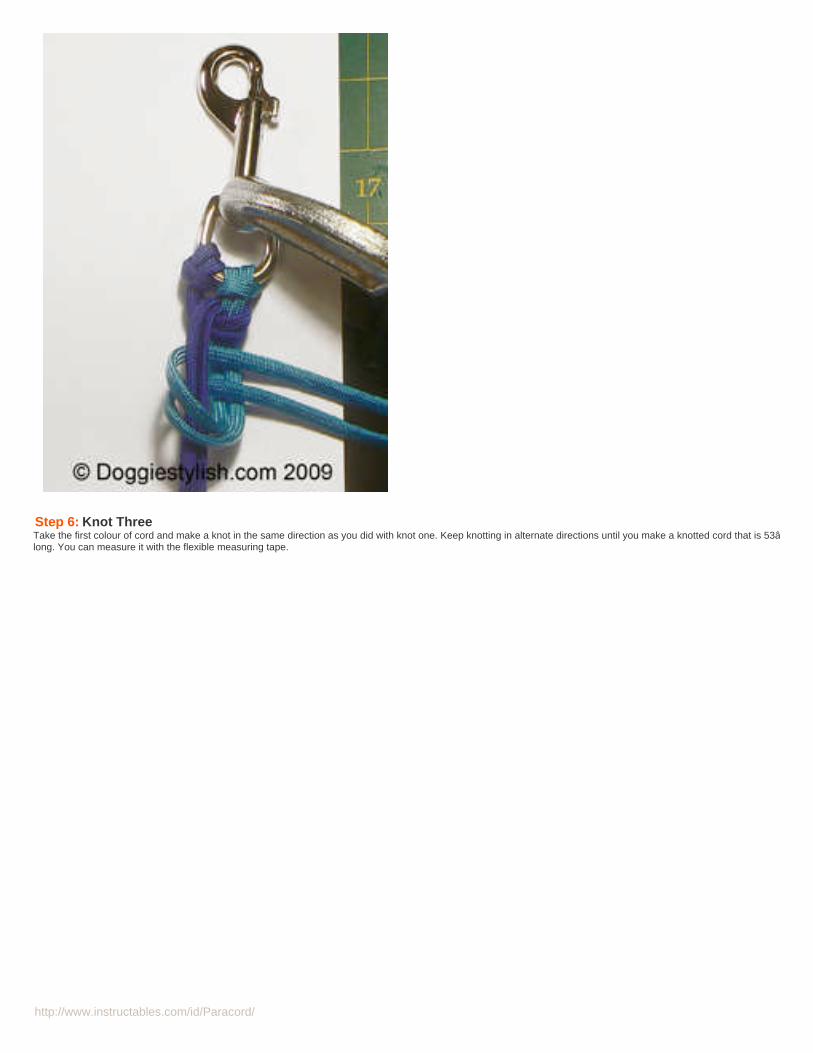
http://www.instructables.com/id/Paracord/
Step 6: Knot ThreeTake the first colour of cord and make a knot in the same direction as you did with knot one. Keep knotting in alternate directions until you make a knotted cord that is 53″long. You can measure it with the flexible measuring tape.
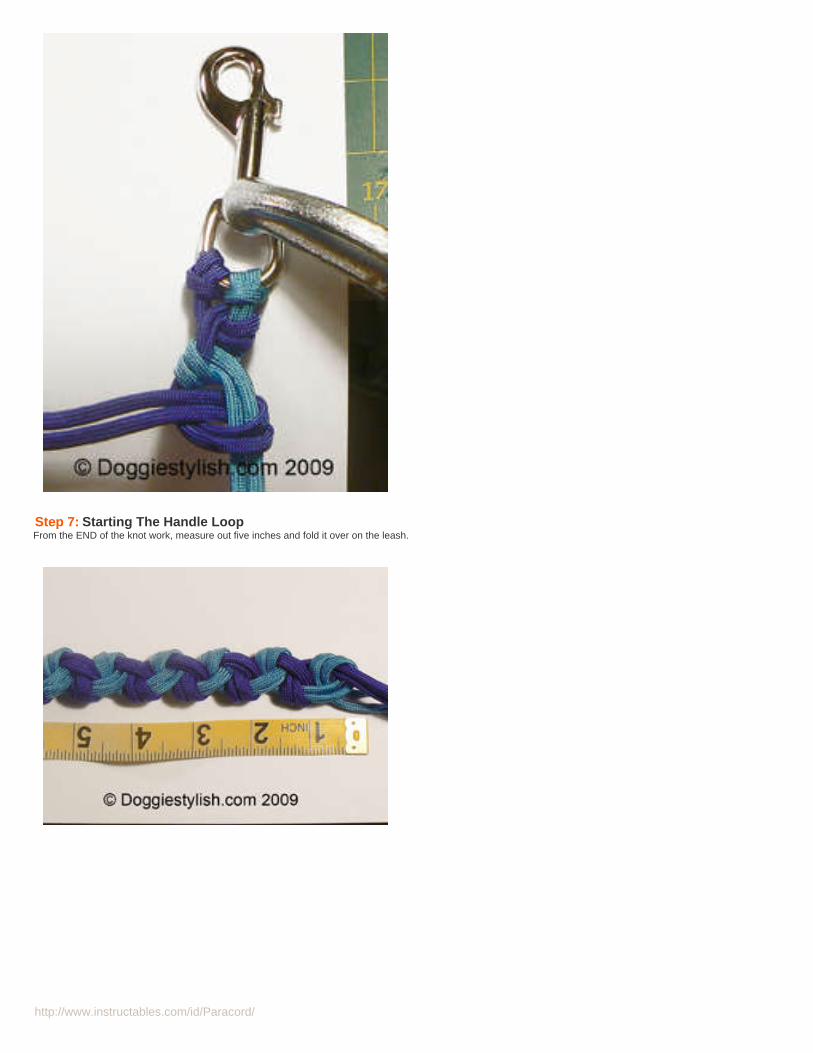
http://www.instructables.com/id/Paracord/
Step 7: Starting The Handle LoopFrom the END of the knot work, measure out five inches and fold it over on the leash.
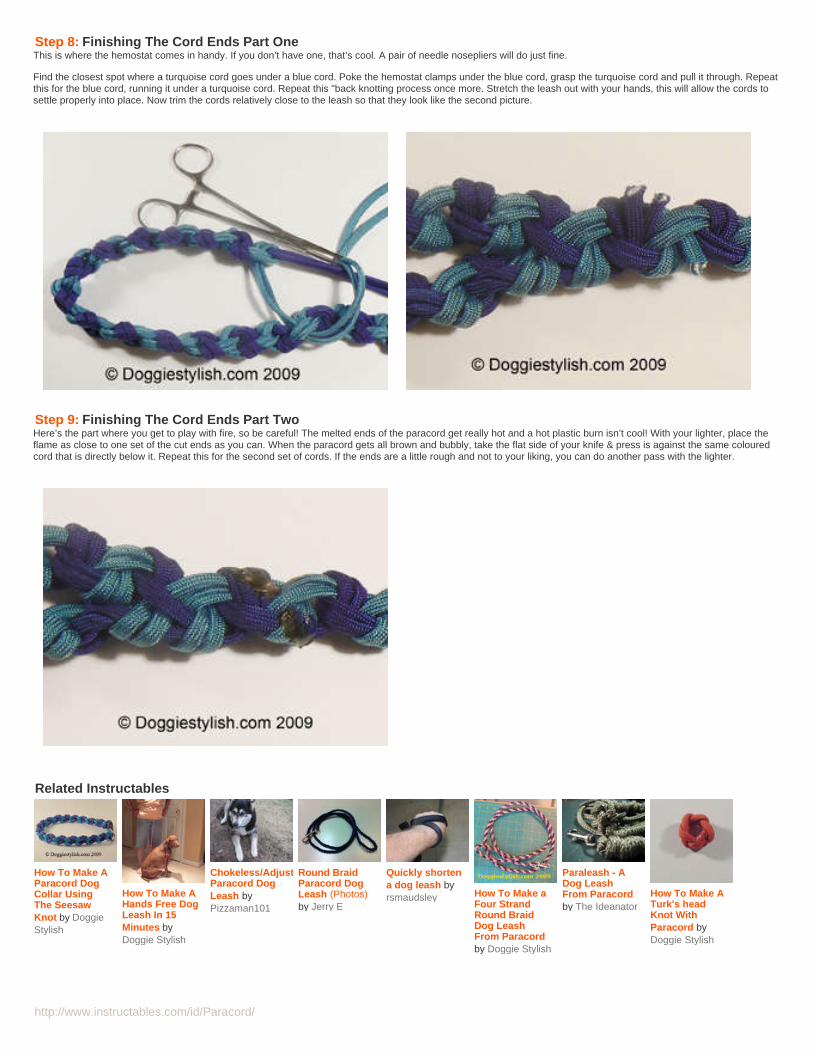
http://www.instructables.com/id/Paracord/
Step 8: Finishing The Cord Ends Part OneThis is where the hemostat comes in handy. If you don’t have one, that’s cool. A pair of needle nosepliers will do just fine.
Find the closest spot where a turquoise cord goes under a blue cord. Poke the hemostat clamps under the blue cord, grasp the turquoise cord and pull it through. Repeatthis for the blue cord, running it under a turquoise cord. Repeat this "back knotting process once more. Stretch the leash out with your hands, this will allow the cords tosettle properly into place. Now trim the cords relatively close to the leash so that they look like the second picture.
Step 9: Finishing The Cord Ends Part TwoHere’s the part where you get to play with fire, so be careful! The melted ends of the paracord get really hot and a hot plastic burn isn’t cool! With your lighter, place theflame as close to one set of the cut ends as you can. When the paracord gets all brown and bubbly, take the flat side of your knife & press is against the same colouredcord that is directly below it. Repeat this for the second set of cords. If the ends are a little rough and not to your liking, you can do another pass with the lighter.
Related Instructables
How To Make AParacord DogCollar UsingThe SeesawKnot by DoggieStylish
How To Make AHands Free DogLeash In 15Minutes byDoggie Stylish
Chokeless/AdjustableParacord DogLeash byPizzaman101
Round BraidParacord DogLeash (Photos)by Jerry E
Quickly shortena dog leash byrsmaudsley How To Make a
Four StrandRound BraidDog LeashFrom Paracordby Doggie Stylish
Paraleash - ADog LeashFrom Paracordby The Ideanator
How To Make ATurk's headKnot WithParacord byDoggie Stylish
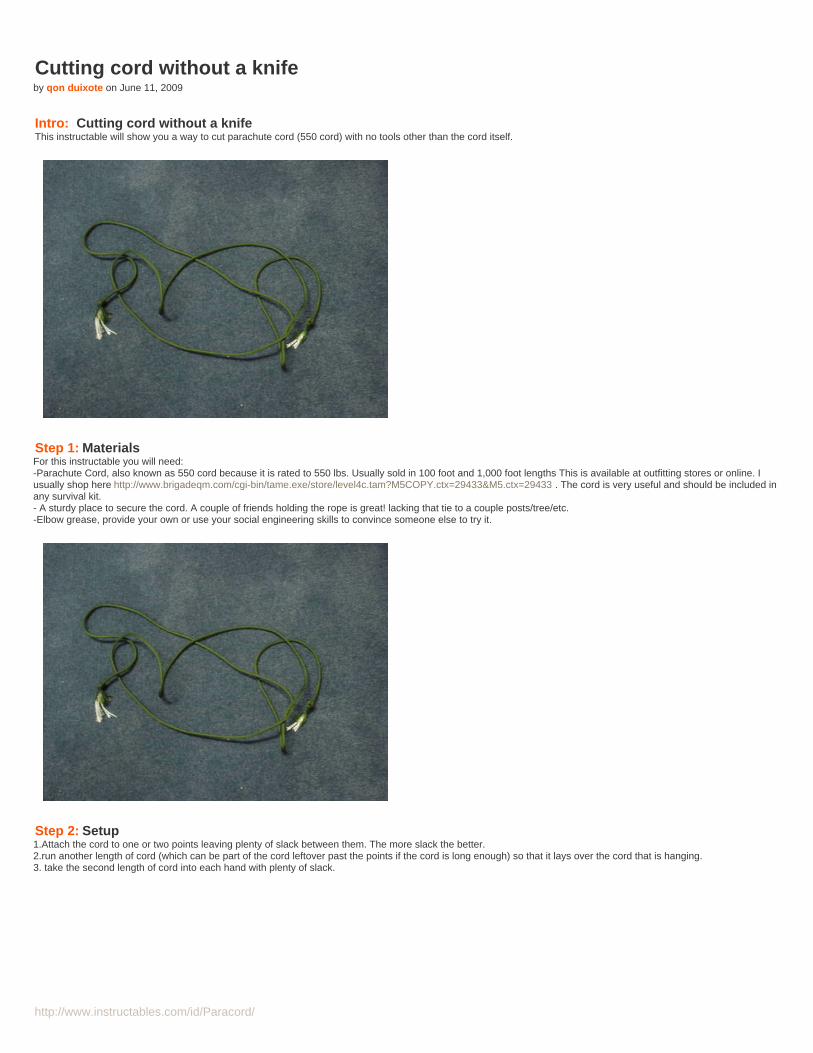
http://www.instructables.com/id/Paracord/
Cutting cord without a knifeby qon duixote on June 11, 2009
Intro: Cutting cord without a knifeThis instructable will show you a way to cut parachute cord (550 cord) with no tools other than the cord itself.
Step 1: MaterialsFor this instructable you will need:-Parachute Cord, also known as 550 cord because it is rated to 550 lbs. Usually sold in 100 foot and 1,000 foot lengths This is available at outfitting stores or online. Iusually shop here http://www.brigadeqm.com/cgi-bin/tame.exe/store/level4c.tam?M5COPY.ctx=29433&M5.ctx=29433 . The cord is very useful and should be included inany survival kit.- A sturdy place to secure the cord. A couple of friends holding the rope is great! lacking that tie to a couple posts/tree/etc.-Elbow grease, provide your own or use your social engineering skills to convince someone else to try it.
Step 2: Setup1.Attach the cord to one or two points leaving plenty of slack between them. The more slack the better.2.run another length of cord (which can be part of the cord leftover past the points if the cord is long enough) so that it lays over the cord that is hanging.3. take the second length of cord into each hand with plenty of slack.
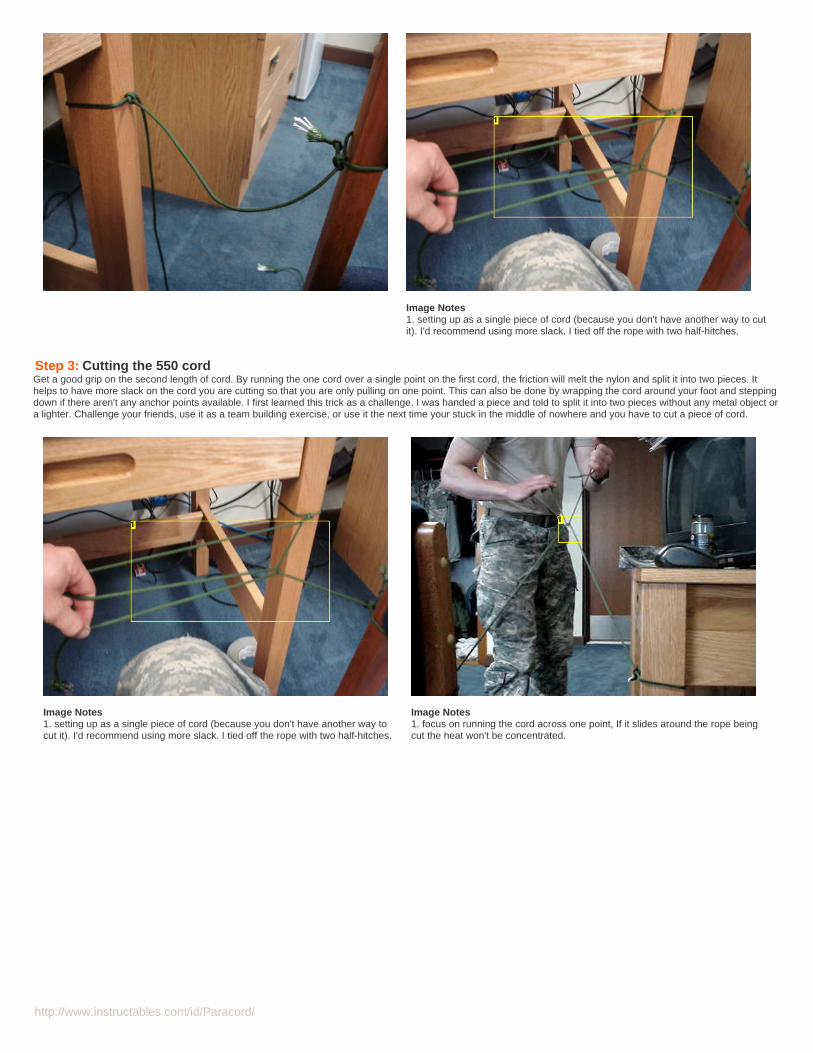
http://www.instructables.com/id/Paracord/
Image Notes1. setting up as a single piece of cord (because you don't have another way to cutit). I'd recommend using more slack. I tied off the rope with two half-hitches.
Step 3: Cutting the 550 cordGet a good grip on the second length of cord. By running the one cord over a single point on the first cord, the friction will melt the nylon and split it into two pieces. Ithelps to have more slack on the cord you are cutting so that you are only pulling on one point. This can also be done by wrapping the cord around your foot and steppingdown if there aren't any anchor points available. I first learned this trick as a challenge. I was handed a piece and told to split it into two pieces without any metal object ora lighter. Challenge your friends, use it as a team building exercise, or use it the next time your stuck in the middle of nowhere and you have to cut a piece of cord.
Image Notes1. setting up as a single piece of cord (because you don't have another way tocut it). I'd recommend using more slack. I tied off the rope with two half-hitches.
Image Notes1. focus on running the cord across one point, If it slides around the rope beingcut the heat won't be concentrated.
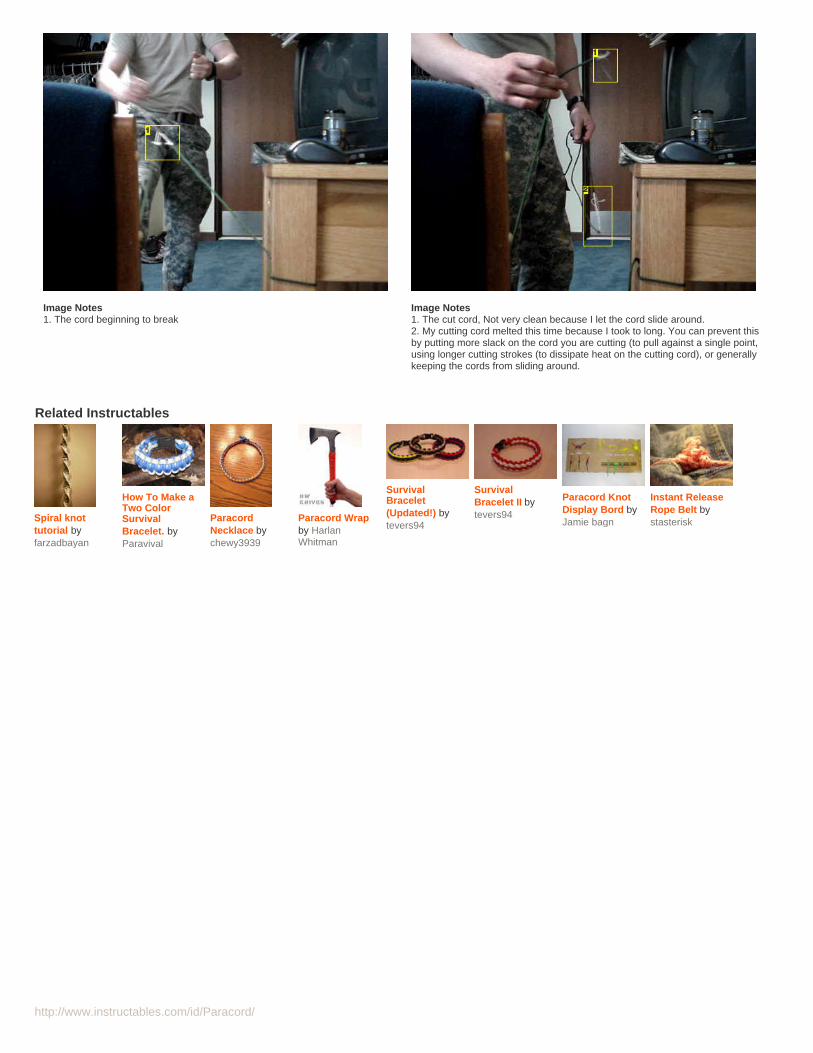
http://www.instructables.com/id/Paracord/
Image Notes1. The cord beginning to break
Image Notes1. The cut cord, Not very clean because I let the cord slide around.2. My cutting cord melted this time because I took to long. You can prevent thisby putting more slack on the cord you are cutting (to pull against a single point,using longer cutting strokes (to dissipate heat on the cutting cord), or generallykeeping the cords from sliding around.
Related Instructables
Spiral knottutorial byfarzadbayan
How To Make aTwo ColorSurvivalBracelet. byParavival
ParacordNecklace bychewy3939
Paracord Wrapby HarlanWhitman
SurvivalBracelet(Updated!) bytevers94
SurvivalBracelet II bytevers94
Paracord KnotDisplay Bord byJamie bagn
Instant ReleaseRope Belt bystasterisk
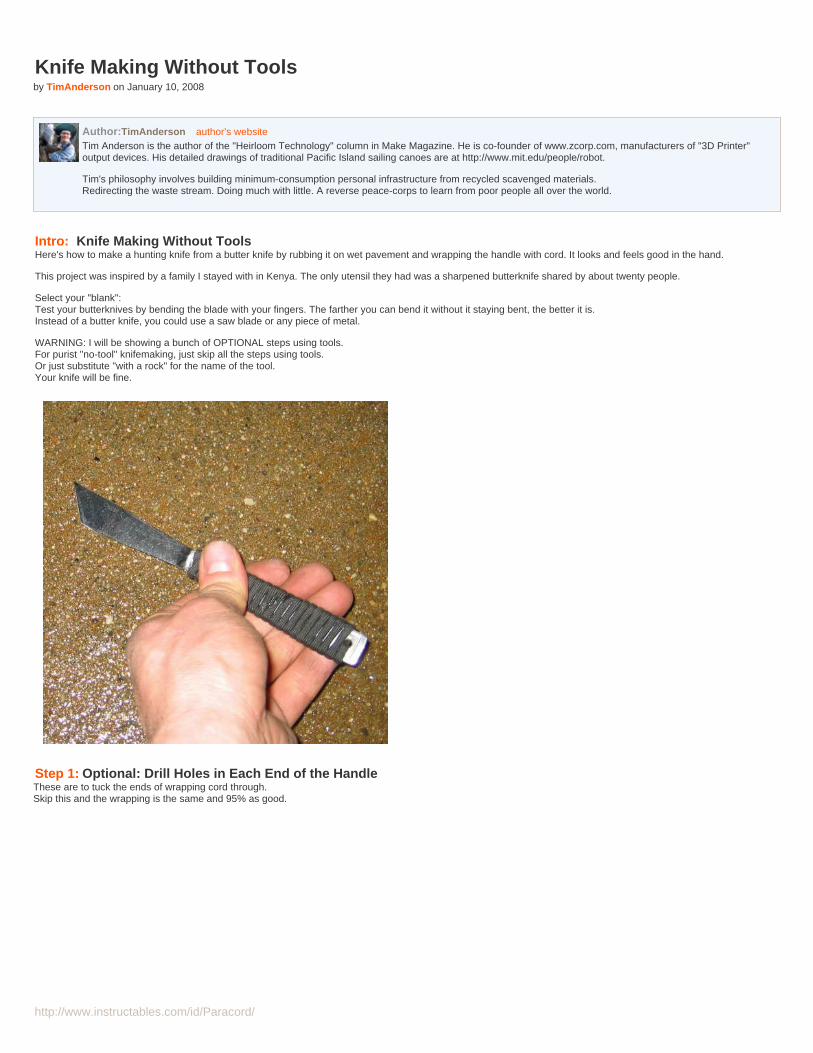
http://www.instructables.com/id/Paracord/
Knife Making Without Toolsby TimAnderson on January 10, 2008
Author:TimAnderson author's websiteTim Anderson is the author of the "Heirloom Technology" column in Make Magazine. He is co-founder of www.zcorp.com, manufacturers of "3D Printer"output devices. His detailed drawings of traditional Pacific Island sailing canoes are at http://www.mit.edu/people/robot.
Tim's philosophy involves building minimum-consumption personal infrastructure from recycled scavenged materials.Redirecting the waste stream. Doing much with little. A reverse peace-corps to learn from poor people all over the world.
Intro: Knife Making Without ToolsHere's how to make a hunting knife from a butter knife by rubbing it on wet pavement and wrapping the handle with cord. It looks and feels good in the hand.
This project was inspired by a family I stayed with in Kenya. The only utensil they had was a sharpened butterknife shared by about twenty people.
Select your "blank":Test your butterknives by bending the blade with your fingers. The farther you can bend it without it staying bent, the better it is.Instead of a butter knife, you could use a saw blade or any piece of metal.
WARNING: I will be showing a bunch of OPTIONAL steps using tools.For purist "no-tool" knifemaking, just skip all the steps using tools.Or just substitute "with a rock" for the name of the tool.Your knife will be fine.
Step 1: Optional: Drill Holes in Each End of the HandleThese are to tuck the ends of wrapping cord through.Skip this and the wrapping is the same and 95% as good.
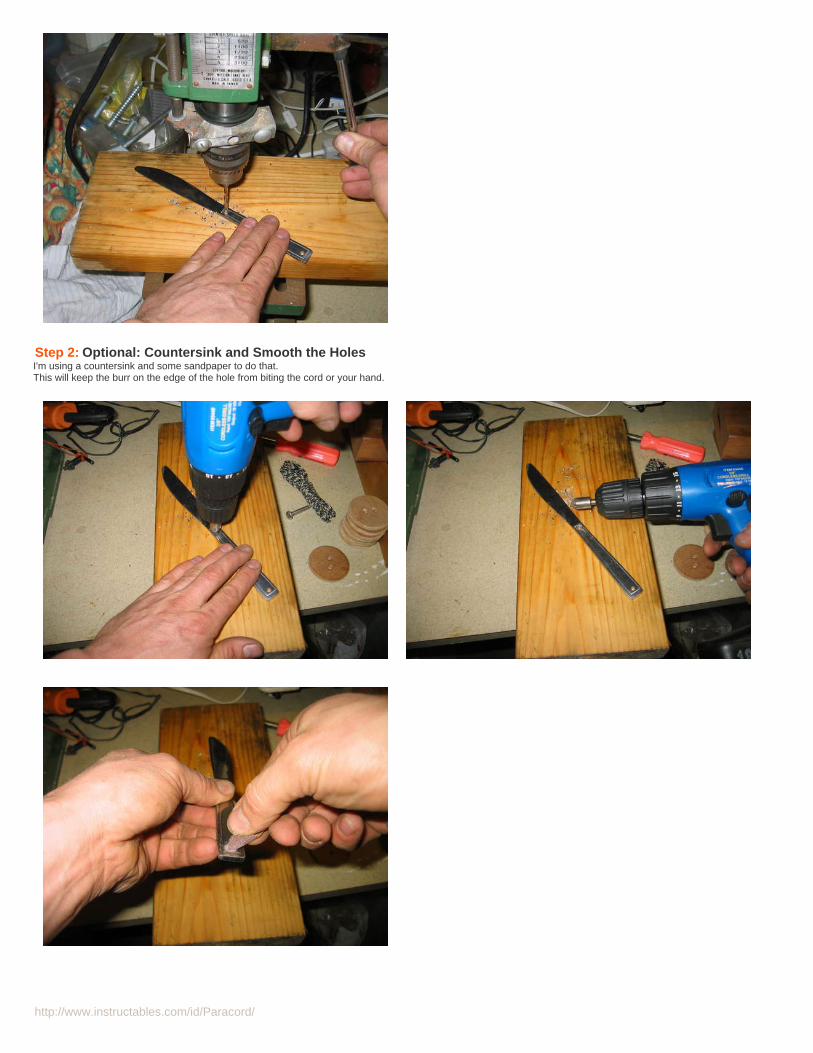
http://www.instructables.com/id/Paracord/
Step 2: Optional: Countersink and Smooth the HolesI'm using a countersink and some sandpaper to do that.This will keep the burr on the edge of the hole from biting the cord or your hand.

http://www.instructables.com/id/Paracord/
Step 3: Optional: Melt and Taper the Cord EndThis will make it easier to poke through the hole. Unnecessary if you skipped the holes.Get your fingers wet so the melted plastic won't stick and burn you like napalm.
This is 1/8" nylon "parachute" cord. 1/8" Polyester is better because it doesn't get loose when wet. Get it at a chandler. (marine supply)
Step 4: Start WrappingIf your cord is nylon get it wet first.If it's cotton or other cellulose fiber, make sure it's dry first.Nylon shrinks when it dries, cotton shrinks when it's wet.
You don't really need the hole, that's just something to make it look less like a butter knife.If you drilled holes poke the cord through one of the holes.Leave a tail a few inches long.If you skipped the hole just lay down the tail and wrap over it.Wrap over the tail until you get halfway up the handle.
Step 5: Lay Down a LoopEventually we'll need a way to pull the far tail back under the wrapping.To do that we'll lay down a loop of thin cord and wrap over that.
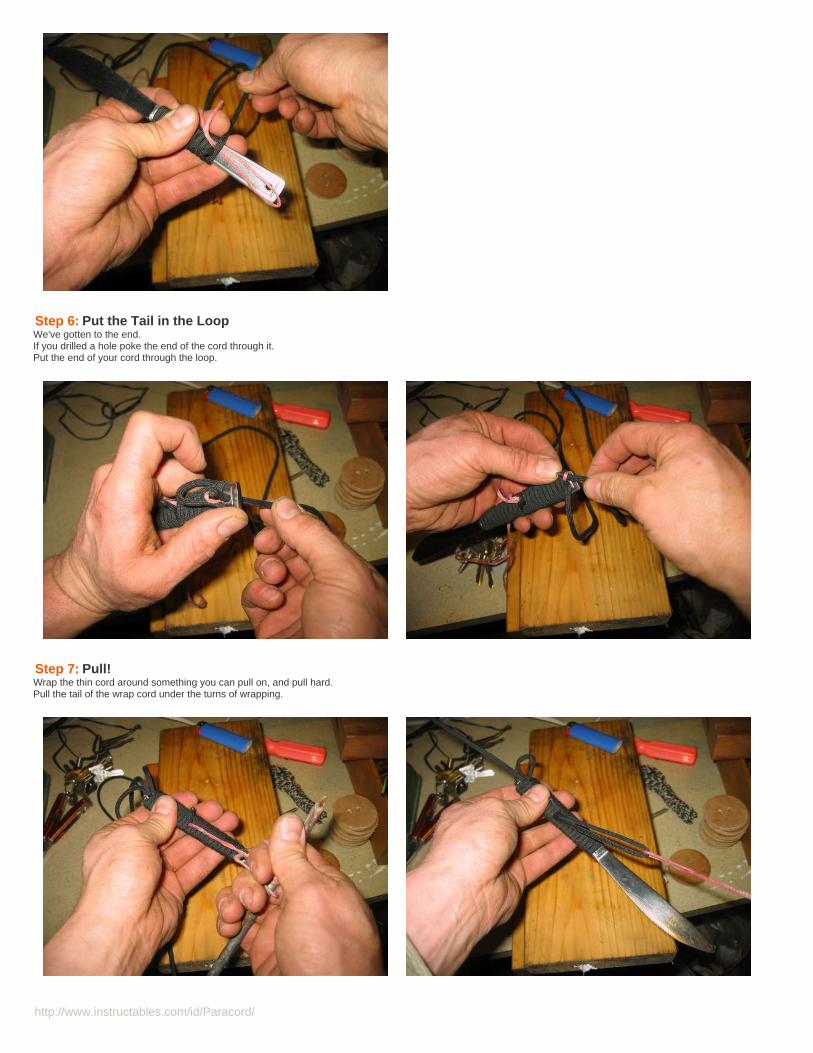
http://www.instructables.com/id/Paracord/
Step 6: Put the Tail in the LoopWe've gotten to the end.If you drilled a hole poke the end of the cord through it.Put the end of your cord through the loop.
Step 7: Pull!Wrap the thin cord around something you can pull on, and pull hard.Pull the tail of the wrap cord under the turns of wrapping.
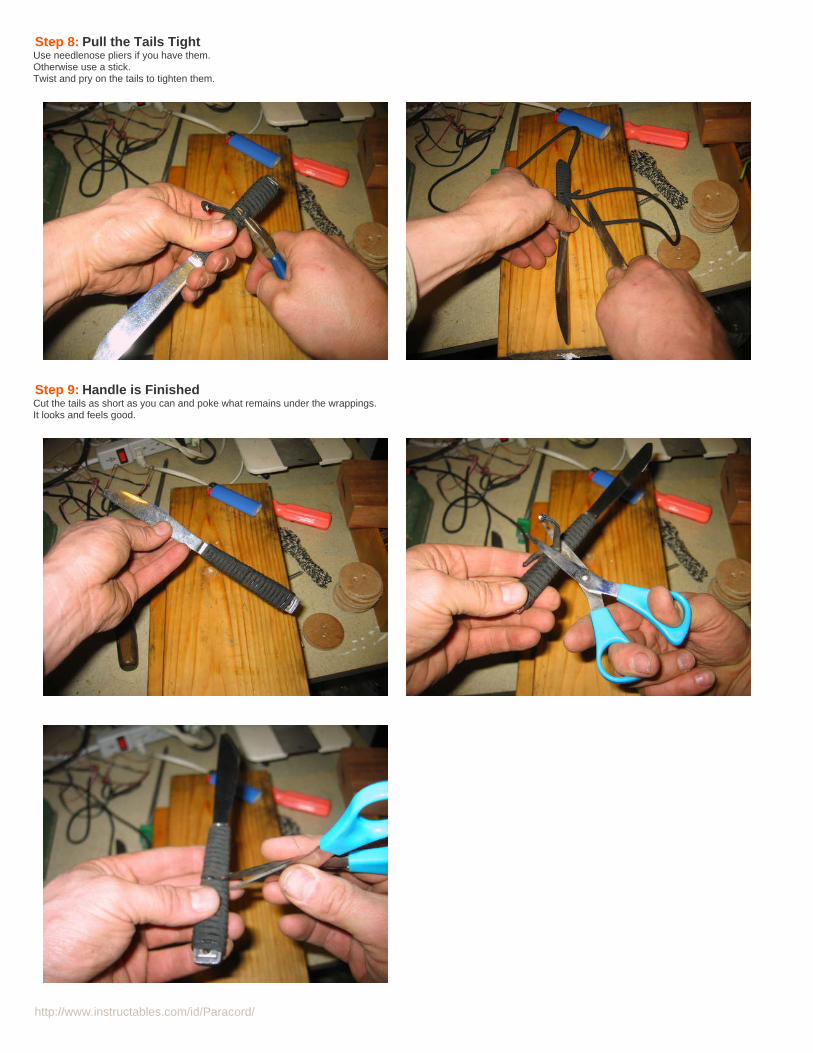
http://www.instructables.com/id/Paracord/
Step 8: Pull the Tails TightUse needlenose pliers if you have them.Otherwise use a stick.Twist and pry on the tails to tighten them.
Step 9: Handle is FinishedCut the tails as short as you can and poke what remains under the wrappings.It looks and feels good.
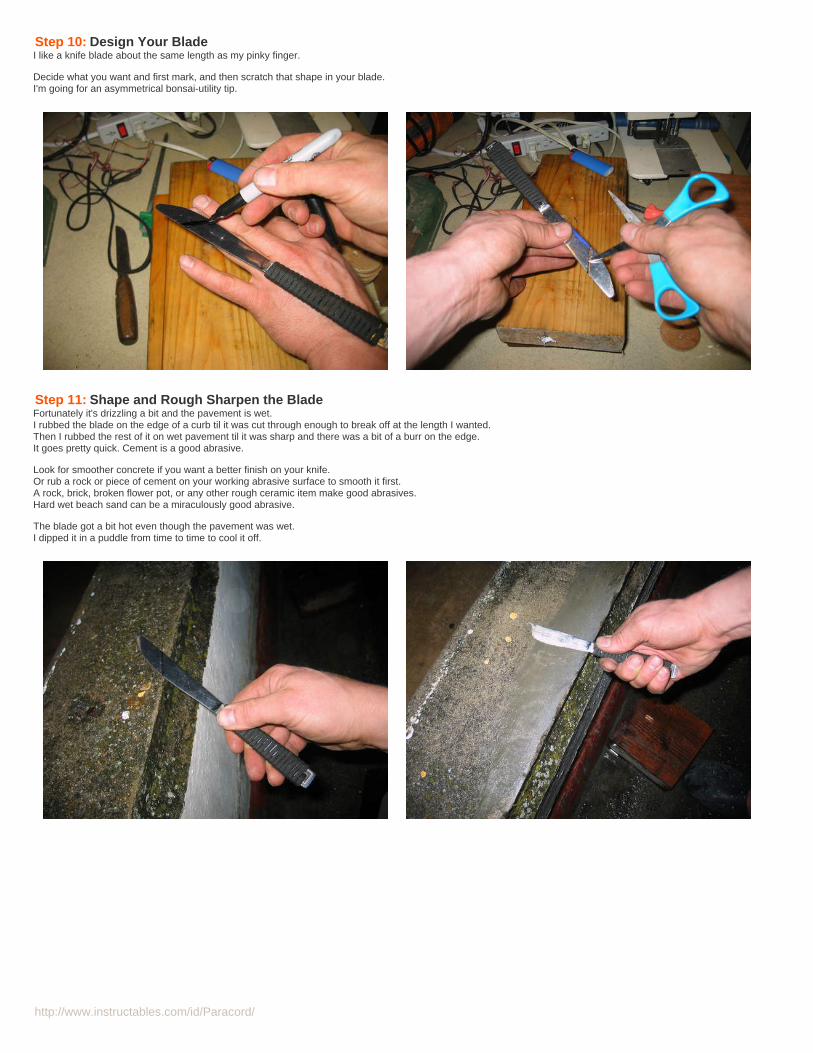
http://www.instructables.com/id/Paracord/
Step 10: Design Your BladeI like a knife blade about the same length as my pinky finger.
Decide what you want and first mark, and then scratch that shape in your blade.I'm going for an asymmetrical bonsai-utility tip.
Step 11: Shape and Rough Sharpen the BladeFortunately it's drizzling a bit and the pavement is wet.I rubbed the blade on the edge of a curb til it was cut through enough to break off at the length I wanted.Then I rubbed the rest of it on wet pavement til it was sharp and there was a bit of a burr on the edge.It goes pretty quick. Cement is a good abrasive.
Look for smoother concrete if you want a better finish on your knife.Or rub a rock or piece of cement on your working abrasive surface to smooth it first.A rock, brick, broken flower pot, or any other rough ceramic item make good abrasives.Hard wet beach sand can be a miraculously good abrasive.
The blade got a bit hot even though the pavement was wet.I dipped it in a puddle from time to time to cool it off.
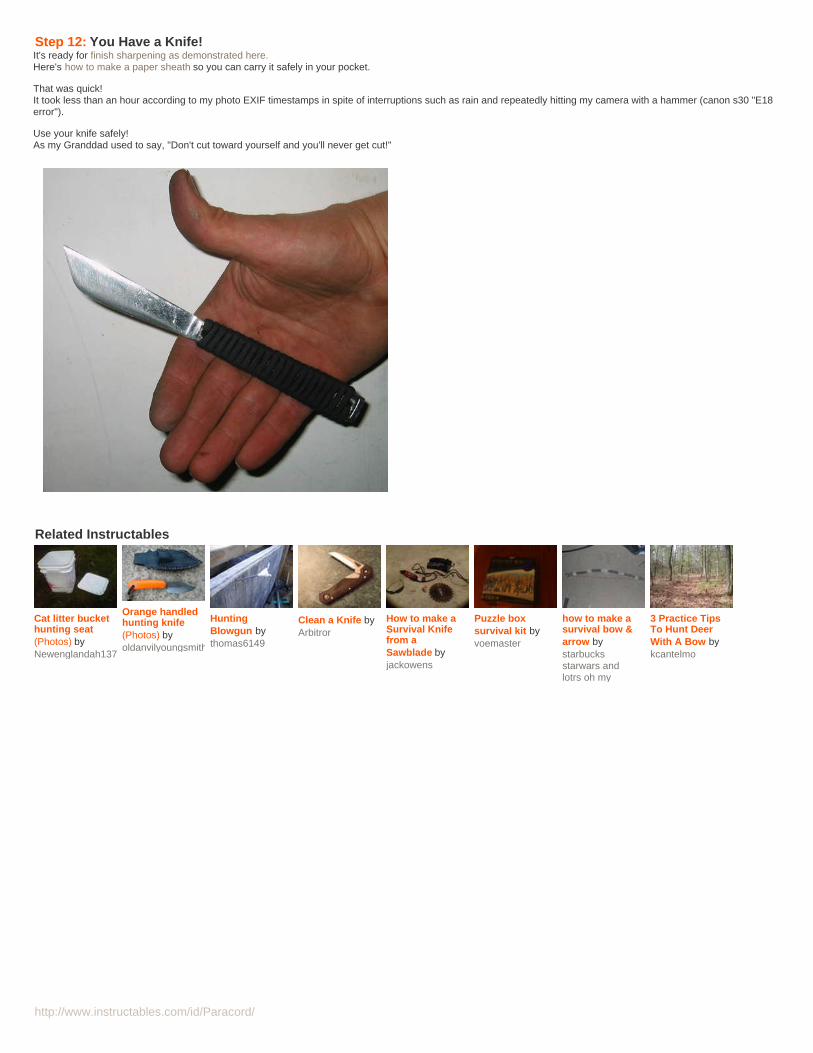
http://www.instructables.com/id/Paracord/
Step 12: You Have a Knife!It's ready for finish sharpening as demonstrated here.Here's how to make a paper sheath so you can carry it safely in your pocket.
That was quick!It took less than an hour according to my photo EXIF timestamps in spite of interruptions such as rain and repeatedly hitting my camera with a hammer (canon s30 "E18error").
Use your knife safely!As my Granddad used to say, "Don't cut toward yourself and you'll never get cut!"
Related Instructables
Cat litter buckethunting seat(Photos) byNewenglandah1376
Orange handledhunting knife(Photos) byoldanvilyoungsmith
HuntingBlowgun bythomas6149
Clean a Knife byArbitror
How to make aSurvival Knifefrom aSawblade byjackowens
Puzzle boxsurvival kit byvoemaster
how to make asurvival bow &arrow bystarbucksstarwars andlotrs oh my
3 Practice TipsTo Hunt DeerWith A Bow bykcantelmo
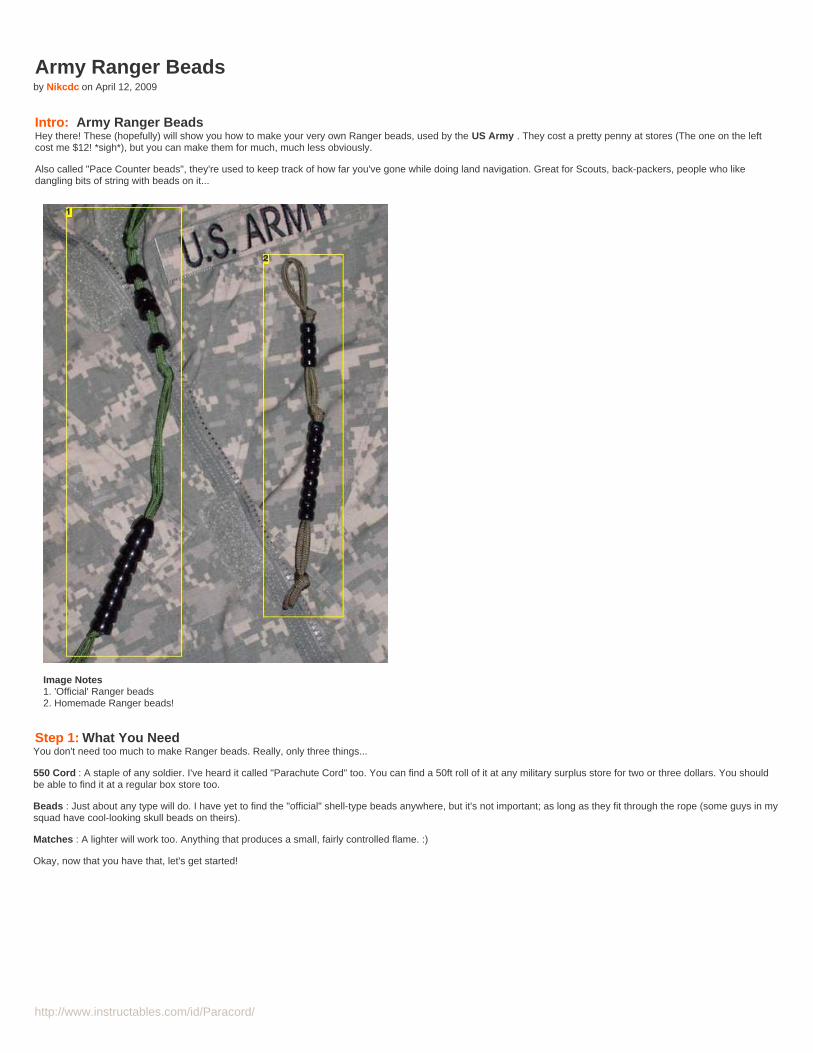
http://www.instructables.com/id/Paracord/
Army Ranger Beadsby Nikcdc on April 12, 2009
Intro: Army Ranger BeadsHey there! These (hopefully) will show you how to make your very own Ranger beads, used by the US Army . They cost a pretty penny at stores (The one on the leftcost me $12! *sigh*), but you can make them for much, much less obviously.
Also called "Pace Counter beads", they're used to keep track of how far you've gone while doing land navigation. Great for Scouts, back-packers, people who likedangling bits of string with beads on it...
Image Notes1. 'Official' Ranger beads2. Homemade Ranger beads!
Step 1: What You NeedYou don't need too much to make Ranger beads. Really, only three things...
550 Cord : A staple of any soldier. I've heard it called "Parachute Cord" too. You can find a 50ft roll of it at any military surplus store for two or three dollars. You shouldbe able to find it at a regular box store too.
Beads : Just about any type will do. I have yet to find the "official" shell-type beads anywhere, but it's not important; as long as they fit through the rope (some guys in mysquad have cool-looking skull beads on theirs).
Matches : A lighter will work too. Anything that produces a small, fairly controlled flame. :)
Okay, now that you have that, let's get started!
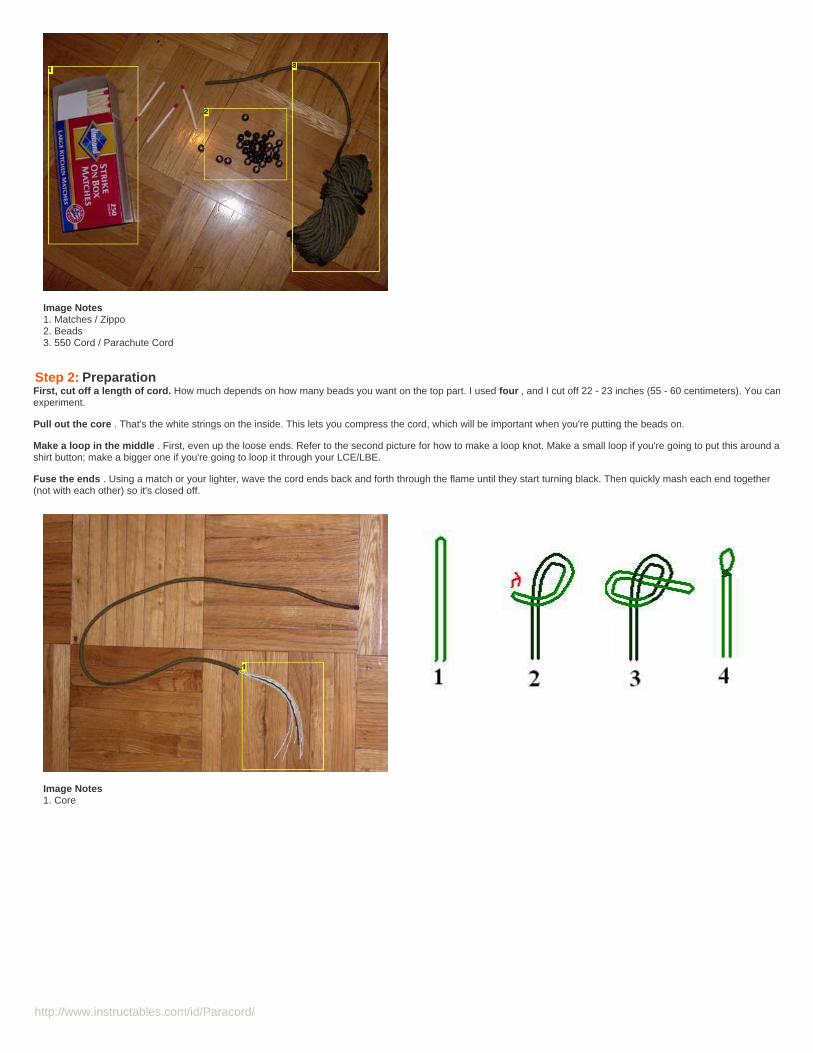
http://www.instructables.com/id/Paracord/
Image Notes1. Matches / Zippo2. Beads3. 550 Cord / Parachute Cord
Step 2: PreparationFirst, cut off a length of cord. How much depends on how many beads you want on the top part. I used four , and I cut off 22 - 23 inches (55 - 60 centimeters). You canexperiment.
Pull out the core . That's the white strings on the inside. This lets you compress the cord, which will be important when you're putting the beads on.
Make a loop in the middle . First, even up the loose ends. Refer to the second picture for how to make a loop knot. Make a small loop if you're going to put this around ashirt button; make a bigger one if you're going to loop it through your LCE/LBE.
Fuse the ends . Using a match or your lighter, wave the cord ends back and forth through the flame until they start turning black. Then quickly mash each end together(not with each other) so it's closed off.
Image Notes1. Core

http://www.instructables.com/id/Paracord/
Step 3: Adding beads (Top Rung)I'm not going to lie, this part is a pain.There are several ways to do this; here's my method...
First, put the bead through one end of the cord . Pull it an inch or two up the cord.***(If you can't get it in, use scissors to cut the black melted part until you can. I suggest a slanted cut to make it easer)***
Get the second end stuck inside the bead . Unless you're really really lucky, you won't be able to just push it through. Soooo...
Use the match to push the second end the rest of the way . A tooth pick or needle will work too. Try to have the point hit the black melted part so you can push off it.You may have to cut the second end as well.
How many beads you put on this first part depends on how far you're planning on walking. In the Army, each of the top beads represent 1000 meters. You may useyards, feet, miles, gigawatts, or any other unit.
Image Notes1. Bead
Image Notes1. Knot
Step 4: Adding beads (Second Rung)First, tie a knot in the cord . It should be an inch or two below the last bead; enough so you can slide them up and down.
Next, add NINE beads . This is assuming you're using a system based on ten. When we're doing land nav, we pull one bead down for every 100 meters we walk, untilwe hit 1000. If you're using this for counting something in base 12, 16, or whatever, you would use a different "count-up-to" number.
Finally, tie another knot in the cord . Leave an inch or two, same as before.
Congratulations! If you've been following along, you've just made your first set of Ranger beads. Now, how do you use them?
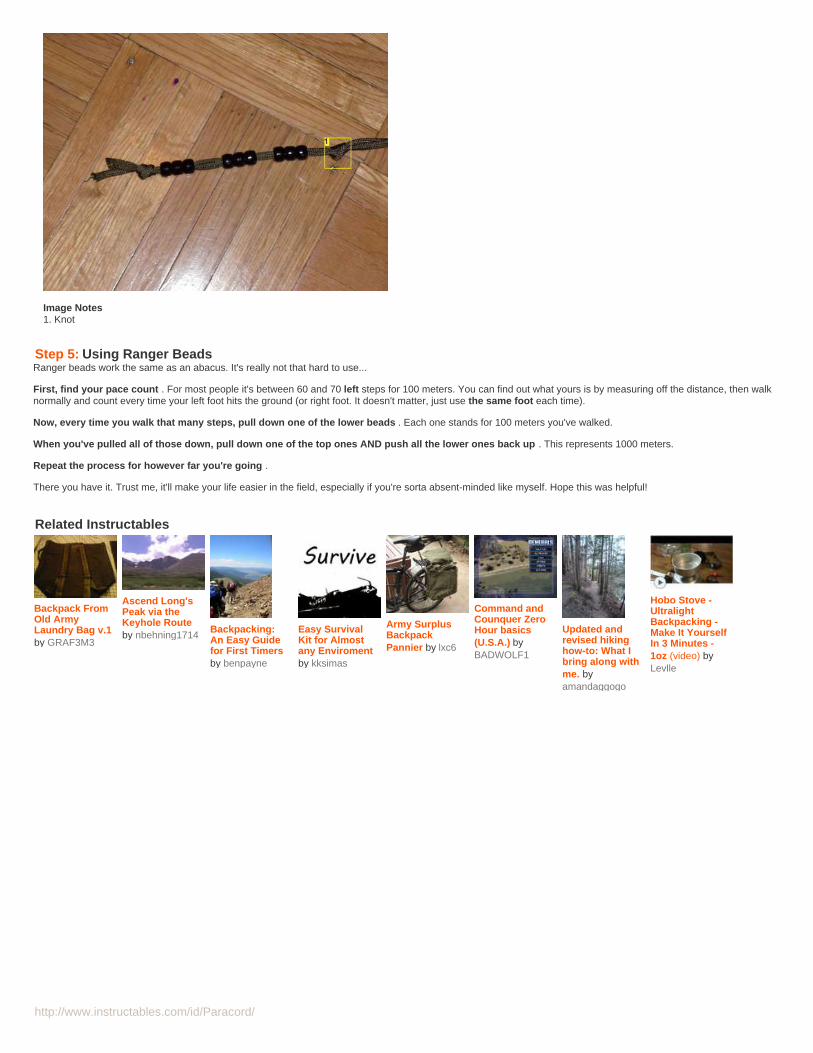
http://www.instructables.com/id/Paracord/
Image Notes1. Knot
Step 5: Using Ranger BeadsRanger beads work the same as an abacus. It's really not that hard to use...
First, find your pace count . For most people it's between 60 and 70 left steps for 100 meters. You can find out what yours is by measuring off the distance, then walknormally and count every time your left foot hits the ground (or right foot. It doesn't matter, just use the same foot each time).
Now, every time you walk that many steps, pull down one of the lower beads . Each one stands for 100 meters you've walked.
When you've pulled all of those down, pull down one of the top ones AND push all the lower ones back up . This represents 1000 meters.
Repeat the process for however far you're going .
There you have it. Trust me, it'll make your life easier in the field, especially if you're sorta absent-minded like myself. Hope this was helpful!
Related Instructables
Backpack FromOld ArmyLaundry Bag v.1by GRAF3M3
Ascend Long'sPeak via theKeyhole Routeby nbehning1714
Backpacking:An Easy Guidefor First Timersby benpayne
Easy SurvivalKit for Almostany Enviromentby kksimas
Army SurplusBackpackPannier by lxc6
Command andCounquer ZeroHour basics(U.S.A.) byBADWOLF1
Updated andrevised hikinghow-to: What Ibring along withme. byamandaggogo
Hobo Stove -UltralightBackpacking -Make It YourselfIn 3 Minutes -1oz (video) byLevlle
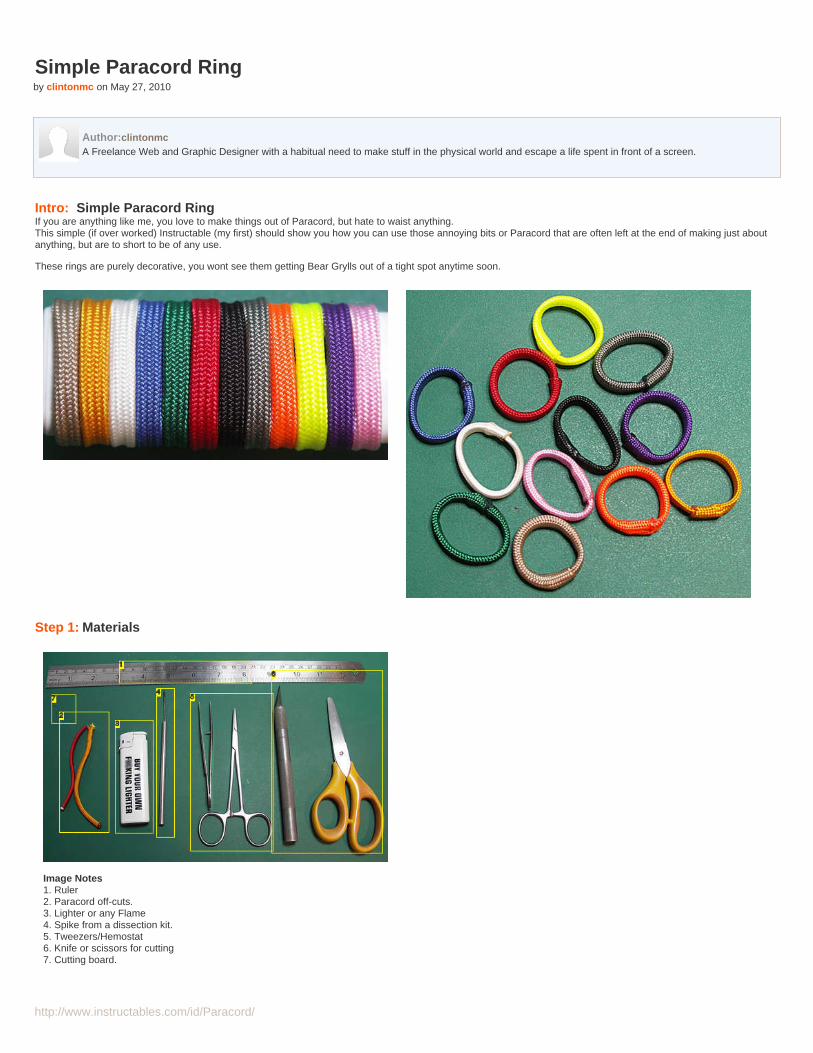
http://www.instructables.com/id/Paracord/
Simple Paracord Ringby clintonmc on May 27, 2010
Author:clintonmcA Freelance Web and Graphic Designer with a habitual need to make stuff in the physical world and escape a life spent in front of a screen.
Intro: Simple Paracord RingIf you are anything like me, you love to make things out of Paracord, but hate to waist anything.This simple (if over worked) Instructable (my first) should show you how you can use those annoying bits or Paracord that are often left at the end of making just aboutanything, but are to short to be of any use.
These rings are purely decorative, you wont see them getting Bear Grylls out of a tight spot anytime soon.
Step 1: Materials
Image Notes1. Ruler2. Paracord off-cuts.3. Lighter or any Flame4. Spike from a dissection kit.5. Tweezers/Hemostat6. Knife or scissors for cutting7. Cutting board.
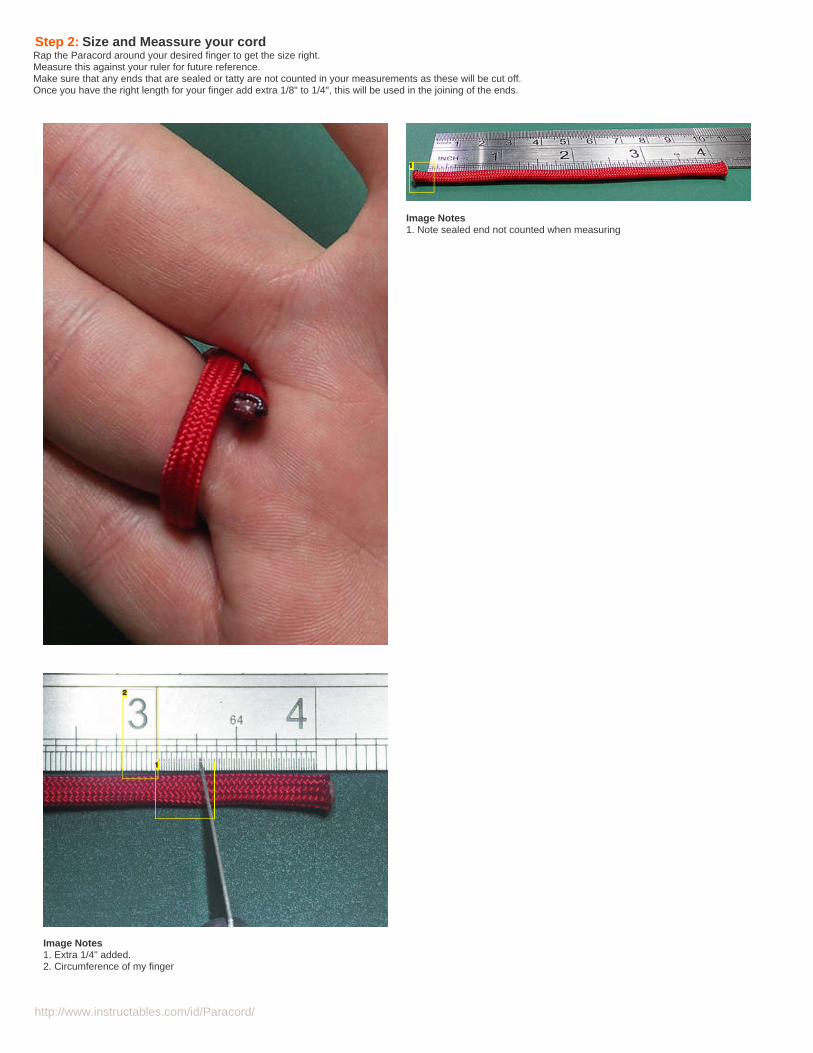
http://www.instructables.com/id/Paracord/
Step 2: Size and Meassure your cordRap the Paracord around your desired finger to get the size right.Measure this against your ruler for future reference.Make sure that any ends that are sealed or tatty are not counted in your measurements as these will be cut off.Once you have the right length for your finger add extra 1/8" to 1/4", this will be used in the joining of the ends.
Image Notes1. Note sealed end not counted when measuring
Image Notes1. Extra 1/4" added.2. Circumference of my finger
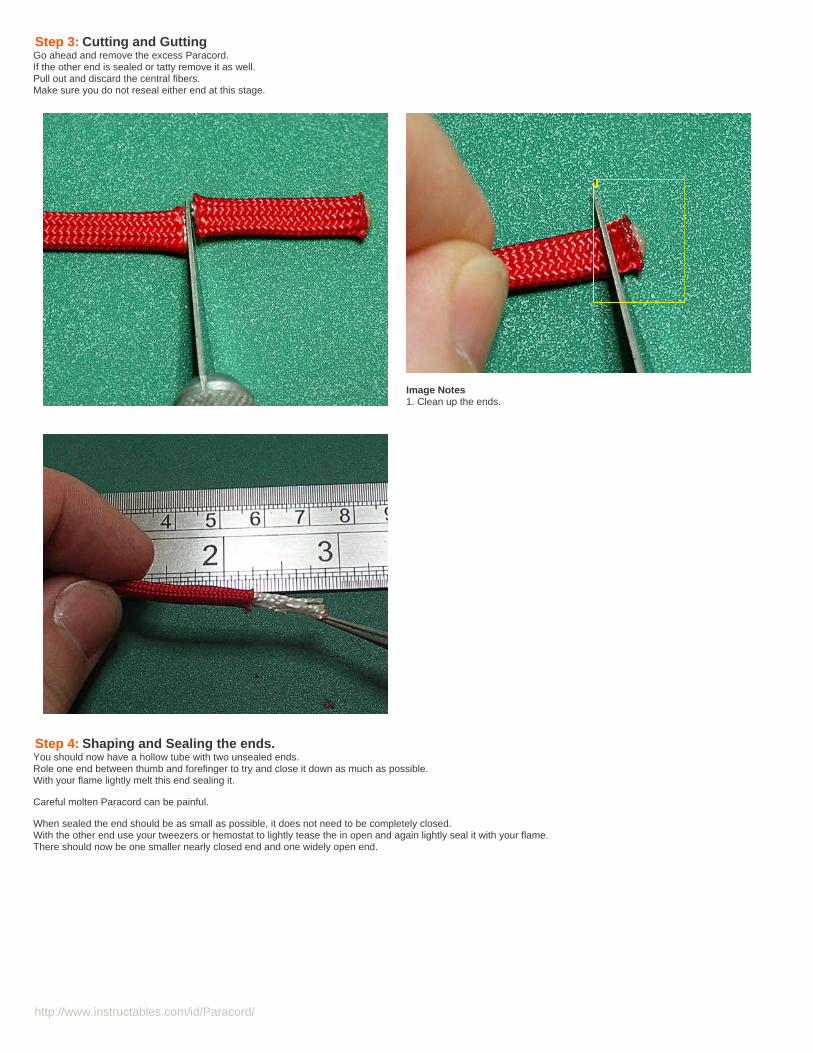
http://www.instructables.com/id/Paracord/
Step 3: Cutting and GuttingGo ahead and remove the excess Paracord.If the other end is sealed or tatty remove it as well.Pull out and discard the central fibers.Make sure you do not reseal either end at this stage.
Image Notes1. Clean up the ends.
Step 4: Shaping and Sealing the ends.You should now have a hollow tube with two unsealed ends.Role one end between thumb and forefinger to try and close it down as much as possible.With your flame lightly melt this end sealing it.
Careful molten Paracord can be painful.
When sealed the end should be as small as possible, it does not need to be completely closed.With the other end use your tweezers or hemostat to lightly tease the in open and again lightly seal it with your flame.There should now be one smaller nearly closed end and one widely open end.
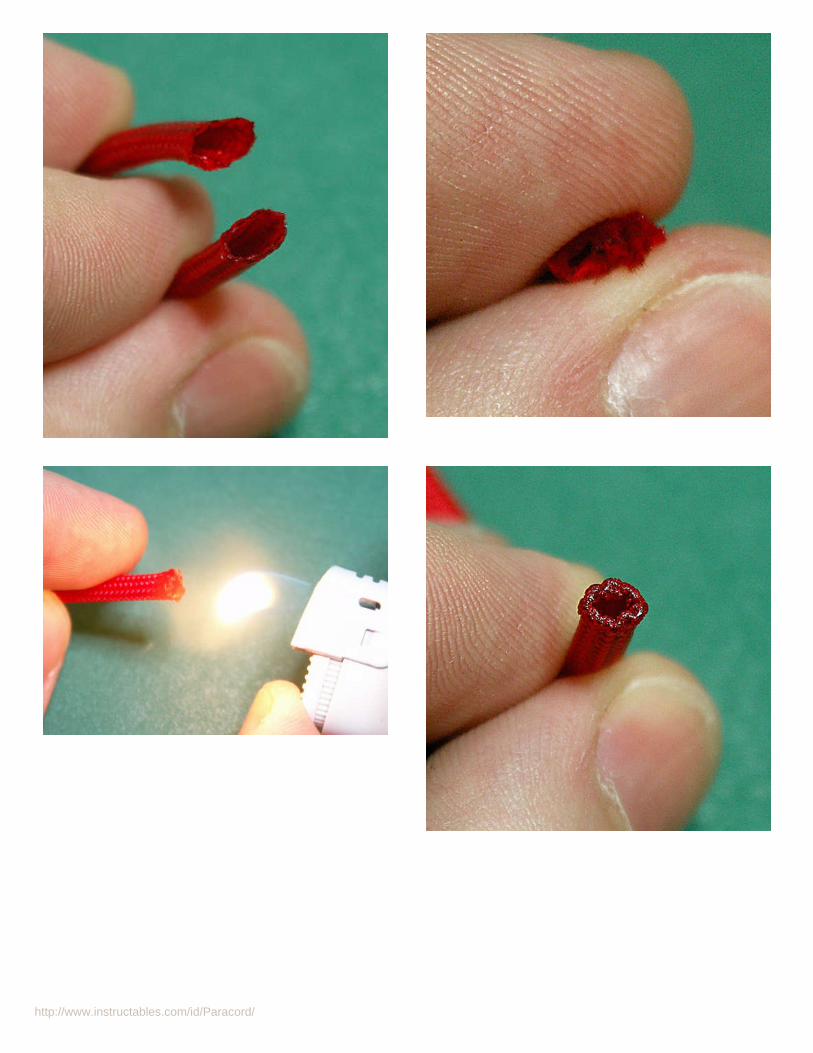
http://www.instructables.com/id/Paracord/
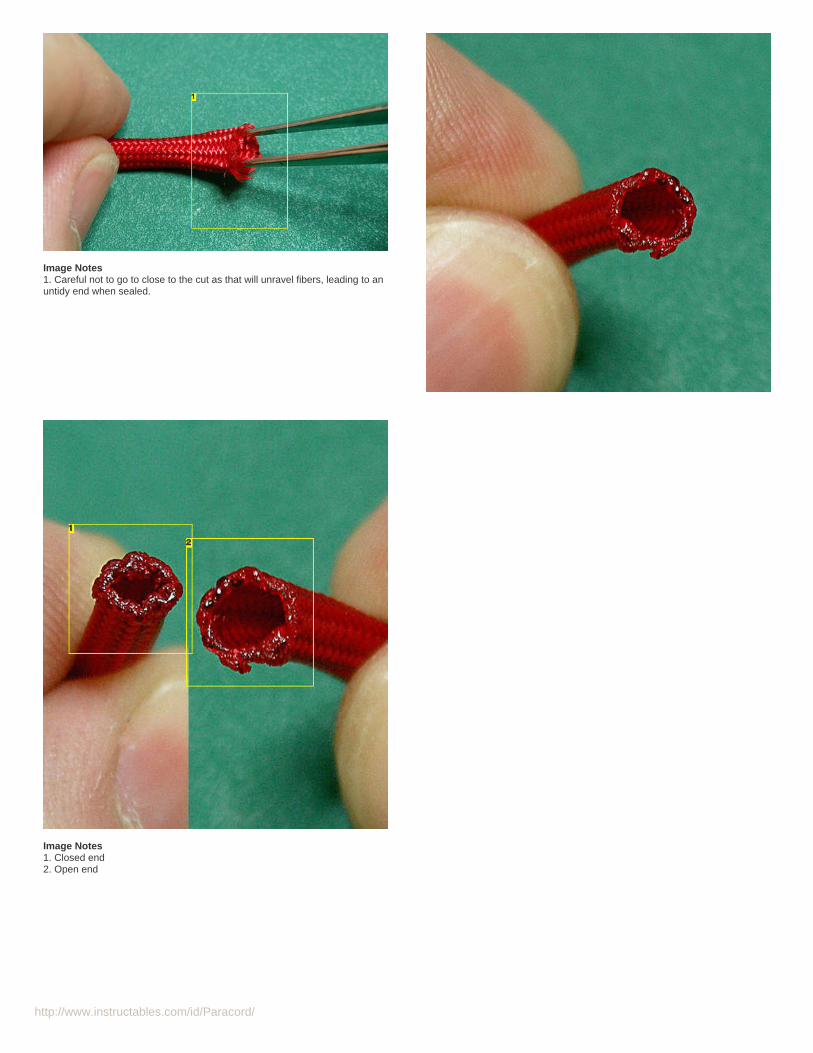
http://www.instructables.com/id/Paracord/
Image Notes1. Careful not to go to close to the cut as that will unravel fibers, leading to anuntidy end when sealed.
Image Notes1. Closed end2. Open end
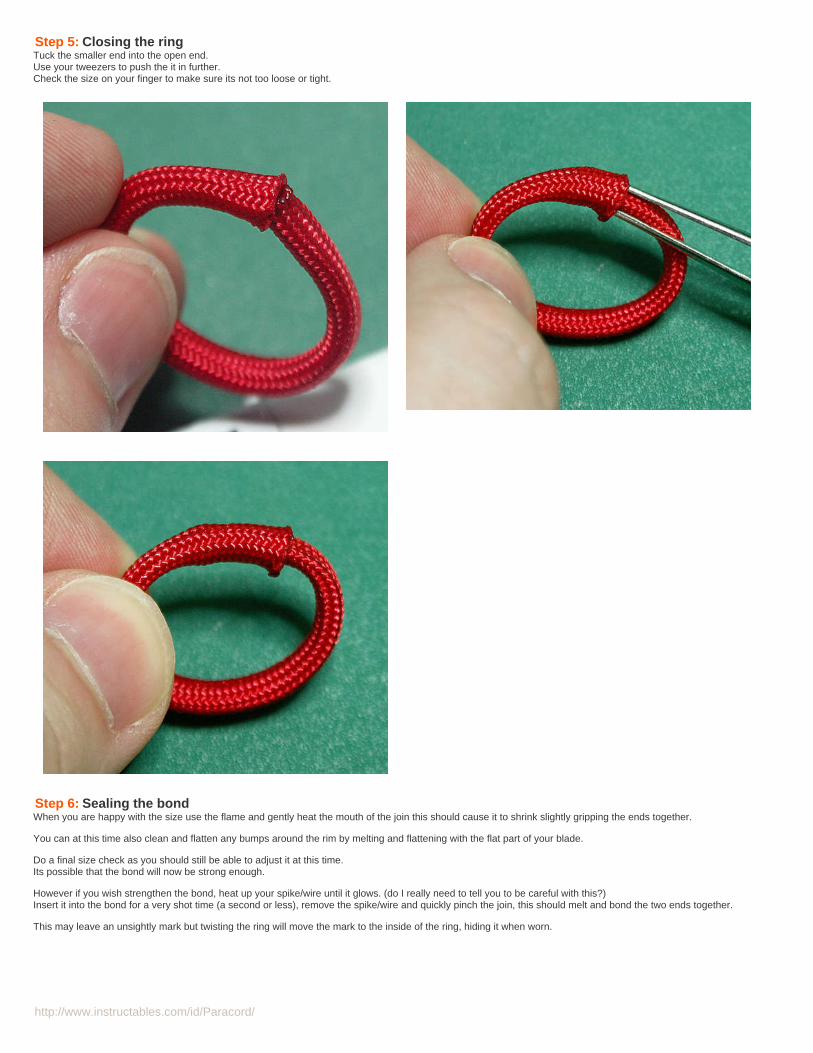
http://www.instructables.com/id/Paracord/
Step 5: Closing the ringTuck the smaller end into the open end.Use your tweezers to push the it in further.Check the size on your finger to make sure its not too loose or tight.
Step 6: Sealing the bondWhen you are happy with the size use the flame and gently heat the mouth of the join this should cause it to shrink slightly gripping the ends together.
You can at this time also clean and flatten any bumps around the rim by melting and flattening with the flat part of your blade.
Do a final size check as you should still be able to adjust it at this time.Its possible that the bond will now be strong enough.
However if you wish strengthen the bond, heat up your spike/wire until it glows. (do I really need to tell you to be careful with this?)Insert it into the bond for a very shot time (a second or less), remove the spike/wire and quickly pinch the join, this should melt and bond the two ends together.
This may leave an unsightly mark but twisting the ring will move the mark to the inside of the ring, hiding it when worn.
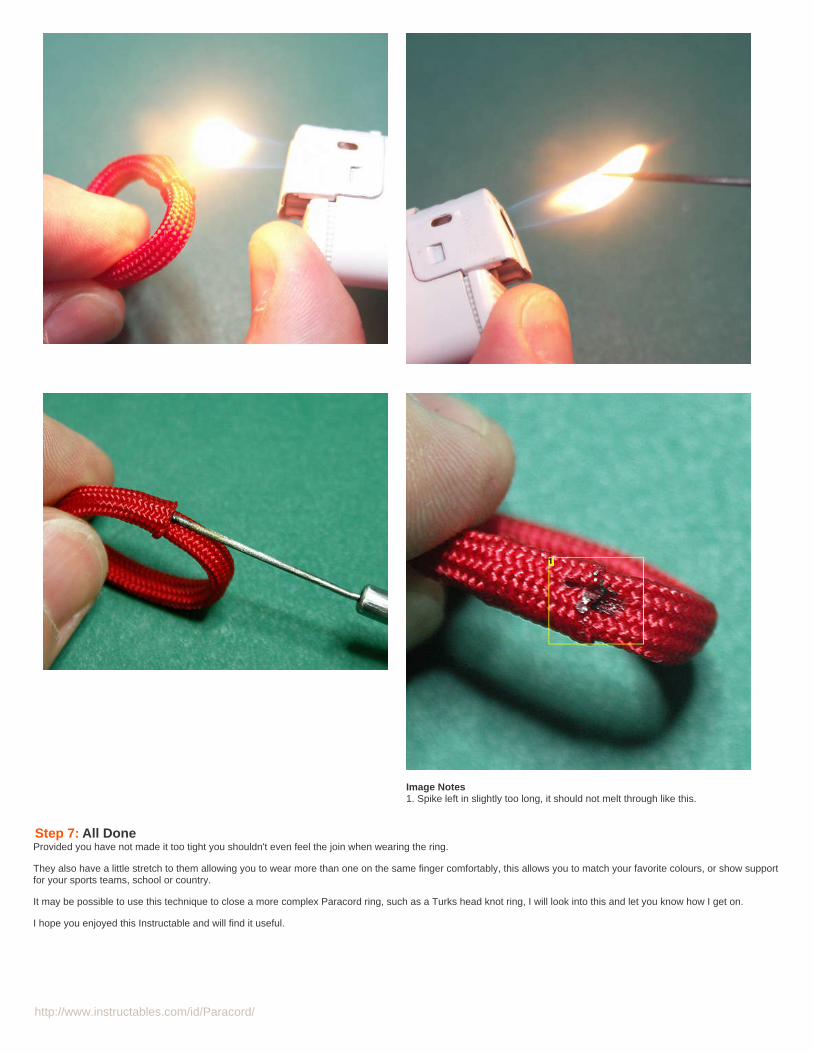
http://www.instructables.com/id/Paracord/
Image Notes1. Spike left in slightly too long, it should not melt through like this.
Step 7: All DoneProvided you have not made it too tight you shouldn't even feel the join when wearing the ring.
They also have a little stretch to them allowing you to wear more than one on the same finger comfortably, this allows you to match your favorite colours, or show supportfor your sports teams, school or country.
It may be possible to use this technique to close a more complex Paracord ring, such as a Turks head knot ring, I will look into this and let you know how I get on.
I hope you enjoyed this Instructable and will find it useful.
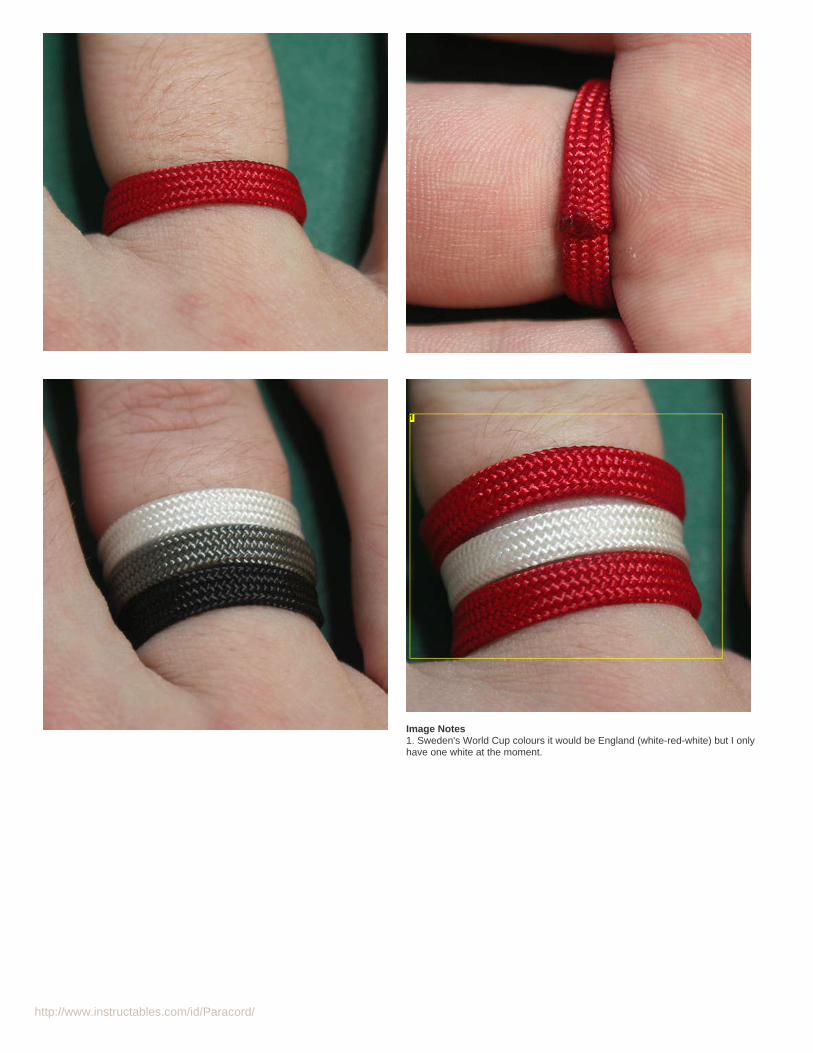
http://www.instructables.com/id/Paracord/
Image Notes1. Sweden's World Cup colours it would be England (white-red-white) but I onlyhave one white at the moment.
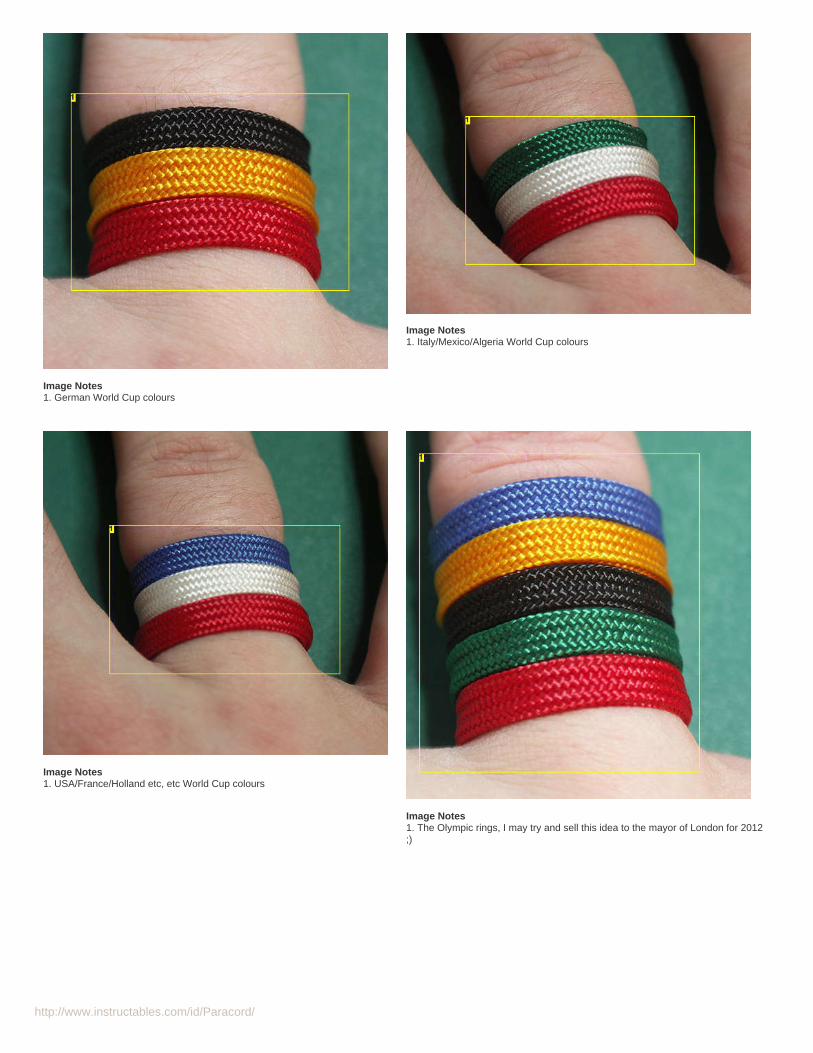
http://www.instructables.com/id/Paracord/
Image Notes1. German World Cup colours
Image Notes1. Italy/Mexico/Algeria World Cup colours
Image Notes1. USA/France/Holland etc, etc World Cup colours
Image Notes1. The Olympic rings, I may try and sell this idea to the mayor of London for 2012;)
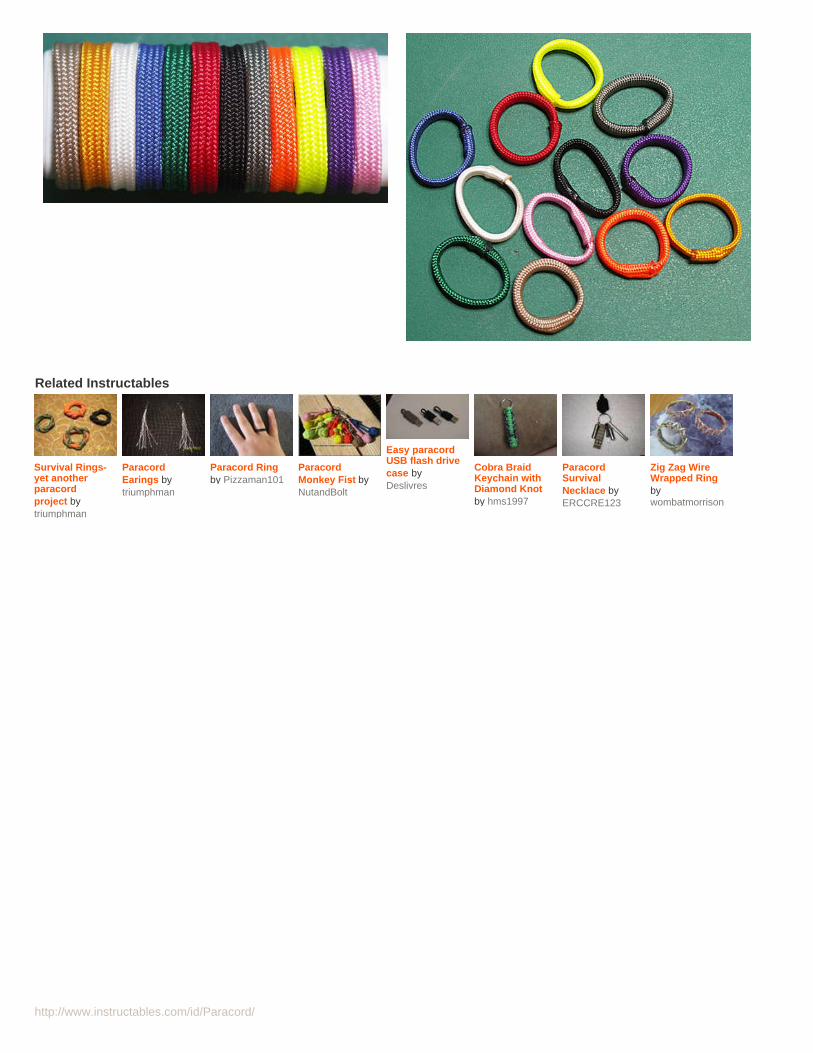
http://www.instructables.com/id/Paracord/
Related Instructables
Survival Rings-yet anotherparacordproject bytriumphman
ParacordEarings bytriumphman
Paracord Ringby Pizzaman101
ParacordMonkey Fist byNutandBolt
Easy paracordUSB flash drivecase byDeslivres
Cobra BraidKeychain withDiamond Knotby hms1997
ParacordSurvivalNecklace byERCCRE123
Zig Zag WireWrapped Ringbywombatmorrison
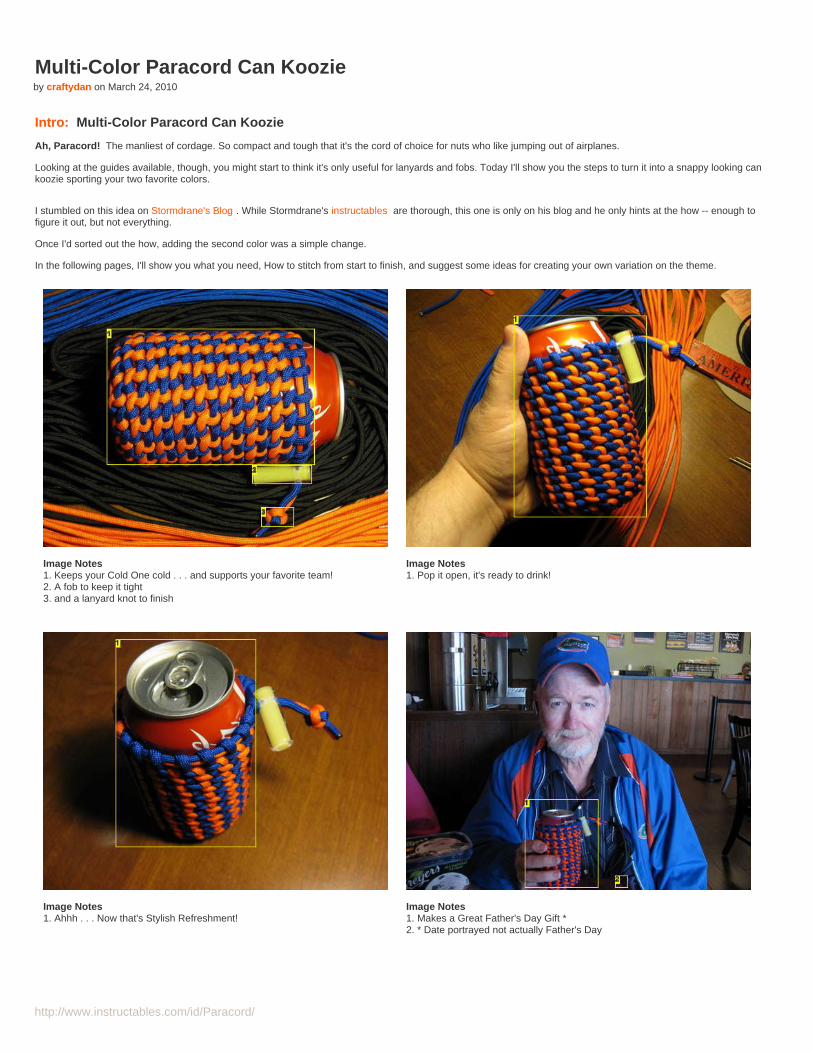
http://www.instructables.com/id/Paracord/
Multi-Color Paracord Can Koozieby craftydan on March 24, 2010
Intro: Multi-Color Paracord Can Koozie
Ah, Paracord! The manliest of cordage. So compact and tough that it's the cord of choice for nuts who like jumping out of airplanes.
Looking at the guides available, though, you might start to think it's only useful for lanyards and fobs. Today I'll show you the steps to turn it into a snappy looking cankoozie sporting your two favorite colors.
I stumbled on this idea on Stormdrane's Blog . While Stormdrane's instructables are thorough, this one is only on his blog and he only hints at the how -- enough tofigure it out, but not everything.
Once I'd sorted out the how, adding the second color was a simple change.
In the following pages, I'll show you what you need, How to stitch from start to finish, and suggest some ideas for creating your own variation on the theme.
Image Notes1. Keeps your Cold One cold . . . and supports your favorite team!2. A fob to keep it tight3. and a lanyard knot to finish
Image Notes1. Pop it open, it's ready to drink!
Image Notes1. Ahhh . . . Now that's Stylish Refreshment!
Image Notes1. Makes a Great Father's Day Gift *2. * Date portrayed not actually Father's Day
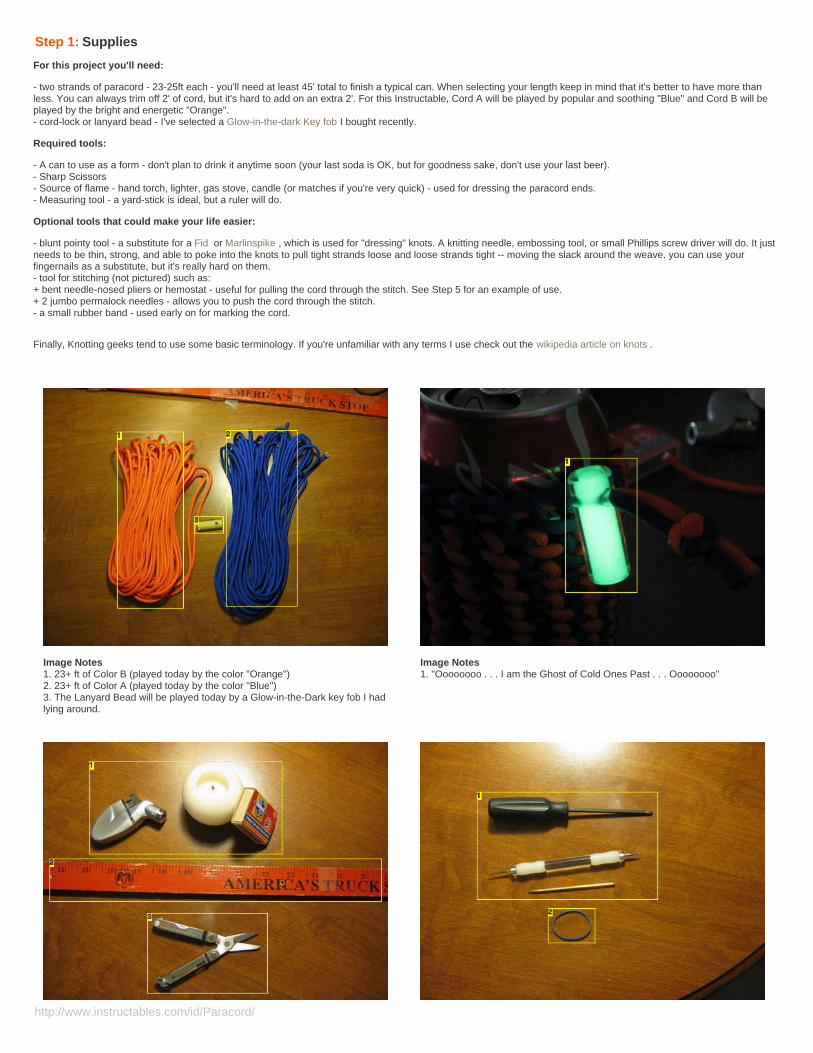
http://www.instructables.com/id/Paracord/
Step 1: Supplies
For this project you'll need:
- two strands of paracord - 23-25ft each - you'll need at least 45' total to finish a typical can. When selecting your length keep in mind that it's better to have more thanless. You can always trim off 2' of cord, but it's hard to add on an extra 2'. For this Instructable, Cord A will be played by popular and soothing "Blue" and Cord B will beplayed by the bright and energetic "Orange".- cord-lock or lanyard bead - I've selected a Glow-in-the-dark Key fob I bought recently.
Required tools:
- A can to use as a form - don't plan to drink it anytime soon (your last soda is OK, but for goodness sake, don't use your last beer).- Sharp Scissors- Source of flame - hand torch, lighter, gas stove, candle (or matches if you're very quick) - used for dressing the paracord ends.- Measuring tool - a yard-stick is ideal, but a ruler will do.
Optional tools that could make your life easier:
- blunt pointy tool - a substitute for a Fid or Marlinspike , which is used for "dressing" knots. A knitting needle, embossing tool, or small Phillips screw driver will do. It justneeds to be thin, strong, and able to poke into the knots to pull tight strands loose and loose strands tight -- moving the slack around the weave. you can use yourfingernails as a substitute, but it's really hard on them.- tool for stitching (not pictured) such as:+ bent needle-nosed pliers or hemostat - useful for pulling the cord through the stitch. See Step 5 for an example of use.+ 2 jumbo permalock needles - allows you to push the cord through the stitch.- a small rubber band - used early on for marking the cord.
Finally, Knotting geeks tend to use some basic terminology. If you're unfamiliar with any terms I use check out the wikipedia article on knots .
Image Notes1. 23+ ft of Color B (played today by the color "Orange")2. 23+ ft of Color A (played today by the color "Blue")3. The Lanyard Bead will be played today by a Glow-in-the-Dark key fob I hadlying around.
Image Notes1. "Oooooooo . . . I am the Ghost of Cold Ones Past . . . Oooooooo"
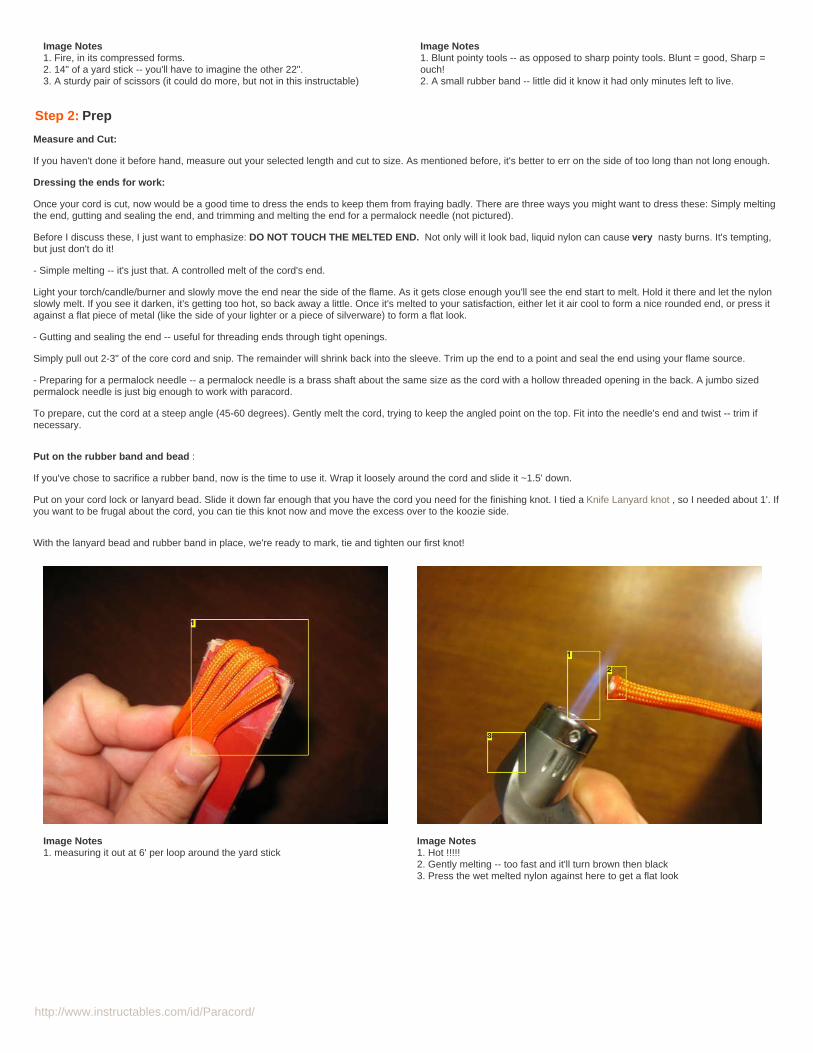
http://www.instructables.com/id/Paracord/
Image Notes1. Fire, in its compressed forms.2. 14" of a yard stick -- you'll have to imagine the other 22".3. A sturdy pair of scissors (it could do more, but not in this instructable)
Image Notes1. Blunt pointy tools -- as opposed to sharp pointy tools. Blunt = good, Sharp =ouch!2. A small rubber band -- little did it know it had only minutes left to live.
Step 2: Prep
Measure and Cut:
If you haven't done it before hand, measure out your selected length and cut to size. As mentioned before, it's better to err on the side of too long than not long enough.
Dressing the ends for work:
Once your cord is cut, now would be a good time to dress the ends to keep them from fraying badly. There are three ways you might want to dress these: Simply meltingthe end, gutting and sealing the end, and trimming and melting the end for a permalock needle (not pictured).
Before I discuss these, I just want to emphasize: DO NOT TOUCH THE MELTED END. Not only will it look bad, liquid nylon can cause very nasty burns. It's tempting,but just don't do it!
- Simple melting -- it's just that. A controlled melt of the cord's end.
Light your torch/candle/burner and slowly move the end near the side of the flame. As it gets close enough you'll see the end start to melt. Hold it there and let the nylonslowly melt. If you see it darken, it's getting too hot, so back away a little. Once it's melted to your satisfaction, either let it air cool to form a nice rounded end, or press itagainst a flat piece of metal (like the side of your lighter or a piece of silverware) to form a flat look.
- Gutting and sealing the end -- useful for threading ends through tight openings.
Simply pull out 2-3" of the core cord and snip. The remainder will shrink back into the sleeve. Trim up the end to a point and seal the end using your flame source.
- Preparing for a permalock needle -- a permalock needle is a brass shaft about the same size as the cord with a hollow threaded opening in the back. A jumbo sizedpermalock needle is just big enough to work with paracord.
To prepare, cut the cord at a steep angle (45-60 degrees). Gently melt the cord, trying to keep the angled point on the top. Fit into the needle's end and twist -- trim ifnecessary.
Put on the rubber band and bead :
If you've chose to sacrifice a rubber band, now is the time to use it. Wrap it loosely around the cord and slide it ~1.5' down.
Put on your cord lock or lanyard bead. Slide it down far enough that you have the cord you need for the finishing knot. I tied a Knife Lanyard knot , so I needed about 1'. Ifyou want to be frugal about the cord, you can tie this knot now and move the excess over to the koozie side.
With the lanyard bead and rubber band in place, we're ready to mark, tie and tighten our first knot!
Image Notes1. measuring it out at 6' per loop around the yard stick
Image Notes1. Hot !!!!!2. Gently melting -- too fast and it'll turn brown then black3. Press the wet melted nylon against here to get a flat look
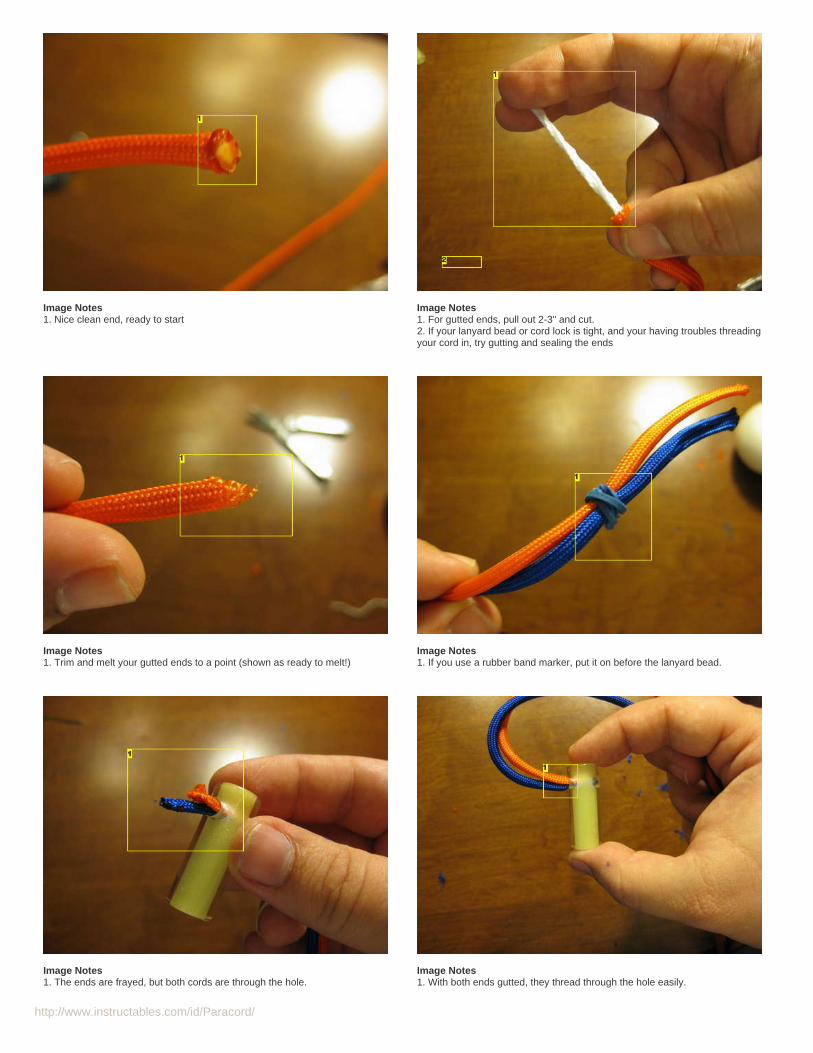
http://www.instructables.com/id/Paracord/
Image Notes1. Nice clean end, ready to start
Image Notes1. For gutted ends, pull out 2-3" and cut.2. If your lanyard bead or cord lock is tight, and your having troubles threadingyour cord in, try gutting and sealing the ends
Image Notes1. Trim and melt your gutted ends to a point (shown as ready to melt!)
Image Notes1. If you use a rubber band marker, put it on before the lanyard bead.
Image Notes1. The ends are frayed, but both cords are through the hole.
Image Notes1. With both ends gutted, they thread through the hole easily.
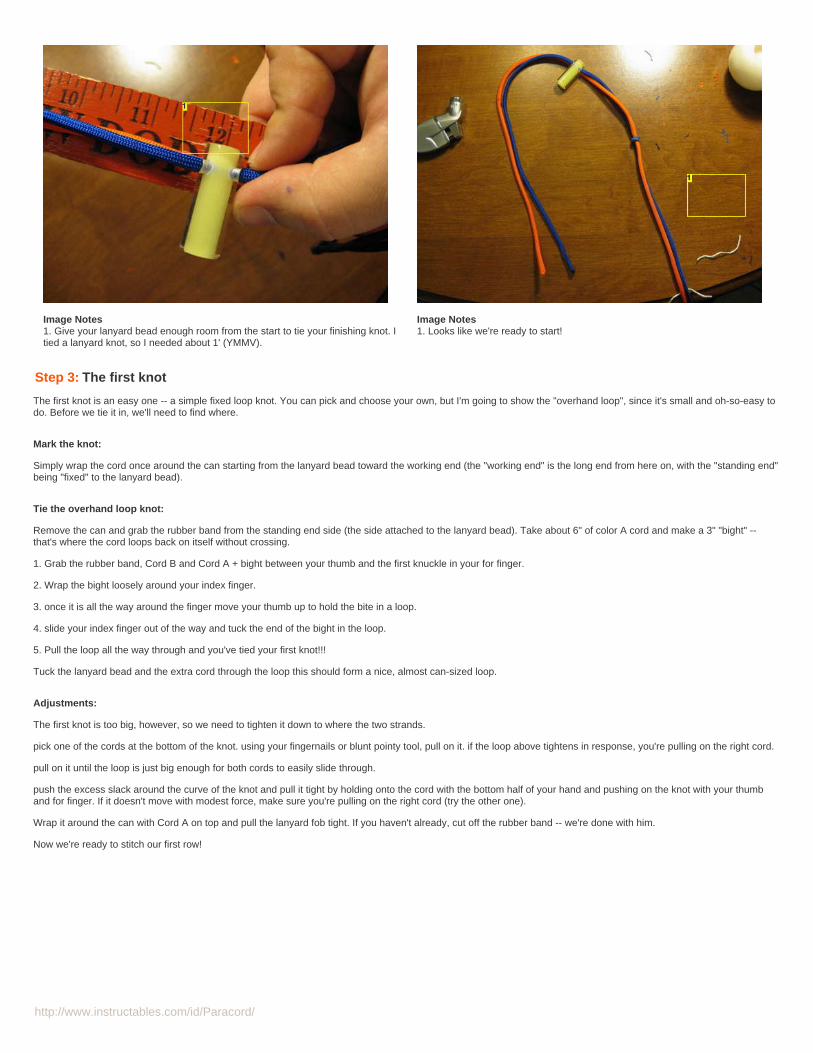
http://www.instructables.com/id/Paracord/
Image Notes1. Give your lanyard bead enough room from the start to tie your finishing knot. Itied a lanyard knot, so I needed about 1' (YMMV).
Image Notes1. Looks like we're ready to start!
Step 3: The first knot
The first knot is an easy one -- a simple fixed loop knot. You can pick and choose your own, but I'm going to show the "overhand loop", since it's small and oh-so-easy todo. Before we tie it in, we'll need to find where.
Mark the knot:
Simply wrap the cord once around the can starting from the lanyard bead toward the working end (the "working end" is the long end from here on, with the "standing end"being "fixed" to the lanyard bead).
Tie the overhand loop knot:
Remove the can and grab the rubber band from the standing end side (the side attached to the lanyard bead). Take about 6" of color A cord and make a 3" "bight" --that's where the cord loops back on itself without crossing.
1. Grab the rubber band, Cord B and Cord A + bight between your thumb and the first knuckle in your for finger.
2. Wrap the bight loosely around your index finger.
3. once it is all the way around the finger move your thumb up to hold the bite in a loop.
4. slide your index finger out of the way and tuck the end of the bight in the loop.
5. Pull the loop all the way through and you've tied your first knot!!!
Tuck the lanyard bead and the extra cord through the loop this should form a nice, almost can-sized loop.
Adjustments:
The first knot is too big, however, so we need to tighten it down to where the two strands.
pick one of the cords at the bottom of the knot. using your fingernails or blunt pointy tool, pull on it. if the loop above tightens in response, you're pulling on the right cord.
pull on it until the loop is just big enough for both cords to easily slide through.
push the excess slack around the curve of the knot and pull it tight by holding onto the cord with the bottom half of your hand and pushing on the knot with your thumband for finger. If it doesn't move with modest force, make sure you're pulling on the right cord (try the other one).
Wrap it around the can with Cord A on top and pull the lanyard fob tight. If you haven't already, cut off the rubber band -- we're done with him.
Now we're ready to stitch our first row!
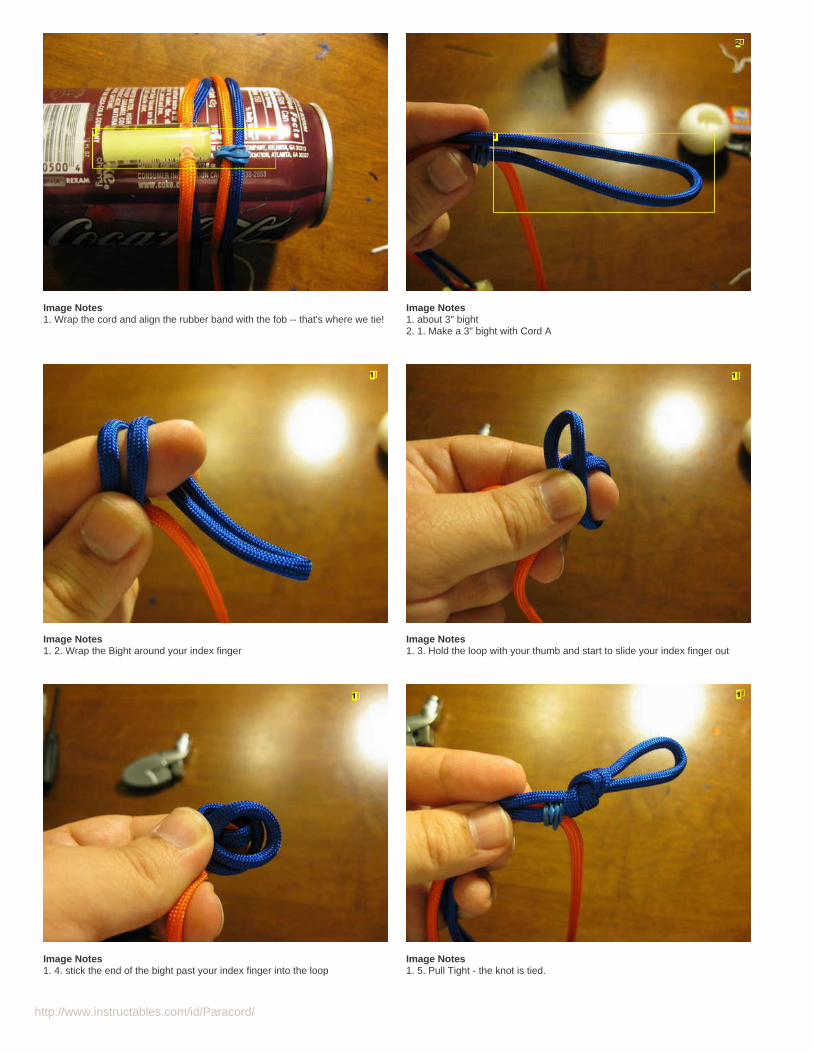
http://www.instructables.com/id/Paracord/
Image Notes1. Wrap the cord and align the rubber band with the fob -- that's where we tie!
Image Notes1. about 3" bight2. 1. Make a 3" bight with Cord A
Image Notes1. 2. Wrap the Bight around your index finger
Image Notes1. 3. Hold the loop with your thumb and start to slide your index finger out
Image Notes1. 4. stick the end of the bight past your index finger into the loop
Image Notes1. 5. Pull Tight - the knot is tied.
http://www.instructables.com/id/Paracord/
Image Notes1. . . . through the loop2. Slip the lanyard bead . . .
Image Notes1. Hey! I think a Can could fit here!!!!
Image Notes1. nice knot, but the loop is too big. we need to shrink it.
Image Notes1. The extra space in the loop . . .2. . . . Got pulled over here
Image Notes1. >>>>Pull the slack out of the knot >>>
Image Notes1. Hey, It DOES fit around the can! Maybe we'll finish this project yet!2. Make sure Cord A is on top.
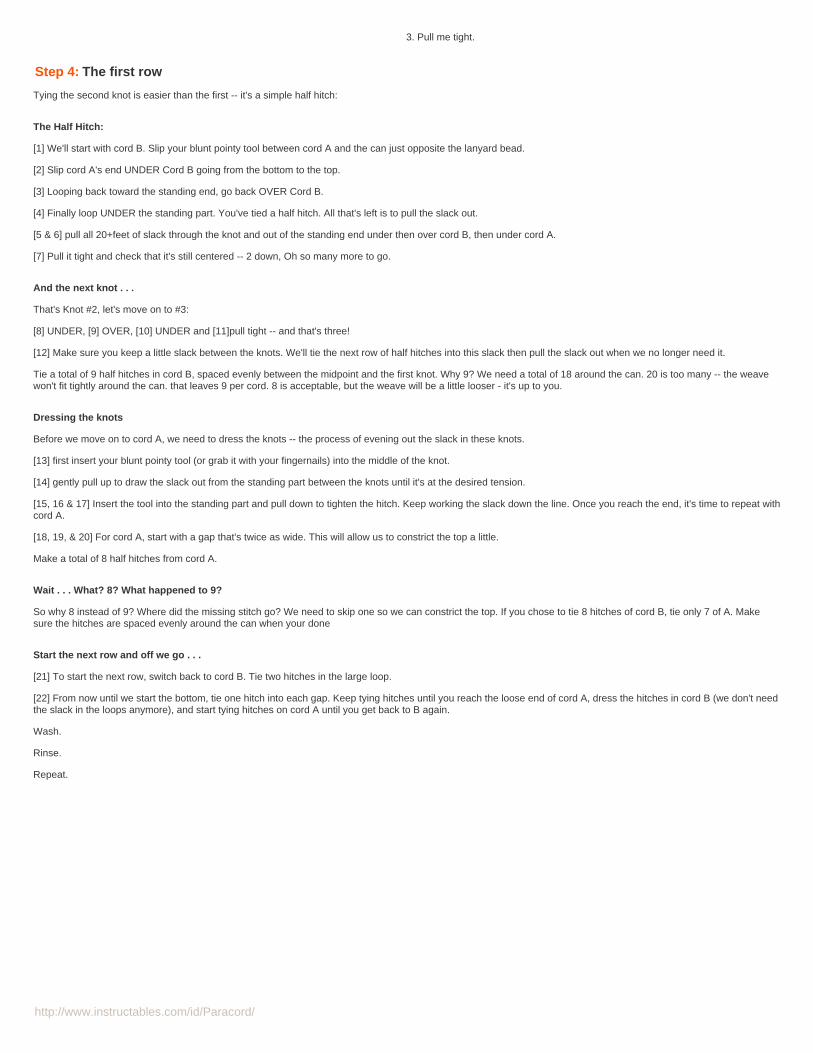
http://www.instructables.com/id/Paracord/
3. Pull me tight.
Step 4: The first row
Tying the second knot is easier than the first -- it's a simple half hitch:
The Half Hitch:
[1] We'll start with cord B. Slip your blunt pointy tool between cord A and the can just opposite the lanyard bead.
[2] Slip cord A's end UNDER Cord B going from the bottom to the top.
[3] Looping back toward the standing end, go back OVER Cord B.
[4] Finally loop UNDER the standing part. You've tied a half hitch. All that's left is to pull the slack out.
[5 & 6] pull all 20+feet of slack through the knot and out of the standing end under then over cord B, then under cord A.
[7] Pull it tight and check that it's still centered -- 2 down, Oh so many more to go.
And the next knot . . .
That's Knot #2, let's move on to #3:
[8] UNDER, [9] OVER, [10] UNDER and [11]pull tight -- and that's three!
[12] Make sure you keep a little slack between the knots. We'll tie the next row of half hitches into this slack then pull the slack out when we no longer need it.
Tie a total of 9 half hitches in cord B, spaced evenly between the midpoint and the first knot. Why 9? We need a total of 18 around the can. 20 is too many -- the weavewon't fit tightly around the can. that leaves 9 per cord. 8 is acceptable, but the weave will be a little looser - it's up to you.
Dressing the knots
Before we move on to cord A, we need to dress the knots -- the process of evening out the slack in these knots.
[13] first insert your blunt pointy tool (or grab it with your fingernails) into the middle of the knot.
[14] gently pull up to draw the slack out from the standing part between the knots until it's at the desired tension.
[15, 16 & 17] Insert the tool into the standing part and pull down to tighten the hitch. Keep working the slack down the line. Once you reach the end, it's time to repeat withcord A.
[18, 19, & 20] For cord A, start with a gap that's twice as wide. This will allow us to constrict the top a little.
Make a total of 8 half hitches from cord A.
Wait . . . What? 8? What happened to 9?
So why 8 instead of 9? Where did the missing stitch go? We need to skip one so we can constrict the top. If you chose to tie 8 hitches of cord B, tie only 7 of A. Makesure the hitches are spaced evenly around the can when your done
Start the next row and off we go . . .
[21] To start the next row, switch back to cord B. Tie two hitches in the large loop.
[22] From now until we start the bottom, tie one hitch into each gap. Keep tying hitches until you reach the loose end of cord A, dress the hitches in cord B (we don't needthe slack in the loops anymore), and start tying hitches on cord A until you get back to B again.
Wash.
Rinse.
Repeat.
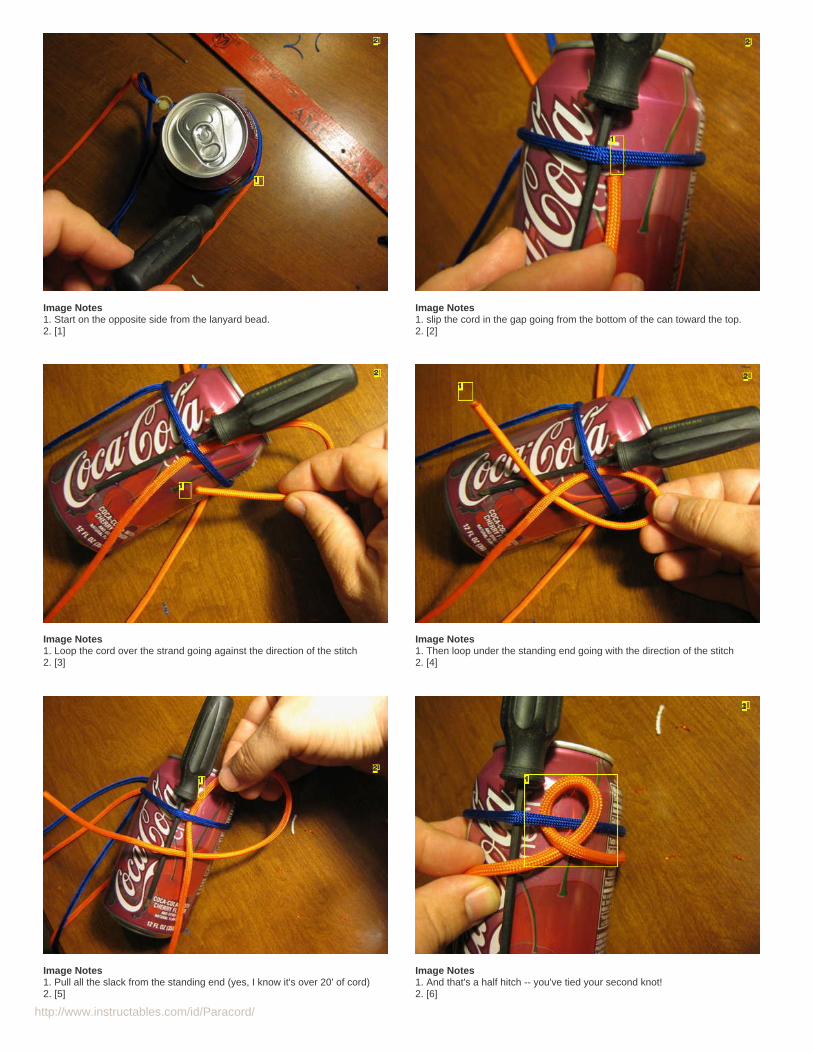
http://www.instructables.com/id/Paracord/
Image Notes1. Start on the opposite side from the lanyard bead.2. [1]
Image Notes1. slip the cord in the gap going from the bottom of the can toward the top.2. [2]
Image Notes1. Loop the cord over the strand going against the direction of the stitch2. [3]
Image Notes1. Then loop under the standing end going with the direction of the stitch2. [4]
Image Notes1. Pull all the slack from the standing end (yes, I know it's over 20' of cord)2. [5]
Image Notes1. And that's a half hitch -- you've tied your second knot!2. [6]

http://www.instructables.com/id/Paracord/
Image Notes1. And pull it tight!2. [7]
Image Notes1. and we repeat -- Under the strand2. [8]
Image Notes1. Back and over the strand2. [9]
Image Notes1. Under the standing end (well go forward next)2. [10]
Image Notes Image Notes
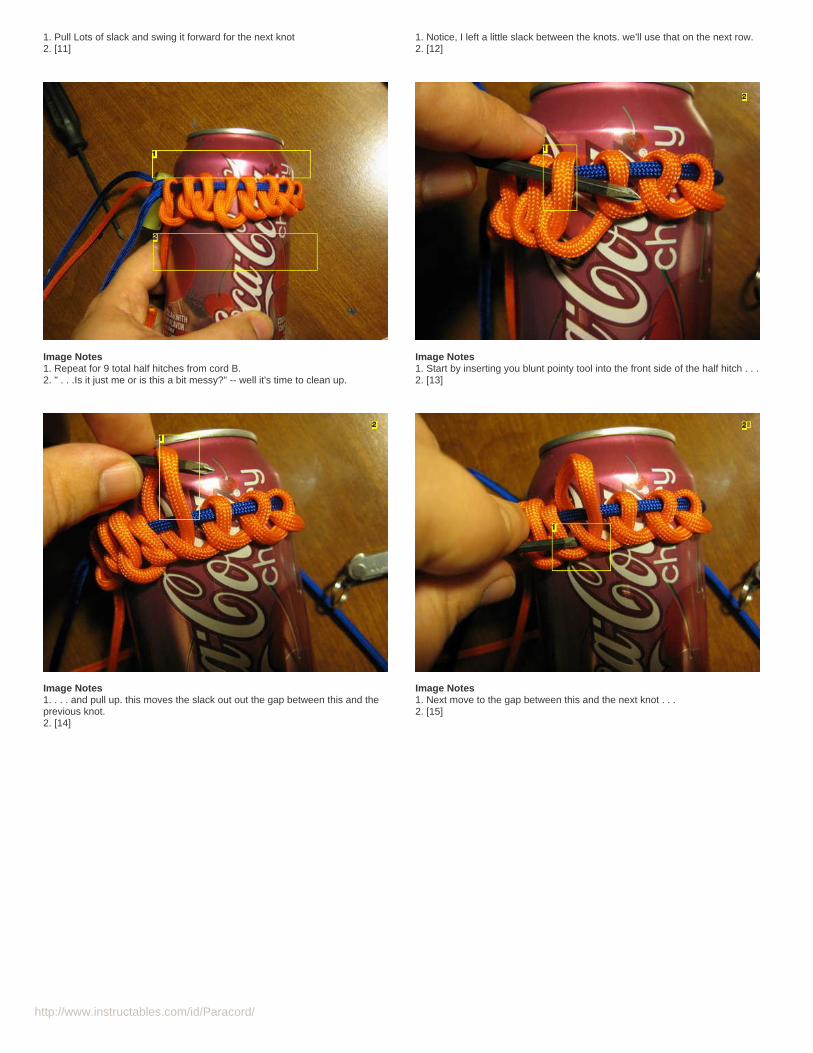
http://www.instructables.com/id/Paracord/
1. Pull Lots of slack and swing it forward for the next knot2. [11]
1. Notice, I left a little slack between the knots. we'll use that on the next row.2. [12]
Image Notes1. Repeat for 9 total half hitches from cord B.2. " . . .Is it just me or is this a bit messy?" -- well it's time to clean up.
Image Notes1. Start by inserting you blunt pointy tool into the front side of the half hitch . . .2. [13]
Image Notes1. . . . and pull up. this moves the slack out out the gap between this and theprevious knot.2. [14]
Image Notes1. Next move to the gap between this and the next knot . . .2. [15]
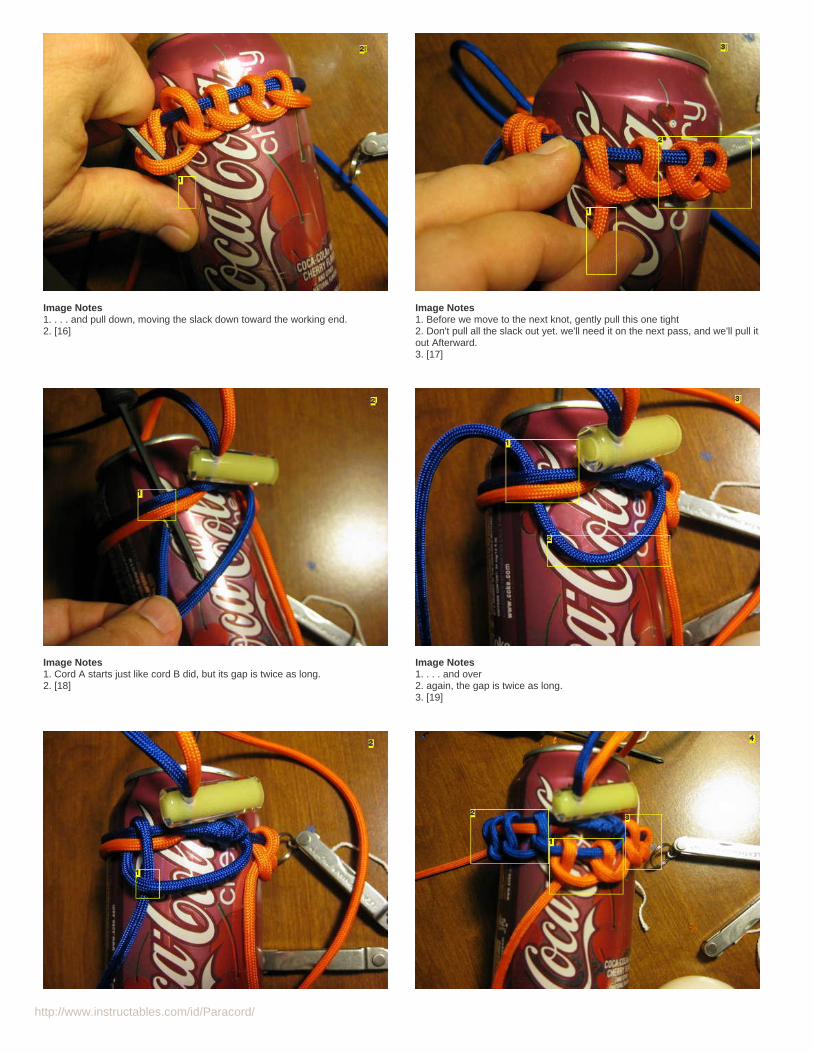
http://www.instructables.com/id/Paracord/
Image Notes1. . . . and pull down, moving the slack down toward the working end.2. [16]
Image Notes1. Before we move to the next knot, gently pull this one tight2. Don't pull all the slack out yet. we'll need it on the next pass, and we'll pull itout Afterward.3. [17]
Image Notes1. Cord A starts just like cord B did, but its gap is twice as long.2. [18]
Image Notes1. . . . and over2. again, the gap is twice as long.3. [19]
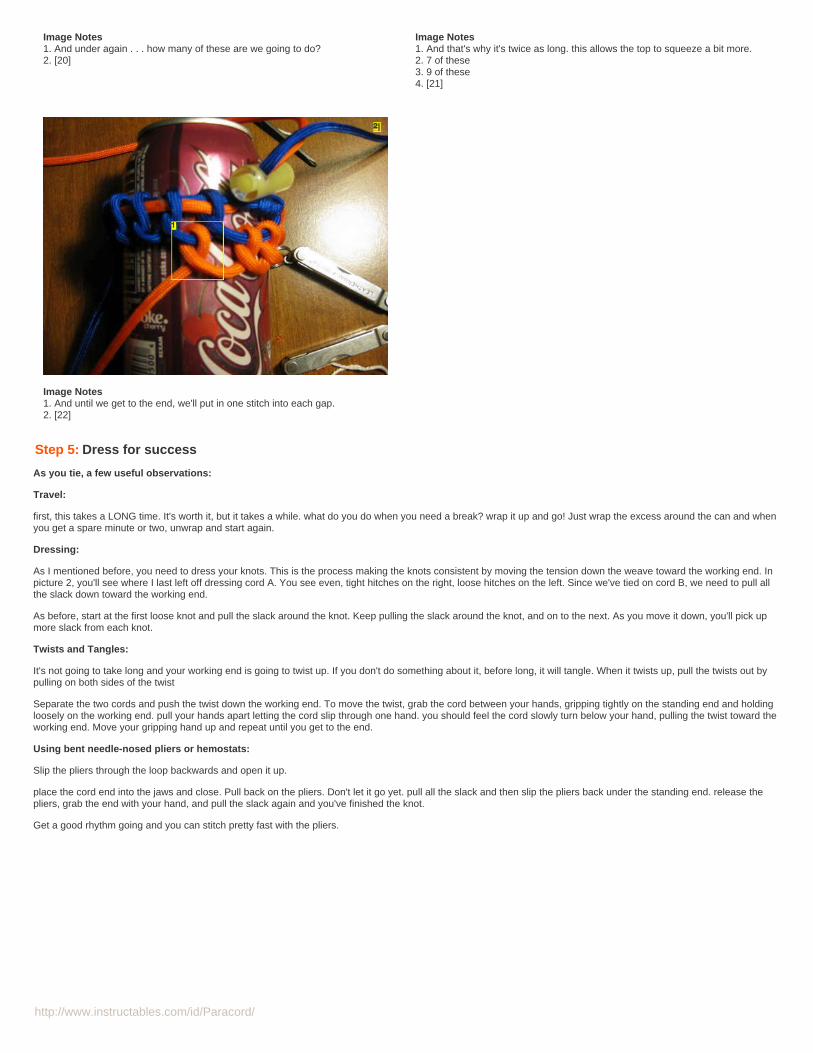
http://www.instructables.com/id/Paracord/
Image Notes1. And under again . . . how many of these are we going to do?2. [20]
Image Notes1. And that's why it's twice as long. this allows the top to squeeze a bit more.2. 7 of these3. 9 of these4. [21]
Image Notes1. And until we get to the end, we'll put in one stitch into each gap.2. [22]
Step 5: Dress for success
As you tie, a few useful observations:
Travel:
first, this takes a LONG time. It's worth it, but it takes a while. what do you do when you need a break? wrap it up and go! Just wrap the excess around the can and whenyou get a spare minute or two, unwrap and start again.
Dressing:
As I mentioned before, you need to dress your knots. This is the process making the knots consistent by moving the tension down the weave toward the working end. Inpicture 2, you'll see where I last left off dressing cord A. You see even, tight hitches on the right, loose hitches on the left. Since we've tied on cord B, we need to pull allthe slack down toward the working end.
As before, start at the first loose knot and pull the slack around the knot. Keep pulling the slack around the knot, and on to the next. As you move it down, you'll pick upmore slack from each knot.
Twists and Tangles:
It's not going to take long and your working end is going to twist up. If you don't do something about it, before long, it will tangle. When it twists up, pull the twists out bypulling on both sides of the twist
Separate the two cords and push the twist down the working end. To move the twist, grab the cord between your hands, gripping tightly on the standing end and holdingloosely on the working end. pull your hands apart letting the cord slip through one hand. you should feel the cord slowly turn below your hand, pulling the twist toward theworking end. Move your gripping hand up and repeat until you get to the end.
Using bent needle-nosed pliers or hemostats:
Slip the pliers through the loop backwards and open it up.
place the cord end into the jaws and close. Pull back on the pliers. Don't let it go yet. pull all the slack and then slip the pliers back under the standing end. release thepliers, grab the end with your hand, and pull the slack again and you've finished the knot.
Get a good rhythm going and you can stitch pretty fast with the pliers.
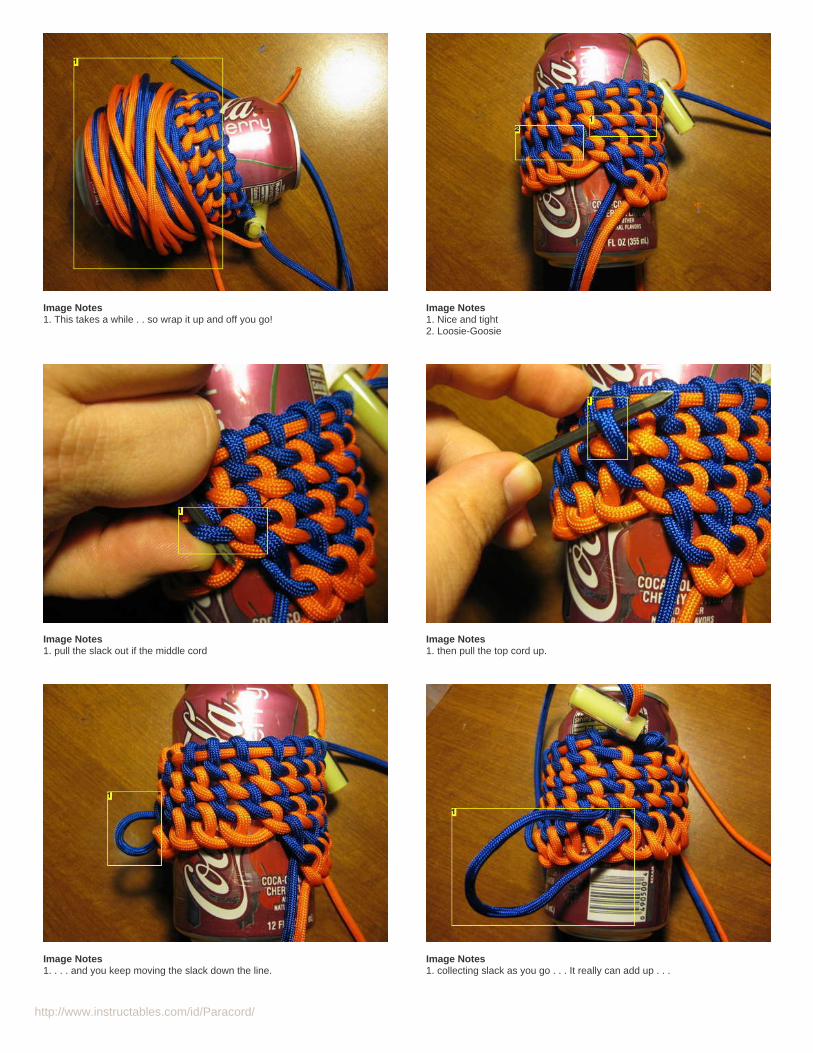
http://www.instructables.com/id/Paracord/
Image Notes1. This takes a while . . so wrap it up and off you go!
Image Notes1. Nice and tight2. Loosie-Goosie
Image Notes1. pull the slack out if the middle cord
Image Notes1. then pull the top cord up.
Image Notes1. . . . and you keep moving the slack down the line.
Image Notes1. collecting slack as you go . . . It really can add up . . .
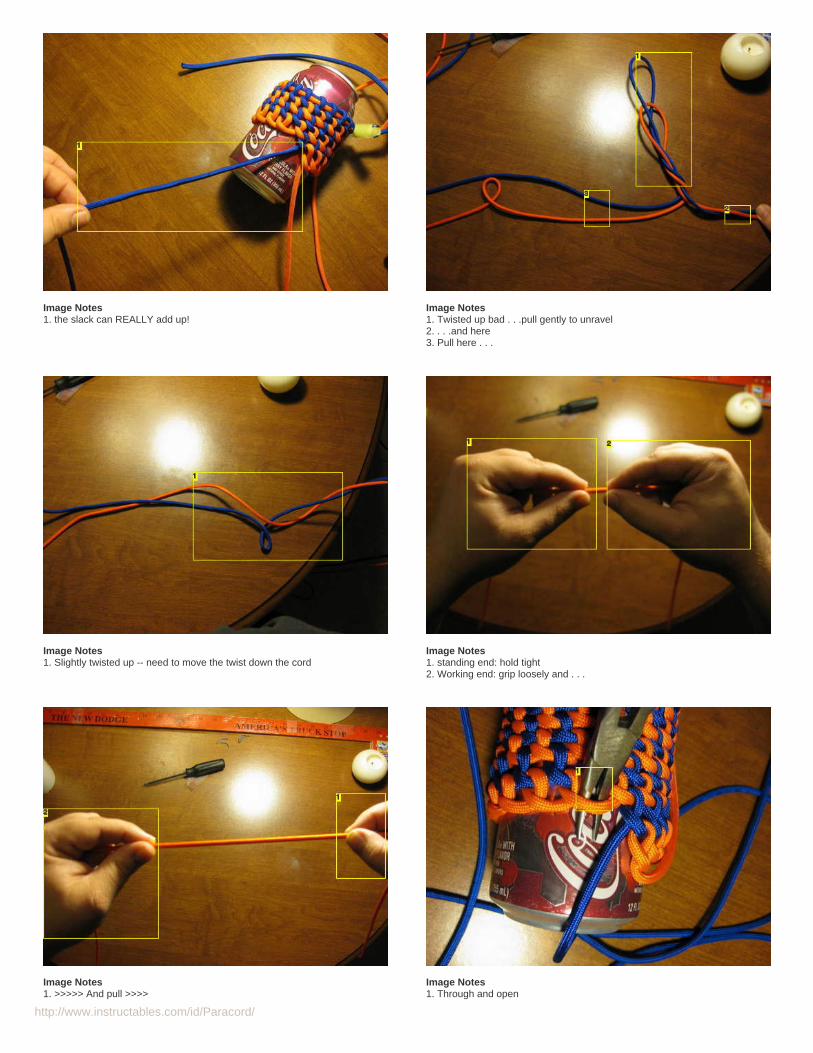
http://www.instructables.com/id/Paracord/
Image Notes1. the slack can REALLY add up!
Image Notes1. Twisted up bad . . .pull gently to unravel2. . . .and here3. Pull here . . .
Image Notes1. Slightly twisted up -- need to move the twist down the cord
Image Notes1. standing end: hold tight2. Working end: grip loosely and . . .
Image Notes1. >>>>> And pull >>>>
Image Notes1. Through and open
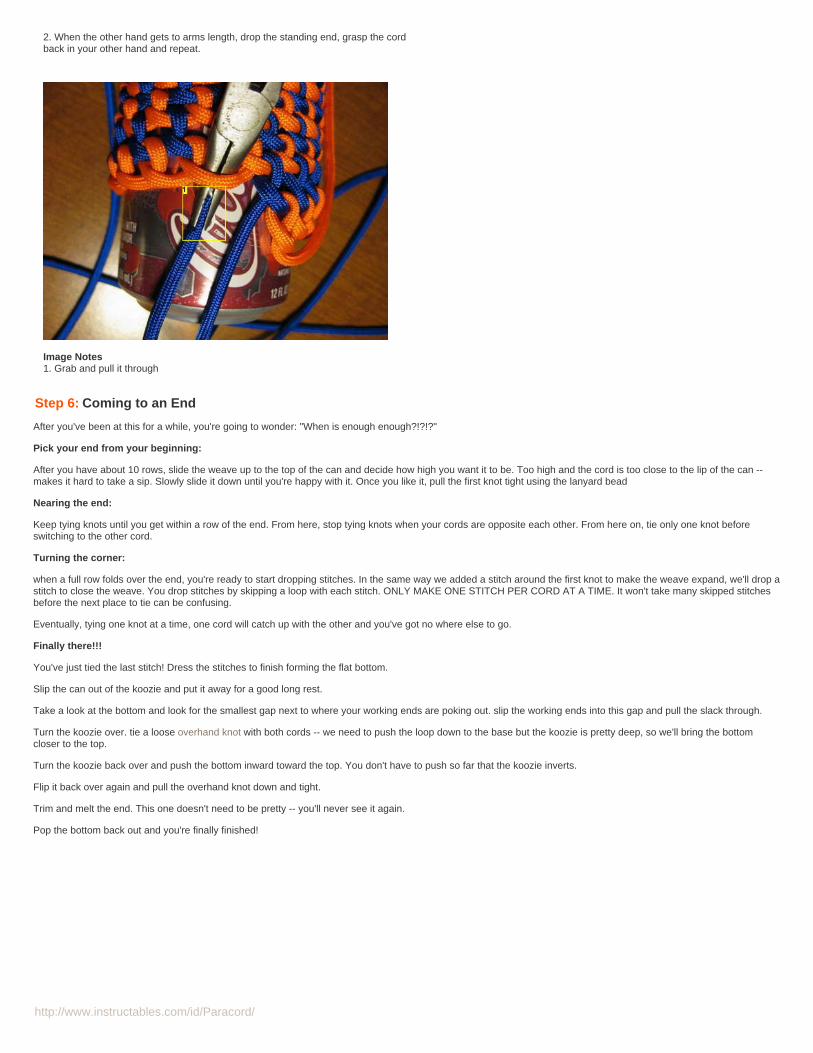
http://www.instructables.com/id/Paracord/
2. When the other hand gets to arms length, drop the standing end, grasp the cordback in your other hand and repeat.
Image Notes1. Grab and pull it through
Step 6: Coming to an End
After you've been at this for a while, you're going to wonder: "When is enough enough?!?!?"
Pick your end from your beginning:
After you have about 10 rows, slide the weave up to the top of the can and decide how high you want it to be. Too high and the cord is too close to the lip of the can --makes it hard to take a sip. Slowly slide it down until you're happy with it. Once you like it, pull the first knot tight using the lanyard bead
Nearing the end:
Keep tying knots until you get within a row of the end. From here, stop tying knots when your cords are opposite each other. From here on, tie only one knot beforeswitching to the other cord.
Turning the corner:
when a full row folds over the end, you're ready to start dropping stitches. In the same way we added a stitch around the first knot to make the weave expand, we'll drop astitch to close the weave. You drop stitches by skipping a loop with each stitch. ONLY MAKE ONE STITCH PER CORD AT A TIME. It won't take many skipped stitchesbefore the next place to tie can be confusing.
Eventually, tying one knot at a time, one cord will catch up with the other and you've got no where else to go.
Finally there!!!
You've just tied the last stitch! Dress the stitches to finish forming the flat bottom.
Slip the can out of the koozie and put it away for a good long rest.
Take a look at the bottom and look for the smallest gap next to where your working ends are poking out. slip the working ends into this gap and pull the slack through.
Turn the koozie over. tie a loose overhand knot with both cords -- we need to push the loop down to the base but the koozie is pretty deep, so we'll bring the bottomcloser to the top.
Turn the koozie back over and push the bottom inward toward the top. You don't have to push so far that the koozie inverts.
Flip it back over again and pull the overhand knot down and tight.
Trim and melt the end. This one doesn't need to be pretty -- you'll never see it again.
Pop the bottom back out and you're finally finished!
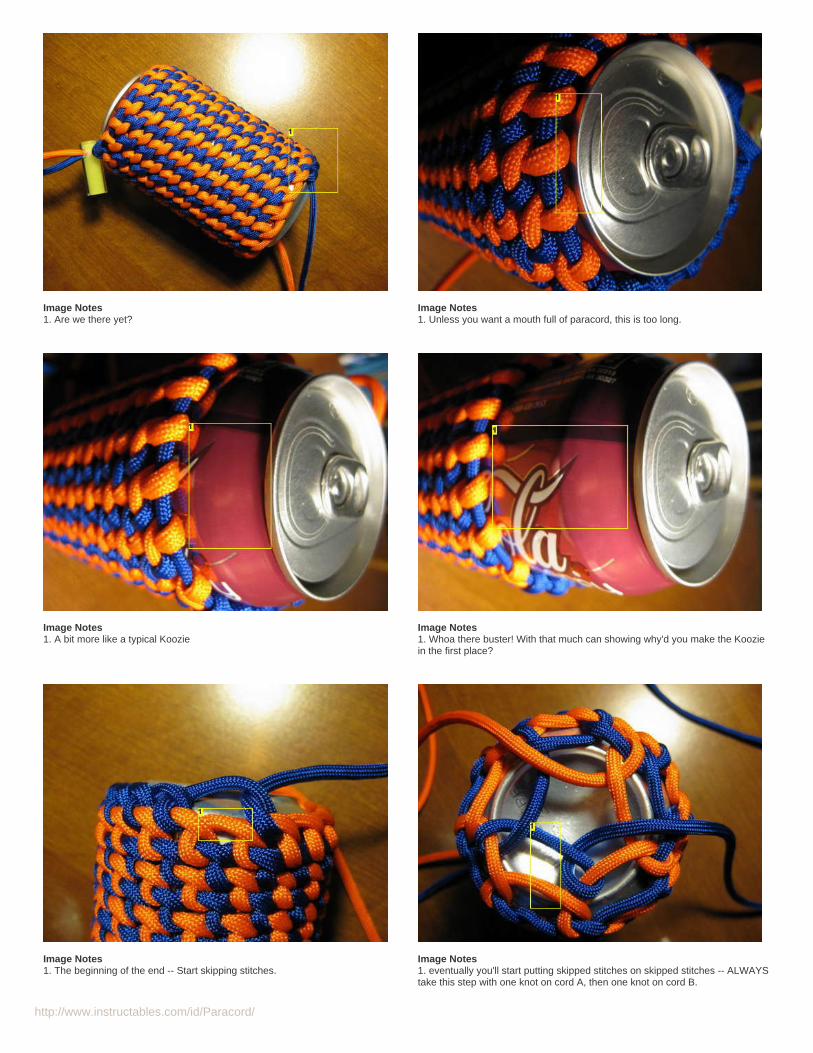
http://www.instructables.com/id/Paracord/
Image Notes1. Are we there yet?
Image Notes1. Unless you want a mouth full of paracord, this is too long.
Image Notes1. A bit more like a typical Koozie
Image Notes1. Whoa there buster! With that much can showing why'd you make the Kooziein the first place?
Image Notes1. The beginning of the end -- Start skipping stitches.
Image Notes1. eventually you'll start putting skipped stitches on skipped stitches -- ALWAYStake this step with one knot on cord A, then one knot on cord B.
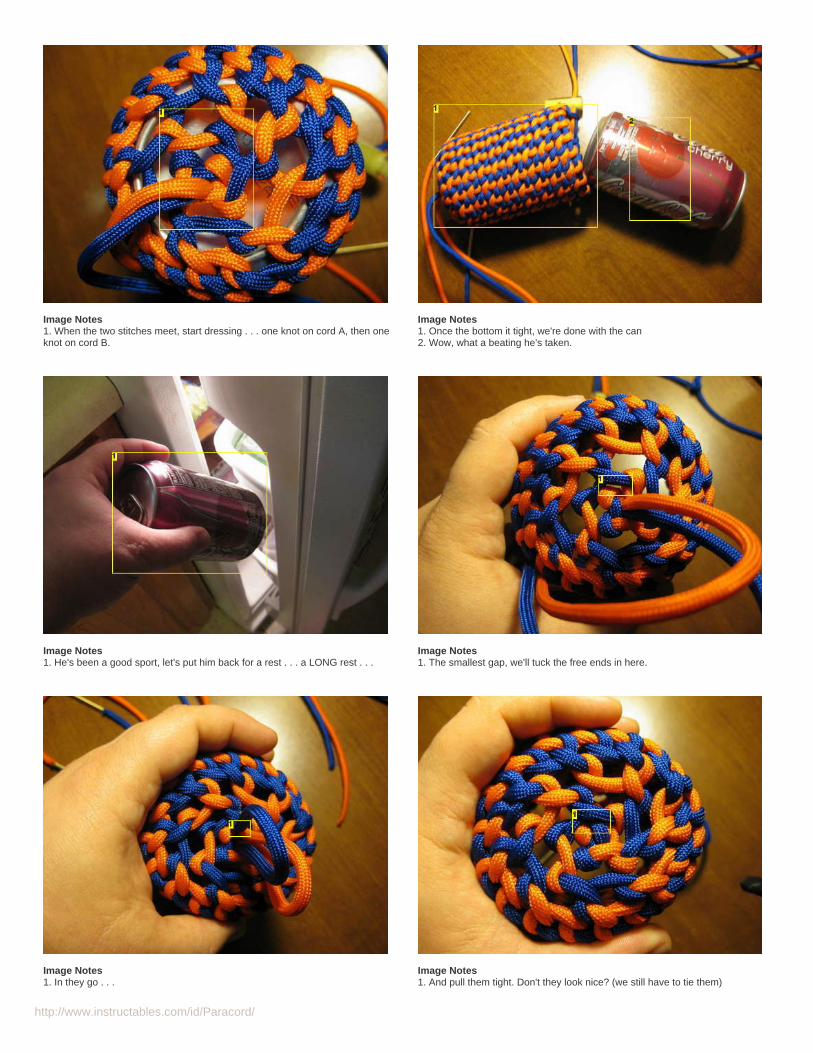
http://www.instructables.com/id/Paracord/
Image Notes1. When the two stitches meet, start dressing . . . one knot on cord A, then oneknot on cord B.
Image Notes1. Once the bottom it tight, we're done with the can2. Wow, what a beating he's taken.
Image Notes1. He's been a good sport, let's put him back for a rest . . . a LONG rest . . .
Image Notes1. The smallest gap, we'll tuck the free ends in here.
Image Notes1. In they go . . .
Image Notes1. And pull them tight. Don't they look nice? (we still have to tie them)
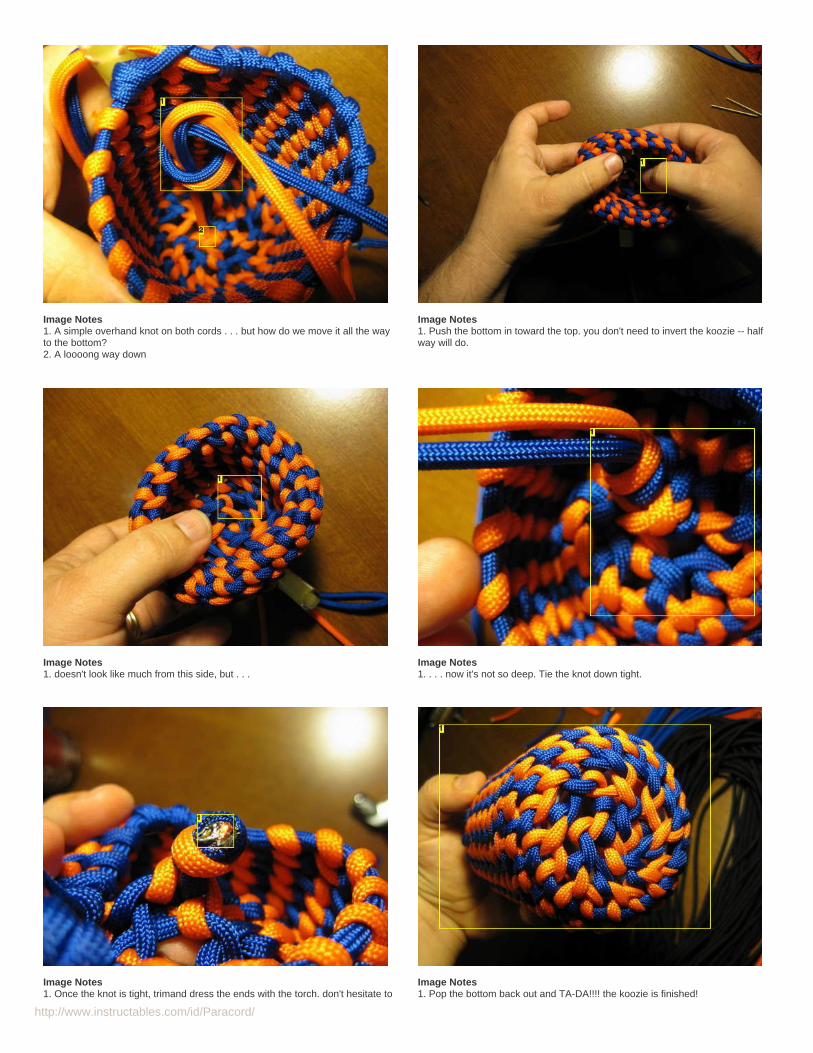
http://www.instructables.com/id/Paracord/
Image Notes1. A simple overhand knot on both cords . . . but how do we move it all the wayto the bottom?2. A loooong way down
Image Notes1. Push the bottom in toward the top. you don't need to invert the koozie -- halfway will do.
Image Notes1. doesn't look like much from this side, but . . .
Image Notes1. . . . now it's not so deep. Tie the knot down tight.
Image Notes1. Once the knot is tight, trimand dress the ends with the torch. don't hesitate to
Image Notes1. Pop the bottom back out and TA-DA!!!! the koozie is finished!
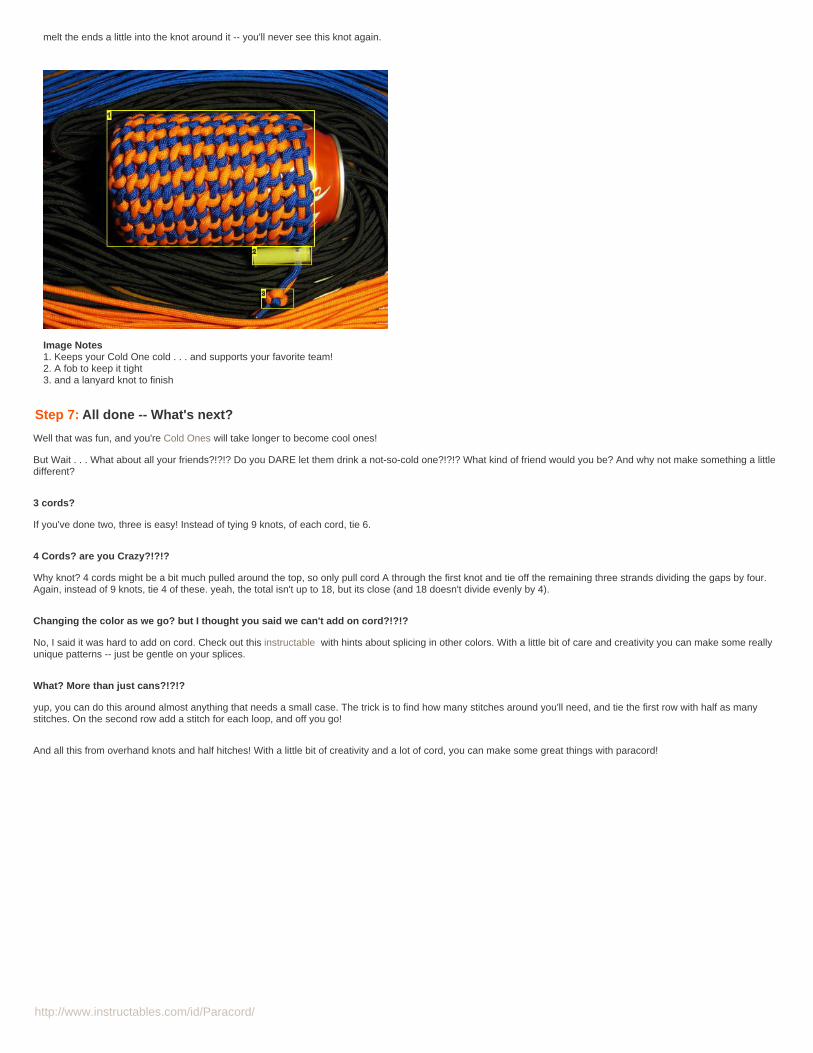
http://www.instructables.com/id/Paracord/
melt the ends a little into the knot around it -- you'll never see this knot again.
Image Notes1. Keeps your Cold One cold . . . and supports your favorite team!2. A fob to keep it tight3. and a lanyard knot to finish
Step 7: All done -- What's next?
Well that was fun, and you're Cold Ones will take longer to become cool ones!
But Wait . . . What about all your friends?!?!? Do you DARE let them drink a not-so-cold one?!?!? What kind of friend would you be? And why not make something a littledifferent?
3 cords?
If you've done two, three is easy! Instead of tying 9 knots, of each cord, tie 6.
4 Cords? are you Crazy?!?!?
Why knot? 4 cords might be a bit much pulled around the top, so only pull cord A through the first knot and tie off the remaining three strands dividing the gaps by four.Again, instead of 9 knots, tie 4 of these. yeah, the total isn't up to 18, but its close (and 18 doesn't divide evenly by 4).
Changing the color as we go? but I thought you said we can't add on cord?!?!?
No, I said it was hard to add on cord. Check out this instructable with hints about splicing in other colors. With a little bit of care and creativity you can make some reallyunique patterns -- just be gentle on your splices.
What? More than just cans?!?!?
yup, you can do this around almost anything that needs a small case. The trick is to find how many stitches around you'll need, and tie the first row with half as manystitches. On the second row add a stitch for each loop, and off you go!
And all this from overhand knots and half hitches! With a little bit of creativity and a lot of cord, you can make some great things with paracord!
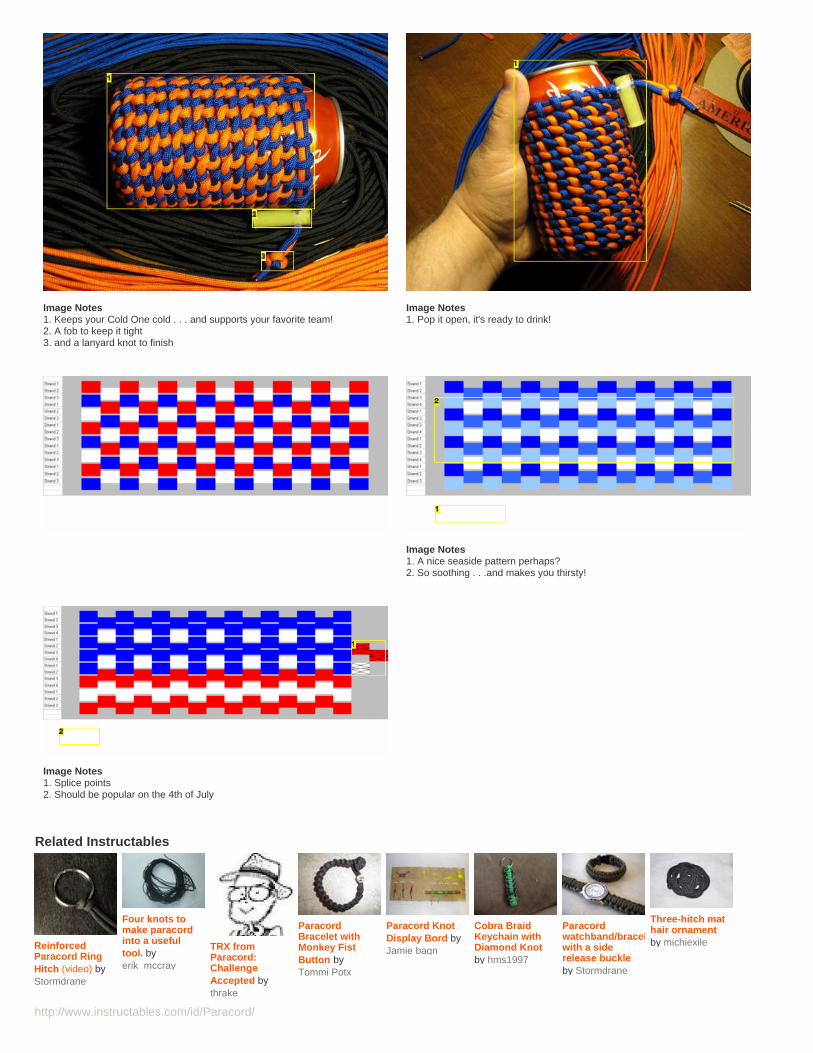
http://www.instructables.com/id/Paracord/
Image Notes1. Keeps your Cold One cold . . . and supports your favorite team!2. A fob to keep it tight3. and a lanyard knot to finish
Image Notes1. Pop it open, it's ready to drink!
Image Notes1. A nice seaside pattern perhaps?2. So soothing . . .and makes you thirsty!
Image Notes1. Splice points2. Should be popular on the 4th of July
Related Instructables
ReinforcedParacord RingHitch (video) byStormdrane
Four knots tomake paracordinto a usefultool. byerik_mccray
TRX fromParacord:ChallengeAccepted bythrake
ParacordBracelet withMonkey FistButton byTommi Potx
Paracord KnotDisplay Bord byJamie bagn
Cobra BraidKeychain withDiamond Knotby hms1997
Paracordwatchband/braceletwith a siderelease buckleby Stormdrane
Three-hitch mathair ornamentby michiexile

http://www.instructables.com/id/Paracord/
http://www.instructables.com/id/Paracord/
How to Make a Paracord Fender Keychainby SyberProdigy on February 13, 2012
Author:SyberProdigy Unique RopecraftA knot tying enthusiast at the end of his rope.
Intro: How to Make a Paracord Fender KeychainFor those who don’t know, a fender is a bumper used mainly on boats to keep the boat from being damaged from bumping into objects.While this isn’t an actual fender, it serves as a great decorative keychain.
Step 1: SUPPLIES3- Strands of paracord that are 40 inches long will create a keychain that is four inches tall (loop included)Scissors (any instrument that will cut the cord will work)LighterRuler or Tape Measure (I prefer to use a yardstick)Masking Tape (any tape that will stick and hold to the paracord)
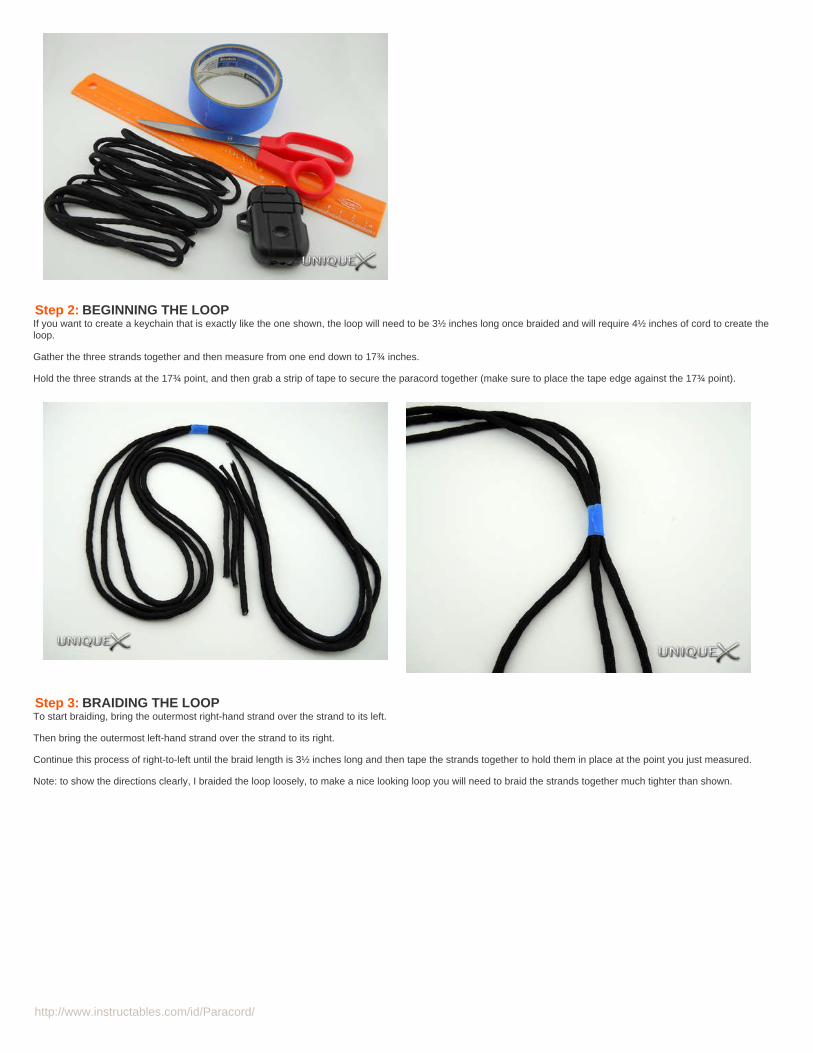
http://www.instructables.com/id/Paracord/
Step 2: BEGINNING THE LOOPIf you want to create a keychain that is exactly like the one shown, the loop will need to be 3½ inches long once braided and will require 4½ inches of cord to create theloop.
Gather the three strands together and then measure from one end down to 17¾ inches.
Hold the three strands at the 17¾ point, and then grab a strip of tape to secure the paracord together (make sure to place the tape edge against the 17¾ point).
Step 3: BRAIDING THE LOOPTo start braiding, bring the outermost right-hand strand over the strand to its left.
Then bring the outermost left-hand strand over the strand to its right.
Continue this process of right-to-left until the braid length is 3½ inches long and then tape the strands together to hold them in place at the point you just measured.
Note: to show the directions clearly, I braided the loop loosely, to make a nice looking loop you will need to braid the strands together much tighter than shown.
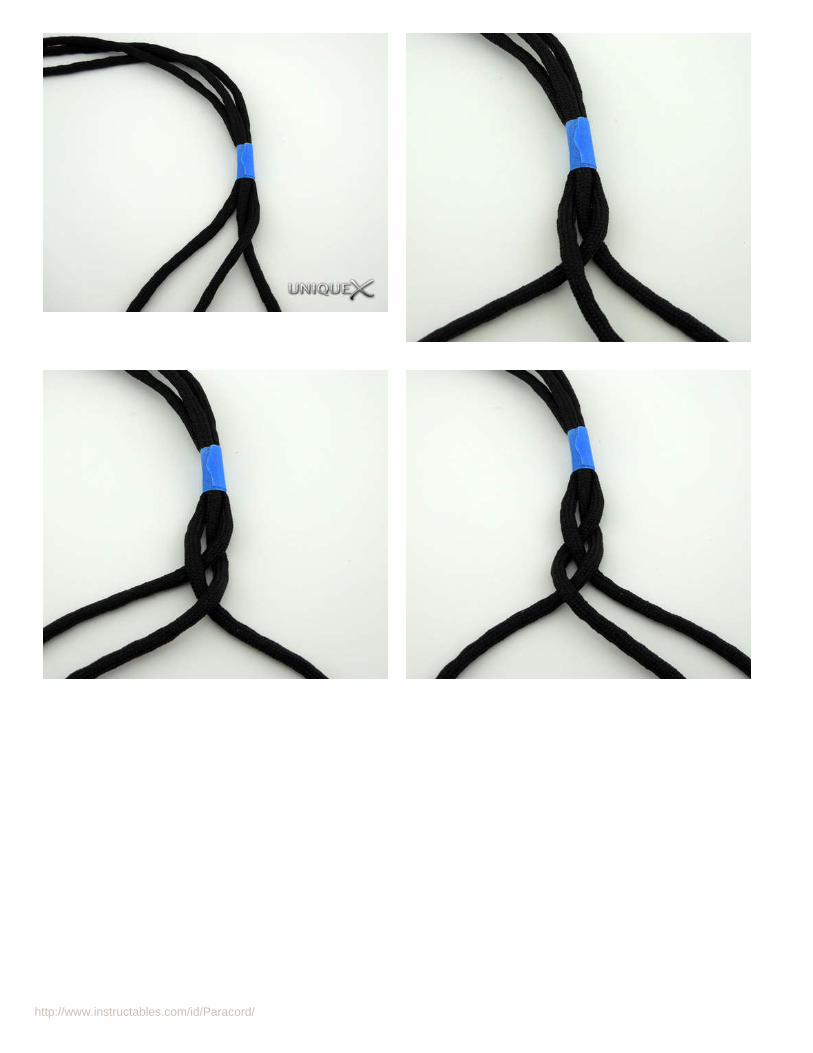
http://www.instructables.com/id/Paracord/
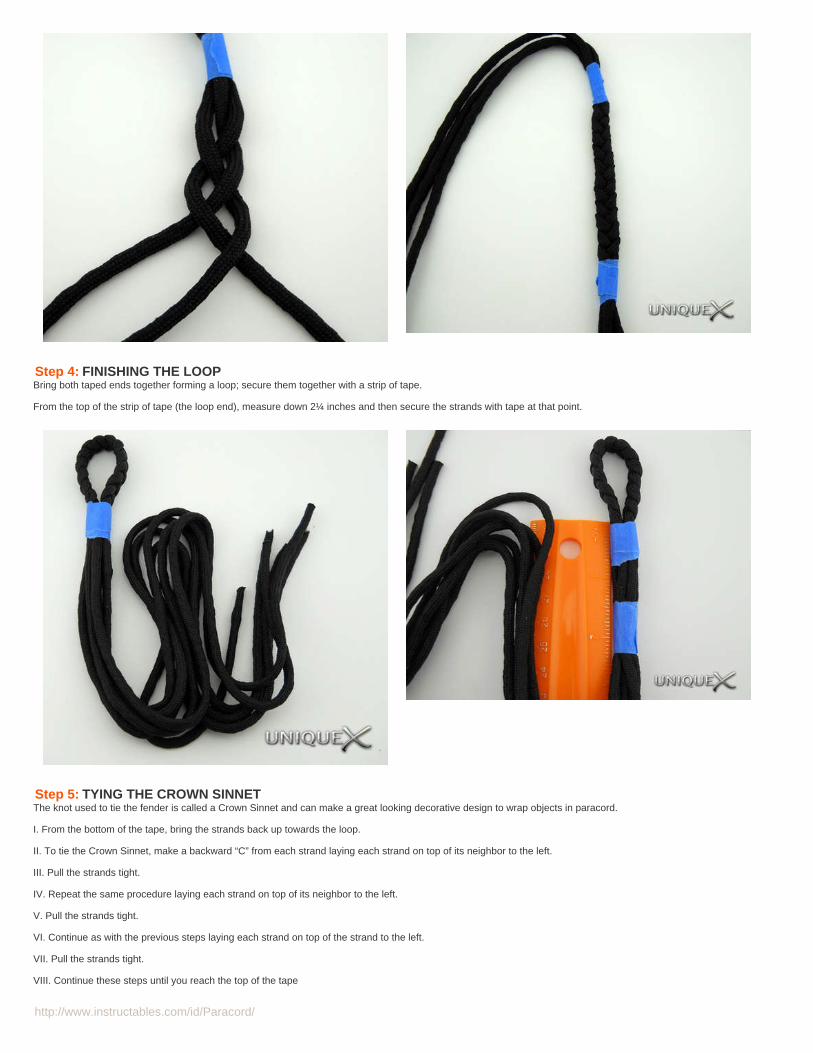
http://www.instructables.com/id/Paracord/
Step 4: FINISHING THE LOOPBring both taped ends together forming a loop; secure them together with a strip of tape.
From the top of the strip of tape (the loop end), measure down 2¼ inches and then secure the strands with tape at that point.
Step 5: TYING THE CROWN SINNETThe knot used to tie the fender is called a Crown Sinnet and can make a great looking decorative design to wrap objects in paracord.
I. From the bottom of the tape, bring the strands back up towards the loop.
II. To tie the Crown Sinnet, make a backward “C” from each strand laying each strand on top of its neighbor to the left.
III. Pull the strands tight.
IV. Repeat the same procedure laying each strand on top of its neighbor to the left.
V. Pull the strands tight.
VI. Continue as with the previous steps laying each strand on top of the strand to the left.
VII. Pull the strands tight.
VIII. Continue these steps until you reach the top of the tape
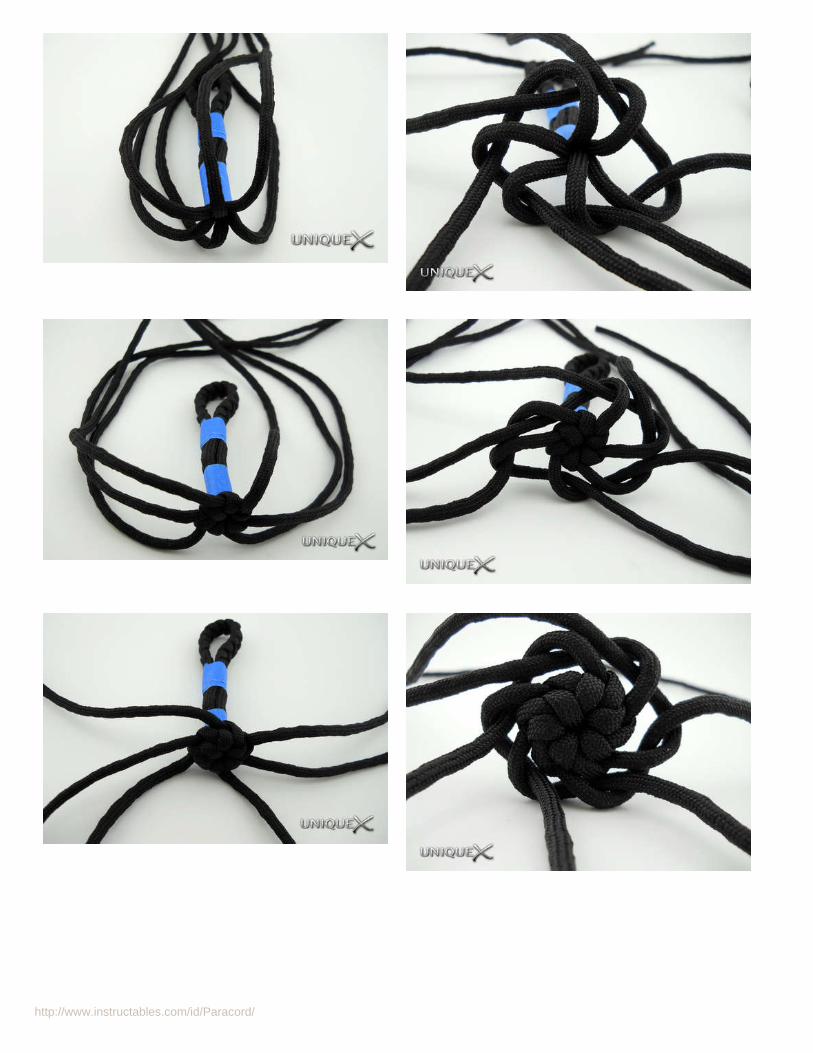
http://www.instructables.com/id/Paracord/
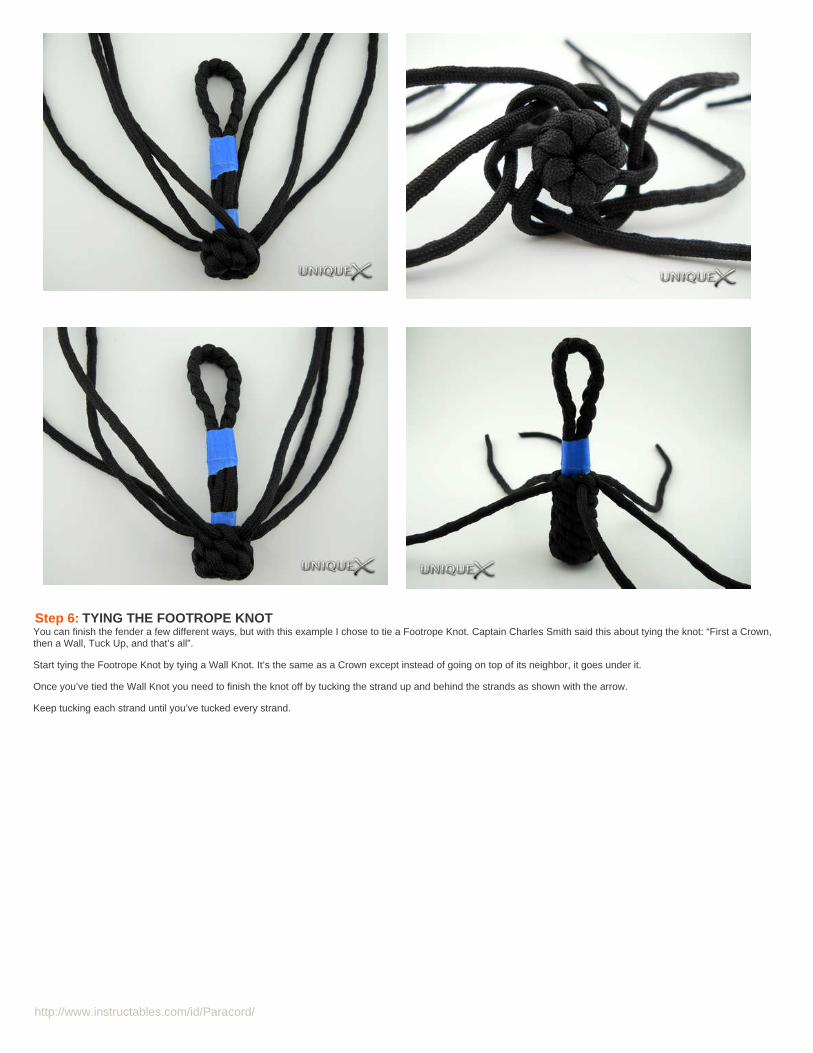
http://www.instructables.com/id/Paracord/
Step 6: TYING THE FOOTROPE KNOTYou can finish the fender a few different ways, but with this example I chose to tie a Footrope Knot. Captain Charles Smith said this about tying the knot: “First a Crown,then a Wall, Tuck Up, and that’s all”.
Start tying the Footrope Knot by tying a Wall Knot. It’s the same as a Crown except instead of going on top of its neighbor, it goes under it.
Once you’ve tied the Wall Knot you need to finish the knot off by tucking the strand up and behind the strands as shown with the arrow.
Keep tucking each strand until you’ve tucked every strand.
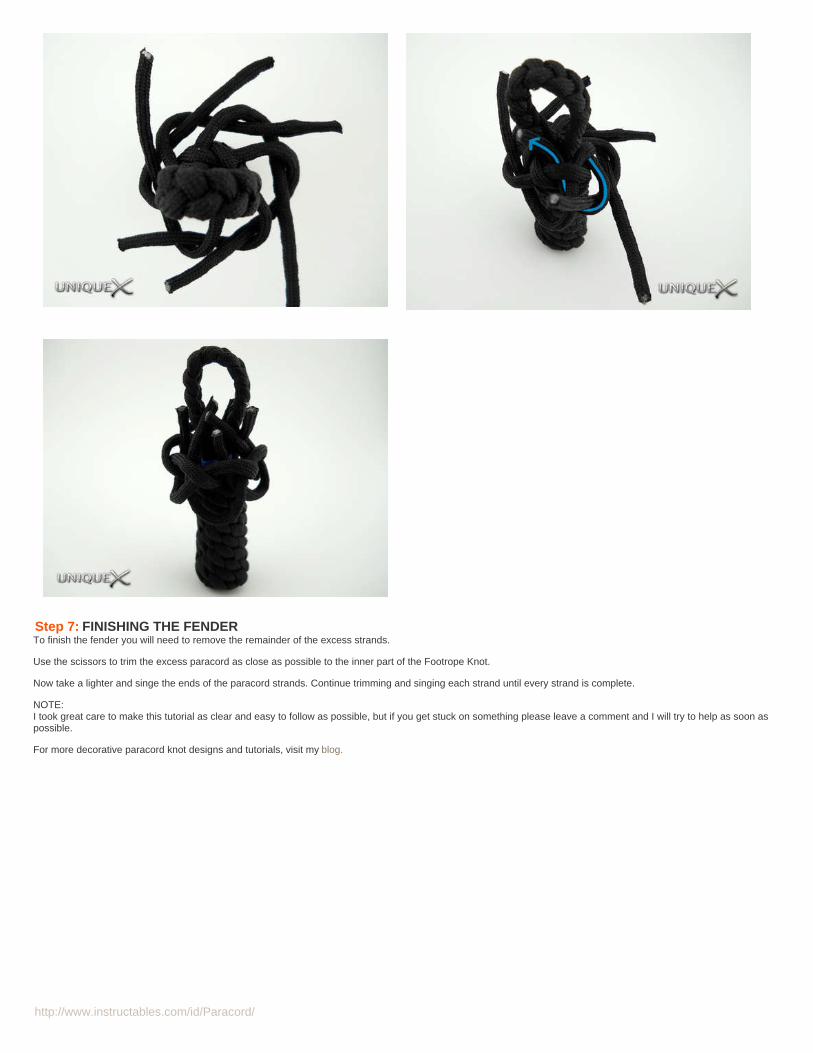
http://www.instructables.com/id/Paracord/
Step 7: FINISHING THE FENDERTo finish the fender you will need to remove the remainder of the excess strands.
Use the scissors to trim the excess paracord as close as possible to the inner part of the Footrope Knot.
Now take a lighter and singe the ends of the paracord strands. Continue trimming and singing each strand until every strand is complete.
NOTE:I took great care to make this tutorial as clear and easy to follow as possible, but if you get stuck on something please leave a comment and I will try to help as soon aspossible.
For more decorative paracord knot designs and tutorials, visit my blog.

http://www.instructables.com/id/Paracord/
Related Instructables
FREE ParacordRattlesnakeKeychain + DIYInstructions(video) byzombiesurvivalblog
Making aParacord Whipby SAIPeregrinus
How to EyeSplice Paracordby Mrballeng How To Make a
Four StrandRound BraidDog LeashFrom Paracordby Doggie Stylish
How to make asurvivalparacord beltusing only twocords! bybuilding king
ParacordLighter Wrap byMETALBLADE
Cross KnotParacordLanyard byStormdrane FREE Paracord
Bracelet + DIYinstructions(video) byzombiesurvivalblog
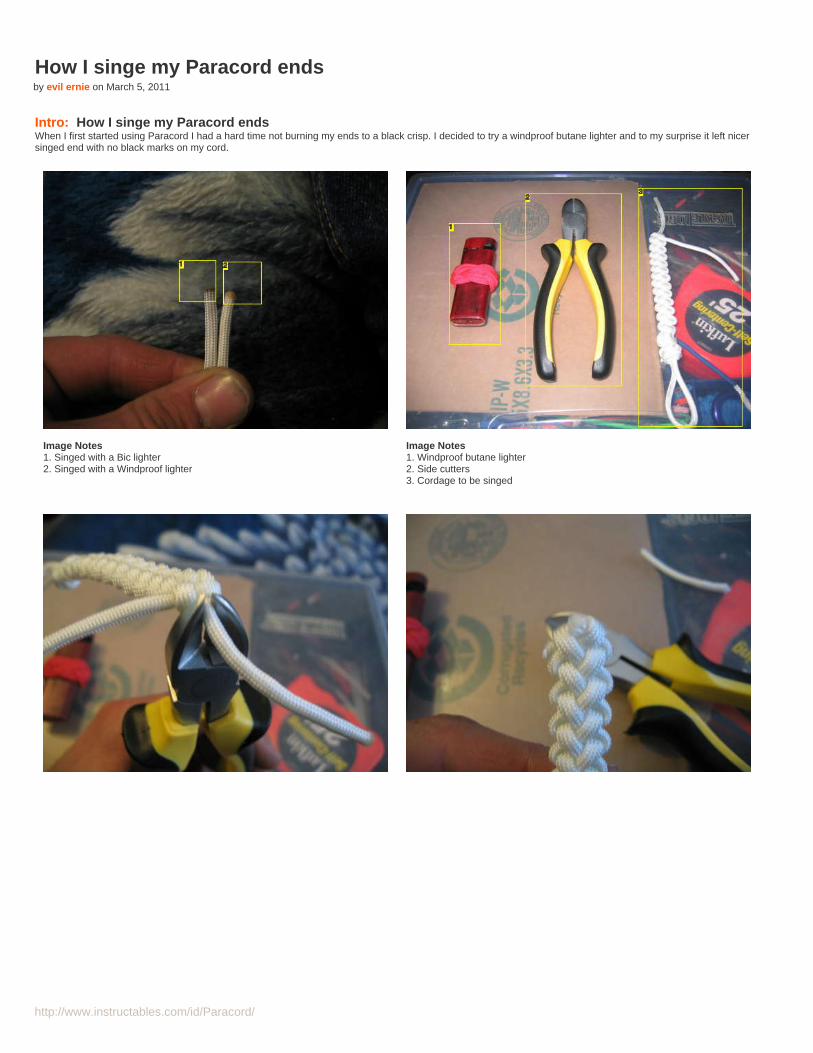
http://www.instructables.com/id/Paracord/
How I singe my Paracord endsby evil ernie on March 5, 2011
Intro: How I singe my Paracord endsWhen I first started using Paracord I had a hard time not burning my ends to a black crisp. I decided to try a windproof butane lighter and to my surprise it left nicersinged end with no black marks on my cord.
Image Notes1. Singed with a Bic lighter2. Singed with a Windproof lighter
Image Notes1. Windproof butane lighter2. Side cutters3. Cordage to be singed
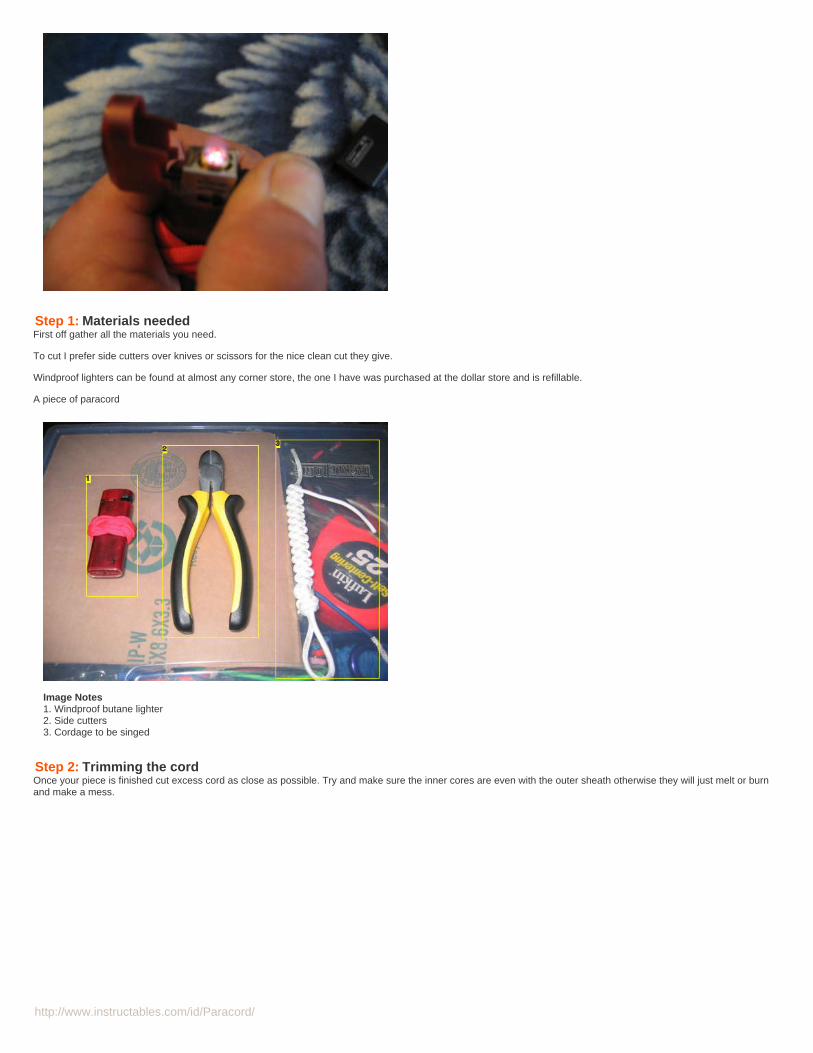
http://www.instructables.com/id/Paracord/
Step 1: Materials neededFirst off gather all the materials you need.
To cut I prefer side cutters over knives or scissors for the nice clean cut they give.
Windproof lighters can be found at almost any corner store, the one I have was purchased at the dollar store and is refillable.
A piece of paracord
Image Notes1. Windproof butane lighter2. Side cutters3. Cordage to be singed
Step 2: Trimming the cordOnce your piece is finished cut excess cord as close as possible. Try and make sure the inner cores are even with the outer sheath otherwise they will just melt or burnand make a mess.
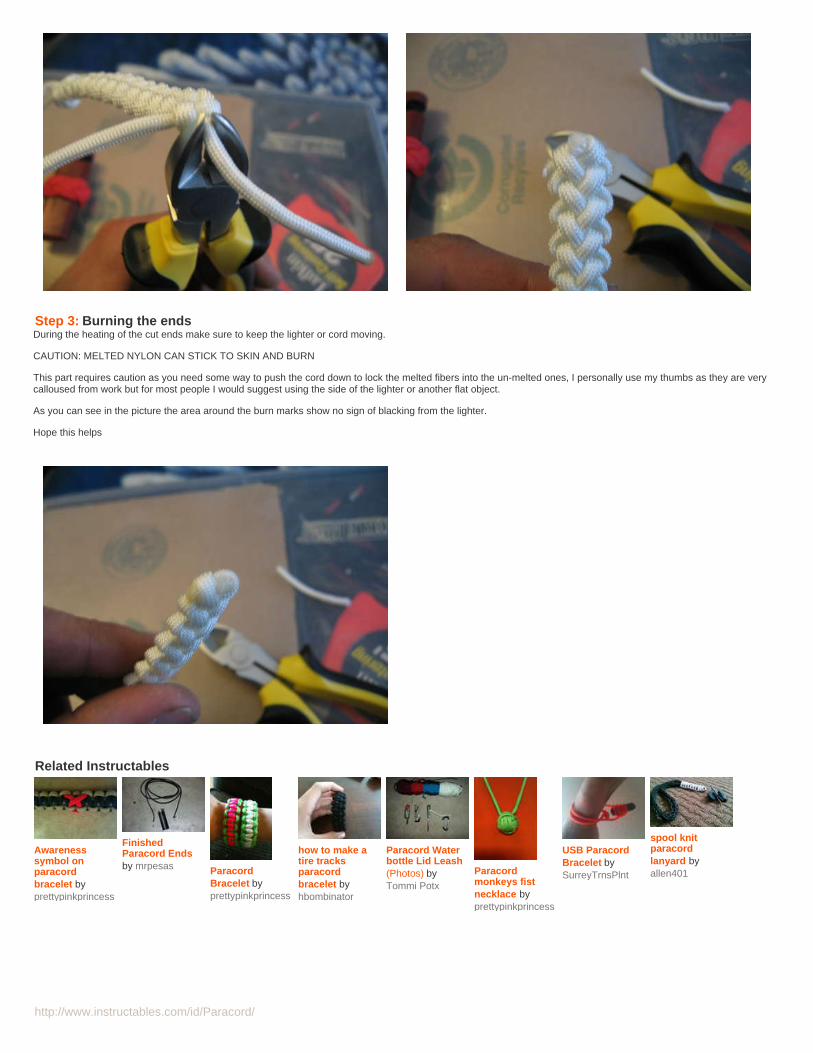
http://www.instructables.com/id/Paracord/
Step 3: Burning the endsDuring the heating of the cut ends make sure to keep the lighter or cord moving.
CAUTION: MELTED NYLON CAN STICK TO SKIN AND BURN
This part requires caution as you need some way to push the cord down to lock the melted fibers into the un-melted ones, I personally use my thumbs as they are verycalloused from work but for most people I would suggest using the side of the lighter or another flat object.
As you can see in the picture the area around the burn marks show no sign of blacking from the lighter.
Hope this helps
Related Instructables
Awarenesssymbol onparacordbracelet byprettypinkprincess
FinishedParacord Endsby mrpesas Paracord
Bracelet byprettypinkprincess
how to make atire tracksparacordbracelet byhbombinator
Paracord Waterbottle Lid Leash(Photos) byTommi Potx
Paracordmonkeys fistnecklace byprettypinkprincess
USB ParacordBracelet bySurreyTrnsPlnt
spool knitparacordlanyard byallen401
http://www.instructables.com/id/Paracord-Water-bottle-Lid-Leash/?utm_source=pdf&utm_campaign=related
http://www.instructables.com/id/Paracord-Water-bottle-Lid-Leash/?utm_source=pdf&utm_campaign=related
http://www.instructables.com/id/Paracord-Water-bottle-Lid-Leash/?utm_source=pdf&utm_campaign=related
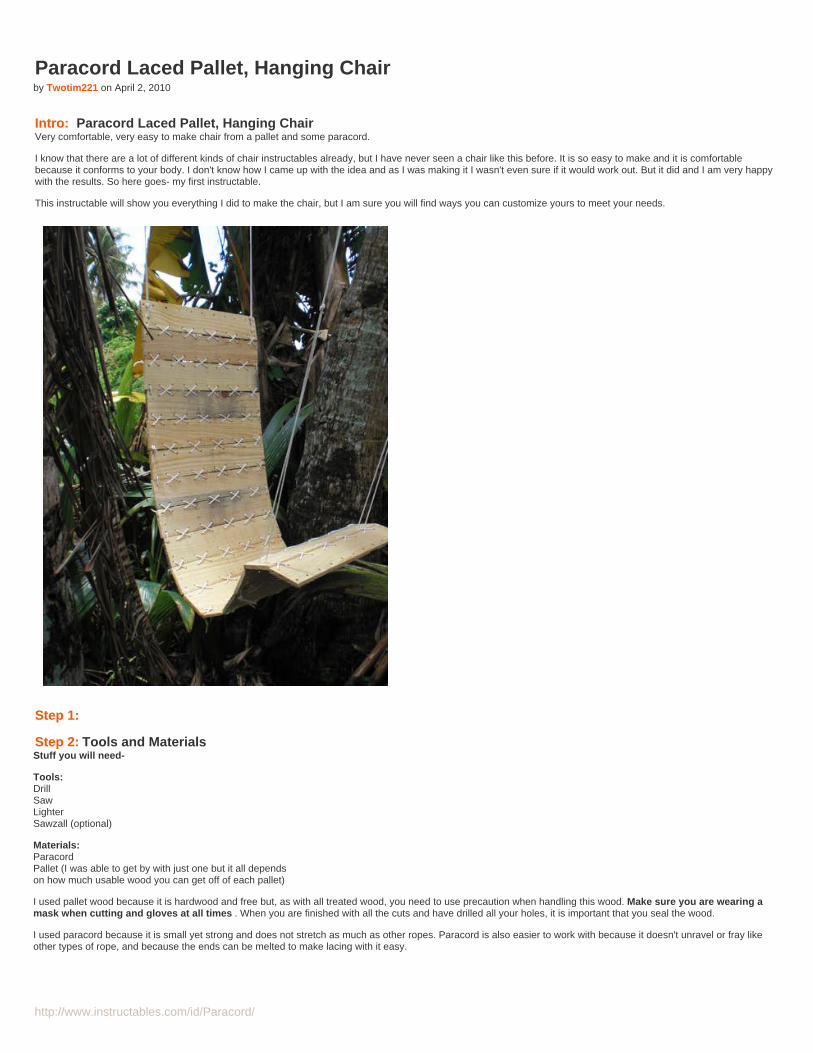
http://www.instructables.com/id/Paracord/
Paracord Laced Pallet, Hanging Chairby Twotim221 on April 2, 2010
Intro: Paracord Laced Pallet, Hanging ChairVery comfortable, very easy to make chair from a pallet and some paracord.
I know that there are a lot of different kinds of chair instructables already, but I have never seen a chair like this before. It is so easy to make and it is comfortablebecause it conforms to your body. I don't know how I came up with the idea and as I was making it I wasn't even sure if it would work out. But it did and I am very happywith the results. So here goes- my first instructable.
This instructable will show you everything I did to make the chair, but I am sure you will find ways you can customize yours to meet your needs.
Step 1:
Step 2: Tools and MaterialsStuff you will need-
Tools: DrillSawLighterSawzall (optional)
Materials: ParacordPallet (I was able to get by with just one but it all dependson how much usable wood you can get off of each pallet)
I used pallet wood because it is hardwood and free but, as with all treated wood, you need to use precaution when handling this wood. Make sure you are wearing amask when cutting and gloves at all times . When you are finished with all the cuts and have drilled all your holes, it is important that you seal the wood.
I used paracord because it is small yet strong and does not stretch as much as other ropes. Paracord is also easier to work with because it doesn't unravel or fray likeother types of rope, and because the ends can be melted to make lacing with it easy.
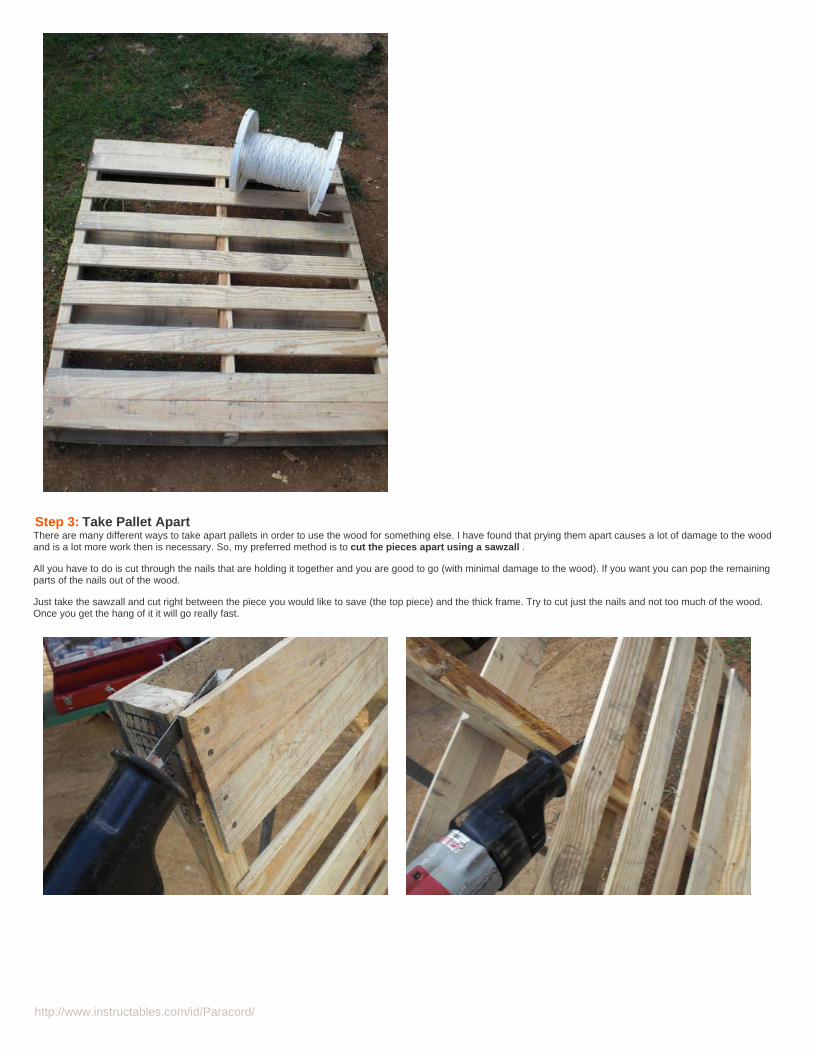
http://www.instructables.com/id/Paracord/
Step 3: Take Pallet ApartThere are many different ways to take apart pallets in order to use the wood for something else. I have found that prying them apart causes a lot of damage to the woodand is a lot more work then is necessary. So, my preferred method is to cut the pieces apart using a sawzall .
All you have to do is cut through the nails that are holding it together and you are good to go (with minimal damage to the wood). If you want you can pop the remainingparts of the nails out of the wood.
Just take the sawzall and cut right between the piece you would like to save (the top piece) and the thick frame. Try to cut just the nails and not too much of the wood.Once you get the hang of it it will go really fast.
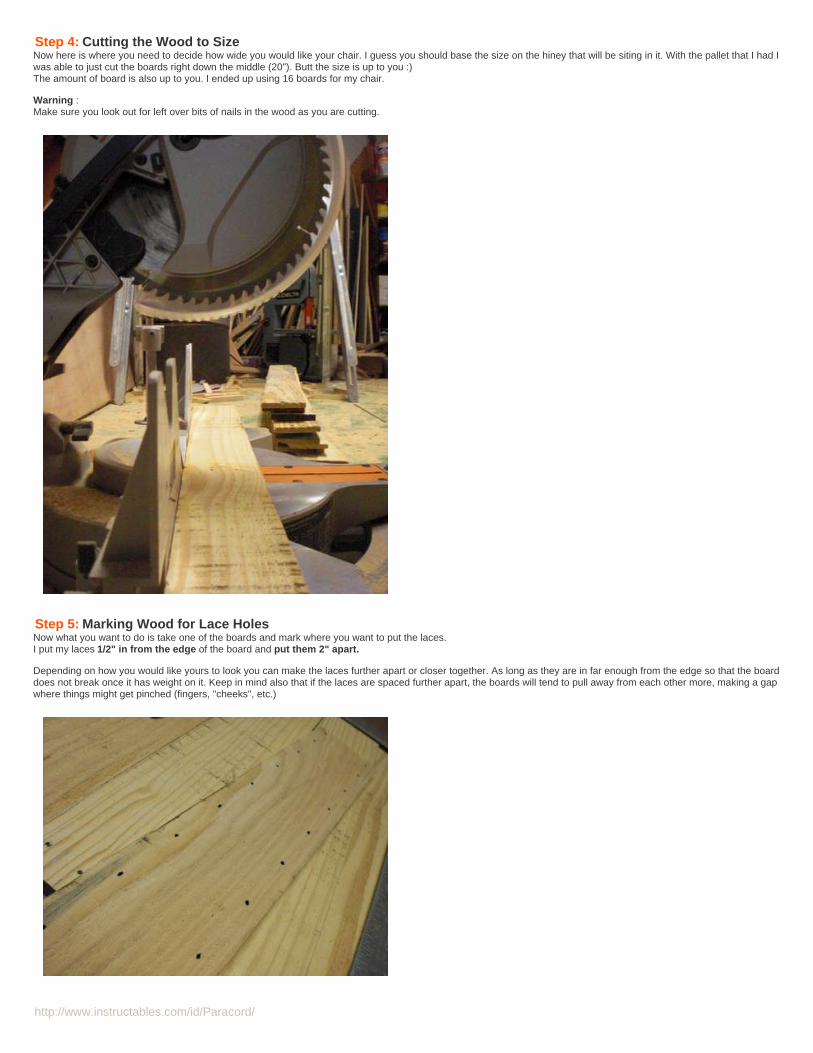
http://www.instructables.com/id/Paracord/
Step 4: Cutting the Wood to SizeNow here is where you need to decide how wide you would like your chair. I guess you should base the size on the hiney that will be siting in it. With the pallet that I had Iwas able to just cut the boards right down the middle (20"). Butt the size is up to you :)The amount of board is also up to you. I ended up using 16 boards for my chair.
Warning :Make sure you look out for left over bits of nails in the wood as you are cutting.
Step 5: Marking Wood for Lace HolesNow what you want to do is take one of the boards and mark where you want to put the laces.I put my laces 1/2" in from the edge of the board and put them 2" apart.
Depending on how you would like yours to look you can make the laces further apart or closer together. As long as they are in far enough from the edge so that the boarddoes not break once it has weight on it. Keep in mind also that if the laces are spaced further apart, the boards will tend to pull away from each other more, making a gapwhere things might get pinched (fingers, "cheeks", etc.)
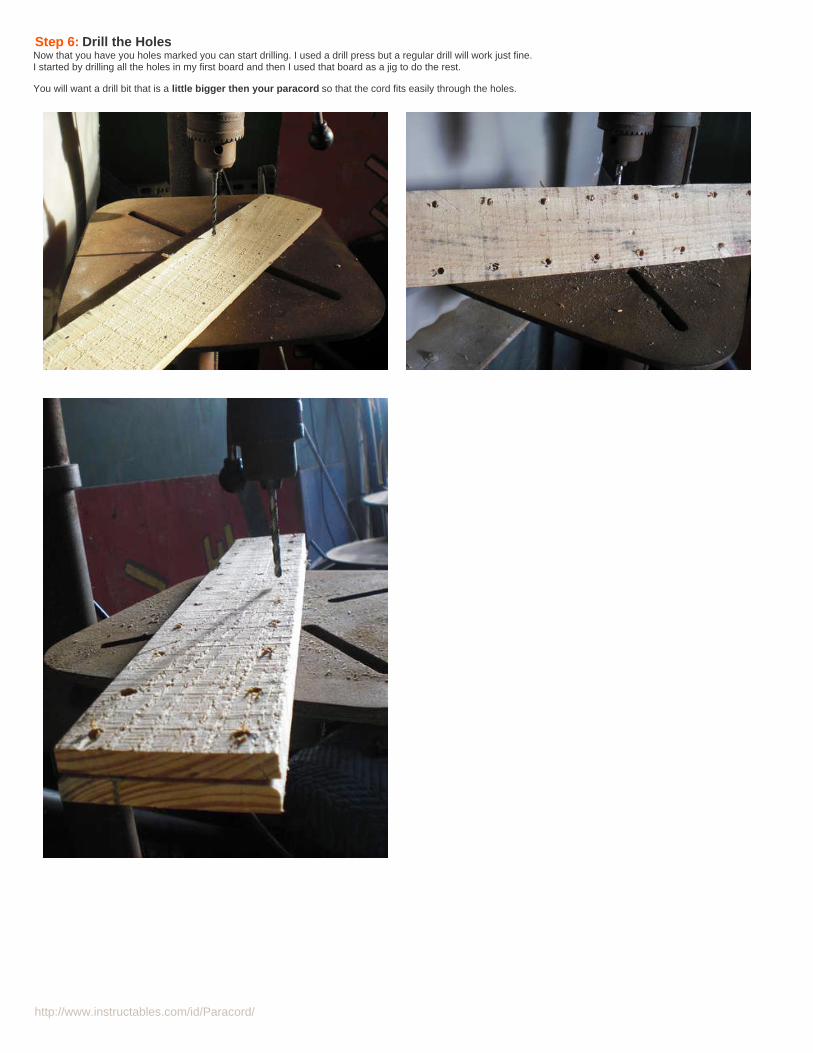
http://www.instructables.com/id/Paracord/
Step 6: Drill the HolesNow that you have you holes marked you can start drilling. I used a drill press but a regular drill will work just fine.I started by drilling all the holes in my first board and then I used that board as a jig to do the rest.
You will want a drill bit that is a little bigger then your paracord so that the cord fits easily through the holes.
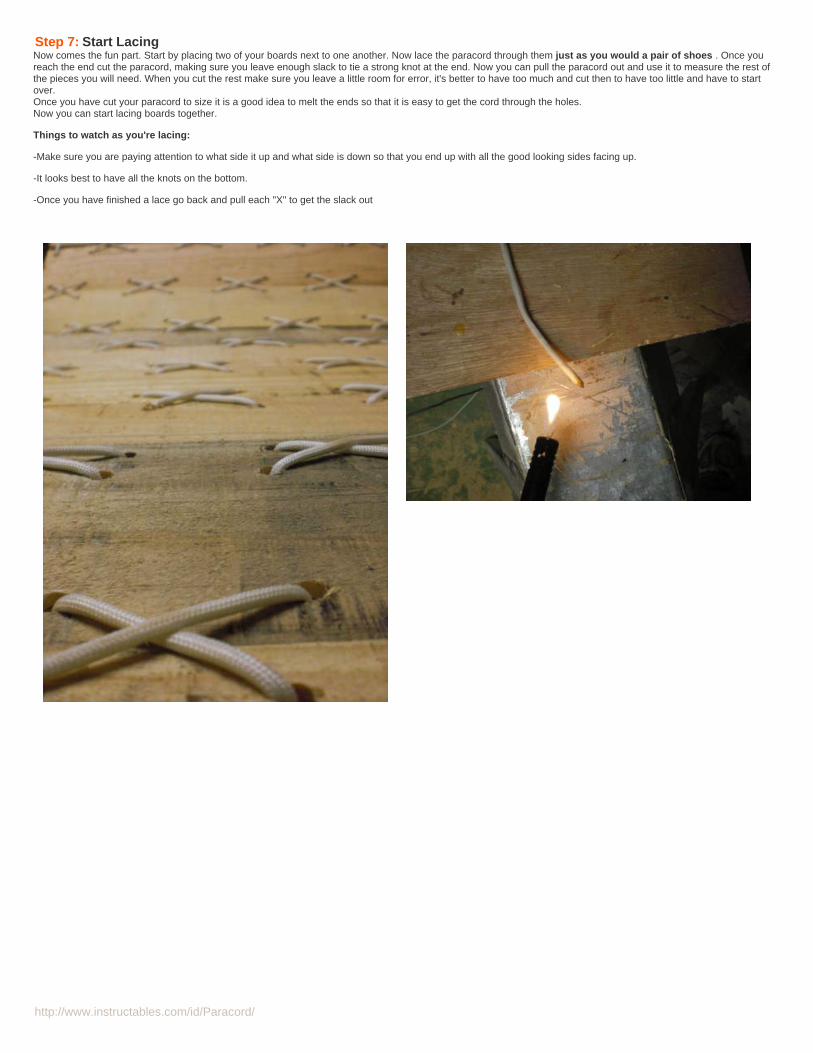
http://www.instructables.com/id/Paracord/
Step 7: Start LacingNow comes the fun part. Start by placing two of your boards next to one another. Now lace the paracord through them just as you would a pair of shoes . Once youreach the end cut the paracord, making sure you leave enough slack to tie a strong knot at the end. Now you can pull the paracord out and use it to measure the rest ofthe pieces you will need. When you cut the rest make sure you leave a little room for error, it's better to have too much and cut then to have too little and have to startover.Once you have cut your paracord to size it is a good idea to melt the ends so that it is easy to get the cord through the holes.Now you can start lacing boards together.
Things to watch as you're lacing:
-Make sure you are paying attention to what side it up and what side is down so that you end up with all the good looking sides facing up.
-It looks best to have all the knots on the bottom.
-Once you have finished a lace go back and pull each "X" to get the slack out
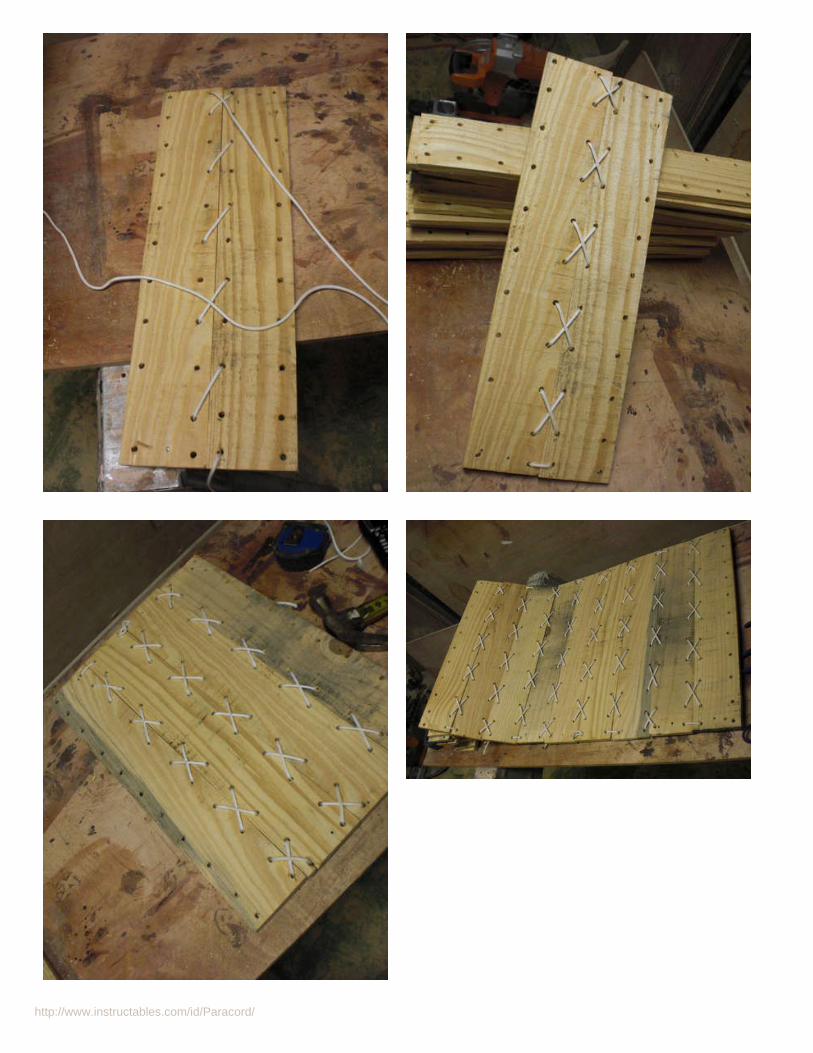
http://www.instructables.com/id/Paracord/
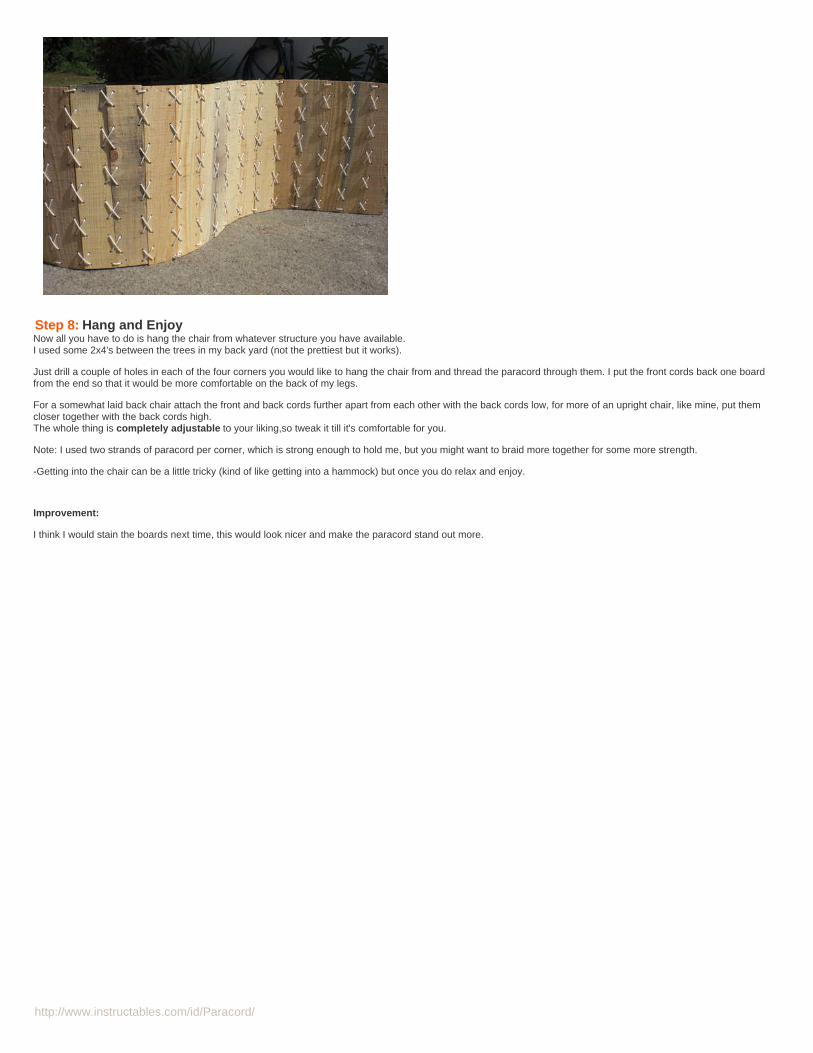
http://www.instructables.com/id/Paracord/
Step 8: Hang and EnjoyNow all you have to do is hang the chair from whatever structure you have available.I used some 2x4's between the trees in my back yard (not the prettiest but it works).
Just drill a couple of holes in each of the four corners you would like to hang the chair from and thread the paracord through them. I put the front cords back one boardfrom the end so that it would be more comfortable on the back of my legs.
For a somewhat laid back chair attach the front and back cords further apart from each other with the back cords low, for more of an upright chair, like mine, put themcloser together with the back cords high.The whole thing is completely adjustable to your liking,so tweak it till it's comfortable for you.
Note: I used two strands of paracord per corner, which is strong enough to hold me, but you might want to braid more together for some more strength.
-Getting into the chair can be a little tricky (kind of like getting into a hammock) but once you do relax and enjoy.
Improvement:
I think I would stain the boards next time, this would look nicer and make the paracord stand out more.
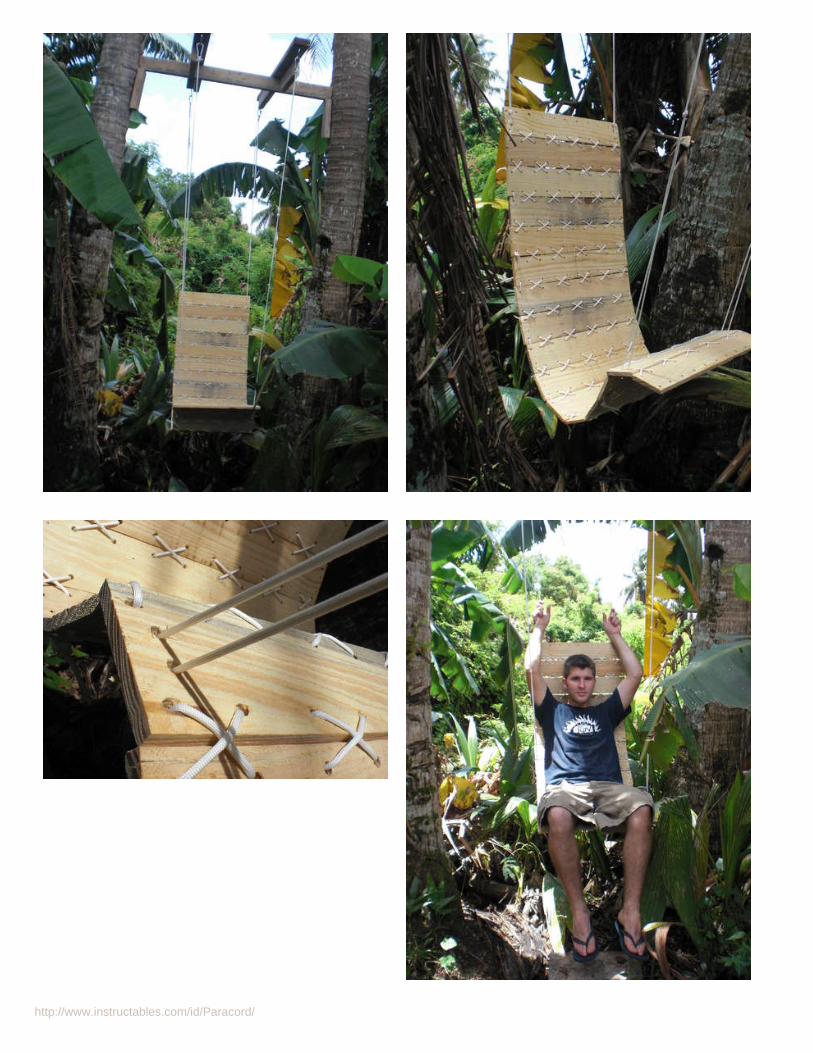
http://www.instructables.com/id/Paracord/

http://www.instructables.com/id/Paracord/
Related Instructables
Nalgene CapParacord Fix byrstupplebeen
DIY CampingHammock bylerickson
Super-easyParacord CampChair byRavingMadStudios
Pallet Table andChair byIanCarlson
Window Sheersinto KidsHammocks byMikeO
10 minuteparacordhammock byjcsuperman
How tobackpack betterwith a hammockby HAL 9000
Sellf AdjustingHammock(Photos) bycsiebe
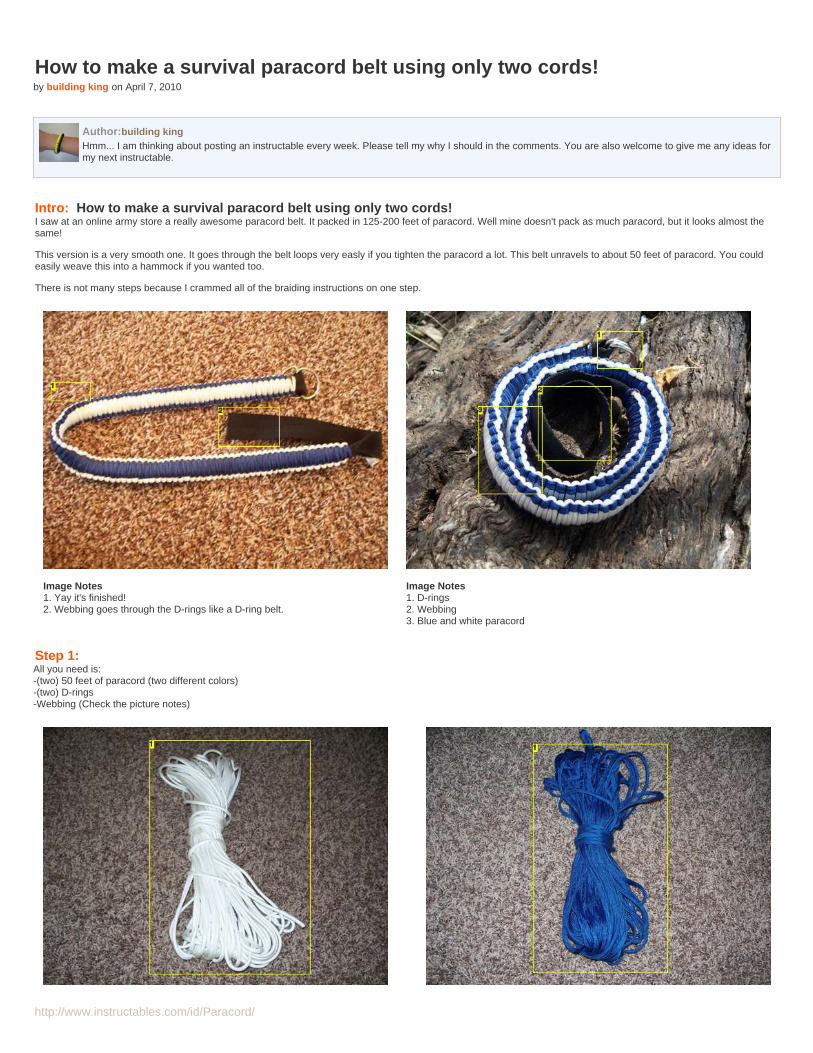
http://www.instructables.com/id/Paracord/
How to make a survival paracord belt using only two cords!by building king on April 7, 2010
Author:building kingHmm... I am thinking about posting an instructable every week. Please tell my why I should in the comments. You are also welcome to give me any ideas formy next instructable.
Intro: How to make a survival paracord belt using only two cords!I saw at an online army store a really awesome paracord belt. It packed in 125-200 feet of paracord. Well mine doesn't pack as much paracord, but it looks almost thesame!
This version is a very smooth one. It goes through the belt loops very easly if you tighten the paracord a lot. This belt unravels to about 50 feet of paracord. You couldeasily weave this into a hammock if you wanted too.
There is not many steps because I crammed all of the braiding instructions on one step.
Image Notes1. Yay it's finished!2. Webbing goes through the D-rings like a D-ring belt.
Image Notes1. D-rings2. Webbing3. Blue and white paracord
Step 1: All you need is:-(two) 50 feet of paracord (two different colors)-(two) D-rings-Webbing (Check the picture notes)
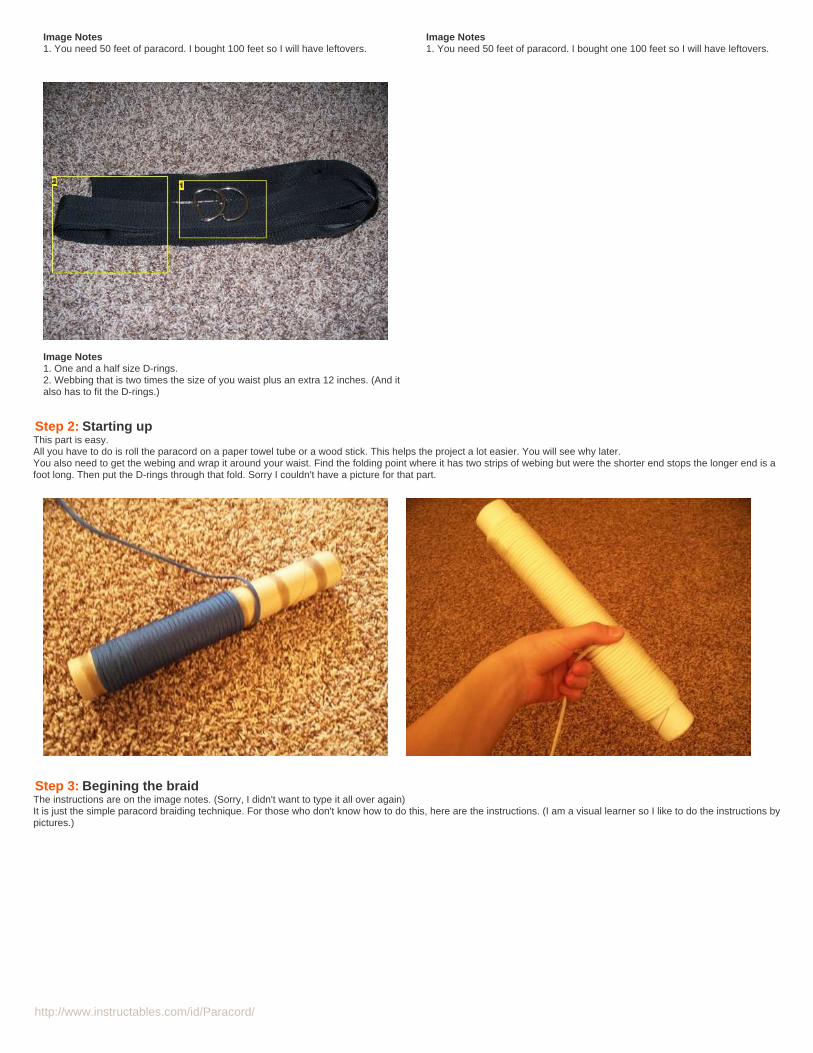
http://www.instructables.com/id/Paracord/
Image Notes1. You need 50 feet of paracord. I bought 100 feet so I will have leftovers.
Image Notes1. You need 50 feet of paracord. I bought one 100 feet so I will have leftovers.
Image Notes1. One and a half size D-rings.2. Webbing that is two times the size of you waist plus an extra 12 inches. (And italso has to fit the D-rings.)
Step 2: Starting upThis part is easy.All you have to do is roll the paracord on a paper towel tube or a wood stick. This helps the project a lot easier. You will see why later.You also need to get the webing and wrap it around your waist. Find the folding point where it has two strips of webing but were the shorter end stops the longer end is afoot long. Then put the D-rings through that fold. Sorry I couldn't have a picture for that part.
Step 3: Begining the braidThe instructions are on the image notes. (Sorry, I didn't want to type it all over again)It is just the simple paracord braiding technique. For those who don't know how to do this, here are the instructions. (I am a visual learner so I like to do the instructions bypictures.)
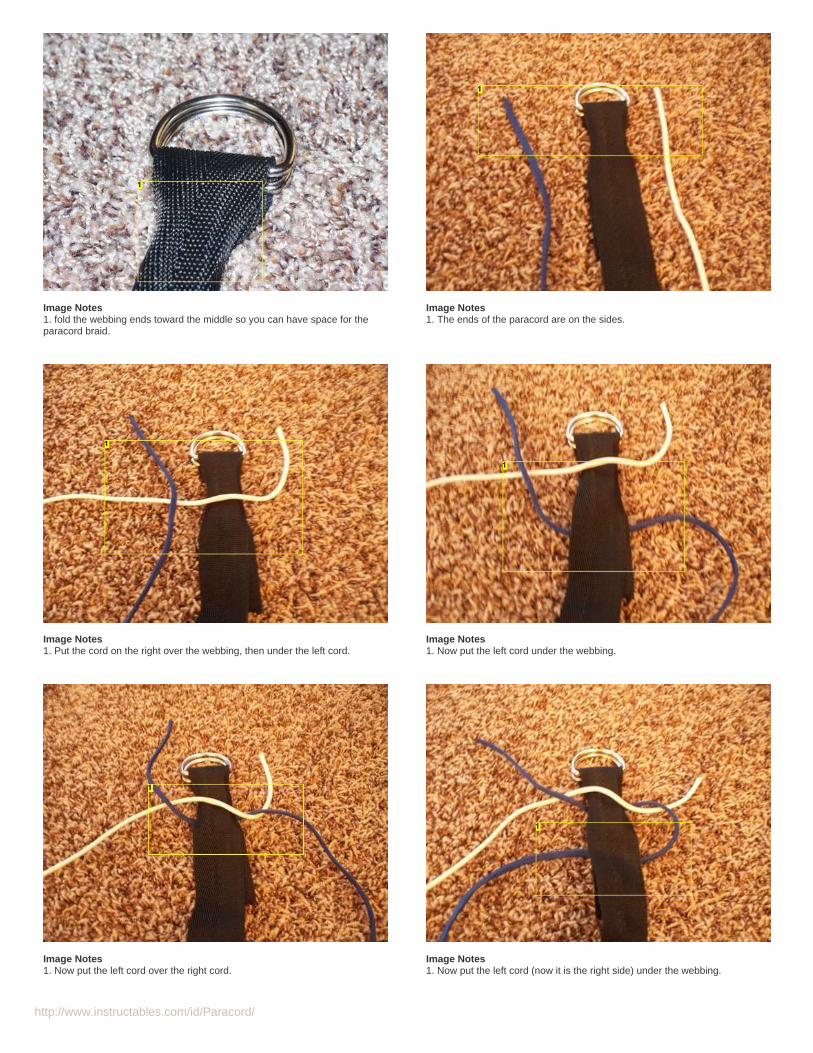
http://www.instructables.com/id/Paracord/
Image Notes1. fold the webbing ends toward the middle so you can have space for theparacord braid.
Image Notes1. The ends of the paracord are on the sides.
Image Notes1. Put the cord on the right over the webbing, then under the left cord.
Image Notes1. Now put the left cord under the webbing.
Image Notes1. Now put the left cord over the right cord.
Image Notes1. Now put the left cord (now it is the right side) under the webbing.
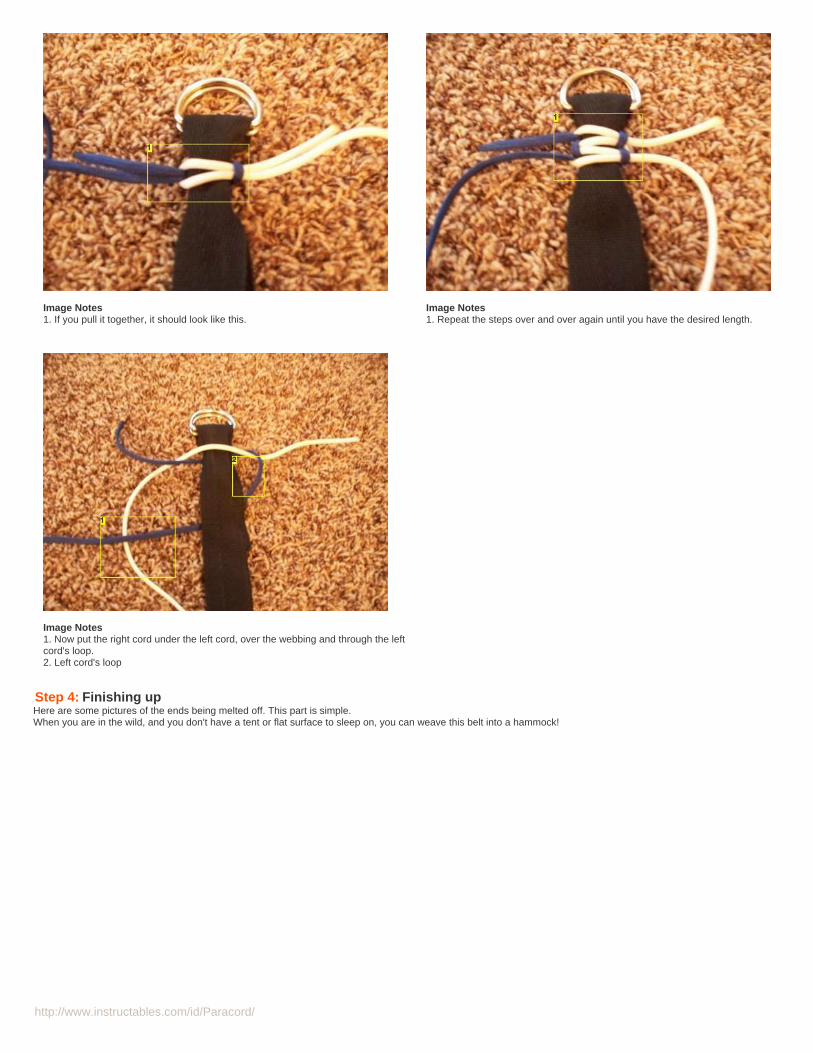
http://www.instructables.com/id/Paracord/
Image Notes1. If you pull it together, it should look like this.
Image Notes1. Repeat the steps over and over again until you have the desired length.
Image Notes1. Now put the right cord under the left cord, over the webbing and through the leftcord's loop.2. Left cord's loop
Step 4: Finishing upHere are some pictures of the ends being melted off. This part is simple.When you are in the wild, and you don't have a tent or flat surface to sleep on, you can weave this belt into a hammock!
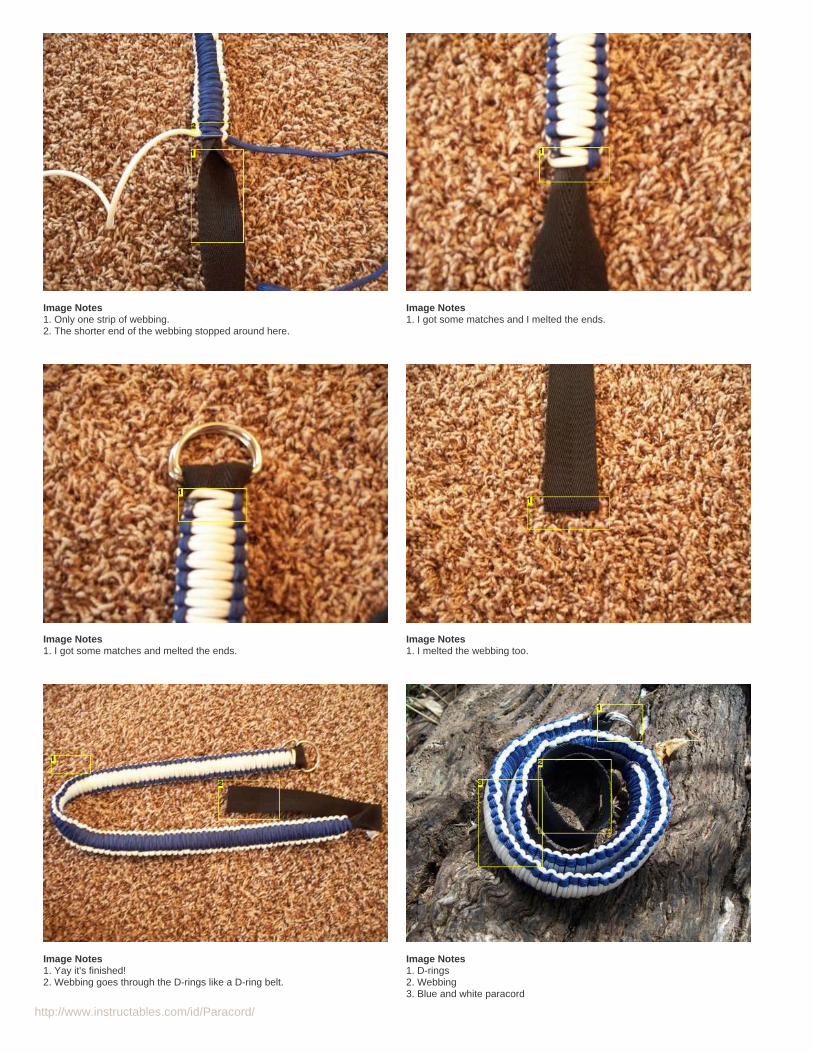
http://www.instructables.com/id/Paracord/
Image Notes1. Only one strip of webbing.2. The shorter end of the webbing stopped around here.
Image Notes1. I got some matches and I melted the ends.
Image Notes1. I got some matches and melted the ends.
Image Notes1. I melted the webbing too.
Image Notes1. Yay it's finished!2. Webbing goes through the D-rings like a D-ring belt.
Image Notes1. D-rings2. Webbing3. Blue and white paracord
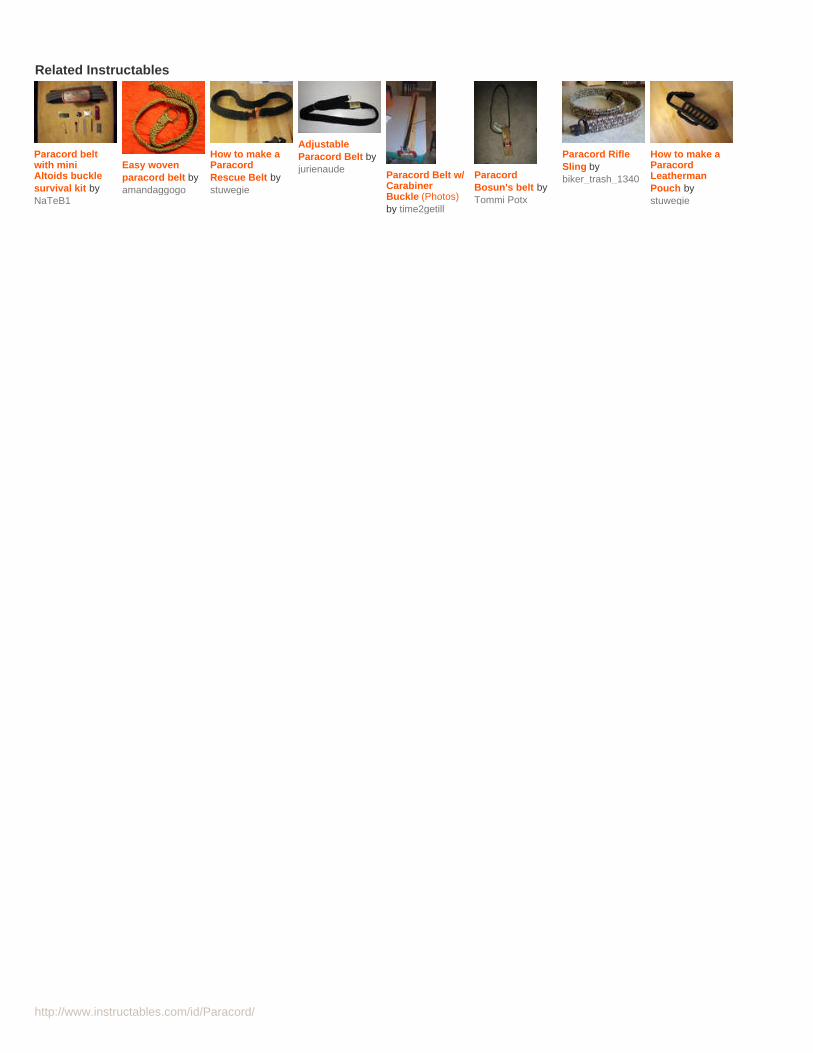
http://www.instructables.com/id/Paracord/
Related Instructables
Paracord beltwith miniAltoids bucklesurvival kit byNaTeB1
Easy wovenparacord belt byamandaggogo
How to make aParacordRescue Belt bystuwegie
AdjustableParacord Belt byjurienaude Paracord Belt w/
CarabinerBuckle (Photos)by time2getill
ParacordBosun's belt byTommi Potx
Paracord RifleSling bybiker_trash_1340
How to make aParacordLeathermanPouch bystuwegie
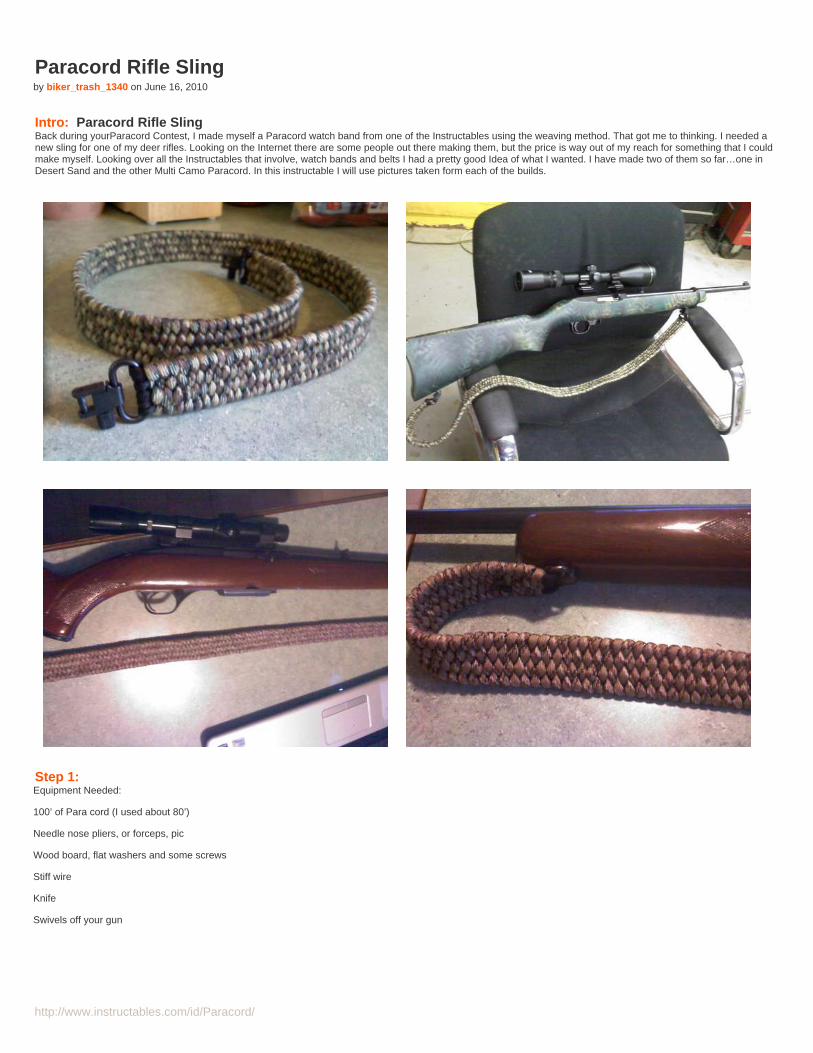
http://www.instructables.com/id/Paracord/
Paracord Rifle Slingby biker_trash_1340 on June 16, 2010
Intro: Paracord Rifle SlingBack during yourParacord Contest, I made myself a Paracord watch band from one of the Instructables using the weaving method. That got me to thinking. I needed anew sling for one of my deer rifles. Looking on the Internet there are some people out there making them, but the price is way out of my reach for something that I couldmake myself. Looking over all the Instructables that involve, watch bands and belts I had a pretty good Idea of what I wanted. I have made two of them so far…one inDesert Sand and the other Multi Camo Paracord. In this instructable I will use pictures taken form each of the builds.
Step 1: Equipment Needed:
100’ of Para cord (I used about 80’)
Needle nose pliers, or forceps, pic
Wood board, flat washers and some screws
Stiff wire
Knife
Swivels off your gun
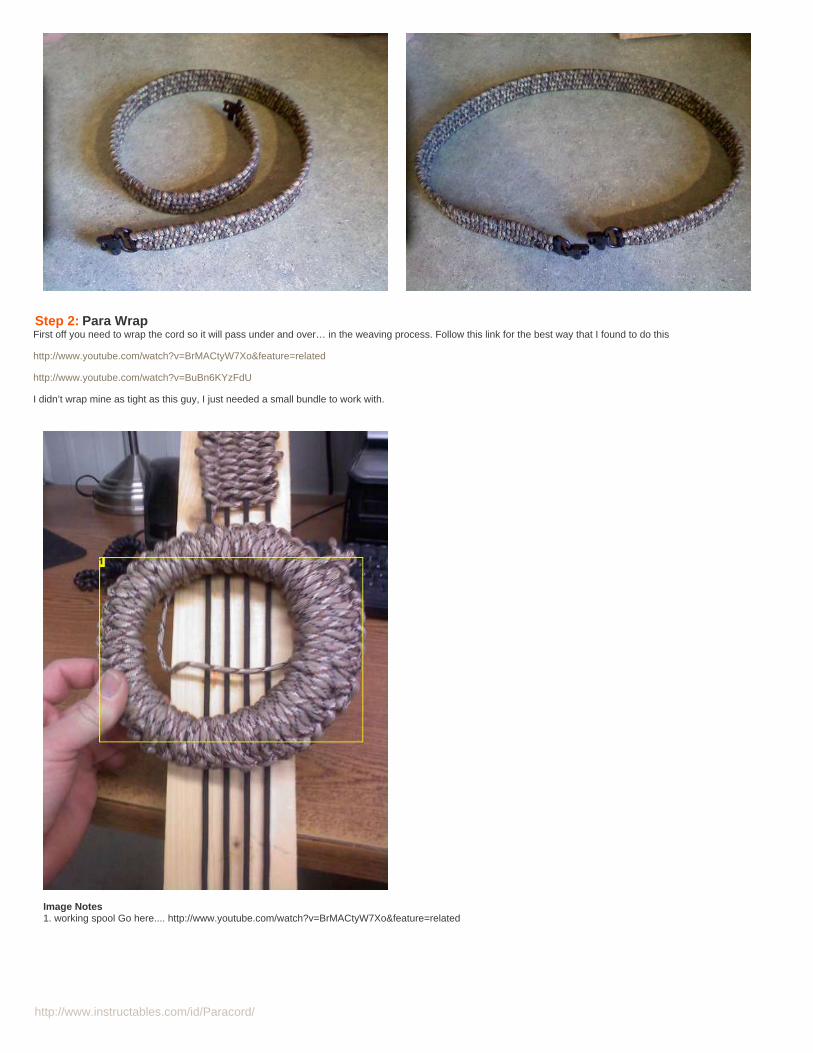
http://www.instructables.com/id/Paracord/
Step 2: Para WrapFirst off you need to wrap the cord so it will pass under and over… in the weaving process. Follow this link for the best way that I found to do this
http://www.youtube.com/watch?v=BrMACtyW7Xo&feature=related
http://www.youtube.com/watch?v=BuBn6KYzFdU
I didn’t wrap mine as tight as this guy, I just needed a small bundle to work with.
Image Notes1. working spool Go here.... http://www.youtube.com/watch?v=BrMACtyW7Xo&feature=related
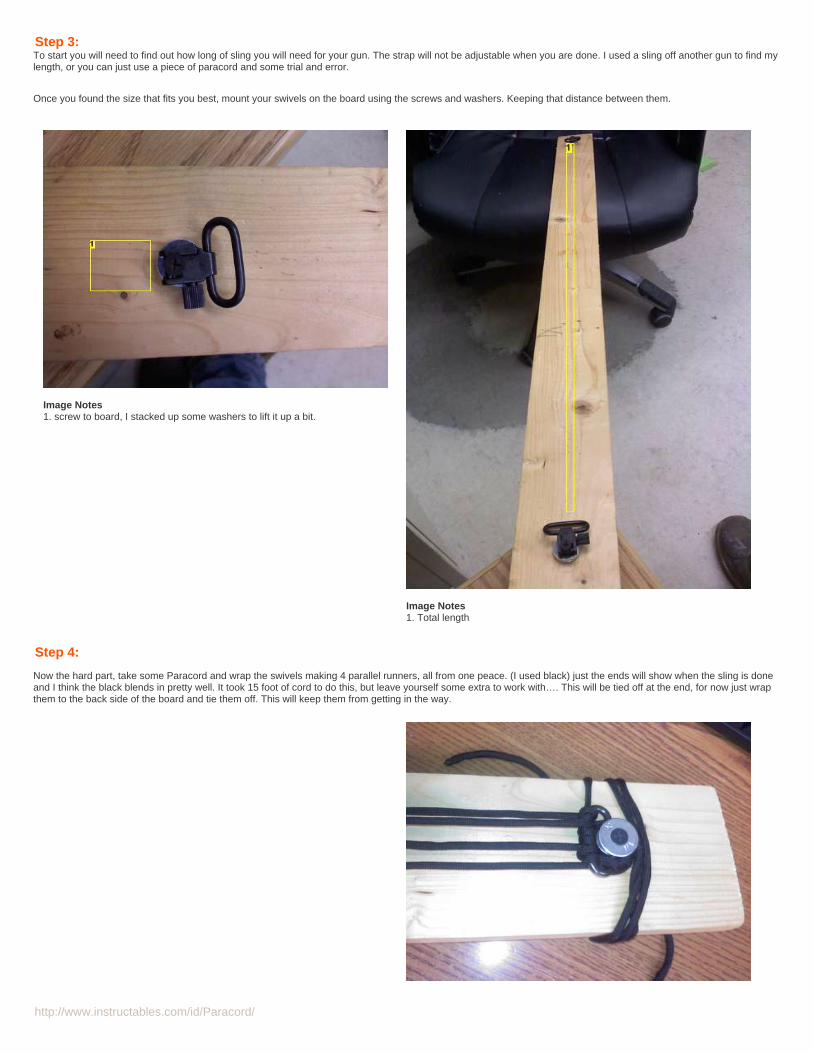
http://www.instructables.com/id/Paracord/
Step 3: To start you will need to find out how long of sling you will need for your gun. The strap will not be adjustable when you are done. I used a sling off another gun to find mylength, or you can just use a piece of paracord and some trial and error.
Once you found the size that fits you best, mount your swivels on the board using the screws and washers. Keeping that distance between them.
Image Notes1. screw to board, I stacked up some washers to lift it up a bit.
Image Notes1. Total length
Step 4:
Now the hard part, take some Paracord and wrap the swivels making 4 parallel runners, all from one peace. (I used black) just the ends will show when the sling is doneand I think the black blends in pretty well. It took 15 foot of cord to do this, but leave yourself some extra to work with…. This will be tied off at the end, for now just wrapthem to the back side of the board and tie them off. This will keep them from getting in the way.
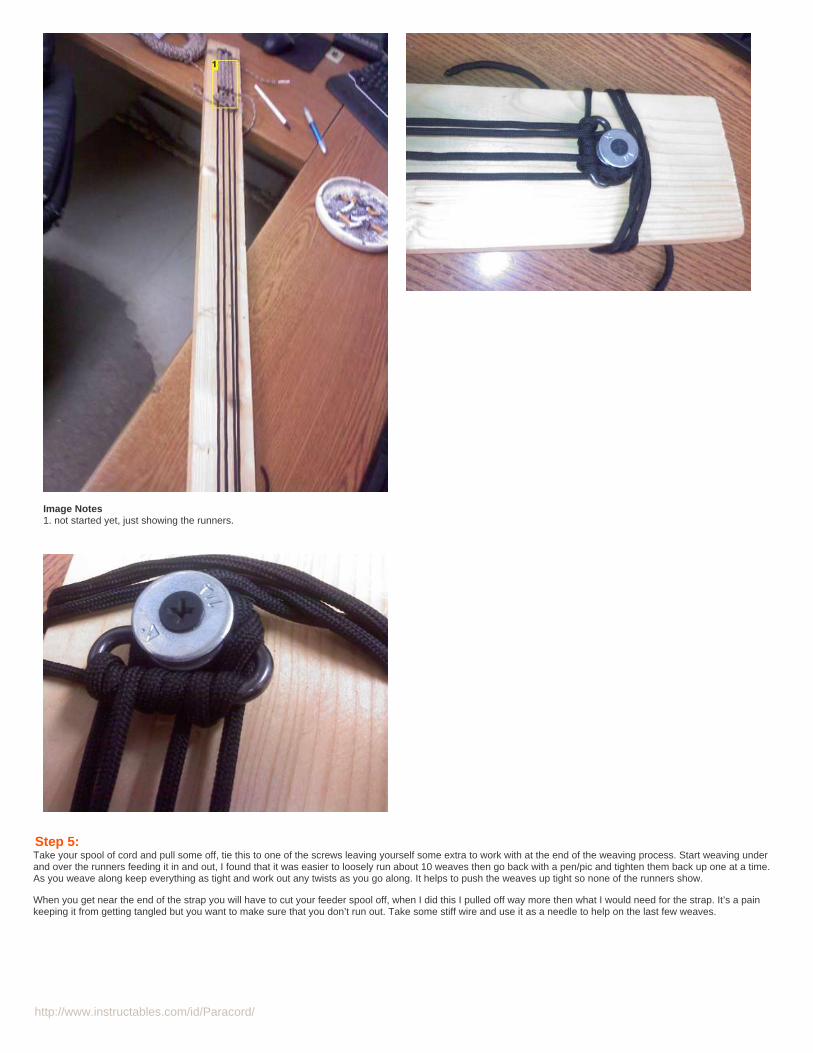
http://www.instructables.com/id/Paracord/
Image Notes1. not started yet, just showing the runners.
Step 5: Take your spool of cord and pull some off, tie this to one of the screws leaving yourself some extra to work with at the end of the weaving process. Start weaving underand over the runners feeding it in and out, I found that it was easier to loosely run about 10 weaves then go back with a pen/pic and tighten them back up one at a time.As you weave along keep everything as tight and work out any twists as you go along. It helps to push the weaves up tight so none of the runners show.
When you get near the end of the strap you will have to cut your feeder spool off, when I did this I pulled off way more then what I would need for the strap. It’s a painkeeping it from getting tangled but you want to make sure that you don’t run out. Take some stiff wire and use it as a needle to help on the last few weaves.
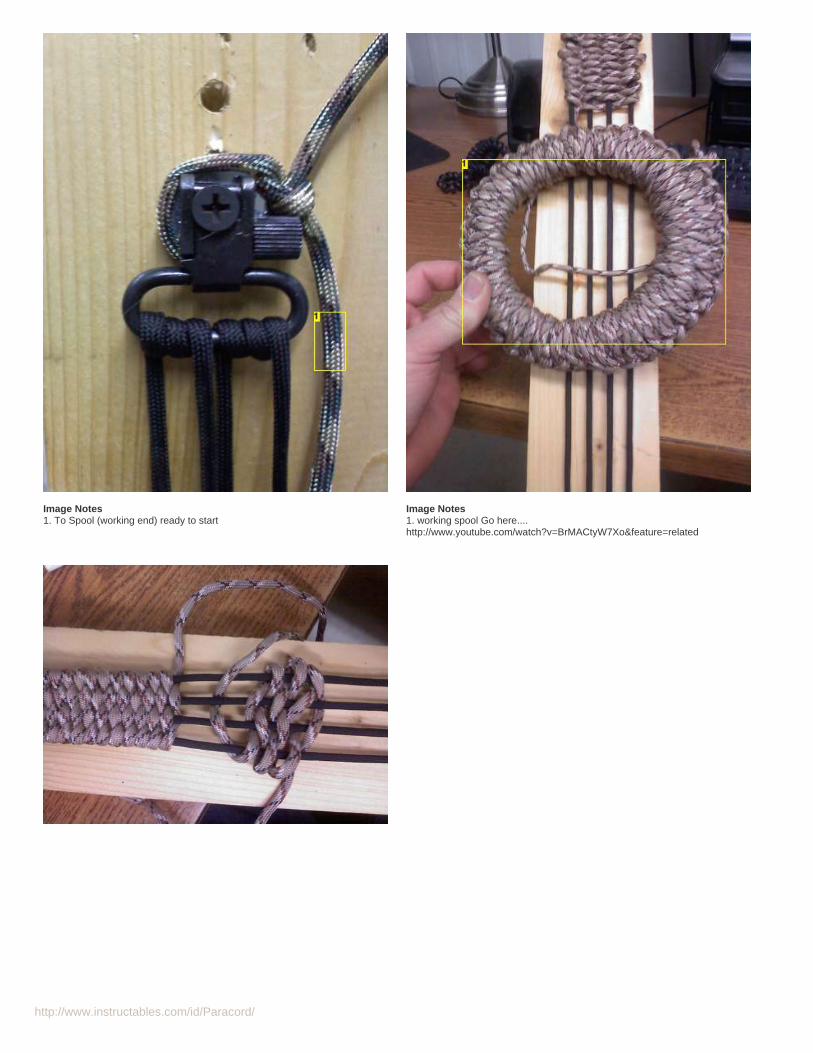
http://www.instructables.com/id/Paracord/
Image Notes1. To Spool (working end) ready to start
Image Notes1. working spool Go here....http://www.youtube.com/watch?v=BrMACtyW7Xo&feature=related
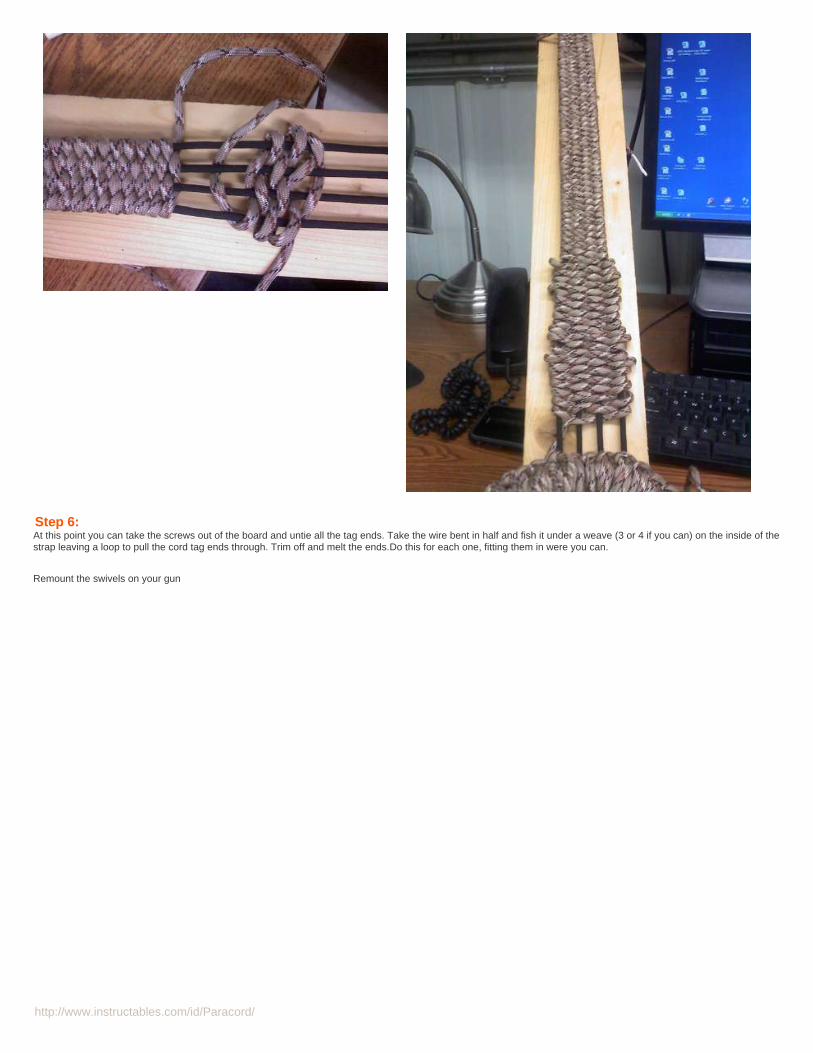
http://www.instructables.com/id/Paracord/
Step 6: At this point you can take the screws out of the board and untie all the tag ends. Take the wire bent in half and fish it under a weave (3 or 4 if you can) on the inside of thestrap leaving a loop to pull the cord tag ends through. Trim off and melt the ends.Do this for each one, fitting them in were you can.
Remount the swivels on your gun
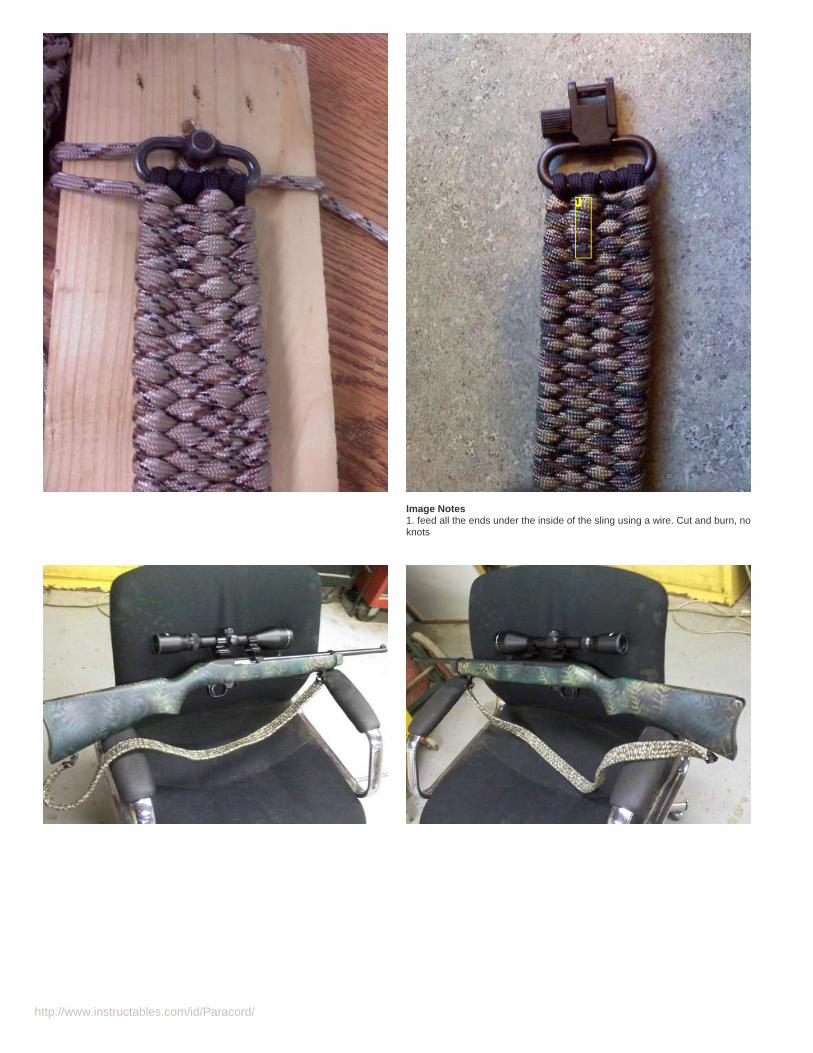
http://www.instructables.com/id/Paracord/
Image Notes1. feed all the ends under the inside of the sling using a wire. Cut and burn, noknots
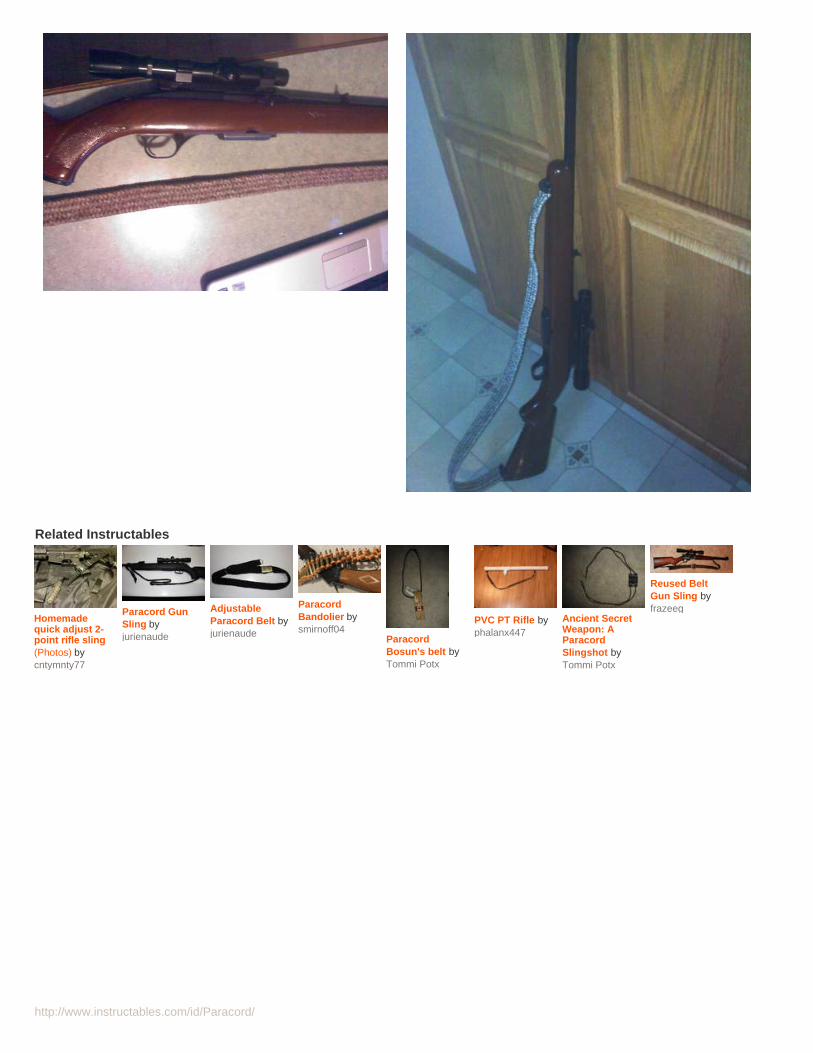
http://www.instructables.com/id/Paracord/
Related Instructables
Homemadequick adjust 2-point rifle sling(Photos) bycntymnty77
Paracord GunSling byjurienaude
AdjustableParacord Belt byjurienaude
ParacordBandolier bysmirnoff04
ParacordBosun's belt byTommi Potx
PVC PT Rifle byphalanx447
Ancient SecretWeapon: AParacordSlingshot byTommi Potx
Reused BeltGun Sling byfrazeeg
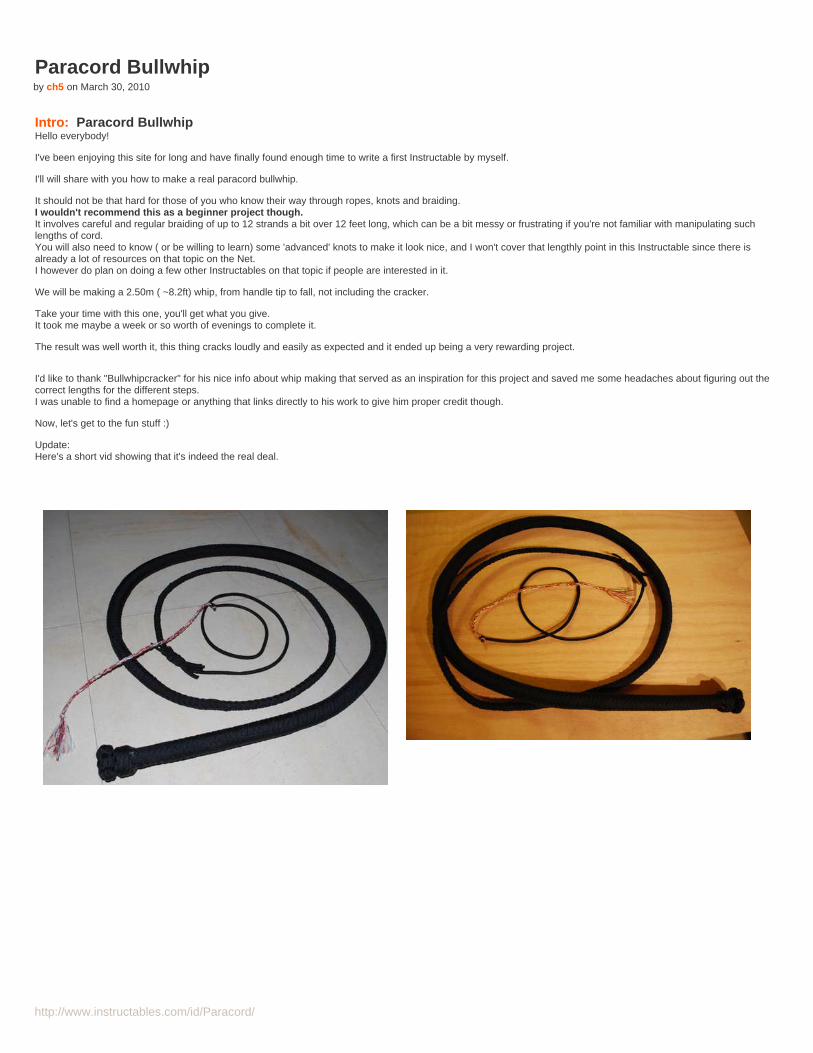
http://www.instructables.com/id/Paracord/
Paracord Bullwhipby ch5 on March 30, 2010
Intro: Paracord BullwhipHello everybody!
I've been enjoying this site for long and have finally found enough time to write a first Instructable by myself.
I'll will share with you how to make a real paracord bullwhip.
It should not be that hard for those of you who know their way through ropes, knots and braiding.I wouldn't recommend this as a beginner project though.It involves careful and regular braiding of up to 12 strands a bit over 12 feet long, which can be a bit messy or frustrating if you're not familiar with manipulating suchlengths of cord.You will also need to know ( or be willing to learn) some 'advanced' knots to make it look nice, and I won't cover that lengthly point in this Instructable since there isalready a lot of resources on that topic on the Net.I however do plan on doing a few other Instructables on that topic if people are interested in it.
We will be making a 2.50m ( ~8.2ft) whip, from handle tip to fall, not including the cracker.
Take your time with this one, you'll get what you give.It took me maybe a week or so worth of evenings to complete it.
The result was well worth it, this thing cracks loudly and easily as expected and it ended up being a very rewarding project.
I'd like to thank "Bullwhipcracker" for his nice info about whip making that served as an inspiration for this project and saved me some headaches about figuring out thecorrect lengths for the different steps.I was unable to find a homepage or anything that links directly to his work to give him proper credit though.
Now, let's get to the fun stuff :)
Update:Here's a short vid showing that it's indeed the real deal.
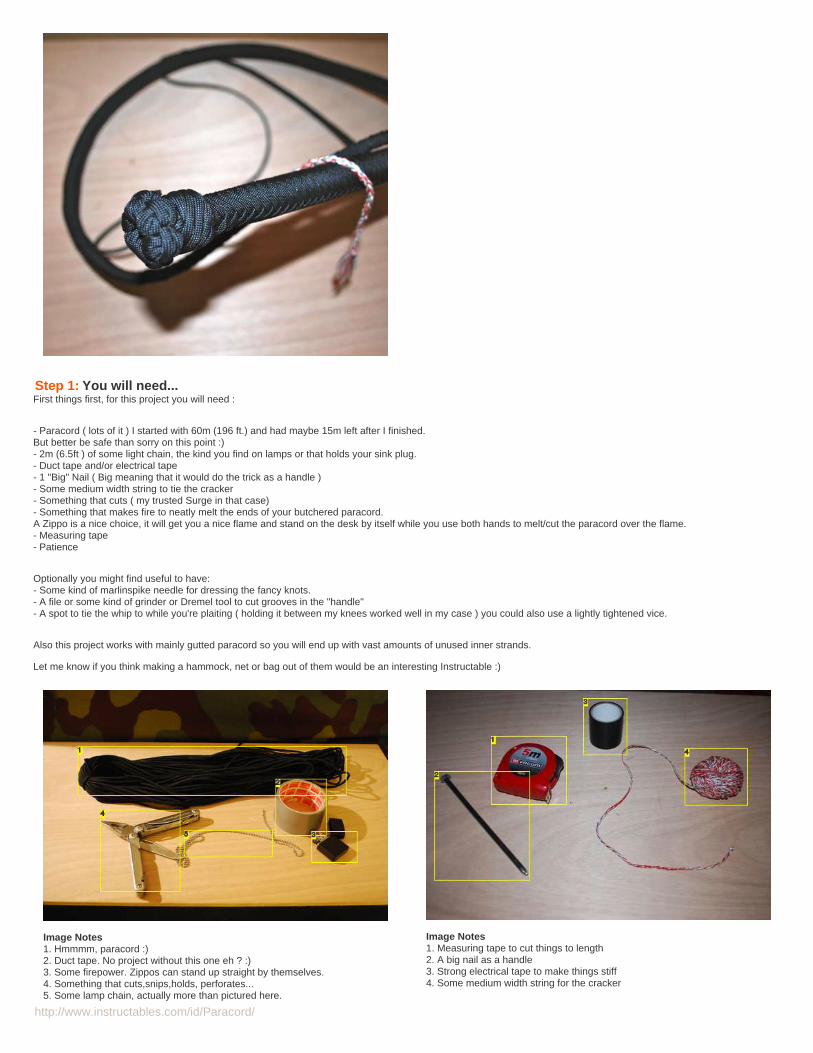
http://www.instructables.com/id/Paracord/
Step 1: You will need...First things first, for this project you will need :
- Paracord ( lots of it ) I started with 60m (196 ft.) and had maybe 15m left after I finished.But better be safe than sorry on this point :)- 2m (6.5ft ) of some light chain, the kind you find on lamps or that holds your sink plug.- Duct tape and/or electrical tape- 1 "Big" Nail ( Big meaning that it would do the trick as a handle )- Some medium width string to tie the cracker- Something that cuts ( my trusted Surge in that case)- Something that makes fire to neatly melt the ends of your butchered paracord.A Zippo is a nice choice, it will get you a nice flame and stand on the desk by itself while you use both hands to melt/cut the paracord over the flame.- Measuring tape- Patience
Optionally you might find useful to have:- Some kind of marlinspike needle for dressing the fancy knots.- A file or some kind of grinder or Dremel tool to cut grooves in the "handle"- A spot to tie the whip to while you're plaiting ( holding it between my knees worked well in my case ) you could also use a lightly tightened vice.
Also this project works with mainly gutted paracord so you will end up with vast amounts of unused inner strands.
Let me know if you think making a hammock, net or bag out of them would be an interesting Instructable :)
Image Notes1. Hmmmm, paracord :)2. Duct tape. No project without this one eh ? :)3. Some firepower. Zippos can stand up straight by themselves.4. Something that cuts,snips,holds, perforates...5. Some lamp chain, actually more than pictured here.
Image Notes1. Measuring tape to cut things to length2. A big nail as a handle3. Strong electrical tape to make things stiff4. Some medium width string for the cracker
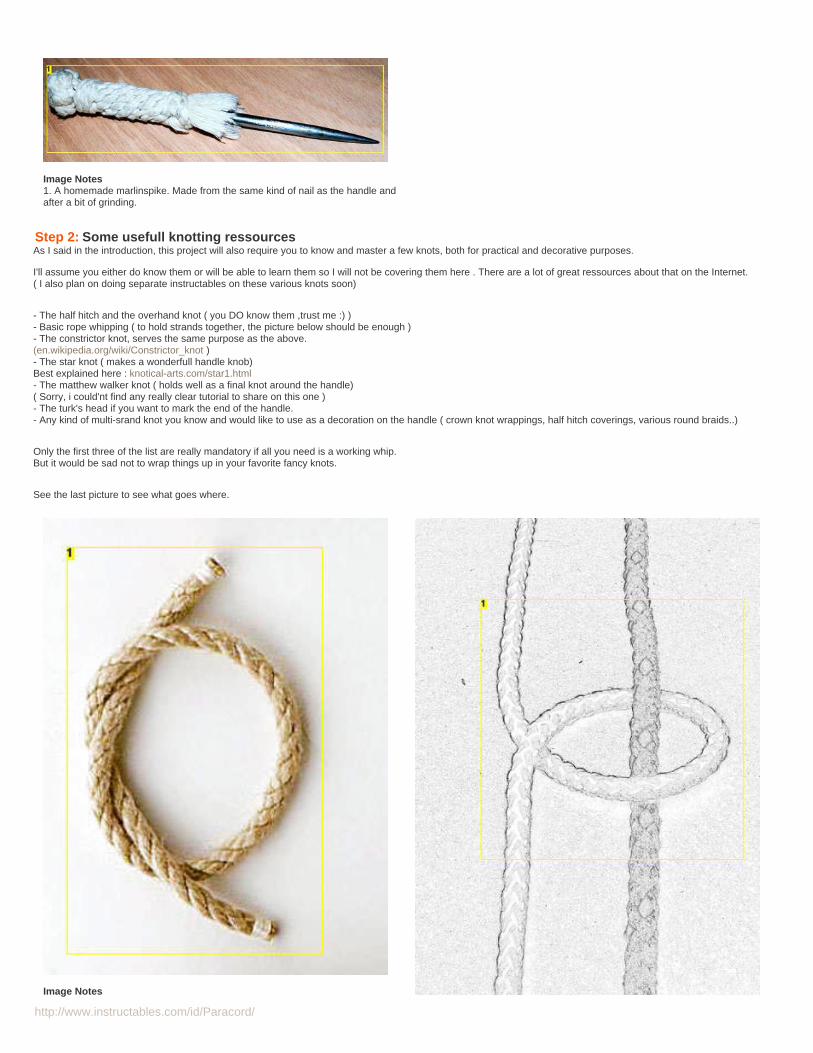
http://www.instructables.com/id/Paracord/
Image Notes1. A homemade marlinspike. Made from the same kind of nail as the handle andafter a bit of grinding.
Step 2: Some usefull knotting ressourcesAs I said in the introduction, this project will also require you to know and master a few knots, both for practical and decorative purposes.
I'll assume you either do know them or will be able to learn them so I will not be covering them here . There are a lot of great ressources about that on the Internet.( I also plan on doing separate instructables on these various knots soon)
- The half hitch and the overhand knot ( you DO know them ,trust me :) )- Basic rope whipping ( to hold strands together, the picture below should be enough )- The constrictor knot, serves the same purpose as the above.(en.wikipedia.org/wiki/Constrictor_knot )- The star knot ( makes a wonderfull handle knob)Best explained here : knotical-arts.com/star1.html- The matthew walker knot ( holds well as a final knot around the handle)( Sorry, i could'nt find any really clear tutorial to share on this one )- The turk's head if you want to mark the end of the handle.- Any kind of multi-srand knot you know and would like to use as a decoration on the handle ( crown knot wrappings, half hitch coverings, various round braids..)
Only the first three of the list are really mandatory if all you need is a working whip.But it would be sad not to wrap things up in your favorite fancy knots.
See the last picture to see what goes where.
Image Notes
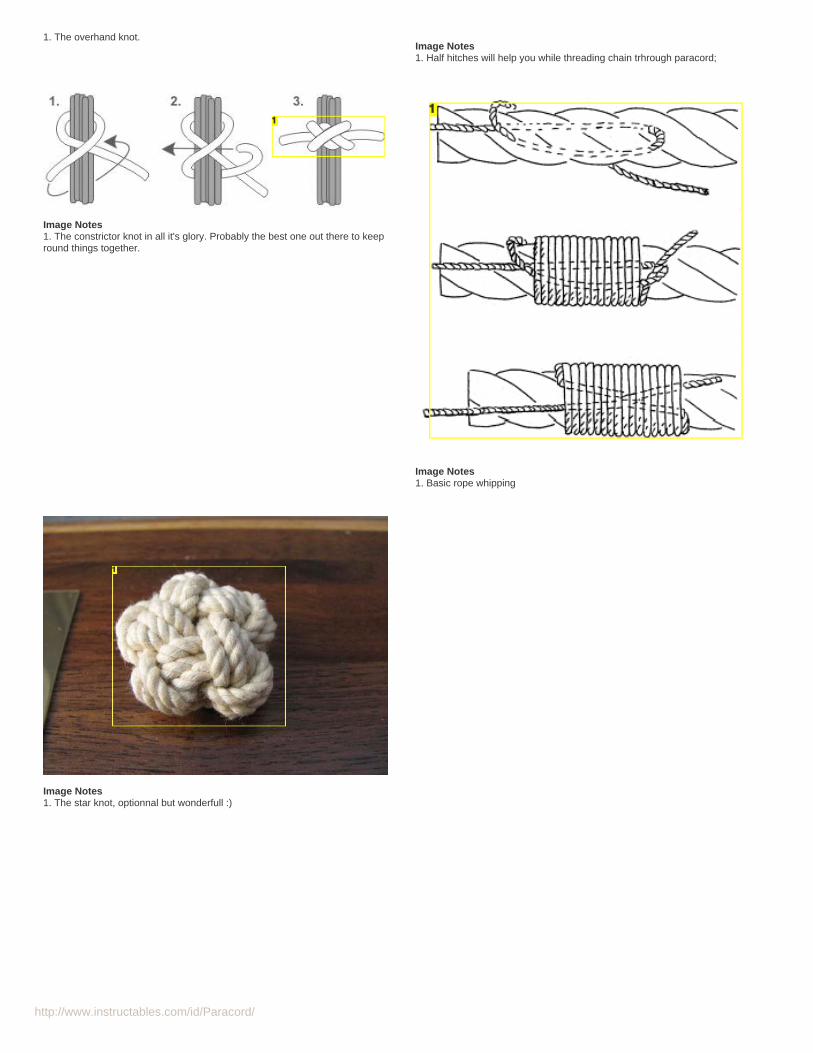
http://www.instructables.com/id/Paracord/
1. The overhand knot.Image Notes1. Half hitches will help you while threading chain trhrough paracord;
Image Notes1. The constrictor knot in all it's glory. Probably the best one out there to keepround things together.
Image Notes1. Basic rope whipping
Image Notes1. The star knot, optionnal but wonderfull :)
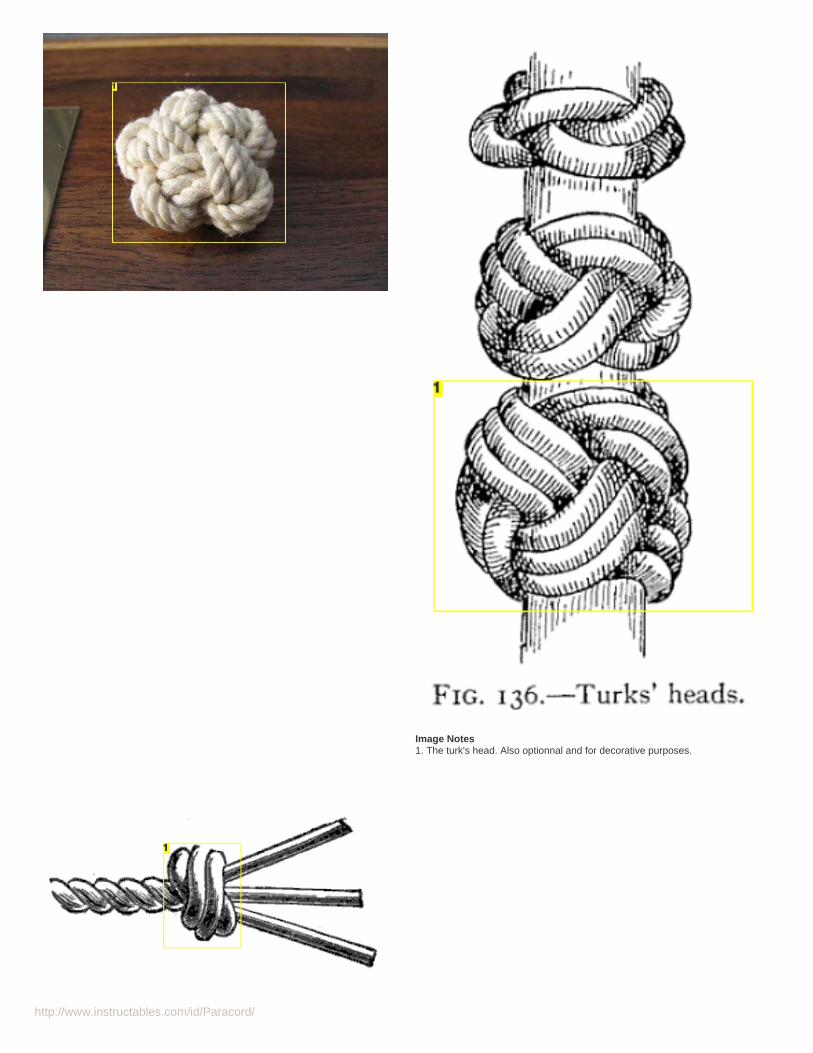
http://www.instructables.com/id/Paracord/
Image Notes1. The turk's head. Also optionnal and for decorative purposes.
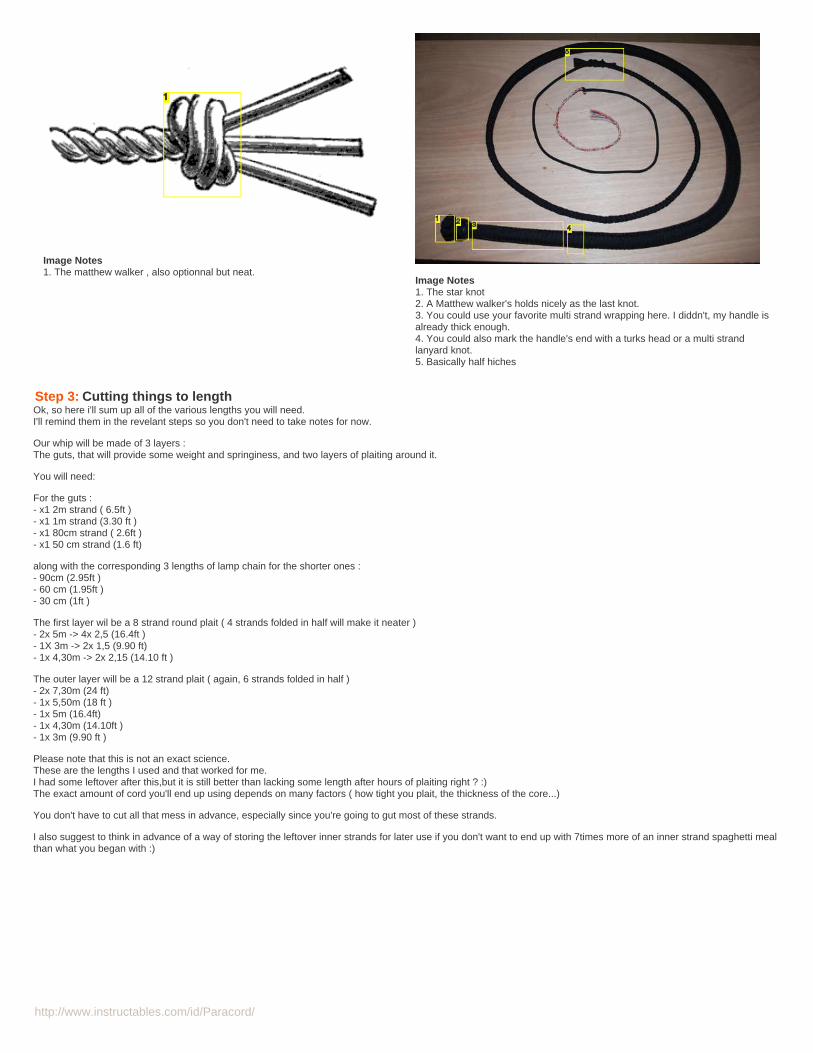
http://www.instructables.com/id/Paracord/
Image Notes1. The matthew walker , also optionnal but neat.
Image Notes1. The star knot2. A Matthew walker's holds nicely as the last knot.3. You could use your favorite multi strand wrapping here. I diddn't, my handle isalready thick enough.4. You could also mark the handle's end with a turks head or a multi strandlanyard knot.5. Basically half hiches
Step 3: Cutting things to lengthOk, so here i'll sum up all of the various lengths you will need.I'll remind them in the revelant steps so you don't need to take notes for now.
Our whip will be made of 3 layers :The guts, that will provide some weight and springiness, and two layers of plaiting around it.
You will need:
For the guts :- x1 2m strand ( 6.5ft )- x1 1m strand (3.30 ft )- x1 80cm strand ( 2.6ft )- x1 50 cm strand (1.6 ft)
along with the corresponding 3 lengths of lamp chain for the shorter ones :- 90cm (2.95ft )- 60 cm (1.95ft )- 30 cm (1ft )
The first layer wil be a 8 strand round plait ( 4 strands folded in half will make it neater )- 2x 5m -> 4x 2,5 (16.4ft )- 1X 3m -> 2x 1,5 (9.90 ft)- 1x 4,30m -> 2x 2,15 (14.10 ft )
The outer layer will be a 12 strand plait ( again, 6 strands folded in half )- 2x 7,30m (24 ft)- 1x 5,50m (18 ft )- 1x 5m (16.4ft)- 1x 4,30m (14.10ft )- 1x 3m (9.90 ft )
Please note that this is not an exact science.These are the lengths I used and that worked for me.I had some leftover after this,but it is still better than lacking some length after hours of plaiting right ? :)The exact amount of cord you'll end up using depends on many factors ( how tight you plait, the thickness of the core...)
You don't have to cut all that mess in advance, especially since you're going to gut most of these strands.
I also suggest to think in advance of a way of storing the leftover inner strands for later use if you don't want to end up with 7times more of an inner strand spaghetti mealthan what you began with :)
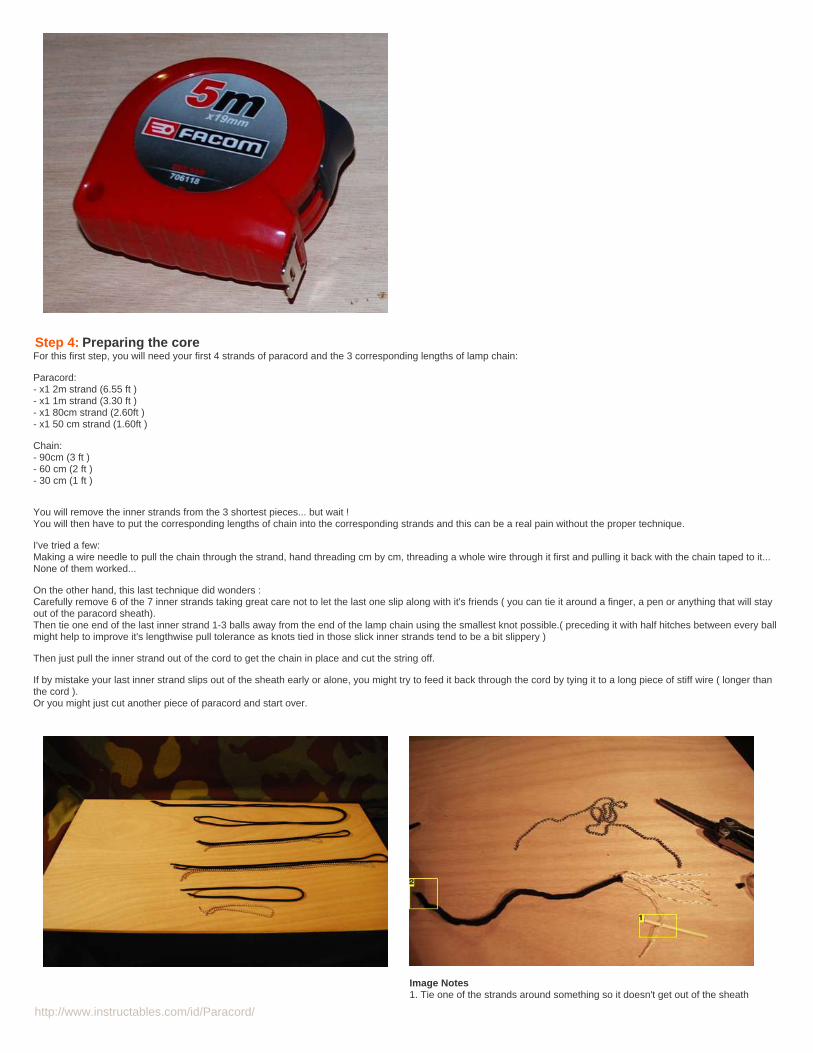
http://www.instructables.com/id/Paracord/
Step 4: Preparing the coreFor this first step, you will need your first 4 strands of paracord and the 3 corresponding lengths of lamp chain:
Paracord:- x1 2m strand (6.55 ft )- x1 1m strand (3.30 ft )- x1 80cm strand (2.60ft )- x1 50 cm strand (1.60ft )
Chain:- 90cm (3 ft )- 60 cm (2 ft )- 30 cm (1 ft )
You will remove the inner strands from the 3 shortest pieces... but wait !You will then have to put the corresponding lengths of chain into the corresponding strands and this can be a real pain without the proper technique.
I've tried a few:Making a wire needle to pull the chain through the strand, hand threading cm by cm, threading a whole wire through it first and pulling it back with the chain taped to it...None of them worked...
On the other hand, this last technique did wonders :Carefully remove 6 of the 7 inner strands taking great care not to let the last one slip along with it's friends ( you can tie it around a finger, a pen or anything that will stayout of the paracord sheath).Then tie one end of the last inner strand 1-3 balls away from the end of the lamp chain using the smallest knot possible.( preceding it with half hitches between every ballmight help to improve it's lengthwise pull tolerance as knots tied in those slick inner strands tend to be a bit slippery )
Then just pull the inner strand out of the cord to get the chain in place and cut the string off.
If by mistake your last inner strand slips out of the sheath early or alone, you might try to feed it back through the cord by tying it to a long piece of stiff wire ( longer thanthe cord ).Or you might just cut another piece of paracord and start over.
Image Notes1. Tie one of the strands around something so it doesn't get out of the sheath
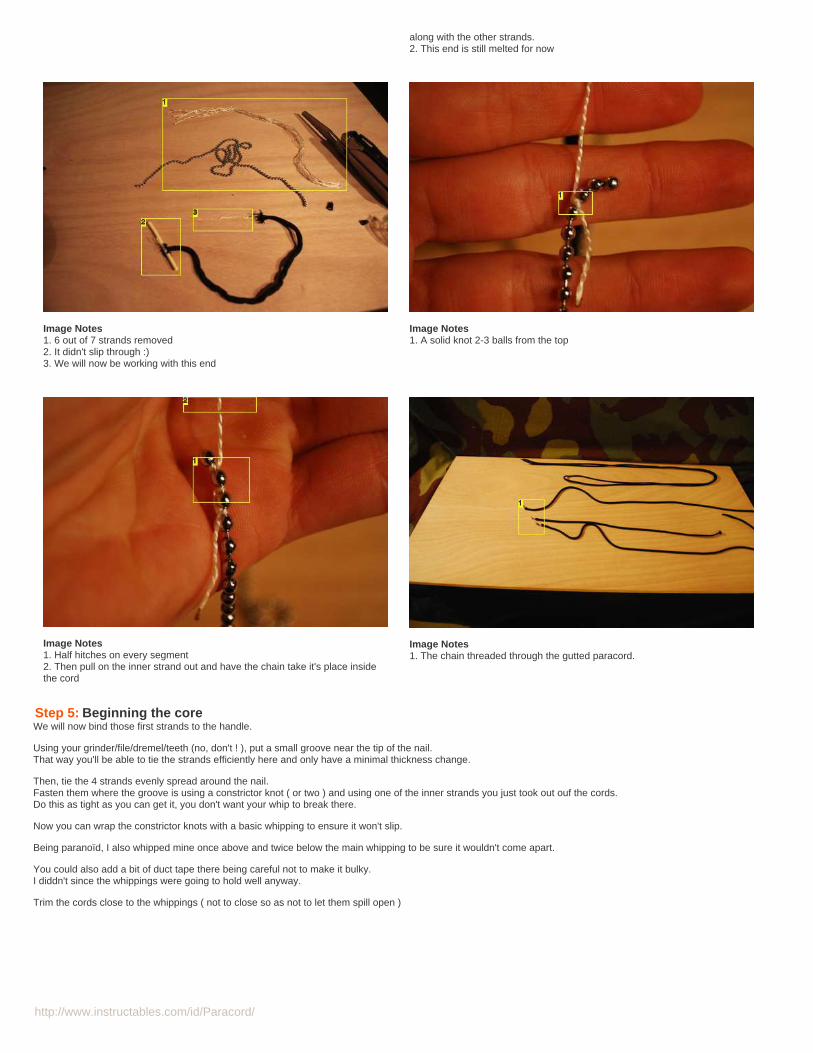
http://www.instructables.com/id/Paracord/
along with the other strands.2. This end is still melted for now
Image Notes1. 6 out of 7 strands removed2. It didn't slip through :)3. We will now be working with this end
Image Notes1. A solid knot 2-3 balls from the top
Image Notes1. Half hitches on every segment2. Then pull on the inner strand out and have the chain take it's place insidethe cord
Image Notes1. The chain threaded through the gutted paracord.
Step 5: Beginning the coreWe will now bind those first strands to the handle.
Using your grinder/file/dremel/teeth (no, don't ! ), put a small groove near the tip of the nail.That way you'll be able to tie the strands efficiently here and only have a minimal thickness change.
Then, tie the 4 strands evenly spread around the nail.Fasten them where the groove is using a constrictor knot ( or two ) and using one of the inner strands you just took out ouf the cords.Do this as tight as you can get it, you don't want your whip to break there.
Now you can wrap the constrictor knots with a basic whipping to ensure it won't slip.
Being paranoïd, I also whipped mine once above and twice below the main whipping to be sure it wouldn't come apart.
You could also add a bit of duct tape there being careful not to make it bulky.I diddn't since the whippings were going to hold well anyway.
Trim the cords close to the whippings ( not to close so as not to let them spill open )
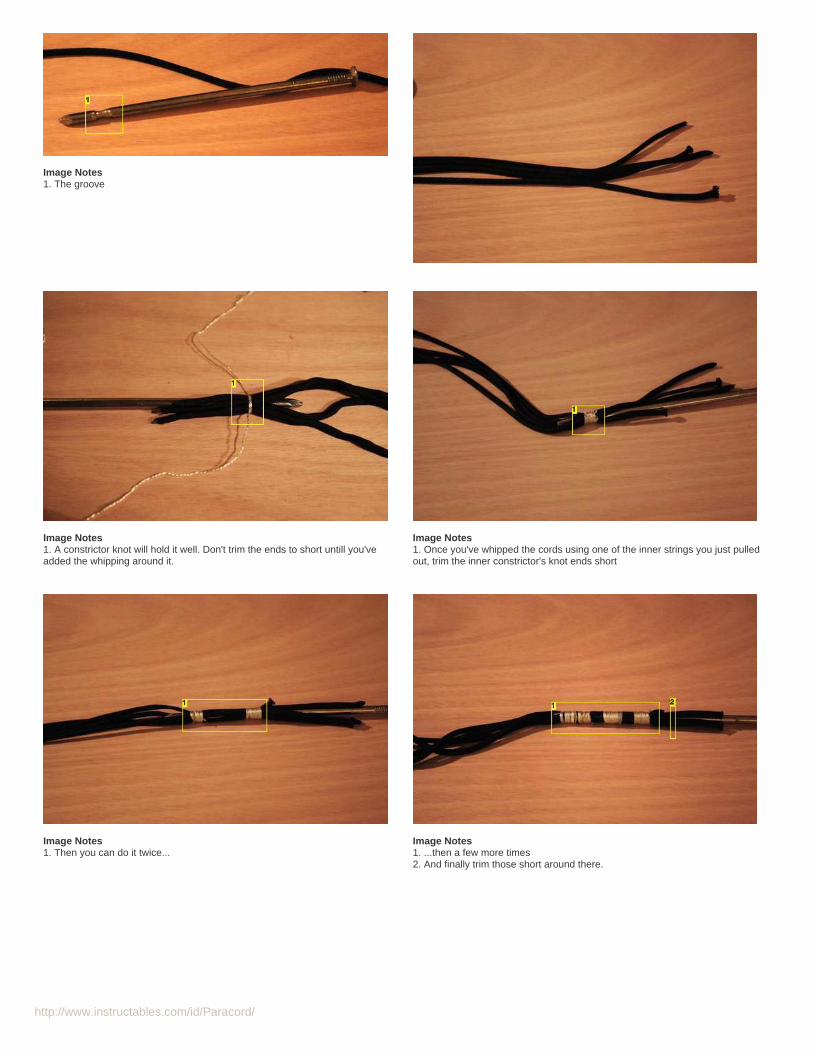
http://www.instructables.com/id/Paracord/
Image Notes1. The groove
Image Notes1. A constrictor knot will hold it well. Don't trim the ends to short untill you'veadded the whipping around it.
Image Notes1. Once you've whipped the cords using one of the inner strings you just pulledout, trim the inner constrictor's knot ends short
Image Notes1. Then you can do it twice...
Image Notes1. ...then a few more times2. And finally trim those short around there.
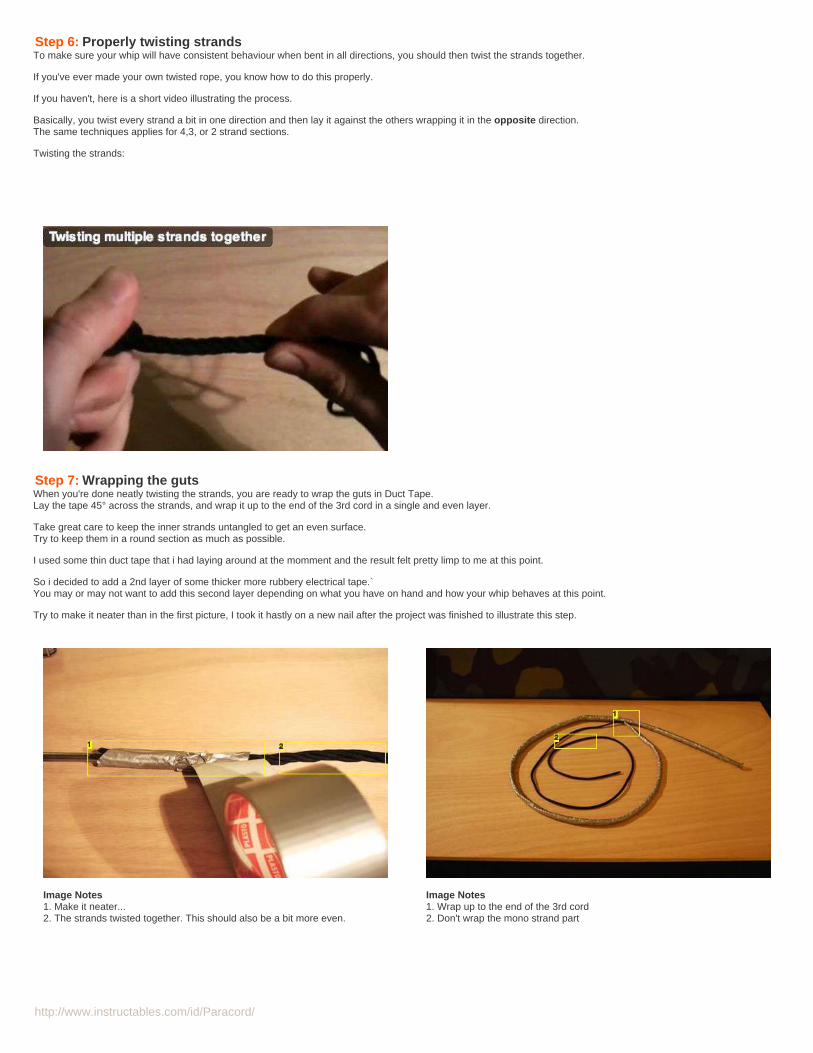
http://www.instructables.com/id/Paracord/
Step 6: Properly twisting strandsTo make sure your whip will have consistent behaviour when bent in all directions, you should then twist the strands together.
If you've ever made your own twisted rope, you know how to do this properly.
If you haven't, here is a short video illustrating the process.
Basically, you twist every strand a bit in one direction and then lay it against the others wrapping it in the opposite direction.The same techniques applies for 4,3, or 2 strand sections.
Twisting the strands:
Step 7: Wrapping the gutsWhen you're done neatly twisting the strands, you are ready to wrap the guts in Duct Tape.Lay the tape 45° across the strands, and wrap it up to the end of the 3rd cord in a single and even layer.
Take great care to keep the inner strands untangled to get an even surface.Try to keep them in a round section as much as possible.
I used some thin duct tape that i had laying around at the momment and the result felt pretty limp to me at this point.
So i decided to add a 2nd layer of some thicker more rubbery electrical tape.`You may or may not want to add this second layer depending on what you have on hand and how your whip behaves at this point.
Try to make it neater than in the first picture, I took it hastly on a new nail after the project was finished to illustrate this step.
Image Notes1. Make it neater...2. The strands twisted together. This should also be a bit more even.
Image Notes1. Wrap up to the end of the 3rd cord2. Don't wrap the mono strand part
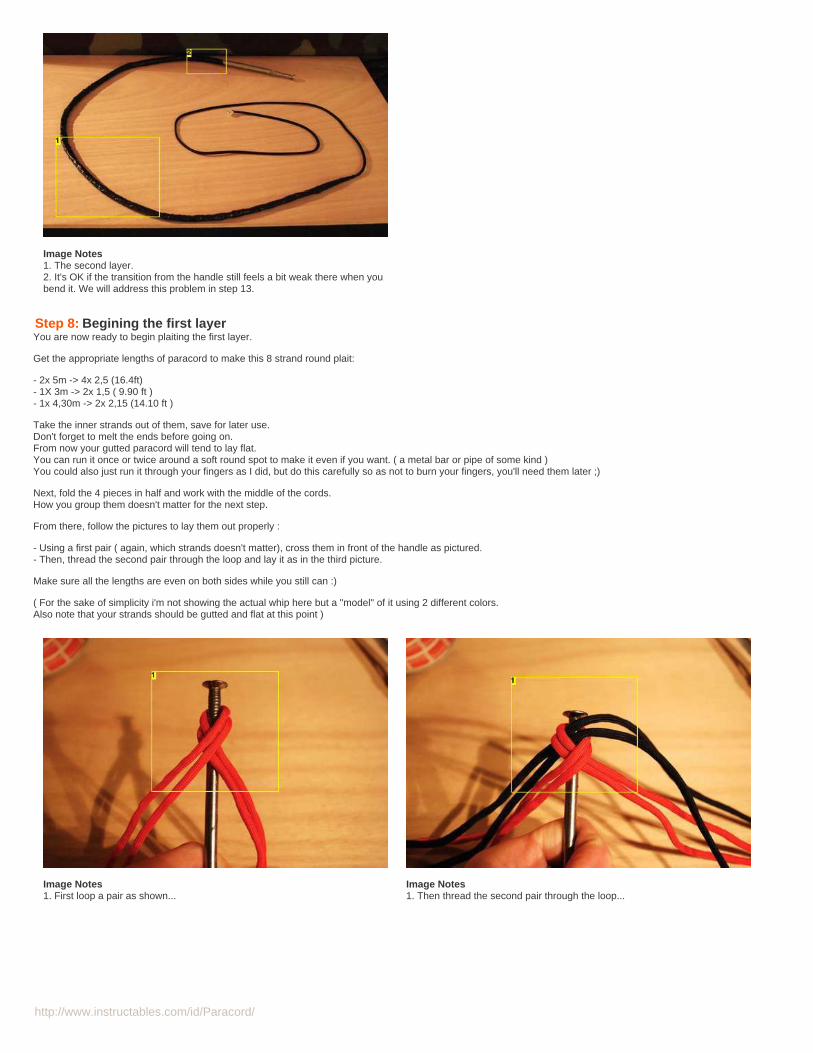
http://www.instructables.com/id/Paracord/
Image Notes1. The second layer.2. It's OK if the transition from the handle still feels a bit weak there when youbend it. We will address this problem in step 13.
Step 8: Begining the first layerYou are now ready to begin plaiting the first layer.
Get the appropriate lengths of paracord to make this 8 strand round plait:
- 2x 5m -> 4x 2,5 (16.4ft)- 1X 3m -> 2x 1,5 ( 9.90 ft )- 1x 4,30m -> 2x 2,15 (14.10 ft )
Take the inner strands out of them, save for later use.Don't forget to melt the ends before going on.From now your gutted paracord will tend to lay flat.You can run it once or twice around a soft round spot to make it even if you want. ( a metal bar or pipe of some kind )You could also just run it through your fingers as I did, but do this carefully so as not to burn your fingers, you'll need them later ;)
Next, fold the 4 pieces in half and work with the middle of the cords.How you group them doesn't matter for the next step.
From there, follow the pictures to lay them out properly :
- Using a first pair ( again, which strands doesn't matter), cross them in front of the handle as pictured.- Then, thread the second pair through the loop and lay it as in the third picture.
Make sure all the lengths are even on both sides while you still can :)
( For the sake of simplicity i'm not showing the actual whip here but a "model" of it using 2 different colors.Also note that your strands should be gutted and flat at this point )
Image Notes1. First loop a pair as shown...
Image Notes1. Then thread the second pair through the loop...
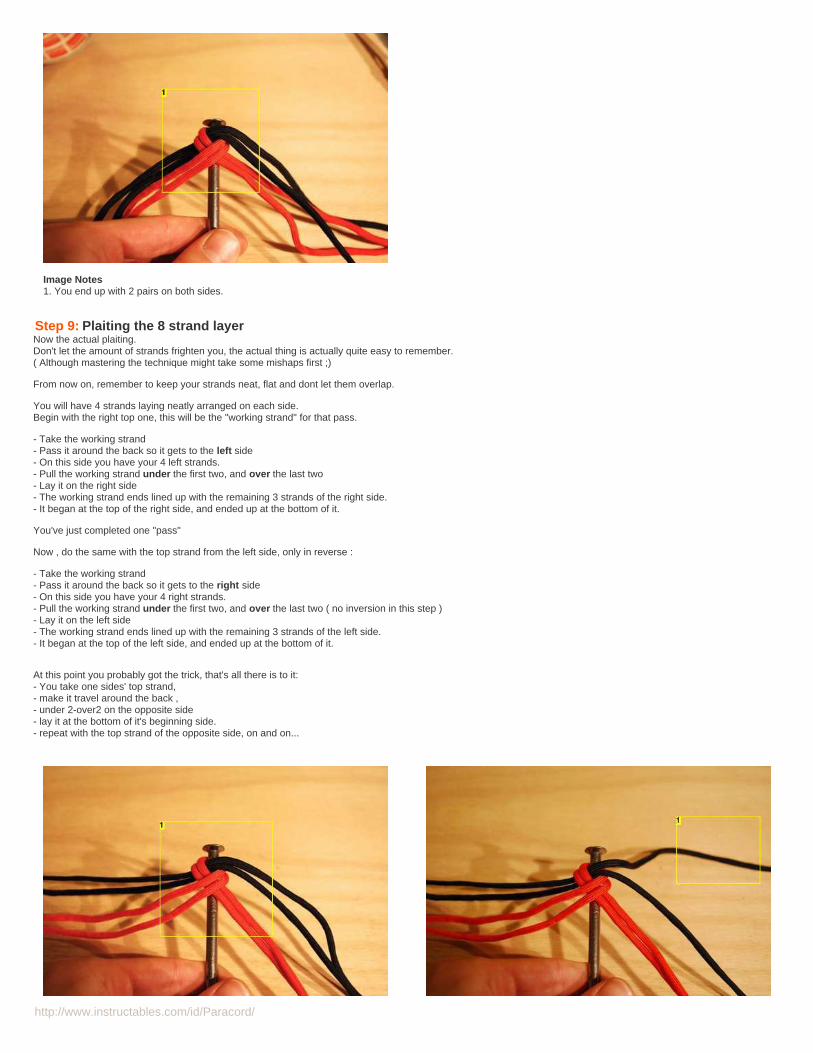
http://www.instructables.com/id/Paracord/
Image Notes1. You end up with 2 pairs on both sides.
Step 9: Plaiting the 8 strand layerNow the actual plaiting.Don't let the amount of strands frighten you, the actual thing is actually quite easy to remember.( Although mastering the technique might take some mishaps first ;)
From now on, remember to keep your strands neat, flat and dont let them overlap.
You will have 4 strands laying neatly arranged on each side.Begin with the right top one, this will be the "working strand" for that pass.
- Take the working strand- Pass it around the back so it gets to the left side- On this side you have your 4 left strands.- Pull the working strand under the first two, and over the last two- Lay it on the right side- The working strand ends lined up with the remaining 3 strands of the right side.- It began at the top of the right side, and ended up at the bottom of it.
You've just completed one "pass"
Now , do the same with the top strand from the left side, only in reverse :
- Take the working strand- Pass it around the back so it gets to the right side- On this side you have your 4 right strands.- Pull the working strand under the first two, and over the last two ( no inversion in this step )- Lay it on the left side- The working strand ends lined up with the remaining 3 strands of the left side.- It began at the top of the left side, and ended up at the bottom of it.
At this point you probably got the trick, that's all there is to it:- You take one sides' top strand,- make it travel around the back ,- under 2-over2 on the opposite side- lay it at the bottom of it's beginning side.- repeat with the top strand of the opposite side, on and on...
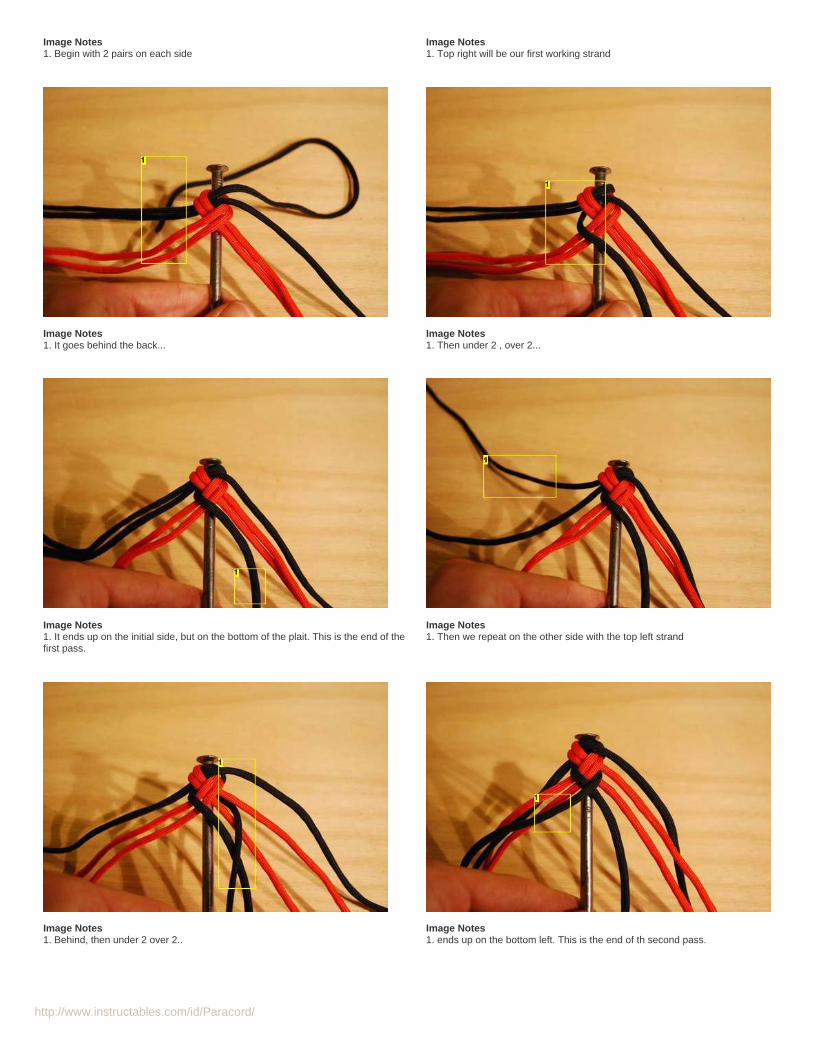
http://www.instructables.com/id/Paracord/
Image Notes1. Begin with 2 pairs on each side
Image Notes1. Top right will be our first working strand
Image Notes1. It goes behind the back...
Image Notes1. Then under 2 , over 2...
Image Notes1. It ends up on the initial side, but on the bottom of the plait. This is the end of thefirst pass.
Image Notes1. Then we repeat on the other side with the top left strand
Image Notes1. Behind, then under 2 over 2..
Image Notes1. ends up on the bottom left. This is the end of th second pass.
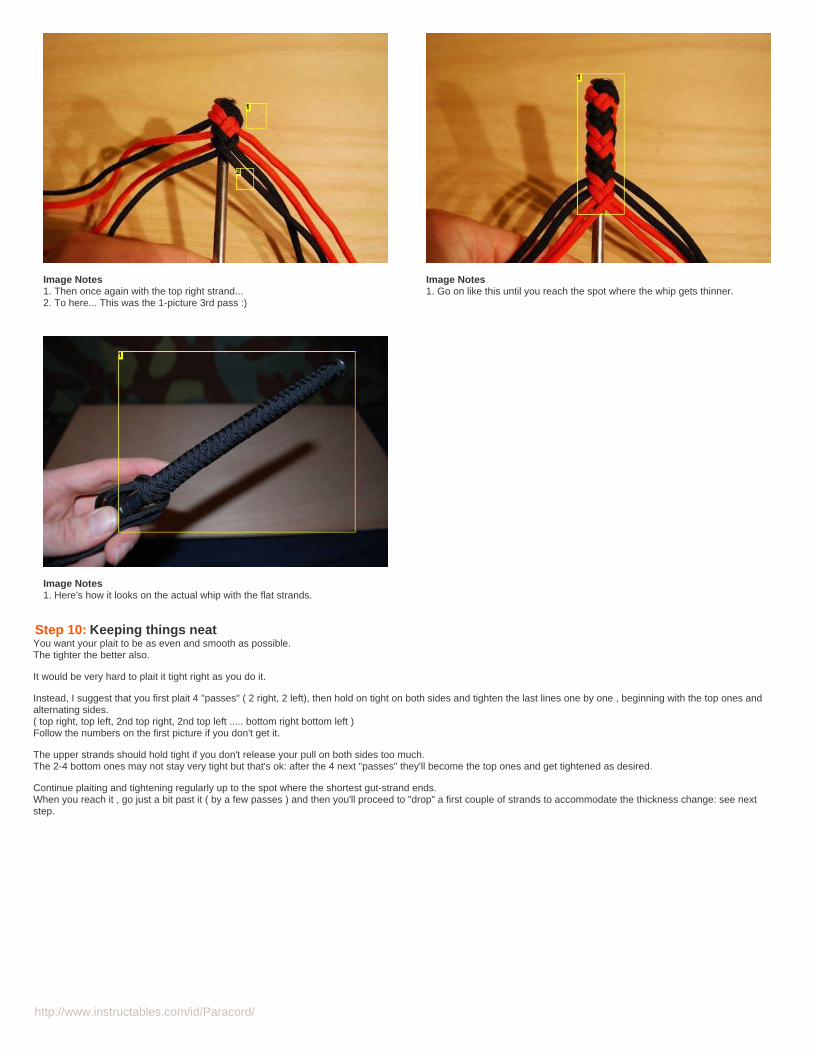
http://www.instructables.com/id/Paracord/
Image Notes1. Then once again with the top right strand...2. To here... This was the 1-picture 3rd pass :)
Image Notes1. Go on like this until you reach the spot where the whip gets thinner.
Image Notes1. Here's how it looks on the actual whip with the flat strands.
Step 10: Keeping things neatYou want your plait to be as even and smooth as possible.The tighter the better also.
It would be very hard to plait it tight right as you do it.
Instead, I suggest that you first plait 4 "passes" ( 2 right, 2 left), then hold on tight on both sides and tighten the last lines one by one , beginning with the top ones andalternating sides.( top right, top left, 2nd top right, 2nd top left ..... bottom right bottom left )Follow the numbers on the first picture if you don't get it.
The upper strands should hold tight if you don't release your pull on both sides too much.The 2-4 bottom ones may not stay very tight but that's ok: after the 4 next "passes" they'll become the top ones and get tightened as desired.
Continue plaiting and tightening regularly up to the spot where the shortest gut-strand ends.When you reach it , go just a bit past it ( by a few passes ) and then you'll proceed to "drop" a first couple of strands to accommodate the thickness change: see nextstep.
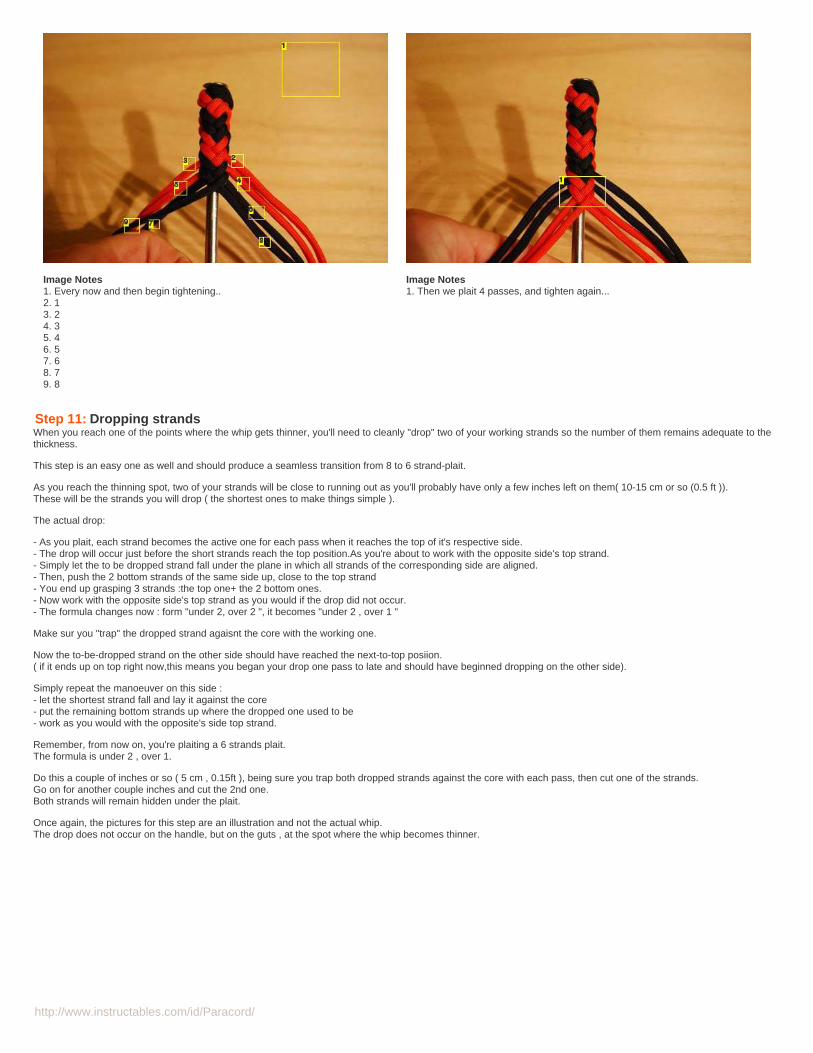
http://www.instructables.com/id/Paracord/
Image Notes1. Every now and then begin tightening..2. 13. 24. 35. 46. 57. 68. 79. 8
Image Notes1. Then we plait 4 passes, and tighten again...
Step 11: Dropping strandsWhen you reach one of the points where the whip gets thinner, you'll need to cleanly "drop" two of your working strands so the number of them remains adequate to thethickness.
This step is an easy one as well and should produce a seamless transition from 8 to 6 strand-plait.
As you reach the thinning spot, two of your strands will be close to running out as you'll probably have only a few inches left on them( 10-15 cm or so (0.5 ft )).These will be the strands you will drop ( the shortest ones to make things simple ).
The actual drop:
- As you plait, each strand becomes the active one for each pass when it reaches the top of it's respective side.- The drop will occur just before the short strands reach the top position.As you're about to work with the opposite side's top strand.- Simply let the to be dropped strand fall under the plane in which all strands of the corresponding side are aligned.- Then, push the 2 bottom strands of the same side up, close to the top strand- You end up grasping 3 strands :the top one+ the 2 bottom ones.- Now work with the opposite side's top strand as you would if the drop did not occur.- The formula changes now : form "under 2, over 2 ", it becomes "under 2 , over 1 "
Make sur you "trap" the dropped strand agaisnt the core with the working one.
Now the to-be-dropped strand on the other side should have reached the next-to-top posiion.( if it ends up on top right now,this means you began your drop one pass to late and should have beginned dropping on the other side).
Simply repeat the manoeuver on this side :- let the shortest strand fall and lay it against the core- put the remaining bottom strands up where the dropped one used to be- work as you would with the opposite's side top strand.
Remember, from now on, you're plaiting a 6 strands plait.The formula is under 2 , over 1.
Do this a couple of inches or so ( 5 cm , 0.15ft ), being sure you trap both dropped strands against the core with each pass, then cut one of the strands.Go on for another couple inches and cut the 2nd one.Both strands will remain hidden under the plait.
Once again, the pictures for this step are an illustration and not the actual whip.The drop does not occur on the handle, but on the guts , at the spot where the whip becomes thinner.
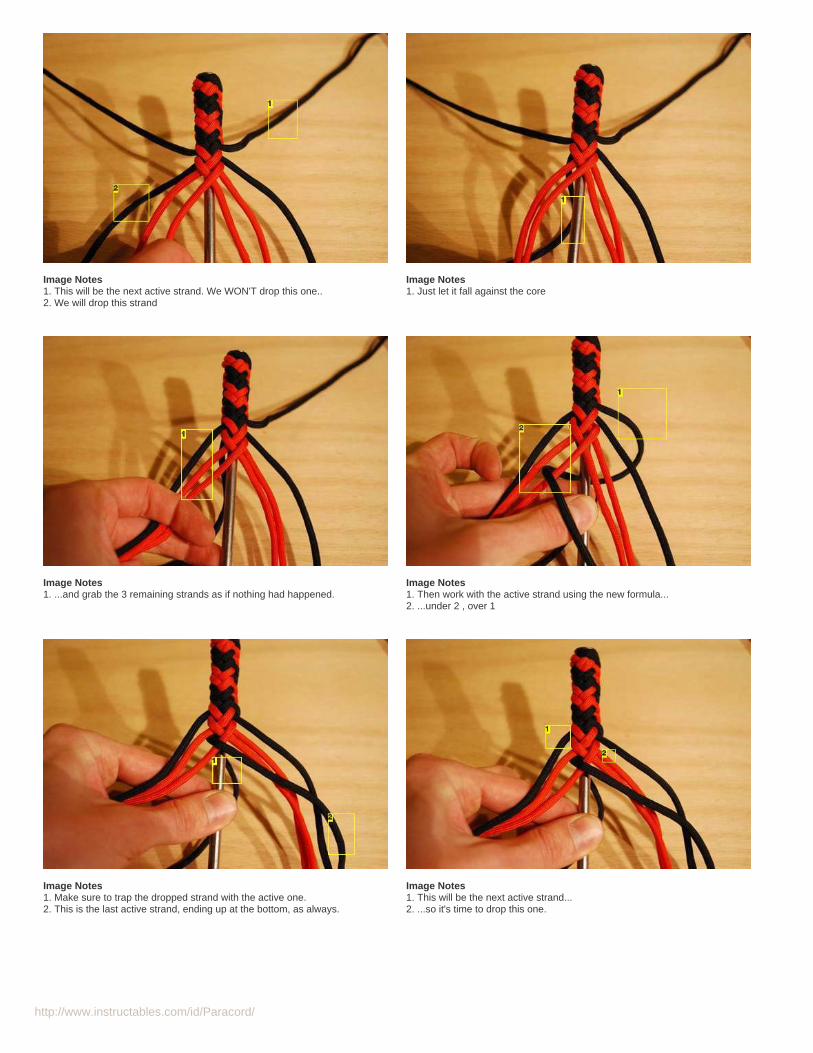
http://www.instructables.com/id/Paracord/
Image Notes1. This will be the next active strand. We WON'T drop this one..2. We will drop this strand
Image Notes1. Just let it fall against the core
Image Notes1. ...and grab the 3 remaining strands as if nothing had happened.
Image Notes1. Then work with the active strand using the new formula...2. ...under 2 , over 1
Image Notes1. Make sure to trap the dropped strand with the active one.2. This is the last active strand, ending up at the bottom, as always.
Image Notes1. This will be the next active strand...2. ...so it's time to drop this one.
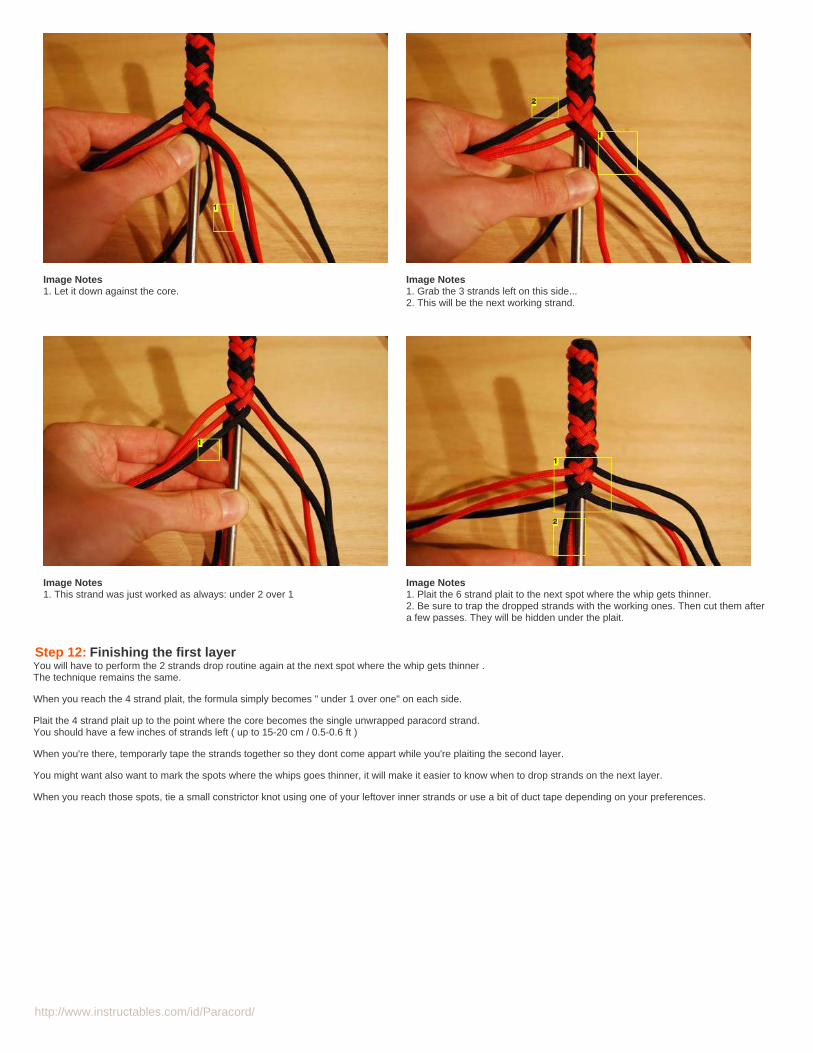
http://www.instructables.com/id/Paracord/
Image Notes1. Let it down against the core.
Image Notes1. Grab the 3 strands left on this side...2. This will be the next working strand.
Image Notes1. This strand was just worked as always: under 2 over 1
Image Notes1. Plait the 6 strand plait to the next spot where the whip gets thinner.2. Be sure to trap the dropped strands with the working ones. Then cut them aftera few passes. They will be hidden under the plait.
Step 12: Finishing the first layerYou will have to perform the 2 strands drop routine again at the next spot where the whip gets thinner .The technique remains the same.
When you reach the 4 strand plait, the formula simply becomes " under 1 over one" on each side.
Plait the 4 strand plait up to the point where the core becomes the single unwrapped paracord strand.You should have a few inches of strands left ( up to 15-20 cm / 0.5-0.6 ft )
When you're there, temporarly tape the strands together so they dont come appart while you're plaiting the second layer.
You might want also want to mark the spots where the whips goes thinner, it will make it easier to know when to drop strands on the next layer.
When you reach those spots, tie a small constrictor knot using one of your leftover inner strands or use a bit of duct tape depending on your preferences.
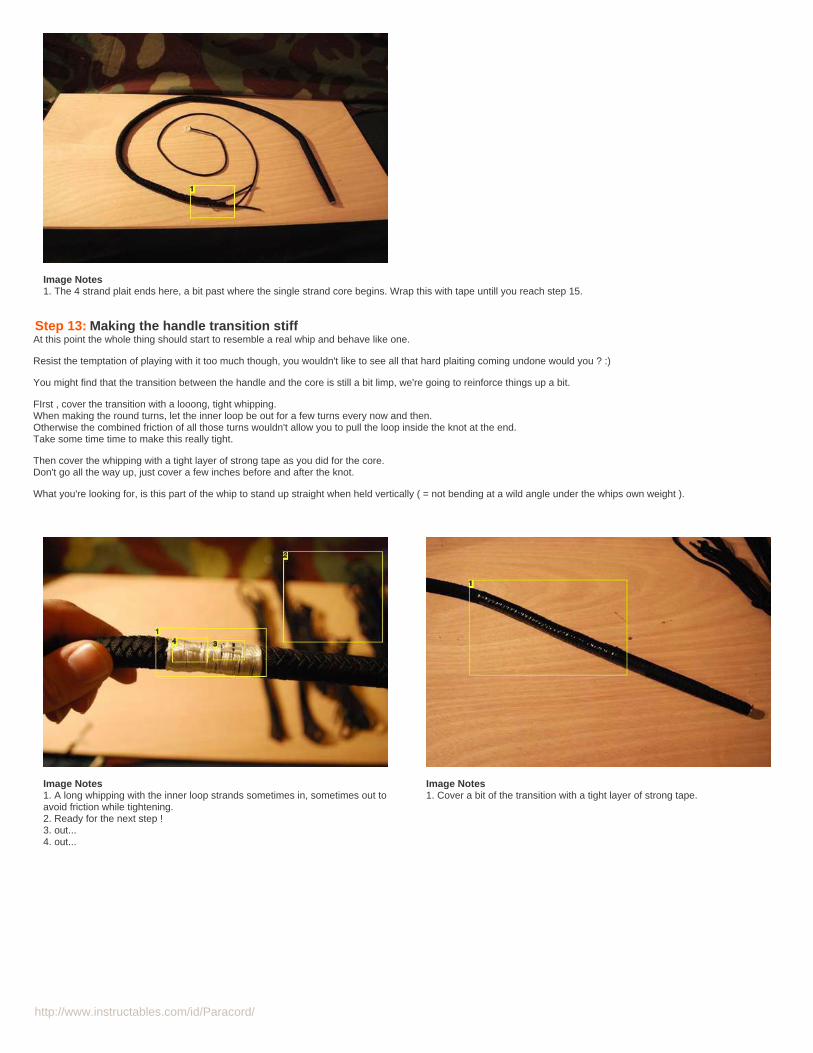
http://www.instructables.com/id/Paracord/
Image Notes1. The 4 strand plait ends here, a bit past where the single strand core begins. Wrap this with tape untill you reach step 15.
Step 13: Making the handle transition stiffAt this point the whole thing should start to resemble a real whip and behave like one.
Resist the temptation of playing with it too much though, you wouldn't like to see all that hard plaiting coming undone would you ? :)
You might find that the transition between the handle and the core is still a bit limp, we're going to reinforce things up a bit.
FIrst , cover the transition with a looong, tight whipping.When making the round turns, let the inner loop be out for a few turns every now and then.Otherwise the combined friction of all those turns wouldn't allow you to pull the loop inside the knot at the end.Take some time time to make this really tight.
Then cover the whipping with a tight layer of strong tape as you did for the core.Don't go all the way up, just cover a few inches before and after the knot.
What you're looking for, is this part of the whip to stand up straight when held vertically ( = not bending at a wild angle under the whips own weight ).
Image Notes1. A long whipping with the inner loop strands sometimes in, sometimes out toavoid friction while tightening.2. Ready for the next step !3. out...4. out...
Image Notes1. Cover a bit of the transition with a tight layer of strong tape.
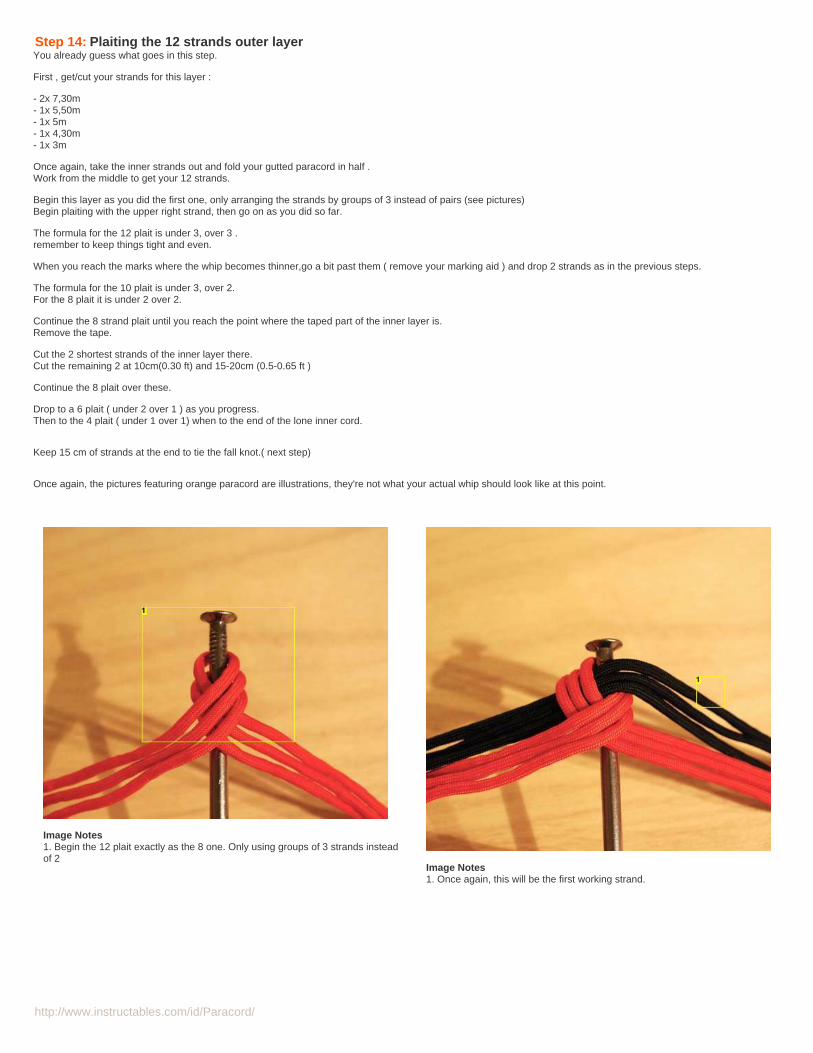
http://www.instructables.com/id/Paracord/
Step 14: Plaiting the 12 strands outer layerYou already guess what goes in this step.
First , get/cut your strands for this layer :
- 2x 7,30m- 1x 5,50m- 1x 5m- 1x 4,30m- 1x 3m
Once again, take the inner strands out and fold your gutted paracord in half .Work from the middle to get your 12 strands.
Begin this layer as you did the first one, only arranging the strands by groups of 3 instead of pairs (see pictures)Begin plaiting with the upper right strand, then go on as you did so far.
The formula for the 12 plait is under 3, over 3 .remember to keep things tight and even.
When you reach the marks where the whip becomes thinner,go a bit past them ( remove your marking aid ) and drop 2 strands as in the previous steps.
The formula for the 10 plait is under 3, over 2.For the 8 plait it is under 2 over 2.
Continue the 8 strand plait until you reach the point where the taped part of the inner layer is.Remove the tape.
Cut the 2 shortest strands of the inner layer there.Cut the remaining 2 at 10cm(0.30 ft) and 15-20cm (0.5-0.65 ft )
Continue the 8 plait over these.
Drop to a 6 plait ( under 2 over 1 ) as you progress.Then to the 4 plait ( under 1 over 1) when to the end of the lone inner cord.
Keep 15 cm of strands at the end to tie the fall knot.( next step)
Once again, the pictures featuring orange paracord are illustrations, they're not what your actual whip should look like at this point.
Image Notes1. Begin the 12 plait exactly as the 8 one. Only using groups of 3 strands insteadof 2
Image Notes1. Once again, this will be the first working strand.
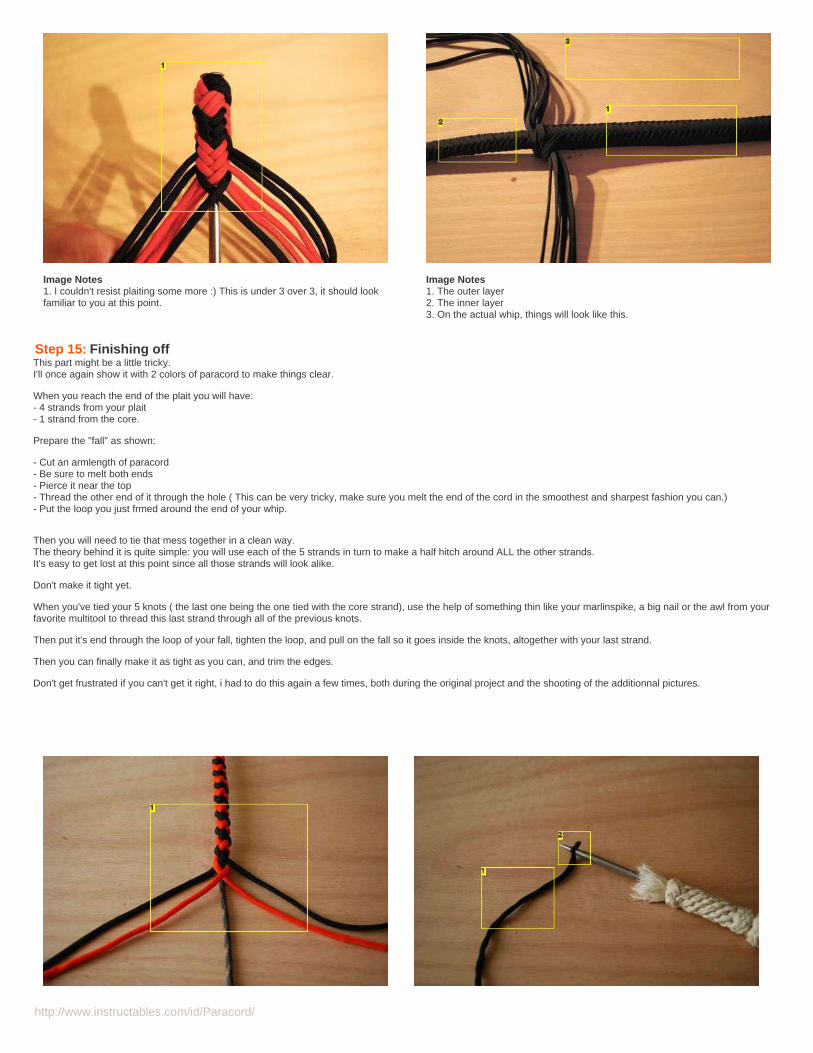
http://www.instructables.com/id/Paracord/
Image Notes1. I couldn't resist plaiting some more :) This is under 3 over 3, it should lookfamiliar to you at this point.
Image Notes1. The outer layer2. The inner layer3. On the actual whip, things will look like this.
Step 15: Finishing offThis part might be a little tricky.I'll once again show it with 2 colors of paracord to make things clear.
When you reach the end of the plait you will have:- 4 strands from your plait- 1 strand from the core.
Prepare the "fall" as shown:
- Cut an armlength of paracord- Be sure to melt both ends- Pierce it near the top- Thread the other end of it through the hole ( This can be very tricky, make sure you melt the end of the cord in the smoothest and sharpest fashion you can.)- Put the loop you just frmed around the end of your whip.
Then you will need to tie that mess together in a clean way.The theory behind it is quite simple: you will use each of the 5 strands in turn to make a half hitch around ALL the other strands.It's easy to get lost at this point since all those strands will look alike.
Don't make it tight yet.
When you've tied your 5 knots ( the last one being the one tied with the core strand), use the help of something thin like your marlinspike, a big nail or the awl from yourfavorite multitool to thread this last strand through all of the previous knots.
Then put it's end through the loop of your fall, tighten the loop, and pull on the fall so it goes inside the knots, altogether with your last strand.
Then you can finally make it as tight as you can, and trim the edges.
Don't get frustrated if you can't get it right, i had to do this again a few times, both during the original project and the shooting of the additionnal pictures.
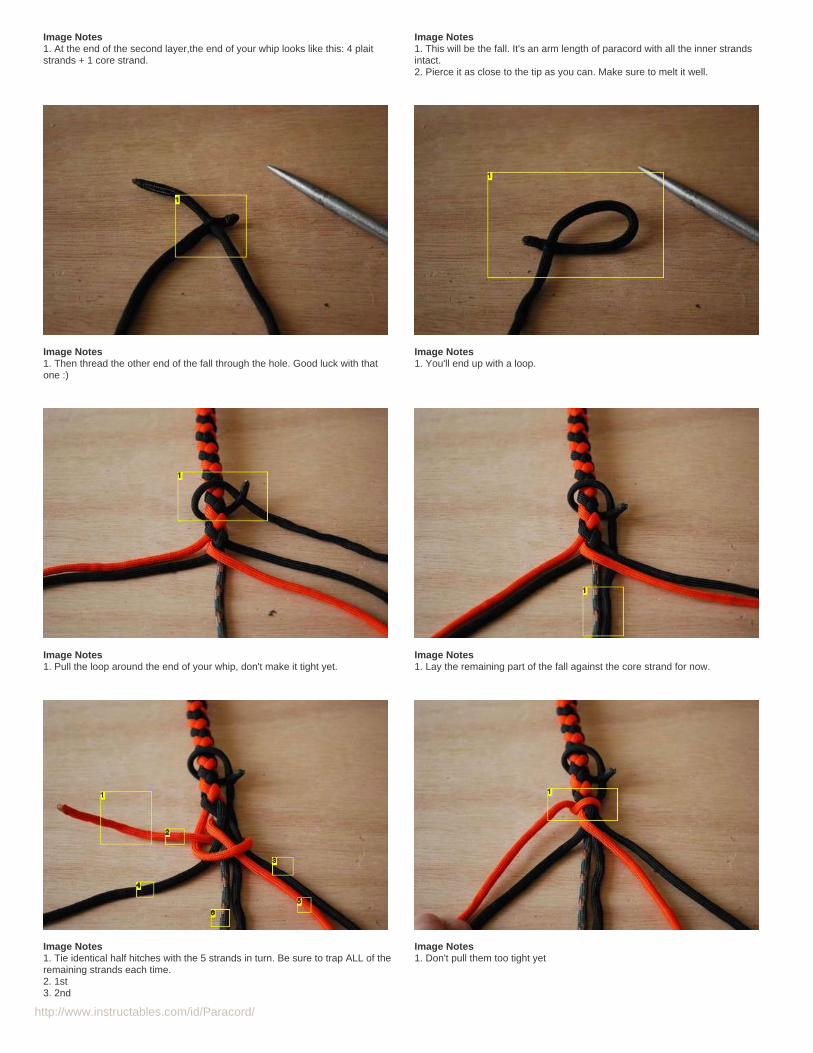
http://www.instructables.com/id/Paracord/
Image Notes1. At the end of the second layer,the end of your whip looks like this: 4 plaitstrands + 1 core strand.
Image Notes1. This will be the fall. It's an arm length of paracord with all the inner strandsintact.2. Pierce it as close to the tip as you can. Make sure to melt it well.
Image Notes1. Then thread the other end of the fall through the hole. Good luck with thatone :)
Image Notes1. You'll end up with a loop.
Image Notes1. Pull the loop around the end of your whip, don't make it tight yet.
Image Notes1. Lay the remaining part of the fall against the core strand for now.
Image Notes1. Tie identical half hitches with the 5 strands in turn. Be sure to trap ALL of theremaining strands each time.2. 1st3. 2nd
Image Notes1. Don't pull them too tight yet
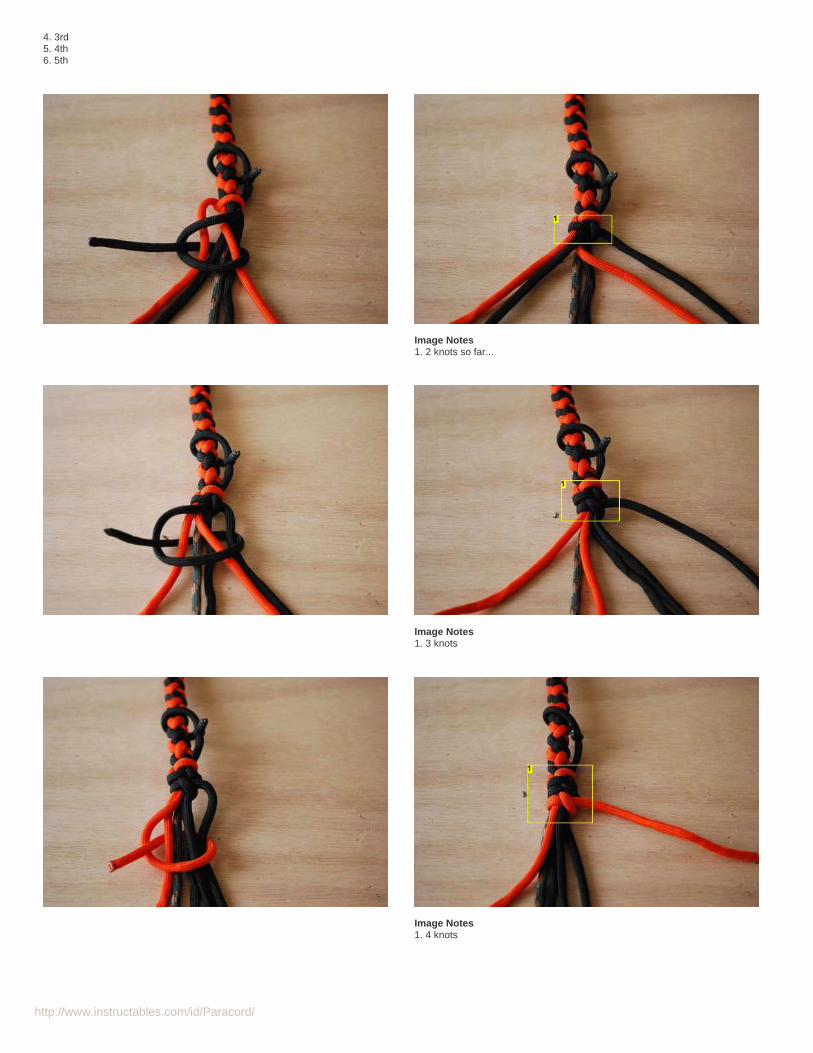
http://www.instructables.com/id/Paracord/
4. 3rd5. 4th6. 5th
Image Notes1. 2 knots so far...
Image Notes1. 3 knots
Image Notes1. 4 knots
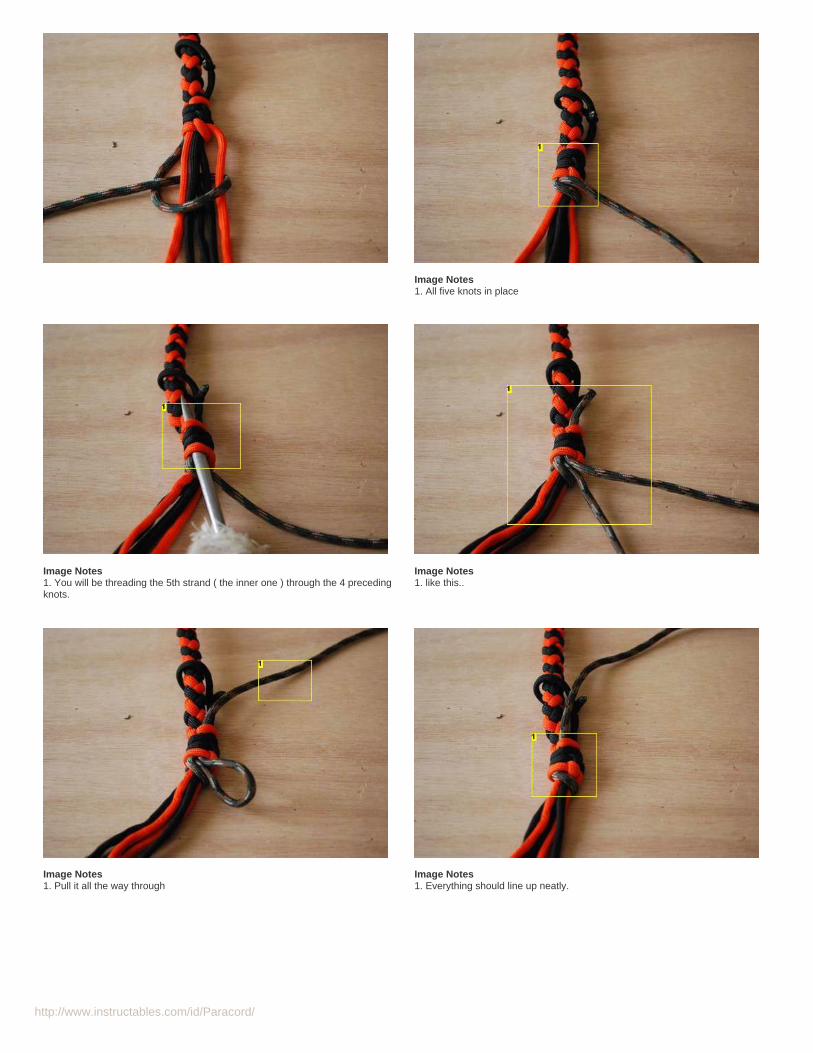
http://www.instructables.com/id/Paracord/
Image Notes1. All five knots in place
Image Notes1. You will be threading the 5th strand ( the inner one ) through the 4 precedingknots.
Image Notes1. like this..
Image Notes1. Pull it all the way through
Image Notes1. Everything should line up neatly.
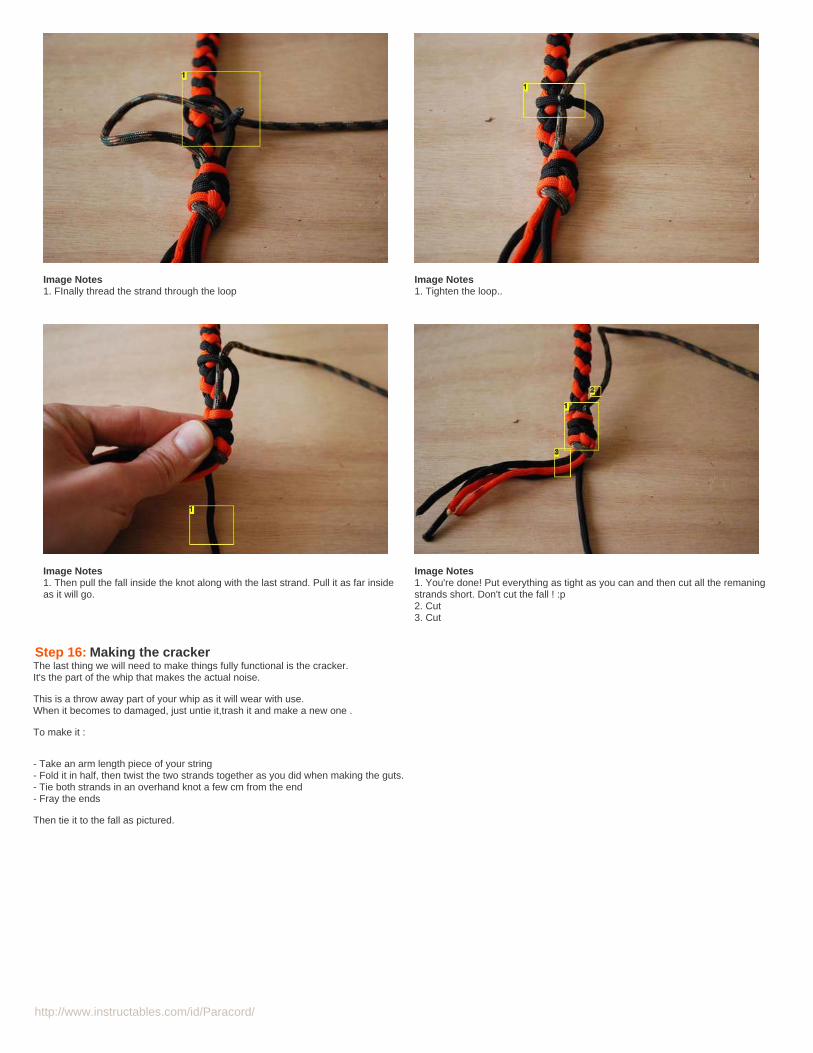
http://www.instructables.com/id/Paracord/
Image Notes1. FInally thread the strand through the loop
Image Notes1. Tighten the loop..
Image Notes1. Then pull the fall inside the knot along with the last strand. Pull it as far insideas it will go.
Image Notes1. You're done! Put everything as tight as you can and then cut all the remaningstrands short. Don't cut the fall ! :p2. Cut3. Cut
Step 16: Making the crackerThe last thing we will need to make things fully functional is the cracker.It's the part of the whip that makes the actual noise.
This is a throw away part of your whip as it will wear with use.When it becomes to damaged, just untie it,trash it and make a new one .
To make it :
- Take an arm length piece of your string- Fold it in half, then twist the two strands together as you did when making the guts.- Tie both strands in an overhand knot a few cm from the end- Fray the ends
Then tie it to the fall as pictured.
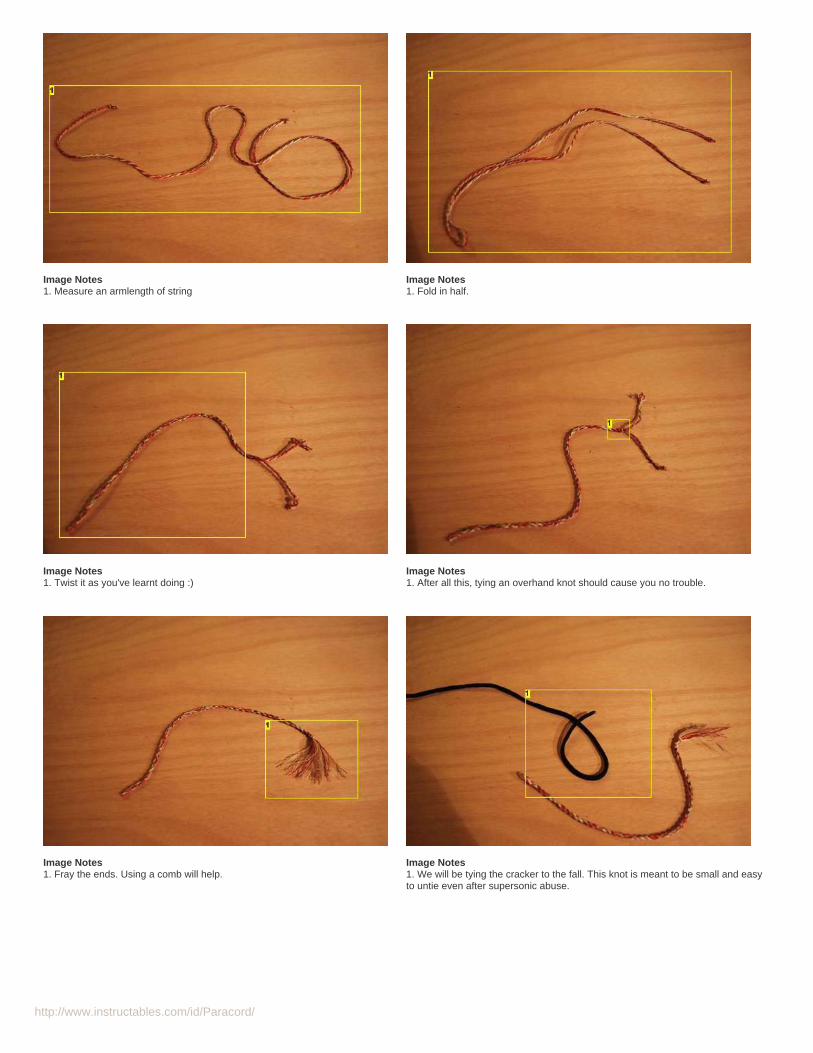
http://www.instructables.com/id/Paracord/
Image Notes1. Measure an armlength of string
Image Notes1. Fold in half.
Image Notes1. Twist it as you've learnt doing :)
Image Notes1. After all this, tying an overhand knot should cause you no trouble.
Image Notes1. Fray the ends. Using a comb will help.
Image Notes1. We will be tying the cracker to the fall. This knot is meant to be small and easyto untie even after supersonic abuse.
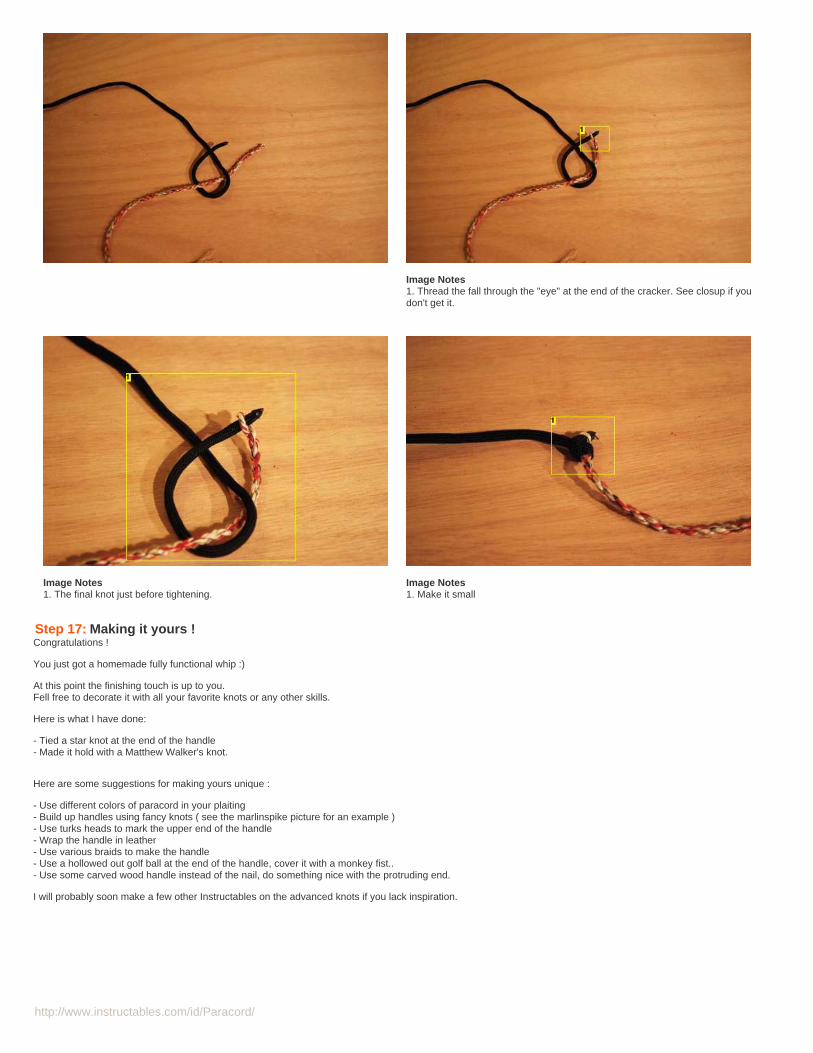
http://www.instructables.com/id/Paracord/
Image Notes1. Thread the fall through the "eye" at the end of the cracker. See closup if youdon't get it.
Image Notes1. The final knot just before tightening.
Image Notes1. Make it small
Step 17: Making it yours !Congratulations !
You just got a homemade fully functional whip :)
At this point the finishing touch is up to you.Fell free to decorate it with all your favorite knots or any other skills.
Here is what I have done:
- Tied a star knot at the end of the handle- Made it hold with a Matthew Walker's knot.
Here are some suggestions for making yours unique :
- Use different colors of paracord in your plaiting- Build up handles using fancy knots ( see the marlinspike picture for an example )- Use turks heads to mark the upper end of the handle- Wrap the handle in leather- Use various braids to make the handle- Use a hollowed out golf ball at the end of the handle, cover it with a monkey fist..- Use some carved wood handle instead of the nail, do something nice with the protruding end.
I will probably soon make a few other Instructables on the advanced knots if you lack inspiration.
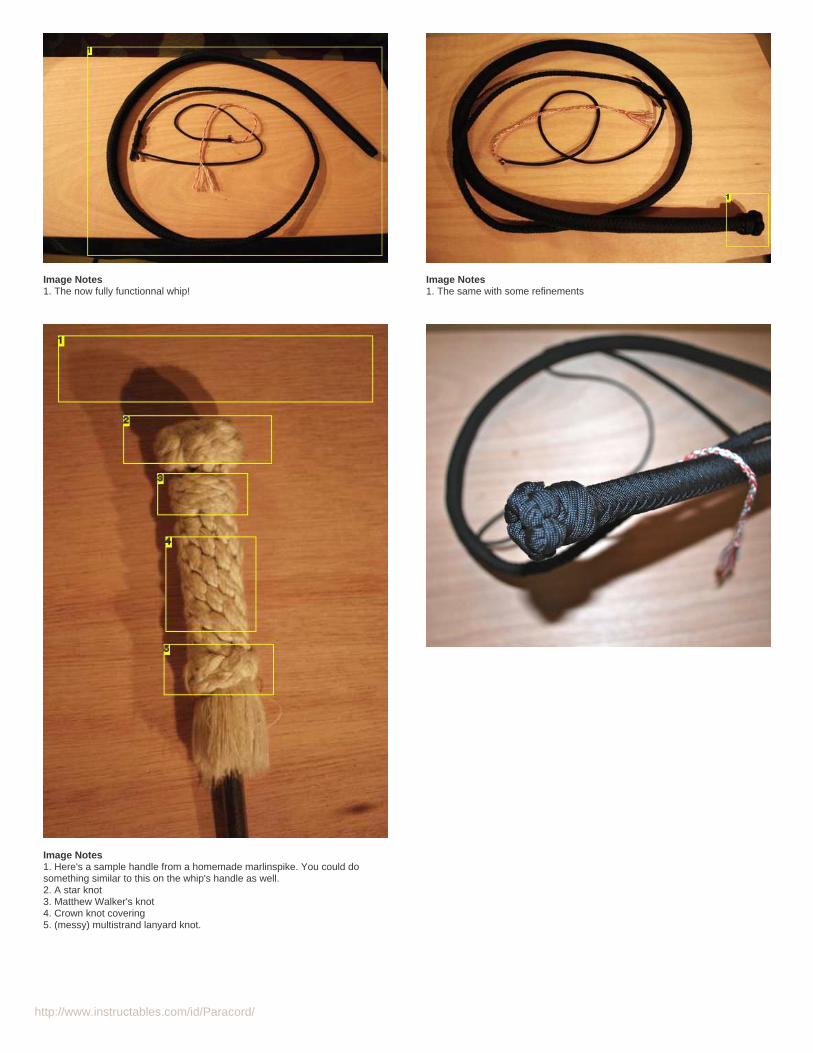
http://www.instructables.com/id/Paracord/
Image Notes1. The now fully functionnal whip!
Image Notes1. The same with some refinements
Image Notes1. Here's a sample handle from a homemade marlinspike. You could dosomething similar to this on the whip's handle as well.2. A star knot3. Matthew Walker's knot4. Crown knot covering5. (messy) multistrand lanyard knot.
http://www.instructables.com/id/Paracord/
Step 18: Trying things outOk, now go outside for a test run of your new toy.
Cracking your whip is about technique, not force ( and my technique just plain sucks , these are my first tries :)They're lots of vids on youtube teaching you proper moves.Be sure to check a few out before trying to go Indianna Jones.
Remember to do this outside, and wear proper face protection untill you feel completely confident with it.( A full face paintball mask would not be too much for beginners, it's SO easy to have the thing jump back at your face even if you think you are being carefull... And trustme...that hurts.)
I hope you enjoyed this instructable as much as I did doing this project.
Have fun and play safe!
Leave suggestions in the comments if you think that some steps deserve further explanation.
Step 19: FInal reference sheetHere's a final reference sheet with all the revealant data for making the whip once you've understood the process.
It sums up everything number related :)
You will need (Total):
- 60m (196 ft.) of paracord- 2m (6.5ft ) of lamp chain
Then cut it to the following lengths:
For the guts :- x1 2m strand ( 6.5ft )- x1 1m strand (3.30 ft )- x1 80cm strand ( 2.6ft )- x1 50 cm strand (1.6 ft)
Along with the corresponding 3 lengths of lamp chain for the shorter strands :- 90cm (2.95ft )- 60 cm (1.95ft )- 30 cm (1ft )
The first layer is a 8 strand round plait- 2x 5m -> 4x 2,5 (16.4ft )- 1X 3m -> 2x 1,5 (9.90 ft)- 1x 4,30m -> 2x 2,15 (14.10 ft )
The outer layer is a 12 strand plait:- 2x 7,30m (24 ft)- 1x 5,50m (18 ft )- 1x 5m (16.4ft)- 1x 4,30m (14.10ft )- 1x 3m (9.90 ft )
The formulas for the various plaits:
12 strand: Under 3 Over 310 strand: Under 3 Over 28 strand: Under 2 Over 26 strand: Under 2 Over 14 strand: Under 1 Over 1
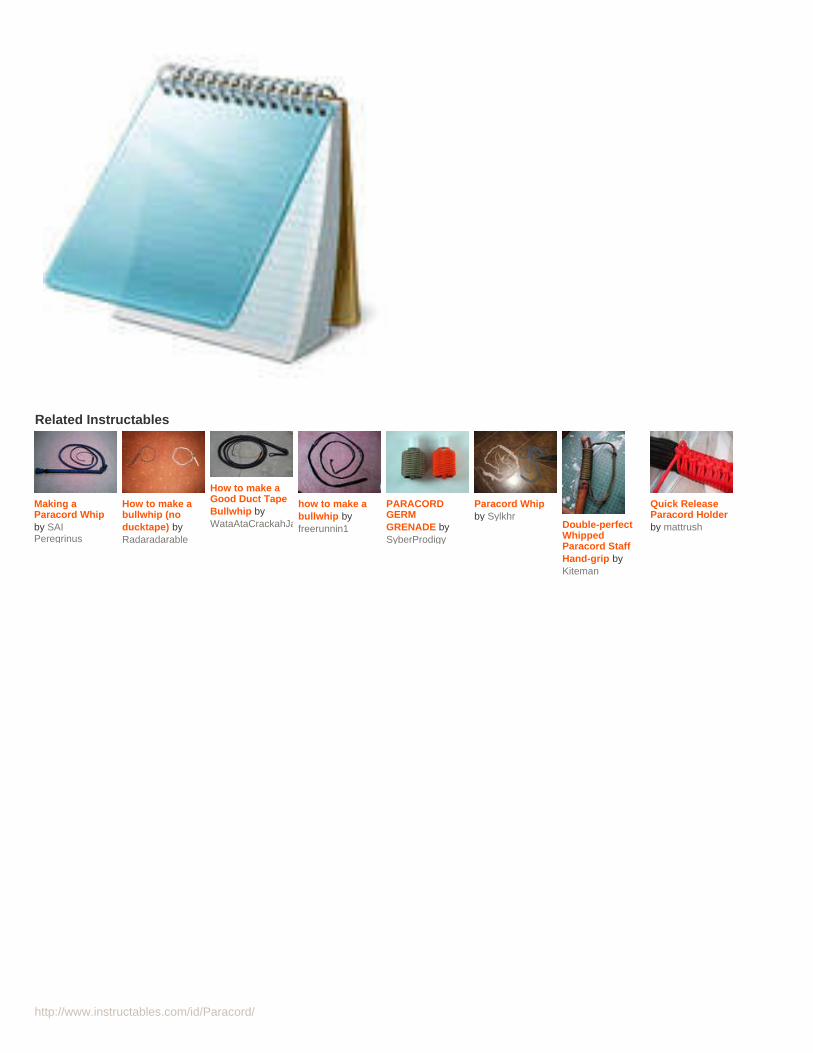
http://www.instructables.com/id/Paracord/
Related Instructables
Making aParacord Whipby SAIPeregrinus
How to make abullwhip (noducktape) byRadaradarable
How to make aGood Duct TapeBullwhip byWataAtaCrackahJack
how to make abullwhip byfreerunnin1
PARACORDGERMGRENADE bySyberProdigy
Paracord Whipby Sylkhr
Double-perfectWhippedParacord StaffHand-grip byKiteman
Quick ReleaseParacord Holderby mattrush
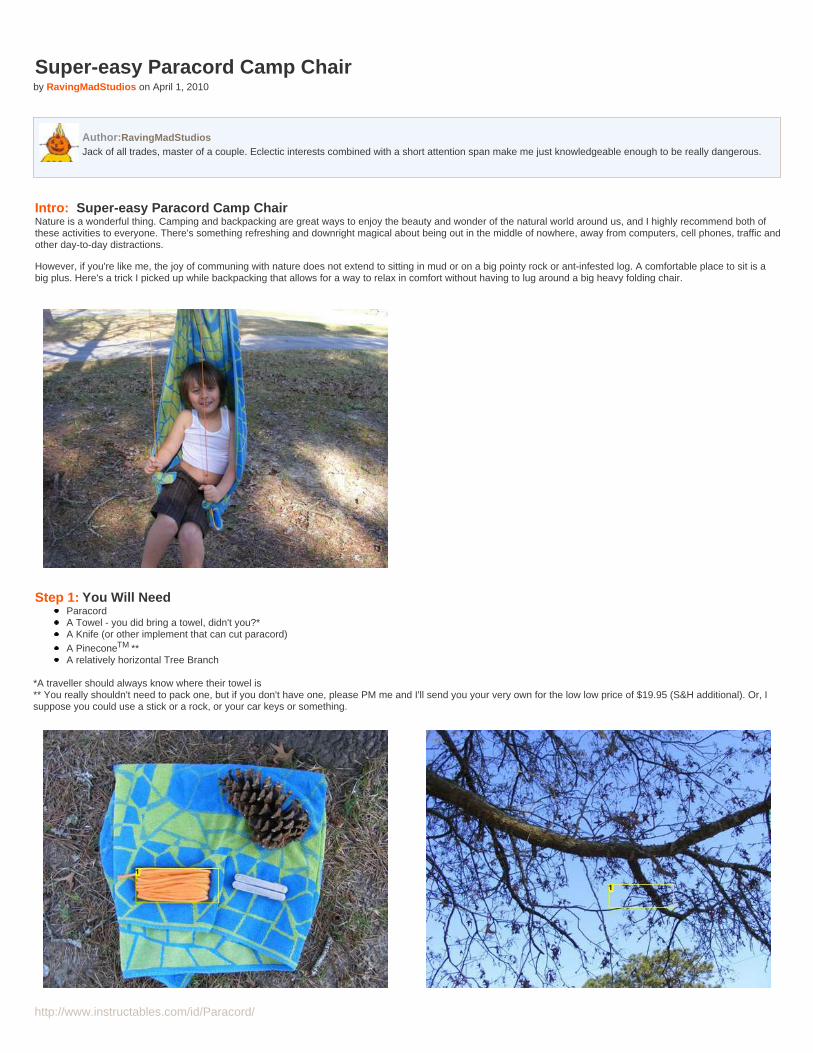
http://www.instructables.com/id/Paracord/
Super-easy Paracord Camp Chairby RavingMadStudios on April 1, 2010
Author:RavingMadStudiosJack of all trades, master of a couple. Eclectic interests combined with a short attention span make me just knowledgeable enough to be really dangerous.
Intro: Super-easy Paracord Camp ChairNature is a wonderful thing. Camping and backpacking are great ways to enjoy the beauty and wonder of the natural world around us, and I highly recommend both ofthese activities to everyone. There's something refreshing and downright magical about being out in the middle of nowhere, away from computers, cell phones, traffic andother day-to-day distractions.
However, if you're like me, the joy of communing with nature does not extend to sitting in mud or on a big pointy rock or ant-infested log. A comfortable place to sit is abig plus. Here's a trick I picked up while backpacking that allows for a way to relax in comfort without having to lug around a big heavy folding chair.
Step 1: You Will NeedParacordA Towel - you did bring a towel, didn't you?*A Knife (or other implement that can cut paracord)A PineconeTM **A relatively horizontal Tree Branch
*A traveller should always know where their towel is** You really shouldn't need to pack one, but if you don't have one, please PM me and I'll send you your very own for the low low price of $19.95 (S&H additional). Or, Isuppose you could use a stick or a rock, or your car keys or something.
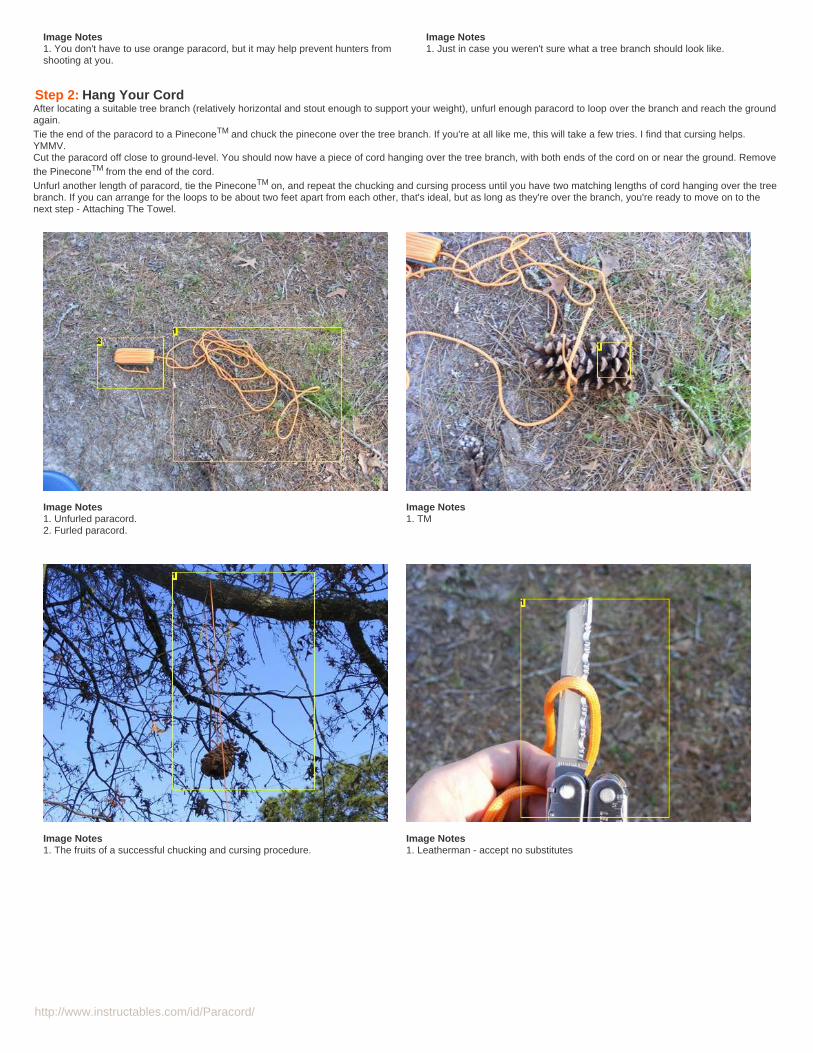
http://www.instructables.com/id/Paracord/
Image Notes1. You don't have to use orange paracord, but it may help prevent hunters fromshooting at you.
Image Notes1. Just in case you weren't sure what a tree branch should look like.
Step 2: Hang Your CordAfter locating a suitable tree branch (relatively horizontal and stout enough to support your weight), unfurl enough paracord to loop over the branch and reach the groundagain.Tie the end of the paracord to a PineconeTM and chuck the pinecone over the tree branch. If you're at all like me, this will take a few tries. I find that cursing helps.YMMV.Cut the paracord off close to ground-level. You should now have a piece of cord hanging over the tree branch, with both ends of the cord on or near the ground. Removethe PineconeTM from the end of the cord.Unfurl another length of paracord, tie the PineconeTM on, and repeat the chucking and cursing process until you have two matching lengths of cord hanging over the treebranch. If you can arrange for the loops to be about two feet apart from each other, that's ideal, but as long as they're over the branch, you're ready to move on to thenext step - Attaching The Towel.
Image Notes1. Unfurled paracord.2. Furled paracord.
Image Notes1. TM
Image Notes1. The fruits of a successful chucking and cursing procedure.
Image Notes1. Leatherman - accept no substitutes
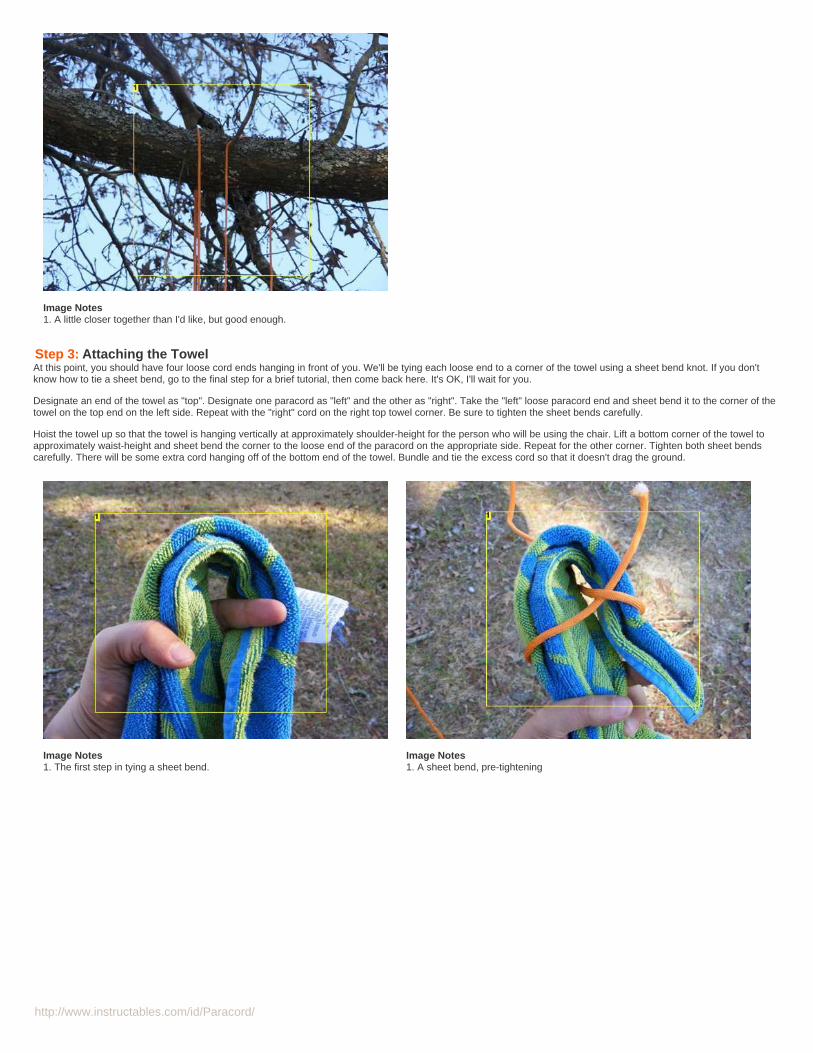
http://www.instructables.com/id/Paracord/
Image Notes1. A little closer together than I'd like, but good enough.
Step 3: Attaching the TowelAt this point, you should have four loose cord ends hanging in front of you. We'll be tying each loose end to a corner of the towel using a sheet bend knot. If you don'tknow how to tie a sheet bend, go to the final step for a brief tutorial, then come back here. It's OK, I'll wait for you.
Designate an end of the towel as "top". Designate one paracord as "left" and the other as "right". Take the "left" loose paracord end and sheet bend it to the corner of thetowel on the top end on the left side. Repeat with the "right" cord on the right top towel corner. Be sure to tighten the sheet bends carefully.
Hoist the towel up so that the towel is hanging vertically at approximately shoulder-height for the person who will be using the chair. Lift a bottom corner of the towel toapproximately waist-height and sheet bend the corner to the loose end of the paracord on the appropriate side. Repeat for the other corner. Tighten both sheet bendscarefully. There will be some extra cord hanging off of the bottom end of the towel. Bundle and tie the excess cord so that it doesn't drag the ground.
Image Notes1. The first step in tying a sheet bend.
Image Notes1. A sheet bend, pre-tightening
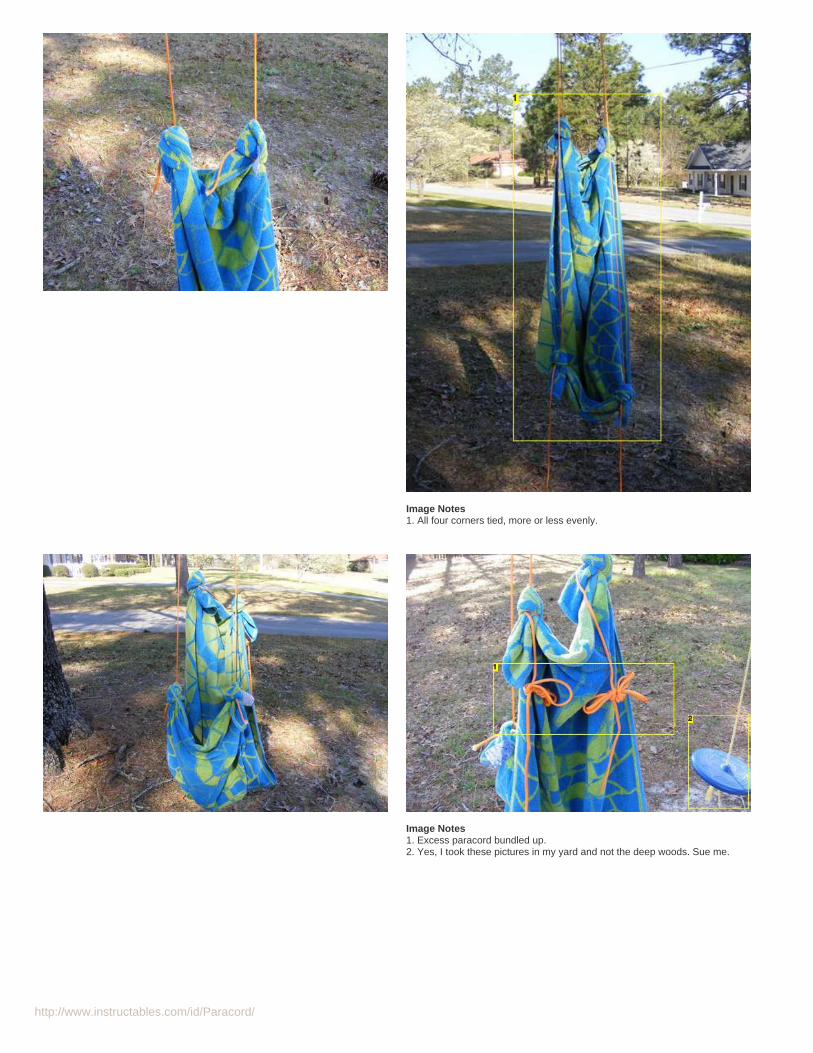
http://www.instructables.com/id/Paracord/
Image Notes1. All four corners tied, more or less evenly.
Image Notes1. Excess paracord bundled up.2. Yes, I took these pictures in my yard and not the deep woods. Sue me.
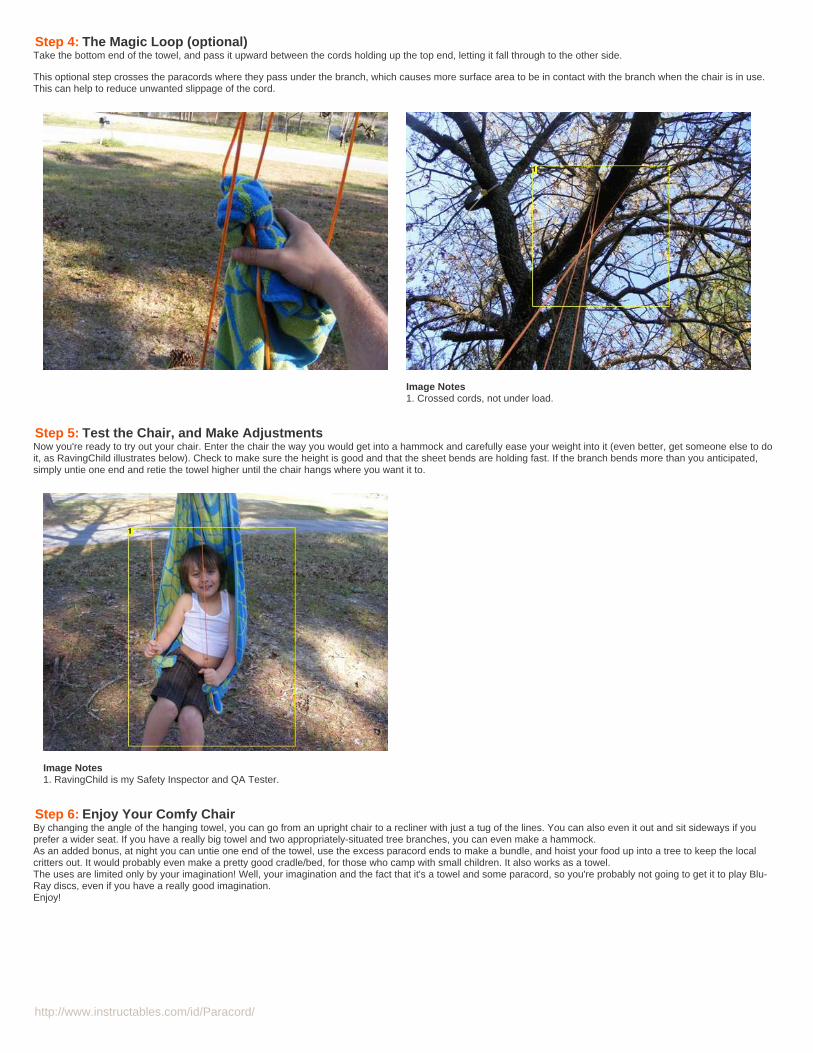
http://www.instructables.com/id/Paracord/
Step 4: The Magic Loop (optional)Take the bottom end of the towel, and pass it upward between the cords holding up the top end, letting it fall through to the other side.
This optional step crosses the paracords where they pass under the branch, which causes more surface area to be in contact with the branch when the chair is in use.This can help to reduce unwanted slippage of the cord.
Image Notes1. Crossed cords, not under load.
Step 5: Test the Chair, and Make AdjustmentsNow you're ready to try out your chair. Enter the chair the way you would get into a hammock and carefully ease your weight into it (even better, get someone else to doit, as RavingChild illustrates below). Check to make sure the height is good and that the sheet bends are holding fast. If the branch bends more than you anticipated,simply untie one end and retie the towel higher until the chair hangs where you want it to.
Image Notes1. RavingChild is my Safety Inspector and QA Tester.
Step 6: Enjoy Your Comfy ChairBy changing the angle of the hanging towel, you can go from an upright chair to a recliner with just a tug of the lines. You can also even it out and sit sideways if youprefer a wider seat. If you have a really big towel and two appropriately-situated tree branches, you can even make a hammock.As an added bonus, at night you can untie one end of the towel, use the excess paracord ends to make a bundle, and hoist your food up into a tree to keep the localcritters out. It would probably even make a pretty good cradle/bed, for those who camp with small children. It also works as a towel.The uses are limited only by your imagination! Well, your imagination and the fact that it's a towel and some paracord, so you're probably not going to get it to play Blu-Ray discs, even if you have a really good imagination.Enjoy!
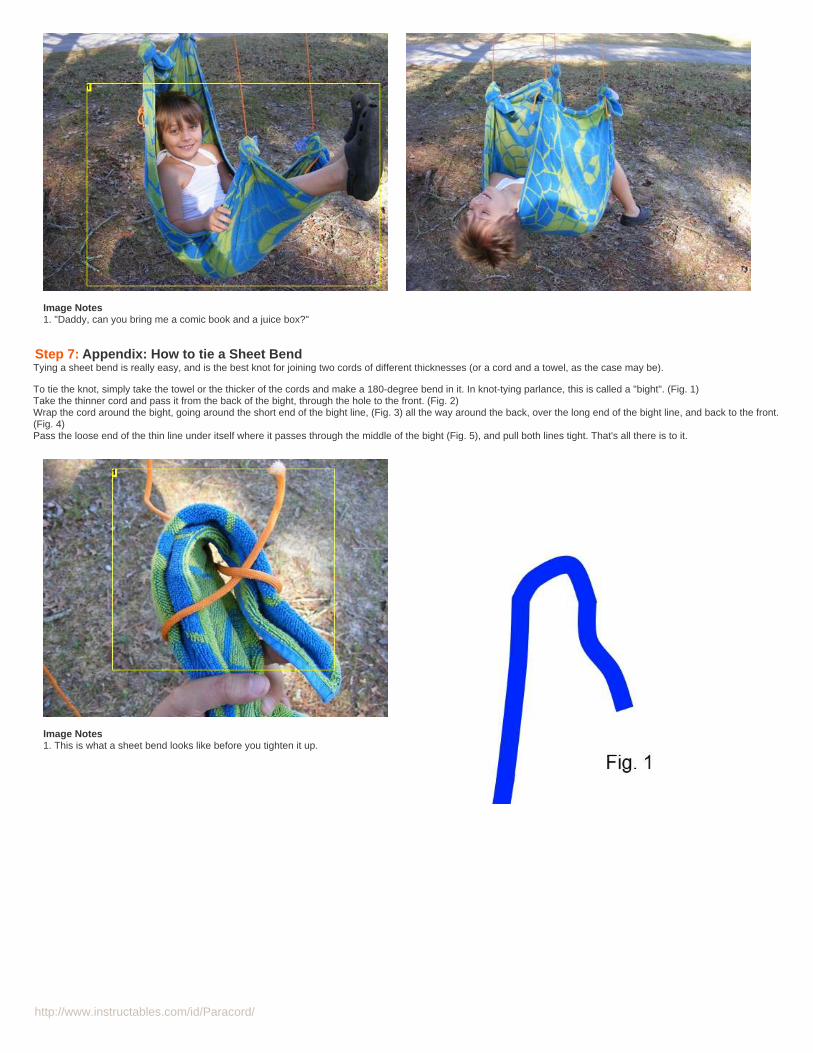
http://www.instructables.com/id/Paracord/
Image Notes1. "Daddy, can you bring me a comic book and a juice box?"
Step 7: Appendix: How to tie a Sheet BendTying a sheet bend is really easy, and is the best knot for joining two cords of different thicknesses (or a cord and a towel, as the case may be).
To tie the knot, simply take the towel or the thicker of the cords and make a 180-degree bend in it. In knot-tying parlance, this is called a "bight". (Fig. 1)Take the thinner cord and pass it from the back of the bight, through the hole to the front. (Fig. 2)Wrap the cord around the bight, going around the short end of the bight line, (Fig. 3) all the way around the back, over the long end of the bight line, and back to the front.(Fig. 4)Pass the loose end of the thin line under itself where it passes through the middle of the bight (Fig. 5), and pull both lines tight. That's all there is to it.
Image Notes1. This is what a sheet bend looks like before you tighten it up.
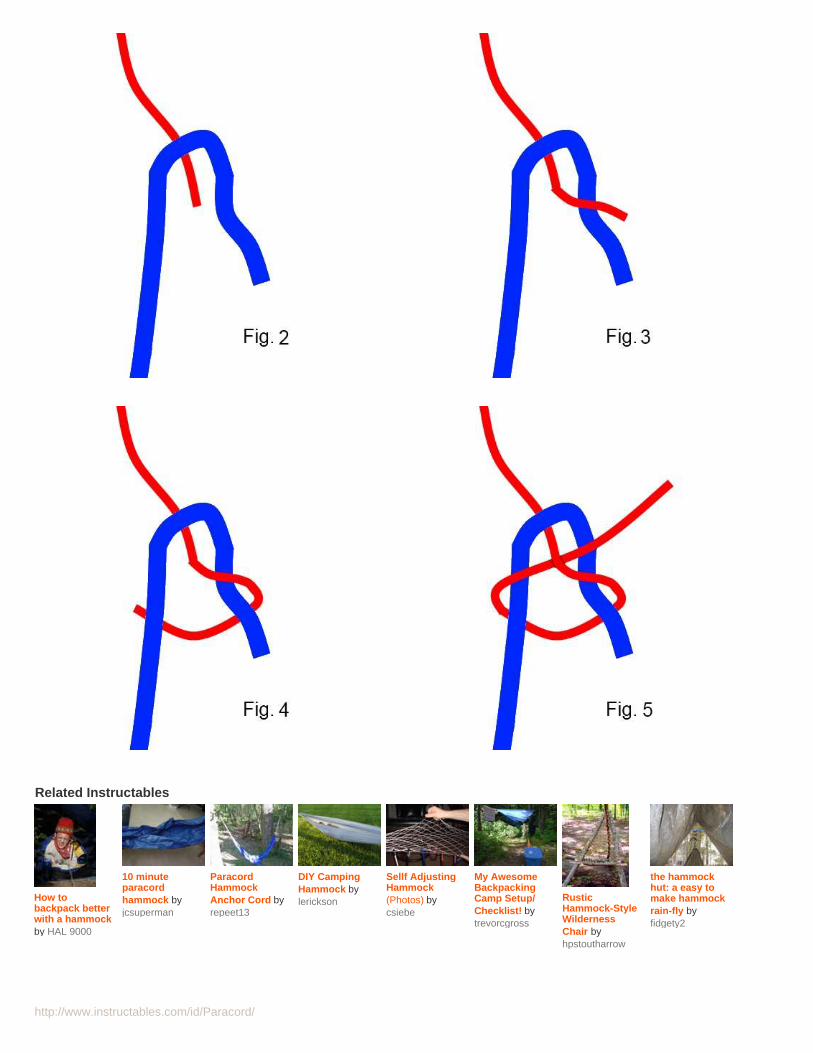
http://www.instructables.com/id/Paracord/
Related Instructables
How tobackpack betterwith a hammockby HAL 9000
10 minuteparacordhammock byjcsuperman
ParacordHammockAnchor Cord byrepeet13
DIY CampingHammock bylerickson
Sellf AdjustingHammock(Photos) bycsiebe
My AwesomeBackpackingCamp Setup/Checklist! bytrevorcgross
RusticHammock-StyleWildernessChair byhpstoutharrow
the hammockhut: a easy tomake hammockrain-fly byfidgety2
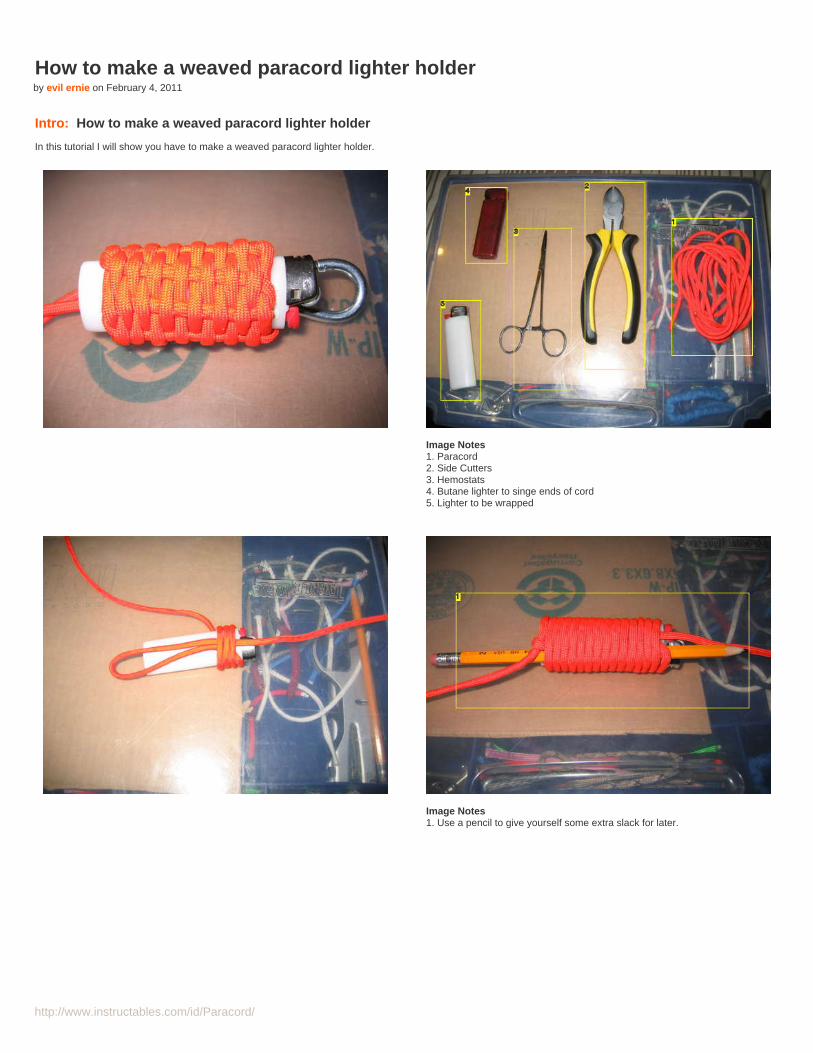
http://www.instructables.com/id/Paracord/
How to make a weaved paracord lighter holderby evil ernie on February 4, 2011
Intro: How to make a weaved paracord lighter holder
In this tutorial I will show you have to make a weaved paracord lighter holder.
Image Notes1. Paracord2. Side Cutters3. Hemostats4. Butane lighter to singe ends of cord5. Lighter to be wrapped
Image Notes1. Use a pencil to give yourself some extra slack for later.

http://www.instructables.com/id/Paracord/
Image Notes1. Pull the cord through the loop from the start2. Pull here to close the bottom loop
Image Notes1. Use your hemostat to go under and over the cords to weave
Image Notes1. With the lighter removed pull the cord from the top back down to the bottom ofthe holder
Image Notes1. Weave the starting part back up with your last weave up
Image Notes1. Pick at least 3 weaves to bring your cord back down through after you haveadded your clasp
Image Notes1. All done
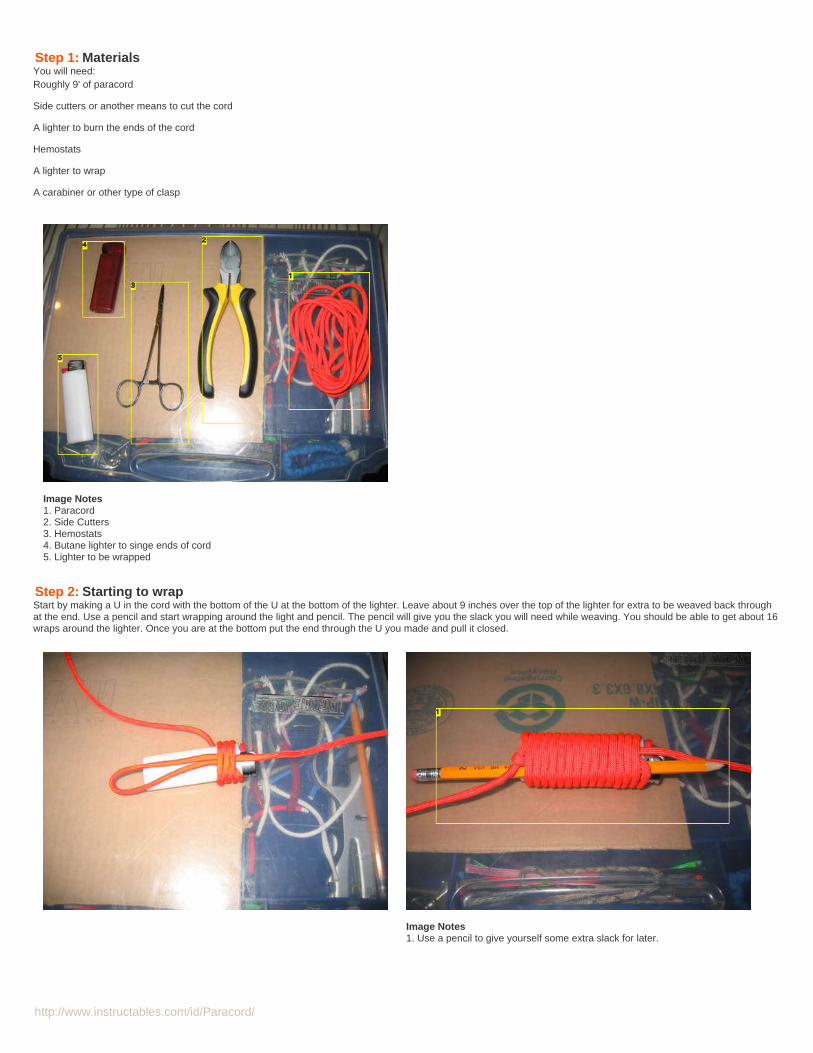
http://www.instructables.com/id/Paracord/
Step 1: MaterialsYou will need:Roughly 9' of paracord
Side cutters or another means to cut the cord
A lighter to burn the ends of the cord
Hemostats
A lighter to wrap
A carabiner or other type of clasp
Image Notes1. Paracord2. Side Cutters3. Hemostats4. Butane lighter to singe ends of cord5. Lighter to be wrapped
Step 2: Starting to wrapStart by making a U in the cord with the bottom of the U at the bottom of the lighter. Leave about 9 inches over the top of the lighter for extra to be weaved back throughat the end. Use a pencil and start wrapping around the light and pencil. The pencil will give you the slack you will need while weaving. You should be able to get about 16wraps around the lighter. Once you are at the bottom put the end through the U you made and pull it closed.
Image Notes1. Use a pencil to give yourself some extra slack for later.
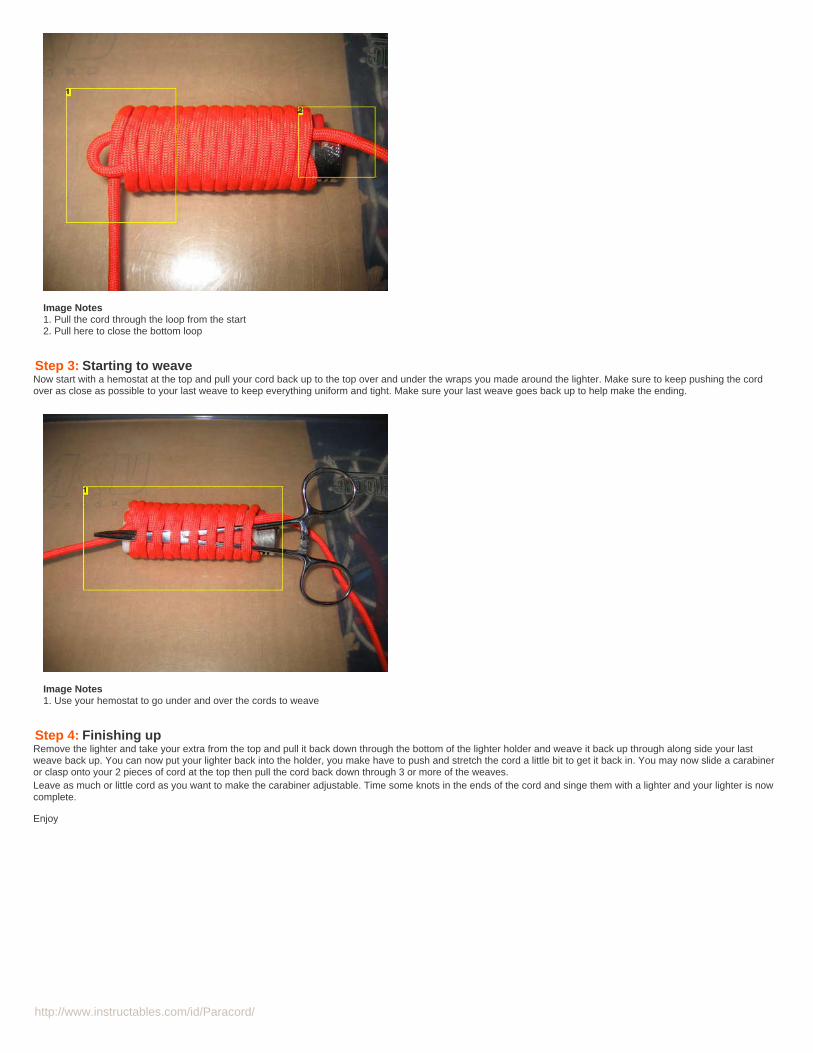
http://www.instructables.com/id/Paracord/
Image Notes1. Pull the cord through the loop from the start2. Pull here to close the bottom loop
Step 3: Starting to weaveNow start with a hemostat at the top and pull your cord back up to the top over and under the wraps you made around the lighter. Make sure to keep pushing the cordover as close as possible to your last weave to keep everything uniform and tight. Make sure your last weave goes back up to help make the ending.
Image Notes1. Use your hemostat to go under and over the cords to weave
Step 4: Finishing upRemove the lighter and take your extra from the top and pull it back down through the bottom of the lighter holder and weave it back up through along side your lastweave back up. You can now put your lighter back into the holder, you make have to push and stretch the cord a little bit to get it back in. You may now slide a carabineror clasp onto your 2 pieces of cord at the top then pull the cord back down through 3 or more of the weaves.Leave as much or little cord as you want to make the carabiner adjustable. Time some knots in the ends of the cord and singe them with a lighter and your lighter is nowcomplete.
Enjoy
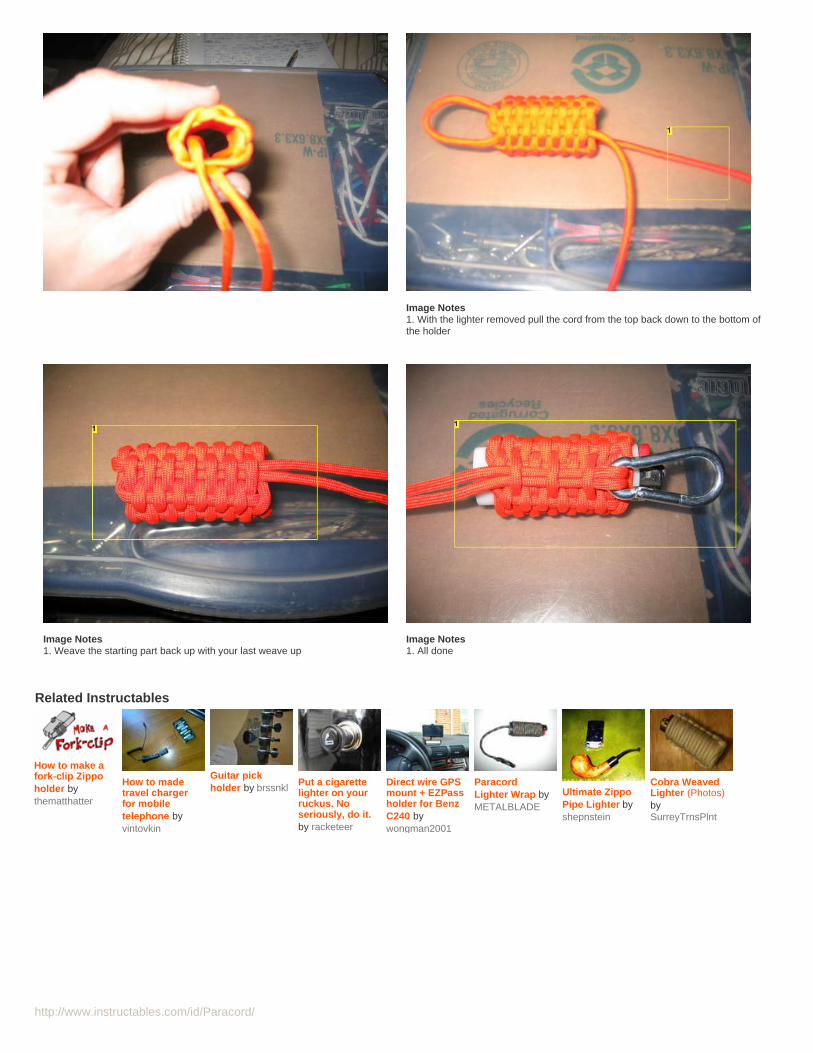
http://www.instructables.com/id/Paracord/
Image Notes1. With the lighter removed pull the cord from the top back down to the bottom ofthe holder
Image Notes1. Weave the starting part back up with your last weave up
Image Notes1. All done
Related Instructables
How to make afork-clip Zippoholder bythematthatter
How to madetravel chargerfor mobiletelephone byvintovkin
Guitar pickholder by brssnkl
Put a cigarettelighter on yourruckus. Noseriously, do it.by racketeer
Direct wire GPSmount + EZPassholder for BenzC240 bywongman2001
ParacordLighter Wrap byMETALBLADE
Ultimate ZippoPipe Lighter byshepnstein
Cobra WeavedLighter (Photos)bySurreyTrnsPlnt
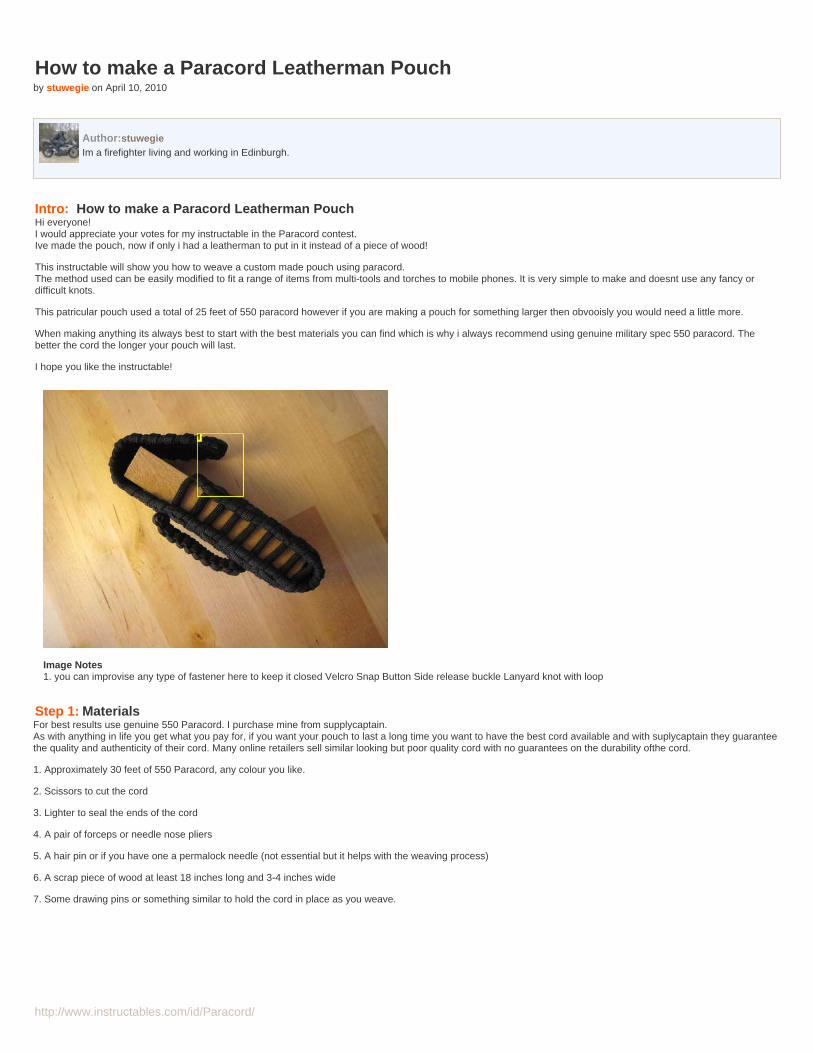
http://www.instructables.com/id/Paracord/
How to make a Paracord Leatherman Pouchby stuwegie on April 10, 2010
Author:stuwegieIm a firefighter living and working in Edinburgh.
Intro: How to make a Paracord Leatherman PouchHi everyone!I would appreciate your votes for my instructable in the Paracord contest.Ive made the pouch, now if only i had a leatherman to put in it instead of a piece of wood!
This instructable will show you how to weave a custom made pouch using paracord.The method used can be easily modified to fit a range of items from multi-tools and torches to mobile phones. It is very simple to make and doesnt use any fancy ordifficult knots.
This patricular pouch used a total of 25 feet of 550 paracord however if you are making a pouch for something larger then obvooisly you would need a little more.
When making anything its always best to start with the best materials you can find which is why i always recommend using genuine military spec 550 paracord. Thebetter the cord the longer your pouch will last.
I hope you like the instructable!
Image Notes1. you can improvise any type of fastener here to keep it closed Velcro Snap Button Side release buckle Lanyard knot with loop
Step 1: MaterialsFor best results use genuine 550 Paracord. I purchase mine from supplycaptain.As with anything in life you get what you pay for, if you want your pouch to last a long time you want to have the best cord available and with suplycaptain they guaranteethe quality and authenticity of their cord. Many online retailers sell similar looking but poor quality cord with no guarantees on the durability ofthe cord.
1. Approximately 30 feet of 550 Paracord, any colour you like.
2. Scissors to cut the cord
3. Lighter to seal the ends of the cord
4. A pair of forceps or needle nose pliers
5. A hair pin or if you have one a permalock needle (not essential but it helps with the weaving process)
6. A scrap piece of wood at least 18 inches long and 3-4 inches wide
7. Some drawing pins or something similar to hold the cord in place as you weave.
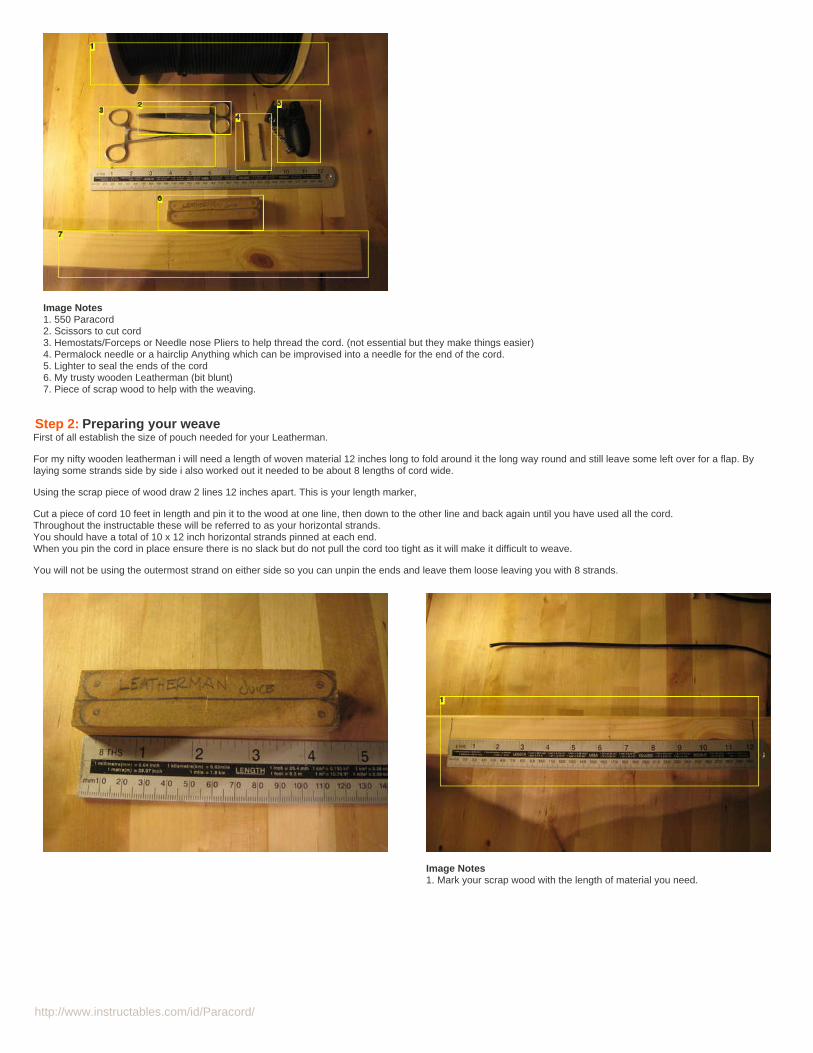
http://www.instructables.com/id/Paracord/
Image Notes1. 550 Paracord2. Scissors to cut cord3. Hemostats/Forceps or Needle nose Pliers to help thread the cord. (not essential but they make things easier)4. Permalock needle or a hairclip Anything which can be improvised into a needle for the end of the cord.5. Lighter to seal the ends of the cord6. My trusty wooden Leatherman (bit blunt)7. Piece of scrap wood to help with the weaving.
Step 2: Preparing your weaveFirst of all establish the size of pouch needed for your Leatherman.
For my nifty wooden leatherman i will need a length of woven material 12 inches long to fold around it the long way round and still leave some left over for a flap. Bylaying some strands side by side i also worked out it needed to be about 8 lengths of cord wide.
Using the scrap piece of wood draw 2 lines 12 inches apart. This is your length marker,
Cut a piece of cord 10 feet in length and pin it to the wood at one line, then down to the other line and back again until you have used all the cord.Throughout the instructable these will be referred to as your horizontal strands.You should have a total of 10 x 12 inch horizontal strands pinned at each end.When you pin the cord in place ensure there is no slack but do not pull the cord too tight as it will make it difficult to weave.
You will not be using the outermost strand on either side so you can unpin the ends and leave them loose leaving you with 8 strands.
Image Notes1. Mark your scrap wood with the length of material you need.
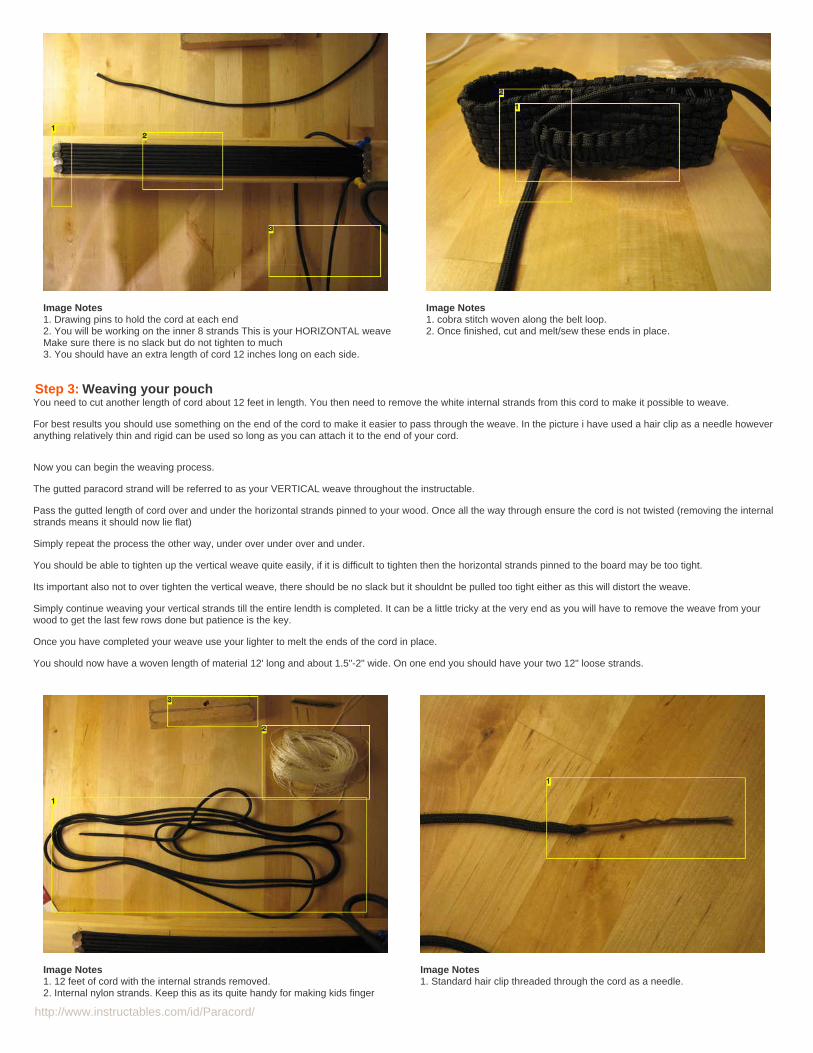
http://www.instructables.com/id/Paracord/
Image Notes1. Drawing pins to hold the cord at each end2. You will be working on the inner 8 strands This is your HORIZONTAL weaveMake sure there is no slack but do not tighten to much3. You should have an extra length of cord 12 inches long on each side.
Image Notes1. cobra stitch woven along the belt loop.2. Once finished, cut and melt/sew these ends in place.
Step 3: Weaving your pouchYou need to cut another length of cord about 12 feet in length. You then need to remove the white internal strands from this cord to make it possible to weave.
For best results you should use something on the end of the cord to make it easier to pass through the weave. In the picture i have used a hair clip as a needle howeveranything relatively thin and rigid can be used so long as you can attach it to the end of your cord.
Now you can begin the weaving process.
The gutted paracord strand will be referred to as your VERTICAL weave throughout the instructable.
Pass the gutted length of cord over and under the horizontal strands pinned to your wood. Once all the way through ensure the cord is not twisted (removing the internalstrands means it should now lie flat)
Simply repeat the process the other way, under over under over and under.
You should be able to tighten up the vertical weave quite easily, if it is difficult to tighten then the horizontal strands pinned to the board may be too tight.
Its important also not to over tighten the vertical weave, there should be no slack but it shouldnt be pulled too tight either as this will distort the weave.
Simply continue weaving your vertical strands till the entire lendth is completed. It can be a little tricky at the very end as you will have to remove the weave from yourwood to get the last few rows done but patience is the key.
Once you have completed your weave use your lighter to melt the ends of the cord in place.
You should now have a woven length of material 12' long and about 1.5"-2" wide. On one end you should have your two 12" loose strands.
Image Notes1. 12 feet of cord with the internal strands removed.2. Internal nylon strands. Keep this as its quite handy for making kids finger
Image Notes1. Standard hair clip threaded through the cord as a needle.
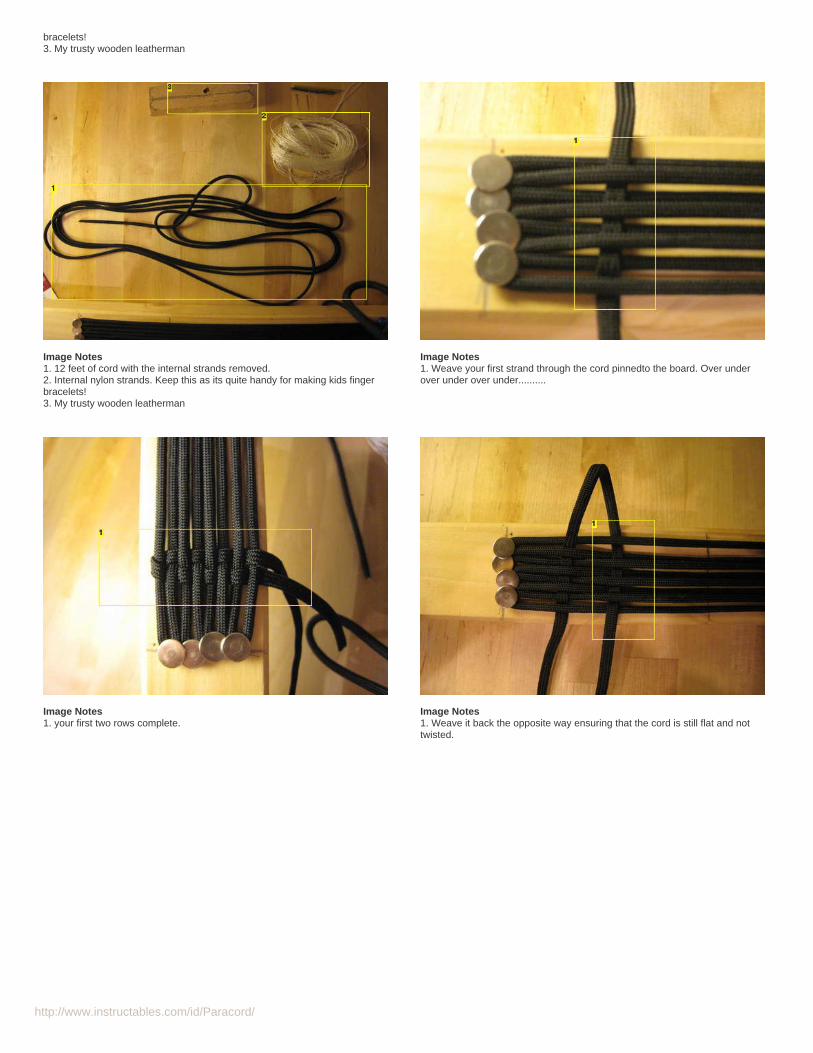
http://www.instructables.com/id/Paracord/
bracelets!3. My trusty wooden leatherman
Image Notes1. 12 feet of cord with the internal strands removed.2. Internal nylon strands. Keep this as its quite handy for making kids fingerbracelets!3. My trusty wooden leatherman
Image Notes1. Weave your first strand through the cord pinnedto the board. Over underover under over under..........
Image Notes1. your first two rows complete.
Image Notes1. Weave it back the opposite way ensuring that the cord is still flat and nottwisted.
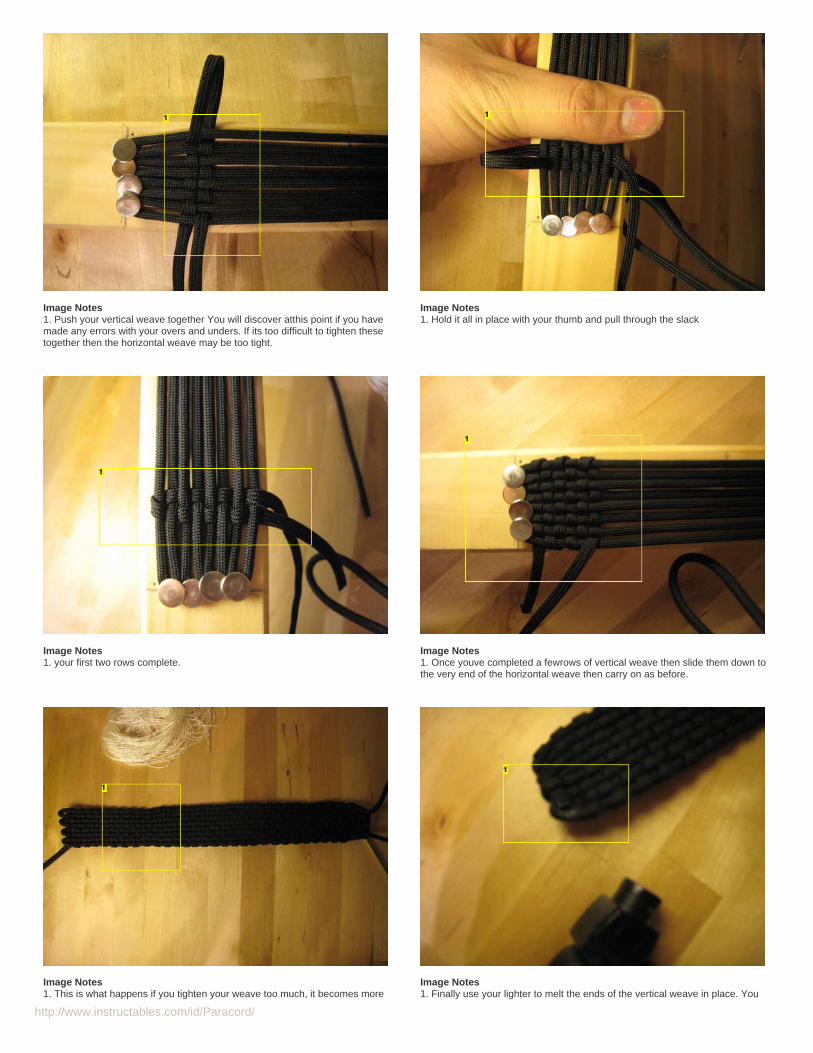
http://www.instructables.com/id/Paracord/
Image Notes1. Push your vertical weave together You will discover atthis point if you havemade any errors with your overs and unders. If its too difficult to tighten thesetogether then the horizontal weave may be too tight.
Image Notes1. Hold it all in place with your thumb and pull through the slack
Image Notes1. your first two rows complete.
Image Notes1. Once youve completed a fewrows of vertical weave then slide them down tothe very end of the horizontal weave then carry on as before.
Image Notes1. This is what happens if you tighten your weave too much, it becomes more
Image Notes1. Finally use your lighter to melt the ends of the vertical weave in place. You
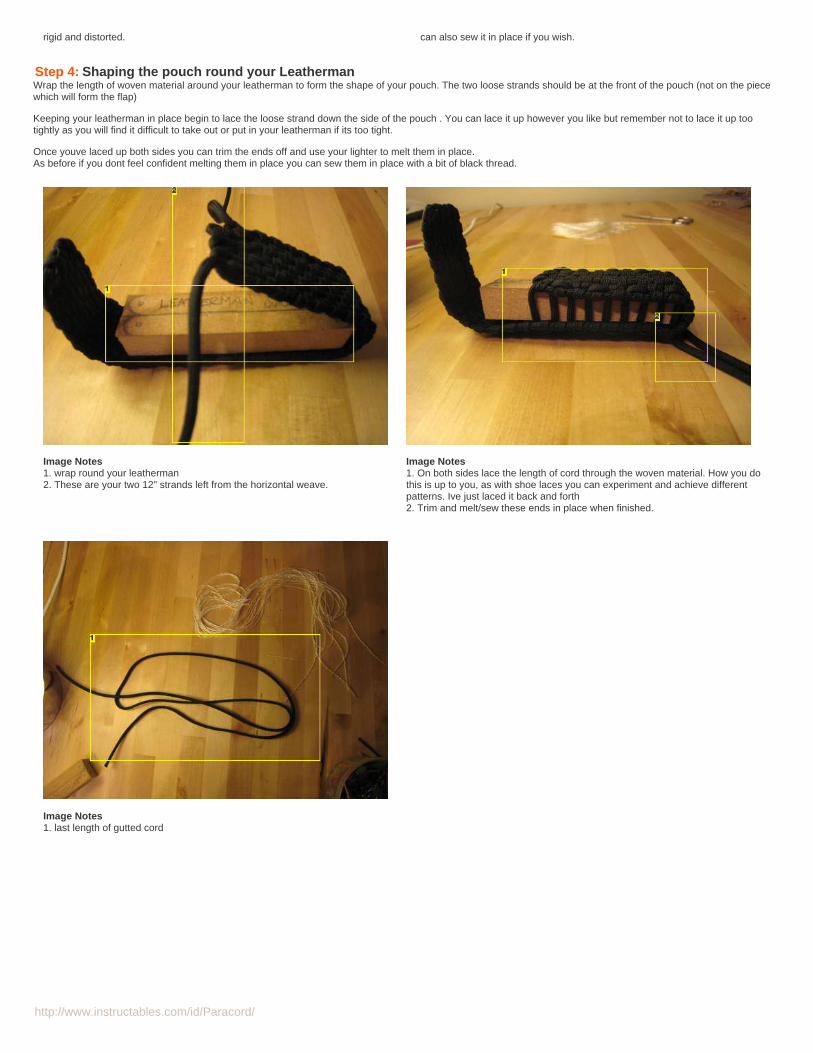
http://www.instructables.com/id/Paracord/
rigid and distorted. can also sew it in place if you wish.
Step 4: Shaping the pouch round your LeathermanWrap the length of woven material around your leatherman to form the shape of your pouch. The two loose strands should be at the front of the pouch (not on the piecewhich will form the flap)
Keeping your leatherman in place begin to lace the loose strand down the side of the pouch . You can lace it up however you like but remember not to lace it up tootightly as you will find it difficult to take out or put in your leatherman if its too tight.
Once youve laced up both sides you can trim the ends off and use your lighter to melt them in place.As before if you dont feel confident melting them in place you can sew them in place with a bit of black thread.
Image Notes1. wrap round your leatherman2. These are your two 12" strands left from the horizontal weave.
Image Notes1. On both sides lace the length of cord through the woven material. How you dothis is up to you, as with shoe laces you can experiment and achieve differentpatterns. Ive just laced it back and forth2. Trim and melt/sew these ends in place when finished.
Image Notes1. last length of gutted cord
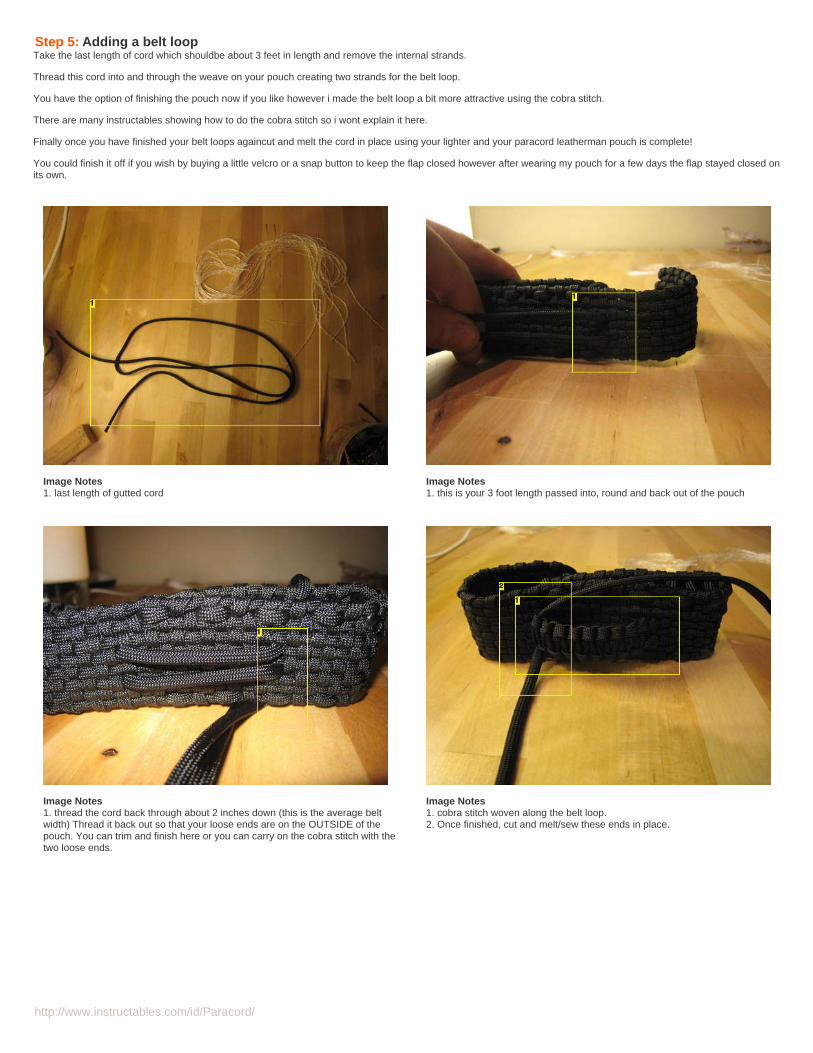
http://www.instructables.com/id/Paracord/
Step 5: Adding a belt loopTake the last length of cord which shouldbe about 3 feet in length and remove the internal strands.
Thread this cord into and through the weave on your pouch creating two strands for the belt loop.
You have the option of finishing the pouch now if you like however i made the belt loop a bit more attractive using the cobra stitch.
There are many instructables showing how to do the cobra stitch so i wont explain it here.
Finally once you have finished your belt loops againcut and melt the cord in place using your lighter and your paracord leatherman pouch is complete!
You could finish it off if you wish by buying a little velcro or a snap button to keep the flap closed however after wearing my pouch for a few days the flap stayed closed onits own.
Image Notes1. last length of gutted cord
Image Notes1. this is your 3 foot length passed into, round and back out of the pouch
Image Notes1. thread the cord back through about 2 inches down (this is the average beltwidth) Thread it back out so that your loose ends are on the OUTSIDE of thepouch. You can trim and finish here or you can carry on the cobra stitch with thetwo loose ends.
Image Notes1. cobra stitch woven along the belt loop.2. Once finished, cut and melt/sew these ends in place.
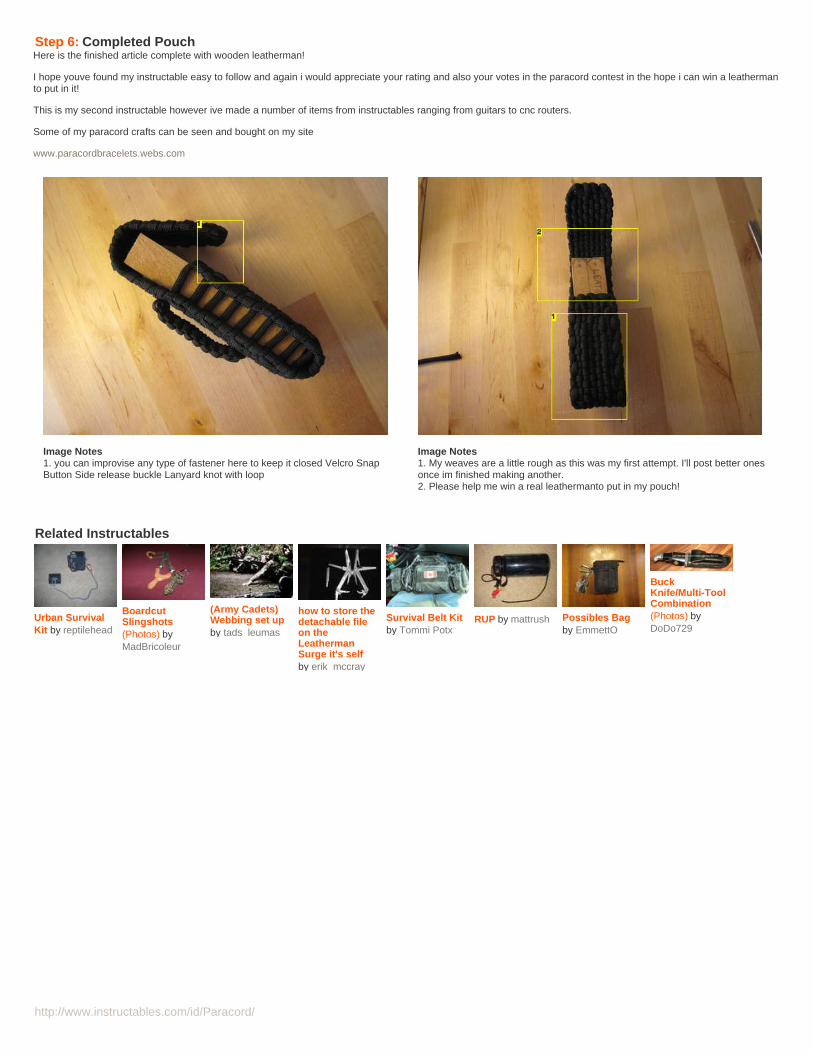
http://www.instructables.com/id/Paracord/
Step 6: Completed PouchHere is the finished article complete with wooden leatherman!
I hope youve found my instructable easy to follow and again i would appreciate your rating and also your votes in the paracord contest in the hope i can win a leathermanto put in it!
This is my second instructable however ive made a number of items from instructables ranging from guitars to cnc routers.
Some of my paracord crafts can be seen and bought on my site
www.paracordbracelets.webs.com
Image Notes1. you can improvise any type of fastener here to keep it closed Velcro SnapButton Side release buckle Lanyard knot with loop
Image Notes1. My weaves are a little rough as this was my first attempt. I'll post better onesonce im finished making another.2. Please help me win a real leathermanto put in my pouch!
Related Instructables
Urban SurvivalKit by reptilehead
BoardcutSlingshots(Photos) byMadBricoleur
(Army Cadets)Webbing set upby tads_leumas
how to store thedetachable fileon theLeathermanSurge it's selfby erik_mccray
Survival Belt Kitby Tommi Potx
RUP by mattrush Possibles Bagby EmmettO
BuckKnife/Multi-ToolCombination(Photos) byDoDo729
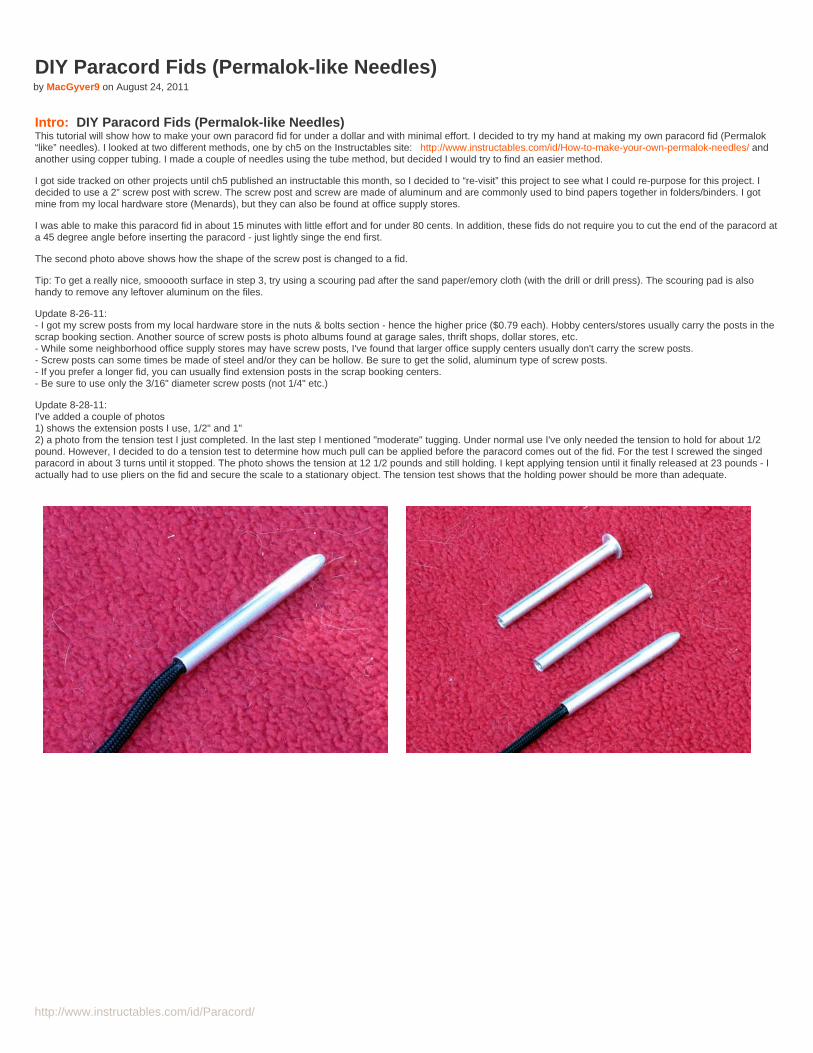
http://www.instructables.com/id/Paracord/
DIY Paracord Fids (Permalok-like Needles)by MacGyver9 on August 24, 2011
Intro: DIY Paracord Fids (Permalok-like Needles)This tutorial will show how to make your own paracord fid for under a dollar and with minimal effort. I decided to try my hand at making my own paracord fid (Permalok“like” needles). I looked at two different methods, one by ch5 on the Instructables site: http://www.instructables.com/id/How-to-make-your-own-permalok-needles/ andanother using copper tubing. I made a couple of needles using the tube method, but decided I would try to find an easier method.
I got side tracked on other projects until ch5 published an instructable this month, so I decided to “re-visit” this project to see what I could re-purpose for this project. Idecided to use a 2” screw post with screw. The screw post and screw are made of aluminum and are commonly used to bind papers together in folders/binders. I gotmine from my local hardware store (Menards), but they can also be found at office supply stores.
I was able to make this paracord fid in about 15 minutes with little effort and for under 80 cents. In addition, these fids do not require you to cut the end of the paracord ata 45 degree angle before inserting the paracord - just lightly singe the end first.
The second photo above shows how the shape of the screw post is changed to a fid.
Tip: To get a really nice, smooooth surface in step 3, try using a scouring pad after the sand paper/emory cloth (with the drill or drill press). The scouring pad is alsohandy to remove any leftover aluminum on the files.
Update 8-26-11:- I got my screw posts from my local hardware store in the nuts & bolts section - hence the higher price ($0.79 each). Hobby centers/stores usually carry the posts in thescrap booking section. Another source of screw posts is photo albums found at garage sales, thrift shops, dollar stores, etc.- While some neighborhood office supply stores may have screw posts, I've found that larger office supply centers usually don't carry the screw posts.- Screw posts can some times be made of steel and/or they can be hollow. Be sure to get the solid, aluminum type of screw posts.- If you prefer a longer fid, you can usually find extension posts in the scrap booking centers.- Be sure to use only the 3/16" diameter screw posts (not 1/4" etc.)
Update 8-28-11:I've added a couple of photos1) shows the extension posts I use, 1/2" and 1"2) a photo from the tension test I just completed. In the last step I mentioned "moderate" tugging. Under normal use I've only needed the tension to hold for about 1/2pound. However, I decided to do a tension test to determine how much pull can be applied before the paracord comes out of the fid. For the test I screwed the singedparacord in about 3 turns until it stopped. The photo shows the tension at 12 1/2 pounds and still holding. I kept applying tension until it finally released at 23 pounds - Iactually had to use pliers on the fid and secure the scale to a stationary object. The tension test shows that the holding power should be more than adequate.
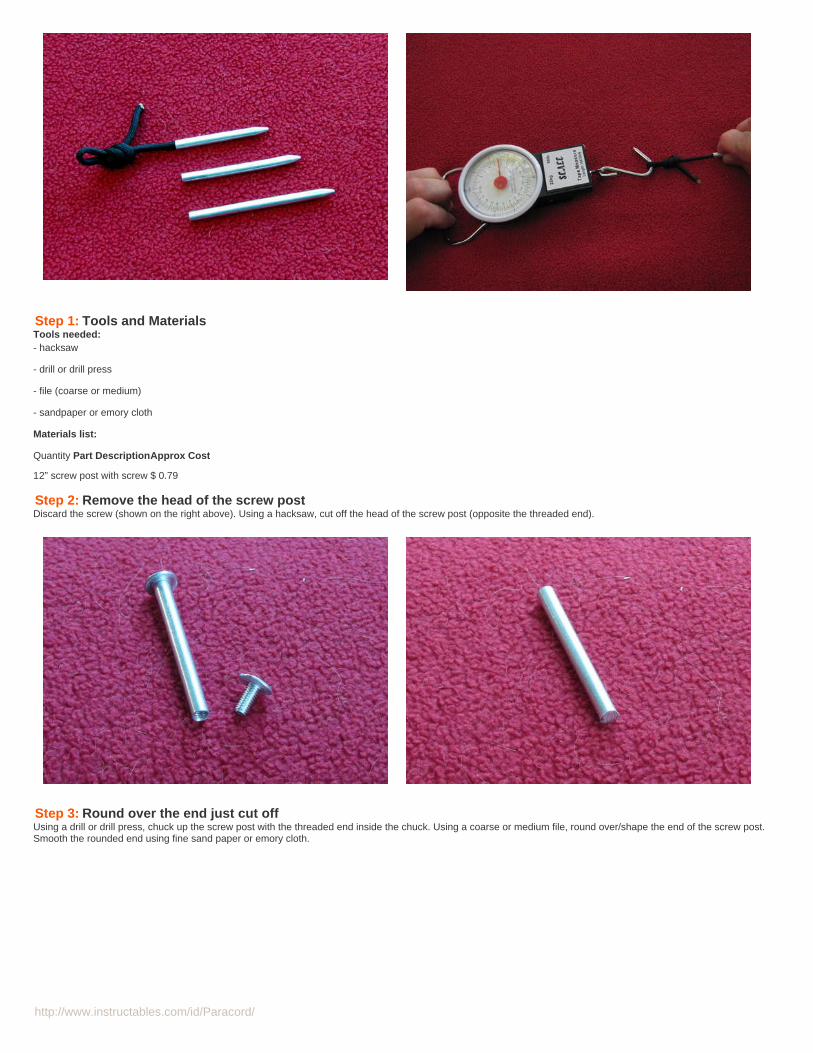
http://www.instructables.com/id/Paracord/
Step 1: Tools and MaterialsTools needed:- hacksaw
- drill or drill press
- file (coarse or medium)
- sandpaper or emory cloth
Materials list:
Quantity Part DescriptionApprox Cost
12” screw post with screw $ 0.79
Step 2: Remove the head of the screw postDiscard the screw (shown on the right above). Using a hacksaw, cut off the head of the screw post (opposite the threaded end).
Step 3: Round over the end just cut offUsing a drill or drill press, chuck up the screw post with the threaded end inside the chuck. Using a coarse or medium file, round over/shape the end of the screw post.Smooth the rounded end using fine sand paper or emory cloth.
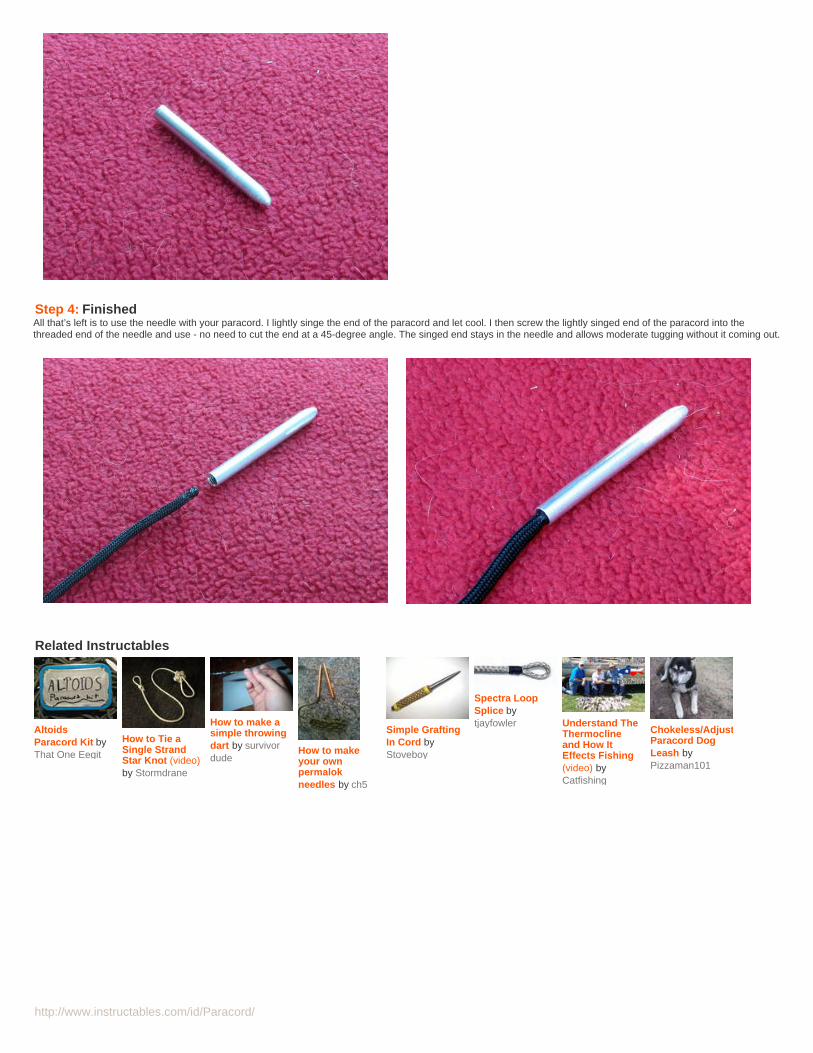
http://www.instructables.com/id/Paracord/
Step 4: FinishedAll that’s left is to use the needle with your paracord. I lightly singe the end of the paracord and let cool. I then screw the lightly singed end of the paracord into thethreaded end of the needle and use - no need to cut the end at a 45-degree angle. The singed end stays in the needle and allows moderate tugging without it coming out.
Related Instructables
AltoidsParacord Kit byThat One Eegit
How to Tie aSingle StrandStar Knot (video)by Stormdrane
How to make asimple throwingdart by survivordude
How to makeyour ownpermalokneedles by ch5
Simple GraftingIn Cord byStoveboy
Spectra LoopSplice bytjayfowler Understand The
Thermoclineand How ItEffects Fishing(video) byCatfishing
Chokeless/AdjustableParacord DogLeash byPizzaman101
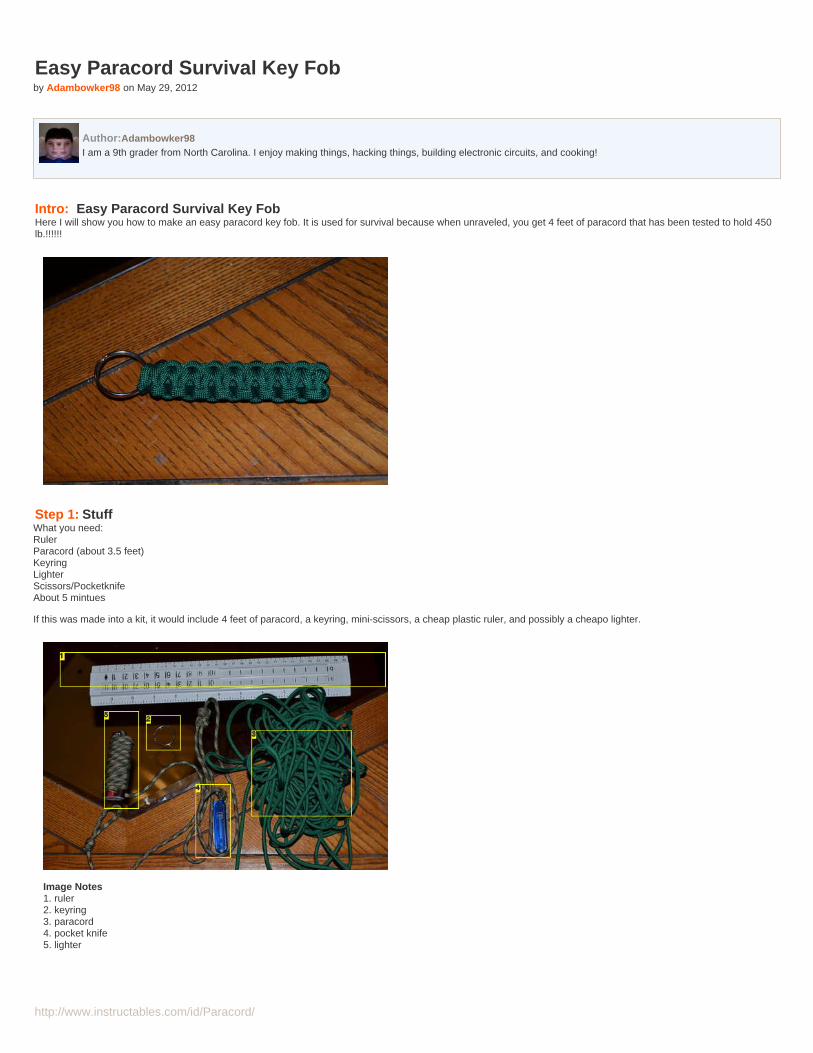
http://www.instructables.com/id/Paracord/
Easy Paracord Survival Key Fobby Adambowker98 on May 29, 2012
Author:Adambowker98I am a 9th grader from North Carolina. I enjoy making things, hacking things, building electronic circuits, and cooking!
Intro: Easy Paracord Survival Key FobHere I will show you how to make an easy paracord key fob. It is used for survival because when unraveled, you get 4 feet of paracord that has been tested to hold 450lb.!!!!!!
Step 1: StuffWhat you need:RulerParacord (about 3.5 feet)KeyringLighterScissors/PocketknifeAbout 5 mintues
If this was made into a kit, it would include 4 feet of paracord, a keyring, mini-scissors, a cheap plastic ruler, and possibly a cheapo lighter.
Image Notes1. ruler2. keyring3. paracord4. pocket knife5. lighter
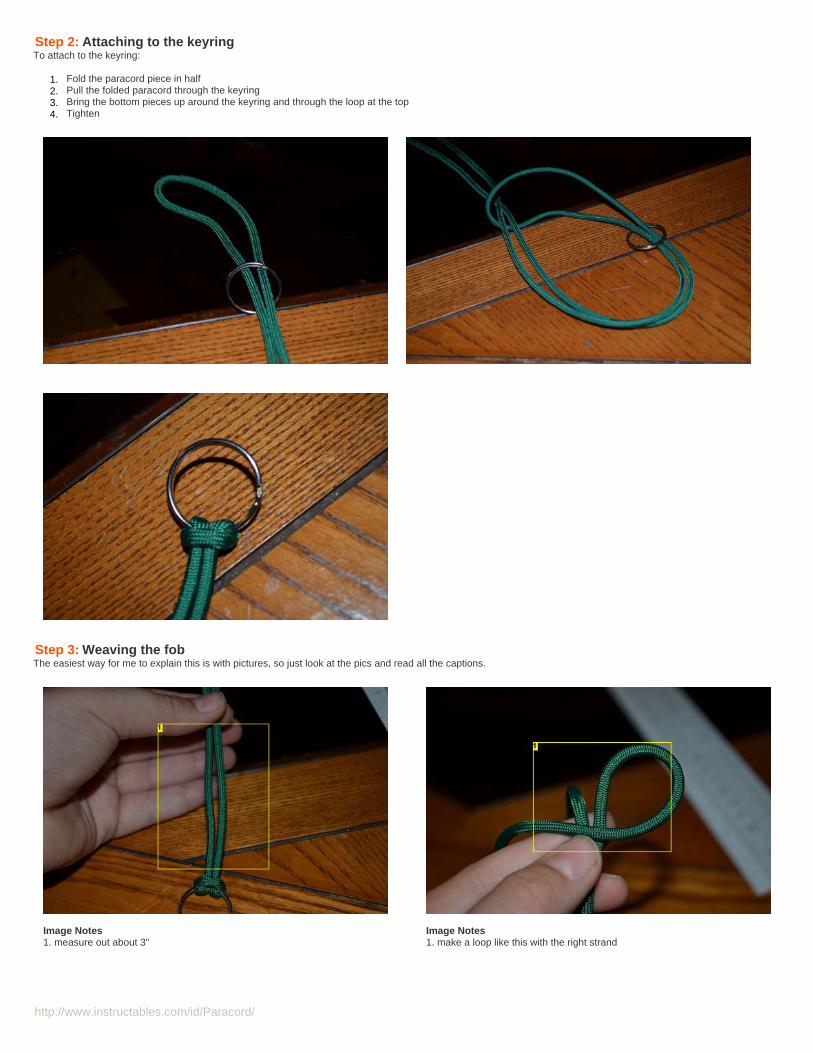
http://www.instructables.com/id/Paracord/
Step 2: Attaching to the keyringTo attach to the keyring:
Fold the paracord piece in half1.Pull the folded paracord through the keyring2.Bring the bottom pieces up around the keyring and through the loop at the top3.Tighten4.
Step 3: Weaving the fobThe easiest way for me to explain this is with pictures, so just look at the pics and read all the captions.
Image Notes1. measure out about 3"
Image Notes1. make a loop like this with the right strand
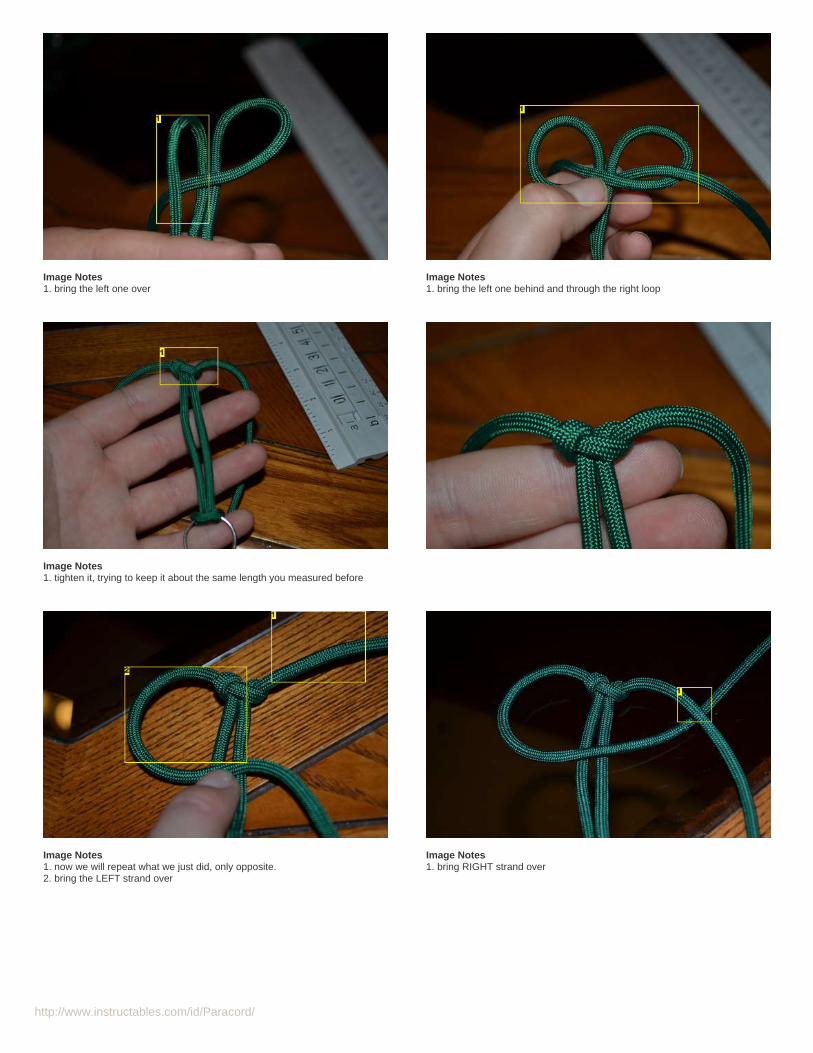
http://www.instructables.com/id/Paracord/
Image Notes1. bring the left one over
Image Notes1. bring the left one behind and through the right loop
Image Notes1. tighten it, trying to keep it about the same length you measured before
Image Notes1. now we will repeat what we just did, only opposite.2. bring the LEFT strand over
Image Notes1. bring RIGHT strand over
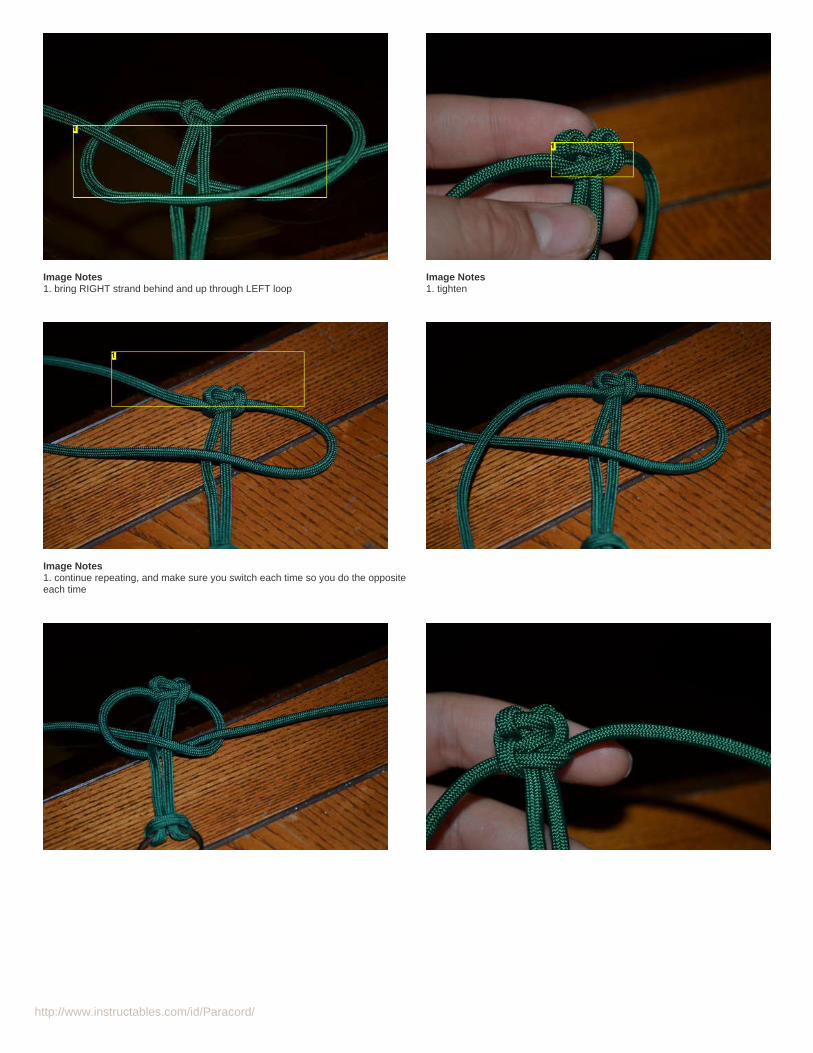
http://www.instructables.com/id/Paracord/
Image Notes1. bring RIGHT strand behind and up through LEFT loop
Image Notes1. tighten
Image Notes1. continue repeating, and make sure you switch each time so you do the oppositeeach time
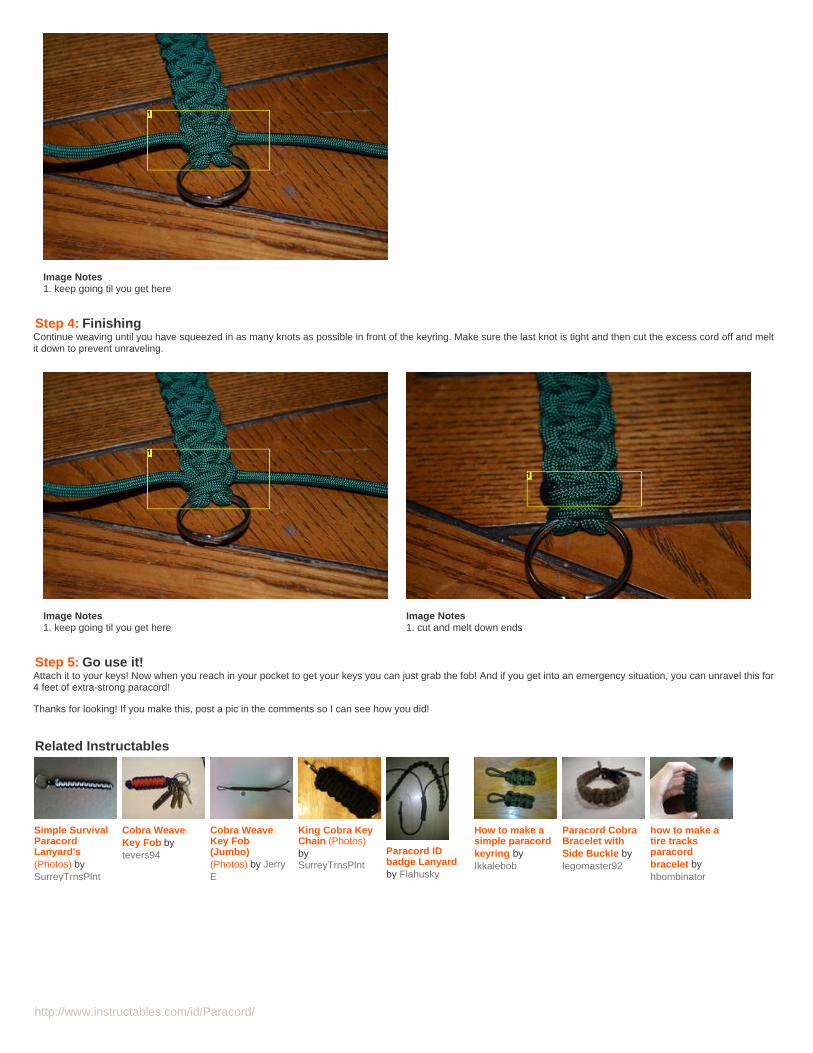
http://www.instructables.com/id/Paracord/
Image Notes1. keep going til you get here
Step 4: FinishingContinue weaving until you have squeezed in as many knots as possible in front of the keyring. Make sure the last knot is tight and then cut the excess cord off and meltit down to prevent unraveling.
Image Notes1. keep going til you get here
Image Notes1. cut and melt down ends
Step 5: Go use it!Attach it to your keys! Now when you reach in your pocket to get your keys you can just grab the fob! And if you get into an emergency situation, you can unravel this for4 feet of extra-strong paracord!
Thanks for looking! If you make this, post a pic in the comments so I can see how you did!
Related Instructables
Simple SurvivalParacordLanyard's(Photos) bySurreyTrnsPlnt
Cobra WeaveKey Fob bytevers94
Cobra WeaveKey Fob(Jumbo)(Photos) by JerryE
King Cobra KeyChain (Photos)bySurreyTrnsPlnt
Paracord IDbadge Lanyardby Flahusky
How to make asimple paracordkeyring byIkkalebob
Paracord CobraBracelet withSide Buckle bylegomaster92
how to make atire tracksparacordbracelet byhbombinator
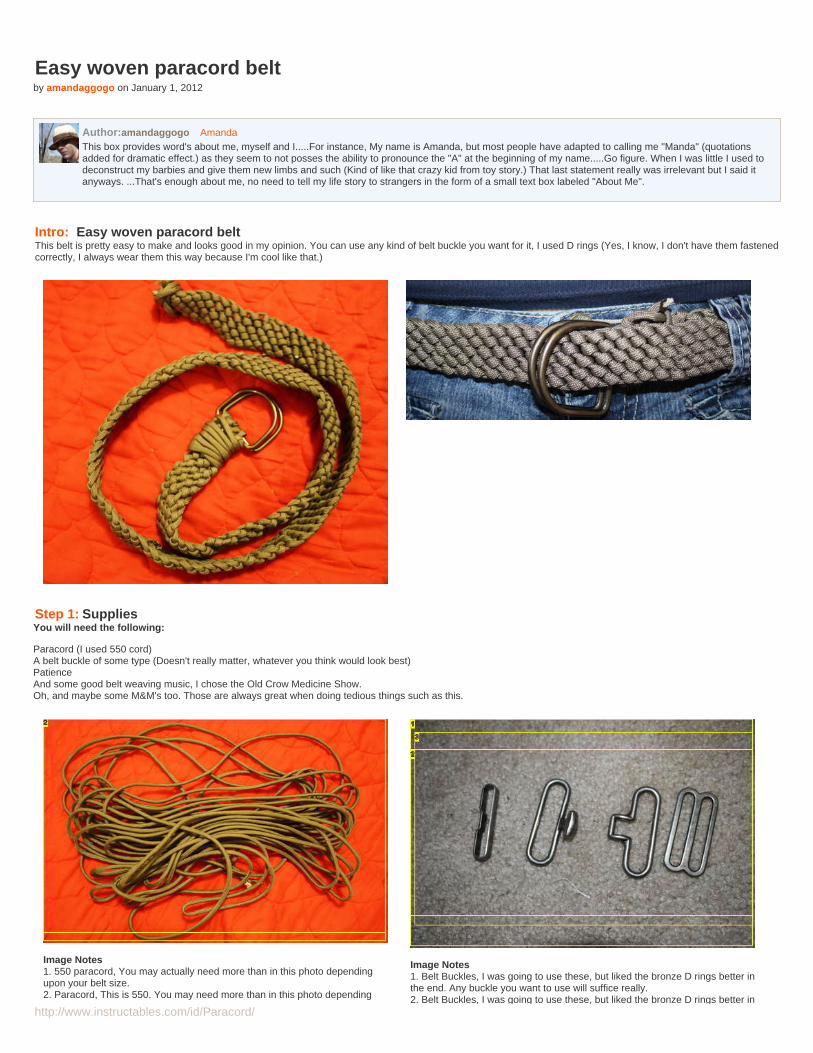
http://www.instructables.com/id/Paracord/
Easy woven paracord beltby amandaggogo on January 1, 2012
Author:amandaggogo AmandaThis box provides word's about me, myself and I.....For instance, My name is Amanda, but most people have adapted to calling me "Manda" (quotationsadded for dramatic effect.) as they seem to not posses the ability to pronounce the "A" at the beginning of my name.....Go figure. When I was little I used todeconstruct my barbies and give them new limbs and such (Kind of like that crazy kid from toy story.) That last statement really was irrelevant but I said itanyways. ...That's enough about me, no need to tell my life story to strangers in the form of a small text box labeled "About Me".
Intro: Easy woven paracord beltThis belt is pretty easy to make and looks good in my opinion. You can use any kind of belt buckle you want for it, I used D rings (Yes, I know, I don't have them fastenedcorrectly, I always wear them this way because I'm cool like that.)
Step 1: SuppliesYou will need the following:
Paracord (I used 550 cord)A belt buckle of some type (Doesn't really matter, whatever you think would look best)PatienceAnd some good belt weaving music, I chose the Old Crow Medicine Show.Oh, and maybe some M&M's too. Those are always great when doing tedious things such as this.
Image Notes1. 550 paracord, You may actually need more than in this photo dependingupon your belt size.2. Paracord, This is 550. You may need more than in this photo depending
Image Notes1. Belt Buckles, I was going to use these, but liked the bronze D rings better inthe end. Any buckle you want to use will suffice really.2. Belt Buckles, I was going to use these, but liked the bronze D rings better in
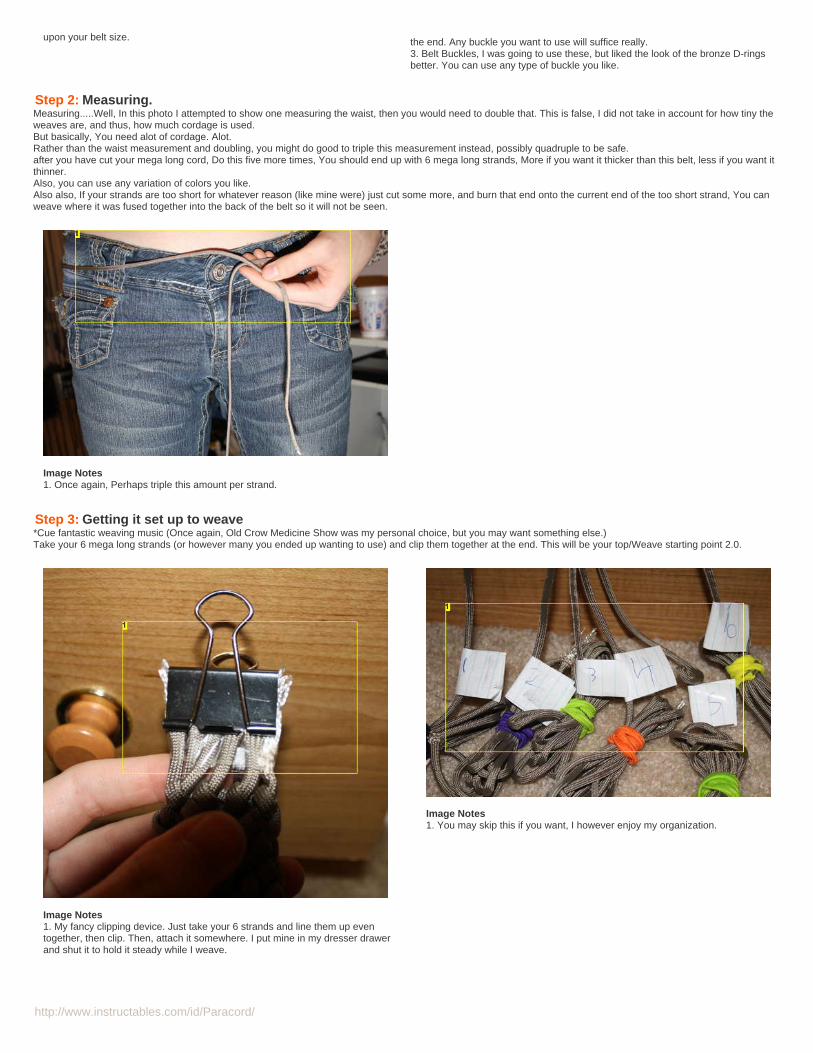
http://www.instructables.com/id/Paracord/
upon your belt size. the end. Any buckle you want to use will suffice really.3. Belt Buckles, I was going to use these, but liked the look of the bronze D-ringsbetter. You can use any type of buckle you like.
Step 2: Measuring.Measuring.....Well, In this photo I attempted to show one measuring the waist, then you would need to double that. This is false, I did not take in account for how tiny theweaves are, and thus, how much cordage is used.But basically, You need alot of cordage. Alot.Rather than the waist measurement and doubling, you might do good to triple this measurement instead, possibly quadruple to be safe.after you have cut your mega long cord, Do this five more times, You should end up with 6 mega long strands, More if you want it thicker than this belt, less if you want itthinner.Also, you can use any variation of colors you like.Also also, If your strands are too short for whatever reason (like mine were) just cut some more, and burn that end onto the current end of the too short strand, You canweave where it was fused together into the back of the belt so it will not be seen.
Image Notes1. Once again, Perhaps triple this amount per strand.
Step 3: Getting it set up to weave*Cue fantastic weaving music (Once again, Old Crow Medicine Show was my personal choice, but you may want something else.)Take your 6 mega long strands (or however many you ended up wanting to use) and clip them together at the end. This will be your top/Weave starting point 2.0.
Image Notes1. My fancy clipping device. Just take your 6 strands and line them up eventogether, then clip. Then, attach it somewhere. I put mine in my dresser drawerand shut it to hold it steady while I weave.
Image Notes1. You may skip this if you want, I however enjoy my organization.
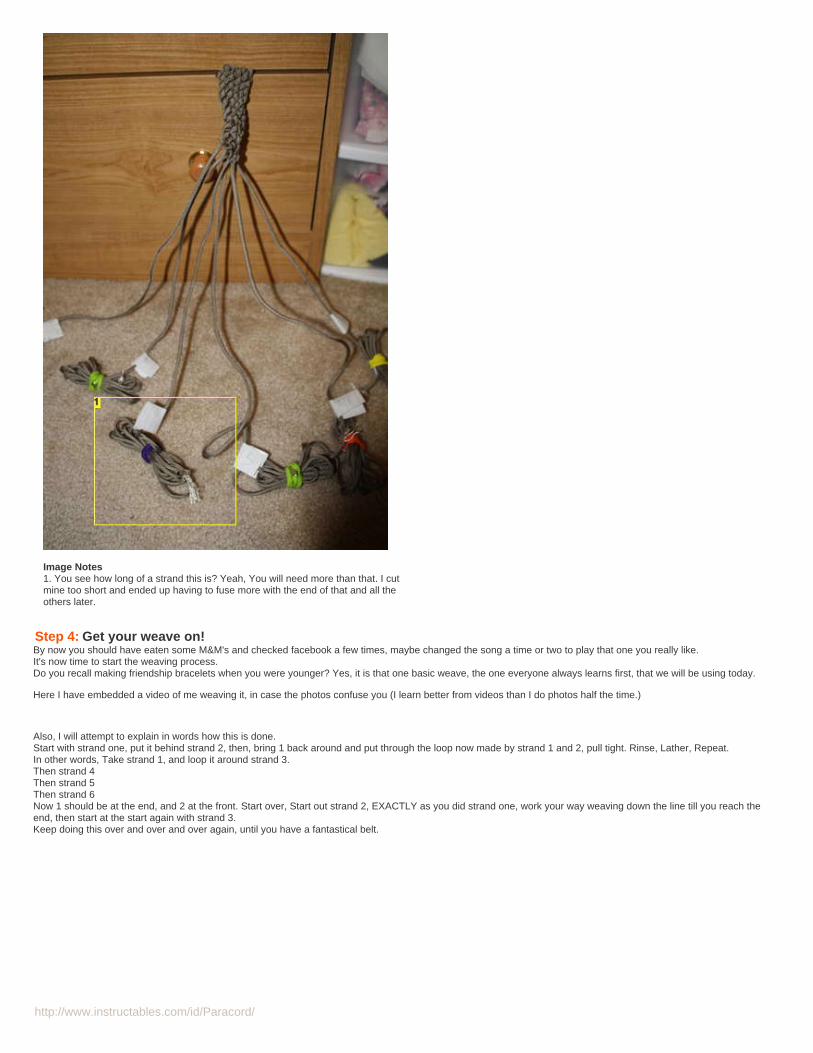
http://www.instructables.com/id/Paracord/
Image Notes1. You see how long of a strand this is? Yeah, You will need more than that. I cutmine too short and ended up having to fuse more with the end of that and all theothers later.
Step 4: Get your weave on!By now you should have eaten some M&M's and checked facebook a few times, maybe changed the song a time or two to play that one you really like.It's now time to start the weaving process.Do you recall making friendship bracelets when you were younger? Yes, it is that one basic weave, the one everyone always learns first, that we will be using today.
Here I have embedded a video of me weaving it, in case the photos confuse you (I learn better from videos than I do photos half the time.)
Also, I will attempt to explain in words how this is done.Start with strand one, put it behind strand 2, then, bring 1 back around and put through the loop now made by strand 1 and 2, pull tight. Rinse, Lather, Repeat.In other words, Take strand 1, and loop it around strand 3.Then strand 4Then strand 5Then strand 6Now 1 should be at the end, and 2 at the front. Start over, Start out strand 2, EXACTLY as you did strand one, work your way weaving down the line till you reach theend, then start at the start again with strand 3.Keep doing this over and over and over again, until you have a fantastical belt.
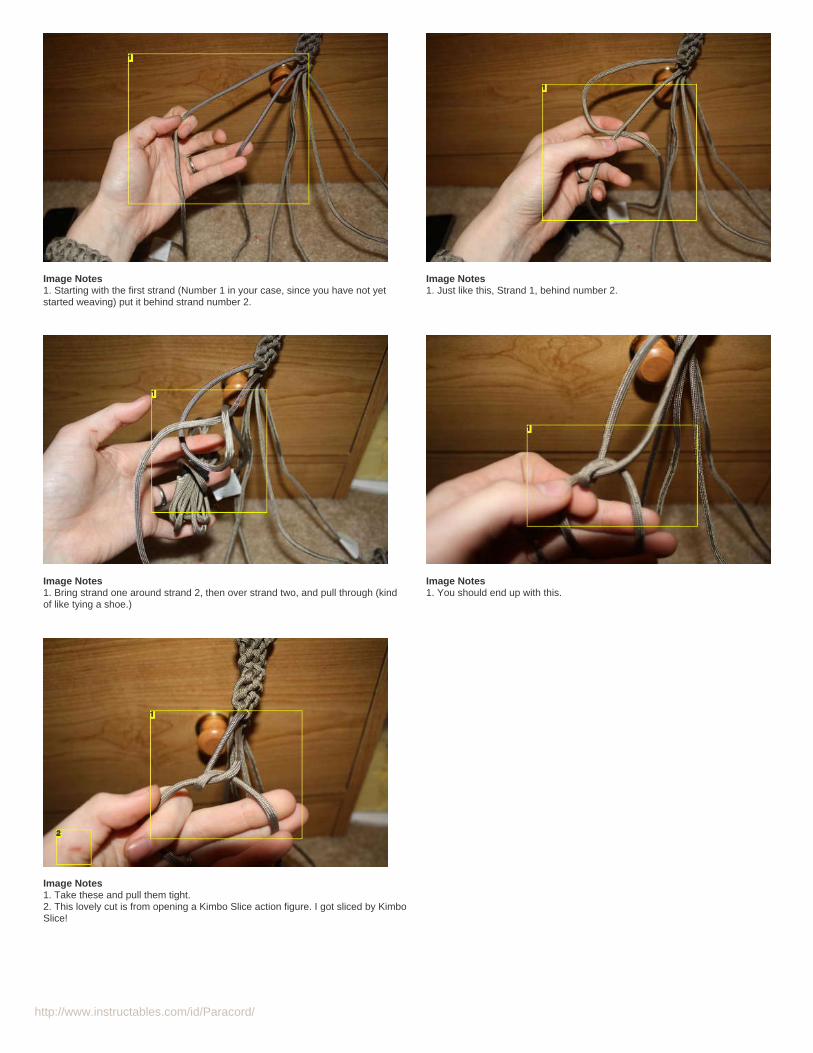
http://www.instructables.com/id/Paracord/
Image Notes1. Starting with the first strand (Number 1 in your case, since you have not yetstarted weaving) put it behind strand number 2.
Image Notes1. Just like this, Strand 1, behind number 2.
Image Notes1. Bring strand one around strand 2, then over strand two, and pull through (kindof like tying a shoe.)
Image Notes1. You should end up with this.
Image Notes1. Take these and pull them tight.2. This lovely cut is from opening a Kimbo Slice action figure. I got sliced by KimboSlice!
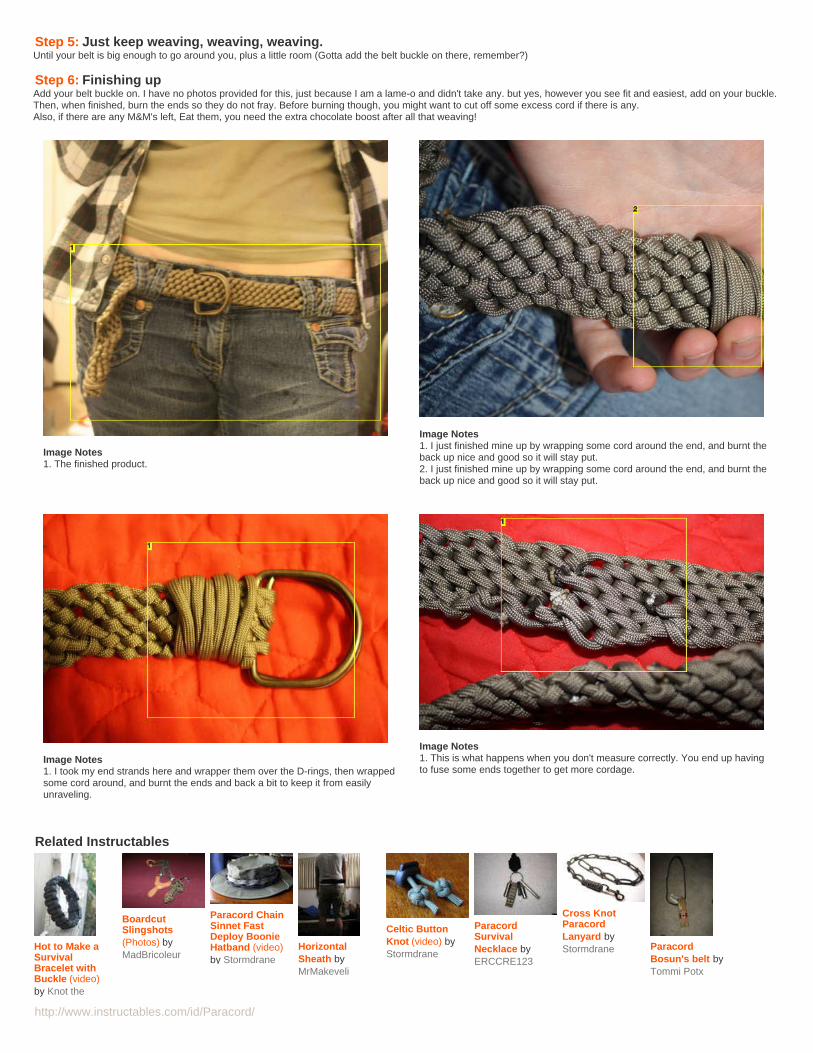
http://www.instructables.com/id/Paracord/
Step 5: Just keep weaving, weaving, weaving.Until your belt is big enough to go around you, plus a little room (Gotta add the belt buckle on there, remember?)
Step 6: Finishing upAdd your belt buckle on. I have no photos provided for this, just because I am a lame-o and didn't take any. but yes, however you see fit and easiest, add on your buckle.Then, when finished, burn the ends so they do not fray. Before burning though, you might want to cut off some excess cord if there is any.Also, if there are any M&M's left, Eat them, you need the extra chocolate boost after all that weaving!
Image Notes1. The finished product.
Image Notes1. I just finished mine up by wrapping some cord around the end, and burnt theback up nice and good so it will stay put.2. I just finished mine up by wrapping some cord around the end, and burnt theback up nice and good so it will stay put.
Image Notes1. I took my end strands here and wrapper them over the D-rings, then wrappedsome cord around, and burnt the ends and back a bit to keep it from easilyunraveling.
Image Notes1. This is what happens when you don't measure correctly. You end up havingto fuse some ends together to get more cordage.
Related Instructables
Hot to Make aSurvivalBracelet withBuckle (video)by Knot the
BoardcutSlingshots(Photos) byMadBricoleur
Paracord ChainSinnet FastDeploy BoonieHatband (video)by Stormdrane
HorizontalSheath byMrMakeveli
Celtic ButtonKnot (video) byStormdrane
ParacordSurvivalNecklace byERCCRE123
Cross KnotParacordLanyard byStormdrane Paracord
Bosun's belt byTommi Potx

http://www.instructables.com/id/Paracord/
Ordinary
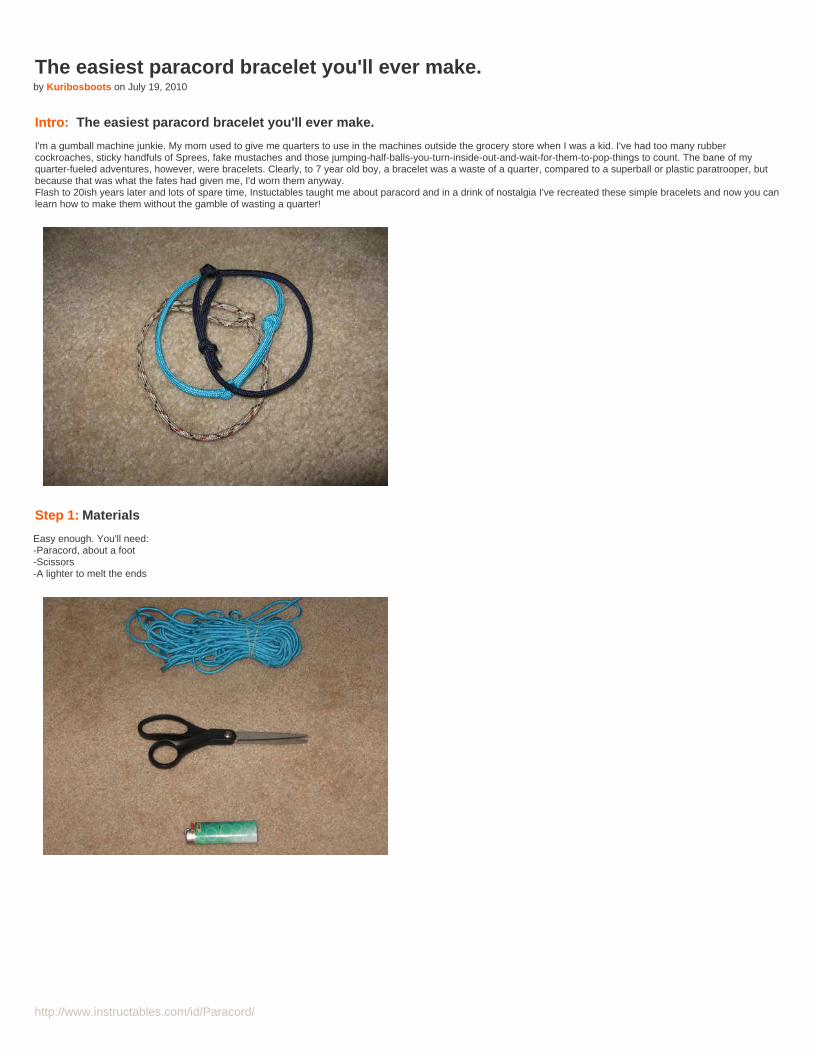
http://www.instructables.com/id/Paracord/
The easiest paracord bracelet you'll ever make.by Kuribosboots on July 19, 2010
Intro: The easiest paracord bracelet you'll ever make.
I'm a gumball machine junkie. My mom used to give me quarters to use in the machines outside the grocery store when I was a kid. I've had too many rubbercockroaches, sticky handfuls of Sprees, fake mustaches and those jumping-half-balls-you-turn-inside-out-and-wait-for-them-to-pop-things to count. The bane of myquarter-fueled adventures, however, were bracelets. Clearly, to 7 year old boy, a bracelet was a waste of a quarter, compared to a superball or plastic paratrooper, butbecause that was what the fates had given me, I'd worn them anyway.Flash to 20ish years later and lots of spare time, Instuctables taught me about paracord and in a drink of nostalgia I've recreated these simple bracelets and now you canlearn how to make them without the gamble of wasting a quarter!
Step 1: Materials
Easy enough. You'll need:-Paracord, about a foot-Scissors-A lighter to melt the ends
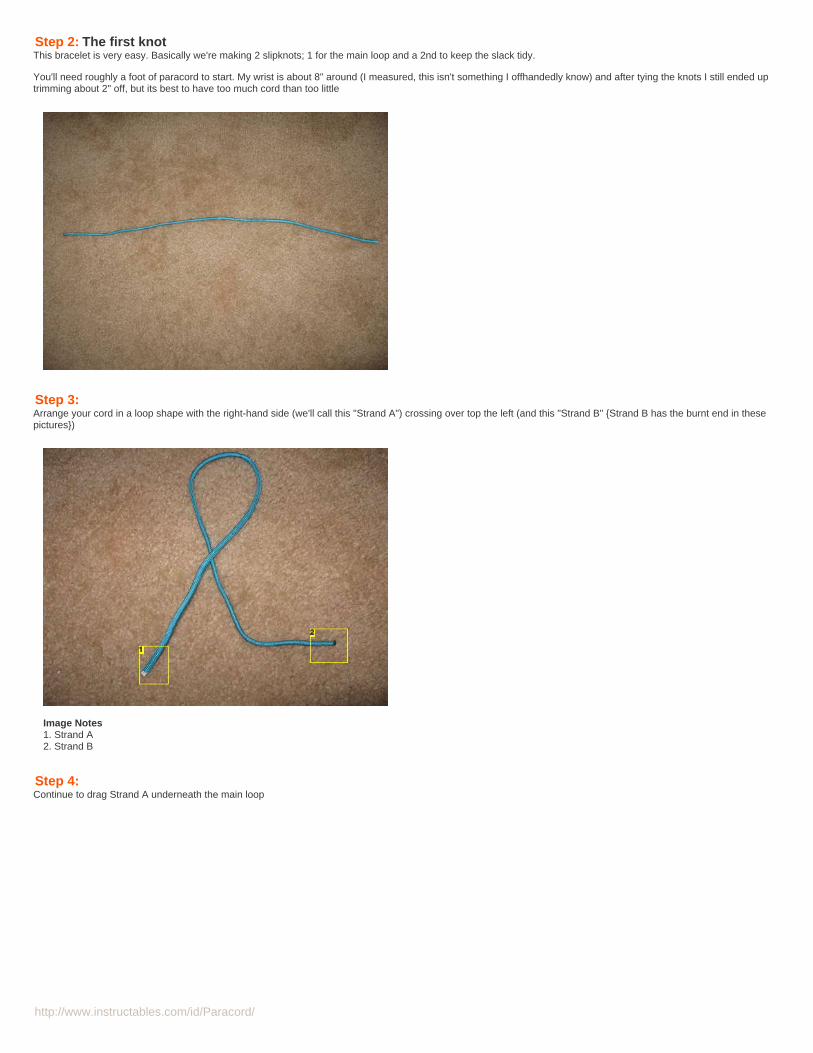
http://www.instructables.com/id/Paracord/
Step 2: The first knotThis bracelet is very easy. Basically we're making 2 slipknots; 1 for the main loop and a 2nd to keep the slack tidy.
You'll need roughly a foot of paracord to start. My wrist is about 8" around (I measured, this isn't something I offhandedly know) and after tying the knots I still ended uptrimming about 2" off, but its best to have too much cord than too little
Step 3: Arrange your cord in a loop shape with the right-hand side (we'll call this "Strand A") crossing over top the left (and this "Strand B" {Strand B has the burnt end in thesepictures})
Image Notes1. Strand A2. Strand B
Step 4: Continue to drag Strand A underneath the main loop
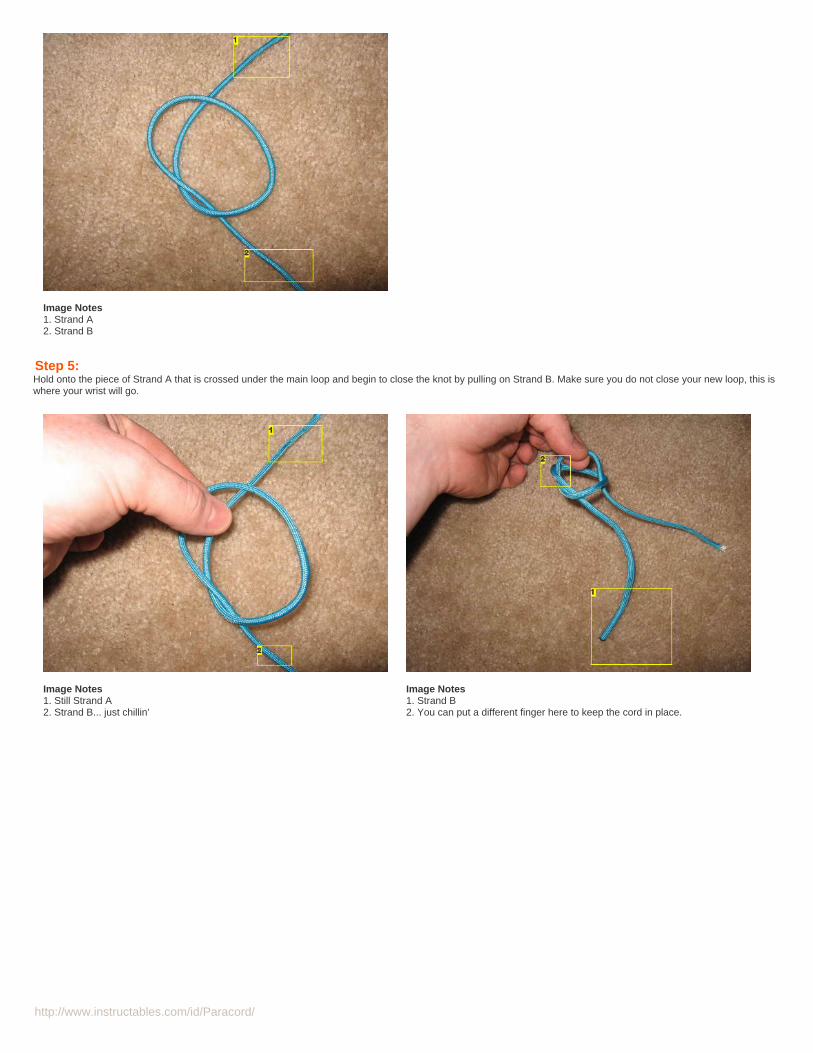
http://www.instructables.com/id/Paracord/
Image Notes1. Strand A2. Strand B
Step 5: Hold onto the piece of Strand A that is crossed under the main loop and begin to close the knot by pulling on Strand B. Make sure you do not close your new loop, this iswhere your wrist will go.
Image Notes1. Still Strand A2. Strand B... just chillin'
Image Notes1. Strand B2. You can put a different finger here to keep the cord in place.
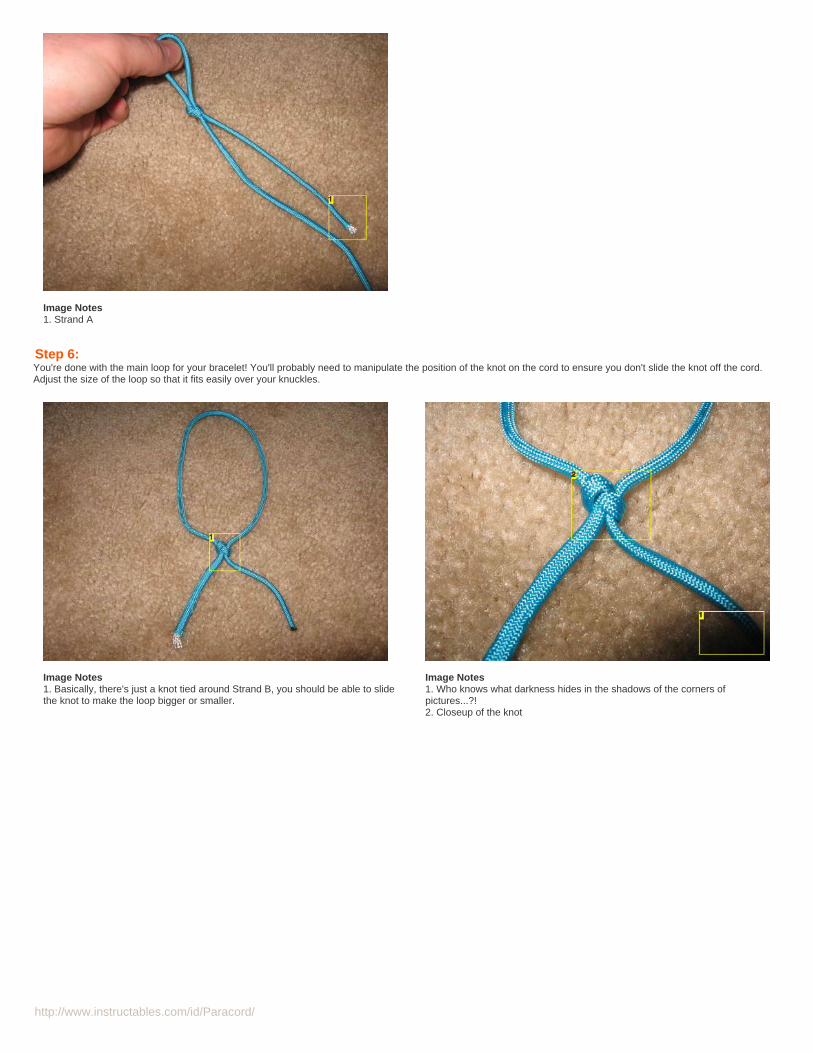
http://www.instructables.com/id/Paracord/
Image Notes1. Strand A
Step 6: You're done with the main loop for your bracelet! You'll probably need to manipulate the position of the knot on the cord to ensure you don't slide the knot off the cord.Adjust the size of the loop so that it fits easily over your knuckles.
Image Notes1. Basically, there's just a knot tied around Strand B, you should be able to slidethe knot to make the loop bigger or smaller.
Image Notes1. Who knows what darkness hides in the shadows of the corners ofpictures...?!2. Closeup of the knot
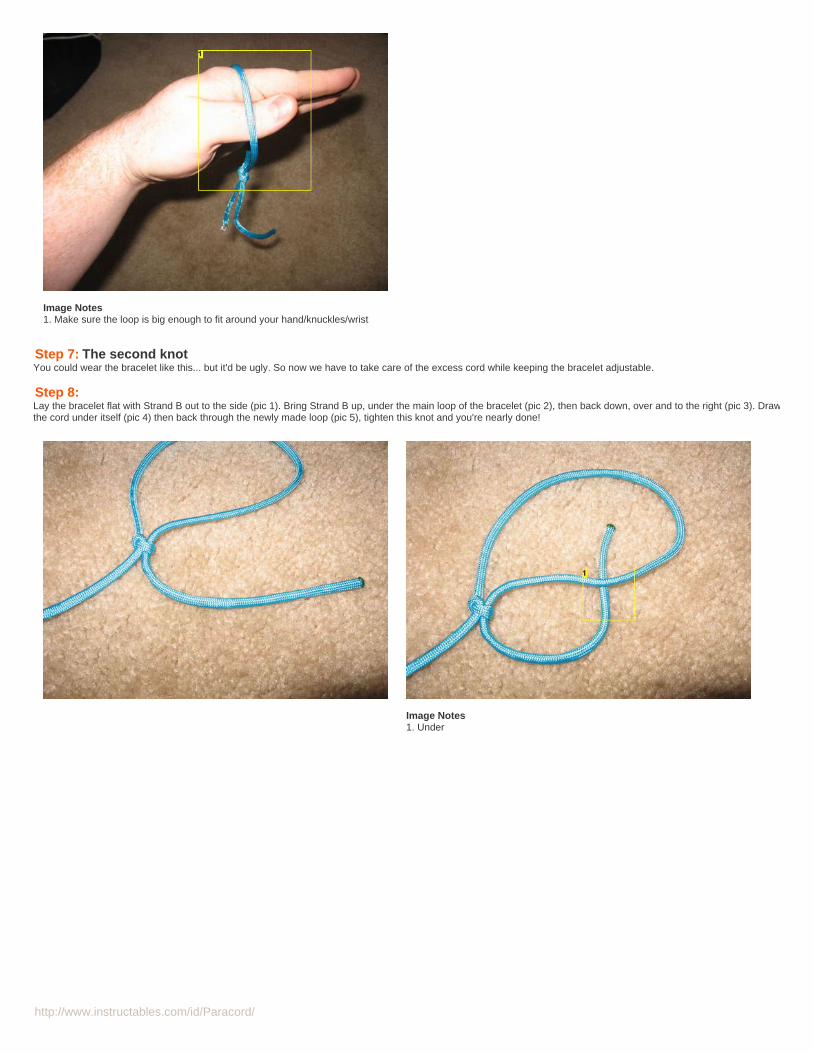
http://www.instructables.com/id/Paracord/
Image Notes1. Make sure the loop is big enough to fit around your hand/knuckles/wrist
Step 7: The second knotYou could wear the bracelet like this... but it'd be ugly. So now we have to take care of the excess cord while keeping the bracelet adjustable.
Step 8: Lay the bracelet flat with Strand B out to the side (pic 1). Bring Strand B up, under the main loop of the bracelet (pic 2), then back down, over and to the right (pic 3). Drawthe cord under itself (pic 4) then back through the newly made loop (pic 5), tighten this knot and you're nearly done!
Image Notes1. Under
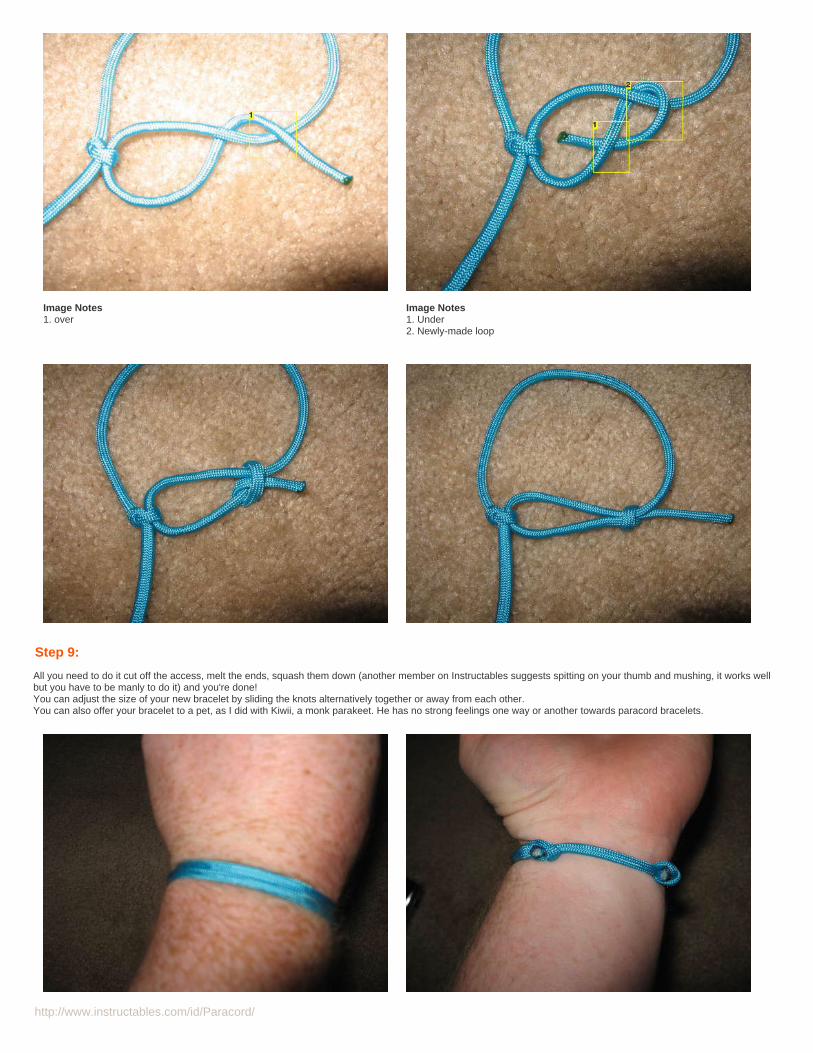
http://www.instructables.com/id/Paracord/
Image Notes1. over
Image Notes1. Under2. Newly-made loop
Step 9:
All you need to do it cut off the access, melt the ends, squash them down (another member on Instructables suggests spitting on your thumb and mushing, it works wellbut you have to be manly to do it) and you're done!You can adjust the size of your new bracelet by sliding the knots alternatively together or away from each other.You can also offer your bracelet to a pet, as I did with Kiwii, a monk parakeet. He has no strong feelings one way or another towards paracord bracelets.
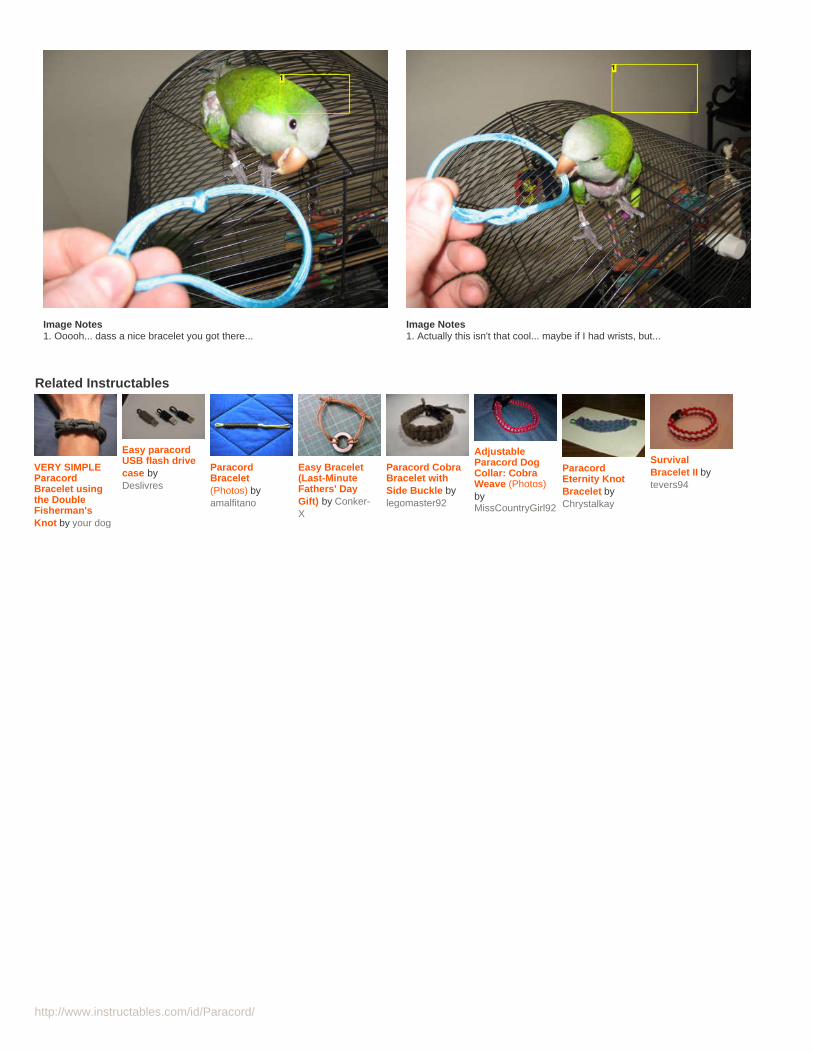
http://www.instructables.com/id/Paracord/
Image Notes1. Ooooh... dass a nice bracelet you got there...
Image Notes1. Actually this isn't that cool... maybe if I had wrists, but...
Related Instructables
VERY SIMPLEParacordBracelet usingthe DoubleFisherman'sKnot by your dog
Easy paracordUSB flash drivecase byDeslivres
ParacordBracelet(Photos) byamalfitano
Easy Bracelet(Last-MinuteFathers' DayGift) by Conker-X
Paracord CobraBracelet withSide Buckle bylegomaster92
AdjustableParacord DogCollar: CobraWeave (Photos)byMissCountryGirl92
ParacordEternity KnotBracelet byChrystalkay
SurvivalBracelet II bytevers94
http://www.instructables.com/id/Paracord-Eternity-Knot-Bracelet/?utm_source=pdf&utm_campaign=related
http://www.instructables.com/id/Paracord-Eternity-Knot-Bracelet/?utm_source=pdf&utm_campaign=related
http://www.instructables.com/id/Paracord-Eternity-Knot-Bracelet/?utm_source=pdf&utm_campaign=related
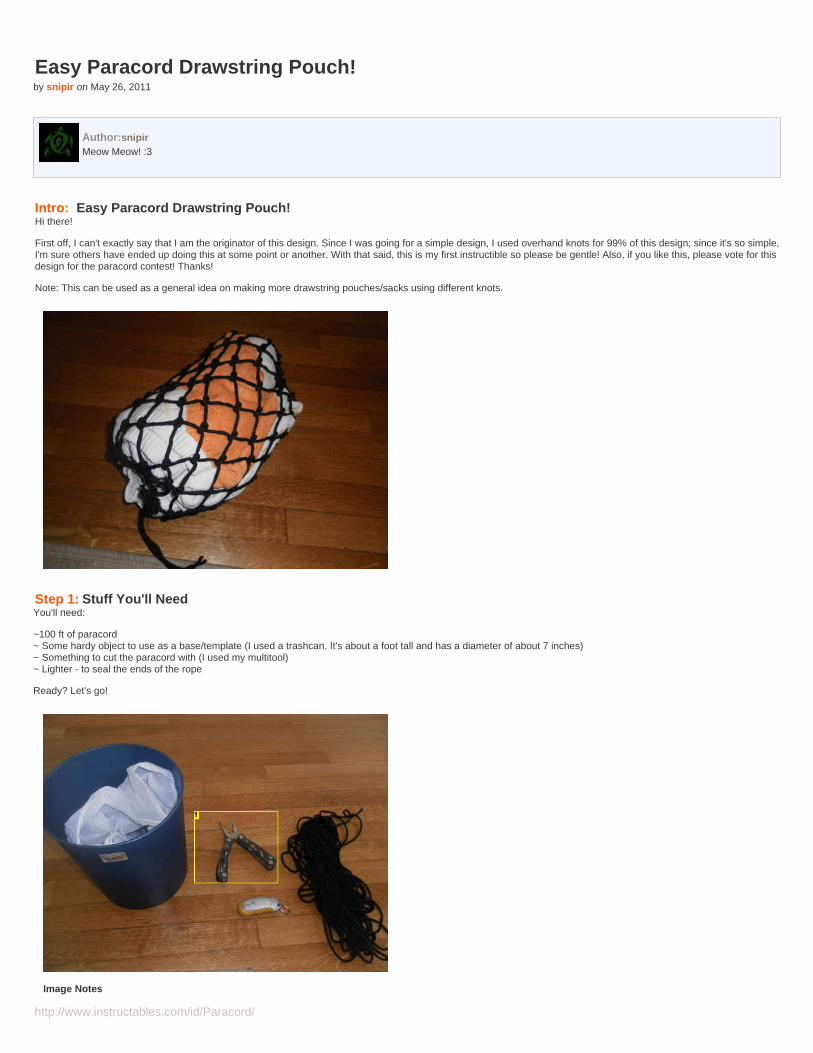
http://www.instructables.com/id/Paracord/
Easy Paracord Drawstring Pouch!by snipir on May 26, 2011
Author:snipirMeow Meow! :3
Intro: Easy Paracord Drawstring Pouch!Hi there!
First off, I can't exactly say that I am the originator of this design. Since I was going for a simple design, I used overhand knots for 99% of this design; since it's so simple,I'm sure others have ended up doing this at some point or another. With that said, this is my first instructible so please be gentle! Also, if you like this, please vote for thisdesign for the paracord contest! Thanks!
Note: This can be used as a general idea on making more drawstring pouches/sacks using different knots.
Step 1: Stuff You'll NeedYou'll need:
~100 ft of paracord~ Some hardy object to use as a base/template (I used a trashcan. It's about a foot tall and has a diameter of about 7 inches)~ Something to cut the paracord with (I used my multitool)~ Lighter - to seal the ends of the rope
Ready? Let's go!
Image Notes
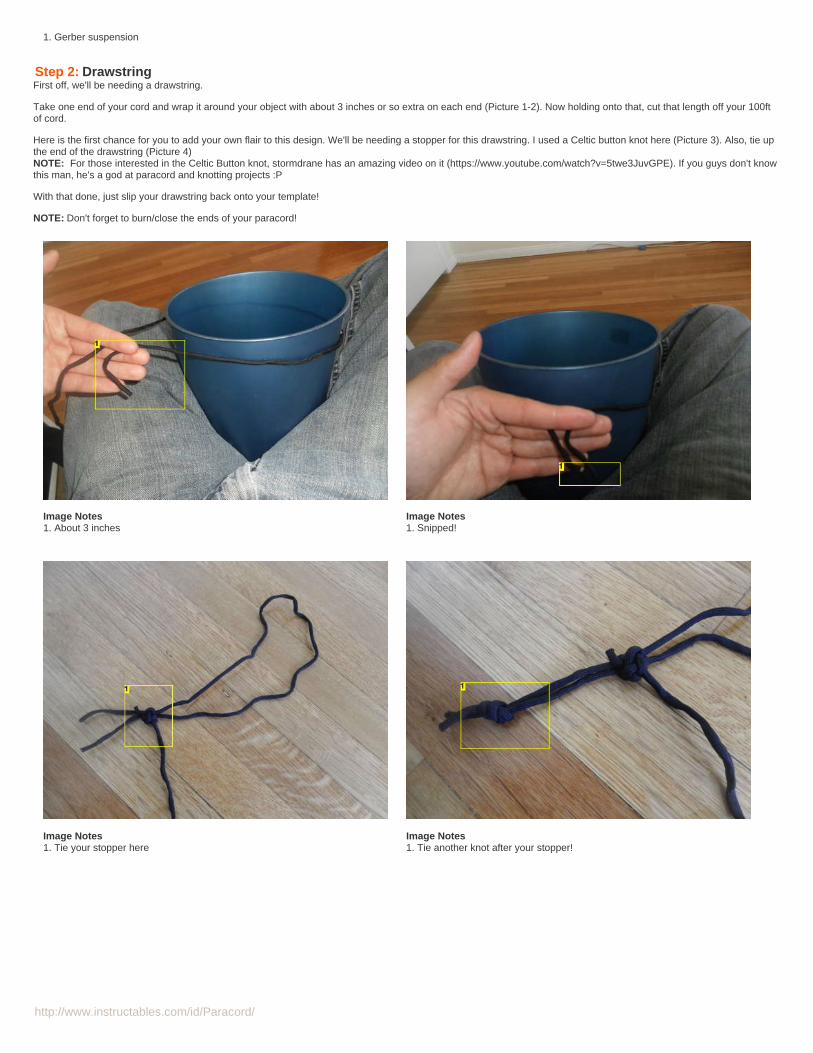
http://www.instructables.com/id/Paracord/
1. Gerber suspension
Step 2: DrawstringFirst off, we'll be needing a drawstring.
Take one end of your cord and wrap it around your object with about 3 inches or so extra on each end (Picture 1-2). Now holding onto that, cut that length off your 100ftof cord.
Here is the first chance for you to add your own flair to this design. We'll be needing a stopper for this drawstring. I used a Celtic button knot here (Picture 3). Also, tie upthe end of the drawstring (Picture 4)NOTE: For those interested in the Celtic Button knot, stormdrane has an amazing video on it (https://www.youtube.com/watch?v=5twe3JuvGPE). If you guys don't knowthis man, he's a god at paracord and knotting projects :P
With that done, just slip your drawstring back onto your template!
NOTE: Don't forget to burn/close the ends of your paracord!
Image Notes1. About 3 inches
Image Notes1. Snipped!
Image Notes1. Tie your stopper here
Image Notes1. Tie another knot after your stopper!
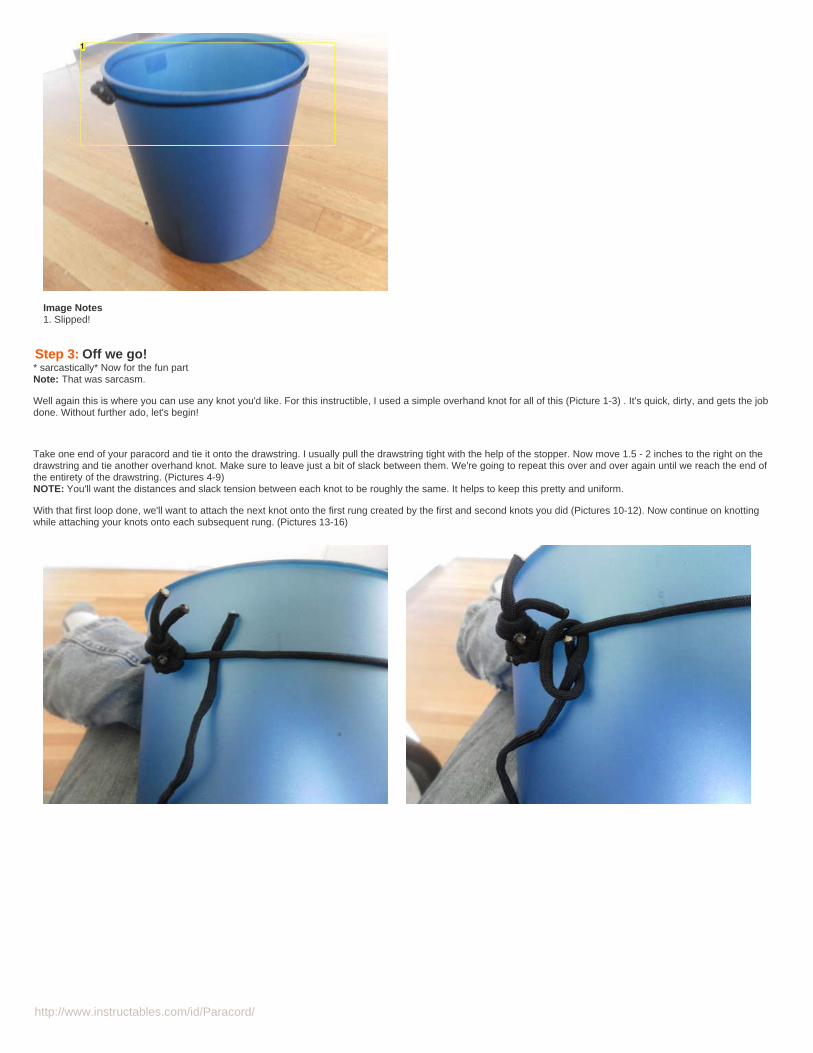
http://www.instructables.com/id/Paracord/
Image Notes1. Slipped!
Step 3: Off we go!* sarcastically* Now for the fun partNote: That was sarcasm.
Well again this is where you can use any knot you'd like. For this instructible, I used a simple overhand knot for all of this (Picture 1-3) . It's quick, dirty, and gets the jobdone. Without further ado, let's begin!
Take one end of your paracord and tie it onto the drawstring. I usually pull the drawstring tight with the help of the stopper. Now move 1.5 - 2 inches to the right on thedrawstring and tie another overhand knot. Make sure to leave just a bit of slack between them. We're going to repeat this over and over again until we reach the end ofthe entirety of the drawstring. (Pictures 4-9)NOTE: You'll want the distances and slack tension between each knot to be roughly the same. It helps to keep this pretty and uniform.
With that first loop done, we'll want to attach the next knot onto the first rung created by the first and second knots you did (Pictures 10-12). Now continue on knottingwhile attaching your knots onto each subsequent rung. (Pictures 13-16)
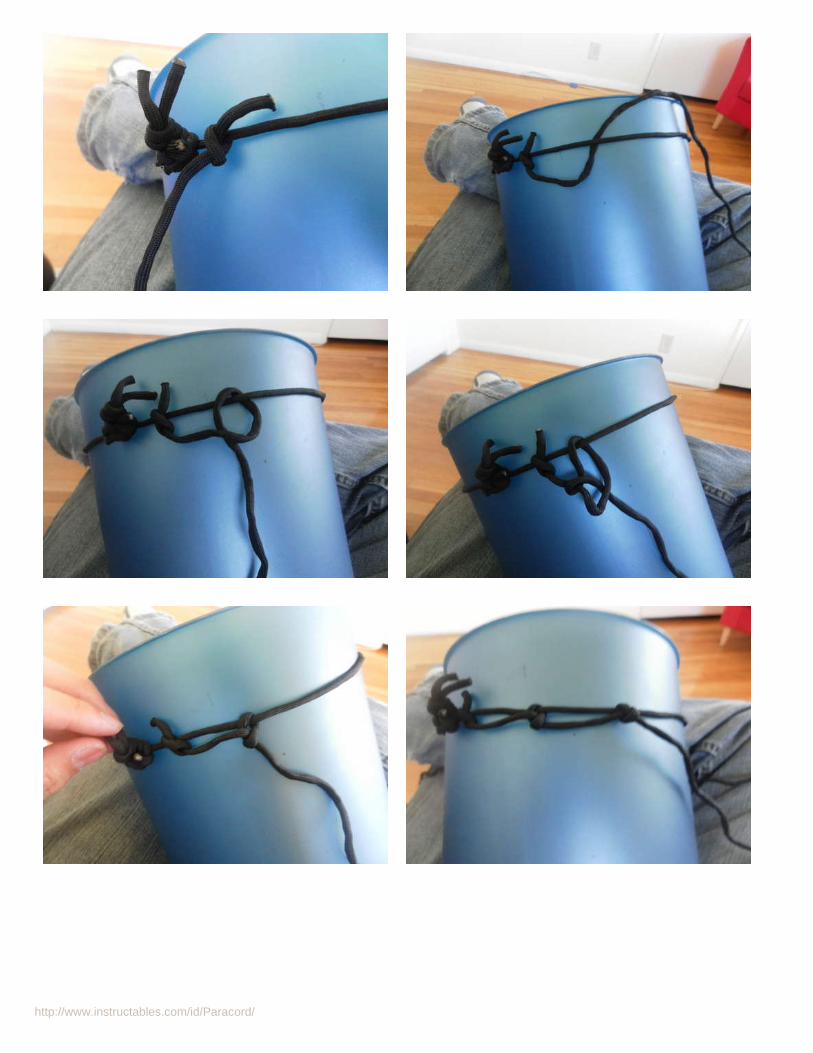
http://www.instructables.com/id/Paracord/
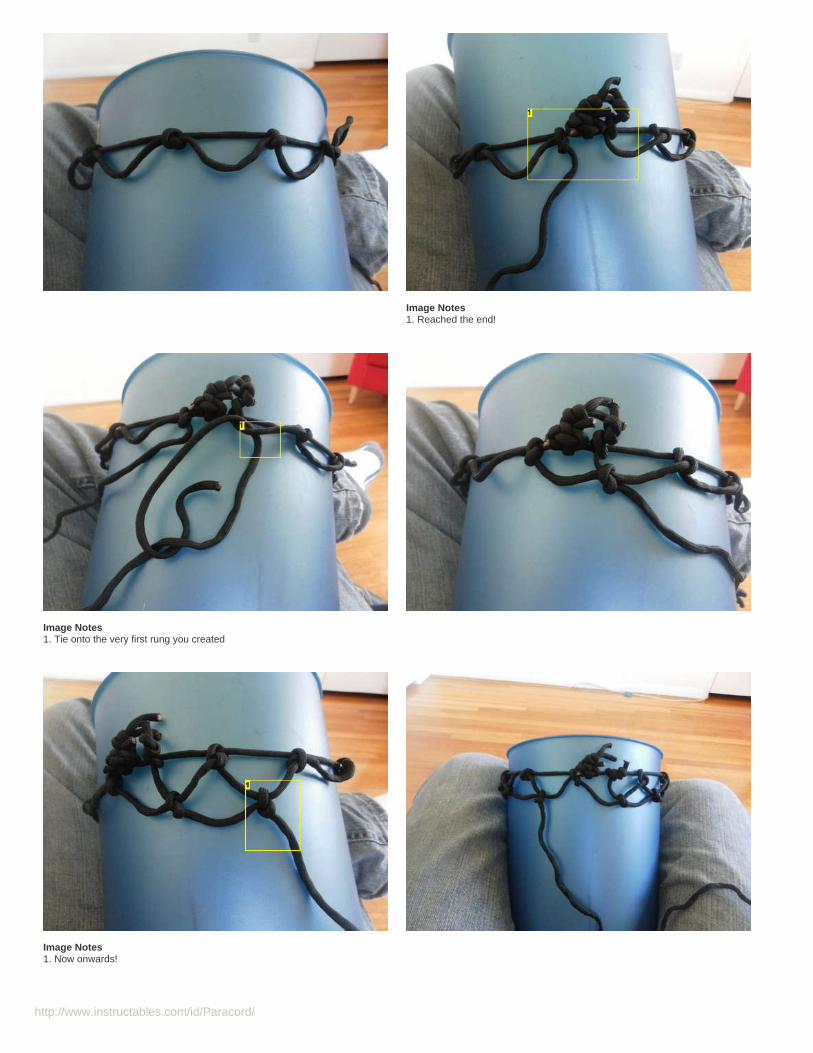
http://www.instructables.com/id/Paracord/
Image Notes1. Reached the end!
Image Notes1. Tie onto the very first rung you created
Image Notes1. Now onwards!
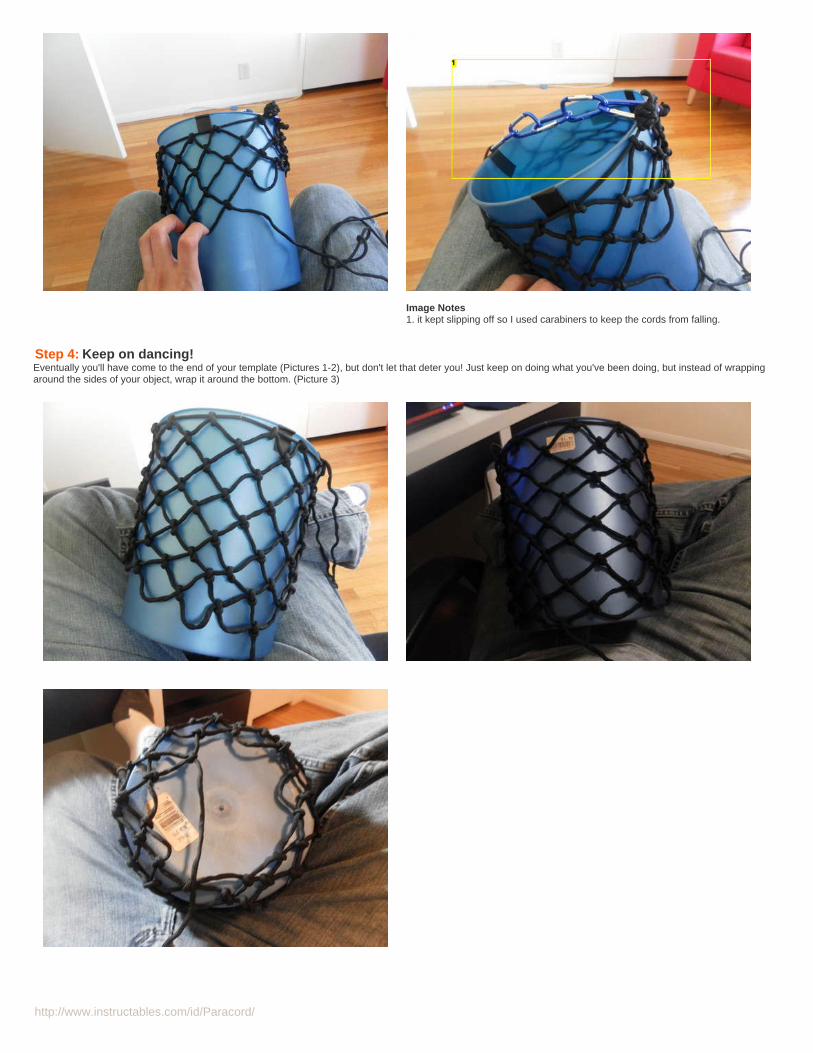
http://www.instructables.com/id/Paracord/
Image Notes1. it kept slipping off so I used carabiners to keep the cords from falling.
Step 4: Keep on dancing!Eventually you'll have come to the end of your template (Pictures 1-2), but don't let that deter you! Just keep on doing what you've been doing, but instead of wrappingaround the sides of your object, wrap it around the bottom. (Picture 3)
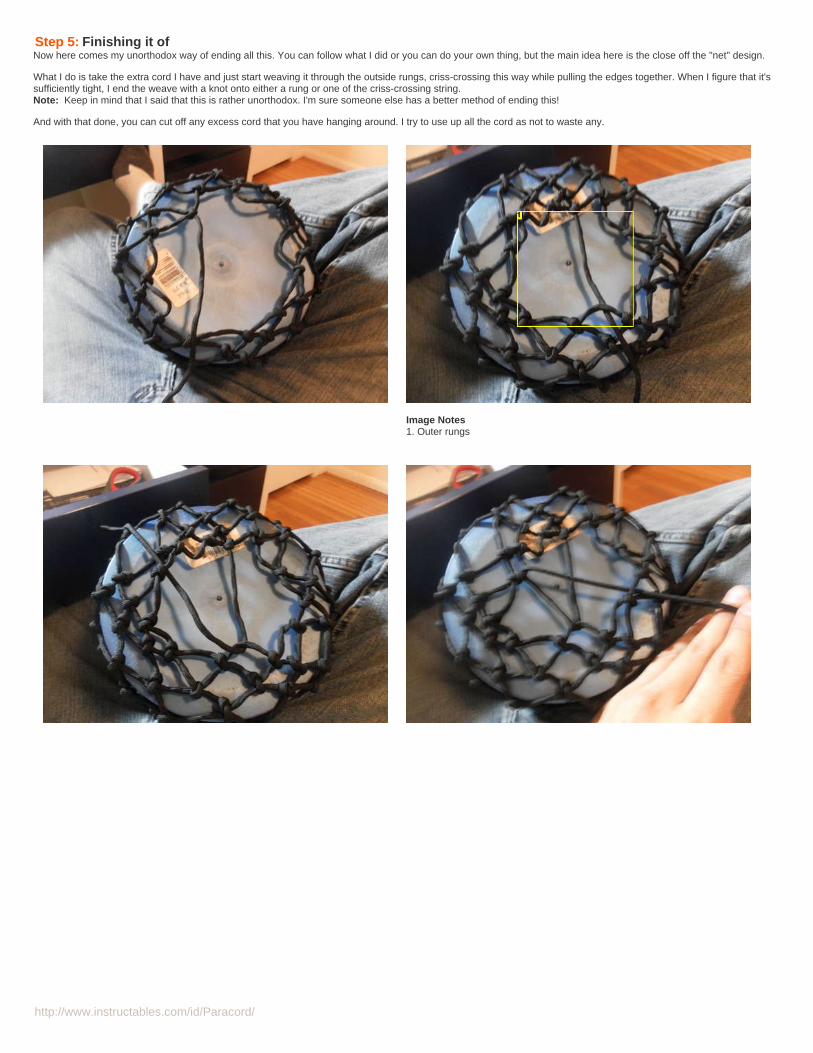
http://www.instructables.com/id/Paracord/
Step 5: Finishing it ofNow here comes my unorthodox way of ending all this. You can follow what I did or you can do your own thing, but the main idea here is the close off the "net" design.
What I do is take the extra cord I have and just start weaving it through the outside rungs, criss-crossing this way while pulling the edges together. When I figure that it'ssufficiently tight, I end the weave with a knot onto either a rung or one of the criss-crossing string.Note: Keep in mind that I said that this is rather unorthodox. I'm sure someone else has a better method of ending this!
And with that done, you can cut off any excess cord that you have hanging around. I try to use up all the cord as not to waste any.
Image Notes1. Outer rungs
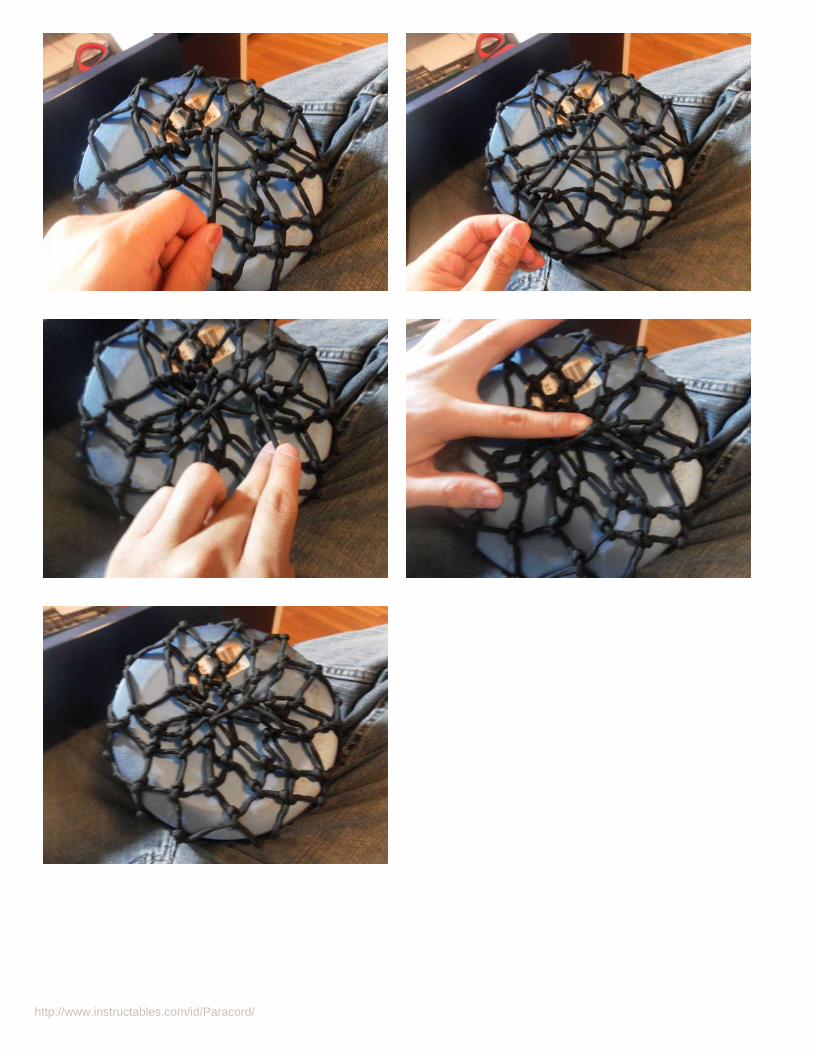
http://www.instructables.com/id/Paracord/
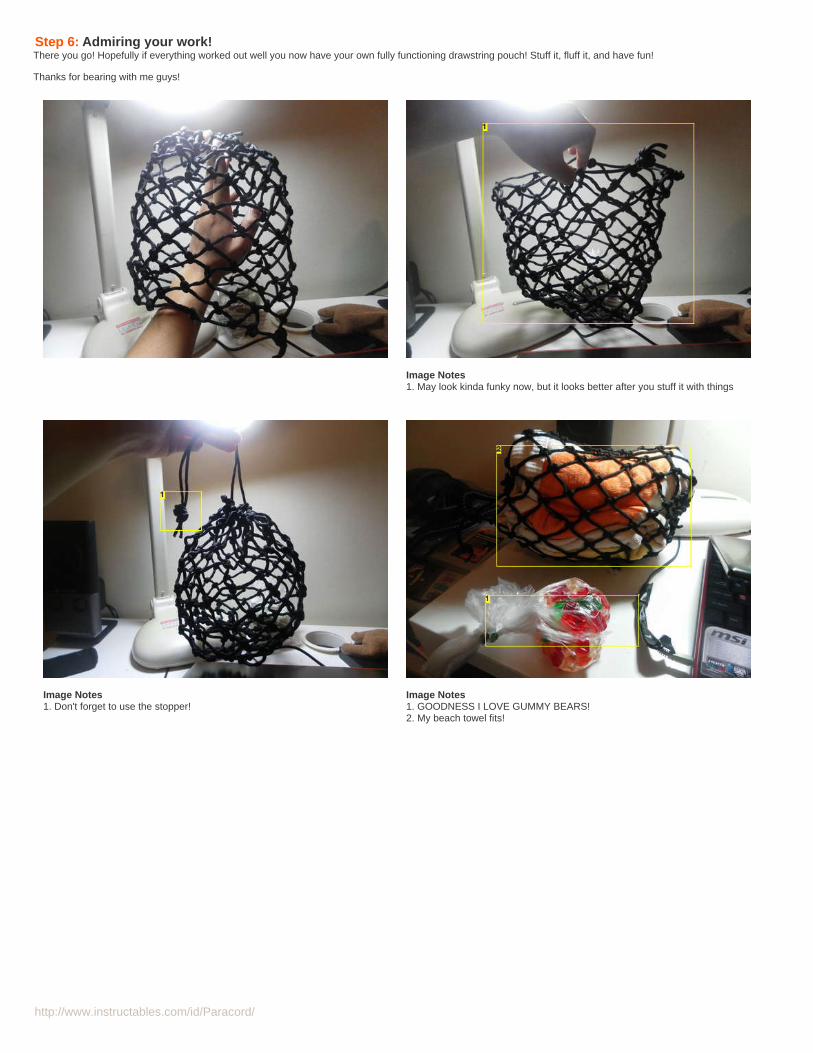
http://www.instructables.com/id/Paracord/
Step 6: Admiring your work!There you go! Hopefully if everything worked out well you now have your own fully functioning drawstring pouch! Stuff it, fluff it, and have fun!
Thanks for bearing with me guys!
Image Notes1. May look kinda funky now, but it looks better after you stuff it with things
Image Notes1. Don't forget to use the stopper!
Image Notes1. GOODNESS I LOVE GUMMY BEARS!2. My beach towel fits!
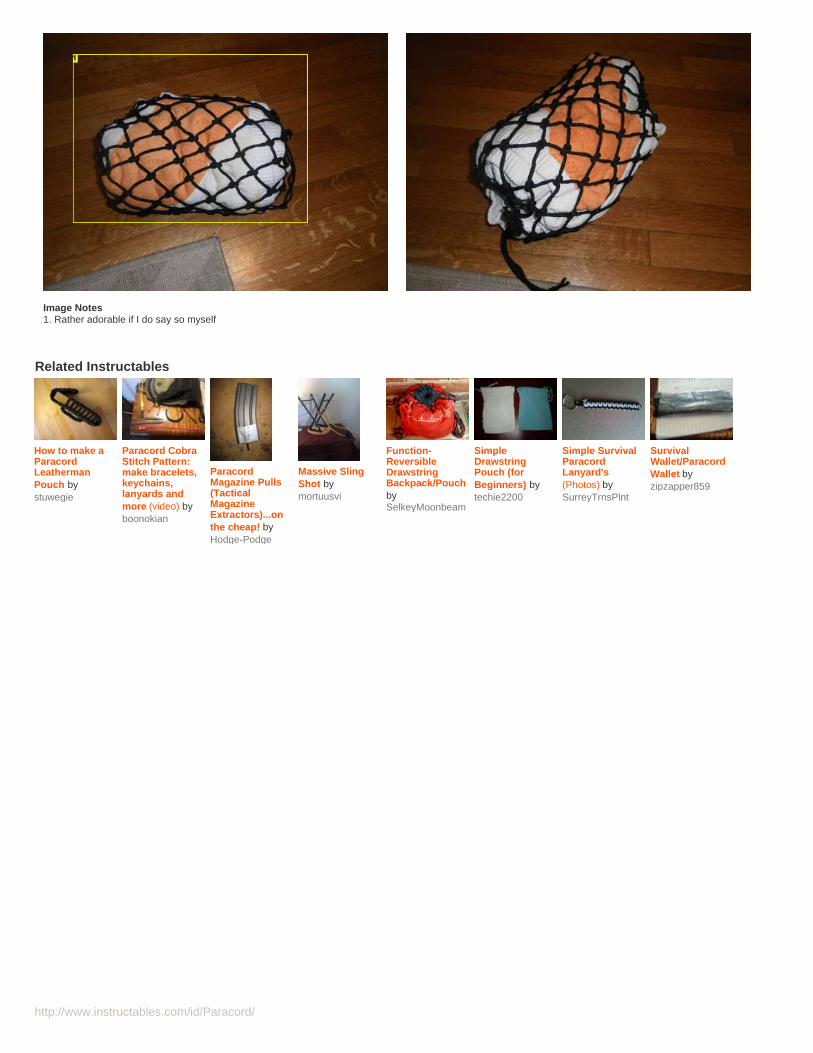
http://www.instructables.com/id/Paracord/
Image Notes1. Rather adorable if I do say so myself
Related Instructables
How to make aParacordLeathermanPouch bystuwegie
Paracord CobraStitch Pattern:make bracelets,keychains,lanyards andmore (video) byboonokian
ParacordMagazine Pulls(TacticalMagazineExtractors)...onthe cheap! byHodge-Podge
Massive SlingShot bymortuusvi
Function-ReversibleDrawstringBackpack/PouchbySelkeyMoonbeam
SimpleDrawstringPouch (forBeginners) bytechie2200
Simple SurvivalParacordLanyard's(Photos) bySurreyTrnsPlnt
SurvivalWallet/ParacordWallet byzipzapper859
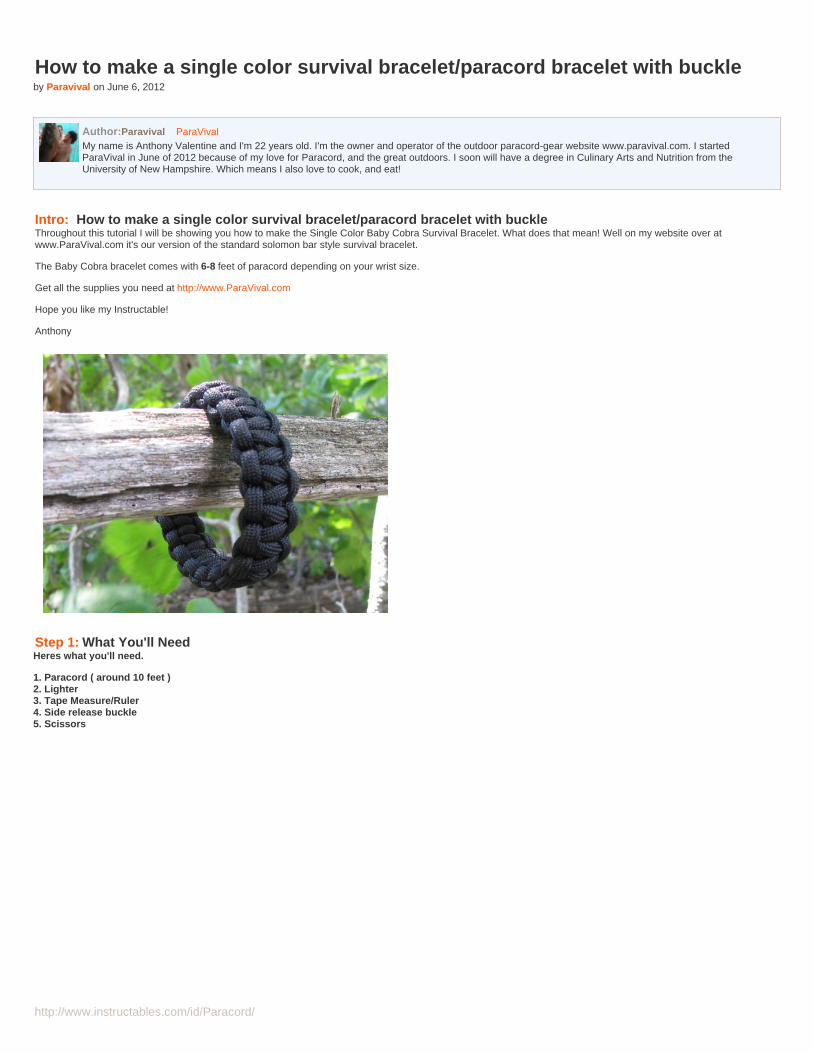
http://www.instructables.com/id/Paracord/
How to make a single color survival bracelet/paracord bracelet with buckleby Paravival on June 6, 2012
Author:Paravival ParaVivalMy name is Anthony Valentine and I'm 22 years old. I'm the owner and operator of the outdoor paracord-gear website www.paravival.com. I startedParaVival in June of 2012 because of my love for Paracord, and the great outdoors. I soon will have a degree in Culinary Arts and Nutrition from theUniversity of New Hampshire. Which means I also love to cook, and eat!
Intro: How to make a single color survival bracelet/paracord bracelet with buckleThroughout this tutorial I will be showing you how to make the Single Color Baby Cobra Survival Bracelet. What does that mean! Well on my website over atwww.ParaVival.com it's our version of the standard solomon bar style survival bracelet.
The Baby Cobra bracelet comes with 6-8 feet of paracord depending on your wrist size.
Get all the supplies you need at http://www.ParaVival.com
Hope you like my Instructable!
Anthony
Step 1: What You'll NeedHeres what you'll need.
1. Paracord ( around 10 feet )2. Lighter3. Tape Measure/Ruler4. Side release buckle5. Scissors
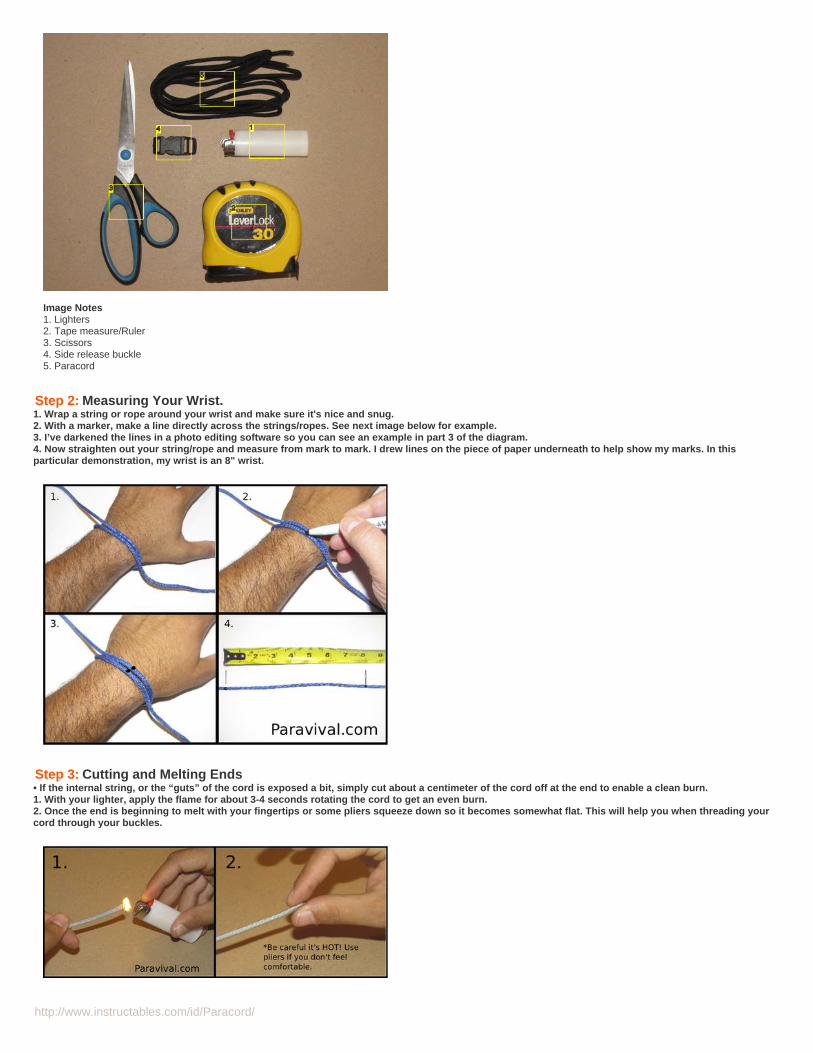
http://www.instructables.com/id/Paracord/
Image Notes1. Lighters2. Tape measure/Ruler3. Scissors4. Side release buckle5. Paracord
Step 2: Measuring Your Wrist.1. Wrap a string or rope around your wrist and make sure it's nice and snug.2. With a marker, make a line directly across the strings/ropes. See next image below for example.3. I’ve darkened the lines in a photo editing software so you can see an example in part 3 of the diagram.4. Now straighten out your string/rope and measure from mark to mark. I drew lines on the piece of paper underneath to help show my marks. In thisparticular demonstration, my wrist is an 8" wrist.
Step 3: Cutting and Melting Ends• If the internal string, or the “guts” of the cord is exposed a bit, simply cut about a centimeter of the cord off at the end to enable a clean burn.1. With your lighter, apply the flame for about 3-4 seconds rotating the cord to get an even burn.2. Once the end is beginning to melt with your fingertips or some pliers squeeze down so it becomes somewhat flat. This will help you when threading yourcord through your buckles.
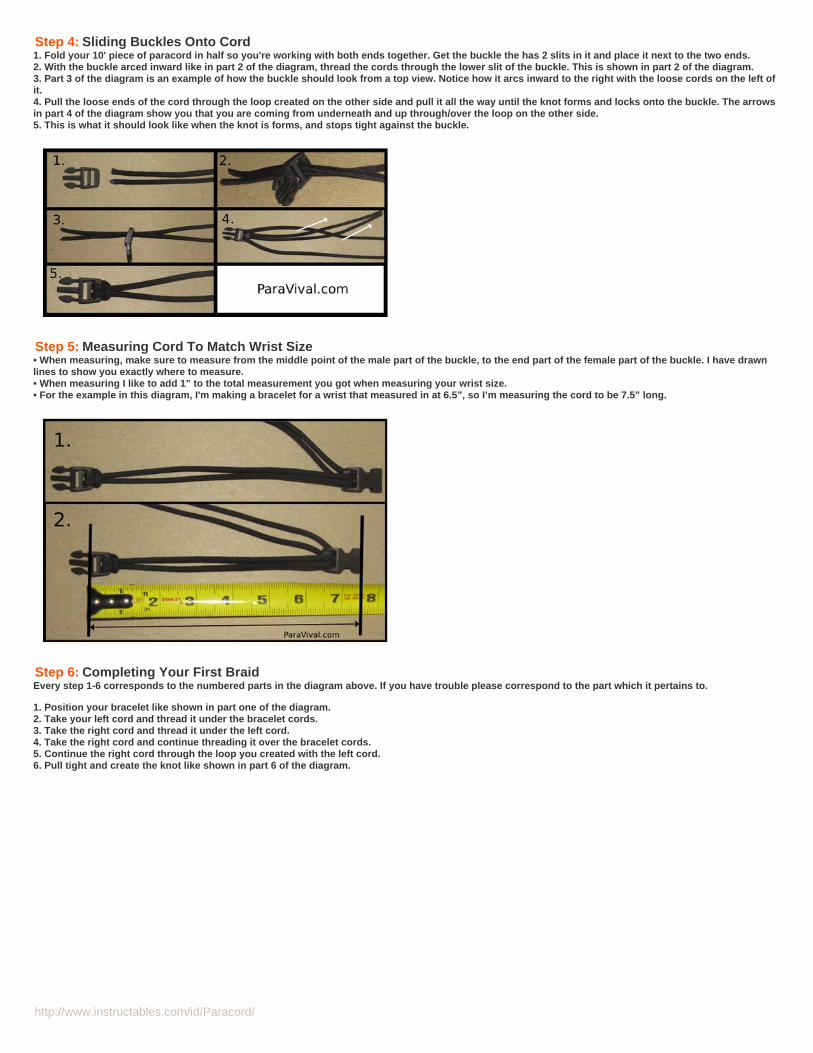
http://www.instructables.com/id/Paracord/
Step 4: Sliding Buckles Onto Cord1. Fold your 10' piece of paracord in half so you're working with both ends together. Get the buckle the has 2 slits in it and place it next to the two ends.2. With the buckle arced inward like in part 2 of the diagram, thread the cords through the lower slit of the buckle. This is shown in part 2 of the diagram.3. Part 3 of the diagram is an example of how the buckle should look from a top view. Notice how it arcs inward to the right with the loose cords on the left ofit.4. Pull the loose ends of the cord through the loop created on the other side and pull it all the way until the knot forms and locks onto the buckle. The arrowsin part 4 of the diagram show you that you are coming from underneath and up through/over the loop on the other side.5. This is what it should look like when the knot is forms, and stops tight against the buckle.
Step 5: Measuring Cord To Match Wrist Size• When measuring, make sure to measure from the middle point of the male part of the buckle, to the end part of the female part of the buckle. I have drawnlines to show you exactly where to measure.• When measuring I like to add 1” to the total measurement you got when measuring your wrist size.• For the example in this diagram, I'm making a bracelet for a wrist that measured in at 6.5”, so I’m measuring the cord to be 7.5” long.
Step 6: Completing Your First BraidEvery step 1-6 corresponds to the numbered parts in the diagram above. If you have trouble please correspond to the part which it pertains to.
1. Position your bracelet like shown in part one of the diagram.2. Take your left cord and thread it under the bracelet cords.3. Take the right cord and thread it under the left cord.4. Take the right cord and continue threading it over the bracelet cords.5. Continue the right cord through the loop you created with the left cord.6. Pull tight and create the knot like shown in part 6 of the diagram.
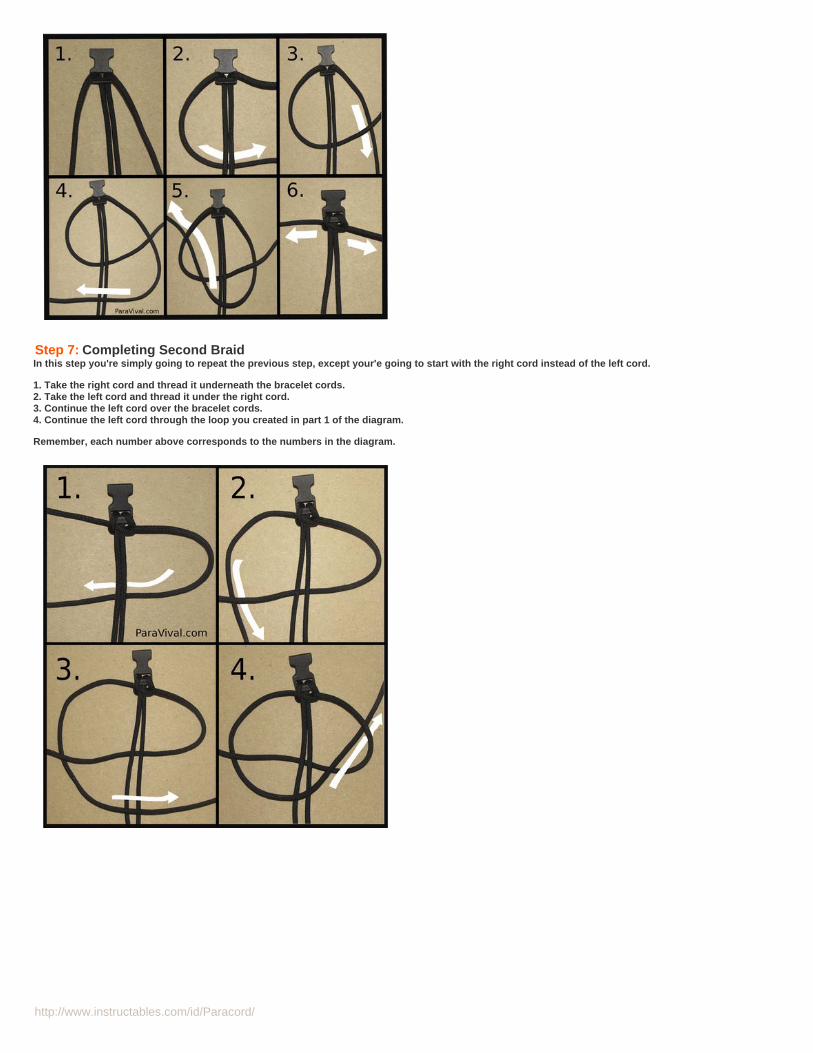
http://www.instructables.com/id/Paracord/
Step 7: Completing Second BraidIn this step you're simply going to repeat the previous step, except your'e going to start with the right cord instead of the left cord.
1. Take the right cord and thread it underneath the bracelet cords.2. Take the left cord and thread it under the right cord.3. Continue the left cord over the bracelet cords.4. Continue the left cord through the loop you created in part 1 of the diagram.
Remember, each number above corresponds to the numbers in the diagram.

http://www.instructables.com/id/Paracord/
Step 8: Finish All Braids and Pull For More SlackAlternate steps 6 and 7 until you reach the buckle at the bottom. Don't make your knots too tight or unraveling your bracelet in a time of need will be thatmuch more difficult.
1. This is what it should look like when you braid all the way to the buckle.-Notice the left over slack.2. Hold on to the male buckle (the bottom buckle in part 1 of the diagram) and pull on your braids towards the female buckle. This is shown in part 2 of thediagram.3. After you pull for slack you should have more room to braid. Like shown here in part 3 of the diagram.
Step 9: Finishing It OffIn this step we will be beginning the final steps towards finishing up the bracelet.
Once you find the last diagonal braid, pull it up to form a loop like you see in part 3 of the diagram.
1. Take your lose cords and thread them through the remaining "Slit" of the male buckle. The cords should be thread from the outside of the bracelet to the inside of thebracelet. This is demonstrated in part 1 of the diagram with the arrows that are pointing from right to left.
- Also in part one, You want to find the last "Diagonal Braid" on the "Inside" of the bracelet. In part 1 of the diagram it shows you what the diagonal braids look like andwhere they are. (notice in part 1 it's on the outside, we want to find the last braid on the inside)- When the last braid is found, pull it out a little, pull your cord loosening the braid forming a loop like shown in part 3 of the diagram.
2. In part 2 of the diagram it's simply showing you the "Inside" and "Outside" of the bracelet. Notice which way the buckles are arcing. The bottom of the bracelet, or"Inside" is the one where the buckles are arcing downward.
3. After forming the loop with the "Last diagonal braid" pull your loose cords through the loops that you formed.
4. This is what it should look like when done.
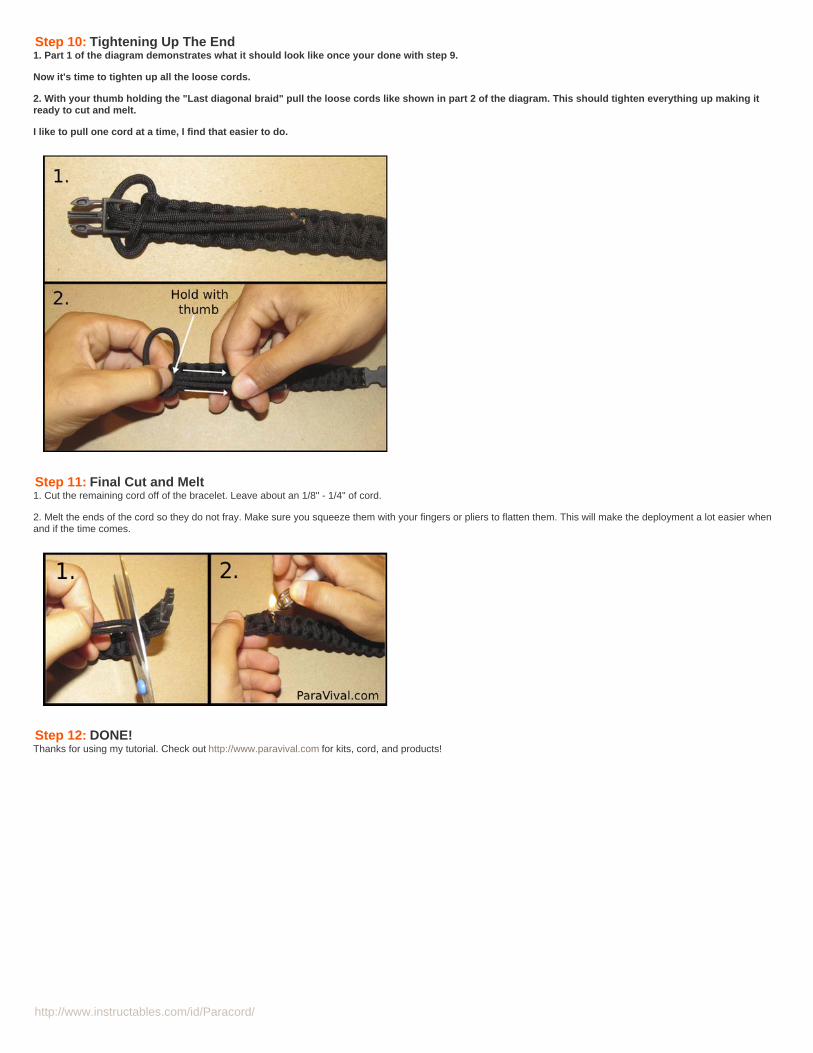
http://www.instructables.com/id/Paracord/
Step 10: Tightening Up The End1. Part 1 of the diagram demonstrates what it should look like once your done with step 9.
Now it's time to tighten up all the loose cords.
2. With your thumb holding the "Last diagonal braid" pull the loose cords like shown in part 2 of the diagram. This should tighten everything up making itready to cut and melt.
I like to pull one cord at a time, I find that easier to do.
Step 11: Final Cut and Melt1. Cut the remaining cord off of the bracelet. Leave about an 1/8" - 1/4" of cord.
2. Melt the ends of the cord so they do not fray. Make sure you squeeze them with your fingers or pliers to flatten them. This will make the deployment a lot easier whenand if the time comes.
Step 12: DONE!Thanks for using my tutorial. Check out http://www.paravival.com for kits, cord, and products!
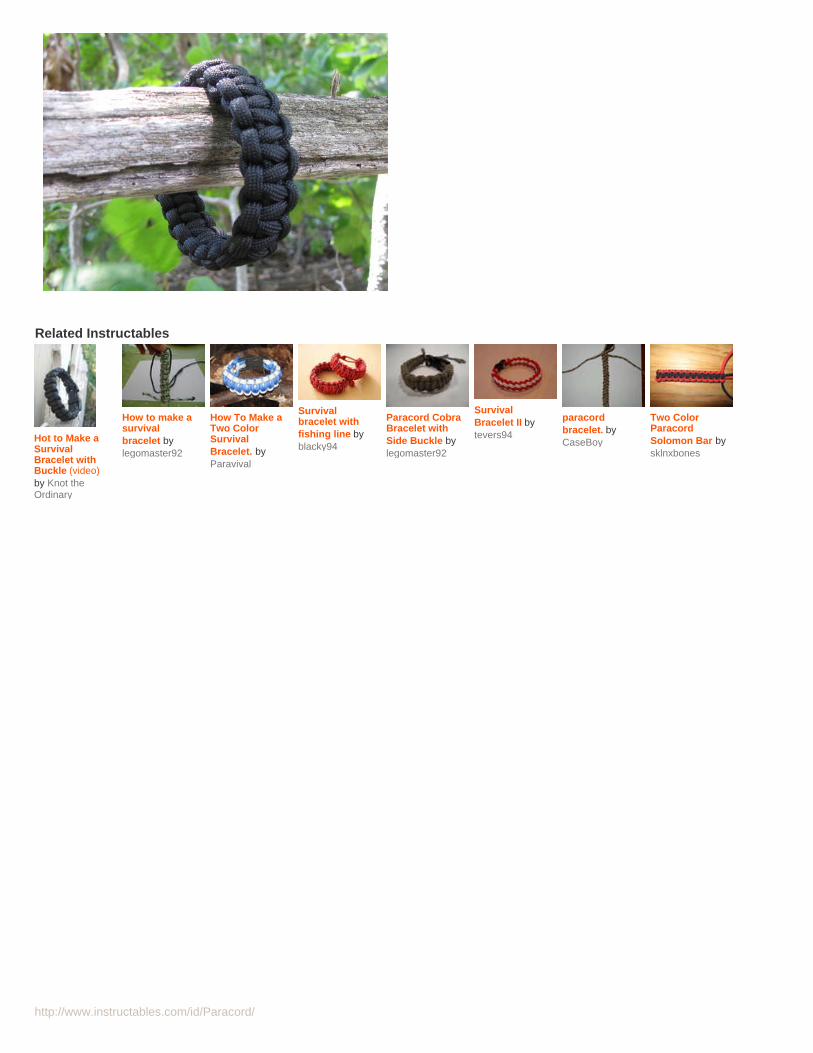
http://www.instructables.com/id/Paracord/
Related Instructables
Hot to Make aSurvivalBracelet withBuckle (video)by Knot theOrdinary
How to make asurvivalbracelet bylegomaster92
How To Make aTwo ColorSurvivalBracelet. byParavival
Survivalbracelet withfishing line byblacky94
Paracord CobraBracelet withSide Buckle bylegomaster92
SurvivalBracelet II bytevers94
paracordbracelet. byCaseBoy
Two ColorParacordSolomon Bar bysklnxbones
http://www.instructables.com/id/How-to-make-a-survival-bracelet/?utm_source=pdf&utm_campaign=related
http://www.instructables.com/id/How-to-make-a-survival-bracelet/?utm_source=pdf&utm_campaign=related
http://www.instructables.com/id/How-to-make-a-survival-bracelet/?utm_source=pdf&utm_campaign=related
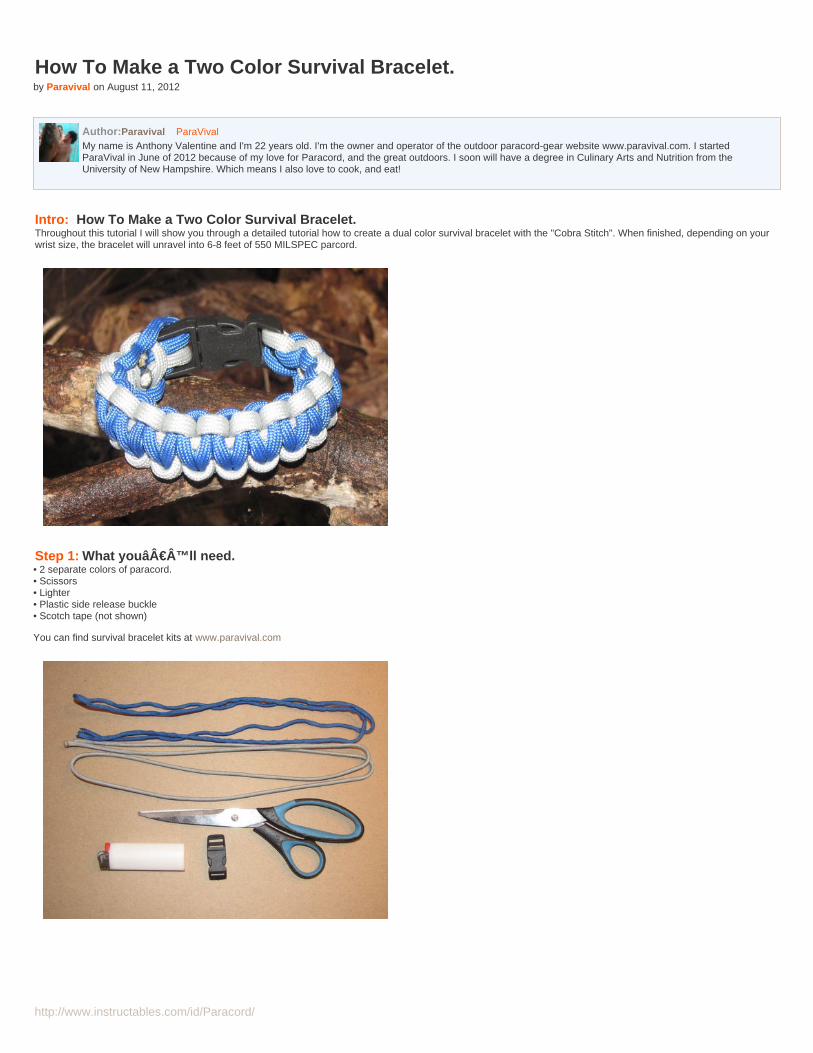
http://www.instructables.com/id/Paracord/
How To Make a Two Color Survival Bracelet.by Paravival on August 11, 2012
Author:Paravival ParaVivalMy name is Anthony Valentine and I'm 22 years old. I'm the owner and operator of the outdoor paracord-gear website www.paravival.com. I startedParaVival in June of 2012 because of my love for Paracord, and the great outdoors. I soon will have a degree in Culinary Arts and Nutrition from theUniversity of New Hampshire. Which means I also love to cook, and eat!
Intro: How To Make a Two Color Survival Bracelet.Throughout this tutorial I will show you through a detailed tutorial how to create a dual color survival bracelet with the "Cobra Stitch". When finished, depending on yourwrist size, the bracelet will unravel into 6-8 feet of 550 MILSPEC parcord.
Step 1: What you’ll need.• 2 separate colors of paracord.• Scissors• Lighter• Plastic side release buckle• Scotch tape (not shown)
You can find survival bracelet kits at www.paravival.com
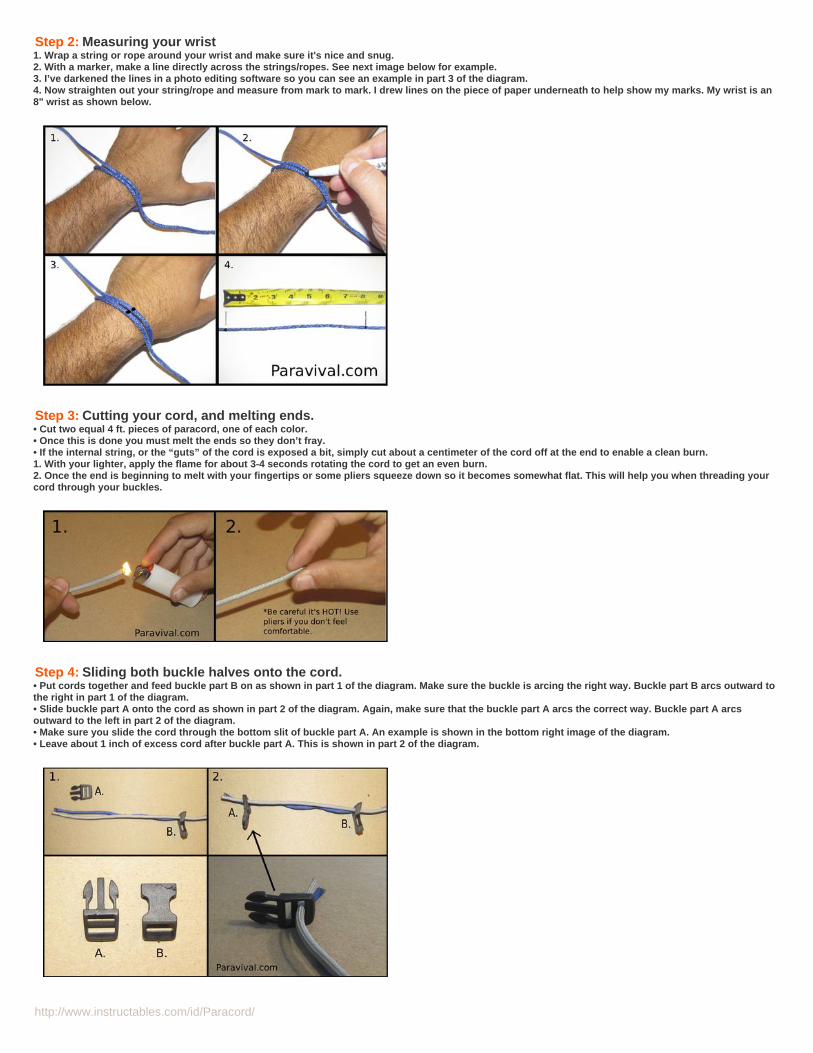
http://www.instructables.com/id/Paracord/
Step 2: Measuring your wrist1. Wrap a string or rope around your wrist and make sure it's nice and snug.2. With a marker, make a line directly across the strings/ropes. See next image below for example.3. I’ve darkened the lines in a photo editing software so you can see an example in part 3 of the diagram.4. Now straighten out your string/rope and measure from mark to mark. I drew lines on the piece of paper underneath to help show my marks. My wrist is an8" wrist as shown below.
Step 3: Cutting your cord, and melting ends.• Cut two equal 4 ft. pieces of paracord, one of each color.• Once this is done you must melt the ends so they don’t fray.• If the internal string, or the “guts” of the cord is exposed a bit, simply cut about a centimeter of the cord off at the end to enable a clean burn.1. With your lighter, apply the flame for about 3-4 seconds rotating the cord to get an even burn.2. Once the end is beginning to melt with your fingertips or some pliers squeeze down so it becomes somewhat flat. This will help you when threading yourcord through your buckles.
Step 4: Sliding both buckle halves onto the cord.• Put cords together and feed buckle part B on as shown in part 1 of the diagram. Make sure the buckle is arcing the right way. Buckle part B arcs outward tothe right in part 1 of the diagram.• Slide buckle part A onto the cord as shown in part 2 of the diagram. Again, make sure that the buckle part A arcs the correct way. Buckle part A arcsoutward to the left in part 2 of the diagram.• Make sure you slide the cord through the bottom slit of buckle part A. An example is shown in the bottom right image of the diagram.• Leave about 1 inch of excess cord after buckle part A. This is shown in part 2 of the diagram.
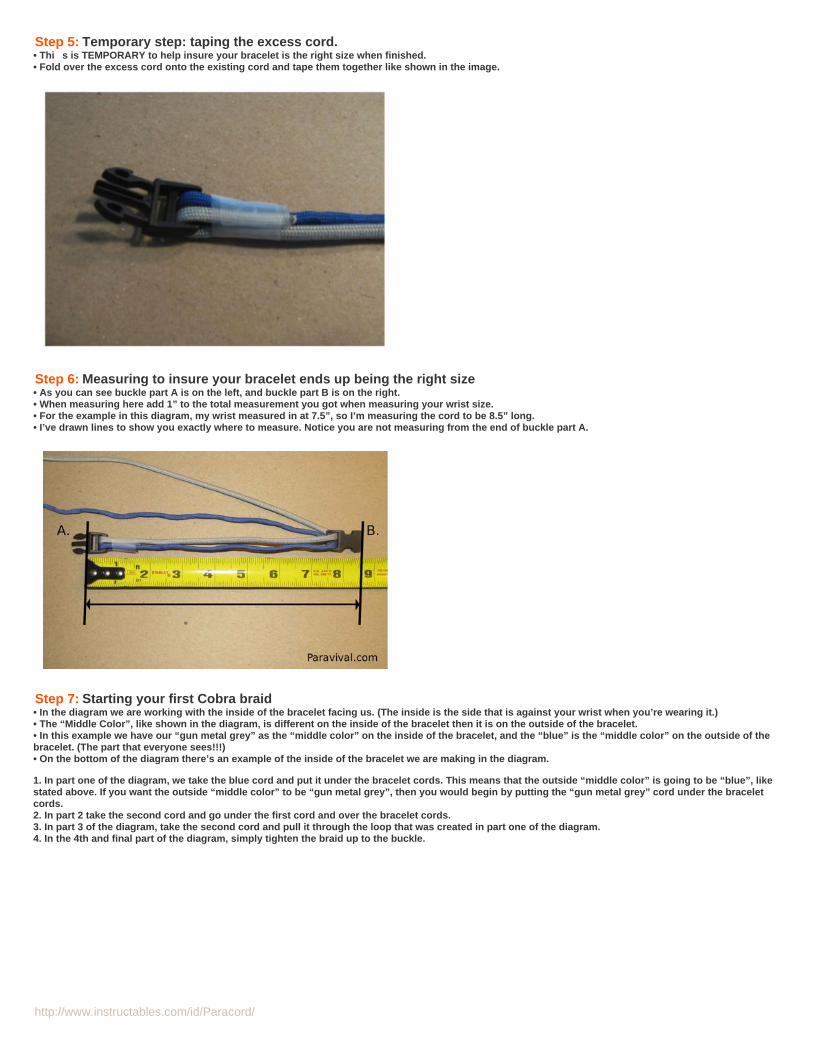
http://www.instructables.com/id/Paracord/
Step 5: Temporary step: taping the excess cord.• Thi s is TEMPORARY to help insure your bracelet is the right size when finished.• Fold over the excess cord onto the existing cord and tape them together like shown in the image.
Step 6: Measuring to insure your bracelet ends up being the right size• As you can see buckle part A is on the left, and buckle part B is on the right.• When measuring here add 1” to the total measurement you got when measuring your wrist size.• For the example in this diagram, my wrist measured in at 7.5”, so I’m measuring the cord to be 8.5” long.• I’ve drawn lines to show you exactly where to measure. Notice you are not measuring from the end of buckle part A.
Step 7: Starting your first Cobra braid• In the diagram we are working with the inside of the bracelet facing us. (The inside is the side that is against your wrist when you’re wearing it.)• The “Middle Color”, like shown in the diagram, is different on the inside of the bracelet then it is on the outside of the bracelet.• In this example we have our “gun metal grey” as the “middle color” on the inside of the bracelet, and the “blue” is the “middle color” on the outside of thebracelet. (The part that everyone sees!!!)• On the bottom of the diagram there’s an example of the inside of the bracelet we are making in the diagram.
1. In part one of the diagram, we take the blue cord and put it under the bracelet cords. This means that the outside “middle color” is going to be “blue”, likestated above. If you want the outside “middle color” to be “gun metal grey”, then you would begin by putting the “gun metal grey” cord under the braceletcords.2. In part 2 take the second cord and go under the first cord and over the bracelet cords.3. In part 3 of the diagram, take the second cord and pull it through the loop that was created in part one of the diagram.4. In the 4th and final part of the diagram, simply tighten the braid up to the buckle.
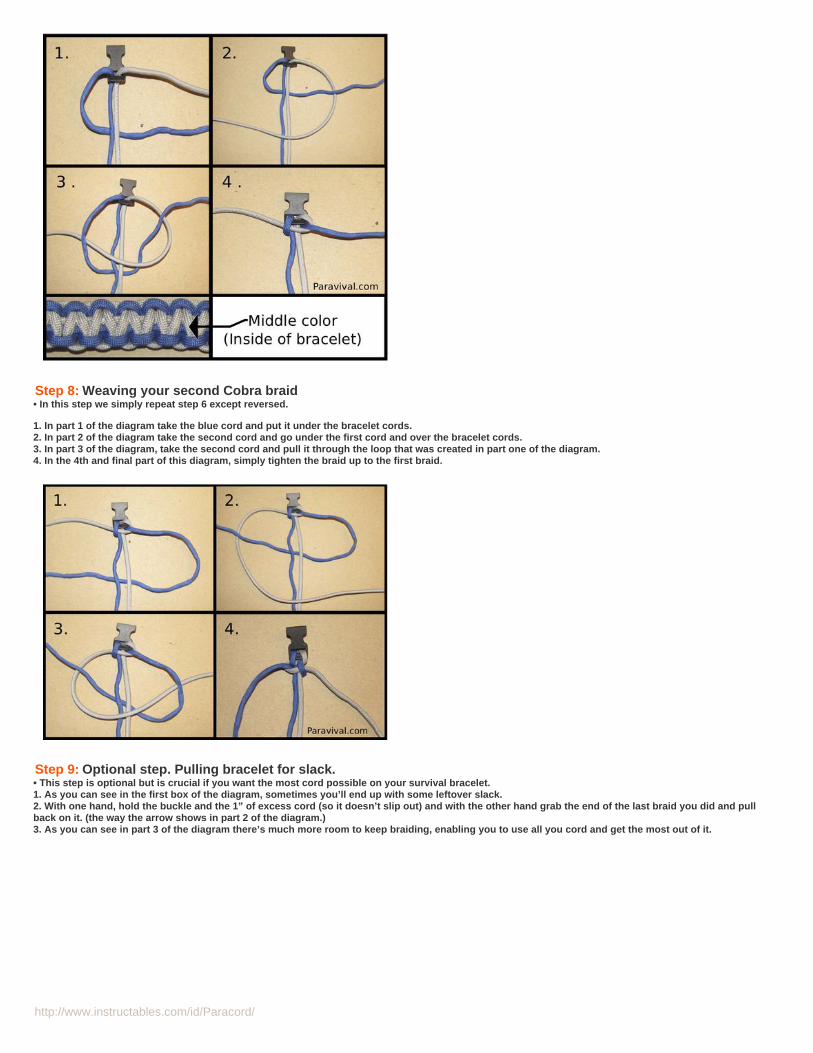
http://www.instructables.com/id/Paracord/
Step 8: Weaving your second Cobra braid• In this step we simply repeat step 6 except reversed.
1. In part 1 of the diagram take the blue cord and put it under the bracelet cords.2. In part 2 of the diagram take the second cord and go under the first cord and over the bracelet cords.3. In part 3 of the diagram, take the second cord and pull it through the loop that was created in part one of the diagram.4. In the 4th and final part of this diagram, simply tighten the braid up to the first braid.
Step 9: Optional step. Pulling bracelet for slack.• This step is optional but is crucial if you want the most cord possible on your survival bracelet.1. As you can see in the first box of the diagram, sometimes you’ll end up with some leftover slack.2. With one hand, hold the buckle and the 1” of excess cord (so it doesn’t slip out) and with the other hand grab the end of the last braid you did and pullback on it. (the way the arrow shows in part 2 of the diagram.)3. As you can see in part 3 of the diagram there’s much more room to keep braiding, enabling you to use all you cord and get the most out of it.
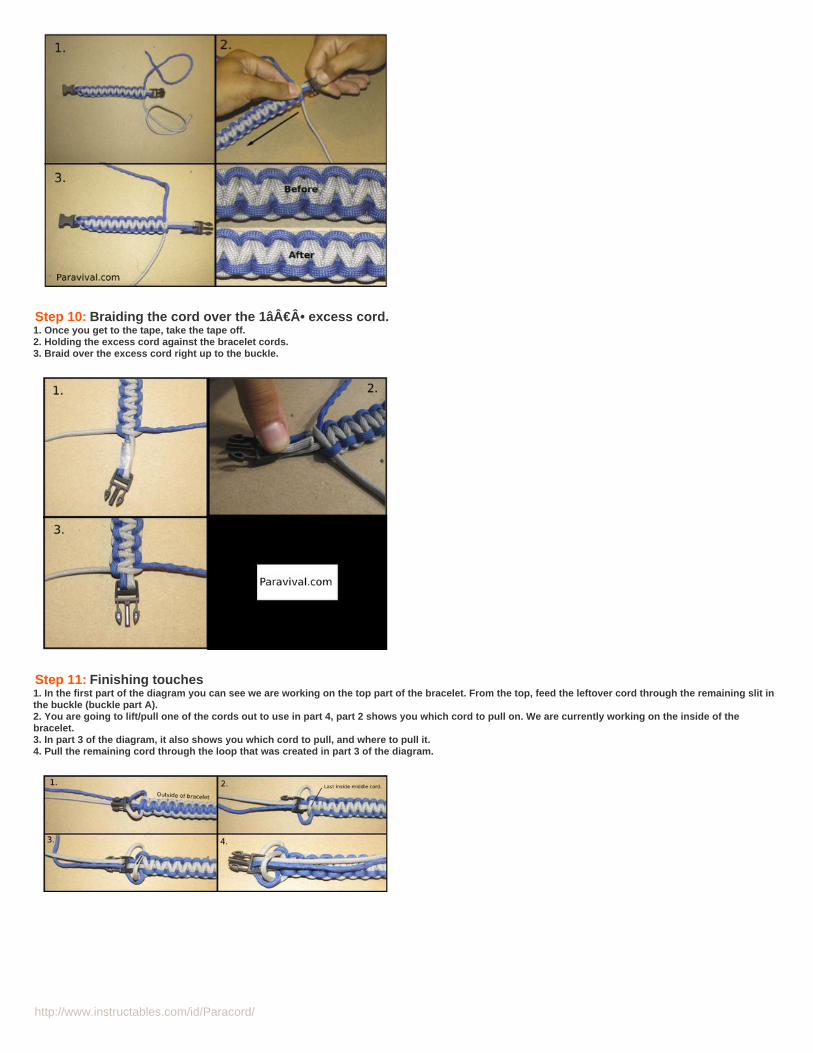
http://www.instructables.com/id/Paracord/
Step 10: Braiding the cord over the 1âۥ excess cord.1. Once you get to the tape, take the tape off.2. Holding the excess cord against the bracelet cords.3. Braid over the excess cord right up to the buckle.
Step 11: Finishing touches1. In the first part of the diagram you can see we are working on the top part of the bracelet. From the top, feed the leftover cord through the remaining slit inthe buckle (buckle part A).2. You are going to lift/pull one of the cords out to use in part 4, part 2 shows you which cord to pull on. We are currently working on the inside of thebracelet.3. In part 3 of the diagram, it also shows you which cord to pull, and where to pull it.4. Pull the remaining cord through the loop that was created in part 3 of the diagram.
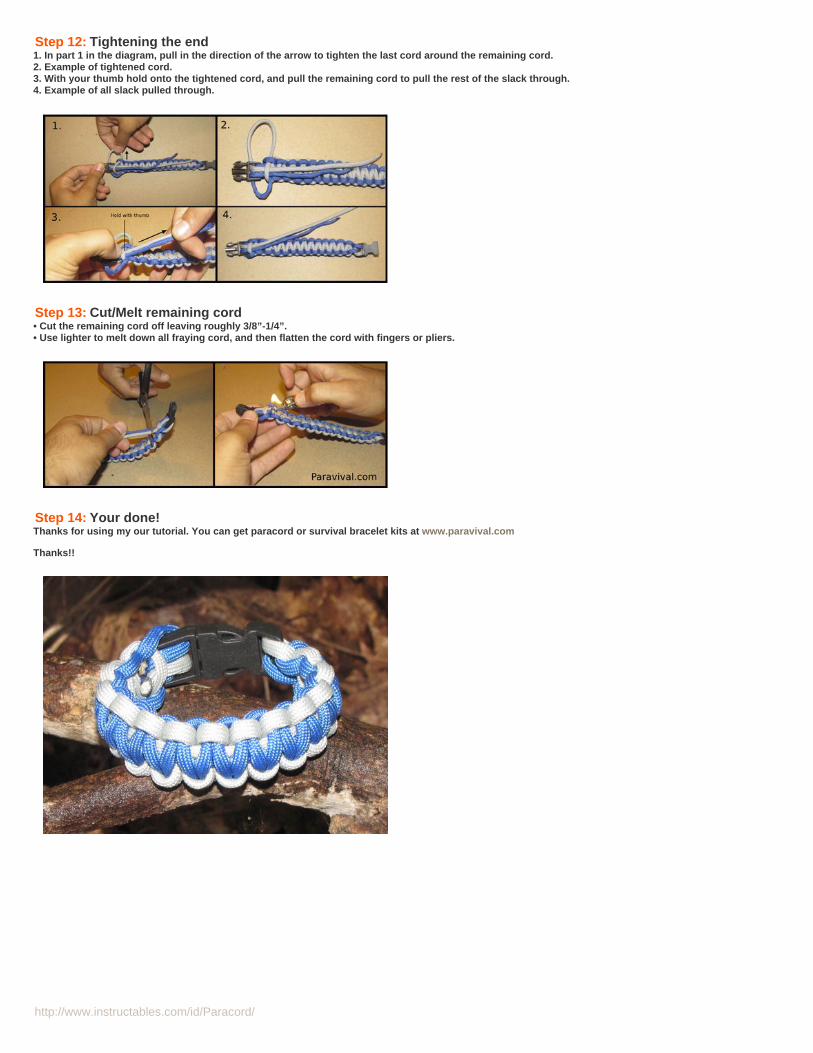
http://www.instructables.com/id/Paracord/
Step 12: Tightening the end1. In part 1 in the diagram, pull in the direction of the arrow to tighten the last cord around the remaining cord.2. Example of tightened cord.3. With your thumb hold onto the tightened cord, and pull the remaining cord to pull the rest of the slack through.4. Example of all slack pulled through.
Step 13: Cut/Melt remaining cord• Cut the remaining cord off leaving roughly 3/8”-1/4”.• Use lighter to melt down all fraying cord, and then flatten the cord with fingers or pliers.
Step 14: Your done!Thanks for using my our tutorial. You can get paracord or survival bracelet kits at www.paravival.com
Thanks!!

http://www.instructables.com/id/Paracord/
Related Instructables
SurvivalBracelet(Updated!) bytevers94
How to make asingle colorsurvivalbracelet/paracordbracelet withbuckle byParavival
Two ColorParacordSolomon Bar bysklnxbones
ParacordBracelet withoutClip or Knot! byDFree
4 color paracordbracelet(Photos) bygb0374
Paracord CobraBracelet withSide Buckle bylegomaster92
Hot to Make aSurvivalBracelet withBuckle (video)by Knot theOrdinary
FREE ParacordBracelet + DIYinstructions(video) byzombiesurvivalblog
Related Documents