Paperless Recorder PAPERLESS RECORDER USER MANUAL SKU: ATO-PLR-CH18 Automation www.ato.com [email protected] Global Shipping +1 800-585-1519 (Toll-free)

Welcome message from author
This document is posted to help you gain knowledge. Please leave a comment to let me know what you think about it! Share it to your friends and learn new things together.
Transcript

Paperless Recorder
PAPERLESS RECORDER
USER MANUAL
SKU: ATO-PLR-CH18
Automation www.ato.com [email protected] Global Shipping +1 800-585-1519 (Toll-free)

Paperless Recorder
Automation www.ato.com [email protected] Global Shipping
I
+1 800-585-1519 (Toll-free)
Preface
Thank you for purchasing our products!
This manual is about meter functions, settings, connection methods,
operation flow, and methods to identify the faults.
Please read this manual carefully before operating and using it
correctly to avoid unnecessary losses caused by false operation.
After reading it, please keep it properly in the place where you may
read it any time for your reference.
Note
Modification of this manual’s contents will not be notified as a result
of some factors, such as function upgrading.
We try our best to guarantee that the manual content is accurate, if you
find something wrong or incorrect, please contact us.
Any reprint and copy of the manual content is strictly prohibited either
in whole or in part.

Paperless Recorder
Automation www.ato.com [email protected] Global Shipping
II
+1 800-585-1519 (Toll-free)
Contents Chapter 1 Performance Index. ................................................................... 1
1.1. Main parameters ................................................................................ 2 1.2. Input signal ......................................................................................... 3 1.3. Output signal ...................................................................................... 4
1.4. Other parameters ............................................................................... 4 Chapter2 Installation and Wiring ............................................................... 4
2.1. Unpacking........................................................................................... 5 2.2. Installation. ......................................................................................... 5 2.3. Wiring .................................................................................................. 7
2.3.1 The name and location of the terminal .................................... 7
2.3.2 Wiring signal lines ............................................................... 11 Chapter 3 Basic Operation Methods ........................................................ 12
3.1. Panel component ............................................................................. 12 3.2. Button Operation. ............................................................................. 12
3.2.1. Screen Operation. ................................................................. 12 3.2.2. Configuration login ................................................................ 22 3.2.3. Enable configuration. ............................................................ 22
3.2.4. Parameters and setting ......................................................... 23 Chapter 4 Configuration instructions ............................................................... 28
4.1. Input Settings ................................................................................... 28 4.1.1 Configuration Item Description .............................................. 28 4.1.2 Alarm setting screen. ............................................................. 29
4.2. AO output .......................................................................................... 30 4.3. Flow setting. ..................................................................................... 31 4.4. Accumulation setting ........................................................................ 33 4.5. Control setting .................................................................................. 34 4.6. Function setting ................................................................................ 35
4.6.1. Zero clearing .......................................................................... 35 4.6.2. U disk operation..................................................................... 35 4.6.3. Communication setting ......................................................... 35 4.6.4. Remote setting. ..................................................................... 36 4.6.5. User-defined screen. ............................................................. 38
4.7. System Settings ............................................................................... 38
Appendix 1:Address and Examples of Modbus............................................ 40
Appendix 2: Calculation of flow coefficient K ................................................ 42

Paperless Recorder
Automation www.ato.com [email protected] Global Shipping
1
+1 800-585-1519 (Toll-free)
Chapter 1 Performance Index
Overview
The paperless recorder set various industrial, measurement data in civil
applications, display, processing, computing, alarming, and recording a
variety of reports and other functions in it. It has a 18-channel analog signal
input channel, 4-channel relay alarm output channel, 150mA distribution
output channel (which can be accessed 6-way two-wire transmitter, or 2-way
four-wire transmitter), an RS-485 communication interface it has a USB data
dump interface.
In hardware, the enhanced SUP-R9600 Paperless Recorder replaces the 6-
channel analog quantity input function with 4-channel analog quantity
output and one RS-485 input function. In software, it adds 4-channel flow,
4-channel accumulation and 4-channel PID calculation function. Also, it
includes a user-defined interface, which allows the user to arrange the
channels in the interface at will.
Comparison of function between enhanced recorder and basic recorder:

Automation www.ato.com [email protected] Global Shipping
2
+1 800-585-1519 (Toll-free)
Paperless Recorder
Table1-1
The paperless recorder uses high-speed, high-performance 32-
bit cortex-M4 microprocessor in its internal. Circuit board is handled
through three anti-coating processes-----"anti-corrosion, anti-moisture,
anti-dust". High-performance power meter has a strong anti-jamming
capability and can effectively suppress external harmonic interference to
improve the overall stability greatly.
The paperless recorder can be used in metallurgy, petroleum, chemicals,
building materials, paper, electricity, food, pharmaceutical, industrial water
treatment and other industries.
1.1.Main parameters
Table1-2 The main parameters
Display 3.5-inch TFT true color LCD screen. resolution is 320 * 240
Dimension Dimension:96mm×96mm×100mm
Mounting :92mm×92mm
Thickness of
mounted panel 1.5mm~6.0mm
Weight 0.37kg
Power supply (176~264)VAC,47~63Hz (24VDC can be customized)
Internal storage 48M bytes Flash
External storage U disk support (standard USB2.0 communication interface)
The maximum power consumption
20VA
Function Basic type Enhanced type
Analog quantity input 18 channels 1—12 channels
Analog quantity output N/A 4 channels
Relay output 4 channels 4 channels
RS-485 output Yes Yes
RS-485 input N/A Yes
Power distribution Yes Yes
Flow (temperature and pressure compensation) N/A Yes
Accumulation N/A Yes
PID calculation N/A Yes
User-defined interface N/A Yes

Automation www.ato.com [email protected] Global Shipping
3
+1 800-585-1519 (Toll-free)
Paperless Recorder
Relative humidity (10~85)%RH(No condensation)
Operating temperature (0~50)℃
Transport and storage conditions
temperature (-20~60)℃, Relative humidity (5~95)%RH( No
condensation)
1.2.Input signal
Table1-3 DC voltage / current input
Type The maximum permissible error(%FS)
(1~5)V
±0.1 (0~10)V
(0~5)V
(0~100)mV
(4~20)mA
±0.2 (0~20)mA
(0~10)mA
(-20~20)mV ±0.25 (0~20)mV
Table1-4 thermocouple input(not include cold junction error)
Type Measure range(℃) The maximum permissible error(℃
B 600 ~ 1800 ±2.4
E -200 ~ 1000 ±2.4
J -200 ~ 1200 ±2.4
K -200 ~ -100 ±3.3
-100 ~ 1300 ±2.0
S -50 ~ 100 ±3.7
100 ~ 300 ±2.0
300 ~ 1600 ±1.5
T -200 ~ -100 ±1.9
-100 ~ 380 ±1.6
R -50 ~ 100 ±3.7
100 ~ 300 ±2.0
300 ~ 1600 ±1.5
N -200 ~ 1300 ±3.0
Table1- 5 RTD input
Type Measure range (℃) The maximum permissible error(℃
Cu50 -50 ~ 140 ±1.0
Pt100 -200 ~ 800 ±1.0
NOTE:special RTD can be customized,like Pt1000 etc

Automation www.ato.com [email protected] Global Shipping
4
+1 800-585-1519 (Toll-free)
Paperless Recorder
1.3.Output signal
Table 1-6 The alarm output
Type Scale range Contact types Contact capacity Response cycle The
alarm output
0/1 Normally
open contacts 2A /250VAC 1 second
Table 1-7 Current output
Type Range (mA) Maximum permissible error
Current output 4 ~ 20 ±0.2
1.4.Other parameters
Table 1-8 Other parameters
Fuse Specifications 3.15A/250VAC, Hard-fusing type
power distribution specifications
150mA, 24 VDC.
Power failure protection
All data is stored in Flash storage to make sure that all historical data and configuration parameters are not lost due to power failure. The real-time clock powered by a lithium battery after power failure.
Alarm output It has up to 4 channels. Relays are normally open contacts and the contact capacity is 2A / 250VAC (resistive load).
Communication Interface 1channel RS485 communication interface.one RS-485
input(optional)
Communication protocol Using Modbus communication protocol
Sampling period 1s
Chapter2 Installation and Wiring This chapter describes the installation and wiring methods of this
instrument. It is necessary for technicians to learn when they use the
instrument for the first time.
This is a procedure which enables the instrument to normal operation,as the
table2-1

Automation www.ato.com [email protected] Global Shipping
5
+1 800-585-1519 (Toll-free)
Paperless Recorder
Figure 2-1 Flow diagram from unpacking to operation
2.1. Unpacking
Upon receipt of the instrument, Please check the packaging whether
intact or not. Do not put excessive force to the box when unpacking the box.
The box should be facing up opened from the seal. Remove the instrument
from the box carefully to make sure the housing is not deformed, broken or
cracked. You can check the packing list of the machine equipment and other
items.
2.2. Installation
Instrument operating environment will not only affect the normal use of the
instrument, but also affect the maintenance and calibration work.
Instrumentation environment should meet the following requirements:
Indoor installation
Operating temperature:(0~50)℃
Relative humidity:(10~85)%RH(No condensation)
Ventilation requirements: ventilated to prevent the internal meter
temperature is too high
Operation
Configuration
Electricity
suppp
Wiring
Installation
Unpacking

Automation www.ato.com [email protected] Global Shipping
6
+1 800-585-1519 (Toll-free)
Paperless Recorder
Vibration disturbance:Less mechanical vibration
Air ingredients: NOT easy to produce condensate, non-corrosive gas or
flammable gas
Inductive interference: no strong inductive interference, not easy to
produce static electricity, magnetic fields or noise
Meter position: When installing the instrument, try to maintain the
level and do not tilt left and right
Dimension drawings
Unit: mm
Installation diagram Mounting

Automation www.ato.com [email protected] Global Shipping
7
+1 800-585-1519 (Toll-free)
Paperless Recorder
安装支架安装
支架安装支架
安装螺钉安装螺钉
安装螺钉Figure 2-2 Product dimension and installation drawing
2.3. Wiring
In order to improve the stability and accuracy of the signals, it is
recommended that you use the cold terminal signal cable to wire.
2.3.1 The name and location of the terminal
Terminal arrangement is shown in figure 2-3 、 figure 2-4.Specific definition of terminal symbols and Explanation are described in figure 2-1.
Installation
bracket
front
panel
installation
screw
92+0.5 -0
Unit: mm
92+0.5
-0

Automation www.ato.com [email protected] Global Shipping
8
+1 800-585-1519 (Toll-free)
Paperless Recorder
Figure 2-3 Terminal view of basic type

Automation www.ato.com [email protected] Global Shipping
9
+1 800-585-1519 (Toll-free)
Paperless Recorder
NOTE:
Figure 2-4 Terminal view of enhanced type
The analog quantity output board needs an external 24V power supply,
which can be provided by the power adapter accompanied with the product.
As the power is large, please do not power any other transmitter at this time.

Paperless Recorder
Automation www.ato.com [email protected] Global Shipping
10
+1 800-585-1519 (Toll-free)
Table2-1 Specific instructions of each terminal
Terminal No. Signal type Description
E、N、L E、N、L
24VDC power supply: L is 24V+; N is 24V-; E is undefined.
AC Power ( (single-phase three wire system ) terminal block: L is Phase line terminals, N is Zero line terminals, E is Ground terminal.
Signal input Terminal Description
1A,1B,1C universal input analog input channel 1
2A,2B,2C universal input analog input channel2
3A,3B,3C universal input analog input channel 3
4A,4B,4C universal input analog input channel 4
5A,5B,5C universal input analog input channel 5
6A,6B,6C universal input analog input channel 6
7A,7B,7C universal input analog input channel 7
8A,8B,8C universal input analog input channel 8
9A,9B,9C universal input analog input channel 9
10A,10B,10C universal input analog input channel 10
11A,11B,11C universal input analog input channel 11
12A,12B,12C universal input analog input channel 12
13A,13B,13C universal input analog input channel 13
14A,14B,14C universal input analog input channel 14
15A,15B,15C universal input analog input channel 15
16A,16B,16C universal input analog input channel 16
17A,17B,17C universal input analog input channel 17
18A,18B,18C universal input analog input channel 18
Signal output Terminal Description
A 485+ communication port RS-485
B 485- communication port RS-485
Distribution output Terminal Description
Table2-2 Specific instructions of each terminal
Terminal No. Signal type Description
P+ / 24V+
P- / 24V-
Alarm output Terminal Description
DO1 Relays Alarm output Channel 1
DO2 Relays Alarm output Channel 2
DO3 Relays Alarm output Channel 3

Paperless Recorder
Automation www.ato.com [email protected] Global Shipping
11
+1 800-585-1519 (Toll-free)
DO4 Relays Alarm output Channel 4
COM Alarm Commons
Instructions for enhanced type terminal:
Terminal No. Signal type Description
13A,13B Current output Analog quantity output of the first channel
13C,14A Current output Analog quantity output of the second channel
14B,14C Current output Analog quantity output of the third channel
15A,15B Current output Analog quantity output of the fourth channel
16A,16B Power distribution input
of the board 16A:24V+,16B:24V-
18B,18C RS-485 input 18B:A,18C:B
2.3.2 Wiring signal lines
Figure 2-5 Schematic diagram of signal cables
mA input( without power distribution) mA input( with power distribution)
V/mV input TC input
RTD input

Paperless Recorder
Automation www.ato.com [email protected] Global Shipping
12
+1 800-585-1519 (Toll-free)
Chapter 3 Basic Operation Methods
Figure 3-1 Panel component distribution
Panel component distribution of paperless recorder is shown in figure 3-1.
3.1.Panel component
LCD Screen:Display monitor and configuration.
Button:
Button Name of button Button Name of button
Up key Right key
Down key Enter key
Left key Cancel key
3.2. Button Operation
3.2.1.Screen Operation
Information bar Screen Description
Indicating U disk
Indicating alarm System time
Indicating low battery
□ Battery Capacity: Replace the
batteries when there is such a sign,Pay
attention to backup data before
replacement
□ Alarm: When there is an alarm message
appears, please enter the alarm screen to
check it and then it will disappear.
□ U disk Tip: When insert U disk ,this sign

Paperless Recorder
Automation www.ato.com [email protected] Global Shipping
13
+1 800-585-1519 (Toll-free)
will appear.
□ System time: Time of present system
Front Panel Screen Description
16-03-07 16:00:37
CH1 HH CH2 CH3
CH4 CH5 CH6
□ Show all bit of analog input resolution,
instantaneous value, units and alarm
status
□ “ XXXXX ” represents the channel
disconnection
□ You can switch the former and later
picture through left key and right key.
Digital display screen Screen Description
16-03-07 16:00:42
CH1 Hi HH CH2
CH3 CH4
CH5 CH6
□ Display channel bit number, the
instantaneous value, units and alarm
status.
□ Pressing up-key can switch channel.
□ You can switch the former and later
picture through left key and right key.
Digital display screen(original signal) Screen Description
16-03-07 19:27:13
CH1 CH2
mA mA
CH3 CH4
mA mA
CH5 CH6
mA mA
□ Display channel bit number, the
instantaneous value of the original signal
and the signal type.
□ Pressing up-key can switch channel.
□ You can switch the former and later
picture through left key and right key.
Bar graph screen(vertical) Screen Description
16-03-07 16:00:46
100% 99.7
80% Hi 79.4 75.0
60%
40%
29.7 20% 20.6
0% 0.3
CH1 CH2 CH3 CH4 CH5 CH6
□ Display channel bit number, the
instantaneous value, units and alarm
status.
□ Pressing up-key can switch channel.
□ You can switch the former and later
picture through left key and right key.
Bar graph screen(horizontal) Screen Description

Paperless Recorder
Automation www.ato.com [email protected] Global Shipping
14
+1 800-585-1519 (Toll-free)
CH1
16-03-07 19:27:18 □ Display channel bit number, the
instantaneous value, units and alarm
status.
□ Pressing up-key can switch channel.
□ You can switch the former and later
picture through left key and right key.
Lo LL
0.3
CH2 34.5
CH3 83.5
CH4 98.9
CH5 65.4
CH6 16.5
Real-time curve interface Screen Description
17-01-16 15:48:33
□ Real-time curve display: Channel
number, instantaneous value
□ Press Addition key can switch channels.
□ Press Left/Right key can switch the
previous and the current interfaces.
105% Sin
CH2 78%
CH3
52%
CH4
26%
CH5
0%
CH6
Flow interface Screen Description
Flux1
Flux3
16-12-29 15:09:11
Flux2
Flux4
□ Display items of flow channel: channel
number, instantaneous value, unit and
alarm state.
□ Press Left/Right key can switch the
previous and the current interfaces.
16-12-29 15:09:18 □ Press Addition key can switch and check
detailed information of the channel.
□ Allow check of more parameters:
temperature, pressure and density ,etc.
□ Continue to press Addition key to return
to the initial state.
Channel Flux1
Flow model HAVN'T SQRT
Compensation Superheated Vapor
Flux 23.0
Source 87.2
Density 6.0929
Temperature 307.7

Paperless Recorder
Automation www.ato.com [email protected] Global Shipping
15
+1 800-585-1519 (Toll-free)
16-12-29 15:09:24
Density 22.2765
Temperature 282.7
Pressure 4.4
Flow K 1.00000
Heat calculation Close
Enthalpy 0.000
Heat 0.0
Accumulation interface Screen Description
16-12-29 15:09:50 □ Display instantaneous value and total
accumulation value at the same time.
□ Press Left/Right key can switch the
previous and the current interfaces.
ACC1 ACC2
ACC3
ACC4
∑
Log screen Screen Description 16-03-07 16:00:50
□ Display the log information.
□ Pressing up-key can switch channel.
□ You can switch the former and later
picture through left key and right key.
NO Time Logs
0002 16-03-07 11:14:08 Save CFG
0001 16-03-07 11:10:49 Save CFG

Paperless Recorder
Automation www.ato.com [email protected] Global Shipping
16
+1 800-585-1519 (Toll-free)
Power off safeguard screen Screen Description
16-12-29 15:09:57
NO PowerOff Time PowerOn time
00016h11m44s
□ Display power off time and power on
time and cumulative time of power
off.
□ Pressing up-key can switch channel.
□ You can switch the former and later
picture through left key and right key.
Report interface Screen Description
17-01-16 15:58:12
□ Display accumulation time report.
□ Press Addition key can switch the
location of blue cursor.
□ Allow switch of previous and the
current interface and channel.
Hour Report
Time
17-01-16 15:58:22
Hour Report
Time
17-01-16 15:58:31
Hour Report
Time

Paperless Recorder
Automation www.ato.com [email protected] Global Shipping
17
+1 800-585-1519 (Toll-free)
Alarm screen Screen Description 16-03-07 16:00:55
Channnel Type Alm Start Alm Stop
□ Display alarm channel, type, beginning
and ending time of alarm.
□ Pressing up-key can switch channel.
□ You can switch the former and later
picture through left key and right key.
History screen Screen Description
16-04-28 16:14:37 □ The historic interface includes two
modes: real-time mode and historic mode.
□ Under real-time mode, the data will be
refreshed according to record intervals.
Historic mode is a query mode under
which relevant historic data will be
displayed according to the input time.
□ Press Addition key can switch of status.
□ You can switch the former and later
picture through left key and right key.
105% CH13
CH14
78% CH15
52%
CH16
26%
CH17
0%
CH18
History screen-1 Screen Description
16-04-28 16:14:55
□ Pressing Addition key reaches channel
switch status first.
□ Press Left/Right key can switch channels,
continue to press Addition key to switch
to the next state.
105% CH13
CH14 78%
CH15
52%
CH16
26%
CH17
0%
CH18
History screen-2 Screen Description
16-04-28 16:15:01
□ Press Addition key again to switch to
blanking state.
□ At this time, press Left/Right key to select
channels to be blanked.
□ Press Confirmation key to blank or
display the selected curve.
105% CH13
CH14
78% CH15
52%
CH16
26%
CH17
0%
CH18

Paperless Recorder
Automation www.ato.com [email protected] Global Shipping
18
+1 800-585-1519 (Toll-free)
History screen-3 Screen Description 16-04-28 16:15:01
105% CH13
CH14 78%
CH15
52% CH16
26% CH17
0% CH18
One time
16-04-28 16:15:51
105% CH13
CH14 78%
CH15
52% CH16
26% CH17
0% CH18
Two times
16-04-28 16:15:23
105% CH13
CH14 78%
CH15
52% CH16
26% CH17
0% CH18
Four times
□ Press Addition key again to switch to the
zoom state.
□ Press Left/Right key can change the
displayed times. There are three choices
of 1,2,4 times. Continue to press Addition
key to switch to the next state.
History screen-4 Screen Description
16-04-28 16:16:12
105% CH13
CH14
78%
CH15
52% CH16
26% CH17
0% CH18
Auto mode state: A
□ Press Addition key again to switch to
real-time/historic mode switch state.
□ At this time, Left/Right key can change
the real-time mode and historic mode
state,Continue to press Addition key to
switch to the next state.

Paperless Recorder
Automation www.ato.com [email protected] Global Shipping
19
+1 800-585-1519 (Toll-free)
105%
78%
52%
26%
0%
16-04-28 16:16:16 CH13
CH14
CH15
CH16
CH17
CH18
Historic mode state: M
History screen-5 Screen Description
105%
78%
52%
26%
0%
16-04-28 16:16:16
CH13
CH14
CH15
CH16
CH17
CH18
□ Under historic mode, press Addition key
to switch to manual query mode (An
arrow occurs).
□ At this time, Left/Right key enable check
of previous and current historic data
value. Press and hold this key can move
quickly.
□ Continue to press Addition key to switch
to the next state.
History screen-6 Screen Description
105%
78%
52%
26%
0%
105%
78%
52%
26%
0%
16-04-28 16:16:14
CH13
CH14
CH15
CH16
CH17
CH18
16-04-28 16:16:14 CH13
CH14
YY-MM-DD HH:MM:SSCH15
16 - 04 - 28 16 : 16 : 14 CH16
CH17
CH18
□ Press Addition key again to switch to
query mode of fixed point.
□ At this time, if pressing Confirmation key,
time setting will pop up.
□ Set the time and press Confirmation key,
then you can perform query.
□ Press Addition key again to exit operation
state in historic state.

Paperless Recorder
Automation www.ato.com [email protected] Global Shipping
20
+1 800-585-1519 (Toll-free)
Data save interface Screen Description
Save All HDA
Save Part HDA
Save All CSV
16-04-28 16:21:55
Save Alm Info
SavePowOn Info
Save ACC Info
□ Can save historic data. With HDA and
CSV format available (You can check it at
a host computer). Records pertaining to
alarms, power loss, logs, can be saved in
CSV format. (NOTE 1)
□ The saved data is displayed on the lower
right part for ease of check.
Data save interface-1 Screen Description
Save
Save
Save
OK
16-04-28 16:24:17
Save Alm Info
SavePowOn Info
Save ACC Info
Cancel
□ Setting start time and end time can save
part of historic data in HDA format.
user-defined interface Screen Description
17-03-13 14:42:26
□ Channel of user-defined interface is
customized. If not, then it’s unavailable.
□ You can switch the former and later
picture through left key and right key.
CH2 Flux1
∑
PID overview Screen Description
17-01-16 16:00:26
□ The bar graph displays 4-channel PID
measurement value, setting value, output
value and manual/auto state.
PID1: MAN PID2: MAN PID3: MAN PID4: MAN
PV: 16.5 PV: 16.5 PV: 16.5 PV: 16.5
SV: 16.5 SV: 16.5 SV: 16.5 SV: 16.5
MV: 10.0 MV: 10.0 MV: 10.0 MV: 10.0

Paperless Recorder
Automation www.ato.com [email protected] Global Shipping
21
+1 800-585-1519 (Toll-free)
PID debugging Screen Description 17-01-16 16:00:34
□ Show PID loop information in detail,
including PID parameters to facilitate
debugging.
PID1: OPEN PV: 55.2 P: 9999.9%
MAN SV: 55.2 I: 20.0
Local MV: 10.0 D: 0.0
100%
75%
50%
25%
0%
17-01-16 16:00:41
□ Press Addition key can switch the
location of gray cursor, Left/Right key
modifies the channel, manual/auto state,
setting value/output value and given
internal and external state. PID parameter
cannot be modified.
PID3: OPEN PV: 87.2 P: 100.0%
MAN SV: 87.2 I: 20.0
Local MV: 10.0 D: 0.0
100%
75%
50%
25%
0%
【Note 1】: File saving path
Files of this recorder are all saved in relevant folders corresponding to the root directory (recorder name). The recorder name can be modified in “system setting” configuration.
File name:
Document Subdirectory File name
Historic record /History H160109A.csv/ H160109A.hda
Accumulation record /Info A160109A.csv
Alarm information /Info B160109A.csv
Power off record /Info P160109A.csv
Log record /Info L160109A.csv
Where:
The initial letter H、A、B、P、L denotes file type. The six numbers that
follow represent the saved date. The last letter can be A~Z, indicating that a
type can be saved for 26 times a day. If it’s full, then the no files can be saved.
Tips:
After inserting a U disk, it the system identifies such disk, it will
automatically transfer and save the data into the U disk at exactly 2 o’clock
every day.

Paperless Recorder
Automation www.ato.com [email protected] Global Shipping
22
+1 800-585-1519 (Toll-free)
3.2.2. Configuration login Step Interface Operation
1
17-01-16 16:00:41
Password ******
Enter
□ Under the left interface, press and
hold and keyto enter login interface.
2
17-01-16 16:18:48
Password ******
0***** Enter
□ Press Left/Right key to switch the
location of the cursor, and press
Confirmation key to enter
configuration or input password.
□ When entering the password,
pressing Addition/deletion key to
modify the password. Left/Right
key can modify the location of
numbers. Pressure Conformation
key for confirmation of the input.
3
□ Confirm the correct password,
select enter configuration and
press Confirmation key to login.
3.2.3. Enable configuration Step Interface Operation
1
17-01-16 14:08:51
AI ACC
AO Control
PWM Function
Flow System
□ After completing
modification, press Cancel
key until the configuration
interface appears.
2
□ Press Cancel key again. If the
configuration is modified, a
confirmation dialog box will
appear. If not, enter the
monitoring interface directly.

Paperless Recorder
Automation www.ato.com [email protected] Global Shipping
23
+1 800-585-1519 (Toll-free)
Step Interface Operation
17-01-16 14:09:30
AI ACC
AO Save & Exit?Control
PWM OK
CFaunnccetilon
Flow System
3
17-01-16 14:09:32
AI ACC
AO Save & Exit?Control
PWM OK
CFaunnccetilon
Flow System
□ Select “OK” and press
Confirmation key. NOTE: The
cursor selects “Cancel” by
default.
3.2.4. Parameters and setting
Digital input
Step Interface Operation
1
16-03-07 16:29:23
Channel
Copy
Paste
Tag
Unit
Signal
LRV
□ Select the parameter to be
modified,and press Confirmation
key.
2
16-03-07 16:29:40
Channel
Copy
Paste
Tag
Unit
Signal
LRV
□ Left/Right key can select the
parameter location to be modified.
3 □ Addition/Deletion key can modify

Paperless Recorder
Automation www.ato.com [email protected] Global Shipping
24
+1 800-585-1519 (Toll-free)
Step Interface Operation
Channel
Copy
Paste
Tag
Unit
Signal
LRV
16-03-07 16:36:51 the numbers
location.
at the selected
4
Channel
Copy
Paste
Tag
Unit
Signal
LRV
16-03-07 16:40:05
□ After entering, press Confirmation
key to adjust the decimal point.
5
Channel
Copy
Paste
Tag
Unit
Signal
LRV
16-03-07 16:40:30
□ Left/Right key can modify the
location of decimal point.
6
Channel
Copy
Paste
Tag
Unit
Signal
LRV
16-03-07 16:41:28
□ Press Confirmation key again to
complete numerical entering.
□ Press Cancel key to cancel the
modification.

Paperless Recorder
Automation www.ato.com [email protected] Global Shipping
25
+1 800-585-1519 (Toll-free)
Step Interface Operation
16-03-07 16:42:07
Channel
Copy
Paste
Tag
Unit
Signal
LRV
Input of bit channel No. and unit
Step Interface Operation
1
16-03-07 16:42:07
Channel
Copy
Paste
Tag
Unit
Signal
LRV
□ Select the parameter to be
modified, and press
Confirmation key.
2
16-03-07 16:42:25
Channel
Copy
Paste
Tag
Unit
Signal
LRV
□ Press Addition key can switch
the type of input character.

Paperless Recorder
Automation www.ato.com [email protected] Global Shipping
26
+1 800-585-1519 (Toll-free)
Step Interface Operation
16-03-07 16:42:3
Channel
Copy
Paste
Tag
Unit
Signal
LRV
Channel
Copy
Paste
Tag
Unit
Signal
LRV
16-03-07 16:43:05
Channel
Copy
Paste
3 Tag
Unit
Signal
LRV
16-03-07 16:43:22
□ Press Left/Right key can
select the input character.
□ Press Confirmation key for
confirmation.
□ Press Deletion key to delete
input.
□ Press Cancel key to exit.
16-03-07 16:42:52
Channel
Copy
Paste
Tag
Unit
Signal
LRV

Paperless Recorder
Automation www.ato.com [email protected] Global Shipping
27
+1 800-585-1519 (Toll-free)
Choice box
Step Interface Operation
1
Channel
Copy
Paste
Tag
Unit
Signal
LRV
16-03-07 16:43:39
□ Select the parameter
modified, and
Confirmation key.
to be
press
2
Channel
Copy
Paste
Tag
Unit
Signal
LRV
16-03-07 16:43:39
□ Left/Right key can select items.
□ Confirmation key saves the items
and exits.
□ Cancel key cancels and exits.
System time
Step Interface Operation
1
16-03-07 16:43:39
Password
Device ID
DEVICE01 Sys Time
16-03-0 -03-07 16:44:35
Time Format YY-MM-
DD Rec Interval 1sec
Axis Percent
□ Select the parameter to be
modified, and press Confirmation
key.
□ Left/Right key can select
location.
□ Addition/Deletion key can
modify numbers (letters).
□ Confirmation key saves the items
and exits, Cancel key cancels and
exits.

Automation www.ato.com [email protected] Global Shipping
28
+1 800-585-1519 (Toll-free)
Paperless Recorder
Recorder name
Step Interface Operation
1
16-03-07 16:44:55
Password
Device ID
DEVICE01 Sys Time DEVICE01
16-03-0 16:
Time Format YY-MM-
DD Rec Interval 1sec
Axis Percent
□ Select the parameter to be
modified, and press
Confirmation key.
□ Left/Right key can select
location.
□ Addition/Deletion key can
modify numbers (letters).
□ Confirmation key saves the
items and exits, Cancel key
cancels and exits.
Tips: Under Input setting mode, the channel can be switched by Addition/Deletion key
Chapter 4 Configuration instructions
This chapter introduces the individual configuration parameters of
instrument.
4.1.Input Settings
4.1.1 Configuration Item Description: configuration Item Function Description Parameter range
Channel Select set analog channel AI1~AI18(The real display shall prevail.)
Copy Copy the configuration
Paste Paste the copied configuration information
Bit Set bit of the analog channel Custom string’s length is 8
Unit Set the unit for analog channel Custom string’s length is 8
Signal Setting Signal Types (4~20)mA、(0~20)mA、
(0~10)mA、PT100、Cu50、
(1~5)V、(0~10)V、(0~5)
V、B、E、J、K、S、T、R、
N、(0~20)mV、(-20~20)
mV、(0~100)mV
Lower Range limit Set lower Range limit -99999~99999
Upper Range limit Set upper range limit -99999~99999
Correction factor A A in Y=A*X+B -99999~99999
Correction factor B B in Y=A*X+B -99999~99999

Automation www.ato.com [email protected] Global Shipping
29
+1 800-585-1519 (Toll-free)
Paperless Recorder
First-order filter First-order filter parameter 0s, 1s, 2s, 5s, 10s, 15s, 30s Disconnection display
Displays the value of channel disconnection
-99999~99999
Alarm setting Enter to alarm setting screen.
4.1.2 Alarm setting screen
configuration Item Function Description Parameter range
Higher alarm HH Higher alarm value -99999~99999
Higher alarm output Higher alarm output terminal None、DO1、DO2、DO3、DO4
(The real display shall prevail.)
High alarm Hi High alarm value -99999~99999
High alarm output High alarm output terminal None、DO1、DO2、DO3、DO4
(The real display shall prevail.)
Low alarm Lo Low alarm value -99999~99999
Low alarm output Low alarm output terminal None、DO1、DO2、DO3、DO4
(The real display shall prevail.)
Lower alarm LL Lower alarm value -99999~99999
Lower alarm output Lower alarm output terminal None、DO1、DO2、DO3、DO4
(The real display shall prevail.)
Hysteresis Alarm Hysteresis -99999~99999
Note: Hysteresis prevents repeated alarm when the measures date
fluctuates from the alarm point. The high or low level alarm and Hysteresis
figure is showed in Figure 4-1 below. At high level alarm, when the actual
engineering value is larger than or equal to the alarm value, the recorder
enters into the alarm state. When the input is reduced, the actual engineering
value is less than the alarm value, but the recorder will not exit the alarm state
immediately. Until the actual engineering value is less than the alarm value
and Hysteresis value, will the recorder exit the alarm state. The same is for
low level alarm.

Paperless Recorder
Automation www.ato.com [email protected] Global Shipping
30
+1 800-585-1519 (Toll-free)
Figure 4-1: High or low level alarm and Hysteresis
4.2.AO output
The current output module provides 4 independent 4~20 mA current
output. It can output measurement value, flow value and PID calculation
value. It can also achieve transferring output and PID control function.
Configuration Item Description:
configuration Item Function Description Parameter range
Channel Select AO channel AO1~AO4
State Enable/Disenable this channel
Enable/Disenable
Signal source Channel to be output AI1~AI12、FLOW1~FLOW4、
PID1~PID4、VA1~VA4【Note 1】
Signal type Output analog quantity type (4~20)mA【Note 2】
Lower limit of range Lower limit of channel -99999~99999
Upper limit of range Upper limit of channel -99999~99999
Zero mark calibration mA
Can be slightly adjusted in mA.
-5mA~5mA
【Note 1】:
VA is the special channel defined by the user. If you have not defined this channel,
please ignore it.
Alarm on
Hysteresis
Alarm off
Alarm on

Paperless Recorder
Automation www.ato.com [email protected] Global Shipping
31
+1 800-585-1519 (Toll-free)
【Note 2】: Signal source − Lower limit of range
Current output = Upper limit of range − Lower limit of range
∗ 16mA
+ 4mA + Zero mark calibration
4.3.Flow setting
The flow function can be used to measure such medium as superheated
steam, saturated steam, general gas, mixed gas, natural gas, coal gas, water,
hot water, chemical liquid,etc. It’s applicable to be used with the vortex
flowmeter, turbine flowmeter, V-cone flowmeter, elbow flowmeter,
electromagnetic flowmeter, mass flowmeter, orifice flowmeter, nozzle
flowmeter, classic venturi and other flow products.
Configuration Item Description: configuration Item Function Description Parameter range
Channel Select fiow channel FLOW1~FLOW4
State Enable/Disenable
this channel
Enable/Disenable
Unit The display unit in flow interface
User-defined 8-bit character string
Signal source Channel of flow signal AI1~AI18【Note1】
Lower limit of range Lower limit of range after
flow compensation -99999~99999
Upper limit of range Upper limit of range after flow compensation
-99999~99999
Flow model Select formula suitable for restriction choke
No extraction of a root 、 No
extraction of a root for
differential pressure 、 Extraction of a root for
differential pressure 【Note 2】
Signal removal Removal of small flow -99999~99999
Flow coefficient K in the formula【Note 2】 -100000000~100000000
Compensation mode Select algorithm of density compensation
Given density, superheated steam, saturated steam P, saturated steam T, general gas, without compensation, temperature linear compensation, pressure linear
compensation【Note 3】
Pressure signal P in density compensation None、AI1~AI18【Note 1】

Paperless Recorder
Automation www.ato.com [email protected] Global Shipping
32
+1 800-585-1519 (Toll-free)
in MPa
Emergency pressure Emergency value in case of abnormal pressure
-100000000~100000000
Temperature signal T in density compensation in °C
None、AI1~AI18【Note 1】
Emergency temperature
Emergency value in case of abnormal temperature
-100000000~100000000
Linear compensation A
Use in Note 3 -100000000~100000000
Linear compensation B
Use in Note 3 -100000000~100000000
Heat calculation Select the model for heat calculation
Close, give enthalpy, auto
calculation【Note 4】
Given enthalpy Used when selecting a given enthalpy
-100000000~100000000
Alarm setting Enter alarm setting interface
【Note 1】:When mode A or remote Modbus input is selected, only AI1~AI12 is available.
【 Note 2 】 : Methods for calculating flow are various, such as throttling model, speed
model, pulse frequency model, volumetric model, mass model, and so on.
In this recorder, three types of methods are concluded:
Flow model Formula
No extraction of a root Q K * I f *
No extraction of a root for differential pressure Q K * P*
Extraction of a root for differential pressure Q K * P*
Where:
Q:Mass flow rate K:
Flow coefficient
◻ :Fluid density
:Differential pressure signa
If : Flow value of restriction choke. It may be a current signal or a
frequency signal.
【Note 3】: It can be seen from the flow model that the calculation of mass flow is directly related with the fluid density. As the gas density varies greatly with the operating conditions, the calculation of the working density is required. The table below is the calculation method for setting different gas

Paperless Recorder
Automation www.ato.com [email protected] Global Shipping
33
+1 800-585-1519 (Toll-free)
densities.
【Note 4】:
Qheat=Kheat*Q*H Where:
Qheat: Heat flow rate
Kheat: Heat flow rate coefficient (The coefficient of enthalpy of this
recorder is 1) Q: Mass flow rate H: Enthalpy
4.4.Accumulation setting
The accumulation function accumulates selected signal sources in terms of
hour, day, and month, which forms a time report, a daily report, and a
monthly report.
Configuration Item Description:
configuration Item Function Description Parameter range
Channel Select the accumulated channel ACC1~ACC4
Status Enable/Disenable this channel Enable/Disenable
Unit Unit displayed in accumulation interface
User-defined 8-bit character string
Signal source Channel to be accumulated AI1~AI18 、
FLOW1~FLOW4【Note 1】
Compensation mode Calculation method Applicable fluid
Given density Calculate as per given density
Liquid
Superheated steam Calculate as per IAPWS-IF97
Superheated steam
Saturated steam P Calculate through pressure as per IAPWS-IF97
Saturated steam
Saturated steam T Calculate through temperature as per IAPWS-IF97
Saturated steam
General gas Calculate as per ideal equation, a standard density is required.
Oxygen, nitrogen, hydrogen, etc
Without compensation Calculate as per constant 1
Measure volume flow rate
Temperature linear compensation ρ = A + B ∗ t, A, B are linear compensation coefficients
Pressure linear compensation ρ = A + B ∗ P, A, B are linear compensation coefficients
Paperless Recorder
Automation www.ato.com [email protected] Global Shipping
34
+1 800-585-1519 (Toll-free)
Accumulation multiplying power
Multiply by multiplying power 0~99999
Accumulated initial value
Initial value at restoration 0~999999
Eliminate accumulated value
Reset this channel according to accumulated initial value
【Note 2】
【 Note 1 】 : When mode AO or remote Modbus input is selected, only
AI1~AI12 is available.
【Note 2】:After modifying the accumulated initial value, it requires to enable
the configuration again to make it effective.
4.5.Control setting
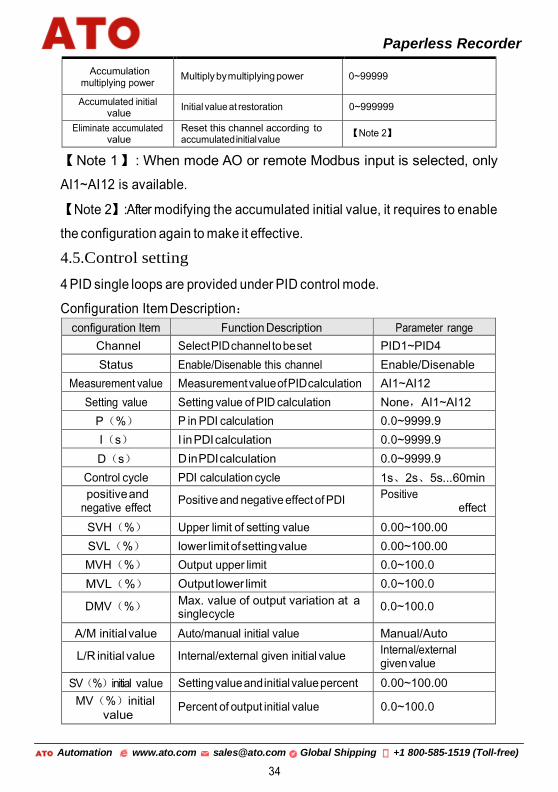
4 PID single loops are provided under PID control mode.
Configuration Item Description:
configuration Item Function Description Parameter range
Channel Select PID channel to be set PID1~PID4
Status Enable/Disenable this channel Enable/Disenable
Measurement value Measurement value of PID calculation AI1~AI12
Setting value Setting value of PID calculation None,AI1~AI12
P(%) P in PDI calculation 0.0~9999.9
I(s) I in PDI calculation 0.0~9999.9
D(s) D in PDI calculation 0.0~9999.9
Control cycle PDI calculation cycle 1s、2s、5s...60min
positive and negative effect
Positive and negative effect of PDI Positive
effect/ negative effect
SVH(%) Upper limit of setting value 0.00~100.00
SVL(%) lower limit of setting value 0.00~100.00
MVH(%) Output upper limit 0.0~100.0
MVL(%) Output lower limit 0.0~100.0
DMV(%) Max. value of output variation at a single cycle
0.0~100.0
A/M initial value Auto/manual initial value Manual/Auto
L/R initial value Internal/external given initial value Internal/external given value
SV(%)initial value Setting value and initial value percent 0.00~100.00
MV(%)initial
value Percent of output initial value 0.0~100.0

Paperless Recorder
Automation www.ato.com [email protected] Global Shipping
35
+1 800-585-1519 (Toll-free)
configuration Item Function Description Parameter range
A/M undisturbed switch
Undisturbed Manual/Auto switch Enable/Disenable
Fault output Output action in case of abnormal input signal
MVH 、 MVL 、 MV
initial value
4.6.Function setting
4.6.1.Zero clearing
Configuration Item Description:
4.6.2.U disk operation
The instrument supports saving the current configuration to a USB disk or
reading the configuration file therein.
Configuration Item Description:
configuration Item Function Description File format
Save recorder configuration
Save current recorder configuration CFG(.cfg)
Read recorder configuration
Read recorder configuration in U disk
NOTE: The recorder configuration is scanned when the U disk is inserted. The newly saved configuration can merely be displayed when U disk is inserted and plugged for once.
Save log records Save log records
4.6.3.Communication setting
This product supports communication operation with a host computer (the
matched host computer can be obtained in our WeChat official
account/official website), thereby realizing real-time monitoring of the
instrument. This product only supports Modbus protocol.
Configuration Item Description:
configuration Item Function Description
Clear log record Clear all log records
Clear accumulated report Clear all accumulated reports
Clear power loss record Clear all power loss records
Clear alarm information Clear all alarm information

Paperless Recorder
Automation www.ato.com [email protected] Global Shipping
36
+1 800-585-1519 (Toll-free)
configuration Item Function Description Parameter range Instrument address Modbus Device Address 1~254
Baud Rate Communication speed 1200,9600,57600,115200
Parity bit Communication verify No parity, odd parity, even parity
Floating-point format Floating point format 1234,2143,3412,4321
4.6.4.Remote setting
The remote input module can read the Modbus channel through the RS-485 terminal on the current board .It supports a maximum of 6 channels.
Configuration Item Description:
configuration Item Function Description Parameter range
Status Functional switch for remote input
Enable/Disenable
Baud rate Baud rate of serial port data 1200、9600、57600、115200
Check bit Check bit of serial port data No parity check, odd parity check, even-parity check
Channel 1
Device address Device address for the first remote channel
0-254, 0 indicates a closechannel
Register address Register address for the first remote channel
1~65535
Floating point format
Data format F1234、F2143、F3412、F4321、
L1234、L4321【Note1】
Smoothing time Average value smoothing 0s、1s、2s…30s
Correction factor A A in Y=A*X+B -99999~99999
Correction factor B B in Y=A*X+B -99999~99999
Channel 2
Device address Device address for
the second remote channel
0-254, 0 indicates a closechannel
Register address Device address for
the second remote channel
1~65535
Floating point format
Data format F1234、F2143、F3412、F4321、
L1234、L4321【Note 1】
Smoothing time Average value smoothing 0s、1s、2s…30s
Correction factor A A in Y=A*X+B -99999~99999
Correction factor B B in Y=A*X+B -99999~99999
Channel 3
Device address Device address for the third remote channel
0-254, 0 indicates a closechannel

Paperless Recorder
Automation www.ato.com [email protected] Global Shipping
37
+1 800-585-1519 (Toll-free)
configuration Item Function Description Parameter range
Register address Device address for the third remote channel
1~65535
Floating point format
Data format F1234、F2143、F3412、F4321、
L1234、L4321【Note 1】
Smoothing time Average value smoothing 0s、1s、2s…30s
Correction factor A A in Y=A*X+B -99999~99999
Correction factor B B in Y=A*X+B -99999~99999
Channel 4
Device address Device address for the fourth remote channel
0-254, 0 indicates a closechannel
Register address Device address for the fourth remote channel
1~65535
Floating point format
Data format F1234、F2143、F3412、F4321、
L1234、L4321【Note 1】
Smoothing time Average value smoothing 0s、1s、2s…30s
Correction factor A A in Y=A*X+B -99999~99999
Correction factor B B in Y=A*X+B -99999~99999
Channel 5
Device address Device address for the fifth remote channel
0-254, 0 indicates a closechannel
Register address Device address for the fifth remote channel
1~65535
Floating point format
Data format F1234、F2143、F3412、F4321、
L1234、L4321【Note 1】
Smoothing time Average value smoothing 0s、1s、2s…30s
Correction factor A A in Y=A*X+B -99999~99999
Correction factor B B in Y=A*X+B -99999~99999
Channel 6
Device address Device address for the sixth remote channel
0-254, 0 indicates a closechannel
Register address Device address for the sixth remote channel
1~65535
Floating point format
Data format F1234、F2143、F3412、F4321、
L1234、L4321【Note 1】
Smoothing time Average value smoothing 0s、1s、2s…30s
Correction factor A A in Y=A*X+B -99999~99999
Correction factor B B in Y=A*X+B -99999~99999

Paperless Recorder
Automation www.ato.com [email protected] Global Shipping
38
+1 800-585-1519 (Toll-free)
【Note 1】:F1234、F2143、F3412、F432 is a single precision floating-point number of 4
bytes.L1234、L4321 is the 4-byte integer
Use of remote channel
Step Interface Operation
1
17-01-16 15:36:45
Channel
Copy
Paste
Tag
Unit
Signal
LRV
□ Select Remote1~Remote6
in the Signal
configuration under Input
Setting, which
corresponds to remote
channel 1-6, namely
allowing display, alarm
and record signal of same
analog quantity.
4.6.5. User-defined screen
configuration Item Function Description Parameter range
Channel 1 Define the first channel AI、FLOW
Channel 2 Define the second channel AI、FLOW
Channel 3 Define the third channel AI、FLOW
Channel 4 Define the fourth channel AI、FLOW
Channel 5 Define the fifth channel AI、FLOW
Channel 6 Define the sixth channel AI、FLOW
4.7.System Settings
Configuration Item Description:
configuration Item
Function Description Parameter range
Password Set password 000000~999999
recorder name Set recorder name 8-bit character string
System time Set recorder time
Time format Set time
display format.
YY-MM-DD、DD-MM-YY、MM-DD-YY
record interval Set record interval 1s 、 2s 、 5s...60min(One second can be
recorded for 10 days)
Curve coordinate
Set curve coordinate Percent and engineering quantity
Language Select system language
Chinese/English

Paperless Recorder
Automation www.ato.com [email protected] Global Shipping
39
+1 800-585-1519 (Toll-free)
configuration Item
Function Description Parameter range
Starting up interface
Set thedefault
starting up interface
General interface, digital display interface, historical interface, flow interface, cumulative flow, real-time curve.
Cycling time Display cycling time by group
0s、5s、10s、30s
Atmospheric pressure MPa
Set the atmospheric -100000000~100000000
Reset default configuration
pressure of the recorder
Configuration item Function Description Parameter range
Supplier password Set supplier password 000000~999999
Acquirer password Set acquirer password 000000~999999
Instrument name Set instrument name Strings of 8 bytes
System time Set system time
Time format Set time format YY-MM-DD, DD-MM-YY, MM-DD-YY
Recording interval Set recording interval 1s,2s,5s,10s,15s,30s,
1s,2s,5s,10s,30s,60s
Startup screen Set the default startup screen. Front Panel ,digital display screen, history screen
Cycle Time The screen displays the cycle time of grouping
0s、5s、10s、30s
Atmospheric pressure MPa
Set the Atmospheric pressure of
the instruments -999999~9999999
Restore factory configuration
Restore factory configuration

Paperless Recorder
Automation www.ato.com [email protected] Global Shipping
40
+1 800-585-1519 (Toll-free)
Appendix 1:Address and Examples of Modbus
Address table of Modbus:
Number Parameter Types of parameter Starting address of
register(decimal)
The number of register1 No.1 channel
analog input Floating point type 1 2 registers
2 No.2 channel analog input
Floating point type 3 2 registers
3 No.3 channel analog input
Floating point type 5 2 registers
4 No.4 channel analog input
Floating point type 7 2 registers
5 No.5 channel analog input
Floating point type 9 2 registers
6 No.6 channel analog input
Floating point type 11 2 registers
7 No.7 channel analog input
Floating point type 13 2 registers
8 No.8 channel analog input
Floating point type 15 2 registers
9 No.9 channel analog input
Floating point type 17 2 registers
10 No.10 channel analog input
Floating point type 19 2 registers
11 No.11 channel analog input
Floating point type 21 2 registers
12 No.12 channel analog input
Floating point type 23 2 registers
13 No.13 channel analog input
Floating point type 25 2 registers
14 No.14 channel analog input
Floating point type 27 2 registers
15 No.15 channel analog input
Floating point type 29 2 registers
16 No.16 channel analog input
Floating point type 31 2 registers
17 No.17 channel analog input
Floating point type 33 2 registers
18 No.18 channel analog input
Floating point type 35 2 registers
Paperless Recorder
Automation www.ato.com [email protected] Global Shipping
41
+1 800-585-1519 (Toll-free)
No. Parameter Parameter
type
Initial address of register
(Decimalism)
Register number
1 Flow of the first
channel
Parameter
type 2001 2 registers
2 Flow of the second
channel
Parameter
type 2003 2 registers
3 Flow of the third
channel
Parameter
type 2005 2 registers
4 Flow of the fourth
channel Parameter
type 2007 2 registers
No. Parameter Paramete
r type
Initial address of
register (Decimalism)
Register
number
1 Accumulated Flow of
the first channel Integer 4001 2 registers
2 Accumulated Flow of
the second channel Integer 4003 2 registers
3 Accumulated Flow of
the third channel Integer 4005 2 registers
4 Accumulated Flow of
the fourth channel Integer 4007 2 registers
No. Parameter Parameter type Initial address of
register (Decimalism) Register number
1 Accumulated Flow of
the first channel Parameter type 5001 2 registers
2 Accumulated Flow of
the second channel Parameter type 5003 2 registers
3 Accumulated Flow of
the third channel Parameter type 5005 2 registers
4 Accumulated Flow of
the fourth channel Parameter type 5007 2 registers

Paperless Recorder
Automation www.ato.com [email protected] Global Shipping
42
+1 800-585-1519 (Toll-free)
Communication Example:
Example 1:Real-time value of analog input 2
State:
Explanations :06 03 00 03 00 02 35 BC
06:instruments address (Configuration can be changed)
03:03 order to Modbus
00 03:Address 3 of register
00 02:The number of registers is 2
35 BC:CRC Verify
Returned data:01 03 04 42 C8 00 00 6F B5 Explanations:
01:Instruments address 03:
03 order to Modbus 04:Four
bytes of returned date
42 C8 00 00:Floating point(F4321,configuration can be modified),It
represents 100.0
6F F5:CRC Verify
Appendix 2: Calculation of flow coefficient K
Case 1: Orifice (no extraction of a root for differential pressure), measure the
flow of oxygen in Nm3/h.
Calculation sheet process data: absolute pressure temperature Flow expansion coefficient reynolds fluid velocity pressure loss differential pressure
design
950.000
20.0
40000.00000
0.9994
278E+04 12.3963
0.1066
1.8400
max norm min
36000.00000
1.0000
25,009E+02
11.1567
0.0863
1.4901
21500.00000
0.9998
14,936E+02
6.6630
0.0308
0.5312
10800.00000
0.9995
75,026E+01
3.3470
0.0078
0.1340
Einheit
kPa
℃
Nm3/h
-
-
m/s kPa
kPa

Paperless Recorder
Automation www.ato.com [email protected] Global Shipping
43
+1 800-585-1519 (Toll-free)
Obtain the following information based on the calculation sheet:
parameter Value
Design pressure 0.95MPa
Design temperature 20℃
Design flow 40000Nm3/h
Design differential pressure 1.84kPa
Calculation method:
The oxygen density under standard conditions and design temperature
pressure are calculated.
According to the ideal state equation:
PV (mRT / M ) nRT
PV mRT / M
PM / RT m /V
◻ PM / RT
The density under standard conditions is 1.429Kg/m3.
The density under design temperature pressure is 12.485Kg/m3.
Calculate according to the formula
substituted by design parameters.
Q K * * , which is
40000 *1.429 K *
K=11926.1
Special explanation:
1.84 *12.485
Since the designed flow unit is Nm3/h, first, convert the designed flow unit into
standard unit. The flow unit obtained at this time is Kg/h. If you want to
acquire t/h, you need to reduce K by 1000 times to 11.9261. If you want to
acquire Nm3/h, you need to use K to divide by the density under standard
conditions 1.429 to obtain 8345.7.
Related Documents


