PANASONIC KX TGP-500 B08 & KX TPA-50 DOT (DIGITAL OFFICE TECHNOLOGY) TM USER GUIDE

Welcome message from author
This document is posted to help you gain knowledge. Please leave a comment to let me know what you think about it! Share it to your friends and learn new things together.
Transcript

PANASONIC KX TGP-500 B08 & KX TPA-50 DOT (DIGITAL OFFICE TECHNOLOGY)
TM
USER GUIDE
/OVERVIEW OF THE KX TGP-500 AND TPA-50 CORDLESS IP PHONES 2
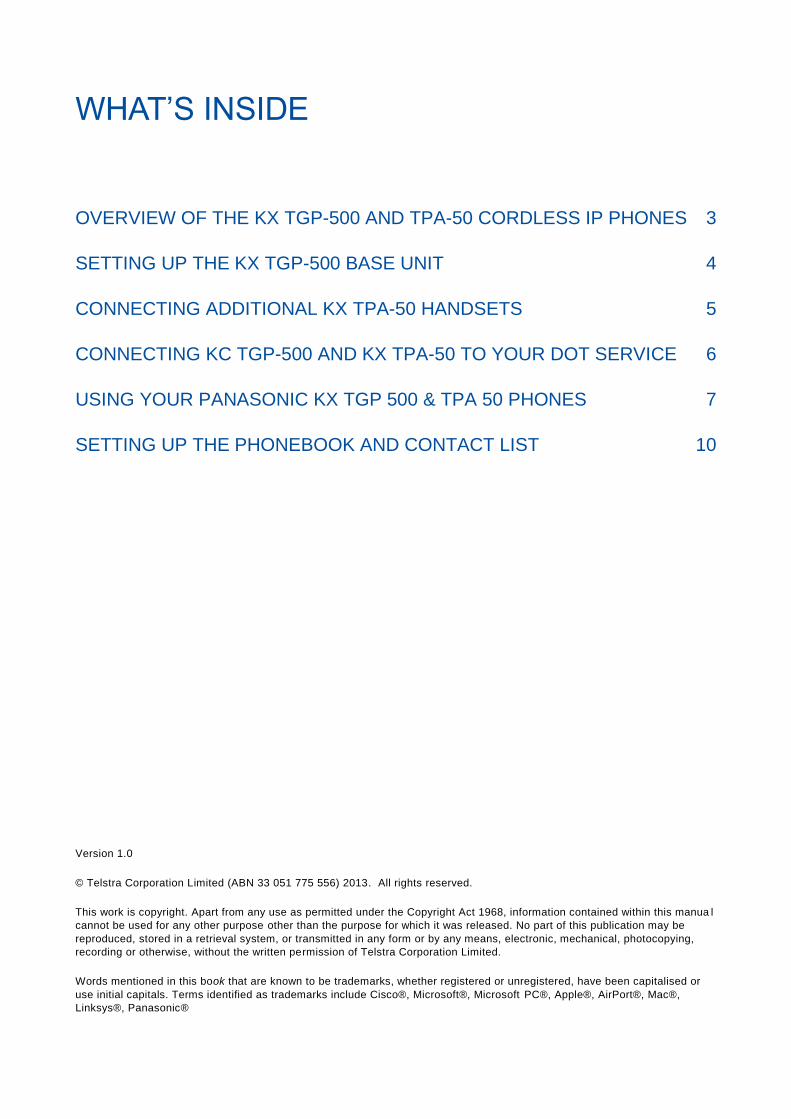
WHAT’S INSIDE
OVERVIEW OF THE KX TGP-500 AND TPA-50 CORDLESS IP PHONES 3
SETTING UP THE KX TGP-500 BASE UNIT 4
CONNECTING ADDITIONAL KX TPA-50 HANDSETS 5
CONNECTING KC TGP-500 AND KX TPA-50 TO YOUR DOT SERVICE 6
USING YOUR PANASONIC KX TGP 500 & TPA 50 PHONES 7
SETTING UP THE PHONEBOOK AND CONTACT LIST 10
Version 1.0
© Telstra Corporation Limited (ABN 33 051 775 556) 2013. All rights reserved.
This work is copyright. Apart from any use as permitted under the Copyright Act 1968, information contained within this manua l
cannot be used for any other purpose other than the purpose for which it was released. No part of this publication may be
reproduced, stored in a retrieval system, or transmitted in any form or by any means, electronic, mechanical, photocopying,
recording or otherwise, without the written permission of Telstra Corporation Limited.
Words mentioned in this book that are known to be trademarks, whether registered or unregistered, have been capitalised or
use initial capitals. Terms identified as trademarks include Cisco®, Microsoft®, Microsoft PC®, Apple®, AirPort®, Mac®,
Linksys®, Panasonic®
/OVERVIEW OF THE KX TGP-500 AND TPA-50 CORDLESS IP PHONES 3
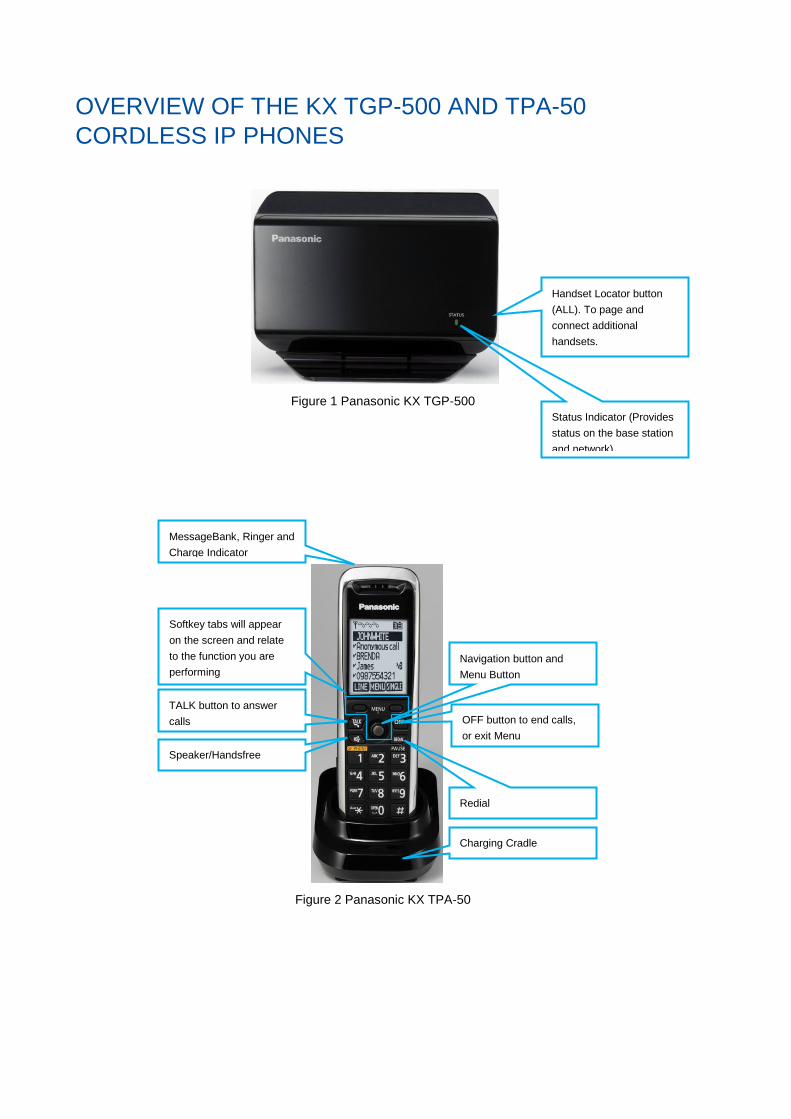
OVERVIEW OF THE KX TGP-500 AND TPA-50
CORDLESS IP PHONES
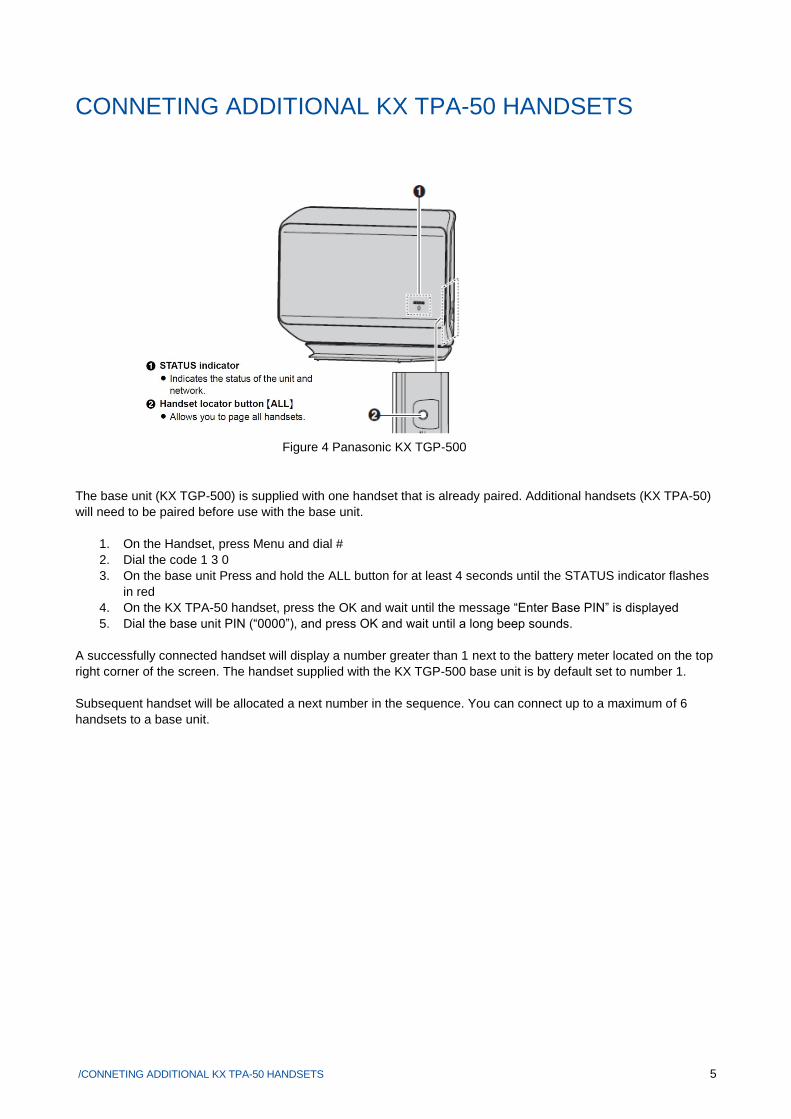
Status Indicator (Provides
status on the base station
and network)
Handset Locator button
(ALL). To page and
connect additional
handsets.
MessageBank, Ringer and
Charge Indicator
Softkey tabs will appear
on the screen and relate
to the function you are
performing
TALK button to answer
calls
Speaker/Handsfree
OFF button to end calls,
or exit Menu
Navigation button and
Menu Button
Redial
Charging Cradle
Figure 1 Panasonic KX TGP-500
Figure 2 Panasonic KX TPA-50
/ SETTING UP THE KX TGP-500 BASE UNIT 4
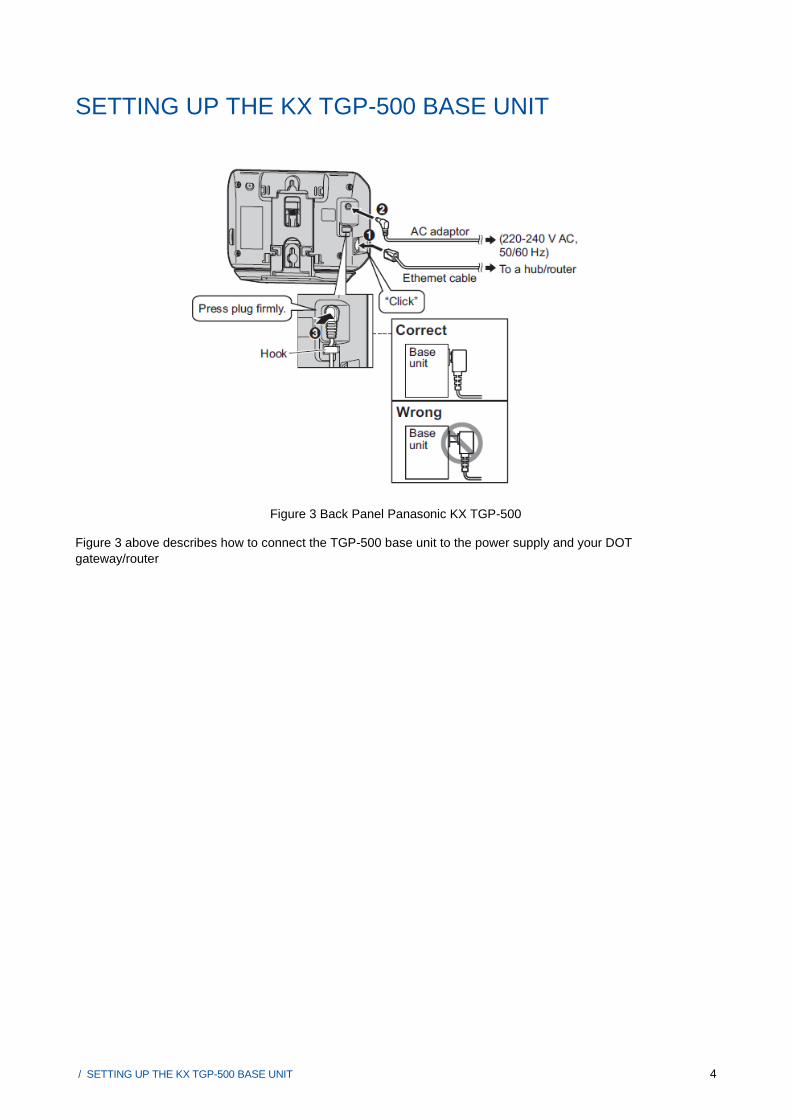
SETTING UP THE KX TGP-500 BASE UNIT
Figure 3 above describes how to connect the TGP-500 base unit to the power supply and your DOT
gateway/router
Figure 3 Back Panel Panasonic KX TGP-500
/CONNETING ADDITIONAL KX TPA-50 HANDSETS 5
CONNETING ADDITIONAL KX TPA-50 HANDSETS
The base unit (KX TGP-500) is supplied with one handset that is already paired. Additional handsets (KX TPA-50)
will need to be paired before use with the base unit.
1. On the Handset, press Menu and dial #
2. Dial the code 1 3 0
3. On the base unit Press and hold the ALL button for at least 4 seconds until the STATUS indicator flashes
in red
4. On the KX TPA-50 handset, press the OK and wait until the message “Enter Base PIN” is displayed
5. Dial the base unit PIN (“0000”), and press OK and wait until a long beep sounds.
A successfully connected handset will display a number greater than 1 next to the battery meter located on the top
right corner of the screen. The handset supplied with the KX TGP-500 base unit is by default set to number 1.
Subsequent handset will be allocated a next number in the sequence. You can connect up to a maximum of 6
handsets to a base unit.
Figure 4 Panasonic KX TGP-500
CONNECTING KC TGP-500 AND KX TPA-50 TO YOUR DOT SERVICE 6
CONNECTING KC TGP-500 AND KX TPA-50 TO YOUR
DOT SERVICE
ACTIVATING THE BASE UNIT AND HANDSETS WITH DOT
1. Press Menu button on a KX TPA-50 that is paired to the base unit
2. Select the toolbox/briefcase icon
3. Select Call Features
4. Select Settings
5. Select Authentication
6. Enter the User ID and Password:
Refer to your DOT Configuration Summary email for User ID and Password
Enter the User ID and Password for the Device Type TGP 500, described in the Configuration
Summary email
Additional KX TPA-50 handset User ID and Passwords are displayed as NULL and are not required
7. Press the OFF button to complete the installation
8. The STATUS lamp on the base unit will start flashing in amber and change to solid green when
successful activated
9. Press the Line button on the TPA-50 handset to view all the phone numbers connected to the base unit
and available for use with the handsets.
ASSIGN PHONE NUMBERS TO HANDSET
Each handset registered to the base station will be connected to all phone numbers. Press the Line button on each
handset to display all the phone numbers accessible for each handset.
You can modify each handset to make and/or receive calls on selected phone numbers.
ASSIGN INCOMING CALL NUMBER TO A TPA-50 HANDSET
1. Press Menu
2. Select IP Service
3. Select Call Features
4. Select Settings
5. Select Incoming call
6. Select Line 1-4 or 5-8 to view the available phone numbers
7. Phone numbers with a “*”are assigned as incoming numbers to the handset
8. Scroll up/down to select the phone number and press Select
9. Select Yes to assign incoming number to the handset. This handset will ring on incoming calls to this
number
10. Select No to un-assign the incoming number. Handset will not ring on incoming calls to this number.
Repeat these steps on each handset.
ASSIGN OUTGOING CALL NUMBER TO A TPA-50 HANDSET
1. Press Menu
2. Select IP Service
3. Select Call Features
4. Select Settings
5. Select Outgoing call
6. Select Line 1-4 or 5-8 to view the phone numbers
7. Phone numbers with a “*”are assigned numbers from which outgoing calls can be place from the handset
8. Scroll up/down to select the phone number and press Select
USING YOUR PANASONIC KX TGP 500 & TPA 50 PHONES 7
9. Select ‘Yes’ to Assign outgoing number to the handset. The handset can place calls from this number
10. Select ‘No’ to Un-assign outgoing number. The Handset is unable to place calls from this number.
Repeat these steps on each handset.
NAMING EACH HANDSET
Each handset can be provided a unique name that will be displayed on the handset’s screen by the following
steps:
1. Press Menu
2. Select Initial Settings
3. Scroll Down to select Handset Name
4. Enter the name or number using the keypad
5. Press OK
6. Select “ON” for standby display
7. Press save.
USING YOUR PANASONIC KX TGP 500 & TPA 50
PHONES
PERSONALISE, ACTIVATE AND ACCESS YOUR VOICE MAIL BOX
Set up MessageBank
1. Dial 101 to reach the Telstra’s MessageBank, and follow the prompts to set-up your voicemail greetings,
etc.
Listen to your messages
1. Dial 101 to and follow the prompts to list to your messages.
The Message Indicator on the top left corner of the handset will light up, if there are messages waiting.
PLACING A CALL
Call from Call History
1. Press the CID softkey, then scroll to view the missed call history
2. Scroll to the number and press Talk button to place the call.
Call from the Phone Directory
1. Press the Menu softkey, then scroll to select the Phonebook icon
2. Scroll to search the contact, or use the keypad to search the first alphabet of the contact name
3. Scroll to the contact and press Talk button to place the call.
Redial a number
1. Press the REDIAL button to view Call History
2. Scroll to the number

USING YOUR PANASONIC KX TGP 500 & TPA 50 PHONES 8
3. Press TALK button.
PLACE CALL ON HOLD
1. To put an active call on hold press the HOLD softkey
2. “Line of Hold” will be displayed on the screen, and the HOLD softkey will begin to flash
3. To resume the call from hold, press the HOLD softkey again.
MAKE A CONFERENCE CALL
While on an active call:
1. Press the Menu softkey
2. Scroll down to Conference and press Select
3. Wait for a continuous dial tone, and enter the new party’s number
4. Press CALL softkey
5. When the new party answers the call, Press the CONF softkey to connect all parties into the conference.
A maximum of three parties, including the called can be on a conference call.
TRANSFER A CALL
The Panasonic KX series offers the ability to perform internal call transfer calls as well as calls to other phone
numbers.
Transfer a call to another handset (Internal Transfer)
During active call you can complete a supervised or blind transfer to other handsets within your business, including
those that are on the same phone number.
Blind Transfer lets you transfer a call to another handset without announcing the call prior to transfer.
1. During a call, press the Menu softkey
2. Select Intercom to display all the Panasonic KX series handsets
3. Scroll to select the other party’s handset
4. Press the CALL softkey
5. Press OFF when the party’s phone rings to complete the transfer
6. If the party does not answer the call within 1 minute, the call will be transferred back to your phone.
Supervised Transfer lets you transfer a call after announcing the call to the party
1. During a call, press the Menu softkey
2. Select Intercom to display all the Panasonic KX series handsets
3. Scroll to select the other party’s handset
4. Press the CALL softkey
5. Wait for the party to answer the call and announce the call
6. Press OFF to complete the transfer.
Transfer a call to another phone number
During active call you can complete a supervised or blind transfer to other phone numbers.
Blind Transfer lets you transfer a call to another phone number without announcing the call prior to transfer.
1. During a call, press the Menu softkey
2. Scroll down to Blind Transfer, and Press SELECT
USING YOUR PANASONIC KX TGP 500 & TPA 50 PHONES 9
3. Enter the other party’s phone number to complete the Blind Transfer.
Supervised Transfer lets you transfer a call after announcing the call to the party
1. During a call, press the Menu softkey
2. Scroll down to Transfer, and Press SELECT
3. Enter the other party’s phone number and Press the CALL softkey
4. Wait for the party to answer the call and announce the call
5. Press the TRANS softkey to complete the transfer.
VIEW CALL HISTORY
View your Redial List 1. Press the Redial button on the handset
2. Scroll up or down to view the list.
View your Missed Calls 1. Press the CID softkey
2. Scroll up or down to view the list.
CALL FORWARDING AND CALL WAITING
There are 3 Call Forward options which can be set from your handset: Call Forward Always, Call Forward No
Answer and Call Forward Busy.
Call Forwarding Always Activation
1. Lift the phone handset
2. Dial * 7 2 #
3. You’ll be prompted to enter the phone number to which calls will be forwarded
4. Replace the handset.
The Call Forwarding Always service is on. To turn it off, repeat these steps using the code * 7 3 #
Call Forwarding Busy Activation
Follow the Call Forwarding instructions above but use code * 9 0 # to turn it on, and code * 9 1 # to turn it off.
Call Forwarding No Answer Activation
Follow the Call Forwarding instructions above but use code * 9 2 # to turn it on, and code * 9 3 # to turn it off.
Call Waiting Activation
1. Lift the telephone handset.
2. Enter the assigned code * 4 3 #
The Call Waiting feature is now turned on. To turn it off, repeat these steps using the code # 4 3 #
SETTING UP THE PHONEBOOK AND CONTACT LIST 10
SETTING UP THE PHONEBOOK AND CONTACT LIST
SET UP THE PHONE DIRECTORY (PERSONAL ADDRESS BOOK)
Each handset has its own phone directory, and will need to be set-up individually.
The phone directory can be enter into the each handset directly by entering each contact one at a time, OR more
conveniently by importing your contact list from Microsoft Outlook.
Create a Contact using the handset
Save a number into the directory
1. Press the Menu softkey, then scroll to select the Phonebook icon
2. Press the ADD softkey
3. Use the keypad to enter the contact’s name, press OK
4. Use the keypad to enter the contact’s number, press OK
5. Press Select to create a distinctive ringtone for the contact, or press SAVE to save the contact
6. Repeat the steps above to add another contact, or press OFF button to exit.
Save a number from Missed Call List
1. Press the CID softkey, then scroll to view the missed call history
2. Scroll to the number and press the Menu softkey
3. Press Add Phonebook and press Select to Enter the Name
4. User the keypad to enter contact’s name, press OK
5. Press Save to save the contact
6. Press OFF to exit.
Importing a Contact List from Microsoft Outlook
Step A: Export the Microsoft Outlook address book data
1. In Microsoft Outlook, click File, and then click Import and Export 2. Select Export to a file, and click Next 3. Select Tab Separated Values (Windows), and click Next 4. Select Contacts, and click Next 5. Click Browse, select a folder, and then enter the file name to export the data 6. Click OK 7. On the Export to a File window, click Next 8. Click Map Custom Fields 9. Clear all items in the To list by clicking Clear Map. Then, drag only Last Name and Business
Phone from the From list to the To list, and click OK 10. On the Export to a File window, click Finish. 11. Open Microsoft Excel 12. Click Office Button, and then Open.
Note Make sure to open a TSV file in this procedure. If you change the extension of a TSV file to ".csv", the file
will open by simply double-clicking it. However, the character encoding of the file might not be recognized properly, resulting in garbled characters, or the phone numbers might be recognized as numbers, resulting in data alteration.
13. Select All Files for the file type, select the exported phonebook data file, and click Open.

SETTING UP THE PHONEBOOK AND CONTACT LIST 11
14. On the Text Import Wizard - Step 1 of 3 window, click Next.
15. On the Text Import Wizard - Step 2 of 3 window, select Tab for Delimiters, and then click Next.
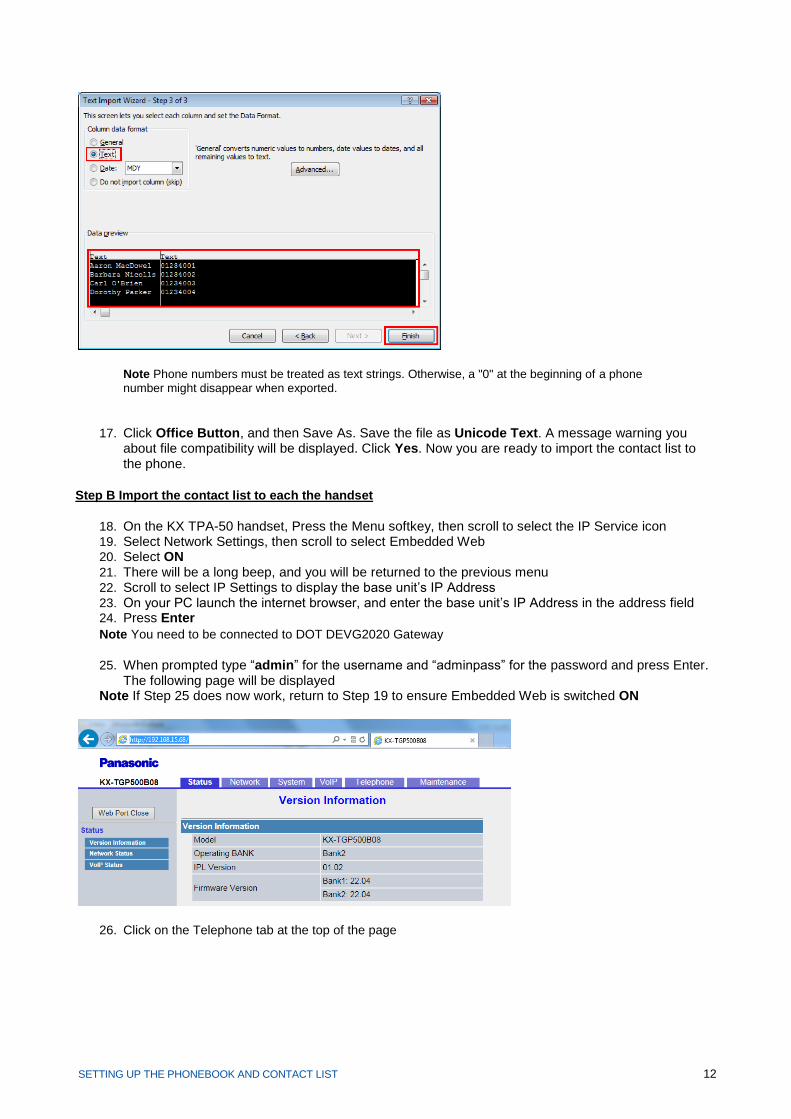
16. On the Text Import Wizard - Step 3 of 3 window, select all columns in Data preview, select Text in Column data format, and then click Finish. The TSV file will be opened.
SETTING UP THE PHONEBOOK AND CONTACT LIST 12
Note Phone numbers must be treated as text strings. Otherwise, a "0" at the beginning of a phone
number might disappear when exported.
17. Click Office Button, and then Save As. Save the file as Unicode Text. A message warning you
about file compatibility will be displayed. Click Yes. Now you are ready to import the contact list to the phone.
Step B Import the contact list to each the handset
18. On the KX TPA-50 handset, Press the Menu softkey, then scroll to select the IP Service icon 19. Select Network Settings, then scroll to select Embedded Web 20. Select ON 21. There will be a long beep, and you will be returned to the previous menu 22. Scroll to select IP Settings to display the base unit’s IP Address 23. On your PC launch the internet browser, and enter the base unit’s IP Address in the address field 24. Press Enter
Note You need to be connected to DOT DEVG2020 Gateway
25. When prompted type “admin” for the username and “adminpass” for the password and press Enter. The following page will be displayed
Note If Step 25 does now work, return to Step 19 to ensure Embedded Web is switched ON
26. Click on the Telephone tab at the top of the page
SETTING UP THE PHONEBOOK AND CONTACT LIST 13
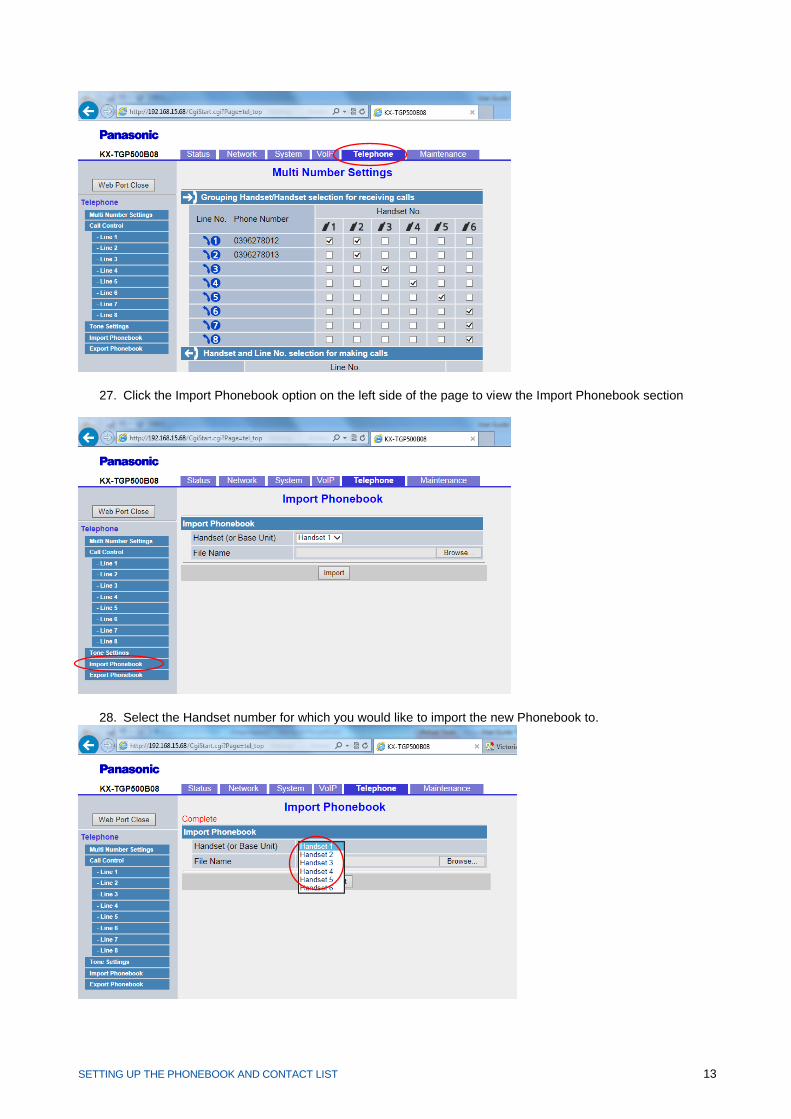
27. Click the Import Phonebook option on the left side of the page to view the Import Phonebook section
28. Select the Handset number for which you would like to import the new Phonebook to.
SETTING UP THE PHONEBOOK AND CONTACT LIST 14
29. Click on Browse and locate the file phonebook file that was created is step 17 above. Note that this will be a *.txt file
30. Press the Import button. The selected handset’s screen will display the message “Receiving” and when completed in will be sound a beep
31. To validate the phonebook was imported, on the handset press Menu, scroll and select to the Phonebook icon. Use the navigation button to scroll through the contacts.
Related Documents