Assembly Instructions 1525 Hymus Boul. Dorval, QC H9P-1J5 Canada Phone: 1-514-421-0309 [email protected] Arezzo Forever Crib www.pali-design.com This crib has been designed for your child's comfort and your convenience. Quality material and workmanship have gone into this crib which will provide a sound and comfortable bed for your baby if properly assembled and maintained. For the security of your child and your own peace of mind be sure to follow the assembly instructions exactly. Adult assembly is required. A periodic check should be made of all bolts and screws, which should be tightened if needed. Moisture and heat are harmful to the finish; for this reason use extreme caution when vaporizer is in use. The vapor steam should always be aimed away from the crib as well as away from other wood furniture. Some types of soft plastic toys could damage the finish when placed against it. Pali Design, Inc. 8x 8x D 8x Hardware list A B C 6x F 4x Allenhead Bolt (120 mm) E INSTRUCTION LEAFLET Important, keep for future reference. Read carefully. G Allen Wrench 1x Allenhead Bolt (95 mm) Allenhead Bolt (45 mm) IMPORTANT: In order to properly assemble the crib, carry out the operations in the order specified. Failure to assemble the crib in the manner recommended could make the crib hazardous. Carefully remove and lay out all parts. Familiarize yourself with all diagrams to facilitate the assembly of your crib. Check parts enclosed in hardware bag with the HARDWARE PARTS LIST to be sure all are included and quantities are correct. Crib Parts List: 1x 2x 1x 1x 2x Mattress Support (H) End Panels (P1 + P2) Headboard (J) Footboard (K) Stabilizer Bars (L) Tools Needed for Assembly: 12x Phillips Head Screw Wing Nut KD Bolt Nut Pali Design, Inc. AIM-600-090109-1530 Page 1 of 6

Pali Design, Inc. Assembly · Assembly Instructions 1525 Hymus Boul. Dorval, QC H9P-1J5 Canada Phone: 1-514-421-0309 [email protected] Arezzo Forever Crib This crib
Dec 24, 2018
Welcome message from author
This document is posted to help you gain knowledge. Please leave a comment to let me know what you think about it! Share it to your friends and learn new things together.
Transcript

Assembly Instructions
1525 Hymus Boul.Dorval, QCH9P-1J5 CanadaPhone: 1-514-421-0309
[email protected] Forever Cribwww.pali-design.com
This crib has been designed for your child'scomfort and your convenience. Quality materialand workmanship have gone into this crib whichwill provide a sound and comfortable bed for yourbaby if properly assembled and maintained. Forthe security of your child and your own peace ofmind be sure to follow the assembly instructionsexactly. Adult assembly is required. A periodiccheck should be made of all bolts and screws,which should be tightened if needed. Moisture and heat are harmful to the finish; for this reason useextreme caution when vaporizer is in use. Thevapor steam should always be aimed away fromthe crib as well as away from other wood furniture.Some types of soft plastic toys could damage thefinish when placed against it.
Pali Design, Inc.
8x 8x
D
8x
Hardware listA B C
6x
F
4x
Allenhead Bolt (120 mm)
E INSTRUCTION LEAFLET
Important, keep for future reference.
Read carefully.
G Allen Wrench
1x
Allenhead Bolt (95 mm)
Allenhead Bolt (45 mm)
IMPORTANT: In order to properly assemble thecrib, carry out the operations in the order specified.Failure to assemble the crib in the manner recommendedcould make the crib hazardous. Carefully remove and layout all parts. Familiarize yourself with all diagrams tofacilitate the assembly of your crib. Check parts enclosedin hardware bag with the HARDWARE PARTS LIST to besure all are included and quantities are correct.
Crib Parts List:1x2x1x1x2x
Mattress Support (H)End Panels (P1 + P2)
Headboard (J)Footboard (K)
Stabilizer Bars (L)
Tools Needed for Assembly:
12x
Phillips Head Screw Wing Nut KD Bolt Nut
Pali Design, Inc. AIM-600-090109-1530 Page 1 of 6

CRIBStep
1
• As soon as baby starts to sit up you must use the lowest mattress support position.• This crib has three mattress support positions for use in your baby's first months.
• When using the crib as a toddler bed, remove the Footboard (K) and the lower mattress support position must be used.
Assembling Crib
• To assemble the crib with the high mattress support position see Step 1.
Hi Lo
Middle
A
B
L
A
A
A
A
B
BB
B
AA A
A
B
B
B
B LA
B
L
L
P1
P2
P2
LC
L
C
C x 2
P2D x 2
L
L
C x 2
C x 2C x 2
E x 2
L
L
EE
DD
HH
H
D x 2
E x 2
H
H
H
Front
Back
Pali Design, Inc. AIM-600-090109-1530 Page 2 of 6
Crib
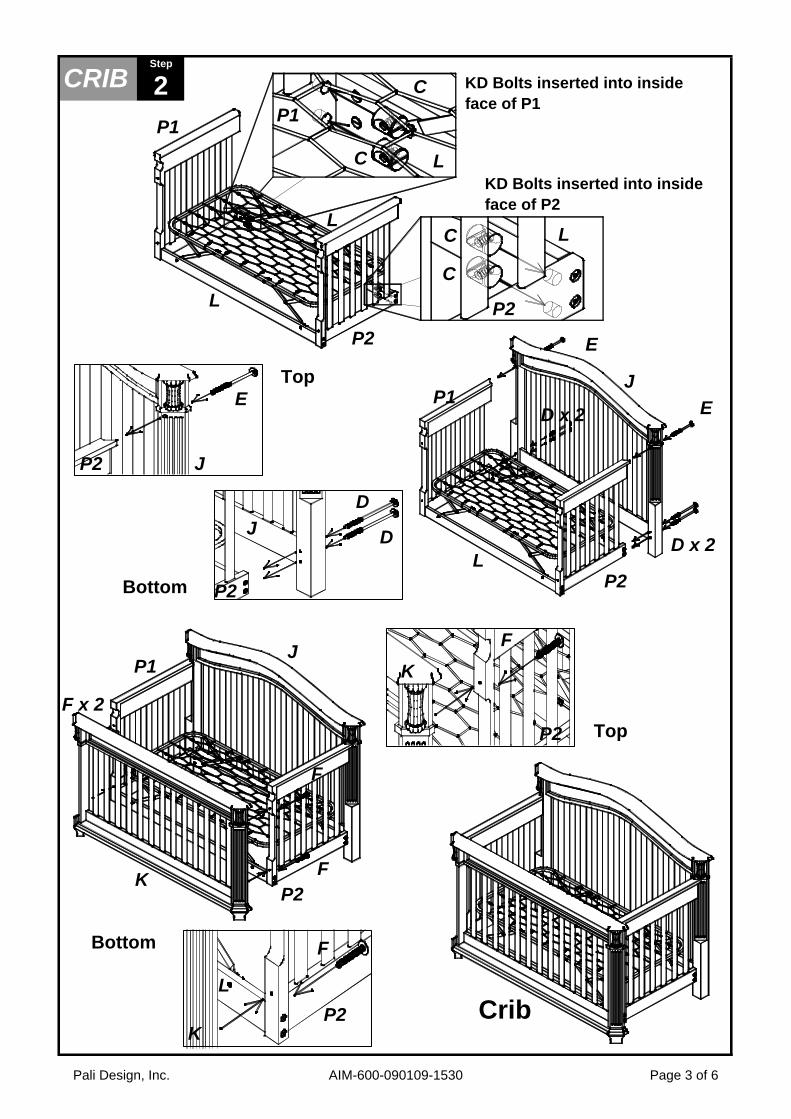
CRIBStep
2 KD Bolts inserted into inside face of P1
C
C
C
C
L
L
P1
P2
P2
J
D
P1Top
Bottom
D
E
F
E
L
J
J
JP1
P2K
K
K
P2
P2
P2
D x 2
P2
P1
P2
L
L
D x 2
E
F
Top
Bottom
F
F
F x 2
L
KD Bolts inserted into inside face of P2
Pali Design, Inc. AIM-600-090109-1530 Page 3 of 6

3
Day 2Bed
StepTransforming Crib into a Child's Day Bed or a Toddler Bed
Toddler Bed
Child's Day + Toddler
Bed 1 (Toddler Rail Conversion Kit sold separately )
Child's Day BedToddler Step
BED
Child's Step
Extra Post
Guard Rail
JP1
P2K
JP1
P2
JP1
P2
P2
P2
FK
P2
K
P2
FL
Top
Bottom
F
F
F
F
F
F
F
F
Extra Post
F
F
L
Top
Bottom
Left
Right
Extra Bolt (45mm)
Extra Bolt (45mm)
Pali Design, Inc. AIM-600-090109-1530 Page 4 of 6
•
•
•
•
•
•
•
•
•
•
••
•
•
•••
To reduce the risk of SIDS, pediatricians recommend healthy infants to be placed on their backs to sleep, unless otherwise advised by your physician.
Strings can cause strangulation! Do not place items with a string around a child’s neck, such as hood strings or pacifier cords. Do not suspend strings over a crib or attach strings to toys.
To help prevent strangulation tighten all fasteners. A child can trap parts of the body or clothing on loose fasteners.
WARNING STATEMENTSRead all instructions before assembling crib. Keep instructions for future use.Failure to follow these warnings and the assembly instructions could result in serious injury or death.Never use plastic shipping bags or other plastic film as mattress covers because they can cause suffocation.Infants can suffocate in gaps between crib sides and a mattress that is too small.Infants can suffocate on soft bedding. Never add a pillow, comforter or padding.
DO NOT place crib near window where cords from blinds or drapes may strangle a child.
When child is able to pull to a standing position, set mattress to lowest position and remove bumper pads, large toys and other objects that could serve as steps for climbing out.If using a dropside crib, make sure latches are secure after raising the dropside.If using a dropside crib, DO NOT leave child in crib with side lowered. Be sure side is in raised and locked position whenever child is in crib.When child is able to climb out or reaches the height of 35 in. (90 cm), the crib shall no longer be used.
Check this product for damaged hardware, loose joints, missing parts or sharp edges before and after assembly and frequently during use. DO NOT use crib if any parts are missing, damaged or broken. Contact Pali for replacement parts and instructional literature if needed. DO NOT substitute parts.
DO NOT use a water mattress.If refinishing, use a non-toxic finish specified for children's products.CAUTION: ANY MATTRESS USED IN THIS CRIB MUST BE AT LEAST 27 1/4 IN. (69 CM) BY 51 5/8 IN. (131 CM) WITH A THICKNESS NOT EXCEEDING 6 IN. (15 CM)
Pali Design, Inc. AIM-600-090109-1530 Page 5 of 6

•
•
•
•
•
•
•
•
TODDLER BED WARNING STATEMENTSFailure to follow these warnings and assembly instructions could result in serious injury or death from entrapment or strangulation.DO NOT place bed near window where cords from blinds or drapes may strangle a child.
The mattress intended for use on the bed shall be a full-size crib mattress having minimum dimensions of 51 5/8 in. (1310mm) in length, 27 1/4 in. (690mm) in width and 4 in. (100mm) in thickness.
Strings can cause strangulation! Do not place items with a string, cord or ribbon around a child's neck, such as hood strings or pacifier cords. Do not suspend strings over a toddler bed for any reason or attach strings to toys.
The minimum age of the intended user shall not be less than 15 months and the maximum weight shall not be greater than 50 lbs. (22.7kg).
When storing crib use caution as extreme changes in temperature or humidity can compromise the crib making it extremely dangerous to your child.
The guardrail provided must be used to avoid the formation of a gap between the mattress and the bed that could cause an entrapment.
CARE AND MAINTENANCEWhen cleaning your crib, please use a non-toxic, non-abrasive cleaner. Mix a solution of water with a small amount of mild dishwashing liquid. Apply to crib surface with a soft, damp cloth lightly dampened in solution. After cleaning, dry completely with a soft, dry cloth.
Pali Design, Inc. AIM-600-090109-1530 Page 6 of 6
Related Documents